Blog by Steve Laug
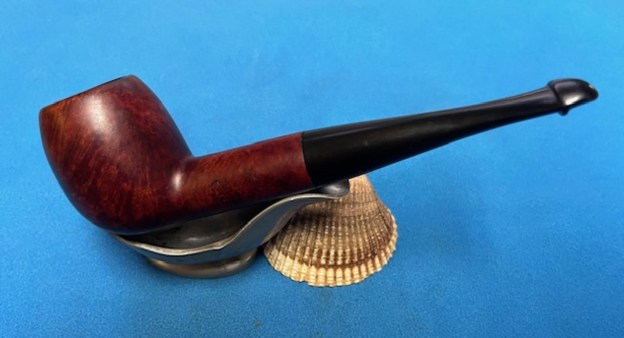
The next pipe I am working on is a nice looking was purchased from an antique store in Bozeman, Montana, USA on 07/22/17. Kirsten pipes have always been a bit of an enigma to me. The combination of briar and aluminum is unique. It is a pipe that is not really fish or fowl in terms of briar or metal. It is a pipe with an aluminum radiator with a bowl attached to it. The vulcanite stem is attached to an aluminum metal pin that extends the length of the radiator. On the end is a valve that controls the flow of air to bowl and is adjustable. In this case it is not frozen which is a blessing. On the left side of the radiator it is stamped with Companion in script. On the underside of the polished aluminum barrel it is stamped Made in U.S.A. followed by K. It is a straight pipe with large rusticated Dublin bowl. The metal base is actually in good condition. The pipe has gaskets on the valve on the front and on the stem insert. Stem is oxidized, tooth marks, chatter near the button. There was a thick cake in the bowl and heavy lava overflow on the rim top and edges. The rusticated bowl is filthy with grime and dusty ground into the bowl sides. The bowl has a metal cup on the base and a screw runs through the bowl and screws into the top of the radiator. The knurled valve has some light damage from what looks like marks left behind by pliers. The pipe is very dirty. Jeff took photos of the pipe to show its general condition before he did his cleanup. 
 The exterior of the pipe was very dirty – grime and grit ground in from years of use and sitting. The rim top was covered with a coat of thick lava that overflowed the thickly caked bowl. It was hard to know the condition of the rim top or edges due to the thick lava and cake. Only a clean up would make that known. The stem was dirty, oxidized, calcified and had light tooth marks and chatter on both sides ahead of the button.
 Jeff took a photo of the sides of the bowl to give a better feel for the condition of the bowl. You can see the heavy grime ground into the rusticated finish in the photos. It is a mess.
 He took a photo of the knurled valve on the radiator end. You can see the light pliers marks on the knurled edges.
 The next photos show the stamping on the sides of the aluminum radiator and it is very readable. It reads as noted above.
 I turned to Pipedia (https://pipedia.org/wiki/Kirsten_Pipe_Company) to do a bit of research on the history of this particular pipe. I have included pertinent portions of the article below.
The first and only Kirsten I had, had to be an old Companion model that came from one of the Kirsten cards you found in those days in some smoke shops. It might even have been in some small-town drugstore. If I recall correctly, it did not even have the Kirsten name on it – just “Companion”.
It would be another four decades before I ran into the Kirstens again as I began buying and restoring old pipes. I had accumulated about a half dozen Kirstens from several lots I acquired and they lay around in my work area for several months before I decided to see what I could do with them.
Old Kirstens are a problem. When bought in lots of other pipes, and many times when bought used individually, they are a mess. By the very nature of the pipe, which is made up of five basic components – mouthpiece, radiator body, valve, bowl and bowl screw (a sixth component, the bowl ring, is found in many Kirstens) – there is a lot of room for problems. For the most part, used Kirstens have set for some time, usually in an uncleaned state, and the old tobacco juices have created a sort of binder that holds them tightly together.
My experience has been that only about three or four out of every five used Kirstens I buy are completely restorable. The remainder furnish parts for those that are restored.
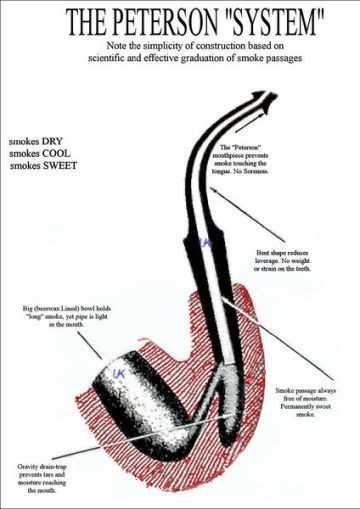
By the time I had completely restored my first half dozen Kirstens I came to realize there are many variations in the pipe, designed in 1936 by Professor Frederick Kirsten – the man who invented Boeing’s first wind tunnel – after he has been advised by his physician to stop smoking. Kirsten was looking for a way to trap the tars and moisture from tobacco and the Kirsten pipe was his solution.
Some Kirstens had “O” rings on the valve and mouthpiece and others had none. Some had an “O” ring on the valve and not on the stem. Some had bowl rings and others not. Some came with shiny finishes, others were a rough Parkerized-like finish called “Heritage.” Some were silver, some were gold, some were black, and yet another was a gold-tone finish with an overlay of what looked like tarnish made from “Eternalum” and referred to as Kirsten’s “Traditional” finish.
There were straight Kirstens, quarter bents and full bents. Some sat flat on their radiator body, others stood tall on a special valve with a flat plate on the bottom.
From collector’s standpoint, there were more variations than one could hope to acquire.
It dawned on me that there had to be some way to classify Kirstens. An e-mail or two to the Kirsten factory in Seattle, Wash., showed the company had not kept exacting records as to their years and types of production. So I borrowed from the Colt Peacemaker collectors and decided to try to classify Kirstens by generations, including some transitional models and some non-traditional Kirstens.
Since the pipe was invented in 1936 and some of the early pipes were stamped “PAT APPLIED FOR” it was easy to establish these as the Generation 1 pipes. But, although the basic pipe models offered in that generation – S for Standard, M for Medium and L for Large – continued to be produced after the stamping was changed to “PATS & PATS PENDING” it appeared there would be some divisions even within the generations.
It was determined that the ‘PAT APPLIED FOR” stamp was only used for a couple of years so I concluded that those pipes were probably produced in 1936 and were produced until 1938 and the ones stamped “PATS & PATS PENDING” were most probably made from around 1938 until about 1958 – a somewhat hypothetical date albeit maybe more accurate than we think when it comes to dividing the Kirstens into generations.
Lynn Kirsten, granddaughter of the founder and daughter of Gene Kirsten who ran the factory for many years, said the biggest change in models and pipemaking techniques took place around 1958 when the company was incorporated. She confirmed that clear records of year of manufacture, model types and styles, and other basic information about the Kirsten pipes had not been kept by the company.
However, she made one statement to the effect that during the transition period between what I have classified as Generation 1 anf Generation 2, Kirsten used up a lot of miscellaneous parts. Therefore, I have found many pipes that do not clearly fit the generation classifications I have developed but are clearly what I call “transition” pipes or Generation 1.5.
Altogether, there are three distinct Kirsten generations, 1, 2 and 3 by numerical order. Generation 1 runs from 1936 to roughly 1958. Generation 2 runs from 1958 to about 1985. Generation 3 runs from 1985 to the present with possibly some backward overlap. And, the pipes from the transitional period, or Generation 1.5, can be grouped in the mid-to-late ’50s.
The biggest thing that separates the Generation 1 from the Generation 2 pipes are the “O” rings, actually rubber rings on both the valve and mouthpiece that help provide a tighter seal as they are inserted into the radiator stem. Instead of “O” rings, the machining of the Generation 1 pipes was so precise the fit was exact. Hence the difficulty in dismanteling many of the older pipes because residue left in them for years has bonded the two metals.
There are, of course, exceptions to every rule. Take for instance what is referred to as the Kirsten “Thrifty,” the only pipe I have run across that actually bears the Kirsten shield logo. Most Kirstens, with the exception of some of the Companions – as noted above – bear the Kirsten stamped script logo. The “Thrifty” has not just an “O” on only the valve but a black offset valve that works in reverse of all other Kirsten valves I have run across. Traditionally the valve on a Kirsten has a flat spot on one wide of its outer rim. When the flat spot is lined up with the bowl, an opening in the inner valve tube is aligned with the air hole in the bottom of the bowl and the pipe is ready to smoke. Adversely, when the flat spot is in any other position about the pipe, the hole is closed and no trapped liquids can run back into the bowl. But the “Thrifty’s” flat spot, when lined up with the bowl, indicates the valve is closed so no trapped liquids can run back into the bowl and when it is in any other position the passageway to the bowl is open and the pipe can be smoked.
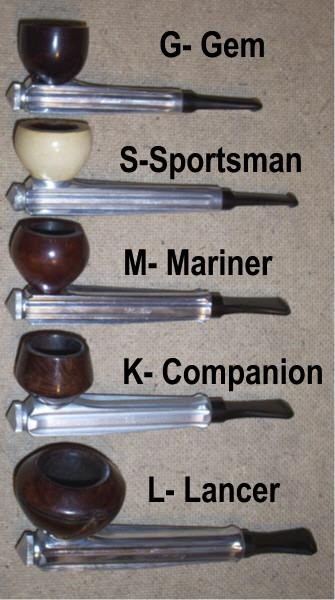 I turned to a catalogue for Kirsten pipes that I have in my files and found this pipe in the catalogue. It is shown in the photo below. The K stamp identifies it as a Companion pipe.
There is also some great history on the brand on Pipedia that is well worth a read. It gives clear information on the development of the brand (https://pipedia.org/wiki/Kirsten_Pipe_Company).
Jeff hates cleaning Kirstens probably as much as I do. However, he cleaned the pipes with his usual thoroughness that I really appreciate. He had reamed it with a PipNet pipe reamer and cleaned up the remaining cake in the bowl with a Savinelli Fitsall Pipe Knife. He scrubbed out the internals with alcohol, pipe cleaners and cotton swabs until the pipe was clean. He scrubbed the exterior of the bowl with Murphy’s Oil Soap and a tooth brush to remove the grime and grit on the briar and the lava on the rim top. The finish looks very good with good looking grain around the bowl and shank. Jeff took the pipe apart and cleaned the radiator, the adjustable valve and the stem with alcohol, pipe cleaners and cotton swabs. He scrubbed the stem with Soft Scrub and soaked it in Before & After Deoxidizer to remove the oxidation on the rubber. When the pipe arrived here in Vancouver for the second stop of its restoration tour it looked a lot better. It has been sitting in my drawer here since 2018 so the stem has taken on some more oxidation during its rest in my bin of metal pipes. I took photos before I started my part of the work.
 I took some close up photos of the rim top and also of the stem surface. I wanted to show what cleaned bowl and rim top looked like. The rim top and edges of the bowl looked very good. The screw in the bottom of the bowl looks very good with no damage to the slots. I also took close up photos of the stem to show the light tooth marks and the remaining oxidation on the stem.
 I took photos of the tamping on the radiator sides. The left side is stamped Companion in script and on the underside it is stamped with the words Made in the U.S.A. followed by the letter K.
 I took the pipe apart and took photos of the parts of the pipe to give a picture of what it looked like.
 Now, on to my part of the restoration of this Kirsten Companion K pipe. The rim top was in looked quite good. The rim top was smooth with two rusticated portions on the sides of the top. I decided to begin my work by polishing the bowl and rim top with micromesh sanding pads – dry sanding with 1500-12000 grit pads and wiping the briar down with a damp cloth after each sanding pad.
 With the polishing finished it was time to put the bowl back together. I greased the screw threads with Vaseline and dropped it through the hole in the bowl bottom. I screwed the base plate back on the bowl and took photos.
 I rubbed the bowl down with Before & After Restoration Balm. I worked it into the surface of the bark on the bowl sides and shank with my fingertips to clean, enliven and protect it. I let the balm sit for a little while and then buffed with a cotton cloth to raise the shine.
 I screwed the bowl back onto the radiator and took photos of the pipe as it looked at this point in the process.
 I rubbed down the valve and o-ring with Vaseline and then inserted it in the end of the radiator. The pipe was coming together very well at this point.
 I set the bowl and metal barrel aside and turned my attention to the stem. I scrubbed the oxidized stem with SoftScrub on cotton pads to break down the oxidation. Once finished it looked much better.
 I sanded out the stem surface with 220 grit sandpaper to remove the remaining oxidation and the light tooth marks and chatter. I started to polish it with 400 grit wet dry sandpaper.
 I polished the vulcanite with micromesh sanding pads – 1500-12000 grit pads. I wiped it down with a damp cloth after each sanding pad.
 I polished it with Before & After Pipe Stem Polish – both Fine and Extra Fine. I gave it a coat of Obsidian Pipe Stem Oil. It works to keep the stem from oxidizing as quickly. I set it aside to dry.
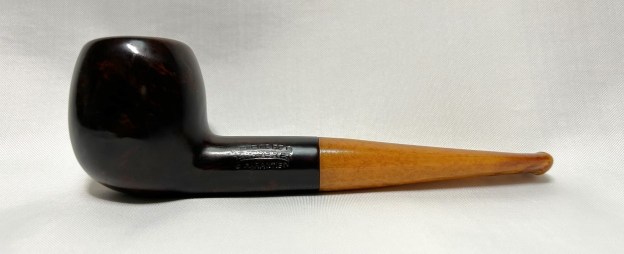
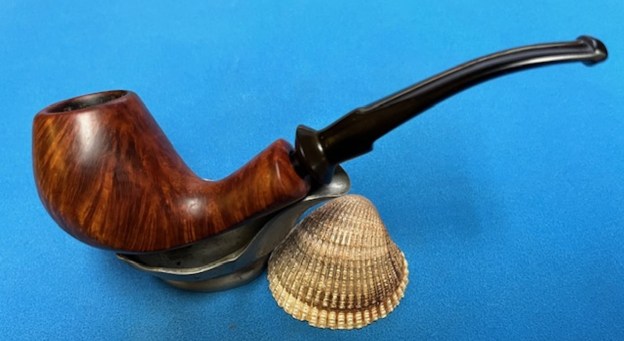
  This Kirsten Companion Made in USA K Generation 2 pipe turned out to be another great looking pipe. The finish on the pipe is in excellent condition and works well with the polished vulcanite saddle stem. I put the pipe back together and carefully buffed it with Blue Diamond on the buffing wheel. I gave the bowl and stem multiple coats of carnauba wax on the buffing wheel and followed that by buffing the entire pipe with a clean buffing pad. I hand buffed the pipe with a microfiber cloth to deepen the shine. Give the finished Kirsten Companion K pipe a look in the photos below. The dimensions of the pipe are Length: 5 ½ inches, Height: 2 inches, Outside diameter of the bowl: 1 ½ inches, Chamber diameter: 1 inch. The weight of the pipe is 1.66 ounces/47 grams. This beauty is already spoken for and it will soon be heading south to the new steward. Thanks for reading this blog and my reflections on the pipe while I worked on it. This is an interesting estate to bring back to life.
As always, I encourage your questions and comments as you read the blog. Thanks to each of you who are reading this blog. Remember we are not pipe owners; we are pipe men and women who hold our pipes in trust until they pass on into the trust of those who follow us.


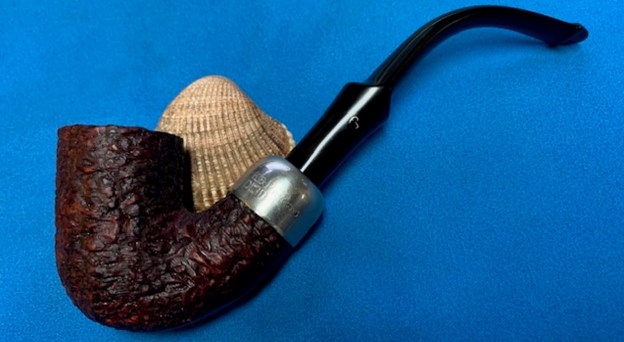
 The next pipe on the table is the scoop shaped bowl without a stem at the top of the photo above. It is stamped on the underside of the shank and reads Danmore [over] Made in Denmark. On the right side of the shank it is stamped De Luxe. There is no visible shape number stamped on the pipe. There was a thick cake in the bowl, cobwebs in the bottom and on the bowl walls and some remnants of tobacco. The airway was plugged and there was no draught on the pipe. There was a lava overflow on the rim top. The inner edges of the bowl were damaged and the outer edge had been knocked about and damaged on the front side. The finish was dirty and dusty and there was lava on the sides and heel of the bowl. The pipe did not come with a stem so I would have to go through my collection of stems here to find one that fit well. I took photos of the pipe before I started my cleanup work on it.
 I took a photo of the bowl and rim top to show the cake in the bowl and the lava build up and the damage on the edges of the bowl. The cake was thick and hard and I am hoping that at some level it protected the edges from damage. You can see the nicks in the inner edge and the damage on the rim top. I also took a photo of the shank end. You can see the tars and build up around the opening.
 I turned to Pipedia to read about the Danmore brand (https://pipedia.org/wiki/Danmore). There was a brief article there that I quote below.
 With that I turned to work on the pipe. I went through my can of stems and found one that would work well with the bowl. It is a uniquely carved saddle stem with a twist of a freehand. I sanded the tenon now slightly to allow it to fit the shank. I put it in the shank and took photos of the pipe. I like the looks of the one I chose over the original!
 I set the stem aside and turned to the bowl clean up. I reamed the bowl with a PipNet pipe reamer using the second and the third cutting head to take the cake back to bare briar. I cleaned up the reaming with a Savinelli Fitsall Pipe Knife. I sanded the walls with a piece of 220 grit sandpaper wrapped around a dowel to smooth them out.
 I scrubbed the exterior of the briar with a tooth brush and undiluted Murphy’s Oil Soap. It looked much better and the dust and debris was gone. I dried it with a cotton towel.
 I scrubbed out the internals of the pipe with 99% isopropyl alcohol, pipe cleaners and cotton swabs. I cleaned out the airway in the stem as well. I worked on these areas repeatedly until the shank and the airway in all the parts was clean.
 I worked over the damage on the inner edge of the bowl and the rim top. I also smoothed out the damage on the outer edge with a folded piece of 220 grit sandpaper. It looked much better after I sanded the damaged areas smooth.
 I polished the briar with 1500-12000 grit micromesh sanding pads. I wiped it down with a damp cloth after each pad. The briar took on a deep shine that highlighted the grain.


 I worked some Before & After Restoration Balm into the surface of the briar with my fingertips to clean, enliven and protect the briar. I let the balm sit for 15 minutes and then buffed with a cotton cloth to raise the shine. The photos show the bowl at this point in the restoration process.

 With that done, the bowl was finished other than the final buffing. I set it aside and turned my attention to the stem. I “painted” the surface of the stem with the flame of a lighter to lift the tooth marks. I sanded out what remained with 220 grit sandpaper and started polishing the stem with 600 grit wet dry sandpaper.
 I polished the stem with micromesh sanding pads – wet sanding with 1500-12000 grit sanding pads. I wiped it down after each sanding pad with Obsidian Oil.
 I finished polishing the stem with Before & After Pipe Stem polish (both Fine and Extra Fine) then wiped the stem down with another coat of Obsidian Oil.
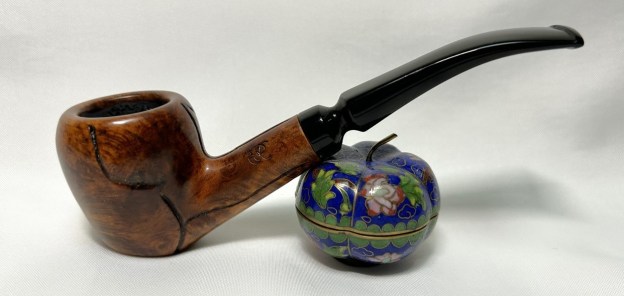
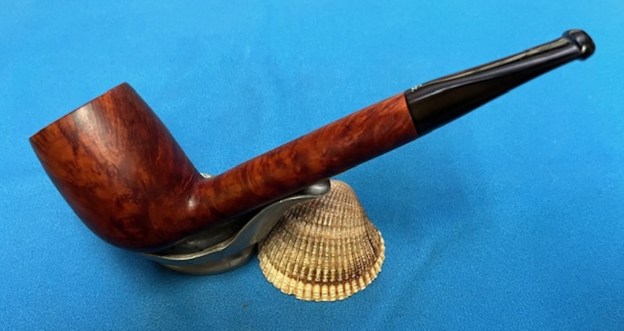
 I am excited to finish this restemmed Danmore De Luxe 3041 Made in Denmark Scoop. I put the pipe back together and buffed it with Blue Diamond on the buffing wheel. I gave the bowl and the stem multiple coats of carnauba wax. I buffed the pipe with a clean buffing pad to raise the shine and hand buffed it with microfiber cloth to deepen the shine. It is fun to see what the polished bowl looks like with the rusticated gourd and the polished black, fancy turned vulcanite stem was beautiful. This Danmore De Luxe 3041 Scoop is nice looking and the pipe feels great in my hand. It is light and well balanced. Have a look at it with the photos below. The dimensions are Length: 6 inches, Height: 1 ¾ inches, Outside diameter of the bowl: 1 inch, Chamber diameter: ¾ of an inch. The weight of the pipe is 1.66 ounces/48 grams. It is a beautiful pipe and one that I will be putting in the Danish Pipemaker Section on the rebornpipes store. Thanks for walking through the cleanup with me as I worked over this pipe.