Tag Archives: super glue

Repairing and Refurbishing a Jobey “Gondoli” From Steve’s Grab Box


Blog by Paresh Deshpande

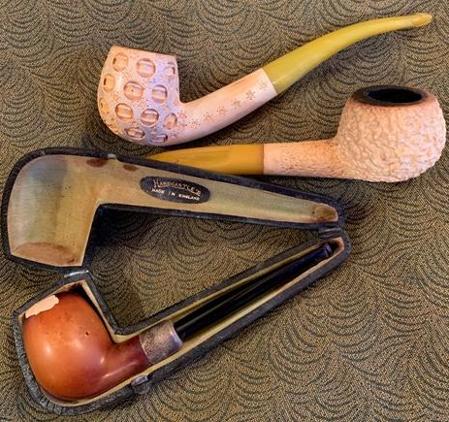
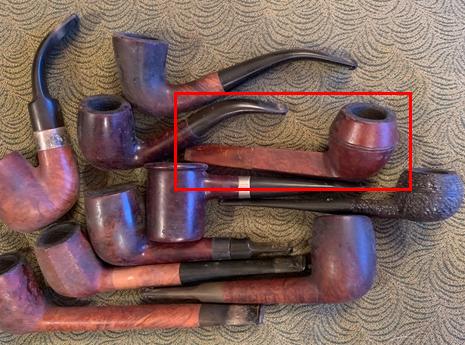
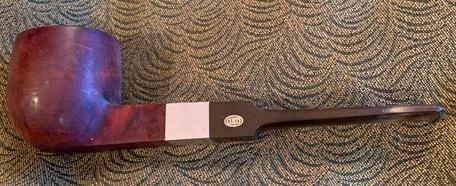
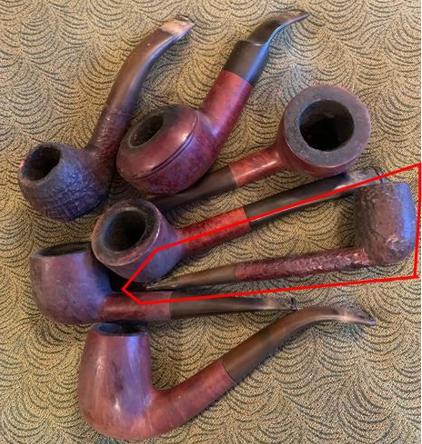
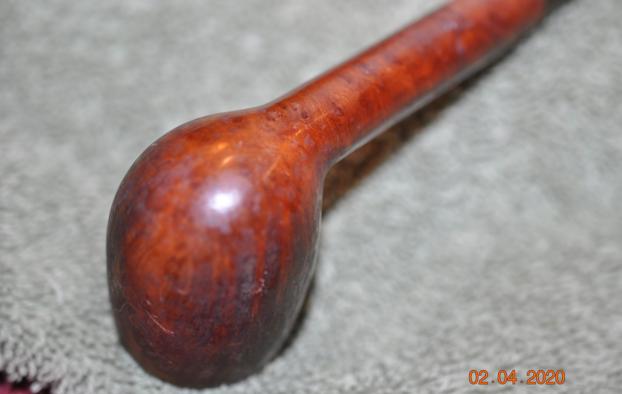
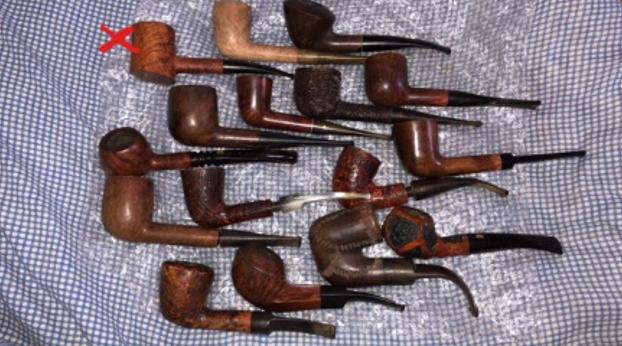
Steve, my friend and mentor, had sent me a pipe lot of 15 pipes for restoration about 3 years back. These assorted pipes were requested by me with an intent that these would provide me with an opportunity to further hone my skills and gain experience in tackling varied issues that one may come across during restoration. Each of these pipes has its own set of issues to address and I look forward to work on each one of this pipe lot. Here is the picture of the pipes as I received it. The one marked with a red cross is a Dunhill Root that has been restored by Steve for my personal collection.

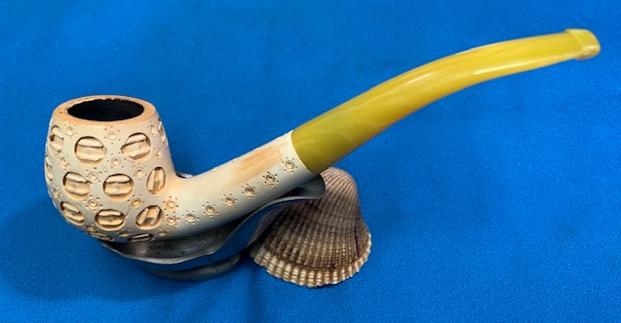
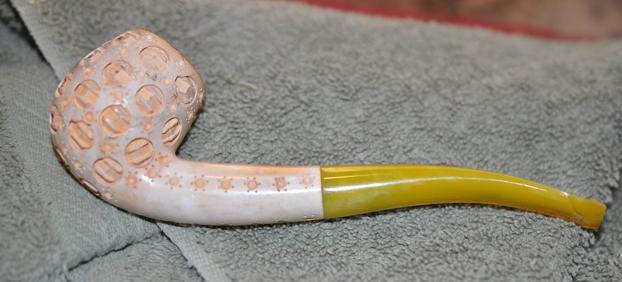
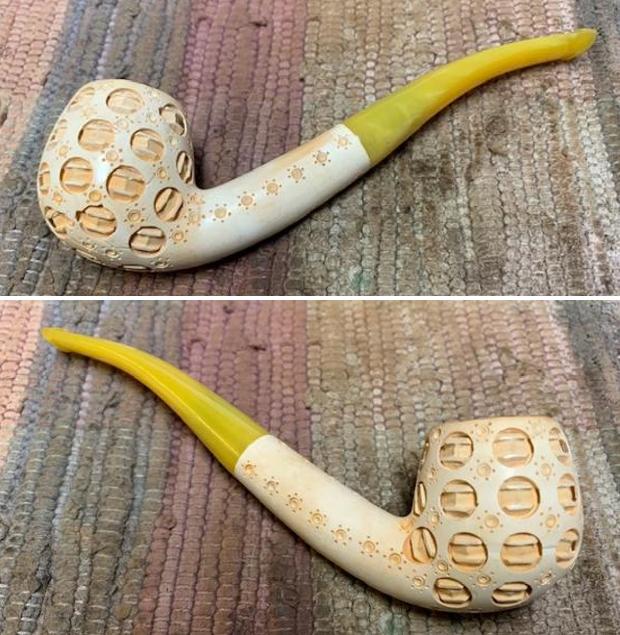
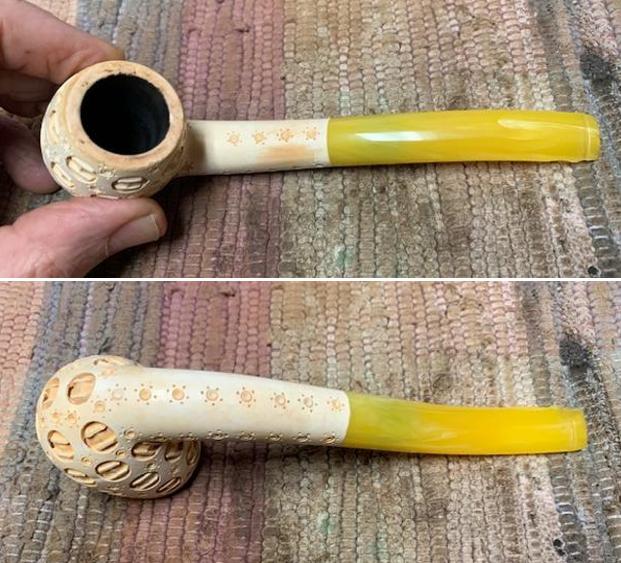
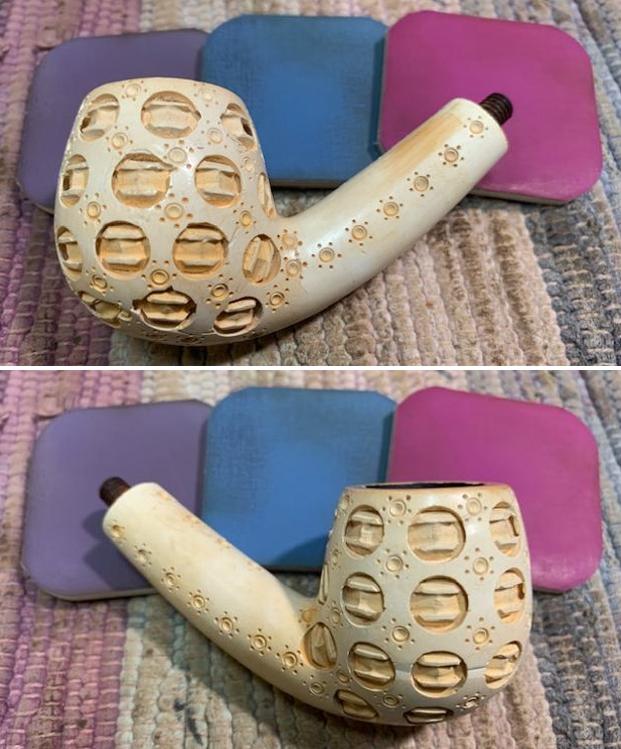
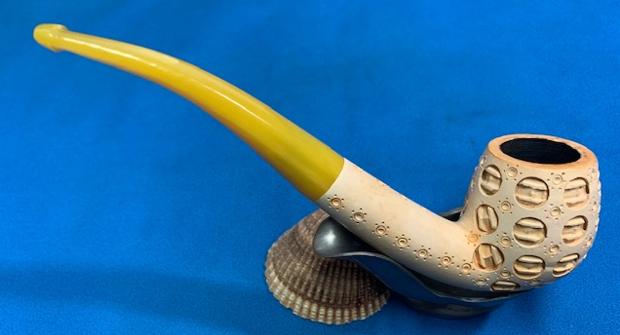
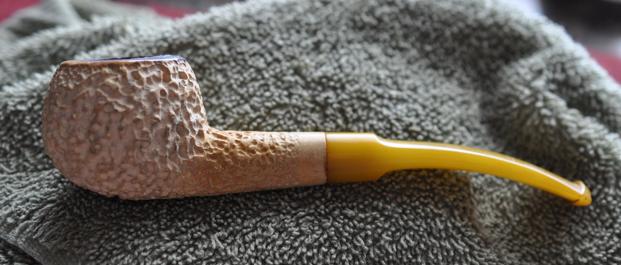
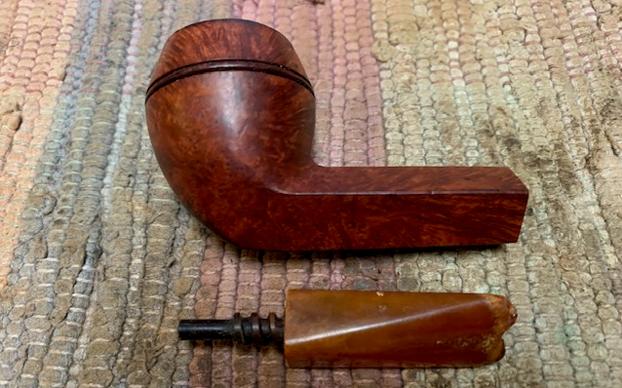
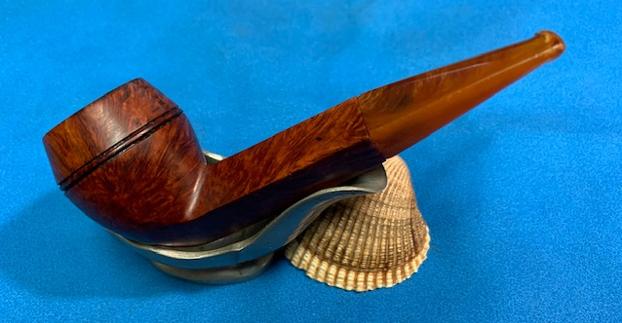
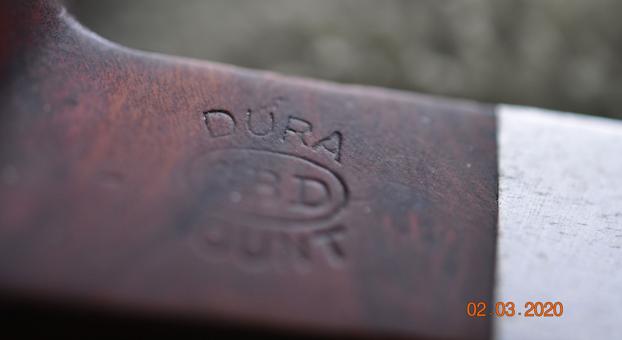
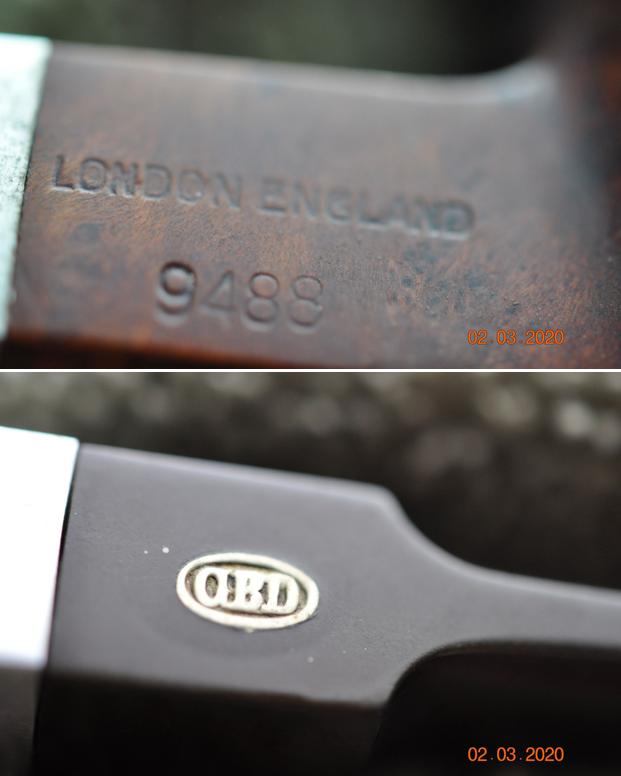
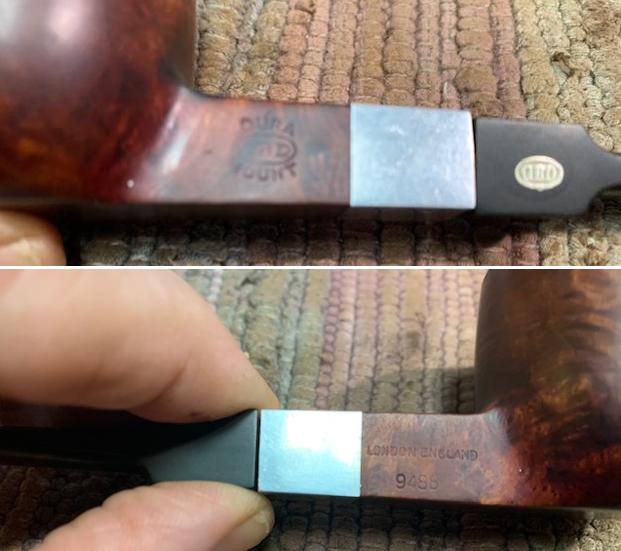
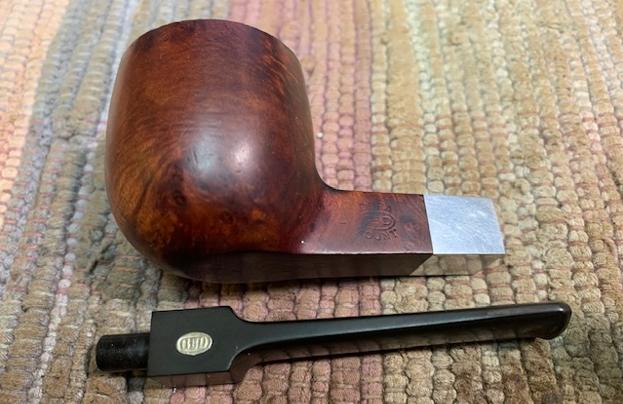
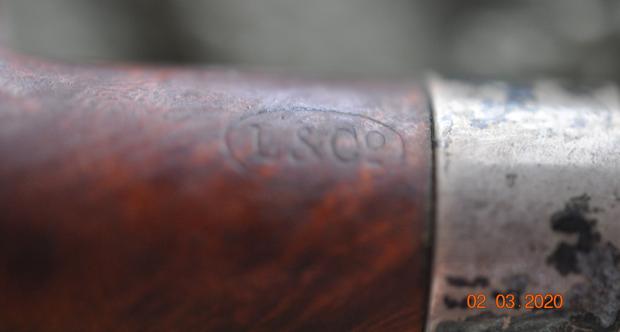
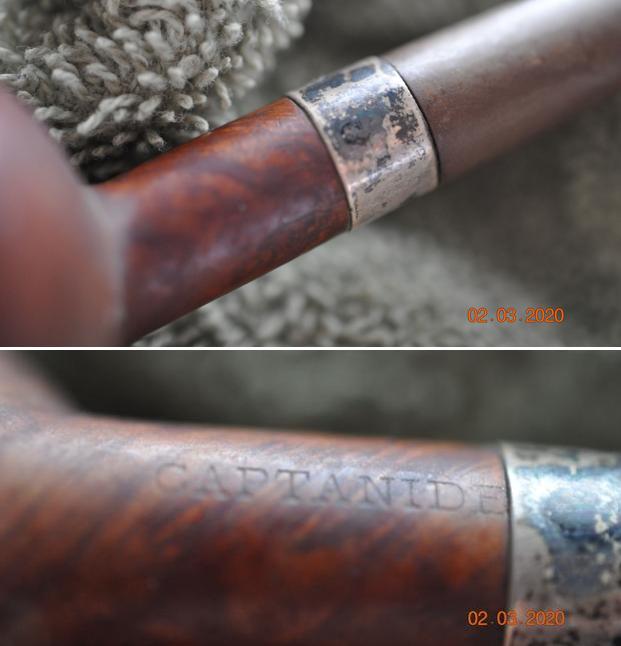
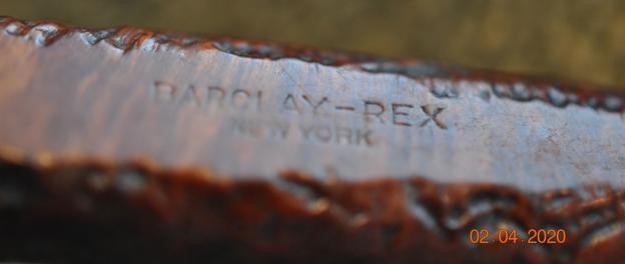
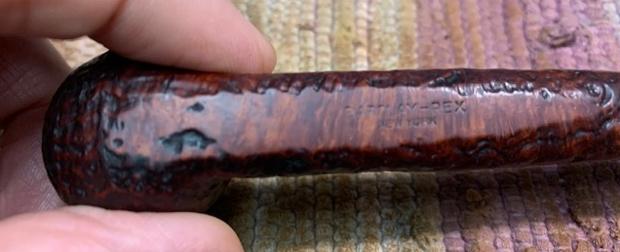
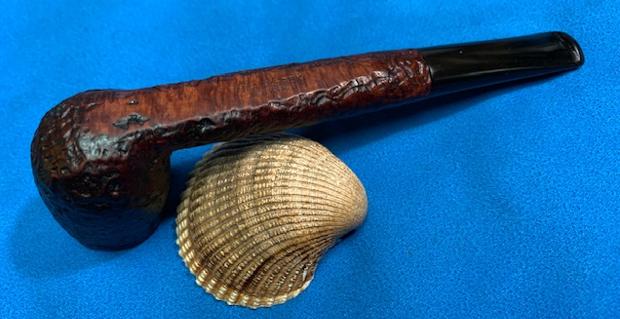
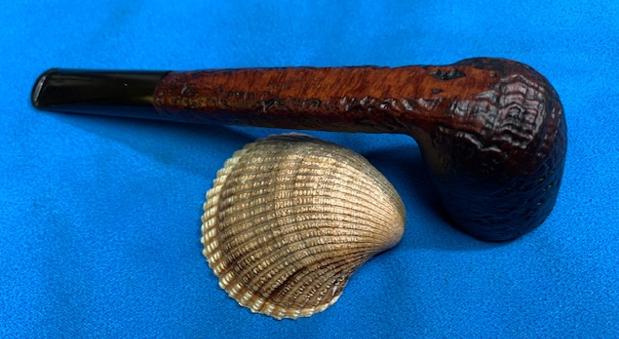
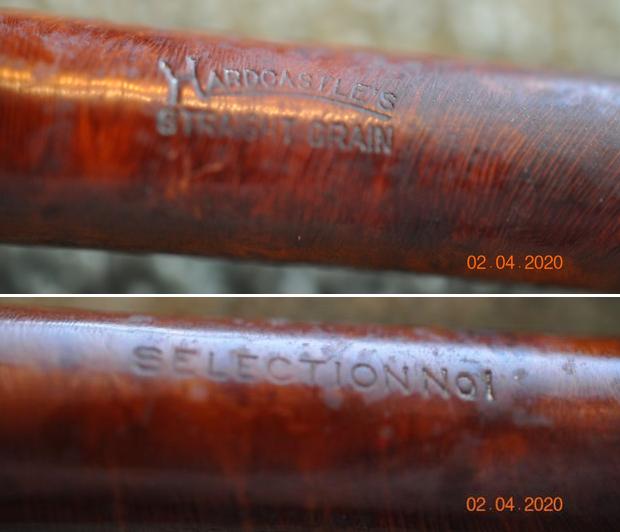
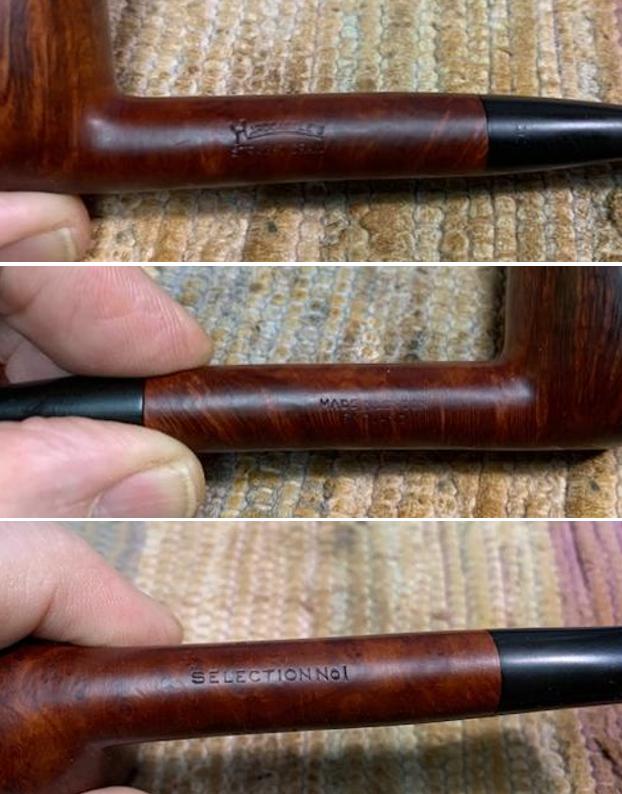
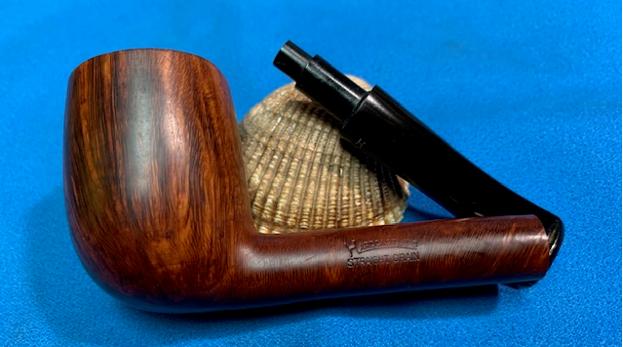
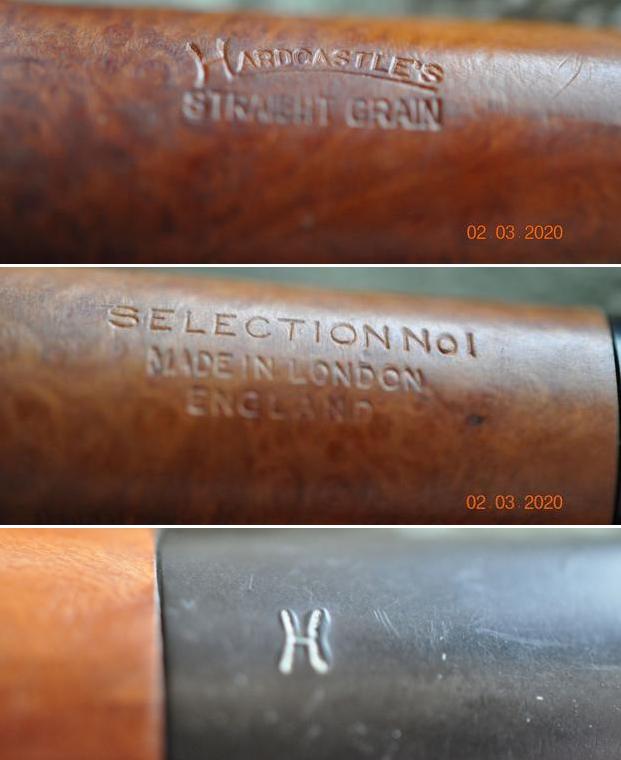
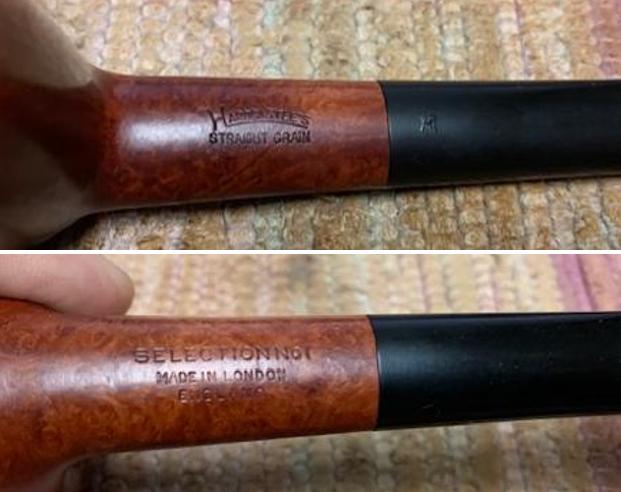
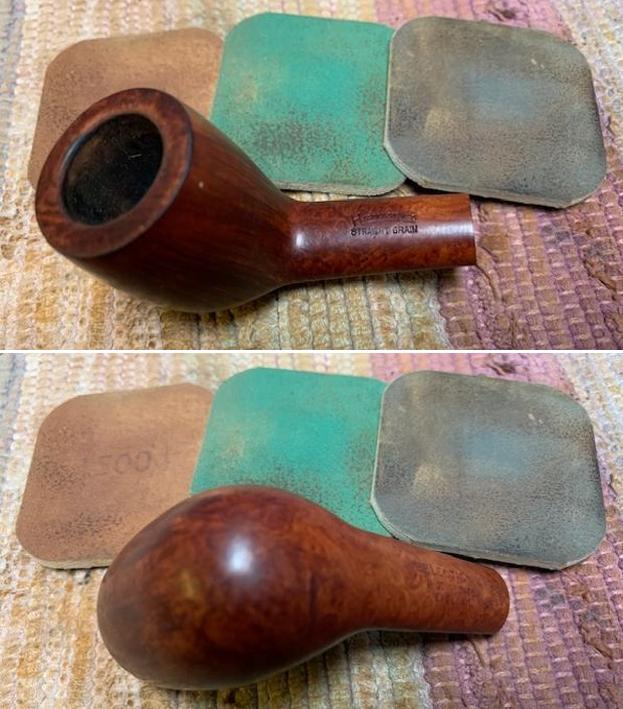
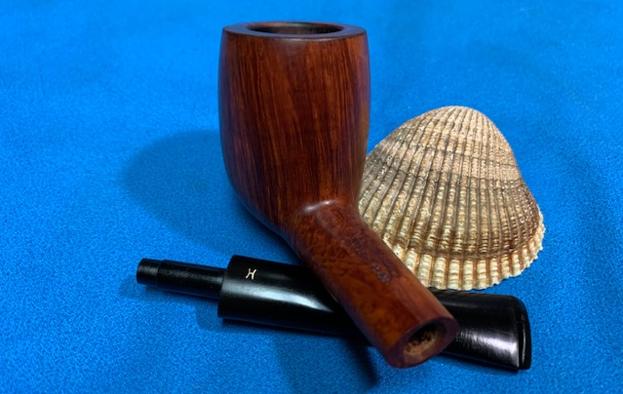
I have worked on a no name straight billiard and an Oom Paul from this lot and both turned out to be beautiful pipes. The next pipe from this lot that I selected to work on is a Jobey “GONDOLI” and is marked with a green arrow and numeral 3.This pipe has a nice hand feel to it and the classic Prince shape with a beautiful variegated fancy stem makes it a very attractive looking pipe. The stummel boasts of beautiful mixed grains. It is stamped on the left side of the shank as “Jobey” in fancy script over “GONDOLI” in capital letters, towards the shank end. On the right side of the shank it is stamped with shape code “965”. The variegated acrylic stem with swirls of brown carries the trademark logo of JOBEY in a brass roundel atop the surface of the stem.I had previously worked on two Jobey pipes and had researched the brand at that time. Here is the link for the research and write on the pipe.  A Simple Restoration of a “Jobey Filtersan # 690” | rebornpipes

No other information was available on the internet that I could link with the GONDOLI line or the shape code # 965. Any assistance in unearthing additional information is most welcome!!

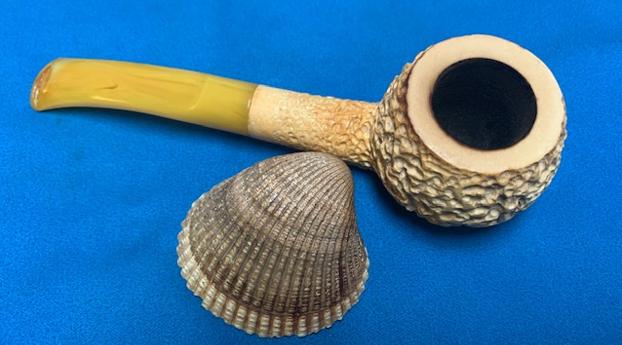
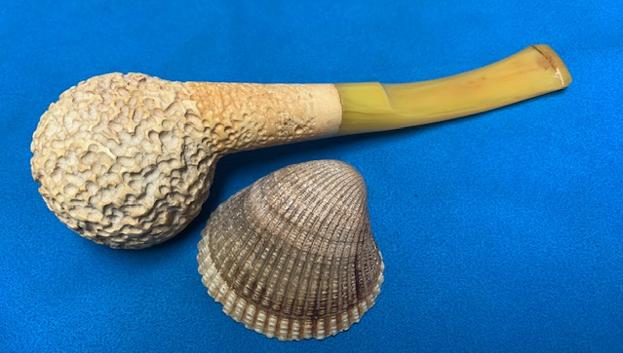
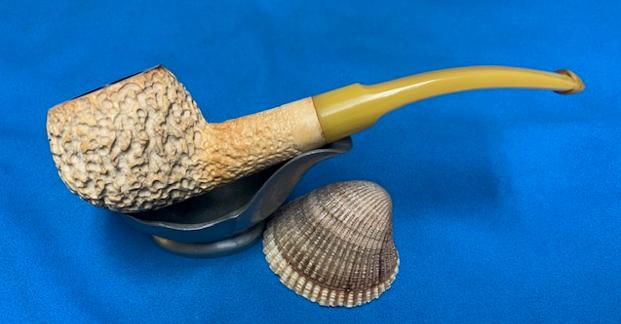
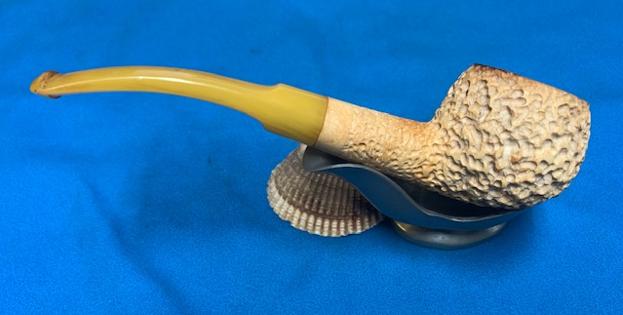
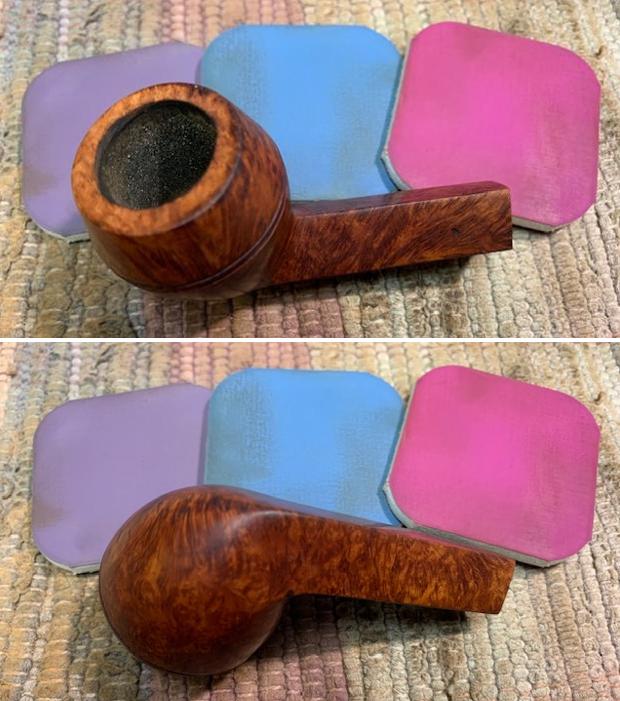
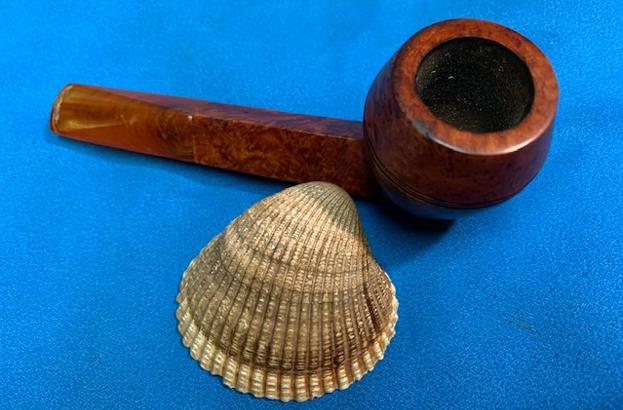
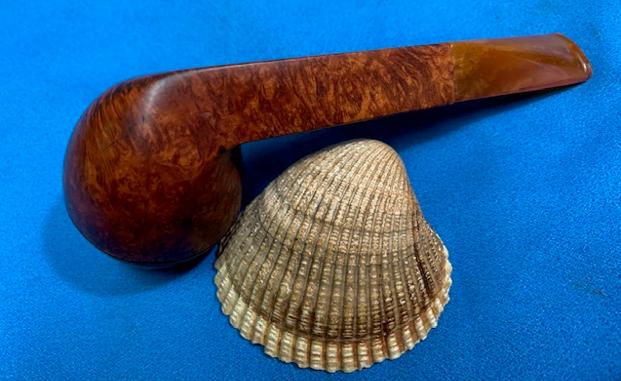
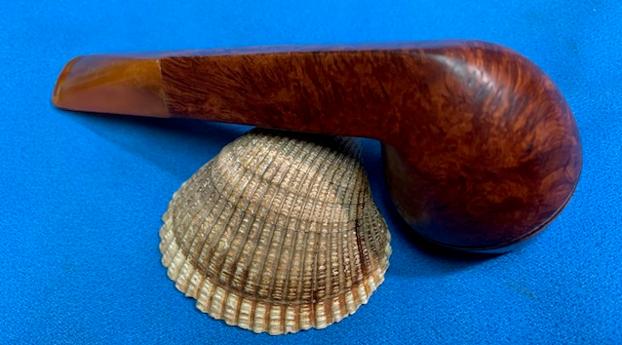
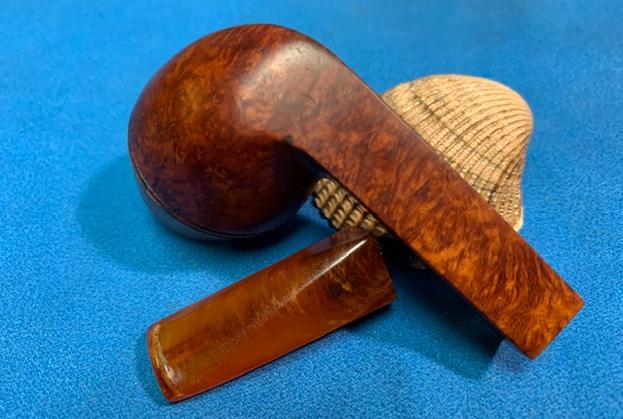
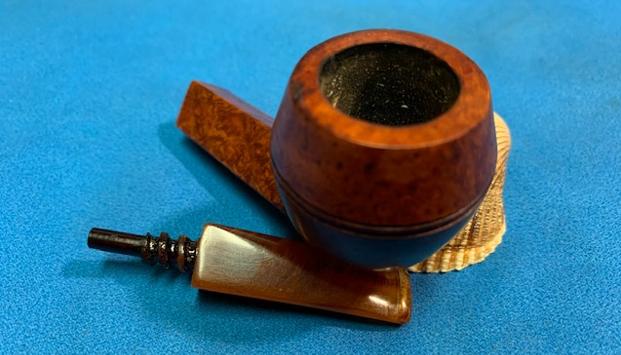
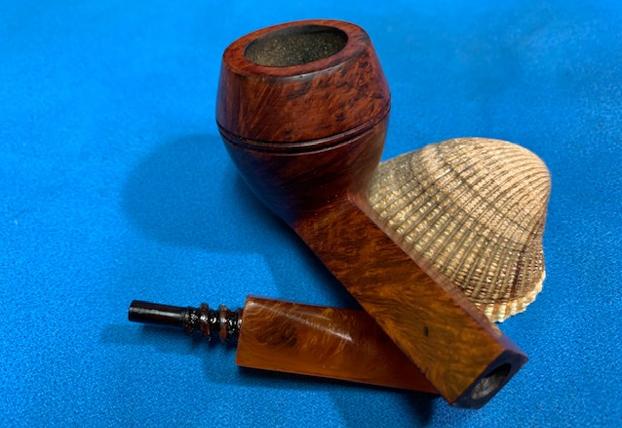
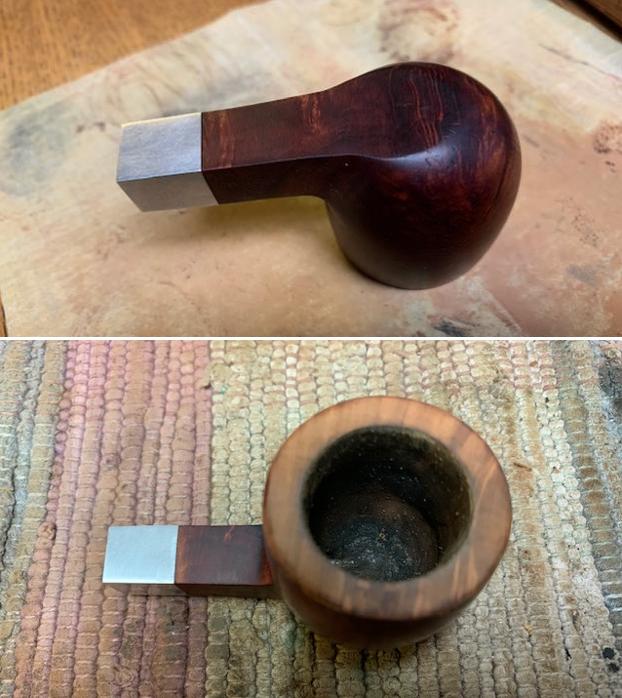
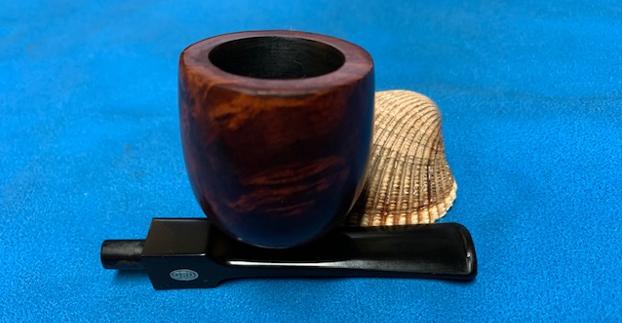
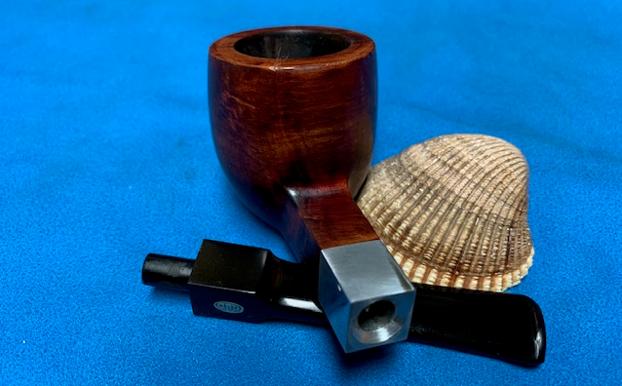
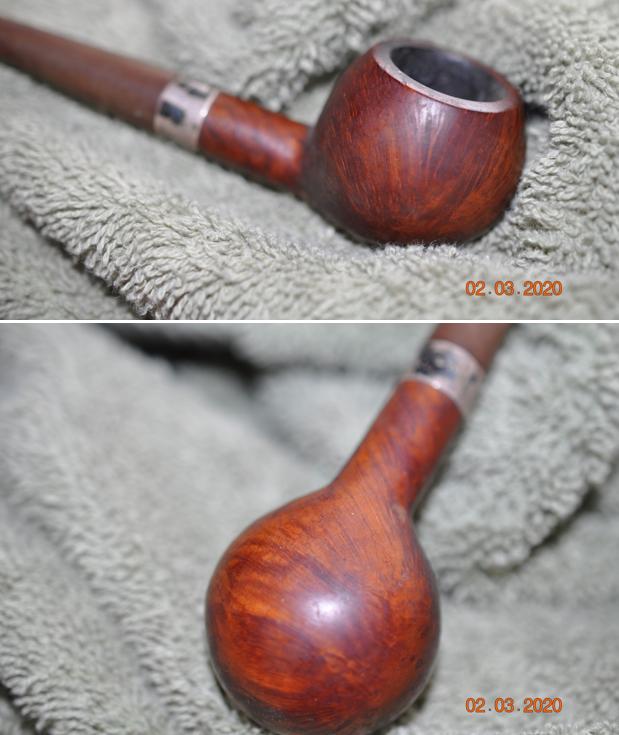
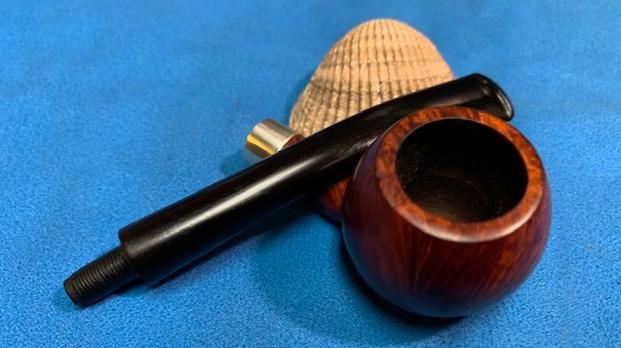
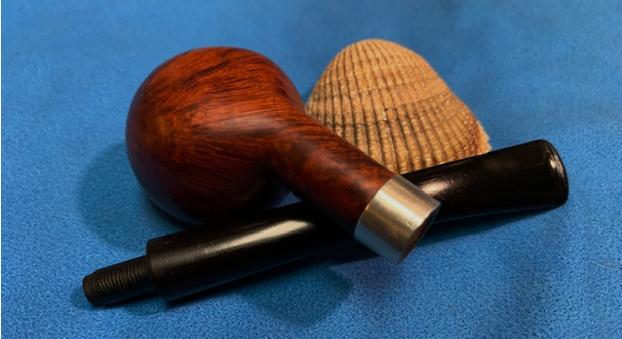
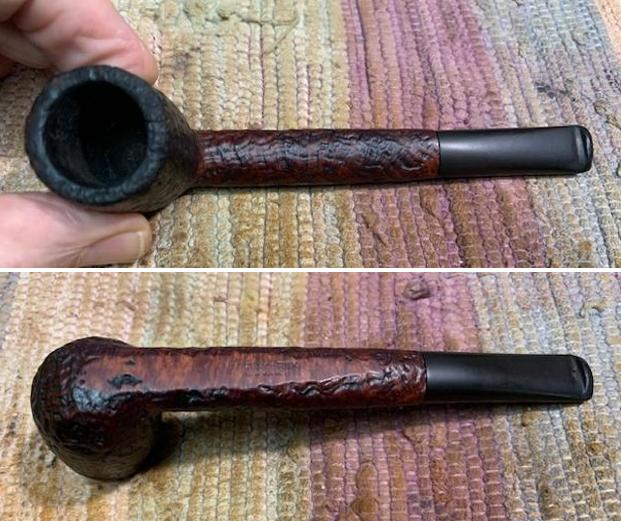
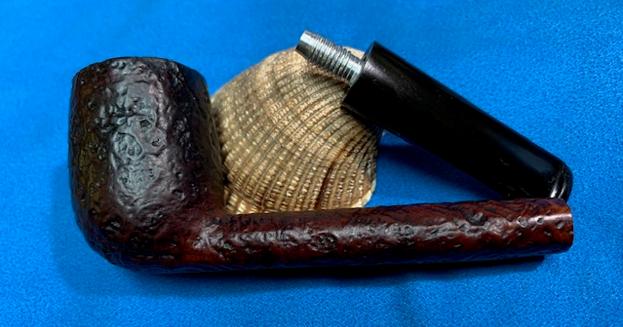
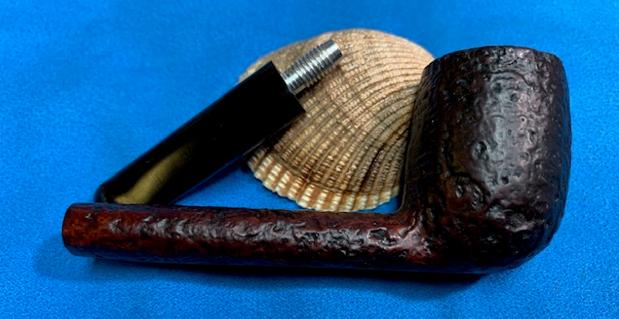
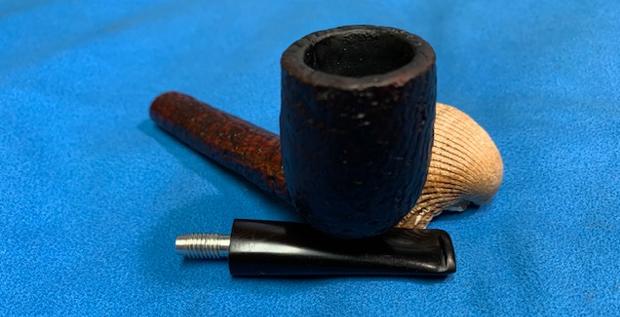
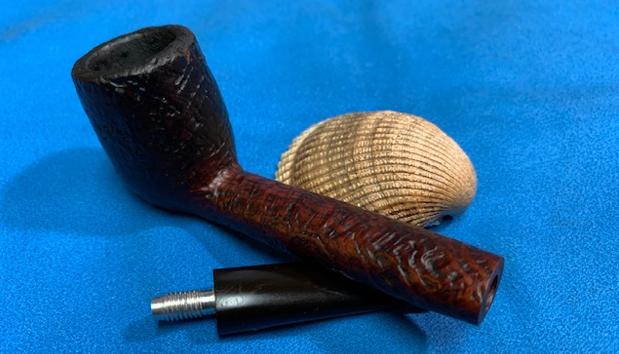
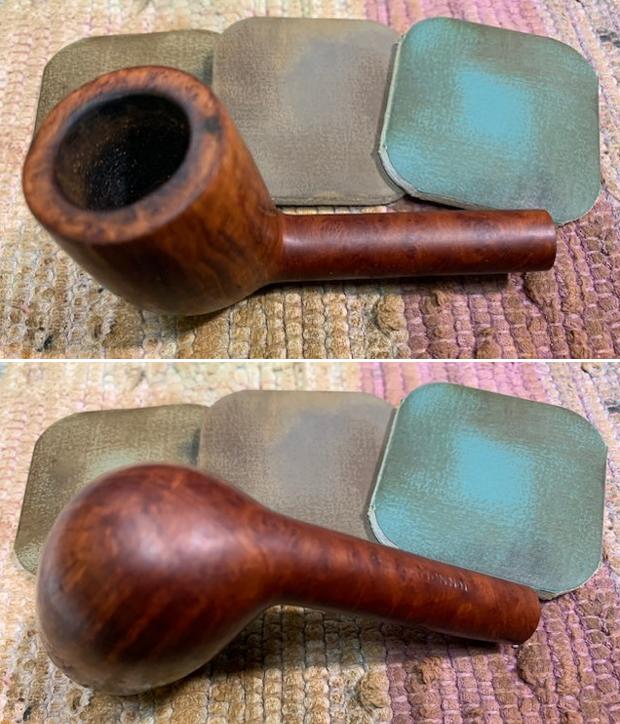
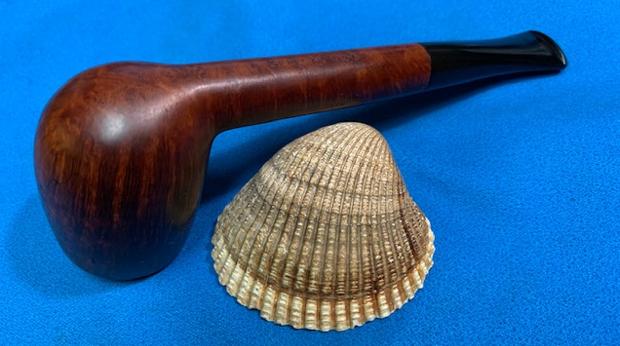
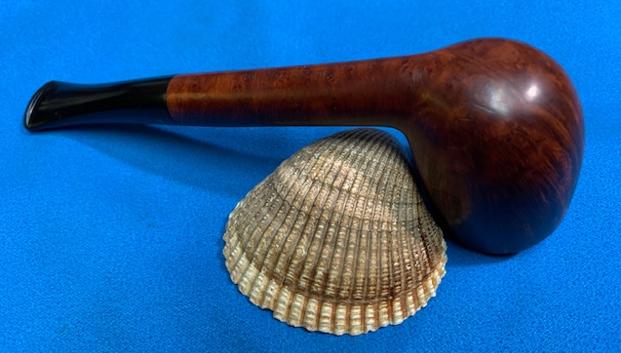
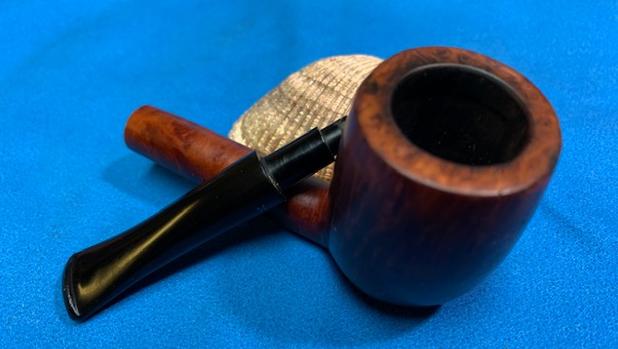
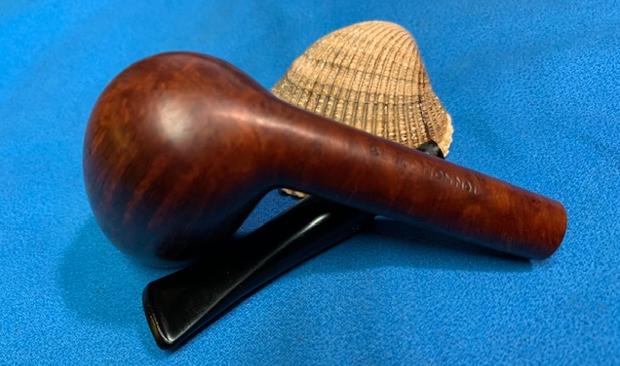
Initial Visual Inspection
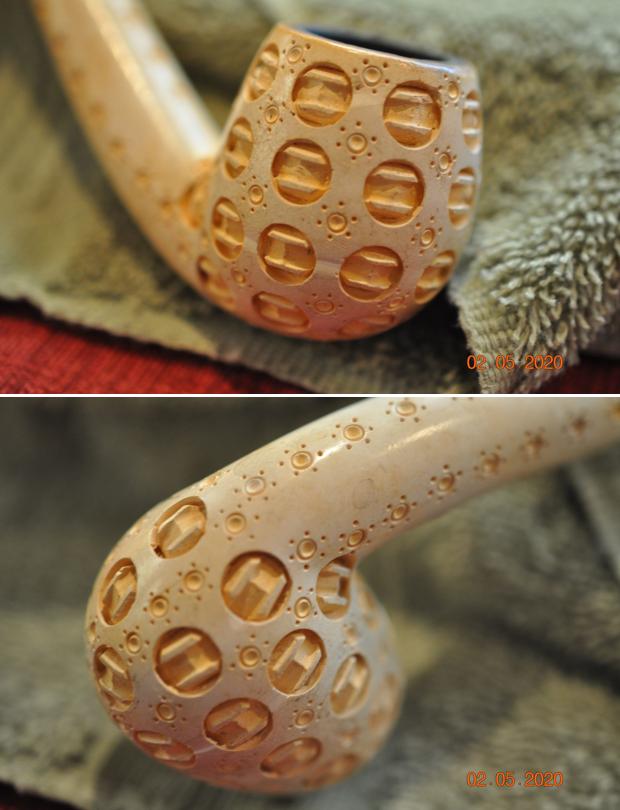
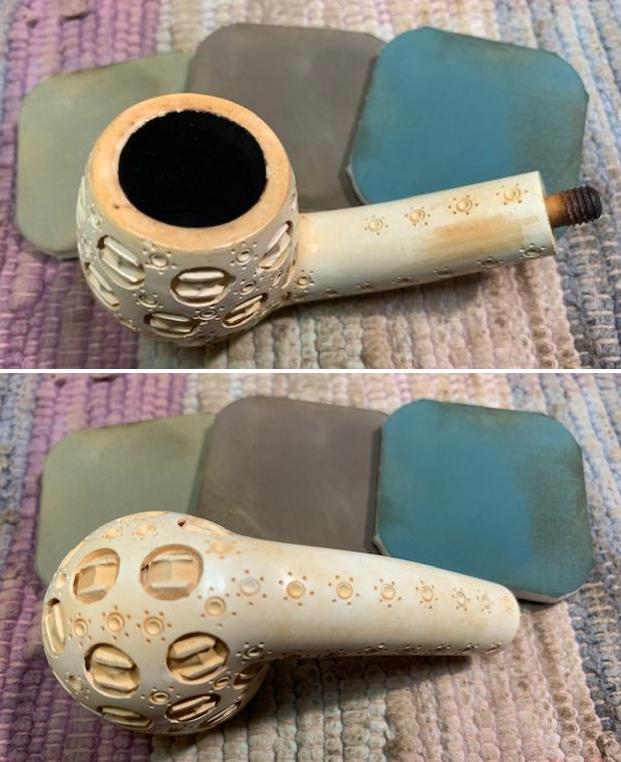
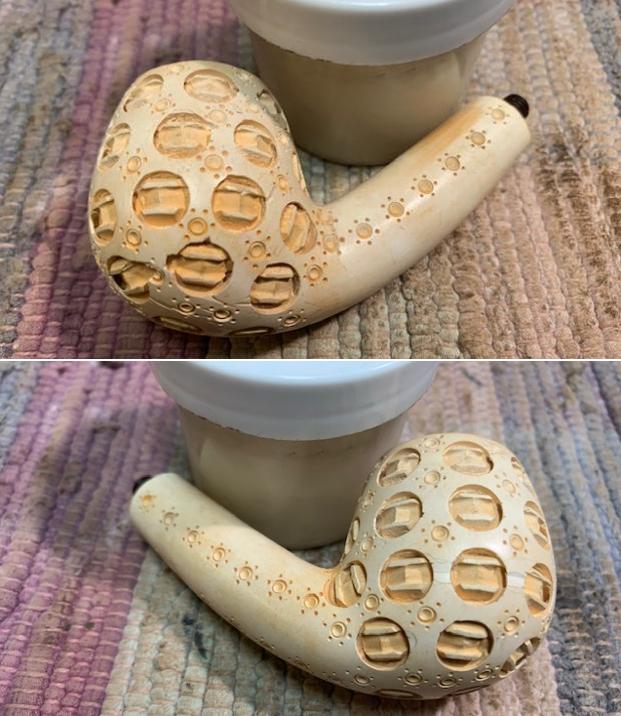
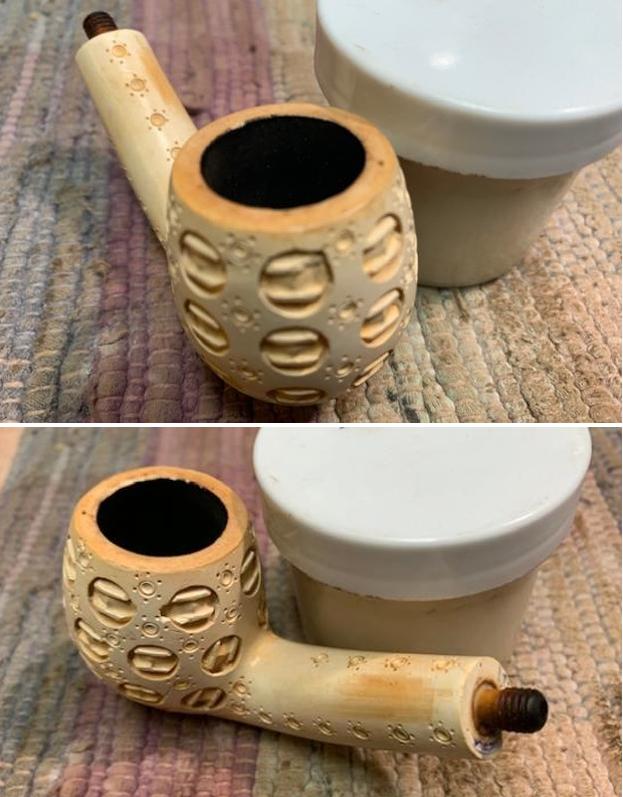
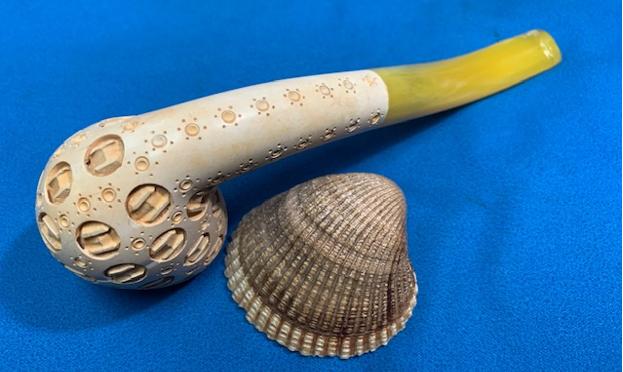
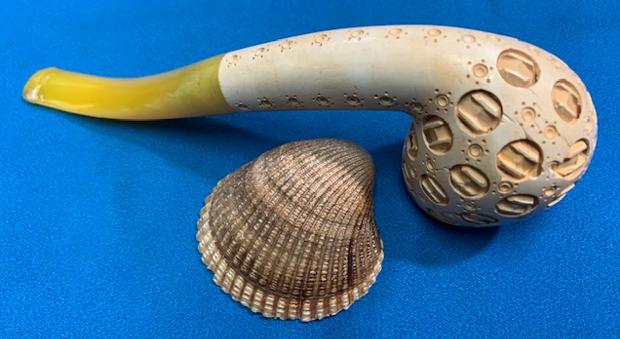
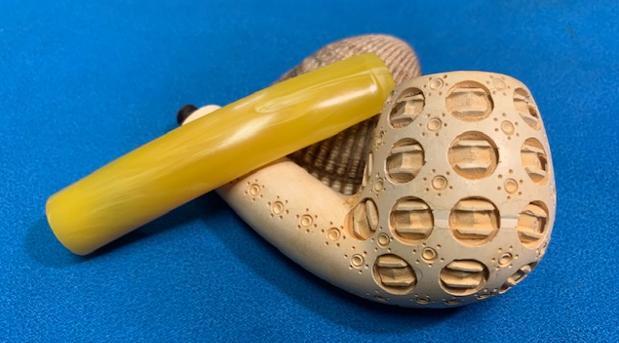
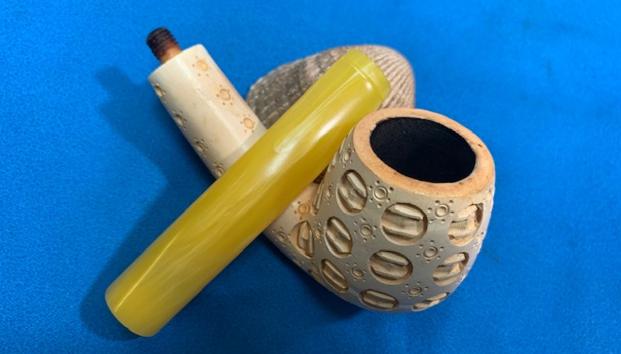
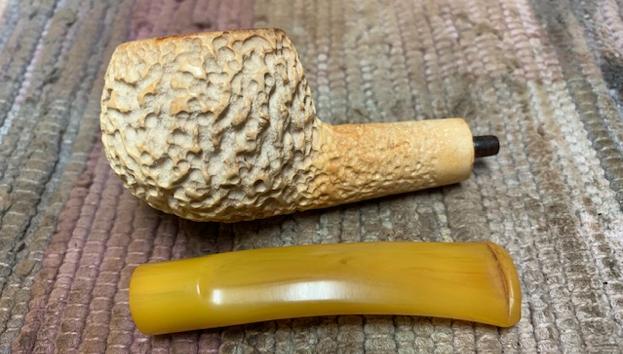
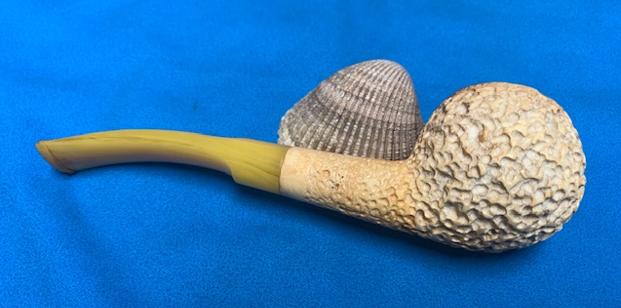
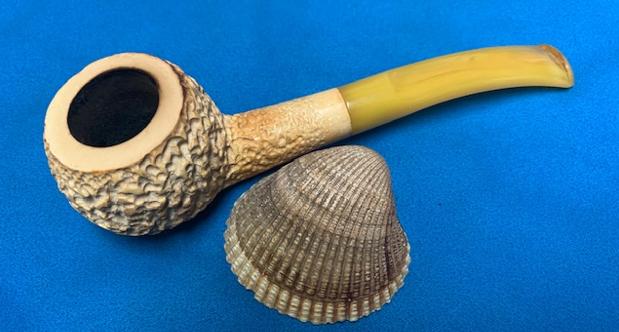
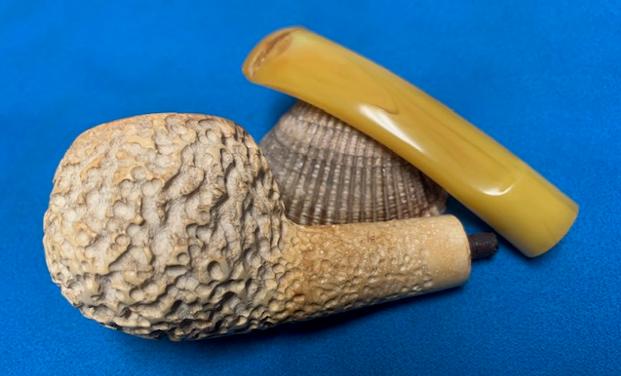
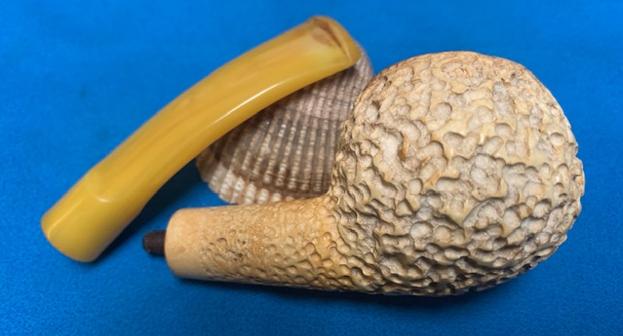
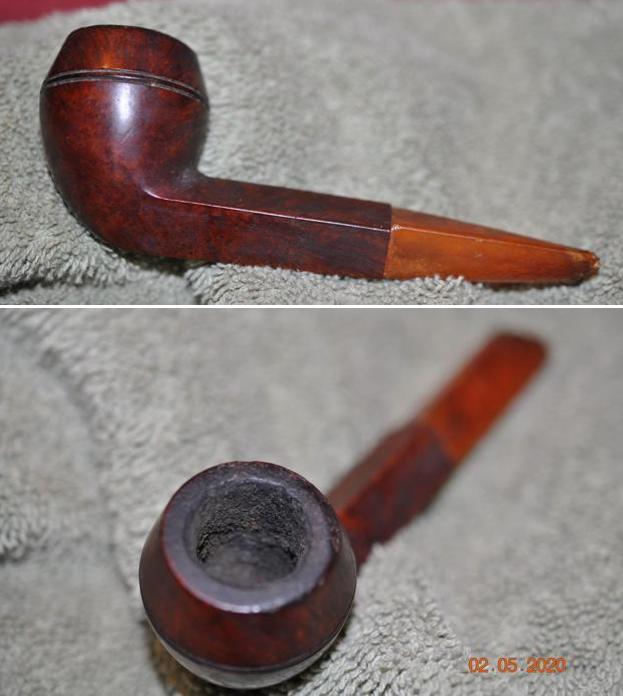
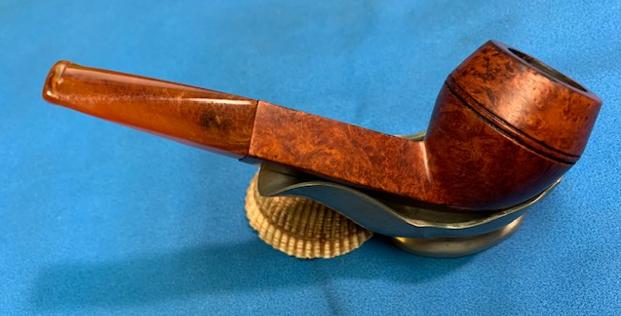
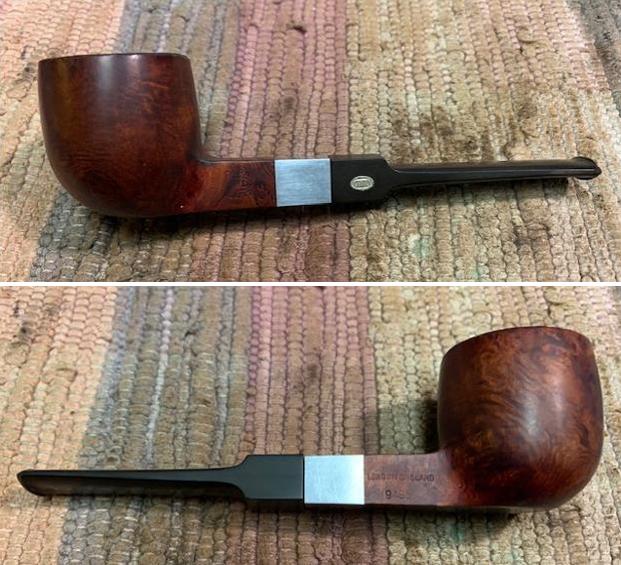
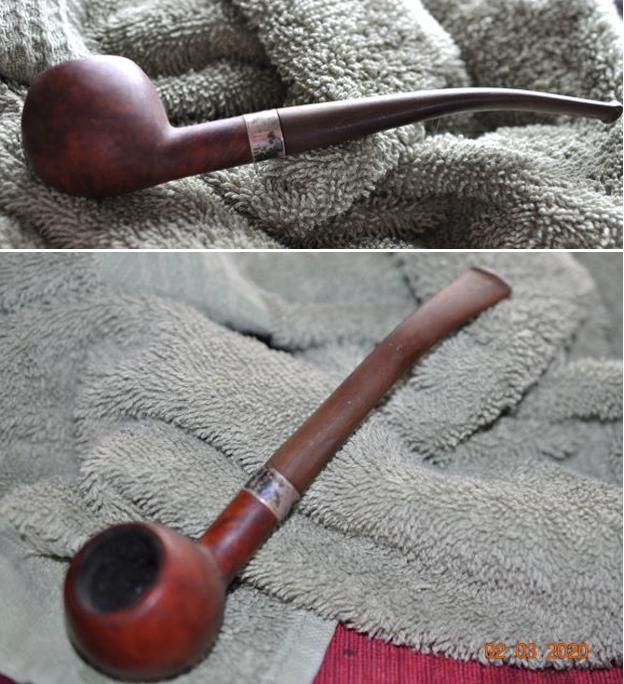
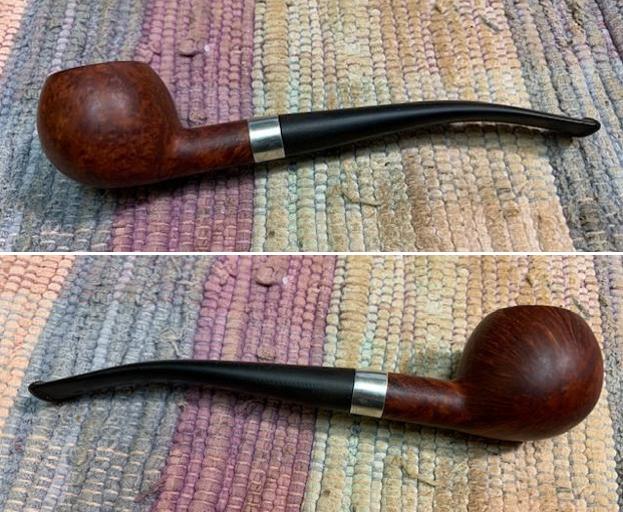
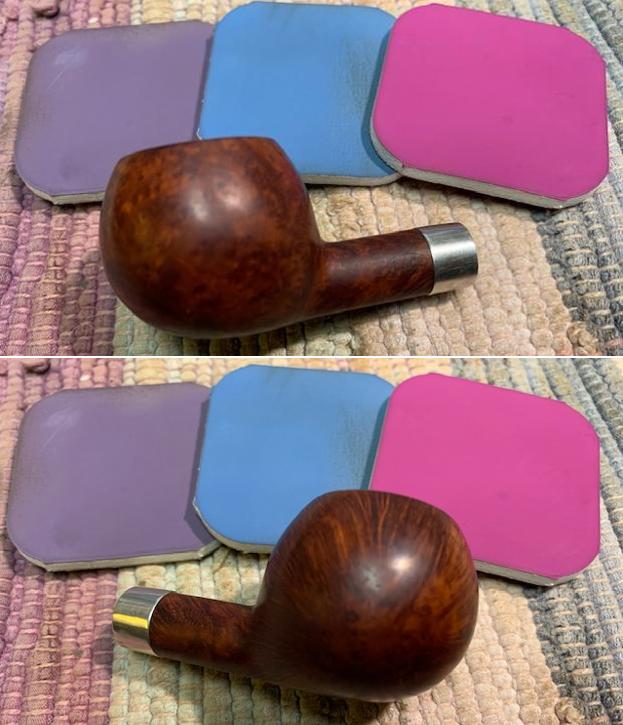
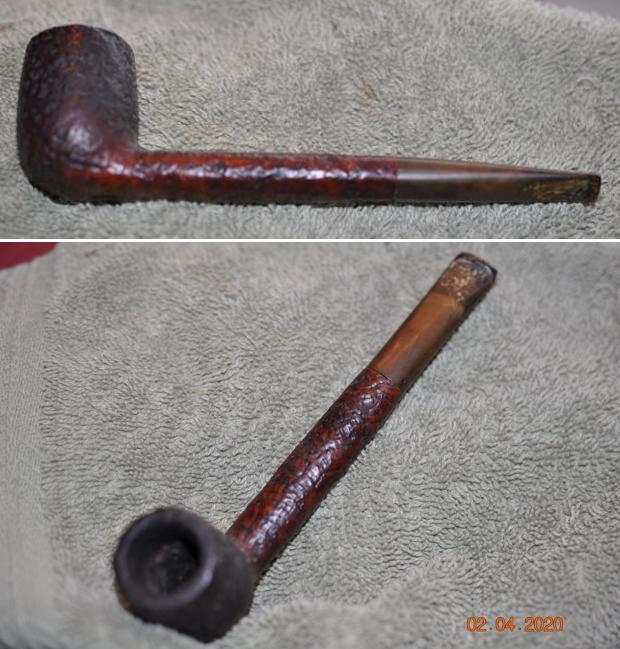
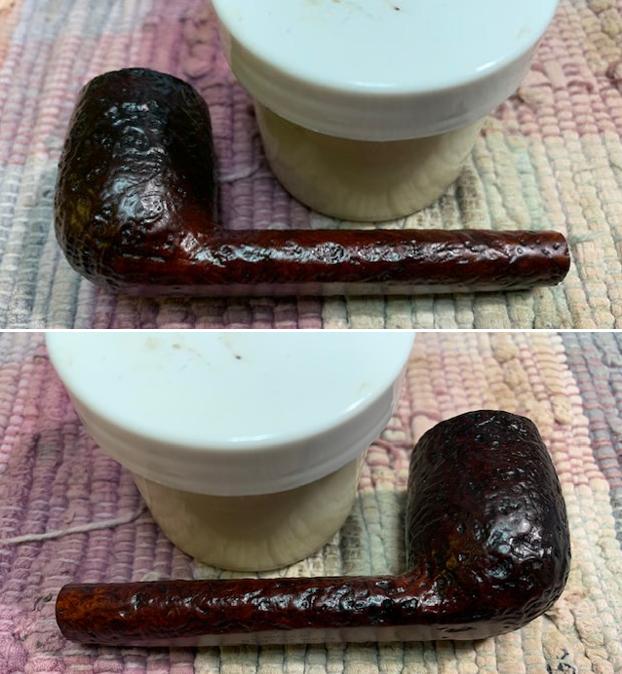
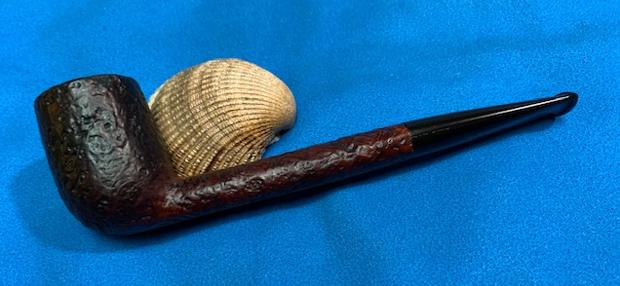
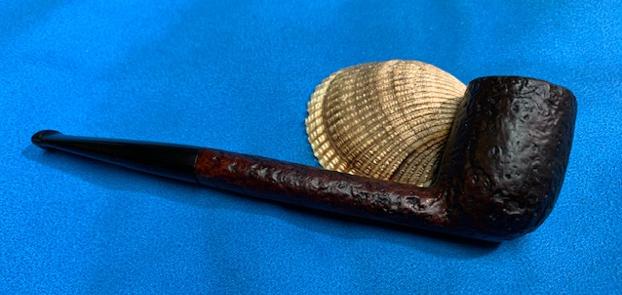
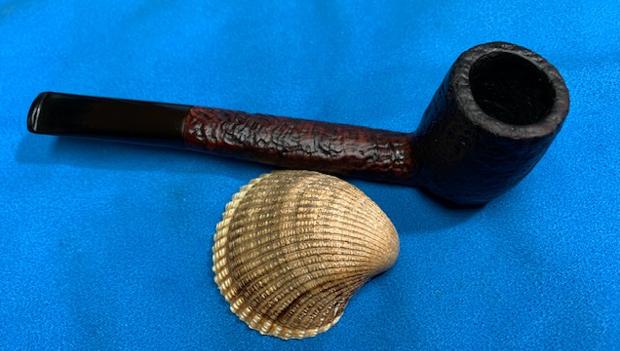
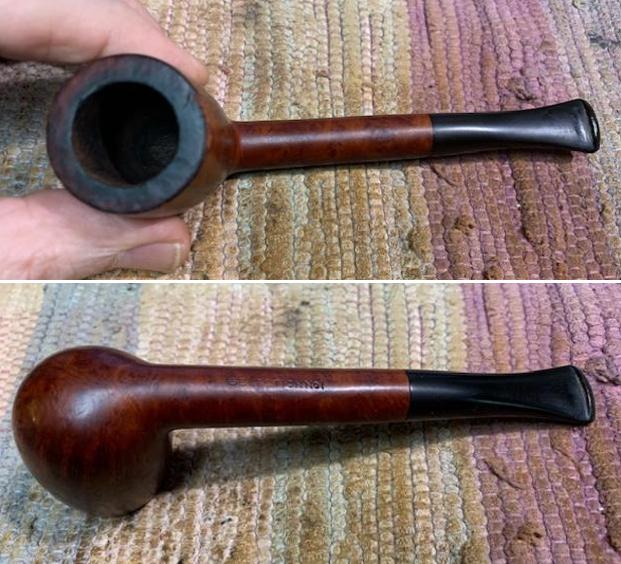
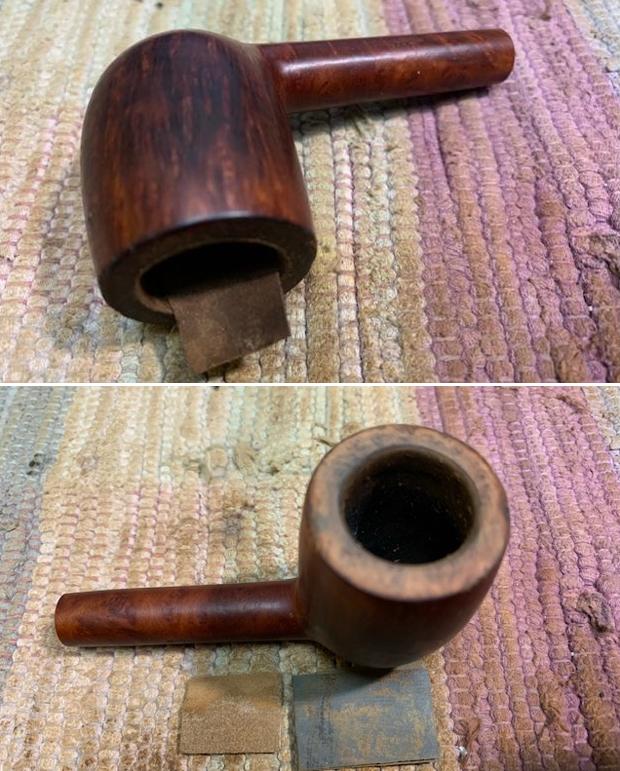
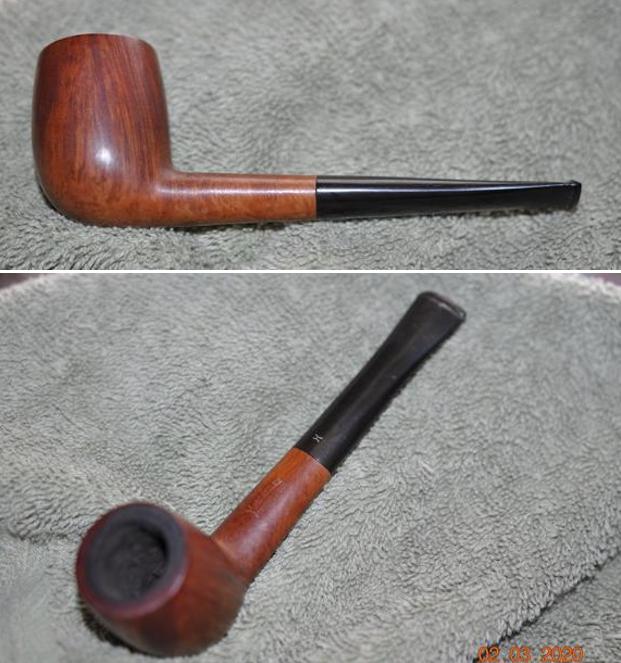
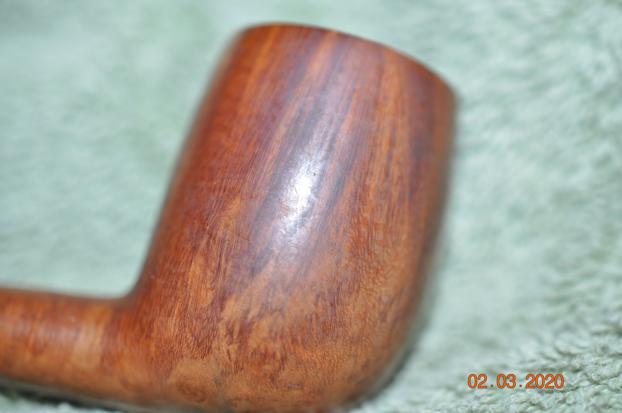
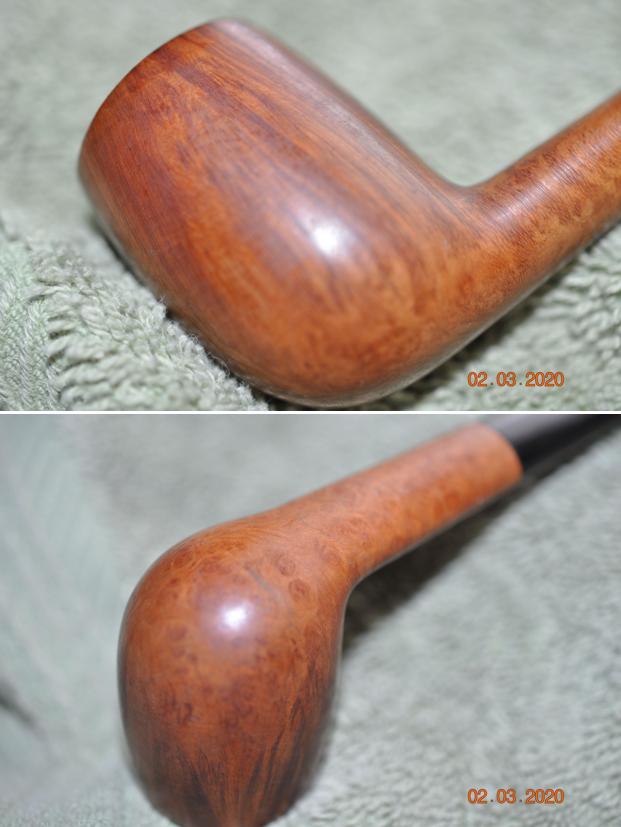
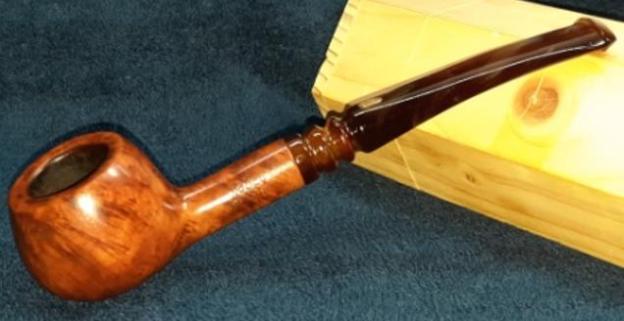
This grab bag that Steve had sent me contained few pipes that Jeff had already cleaned and sent across to Steve for further restoration. Thus, unfortunately, before condition pictures are not available with me to share with the readers, but fortunately, I get to work on a pipe that Jeff has already worked his magic upon and presented me with a clean pipe. Below are a few pictures of the pipe as I had received it.
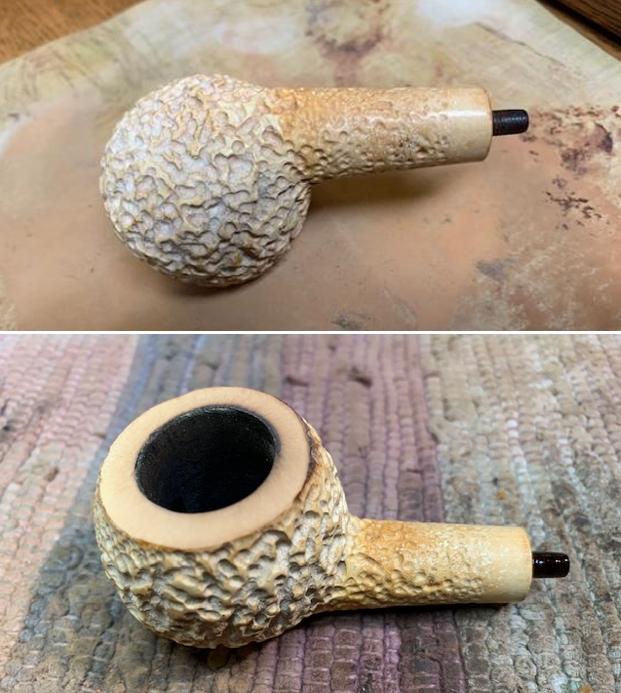
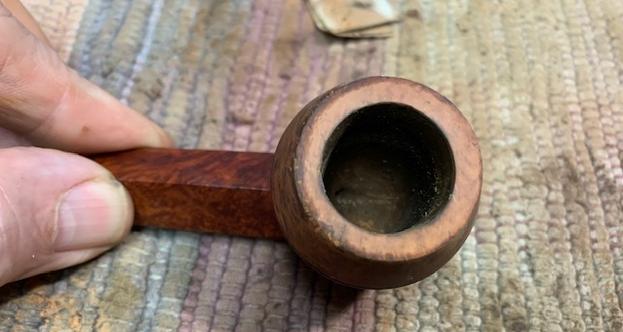
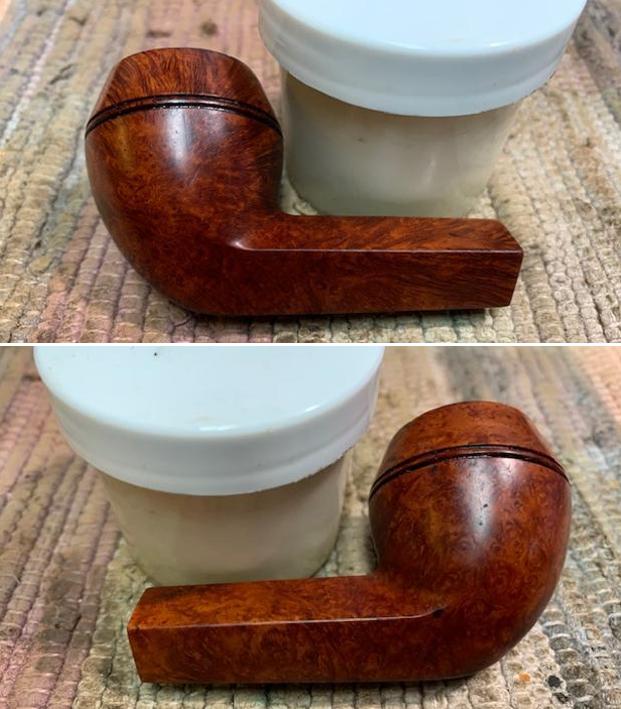
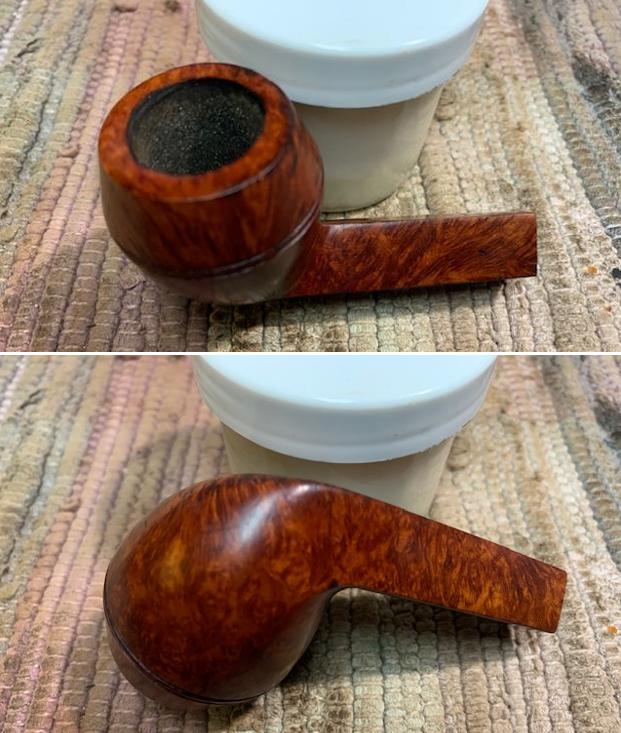
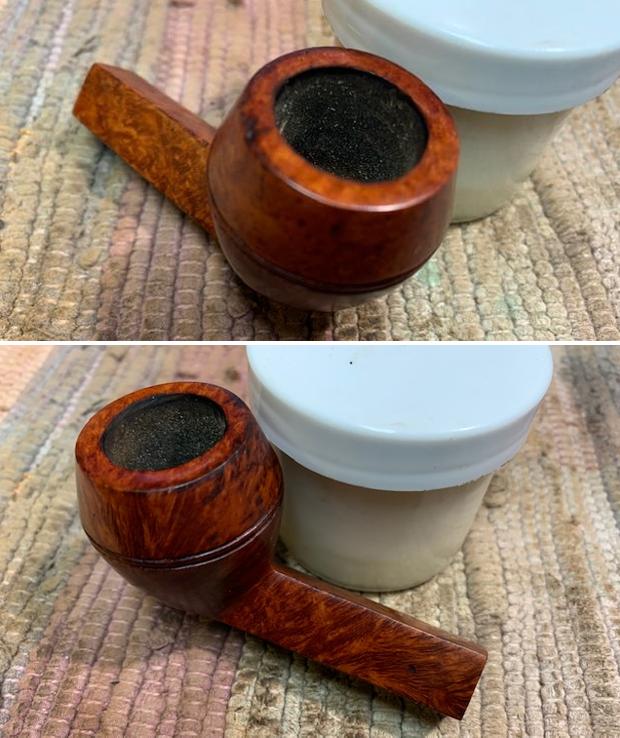
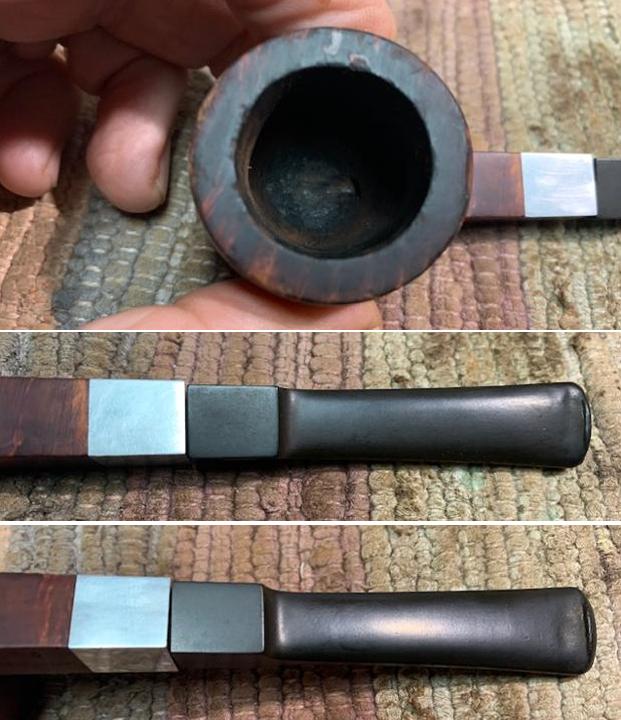
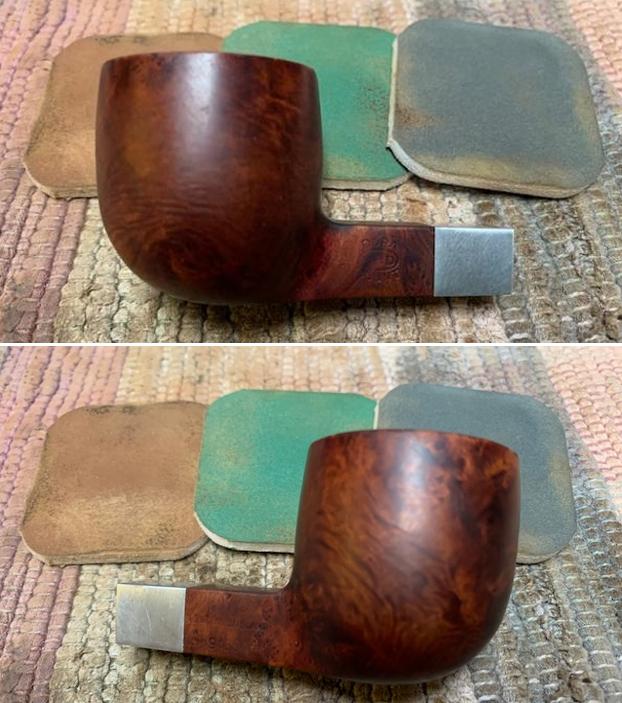
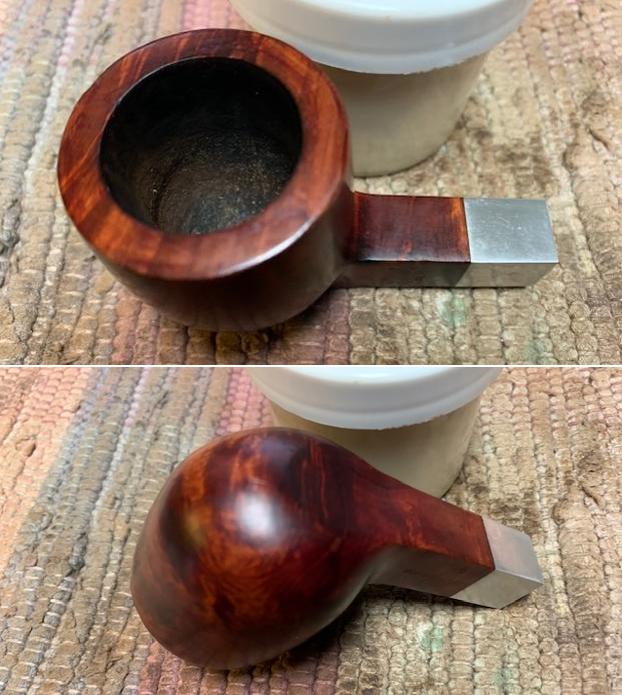
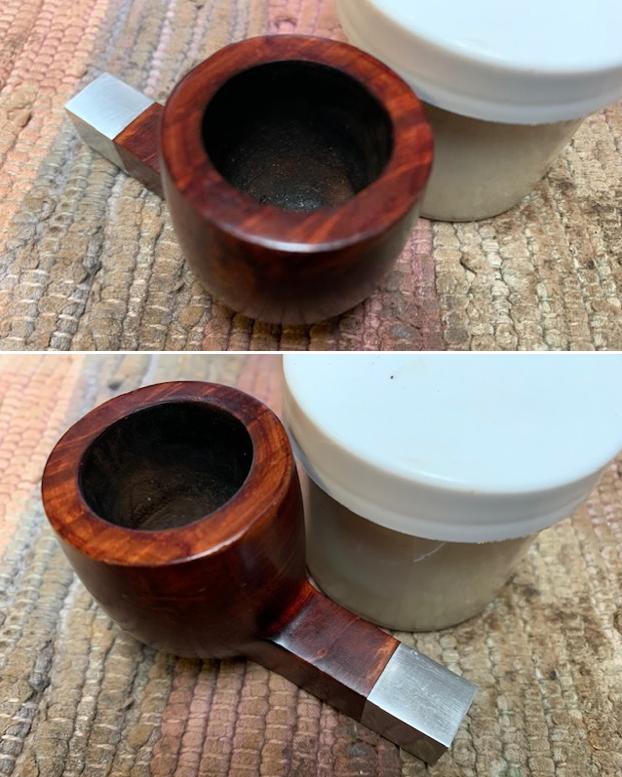
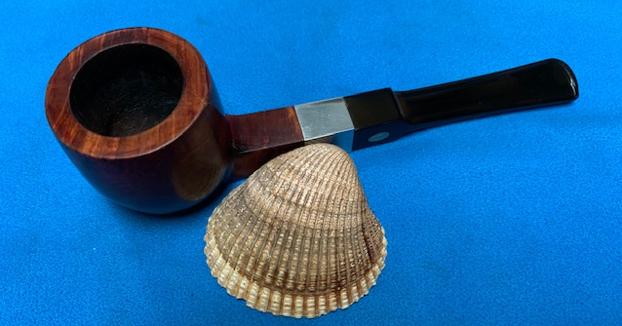
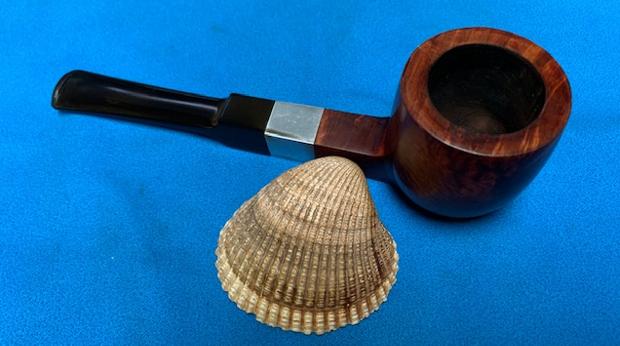
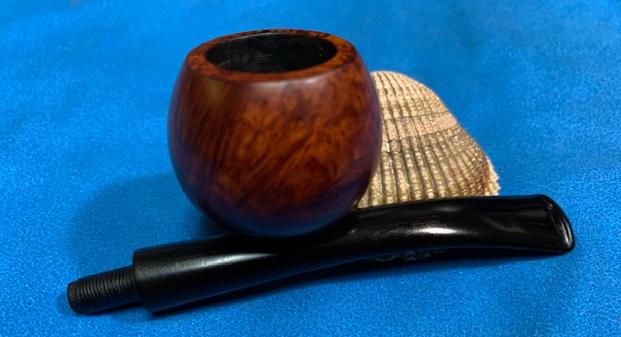
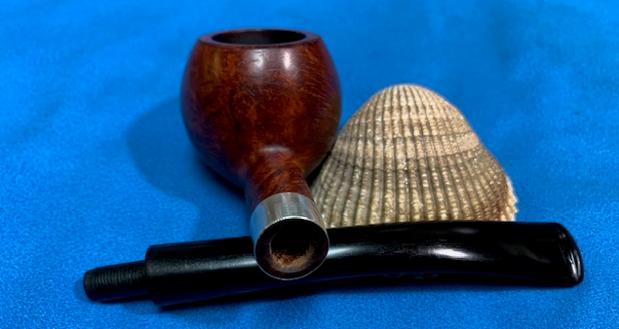
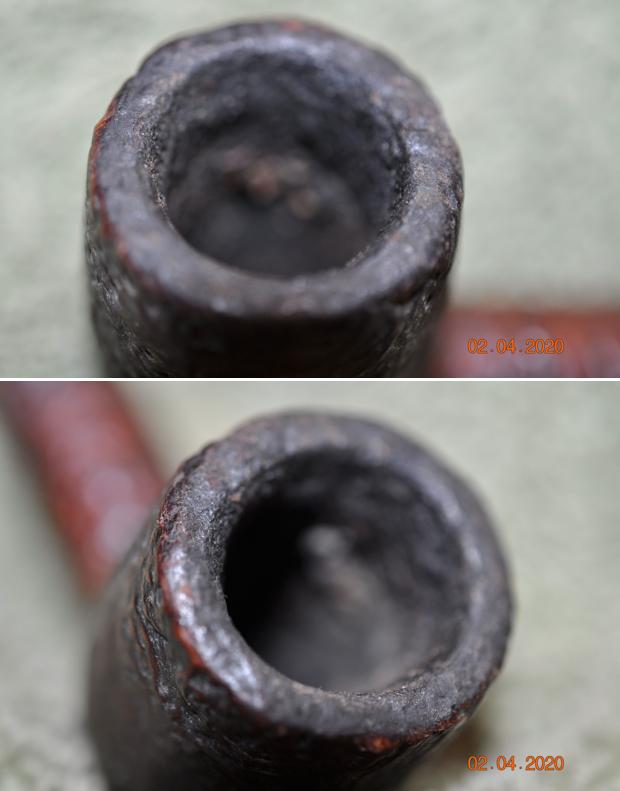
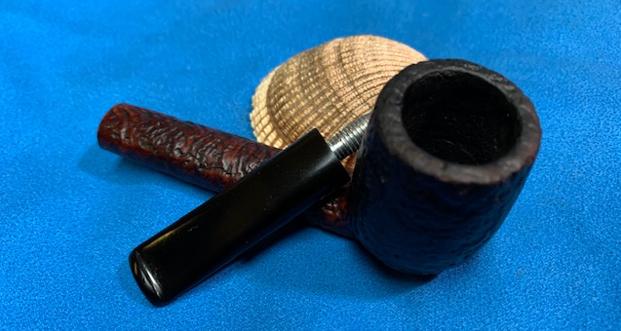
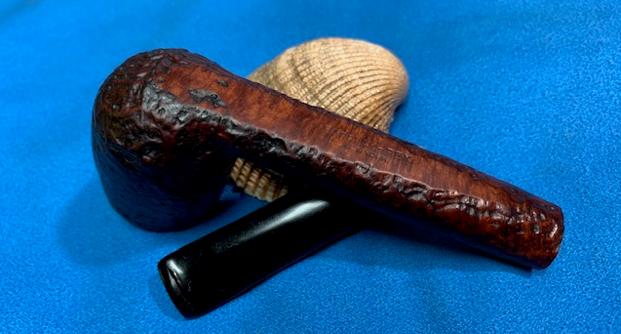
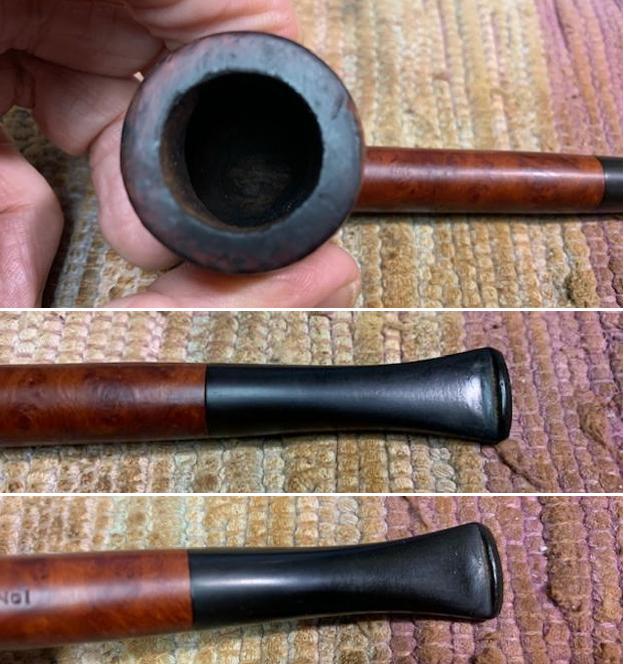
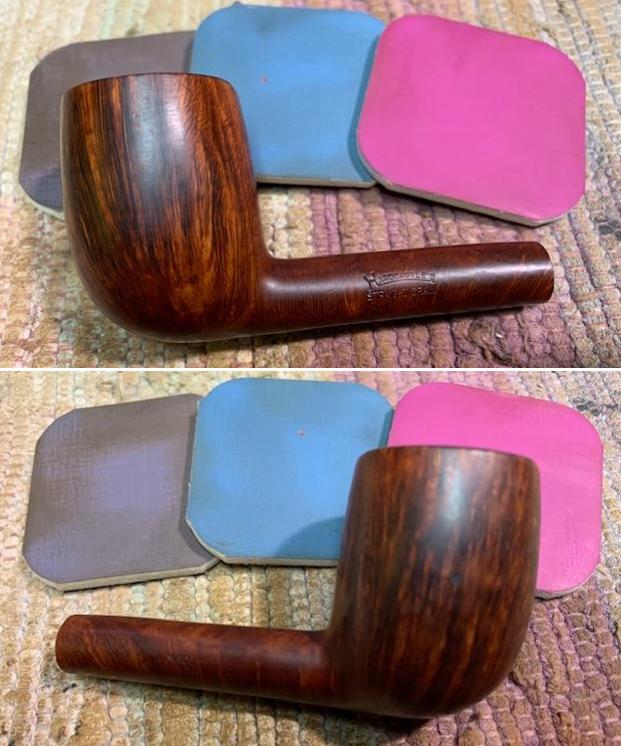
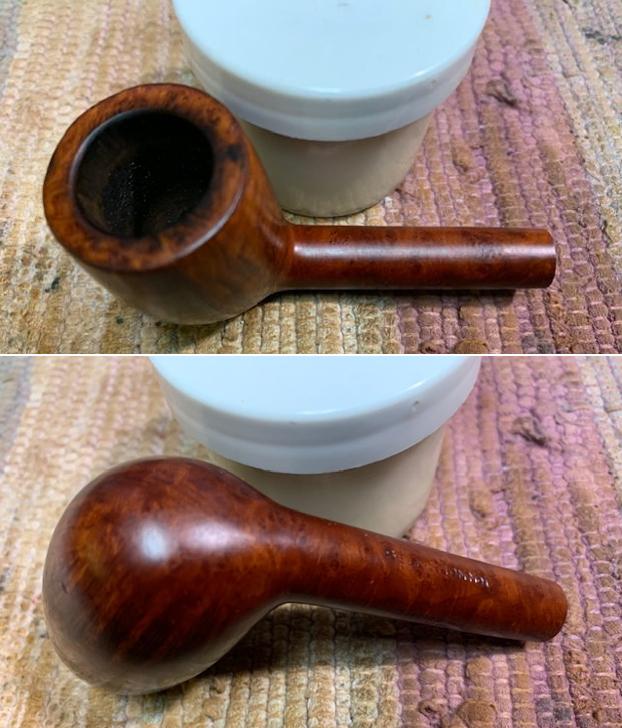
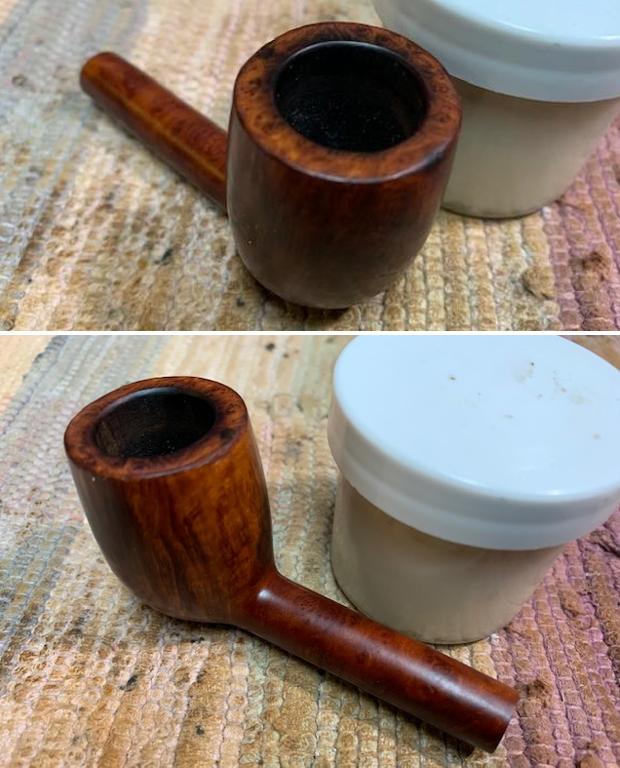
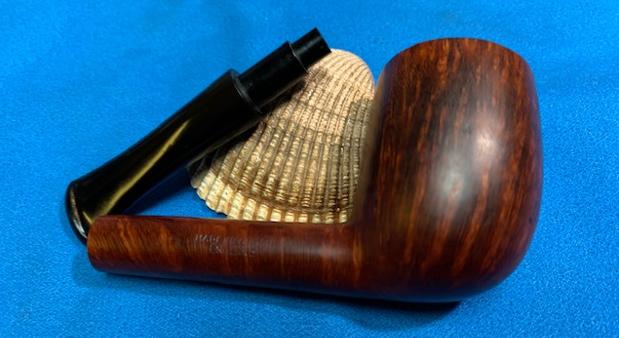
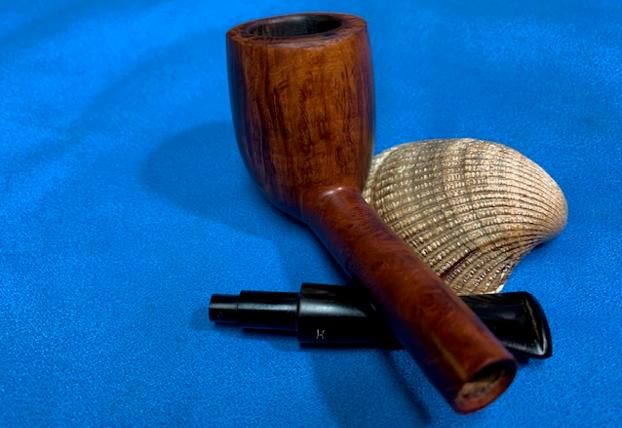
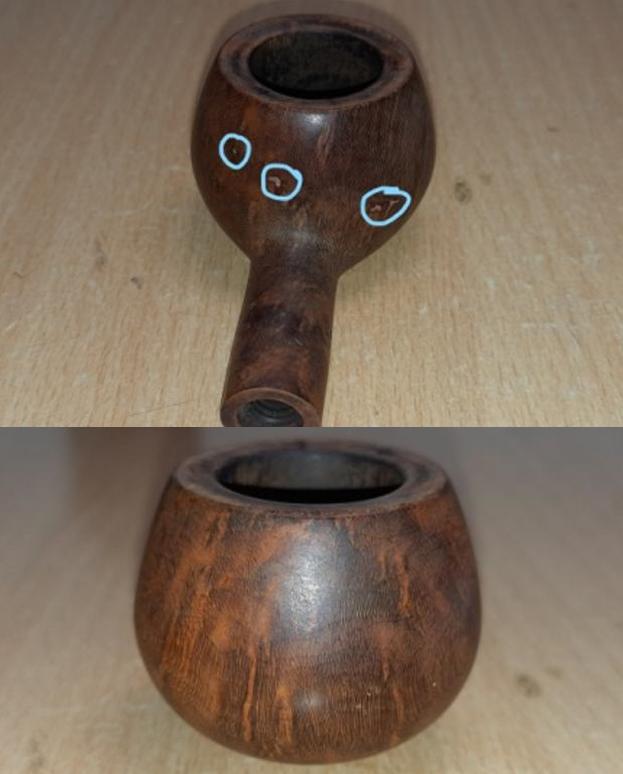
 Detailed Inspection
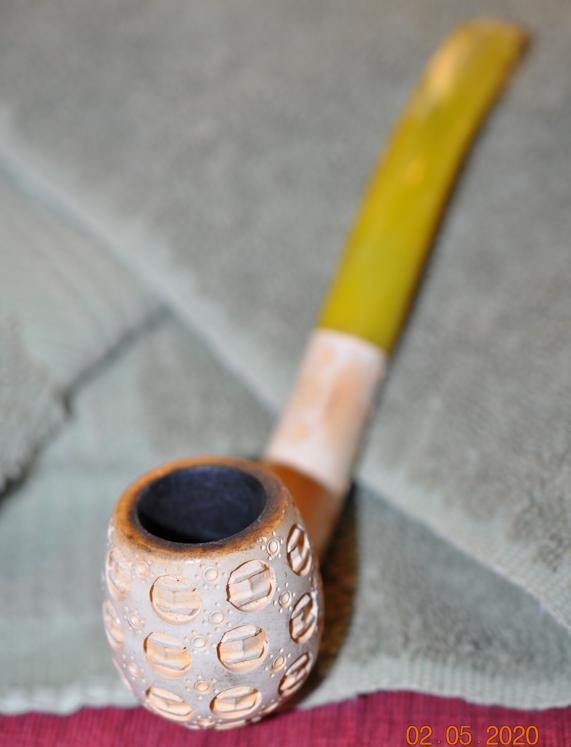
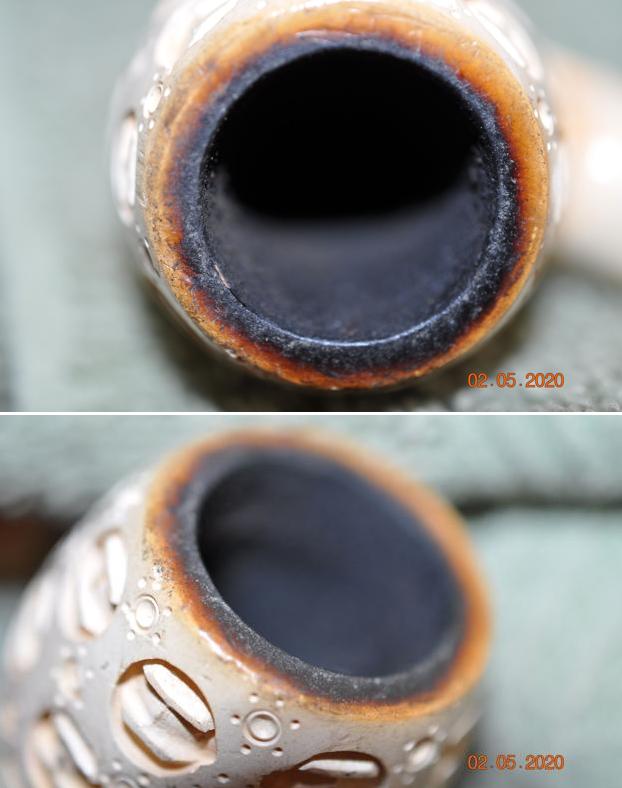
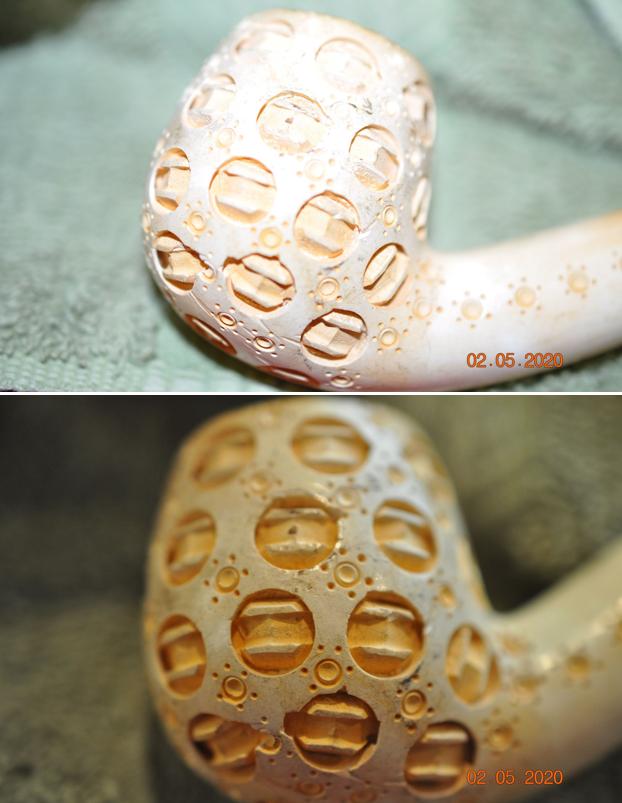
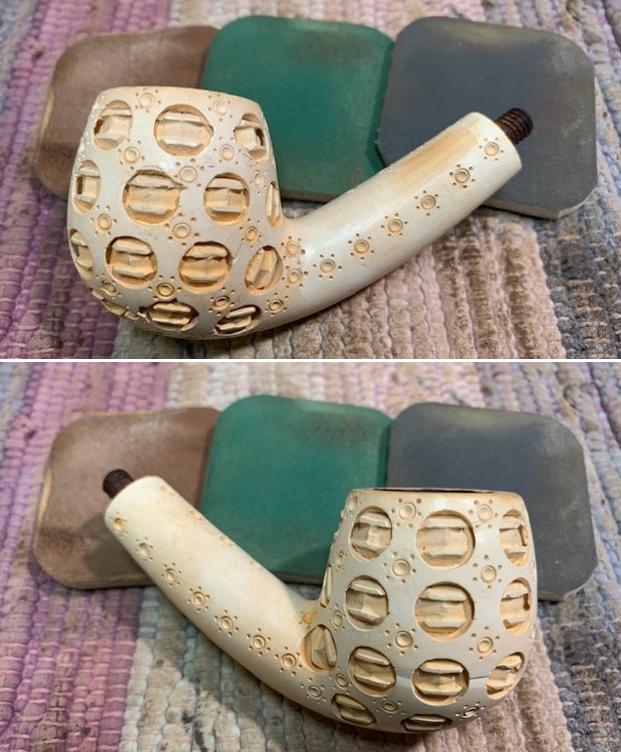
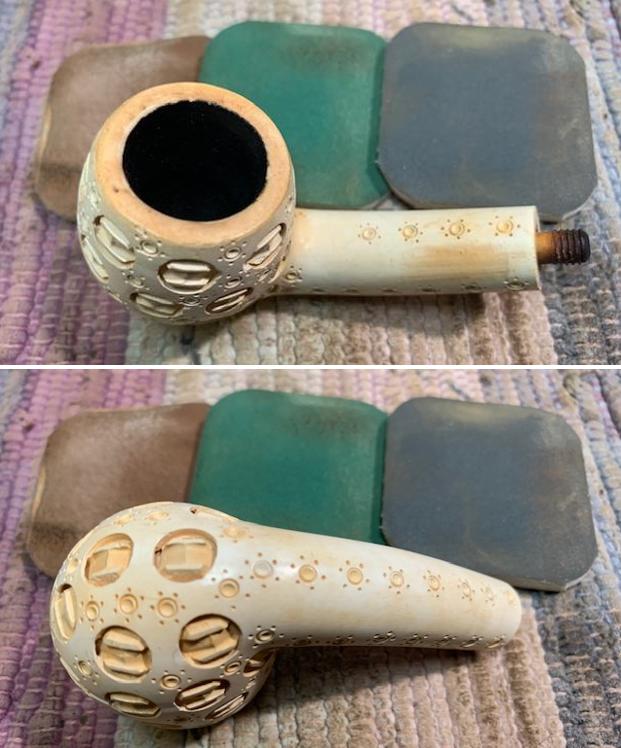
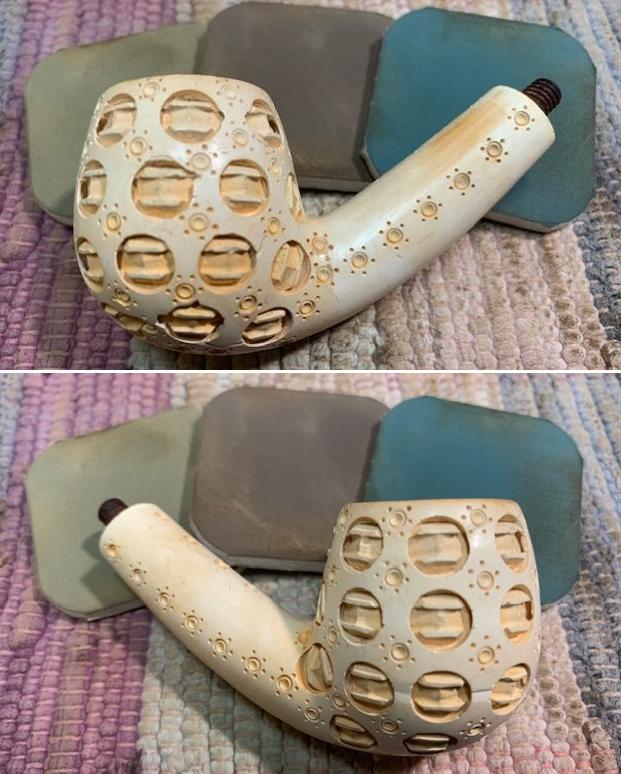
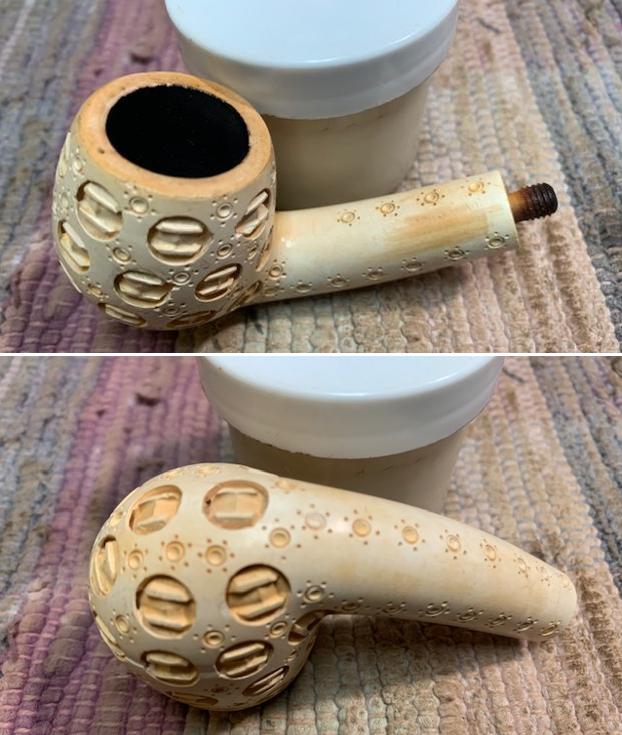
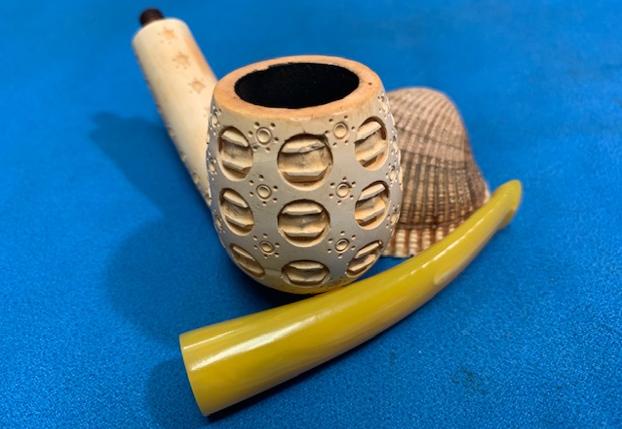
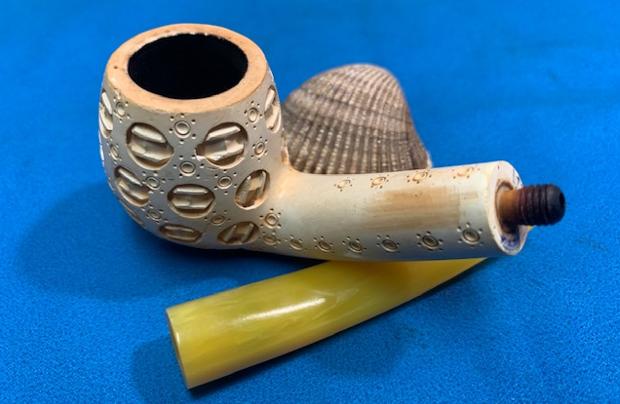
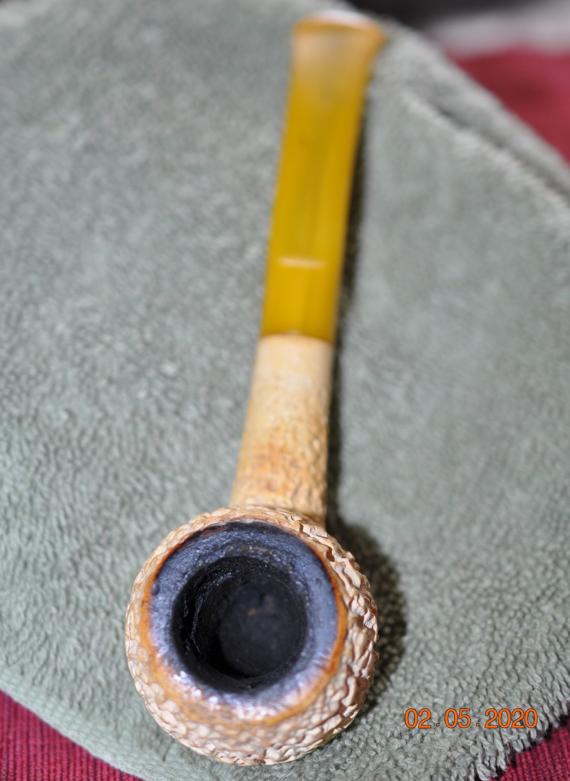
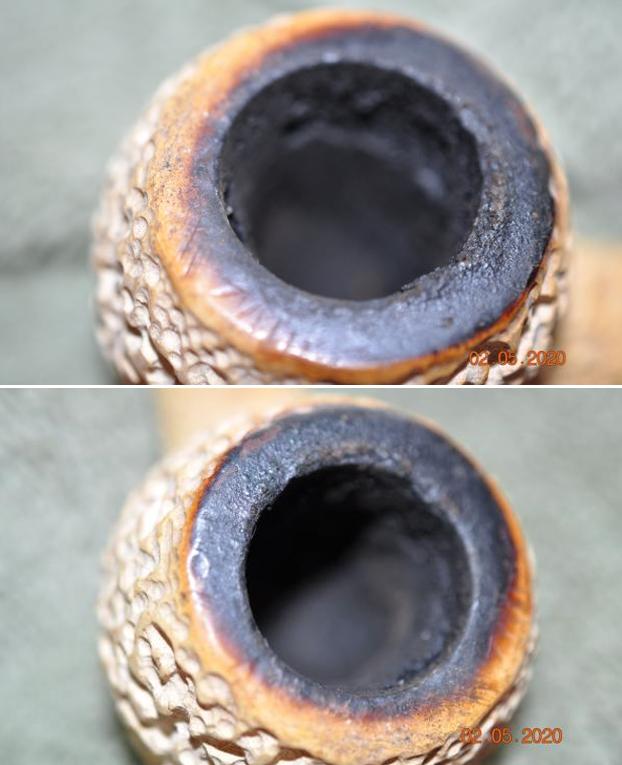
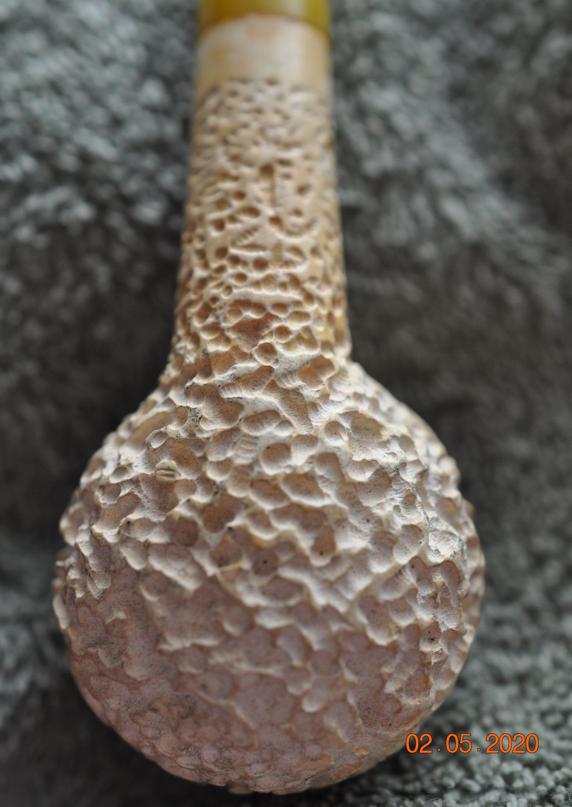
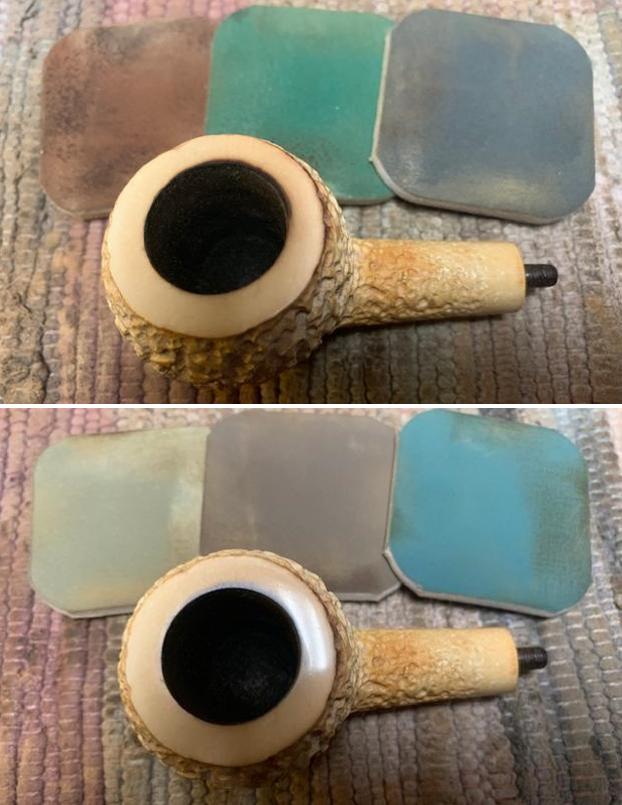
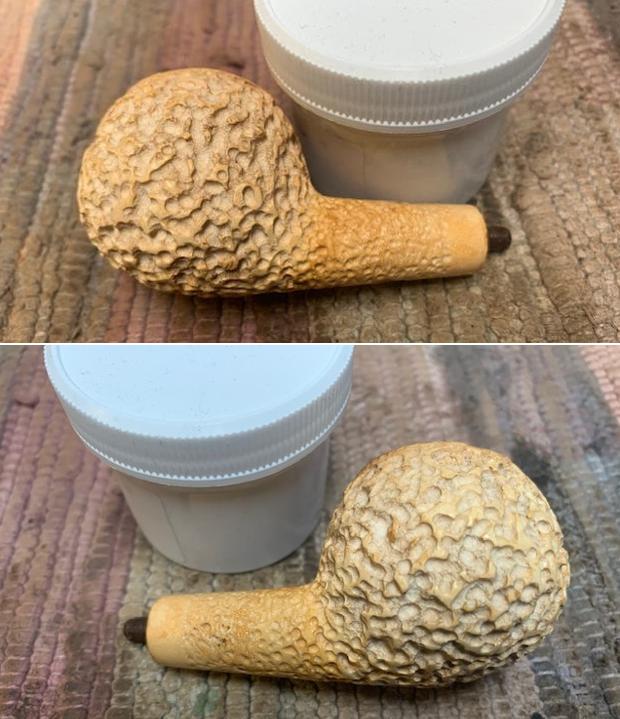
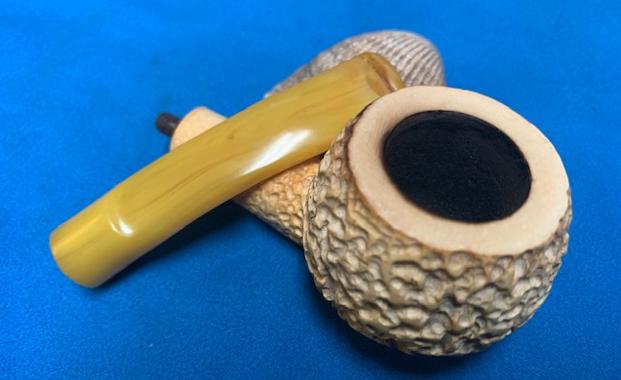
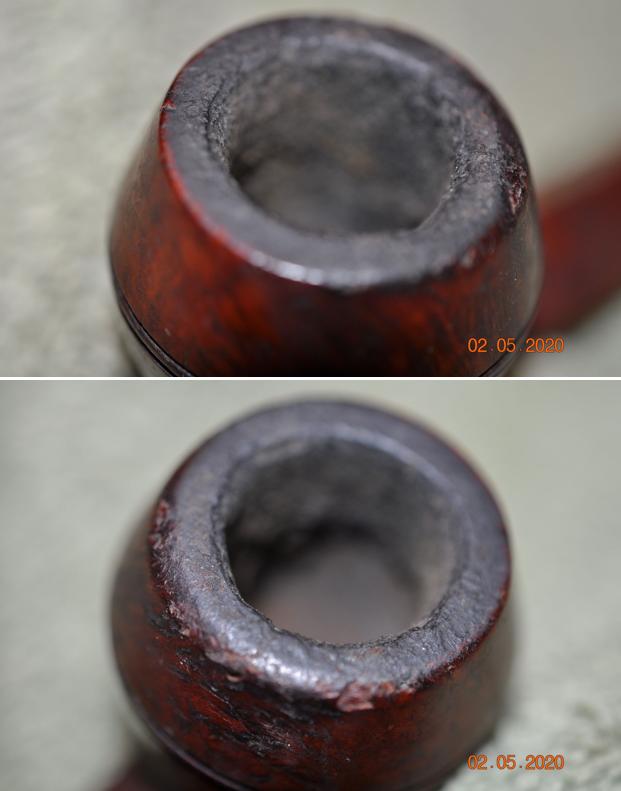
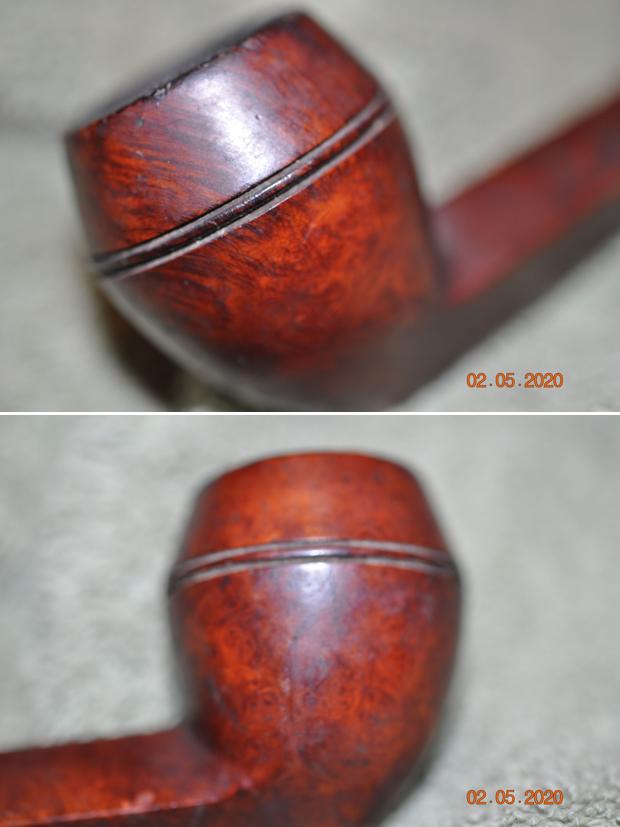
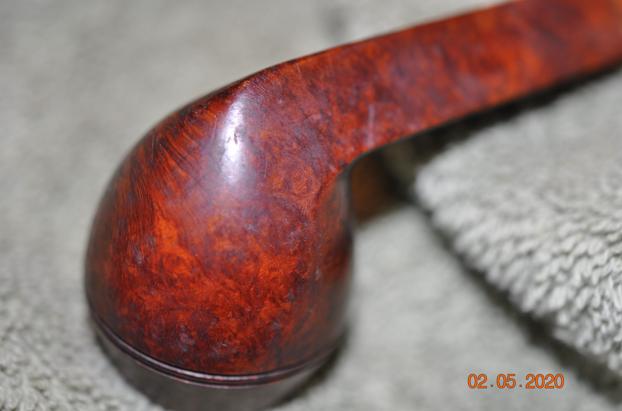
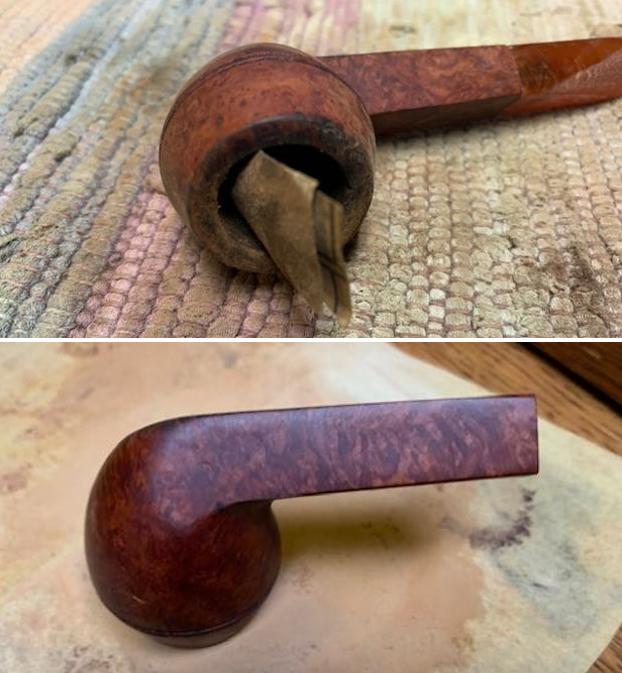
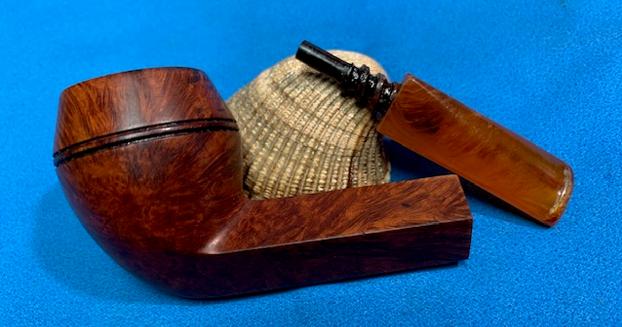
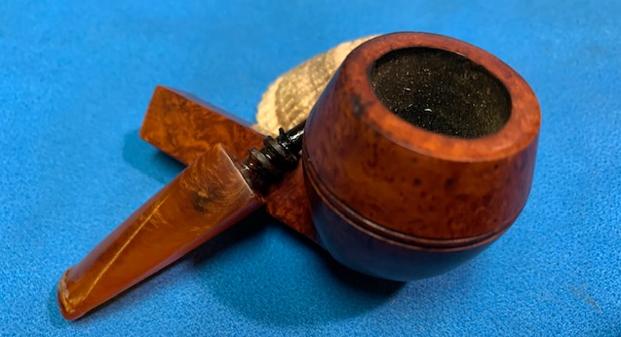
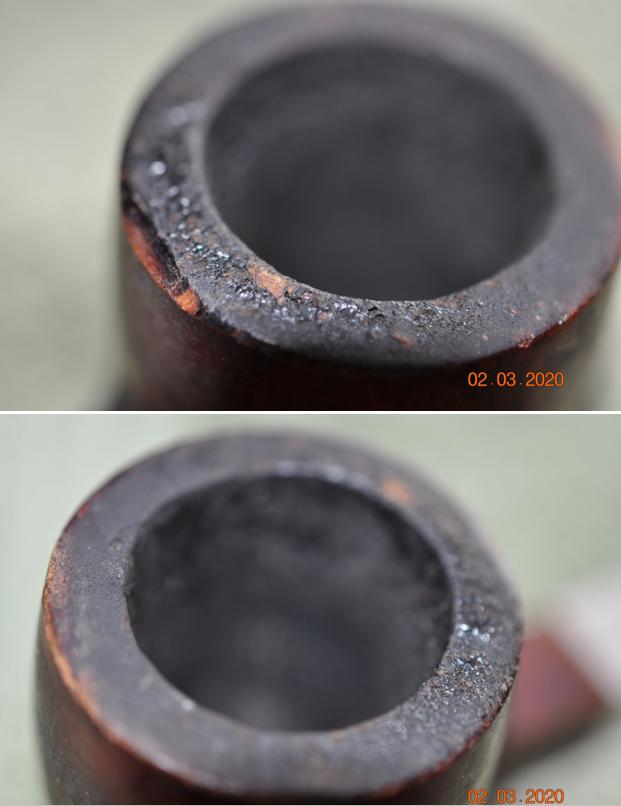
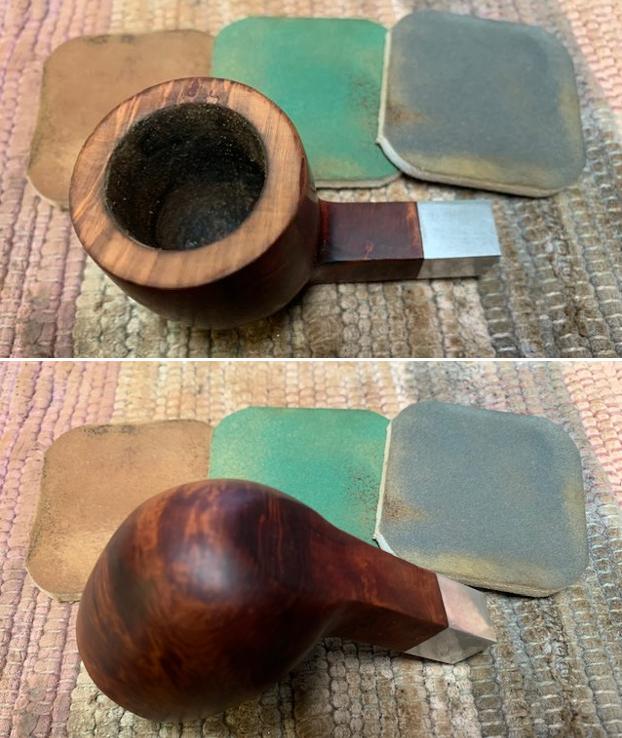
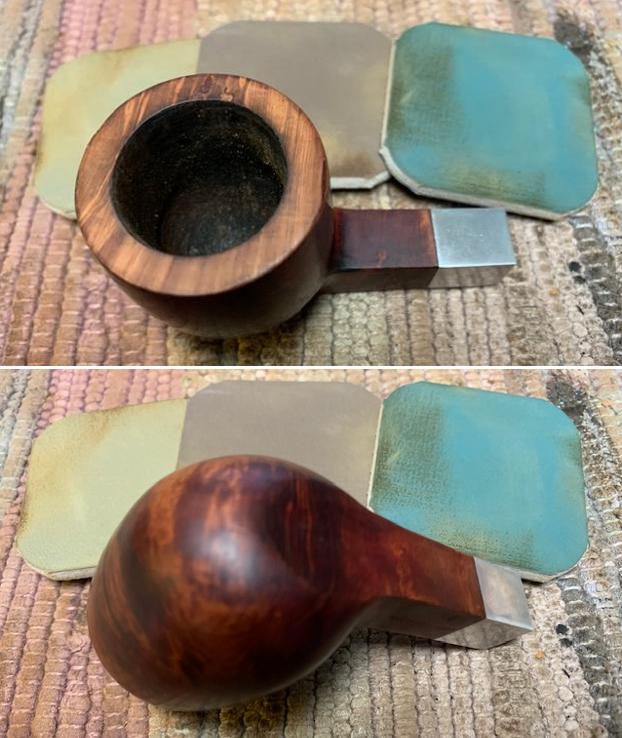
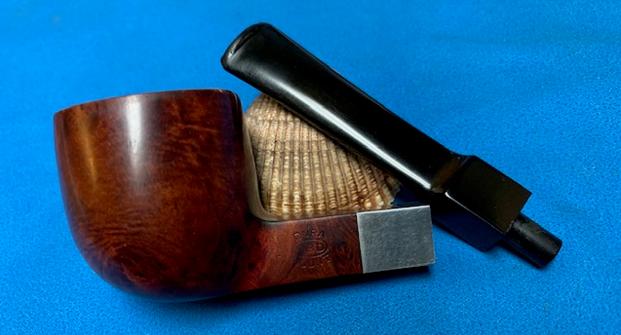
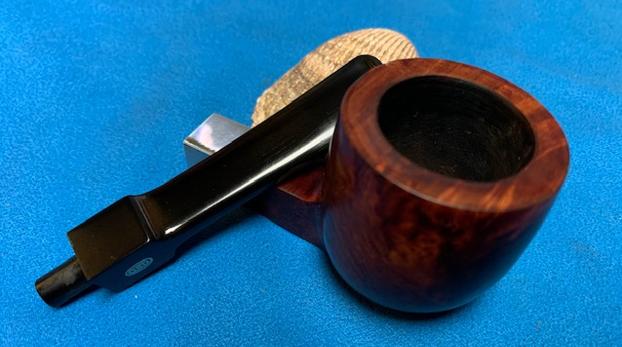
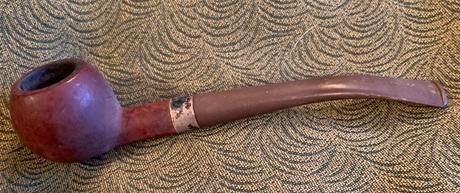
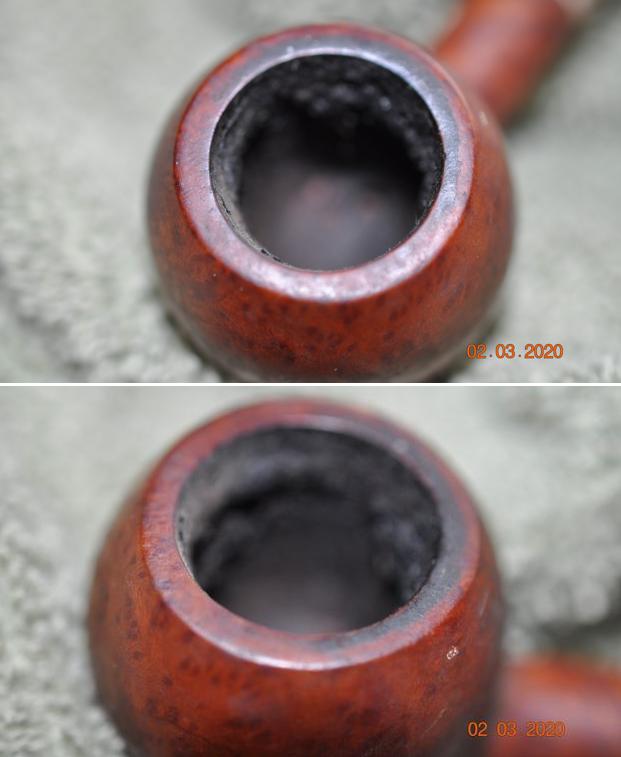
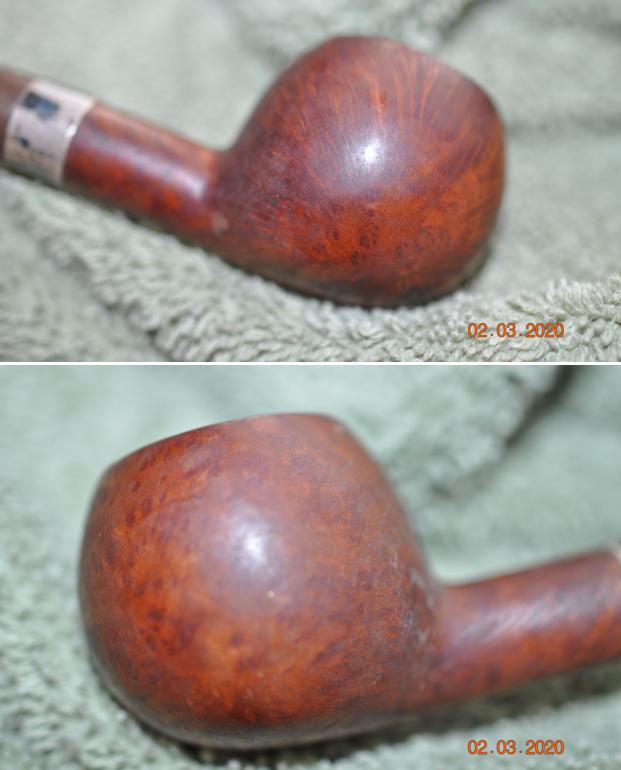
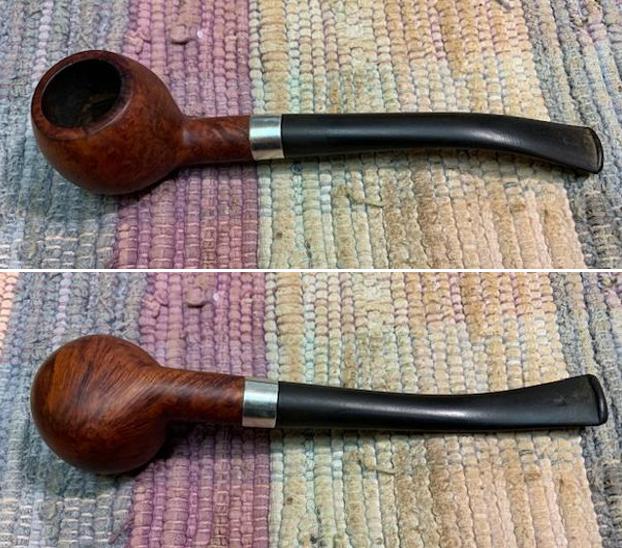
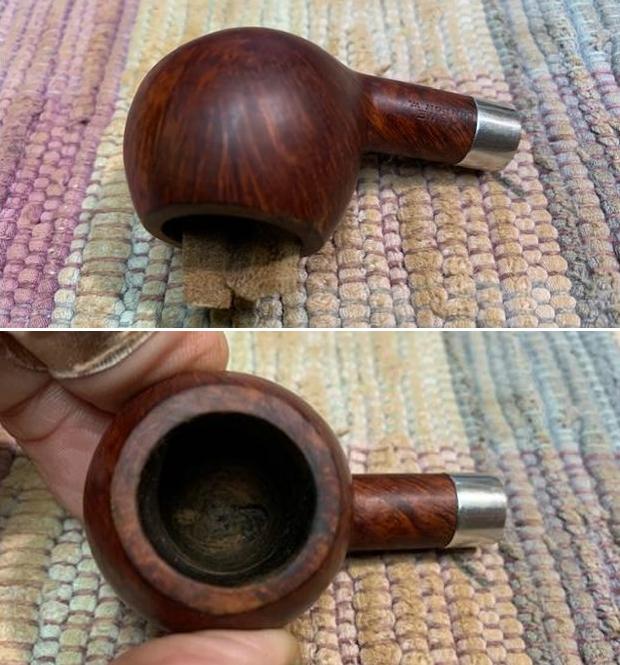
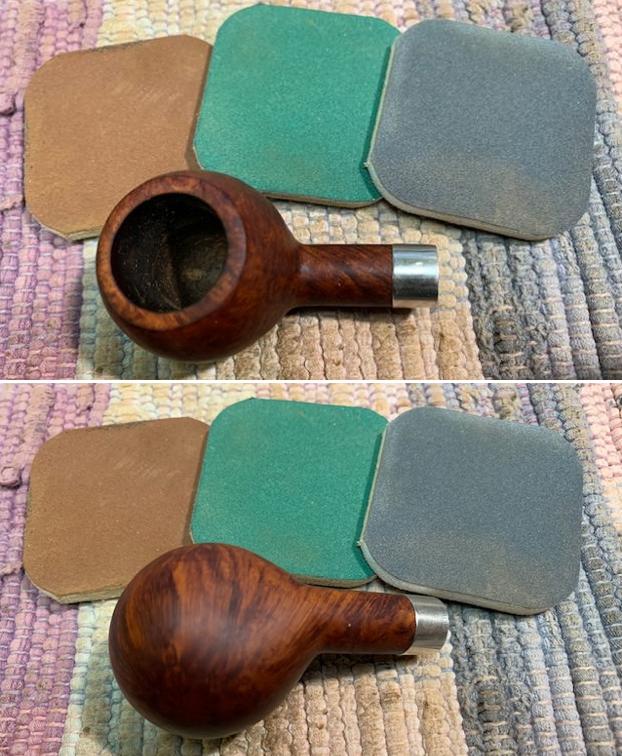
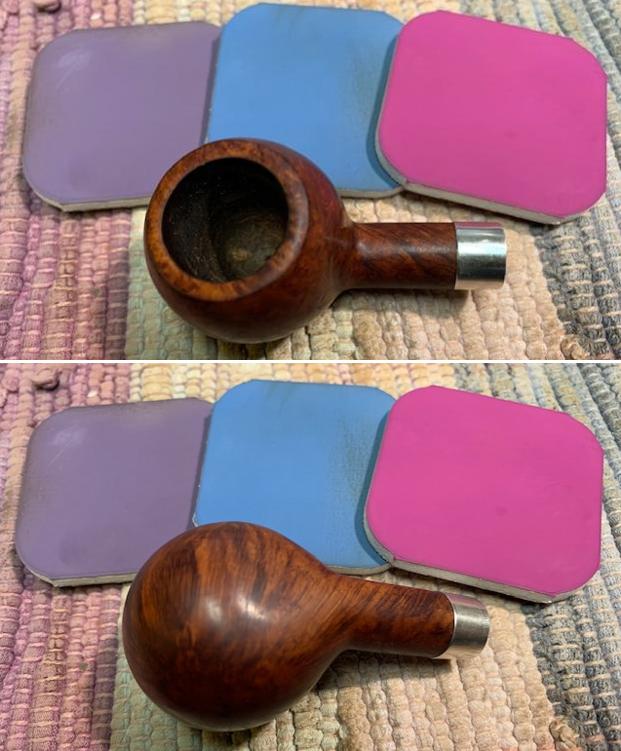
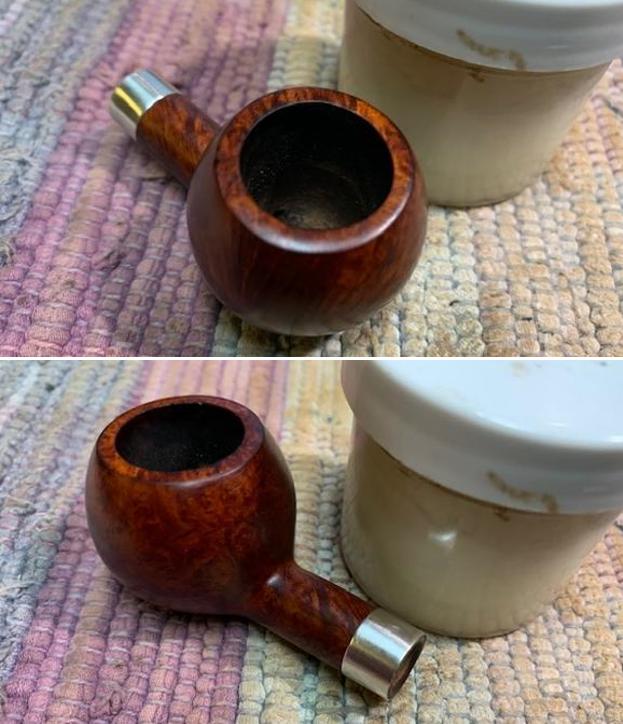
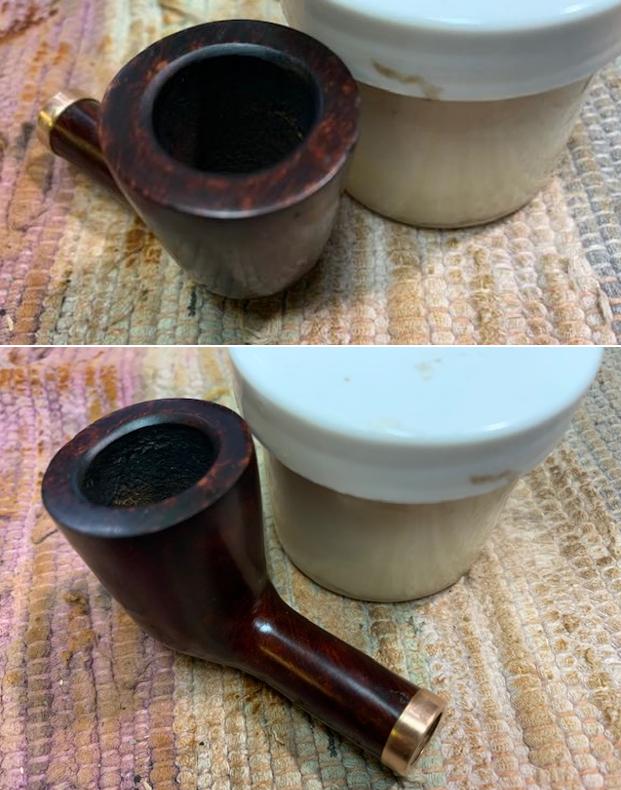
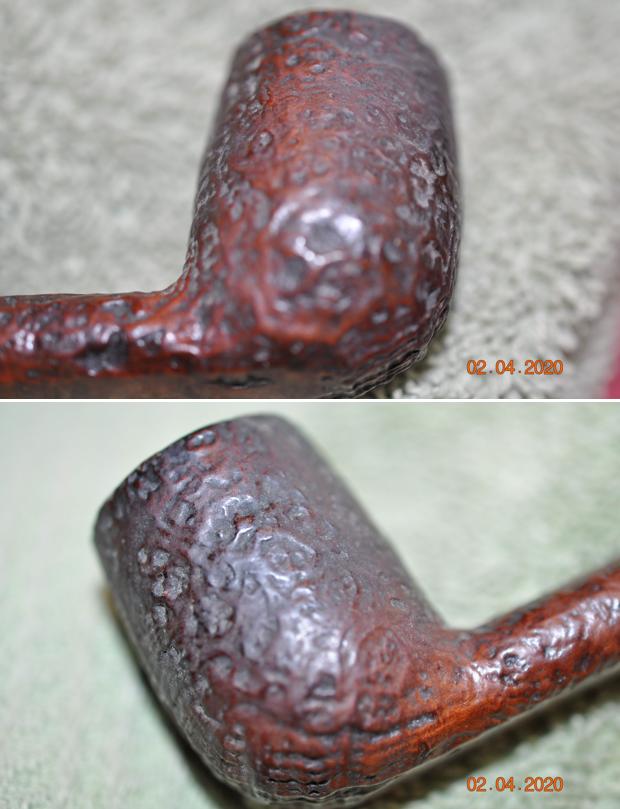
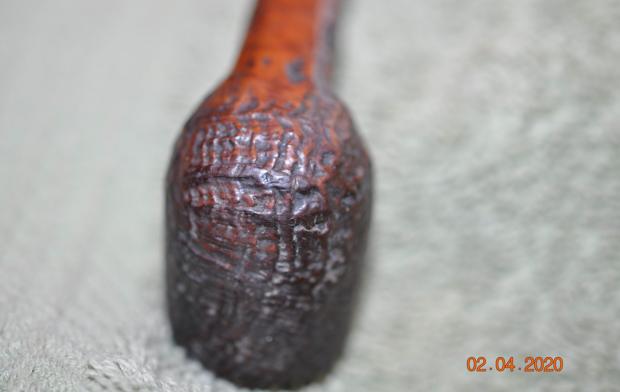
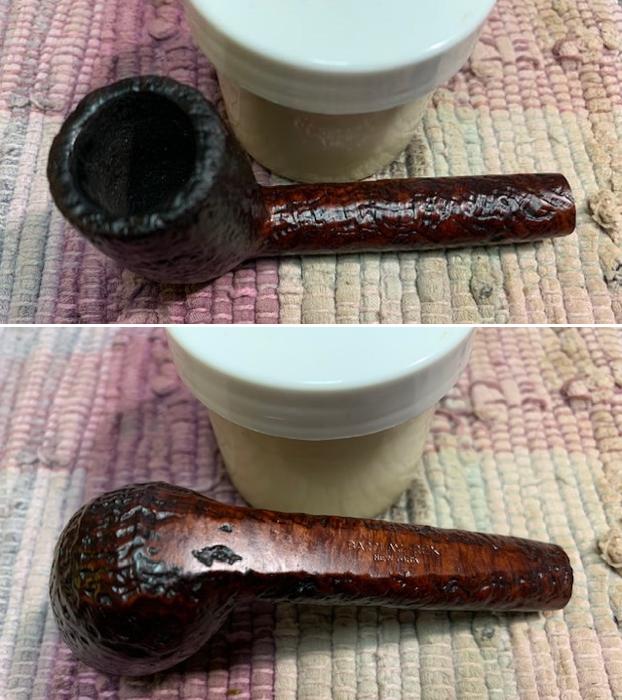
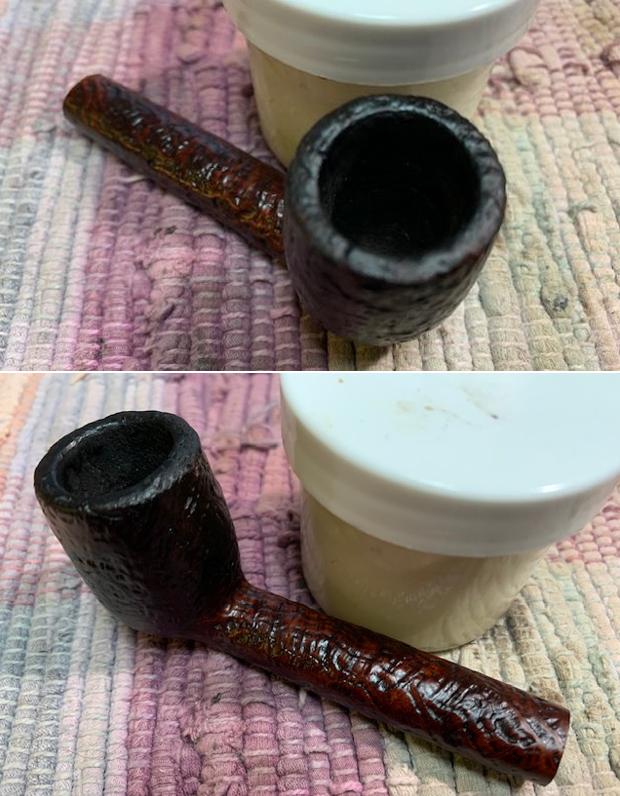
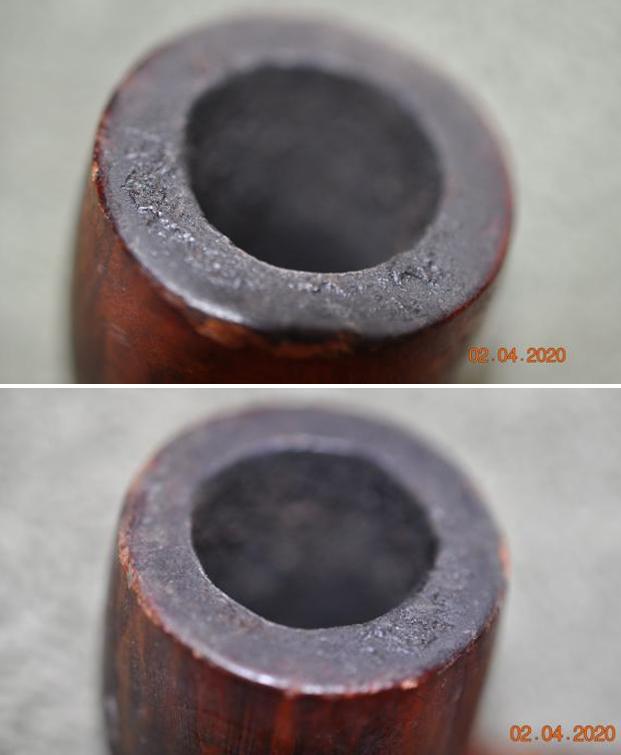
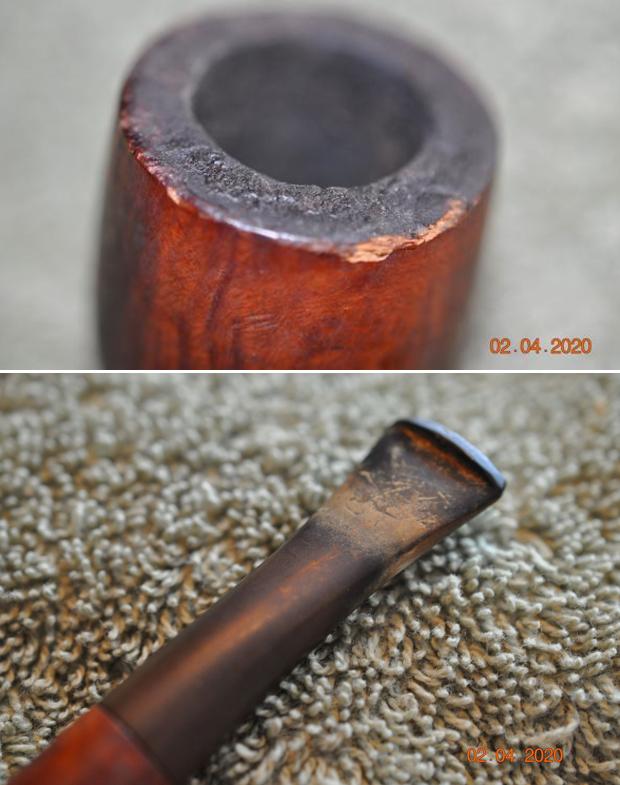
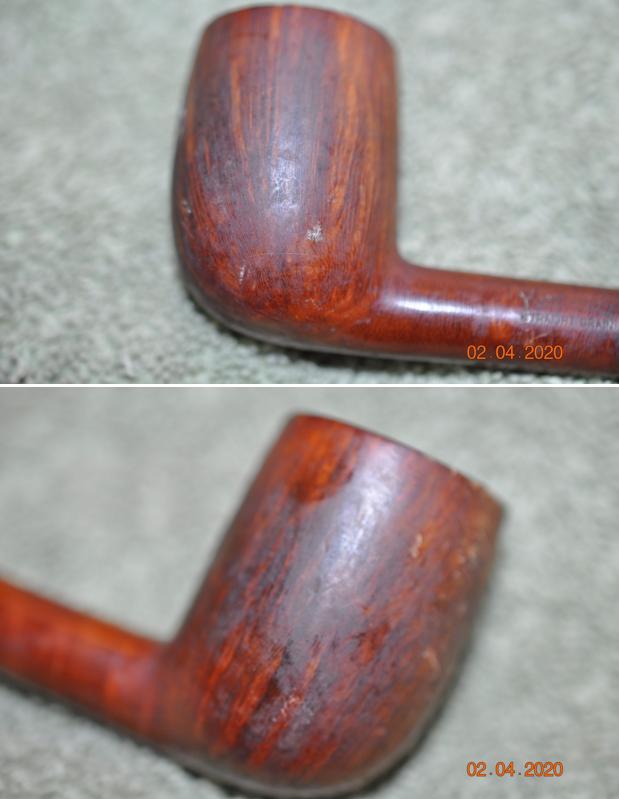
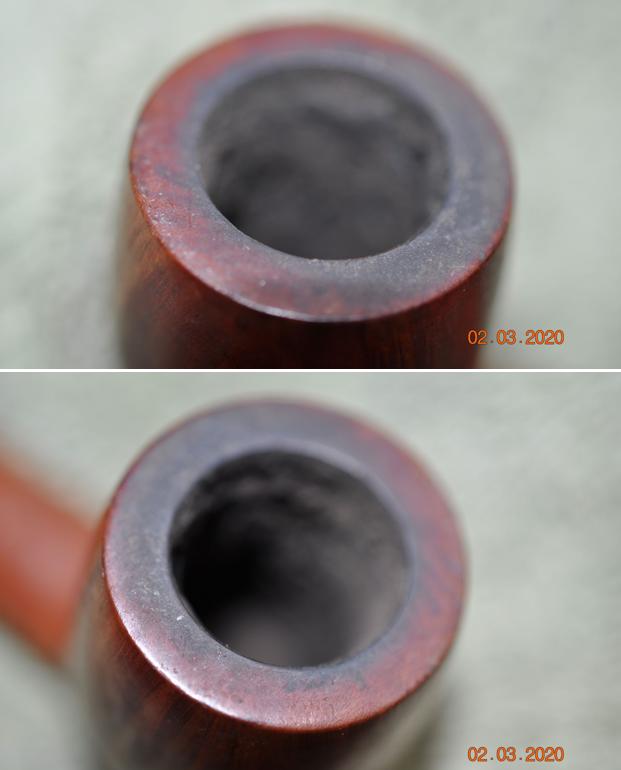
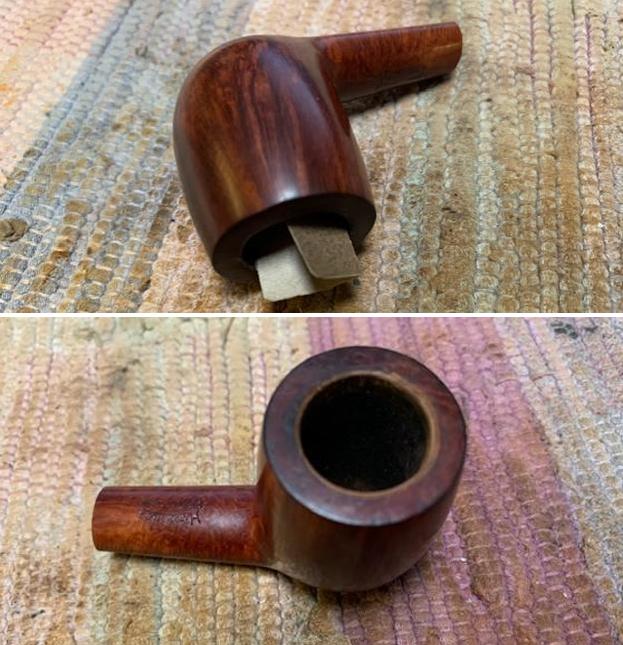
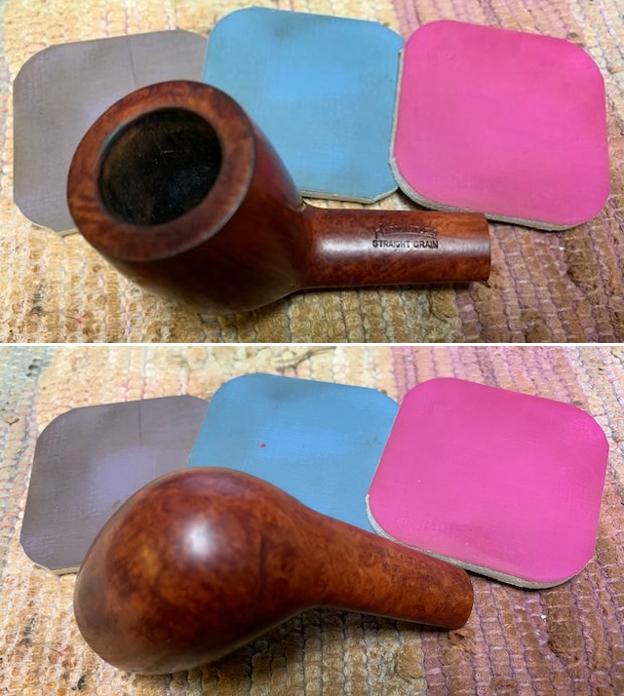
The chamber is nice and clean with thick walls without any damage. The rim top surface has a couple of darkened areas which should be easy to clean up. The inner and outer rim edges are in decent shape and the chamber smells clean.The external surface of the stummel has been cleaned and lacquer coat has been removed in most of the places. However, a few spots remain where the lacquer coating is visible. The stummel had a reddish orange stain that has been cleaned out but would need to be eliminated completely (personal choice!). There are a few fills (encircled in pastel blue) at the back of the stummel that would need to be refreshed. There are few dents and dings over the stummel surface that needs attention. Through all this patchy lacquer coat and stain, beautiful Angel’s hair peeks out from the smooth surface. Once the stummel is cleaned and polished, these grains will pop out in all their refined glory. All in all as it stands now, this is one dull and tired looking stummel that requires a lot of TLC!! 
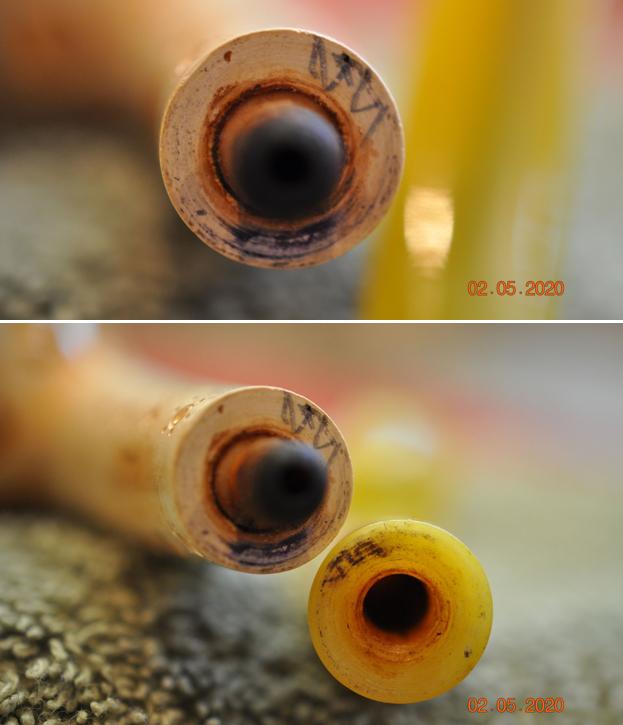
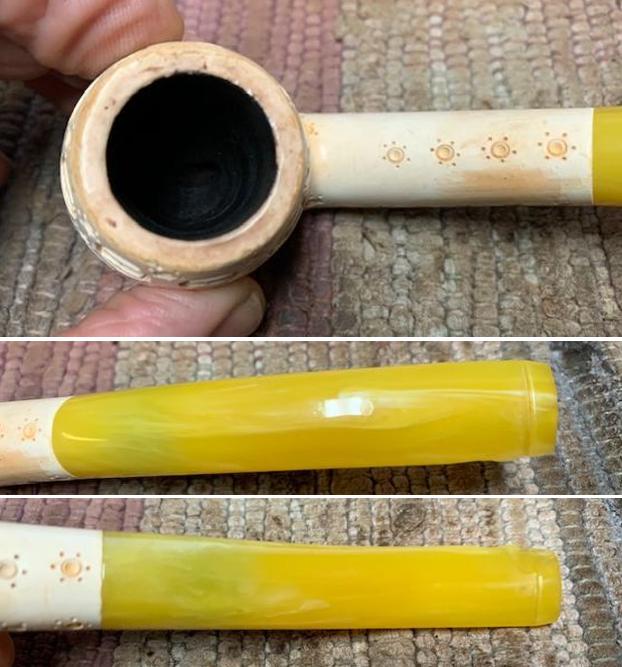
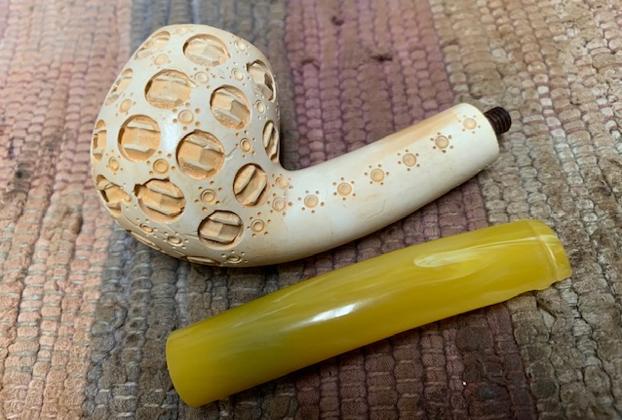
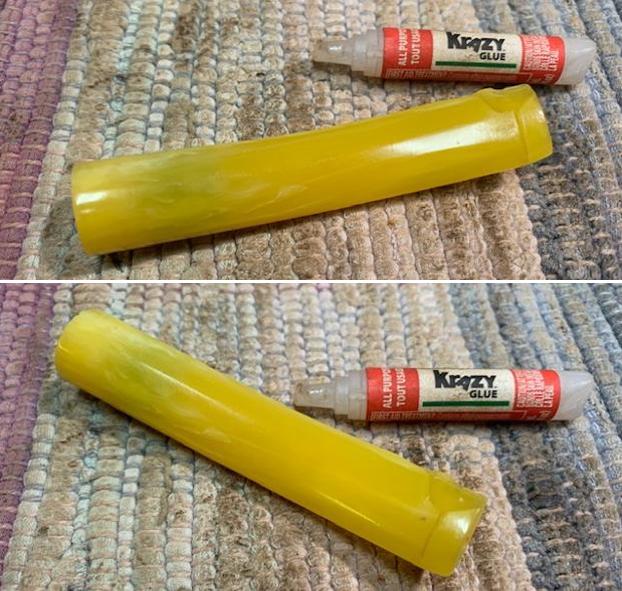
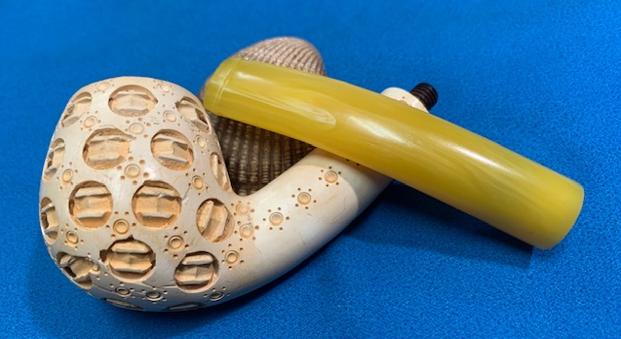
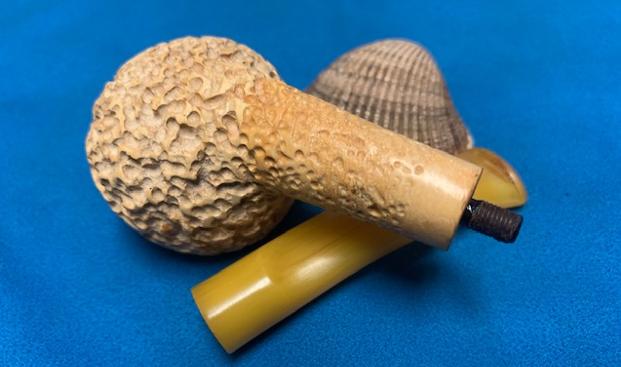
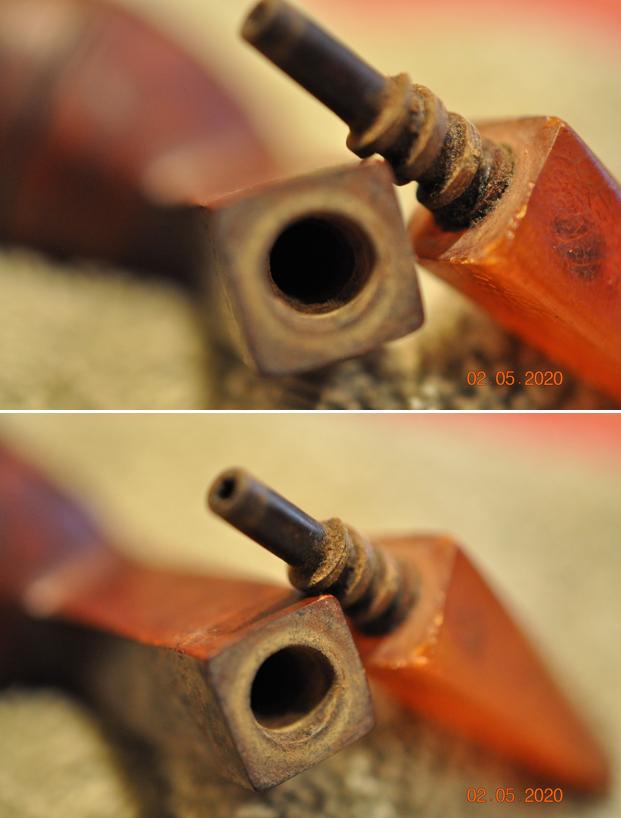
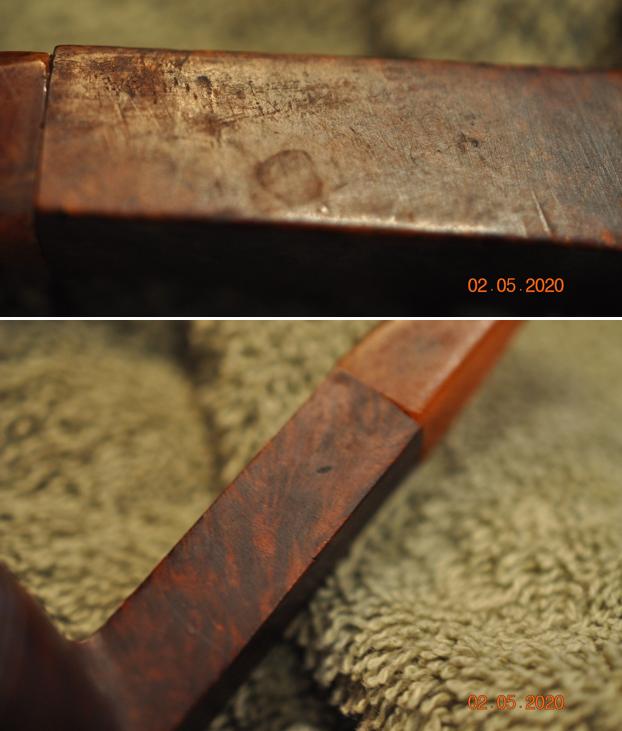
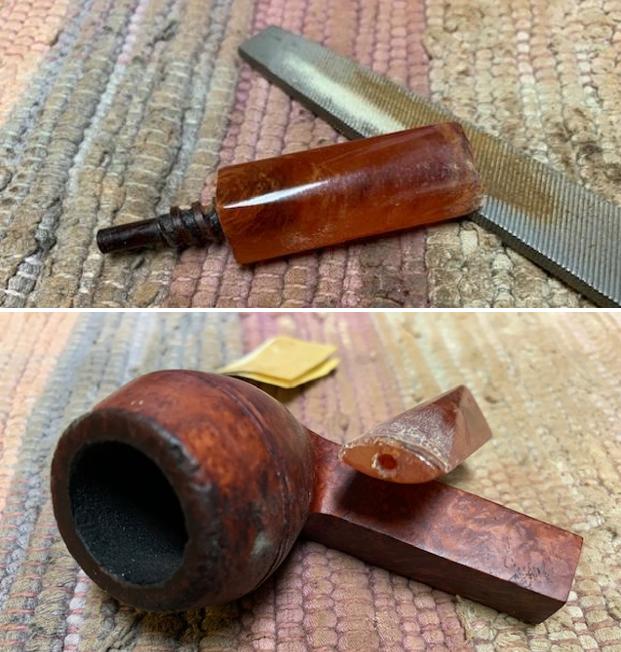
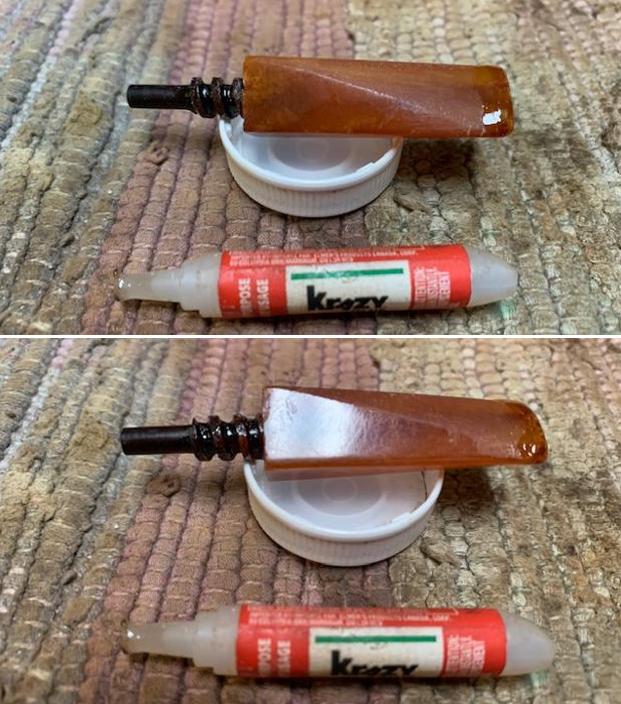
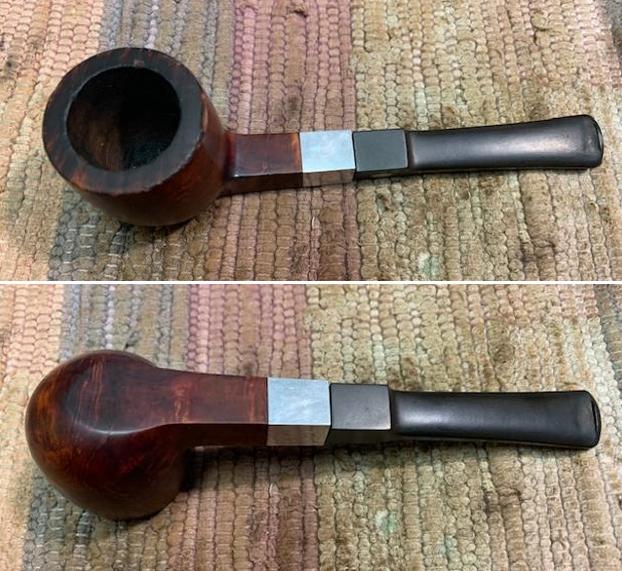
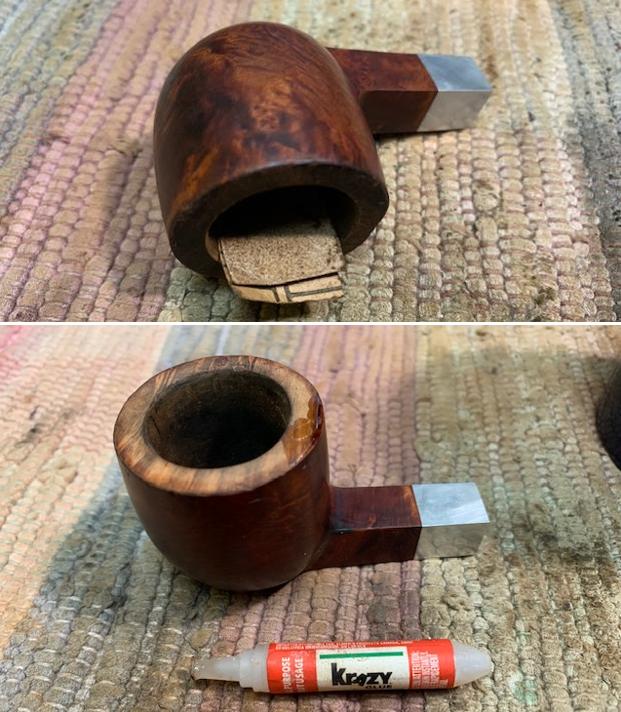
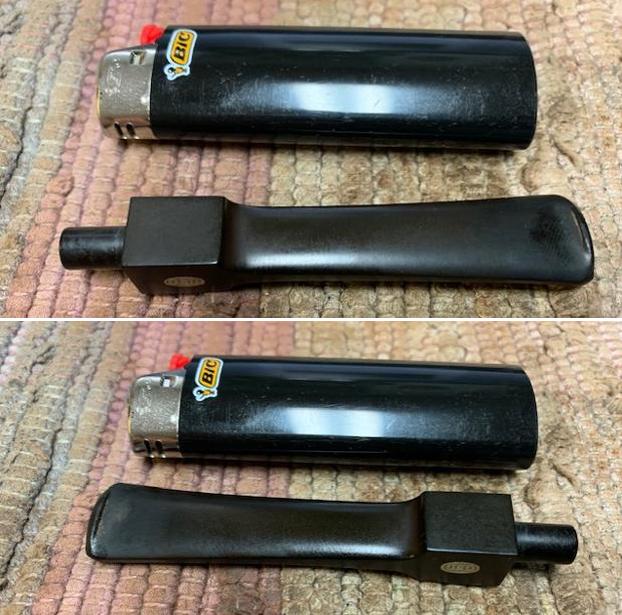
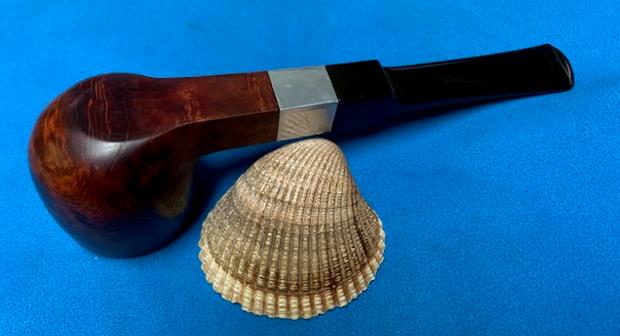
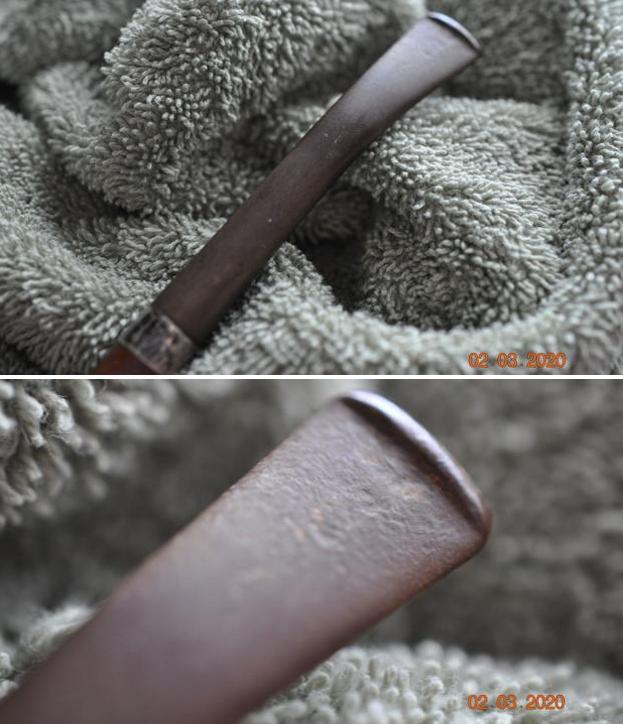
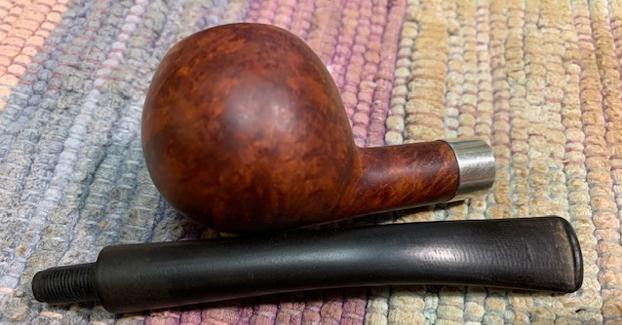
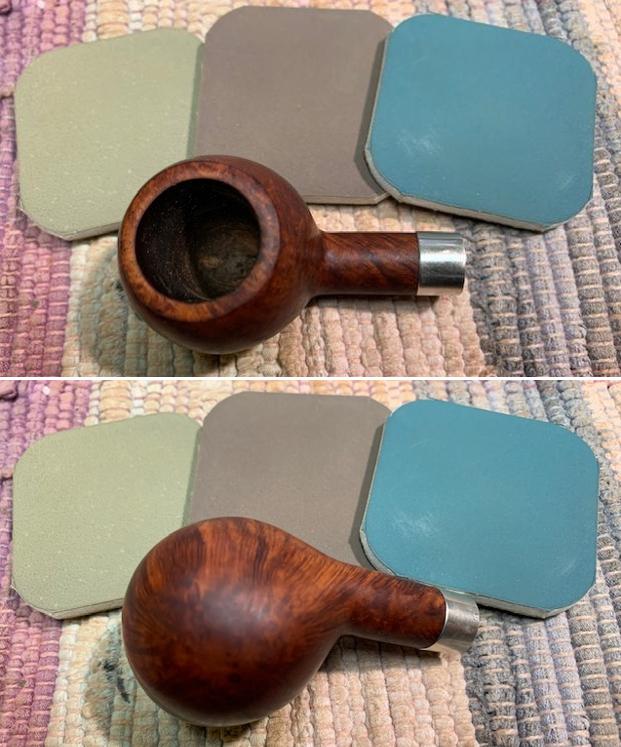
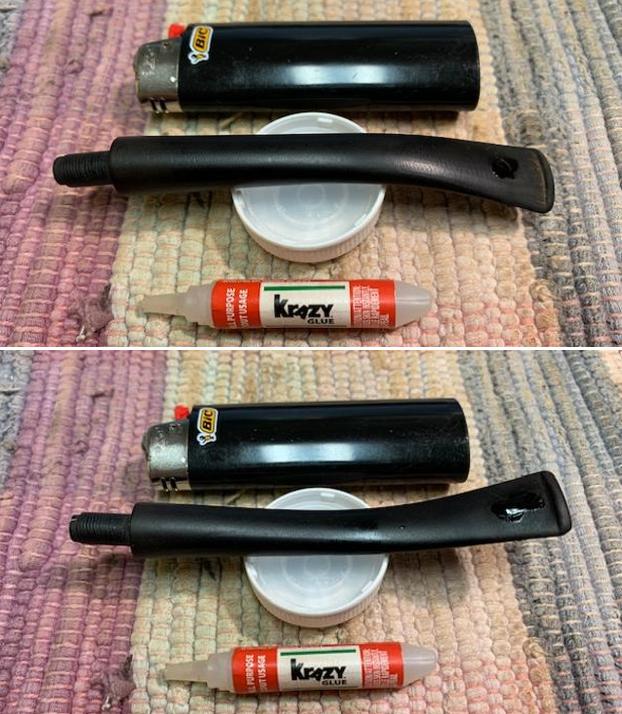
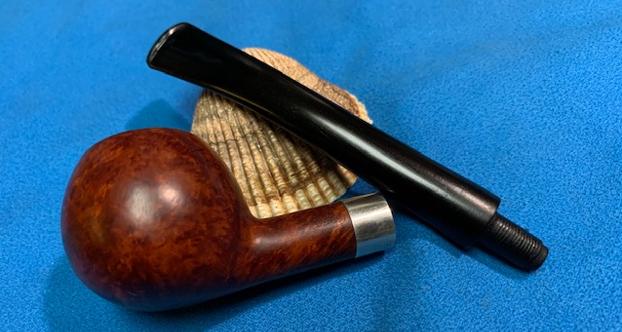
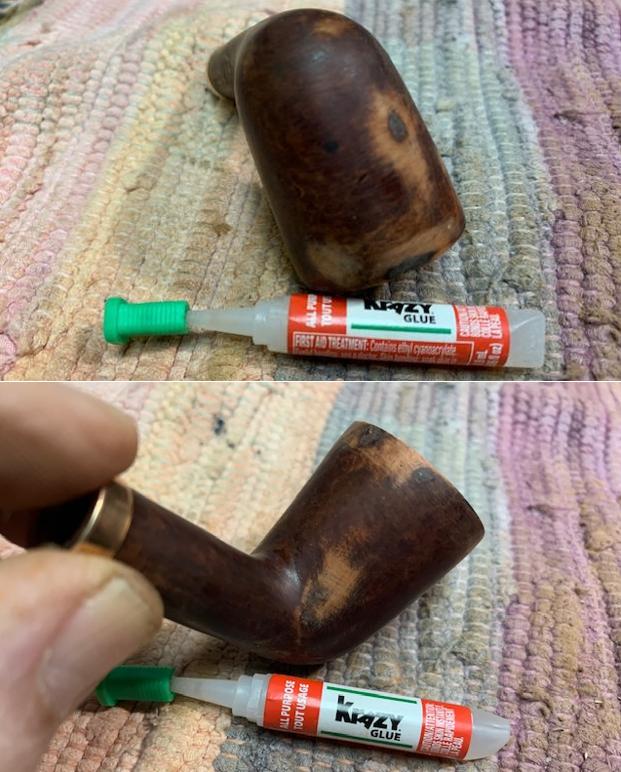
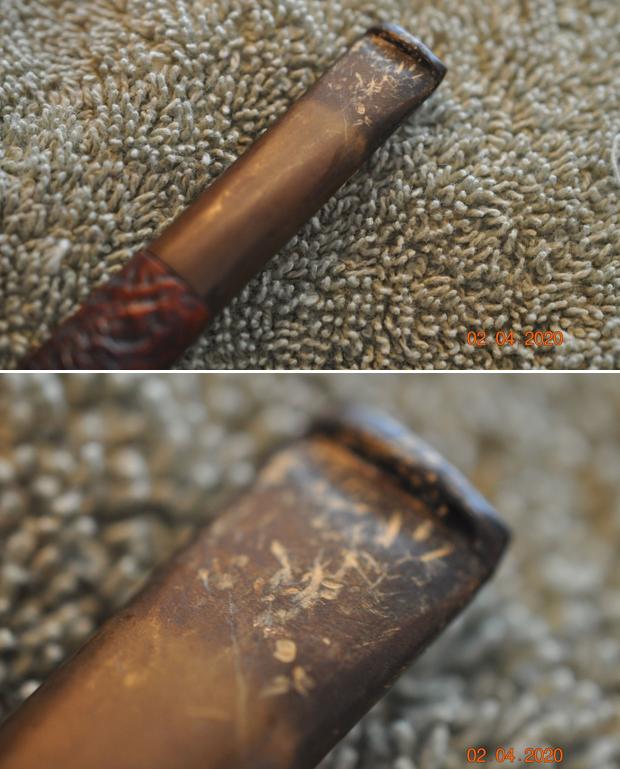
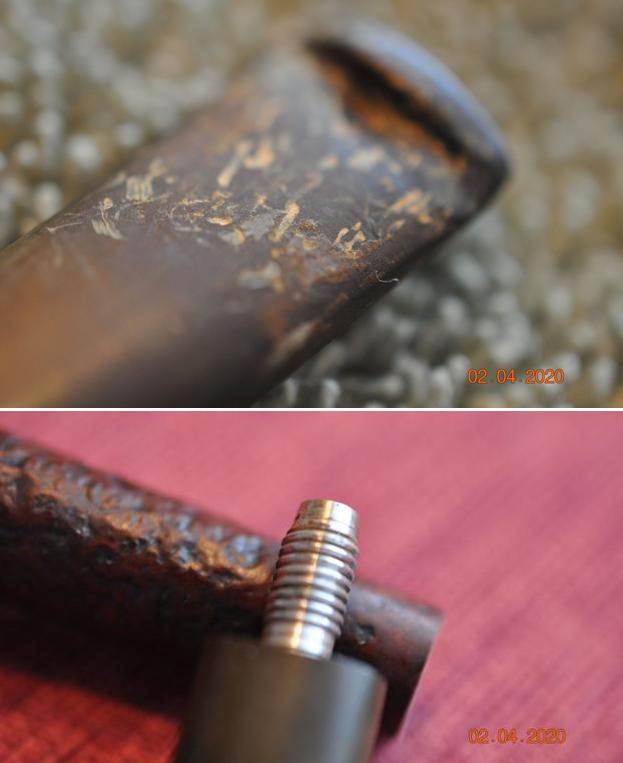
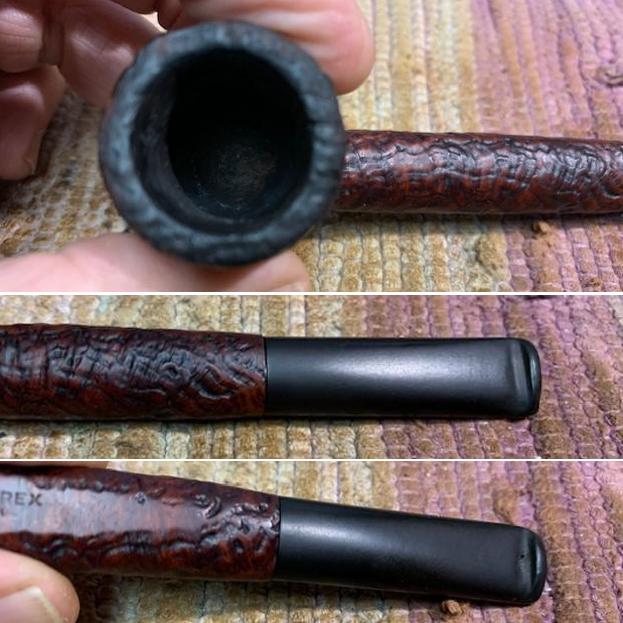
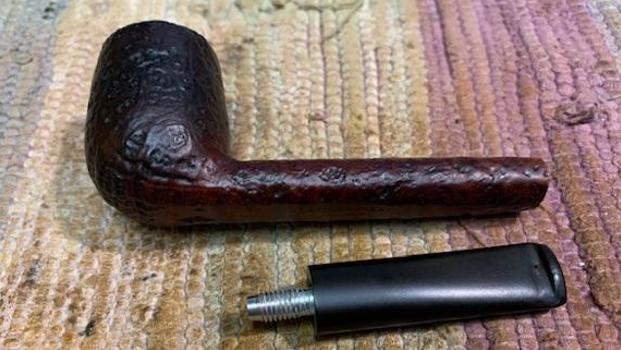
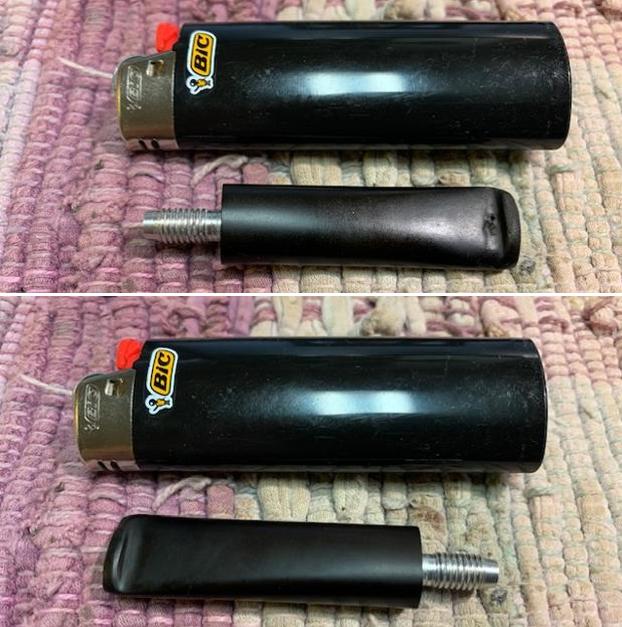
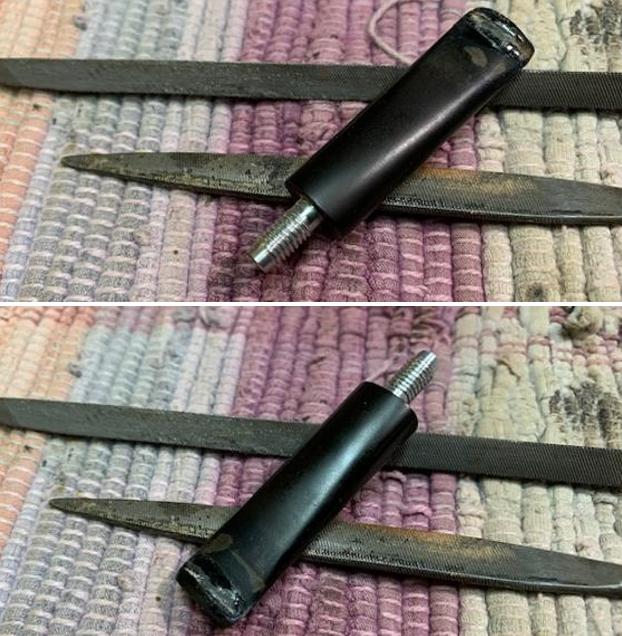
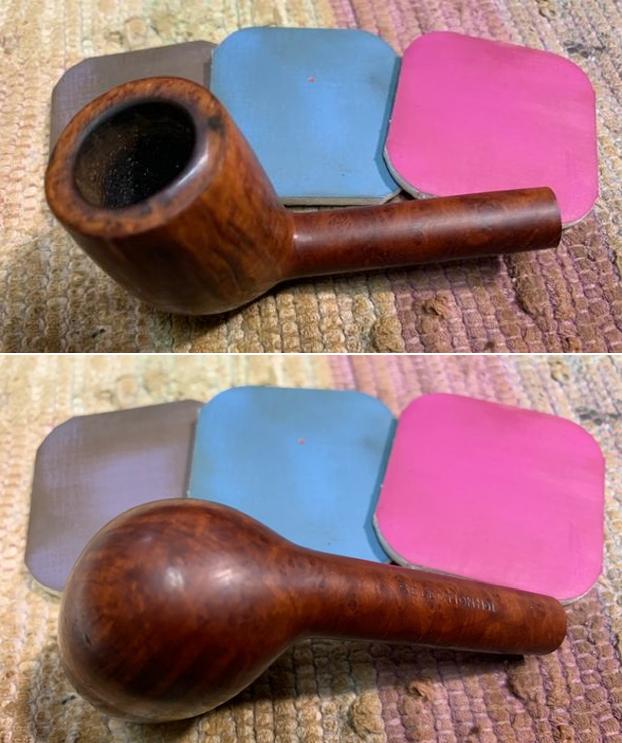
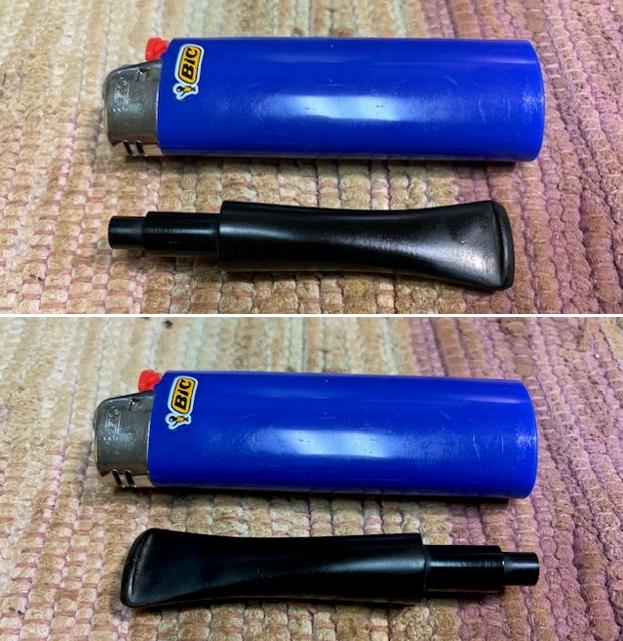
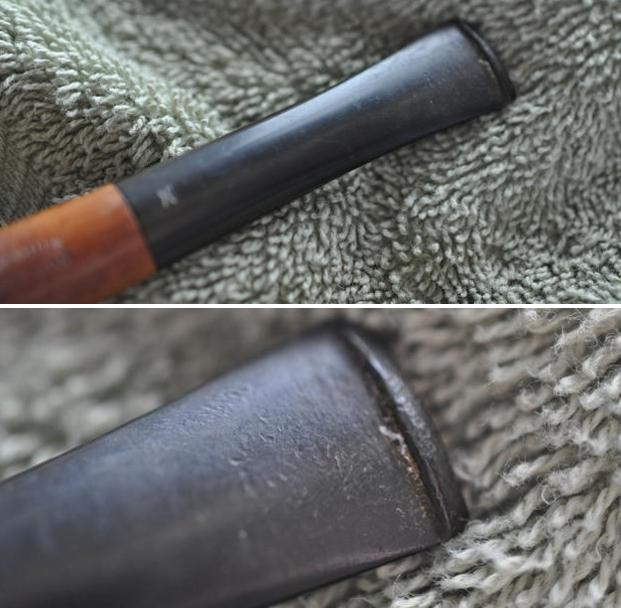
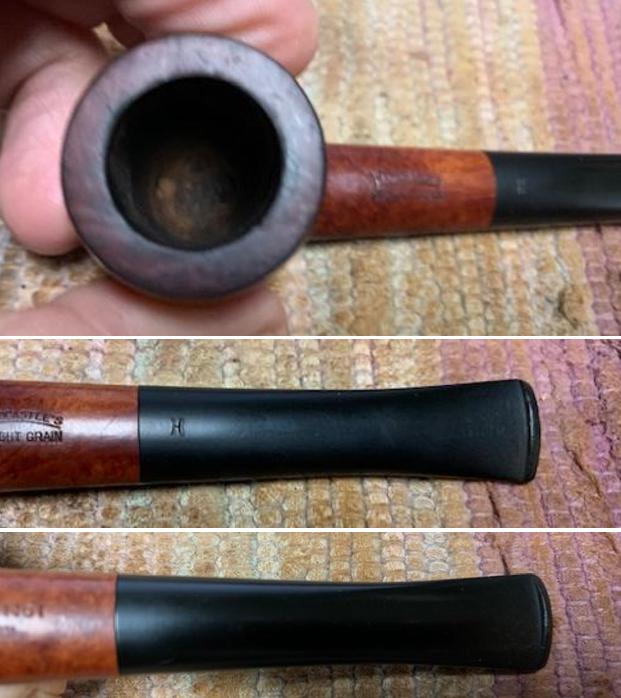
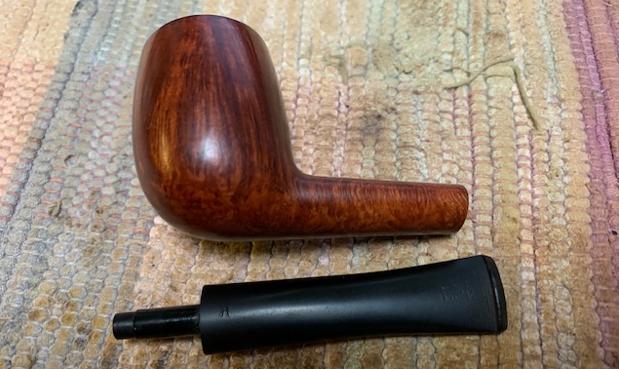
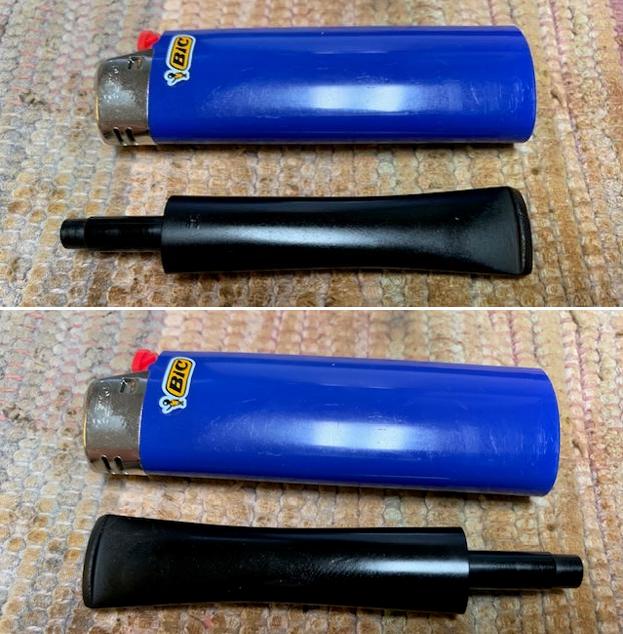
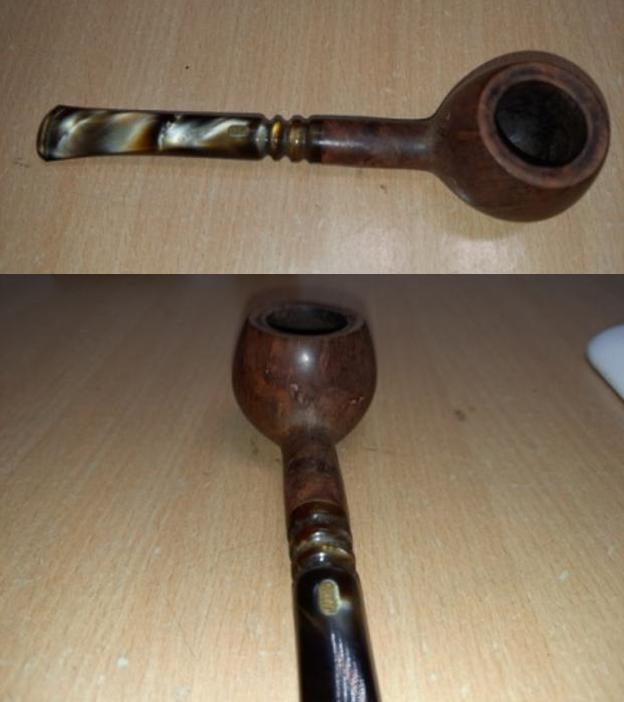
The mortise is threaded to accommodate the screw-in Jobey link tenon which was patented by Jobey. The mortise is otherwise clean but for the accumulation of dust and grime from three years of storage. This will need to be thoroughly cleaned. The famed Jobey-link Delrin tenon is shown below.
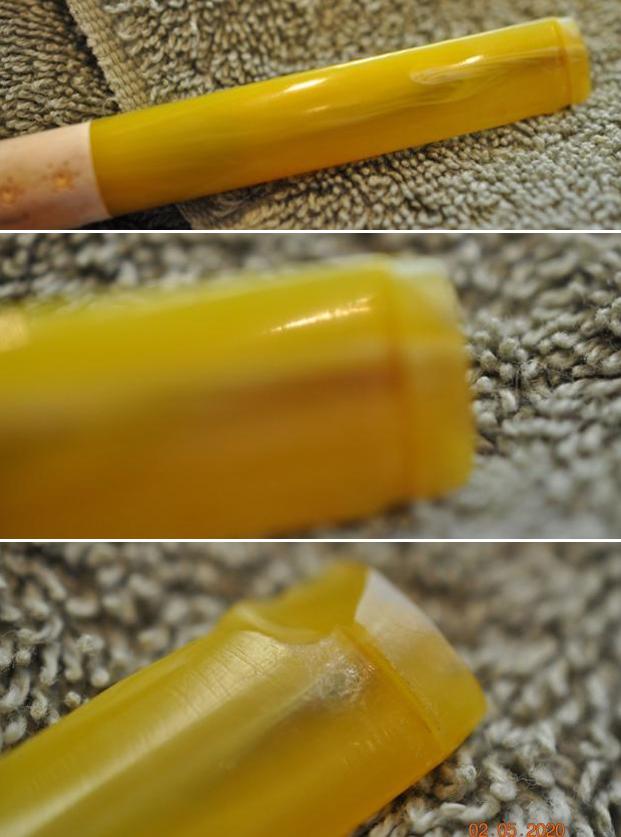
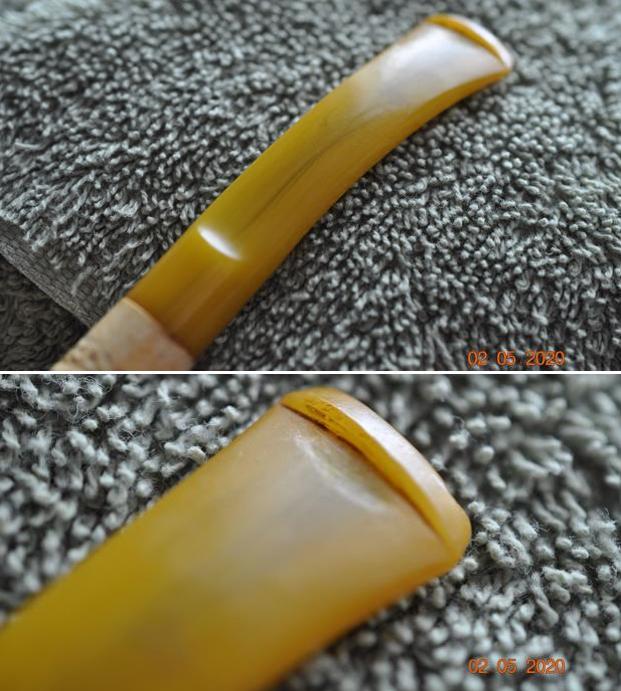
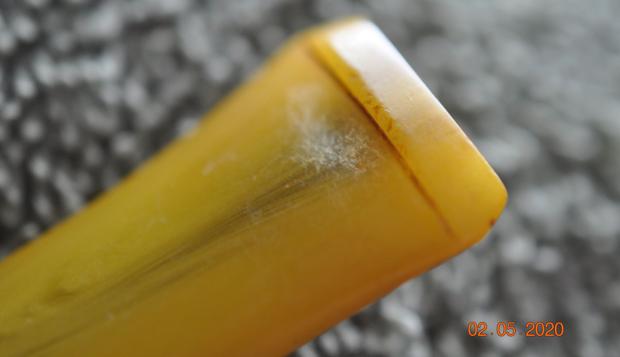
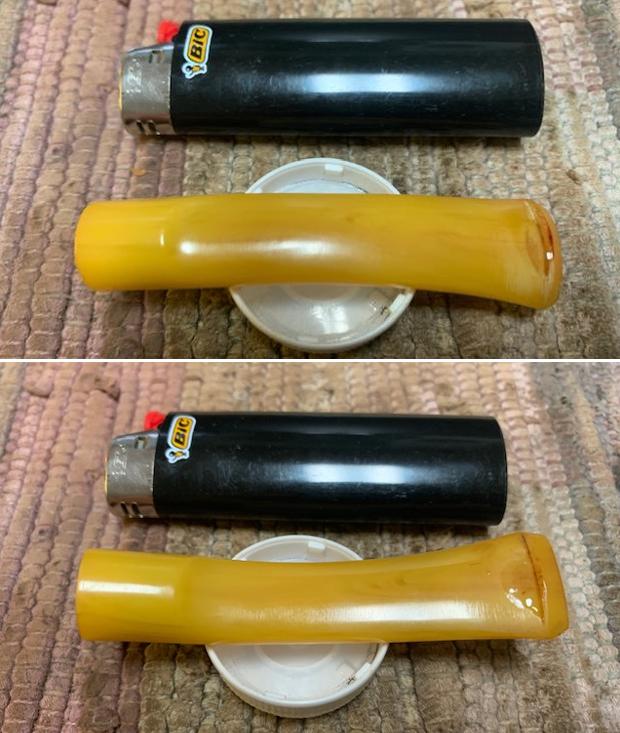
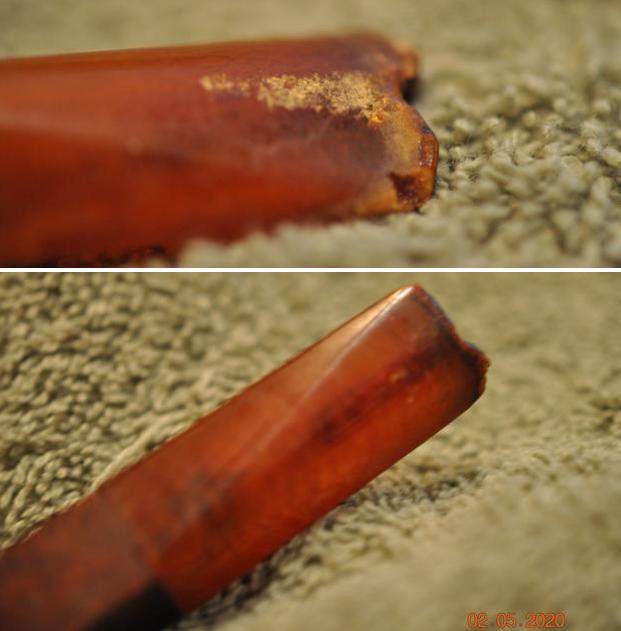
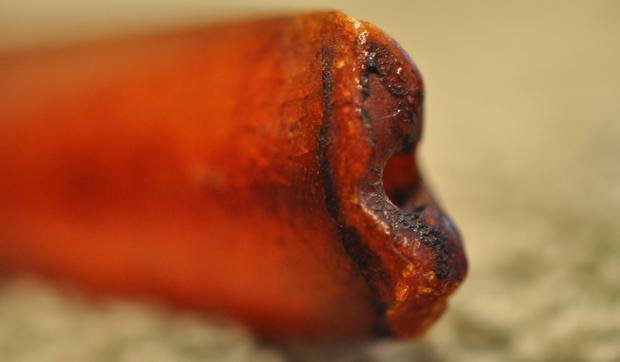
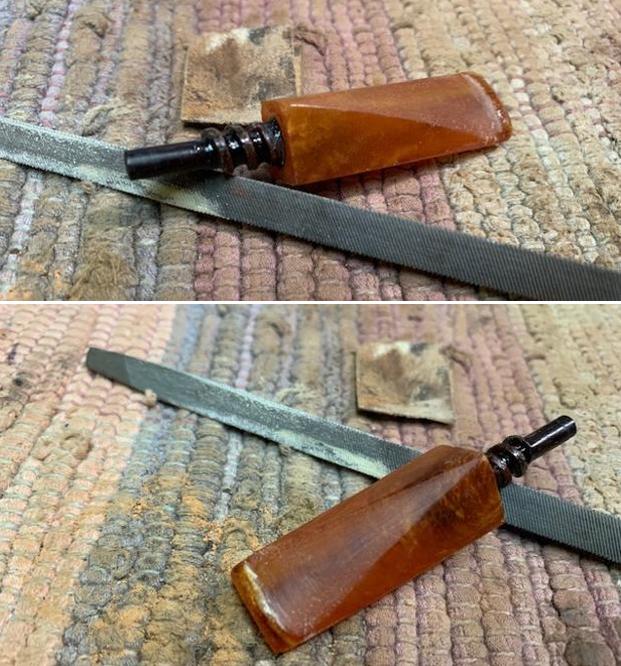
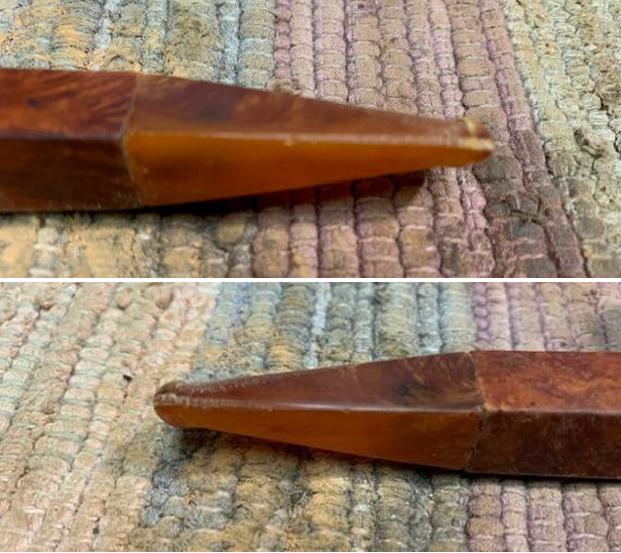
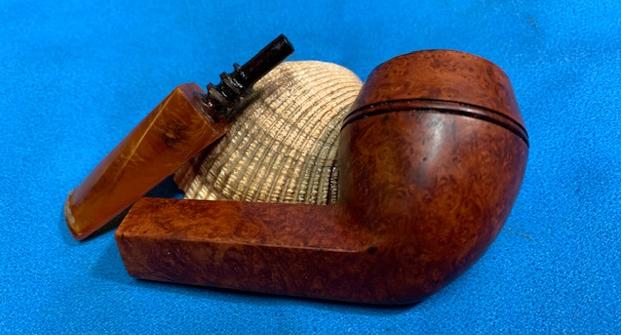
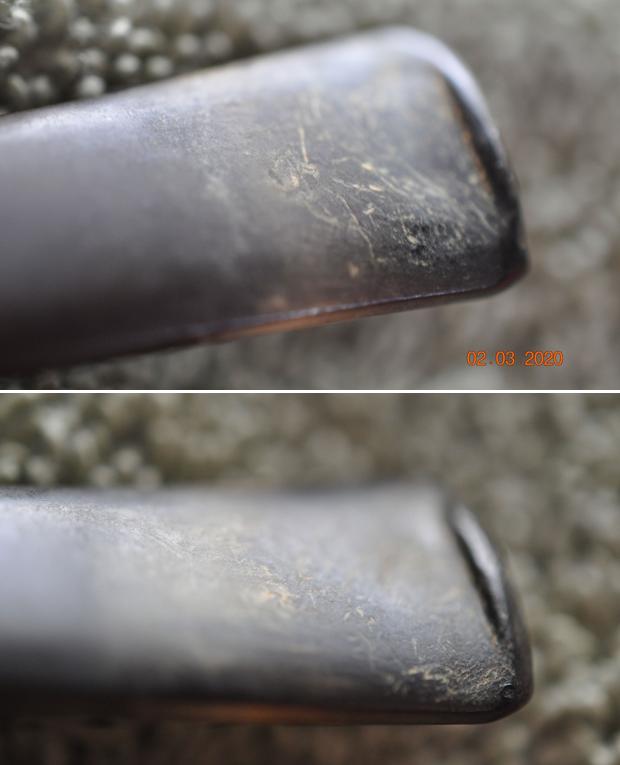
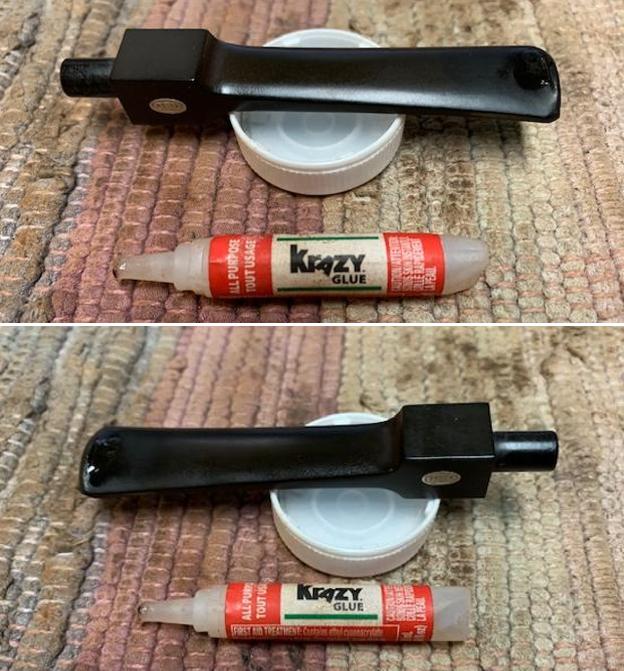
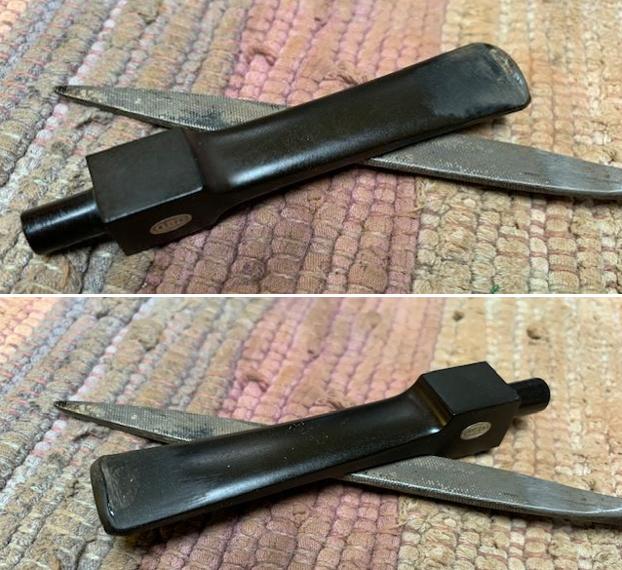
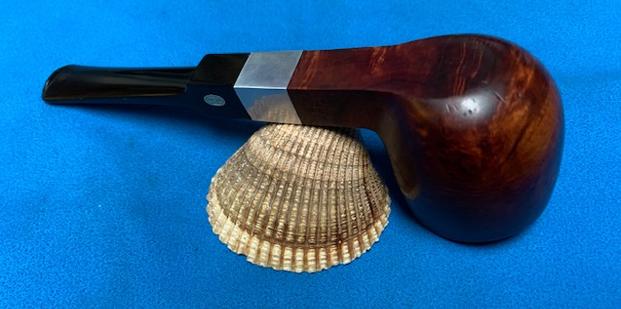
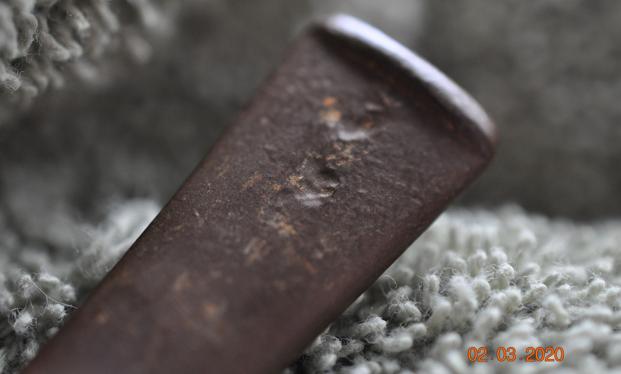
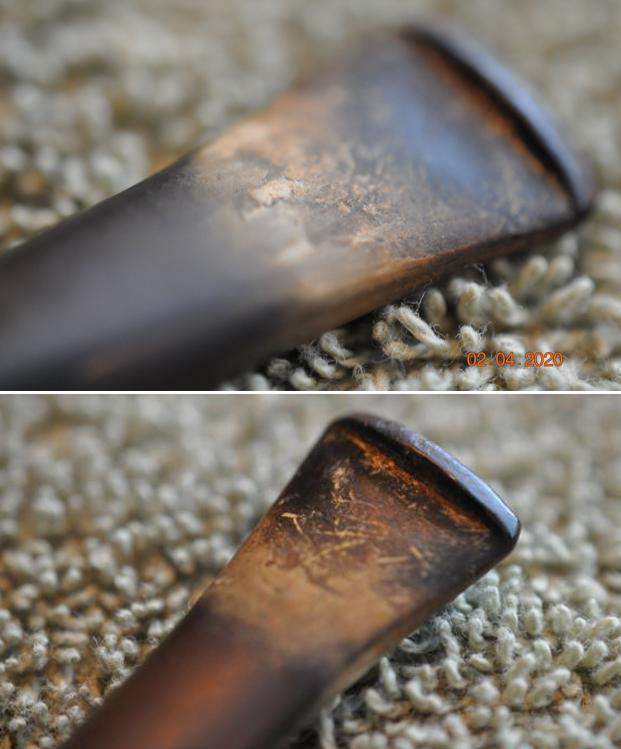
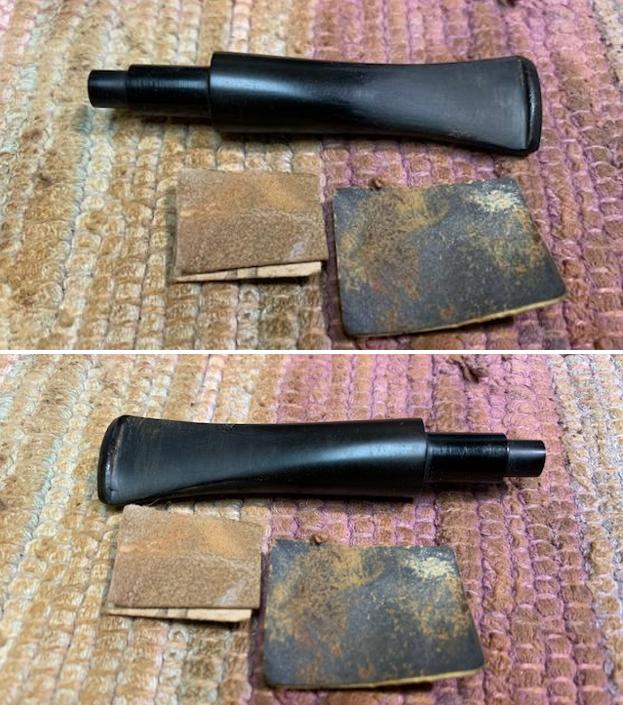
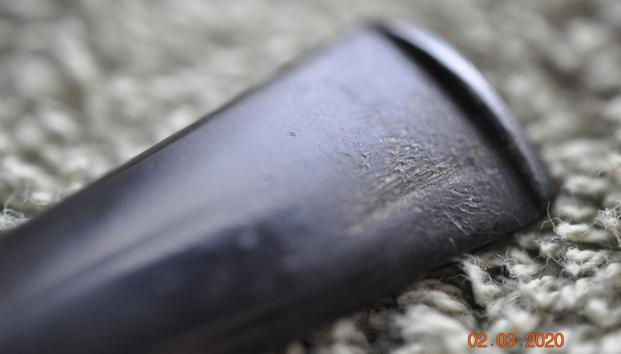
The variegated acrylic fancy stem with swirls of browns and grey look very attractive, but to put it mildly, is an utter mess!! It has bite marks (encircled in green) on both upper and lower stem surface with minor tooth chatter all over the bite zone on both sides; however, these should be an easy fix. The real serious damage to the stem can be seen at the tenon end. There is a deep crack from the face of the tenon end on either surface that extends right up to the shoulders of the stem. Along the way this crack on either surface, has further bifurcated in to a couple of more cracks extending to the sides. The extents of all these cracks are indicated with red arrows.

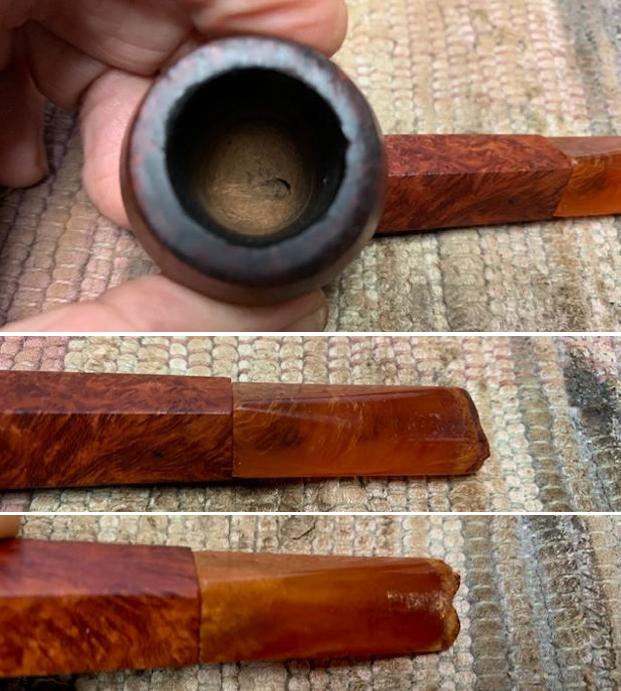
Note: This is one tricky stem repair that I would be undertaking. I had half a mind to completely replace this stem with a new one rather than repair it. But I wanted to preserve the originality of the pipe and secondly, I did not have a suitable acrylic stem to match the beauty of the original stem and pipe combo. So repairs to this stem are the way out for me at the moment. The Process
Firstly, I cleaned the stummel exterior with Murphy’s soap and hard bristled tooth brush. I used an abrasive Scotch Brit pad to completely eliminate the lacquer coat from the surface. I diligently worked the rim top surface to remove the minor traces of darkened stains that remained. With a shank brush, I thoroughly cleaned the mortise of all the dust that had accumulated inside and along the mortise walls.

Note: The reddish orange stain on the stummel has reduced significantly, but not completely. I would need to resort to other stronger measures to eliminate the old stain. The rim top is now clean and the lacquer coating from surface has been removed completely. The fills would need to be refreshed. Next, I wiped the stummel with pure acetone on a cotton swab to eliminate the minor reddish orange stain that remained on the surface. The acetone worked well and the stummel is now free of the old stain, presenting me a fresh canvas to work further. 
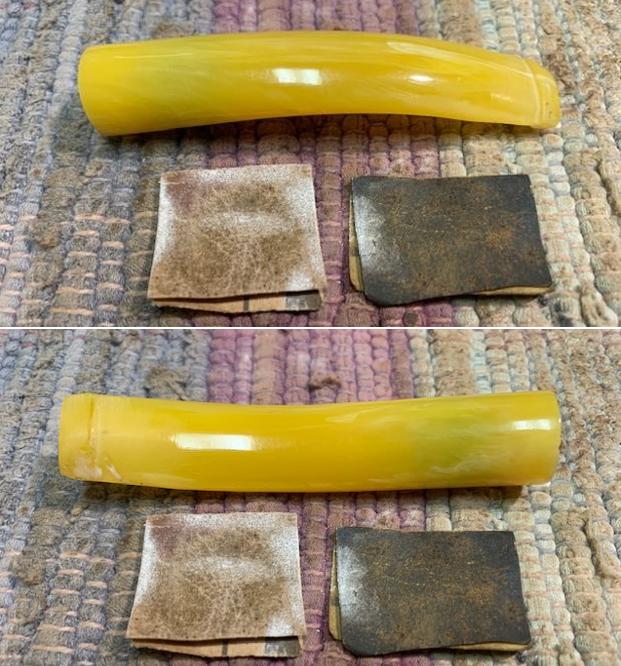
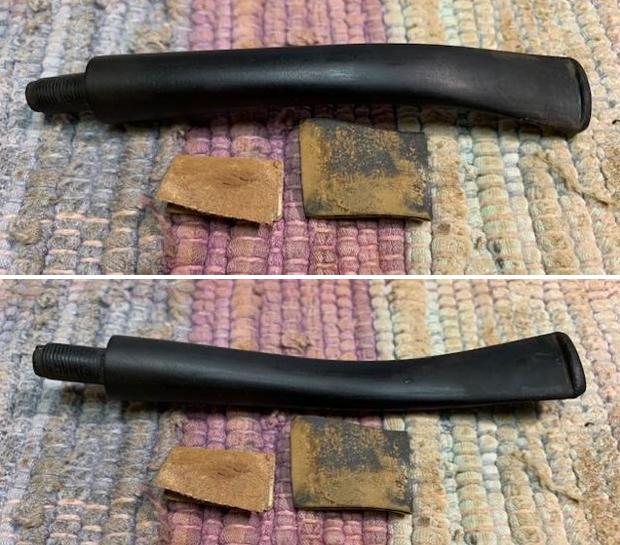
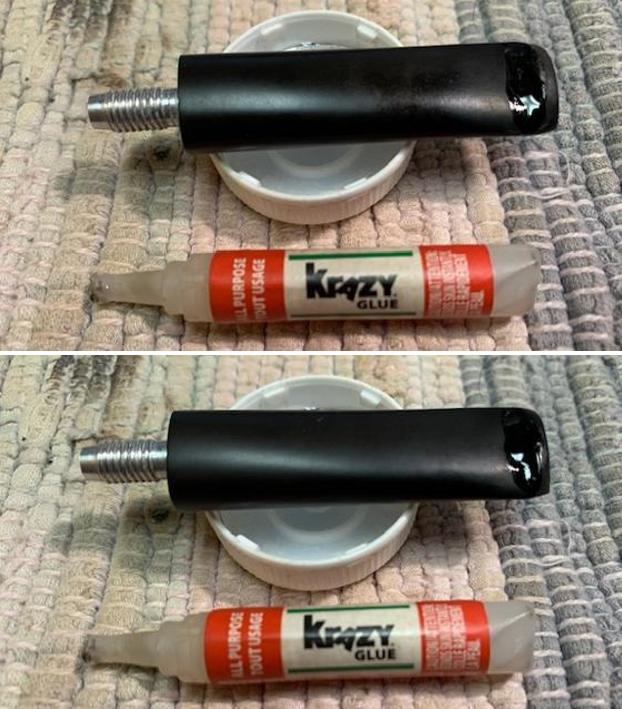
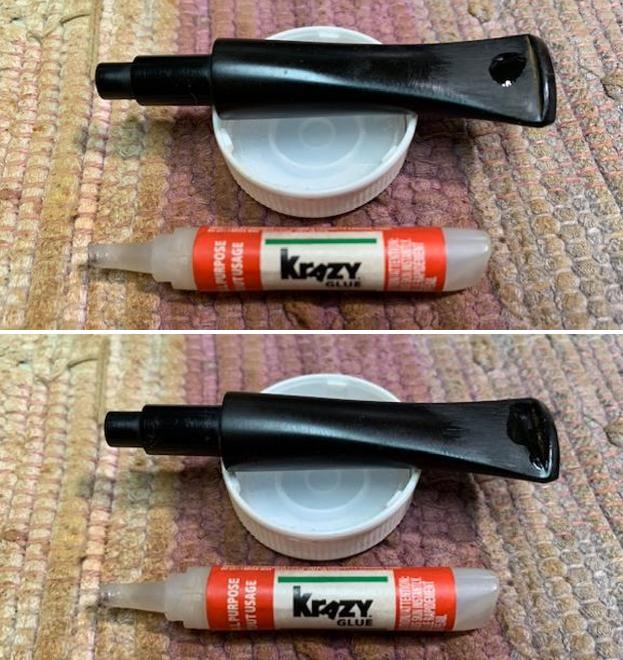
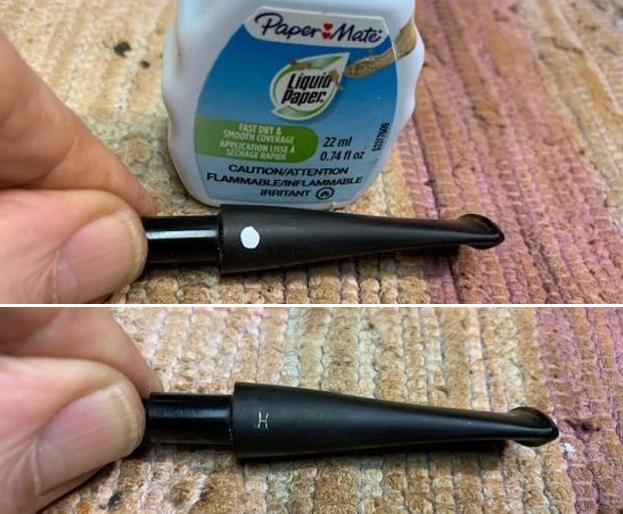
Continuing with the stummel refurbishment, I decided to refresh the fills at the back of the stummel. Using a sharp dental tool, I removed the old fills and cleaned the area with a cotton swab and isopropyl alcohol. The gouged out spots were filled with clear CA superglue and set aside for curing.
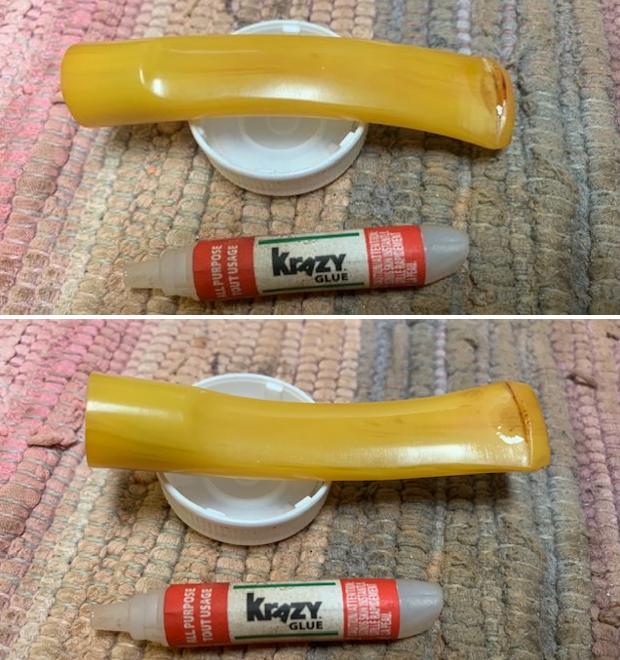
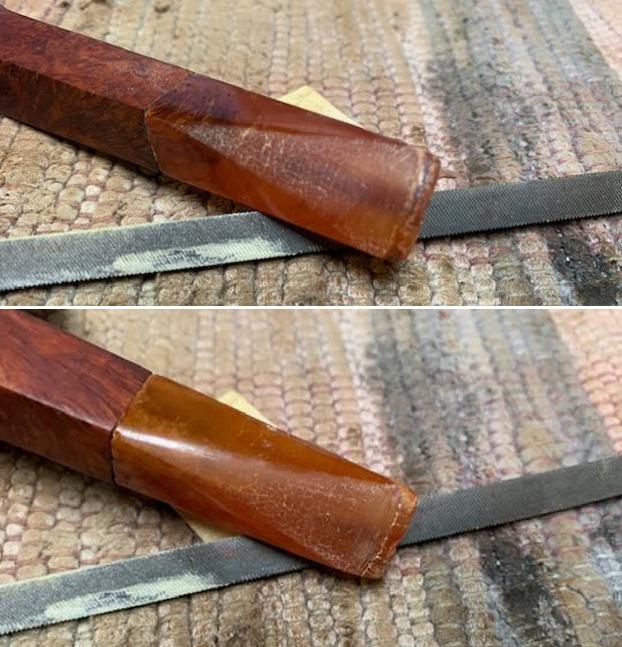
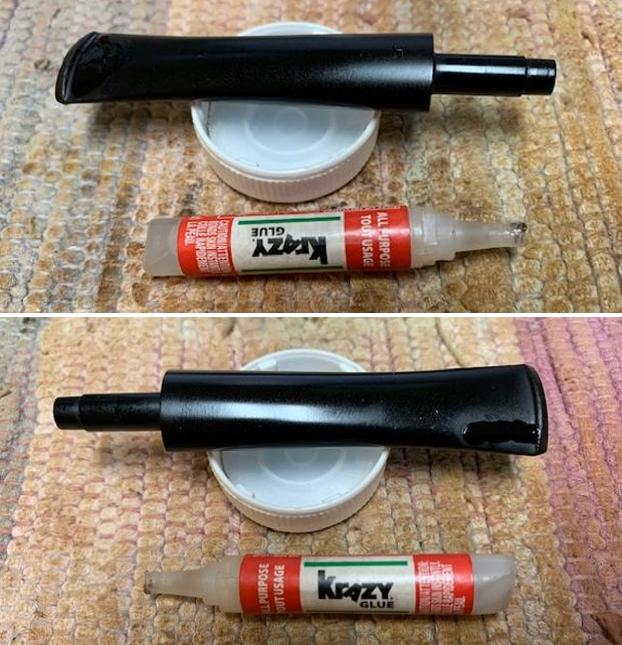
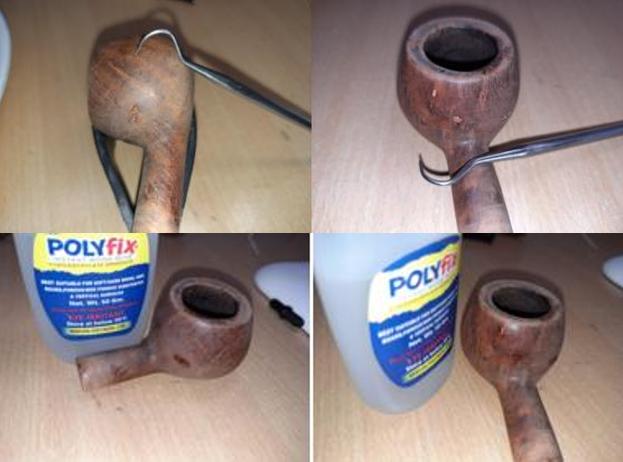
With the stummel fills set aside for curing, it was time to undertake the repairs to the stem. I first cleaned the stem surface with isopropyl alcohol on a cotton swab. Using nose pliers, I gently flexed the crack just enough for the superglue to seep in. I applied a generous layer of clear CA superglue of medium viscosity over the crack and flexed it a couple of times to make sure that the glue had seeped in to the crack. I pressed the crack together in a vice and set it aside for the glue to cure.

Note: The last picture shows that the glue had seeped completely in to the crack and inside the stem opening that houses the tenon. I shall resort to sanding to remove the excess glue from inside the stem.  
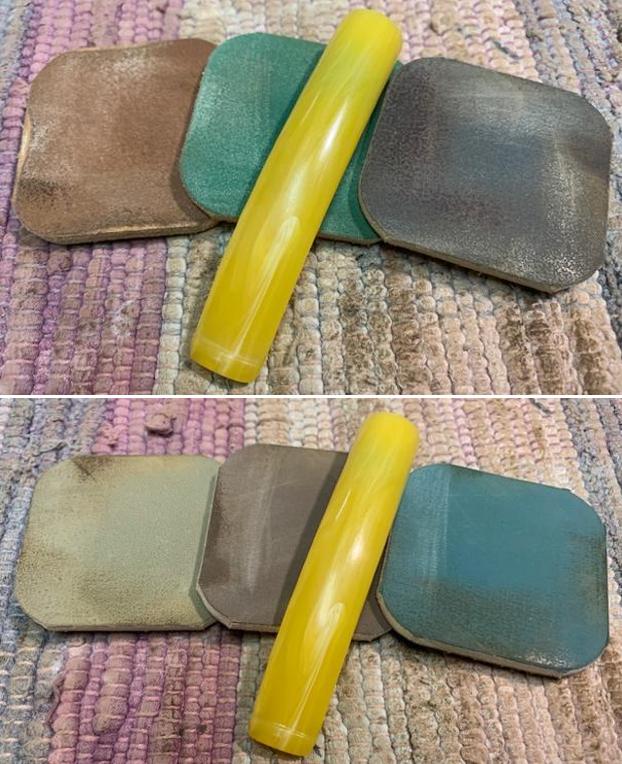
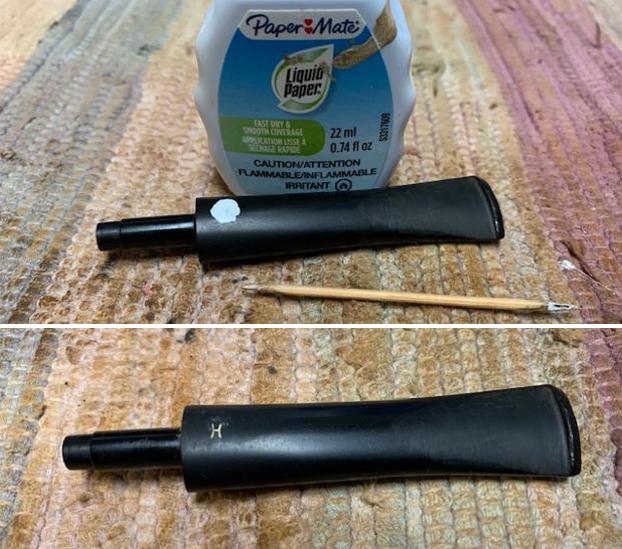
Once the glue had completely hardened, I applied another coat of superglue over and around the cracks on either surface. I spot filled the tooth indentations in the bite zone with clear CA superglue and set the stem aside for the glue to cure.
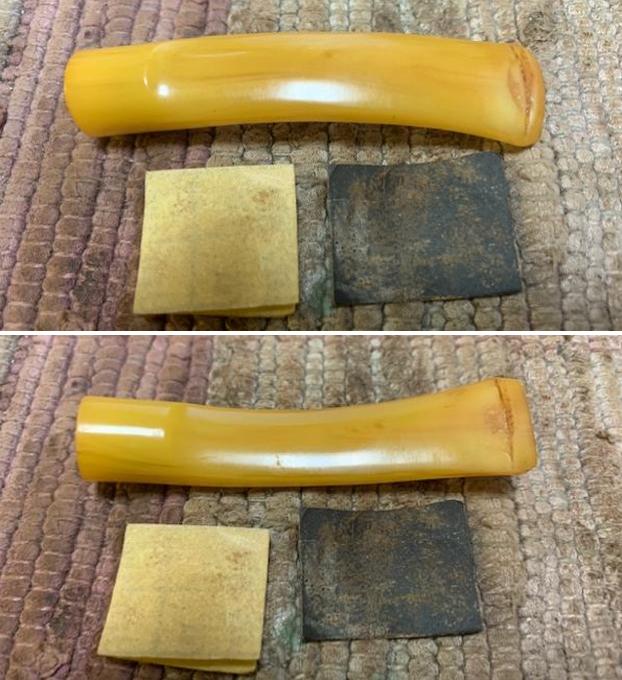
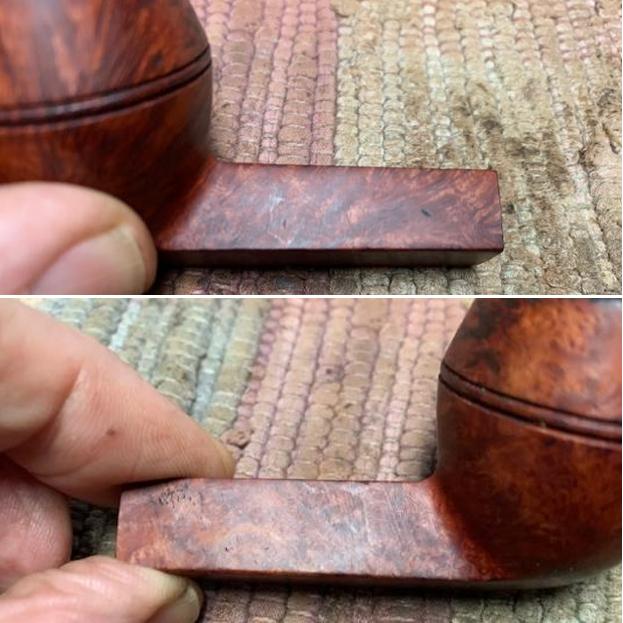
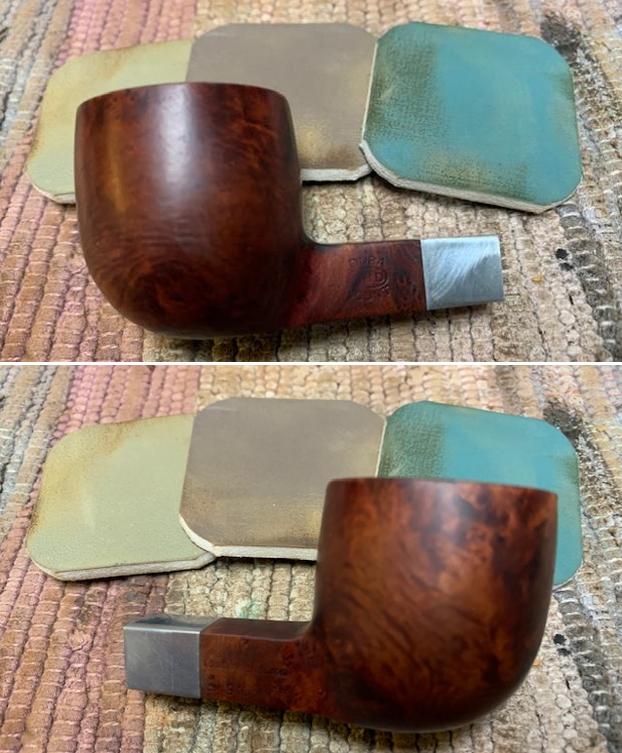
Next, while the stem fills are curing, I sand the stummel fills with a flat head needle file to achieve a rough match with the rest of the surface. To achieve a better match and also to address the dents/ dings over the stummel surface, I sand the entire stummel surface with a piece of 220 grit sand paper. I also work the rim top surface and inner rim edge with the sandpaper to even out the rim edge. This sanding also helps in removing residual old stain while providing a smooth surface for the next stage which is polishing cycle using complete set of micromesh pads. I was especially very careful while sanding the sides of the shank around the stampings, as it is very easy to miss out the stamp and one swipe of the sand paper is enough to ruin/ damage the stampings. 
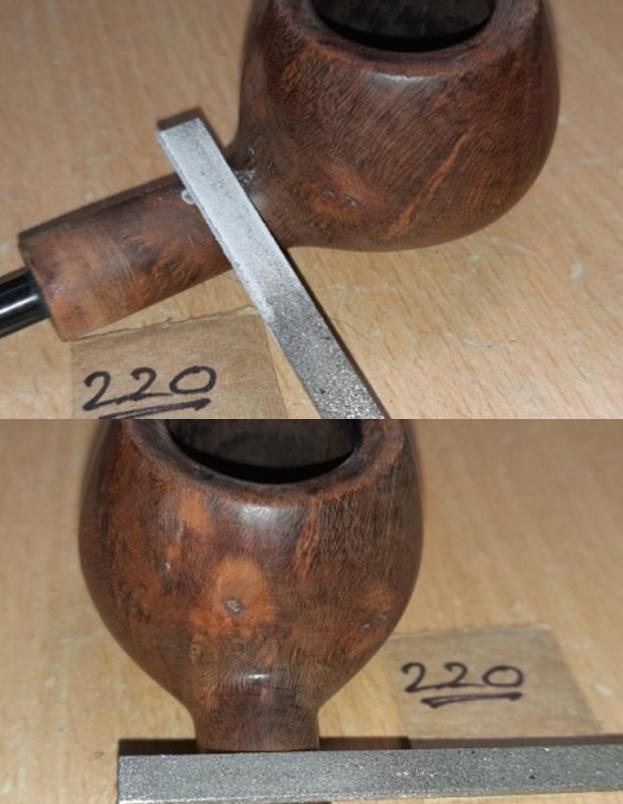
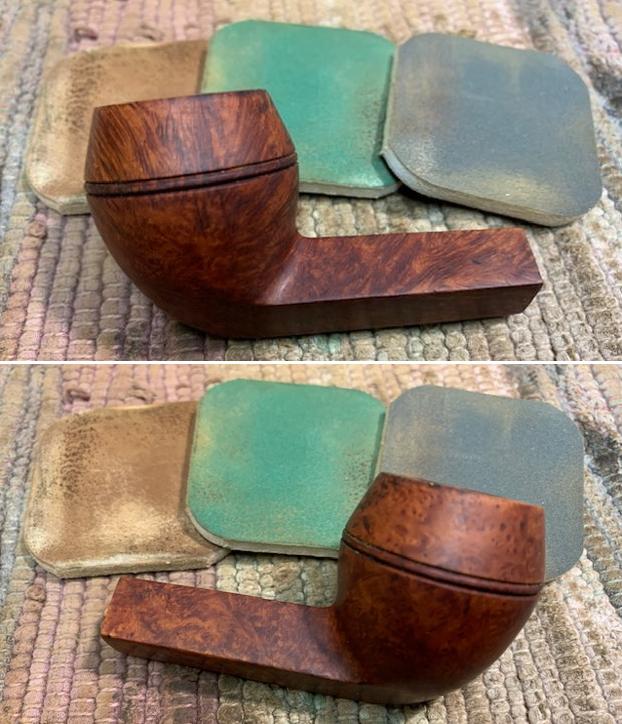
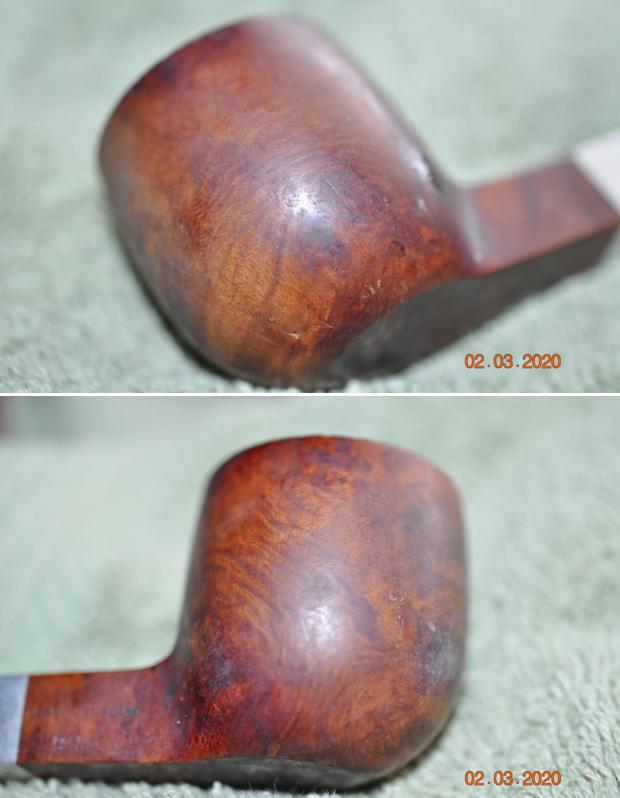
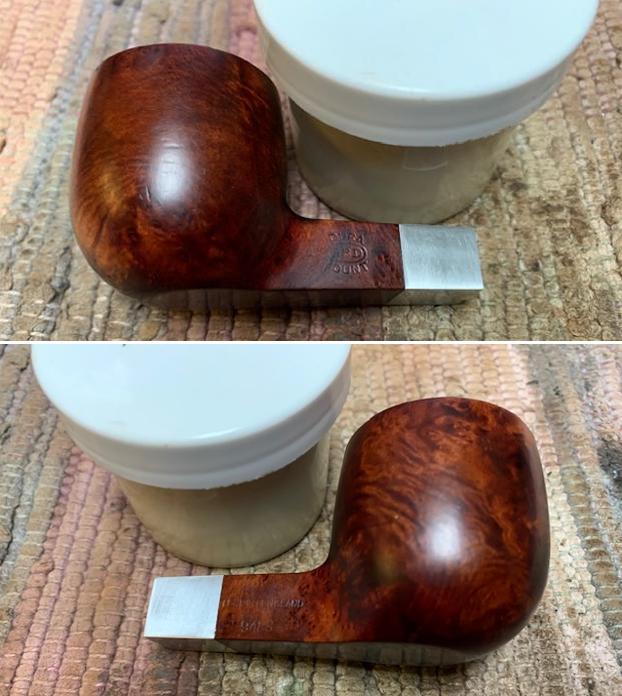
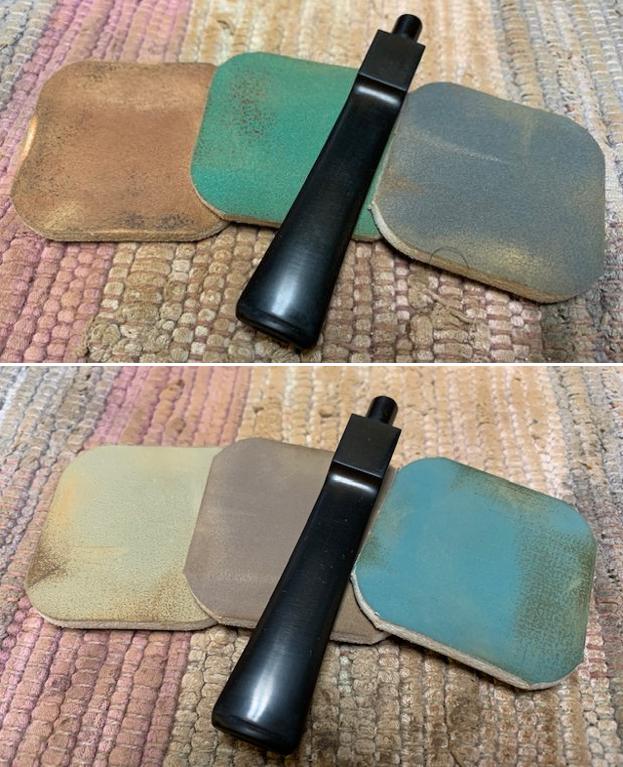
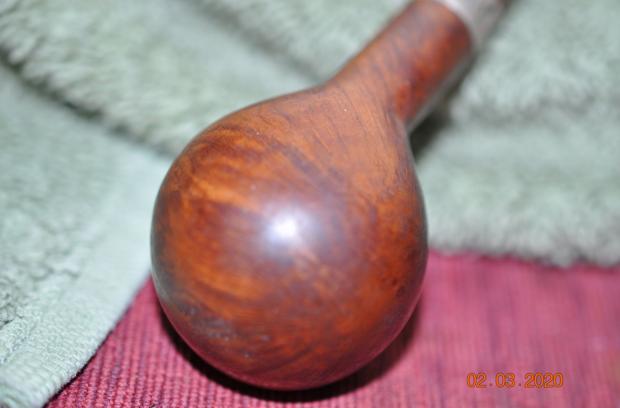
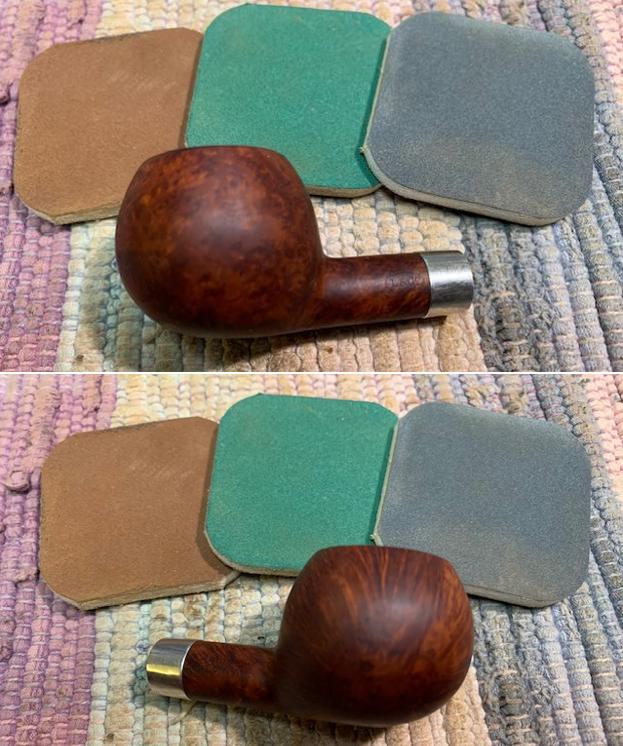
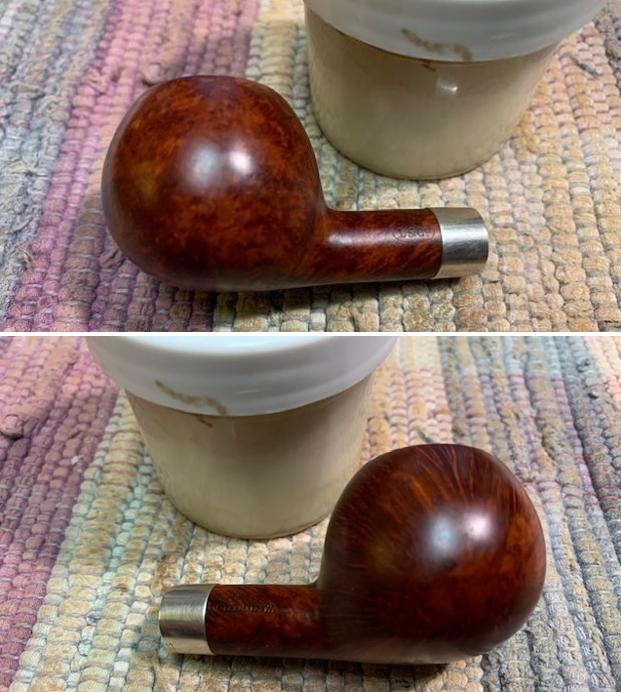
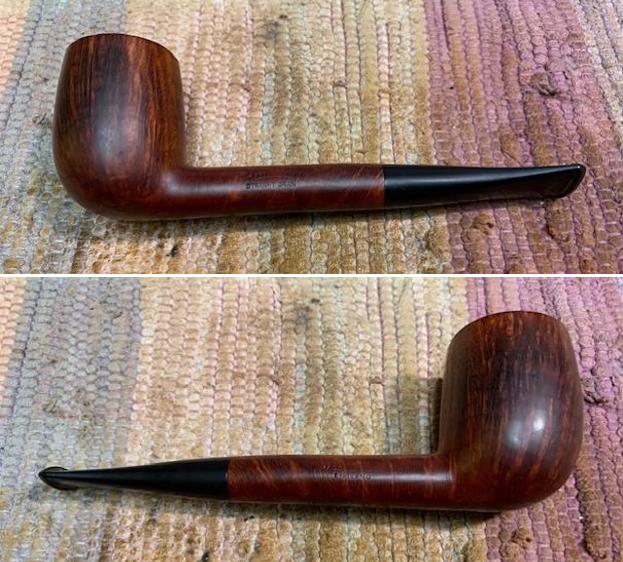
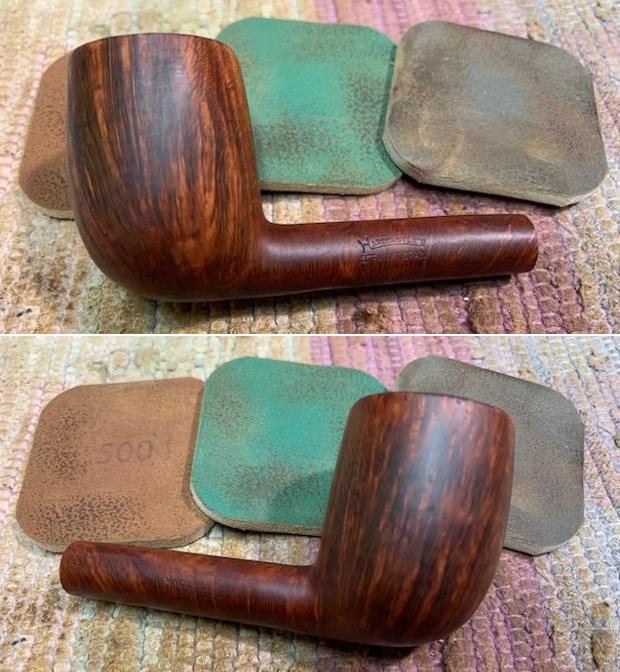
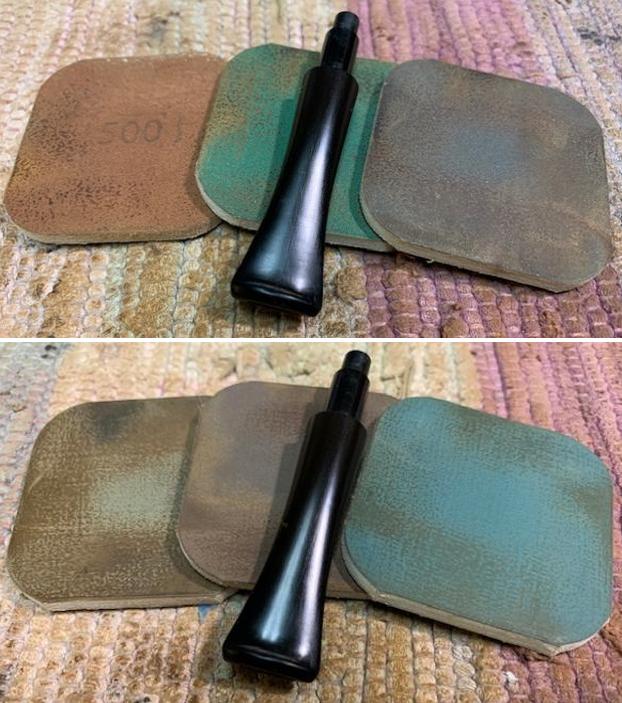
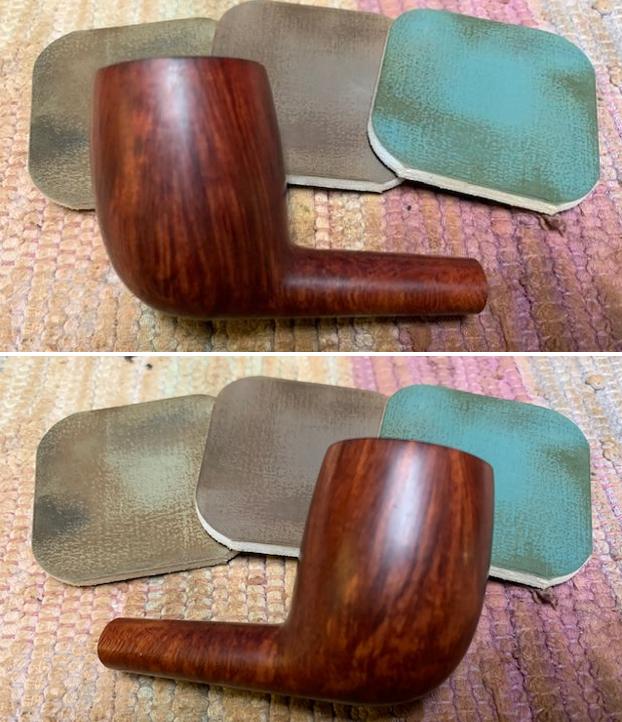
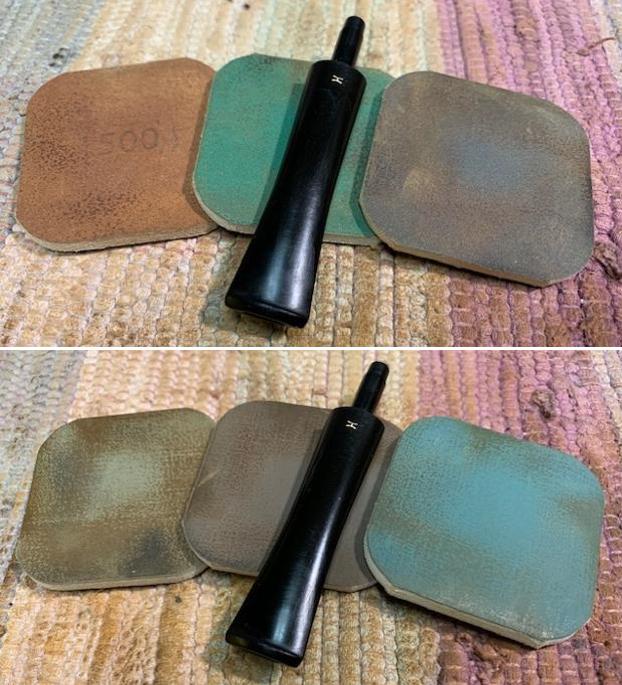
To remove the sanding marks and bring a deeper shine, I polished the stummel with micromesh pads, wet sanding with 1500 to 12000 pads. I wiped the surface with a soft cloth at the end of the micromesh cycle. The shining stummel looks amazing with a deep brown coloration and beautiful Angel’s hair grains popping over the stummel surface. 
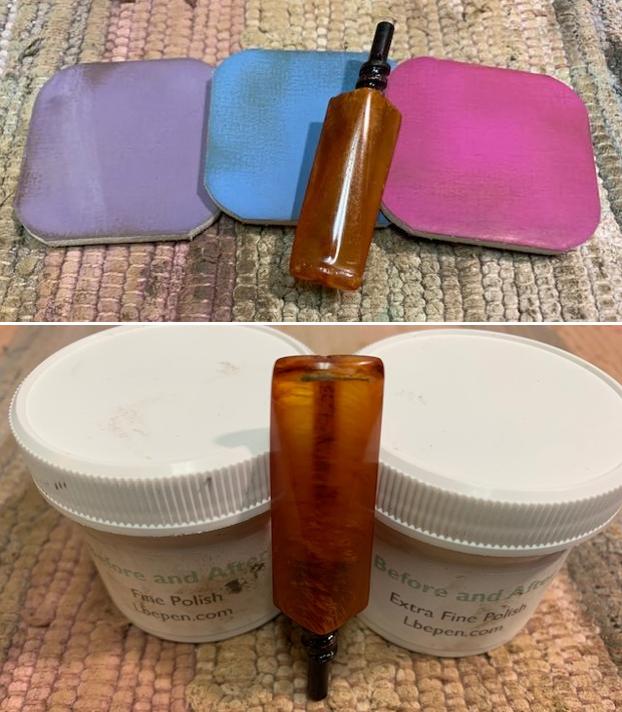
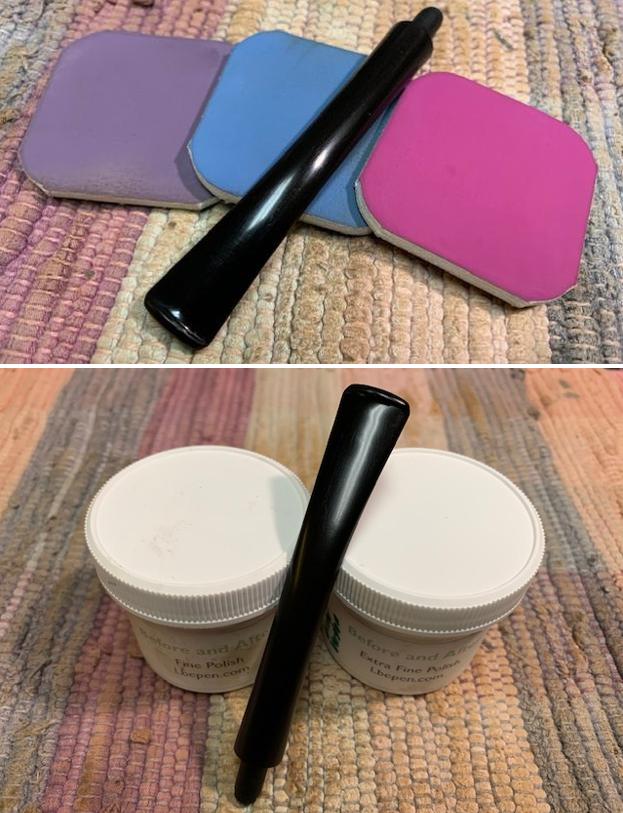
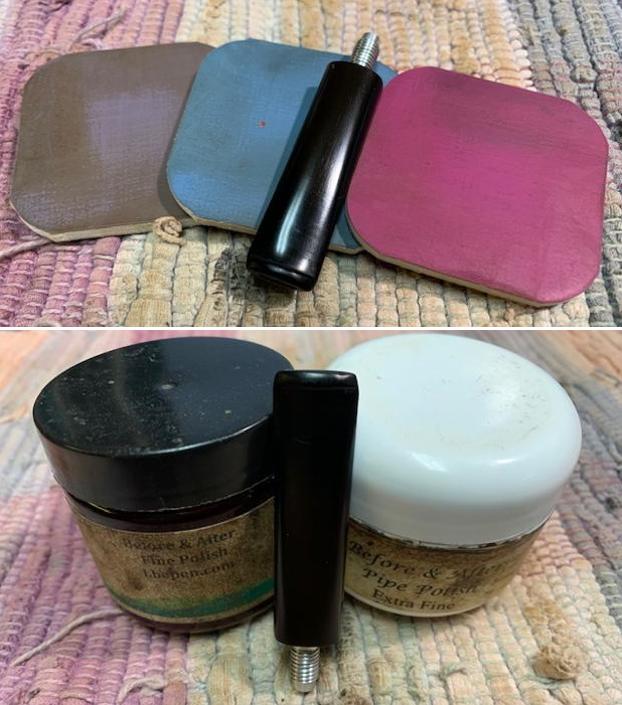
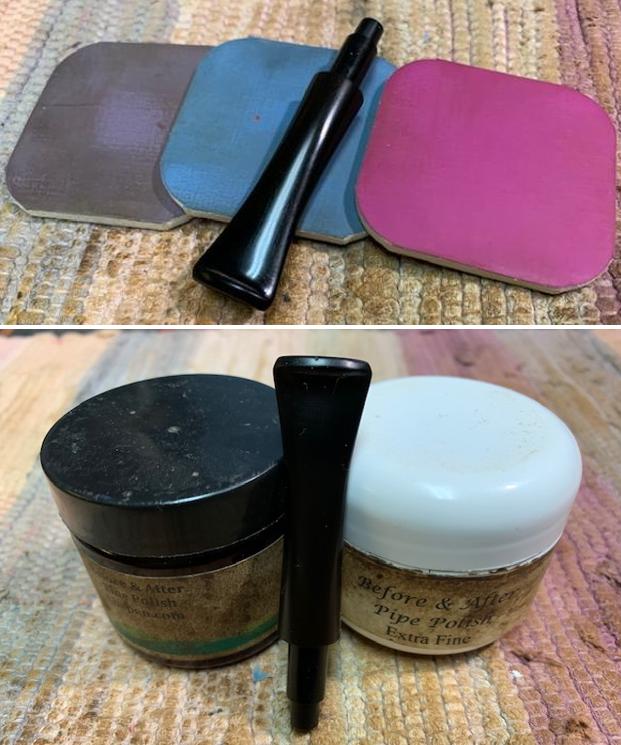
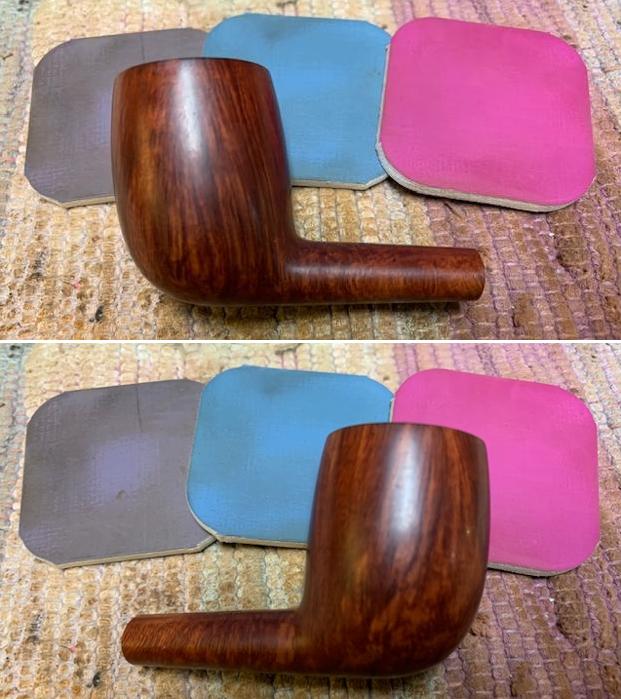
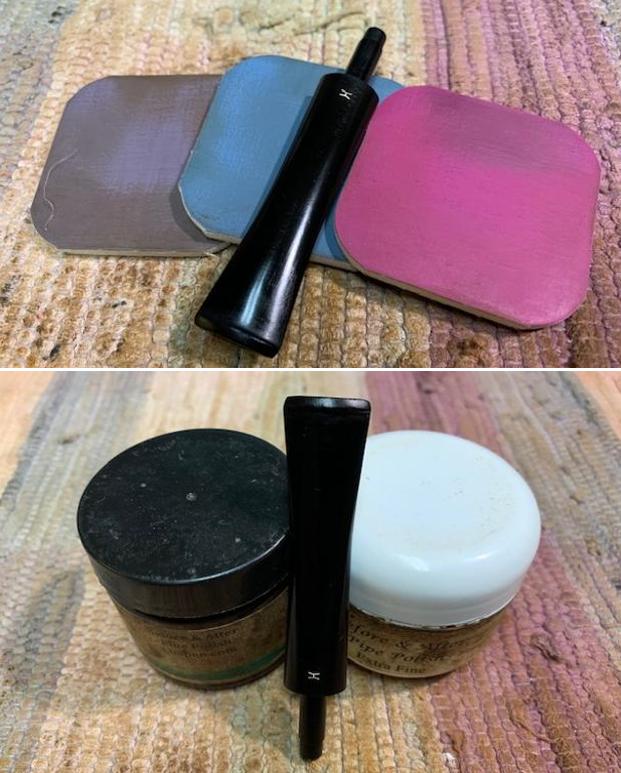
Next, I rub a small quantity of “Before and After Restoration Balm” in to the briar with my finger tips and let it rest for a few minutes. The balm almost immediately works its magic and the briar now has a nice vibrant appearance with the beautiful darkened grain patterns on full display. I further buff it with a horse hair shoe brush. The next afternoon, I work the stem as the fills had hardened nicely. First, with a flat head needle file, I sand the fills in the bite zone to achieve a rough match. I further fine tuned the match by sanding the filled area with a folded piece of 220 grit sand paper pinched between my thumb and forefinger.Next, I sand the excess glue from over and around the crack using a flat head needle file followed by a piece of 220 grit sand paper. I used a round needle file and a rolled piece of 220 grit sandpaper to sand out the excess glue from inside the stem opening for the tenon. I also remove excess glue from within the grooves of the fancy stem.

Note: I was careful to maintain a very thin layer of glue over the cracked surface as it would lend additional support and rigidity to the cracked area. Also, I was extra careful while sanding the inside of the stem opening for the tenon to achieve a smooth and even surface for the seating of the tenon.
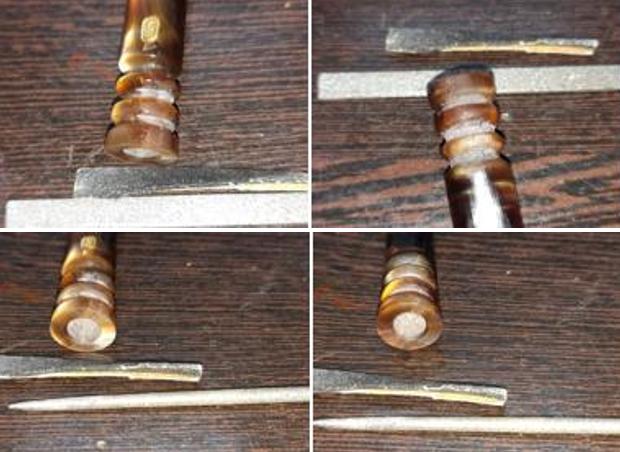
One of the probable causes for the cracks over the tenon end of the stem could have been a very tight fitting tenon. I lightly sand the smooth end of the Delrin tenon with a folded piece of 220 grit sandpaper to achieve a snug fit (not tight and not very loose) in to the stem opening for the tenon. I frequently checked for the seating as I did not want to open up the cracks again. At this stage I am very pleased with the stem repairs and the seating of the Delrin tenon in to the stem.

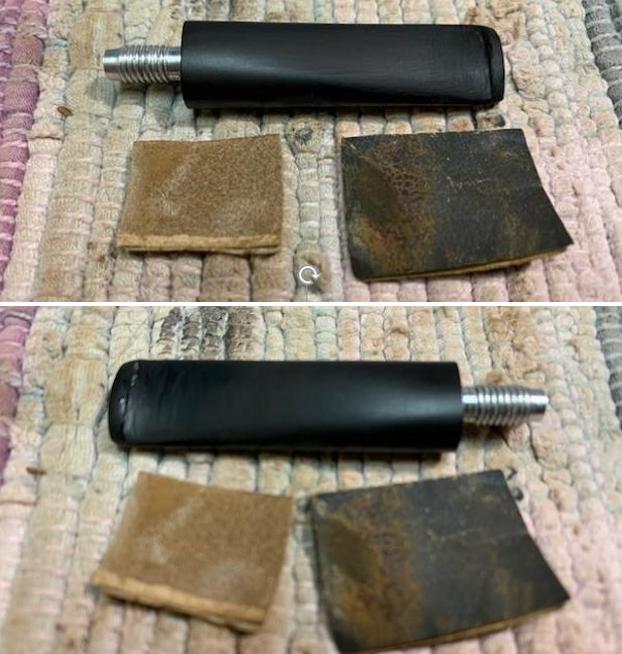
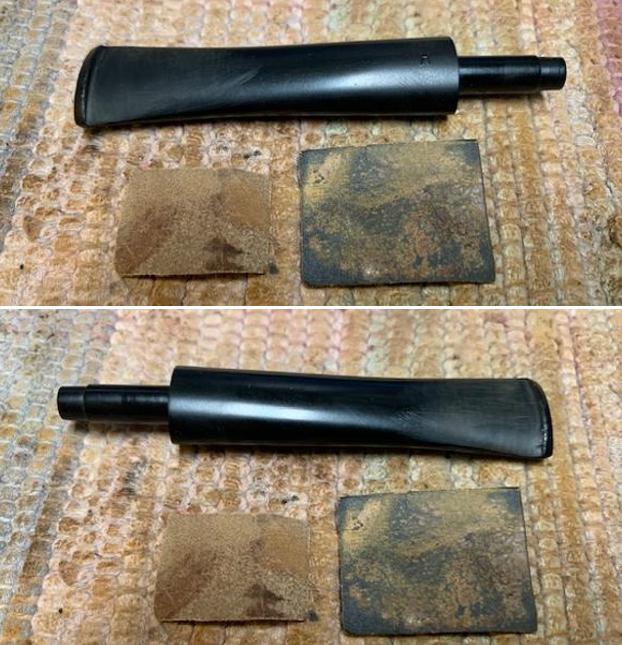
Note: While sanding the smooth end of the Delrin tenon, one has to be careful and ensure an even all around sanding of tenon as it directly affects the seating of the tenon in to the mortise and thus the seating of the stem face against the shank.  Next I dry sand the entire stem surface using 600 and 800 grit sand papers followed by wet sanding with 1000 grit sandpaper. This serves to reduce the sanding marks of the more abrasive sand papers. I also sharpened the button edges with the sand papers. I wiped the stem with a cotton swab and alcohol to remove all the oxidation and sanding dust from the surface.
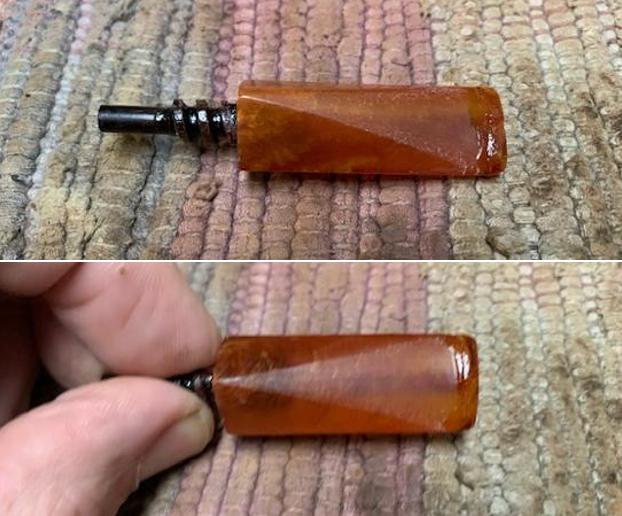
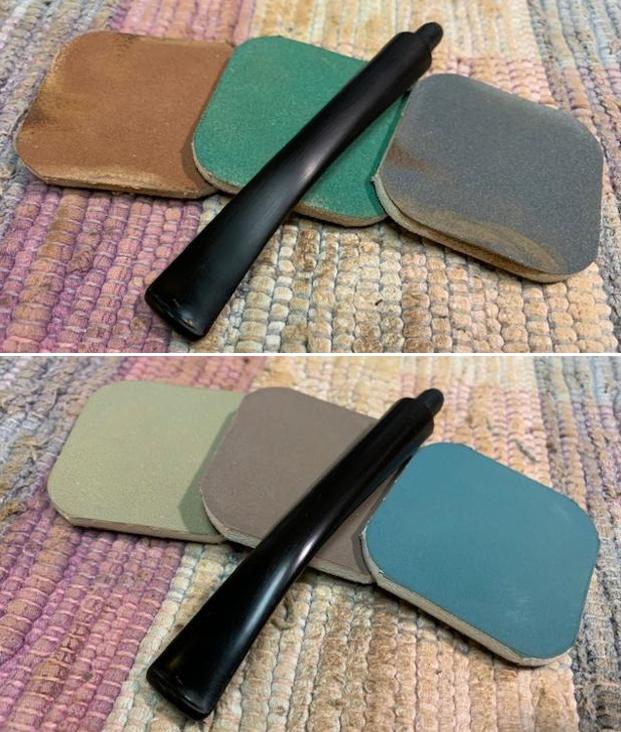
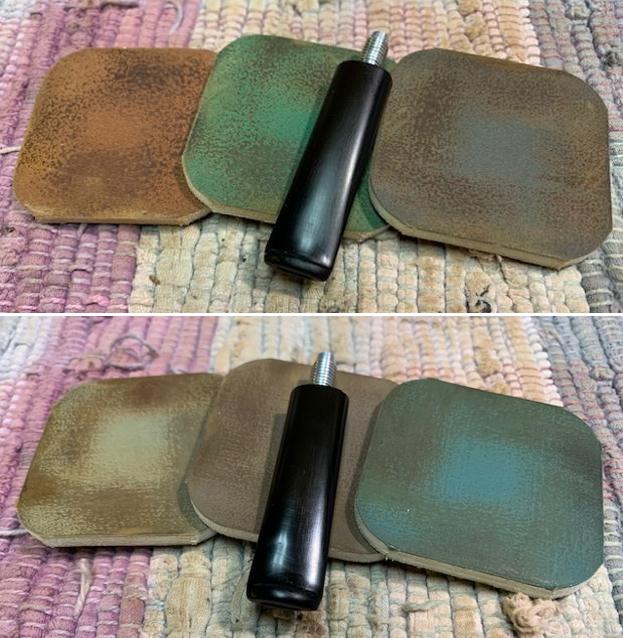
I followed up the sanding regime with micromesh polishing to bring a shine on the stem surface. I wet sand the stem with 1500 to 12000 girt micromesh pads. I rub a small quantity of olive oil (though not necessary for acrylic stem) in to the stem surface to hydrate it and set it aside. The stem looks nice and shinning.Now, on to the home stretch!! I very excited to see the result of the final polishing cycle with Blue Diamond and carnauba wax.

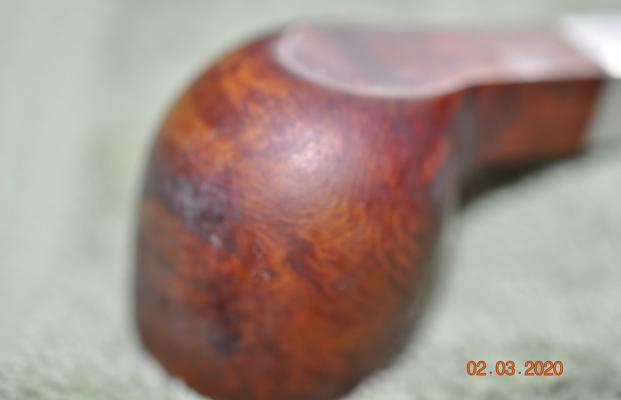
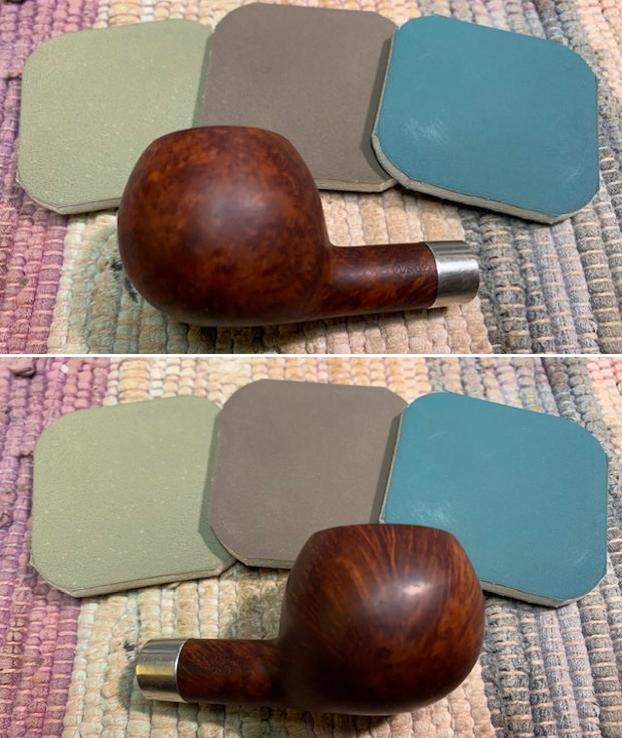
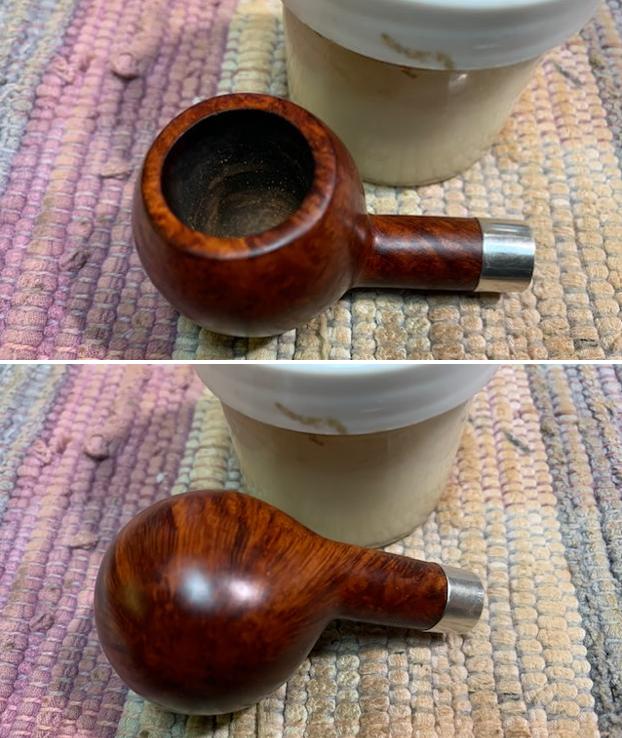
To apply the finishing touches, I first mount a cotton cloth buffing wheel on to my hand held rotary tool and apply a coat of Blue Diamond to the stummel and the stem to polish out the minor scratches. 
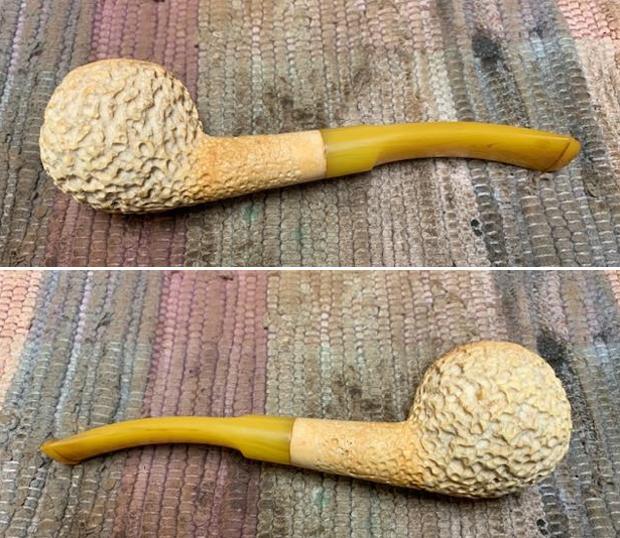
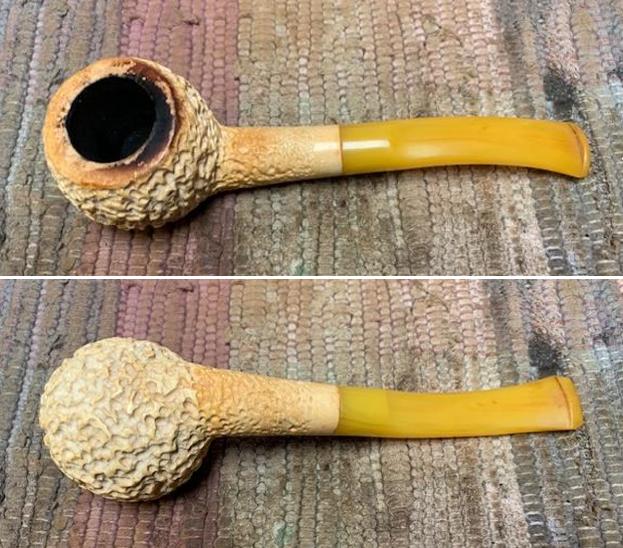
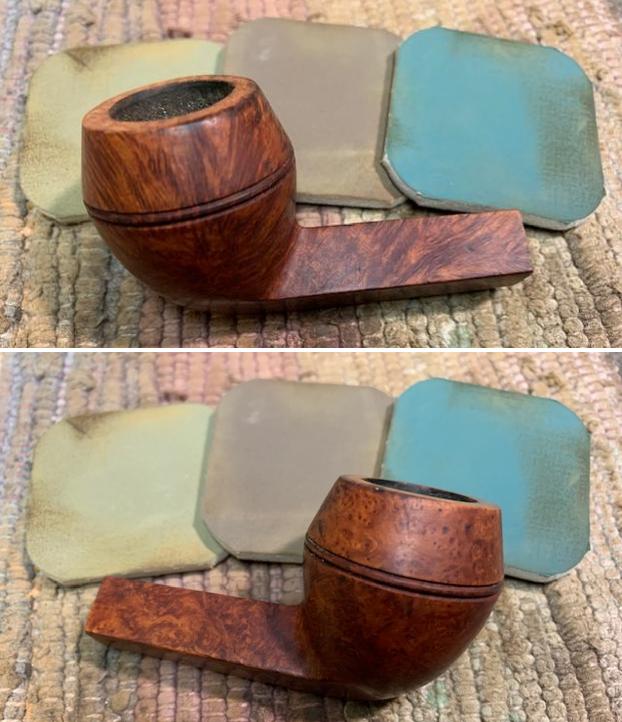
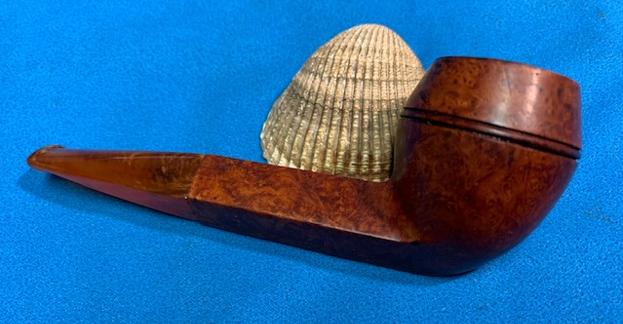
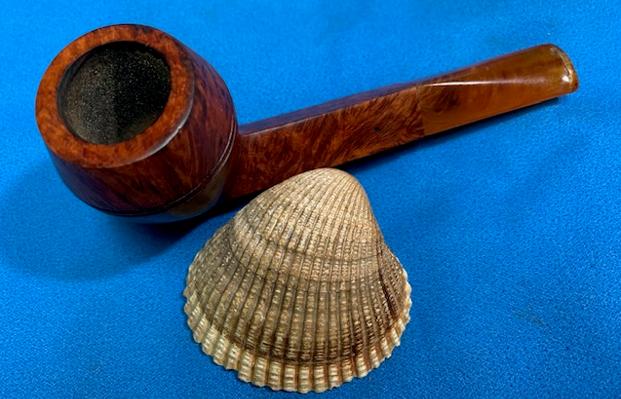
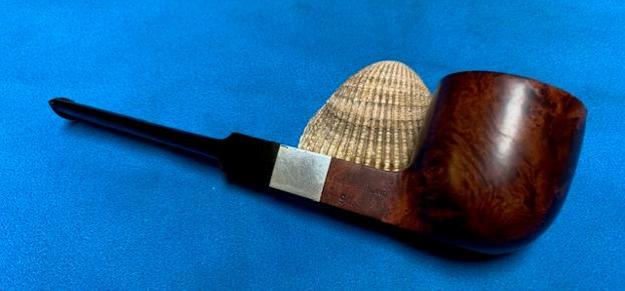
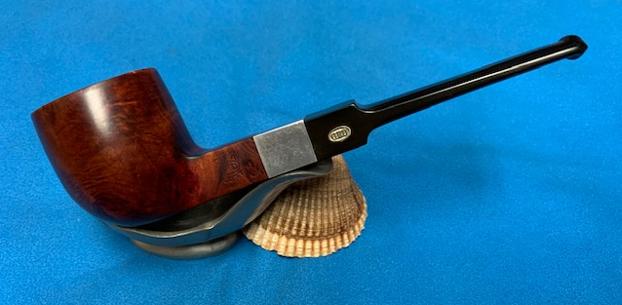
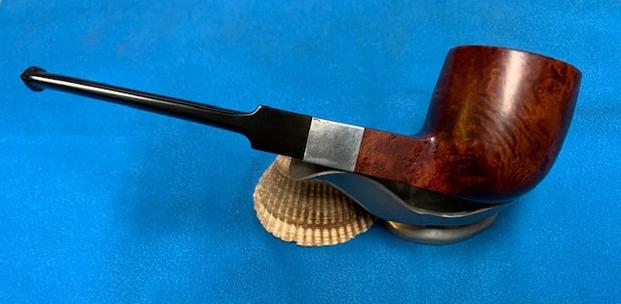
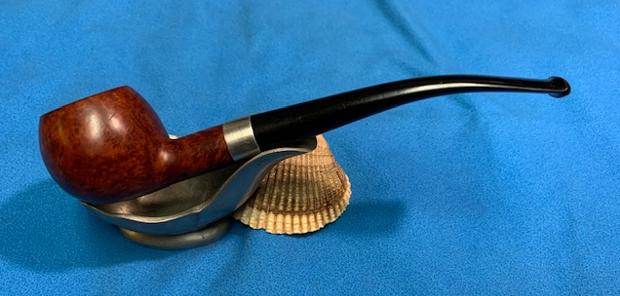
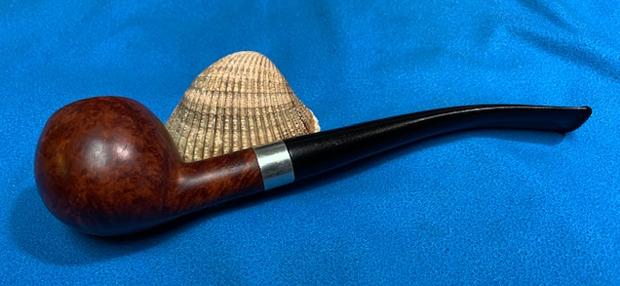
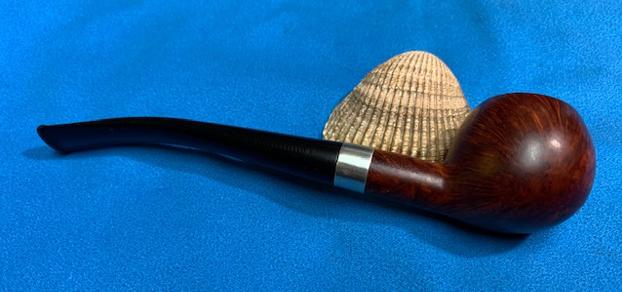
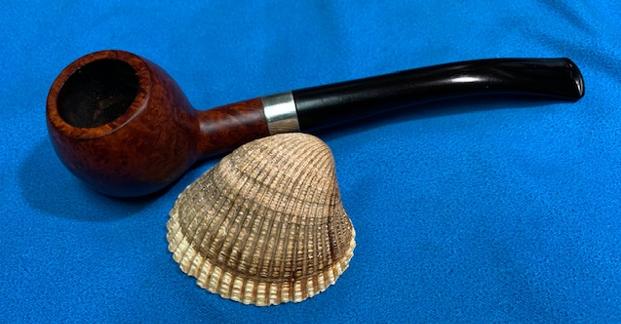
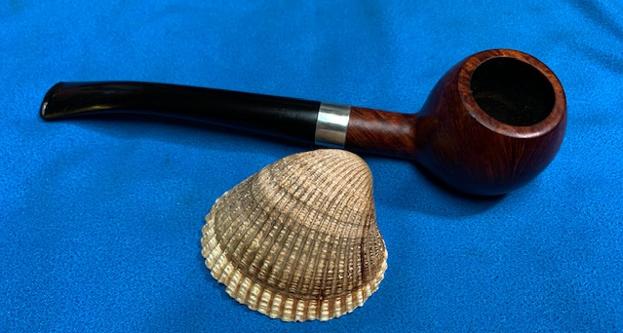
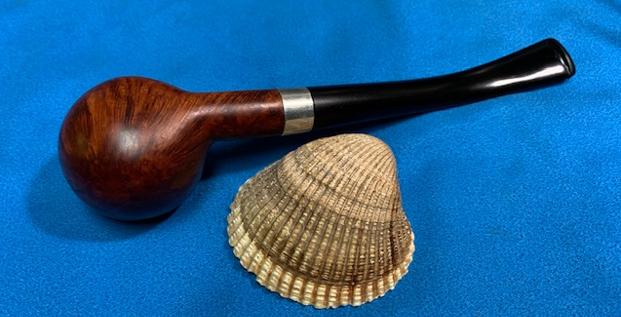
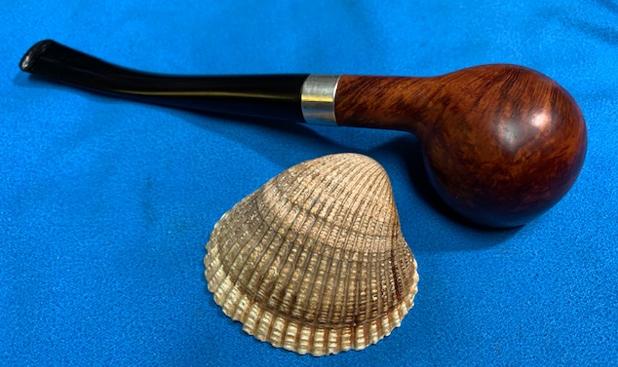
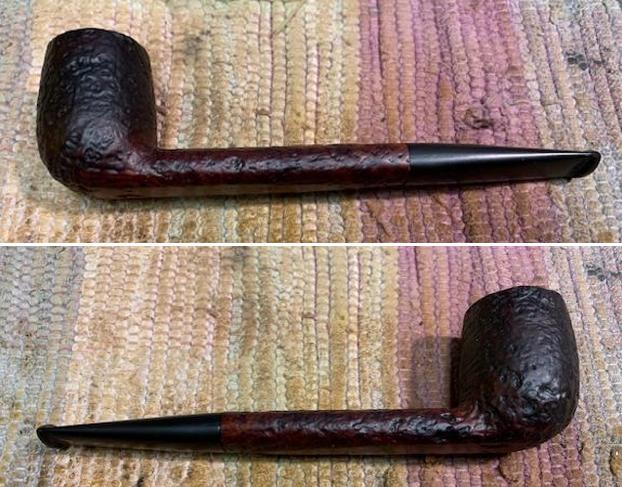
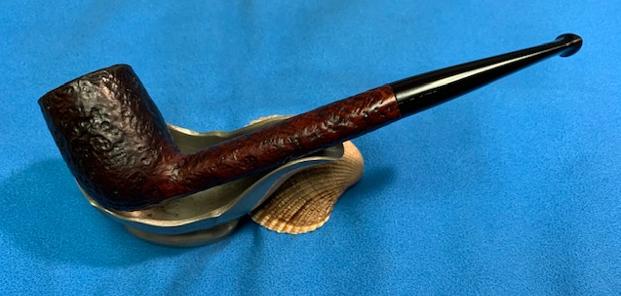
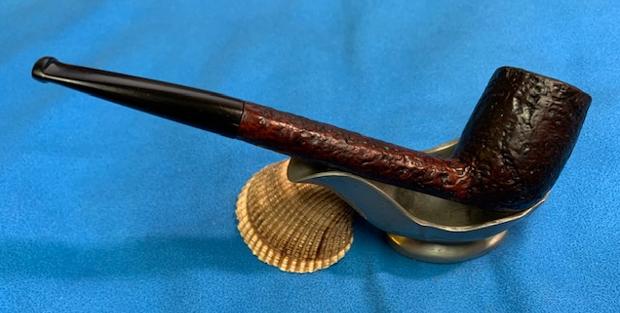
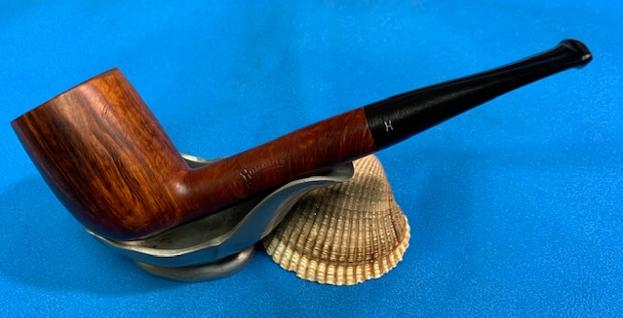
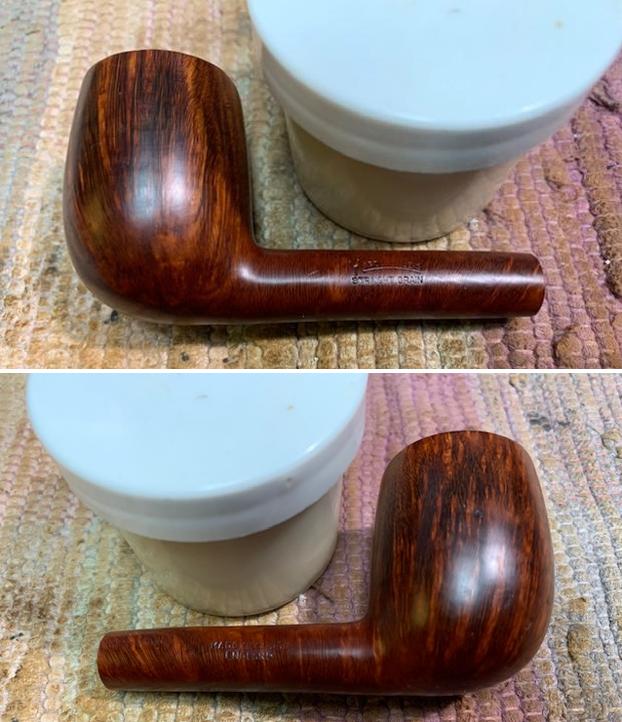
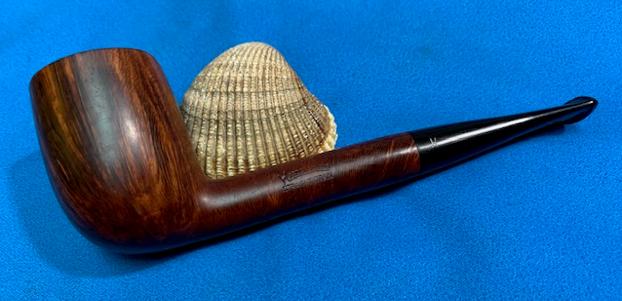
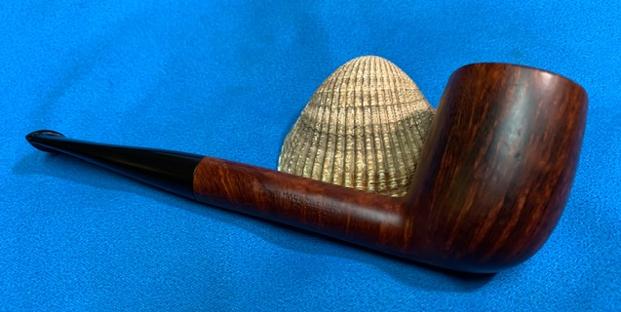
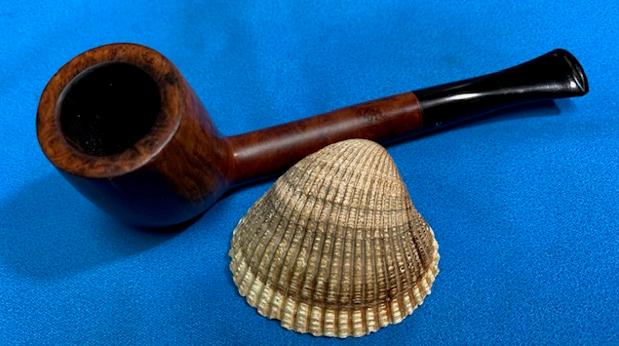
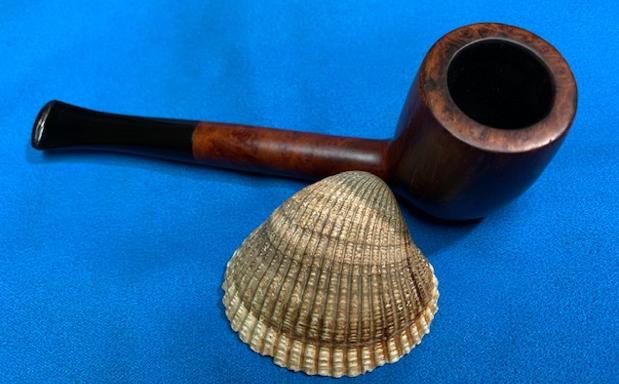
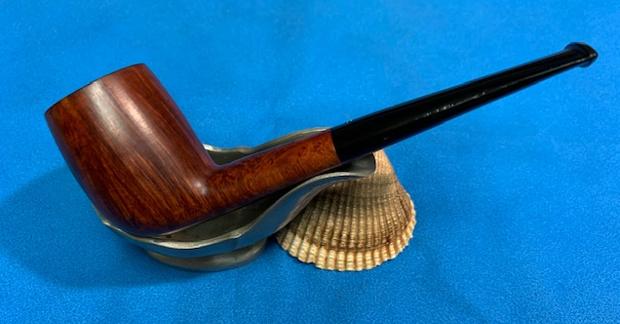
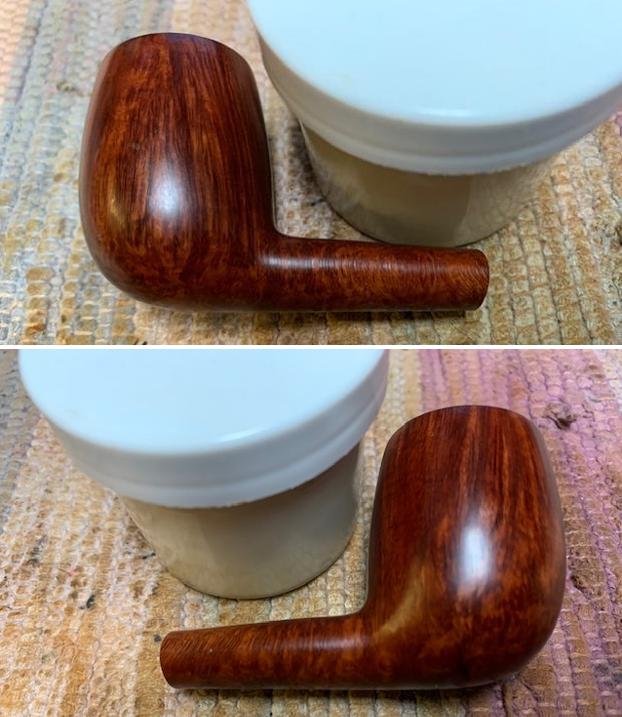
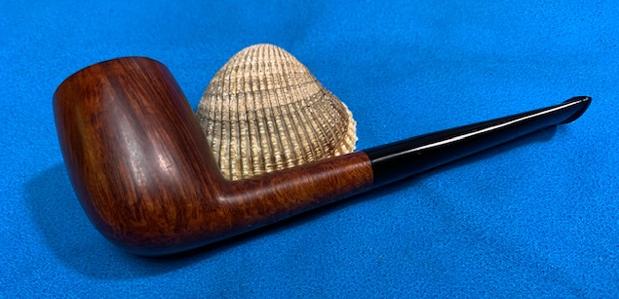
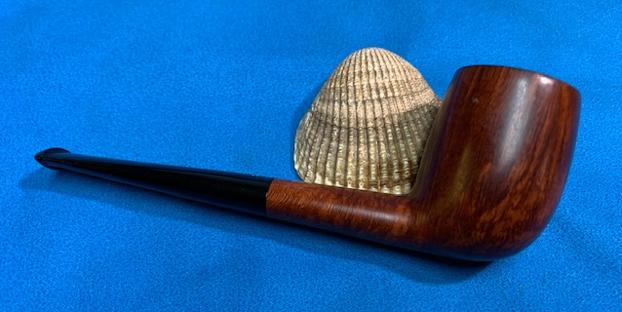
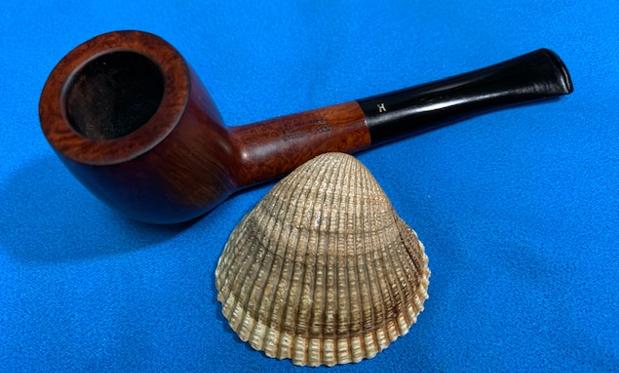
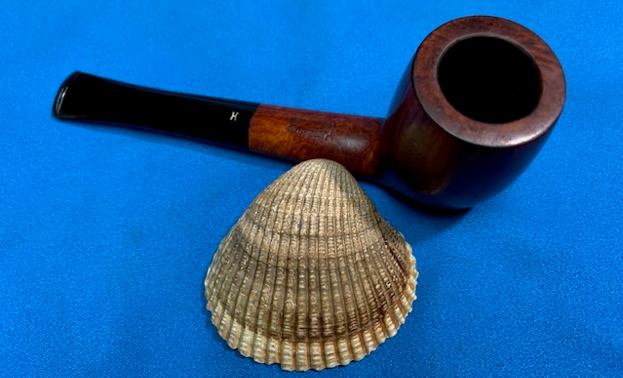
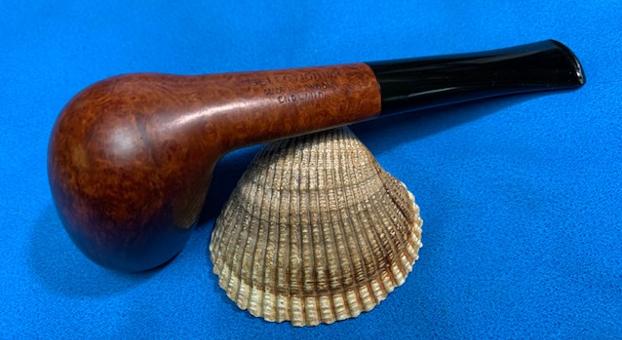
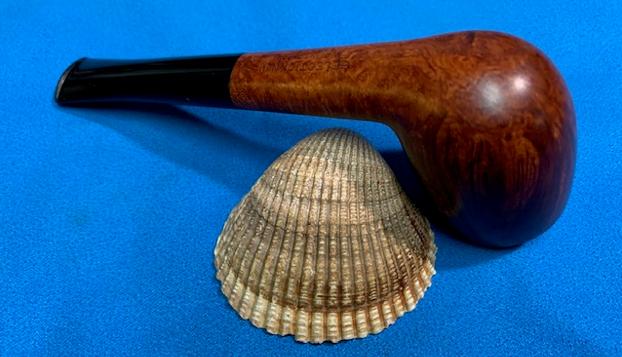
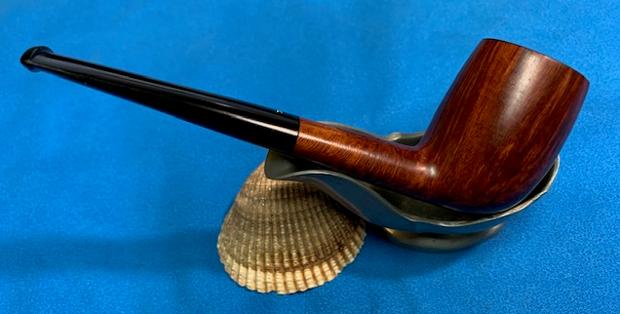
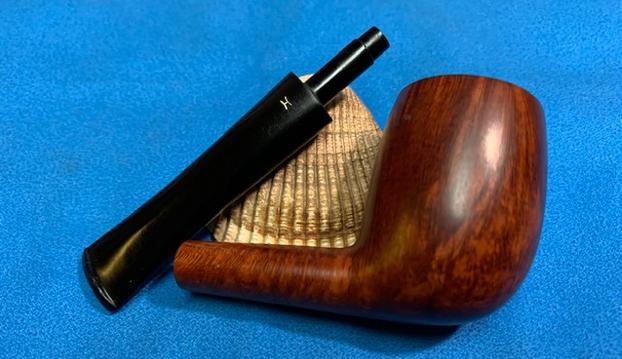
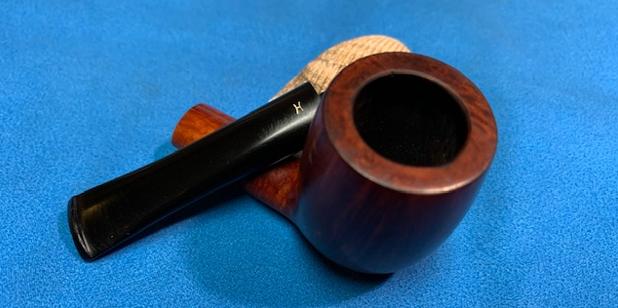
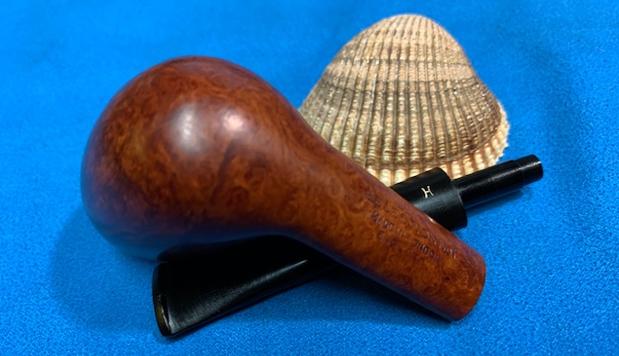
With a cotton buffing wheel that I use for carnauba wax, I apply a coat of carnauba wax and continue to work on it till the complete coat of wax had been polished out. I mount a clean cotton cloth buffing wheel and give the entire pipe a once over buff. I finished the restoration by giving the entire pipe a rigorous hand buffing using a microfiber cloth to raise the shine further. The finished pipe looks fantastic, the beauty of which is accentuated by its classic shape, size and hand feel. 
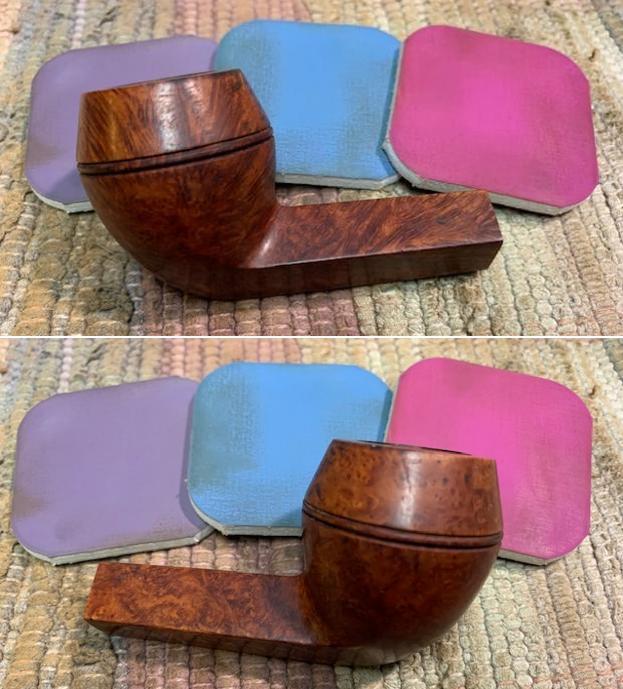
P.S. The stem repairs are solid and with a little care while handling, this pipe should last a few more decades. This pipe is all set for a new home and is now truly ready for a long hiatus with a new piper, providing years of service in future.

Thank you all for reading through this write up and for the valuable time you have invested in doing so. If any reader is interested in adding this pipe to his/ her pipe rotation, feel free to contact me at deshpandeparesh@yahoo.co.in

Breathing Life into a well carved Meerschaum Bent Billiard


Blog by Steve Laug

I have finished restoring quite a few of the pipes in this collection that we purchased from the older gentleman. He sent me the photos and I was amazed at what I saw. You have seen many of the pipes that he had. These included Dunhill, BBB, Orlik, Barclay Rex, a cased Ben Wade, an H. Simmons all briar, Hardcastles and some Meerschaums. There were also some assorted others that I will get to in the days ahead. It was a great collection.

The next pipe I have chosen is a worn and dirty looking Bent Meerschaum Billiard. It is the first [top] of the three meerschaum pipes in the photo above. There was a thick cake in the bowl and the rim top and edges were told buried under a thick coat of lava. It was filthy both inside and out. The shape probably caught my eye because it is quite lovely even under the grime and wear. The stem is yellow acrylic and it is chipped and damaged. The exterior of the bowl had a lot of debris in the rustication around the bowl. The stem had tooth chatter on the top and underside near the button. This was another well loved pipe that obviously been a good smoker!

Jeff took some photos of the Meerschuam Bent Billiard before he worked his magic in cleaning up the pipe. It is a an interesting pipe with a lot of potential and what appears to be some great grain under the grime and debris of the years. Jeff took photos of the bowl, rim top to show the thickness of the cake in the bowl and the thick lava on the rim top. The rim top and inner edge are so thickly covered that it is hard to know their condition. All of the issues will become clearer after the clean up. He took photos of the top and underside of the acrylic stem showing the tooth chatter on both sides and the chip out of the underside of the stem on the right.   Jeff also took some photos of the threaded metal tenon in the shank and the threaded inside of the stem to show the appearance and condition of both.Jeff took photos of the sides and heel of the bowl to show the condition of the rustication. You can see the beautiful shape of the bowl and some interesting patterns in the meerschaum even through the dirt and debris of many years. This unstamped Meerschaum Bent Billiard is an interesting looking pipe. There appears to be a JW written on both the face of the shank and stem. Because the old gentleman that we bought the pipes from intimated that he purchased his pipes at the Manhattan Barclay-Rex store I would imagine that he may have purchased this one from them as well. I was unable to pin down any information regarding the date this pipe so it was time to move on and work on the pipe.

Jeff carefully cleaned the pipe. He reamed it with a PipNet pipe reamer and then cleaned up the reaming with a Savinelli Fitsall Pipe Knife. He scrubbed out the internals of the shank, stem and shank extension with alcohol, pipe cleaners and cotton swabs until the pipe was clean. He scrubbed the exterior of the bowl with Murphy’s Oil Soap and a tooth brush to remove the grime and grit on the briar and lava on the rim top. The finish looks much better and has a deep richness in the colour that highlights the dimensions of the rustication. The edges looked good otherwise. He scrubbed the acrylic stem with Soft Scrub to remove the grime and oils on the stem. When the pipe arrived here in Vancouver I was amazed that it looked so good. Here are some photos of what I saw. I took some close up photos of the rim top and the stem surface. The top and inner and outer edge of the rim showed some darkening/heavy tars and damage. The stem had tooth marks and chatter on both sides near the button.I removed the stem from the shank and took a photo of the parts of the pipe. I started my work on the pipe by polishing the smooth rim top with micromesh sanding pads – dry sanding with 1500-12000 grit sanding pads. I wiped the bowl down after each pad with a damp cloth to remove the sanding debris. I worked some Before & After Restoration Balm into the surface of the bowl and shank with my fingertips to clean, enliven and protect the smooth surfaces of the meerschaum. I let the balm sit for 15 minutes and then buffed with a cotton cloth to raise the shine. The photos show the bowl at this point in the restoration process. I filled in the large chip on the right underside with clear CA glue, layering it on to repair both the stem ahead of the button and building up the button. I set it aside to cure. Once it cured I sanded it smooth with 220 grit sandpaper and started the polishing with 400 grit wet dry sandpaper. I polished the stem with micromesh sanding pads – dry sanding with 1500-12000 grit sanding pads. I wiped it down after each sanding pad with Obsidian Oil. I polished it with Before & After Pipe Stem Polish – both Fine and Extra Fine. I gave it a final coat of Obsidian Oil. It looks significantly better and is smooth but the repairs show! With the bowl and the stem finished I put the beautiful Meerschaum Bent Billiard back together and buffed it lightly on the wheel using Blue Diamond to give it a shine. I gave the stem multiple coats of carnauba wax on the wheel. I buffed the bowl with a horsehair shoe brush to raise the shine. I hand buffed it with a microfiber cloth to deepen the shine. The smooth and carved finish is a great looking. The dimensions of the pipe are – Length: 6 inches, Height: 1 ¾  inches, Outside diameter of the bowl: 1 ¼ inches, Chamber diameter: ¾ of an inch. The weight of this large pipe is 1.27 ounces /36 grams. This Meerschaum Bent Billiard is another great find from this collection. It is much more beautiful in person than these photos can capture. I will be adding it to the rebornpipes store soon. If you want to add it to your collection it will make a fine smoking addition. This is another pipe that has the possibility of transporting the pipe man or woman back to a slower paced time in history where you can enjoy a respite. Thanks for walking through the restoration with me.

Breathing Life into a Rusticated Meerschaum Prince


Blog by Steve Laug

I have finished restoring quite a few of the pipes in this collection that we purchased from the older gentleman. He sent me the photos and I was amazed at what I saw. You have seen many of the pipes that he had. These included Dunhill, BBB, Orlik, Barclay Rex, a cased Ben Wade, an H. Simmons all briar, Hardcastles and some Meerschaums. There were also some assorted others that I will get to in the days ahead. It was a great collection.

The next pipe I have chosen is a worn and dirty looking rusticated Meerschaum Prince. It is the middle of the three meerschaum pipes in the photo above. There was a thick cake in the bowl and the rim top and edges were told buried under a thick coat of lava. It was filthy both inside and out. The shape probably caught my eye because it is quite lovely even under the grime and wear. The stem is yellow acrylic and it was a complete mess. The exterior of the bowl had a lot of debris in the rustication around the bowl. The stem had tooth marks on the top and underside near the button. This was another well loved pipe that obviously been a good smoker!

Jeff took some photos of the Rusticated Meerschaum Prince before he worked his magic in cleaning up the pipe. It is a an interesting pipe with a lot of potential and what appears to be some great grain under the grime and debris of the years. Jeff took photos of the bowl, rim top to show the thickness of the cake in the bowl and the thick lava on the rim top. The rim top and inner edge are so thickly covered that it is hard to know their condition. It appears that there were nicks and chips on the rim top. All of the issues will become clearer after the clean up. He took photos of the top and underside of the acrylic stem showing the tooth marks and chatter on both sides.   Jeff also took some photos of the threaded metal tenon in the shank and the threaded inside of the stem to show the appearance and condition of both.Jeff took photos of the sides and heel of the bowl to show the condition of the rustication. You can see the beautiful shape of the bowl and some interesting patterns in the meerschaum even through the dirt and debris of many years. This unstamped Meerschaum Prince is an interesting looking pipe. Because the old gentleman that we bought the pipes from intimated that he purchased his pipes at the Manhattan Barclay-Rex store I would imagine that he may have purchased this one from them as well. I was unable to pin down any information regarding the date this pipe so it was time to move on and work on the pipe.

Jeff carefully cleaned the pipe. He reamed it with a PipNet pipe reamer and then cleaned up the reaming with a Savinelli Fitsall Pipe Knife. He scrubbed out the internals of the shank, stem and shank extension with alcohol, pipe cleaners and cotton swabs until the pipe was clean. He scrubbed the exterior of the bowl with Murphy’s Oil Soap and a tooth brush to remove the grime and grit on the briar and lava on the rim top. The finish looks much better and has a deep richness in the colour that highlights the dimensions of the rustication. The edges looked good otherwise. He scrubbed the acrylic stem with Soft Scrub to remove the grime and oils on the stem and chewed stem end. When the pipe arrived here in Vancouver I was amazed that it looked so good. Here are some photos of what I saw. I took some close up photos of the rim top and the stem surface. The top and inner and outer edge of the rim showed some darkening/heavy tars and damage. The stem had tooth marks and chatter on both sides near the button.I removed the stem from the shank and took a photo of the parts of the pipe. I started my work on the pipe by addressing the damage and tars on the rim top and edges of the bowl. I topped it on a topping board with 220 grit sandpaper. I cleaned up the inner edge with a piece of 220 grit sandpaper.I polished the smooth rim top with micromesh sanding pads – dry sanding with 1500-12000 grit sanding pads. I wiped the bowl down after each pad with a damp cloth to remove the sanding debris. I worked some Before & After Restoration Balm into the surface of the bowl and shank with my fingertips to clean, enliven and protect the briar. I let the balm sit for 15 minutes and then buffed with a cotton cloth to raise the shine. The photos show the bowl at this point in the restoration process. I “painted” the stem surface with the flame of a Bic lighter to lift them. I have tried it before on acrylic stems but it has never worked and still did not. I filled in the tooth marks with clear CA glue and set it aside to cure. Once it cured I sanded it smooth with 220 grit sandpaper and started the polishing with 400 grit wet dry sandpaper. I polished the stem with micromesh sanding pads – dry sanding with 1500-12000 grit sanding pads. I wiped it down after each sanding pad with Obsidian Oil. I polished it with Before & After Pipe Stem Polish – both Fine and Extra Fine. I gave it a final coat of Obsidian Oil. It looks significantly better and is smooth but the repairs show! With the bowl and the stem finished I put the beautiful Rusticated Meerschaum Prince back together and buffed it lightly on the wheel using Blue Diamond to give it a shine. I gave the stem multiple coats of carnauba wax on the wheel. I buffed the pipe with a horsehair shoe brush to raise the shine. I hand buffed it with a microfiber cloth to deepen the shine. The smooth and rusticated finish is a great looking. The dimensions of the pipe are – Length: 4 ¾ inches, Height: 1 ½ inch, Outside diameter of the bowl: 1 ¼ inches, Chamber diameter: ¾ of an inch. The weight of this large pipe is 1.23 ounces /35 grams. This Rusticated Meerschaum Prince is another great find from this collection. It is much more beautiful in person than these photos can capture. I will be adding it to the rebornpipes store soon. If you want to add it to your collection it will make a fine smoking addition. This is another pipe that has the possibility of transporting the pipe man or woman back to a slower paced time in history where you can enjoy a respite. Thanks for walking through the restoration with me.

Resurrecting an old Bulldog with a Bakelite Stem


Blog by Steve Laug

I have finished restoring quite a few of the pipes in this collection that we purchased from the older gentleman. He sent me the photos and I was amazed at what I saw. You have seen many of the pipes that he had. These included Dunhill, BBB, Orlik, Barclay Rex, a cased Ben Wade, an H. Simmons all briar, Hardcastles and some Meerschaums. There were also some assorted others that I will get to in the days ahead. It was a great collection.

The next pipe I have chosen is a tired and worn looking older style Bulldog with a Bakelite stem with a bone tenon. I don’t know what it is about this pipe that caught my eye but something did. It certainly was not the condition of pipe. The bowl was in very rough shape. There was a thick cake in the bowl and the rim top and edges were told buried under a thick coat of lava. The pipe was really a stranger to pipe cleaners. It was filthy both inside and out. The shape probably caught my eye because it is quite lovely even under the grime and wear. The stem is Bakelite and it was a complete mess. It had the end gnawed off  leaving behind a chipped and chewed end that was not eve square. I am not sure how much longer it was when it was made but it must have been longer than what we saw when we got. This was one well loved pipe that had been “ridden hard and put away wet”! It would be a challenge to see what I could do with it! In the end that is probably what drew me to the pipe!

Jeff took some photos of the Bakelite Stemmed Bulldog before he worked his magic in cleaning up the pipe. It is a an interesting pipe with a lot of potential and what appears to be some great grain under the grime and debris of the years.Jeff took photos of the bowl, rim top to show the thickness of the cake in the bowl and the thick lava on the rim top. The rim top and both inner and outer edges are so thickly covered that it is hard to know their condition. It appears that there were nicks and chips on the outer edge at the back of the bowl that will require a bit of attention. All of the issues will become clearer after the clean up. He took photos of the top and underside of the Bakelite stem showing the gnawed end of the stem and the broken and missing chunks from the stem end. It appears that there were button remnants on both sides. Jeff also took some photos of the bone tenon and the shank end to show the appearance and condition of both.Jeff took photos of the sides and heel of the bowl to show the condition of the briar. You can see the beautiful shape of the bowl and some interesting grain even through the dirt and debris of many years.   Jeff took photos of the stamping on the sides of the shank to show the lack of a stamping. It appears that both sides had some sort of stamp on them but it was worn away.This unstamped Bulldog is an interesting looking pipe. Because the old gentleman that we bought the pipes from intimated that he purchased his pipes at the Manhattan Barclay-Rex store I would imagine that he may have purchased this one from them as well. I was unable to pin down any information regarding the date this pipe was made but the fact that it is among the old timers I have been working on and the older Bakelite stem make me think it is older as well.

Jeff carefully cleaned the pipe. He reamed it with a PipNet pipe reamer and then cleaned up the reaming with a Savinelli Fitsall Pipe Knife. He scrubbed out the internals of the shank, stem and shank extension with alcohol, pipe cleaners and cotton swabs until the pipe was clean. He scrubbed the exterior of the bowl with Murphy’s Oil Soap and a tooth brush to remove the grime and grit on the briar and lava on the rim top. The finish looks much better and has a deep richness in the colour that highlights the dimensions of the grain. The edges looked good otherwise. He scrubbed the Bakelite stem with Soft Scrub to remove the grime and oils on the stem and chewed stem end. When the pipe arrived here in Vancouver I was amazed that it looked so good. Here are some photos of what I saw. I took some close up photos of the rim top and the stem surface. The top and inner and outer edge of the rim showed damage. There was serious damage back outer edge of the bowl. The stem was gnawed and that damage is very visible in the photos. I took photos of the shank sides to show that the stamping was worn away.I removed the stem from the shank and took a photo of the parts of the pipe. I started my work on the pipe by dealing with the chewed end of the stem. I used a file/rasp that I have here to flatten the chewed off end. I squared it off to have a fresh surface to work on a new button. I propped the stem up on the shank to take a picture of the squared end of the stem.I used a triangular file to recut the sharp edge of a button on the newly shaped stem end. I used 220 grit sandpaper to shape the top of the stem and shape the angles.I spread a coat of clear CA glue on top of the button to seal the new edge and top of the button and set it aside to cure. I followed up on that by layering glue on the top of the button to build it up and give it some shape. Once the button repair cured I used the triangle file and 180 grit sandpaper to shape the button surface.There was still more shaping to do but the  stem was taking form. I took profile pictures of it to give a sense of the shape. There is much more sanding to do but it was coming along.I set the stem aside and turned my attention to the bowl. I used a folded piece of 180 grit sandpaper to bring the inner edges of the bowl back into round. I topped the bowl with 220 grit sandpaper to minimize the damage on the rim top and particularly the back of the bowl. I took a photo of the rim top after the topping. I polished the briar with micromesh sanding pads – dry sanding with 1500-12000 grit sanding pads. I wiped the bowl down after each pad with a damp cloth to remove the sanding debris. I stained the rim top with an Oak stain pen to match the surrounding briar. Once it is buffed the match should be perfect.I worked some Before & After Restoration Balm into the surface of the bowl and shank with my fingertips to clean, enliven and protect the briar. I let the balm sit for 15 minutes and then buffed with a cotton cloth to raise the shine. The photos show the bowl at this point in the restoration process. With stem reshaped and built earlier in the process all that remained was to polish it. I polished the stem with micromesh sanding pads – dry sanding with 1500-12000 grit sanding pads. I wiped it down after each sanding pad with Obsidian Oil. I polished it with Before & After Pipe Stem Polish – both Fine and Extra Fine. I gave it a final coat of Obsidian Oil. With the bowl and the stem finished I put the beautiful No Name Bulldog back together and buffed it on the wheel using Blue Diamond to give it a shine. I gave the bowl and the stem multiple coats of carnauba wax on the wheel. I buffed it with a clean buffing pad to raise the shine. I hand buffed it with a microfiber cloth to deepen the shine. The grain on this pipe really is a great looking. The dimensions of the pipe are – Length: 4 ¾ inches, Height: 1 ¾ inch, Outside diameter of the bowl: 1 ¼ inches, Chamber diameter: ¾ of an inch. The weight of this large pipe is 1.16 ounces /33 grams. This Old Bakelite Stemmed Bulldog is another great find from this collection. It is much more beautiful in person than these photos can capture. This is another pipe that has the possibility of transporting the pipe man or woman back to a slower paced time in history where you can enjoy a respite. Thanks for walking through the restoration with me.

Resurrecting an interesting GBD  Square Shank Dura Mount 9488 Pot


Blog by Steve Laug

I have quite a few of the pipes in this collection that we purchased from the older gentleman. He sent me the photos and I was amazed at what I saw. You have seen many of the pipes that he had. These included Dunhill, BBB, Orlik, Barclay Rex, a cased Ben Wade, an H. Simmons all briar, Hardcastles and some Meerschaums. There were also some assorted others that I will get to in the days ahead. It was a great collection.

Now it was time to work on some of the single pipes that he had. The next one of these is a interesting Pot that is stamped on the left side of the diamond shank and reads DURA [over] GBD in an oval [over] MOUNT. On the right side it is stamped LONDON, ENGLAND [over] 9488 (the shape number). The stamping is clear and readable. It is a nice looking Pot that has the kind of damage to the rim edges that I have come to expect in this lot. The Duramount fitting on the shank end is something I have not seen before. The vulcanite saddle stem does not have any stamping on either side. It is the top pipe in the above photo.

Jeff took some photos of the GBD Dura Mount 9488 Pot before he worked his magic in cleaning up the pipe. It is a an interesting pipe with a lot of potential and what appears to be some great grain under the grime and debris of the years.Jeff took photos of the bowl, rim top to show the thickness of the cake in the bowl and the thick lava on the rim top. The rim top and both inner and outer edges are so thickly covered that it is hard to know their condition. It appears that there is a large chip on the outer edge at the back of the bowl that will require a bit of attention. All of the issues will become clearer after the clean up. He took photos of the top and underside of the vulcanite stem showing the oxidation, calcification, tooth marks, chatter and wear on the stem and button. Jeff took photos of the sides and heel of the bowl to show the condition of the briar. You can see the beautiful shape of the bowl and some interesting grain even through the dirt and debris of many years.   Jeff took photos of the stamping on the sides of the shank to show the clarity and readability of the stamp. It reads as mentioned above. He also took a photo of the brass GBD logo on the stem. I turned to Pipephil’s site and to the general GBD listing for the GBD Dura Mount pipe and other than a picture of the pipe and the stamping on Pipedia there was not any significant information on the line. I turned to the section on Pipedia on GBD Model Information to see what I could find (https://pipedia.org/wiki/GBD_Model_Information). There was one short line that I quote below.

Dura Mount — Factory unknown: Metal stem/bit fitting?

I assume from the design of the pipe the note above on Metal Stem/Bit Fitting ? is referring to the aluminum shank extension and mortise that holds the tenon firmly in place. I would guess that it was designed to protect both the shank and the tenon by providing this “DURABLE” shank end.

This GBD DURA MOUNT 9488 Pot is an interesting looking pipe. Because the old gentleman that we bought the pipes from intimated that he purchased his pipes at the Manhattan Barclay-Rex store I would imagine that he bought this one from them as well. I was unable to pin down any information regarding the date this pipe was made but the fact that it is among the old timers I have been working on makes me think it is older as well.

Jeff carefully cleaned the pipe. He reamed it with a PipNet pipe reamer and then cleaned up the reaming with a Savinelli Fitsall Pipe Knife. He scrubbed out the internals of the shank, stem and shank extension with alcohol, pipe cleaners and cotton swabs until the pipe was clean. He scrubbed the exterior of the bowl with Murphy’s Oil Soap and a tooth brush to remove the grime and grit on the briar and lava on the rim top. The finish looks much better and has a deep richness in the colour that highlights the dimensions of the grain. The chip on the back of the rim top was clear and looked like a relatively easy repair. The edges looked good otherwise. He soaked the stem in Briarville’s Pipe Stem Deoxidizer and scrubbed it with Soft Scrub to remove the remnants of oxidation. When the pipe arrived here in Vancouver I was amazed that it looked so good. Here are some photos of what I saw. I took some close up photos of the rim top and the stem surface. The top and inner and outer edge of the rim showed damage. There was serious damage back outer edge of the bowl. The stem had tooth marks just ahead of the button and on the button surface. I took photos of the stamping on the sides of the shank. It is readable and clear.I removed the stem from the shank and took a photo of the parts of the pipe. I started my work on the pipe by dealing with the damaged rim top and edges. I used a folded piece of 180 grit sandpaper to smooth out the nicks the inner edge of the bowl. I lightly sanded the rim top in preparation for the repair to the back outer edge. I stained the chipped area with a Maple stain pen to match the bowl and then built it up with clear CA glue. Once the glue cured I topped the bowl on a topping board with 220 grit sandpaper and sanded the outer edge with 220 at the same time. I took a photo of the rim top at this point in the process. I polished the briar and aluminum shank extension with micromesh sanding pads – dry sanding with 1500-12000 grit sanding pads. I wiped the bowl down after each pad with a damp cloth to remove the sanding debris. I stained the rim top with a Maple and a Cherry Stain pen to match the surrounding briar. Once it is buffed the match should be perfect.I worked some Before & After Restoration Balm into the surface of the bowl and shank with my fingertips to clean, enliven and protect the briar. I let the balm sit for 15 minutes and then buffed with a cotton cloth to raise the shine. The photos show the bowl at this point in the restoration process. I set the bowl aside and turned my attention to the stem. I “painted” the surface of the stem on both sides to lift the tooth marks. I was able to lift most of them. I filled in what remained next to the button with clear CA glue. Once the repairs cured, I sanded them with a folded piece of 220 grit sandpaper to smooth out the surface of the stem and reshape the button. I started polishing the stem with 400 grit wet dry sandpaper. I polished the stem with micromesh sanding pads – dry sanding with 1500-12000 grit sanding pads. I wiped it down after each sanding pad with Obsidian Oil. I polished it with Before & After Pipe Stem Polish – both Fine and Extra Fine. I gave it a final coat of Obsidian Oil. With the bowl and the stem finished I put the beautiful GBD Dura Mount 9488 Pot back together and buffed it on the wheel using Blue Diamond to give it a shine. I gave the bowl and the stem multiple coats of carnauba wax on the wheel. I buffed it with a clean buffing pad to raise the shine. I hand buffed it with a microfiber cloth to deepen the shine. The grain on this pipe really is a great looking. The dimensions of the pipe are – Length: 5 ¾ inches, Height: 1 ¾ inch, Outside diameter of the bowl: 1 ½ inches, Chamber diameter: 1 of an inch. The weight of this large pipe is 1.34 ounces /39 grams. This GBD Dura Mount is another great find from this collection. It is much more beautiful in person than these photos can capture. I will be putting it on the rebornpipes store soon. If you would like to add it to your collection let me know. This is another pipe that has the possibility of transporting the pipe man or woman back to a slower paced time in history where you can enjoy a respite. Thanks for walking through the restoration with me.

Restoring a Great Looking L&Co CAPTANIDE Prince


Blog by Steve Laug

I have finished restoring all of the Barclay-Rex pipes in the collection of pipes that we purchased from the older gentleman. He sent me the photos and I was amazed at what I saw. You have seen many of the pipes that he had. These included Dunhill, BBB, Orlik, Barclay Rex, a cased Ben Wade, an H. Simmons all briar, Hardcastles and some Meerschaums. There were also some assorted others that I will get to in the days ahead. It was a great collection.

Now it was time to work on some of the single pipes that he had. The first of these is a beautiful little Prince that is stamped L& Co in an oval on the left side of the shank and LOEWE [over] LONDON W. on the right side of the shank. On the underside of the shank it is stamped CAPTANIDE. The band on the shank is a Sterling Silver repair band put on when the crack on the topside of the shank was repaired.

Jeff took some photos of the LOEWE Captanide Prince before he worked his magic in cleaning up the pipe. It is a an interesting pipe with a lot of potential and what appears to be some great grain under the grime and debris of the years. Jeff took photos of the bowl, rim top to show the thickness of the cake in the bowl and the thick lava on the rim top. The rim top and both inner and outer edges looked good. He took photos of the top and underside of the vulcanite stem showing the oxidation, calcification, tooth marks, chatter and wear on the stem and button. Jeff took photos of the sides and heel of the bowl to show the condition of the briar. You can see the beautiful shape and the grain on the bowl even through the dirt and debris of many years. Jeff took a photos of the stamping on the sides of the shank to capture the readable stamping. As is my habit I turned to Pipephil’s site (http://pipephil.eu/logos/en/logo-l5.html) on the Loewe brand. I have included a screen capture of the information that is shown there. I quote from the sidebar on the site below as it gives a good summary of information.

Brand founded 1856 by Emil Loewe. First overtaken by Civic the brand became part of Cadogan group (BBB, Civic, Comoy, GBD, Loewe, Orlik) about 1979.

I also quote from what I found previously on Pipedia (https://pipedia.org/wiki/Loewe_%26_Co.).

Loewe is one of the haunting old names of British pipe-making, characteristic of an almost vanished “upper middle class” of the trade, which also incorporated makes such as BBB, Orlik, Comoy’s and GBD. Along with these brands, Loewe has long dwindled into pseudo-existence, becoming little more than a logo occasionally used by the Cadogan factory in Southend-on-Sea. But owners of older Loewes treasure them as superb, featherweight smokers, excellently crafted and with grain characteristics superior to those of many contemporary Dunhills.

The firm and its facilities were later taken over by Civic, well before becoming a fully integrated part of the Cadogan group sometime in the final quarter of the twentieth century. As with other brands belonging to this group, it is not easy to pinpoint a date marking the end of Loewe’s independence and singularity. This is partly due to Cadogan’s own development from a cooperative to a monolithic entity.

In 1979, a German paperback said that the Loewe brand had been discontinued two years previously, but that the pipes themselves were due to reappear as high-end GBDs. Interestingly, the year of publication coincided with the year in which the Loewe trademark became Cadogan’s, who by this time already owned GBD. From today’s point of view, the author appears to have been working on confused, but partly true information. If there were ever really plans to fully amalgamate the two lines, they were dropped. Also, a two-year break at this time seems impossible, since we have hallmark evidence of Loewes made in 1978 and 1979. However, there are firm indications that Loewe shapes were later marketed as Comoy’s (another Cadogan brand). There may also have been a phase of dissolution regarding location. The reported appearance of French Loewes in the early 1980s is a sign that Loewes were being produced in more than one place at some stage before the Cadogan-era proper.

From what I can gather, Cardogan’s various brands continued to be made in separate facilities throughout the1970s. It was the purchase of Orlik in 1980 that enabled the Cadogan group to consolidate all manufacturing in that company’s new factory in Southend-on-Sea. Whether or not this transferral was a gradual process and when it affected Loewe is unclear. We hear that, as a company, Loewe was not formally wound up by Cadogan (the successor to Civic) until the late 1980s. Of course, today’s ‘Loewes’ are definitely made in Southend – though, according to Cardogan, the trademark is no longer used very much.

The Frenchman Emil Loewe founded the company, both shop and workshop, in 1856 at the Haymarket 62, London. He is said to have been the first to make briar pipes in England. Richard Hacker maintains that theatre people from the West End were among the shop’s heyday aficionados. Loewe’s spigots are especially well regarded by lovers of elegance today – they were originally introduced for practical reasons, to facilitate the production of replacement stems for customers abroad.

The article also included a link to a shape chart which I have included the pertinent portion to the left for ease of reference https://pipedia.org/wiki/Loewe_Shape_Chart).

The pipe I am working on is a shape that is called a Captanide which is the town name for the Prince shape. (I did a bit of searching on Google for Captanide as a town in England and came up empty-handed.) The shape is listed in the chart to the left as having a 1/8 bent stem. That was helpful information as I was not sure what the Captanide stamping meant.

With the information from Pipedia I knew that I was working on a pipe from Loewe & Co. that was made before 1979 when Loewe was bought out by the  Cadogan Group and joined many other of the old brands that were purchased – BBB, GBD, Comoys and Orlik. The old gentleman that we bought the pipes from intimated that he purchased it at the Manhattan Barclay-Rex store. I was unable to pin down any information regarding the date this pipe was made. Now it was time to work on the pipe.

Jeff carefully cleaned the pipe. He reamed it with a PipNet pipe reamer and then cleaned up the reaming with a Savinelli Fitsall Pipe Knife. He scrubbed out the internals of the shank, stem and shank extension with alcohol, pipe cleaners and cotton swabs until the pipe was clean. He scrubbed the exterior of the bowl with Murphy’s Oil Soap and a tooth brush to remove the grime and grit on the briar and lava on the rim top. The finish looks much better and has a deep richness in the colour that highlights grain of the briar. The rim top looked good with some darkening on the top and damage to the back outer edge of the bowl. He soaked the stem in Briarville’s Pipe Stem Deoxidizer and scrubbed it with Soft Scrub to remove the remnants of oxidation. He also cleaned and polished the silver band til it glowed. When the pipe arrived here in Vancouver I was amazed it looked so good. Here are some photos of what I saw. I took some close up photos of the rim top and the stem surface. The top and inner and outer edge of the rim look very good. There is some slight darkening around the inner edge of the rim but otherwise no damage. I took close up photos of the stem to show the condition of the surface and button. The stem top had tooth marks ahead of the button on both sides. I took a picture of the stamping on the left side of the shank and it was faint but readable as noted above.I removed the stem from the shank and took a photo of the parts of the pipe. I started my work on the pipe by addressing the darkening on the rim top and edges of the bowl – inner and outer. I worked over the rim top and edges with 220 grit sandpaper until the darkening was minimized.I polished the briar with micromesh sanding pads – dry sanding with 1500-12000 grit pads. I wiped the briar down with a damp cloth after each pad. I worked some Before & After Restoration Balm into the surface of the bowl and shank with my fingertips to clean, enliven and protect the briar. I let the balm sit for 15 minutes and then buffed with a cotton cloth to raise the shine. The photos show the bowl at this point in the restoration process. I set the bowl aside and turned my attention to the stem. I “painted” it with the flame of a Bic lighter to lift the tooth dents in the vulcanite on both sides. I sanded what remained smooth with a folded piece of 220 grit sandpaper to blend them in the rest of the stem surface. I started polishing the stem with 400 grit wet dry sandpaper. I polished the stem with micromesh sanding pads – dry sanding with 1500-12000 grit sanding pads. I wiped it down after each sanding pad with Obsidian Oil. I polished it with Before & After Pipe Stem Polish – both Fine and Extra Fine. I gave it a final coat of Obsidian Oil. With the bowl and the stem finished I put the beautiful L&Co. (Loewe & Co.) Captanide Prince back together and buffed it on the wheel using Blue Diamond to give it a shine. I gave the bowl and the stem multiple coats of carnauba wax on the wheel. I buffed it with a clean buffing pad to raise the shine. I hand buffed it with a microfiber cloth to deepen the shine. It really is a great looking sandblast. The dimensions of the pipe are – Length: 5 ½ inches, Height: 2 inches, Outside diameter of the bowl: 1 ¼ inches, Chamber diameter: ¾ of an inch. The weight of this large pipe is 1.59 ounces /44 grams. This L&Co. Captanide Prince is another great find in this collection. It is much more beautiful in person than these photos can capture. I will be putting it on the rebornpipes store soon. If you would like to add it to your collection let me know. This is another pipe that has the possibility of transporting the pipe man or woman back to a slower paced time in history where you can enjoy a respite. Thanks for walking through the restoration with me.


Repairing a Trio of His Dad’s Pipes for a fellow here in Vancouver – Part 3


Blog by Steve Laug

Last week I received a call from a fellow pipeman, Keith here in Vancouver who had been referred to me by City Cigar, a local pipe and cigar shop in the city. He was a soft spoken gentleman who had a request for me. In January  this year his Dad died and he had three of his Dad’s pipes that he wanted restored in memory of his Dad. He also was a pipe smoker so he fully intended to enjoy them for a long time as he smoked them in his Dad’s honour. I told him to send me some photos of the pipes so I would know what I was dealing with.

I received the email below from Keith that included the photos of the pipes that he wanted me to work on. He even went to the trouble of marking the trouble with each of the pipes that needed work.

Hi Steve,

Glad your call back today, my name is Keith, I got your contact from City Cigar. My dad has three pipes include two Dr Plumb DINKY and one not sure brand. My dad passed this year January and I looking for fix those pipes which had broken and cracked, understand they are not expensive pipes but for me is priceless memory…

…Have a wonderful day!

Best regards

Keith

I called him as soon as I received the photos and talked over what I saw when I looked them over. We struck a deal and he dropped them off to me late on Friday afternoon and I started to work on them a bit over the weekend. All three pipes needed varying degrees of work on them. Two were Dr. Plumb Dinky Bent Billiards and one was a Real Briar Dublin. I decided to work on them in the order of the photos that he sent me. I completed the restoration of the first one and posted the blog (https://rebornpipes.com/2021/03/16/repairing-a-trio-of-his-dads-pipes-for-a-fellow-here-in-vancouver-part-one/). I finished the second Dr. Plumb Dinky Bent Billiard as well (https://rebornpipes.com/2021/03/17/repairing-a-trio-of-his-dads-pipes-for-a-fellow-here-in-vancouver-part-two/). Give them a read.

The third of them is Real Briar Straight Billiard. It was in rough shape with burn damage on the rim top and inner edge as well as many fills that were damaged around the bowl. There was a crack in the shank on the top side. The rim top was damaged on both the front side and there was a thick cake in the bowl. In the first two photos show what the pipe looks like as a whole. You can see the damage on the outer edge of the rim on both as well as the damage at the stem shank junction. The third photo Keith included show the damage to the rim top – he identifies it as ring damage. The crack in the top of the shank is also visible in the photo. I took pictures of the pipe when Keith dropped it off before I started my clean up work. The rim top was darkened and damaged with burn and charring on the front left rim top and inner edge. It appeared to also have been lit with a torch lighter. There were chips around the outer edge of the bowl and shrunken fills in the finish. You can also see the crack in the topside of the shank at the end of the shank. I took a close up photo of the rim to show the condition of the bowl and the rim. You can see the thick cake in the bowl and the damage to the rim top and inner edge of the bowl as noted above and shown in the photo below. The cracked shank is also visible. I also took photos of the stem to show the general condition as noted above.I took a photo of the stamping on the left side of the shank – it was clear and readable (though double stamped) and read REAL BRIAR.I removed the stem from the shank and took a photo of the pipe. There is something quite winsome about this pipe though it was a little bigger than the two Dr. Plumb Dinky Bent Billiards.  I took a photo of the crack and damaged shank. It was missing a piece of briar and was a significant issue. The stem had been held in place with a build up of wax or white glue around the tenon. Fortunately it had dried before being put on the shank.I decided to address the cracked shank first. Interestingly it turned back on itself so it was not going further up the shank. The missing chip was the other side of the crack. That made this quite simple. I squeezed the shank together and pressed some briar dust into the crack. While holding it I dribbled some CA glue in the crack and held it until the glue cured. I filled in the spots on the shank again with CA and more briar dust until they were smooth. I put a small bead of glue around the shank end and pressed the band I had chosen for the shank onto it. It was a snug fit and the glue would guarantee the fit to the shank. That was the end of the crack. I topped the bowl on a topping board using 220 grit sandpaper. I wanted to remove the damage to the rim top and minimize the damage to the inner and outer edges.I paused and took photos of the banded shank to give an idea of that it looked like repaired and banded. I finished topping the bowl and gave the inner edge a bevel to minimize the damage on the front inner edge. The pipe was beginning to look very good.I reamed the bowl with a PipNet pipe reamer and cleaned up the reaming with a Savinelli Fitsall pipe knife. I took the cake back to bare briar and the bowl looked to be in good condition under the cake.I filled in the badly damaged fills around the bowl with clear CA glue and then sanded them smooth to blend them into the surface of the briar. I sanded the bowl with 1500-2400 micromesh sanding pads to remove the shiny varnish coat and then restained the bowl with a light brown stain. I applied the stain then flamed it to set in the briar. I repeated the process until the coverage was acceptable. I set the bowl aside for an hour and let the stain coat cure.Once the stain had cured I wiped it down with a cotton pad and alcohol to make it more transparent. There was not a lot of grain around the bowl but I really wanted to give the bowl a sense of depth. I polished the briar with micromesh sanding pads – dry sanding with 1500-12000 grit pads. I wiped the bowl down after each  pad with a damp cloth. As the finish becomes more transparent I like what I see. I worked some Before & After Restoration Balm into the surface of the bowl and shank with my fingertips to clean, enliven and protect the briar. I let the balm sit for 15 minutes and then buffed with a cotton cloth to raise the shine. The photos show the bowl at this point in the restoration process.   I set the bowl aside and turned my attention to the stem. Earlier, when I was working on the first Dinky pipe I had taken the stem out of the Briarville Pipe Stem Deoxidizer Bath and dried it off with a cotton pad. It looked better. I scrubbed the softened oxidation with Soft Scrub All Purpose Cleaner and removed the remaining oxidation. I cleaned out the stem with alcohol and pipe cleaners and it was surprisingly clean. I went back and did the same with the shank and it also was relatively clean other than the debris from when I reamed the bowl.I polished the stem with micromesh sanding pads – dry sanding with 1500-12000 grit sanding pads. I wiped it down after each sanding pad with Obsidian Oil. I polished it with Before & After Pipe Stem Polish – both Fine and Extra Fine. I gave it a final coat of Obsidian Oil. With the bowl and the stem finished I put the third pipe – a Real Briar Straight Dublin, back together and buffed it on the wheel using Blue Diamond to give it a shine. I gave the bowl and the stem multiple coats of carnauba wax on the wheel. I buffed the pipe with a clean buffing pad to raise the shine. I hand buffed it with a microfiber cloth to deepen the shine. It really is a great looking pipe. The dimensions of the pipe are – Length: 5 inches, Height: 1 ½ inches, Outside diameter of the bowl: 1 ¼ inches, Chamber diameter: ¾ inch. The weight of this small pipe is .88 ounces /25 grams. This third pipe from the estate is a small Real Briar Dublin that will be another great reminder for Keith of his Dad’s pipe smoking and one that he can enjoy for a long time. With the completion of the last of the pipes I am sure he will want to pick them up soon. Once he does he will be excited to load them with a memorable tobacco and slip back into the memories of his Dad. Thanks for walking through the restoration with me.

Working on the First of Seven Barclay-Rex Pipes – A Sandblast Canadian


Blog by Steve Laug

It seems like just a few weeks ago I was contacted by an older gentleman about purchasing his pipe collection. He sent me the photos and I was amazed at what I saw. He had Dunhill pipes, BBB pipes, Orlik pipes, Barclay Rex Pipes, a couple of Meerschaums and a whole lot of other pipes. All I could say as I looked at the pipes was what a collection it was. We negotiated a deal and I think we both walked away quite happy with the exchange.

You have seen the work we have done on the Dunhills, Hardcastles, H. Simmons all briar billiard and BBB pipes from the lot but there are still more. The above photo shows all of the Barclay-Rex pipes that were purchased from the New York City shop by the fellow we bought the collection from. It is one of two sandblast pipes that he had and it is a Canadian shaped pipe.

I have worked on several Barclay-Rex pipes in the past but this one was unique in many ways that will become evident in the photos below. This pipe is stamped on a smooth panel on the underside of the shank and reads BARCLAY-REX [over] New York. The stamping is clear and readable and there is no shape number evident.

Jeff took some photos of the BARCLAY-REX sandblast Canadian before he worked his magic in cleaning up the pipe. It is a an interesting pipe with a lot of potential and what appears to be some great grain under the grime and debris of the years.Jeff took photos of the bowl, rim top to show the thickness of the cake in the bowl and the thick lava on the rim top. He took photos of the top and underside of the vulcanite stem showing the tooth marks, chatter and wear on the stem and button. Jeff removed the stem from the shank and it turned out to be a threaded metal tenon that appears to have been original. Jeff took photos of the sides and heel of the bowl to show the condition of the briar. You can see the beautiful shape and the grain on the bowl even through the dirt and debris of many years. Jeff took a photo of the stamping on the underside of the shank. You can see that it is clear and readable as noted above. I turned to Pipephil’s site to see what I could learn about the Barclay-Rex brand and particularly the sandblast one I was working on (http://pipephil.eu/logos/en/logo-b1.html). I have included a screen capture of the information that is shown there.I quote from the sidebar on the site below as it gives a good summary of information.

Brand created in 1910. The shop was situated on Maiden Lane. Three addresses now (2010): 75 Broad Street, 70 East 42nd Street, 570 Lexington Avenue. See also: André

I turned to Pipedia to try and place this pipe in the timeline of the brand and was able find some helpful information which I have included below (https://pipedia.org/wiki/Barclay_Rex). I quote the information below.

Barclay-Rex, a downtown Manhattan tobacconist, was founded in 1910 by Vincent Nastri, a pipemaker from Salerno, Italy. The store was originally located at Barclay and Church Street, and the name was taken from that location and Nastri’s beloved Great Dane, Rex. The business is still run by Vincent Nastri, III and owned by Vincent Nastri, Jr.. They have several locations in New York City. The store has carried pipes from all fine makers, and the Barclay-Rex line of pipes is also much sought after, in that pipes were made in a range from the very inexpensive into the several hundreds of dollars. The pipes were, at least into the 1960’s, made of Algerian briar.

In addition to pipes made by Mr. Nastri over the years, Mr. Nastri, III, has been quoted as stating that a pipemaker just leaving Dunhill made pipes with a small off-white dot on the stem for a time for the shop. As was discovered by Steve Laug of Reborn Pipes, they were evidently made by a pipemaker whose initials were HGP, and stamped on the pipe as such. These pipes were made for a single run only, and then never made again.

In addition, Sasieni at least for a time made private label pipes stamped with the Barclay-Rex name, but with their own shapes and shape numbers.

Locations: (Flagship Store) 75 Broad Street, New York, New York 10004 Telephone: (212) 962-3355

70 East 42nd Street, New York, New York 10165 Telephone: (212) 692-9680

570 Lexington Avenue, New York, New York 10022 Telephone: (212) 888-1015

Email: info@barclayrex.com Website: http://www.barclayrex.com Toll Free: (888) 278-6222 Fax: (212) 962-3372

With the information from Pipedia I knew that I was working on a pipe from the Barclay-Rex Tobacconist in New York City. The fellow we bought them from intimated that he purchased them at the Manhattan store. I was unable to pin down any information regarding the date this pipe was made. Now it was time to work on the pipe.

Jeff carefully cleaned the pipe. He reamed it with a PipNet pipe reamer and then cleaned up the reaming with a Savinelli Fitsall Pipe Knife. He scrubbed out the internals of the shank, stem and shank extension with alcohol, pipe cleaners and cotton swabs until the pipe was clean. He scrubbed the exterior of the bowl with Murphy’s Oil Soap and a tooth brush to remove the grime and grit on the briar and lava on the rim top. The finish looks much better and has a deep richness in the colour that highlights grain of the briar. The rim top looked good with some darkening on the top and light damage to the inner edge of the bowl. When the pipe arrived here in Vancouver I was amazed it looked so good. Here are some photos of what I saw.   I took some close up photos of the rim top and the stem surface. The inner edge of the rim was in decent condition and there was some darkening in the sandblast of the rim top that would need to be cleaned up. I took close up photos of the stem end of the pipe to show the condition of the surface and button. I took a picture of the stamping on the underside of the shank and it was clear and readable as noted above. I removed the stem from the shank and took a photo of the parts of the pipe. The metal tenon is in excellent condition and the threaded shank also looks very good.I started my work on the pipe by addressing the darkening on the rim top and the damage on the inner edges of the bowl. I used a brass bristle brush to scrub the surface of the rim and the edges. I worked some Before & After Restoration Balm into the surface of the bowl and shank with my fingertips and a horse hair shoe brush to clean, enliven and protect the briar. I let the balm sit for 15 minutes and then buffed with a cotton cloth to raise the shine. The photos show the bowl at this point in the restoration process. I set the bowl aside and turned my attention to the stem. I “painted” it with the flame of a Bic lighter to lift the tooth dents in the surface of the vulcanite. I was able to lift the majority of them and interestingly the small pin hole on the topside sealed off. I filled in the remaining marks with clear CA glue. Once the repairs cured I used two files to flatten out the repairs and recut the sharp edge of the button. I sanded them smooth with a folded piece of 220 grit sandpaper to blend them in the rest of the stem surface. I started polishing the stem with 400 grit wet dry sandpaper.  I polished the stem with micromesh sanding pads – dry sanding with 1500-12000 grit sanding pads. I wiped it down after each sanding pad with Obsidian Oil. I polished it with Before & After Pipe Stem Polish – both Fine and Extra Fine. I gave it a final coat of Obsidian Oil. With the bowl and the stem finished I put the beautiful Sandblast Barclay-Rex Canadian back together and buffed it on the wheel using Blue Diamond to give it a shine. I gave the bowl multiple coats of Conservator’s Wax and the stem multiple coats of carnauba wax on the wheel. I buffed it with a clean buffing pad to raise the shine. I hand buffed it with a microfiber cloth to deepen the shine. It really is a great looking sandblast. The dimensions of the pipe are – Length: 5 ½ inches, Height: 1 ½ inches, Outside diameter of the bowl: 1 1/8 inches, Chamber diameter: ¾ of an inch. The weight of this large pipe is .95ounces /27 grams. This Barclay-Rex Sandblast is another great find in this collection. I will be putting it on the rebornpipes store soon. If you would like to add it to your collection let me know. This is another pipe that has the possibility of transporting the pipe man or woman back to a slower paced time in history where you can enjoy a respite. Thanks for walking through the restoration with me.

Working on the second of two Hardcastle’s  Straight Grain Selection No. 1 Pipes


Blog by Steve Laug

It seems like just a few weeks ago I was contacted by an older gentleman about purchasing his pipe collection. He sent me the photos and I was amazed at what I saw. He had Dunhill pipes, BBB pipes, Orlik pipes, Barclay Rex Pipes, a couple of Meerschaums and a whole lot of other pipes. All I could say as I looked at the pipes was what a collection it was. We negotiated a deal and I think we both walked away quite happy with the exchange.

You have seen the work we have done on the Dunhills and BBB pipes from the lot but there are still more. The above photo shows a pair of Hardcastle’s pipes – the top one a Liverpool and the bottom one an oval shank billiard. Both are stamped Hardcastle’s Straight Grain Selection No. 1 and both are beautiful. I have chosen to work on the first pipe pictured above – the round shank, short stemmed Liverpool.

I have worked on a lot of Hardcastle’s over the years but most of them have been Jack’O London and other lower end ones. These are the first two of this quality I have worked on – both of them are Hardcastle’s Straight Grain pipes. This pipe is stamped on the left side of the shank and reads HARDCASTLE’S (arched over) STRAIGHT GRAIN. On the underside of the shank it is stamped SELECTION No. 1 and on the right side it reads Made in London [over] England. The stamping is clear and readable and there is no shape number evident. The taper stem also bears the Hardcastle’s “H” logo on the left side.

Jeff took some photos of the Hardcastle’s Straight Grain Liverpool before he worked his magic in cleaning up the pipe. It is a an interesting pipe with a lot of potential and what appears to be some great grain under the grime and debris of the years.Jeff took photos of the bowl, rim top to show the thickness of the cake in the bowl and the lava on the rim top. The bowl had a thick cake that overflowed in lava on the inner edge and rim top of the bowl. I am hoping that the thick lava coat protected things underneath it from damage to the edges and top. The outer edge appeared to have some significant damage that would need to be dealt with. Cleaning the pipe would make the extent of the damage clear! He took photos of the top and underside of the stem showing the tooth chatter, scratching, calcification and oxidation on the stem surface and wear on the edges of the button.    Jeff took photos of the sides and heel of the bowl to show the condition of the briar. You can see the beautiful shape and the grain on the bowl even through the dirt and debris of many years. Jeff took photos of the stamping on the sides of the shank. You can see that it is clear and readable.I turned to Pipedia to try and place this pipe in the timeline of the brand and was able find some helpful information which I have included below (https://pipedia.org/wiki/Hardcastle).

Hardcastle was founded in 1908 by Edmund Hardcastle and built itself a good reputation among the numerous British mid-graders. In 1935 Dunhill started to build a factory next door to Hardcastle in Forest Road, Walthamstow, London E17. The family owned Hardcastle Pipes Limited sold 49% of its equity to Dunhill In 1936.

Along with closing down its pipe factory in Notting Hill in 1946 Dunhill bought the remaining shares, turning Hardcastle into a 100% Dunhill subsidiary. As members of the Hardcastle family continued as executives in the company’s management Hardcastle retained a certain independence.

This ended in 1967. Dunhill merged Hardcastle with Parker (100% Dunhill as well). The new Parker Hardcastle Limited also absorbed the former Masta Patent Pipe Company. Hardcastle’s Forest Road plant was immediately given up and the production of Hardcastle pipes was shifted to Parker’s nearby St. Andrews Road factory – now consequently called Parker-Hardcastle factory.

In fact this put a definite end to Hardcastle as an own-standing pipe brand, and none other than Edwin Hardcastle, the last of the family executives, spoke frankly and loudly of Hardcastle pipes being degenerated to an inferior Dunhill second.

Today Hardcastle pipes use funneled down bowls that are not deemed suitable to bear the Dunhill or even the Parker name (as well as obtaining briar from other sources).

Timeline

Jack O London (Forrest Rd. factory era) sheet, courtesy Doug Valitchka

  • 1903: Edmund Hardcastle establishes the brand
  • 1936: Family sells 49% of the Hardcastle Pipes Limited shares to Dunhill
  • 1946: Dunhill buys the remaining shares, but the family continues to manage the company
  • 1967: Dunhill merges Hardcastle with Parker. The new Parker-Hardcastle Limited company absorbs the Masta Patent Pipe Company also.
  • After 1967 it is speculated that Hardcastle became the brand for “Parker Seconds”

John Loring states in “The Dunhill Briar Pipe – ‘the patent years and after'” that in the absence of sales receipts, or other items of provenance, Hardcastles cannot be accurately dated. Loring further states that he knows of no way to distinguish the briar source when looking at Hardcastle, Parker, or Parker-Hardcastle pipes. We should not expect to find any actual Dunhill production in these lines, and while one might be there, it is doubtful we will ever be able to determine it [1].

Models & Grades – Family Period

Straight Grain, Supergrain, Leweard, Nut Bruyere, De Luxe, Royal Windsor Sandhewn, Royal Crown, The Crown, Phito Dental, Old Bruyere, Jack O’London, Dental Briar, Phito, Dental, Dryconomy, Drawel, Phithu, Telebirar, Camden, Lightweight, The Table, Dovetail, Dental, Crescent Extra, Lonsdale, Welard De Luxe

With the information from Pipedia I knew that I was working on a Family Period Pipe and it was the top grade. It appears that it can be dated between 1903-1946 when the company was sold in full to Dunhill. Now it was time to work on the pipe.

Jeff carefully cleaned the pipe. He reamed it with a PipNet pipe reamer and then cleaned up the reaming with a Savinelli Fitsall Pipe Knife. He scrubbed out the internals of the shank, stem and shank extension with alcohol, pipe cleaners and cotton swabs until the pipe was clean. He scrubbed the exterior of the bowl with Murphy’s Oil Soap and a tooth brush to remove the grime and grit on the briar and lava on the rim top. The finish looks much better and has a deep richness in the colour that highlights grain of the briar. The rim top looked good with some darkening on the top and damage to the inner edge of the bowl. The briar on the outer edge seems to have swollen and repaired some of the damage during the scrubbing and cleaning procedure. It looked much better than it did in the previous photos.  Jeff soaked the stem in bath of Briarville’s Pipe Stem Deoxidizer to remove the oxidation on the rubber. He worked it over with Soft Scrub All Purpose Cleaner to remove any remnants of oxidation. When the pipe arrived here in Vancouver I was amazed it looked so good. Here are some photos of what I saw.  I took some close up photos of the rim top and the stem surface. The inner edge of the rim was darkened and damaged. The outer rim showed some nicks and chipping. I took close up photos of the stem to show the condition of the surface and button. I took a picture of the stamping on the shank sides and it was all clear and readable as noted above.I took the pipe apart and took a photo of the pipe with the stem. It is a good looking pipe and very unique.I started my work on the pipe by addressing the darkening on the rim top and the damage on the inner and outer edges of the bowl. I used a folded piece of 220 grit sandpaper to work over the inner and outer edge to smooth out the damage and to remove the darkening on the rim top as well.I polished the briar with micromesh sanding pads – dry sanding it with 1500-12000 grit pads. After each pad I wiped the briar down with a damp cloth.  I was able to give a shine to the bowl and remove some of the surface scratches in the process. I worked some Before & After Restoration Balm into the surface of the bowl and shank with my fingertips to clean, enliven and protect the briar. I let the balm sit for 15 minutes and then buffed with a cotton cloth to raise the shine. The photos show the bowl at this point in the restoration process. I set the bowl aside and turned my attention to the stem. I “painted” it with the flame of a Bic lighter to lift the tooth dents in the surface of the vulcanite. I was able to lift the majority of them. I filled in the remaining marks with clear CA glue. Once the repairs cured I sanded them smooth with a folded piece of 220 grit sandpaper to blend them in the rest of the stem surface. I started polishing the stem with 400 grit wet dry sandpaper. I used Liquid Paper White to touch up the white stamped “H” on the top of the stem. I rubbed it into the stamp with a tooth pick and buffed it off with a cotton pad and a 1500 grit micromesh pad.  I polished the stem with micromesh sanding pads – dry sanding with 1500-12000 grit sanding pads. I wiped it down after each sanding pad with Obsidian Oil. I polished it with Before & After Pipe Stem Polish – both Fine and Extra Fine. I gave it a final coat of Obsidian Oil. With the bowl and the stem finished I put the beautiful Hardcastle’s Straight Grain back together and buffed it on the wheel using Blue Diamond to give it a shine. I gave the bowl and stem multiple coats of carnauba wax on the wheel and then buffed it with a clean buffing pad to raise the shine. I hand buffed it with a microfiber cloth to deepen the shine. It really is an amazing piece of briar with stunning grain. The dimensions of the pipe are – Length: 5 ¼ inches, Height: 1 ¾ inches, Outside diameter of the bowl: 1 ¼ inches, Chamber diameter: ¾ of an inch. The weight of this large pipe is .99ounces /28 grams. This Hardcastle’s Straight Grain Selection No. 1 is another great find in this collection. I will be putting it on the rebornpipes store soon. If you would like to add it to your collection let me know. This is another pipe that has the possibility of transporting the pipe man or woman back to a slower paced time in history where you can enjoy a respite. Thanks for walking through the restoration with me.


Working on the first of two Hardcastle’s Straight Grain Selection No. 1 Pipes


Blog by Steve Laug

It seems like just a few weeks ago I was contacted by an older gentleman about purchasing his pipe collection. He sent me the photos and I was amazed at what I saw. He had Dunhill pipes, BBB pipes, Orlik pipes, Barclay Rex Pipes, a couple of Meerschaums and a whole lot of other pipes. All I could say as I looked at the pipes was what a collection it was. We negotiated a deal and I think we both walked away quite happy with the exchange.

You have seen the work we have done on the Dunhills and BBB pipes from the lot but there are still more. The above photo shows a pair of Hardcastle’s pipes – the top one a Liverpool and the bottom one an oval shank billiard. Both are stamped Hardcastle’s Straight Grain Selection No. 1 and both are beautiful. I have chosen to work on the second pipe pictured above – the oval shank billiard.

I have worked on a lot of Hardcastle’s over the years but most of them have been Jack’O London and other lower end ones. These are the first two of this quality I have worked on – both of them are Hardcastle’s Straight Grain pipes. This pipe is stamped on the top of the oval shank and reads HARDCASTLE’S (arched over) STRAIGHT GRAIN. On the underside of the shank it is stamped SELECTION No. 1 [over] Made in London [over] England. The stamping is clear and readable and there is no shape number evident. The oval taper stem also bears the Hardcastle’s “H” logo on the top side.

Jeff took some photos of the Hardcastle’s Straight Grain oval billiard before he worked his magic in cleaning up the pipe. It is a an interesting pipe with a lot of potential and what appears to be some great grain under the grime and debris of the years.Jeff took photos of the bowl, rim top to show the thickness of the cake in the bowl and the lava on the rim top. The bowl had a thick cake that overflowed in lava on the inner edge and rim top of the bowl. I am hoping that the thick lava coat protected things underneath it from damage to the edges and top. Cleaning it would make that clear! He took photos of the top and underside of the stem showing the tooth chatter, scratching and oxidation on the stem surface and wear on the edges of the button.    Jeff took photos of the sides and heel of the bowl to show the condition of the briar. You can see the beautiful shape and the grain on the bowl even through the dirt and debris of many years. Jeff took photos of the stamping on the top and underside of the shank. You can see that it is clear and readable. He also captured the white “H” logo on the top of the stem.I turned to Pipedia to try and place this pipe in the timeline of the brand and was able find some helpful information which I have included below (https://pipedia.org/wiki/Hardcastle).

Hardcastle was founded in 1908 by Edmund Hardcastle and built itself a good reputation among the numerous British mid-graders. In 1935 Dunhill started to build a factory next door to Hardcastle in Forest Road, Walthamstow, London E17. The family owned Hardcastle Pipes Limited sold 49% of its equity to Dunhill In 1936.

Along with closing down its pipe factory in Notting Hill in 1946 Dunhill bought the remaining shares, turning Hardcastle into a 100% Dunhill subsidiary. As members of the Hardcastle family continued as executives in the company’s management Hardcastle retained a certain independence.

This ended in 1967. Dunhill merged Hardcastle with Parker (100% Dunhill as well). The new Parker Hardcastle Limited also absorbed the former Masta Patent Pipe Company. Hardcastle’s Forest Road plant was immediately given up and the production of Hardcastle pipes was shifted to Parker’s nearby St. Andrews Road factory – now consequently called Parker-Hardcastle factory.

In fact this put a definite end to Hardcastle as an own-standing pipe brand, and none other than Edwin Hardcastle, the last of the family executives, spoke frankly and loudly of Hardcastle pipes being degenerated to an inferior Dunhill second.

Today Hardcastle pipes use funneled down bowls that are not deemed suitable to bear the Dunhill or even the Parker name (as well as obtaining briar from other sources).

Timeline

Jack O London (Forrest Rd. factory era) sheet, courtesy Doug Valitchka

  • 1903: Edmund Hardcastle establishes the brand
  • 1936: Family sells 49% of the Hardcastle Pipes Limited shares to Dunhill
  • 1946: Dunhill buys the remaining shares, but the family continues to manage the company
  • 1967: Dunhill merges Hardcastle with Parker. The new Parker-Hardcastle Limited company absorbs the Masta Patent Pipe Company also.
  • After 1967 it is speculated that Hardcastle became the brand for “Parker Seconds”

John Loring states in “The Dunhill Briar Pipe – ‘the patent years and after'” that in the absence of sales receipts, or other items of provenance, Hardcastles cannot be accurately dated. Loring further states that he knows of no way to distinguish the briar source when looking at Hardcastle, Parker, or Parker-Hardcastle pipes. We should not expect to find any actual Dunhill production in these lines, and while one might be there, it is doubtful we will ever be able to determine it [1].

Models & Grades – Family Period

Straight Grain, Supergrain, Leweard, Nut Bruyere, De Luxe, Royal Windsor Sandhewn, Royal Crown, The Crown, Phito Dental, Old Bruyere, Jack O’London, Dental Briar, Phito, Dental, Dryconomy, Drawel, Phithu, Telebirar, Camden, Lightweight, The Table, Dovetail, Dental, Crescent Extra, Lonsdale, Welard De Luxe

With the information from Pipedia I knew that I was working on a Family Period Pipe and it was the top grade. It appears that it can be dated between 1903-1946 when the company was sold in full to Dunhill. Now it was time to work on the pipe.

Jeff carefully cleaned the pipe. He reamed it with a PipNet pipe reamer and then cleaned up the reaming with a Savinelli Fitsall Pipe Knife. He scrubbed out the internals of the shank, stem and shank extension with alcohol, pipe cleaners and cotton swabs until the pipe was clean. He scrubbed the exterior of the bowl with Murphy’s Oil Soap and a tooth brush to remove the grime and grit on the briar and the tarnish and lava on the rim top. The finish looks much better and has a deep richness in the colour that highlights grain of the briar. The rim top looked good with some darkening on the top and inner edge of the bowl. Jeff soaked the stem in bath of Briarville’s Pipe Stem Deoxidizer to remove the oxidation on the rubber. He worked it over with Soft Scrub All Purpose Cleaner to remove any remnants of oxidation. When the pipe arrived here in Vancouver I was amazed it looked so good. Here are some photos of what I saw.  I took some close up photos of the rim top and the stem surface. The inner edge of the rim was darkened and lightly damaged. I took close up photos of the stem to show the condition of the surface and button. I took a picture of the stamping on the shank. The reflection on the silver did not capture the clarity of the stamping on the band but it was all clear and readable as noted above.I took the pipe apart and took a photo of the pipe with the stem. It is a good looking pipe and very unique. I started my work on the pipe by addressing the darkening on the edges and rim top. I used a folded piece of 220 grit sandpaper to work over the inner edge to smooth out the damage and to remove the darkening. I polished the briar with micromesh sanding pads – dry sanding it with 1500-12000 grit pads. After each pad I wiped the briar down with a damp cloth.  I was able to give a shine to the bowl and remove some of the surface scratches in the process. I worked some Before & After Restoration Balm into the surface of the bowl and shank with my fingertips to clean, enliven and protect the briar. I let the balm sit for 15 minutes and then buffed with a cotton cloth to raise the shine. The photos show the bowl at this point in the restoration process. I set the bowl aside and turned my attention to the stem. I “painted” it with the flame of a Bic lighter to lift the tooth dents in the surface of the vulcanite. I was able to lift the majority of them. I filled in the remaining marks with clear CA glue. Once the repairs cured I sanded them smooth with a folded piece of 220 grit sandpaper to blend them in the rest of the stem surface. I started polishing the stem with 400 grit wet dry sandpaper. I used Liquid Paper White to touch up the white stamped “H” on the top of the stem. I rubbed it into the stamp with a tooth pick and buffed it off with a cotton pad and a 1500 grit micromesh pad.   I polished the stem with micromesh sanding pads – dry sanding with 1500-12000 grit sanding pads. I wiped it down after each sanding pad with Obsidian Oil. I polished it with Before & After Pipe Stem Polish – both Fine and Extra Fine. I gave it a final coat of Obsidian Oil. With the bowl and the stem finished I put the beautiful Hardcastle’s Straight Grain back together and buffed it on the wheel using Blue Diamond to give it a shine. I gave the bowl and stem multiple coats of carnauba wax on the wheel and then buffed it with a clean buffing pad to raise the shine. I hand buffed it with a microfiber cloth to deepen the shine. It really is an amazing piece of briar with stunning grain. The dimensions of the pipe are – Length: 5 inches, Height: 1 ¾ inches, Outside diameter of the bowl: 1 ¼ inches, Chamber diameter: ¾ of an inch. The weight of this large pipe is 1.02ounces /29 grams. This Hardcastle’s Straight Grain Selection No. 1 is another great find in this collection. I will be putting it on the rebornpipes store soon. If you would like to add it to your collection let me know. This is another pipe that has the possibility of transporting the pipe man or woman back to a slower paced time in history where you can enjoy a respite. Thanks for walking through the restoration with me.