Tag Archives: stem work

Refurb on a London Made Dainty Prince


This was a refurb I did last August while I was laid up with a couple of cracked ribs. I wanted to post it here because it gives a good idea of the process of refurbishing and taking grimy old pipes and bringing them back to life.

I am a bit laid up after a fall so I am sitting quietly in my shop instead of doing painting and trim on the house (original plan for the holidays). The great part of this is no guilt about not working on the house or yard. Because of that I am getting a bunch of old pipes I have in boxes cleaned up and finished.

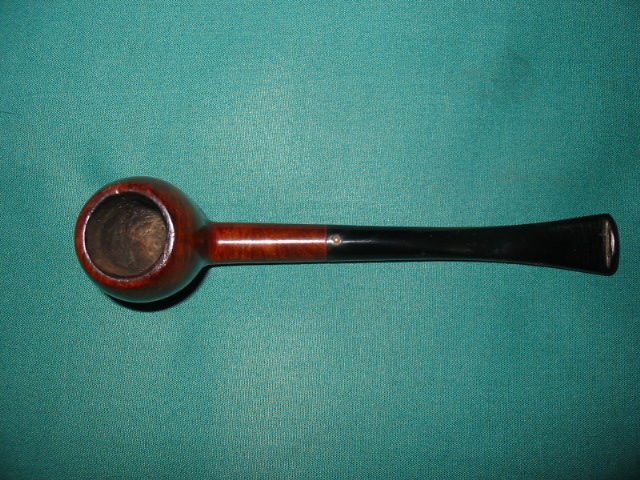
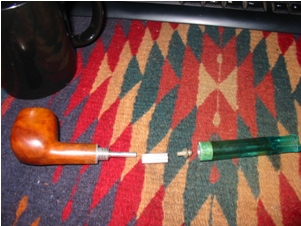
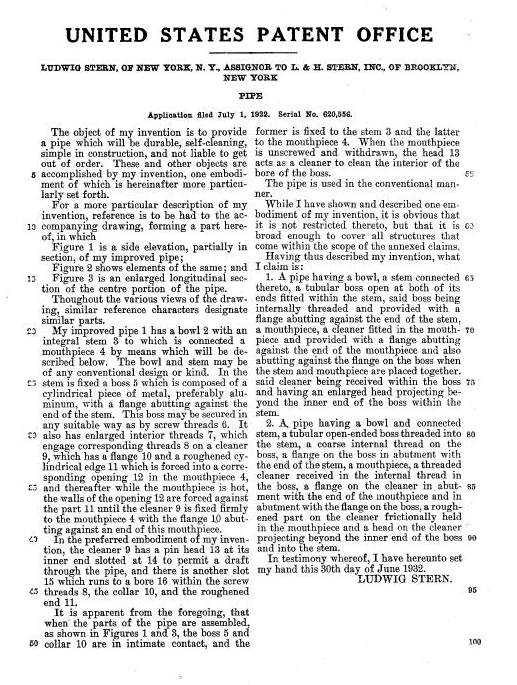
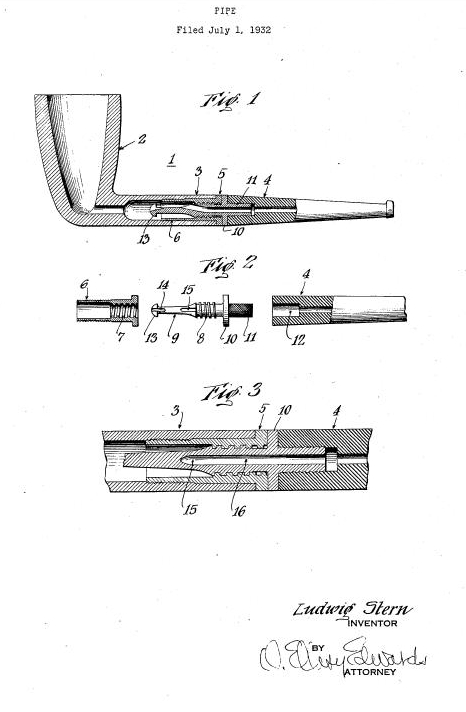
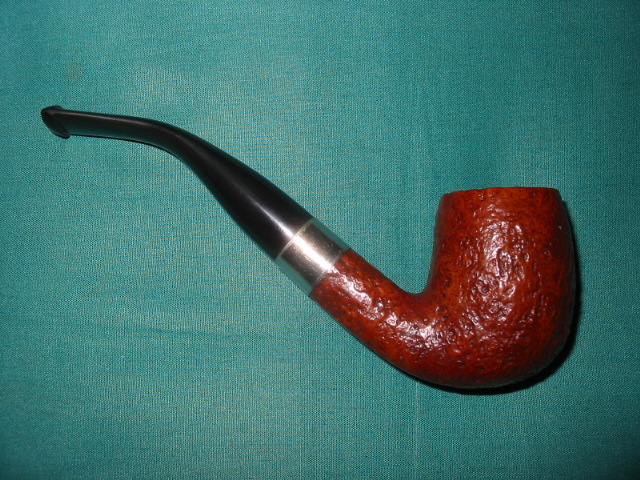
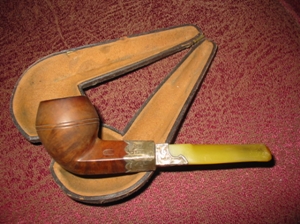
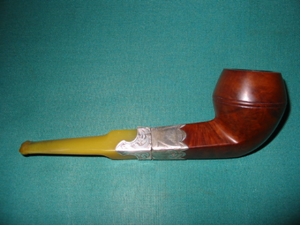
The first one today (Aug. 1) is a nice little London Made Prince with a patented Flat Grip Stem. (I cannot remember who made these but I have had a few over the years). The stem is stamped Flat Grip and has a nice raised silver spot on the stem. The bowl is stamped London Made. It is a small pipe – 5 1/4 inches long but about a group one sized bowl.

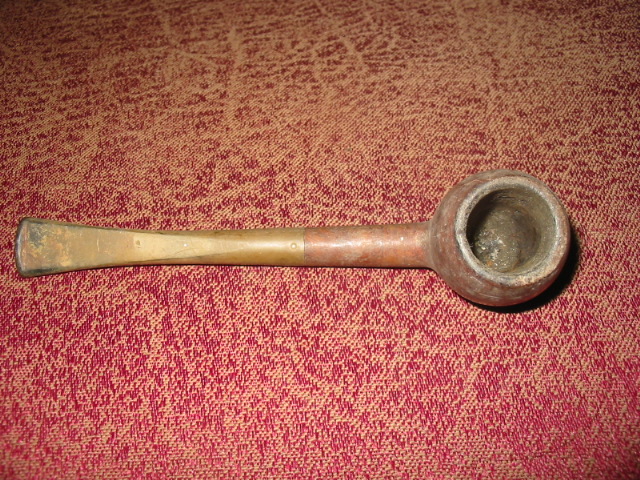
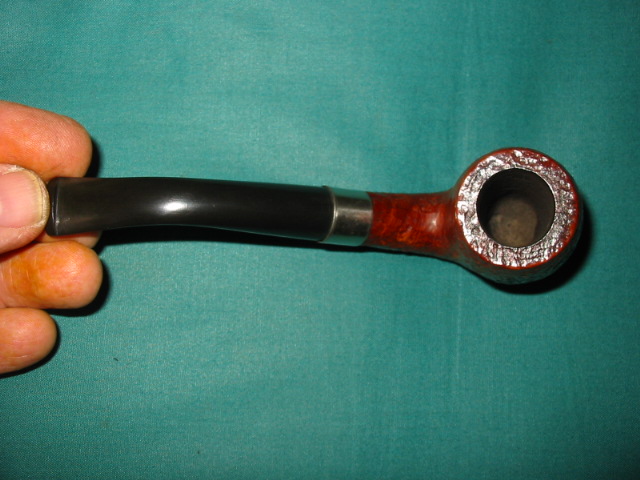
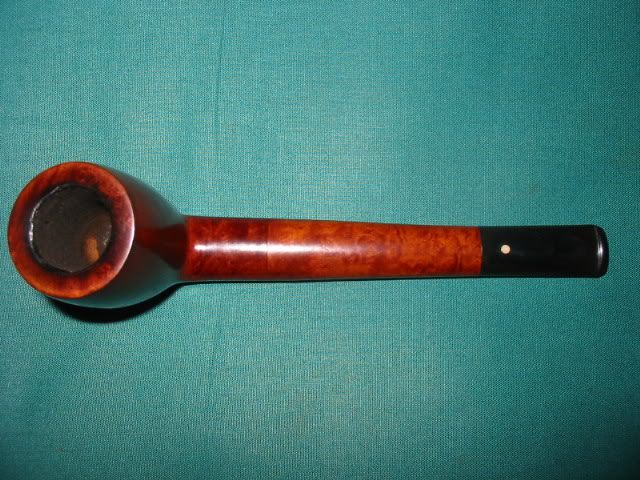
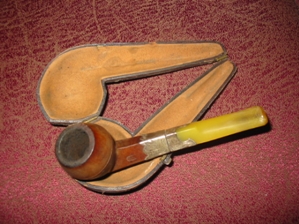
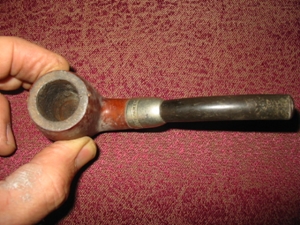
From the pictures below you can see the state it was in after the reaming. I got into a groove and forgot to take pictures before I reamed it. But it was really dirty and caked – to the point that a pencil could not stand in the bowl. It always amazes me that in these small pipes, which hold very little tobacco any way, people let them get to the point where they hold even less tobacco. Just a few minutes of work and they would have had a clean bowl.

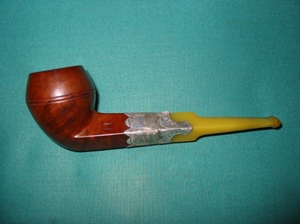
I reamed and cleaned the bowl and shank and put it in my alcohol bath for the morning. I have a pint jar filled with Isopropyl alcohol that serves as the bath for filthy bowls. In this case it sat in the bath for 3 hours before I got to work on it. It is a nice sized jar in that I can drop 4 or 5 bowls in it at the same time and work on the stems while they soak. Once it came out and dried I sanded the bowl all around and cleaned it once again to get any residual grime out. The airway was clogged so a paper clip took care of that and then a good scrub with a bristle pipe shank brush and repeated pipe cleaners. Once clean I stained it with a cherry stain that works with these old timers and brings out the colours of the briar. It was then buffed with Tripoli and White Diamond and waxed it with carnauba.

The stem was rough so I buffed and sanded and buffed and sanded and got the oxidation off and then sanded a bit more to get the teeth chatter off of the surface of the stem near the button. I always start with a 220 or 240 grit sandpaper in removing the oxidation and tooth chatter and then progress through 400 and 600 grit wet dry sandpaper before finishing the progress with micromesh sanding pads – 1500, 1800, 2400, 3200, 4000 and 6000 grit. Once the sanding is finished I took the pipe to the buffer for a final buff with White Diamond before polishing the whole pipe with carnauba wax.

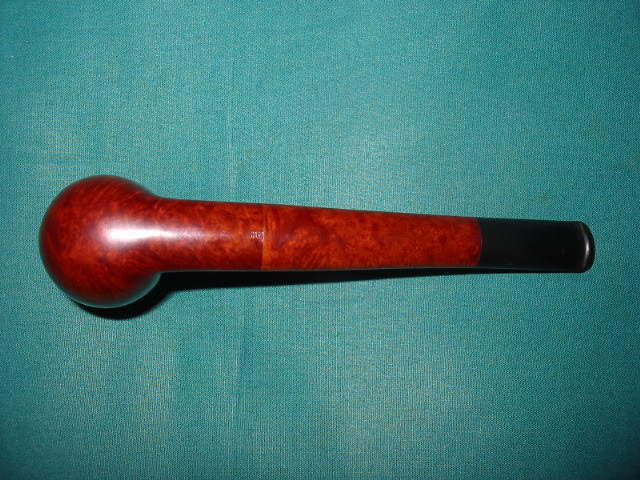
Before shots: (I reamed out the cake prior to this photo set)

ImageImage

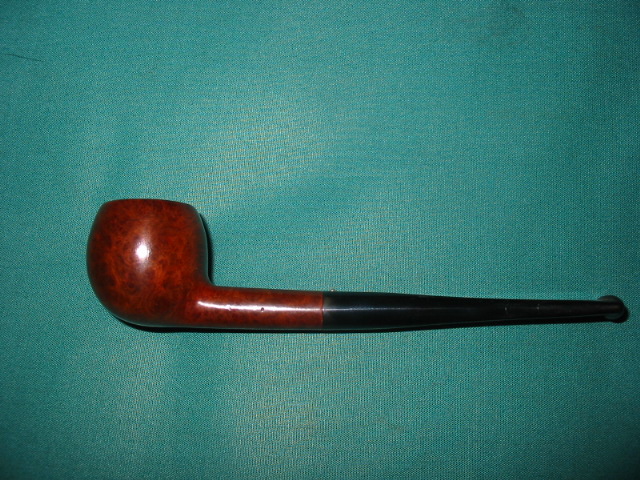
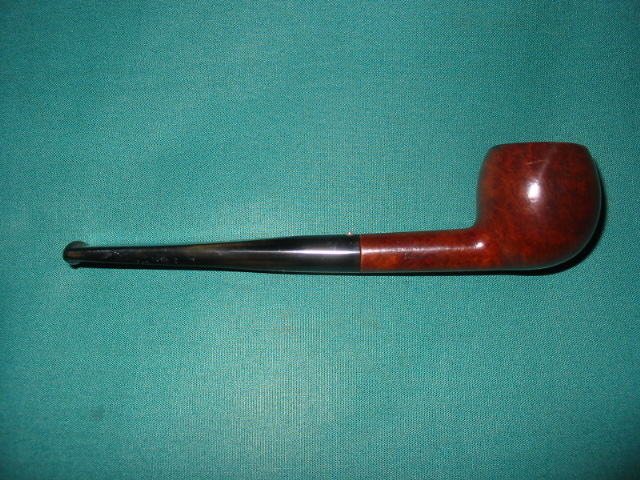
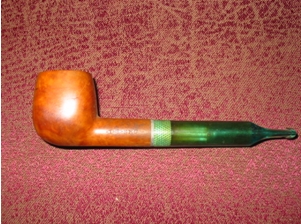
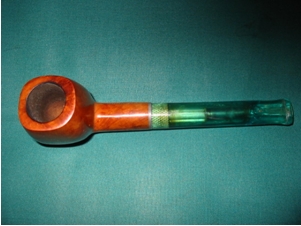
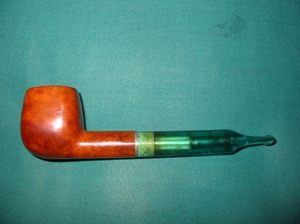
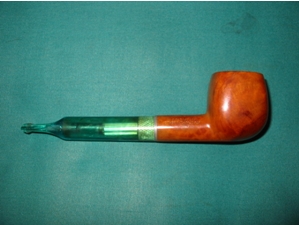
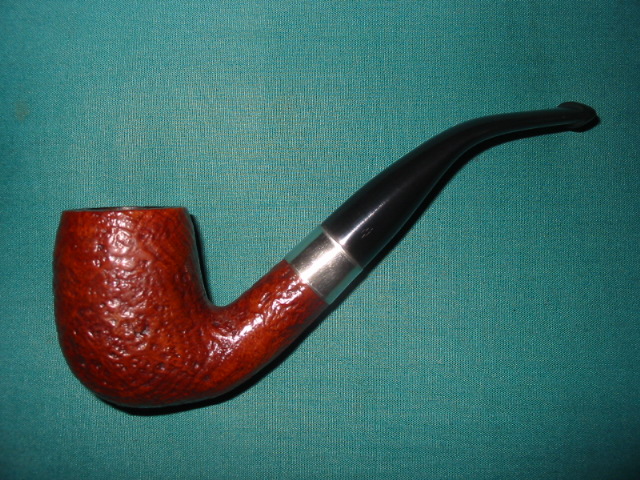
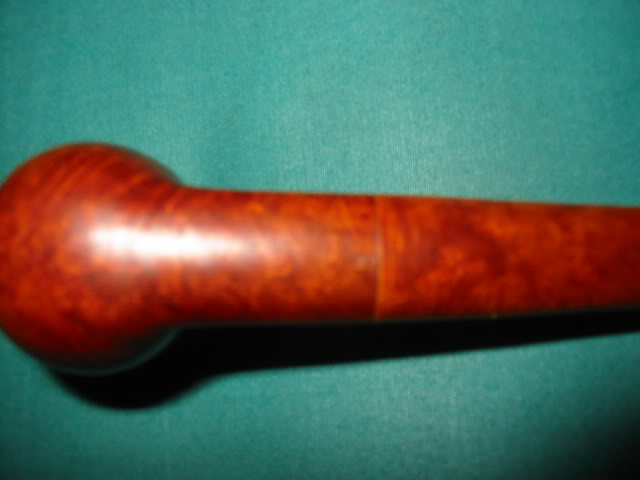
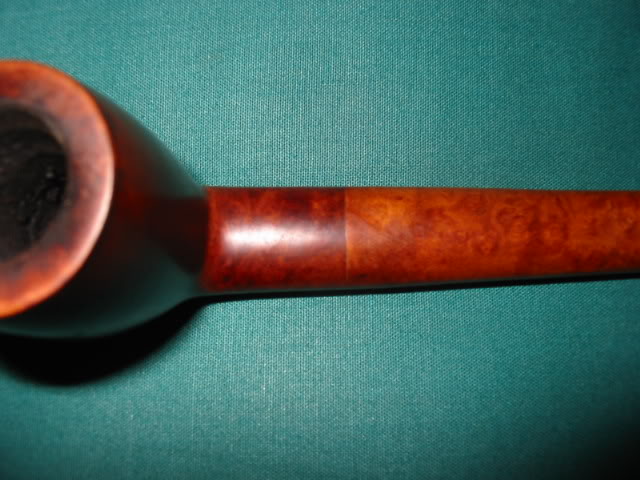
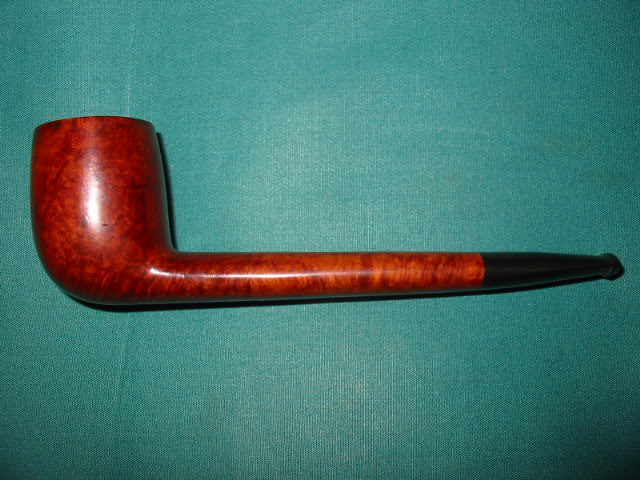
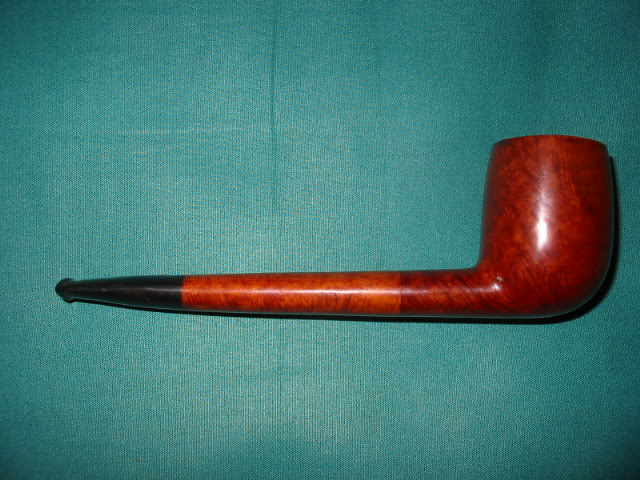
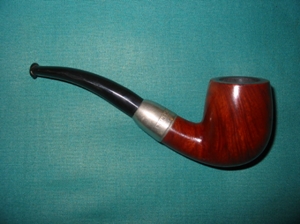
Photos of the finished pipe:

ImageImageImage

Correcting an overturn on a stem with a bone tenon


Blog by Steve Laug

I started this process of correction with tried and true information and experience gained from working on older stems with metal tenons. I had developed a process and perfected it for my use in correcting an overturned stem by heating the tenon in the stem to loosen the glue. Once the glue is softened with the heat then the stem can be screwed on to the shank and turned to the proper position and left to cool. Care should be taken in aligning the stem and shank to the correct position. If it cools before it is straight, it can be reheated to align it correctly. I have used this procedure for a long time and it works perfectly each time I have used it. I am sure I will refine it but it works!

With that background and a couple of older stems on meerschaum and briar pipes with bone screw tenons that were overturned I put the following question out on the various online pipe forums that I am a part of.

“Does anyone know how to correct over turned bone tenons? I have a couple old timers that are over turned I am looking for a corrective…Help!”

I did not receive any response to my query so I decided to try the method I had used with metal tenons and see what happened. I chose a pipe to experiment with that would no be a loss if it did not work. The stem was made of Bakelite and the tenon was a bone screw. I put a cup of water in the microwave and stood the stem in it tenon down and set the timer for two minutes (time to boil a cup of water in my microwave). I took it out at a minute and gave it a try and it was better. I put it back in the water and let the two minutes finish. I then dried it off with a towel and turned it into the shank and was able to turn it until it was aligned. There was no damage done to the tenon or the stem in the process. The alignment on the stem was perfect and once the pipe cooled it remained aligned.

My two concerns with the use of the boiling water were first, would there be any integral damage to the bone tenon from the heat moving from the inside out and second, would the heat cause any damage to the Bakelite. I did not want it to become brittle from the boiling water process. I have learned on the metal screw tenons that I could put the entirety (stem and tenon) into the microwave with the water and leave it there through the heating cycle on the microwave. I had done the same with a Bakelite stem and metal tenon and it worked well to insert the stem and tenon while the water heated in the microwave. I decided to do that as well with the screw bone tenon and Bakelite stem. There does not seem to be any increased brittleness or crackling of the stem or bone – all is well.

Refurb LHS SEC system pipe – strange one


Blog by Steve Laug

In my ongoing quest to collect pipes that are unique and give a picture of the history of interesting inventions and modifications to the simple smoking pipe I wanted to post this refurb that I finished. It is a LH Stern (LHS) SEC pipe. It is a system pipe as can be seen from the blown out pictures and the diagrams from the patent office. It is an interesting piece of history. The apparatus inside is quite elaborate. The stem is green perspex that serves as a collection chamber for sediments before the smoke goes to your mouth. I cleaned and reamed the bowl and polished it with carnauba wax. The stem had some tooth marks and cuts. I lifted the majority of them with my heat gun and finished by sanding them  and buffing them smooth.

Here are pictures of the pipe when it arrived:

ImageImage

Here are pictures of the pipe after I cleaned it and polished it:

ImageImageImage

Here is the pipe taken apart – it has an amazing assortment of parts. I have also included a copy of the patent information for those interested in the background of this pipe.

ImageImageImage

Replacing a screw mount stem


I have always wondered how to replace screw mount tenons without drilling out the mortise. I have done that before and it works well but I wanted to try to create a new screw mount stem using the existing tenon. I have learned from repairing overturned stems that you can heat the tenon and adjust its fit so I figured heating it and removing it would work much the same. So for the subject of the experiment I decided to tackle refurbishing an old Whitehall pipe I had here.

The Whitehall had a screw mount stem with a stinger attachment. The stinger was removable leaving about a half inch of tenon that I could work with. The stem had a huge hole on the underside of the stem near the button and was not a candidate for a stem patch. It would work perfect for the plan.

I heated the metal tenon with my heat gun until I could loosen it from the stem. I used a pair of needle nose pliers after wrapping the tenon with a cotton cloth to protect the threads. With a minimal effort of wiggling the tenon it came out very easily. Once it was removed I cleaned it thoroughly with pipe cleaners, alcohol and steel wool.

I then matched the length of the existing tenonless stem with my stem blanks until I had one that was roughly the same length and thickness. I used my Dremel to cut off the precast tenon until it was close to the flat surface of the stem. I then used the flat board with sandpaper attached (like I do when topping a bowl) to sand the surface flush. Care must be exercised to keep the stem vertical or the surface will quickly get an angle. I smooth that surface with wet dry sandpaper 40 and 600 grit and finished it with the micromesh pads.

Once completed smoothing the end of the stem I used a series of drill bits to work my way up to 1/4 inch diameter hole that the tenon insert required. I have learned the hard way that to start with the size I want can often cause the stem to break in my hands. So because of that I progress through the series of bits until it is the correct size. Before gluing the insert in place I screwed it into the shank and put the stem on so that it was correctly aligned. I did not want to have an overturned or under-turned stem when I was finished. I marked the insert with a black marker so that I would know which side was the top and then unscrewed it from the shank. I coated the insert end with some epoxy (like I do when inserting Delrin tenons in to the stem) and pressure fit it into the stem with the mark on the top side of the fitting. It was a perfect fit. The superglue dries quickly so I checked the fit on the stem again to make sure it still aligned. It did!!

I used my Dremel to shape the diameter of the stem until it was a close fit and then finished the fit with sand papers and micromesh. When I had it smooth and shiny I buffed it with Tripoli, White Diamond and finally several coats of carnauba wax. I then used my heat gun to bend the stem to the right angle for this bent pipe. I cooled it under cold water and then polished and buffed it again.

The bowl had been cleaned and scrubbed to remove the grime and build-up of the years with Murphy’s Oil Soap and a soft bristle tooth brush. Once it was clean I gave a light coat of medium brown stain and then waxed it with Halcyon II wax.

Here is the finished pipe:

ImageImageImage

This One is a Mystery Pipe – Is it a ?Dunhill?


You will notice from the title of this blog piece that the Dunhill title is framed with question marks. The pipe is a mystery to me all the way around. There is nothing straightforward with it in terms of stamping or composition. It is composed of three distinct pieces (stem, shank and shank/bowl) that have been joined together at some point in the pipe’s history. From the pictures below you can see the junction of the bowl and the shank. The stem on the shank is a white dotted Dunhill stem. How did this pipe come to be and how did it incorporate at least two different pipes? It would be great if this old timer could tell its story because I am sure that it would be an interesting tale. Did the original owner break the shank on his pipe and then have a repair man do the fix? If so, did the repairman use a second pipe shank to add to the bowl for the repair or did the original owner take two of his pipes (both broken) and have them put together in this creative fashion? Did he take the bowl from one and the longer shank and stem from another and join them to form a new third pipe? Was the original of both pipes a Canadian or was the one that the bowl came from a billiard? I don’t think I will ever know the answer to those questions and even others if I took the time to think it out. But I do know that this is part of the pleasure I derive from working on estate pipes. I enjoy trying to put together the story of an old pipe.

I picked this one up from EBay. I was the only one bidding on it. I think the seller had marked it a Dunhill Canadian for sale so it had many viewers but no other bidders. I knew from a quick look at the pictures the seller provided that it was probably not a Dunhill. I could not be certain but the shape of the bowl did not quite measure up to other Dunhill Canadians that I have and the flow of the stem and bowl was different to my eye. Others may be able to point out other inconsistencies that they see but that is what I felt as I looked at the pipe. What caught my eye though and caused me to put in a minimal bid were the shank construction (reconstruction) and the flow of the pipe. I liked the looks of it. I was also curious to see how it was done. It looked like a well done repair, if indeed it was one. I wanted to see it close up and study it. The white spot on the stem was a bonus though I could see from the photos that it was not likely a Dunhill.

When it arrived I took it from the box and did a quick field dress cleaning of the pipe. Reamed the bowl, wiped down the outside with an alcohol damp cloth so that I could see the stamping or remnants of stamping that remained. The bowl portion (the section from the front to the union on the shank) has stamping on the bottom of the shank that looks to be what remains of a Sasieni stamp or at least the last few letters “ieni”. That is a bit mysterious to me in that the other Sasieni Canadian I have has the stamping running in the opposite direction. So my guess is that this one is upside down – not unheard of but interesting nonetheless. The shank and stem portion (from the junction backward to the stem) are definitely from the same pipe. The fit of the stem to the shank is absolutely perfect with no sanding or shaping marks, no gap and no change of profile to the stem. Under a bright light is possible to make out faint stampings on the shank remnant – and I do mean faint. They appear to be the last four letters of Dunhill – “hill” and under that there are the four letters “land” which could be then end of the word England. From that I would conjecture that what I have is a combination of a Sasieni and a Dunhill pipe. The Sasieni contributed the bowl and part of the shank and the Dunhill the rest of the shank and the stem. Whoever did the union of the two old pipes did a superb job as the joint is very well done. The grains of the two parts of the shank are very different and the staining does not match. But other than that it is a flawless union.

ImageImageImage

With the mystery still unsolved I went to work on the ?Dunhill?/Sasieni. I gave it a better reaming and also cleaned it. The bowl had been very caked when I initially cleaned it so I did a deeper reaming taking it back to the wood. It had a very heady smell of Lakeland style tobaccos so I wanted to remove the remnant of that in the cake and prepare it for the tobacco that I would smoke in it. The shank and stem were tarry and restricted by the gunk inside them. I used a shank brush and many pipe cleaners to clear out the airway. I also tried to shine a light down the bowl to see if there was any evidence of how the repairman had done the union of the shank pieces. But the light would not shine that far down the shank. From the ease with which the pipe cleaners slid down the shank and the smoothness of the airway it was clear that the job was very well done. I also used a drill bit on my KleenReem reamer and ran it through the shank with no catches.

Obviously this was a favourite pipe for the previous owner. It was well cared for, repaired and put together and well smoked. I cleaned it with Isopropyl 99% and then sanded out the tooth chatter on the mouth piece. I wiped down the bowl and shank with undiluted Murphy’s Oil Soap and scrubbed it with a tooth brush. It removed the grime from the bowl and the rim. Once dry I cleaned off the remaining lava on the rim with 400 and 600 grit wet dry sandpaper. Once the bowl and shank were clean I wiped the entirety down with acetone. I wanted to get as much of the stain out so that I could try to get a bit better match on the two parts. I re-stained it with a cherry stain I have in the shop as it seemed likely that it was that colour from what was under the grime. The union of the two is still very visible even with a re-stain. The two parts took the stain very differently. I finished by buffing it with Tripoli and White Diamond before giving it multiple coats of Carnuba wax. I am happy with the results. I have smoked it quite often since the refurbishing and find that it is a great smoker. It is lightweight and comfortable in the mouth and the hand. The only thing that would make it even better in my opinion is to have the whole story behind this pipe. Ah well… I am going to go and fire up a bowl of good Virginia and enjoy adding my story to this pipe.

ImageImageImageImage

A BIC lighter and Oxidation


Blog by Rob Hardy and Steve Laug

Thanks to a serendipitous discovery by a friend of mine, Rob Hardy (incoinnu on Smokers Forums), who also does refurbishing as a hobby we have worked out a very different method of dealing with oxidation on vulcanite stems. The long term effects of the procedure are still in the process of being worked out though it is hard to imagine any long term effects as the heat is not left on the surface of the stem for a significant amount of time at all. The short term benefit is pretty astounding.
BIC
This is what he wrote regarding his new process with my additions and after thoughts. “Those of us who love refurbishing have spent too many hours trying to remove oxidation from vulcanite stems. We all longed for some magic solution that would reverse the process of oxidation. We have tried one or all of these products in our efforts to fight back the dreaded green brown, noxious discolouration of the stem – Oxyclean, sodium hypochlorite solution from 1-12%, Armorall, Armorall Tire Foam, olive oil, stem oil, automotive lens cleaner, eye of newt, toe of frog, etc. These liquids served to either soften the oxidation or disguise it. None of them remove the problem and under a strong light or magnification it was still there. Many of us have sanded using a variety of sandpaper grits both dry and wet, micromesh sanding pads or paper, and toothpaste with micro abrasives until our fingers were sore and raw. The overall effect of this process served merely to level the surface of the stem until the oxidation would be sanded away. It is very effective but also very time consuming. Over time the shape and sharp angles of the stem are changed. There had to be a better way of dealing with this that was still effective and less labour intensive. I was fortunate to be able to purchase a lot of 17 estate pipes from my local B&M, over half of them had heavily oxidized stems. After refurbishing the Savinelli Punto de Oro that was in the lot I was considering taking up refurbishing as a new hobby. I then started on the Dunhill and K&P Peterson. The Peterson was cleaned and reamed and was ready for the stem work. There was a minute tooth mark near the button that I wanted to remove so I was using Steve Laug’s technique of applying heat to the indentation to raise the dents. Usually I do this after I have removed the oxidation and work on a clean stem. This time however, for who knows what reason the stem had not been clean at all and was an oxidized mess. To raise the tooth dent I applied the heat from a BIC lighter with the flame 1/2″ from the stem. The indentation lifted…AND THE OXIDATION DISAPPEARED! Wow! I could not believe my eyes so I continued for the length of the stem and it worked – the oxidation was gone. I used short strokes with the flame of the lighter and wipes with a wet paper towel. After each wipe the paper towel came out with yellow stains. This seemed too good to be true. Out came my jewellers’ loupe for closer examination. I had to see this close up and personal. Under the magnification I could see that the heat had evened out the surface of the vulcanite and pitting and oxidation were gone. There was only BLACK vulcanite. I stayed up until one o’clock in the morning sanding the stem up through 8000 grit micromesh. I left the waxing until this morning. This stem now looks like it did when it left the factory over 60 years ago. I was and still am amazed at the results. I had to try it again this morning on a Stanwell stem. I used the same technique with the lighter and the wet paper towel. I used a lot of caution around the logo, covering it with a wet paper towel to protect it while heating with the lighter). It took only ten minutes to clean the stem of the oxidation! What a difference in the amount of time it took to clean this stem. It is cleaned and now ready for sanding and buffing. I tried it on a third stem. I moved over the stem with the lighter, six seconds per inch of stem, before wiping with a wet paper towel. Again the towel came out with the yellow colouring of the oxidation and all that remained behind was the black vulcanite. Each of the three stems took little time to clean and all that remained to finish them was to sand and smooth and then buff and polish.” Here are just a few important pointers that Rob and I have learned in the process:

  1. Do not leave the flame in one spot, keep it moving – burning vulcanite stinks and you will ruin the stem.
  2. Use a slow 1″ side to side sweep with the flame half an inch below the stem. Repeat until the stem is completely black and then sand.
  3. As the flame moves across the surface there is a light sulfur smell that is given off as the oxidation burns.
  4. In sanding the stem use a variety of grits of sandpaper (400 and 600 grit wet dry and higher grits if you choose) then micromesh pads or paper (1500, 1800, 2400, 3200, 4000, 6000) before buffing with Tripoli and White Diamond. I have also used 0000 steel wool and found that it is a good first step before the wet dry sandpaper is used.

A New Polishing Tool (at least to me)


I received an email advertisement from Stewart-Macdonald the same company that sells black super glue. In it they were talking about a new product that is used in the guitar making industry. I have found that several of the tools and sanding blocks etc. work very well in refurbishing pipes. These particular tools are called Fret Erasers. They are flexible self-padded rubber blocks embedded with abrasive grits. They were being billed as “incredibly handy, to erase fine file marks and scratches”. The grits are color-coded for convenience. The ad went on to say that they polish the frets to a high gloss shine.

Image

They come in coarse, medium, medium fine, fine and extra fine. I ordered a pair of the two finest grits to try out in my work on stems. My expectations were that they would exceptionally well up against the angles of the button at the end of the pipe stem and also very well around inset logos and medallions. The edges are square and the block fits well in the hand and can be held against the angle of the button easily. I have sanding wedges and small sanding blocks that I used to work with around the button and always fought them a bit to keep the sand paper from slipping or getting worn thin at the crease. This product does not have that problem and they leave behind no sandy grit or particles of steel wool (as the advert promised).

I put them through their paces on the last batch of stems that I cleaned up and they worked nicely and left a smooth shiny surface. In my experimenting with them I used them between the wet dry sandpaper and the micromesh pads. I left the final polishing to the higher grits of micromesh pads. I also used them around the BBB Diamond and the GBD rondelles and they were easily maneuvered around those without compromising the relief of the stamping. I also want to try them around stamped logos and see how well they work. In the future I plan on using these two blocks in place of the 4000 and 6000 grit micromesh pads for the final polishing before I buff them on the wheel.

Here is the link to the Stewart-Macdonald website and the Fret erasers.
http://www.stewmac.com/npa/0472?utm_…_0472_20120423

Image

Anybody else ever used these?


Refurb on an Old BW Dog with Bling


This one is another mystery to me. Because I am always picking up these old timers I have a habit of researching out as much information as I can once they have arrived and I can see the stamping and hallmarks up close. This one bears the hallmarking of the Anchor which tells me it is made or assayed in Birmingham, the Lion which tells me it is Sterling silver and the date letter that though worn looks to be a capital E which would date it as an 1850 pipe. That is as close as I can tell to the date and time frame for this old timer. There is also a Makers Mark in the silver stamped BW and the briar of the pipe is also stamped BW. I cannot find any information on that maker in all of my searching so that is where it stands. If anyone reading this can shed light on the initials and what they may refer to I would deeply appreciate it. Until then I have a nice old bulldog from 1850 that smokes exceptionally well and it is a mystery regarding its maker.

When the pipe arrived it was in rough shape. The silver was very tarnished and dull looking. It was also scratched and much worn in places. The bowl had a very spotty finish with just the remnants of the original stain. The rim was tarred and the bowl heavily tarred and caked. The stem is made of some amberoid substance or may be Bakelite. It seems to be a softer material than the hard Bakelite. It has a bone tenon that was over turned so the stem was off to the side. The button also has an orific hole in the button instead of the newer slotted button.

I reamed the bowl and cleaned it with Isopropyl alcohol and many pipe cleaners and cotton swabs. I sanded the bowl to remove a bit more of the cake and take it back to the wood. I then put the bowl in an alcohol soak to remove the remnants of finish and the grime that was worked into the surface of the pipe. Once I removed it from the alcohol bath I re-stained it with Cherry stain. The stem was crackled a bit – lots of tiny spidering all over the surface so I did not want to chance using alcohol on it as it can cause more spidering and cracking. So I cleaned it with Gojo an all purpose hand cleaner with grit suspended in liquid soap. I ran it through the stem repeatedly to remove the tars and grime inside the airway. When it was clean I rinsed it with warm water to remove any residual soap. I sanded the tooth chatter and used my needle files to recut the button as it was pretty worn. I sanded and polished the stem with micromesh pads 1500-6000 grit as is my usual practice. I also heated the bone tenon with hot water and readjusted the fit to the shank. Upon completion of the refurbishing above the pipe and stem were given a final buff with carnauba wax. I also gave the black leather pipe case a cleaning with leather renewer and a coat of wax as well.

Here is what it looked like when I got it from EBay

ImageImage

Here is what the pipe looks like today

ImageImageImage

Refurb on an old Morell Mackenzie Bent


Blog by Steve Laug

Yes a Morell Mackenzie. That is how the pipe is stamped and I had no idea what I was dealing with. I have a thing for collecting late 1800 and early 1900 pipes so when this one came up on EBay I just naturally hit the bid button. When it arrived I decided to do a bit of research on it and uncovered the following information. This is taken from a paper on BBB pipes by Jacques Cole:

“Probably one of the first filter pipes (paper filter) was the BBB “Sir Morell Mackenzie‘. That this pipe was made before 1900 is shown by a letter dated August 27, 1891 from Sir Morell Mackenzie regarding these models with longer mouthpieces. The brand survived into the 1960s.”

That is pretty clear information and fascinating as well. I had no idea of the time frame of the introduction of the paper filter in pipes. But this is a nice little pipe. It has the orific button on the mouthpiece (the round hole instead of the slotted airway). It is also a military mount stem. Inside there is a reservoir for the paper filter to sit in. It has a sterling silver shank cap and is stamped Morell Mackenzie. The briar is a nice flame grain and the bowl is well done and well drilled.

I cleaned out the reservoir and the airway to the bowl. Took a bit as I had to work a paper clip through the airway and then a shank brush and finally bristle and fluffy pipe cleaners. The shank and reservoir are now clean!! The stem was an interesting proposition. It was pretty clean as it is built to hold the other end of the paper filter. I cleaned and swabbed it out. The stem needed to be sanded to remove tooth chatter and oxidation. Then I sanded with micromesh pads and buff with Tripoli, white diamond and finally carnauba.

Here are pictures of the pipe before the cleanup:

ImageImage

Here it is after the refurbishing

ImageImageImage

GBD 9438 Tapestry Refurb


Blog by Al Jones

I am truly honored that forum owner, Steve, asked me to write a guest article on his wonderful blog. Just a little over one year ago, I made the transition from occasional cigar smoker to an avid pipe smoker/collector. Pretty early on, I discovered that access to better quality pipes could be had through the estate market. It was also about that time I found the SmokersForums.uk forum and quickly made that venue my go-to spot for pipe information. While reading the “Restoration & Maintenance” section, it became apparent to me that even finer estates could be found if I was willing to put in a little elbow-grease and restore them. If one reads the “Stickies” in that section, pipe restoration techniques can be quickly learned thru contributions from professionals and amateurs. I was fascinated and dove in.

My tools evolved from simple sandpaper and some buffing wheels mounted in a hand drill to a bench mounted buffer, micromesh sanding papers, reamers, needle files etc. Making some of the tools to save a few bucks was all part of the fun and learning process. I favor Vulcanite stems, so occasional maintenance will be a part of my pipe smoking experience.

Due to my Welsh heritage, I’m a big fan of anything British, primarily cars and motorcycles. So, it seemed natural to be attracted to the classic shapes produced by the British masters. I’m a fan of GBD brand pipes and those estates can be readily found at reasonable prices thru Ebay, etc. The 9438 Author shape is a particular favorite and I have several models of that shape. The pipe I chose to document in this article is in Tapestry finish. I was intrigued by the turned stem and after a little research, I found it was a “chair-leg” stem used on certain Tapestry models. My joy in finding this pipe quickly evaporated when I opened the box and saw the level of oxidation on the many curves and crevices. I tend to purchase estates with saddle stems, but this one ramped the difficulty notch up significantly. Indeed this stem proved to be the most difficult I’ve encountered.

Some “before” shots of the pipe:

Typically, it takes me about an hour or so to restore a stem. This one took nearly twice that long. Fortunately, the previous owner had left no teeth indention issues to resolve. I soaked the stem in a mild Oxyclean solution as the first step. In badly oxidized stems, I think this step pays off in removing oxidation from the inside of the stem as well. Next up, I used some 1500 and than 2000 grit wet paper until the brown was removed. Getting oxidation from the chairleg creases was frustrating and finger aching. I almost gave up at one point, but sitting the project down for a few hours strengthened my resolve. I’m always eager to smoke an estate I’ve cleaned up, so there is always that pot at the end of the rainbow. I found wrapping the sandpaper around a thin kitchen knife allowed me to get the oxidation from those thin crevices. Next up, was a polish with each of the final four grades of “micromesh” (4000, 6000, 8000 and 12000). Micromesh comes in pads and sheets. I found the larger, 6” x 2” sheets last longer and are easier to fold into creases, etc. Following the micromesh, the stem had a deep, black shine that I enjoy on my mostly Vulcanite stems.

The next step was to buff the stem lightly with some White diamond and then “Blue Magic Plastic Polish”, each product getting it’s own cloth wheel. The Blue Magic product is made for the automotive industry and available at most autoparts stores (Megiuars also makes a similar product). Some folks are adverse to putting an automotive product on their stems, but so far, I’ve found no adverse tastes, etc. I do think the product helps “seal” the Vulcanite as oxidation seems to either not occur or very slowly. James Upshall pipes are noted for their fast oxidation, but so far my restorations using this product has kept my collection shiny. I also gave the pipe a light coat of “Obsidian Stem Oil”.

The bowl wasn’t in bad shape, but had the usual tobacco/tar buildup on the bowl top. I used my Castleford reamer set to remove the thin cake than soaked the bowl with Sea Salt and Everclear for a few hours. This was done while I was working on the stem. Following the soak, the draft hole was thoroughly cleaned with a series of bristle pipe cleaners soaked in Everclear. I’ve had success eliminating ghosts by cleaning this area of the pipe until the cleaners come out nearly white. I gave the bowl a light buff on the wheel with some white diamond, then Carnuba wax. A hand polish with Paragon wax completed the briar clean up. The wood on the bowl top was a little lighter in color, but I knew smoking it would even out and darken that area. (plus I was not looking forward to prepping and staining the mixed “Tapestry” finish..)

The completed pipe:

It may be a combination of the pipe shape and the effort required to refurbish it, but this particular pipe has become a favorite. I swore that I’d never purchase another chairleg stemmed pipe, but won an Ebay auction last night for another GBD Tapestry pipe with a chairleg stem……

Smoke safe!
Al Jones