Blog by Steve Laug
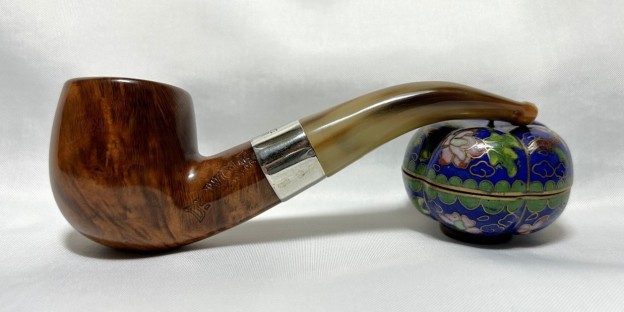
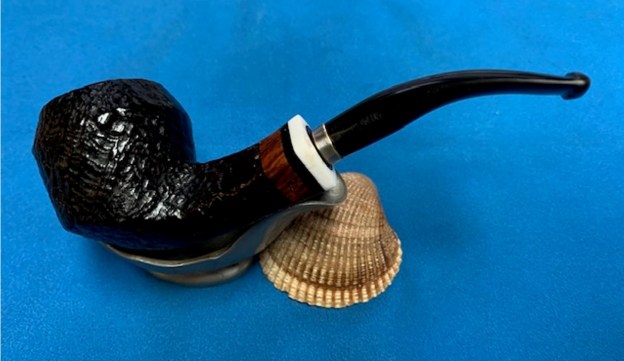
The next pipe on the table came to me for restoration from a friend in the US. He sent three pipes for me to restore for him. These included this GBD London England 347 Apple, a Ben Wade Connoisseurs Collection First Edition Long Diamond Shank Brandy with a saddle stem and an interesting Ivarsson 389 Product Apple. All are gorgeous examples of pipe craft and all were incredibly dirty and showed various issues with their finishes. I chose to work on the GBD first. The stamping on the pipe was as follows. On the left side it had a GBD in an oval stamped mid shank and on the right side it was stamped London England [over] the shape number 347. The Sterling Silver Band also had the GBD oval stamp [over] three hallmarks – the date stamp letter “S”, a Rampant Lion and a Leopard’s Head all in square cartouches with rounded corners. Underneath that it was stamped MR&Co in a rectangle with a pointed end on each side. The pipe was in dirty condition. The finish on the bowl and shank were worn and dirty with grime and darkening ground into the surface all around the bowl and shank. Under the tars the rim top and inner and outer edges of the bowl appeared to be in ok condition but cleaning would tell the story. The Sterling Silver band was tarnished and the stamping faint though readable. The vulcanite stem was dirty and had file marks and tooth marks and chatter on both sides ahead of the button. I took photos of the pipe before I started my clean up work on it to give a clear photo of the condition of the pipe before I started my work.
 I took a photo of the bowl and the rim top. The bowl had a moderate cake on the bowl walls and bottom. The crowned rim top and the inner edge of the bowl showed some nicks and some lava overflow. It was hard to know for sure what was underneath but I would be there would be some darkening. The vulcanite stem shows light tooth marks and chatter on both sides ahead of the button as mentioned above. There were also some file or coarse sandpaper marks. It had promise but it was dirty!
 I took photos of the shank sides to try to capture the stamping on the briar. It is neat to see the GBD ovals line up on the left side of the shank, band and stem. Because I expected this I can faintly see it. The stamping on the right side is not readable at all.
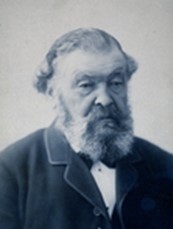
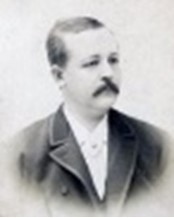
 I turned to Pipephil to renew my memory of the brand (http://www.pipephil.eu/logos/en/logo-gbd.html). It gave a brief history of the brand and the changes of owners. I was looking for the MR&Co stamp and found mention of Marechal & Ruchon Cie. The name of the French owners of the GBD lines after the original founders in 1850 sold it. I have included comments below.
Brand created in 1850 in Paris by Ganneval, Bondier and Donninger.
Marechal & Ruchon Cie first, then C.J. Verguet Frères (closed in 1970) owned GBD from 1903 to 1970 and manufactured these pipes in the St Claude (Fr) plant.
Sometime in the 1970s Cadogan company (Oppenheimer group) took over GBD. Prior to this time, the pipes were stamped “London England” in a straight line, even if they were sometimes crafted in France.
I also reread the history of the brand on Pipedia (https://pipedia.org/wiki/GBD). It gave more detail than Pipedia but nothing stunningly helpful.
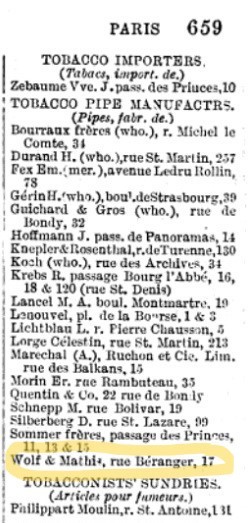
I went back to Pipephil and did a quick look at some of the additional links that are present on hallmarks (http://www.pipephil.eu/logos/en/infos/hallmark-london.html). I found a great reference tool for London Hallmarks that applied to the pipe in hand. I have included a screen capture of that below. You can see from the information above that the Leopard’s head in a square was the mark for the City of London. That gave me information that the band (the pipe?) was made in London. Secondly the Rampant Lion shown in the second photo above is the same as the mark on this band which certifies the quality of the Sterling Silver in the band. That gave me the information on the two marks on the band. It was thus the London town Mark and the .925 Sterling silver mark. Now I need to look at the date stamp “S” that was on the band.
The page contained a dating chart as well as the above information. It stated that the “Twenty letters of the alphabet of different shape identify the year in which the piece was verified by the assay office.” It included a chart for the years 1896 – 2001. I did a screen capture of that below. To me the “S” stamp matches the one under 1913 in the chart below. I have drawn a red box around it for ease of reference for you.
Given those facts the Hallmarks can be interpreted. The pipe is a GBD London England Made pipe (GBD Logo and stamp on the briar and band). It has a London town mark (Leopard head without the crown), a .925 Sterling Silver certification (the Rampant Lion) and a 1913 date stamp (“S”). The MR&Co stamp identifies it as being made during the time Marechal & Ruchon Cie (1903-1970). That fit well with the 1913 date stamp. Now it was time to work on this old timer.
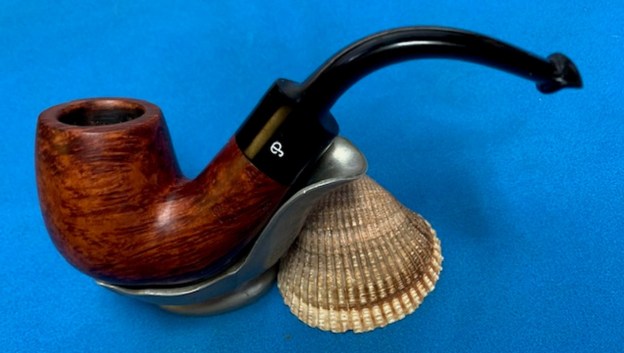
I started my work by reaming the bowl with a PipNet pipe reamer to remove the thick cake on the walls so I could see what they looked like. I used a Savinelli Fitsall Pipe Knife to scrape off the remaining cake on the bowl walls. I followed that by sanding the walls of the bowl until they were smooth with 220 grit sandpaper wrapped around a piece of dowel. The bowl walls showed no checking or cracking which is remarkable.
 I cleaned out the airway and mortise in the shank and the airway in the stem. I used 99% isopropyl alcohol, pipe cleaners and cotton swabs to remove the tars and oils. It was extremely dirty and once cleaned smelled and looked better.
 I scrubbed the exterior of the briar with a tooth brush and undiluted Murphy’s Oil Soap to remove the build up on the surface of the briar and clean off the lava on the rim top. I scrubbed it and then carefully rinsed the bowl with warm water. I dried it with a soft cotton cloth. It certainly looked significantly better and the patina remained in the wood.
 I cleaned the oxidation on the silver band with Hagerty’s Tarnish Preventive Silver Polish. I was able to remove all of it without damaging the stamping on the band. I polished it further with a jeweler’s cloth to further protect it from tarnish.

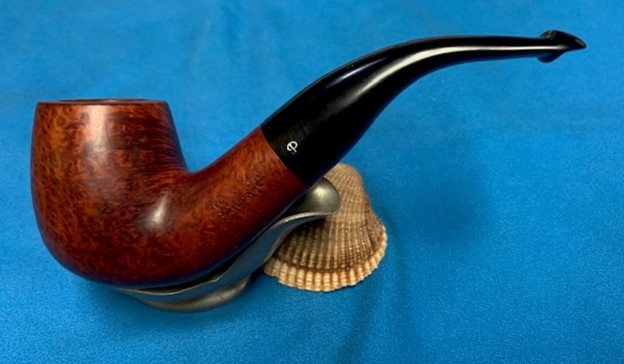
 I worked on the finish around the rim top and bowl with micromesh sanding pads – 1500-12000 grit sanding pads to dry sand the briar. I wiped it down after each sanding pad with a damp cloth after each sanding pads.


 I rubbed the bowl and shank down with Before & After Restoration Balm. I worked it into the surface of the bowl sides and shank with my fingertips and a horsehair shoe brush. The product works to clean, enliven and protect the briar. I let the balm sit for ten minutes and then buffed with a cotton cloth to raise the shine.

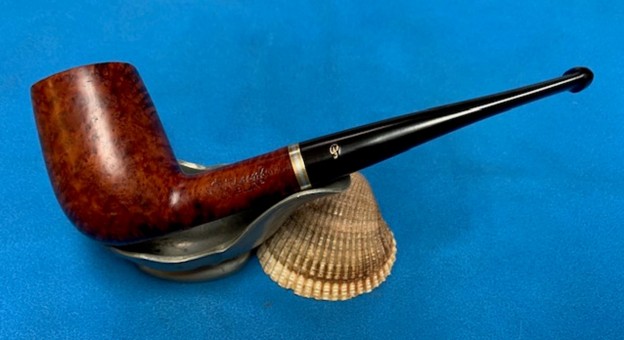
 I set the bowl aside and turned my attention to the stem. I painted the stem surface with the flame of a Bic lighter to lift the tooth marks. I was able to lift them all with little issue left. I sanded out what remained with a folded piece of 220 grit sandpaper. I started polishing the stem with 600 grit wet dry sandpaper. With a pipe of this age I was careful to not sand much as the stem is thin around the button. I did not repair the bite marks with CA as I wanted to leave it as pristine as possible. There are light marks on both sides on the side edge ahead of the button on both sides.
 I polished the stem surface with micromesh sanding pads – 1500-12000 grit pads. I wiped it down Obsidian Oil on a cotton cloth.
 I finished my polishing with Before & After Pipe Stem Polish – both Fine and Extra-Fine polishes. I wiped it down with a final coat of Obsidian Oil and set aside.
  I am excited to finish restoration of this 1913 GBD London England 347 Apple. I put the pipe back together and buffed it with Blue Diamond on the buffing wheel. I gave the bowl and the stem multiple coats of carnauba wax. I hand buffed the pipe with a clean buffing pad to raise the shine. It is fun to see what the polished bowl looks like with beautiful mixed grain all around it. I love the look of the polished grain on the pipe with the polished black vulcanite stem. This smooth 1913 GBD 347 Straight Apple is great looking and the pipe feels great in my hand. It is light and well balanced. Have a look at it with the photos below. The dimensions are Length: 5 ¼ inches, Height: 1 ¾ inches, Outside diameter of the bowl: 1 ¼ inch, Chamber diameter: ¾ of an inch. The weight of the pipe is 45 grams/1.59 ounces. It turned out to be a beautiful pipe. I will be sending it back to the pipeman who sent it to me once I finish the remaining two pipes. Thanks for reading this blog and my reflections on the pipe while I worked on it.
As always, I encourage your questions and comments as you read the blog. Thanks to each of you who are reading this blog. Remember we are not pipe owners; we are pipe men and women who hold our pipes in trust until they pass on into the trust of those who follow us.