Tag Archives: repairing tooth marks

Bringing Back a Lovely Poul Hansen Bent Dublin


Blog by Kenneth Lieblich

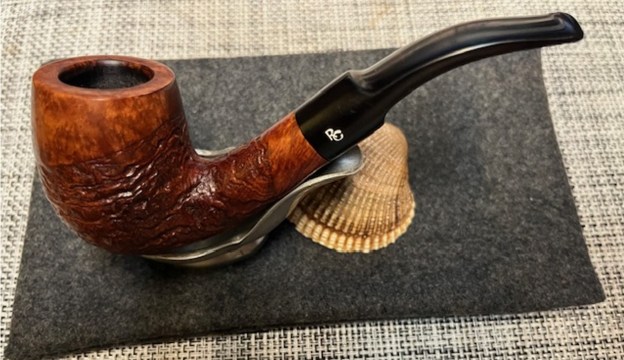
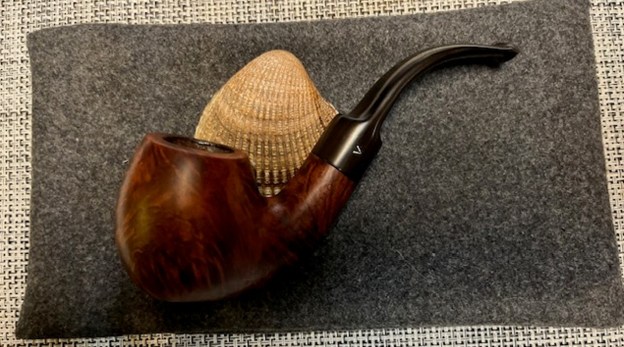
This charming pipe came across my workbench recently and, despite its rough appearance, I could tell there was a beautiful and well-made pipe in there. It was a very attractive shape and felt very good in my hand. Given the amount of abuse heaped on this pipe, it was clearly someone’s favourite. 
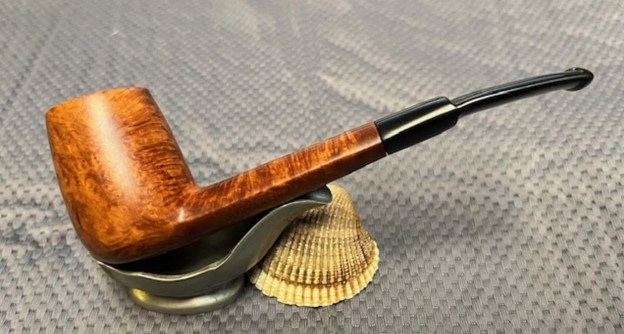
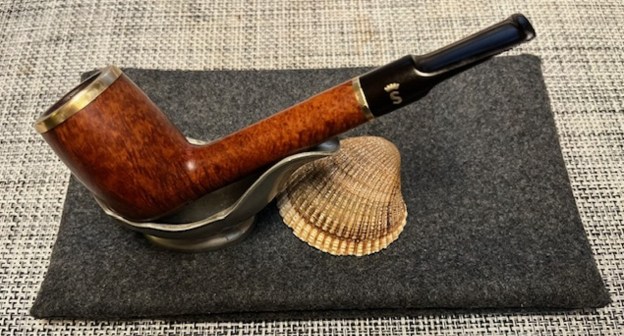
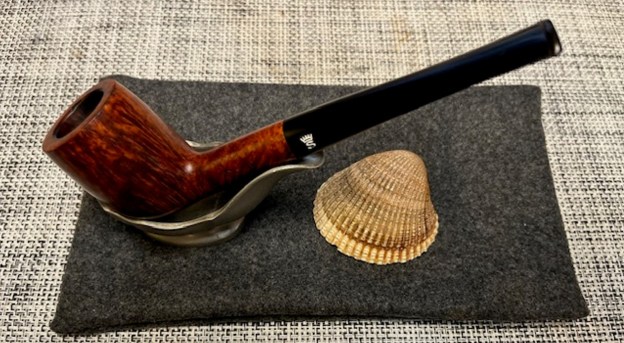
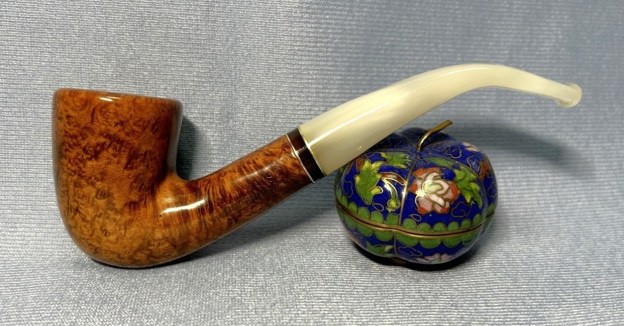
Let’s have a closer look. This pipe is a bent Dublin, made by Poul Hansen. It’s a lovely briar bowl and a white acrylic stem with a brass and wood band. That band is really attractive. The markings on the left side of the shank are Poul Hansen [over] Copenhagen. No other markings were found. I checked the usual sources for information about Poul Hansen. I knew that his pipes were mostly from the 1960s and 70s and commanded the same prices as Preben Holm, Rasmussen and other high-end Danish carvers. Pipephil offered this lovely little tidbit about the man:Over to Pipedia – they had a bit more information, and I include some, but not all, of it below:

Poul Hansen was a very skilled toolmaker and builder of machine tools. Around 1960 he got in contact with the workshops of Pibe-Dan, W.Ø. Larsen and others. So he began to make a lot of special tools and machines for a large number of the Danish pipemakers in the early 60’s. He was inspired by the many beautiful pipes he saw when he visited the pipemakers and soon he decided to try out the art himself. Poul Hansen was basically “self taught” and his early attempts suffered from kind of awkward shapes and finishing. Things turned for the better significantly when Sixten Ivarsson, appreciating the talent, began to tutor Hansen for a while and taught him the vital “tricks” of pipemaking. Soon after Hansen was in business fine. Right from the start he avoided the competition at home and concentrated on the American, Japanese and German markets. Hansen carved the bulk of his pipes during the 1960’s and 1970’s. Around the midst of the 1970’s he took over a small Copenhagen tobacconist’s shop from it’s retiring owner. Now, operating the shop took a lot of his time but vice versa secured a steady income, and Hansen reduced his output considerably. BTW In Denmark he only sold a very limited amount of pipes – but some of his very best. Poul Hansen is little known in today’s circles, those collectors (especially in the States) who have his pipes, tend not to sell them.

On to the pipe itself: it was very dirty and harshly treated. The bowl was filthy and had quite a bit of lava and plenty of cake – just look at the photos! The rim had been heavily bashed in – presumably from banging out dottle etc. The outside of the bowl had some small fills and some minor scratches. The stem was in better shape, but still needed help. It had some tooth dents and it was dirty on the inside – through the draught hole. To work! The stem was first on my list. I wiped the outside down with Murphy’s Oil Soap on some cotton pads. Then I cleaned out the inside with pipe cleaners and isopropyl alcohol. These acrylic stems are so frustrating to clean and it took a lot of elbow grease. In fact, I also used my tube brushes and Castile soap to get out as much filth as I could. Fortunately, these acrylic stems don’t require deoxidizing, so I moved on. I built up the dents on the stem with clear cyanoacrylate adhesive and let them cure. I then sanded the adhesive down with 220- and 400-grit sandpapers to meld seamlessly into the stem. I then used all nine Micromesh pads (1,500 through 12,000 grit) to polish it and highlight the pearl-like colouring on the stem. I also used Obsidian Pipe Stem Oil in between each pad scrubbing. Moving on to the stummel, I first decided to ream out the bowl. It was unbelievably occluded with cake. I used the PipNet Reamer to remove the built-up cake and followed that with 220-grit sandpaper taped to a couple of dowels to eliminate as much as possible. I took the chamber down to bare briar to ensure there were no hidden flaws in the wall. Fortunately, there were none.The stummel’s insides were absolutely clogged with filth. The previous owner must not have been a fan of cleaning his pipe! I actually used two drill bits (by hand – not in a drill) to break into the encrusted gunk in the stem.Then, I started cleaning the inside with lemon-infused isopropyl alcohol, Q-tips, and pipe cleaners. This took a long while. The inside was terribly dirty and it took an awful lot of cotton. As usual, I followed that up by cleaning the insides with some Castile soap and tube brushes.I soaked the rim of the pipe in some Murphy’s Oil Soap to loosen up the hardened stuff and, after about ten minutes, used a toothbrush to help that process along. I then used cotton rounds and some Murphy’s to scrub the outside of the stummel. I decided to de-ghost the pipe in order to remove any lingering smells of the past. I thrust cotton balls into the bowl and the shank and saturated them with 99% isopropyl alcohol. I let the stummel sit overnight. This caused any remaining oils, tars and smells to leach out into the cotton. The bowl was nice and clean after this.Then I was able to address the small nicks on the rim and the bowl. I dug out my iron and a damp cloth to try to raise the nicks. The hot and moist steam can often cause the wood to swell slightly and return to shape. This worked very well and many of the scratches were corrected with this method. Now it was time to address the remaining fills on the bowl. I repaired them with a mixture of briar dust and cyanoacrylate adhesive. This ensures a strong repair and one that looks similar to the surrounding wood. I sanded the repairs down with 200- and 400-grit sandpaper until they were level with the surrounding briar. Now I could address the roughness on the rim. I “topped” the pipe – that is, I gently and evenly sanded the rim on a piece of 220-grit sandpaper. But I didn’t go as far as I usually do – this rim originally had fillet edges on both the inside and outside of the rim. I wanted to keep this shape and so I did most of the shaping by hand.Then, I used all nine Micromesh pads (1,500 through 12,000 grit) on the stummel to finish it off and make it lovely and smooth. At this point, I rubbed some Before & After Restoration Balm into the briar and left it to sit for 20 minutes or so. I polished it with a microfibre cloth. The B&ARB does wonderful things to the wood, and I really like the natural colour of the briar. I also polished up the bit of brass on the stem’s band. 
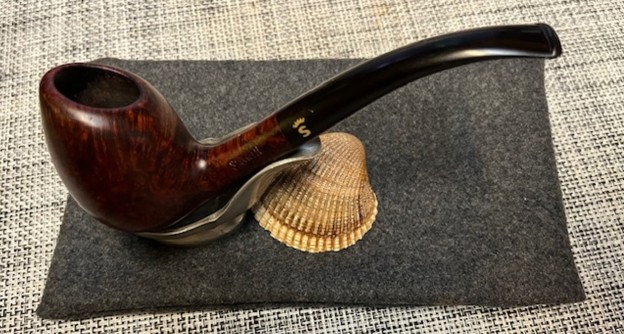
Off to the bench polisher to put the final touches on this pipe. I first gave it a thorough going-over with White Diamond compound. Following that, several coats of carnauba wax created a beautiful, glossy seal on the pipe.And that’s that! This Poul Hansen Bent Dublin looks fantastic and is ready to be enjoyed again by the next owner. I am pleased to announce that this pipe is for sale! If you are interested in acquiring it for your collection, please have a look in the “Danish” section of the store here on Steve’s website. You can also email me directly at kenneth@knightsofthepipe.com. The approximate dimensions of the pipe are as follows: length 5⅓ in. (135 mm); height 2⅛ in. (55 mm); bowl diameter 1¼ in. (32 mm); chamber diameter ¾ in. (20 mm). The weight of the pipe is 1¼ oz. (37 g). I hope you enjoyed reading the story of this pipe’s restoration as much as I did restoring it. If you are interested in more of my work, please follow me here on Steve’s website or send me an email. Thank you very much for reading and, as always, I welcome and encourage your comments.

Restoring a Handsome Tanganyika Meerschaum


Blog by Kenneth Lieblich

My cousin sent me a very good-looking pipe that he found in his meanderings and send it to me for some repairs. Naturally, I was happy to help, but this one provided some tough work. I like the tough ones though – makes me feel like an old timer has truly been saved. This is a Tanganyika Genuine Block Meerschaum 290 Bent Dublin. As soon as I saw it, I liked it. It looked like a really good smoker. The stummel was very handsomely cut – thick and robust. The stem had a metal tenon that screwed into the mortise. There were a few markings on the pipe. On the underside of the shank was engraved Genuine Block [over] Meerschaum. To the left of this (and perpendicular), was the number 290, the shape number. On the left side of the stem was the logo: a charming little elephant. Underneath the stem was the word Tanganyika – this stamping was very faint and I was worried about it. Finally, I wonder if there was something else. On the very end of the shank, was engraved what looked like a capital T. If that’s what it is, then presumably it stands for Tanganyika. If anyone has further information, please post it in the comments below. I looked in the book, Pipes: Artisans and Trademarks by José Manuel Lopes, to learn more about Tanganyika pipes. It had the following entry for the Tanganyika Meerschaum Corporation:

Company formed in 1955 by Kenyan businessmen from Nairobi after the discovery of a meerschaum mine relatively close to the surface on Kilimanjaro. The meerschaum is tougher, less porous, and cheaper than the Turkish variety. Another mine was soon discovered in Sinya, in the famous Amboseli Game Park. The company, previously based in Arusha (Tanzania), became an associate of a Belgium firm, but closed some years after. It produced the Caveman, Countryman, Kiko, Killimanjaro, Sportsman, Townsman, and Wiga brands. It maintained a link with GBD for the making of the GBD Block Meerschaum series, and after its closure, the English firms, London Meerschaum and Manx Pipes (Manx Meerschaum) continued producing with African meerschaum.Pipedia also included the above information, but also referred me to the page on Amboseli Pipes.

Amboseli Pipes made calabash and meerschaum pipes in Tanganyika. They moved to Arusha, Tanzania, and later closed. Countryman is one of the brands Amboseli produced. Its symbol is an elephant. Other brands include Hillbilly, Kiko, Kilimanjaro, London Meerschaum, Merlin, Sportsman, Tanganyika Meerschaum Corporation, and Tembo.Pipedia also seemed to direct all related pages to Kiko Pipes. This page did have the most information, but I wasn’t much closer to figuring out which brand of pipe this was. By comparing the descriptions from the Amboseli brochure below and various animal logos, I was able to eliminate some of the brands. I also looked at some previous articles here on rebornpipes. Therefore, this pipe is probably either a Caveman, Sportsman, or Townsman – without having that specific nomenclature on the pipe itself. But, truth be told, that is no more than an educated guess.Moving on. The stummel was in nice shape. The outside definitely had seem some wear and tear, but there were no major issues. Sure, it was dirty inside, but nothing more than what would be expected. I was pleased to see that the threaded mortise was in excellent condition. I had been concerned that the threads might have been damaged over the years, but no such damage was there. Meanwhile, the big problems lay with the stem. It was heavily oxidized, and thoroughly chewed. In fact, as the photos attest, the button was completely broken. A major rebuild would be required. Even though I would need to rebuild the stem, I wanted to save as much of the original as possible. So, I “painted” the stem with my BIC lighter in order to try and lift some of the bite marks all over the end of it. This worked reasonably well, but there was still a lot of damage.Next, I took some pipe cleaners and lemon-infused 99% isopropyl alcohol, and cleaned the revolting insides of the stem. The photo only shows a few of the pipe cleaners needed. It was pretty darn dirty. I also wiped down the outside with some Murphy’s on some cotton rounds. This removed some of the surface filth. As usual, I sent the stem for a swim in the deoxidizing fluid over night. I could tell even before this that the oxidation was deeply set into the vulcanite, but I needed to clean what I could. The following day, I wiped down the stem with SoftScrub cleanser and made sure to scrub hard. A lot of oxidation came off, but a lot of oxidation remained. I actually sent it for a second bath, and that helped, but not enough. Once it was a clean as I could get it, it was time to build up the damage. I brought out my black cyanoacrylate adhesive and I applied it to the bitemarks and such. The missing chunks would need far more work. I created a new button out of black cyanoacrylate, impregnated with carbon and rubber. I first plugged up the stem’s draught hole with a folded pipe cleaner, coated in petroleum jelly. This ensured that any of the glue would not accidentally plug up the air passage in the stem. This is always a tricky business and it took some patience to make it work. After I applied the cyanoacrylate, it looked pretty darn ugly, but I was expecting that. After the curing, I ended up sanding down the end of the stem to reduce some of the excess material. To carry this process on, I used some miniature files to further shape the button and make it suitable for sanding. I used another file on the inside to ensure there were no rough edges in the bore. I then sanded the stem down with sandpaper to keep the shape. I then used all nine Micromesh pads (1,500 through 12,000 grit) to smooth everything out. I also used Obsidian Pipe Stem Oil in between each pad scrubbing. It is worth noting that a repair this big on a stem will never be completely invisible – especially on this pipe. Finally, I used some 0000-grit steel wool on the aluminum tenon to make it shiny.

On to the stummel. Normally, at this point, I would use a reamer to remove the built-up cake inside the bowl, but meerschaum has the potential to crack in those circumstances. Instead, I simply used some sandpaper taped to a wooden dowel to scrape the bowl down. Fortunately, everything looked sound on the inside of the bowl. I then proceeded to clean out the shank with Q-tips, pipe cleaners, and isopropyl alcohol. There was a lot of nastiness inside this stummel and – boy-oh-boy – it took a lot of cotton to get this thing clean! I then moved on to cleaning the outside of the stummel with Murphy’s Oil Soap and some cotton pads. I also cleaned the insides with some Castile soap and tube brushes. Now in this case, I did it especially carefully because too much soaking can cause meerschaum to soften. In this case, I moved quickly, nothing softened, and everything turned out well. After this, I used my Micromesh pads to sand down and minimize the scratches in the meerschaum and make everything smooth. I then applied some Clapham’s Beeswax Finish to the meerschaum and let it sit for about 30 minutes. I then buffed it with a microfibre cloth. I repeated this process and left it – it sure was pretty! I took the stem (but not the stummel) to my buffing wheel and finished it with some White Diamond polish. Worked like a charm. This Tanganyika Genuine Block Meerschaum 290 Bent Dublin looks beautiful once again. I’m sure my cousin will love it. I hope you enjoyed reading the story of this pipe as much I as I did restoring it. The approximate dimensions of the pipe are as follows: length 5⅛ in. (131 mm); height 2¼ in. (58 mm); bowl diameter 1½ in. (39 mm); chamber diameter ⅞ in. (22 mm). The weight of the pipe is 1⅝ oz. (49 g). If you are interested in more of my work, please follow me here on Steve’s website or email me directly at kenneth@knightsofthepipe.com. Thank you very much for reading and, as always, I welcome and encourage your comments.

I was not hoping for much with this poor Malaga Second Oval Shank Brandy


Blog by Steve Laug

For the next little while I am working on some Malaga Pipes. I have several in queue to work on so I tend to pick them by what catches my eye. The next pipe is the last of the latest batch of Malaga Pipes. This one is a Oval Shank Brandy with a ¼ bent vulcanite stem. Jeff saw it on eBay and purchased it on 09/30/2023 from a seller in Cape Fair, Missouri, USA. The grain on this pipe is quite nice. Once again it was obviously someone’s favourite smoker. The pipe is stamped on the underside of the shank and reads MALAGA [over] Second. The smooth briar bowl and shank were dirty and worn. There were tars and oils ground into the surface of the briar. The bowl had a very thick cake that flowed over the top of the inwardly bevelled rim in a thick lava coat. The cake in the bowl was thick right up to the top of the rim. It was hard to fully assess the condition of the inner edge. It looked like the rim top had some burn marks and chips on the back and the front side. The inner edge was also damaged. The condition of the rim edge and top would become clear in the cleaning process. The outer edge also had some damage. The saddle stem was vulcanite and had light tooth marks on the top and the underside of the stem ahead of the button. Jeff took photos of the pipes before he started his clean up work. Jeff took photos of the rim and bowl to show the heavy cake and lava on the rim top and edges. You can also see the damage on the rim top. The back top and outer edges appear to have been knocked against some hard surface given the amount of damage. The inner edge of the rim showed thick cake coming up to the top and flowing over the edge. It was a dirty pipe but still a beauty. The vulcanite saddle stem had tooth marks and chatter on the top and underside of the stem ahead of the button. The photos of the sides and heel of the bowl show some stunning and unique grain all around the pipe. The oil curing/finish makes the grain really stand out on the bowl and shank. Jeff took a photo of the stamping on the underside of the shank. It read “Malaga” [over] Second. The stamping was clear and readable as noted above.Jeff took photos of the flaws in the briar on the underside of the shank. There are fills in place in the shank but they are shrunken and are quite tactile. I am sure that this is what made the pipe a Malaga Second.For those of you who are unfamiliar with the brand, I am also including the link to a blog that I wrote that gives some of the history of the Malaga brand and the Malaga Pipe Shop in Royal Oak, Michigan in the USA. Here is the link – https://rebornpipes.com/2013/02/09/george-khoubesser-and-malaga-pipes/. That blog also includes links to a catalogue and the history of the pipemaker George Khoubesser. If you are interested to learn more then I invite you to follow the link to get a feel for the brand and the pipemaker.

I am also am including a link to some printed material on the Malaga brand that came to me from the daughter of George Koch (we purchased George’s pipes from his daughter) to help identify the particular stamping on the pipe. The link takes you to the entire collection of materials that were sent to me (https://rebornpipes.com/2019/02/27/malaga-pipes-catalogue-of-pipes-and-tobaccos/).

This particular pipe was a second and it is not listed in the catalogue.

Jeff had cleaned up the pipe using his usual procedure. He reamed the pipe with a PipNet pipe reamer and removed the rest of it with a Savinelli Fitsall Pipe Knife. He scrubbed the bowl with undiluted Murphy’s Oil Soap with a tooth brush. He rinsed it under running warm water to remove the soap and grime from around the bowl sides. It looked much better. He cleaned out the inside of the shank and the airway with alcohol, cotton swabs and pipe cleaners. The stem looked much better and the light tooth marks on both sides were still visible and would need a little work. I took photos of the pipe once I received it.  I took a photo of the rim top and the stem to show their condition. Jeff was able to clean up the cake and the lava overflow that was shown in the rim and bowl photos above. The rim top was clean but there were chips, nicks burned areas around the rim top and the edges of the bowl. There was also some darkening on the flat surface of the rim and the edges. It is visible in the first photo below. The stem looked better, though there were tooth marks and chatter on both sides ahead of the button. I took a photo of the stamping on the underside of the shank. It is quite readable as noted above. I removed the stem from the shank and took a photo of the parts to give a sense of what the pipe looks like.I started my work on the pipe by addressing the damage to the rim top and outer edge of the bowl. I topped it with a topping board and 220 grit sandpaper. I cleaned up the inward bevel on the bowl edge with a folded piece of 220 grit sandpaper. I brought it back to the same inward bevel that it had before I topped it. I turned my attention to the flaws and fills in the heel and the underside of the shank. I filled these in with clear CA glue. I smooth out the repairs with a folded pipe cleaner to smooth them out.I sanded the bowl top and the repaired fills on the shank and heel with a 320 grit sanding pad to blend them into the surrounding briar. They looked significantly better. From there I chose to sand the entire bowl and shank with 320-3500 grit sanding pads. This removed the darker areas and blended the repairs into the bowl and shank. It also took care of the roughness to the finish and some of the marks on the outside of the bowl and shank. The grain really began to stand out on the pipe. From there I went on to polish the briar with micromesh sanding pads – dry sanding with 1500-12000 grit pads. I wiped the bowl down after each pad. The pipe really began to have a rich shine and some beautiful grain that minimized the repaired fills. I rubbed the bowl and shank down with Before & After Restoration Balm to deep clean the finish on the bowl and shank. The product works to clean, enliven and protect the briar. I worked it in with my fingers to get it into the briar. I let it sit for 10 minutes then I wiped it off and buffed it with a soft cloth. The briar really began to have a rich shine. I took some photos of the bowl at this point to mark the progress in the restoration, it is a beautiful bowl. I set the bowl aside and turned my attention to the stem. I “painted” the tooth marks with the flame of a lighter and was able to lift them significantly. I filled in what remained with a black CA glue. Once it cured I used a small file to flatten the repairs and start the process of blending them into the surrounding vulcanite. Once the repairs cured I straightened out the stem a bit to give it a more gentle bend. To me the previous bend was to abrupt and made the stem hang from the mouth poorly. I adjusted it so that in the mouth it sits comfortably.Once the bend was corrected I sanded the repairs smooth with a folded piece of 220 grit sandpaper. I was able to further blend it into the surrounding vulcanite.I started the polishing of the stem with 2 x 2 inch sanding pads – dry sanding with 320-3500 grit pads and wiping it down after each pad. I was able to remove the light tooth marks and chatter on the stem surface on both sides. I polished the stem with micromesh sanding pads – dry sanding with 1500-12000 grit pads. I wiped the stem down after each sanding pad with Obsidian Oil.  I did a final hand polish of the stem with Before & After Pipe Stem Polish – both Fine and Extra Fine. I gave it a coat of Obsidian Pipe Stem Oil. It works to protect the stem from oxidizing. I set it aside to dry. I put the pipe back together – the bowl with its new stem. This restored Malaga Second Long Shank Brandy turned out surprisingly to be a real beauty. I did not hold out much hope for it when I started on it but boy was I surprised. The grain on the bowl is quite beautiful came alive with the buffing. I used Blue Diamond on the buffing wheel on both the bowl and stem. I gave both multiple coats of carnauba wax on the wheel then buffed it with a clean buffing pad to raise the shine. I hand buffed it with a microfibre cloth to deepen the shine. The Malaga Second Brandy feels great in the hand. It is lightweight and the contrast in the browns of the briar and the polished vulcanite stem is quite amazing. The dimensions of the pipe are Length: 6 inches, Height: 2 inches, Outer diameter of the bowl: 1 ¼ inches, Chamber diameter: ¾ of an inch. The weight of the pipe is 1.90 ounces/54 grams. It really is a beauty. I will be putting it on the rebornpipes store in the American (US) Pipe Makers section shortly if you are interested in adding it to your collection. Thanks for walking through the restemming and the restoration with me. Cheers.

This Rare and Beautiful “Malaga” Raskassa Cutty cleaned up extremely well


Blog by Steve Laug

For the next little while I am working on some Malaga Pipes. I have several in queue to work on so I tend to pick them by what catches my eye. The next pipe on the table is an interesting Malaga Raskassa Large Cutty. Jeff saw it on eBay and purchased it on 10/05/2023 from a seller in Pomona, Missouri, USA. The grain on this pipe is very stunning. It was obviously someone’s favourite smoker. The pipe is stamped on the left side of the shank and reads RASKASSA. The smooth bowl and shank were dirty and worn. There were tars and oils ground into the surface of the briar. The bowl had a very thick cake that flowed over the top of the smooth rim in a spotty lava coat. The cake in the bowl was thick right up to the top of the rim. It was hard to fully assess the condition of the inner edge. The rim top and inner edge of the bowl appeared to have some damage but more would become clear in the cleaning process. The outer edge had chips and dents from knocking the pipe against a hard surface. The taper stem appeared to be either vulcanite or hard rubber. There were tooth marks on the top and the underside ahead of the button. Jeff took photos of the pipes before he started his clean up work.Jeff took photos of the rim and bowl to show the heavy cake and lava spots on the rim top and edges. The bevelled inner edge of the rim showed some darkening and had some cake on it. The grain on the rim top is quite stunning. It was a dirty pipe but still a beauty. The hard rubber stem had tooth marks and chatter on the top and underside of the stem ahead of the button. The photos of the sides and heel of the bowl show some stunning and unique grain all around the pipe. The oil curing/finish makes the grain really stand out on the bowl and shank. Jeff took a photo of the stamping on the left side it read Raskassa as noted above. It was clear and readable.For those of you who are unfamiliar with the brand, I am also including the link to a blog that I wrote that gives some of the history of the Malaga brand and the Malaga Pipe Shop in Royal Oak, Michigan in the USA. Here is the link – https://rebornpipes.com/2013/02/09/george-khoubesser-and-malaga-pipes/. That blog also includes links to a catalogue and the history of the pipemaker George Khoubesser. If you are interested to learn more then I invite you to follow the link to get a feel for the brand and the pipemaker.

I am also am including a link to some printed material on the Malaga brand that came to me from the daughter of George Koch (we purchased George’s pipes from his daughter) to help identify the particular stamping on the pipe. The link takes you to the entire collection of materials that were sent to me. I have included a screen capture of one particular page that helps identify the RAS KASSA stamping on the pipe (https://rebornpipes.com/2019/02/27/malaga-pipes-catalogue-of-pipes-and-tobaccos/). I have enclosed the section on the brand in a red box in the picture above. To summarize, it basically says that the stamping is applied to pipes with special rare grain patterns in the briar. These appear to be straight grain, birdseye, swirled grains etc. that are tight patterns. They are rare – 1 or 2 in every hundred pipes. This pipe is one of those. You can read the description in the detailed explanation below.

Jeff had cleaned up the pipe using his usual procedure. He reamed the pipe with a PipNet pipe reamer and removed the rest of it with a Savinelli Fitsall Pipe Knife. He scrubbed the bowl with undiluted Murphy’s Oil Soap with a tooth brush. He rinsed it under running warm water to remove the soap and grime. He cleaned out the inside of the shank and the airway with alcohol, cotton swabs and pipe cleaners. The shank had an inset to take in the tenon and the end of the stem so I would need to fit a stem to sit in the shank. I took photos of the pipe once I received it. I took a photo of the rim top and the stem to show their condition. Jeff was able to clean up the cake and the lava overflow that was shown in the rim and bowl photos above. The rim top was clean but there were chips and nicks around the inner edge of the bowl and nicks on the outer edge. There was also some darkening on the flat surface of the rim. It is visible in the first photo below. The stem looked better, though there were tooth marks and chatter on both sides near the button and on the button surface itself.I took a photo of the stamping on the left side of the shank to show that it was readable and undamaged by the cleanup work. I removed the stem from the shank and took a photo of the parts to give a sense of what the pipe looks like.It was time to start my work on the pipe. I started with the rim top and edges of the bowl. I sanded the inner and the outer edge of the bowl. I used a topping board and 220 grit sandpaper to clean up the rim top and darkening. Once I was finished with the light topping the grain on the rim top looked very good. I polished the smooth panels on the bowl sides and the smooth rim top with micromesh sanding pads. I dry sanded it with 1500-2400 grit sanding pads and wiped the bowl down with a damp cloth after each sanding pad. I touched up the clean rim top with a Maple Stain Pen. After the staining I continued sanding the rim top and bowl with 3200-12000 grit micromesh pads. I wiped it down after each pad. It really began to be beautiful. I rubbed the bowl and shank down with Before & After Restoration Balm to deep clean the finish on the bowl and shank. The product works to clean, enliven and protect the briar. I worked it in with my fingers to get it into the briar. I let it sit for 10 minutes then I wiped it off and buffed it with a soft cloth. The briar really began to have a rich shine. I took some photos of the bowl at this point to mark the progress in the restoration. It is a beautiful bowl. I set the bowl aside and turned my attention to the stem. I filled in the tooth marks on both sides with black CA glue. I set it aside to cure. Once the repairs hardened I used a small needle file to flatten out the repairs. I smoothed them out with 220 grit sandpaper to blend them into the rest of the surrounding vulcanite. I set the finished bowl aside and we back to the stem. I started the polishing of the stem with 2 x 2 inch sanding pads – dry sanding with 320-3500 grit pads and wiping it down after each pad.I polished the stem with micromesh sanding pads – dry sanding with 1500-12000 grit pads. I wiped the stem down after each sanding pad with Obsidian Oil. I did a final hand polish of the stem with Before & After Pipe Stem Polish – both Fine and Extra Fine. I gave it a coat of Obsidian Pipe Stem Oil. It works to protect the stem from oxidizing. I set it aside to dry.I put the stem back on the “Malaga” Beautifully Grained Raskassa Large Cutty and took it to the buffer. I buffed the bowl and stem with Blue Diamond to polish the briar and the vulcanite. Blue Diamond does a great job on the smaller scratches that remain in both. I gave the bowl and the stem several coats of carnauba wax and buffed the pipe with a clean buffing pad to raise the shine. I hand buffed it with a microfiber cloth to deepen the shine. I am amazed at how well it turned out. The finished pipe is shown in the photos below. This is a beautiful “Malaga” Large Raskassa Cutty and the hard rubber taper stem and smooth finish combine to give the pipe a great look. I honestly have no idea why it is labeled a second as there are no fills or flaws in the briar. The dimensions of the pipe are Length: 7 inches, Height: 2 ¼ inches, Outside diameter of the bowl: 1 ½ inches, Chamber diameter: 7/8 of an inch. The weight of the pipe is 1.98 ounces/56 grams. This is another pipe that I will be putting on the rebornpipes online store in the American Pipe Makers and Pipemaking Companies Section shortly, if you are interested in adding it to your collection. Thanks for walking through the restoration with me on this beauty!

As always, I encourage your questions and comments as you read the blog. Thanks to each of you who are reading this blog. Remember we are not pipe owners; we are pipe men and women who hold our pipes in trust until they pass on into the trust of those who follow us.

Cleaning up a Royal Guard 585 Bent Billiard


Blog by Steve Laug

The next pipe I am working on was purchased quite a while ago on 01/16/2017 from an eBay auction in Covington, Ohio, USA. This was another dirty pipe but underneath it had a great mix of sandblast and smooth finishes. It was obviously someone’s favourite smoker. The pipe was stamped on the underside of the shank that reads Royal Guard [over] Made in Denmark. On the right of the shank next to the stem/shank junction it is stamped the shape number 373. The pipe was a bent billiard. The dirty finish was not able to hide the beauty in the grime. There were tars and oils ground into the surface of the briar. The bowl had a thick cake that flowed over the top of the rim in a heavy lava coat. The condition of the inner edge was hard to assess under the cake and the lava coat. The stem was a black vulcanite saddle stem with a stamped white RG logo on the left side. There were tooth marks and chatter on both sides ahead of the button. Jeff took photos of the pipes before he started his clean up work. Jeff took photos of the rim and bowl to show the heavy cake and heavy lava coat covering the rim top. The inner edge of the rim is caked and hard to assess in terms of its condition. It really was a dirty pipe but still a beauty. He also took photos of the stem surfaces to show its overall condition when it arrived. You can see the tooth marks and chatter on both sides of the stem. The photos of the sides and heel of the bowl show contrast between the sandblast portions and the smooth areas in the finish. It is a beautiful combination. The brown stain on the briar adds depth to the finish on the pipe and makes the grain really stand out. It shows a lot of promise. Jeff took photos of the stamping on the shank sides. You can see that they are clear and read as noted above. On Pipephil’s site(http://www.pipephil.eu/logos/en/logo-r6.html) there is a section on the royal Guard that says it is a Stanwell Second. There is also some interesting information on the section so I did a screen capture of it and have included it below.Stanwell seconds :Christian, Danish Natural, Danish Sovereign, Danske Club, Henley, Majestic, Royal Danish, Royal Guard, Scandia

Royal Guard is listed on Pipedia’s site (https://pipedia.org/wiki/Stanwell) as a Stanwell second line. The site also has a great short review of Stanwell history and links to several articles on the site that interesting.

Jeff cleaned up the pipe for me. He reamed the bowl with a PipNet pipe reamer and cleaned it up with a Savinelli Fitsall Pipe Knife. He scrubbed the exterior with Murphy’s Oil Soap and a tooth brush to clean off the grime off the finish and the overflow of lava on the rim top. The cleaning had removed the grime on the rim top. He cleaned up the internals of the shank, mortise and stem with pipe cleaners, cotton swabs and alcohol to remove all of the oils and tars in the pipe. He soaked the stem in Briarvilles Pipe Stem Deoxidizer and was able to remove much of the oxidation, calcification. When it arrived here in Vancouver it was a clean pipe and I knew what I had to work with. I took photos of it before I started my part of the restoration. I took a photo of the rim top and the stem to show their condition once it arrived in Canada. Jeff was able to clean up the cake and the lava overflow that was shown in the rim and bowl photos above. The rim top and the inner edge of the bowl looked very good – just some darkening. The stem looked better and the tooth marks and chatter on both sides near the button. The stamping was clear and readable as noted above. I removed the stem from the shank and took a photo to give a sense of the proportions of this pipe. I started my work on the pipe by addressing the darkening on the rim top and inner edge of the bowl. I used a folded piece of 220 grit sandpaper to remove the darkening and prepare it for deeper polishing.I polished the rim top and the smooth portions of the briar with sanding pads. I dry sanded it with 1500-12000 grit micromesh sanding pads. I wiped the bowl down after each sanding pad with a damp cloth. I rubbed the briar down with Before & After Restoration Balm. I worked it into the briar with my fingertips. The product works to clean, enliven and preserve the briar. I let it sit for 10 minutes while I worked on the stem. After the time passed I buffed it with a cotton cloth to deepen the shine. The briar really comes alive with the balm. I set the bowl aside and turned my attention to the stem. I started by addressing the tooth marks on the surface of the stem on both sides. I “painted” the surface of the stem with the flame of a lighter to lift them. I was able to lift them significantly. I scrubbed the stem surface with Soft Scrub cleanser to remove the oxidation in the tooth marks. I used a rubberized black super glue to fill in the remaining marks. I set the stem aside to let the repairs cure. Once it cured I used a small file to flatten the repair and recut the button edge. I used a folded piece of 220 grit sandpaper to smooth out the repairs.  I touched up the RG stamp on the left side of the stem with some white acrylic fingernail polish. I scraped off the excess and buffed it lightly with a 1000 grit sanding pad. It is clear and readable.I started working on polishing the stem with my 320-3500 grit sanding pads. I was able to remove the tooth marks and chatter on both sides ahead of the button. It looked much better at this point in the process. I polished the stem with micromesh sanding pads – dry sanding with 1500-12000 grit pads. I wiped the stem down after each sanding pad with Obsidian Oil. I polished it with Before & After Pipe Stem Polish – both Fine and Extra Fine. I gave it a coat of Obsidian Pipe Stem Oil. It works to protect the stem from oxidizing. I set it aside to dry. This beautiful Stanwell Second Danish Made Royal Guard 585 Bent Billiard with a saddle vulcanite stem turned out very nice. The mix of brown stains on the smooth and sandblast portions highlights the great grain around the bowl sides and bottom. The finish on the pipe is in excellent condition. I put the stem back on the bowl and carefully buffed the pipe with Blue Diamond on the buffing wheel. I gave the bowl and stem multiple coats of carnauba wax on the buffing wheel and followed that by buffing the entire pipe with a clean buffing pad. I hand buffed the pipe with a microfiber cloth to deepen the shine. The finished Royal Guard Bent Billiard is very nice and feels great in the hand. Give the finished pipe a look in the photos below. It is a nice pipe whose dimensions are Length: 5 inches, Height: 2 inches, Outside diameter of the bowl: 1 ¼ inches, Chamber diameter: ¾ of an inch. The weight of the pipe is 48 grams/1.69 ounces. Thanks for walking through the restoration with me as I worked over another beautiful pipe. This one will be going on the rebornpipes store, in the Danish Pipe Makers Section shortly. If you are interested in adding it to your collection let me know by message or by email to slaug@uniserve.com. Thanks for your time.

As always, I encourage your questions and comments as you read the blog. Thanks to each of you who are reading this blog. Remember we are not pipe owners; we are pipe men and women who hold our pipes in trust until they pass on into the trust of those who follow us.

Fresh Life for a Vallo Made in Denmark 373 Bent Sitter


Blog by Steve Laug

The next pipe I am working on was purchased quite a while ago on 10/20/2016 from an antique shop in Astoria, Oregon, USA. This was another dirty pipe but underneath it had some nice grain and a nice shape and no fills that were visible. It was obviously it had been someone’s favourite smoker. The pipe was stamped on the left side of the shank that reads Vallo [over] Made in Denmark. On the underside of the shank next to the stem/shank junction it is stamped the shape number 373. The pipe was and egg light shape made to be a sitter. It was well balanced and stood. The dirty finish was not able to hide the beauty in the grime. There were tars and oils ground into the surface of the briar. The bowl had a thick cake that flowed over the top of the rim in a heavy lava coat. The condition of the inner edge was hard to assess under the cake and the lava coat. The stem was a black vulcanite saddle stem with a stamped white V on the left side. There were many tooth marks and chatter on both sides ahead of the button. Jeff took photos of the pipes before he started his clean up work. Jeff took photos of the rim and bowl to show the heavy cake and heavy lava coat covering the rim top. The inner edge of the rim is caked and hard to assess in terms of its condition. It really was a dirty pipe but still a beauty. He also took photos of the stem surfaces to show its overall condition when it arrived. You can see the tooth marks and chatter on both sides of the stem. The photos of the sides and heel of the bowls show some beautiful grain around the bowl and shank sides. The brown stain on the briar adds depth to the finish on the pipe and makes the grain really stand out. It shows a lot of promise. He also took photos of the stamping on the shank sides. They are clear and it reads as noted above. He also took a photo of the Vallo “V” stamp on the left side of the stem. I looked on Pipedia and on Pipephil and found nothing on the Vallo brand. I turned to my copy of the book Who made That Pipe. It identifies Vallo pipe as having been made by Jarl, Denmark.

Armed with that information I went back to Pipedia and looked up information on the Jarl pipe (https://pipedia.org/wiki/Jarl). I quote the information on that below.

In December of 2010 Ellen Jarl wrote that Jarl pipes were made by her grandfather, Niels Mogens Jørgensen in a little factory in the town of Bramdrupdam, just outside Kolding, Denmark. We have no reason to doubt that Niels Mogens Jørgensen is the maker of these pipes.

I now knew a bit about the pipe. It was now time to go to work on the pipe itself.

Jeff cleaned up the pipe for me. He reamed the bowl with a PipNet pipe reamer and cleaned it up with a Savinelli Fitsall Pipe Knife. He scrubbed the exterior with Murphy’s Oil Soap and a tooth brush to clean off the grime off the finish and the overflow of lava on the rim top. The cleaning had removed the grime on the rim top. He cleaned up the internals of the shank, mortise and stem with pipe cleaners, cotton swabs and alcohol to remove all of the oils and tars in the pipe. He soaked the stem in Briarvilles Pipe Stem Deoxidizer and was able to remove much of the oxidation, calcification. When it arrived here in Vancouver it was a clean pipe and I knew what I had to work with. I took photos of it before I started my part of the restoration. I took a photo of the rim top and the stem to show their condition once it arrived in Canada. Jeff was able to clean up the cake and the lava overflow that was shown in the rim and bowl photos above. The rim top and the inner edge of the bowl looked very good – just some darkening. The stem looked better and the tooth marks and chatter on both sides near the button. The stamping was clear and readable as noted above. I removed the stem from the shank and took a photo to give a sense of the proportions of this pipe. I started my work on the pipe by polishing the briar with micromesh because it was in such good condition. I polished it with 1500-12000 grit micromesh sanding pads. I wiped the bowl down after each sanding pad with a damp cloth. I rubbed the briar down with Before & After Restoration Balm. I worked it into the briar with my fingertips. The product works to clean, enliven and preserve the briar. I let it sit for 10 minutes while I worked on the stem. After the time passed I buffed it with a cotton cloth to deepen the shine. The briar really comes alive with the balm. I set the bowl aside and turned my attention to the stem. I started by addressing the tooth marks on the surface of the stem on both sides. I “painted” the surface of the stem with the flame of a lighter to lift them. I was able to lift them significantly. I scrubbed the stem surface with Soft Scrub cleanser to remove the oxidation in the tooth marks. I used a rubberized black super glue to fill in the remaining marks. I set the stem aside to let the repairs cure. Once it cured I used a small file to flatten the repair and recut the button edge. I used a folded piece of 220 grit sandpaper to smooth out the repairs. I touched up the V stamp on the left side of the stem with some white acrylic fingernail polish. I scraped off the excess and buffed it lightly with a 100 grit sanding pad. It is clear and readable.I started working on polishing the stem with my 320-3500 grit sanding pads. I was able to remove the tooth marks and chatter on both sides ahead of the button. It looked much better at this point in the process. I polished the stem with micromesh sanding pads – dry sanding with 1500-12000 grit pads. I wiped the stem down after each sanding pad with Obsidian Oil. I polished it with Before & After Pipe Stem Polish – both Fine and Extra Fine. I gave it a coat of Obsidian Pipe Stem Oil. It works to protect the stem from oxidizing. I set it aside to dry.This beautifully grained Danish Made by Jarl, Vallo Bent Apple 373 Sitter with a saddle vulcanite stem turned out very nice. The mix of brown stains highlights the great grain around the bowl sides and bottom. The brass banded top edge and rim top and brass band give the pipe a touch of class. The finish on the pipe is in excellent condition. I put the stem back on the bowl and carefully buffed the pipe with Blue Diamond on the buffing wheel. I gave the bowl and stem multiple coats of carnauba wax on the buffing wheel and followed that by buffing the entire pipe with a clean buffing pad. I hand buffed the pipe with a microfiber cloth to deepen the shine. The finished Vallo Bent Apple Sitter is very nice and feels great in the hand. Give the finished pipe a look in the photos below. It is a nice pipe whose dimensions are Length: 5 inches, Height: 1 ¾ inches, Outside diameter of the bowl: 1 ¼ inches, Chamber diameter: ¾ of an inch. The weight of the pipe is 59 grams/2.08 ounces. Thanks for walking through the restoration with me as I worked over another beautiful pipe. This one will be going on the rebornpipes store, in the Danish Pipe Makers Section shortly. If you are interested in adding it to your collection let me know by message or by email to slaug@uniserve.com. Thanks for your time.

As always, I encourage your questions and comments as you read the blog. Thanks to each of you who are reading this blog. Remember we are not pipe owners; we are pipe men and women who hold our pipes in trust until they pass on into the trust of those who follow us.

Giving new life to a lovely Danish Made Gilt Edge Stanwell 98 Lovat


Blog by Steve Laug

The next pipe I am working on was purchased a year ago on 01/26/2023 as part of a group of pipes from a fellow in Copenhagen, Denmark. This was another dirty pipe but underneath it had some nice grain. It was obviously it had been someone’s favourite smoker. The pipe was stamped on the underside of the shank that reads Stanwell [over] Made in Denmark [over] Gilt Edge. On the right side of the shank it is stamped with a 98 which is the shape for a Lovat. There was a gold band around the shank end and at the rim top and edge that were a very nice touch and what gave it the name Gilt Edge. The dirty finish was not able to hide the beauty in the grime. There were tars and oils ground into the surface of the briar. The bowl had a thick cake that flowed over the top of the rim in a heavy lava coat. The condition of the inner edge was hard to assess under the cake and the lava coat. The stem was a black vulcanite saddle stem with an inlaid brass crown S on the left side. There were light tooth marks and chatter on both sides ahead of the button. The bite mark on the underside was deep and almost through the vulcanite. Jeff took photos of the pipes before he started his clean up work. Jeff took photos of the rim and bowl to show the heavy cake and heavy lava coat covering the rim top. The inner edge of the rim is caked and hard to assess in terms of its condition. It really was a dirty pipe but still a beauty. He also took photos of the stem surfaces to show its overall condition when it arrived. You can see the small deep tooth mark on the underside. The photos of the sides and heel of the bowls show some beautiful grain around the bowl and shank sides. The brown stain on the briar adds depth to the finish on the pipe and makes the grain really stand out. The gold rim cap and shank band are a beautiful addition. It shows a lot of promise. He also took photos of the stamping on the shank sides. It is faint but reads as noted above. He also took a photo of the Crown S stamp on the left side of the stem. From what I can find on the web the Rondo line was an older line of Stanwell pipes that is similar to the Brass Band line but has yellow acrylic between the bands. It is a nice looking pipe but one about which I could find little information.

I turned to the article on Pipedia that gave background information the shape numbers and the designers of the shapes (https://pipedia.org/wiki/Stanwell_Shape_Numbers_and_Designers). From what I can see there the shape number 98 was made in two versions. The first is a Pot shaped pipe with a saddle stem. The second shape is a Lovat. The pipe on the table is clearly the second shape listed – a Lovat.

Jeff cleaned up the pipe for me. He reamed the bowl with a PipNet pipe reamer and cleaned it up with a Savinelli Fitsall Pipe Knife. He scrubbed the exterior with Murphy’s Oil Soap and a tooth brush to clean off the grime off the finish and the overflow of lava on the rim top. The cleaning had removed the grime on the rim top. He cleaned up the internals of the shank, mortise and stem with pipe cleaners, cotton swabs and alcohol to remove all of the oils and tars in the pipe. He soaked the stem in Briarvilles Pipe Stem Deoxidizer and was able to remove much of the oxidation, calcification. When it arrived here in Vancouver it was a clean pipe and I knew what I had to work with. I took photos of it before I started my part of the restoration. I took a photo of the rim top and the stem to show their condition once it arrived in Canada. Jeff was able to clean up the cake and the lava overflow that was shown in the rim and bowl photos above. The rim top and the inner edge of the bowl showed some darkening on the top and some damage on the left inner edge with a burn mark. The stem looked better and the tooth marks and chatter on both sides near the button. It is hard to see the pinhole in the stem surface on the underside but it is present and small.The stamping was hard to capture it with the camera but it is readable on the underside of the shank near the shank/stem junction. The stamping on the right side of the shank shows the shape number 98 mid shank. I removed the stem from the shank and took a photo to give a sense of the proportions of this Lovat.I started my work on the pipe by cleaning up the darkening around the inner edge of the rim and the top. I started by addressing the chip out of the top inner edge and top of the bowl. I worked on the inner edge with a folded piece of 220 grit sandpaper and smoothed out the rim top at the same time. It began to look very good at this point. The grain and colour began to shine through.I polished the briar with micromesh because it was in such good condition. I polished it with 1500-12000 grit micromesh sanding pads. I wiped the bowl down after each sanding pad with a damp cloth. I rubbed the briar down with Before & After Restoration Balm. I worked it into the briar with my fingertips. The product works to clean, enliven and preserve the briar. I let it sit for 10 minutes while I worked on the stem. After the time passed I buffed it with a cotton cloth to deepen the shine. The briar really comes alive with the balm. I set the bowl aside and turned my attention to the stem. I started by addressing the deep tooth marks on the surface of the stem on both sides. The marks on the underside were significantly deeper and had created a pin hole in the surface. I used a rubberized black super glue to fill in the deep marks and repair the pin hole. I set the stem aside to let the repairs cure. Once it cured I used a small file to flatten the repair. I used a folded piece of 220 grit sandpaper to smooth out the repairs. I started working on polishing the stem with my 320-3500 grit sanding pads. I was able to remove the tooth marks and chatter on both sides ahead of the button. It looked much better at this point in the process.I polished the stem with micromesh sanding pads – dry sanding with 1500-12000 grit pads. I wiped the stem down after each sanding pad with Obsidian Oil.I polished it with Before & After Pipe Stem Polish – both Fine and Extra Fine. I gave it a coat of Obsidian Pipe Stem Oil. It works to protect the stem from oxidizing. I set it aside to dry.This beautifully grained Danish Made Stanwell Gilt Edge 98 Lovat with a saddle vulcanite stem turned out very nice. The mix of brown stains highlights the great grain around the bowl sides and bottom. The brass banded top edge and rim top and brass band give the pipe a touch of class. The finish on the pipe is in excellent condition. I put the stem back on the bowl and carefully buffed the pipe with Blue Diamond on the buffing wheel. I gave the bowl and stem multiple coats of carnauba wax on the buffing wheel and followed that by buffing the entire pipe with a clean buffing pad. I hand buffed the pipe with a microfiber cloth to deepen the shine. The finished Stanwell Gilt Edge Lovat is very nice and feels great in the hand. Give the finished pipe a look in the photos below. It is a nice pipe whose dimensions are Length: 5 inches, Height: 1 ¾ inches, Outside diameter of the bowl: 1 1/8 inches, Chamber diameter: ¾ of an inch. The weight of the pipe is 37 grams/1.31 ounces. Thanks for walking through the restoration with me as I worked over another beautiful pipe. This one will be going on the rebornpipes store, in the Danish Pipe Makers Section shortly. If you are interested in adding it to your collection let me know by message or by email to slaug@uniserve.com. Thanks for your time.

As always, I encourage your questions and comments as you read the blog. Thanks to each of you who are reading this blog. Remember we are not pipe owners; we are pipe men and women who hold our pipes in trust until they pass on into the trust of those who follow us.

Restoring a Danish Made Stanwell Rondo Lovat


Blog by Steve Laug

The next pipe I am working on was purchased a year ago on 01/26/2023 as part of a group of pipes from a fellow in Copenhagen, Denmark. This was another dirty pipe but underneath it had some nice grain. It was obviously it had been someone’s favourite smoker. The pipe was stamped on the underside of the shank that reads Stanwell [over] Made in Denmark [over] Rondo. The stamping is faint but possibly the shape number is 98 which is the shape for a lovat. The dirty finish was not able to hide the beauty in the grime. There were tars and oils ground into the surface of the briar. The bowl had a moderate cake that flowed over the top of the rim in a spotty lava coat. The inner edge looked to be in good condition under the light lava coat. The stem was a black acrylic saddle stem with an inlaid silver crown S on the left side. There were light tooth marks and chatter on both sides ahead of the button. Jeff took photos of the pipes before he started his clean up work. Jeff took photos of the rim and bowl to show the heavy cake and heavy lava coat covering the rim top. The inner edge of the rim is caked but appears to be in good condition. It really was a dirty pipe but still a beauty. He also took photos of the stem surfaces to show its overall condition when it arrived. The photos of the sides and heel of the bowls show some beautiful grain around the bowl and shank sides. The brown stain on the briar adds depth to the finish on the pipe and makes the grain really stand out. It shows some promise.He also took photos of the stamping on the shank sides. It is faint but reads as noted above. He also took a photo of the Crown S stamp on the left side of the stem. From what I can find on the web the Rondo line was an older line of Stanwell pipes that is similar to the Brass Band line but has yellow acrylic between the bands. It is a nice looking pipe but one about which I could find little information.

I turned to the article on Pipedia that gave background information the shape numbers and the designers of the shapes (https://pipedia.org/wiki/Stanwell_Shape_Numbers_and_Designers). From what I can see there the shape number 98 was made in two versions. The first is a Pot shaped pipe with a saddle stem. The second shape is a Lovat. It seems to me that the pipe I am working on kind of combines these two shapes – it is a Lovat shaped Pot. Long shank with a Pot shaped bowl.

Jeff cleaned up the pipe for me. He reamed the bowl with a PipNet pipe reamer and cleaned it up with a Savinelli Fitsall Pipe Knife. He scrubbed the exterior with Murphy’s Oil Soap and a tooth brush to clean off the grime off the finish and the overflow of lava on the rim top. The cleaning had removed the grime on the rim top. He cleaned up the internals of the shank, mortise and stem with pipe cleaners, cotton swabs and alcohol to remove all of the oils and tars in the pipe. He soaked the stem in Briarvilles Pipe Stem Deoxidizer and was able to remove much of the oxidation, calcification. When it arrived here in Vancouver it was a clean pipe and I knew what I had to work with. I took photos of it before I started my part of the restoration. I took a photo of the rim top and the stem to show their condition once it arrived in Canada. Jeff was able to clean up the cake and the lava overflow that was shown in the rim and bowl photos above. The rim top and the inner edge of the bowl looked very good. The stem looked better, though there were light tooth marks and chatter on both sides near the button.The stamping was faint enough that I could not capture it with the camera. I removed the stem from the shank and took a photo to give a sense of the proportions of this Lovat and Pot bowl.I started my work on the pipe by cleaning up the darkening around the inner edge of the rim and the top with a folded piece of 220 grit sandpaper.I polished the briar with micromesh because it was in such good condition. I polished it with 1500-12000 grit micromesh sanding pads. I wiped the bowl down after each sanding pad with a damp cloth. I rubbed the briar down with Before & After Restoration Balm. I worked it into the briar with my fingertips. The product works to clean, enliven and preserve the briar. I let it sit for 10 minutes while I worked on the stem. After the time passed I buffed it with a cotton cloth to deepen the shine. The briar really comes alive with the balm. I started working on polishing the stem with my 320-3500 grit sanding pads. I was able to remove the tooth marks and chatter on both sides ahead of the button. It looked much better at this point in the processI polished the stem with micromesh sanding pads – dry sanding with 1500-12000 grit pads. I wiped the stem down after each sanding pad with Obsidian Oil.I polished it with Before & After Pipe Stem Polish – both Fine and Extra Fine. I gave it a coat of Obsidian Pipe Stem Oil. It works to protect the stem from oxidizing. I set it aside to dry.This beautifully grained Danish Made Stanwell Rondo 98 Lovat with a saddle vulcanite stem turned out very nice. The mix of brown stains highlights the great grain around the bowl sides and bottom. The rim top and edges look very good. The finish on the pipe is in excellent condition. I put the stem back on the bowl and carefully buffed the pipe with Blue Diamond on the buffing wheel. I gave the bowl and stem multiple coats of carnauba wax on the buffing wheel and followed that by buffing the entire pipe with a clean buffing pad. I hand buffed the pipe with a microfiber cloth to deepen the shine. The finished Stanwell Rondo Lovat is very nice and feels great in the hand. Give the finished pipe a look in the photos below. It is a nice pipe whose dimensions are Length: 5 inches, Height: 1 ½ inches, Outside diameter of the bowl: 1 ¼ inches, Chamber diameter: ¾ of an inch. The weight of the pipe is 28 grams/0.99 ounces. Thanks for walking through the restoration with me as I worked over another beautiful pipe. This one will be going on the rebornpipes store, in the Danish Pipe Makers Section shortly. If you are interested in adding it to your collection let me know by message or by email to slaug@uniserve.com. Thanks for your time.

As always, I encourage your questions and comments as you read the blog. Thanks to each of you who are reading this blog. Remember we are not pipe owners; we are pipe men and women who hold our pipes in trust until they pass on into the trust of those who follow us.

Such Stunning Grain on this Danish Made Stanwell Royal Prince 51 Billiard


Blog by Steve Laug

The next pipe I am working on was purchased a year ago on 01/26/2023 as part of a group of pipes from a fellow in Copenhagen, Denmark. This was another dirty pipe but underneath it had some astonishingly beautiful grain. It was obviously it had been someone’s favourite smoker. The pipe was stamped on the left side of the shank that reads Stanwell [over] Royal [over] Prince. On the right side of the shank it was stamped with the shape number 51. The dirty finish was not able to hide the beauty in the grime. There were tars and oils ground into the surface of the briar. The bowl had a very thick cake that flowed over the top of the rim in a heavy lava coat. The inner edge looked to be in good condition and showed lava and darkening. The stem was a black vulcanite taper stem stamped with a faded white crown S on the left side. It had some light tooth marks and chatter on both sides ahead of the button. There was some oxidation and calcification on both sides but it had a lot of potential. Jeff took photos of the pipes before he started his clean up work. Jeff took photos of the rim and bowl to show the heavy cake and heavy lava coat covering the rim top. The inner edge of the rim is caked but appears to be in good condition. It really was a dirty pipe but still a beauty. He also took photos of the stem surfaces to show its overall condition when it arrived. The photos of the sides and heel of the bowls show some beautiful grain around the bowl and shank sides. The brown stain on the briar adds depth to the finish on the pipe and makes the grain really stand out. It shows some promise. He also took photos of the stamping on the shank sides. It reads as noted above. He also took a photo of the Crown S stamp on the left side of the stem. I did some searching on Google and found a pipe very much like the pipe that I am working on  Pinterest (https://www.pinterest.ca/pin/danish-estates-stanwell-royal-prince-51-pre2010-unsmoked–6544361942508713/). It gives a great description of the 51 Billiard in the Royal Prince line. I quote it below.

A beautiful little classic Billiard from Stanwell, this “51” shape features a lot of iconic Danish cues — like the lower-set waistline of the bowl, the slight sweeping motion of the transition, and the clean, minimalist lines of the shank and stem. The chamber proportions are perfect for a bit of folded flake or some pure Virginias, and the flame grain on this Royal Prince edition is stunning.

Jeff cleaned up the pipe for me. He reamed the bowl with a PipNet pipe reamer and cleaned it up with a Savinelli Fitsall Pipe Knife. He scrubbed the exterior with Murphy’s Oil Soap and a tooth brush to clean off the grime off the finish and the overflow of lava on the rim top. The cleaning had removed the grime on the rim top. He cleaned up the internals of the shank, mortise and stem with pipe cleaners, cotton swabs and alcohol to remove all of the oils and tars in the pipe. He soaked the stem in Briarvilles Pipe Stem Deoxidizer and was able to remove much of the oxidation, calcification. When it arrived here in Vancouver it was a clean pipe and I knew what I had to work with. I took photos of it before I started my part of the restoration. I took a photo of the rim top and the stem to show their condition once it arrived in Canada. Jeff was able to clean up the cake and the lava overflow that was shown in the rim and bowl photos above. The rim top and the inner edge of the bowl looked very good. The stem looked better, though there were light tooth marks and chatter on both sides near the button. I took photos of the stamping on the shank sides to show that it was readable and undamaged by the cleanup work. I removed the stem from the shank and took a photo of the parts to give a sense of what the pipe looks like. I started my work on the pipe by polishing the briar with micromesh because it was in such good condition. I polished it with 1500-12000 grit micromesh sanding pads. I wiped the bowl down after each sanding pad with a damp cloth. I rubbed the briar down with Before & After Restoration Balm. I worked it into the briar with my fingertips. The product works to clean, enliven and preserve the briar. I let it sit for 10 minutes while I worked on the stem. After the time passed I buffed it with a cotton cloth to deepen the shine. The briar really comes alive with the balm. I set the bowl aside and turned my attention to the stem. The upper portion of the stem was in good condition so I started with touching up the white crown S stamp on the left side of the stem. I used white acrylic fingernail polish to rework the stamping. I applied it with the brush that came with it and when it dried scraped off the excess and polished it off with a 2000 grit sanding pad. I started working on polishing the stem with my 320-2500 grit sanding pads. I was able to remove the scratches and light tooth marks and chatter on both sides ahead of the button. It looked much better at this point in the process.I polished the stem with micromesh sanding pads – dry sanding with 1500-12000 grit pads. I wiped the stem down after each sanding pad with Obsidian Oil. I polished it with Before & After Pipe Stem Polish – both Fine and Extra Fine. I gave it a coat of Obsidian Pipe Stem Oil. It works to protect the stem from oxidizing. I set it aside to dry. This beautifully grained Danish Made Stanwell Royal Prince 51 Billiard with a taper vulcanite stem turned out very nice. The mix of brown stains highlights the great grain around the bowl sides and bottom. The rim top and edges look very good. The finish on the pipe is in excellent condition. I put the stem back on the bowl and carefully buffed the pipe with Blue Diamond on the buffing wheel. I gave the bowl and stem multiple coats of carnauba wax on the buffing wheel and followed that by buffing the entire pipe with a clean buffing pad. I hand buffed the pipe with a microfiber cloth to deepen the shine. The finished Stanwell Royal Prince 51 Billiard is very nice and feels great in the hand. Give the finished pipe a look in the photos below. It is a nice pipe whose dimensions are Length: 5 ¾ inches, Height: 1 ¾ inches, Outside diameter of the bowl: 1 ¼ inches, Chamber diameter: ¾ of an inch. The weight of the pipe is 34 grams/1.20 ounces. Thanks for walking through the restoration with me as I worked over another beautiful pipe. This one will be going on the rebornpipes store, in the Danish Pipe Makers Section shortly. If you are interested in adding it to your collection let me know by message or by email to slaug@uniserve.com. Thanks for your time.

As always, I encourage your questions and comments as you read the blog. Thanks to each of you who are reading this blog. Remember we are not pipe owners; we are pipe men and women who hold our pipes in trust until they pass on into the trust of those who follow us.

A Fun Restoration of a Danish Made Golden Contrast 02 Scoop


Blog by Steve Laug

I have always been intrigued by the Stanwell Golden Contrast finish regardless of the pipes it has been applied to. The contrast of dark and light playing across the grain is beautiful. To me the lines and the elegance of the pipe are stunning and the contrast stain makes the lay of pipe with the grain gorgeous. The stain highlights the birdseye and the flame grain and makes them pop from the surface of the bowl and shank. I did a little digging because I wanted to confirm my guess/my suspicions about the designer. What I found out confirmed what I was thinking. There are two versions listed of the shape number 02. The first is a Freehand, oval bowl and stem, by Sixten Ivarsson. The second is a bent, egg-shaped bowl, sloping top, full mouthpiece. The second one is a clear description of the pipe in hand. Still uncertain of the designer but it is distinctively Danish. For a list of various Stanwell Shape numbers and who they are attributed to you can read this list compiled by leading Stanwell Collector, the late Bas Stevens on rebornpipes at: https://rebornpipes.com/2013/09/03/stanwell-shapes-compiled-by-bas-stevens/

This particular pipe was purchased from an auction in Garland, Texas, USA on 06/24/2023. We always keep an eye out for Stanwell pipes and particularly Golden Contrast pipes. This one was in pretty decent shape. The finish was filthy but appeared to be in great shape. The rim showed an overflow of thick lava coming from the thick cake in the bowl. It is always hard to tell the condition of the inner edge with this kind of lava and cake but it can go one of two ways – protected and fine or damaged and burned. Cleaning would reveal which is true here. The internals were dirty with tars and oils. The stem was oxidized and calcified on the top and underside of the stem from the button forward. There was some tooth chatter as well but no deep tooth marks. The brass crown S on the left side of the taper stem was heavily oxidized with white dusty build up around the entire inlay. The various photos that follow are ones that my brother took before he cleaned the pipe. They show the amazing grain on this beauty.The next photos of the rim and the shank show the condition of the pipe at arrival in Idaho. The grain around the rim top is quite stunning to me. You can see the cake in the bowl and the thick lava on the top. It was a mess but the contrast stain makes the grain even show through the lava on the rim top. Jeff took photos of the grain on the sides and heel of the bowl. It really is a stunning piece of briar. The contrast stain really makes it stand out clearly. The next photos show the various stamping on the sides of the shank. On the left side of the shank it reads Stanwell [over] Golden [over] Contrast in script on the right side it is stamped with the 02 Shape number and on the underside it reads Made in Denmark. All the stamping is sharp and clear. He also captured the heavily oxidized golden Crown “S” Stanwell logo on the left side of the taper stem. I turned to Pipedia to see if I could find specific information on the Golden Contrast line of pipes (https://pipedia.org/wiki/Stanwell). There was a short note there that I have included in full below.

Golden Contrast:  An old series. The blocks are cut on the cross grain. The pipes from this series exhibit Birds Eye grain only. Brass band and brass S in the stem. The pipes have a two-tone staining which really shows the beautiful bird’s eye grain. However, this staining simply takes too much work so the series is discontinued.

With that information I now knew about the discontinued Golden Contrast line. The pipe I was working on did not have a brass band but it did have the kind of staining and colour on the grain on the pipe. It was definitely a two-tone stain on the pipe. Now it was time to work on the pipe.

Jeff had done a great job cleaning up the pipe as usual. He reamed the pipe with a PipNet reamer and cut back the cake back to the bare briar. He cleaned up the walls with a Savinelli Fitsall Pipe Knife. He scrubbed the interior of the bowl and shank with pipe cleaners, cotton swabs and alcohol to remove the tars and oils. He scrubbed the exterior of the pipe with Murphy’s Oil Soap and a tooth brush to remove the grime from the finish. He worked on the rim top lava and darkening with the soap and tooth brush. He scrubbed the inside of the stem with alcohol and pipe cleaners. He scrubbed the exterior with Soft Scrub and then soaked it in Briarville’s Pipe Stem Deoxidizer. He washed it off with warm water to remove the Deoxidizer. The pipe looked far better when it arrived. I took photos of the bowl and rim top as well as the stem to show how clean they were. You can see that rim top and edges look very good. The stem is clean and the tooth and chatter on both sides ahead of the button is very light.I took photos of the stamping on the sides of the shank. The stamping is readable as noted above. I took the stem off the shank and took a photo to give a sense of the flow and proportion of the pipe. It is a beautiful looking pipe. I started my work on the pipe by polishing the briar with micromesh because it was in such good condition. I polished it with 1500-12000 grit micromesh sanding pads. I wiped the bowl down after each sanding pad with a damp cloth. I rubbed the briar down with Before & After Restoration Balm. I worked it into the briar with my fingertips. The product works to clean, enliven and preserve the briar. I let it sit for 10 minutes while I worked on the stem. After the time passed I buffed it with a cotton cloth to deepen the shine. The briar really comes alive with the balm. I set the bowl aside and turned my attention to the stem. I started working on polishing the stem with my 320-2500 grit sanding pads. I was able to remove the scratches and light tooth marks and chatter on both sides ahead of the button. It looked much better at this point in the process.I polished the stem with micromesh sanding pads – dry sanding with 1500-12000 grit pads. I wiped the stem down after each sanding pad with Obsidian Oil. I polished it with Before & After Pipe Stem Polish – both Fine and Extra Fine. I gave it a coat of Obsidian Pipe Stem Oil. It works to protect the stem from oxidizing. I set it aside to dry.This beautiful Stanwell Golden Contrast 02 Freehand Scoop with a taper vulcanite stem turned out very nice. The mix of brown stains highlights the birdseye and cross grain around the bowl sides and bottom. The rim top and edges look very good. The finish on the pipe is in excellent condition. I put the stem back on the bowl and carefully buffed the pipe with Blue Diamond on the buffing wheel. I gave the bowl and stem multiple coats of carnauba wax on the buffing wheel and followed that by buffing the entire pipe with a clean buffing pad. I hand buffed the pipe with a microfiber cloth to deepen the shine. The finished Stanwell Golden Contrast 02 is very nice and feels great in the hand. Give the finished pipe a look in the photos below. It is a nice pipe whose dimensions are Length: 5 ½ inches, Height: 2 inches, Outside diameter of the bowl: 1 ½ inches, Chamber diameter: ¾ of an inch. The weight of the pipe is 48 grams/1.69 ounces. Thanks for walking through the restoration with me as I worked over another beautiful pipe. This one will be going on the rebornpipes store, in the Danish Pipe Makers Section shortly. If you are interested in adding it to your collection let me know by message or by email to slaug@uniserve.com. Thanks for your time.

As always, I encourage your questions and comments as you read the blog. Thanks to each of you who are reading this blog. Remember we are not pipe owners; we are pipe men and women who hold our pipes in trust until they pass on into the trust of those who follow us.