Blog by Paresh
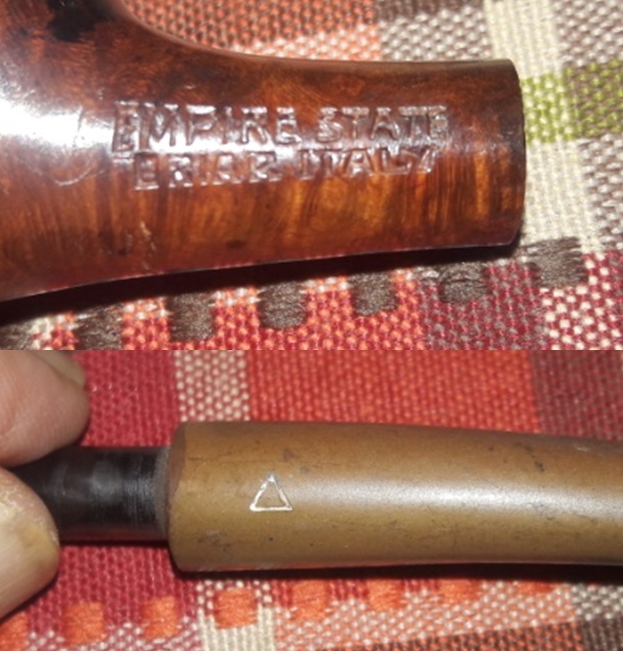
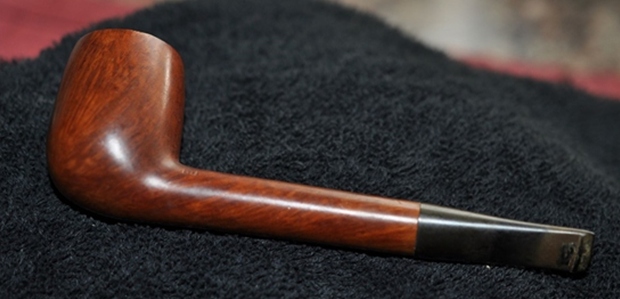
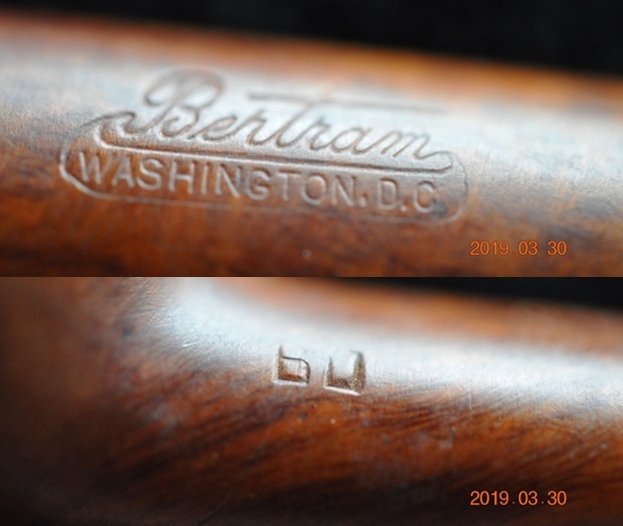
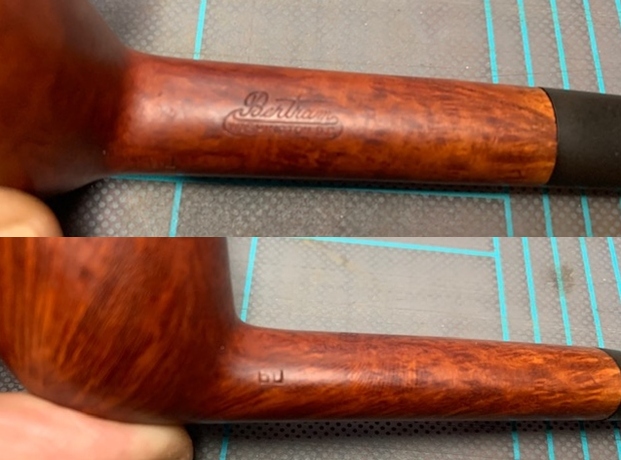
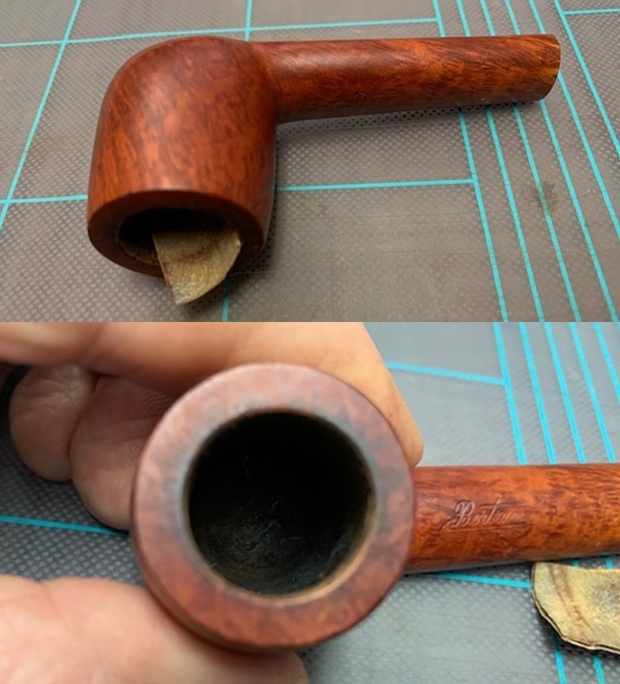
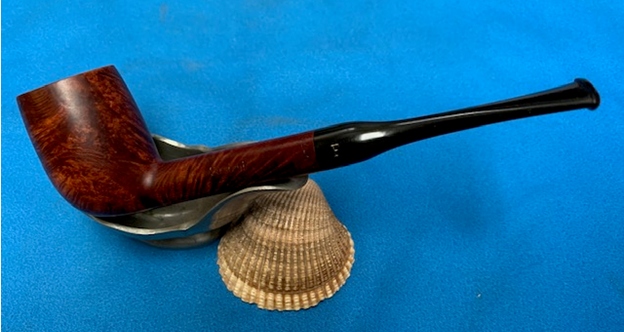
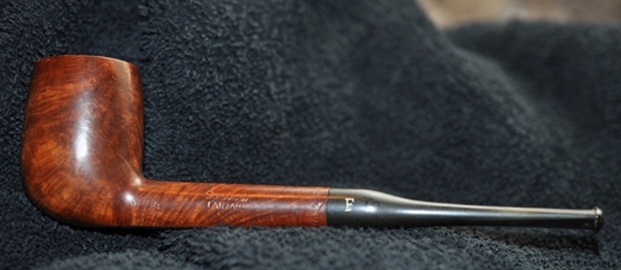
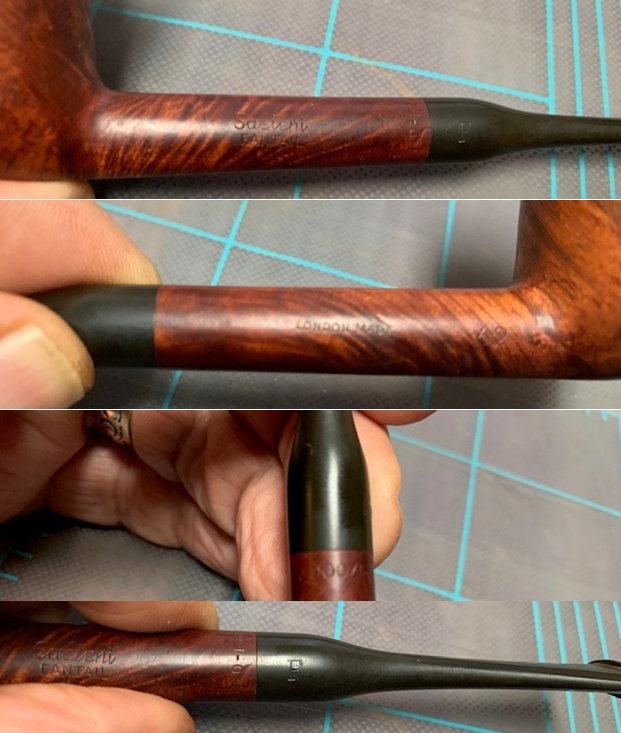
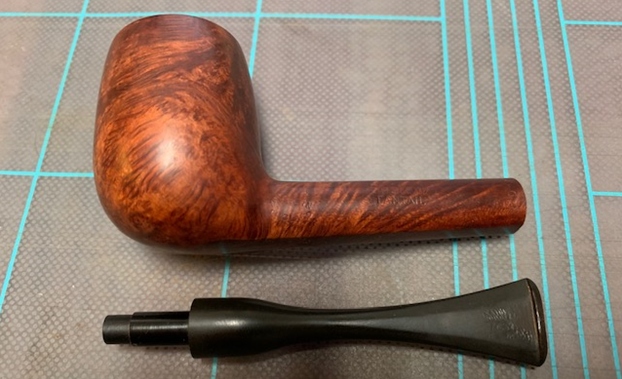
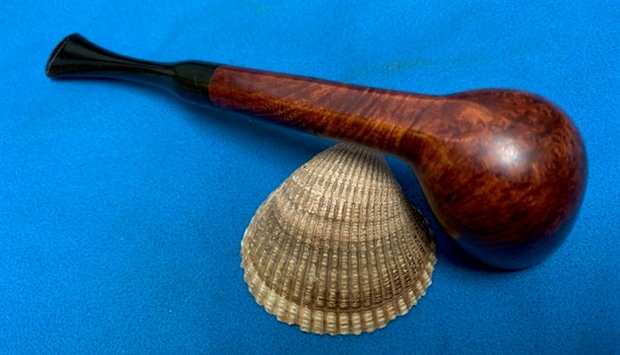
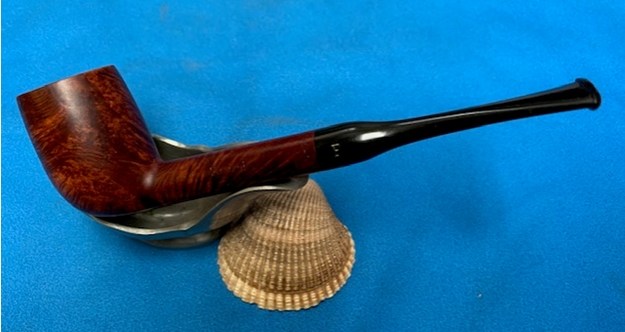
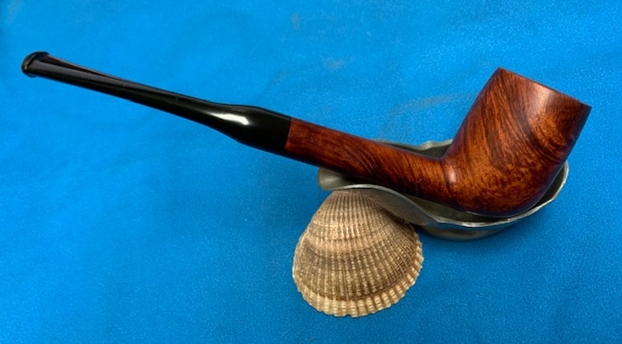
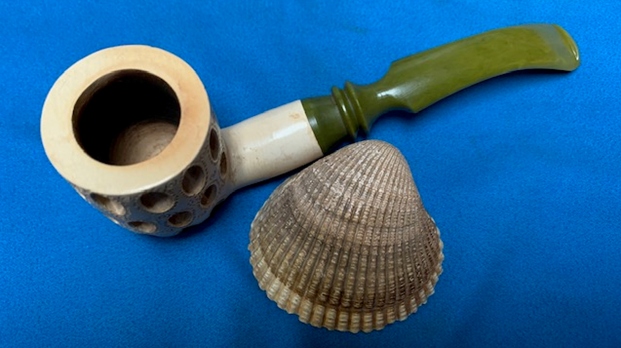
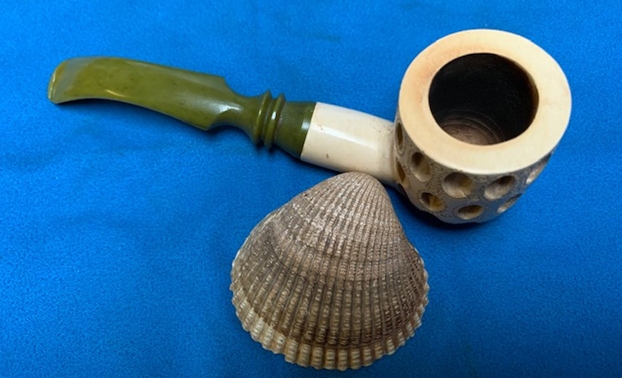
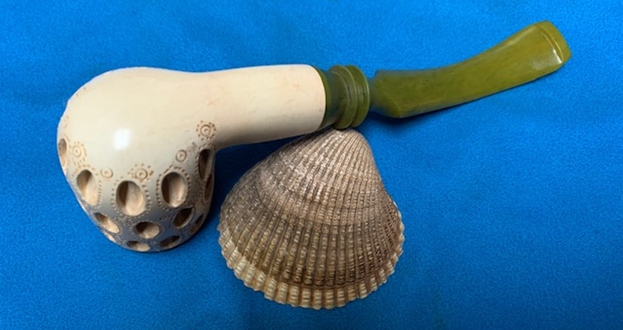
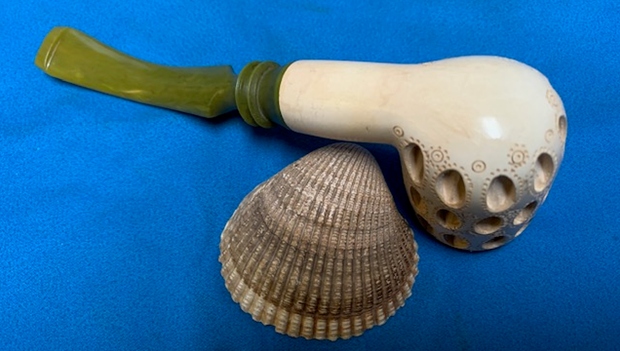
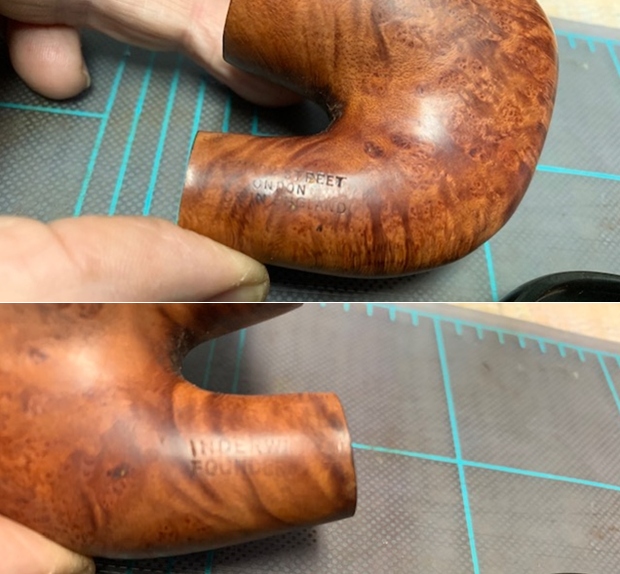
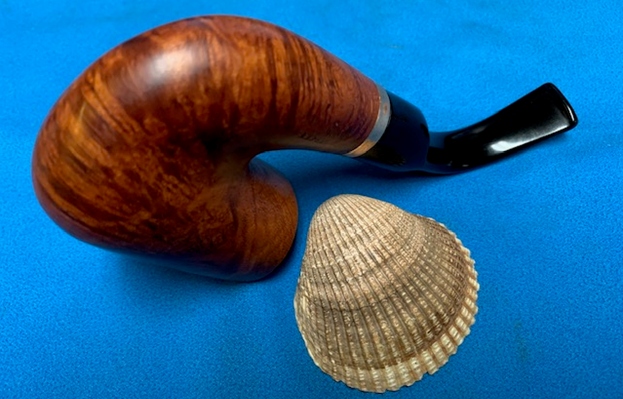
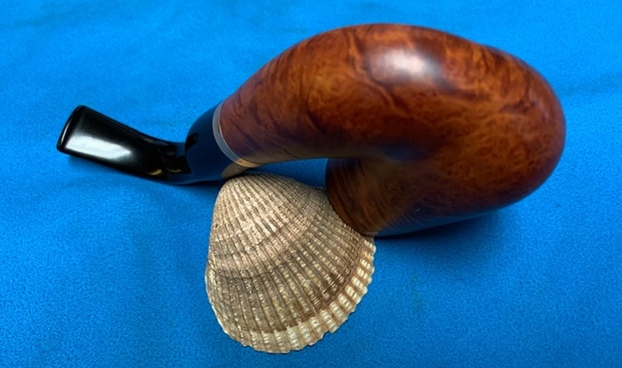
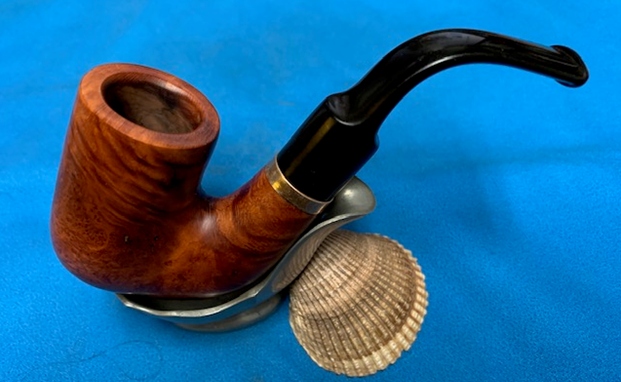
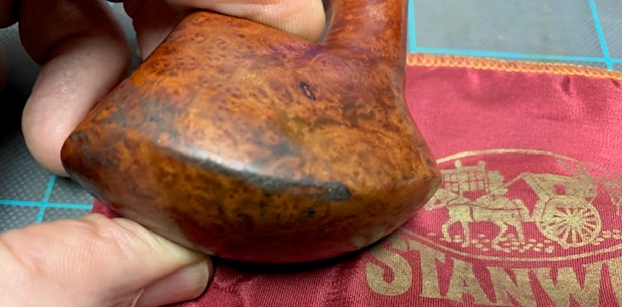
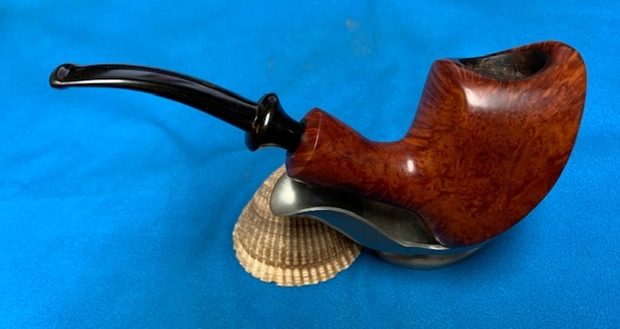
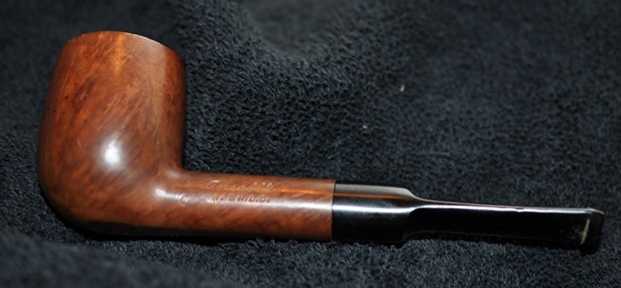
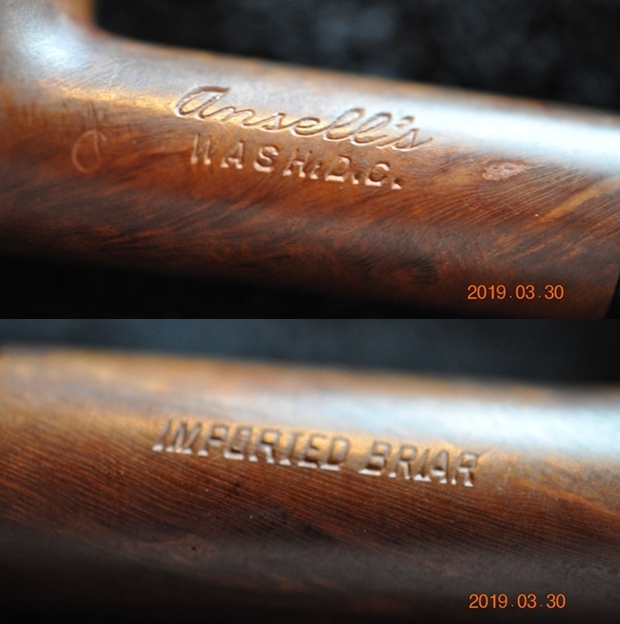
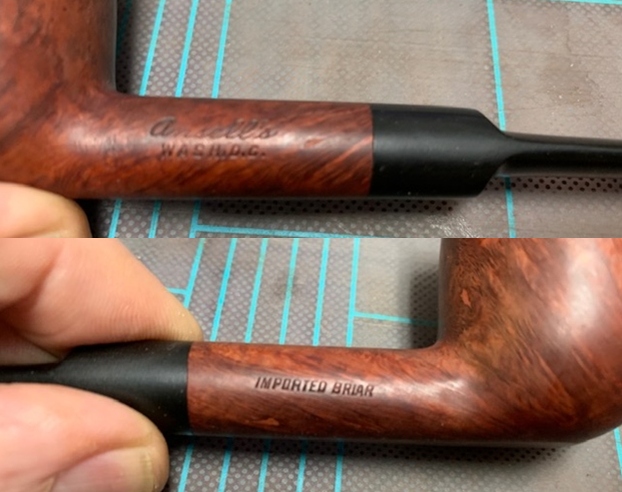
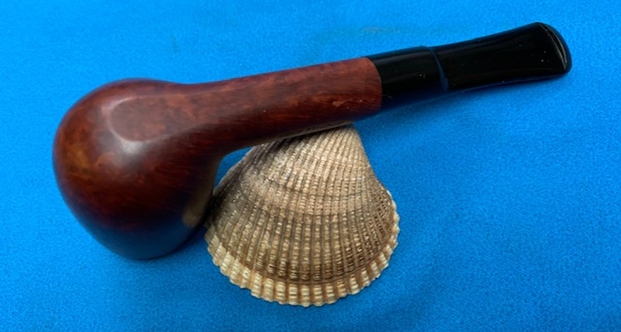
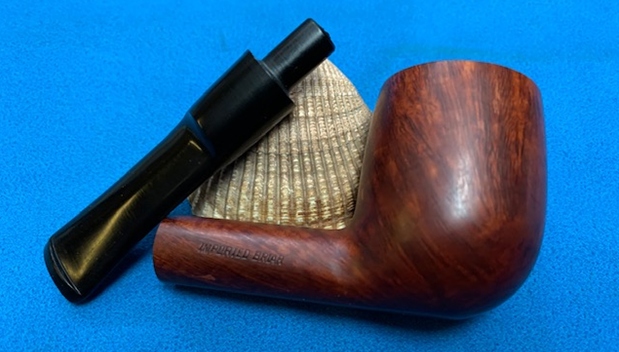
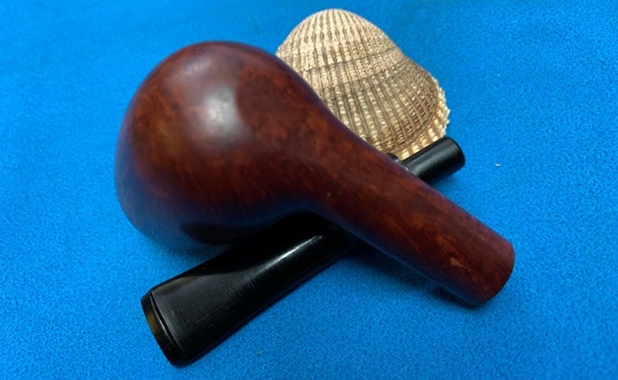
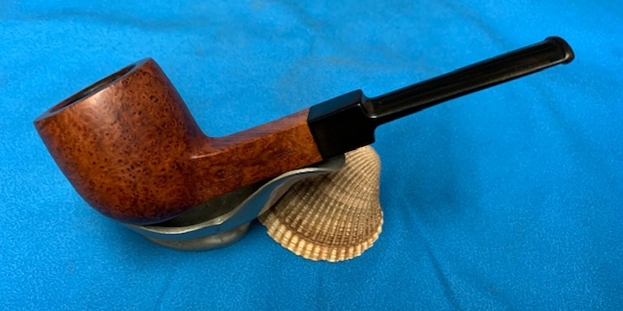
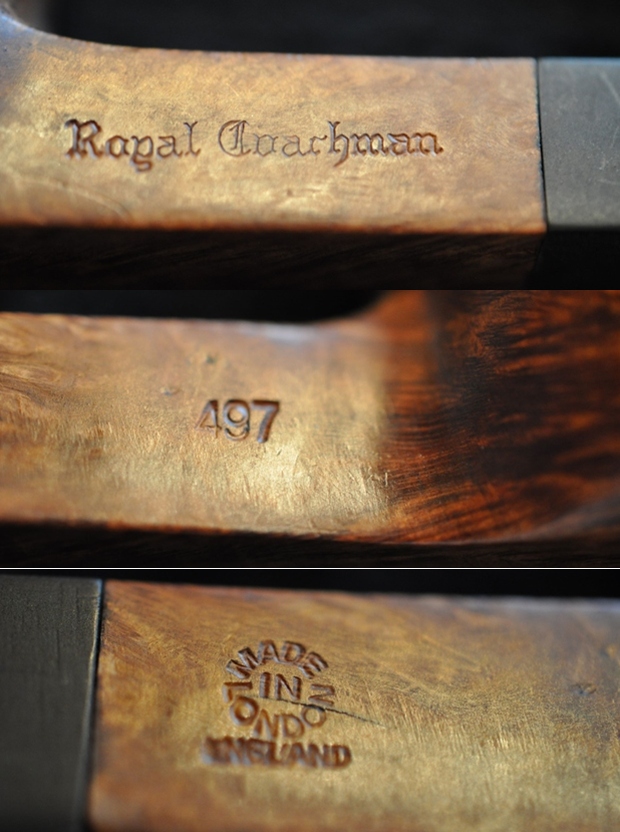
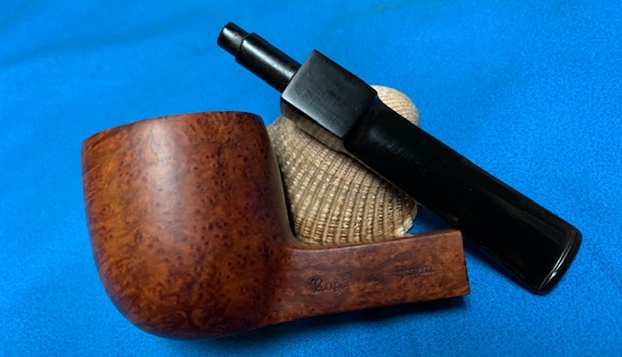
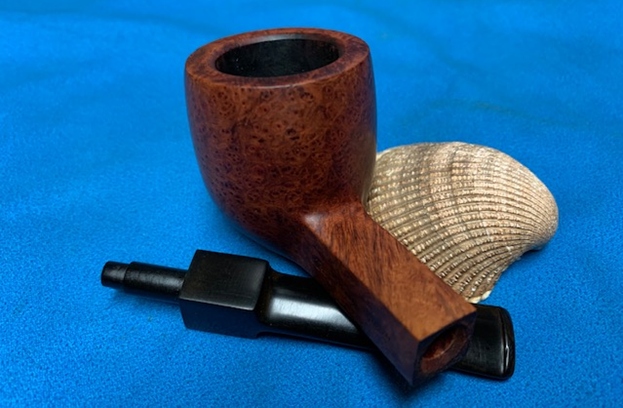
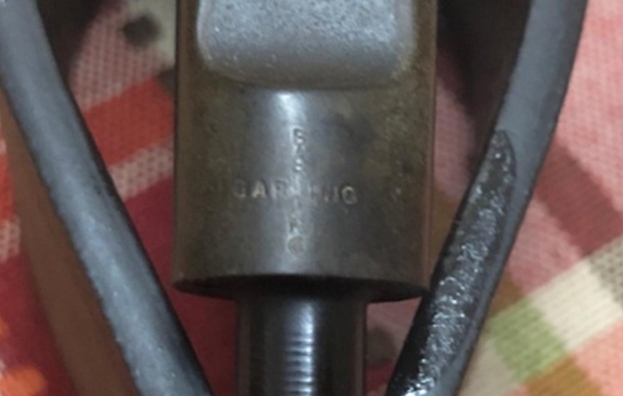
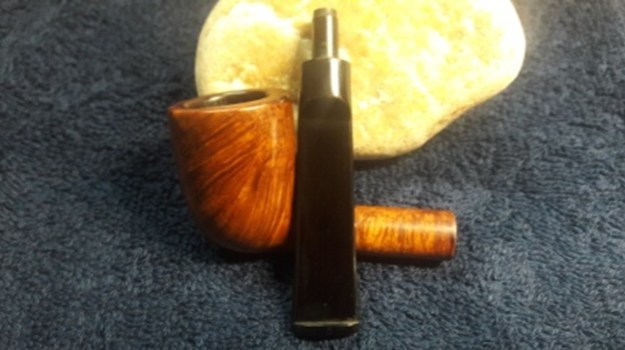
I had picked up a job lot of six pipes from a Curio Store on eBay. This lot contained brands like Barling’s, Parker and Orlik and other English make pipes. These are some of my favorite brands and I couldn’t pass them over even though they were in a hopelessly beat up condition. Here are pictures of the pipe lot that the seller had posted. This lot contained a variety of nicely shaped and grained pipes which I had been looking forward to work on. The two pipes from this pipe lot that I have completed are indicated in red and indigo arrow. The third pipe that I had selected to work on is shown in brown arrow.  The third pipe that I decided to work on from this lot is a small sized classic Dublin shaped pipe. This pipe sometime during its period of existence has had its shank repaired, thus obliterating any stampings that would have been stamped on it when it came out of the factory. However, the quality of the briar, shape and the stem style all scream BARLING!! A couple of years ago I had restored a quaint little Billiard pipe from my inherited pipe lot and this pipe does remind me of it. I visited rebornpipes.com and went through the write up (https://rebornpipes.com/2018/12/10/decking-out-my-grandfathers-battered-pre-transition-barling-1354/) to compare these two pipes. The more I saw the pre-transition Barling, the more I was convinced that this pipe had to be a Barling. The partially visible stamping on the left side of the shank shows the start of the letter B in cursive hand over LO in block letters. Having just recently worked on an Early Corporate Era Barling pipe and the shape of the stem that tapers from the broader slot end in to a narrow saddle portion is typical of Barling. The tapered vulcanite stem too has its stampings completely buffed out!
 With no clues whatsoever to pursue and me being convinced about this pipe being a Barling, I proceed with my initial visual inspection.
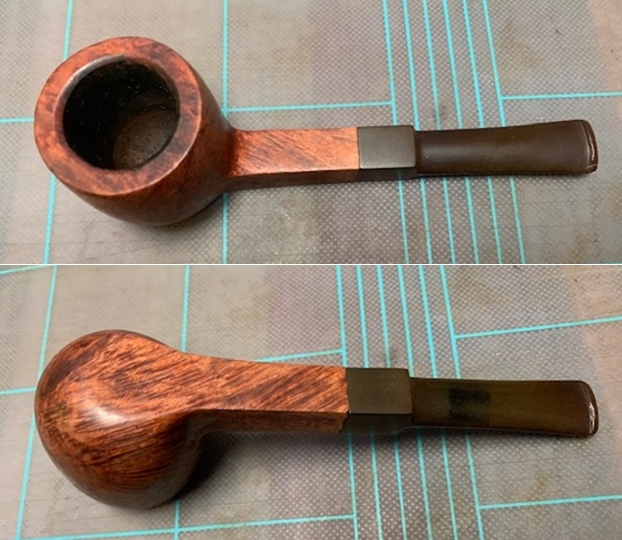
Initial Visual Inspection
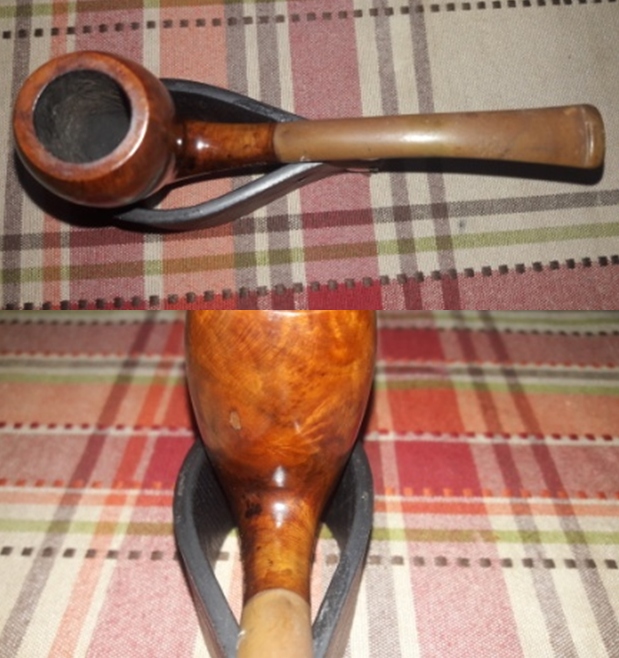
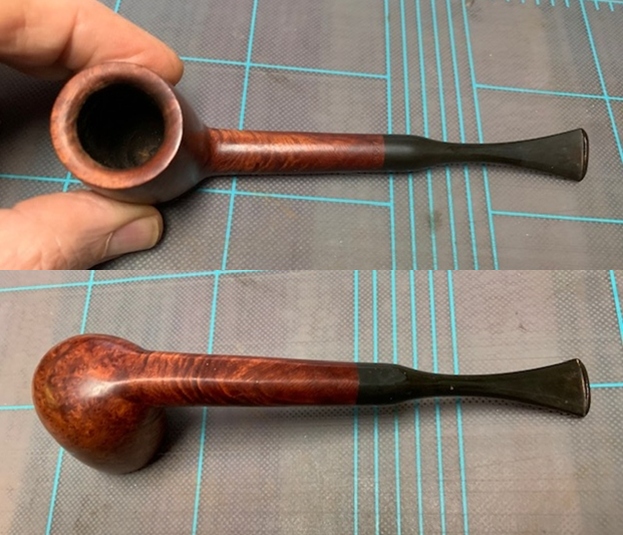
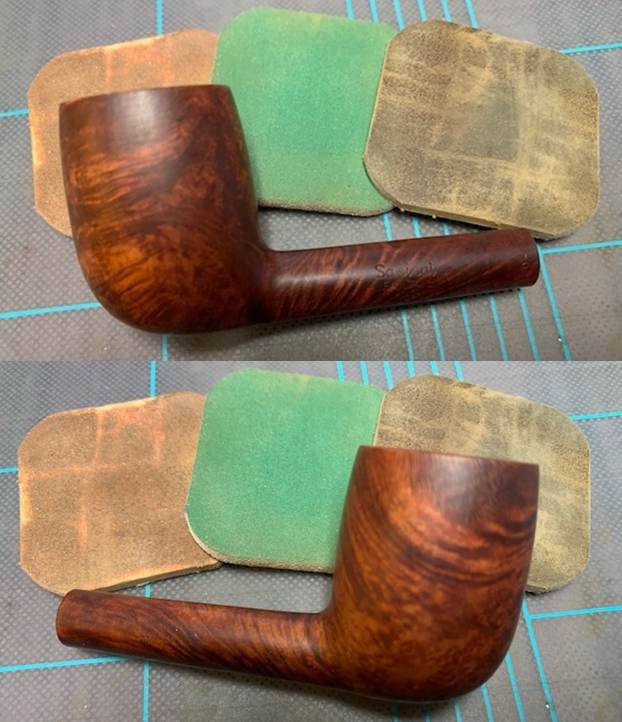
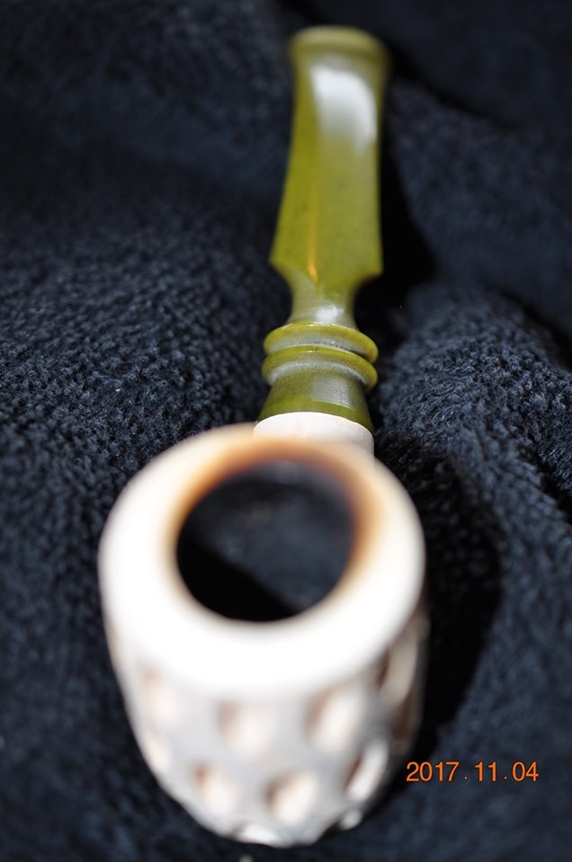
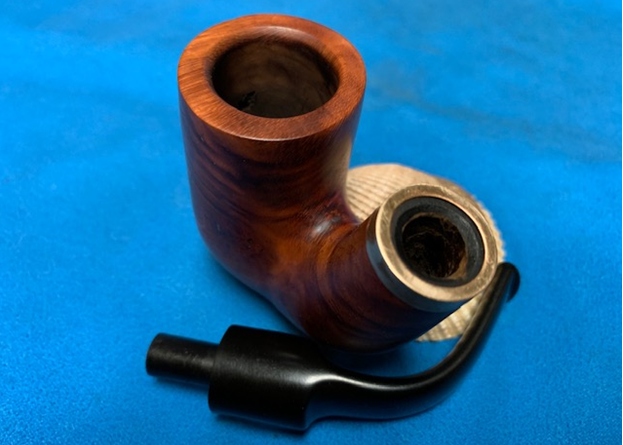
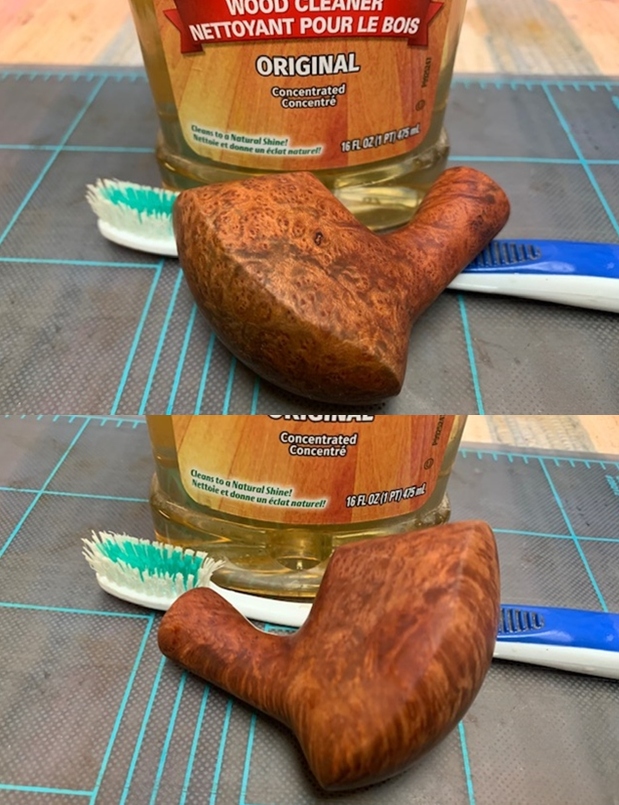
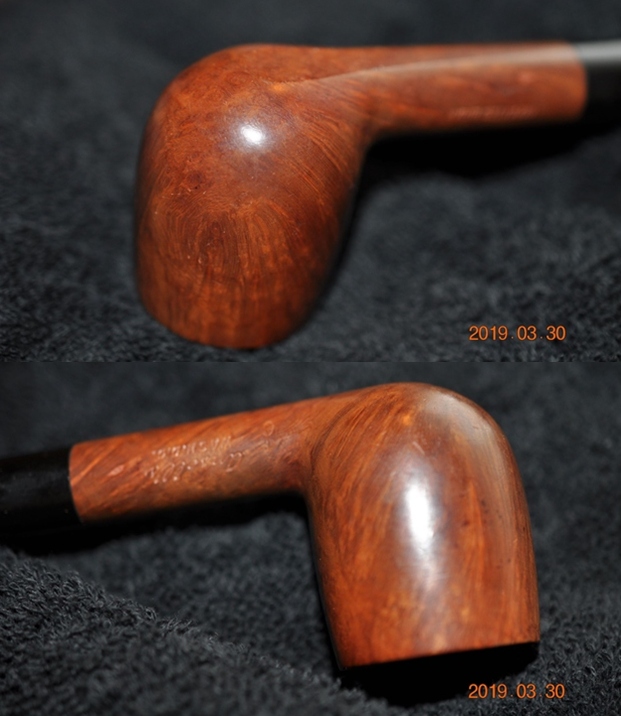
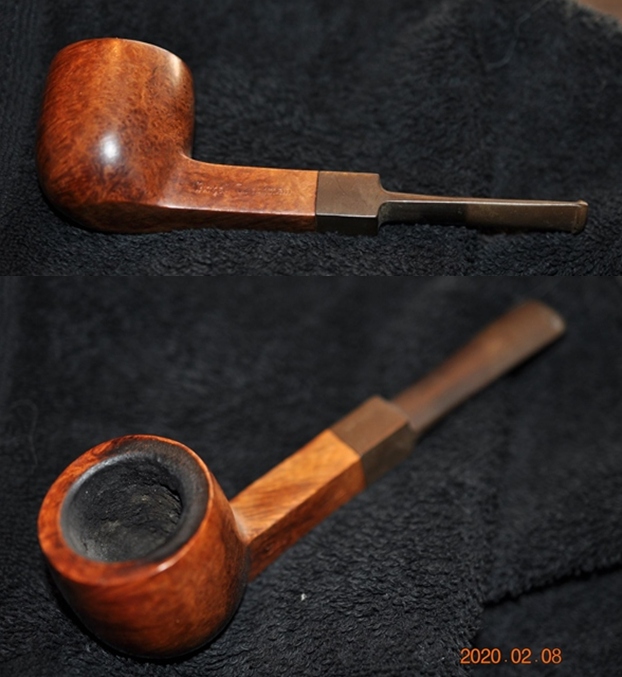
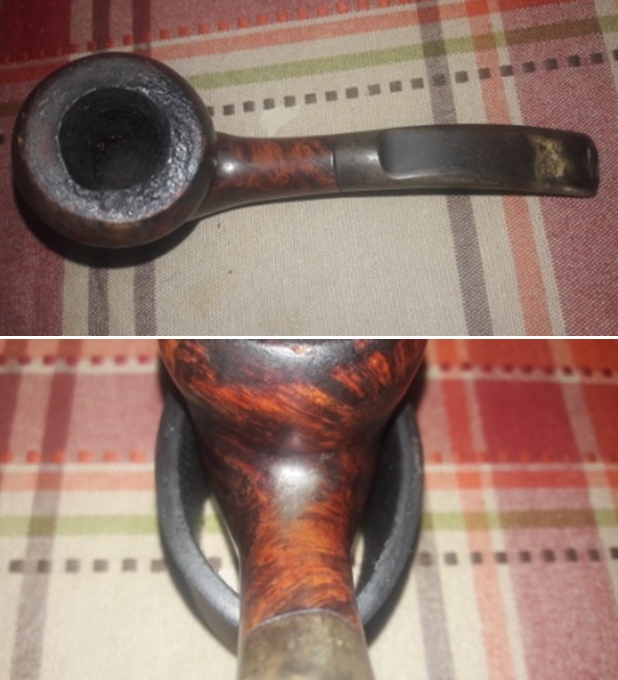
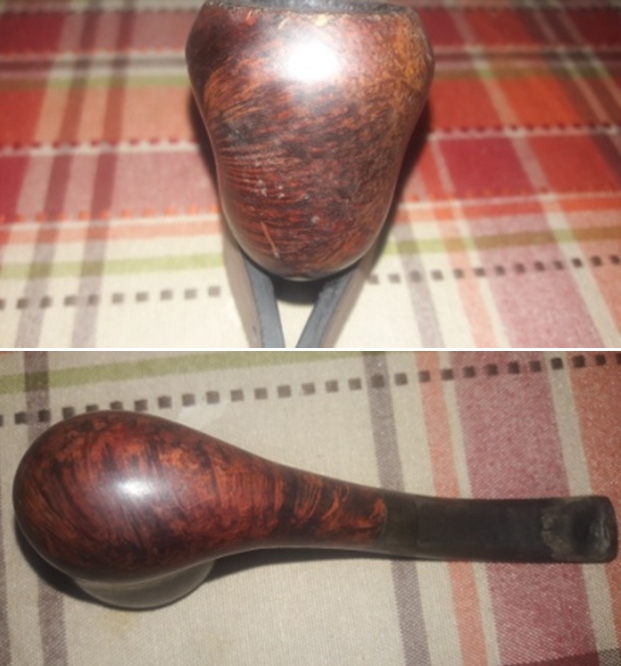
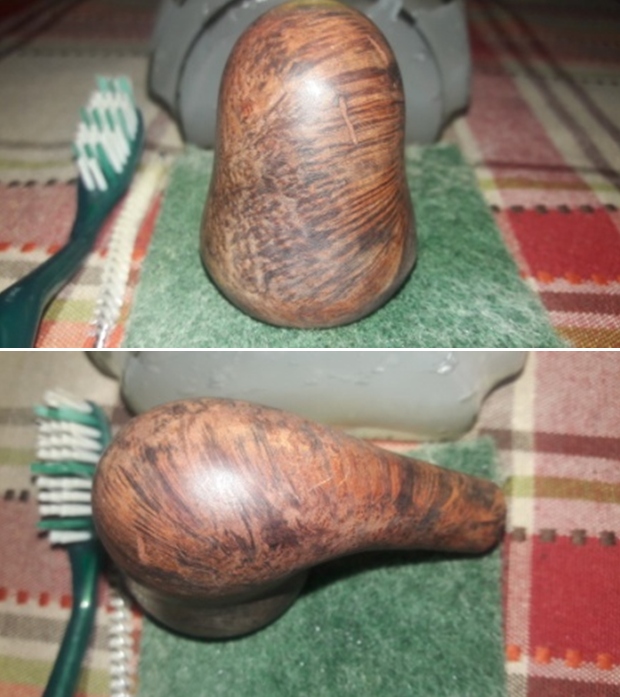
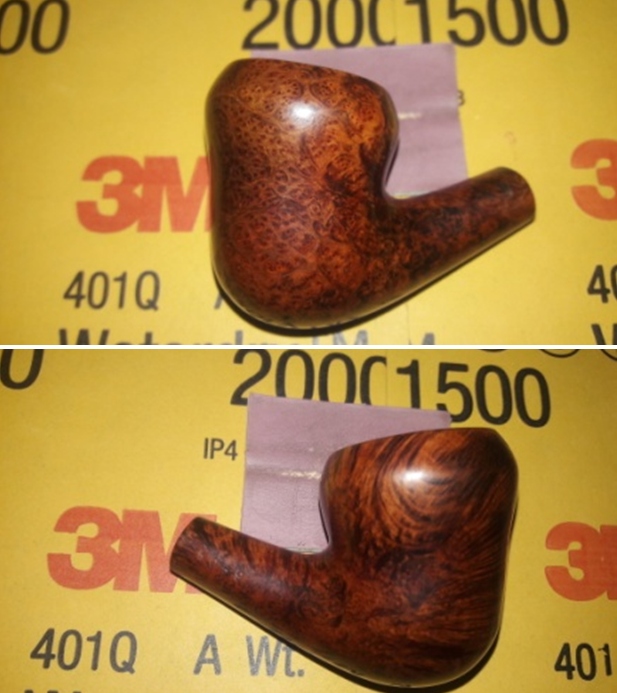
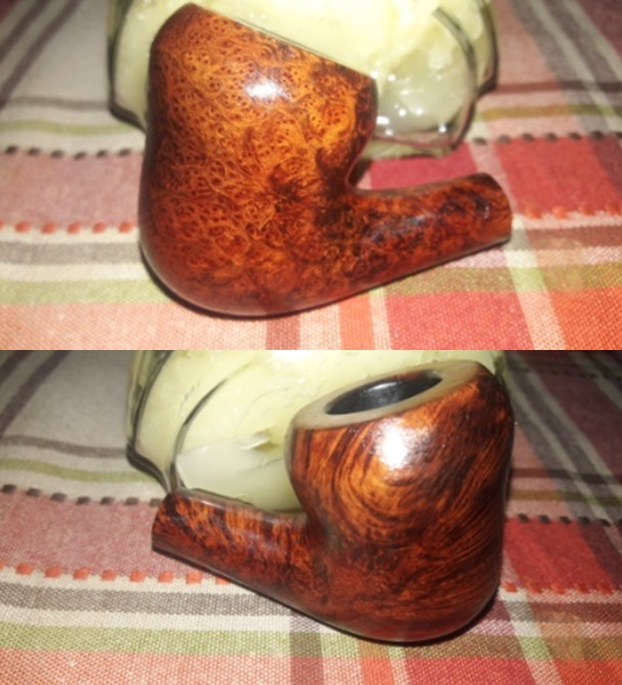
This pipe has a quaint little bowl size with a chamber depth of about 1 inch. The stummel boasts of some beautiful cross grains to the sides and back of the bowl and all around the shank and tight Bird’s Eye to the front of the stummel. The stummel is covered in dirt and grime of the overflowed lava and dirt accumulated over the years of heavy smoking and uncared attention to cleaning. The stummel has a dull and lifeless appearance to it. The stem repair, though clearly visible, the repairs are solid and seem to have been done by a professional. There is a thick layer of cake in the chamber and some damage is likely to the front of the rim top surface. The stem is heavily oxidized with a few deep bite marks to the button edge in the bite zone. The pipe’s appearance, as it sits on my work table, does not present an encouraging picture. The condition and state of this pipe including the damages are identical to the last two pipes that I had worked on. I think all these pipes are from the same estate and the previous piper was set in his ways of smoking and handling his pipes.
 Detailed Inspection Of The Pipe And Observations
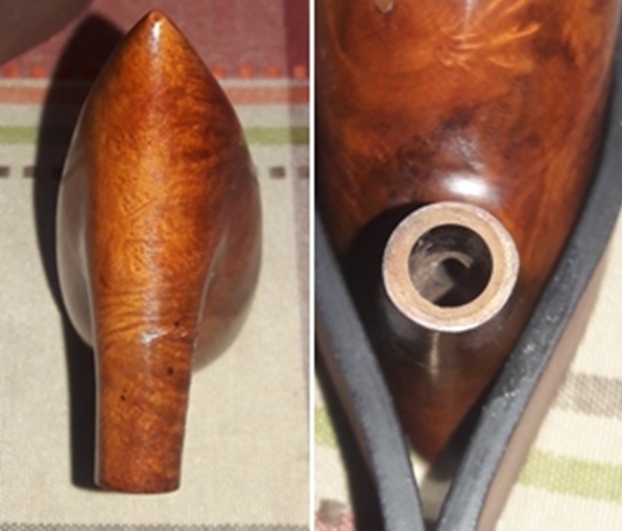
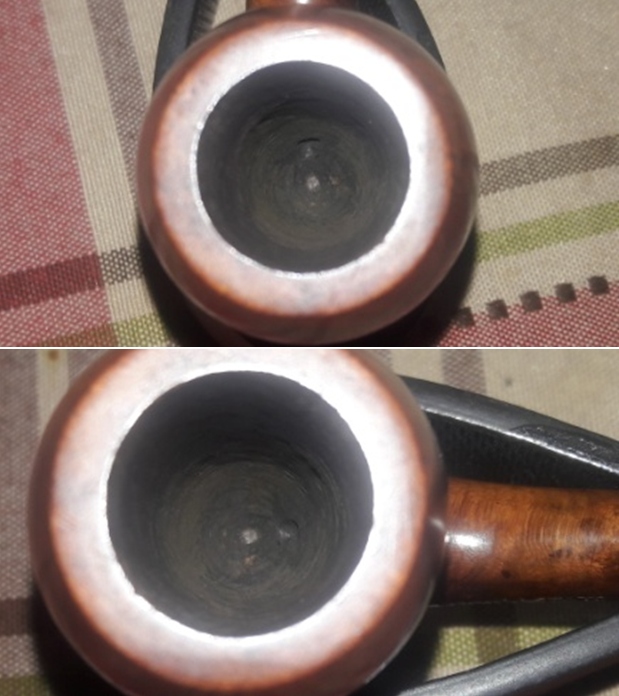
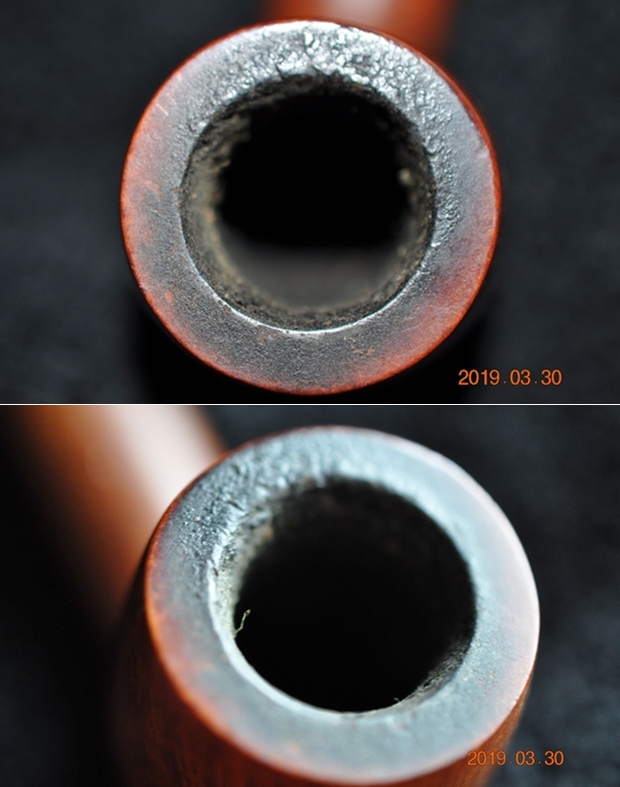
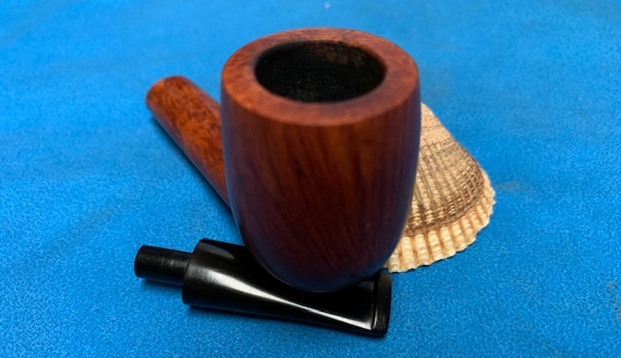
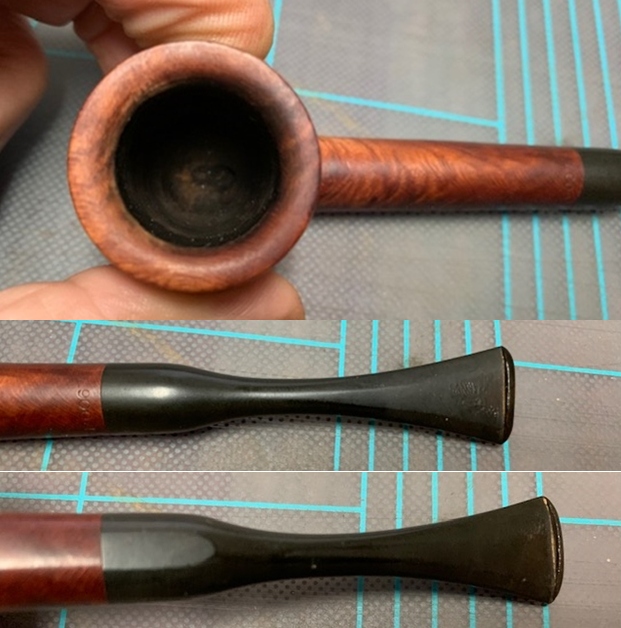
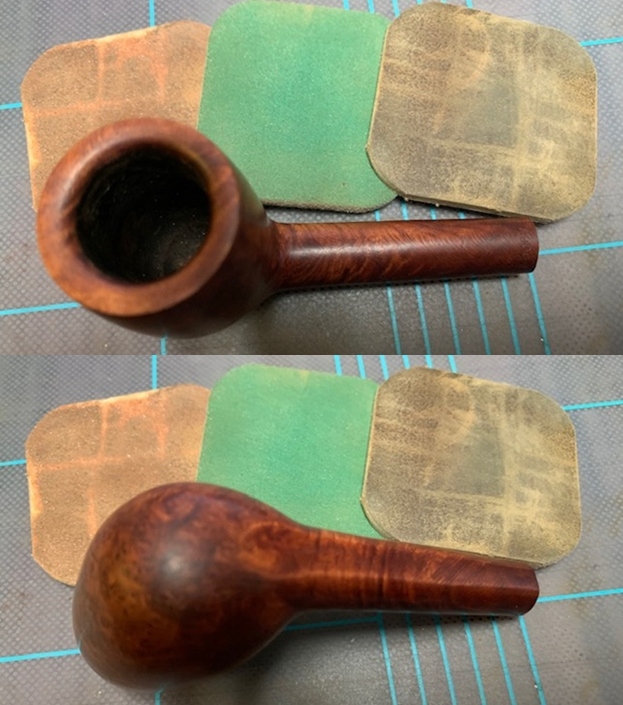
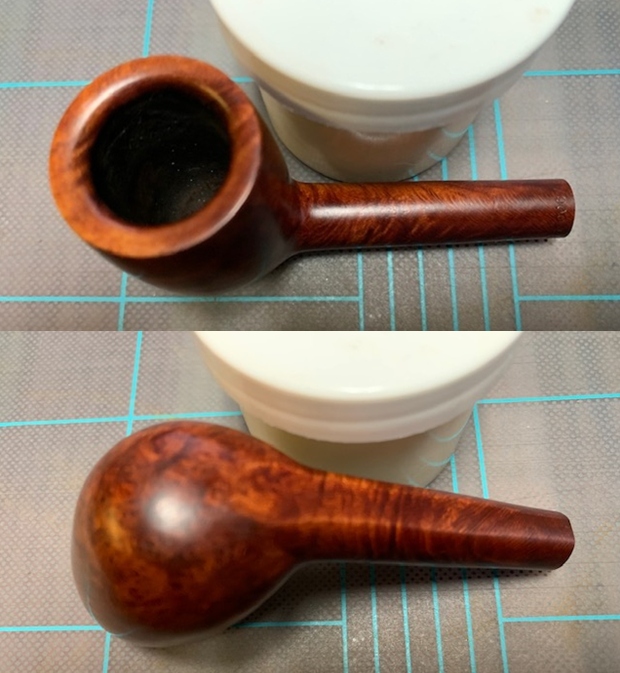
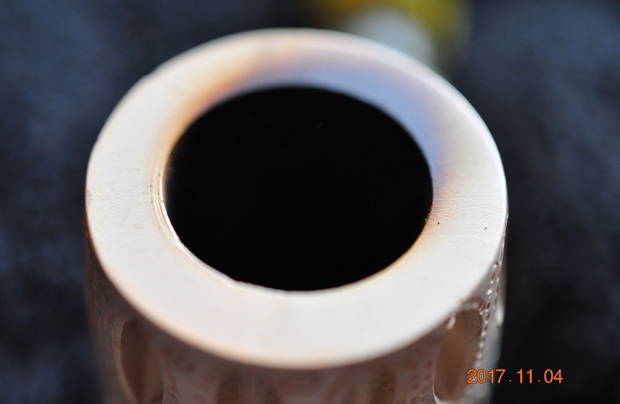
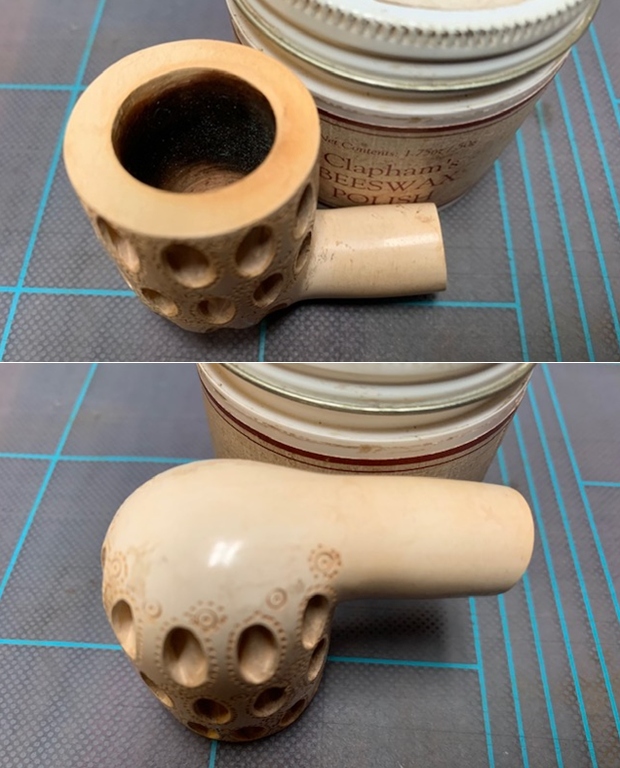
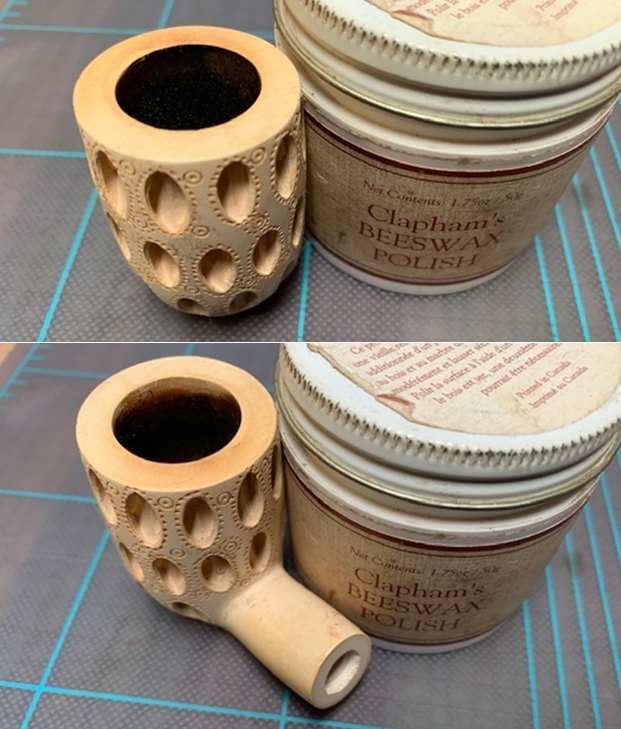
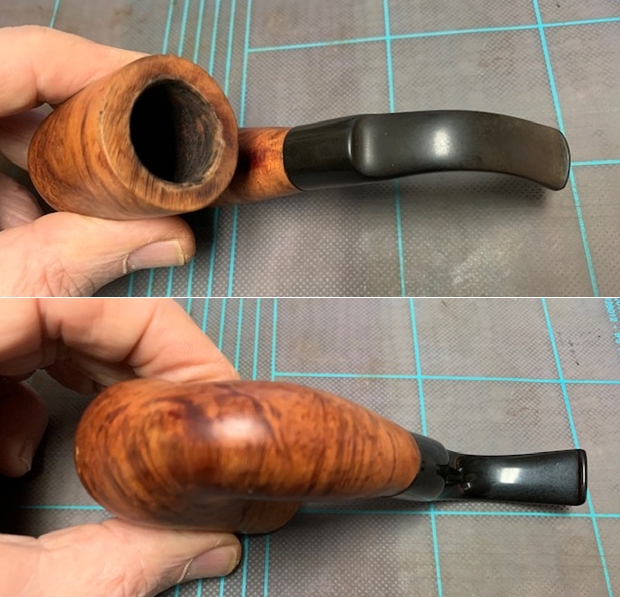
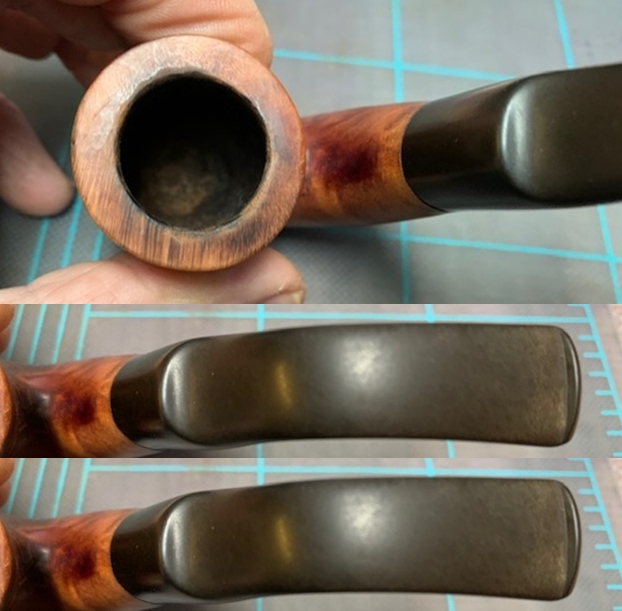
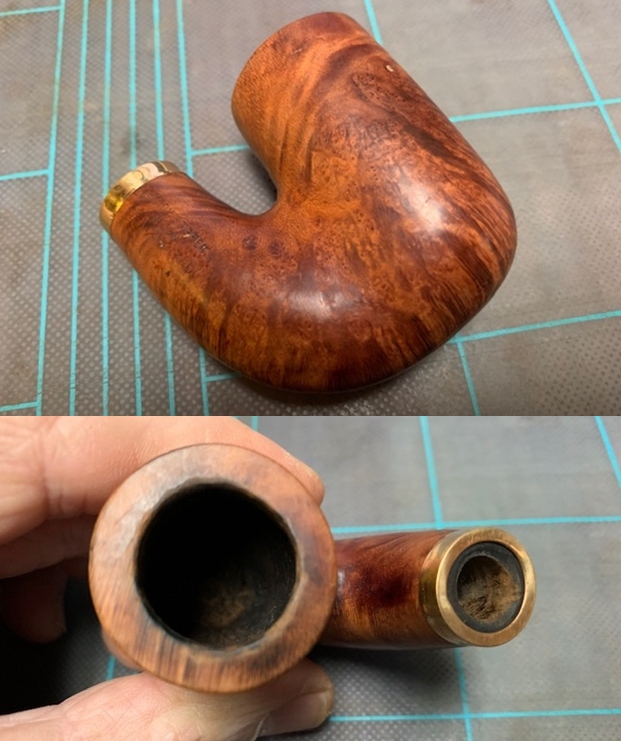
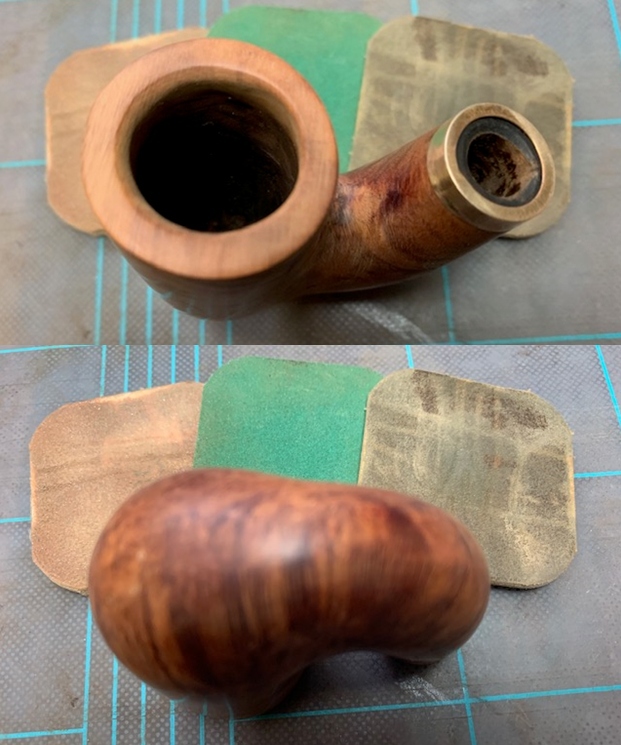
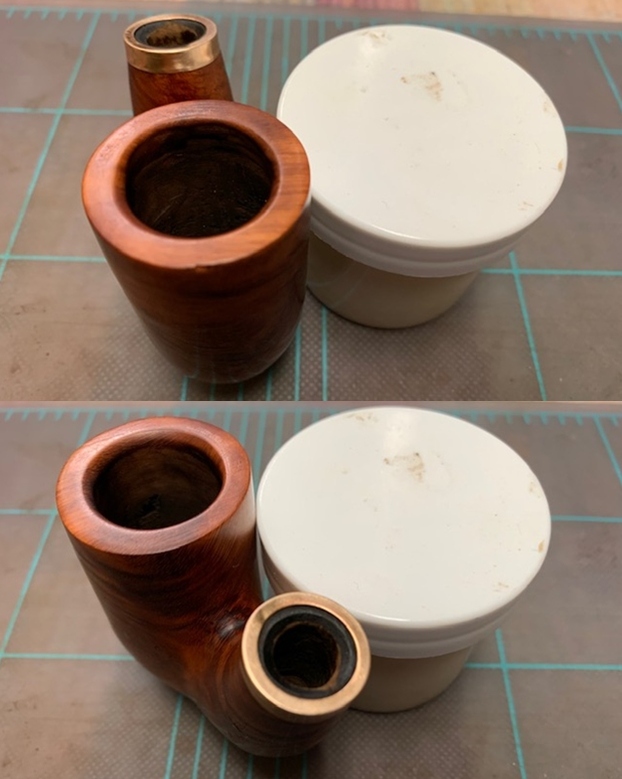
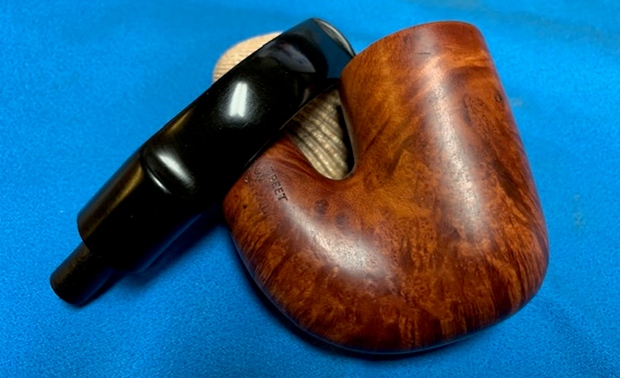
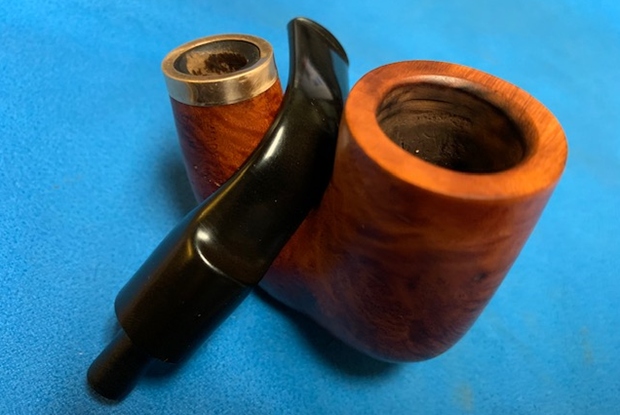
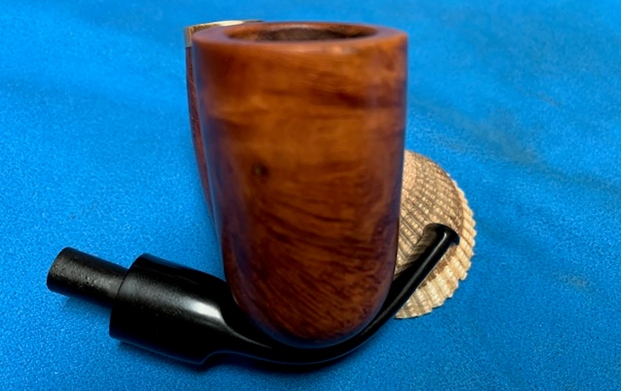
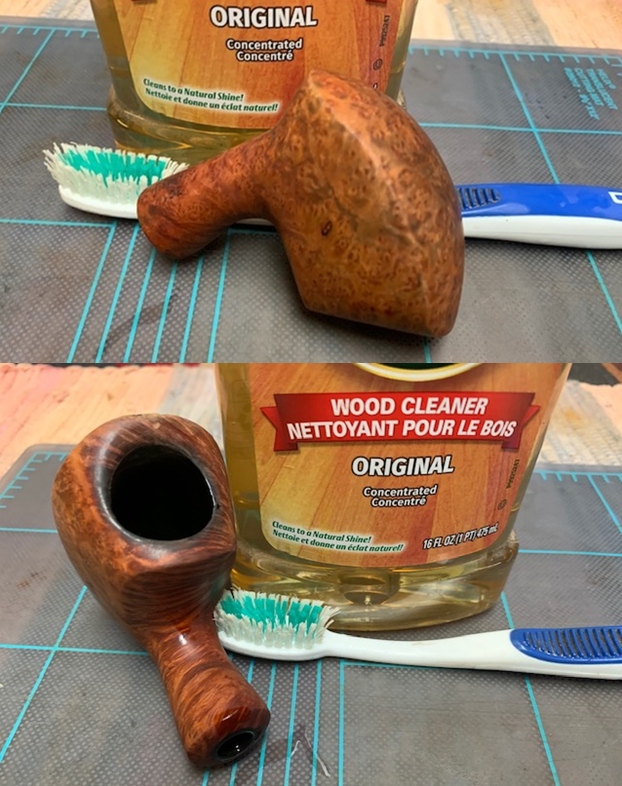
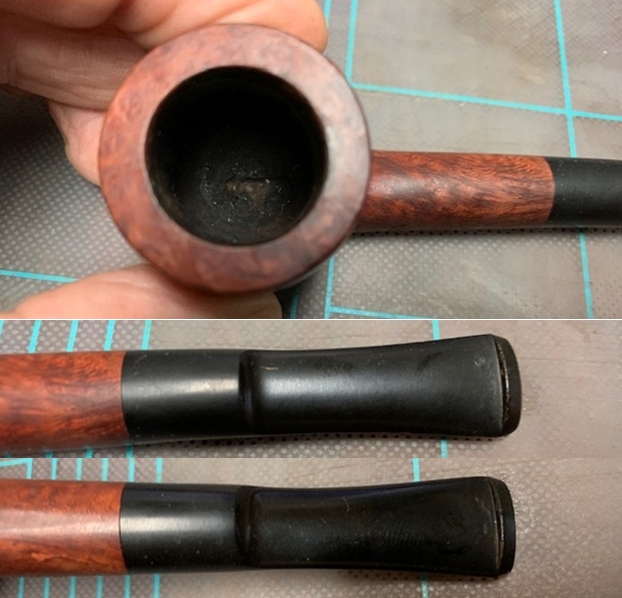
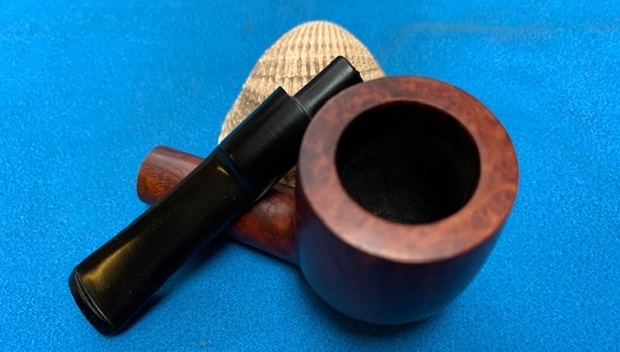
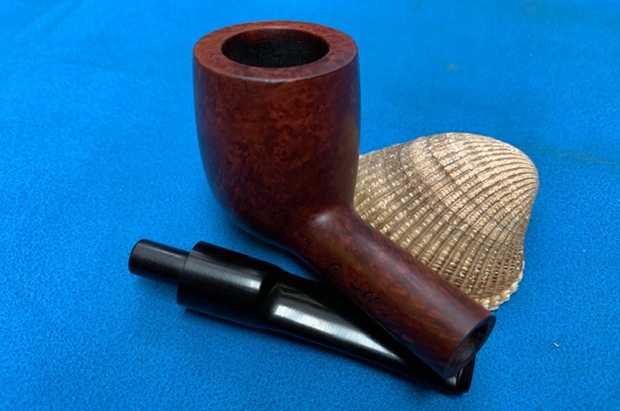
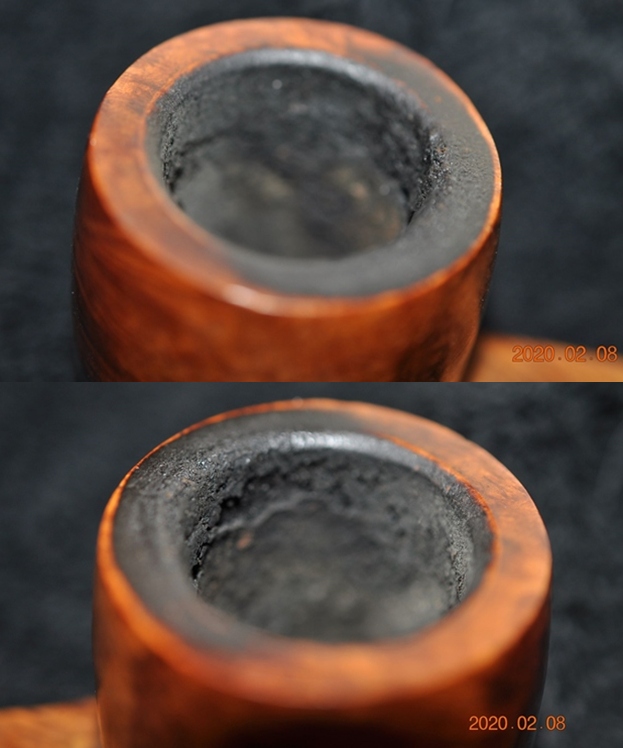
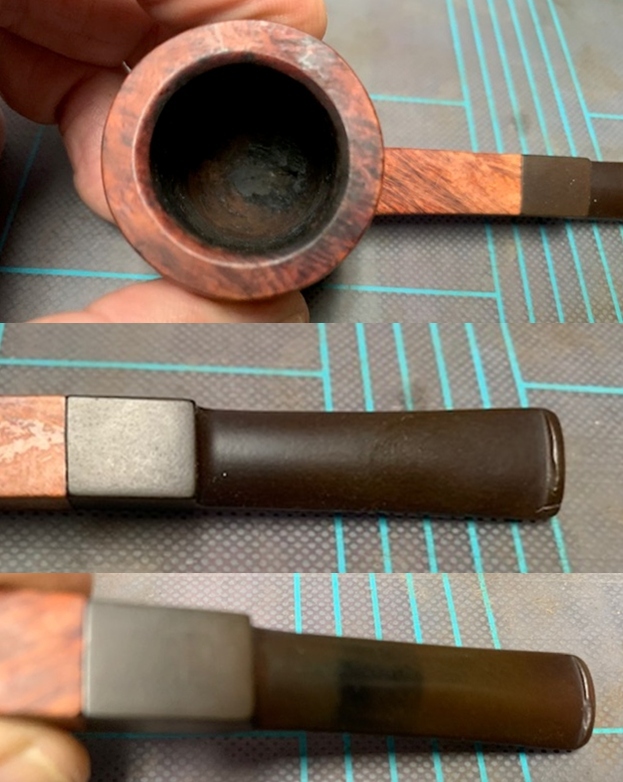
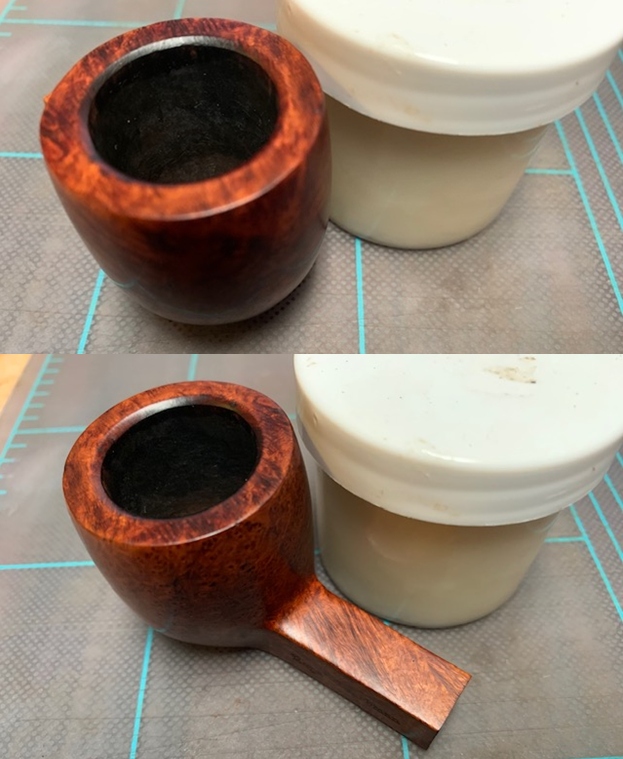
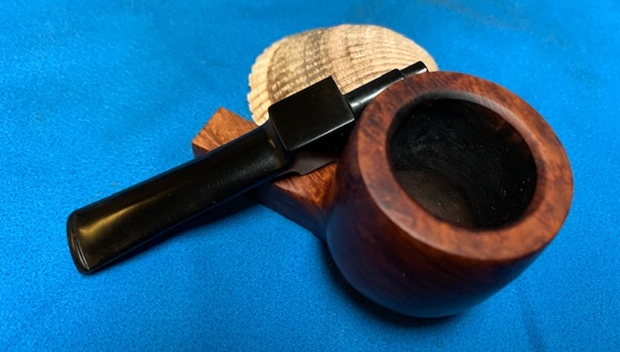
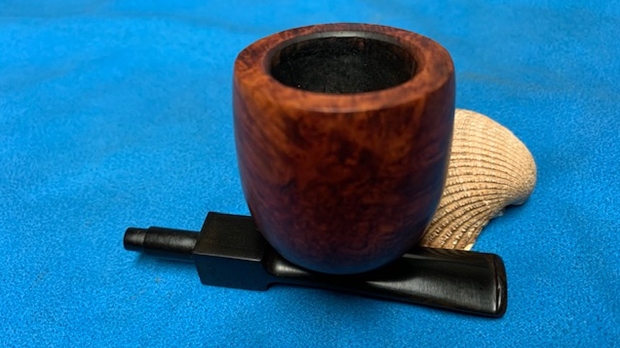
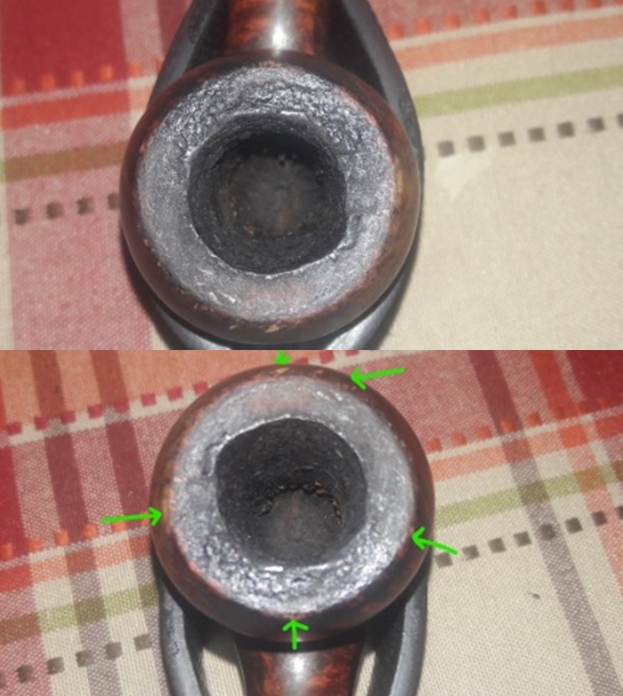
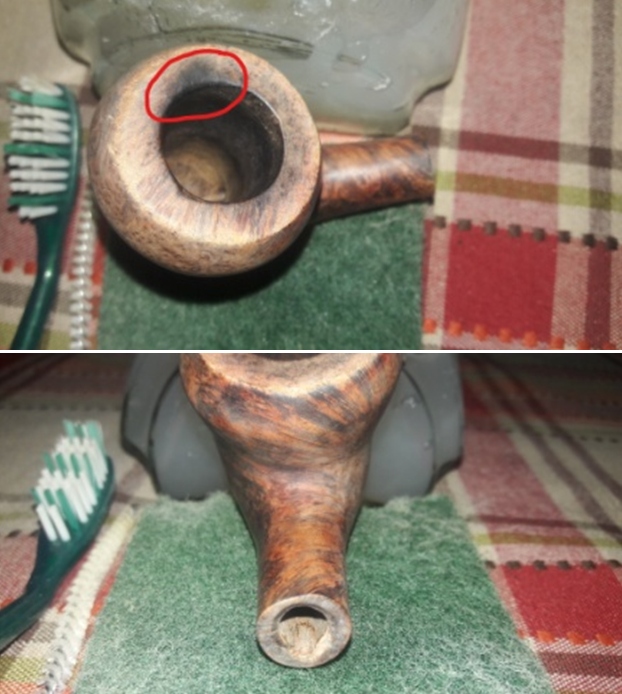
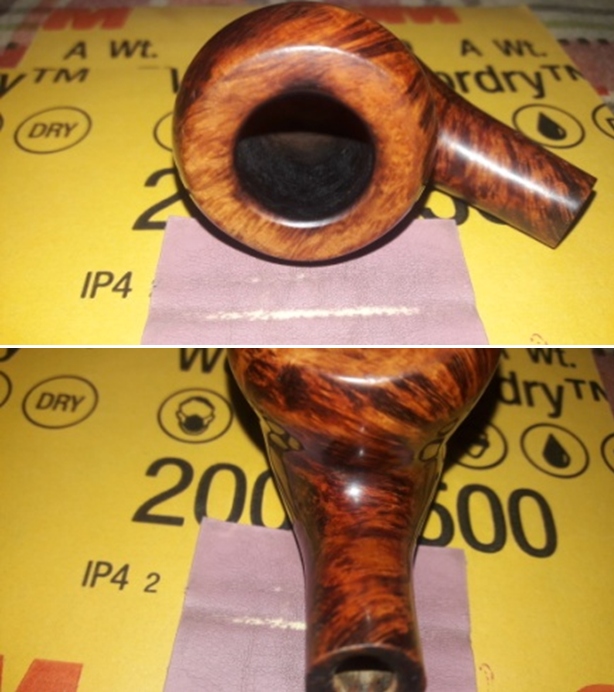
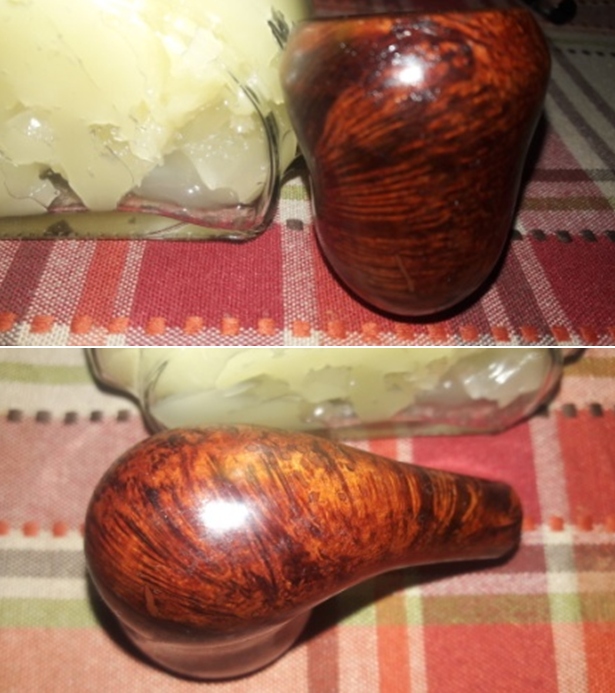
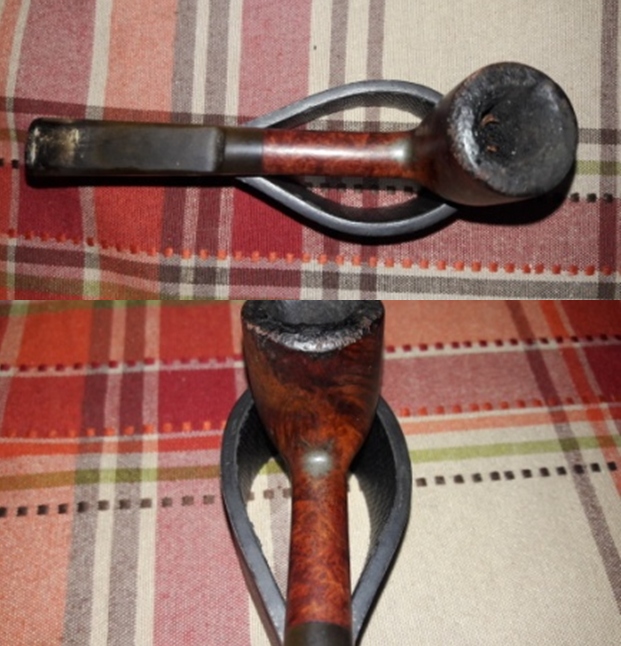
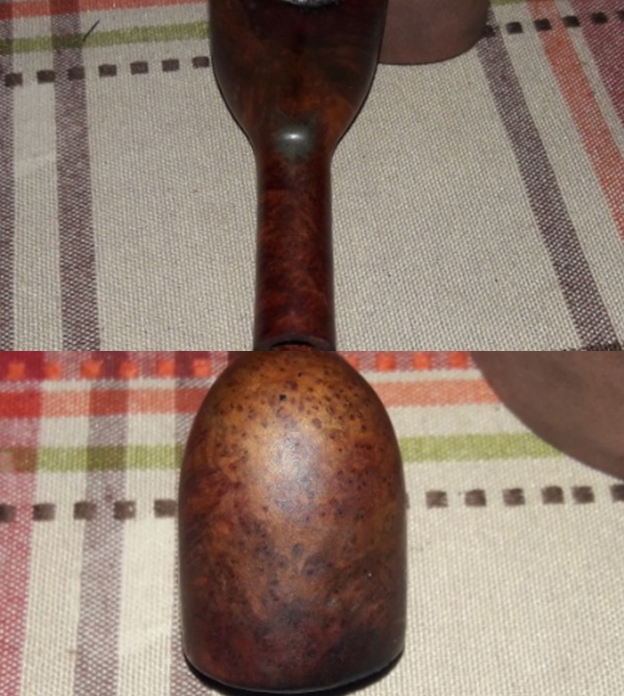
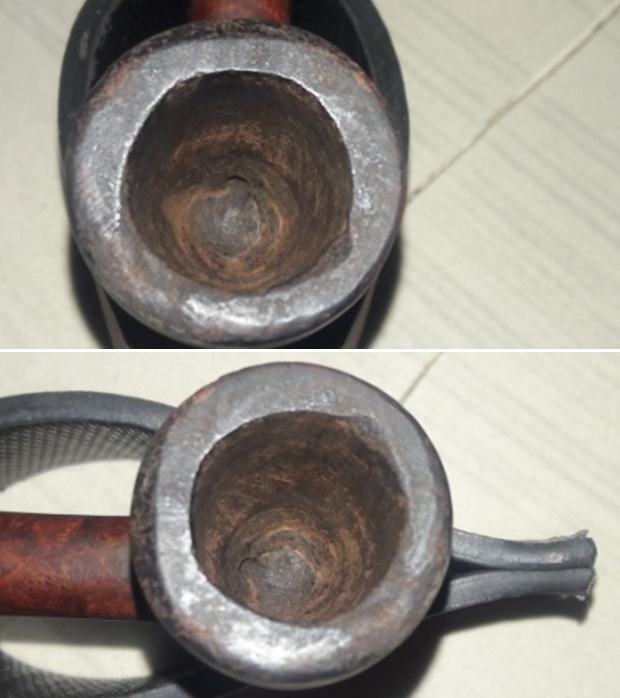
This is a small sized pipe with a chamber depth of about I inch. The bowl rim slightly tapers down towards the heel giving it a classic Dublin shape. The draught hole dead center and at the bottom of the heel. The chamber has an even layer of very thick hard cake with remnants of un-burnt tobacco seen at the heel of the chamber. The rim top surface is covered with thick lava overflow and has max accumulation in the 6 o’ clock direction. The layer of lava overflow is so thick that the rim top surface is just not visible. The inner rim edge is charred and damaged in the 10 o’ clock direction (encircled in yellow) which makes the chamber appear out of round. The outer rim edge has dents and dings all around but is most severely damaged in the 6 o’clock direction (encircled in green), a damage that can result only due to repeated strikes against a hard edged surface. The condition of the inner walls of the chamber can be commented upon after the cake has been taken down to the bare briar. There is a strong ghost smell in the chamber which is all pervading. The stummel appears solid to the touch all around and hence I do not foresee any serious damage to the walls in the form of burnout/ deep heat fissures/ lines or pits. The dark inner rim edge, in the 10 o’clock direction, may be charred further than anticipated and the same will be confirmed after the surface has been thoroughly cleaned. I need to resort to topping the rim top in order to address the damage to the surface. The ghost smells should reduce once the cake from the chamber is removed and the shank has been cleaned. 
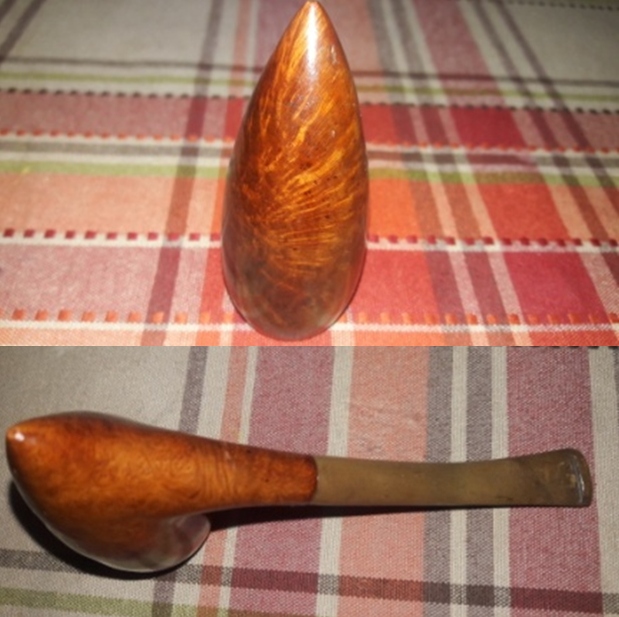
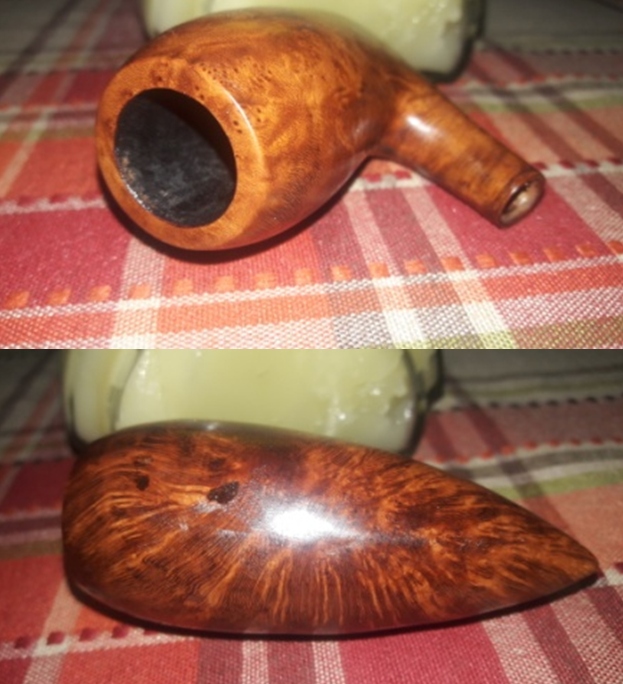
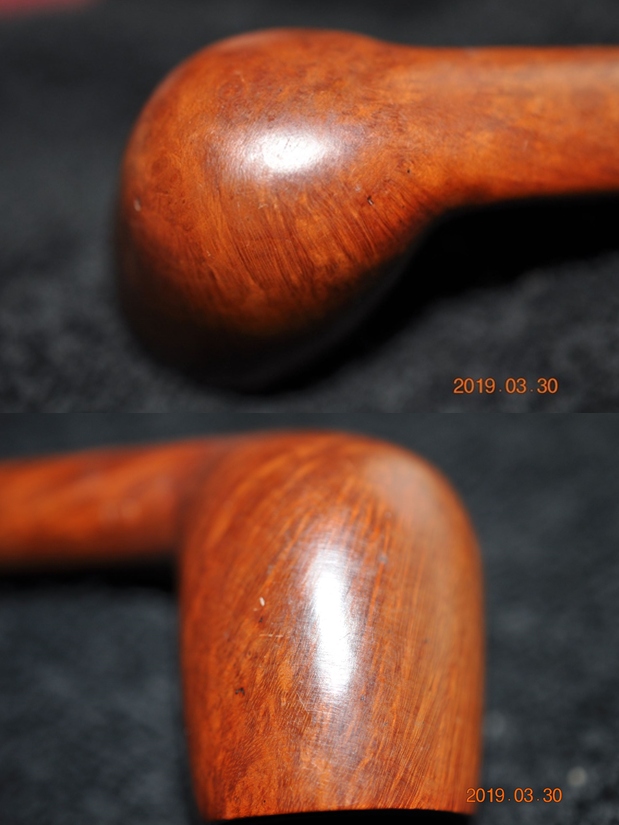
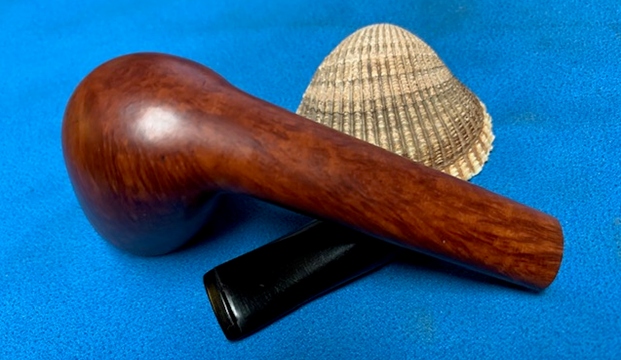
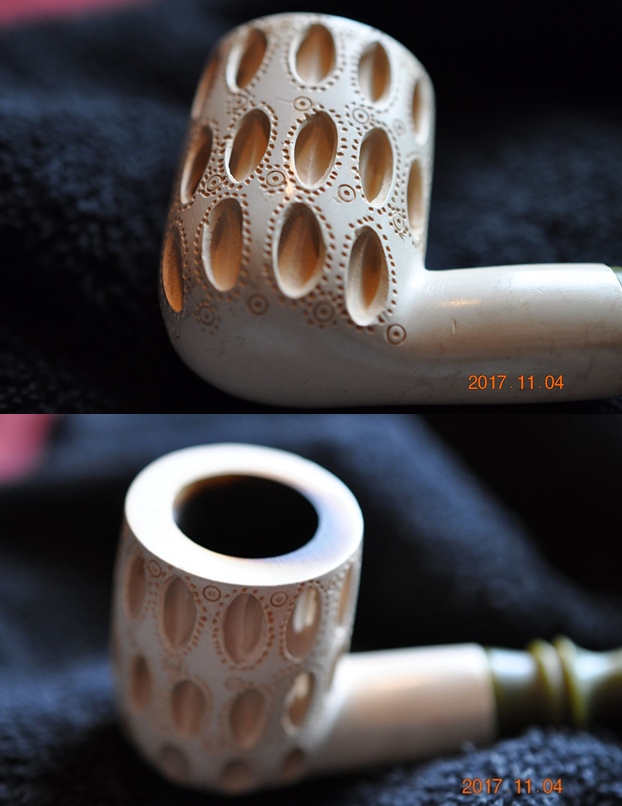
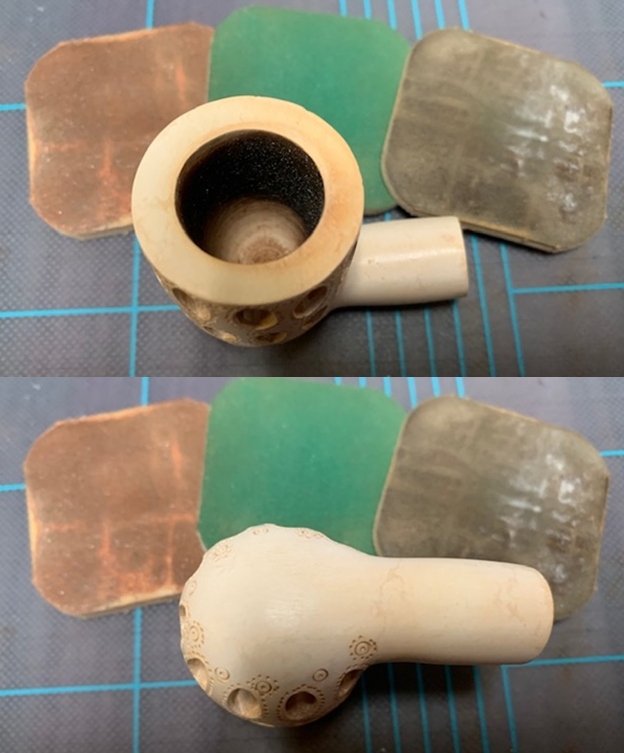
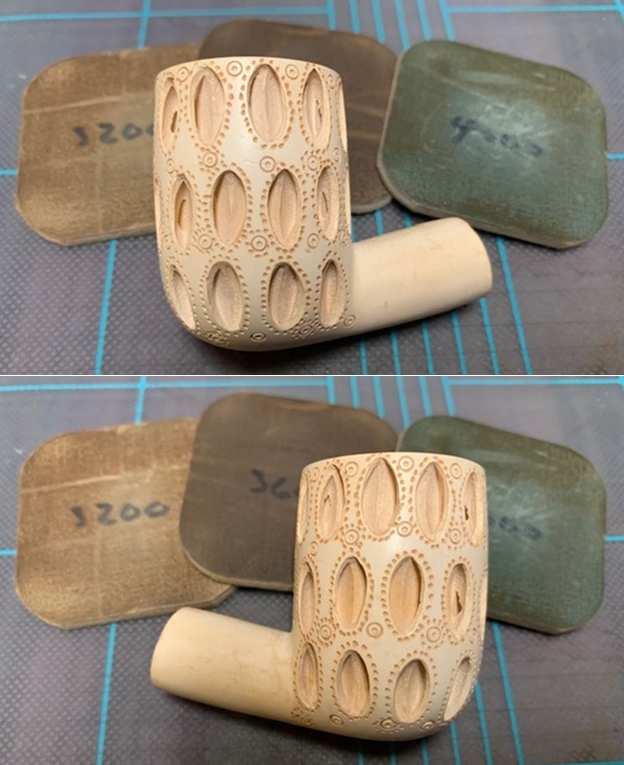
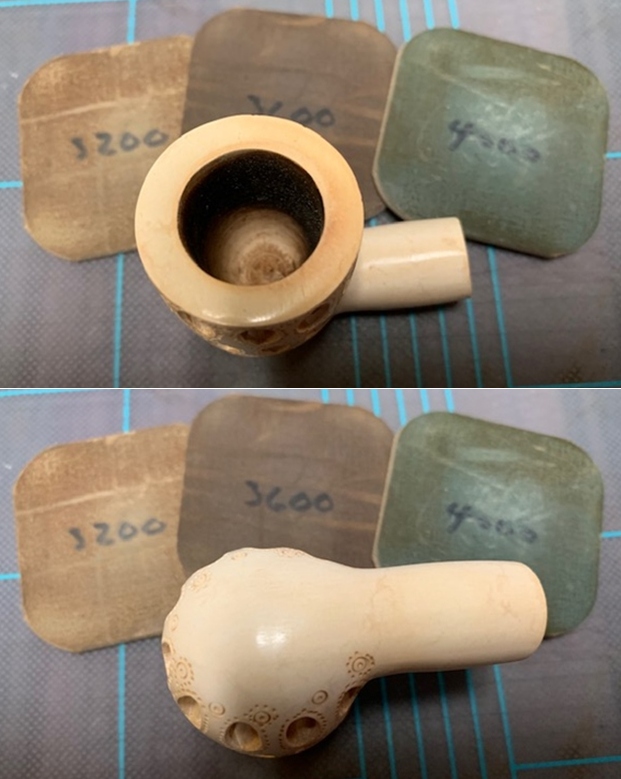
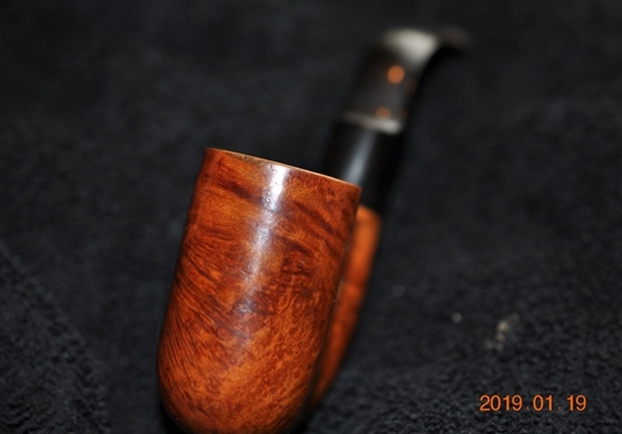
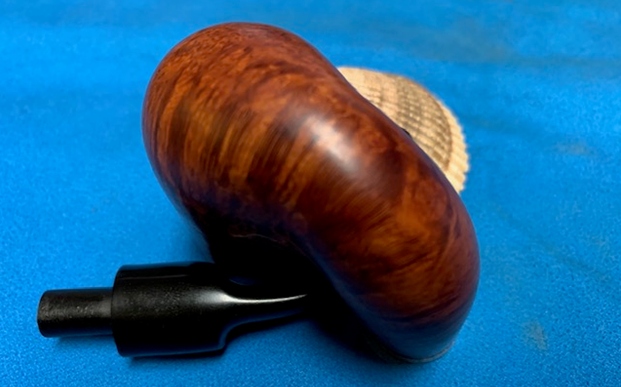
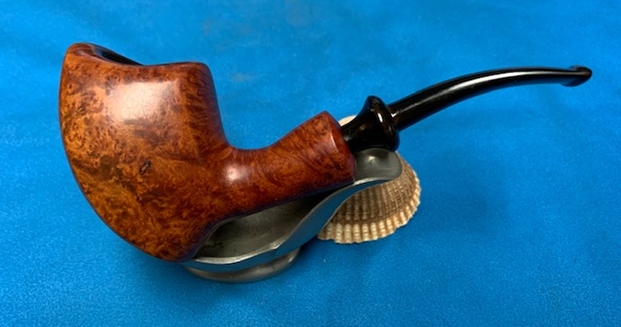
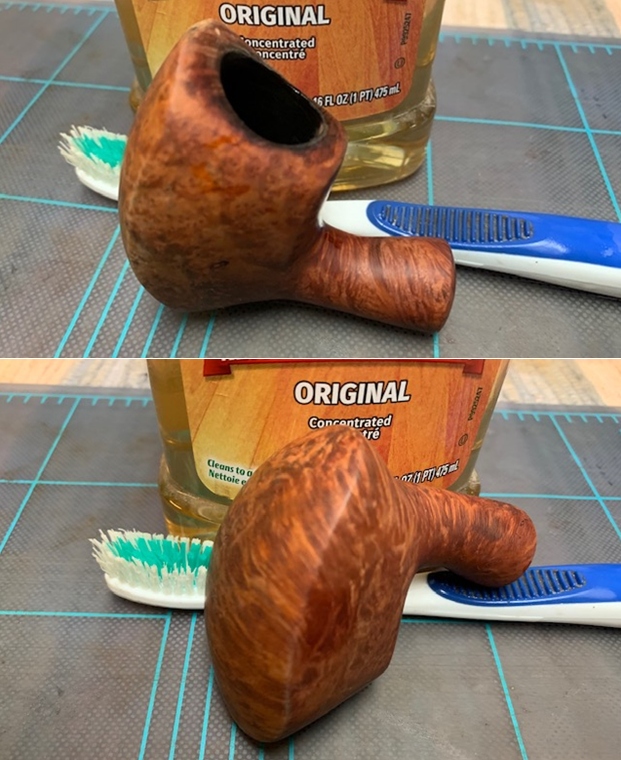
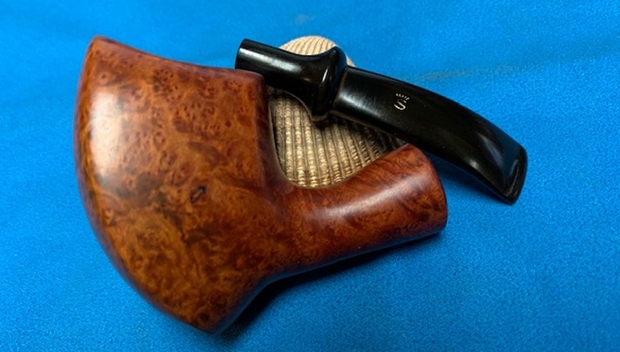
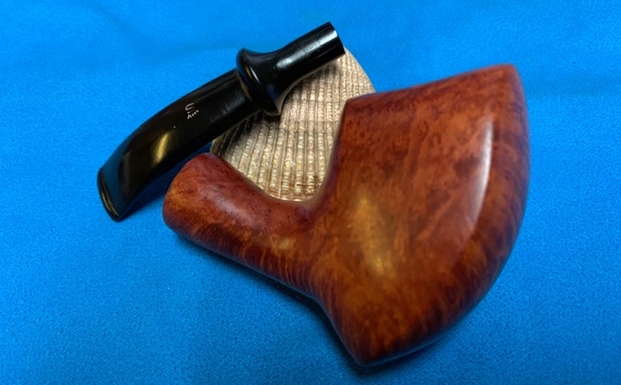
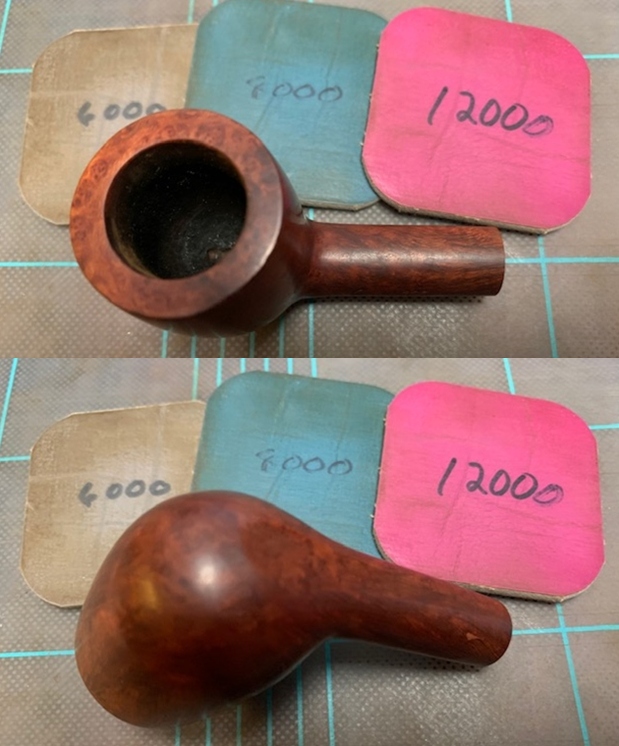
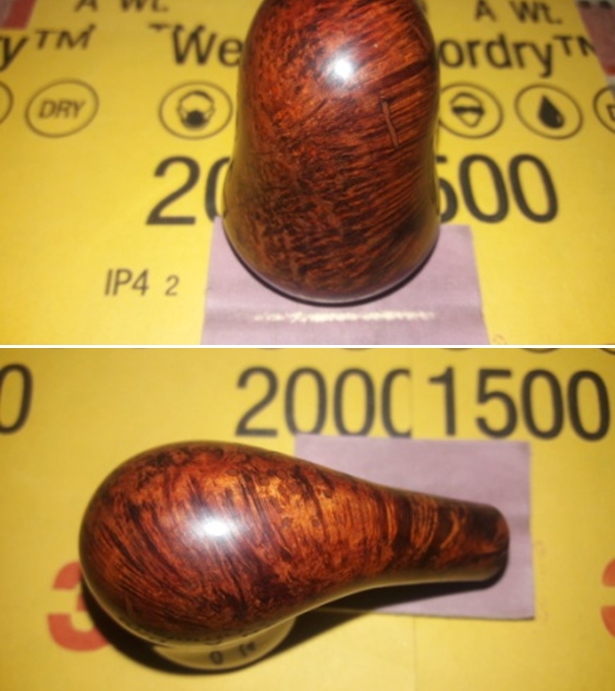
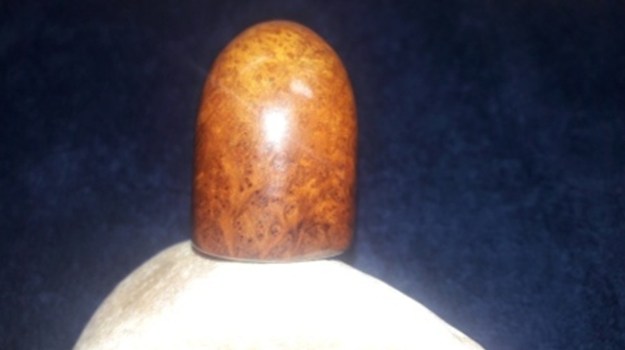
 The smooth stummel surface is covered in dust, lava overflow and grime through which one can make out the beautiful cross grains to the sides and back of the bowl and all around the shank and tight Bird’s Eye to the front of the stummel. There are no fills in the stummel signifying the use of a very high quality piece of briar. The briar is looking lifeless and bone dry. For a pipe that has been so heavily smoked, there are surprisingly no dents and dings over the stummel surface save for the outer rim edge. Once the stummel has been thoroughly cleaned, dents and dings to the stummel surface, if any, will be apparent. Thorough cleaning and rising of the stummel under warm water will highlight the grain patterns. Micromesh polishing will help in imparting a nice shine to the briar.
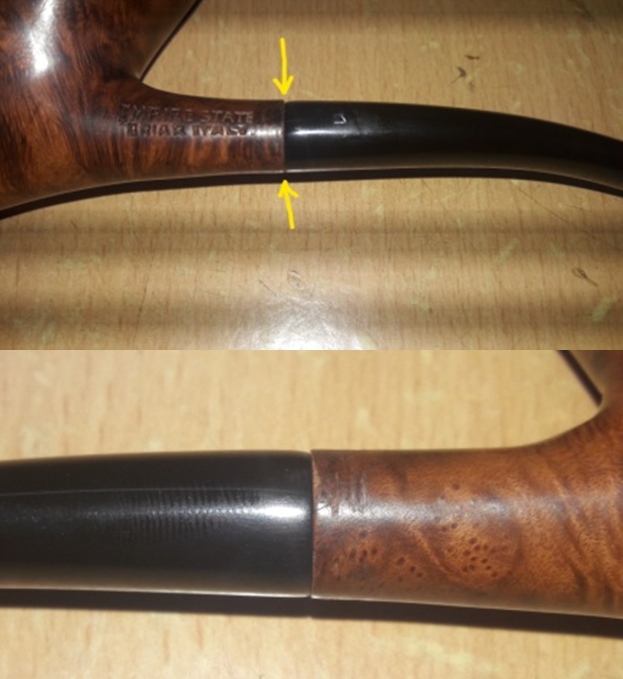
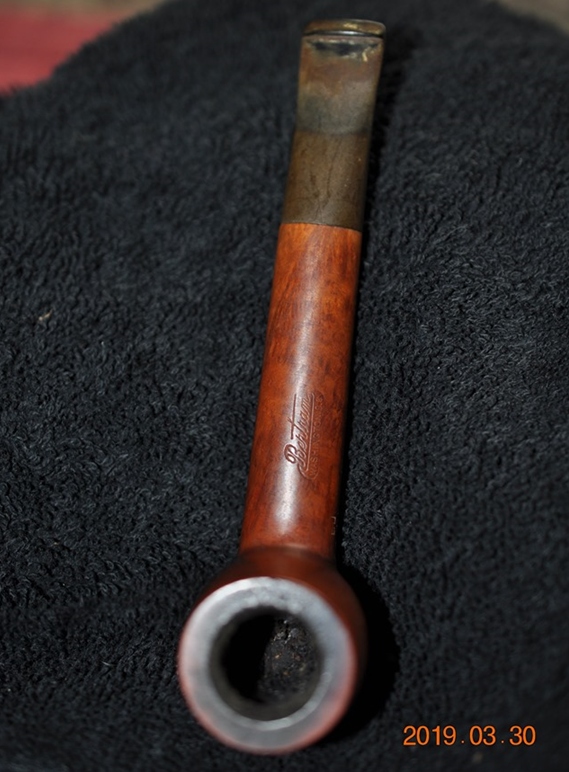
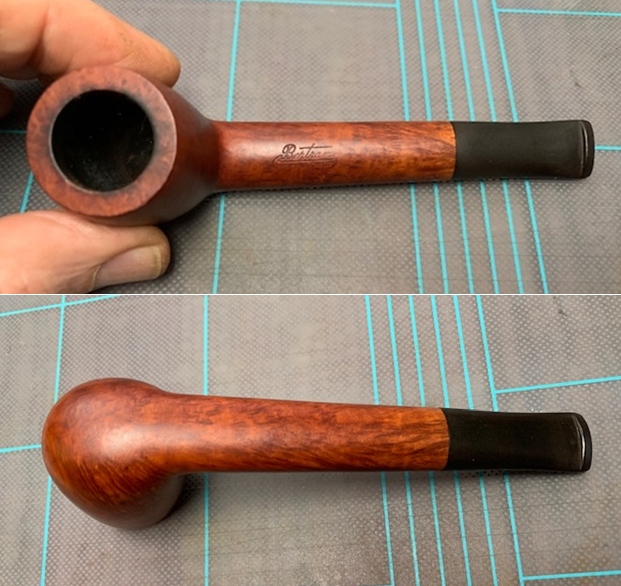
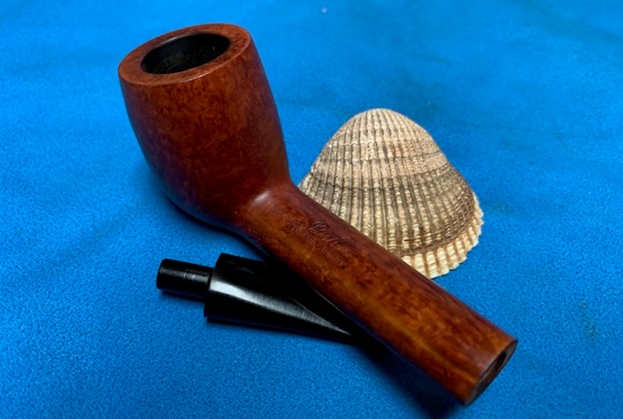
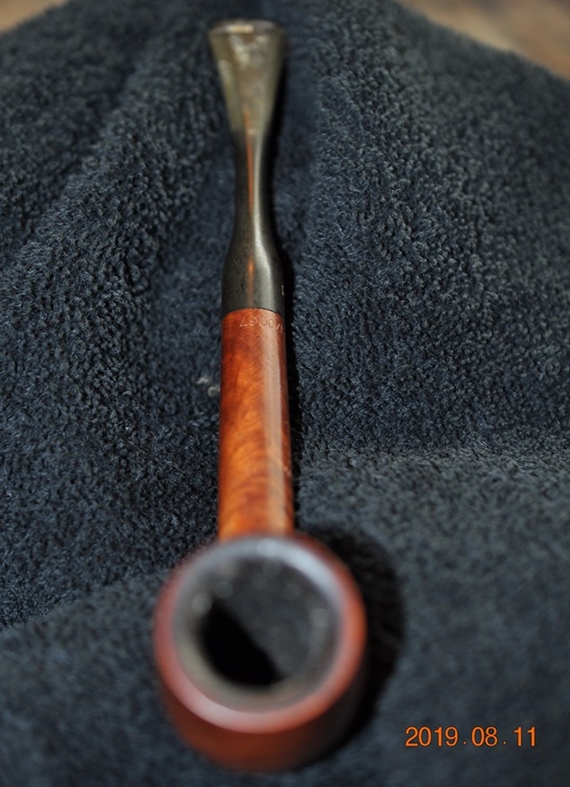
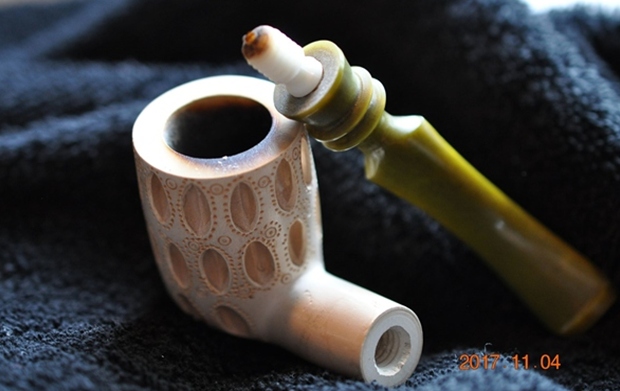
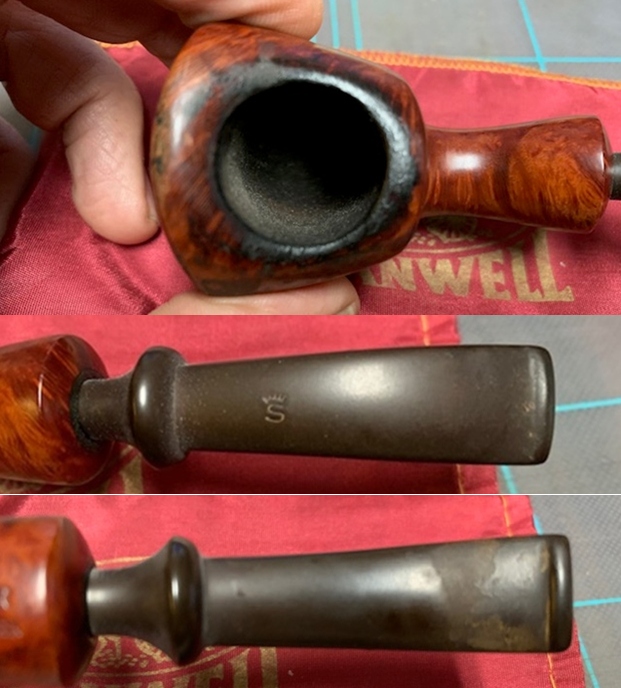
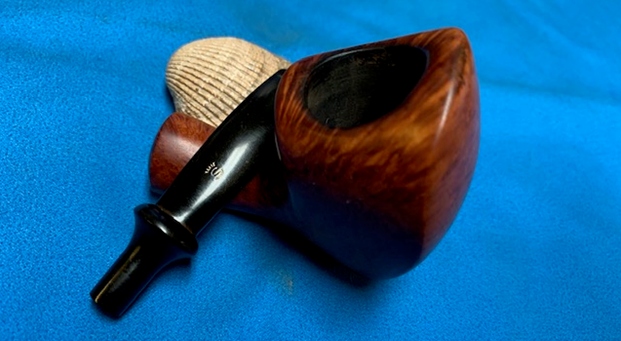
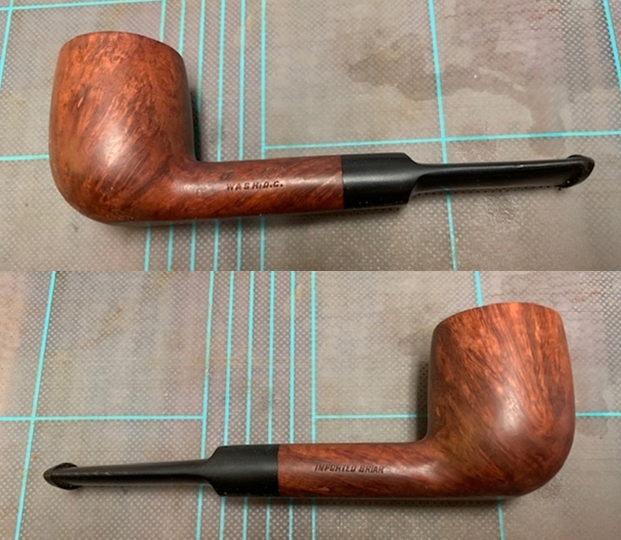
 The shank was spliced but the joint is one that is seamless and smooth transition between the old shank and the spliced shank piece (indicated by pastel blue arrows). The repairman had even ensured that the seating of the stem in to the mortise is factory perfect. The repairs are solid and speak highly of the competence of the repairman and his skill sets. I shall not be tinkering with the shank repairs as it is professionally well executed and in excellent solid shape.
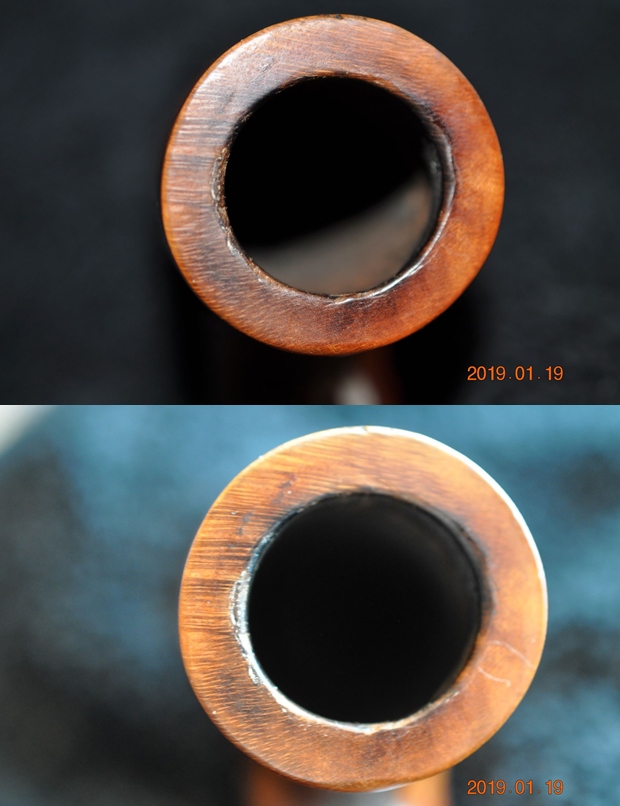
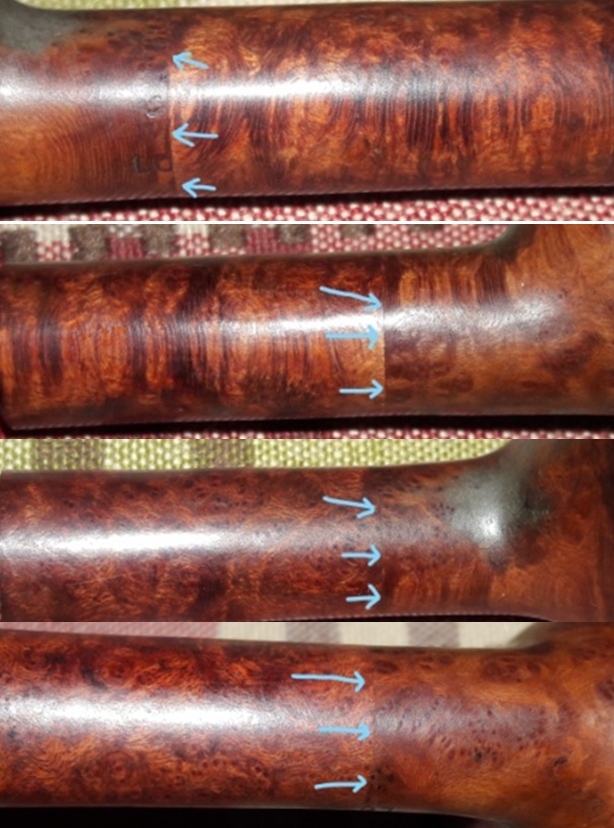 The mortise shows accumulation of oils, tars and gunk and the air flow is not full and smooth. The shank end face is a perfect round pointing to excellent craftsmanship and attention to quality. The seating of the stem is flush and aligned perfectly and precisely. The air flow will smooth and the draw full once the mortise is cleaned out. The ghost smells should further reduce after the mortise and shank walls are thoroughly cleaned.
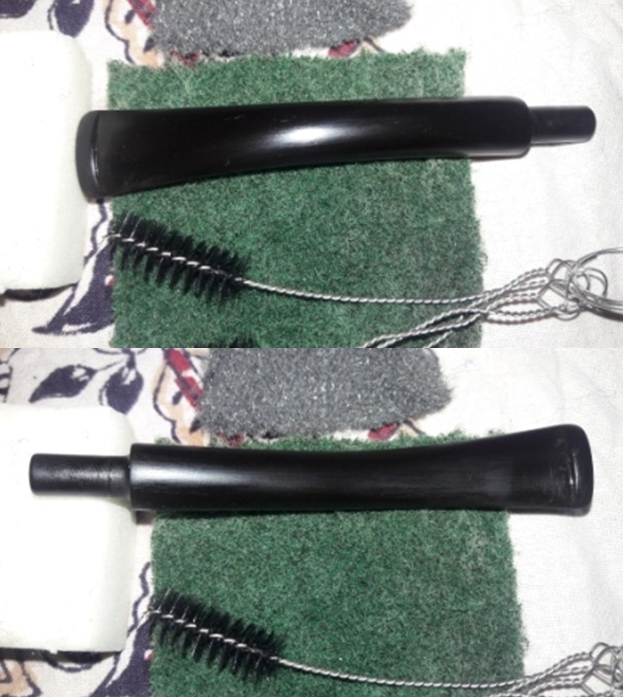
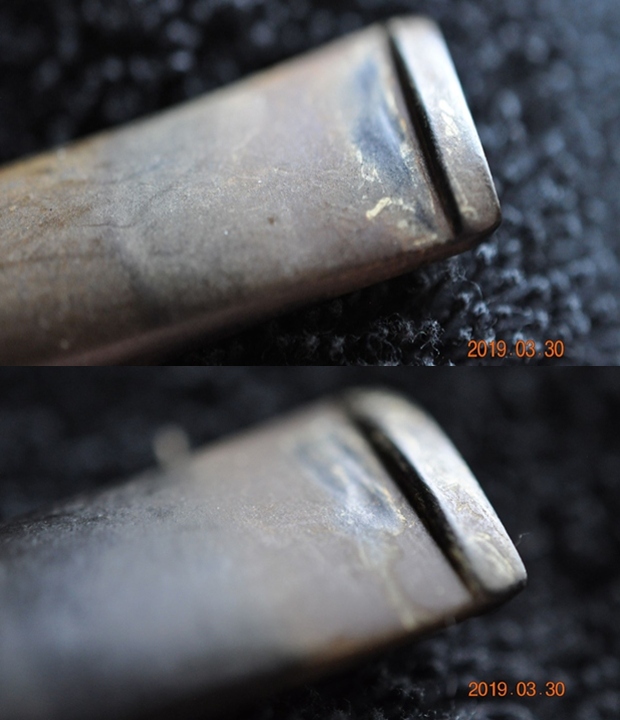
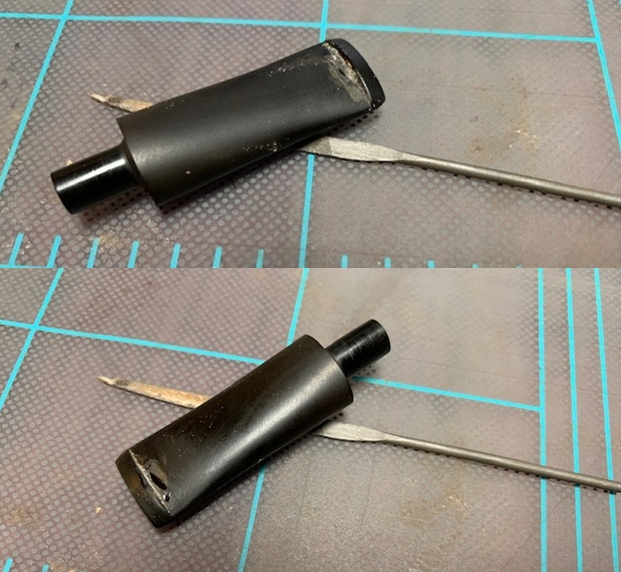
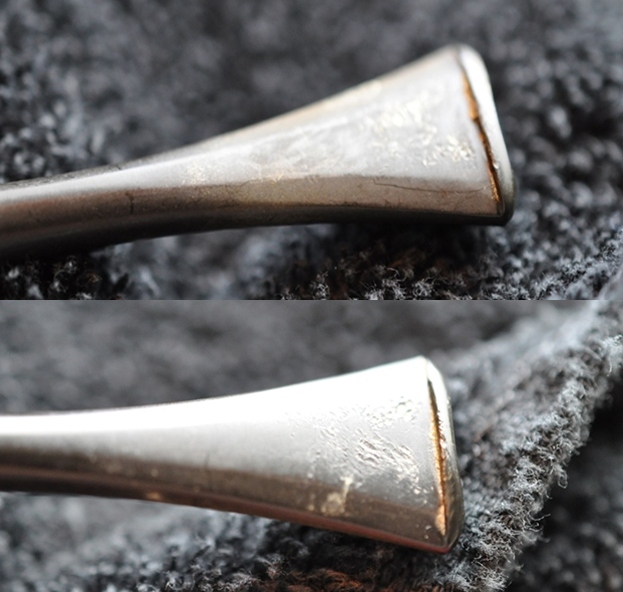
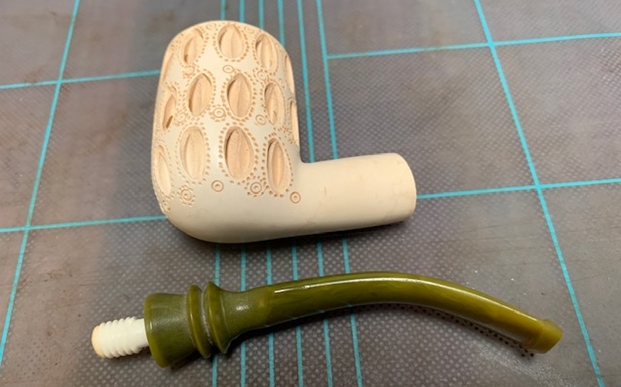
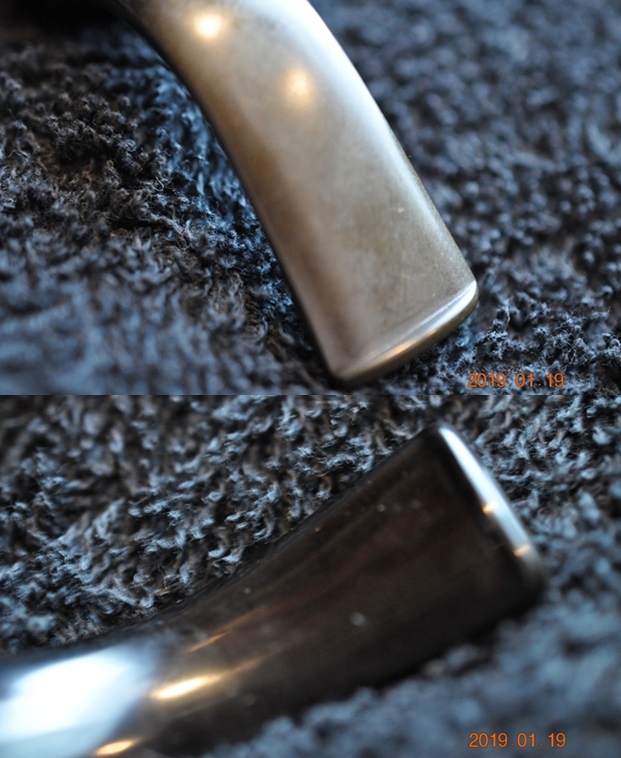
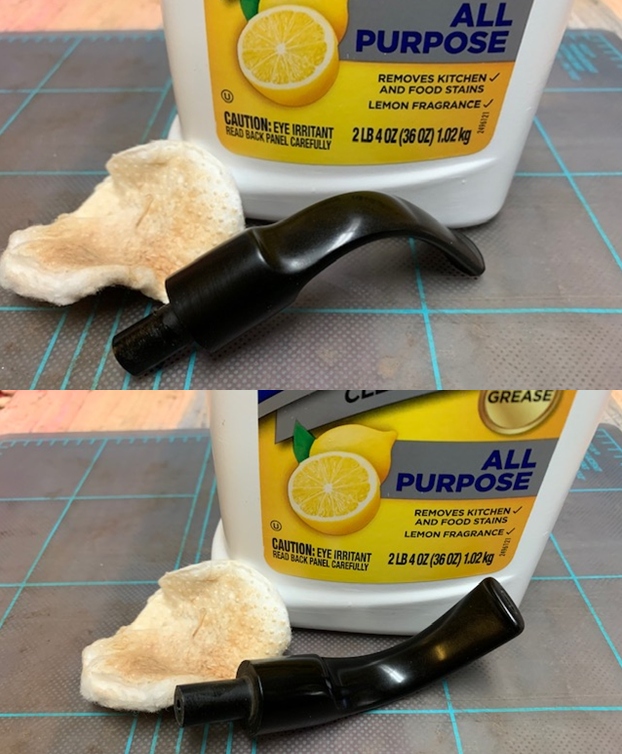
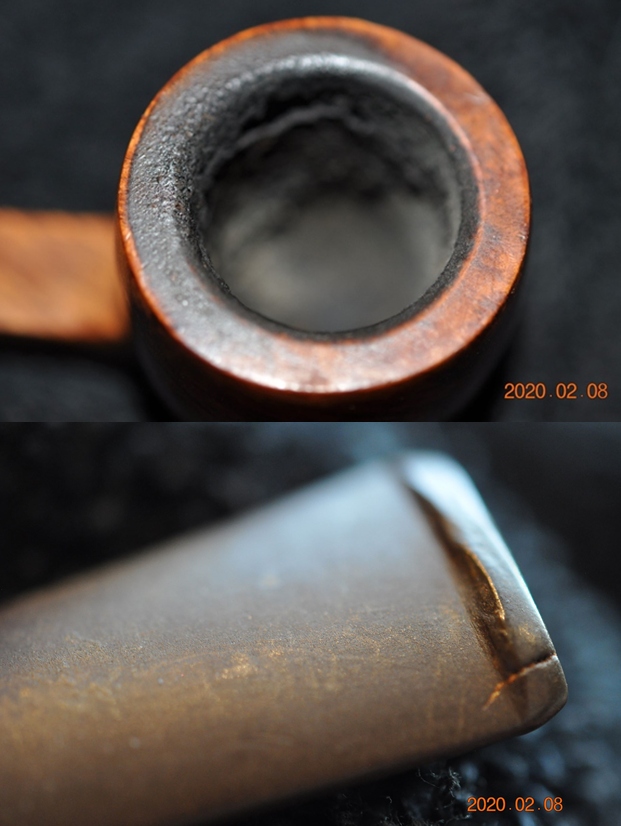
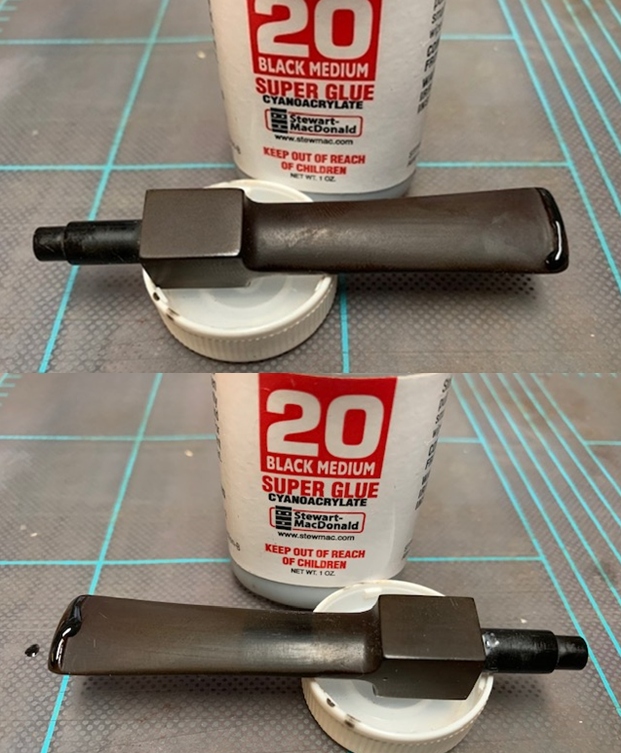
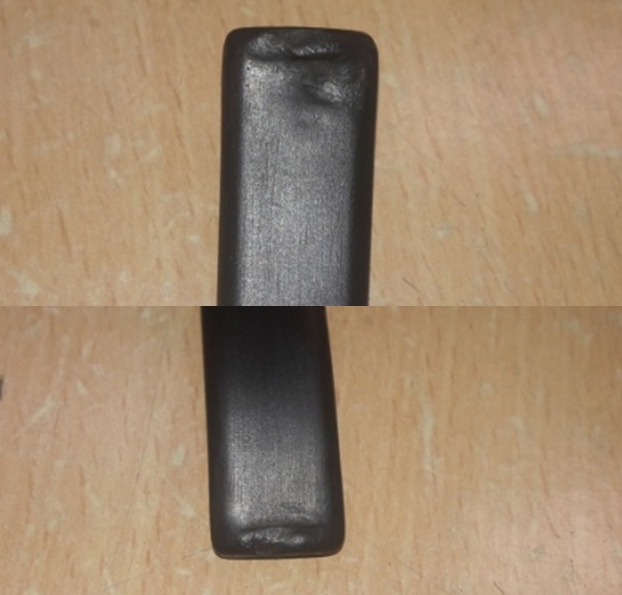
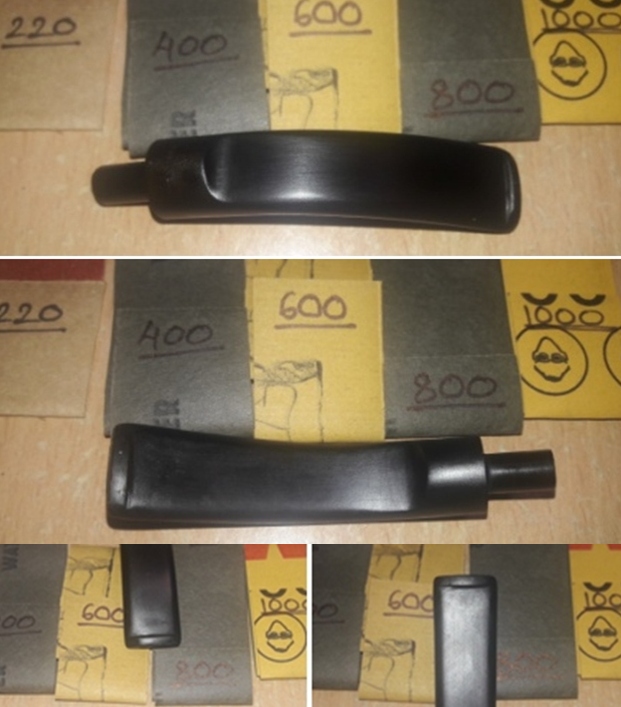
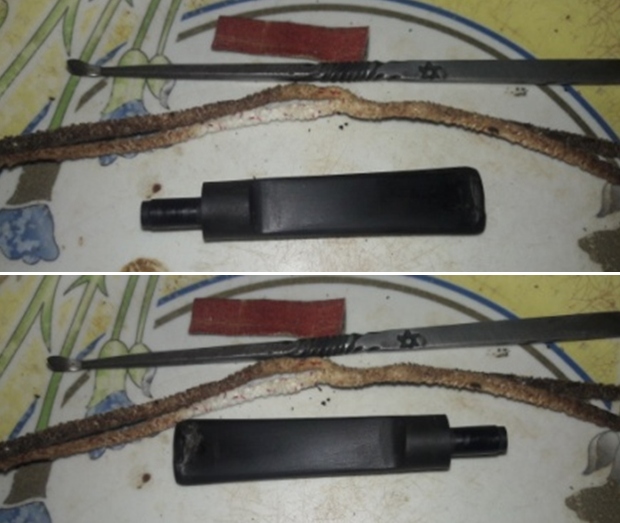
 The high quality vulcanite tapered saddle stem is typical Barling with a narrow saddle at the end of a proportionately broad stem. The stem is so heavily oxidized that it appears brownish green in color! Deep calcification is seen in the bite zone probably from prolonged use of rubber bit. Some heavy tooth chatter and deep bite marks in the bite zone are seen on both the upper and lower surfaces of the stem. The button edges on either surface have been completely flattened with the lip edges seen as mere straight thin edges with no shape and sharpness at all. The tenon air opening is completely blocked with accumulated ash and oils/ tars that have dried out on the inside as well as on the outside. The horizontal slot end is completely deformed and the slot itself is chock-a-block with gunk. The bite marks will be raised to the surface by heating to the extent possible and further will be filled using charcoal and CA superglue mix. The button end, including the button itself on either surface will have to be completely rebuilt and reshaped. The tooth chatter and the calcified deposits will be removed by sanding with a piece of 220 grit sand paper.
 I am convinced that all the pipes in this lot is from one estate as the damage to the rim, damage to the stem and general condition of each is exactly the same.
The Process
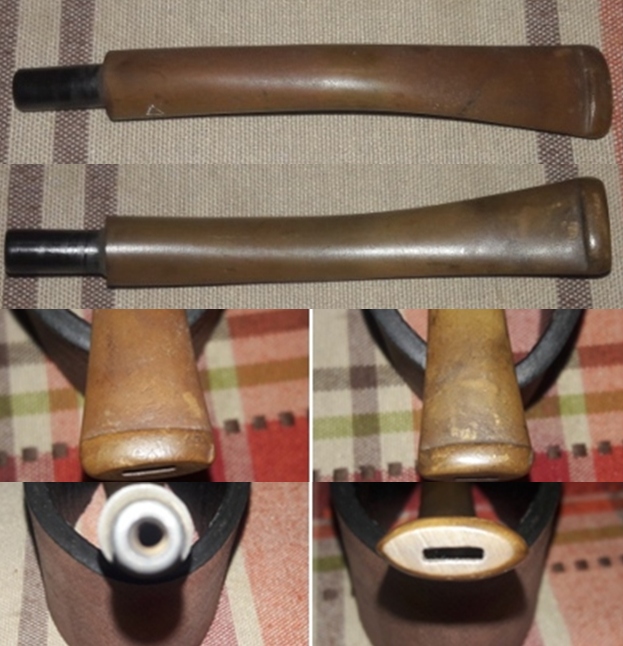
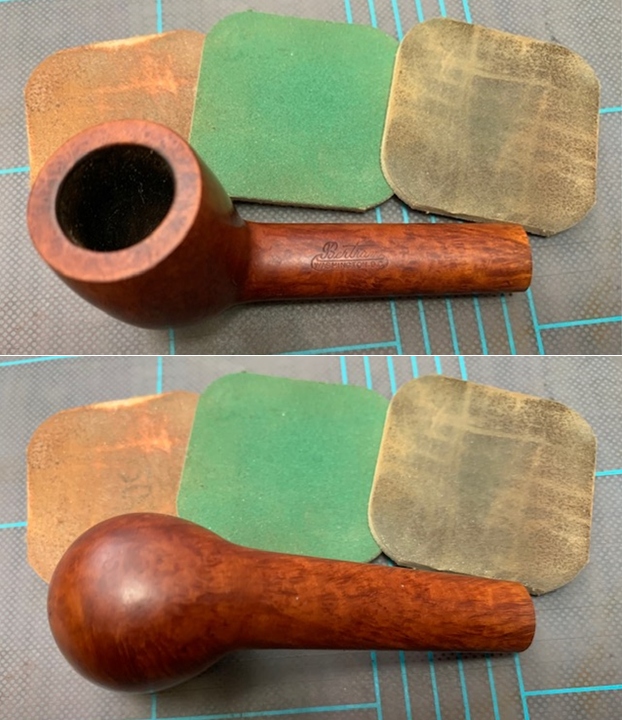
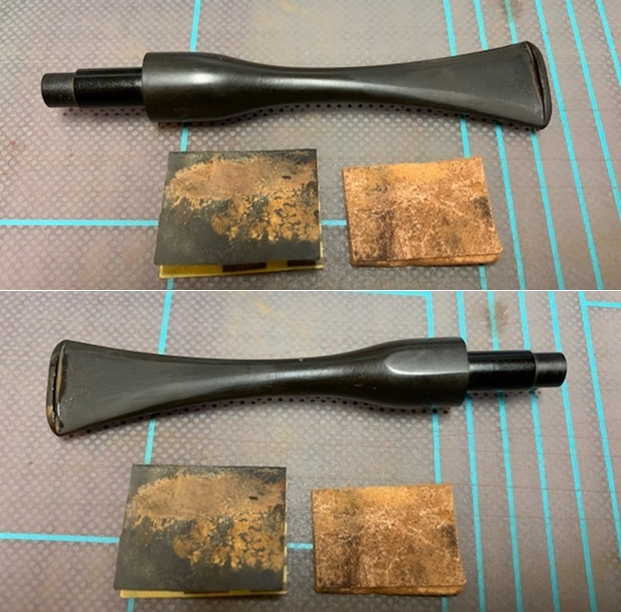
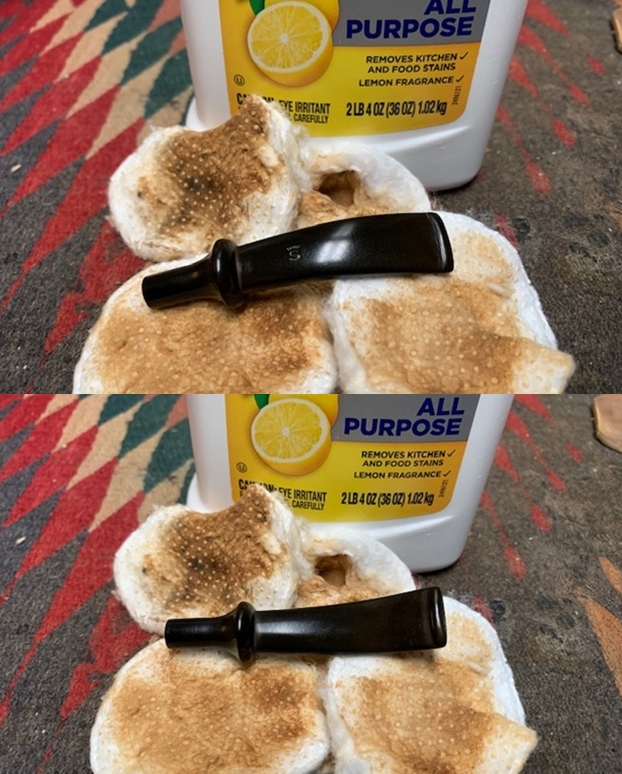
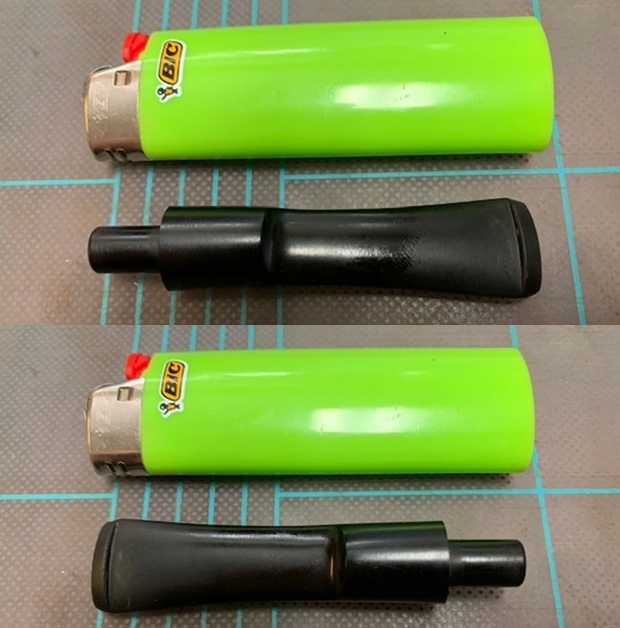
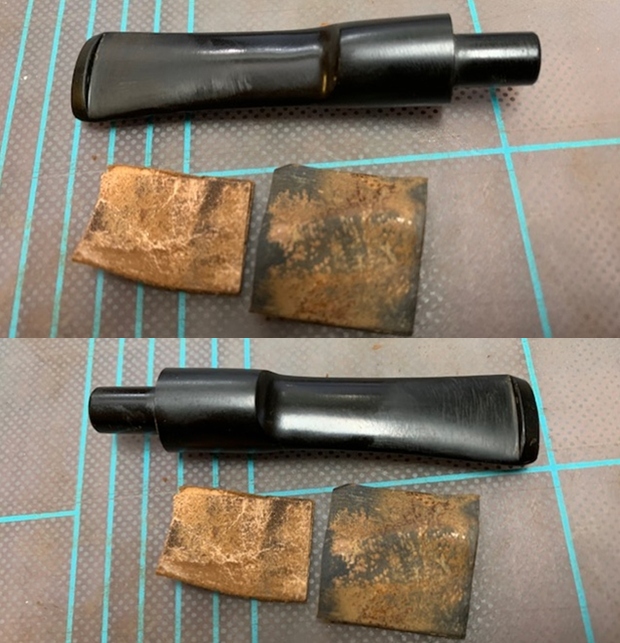
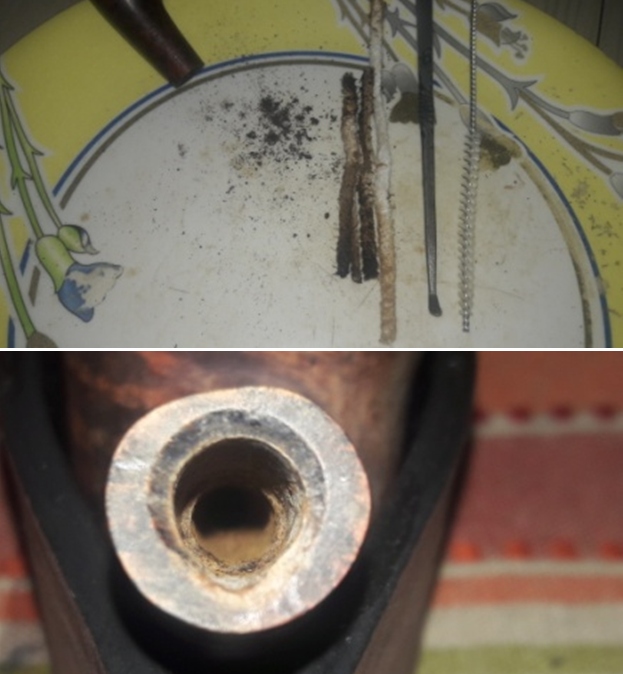
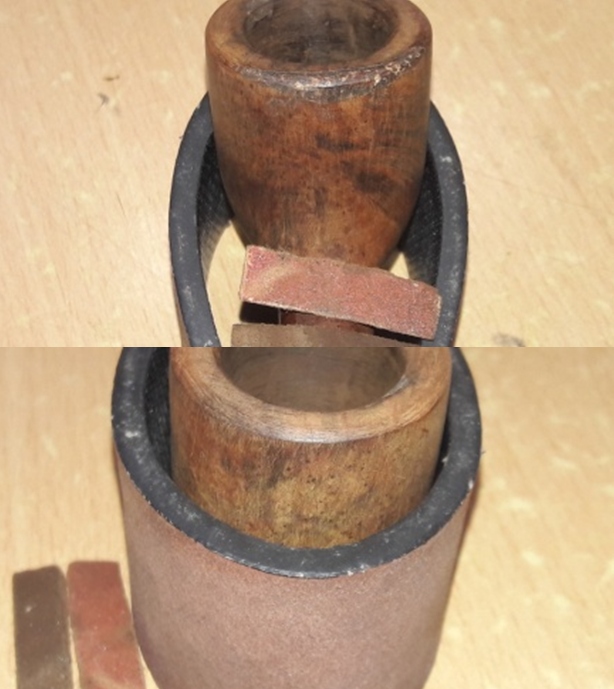
Abha, my wife, first cleaned the internals of the stem with stem brush, bristled/ regular pipe cleaners and 99.9% pure isopropyl alcohol. She scraped out the dried oils and tars from the tenon end with my fabricated knife and also removed the dried oils and tars from the slot end. She followed it up by sanding the entire stem with a folded piece of 220 grit sand paper to remove the surface oxidation. The amount of gunk that has been scraped out of the stem surface just to get to the black vulcanite shows that the oxidation was very deep and heavy over the stem surface. It has been our experience that sanding a stem before dunking it in to the deoxidizer solution helps in bringing the deep seated oxidation to the surface which in turn make further cleaning a breeze with fantastic result.
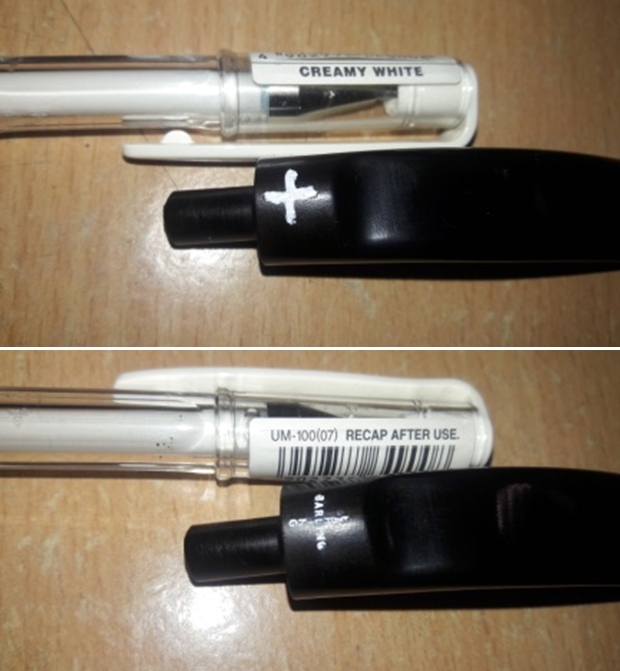
 She, thereafter, dropped the stem in to “Before and After Deoxidizer” solution developed by my friend Mark Hoover. The solution helps to draw out heavy oxidation to the surface, making its further removal a breeze, while the minor oxidation is eliminated to a very great extent. The initial sanding helps to draw out the complete oxidation as the sanding opens up the stem surface that has been initially covered with oxidation. We usually dunk stems of 4-5 pipes that are in-line for restoration and this pipe is marked in green arrow. We generally allow the stems to soak in this solution overnight to do its work.
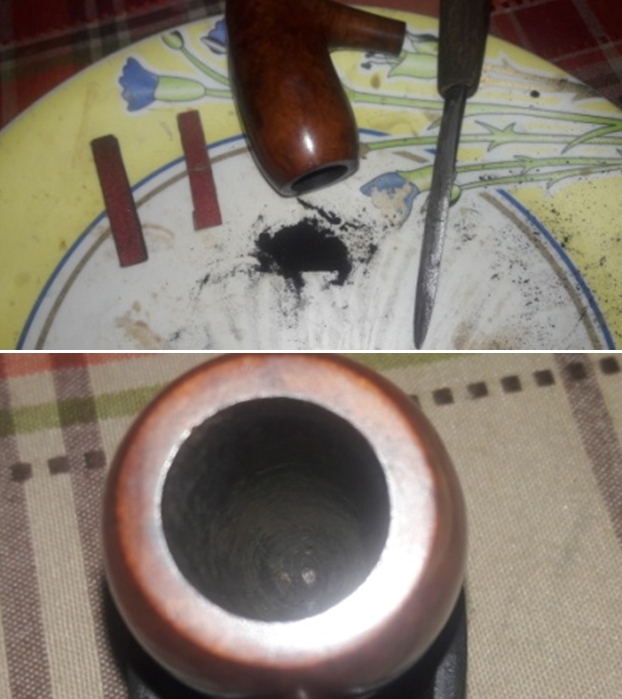
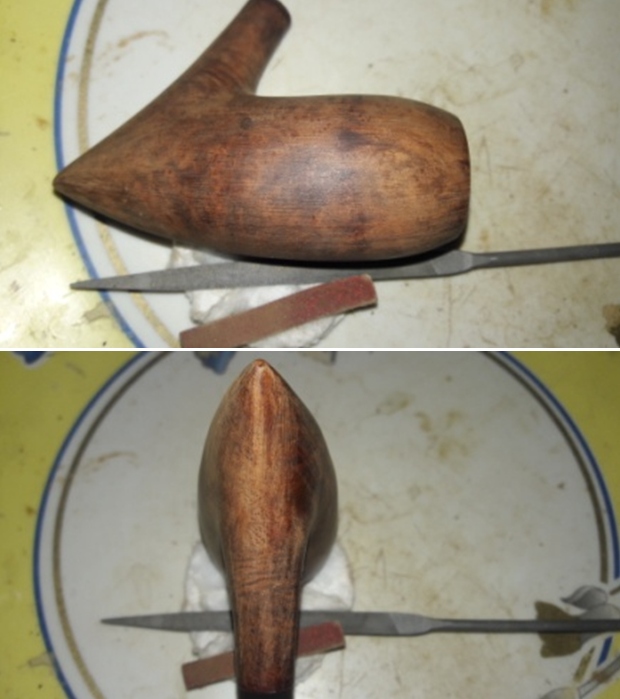
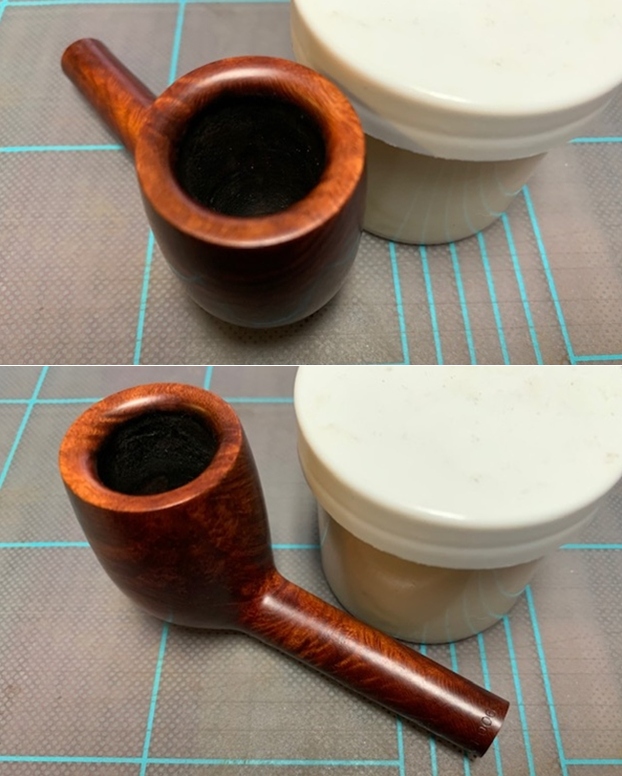
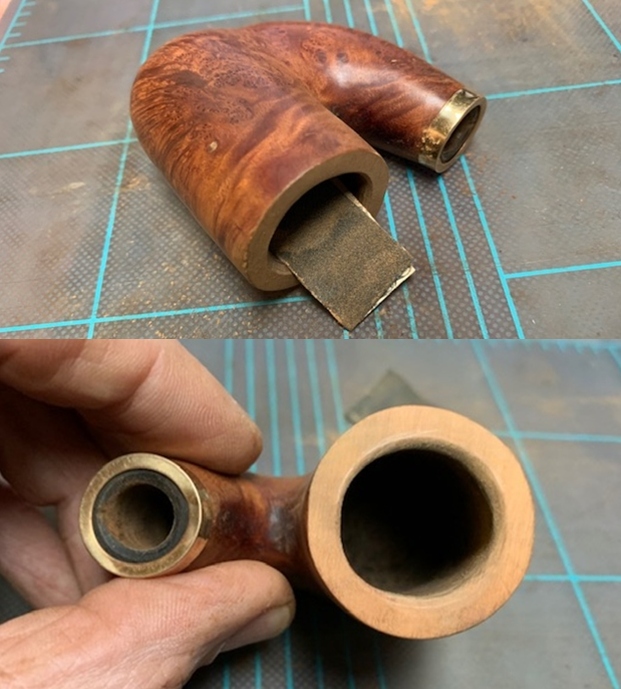
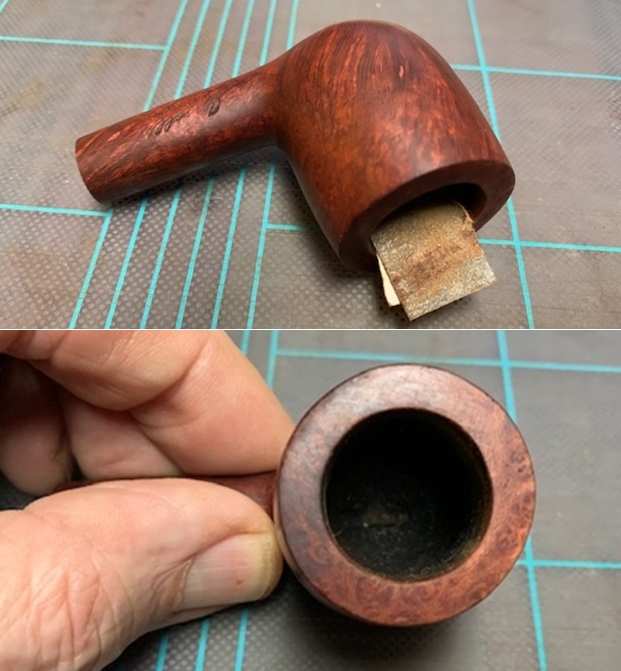
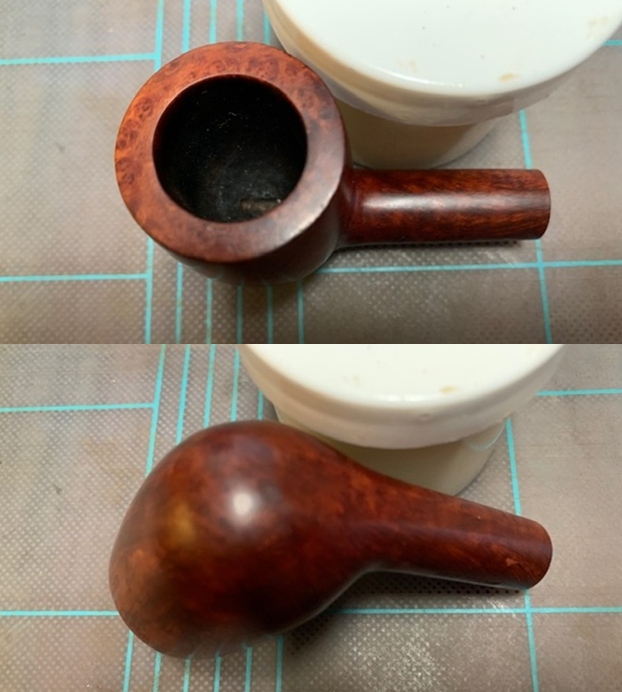
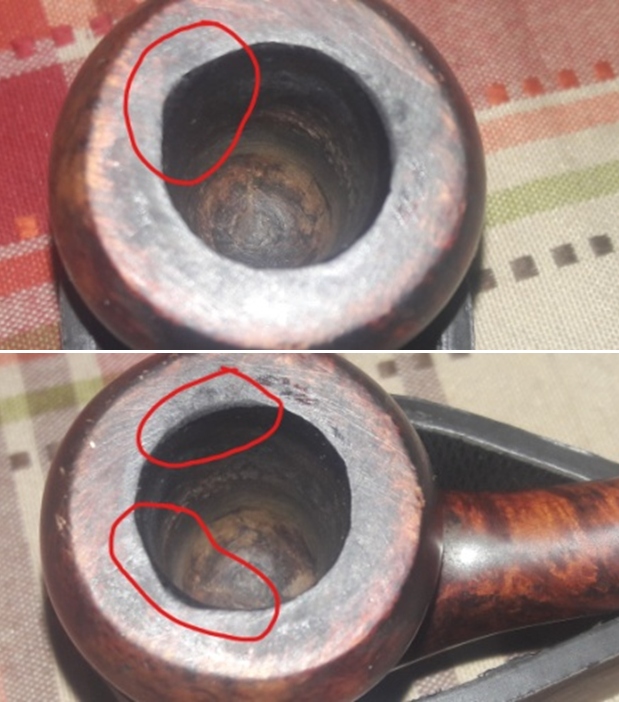
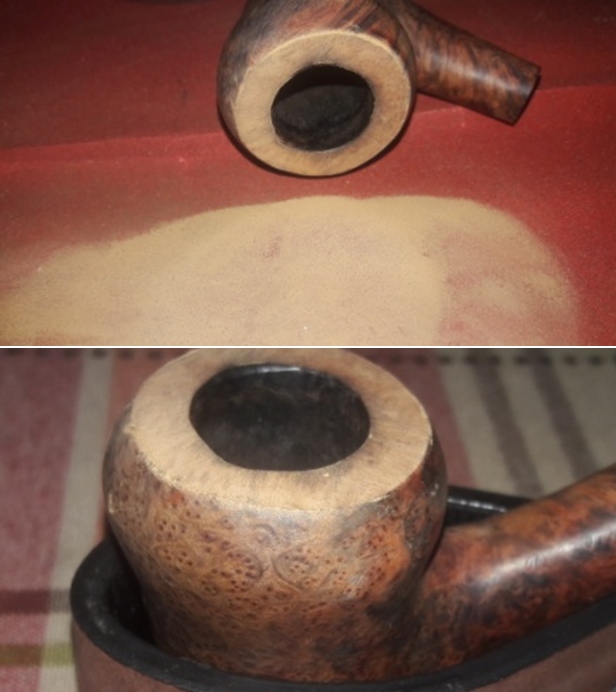
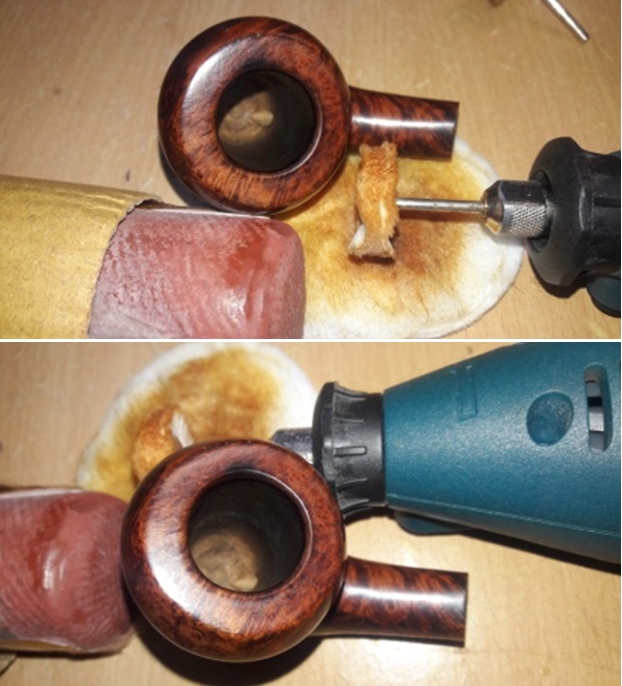
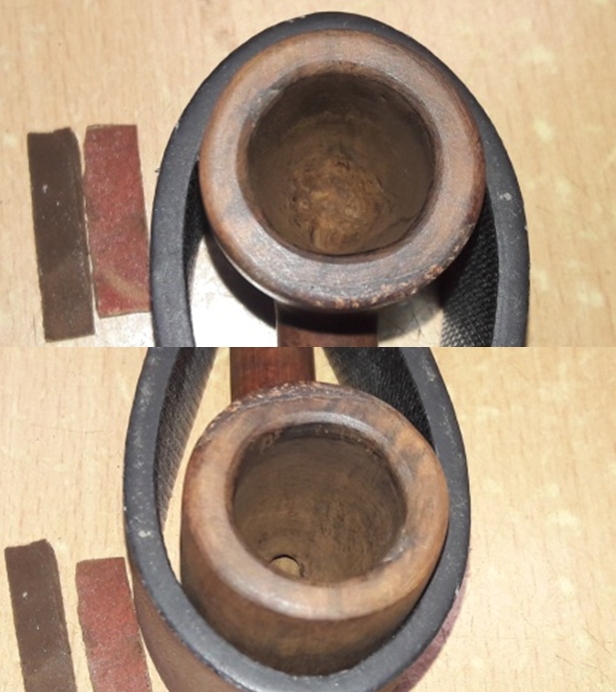
 While the stem was soaking in the deoxidizer solution, I worked on the stummel by first reaming the chamber with size 1 followed by size 2 Castleford reamer head. I further scraped the chamber walls with my fabricated knife to remove the remaining carbon deposits where the reamer head could not reach. I scraped out the lava overflow from the rim top surface, especially from the area in the 6 o’clock direction. Once the cake was reamed back to the bare briar, I used a 150 grit sand paper followed by 220 grit sand paper to remove all the traces of remaining cake and also to smooth out the inner walls of the chamber surface. Finally, to remove the residual carbon dust, I wiped the chamber with a cotton pad wetted with 99.9% pure isopropyl alcohol. The inner rim edge was charred in 10 ‘O’ clock and 2 o’clock direction which have been encircled in red. I scrapped off the charred briar from these areas and now the chamber is seriously out of round. The outer rim edge damage is significantly deeper than I had anticipated (marked in green circle). The chamber walls are pristine without any damage. The inner rim charring in the 10 o’clock is very deep and creating a bevel to mask it will result in a very thin rim top surface. I may consider rebuilding both the damaged inner and outer rim edge with superglue and briar dust after I have topped the rim surface. The ghost smells are still very strong and may reduce after the shank/ mortise are thoroughly cleaned. The rim top surface is still considerably darkened and would need to be thoroughly cleaned to know the exact damage to the surface.
 I followed up the reaming with cleaning the mortise using cue tips, pipe cleaners and shank brush dipped in isopropyl alcohol. I scraped the walls of the mortise with my fabricated knife to remove the dried oils and tars. The end of the mortise now shows the shiny end of a metal tubing which has been inserted to strengthen the spiced joint, another pointer to an excellent and solid repair job. The ghost smells are still very strong and would require a salt and alcohol treatment.
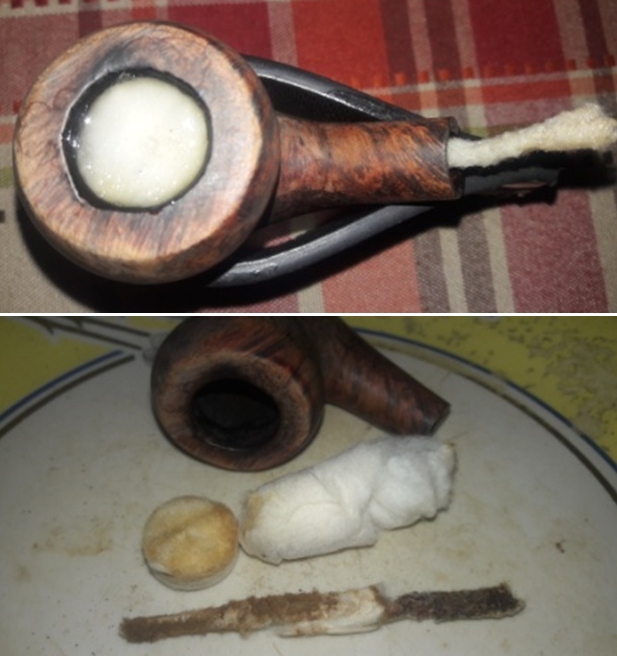
 I continued the internal cleaning of the chamber and shank with a salt and alcohol bath. I use cotton balls which is an at par substitute as I have realized over the years. I draw out a wick from the cotton and along with a folded regular pipe cleaner; insert it in to the mortise and through the draught hole in to the chamber. Thereafter, I packed the chamber with cotton balls to about quarter of an inch below the inner rim edge and soaked the cotton balls with isopropyl alcohol up to the brim. About half an hour later, the level of alcohol had gone down, having being absorbed by the cotton. I topped it up once again and set it aside overnight. By next afternoon, the cotton and alcohol had drawn out all the remaining oils and tars from the chamber and mortise, fulfilling its intended task. I removed the cotton balls and ran pipe cleaners through the mortise to clean out all the loosened tars and gunk and further cleaned it with alcohol and q-tips. The chamber now smells clean and fresh. I set the stummel aside to dry out naturally.
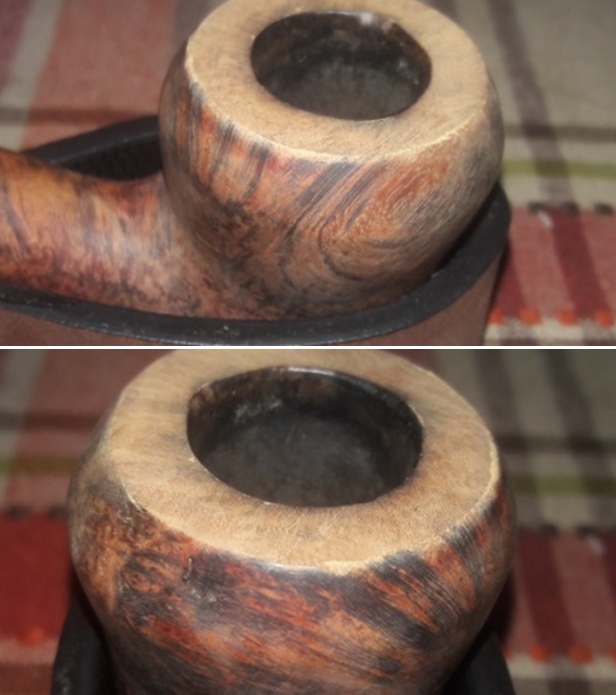
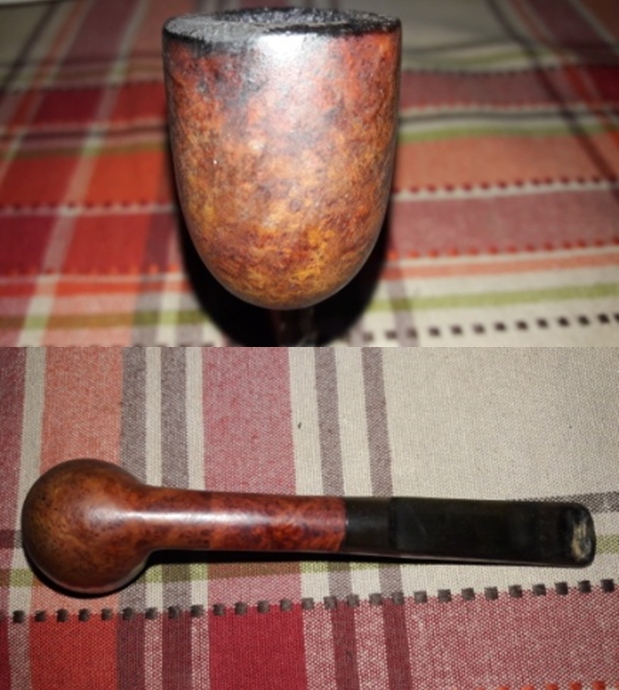
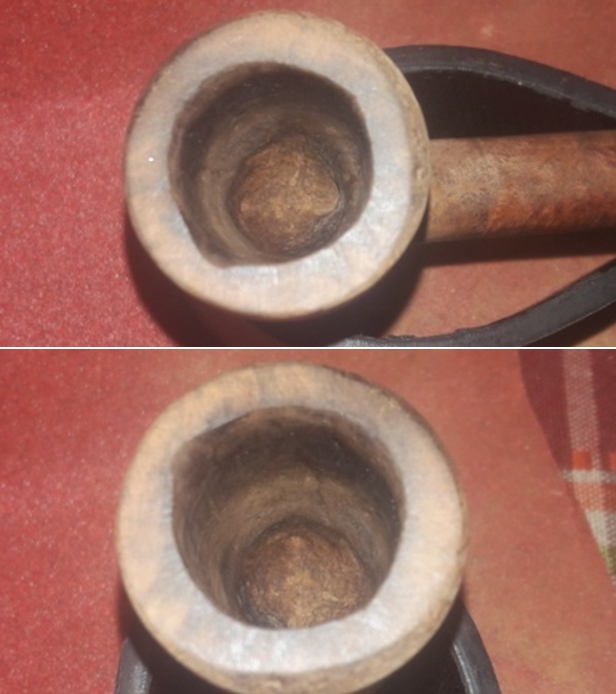
 With the bowl internals clean, I move to clean the exterior of the stummel. I used a hard bristled tooth brush and Murphy’s Oil soap to scrub the stummel and rim top. I set the stummel aside for 10 minutes for the oil soap to draw out all the grime from the briar surface. After 10 minutes, I washed the stummel under running warm water with anti oil dish washing detergent till the stummel surface was clean and dried it using paper towels and soft cotton cloth. I simultaneously cleaned the shank internals with the detergent and hard bristled shank brush and set the stummel aside to dry out naturally. The stummel surface has cleaned up nicely and the beautiful grain patterns are now on full display. The charring to the inner rim edge in 10 o’clock direction is significantly deeper than anticipated. The outer rim edge chipping too is significant. I shall have to resort to topping to address this damage and also the issue of chipped outer rim edge to some extent. To completely address these issues, I shall have to resort to a rebuild the damaged portion of outer and inner rim edge using briar dust and superglue.

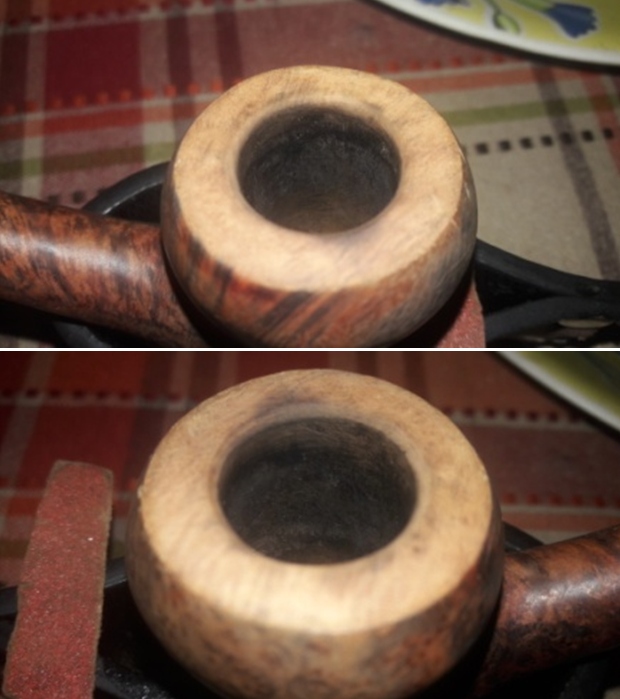
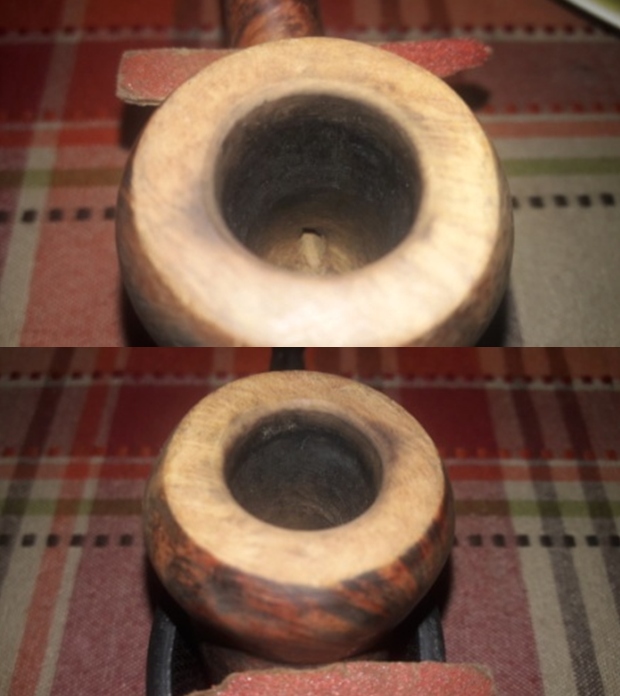
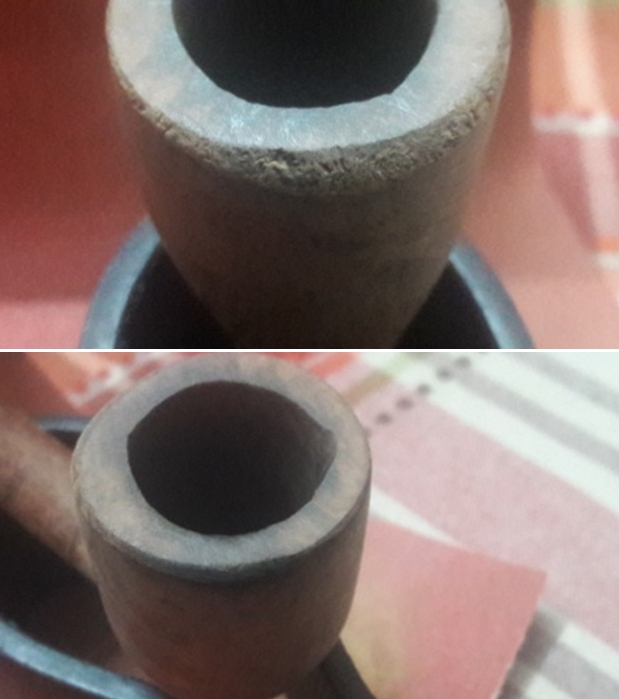
 Continuing with the stummel repairs, I topped the rim top over a piece of 220 grit sand paper till I had a smooth even surface and the charred surface in the 2 o’clock direction was completely eliminated. However the out of round chamber in the 10 o’clock direction and the chipped outer rim edge damage is still significant and would necessitate a rebuild. These damages are highlighted in the last two pictures below.
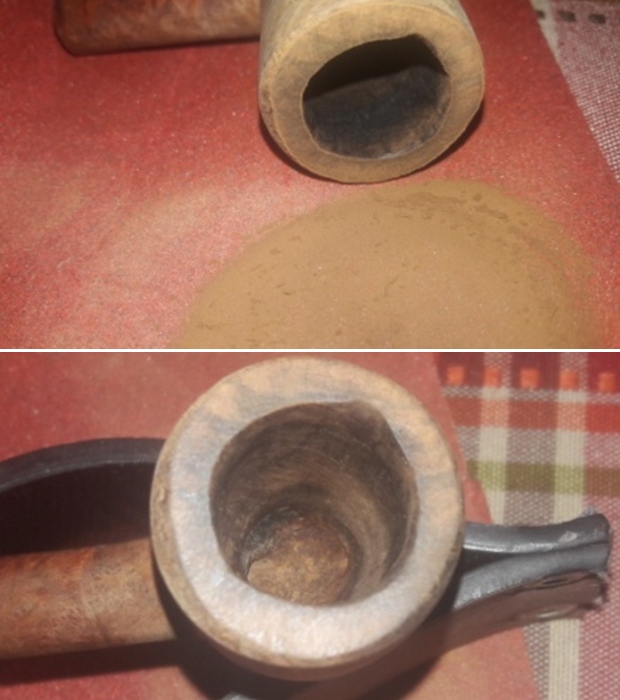
 Further repairs to the stummel is being put on hold as I did not have briar dust in required quantity and neither did I have any superglue at home. I shall complete these repairs once I rejoin my place of work once the lockdown due to COVID-19 pandemic is lifted.
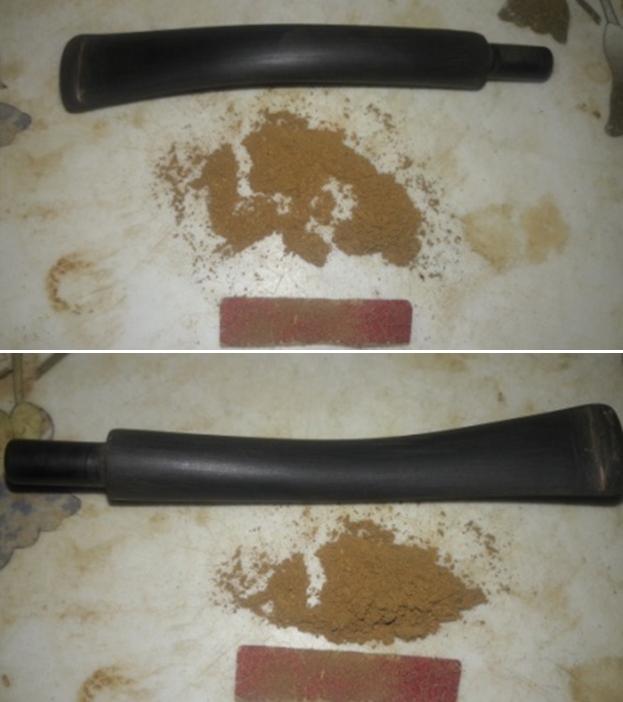
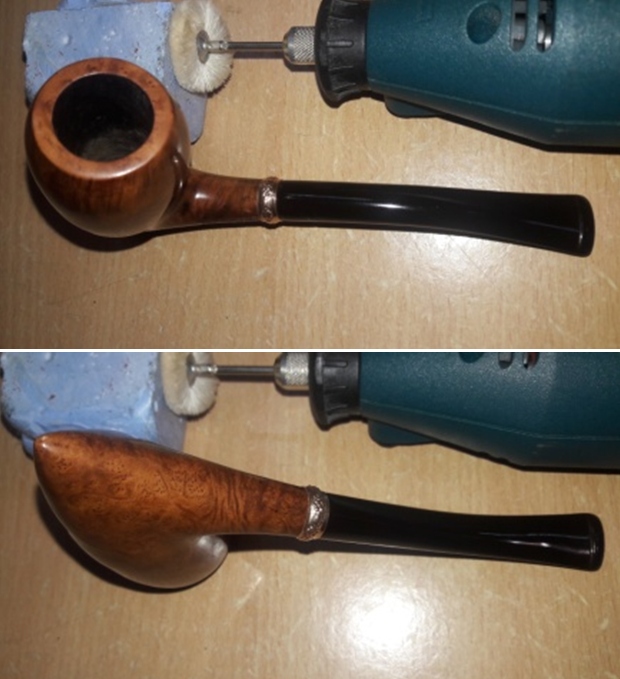
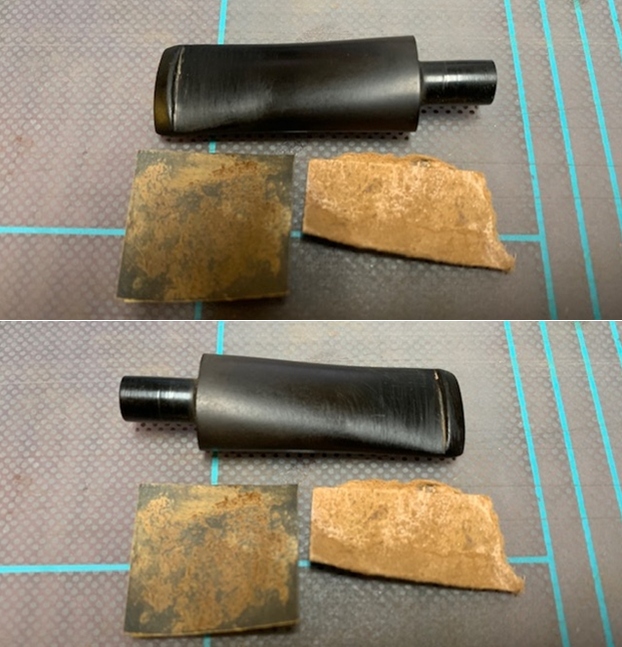
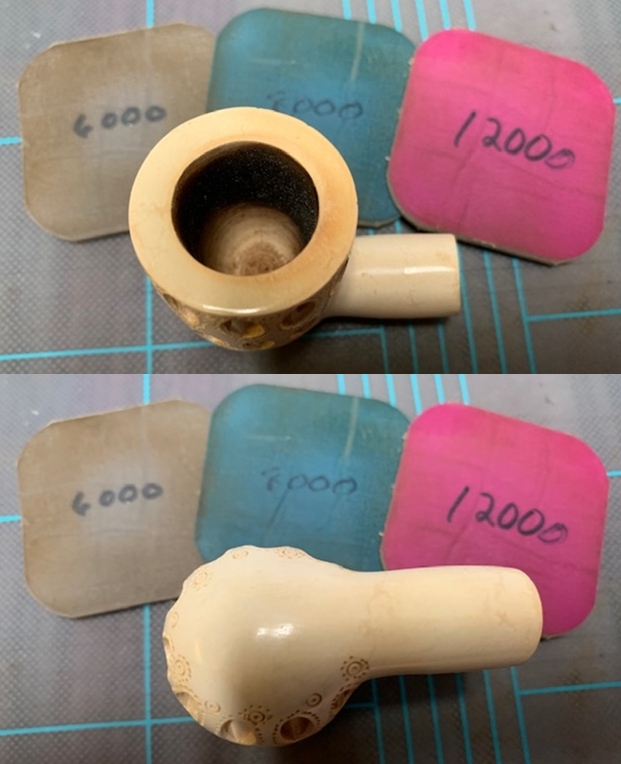
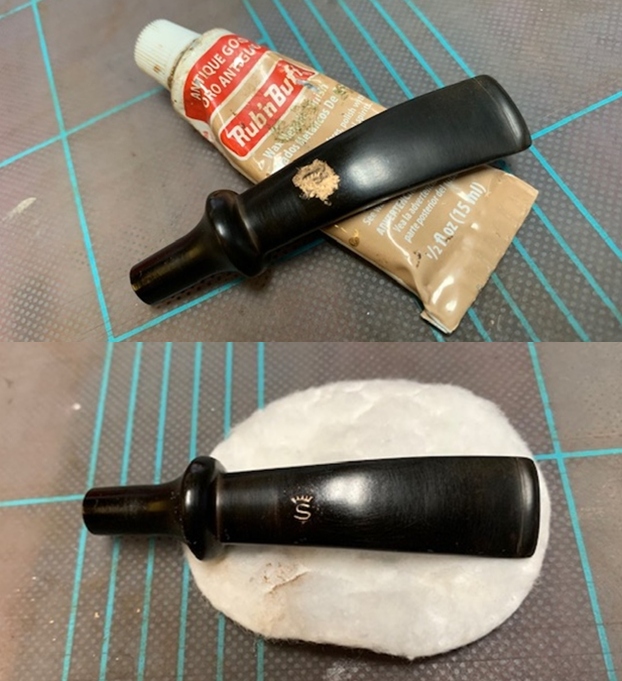
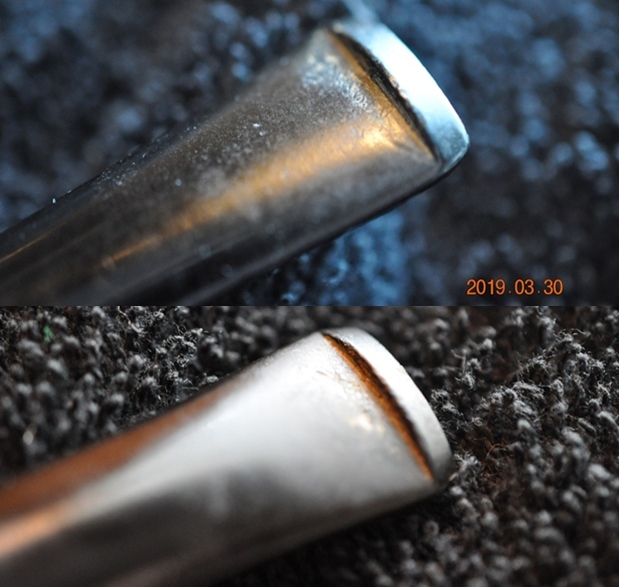
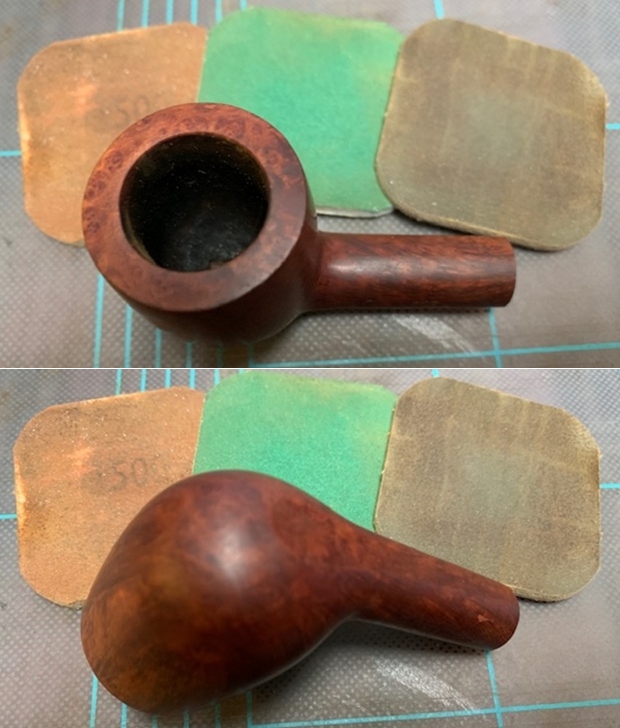
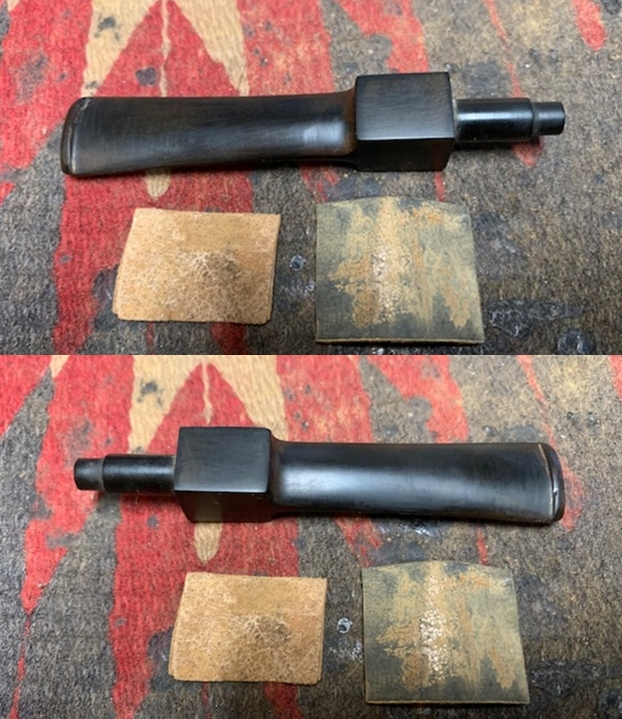
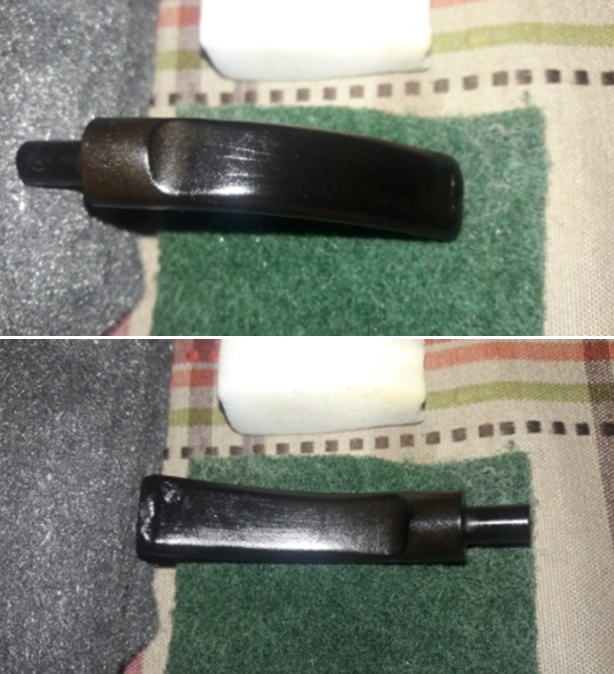
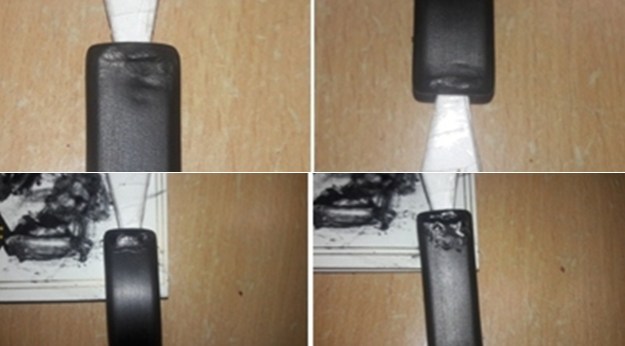
While the stummel repairs were being put on hold, the next morning Abha removed the stem that had been soaking in the deoxidizer solution overnight. She cleaned the stem under running warm water and scrubbed the raised oxidation from the stem surface using a Scotch Brite pad and cleaned the airway with a thin shank brush. She further removed the oxidation by scrubbing the stem with 0000 grade steel wool and applied a little EVO to rehydrate the stem. This now gives a clearer picture of the extent of depth of the bite marks as can be seen in the pictures below. These will definitely require a fill even after I have heated and raised the vulcanite. The buttons on either surface will have to be reconstructed and reshaped. I need to further sand the stem to completely remove the oxidation.  The deep tooth indentations are now clearly visible and I decided to address these issues at this stage. Since I did not have a lighter (I generally prefer to use it for this purpose), I used a lit candle instead. The result is equally good; however, one has to be doubly careful as the heat from a candle flame is more intense as compared to a lighter. These tooth indentations were raised to the surface to some extent due to the heating; however, it would require a fill to complete the repairs.
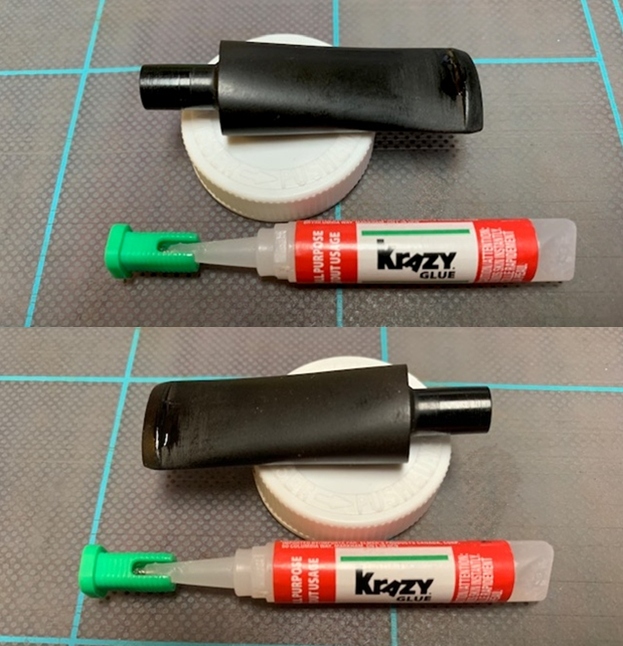
 I prepared a mix of CA superglue and activated charcoal and carefully applied it over the damaged bite zone on both surfaces and lip and set it aside for curing over night. I applied this mix in sufficient thickness as it would help during the filing and sanding to match the fills with the stem surface and reshaping the button.
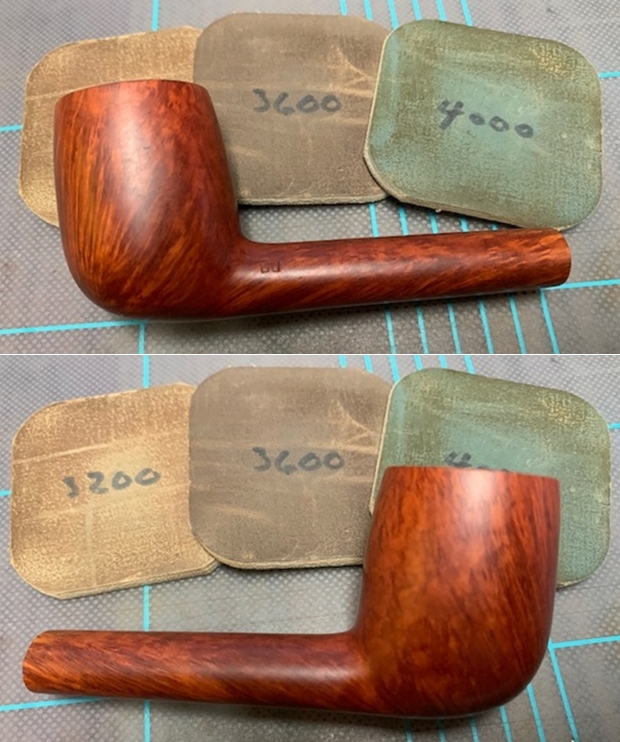
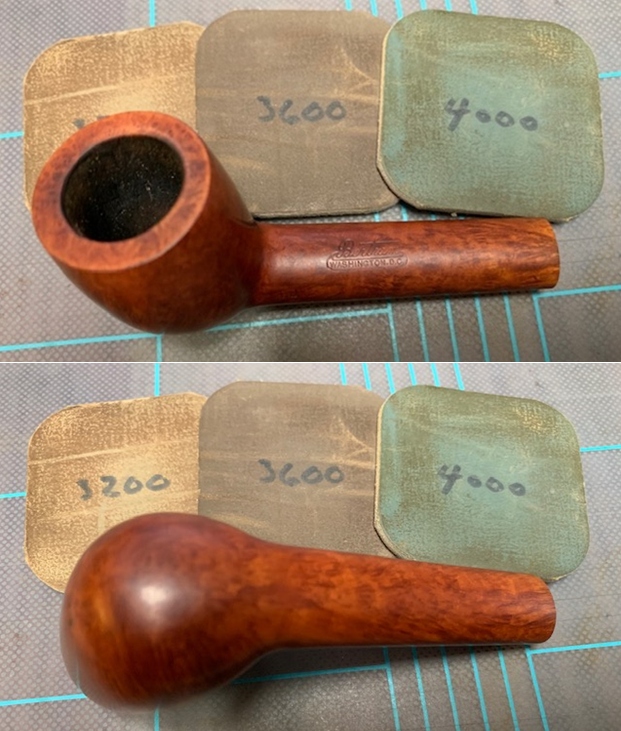
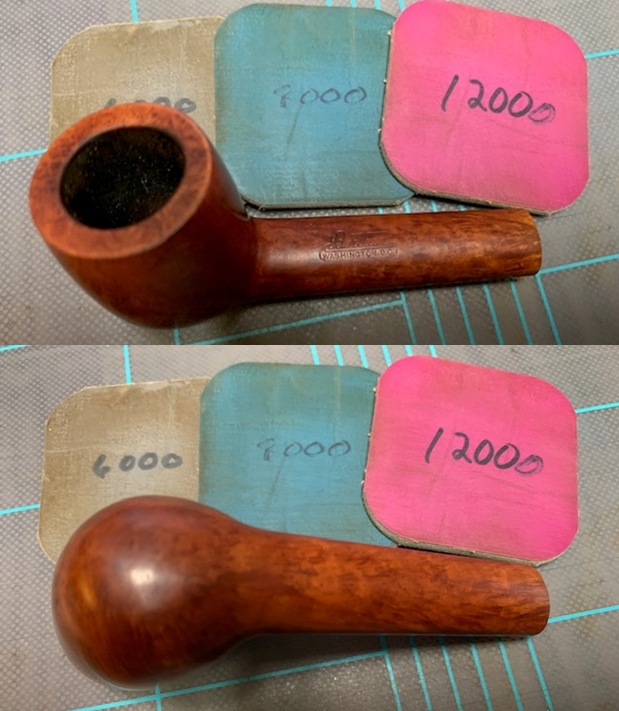
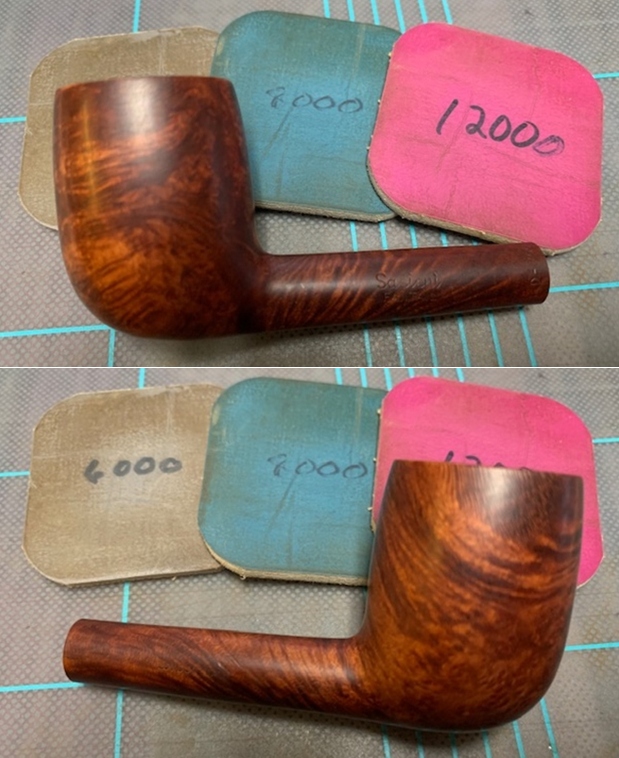
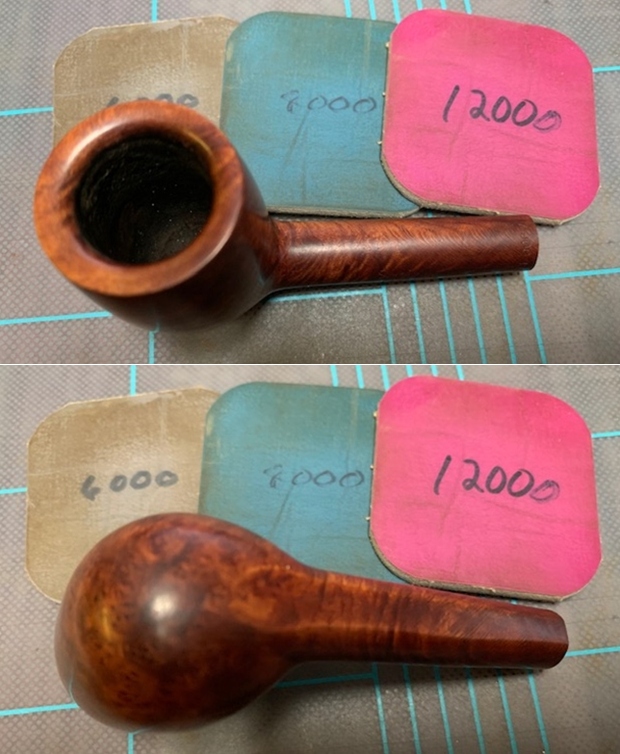
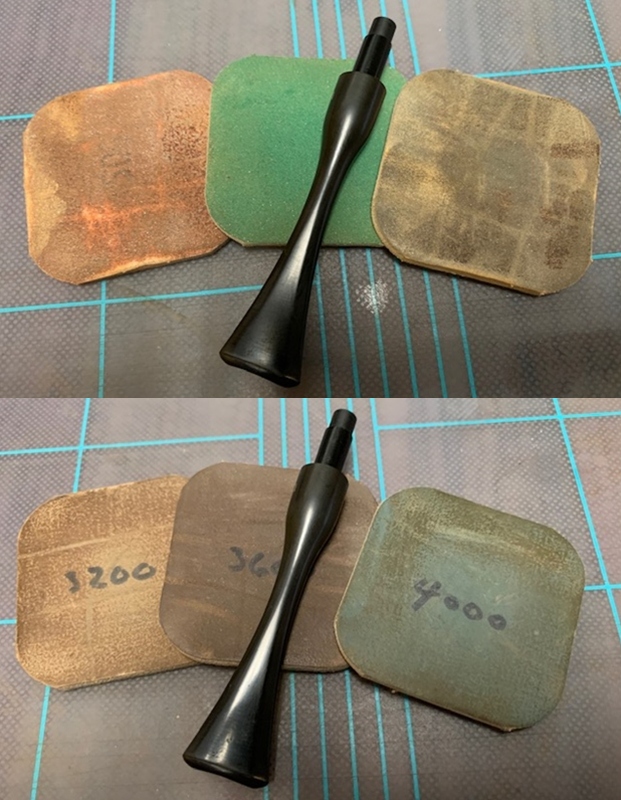
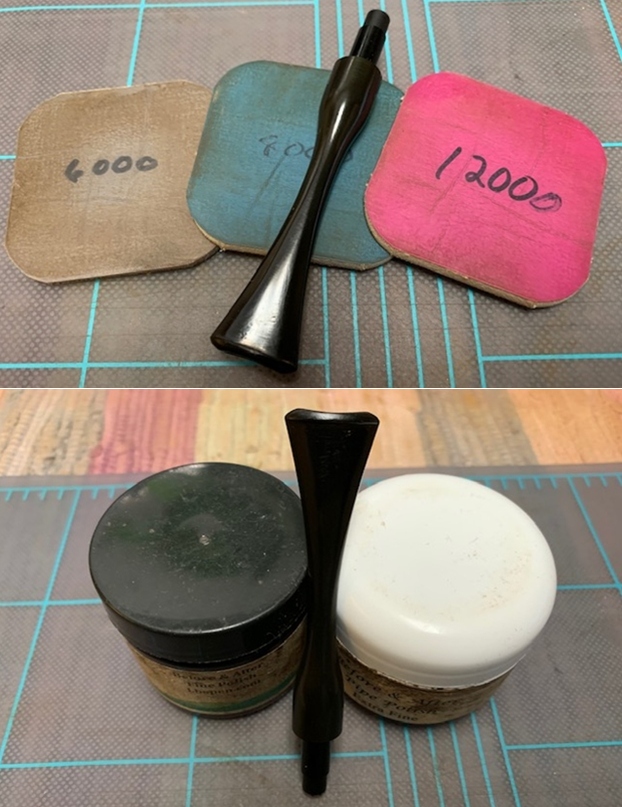
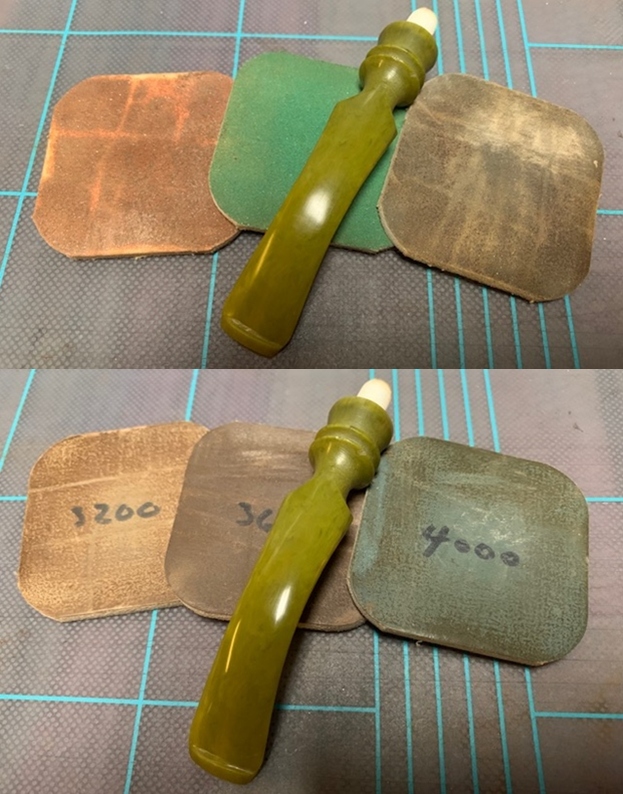
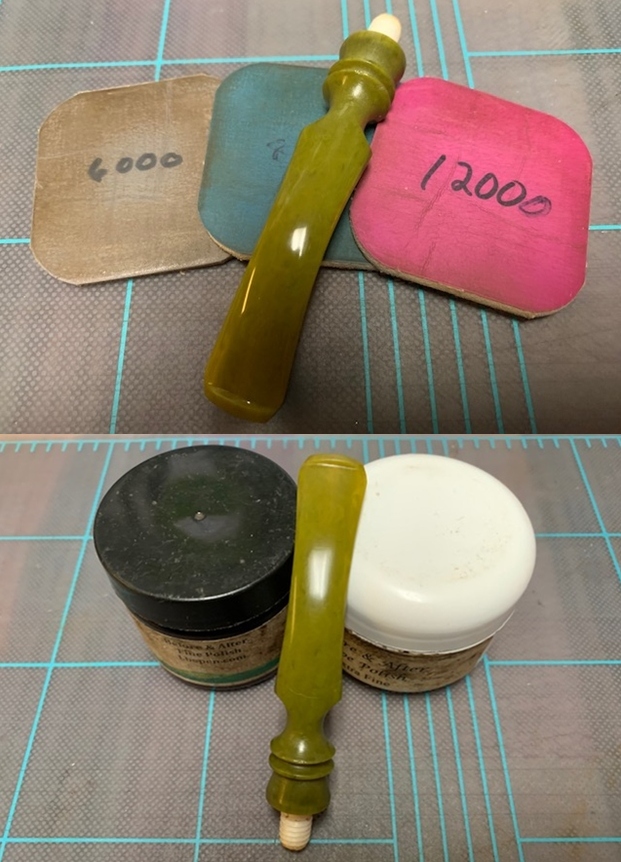
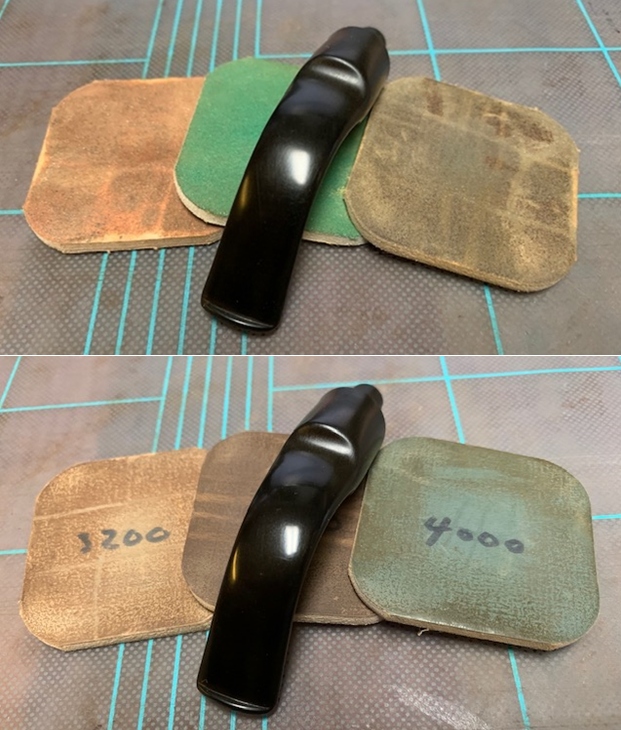
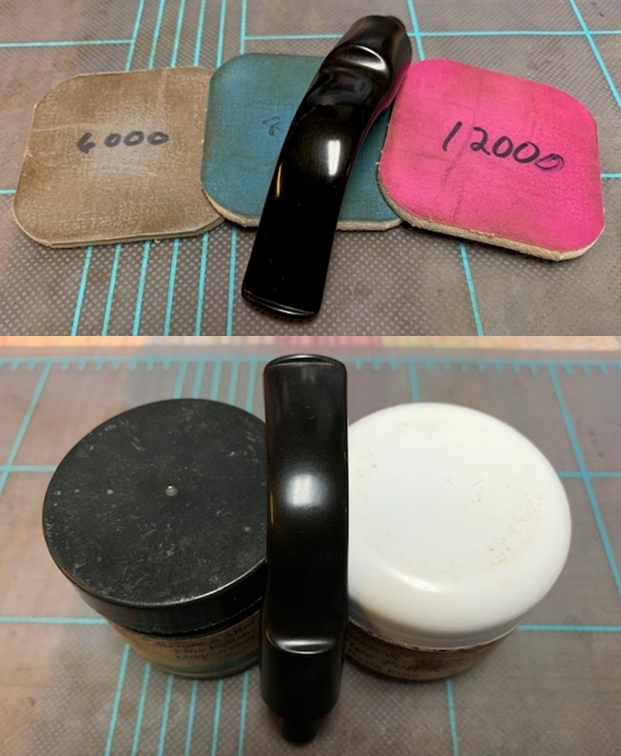
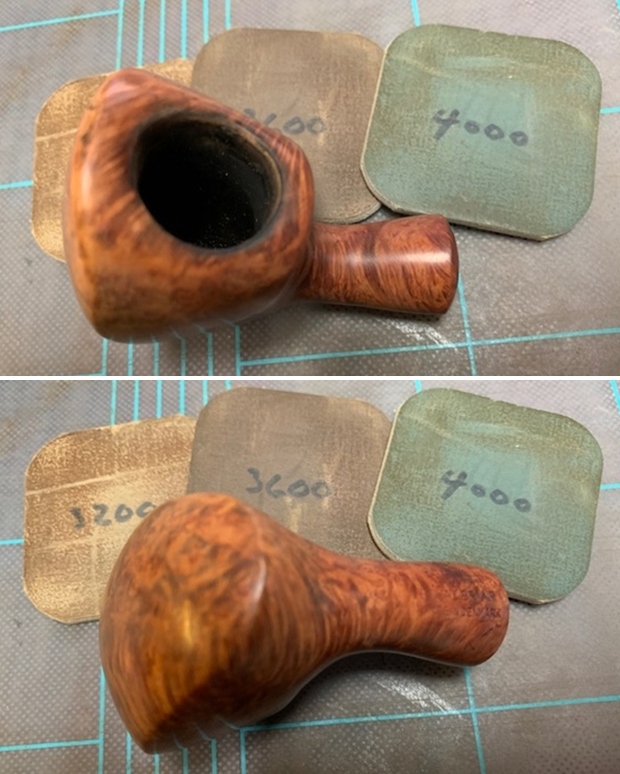
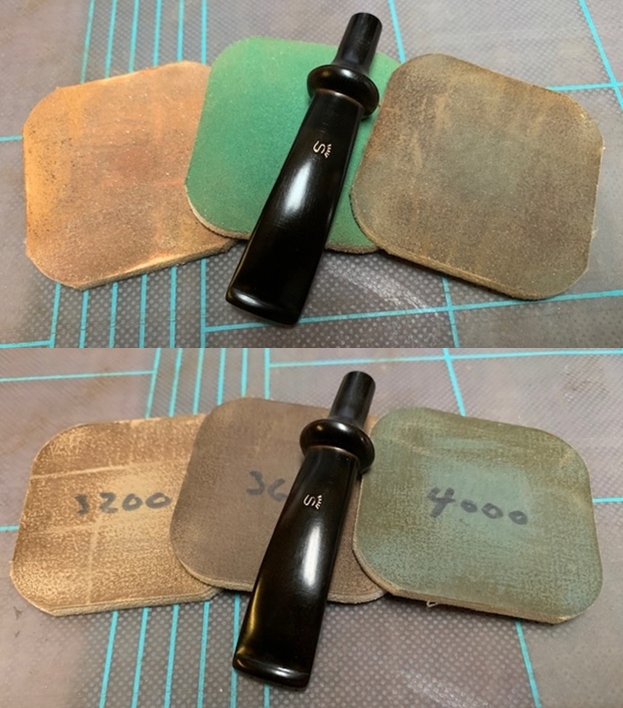
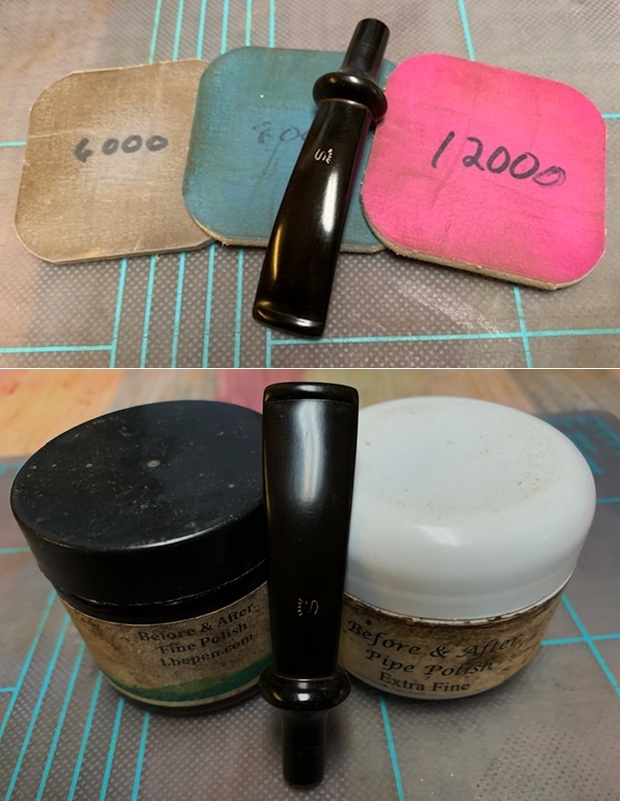
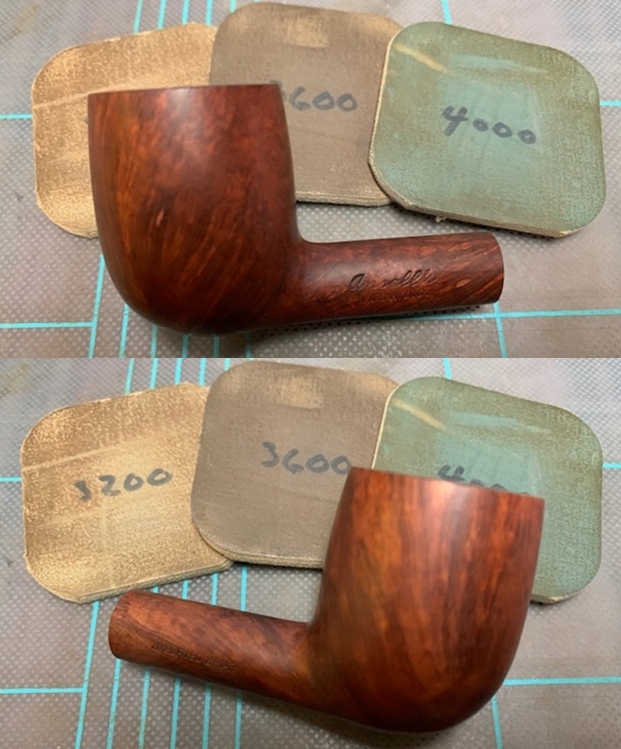
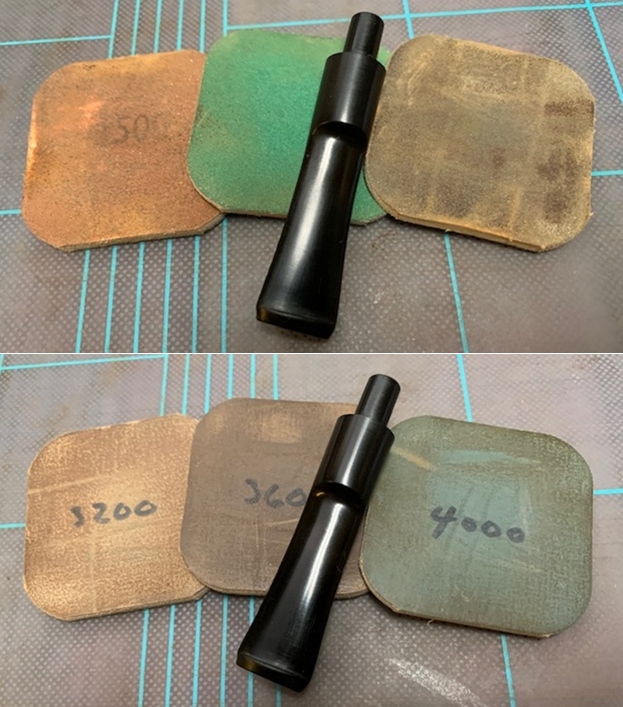
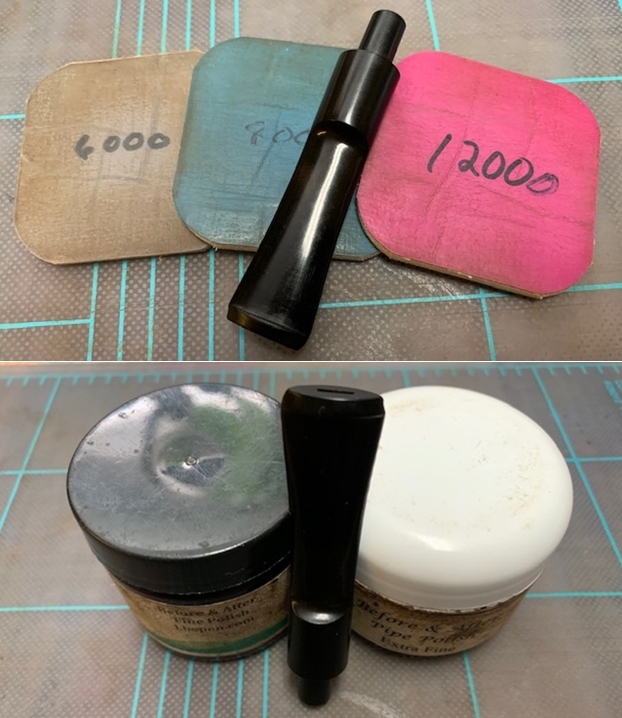
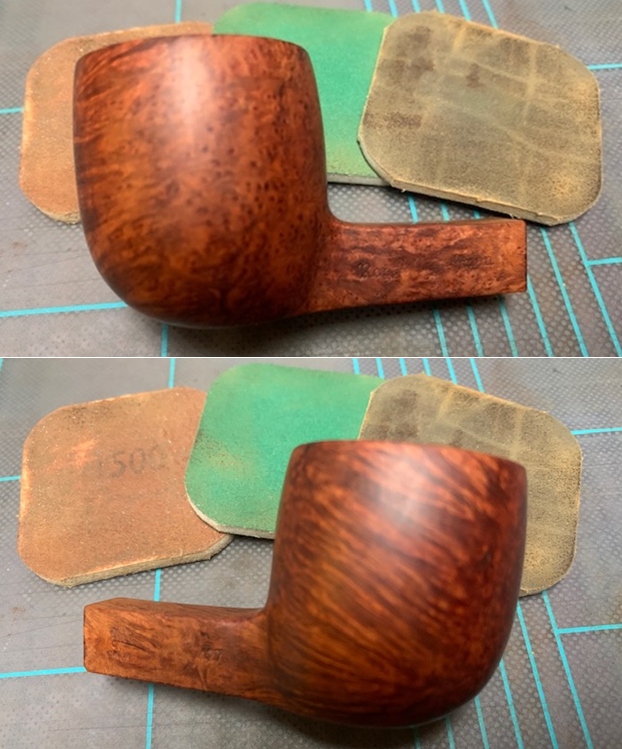
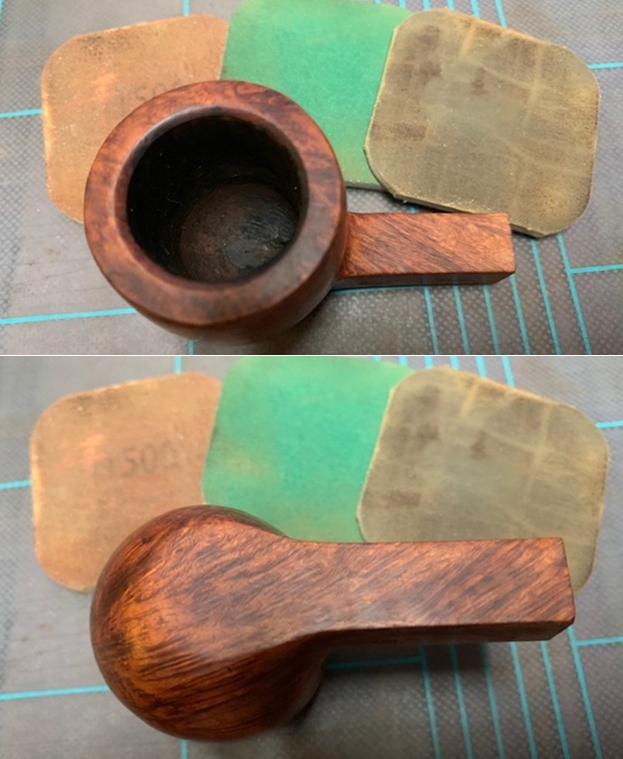
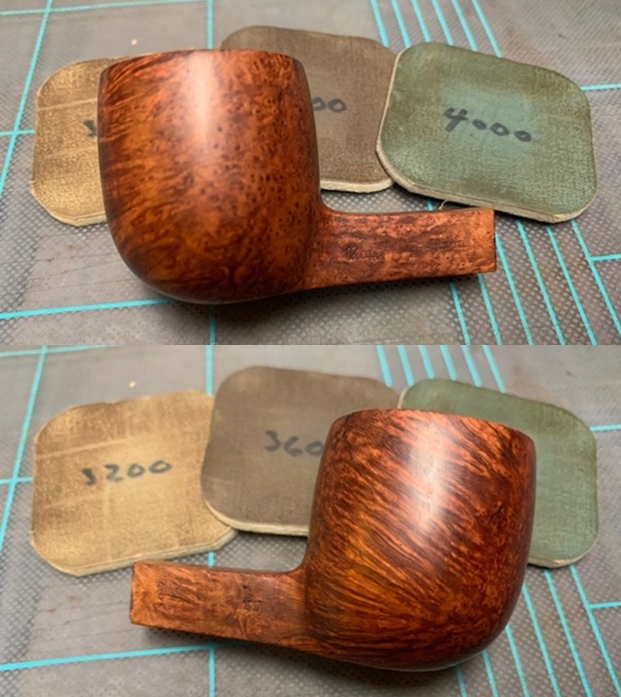
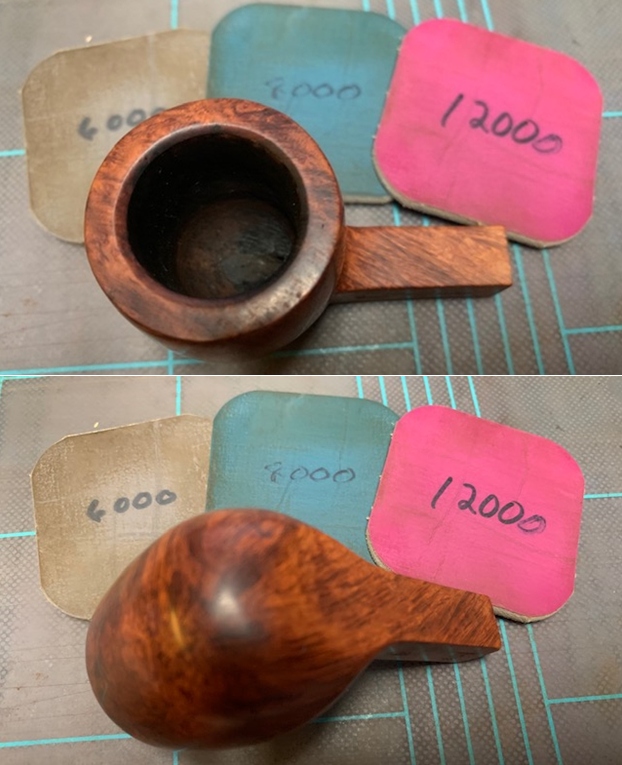
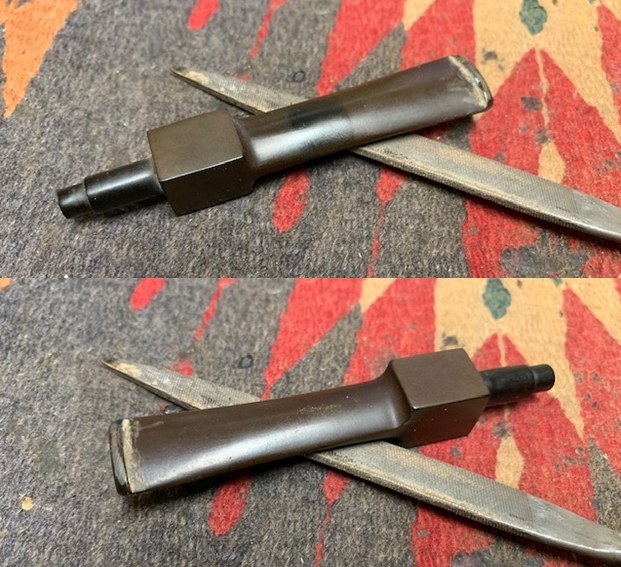
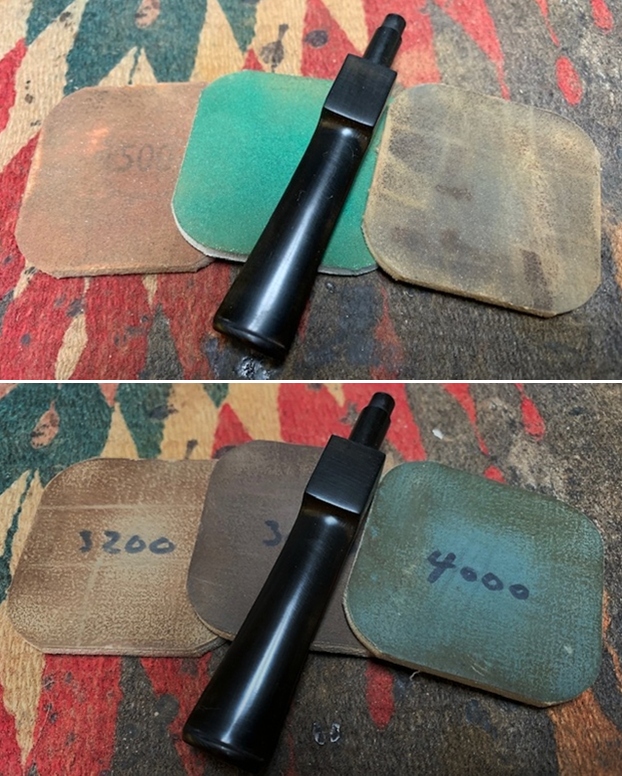
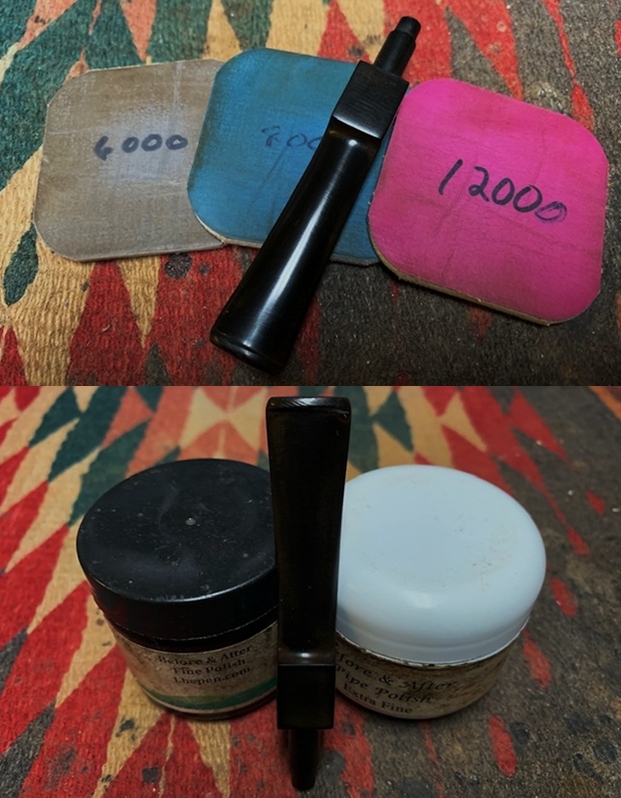
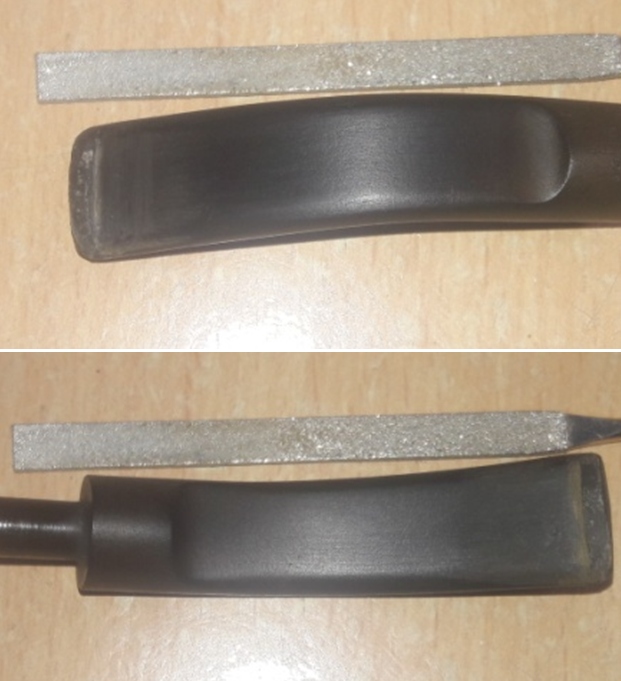
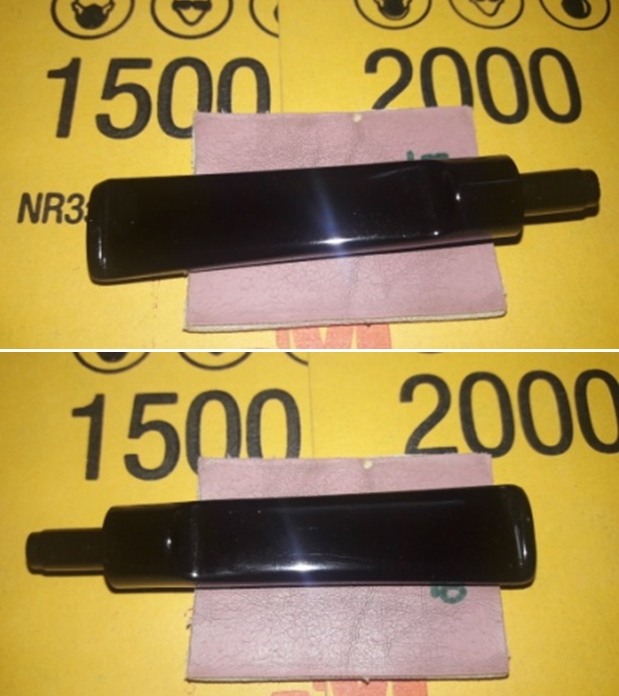
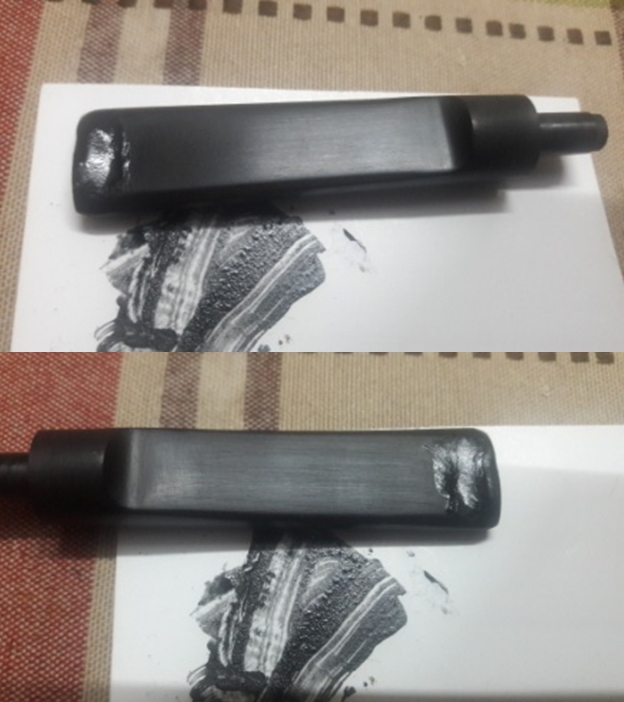 Using a flat head needle file, I reshaped the button and followed it up by sanding the stem with a folded piece of 220 grit sand papers. I followed it up by further sanding the stem with 320, 600 and 800 grit sand papers. Once I was satisfied that the fills had perfectly matched with the rest of the stem surface, using micromesh pads, I completed the polishing cycle by wet sanding the surface with 1500 and 2000 grit sand papers and further dry sanding with 3200 to 12000 grit pads. The stem looks great with the fills nicely matched with the rest of the surface. I rub a little quantity of Extra Virgin Olive oil into the stem surface.
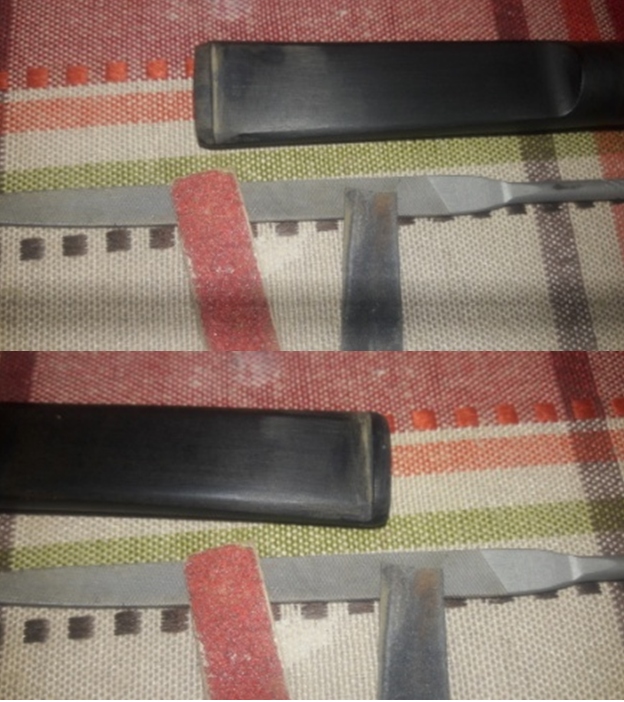
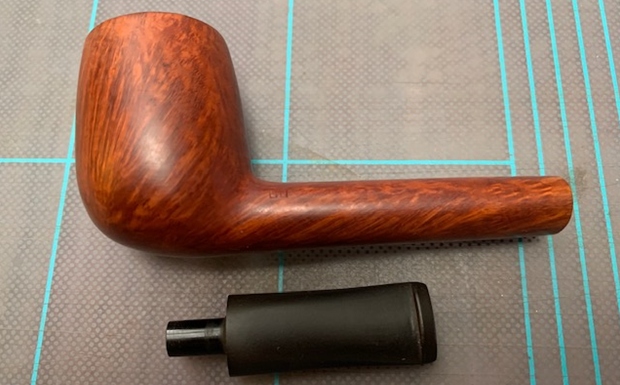
 I have since rejoined back at my place of work and necessary tools, equipment and materials are now available to me to complete my pending projects that I have carried back from home to my work place. I had noted the issues that needed to be addressed on each pipe that I had carried and this pipe needed the rim inner as well as outer rim edge rebuilt, micromesh polishing of the stummel and final carnauba wax polish.
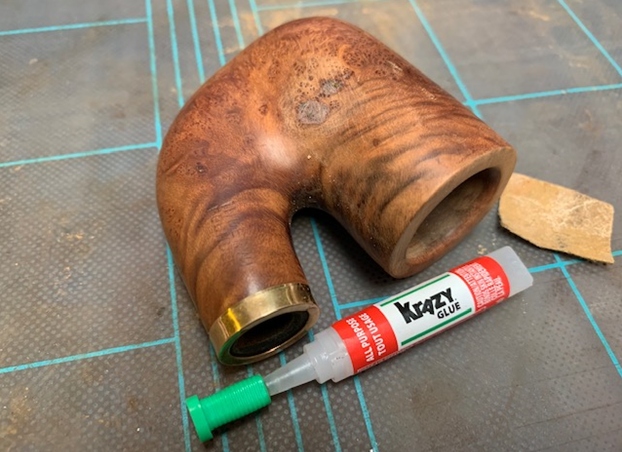
Starting with the rebuild of the rim edges, I reconstructed the inner and outer rim edge with briar dust and CA superglue using the layering technique. I ensured that the fill was slightly above the rest of the rim top surface as this would enable me to get a correct perspective of the match with rest of the stummel surface when I file and sand these reconstructed parts with the rest of the rim top. I set the stummel aside for the mix to cure.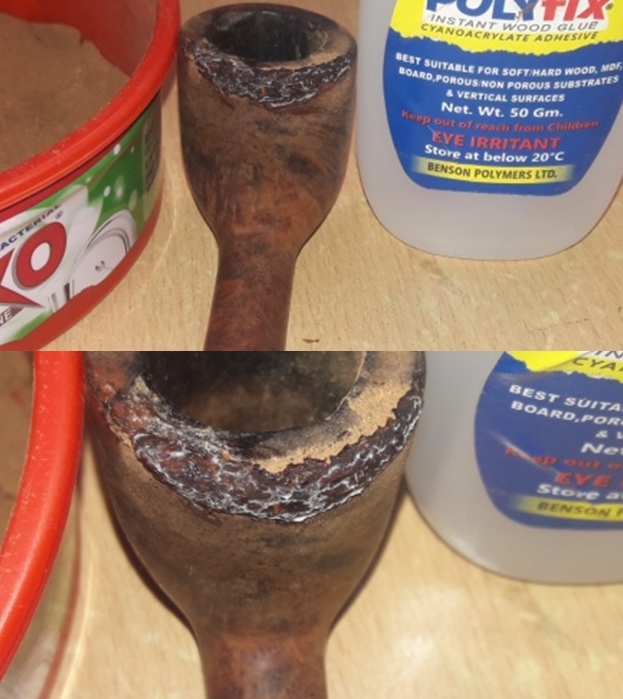
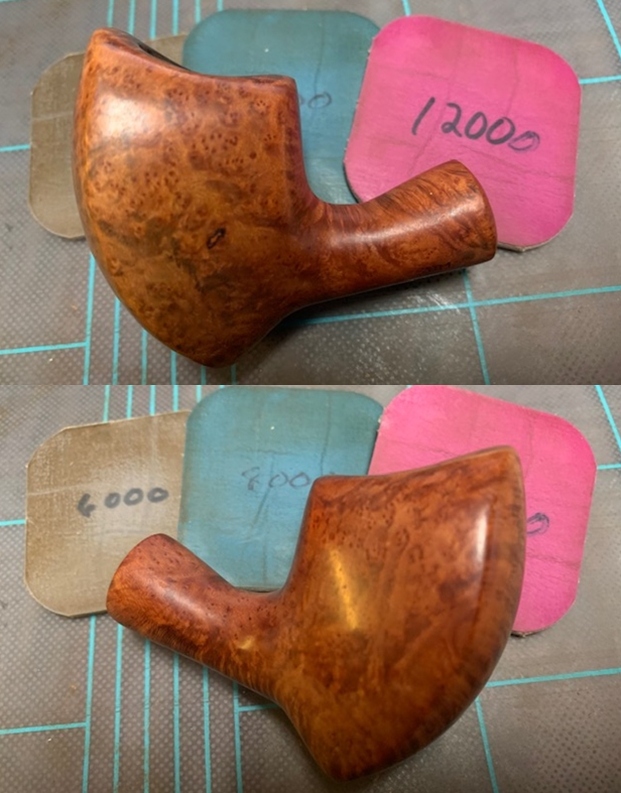
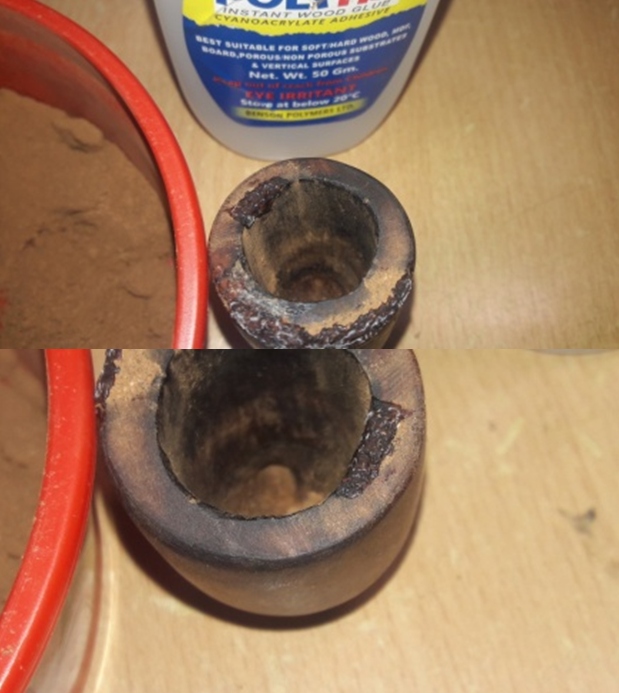 Once the fills had sufficiently hardened, with a flat head needle file, I sand the top portion of the fill to achieve a rough match with the rim top surface. I used a flat head needle file to match reconstructed portion of the outer rim edge with the rest of the stummel surface. For matching the inner rim edge fill with the chamber walls, I resorted to a 180 grit sand paper as the needle file did not afford me the flexibility that was required to shape this portion of the fill. I am quite pleased with the progress being made so far.
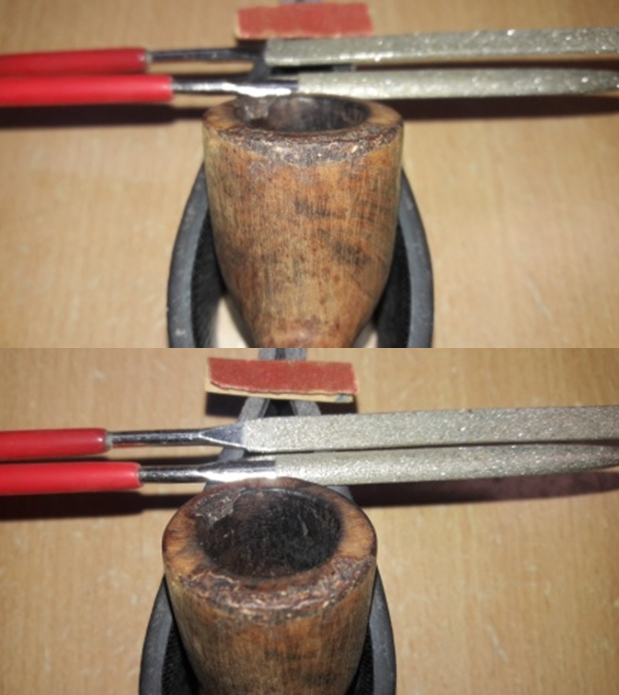
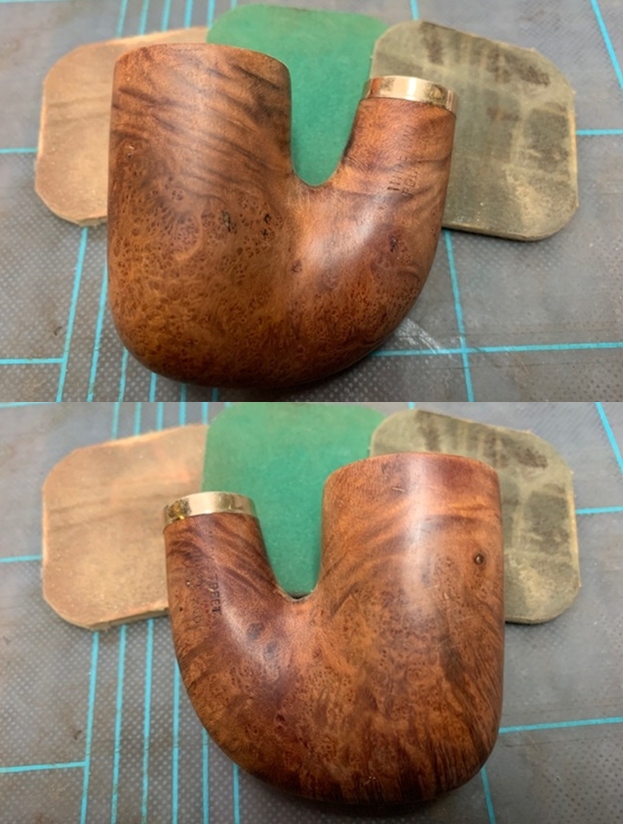
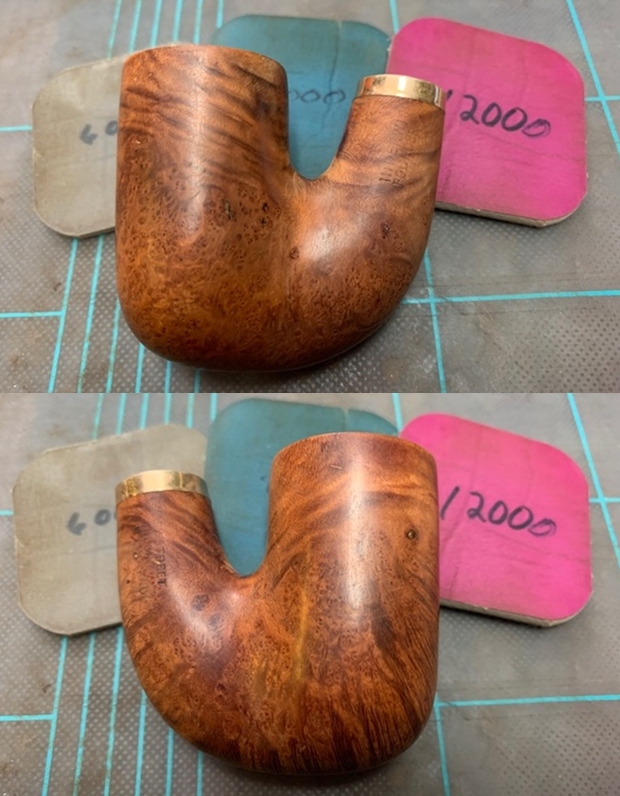
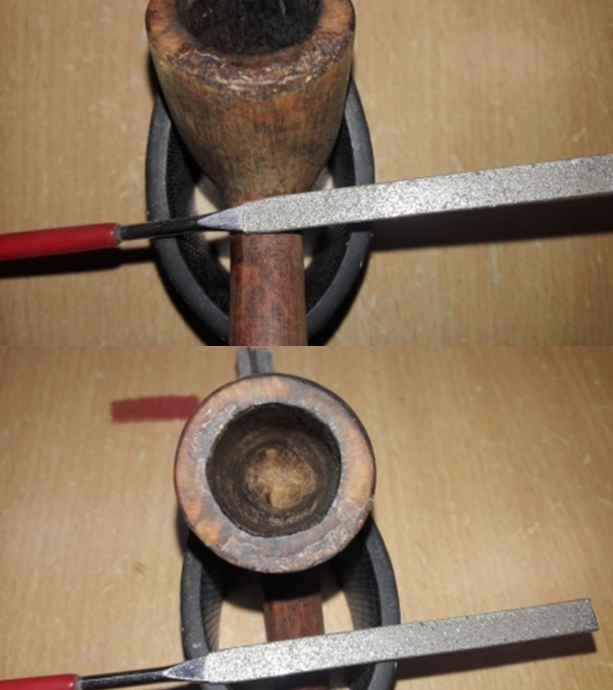 For a perfect match of the reconstructed portion of the rim edges and also to further reduce the darkened rim top in 2 o’ clock direction, I again topped the rim surface on a piece of 180 grit sand paper. With a folded piece of 220 grit sand paper, I created a slight bevel to both the outer and inner rim edges to blend in the fills and also to address the minor dings and charring to the outer and inner rim edges respectively. The fills are now perfectly matched and rim top now looks pristine.
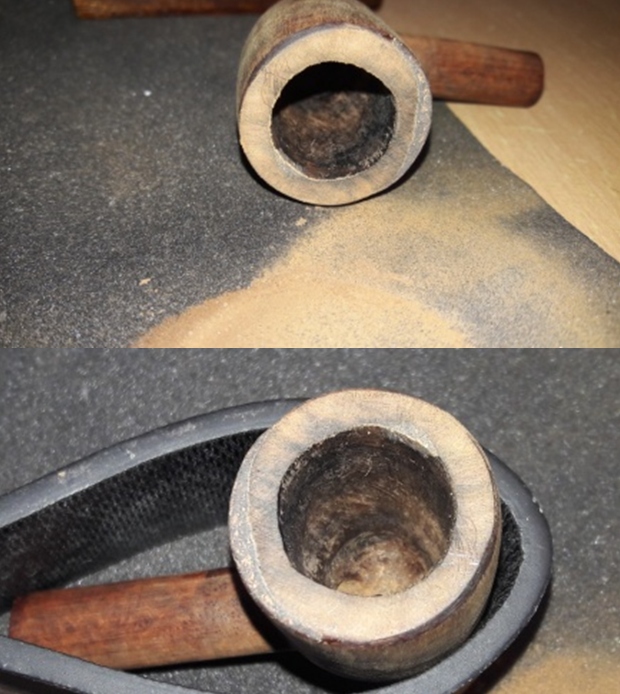
 To protect the briar dust and superglue fill on the inner edge of the rim from coming in to direct contact with the burning tobacco and also to prevent the heat from reaching the external surface of the stummel and causing a burnout, I plan, firstly, to fill only the small reconstructed inner rim edge of the chamber with J B Weld followed by a second coat of activated charcoal and yogurt to the entire chamber which would assist in faster cake formation. J B Weld is a two-part epoxy Cold Weld that consists of two parts; hardener and steel which are mixed in equal parts in a ratio of 1:1 with hardening time of 5-6 minutes and complete curing time of 6-8 hours. I poured the contents of the two tubes and mixed it well. With a flat bamboo frond, I applied this mix and filled the intended rebuilt inner rim edge. I worked fast to ensure a complete and even filling of the inner rim edge and set the stummel aside for the J B Weld to harden.
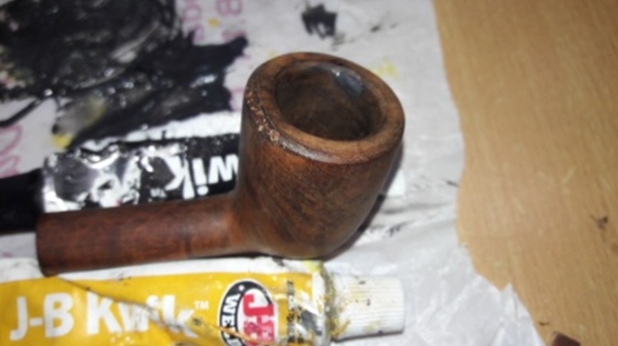 Once the J B Weld had sufficiently cured, I sand it down with a semi circular needle file to remove excess weld from the area. I used a folded piece of 220 grit sand paper to further sand the fill and achieve a perfect blend and smooth coat of J B Weld over the reconstructed inner rim edge.
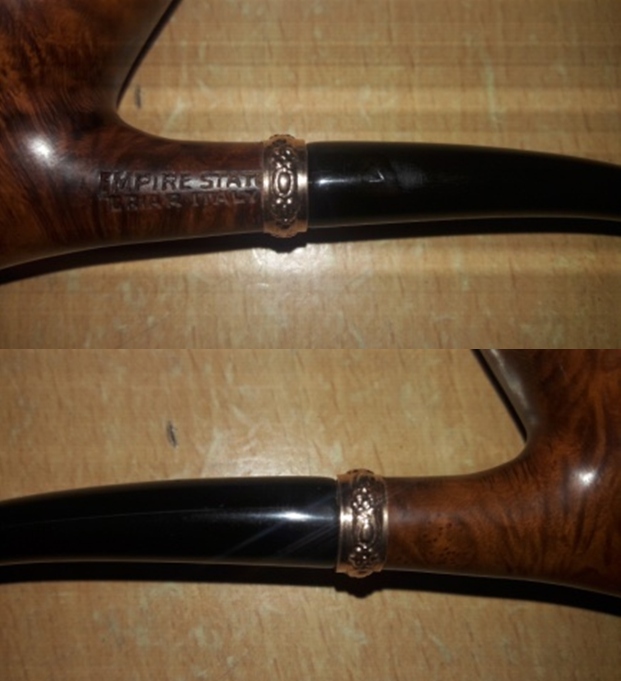
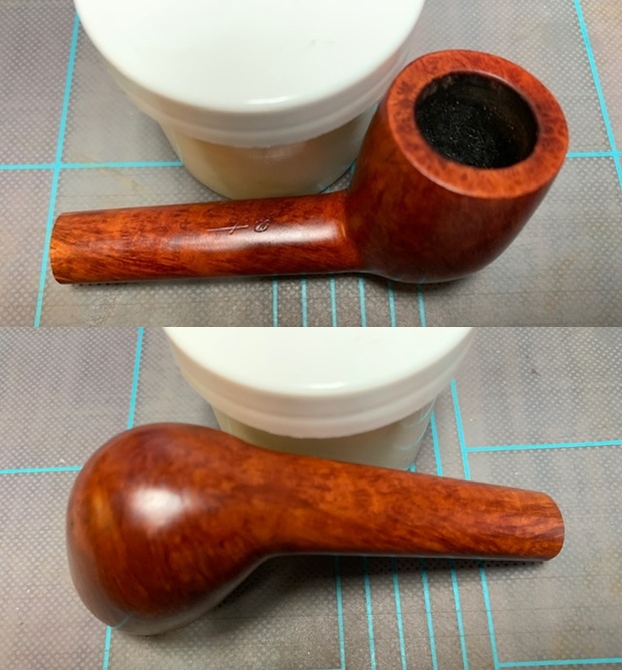
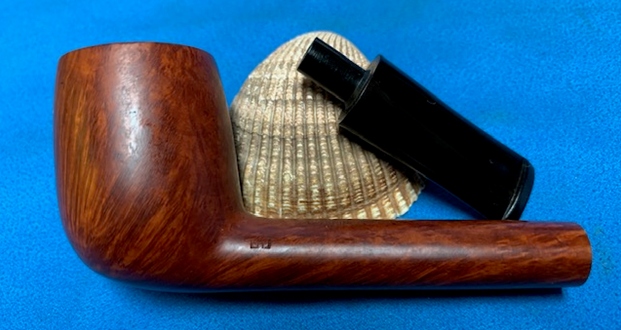
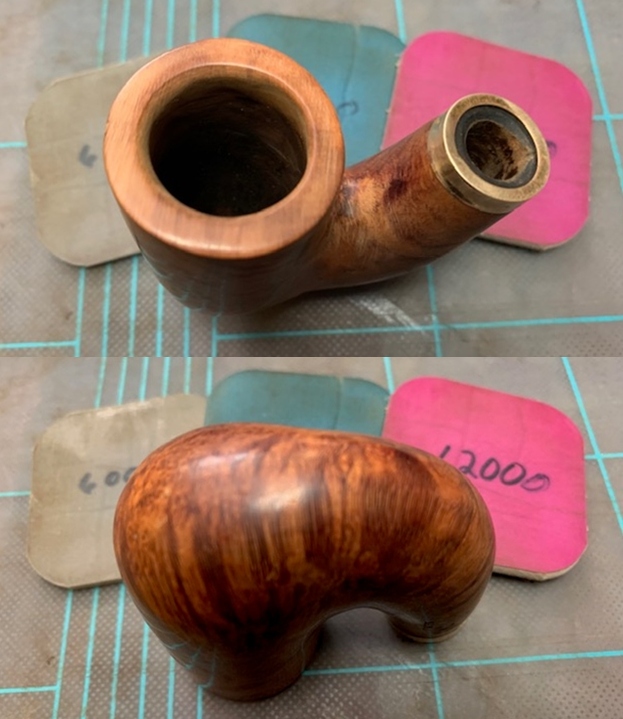
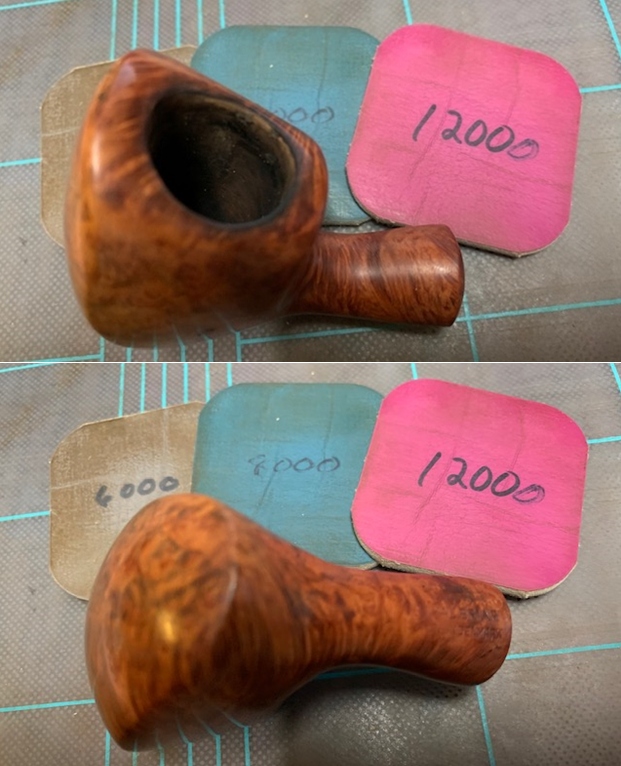
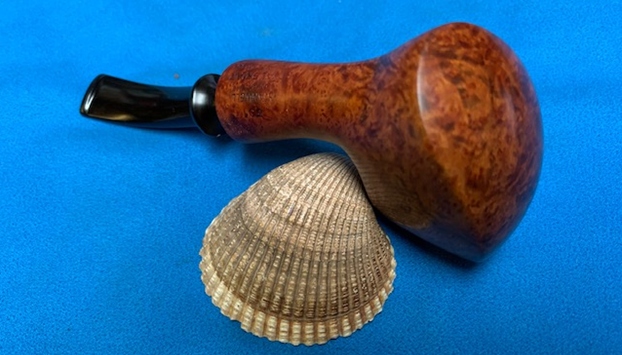
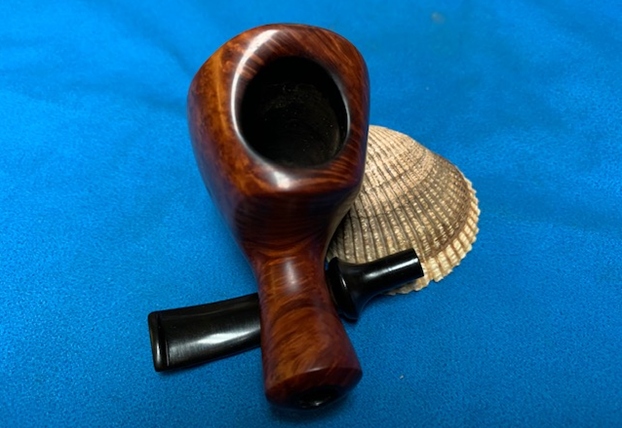
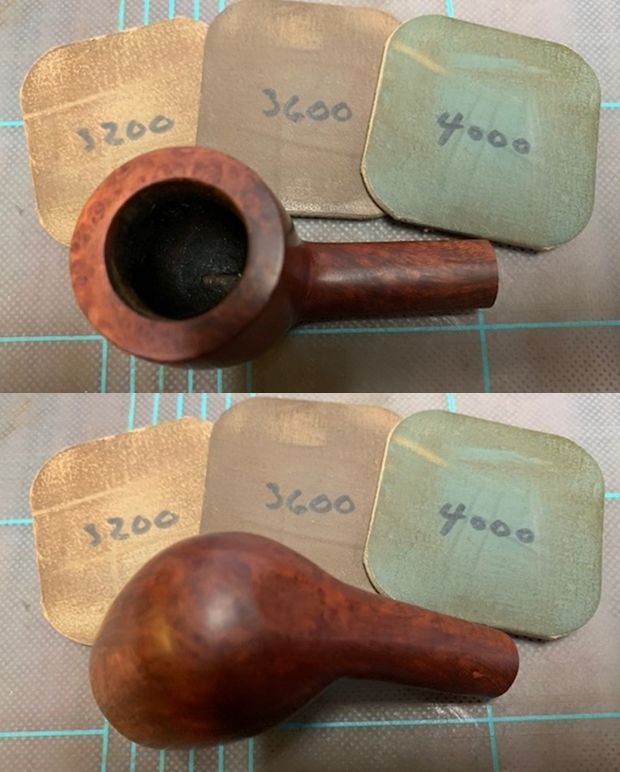
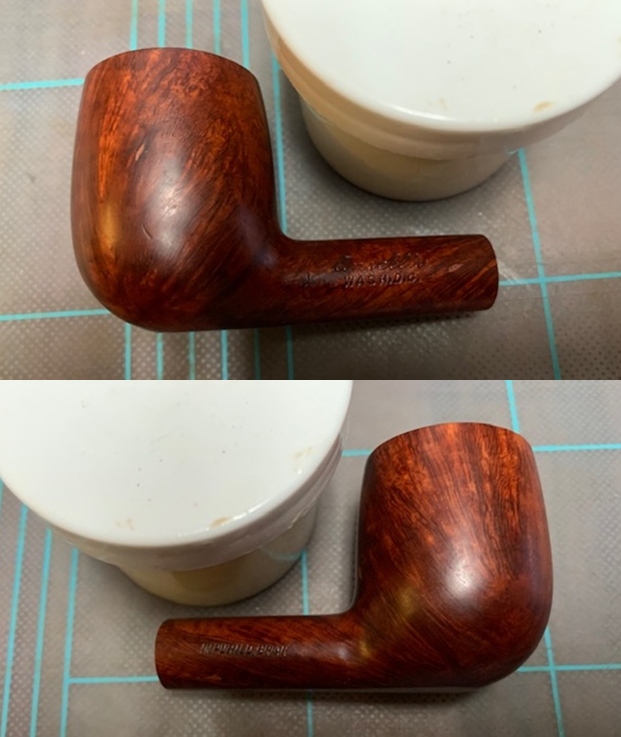
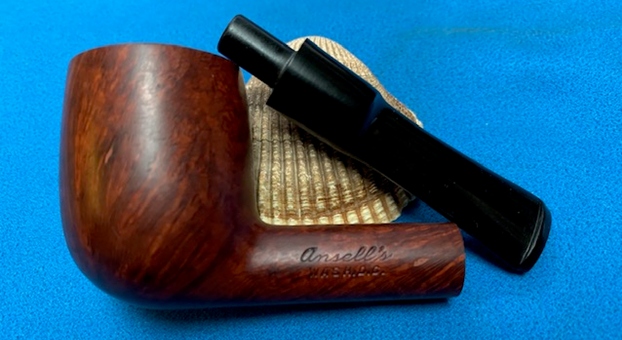
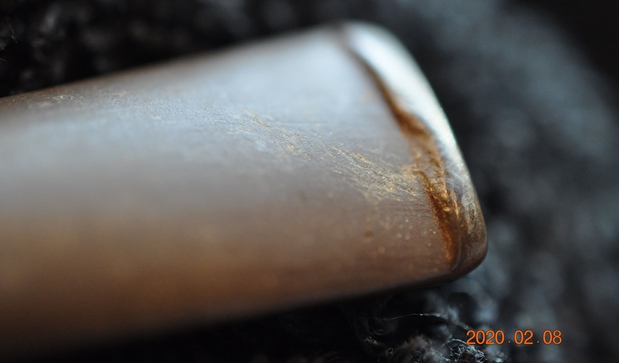
 At this stage, I observed a couple of air pockets over the outer rim edge rebuilt surface. I applied a coat of clear CA superglue and set the stummel aside for the coat of superglue to cure. Once the superglue had hardened, I sand the portion with a piece of 220 grit sand paper to match the rest of the rim edge. I followed it by wet sanding the stummel with 1500 to 12000 grit micromesh pads, wiping frequently with a moist cloth to check the progress. The outer rim edge is now smooth and completely filled with no air pockets. However, the light colored patches are still visible. I shall stain the rebuilt patch with a dark brown stain pen to mask these pockets. The spliced shank with the joint is now clearly visible. With the spliced part of the shank having such beautiful Bird’s eye and cross grains over the surface, I really don’t have the heart to stain it just to mask the repairs!!

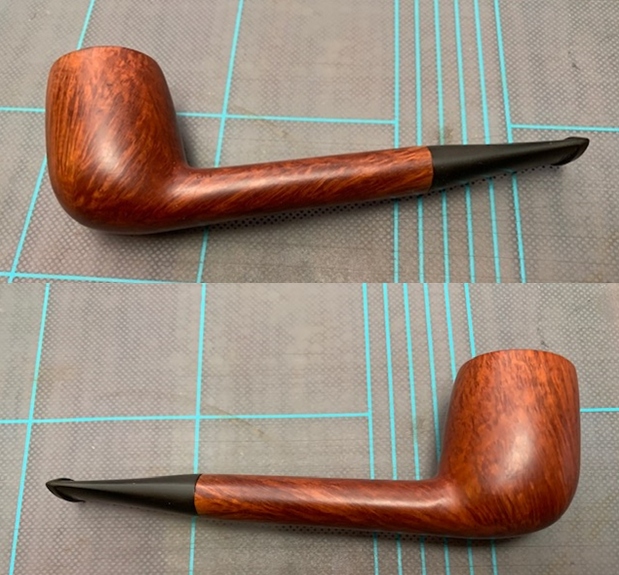
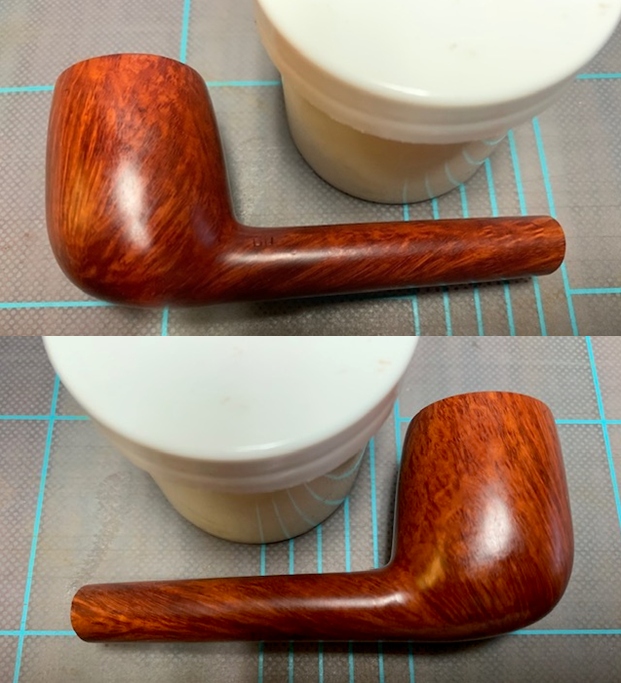
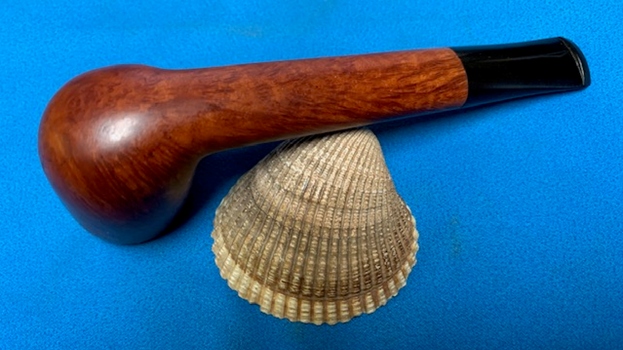
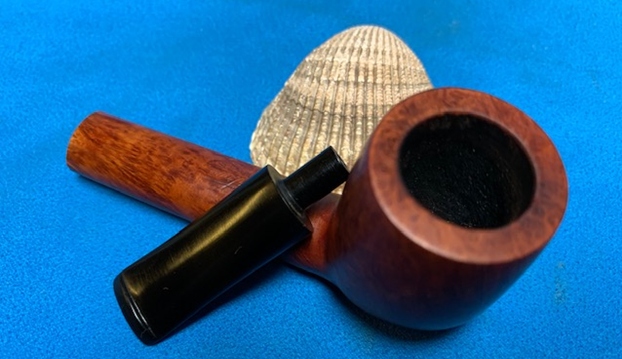
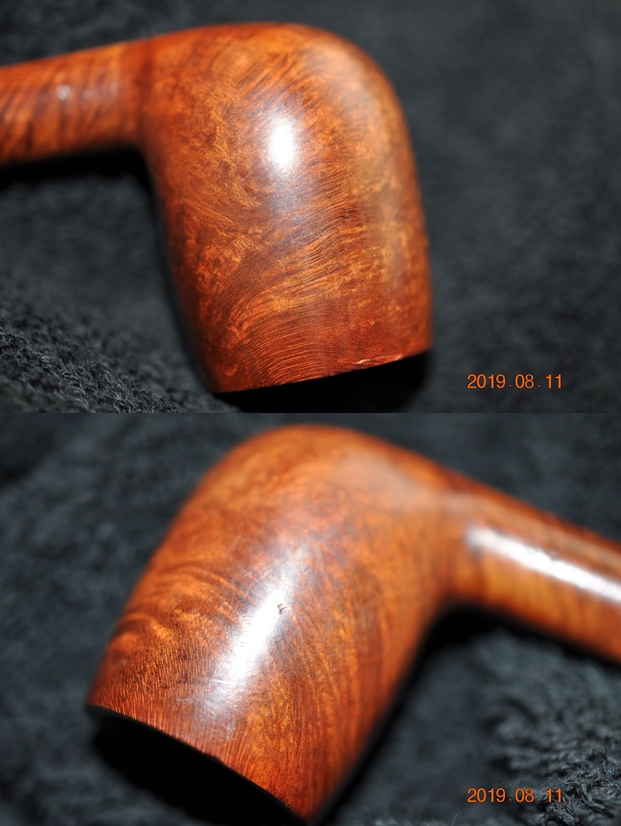
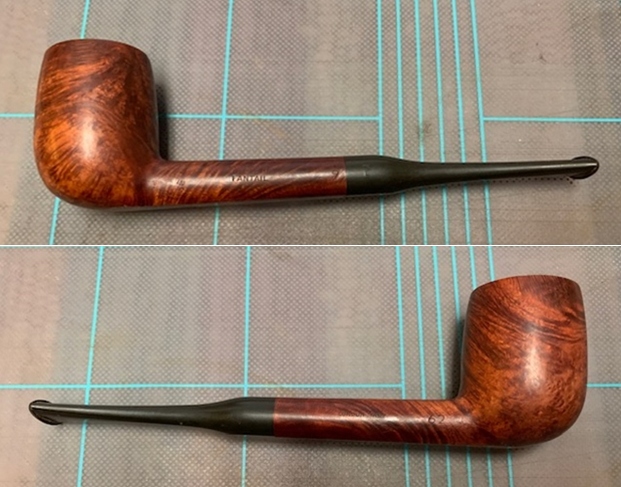
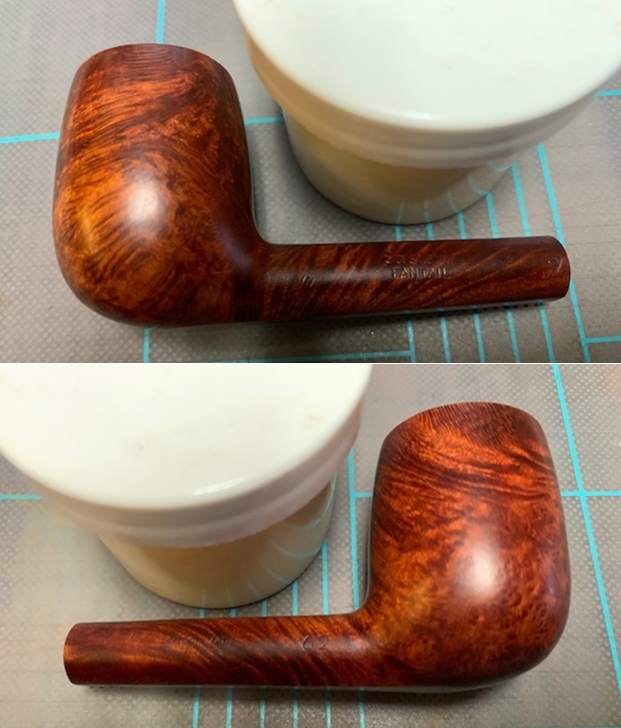
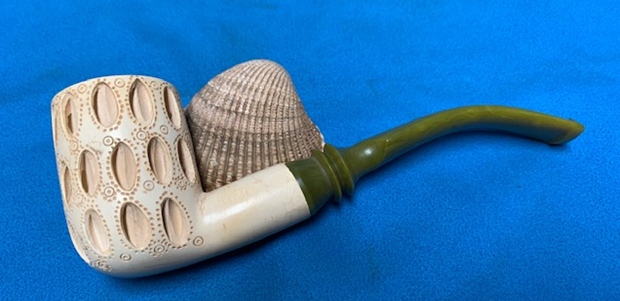
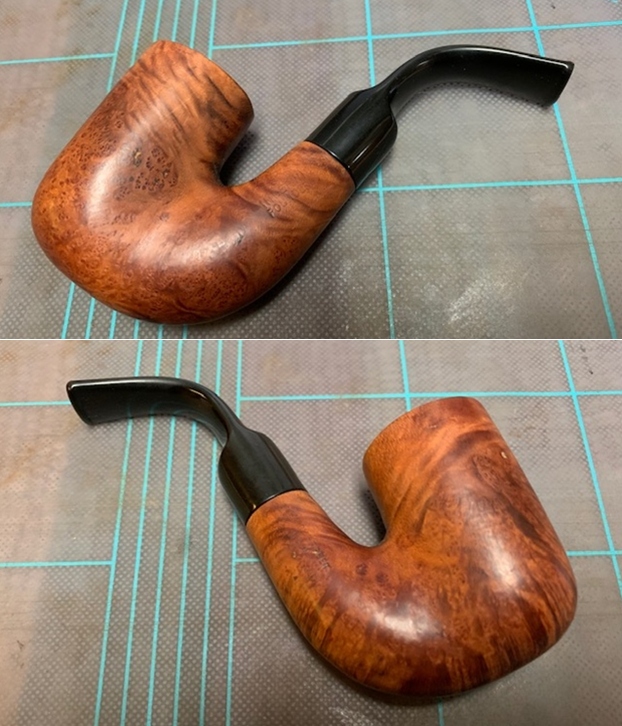
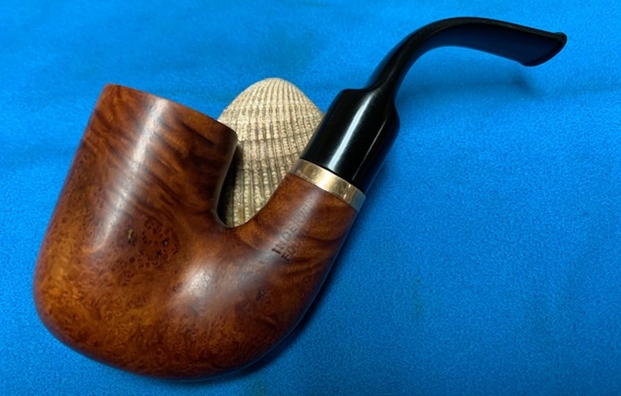
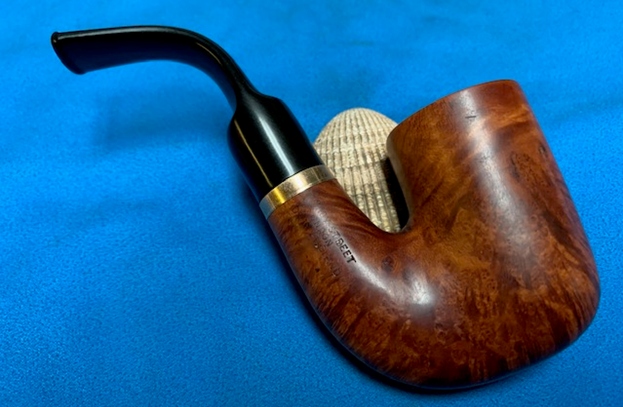
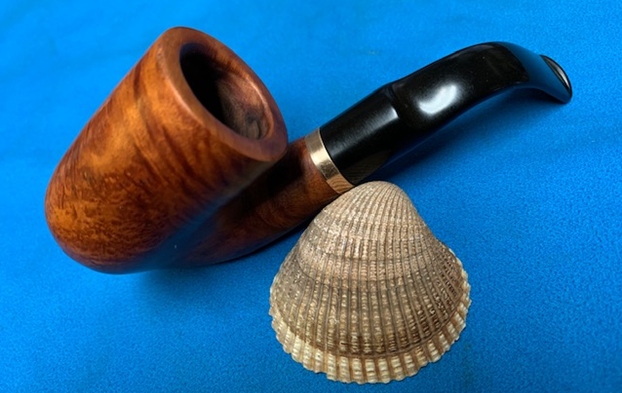
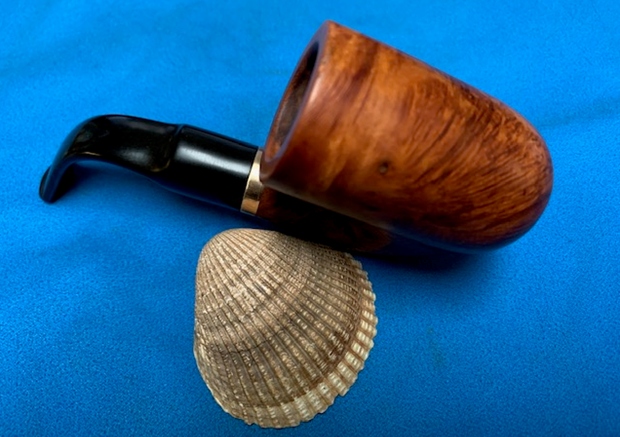
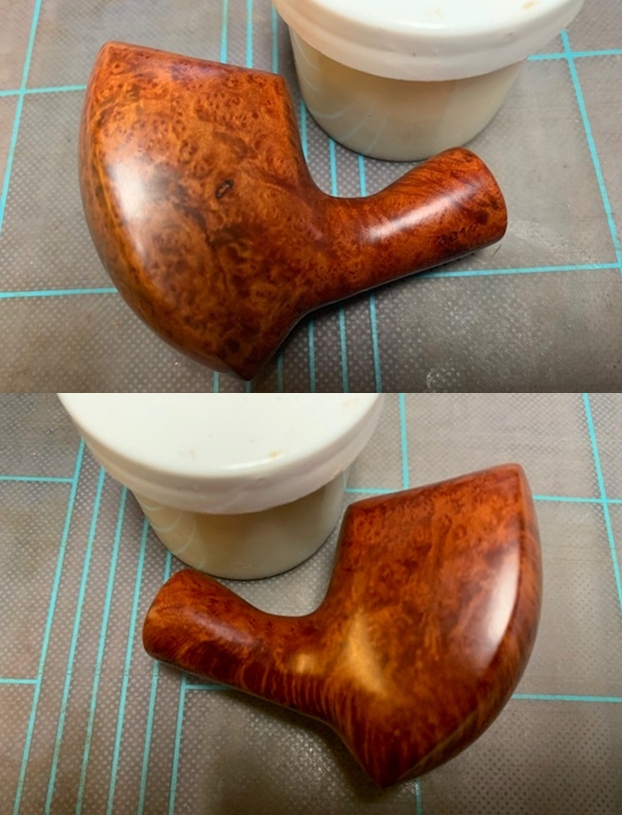
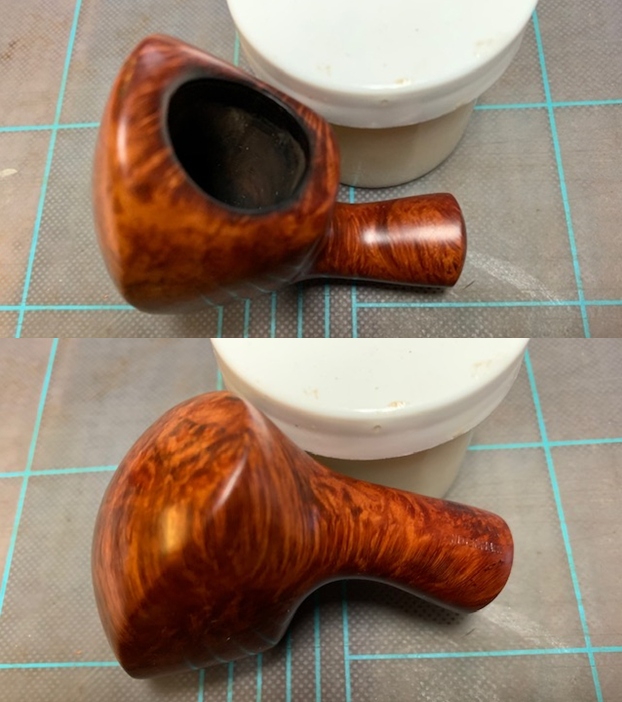
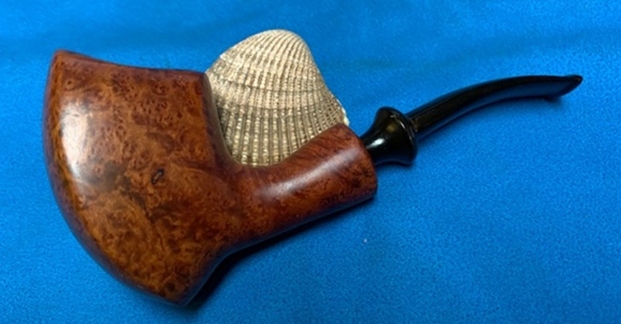
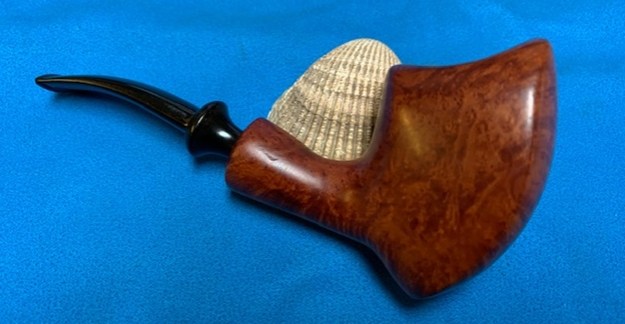
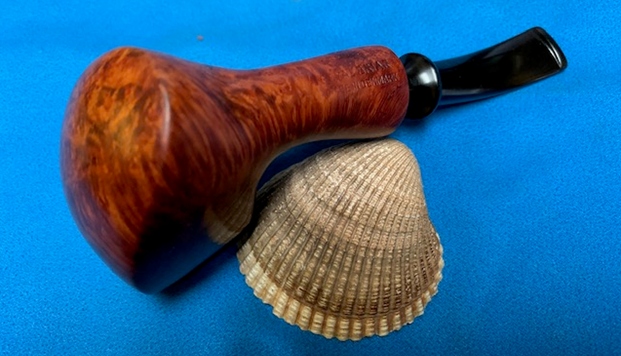
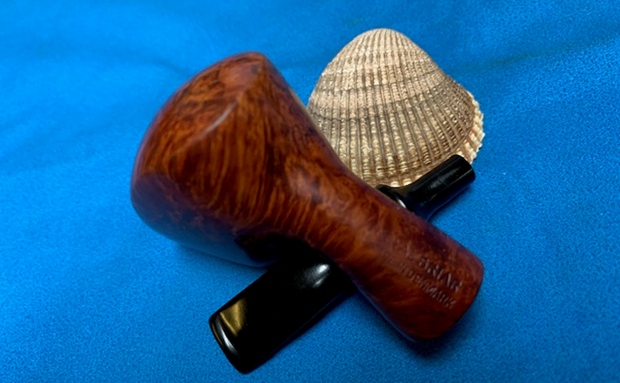
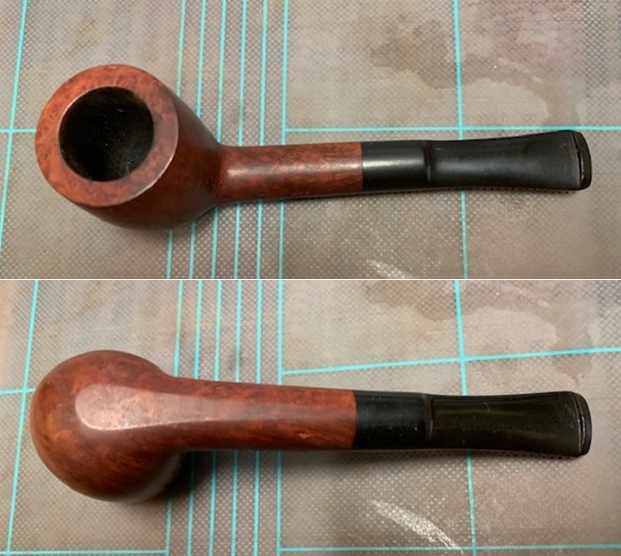
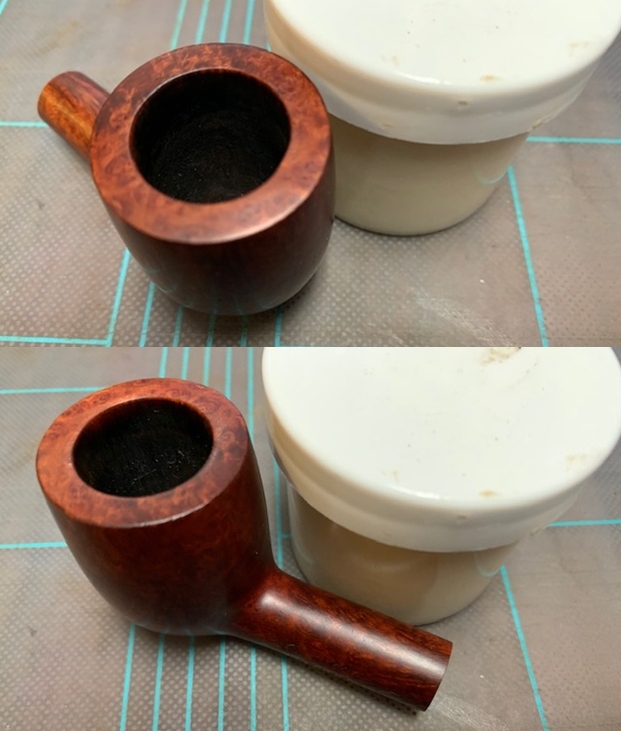
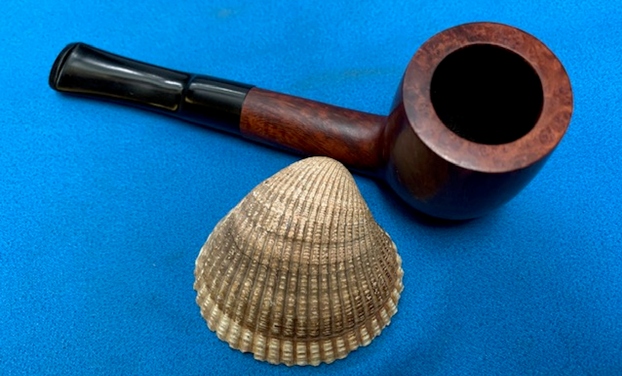
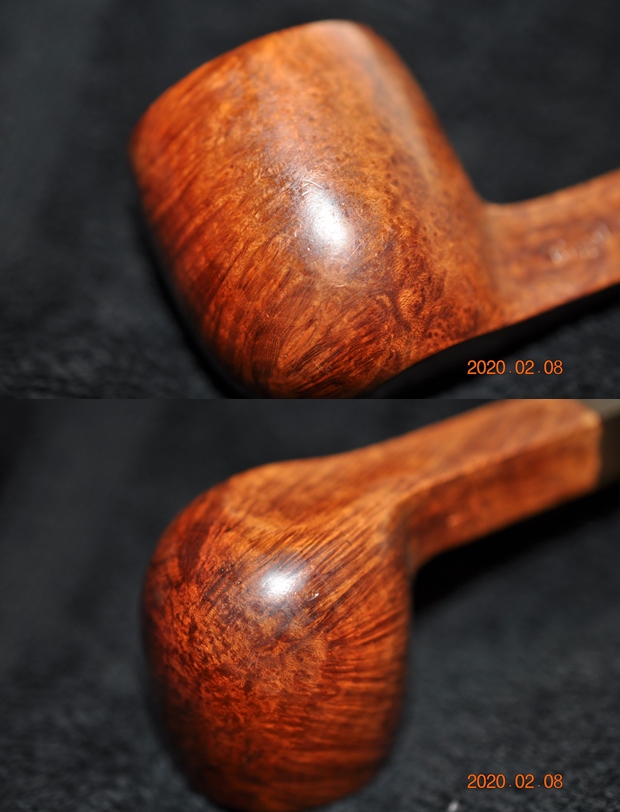
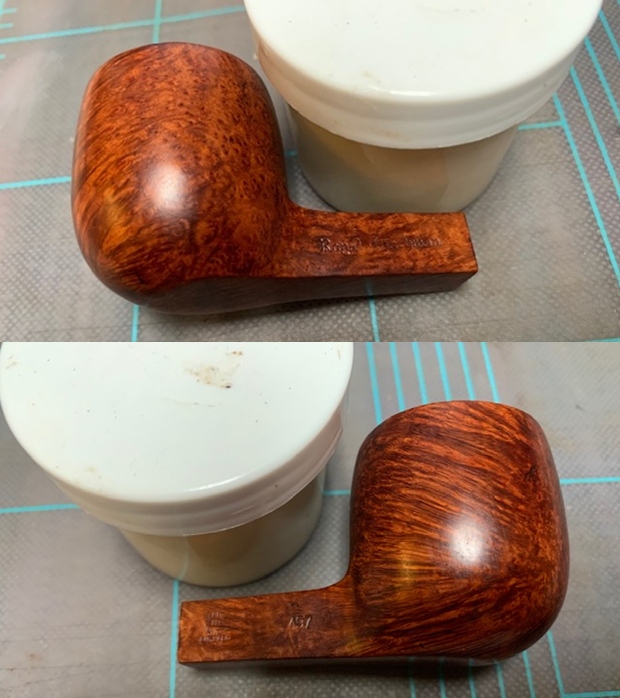
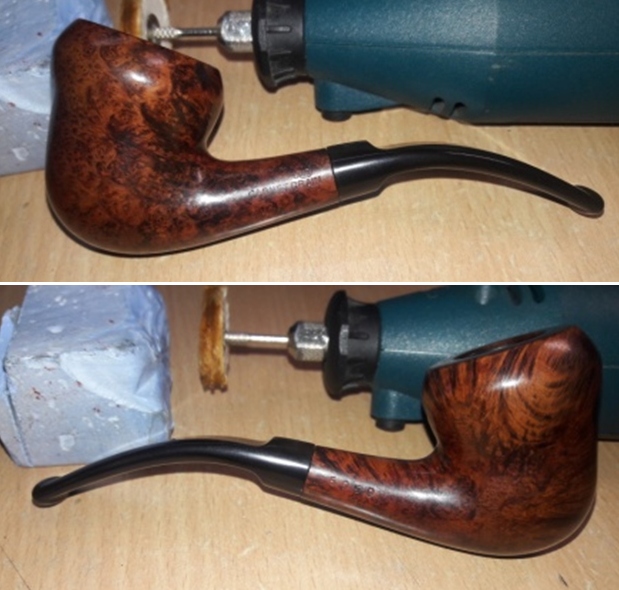
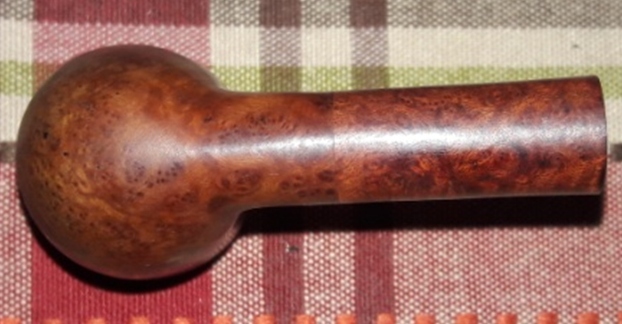
 Next, I rubbed a small quantity of “Before and After Restoration Balm” deep in to the briar with my finger tips and let it rest for a few minutes. The balm almost immediately works its magic and the briar now has a nice vibrant appearance with the beautiful grain patterns displayed in their complete splendor. I further buffed it with a horse hair brush and gave a vigorous buff with a microfiber cloth to deepen the shine. The dark browns of the bird’s eye and cross grains spread across the stummel makes for a visual treat. It really is a nice piece of briar.

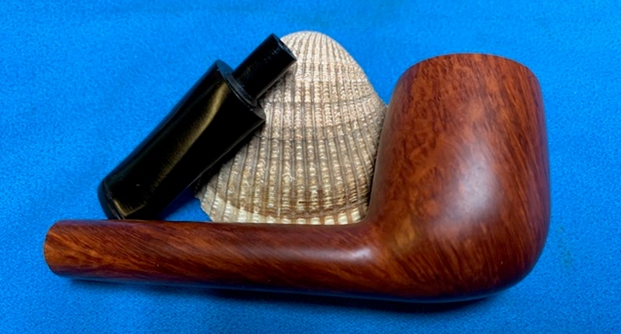
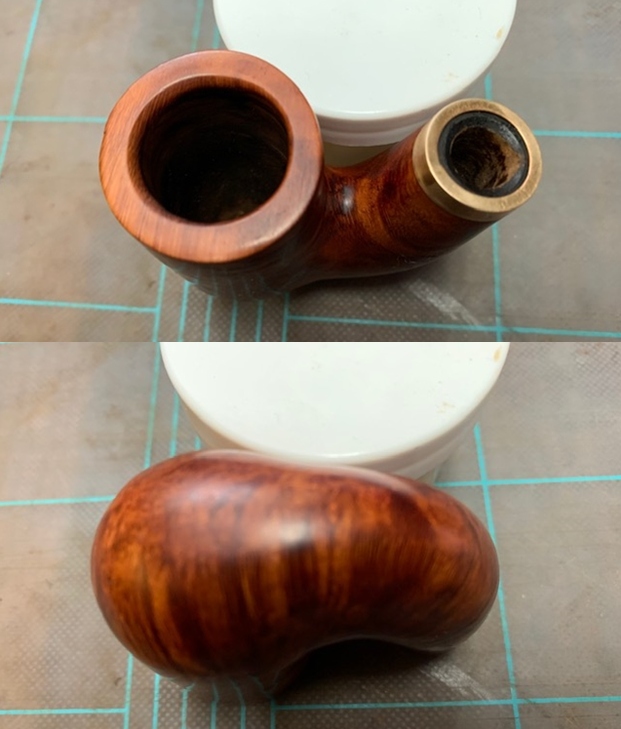
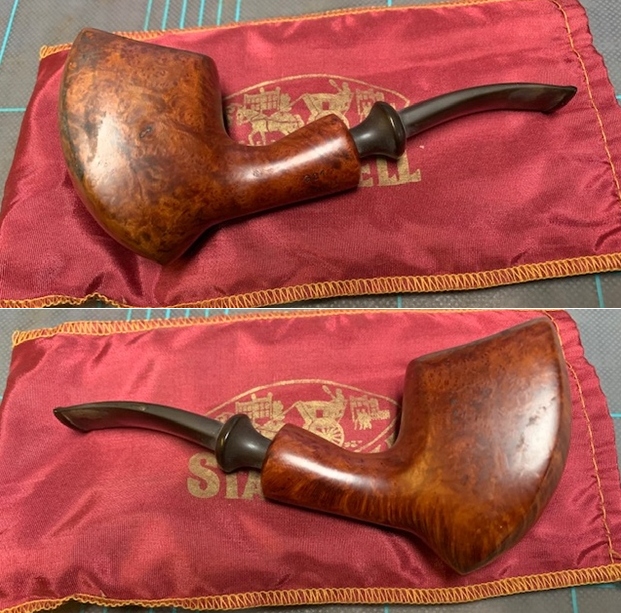
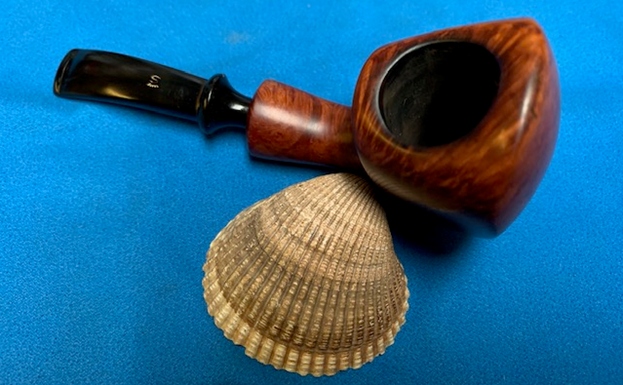
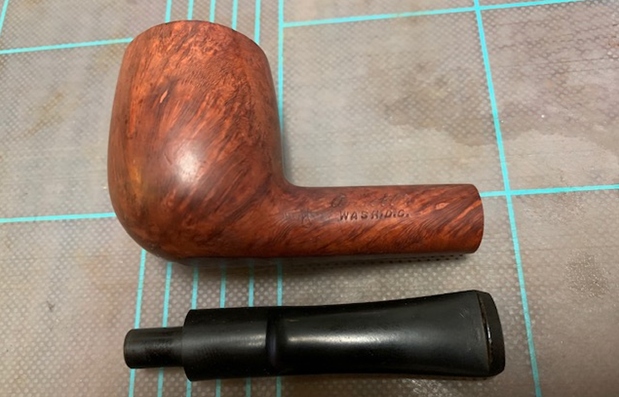
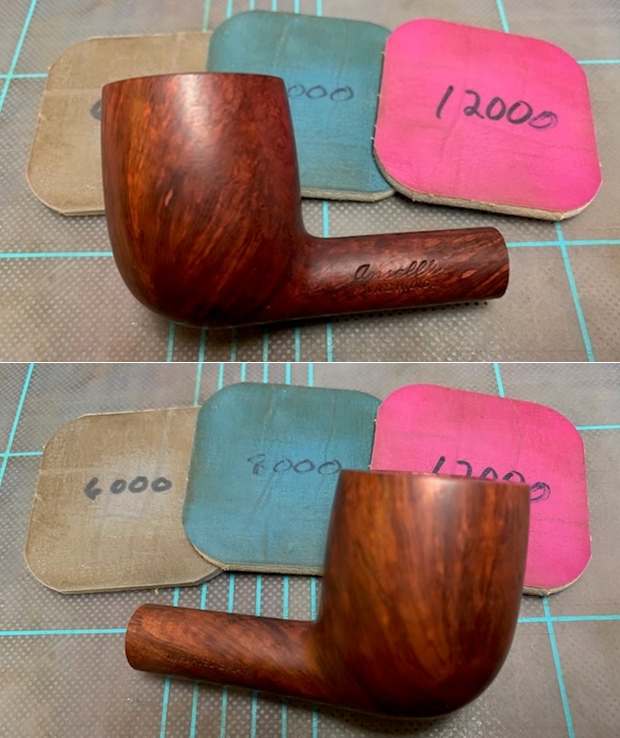
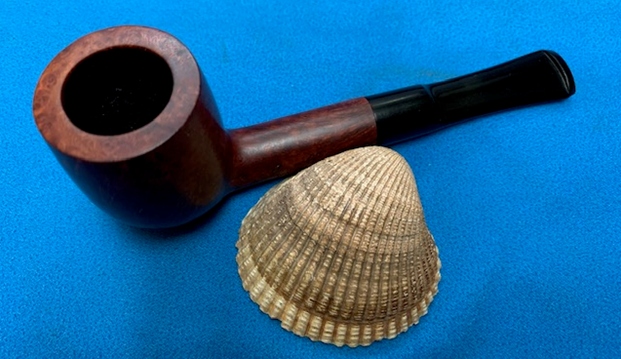
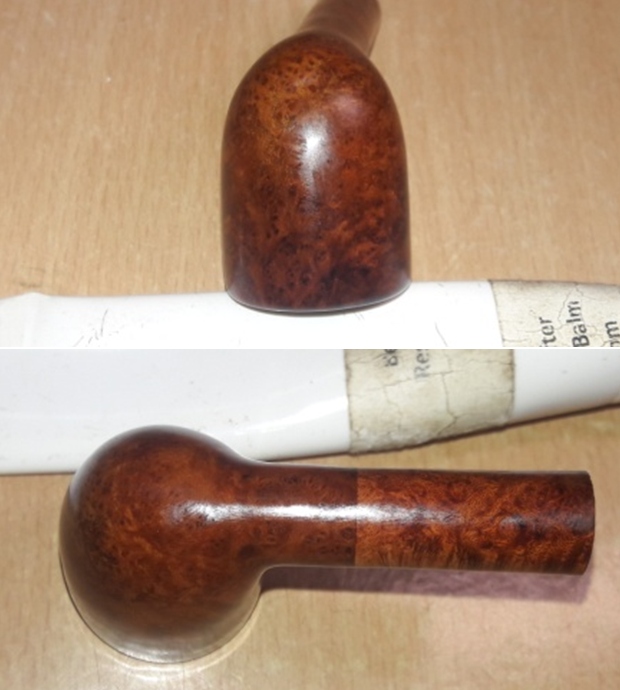 I shared the pictures of the pipe and sought his opinion if I should stain the pipe to mask the shank repairs on leave it be? His characteristic reply was that “he would not stain it”!! With this aspect decided, I move ahead with the final polishing of the pipe. I mount a cotton cloth buffing wheel on to my hand held rotary tool and polished the stummel and stem with Blue Diamond compound. This compound helps to remove the minor scratch marks that remain from the sanding. This pipe is starting to look really beautiful with the glossy dark brown through which the beautiful grains pop out over the stummel surface.
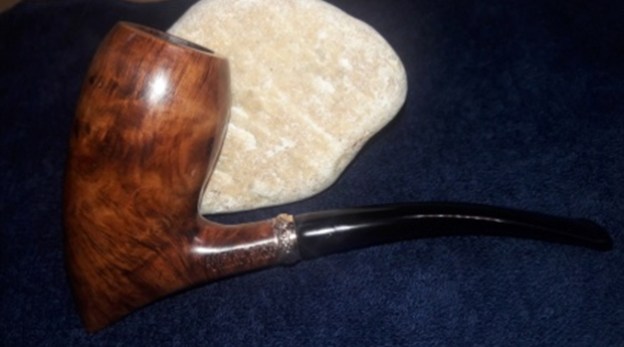
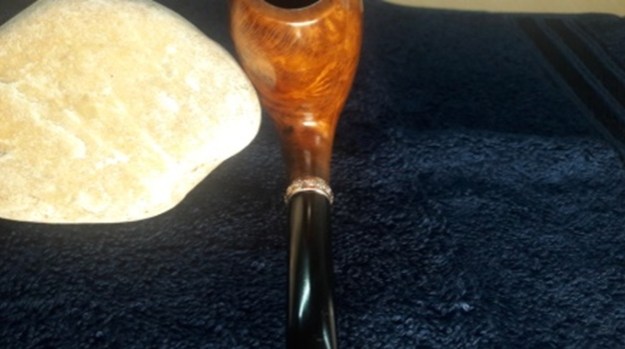
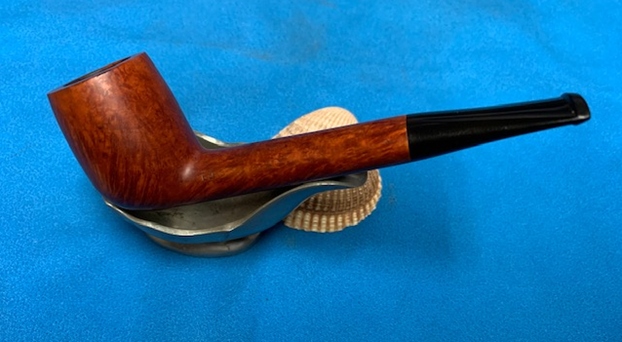
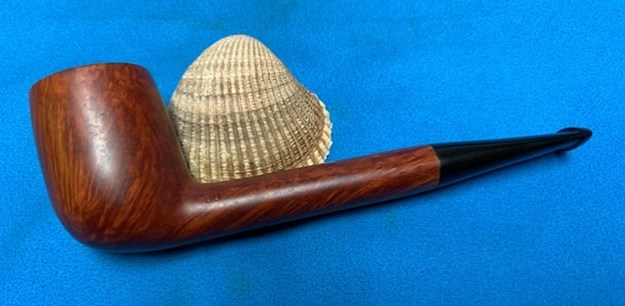
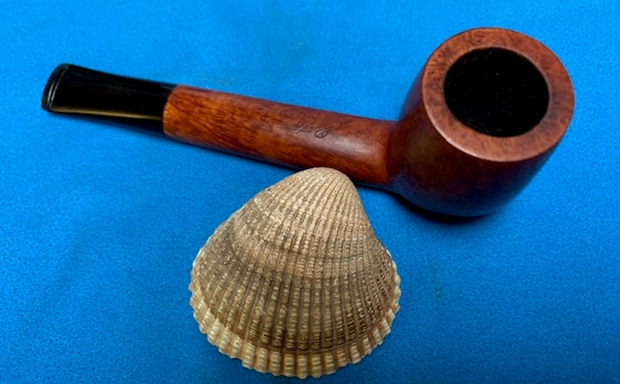
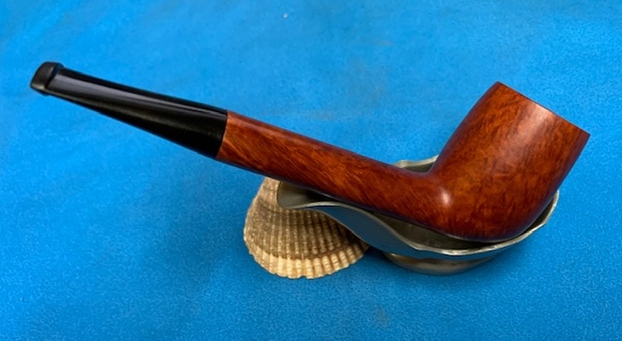
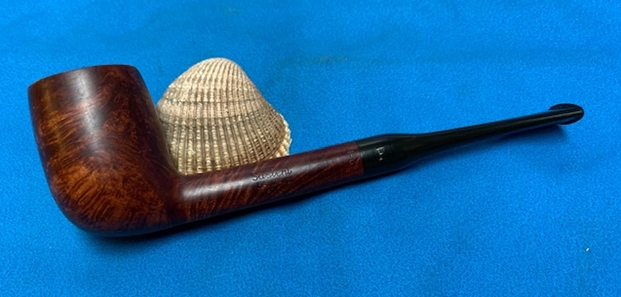
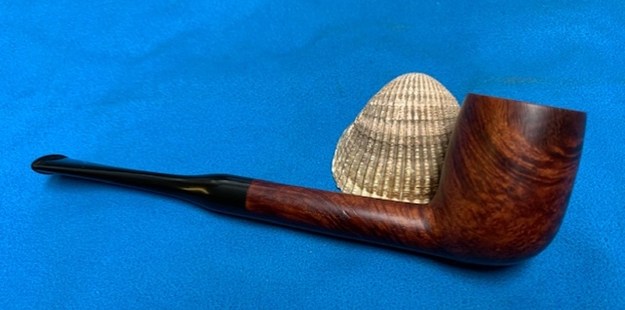
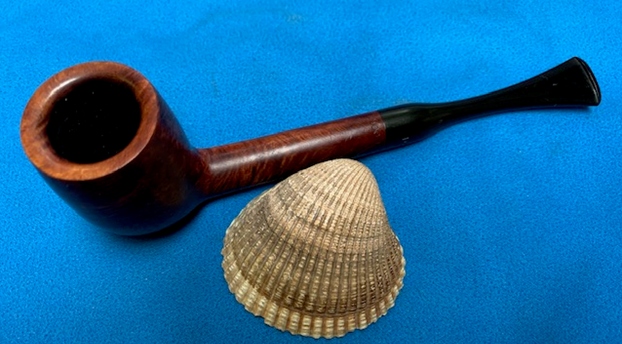
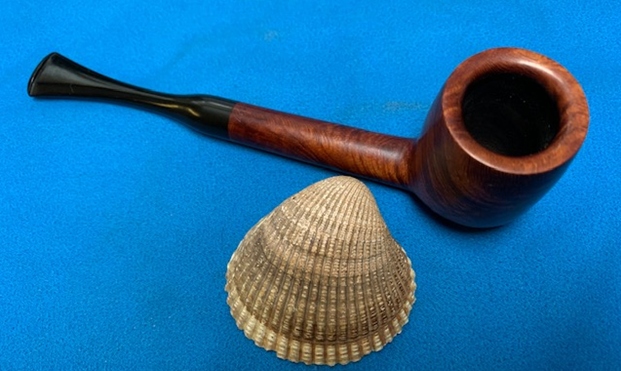
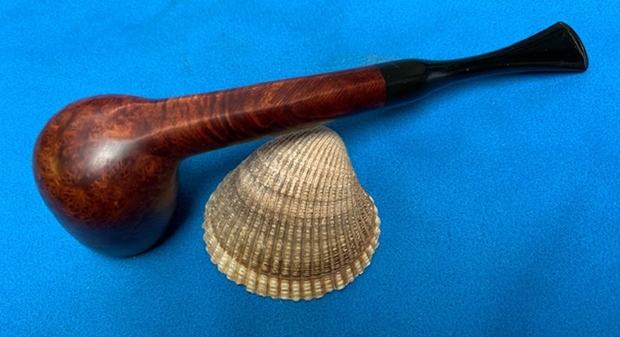
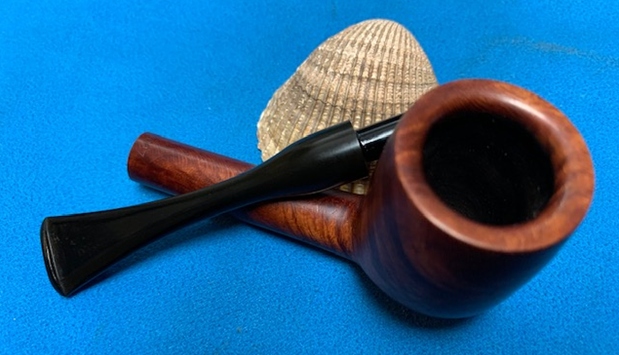
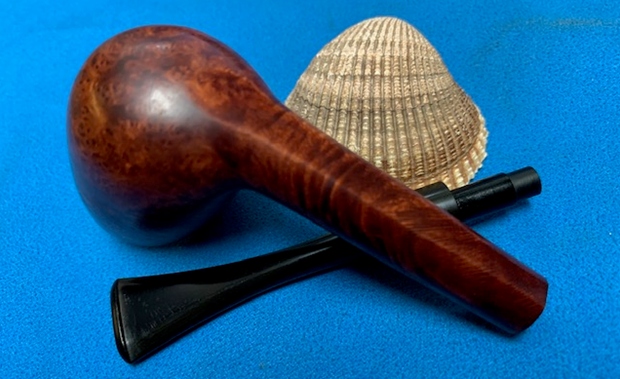
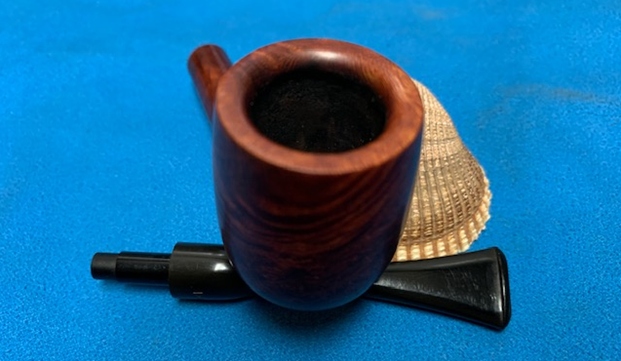
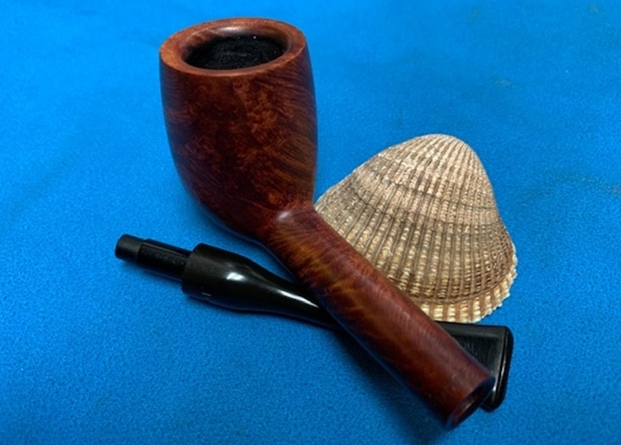
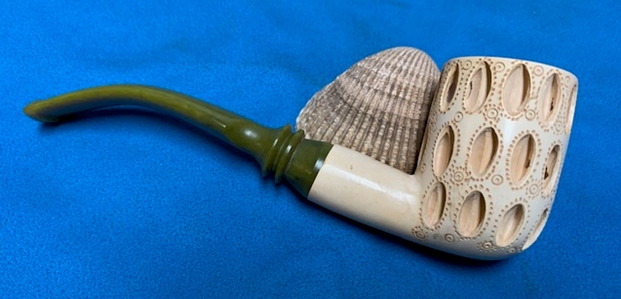
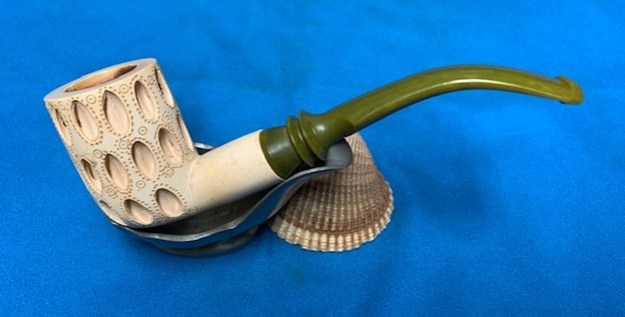
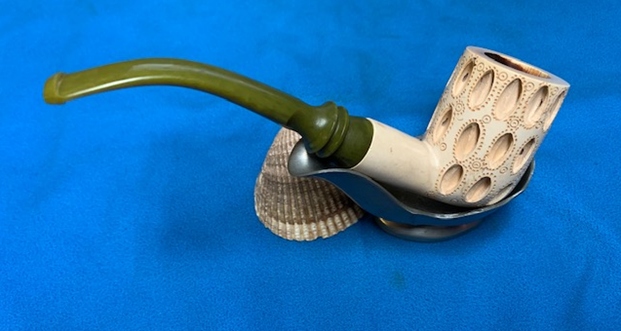
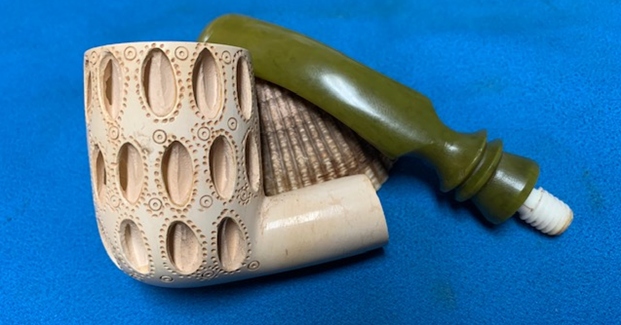
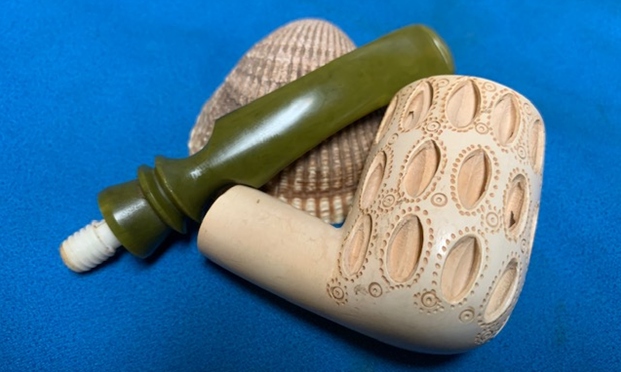
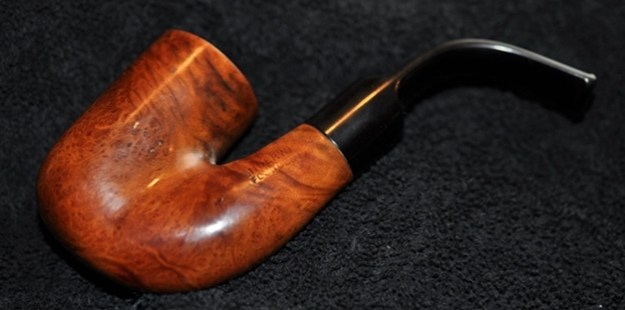
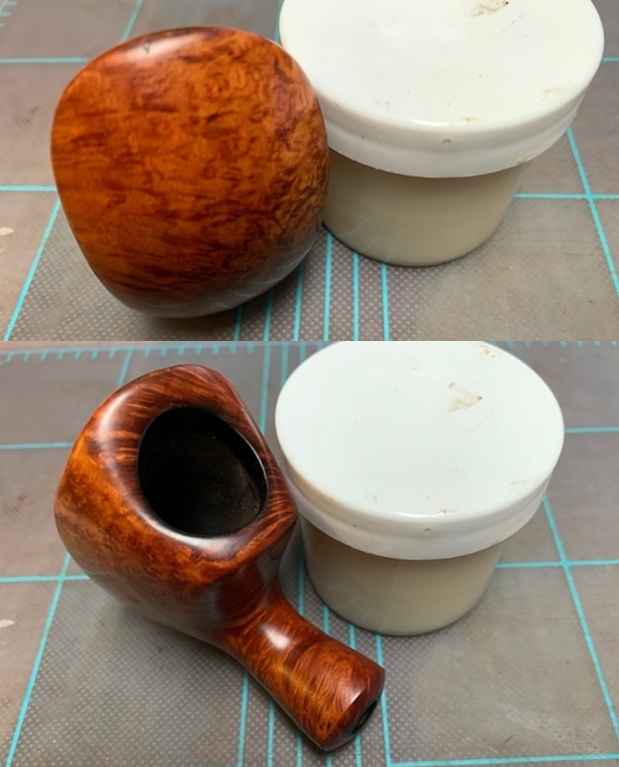
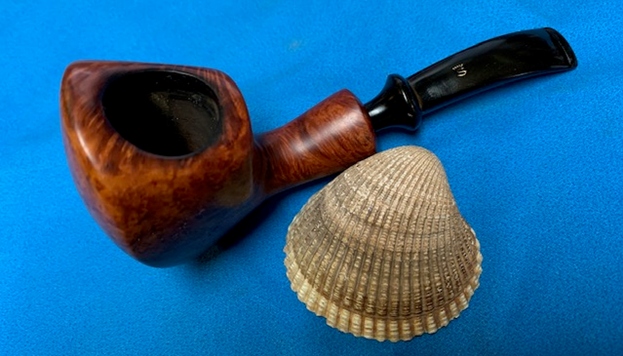
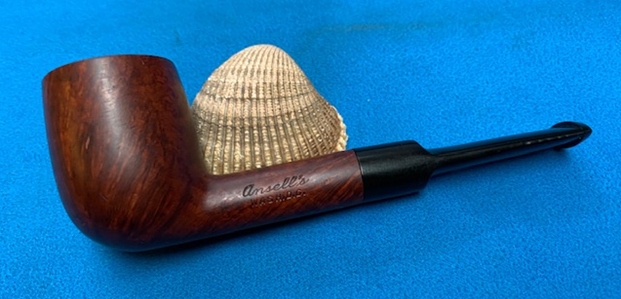
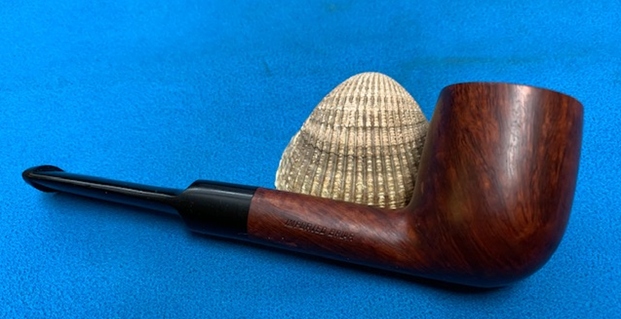
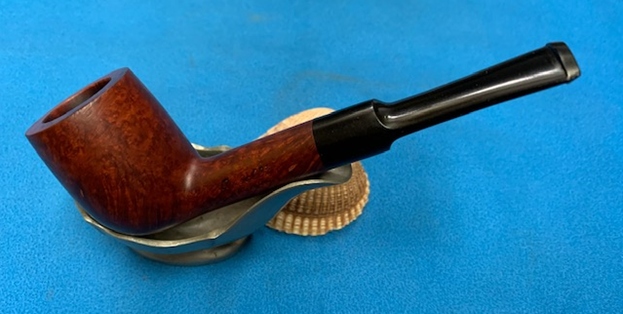
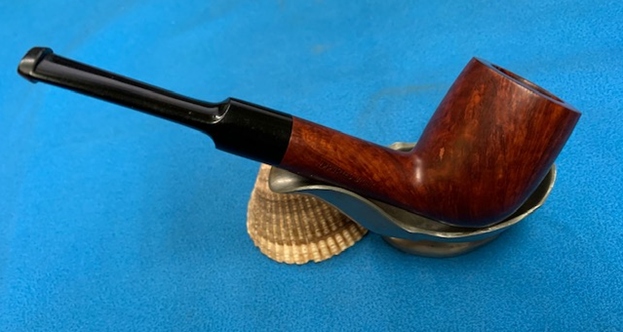
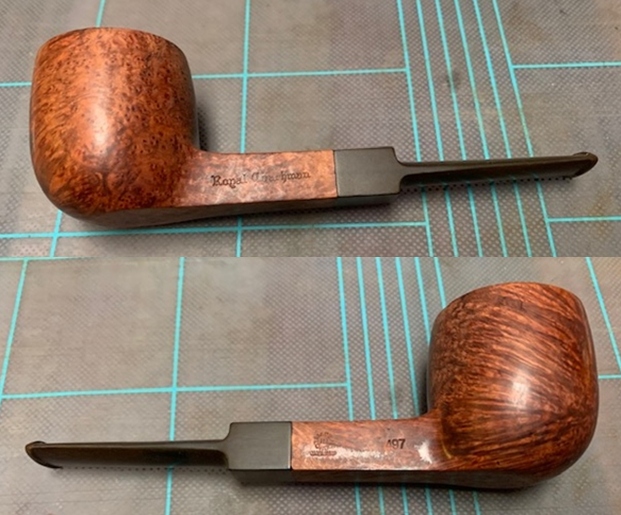
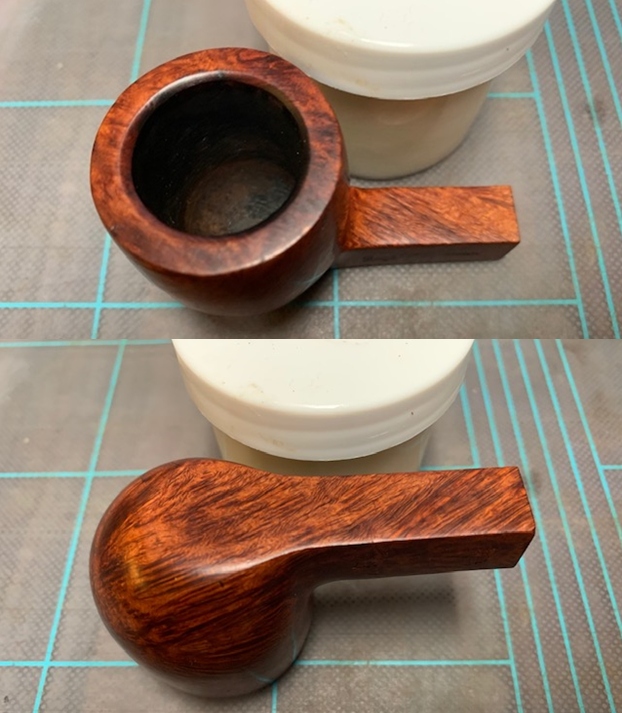
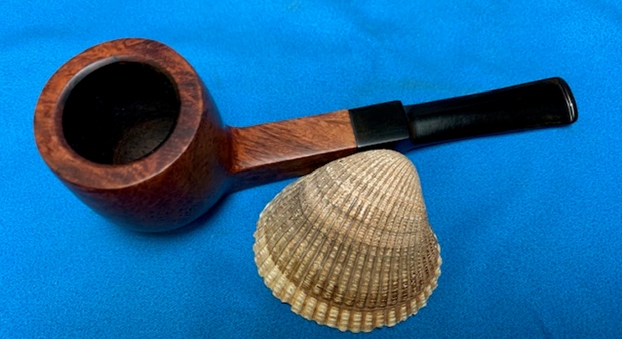
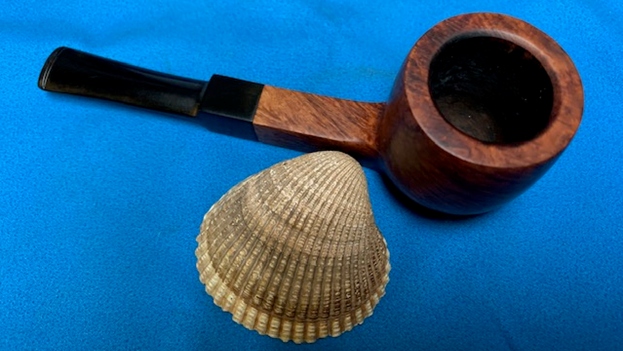
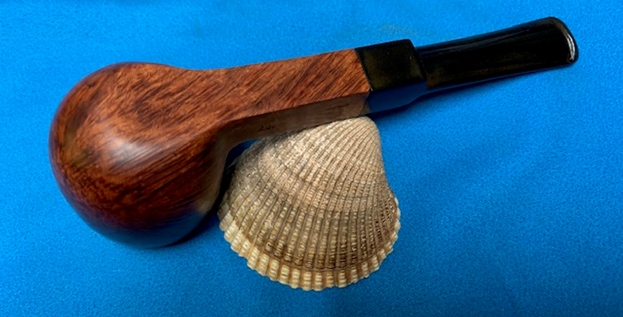
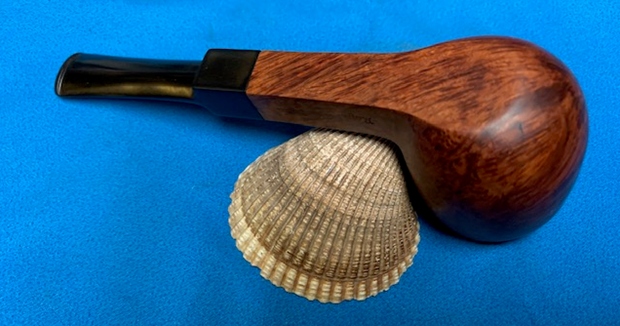
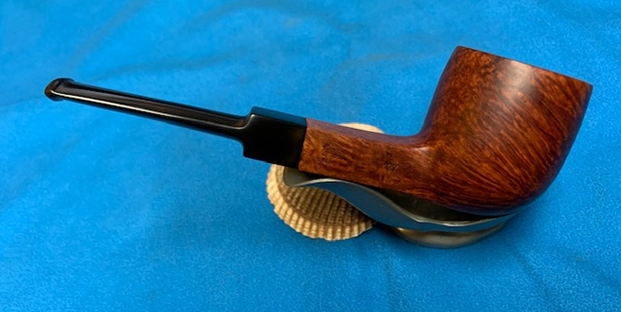
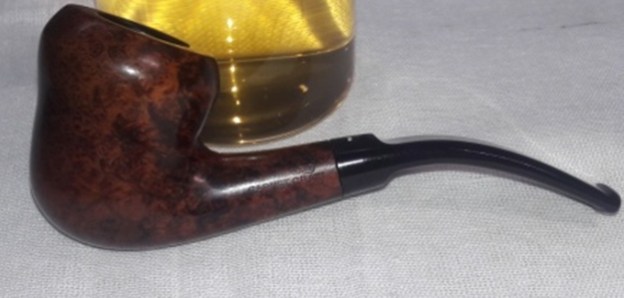
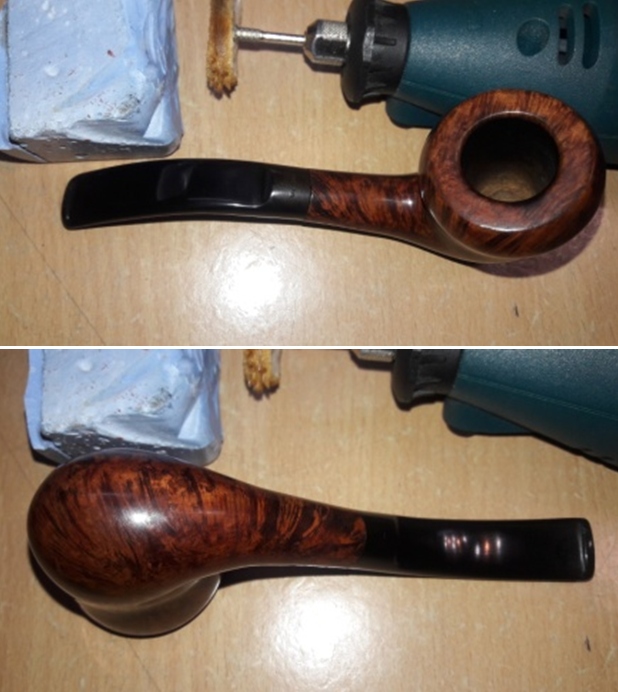
 I mount another cotton buffing wheel that I have earmarked for carnauba wax and applied several coats of the wax. I finished the restoration by giving the entire pipe a rigorous hand buffing using a microfiber cloth to raise the shine further. The finished pipe looks amazingly beautiful and coupled with the quaint size and ultra light weight makes it an ideal pipe for a quick smoke while you continue working with your hands. If you feel that this pipe calls out your name, please let Steve know and we shall make arrangements for it to reach you.


 P.S. To avoid the J B Weld coated minor spot, though high nearer to the rim top from coming in to direct contact with the burning tobacco and also to aid in faster cake formation, I gave the bowl a coat of yogurt and activated charcoal. Unfortunately, I missed out on taking pictures of the process.
I wish to thank each one for sparing their valuable time to read through this write up and each one is my prayers. Stay home…stay safe!!