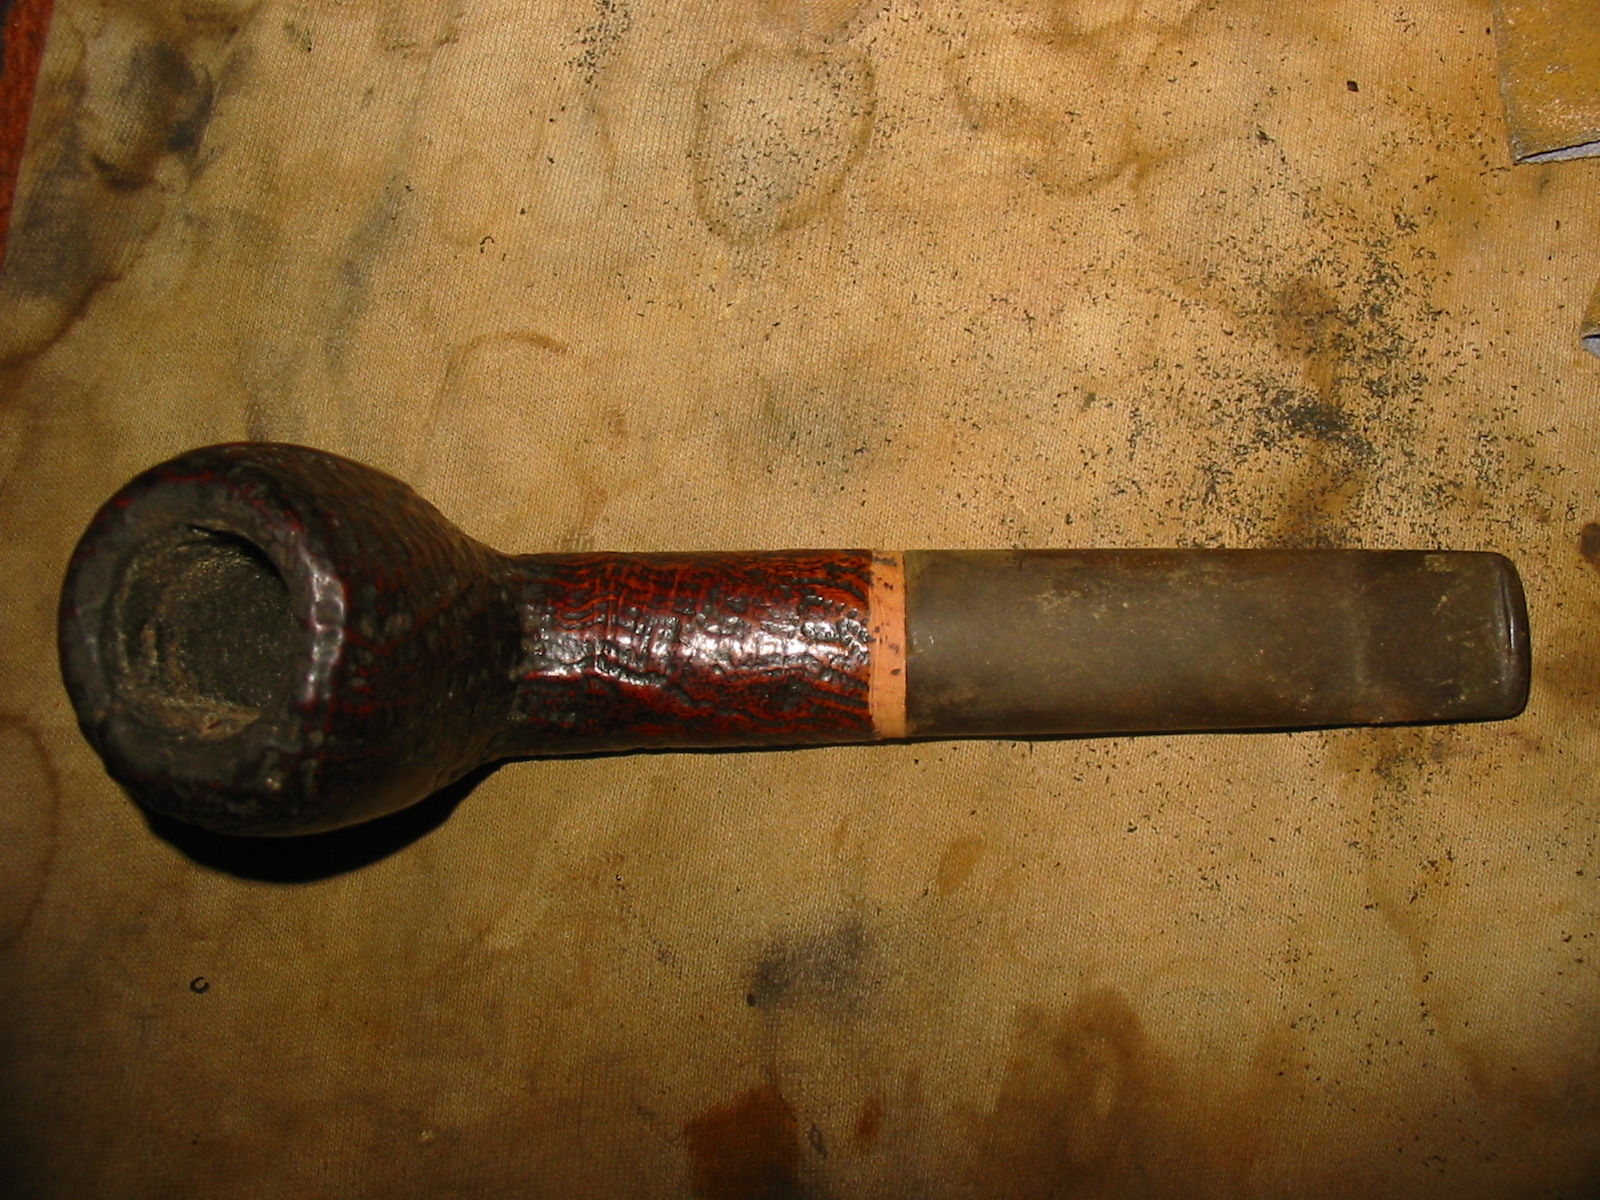
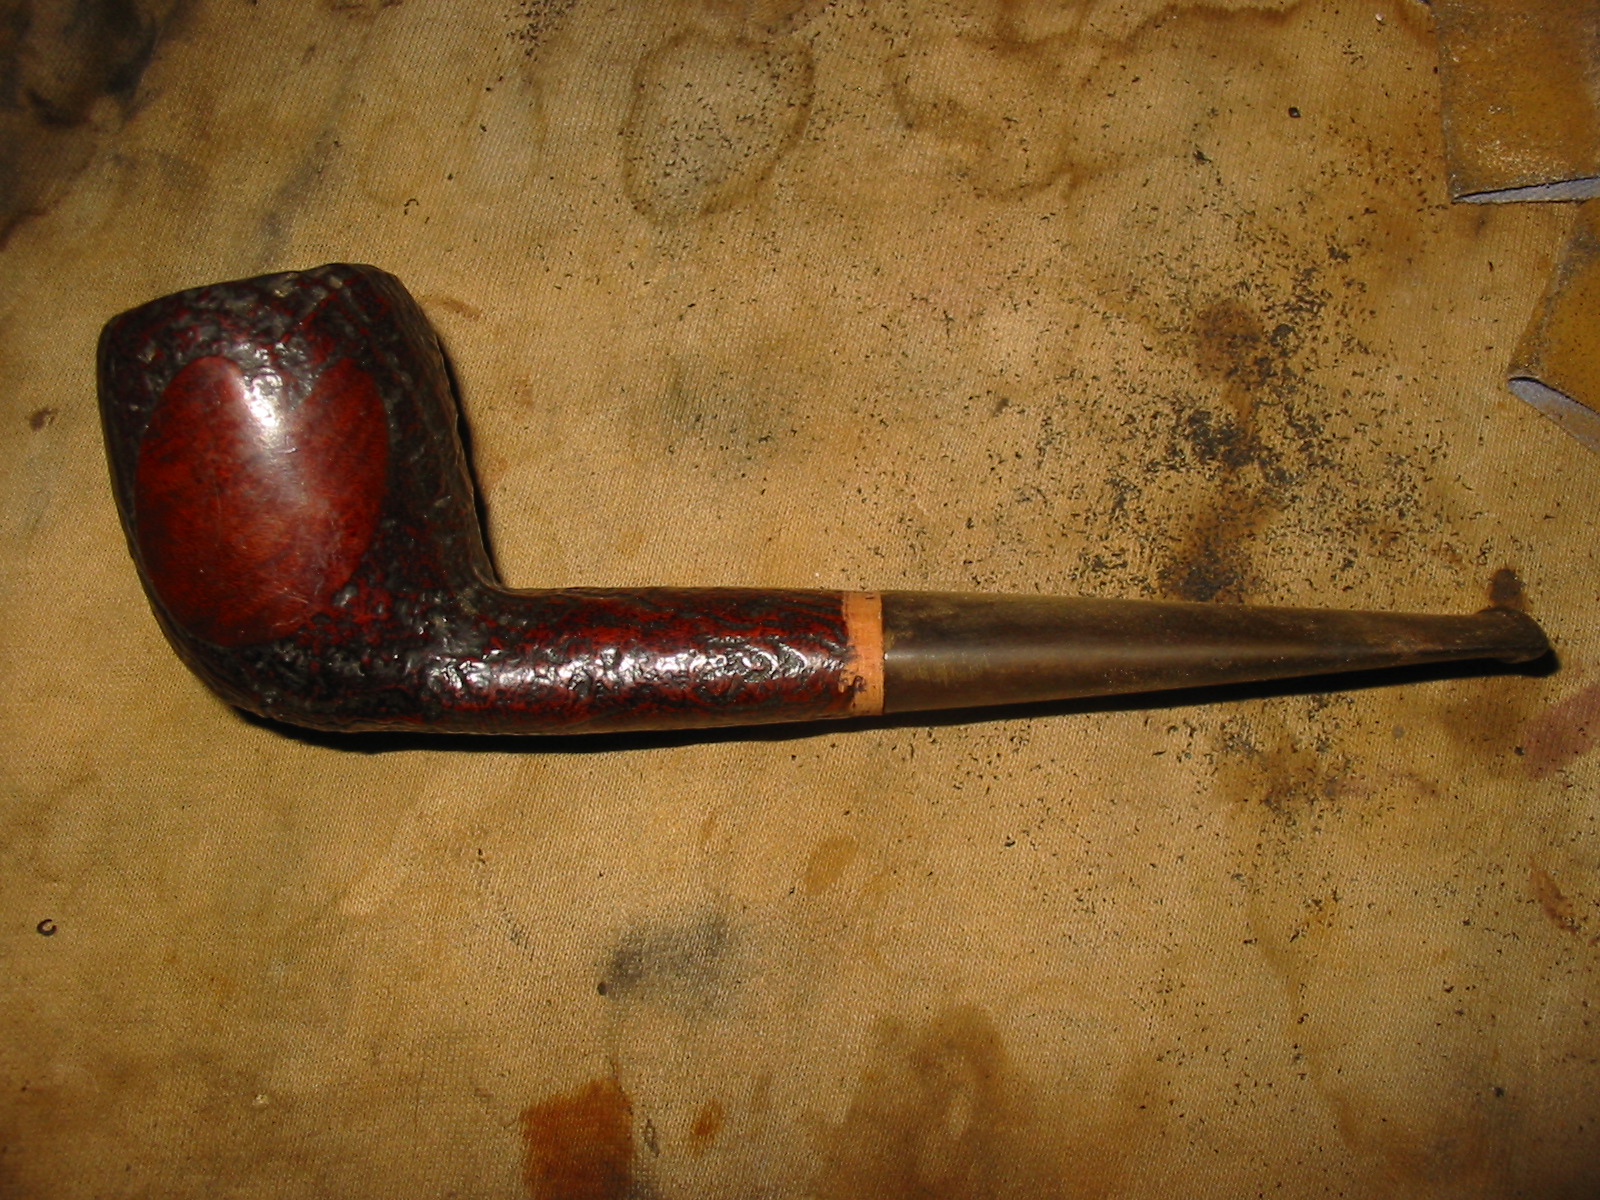
Tag Archives: cleaning a sandblast finish

Parker Super Briarbark Cherrywood 809


Blog by Steve Laug

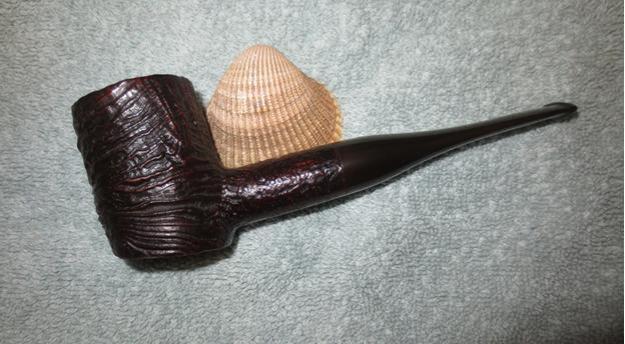
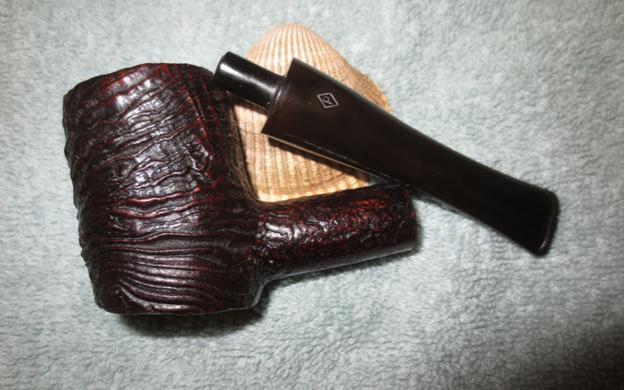
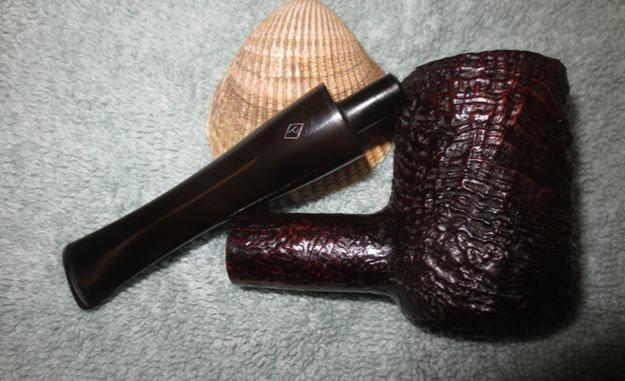
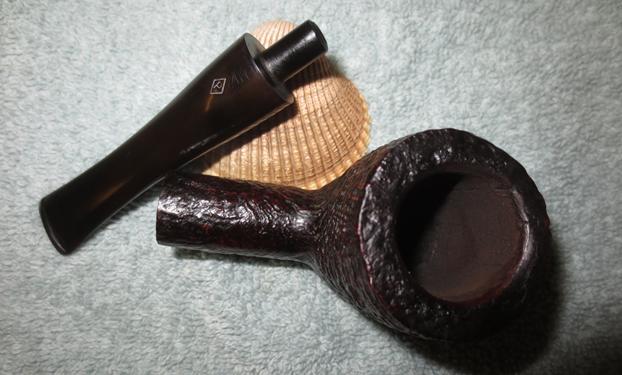
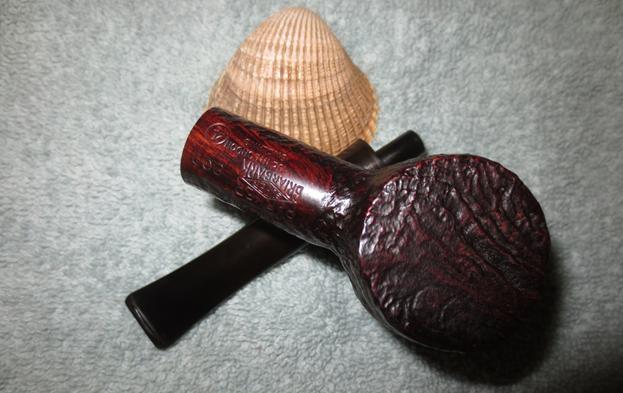
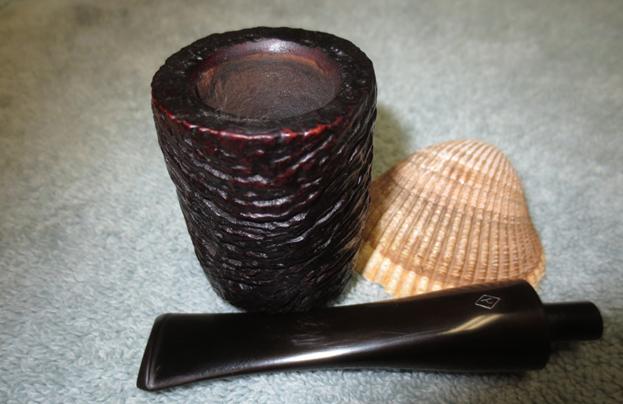
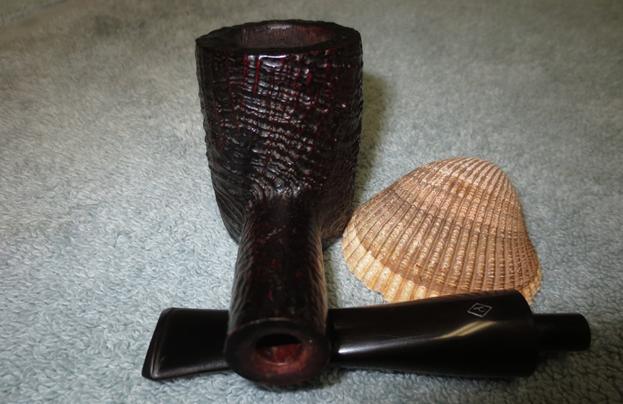
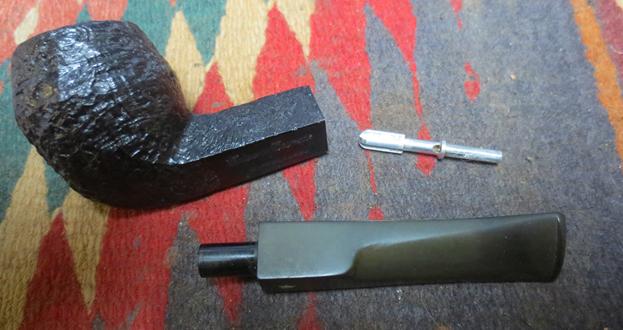
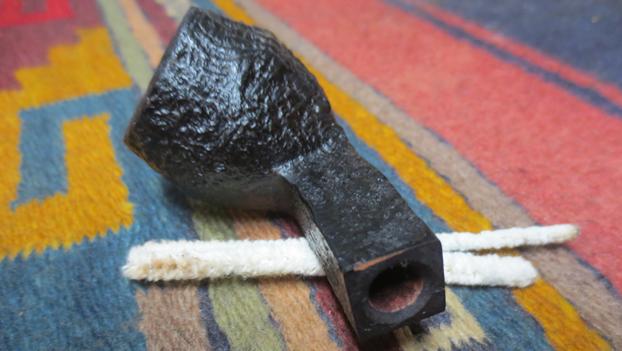
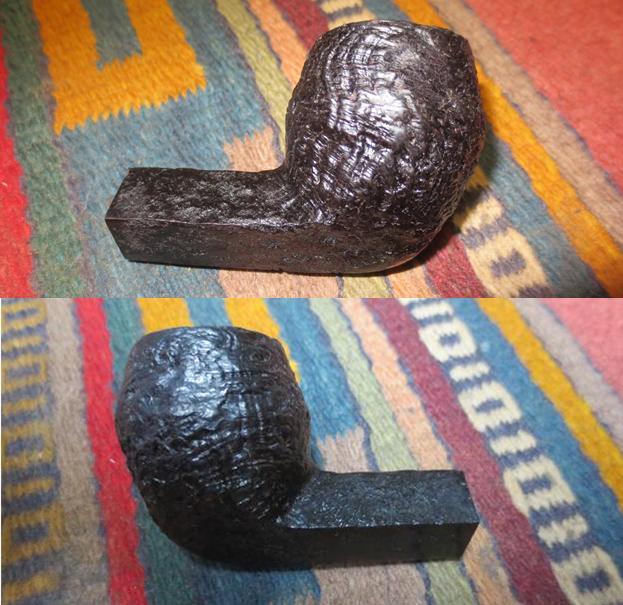
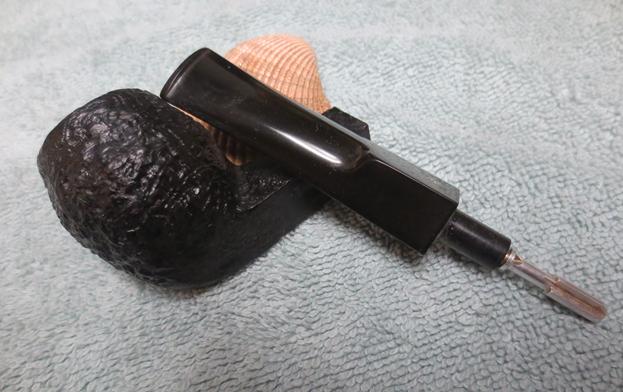
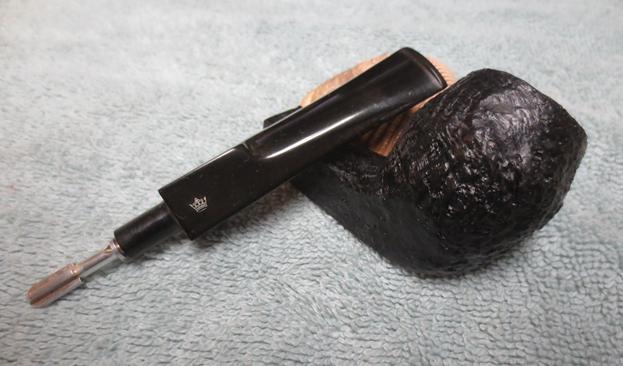
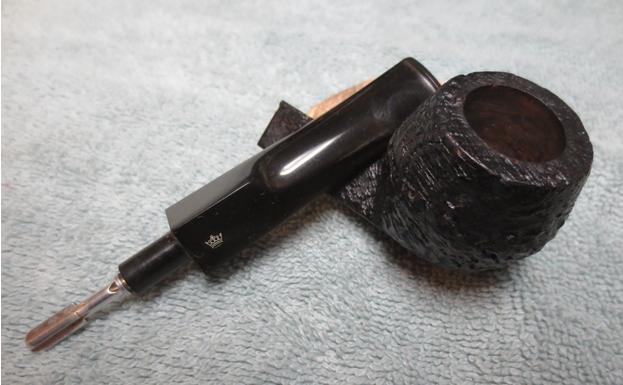
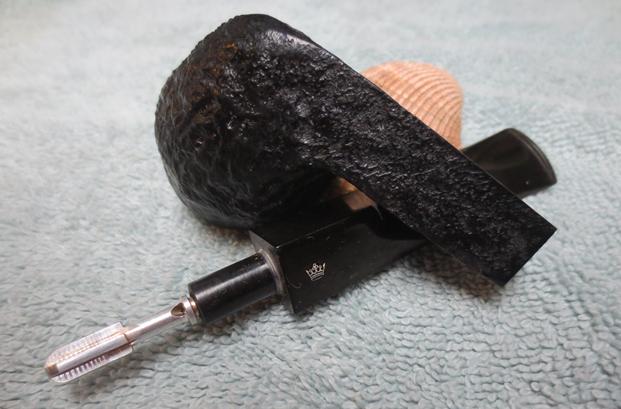
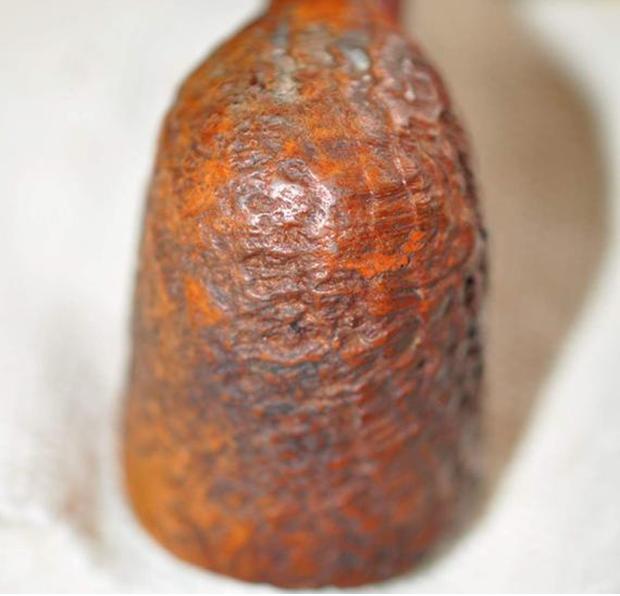
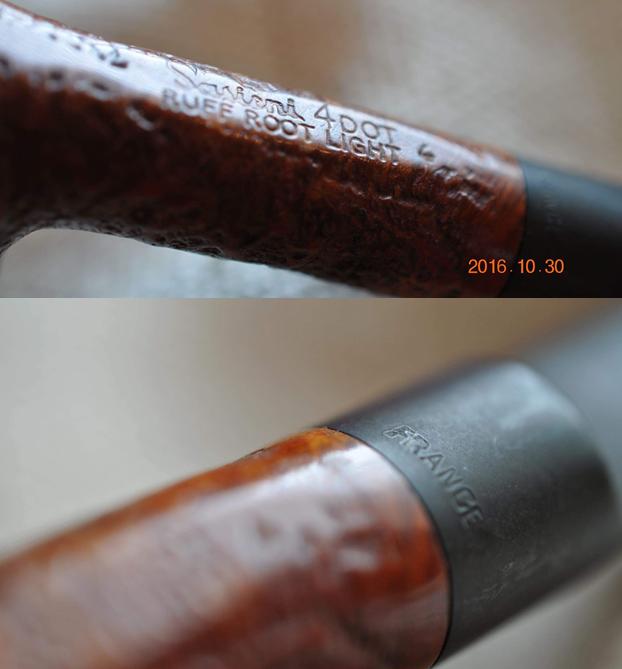
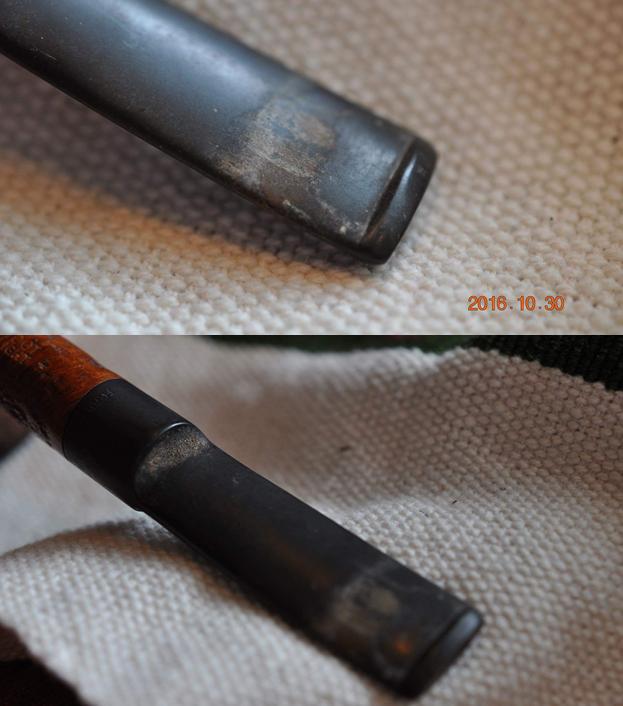
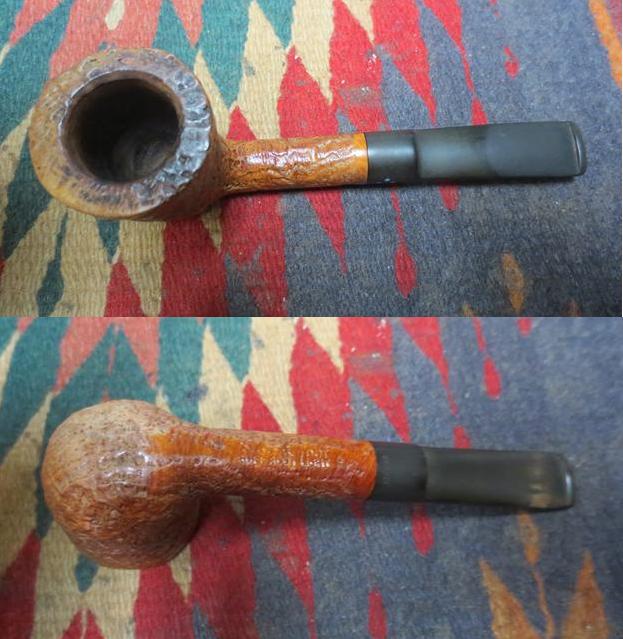
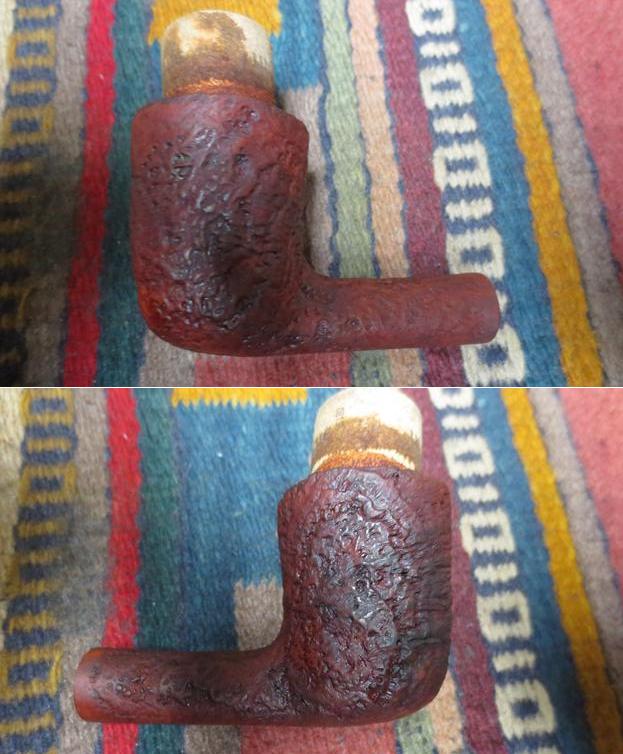
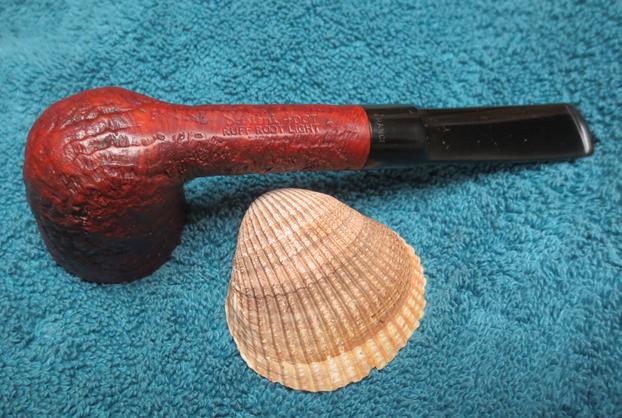
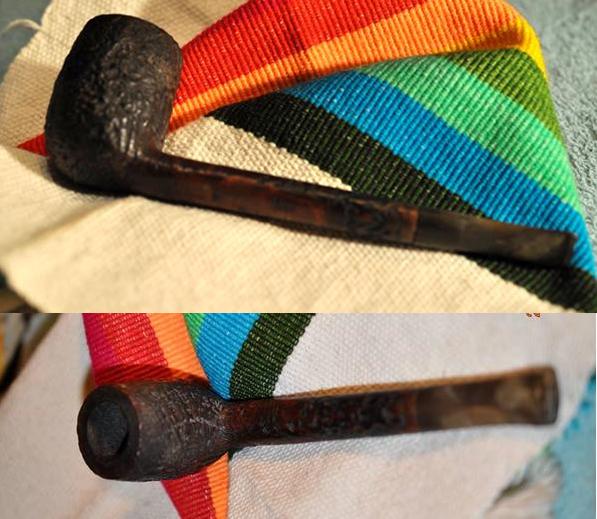
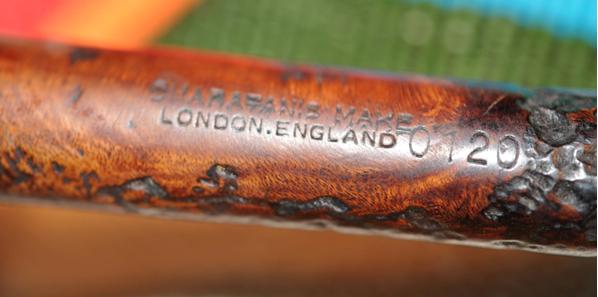
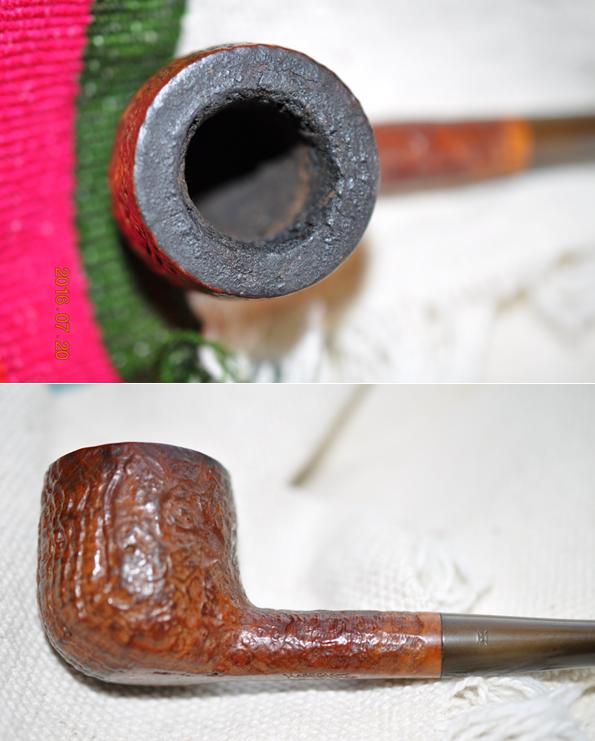
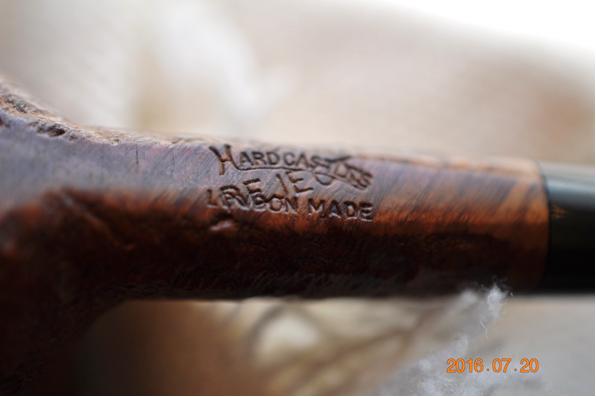
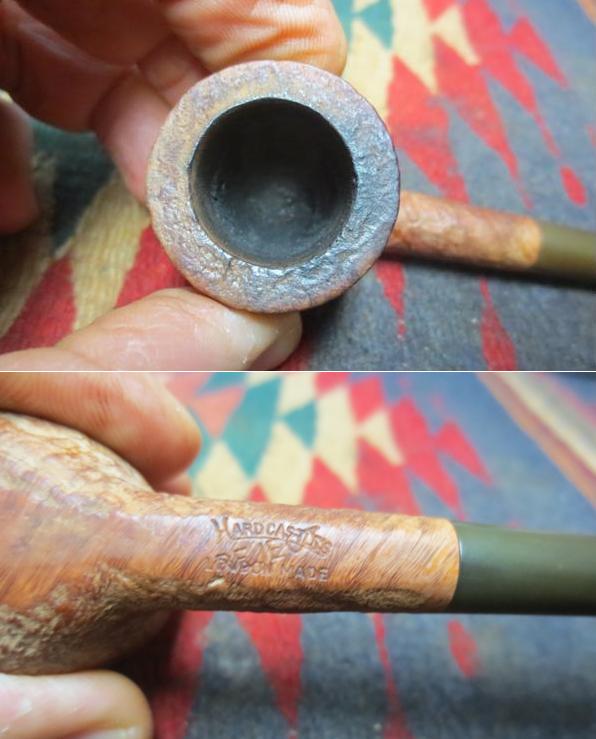
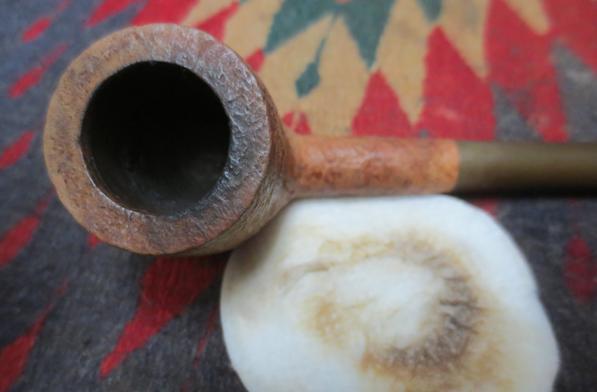
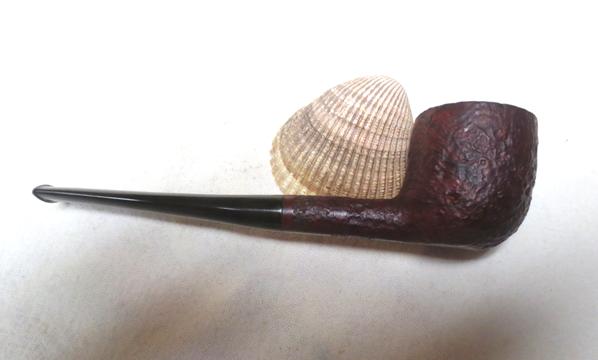
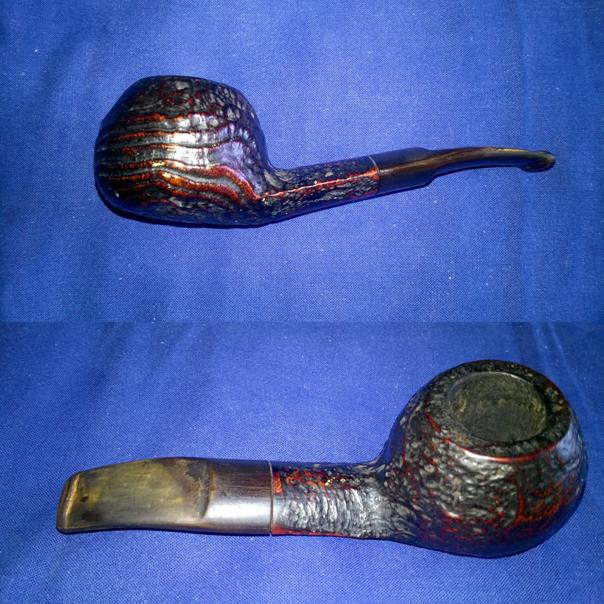
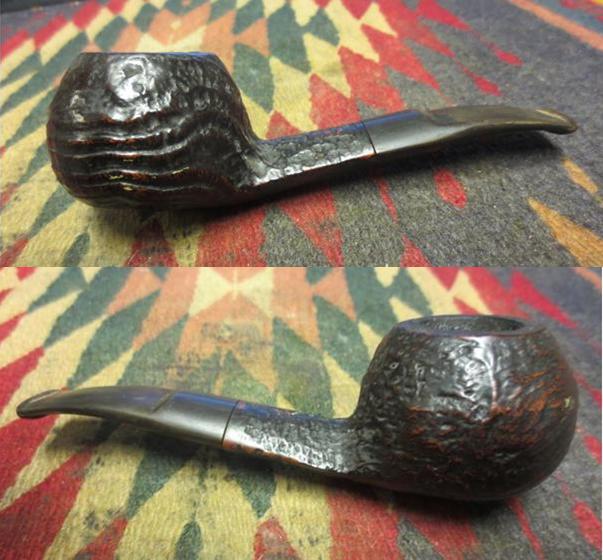
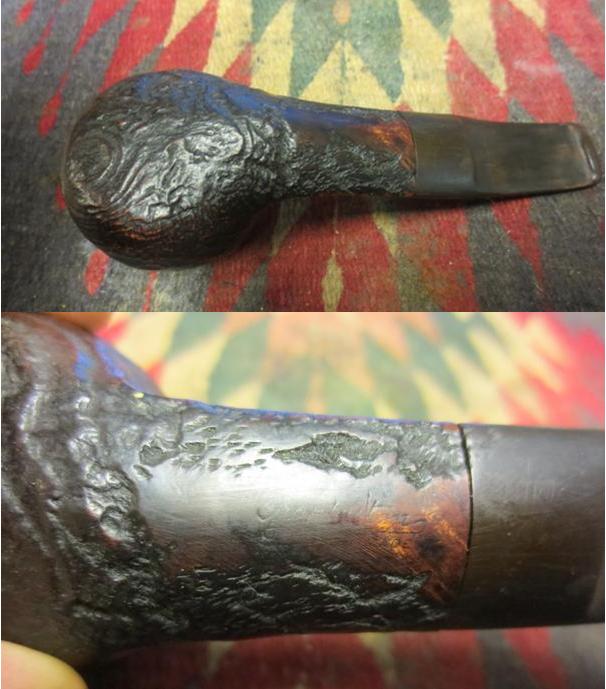
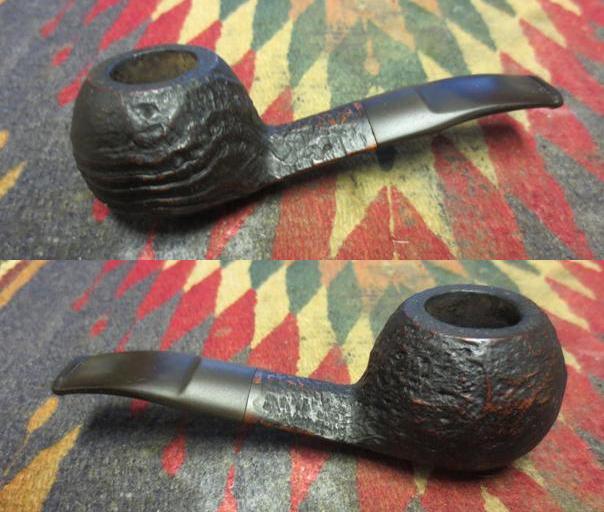
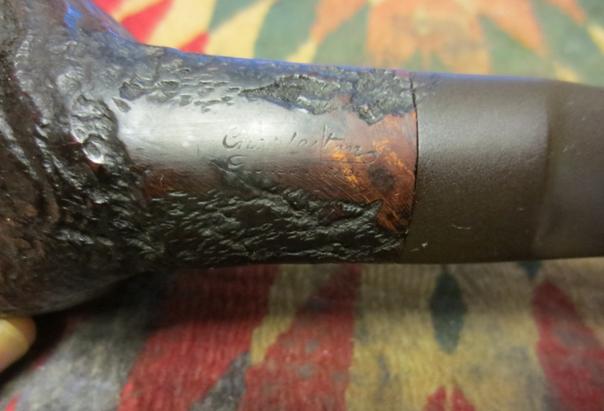
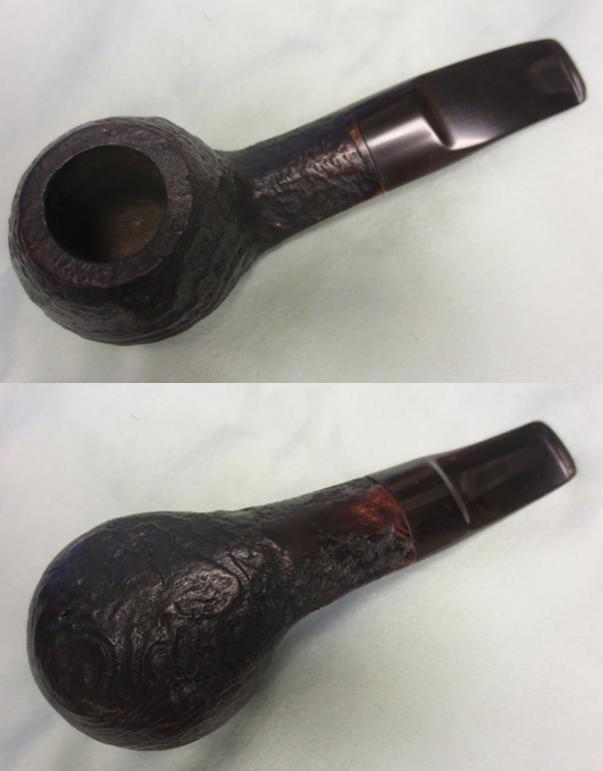
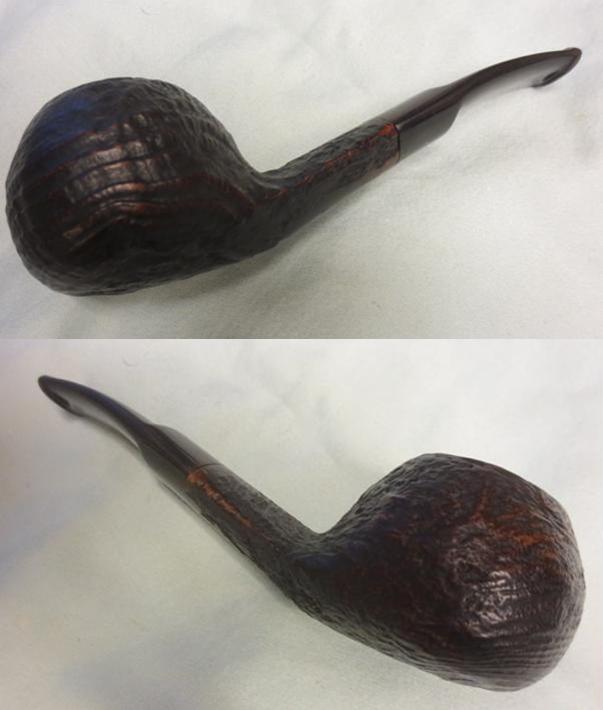
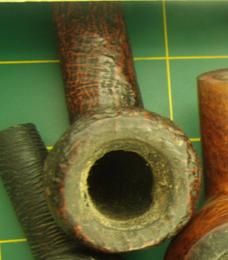
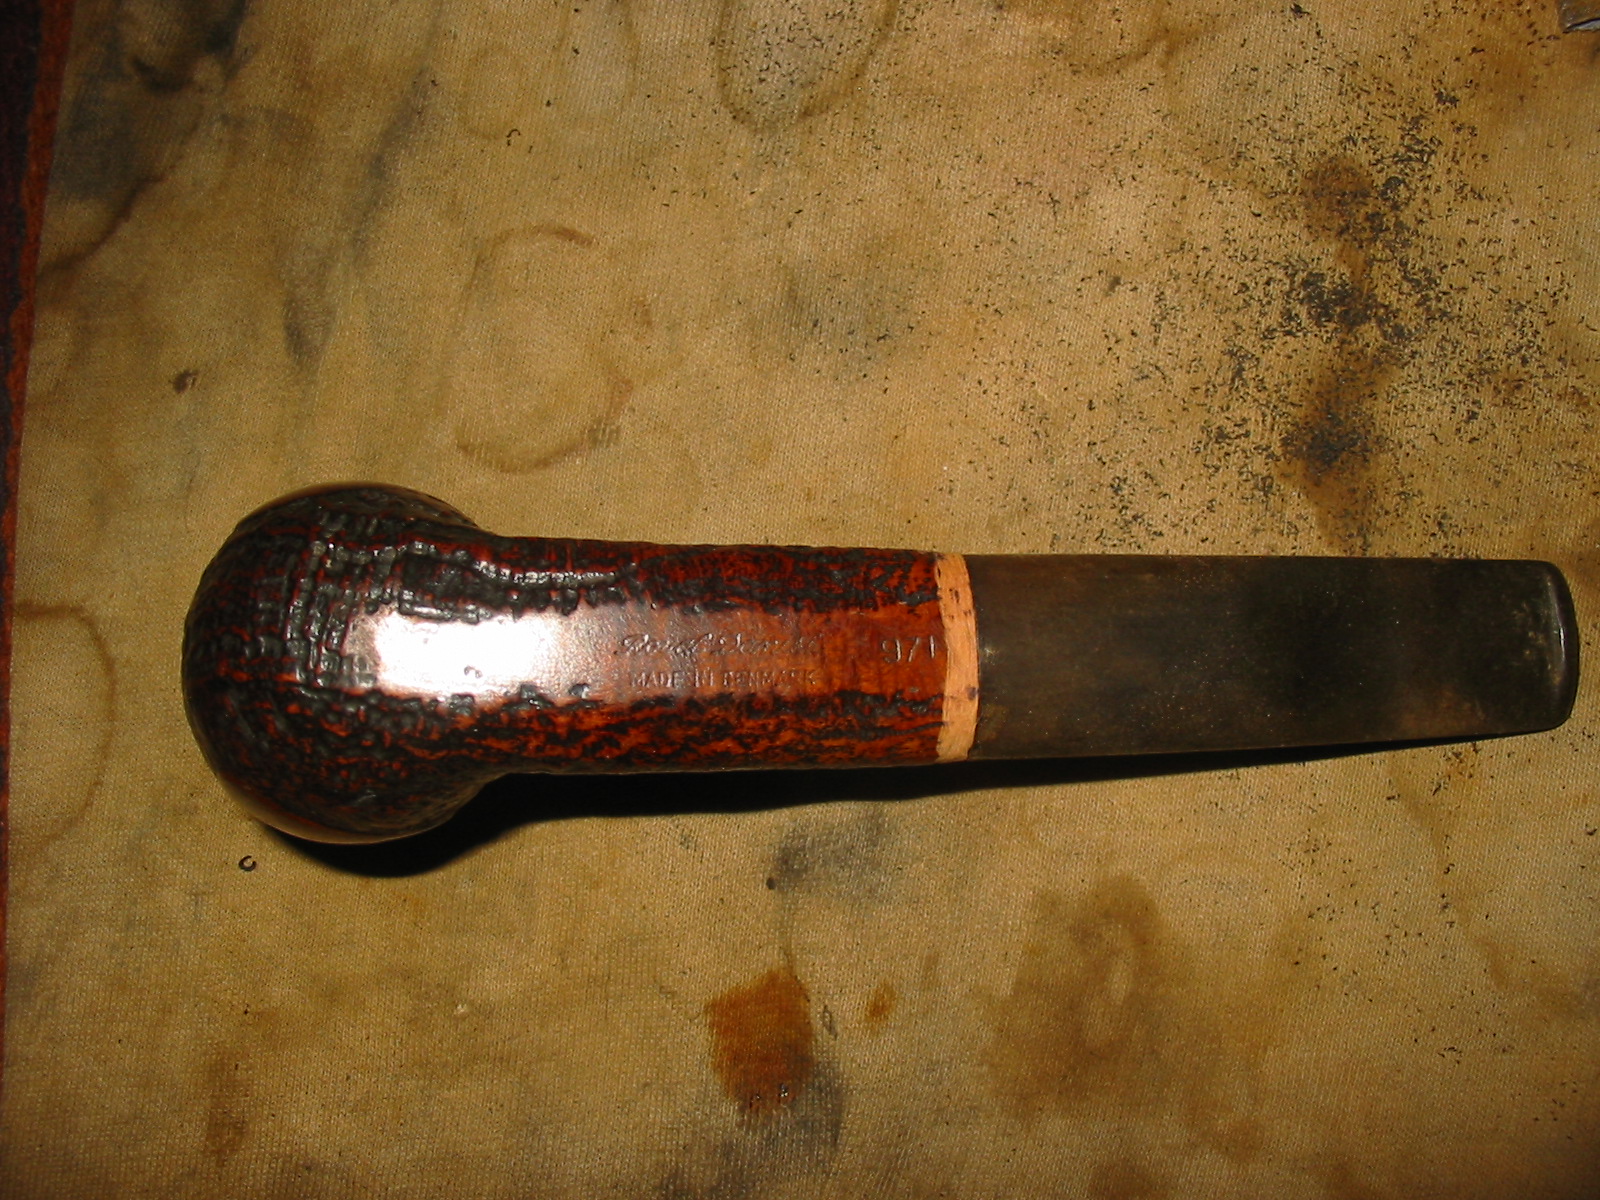
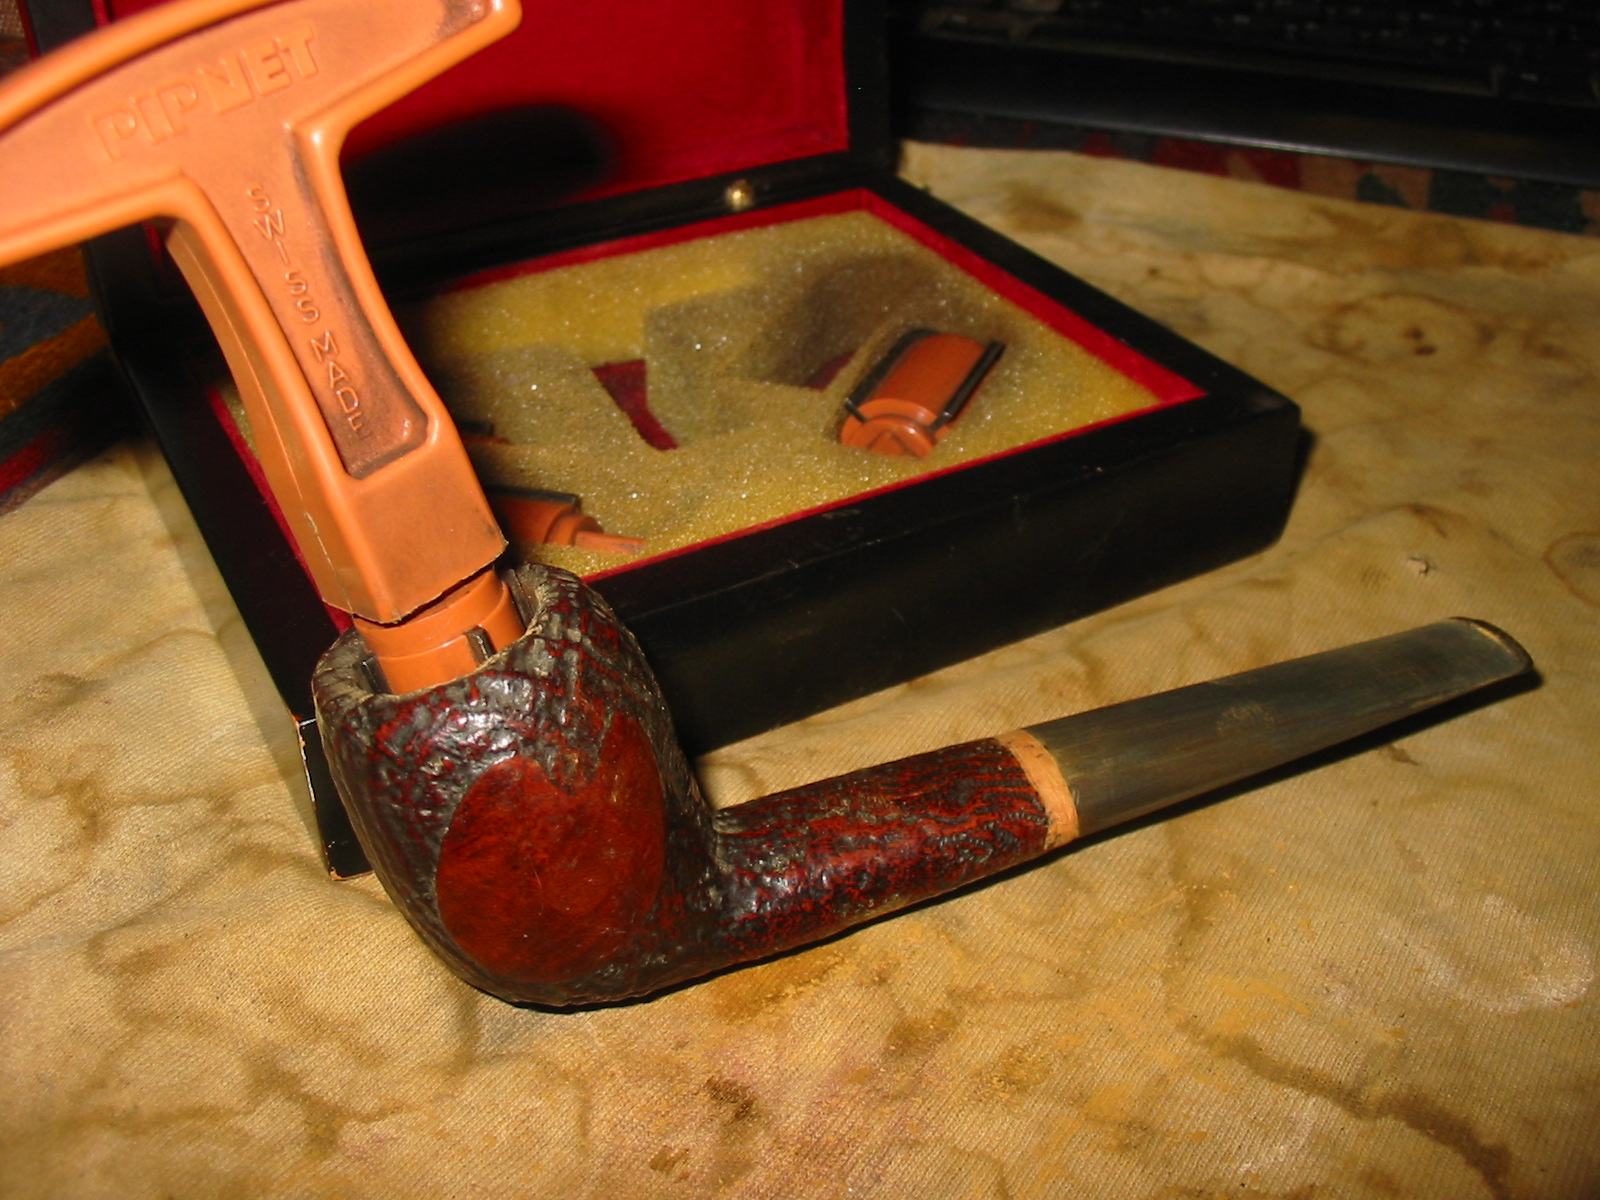
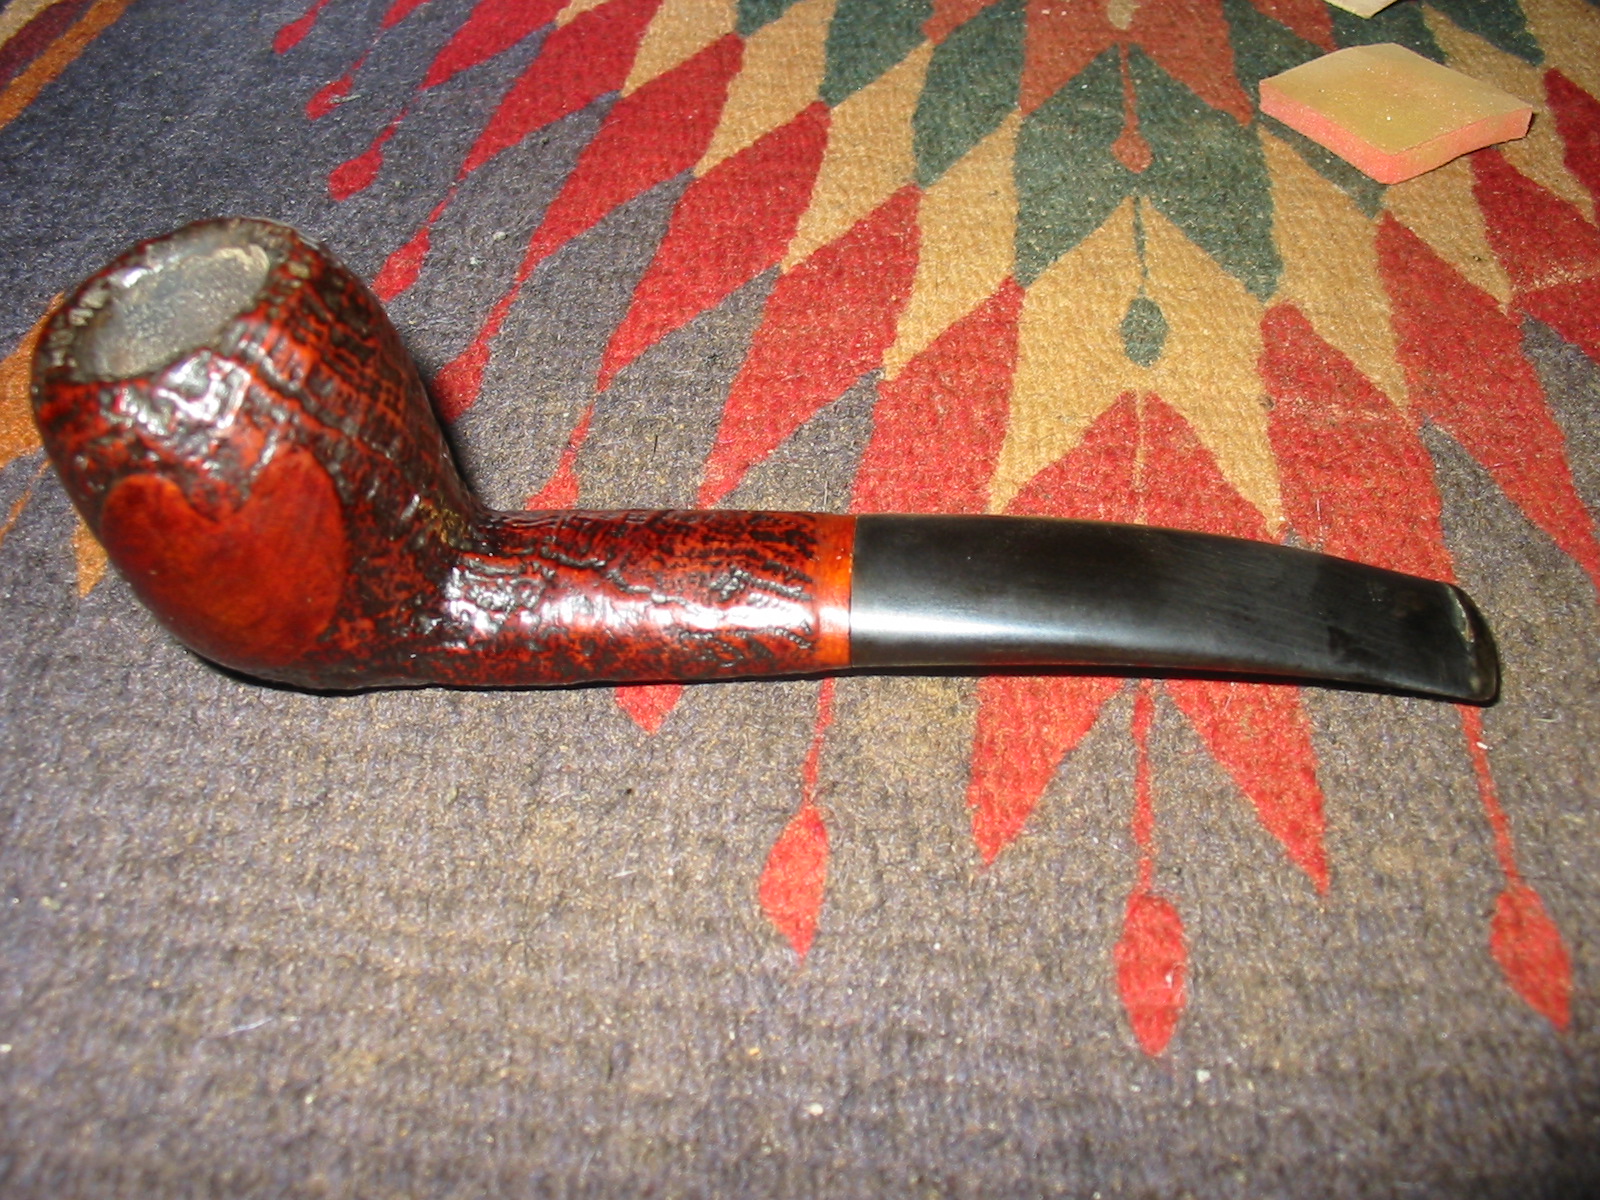
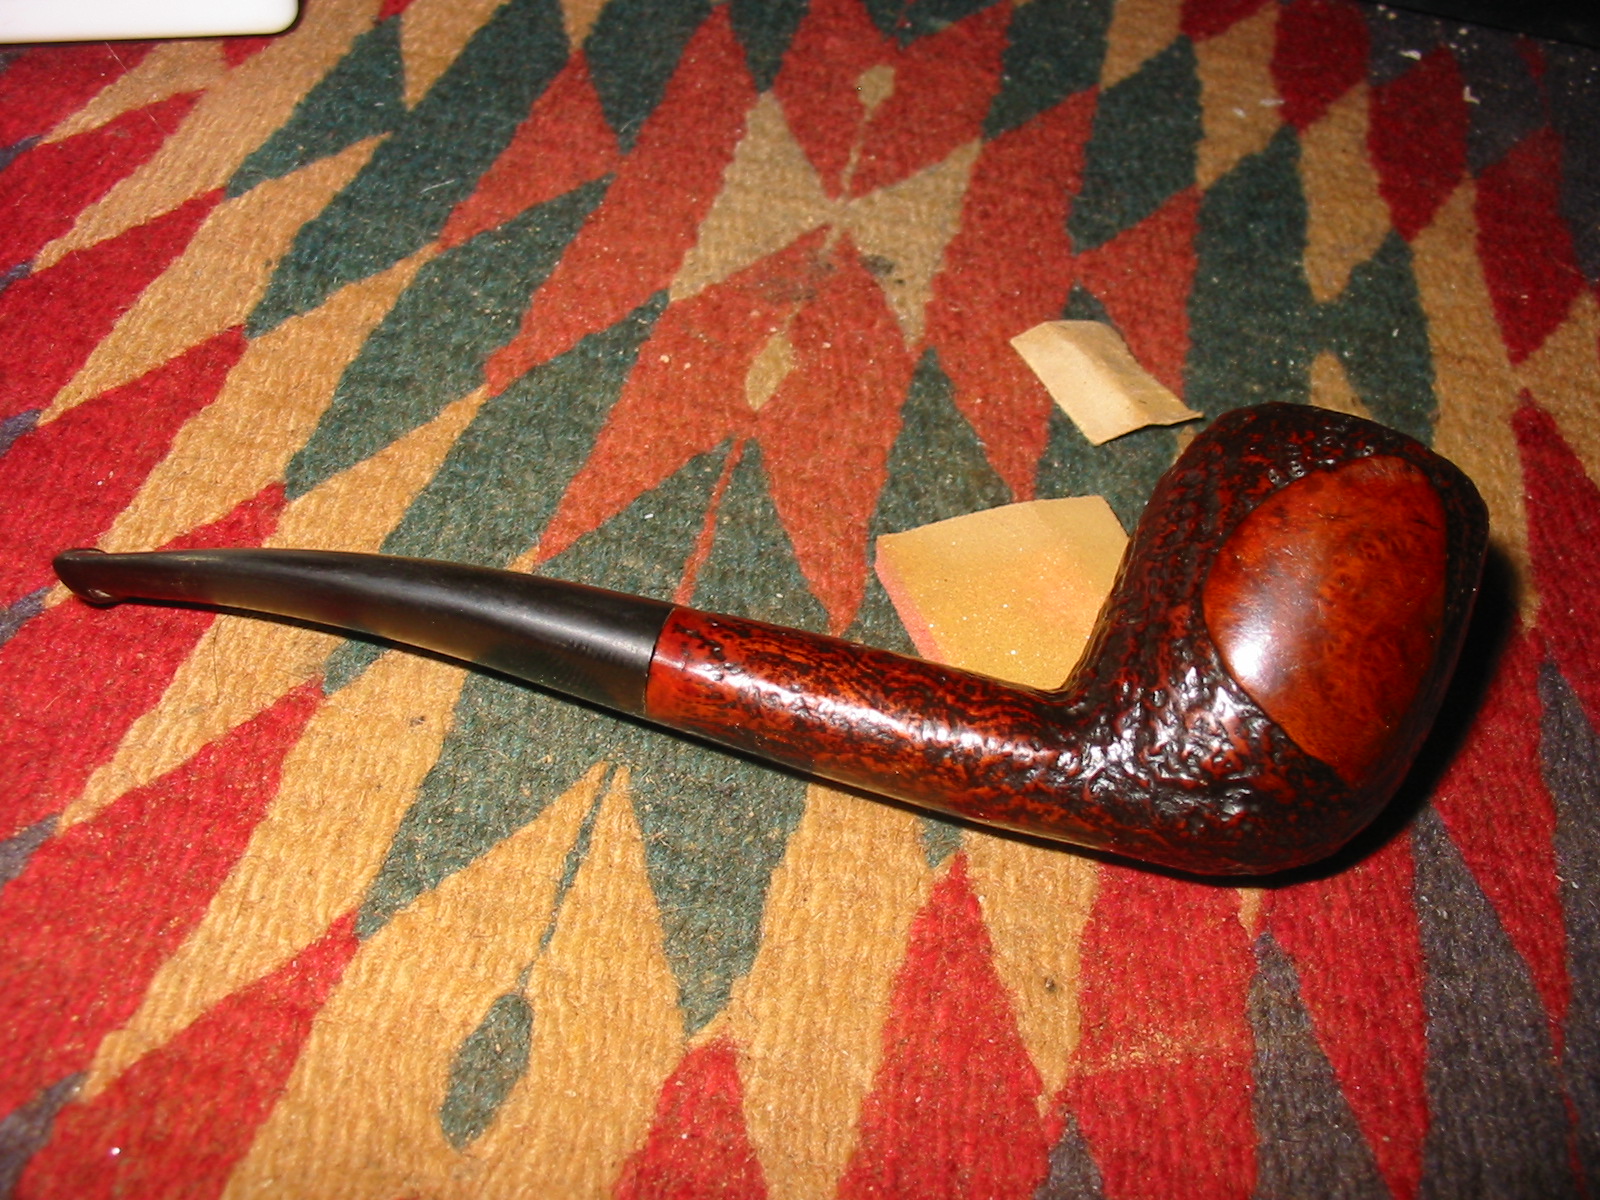
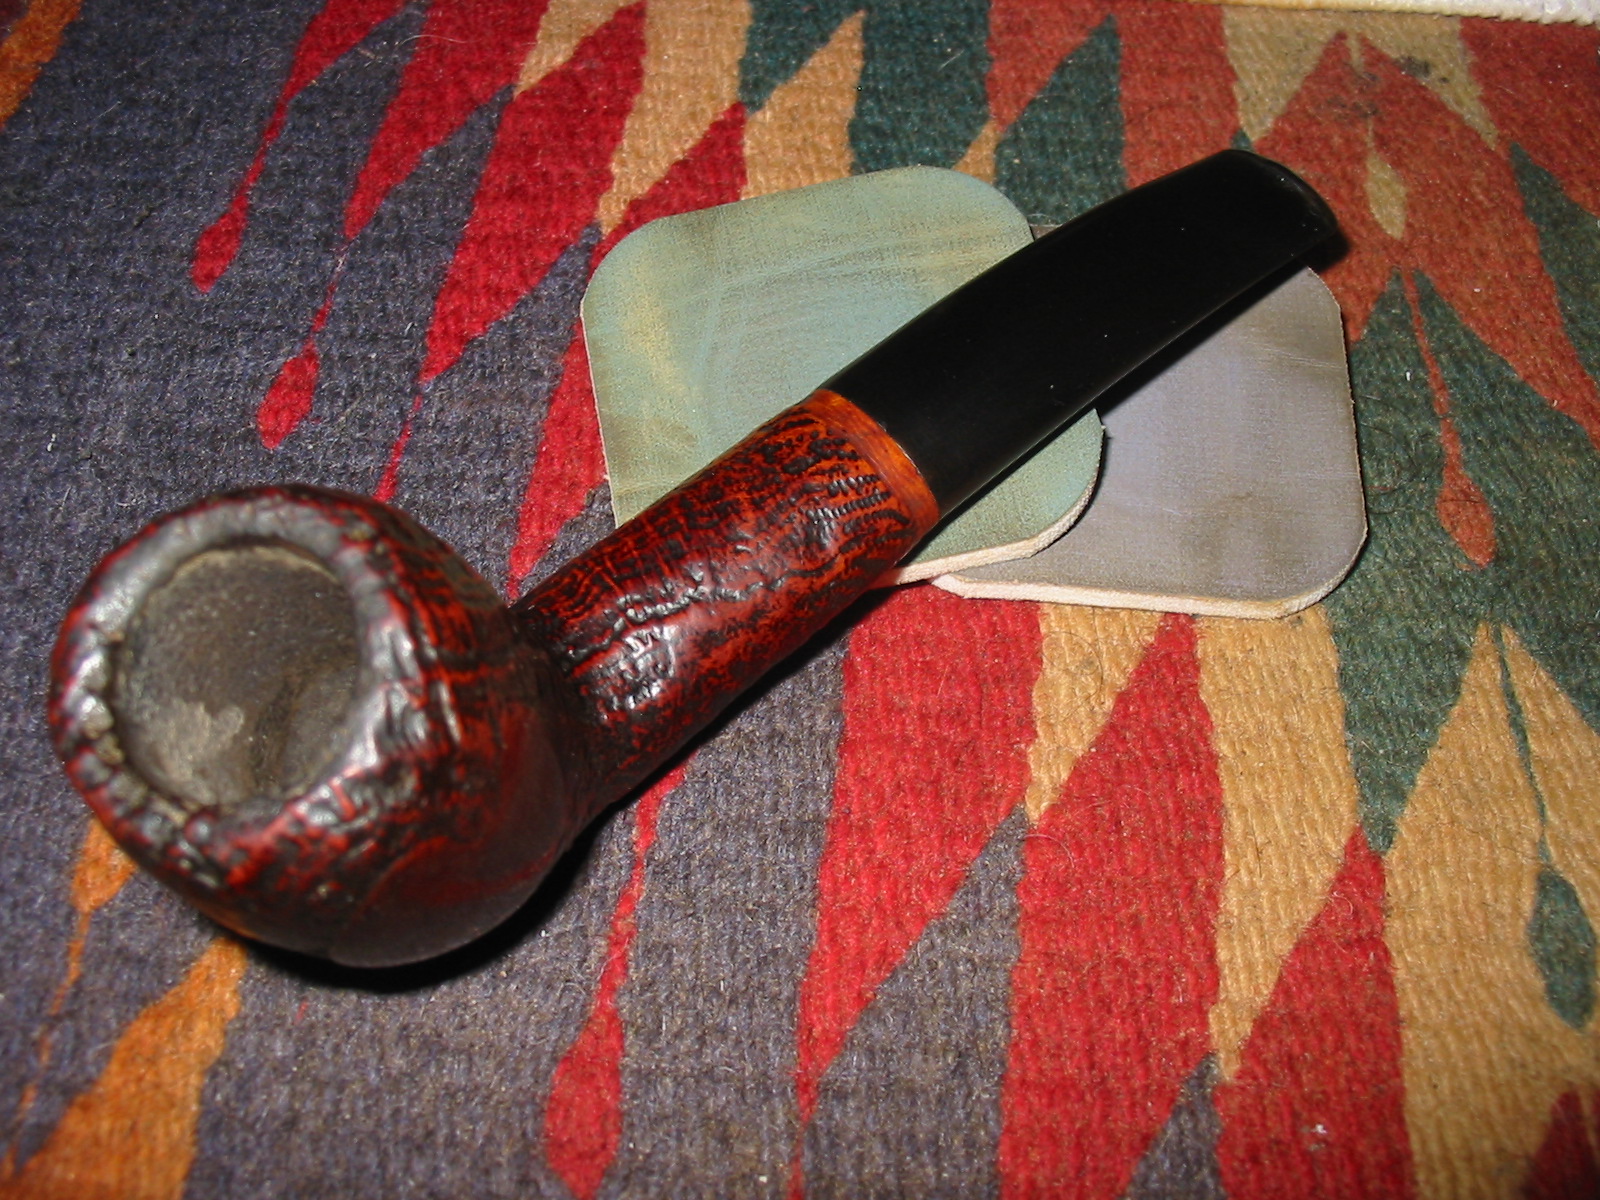
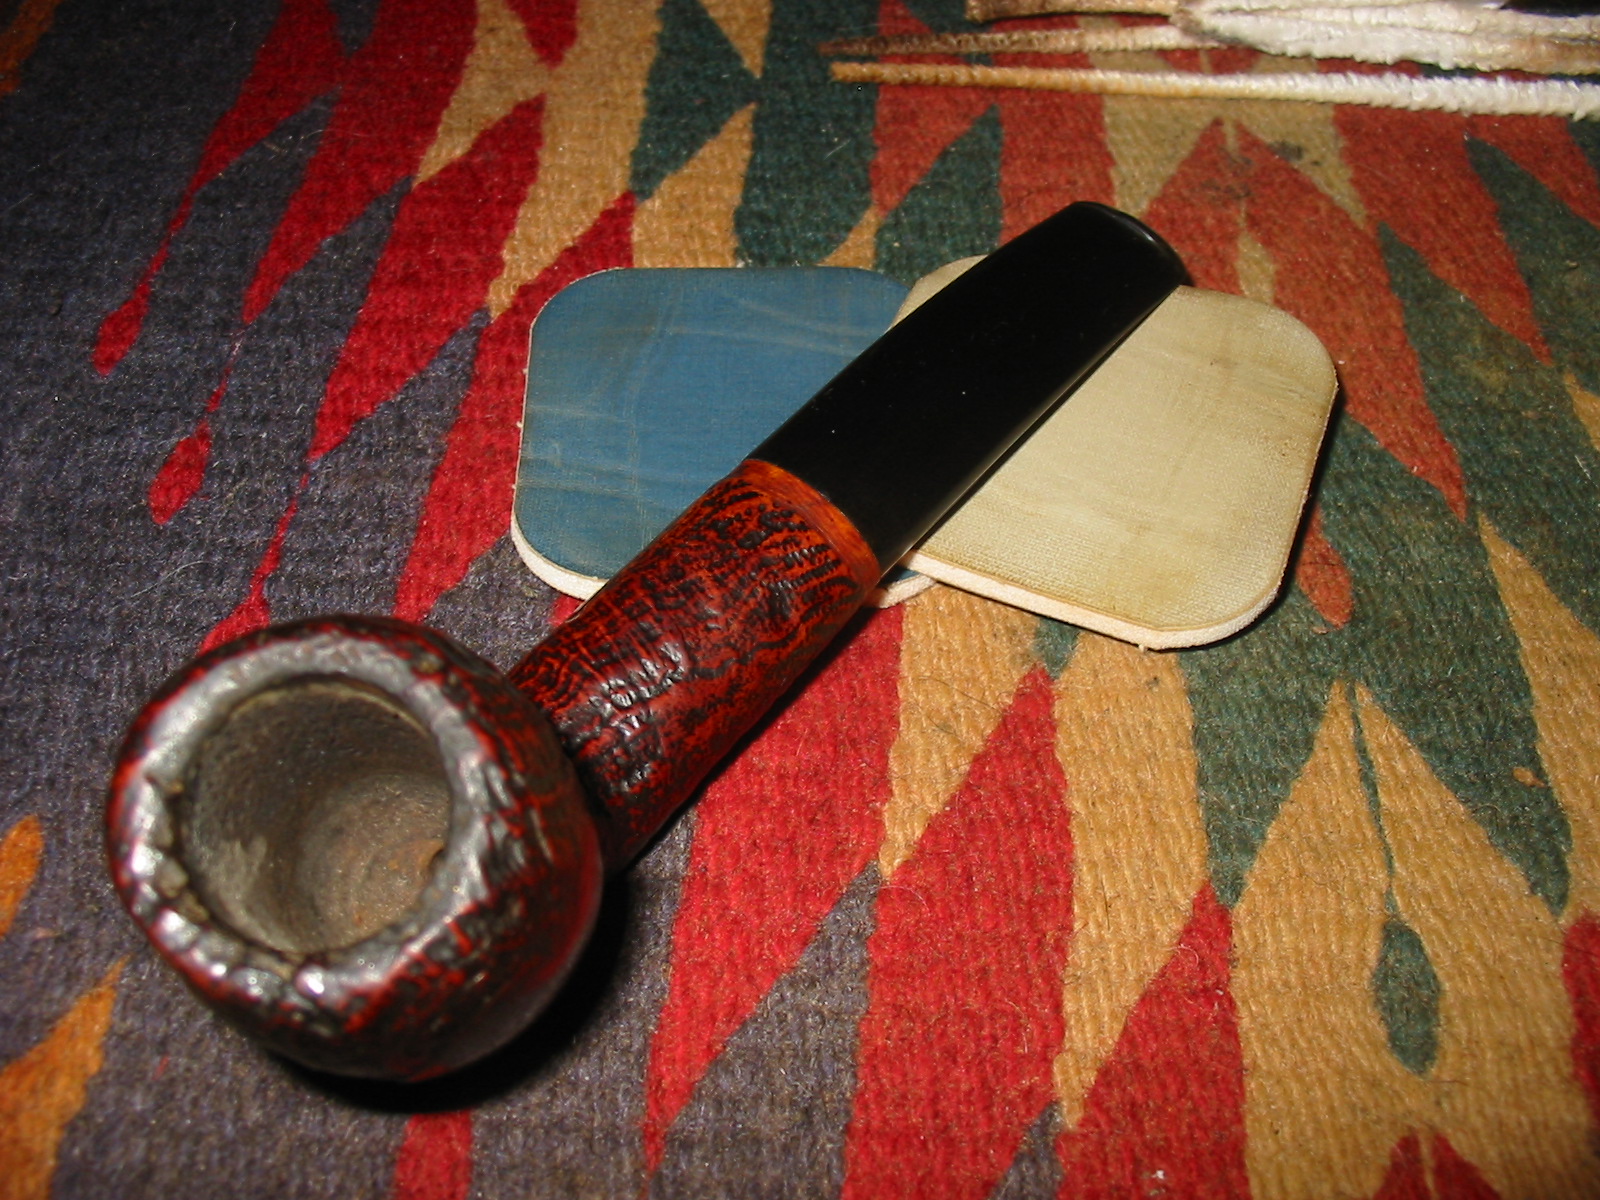
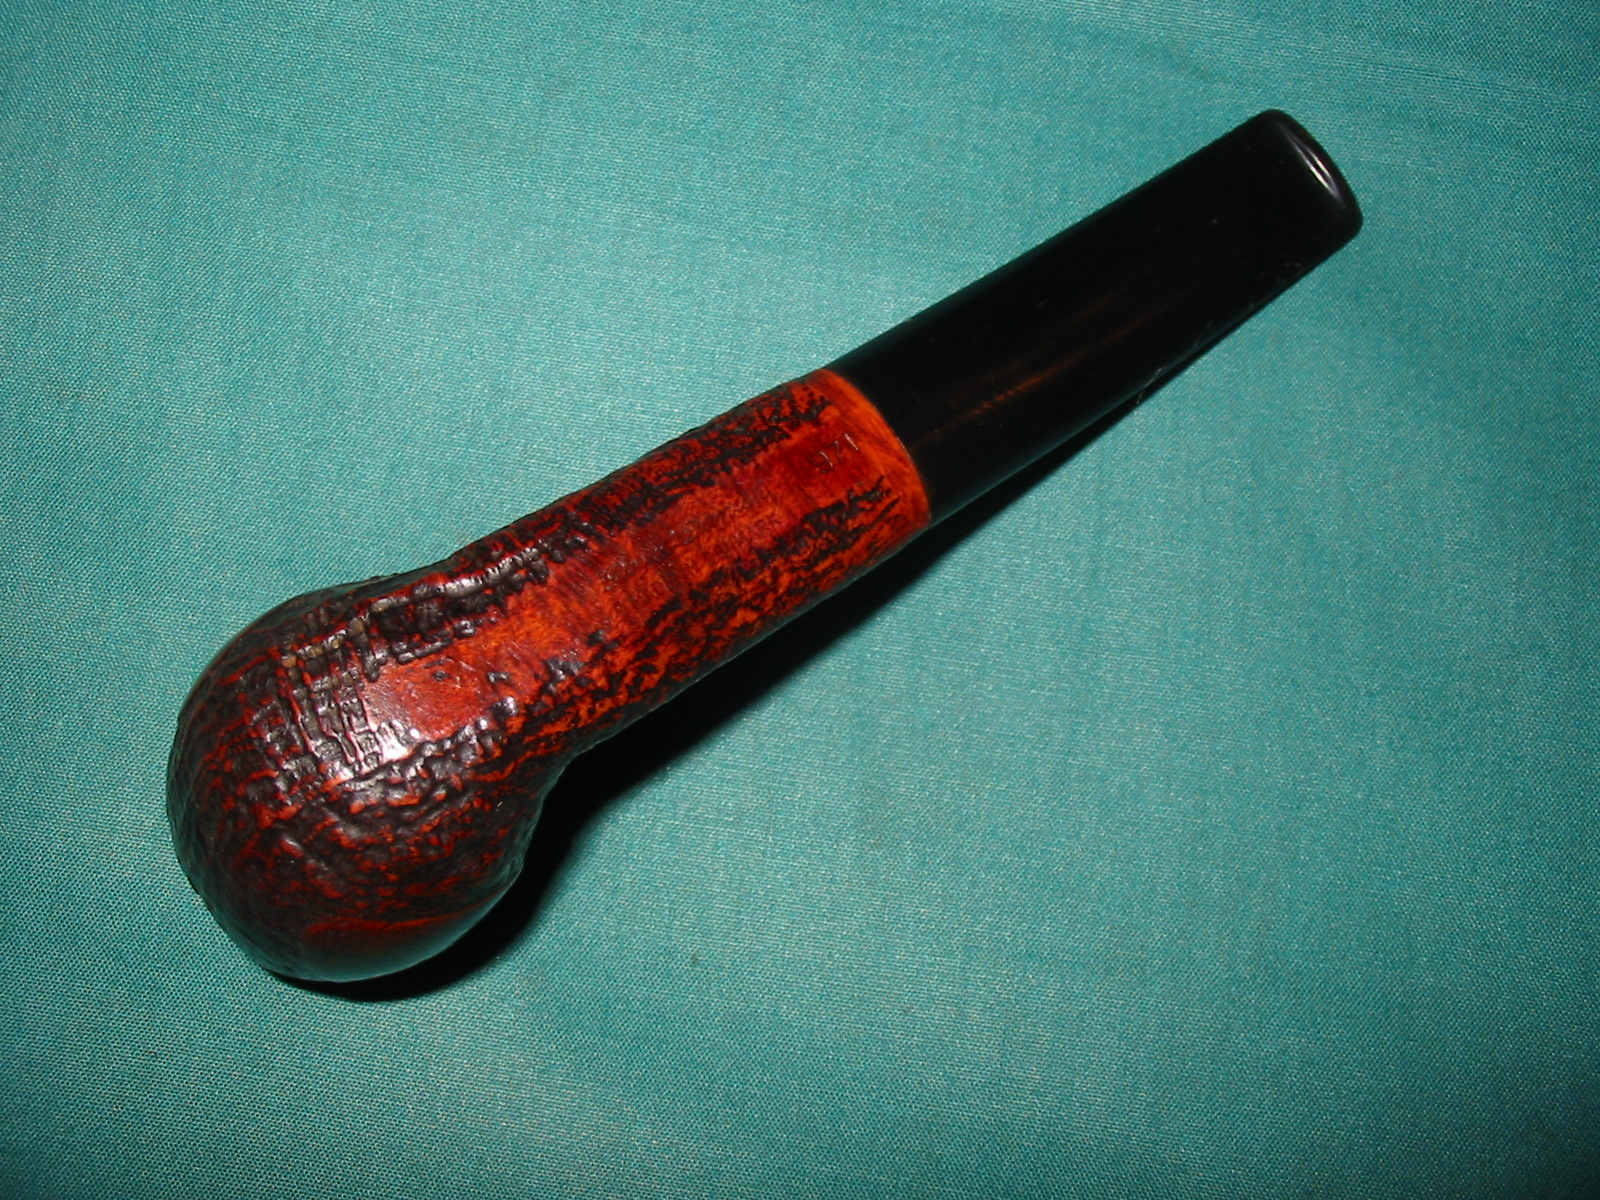
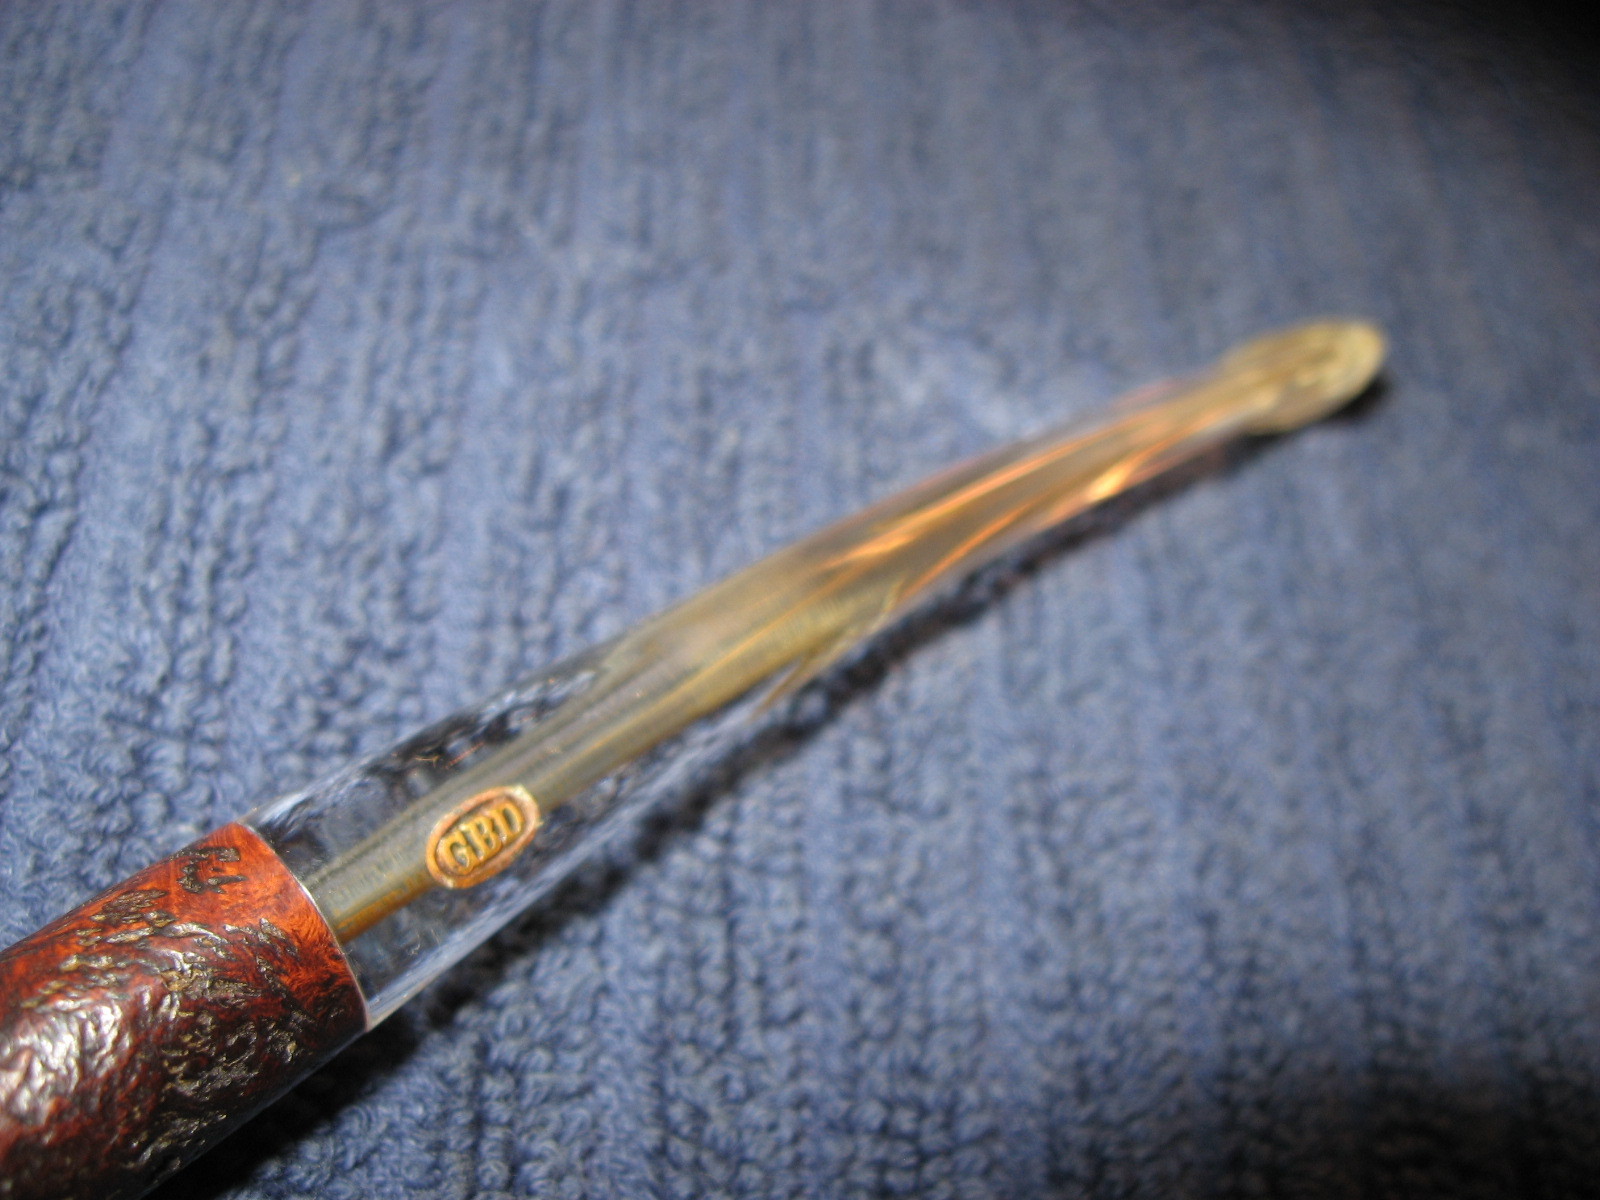
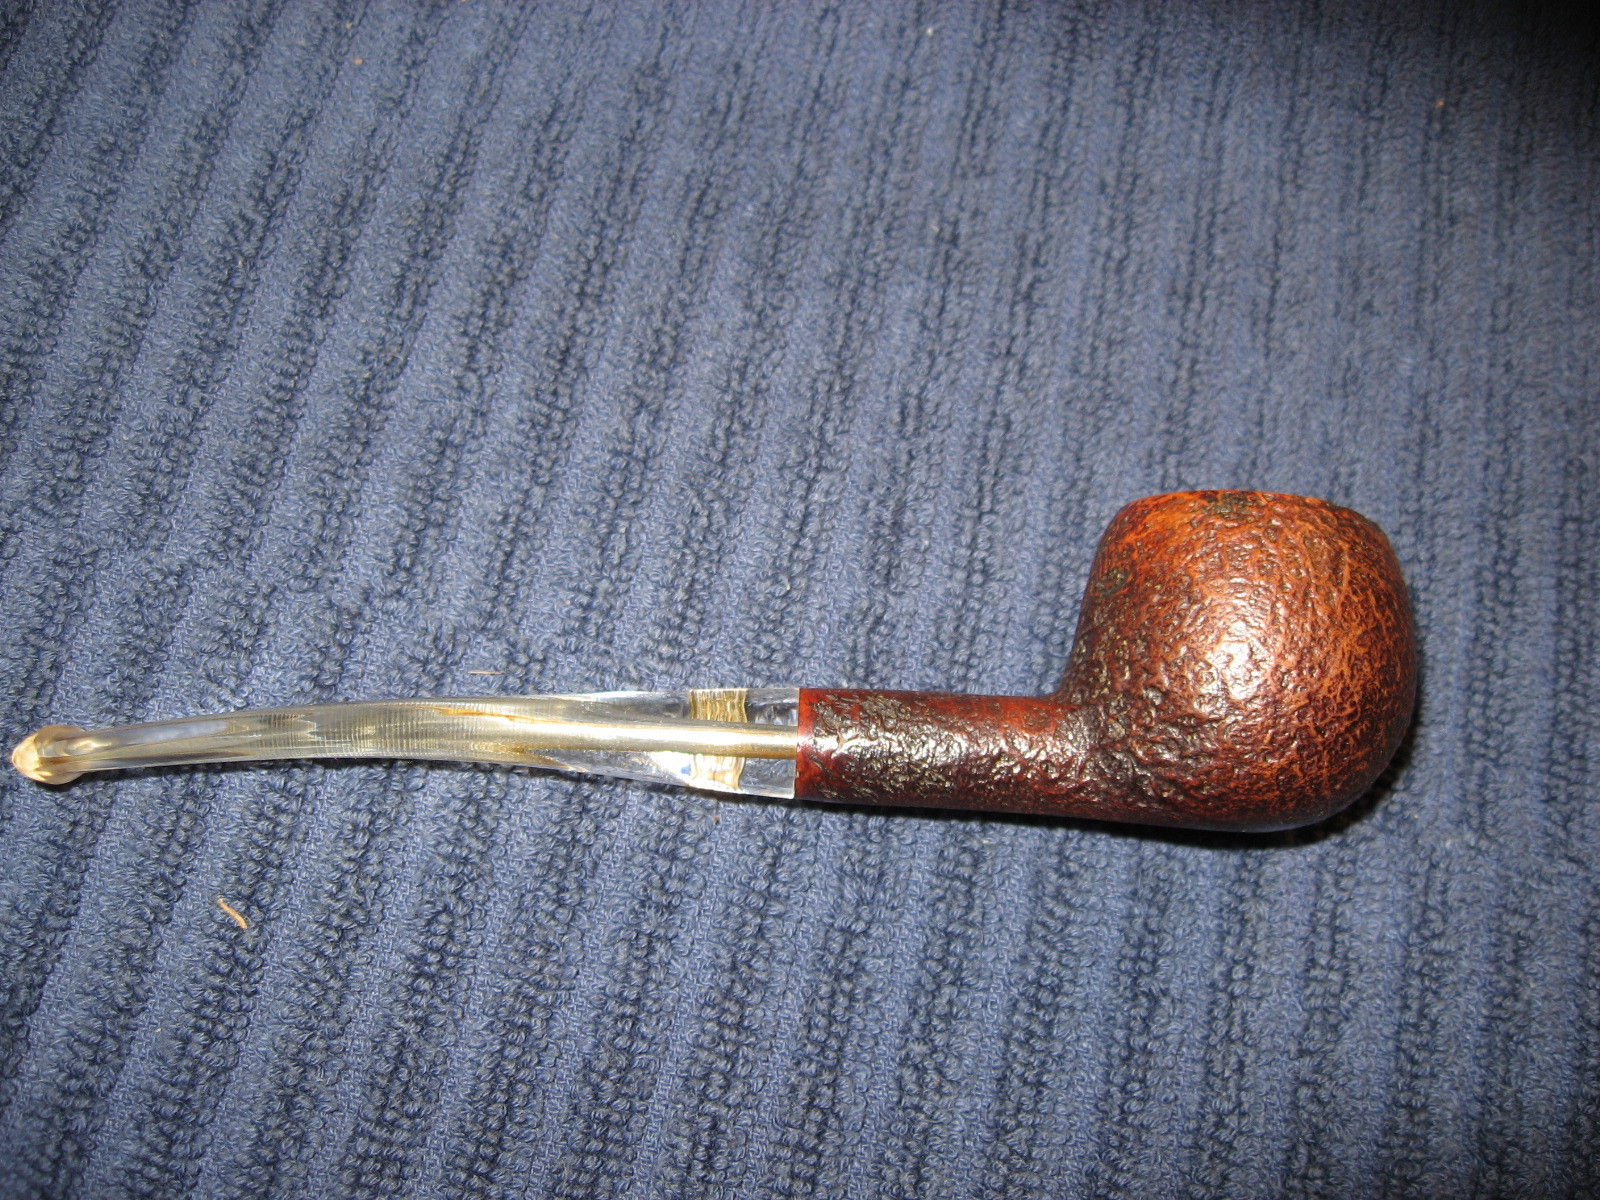
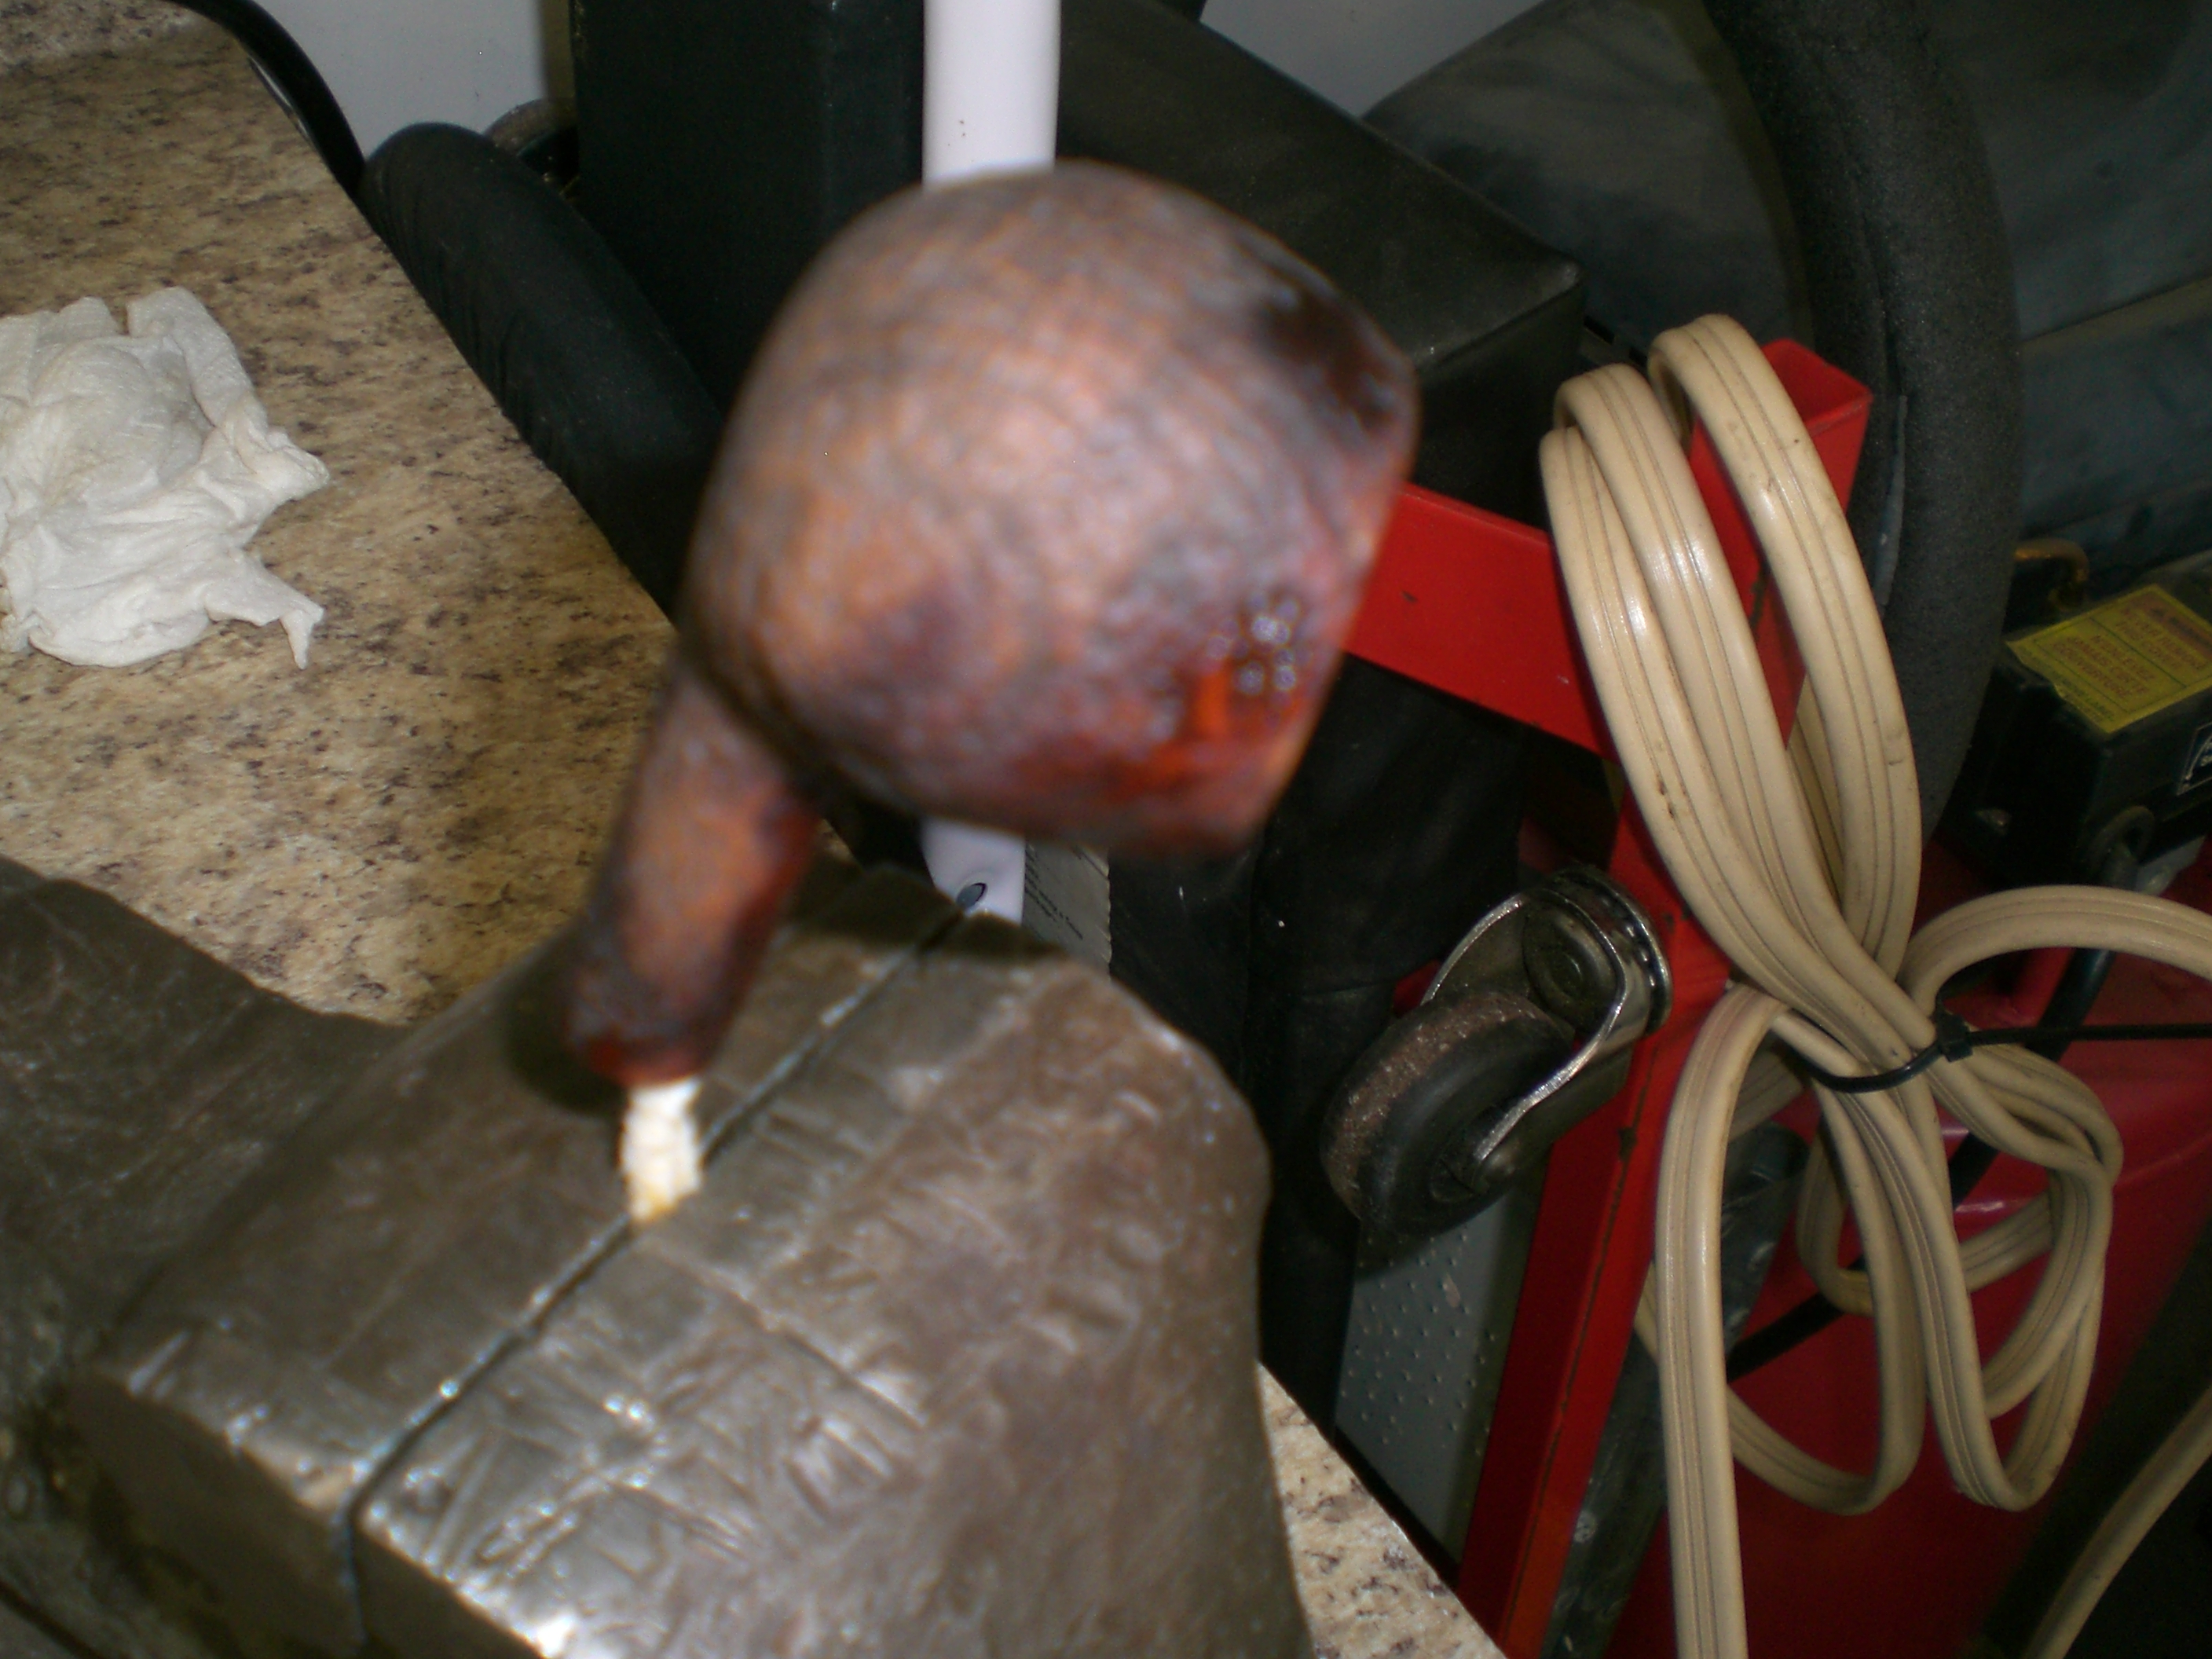
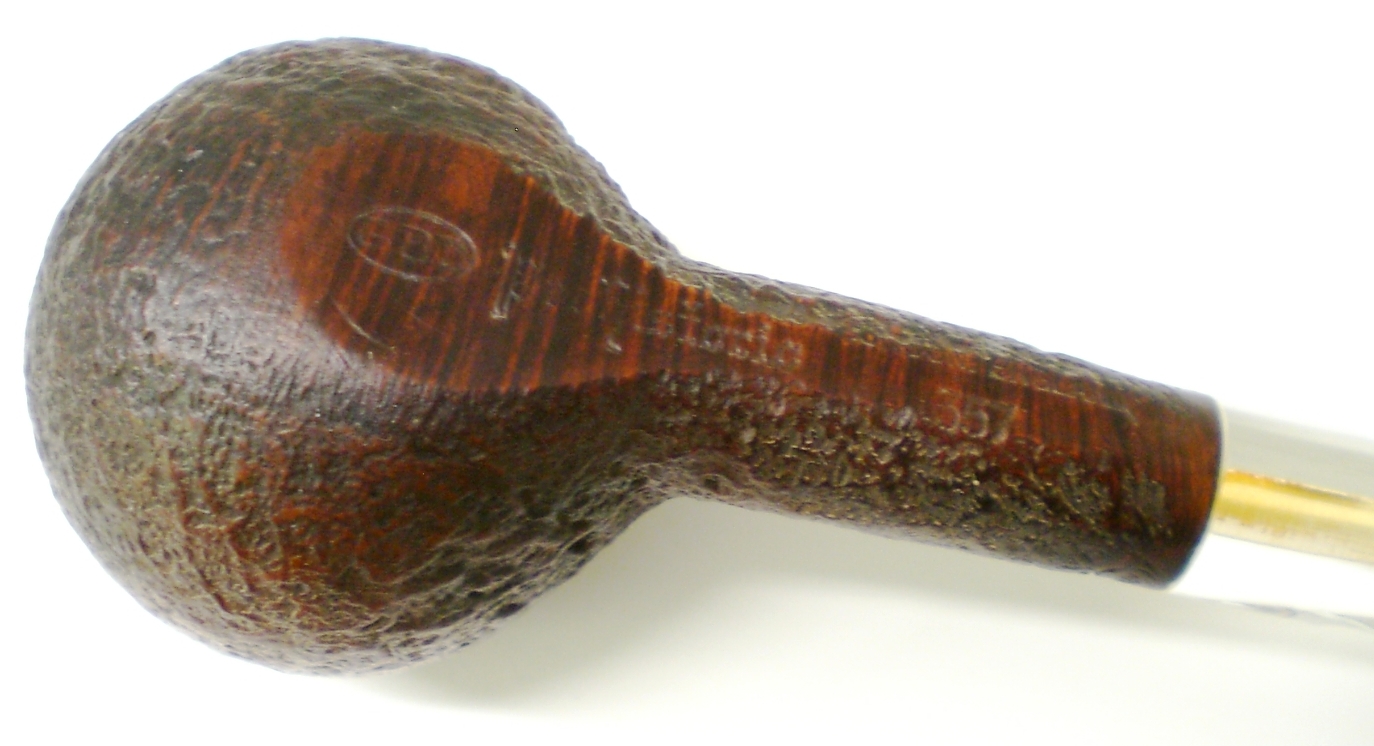
The grain on this Parker is absolutely stunning. The sandblast follows the cross grain around the bowl with a deep, craggy blast. The shape is a classic poker or Cherrywood. It is stamped on underside of the shank with the brand name Parker over Super in a Diamond over Briarbark over Made in London England. Next to the shank/stem union it’s stamped with the shape no. 809 and a circled 4 designating the bowl size. There is a Diamond P on top of the stem. The finish is in decent shape with a medium to dark brown stain. When I received the pipe it had a thick cake in the bowl and the lava had overflowed onto the rim filling in the grooves of the sandblast. It is hard to tell if there was rim damage as it is so caked and encrusted on the rim. The stem had calcification from a softee bit on the first inch from the button forward. There were deep tooth marks on top & bottom side of the stem near the button. The following four pictures show the general condition of the pipe when I brought it to my work table. 
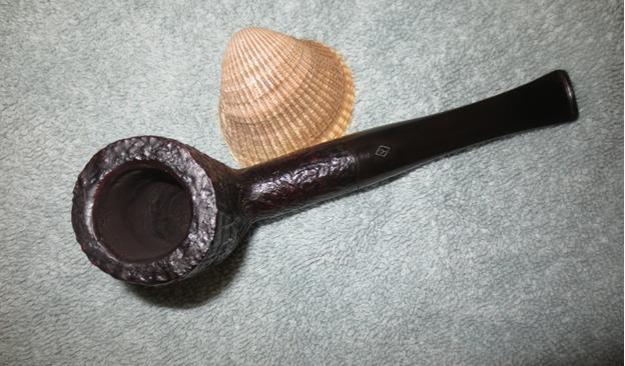
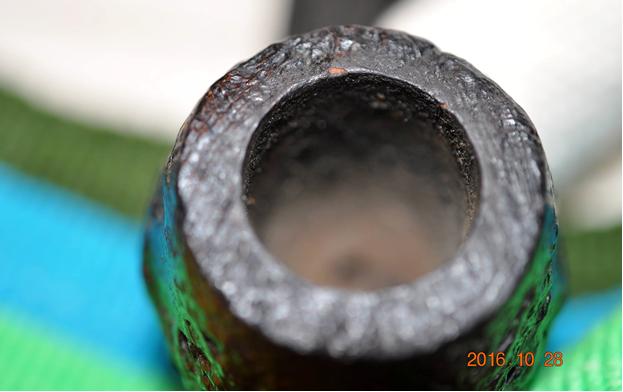
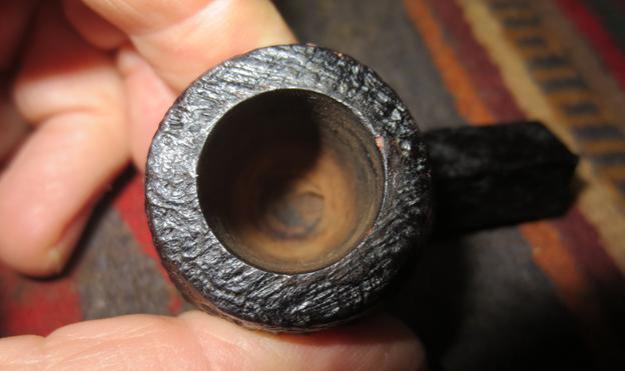
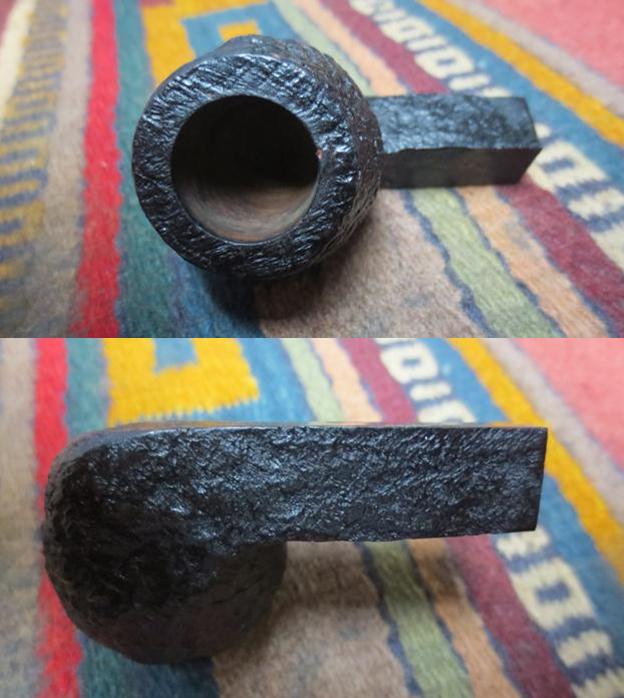
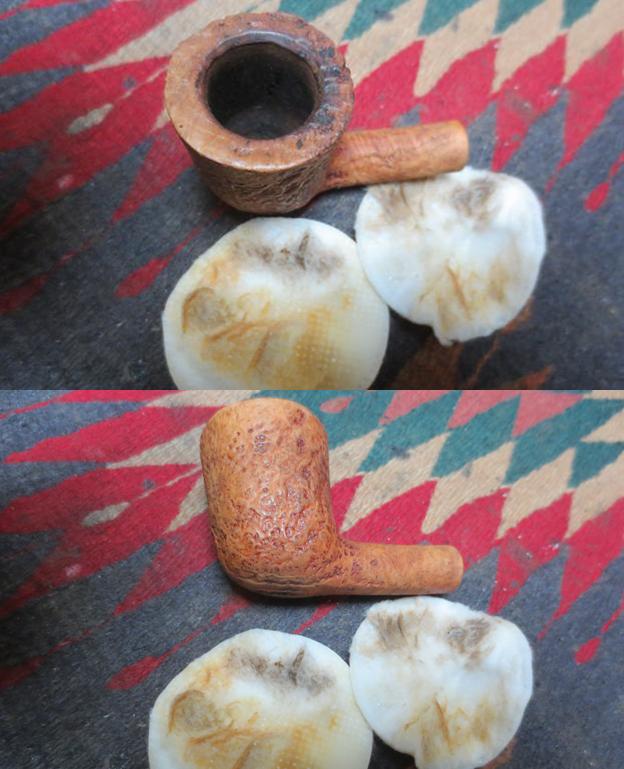
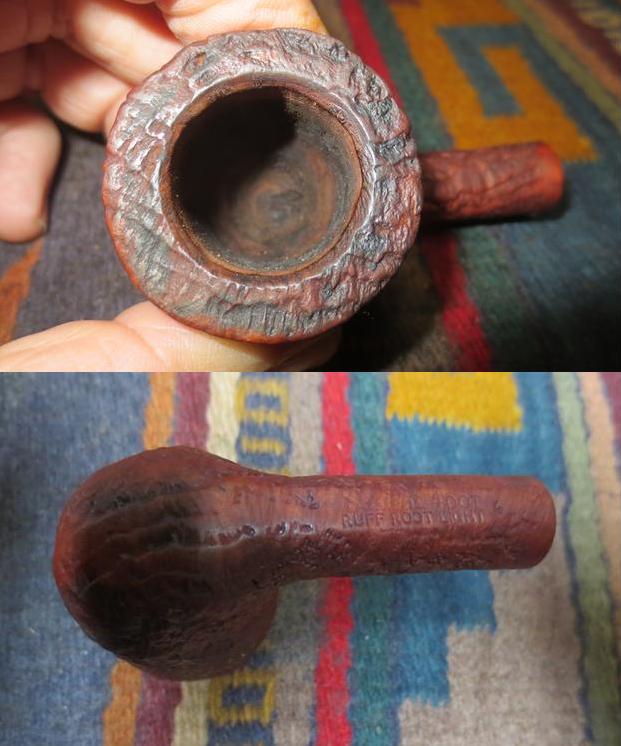
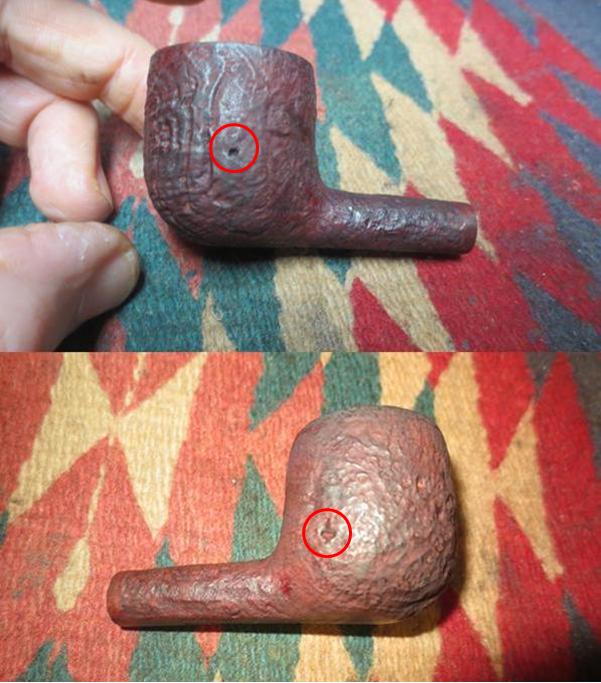
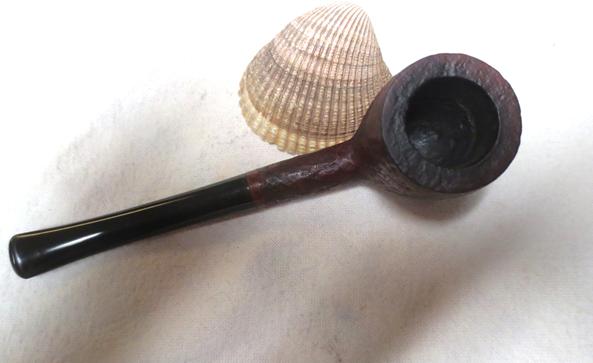
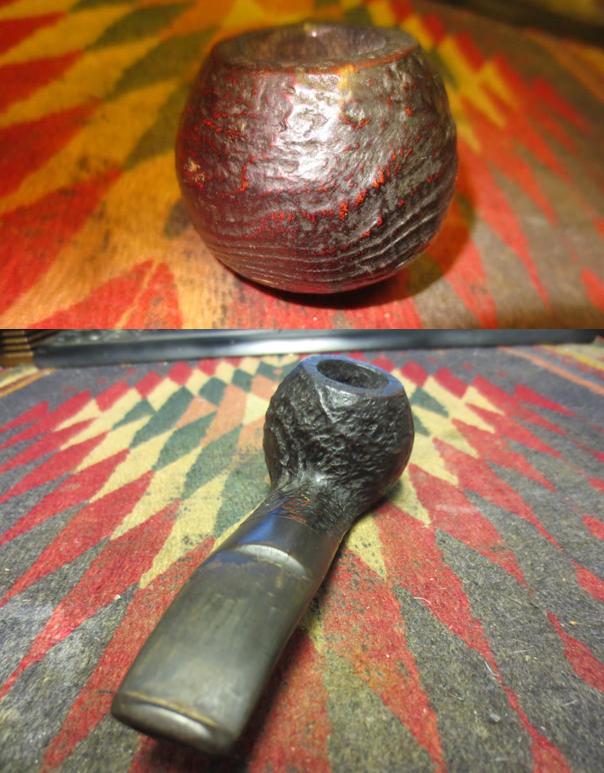
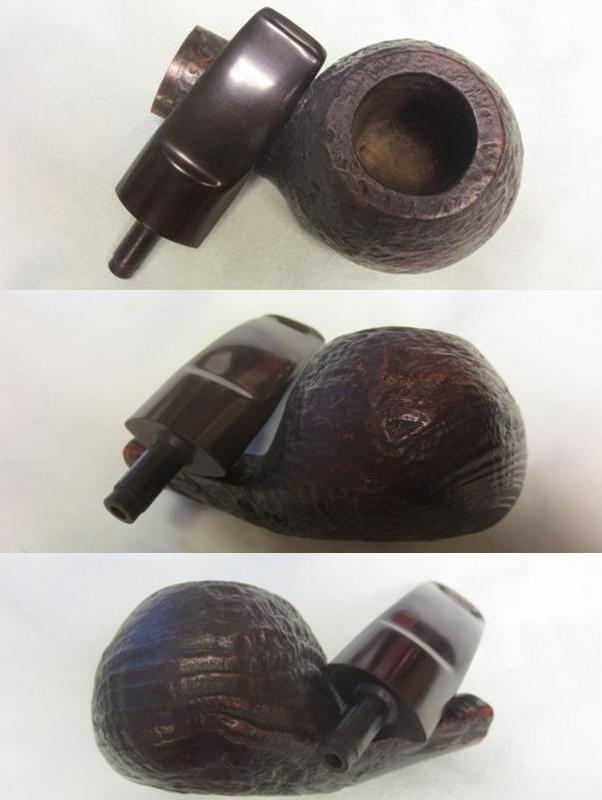
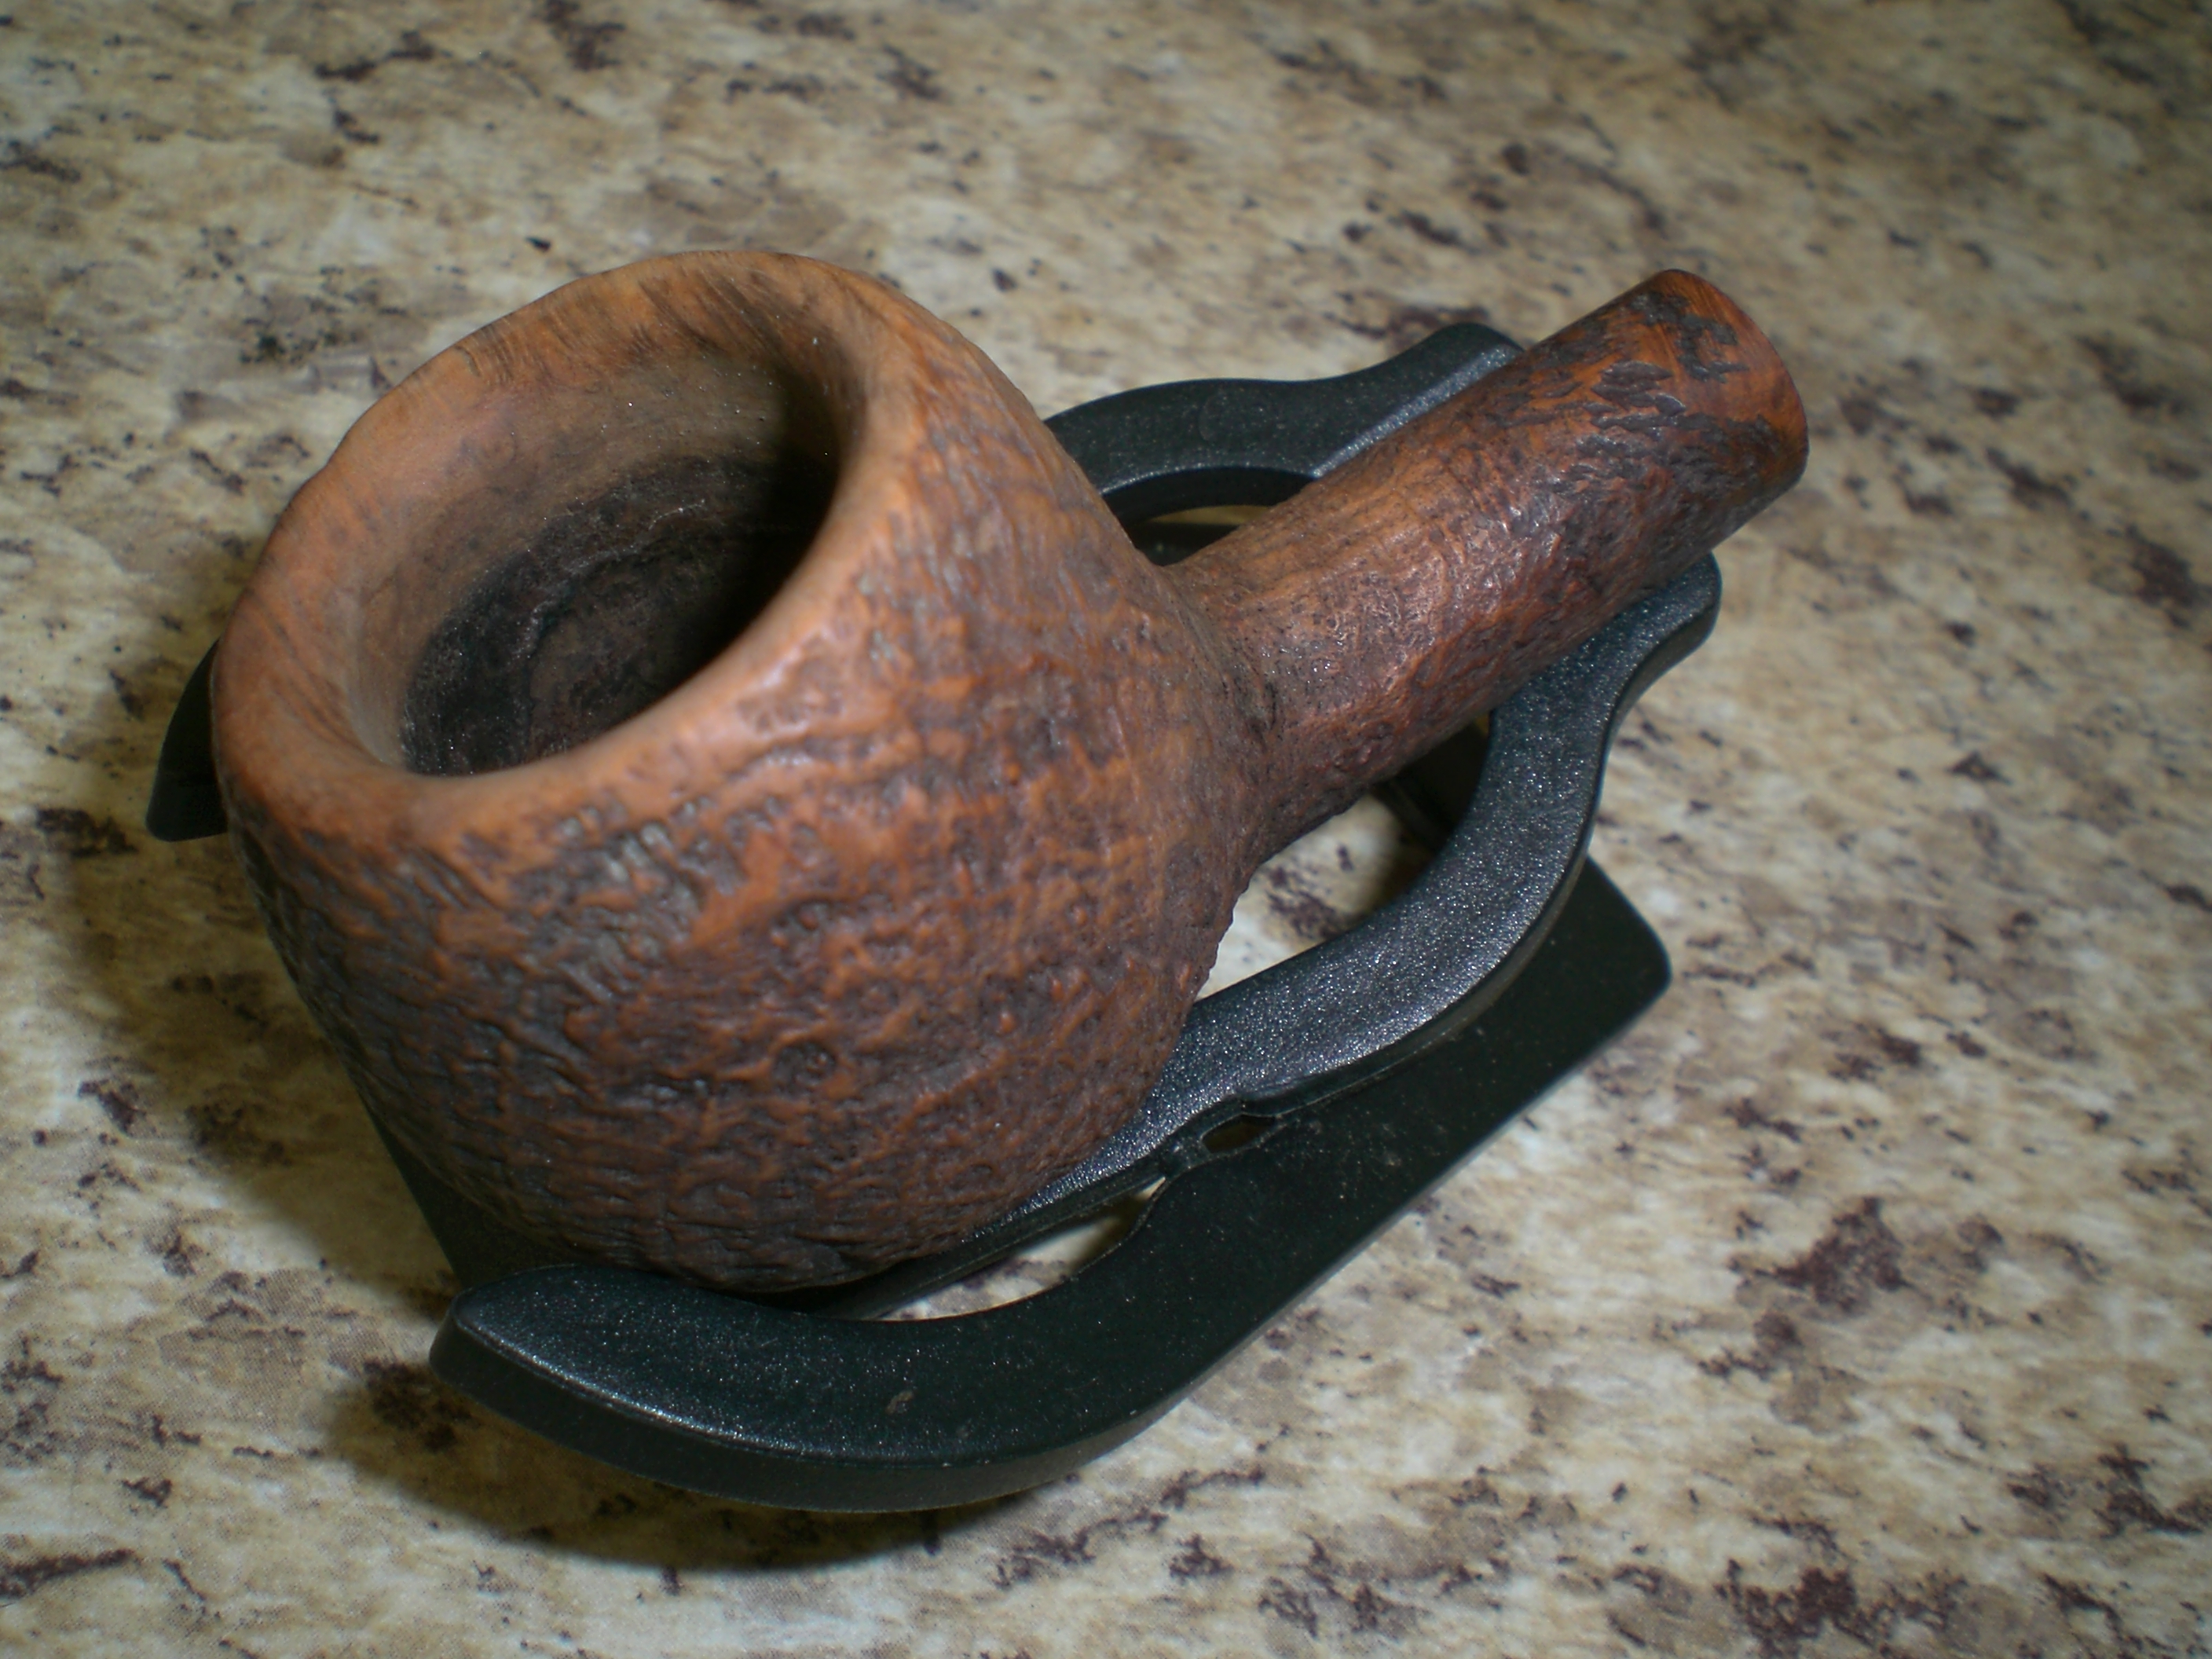
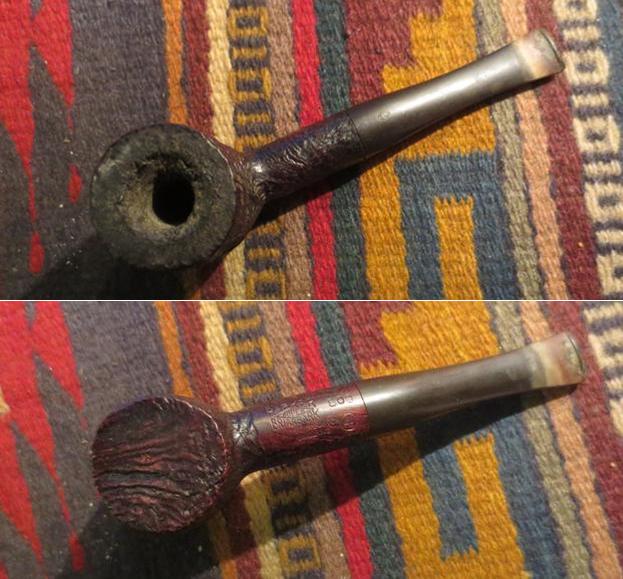
The next photo shows the rim top and the thickness of the cake. The cake was very hard and it would take some serious work to remove it from the bowl. It also looked to me like there was rim edge and bowl damage on the front left side. Once I had reamed it I would know for sure. (Just a side note – this is where I really appreciate my brother’s clean up work. I really like working on pre-cleaned pipes.)
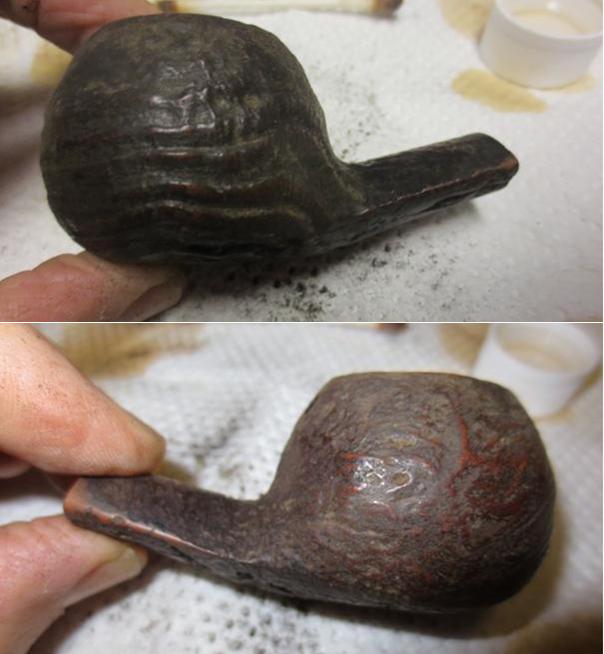
The cake was very hard. I have found that on some of these older pipes the tobacco must have been significantly different as the cake is like concrete whereas on the newer tobaccos it is never this hard. Could it be just the fact that the pipe has been sitting for a long time? I reamed it with the PipNet reamer starting with the smallest cutting head and working my way up to the third head. I used the Savinelli Fitsall Pipe Knife to work on the cake as well. It took a lot of time to get the pipe cleaned out. I probably spent over 45 minutes just reaming this bowl. The second photo below shows the bowl at the end of the 45 minutes of work. Still work to do on it as you can see the remnants of the cake on the walls. I used the Savinelli Fitsall to clean it up further.
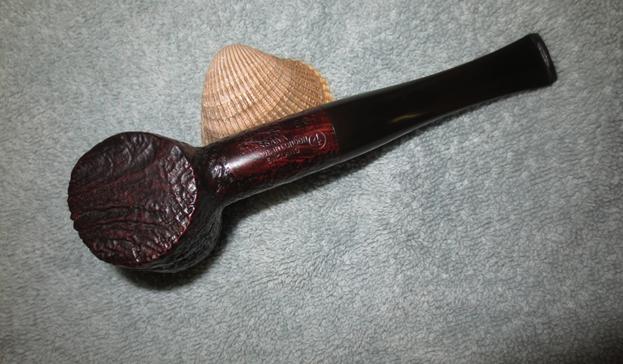
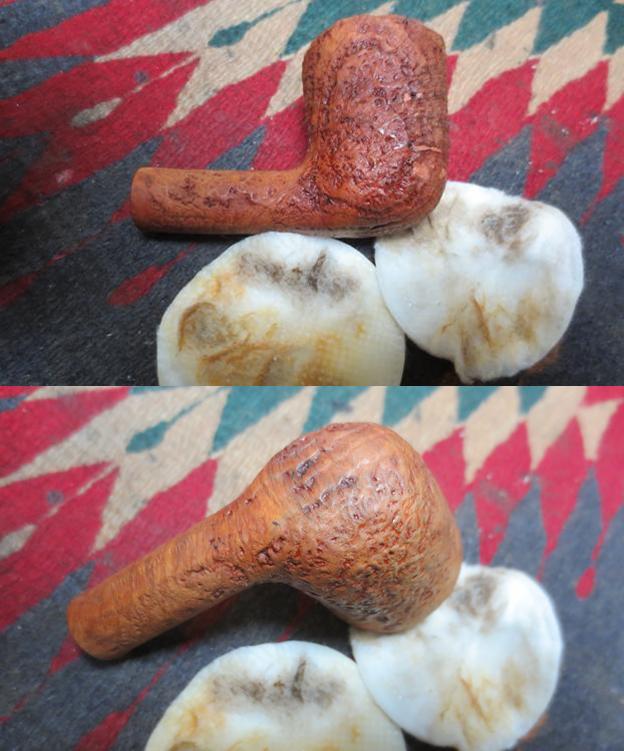
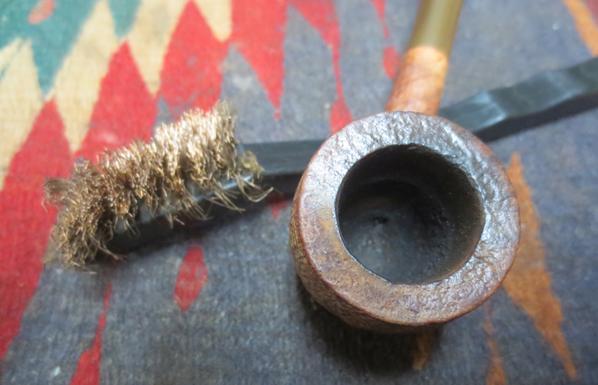
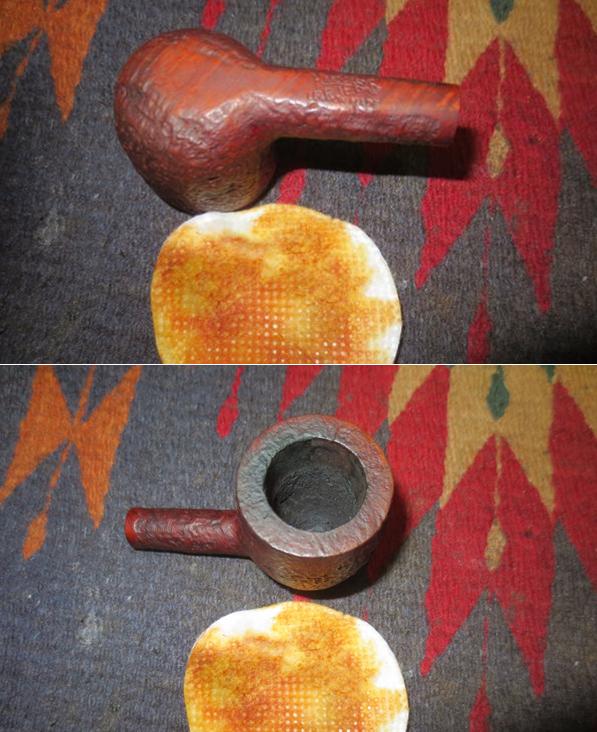
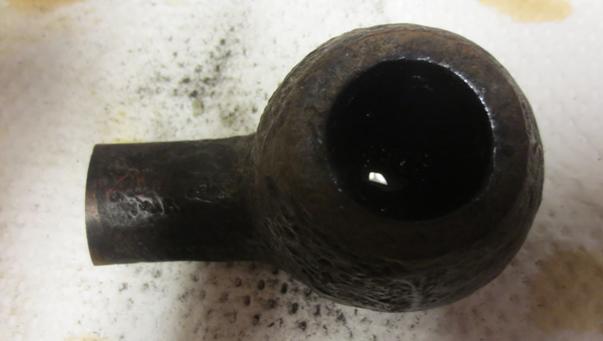
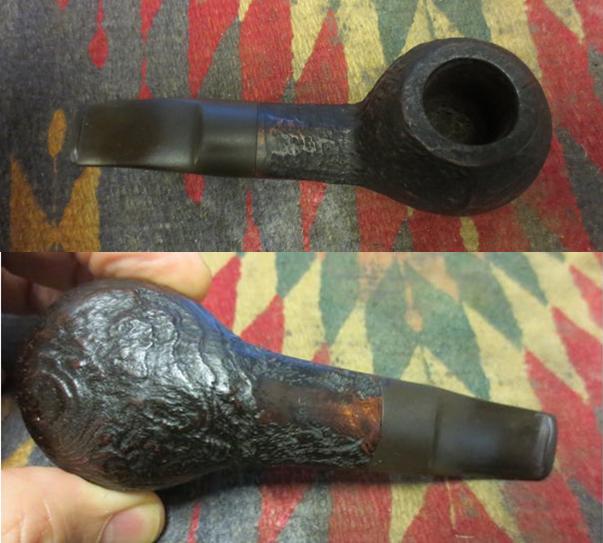
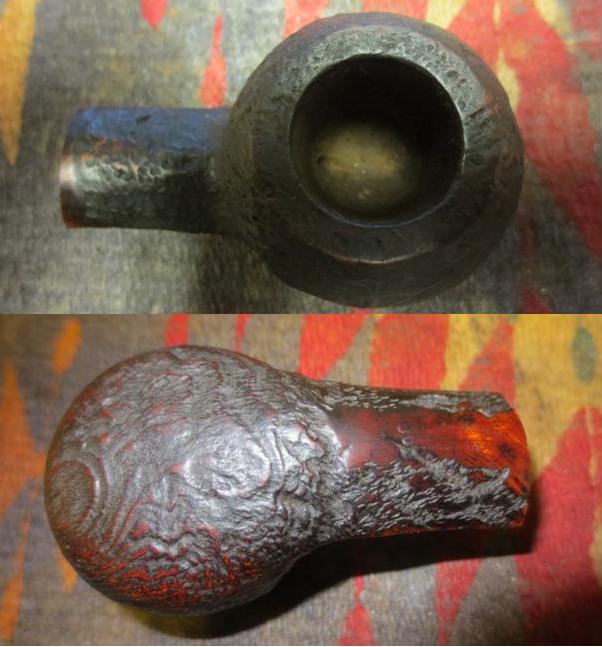
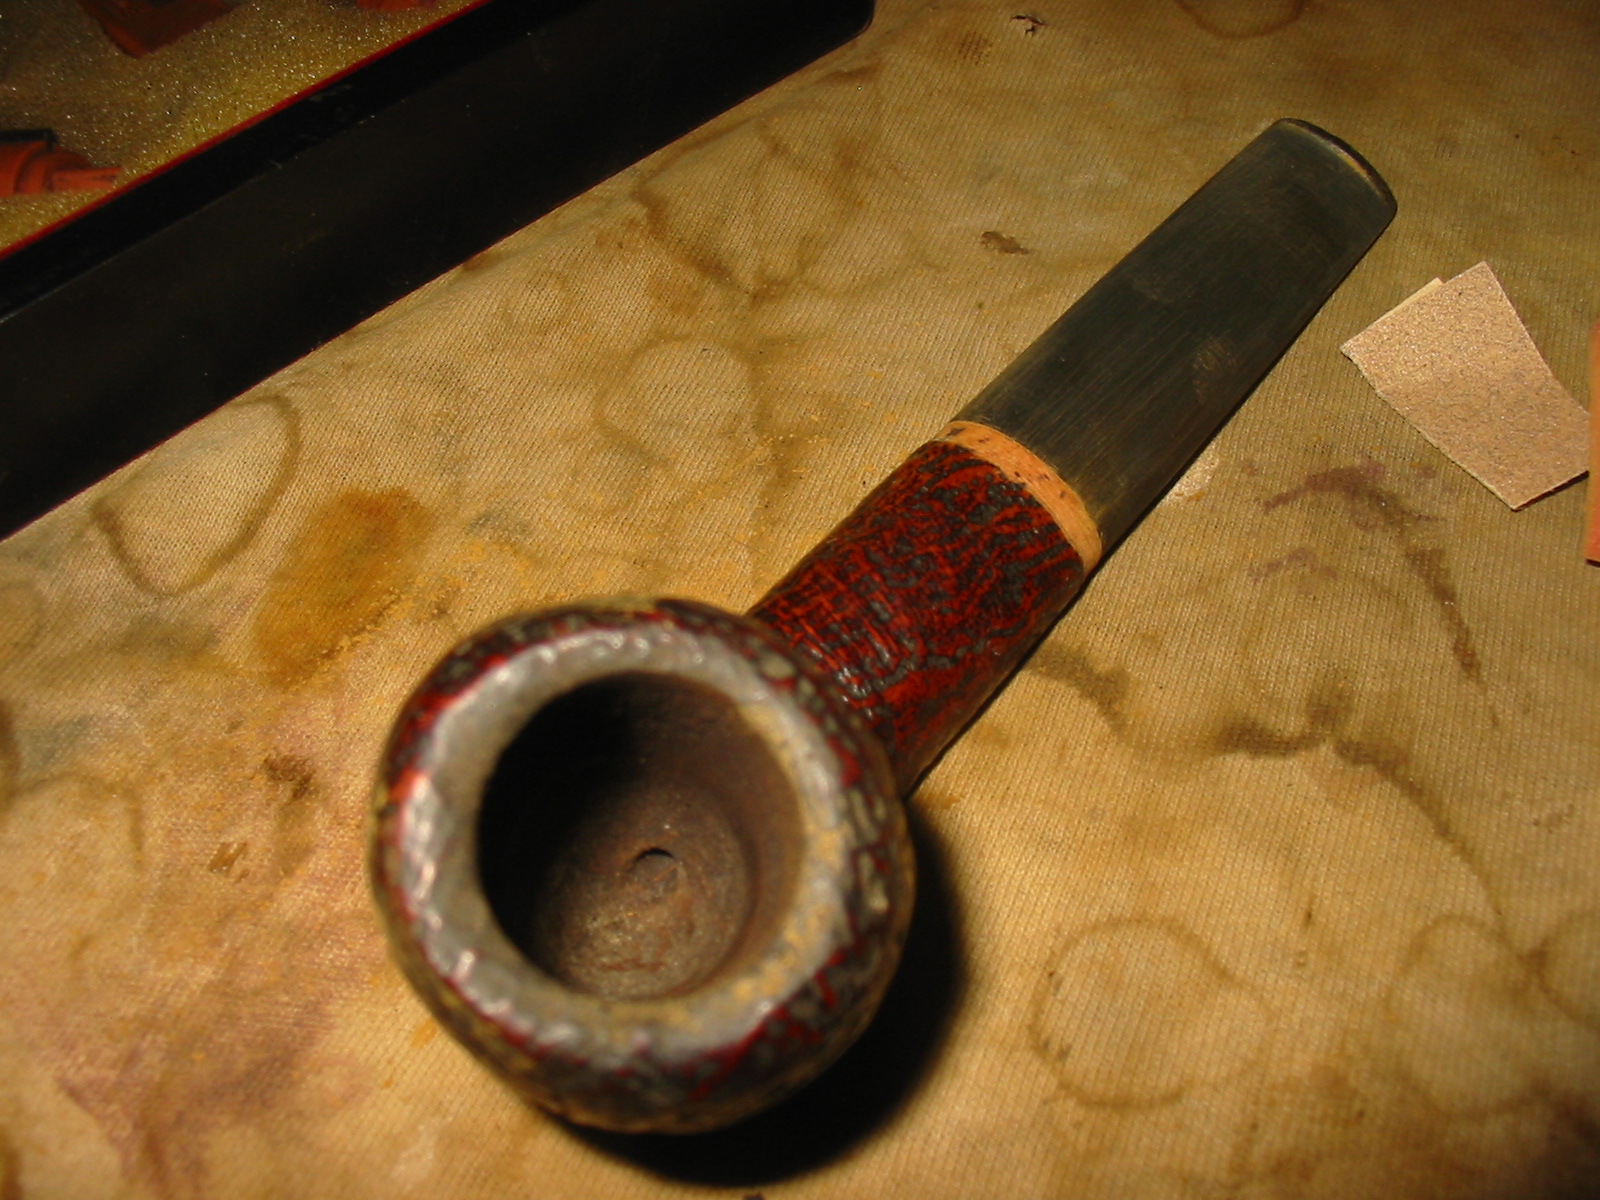
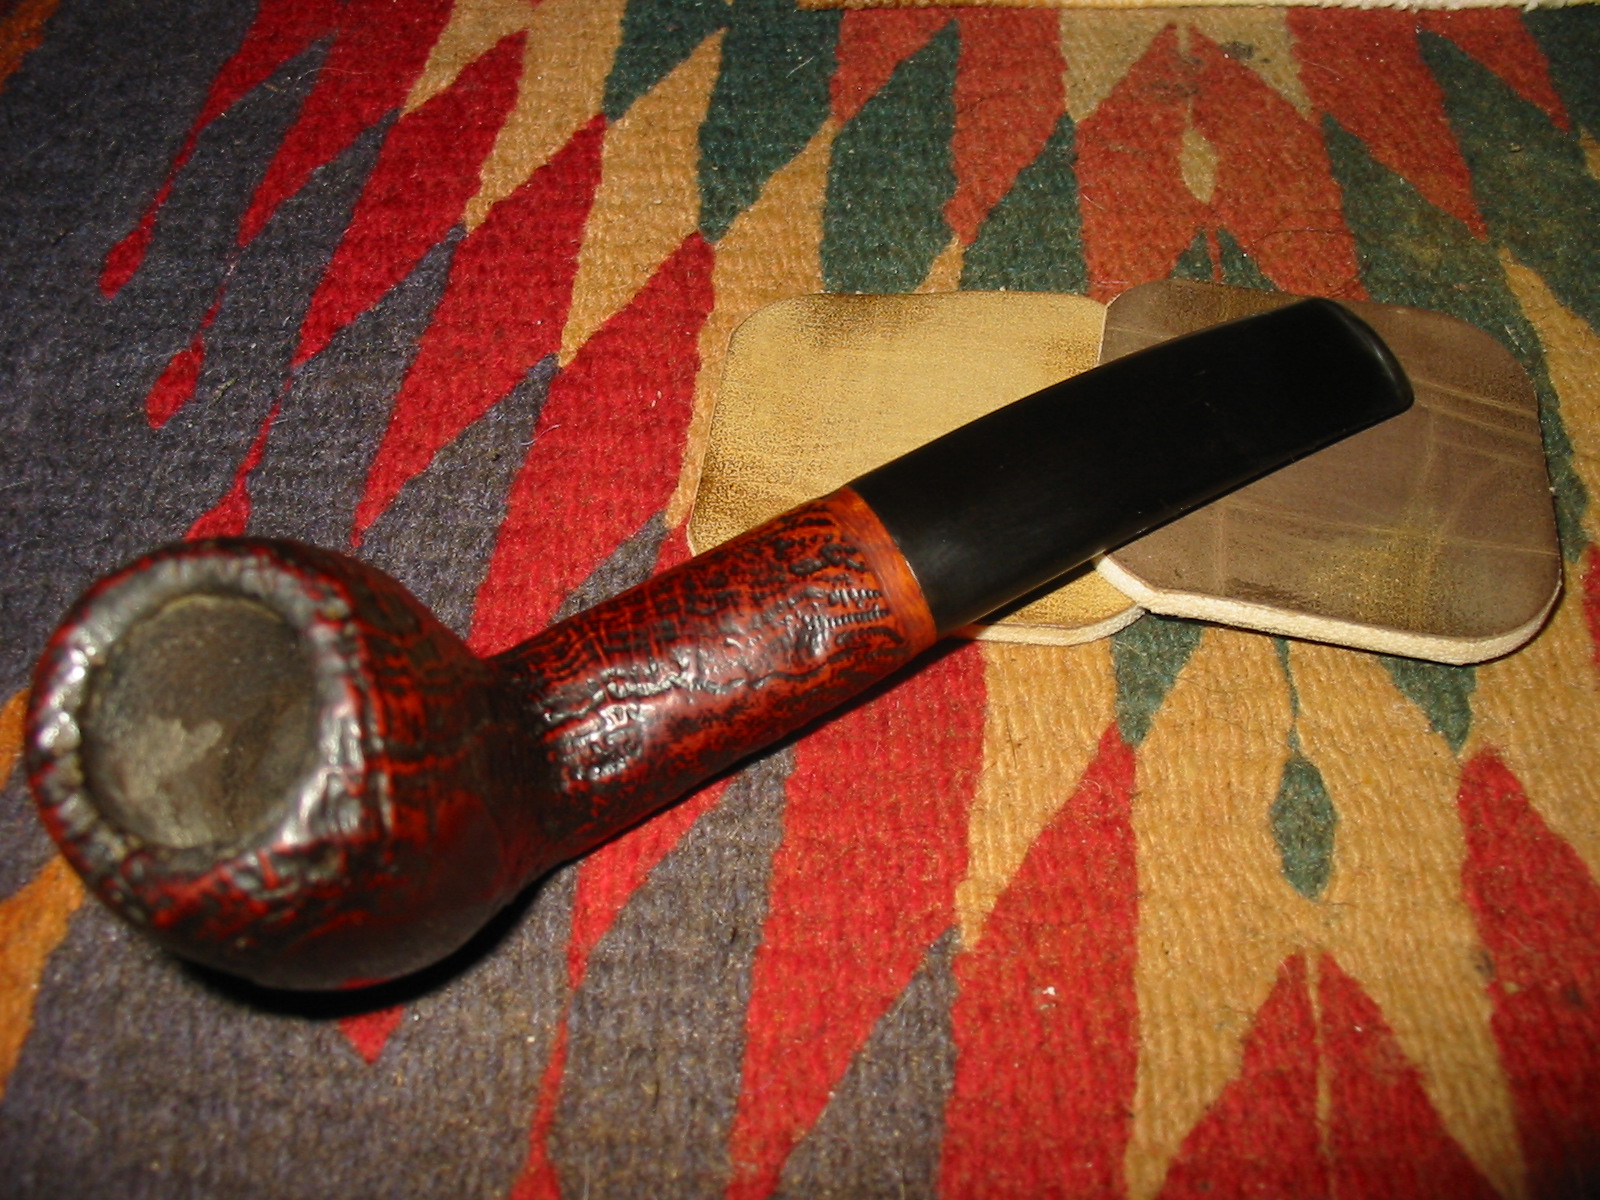
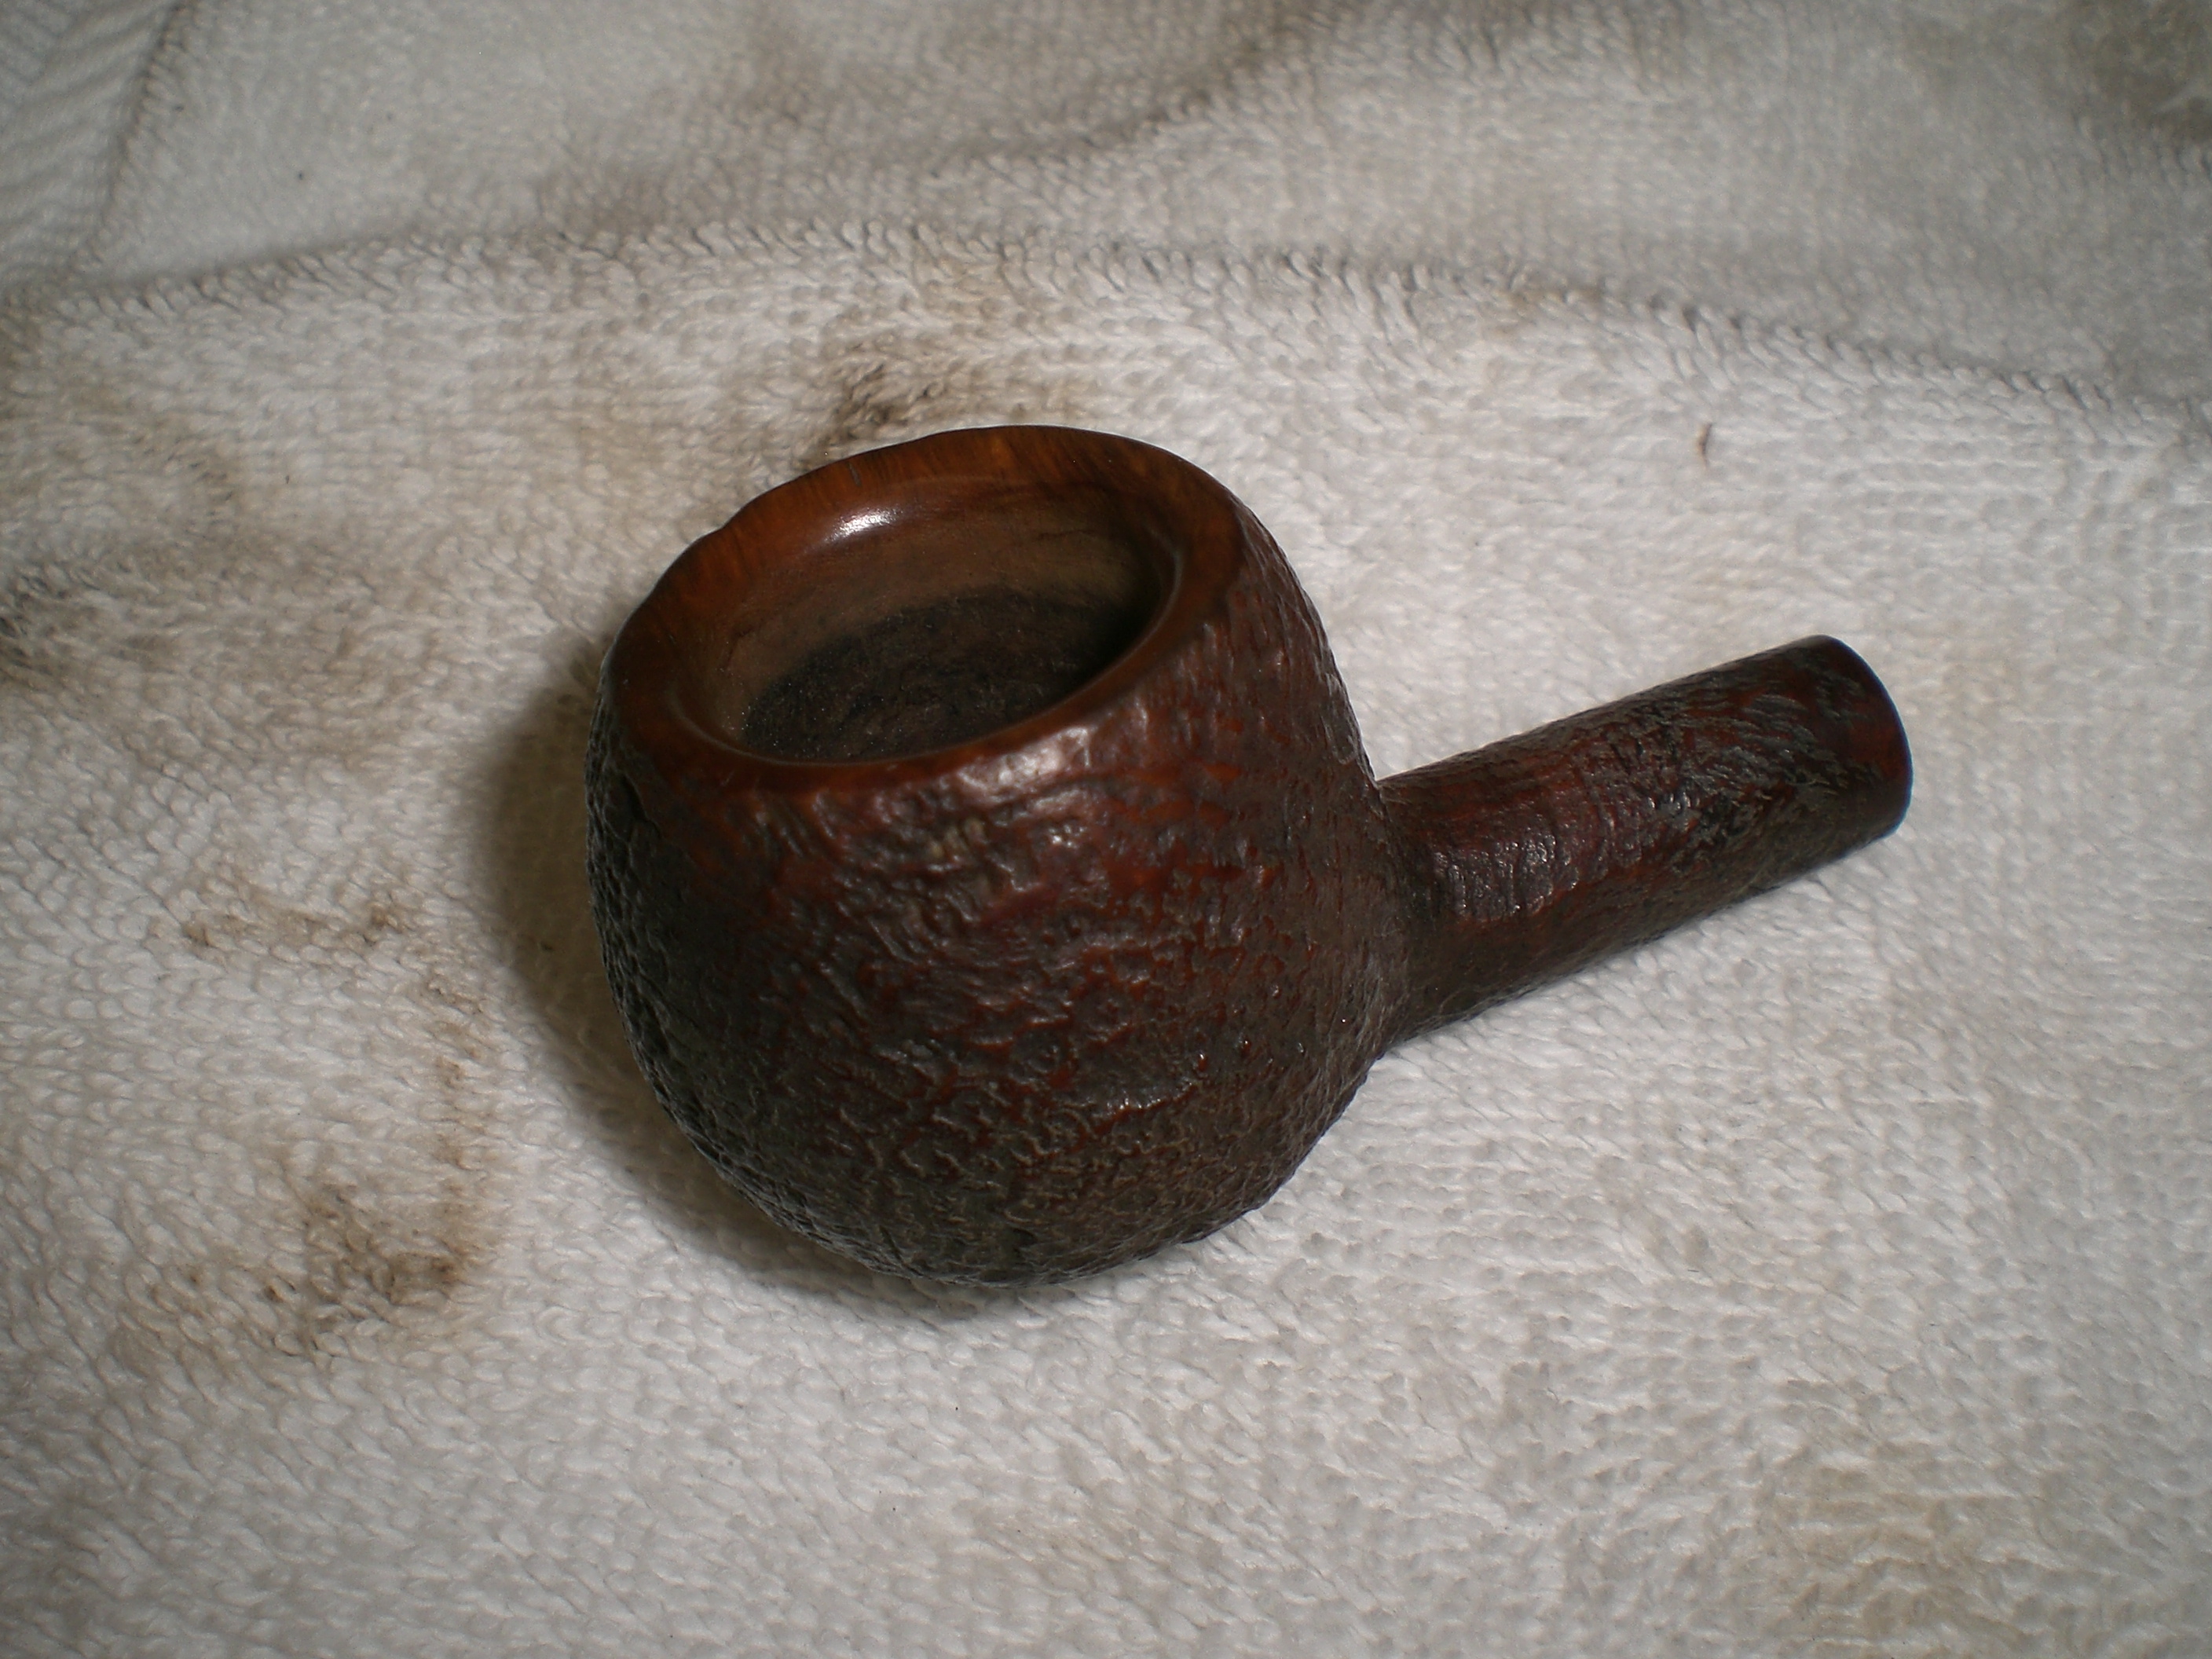
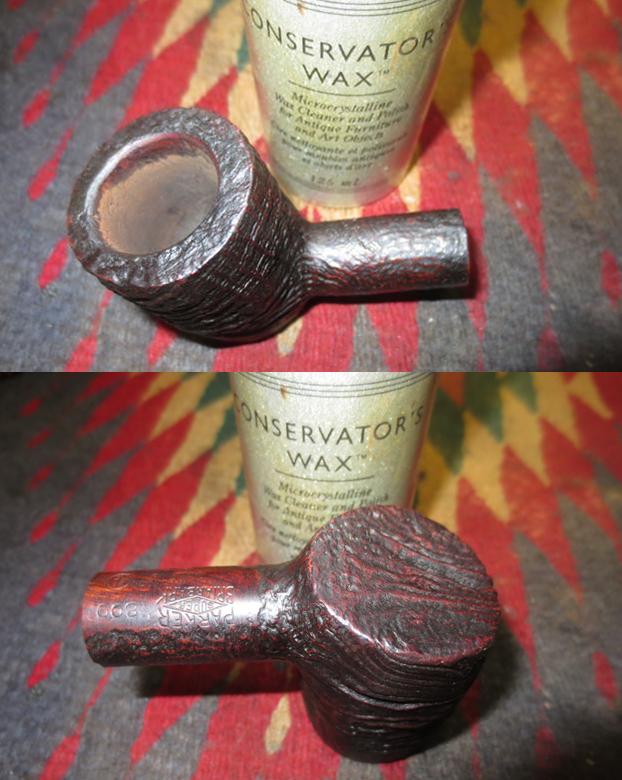
I picked at the lava on the rim with a dental pick to loosen the rock hard buildup and a brass bristle brush to clean off the debris once I had it loosened. The photo below shows the cleaned out bowl and the cleaned rim. Notice the damage to the front left inner edge of the rim.
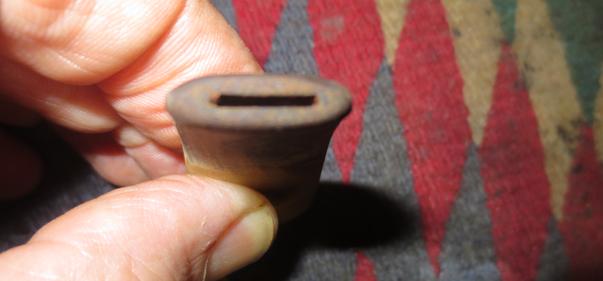
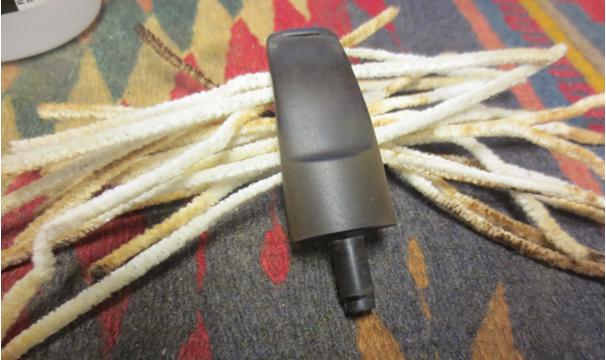
With the bowl cleaned and reamed I turned my attention to the internals. I scrubbed out the mortise and the airway in the shank and the stem with pipe cleaners, cotton swabs and alcohol. It took some coaxing with the swabs and cleaners to finally get the internals free of buildup and debris.
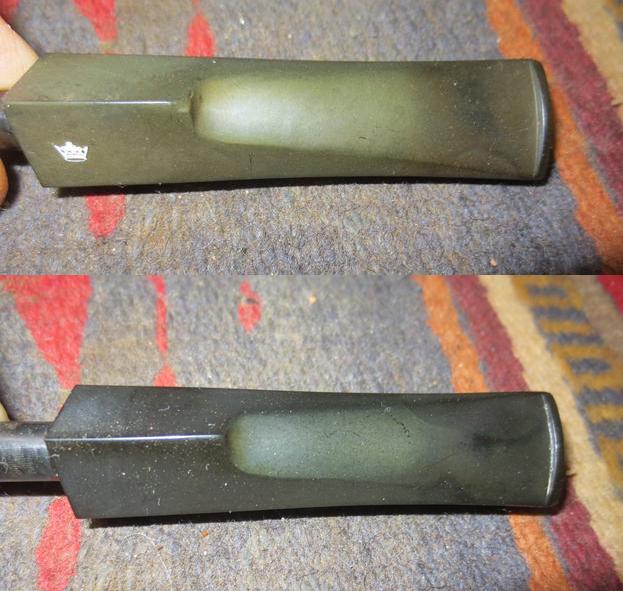
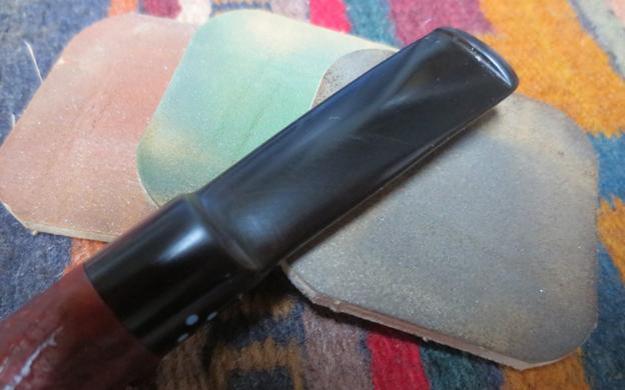
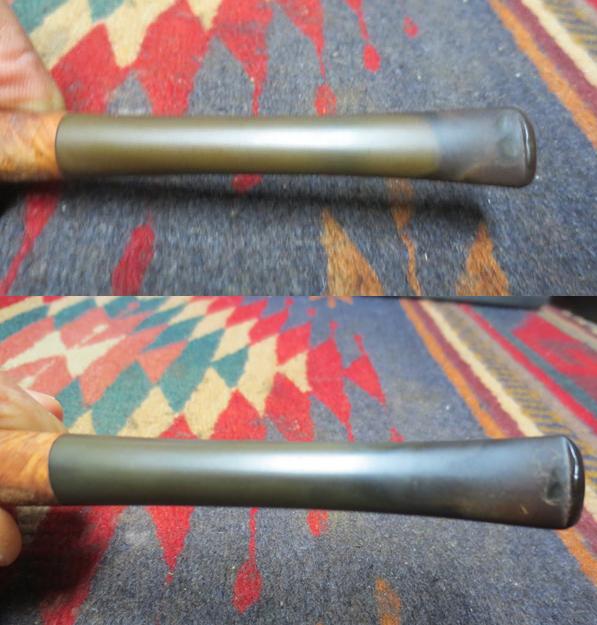
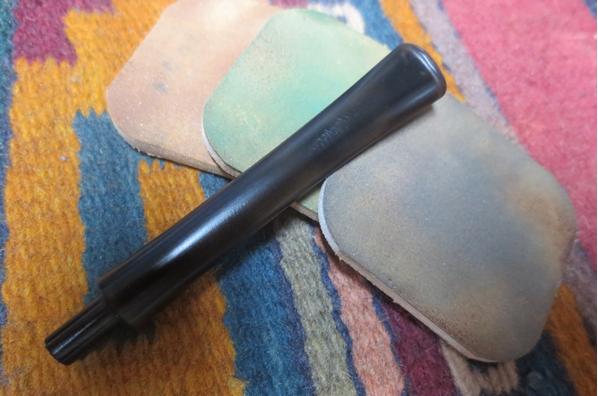
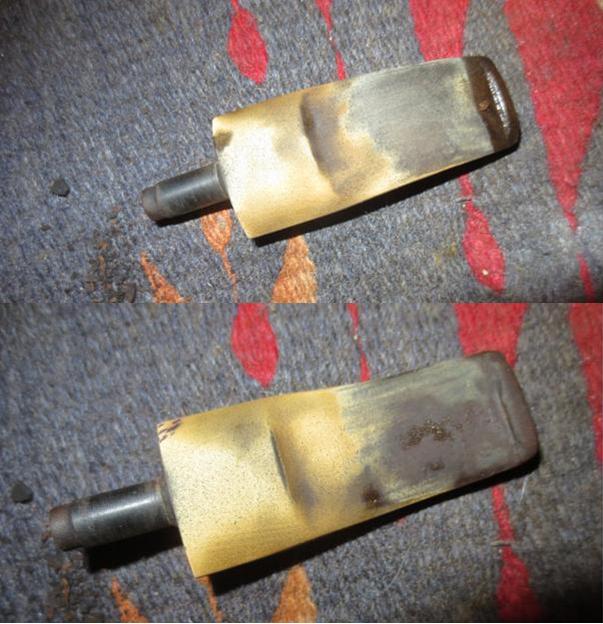
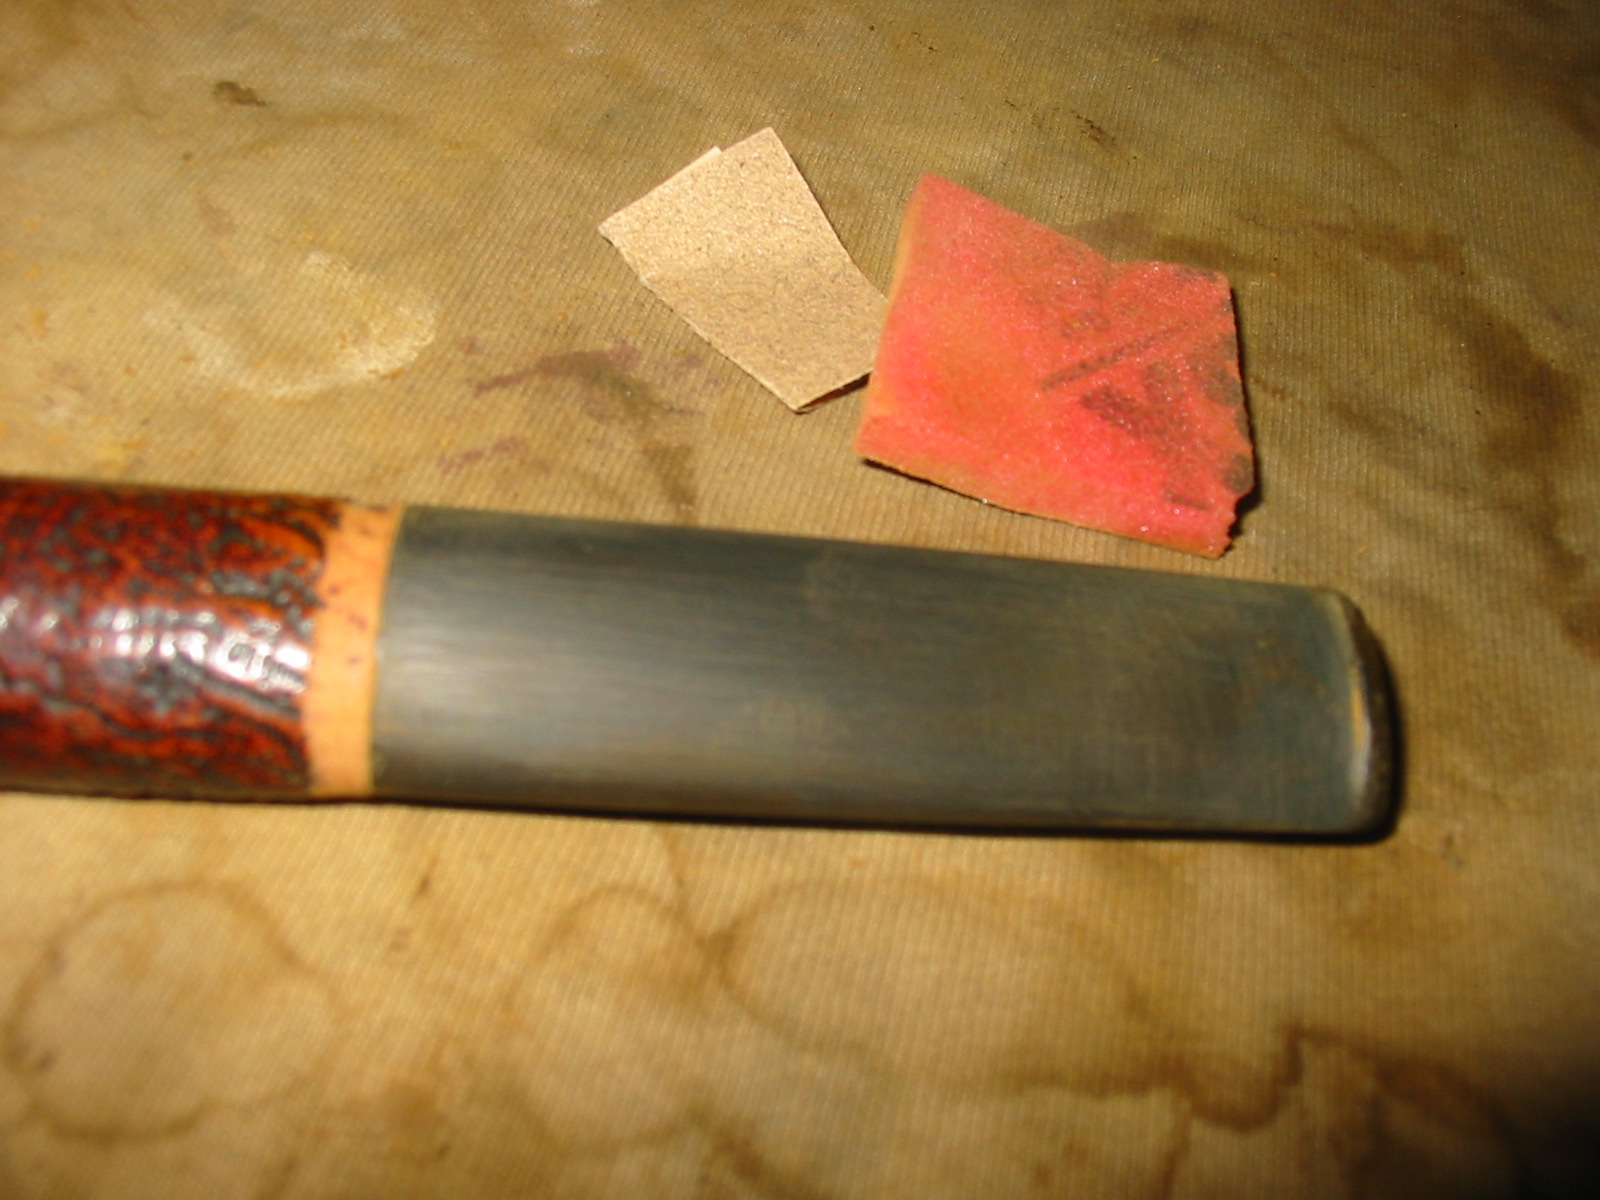
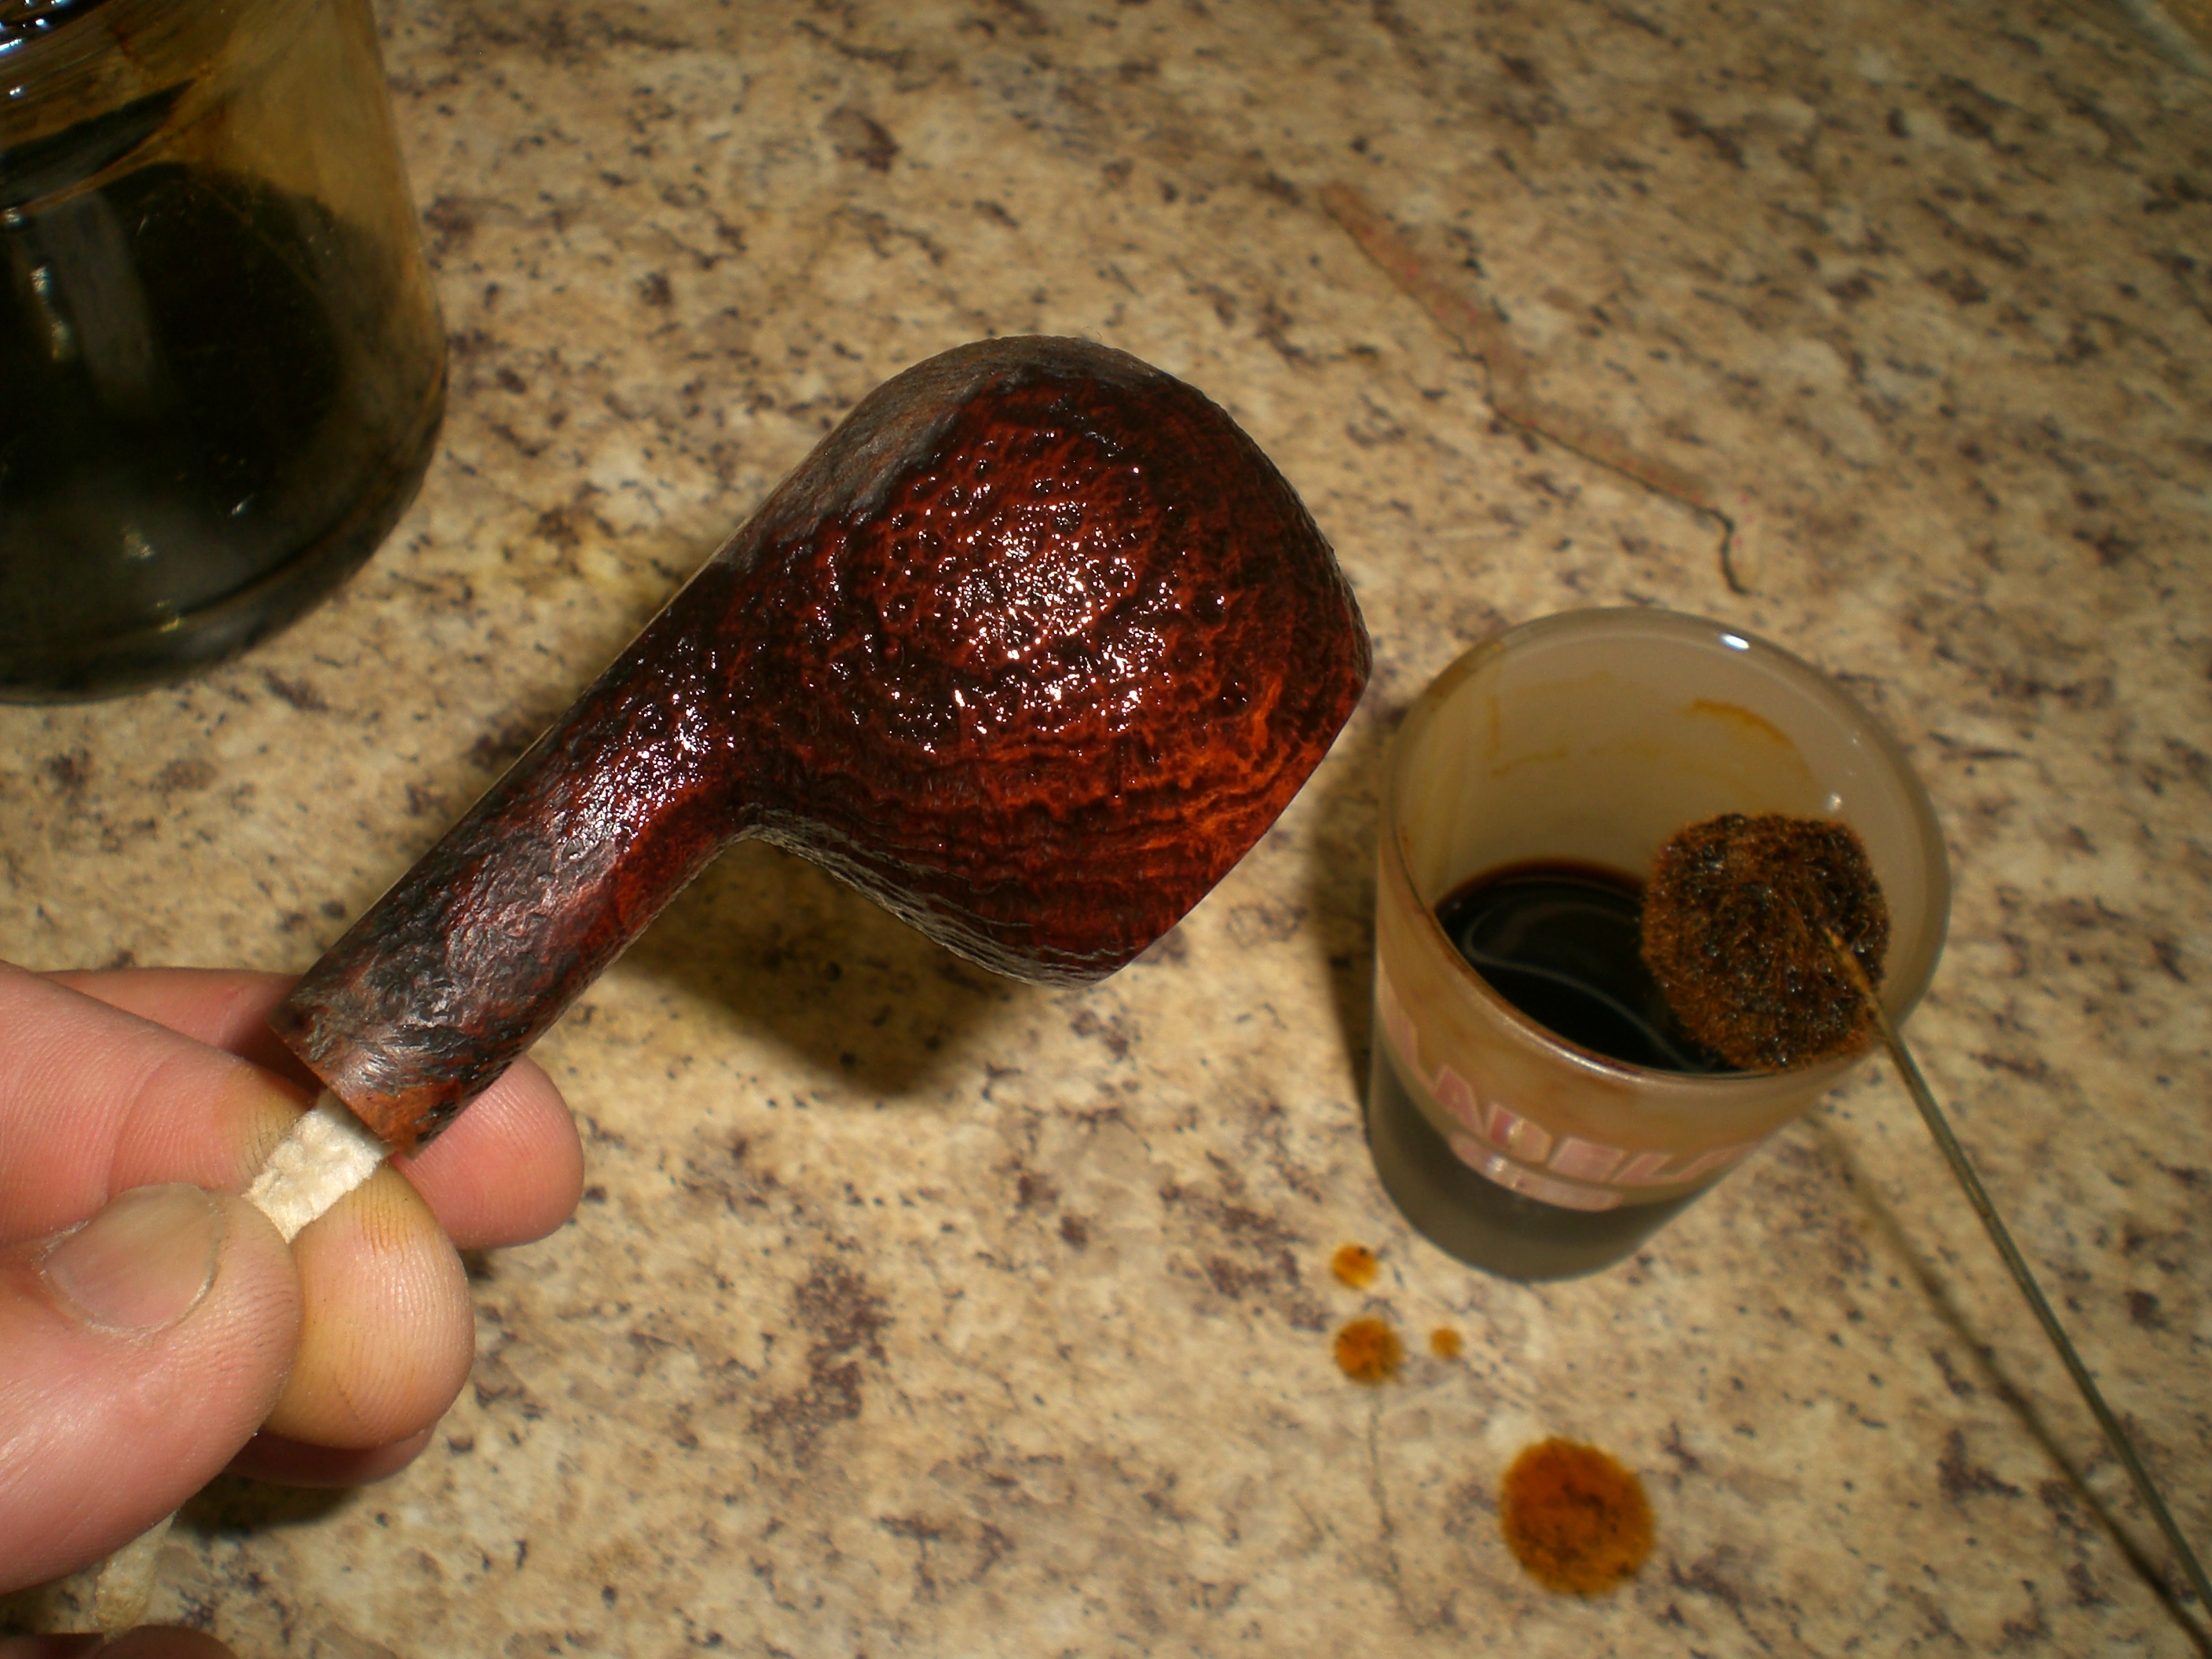
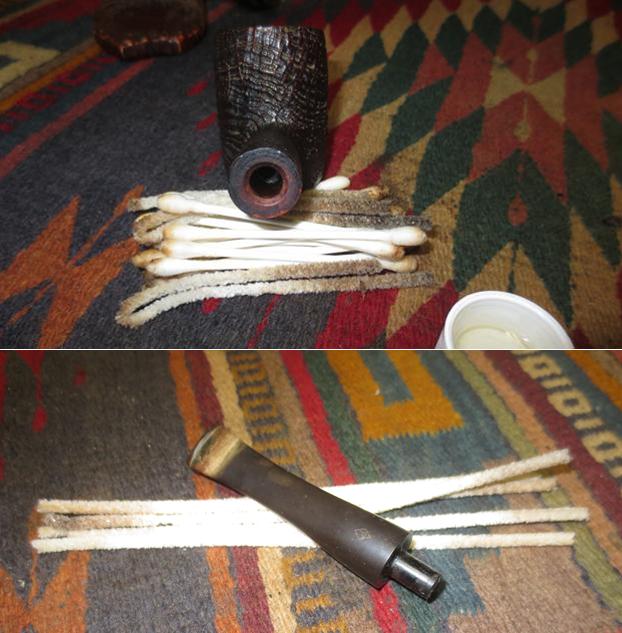
The stem had a thick calcified buildup on the first inch from the button forward on both sides. This too was rock hard. I sanded the calcification off the surface of the vulcanite. Doing so revealed the tooth dents on the surface of the both sides of the stem near the button.
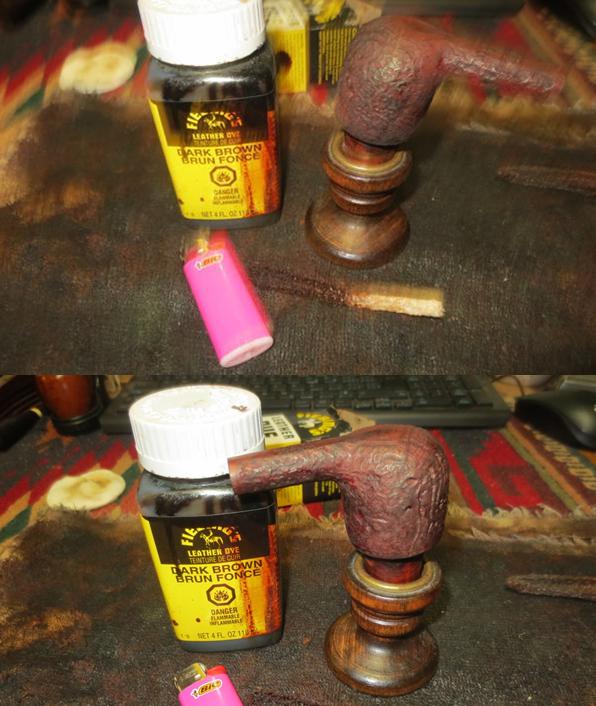
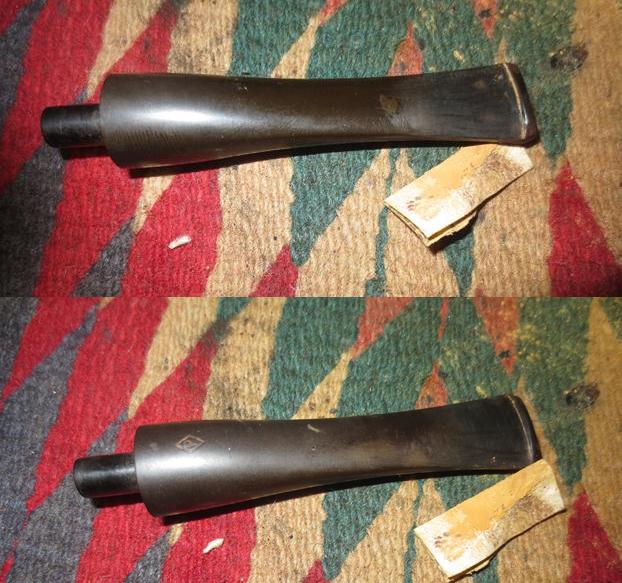
I “painted” the stem with a Bic lighter flame to raise the tooth dents as much as possible. While they came up significantly some of the edges were sharp and the dents would rise no more. I wiped the stem down with some alcohol to clean out the dents and filled them in with black super glue. I set the stem aside so that the repairs would cure and headed off to work.
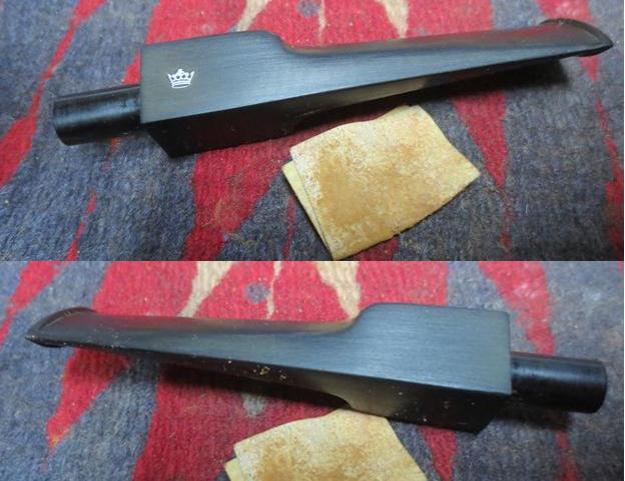
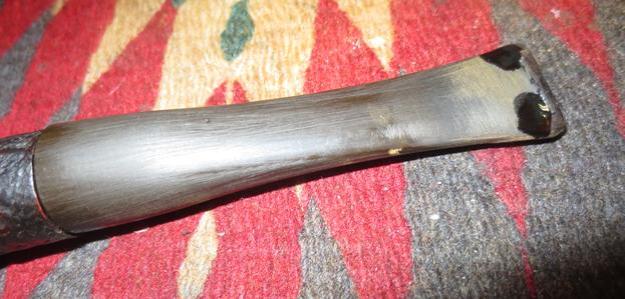
When I returned in the evening the patches had cured. I sanded the repairs with 220 grit sandpaper and sharpened the 90 degree angle of the button with needle files. I sanded the stem surface some more to remove the oxidation.
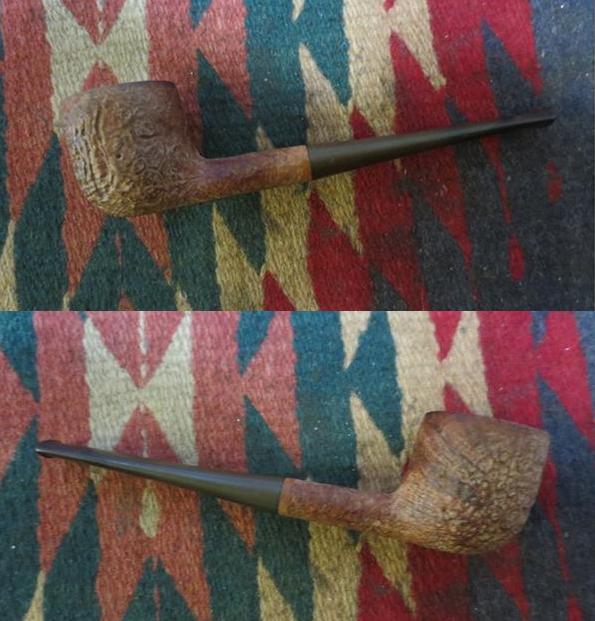
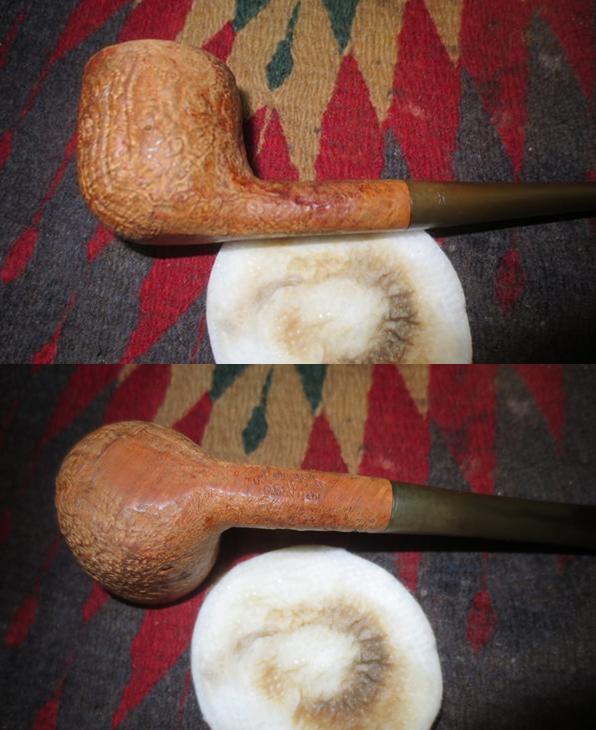
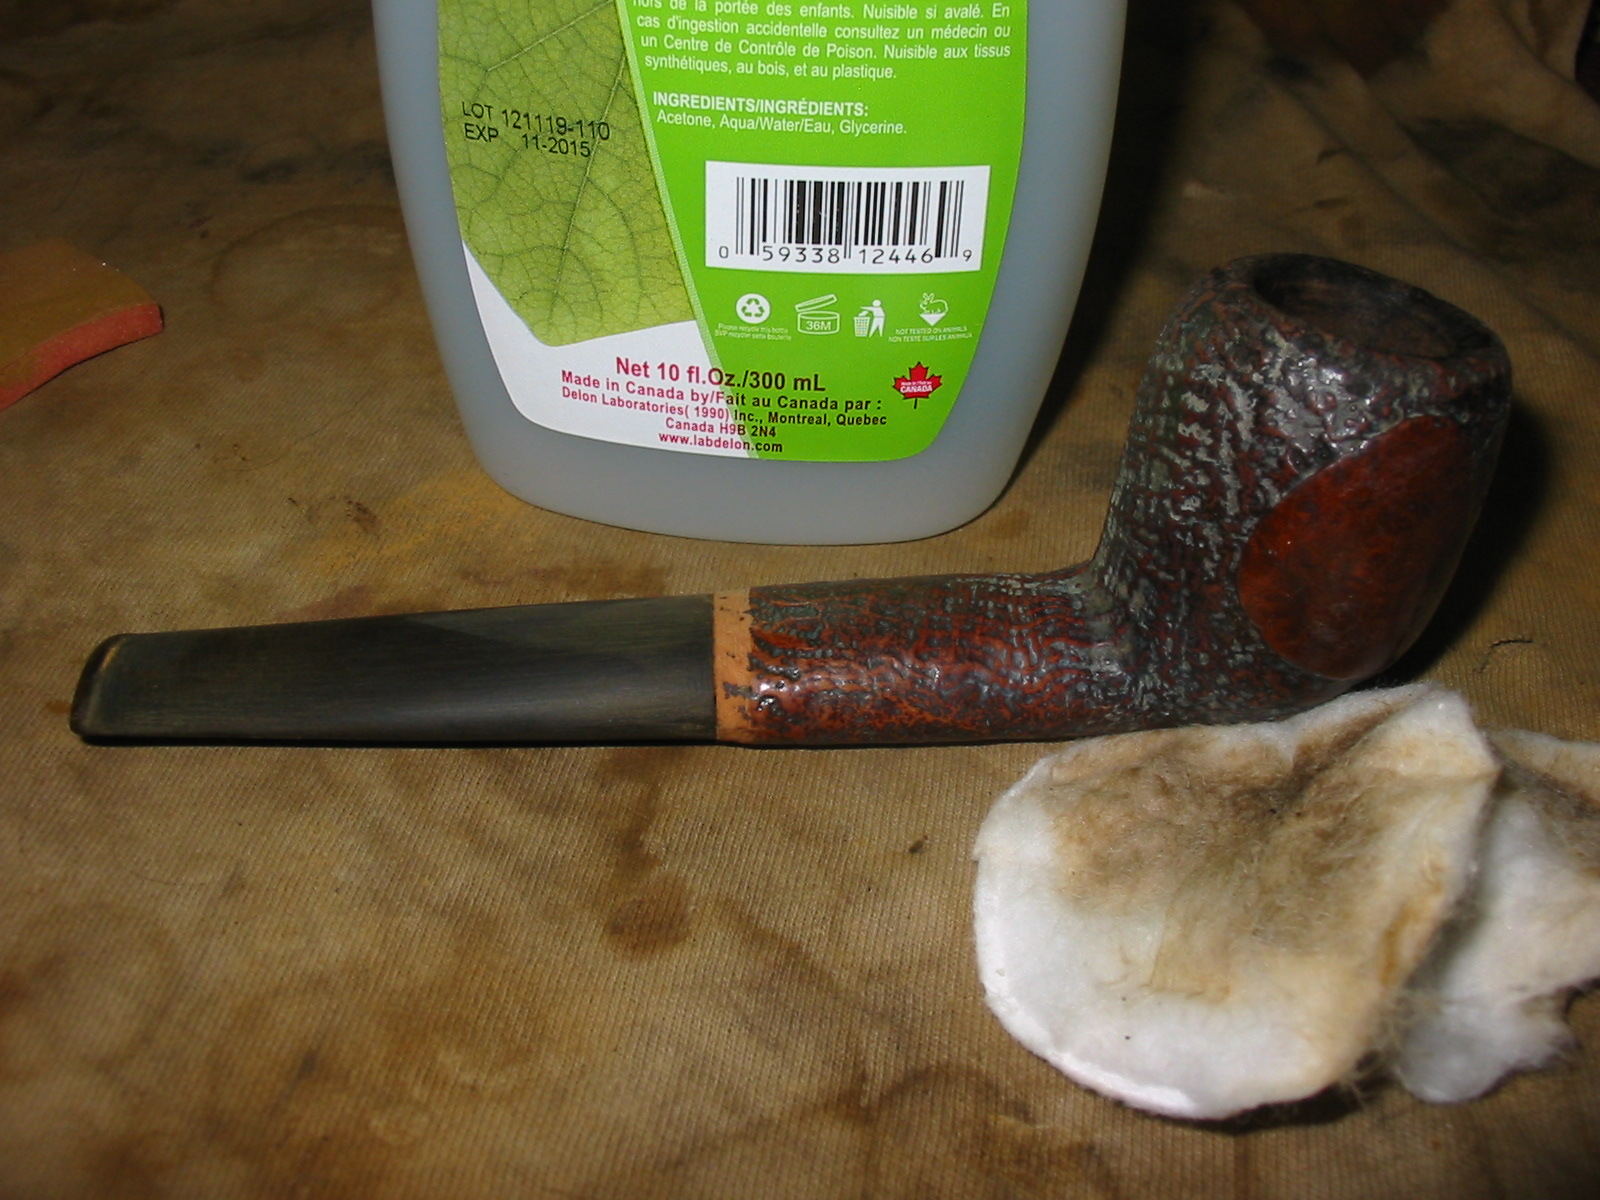
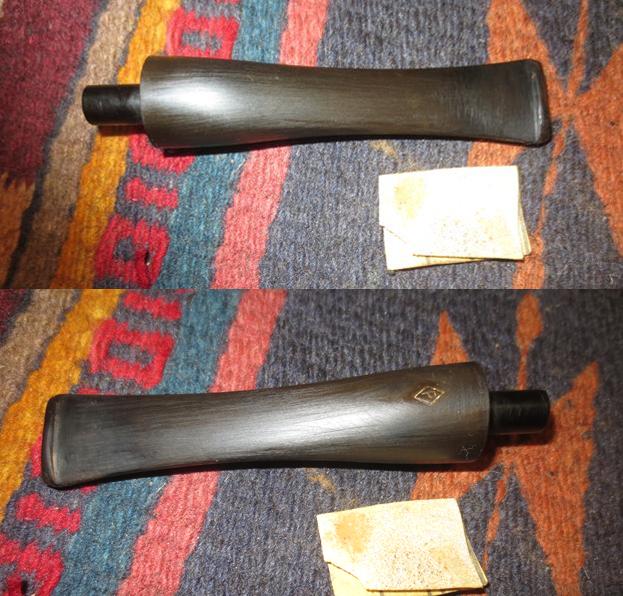
I decided to take a bit of time and work on the bowl so I set the stem aside for a while. I touched up the worn spots on the rim and on the shank end with a dark brown stain pen. The colour was a perfect match to the rest of the bowl and it blended in very well. 
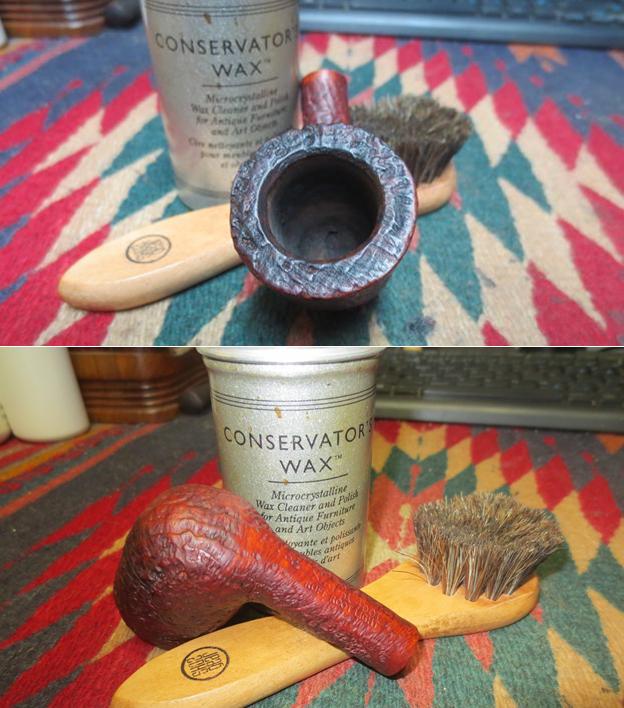
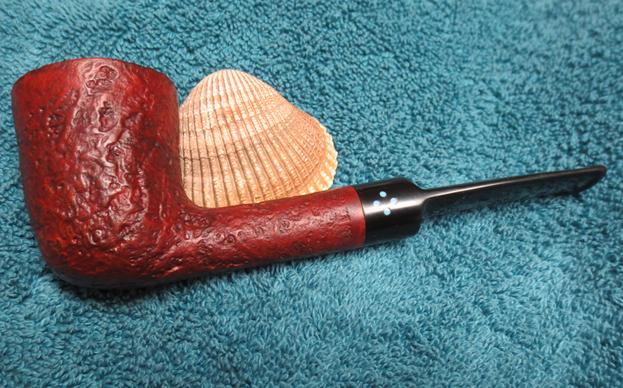
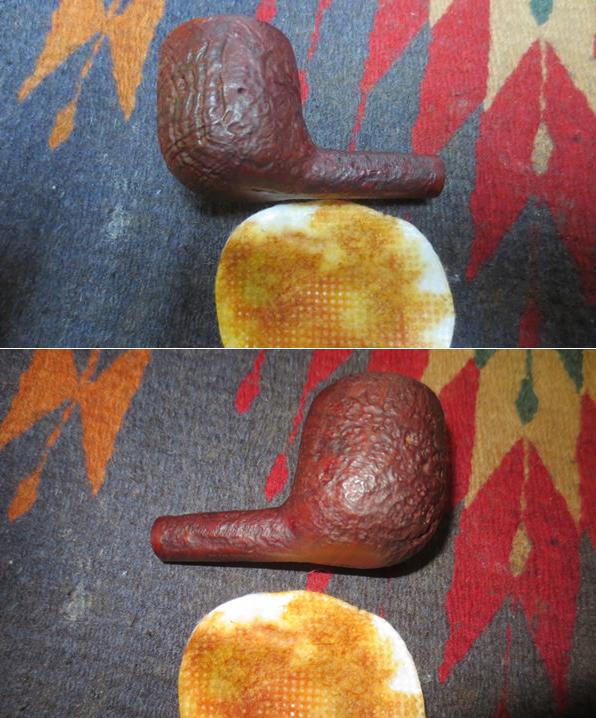
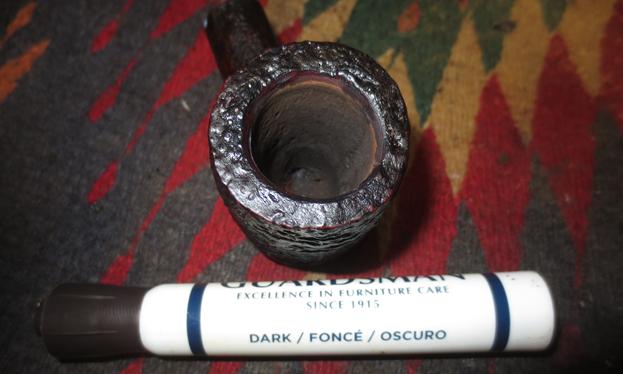
I waxed the briar with Conservator’s Wax. It is a soft rub on past that work well with sandblast and rusticated finishes. I buff it with a shoe brush and I am able to polish even the deep grooves in the grain so that no wax sits in those and hardens, dulling the finish. I lightly buffed the bowl with a soft microfibre cloth to raise the shine. The photos below show the bowl at this point in the process. 
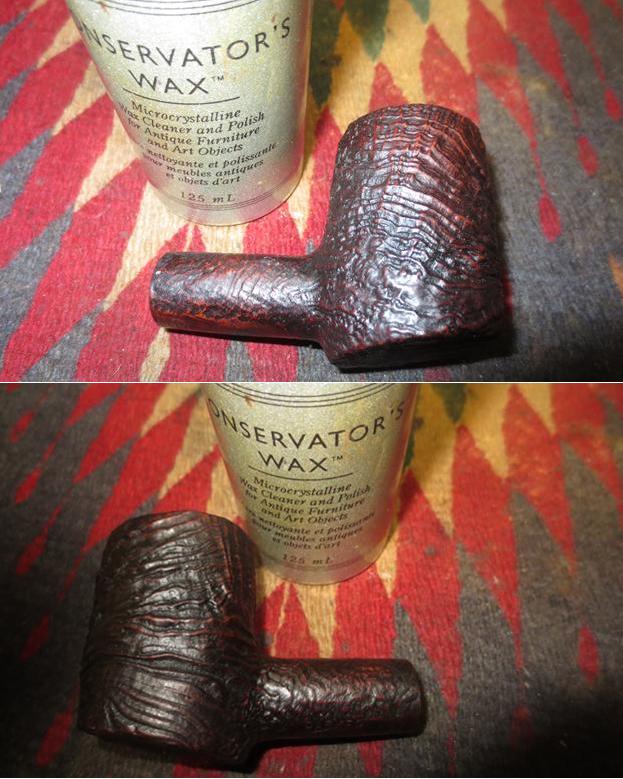
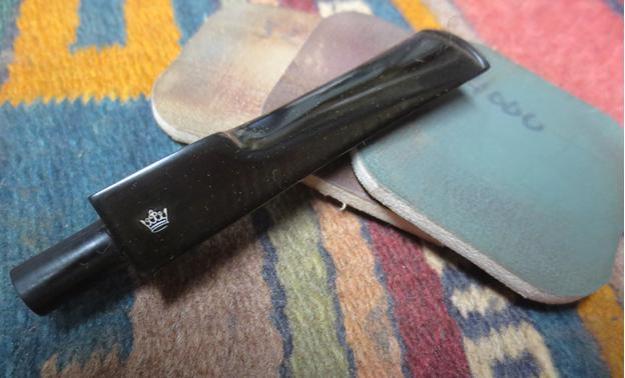
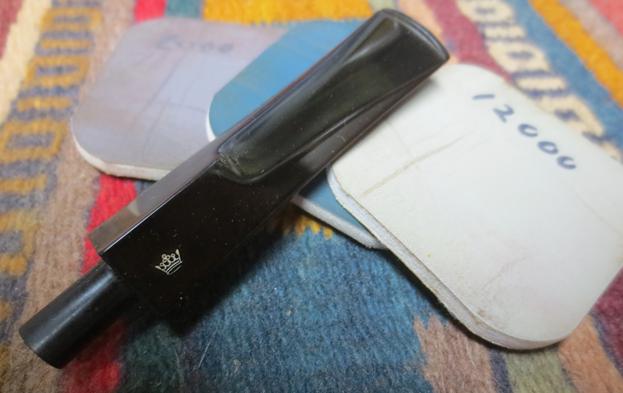
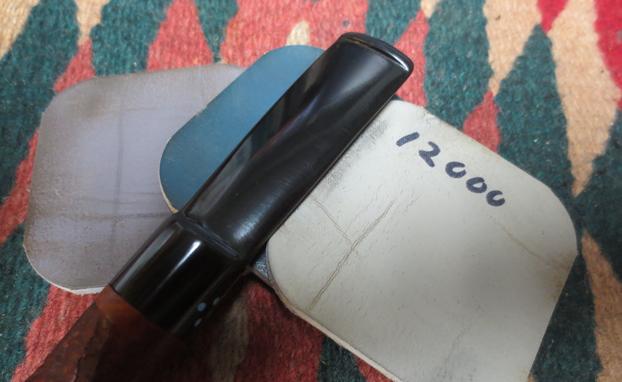
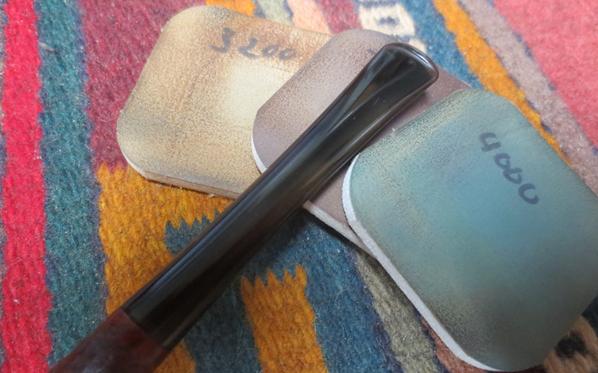
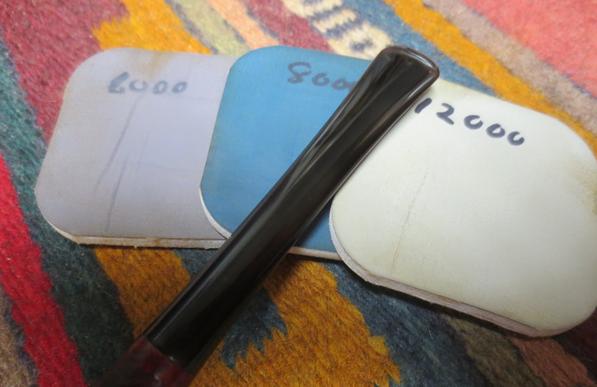
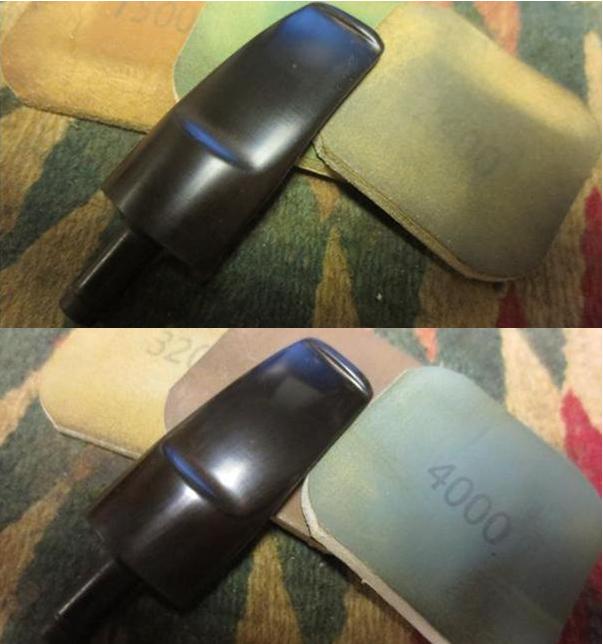
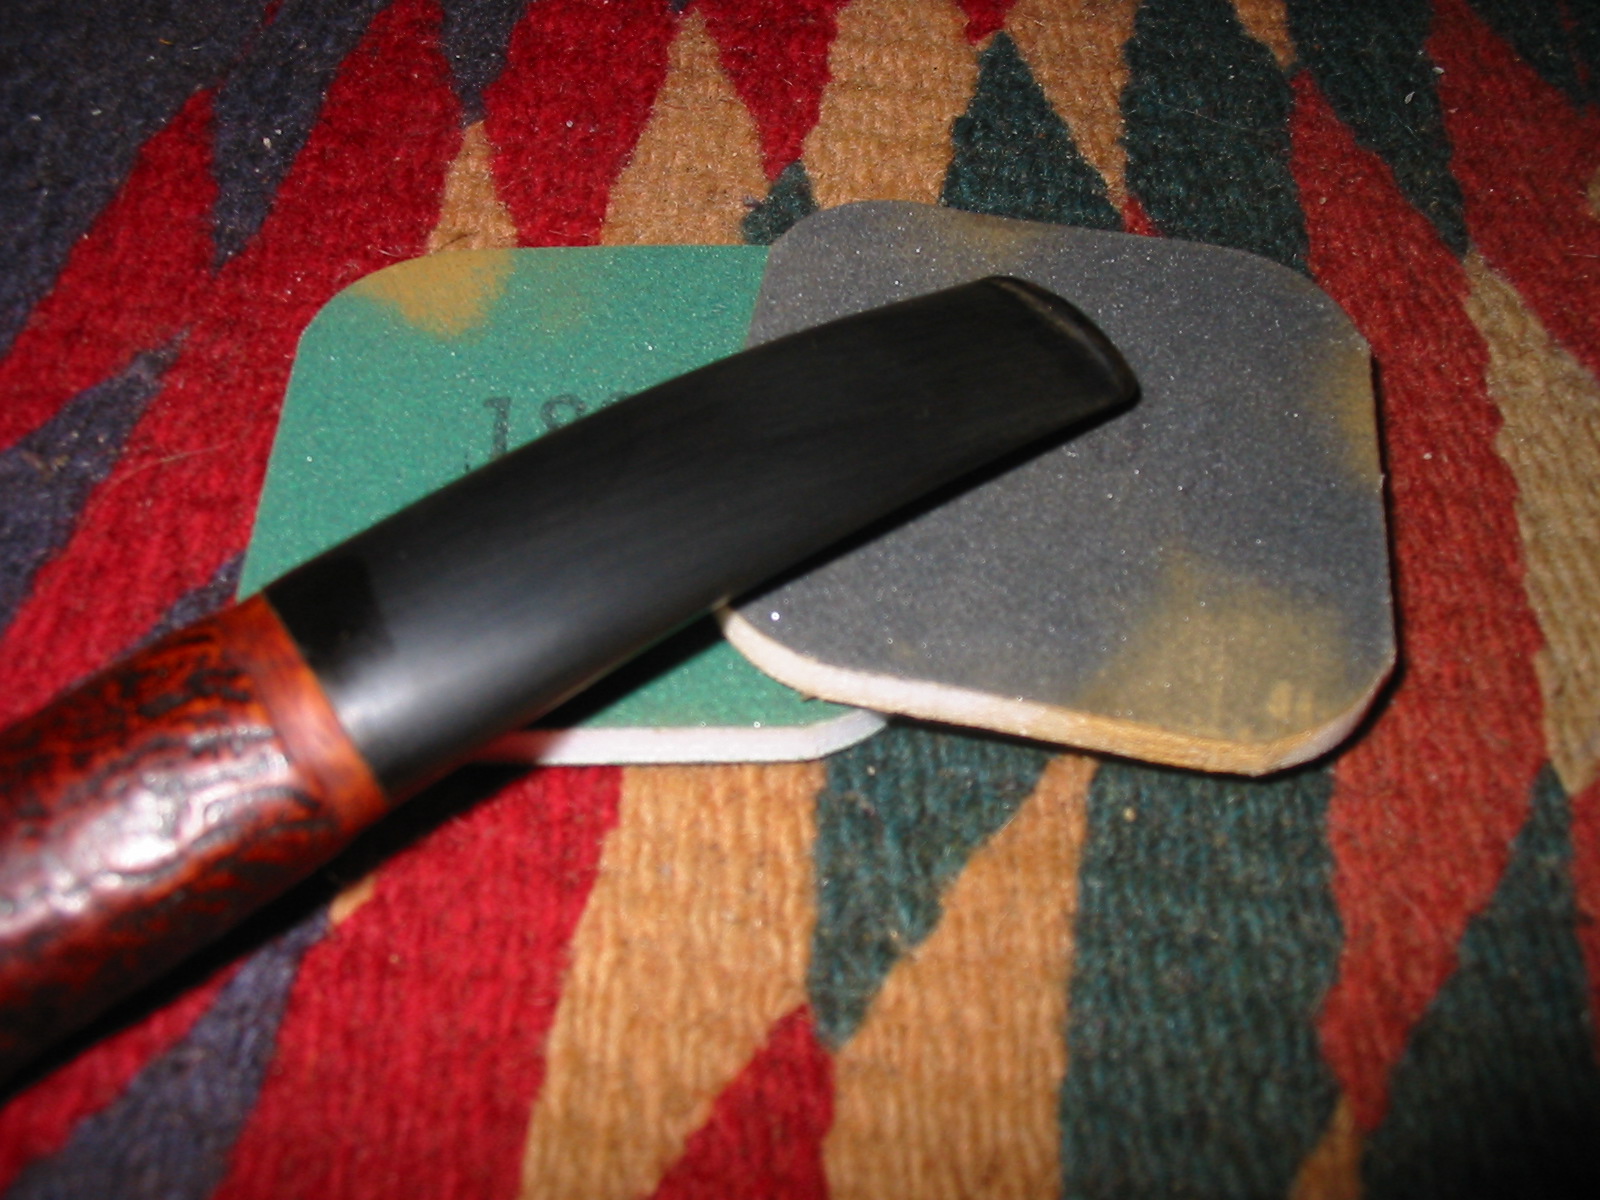
I decided to polish the stem using a different method than my normal routine. I sanded it with 1500-2400 grit micromesh sanding pads to remove the scratching in the vulcanite. I use a product that I have used before called Before & After Pipe Stem Deoxidizer to work over the remaining oxidation. I repeated the process until the vulcanite was clean. I polished it with the Before & After Pipe Polish in both Fine and Extra Fine grits. I rubbed the stem down with a soft cotton pad to remove the polishing compound and buffed it with Blue Diamond on the buffing wheel. I rubbed it down with a coat of Obsidian Oil and set it aside to dry.I used an artist’s fine bristle brush and white acrylic paint to fill in the Parker Diamond P stamp on the stem. I wiped it down afterwards and lightly buffed it with Blue Diamond to remove the excess paint.
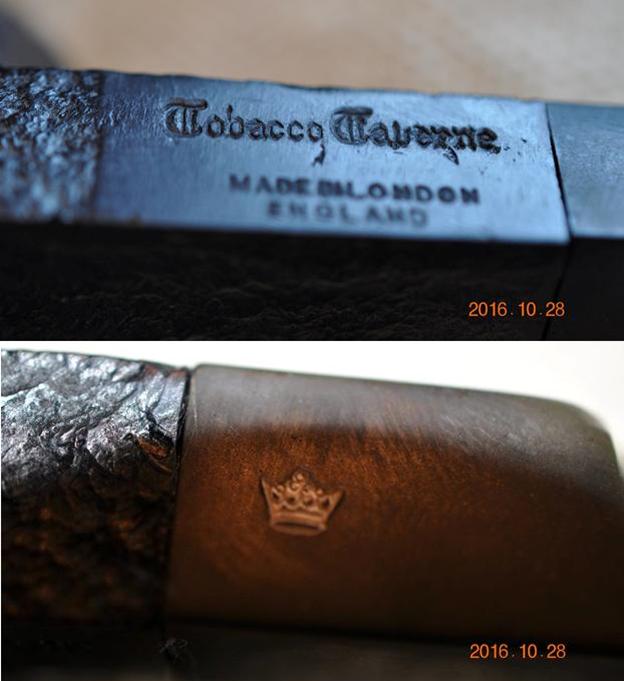
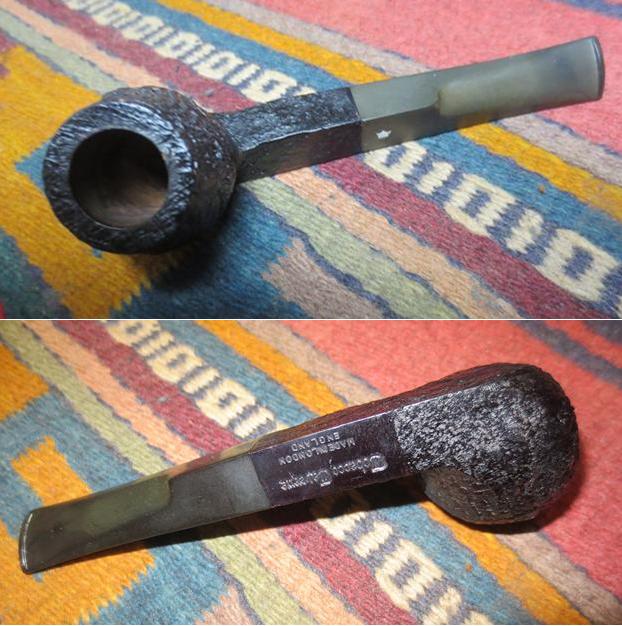
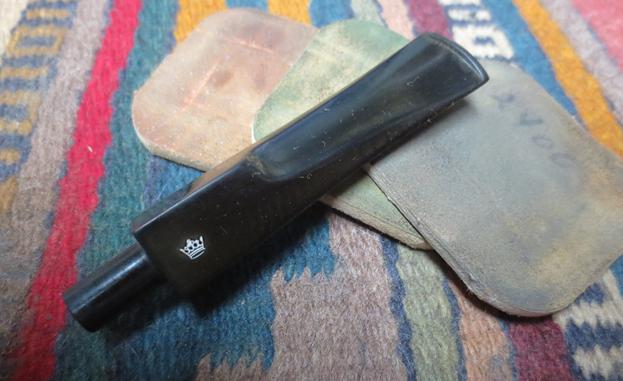
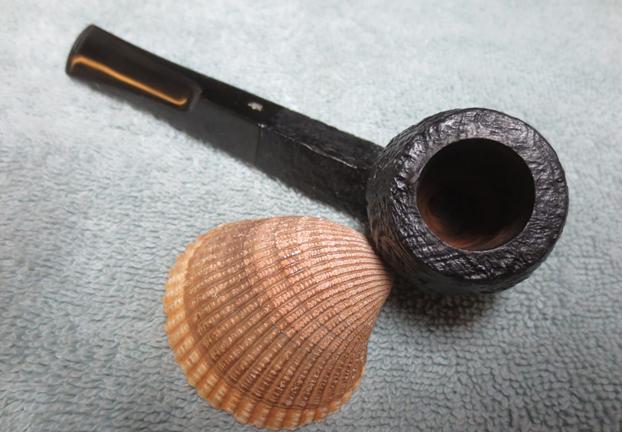
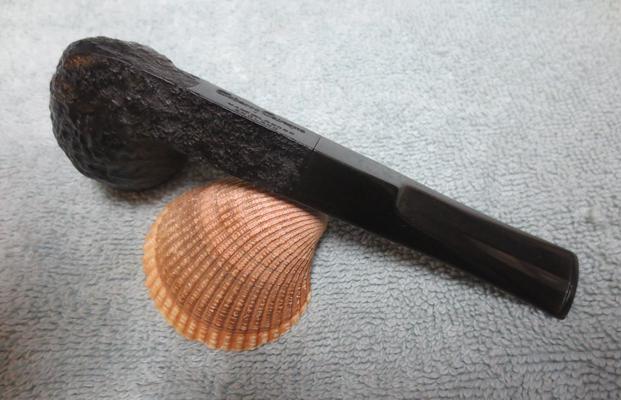
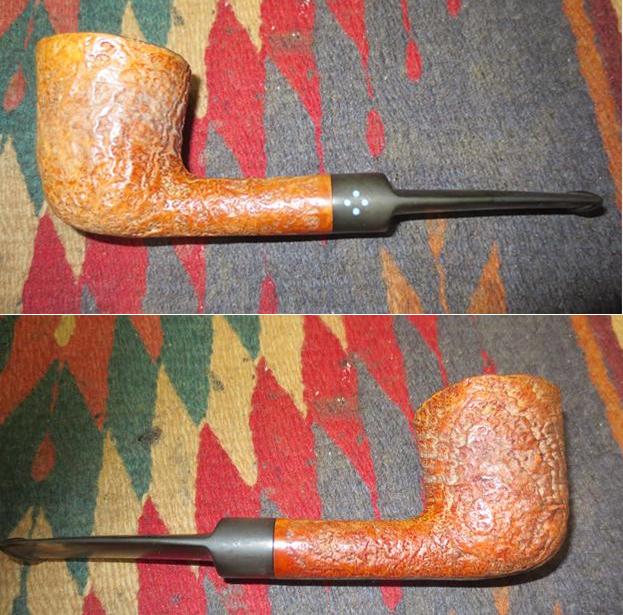
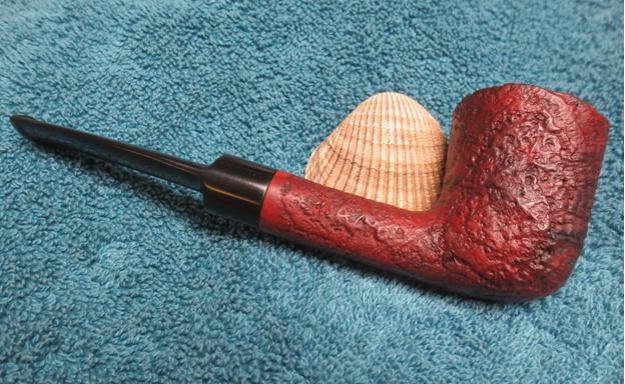
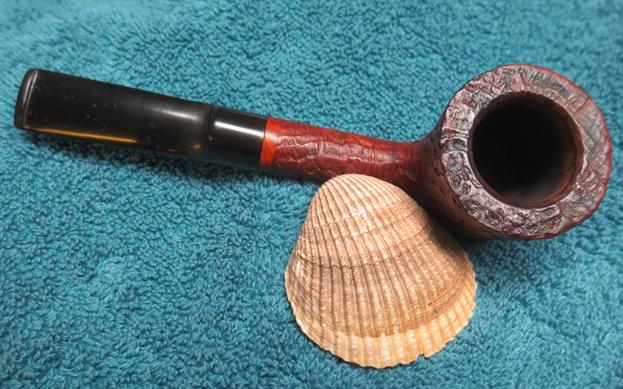
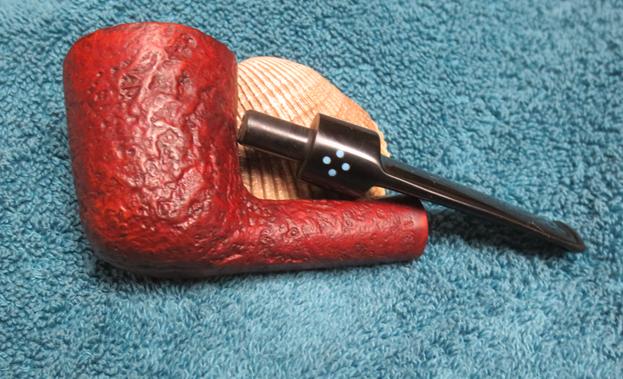
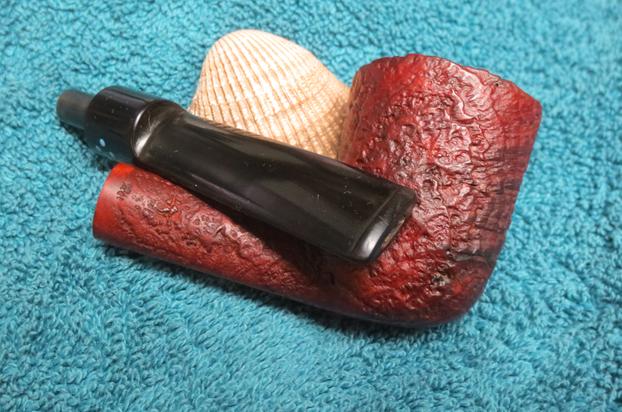
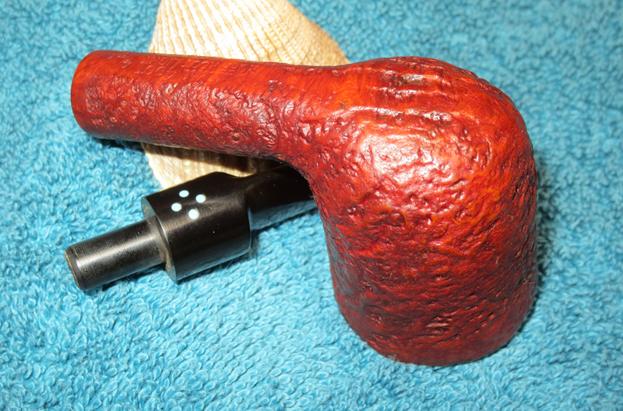
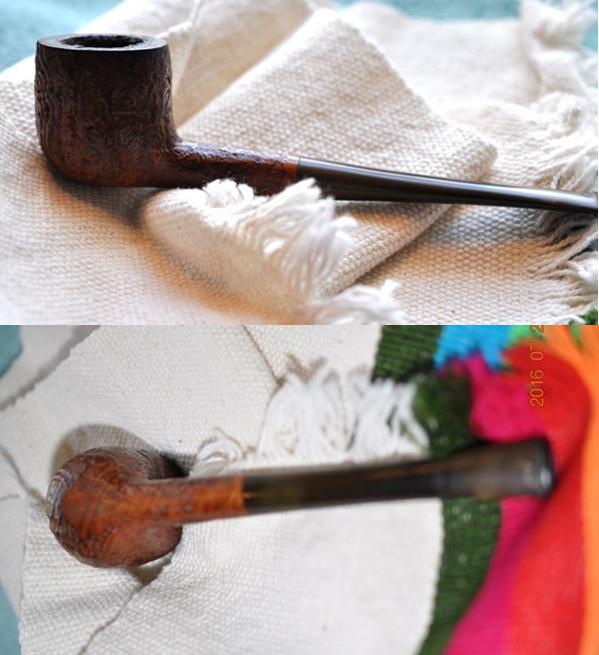
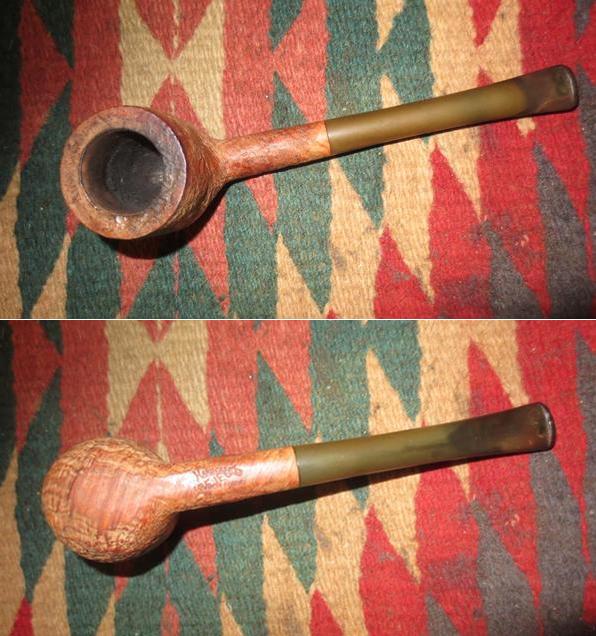
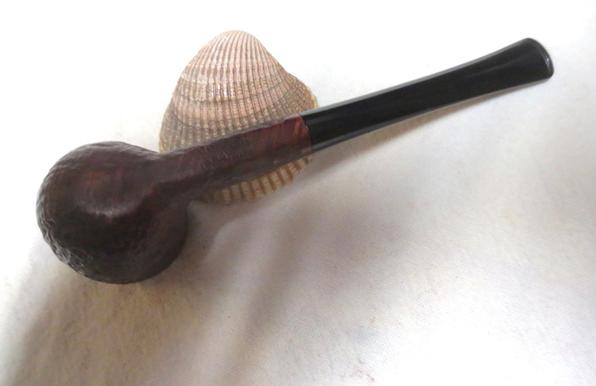
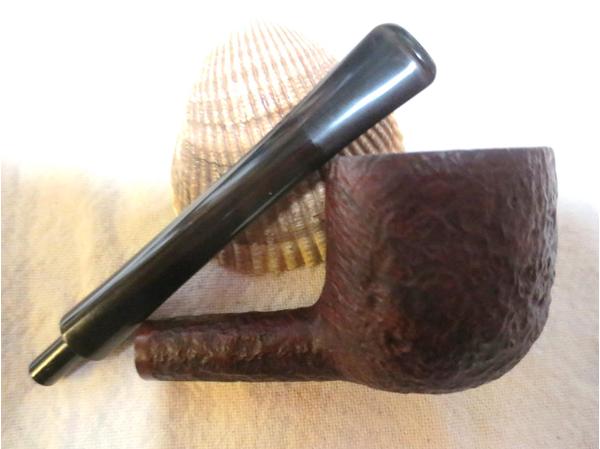
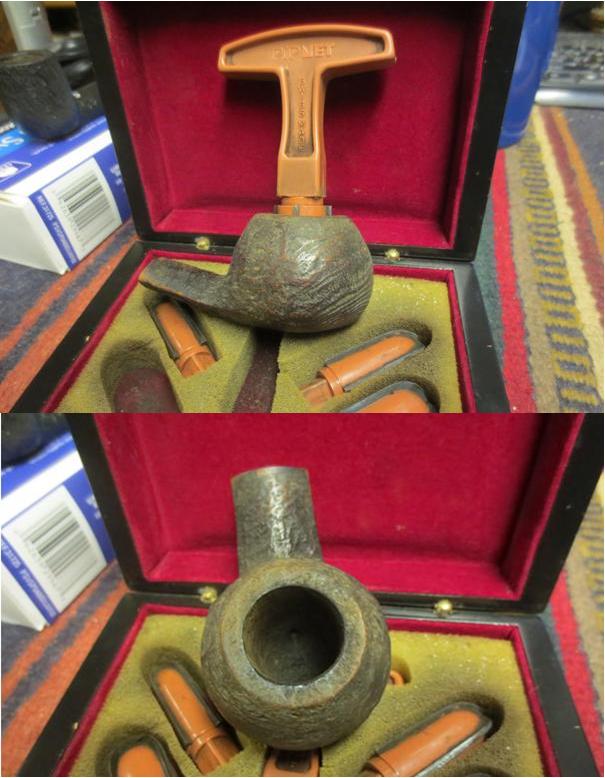
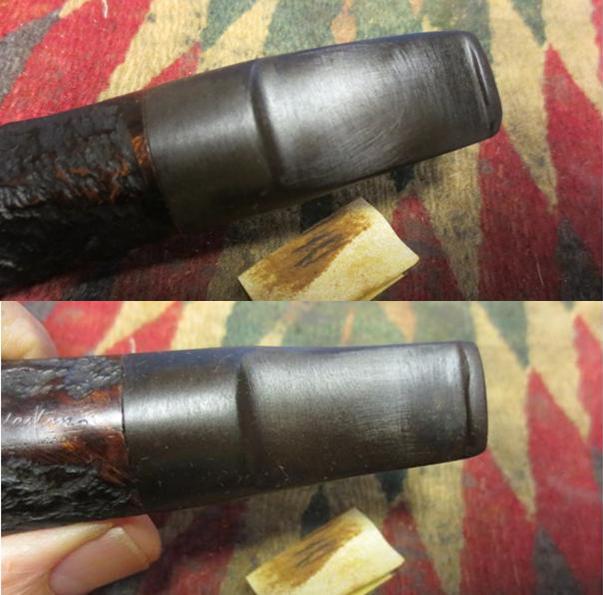
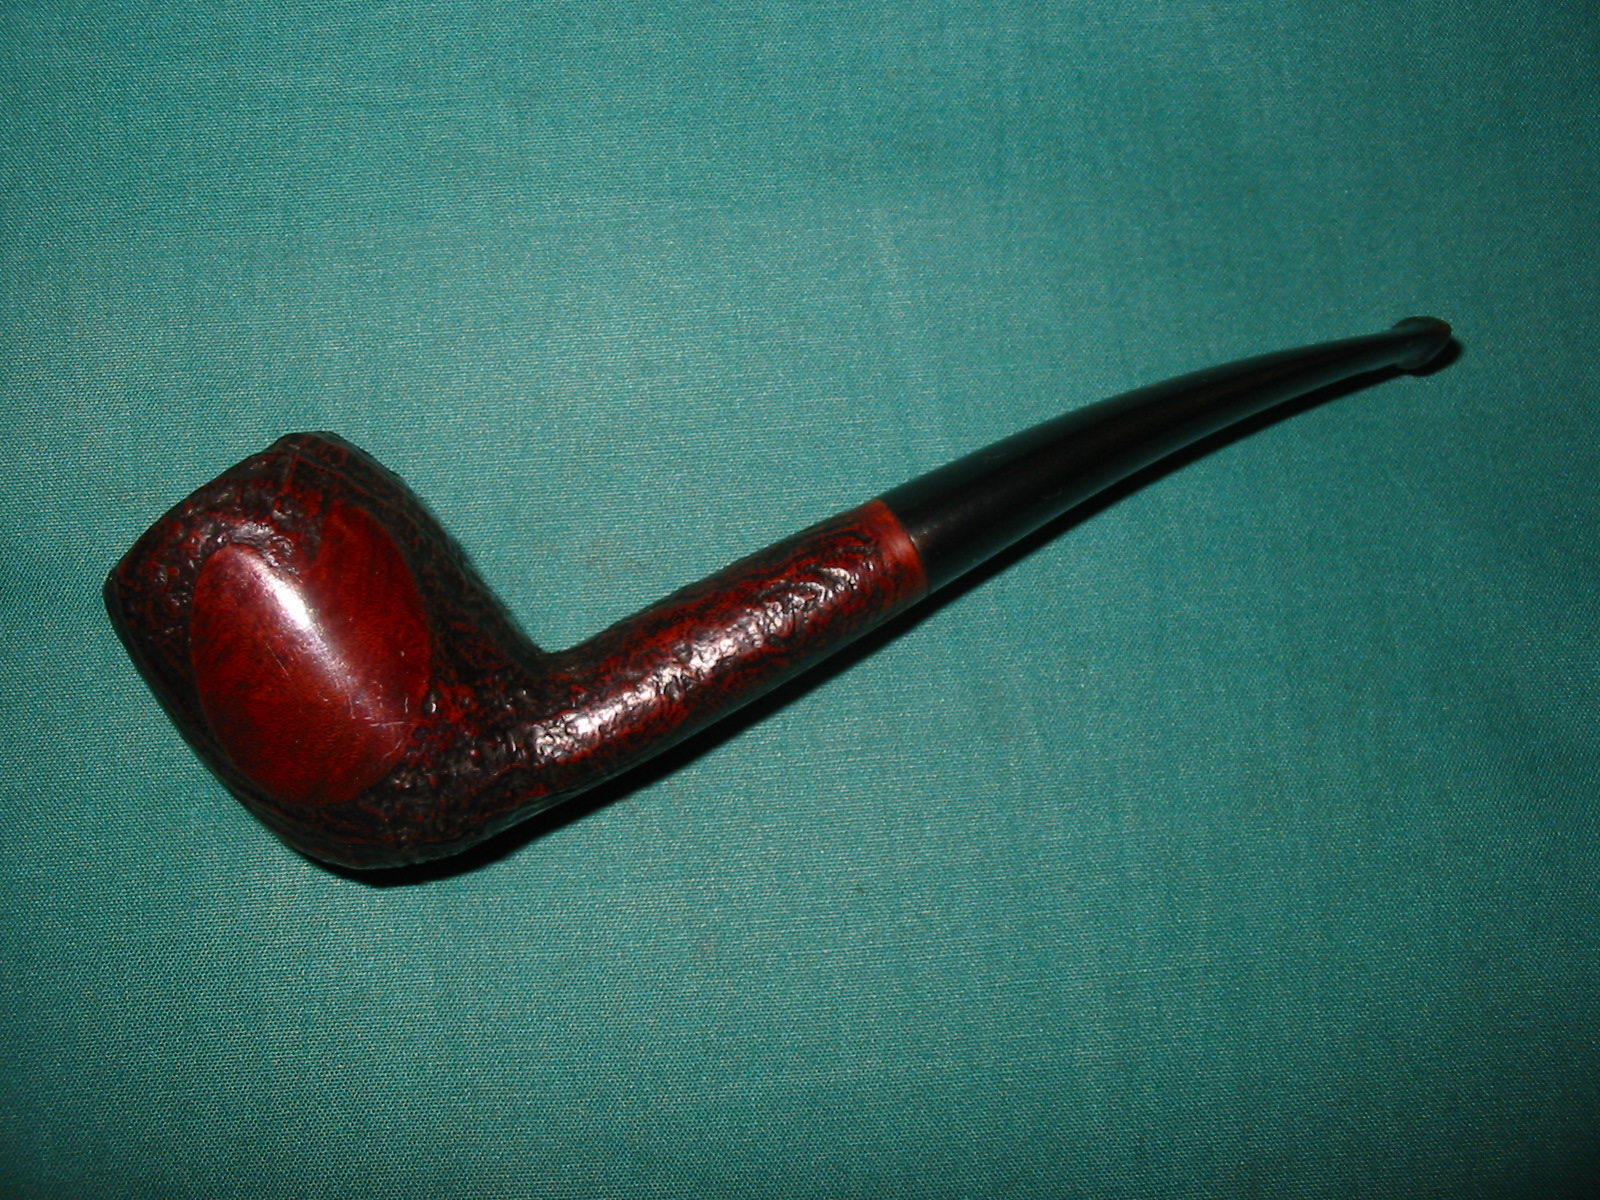
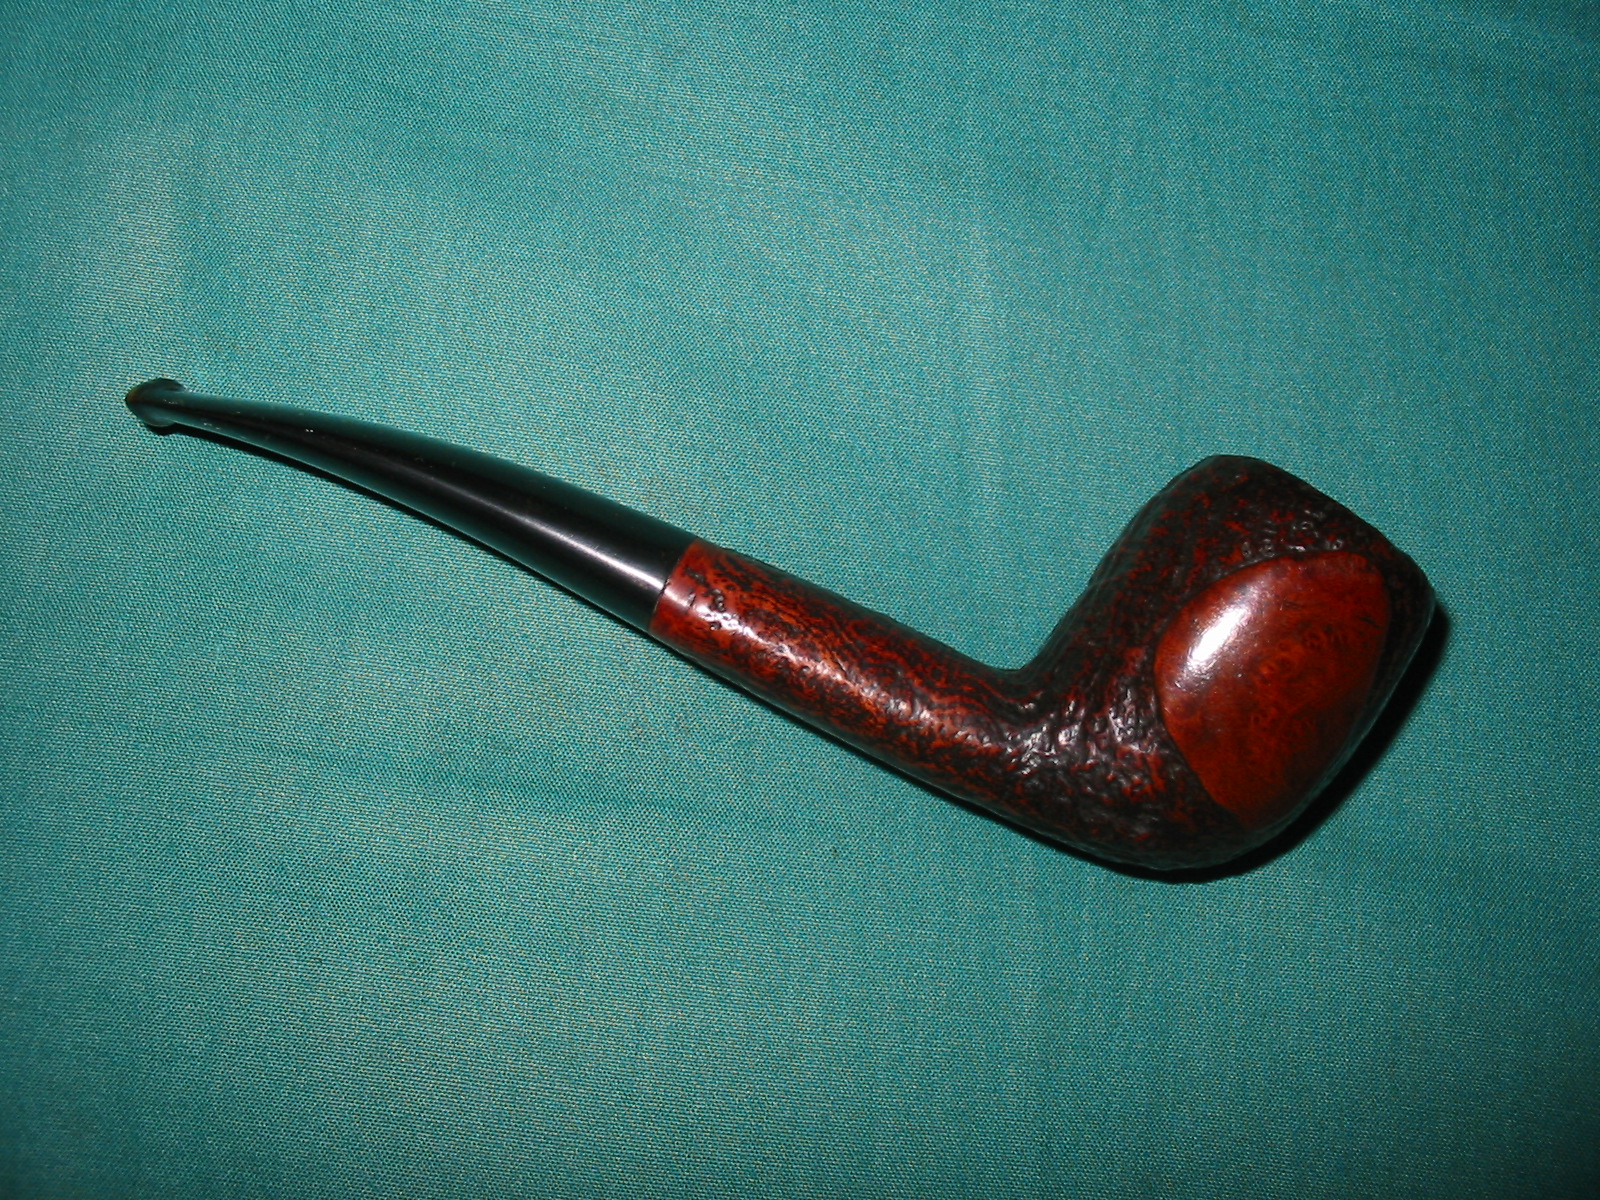
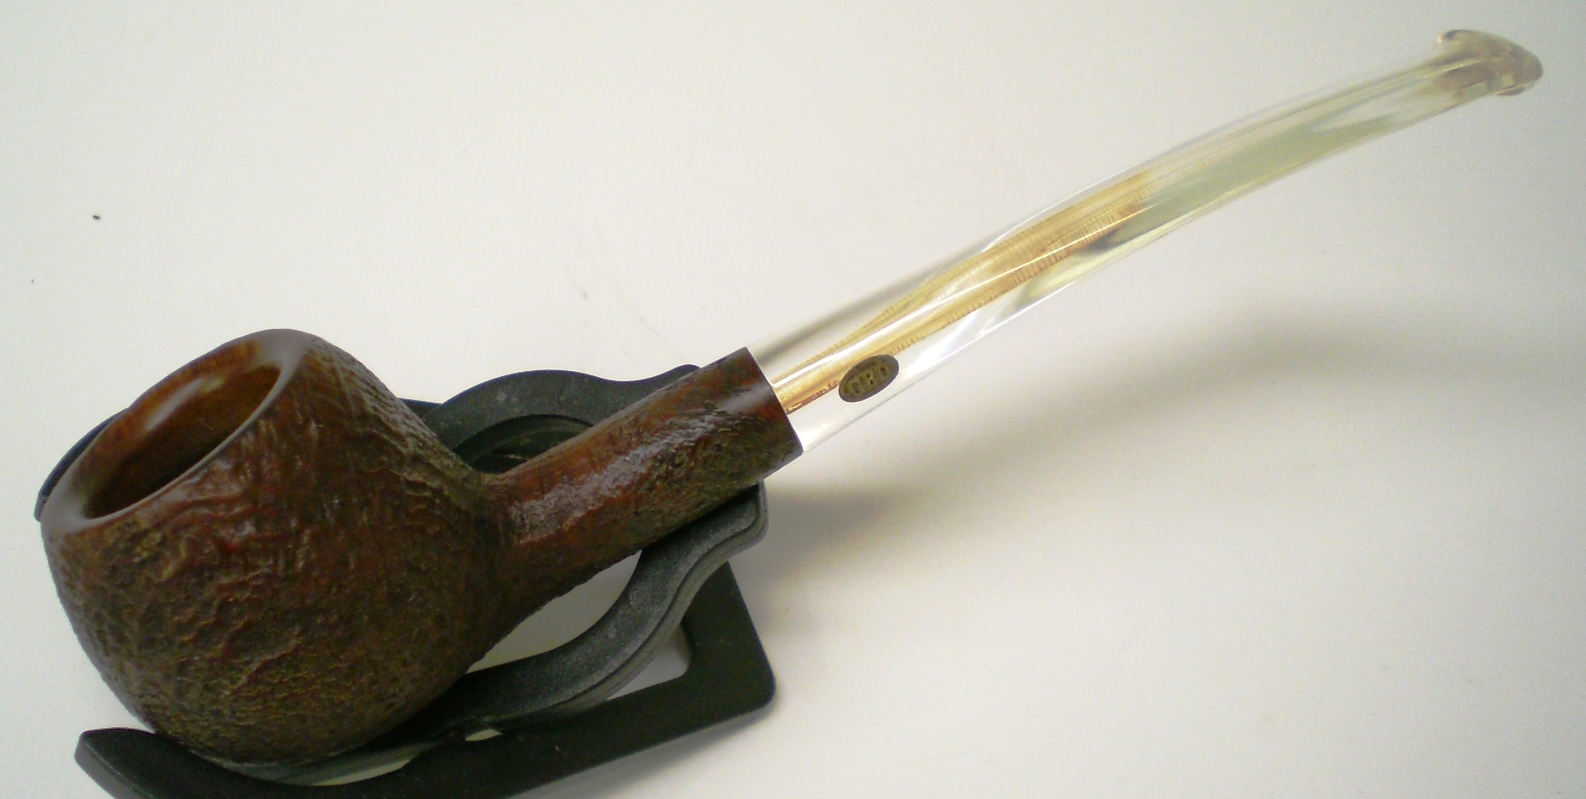
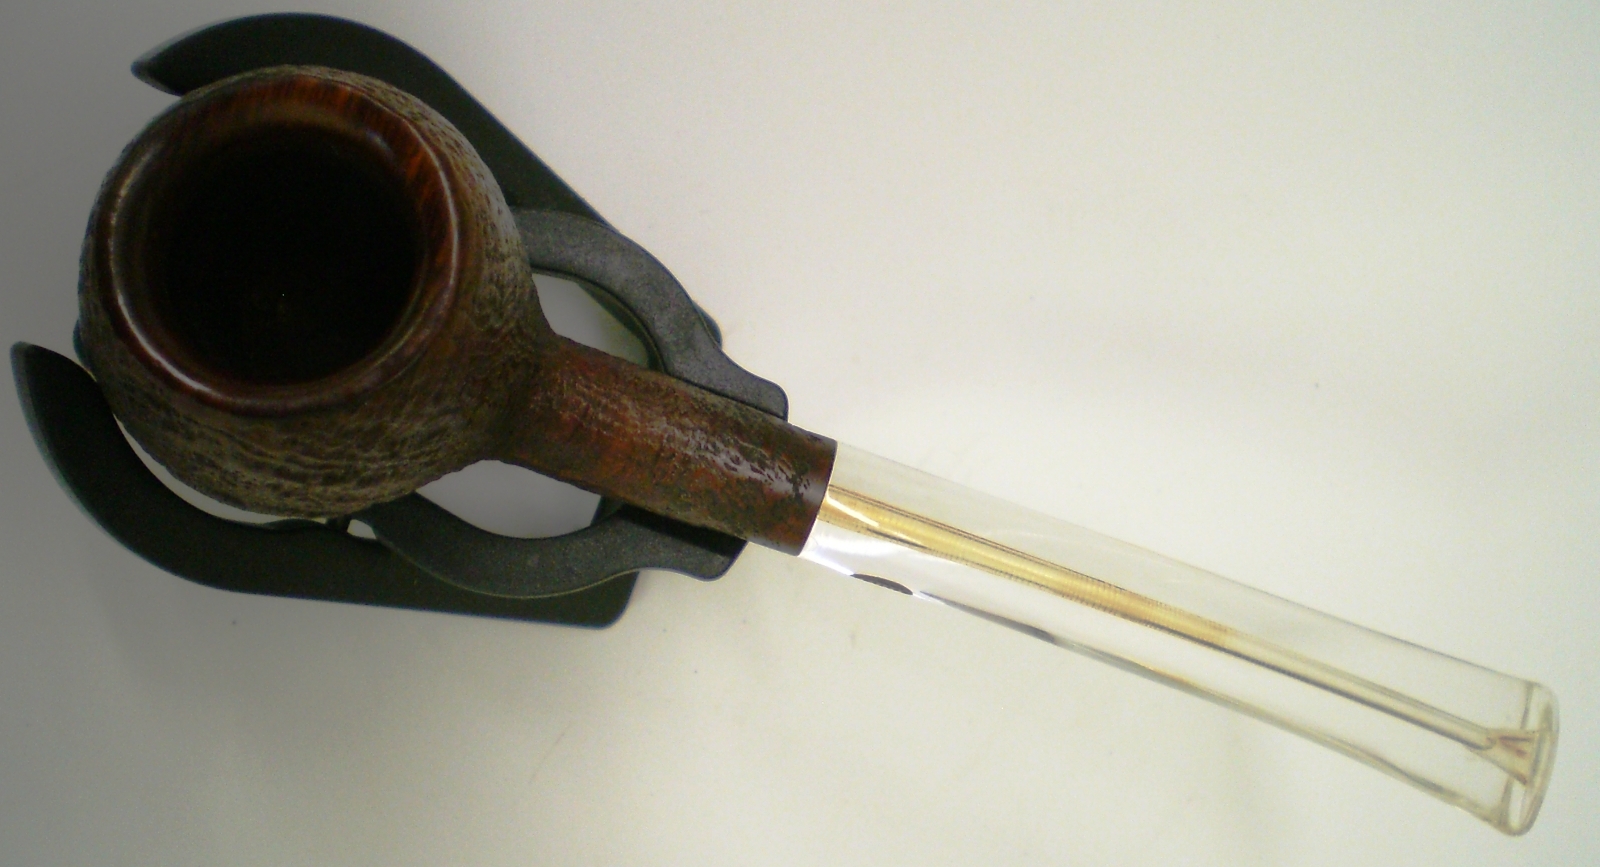
I buffed the pipe and stem with Blue Diamond on the buffing wheel – with a light touch on the bowl. The finish shows up beautifully, the sandblasted ring grain standing out front. It is one of those rugged blasts that are a tactile wonder as it heats up during a smoke. I gave the bowl another coat of Conservator’s Wax and the stem multiple coats of carnauba followed by a buff with a clean buffing pad. I hand buffed the bowl with a shoe brush and then with a microfibre cloth to deepen the shine. The finished pipe is shown in the photos below. The dimensions of the pipe are Length: 6 inches, Height: 2 inches, Outer diameter of the bowl: 1 1/2 inches, Chamber diameter: 7/8 inches. The contrast of the dark brown and a medium brown that shines through give the finish a rich patina. The bowl has been cleaned and the entire pipe is ready to smoke. The stem is in great shape. The tooth marks have been removed though there is slight scratching on the vulcanite. It is a beautiful pipe, just a little big for my liking or I would hang on to it. I will be putting it on the rebornpipes store soon. If you are interested in adding it to your collection email me at slaug@uniserve.com or send me a message on Facebook. Thanks for looking.


A Simple Cleanup – A Tobacco Taverne Bulldog


Blog by Steve Laug

I reached into the last box my brother sent and pulled out a black sandblast bulldog with a saddle stem. I was in the mood for a simple cleanup today so this one would fit the bill. The blast and finish on it was very nice. The stain was clean though there was dust and debris in the crevices of the blast. The rim was very clean and the outer and inner edges of the bowl were undamaged. There were several spots that were light nicks in the sandblast and showed raw briar through the stain. These would be easy to deal with as the sandblast finish is very forgiving. The pipe was stamped on the left underside of the shank in a smooth portion. It read Tobacco Taverne (both T’s are in Germanic Script) under that it was stamped Made in London over England in an uppercase font. The next photos are ones that my brother took before he cleaned it.bull1He took a close up photo of the rim to show what it looked like when he got it. The inner edge of the bowl had a few nicks back to bare briar but overall the edges were in great shape. There was a light cake in the bowl.bull2He also took some close up photos of the great sandblast on the bowl sides. The blast is deep and rugged with deep crevices and grooves along with the ridges. It truly is a beautiful sandblast that really shows the ring grain on the piece of briar.bull3He took a photo of the stamping on the shank and the crown logo on the left side of the saddle shank. The stamping is readable and sharp.bull4Both sides of the stem are in great shape. There was some light oxidation and some pitting from the oxidation. There was tooth chatter but no tooth marks in the vulcanite on either side.bull5My brother reamed and cleaned the pipe. He scrubbed the surface of the stem and briar with Murphy’s Oil Soap and removed all of the dust and grime in the grooves and crevices. He cleaned the shank, mortise and internals of the stem with alcohol, cotton swabs and pipe cleaners. I took photos of the pipe when I received it in Vancouver. The first four photos of the pipe show why I thought it was going to be an easy cleanup.bull6 bull7I took a close up photo of the bowl and rim to show the condition of both. The bowl is very clean and looks to be unsmoked in the bottom half of the bowl. The inner edge of the bowl shows a few nicks that will need to be touched up.bull8The stem is oxidized but the surface is quite clean. It should be a pretty easy task to polish it clean.bull9There was an odd stinger in the tenon that was easily removed. It was aluminum with four fins on the pointed end. There is a hole in the top side of the stinger that takes the air that whirls around the inside of the shank, flows up the fins and into the airway in the stem. The photo below shows the three parts of the pipe.bull10I sanded the surface of the stem with 220 grit sandpaper to remove the oxidation on the surface of the stem. I was careful sanding around the crown logo on the shank side.bull11I ran a folded pipe cleaner and alcohol through the shank and another through the airway in the stem. Both were very clean and took very little cleaning. All that came out of the shank and stem was the dust from the sanding.bull12I used a black Sharpie Pen to touch up the chipped spots on the inner edge of the rim and shank end. I gave the bowl several coats of Conservator’s Wax and buffed the bowl with a shoe brush. The photos below show the finished bowl.bull13 bull14 bull15I polished the stem with micromesh sanding pads – wet sanding with 1500-2400 grit sanding pads and dry sanding with 3200-12000 grit pads. I rubbed the stem down with Obsidian Oil after each set of three pads and after the last set of pads I gave it a final coat of oil and set the stem aside to dry.bull16 bull17 bull18I lightly buffed the bowl with a clean buffing pad to shine it. I buffed the stem with Blue Diamond and gave it multiple coats of carnauba wax. I buffed the entire pipe with a clean buffing pad to raise the shine. I hand buffed it with a microfibre cloth to deepen the shine. The finished pipe is shown in the photos below. It is a well-made bulldog and the Made in London England stamp points to a pipe made by GBD. The lack of a definitive shape number makes it impossible to be 100% certain as to the origin but I am pretty sure that it is a GBD made pipe. The Tobacco Taverne stamping is from a tobacco shop but I was unable to identify the shop. There are shops near Philadelphia, Pennsylvania and one it Houston, Texas that have that name and there are several others in the US that are called Tobacco Tavern. Maybe some of you who are reading this may have some information on the shop or the brand. Let us know what you know. Thanks for looking.bull19 bull20 bull21 bull22 bull23 bull24 bull25 bull26

I wonder how old this Sasieni Ruff Root Light 4 Dot Dublin is?


Blog by Steve Laug

Not being too knowledgeable about the ebb and flow of Sasieni pipe history leaves me with a lot of questions about the latest pipe that my brother sent my way. It is stamped on the underside of the shank Sasieni 4 Dot over Ruff Root Light. There is a 4 stamped at the end of the name stamping next to the stem/shank junction. The stem itself is stamped France. There are four blue dots on the left side of the saddle portion of the stem. He picked it up in a thrift shop in Boise, Idaho along with the Dunhill Shell 5113 I wrote about restoring in an earlier blog (https://rebornpipes.com/2016/12/18/an-unsullied-once-the-paint-was-removed-dunhill-5113-bent-apple/). When my brother first sent the following photos before his cleanup work I was intrigued but the finish looked very spotty. The stem appeared to be in overall good condition with no bite marks or tooth chatter on either side. Can any of you help me regarding the age of the pipe? Any help would be much appreciated.sas1We discussed this a bit and he sent me a photo of the front of the bowl from the bottom side that showed the spotty finish that I noted. There was also a lot of grime in the sandblast grooves on the bowl leaving it with a muddy appearance.sas2The bowl had a thick cake that overflowed over the top of the rim obscuring the blast features on the top side. They also made it hard to tell if there was any damage to the inner or outer edges of the rim.sas3The stamping on the smooth underside of the shank was really quite clear and sharp. The bowl and stem had not been over buffed which were good omens for what it would look like when it was cleaned up.sas4The close up photos of the stem told a little different story than the overall photos. There was light oxidation on the surface and what appeared to be some sticky glue left behind by a price tag from the shop the pipe came from. Just and aside; if you sell pipes in an antique shop or have a booth in an antique mall do not used gummed labels to price your merchandise. It leaves behind residue that is a pain to remove.sas5I was curious to see what the pipe would look like once my brother had worked his cleaning magic on it. I was sure I would be surprised at what it came out looking like. I wondered if the mottled finish would survive the cleanup and whether the stem would be oxidized further as well in the process. When the pipe arrived in Vancouver I took some photos of it to show what it looked like before I worked on it. He had been able to remove much of the mottled finish and the grime in the grooves of the sandblast. The gummy substance on the stem was gone and the stem was not too badly oxidized. There were no tooth marks or chatter on the stem. The reaming job on the bowl had taken care of the cake and the scrubbing had removed most of the buildup on the rim. What remained was a little darkening and some grime deep in the grooves.sas6 sas7I took a close up photo of the rim and bowl. The bowl was reamed clean. The rim needed some more work with a brass bristle brush to clean out the remaining debris deep in the grooves of the blast.sas8I took some photos of the stem to show the overall condition it was in before I started working on it. I was glad to see that there were no deep bite marks or tooth chatter that I would need to deal with on this one. It would be a pleasant change.sas9I scrubbed the rim with a brass bristle tire brush and was able to remove more of the grime in the grooves. I scrubbed down the exterior of the bowl and shank with acetone on a cotton pad to remove the shiny spots of varnish on the finish and even out the mottled appearance.sas10 sas11I used a black Sharpie Pen to add some dark to the rim and to some of the spots on the bowl that appeared to be lighter. I put a cork in the bowl to use as a handle while I stained the bowl with a dark brown aniline stain cut 50/50 with isopropyl alcohol. I was aiming for the brown colour with darker highlights that I had seen on other Ruff Root Light pipes. I flamed the stain and repeat the process until the coverage was even.sas12 sas13Since the oxidation was on the surface and I was not dealing with any tooth marks on the stem I started right away with polishing the stem. I wet sanded it with 1500-2400 grit micromesh sanding pads and rubbed it down with Obsidian Oil. I dry sanded it with 3200-12000 grit pads and gave it a coat of oil after each set of three pads. After the final set of pads I gave it a final coat of oil and set the stem aside to dry.sas14 sas15 sas16I gave the bowl and shank several coats of Conservator’s Wax, let it dry and buffed it with a shoe brush.sas17 sas18I gave the stem multiple coats of carnauba wax and buffed the bowl and stem with a clean buffing pad to raise the shine. I hand buffed it with a microfibre cloth to deepen the shine. The finished pipe is shown in the photos below. I think the look of the finished pipe is pretty close to the original look it must have had when it left the Sasieni factory. The depth of the shine, the multifaceted colours that come through with the browns and black on the sandblast add another dimension to the look of the pipe. The blue four dots on the stem stand out nicely against the shiny and polished vulcanite stem. Overall it is a pleasant looking pipe and one that was a pleasure to restore. Thanks for looking.sas19 sas20 sas21 sas22 sas23 sas24 sas25 sas26

Restoring the third Classic Find – a Charatan’s Make 0120 Canadian


Blog by Steve Laug

My brother and I recently purchased some pipes from an estate sale from an old pipeman named Gene in Pocatello, Idaho. There were a lot of great pipes in the lot. I have written about the pipes on a previous blog: (https://rebornpipes.com/2016/10/07/a-good-day-hunting-orchestrated-between-british-columbia-and-idaho/). I wrote of how he had stopped at an antique shop and four found prestigious finds. These included a Four Dot Sasieni Pembroke with a patent number, Pat.No. 150221/20, a Dunhill Root Briar Canadian EC 4R, a Charatan’s Make Canadian Sandblast 0121 and a Jost’s Supreme Diamond Shank bent billiard. I wrote about the restoration of the Sasieni and the Dunhill earlier in two other blogs: (https://rebornpipes.com/2016/11/05/restoring-a-classic-find-a-sasieni-four-dot-london-made-pembroke/) (https://rebornpipes.com/2016/11/06/restoring-another-classic-find-a-dunhill-4r-root-briar-canadian-ec/). The third pipe that I have chosen to restore is the sandblast Charatan’s Make 0120 Canadian.

The Charatan pipe also had a replacement stem as there was no sign of a CP logo stamp on the top side. The stamping was on the smooth underside of the shank and it read Charatan’s Make and underneath it read London, England. At the end of the brand stamping was the number 0120 which is the shape number of a Canadian. I did some searching online and read the Charatan’s entry in Pipedia (https://pipedia.org/wiki/Dating_of_Charatans). I quote from there: “Pipes that belong to eras till the 1960 have the engraving ‘CHARATAN’S MAKE LONDON, ENGLAND’ in two lines, the shape code is composed by numbers only. The X and the DC appear only on pipes after 1960.

My brother had found another good one. The stamping gave me information about the time frame it was made. I knew that it was made prior to 1960 by the style of the stamping. It came from what the article identified as the Reuben era of Charatans that went from 1910-1960.  Like the Dunhill the only thing that would have been better was if it had come with the original stem. My brother took the photos that follow. They show the pipe before he cleaned it up and sent it to me. It had a nice sandblast that deep and craggy on the bowl and shank. From mid shank back to the stem it appeared that the pipe had been rusticated to match the blast pattern. He took some photos of the pipe to give a feel for the overall look of it when he received it. These photos show the pipe before he cleaned and reamed it.char1He took some close up photos of the bowl and sandblast on the bottom of the bowl. The bowl had a thick cake that had flowed over the top of the rim in hard tarry lava. It was thick but it appeared that the outer rim was undamaged and with any luck the inner one would be as well. The blast is interesting in that it also has a rustication pattern on the bowl bottom and also on the shank. It follows the pattern of the grain on the bowl.char2The next photo shows the clear and sharp stamping on smooth underside of the shank. It reads as noted above – Charatan’s Make over London England with the shape number 0120 on the stem end of the shank.char3The stem had a lot of tooth chatter and some shallow tooth dents. There was oxidation and also calcification.char4My brother did his normal thorough job of cleaning the pipe. He scrubbed it with a tooth brush and Murphy’s Oil Soap. He cleaned out all of the dust and debris in the grooves and crevices of the “blastication”. The stem does not fit tightly against the shank at this point. The next photos below show the pipe as it looked when I brought it to my work table.char5 char6I took some close up photos of the rim to show how well it cleaned up. My brother was able to get the lava out of the grooves on the rim and also on the underside of the shank. The stamping was still very clear.char7He cleaned out a lot of the gunk in the shank but the stem still did fit tightly against the shank end. He did get the calcification and some of the oxidation off the stem. You can clearly see the tooth chatter and the tooth dents now that the stem was clean.char8I scraped out the inside of the mortise with a dental pick with a flattened blade end. I scraped the stepped down area of the mortise as it entered the airway in the shank. I took a lot of tar and gunk out the shank area.char9I scrubbed the mortise, the airway in the shank and the stem with cotton swabs, pipe cleaners and alcohol. Once it was clean the stem fit more closely against the end of the shank.char10I scrubbed down the bowl and shank with acetone on cotton pads to remove the finish that remained on the pipe.char11 char12I restained the pipe with a dark brown aniline stain thinned 50/50 with isopropyl alcohol. I flamed the stain and repeated the process until the coverage was even.char13I put the stem in the shank and took the pipe to the buffer. I buffed it to polish the stain. When I was just about finished I could not believe what happened. It is that moment when you are buffing a pipe where you get a sick feeling. The wheel grabbed the pipe out of my hand, off my finger and threw it against the table top under the buffer. It was not far – a mere 2 inches but I heard the snap as the tenon broke. I was sick to my stomach. I was almost finished with the pipe and then this had to happen. I took a photo of the broken tenon once I had pulled it from the shank. It was almost a clean break at the end of the stem. Oh the frustration.

I used a Dremel to flatten the broken edge of the tenon against the face of the shank. It took a few moments to smooth out the broken part. I used the topping board with 220 grit sandpaper to face the end of the stem. I went through my box of threaded tenons and actually had one left in the box that was not a Jobey Link system tenon. It was the same diameter as the broken tenon.char14I chucked a drill bit in the cordless drill that was just a little larger than the air way in the stem. I turned the stem onto the drill bit the length of the threaded portion of the replacement tenon. I put two more drill bits in the drill and turned the stem onto the bits. Once it was the same diameter as the threaded portion I shortened the threaded end slightly so that it would fit tight against the stem. I roughed up the threads with the Dremel and a sanding drum. I left the threads in place so that I could turn it into the stem.char15I screwed it into the stem as far as it would go by hand and then used a pair of pliers to finish turning it tight against the stem face.char16I put the stem in place in the shank and the fit was tight against the shank. I polished the stem with micromesh sanding pads – wet sanding with 1500-2400 grit pads and dry sanding with 3200-12000 grit pads. I rubbed it down with Obsidian Oil after each set of three pads. After the final set I rubbed it down with a last coat of oil. I set the stem aside to dry. (In the photos below of the shank and stem I did not push the stem in against the shank so it shows a small gap at that point. You will notice in the final photos that I pushed it back in place.)char17 char18 char19With fear and trepidation I took the pipe back to the buffer. I did not want to repeat the broken tenon so I was very careful. I worked the pipe against the buffing wheel that had been charged with Blue Diamond polish. I buffed it until the stem shone. I lightly buffed the bowl with the polish as well – being careful to not let it build up in the grooves. I polished the stem with carnauba wax and put Conservator’s Wax on the sandblast finish of the bowl and shank. I buffed the pipe with a clean buffing pad to raise the shine. I hand buffed it with a microfibre cloth to deepen the shine. The finished pipe is shown in the photos below. The fit of the stem against the shank was better than when I started. Thanks for walking through the restoration with me and also through the frustrating need to replace the tenon.char20 char21 char22 char23 char24 char25 char26 char27

New Life for a Hardcastle’s London Made Reject Pot


Blog by Steve Laug

This perfectly shaped little Hardcastle’s sandblast pot was the next pipe to my worktable. It is a small almost pencil shank pot. It is stamped Hardcastle’s London Made and across that it is stamped Reject. It has a rich blast on the sides of the bowl and shank. There is a smooth portion on the bottom of the bowl and shank for the stamping and allowing it to be a sitter. My brother took the next photos to show the condition of the pipe before he cleaned it up.hard1He took some close up photos of the bowl and stamping. The bowl had a thick cake and a large overflow of lava on the rim. The lava covered the light blast finish on the rim completely and it was hard to tell the condition of the bowl at this point. The finish was worn and dirty but there were no chips or dents marring the finish. The stem is oxidized and you can see the Hardcastle’s H stamp on the left side near the shank. You can see the stamping on the shank and clearly see the REJECT stamp across the initial stamping. I am not sure why this pipe was rejected. It appears to be a decent piece of briar. There were two small sandpits on the sides of the bowl that I suppose may have caused it to be a reject but that is not clear to me.hard2 hard3My brother did his usual great clean up on the exterior of the pipe. He scrubbed it with Murphy’s Oil Soap and a tooth brush and was able to remove the finish. He reamed the bowl and removed the lava build up on the rim and left a slightly darkened rim with no burns or damage to the edges. I took the next set of photos to show what the pipe looked like when it arrived in Vancouver.hard4 hard5I took a close up photo of the rim to show the darkening on the back side of the top. It was clean but darkened. There were no burn marks or damaged briar on the edges of the bowl. The stamping is also shown and it remains sharp and distinct.hard6The stem was lightly oxidized and there were tooth dents and chatter on the top and underside near the button. The button had some flattening and wear as well.hard7I used a brass bristle tire brush to scrub the top of the rim and try to clean out some of the darkening on the rim. I was able to remove some of it and make it less pronounced.hard8I wiped the bowl down with acetone on cotton pads to clean of any remnants of the old finish and to remove the debris from the brass brush work on the rim.hard9 hard10 hard11With the bowl cleaned I stained it with a dark brown aniline stain mixed 50/50 with isopropyl alcohol. I flamed the stain and repeated the process until the coverage was even on the bowl and in the deep pits of the sandblast finish.hard12I took some photos of the pipe at this point in the process. The stain had covered well. The colour was a little dark for my liking and would need to be lightened a bit before I was finished. You can see the sand pits on both sides of the bowl that may have made this pipe a reject. I have circled them in red.hard13 hard14I cleaned the mortise with a dental spatula and then cotton swabs, pipe cleaners and alcohol. I also cleaned out the airway into the bowl and in the stem.hard15To lighten the colour of the stain I washed it down with some alcohol on cotton pads until the colour was more to my liking. The finished colour is shown in the photos below.hard17 hard18I painted the dents in the stem with the flame of a Bic lighter and was able to raise them almost smooth. I sanded the stem with 220 grit sandpaper to smooth out the slight dimples that remained in the surface. I wet sanded the stem with 1500-2400 grit micromesh sanding pads and rubbed it down with Obsidian Oil. I dry sanded it with 3200-12000 grit pads and rubbed it down with the oil after each set of three pads. After the final 12000 grit sanding I gave it a final coat of Obsidian Oil and set it aside to dry.hard19 hard20 hard21I buffed the pipe with Blue Diamond on the buffer and gave the stem multiple coats of carnauba wax. I hand waxed the bowl with Conservator’s Wax. I buffed the bowl and stem with a clean buffing pad and again by hand with a microfibre cloth to raise and deepen the shine on the briar. The finished pipe is shown in the photos below. I am pretty happy with the finished pipe. Thanks for looking.hard22 hard23 hard24 hard25 hard26 hard27 hard28 hard29

Sometimes you get lucky and it’s an easy cleanup – a Royal Danish 930 Acorn


Blog by Steve Laug

It seems that over the years I have picked up a lot of hard case pipes – pipes that need lots of TLC to even make them usable once again. Somehow, lately my brother has been picking up some pretty sweet pipes that don’t take a lot of work and if you saw my refurbishing bin you would understand why that really makes me thankful. The current pipe I am working on is one those easy ones. He did the lions share of cleaning work on it. He reamed the bowl and scrubbed the internals – the mortise and airways in the shank and stem. He scrubbed the exterior of the pipe so that added to the ease of the cleanup. The pipe is a Stanwell second or sub line. It is stamped on the underside of the shank in a smooth patch Royal Danish over Made in Denmark. To the left of that stamping is the shape number 930 which to my mind is the classic Danish acorn shape. The pipe has a shallow sandblast finish with two smooth patches on the sides of the bowl. The graceful stem gives it a classic look. There is some light oxidation on the stem and some light cake in the bowl and lava on top of the bowl. My brother took the next photos to show the overall look of the pipe.danish1 danish2He also took some close up photos of the rim, the stamping and the stem logo. The first photo below shows the light cake and lava on the rim. It should clean up nicely. The second and third photos show the stamping on the shank and the stem. The crown logo on the stem is faded and worn but still quite legible.danish3 danish4When I brought it to the work table I took the following four photos to show the state of the pipe before I cleaned or polished it. You can see from the photos that the finish was in good shape. The stem was oxidized but otherwise clean with no tooth marks or chatter.danish5 danish6I took some close up photos of the rim and bowl. The rim is in good shape. My brother cleaned off the rim with a tooth brush and Murphy’s Oil Soap to remove the grime and tars. He reamed the bowl and cleaned it. There was some lightening of the stain on the rim.danish7The stem was in great shape other than the oxidation. There were no tooth marks or chatter on the top or the underside of the stem.danish8I wet sanded the stem with 1500-2400 micromesh sanding pads to loosen the oxidation. I scrubbed the stem with the Before & After Pipe Stem Deoxidizer and paper towels. I scrubbed it with Before & After Pipe Polish Fine and Extra Fine. I rubbed the stem down with Obsidian Oil to protect and give life to the stem. I buffed it with carnauba wax and hand buffed it with a microfibre cloth.danish9 danish10I buffed the bowl lightly with Blue Diamond and the stem with a bit more pressure. I was careful around the stamping on the stem and shank. I gave the stme mulitple coats of carnauba wax and buffed it with a clean buffing pad. I waxed the bowl with Conservator’s Wax and buffed it with a clean buffing pad. I hand polished the stem with a microfibre cloth to deepen the shine. The finished pipe is shown in the photos below. The pipe will also one day be listed on the store. It is for sale now if anyone is interested. It would make a great addition to your collection.danish12 danish13 danish14 danish15 danish16 danish17 danish18 danish19

Cleaning up a London Made Charleston Banker


Blog by Steve Laug

When I saw this pipe on Ebay I decided to bid on it. I had bought from this English sell a few times in the past and he generally has some great older pipes. He had listed this one as a Criterion London Made pipe. I had looked and found that Criterion was made by Comoy’s. He described it as a 1/8th bent sandblasted prince. To me it is almost a Banker shape. The bowl is quite large and the oval shank ends with a saddle bit. It is 5 inches (12.75cms) long and the bowl height is 1.5 inches (3.75cms). He described it as lightly smoked, and in very good condition and as usual his description was perfect. He said that the markings on the bottom of shank were very faint and read Criterion over London Made. When the pipe arrived I looked at the faint stamping with a lens and a bright light and it actually reads: Charleston in script over block script LONDON MADE. I had not heard of Charleston pipes before so I did a bit of research and found the brand listed in Who Made That Pipe. It was listed as being made by Sydney Charleston Ltd. London, England. The first two photos are the ones provided by the seller on Ebay.Charleston1 When the pipe arrived I took it to the work table and took a few photos of the state of the pipe before I began to work on it. It was in pretty decent shape. The finish was dirty and the rim had dirt on it. The bowl had a cake build up. The stem was oxidized with a few small tooth marks on the top and bottom of the stem near the button. The slot was virtually plugged so I could not get a pipe cleaner through it to clean the inside.Charleston2

Charleston3

Charleston4

Charleston5 I took the pipe apart and put the bowl in an alcohol bath to soften the hard cake and the stem into an Oxyclean bath to soften the oxidation on the stem. I left them to soak overnight.Charleston6 When I took the bowl out in the morning I scrubbed it with a brass bristle whitewall tire brush to clean out the grooves in the blast on the bowl and the rim. I was able to remove all of the build up and grime from the ridges and grooves.Charleston7

Charleston8 I wiped out the bowl with a cotton swab and then reamed it with a PipNet reamer to remove the cake. The bath had softened the cake so it came out very easily.Charleston9 I took the stem out of the Oxyclean bath and the oxidation had all come to the surface. It was soft and would be easier to remove.Charleston10 I used a dental pick to clean out the slot and then a pipe cleaner to make sure the edges of the Y were wide open to further clean it.Charleston11 I scrubbed down the bowl and stem with a Mr. Clean Magic Eraser and gave the bowl a light rub down with olive oil. I took the following photos. There was progress to be seen.Charleston12

Charleston13 The cleaning and oil seemed to make the stamping more legible. In the photo below you can see the Charleston with a curled line under it and the London Made stamping underneath the line.Charleston14 I cleaned out the bowl, shank and stem with pipe cleaners, cotton swabs and alcohol. It was incredibly dirty. I would need to use the retort to really clean it.Charleston15

Charleston16 I sanded the stem with 220 grit sandpaper and worked out the tooth marks on the top and underside near the button.Charleston17 I set up the retort and held the tube over the flame to boil the alcohol through the stem and bowl. I ran three test tubes of alcohol through the pipe before it came out clean. The fourth bowl came through with clear.Charleston18

Charleston19 I took the cotton ball out of the bowl, wiped out the bowl with a cotton swab and ran pipe cleaners through the stem and shank to remove any moisture and final debris. The pipe smelled fresh and clean and the interior was clear.Charleston20

Charleston21 I worked on the stem with a medium and a fine grit sanding sponge and then wet sanded with 1500-2400 grit micromesh sanding pads. I rubbed the stem down with Obsidian Oil before dry sanding with 3200-4000 grit pads. I gave it another rub down with oil and then finished sanding with 6000-12000 grit pads. I gave it a final rub down of Obsidian Oil and let it dry.Charleston22

Charleston23 I buffed the pipe with White Diamond and Blue Diamond on the buffing wheel and then gave it multiple coats of carnauba wax. I then buffed it with a clean flannel buff and a final hand buff with a microfibre cloth. The finished pipe is shown in the photos below. It is fresh and ready to smoke. I intend to fire up a bowl today!

Thanks for looking.Charleston24

Charleston25

Charleston26

Royal Danish Acorn Shape 971 Reborn


Blog by Steve Laug

This is another pipe from the lot I picked up on Ebay not long ago. The lot is pictured in the photo below and this one is the third pipe down on the first column, left side. It is stamped Royal Danish in script over MADE IN DENMARK on the underside of the shank. It is also stamped 971. To me the shape is an oval shanked acorn. It has a sandblast finish with a smooth area on each side of the bowl and on the area that bears the stamping on the shank. The bowl was heavily caked as can be seen in the second photo. The finish was not in bad shape just dirty and the smooth areas had small scratches on the surface. The rim was caked with spill over from the bowl and would need to be scrubbed to remove the build up and make the sand blasted rim visible again. The bowl came without a stem.

bowls1

Danish

I sorted through my box of stems to see if I had one that was suitable for this pipe and found an estate stem that would work with a little cleanup. It was heavily oxidized and had some tooth chatter on the surface of the stem that became very visible as I cleaned it. The stem was clogged with tar and oils and I would have to unclog it to make it work. I used a paper clip that I straightened out to clean out the build up in the stem then sanded the tenon until the stem fit the pipe. I lined it up with the curves on the shank. Because of the sandblast on the shank the stem would not line up perfectly so I decided to sand a smooth band around the shank for the stem to line up with. I used a Dremel with a sanding drum to smooth out the edge of the shank. The next four photos show the finished band around the shank. Once it was stained I thought it would be a good contrast with the stem and the finish of the sandblast.

IMG_1282

IMG_1283

IMG_1284

IMG_1285

I reamed the bowl with a PipNet reamer. I began with the smallest cutting head and worked my way up to the second cutting head (first photo below). Once I had the bowl cleaned out I worked on the stem to clean up the oxidation and work on the tooth marks. I sanded it with 220 grit sandpaper and then with a fine grit sanding sponge (photos 2 and 3 below). I also sanded the banded area that I cut with the sanding drum.

IMG_1286

IMG_1287

IMG_1288

I wiped the bowl and shank down with acetone and a cotton pad. I wanted to remove the grime in the crevices of the blast on the shank and bowl. I used a soft bristle tooth brush and acetone to clean up the rim of the pipe. I scrubbed it until the finish was clean. Photos 1 and 2 below show the finish after the cleaning. The grey is the finish after it broke down with the acetone. I continued to scrub it until the finish was clean.

IMG_1291

IMG_1292

I set up the heat gun and heated the stem and bent it over the rolling pin that I use to get a good straight bend in the stem. I also buffed the stem and bowl with White Diamond. I used a light touch on the stem as I intended to keep sanding it with the micromesh sanding pads. I took it back to the work table and restained it with a dark brown aniline stain thinned with isopropyl alcohol. The mix was my attempt to match it to the original stain. I wanted the dark stain in the grooves of the blast to stand out against the brown over stain. The next three photos show the bend in the stem and the restained bowl. The band that I sanded in the shank is a nice contrast to the sandblast and the black of the vulcanite stem.

IMG_1296

IMG_1297

IMG_1298

I sanded the stem with micromesh sanding pads from 1500-12,000 grit. I wet sanded with the 1500-2400 grit pads and then dry sanded with the 3200-12,000 grit pads. The next series of four photos show how each progressive grit of sanding pads bring a deeper shine to the stem.

IMG_1304

IMG_1305

IMG_1306

IMG_1307

I wiped the stem down with Obsidian Oil to protect the new shine against oxidation and then once it was dry took it to the buffer and buffed the stem with White Diamond. I finished by buffing the bowl and stem lightly with White Diamond a second time. It took the pipe back to my work table and gave it several coats of Halcyon II Wax. I have found that it does a great job on sandblast and rusticated finishes. When it was dry I hand buffed it with a shoe brush until it had a rich shine. The next series of photos show the finished pipe. I like the new look to the shank and bowl and the new stem looks like it came with the pipe!

IMG_1309

IMG_1310

IMG_1311

IMG_1312

GBD Prehistoric Prince 357 Refurb


Blog by Al Jones

These old GBD’s just seem to follow me home. This one, a Model 357 in Prehistoric finish, wasn’t getting much action on Ebay and I bit. The Ebay pictures showed the briar was in pretty good shape and Perspex stems are generally pretty easy to restore. I didn’t have a Prince style pipe in my collection and this one looked like a suitable candidate. I weighed the pipe at 35 grams. That was also appealing and it should be comfortable in the mouth.

The pipe as I received it from the seller:

GBD_357_Prehistoric_Prince_Ebay ad (2)

GBD_357_Prehistoric_Prince_Ebay ad

GBD_357_Prehistoric_Prince_Ebay ad (3)

Using my Castleford tool, I reamed the light cake in the bowl and let it soak with some Sea Salt and Everclear. The Everclear took some of the finish off the bowl top and revealed some scrapes as well. I decided the blast was too nice to leave it in that condition and I knew the nicks on the bowl top would polish smooth. A smooth, beveled GBD bowl top looks great in my opinion and that feature is an attractive aspect of these pipes.

While the bowl was soaking, I worked on the Perspex stem. It had a few tooth marks that I was able to sand out starting with some 1500 than 2000 grit wet paper. I than buffed it with the 8,000 and 12,000 grade micromesh pads. I ran some bristle pipe cleaners with Everclear thru the stem. I’d been advised previously to run a dry cleaner thru following the Everclear as to not cloud the stem draft hold of Perspex material.

Then, as with the stem, I used some 1500 than 2000 grit wet paper on the polished bowl top, than the last two grades of micromesh. Next up, re-staining, which is still a little nerve-wracking to me.

I reviewed Steve’s past blog entries on re-staining a bowl. I had previously completed that step only two other times. I soaked the bowl in a small container of isopropyl alcohol for several hours. I used an old brass bristle brush to help remove the stain and any wax. Than, I let it soak for another few hours. Once the finish was removed, I prepared to re-stain it. I really liked the light brown factory finish and used some Fieberlings Medium Brown stain, but thinned it considerably. On my first two re-stain jobs, my finish came out too dark. This time, I nailed it and the color is just what I desired. I used the dauber supplied by Fieberlings to apply the stain, held by a bent pipe cleaner. After the first coat dried, I applied a second coat. This time I set the stain with a flamer from a lighter. Be sure to not have the pipe sopping with stain, as that burns too long and could leave a burn mark on the briar.

Applying the stain:

GBD_357_Prehistoric_Prince_Restain (1)

GBD_357_Prehistoric_Prince_Restain (2)

GBD_357_Prehistoric_Prince_Restain

The next step was on the buffing wheel with some White Diamond rouge. A light touch is used as to not damage the bowl or add any unnecessary wear. Carnuba wax was then applied using a dedicated loose cotton buff. The bowl following the White Diamond and Carnuba wax applications:

GBD_357_Prehistoric_Prince_Finished (8)

The final step was a hand polish with Halycon wax and she was ready to smoke. I’m dedicating this one to Orlik’s “Golden Sliced” blend, which is a good smoke in the hot summer months of Maryland.

The finished pipe:

GBD_357_Prehistoric_Prince_Gallery

GBD_357_Prehistoric_Prince_Finished (3) Cropped

GBD_357_Prehistoric_Prince_Finished (1) Cropped