No name basket pipe#2


Troy gave some real life to this one with his understain of Black Sharpie Ink… great job.

Troy W's avatarBaccy Pipes

My earlier no name basket pipe post was pretty popular ( one of my most viewed ) . I though i would share another  unmarked pipe i picked up and re-did back in May 2014. I originally posted the refurbish on Dr. Grabow Collectors Forum. I still own and smoke the pipe today.

I got the pipe from a co-worker who was selling her fathers old pipes. She brought a box of pipes for me to look at one day at work. I did not see anything that really grabbed my eye but one  unmarked Lumberman. Most were full bents and such that i just don’t care for . I agreed  to purchase it and a nice twelve pipe inline rack that you can hang on the wall. I think i agreed to give her twenty dollars for the rack and pipe. I sent some pictures of the other pipes to a friend of…

View original post 792 more words

A Restoration Project – A Small Bent Billiard from a Past Era


Blog by Steve Laug

When I saw this pipe on Ebay I decided I wanted to have it in the collection. The seller said the stem was amber and it may be though I am thinking it is more of an Amberoid. The bowl had a fill on the back left side at the shank bowl junction. The band on the shank was rotated to the right and a little loose. The finish was worn and dirty. The rim was covered in tars and lava and the bowl was caked and half filled with the last unfinished bowl of tobacco. There was no information from the seller as to stampings or markings on the bowl or shank. It appeared to be a no name pipe. The seller thought the stem was horn or amber but it did not look like that to me. The stem looked to be in decent shape though it had tooth marks on the top and the underside near the button. The stem was very dull in appearance and the airway was black. The case was in decent shape with a lot of ash and detritus from the years. All in all the pipe was tired but it looked to be easily restorable. The photos below came from the seller.amber1 amber2 amberr3The next two photos show the stem damage. It does not appear to be extensive more chatter than any deep bite marks. The way the marks look on the stem it looks to me that the stem is amberoid or Bakelite not amber or horn.amber4 amber5The pipe is diminutive – a small one all the way around. It is well proportioned but is 4 inches long with a bowl height of 1 ½ inches. The inside diameter of the bowl is 5/8 inches.amber6The seller also included several close up photos – one of a large fill on the back left side of the bowl. It appeared to be tight and smooth but I would know more once I cleaned up the bowl. The other photo was of the metal band. It was stamped with faux hallmarks and an EP in a diamond that signified that the band was electroplated.amber7 amber8The case was in decent shape for a pipe this age.amber9When the pipe arrived I unpacked it and took it out of the case and took a few photos of my own to confirm my assessment from the seller’s photos. The pipe was solid and clean. The finish was worn and tired – dirty but would clean up nicely. The lava on the rim and the damage to the rim edges would need some work. The stem was not amber or horn but amberoid or Bakelite. It had some interesting swirls and would clean up nicely. The material on the inside of the case had a lot of ash and was dirty but intact.amber10 amber11 amber12 amber13 amber14I removed the stem from the shank and was surprised that I was able to unscrew the bone tenon from the stem. It was a little sticky but with a bit of wiggling it came free.amber15With the stem out I worked on the inside of the stem. The airway was almost black with tars and oils. I wanted to clean out the stem as much as possible and bring it back to a clean airway that blended with the stem material. I used alcohol, pipe cleaners and cotton swabs. The photo below shows the first stage of the cleaning. Following the scrubbing I also used Barkeepers Companion with pipe cleaners dipped in it and using that to scrub out the airways. I was able to clean out the majority of the stains.amber16 amber17I reamed the bowl with a PipNet reamer and took the cake back to bare briar. amber18 amber19To clean up the rim I topped it with 220 grit sandpaper. I was able to take off all of the lava and cleaned up the edges of the rim. I sanded the inside edge of the rim with a folded piece of sandpaper. I cleaned up the rough edges and the inside of the bowl.amber20 amber21 amber22I scrubbed the exterior of the bowl with acetone on cotton pads. It removed the finish and the grime from the bowl.amber23 amber24 amber25I removed the loose band and cleaned the outside of the shank. I reglued the band with Wellbond white all purpose glue.amber26I cleaned out the inside of the mortise and airway with cotton swabs, pipe cleaners and alcohol.amber27I used a black Sharpie to hide the fill on the back of the bowl and then stained the pipe with Dark Brown aniline stain. I flamed it and restained and reflamed it.amber28 amber29 amber30 amber31I sanded the tooth chatter with 220 grit sandpaper to remove it. I wet sanded the stem with 1500-2400 grit micromesh sanding pads to begin the process of polishing the stem. I rubbed it down with Obsidian Oil and then dry sanded it with 3200-4000 grit pads. I gave it another coat of oil and then sanded it with 6000-12000 grit pads. I gave it a final coat of oil and let it dry.amber32 amber33 amber34I lightly buffed the stem and bowl with Blue Diamond and then gave the pipe several coats of carnauba wax. I buffed it with a clean flannel buffing pad and then with a microfibre cloth. I brushed out the inside of the case with the shoe brush to remove the dust and ash. The finished pipe is shown in the photos below.amber35 amber36 amber37 amber38 amber39 amber40 amber41 amber42 amber43This is a great old pipe and one that will hold a spot in my collection. I will keep it in trust, using it and caring for it until I pass it into the hands of the next pipe man. Thanks for looking.

Gift from a Newfoundland Friend– Rare & Unique Unsmoked Ellsworth Roto Bowl


Blog by Steve Laug

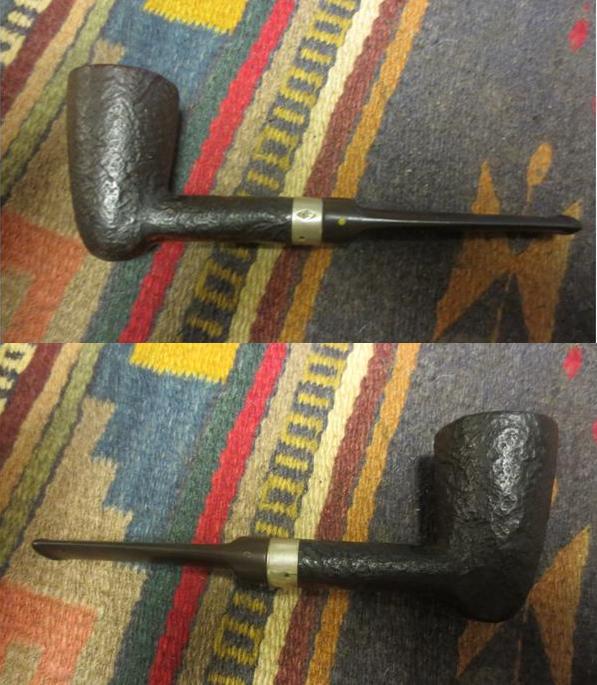
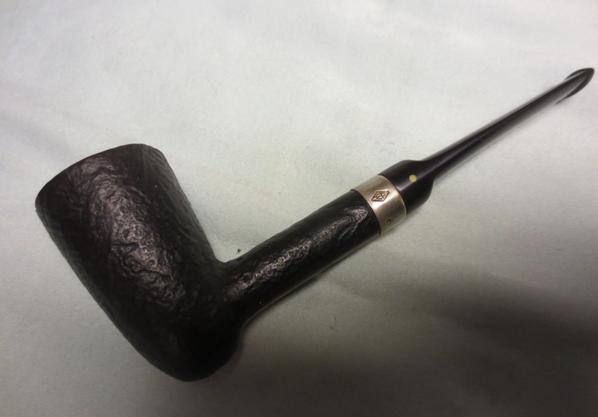
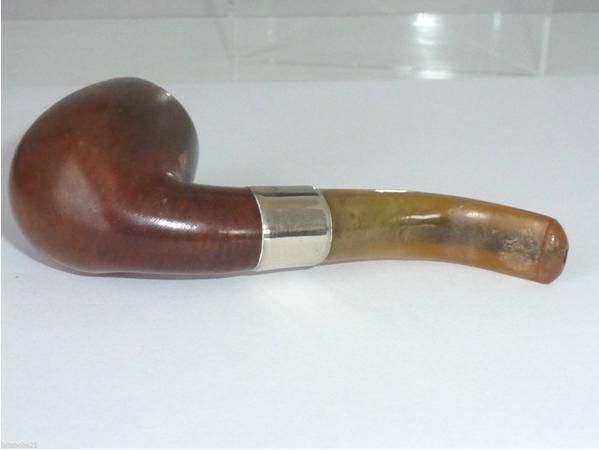
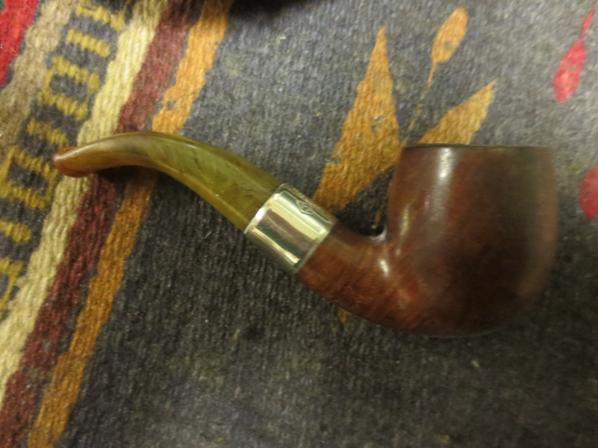
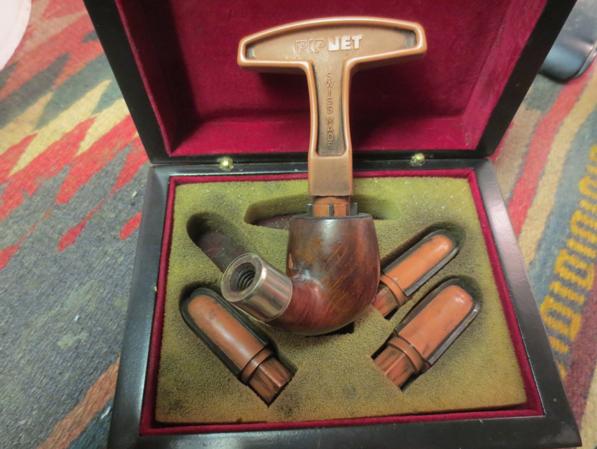
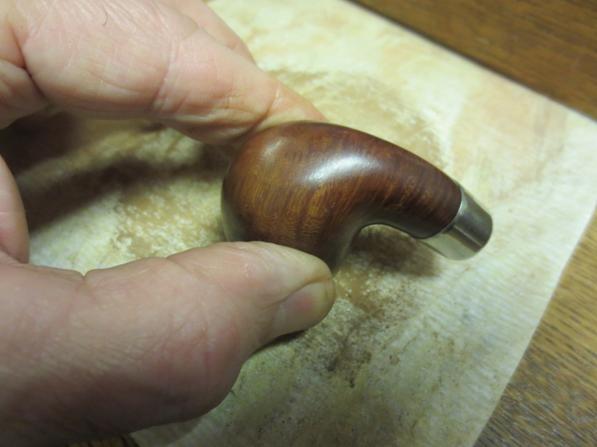
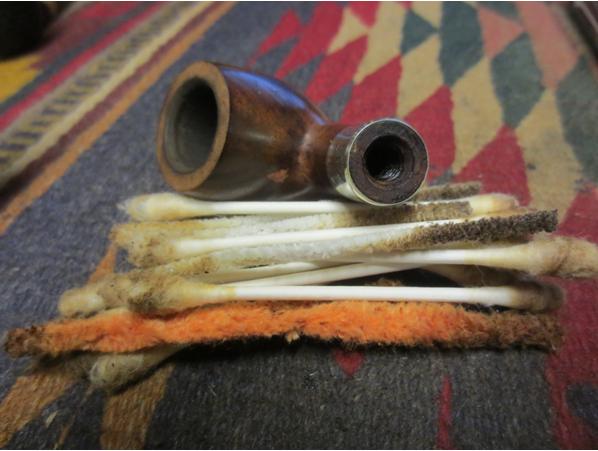
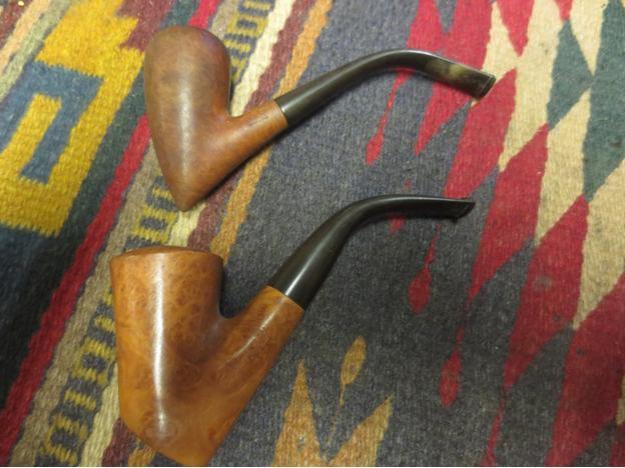
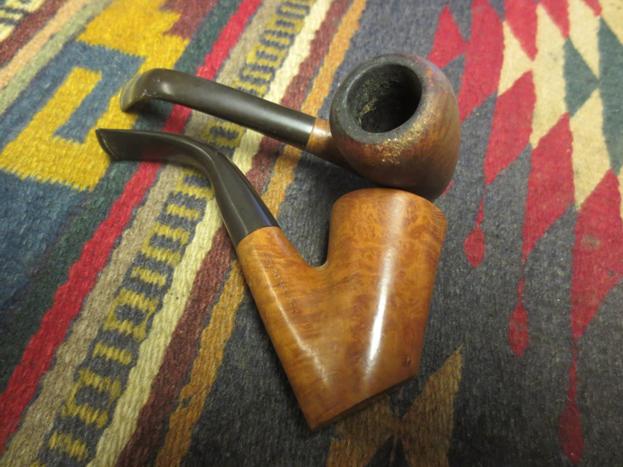
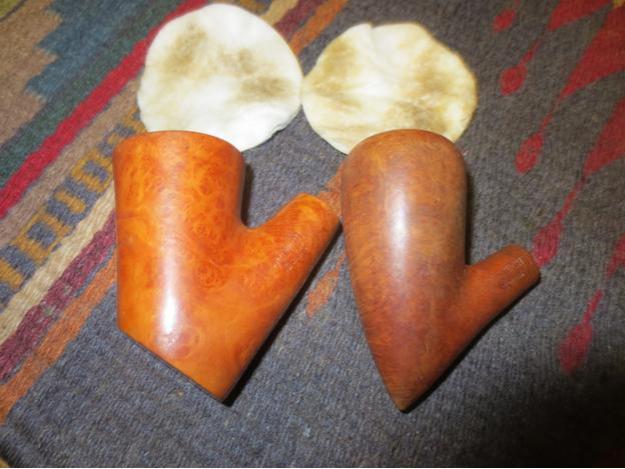
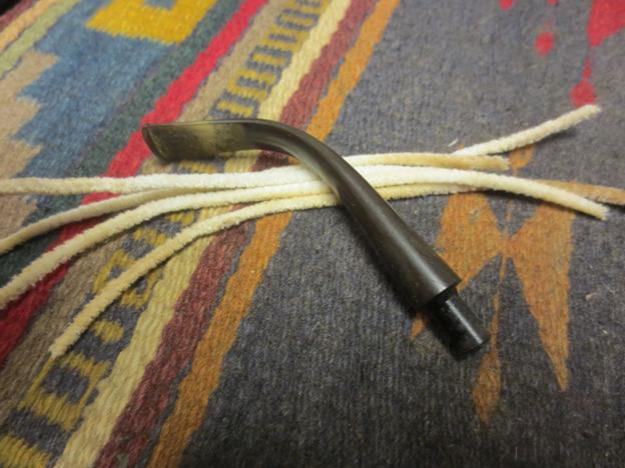
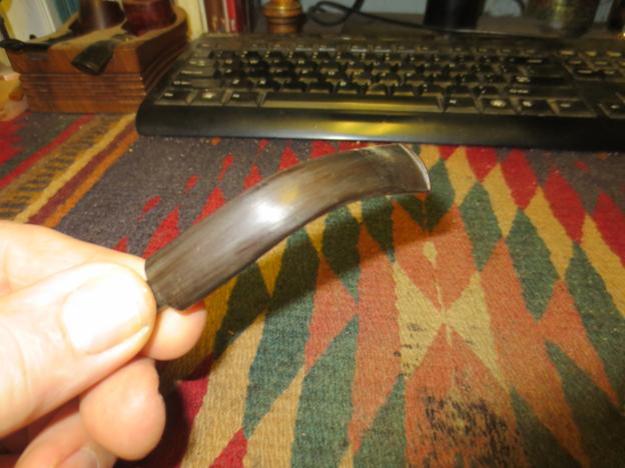
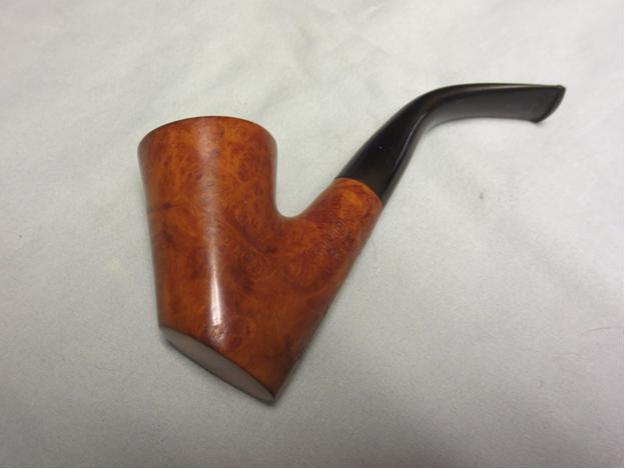
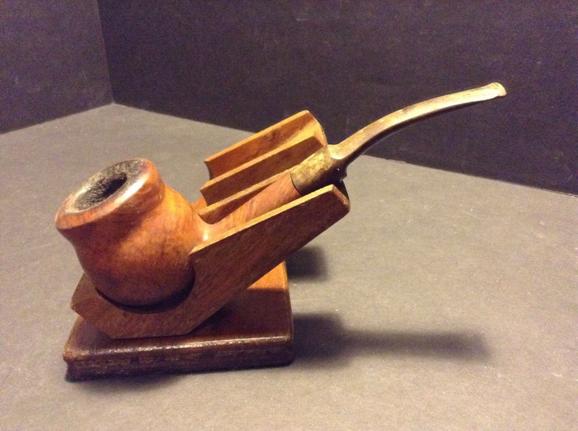
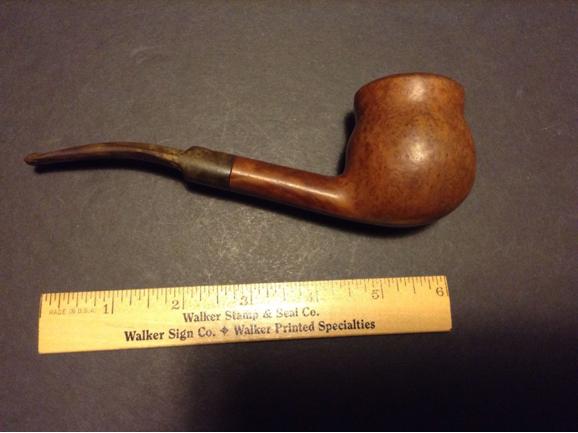
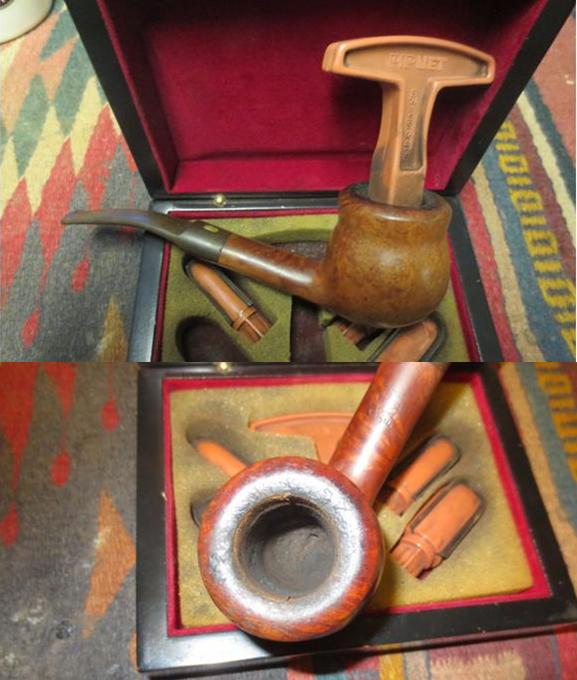
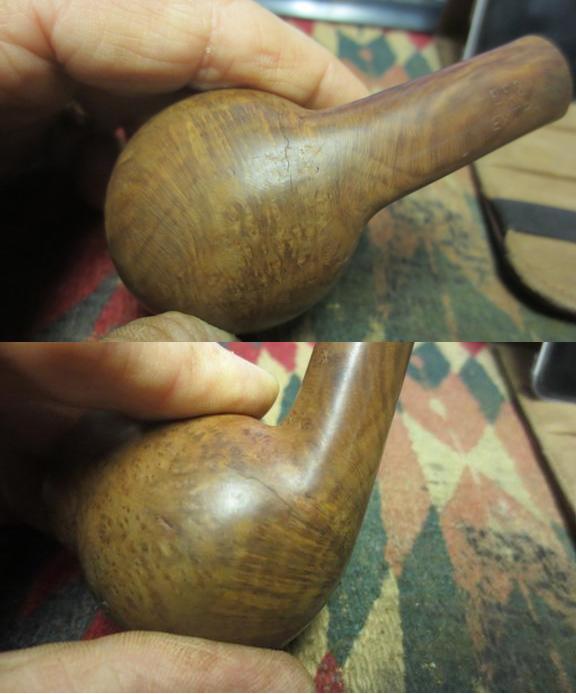
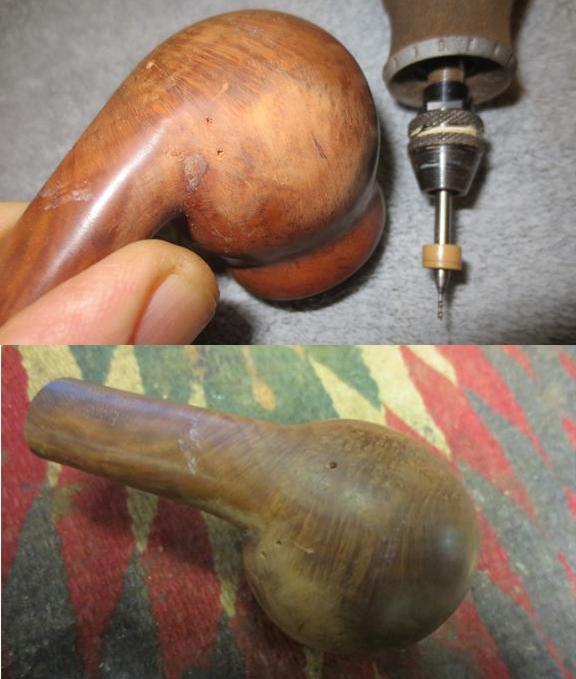
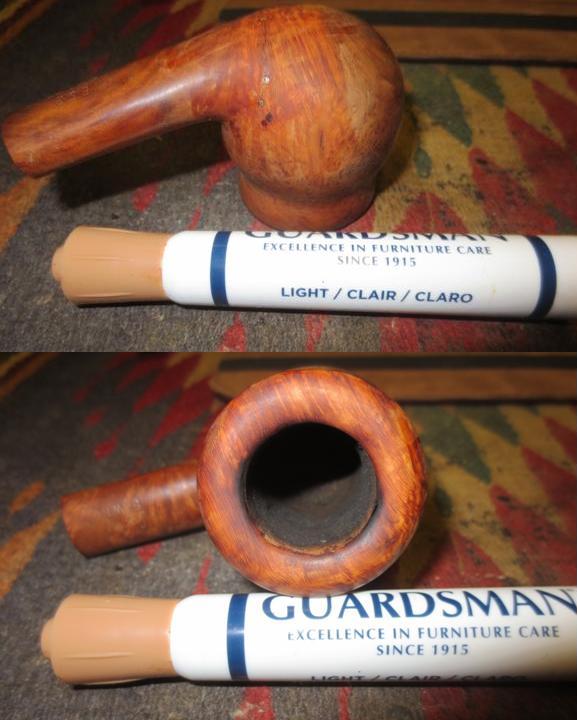
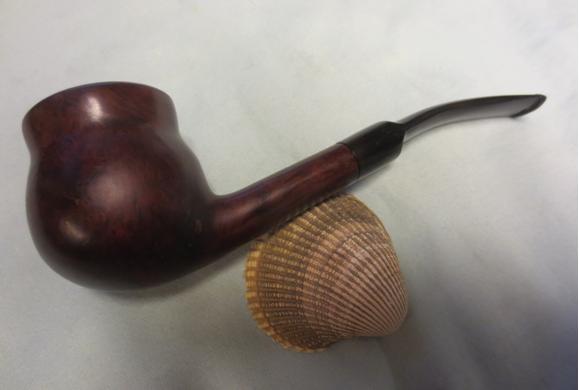
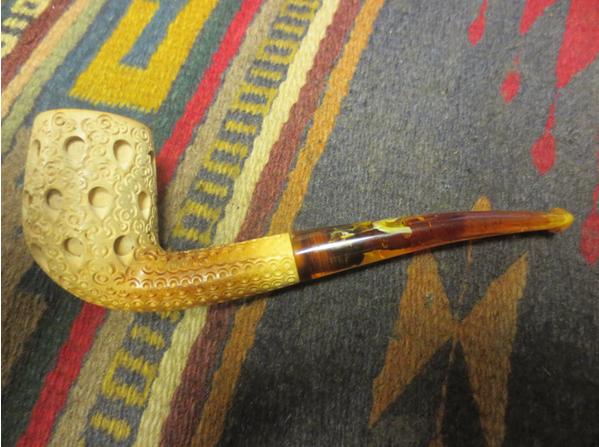
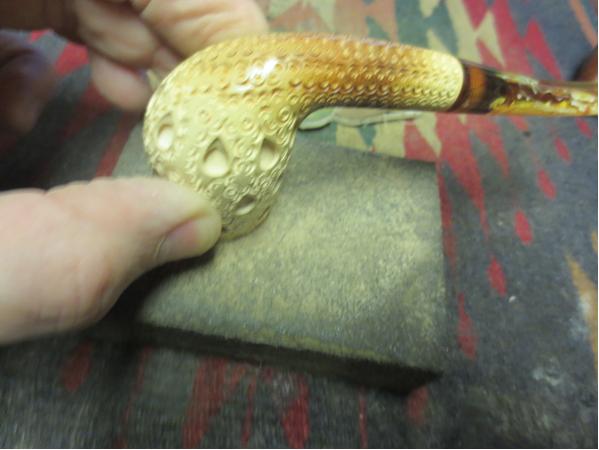
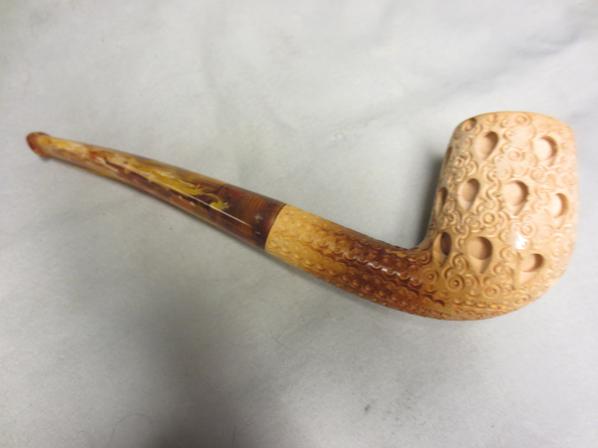
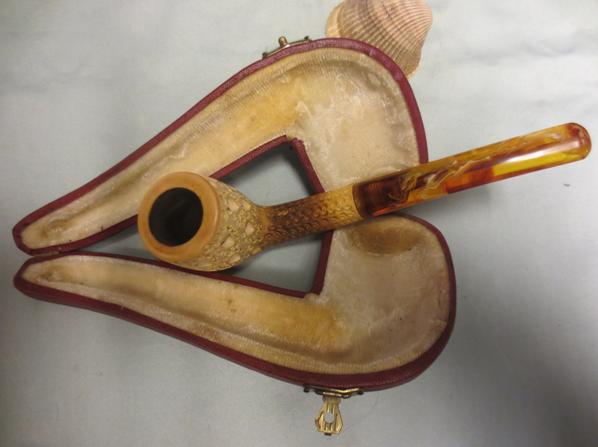
A friend I did a pipe repair for in Newfoundland, on the east coast of Canada, left a message on my phone the other day to let me know that he was sending a package to me. He said that it would have a couple of horn stem pipes – old timers and a unsmoked unique pipe that he thought I would be interested in having. He had purchased 6 of these pipes that were unsmoked and sent me one of them. The package arrived yesterday and the horn stem pipes were great and would clean up nicely. The Roto Bowl is in stellar shape and is a (New Old Stock) NOS pipe. I had never heard of the brand but was intrigued by his description of it over the phone when we talked over a month ago. I took some photos of the pipe when I unpacked it to show you all. It is pretty unique. The overall length of the pipe is 5 1/2 inches. Ellsworth1 Ellsworth2 Ellsworth3 Ellsworth4
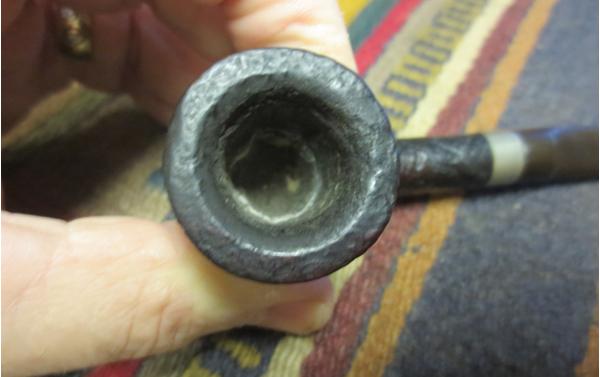
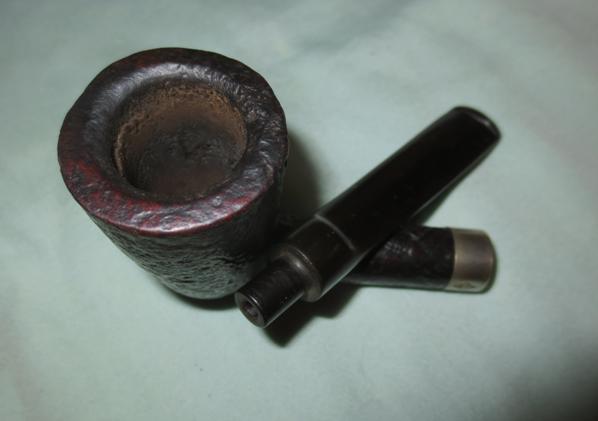
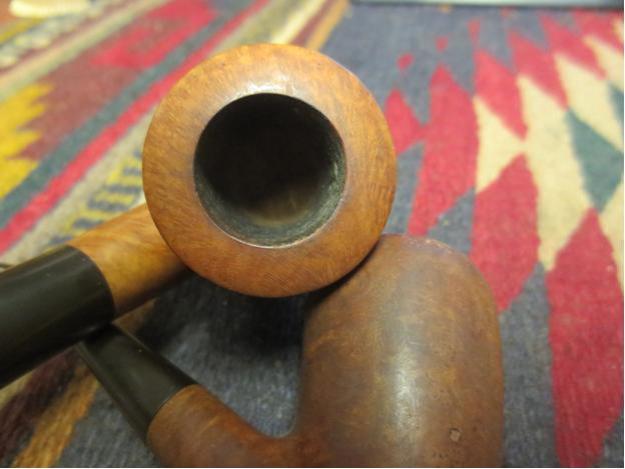
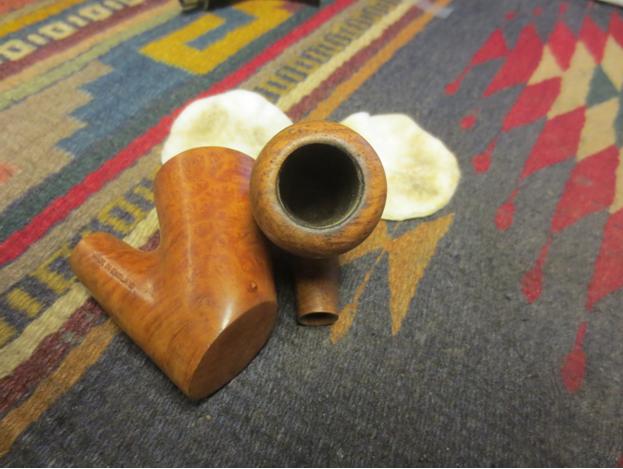
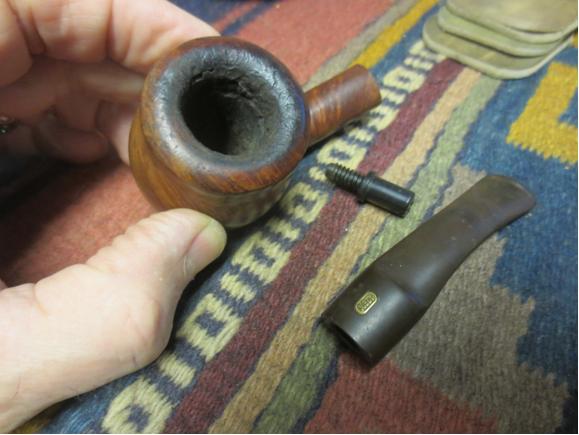
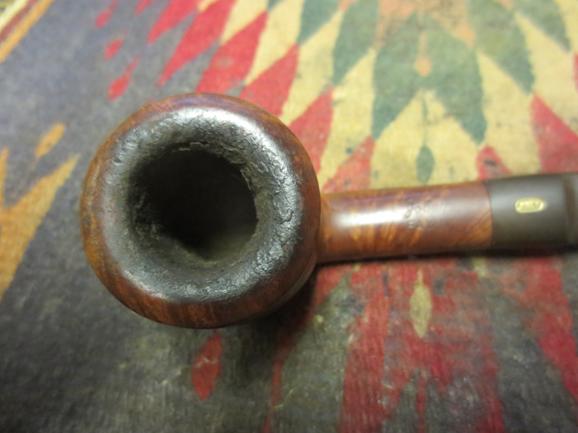
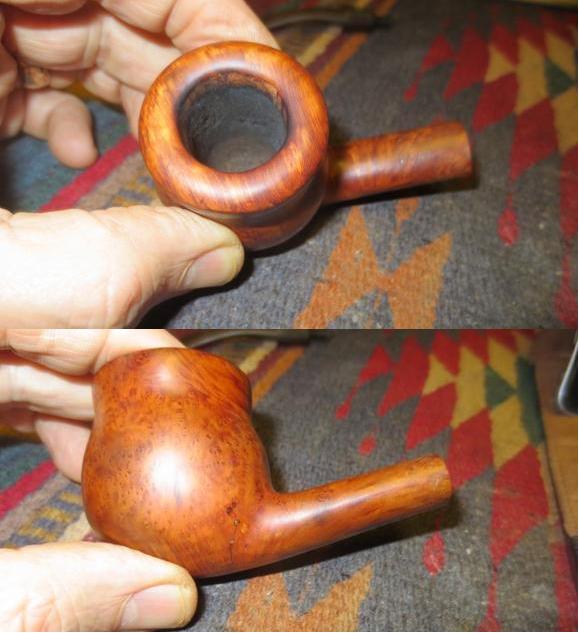
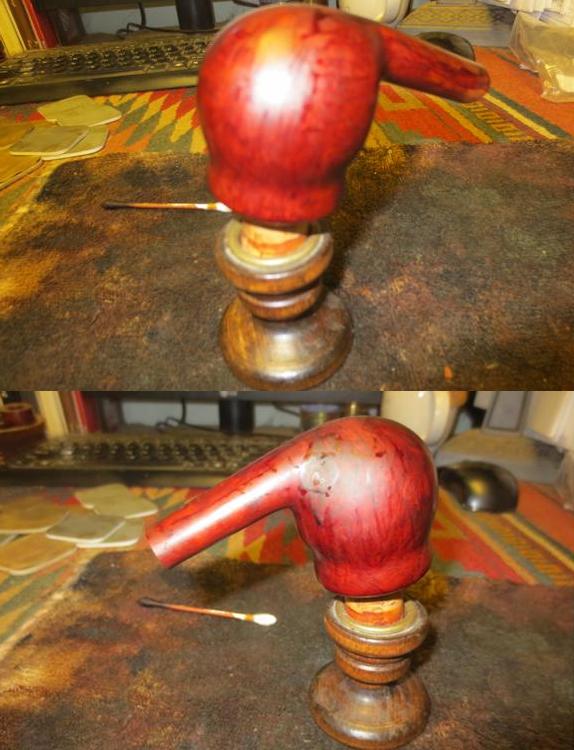
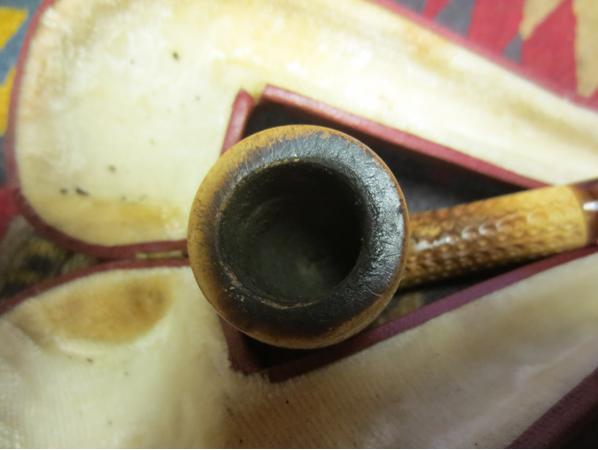
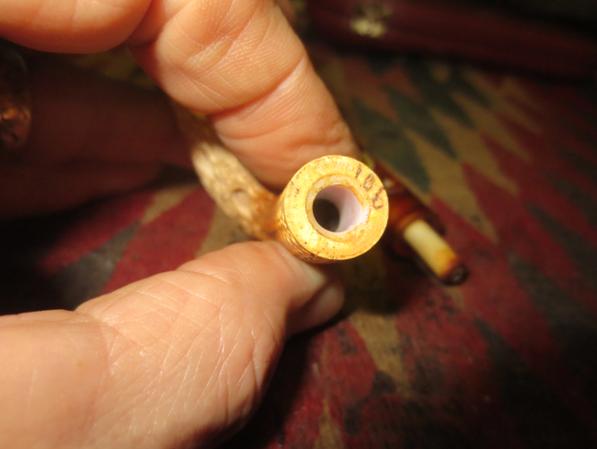
I rotated the bowl insert from the base and took a photo of the inside of the bowl to show the unique drilling it had. There are two air holes on the bottom on the sides and then two of them half way up the bowl sides.Ellsworth5
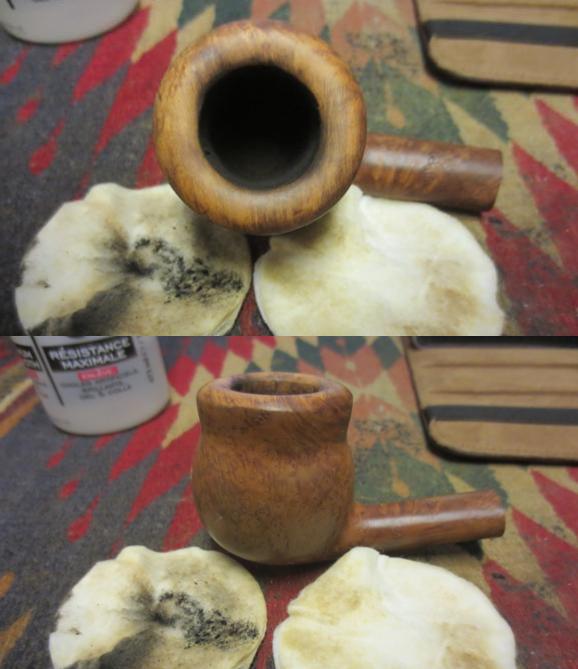
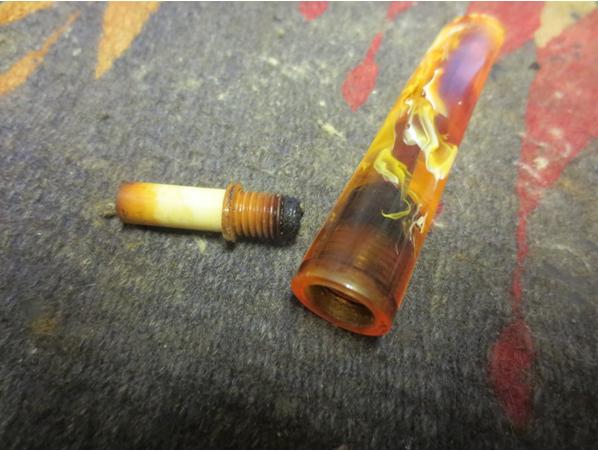
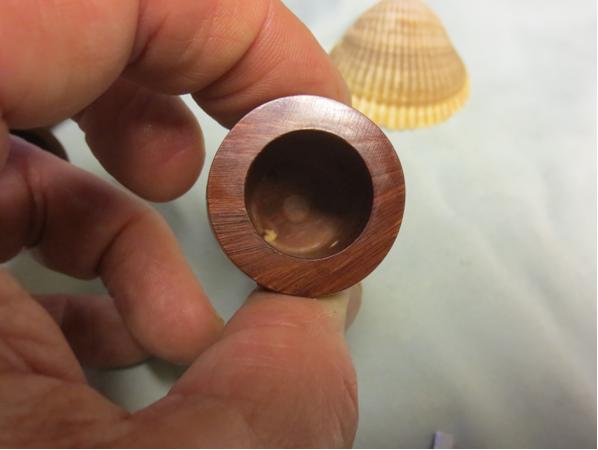
When I lifted the bowl insert out of the bowl (it was pressure fit and was easily removed) I could see that the airway entered the bottom of the outer bowl perfectly centered. There was a groove carved from the airway up to the height of the upper air holes in the bowl insert.Ellsworth6 Ellsworth7 Ellsworth8
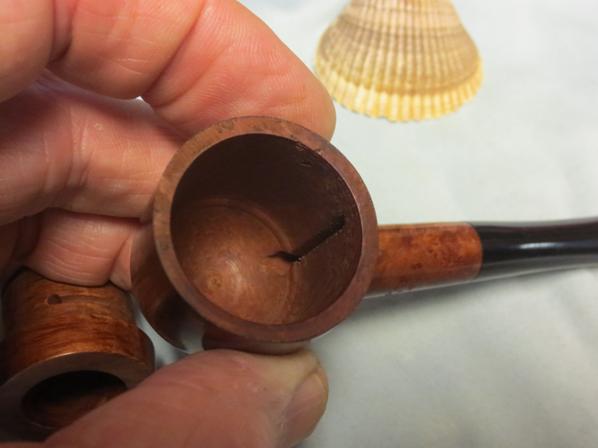
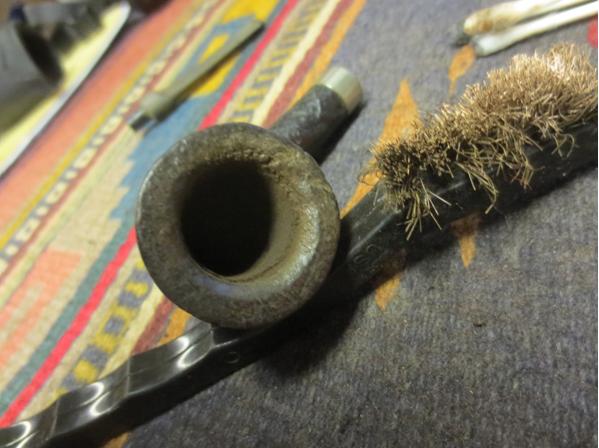
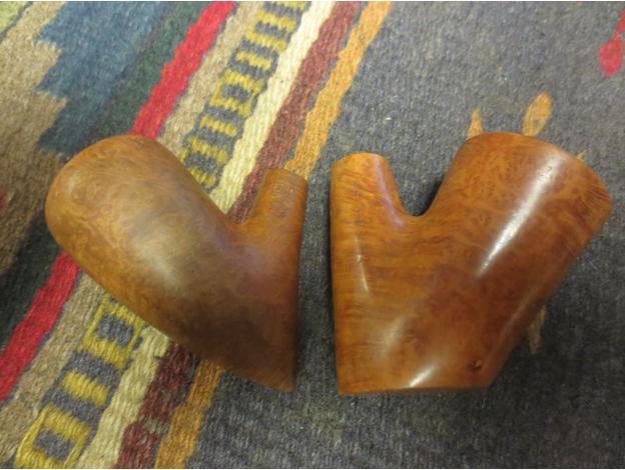
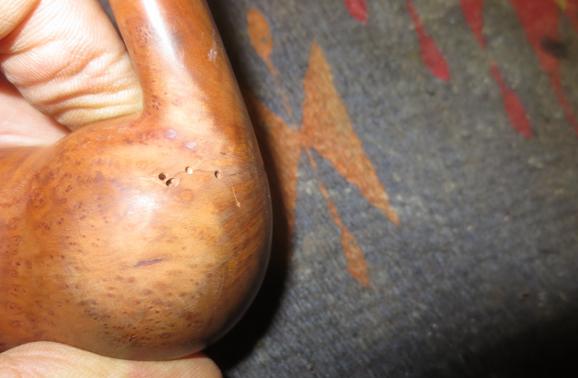
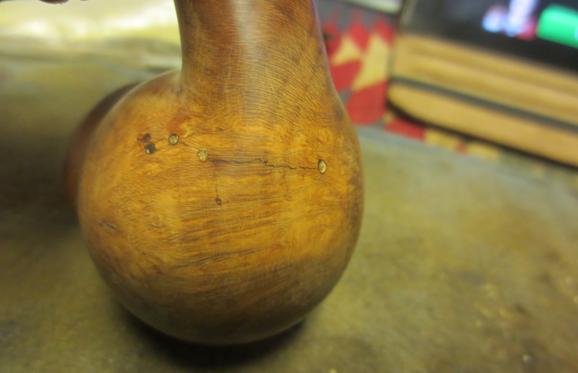
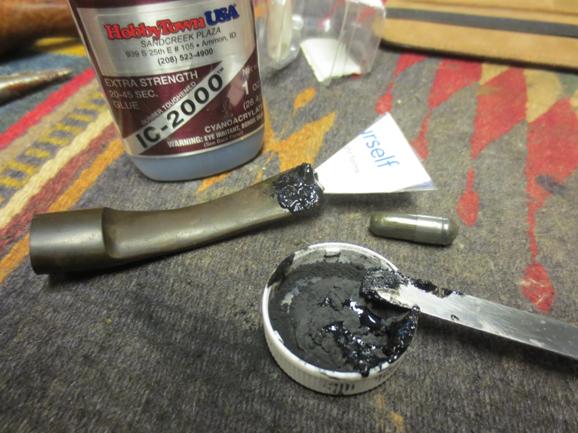
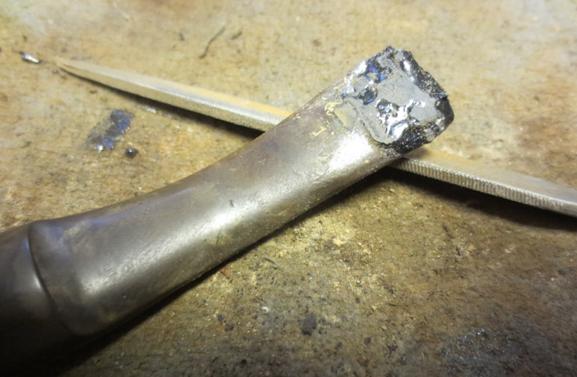
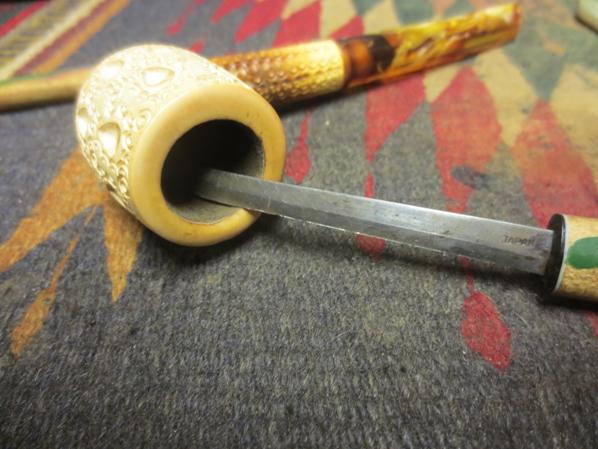
There were also marks on what would have been the front and the back of the bowl insert. The first mark was a single small drilled circle and the second one was two drilled circles. When the single mark was turned to the back of the bowl the airflow was constricted by at least half. When the double marks were turned to the back the flow was wide open. It kind of works like a Kirsten end valve is controlling the airflow from the bowl to the stem. It controls burn rate as well. Each turn of the bowl insert modified the airflow proportionally between the single and the double mark. Overall this little pipe was intriguing to say the least. It was yet again another attempt to find a drier and cooler smoke.

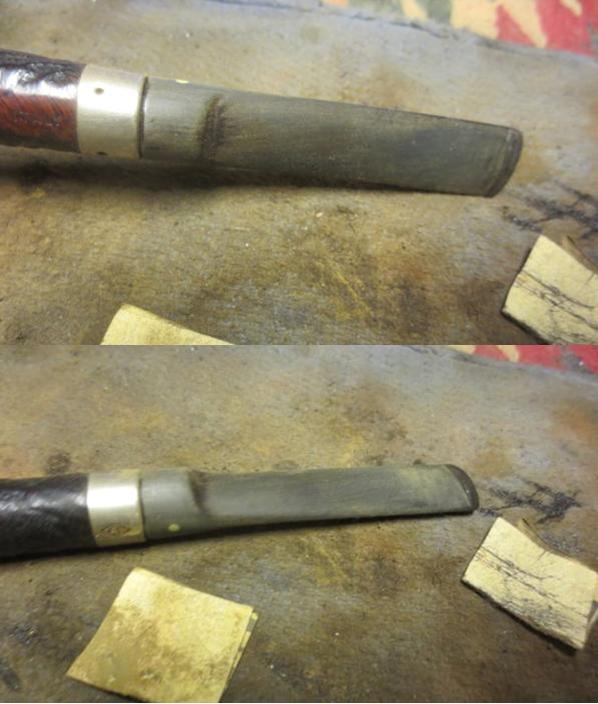
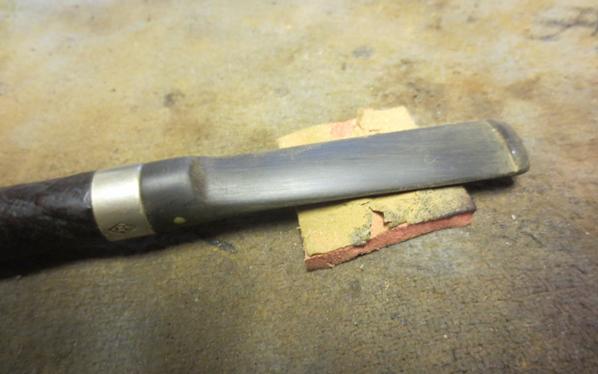
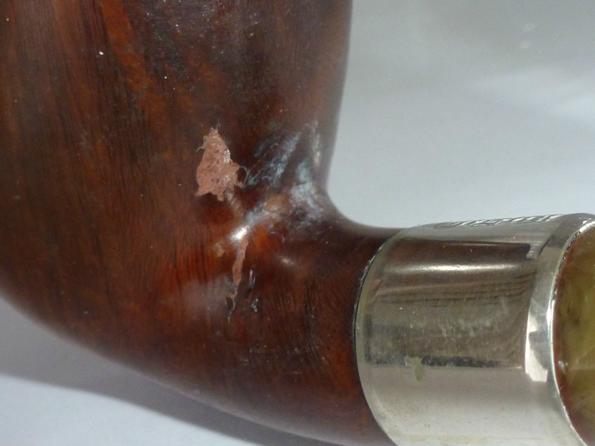
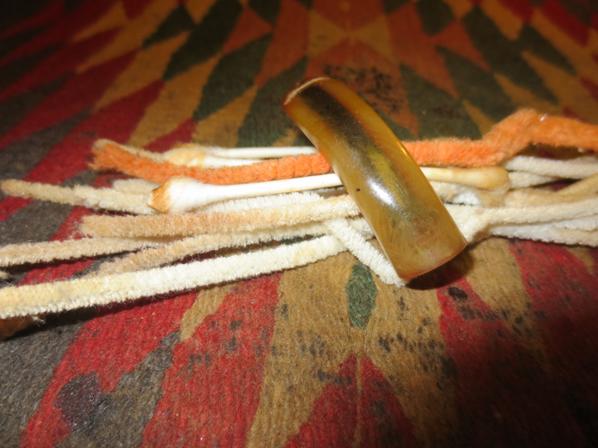
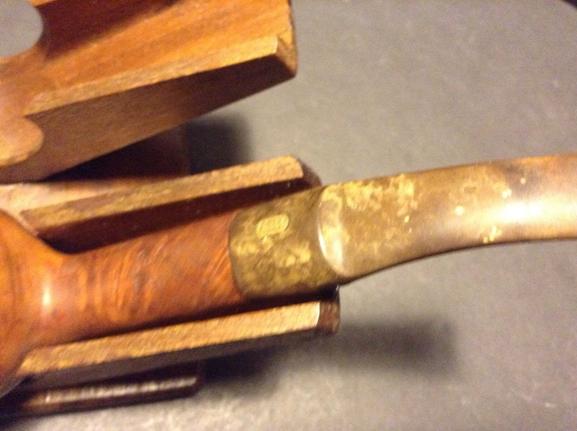
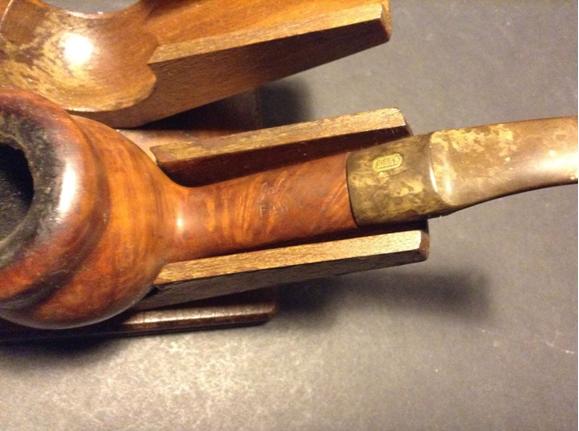
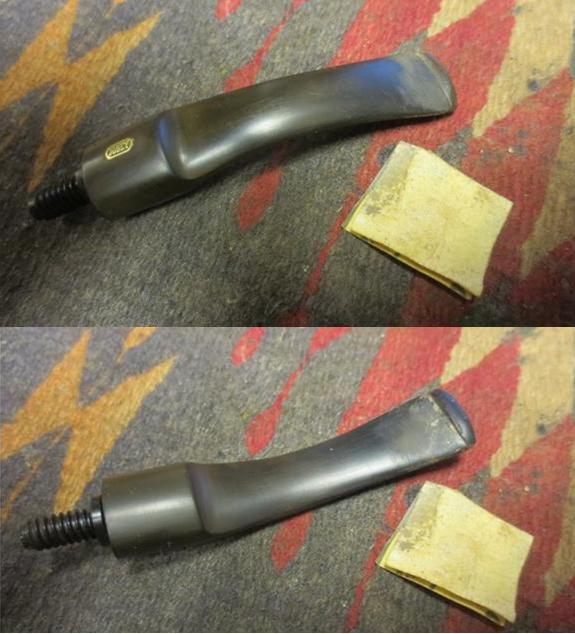
Since I had never heard of the brand I did some searching on the web and found a bit of information based on the stamping I found on the pipe. On the left side of the shank it is stamped with the name of the pipe in a circle with ROTO arched on the top of the circle and Bowl arched on the underside. There was a dot in between ROTO and BOWL and one in the centre of the stamp. On the right side of the shank it is stamped PAT. NO. 1988588 and on the underside of the shank Imported Briar. There are no other marks or stamping on the pipe, the bowl insert or the stem.

I found the first information on eBay on a previous sale (http://www.ebay.com/itm/Vintage-Ellsworth-Roto-Bowl-Pipe-NOS-1946-/272119388370?hash=item3f5b9458d2:g:~MoAAOSwKtlWq9Xh). The link will likely be dead shortly so I copied the text and the photos for reference. The seller not only gave some pertinent information on the brand but also photos of the booklet that came with the pipe. Here is what the seller said about the pipe (including the sales pitch).

“Here is your chance to own one of the rarest of the rare in Brand New unsmoked condition with original instruction booklet. This pipe was manufactured in small number in 1946 by Francis P. Ellsworth. It is called a Roto-Bowl and was quite the invention. This pipe sold new in 1946 for $12.50 and in today’s dollar that amounts to $123.00. You can see why not many of these pipes were sold. Check out the pics for the best description. This pipe would enhance even the most advanced collection. I searched the internet and could find out very little about these pipes.”

I saved the photos he included with the sale information and have included them below.Ellsworth9 Ellsworth10 Ellsworth11The brochure gave me some more information as well as the name of the pipe’s inventor, Francis P. Ellsworth. The brochure was produced in 1946 by Woodward and McDonald Inc, New York. Some of the descriptive phrases and turn of phrase on the cover were great. The first is “It’s Your Move to Lasting Sweet Smoking Satisfaction” and “Read a Scientific Analysis of Smoking Pipes”. On the back cover it reads “It’s no pipe dream…it’s a dream of a pipe”. Take time to read the inside of the booklet as it is a fun read. The 1940’s description and “Scientific” information is entertaining.Ellsworth12 Ellsworth13
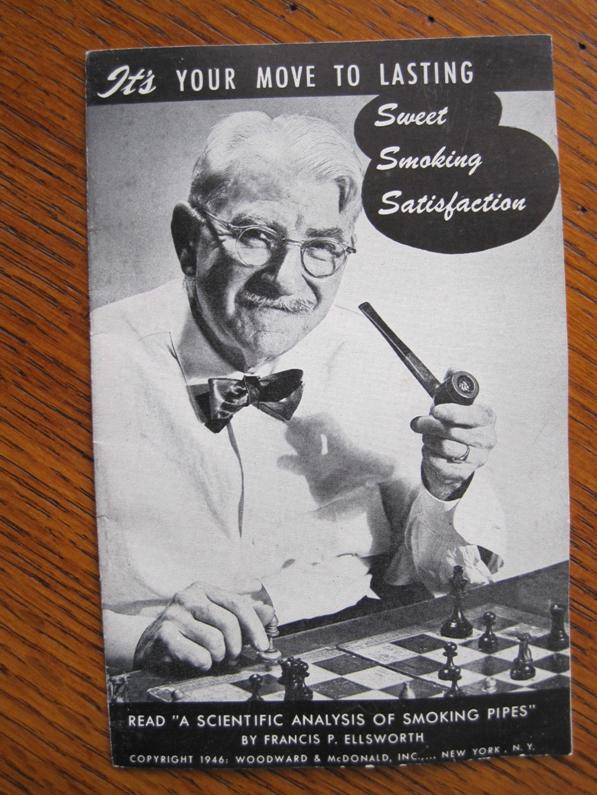
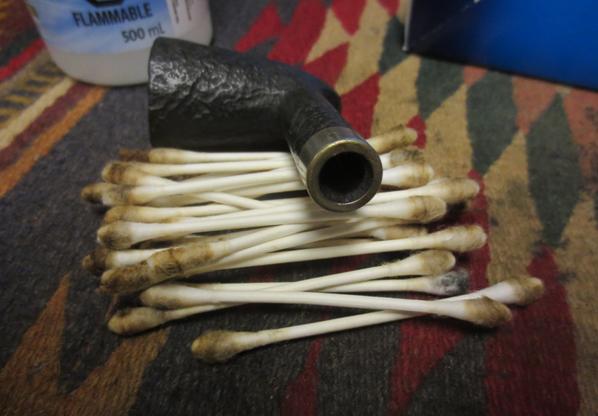
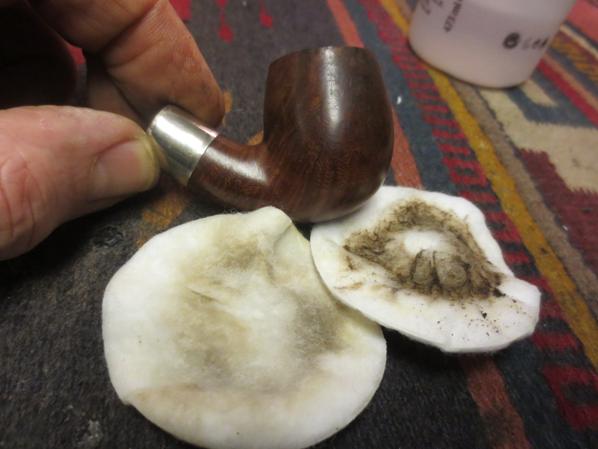
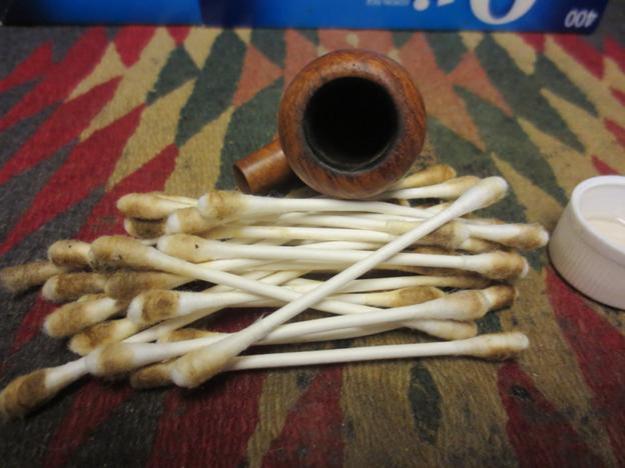
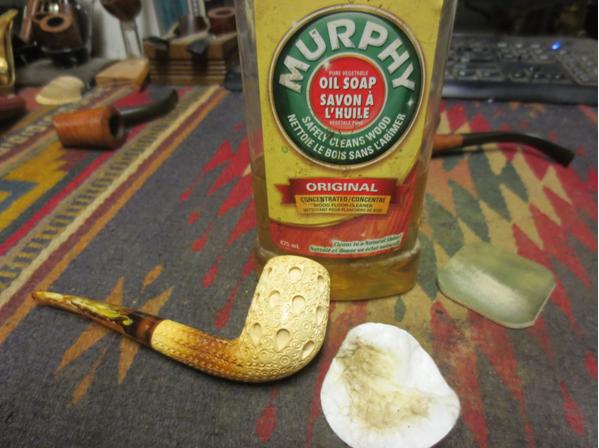
I would never have guessed that the bowl was to be smoked with a cotton ball placed in the bottom of the bowl between the bowl and the insert for trapping and retaining moisture from the smoke. I know that there are more pages in the booklet but this is all that were included by the eBay seller. Here is a photo of the back cover of the booklet.Ellsworth14
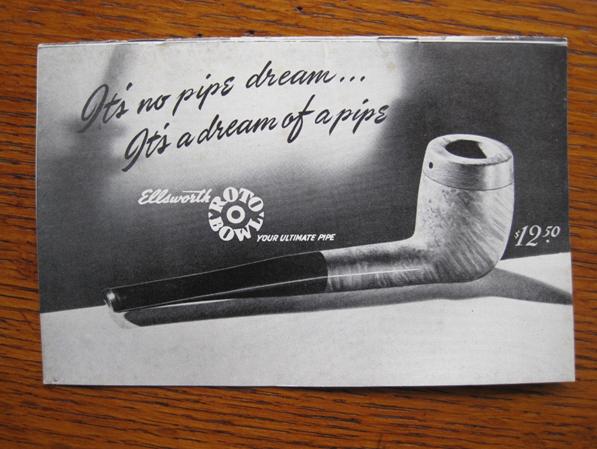
Further digging using the patent number on the right shank led to me the following link on the US Patent Search website: http://pdfpiw.uspto.gov/.piw?docid=01988588&PageNum=1&&IDKey=E06B2A6032A2&HomeUrl=http://patft.uspto.gov/netacgi/nph-Parser?Sect1=PTO1%2526Sect2=HITOFF%2526d=PALL%2526p=1%2526u=%25252Fnetahtml%25252FPTO%25252Fsrchnum.htm%2526r=1%2526f=G%2526l=50%2526s1=1,988,588.PN.%2526OS=PN/1,988,588%2526RS=PN/1,988,588

Included with the patent information is a set of drawings by the inventor and also a narrative description of the pipe and how it was supposed to work. It makes for fascinating reading for those of us who love the descriptions and details of these old timers.Ellsworth15 Ellsworth16 Ellsworth17 Ellsworth18 Ellsworth19This was a rare pipe for me not just because of its uniqueness and age but because it is one of very few that I have received that I did not have to work on or clean up. I want to give a shout out to Joe in Newfoundland for the amazing gift pipe. Thanks so much Joe for thinking of me.

Improving a no name basket pipe


Troy did a great rework on this pipe. Not it is truly a sitter and it looks really good. Great work Troy. He also shows his use of a Sharpie pen… a trick that we share.

Troy W's avatarBaccy Pipes

I actually got this pipe back around summer of 2014 when i first started refurbishing and repairing pipes. It was gifted to be by a member on the Dr.Grabow Collectors Forum. I was giving a few pipes by him that he did not want or use . I did not have many pipes at the time so the gifts were eagerly accepted by me . One of those pipes was this no name he picked up in a  junk/antique store lot if I’m not mistaken. I don’t think he had more than a  couple of dollars in it.

For the last two summers this has been one of my favorite pipes to sit outside with on the warm evening and nights . I usually load it up with some John Patton “Dark Horse” or “Storm Front” , just sit ,relax and drift away.

Well the warmer weather is arriving here  so…

View original post 545 more words

A Rare Find – A Pair of Fieldcraft Dulwich Quaints


Blog by Steve Laug

My brother found this pair of Dulwich Quaints – one a sitter, kind of bent poker and the other a kind of pickaxe shape. The shape and the look of them were unique and there was something about them that immediately drew me to them. They are not big pipes but they have full sized bowls. The stems were made out of very good vulcanite. The briar was quite nice even though both pipe sported a few fills. The bent poker is stamped DULWICH over Quaint on the left side of the shank and Made in England on the right side. On the underside of the shank it is stamped Fieldcraft and the shape number 102. The pickaxe is stamp DULWICH over Quaint on the left side and Made in England on the right and on the underside it has the shape number 126. I have hunted high and low for information on the brand using the Dulwich moniker as well as the Fieldcraft one. Both take me nowhere. One of the earlier pipes I repaired was stamped with the Fieldcraft name and the shape number was clearly a Orlik Pipe Shape. In this case I have no idea who the maker was. Both are interesting old pipes.Dulwich1 Dulwich2The poker shaped sitter had hardly been smoked with over half of the bowl undarkened briar. The stem had some tooth chatter on the underside near the button but other than being oxidized it was a clean pipe. The finish on it was also pretty decent with a few small fills toward the bottom of the bowl on the left side and the front. There was some scratching in the briar as well particularly on the bottom of the bowl. The pickaxe was in rougher shape all the way around. It had a thick cake in the bowl with lava on the rim. The front right rim edge and top had been badly beaten against something that left the briar very rough. The stem was oxidized and had a line of calcification. There was tooth chatter on both the top and bottom sides near the button.Dulwich3 Dulwich4 Dulwich5I took a close up picture of both rims to show what they looked like when I started the refurb. The poker had a slightly crowned rim that is undamaged and has no lava or tars. The pickaxe is another story.Dulwich6 Dulwich7I reamed the bowl of the pickaxe with a PipNet reamer using the smallest cutting head. I took the cake back to bare briar so that I could repair the rim damage.Dulwich8 Dulwich8aI wiped both bowls down with acetone on cotton pads to remove the finish and the grime that was particularly prevalent on the pickaxe.Dulwich9 Dulwich10I sanded the rim of the pickaxe with 220 grit sandpaper to remove the damage to the surface of the front edge and top. I sanded it with a medium and a fine grit sanding sponge and then with micromesh sanding pads – 1500-24000 grit. I wiped the rim down with acetone.Dulwich11 Dulwich12I buffed both bowls with White Diamond on the wheel to get a natural shine.Dulwich13 Dulwich14 Dulwich15 Dulwich16I cleaned out the mortise and the airway on both pipes with cotton swabs, pipe cleaners and alcohol.Dulwich17 Dulwich18I cleaned out the airways on both stems with alcohol and pipe cleaners.Dulwich19 Dulwich20I sanded the stems with 220 grit sandpaper to clear the surface of the oxidation and the calcification on the pickaxe stem. I scrubbed the bite marks on the underside of the stem and used black super glue to repair them.Dulwich21 Dulwich22I sanded the poker stem with 220 grit sandpaper and removed the tooth marks on the underside of the stem near the button.Dulwich23 Dulwich24I rubbed the stems down with some Obsidian Oil and put them back on the bowls to get a quick look at how the work was coming along.Dulwich25I scrubbed the stems with Meguiar’s Scratch X2.0 Fine scratch and blemish remover. It worked really well on the pencil stem on the pickaxe and not as effectively on the thicker stem of poker.Dulwich26I wet sanded the stem of the pickaxe and the stem on the poker with 1500-2400 grit micromesh sanding pads and then rubbed the stem down again with the Obsidian Oil. I dry sanded the stems of both with 3200-4000 grit micromesh and then gave them another coat of the oil. I finished sanding them with the 6000-12000 grit micromesh pads and gave them a final coat of oil and set them aside to dry.Dulwich27 Dulwich28 Dulwich29 Dulwich30The briar was naturally finished so I did not stain either bowl. I gave them a light coat of olive oil and then buffed the stems and bowls of both pipe with Blue Diamond on the wheel. I gave them both several coats of carnauba wax. I buffed them with a clean flannel buffing pad and then by hand with a microfiber cloth. The finished pipes are shown in the photos below. Do any of you who are reading this have any information on either Fieldcraft or Dulwich pipes? I have seen and repaired several over the years and so far have been unable to identify them beyond the initial one that was an Orlik made pipe. Thanks ahead of time for any help that you may have.Dulwich31 Dulwich32 Dulwich33 Dulwich34 Dulwich35 Dulwich36 Dulwich37 Dulwich38 Dulwich39 Dulwich40 Dulwich41 Dulwich42 Dulwich43 Dulwich44

Mint in Box Briarcraft Sterling Hall Standard


Been awhile since I reblogged one of Troy’s pieces but this one was one I had to do! The information and the beauty of this old pipe makes it an interesting addition to pipe information.

Troy W's avatarBaccy Pipes

I picked up this Braircraft Sterling Hall off EBAY .

For some odd reason it  was listed under religious medals category  instead of pipes ,so it flew under the radar of the pipe bidders. I was lucky enough to see it and win it on opening low bid. I had been looking for  nice Braircraft pipe as its one of the few early-mid  20th century pipe brands i did not have.

From my  quick research on the pipe i can not find any ads for the Sterling Hall model prior to early 40’s , so i think its a 1940’s pipe . Briarcraft made pipes for only 20 years . They lasted from 1920-1950. Some pipe smokers consider them one of the best smoking American made pipes of their time. Especially the Briarcraft  Smokemaster models.

Here is a 1946 Sterling Hall ad.

s-l1600.jpg

I have a online  friend who owns several hundred…

View original post 243 more words

More than met the eye: Would I be able to bring this Jobey Fawn Cauldron back to life?


Blog by Steve Laug

My brother sent me the Ebay link to this Jobey Cauldron and I was hooked. It was in pretty worn shape in terms of the finish and the rim. There was a thick cake in the bowl and some serious lava had overflowed the rim. There were nicks around the outer edge of the rim and the bevel on the inner edge was pretty well covered with lava. There were scratches in the sides of the bowl and it was truly filthy. The stem was oxidized and spotty on the stop side and the saddle. Underneath it was missing a large triangular chunk from the button forward. It was a Jobey so it had the Jobey link tenon that screwed into the shank and the stem fit over the tenon. It was made for a quick and easy replacement. The photos below are from the Ebay seller and clearly show the state of the pipe he was selling. We bid on it and won. Little did I know that what I saw in terms of issues with this pipe were only part of the problems that I would need to deal with in restoring it. Cauldron1 Cauldron2 Cauldron3The seller included a few close up photos to show some of the damage to the pipe. The oxidized and spotty stem is shown in the first photo and the second shows the state of the rim and bowl.Cauldron4 Cauldron5The next two photos show the stamping on the pipe. The top of the shank is stamped Jobey in script over FAWN. The underside is stamped E52 over EXTRA.Cauldron6 Cauldron7The seller also included the following photos to give a clear picture of the profile of the pipe and the damage to the underside of the stem. He gets full props for full disclosure of the issues with this pipe (at least those that were visible through the grime and build up on the briar and stem).Cauldron8 Cauldron9 Cauldron10I went online and searched for a photo of what the pipe had originally looked like and found this one on Smokingpipes.com. Looking at it gave me hope for the repairs and restoration of the one we purchased.Cauldron11When the pipe arrived I put it in my box of pipes to be refurbed and it sat for several months. When I took it out and looked it over I found that the stem was not aligned. I tried to unscrew it from the shank and it would not turn. I tried to wiggle the stem free from the shank and in the process heard that awful cracking sound which refurbishers the world over have come to dread. The tenon snapped off. Great! Now I added one more issue to the refurbishing process on this old pipe. Fortunately, I was able to clear the broken end out of the stem with very little problem but the one in the shank took a bit more ingenuity. I finally was able to remove it by hand turning a drill bit into the broken end and then turning it free of the shank. I cleaned out the shank with pipe cleaners, cotton swabs and alcohol, and then put the parts aside. Since I had no Jobey Link tenons in my kit I would need to wait until I could get some. I called Tim West at JH Lowe and put in an order for tenons. Even that turned out to be far more of an issue than I expected – they came in five sizes and the one I had was so shattered that I was unable to get the measurements. I could estimate the measurements but not get an accurate diameter on either the threaded end or the insert. So I had to order one of each of the three sizes that Tim had in stock. I was hoping that when they arrived that one of them would fit the stem and the shank. Now I would have to wait for their arrival.

It did not take too long of the package to come from Tim. I took out the various Jobey Links that he included and breathed a sigh of relief when the middle sized link was a perfect fit in the shank. The end of the tenon is slotted so that it can be screwed into the shank and unscrewed with a slotted screw driver. In this case it turned into the shank with no issues. The stem did not fit over the end of the tenon but the measurements were correct so I cleaned out the end of the stem and was astonished at the amount of grit that came out of it. I used cotton swabs and alcohol to scrub it clean. Once it was clean the stem fit snuggly over the end of the tenon and all parts aligned perfectly.Cauldron12 Cauldron13 Cauldron14 Cauldron15With the stem fit completed and the new tenon in place it was time to clean up the pipe and see what I was dealing with underneath the grime and dirt. I took some close up photos of the bowl and the stem issues and a complete set of photos of the pipe from multiple angles to show what it looked like when I started.Cauldron16 Cauldron17 Cauldron18 Cauldron19The bowl on this pipe is quite large. I reamed it with the two largest cutting heads on the PipNet pipe reamer and took the cake back to bare briar. I cleaned up the ridges and edges of the broken cake shown in the second photo below with a pen knife and the bowl inside was smooth and clean.Cauldron20I lightly sanded the rim with 220 grit sandpaper to cut through the thick lava on the rim and the inner edge of the bowl. I was able to remove most of it with the sandpaper and finished by scrubbing the bowl down with acetone on cotton pads. The next photo shows the beauty of the rim that lay beneath the lava flow.Cauldron21Once I had removed the grime and the finish I examined the bowl to look for issues that I would need to deal with. Sadly I found that there was a hairline crack where the shank connected to the bowl. It was on the underside of that junction and went up the left side. It was about an inch long. This Jobey Cauldron was turning out to be far more work than I originally imagined when my brother and I had looked at the Ebay photos.Cauldron22This crack, though not deep and pretty cosmetic at this point, would need to be dealt with so that it would not become a bigger issue. I used a micro drill bit on the Dremel and drilled both ends of the crack. I examined it with a lens and saw that it went a little further than I had expected originally and redrilled the end of the crack on the side of the bowl.Cauldron23I decided to also drill some small holes along the crack to make sure that I could seal it further.Cauldron24I pressed some briar dust into the drill holes with a dental pick and then put drops of super glue into the filled holes. I pressed some more briar dust into the surface of the holes to deal with expected shrinkage as the patches dried. At this point the repair always looks ugly and over done but I have found if I skip the last step I have to repeat the process to ensure that the holes are filled.Cauldron25I sanded the repairs with 220 grit sandpaper and then with a medium and fine grit sanding sponge.Cauldron26I stained the repair area and the top of the rim with a light brown stain pen to blend it into the colour of the bowl and shank. This would not be the final colour of the bowl but I wanted to minimize the difference between the sanded areas and the rest of the bowl and shank when I gave it a final stain coat.Cauldron27

I buffed the bowl with Blue Diamond to even out the stain. While the repairs showed through the stain at this point I intended to darken the stain later and it would blend in the repairs a bit more.Cauldron28 Cauldron29With the bowl basically finished at this point I worked on the stem. The missing chunk in the stem end was the expected major repair that needed to be addressed. I mixed up a batch of black super glue and activated charcoal powder to make a paste. I put a wedge of cardboard wrapped in packing tape in what remained of the slot in the stem and applied the paste to the hole in the stem with a dental spatula. At this point I was more interested in getting a good thick coat of the paste in place than in making it look pretty. Shaping and smoothing would be done once it cured.Cauldron30 Cauldron31Once the patch had cured I used a file to define the edge of the button and to smooth out the surface of the stem. I used the topping board to smooth out the end of the stem.Cauldron32It took a lot of filing with needle files to clean up and define the button and then sanding with 220 grit sandpaper to blend the patch into the surface of the surround stem. I used a round, an oval and a flattened oval needle file to open up and shape the slot on the bottom side to match that of the top side.Cauldron33I continued to sand the stem surface with 220 grit sandpaper to shape the blade and the button. The stem was beginning to take shape. The new button and the repair to the bottom of the stem were complete.Cauldron34I wanted to make sure to stain the bowl before I called it a night so I set the stem aside for a bit and stained the bowl. I gave it several coats of dark brown aniline stain and flamed it between to set the colour in the briar. The darker colour would bring the pipe to a similar colour to the one that I found on Smoking pipes.com (shown above).Cauldron35In the morning I worked some more on the stem. I wet sanded it with 1500-2400 micromesh sanding pads. I gave it a coat of Obsidian Oil and then dry sanded it with 3200-4000 grit pads. I gave it another coat of oil and then finished sanding it with 6000-12000 grit pads. I gave it a final coat of Obsidian Oil and set it aside to dry. Cauldron36 Cauldron37 Cauldron38At this point in the process you can see the scratches on the underside of the stem. No matter how much I sanded them with the micromesh pads these still remained. I started over the process of sanding with the pads – beginning with 1500 grit I worked my way through them until I had finished with 12000 grit. Finally I was able to remove the scratches. I buffed the stem and bowl with Blue Diamond on the wheel and then gave both the bowl and stem several coats of carnauba wax. I buffed it with a clean flannel buff and then with a microfiber cloth before taking the photos below. The finished pipe is shown in the photos below. The repairs to the hairline crack and the stem repair though still visible under scrutiny blend in well with the rest of the bowl and stem. The darker stain covers the repairs on the bowl and look quite natural. The bowl has been brought back to life and I like the rich colour of the buffed and polished dark brown stain. Thanks for looking.Cauldron39 Cauldron40 Cauldron41 Cauldron42 Cauldron43 Cauldron44 Cauldron45 Cauldron46

This is one Beautiful Meerschaum – a Lattice Billiard with a 1/8 bent stem


Blog Steve Laug

I have no idea who carved this Meerschaum Billiard but the tear drop cuts in the outer finish of the bowl and the swirls and circles that work around the tear drops and up the shank give the pipe a look of grandeur. The rim is smooth underneath all of the tar and oil build up and the bowl is already colouring. The shank has picked up some darker amber hues and the underside of the bowl also has colour. The stem has a push tenon and the amber swirl acrylic of the stem works well with the bowl as it is colouring. The stem has some whites, creams and varieties of amber colouring that are really beautiful. The bowl had a slight cake build up and the shank was dirty with oils. The push tenon was discoloured and the threads into the stem were also black and dirty. The stem had some tooth chatter on the top and bottom sides near the button. The pipe came in a red artificial leather case lined with a plush cream coloured fabric that the bowl sat against. The case was in good shape externally and the inside had flecks of dirt and tobacco ash on the surface.Amber1 Amber2I took a close-up photo of the bowl and rim to show the cake and the build up on the rim top. The inner and outer edges of the rim were in great shape. There was a slight crown to the rim curving from the inner edge to the outer edge giving it a rounded look. Amber3I took some photos of the pipe out of the case to give a clear picture of the condition of the pipe. The stem is quite beautiful and will clean up nicely.Amber4 Amber5 Amber6 Amber7I decided to gently top the bowl – not removing any meerschaum but removing the hard tar build up on the rim face. I used a medium and a fine grit topping sponge to break through the tars. It did not take long before I had the surface back to its original smooth and clean state.Amber8 Amber9I carefully reamed the bowl with a pen knife. I scraped the cake back to the smooth meerschaum surface.Amber10I scrubbed the bowl with Murphy’s Oil Soap and cotton pads to remove the dirty spots on the bowl. I wanted to remove these soiled areas and leave the patina intact so the Murphy’s Soap works well for that. I scrubbed the bowl with undiluted soap and then rinsed it with a wet cotton pad to remove the soap left behind.Amber11I cleaned out the shank and the inside of the stem with alcohol, pipe cleaners and cotton swabs and was surprised at how clean it was. It did not take much to clean up the airways.Amber12I sanded the tooth marks next to the button on both top and bottom of the stem with 220 grit sandpaper and removed all sign of the marks. Fortunately they were not deep marks.Amber13I wet sanded the stem with 1500-2400 grit micromesh sanding pads. Amber14While I was sanding the stem I tried to unscrew the push tenon and to my surprise it came out easily. This allowed me to clean out the end of the stem with alcohol, pipe cleaners and cotton swabs to remove the black tars that had built up behind the threads in the end of the stem. I scrubbed the threads on the tenon with a brass bristle brush and wiped them down with alcohol.Amber15 Amber16I lightly sanded the darkened areas on the push tenon with the micromesh sanding pads to remove any build up that was present. I dry sanded the stem with 3200-4000 grit micromesh sanding pads and wiped the stem down with the Obsidian Oil to give me some bite with the final micromesh pads. I completed the sanding with 6000-12000 grit pads.Amber17 Amber18Before put the stem back in place in the shank I took a closer look at the end of the tenon. There was some writing on the meerschaum on the top right side. It appears to be the numbers 106 but I am not sure. Anyone have any ideas what that might signify??Amber19I put the stem in place and wiped the bowl and stem down with a soft microfibre cloth to give it a little shine. The finished pipe is shown in the photos below. The colouring on the shank of the meerschaum matches nicely with the colouring of the swirled acrylic stem. The rest of the meerschaum looks clean with a slight darkening that gives it a cream colour.AMber20 Amber21 Amber22 Amber23 Amber24 Amber25I cleaned the inside of the case with a brush to remove the lint and the tobacco bits that were on the material. It came out quite well. The pipe is cleaned and ready for an inaugural smoke. Thanks for looking.Amber26

A Crack Pinning Tutorial


Charles put together this tutorial on the pinning and repair of the pipe we worked on together. Since it would be new territory for a lot of folks, he broke it out into its own post. It’s not nearly as daunting as it sounds. The worst you could do is over-drill a hole and give yourself another fill to fix. 😉

Charles and I will be following up on the stability of the repair after I have had a chance to fire up the pipe a few times.

Charles Lemon's avatar

Pipe forums and other discussion groups are full of posts asking about crack repairs, especially to pipe bowls. Bowl cracks are generally the result of either accident, abuse or neglect – accidental drops or impacts can crack the wood, as can outright abuse like whacking the pipe against a hard surface to knock dottle out of the bowl. Cracks caused by neglect are usually due to a failure to maintain the level of cake (carbon buildup) inside the tobacco chamber.

Cake forms on the walls of the chamber when the pipe is smoked. Tars, ash Cake Pressure
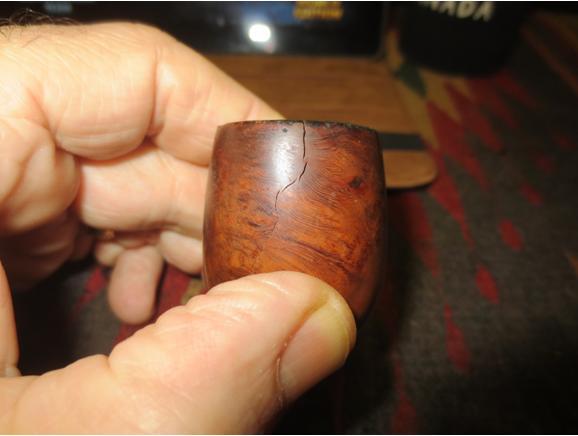
and carbon combine to form a dense, heat resistant layer that is actually beneficial to the briar pipe up to a point. The ideal cake thickness is about the thickness of a dime, at which point it adds a layer of insulation to the tobacco chamber that helps protect the briar walls from burnouts. Too much cake…

View original post 1,298 more words

Restoring a Genuine Sandblast Silverknight Dublin


Blog by Steve Laug

Going through the box of pipes to refurbish I came across this interestingly shaped pipe. I would describe it as a Dublin but the rounded bottom extending below the bottom of the shank gives it a very unique look. It is a tall pipe with a sandblast finish. The sandblast is not deep and craggy but it is shallow and lot of swirls. The finish was dirty and lots of dust was in the grooves of the finish. The rim was dirty with a build up on the inner bevel of the rim. The outer edge was in pretty good shape with a light rustication. The bowl was lightly caked and there was some dried white wax in the bowl from whoever had given the pipe a buff before selling it on Ebay. There was a silver band on the shank for decorative purposes. It is stamped with an EP in a diamond. The EP stands for Electro Plated. On the underside of the shank there is a smooth un-sandblasted portion that is stamped GENUINE SANDBLASTED over SILVERKNIGHT. At the end of the shank it is stamped Italy. The brand is not one that I have seen before and I could not find it in any of my usual sources. The stem was oxidized and had some tooth marks and chatter on the top and bottom sides. The button was worn on both the top and the bottom. It had an interesting dot on the stem that looked like a white spot. The closer I looked I could see that it was a pale yellow spot.Blast1 Blast2I took some close-up photos of the rim and the bowl to show the interior of the bowl and the rim condition. There was some tar and oil build up on the top of the rim.Blast3The next two photos show the tooth marks on the stem.Blast4I reamed the bowl with a PipNet reamer to take the cake back to bare briar. I wanted to remove the white material in the bowl. Once I had it on the reamer it was clear that it was wax.Blast5 Blast6I used a brass tire brush to scrub the top of the rim and the inner bevel. The brass bristles do not scratch the finish but they loosen the tars and oils on the rim.Blast7I scrubbed out the interior of the mortise and airway into the shank with pipe cleaners, cotton swabs and alcohol to remove the tars and oils. I scrubbed until the cleaners came out white.Blast8I worked on the stem. I sanded it with 220 grit sandpaper to remove the tooth marks and tooth chatter. I sanded the whole stem to remove the oxidation on the surface of the stem.Blast9I cleaned out the airway on the stem with pipe cleaners – both regular and bristle ones – and alcohol. Once they came out clean the stem interior was finished.Blast10I redefined the button on the top and bottom sides of the stem with a needle files to give it a sharper more distinct edge.Blast11I sanded the file marks with 220 grit sandpaper to remove the file marks.Blast12I sanded the stem with a medium and a fine grit sanding sponge to minimize the scratches.Blast13I wetsanded the stem with 1500-2400 grit micromesh sanding disks to begin the process of polishing it. I rubbed it down with Obsidian Oil and then dry sanded it with 3200-4000 grit pads. I gave it another coat of oil and then finished sanding it with 6000-12000 grit pads. I gave it a final coat of the oil and let it dry.Blast14 Blast15 Blast16I buffed the pipe and stem with Blue Diamond on the wheel. I lightly buffed the bowl and gave the stem a bit more pressure. I gave the stem several coats of carnauba wax and buffed the bowl and the stem with a clean buff. I brought it back to the work table and gave the bowl a light coat of Conservator’s Wax and buffed it with a shoe brush. The finished pipe is shown in the photos below. It is cleaned and ready to smoke.

Do any of you have any idea who may have made this pipe? It is light weight and well made. The draught on it is perfect and the conical bowl is in really good shape. Thanks for looking.Blast17 Blast18 Blast19 Blast20 Blast21 Blast23Blast22