Monthly Archives: August 2018

Breathing New Life into a Signature Imported Briar Billiard


Blog by Steve Laug

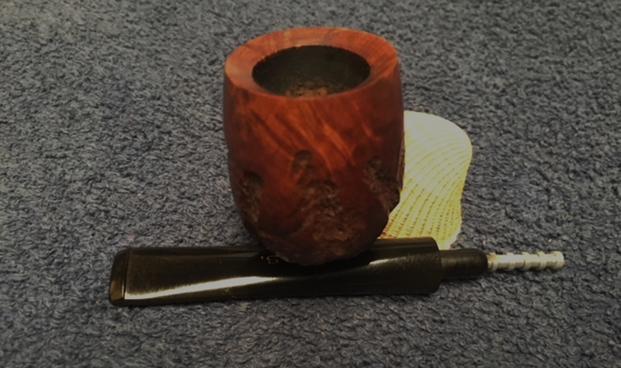
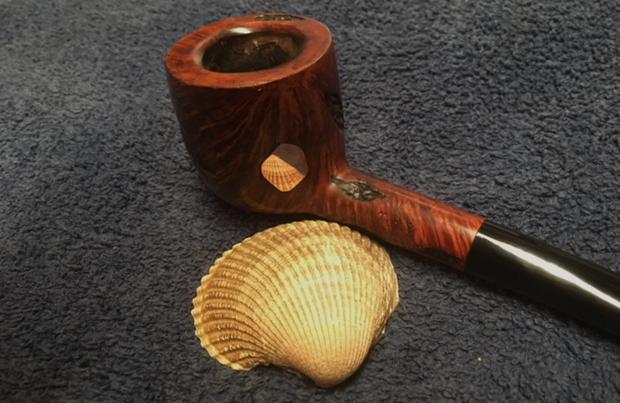
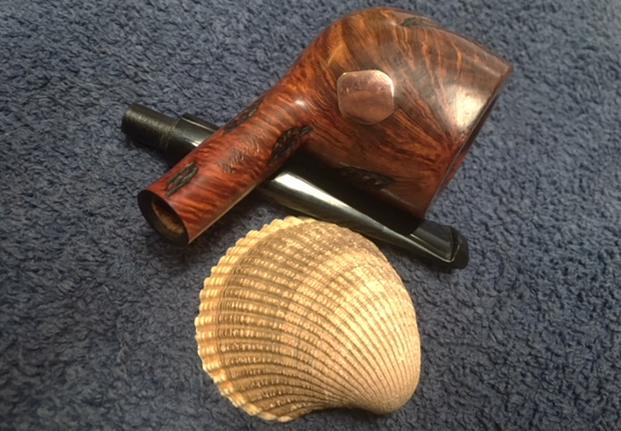
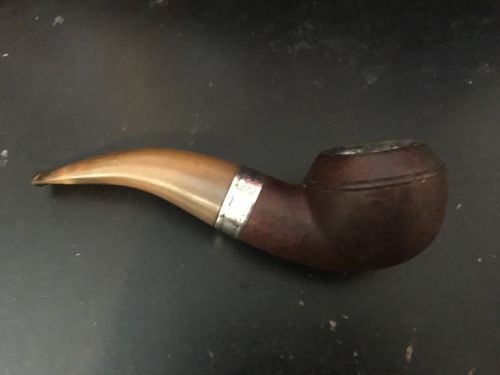
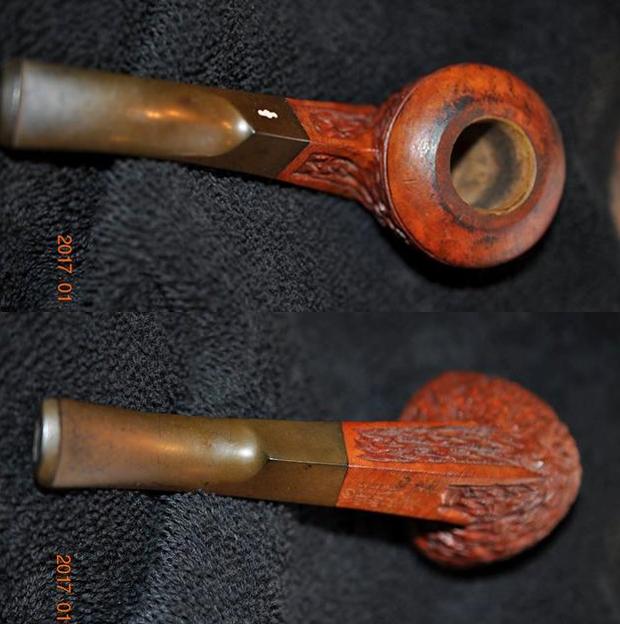
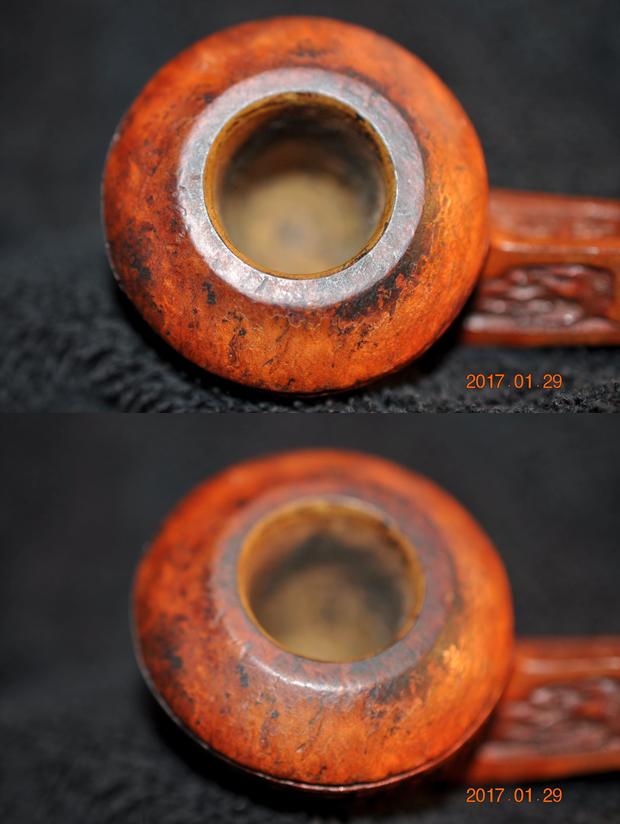
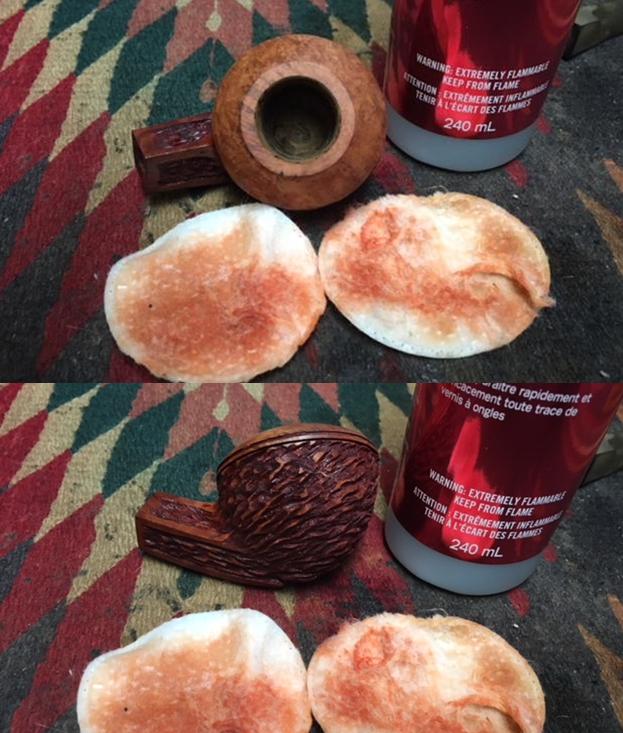
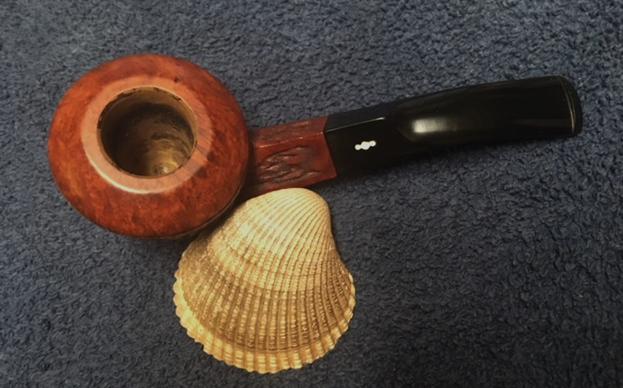
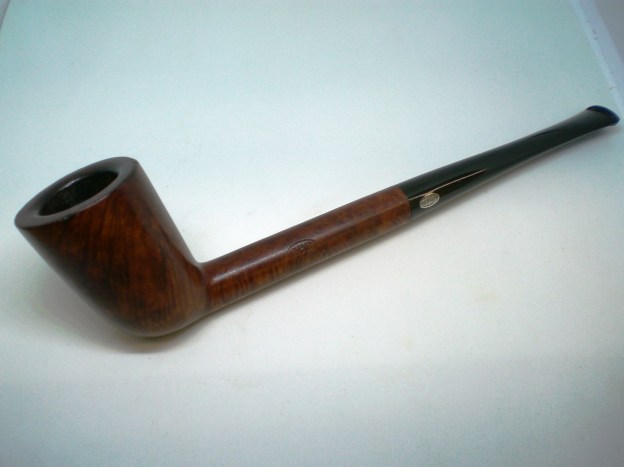
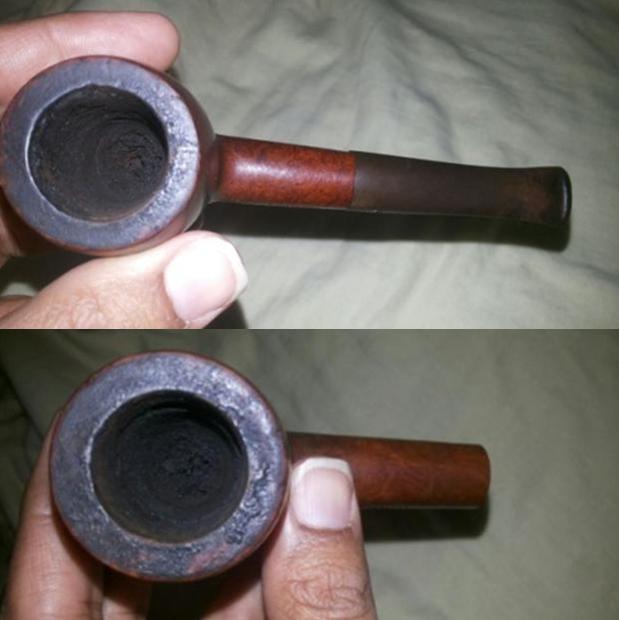
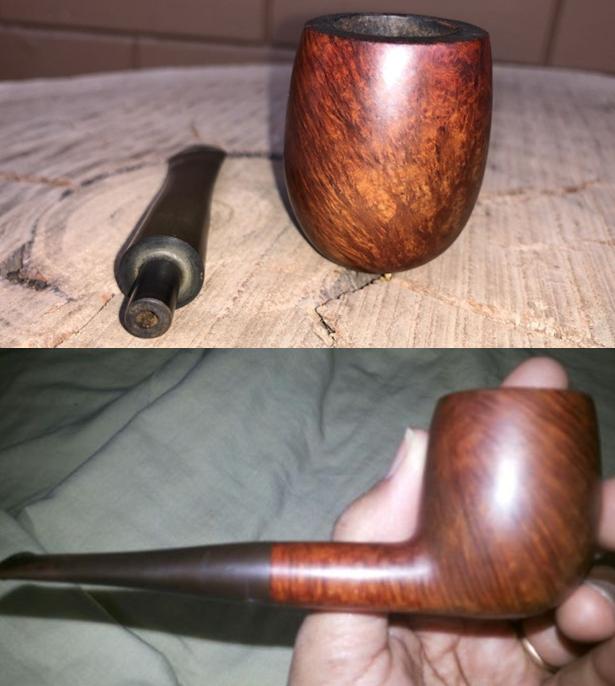
Jeff picked up this interesting looking partially rusticated billiard from an auction on Facebook back in February of this year. It is stamped on the left side of the shank with the script Signature over Imported Briar. The rustication pattern is similar to the carving on Custom-Bilt pipes. The rim top is beveled inward to the bowl. There is an aluminum band on the shank that is slightly oxidized. The bowl has hardly been smoked. The bottom 2/3s of the bowl is still raw briar with some slight darkening on the top part of the bowl. The stem is quality vulcanite that is slightly oxidized but does not have any tooth chatter or marks. It is embossed on the top of the stem with the gold initials M.M.S. There is a stinger in the tenon that is different from any I have seen before. It is aluminum and built like a stack of circles. There is a slot where it is inserted in the tenon end. It is pristine. The stem interior is very clean. Jeff took some photos of the pipe before he started his cleanup on it.Jeff took a close up photo of the bowl and rim to show the condition of the pipe before he started to work his magic on it. The rim top is pristine and the bowl was quite clean. The pipe may have been smoked once in its life time. There is no cake in the bowl and there was no smell of tobacco. The finish of the bowl was dirty and dusty from a long time sitting in storage. 
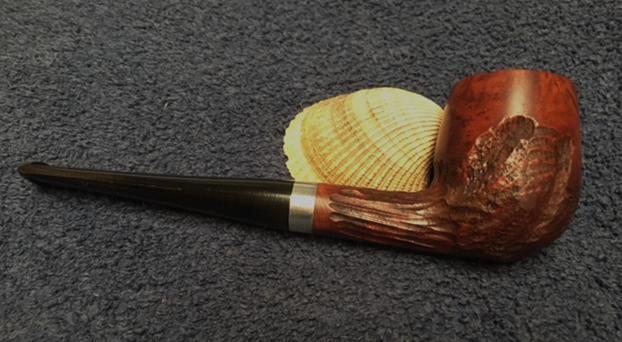
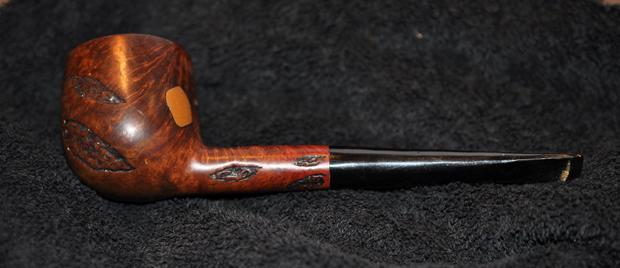
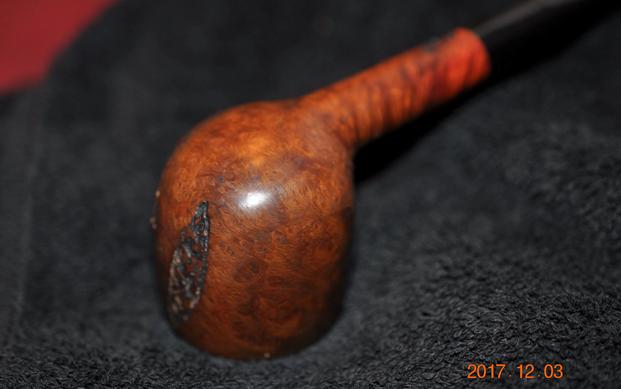
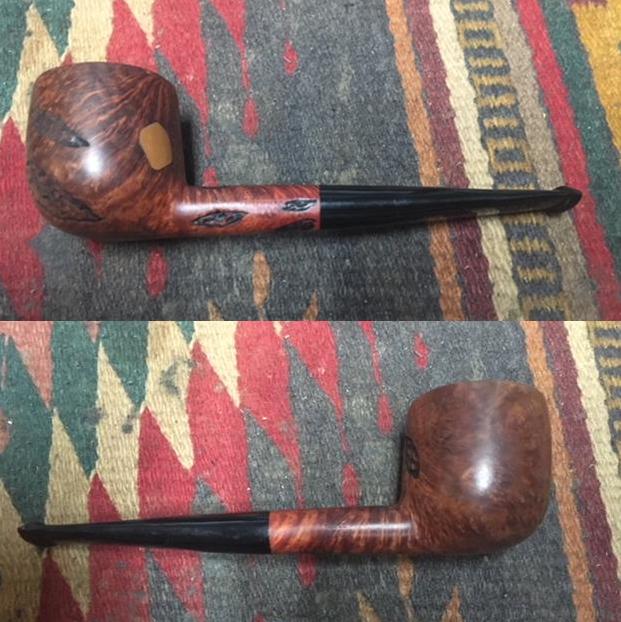
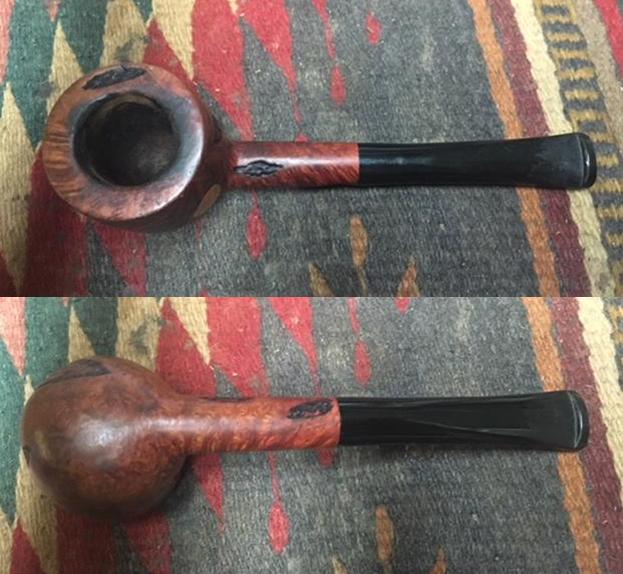
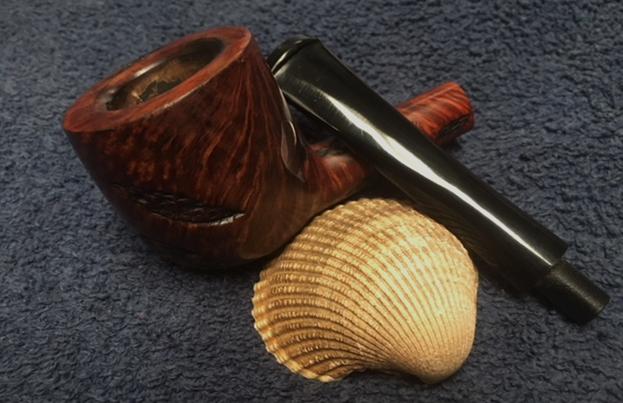
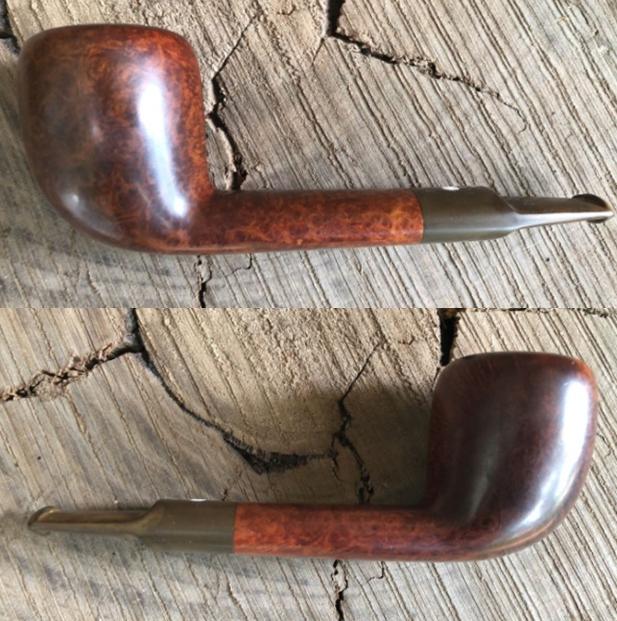
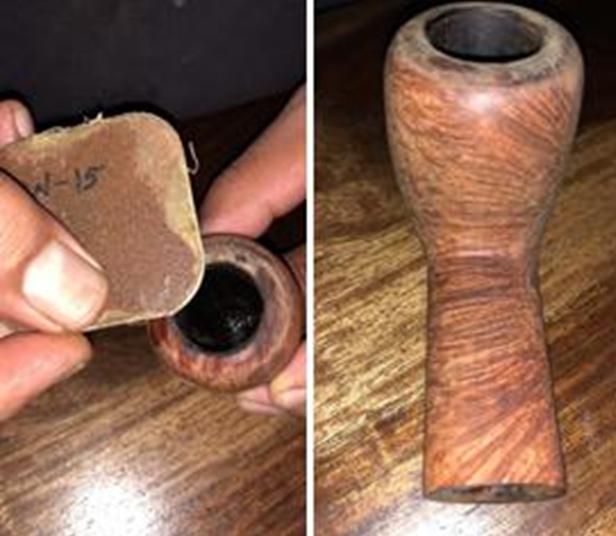
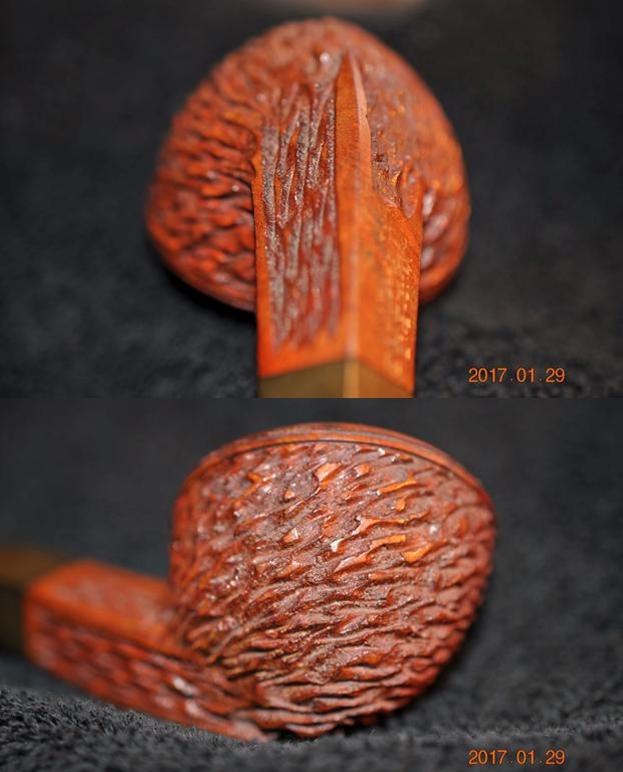
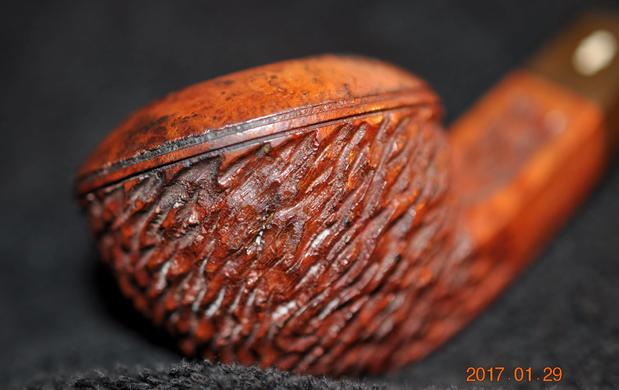
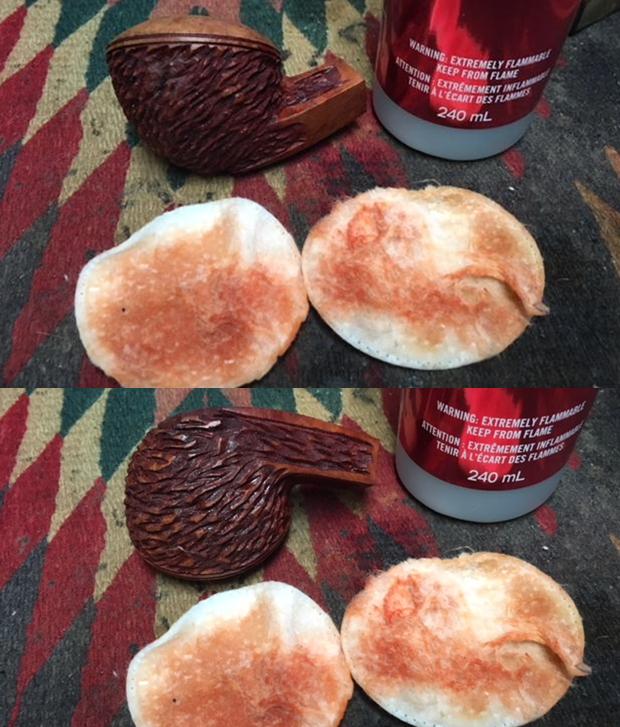
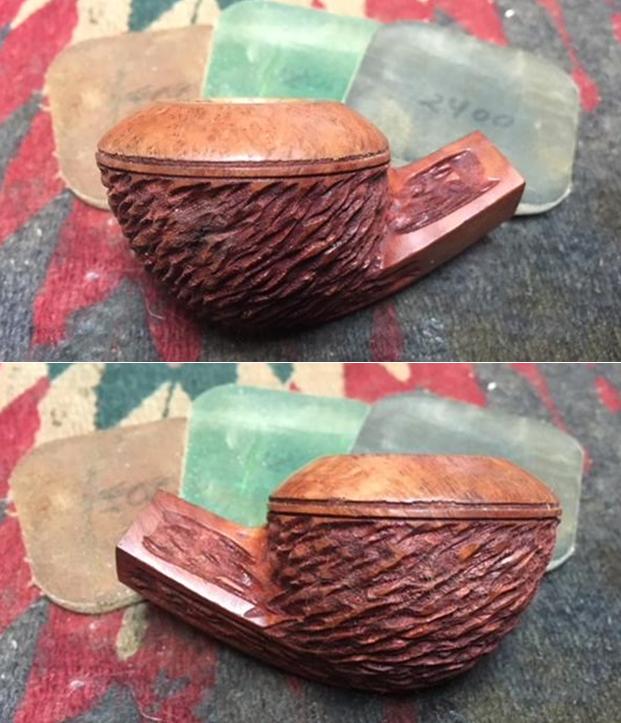
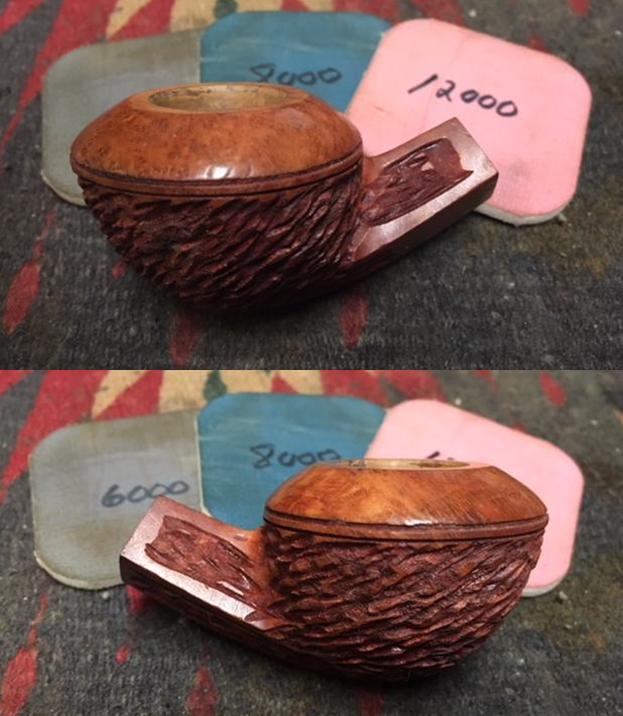
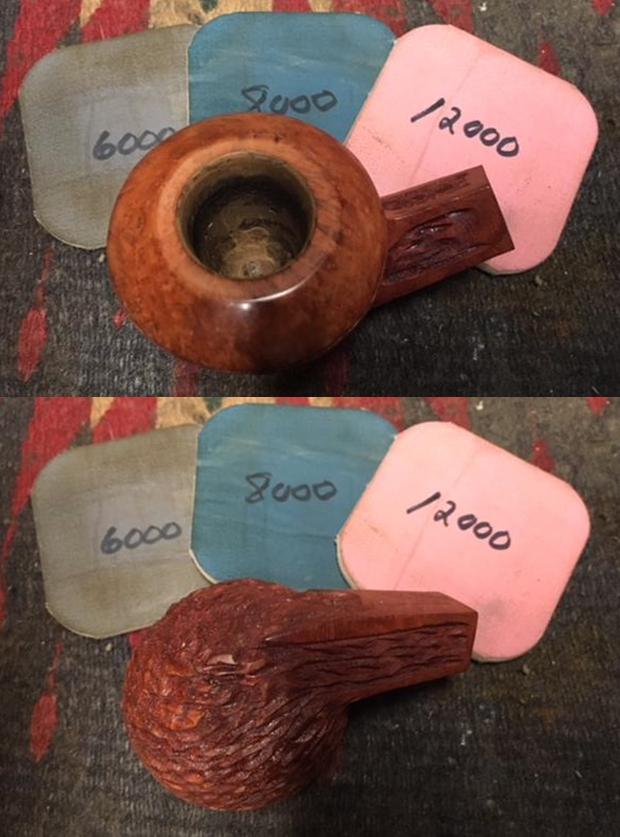
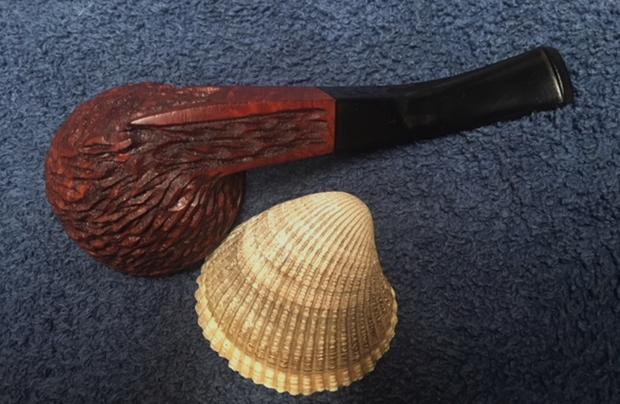
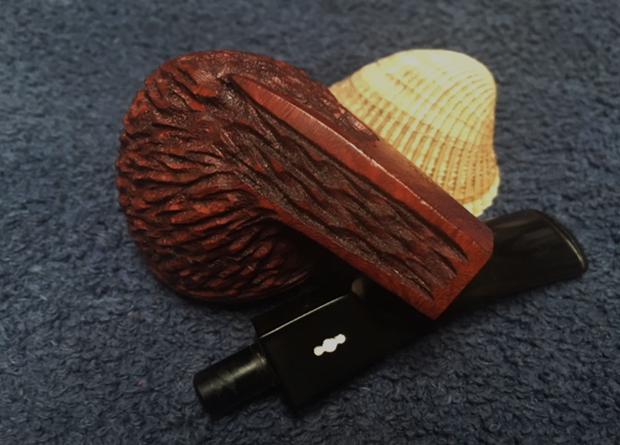
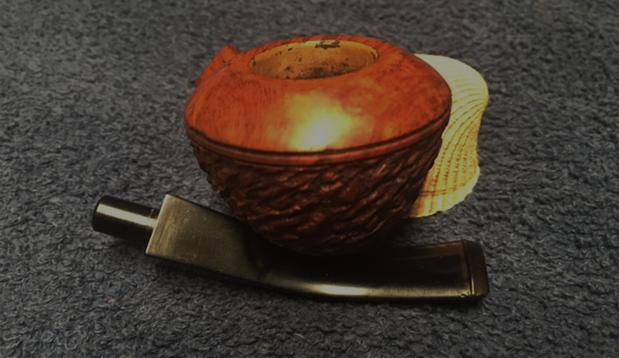
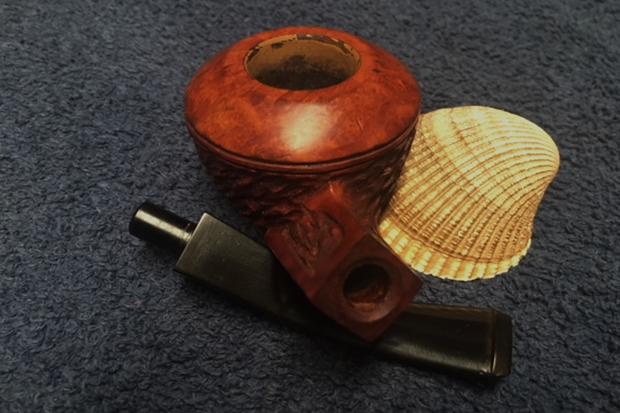
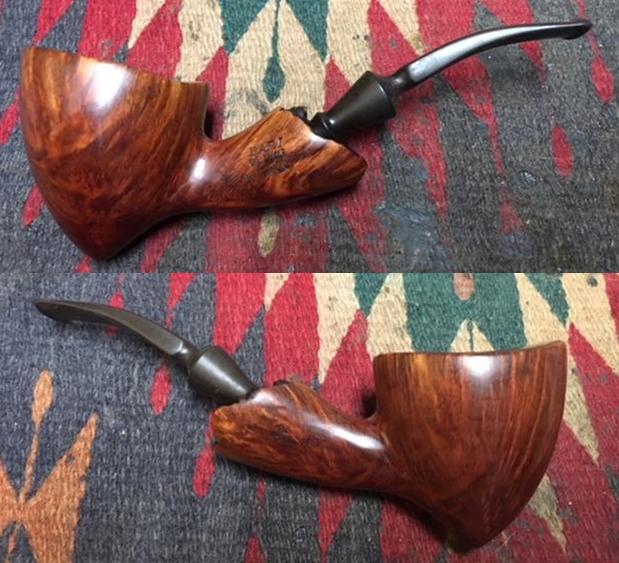
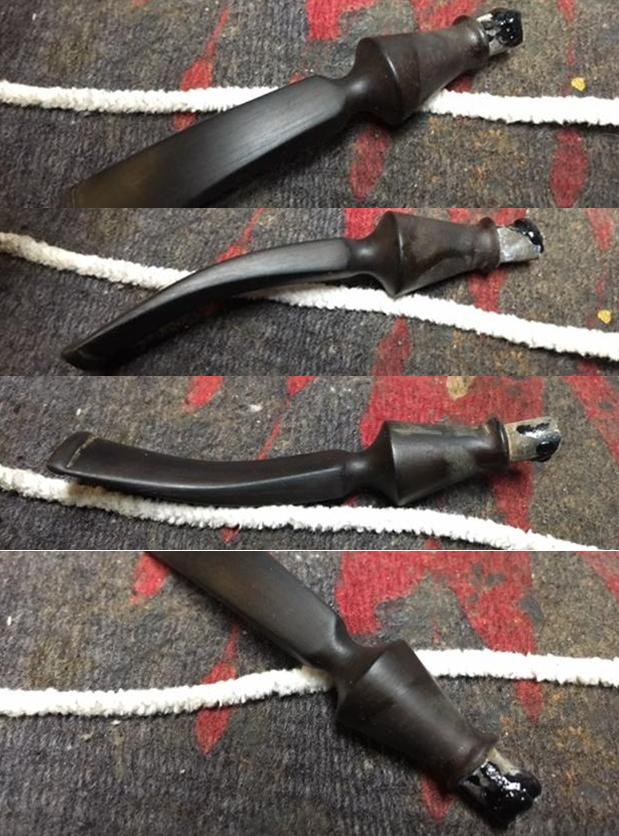
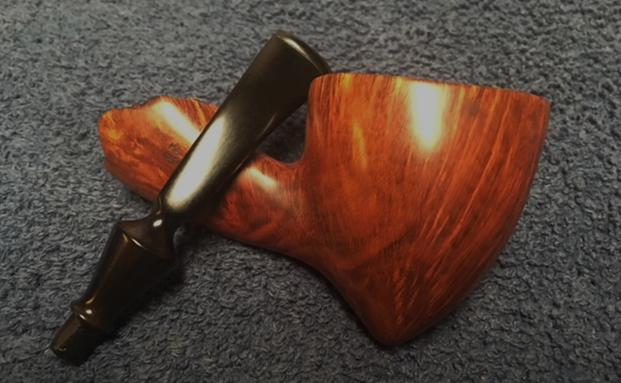
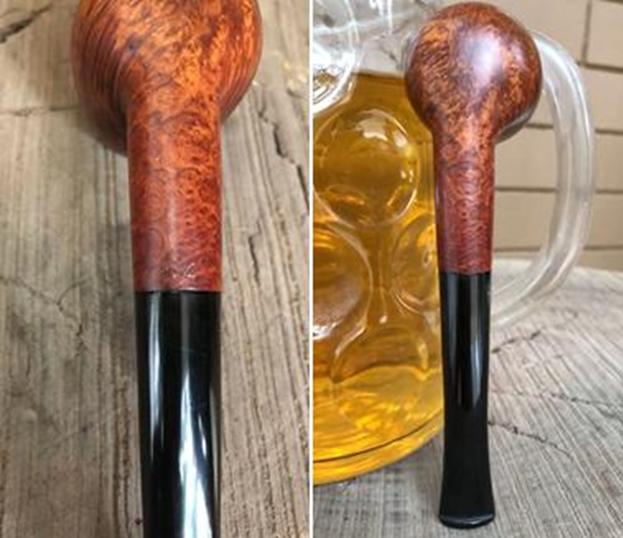
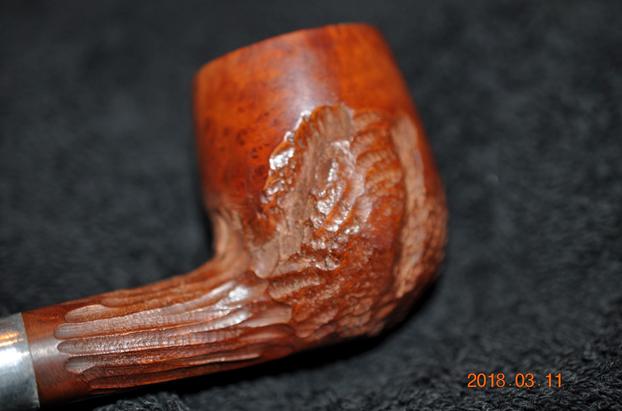
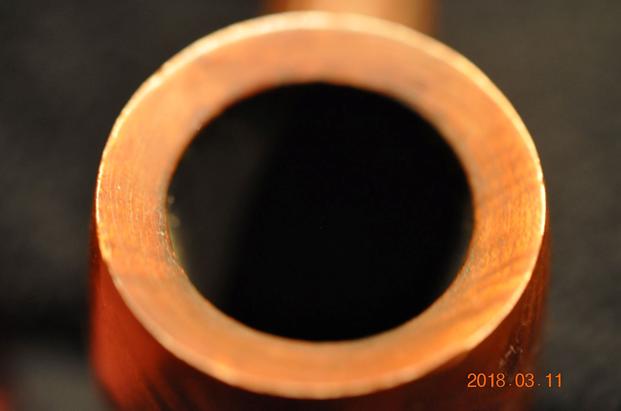
He also took photos of the sides of the bowl and shank from different angles to show the condition and the design of the bowl. The pipe looked good other than lots of dust and grime in the carvings and grooves. 
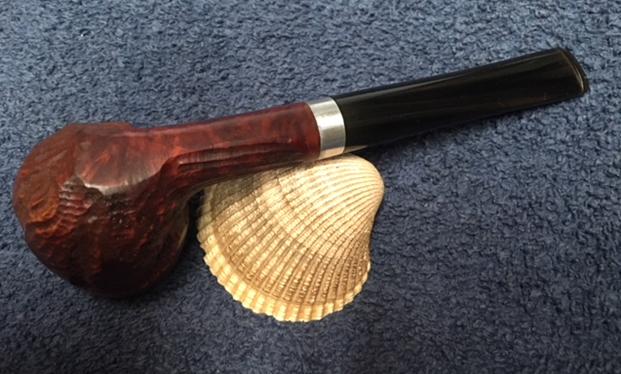
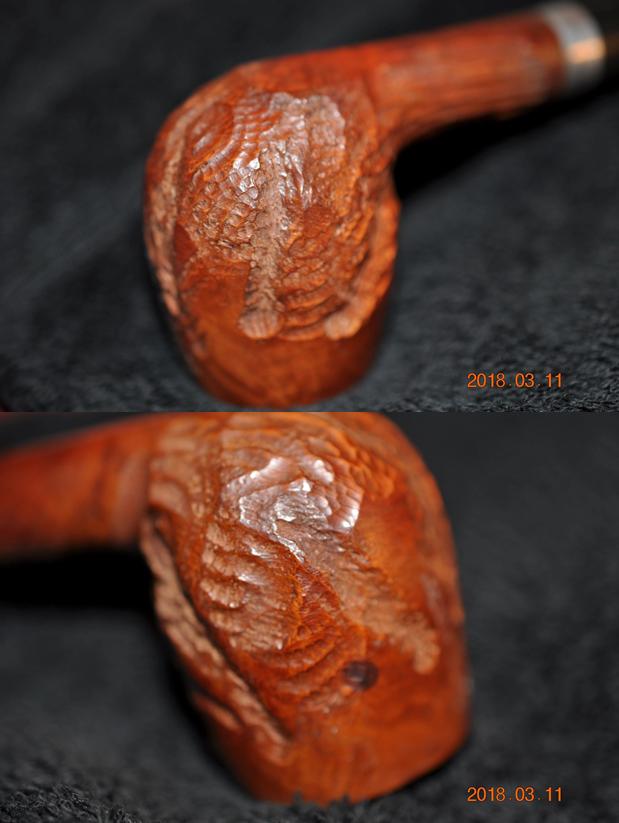
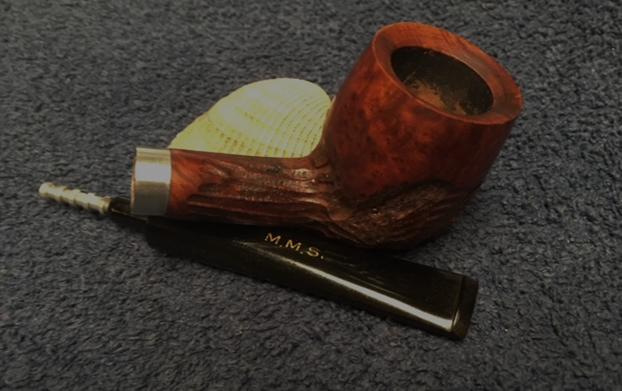
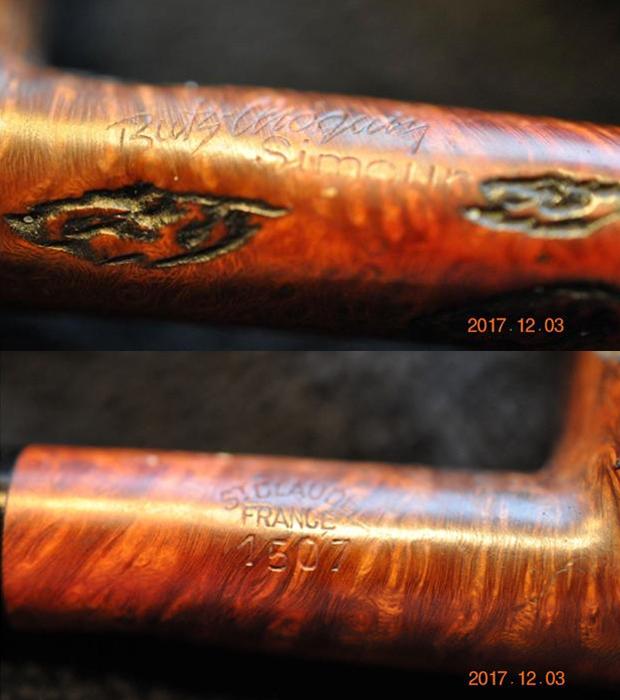
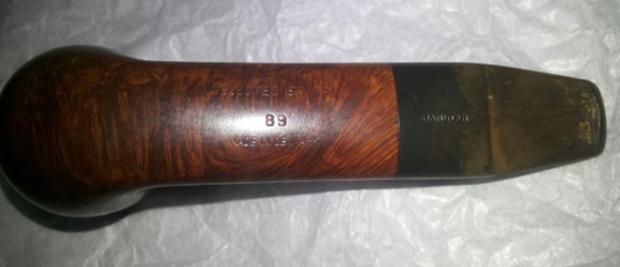
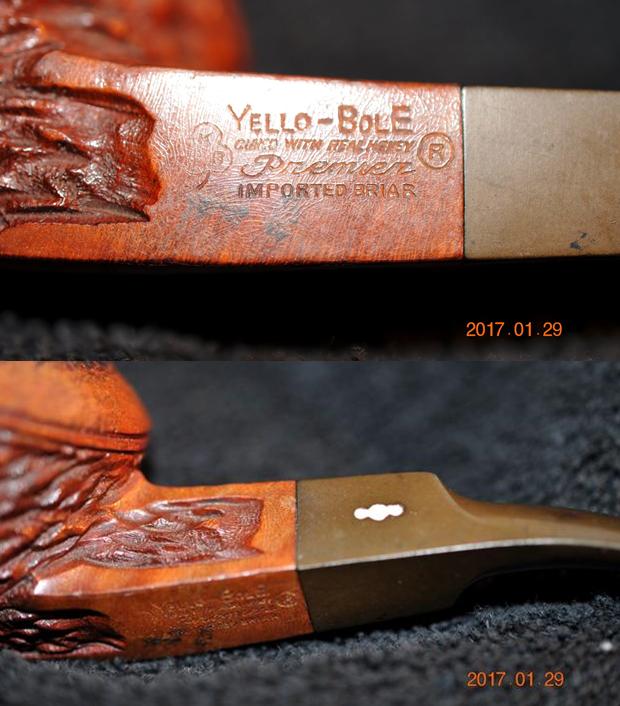
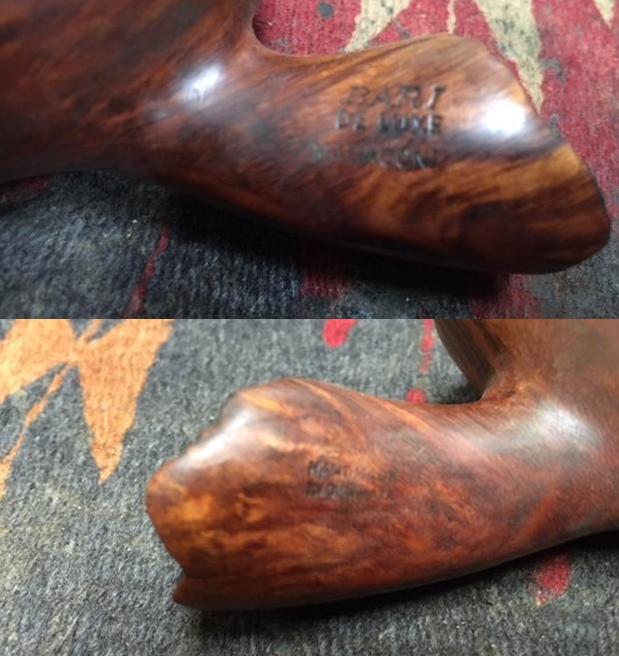
Jeff took a photo to capture the stamping on the left side of the shank. The stamping was readable and clear.
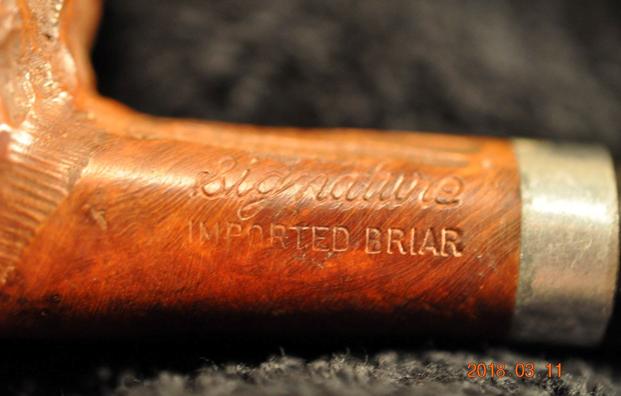
The stem looked pretty good – lots of scratches and light nicks in the vulcanite but not any tooth marks. There some light oxidation but the stamping on the surface of the stem were stamped and embossed.
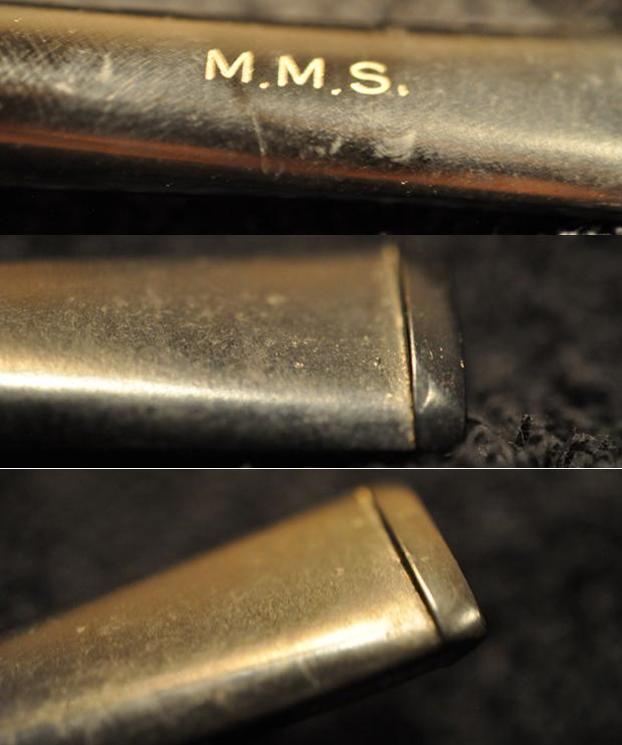
I was unfamiliar with the Signature brand that was stamped on the pipe so I did a bit of digging to see if I could find some information. I turned to the two sites that I always check – Pipephil and Pipedia. Pipedia had no information on the brand so it was singularly unhelpful. Pipephil had some helpful information. I have done a screen capture of the information and also included the text from the site. It says: This brand of the Larus & Brother Co. proposed to customize their pipes by engraving the owner’s signature or initials on the stem in addition to the “L” logo.  http://www.pipephil.eu/logos/en/logo-s7.html
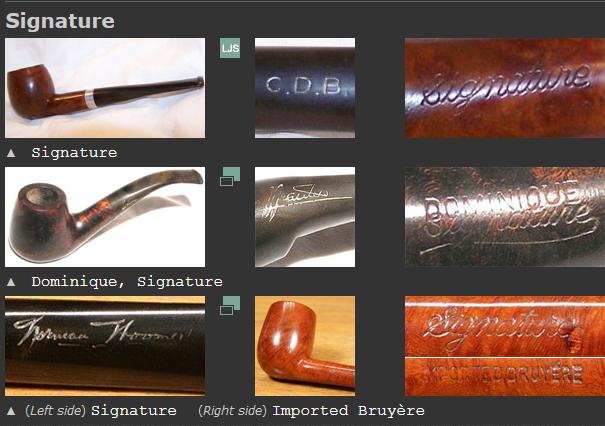
I now knew that the Signature brand was made for or by the Larus & Brother Co. It was made to be customized. I did a search for the Larus & Brother trademark and found a link that gave some more information on the brand. Here is the link – https://trademarks.justia.com/owners/larus-brother-company-4959/. It confirms that the pipe was made by Larus.Armed with that information I googled the company and found more information. I found a link on Wikipedia (https://en.wikipedia.org/wiki/Larus_and_Brother_Company) that gave some history and background on the company. I quote some of the pertinent information.

Charles D. Larus and Herbert C. Larus purchased the Richmond-based Harris Tobacco Company and founded Larus and Brother Company in 1877. They manufactured pipe and chewing tobacco. In 1882, Herbert Clinton Larus died and William Thomas Reed, his nephew, became the company’s partner and general manager. For the rest of its history, the company was led by members of the Reed and Larus families.[1]

The company was dissolved on June 10, 1968. Larus Investing Company, a holding company, was established for the tobacco and media businesses. The tobacco subsidiary, Larus and Brother Company, was sold later that year. In 1969, the last media subsidiary was sold.[1] The Virginia Historical Society holds Larus and Brother Company records at the Reynolds Business History Center.

Further down the page of the wiki article it gave a connection some of the tobaccos that the company produced. I thought that it was interesting to see the connection to Edgeworth Tobacco.

From 1878 to 1897, the company relied on prison labor at the Virginia State Penitentiary.[3] After that, it operated for more than 75 years on Twenty-first Street (along Tobacco Row) in Richmond. Larus and Brother Company incorporated in 1900.[1] By 1901, the company’s workers were represented by the Tobacco Workers International Union (TWIU).[4][a]

Edgeworth tobacco products were introduced in 1903 and became the best selling pipe tobacco in its price class. Edgeworth Sliced tobacco was the first pipe tobacco product to be advertised nationally. Broken into smaller pieces, Edgeworth Ready-Rubbed was introduced in 1912.[1][2]

The company began to manufacture cigarettes after it purchased the Reed Tobacco Company and adopted it as a subsidiary in 1913. Distribution companies were opened in San Francisco and Boston in the early 1930s. In 1935, Larus bought the plug tobacco plant, Sparrow and Graveley of Martinsville, Virginia, which was closed in 1942 because it was unprofitable. The plug tobacco operations were transferred to Richmond.[1] Holiday, the aromatic smoking tobacco company, was purchased in 1942. Holiday and Edgeworth were Larus’ best selling products.[1] The company’s tobacco supply went to the United States Army and aid agencies during World War I and II. Packets of four cigarettes were labeled with the words, “I Shall Return”, and distributed secretly in the Philippines.[1]…

As more people began to smoke cigarettes, the company’s profits from pipe tobacco began to decline and the company sought to diversify. Larus and Brother Company, the tobacco subsidiary of Larus Investing Company, was sold to Rothman’s of Canada, Limited on October 18, 1968.[1]

I found one more interesting site that gave a quick summary of information on the brand and the connection with Edgeworth Pipe Tobacco (https://www.virginiahistory.org/collections-and-resources/virginia-history-explorer/larus-brother-advertisements). I quote:

In 1
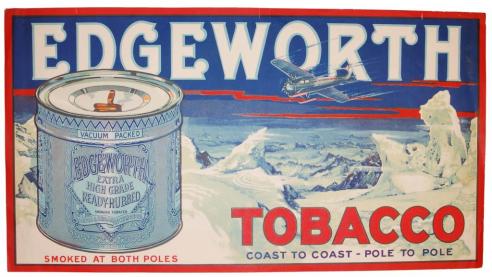
877 a partnership between Charles D. Larus and Herbert C. Larus formed the Larus & Brother Company. This small tobacco company, based in Richmond, Virginia, received national recognition with Edgeworth pipe tobacco, which then became the international hallmark of the company. By the 1930s, Larus had expanded to manufacture cigarettes, operate distribution centers outside Virginia, sponsor national radio programs, and manage local radio and television stations…

…During both world wars the federal government requisitioned Larus’s entire line of production. One special war project involved the secret distribution of cigarettes in the Philippines whose packages bore the words, “I Shall Return,” and the signature of General Douglas MacArthur. After the war, Larus prospered both as a tobacco company and a broadcasting company until the late 1960s. The company dissolved in 1974.

Armed with that information I knew that the pipe was made before 1974 when the company dissolved. I was not sure of the other end of the spectrum but my guess is that the pipe was tied to the Edgeworth Brand… If any of you have information on the brand please let me know.

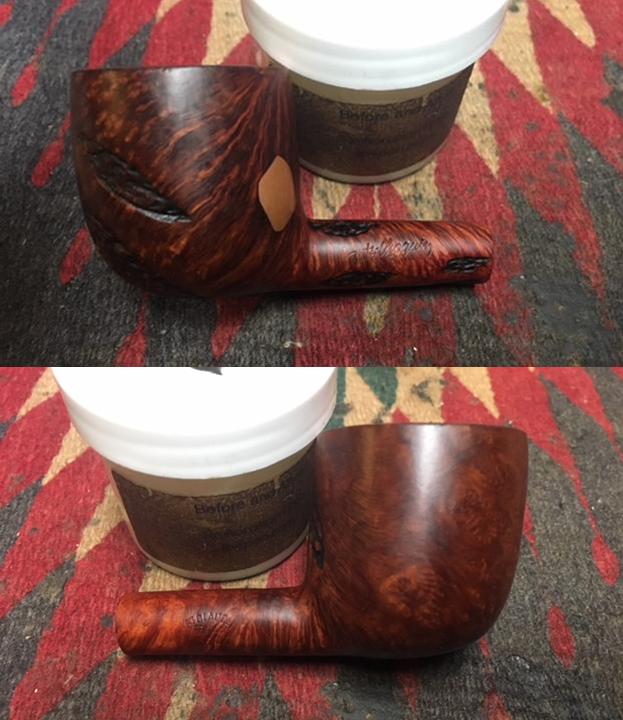
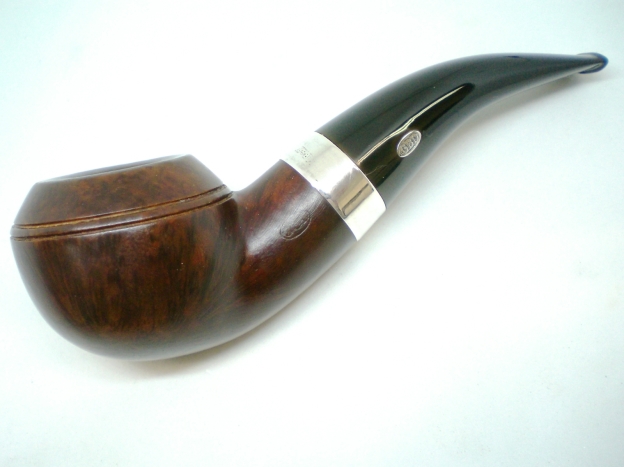
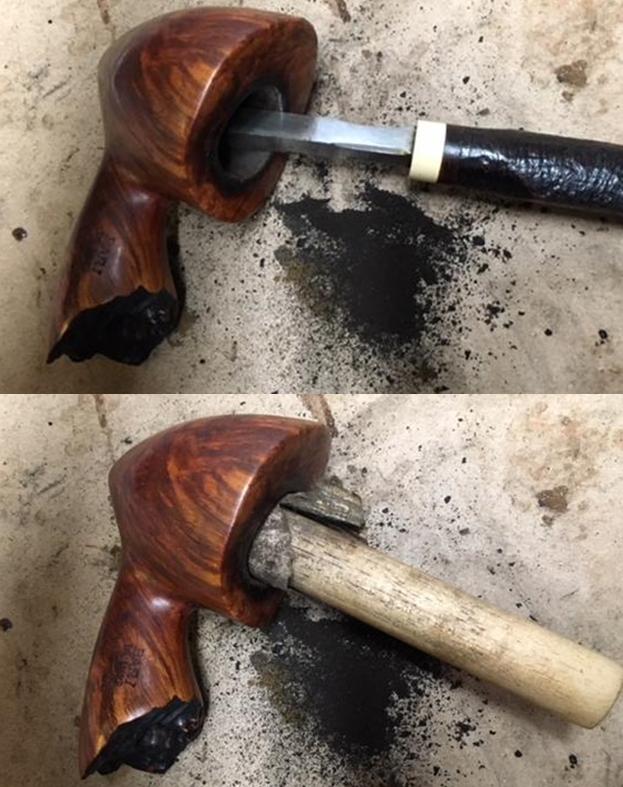
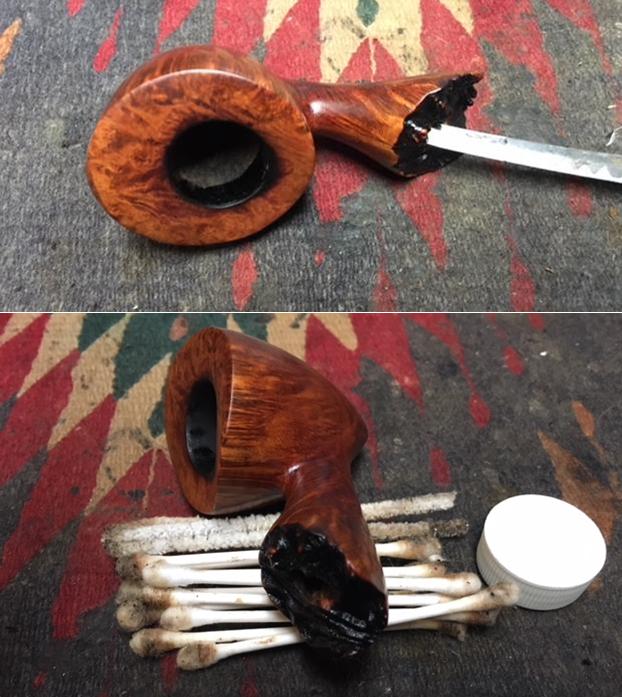
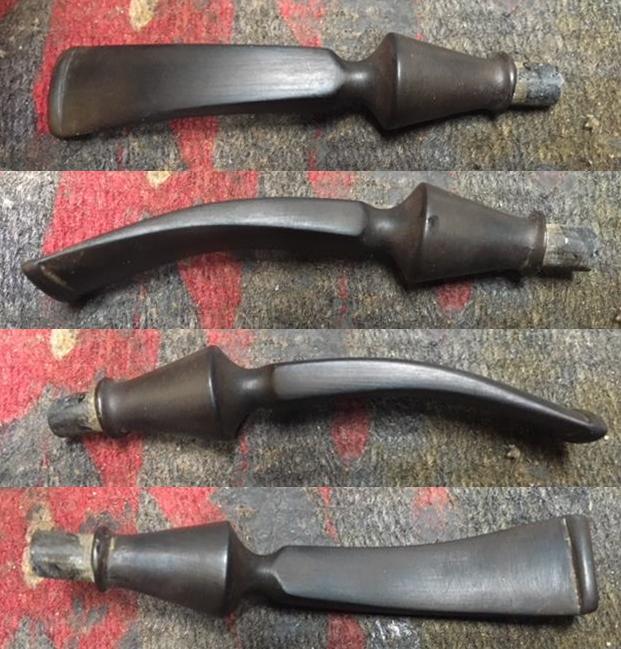
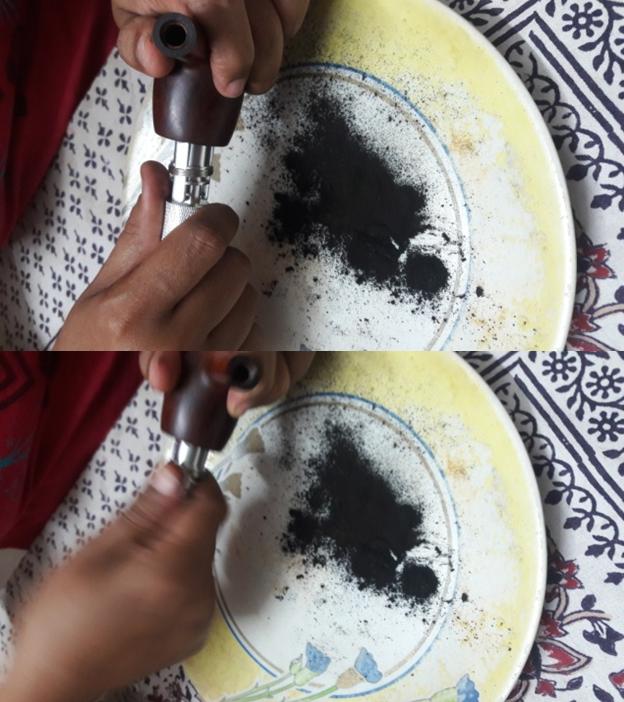
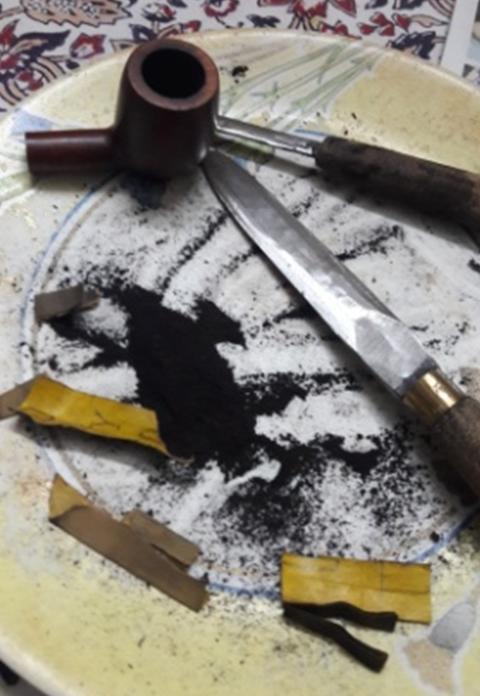
I turned to work on the pipe. Jeff cleaned this one up before he sent it my way. He is really good at the cleanup work. He had cleaned up the bowl inside with a Savinelli Fitsall pipe knife to remove the debris. He scrubbed out the mortise and the airway in the shank and the stem with alcohol, cotton swabs and pipe cleaners. He scrubbed the exterior of the bowl, rim, shank and stem with a tooth brush and Murphy’s Oil Soap to remove the oils and tars on the smooth portions and rustication patterns on the bowl and shank. He rinsed it under running water. He dried it off with a soft cloth. Without the grime the finish looked really good. The vulcanite stem would need to be cleaned up but it was in good condition. I took photos of the pipe to show its condition before I started my work on it.  
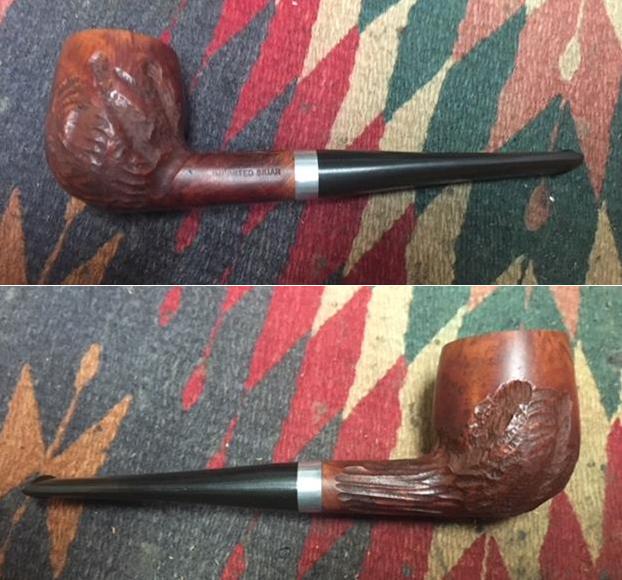
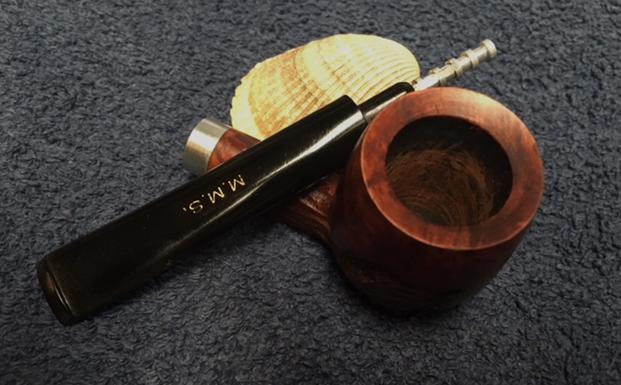
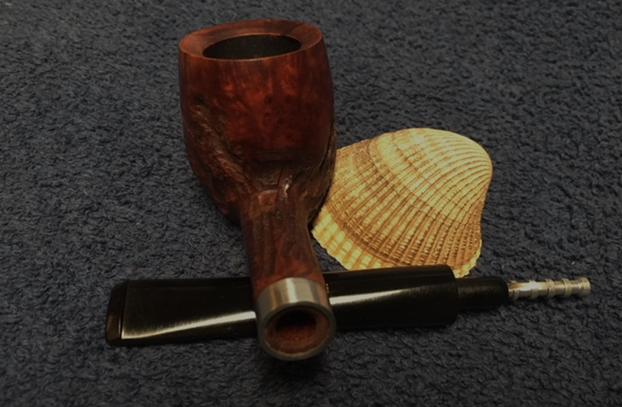
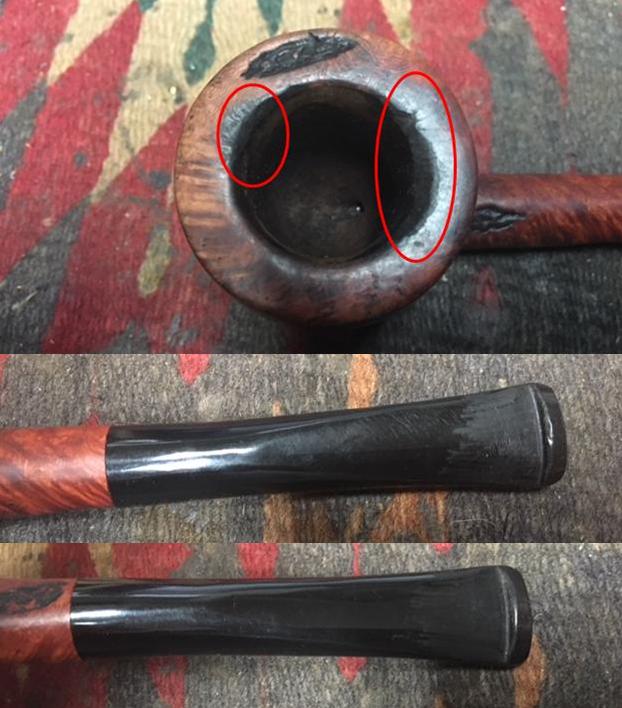
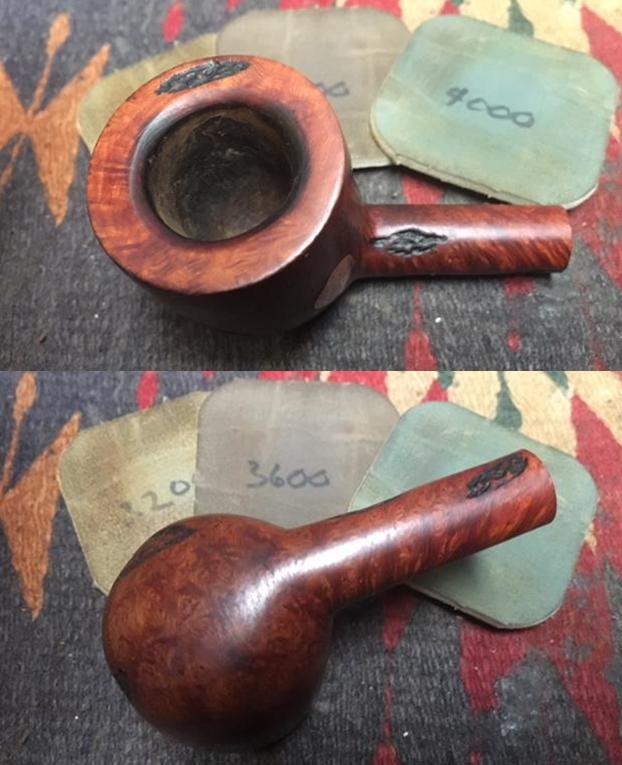
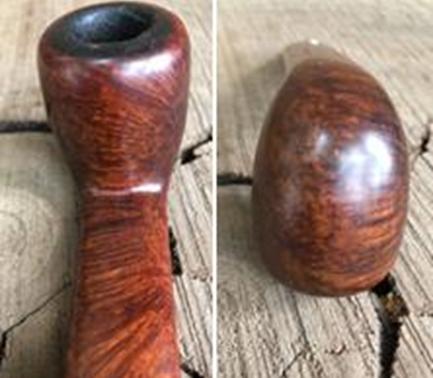
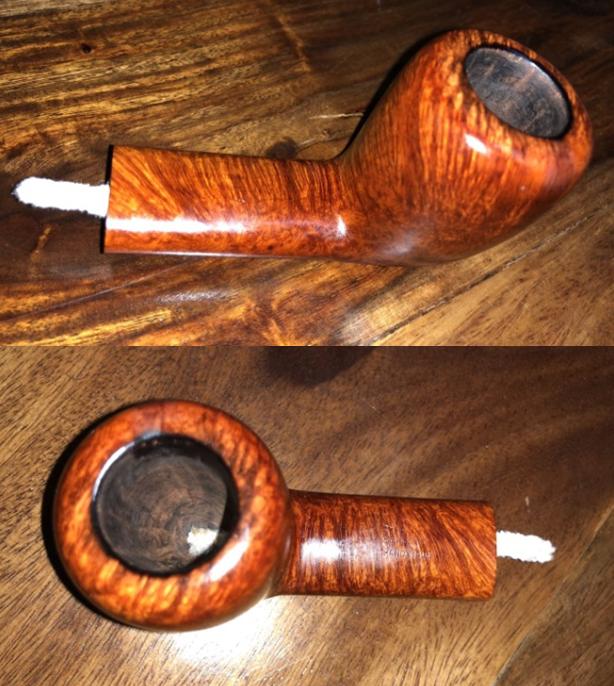
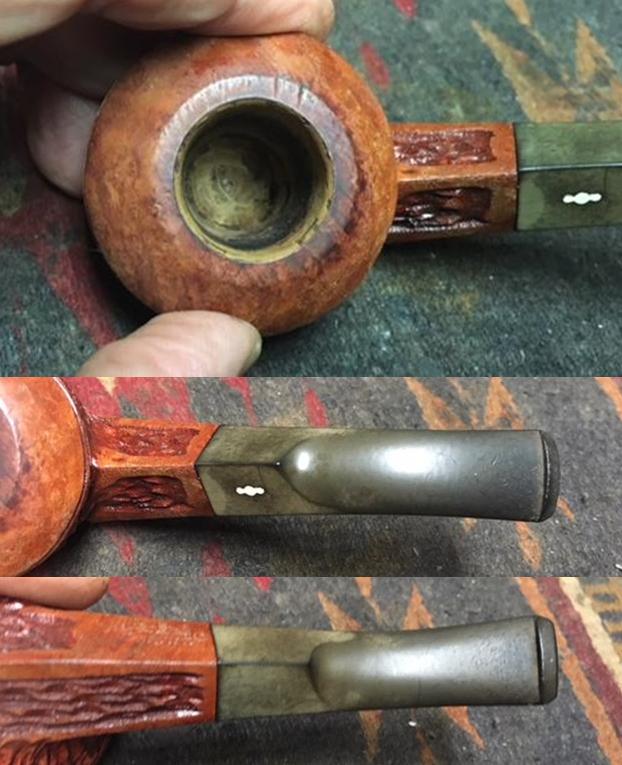
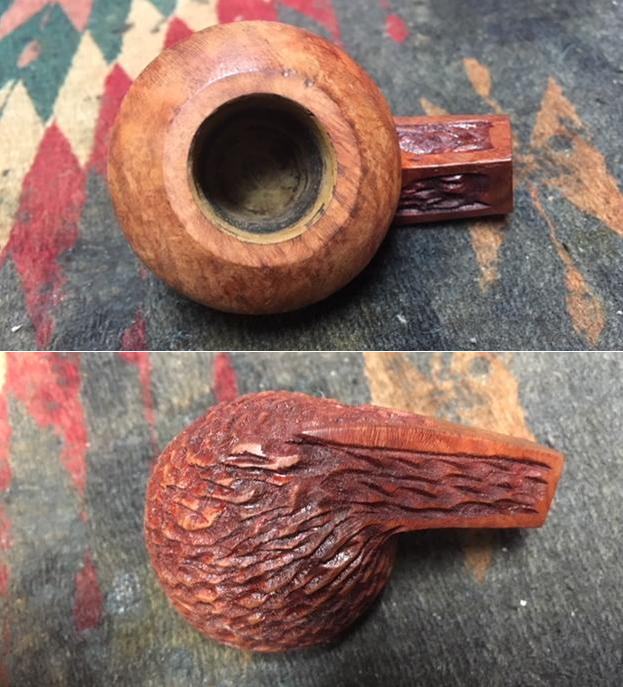
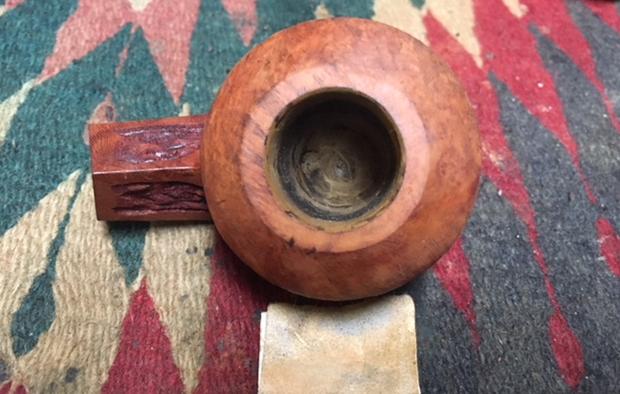
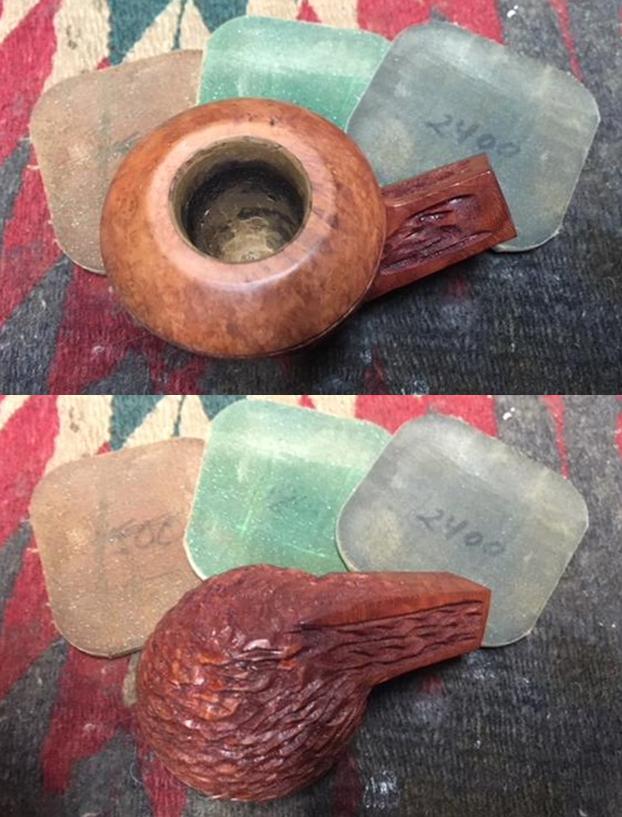
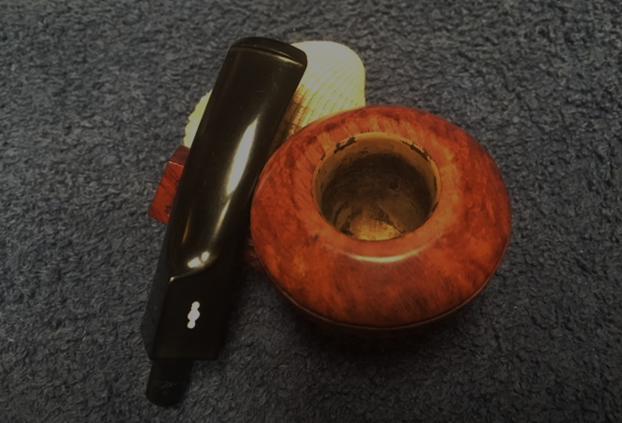
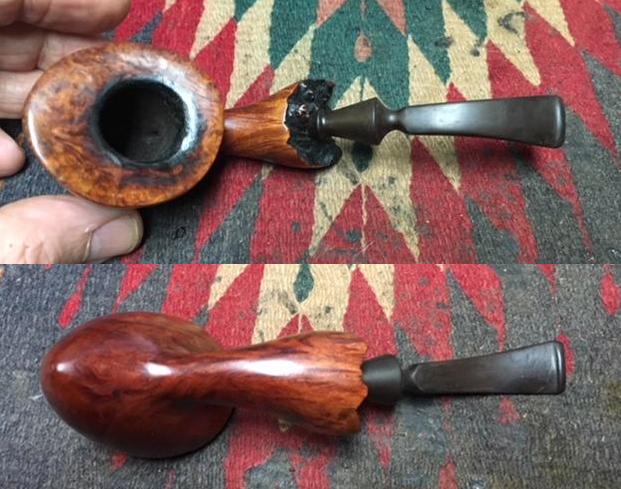
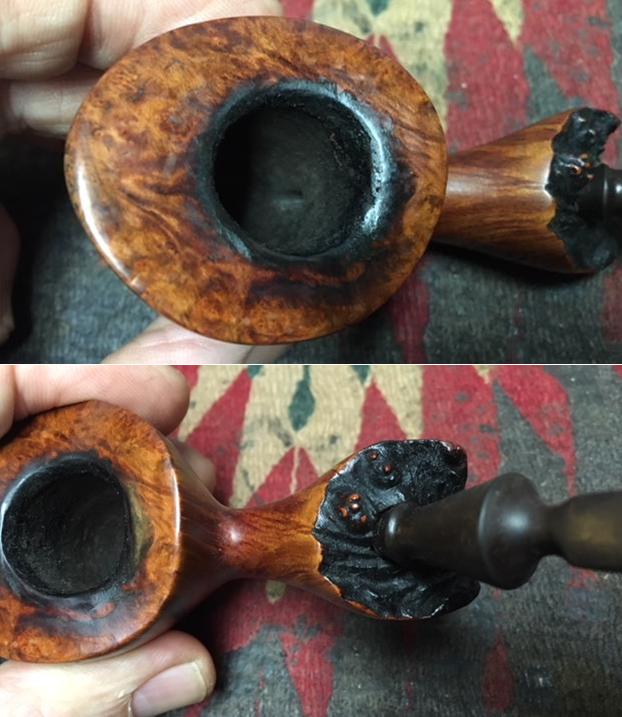
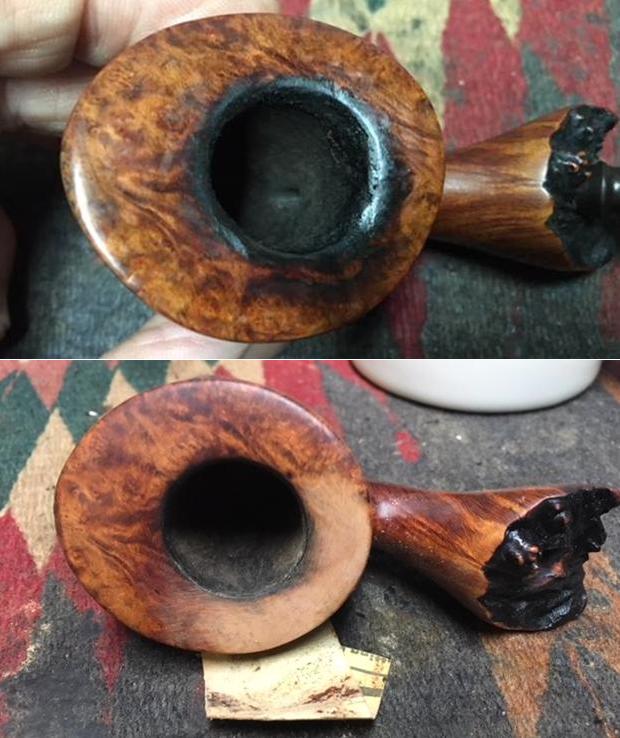
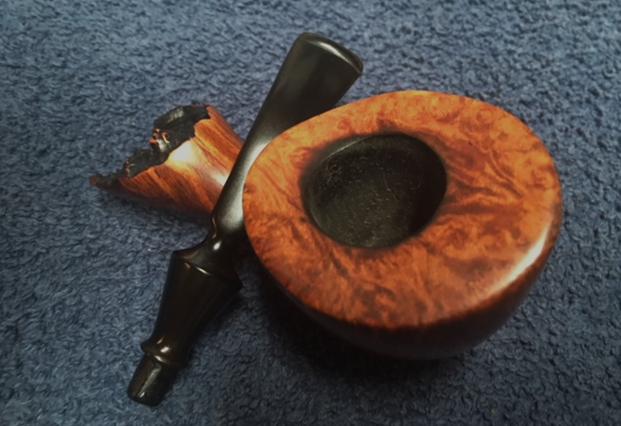
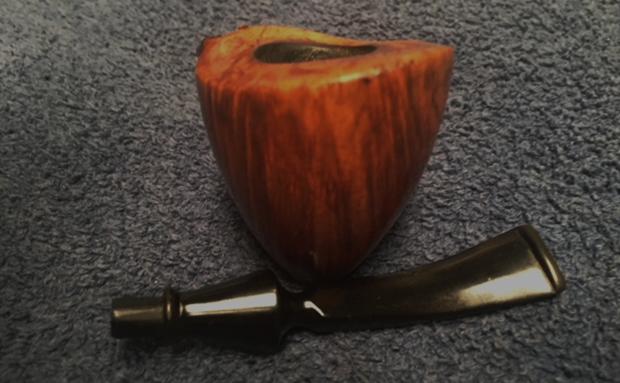
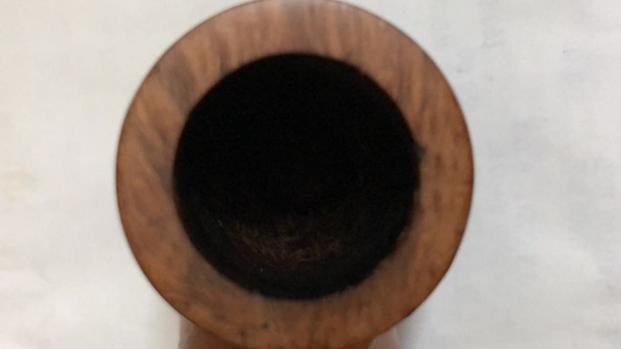
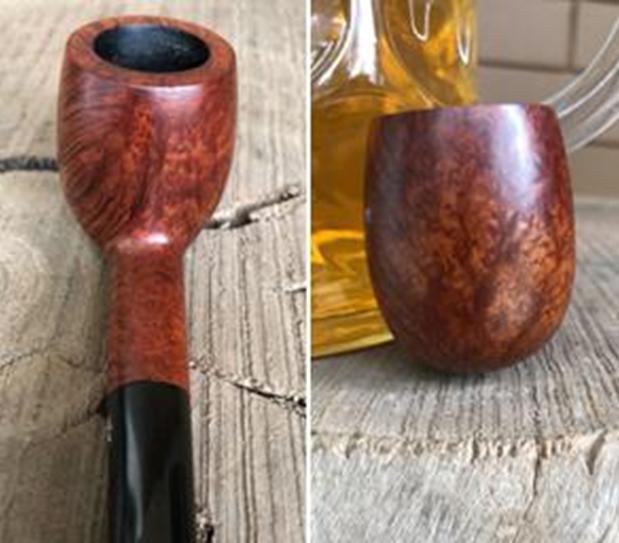
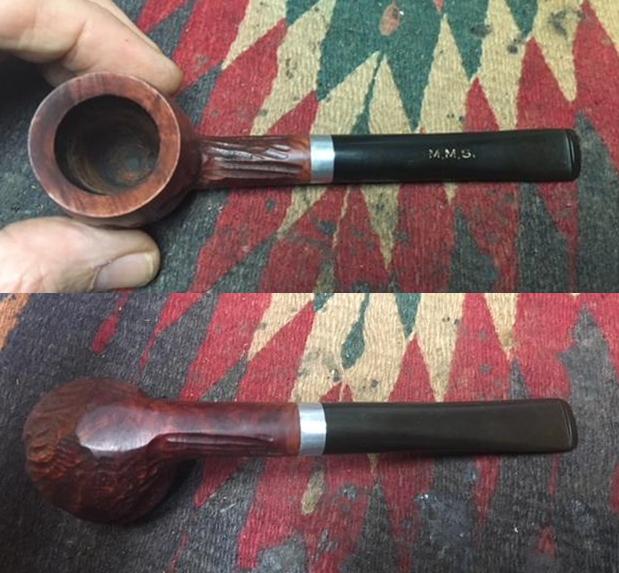
I took a close up photo of the bowl and rim top as well as the stem. You can see the condition of the rim top and bowl in the first photo. The top was in excellent condition and appears to be unused. The inside of the bowl also looks really clean and there is raw briar in most of the bowl. The monogrammed vulcanite stem had some light oxidation but otherwise looked really good.
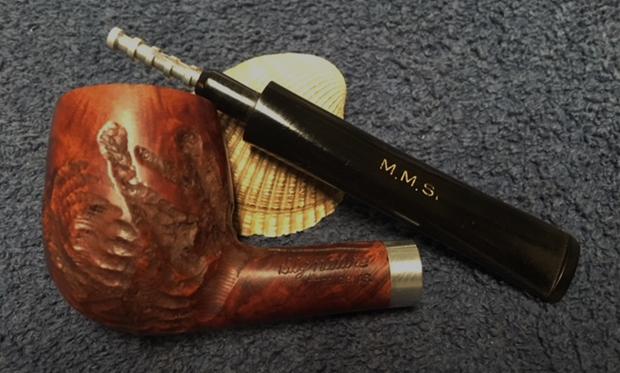
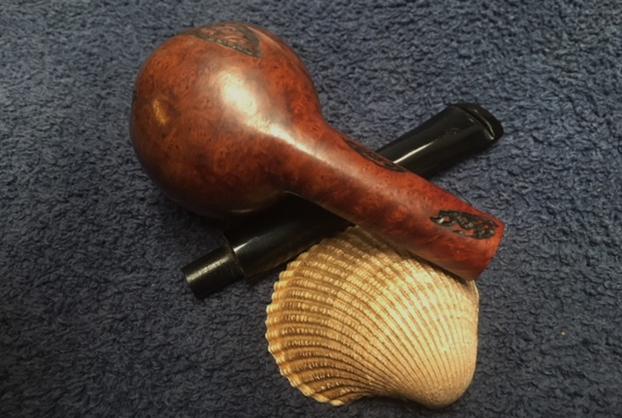
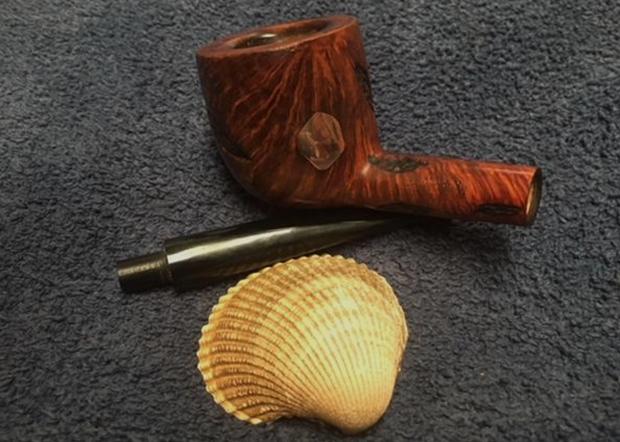
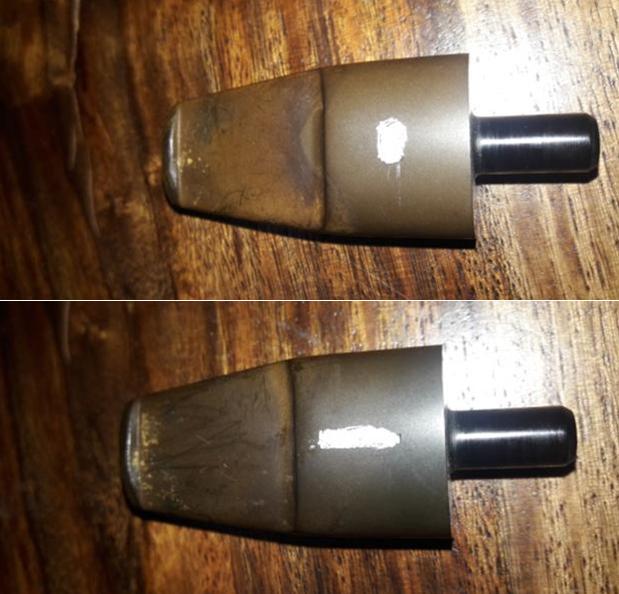
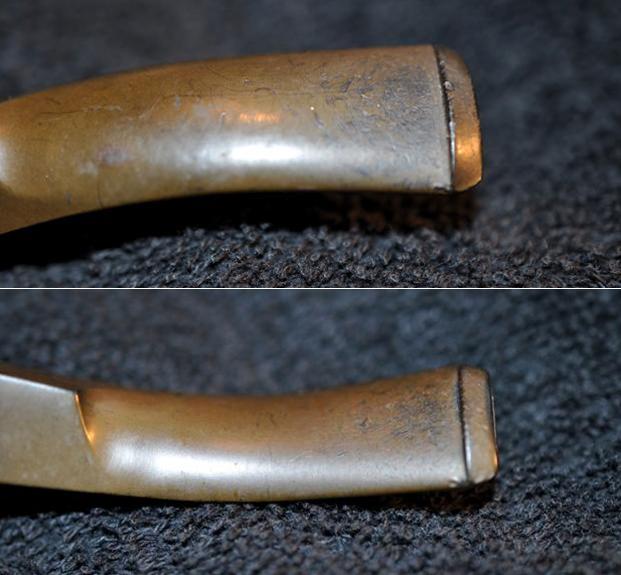
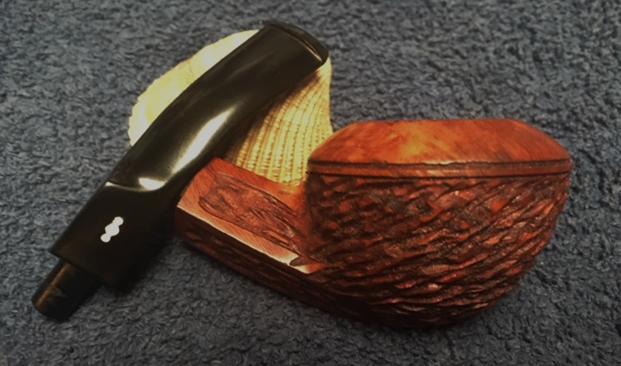
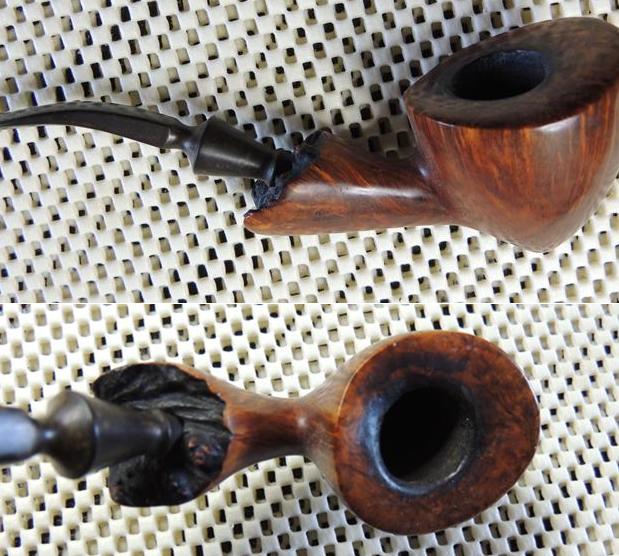
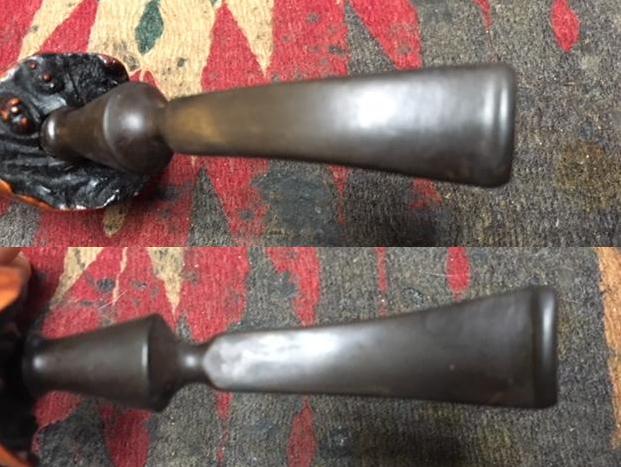
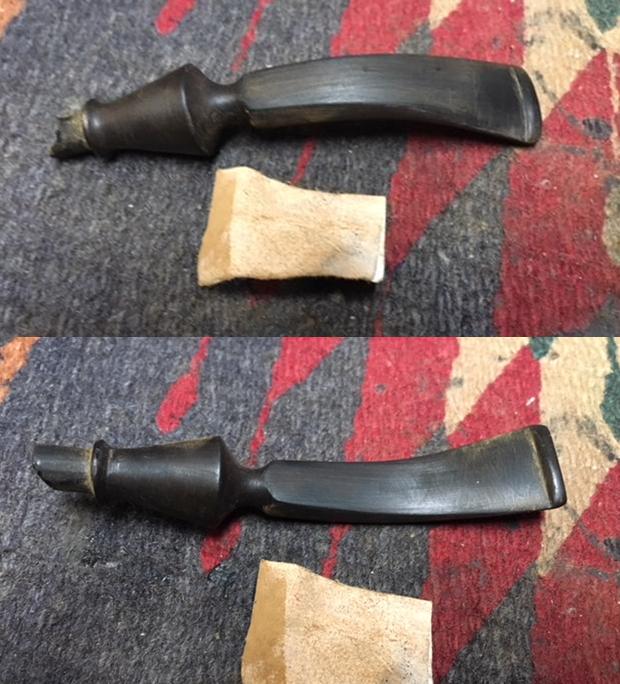
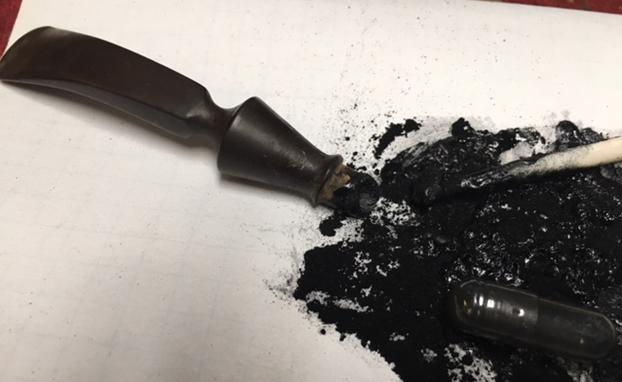
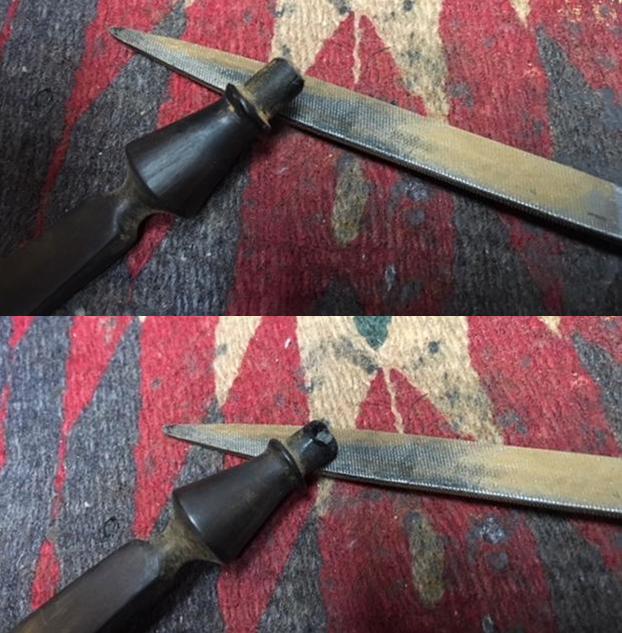
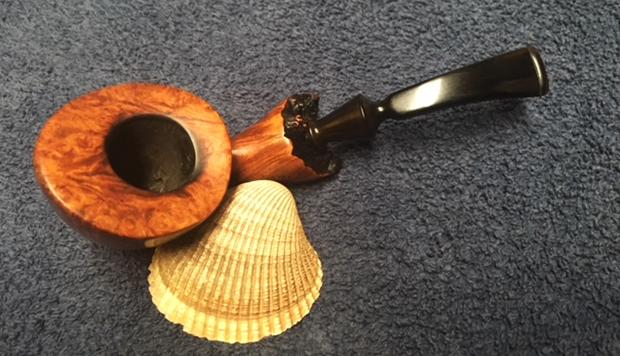
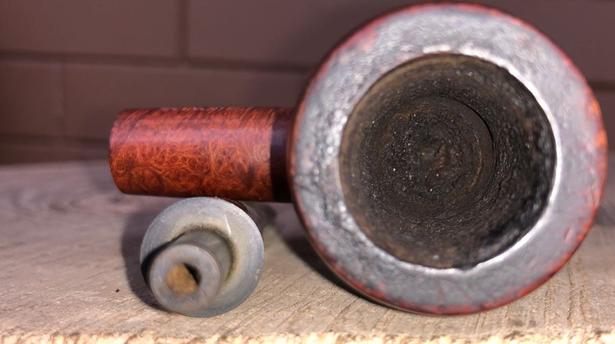
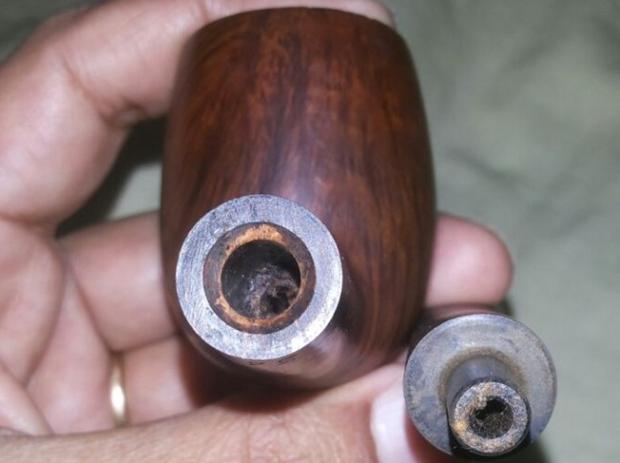
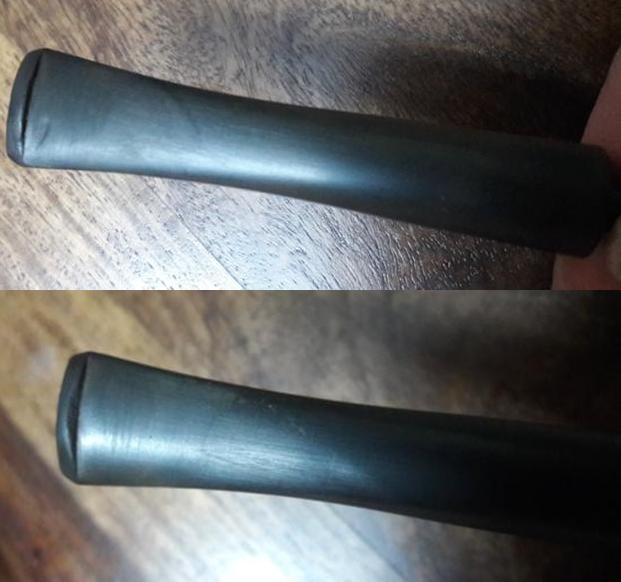
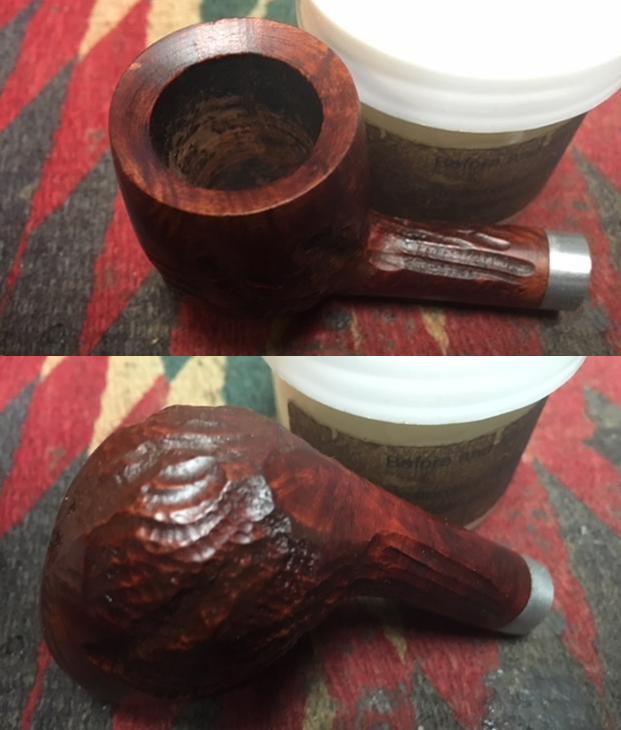
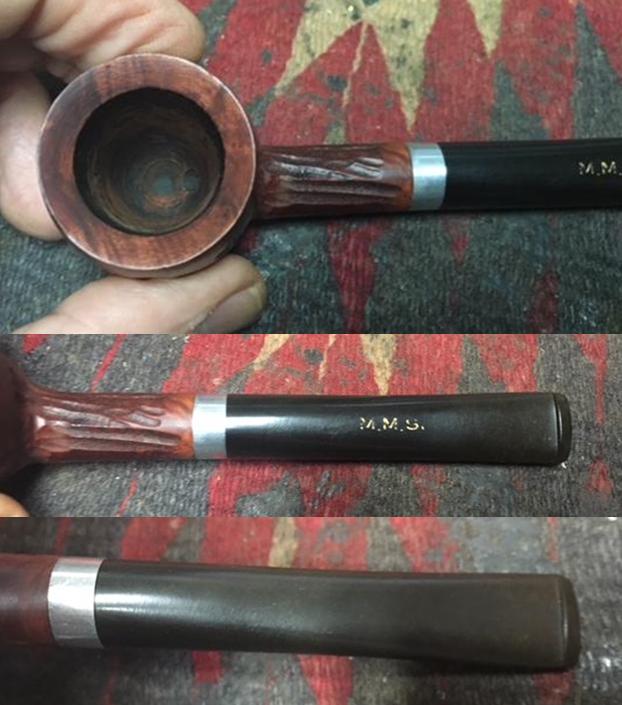
I took the stem out of the shank and was surprised to see a very clean aluminum stinger apparatus. The photos below show the look of the rounded tenon end and the unique stinger.
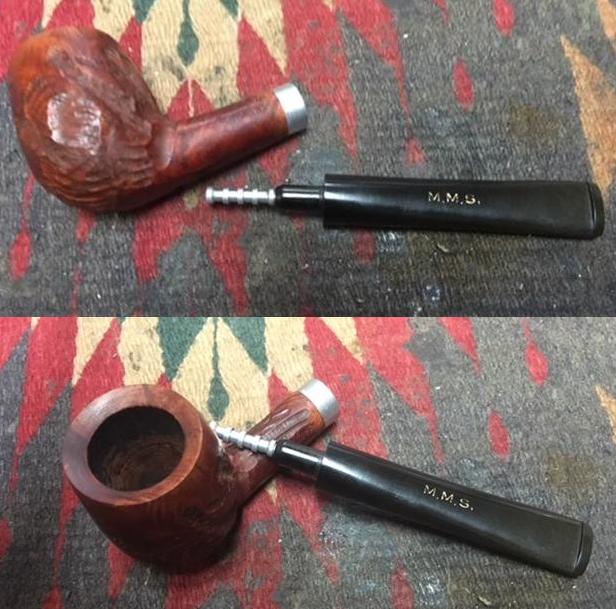
I took a photo of the stamping on the shank as well and it matched the photos of it on the Pipephil site. Underneath Signature it reads Imported Briar.
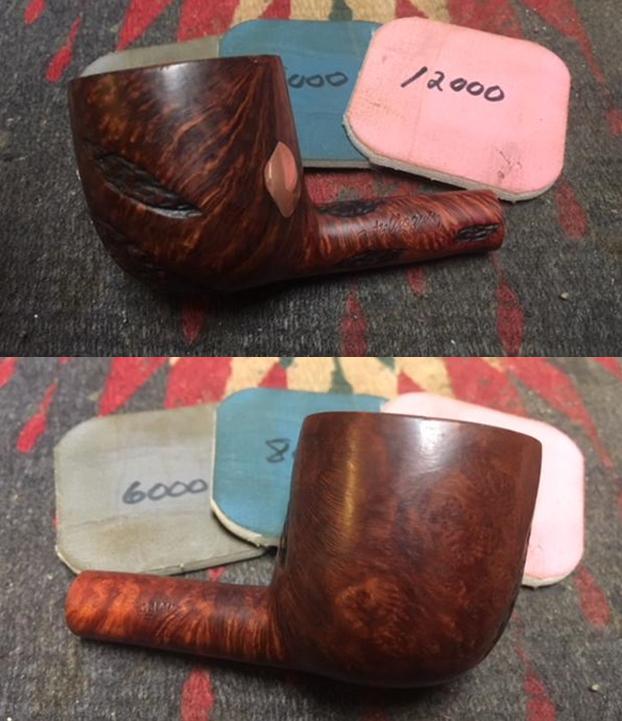
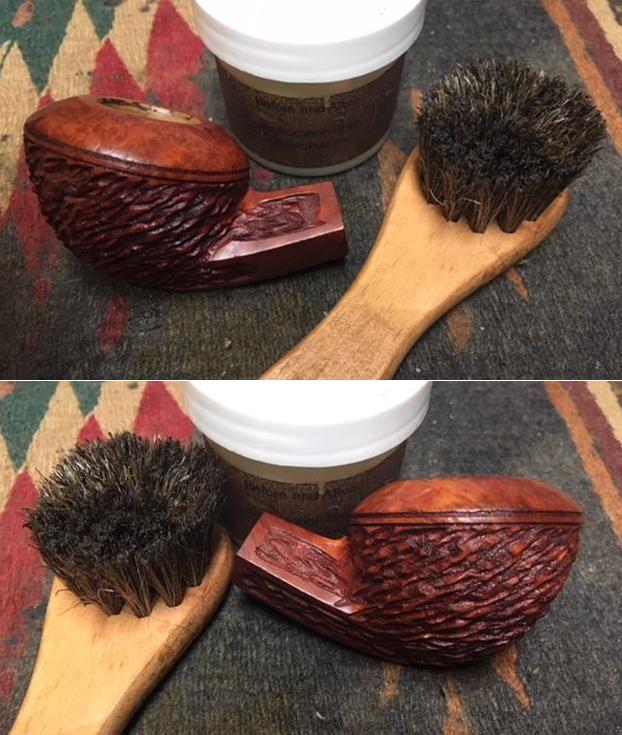
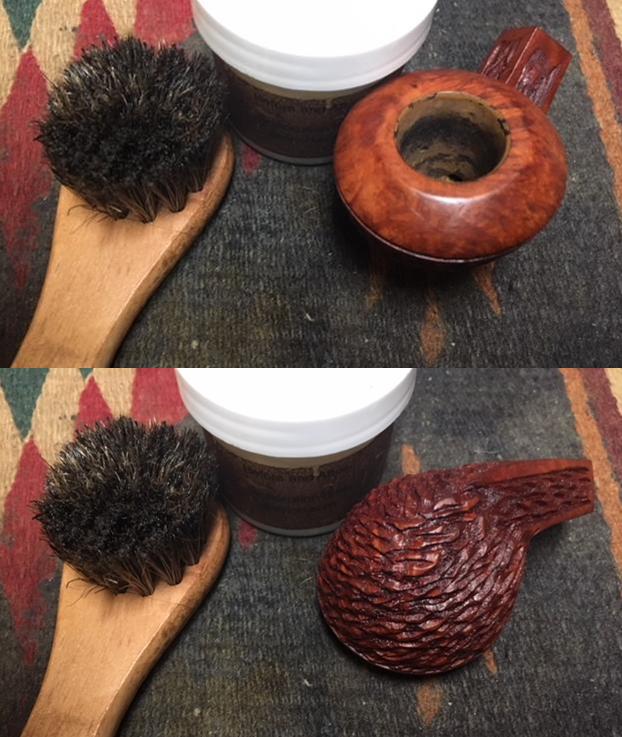
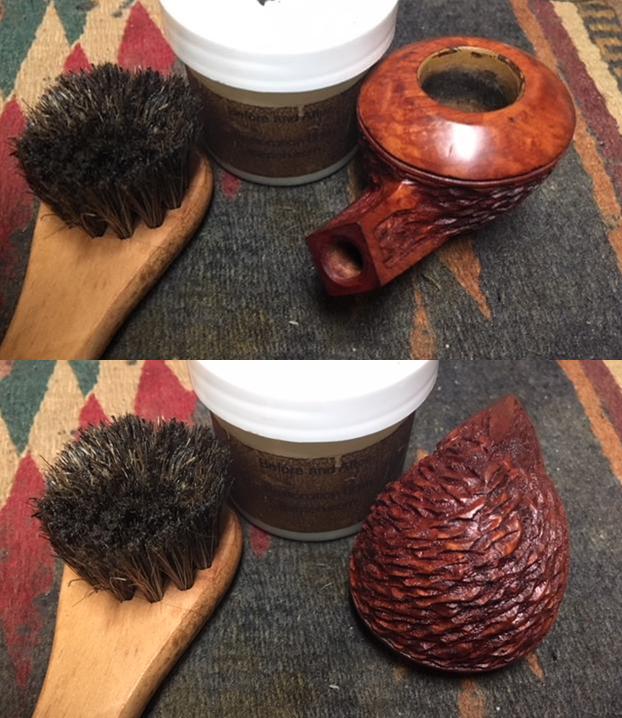
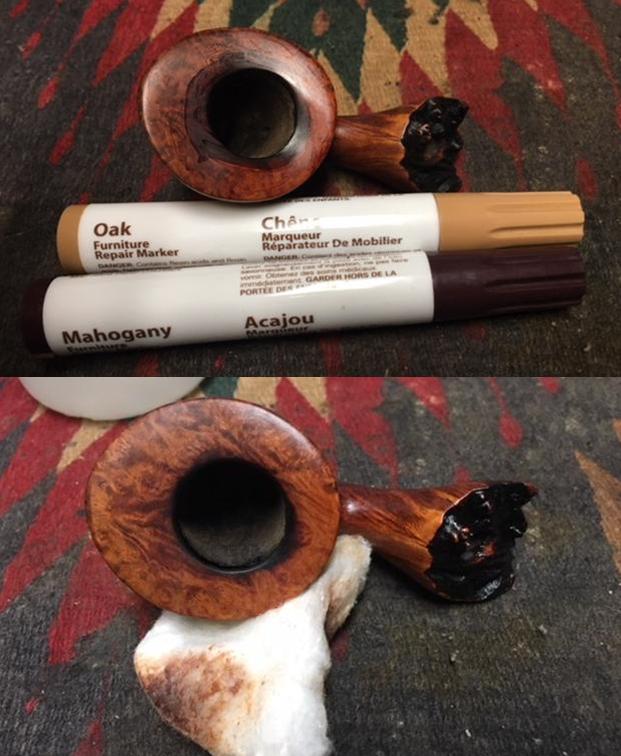
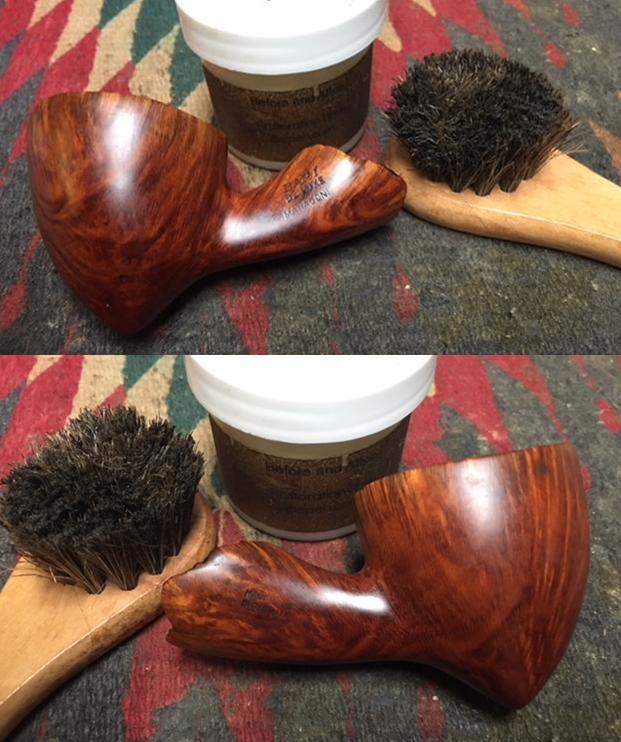
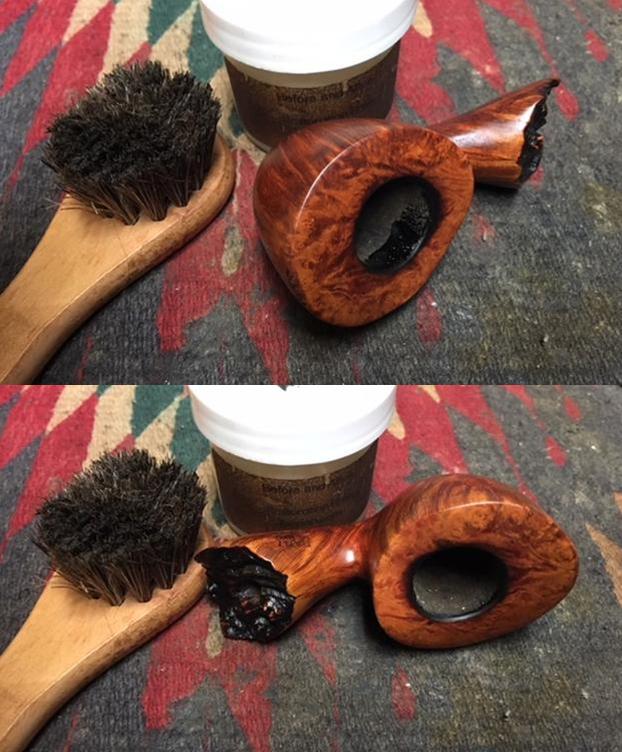
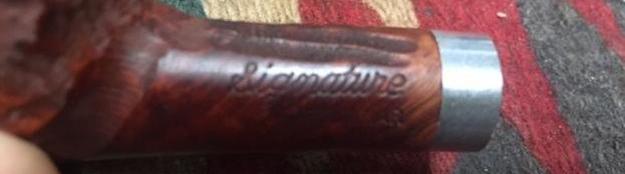
I rubbed down the briar with Before & After Restoration Balm. I worked it into the rustication around the sides of the bowl and shank. I rubbed it into the smooth portions of the bowl and the beveled rim. The Balm works to clean, enliven and protect the briar. I worked it into the briar with my fingertips and the help of a horsehair shoe brush. I let the balm sit for a little wall and then buffed with a cotton cloth to raise the shine. 
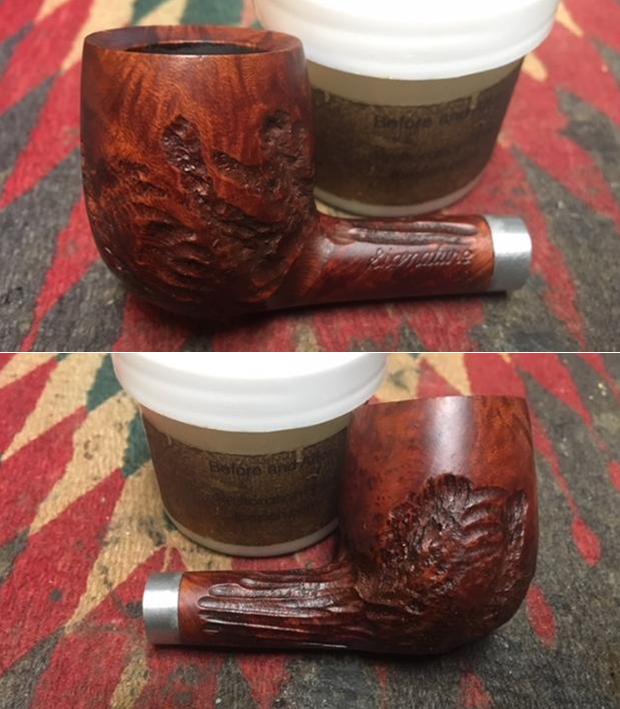
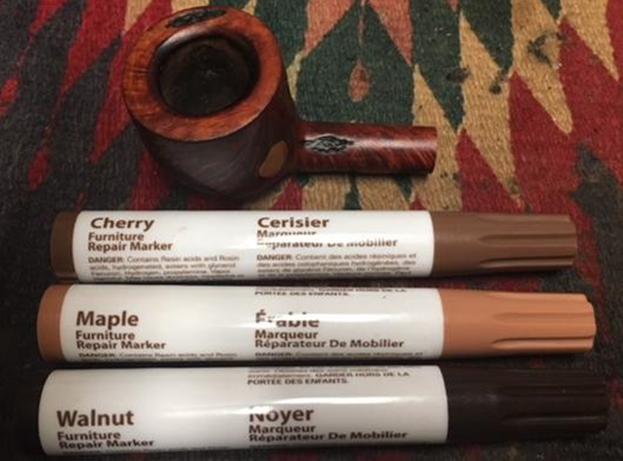
I touched up the gold stamping on the top of the stem with Rub’N Buff Antique Gold. I used a tooth pick to push the product into the grooves of the monogram stamping. I rubbed it over the surface of the stem. Once it had dried I buffed it off with a soft cotton cloth.
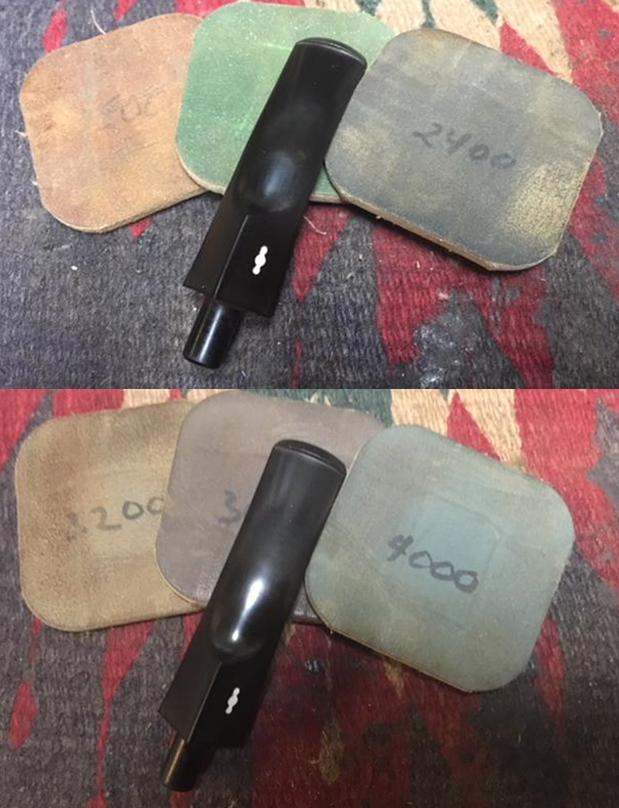
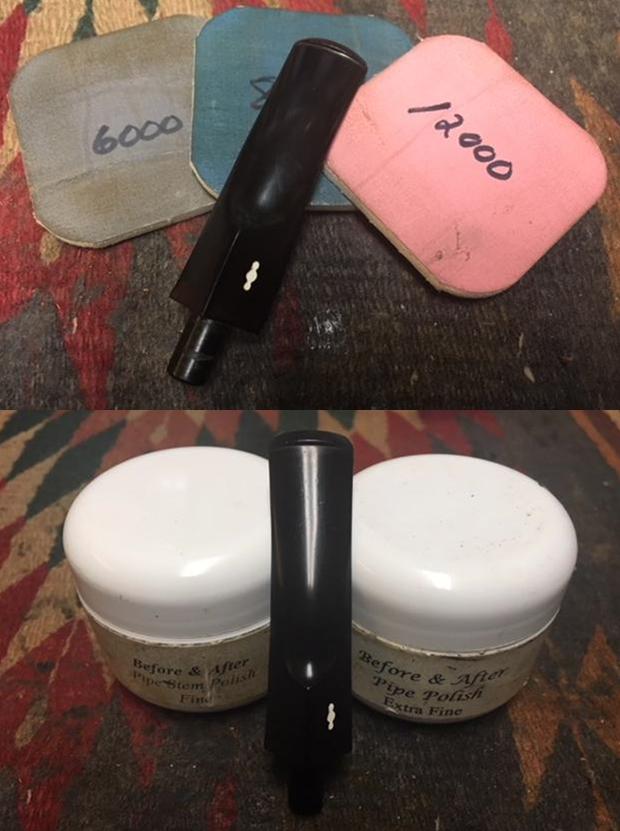
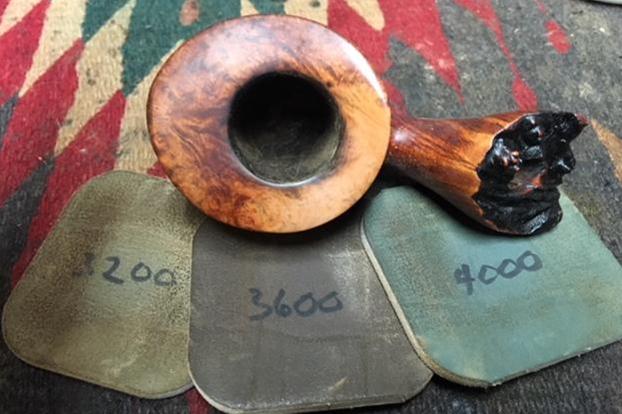
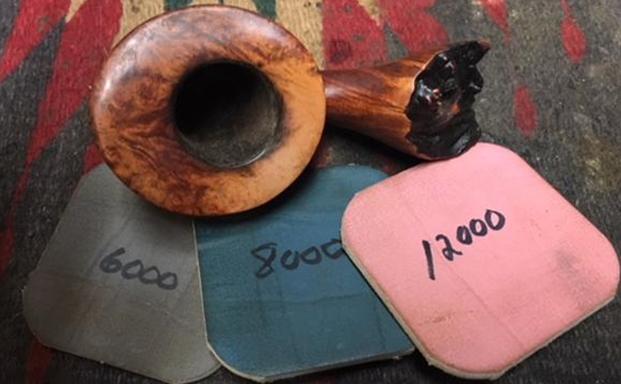
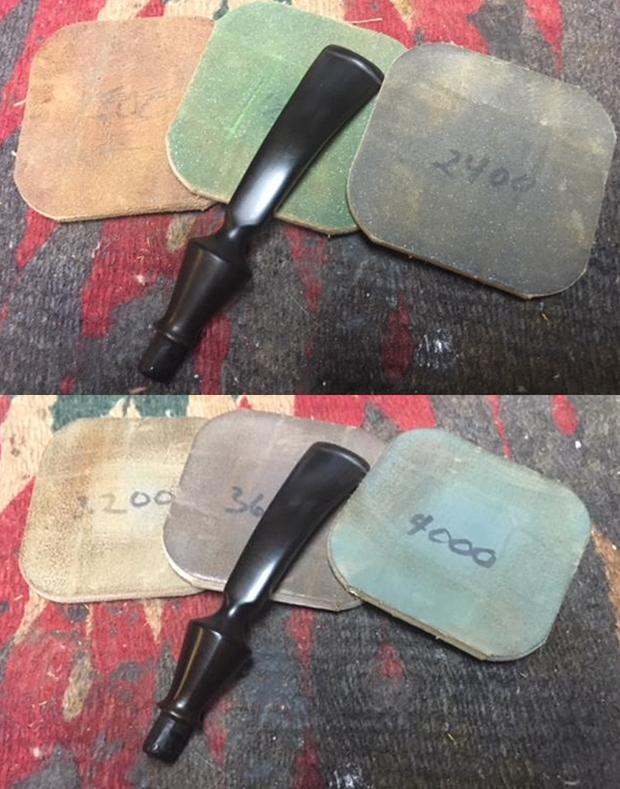
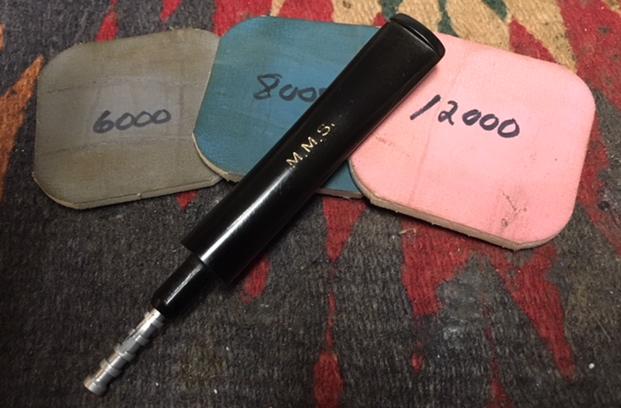
I polished the stem with micromesh sanding pads – wet sanding with 1500-2400 grit pads and dry sanding with 3200-12000 grit pads. I wiped the stem down after each pad with Obsidian Oil to preserve and protect the rubber. After the final pad I gave it a final coat and set it aside to dry. 
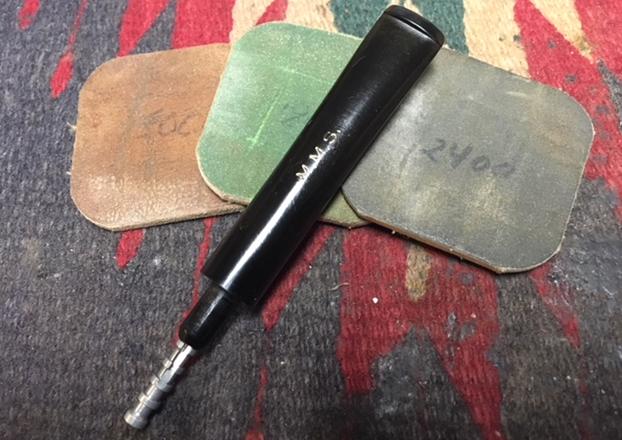
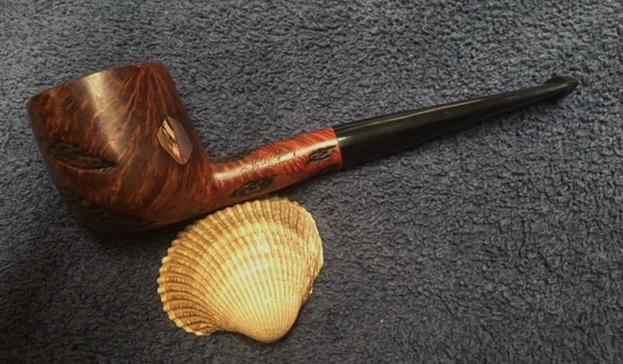
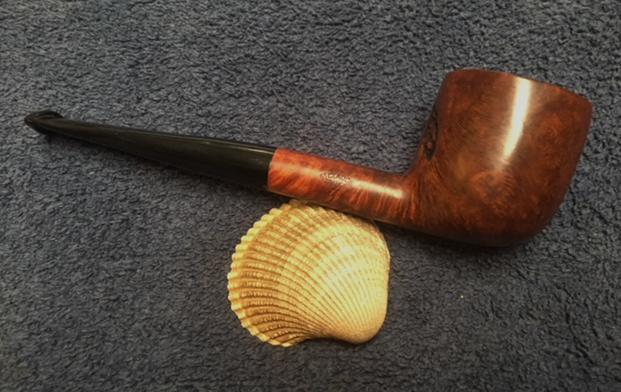
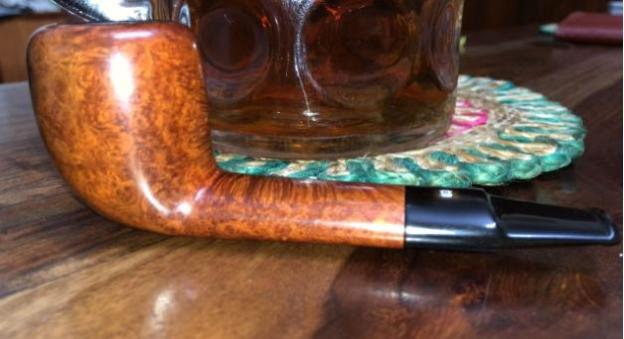
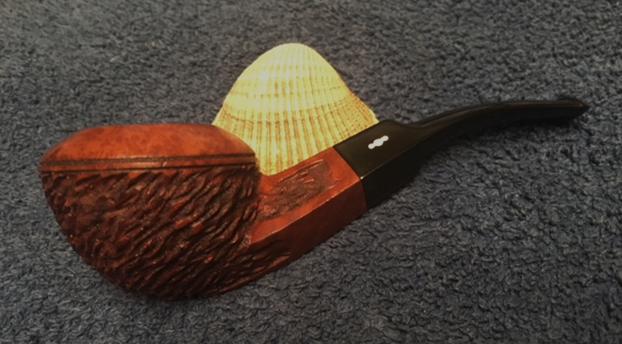
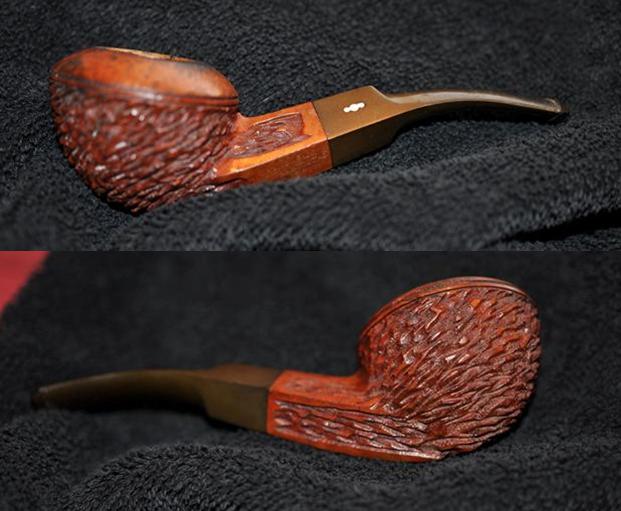
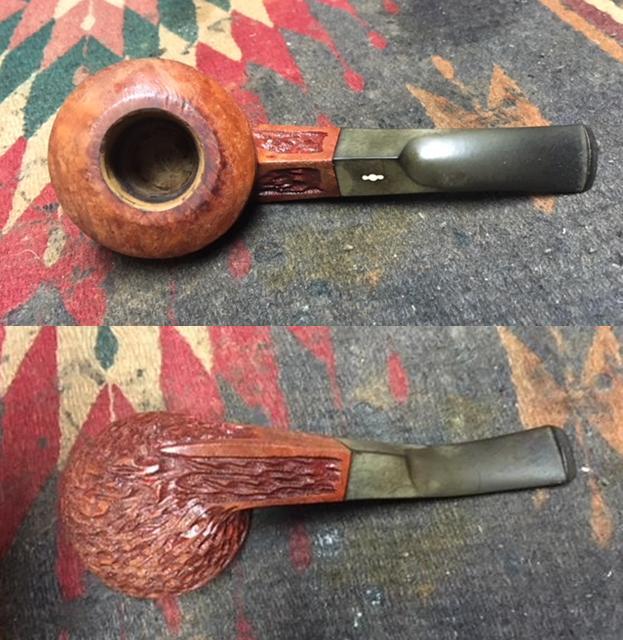
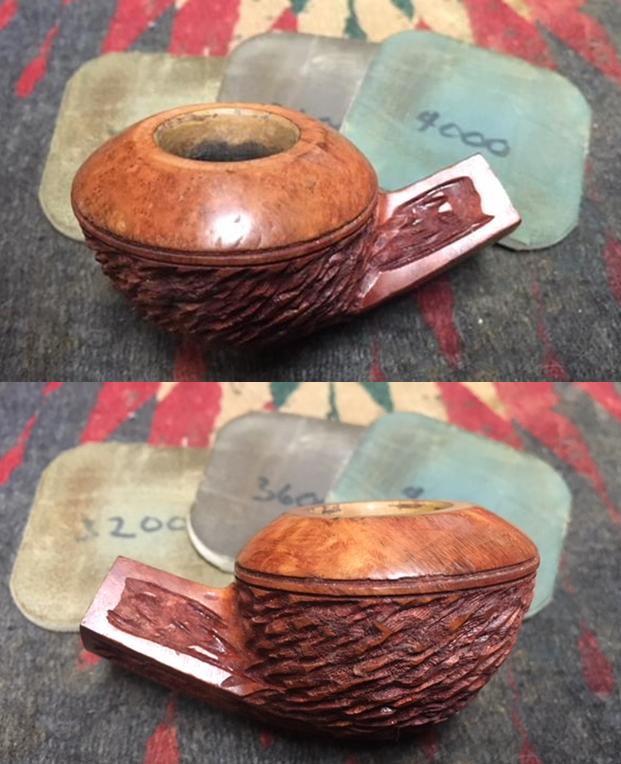
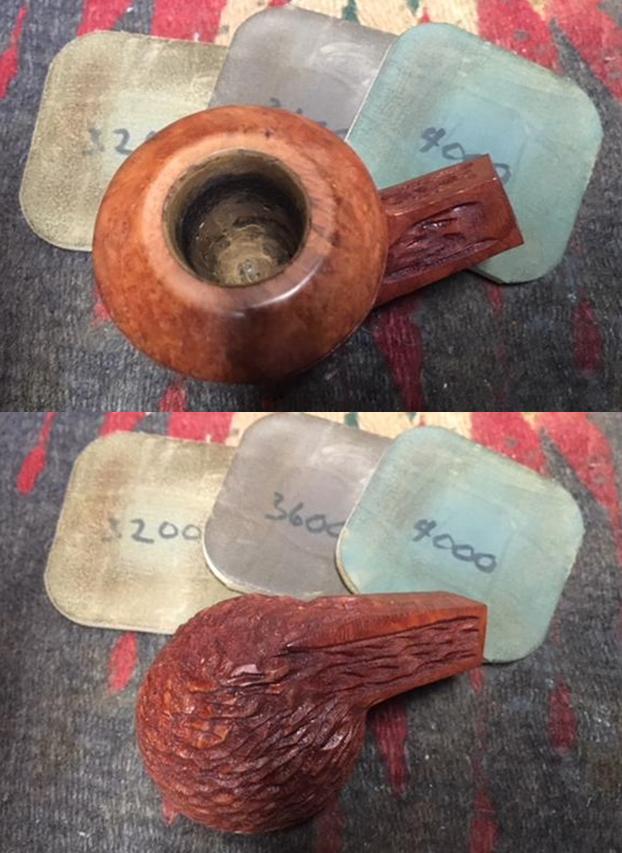
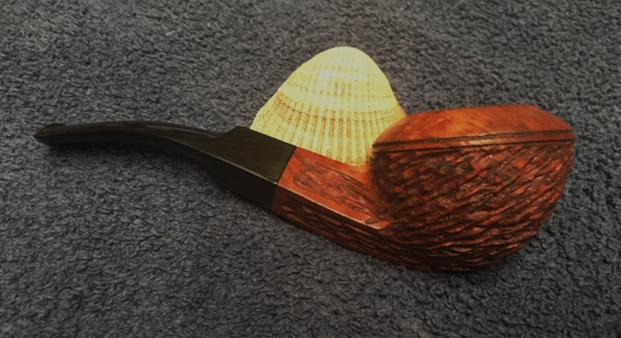
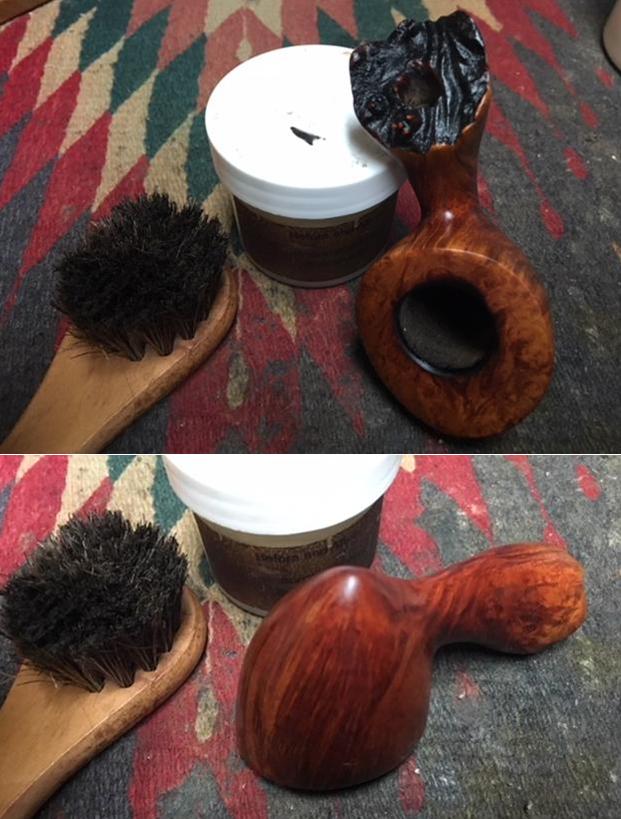
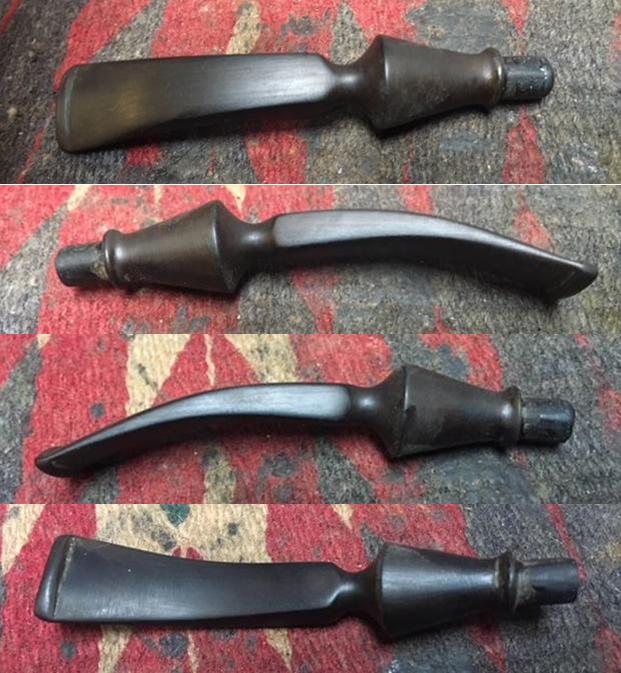
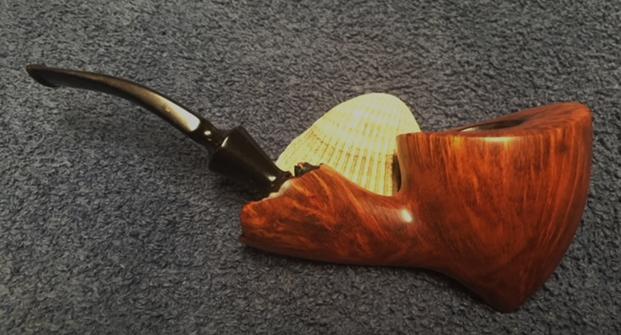
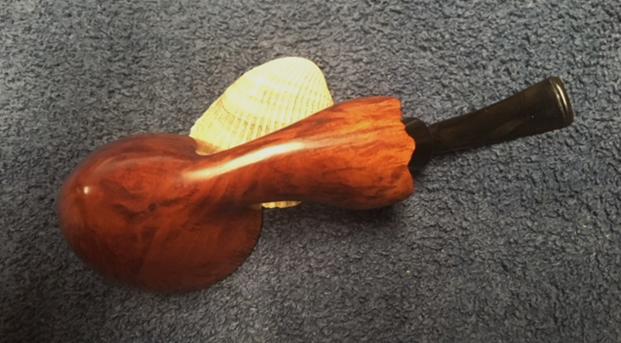
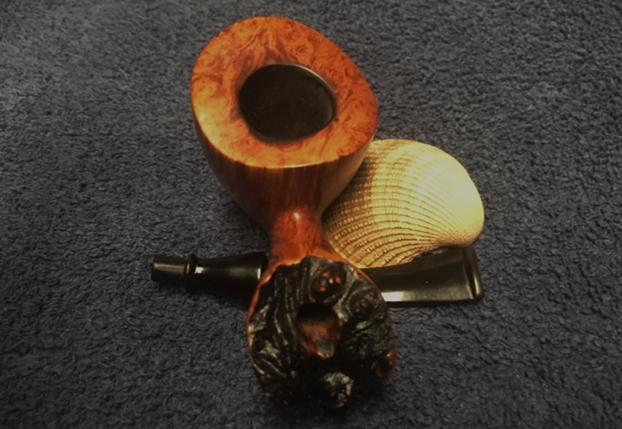
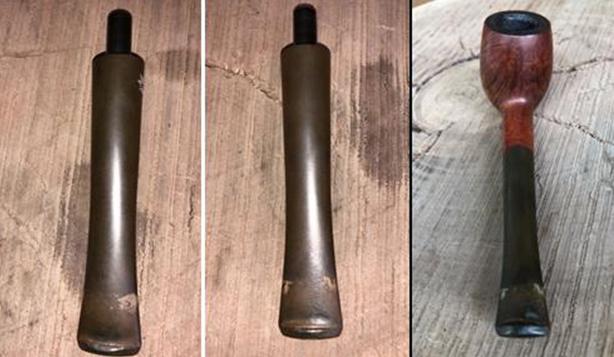
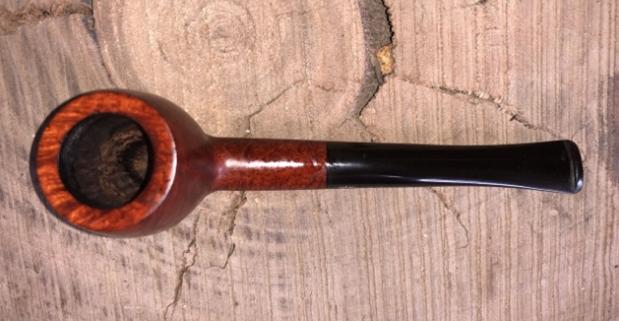
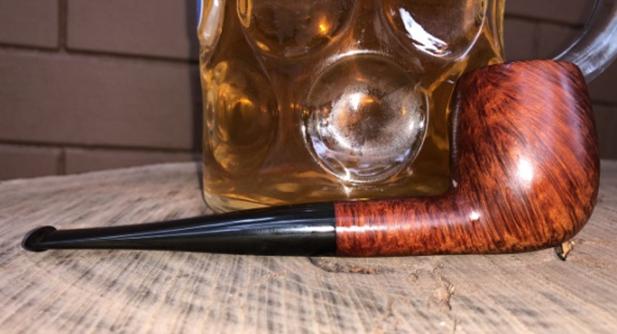
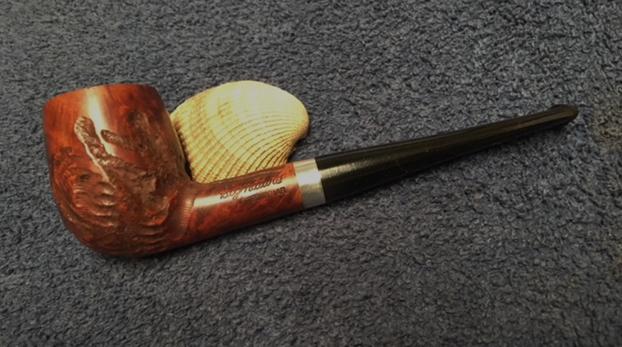
I the polished the bowl and stem with Blue Diamond to polish out the remaining small scratches and raise the shine. I gave the bowl and stem multiple coats of carnauba wax and buffed the pipe with a clean buffing pad to raise the shine. I hand buffed it with a microfiber cloth to deepen the shine. The pipe polished up pretty nicely. This turned out to be a beautiful pipe in terms of shape and finish. The finished pipe is shown in the photos below. The dimensions are Length: 5 3/4 inches, Height: 1 3/4 inches, Outside diameter of the bowl: 1 1/4 inches, Chamber diameter: 7/8 of an inch. Thanks for walking through the restoration with me as I worked over this interesting piece of pipe history made for the Larus & Brother Company. I will be adding it to the rebornpipes store shortly so if you are interested in adding it to your collection send me an email or a message on Facebook. Thanks for looking. 

Bringing a Butz Choquin Simour 1507 Back to Life


Blog by Steve Laug

With this blog I worked on another of the pipes from Kathy’s Dad’s estate. This is the twelfth of the pipes from collection. For a reminder to myself and those of you who are reading this blog I will retell the story of the estate. Last fall I received a contact email on rebornpipes from Kathy asking if I would be interested in purchasing her late Father, George Koch’s estate pipes. He was a lover of “Malaga” pipes as well as others and she wanted to move them out as she cleaned up the estate. We emailed back and forth and I had my brother Jeff follow up with her as he also lives in the US and would make it simpler to carry out this transaction. The long and short of it is that we purchased her Dad’s pipes – Malagas and others. Included in the lot was this interesting Butz-Choquin Classic Pot shaped pipe with an inset of what looks like copper on the left side toward the rear of the bowl. The condition of all them varied from having almost pristine stems to gnawed and damaged stems that need to be replaced. These were some well used and obviously well-loved pipes. Cleaning and restoring them will be a tribute to this pipeman. Jeff took these photos of the Butz-Choquin before he cleaned it. Jeff took photos of the rim top and bowl to show the thick cake and what looked like potential damage to the inner edge of the rim at the right front and the middle at the back. He also took photos of the bowl from various angles to show the condition of the finish and the copper insert I spoke of above.  The stamping on the left side of the shank clearly reads Butz-Choquin and underneath it is a bit more faint but looks to read Simour. On the right side it is stamped St. Claude over France and a shape number 1507 beneath that.The stem was in better condition than most of the others in the collection. There was light tooth chatter on both sides near the button and the sharp edge of the button had some tooth damage. As I look at it I wonder if it is not an acrylic stem. We shall see.Those of you who have followed me for a while know how much I love getting to know about the pipeman who held the pipes in trust before me. That information always gives another dimension to the restoration work. This is certainly true with this lot of pipes. I can almost imagine George picking out each pipe in his collection at the Malaga shop in Michigan. Once again, I am including that information with this restoration so you can know a bit about the pipeman who held these pipes in trust before they are passed on to some of you. I include part of Kathy’s correspondence with my brother as well…. I may well be alone in this, but when I know about the person it is almost as if he is with me while I work on his pipes. In this case Kathy sent us not only information but also a photo of her Dad with a pipe in his mouth.

Jeff…Here is a little about my dad, George P. Koch…I am sending a picture of him with a pipe also in a separate email.

Dad was born in 1926 and lived almost all his life in Springfield, Illinois. He was the youngest son of German immigrants and started grade school knowing no English. His father was a coal miner who died when Dad was about seven and his sixteen year old brother quit school to go to work to support the family. There was not much money, but that doesn’t ruin a good childhood, and dad had a good one, working many odd jobs, as a newspaper carrier, at a dairy, and at the newspaper printing press among others. He learned to fly even before he got his automobile driver’s license and carried his love of flying with him through life, recertifying his license in retirement and getting his instrumental license in his seventies and flying until he was grounded by the FAA in his early eighties due to their strict health requirements. (He was never happy with them about that.) He was in the Army Air Corps during World War II, trained to be a bomber, but the war ended before he was sent overseas. He ended service with them as a photographer and then earned his engineering degree from University of Illinois. He worked for Allis Chalmers manufacturing in Springfield until the early sixties, when he took a job at Massey Ferguson in Detroit, Michigan. We lived in Livonia, and that’s where his love for Malaga pipes began. After a few years he returned to Allis Chalmers and we moved back to Springfield. I remember that when we went back to Michigan to visit friends, Dad had to go to the Malaga store and acquire a few new pipes. Many a year I wrote to Malaga and they picked out a pipe for me to purchase that I could give Dad for a Christmas or birthday present. He was always pleased. His favorites were the straight stemmed medium sized bowl pipes, but he liked them all.  He had some other pipes, but the Malagas were his favorites. I remember him smoking them sitting in his easy chair after work, with feet up on the ledge by the fire burning in the fireplace.  Growing up it was my job to clean them and he liked the inner bowl and stem coated with Watkins vanilla, leaving a little of that liquid in the bowl to soak in when I put them back on the rack. Dad quit smoking later in life and so they’ve sat on the racks for many years unattended, a part of his area by his easy chair and fireplace. Dad passed when he was 89 years old and it finally is time for the pipes to move on. I’m very happy they are being restored by you and your brother and hope they find homes who enjoy them as much as Dad did. Thank-you for your care and interest. — Kathy, the oldest daughter

Kathy, once again I thank you for providing this beautiful tribute to your Dad. We so appreciate your trust in allowing us to clean and restore these pipes. I am also trusting that those of you who are reading this might carry on the legacy of her Dad’s pipes as they will be added to the rebornpipes store once they are finished.

Jeff cleaned this one up before he sent it my way. He is really good at the cleanup work. He had reamed the bowl with a PipNet pipe reamer and followed up with a Savinelli Fitsall pipe knife to remove the cake. He scrubbed out the mortise and the airway in the shank and the stem with alcohol, cotton swabs and pipe cleaners. He scrubbed the exterior of the bowl, rim, shank and stem with a tooth brush and Murphy’s Oil Soap to remove the oils and tars on the bowl, plateau rim and shank. He rinsed it under running water. He dried it off with a soft cloth. The lava mess on the rim was thoroughly removed without harming the finish underneath it. It revealed the burned areas on the inside edge of the rim that I was wondering about. However, without the grime the finish looked really good.  The feather or leaf carvings in the briar of the bowl and shank look good and the inset of what I thought looked like copper was flat. The acrylic stem would need to be worked on but I really like the shape. I took photos of the pipe to show its condition before I started my work on it. I took some close up photos of the rim and bowl to show the damage to the rim top and edge. Jeff did a great job on the cleanup but boy did it reveal some damaged spots. I have circled the damaged areas in red in the first photo below. I have also included some photos of the stem to show the condition before I polished it.The pipe has some stunning grain and then it has this copper coloured insert in the side of the bowl (It may well be a piece of copper, I will know more once I polish it). I am still trying to figure this out. I wrote an email to Butz-Choquin to see if they can give me information on the line. We shall see. The next photo shows the inset.The next photo shows the leaf or feather carvings on the shank and the grain pattern. This is a pretty piece of briar.I had an interesting challenge ahead of me – to try to remove some of the damage to the rim edge without damaging the carved feather/leaf on the rim top. I needed to reduce the burned area on the rim top so that I could bevel the edge inward to hide the darkening in those spots. I progressed slowly on the topping board, checking every couple of rotations to make sure I was not making things worse.Once I had the burn damage removed I worked on the darkening on the top surface of the rim toward the front and at the back side of the bowl. I was able to minimize the damage on the top. I sanded those areas with a folded piece of 220 grit sandpaper to blend it in better. I beveled the rim inward with a folded piece of 180 and 220 grit sandpaper. I was happy with the finished look of the rim edge. A good blend of stains will blend in the edge even more.I stained the rim top with a Maple stain pen first to blend it into the rest of the bowl. I worked on the inner bevel with Cherry and Walnut stain pens to darken the edge of the rim. I feathered the stain toward the out edge of the rim top and buffed it by hand to smooth out the transitions between the pens.I rubbed down the briar with Before & After Restoration Balm. I worked it into the carved feather/leaf patterns around the bowl, rim and shank. I rubbed it into the smooth portions to clean, enliven and protect the briar. I worked it into the briar with my fingertips and the help of a horsehair shoe brush. I let the balm sit for a little wall and then buffed with a cotton cloth to raise the shine. Here is where things are after the balm. I polished the briar with micromesh sanding pads – dry sanding with 1500-12000 grit pads. As I polished the briar the inset metal began to stand out. I was pretty certain that it was a piece of copper. It really began to shine and flash on the side of the bowl. It was an interesting touch to add that kind of adornment to a pipe. I set the bowl aside at this point and turned to work on the stem. I used 220 grit sandpaper to sand out the tooth chatter on both sides of the stem at the button. I also worked on the edge of the button to reshape it at the same time.I polished the acrylic stem with micromesh sanding pads – wet sanding with 1500-2400 grit sanding pads and dry sanding it with 3200-12000 grit sanding pads. I wiped it down after each sanding pad with a damp cloth.


An Interesting Look Back in Time at Pipe Marketing


Blog by Steve Laug

I don’t know how he does this but Jeff comes across things in his pipe hunting, auction cruising perambulations that I never seem to see and in new or next to new condition. This time he found some old pipe labels that had not been used and were in perfect condition. I don’t know if these were printed as box labels or for display boards but they are really quite interesting. Each label has a lot “advertspeak” that I find fascinating, you know the spin that the Marketing Team puts on pipes that their companies make. Jeff sent me these photos of his find. Have a look. They give us an enjoyable look back in time at how pipes were marketed. I will describe each one for you so if you cannot read it at least you will have an idea of what it says. First here are a couple of photos of the lot.I have always enjoyed Yello-Bole pipes and have even sold a few NOS Collegiate pipes so this is an interesting piece for me. It says Yello-Bole Collegiate $4.50 and describes the pipe as coming in Small Youthful Shapes. The imported Briar Bowl is Guaranteed against burn-out for Life. What do you think – are you youthful enough for these small petite pipes? I don’t think I ever was personally.The Checker Pipe was made by Yello-Bole. Over the years I have restored several of these CHECKER pipes that have a Hand Carved Checker-Board design carved into the briar around the bowl. The ones I have worked on have had a mixture of smooth and rusticated patches on the checkerboard differentiating the red and black squares. These pipes sold for $5.50.The Airograte Pipe was also made by Yello-Bole and was their version of the Falcon pipe or the Dr. Grabow Viking. It had a metal base and shank with an interchangeable bowl. Yello-Bole made a variation to the theme by make the bowl more of a tube and inserting a metal grate between the bowl and the base for dry smoking air flow. It also had the Nylon Bit like the Grabow and the Falcon version. These pipes sold for $5.95 and you could purchase a variety of interchangeable bowls for the base.We move from Yello-Bole pipes to the Medico Pipe Company and their lines. The first label in the collection shows the Medico Tuxedo Filter Pipe. The label shows a Tuxedoed Gent with a pipe and a bow tie. These pipes are said to “give pleasure and peace of mind” for only $3.50. They were made of Imported Briar. Who would not want to spend $3.50 when Pleasure and Peace of Mind can be had for such a reasonable price? Are you in?The next one is for a Medico pipe. The label reads MEDICO Medalist Filter Pipes over Imported Briar and a whopping $4.95 to purchase one of these lovelies. I am not sure but I think this may well have been one of the first pipes I ever purchased at a local drugstore.I have worked on quite a few Medico Ventilator Pipes over the years and even converted them to be non-ventilated! This bit of marketing says – “Protect yourself – with the only pipe that must be smoked with a filter.” (So much for deciding to use or not use a filter as the Medico Marketing department decided that you need to purchase those annoying paper tubes to smoke this pipe.) After telling us to protect ourselves the label says Medico Ventilator Filter Pipe. Made of Imported Briar and sporting a Guaranteed Bite-proof Nylon Bit. The pipe sold for $4.95.These next Medicos have survived time and become collectible I hear. I have worked on all the variations in terms of playing card symbols – Diamonds, Hearts, Clubs and Spades. This fancy pipe sold for $5.95 and was labeled Medico Casino Filter Pipes. They were made out of Genuine Sandblasted Imported Briar, were embossed with playing card symbols and once more had those “amazing” Bite-proof Nylon Bits. Can’t you see yourself firing up one of these pipes with the guys at the weekly poker game? The silver coloured band adds a touch of class.The Medico Ever-Dri is yet another attempt to find the cool dry smoke and according to the Marketing Team they have found it and it only costs you $7.95. The label includes the usual Medico Ever-Dri Filter Pipe with a Guaranteed Bite-proof nylon bit. There is a diagram on the label that shows their inventive system. Their system has a Condensor shield and tube that keeps the shank dry, Throw Away Nicotine Trapped in Medico Filter, Dry Heel, Free Draft Drying Chamber and it is made of Imported Briar.The next label is for a “higher end” Medico – a Crest Filter Pipe. The label is golden and lists the price at $10.00. The Medico Crest has a Bulldog smoking a pipe logo. The label says that these Filter Pipe have a Guaranteed Bite-Proof Nylon Bit (Oh boy – I hate nylon stems as they are a bear to clean up after someone has chewed the bite-proof bit).  The pipe is made of the Choicest Imported Briar.These labels give a walk back in time to the era of the 60s. The labels came from two US pipe companies that provided their offerings to the pipe smoking public. The first was Yello-Bole and the second Medico. These pipes were standard fare of the American pipesmoker throughout most of the 20th century. They were reasonably priced and offered outstanding guarantees. They are still readily available on the estate pipe market and are an easy restore (barring the famous Bite-proof nylon stem). Hope you have enjoyed this bit of pipe history. Thanks for reading.


“Vintage Smoking Pipe” (1950 GBD 9242)


By Al Jones

This 1959, silver hallmarked GBD 9242 was advertised on Ebay, with the title “Vintage Smoking Pipe” and the ad included on picture as below.

Because of the listing, it didn’t pop up on any of my Ebay brand searches. It looked like a GBD 9242, so a day before the auction ended, I contacted the seller and asked for additional information and pictures. Sure enough, it was a GBD 9242 with a hallmarked silver band. While heavily worn, it looked solid and the seller said he would take a return, should there be issues. I made an offer to buy the pipe, which the seller accepted and a few days later it was delivered.

The pipe had an incredibly thick cake, which spilled over the bowl top. The stem was heavily oxidized, but in decent shape, with only a few minor teeth indentions. The stem fitment was snug. Below is the pipe as it was received.

The nomenclature was all weak, but legible. I used a jewelers cloth to remove the tarnish on the silver and was delighted to find a P that corresponds with the date code for 1950, so the pipe is 68 years old!

I used a piece of Scotch bright to remove the build-up on the bowl top, followed by 8000 grade micromesh. The stain on the bowl was sun-damaged, so I wiped on a very mild solution of Medium Brown stain. The bowl was then buffed with White Diamond and several coats of Carnuba wax. There was heavy build-up in the bowl rings, I used a small pick to clear the rings, which were in perfect condition.

To ream the cake, it took several bits from my Pipenet set. The great news was, as in many cases, the thick cake seemed to protect the bowl and the interior was in excellent condition. The bowl was then soaked in alcohol and sea salt. While it was soaking, I put a dab of grease on the brass rondell and soaked the stem in a mild Oxy-clean solution. Following the bowl soak, the shank was cleaned and stem inserted.

The oxidation was removed with 400, 800, 1000, 1500 and 2000 grades wet paper. I used a lighter to raise several dents near the button. The stem was then finished with 8,000 and 12,000 grades micromesh, followed by a machine buff with White Diamond and Meguiars Plastic polish.

There were some dings on the bowl top, I raised some of those with an iron and a wet cloth. There was still some damage around the rim, I used a piece of 2000 grit paper to smooth that out.

The finished pipe is below.

?

?

Restoring a STANWELL # 89


Blog by Paresh Deshpande

This pipe, because of its interesting Dublin shape with a round rim, beautiful grain and it being a STANWELL, had been attracting my attention for some time now. However, I was always relegating its restoration since the condition was far worse and would require a ton of work as well as time to complete it.

After I had finished the pair of KRISWILLS, I could not think of working on any other pipe but this STANWELL!!!!!! And so, here I am with this pipe, admiring the shape, feel of the pipe in my hand and the beautiful grain that could be seen through all the dirt, oils, tars and grime.

A medium sized fancy Dublin with an oval shank, this pipe has beautiful densely packed birdseye grain on either side of the bowl with lovely cross grain extending from the front of the bowl right down the bottom to the shank end. Similarly, the grain extends from the back of the bowl up to the shank end!!!!! The flattish surface of the shank further accentuates the dense grain. No wonder then that this Stanwell is stamped as “SELECTED BRIAR”!!!!!!!! This beauty is stamped “STANWELL” in an inverted arch over “REGD No. 969- 48” over “HANDMADE” on top of the shank while on the bottom of the shank it is stamped “SELECTED BRIAR” over “89” over “MADE IN DENMARK”. The stem is stamped on the top of the saddle with a crown over “S” and on the bottom of the saddle with “HANDCUT”.All the stampings are crisp and easily readable.

I searched the net for information on this brand in general and this pipe in particular. The first site I always visit is Pipedia. I gathered a lot of information about the brand and some important snippets of information are reproduced below:

Stanwell Article from smokingpipes.com

When pipe smokers talk about pipes that are consistently great smokers, exhibit the creative and beautiful designs that exemplify Danish pipemaking and offer the best value in factory produced pipes, they are talking about Stanwell. We hear time and time again, from customers and top pipe makers from around the world, that Stanwell is the best factory produced pipe in the world. Stanwell maintains the most modern pipe making facility in the world and for many years has enjoyed some unique relationships with many legendary Danish pipe makers. In fact, Stanwell occupies a pivotal place in the history of the world-wide popularity of Danish-made pipes.

At the end of the war, briar became available again, so Nielsen began importing his own briar and started making briar pipes to compete with the English manufacturers. It must be remembered that in 1948, England was the single great center for pipe making. Therefore, Nielsen changed the name of his pipes to “Stanwell”, which sounded much more like a proper English name than “Nielsen”. He also created the horse drawn carriage logo for its English connotations. He later changed his own last name from Nielsen to Stanwell, a testament to his devotion to the pipes he made. Stanwell’s relationships with Danish pipe makers goes back to Sixten Ivarsson, who is considered the originator of modern Danish pipe making. Ivarsson was commissioned to design Stanwell shapes. In 1969, the factory was moved a town called Borup, just outside of Copenhagen to be closer to Ivarsson.

Essentially the goal of Stanwell is, and always has been, to produce high quality pipes at a price that is truly within the reach of the common man. In this they have succeeded admirably, offering perhaps more pipe for the money than any other pipe manufacturer in their price range. Stanwell pipe offers exceptional quality at a remarkably affordable price. Today it often seems that there are few options in between low cost, very low quality pipes and the handmade pipes that fetch hundreds of dollars. Stanwell manages to fill this void commendably by offering pipes close to the quality of the handmade with prices that are only slightly higher than drug store pipes.

Stanwell pipes are a must for any pipe collection. The Stanwell name is a cornerstone of Danish pipe making. In owning a Stanwell, you will not only enjoy beautifully styled, great smoking pipe at a great price, you will own a piece of pipe making history.

Now that I have some historical information about the brand, I went ahead with my attempt at dating this pipe. I had read that Mr. Basil Stevens is generally considered an authority on Stanwell pipes and so that was logical start point for me. I gathered some information from a site, https://www.scribd.com/document/45022903/Stanwell-Dating-Pricing-Information-by-Basil-D-Stevens, which I have reproduced from the above site:-

Dating Information:

1) Regd. No. stamping discontinued in late 1960s to very early 1970s. This is the Stanwell trade mark registration. The “48” indicates that the registration was made in 1948. (info rec’d from Jorgen Grundtvig, Managing Director, Stanwell A/S)

3) Up until the early 1960s only the top pipes, e.g. “Hand Cut” had the stem/mouth pieces stamped with the Stanwell logo of a crown over “S”.

6) “Handcut” stamped on black vulcanite stems have not been done since at least the 1970s and possibly earlier. (info from J.G.).

STANWELL SHAPES
Shape “89”
Two versions of this shape number
a) Freehand, oval stem, short oval saddle mouthpiece, by Sixten Ivarsson.
b) Large pot, thin, long saddle mouthpiece.

From the above information that I have gathered and highlighted in blue, I feel that this particular pipe was from the 1960s and is a freehand made by Sixten Ivarsson. Any variation or additional information or any incorrect assessment on my part may please be conveyed through your comments on rebornpipes.com

Armed with this information, I carried out my detailed initial visual inspection of the entire pipe. This assessment helps me in identifying the issues that are seen as well as understand likely issues that may present themselves subsequently while making a mental map of the entire restoration process.

INITIAL VISUAL INSPECTION
The stummel is covered in oils, tars and grime to such an extent that the bowl is very dull to look at with all the grains hidden and sticky to the touch. This will need thorough cleaning. Whether to sand the bowl with micromesh pads to bring to fore the lovely grain will be decided later. The bowl is heavily caked and has large amounts of lava overflow on top of the rim. The internal condition of the bowl and rim will be ascertained only after the cake has been completely reamed out. There is always the fear of possibility of charred rim edges or burn fissures or charred briar inside the chamber of pipes in this condition. However, the entire stummel appears solid to touch from the outside reducing the probability of any of the above possibilities being present.The short oval saddle stem is heavily oxidized with a number of light tooth chatter on both surfaces. The lips on both sides have been chewed off. I had masked both the stampings on the stem with a whitener pen, you could of course use acrylic paint or any other stuff, but I found the whitener pen to be the best option as it helps to fill the letters at a later stage. As expected, the airway is clogged and a test draw was rewarded with debris and carbon dust. This will have to be cleaned.THE PROCESS
The first step that I usually follow is the reaming of the bowl. Using a Kleen Reem pipe tool and my trusty and effective fabricated knife, Abha, my wife, cleaned out the cake from the chamber. To smooth out the inner surface of the chamber and completely remove the last traces of remaining cake, she sanded the inner surface with a 220 grit sand paper. With a sharp knife, very gently scraped the surface of the rim top and removed the accumulated tars, oils and grime.She cleaned the bowl and rim using undiluted Murphy’s Oil soap and a toothbrush. Thereafter, the bowl was washed under running tap water and immediately dried out using paper towels and a soft cotton cloth.

The stummel is now clean and fresh. Inspection of the rim and chamber revealed an intact inner edge and a perfect condition of the inner walls of the chamber. What a relief this was!!!!! The only issue was that the rim top is still blackened and an eye sore. I addressed this issue by sanding the rim and the entire stummel with micromesh pads. I very lightly and briefly wet sanded with 1500 to 2400 pads, gently wiping with a moist soft cloth to remove the dust left behind due to sanding.I dry sanded the rim and stummel using 3200 to 12000 grit micromesh pads. At the end of the dry sanding, I rubbed a small quantity of “Before and After Restoration Balm” with my fingers into the briar. The immediate and incredible transformation that takes place is a worthy reward for all the efforts!!! The bowl now looks fresh and attractive with the grains popping out any which way you look at the briar; it feels somewhat like DIWALI, festival of lights celebrated here in India. I polished off the balm with a soft cloth to a lovely shine. I AM ABSOLUTELY IN LOVE WITH THIS PIPE!!!!!Turning my attention to the stem, I started by sanding the stem with a 220 grit sand paper. I was especially careful around the edges and the stampings. Using the crisp edge of the folded sand paper, I reshaped the buttons and sanded it to even out the surface. Thereafter, I sanded the stem with 320 and 440 grit sand paper. To finish the stem I went through the complete set of micromesh pads, wet sanding with 1500 to 2400 pads and dry sanding with 3200 to 12000 grit pads. I wiped the stem with moist cloth after each pad and rubbed olive oil into the stem after every three pads. I carefully removed excess whitener from the stampings. The stem is now looking nice and shiny with crisp stampings. Having addressed the “appearance” aspects of this beauty, I turned my attention to the “performance” aspect to ensure that this beauty smokes as well as it looks. I thoroughly cleaned the shank internals using shank brush, pipe cleaners, cue tips and isopropyl alcohol. The stem airway was cleaned using regular pipe cleaners and also bristled ones dipped in alcohol. The airway is now clean and the draw is full and open.

To complete the restoration, I rubbed a minute quantity of PARAGON WAX on the stummel and the stem. After a few seconds, using muscle power and a microfiber cloth, I polished the entire pipe to a lovely shine. Can’t wait to load and fire up this stunning piece of briar!!!! The finished pipe is shown below and yes… for the curious reader, the prop is not Beer filled mug, but a Beer mug filled with GREEN TEA!!!!! Thank you for your valuable time spent in reading my amateurish chronicle.

Cleaning up a Fascinating KBB Yello-Bole Premier Bulldog


Blog by Steve Laug

I am not sure where Jeff found this old pipe but I like it. Once again he showed that he has an eye for old and unique pipes. This one is a ¼ bent bulldog with a large bowl and a unique rustication pattern on the underside of the bowl and on the shank. The pattern on the shank was framed with smooth frames. The cap on the bulldog was also smooth above the twin rings. The bowl was coated with varnish or some shine coat that was worn off of the smooth part of the pipe but remained in the grooves. The rim top had a lot of dents and damage but that will become evident in the following photos. It was stamped on the left underside of the diamond shank on a smooth panel. It has the KBB in a cloverleaf and next to that it reads Yello-Bole over Cured with Real Honey. Next to that is the symbol for a registered trademark ® (R in a circle). Underneath it reads Premier over Imported Briar. On the stem is the propeller inset logo that appeared on older Yello-Bole pipes. Jeff took photos of the pipe before he started his cleanup work. Jeff took some close up photos of the rim top to show the condition of the bowl and rim. The bowl interestingly, still had some of the Yello-Bole Honey Cured coating on the top edge and the bottom half of the bowl. The rim and cap had been knocked hard on surfaces to empty the bowl. There was some lava and dirt on the rim top and the sides of the cap but there was very little cake in the bowl and the edges looked to be in good condition.Jeff also took photos of the bowl from various angles to show the condition of the finish. You can see the crackling varnish and dust in the grooves of the rustication. The varnish is worn off the smooth portions and high spots on the rustication. There is also dust and crackling varnish filling in the twin rings that separate the smooth cap from the rusticated lower portion. The stamping on the left underside of the diamond shank is clear and readable. The KBB in the cloverleaf has more wear than the rest of the stamping. You can also see the grime on the finish in the photo below. The second photo shows the propeller logo on the top left side of the diamond saddle stem.The stem was in decent condition. It was oxidized on both sides of the stem. There were some nicks and tooth marks on both sides near the button and on the top and underside of the button itself. There were no deep tooth marks which is really a relief.I went back to a previous blog about the various Yello-Bole logos in my collection of these pipes. I reread that blog to try to narrow down a date for the pipe. Here is the link to the post and the comments on the blog: https://rebornpipes.com/2013/01/25/yello-bole-logos-from-my-collection-of-old-yello-bole-pipes/. There was a comment on that blog that came from Troy who I consider my go to guy for Yello-Bole information (who has written on rebornpipes and also has a blog of his own). Troy wrote as follows on dating Yello-Bole pipes by the stamping and logos.

“I have a large KBB Yello-Bole collection. They are some of my most favorite pipes and the best smokers for the money (briar wise) you can find in my opinion. I have restored and researched them quite a bit. I have several listed on my blog that I have cleaned or restored. I own about 30-40 KBB Yello-Boles now.”

“Here is a little guide to dating KBB Yello-Boles. If it has the KBB stamped in the clover leaf it was made 1955 or earlier as they stopped the stamping after being acquired by S.M. Frank. From 1933-1936 they were stamped Honey Cured Briar. Pipes stems stamped with the propeller logo they were made in the 30s or 40s no propellers were used after the 40s. Yello-Bole also used a 4 digit code stamped on the pipe in the 30s. If the pipe had the Yello-Bole circle stamped on the shank it was made in the 30s this stopped after 1939. If the pipe was stamped BRUYERE rather than briar it was made in the 30s.” (NB. The portions above in bold and underlined were highlighted as they pertain to the present pipe.)

From that information I ascertained the following. The rusticated Premier Bulldog I had was stamped with KBB in the cloverleaf on the left underside of the shank which told me that the pipe was made before 1955. It had a propeller logo on the stem which further placed it in the period of the 30s and 40s. With all of that collected I knew the pipe was made between 1930 and 1949 which means that this old Bulldog has seen a lot of life. I wish it could tell its story.

Ah well… I don’t know for sure where it came from or what previous pipeman carried the trust of this pipe before it came to me. It still needed to be cleaned up. I turned my attention to the restoration of the Bulldog.

Jeff had worked his magic in cleaning up this pipe. It is nice to work on pipes that he has cleaned up once again. He reamed it with a PipNet reamer and smoothed the walls of the bowl with a Savinelli Fitsall pipe knife. He scrubbed out the mortise and the airway in the shank and the stem with alcohol, cotton swabs and pipe cleaners. He scrubbed the exterior of the bowl, rim and shank with a tooth brush and Murphy’s Oil Soap to the oils and tars on the bowl, rim and shank. He rinsed it under running water. He dried it off with a soft cloth. He was able to remove much of the crackling varnish in the grooves of the rustication and the briar beneath was in good condition. The cleaning of the stem left a light oxidation in the vulcanite. The tooth marks were clean but visible. I took photos of the pipe to show its condition before I started my work on it. I took some photos of the rim top and cap to show what it looked like after Jeff had cleaned off the grime and tars. The briar was in good condition but there were some deep gouges and scratches in the flat top and there were knock marks all around the cap surface. The stem was oxidized and showed tooth chatter and wear but it was otherwise in good condition. There were no deep tooth marks.I started my work on this pipe by lightly topping the bowl to remove the damage to the surface of the rim. It did not take too much topping to remove the damaged areas.I wiped the bowl down with acetone on cotton pads to remove the varnish that remained. I worked it into the grooves of the rustication with a brass bristle wire brush. Once I was finished the finish was clean and the grain looked really good on the cap and the rim top. The rustication was clean. I took photos of the bowl after the clean up to show the condition of the bowl at this time. It is beginning to look really good. In the third photo below you can see the Yello-Bole Honey Coat still present on the walls of much of the bowl. I used a folded piece of 220 grit sandpaper to sand out the nicks in the surface of the cap and to smooth out the small nicks around the outer edge of the flat rim top. I polished the rim top and the smooth portions of the bowl with micromesh sanding pads – wet sanding with 1500-2400 grit pads and dry sanding with 3200-12000 grit pads. I wiped the bowl down after each pad with a damp cloth. I rubbed some Before & After Restoration Balm into the surface of the briar to enliven, clean and preserve it. I rubbed it in with my fingertips working it into the briar. I worked it into the nooks and crannies in the rustication on the bowl and the shank a shoe brush. I set it aside for a little while to let the balm do its work. I buffed it off with a cotton cloth and then buffed it with a microfiber cloth. The photos below show the pipe at this point in the restoration process. I set aside the bowl and turned my attention to the stem. I sanded the tooth chatter and the oxidation off the surface of the vulcanite. I wiped it down with Obsidian Oil and took some photos of the stem at this point.I polished the stem using micromesh sanding pads – wet sanding with 1500-2400 grit pads and then buffing on the wheel with red Tripoli. I dry sanded the stem with 3200-12000 grit pads to further polish it. After each pad I wiped it down with Obsidian Oil to protect and enliven the stem. I polished it further with Before & After Pipe Polish – both Fine and Extra Fine. When I finished with the polish I gave it a final coat of oil and set it aside to dry. This older rusticated KBB Yello-Bole Premier Bulldog is an interesting and unusual piece. The rustication on the bowl is really unusual and the framing of it on the shank is quite unique. The smooth rim and cap is quite nice and has some birdseye and swirled grain undulating in the briar. The reddish brown of the bowl and the black of diamond vulcanite stem contrast well together. I buffed the bowl and the stem with Blue Diamond polish to raise the shine on the briar and the vulcanite. I lightly buffed the rim top and shank end as well. I was careful to not buff the stamping and damage it. I gave the smooth parts bowl and the stem multiple coats of carnauba wax. I hand waxed the rustication with several coats of Conservator’s wax. I buffed the entire pipe with a clean buffing pad to raise the shine. I hand buffed it with a microfiber cloth to deepen the shine. The finished pipe is shown in the photos below. The dimensions of the pipe are: Length: 5 1/2 inches, Height: 1 3/4 inches, Outside Diameter: 2 inches, Diameter of the chamber: ¾ of an inch. It is an interesting old pipe and should make a great collectible piece. Thanks for walking through the restoration with me.

Restoring a Second Bari De Luxe Mahogany Freehand…


Blog by Steve Laug

I was emailing back and forth with a pipeman in Edmonton who wanted to sell of his pipes. He was cleaning up things and thought he would see if I was interested in them. He said that he had several Bari’s that were in the lot and he wanted to move those out. He sent me photos of the pipes he had and we soon struck a deal. Since we were both in Canada it did not take long for the package to make its way to me. I opened it and went through his pipes to see what I had to work on. There were some pipe racks and accessories in the box as well. I went through the pipes and set them aside. Today I decided it was time to start working on them. I chose a second Bari De Luxe Mahogany Freehand as the second of those Bari’s that I would work on. I have included two of the photos of the pipe that he sent to me before I purchased the lot. You can see that it was a well-loved pipe and one that he smoked often. The finish on the sides and shank was in good condition but dirty. The shank end was a nice natural plateau but not as craggy as the previous one. The rim top had an over flow of lava on the top and there was a burn mark on the back inner edge of the rim. Under the tar and lava it looked like the rim top was in good condition. The stain highlighted the beautiful grain on the briar and the plateau was stained black in stark contrast to the reddish brown of the bowl. The bowl was caked and would need to be reamed but otherwise good condition. The stem was cleaner than the previous one and did not have any sticky substance on it. There was some oxidation under the oil but there were not any tooth marks or chatter on the surface. Tenon end was chipped and broken and would need to be repaired. I took the following photos of the pipe before I began the cleanup. (The pipe came in an original Bari pipe sock.) I took some close up photos of the rim top and the stem to show the condition of the pipe when I started. The rim top shows damage at the back inner edge of the bowl and on the rim top at that point as well. Other than general darkening and tar around the inner edge of the bowl the rim shows some nice grain. The plateau on the shank end is in excellent condition. The stem surface is in good condition other than some oxidation. When I took the stem out to examine the tenon and shank I found a surprise. When I spoke with John he was unaware of the issue as well and was surprised. The tenon had a large chunk out of the top side. There was almost half of the tenon missing.I took photos of the stamping on both sides of the shank. On the left it was stamped Bari over De Luxe over Mahogany and on the right side it was stamped Hand Made in Denmark. The stamping was faint toward the bowl on both sides of the shank but was still readable.In the previous blog on the Bari De Luxe Freehand I quoted a section from Pipedia on Bari pipes. Here is the link to the article on Pipedia: https://pipedia.org/wiki/Bari. I summarize the material that I found there as it gives a clear picture of the brand. I have been working on several pipes by Viggo Nielsen recently so it was a good reminder.

Pipedia states that Bari Piber was founded by Viggo Nielsen in Kolding, Denmark around the turn of 1950/51. His sons Kai and Jørgen both grew into their father’s business from a very young age and worked there till 1975. Both have become successful pipe makers.

Bari successfully adapted the new Danish design that had been started mainly by Stanwell for its own models. Bari was sold in 1978 to Van Eicken Tobaccos in Hamburg, Germany though the pipes were still made in Denmark. From 1978 to 1993 Åge Bogelund and Helmer Thomsen headed Bari’s pipe production.

Helmer Thomson bought the company in 1993 re-naming it to “Bari Piber Helmer Thomsen”. The workshop moved to more convenient buildings in Vejen. Bogelund, who created very respectable freehands of his own during the time at Bari got lost somehow after 1993. Bari’s basic conception fundamentally stayed the same for decades: series pipes pre-worked by machines and carefully finished by hand – thus no spectacular highgrades but solid, reliable every day’s companions were what they turned out. The most famous series are the smooth “Classic Diamond” and the blasted “Wiking”.

I started my cleanup of this pipe by working on the internals. I reamed out the cake with a PipNet pipe reamer and took the cake back to the bare briar. I scraped out the remnants in the bowl with a Savinelli Fitsall Pipe Knife. I sanded the walls in the bowl with a piece of dowel wrapped with 220 grit sandpaper to smooth the walls. I sanded the rim top with a folded piece of 220 grit sandpaper to remove the burn damage on the back side of the bowl. I polished the sanded area with micromesh sanding pads – wet sanding with 1500-2400 grit pads and dry sanding with 3200-12000 grit pads. I wiped the surface down with a damp cloth after each sanding pad. The first photo is a reminder of where things were at when I started the cleanup. While the burn mark was not totally removed it looked much better than when I started the cleanup. I used an Oak stain pen to restain the entire rim top. I used a Mahogany stain pen to touch up the inner edge of the bowl to try to blend in the darkening around the edges. Once the stain dried I rubbed it lightly with an alcohol dampened cotton pad to blend the colours together.I rubbed some Before & After Restoration Balm into the surface of the briar to enliven, clean and preserve it. I rubbed it in with my fingertips working it into the briar. I worked it into the nooks and crannies in the plateau on the rim and the shank end using a cotton swab. I brushed those areas with a shoe brush to work it in more deeply and spread it out. I set it aside for a little while to let the balm do its work. I buffed it off with a cotton cloth and then buffed it with a microfiber cloth. The photos below show the pipe at this point in the restoration process. I scraped the mortise walls with a sharp pen knife to remove the lacquer build up from tobacco juices and oils. It was thickly coated. Once I had that finished I cleaned out the mortise and the airway in the shank with cotton swabs, pipe cleaners and alcohol. It was dirty but I was surprised it was as clean as it was all things considered. I cleaned the airway in the stem the same way as the shank.I set the bowl aside and turned my attention to the stem. I reshaped the button with a needle file and sharpened the edge against the surface of the stem. I sanded the surface of the stem with 220 grit sandpaper to remove the light tooth chatter on the surface of the stem and to break up the oxidation that was prevalent in the grooves and spindles of the stem.  I started the process of rebuilding chipped tenon. I have done this on one other pipe and was quite happy with the results. I mixed a batch of charcoal powder and super glue to make a putty to start the rebuild. I applied it to the edge of the tenon with the sharp tip of a sanding stick. I wanted to layer the edge until the tenon was sharp and smooth. It would be a process of layering and shaping to get what was needed. The process was quite simple – set a base of the superglue and charcoal and shape the repair. Add more of the mix to the tenon and shape it again. The process would be repeated until the tenon was even all the way around. The pictures tell the story of the rebuild process. I applied another coat of the glue to fill in the airspaces left from the charcoal powder. I sanded the rebuilt tenon smooth with 220 grit sandpaper. I wiped the end down with Obsidian Oil after sanding it smooth. It is starting to look really good and once the repair cures it will be durable.I set the stem aside and let it cure overnight and worked on other pipes. When I picked it up again this morning I polished it using micromesh sanding pads – wet sanding with 1500-2400 grit pads and then buffing on the wheel with red Tripoli. I dry sanded the stem with 3200-12000 grit pads to further polish it. After each pad I wiped it down with Obsidian Oil to protect and enliven the stem. I polished it further with Before & After Pipe Polish – both Fine and Extra Fine. When I finished with the polish I gave it a final coat of oil and set it aside to dry. This second Bari De Luxe Mahogany Freehand is another beauty with swirling, straight and flame grain all around the bowl. The shank end has some interesting looking plateau that is deep and craggy. The smooth rim is quite nice and has some swirls of grain undulating in the briar. The brown of the bowl and the black of the plateau look really good with the black of the turned vulcanite stem. I buffed the bowl and the stem with Blue Diamond polish to raise the shine on the briar and the vulcanite. I lightly buffed the rim top and shank end as well. I was careful to not buff the stamping and damage it. I gave the bowl and stem multiple coats of carnauba wax. I buffed the entire pipe with a clean buffing pad to raise the shine. I hand buffed it with a microfiber cloth to deepen the shine. The finished pipe is shown in the photos below. The dimensions of the pipe are: Length: 6 inches, Height: 2 1/8 inches, Outside Diameter: 1 3/4 inches, Diameter of the chamber: ¾ of an inch. This is the second Bari De Luxe that I have worked on and it more average or medium in size. The combination of smooth and rugged looking plateau on the shank end makes it an interesting pipe. Thanks for walking through the restoration with me.

GBD 2100 New Era Restoration


By Al Jones

This GBD was a bit of an odd-ball. First of all, it is a shape number that I’ve never encountered. Second it had no COM (country of manufacture stamp). A GBD knowledgeable friend believes it was made in the 40’s to 50’s era. The tenon is the bullet style, which is seen in older GBD’s and typically New Era grade or higher.

The pipe was in fairly good condition, with a small sharp tooth indention underneath the stem and a degraded button. It had the typical bowl top build-up. The stem did not fit snugly against the shank, but I knew when the shank was cleaned, that issue would be resolved

I reamed the cake and cleaned the bowl top with a piece of worn scotchbrite. The bowl was soaked with sea-salt and alcohol. I used some black superglue and accelerator on the tooth crease and built up the bottom section of the button underneath. There was some mild oxidation on the stem, which was removed with 800, 1500 and 2000 grade wet paper, followed by 8000 and 12000 micromesh sheets.

After the bowl soak, the shank was cleaned, which allowed the stem to bit snugly. The bowl was buffed with White Briar and several coats of Carnuba Wax.

The pipe is just over seven inches long, yet only weighs 25 grams.

Below is the finished pipe.

?

?

Lane Tobacco Ltd.’s The Happy Smoker: Spring/Summer 1946


Posted by Steve Laug

This is another of the old pipe booklets that was posted on the Pipe Club of Brasil Group on Facebook. Victor C. Naddeo, the Administrator of that group and seems to post this kind of pipe memorabilia quite often. I am not sure where he finds them all but all of them have been interesting. He posted this Lane Tobacco Ltd. “The Happy Smoker” magazine a while ago. When I first started smoking a pipe I smoked a lot of Lanes 1Q and a Black & Tan that had an R# that I cannot remember. When I saw this old booklet, it brought back a lot of memories of those days. I would pick up the tobacco in San Diego or in Carlsbad when I lived there. Click on the pictures and they will enlarge. Read the pipe descriptions and prices as well as the tobacco descriptions and let them take you back in time. Thank you Victor for posting these on the Pipe Club Brasil Group. If you would like to check out the group on Facebook here is the link: https://www.facebook.com/groups/1001391469961131/

Restoring a Kriswill “Golden Clipper”


Blog by Paresh Deshpande

“………. and now make me handsome and desirable too!!!!!” This is what the sibling of the Kriswill “CHIEF”, the “GOLDEN CLIPPER” appeared to be demanding of me and who am I to refuse this lovely pipe. So here I am with all my enthusiasm to work on this beautiful pipe with mixed grains.

This was one of the pair of Kriswill pipes which was dug out by my younger daughter from the large pile of pipes, the other being Kriswill “CHIEF”. Both these beauties had an issue with their stems. The stem of the “CHIEF” did not sit flush with the shank and appeared smaller in diameter compared to the shank, while the stem of the “GOLDEN CLIPPER” sat flushed with the shank but was larger in diameter than the shank. I addressed this issue in an ingenious way and completed the restoration of the “CHIEF”. For those interested in knowing the issue of stem in detail, process to address it and the complete restoration, please follow the link https://rebornpipes.com/2018/08/04/breathing-new-life-into-a-kriswill-chief-20/. I am sure you will find it an interesting read.

My joys knew no bounds when the “CHIEF’S” stem fit perfectly like a glove in the shank of the “CLIPPER” (the time-consuming, cautious, accurate and nerve-wracking but enjoyable work of matching the stem and shank of the “CHIEF” still fresh in my mind!!!!!!). Here are the pictures of a perfectly matching stem and shank on the CLIPPER.This KRISWILL “GOLDEN CLIPPER” has a medium sized bowl with mixed grain. It is stamped “KRISWILL” over “GOLDEN CLIPPER” over “HANDMADE IN DENMARK” on the left side of the shank. At the bottom of the shank and close to the edge of the shank where it takes the stem, is stamped with number “54”.As I had determined the dating of this pipe, while searching information for the “CHIEF”, from 1970s (the snowflakes stamp on the stem and block letters on the shank were adopted post 1970), I proceeded to carry out a visual inspection of the condition of the pipe in my hand. This helps me map the road to restoring the pipe by identifying the issues involved and identify methods/ options to address the same.

INITIAL VISUAL INSPECTION

The bowl is covered in dust, oils, tars and grime of yesteryear. It is filled with a thick cake and the lava has overflowed on to the rim. I would still say that this bowl is not as heavily caked as I have gotten used to with my grand old man’s pipes. The cake has completely dried out.The rim surface is pock-marked with few minor dents and dings of being banged around. Exact extent of damage, there appears to be some, to the inner edge will be known after the bowl has been reamed down to its bare briar. The outer edge of the rim appears to be in decent condition.The interchanging of stem with the CHIEF ensured a perfect fit of the stem on this pipe and required no matching the fit to the shank end. The stem is, again comparatively to what I have dealt with before, lightly oxidized with light tooth chatter. The lip has been bitten off at one place and will need to be rebuilt and reshaped. There is some calcification seen around the lip on either surface. As I have come to expect, the airway in the stem is blocked and the mortise is clogged with gunk, debris and tars. I will need to clean both to ensure an open draw.The stummel needs to be cleaned. I will have to decide if I should retain the stain finish or polish it to its natural look and match it to its bigger sibling, the “CHIEF”.
THE PROCESS
Abha, my wife, dealt with the cake by reaming the chamber with a Kleen Reem pipe tool and a British Buttner pipe tool. Using the fabricated pipe knife, she further scraped the cake from the bottom of the bowl and also the walls of the chamber. She was especially very careful while reaming with the knife so as not to damage the inner edge of the rim. Once the solid briar was exposed, she further smoothed the walls and removed remaining cake by sanding with a 180 followed by 220 and 600 grit sand paper. Another advantage of this process is the elimination of traces of ghosting to a great extent. She gently scraped the rim top with the sharp edge of the knife and removed the accumulated overflow of lava. Abha followed this by scrubbing the chamber walls with cotton swab dipped in isopropyl alcohol. This removed the fine cake dust, leaving the chamber clean, fresh and smooth. As can be seen from the picture, after the cleaning, the dents and dings are more pronounced and will need to be addressed. Further, if observed closely, there is a small chip to the inner edge which can be seen on the right side in the 3 o’clock direction. I had the following two courses of action to choose from to address these issues:-
(a)        Create a slight bevel on the inner edge to eliminate the inner edge chip.
(b)        Topping the rim on a topping board.

Abha suggested proceeding with the second option since the “CHIEF” was without a bevel and as these were together, she wanted to maintain the similarities as far as possible. I concurred with her since topping will also address the minor dents and dings seen on the rim top. I gently topped the stummel on a 220 grit sand paper, frequently checking the progress.  This is very important since you do not want to lose too much briar and there is always a fear of distorting the proportions of the pipe due to excessive sanding. How much sanding is sufficient, is a question to which the answer can never be quantified. For me the mantra is, topping or sanding should be kept to the minimum and preserve maximum briar even at the cost of very minute dents/ chips being visible.

I topped the bowl just enough to address the dents and dings on the rim surface. The small nick to the inner edge of the rim has also been addressed to a great extent, but not completely. It is barely perceptible in person and acceptable to me. Hence, I left it at that!!I cleaned out the internals of the shank/ mortise and airway using pipe cleaners, cue tips and isopropyl alcohol. Thereafter using undiluted Murphy’s oil soap and tooth brush, I cleaned all the tars, oils, dust and grime from the bowl and washed it under running water. I wiped it down with paper towels and a soft cotton cloth.

Using a brown stain pen (Yes!!! I finally have them, thanks to my guru, Mr. Steve who had diligently packed them with the pipes that he had sent me after repairs, when he learnt that I was unable lay my hands on them), I stained the rim to match the rest of the bowl and set it aside to dry out. In my haste to finish the restoration, I forgot to click pictures of the above mentioned process and the look of the pipe at this stage.

While the stummel was kept aside for drying, I turned my attention to the stem. Starting with the use of Bic lighter, I painted the surface with its flame to raise the tooth chatter and bite marks as much as possible. I scrubbed the stem with a piece of moist Mr. Magic Clean sponge to clean the stem of the calcification. Minor tooth chatter was addressed to a great extent, however, some stubborn and deep bite marks and the bitten off lip stood out like sore thumb!!! Having learnt my lessons and working around the handicap of glue, I spot applied clear CA superglue with a tooth pick and set it aside to cure over night. The next morning, I applied another layer of the superglue and set it aside to cure. The reason I decided to adopt this technique is because the glue I have and available to me is of very thin consistency and hence the layering technique. After 24 hours, I checked the fills and proceeded to sand down the fills and reshape the edge of the button with a flat head needle file to match the surface of the stem. Using a 220 grit sand paper followed by wet 320 grit sand paper, I evened out the fill and removed oxidation from the stem surface. Thereafter, I used micromesh pads, wet sanding with 1500 to 2400 pads and dry sanding with 3200 to 12000 pads. I deeply rubbed a very small quantity of Extra Virgin Olive oil after every three pads. I am pleased with the way the stem has turned out. It is now smooth and shiny.Using normal and bristled pipe cleaners dipped in alcohol, I completely cleaned out the airway in the stem till the pipe cleaners came out nice and clean from the other end. However, when I checked the draw, I found it to be constricted and laborious. It was not a free flowing and open draw. I checked the alignment of the airway in the stem and shank and realized that the airway was not aligned. With a rounded needle file, I file down the tenon hole and the mortise opening in the shank to the point where there are perfectly aligned. Now the draw is full and open.

By this time, the stain on the rim top has dried out and I applied a small quantity of Before and After Restoration balm to the entire surface of the stummel, including the rim top. This product is absolutely fantastic as it freshens up the briar and makes the grain to pop out. Using a horse hair shoe brush, I buffed the bowl. Later, with a soft cotton cloth, I polished it to a nice shine. As a final touch, I rubbed a very small quantity of PARAGON wax on to the stem and the stummel. A few seconds later, using muscle power and a microfiber cloth, I polished the entire pipe to a lovely shine. Here are the pictures of the finished pipe. Hope you enjoyed reading the write up and yes, my apologies for the lack of pictures since I had to catch a flight late in the evening to rejoin my duty station, I forgot to take pictures at this stage as completing the restoration was priority task.