Monthly Archives: November 2016

A Pair of Rainy Day Pipes – More Adventures in Oddities


Blog by Steve Laug

Have you ever heard of Bartlett Pipes? They are rather strange upside down looking pipes in my opinion. My brother sent me this link to a youtube video on the Bartlett pipes. We were both searching for information on the brand as neither of us had heard of them or seen them close up before.   https://www.youtube.com/watch?v=dyFfLidMmws&feature=youtu.be

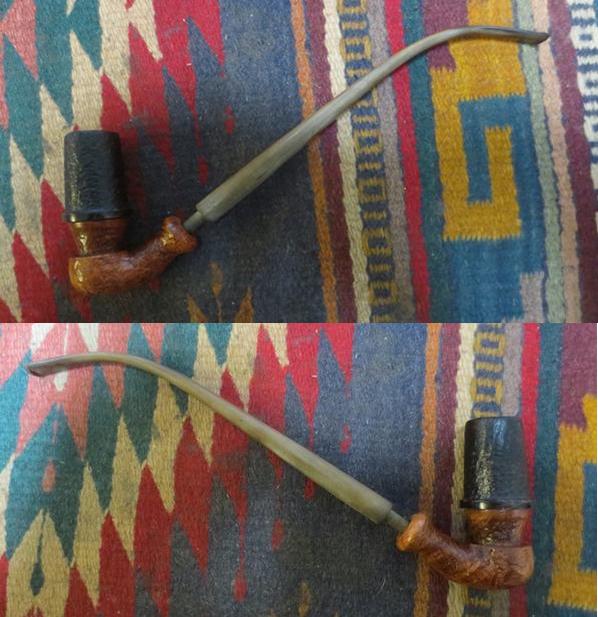
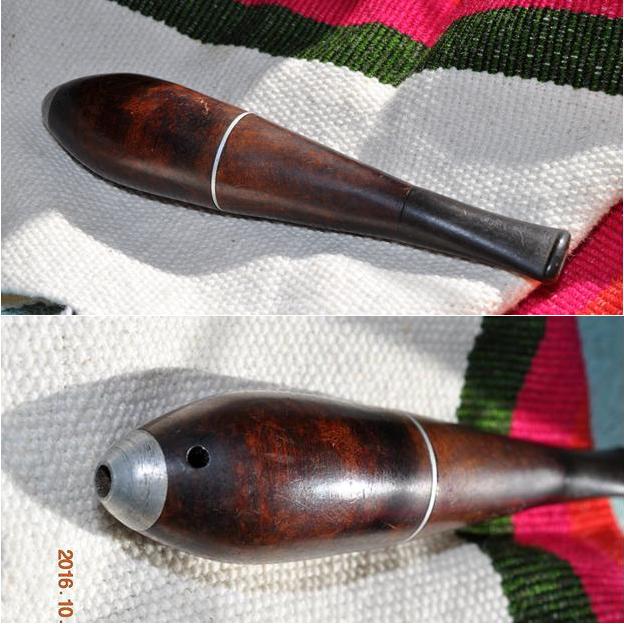
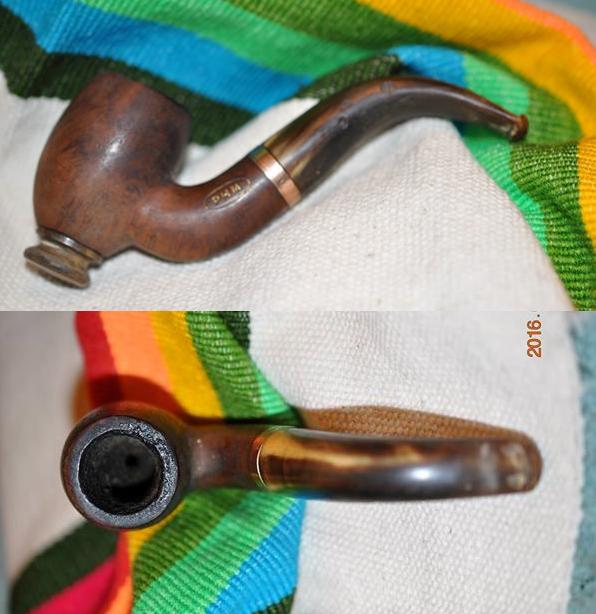
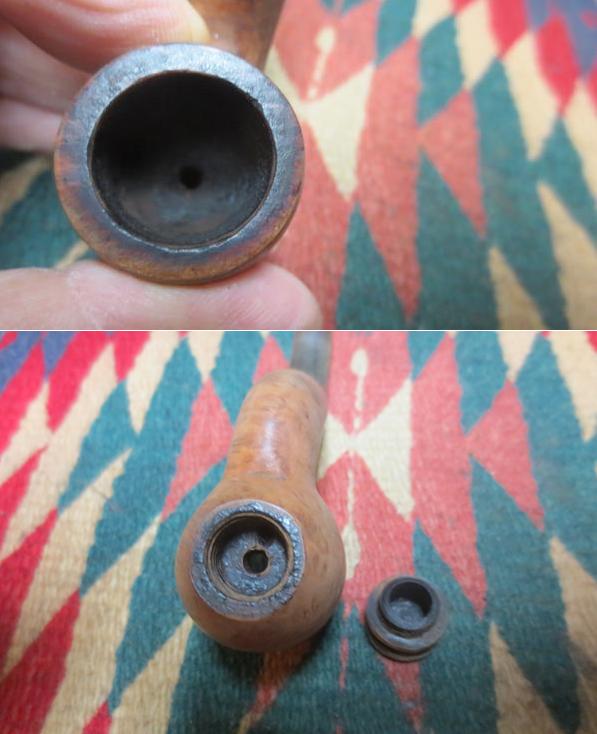
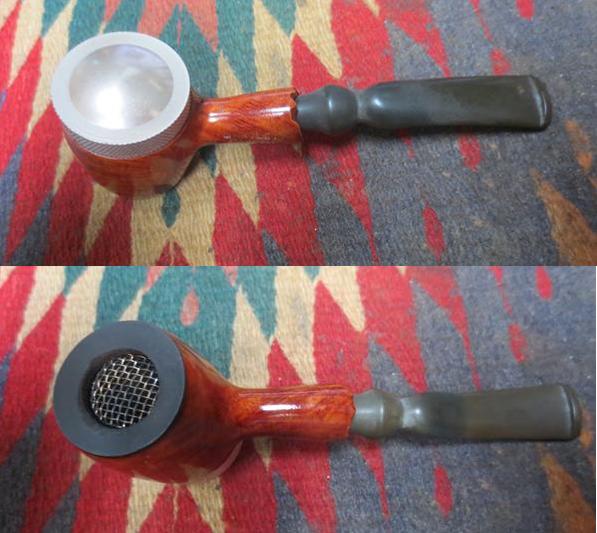
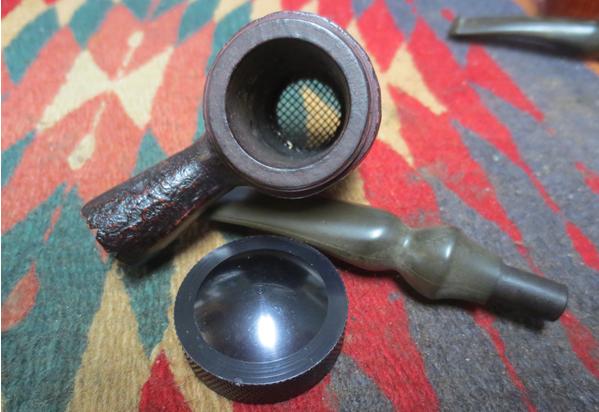
What made the hunt for information regarding this oddity necessary was that my brother had bid on two of these and won both of them on eBay. One of them was NOS (new old stock) and one of them was smoked and well used. In the past I had seen photos and read on the online forums about these pipes but had never really done any research to figure out what they were. They were always a bit of an oddity to me. Either way the stem sat they did not look right and when you removed the cap at the top the airway was almost at the top of the bowl (if the screw on lid was to be considered the top). The angles of the shank and the curve of the stem leads me to think that the capped surface was the top of the bowl. The bottom side of the bowl was a screen that allowed for airflow through the bowl. I am still trying to figure out if you light the pipe from the bottom or the top of the bowl.bart1 bart2
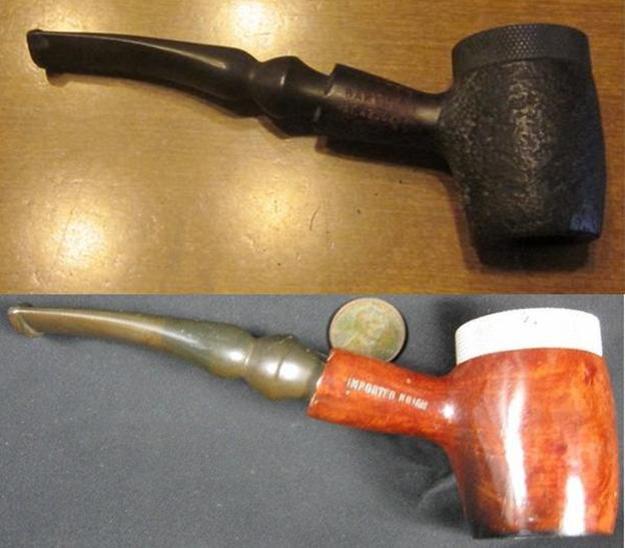
From what I read on the various online forums and in the articles that I could find I was able to piece together how the pipe functioned. The pipe bowl was open at the top and the bottom. The airway into the shank was near the top opening and led directly to the pipe stem. A polished aluminum cover is screwed onto the threaded briar bowl top and is left in place when the pipe is smoked. At the other end of the bowl there is a screen that covers the bottom opening that keeps the tobacco in the bowl while permitting access to the tobacco to light it. The screen is supposedly fine enough that the ash does not fall out of the bowl into the lap of the smoker. With the cover in place on the top opening, the tobacco is ignited via the screen on the bottom, causing  the tobacco to burn from the bottom up. New tobacco may be added at any time by removing the cap from the top of the pipe. It is said that the burning the tobacco from the bottom reduces the moisture that usually collects and thus makes it unnecessary to dry out the bowl between pipes. The bottom lighting also makes lighting the pipe in the wind or rain much simpler.

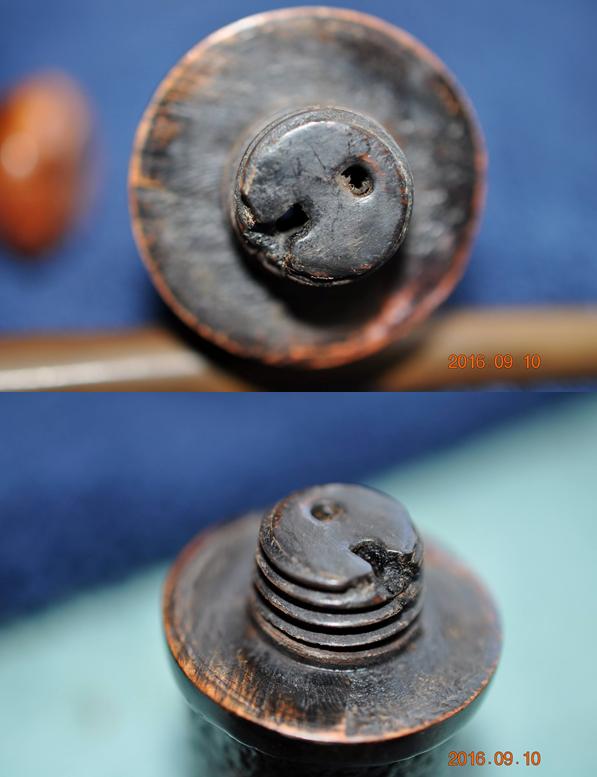
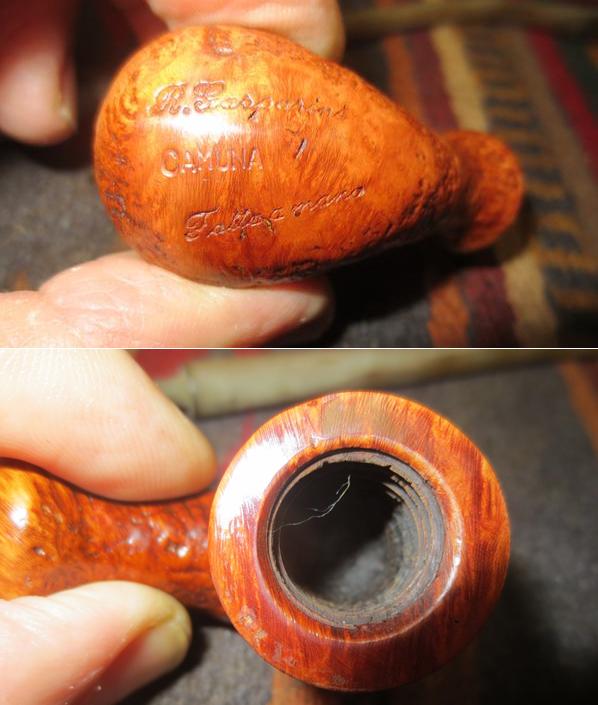
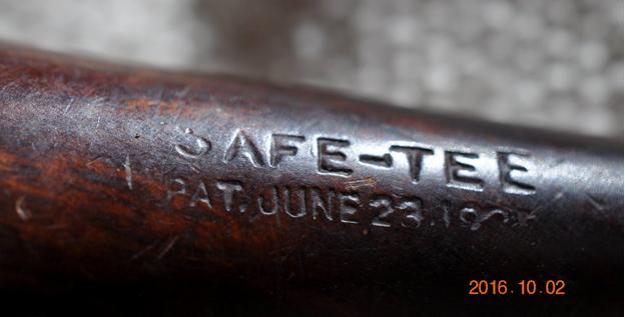
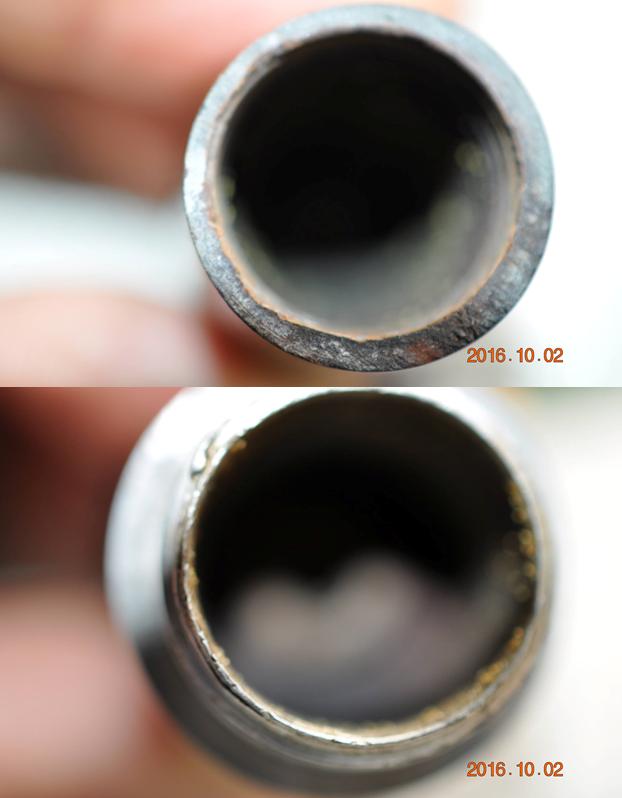
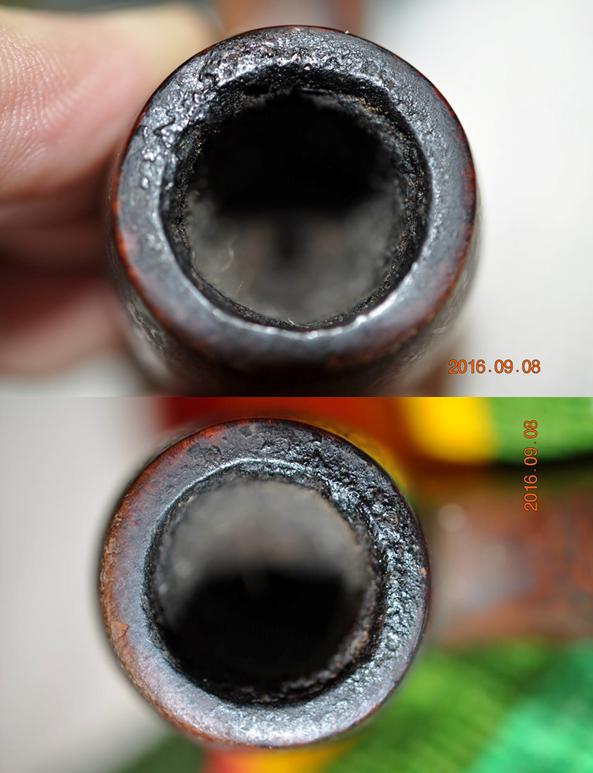
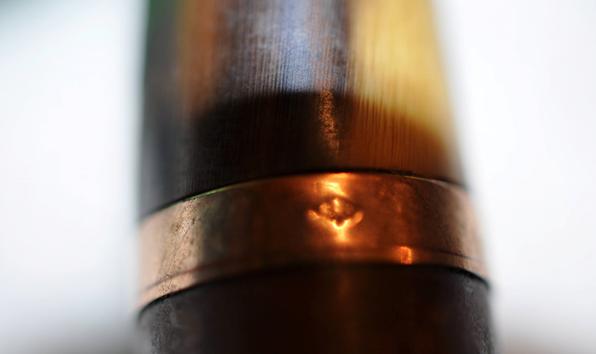
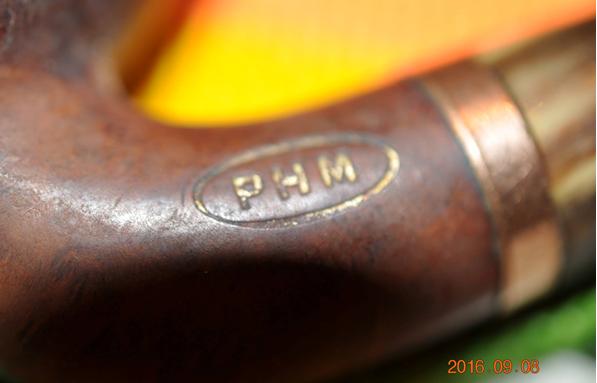
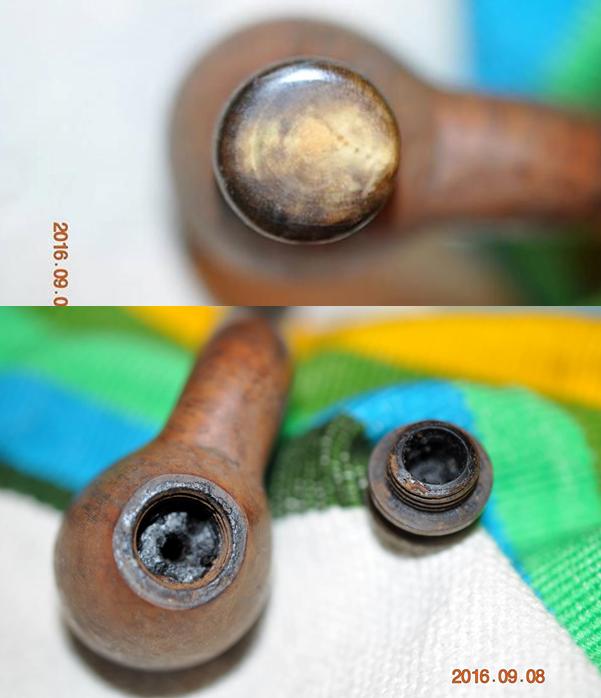
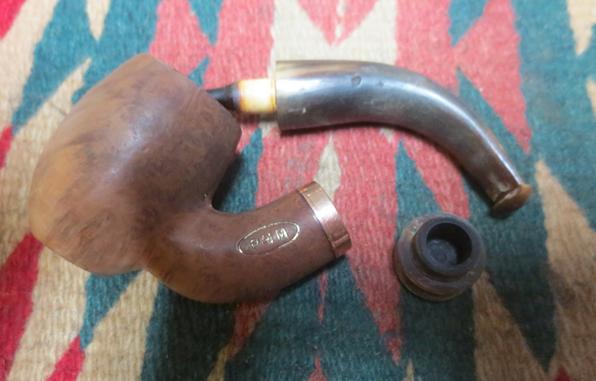
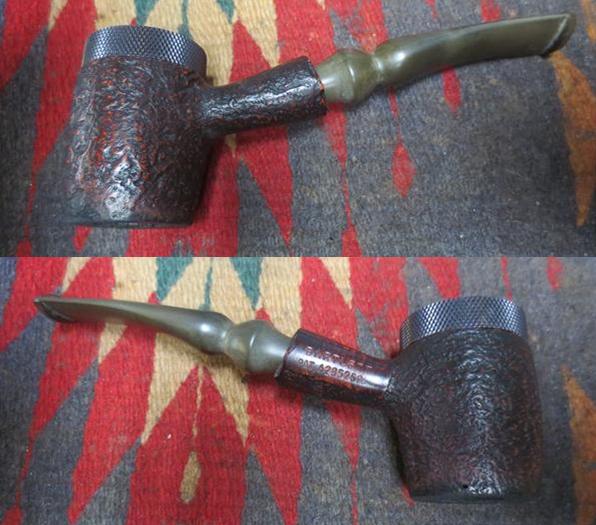
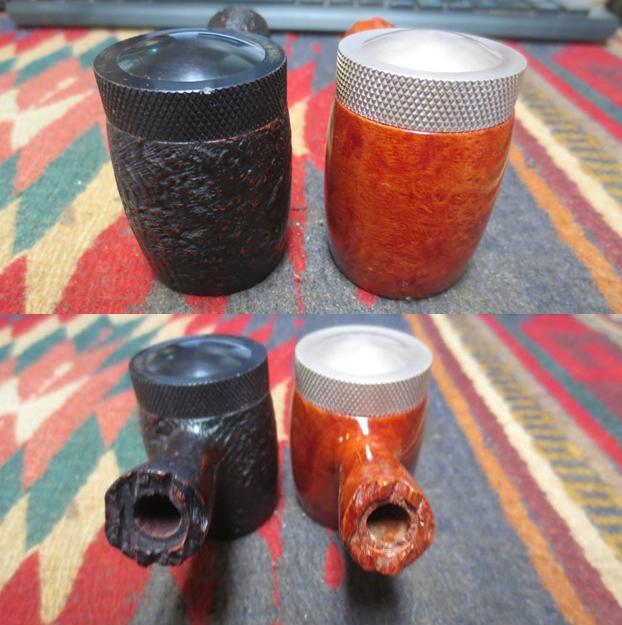
The next photos show the screened bottom of the two pipes that I was going to work on. The smooth pipe is new and unsmoked the sandblasted pipe is used and you can see some charring around the inner edges on the bottom of the bowl. The bowl bottom on the unsmoked pipe was stained black to minimize the darkening that occurs when the pipe is lit.bart3
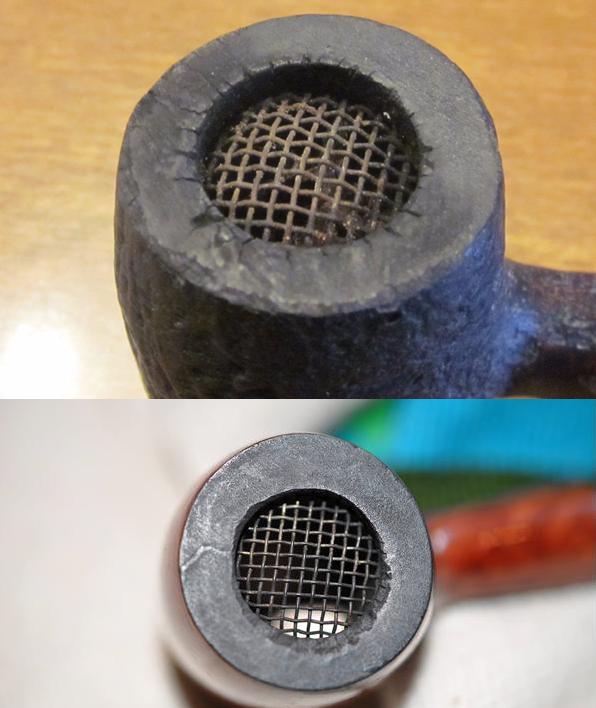
Both pipes were stamped with the name Bartlett over a Patent Number – 4235252. The stamping on the sandblast version was on the right side of the shank and the one on the smooth was on the left side of the shank. Both stampings were very sharp and legible. The smooth briar pipe was also stamped on the right side of the shank with the work Imported Briar.bart4
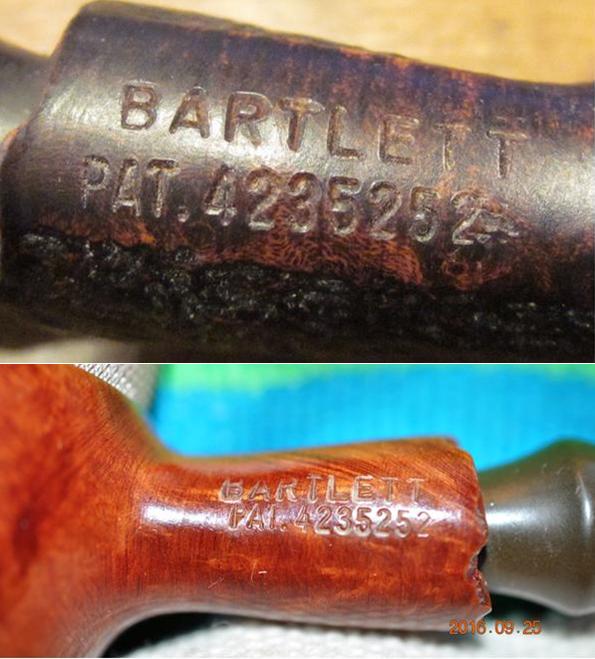
At this point I wanted to know more about the pipe. It was a brand that I was unfamiliar with. In usual unhelpful fashion I found that the Bartlett Pipe was made by the Bartlett Pipe Company Inc. of Bartlett, NH (which I assume is New Hampshire).

On the Pipesmokers Forum I found some interesting information from a friend of the inventor of the pipe. Here is the link to the conversation on that website. http://pipesmokersforum.com/community/threads/an-interesting-surprise.46690/

Adam Hirshan comments: “A friend of mine invented and patented a revolutionary smoking pipe that lights from the bottom. A major manufacturer saw the promise and bought the idea 15 years ago, but it never took off. My friend got the patent back a few years ago and we’ve developed a new rock maple version that we call The Freedom Smoking Pipe.”

“It smokes cool and easy. A stainless steel screen holds the tobacco and ash in place – nothing falls out. No moisture or resin accumulate in the bowl. A cork and leather top makes it wind and rain proof.”

“We had initial success wholesaling through a well-known distributor. We were in about 100 tobacco shops nationwide, and appeared in the Levin catalog. Response from our early customers was strong – most loved it, some hated it. Then interest dropped off and left us wondering what happened.”

I did some more digging and found some information on the Dr. Grabow Collectors Forum. Here is the link: http://drgrabows.myfreeforum.org/viewcardtopic.php?t=1236

I quote: “I was asked what I thought about my Bartlett pipe and figured I’d start a new topic. If you don’t know what it is, it’s the ‘Upside down pipe’. The history as I know it is there have been 3 variations. It was invented in the 70’s. Sparta picked up the rights and produced them in the 80’s for 8-10yrs. Didn’t take off. Rights were returned to the inventor. Seems they are no longer produced. (ed. This seems to go along with the information from Adam Hirshan in the above comment).”

The quote goes on with an interesting reference to the Sparta example of the pipe: “Mine has a red stain, and the chain to hold the cap. My stem is from a junk pipe I had. The weirdest thing is not seeing the baccy burn. First smoke required a tamp halfway through and the bowl got dang hot! Second time out, the pack was perfect. One light, no tamp. Just weird not tending the bowl like normal…….Guess this is why the never went anywhere.”

I was also able to find the patent information for US Pat.4235252. Interestingly it read much like an earlier paragraph that I pieced together regarding the pipe. Here is the document in full. First the written description and then the drawings of the pipe. It read that “the patent was for a smoking pipe having improved smoking characteristics. The smoking pipe includes a bowl having top and bottom openings and a breather hole near the top opening and in communication with a pipe stem. A cover assembly is attached to the bowl adjacent to the top opening and covers the top opening when the pipe is to be smoked. A retainer having a screen cooperates with the bottom opening for retaining smoking tobacco within the bowl while permitting access to the tobacco for the ignition thereof. The retainer may also be removed from its position relative to the bottom opening for the removal of ashes. Tobacco is inserted into the bowl via either opening, but preferably via the top opening and to a level just below the breather hole. With the cover assembly covering the top opening, the tobacco is ignited via the screen of the retainer, causing combustion of the tobacco in a bottom-to-top fashion. New tobacco may be added to existing tobacco via the top opening and ashes may be removed via the bottom opening, even as the smoking process takes place. The bottom-to-top combustion minimizes puddling of tobacco juices or the requirement of drying out periods and facilitates lighting the pipe in the presence of wind, rain, etc. The lack of obstruction of the breather hole by the presence of tobacco results in a smooth draw with the generation of a substantial, satisfying volume of smoke.” (ed. On the two pipes I have the screen on the bottom is not removable and the top is a threaded aluminum cap.)bart5 bart6
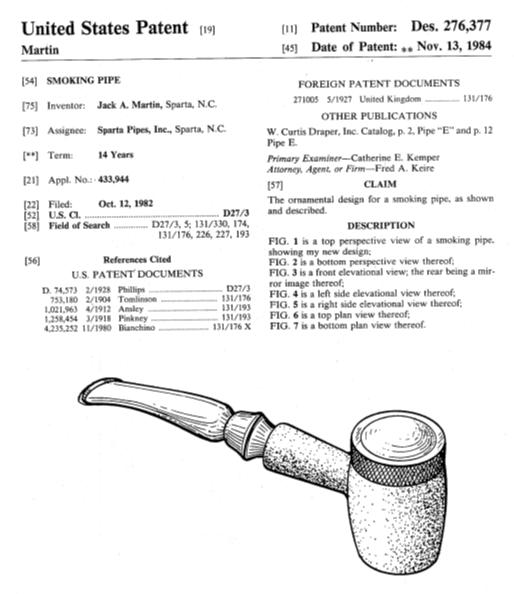
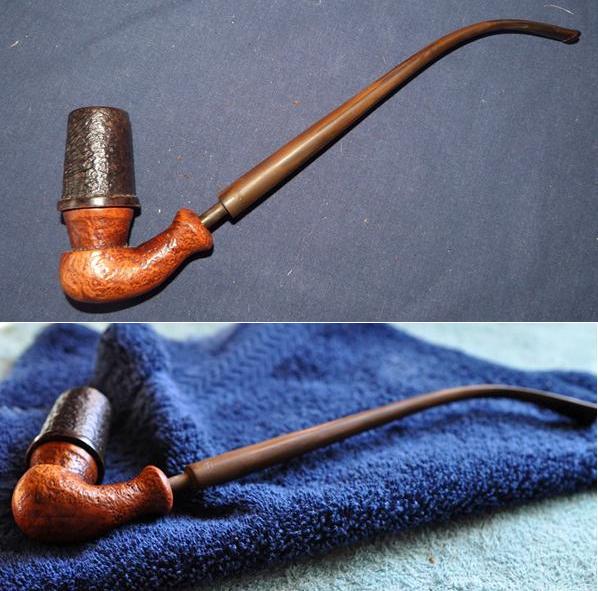
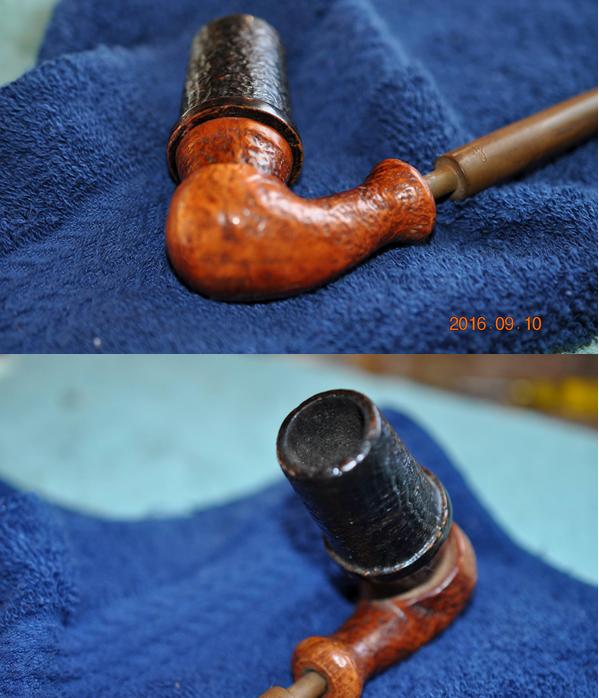
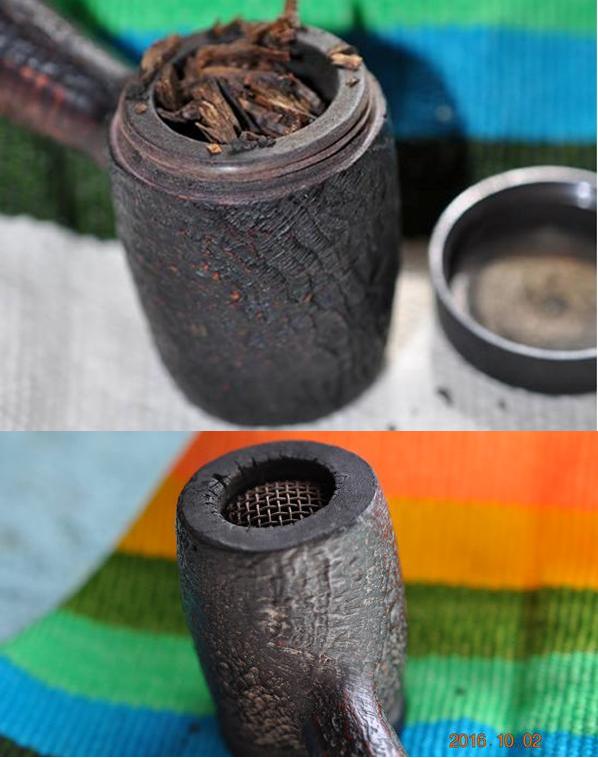
My brother took some photos of the sandblast version of the pipe that shows the shape but also interestingly shows a hidden benefit. When he removed the cap from the top of the bowl the bowl was already filled with a broken flake tobacco. Unfortunately it was dry and crumbled to dust when he cleaned out the bowl.bart7 bart8 bart9
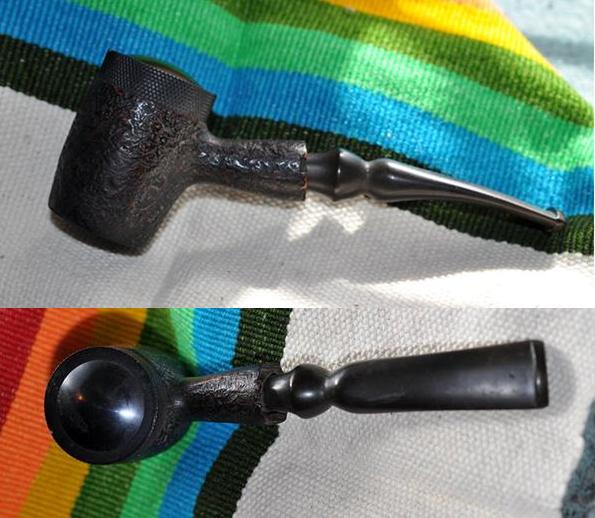
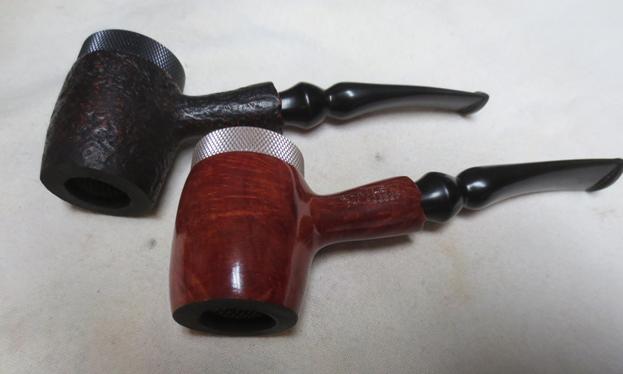
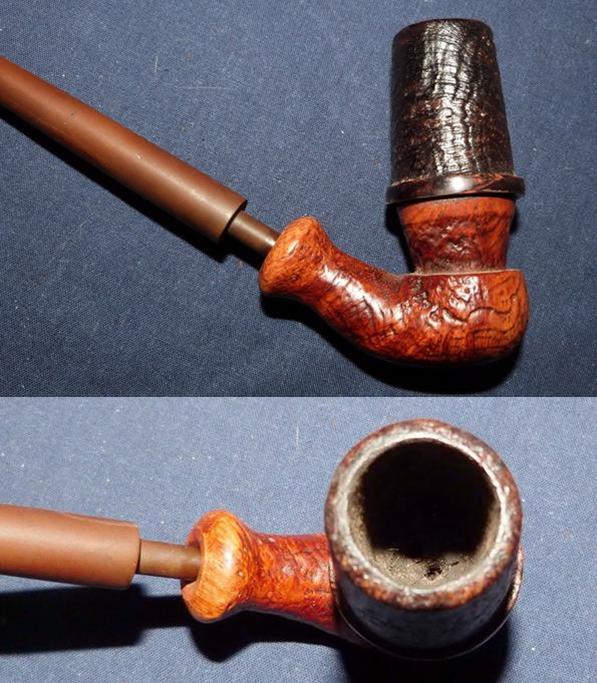
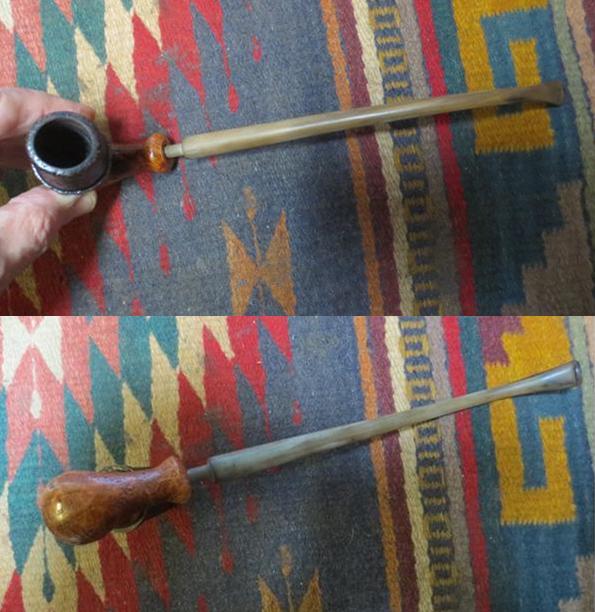
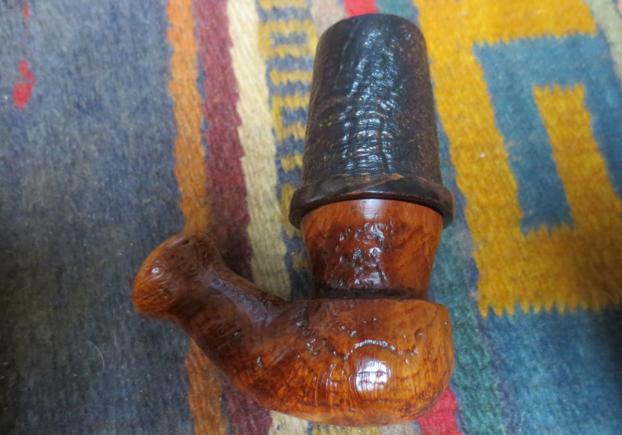
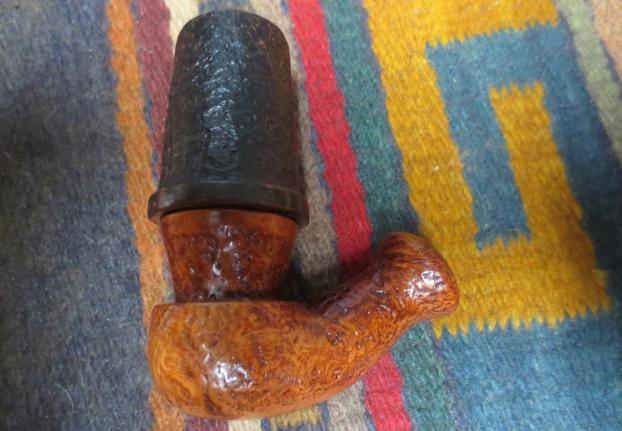
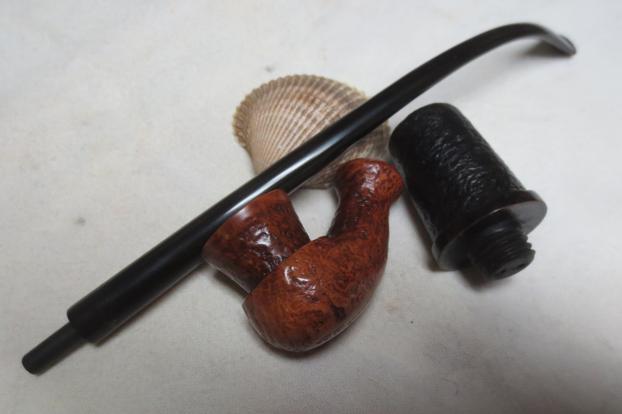
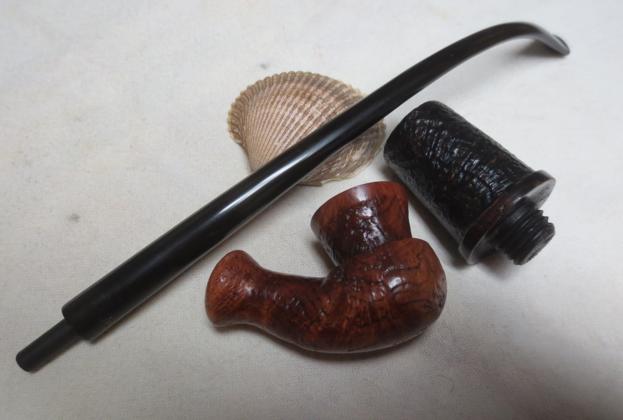
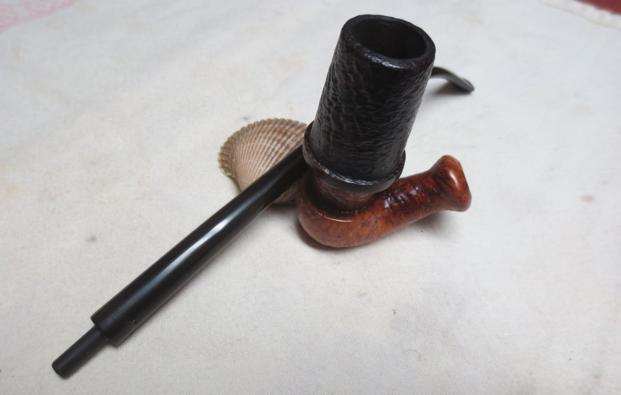
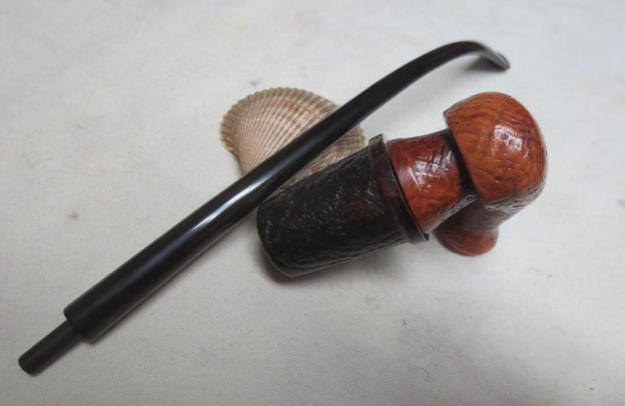
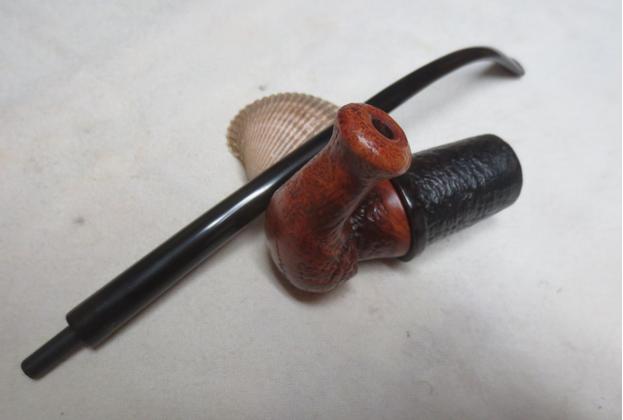
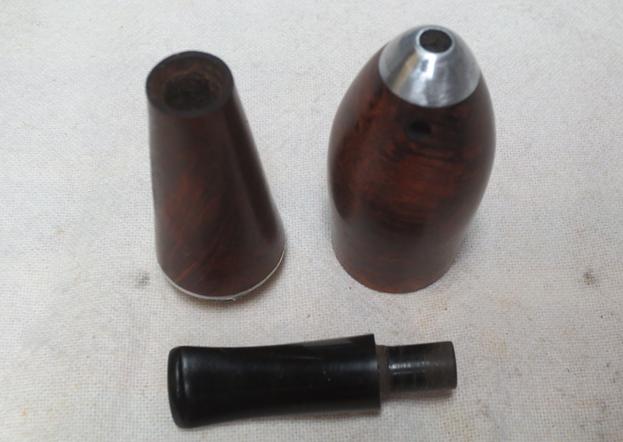
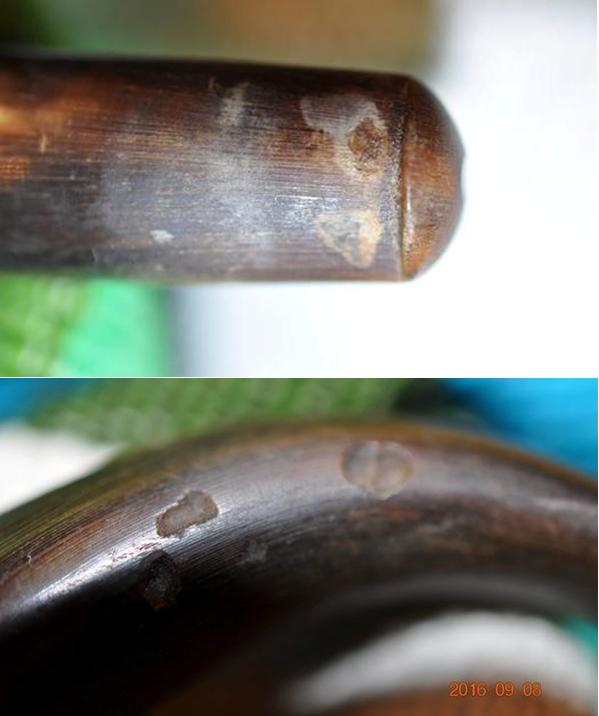
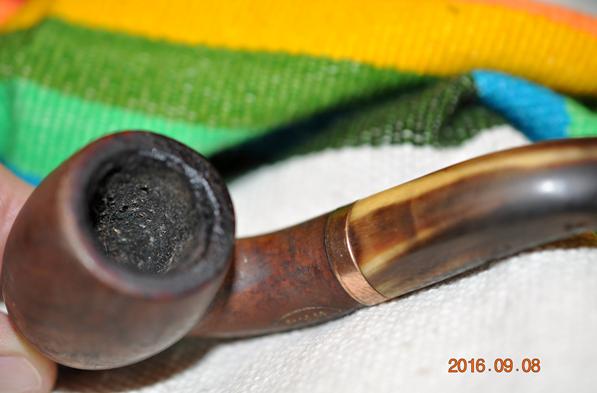
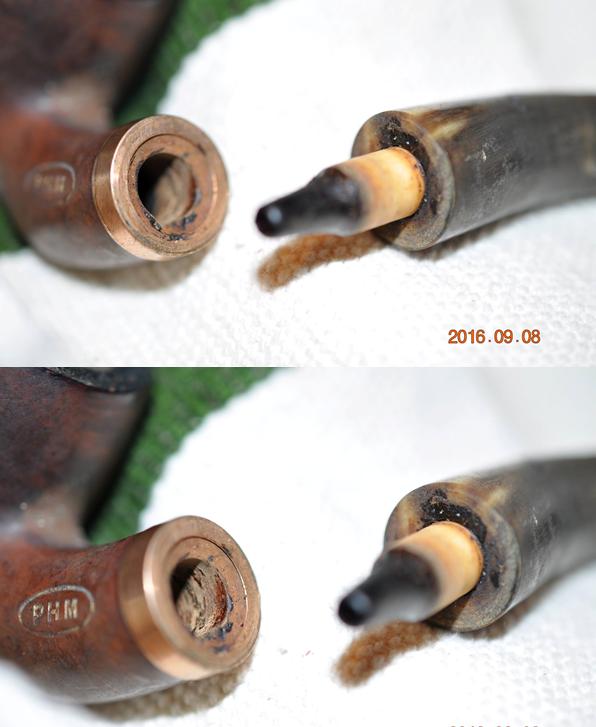
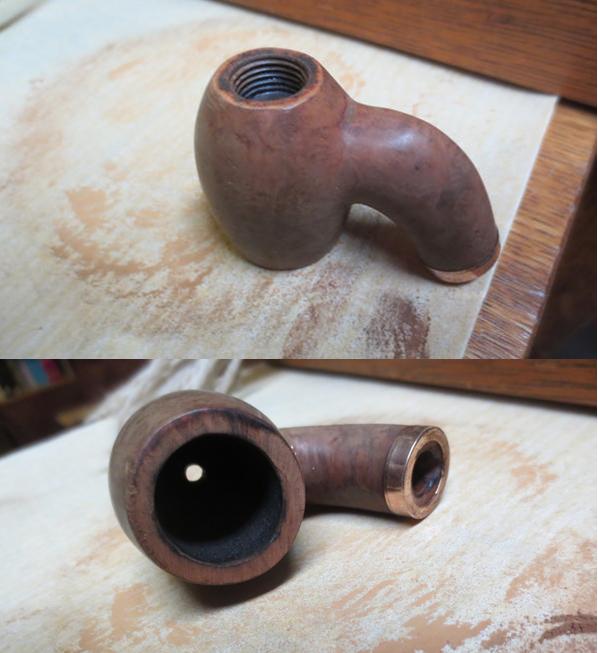
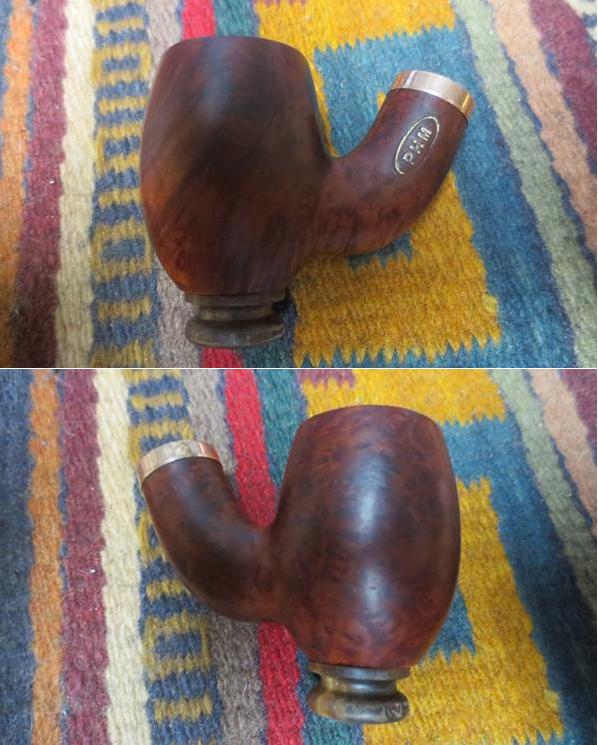
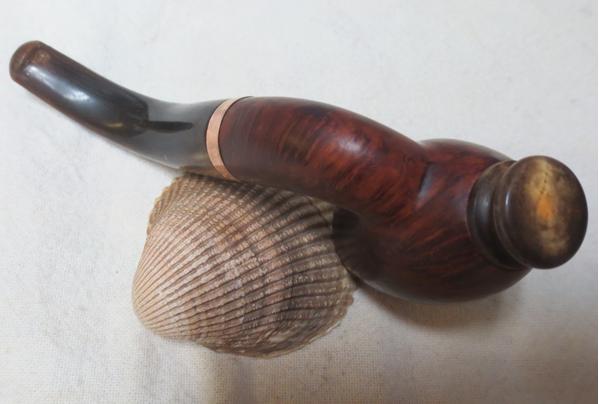
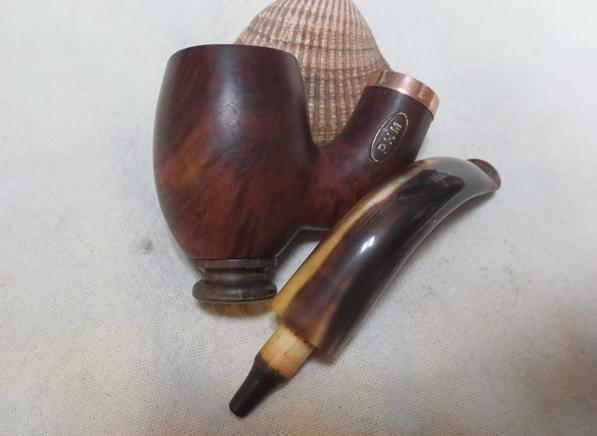
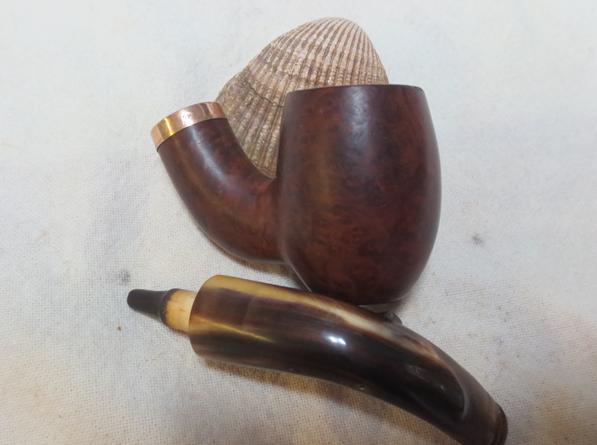
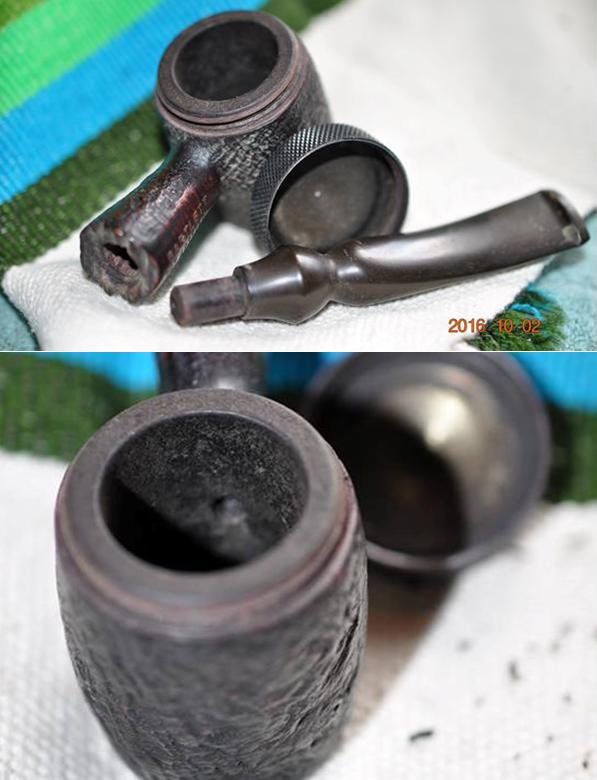
My brother cleaned and reamed the smoked sandblast pipe and cleaned out the dust from the unsmoked smooth one. He scrubbed the briar with Murphy’s Oil Soap and cleaned out the mortise and the airway in the shank and the stem. The stems on both pipes were lightly oxidized and on the smoked pipe there was a small tooth dent on the top of the stem near the button. I took the following photos to show what the pair looked like when I brought them to my work table.bart10 bart11
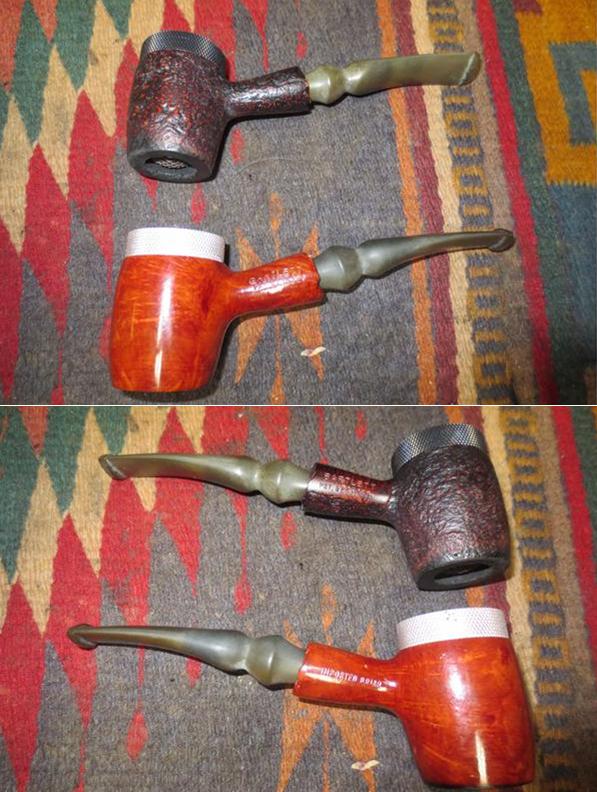
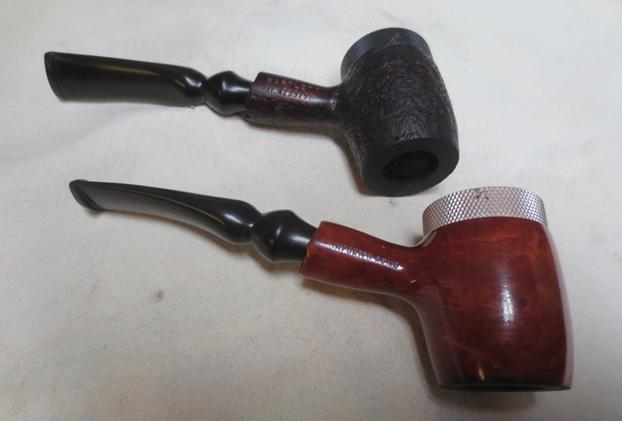
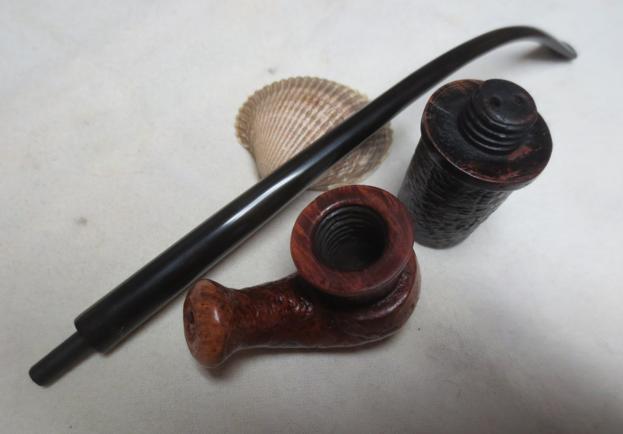
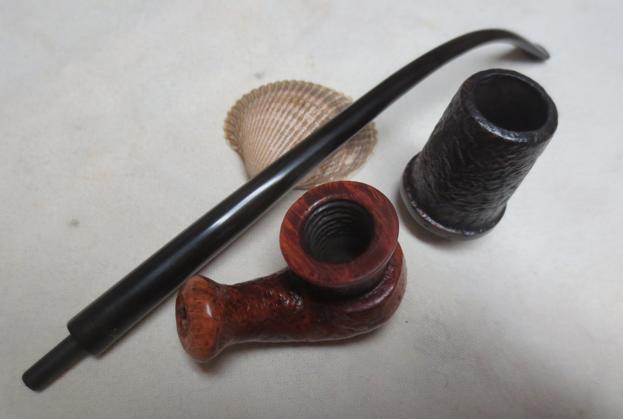
He did a great job cleaning up the aluminum caps on both the inside and the outside. He also cleaned up the thread on the top of both bowls allowing the caps to screw on easily.bart12
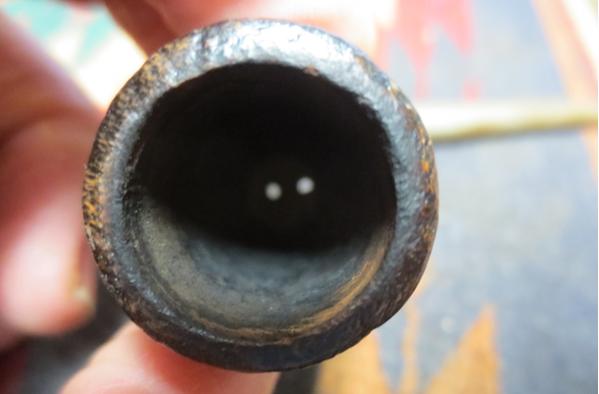
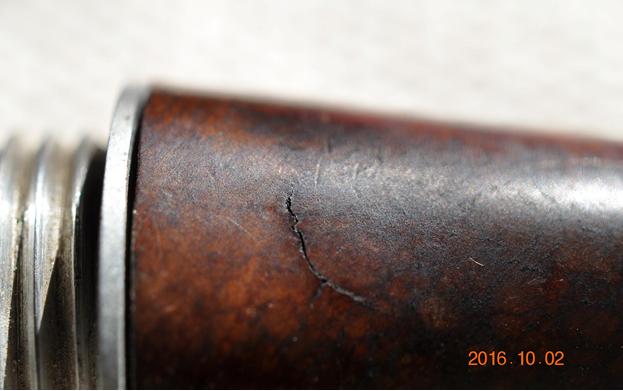
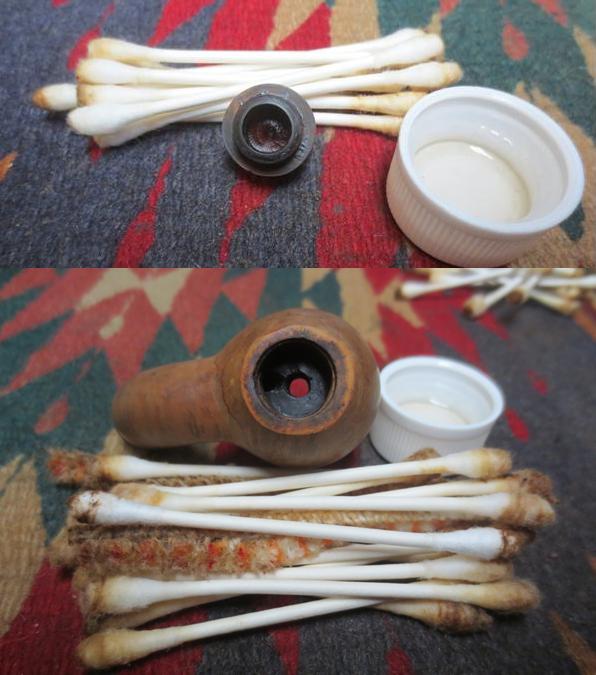
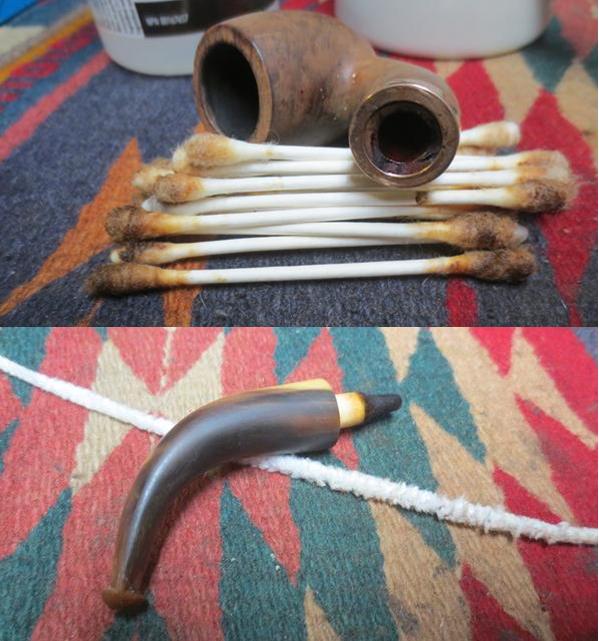
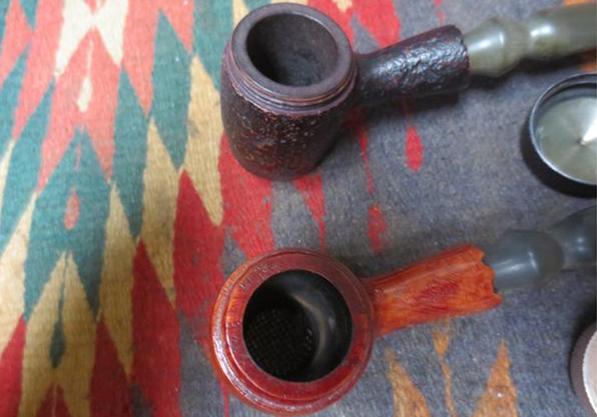
He cleaned the screen on the smoked pipe with cotton swabs and alcohol until it looked as good as the unsmoked pipe. The inner edge of the rim on the bottom of the bowl was charred and showed some wear and tear from lighting the pipe from the bottom. I think one of the draw backs on this pipe is not being able to see the flame hitting the tobacco. The rim on this bowl shows significant rim damage.bart13
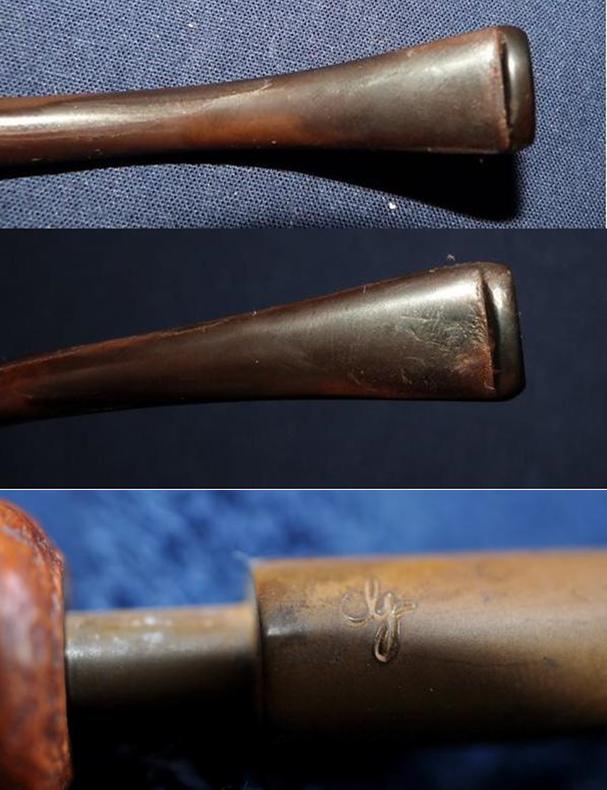
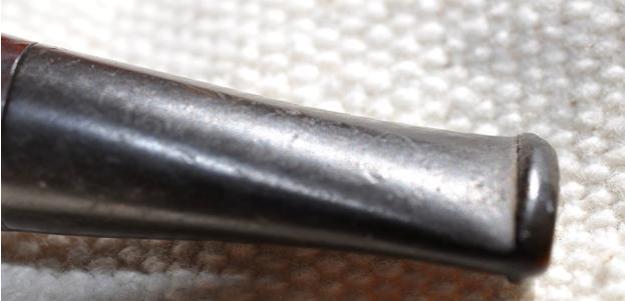
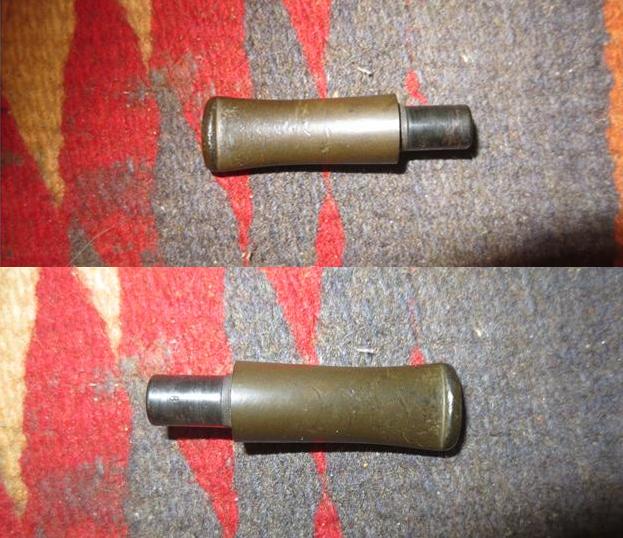
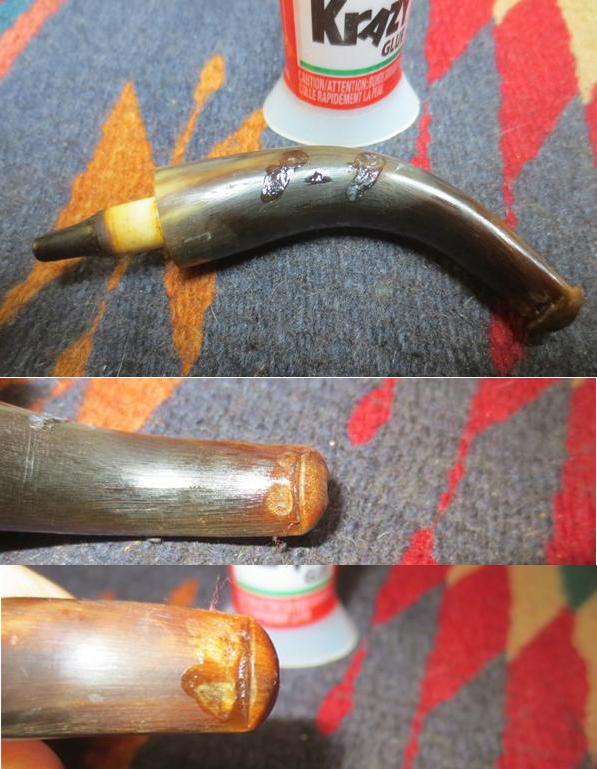
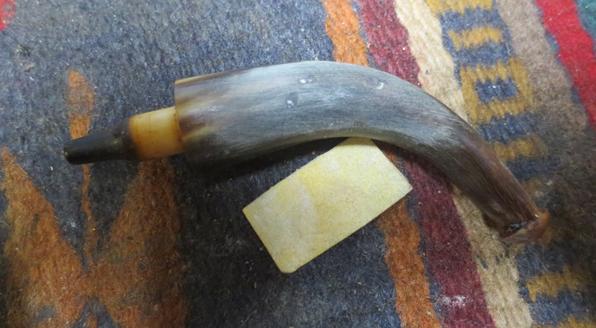
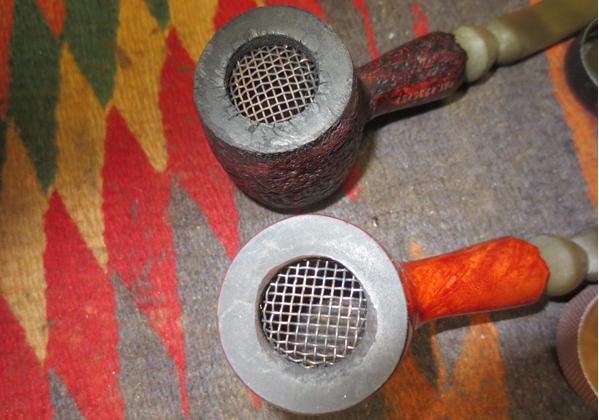
I took close up photos of the stems to show the light oxidation – it is not deep in the vulcanite and the overall condition of the stems. The stem on the sandblast pipe had a small pinprick tooth mark on the top of the stem. I have circled it in red on the first photo below.bart14
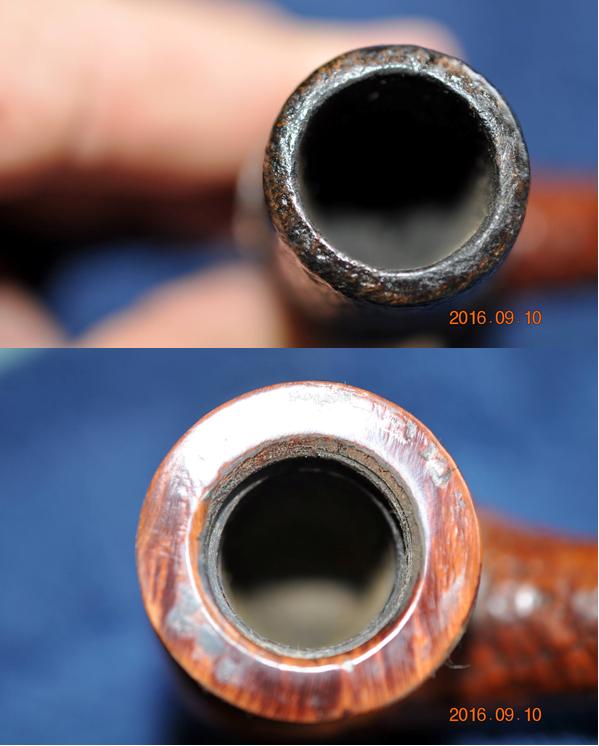
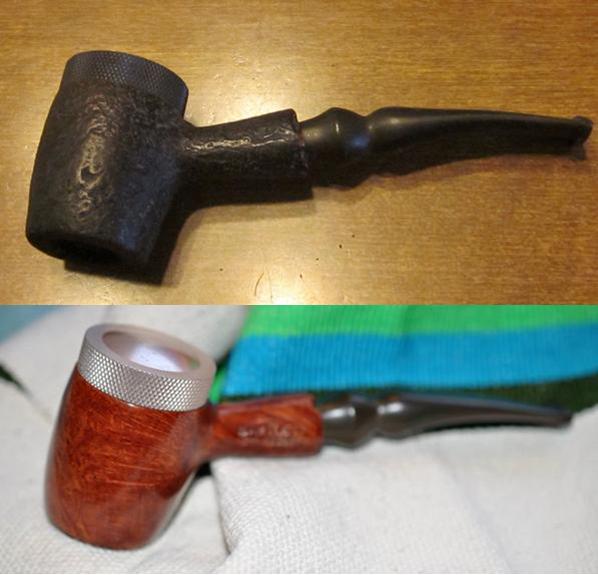
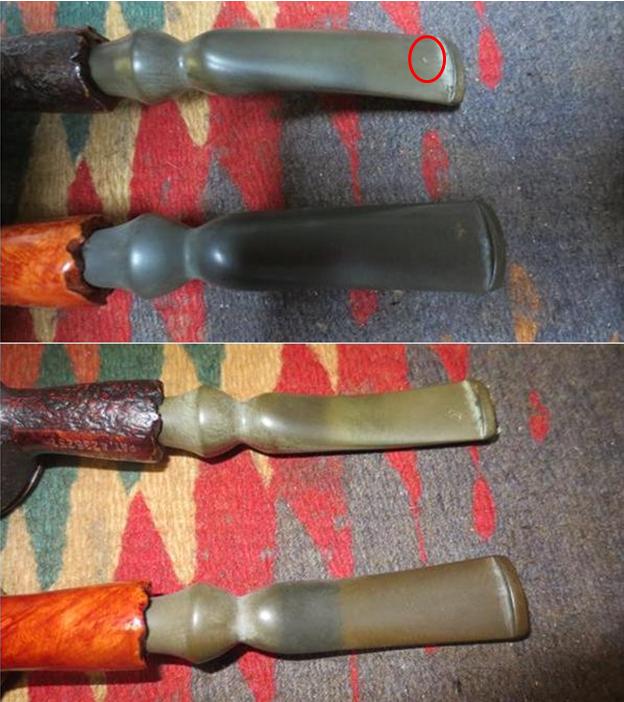
I took some photos of each of the pipes before I cleaned them up. They really were in pretty decent shape. There were some rough spots on the bottom of the bowl around the inner edge of the rim but it looked to be original. The smooth briar is new and has a shiny varnish coat that I decided to leave as the pipe is NOS. It was interesting to me to note that the bottom of the bowl was stained with a flat black stain on the new pipe so when I restored the smoked version I would match them. The sandblast is also in really good shape other than the inner edge of the bottom rim on the bowl.bart15 bart16 bart17 bart18
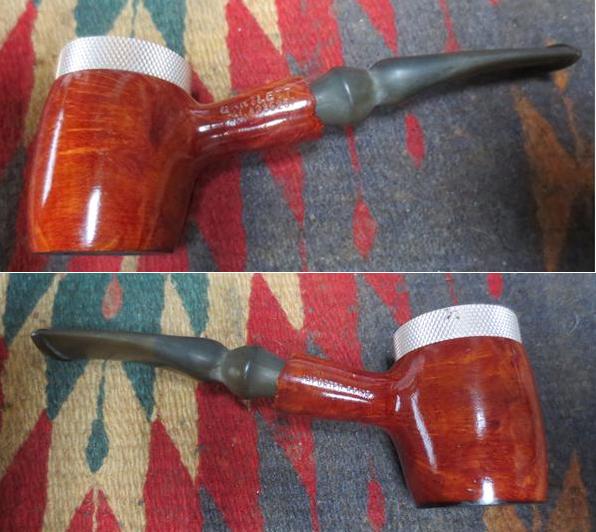
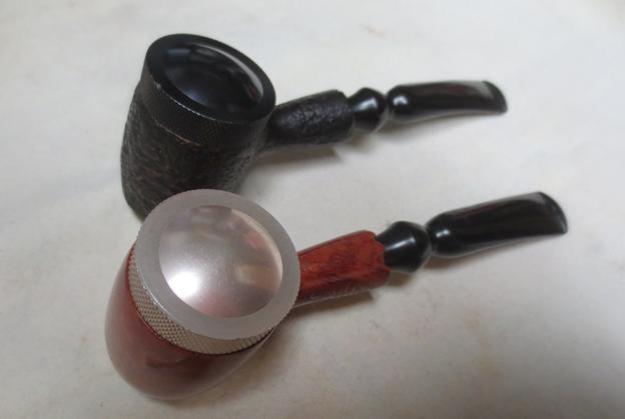
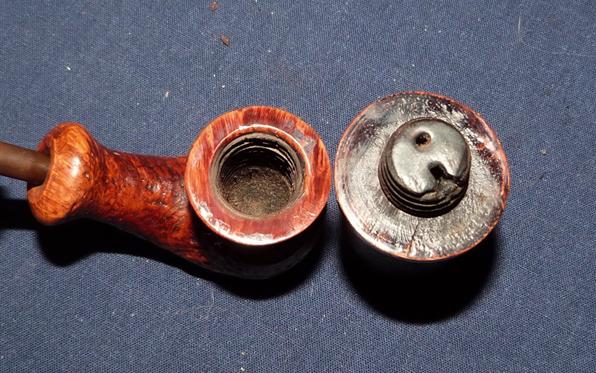
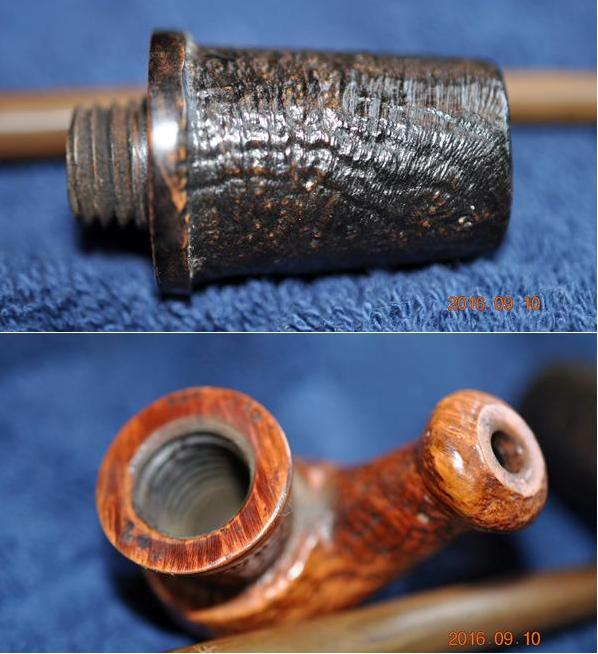
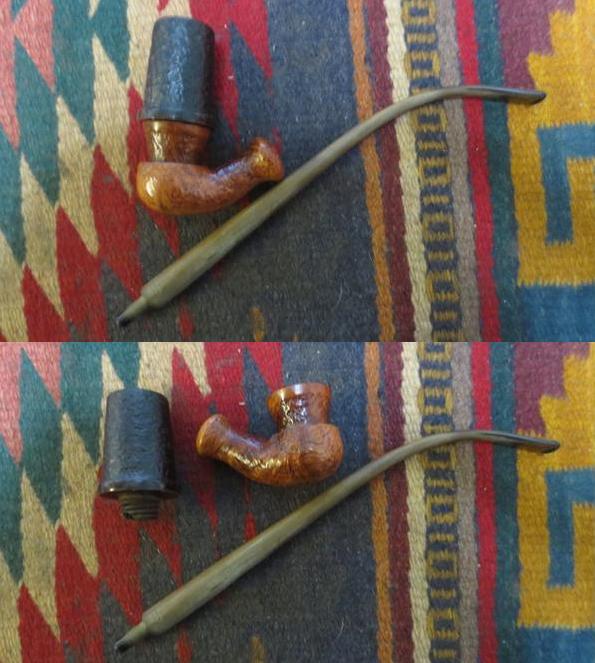
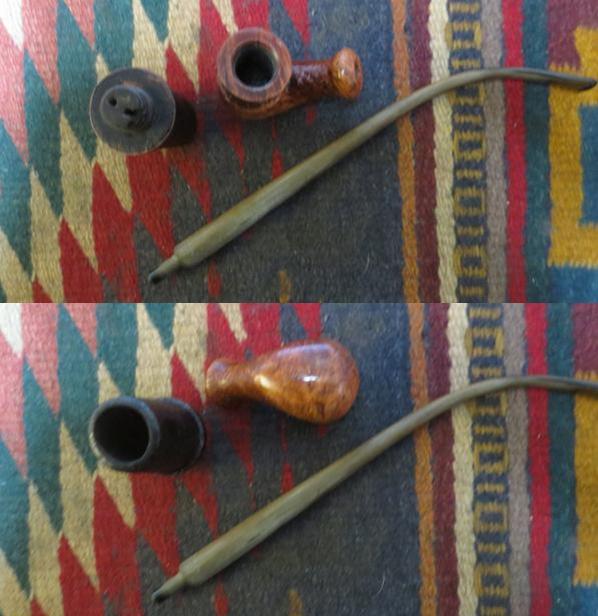
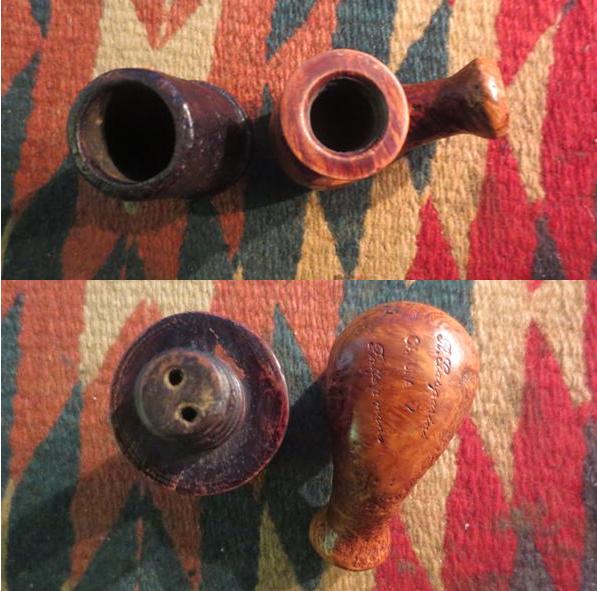
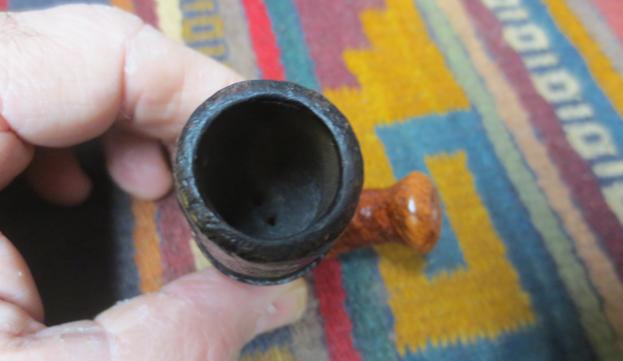
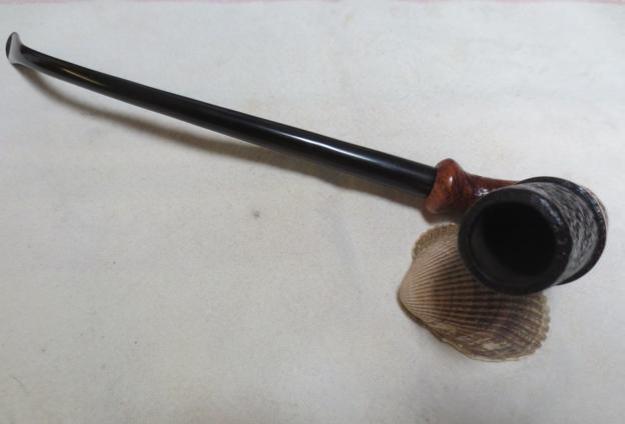
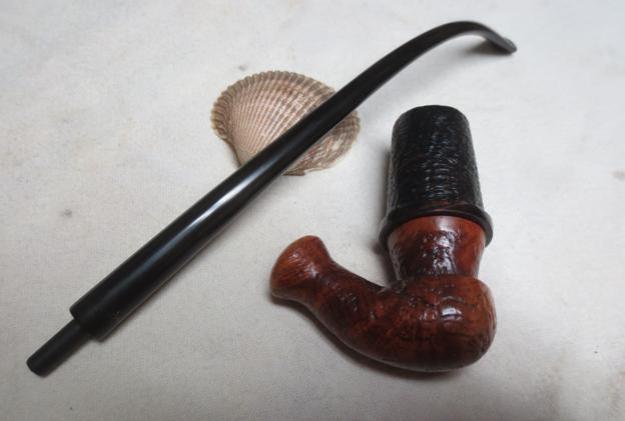
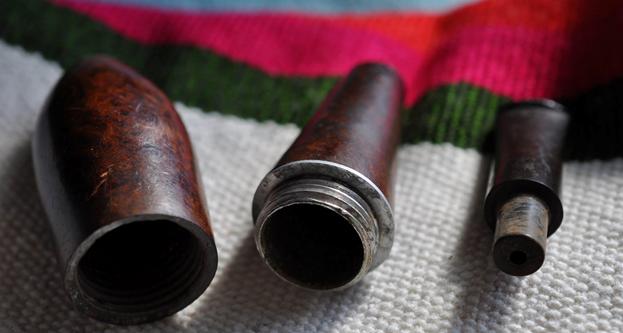
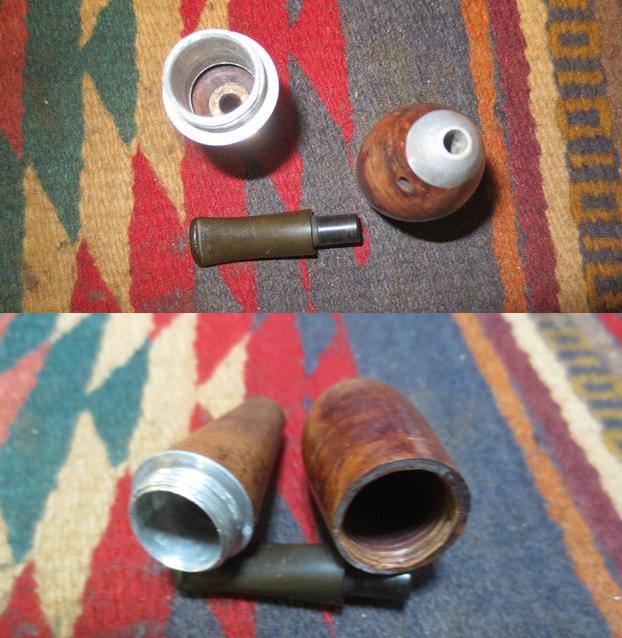
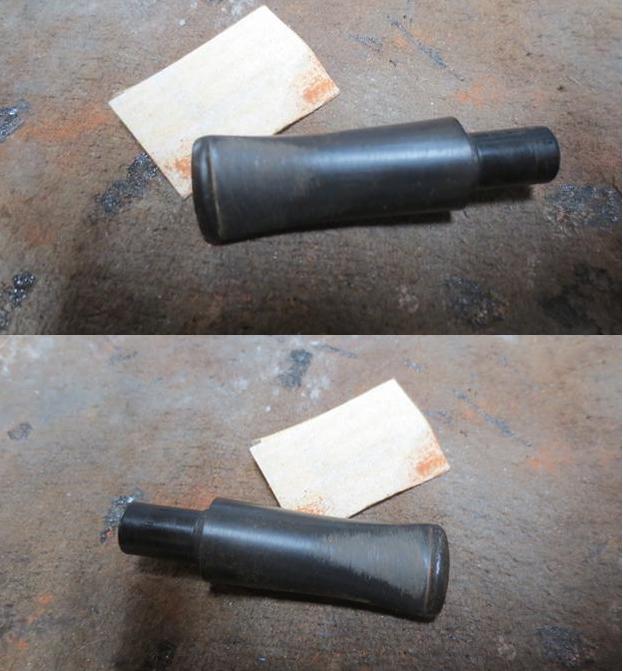
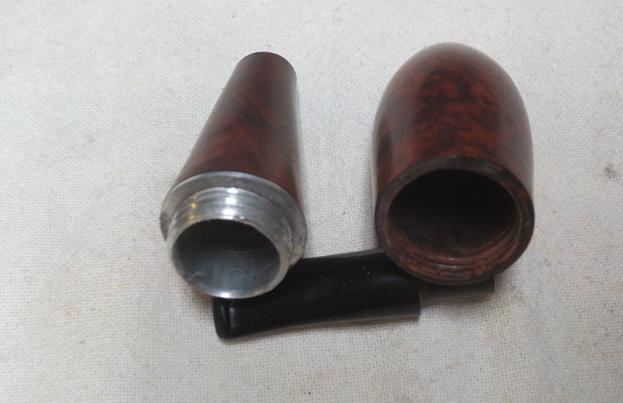
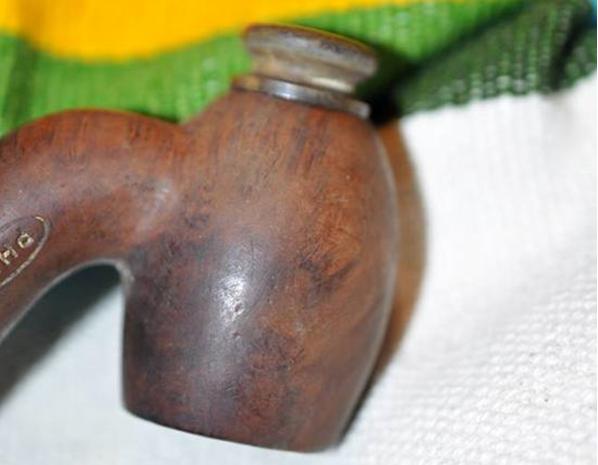
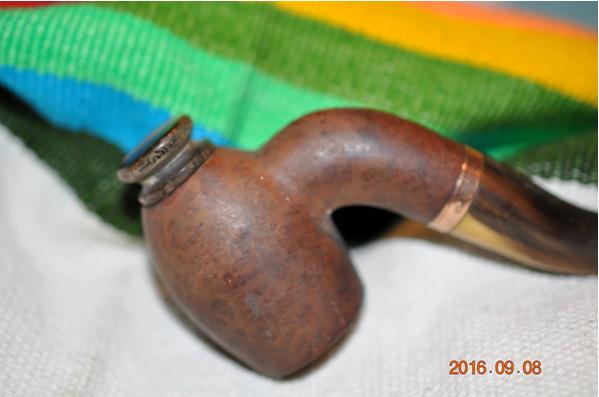
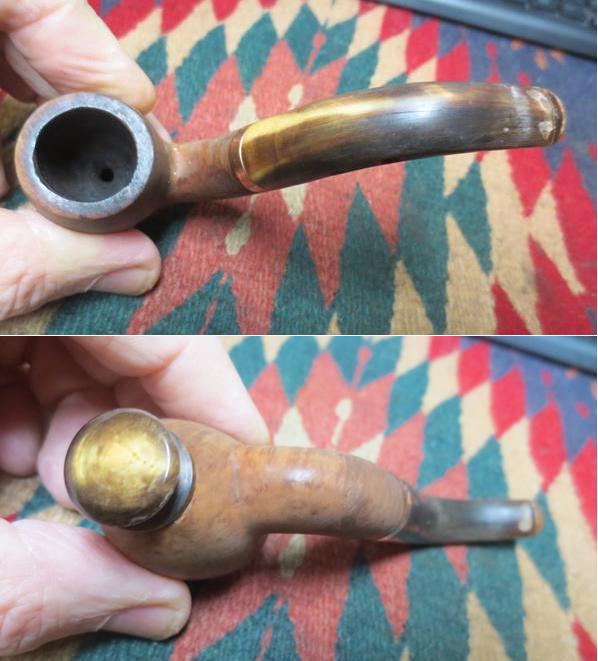
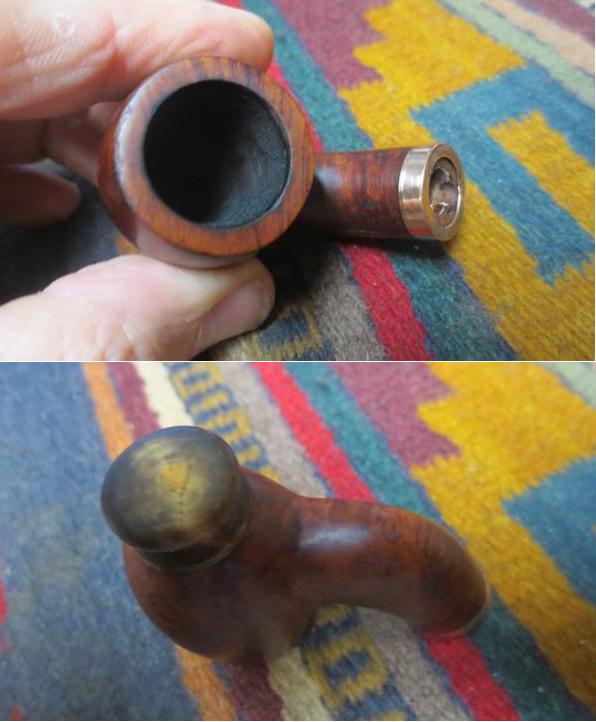
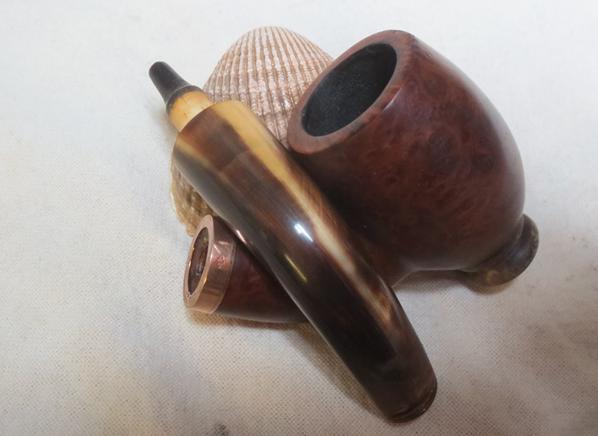
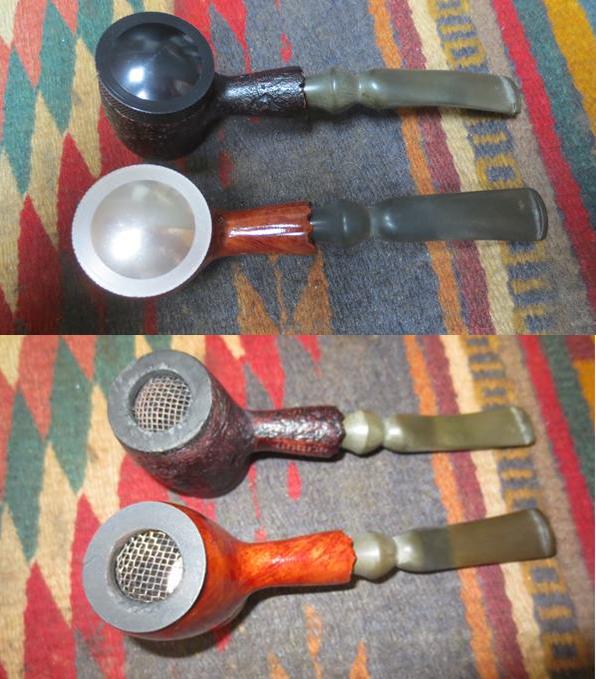
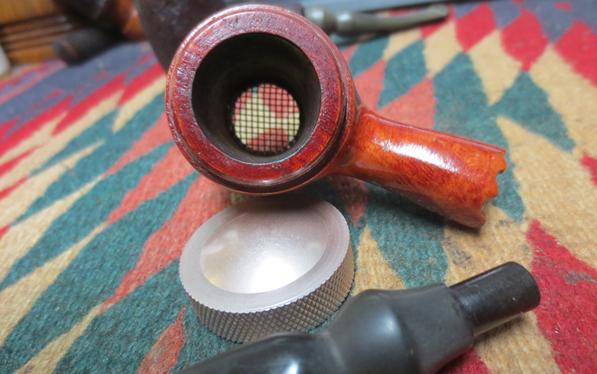
On both pipes the aluminum cap was in perfect condition on both the inside and the polished outside of the cap. I took photos of the pipes with the covers removed and the bowl tilted to give some idea of what the inside of the bowl looked like. It really is no more than a tube with a cap on one end and a screen on the other end.bart19 bart20 bart21 bart22
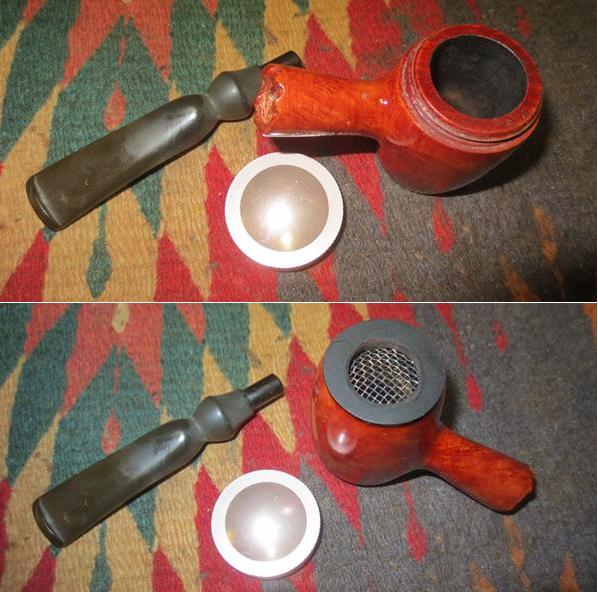
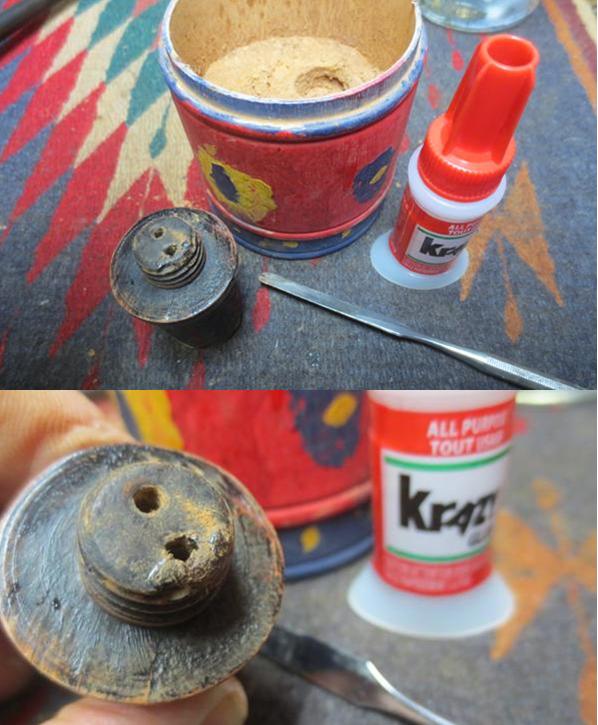
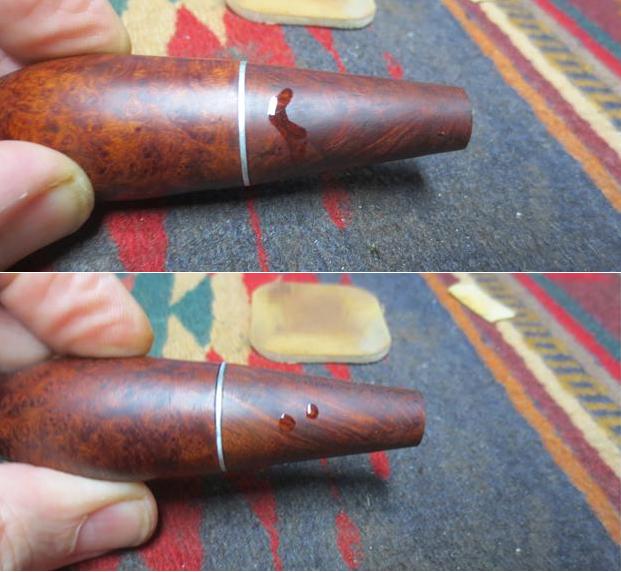
I used the topping board on the damaged bottom of the bowl. I topped it (or maybe bottomed it is more appropriate) until the damage was removed.bart23
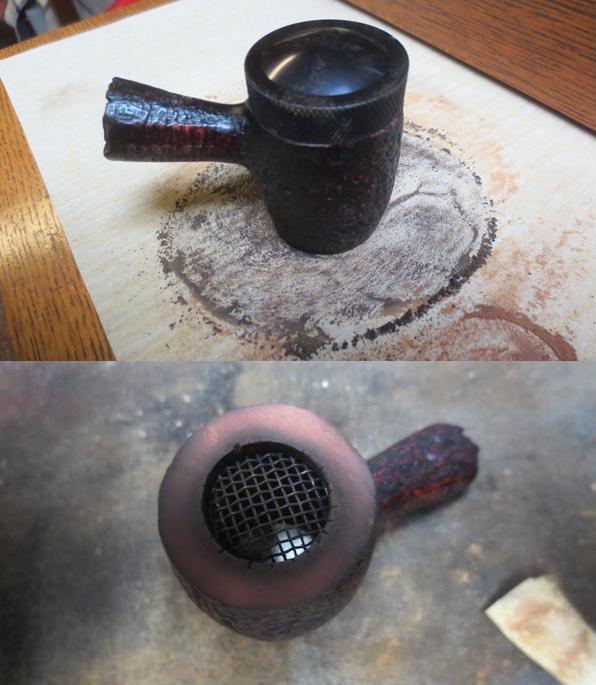
The small crevices that had opened around the inner edge of the bowl were not really cracks but rather areas that had burned with the heat of the flame. I filled them with briar dust and super glue to make them smooth and then retopped the bowl to smooth them out. I stained it with a black aniline stain and touched it up after sanding the repairs.bart24
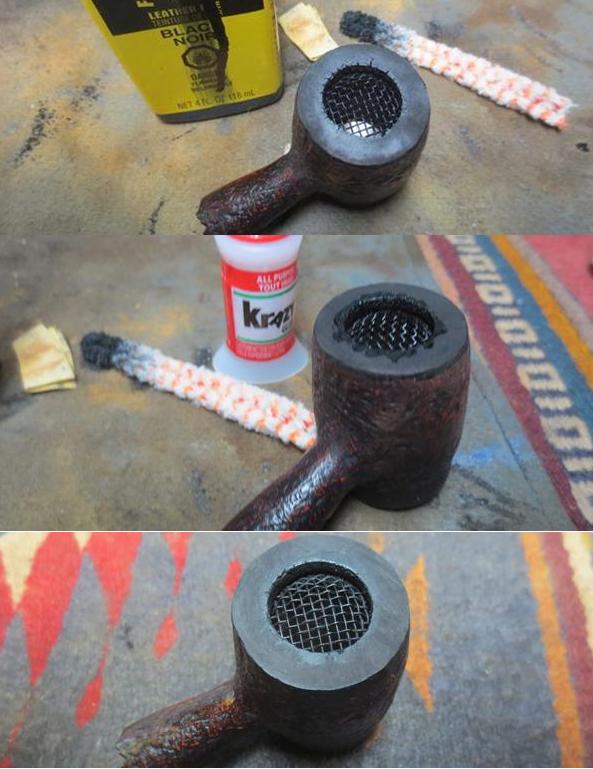
I sanded the two stems with 220 grit sandpaper to remove the oxidation on the surface of both stems. I used a spot of clear super glue to fill in the tooth mark and sanded the repaired area smooth to match the surface of the stem.bart25 bart26
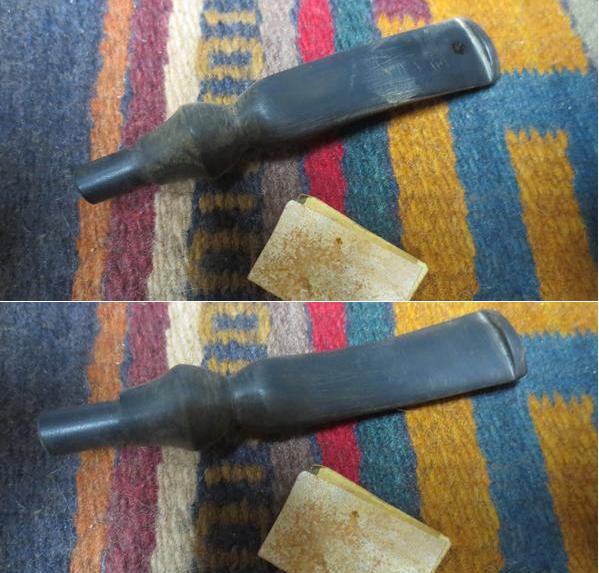
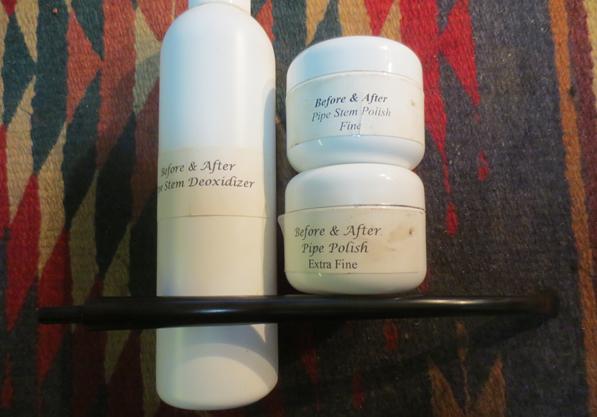
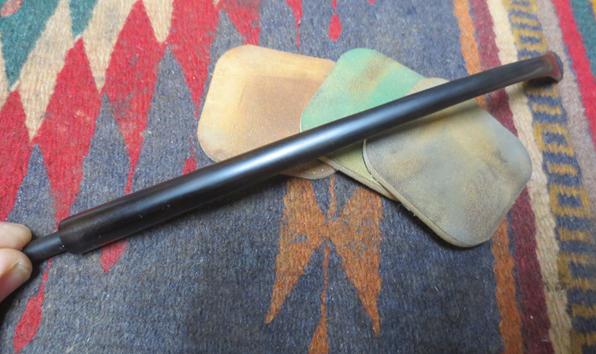
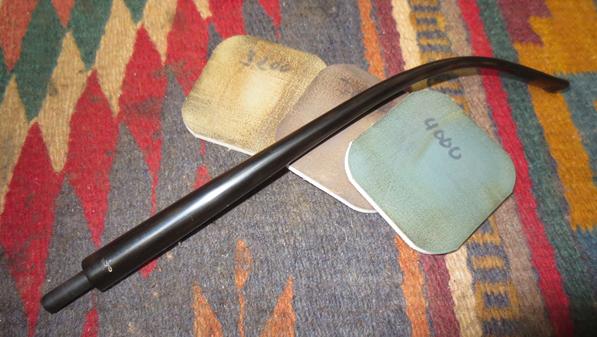
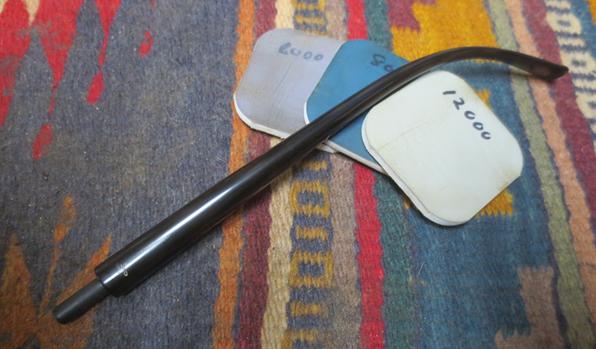
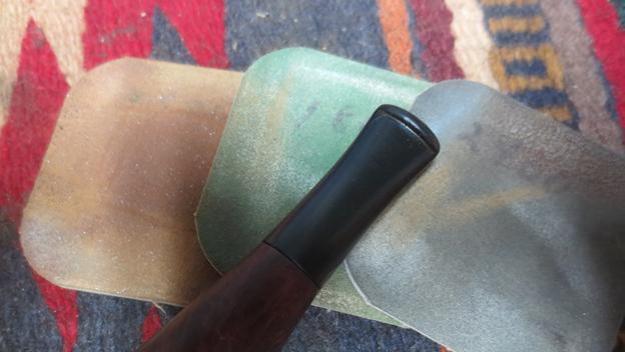
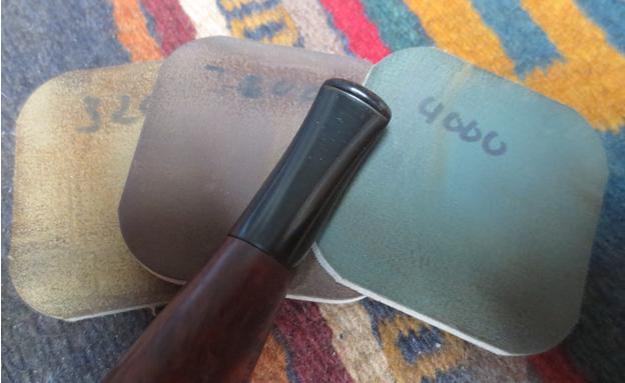
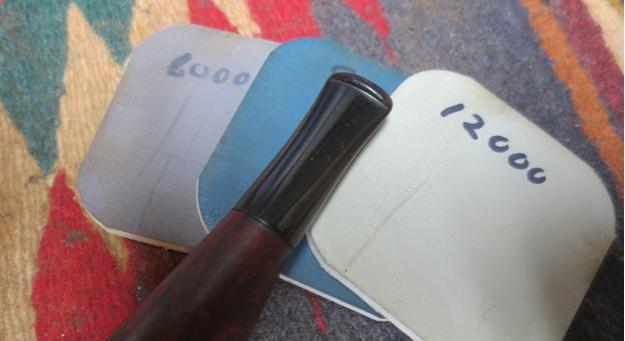
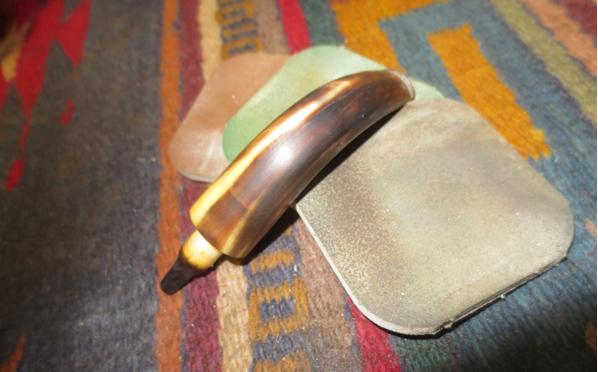
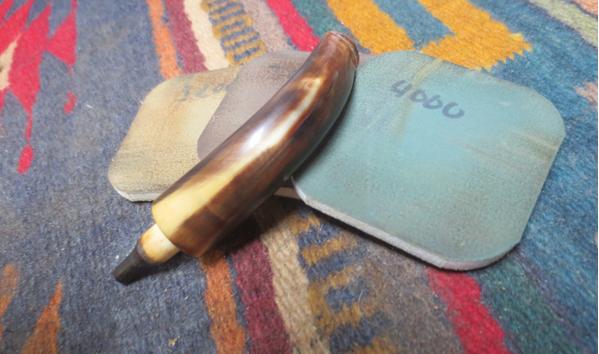
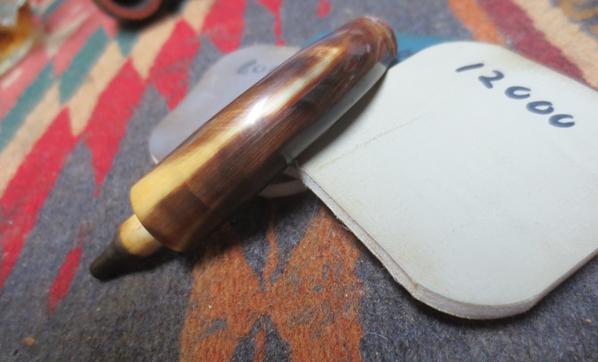
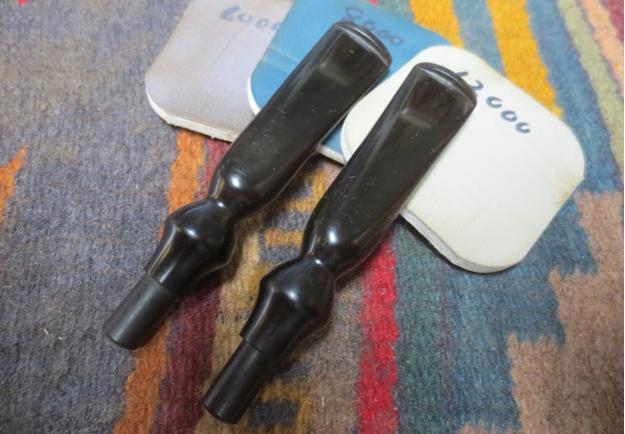
I polished both stems with micromesh sanding pads – wet sanding with 1500-2400 grit pads and dry sanding with 3200-12000 grit pads. I rubbed the stem down with Obsidian Oil after each set of three pads. After the last pad I gave it a final rubdown with the oil and set it aside to dry.bart27 bart28 bart29
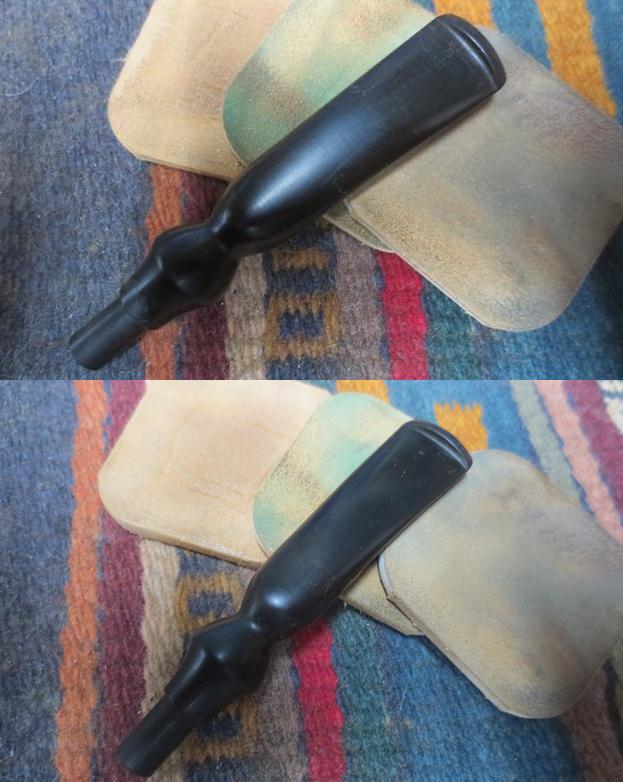
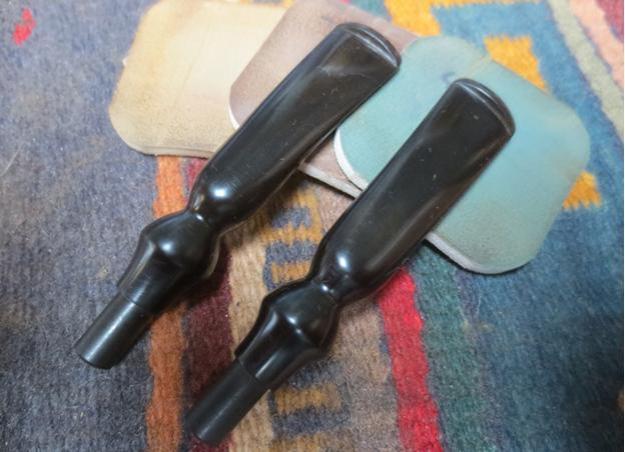
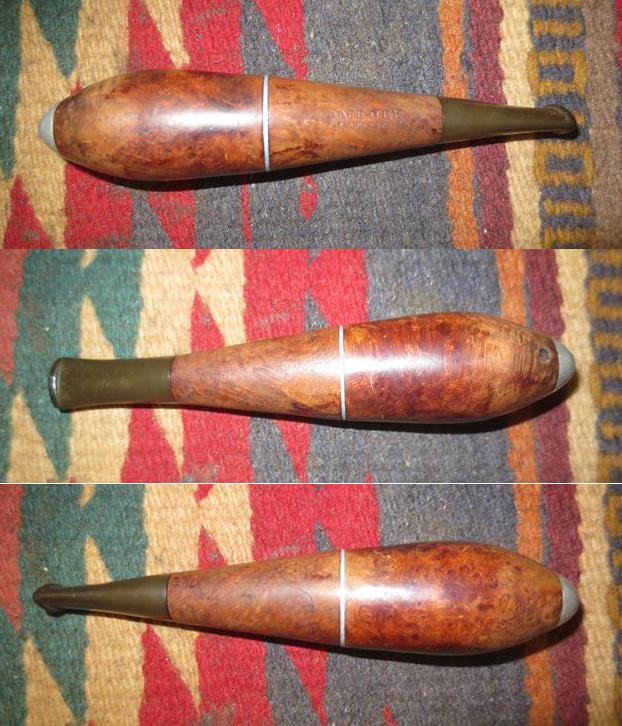
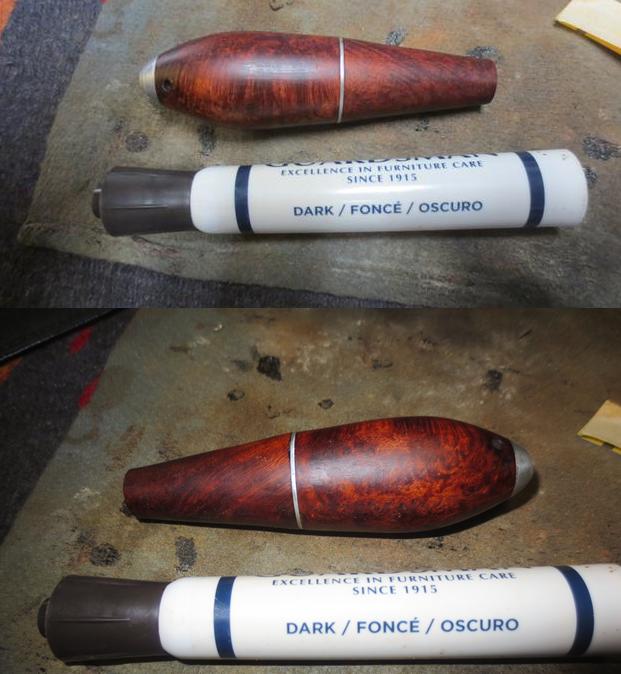
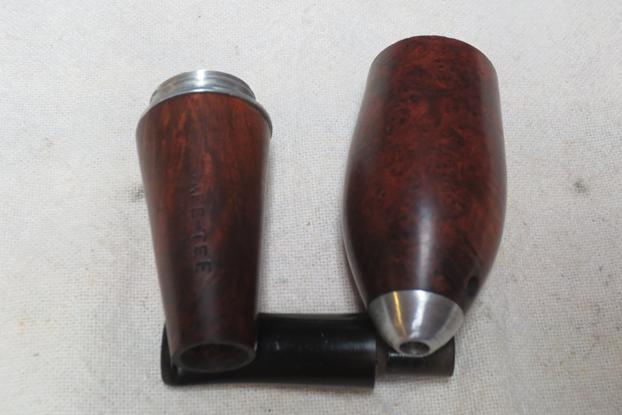
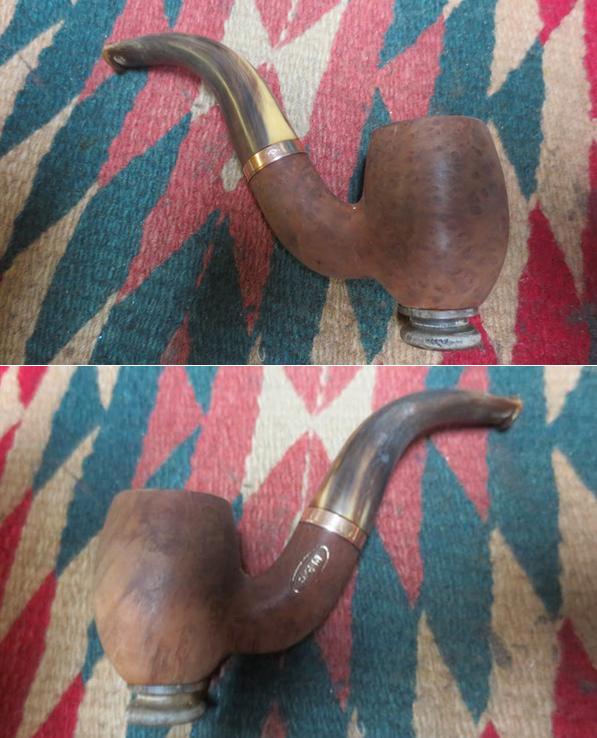
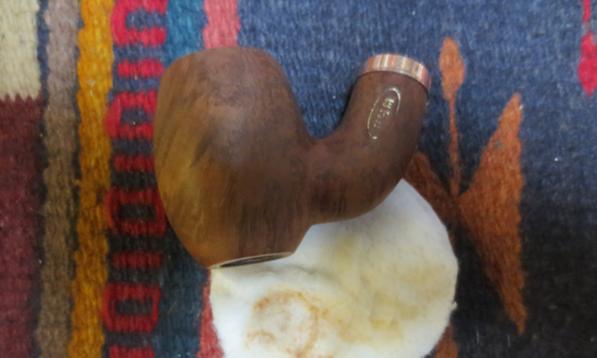
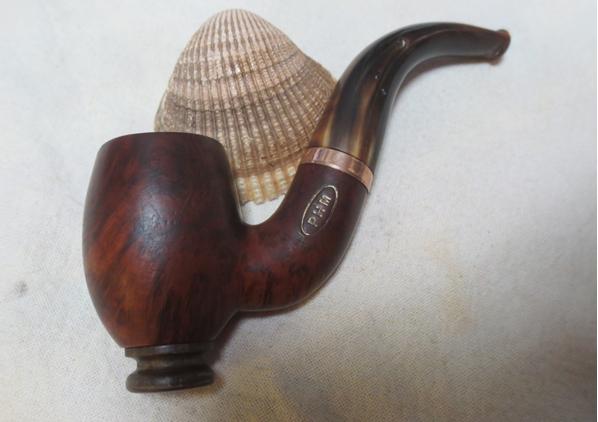
I took a photo of the pipes and stems before I took them to the buffer to show what they looked like at this point in my restoration.bart30
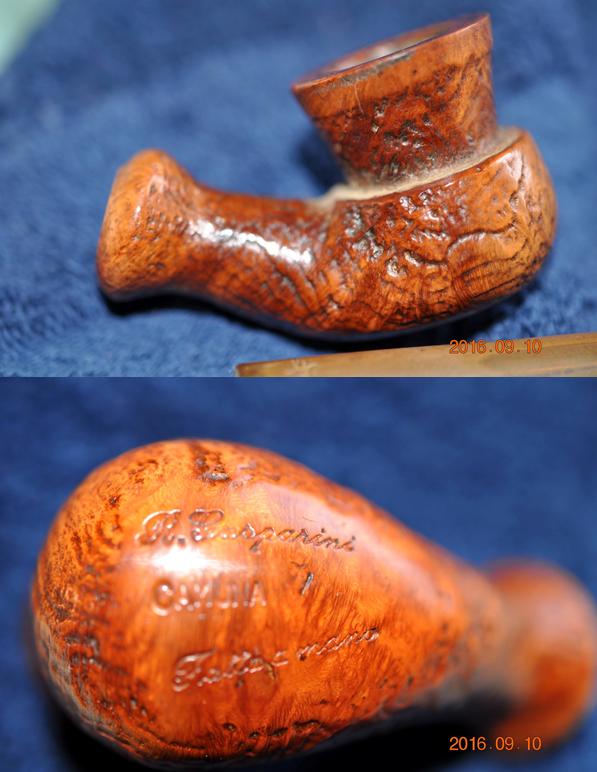
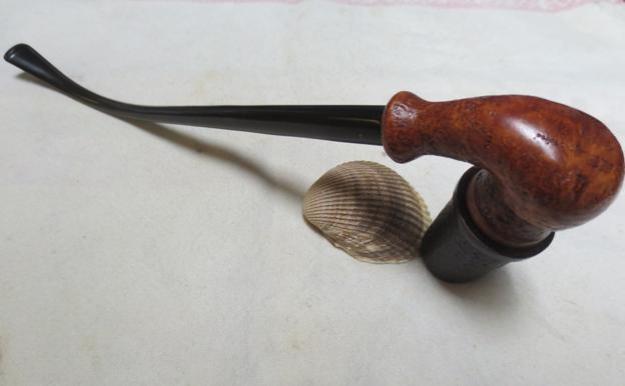
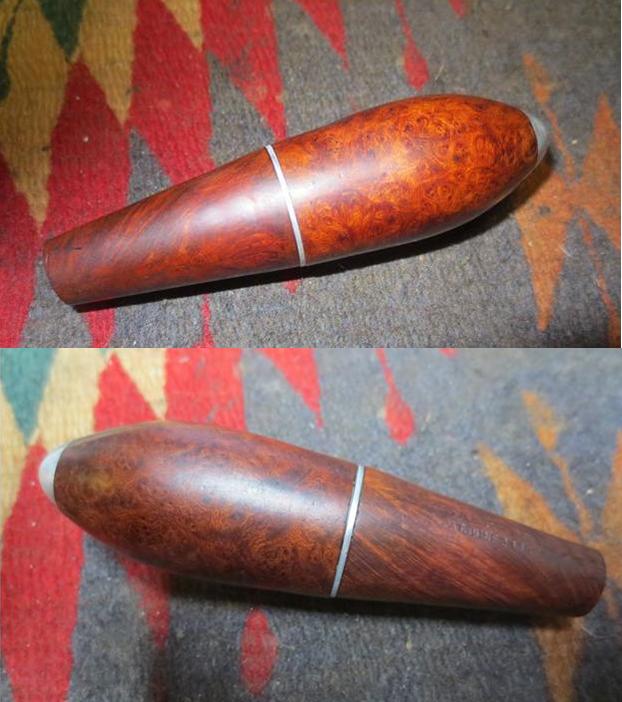
Here are some photos of the bowls from a variety of angles. There is a nice blasé and some pretty grain – they are a nice pair of pipes.bart31 bart32 bart33
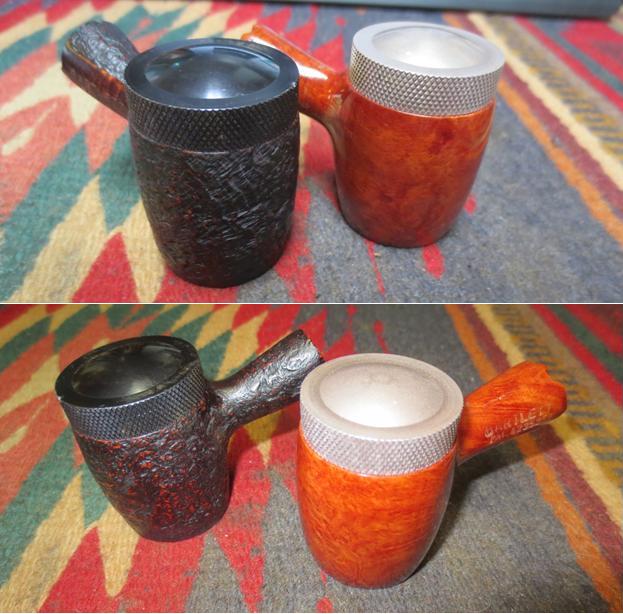
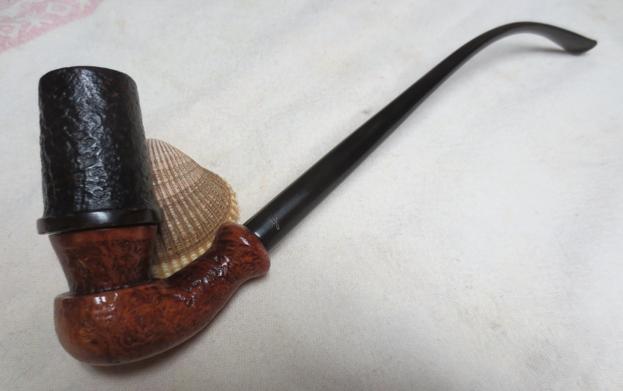
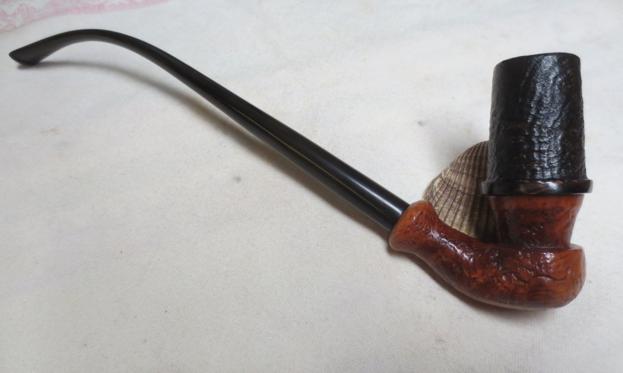
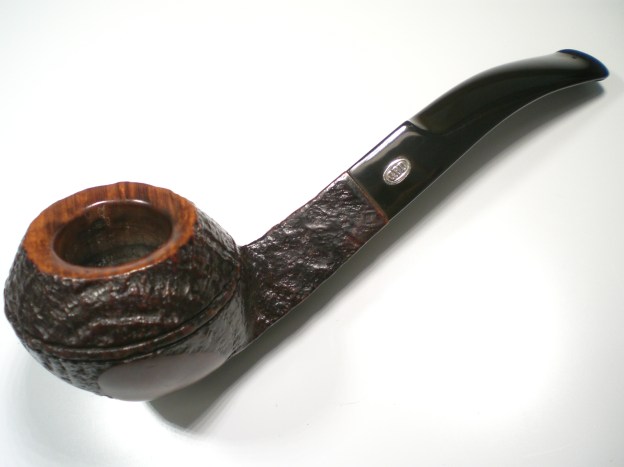
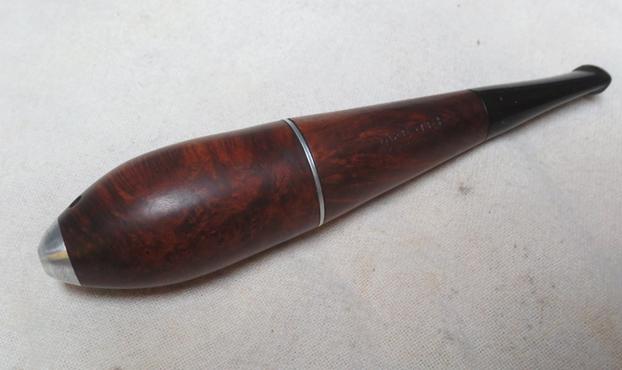
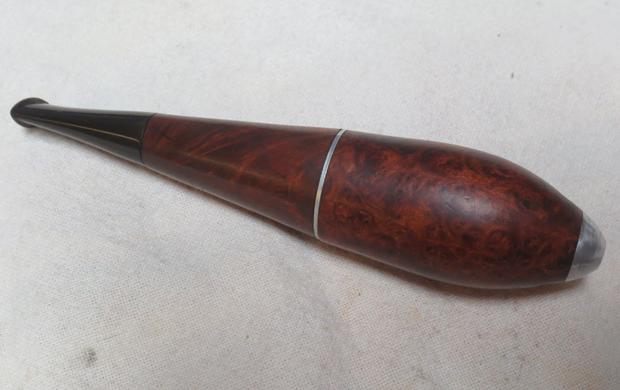
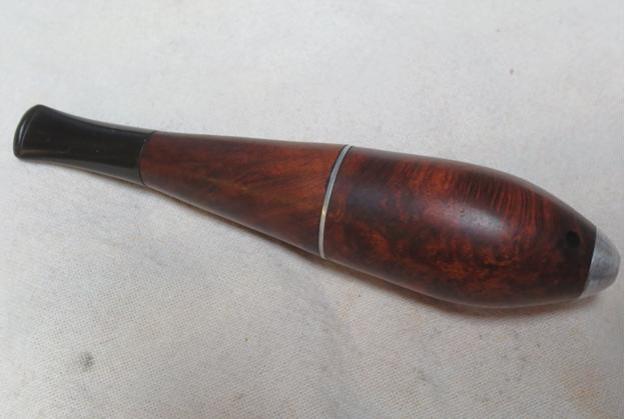
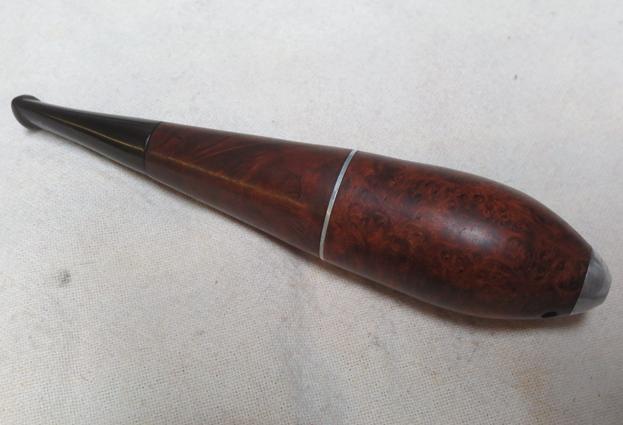
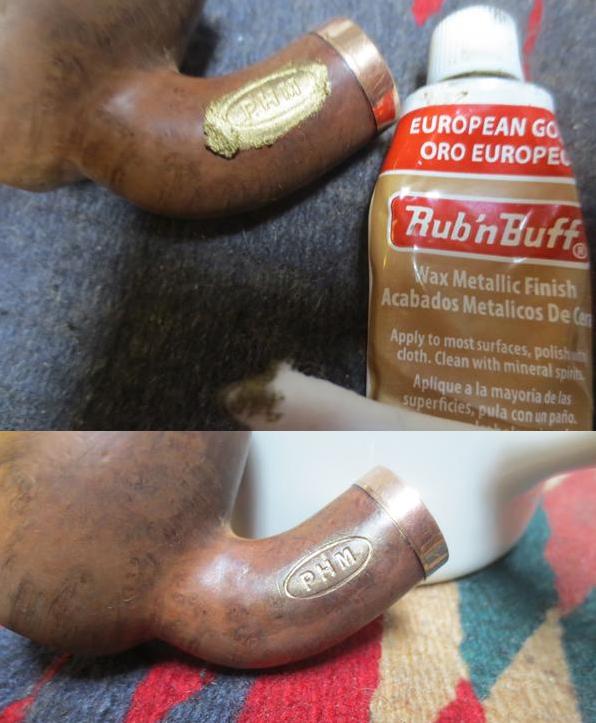
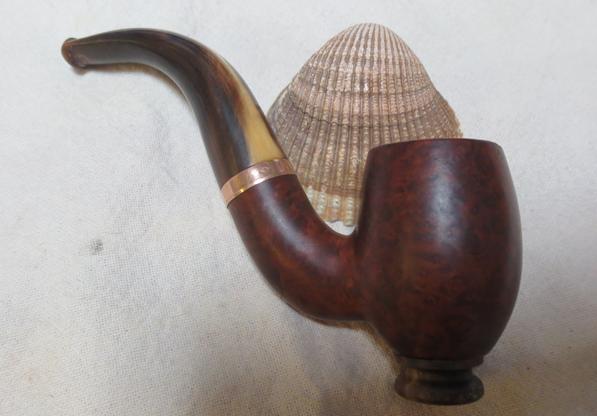
I buffed the pipes with Blue Diamond on the buffing wheel and then gave the stems several coats of carnauba wax. I gave the sandblast bowl several coats of Conservator’s Wax and left the varnish coat alone on the smooth briar bowl. I buffed both pipe with a clean buffing wheel to raise a shine. I hand buffed them both with a microfibre cloth to deepen the shine. The finished pipe is shown in the photos below. It is a unique piece of pipe and tobacco history. It certainly speaks of the inventiveness of pipesmokers who are perpetually looking for the better and drier smoke. Thanks for taking this journey through the restoration and the history of the Bartlett pipe.bart34 bart35 bart36 bart37 bart38 bart39 bart40 bart41


Rejuvenating a Gasparini “Fatta a Mano” Camuna


Blog by Steve Laug

My brother Jeff has an eye for unusual pipes that he thinks might intrigue me. He outdid himself this time. He found an odd three-part pipe – a base, a bowl and stem that I would classify as a churchwarden. It is about 10 inches long and the bowl is 3 inches tall but at the same time it is dainty, delicate and artsy. It is not a heavy pipe and the thin pencil stem and the bowl and base make it seem smaller than it is. The first two photos below show the unique shape and you can get a sense of how the pipe is both big and delicate at the same time.gas1The next photos give a sense of the artistry of the pipe. The base is stained a light brown and has a shallow sandblast finish. The end of the shank is rounded. The stem should sit against the shank end but the mortise needs to be cleaned and the oxidation on the tenon needs to be removed to make that happen. The bow is threaded and screws into the base. It has a contrasting dark brown and medium brown stain coat that gives contrast in the deeper blast and also with the base.gas2 gas3The next photos are close up pictures of the bowl and base. The first shows the bowl removed from the base. You can see from the photo that the bowl is threaded to be screwed into the base. The base and the bowl are dirty. The bottom of the bowl has two air holes that go into the bowl. The one toward the bottom of the photo below shows that a chunk of briar has broken away from the side of the hole and the threaded portion.gas4The second and third photos show the inside of the base and the cake and rim of the bowl. It is dirty but the rim and base are in excellent condition. There is some build up on the area of the base where the rim sits. It will need to be cleaned. To me it looks like it is a combination of dust and wax.gas5The next two photos give a clear picture of the damage to the base of the threaded portion of the bowl. You can see the damage on the outer edge of the tip and to the threads. It looks like a chunk of briar has broken free and a lot of debris and tars have filled in the damaged area.gas6The next photos show the base and the bowl from different angles. The grain and the blast is quite nice and the contrast of stains on the bowl look really good in contrast to the lighter stained base. The fourth photo shows the stamping on the bottom of the base. It reads R. Gasparini over CALUMA over script that reads “Fatta A Mano” which translates as Made by Hand.gas7 gas8The next photos show the stem with the tooth chatter and marks on the top and bottom side near the button. They also show the oxidation and the loss of colour in the G script logo on the side of the stem.gas9I know nothing about Gasparini brand so I looked up the website of the brand and found that the “Fatta a mano” stamped signified a particular freehand style line that Gasparini did. Here is the link to their website http://www.mgasparini.it/en/category-product/hand-made/.

I also looked up the brand on Pipedia. There is a lot of the history of the brand there for those who want to read the article in full. Here is the link: https://pipedia.org/wiki/Gasparini. I quote from that article in part.

“In 1938 Mario Gasparini, with his wife Ida, took his first steps into the world of the pipe. Today his daughter, Marisa Gasparini, sits at his desk. Since 1977 Marisa and her husband, and now her daughter, carry on the tradition of her family…”

“At the beginning of 1950’s, the building, that still today hosts the production department, was enlarged. In 1971 the offices and the warehouse were moved from Milan (where they were situated for marketing purposes) to Luvinate.”

“During those years the skilled workers and our direct partners have always followed the history of the Gasparini factory, becoming very fond of it and devoting themselves, with care and love, to the making of each pipe, with the personal fantasy and skills of the artist…”

“…The cycle of manufacture is basically divided into two separate branches. Pipes from the first branch (my addition, ed.) the “Fatta a Mano” and “da Collezione” are completely hand made, rigorously produced from the best selected briar; the estrus(?) and fantasy of our masters is surely more evident in these series of pipes.”

“The other branch is (my addition, ed.) …Serial pipes are partially machine made (the bowl, shank and drilling) and they are divided into various categories based on the quality and finish.”
“…during the years we have always made the creation of unique pieces for the series “Fatta a Mano” (Hand Made) and “per Collezionisti” (for collectors).”

At the bottom of the Pipedia article there was an email address for contacting the Gasparini Company with any questions that need to be addressed to them. I took the opportunity last evening to write an email to them regarding the age and provenance of the pipe I had in hand. I also included a photo of the pipe’s condition and look when I got it from my brother. This morning I received a reply from none other than Marisa Gasparini herself. Here is her email in full:

Dear Steve,
The pipe you have is a very old pipe that we produced 35 years ago about, and we made only few pieces.

It’s very different from the normal pipes and we have made in the time other interesting pipes, quite original that we keep in our warehouse.
If you are interested I can send you some photos for next week so you can understand what I mean for original.

I would like to know where you bought that pipe, thanks a lot and best regards,

Marisa Gasparini

That gave me some incredibly helpful information. The pipe in my hand is approximately 35 years old and there were only a few of them made at that time. She is going to send me some photos of some of the original pipes next week. I will post them as an addendum to this blog when I receive them. I wrote Marisa back immediately thanking her and answering her question as to where I found the pipe.

Now I had a feel for the age and provenance of the pipe and I was ready to work on it. I took some photos of it before I worked on it. My brother had done the majority of the clean up work on the bowl, base and shank before he sent it to me. He had reamed it and cleaned out the airways in the bowl, base, shank and stem. He scrubbed the externals and remove a lot of the waxy grime that had collected on the bowl over the years. It looked pretty good when I received it.gas10 gas11I took the stem out of the pipe and unscrewed the bowl from the base and took some photos of the pipe before I worked on it.gas12 gas13I took a photo of the stamping on the bottom of the base to give an idea of how that look – it is the only smooth portion on the base other than the rounded shank end.gas14I took some photos of the damage to the bottom of the bowl on the threaded portion to show what it looked like with the oils and tars removed. I took a top down photo to show the cleaned bowl and also the twin airways in the bottom of the bowl.gas15 gas16I cleaned up the reaming with a Savinelli Pipe Knife and scraped out the bits of cake that still were on the walls and at the bottom of the bowl.gas17I wiped down the bottom of the bowl and the damaged area with alcohol on a cotton swab and cotton pad in preparation for repairing the damage. I used clear super glue and briar dust to build up the area of the missing chunk of briar. I was careful to keep the airway open. I layered the glue and the dust until it was smooth.gas18I used the sanding board to lightly “top” the bottom of the bowl and smooth out the repaired area. After I took the second photo below I used needle files to retrace the threads on the damaged area of the bowl.gas19I gave the bowl and base several coats of Conservator’s Wax and buffed them with a shoe brush. The photos below show the bowl and base at this point in the restoration.gas20 gas21I turned my attention to the oxidation on the stem. I lightly sanded it with 220 grit sandpaper to remove the surface oxidation and remove the tooth marks and chatter from the area around the button. I ran a long pipe cleaner through the stem just to check for debris and oils but my brother had done a great job with the airways. I scrubbed the stem with Before & After Pipe Stem Deoxidizer and the with the Fine and Extra Fine Pipe Stem Polish. I was able to get the majority of the oxidation off the stem.gas22I did a touch up on the “G” logo on the stem with white model paint and a fine bristle artist’s brush. When it dried to touch I used a 1500 grit micromesh sanding pad to remove the excess paint and polish the end of the stem.gas23I polished the stem with micromesh sanding pads – wet sanding with 1500-2400 grit pads and dry sanding with 3200-12000 grit pads. I rubbed the stem down with Obsidian Oil after each set of three pads. After the final set I buffed it with Blue Diamond on the wheel and gave it a last rub down with Obsidian Oil. I set the stem aside to let the oil dry. I buffed the stem with carnauba wax and with a clean buffing pad to raise the shine.gas24 gas25 gas26I lightly buffed the bowl and base with Blue Diamond and then gave it a light coat of carnauba, being careful to not let it build up in the grooves and crevices of the sandblast. I buffed it with a clean buffing pad to raise the shine. gas26a gas26b gas26c gas26dI put the pipe back together and gave it a final buff with a clean buffing pad to shine it. I hand buffed it with a microfibre cloth to deepen the shine. The finished pipe is shown in the photos below. I took photos of the pipe as a whole and also taken apart in the various configurations. I am really pleased with the finished pipe and look forward to giving it a smoke. To me it is a very “Gandalfian” looking pipe and feels great in the hand and the mouth. Thanks for walking with me through the history and the process of bringing the pipe back to life.gas27 gas28 gas29 gas30 gas31 gas32 gas33 gas34 gas35 gas36 gas37 gas38 gas39


GBD 549 Fantasy Bulldog Restoration


By Al Jones

The GBD Fantasty and the similiar Tapestry line of pipes were introduced in the 1970’s and I think they fit that funky era perfectly. I can picture a hip 1970’s pipe smoker enjoying this one in a pastel leisure suit, showing care to not get a burn mark on his new silk-screened shirt. This one is the classic GBD bent bulldog, the 549 shape. The pipe had some build-up on the bowl top, but I was sure that a beautiful beveled GBD bowl top was hiding underneath. The stem had some oxidation and a few bite marks.

gbd_549_fantasy_before-1

gbd_549_fantasy_before-2

gbd_549_fantasy_before-3

gbd_549_fantasy_before-4

The bowl was reamed and soaked with alcohol and sea salt. While it was soaking, I put a dab of grease on the brass rondell and soaked it in a mild Oxy-clean solution. I used a cloth and some water to rub off the bowl top tars and then polished it with White Diamond and a few coats of Carnuba wax. I also gave the polished geometric shapes the same treatment. The blasted wood was polished by hand with Halycon wax.

There were some dents in the vulcanite, which I was able lift out with a lighter flame. The stem was mounted and polished progressively with 800, 1500 and 2000 grade wet paper. That was followed with 8000 and 12000 micromesh. The stem was them buffed with White Diamond and Meguiars Plastic Polish. Two tiny teeth pricks remained, one on each side, but there were so small, I left well enough alone.

Below is the finished pipe.

gbd_549_fantasy_finish-1

gbd_549_fantasy_finish-5

gbd_549_fantasy_finish-4

gbd_549_fantasy_finish-3

gbd_549_fantasy_finish-2

?

gbd_549_fantasy_finish-1

Amazing Grain came alive on a Zeppelin Style Safe-Tee Patent Pipe


Blog by Steve Laug

When my brother sent me a photo of another cigar pipe he was bidding on I wondered about it. I have cleaned up two of them made by Mastercraft (https://rebornpipes.com/2016/09/12/back-in-flight-a-pair-of-mastercraft-sparkless-cigar-pipe-zeppelins/). They were an interesting pair of pipes. This one was different he said. The design was quite a bit more streamlined and smooth in terms of look. The aluminum nose cone was smooth and there were two air holes drilled in the briar itself rather than just in the nose cone. I am assuming this was to aid airflow in the pipe. It still had an aluminum to briar connector for the two parts. The vulcanite stem was well fitted.cigar1 cigar2What would be the left shank side was stamped SAFE-TEE over Pat. June 23, 1925. I did a lot of searching online and could only find one other picture of a rusticated version of the pipe. It is not listed on Pipedia or on pipephil’s Logos and Stampings site. I looked in my reference books here and found it listed in Who Made That Pipe. In classic form, giving an almost dictionary style definition the book says that the pipe was made by the Safe-Tee Pipe Company in the US. Now to me that is classic – the SAFE-TEE pipe made by the SAFE-TEE Pipe Company. The only additional piece of information was that it was made in the USA and it was patented originally in 1924. The photo below shows the stamping. cigar3The stem was in great shape with minor pitting and some tooth chatter but no heavy damage. There was light oxidation as well.cigar4My brother took the photos above and the ones below to show the condition of the pipe before he cleaned it. The next one shows the pipe taken apart. The nose cone portion of the pipe is all briar with threads cut into the briar. The shank portion has an aluminum connector that turns into the briar cone. There is a washer that serves as a spacer/band between the portions. The stem is straightforward with no stinger apparatus. He also took photos of each side looking down the barrel.cigar5 cigar6The washer is free and spins on the aluminum connector. It needs to be aligned for the two sides to meet properly. There was a small crack/flaw in the briar of the shank portion of the pipe.cigar7Once again I am thankful for my brother Jeff’s cleaning skills. The inside of the pipe and stem were spotless when it arrived in Vancouver. The exterior had also been scrubbed clean of dirt, debris and the mottle finish. The pipe was ready to restore. I took some photos of it when I brought it to my work table.cigar8I took some photos of the pipe taken apart to show some of the structure on the pipe. You can see the internals of the connector and the metal tube in the bottom of that portion (the one on the left of the photo) you can also see the end of the cone. It is an interesting design that is different from the Mastercraft version.cigar10The next photos show the condition of the stem – you can see both the tooth chatter and the oxidation in the photos. There was also some pitting in the vulcanite.cigar11My first order of business was to repair the crack and several of the deeper pits in the briar. I cleaned the entire pipe with a cotton pad and acetone. I examined the crack to see how deep it went in the briar and was pleased to see that it was really surface flaw. The tube inside the shank portion stabilized it from causing further damage. I used a dental pick to clean it out and filled it in with clear super glue. It was small enough that I did not mix any briar dust with the super glue repair.cigar12When the glue dried I sanded the repairs with 220 grit sandpaper to blend them into the surrounding briar and make them smooth.cigar13I sanded the repaired areas with micromesh sanding pads – wet sanding with 1500-2400 grit pads and dry sanding with 3200-4000 grit pads. I used the higher grit pads on the entire area around the repairs.cigar14I used a dark brown stain pen to touch up the repaired areas and blend them into the colour of the briar on the rest of the pipe. I gave the pipe a coat of Conservator’s Wax and buffed it. I set it aside and turned my attention to the stem.cigar15I did not stain the rest of the pipe but decided to leave it as it was. The repaired areas were stained to match the rest of the pipe but other than that it is unstained by me. I took the next two photos of the repaired areas after waxing and hand buffing them. The repairs blend in very well.cigar17I sanded out the tooth chatter and pitting on the stem with 220 grit sandpaper. It also removed the majority of the oxidation.cigar16I polished the stem with micromesh sanding pads – wet sanding with 1500-1800 grit pads and dry sanding with 2400-12000 grit pads. I rubbed the stem down with Obsidian Oil after each set of three pads. After the final set of pads I gave it a final coat of oil and set it aside to dry.cigar18 cigar19 cigar20I buffed the pipe with Blue Diamond on the buffing wheel being particularly careful around the stamping on the side. The stamping was already light on the left and right side so I did not want to damage it more. I gave it multiple coats of carnauba wax and buffed it with a clean buffing pad to give it a shine. I finished by hand buffing it with a microfiber cloth. The finished pipe is shown in the photos below. It turned out to be a beautiful piece of briar with a mix of flame, cross and birdseye grain surrounding the two halves. The aluminum polished up nicely and the black vulcanite, the natural finish and the aluminum combine to give the pipe a classic appeal. This was a fun one to work on. Thanks for walking with me through the process.cigar21 cigar22 cigar23 cigar24 cigar25 cigar26 cigar27 cigar28 cigar29

Breathing new life into a Unique PHM System Pipe with a Horn Stem


Blog by Steve Laug

My brother first sent me the picture below of this old pipe to see what I thought of it. There was something intriguing about it from my first look. I looked at the eBay ad and all of the pictures included and told him we should go for it. I don’t recall ever seeing a pip this shape with the horn stem and the matching horn button on the bottom of the bowl. It certainly looked like it was a nice piece of briar underneath the grime of age. The horn stem looked to be in good shape overall with no splits or cracks. The horn button on the bottom of the bowl also appeared to be in good shape. The briar had no burns or serious damage to the rim or the edges of the bowl. The band was in decent shape with no dents of dings. The chunky look of the stem and the shank attracted me to the pipe. The striations of colour on the stem showed promise of looking great once buffed and polished. He bid on it and won.hornaWhen Jeff received the pipe he took the following photos before he started cleaning it up. You can see some of the issues that I will need to address in the cleanup and restoration. The overall condition of the pipe is fine. The briar was very dirty and the rim and bowl had a thick, dark and oily cake that overflowed onto the top of the bowl. If you look closely at the photos of the entire pipe you will also see some damage to the horn stem. There are tooth marks on the top and underside near the button and there are some divots out of the left side of the stem.horn1He took some close up photos of the rim and bowl. You can see the cake in the bowl and the overflow of lava on the rim top. It is hard to tell if there is damage to the inner edge of the rim at this point due to the buildup but there could be. There is some wear on the outer edges at the front of the bowl.horn2The close up photos of the stem shows the tooth marks and the divots out of the left side. Both of these will need to be addressed in the restoration.horn3The brass coloured band has a small diamond shaped stamp on it that is aligned on the right side. It has some kind of stamping inside the diamond but even with a light and a magnifier I am unable to read it.horn4The PHM stamp in the oval on the left side of the shank is the only stamping on the pipe. I have hunted high and low for information on the brand and can find nothing. The shape and design of the pipe and stem make me think it is quite old and probably British made but I cannot be certain. Can any of you help identify the maker for me?horn5It is hard to see in the photos but the airway in the bowl is at the bottom of the bowl. The horn cap on the bottom of the bowl is removable and it was hollowed into a bowl to catch the moisture from the burning tobacco. The airway into the shank is in the area where the cap screws into the bowl. The area acts as a bit of a cooling chamber for the smoke that is drawn into the airway allowing the moisture to collect in the horn bowl before wending its way into the airway in the shank of the pipe.horn6 horn8 horn9When my brother unscrewed the cap the chamber inside was extremely dirty with tars and oils. The buildup was quite thick on both the inside of the hollowed out cap and the inside of the chamber/trap it screwed into.horn7He removed the stem from the shank and took photos of the shank end. The brass band turned out to be more of a ferrule that wrapped the shank end. The drilling on the airway in the mortise was at a steep angle into the shank so you can see a small divot at the bottom edge of the shank. The tenon/stinger was bone and was shaped like a nipple that sat against the entrance of the airway in the bottom of the mortise.horn10My brother scrubbed the externals of the bowl, reamed and cleaned out the internals. He said that the insides would take more work once I got it as they were very dirty. I took photos of the pipe when it arrived in Vancouver and I brought it to the work table.horn11 horn12He had cleaned up the stem inside and out and the tooth marks and divots were ready to repair.horn13He had been able to remove all of the cake in the bowl and it revealed the airway at the bottom of the bowl. He also cleaned the rim of the entire lava overflow. It would need to be lightly topped to remove the damage to the inner edge of the rim. He had scrubbed the reservoir under the horn plug on the bottom of the bowl but it would need a lot more work to rid it of all of the thick oils and tars accumulated there.horn14I took a photo of the dismantled pipe to give an idea of the components and the size of the pipe. It is not a big pipe but the bowl is large for the overall size.horn15I wiped down the tooth marks and divots on the side of the stem with a cotton pad dampened with alcohol to remove any remaining debris. I filled them in with clear super glue – slightly overfilling them to ensure that once the glue cured there would be enough for a smooth finish once sanded.horn16While the stem glue cured I worked on cleaning out the reservoir/trap at the bottom of the bowl and inside of the cap. I used cotton swabs and alcohol to clean the area out and it took a lot of finicky cleaning to get all of the nooks and crannies clean. I also cleaned out the airway from the trap into the shank with bristle and regular pipe cleaners.horn17I lightly topped the bowl on the topping board with 220 grit sandpaper to remove the damaged rim surface but not to change the overall shape or flow of the bowl. I sanded it with micromesh sanding pads -1500-4000 grit to remove the scratches left behind by the sandpaper on the topping board.horn18 horn19I cleaned out the mortise and airway in the shank and the stem with pipe cleaners, cotton swabs and alcohol until they came out clean and the pipe smelled fresh.horn20I wiped down the exterior of the bowl with acetone to remove any grit and dirt that I had transferred during the interior cleanup.horn21I used European Gold Rub’n Buff to restore the stamping on the shank. I applied it with a cotton swab and let it sit for a moment before rubbing off the excess with a clean swab. The restored stamping can be seen in the second photo below. The bottom edge of the stamp was not as deep as the rest of the stamp so I was not sure if that area would retain the gold.horn22By this time the glue repairs on the stem had cured. I sanded them smooth with the surface of the stem using 220 grit sandpaper. For some reason the clear glue brings out a white spot in each repaired area – it may be a reaction of the horn to the glue. I will minimize those as I polish the stem but they will remain.horn23I polished the stem with micromesh sanding pads – wet sanding with 1500-2400 grit pads and dry sanding with 3200-12000 grit pads. I rub horn stems down with Obsidian Oil after each set of three pads to give life to the horn. I gave it a final coat of oil after sanding with the 12000 grit pad. I set the stem aside to dry.horn24 horn25 horn26I gave the bowl several coats of Conservator’s Wax and hand buffed it with a shoe brush. I would also buff it on the buffer but I wanted to see where things were at this point. Were there any areas on the bowl sides or top that I needed to do more work on to ensure that it would have a smooth finish.horn27 horn28I worked a little more on the horn cap on the bottom of the bowl and on a few of the nicks on the sides of the bowl using 1500-4000 grit micromesh sanding pads. Once I was satisfied with the look and feel of the pipe I buffed it with Blue Diamond on the wheel being careful around the stamping. I buffed the stem with the polish as well to raise a shine and further blend in the repairs. I gave the bowl and the stem several coats of carnauba wax and buffed them with a clean buffing pad. I finished by hand buffing the pipe with a microfibre cloth to deepen the shine. You will note that I did not stain the bowl at all. The rich patina is merely the wax working with the natural colour of the briar. This pipe is an oddity and a beauty. It was well worth the effort in my opinion. Thanks for walking with me through this process.horn29 horn30 horn31 horn32 horn33 horn34 horn35 horn36