Tag Archives: super glue

New Life for a Bastia Billiard 408 made by Lillehammer Pipes Norway


Blog by Steve Laug

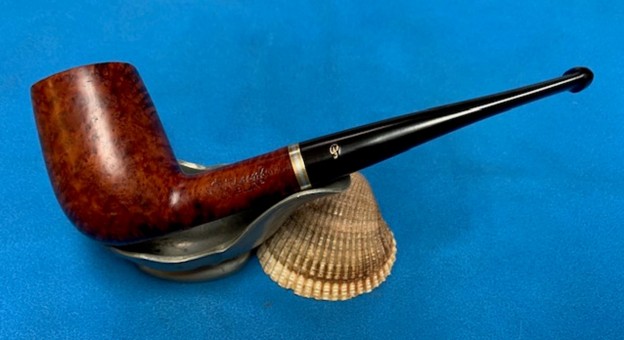
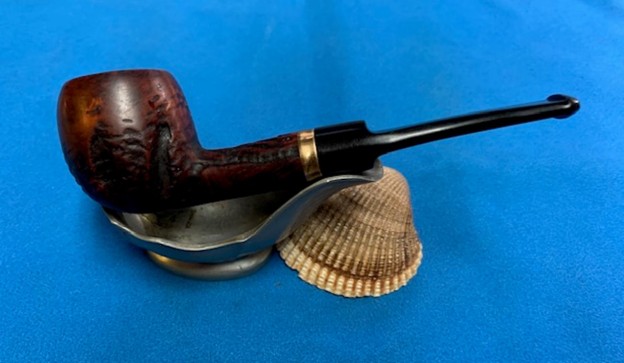
The next pipe I have chosen is an elegant Danish Straight Billiard with a mix of grain around the bowl and shank. This particular pipe came to us from a fellow in Copenhagen, Denmark on 11/14/2022. This Billiard was stamped on the left side of the shank and read Bastia [over] GL. It was stamped on the underside with the shape number 408. The pipe was in filthy condition when Jeff brought it to the table. The finish was dirty with oils and grime ground into the briar sides and rim. The bowl had a thick cake and some darkening on the inner edge of the rim. There was a lava coat flowing on to the rim top from the bowl – heavier on the back side than the front but very present. The stem was dirty – oxidized and calcified with light tooth marks and chatter on the top and underside ahead of the button. There was no stamp or identifying mark on the stem. Jeff took photos of the pipe before his cleanup work. They tell the story and give a glimpse of the promise that we see in this pipe. Jeff took photos of the rim top and stem to show the general condition of the pipe. The bowl showed some thick cake and some darkening on the inner edge. The rim top had a thick coat of lava on the surface, heavier on the back and right side of the top. The photos of the stem show the oxidation, calcification, tooth marks and chatter on both sides near the button. 
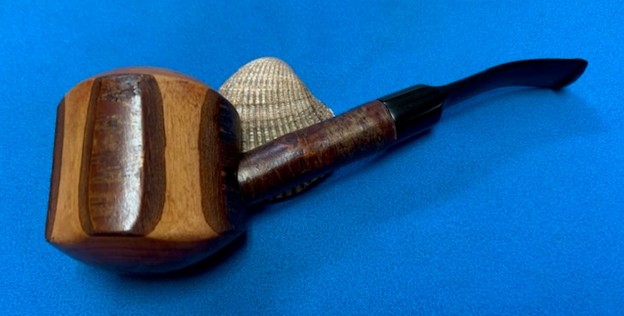
Jeff took some photos of the bowl sides and heel to show the beautiful grain that was around this bowl. It is a nice looking pipe.     He took photos of the sides of the shank to show the stamping. The stamping is readable in the photos below and is as noted above.     I am including the information from Pipephil on Lillehammmer pipes. It connects to the Bastia in sharing the GL initials under the brand stamp (http://www.pipephil.eu/logos/en/logo-l4.html). I have included a scan of the section on Lillehammer. You can see that the GL stamp are the initials of Gudbrand Larsen the founder of Lillehammer.I turned to the Pipedia site for more information (https://pipedia.org/wiki/Lillehammer). There I was able to learn the backstory and history of the brand. I quote in full from that article and include pictures of the two principals.

In the 1830’s a young Norwegian wood-carver named Gudbrand Larsen saw some pipes made from meershcaum. He though they were beautiful and wanted to make pipes like that, but he could not obtain the material. So he decided to go where it was to be found.

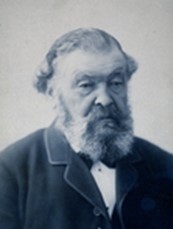
Gudbrand Larsen 91815-1902)

Larsen went to Eskisehir, Turkey, to learn all about meerschaum. But the most beautiful pipes in those days were not made there but in France, so he continued his journey to Marseielle, where he found work in one of the most famous factories at the time. In 1844 he returned to Norway and started a small factory for meerschaum pipes in the town of Lillehammer. The pipes garnered a good reputation from the first.

Gudbrand’s son, August, followed in his father’s footsteps and joined him in the business. However, father and son did not get along very well, so Junior–as August usually was called–did like his father once had, he traveled to learn more about pipe-making.

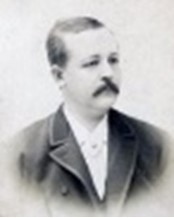
Martin August “Junior” Larsen (1855-1915)

Junior understood that briar, not meerschaum, was the material of the future, so during his journey he studied the subject carefully, first in England and then in France.

In Paris Junior earned a position with a pipemaker of good repute and became highly respected in his work. However, Gudbrand was getting old and considering retirement, so he asked his son to come home and take over the family business, an offer Junior willingly accepted. As a businessman Junior was even more successful than his father, and during his period of leadership the business prospered.

In 1902 Gudbrand Larsen died at almost 90 years of age. Then Junior passed away a dozen years later, in 1914. His death was followed by some unstable years for the factory because it lacked competent management. And World War I had just started on the continent, which made it difficult to obtain raw material.

In 1916 the factory was bought be a company that appointed new management, and a long, stable period of successful expansion had begun. That period was to last for almost half a century. The main part of the production was briar pipes, but they also continued to make some meerschaums.

Problems at the factory began again at the end of the 1960s, when sales slowed dramatically. The main reason was the “fancy pipes” had become very popular, and Larsen’s of Lillehammer had nothing to offer there. Something had to be done and two steps were taken. In the middle of the 1970s the Danish company Kriswill was bought, and in that way they obtained access to that company’s more modern shapes. A new designer was also employed, but these efforts were not sufficient, and in the 1979 the factory closed.

I turned to the Pipe Club of Sweden site to see if there was any more information. There was a great article on the pipe maker Bård Hansen who followed the tradition of the Lillehammer Factory and was trained by a retired engineer from the Lillehammer Factory thus tying him to the brand. In that article there is confirmation for the Pipedia information above (http://www.svenskapipklubben.se/en/pipemakers/bard-hansen/). I quote in part the article there by Jan Andersson. (Once again I have highlighted the pertinent information in the text below using bold, italic and underlined text and marking the main point highlighted in red.

In a Swedish tobacco shop, even in small places in the province, there were usually a fair number of pipes in the 50s and 60s with stems from aluminum. But even for the more traditional pipesmoker, who wanted a pipe from wood and ebonite, there was a lot to choose from. Ratos was the dominant brand, but for those who were willing to spend a little extra, there were usually at least a few more exclusive pipes – pipes in green or blue-checked boxes. Those pipes came from Norway, from G.L. Larsens pipe factory in Lillehammer.

Lillehammer pipes were found in two qualities, Bastia was a little cheaper and Lillehammer GL was for the truly discerning pipesmoker. Later I have learned that there were also more expensive and finer qualities, even one called Best Make, but those luxury pipes were never found in the shops in the small town where I lived. Lillehammer pipes were easily recognizable, they usually were rather slim and with a long stem, which was the fashion at the time. So while a true English gentleman smoked a Dunhill with the white dot on the stem, Norwegian or Swedish pipesmokers preferred an elegant Lillehammer.

We will not go into detail about the interesting story of Lillehammer, but unfortunately we can see that from the beginning of the 70s, it rapidly went downhill for the factory. They bought the Danish company Kriswill but that was not a success, nor was the new series of shapes created by the pipemaker Thorbjørn Rygh. So G.L. Larsen’s pipe factory in Lillehammer had to close, deeply missed by many of us. This feeling persists to this day, which is particularly evident in the great interest in the Lillehammer pipes at auctions and collector’s markets.

Gathering the data together from my research I have learned that the pipe I have on my worktable is made by Lillehammer prior to the buy out by the Kriswill Company with the hope that it would offer new markets for the Lillehammer brand. The Bastia was the cheaper of the lines and interestingly it also bears GL stamping tying it to the higher end pipes from the factory.

Armed with that information I turned to address the pipe itself. Jeff had cleaned up the pipe for me. He reamed the bowl with a PipNet pipe reamer and cleaned it up with a Savinelli Fitsall Pipe Knife. He scrubbed the exterior with Murphy’s Oil Soap and a tooth brush to clean off the grime off the finish and the heavy overflow of lava on the rim top. He cleaned up the internals of the shank, mortise and stem with pipe cleaners, cotton swabs and alcohol to remove all of the oils and tars in the pipe. The rim top still had some darkening that would need to be dealt with but it looked good. He soaked the stem in Briarville’s Pipe Stem Deoxidizer and was able to remove the remnants of the oxidation. When it arrived here in Vancouver it was a clean pipe and I knew what I had to work with. I took photos of it before I started my part of the restoration. The rim top had cleaned up pretty well but you can see the darkening on the inner edge. The burn damage on the rim top and edge at the back right of the bowl. The stem cleaned up very well. You can see the tooth marks on the surface just ahead of the button. I took photos of the stamping on the sides of the shank. You can see that it is stamped as noted above. It is clear and readable. I removed the stem and took a photo of the pipe to have a look at the parts and overall look.I decided to address the damage to the rim top and inner edge of the bowl first. I used a folded piece of 220 grit sandpaper to give the inner edge of the bowl a slight bevel on the inner edge to remove burned areas and blend them into the surrounding briar. I polished the bowl and shank with micromesh sanding pads – dry sanding with 1500-12000 grit pads. I wiped down the bowl after each pad with a damp cloth to remove the sanding debris.   I worked some Before & After Restoration Balm into the surface of the bowl and shank with my fingertips to clean, enliven and protect the briar. I let the balm sit for 15 minutes and then buffed with a cotton cloth to raise the shine. The photos show the bowl at this point in the restoration process. I set the bowl aside and turned my attention to the stem. I filled in the deep marks black CA glue. Once it cured I used a file to flatten them and start blending them into the surface of the surrounding vulcanite. I sanded the repaired areas with a folded piece of 220 grit sandpaper. I started polishing it with 600 wet dry sandpaper.   I polished the stem with micromesh sanding pads – wet sanding with 1500-12000 grit sanding pads. I wiped it down after each sanding pad with Obsidian Oil. I finished polishing the stem with Before & After Pipe Stem Polish – both Fine and Extra Fine. I wiped the stem down with a final coat of Obsidian Oil and let it sit and absorb into the vulcanite. 
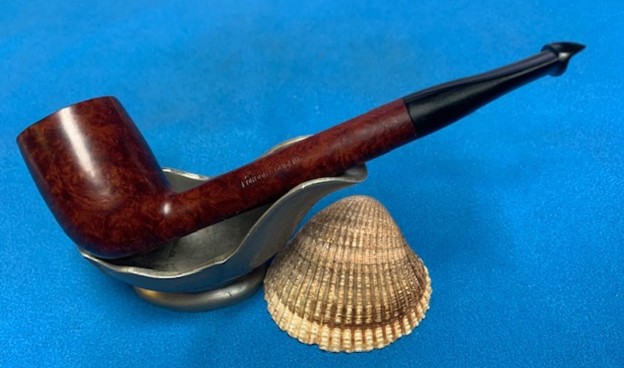
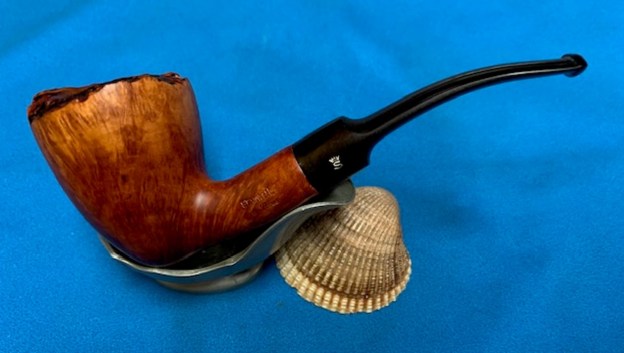
I am excited to finish this Bastia GL 408 Billiard made by Lillehammer. I put the pipe back together and buffed it with Blue Diamond on the buffing wheel. I gave the bowl and the stem multiple coats of carnauba wax. I hand buffed the pipe with a clean buffing pad to raise the shine. It is fun to see what the polished bowl looks like with beautiful cross and birds eye grain all around it. Added to that the polished black vulcanite stem combined with the bowl made a stunning pipe. This smooth Norwegian Bastia GL 408 Billiard is great looking and the pipe feels great in my hand. It is light and well balanced. Have a look at it with the photos below. The dimensions are Length: 6 ¼ inches, Height: 1 ¾ inches, Outside diameter of the bowl: 1 ¼ inches, Chamber diameter: ¾ of an inch. The weight of the pipe is 34 grams/1.20 ounces. It is a beautiful pipe that I will soon be putting on the rebornpipes store in the Danish Pipe Makers Section. If you are interested in adding it to your collection send me an email or a message. Thanks for walking through the restoration with me as I worked over this pipe. Thanks to each of you who are reading this blog.

As always, I encourage your questions and comments as you read the blog. Thanks to each of you who are reading this blog. Remember we are not pipe owners; we are pipe men and women who hold our pipes in trust until they pass on into the trust of those who follow us.

This Interesting Maltese Lovat has quite a history


Blog by Steve Laug

The next pipe I have chosen is a classic British looking Lovat shape. This particular pipe had a very dirty/grimy finish and some peeling varnish. It had some nice grain around the bowl sides and shank underneath the grime and peeling finish. It came to us from an antique store in Vancouver, Washington, USA on 10/20/2022. How it travelled from Malta, an island country in the Mediterranean, to the west coast of the US to an antique shop in Vancouver, Washington is a story I would love to learn more about. But that is a mystery that shall remain with this speechless pipe. The Lovat was stamped on the left side of the shank with a Maltese Cross. On the right side it is stamped Made in Malta. The pipe was in filthy condition when he brought it to the table. The finish was dirty with oils and grime ground into the briar sides and rim. The bowl had a thick cake and a heavy lava overflow on to the rim top. It was hard to know what the inner edge of the rim looked like under the grime. The stem was dirty with some light oxidation or calcification on it ahead of the button. There were light tooth marks and chatter on the top and underside on and near the button. There was also a bite through on the underside of the stem ahead of the button. There was not a logo stamped on the stem. Jeff took photos of the pipe before his cleanup work. They tell the story and give a glimpse of the promise that we see in this pipe. Jeff took photos of the rim top and stem to show the general condition of the pipe. The bowl had a heavy cake and a thick coat of lava on the rim top. It was hard to know what the inner edge looked like at this point but we would know after clean up. The photos of the stem show the tooth marks and chatter on both sides near the button. You can also see the small bite through on the underside of the stem near the button. Jeff took some photos of the bowl sides and heel to show the grain showing through the brown stain and the peeling varnish that was around this bowl. It is a pipe with some great potential.    He took photos of the sides of the shank to show the stamping. The stamping is readable in the photo below and is as noted above. I looked on Pipedia to see if there was any information on the brand. It was listed under the article for the Briar Pipeworks Ltd. (https://pipedia.org/wiki/Briar_Pipeworks_Ltd.). There was not a lot of information on the brand there but it was helpful. I quote it in full below. I highlighted in bold the stamp on this pipe – Maltese Cross.

The Briar Pipeworks Ltd. (or Malta Pipes as they call themselves) is situated in Marsa, Malta and produces hand finished medium priced pipes. The company was founded in 1933 and specializes in Briar and Maltese Olive wood pipes in a vast range of models. They also produce custom made engraved pipes.

The current number of employees is said to be three.

Some brands / models made by Malta Pipes are:

  • Big Bill
  • Boschetto (olive wood)
  • Calypso
  • Champion
  • Comino
  • Darville (churchwarden pipe)
  • Dr. Stewart “Safety Smoke”
  • Filfla
  • Grandmaster
  • Maltese Cross
  • Mayfair
  • Portland Pipe

Jeff had done a great job cleaning up the pipe as usual. He reamed the pipe with a PipNet reamer and cut back the cake back to the bare briar. He cleaned up the walls with a Savinelli Fitsall Pipe Knife. He scrubbed the interior of the bowl and shank with pipe cleaners, cotton swabs and alcohol to remove the tars and oils. He scrubbed the exterior of the pipe with Murphy’s Oil Soap and a tooth brush to remove the grime from the finish. He scrubbed the bowl with acetone to remove the peeling finish. He worked on the rim top lava and the darkened spots with the soap and tooth brush. He scrubbed the inside of the stem with alcohol and pipe cleaners. He scrubbed the exterior with Soft Scrub and then soaked it in Briarville Pipe Stem Deoxidizer. He washed it off with warm water to remove the Deoxidizer. The pipe looked far better when it arrived. The rim top had cleaned up pretty well but you can see the burn damage to the inner edge. The backside of the bowl is worse than the rest of the edge. There scratches and nicks in the surface of the rim top. The stem cleaned up very well. You can see the deep tooth marks on the surface ahead of the button and the bite through on the underside of the stem ahead of the button. It was going to take a bit of work to clean it up and repair it.I took photos of the stamping on the sides of the shank. You can see that it is stamped as noted above. It is clear and readable. I removed the stem and took a photo of the pipe to have a look at the parts and overall look. I decided to address the damage to the front rim top and inner edge of the bowl first. I used a folded piece of 220 grit sandpaper to give the inner edge of the bowl a slight bevel on the inner edge to remove burned areas and blend them into the edge. I used an Oak stain pen to stain the bevel to match the surrounding briar.I polished the bowl and shank with micromesh sanding pads – dry sanding with 1500-12000 grit pads. I wiped down the bowl after each pad with a damp cloth to remove the sanding debris.   I worked some Before & After Restoration Balm into the surface of the bowl and shank with my fingertips to clean, enliven and protect the briar. I let the balm sit for 15 minutes and then buffed with a cotton cloth to raise the shine. The photos show the bowl at this point in the restoration process. I set the bowl aside and turned to work on the stem. I decided to deal with the bite through in the stem surface. I greased a pipe cleaner with Vaseline and inserted it in the airway in the button under the bite through. I filled in the hole with black CA glue. I set it aside to let the repair cure. Once the repair cured. I flattened it with a file to start the blending process. I continued that process with a folded piece of 220 grit sandpaper to smooth it out. I started the polishing process with 600 grit wet dry sandpaper. It was looking much better and the bite through was gone.  I polished the stem with micromesh sanding pads – wet sanding with 1500-12000 grit sanding pads. I wiped it down after each sanding pad with Obsidian Oil.I finished polishing the stem with Before & After Pipe Stem Polish – both Fine and Extra Fine. I wiped the stem down with a final coat of Obsidian Oil and let it sit and absorb into the vulcanite.I am excited to finish this Made in Malta Maltese Cross Lovat. I put the pipe back together and buffed it with Blue Diamond on the buffing wheel. I gave the bowl and the stem multiple coats of carnauba wax. I hand buffed the pipe with a clean buffing pad to raise the shine. It is fun to see what the polished bowl looks like with beautiful mixed grain all around it. Added to that the polished black vulcanite stem combined with the bowl made a stunning pipe. This smooth Classic Lovat shaped Maltese Cross is great looking and the pipe feels great in my hand. It is light and well balanced. Have a look at it with the photos below. The dimensions are Length: 5 inches, Height: 1 ¾ inches, Outside diameter of the bowl: 1 ¼ inches, Chamber diameter: ¾ of an inch. The weight of the pipe is 31 grams/1.09 ounces. It is a beautiful pipe that I will soon be putting on the rebornpipes store in the Pipes from Various Makers Section. If you are interested in adding it to your collection send me an email or a message. Thanks for walking through the restoration with me as I worked over this pipe. Thanks to each of you who are reading this blog.

As always, I encourage your questions and comments as you read the blog. Thanks to each of you who are reading this blog. Remember we are not pipe owners; we are pipe men and women who hold our pipes in trust until they pass on into the trust of those who follow us.

Fresh Life for a Peterson’s Dublin D1 Billiard Made for the Danish Market


Blog by Steve Laug

The next pipe I have chosen is smooth finished Peterson’s “Dublin” Billiard pipe that had a very dirty/grimy finish but had some good looking grain around the bowl sides and shank. It came to us from a fellow in Copenhagen, Denmark on 11/14/2022. This Billiard was stamped on the left side of the shank and read Peterson’s [over] “Dublin”. It was stamped on the right side and read Made in the Republic of Ireland (three lines). Following that near the shank/bowl junction it is stamped D1. The pipe was in filthy condition when he brought it to the table. The finish was dirty with grime ground into the briar sides and rim. The bowl had been reamed recently in its history and the bowl and rim top were quite clean. The inner edge of the bowl was in okay condition with some light damage to the front of the bowl. There was a thin three layered band on the shank end with a piece of silver sandwiched by gold on each side. The stem was dirty but there was no oxidation or calcification on it. There were light tooth marks and chatter on the top and underside on and near the button. There was a faint “P” stamp logo on the taper stem. Jeff took photos of the pipe before his cleanup work. They tell the story and give a glimpse of the promise that we see in this pipe. Jeff took photos of the rim top and stem to show the general condition of the pipe. The bowl and the rim top were clean. The inner edge of the bowl is in good condition. The photos of the stem show the light tooth marks and chatter on both sides near the button. Jeff took some photos of the bowl sides and heel to show the amazing grain that was around this bowl. It is a nice looking pipe.     He took photos of the sides of the shank to show the stamping. The stamping is readable in the photos below and is as noted above.  I am including the link to the Pipedia’s article on Peterson pipes. It is a great read in terms of the history of the brand (https://pipedia.org/wiki/Peterson).

I turned to “The Peterson Pipe” by Mark Irwin and Gary Malmberg to get some background on the Peterson’s London Made England line. On page 298 it had the following information.

“Dublin” (1992-2003) An orange-brown smooth line with a brass-nickel-brass sandwich band, vulcanite fishtail mouthpiece, consisting mostly of D shapes released for the Danish market. Stamped PETERSON’S in script over “DUBLIN”. A tenth anniversary pipe for the line was produced with a sterling band stamped 2001. Market demand fell shortly thereafter and several  pipes stamped “DUBLIN” were released in ’03 for the Fourth of July commemoratives for the US market.

I looked further in the book for information on the D Shapes of Peterson’s Pipes. On page 239 I found the following information.

D Shapes. According to Tom Palmer, the D shapes were produced for Peterson’s Danish distributor Larsen and Peterson, Copenhagen, beginning around 1996, and to the rest of the world as early as the 1998 St. Patrick’s Day release. The idea was to create a traditional Danish looking line of pipes, shapes that were lighter and slimmer than traditional English shapes. Unfortunately, the bottom fell out of the Danish pipe-smoking market with the turn into the new millennium, forcing the company to drop all but the most popular of the D series, which at its height numbered around sixteen shapes. Beginning in 2014, however, new D shapes began to be added to the catalogue, including the 2018 Pipe of the Year, the D22.

Now I knew a date range for the pipe I was working on – 1992-2003. It was specifically made for the Danish Market for distribution by Larsen and Peterson of Copehagen. The D shapes were lighter and slimmer than the traditional English pipes. The D Shape connection pointed to a 1996 date for its Danish release. Now it was time to work on the pipe.

Jeff had done a great job cleaning up the pipe as usual. He reamed the pipe with a PipNet reamer and cut back the cake back to the bare briar. He cleaned up the walls with a Savinelli Fitsall Pipe Knife. He scrubbed the interior of the bowl and shank with pipe cleaners, cotton swabs and alcohol to remove the tars and oils. He scrubbed the exterior of the pipe with Murphy’s Oil Soap and a tooth brush to remove the grime from the finish. He worked on the rim top lava and the darkened spots with the soap and tooth brush. He scrubbed the inside of the stem with alcohol and pipe cleaners. He scrubbed the exterior with Soft Scrub and then soaked it in Briarville Pipe Stem Deoxidizer. He washed it off with warm water to remove the Deoxidizer. The pipe looked far better when it arrived. I took some close up photos of the rim top and also of the stem surface. I wanted to show how well it had cleaned up. The rim top had some looked quite good and the inner edge had some darkening and damage on the front. It should clean up really well. I also took close up photos of the stem to show the light tooth marks on the surface near the button. I took photos of the stamping on the sides of the shank. You can see that it is stamped as noted above. It is clear and readable. I removed the stem and took a photo of the pipe to have a look at the parts and overall look. I decided to address the damage on the rim top and the front inner edge of the bowl first. I used a folded piece of 220 grit sandpaper to smooth out the damage and bring the bowl back to round. It looked much better at this point in the process. I polished the bowl and shank with micromesh sanding pads – dry sanding with 1500-12000 grit pads. I wiped down the bowl after each pad with a damp cloth to remove the sanding debris. I worked some Before & After Restoration Balm into the surface of the bowl and shank with my fingertips to clean, enliven and protect the briar. I let the balm sit for 15 minutes and then buffed with a cotton cloth to raise the shine. The photos show the bowl at this point in the restoration process. I set the bowl aside and touched up the “P” logo stamp on the left side of the taper stem with Rub’n Buff Antique Gold. I worked it into the stamp with a toothpick. I buffed off the excess with a paper towel and polished the stem with some Obsidian Oil.I polished out the light tooth marks and chatter on the stem with micromesh sanding pads – wet sanding with 1500-12000 grit sanding pads. I wiped it down after each sanding pad with Obsidian Oil. I finished polishing the stem with Before & After Pipe Stem Polish – both Fine and Extra Fine. I wiped the stem down with a final coat of Obsidian Oil and it was ready to be buffed. I am excited to finish this Peterson’s “Dublin” D1 Billiard made for the Danish Market. I put the pipe back together and buffed it with Blue Diamond on the buffing wheel. I gave the bowl and the stem multiple coats of carnauba wax. I hand buffed the pipe with a clean buffing pad to raise the shine. It is fun to see what the polished bowl looks like with beautiful mixed grain all around it. Added to that the polished black vulcanite stem combined with the bowl and sandwich brass/nickel/brass band on the shank and made a stunning pipe. This smooth Classic Peterson’s “Dublin” Danish Style D1 Billiard is great looking and the pipe feels great in my hand. It is light and well balanced. Have a look at it with the photos below. The dimensions are Length: 5 ¾ inches, Height: 1 ¾ inches, Outside diameter of the bowl: 1 1/8 inches, Chamber diameter: ¾ of an inch. The weight of the pipe is 33 grams/1.16 ounces. It is a beautiful pipe that I will soon be putting on the rebornpipes store in the Irish Pipe Makers Section. If you are interested in adding it to your collection send me an email or a message. Thanks for walking through the restoration with me as I worked over this pipe. Thanks to each of you who are reading this blog.

As always, I encourage your questions and comments as you read the blog. Thanks to each of you who are reading this blog. Remember we are not pipe owners; we are pipe men and women who hold our pipes in trust until they pass on into the trust of those who follow us.

Restoring a Peterson’s London and Dublin 35P London Made Canadian


Blog by Steve Laug

The next pipe I have chosen is smooth finished Peterson’s London& Dublin Canadian pipe that had a very dirty/grimy finish but had some good looking grain around the bowl sides and shank. It came to us from a fellow in Copenhagen, Denmark on 10/03/2022. This Lightweight Canadian was stamped on the left side of the shank and read Peterson’s [over] London & Dublin. It was stamped on the right side and read London Made [over] England. On the underside near the shank/stem junction it is stamped 35P. The pipe was in filthy condition when he brought it to the table. The finish was dirty with grime ground into the briar sides and rim. There was a thick cake in the bowl and a coat of lava on the rim top but the edges of the bowl. The inner edge of the bowl was rough and looked like it had been reamed with a knife and had a lot of rough edges. The stem was dirty but there was no oxidation or calcification on it. There were tooth marks and chatter on the top and underside on and near the button. There was no “P” stamp logo on the taper stem. Jeff took photos of the pipe before his cleanup work. They tell the story and give a glimpse of the promise that we see in this pipe. Jeff took photos of the rim top and stem to show the general condition of the pipe. The bowl is caked and the rim top has a lava coat and the inner edge of the bowl is rough and shows knife damage. The photos of the stem show tooth marks and chatter on both sides near the button. Jeff took some photos of the bowl sides and heel to show the amazing grain that was around this bowl. It is a nice looking pipe.    He took photos of the sides of the shank to show the stamping. The stamping is readable in the photos below and is as noted above.  I am including the link to the Pipedia’s article on Peterson pipes. It is a great read in terms of the history of the brand (https://pipedia.org/wiki/Peterson).

I turned to “The Peterson Pipe” by Mark Irwin and Gary Malmberg to get some background on the Peterson’s London Made England line. On page 296-297 it had the following information.

MADE IN over ENGLAND and variations shown below (1936-62) Peterson maintained a factory in England for about a quarter of a century, from the late 1930s to ’62. Corporate transcripts and London business periodicals suggest the London operation on White Lion Street was about to get underway in ’37. Only a handful of London hallmarked Petersons are documented, stamped with date marks of 1936 and 1939, and these have no COM stamp. Their output would be limited by the onset of the Battle of Britain in July 1940, but it seems reasonable to suppose pipes were made in the London factory during WWII, inasmuch as the K&P Staff Register lists twelve employees earning wages there in January ’44. London hallmarked Petersons have been identified with dates of 1949-54. Most London made Petersons in a collector’s inventory were made in these postwar years, from 1949 until the closing of the factory in ’62. This narrow range of dates is probably the most reliable indicator of years when the stamp and the variations listed below were employed. The presence of one variation or another on a pipe is not by itself a reliable indicator of age.

Made In over England

Made In England forming a circle

Made In England forming an ellipse

Made in England in a line

A “Peterson’s Product” over Made In England

A Peterson’s Product over Made In England

A Peterson Product over Made in England

Made In over Great Britain

Great Britain

London Made over England

London Made

Now I knew a date range for the pipe I was working on – 1949-1962. I have underlined and made the text bold in the above list to show the stamping on the pipe I am working on. Now it was time to work on the pipe.

Jeff had done a great job cleaning up the pipe as usual. He reamed the pipe with a PipNet reamer and cut back the cake back to the bare briar. He cleaned up the walls with a Savinelli Fitsall Pipe Knife. He scrubbed the interior of the bowl and shank with pipe cleaners, cotton swabs and alcohol to remove the tars and oils. He scrubbed the exterior of the pipe with Murphy’s Oil Soap and a tooth brush to remove the grime from the finish. He worked on the rim top lava and the darkened spots with the soap and tooth brush. He scrubbed the inside of the stem with alcohol and pipe cleaners. He scrubbed the exterior with Soft Scrub and then soaked it in Briarville Pipe Stem Deoxidizer. He washed it off with warm water to remove the Deoxidizer. The pipe looked far better when it arrived. I took some close up photos of the rim top and also of the stem surface. I wanted to show how well it had cleaned up. The rim top had some looked quite good and the inner edge had some darkening and damage. It should clean up really well. I also took close up photos of the stem to show the tooth marks on the surface near the button. I took photos of the stamping on the sides of the shank. You can see that it is stamped as noted above. It is clear and readable. I removed the stem and took a photo of the pipe to have a look at the parts and overall look. I decided to address the damage on the rim top and the hacked inner edge of the bowl first. I used a folded piece of 220 grit sandpaper to smooth out the damage and bring the bowl back to as close to round as possible. The thinness of the walls did not leave a lot of room to work with so it is better but not perfect. I used a walnut stain pen to stain the inner edge of the bowl and the rim top to match the rest of the pipe. I polished the bowl and shank with micromesh sanding pads – dry sanding with 1500-12000 grit pads. I wiped down the bowl after each pad with a damp cloth to remove the sanding debris.   I worked some Before & After Restoration Balm into the surface of the bowl and shank with my fingertips to clean, enliven and protect the briar. I let the balm sit for 15 minutes and then buffed with a cotton cloth to raise the shine. The photos show the bowl at this point in the restoration process. I set the bowl aside and “painted” the stem surface with the flame of a “Bic” lighter to lift the tooth marks. I was able to raise them and I sanded the remaining marks to blend them into the surface of the surrounding vulcanite. I polished the stem with micromesh sanding pads – wet sanding with 1500-12000 grit sanding pads. I wiped it down after each sanding pad with Obsidian Oil.I finished polishing it with Before & After Pipe Stem Polish – both Fine and Extra Fine and buffed it off with a cotton cloth. I gave it a coat of Obsidian Oil to preserve and protect the stem. I am excited to finish this London Made English Peterson’s London & Dublin, Canadian 35P. I put the pipe back together and buffed it with Blue Diamond on the buffing wheel. I gave the bowl and the stem multiple coats of carnauba wax. I hand buffed the pipe with a clean buffing pad to raise the shine. It is fun to see what the polished bowl looks like with beautiful mixed grain all around it. Added to that the polished black vulcanite stem combined with the bowl and brass band on the shank and made a stunning pipe. This smooth Classic Older Peterson’s London & Dublin English Made Canadian 35P is great looking and the pipe feels great in my hand. It is light and well balanced. Have a look at it with the photos below. The dimensions are Length: 5 ½ inches, Height: 2 inches, Outside diameter of the bowl: 1 ¼ inches, Chamber diameter: ¾ of an inch. The weight of the pipe is 34grams/1.20oz. It is a beautiful pipe that I will soon be putting on the rebornpipes store in the Irish Pipe Makers Section. If you are interested in adding it to your collection send me an email or a message. Thanks for walking through the restoration with me as I worked over this pipe. Thanks to each of you who are reading this blog.

As always, I encourage your questions and comments as you read the blog. Thanks to each of you who are reading this blog. Remember we are not pipe owners; we are pipe men and women who hold our pipes in trust until they pass on into the trust of those who follow us.

Tinsky American Long Shank Brandy Reg. No.11/90 over 9 over JBH 502


Blog by Steve Laug

In the last box of pipes Jeff sent me there was an American Smoking Pipe – a Long Shank Brandy. I am a sucker for Mark’s Pipes and Jeff knows it so we pick up every one of them we can find. This particular pipe came to us from a seller in Clarkesville, Virginia, USA on 07/25/2020. It is stamped on the underside of the shank and reads American in an oval [over] Regd. No. [over] 11/90 MT [over] 9 [over] JBH 502. It was a beautiful pipe but another dirty pipe when we received it. The finish on the bowl and shank were beautiful but the grime and oils were ground into the sides. There was a thick cake in the bowl that overflowed as lava on the bevelled rim top and the inner edge of the bowl. It was hard to evaluate the condition of the edge or top with the thickness of the lava. The acrylic saddle stem was dirty and there were deep tooth marks and chatter on the top and underside ahead of the button and on the button surface itself. It had an inlaid logo on the left of the saddle – a silver star set in clear acrylic with what looks like a briar ring around it. Jeff took some photos of the pipe before he started his cleanup work. He took photos of the bowl and rim top to show their general condition. You can see the thick cake in the bowl and the thick lava coat on the top of the rim and inner edge of the bowl. The finish on the bowl is very dirty with grime and oils ground into the bowl, but still very stunning. The round saddle stem is dirty and has chatter and deep tooth marks on the top and underside ahead of the button and on the button surface. Jeff took some photos of the sides and heel of the bowl to give an idea of the grain around the bowl and shank. It is amazing and I cannot wait to see what it looks like once it is polished and waxed. He took some photos of the stamping on the underside of the shank to capture it for me. It is clear and readable as noted above. He also included a photo of the star logo inlaid in clear acrylic in the left side of the stem.I have collected and smoked Mark Tinsky’s pipes for over 30 years now and thoroughly enjoy them. I cannot speak highly enough about the quality and craftsmanship of his pipes. I have pipes made by Mark and by Curt Rollar in my collection and both are great smokers and pipes that reach for regularly in my choice of pipes. I turned to his website for a quick summary of the history of the brand (http://www.amsmoke.com/Index%20Folder/PipeHist.html). I quote from the site as it is a short, concise history.

The American Smoking Pipe Co. was formed in 1978 by Mark Tinsky and Curt Rollar. Both started making pipes for Jack Weinberger ( JHW Pipes ) while in high school and throughout college. Determined to blaze their own path, they formed their own company- its goal to create unique pipes, lightweight and comfortable, where attention to detail was the rule not the exception. Exulting in their new freedom, they carved out new shapes that were balanced between the radical freehand era of the 70’s and the board pipe look of other conservative companies. Hungry for recognition, they stormed the Eastern and Southern shops looking for markets to sell their pipes. Many hidebound retailers refused to try something new, preferring to sell, well, what has always sold before. However, their pipes did take root in many shops and the business thrived.

They continued expanding their pipe making capabilities, adding employees to help finish the pipes. In 1990, over a disagreement over how much to expand, Curt Rollar left the company. This put a break on expansion and coupled with a U.S. recession and rising anti-smoking fervor served to limit production to supplying existing retailers, thus ending a decade of growth. With pipes sales in decline, we turned to pipe repair as a way to supplement revenues. Finding that we liked fixing things, American concentrated on pipe repair. While working hard at repair and manufacture American is ready once again to expand its markets through its existing network of shops serviced by pipe repair.

The pipe I am working on is stamped with a Reg. No. 11/90 MT9 as noted above. The stamp tells me that the pipe was made in November of 1990. The MT stamp signifies that the pipe was carved by Mark Tinsky. The 9 could be a size or even quality designation. There is also a JBH 502. This make me wonder if the pipe was a shape made for John B. Hayes, tobacconist. Now it was time to work on the pipe.

Jeff had thoroughly cleaned up the pipe. He reamed the pipe with a PipNet Pipe Reamer and cleaned up the remnants with a Savinelli Fitsall Pipe Knife. He scrubbed the bowl with undiluted Murphy’s Oil Soap with a tooth brush. He rinsed it under running warm water to remove the soap and grime. He cleaned out the inside of the shank and the airway in the stem with alcohol, cotton swabs and pipe cleaners. He scrubbed the exterior of the stem with Soft Scrub to remove the grime. He soaked the stem in Briarville’s Pipe Stem Deoxidizer and rinsed it off with warm water. The pipe looked very good when it arrived here in Vancouver. I took a photo of the bowl and rim top to show how clean the bowl and the rim top and inner edges of the bowl. I took photos of the stem surface to show the condition and tooth marks and chatter on both sides ahead of the button.I took photos of the stamping on the underside of the shank and the logo on the left side of the stem. It is readable as noted above and though faint is clear. I took a photo of the Silver Star with a black background logo on the stem as well. It is in excellent condition. I removed the stem from the shank and took a photo of the pipe parts. It is quite a stunning piece.I started my work by polishing the bowl and shank with micromesh sanding pads – dry sanding with 1500-12000 grit pads. I wiped the bowl down after each pad with a damp cloth to remove the grit. The bowl began to take on a rich shine. It is a beauty. I rubbed the bowl down with Before & After Restoration Balm. I worked it into the surface of the briar with my fingertips and a shoe brush to get it in the grooves. It works to clean, restore and preserve the briar. I let it do its magic for 15 minutes then buffed it off with a cotton cloth. The pipe looks incredibly good at this point in the process. I set the bowl aside and turned my attention to the stem. I filled in the deep marks in the acrylic stem with black rubberized CA glue. Once it hardened I flattened the repairs out with a small file. I sanded the stem with 220 grit sandpaper to blend them into the rest of the acrylic stem and started the polishing them with 600 wet dry sandpaper. I set the bowl aside and turned my attention to the stem. I polished the stem with micromesh sanding pads – 1500-12000 grit pads. I wiped it down with a damp cloth after each sanding pad. I finished polishing it with Before & After Pipe Stem Polish – both Fine and Extra Fine and buffed it off with a cotton cloth. I gave it a coat of Obsidian Oil to preserve and protect the stem. This American Reg. No. 11/90 MT 9 JBH 502 Brandy is a great looking pipe now that it has been restored. The brown stains really highlight the grain and the polished finish is stunning. I put the stem back on the bowl and carefully buffed the pipe with Blue Diamond on the buffing wheel. I gave the bowl and the stem multiple coats of carnauba wax on the buffing wheel and followed that by buffing the entire pipe with a clean buffing pad. I hand buffed the pipe with a microfiber cloth to deepen the shine. The finished American Mark Tinsky Brandy fits nicely in the hand and feels great. Give the finished pipe a look in the photos below. The dimensions of the pipe are Length: 5 inches, Height: 2 inches, Outside diameter of the bowl: 1 ½ inches, Chamber diameter: 7/8 of an inch. The weight of the pipe is 77 grams / 2.72 ounces. I will be adding the pipe to the American (US) Pipe Makers Section of the rebornpipes store. If you are interested in purchasing this pipe send me a message or an email. Thanks for reading this blog and my reflections on the pipe while I worked on it.

As always, I encourage your questions and comments as you read the blog. Thanks to each of you who are reading this blog. Remember we are not pipe owners; we are pipe men and women who hold our pipes in trust until they pass on into the trust of those who follow us.

Putting Grandfather’s Genuine Amber Stemmed Meerschaum Bulldog back together again


Blog by Steve Laug

I decided I needed a change of pace in my restoration/clean up work. I went through my pipes waiting in the queue and chose the last one from a group of four pipes that were given to us by a woman in Columbus, Ohio, USA. It had belonged to her Grandfather who lived from 1882 to 1977. There were four pipes that she sent us from his estate – the metal bowled apple, a cased meerschaum Bulldog with a broken amber stem, a Whitehall rusticated apple and a BBB Glokar Fraternity Pipe.The cased Meerschaum Bulldog is the last of the lot and one that should be fixable and clean up well. I could see that it was an old timer and that it had been one of her Grandfather’s favourites like the other three. The pipe was dirty and well used. The finish had deep grime ground into the smooth meerschaum rim cap and the sides of the bowl. The rings around the cap are dirty with grime in the grooves. It had a moderate cake in the bowl that flowed onto the rim edges and rim top as a thick cake. It hard to assess the inner and outer edge of the rim there were thick spots of grime on the cap and bowl sides that should come off with work. The stem was amber and had been cleanly broken in half about mid stem. It was screwed on to a metal threaded tenon in the shank. It had tooth marks and chatter on both sides ahead of the stem. Jeff took photos of the pipe before he started his cleanup work. He started with the black leather case which was in good condition though missing the pin in one of the hinges. He opened the case and took photos of the pipe sitting in the case. He took a photo of the label on the inside of the case. It read Genuine Meerschaum around the outside of the black and gold octagonal label. On the inside of the label it reads Real Amber.He took photos of the condition of the bowl and rim top. You can see the cake in the bowl and the lava on the rim top. There are also nicks and scratches around the top and outer edge particular o the front right side of the bowl.He took photos of the broken stem. You can see the break is about halfway down the stem and is clean with no rough edges on the pieces. When the two parts are put together the fit is very clean and smooth. The fit against the shank end is smooth and undamaged. It should clean up well. Jeff also took photos of the tooth marks and chatter on both sides of the stem ahead of the button. They are not deep but are very visible in both photos. Even these marks are not flaking or showing too much depth in the damage.He took photos of the bowl sides and heel to give a sense of the condition of the pipe before clean up. I think it will clean up well. Jeff cleaned up the pipe with his usual regimen and when I received it the bowl had been reamed and washed with Murphy’s Oil Soap and rinsed clean. He was able to remove the lava on the rim and the grime around the bowl. It looked much better. He cleaned out the inside of the shank and stem with alcohol and pipe cleaners. He carefully cleaned the pieces of the broken stem and the fit together was still smooth. The pipe was ready for the next step in the process. I took photos of the pipe when I brought it to the work table. I decided to start my work on this pipe by rejoining the two parts of the stem. I looked at putting a metal tube inside but the amber is brittle and the airway was not big enough to accommodate even the smallest tube I had. I chose inside to glue the parts together with clear rubberized CA glue. I carefully painted the ends of each piece and then pressed them together. They aligned well and I held them until the glue set. I set the stem aside and let the repair cure.I took the family to breakfast and when I returned I put the stem on the shank and took photos of the repaired stem in place. I still needed to sand and smooth out the repairs but you can see the overall look of the pipe.I removed the stem and set it aside. I turned my attention to the bowl. I polished it with micromesh – dry sanding it with 1500-12000 grit pads. I wiped it down after each sanding pad with a damp cloth to remove sanding debris. The bowl began to take on a rich shine. You can see the patina around the bow and the shank. Now it was time to wax the bowl. I melted some beeswax on the stove top and painted it onto the meerschaum bowl. I apply the wax quite heavily as I plan on heating the bowl and wiping it off. I worked it into the twin rings around the bowl cap with the pipe cleaner. I took a few photos of the heavily waxed bowl. I set it aside and called it a night. I would heat and polish it in the morning. This morning I used the heat gun to melt the wax on the bowl. I held it by the metal tenon and carefully moved it over the heat gun. The wax dripped back in the bowl and I also wiped it down with a paper towel. The patina really came alive. You can see it nicely developed on the shank and moving up the bowl sides to the cap. It looks very good at this point and will only look better with buffing and with use. I set the bowl aside and turned my attention to the stem. I used a folded piece of 220 grit sandpaper to blend the repairs into the surrounding amber. I wanted it smooth and with no lumps of glue on the crack or tooth mark areas. I started polishing the stem with 600 grit wet dry sandpaper. I was happy with how the shine was developing.I polished the amber with micromesh sanding pads – wet sanding with 1500-12000 grit micromesh pads. I wiped the stem down after each pad with a cloth impregnated with Obsidian Oil to further polish and give some teeth to the pads. It came out looking very nice. I polished the stem with Before & After Pipe Stem Polish – both Fine an Extra Fine. I rubbed them on with my finger tips and polished them off with soft paper towel. I finished by rubbing the stem down with some Obsidian Oil on a soft impregnated cloth. It looked better.I don’t know how many times I have said this but I love it when I come to the end of a restoration and all of the parts come together and the pipe looks better than when we started the cleanup process. I put the stem back on the Genuine Meerschaum Real Amber Cased Bulldog and carefully buffed the bowl with Blue Diamond on the buffing wheel. I gave the bowl multiple coats of beeswax as shown above and the stem multiple coats of Conservator’s Wax by hand and buffed it by hand with a soft cloth. I also buffed it again with a microfiber cloth to deepen the shine. The finished pipe is a real stunning example of a classic Meerschaum Bulldog with an Amber Stem. It is beautiful and comfortable in hand. There was developing patina around the bowl and shank and was darker on the shank and the rim top. Give the finish pipe a look in the photos below. I can only tell you that it is much prettier in person than the photos capture. The dimensions of the pipe are Length: 5 inches, Height: 1 ½ inches, Outside diameter of the bowl: 1 ¾ inches, Chamber diameter: ¾ of an inch. The weight of the pipe is .95 ounces/27 grams. This meerschaum pipe is a great piece of pipe history that is in great condition. Thanks for walking through the restoration with me as I worked over another beautiful pipe. I will be keeping this one in my collection and enjoying it. Thanks for your time.

As always, I encourage your questions and comments as you read the blog. Thanks to each of you who are reading this blog. Remember we are not pipe owners; we are pipe men and women who hold our pipes in trust until they pass on into the trust of those who follow us.

Back to my Grandfather’s Pipes


by Kenneth Lieblich

Next on the chopping block is a very personal pipe – and one that is staying in my collection. The unusual pipe you see belonged to my late grandfather. It is this pipe’s restoration that I am recounting today. I have blogged here about some of my grandfather’s pipes before, but I haven’t done one in a while. In this case, I do not know where my grandfather acquired it (or under what circumstances), but I suppose it does not ultimately matter. My grandfather was an enthusiastic pipe smoker and he clearly enjoyed this one. I am definitely looking forward to cleaning this one up. It has a value well beyond dollars.The pipe is a pencil-shank Rhodesian, with a long stem made from horn. What a charming and elegant pipe! I do not know the exact date of the pipe, but it seems likely to be from the 1950s or 1960s.On the left-hand side of the shank, the pipe’s markings read simply, Bruyere de Luxe – an utterly unhelpful bit of information. Since that’s all there is, I don’t have any useful information to be provide about the pipe maker. Also, I will apologize in advance for the fact that I don’t have so many photos this time. My brain was obviously in neutral.It’s a nifty pipe – however, it was not without its issues. The stem had some worm holes in the horn (not unusual for this type of stem). There was also some notable tooth wear near the button. The stummel was actually in pretty good shape. It had some minor wear, but nothing too tricky. I suspect that this pipe hadn’t been smoked too much. The wood had a kind of lacquer finish – I must say, I don’t like that look. The stem was first on my list. This stem had a stinger in it – and it was being quite stubborn about coming out of the tenon! I opted to warm the stem and stinger with a heat gun and this provided just enough softening of the internal goo to allow me to pull it out. The stinger then went for a soak in some lemon-infused isopropyl alcohol. I let it set for several hours and then cleaned it off and it looked much improved. I wiped down the outside of the stem with Murphy’s Oil Soap on some cotton pads. Then, I cleaned out the insides with pipe cleaners and isopropyl alcohol. I also built up the worm holes on the stem with clear cyanoacrylate adhesive and let it fully cure.I then sanded the stem down with 220- and 400-grit sandpapers to bring down the repairs to the level of the stem. I ensured that the stem kept its shape and looked like it should. I then used all nine Micromesh pads (1,500 through 12,000 grit) to bring out the beautiful horn grain on the stem. I also used Obsidian Pipe Stem Oil in between each pad scrubbing. Some of the adhesive ended up having a strange reaction with the horn, but in the end, I think it looks pretty good.On to the stummel, and it was quite clean already. I began with some 220-grit sandpaper inside the chamber to even out the surface and remove any debris. I wanted to take the bowl down to bare briar to ensure there were no hidden flaws in the walls of the bowl. Fortunately, there were none. I then proceeded to clean out the insides of the shank with cotton swabs, pipe cleaners, and isopropyl alcohol. There was a bit of filth inside this stummel – it took a few pipe cleaners et cetera to clean it out. I followed that up by cleaning the insides with some dish soap and tube brushes. I then moved on to cleaning the outside of the stummel with Murphy’s Oil Soap and some cotton pads. In order to remove the lacquer finish, I used acetone on some cotton rounds and worked it hard. This worked very effectively.Now, it was time to sand down the stummel. I used all nine Micromesh pads (1,500 through 12,000 grit) to wet/dry sand everything smooth. After that, a light application of Before & After Restoration Balm brought out the best in the stummel’s grain. What a difference that made! There is some beautiful wood there! Then it was off for a trip to the buffer. A dose of White Diamond and a few coats of carnauba wax were just what this pipe needed. The lovely shine made the wood look absolutely beautiful.This is a quirky and charming pipe that has a very elegant feel to it. I hope the final product is worthy of my beloved grandfather’s memory. Obviously, this is one pipe that I am keeping for myself and adding to my collection. The approximate dimensions of the little Rhodesian are as follows: length 6 in. (150 mm); height 1 in. (25 mm); bowl diameter 1½ in. (38 mm); chamber diameter ¾ in. (19 mm). The weight of the pipe is ¾ oz. (24 g). I hope you enjoyed reading the story of this pipe as much I as I did restoring it. If you are interested in more of my work, please follow me here on Steve’s website or email me directly at kenneth@knightsofthepipe.com. Thank you very much for reading and, as always, I welcome and encourage your comments.

Restemming a Lightly Smoked Ropp De Luxe 804 Cherrywood


Blog by Steve Laug

Two of my daughters and I enjoy visiting our local Flea Market. They look for a lot of different things and I keep an eye out for pipes. Not long ago we were there and the girls found their things and I found these two Cherrywood Pipes – one is marked Royal Cherry [over] Made in France (top pipe in the photo below) and the other is marked Ropp in an oval [over] Deluxe [over] France [over] 804. Both are in good condition and both are without their stems. Here is what the pipes looked like when I brought them home. After finishing the Royal Cherry Cherrywood I turned my attention to the Ropp bowl. The octagonal bowl had strips of bark on four of the panels and smooth cherry stripped of the bark on the other four panels. The rim top and the heel of the bowl were stripped of bark and were smooth cherry wood. The shank is a cherry wood branch that has been threaded and screwed into the back side of the bowl. The bark on the shank is undamaged and looks good. The bowl and shank have been given a coat of varnish or shellac as it is smooth and shiny. The bowl has been smoked and there is a light cake in the bowl with some darkening and light lava on the bevelled inner edge of the bowl. The heel of the bowl is also smooth. It is stamped Ropp in an oval [over] De Luxe [over] France [over] 804. There was no stem that came with the pipe so one would need to be fit to the shank. I took a photo of the rim top to show the darkening and lava on the bevel and the light cake in the bowl. The shape of the bowl is well done and looks very good.I took a photo of the stamping on the heel of the bowl. It is clear and readable as noted above.I found a stem in my collection that would fit the shank but it would need to be bent to follow the flow of the shank and bowl. It was used and had some tooth marks in both sides of the stem ahead of the button.I reamed the bowl to take the cake back to bare walls. I used a Savinelli Fitsall Pipe Knife and scraped it clean. I sanded the walls of the bowl smooth with 220 grit sandpaper wrapped around a piece of dowel. The walls of the bowl were smooth and undamaged.I cleaned out the shank airway and mortise with alcohol, cotton swabs and pipe cleaners. I did the same with the airway in the new stem. The pipe was clean when I was finished.I cleaned up the bevelled rim top with a folded piece of 220 grit sandpaper to remove the light lava and the darkening. It came off very well and looked much better.I polished the smooth portions of the cherry with micromesh sanding pads – 1500-12000 grit pads. I dry sanded the wood and then wiped it down with a damp cloth. The polishing work progressively brought a shine to the pipe. It looked really amazing – the combination of bark and smooth portions of the cherrywood. It is a beauty! I rubbed the bowl down with Before & After Restoration Balm. I worked it into the finish with my fingertips. The product works to clean, preserve and protect the wood. I let it sit and absorb for 10 minutes. I buffed it off with a soft cloth and then gave it a rigorous buff to raise the shine. It looks good at this point. I set the bowl aside and turned to address the stem. I heated the stem with the flame of a Bic lighter to soften the vulcanite and bend it to match the curves of the bowl and shank. Once it was soft I bent it and it looks much better. I took photos of the stem surface to show the deep tooth marks on the surface of the stem. I painted the surface of the tooth marks with a lighter flame. I was able to lift them considerably. I filled in what remained with black CA glue. I set it aside to allow them to cure. Once the repair had cured I flattened out the repair with small file to blend it into the stem surface. I sanded it smooth with a folded piece of 220 grit sandpaper. I started the polishing on the stem with a piece of 600 grit sandpaper. I wiped it down with Obsidian Oil and set it aside. I polished the stem with 1500-12000 grit micromesh sanding pads – I dry sanded the chatter on the stem surfaces on both sides and the diameter of the saddle portion of the stem. I wiped it down with Obsidian Oil on a cloth after the sanding pads. Once finished it looked very good. I finished the hand polishing of the stem with Before & After Pipe Polish – both the Fine and Extra Fine polishes. I gave it a final coat of Obsidian oil and set it aside to dry. I am really happy with the way that this restemmed Ropp De Luxe 804 Cherrywood Pipe turned out. It is a nice looking pipe with a great shape and finished with bark on the bowl sides and shank and the rim top and heel of the bowl are smooth. The vulcanite saddle stem turned out very nice. The polished stem works well with the Cherrywood finish. The wood really came alive with the buffing. The bark finish gave the pipe a sense of depth with the polishing and waxing. I put the stem back on the bowl and carefully buffed the pipe with Blue Diamond on the buffing wheel using a light touch on the wood. I gave the bowl multiple coats of Conservator’s Wax and the stem multiple coats of carnauba wax on the buffing wheel. I buffed the pipe with a clean buffing pad to raise the shine. I hand buffed the pipe with a microfiber cloth to deepen the shine. The finished Ropp De Luxe 804 Bent Cherrywood really is a beauty and feels great in the hand and looks very good. Give the finished pipe a look in the photos below. The dimensions of the pipe are Length: 6 ½ inches, Height: 2 inches, Outside diameter of the bowl: 1 ¾ inches, Chamber diameter: ¾ of an inch. The weight of the pipe is 64 grams/ 2.26 ounces. I will be putting the pipe on the rebornpipes store in the French Pipemakers Section. If you would like to add it to your collection let me know. Thanks for reading this blog and my reflections on the pipe while I worked on it. It was a fun one to work on!

As always, I encourage your questions and comments as you read the blog. Thanks to each of you who are reading this blog. Remember we are not pipe owners; we are pipe men and women who hold our pipes in trust until they pass on into the trust of those who follow us.

A Second Pipe from the Old Gentleman’s Estate – A Cracked Shank Whitehall 1B Rustic Apple


Blog by Steve Laug

I decided I needed a change of pace in my restoration/clean up work. I went through my pipes waiting in the queue and chose pone from a group of four pipes that were given to us by a woman in Columbus, Ohio, USA. It had belonged to her Grandfather who lived from 1882 to 1977. There were four pipes that she sent us from his estate – the metal bowled apple, a cased meerschaum with a broken shank and an amber stem, a Whitehall rusticated apple and a BBB Glokar Fraternity Pipe.Even though I generally pass on Whitehall pipes I decided to work on this one because it came with a great back story. The older pipe man who had used it obviously had enjoyed it beyond measure. Since he passed away in 1977 I knew that the pipe was much earlier than that. It was well smoked, reamed with a knife. And it had continued to be smoked even after the shank crack. I am guessing from the marks on the stem that the crack happened when he tried to remove the stem with a pair of pliers. The stamp on the left side of the shank read Whitehall 1B [over] Imported Briar. The pipe was dirty and well used. The finish had deep grime ground into the rustication around the bowl. The bowl had tobacco debris in it and a very thick cake overflowing as lava onto the rim top. The rim top looked to be in rough condition with damage from reaming and burns particularly on the back side of the edge and top. The stem was vulcanite and fit the cracked shank well. It had oxidation, calcification and deep gouges from pliers just behind the saddle. There were light tooth marks and chatter on both sides ahead of the button. Jeff took photos of the pipe before he started his cleanup work.Jeff took photos of the rim top and bowl to show the condition. You can see the thick cake int eh bowl and the lava coat on the top of the rim. The inner edge of the bowl is a mess and very out of round. It was obviously her grandfather’s favourite pipe even though some of his others were nicer. The vulcanite saddle stem was oxidized, calcified and had deep nicks at the saddle end from what appeared to be pliers. It too was going to take some work. Jeff took photos of the cracked shank to show the condition of the crack. He also took photos of the damage to the stem surface just behind the saddle on both sides where it looks like the stem was twisted with pliers. Jeff took photos of the sides and heel of the bowl to show the composition of the pipe. The combination of smooth and rustication is quite nice. There are Custom-bilt like channels from top to bottom of the bowl and horizontal rustication around the bowl between the channels. The rim top and top half of the bowl are smooth. The shank has horizontal rustication all around leaving a smooth panel on the left side for the stamping. It is quite nice looking. He took a photo of the stamping on the smooth panel on the left side of the shank. You can see that it is readable as noted above.I knew that there was a connection between Block Brothers Tobacco and Whitehall as I have had pipe coupons in boxes of Kentucky Club tobacco but I wanted to verify that and get the details. I turned to the listing on Pipedia for Whitehall and read it (https://pipedia.org/wiki/Whitehall). I quote from the site below.

Whitehall pipes are frequently misunderstood to be a model rather than an actual pipe company, which has led collectors to mistakenly ascribe their manufacture to Civic and Ben Wade (Who Made That Pipe; Wilczak & Colwell, 1997).  In fact, Whitehall refers to the pipe company (not a model), which itself produced models such as the Hialeah, Jumbos, London Hall, and Thermofilter.  The history of the Whitehall Pipe Co., Inc. (Richmond Hill, NY), is a complicated one, involving several parent companies and subsidiaries including Whitehall Products, Inc. (Helmetta, NJ), The Bloch Bros. Tobacco Co. (Wheeling, WV), Helme Products, Inc., apparently all subsidiaries of Culbro Corp. (owner also of General Cigar).  The “Imported Briar” stamp on many of the pipes, and the unmistakable Whitehall logo bearing resemblance to the American-made tobaccos of that brand strongly suggest that these are products made for the Whitehall Pipe Co., Inc., an American company.  There is furthermore no evidence that Civic or Ben Wade outsourced any manufactory of pipes to Italy; nor did Ben Wade manufacture pipes with aluminum screw tenons, paper filter inserts and molded acrylic stems.  For irrefutable proof that the American company Whitehall Pipe Co., Ltd., was, in fact, responsible for these brands, one need only consult the University of California, San Francisco “Truth Tobacco Archives” which clearly links these brands to the company (see image below) [on the Pipedia site]…

When the pipe arrived in Vancouver it was very clean. The briar and stem were spotless. The vulcanite stem looked much better and you can see the gouges in the top and underside behind the saddle. The crack in the shank was also very clean and ready to repair. Jeff had reamed the bowl with a Pipenet Pipe Reamer and cleaned up the bowl walls with a Savinelli Fitsall Pipe Knife. He scrubbed the airway in the stem and shank with pipe cleaners, cotton swabs and alcohol. He scrubbed the exterior of the bowl and shank with Murphy’s Oil Soap (undiluted) and a tooth brush. He rinsed the exterior with warm running water and dried. He polished the briar and stem with a small drop of olive oil. The pipe really looked very good. It was going to be a fun one to work on for my part.  I took photos of the pipe when I brought it to the table for my work. This is what I saw. I took photos of the bowl and the rim top to show the condition. It is clean and the damage is quite extensive. The bowl is very clean and there were nicks, burn damage and cuts all around the inner edge and top. The bowl was out of round due to the damage. The crack on the top left of the shank is also visible in the photo below. The vulcanite stem is clean and the damage visible at the blade where it joins the saddle portion. The button and stem surface ahead of the button is clean and undamaged. I took a photo of the left shank side to capture the stamping on the briar. It is faint but it is still readable. I took a photo of the bowl and shank separated to show the condition of the pipe. It really is a great looking pipe.I started my work on the pipe by addressing the cracked shank. I smoothed out the end of the shank so that the band would fit smoothly and not be hampered by the rustication. I used the Dremel and a sanding drum to get it prepared for the band. I heated the band and pressed it onto the shank end. It fit well and bound the crack tightly together. With the shank repair complete I turned to address the issues with the rim top and edge. I started by smoothing out some of the damage with a folded piece of 220 grit sandpaper. I topped the bowl on a topping board with 220 grit sandpaper to flatten on the damage on the rim top. I used a wooden ball and a piece of sandpaper to give the rim edge an inward bevel and smooth out the top. It looked much better! I filled in the damaged back inner edge of the bowl with clear CA glue and briar dust. The edge was damaged but it did not go deeply into the bowl. I sanded out the inside of the edge with a piece of 220 sandpaper wrapped around a dowel. I smoothed out the rim top with a folded piece of 220 grit sandpaper and bevelled the rim a bit more with the sandpaper. I stained the rim top with a Maple Stain Pen to match the smooth portions of the bowl. It was looking good. I polished the briar with micromesh sanding pads – 1500-12000 grit pads. I dry sanded the briar and then progressively brought a shine to the pipe. It looked really amazing – the combination of rustic and smooth portions of the briar. It is a beauty! I rubbed the bowl down with Before & After Restoration Balm. I worked it into the finish with my fingertips and a shoe brush. The product works to clean, preserve and protect the briar. I let it sit and absorb for 10 minutes. I buffed it off with a soft cloth and then gave it a rigorous buff to raise the shine. It looks good at this point. I filled in the gouges in the stem surface on both sides by the saddle with black CA rubberized glue. Once it cured I sanded it smooth with 220 grit sandpaper and started polishing it with 600 grit wet dry sandpaper.I polished out the scratches left behind by the sandpaper on the stem surface with micromesh sanding pads – dry sanding with 1500-12000 grit sanding pads. I wiped it down with Obsidian Oil on a cloth after the sanding pads. I finished the hand polishing of the stem with Before & After Pipe Polish – both the Fine and Extra Fine polishes. I gave it a final coat of Obsidian oil and set it aside to dry. I am really happy with the way that this Whitehall Rusticated Imported Briar 1B Apple turned out. It really is a beautiful looking pipe with a great shape and smooth finished on the upper half of the bowl and rusticated on the lower portion of the bowl and shank. The vulcanite saddle stem turned out very nice. The polished stem works well with the briar both the smooth and rusticated finish. The briar really came alive with the buffing. The rich brown stains of the finish gave the pipe a sense of depth with the polishing and waxing. I put the stem back on the bowl and carefully buffed the pipe with Blue Diamond on the buffing wheel using a light touch on the briar. I gave the bowl multiple coats of Conservator’s Wax and the stem multiple coats of carnauba wax on the buffing wheel. I buffed the pipe with a clean buffing pad to raise the shine. I hand buffed the pipe with a microfiber cloth to deepen the shine. The finished Whitehall Rusticated Saddle Stem Apple really is a beauty and feels great in the hand and looks very good. Give the finished pipe a look in the photos below. The dimensions of the pipe are Length: 5 inches, Height: 1 ½ inches, Outside diameter of the bowl: 1 ¼ inches, Chamber diameter: ¾ of an inch. The weight of the pipe is 27 grams/ .95 ounces. I will be putting the pipe on the rebornpipes store in the American Pipemakers Section. If you would like to add it to your collection let me know. Thanks for reading this blog and my reflections on the pipe while I worked on it. It was a fun one to work on!

As always, I encourage your questions and comments as you read the blog. Thanks to each of you who are reading this blog. Remember we are not pipe owners; we are pipe men and women who hold our pipes in trust until they pass on into the trust of those who follow us.

Replacing a broken tenon and restoring a Stanwell de Luxe


Blog by Steve Laug

Earlier in July I received an email from Peter, a fellow in California regarding a pipe repair he needed. He wrote as follows.

Hi, I’m just wondering if you can repair a Stanwell pipe for me? The stem broke off inside the pipe. Thanks for your time, Peter.

I wrote him back asking for photos so I could have a look at it. I figured he meant that the tenon snapped off inside the shank but I wanted to be certain. He replied

Thanks so much for your very fast response. Pictures are below. Best wishes, Peter We chatted back and forth a bit and Peter decided to send the pipe to me. I received it yesterday and here is what I saw once I unwrapped it. The photos tell the story but here is my review of it. The finish was dirty and worn. The bowl had a thick cake and there was lava buildup flowing along the inner edge and into the plateau on the rim top. The stem was snapped off leaving the tenon in the shank. Fortunately, there was no damage to the shank itself. It did not have any cracks in the sides. The shank end showed a lot of tar buildup. The tenon was still in the shank. The snap at the stem was fairly clean and would just need to be flattened. The stem itself showed a lot of oxidation, calcification and light tooth marks and chatter on both sides ahead of the button. The pipe was stamped on the left side and read Stanwell [over] de Luxe. I could not see any other stamping on the shank. There was a gold crown S on the left side of the saddle stem. This was going to be fun to bring back to life. I decided to begin working on the pipe by trying to pull the broken tenon with my usual methods. I put the bowl in the freezer for 30 minutes, then inserted a screw into the airway in the shank. I wiggled the screw and tried to break it free. It was no use. I used a qtip to dribble alcohol around the edges of the broken tenon in the shank. I repeated that several times and let it sit. I was still unable to remove the broken tenon in the shank. It was stuck and nothing seemed to loosen it. With the tenon being stuck in the shank I stepped up the process and drilled it out. I started with a drill bit slightly larger than the airway. I have had good success in drilling and in the process having the tenon come out on the drill bit. In this case I worked through four drill bits until I used one that was slightly small than the mortise. I then scraped out the remainder of the bits of vulcanite in the shank with a small pen knife until the walls were clear. I took a photo of the pipe at this point in the process – the tenon drilled out, a replacement tenon and the stem. Now it is ready for the next part of my work. I set the stem and tenon aside so that I could work on the bowl and shank. I reamed the bowl with a PipNet pipe reamer. I took the cake back to bare walls so I could check out the walls for damage or checking. It looked very good. I scraped out the remnants of the cake with a Savinelli Fitsall Pipe Knife and then sanded it with a piece of 220 grit sandpaper wrapped around a piece of dowel to smooth out the walls of the bowl. I worked on the buildup in the plateau surface of the rim top with a brass bristle wire brush. I was able to remove the heaviest part of the lava in the grooves of the plateau surface. It looked better but would need to be scrubbed. I scrubbed the exterior of the bowl with a tooth brush and undiluted Murphy’s Oil Soap. I scoured the surface of the briar and rinsed and repeated the process until the bowl was clean and the rim top looking very good. I cleaned up the darkening on the smooth bevelled portion of the inner rim edge next. I used a folded piece of 220 grit sandpaper to remove the damage and also smooth it out. I touched up the deep grooves in the plateau with a black Sharpie pen. The rim top and edge look very good.I polished the smooth rim top portions and the exterior of the pipe with micromesh sanding pads – dry sanding with 1500-12000 grit sanding pads. I wiped the bowl down after each sanding pad with a damp cloth to remove the sanding dust and debris. By the last pad it was looking very good with a shine in the briar that highlights the grain. I cleaned out the shank and mortise with alcohol, cotton swabs and pipe cleaners. I wanted to remove the oils and tars so that I would have a clean surface for the new tenon that I was fitting in the shank. It cleaned up and certainly smelled better once cleaned.I worked some Before & After Restoration Balm into the surface of the briar with my fingertips and a horsehair shoe brush to get into the plateau top. The product works to clean, preserve and protect the briar. I let it sit and work into the briar for 10 minutes then wiped it off with a cotton cloth. I buffed the briar with a clean cloth. The bowl is starting to look beautiful and there is a shine developing. At this point the bowl was finished until I finished with the new tenon insertion. I set the bowl aside and took a photo of the new tenon and the tools for reducing the diameter to fit in the shank. I used the Dremel and a sanding drum to reduce the diameter. I cleaned up the work with a file and then 220 grit sandpaper to get it to a point where the tenon fit in the shank.I put the stem in a bath of Briarville’s Pipe Stem Deoxidizer and set it aside while I worked on the tenon fit. I left it in the bath for three hours and then removed it and rubbed off the bath with a paper towel. The surface of the stem looked significantly better at this point. The oxidation was greatly reduced, the calcification was gone and the stem showed improvement. The tooth marks would still need to be worked on but there was progress.I cleaned out the airway in the stem with pipe cleaners and alcohol the drilled the airway to match the diameter of the new tenon insertion. I started with a drill bit the same size as the airway and gradually increased the bit size until it matched the outside diameter of the tenon. I took a photo of the newly drilled end of the stem. I cleaned up the airway once again in preparation for gluing the new tenon in place. I wiped the tenon end down with black CA glue and then aligned the tenon and the mortise. I pressed the tenon in place in the stem and set it aside to cure. Once it cured I took a photo of the stem and new tenon with the bowl before putting them back together. Once the glue cured I fit the stem in the shank. As seems to be very usual when I do this kind of thing the fit against the shank was not perfect. I would need to shape the stem and shank to make the fit and flow perfect. I took photos of the pipe at this point. The fit is not far off but just enough to be noticeable in the photos on the top and underside and slightly on the right and left sides. I sanded the shank and the stem to match and make the transition smooth all the way around the junction. I used 220 grit sandpaper and sanded it in place on the shank. I had to remove briar and vulcanite on the sides of the shank according to the transition. When finished it looked much better. I polished the sanded areas with micromesh sanding pads to make them smooth. I used an Oak stain pen to touch up the sanded areas and blend them into the rest of the bowl and shank. It blends in very well.I rubbed it down once again with Before & After Restoration Balm. I worked it into the surface of the briar and let it sit for 10 minutes then buffed it off with a soft cloth. I polished the bowl with a cotton cloth and set it aside. I set the bowl aside and turned my attention to finishing the work on the stem. I “painted” the stem surface with the flame of a lighter to lift the tooth marks. I was able to lift them significantly. I filled in what remained with black CA glue. Once the repair cured I used files to smooth out the surface of the repair. I sanded it with 220 grit sandpaper to blend them into the surface of the stem. I started the polishing of the stem with 600 grit wet dry sandpaper. I polished the stem with micromesh sanding pads – dry sanding with 1500-12000 grit pads. I wiped the stem down after each sanding pad with Obsidian Oil. I finished polishing the stem with Before & After Pipe Stem Polish – Fine and Extra Fine. I rubbed it into the surface of the stem and buffed it off with a cloth and buffed it to a shine. I am really happy with the way that this Stanwell Danish Made de Luxe Freehand turned out. It really is a beautiful looking pipe with a great shape and smooth finished bowl and plateau on the rim top. The original vulcanite saddle stem is cleaned up nicely. The polished black of the stem works well with the briar and the plateau portions. The briar really came alive with the buffing. The rich brown stains of the finish gave the pipe a sense of depth with the polishing and waxing. I put the stem back on the bowl and carefully buffed the pipe with Blue Diamond on the buffing wheel using a light touch on the briar. I gave the bowl and the stem multiple coats of carnauba wax on the buffing wheel. I buffed the pipe with a clean buffing pad to raise the shine. I hand buffed the pipe with a microfiber cloth to deepen the shine. The finished Stanwell de Luxe really is a beauty and feels great in the hand and looks very good. Give the finished pipe a look in the photos below. The dimensions of the pipe are Length: 6 inches, Height: 2 ¼ inches, Outside diameter of the bowl: 1 ¾ inches, Chamber diameter: ¾ of an inch. The weight of the pipe is 56 grams/1.98 oz. The pipe will be going back to Peter very soon. I look forward to hearing what he thinks about it. Thanks for reading this blog and my reflections on the pipe while I worked on it. It was a fun one to work on!

As always, I encourage your questions and comments as you read the blog. Thanks to each of you who are reading this blog. Remember we are not pipe owners; we are pipe men and women who hold our pipes in trust until they pass on into the trust of those who follow us.