Tag Archives: staining

A WDC Milano Hesson Guard Reworked


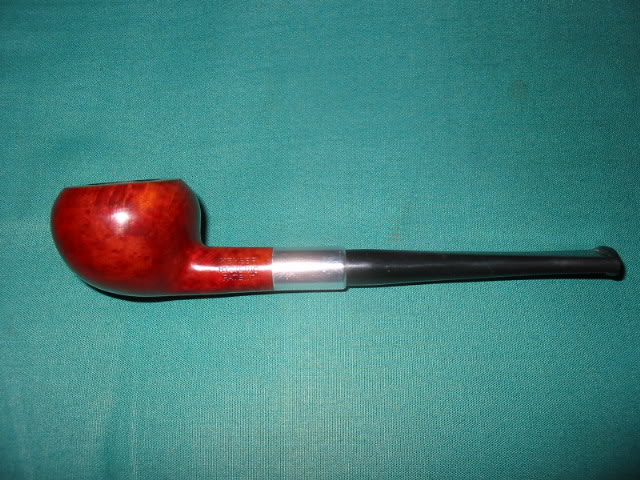
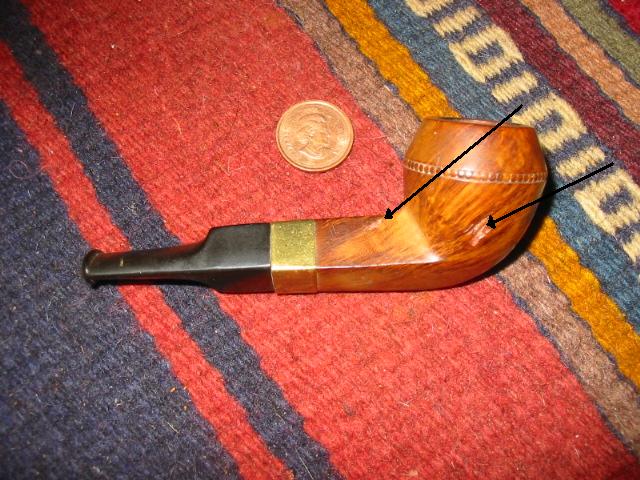
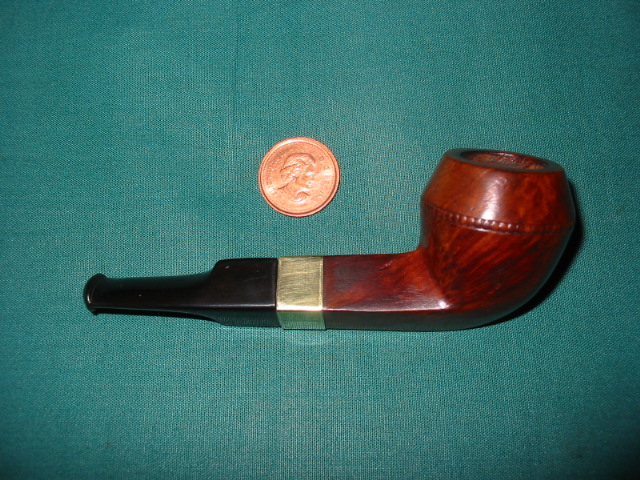
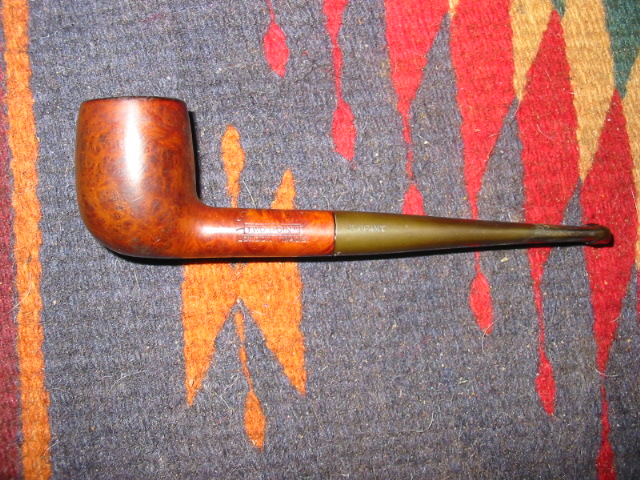
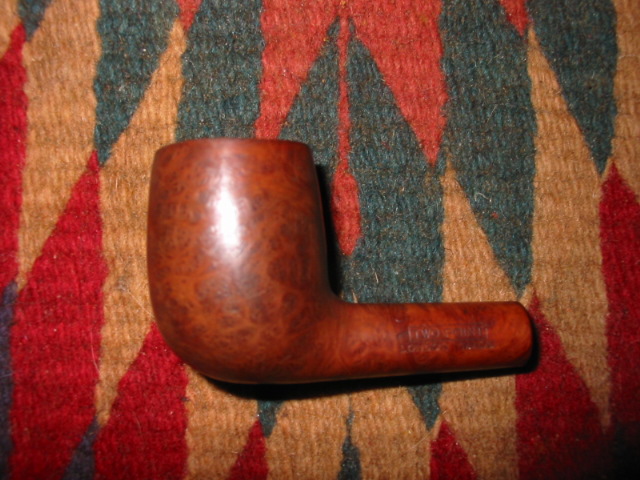
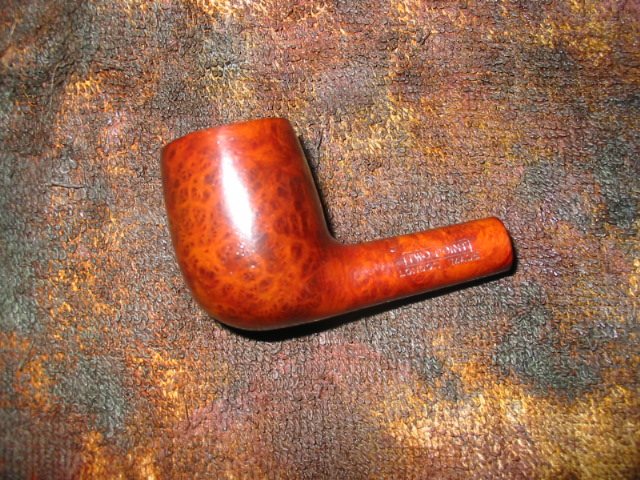
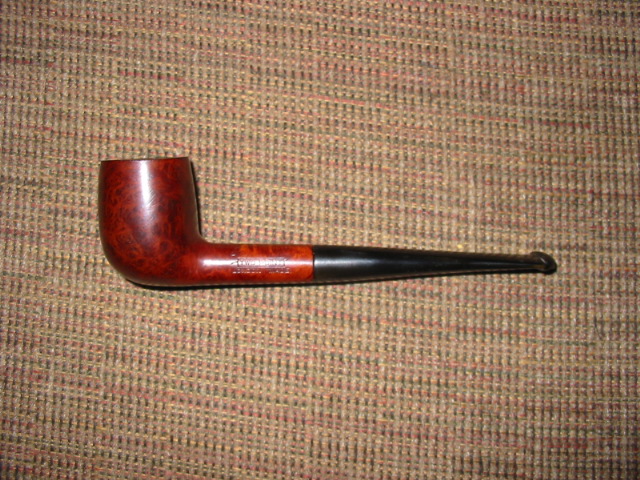
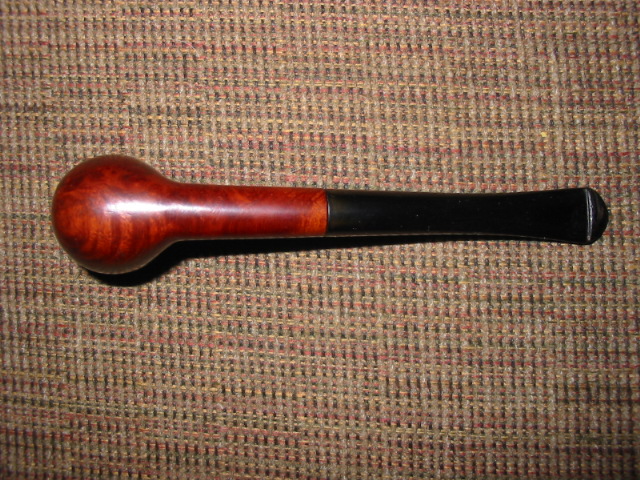
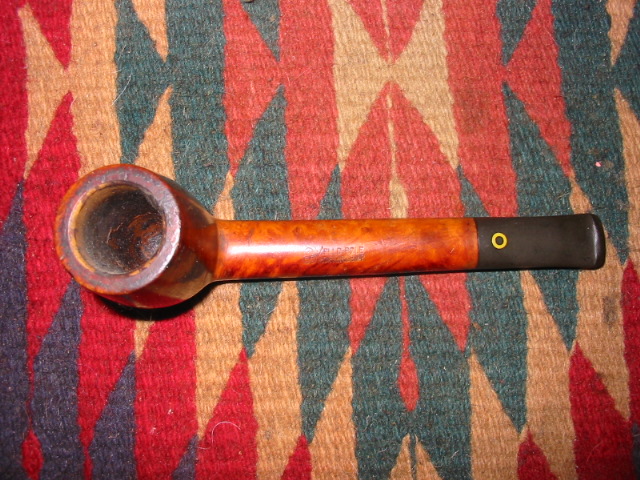
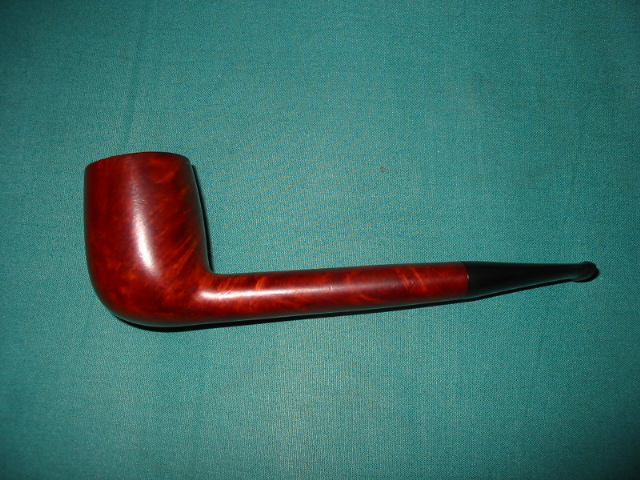
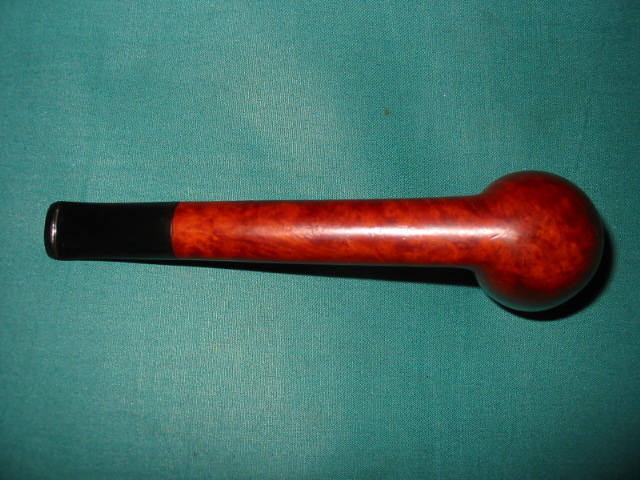
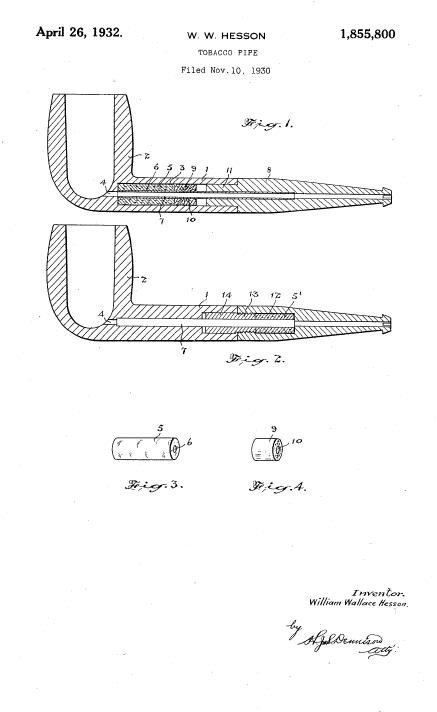
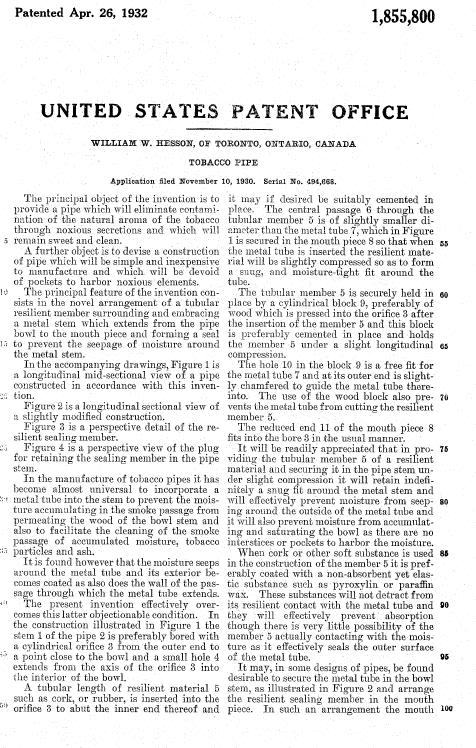
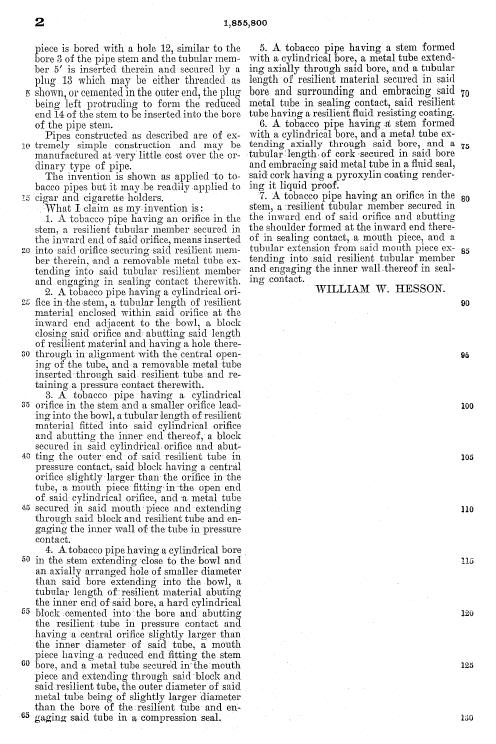
I just worked over this old timer – A WDC Milano Hesson Guard. In order to know more about the pipe I was working on I searched for information regarding the patent number stamped on the pipe and went to the US Patent site where I found documentation. The patent was filed for it in 1932. It is an early example of the pipe. It is in the acorn shape. It has the patent number stamped on it as well as the other WDC labels. The triangle on the stem is silver or steel inlay. For me this is a part of the mystery of unpacking the history and life of the brand and mark. I always like to know as much of the back story as I can find on any of the pipes I refurbish. Patent numbers stamped on the pipe provide a means of ferretting out information on the design and the particular part of the pipe that is patented. I have included the patent site information on the pipe for your reading pleasure. At least to me this part is fascinating information.

ImageImageImage

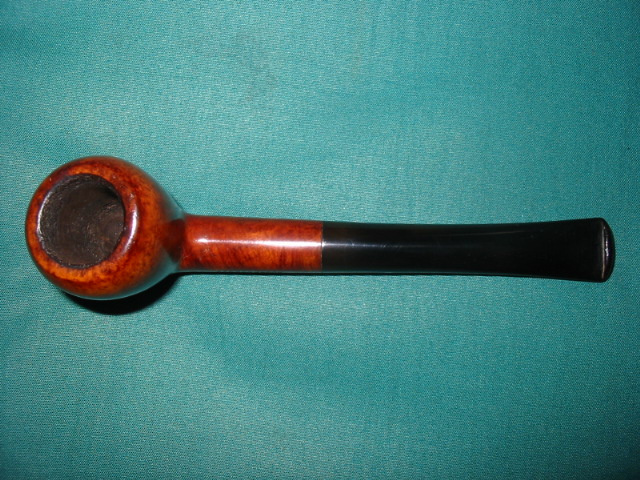
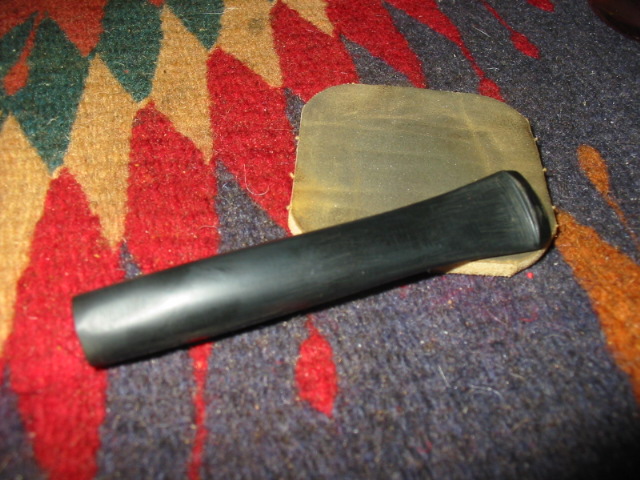
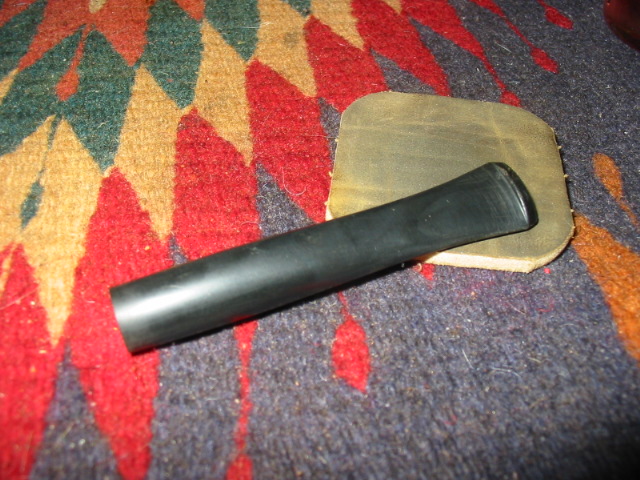
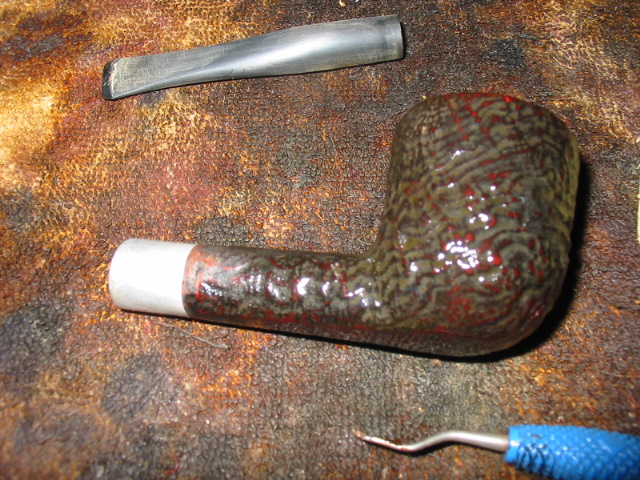
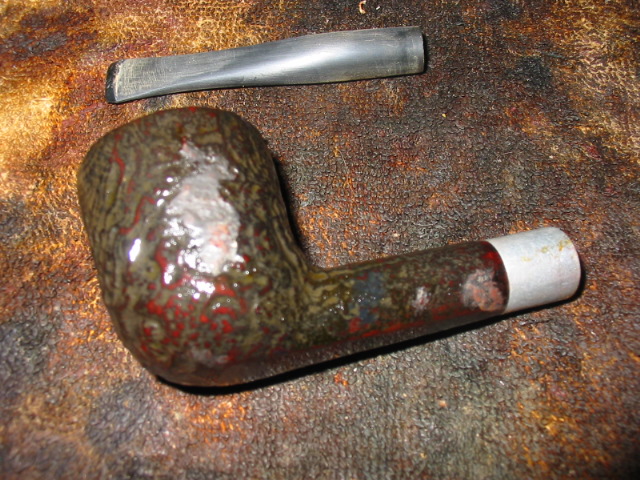
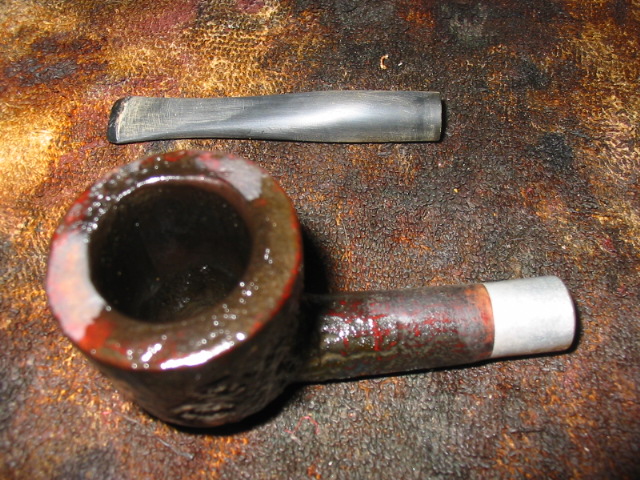
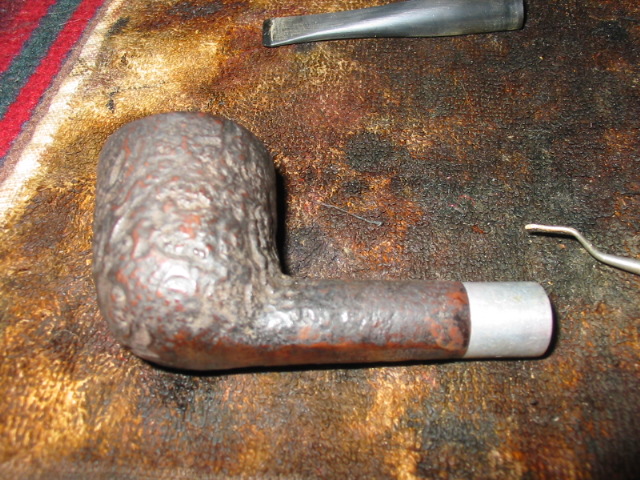
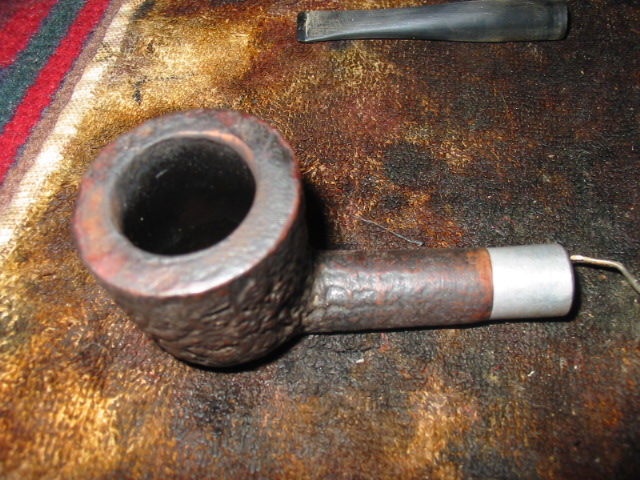
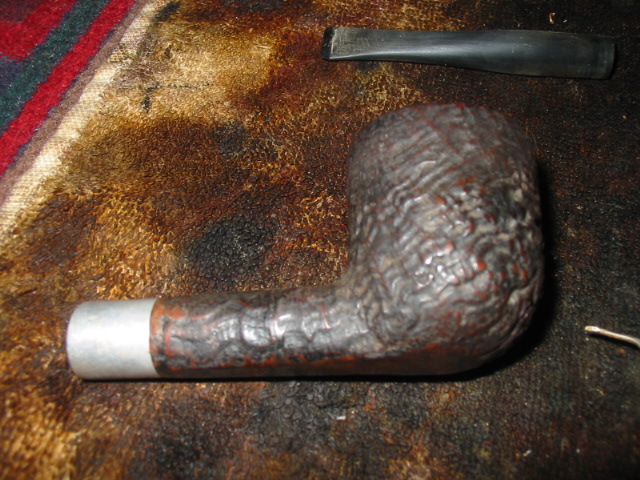
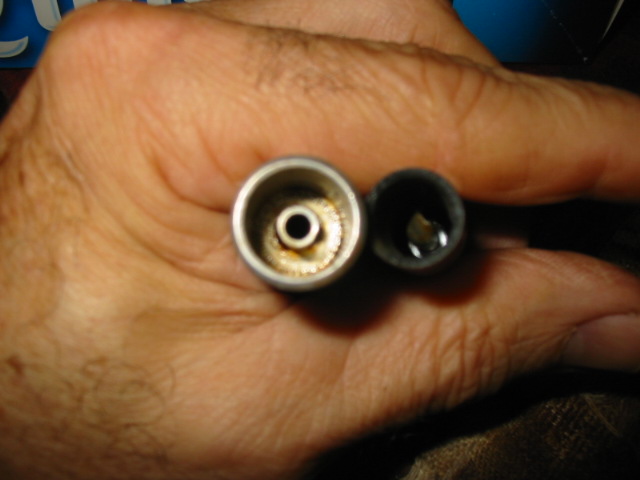
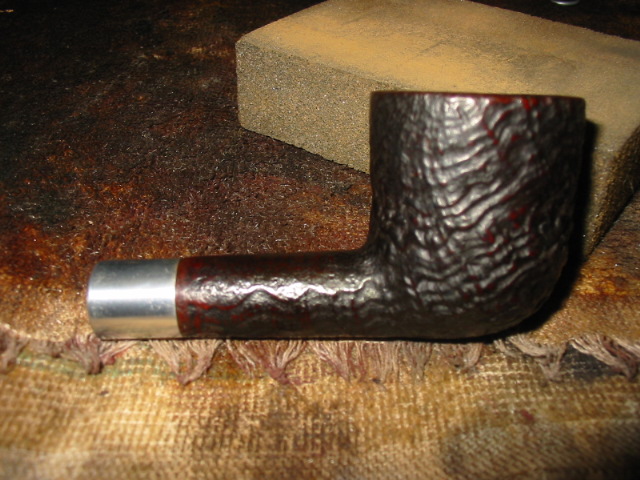
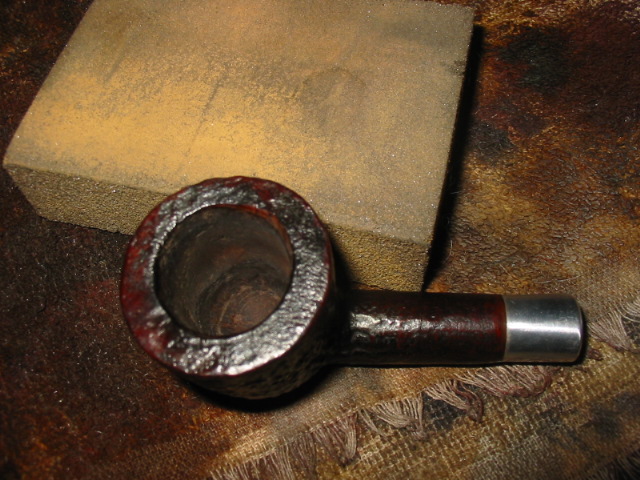
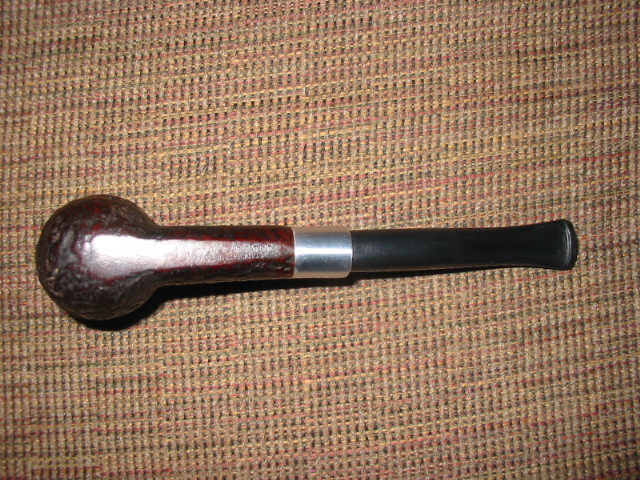
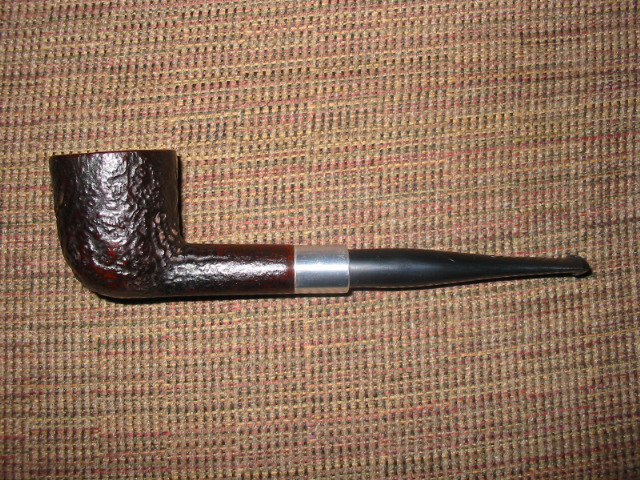
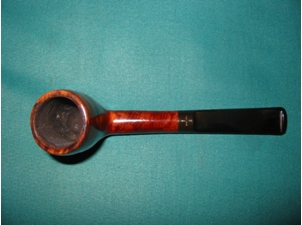
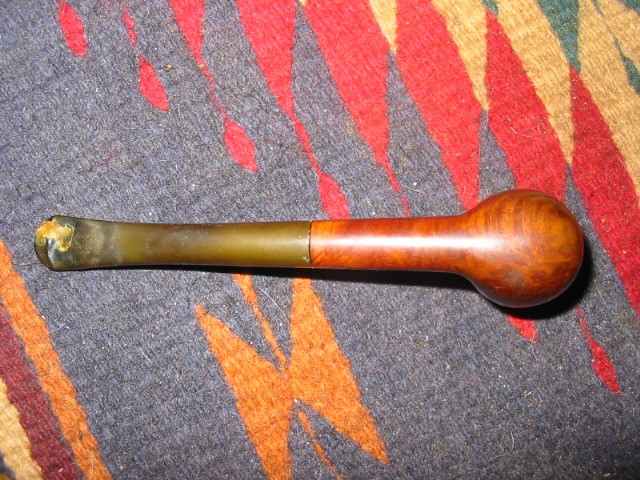
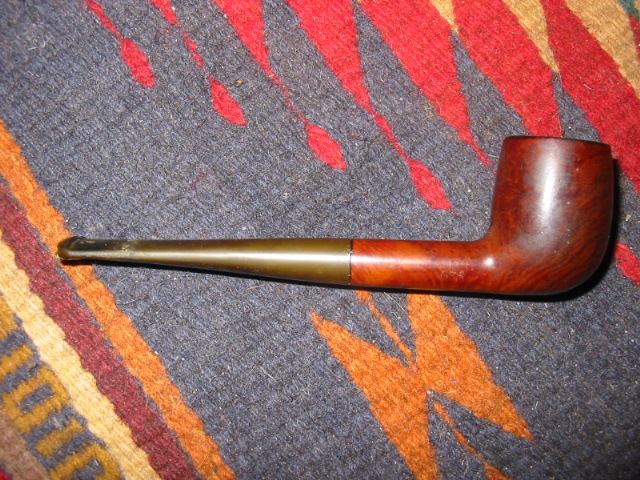
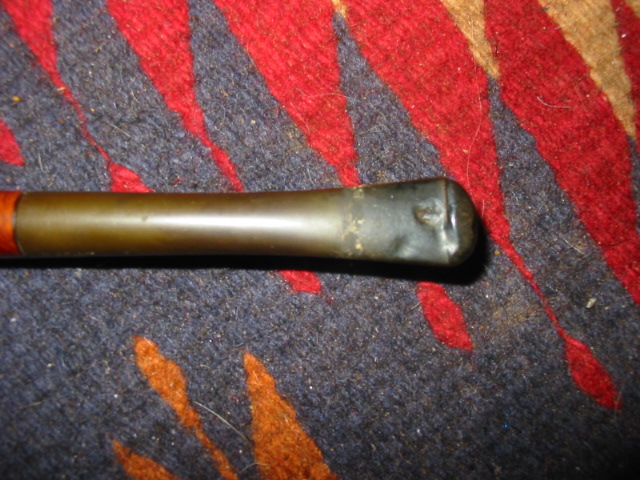
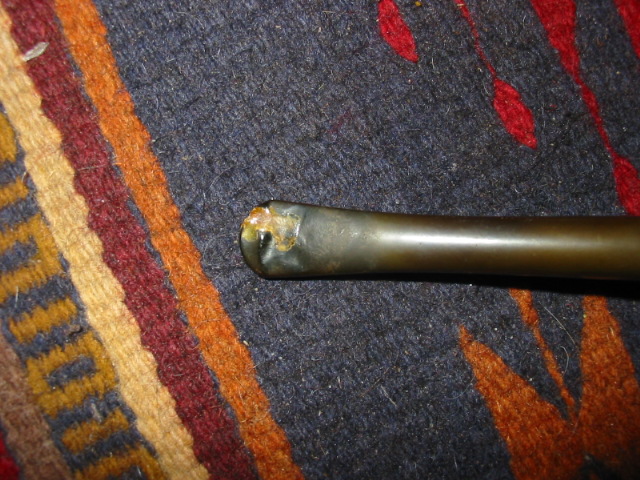
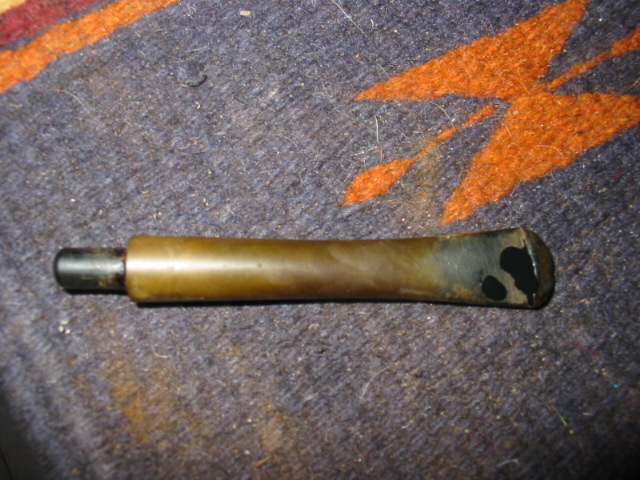
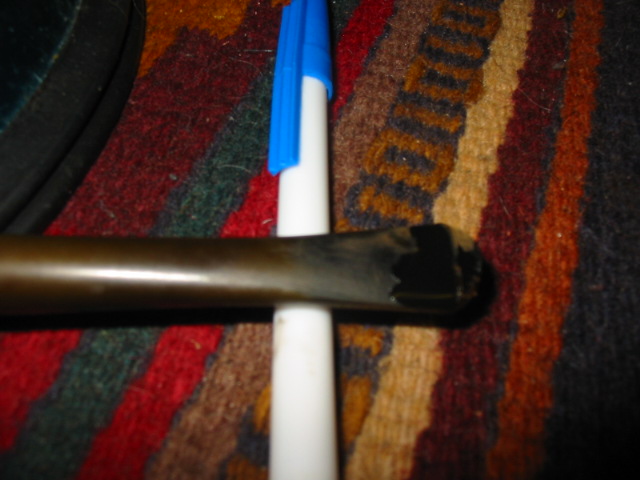
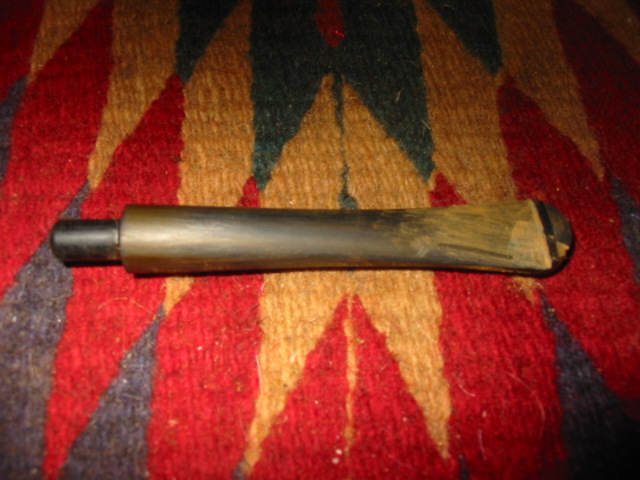
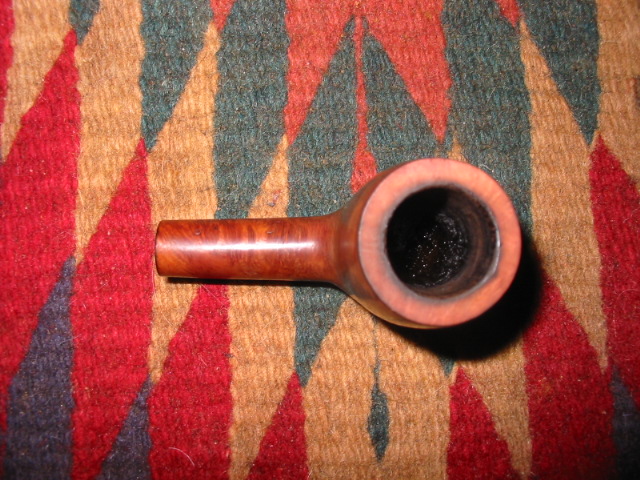
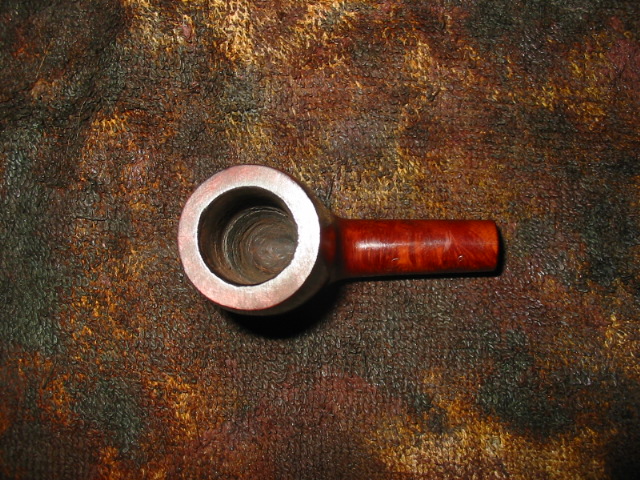
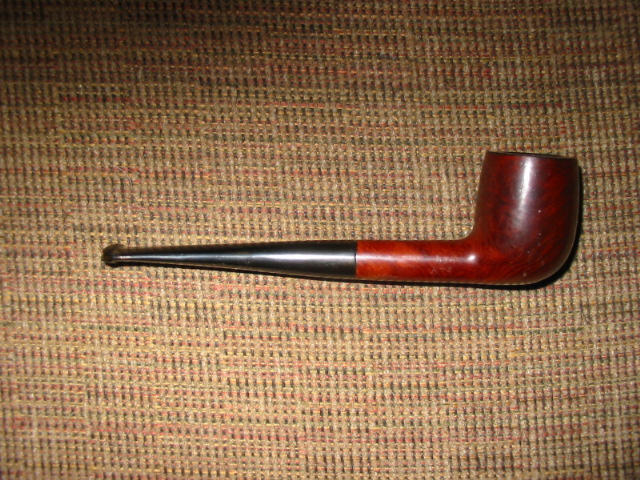
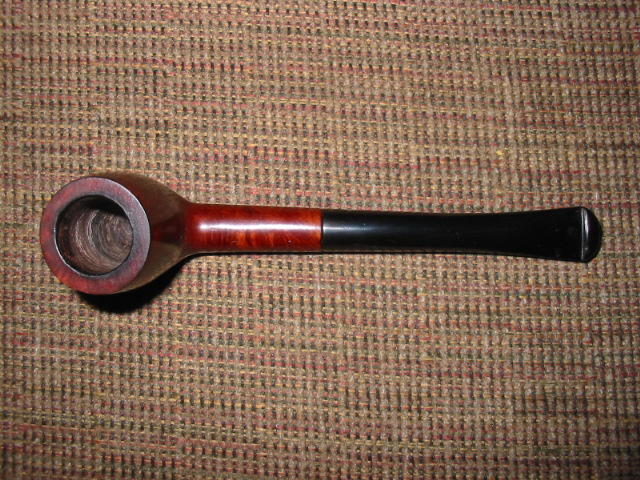
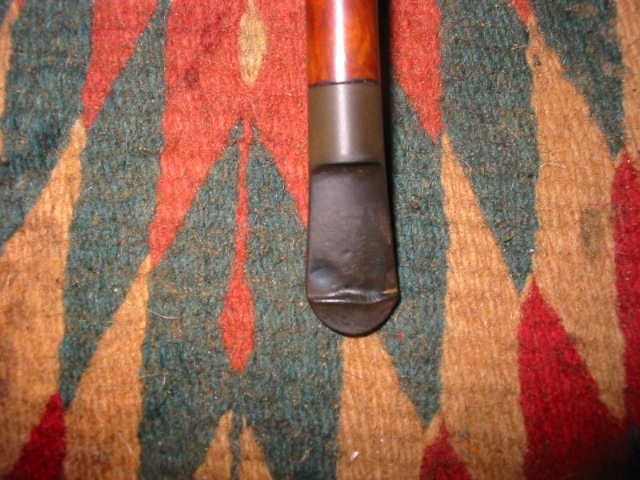
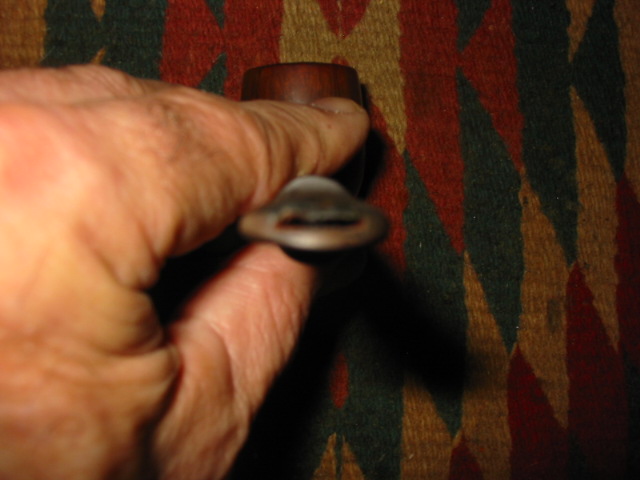
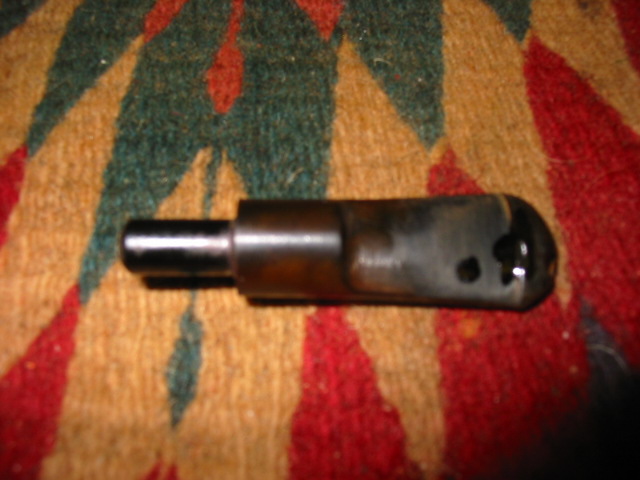
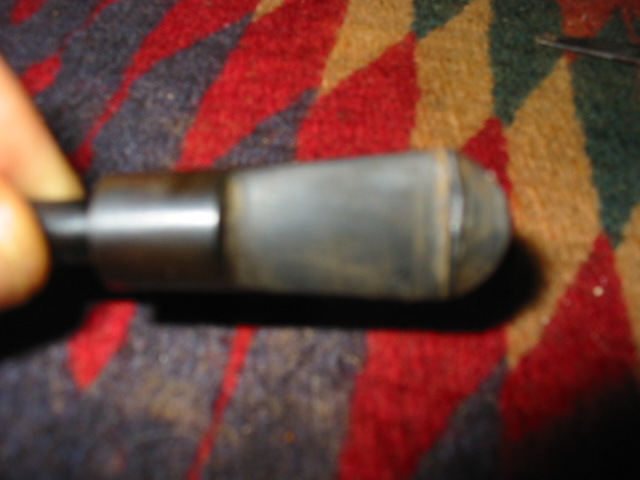
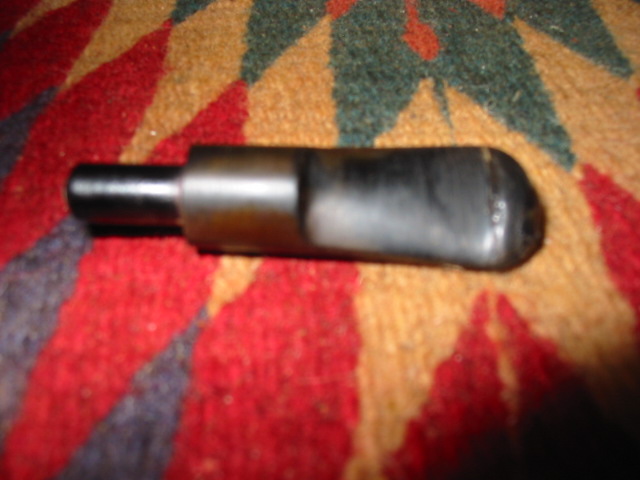
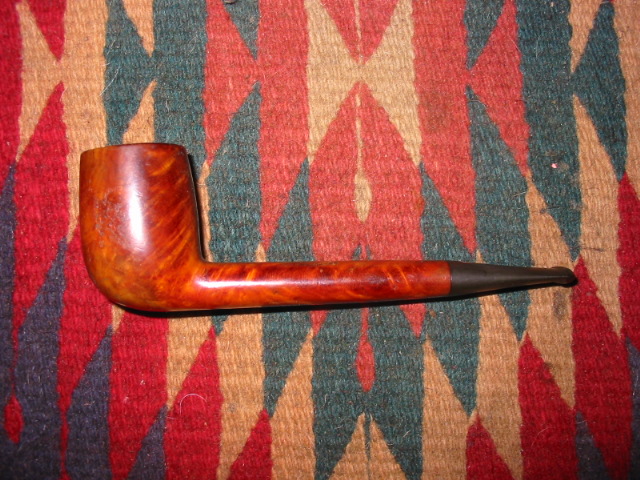
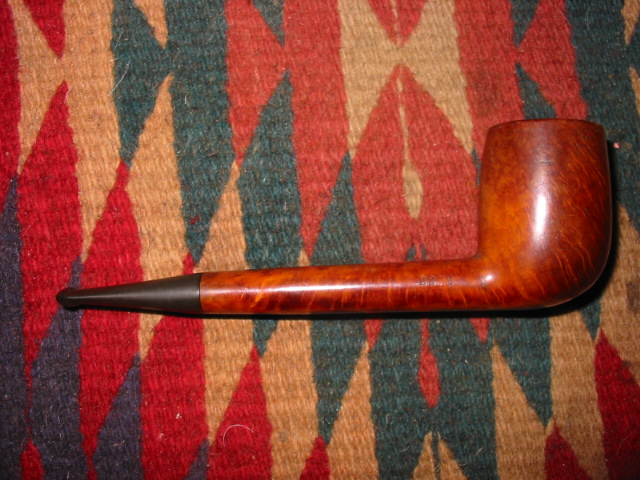
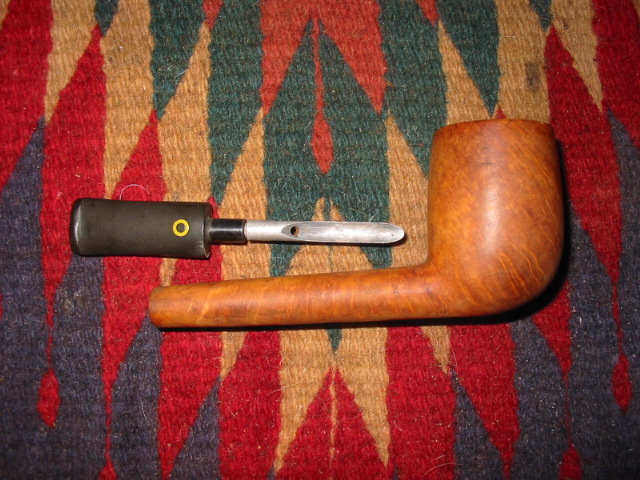
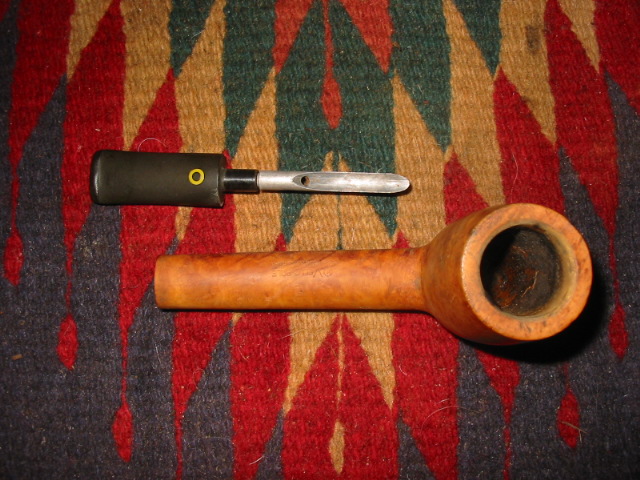
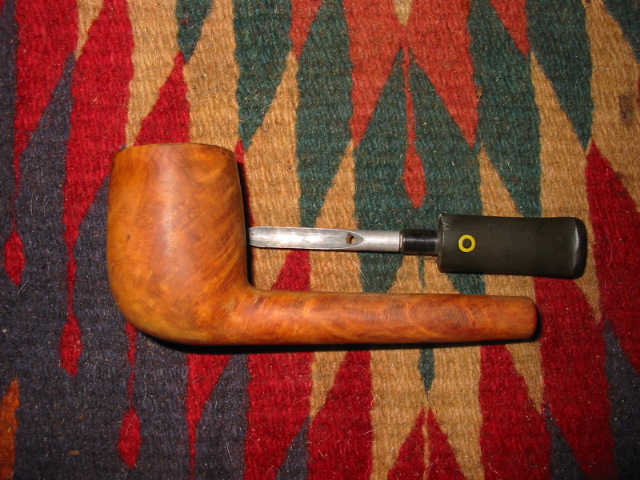
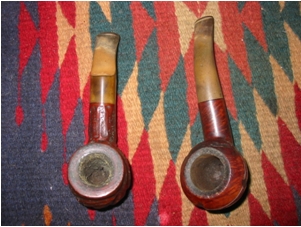
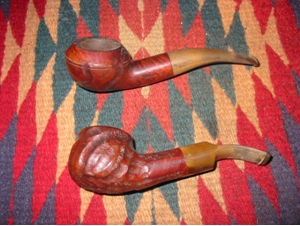
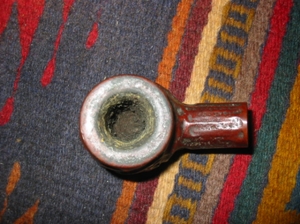
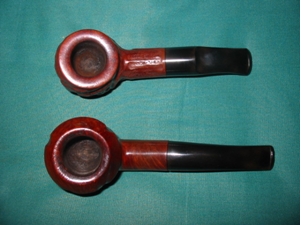
The pipe was caked with a crumbly thick cake that pretty much filled the bowl when I picked it up. I reamed it out to field dress the pipe. I generally do this with most of the pipes I bring home for renewal. It keeps the mess of the carbon from the cake outside and away from my work desk. In the photos below you can see that the finish was pretty dirty with a lot of hand oils and grease ground into the bowl surface. The rim was caked and tarred and it looked like it was damaged. The finish was worn and the stain faded in many places on the bowl sides. The stem was oxidized and had some bubbles in the surface along the button – the bubbles are visible near the button in the second photo below.

ImageImage

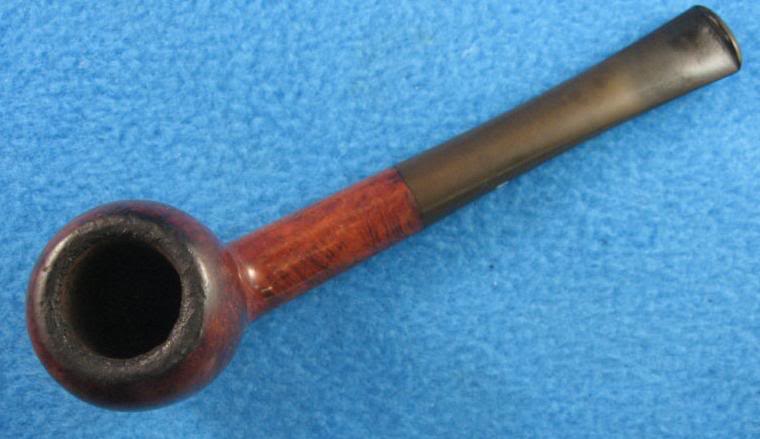
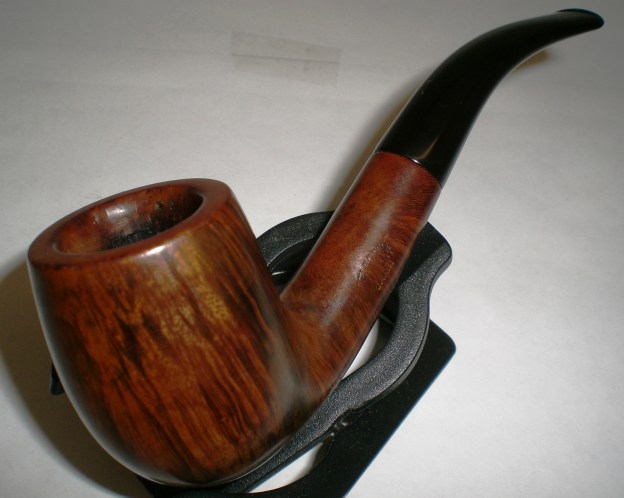
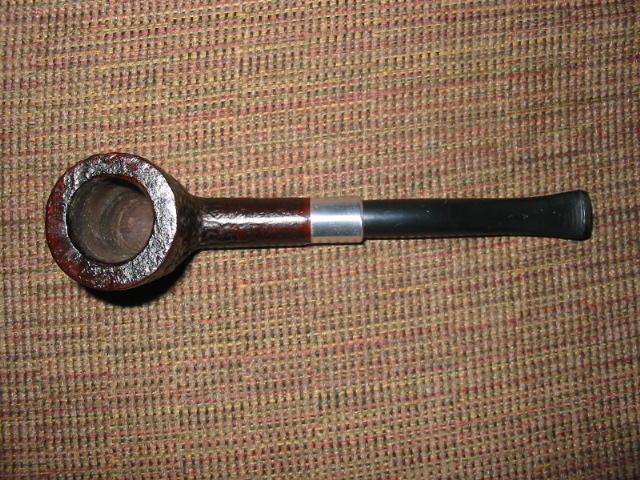
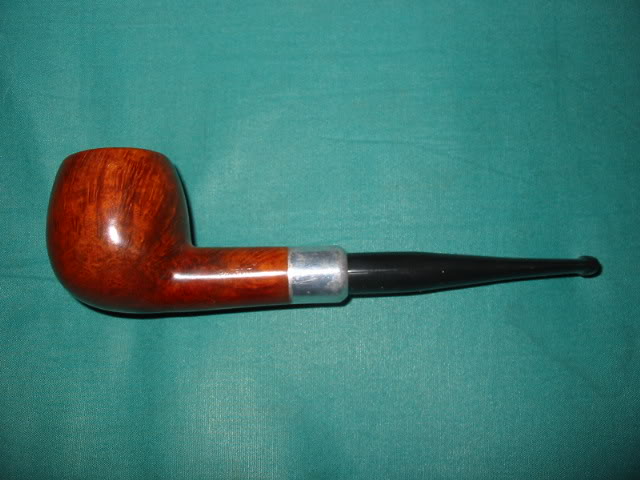
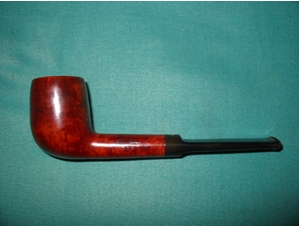
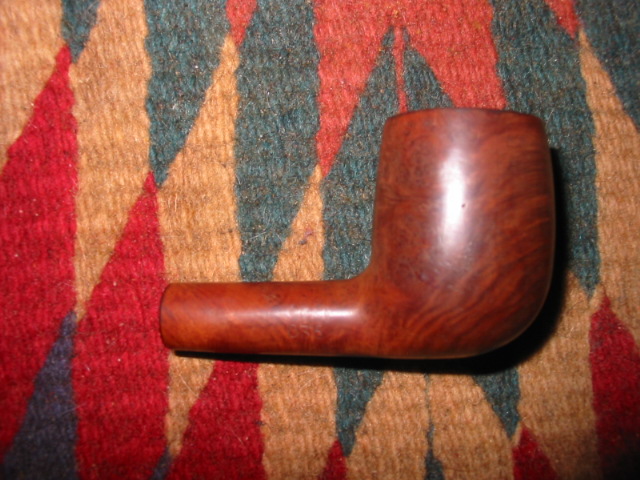
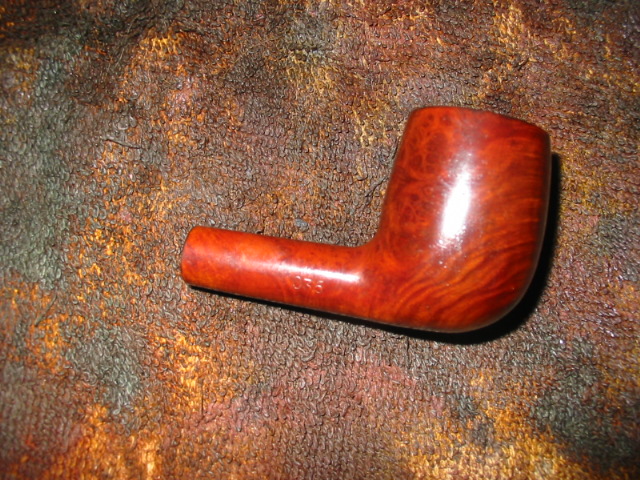
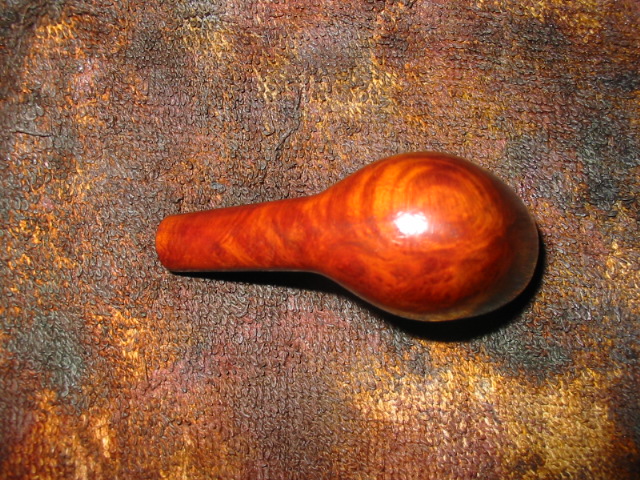
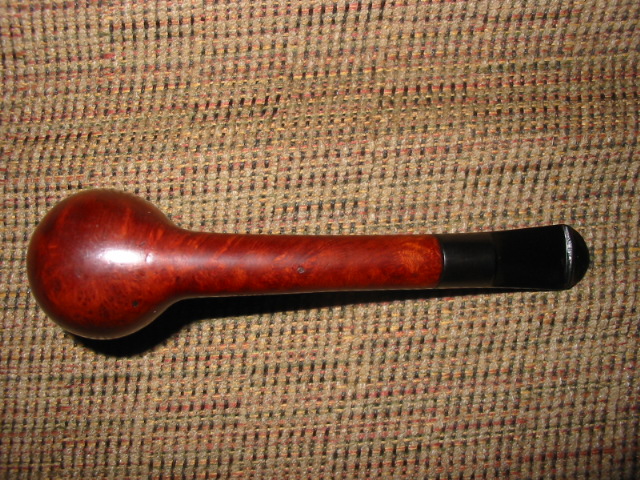
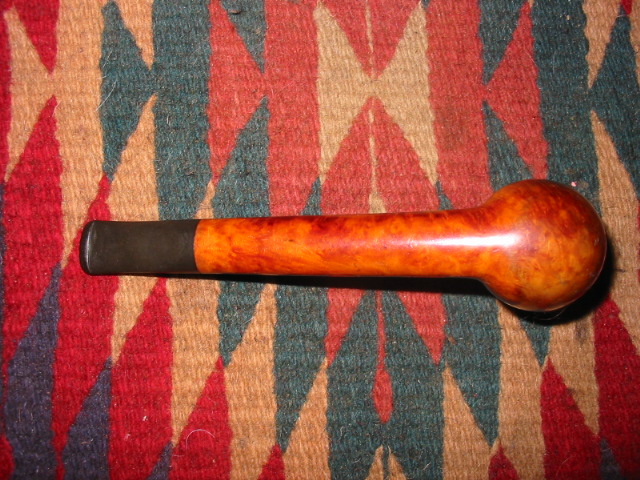
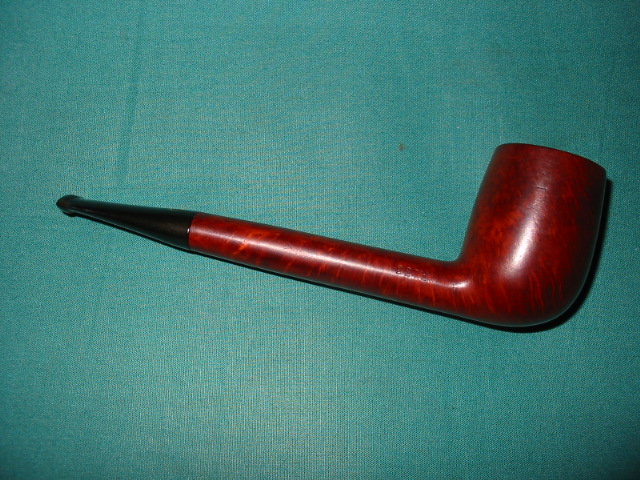
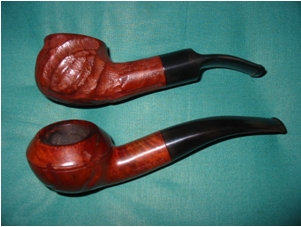
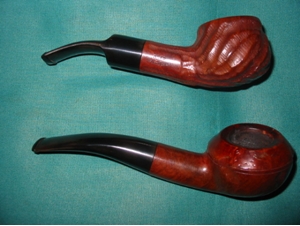
I scrubbed the exterior of the pipe with Murphy’s Oil soap, undiluted. I wipe it on with a cotton cloth and immediately wipe it off. Others have said that it removes the stain if left to long and it does indeed do that. But I have found it unsurpassed in quickly removing grime and grease if rubbed on and rubbed off quickly. I worked on the rim as well with a soft bristle tooth brush and the oil soap to remove the buildup. Once that was done I put it in the alcohol bath and removed the finish that was on it. It seemed to have had some built up waxes and also some kind of varnish coat over the stain. It came off with a bit of elbow grease after soaking. I decided to not stain this pipe as the briar looked great as it was. I just sanded it with the micromesh pads to polish it and remove the surface scratches. Then I took it to the buffer to give it a buff with White Diamond.

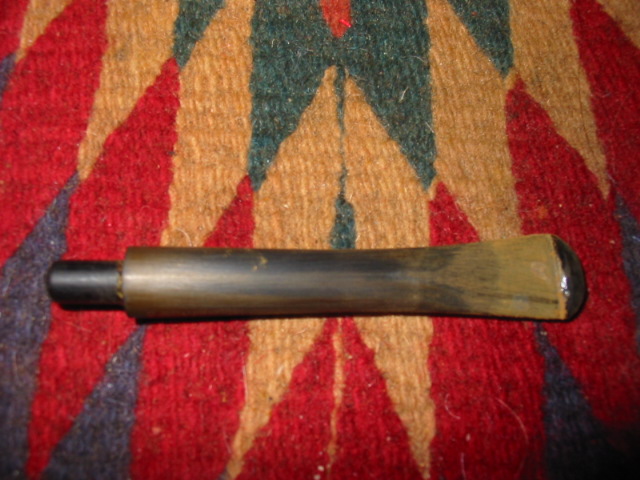
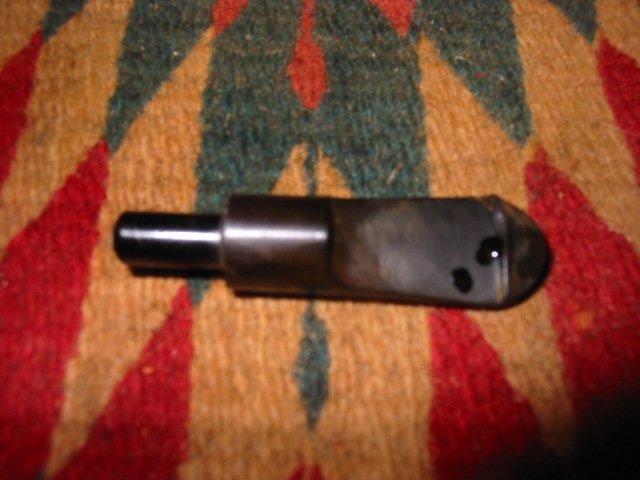
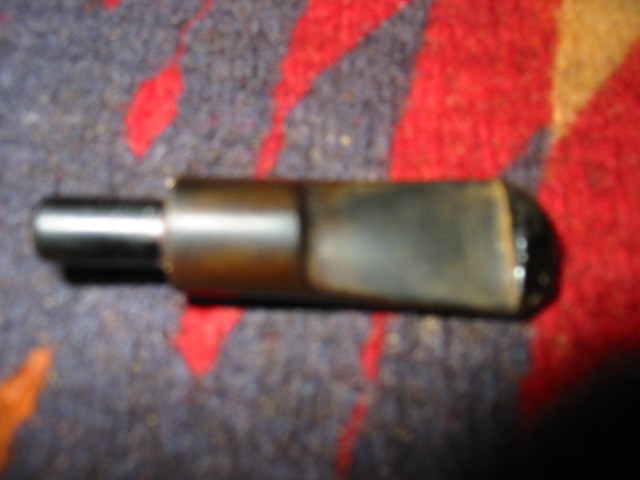
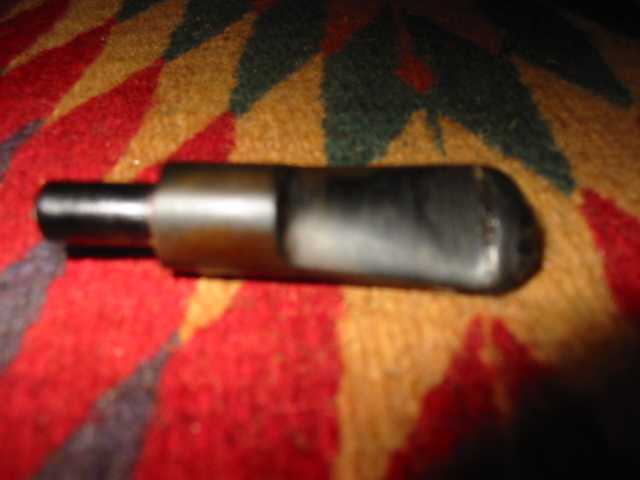
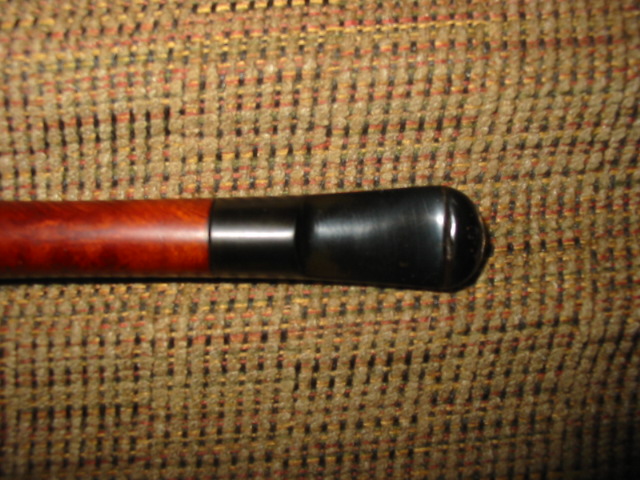
I worked on the stem while the bowl soaked in the bath. I soaked it in the Oxyclean mixture for a while to soften the oxidation. I dried it and buffed it with Tripoli to remove the surface oxidation. I sanded it with 240 grit sandpaper to get the deeper oxidation. I also had to lift a few tooth marks from the underside of the stem near the button. I used the heat gun to do that. The bubble on the top of the stem also was heated to try to smooth it out. It was evidently not a blister but a bump from teeth. It went back in place with the heat. I sanded the remaining signs of bite with 240 grit sandpaper and then 400 and 600 grit wet dry and water. I finished it with the normal regimen of 1500-6000 grit micromesh pads to polish. I put it back on the bowl and then gave the entirety a buff with White Diamond to polish it and finished the restoration with several coats of carnauba wax.

ImageImageImage

Restored a Comoy’s Tradition from the 50’s


I have been looking for a Comoy’s pipe in the higher grades since I read a thread on Smokers Forums on the various grades of Comoy’s. On my anniversary trip to the States I came across a nice Tradition at an antique store. With a little bit of haggling the pipe and three others became mine (in the picture below the top pipe is an older Edwards that I picked up the next day at a different shop).

Please forgive the blurry pictures in the next foursome, I was too hurried to get at the clean up and restoration and did not focus them well. They are clear enough to see that the finish was in pretty good shape. The bowl was thickly caked and the rim was gummed up and looked to be dented. The stem was clean but oxidized and had tooth marks on the top of the stem near the button and on the underside in a matching pattern. I did a bit of field dressing to the pipe last evening while we were at the hotel, cleaned the stem and the inside of the shank with Isopropyl alcohol and also sanded the stem with a piece of 240 grit sand paper and some micromesh pads I had in my bag. (I know – it was my anniversary but I had thrown my book bag in from work and when I opened it I found the sanding disks. I have them in the bag when I have a break at work and want to get outside and have a pipe and work on one I have with me.) My wife was occupied with talking to the kids on the phone and looking through her purchases from the days shopping. So I had about an hour to do a bit of work!

I wiped down the top of the bowl with some Murphy’s Oil Soap (undiluted) on a cotton facial cleansing pad I picked up in the US. I had read about that on a post by Alan (Castana on SF) and they work very well. I applied the soap and removed it three times to soften and remove the grime. Once it was gone I found that the rim itself was pretty pristine. Just a little bit of wear on the chamfering on the right front. I reamed and cleaned the bowl and shank. I also used the micromesh pads (1500 and 1800 grit) on the rim and then restained the rim only with a dark brown aniline stain, wiped on and buffed off to match the bowl.

I worked on the stem next. It had bite marks on the top and bottom side near the button. I heated the stem and raised them as far as I could with heat then sanded out the remaining marks. To sand them I used 240 grit sandpaper first then used a fingernail sanding board that I picked up at Walmart this afternoon before coming home. It is pictured below in several of the pictures with the stem. It worked extremely well to remove the remaining tooth marks in the stem. I cleaned the oxidation with micromesh pads (1500-6000 grit) and put it back on the pipe to give it a buff with some Tripoli before returning to finish the polishing with the micromesh pads. I gave the stem a coat of Obsidian Oil and let it soak in before taking the whole pipe to the buffer to buff it lightly with White Diamond and several coats of carnauba wax.

Here is the finished pipe. I have been researching the stamping on this one. I found out that the stamping dates it to the early 1950’s. It is stamped in a circle with “Made” at the top, “In” in the middle and “London” at the bottom with “England in a straight line beneath. From the Derek Green’s History of Comoy’s Article I quote: “I believe this stamp was first used in the export drive in the early 1950’s and I have not seen any pre WW11 Comoy’s stamped in this way”.
http://www.derek-green.com/comoy_history03.htm

Selected Straight Grain (Comoys) Restoration


By Al Jones

Several months ago, a thread on the SmokersForum.uk about the Comoys “Selected Straight Grain” pipes piqued my interest. Member Dirigo (Tom) was kind enough to share with me how to identify these interesting pipes. I was able to grab this Shape 13 via Ebay last week, which corresponds with the Comoys shape chart. That shape looked to be in decent shape, with the exception of one putty fill. I assume this flaw made the pipe unworthy of the Comoys stamping. There were only the slightest tooth marks and no pesky stem logo to worry about.

From the Ebay picture, you can see the ugly fill.

There was only minimal cake inside the bowl so it was lightly reamed and soaked with Everclear and sea salt. The top of the bowl was scarred, so that was going to take some work.

While the bowl was soaking, I started on the stem, which had been soaking in a Oxyclean solution. I went thru my usual 1500/2000 grit wet paper that onto the final four micromesh grades. The stem was then buffed with white diamond and a final plastic polish. Removing the light chatter was pretty straight forward. The button was worn, so I used a needle file to slightly reform the edges.  Unfortunately, I was unable to remove the oxidation without making the edge of stem slightly rounded.  I need to learn how to avoid this issue.

Once the bowl was done soaking it was moved to an alcohol bath to remove the stain. I spoke to Steve prior to this step and he recommended the fill be corrected using the superglue & briar technique he recently posted on Reborn Pipes. That solution worked well and I used two steps to fill in the pit. After restaining, the fill is just slightly visible, a big improvement from the factories solution using the bubble-gum putty.
The Super-Glue and briar dust patch.

I used a two-step stain process to highlight the grain, also a recommendation from Steve. First I “painted” on some black stain, after the bowl was warmed to open the grain. Then, the bowl was sanded with micromesh and a very diluted application of Medium Brown stain was applied. The bowl was than buffed with Tripoli and white diamond, followed by a final buff with Carnuba wax. I was careful on all steps not to diminish the stamping, which is quite legible.

Thanks to Steven Laug for his help with this one and Tom for information on this interesting Comoys niche.

Keyser Hygienic Patent Pipe


Blog by Steve Laug

Over the past year I have been picking up these Keyser Hygienic pipes on EBay. This one makes the third one I have picked up at a reasonable price. They are made in England and sold exclusively in South Africa. The word is that they were designed to be virtually indestructible for farmer pipe smokers in SA. All versions of the pipe have the same stem – one size fits all. They seem to be made of nylon and rubber or some combination. They are tough and take tooth wear very well. Two of the three I picked up are older and both had the original stems on them. They had tooth chatter and minor dents. Steaming would not raise the dents at all. I had to deal with them with sandpaper and micromesh sanding pads.

The photo below came from the web and pictures a cutaway picture of the pipe and the unique condensing chamber that makes up the patented portion of the pipe. The shank has an aluminum condensing chamber with a tube in the centre that lines up with the tube inside the stem. It is pointing downward so air swirls around in the chamber formed by the military bit stem and the shank. Moisture is trapped and the smoke is cool and dry without loss of flavour.

Image

The pipe I am working on this time is a pot shaped sand blasted pipe. The aluminum was oxidized and dull the blast was dirty and the crevices filled with dirt and grime. The stem was in pretty clean shape other than the tooth chatter near the button. The rim of the bowl was tarred and caked. The cake was uneven and tapering in the bowl – almost as if the bowl was only half filled and smoked that way the majority of the time. The upper portion of the bowl had a very thin layer of cake and the lower portion a thick uneven cake. The condenser in both the stem and the shank were filled with a dark brown tar and the airway was constricted in the shank and clogged in the stem. The photo below shows the condition of the bowl and the stem and highlight where the work would be needed to clean up the exterior of this pipe.

Image

I reamed the bowl back to bare briar and scrubbed the blast surface with a brass tire brush to clean out the crevices. I also used a soft bristle tooth brush to finish cleaning the surface off. Once that was done I put the bowl in the alcohol bath to soak while I worked on the stem. The next two photos below show the stem after I used 240 grit sandpaper to remove the tooth marks and slight dents. I then used micromesh pads from 1500-6000 grit to polish the stem and work out the scratches. I have learned the hard way that you cannot buff these stems on the buffer as a little bit of surface heat from the buffing pads melts and distorts the surface. So these stems are totally buffed and polished by hand.

ImageImage

The next two photos show the stem after it has been sanded up to the 3200 grit micromesh pad. The stem is beginning to get a shine and the scratches are disappearing with the sanding. From this point I went on the sand the stem through the remaining micromesh grits and when finished I gave it a coating of Obsidian Oil to penetrate the surface and give it a deep polish. Once that dried I buffed it by hand with some carnauba wax in paste form that I purchased from Walker Briar Works.ImageImage

From the next series of photos you can see that I interrupted my work on the stem to remove the bowl from the alcohol bath. I did that because I was curious to see how it was cleaning up. You will notice in these photos the brownish grey sludge in the grooves of the blast. I used the tooth brush once again to scrub the surface with Isopropyl from the alcohol bath. Once the grime was removed I washed the bowl down with clean Isopropyl and dried it off.

ImageImageImage

The next series of photos show the dried bowl. The grime is gone and the finish is now down to the stain. Even some of the top coat of stain has been removed and you can see the briar. I laid the bowl aside and finished up the stem as I described it above.

ImageImageImage

The aluminum condensing chamber on the shank and the chamber in the stem needed much work. I used cotton swabs that I flattened to clean the area inside the shank around the airway extension and the same in the stem. Once that was clean I polished the oxidized aluminum with the micromesh pads to burnish the aluminum and get the shine back.

Image

I then restained the bowl with a dark brown stain, knowing that when I buffed it the reddish brown undercoat would shine through on the high spots and the dark would fill the crevices and give the pipe a contrast stain. The next series of three photos show the staining and the way the various grains took the stain. The right side of the bowl has a great ring blast that is fairly deep and craggy. The left side is more of a blast on birdseye. It is an interesting looking blast. The bowl rim came out clean as well and shows an interesting contrast in the light of the flash.

ImageImageImage

The final series of four photos show the finished pipe. The entirety has been given a coat of wax. I used Halcyon II on the blast to polish it without leaving the white residue in the grain of the blast when it dried. I buffed it by hand. The stem received another hand applied coat of carnauba wax and a buff by hand. The pipe pictured is clean and ready to smoke.

ImageImageImageImage

I have included pictures below of the other two Keyser pipes that I picked up and refurbished. The top one is an apple with really nice grain. I have been smoking this one and enjoying the dry and cool smoke that it gives. The second is a smaller prince shape that is no longer available. It had some burns on the rim that are still visible but it too smokes very well. One day will rework the rim a bit and minimize the burn marks. Till then I will smoke these Keyser’s and keep an eye for more of them.

ImageImageImageImage

A Barlings Make Saddle Billiard


Blog by Steve Laug

I enjoy working on Barlings pipes. They are generally carved from great pieces of briar and clean up nicely. They are light weight pipes with one of the most comfortable bits ever made IMHO. I had picked up this little Barlings Make 1364 Billiard. I have no idea on this one’s age as I have not bothered to look it up yet. It is stamped Barlings in an arch over Make inside the arch and then 1364 below that. The other side is stamped with an L. It has the Barlings thin bit saddle stem bearing the Barlings cross on the top and nothing on the underside.
Barling1Barling2

This one came with an over reamed bowl leaving the bowl walls thin and the bowl out of round. The left side was considerably thicker than the other sides. We are not talking a huge difference but visually it was off. The thin sides are probably a 1/8 inch thick and the left side was about a 1/4 inch thick. I carefully rounded the bowl with a knife to bring the 1/4 inch side into sync with the remainder of the bowl. The result is a much more balanced look to the bowl. Then I sanded the bowl carefully so as not to affect the finish on the top of the bowl and then buffed and polished the whole pipe. I am happy with the results and with some careful smoking this one should be able to build a good cake and last a long time.

Image

In terms of the stem I wanted to preserve the Barling cross stamped on the top and the profile. It was not in too bad shape as can be seen from the photos though it was oxidized. The oxidation I worked on by soaking it in Oxyclean to soften it. I find that though it does not remove the oxidation it makes it easier to deal with. I then carefully sanded the stem with micromesh pads. I worked with the 1500 grit pad to sand around the cross and not lose it. I also worked over the surface of the entire stem with the 1500 grit. Then I worked through the rest of the pads from 1500 to 6000 to give the pipe stem a polish. The only thing left to do was to give the pipe a good buff with White Diamond and carnauba wax to finish it up.

ImageImage

Using Super Glue to Repair or Replace Putty Fills


Blog by Steve Laug

On one of the forums another member and I were chatting bemoaning the red putty fills that so often are a part of old time pipes. I have no idea why they choose to use the red putty but as the pipe ages and the stain mellows with age the putty sticks out in all of its awfulness! I really do not like the look of red putty fills. They have a look like pink/reddish bubble gum. On smaller ones I used to pick them out and refill them with briar dust and wood glue. I always over filled them a bit as the glue shrunk as it dried and I found that the wood glue did not take the colour of the stain well. I left that discussion behind and went to work the next day with other things on my mind. I came home that evening and a PM was waiting for me. Another member remembered that an old pipe repairman friend of his used to use superglue and briar dust to repair fills. He asserted that once the glue was dry it was invisible and the stains would cover it as well.

I had this old bulldog in my pipes to be repaired box. There were two large fills on it that had more or less fallen out over time. What remained were two rather large holes or divots in the right side of this old pipe. The top arrow points to the one on the shank about mid way between the bowl and the band. The lower arrow points to the on the lower portion of the bowl.

Image

I used a dental pick to clean out the remaining red putty from the pits. I wanted the holes to be clean of any remnant of the putty. I also used cotton swabs and Isopropyl alcohol to wash out the areas where there was any putty left. Between the pick and the swabs the holes were cleaned out and open as they appear in the picture above.

I then took a tin of briar dust I have saved from pipes I have worked on over the past months. I keep some on hand for patches like these. I wet the end of the dental pick and dipped it into the briar dust and move it around to form a ball of the dust on the end of the pick. I used my finger to move the dust ball into the hole on the shank and the bowl. I patted the dust into the hole with the tip of a knife blade as I wanted a good tight fill. I then squeezed a few drops of super glue into the dust in the hole. As I did this the dust would shrink a bit and I added more dust and more super glue. When I was done the holes were filled and both had a small bump over where they used to be. I always over fill the holes so that when I sand them down they are smooth and I can feather in the fills with the rest of the briar. I was fortunate in this case that the holes were lined up with the grain marking around them. Once the glue dried (very quickly by the way) I sanded and checked to see if I had missed any spots. I wanted the entire surface smooth to the touch and under a jewelers loop. I sanded the spots down and blended them into the bowl surface. Once that was done I wiped the bowl down with a cotton cloth dampened with Isopropyl alcohol to remove any remaining dust.

I then set up my stain area and stained the pipe with an oxblood aniline stain. In this case I did not let it dry but wiped it on and wiped it off. I wanted to make sure that I was getting good coverage on the fills. I repeated the staining until the colour was what I was aiming for. The picture below is of the same pipe after staining and buffing with White Diamond. It was finished with several coats of carnauba wax. Can you see the fills that were evident above? I assure you that in person it is just as hard to see them.

Image

Refurb on a Two Point Billiard – Gnawed Stem


This is the second Two Point pipe that I had in my box to be refurbished. It obviously was owned by the same pipe man as the little Lovat as evidenced by the matching bite marks. The pipe had an uneven cake in the bowl making the bowl conical even though it was U-shaped in reality under the cake. The rim was dirty and tarred but not damaged with dents or knock marks. The finish was spotty and uneven so the bowl would need to be stripped and restained for good coverage. The biggest problem can be seen in the first two pictures below: the stem was very badly chewed. In the first picture it can be seen that the top of the stem had several deep bite marks and the button was eliminated on the left side. It was more of an upward slope to the tip than the sharp angular edge that was originally there. The round cap of the top of the p-lip button was smoothed out and no longer crowned. In the second picture you can see that the bottom tooth marks and bite throughs had been repaired with what appeared to be epoxy that was fairly caked on the stem tip to the point that the lip line and the button were gone. What remained was a working stem that had no beauty to my eye.

ImageImage

The third and fourth photos show the profile of the button and it can be seen to have been virtually eliminated with the slope of the epoxy on the bottom edge and the chewed top edge. You can also see the state of the finish on the pipe. The spottiness and grime that covered the outside of the bowl are visible. Obviously this was a good smoking pipe that the previous owner cobbed a repair on so that he could continue to enjoy smoking it.

ImageImage

The next two photos are enlarged to show the state of the stems. The first one shows the top of the stem and you can see the two large dents (interestingly they are in the same place as those on the other Two Point pipe).You can also see the wearing away of the edge of the button to a slope. The crown is also flattened. The second shows the underside of the stem and the remaining two dents – one next to the button on the bottom half of the stem and the second inward from that dent. You can also clearly see the epoxy patch that fills the bite through and the button. The usual line that separates the button on the p-lip from the stem is gone. To repair these two surfaces the dents need to be raised and the holes filled to the point where it is possible to cut a new button on the top and the bottom. The crown will need to be built up a bit and the epoxy patch hidden or blended into the black of the stem.

Image

IMG_7946
I decided to work on the top side of the stem first and heated the surface of the vulcanite to lift the dents as much as possible. Once that was finished I filled what remained of the two dents with black super glue (see the first photo below). The dent next to the button I over filled so that I could have room to recut the edge of the button. When the glue had dried I sanded it back with 240 grit sandpaper to even the surface. I also recut the button edge to give it more of a sharp distinction. The sanded top surface can be seen in the second photo below.

Image

Image

On the underside of the stem I decided to recut the button and the line with needle files before I refilled the dents and the epoxy patch. I sanded off the extra epoxy to get the surface smooth and level with the surface of the stem. I used 240 grit sand paper to bring the surface down and the needle files to cut the edge on both sides of the line. You can now see that line in the picture below and there is a definite break between the bottom of the p-lip and the stem. It is a duplicate of the button on the Two Point Lovat.

Image

Once I had that recut the button area I filled the surface of the stem with black super glue as seen in the picture below. I propped it with a pen to keep the surface level as I did not want the super glue to run and pool. I also built up the epoxy patch on the edge of the button as well. Once the glue was dry I sanded the surface and did a bit of work with the needle files to redefine the edges. The second picture below shows the sanded stem with a smooth surface.

Image

Image

I finished sanding the stem with 400 and 600 grit sandpaper and water and then moved through the micromesh pads from 1500-6000 grit. The trick was to build a black coating on the epoxy patch. This took repeated coats of the black super glue. Once that was complete then the stem could be polished by hand until I finished with the bowl refinishing.

While I had been working on the stem the bowl had been soaking in the alcohol bath. Before dropping it in the bath I had wiped it down with a soft cloth and acetone (fingernail polish remover works very well) to remove the finish and the grime. It was time for it to be removed from the bath so that I could work on it. The three pictures below show the bowl after it has dried off from the alcohol bath. It now needed to be sanded with micromesh to remove any surface scratches and the rim needed to be thoroughly wiped down in preparation for the staining. I sanded and then wiped it down with a soft alcohol soaked cloth and set up the staining area.

ImageImageImage

The next four photos show the restained bowl. I used a medium brown aniline based stain (Fiebings Leather Dye) to stain the pipe. Once it was stained I flamed it and buffed it to polish the briar and make the grain stand out. The patterns of birdseye and swirls is quite unique. This is a clean piece of briar – no fills and no problem areas.

ImageImageImageImage

I then put the stem on the pipe and buffed the entirety with White Diamond and carnauba wax to bring it back to a shine. The final four photos show the finished pipe. Pay attention to the stem and button areas as they are now very distinct in the profiles and the build-up on the top and bottom give it back its original shape.

ImageImageImageImage

Rebuilding a chewed and dented stem with super glue


I just finished reworking this old stem from an Imperial Two Point Made in London Lovat. The stem was very unique in that it is a p-lip design though slotted in the airway. I have a second one that I am working on that has the same stem so I believe this is one of the hallmarks of the Two Point. That being the case I decided to restore the stem rather than cut a new one. You can see the state of the vulcanite from the three pictures below. The first picture is of the top of the stem. There were three major tooth dents in the surface of the stem, two chunks out of the edge of the button and a piece missing out of the edge of the lip of the slot. The second picture is of the underside of the stem. There you can see one major dent from teeth and also several smaller dents. There is also a dent in the edge of the lip of the pipe that has moved the straight line with a dip in it. The third picture shows the slot in the end of the stem, it is a bit out of focus but you can see the missing piece at the left side of the top edge.

ImageImageImage

I used my heat gun set on low to lift the dents as much as possible before working on the stem with sandpaper and superglue patches. I cleaned the surfaces of both the top and bottom of the stem after heating and then sanded them with 240 grit sandpaper to remove oxidation and anything that would prohibit the glue from sticking. In the first photo below you can see the two patches on the dents that remained after heating on the underside of the stem and the work that has been done straightening the line. I decided to work on the underside first as it needed a bit less repair. Once the glue was dry I turned the stem over and patched the top side. In the second photo below you can see the super glue patches on the surface of the stem, the two dents on the edge of the button to build up the edge. Once it was dry I planned on using needle files on both top and bottom to sharpen the edge of the button to a crisp restored look.

ImageImage

The next two photos show the top and bottom surfaces of the stem after sanding with 240 grit sandpaper to bring the glue patches flush with the surface and using the needle files to sharpen the edges of the patched button.

ImageImage

The next picture (I apologize for the blurriness but I think it still is clear enough to see the point I am making) shows the work that was needed to rebuild the lip of the button on the topside where the chip was. I carefully layered in black superglue making sure not to close off the airway. I used a greased pipe cleaner folded in half in the airway of the slot to provide a base to build on. Once the base was buildt I stood the stem on end and gradually layered in super glue to build up the top edge of the slot. The goal was to return it to a smooth rounded crown with a clean straight slot for the airway.

Image

The next two pictures show the build up area on the end of the button. It is a shiny black spot in the photo at the bottom right edge of the button. Each one shows a bit more of the build up to give an idea of the process. I would have to recut the edge of the button on the top side when the build up was complete.

ImageImage

When I had the surface filled to satisfaction I recut the edge of the button with the needle files and also sanded the surface with 240 grit sandpaper and 400 and 600 grit wet dry and water to smooth out the fill. I then proceeded to use my normal list of micromesh pads from 1500-6000 grit to finish the stem. I put the stem back on the pipe and buffed it with White Diamond. I took it back to the work desk and gave it a coat of Obsidian Oil, wiped it off when dry and gave the stem a final coat of carnauba wax. The pictures below show the finished stem. The first one shows the topside and the rebuilt crown of the button. The glare and shadows on the picture do not allow you to see clearly the recut edge but it is straight and clean. The second picture shows the underside of the stem and the crisp straight edge of the button. The final picture is an end shot to show the slot and the curve and flow of the crown of the button.

ImageImageImage

Overall I am pleased with the repair and now have a renewed pipe.

ImageImage

New Life for a Yello Bole Canadian


On a recent trip to the US to visit my parents I also visited several antique malls in their city. I have three that I usually have on my list when I go there. The one I want to focus on in this post is in an old grain elevator and has three floors of many “antiques” which always surprise me because many are the same age as I am!  Anyway, on the second floor I found a booth with two pipe racks containing over a dozen older pipes. Most were junk in that they had cracked bowls and broken shanks etc. But also in the midst of it was this old Yello Bole Canadian. It had some beautiful briar in it. Yello Bole is the grade down the line for KayWoodie, or so I am told. Pipes that don’t make the grade for KW will often be stamped with the Yello Bole brand. This one was stamped KBB in a cloverleaf on the top of the shank and next to it Yello Bole over honey cured, over imported briar. The stem has the yellow circle inlaid in the vulcanite. If memory serves me correctly this is one of the older pipes in the line.

ImageImage

The bowl was in pretty clean shape. The yellow coating was still visible in the bowl and the bottom half of the bowl was very clean with just a bit of darkening to the yellow coating. The rim was dirty and dented. There were tars on the rim and some deep scratches to go along with the dents. The bowl however, was still round, it had not been ruined by a reamer going a muck. The stem was oxidized and was slightly brown. There was light tooth chatter but no dents on the surface of the stem. The overall finish of the pipe had light spots and dark spots where the finish seems to have been exposed to light or was wiped down and finish removed. There was no over coat of varnish or of lacquer just solid clean briar with a spotty stain.

ImageImage

I broke the pipe down as seen in the pictures below. The stinger apparatus can be seen in the pictures. It is an aluminum shovel like contraption with the hole near the tenon and a long shovel like extension that extends through most of the shank. I cleaned out the bowl with an alcohol scrub on cotton swabs and cleaned out the shank with a shank brush, bristle pipe cleaners and fluffy pipe cleaners and alcohol. When they came out clean I worked on the outside of the bowl. I used cotton balls and acetone to wipe down the outside of the bowl and shank. I wanted to remove the rest of the finish so that I could prepare it for restaining. I applied the acetone until the bowl was free of the stain and finish. The pictures below show the cleaned surface of the bowl. I also used the acetone and some 400 and 600 wet dry sandpaper to clean the top of the bowl and rim. A folded piece of sand paper was used on the inner edge of the rim to clean the beveled edge. Before I stained the pipe I decided to clean and polish the stem. I used the Bic lighter method mentioned in an earlier blog post to get rid of the oxidation. In the pictures below the stem has the majority of the oxidation removed using that method. I then used 400 and 600 grit wet dry sandpaper with water and my usual list of micromesh pads from 1500-6000 grit to polish the stem.

ImageImageImage

Once the stem was cleaned and polished by hand I inserted it into the bowl and used it to hold the pipe while I restained it. I used a medium brown aniline stain on this pipe to approximate the original stain and to highlight the grain. I applied it with the dauber that came with the stain and then flamed it to set the stain. I then took it to the buffer and buffed it with Tripoli to remove some of the opacity of the medium brown stain and bring the grain to life. Once that was done it was buffed with White Diamond. Both the stem and the bowl were buffed. Care should be exercised in the buffing process to not obliterate the stamping. I use a light touch when buffing around the stamping. The four pictures below show the finished pipe – ready to load with a favourite tobacco and enjoy!

ImageImageImageImage


Refurb – A Pair of Custombilt Look A Likes


I just finished up on these two Custom Bilt look a likes. The Rhodesian shaped pipe has no stamping other than Imported Briar. The bent pot is stamped Aged Imported Briar on one side and Ben Rogers on the other side. I am not familiar with the brand. So if anyone has information on it please post it here. I would appreciate learning about the twosome.

ImageImageImage

Both pipes needed quite a bit of work to make them smokeable once more. The bowls had a thick cake and each one of them still stuffed with half a bowl of tobacco. The stems were rough and pitted from the oxidation and had a white lime like coat on them. They were very dirty inside and out. I cleaned them with a shank brush, bristle pipe cleaners and finished with fluffy ones all dipped in isopropyl alcohol until they came out clean. I buffed the stems with Tripoli after cleaning them to try and break down the coat of oxidation. It did not do much so I put them both in a bath of Oxyclean to soak. I find that though it does not remove the oxidation it does soften it considerably and makes sanding and buffing it off much easier.

Once they were soaking I turned to the bowls. First I reamed them both to remove the crumbling and uneven cake. I generally take them back to bare wood when they are in this state or at the most leave a thin bit of cake on the walls. I cleaned the rims with alcohol and a soft cloth and sanded it with 600 wet dry sandpaper to remove the tar deposits and carbon on them. Once that was done I dropped them in the alcohol bath to wet them and scrubbed them with a soft bristle toothbrush. I find that on the smooth and semi-rusticated finish of these pipes the tooth brush works very well to remove deep seated grime and loosen oils and dirt.  I then left them to soak while I went back to the stems.

After the soak the stems came clean pretty easily with 240 grit sandpaper, 400 and 600 wet dry sand paper and a finishing buff with Tripoli. I worked on them for a while with the sandpapers and Tripoli and then used White Diamond for the final polishing buff. I was careful to not buff the last bit around the stem edge that would meet the shank. I would finish it once the bowls were stained and ready. Then I would buff them together with carnauba wax.

By the time I was done with the stems the bowls were ready. I took them out of the bath and wiped them down. Once they were dry I restained them both with a medium brown aniline stain, flamed the stain and then buffed them with White Diamond to remove excess stain and give a contrast between the smooth portions and the rustication. I hand waxed them both with Halcyon wax and buffed with a soft cotton cloth.

ImageImageImage