Tag Archives: repairing bite marks

Resurrecting And Re-Stemming A Vintage Churchwarden Cutty With Reed Shank


Blog by Paresh Deshpande

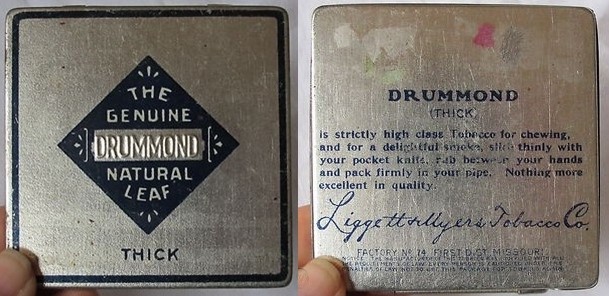
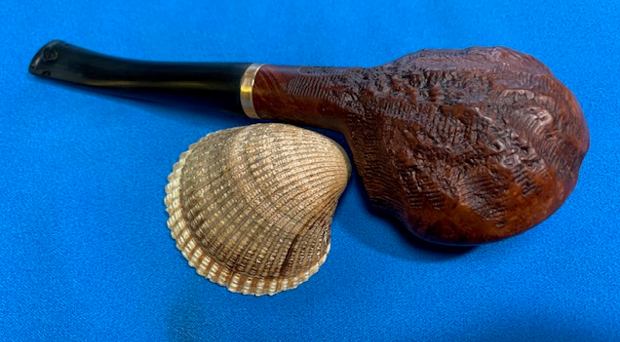
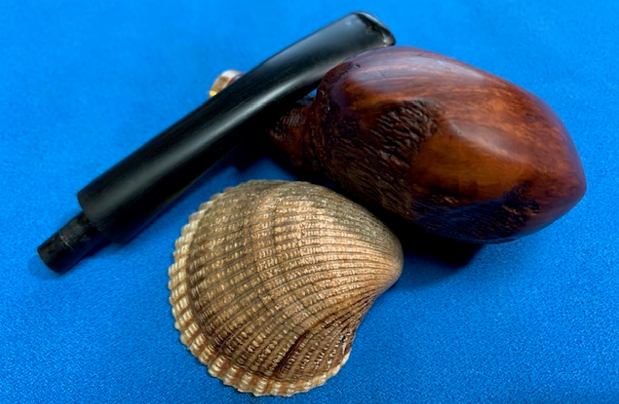
The next pipe that I selected to work on is an old, rustic no name Cutty shaped pipe with a long thin Reed shank that ended in a round orifice when I saw it for the first time. Closer examination confirmed that the round orifice was threaded implying that the stem was MIA. This pipe came to us in 2019 while Abha was in Pune and I was away at my place of work, as a part of estate sale by a French gentleman on Etsy which I am yet to chronicle. There are some really good, interesting and collectible pipes in this lot that I am looking forward to work on in coming days.

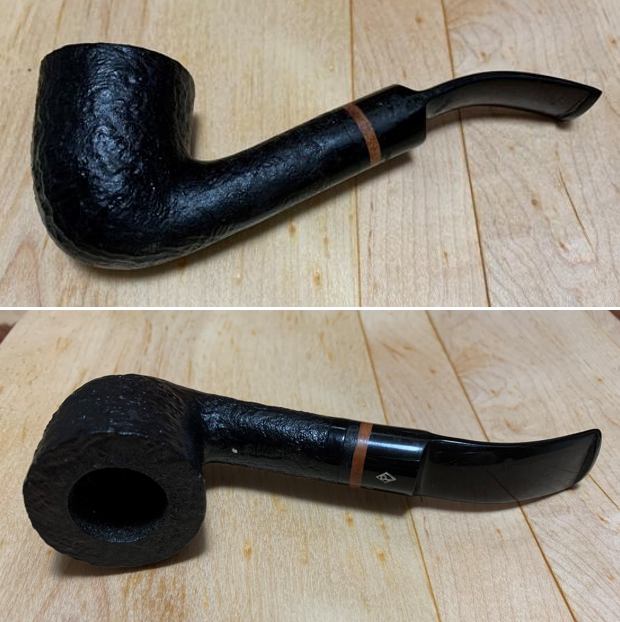
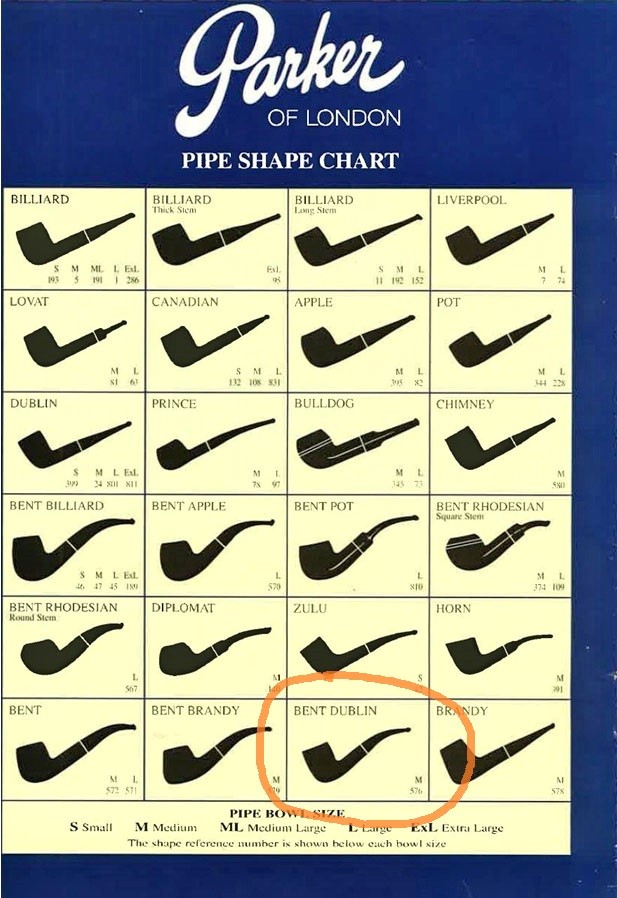
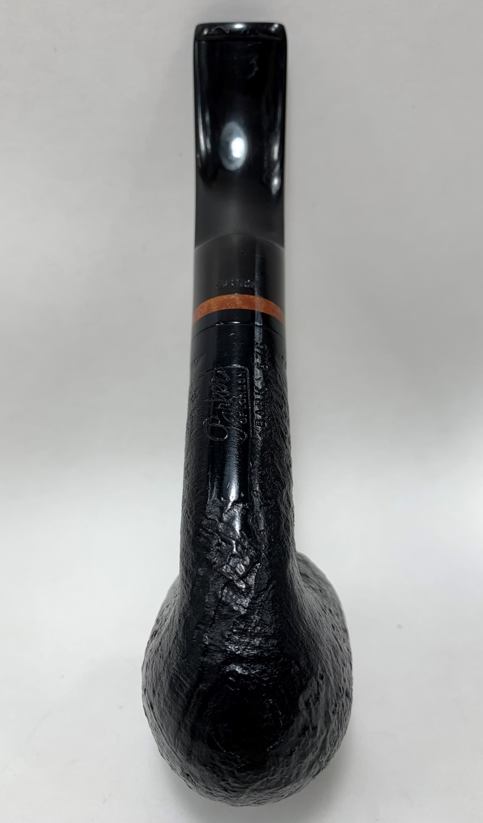
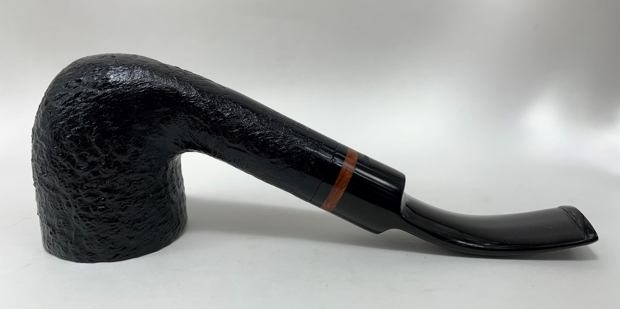
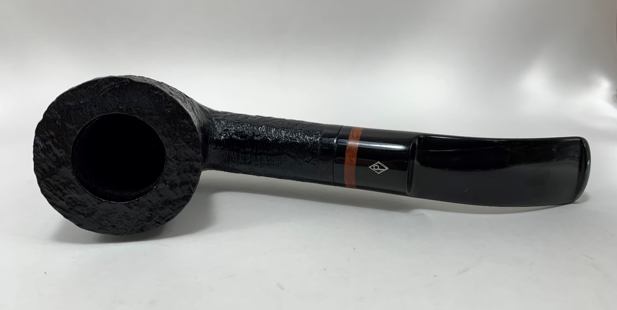
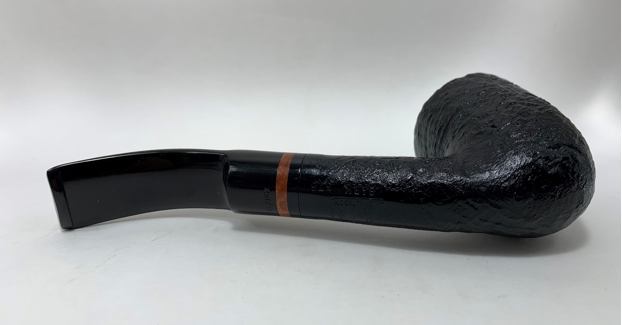
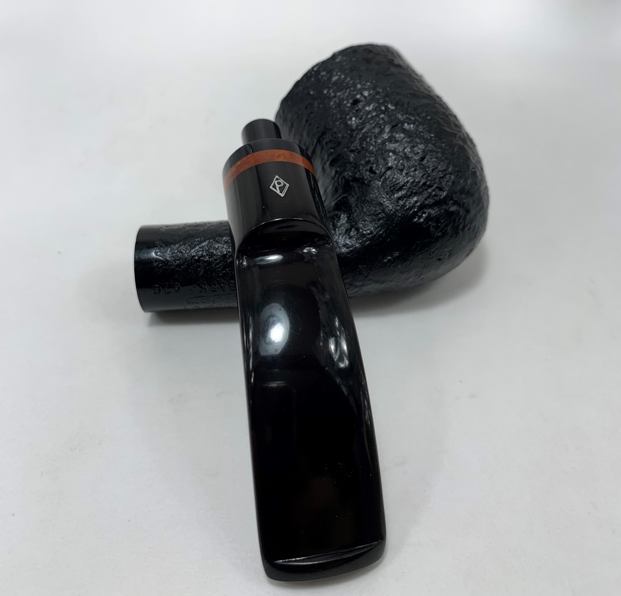
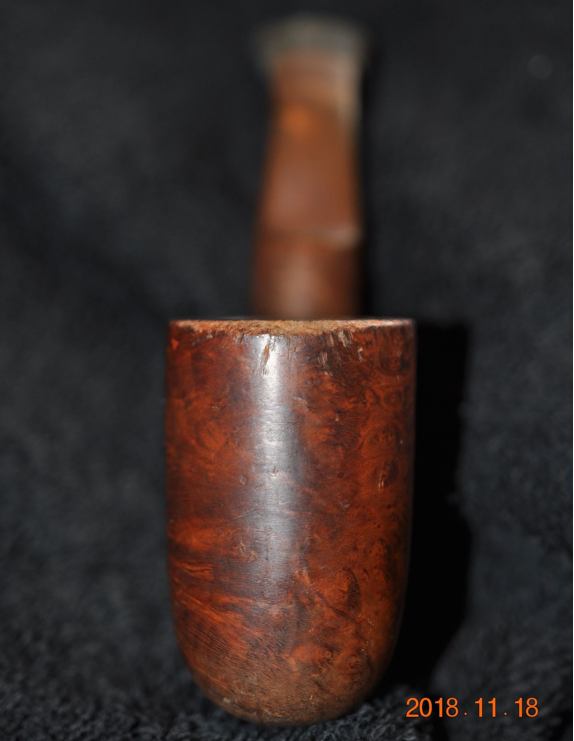
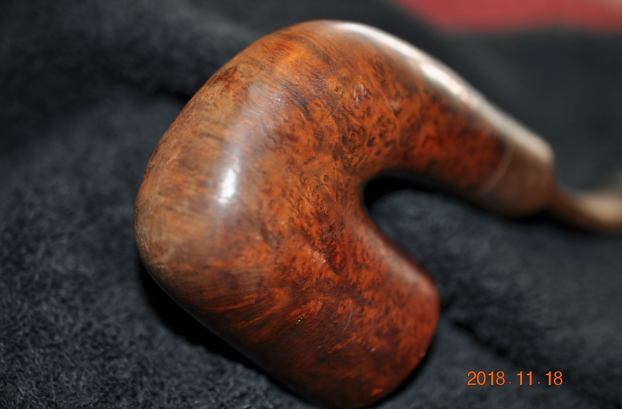
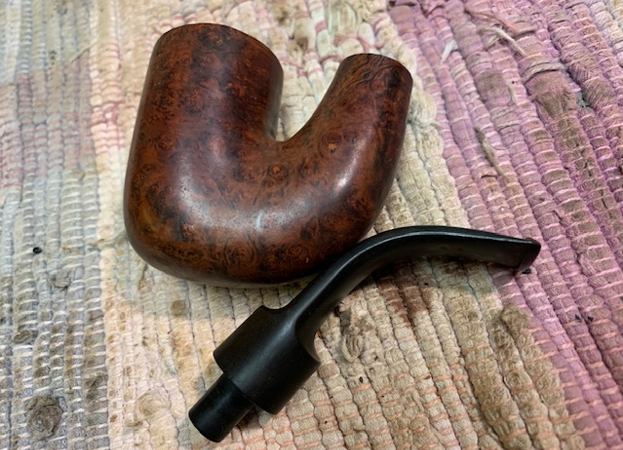
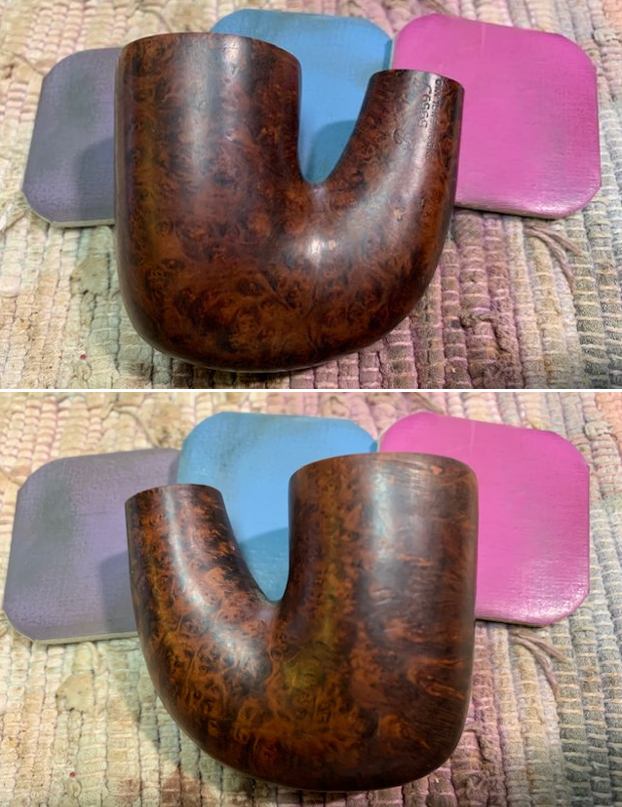
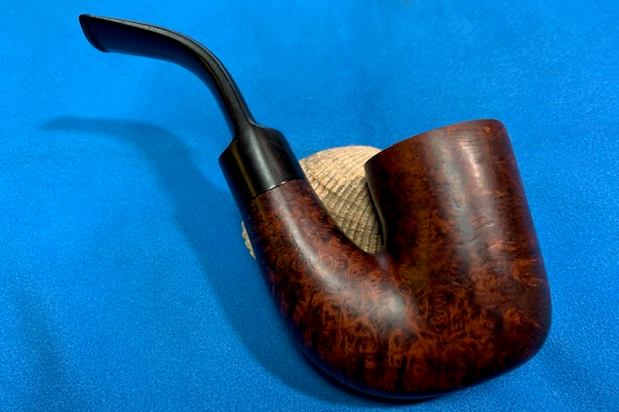
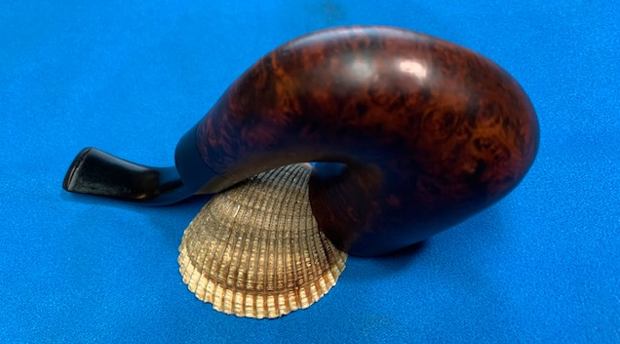
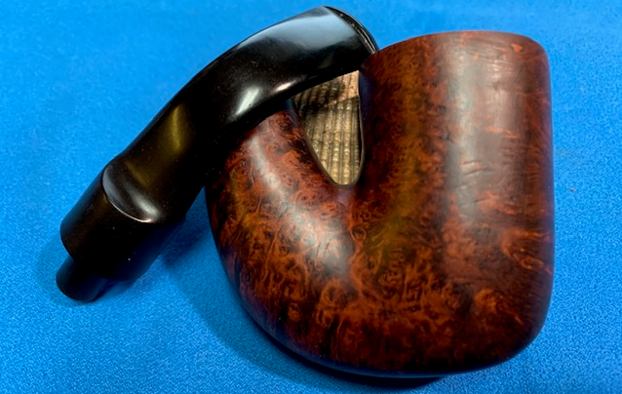
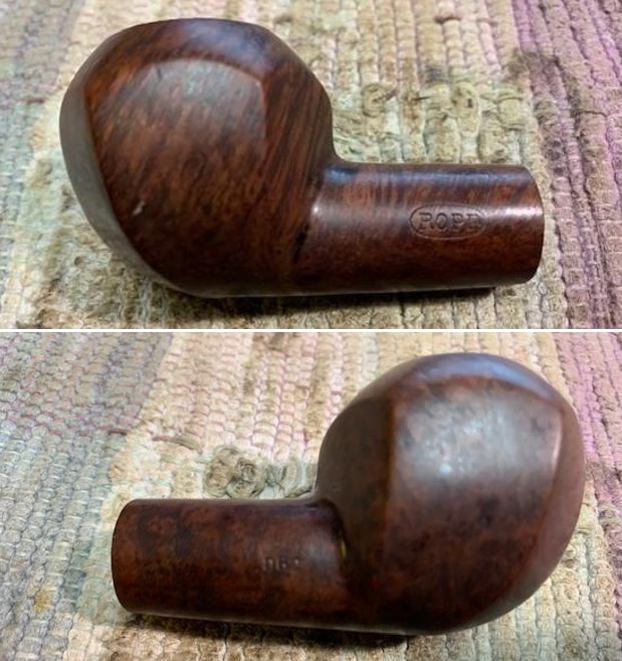
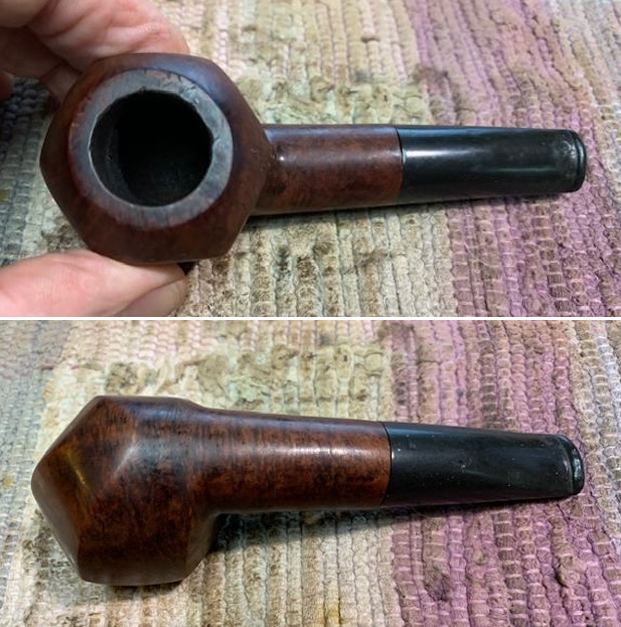
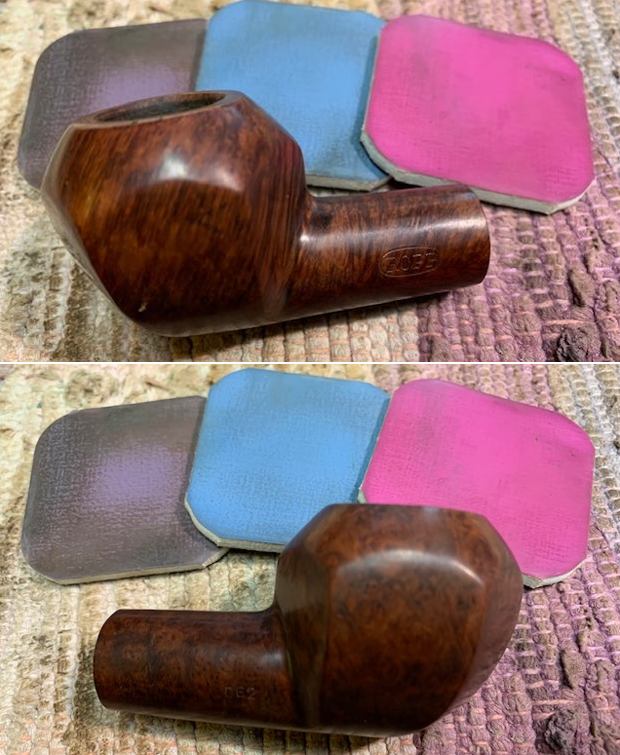
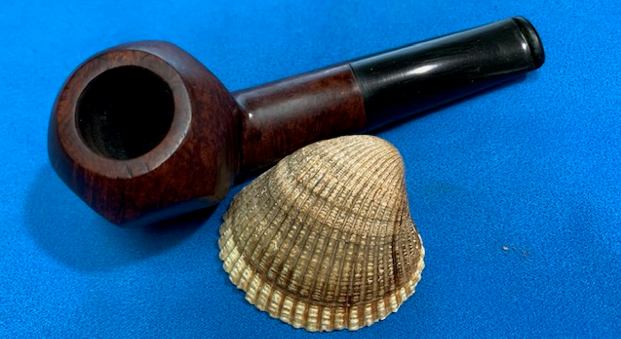
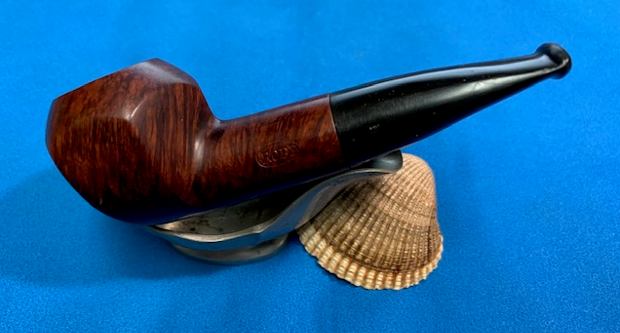
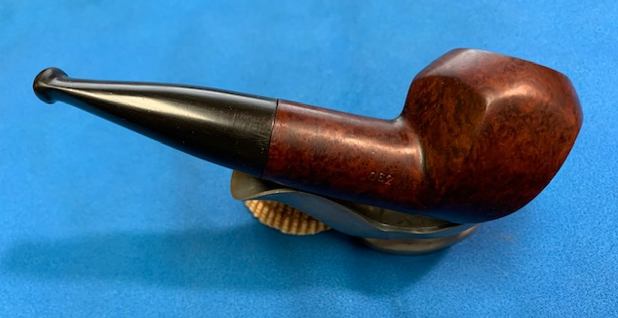
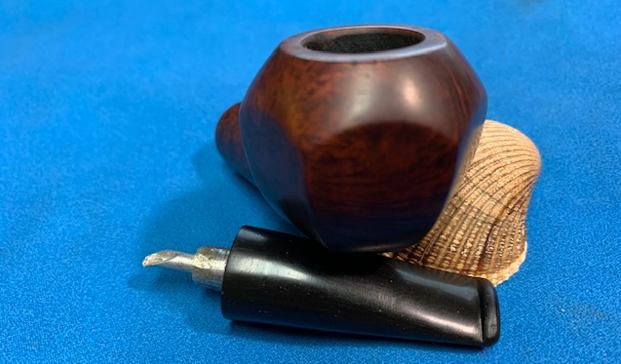
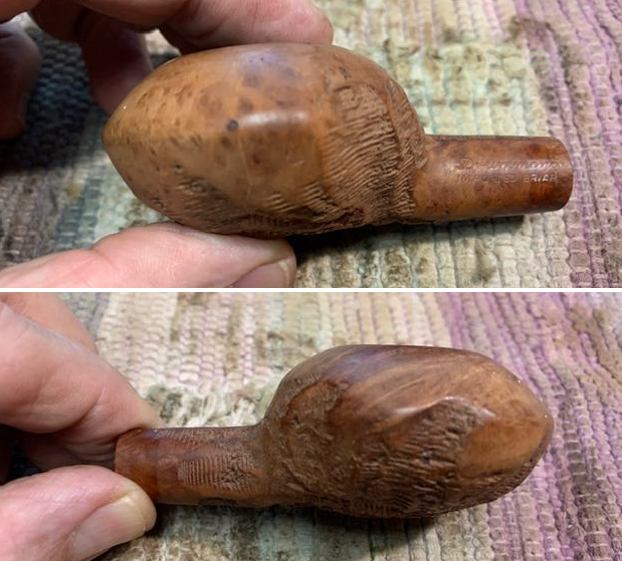
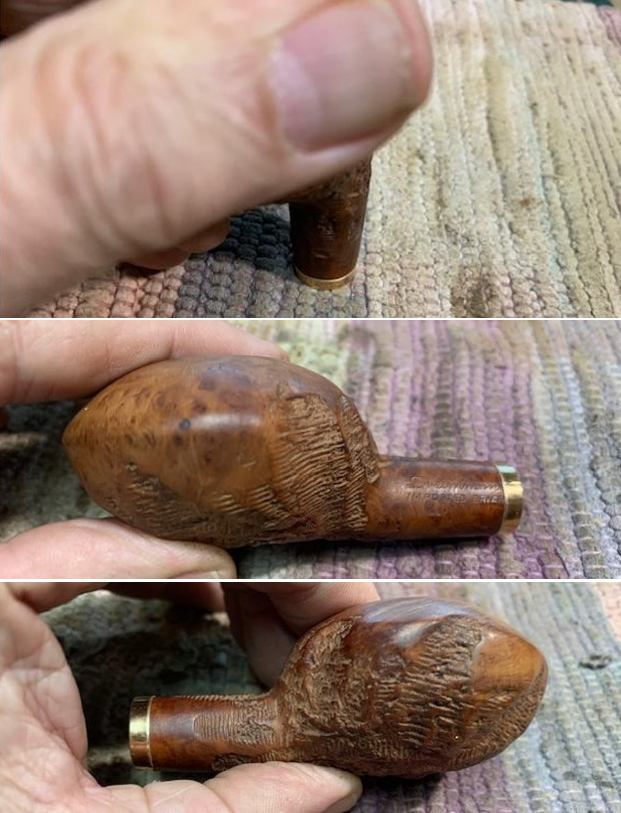
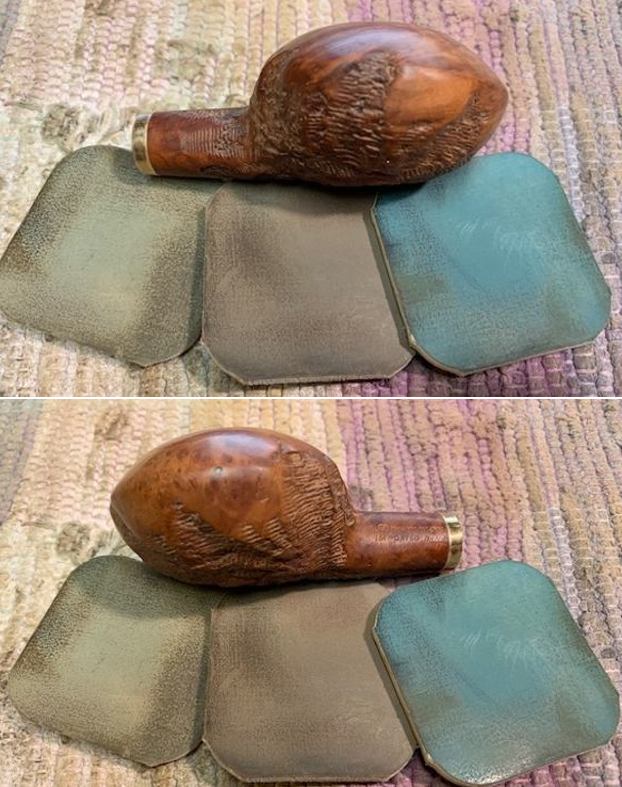
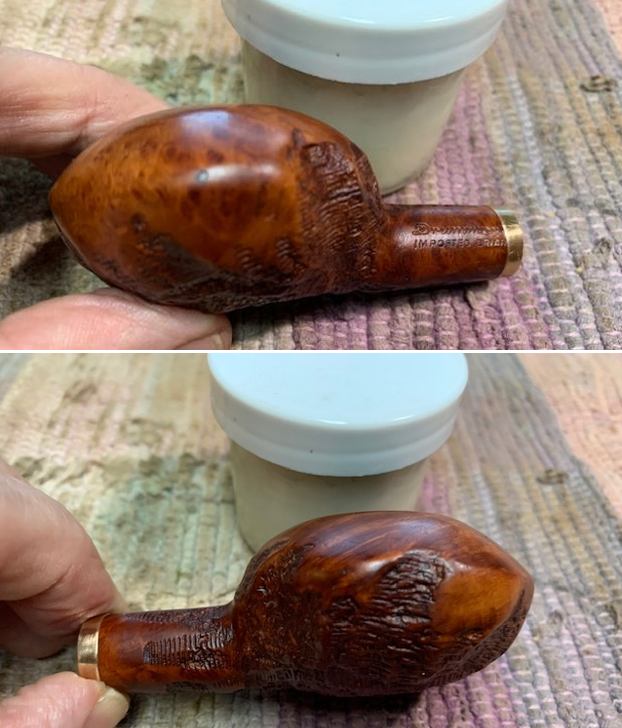
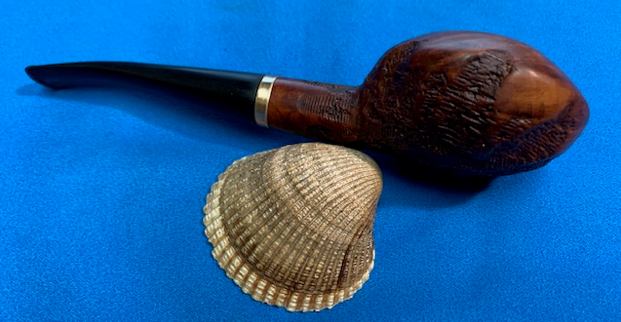
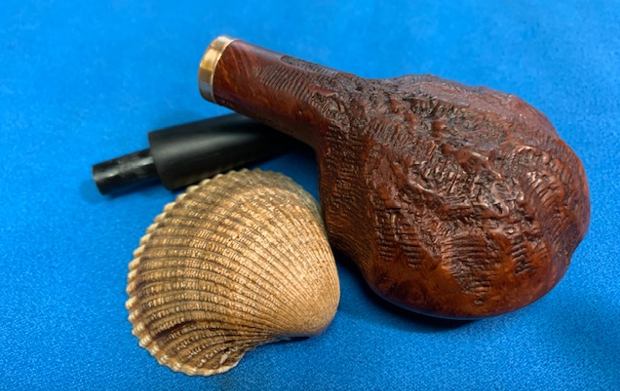
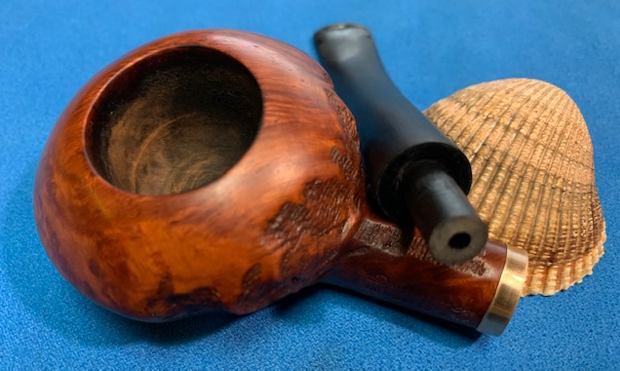
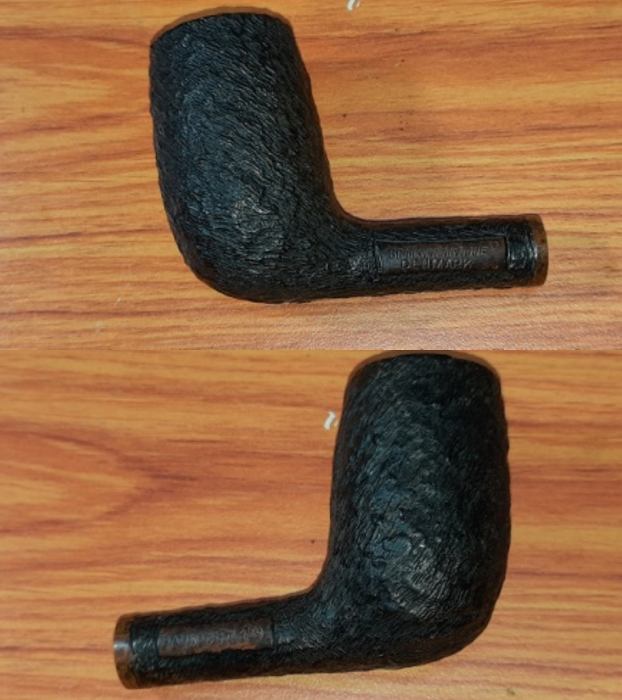
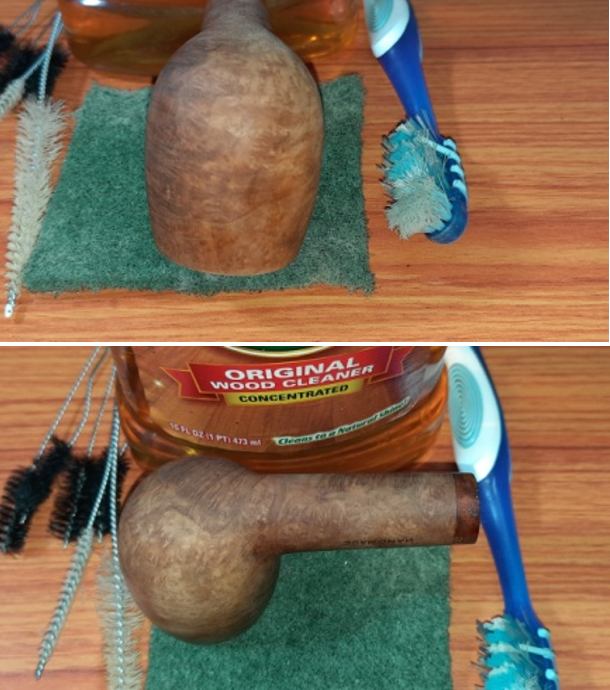
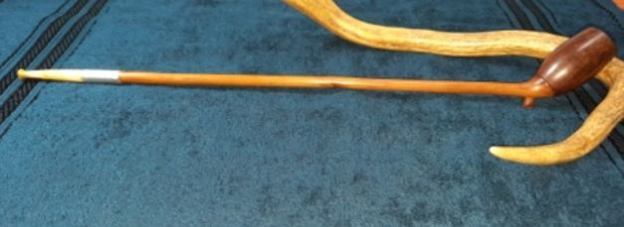
This no name Cutty shaped pipe has a steep forward cant to the stummel. This forward rake appears more pronounced as the stummel itself tapers upwards towards the rim. The stummel is as delicately and beautifully shaped as a Tulip. Here are a few pictures of the pipe as it sits on my worktable.  
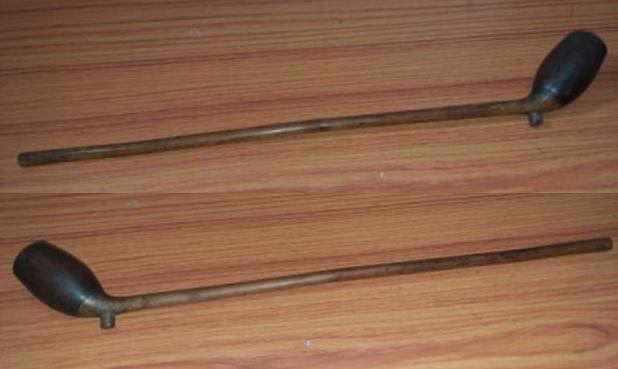
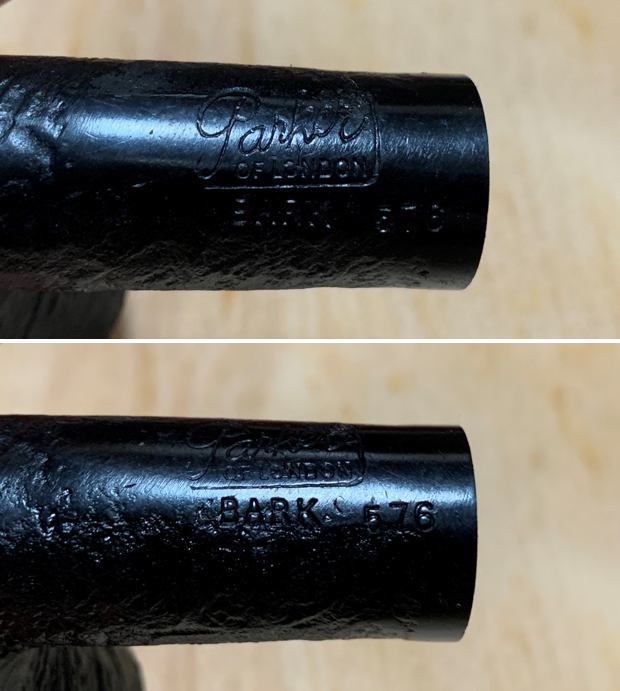
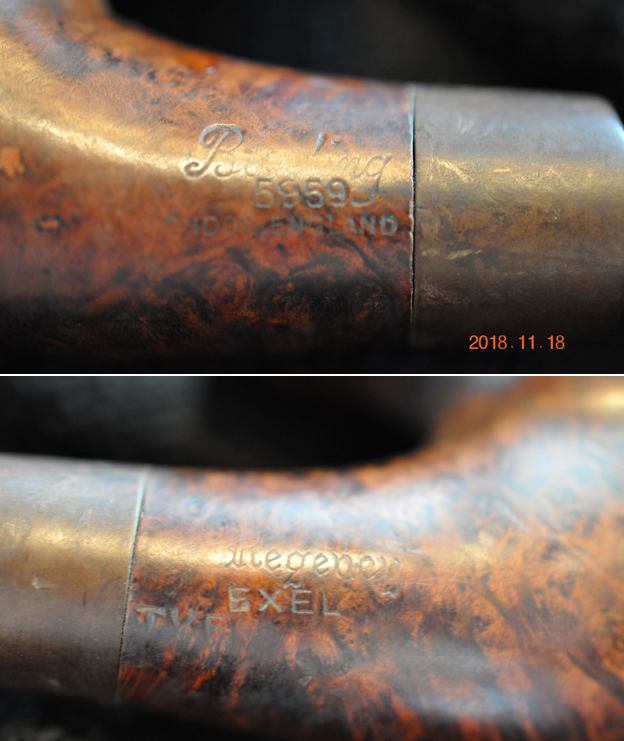
The complete lack of stampings of any kind on the pipe means that the provenance of the pipe cannot be ascertained with documented evidence. However, given the shape, construction, condition and the materials used in making this pipe makes me believe that this was a locally made pipe from the early 20th century. I may be wrong in my appreciation (primarily dictated by inert desire/wish for this pipe to be an old timer!) as I am vastly inexperienced as compared to many of the esteemed readers of rebornpipes and would be glad to learn more about such pipes from them.

Having placed my request, I now move on to the initial visual inspection.

Initial Visual Inspection
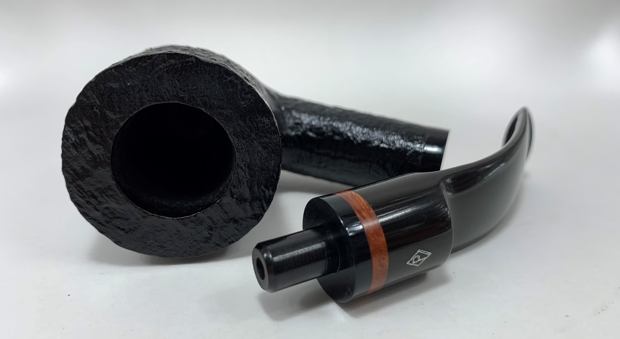
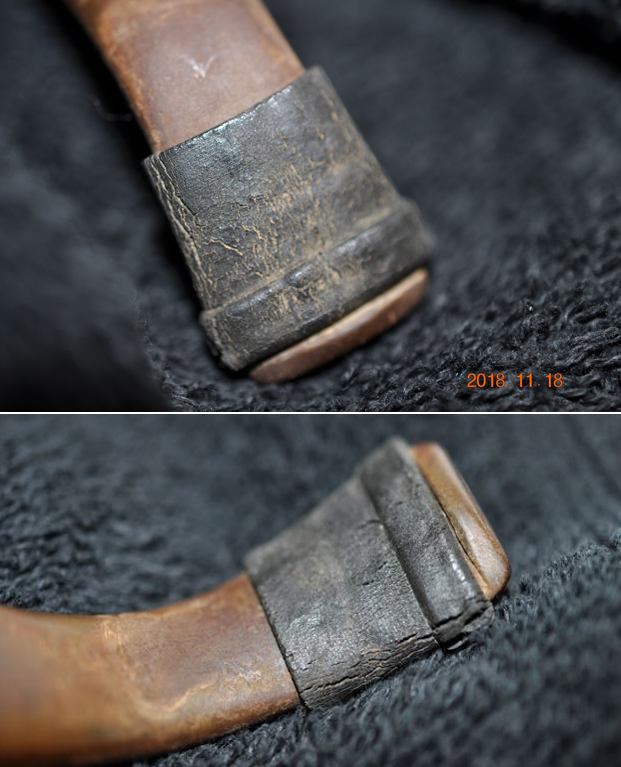
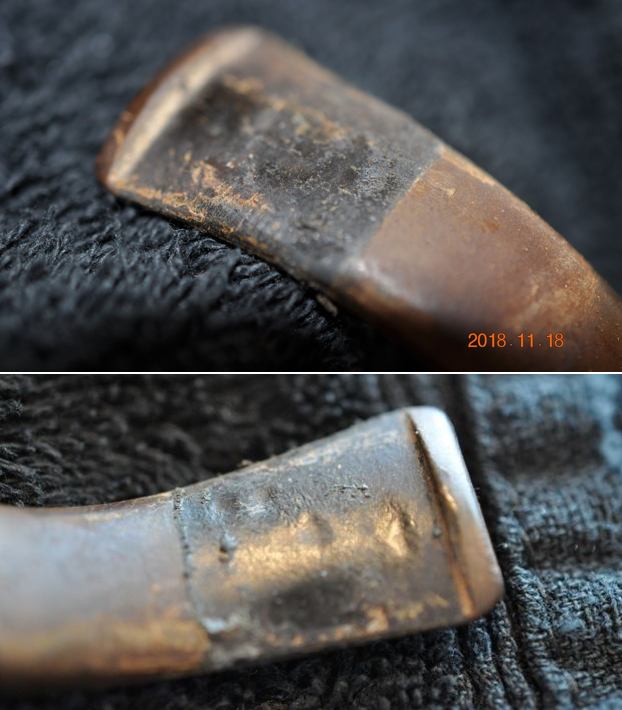
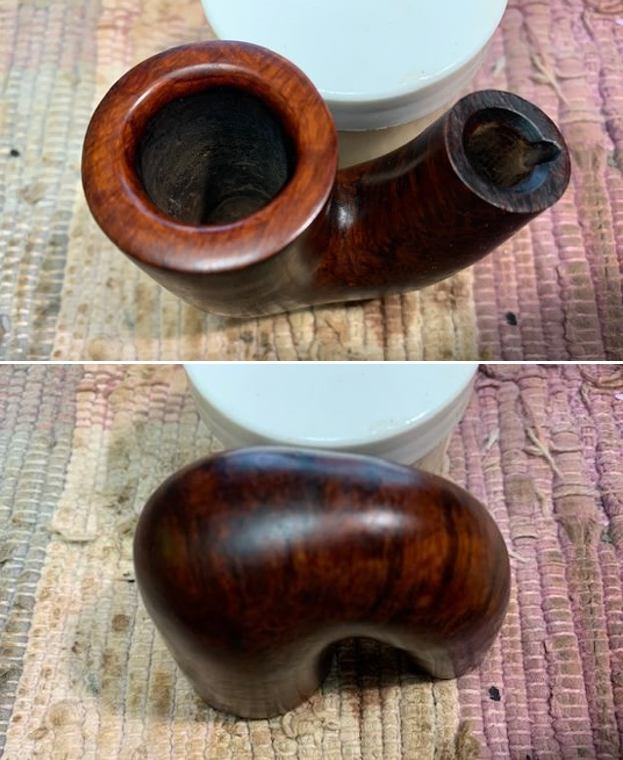
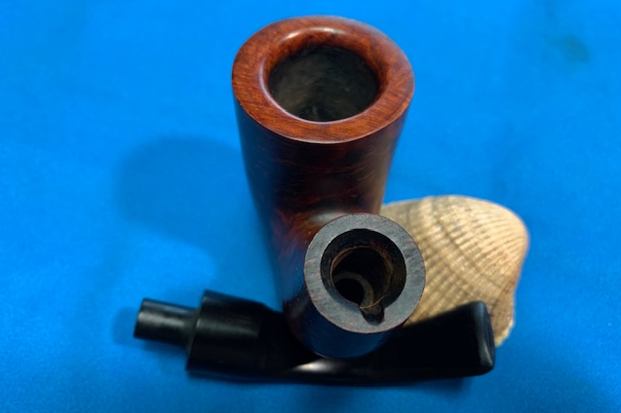
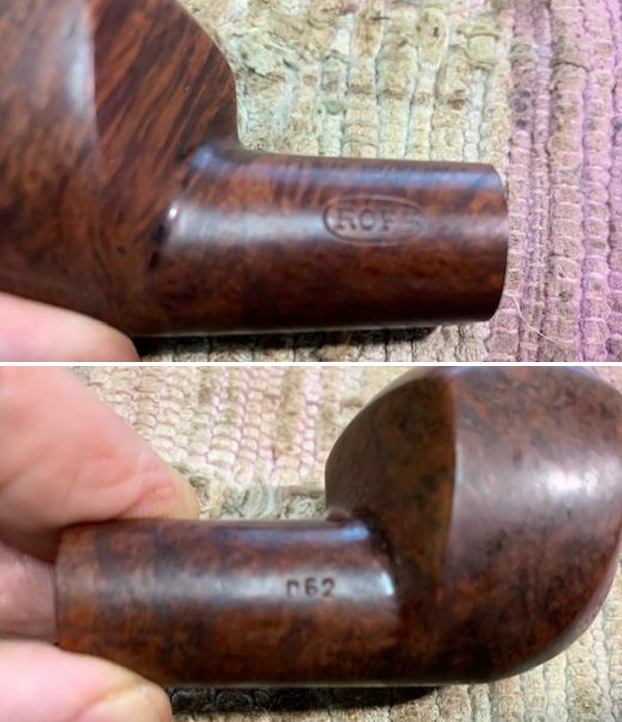
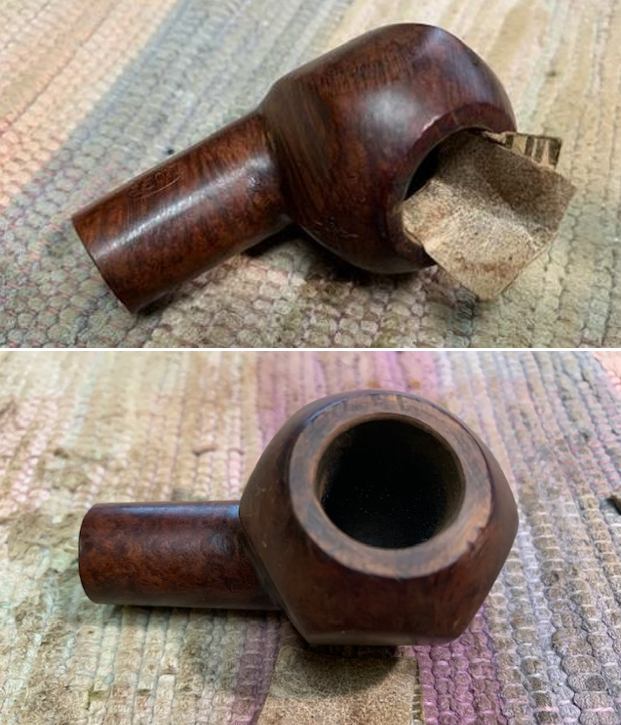
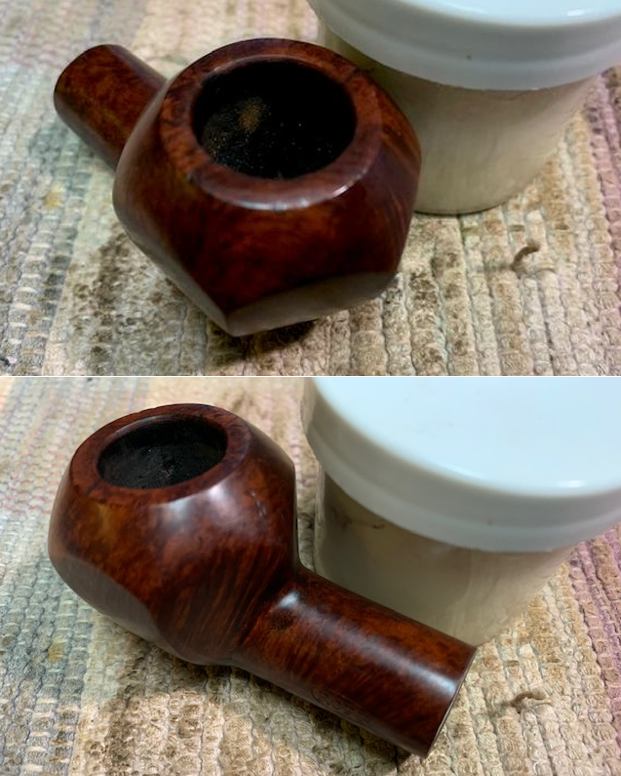
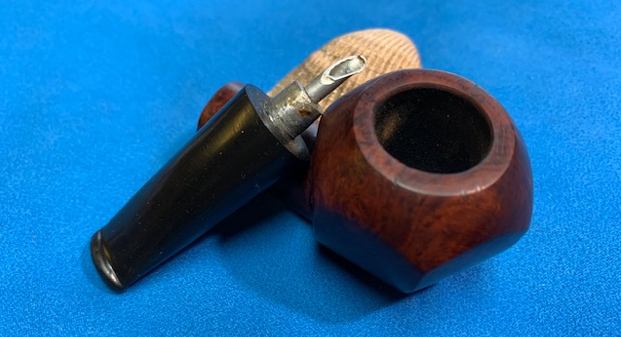
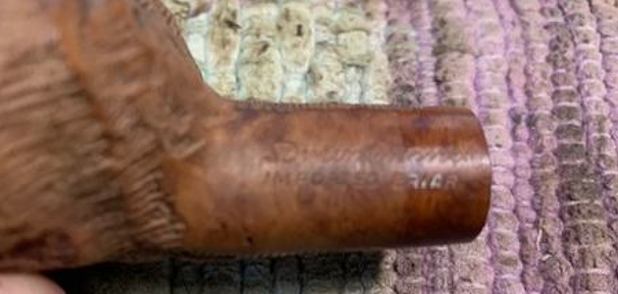
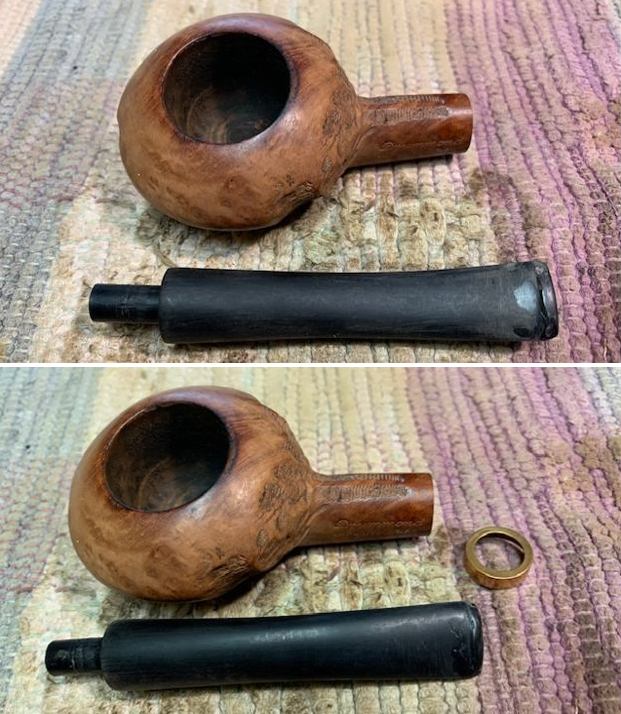
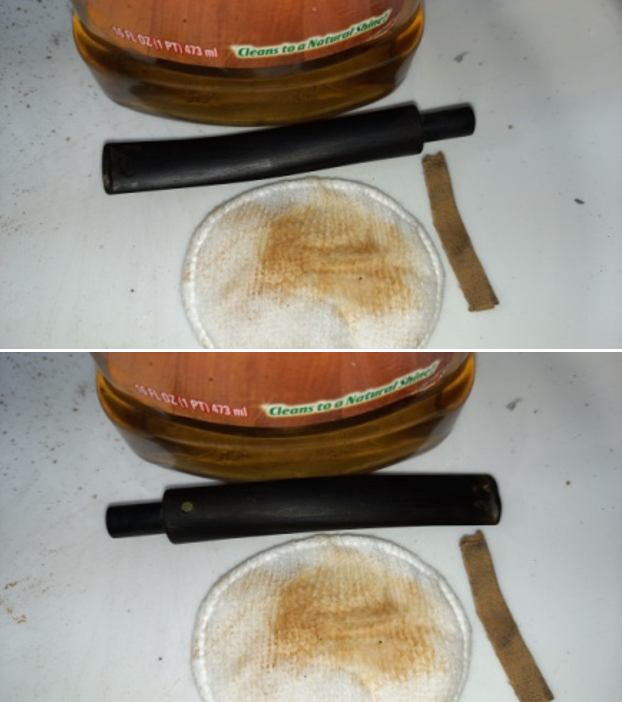
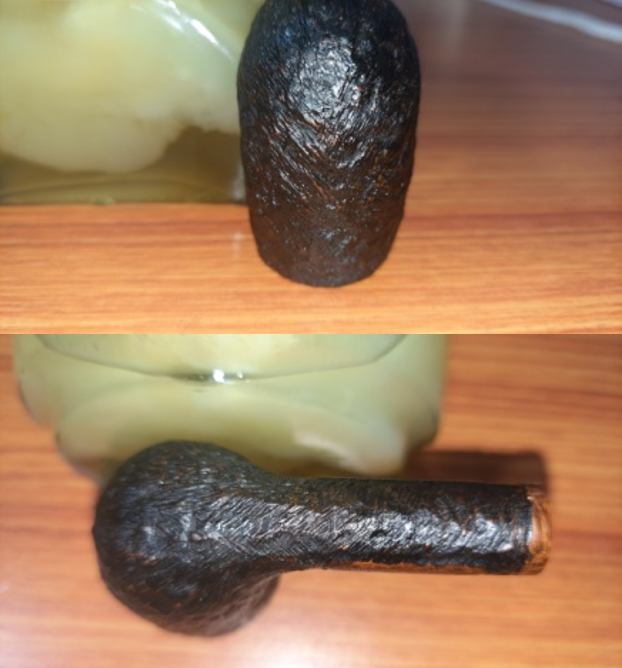
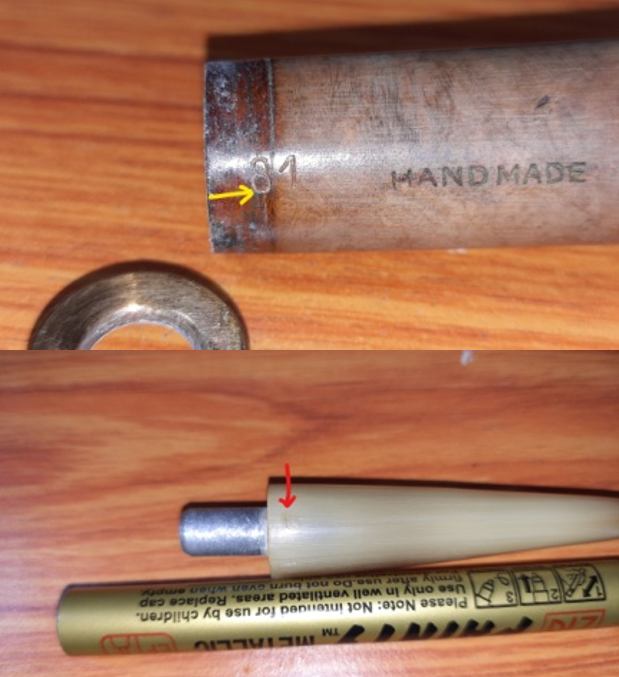
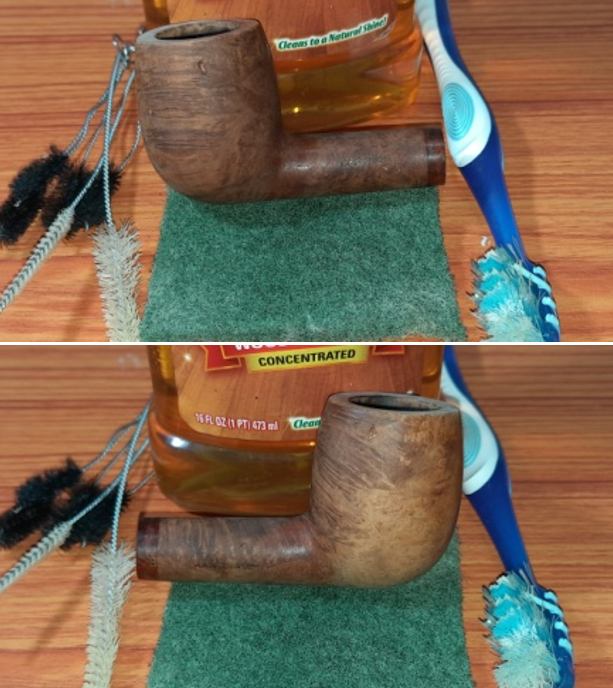
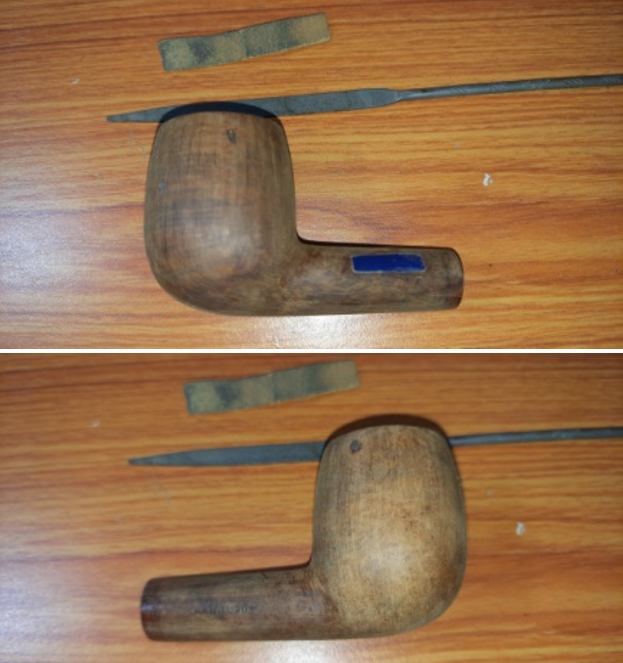
As noted at the start of this write up, this pipe came with a threaded reed shank end that is now missing the stem that would have come with a threaded tenon to seat in to the shank. Given the retro and vintage look of the pipe, I think the stem would have been a bone/ horn or Amber with a bone tenon. So the first step in this restoration would have to be selecting a suitable bone stem with threaded tenon. The shank end face shows two cracks on opposite sides of the shank (encircled in yellow) which would need to be addressed. The stummel end of the reed is upturned, flared and hollowed with threads to seat the stummel and at the bottom of which is the short foot. The threaded surface is covered in dried oils and gunk causing the draught hole to clog. This would have to be cleaned and opened. The entire length of the shank is covered in dirt and grime giving it a dull and dirty appearance. 
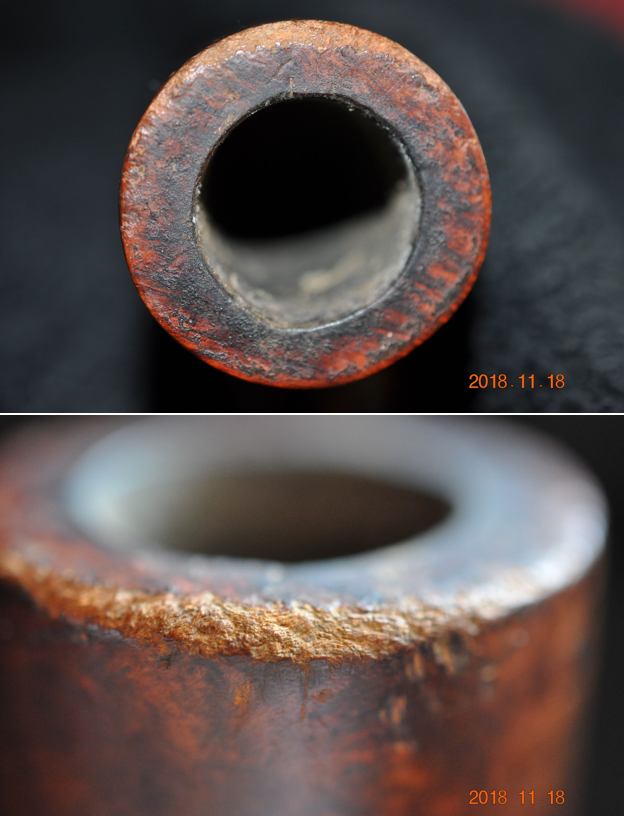
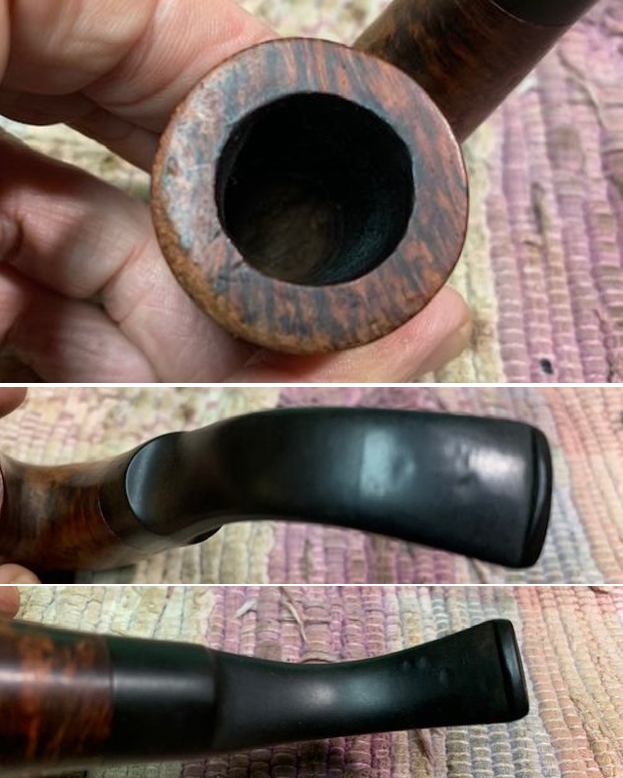
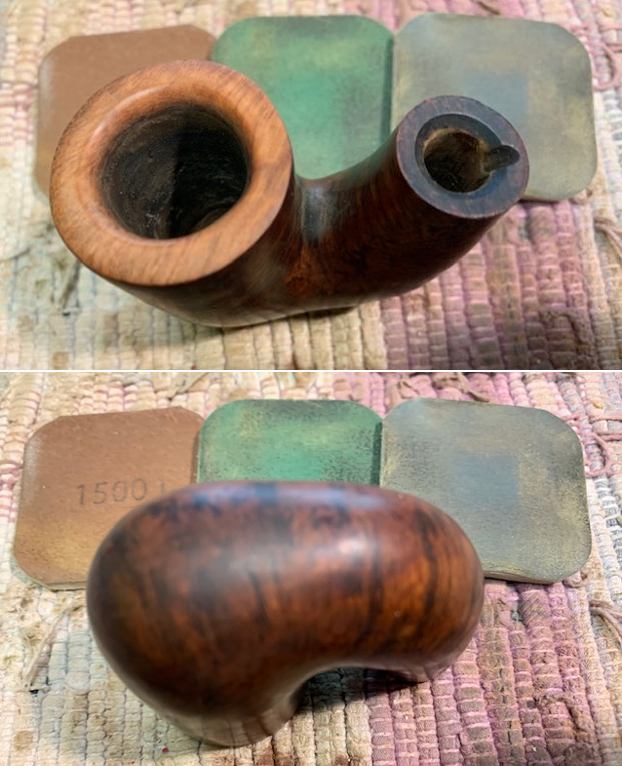
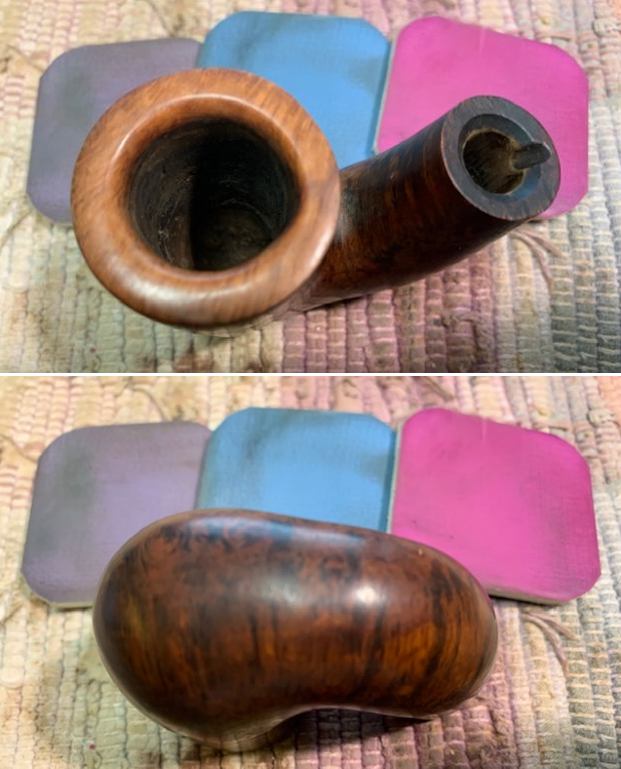
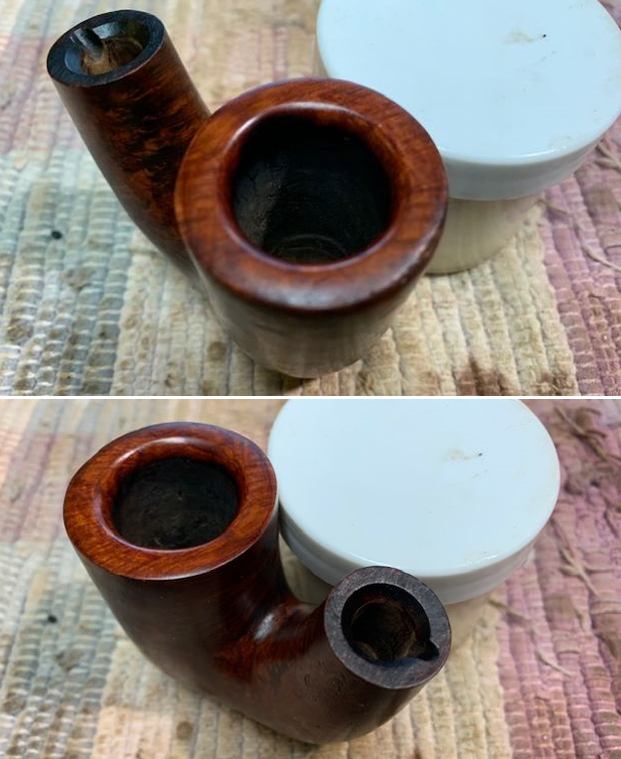
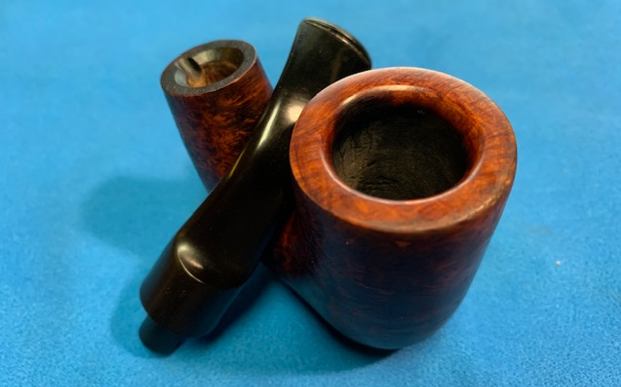
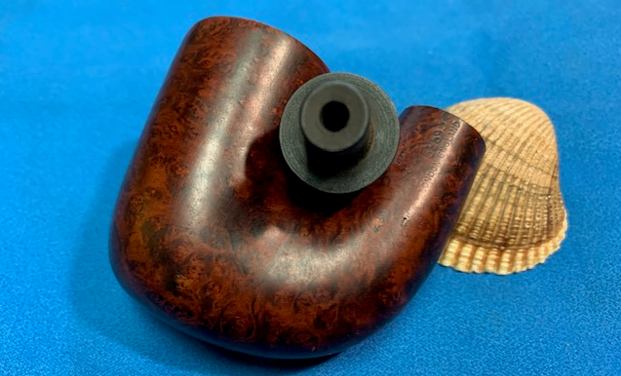
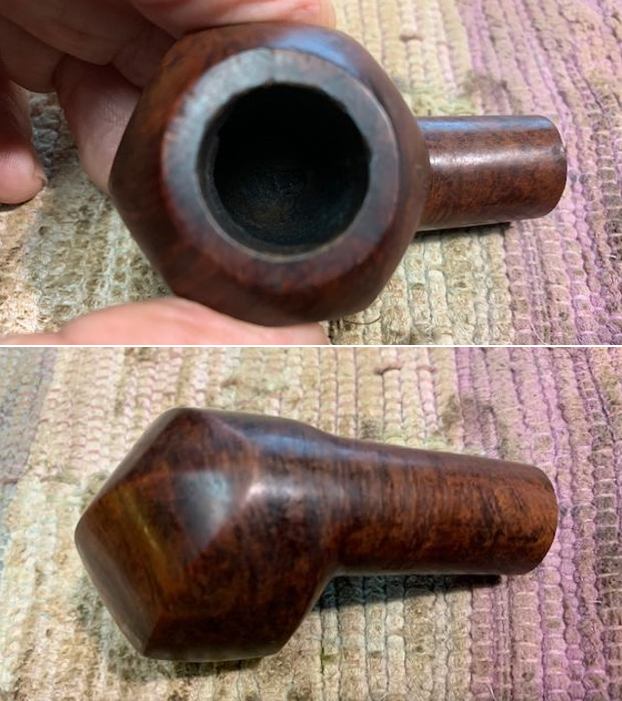
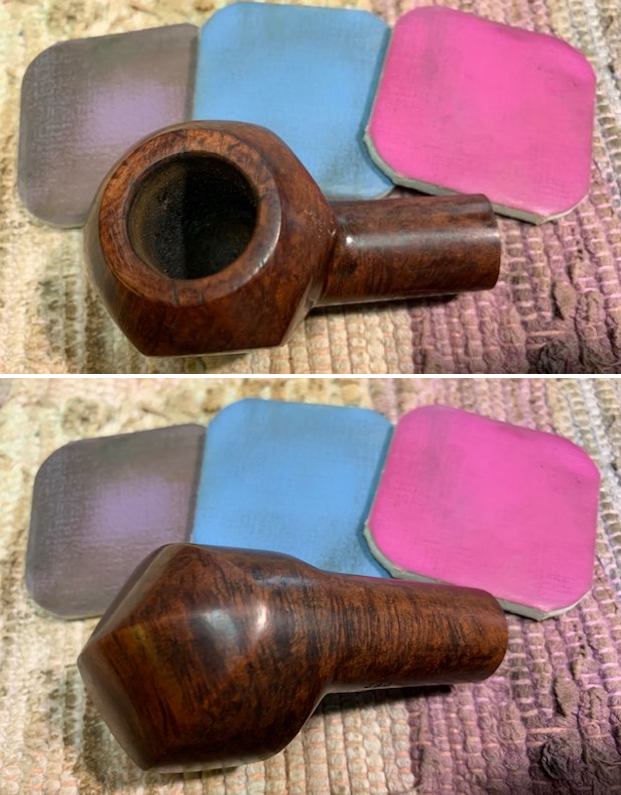
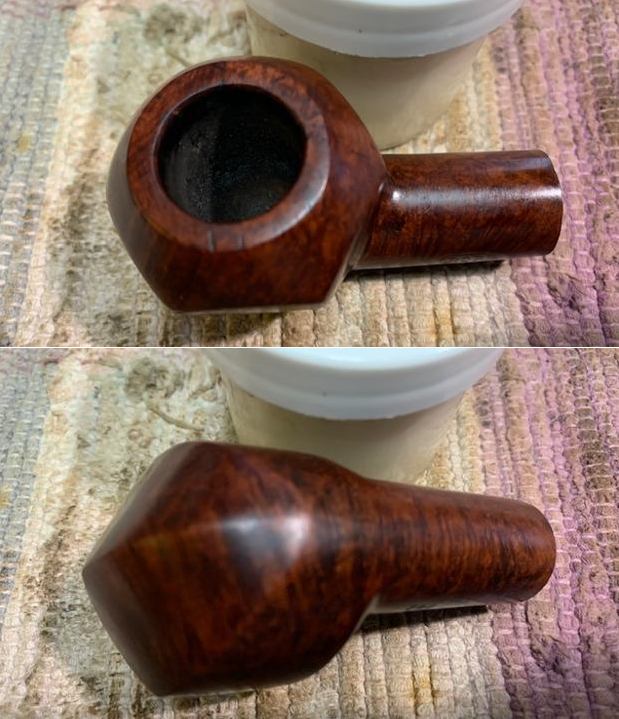
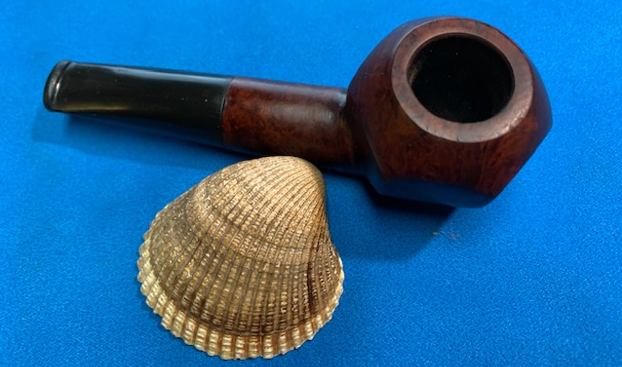
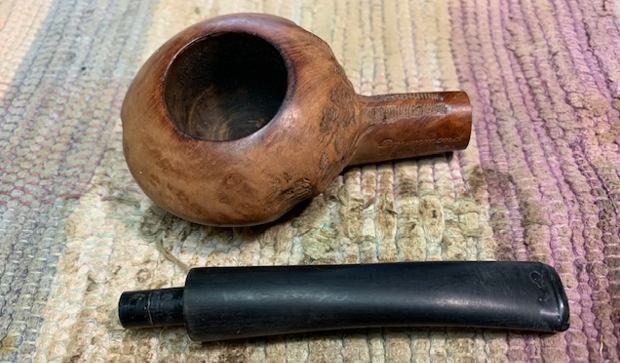
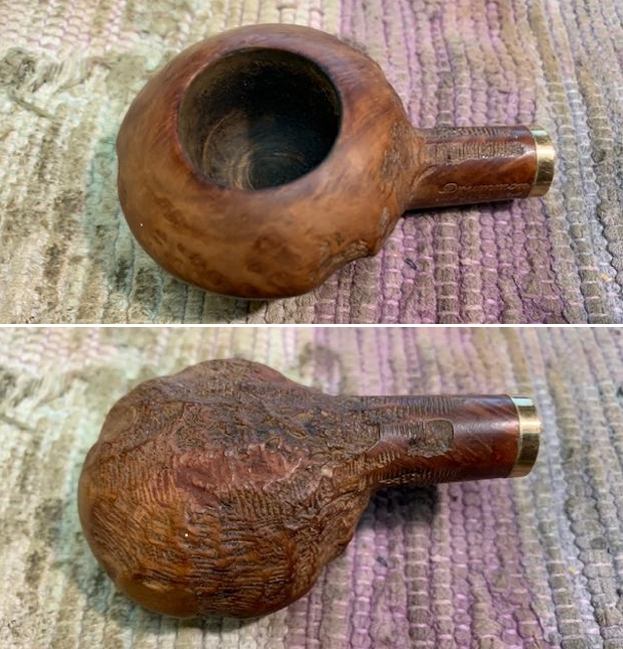
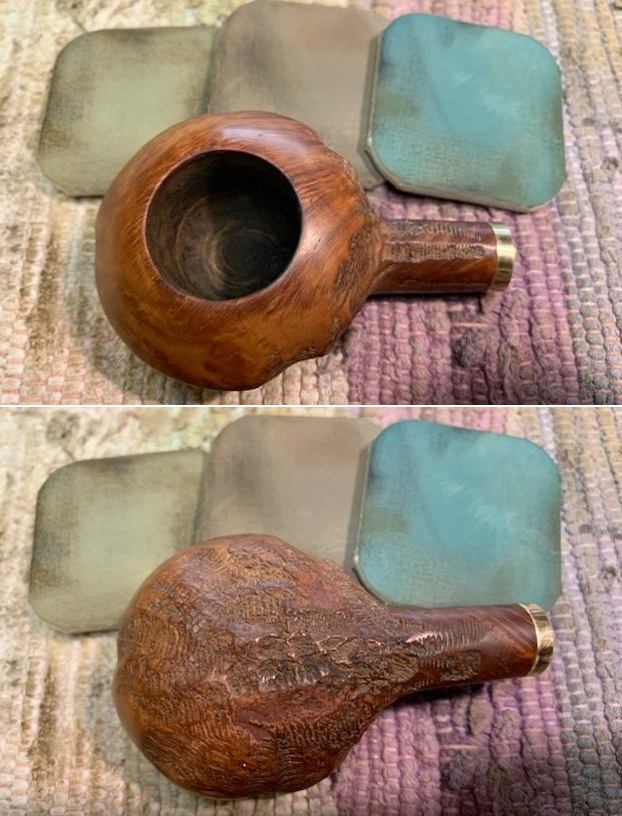
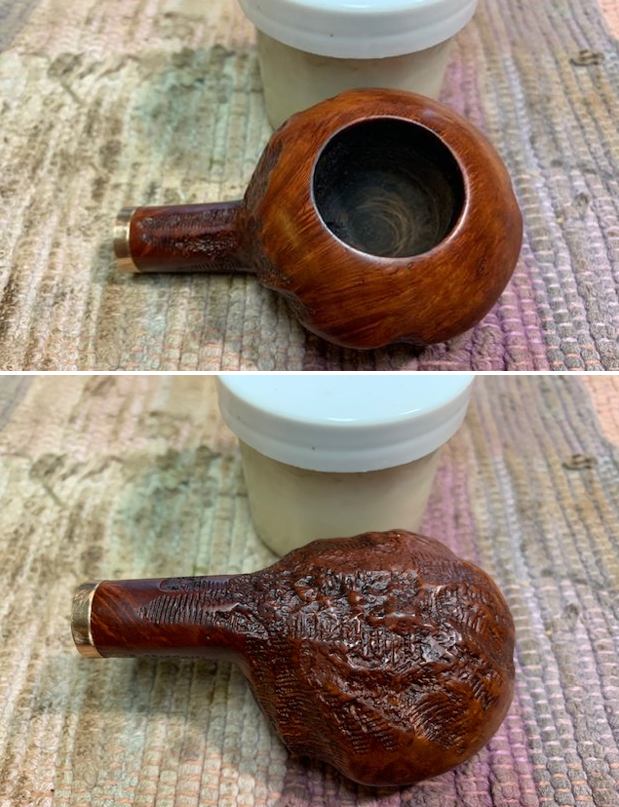
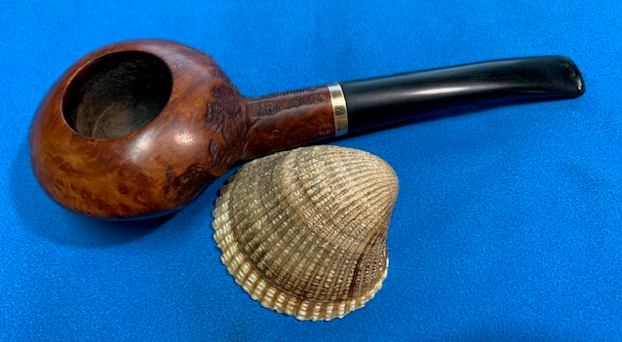
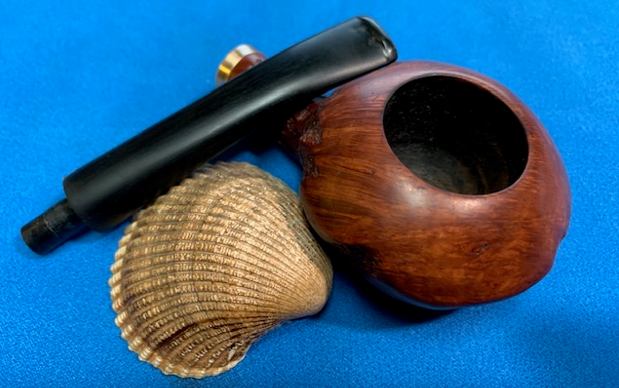
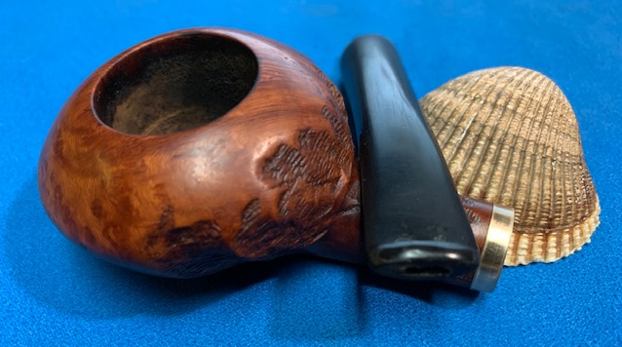
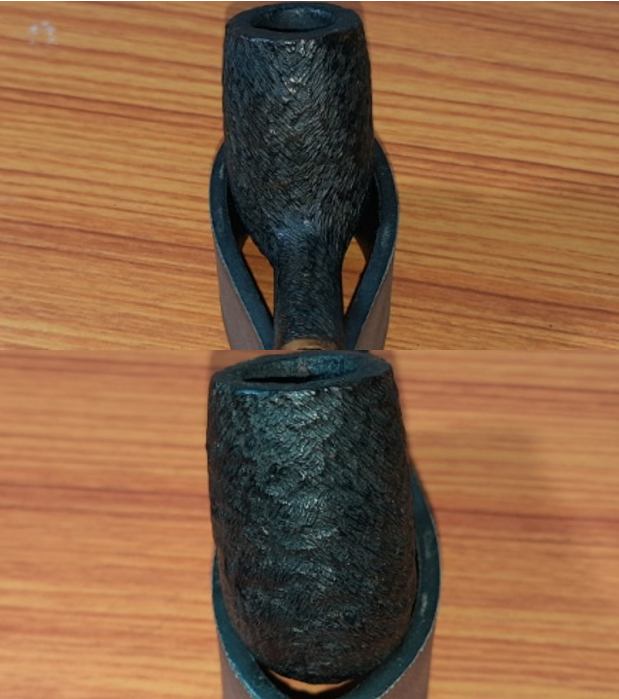
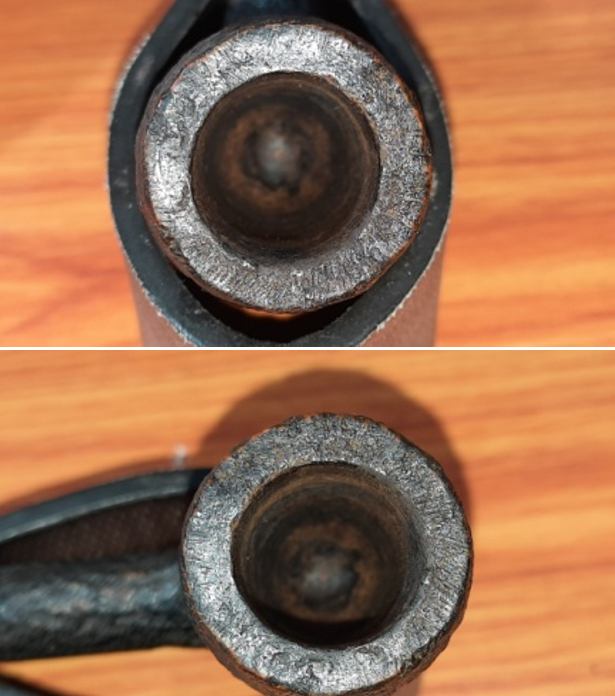
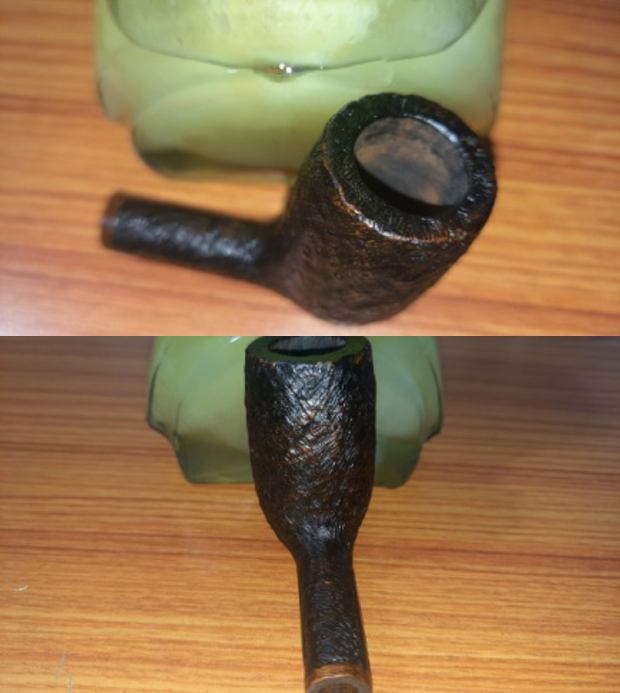
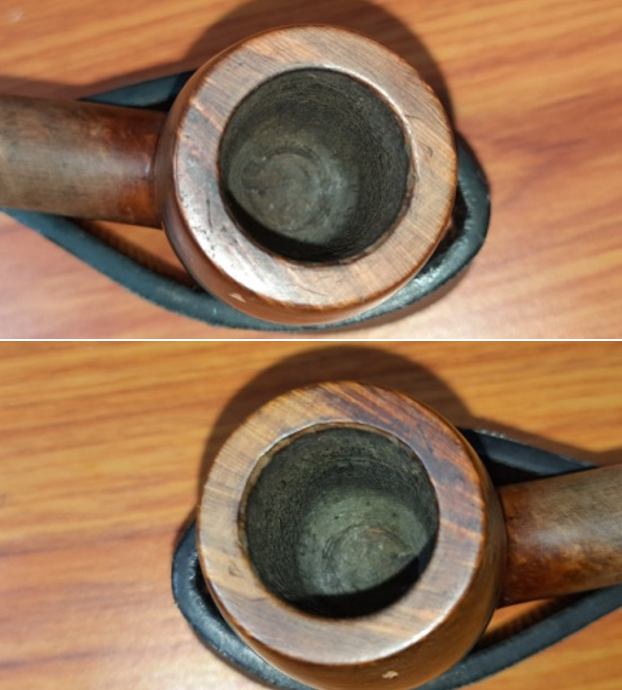
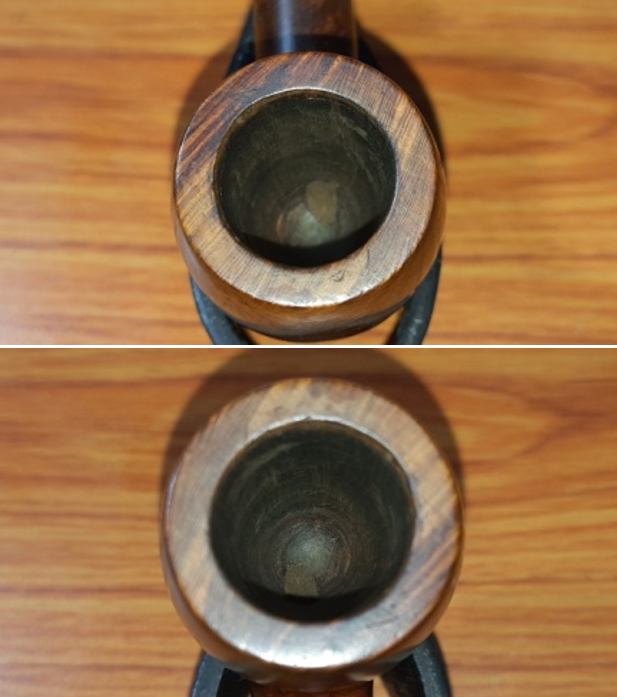
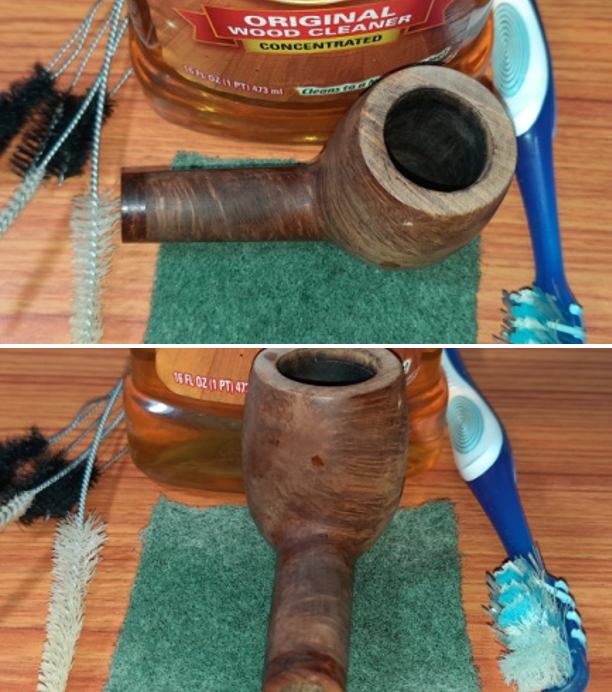
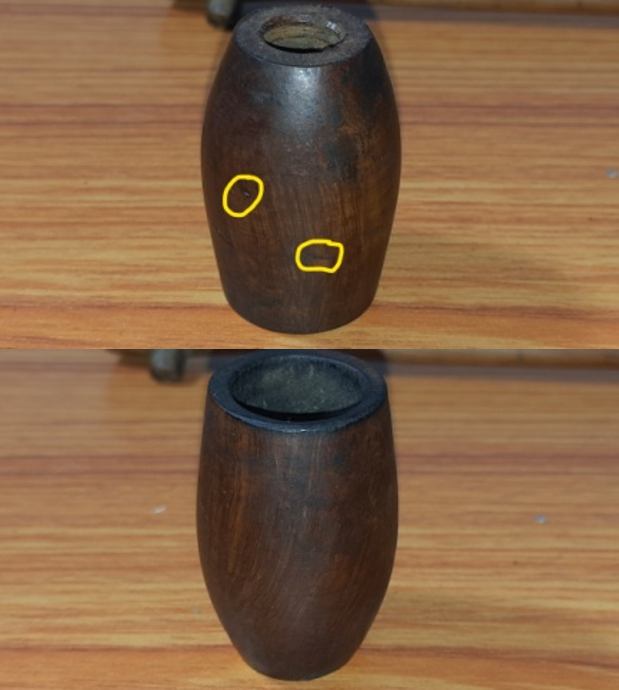
The chamber has a decent layer of cake that is even from top to the bottom of the bowl. The rim top is covered in overflow of lava and hides any dents or chips on the smooth surface. The rim is significantly dark and thin on one side and is encircled in pastel blue. This makes the chamber out of round and gives a lopsided appearance to the top view of the stummel. The bottom of the stummel is threaded and seats atop the threaded reed shank. The threaded area shows heavy accumulation of oils, ash and gunk all around and even within the threads. Cleaning this area would ensure a flush and snug seating of the bowl over the shank.
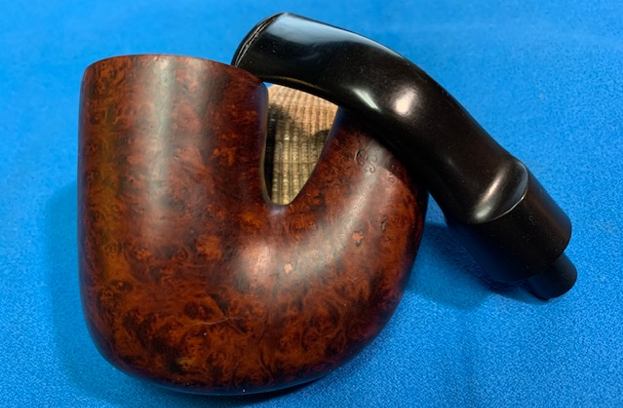
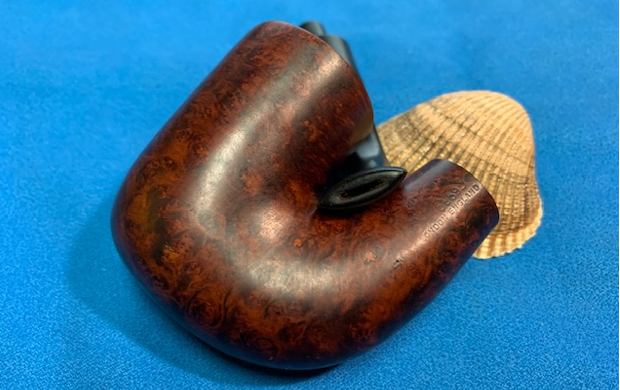
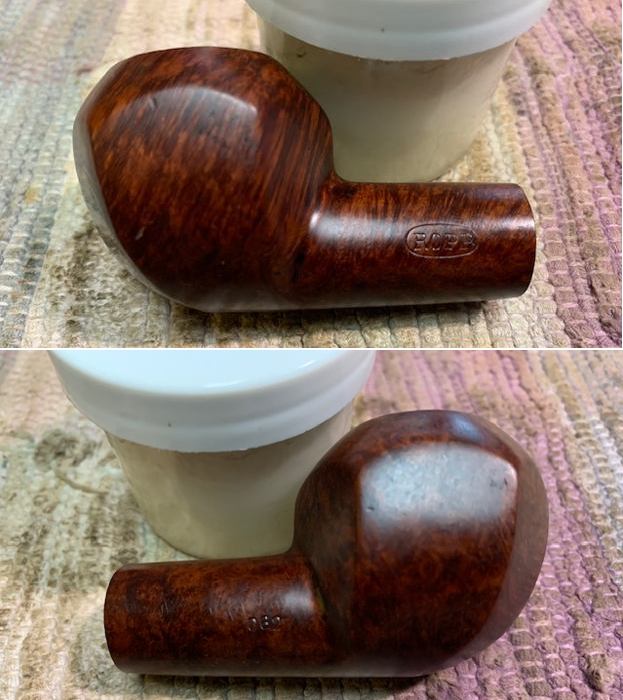
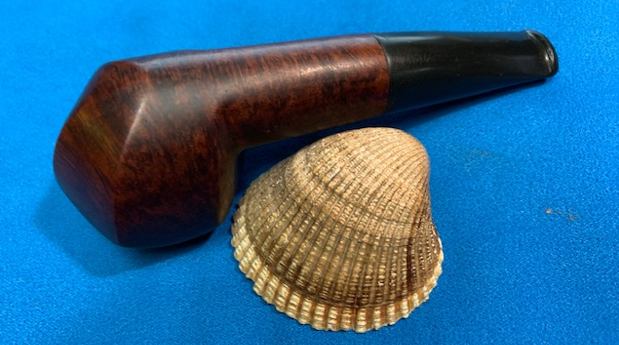
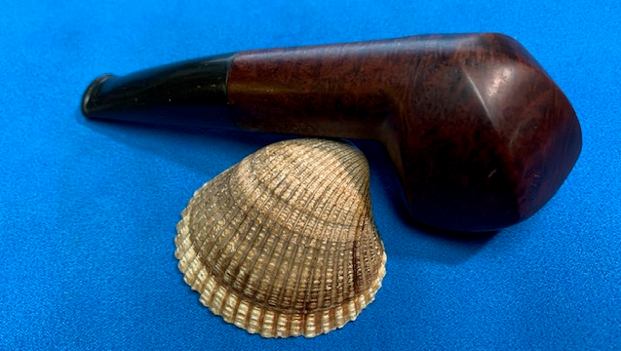
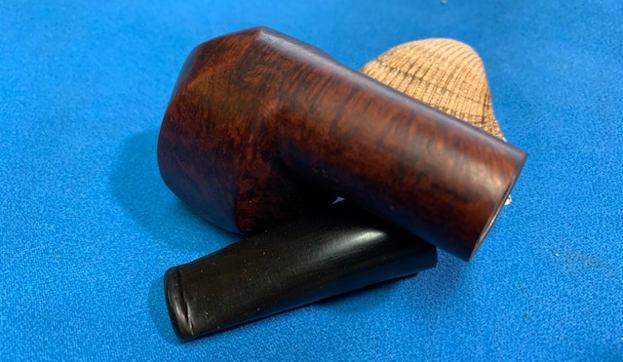
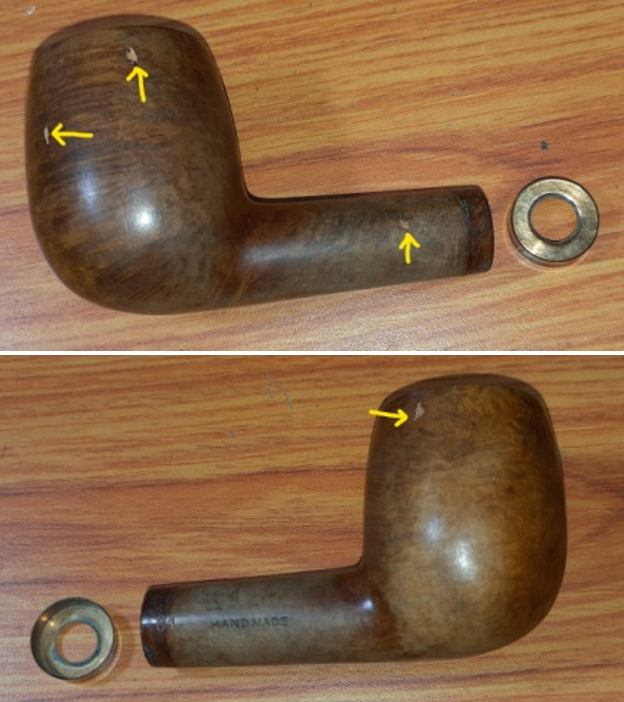
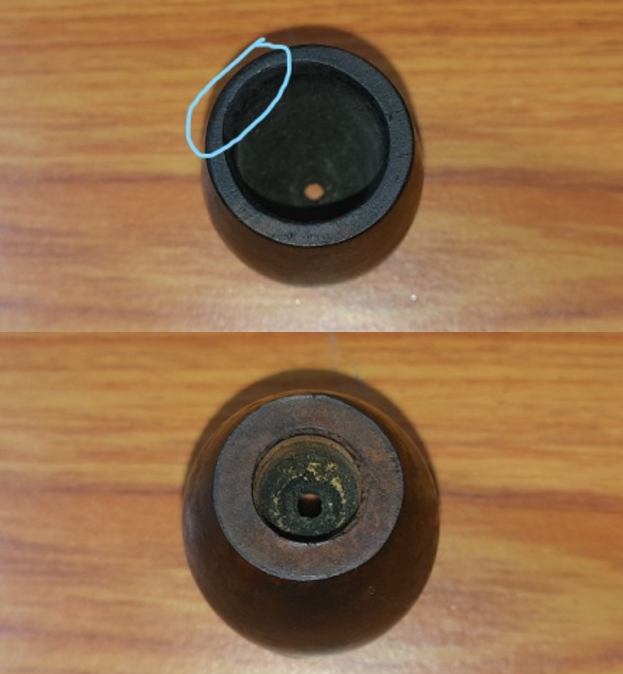
The briar has taken on a nice dark brown patina over a long period of time and prolonged use which when polished and cleaned, should contrast beautifully with the light hues of the long reed shank. There are a few dents and fills (marked in yellow circle) over the entire stummel surface that is visible through the dirt and grime that covers the surface. Truth be told, the stummel does not boast of complete flamboyant straight or bird’s eye or flame grains over the surface, but a mixed pattern of swirls and flame grains that is attractive enough to hold your attention. Preserving the deep brown aged patina will be the primary concern in this bowl refurbishing.
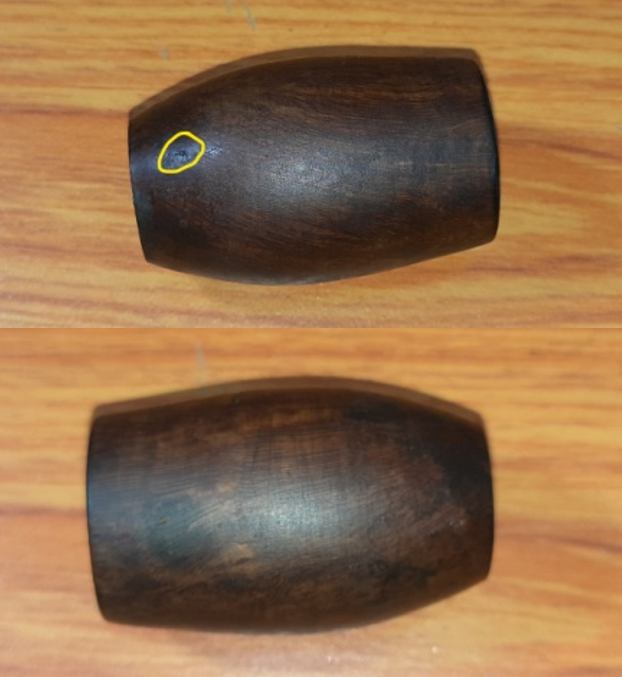
 The Process
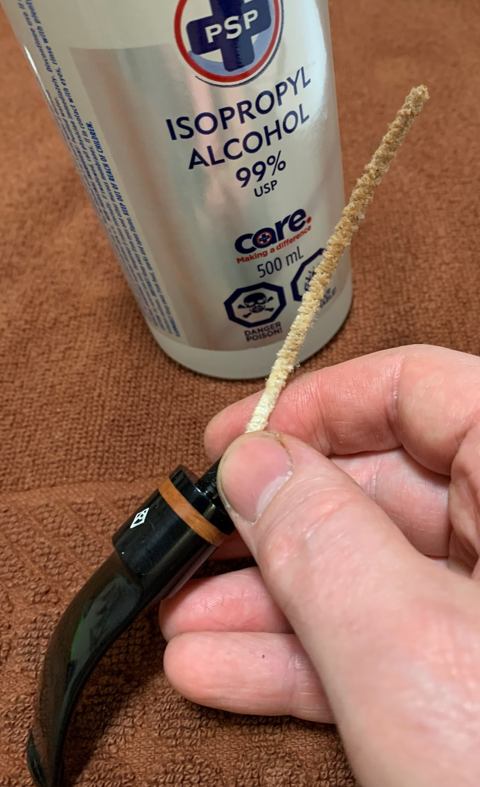
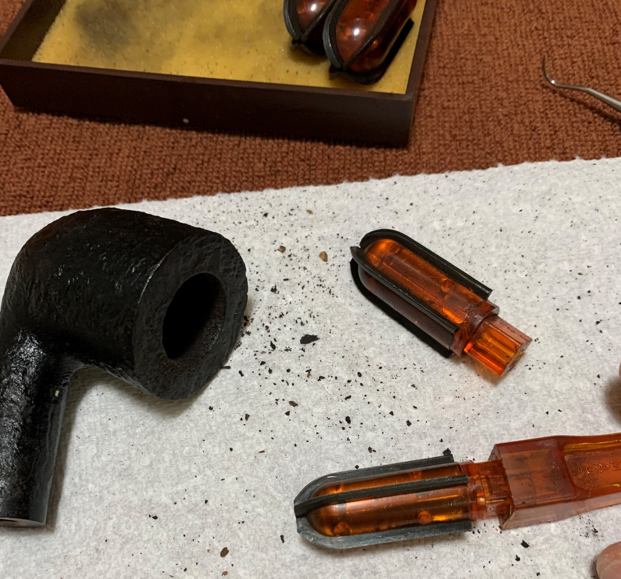
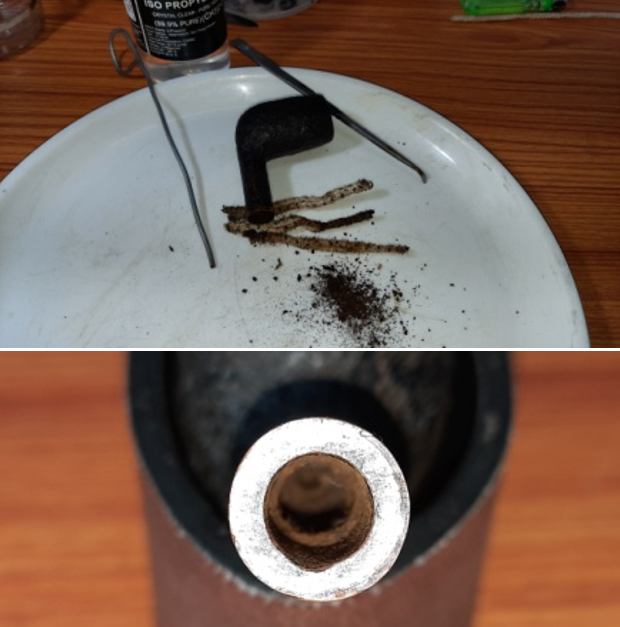
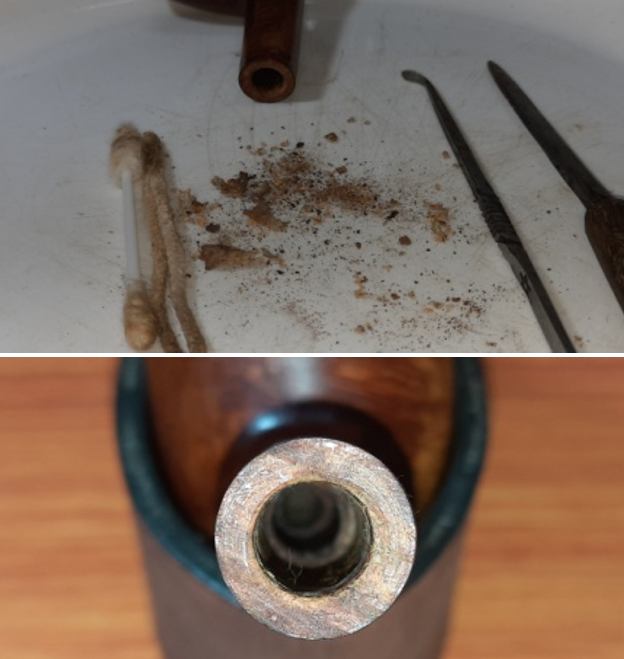
I started the restoration of this pipe with the removal of the carbon cake from the walls of the chamber. Using my fabricated knife, I carefully removed the cake from the chamber to expose the chamber walls. It was heartening to note that there are no heat related issues in the surface of the walls. I smoothed out the surface by sanding the walls with a folded piece of 220 grit sand paper. To remove the last traces of residual carbon dust, I wiped the chamber with a cotton swab wetted with 99.9% pure alcohol. I further cleaned the draught hole at the bottom center of the bowl with a pointed dental tool. The hardened cake had greatly reduced the diameter of the draught hole and ran a pipe cleaner dipped in alcohol to clean it further.
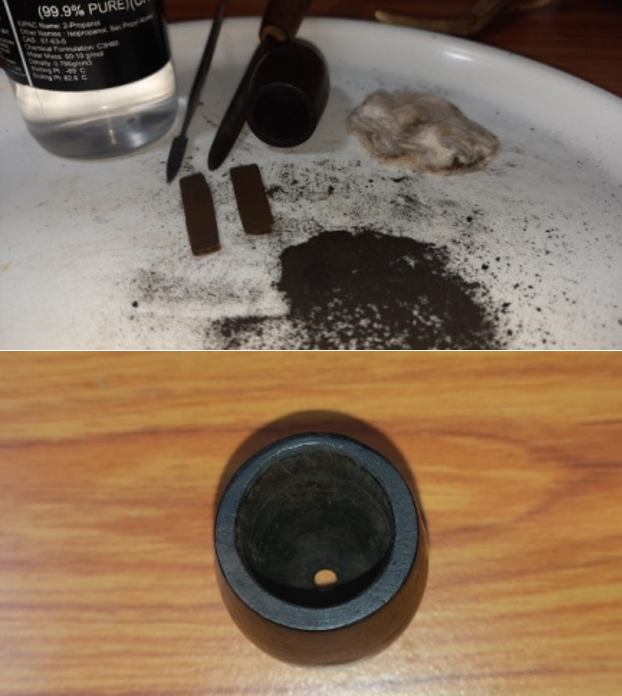
Next, I cleaned the threaded bottom of the stummel that seats atop the long reed shank with a dental tool. I scraped out the entire dried gunk that had accumulated in the hollow space as well as from in between the threads. I further cleaned the bottom of the stummel with q-tips and alcohol.
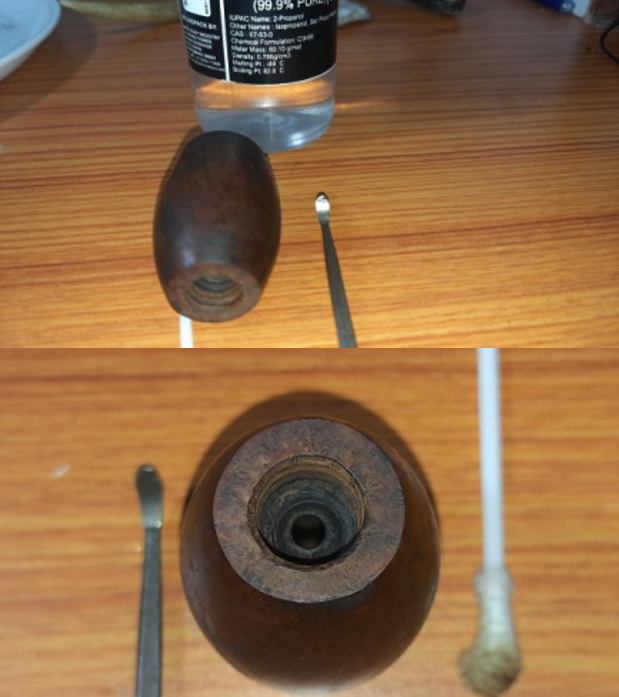
With the preliminary cleaning of the internals of the stummel completed, I turned to cleaning the internals of the long reed shank. With my fabricated pointed tool and round needle file, the dried oils and tars that had formed a block at the neck of the shank and stummel junction was removed and cleaned. I scraped out all the dried debris from the surface of the shank end with a sharp dental tool. I ran a few long pipe cleaners dipped in alcohol through the airway of the stem till the pipe cleaners emerged white.
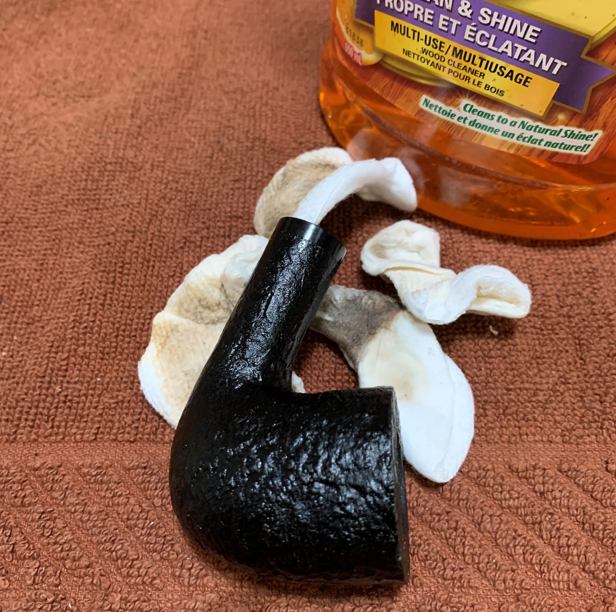
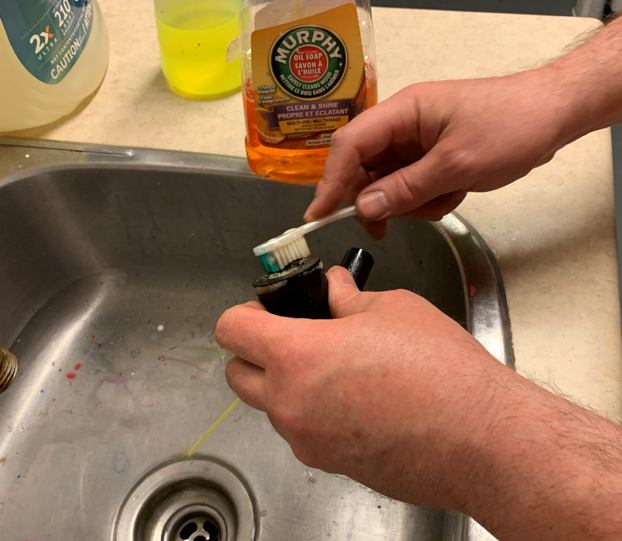
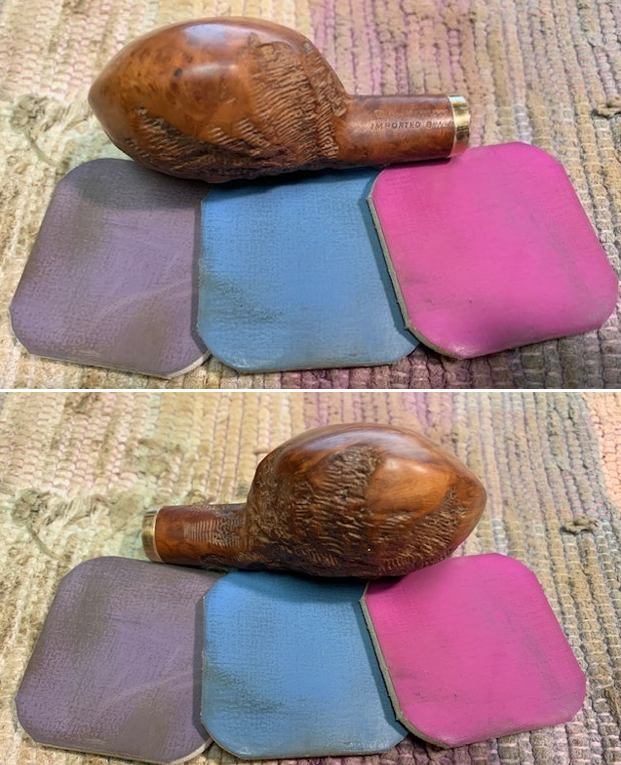
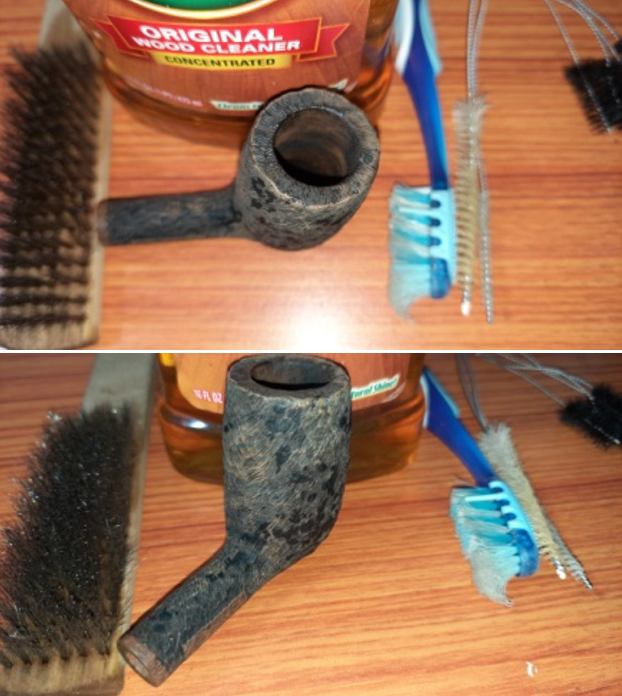
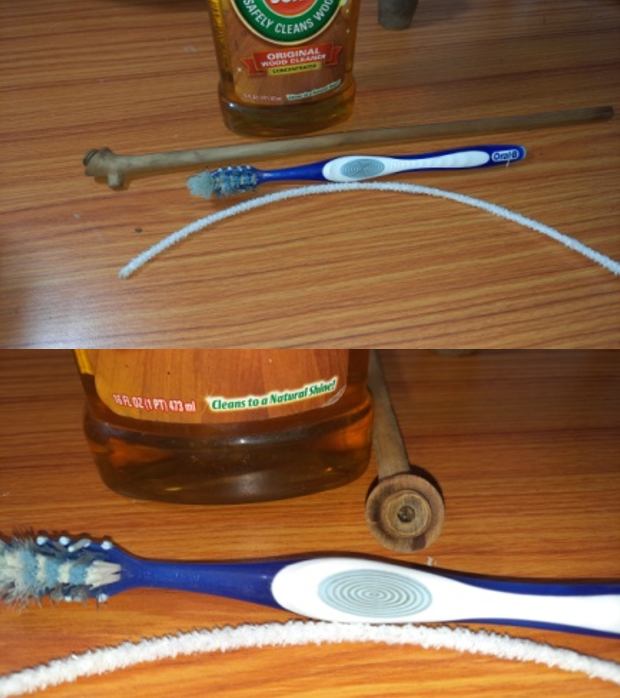
I cleaned the exteriors of the stummel and the reed shank with Murphy’s Oil soap and a tooth brush. I ensured that all the tars and grime was cleaned from both the surfaces. This cleaning has revealed the exact extent of damage to the rim top surface. The area where the rim has thinned out also shows signs of charring which would need to be addressed. I dried the shank surface with a soft paper towel and ran a fluffy pipe cleaner through the shank airway to dry it out. 
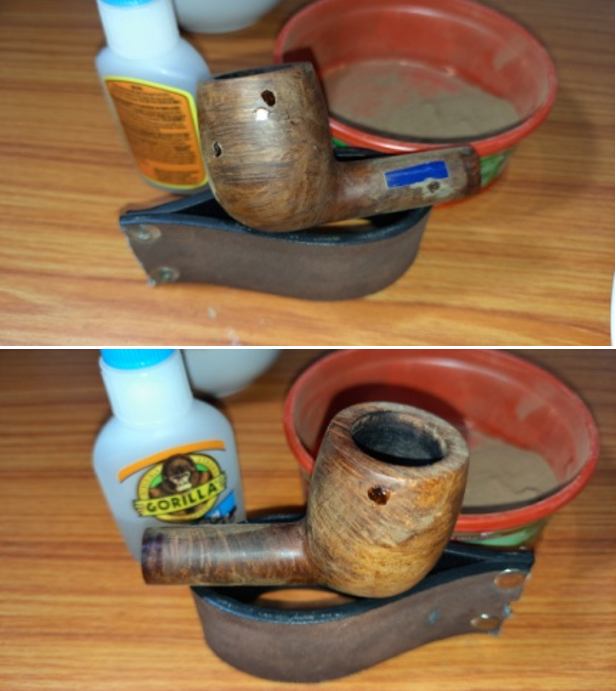
Now that the stem surface is rid of the dirt and grime, the cracks at the shank end are clearly discernible and so is the surprise revelation of a crack at the base of the threaded portion of the shank (encircled in red).I marked the end points of the shank end cracks and that at the stummel end with marker pen under magnifying glass. I shall drill counter holes at the marked end of each of the crack to prevent the further spread of these cracks. I used a 1 mm drill bit mounted on my hand held rotary tool to drill the counter holes… 
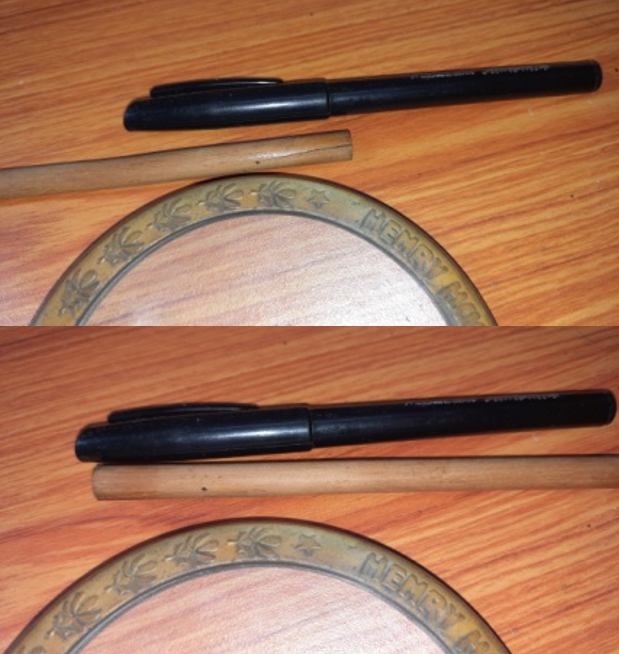
…and filled these and the cracks with clear CA superglue. I set the reed shank aside for the superglue to cure. 
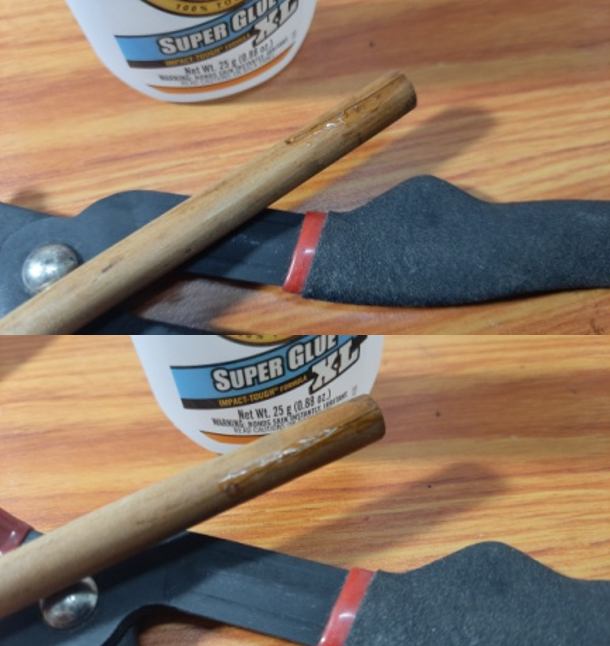
The external cleaning had not only exposed an additional crack at the stummel end of the shank, it had also exposed all the fills and dings over the stummel surface. With a thin sharp knife, I gouged out all the old fills from the surface and cleaned the area with isopropyl alcohol in preparation of filling these gouged out surfaces with a mix of briar dust and CA superglue. I use the layering method to fill these pits in the briar. After all the fills were repaired, I set the stummel aside for the fills to harden and cure completely.The shank repairs had cured by the following noon when I got back from work. Using a flat needle file, I evened out the fills to roughly match the rest of the shank surface. I fine tuned the match by sanding the fills with a folded piece of 320 grit sand paper. 
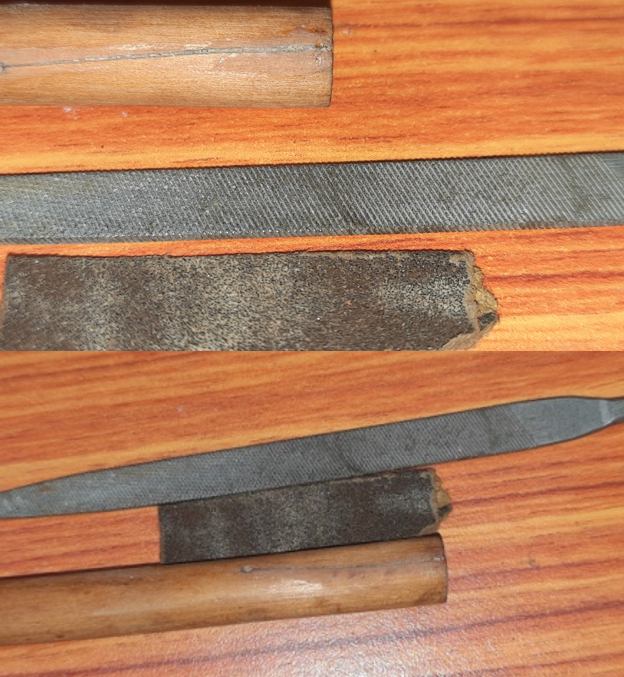
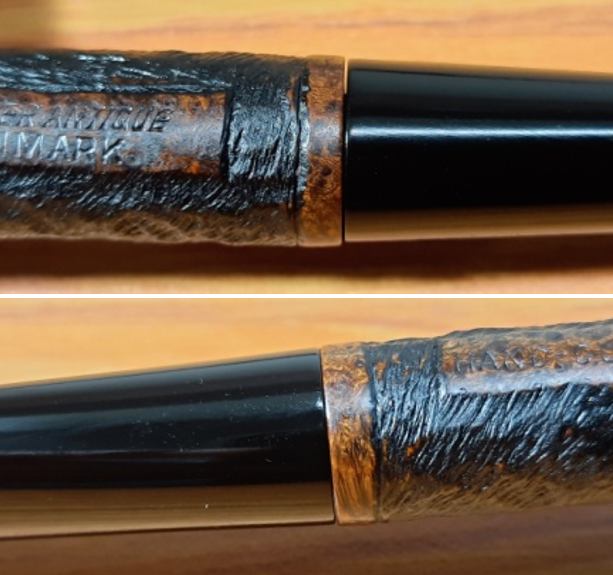
Did I mention having customized a sterling silver band for providing additional support against the crack’s lateral expansion? I guess not. Here in India, our local Silversmiths are very skilled in turning jewelry and at repairs right in front of their customers at very affordable rates. Steve and Jeff are witnesses to such craftsmanship when they had visited us in India. Long and short of the story is that I got a 1.5 inch long silver band customized for this shank and fixed it over the shank end with superglue. That crack isn’t going any further now.
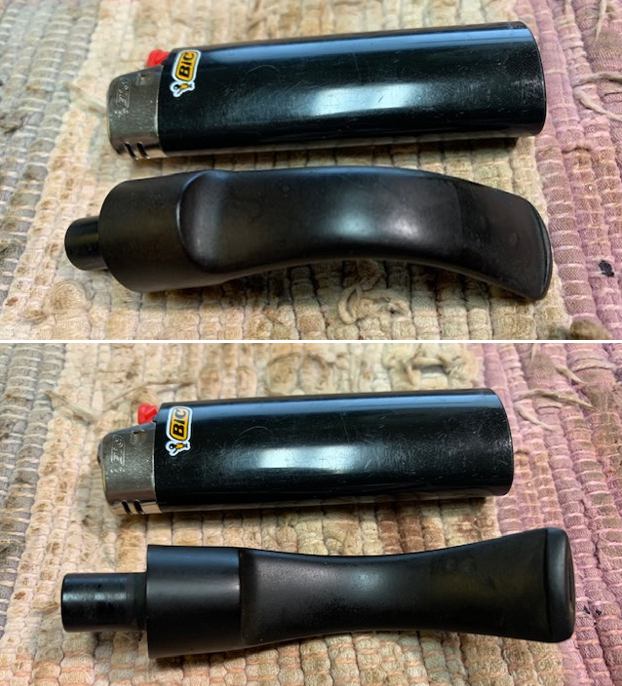
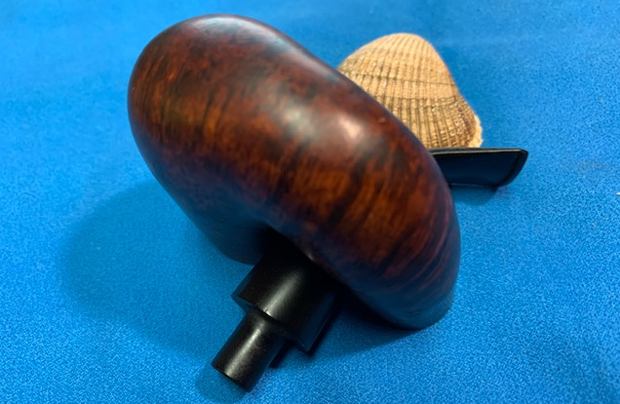
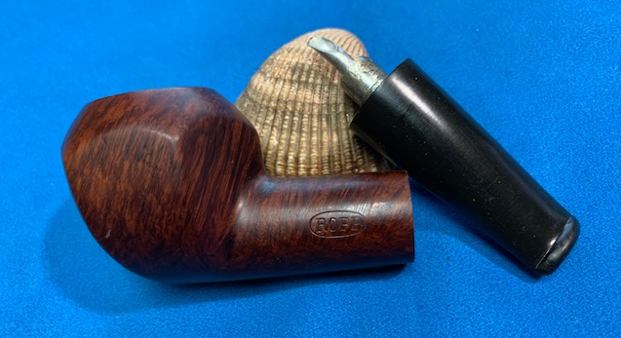
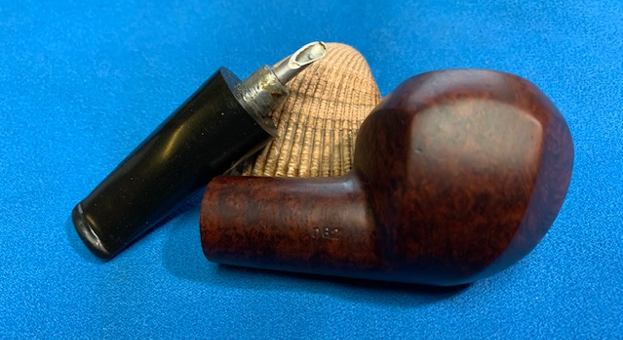
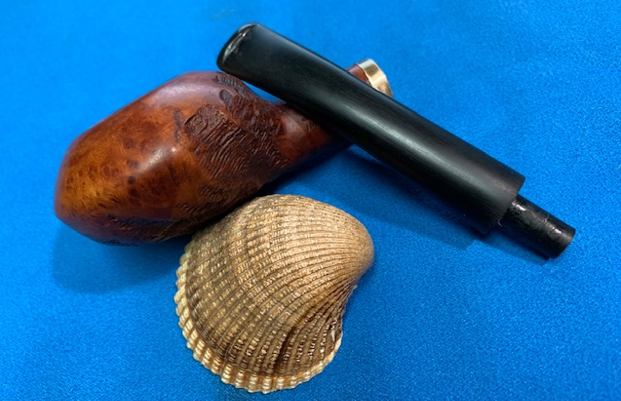
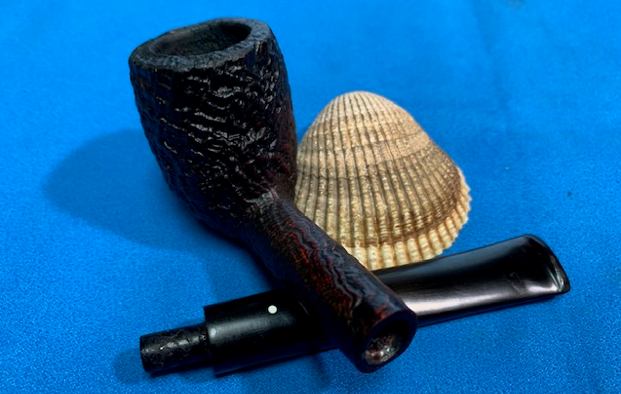
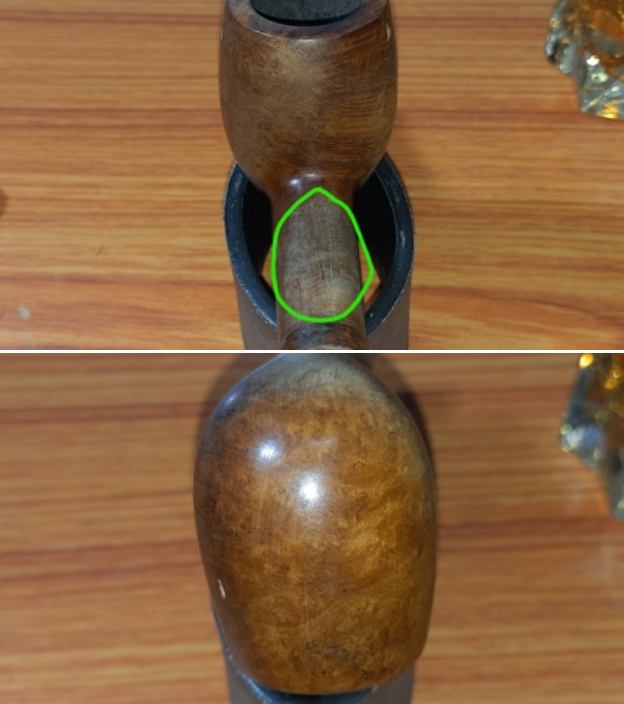
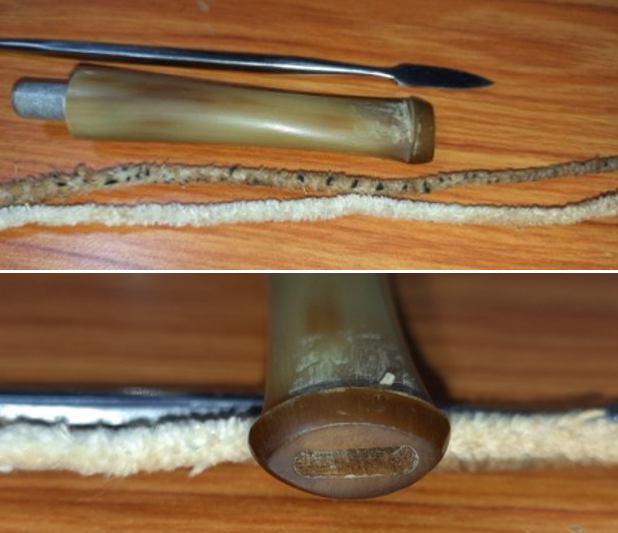
Now that the cracks have been repaired and stabilized, the next goal was to find the right stem to go with the overall profile of the pipe. I selected a couple of suitable bone stems from my stash of spares and asked for Abha’s opinion. She selected a horn stem that was perfectly matched in size and shape with the shank. However, the stem came with its own set of challenges. First, the tenon was broken with half of it sticking inside the stem and secondly, the top section of the stem surface was partially sliced (encircled in blue), but remained firmly attached. Notwithstanding these issues, the stem matched the profile of the pipe to the T and looks amazing. 
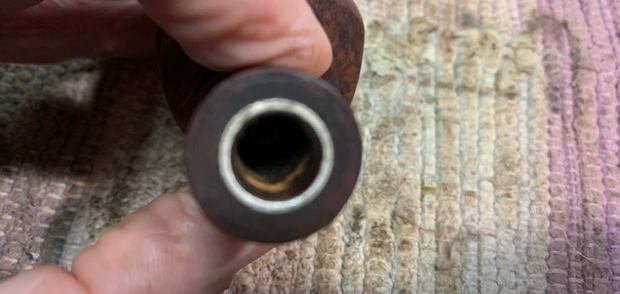
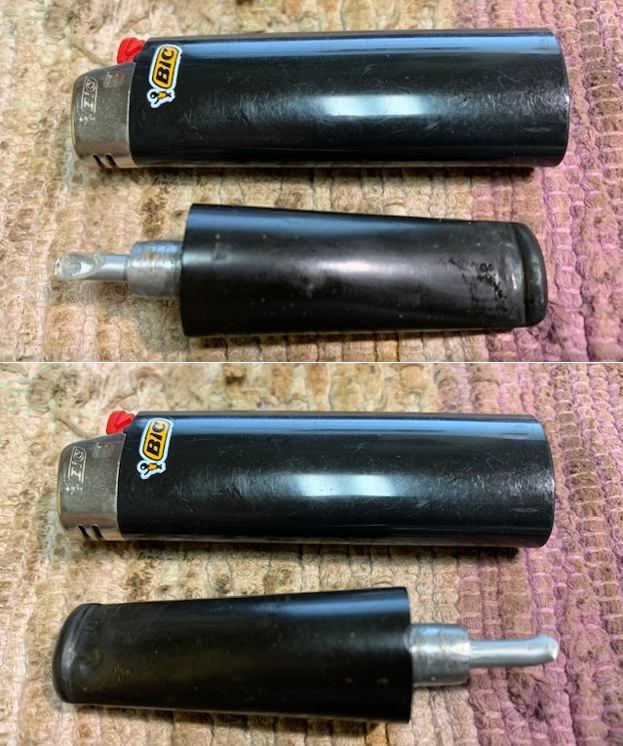
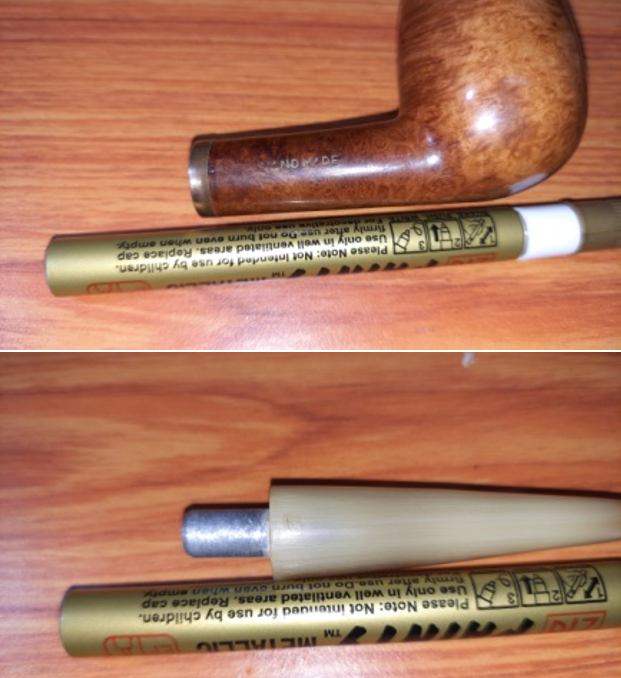
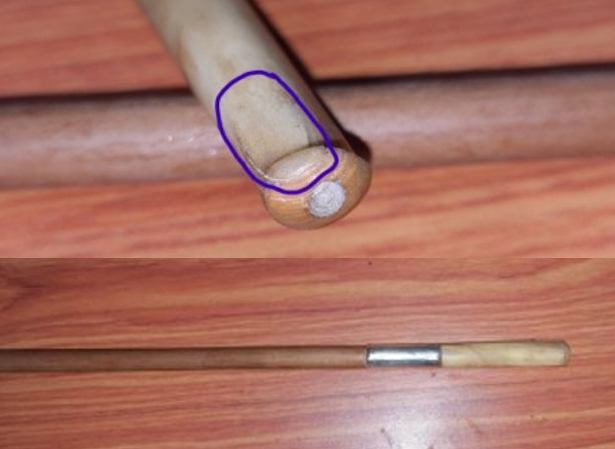
The first issue with the stem that I dealt with was removal of the broken half of the tenon. I mounted a drill bit slightly larger than the tenon opening on to my hand held rotary tool and carefully drilled it inside the tenon. Once the drill bit had a firm grip on the tenon, I turned the motor counter clockwise and dislodged the tenon remnants from the stem revealing a threaded stem end.
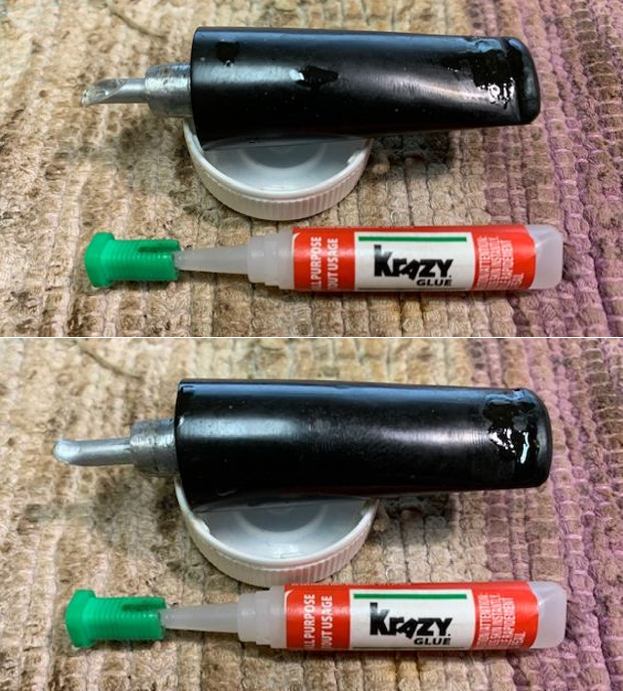
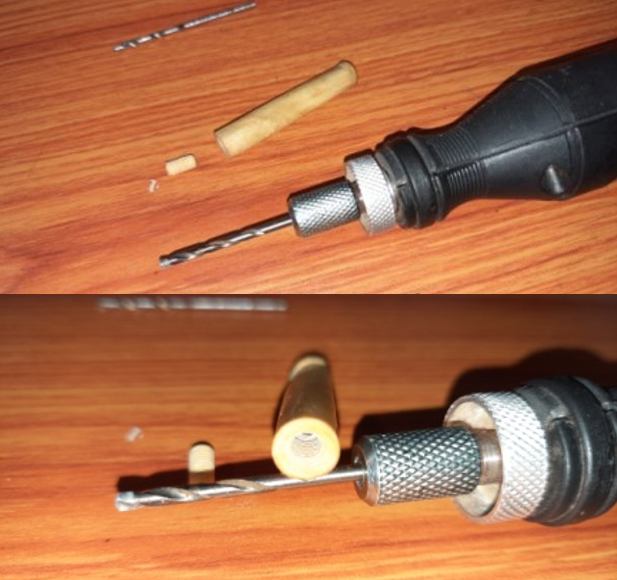
I would need to identify a threaded bone tenon that would match the shank and stem threads for a perfectly aligned seating. I rummaged through my spare parts box and came up with a bone tenon that was threaded at one end and smooth conical shaped at the other end. The seating of the smooth side of the tenon into the stem was perfect and so was the threaded end into the shank end snug and aligned. The Pipe Gods are especially favoring me it seems. A perfectly matching, period correct horn stem and a perfectly matching bone tenon are nothing short of a miracle.
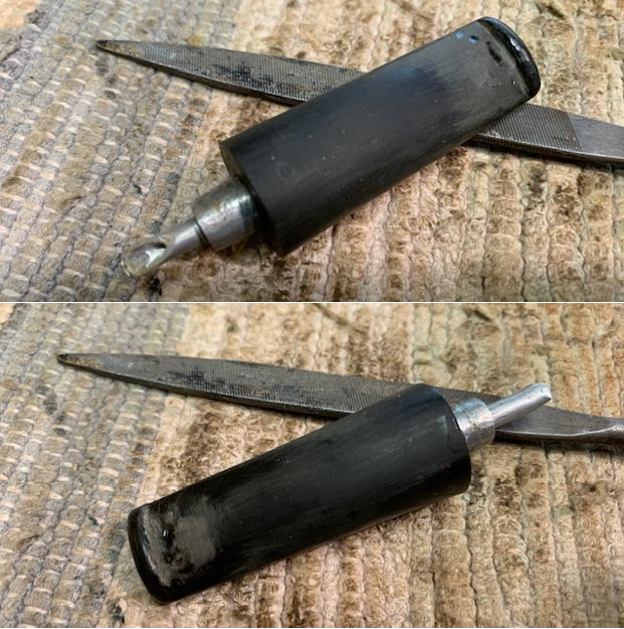
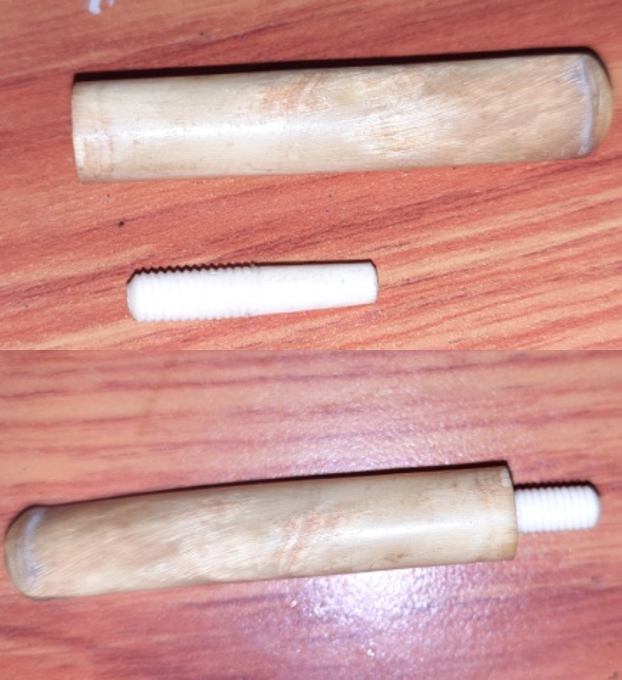
Before fixing the tenon, I cleaned out the stem internals using anti-oil dish washing soap and thin shank brushes. I scrubbed the external surface with soap and Scotch Brite pad. Using paper towels and pipe cleaners, I dried the stem externals and airway respectively. I inserted a petroleum jelly (Vaseline) coated tapered pipe cleaner through the tenon and stem airway and out through the round orifice opening at the slot end. This serves two purposes, firstly, perfect alignment of the tenon and stem airway is ensured and secondly, the petroleum jelly prevents the superglue from seeping into the airway and clogging it shut once the glue has dried. I roughed out the smooth surface of the tenon with a needle file to provide better bonding surface and applied superglue over the smooth surface of the tenon and over the threads in the stem and inserted the tenon into the stem. I wiped the excess glue from the surface and held the two together for the glue to harden a bit and then set it aside for the superglue to harden completely. While the stem was set aside for the glue to cure, I sanded the stummel fills with a flat needle file. To further even out the filled areas and address the minor dents and dings over the stummel surface, I sanded it with a worn out piece of 220 grit sand paper till smooth.
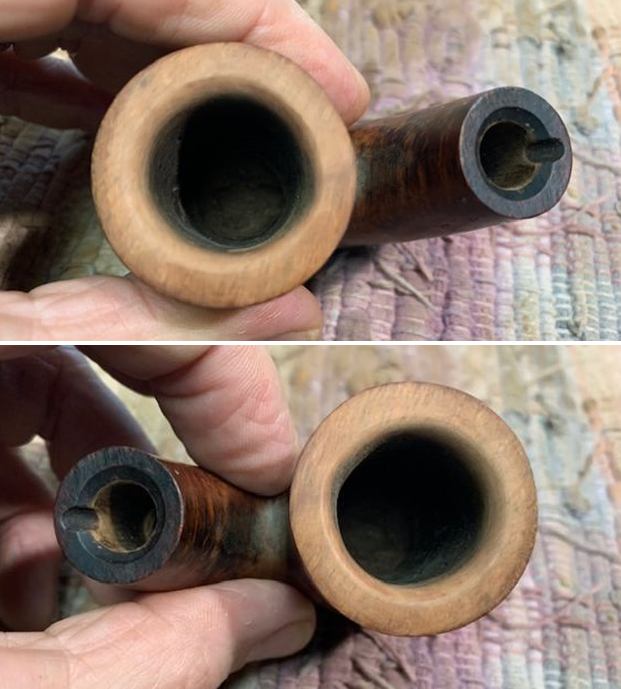
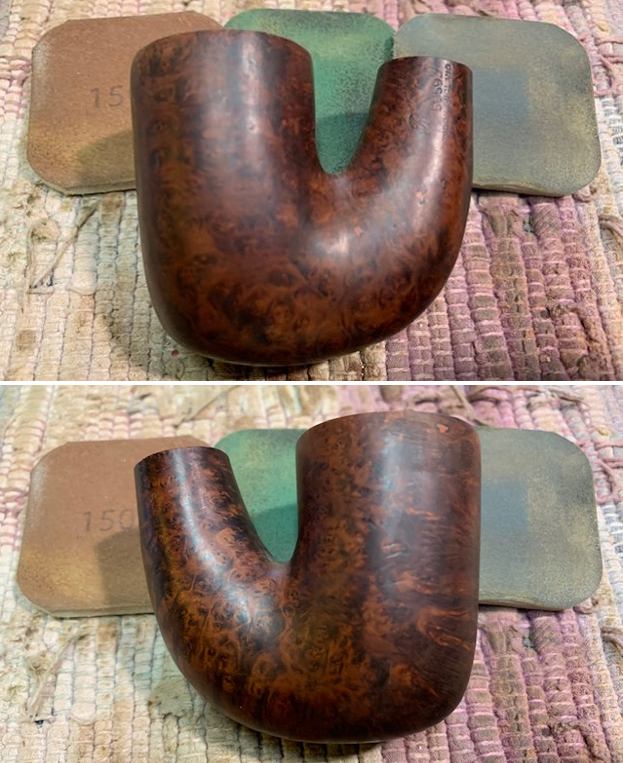
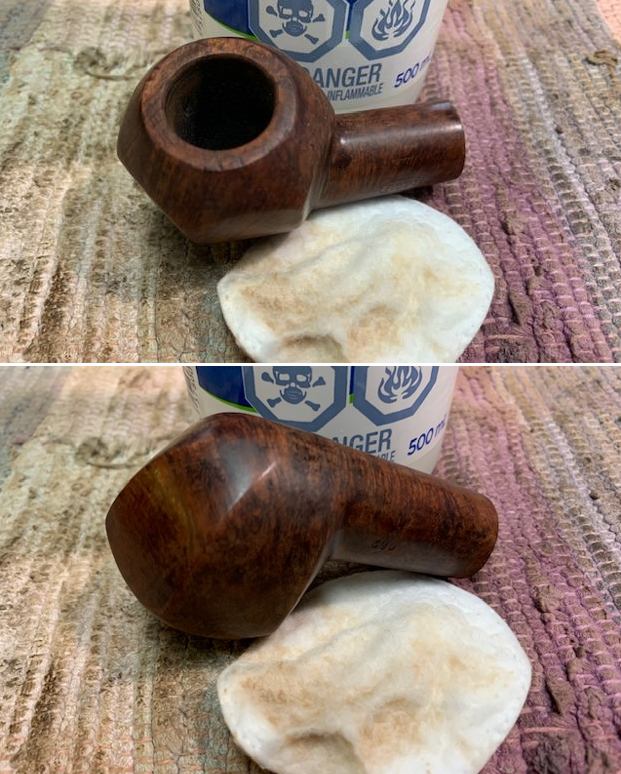
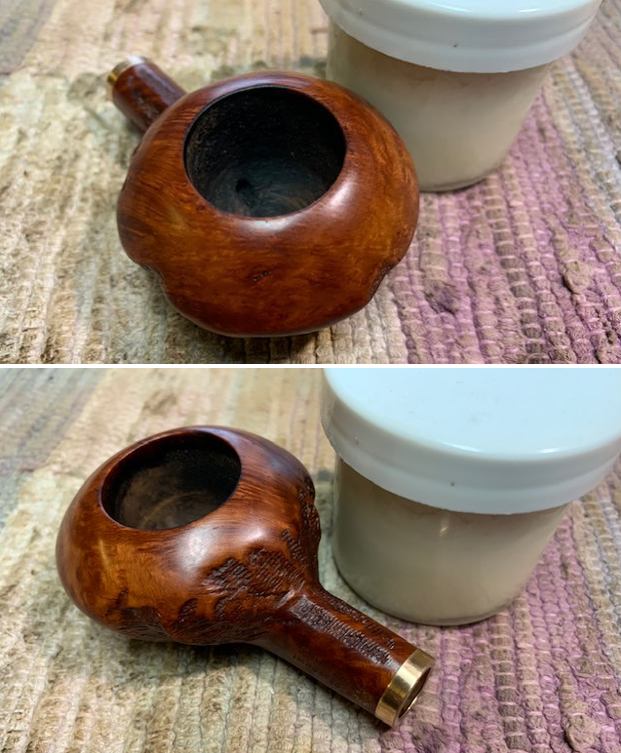
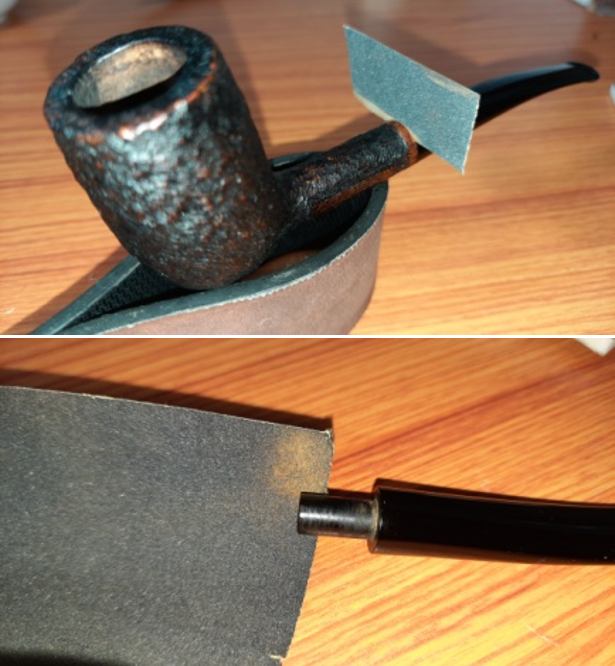
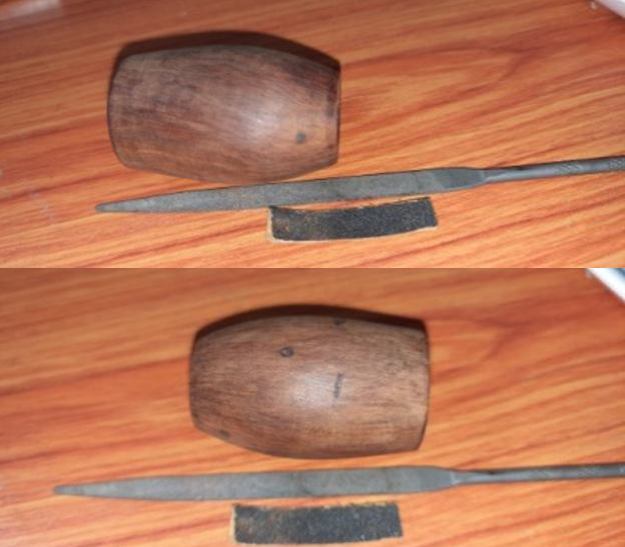
Next I addressed the issue of the charred and out of round chamber. I began with topping the rim over a 220 grit sand paper, frequently checking for the progress being made. I stopped once the charred surface was reduced to an acceptable- to- me level and the thickness of the rim top was close to even all round. To get the chamber back to round, I created a bevel over the inner and outer edge with a folded piece of 180 grit sand paper. I am pretty pleased with the progress being made thus far.While I had been working on the stummel, the tenon fix to the stem had set solid. I checked the seating of the tenon in to the shank end and it was snug and perfectly aligned.
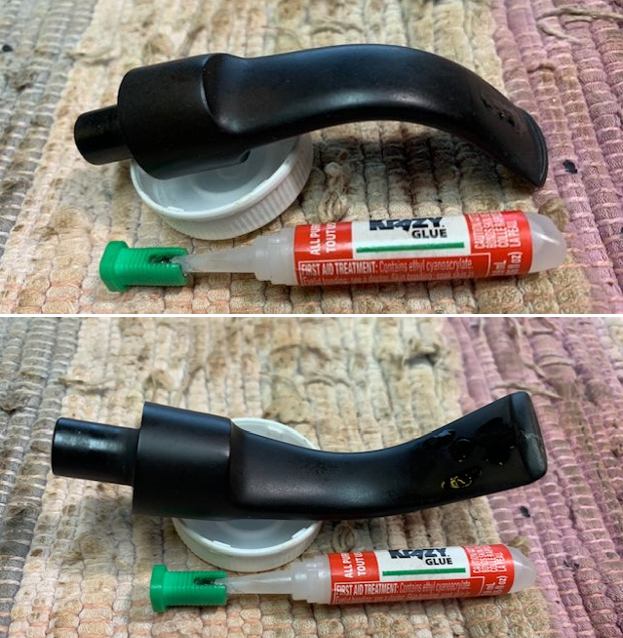
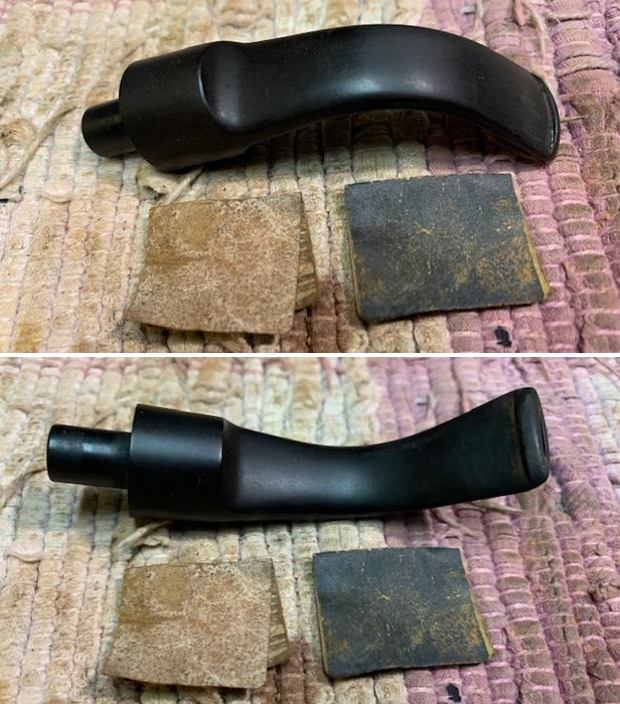
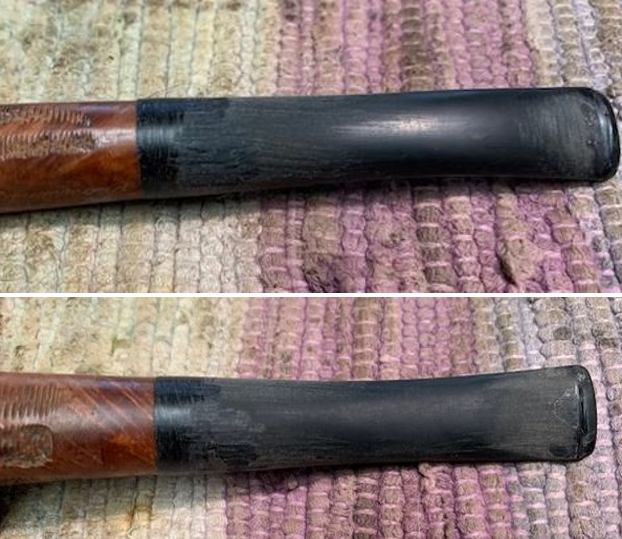
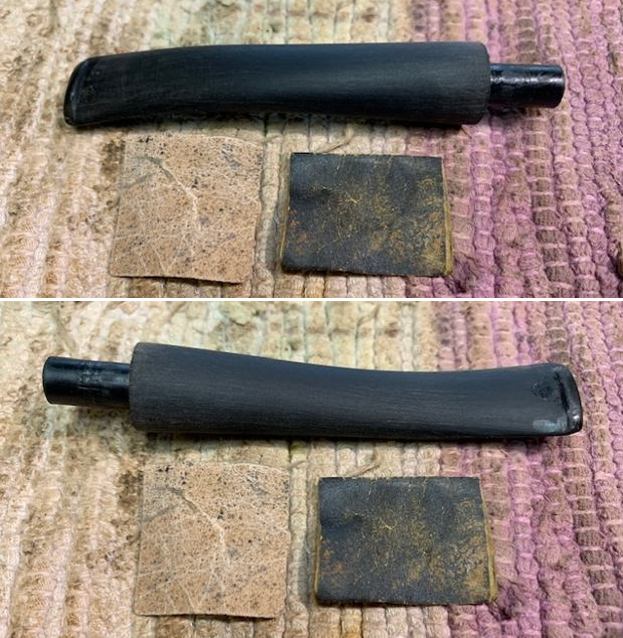
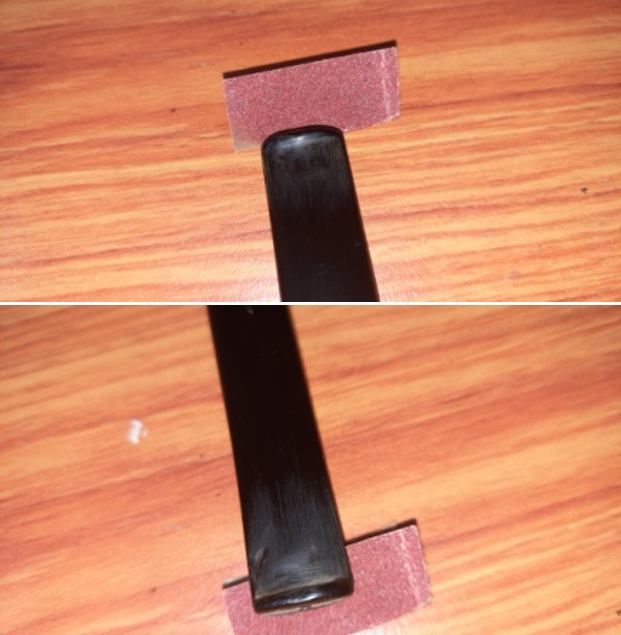
There was this issue of sliced top surface on the stem which I addressed next. I applied clear CA superglue over and under the sliced surface and set the stem aside to cure. I sprayed an accelerator over the superglue to hasten the process of curing. Once the stem repairs were set, with a needle file, I sanded the fill to achieve a rough match with the stem surface. I further fine tuned the match by sanding the entire stem surface with a folded piece of 220 grit sandpaper. I applied a little EVO (Extra Virgin Olive Oil) to the reed shank and stem and set it aside to be absorbed into the surface. 
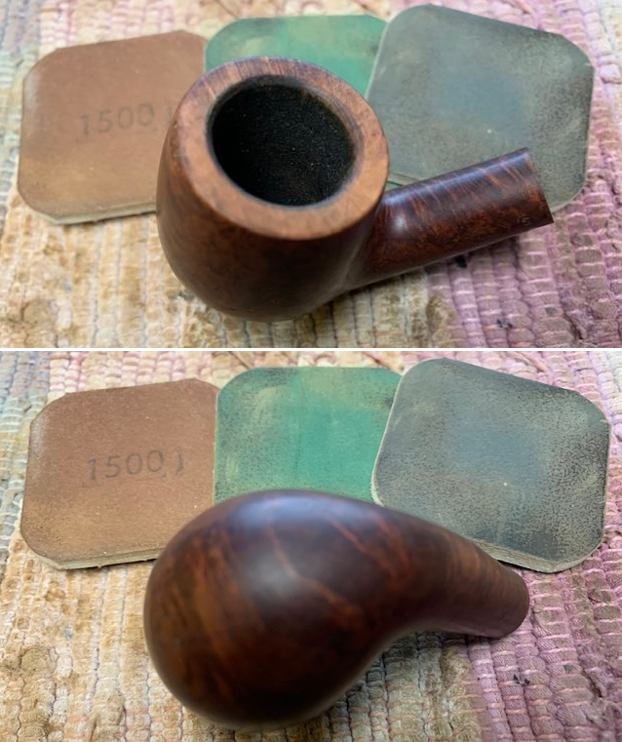
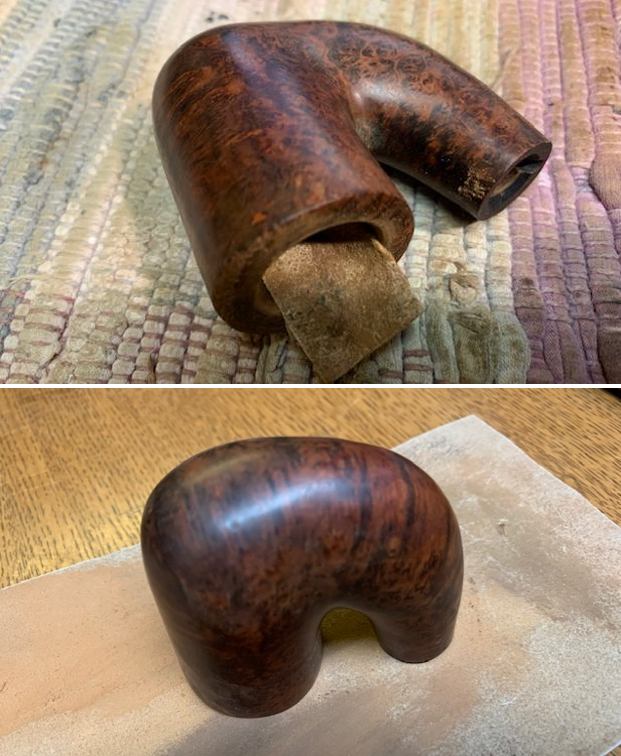
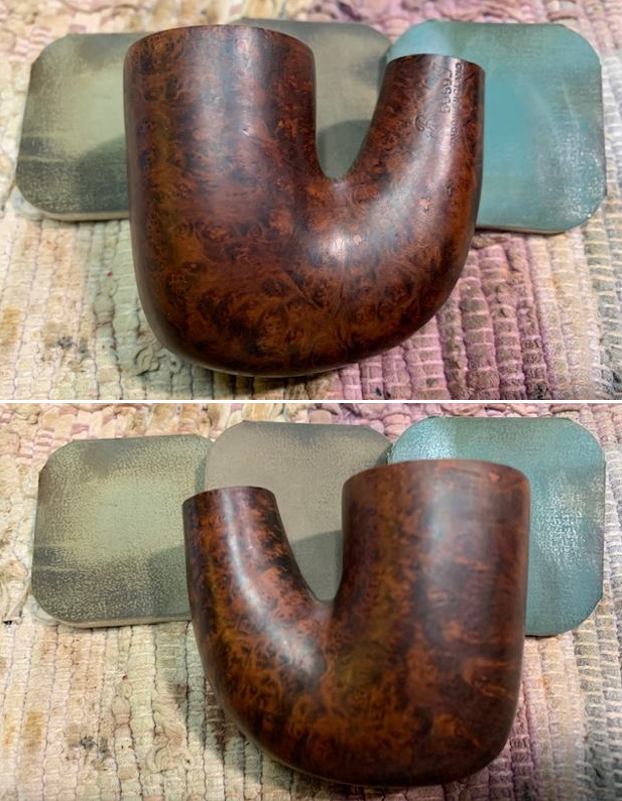
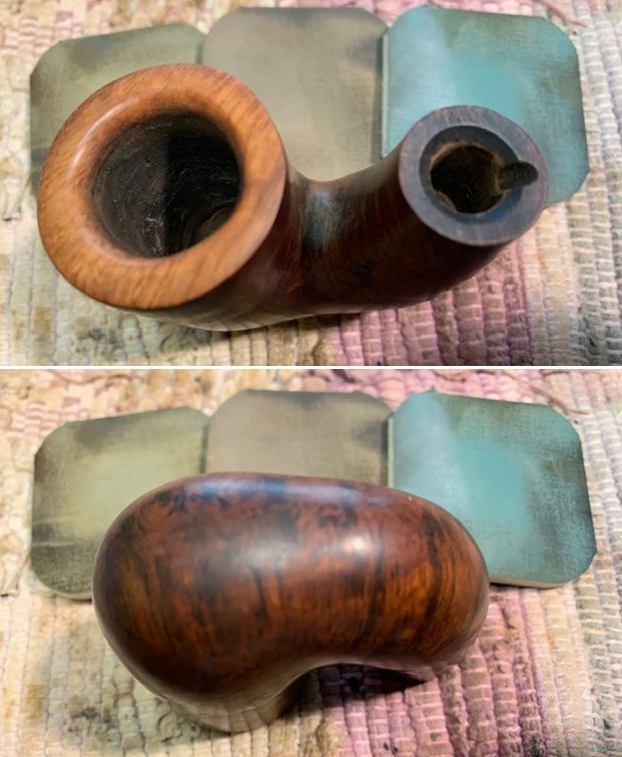
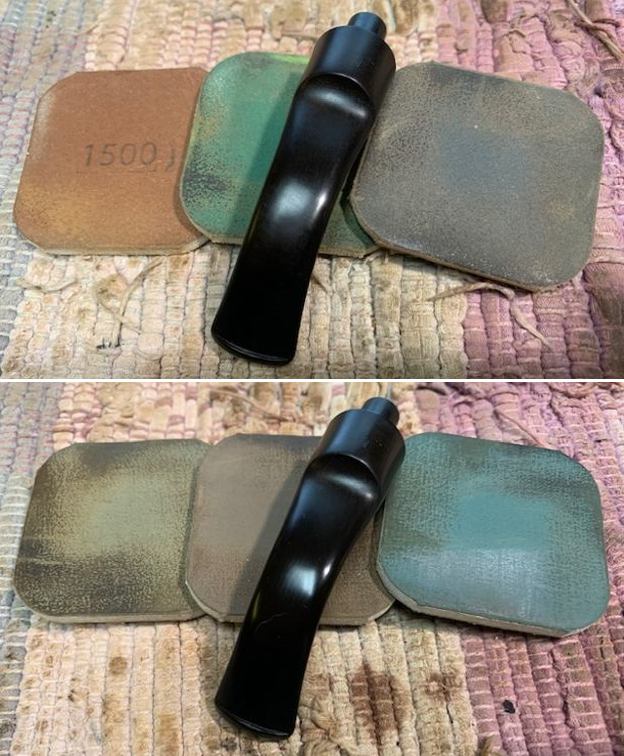
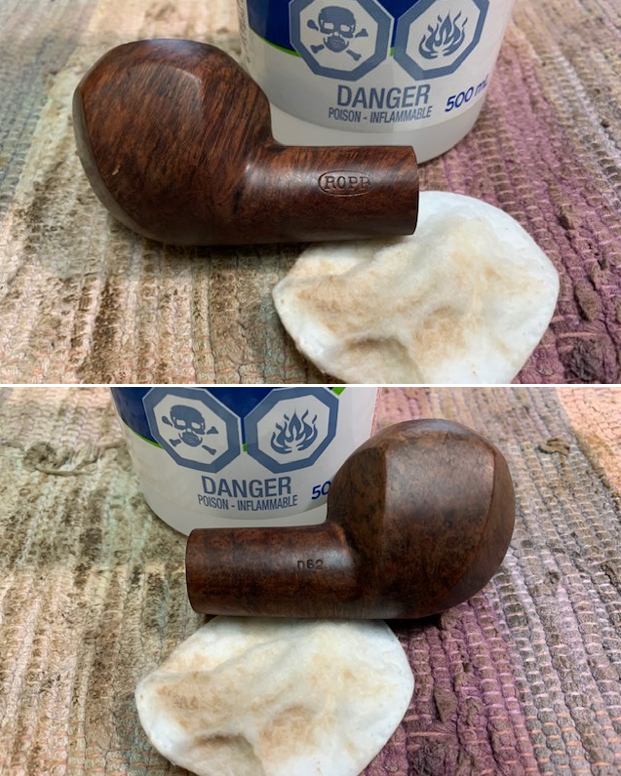
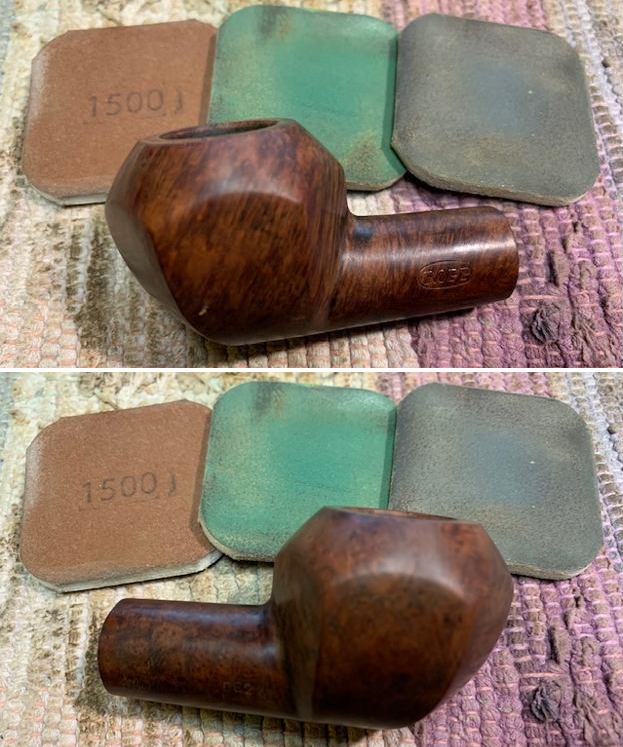
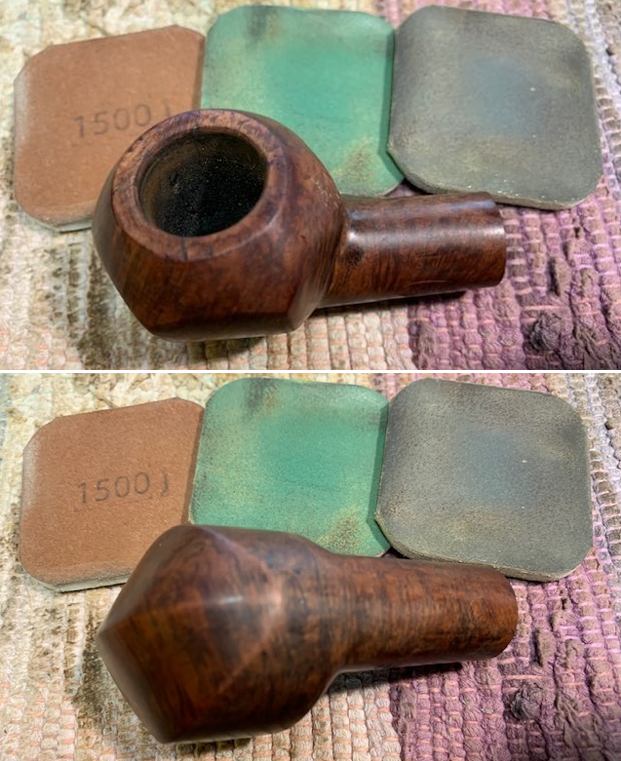
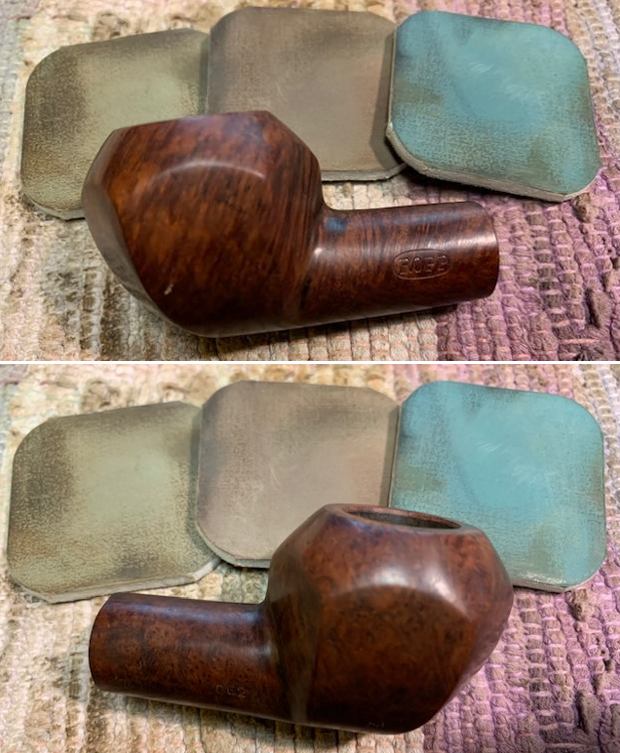
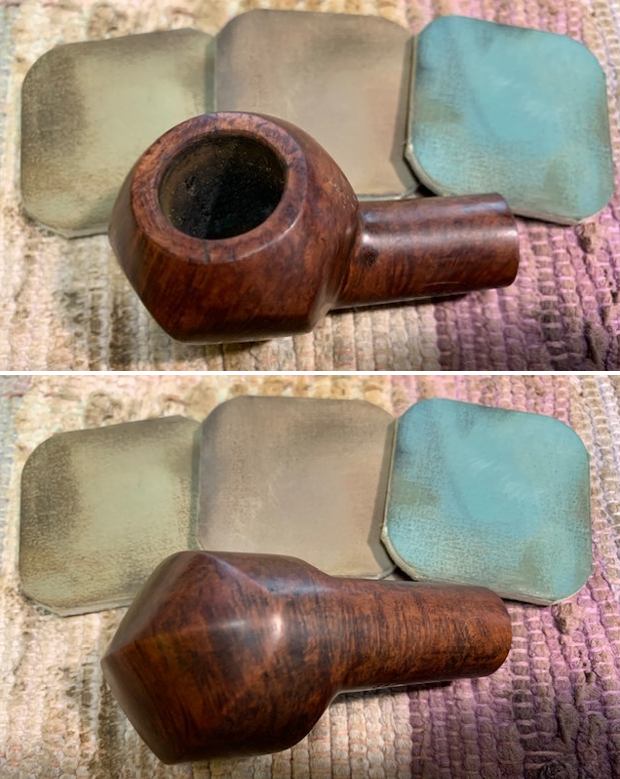
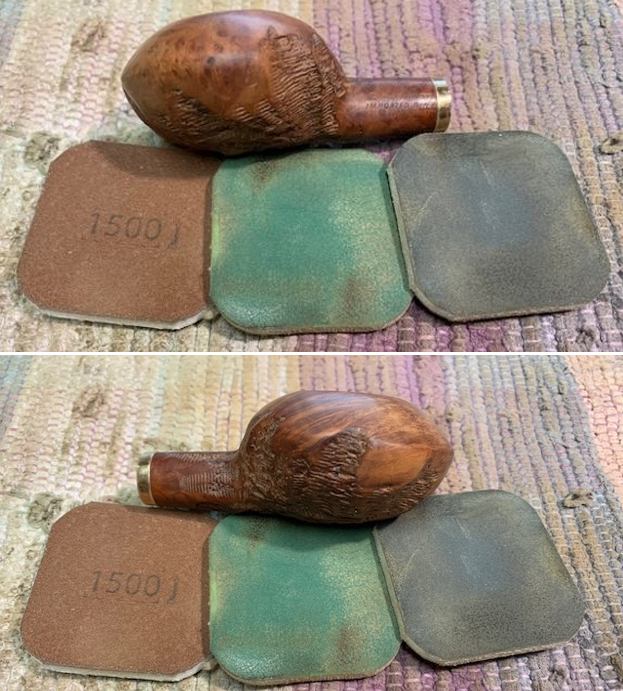
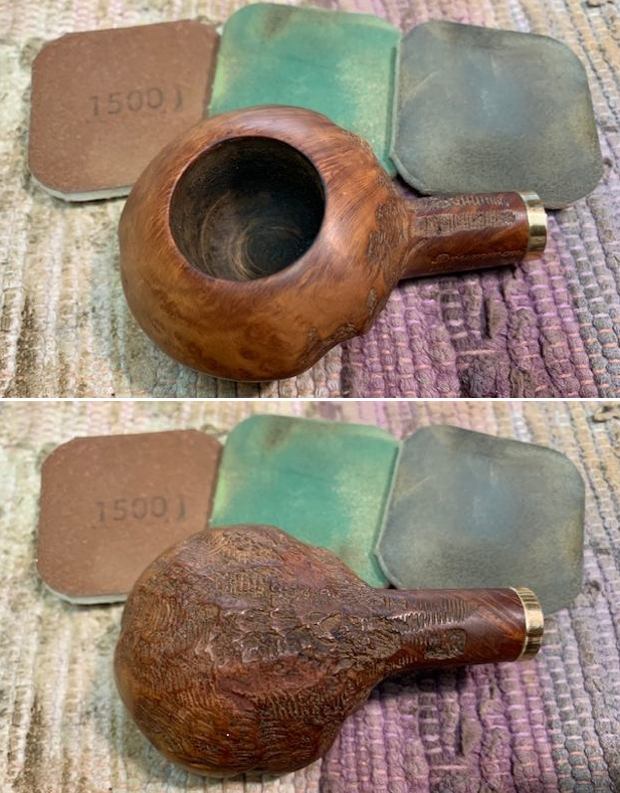
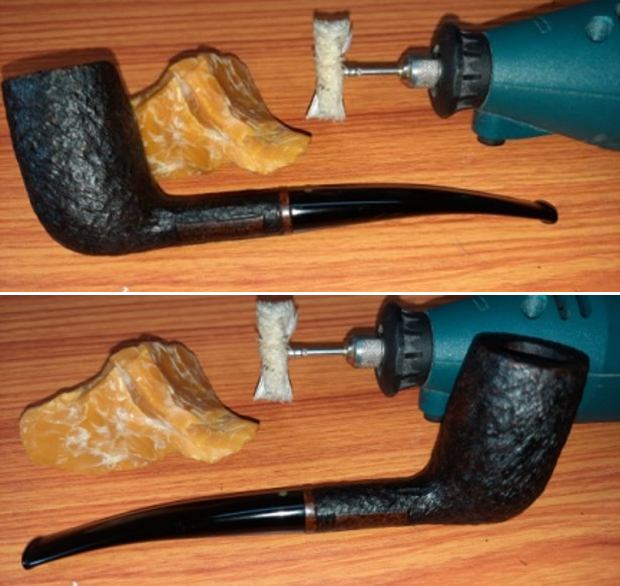
While the shank and stem were set aside to absorb the EVO, I dry sanded and polished the stummel surface with 1500 to 12000 grit micromesh pads. Dry sanding with micromesh pads helps to preserve the patina of the old briar and is a trick I use when restoring all my vintage pipes. I rubbed a small quantity of “Before and After Restoration” balm which moisturizes and enlivens the briar. I let the stummel absorb the balm for 15- 20 minutes and then gave the stummel a rigorous hand buff with a micromesh cloth. The transformation in the appearance of the stummel is phenomenal and immediate. 
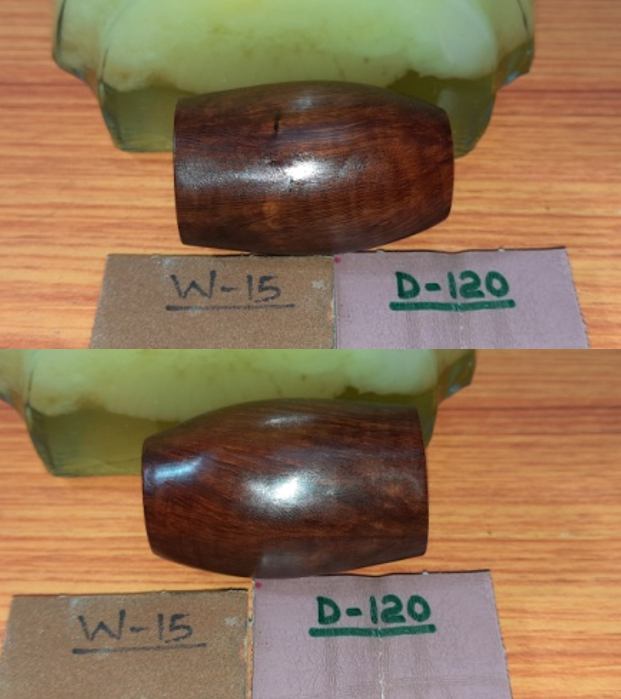
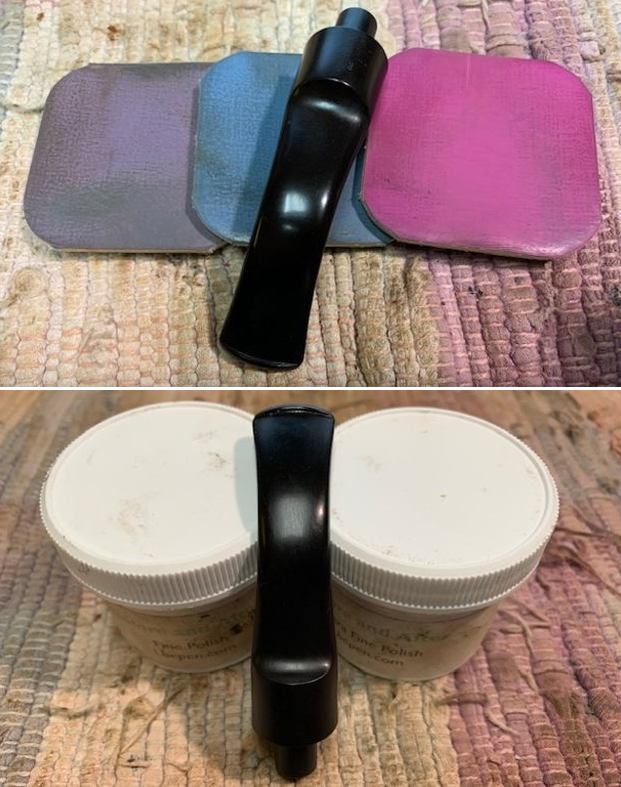
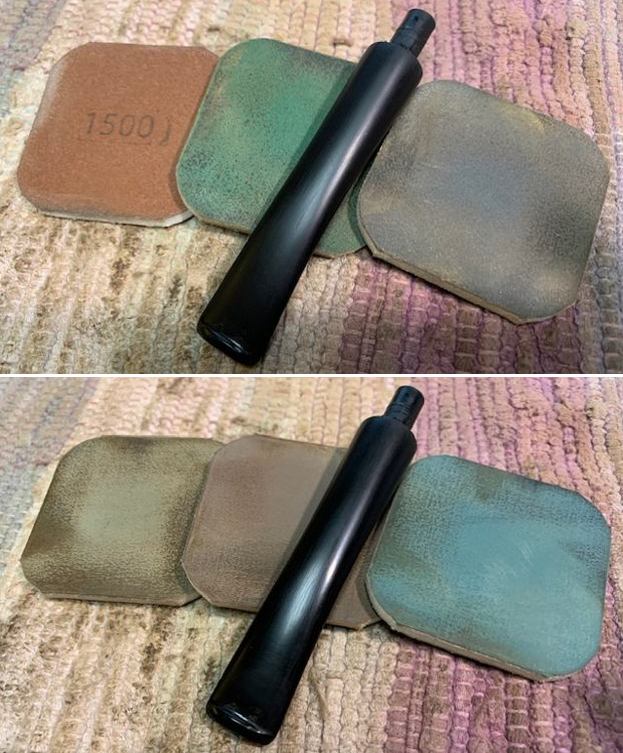
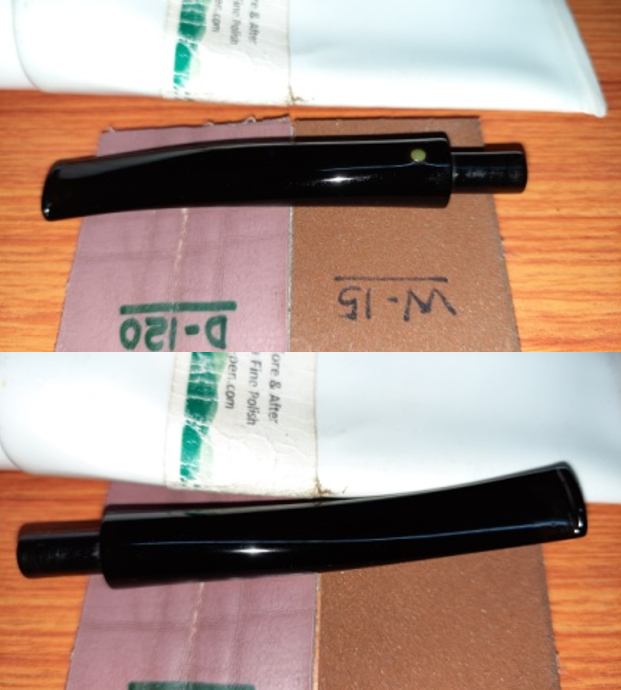
With the stummel now refurbished and rejuvenated, I turned my attention back to the shank and horn stem. I polished the shank and stem by wet sanding using 1500 to 12000 grit micromesh pads. I rubbed a little “Before and After” balm in to the reed shank and a little EVO in to the stem. 
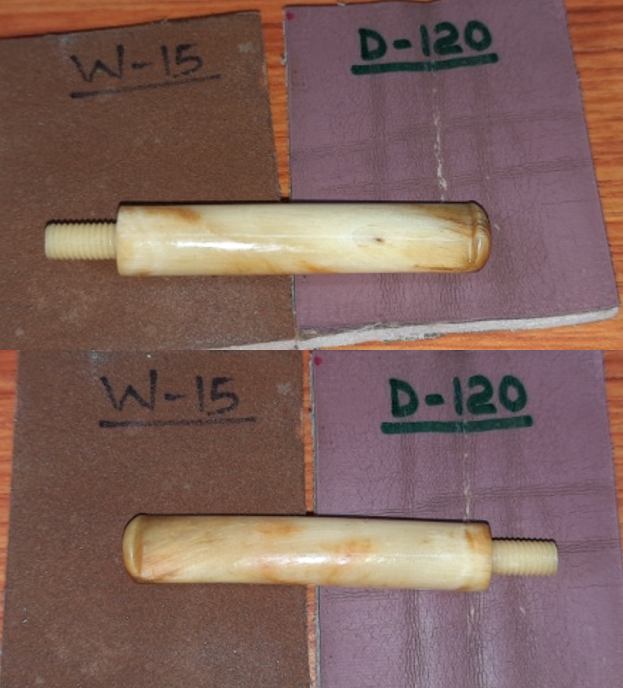
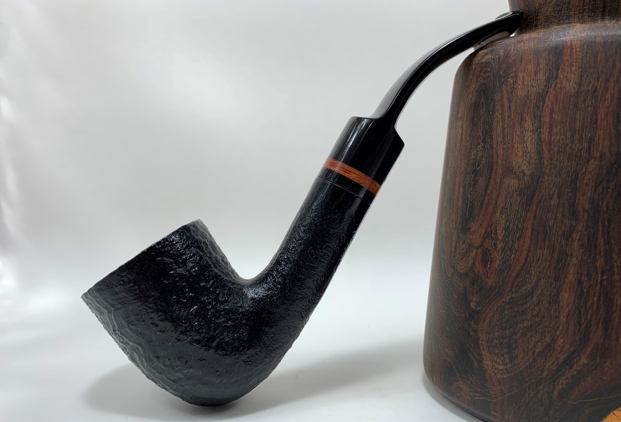
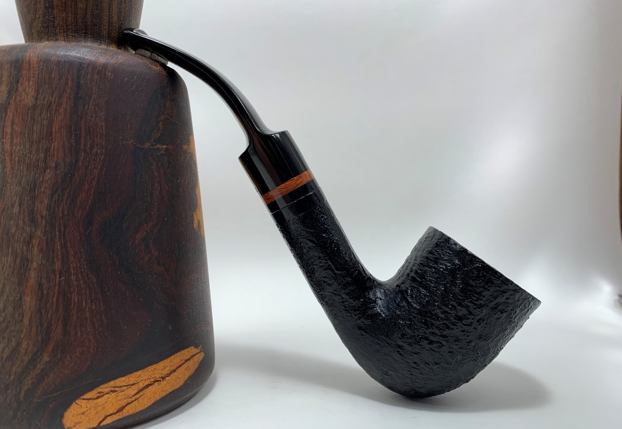
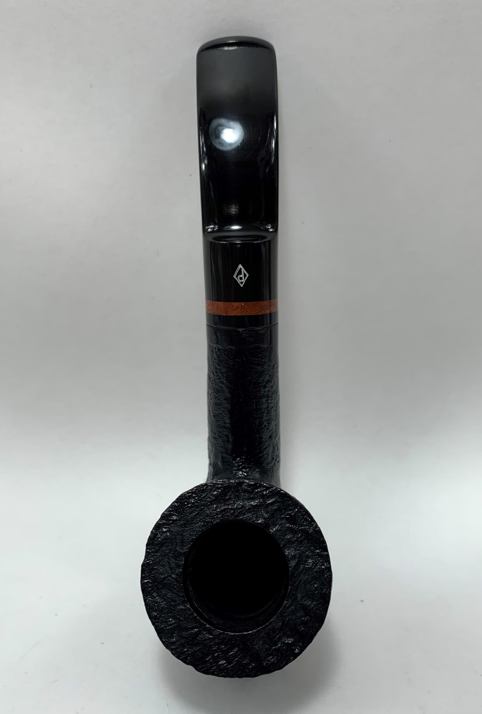
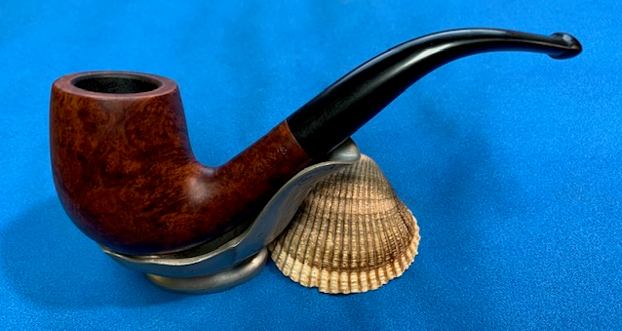
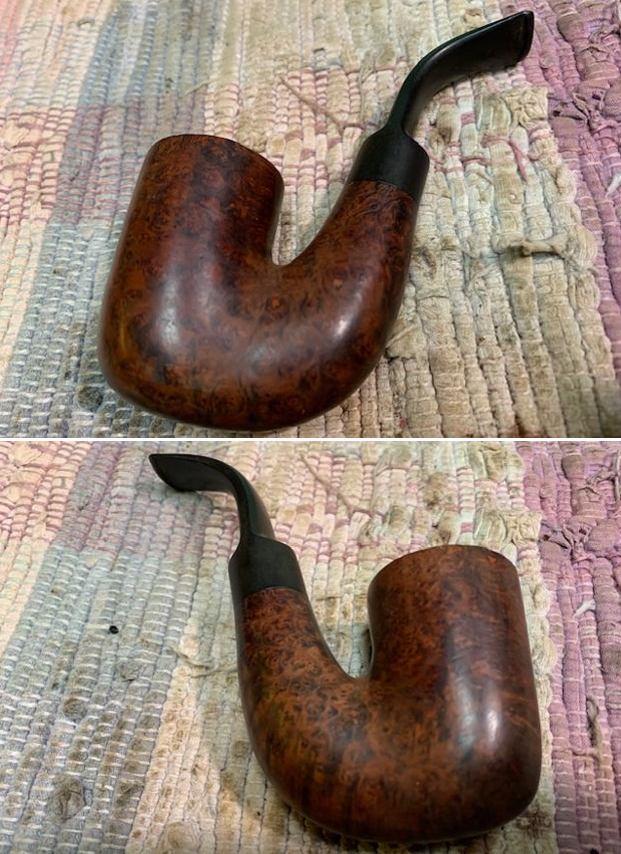
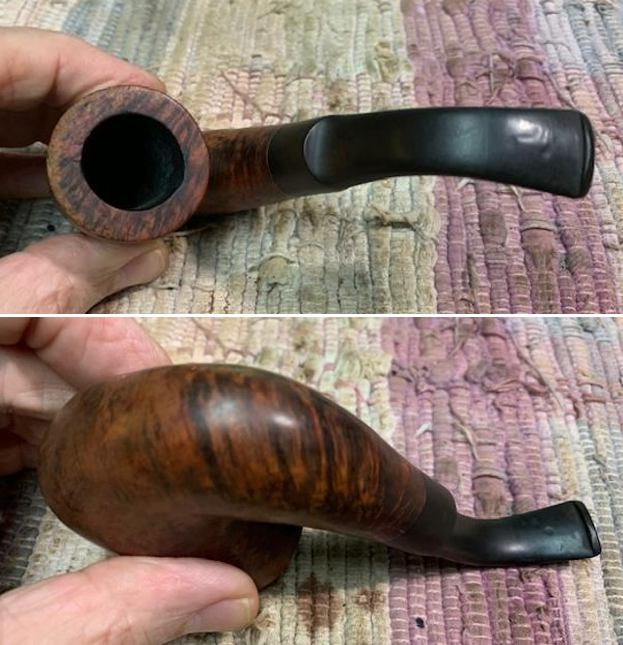
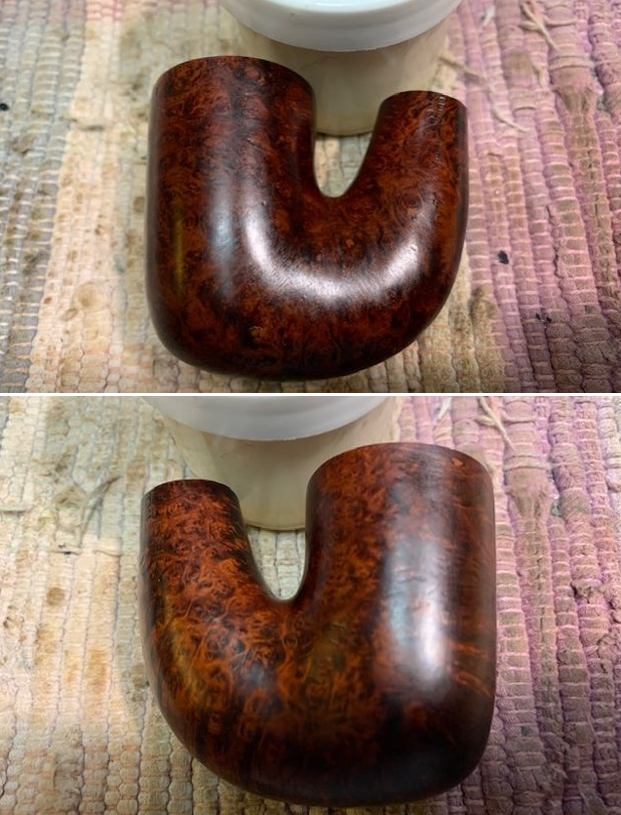
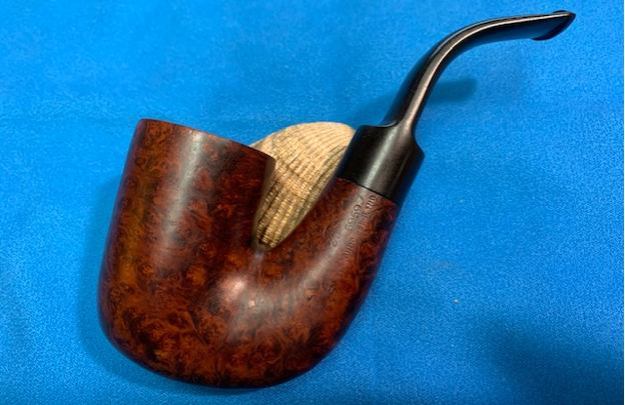
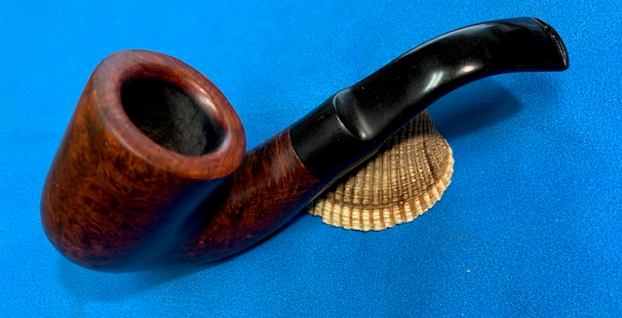
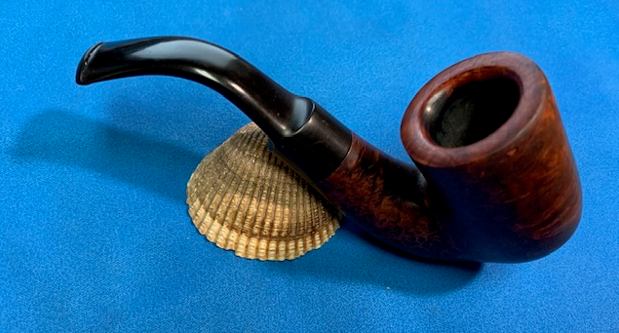
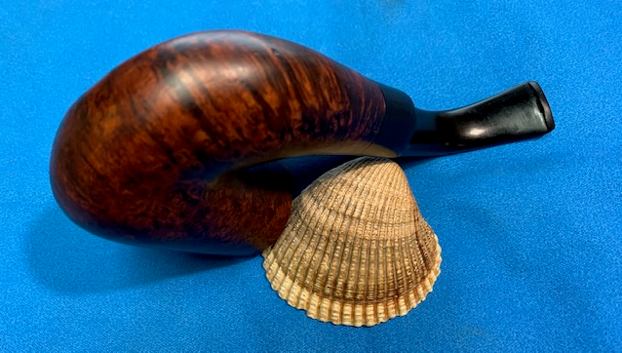
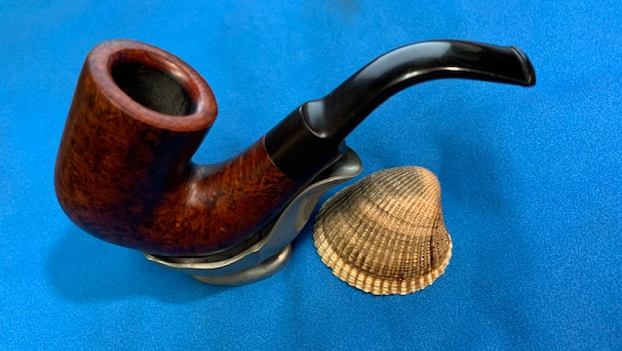
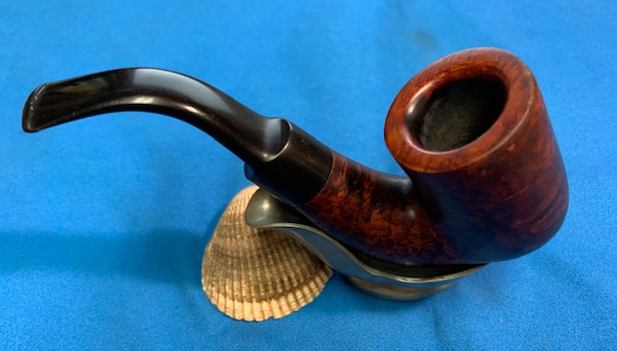
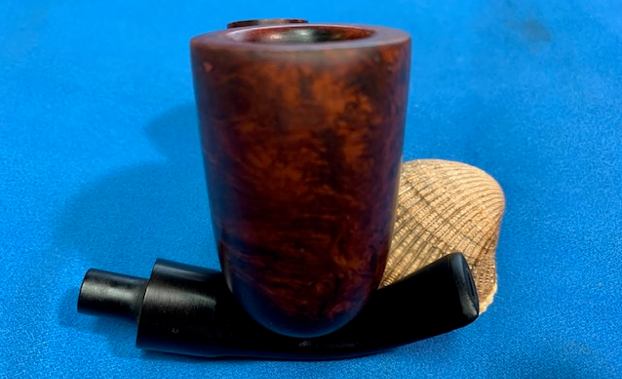
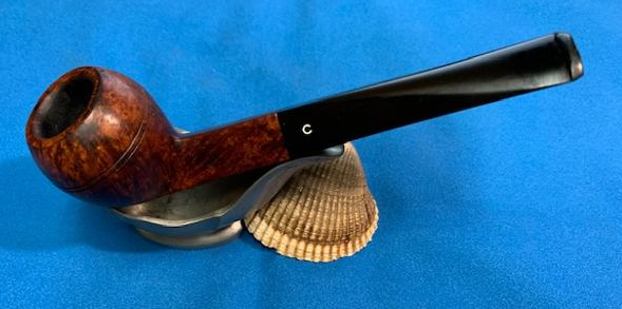
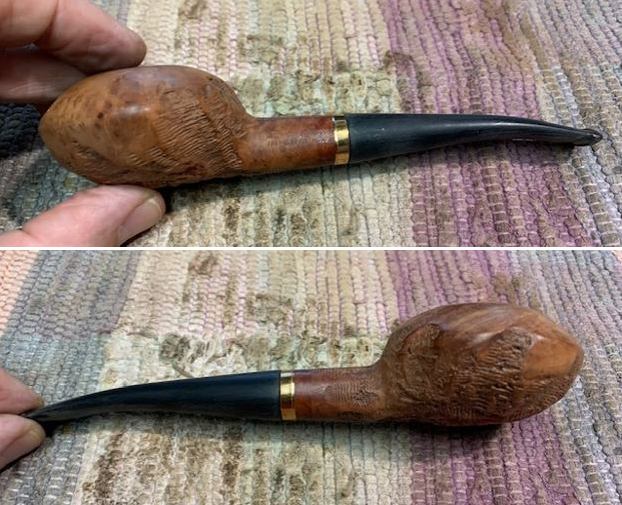
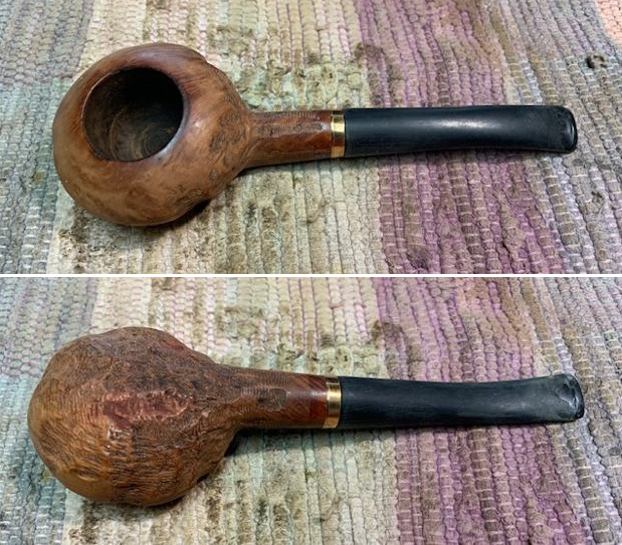
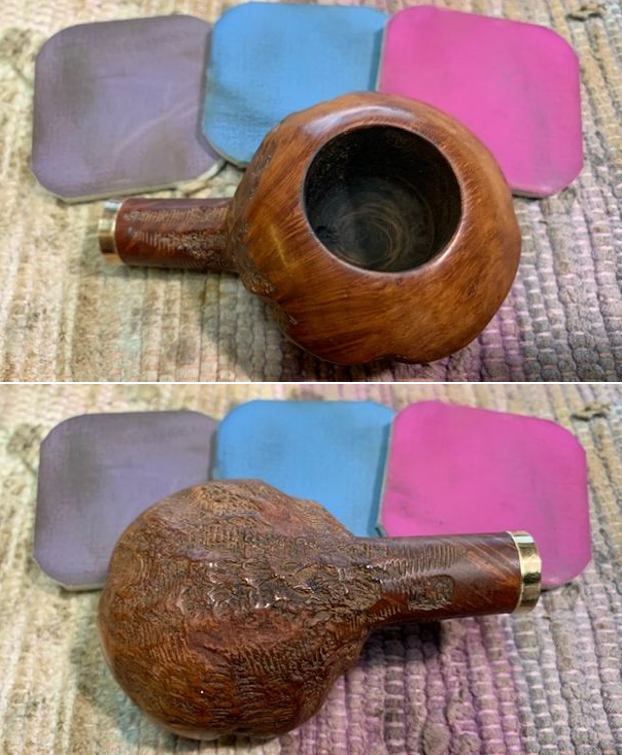
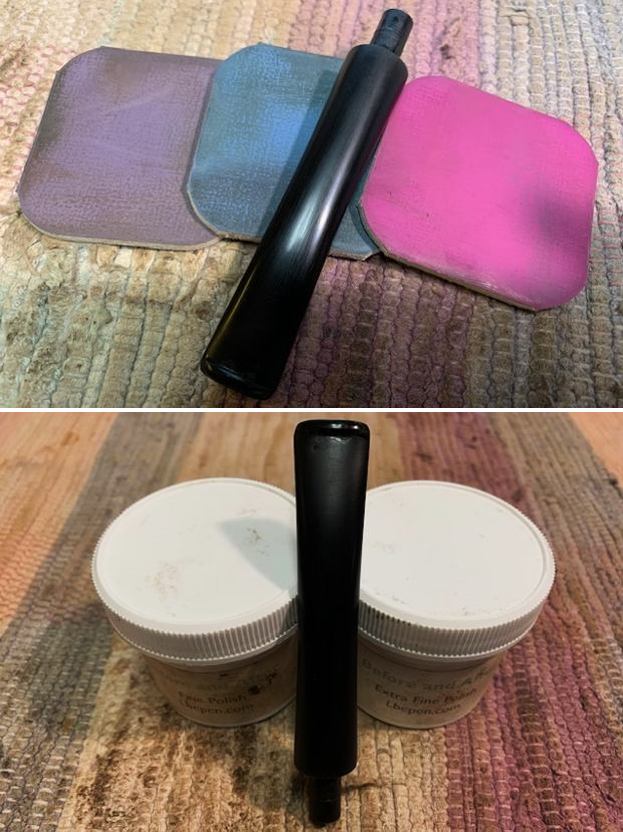
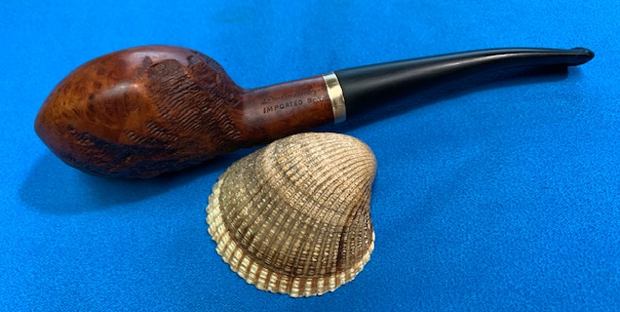
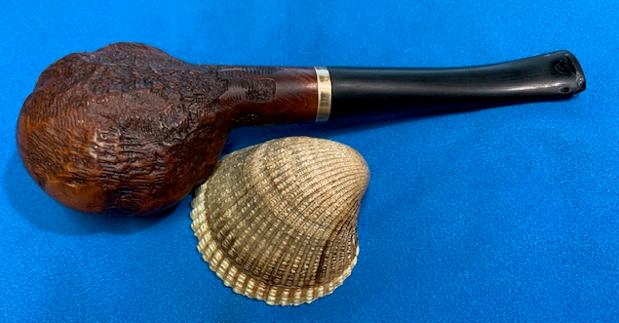
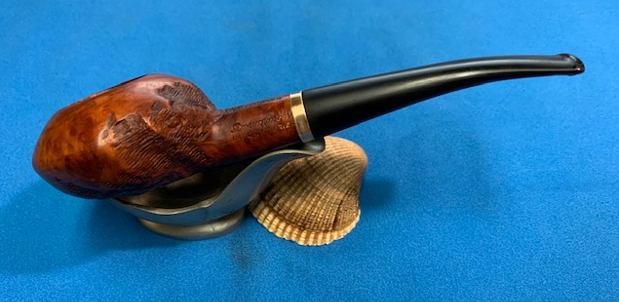
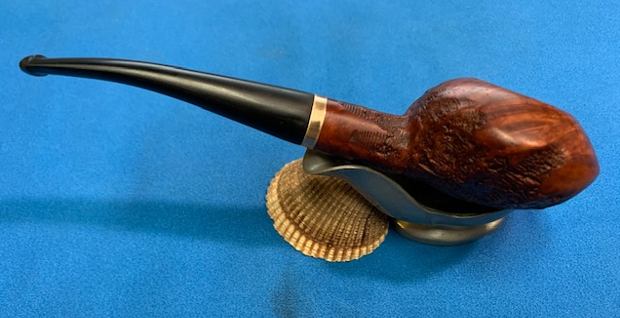
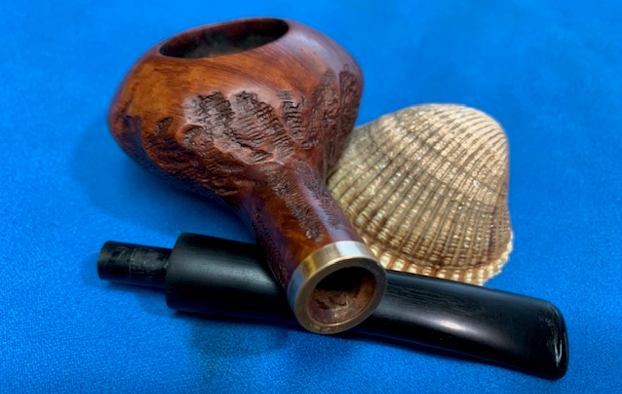
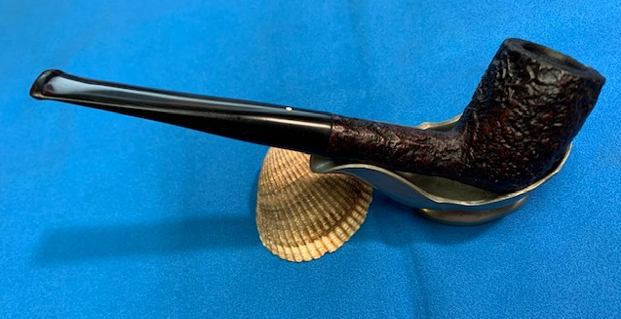
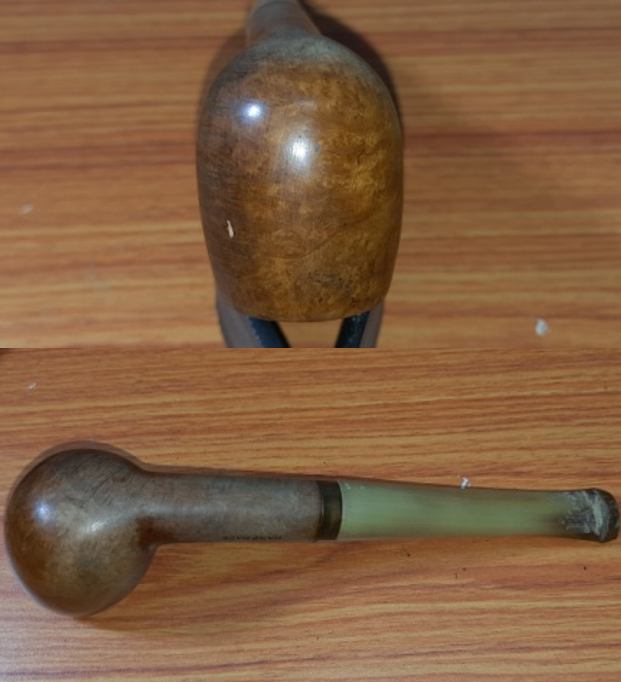
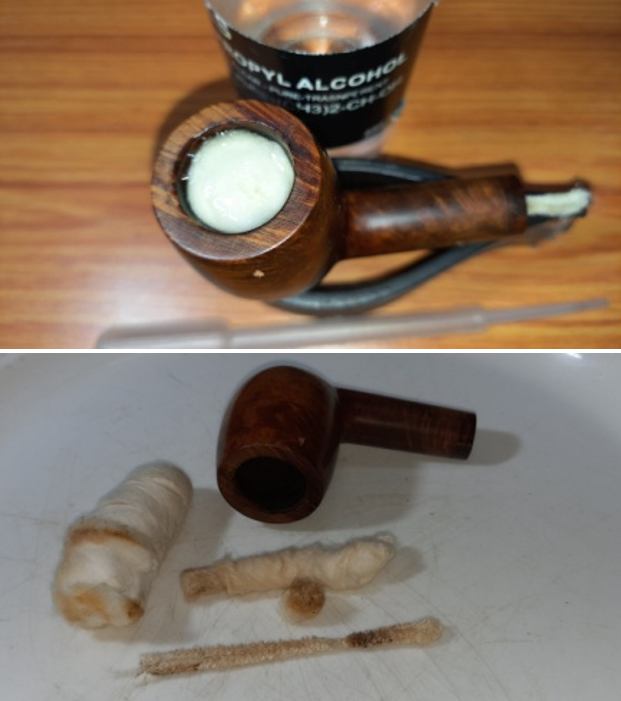
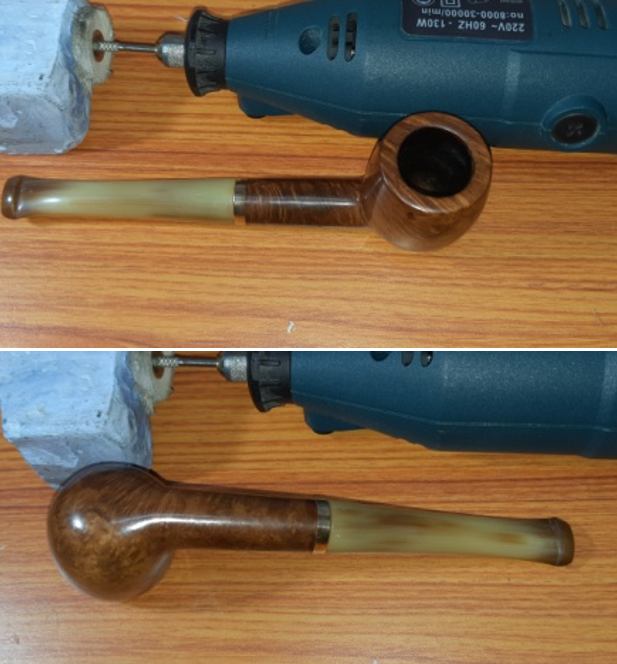
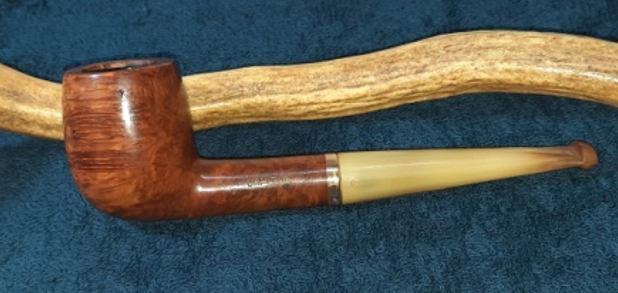
All that remained was a polish with Blue Diamond compound and final wax coating using Carnauba Wax. I mounted a cotton buffing wheel earmarked for Blue Diamond compound on to my hand held rotary tool and applied a coat of the compound over the stummel surface to polish out the minor scratches. With a cotton buffing wheel that I use for carnauba wax, I applied a coat of carnauba wax to the stummel and stem and continued to work on it till the complete coat of wax had been polished out. I mounted a clean cotton cloth buffing wheel and gave the entire pipe a once over buff. I finished the restoration by giving the entire pipe a rigorous hand buffing using a microfiber cloth to deepen the shine further. The finished pipe is shown below. This pipe shall find its way to my collection based purely on its delicate stunning looks and uniqueness of the shape. P.S. The Pipe God was definitely smiling down upon me as I worked this pipe. Rarely does it happen that the replacement stem is a perfect size match and the new tenon is period correct and fits in the shank like a glove.

The most difficult part of this restoration for me was…can you guess? Please let me know your guess in the comments below and a big thank you for your valuable time in reading the write up.

Praying for you and yours… Be safe and stay safe.

Saving a Parker


Blog by Kenneth Lieblich

Next on the chopping block is a beautiful sandblasted pipe by Parker of London. I purchased a group of pipes from a fellow in the Eastern US. It was definitely a mixed bag of very good and very bad. Some pipes were destroyed beyond repair, some pipes were filthy but repairable, some stems were missing their stummels, and some stummels were missing their stems. However, there were a handful that were in decent condition when I found them and they just needed a helping hand – this Parker was one of those. Apologies in advance for the paucity of photographs. I guess I just got carried away with the work! Parker of London has an interesting history. Our friends over at Pipedia have provided this information:

In 1922 the Parker Pipe Co Limited was formed by Alfred Dunhill to finish and market what Dunhill called its “failings” or what has come to be called by collectors as seconds. Previous to that time, Dunhill marketed its own “failings”, often designated by a large “X” over the typical Dunhill stamping or “Damaged Price” with the reduced price actually stamped on the pipe. While the timing and exact nature of the early relationship remains a bit of mystery, Parker was destined to eventually merge with Hardcastle when in 1935 Dunhill opened a new pipe factory next door to Hardcastle, and purchased 49% of the company shares in 1936. In 1946, the remaining shares of Hardcastle were obtained, but it was not until 1967 when Parker-Hardcastle Limited was formed. It is evident through the Dunhill factory stamp logs that Parker and Dunhill were closely linked at the factory level through the 1950s, yet it was much more than a few minor flaws that distinguished the two brands. After the war, and especially after the mid 1950s the differences between Parker and Dunhill became even more evident, and with the merger of Parker with Hardcastle Pipe Ltd, in 1967 the Parker pipe must be considered as an independent product. There is no record of Parker ever being marketed by Dunhill either in its retail catalog or stores. Parker was a successful pipe in the US market during the 1930s up through the 1950s, at which point it faded from view in the US, while continuing to be popular in the UK. Pipedia goes on to say that the old Parkers had a patent number and dating code, but these were gone by 1957. I do not know the specific age of this pipe, but since it is missing both a patent number and dating code, it is safe to say that it was made after 1957. This sandblasted Parker has the following markings on the stummel: Parker of London [over] Bark 576. The stem has the letter P inside a diamond on the topside and it also has the word France on the underside. Furthermore, the following photo, showing one of Parker’s brochures, indicates that the model number 576 is a bent Dublin.Fortunately, this Parker was in pretty good shape when it came to me and that certainly made my job easier. There were a few small discolourations to the stummel and the overall colour was dull, but nothing too serious. The stem had a few nicks and dents, but I was not concerned. Really, this pipe just needed a day at the salon in order to look its best.

The stem was first on my list. I took a BIC lighter and ‘painted’ the stem with its flame in order to lift the marks. This was only modestly successful in raising the dents. Then, I cleaned out the insides of the stem with pipe cleaners and isopropyl alcohol. It was a bit dirty, but not too bad and I only went through a few pipe cleaners in order to clean it up.I then scrubbed then stem vigorously with SoftScrub to clean it up nicely. Before I moved on to the Micromesh pads, I built up the small dents on the stem with cyanoacrylate adhesive and let them fully cure. I then sanded it down with 220-, 400-, and 600-grit sandpapers to meld the repair seamlessly into the stem. This ensures that it keeps its shape and looks like it should. I then used all nine Micromesh pads (1,500 through 12,000 grit) to bring out the lovely black lustre on the stem. I also used Obsidian Pipe Stem Oil in between each pad scrubbing.

On to the stummel, and the usual cleaning procedures were in order for this pipe. I used both the PipNet Reamer to remove the built-up cake and followed that with 220-grit sandpaper to remove as much as I could. I wanted to take the bowl down to bare briar to ensure there were no hidden flaws in the walls of the bowl. Fortunately, there were none. I then proceeded to clean out the insides of the shank with Q-tips, pipe cleaners, and isopropyl alcohol. There wasn’t too much nastiness inside this stummel – it only took a handful of pipe cleaners etc. to sort that out. I followed that up by cleaning the insides with some dish soap and tube brushes. I then moved on to cleaning the outside of the stummel with Murphy’s Oil Soap, a toothbrush, and some cotton pads. That removed any remaining dirt. Fortunately, there was no notable damage to the stummel, so I didn’t have to address that. However, I did do some touch ups to the black stain with my furniture pens. Since the pipe had a sandblast finish, I obviously did not use the Micromesh pads to sand everything. Instead, a light application of Before & After Restoration Balm brought out the best in the stummel’s grain.

Then it was off for a trip to the buffer. A dose of White Diamond and a few coats of Halcyon II wax were just what this pipe needed. The lovely shine gave the wood a deep black look.

In the end, what a beauty this pipe is! It is back to its old glory and ready to be enjoyed again by the next owner. I am pleased to announce that this pipe is for sale! If you are interested in acquiring it for your collection, please have a look in the ‘British’ pipe section of the store here on Steve’s website. You can also email me directly at kenneth@knightsofthepipe.com. The approximate dimensions of the pipe are as follows: length 145 mm/ 5 ¾ inches; height 50 mm/ 2 inches; bowl diameter 38 mm/ 1 ½ inches; chamber diameter 21 mm/ .80 inches. The mass of the pipe is 47 grams/ 1.65 ounces. I hope you enjoyed reading the story of this pipe’s restoration as much I as I did restoring it. If you are interested in more of my work, please follow me here on Steve’s website or send me an email. Thank you very much for reading and, as always, I welcome and encourage your comments.

Restemming & Restoring a Comoy’s Christmas 1987 Shape 42 Bent Billiard


Blog by Steve Laug

This morning I went through my box of stummels (bowls) again and picked out a Bent Billiard bowl that had some promise. I went through my can of stems and found a taper stem that needed some work but was a good fit. The pipe I chose to work on is an interesting Comoy’s Bent Billiard with a mixture grain around the sides. The rim top was had some darkening and some roughness on the front outer edge of the bowl. The inner edge of the bowl looked good. The interior of the bowl was clean without chips, cracks or checking on the walls. The finish was dirty and tired but still quite redeemable. The stamping on the pipe was clear and readable. On the left side it read COMOY’s [over] Christmas [over] 1987. On the right side it had the normal circular Comoy’s COM stamp Made in London in a circle [over] England below that was the shape number 42. I took some photos of the bowl before I started to work on it. I took a photo of the stamping on the left and right sides of the shank. It reads as noted above and is clear and readable.I went through some of stems and found a taper vulcanite stem that had been used previously. It had some calcification and oxidation on the surface and had tooth marks on both sides near the button.The tenon would need to be shortened slightly but I put it on the shank and took some photos of what it looked like at this point.I started my work on the bowl by dealing with the damage to the rim top and outer edge of the bowl. I lightly topped the rim on a topping board with 220 grit sandpaper. I worked over the inner beveled edge of the rim with a folded piece of sandpaper to remove some of the darkening. It was definitely an improvement. I polished the rim top and the bowl with micromesh sanding pads – dry sanding with 1500-12000 grit pads. I wiped the bowl down with a damp cloth between each pad. The bowl began to take on a shine as I went through the various pads. I stained the top of the bowl with a Cherry stain pen to blend in better with the rest of the bowl colour. It will definitely blend well once the pipe is buffed and polished.I rubbed the bowl and shank down with Before & After Restoration Balm. I worked it into the surface of the bowl sides and shank with my fingertips to clean, enliven and protect the briar. I let the balm sit for 10 minutes and then buffed with a cotton cloth to raise the shine. The grain really came alive. It looks better than when I began. With the bowl finished it was time to focus on the stem. I took out the stem and worked on the fit in the tenon. I shortened the length with a Dremel and sanding drum and it fit very well. I used a heat gun to soften the vulcanite enough to give it the proper bend.While I was bending the stem I also heated the bite marks in the stem. I was able to lift many of the tooth mark. I filled in the remaining tooth marks on the button surface and just ahead of it on the underside with clear super glue and set the stems aside to let the repairs cure.    Once the repairs cured I smoothed them out with a small file and started blending them into the surface of the stem. I sanded the repairs with 220 grit sandpaper to further blend it into the stem surface. I started polishing it with 400 grit wet dry sandpaper. I don’t know if this ever happens to you but I was so busy fitting and shaping the stem that I forgot to clean out the inside!! I paused now to do that. I scrubbed out the airway with 99% isopropyl alcohol and pipe cleaners. It was really dirty! Not any more.I polished the stem with micromesh sanding pads – dry sanding with 1500-12000 grit pads. I wiped the stem down after each pad with a cloth and Obsidian Oil. I finished the polishing with Before & After Pipe Stem Polish – both Fine and Extra Fine. I gave it a final coat of Obsidian Oil. I put the pipe back together – the bowl with its new stem. This restemmed and restored Comoy’s Christmas 1987 Shape 42 Bent Billiard is a real beauty and I think that the chosen stem works well with it. The grain on the bowl came alive with the buffing. I used Blue Diamond on the buffing wheel on both the bowl and stem. I gave both multiple coats of carnauba wax on the wheel then buffed it with a clean buffing pad to raise the shine. I hand buffed it with a microfibre cloth to deepen the shine. The Comoy’s Bent Billiard feels great in the hand. It is lightweight and the contrast in the browns of the briar, the Silver band and the polished vulcanite stem with the popping grain on the mixed brown stained bowl is quite amazing. The dimensions of the pipe are Length: 5 inches, Height: 1 ¾ inches, Outer diameter of the bowl: 1 1/8 inches, Chamber diameter: ¾ of an inch. The weight of the pipe is 1.41 ounces/40 grams. It really is a beauty. I will be putting it on the rebornpipes store in the  British Pipe Makers section shortly if you are interested in adding it to your collection. Thanks for walking through the restemming and the restoration with me. Cheers.  

Restoring a Lovely Barling 5959 Regency Oom Paul


Blog by Steve Laug

The next pipe I chose to work on an interesting looking Oom Paul shaped briar pipe that Jeff picked up from an online auction on 11/08/18 in Romney, West Virginia, USA. It was an interesting Oom Paul that has some great grain around the bowl and shank. It is stamped on the left side of the shank and reads Barling [over] 5959 [over] London England. On the right side it is stamped Regency in script [over] EXEL [over] T.V.F. So it is a Barling pipe. I will need to do a bit of work on the stamping to identify when it was made. The stem is a vulcanite saddle stem that had a rotting and cracking rubber Softee Bit on the end. The briar was very dirty and the front of the bowl had been knocked against a hard surface and was damaged and rough. There was a thick cake in the bowl and an over flow of lava covered the rim top. The stem was oxidized, calcified and the rubber Softee bit was worn. Jeff took some photos of the pipe before he started his clean up work on it. He took some photos of the bowl, rim top and edges to show the condition of the pipe before he started. There appeared to be some damage on the inner edge at the back of the bowl. The outer edge at the front was a real mess. He took photos of the stem with the Softee Bit in place and with it removed. It really is a mess with oxidation, calcification and tooth marks and chatter on both sides of the stem.He took photos of the stamping on the shank sides. It is clear and readable as is noted above.He took a photo of the side and heel of the bowl to show the grain that was on this particular piece of briar. It was a beauty.I checked the usual sources for information on the Barling Regency and did not come up with much. I am pretty certain it is a Post Transition Era pipe from the late 1960s to 1970s. I cannot narrow it down much further than that so I know that it is a new pipe (still over 50years old at least). Now it was time to move on to the pipe itself.

Jeff had cleaned up the pipe in his usual manner. He had reamed it with a PipNet pipe reamer and followed that up with a Savinelli Fitsall Pipe Knife afterward. He took the cake back to bare briar and the bowl looked very good. He scrubbed the internals with alcohol, pipe cleaners and cotton swabs to remove the oils and tars. He scrubbed the externals with Murphy’s Oil Soap and a tooth brush to remove the grime from the briar. He scrubbed the stem with Soft Scrub and then soaked it in a bath of Before & After Pipe Stem Deoxidizer. He rinsed it off with warm water and dried it with a coarse cloth to remove the remaining oxidation. The tooth marks are visible in the photos of the stem surfaces below. The pipe looked very good once it arrived here in Vancouver. I took photos of the pipe before I started my work. I took a photo of the rim top and bowl to show the condition of the briar. You can see the damage on the outer edge of the bowl on the front side. The top surface is scratched and marred. The inner edge of the bowl shows some burn damage on the back of the bowl. The stem looked good but the tooth marks are very visible.The next photos show the stamping on both sides of the shank. It is clear and readable though faint. The grain is also quite stunning.I took a photo of the pipe with the stem removed to give a sense of the proportion of the bowl and the stem.I decided to start by dealing with damage to the inner and outer edge of the bowl and clean up the rim top. I began with the inner edge and used a folded piece of 220 grit sandpaper to smooth out the damage there and begin a slight bevel on the edge. I topped the bowl to clean up the top and to deal with the damage on the front outer edge. I took photos of the refreshed rim top and edges. It looked much better. I polished the rim top and the bowl with micromesh sanding pads – dry sanding with 1500-12000 grit pads. I wiped the bowl down with a damp cloth between each pad. The bowl began to take on a shine as I went through the various pads. I stained the top of the bowl with a Maple stain pen to blend in better with the rest of the bowl colour. It will definitely blend well once the pipe is buffed and polished.I rubbed the bowl and shank down with Before & After Restoration Balm. I worked it into the surface of the bowl sides and shank with my fingertips to clean, enliven and protect the briar. I let the balm sit for 10 minutes and then buffed with a cotton cloth to raise the shine. If you look you can see the many small fills in the briar but they actually blend in surprisingly well. I set the bowl aside and turned my attention to the stem. I “painted” the surface of the stem on both sides with the flame of a lighter. I was able to lift many of the tooth mark. I filled in the remaining tooth marks on the button surface and just ahead of it on the underside with clear super glue and set the stems aside to let the repairs cure.    Once they cured I smoothed out the repairs with a small file and started blending them into the surface of the stem (I forgot to take photos of that part of the process). I sanded the repairs with 220 grit sandpaper to further blend it into the stem surface. I started polishing it with 400 grit wet dry sandpaper. I polished the vulcanite stem with micromesh sanding pads – 1500-12000 grit pads. I wiped it down with a damp cloth after each sanding pad. This Barling Regency 5959 Oom Paul with a vulcanite saddle stem is a great looking pipe now that it has been restored. The rich browns and blacks of the contrasting stains came alive with the polishing and waxing. I put the stem back on the bowl and carefully buffed the pipe with Blue Diamond on the buffing wheel using a light touch on the briar. I gave the bowl and the stem multiple coats of carnauba wax on the buffing wheel and followed that by buffing the entire pipe with a clean buffing pad. I hand buffed the pipe with a microfiber cloth to deepen the shine. The finished Barling Regency Oom Paul is a beauty and fits nicely in the hand and looks very good. Give the finished pipe a look in the photos below. The dimensions of the pipe are Length: 4 inches, Height: 2 ¼ inches, Outside diameter of the bowl: 1 ½ inches, Chamber diameter: 7/8 of an inch. The weight of the pipe is 64 grams/2.26 ounces. I will be putting this Barling on the British Pipe Makers section of the rebornpipes store shortly if you want to add it to your collection. Thanks for reading this blog and my reflections on the pipe while I worked on it. There are many more to come!

Restoring a Comoy’s Grand Slam Pipe 233 Straight Bulldog


Blog by Steve Laug

I decided to dig deep in the boxes of pipes I have here to work on. I chose a Comoy’s Grand Slam Pipe Straight Bulldog. It is a beautifully grained Comoy’s Bulldog that was purchased from a Portland Oregon estate sale on 08/16/17. It really is a pipe of Pipe Smoking History. The stamping is the significant marker that points this out for me. It is stamped on the left side of the shank and reads COMOY’S [over] Grand Slam [over] Pipe. On the right side it has the shape number 233 next to the bowl/shank junction and that is followed by a Comoy’s COM stamp that reads Made in London in a circle [over] England. On the underside there was a *7 stamped at the stem/shank junction. There was a lot of grime ground into the smooth finish on the bowl and some darkening around the rim cap and top. The bowl was heavily caked with an overflow of thick lava on the top of the rim and on the inner bevel of the bowl. It was hard to know what the rim top and inner edge of the bowl looked like under the grime. The stem was oxidized, calcified and there were tooth marks and chatter on both sides ahead of the button. There was a three part inlaid C on the left of the taper stem. The pipe had promise but it was very dirty. Jeff took photos of the pipe before he started his cleanup work. He took photos of the rim top and bowl to give a clear picture of the thickness of the cake and the overflow of lava on the rim top and down the side. It is hard to know if there is damage to the inner edge of the bowl because of the lava coat. He also took photos of the top and underside of the stem to show the condition of the stem. He took photos of the stamping on both sides and underside of the shank. They read as noted above. You can also see the 3 part C logo on the left side of the taper stem.   I looked on Pipephil’s site for information on the Comoy’s Grand Slam Pipe and found the following information I have included a screen capture (http://www.pipephil.eu/logos/en/logo-comoy.html). It has the three part C which dated it to 1946 and following. The stamping on the second pipe in the capture is the same as the one I am working on. The *7 is the size of the washer on the end of the stinger. (The pipe in hand is missing the stinger apparatus.)I turned to the article on Pipedia about dating Comoy’s pipes but the style of the stamping (https://pipedia.org/index.php?title=Comoy%27s_Dating_Guide#1917_to_the_end_of_the_1930.27s_.28at_least_1938.29). I have include the section in the screen capture below that date this pipe to the 1950s.

Now the Comoy’s stamp can be found in three variants in the 1950s

  1. A simple block-letter style without serifs but with the C larger than the other letters and the apostrophe before the “S”.
  2. A return to the slightly more fancy block letters with serifs and the apostrophe. (It seems that some grades carried different stamps, or at least that the stamping changed in different years for some grades.)
  3. A simple block-letter style without serifs and without the apostrophe and with the “C” the same size as the rest of the letters. This stamp was probably not used very long.
  4. A simple block-letter style without serifs but with the apostrophe before the “S” and with the “C” the same size as the rest of the letters.

Made in London England

Appears in two versions. This is again stamped in a circle with “MADE” at the top, “IN” in the middle, and “LONDON” at the bottom, with “ENGLAND” in a straight line beneath. It can be assumed that this stamp was first used in the export drive in the early 1950s. On a Bulldog Sandblast from the early 50s the Comoy name no. 2 above was used together with “MADE IN LONDON” over “ENGLAND”. There are no known examples of pre-WW II Comoy’s stamped in this way. The second version is the same as above but in a “rugby ball ” shape. This shape is verified on Comoy´s “Extraordinaire” pipes.

Inlaid “C”

C” was first inlaid in the side of the mouthpiece around 1919. This was a complex inlay needing three drillings. First, a round white inlay was inserted, then the centre of the white was drilled out, and a smaller round black inlay was inserted. Finally, another drilling was made to remove the open part of the “C,” and an even smaller black inlay was inserted. This inlaid “C,” known as the “three-piece C,” was continued until the Cadogan era in the 1980s. However, the “C” in the 1920s and early 30s is much thinner and more delicate than the one post-WW II.

That article gave me some helpful information regarding the pipe that I was working on. I knew that the stamping and logos identified the pipe as having been made in following WW2 and from what I can see from the above information it is a 1950s era pipe.

Jeff had done his usual thorough clean up of the bowl and stem. He reamed the bowl with a PipNet pipe reamer to remove the remaining cake back to briar. He followed up with a Savinelli Fitsall pipe knife to remove the remnants of cake. He scrubbed out the mortise and the airway in the shank and the stem with alcohol, cotton swabs and pipe cleaners. He scrubbed the exterior of the bowl, rim, shank and stem with a tooth brush and Murphy’s Oil Soap to remove the oils and tars on the rim and the grime on the finish of the bowl. He rinsed it under running water and dried it off with a soft cloth. The pipe was remarkably clean considering where it began! The rim top looked much better. There was still some darkening on the top and inner bevel as well as some down the cap on the bowl. It was definitely an improvement but more would need to be done. The stem looked better as well but the tooth marks are very visible in the photos below. I took photos of the stamping on the shank sides. They read as noted above.  I removed the stem from the shank and took a photo of the pipe to give a sense of the proportions of the pipe. It is a beauty.Now it was time to start working on the pipe. I decided to work on the rim top and edges to try to remove the darkening that was present. I used a folded piece of 220 grit sandpaper to smooth out the top and edges and try to lighten them. I am pretty pleased with the way it turned out.  I polished the bowl and the rim top, sides and shank with micromesh sanding pads – dry sanding with 1500-12000 grit pads and wiping it down after each pad with a damp cloth. I carefully avoided the stamping on the shank so as not to damage it.    I rubbed the bowl and shank down with Before & After Restoration Balm. I worked it into the surface of the bowl sides and shank with my fingertips to clean, enliven and protect the briar. I let the balm sit for 10 minutes and then buffed with a cotton cloth to raise the shine.    I set the bowl aside and turned my attention to the stem. I “painted” the surface of the stem on both sides with the flame of a lighter. I was able to lift many of the tooth marks. I filled in the remaining tooth marks on the button surface and just ahead of it on the underside with clear super glue and set the stems aside to let the repairs cure.    I smoothed out the repairs with a needle file and started blending them into the surface of the stem. I sanded the remaining repairs with 220 grit sandpaper to further blend it into the stem surface. I started polishing it with 400 grit wet dry sandpaper.   I polished the vulcanite stem with micromesh sanding pads – 1500-12000 grit pads. I wiped it down with a damp cloth after each sanding pad. This 50s era Comoy’s Grand Slam Pipe 233 Straight Bulldog with a vulcanite taper stem is a great looking pipe now that it has been restored. I did a lot of work on the bowl and the stem. The rich browns and blacks of the contrasting stains came alive with the polishing and waxing. I put the stem back on the bowl and carefully buffed the pipe with Blue Diamond on the buffing wheel using a light touch on the briar. I gave the bowl and the stem multiple coats of carnauba wax on the buffing wheel and followed that by buffing the entire pipe with a clean buffing pad. I hand buffed the pipe with a microfiber cloth to deepen the shine. The finished Comoy’s Grand Slam Bulldog is a beauty and fits nicely in the hand and looks very good. Give the finished pipe a look in the photos below. The dimensions of the pipe are Length: 5 ½ inches, Height: 1 ¾ inches, Outside diameter of the bowl: 1 ¼ inches, Chamber diameter: ¾ of an inch. The weight of the pipe is 38 grams/1.34 ounces. I will be putting this older Comoy’s Bulldog on the rebornpipes store shortly if you want to add it to your collection. Thanks for reading this blog and my reflections on the pipe while I worked on it. There are many more to come!

Reuniting an older Ropp Panel 062 Rhodesian with its original stem


Blog by Steve Laug

I looked through my box of bowls and came across this older Ropp Panel Rhodesian that caught my eye. The shape was really nicely done – a Rhodesian with a thick shank. The bowl was a paneled hexagon. The rim cap was smooth and the bowl top was smooth. The inner edge was nicked like it had been reamed with a knife. The outer edge of the bowl was in good shape. The rim top had some scratches. There were some dents on the bowl but the finish looked good. It appeared to have been cleaned up by Jeff somewhere along the way. The bowl had been reamed and scrubbed. The shank was clean and was lined with a metal shank tube. On the left side of the shank it was stamped ROPP in an oval. On the right it was stamped 062. I took some photos of the stamping on the sides of the shank and they read as noted above. They were clear and readable. I also took a photo of the shank end to show the metal tube that lines the mortise.I went through my can of stems and found a stem that I thought would probably work with the bowl. It had a metal tenon and a metal tube. There were some deep tooth marks on the top and underside near the button. In the third photo below you can see a stamping on the left side of the stem. Under a light with a lens I believe it reads ROPP. I am pretty certain that I have reunited the bowl with its original stem. I took some photos of the bowl and stem together to get a sense of how the pipe looked.I put the stem on the bowl and the fit in the shank was really good. The thickness of the shank and the stem match perfectly. Everything about it looked right. The stem is hard rubber and has an orific hole in the button end.  I decided to start my clean up of the pipe by address the damage on the rim top and inner edge. I used a folded piece of 220 grit sandpaper to smooth out the edge and to polish out the scratches in the rim top. It worked quite well and I was happy with the results.I wiped the bowl down with alcohol to remove the shiny spots of the previous varnish coat on the bowl. It came off very well and the grain began to stand out nicely! I polished the briar with micromesh sanding pads – dry sanding with 1500-12000 grit pads. I wiped the bowl down after each sanding pad to remove the debris. I rubbed the bowl and shank down with Before & After Restoration Balm. I worked it into the surface of the bowl sides and shank with my fingertips to clean, enliven and protect the briar. I let the balm sit for 10 minutes then buffed with a cotton cloth to raise the shine. The grain really came alive. It looks better than when I began. I set the bowl aside and turned my attention to the stem. I “painted” the stem surface with the flame of a Bic lighter to try to lift them. I was able to raise them quite a bit. I filled in the remaining marks and the nicks in the hard rubber stem surface with clear super glue. I used a small file to flatten out the repairs on the top and underside of the stem at the button. I also flattened out the repairs round the rest of the stem. I sanded it with 220 grit sandpaper to smooth it out. I started polishing it with 400 grit wet dry sandpaper. I tried to touch up the ROPP stamp on the left side of the stem. I rubbed it into the stamp with a tooth pick and rubbed it off with a soft cloth. Much of the stamping was not deep enough to hold the Antique Gold Rub’n Buff. The amount of gold in the stamp was not too much but it is still slightly readable.I polished the stem with micromesh sanding pads – 1500-12000 grit pads. I wiped it down with Obsidian Oil after each sanding pad. I used Before & After Pipe Polish – both Fine and Extra Fine to further polish the stem. I gave it a final coat of Obsidian Oil and set it aside to dry. This older style Ropp Panel 062 Rhodesian is a great looking pipe now that it has been restored and reunited with its stem. The finish around the bowl is quite beautiful and highlights the grain and works well with the polished taper stem. I put the stem back on the bowl and carefully buffed the pipe with Blue Diamond on the buffing wheel using a light touch on the briar. I gave the bowl and the stem multiple coats of carnauba wax on the buffing wheel and followed that by buffing the entire pipe with a clean buffing pad. I hand buffed the pipe with a microfiber cloth to deepen the shine. The finished Ropp Panel Rhodesian fits nicely in the hand and feels great. Give the finished pipe a look in the photos below. The dimensions of the pipe are Length: 5 inches, Height: 1 ¾ inches, Outside diameter of the bowl: 1 ½ inches, Chamber diameter: ¾ of an inch. The weight of the pipe is 1.94 oz./55 gr. I will probably be putting it on the rebornpipes store shortly. If you are interested in adding this pipe to your collection send me a message or an email. Thanks for reading this blog and my reflections on the pipe while I worked on it.

Restemming a Drummond Imported Briar Squashed Tomato


 Blog by Steve Laug

The next pipe on the work table is bowl that needed to be restemmed. It has a finish that is reminiscent of Custom-Bilt fame but this one is not one of those. It is a squashed tomato shaped bowl with a smooth rim top and rusticated bowl bottom and shank. The pipe is stamped on the left side of the shank and reads Drummond in script [over] Imported Briar. There was some darkening on the shank end where there had been a band that covered the edge of the final d in Drummond. The band was gone. The bowl had been cleaned with the thoroughness that usually is a sign that Jeff has worked on it. It had been reamed and cleaned. The inside of the bowl and shank looked and smelled clean. The inside edges looked to be in good condition. The briar was dry and lifeless looking and it was without a stem. I took some photos of the bowl before I worked on the new stem for it. It is a very interesting looking old pipe. I took a photo of the stamping on the left side of the shank. It reads as noted above and faint but very readable. I went through my can of stems and found an interesting hard rubber stem with an inset tenon that would fit the shank with a little bit of work. It was a little larger in diameter than the shank so I would need to reduce that. There were some interesting marks on the top and underside ahead of the button that looked like it had been repaired somewhere along the way. It was pretty clean otherwise. I also found a thin brass band that would fit nicely on the shank end and replace the one that had been there previously. I could find nothing listed on either Pipedia or Pipephil’s site on the Drummond Brand. I did a quick search of the name and came across quite a few photos of tins of tobacco and pouches of tobacco made by Liggett & Myers. It is labeled as Antique Pipe Chewing Tobacco Tin that is called The Genuine Drummond Natural Leaf Thick. Have a look at the photos I have included below (https://www.worthpoint.com/worthopedia/antique-pipe-chewing-tobacco-tin-253303793).

Antique Pipe Chewing Tobacco Tin Genuine Drummond Natural Leaf Liggett & MyersI am pretty certain that the pipe was a Tobacco Company Coupon pipe possibly that was earned by tobacco coupons. I cannot prove that but that appears to be what is happening with this mystery brand. Now on to working on the pipe.

Now to work on the pipe itself. I pressed the band in place on the shank and put the stem on the shank to get a feel for the look. I took some photos to show the general look. You can see that the stem is slightly larger in diameter than the shank and will need to be reduced. Even so I really like the slight bend in the stem and the look of the pipe as it stands with the stem.  I started my work on the bowl and permanently pressed the brass band on the shank end against my desk top. It was a tight fit and though it is only cosmetic gave the shank a nice touch of bling. I polished the smooth portions of the briar with micromesh sanding pads – dry sanding with 1500-12000 grit pads and wiping it down after each pad with a damp cloth. I used the final three grits on the rusticated portion as well. It really began to take on a rich shine. I rubbed the bowl and shank down with Before & After Restoration Balm. I worked it into the surface of the bowl sides and shank with my fingertips and a horsehair shoe brush to clean, enliven and protect the briar. I let the balm sit for 10 minutes then buffed with a cotton cloth to raise the shine. The grain and the rustication patterns came alive. It looks better than when I began. I set the bowl aside and turned to work on the stem. The fit of the tenon in the shank was loose so I heated an ice pick and inserted it in the tenon to expand the diameter slightly. It did not take much and the fit was perfect! The next photos are slightly out of order. Before I pressed the band in place on the shank I used the Dremel and sanding drum to take down the diameter of the stem to get a clean fit on the shank. I removed as much of the excess as possible with the sanding drum and would finish the fit with sand paper afterwards. I sanded the stem with 220 grit sandpaper to smooth out the fit to the shank and band as well as smooth out the repairs near the button that stood out on the stem in the photos above. I started the polishing of the stem with 400 grit wet dry sandpaper.  I polished the stem with micromesh sanding pads – 1500-12000 grit pads. I wiped it down with Obsidian Oil after each sanding pad. I used Before & After Pipe Polish – both Fine and Extra Fine to further polish the stem. I gave it a final coat of Obsidian Oil and set it aside to dry.  This Drummond Imported Briar Squashed Tomato is a great looking pipe now that it has been restored and restemmed. The mix of rusticated and smooth finishes around the bowl is quite beautiful and highlights the grain and works well with the polished taper stem. The stem looks very good but the repaired areas ahead of the button on each side are solid but visible. I put the stem back on the bowl and carefully buffed the pipe with Blue Diamond on the buffing wheel using a light touch on the briar. I gave the bowl and the stem multiple coats of carnauba wax on the buffing wheel and followed that by buffing the entire pipe with a clean buffing pad. I hand buffed the pipe with a microfiber cloth to deepen the shine. The finished Drummond Squashed Tomato fits nicely in the hand and feels great. Give the finished pipe a look in the photos below. The dimensions of the pipe are Length: 6 ½ inches, Height: 1 ¼ inches, Outside diameter of the bowl: 2 inches, Chamber diameter: 1 of an inch. The weight of the pipe is 1.66 oz./47 gr. I will be putting it on the rebornpipes store shortly. If you are interested in adding this pipe to your collection send me a message or an email. Thanks for reading this blog and my reflections on the pipe while I worked on it.

Renewing a tired older 1945 Dunhill Shell 111/1 Billiard


Blog by Steve Laug

This is another of those pipes that has been laying around here for a very long time. It was in a small bag with a very dirty and calcified stem that I had assumed belonged to it. It was loose in the shank but the length and the diameter was correct. The bowl was very clean and had all the marks of having been cleaned up by Jeff. However, the stem really throws me as it has not been cleaned, sanitized or anything. It is a general mess. It reminds me a lot of some of the older estate Dunhill pipes that I have restored over the years. It really makes me wonder if somewhere along the way either Jeff or I threw in the Dunhill stem because it fit! I am pretty certain it is not the correct one but it will work. I don’t know if I will ever truly know where and when we received it. The stem was in very rough shape. The calcification on the stem surface was thick and hard. I had to use a knife to scrape the heavy thickness off. I forgot to take photos of the stem before I scraped it but the next photos give a fair idea of what I was dealing with. There was a bite through on the underside of the stem next to the button and some deep tooth marks on both sides. The tenon had a thick shiny coat that would need to be sanded down and smoothed out.I took a photo of the stamping on the shank underside. The stamping on the pipe is 111/1 (smaller text) on the heel of the bowl with an upside down 125 above it and toward the shank. That is followed by Dunhill Shell [over] Patent No. 41754/34. Following the Dunhill Shell stamp is Made in England on one line with a superscript underlined 5. From what I can find I would date it to 1945. I spell out my process in the text that follows.I turned first to Pipephil’s site because it has a great set of charts for dating Dunhill pipes that is kind of a flow chart. I find it incredibly helpful. I turned first to the section on Dunhill pipes to see if I could find similar stamping on the pipes he shows. I have included the following photos below (http://pipephil.eu/logos/en/dunhill/patent3.html#a1). The stamping is very similar on the first one from 1943 while the patent number on the second one (1950) is the same as mine. I turned then to the dating flow chart on the site (http://pipephil.eu/logos/en/dunhill/cledat-en1b.html). I have included Page 2 of the dating key below. I have circled the pertinent section in red in the photo below.Armed with that information I knew I was working on a 1945 Dunhill Shell 111 Billiard. I was uncertain about the stem being the original but it fit well and with some repairs it would serve to make the bowl smokable. Now it was time to work on the pipe itself.

Since the bowl was very clean I decided to rub it down with some Before & After Restoration Balm. I worked it into the sandblast finish with my fingertips and a horse hair shoe brush to get it into the crevices. I let the product sit for 10 minutes before buffing it off with a soft cloth. The product works to clean, enliven and protect briar and I have found that it certainly does a great job of that on the pipes I work on. I set the bowl aside and turned my attention to the stem. I scraped off the rest of the calcification on the stem with a pen knife and lightly sanded it to clean it up. I “painted” the stem surface with the flame of a Bic lighter to lift the tooth marks and the area around the bite through on the underside. There was still work to do but it was getting there. Notice the tenon still needs attention as there is some build up on it as well. I cleaned off the surface of the stem with alcohol and a cotton swab and then greased a folded pipe cleaner with Vaseline in preparation for the stem repair. I slide a greased pipe cleaner into the slot below the bite through and fill it in with black super glue. I built up the damage on the topside of the stem at the same time. I spread the glue with a dental pick to make sure the bite through was well covered. I sprayed the repair with an accelerator to harden the repair more quickly. Once it had hardened to touch I removed the pipe cleaner. Once the repair had cured overnight I used a small file to reshape the button edges on both sides and flatten the stem surface. The repair worked very well. I sanded the repaired areas with a folded piece of 220 grit sandpaper and started the polishing process with 400 grit wet dry sandpaper. I also worked on the tenon to smooth out the previous work that had been done. It is looking better.At this point I decided to put the stem on the bowl and take some photos of it to get a sense of what the pipe looked like. I have included those below. There was still a lot of work to do on the stem. But the general shape and condition were looking much better. I spent quite a bit of time working on the shape of the stem with a 1500 grit micromesh sanding pad to smooth out the transition between the shank and the stem. I also worked on the button edge and the part of the stem just ahead of the button (some call it the bite zone, but honestly that name pains me given the number of chewed up stems I have worked on). I continued to polish the stem with the rest of the micromesh pads (2400-12000 grit pads). I rubbed the stem down after each pad with Obsidian Oil. I polished the stem with Before & After Pipe Stem polish – both Fine and Extra Fine. I gave it a final coat of Obsidian Oil and let it dry. Though the stem I have with the pipe is probably not the correct one for this 1945 Dunhill Shell 111 Billiard it will work and make the pipe usuable. It is far from perfect as far as stems go but it will work while I am on the lookout for the correct one. The stem cleaned up well and the finished pipe looks very good. The rugged looking sandblast and the polished black vulcanite stem work very well together to give the pipe a slender profile that is quite pleasing. The sandblast finish on the bowl came alive with the buffing. I used Blue Diamond on the buffing wheel on both the bowl and stem. I gave the bowl multiple coats of Conservator’s Wax and the stem multiple coats of carnauba wax on the wheel then buffed the pipe with a clean buffing pad to raise the shine. I hand buffed it with a microfibre cloth to deepen the shine. The Dunhill Shell 111 Billiard feels great in the hand. It is lightweight and the contrast in the stains on the briar and the polished vulcanite stem with the rugged sandblast bowl is quite amazing. The dimensions of the pipe are Length: 6 inches, Height: 1 ½ inches, Outer diameter of the bowl: 1 1/8 inches, Chamber diameter: ¾ of an inch. The weight of the pipe is 1.06 ounces/30 grams. It really is a beauty. Thanks for walking through the restoration with me. If any of you happen to have a Dunhill narrow stem or fishtail that you would be willing to part with let me know! Thanks!

A Simple Refurbishing Of A Boxed “Brakner # 129”


Blog by Paresh Deshpande

This is the third and the last Brakner pipe in my inherited collection that came in original Brakner box duly tagged, but I don’t think the box is original as the shape code on the pipe and the box do not match. I had been delaying restoring this pipe as I had my hands full with pipes that I had received for repairs and ones that were selected by brother pipers to be restored/ refurbished by me. In between these commitments, I took the time out to refurbish pipes for my personal collection and this is one such pipe. This uniquely rusticated stacked billiard shaped pipe is stamped on the smooth surface on the left side of the shank as “BRAKNER ANTIQUE” over “DENMARK”. The smooth surface on the right side of the shank is stamped as “HAND-CUT” followed by # 129, the shape number. The vulcanite stem is adorned with a green dot (larger than a Dunhill stem logo), I think made of Jade stone, not sure though. There is a smooth band around the end of the shank.  I have worked on Brakner pipes before and had read about Peter Brakner and his unique “micro-rustication” technique, which has been lost to the pipe community with his demise as he never did share this technique that he had developed. To refresh my memory, I revisited pipedia.org and read the article published therein. One can refer to the article at this link Brakner – Pipedia.

Peter Micklson (†) started his career at the Teofil Suhr workshop, Suhr’s Pibemageri, in Copenhagen, where Sixten Ivarsson was the foreman. He brought in Poul Rasmussen and taught him the two or three important things about pipemaking in a six weeks crash course, before he went off to join Poul Nielsen, the later Mr. Stanwell.

Micklson, who later changed his last name to Brakner,cannot have worked under Rasmussen too long before he felt to be good enough to go off on his own. Indeed he carved himself quite a good name as it was proudly announced 1955’s World Championship of Pipe Smoking was won by a smoker who employed a Peter Brakner pipe.

His fame based fairly on developing an unique and very special “micro-rustication” he called Antique. According to Kai Nielsen, Brakner kept this technique as a secret and only once he showed it to one person – Kai’s mother. Both have passed away, so this secret technique is lost. Kent Rasmussen was recently inspired by Brakner’s Antique finish when he created his new technique of rustication.

Brakner was a close friend of Ole Larsen, the proprietor of the famous W.Ø. Larsen tobacco shop and sold a lot of his pipes there, before Larsen hired his own indoor carvers. From the Larsen Export Catalog 1960/61 we learn a bit about Brakner pipes:

  • Antique Antique finish in tan or black. Smooth pipes also. Each pipe 7.50 $.
  • Bella Danica Antique finish in tan or black. Each pipe 10.00 $.
  • Royal Danois Antique finish in tan or black. Each pipe 12.50 $.

The latter were named after the Royal Danish Guard Regiment, founded in 1689.

Brakner was one of the first high-end carvers from Denmark to enter the US market and was considerably successful there in the early 1970’s. After his sudden death Peter Brakner’s name faded back from the forefront, but his pipes speak to the injustice of that. His body of work has earned him a place in the important history of Danish pipemaking.

Further down the article, there were a few pictures of Brakner Pipes from the 1961-62 catalogs that I have reproduced below which has the shape code of the pipe currently on my work table, albeit in a smooth finish and indicated with a red arrow.Having read the detailed account, I feel blessed to be holding a piece of Danish pipe history.

Initial Visual Inspection
As is generally observed with most of my grandfather’s pipe, the chamber of this pipe too is filled with a thick cake with overflowing lava covering the rim top surface. The thick cake hides the condition of the inner walls of the chamber and will be ascertained only after the cake has been taken down to bare briar. Similarly, the condition of the rim top surface will be commented once the overflowing lava has been scraped off. However, the inner rim and outer rim edge appears to be in good condition with no tell tale signs of damage. There are strong smells emanating from the entire pipe and would need to be addressed. Unlike the other two Brakners in my collection, this one does not have a smooth band below the outer edge of the rim, but has one at the shank end. It has smooth surfaces on either side of the shank which bears the stampings seen on this pipe. The unique rustications on the stummel surface are covered in oils, tars, grime and dust of all these years of use and storage. However, once cleaned up, the dark of the stummel should contrast beautifully with the smooth brown shank end band. The mortise and the shank air way are clogged as expected making the air flow anything but laborious. However, with the draught hole being right at the bottom of the chamber and the perfect alignment of the stem airway, tenon and the shank airway should make this one a fantastic smoker. The vulcanite stem is heavily oxidized with deep tooth marks on both the upper and lower stem surfaces. The buttons on the either surfaces are deformed due to tooth indentation and would have to be rebuilt and reshaped. The trademark green dot on Brakner pipe stem has dulled a bit and would benefit from a nice polish. The tenon end and the slot end showed heavy accumulation of dried oils and gunk.The cardboard box that housed the pipe for these many years does show its age. The edges have separated at the seams at a couple of places and the whites of the insides have yellowed. However, the posters and external surface are bright and in good condition. All in all, judging from the initial examination, I do not envisage any major/ serious issues to present themselves in the course of restoring this beauty and should be an easy project.

The Process
I began the restoration process by first cleaning the stem internals. I cleaned the internals of the stem using hard bristled pipe cleaners dipped in isopropyl alcohol and followed it by cleaning the air way using a small shank brush with anti oil dish cleaning soap. This helps in reducing the number of pipe cleaners required while ensuring a spotless and a very clean stem air way. Once the stem internals were clean, I sand the entire stem surface with a piece of 220 grit sand paper and cleaned the stem surface with Murphy’s Oil soap on a cotton pad. This step helps to remove surface oxidation to some extent while preparing the stem for a dunk in deoxidizer solution for better results. To address the issue of bite marks and tooth chatter on the stem surfaces, I flamed the surface with a lighter. Vulcanite has the property to attain its original shape when heated and this is exactly what was being done. The tooth chatter and deeper bite marks were raised to the surface to a great extent. The remaining minor tooth indentations would be subsequently filled with a mix of clear super glue and activated charcoal. At this stage, I immersed the stem in to the De-oxidizer Solution developed by Mark Hoover. I generally allow the stem soak in the solution overnight.While the stem was soaking in the De-oxidizer solution, I reamed the chamber with size 1 head of the PipNet pipe reamer. I removed the carbon from the areas where the reamer head could not reach with my fabricated knife. To completely remove the residual carbon from the walls of the chamber and smooth out the walls, I sand the chamber walls with a folded piece of 220 grit sandpaper followed by cleaning the chamber with a cotton swab wetted with isopropyl alcohol. The chamber walls are in pristine condition. I deliberately avoided scraping off the lava build up over the rim top to avoid damage to the micro-rustications over the surface. I cleaned the mortise and shank airway using dental pick and hard/ soft bristled pipe cleaners dipped in isopropyl alcohol. I shall continue with further cleaning of the shank internals once I clean the external stummel surface.Once the internals of the chamber and shank were cleaned, I cleaned the external surface of the stummel with Murphy’s Oil soap and cotton swabs followed by scrubbing the rusticated surface with a toothbrush and dish washing soap. This rid the stummel rustications of all the accumulated dust, dirt and grime and the smooth brown band around the shank now contrasts beautifully with the dark stummel surface. Using a soft brass brush, I deliberately cleaned the rim top micro-rustications till clean. I also cleaned the shank internals with dish washing soap and shank brush.I had expected that after such a thorough cleaning of the chamber and shank internals, the ghost smells would have been greatly reduced or eliminated completely, but that was not so. I decided to subject the chamber and mortise to cotton and alcohol bath. I packed the chamber with cotton and drew out a wick from the cotton and along with a folded regular pipe cleaner, inserted it into the mortise and through the draught hole into the chamber. I tightly packed cotton balls in to the remaining portion of the mortise. Thereafter, I soaked the cotton balls with isopropyl alcohol up to the brim. About half an hour later, the level of alcohol had gone down, having being absorbed by the cotton. I topped it up once again and set it aside overnight. By next afternoon, the cotton and alcohol had drawn out all the remaining oils and tars from the chamber and mortise. I removed the cotton balls and the dirt can be gauged by the appearance and coloration of the cotton balls and the pipe cleaner. With my fabricated knife and dental tools, I spent the next hour scrapping out the entire loosened gunk from the mortise. I ran pipe cleaners through the mortise and draught hole to clean out all the loosened tars and gunk that was lodged in the draught hole and mortise. The chamber and mortise now smelled clean, fresh and looked it too. I set the stummel to dry out naturally. To enhance the contrast and break the monotony of the black stained stummel and the soon-to-be shining black stem, I polished the smooth briar band at the shank end, dry sanding with 1500 to 12000 grit micromesh pads.To enliven the briar wood and further enhance the contrast of the band with the rest of the dark stummel surface, I rubbed a little quantity of “Before and After” balm in to stummel surface and set it aside for 20 minutes for the balm to be absorbed in to the briar. Thereafter I hand buffed it with a microfiber to deepen the shine. The stummel looks nice and vibrant.With the stummel refurbishment almost complete, I turned my attention to the stem which had been soaking in the solution now for nearly 24 hours. I cleaned the stem and the stem airway under running warm water and scrubbed the raised oxidation from the surface using a Scotch Brite pad and the airway with thin shank brush. I further removed the oxidation by scrubbing the stem with 0000 grade steel wool. Once the stem was dried with paper towels, I sand the bite zone to completely eliminate the raised oxidation in preparation for filling the tooth indentations and applied a little olive oil to rehydrate the stem.I prepared a mix of CA superglue and activated charcoal and spot filled the tooth indentations and set it aside to cure overnight.Once the fills had cured completely, I sand the fill with a flat head needle file till I had achieved a rough match of the fill with the rest of stem surface. I continued the sanding cycle by dry sanding with 320, 400, 600 and 800 grit sand papers. I wet sand the entire stem with 1000, 1500 and 2000 grit sand papers. This not only ensured a nice blend of the filled areas with the rest of the stem surface, but also removed the oxidation from the surface. I rubbed the stem surface with some EVO and set it aside to be absorbed in to stem surface. Thereafter, I launched a second determined assault on the stem, subjecting it to the complete cycle of micromesh polish. The end result is a gorgeous, smooth and shiny looking black of the vulcanite stem.When the stem and the stummel were united for a polish using carnauba wax, I saw a mysterious gap appear between the stem and shank face. This gap was definitely not noticed during my initial inspection and neither the stem face was shouldered during the polishing process. I really am not aware about the reasons for this happenstance, but now that it has been noticed, it needs to be addressed. I attach the stem to the shank and insert a piece of 320 grit sand paper between the two and sand the shank face opposite to the gap. I also gave a few turns to the tenon end over the same sand paper. I continued the micro adjustments till I had achieved a perfect seating of the stem in to the shank end. Just a word of caution here; please be extremely diligent and careful during this step as it has the potential to ruin the pipe completely due to over sanding. Remember “LESS IS MORE” and “SAND ONCE AND CHECK TWICE/ THRICE”.  This was followed by the routine regime of polish with carnauba wax using my hand held rotary tool. The Brakner looks unique and oozes quality.To deepen the shine, I gave a vigorous rub to the entire pipe with a microfiber cloth. This is truly a beautiful pipe and will be joining my now increasing personal collection. Here are a few pictures that should give you a fair idea about the end results…. Thank you all for being a part of this journey and support extended.P.S.- I had requested my youngest daughter, Pavni, to help me repair the box which housed the pipe. This kind of work is right up there in her alley and she did oblige me. The box has been repaired solid and cleaned. Here are a few pictures of the box with the pipe.Praying for the health and safety of you and your loved ones…

So long until the next project.

An Amazing Transformation Of a “Capitol” Hand Made # 81 Pipe


Blog by Paresh Deshpande

This horn stemmed billiard had been around for so long a time that I do not even remember where it came from. It is really a beautifully shaped billiard with perfectly proportioned size and shape. I would call the bowl an average sized one. There are a few fills in the briar and remnants of what appear to a lacquer coat on the surface which has been worn out over time or could be that attempts were made to get rid of it. There is a brass band at the shank end and covers the shank end face. The stem is a tapered bone with some damage to the bite zone on either surface. The pipe as it sits on my work table is shown below: The pipe is stamped on the left shank as “CAPITOL” in capital letters in gold while the right side is stamped as “HAND MADE” also in capital gold letters followed by shape code “81” which I initial had thought to be 1 (indicated with red arrow) but during the course of my initial inspection the brass band came off revealing “8” (indicated with yellow arrow). It also provided me an opportunity to inspect the shank end face to check for any cracks or damage and was happy to note that there was none. Also, the letter “C” (again indicated with red arrow) in gold was embossed on the left side of the horn stem and revealed when I polished the stem with micromesh pads. When I had read about Savinelli pipes while working on the Savinelli Dry System pipe, I recollected having read that CAPITOL was a Savinelli second/ Sub brand. However, the lack of COM stamp and the trade mark Savinelli shield raised doubts in my mind and I decided to research further. I visited pipephil.eu site and searched the index for stem logo with one letter. I found both the letter C as well as brand CAPITOL both of which matched the stampings on the pipe in front of me (Pipes : 1 letter on the stem (pipephil.eu). Further exploration took me to the page that had the information about the pipe I desired (Can-Car — Pipes : Logos & Markings (pipephil.eu)). I have reproduced a screenshot of the page below.The stampings shown above perfectly match those of the pipe currently on my work table. Thus far, the only thing I have learned is that this pipe could be either from R M Littaur & Co, Great Britain, or KB & B.

Thus the provenance of this pipe is ambiguous and through informed guess work, I would place this pipe as being sold by R M Littaur & Co of Great Britain.

Initial Visual Inspection
The chamber has a thin layer of carbon cake and appears to have been reamed recently. There are a couple of scratches and dings over the smooth rim top surface (encircled in red). The draught hole is dead center and at the bottom of the bowl and this geometry should make it a good smoker. The chamber walls are solid to the touch and I do not foresee any major issues with the walls of the chamber. The stummel displays some beautiful cross grain on the front and aft of the bowl and also over the upper and lower shank surfaces. However, the beauty of the stummel is marred by a few fills (indicated with yellow arrows). There are scrub marks all over the stummel, noticeably more over the shank surfaces and at the foot of the stummel (encircled in green). The dark shiny clear coat of lacquer is blotchy over the stummel surface but completely removed from the shank surfaces and the foot of the stummel. Playing Sherlock Holmes, it is most likely that a start for restoring this pipe was undertaken, but for reasons best known to the person it was shelved. The mortise has a layer of something akin to a parchment paper that is beginning to turn in to white powder like substance. This was placed to ensure a snug fit of the tenon in to the mortise. Since this packing was crumbling, I would be removing it completely. The tapered horn stem is in a relatively good shape. There are a few bite marks at the base of the button edge in the bite zone on both upper and lower surfaces. This has exposed the tissue fibers and it has been my experiences that filling it with clear superglue always leaves behind a patchy white clump of tissue fiber peeking out from under the fill after the stem has been polished. The aluminum tenon is threaded and has a screw-in flat stinger. The horizontal slot is clean but has the airway opening skewed to the extreme right of the stem slot (indicated by a green arrow). Though this did not affect the usability of the pipe itself, but the draw was laborious and not smooth. This would need to be addressed. The stem airway is clean and so are the aluminum stinger and tenon. The contrasting dark and light tissue strands will be a visual treat once the stem has been polished. The Process
I first decided to tackle the stummel as the repairs to the fills would require additional time for filling, curing and shaping. As I had noted earlier, the chamber appeared to have been reamed and a thin layer of cake was left behind. With my fabricated knife, I removed all the cake and took it down to the bare briar. I further sand the chamber walls with a folded piece of 180 grit sandpaper to smooth out the walls and remove the last bit of stubborn carbon stuck to the walls. To finish the reaming process, I wiped the chamber walls with a cotton swab dipped in alcohol to clean the last traces of residual carbon dust. I was happy to note a clean solid chamber with no signs of any heat lines or fissures. Next I cleaned out the shank internals. I scraped out all the dried and crumbly parchment paper like packing with my fabricated tool. I cleaned out the mortise and shank walls with q-tips and pipe cleaners dipped in alcohol. I shall continue further cleaning of the shank and mortise while going through the other processes.Staying with the internal cleaning of the stummel, I subjected the chamber and shank internals to a cotton and alcohol bath and left it overnight to allow the alcohol to draw out the old oils and tars and the cotton to trap them. By next day evening, the cotton and alcohol had fulfilled its intended task. I ran a couple of hard bristled pipe cleaners to remove the moist and loosened out gunk and now the chamber and shank smells fresh and clean and looks it too. While the stummel was soaking in the cotton and alcohol bath, I used the time to address the stem issues. I separated the threaded stinger from the tenon and ran a couple of pipe cleaners dipped in alcohol through the stem airway. The pipe cleaners came out quite clean. With a sharp dental tool, I scraped out the little dried oils and gunk from the slot end.Next I addressed the tooth chatter and the issue of exposed tissue fiber in the bite zone. As brought out earlier, repairs using CA superglue leaves behind clumps of dirty grey fibers visible through the shine and thus I decided to sand the tooth indentations down till I reached the intact surface below. That the stem was adequately thick in the bite zone also helped in making this decision. With a flat head needle file, I went to town sanding the exposed fibers on either surface till they were eliminated. I followed it up by sanding the bite zone with a folded piece of 220 grit sandpaper to evenly match the bite zone surface with the rest of the stem surface. I finished the stem refurbishing by wet sanding the entire stem surface with 1500 to 12000 grit micromesh pads. It helps to keep wiping the surface intermittently with a moist cloth to remove the sanding dust and gauge the progress being made. I applied a little EVO to the surface and set the stem aside for the oil to be absorbed. The finished stem is amazingly beautiful as can be seen in the pictures below.With the stem refurbishing completed and the stummel internals all cleaned up, it was time for the external cleaning of the stummel surface. I cleaned the external surface with a hard bristled toothbrush and Murphy’s Oil soap and rinsed it under running warm water. Using a shank brush and anti-oil dish washing soap, I cleaned the mortise and shank internals till all I had was white foam. I used a Scotch Brite pad with dish washing soap and diligently scrubbed the stummel surface. This helped in removing the residual lacquer coat from over the stummel surface to a great extent. I dried the stummel internals and externals with paper towels and soft absorbent cotton cloth and set it aside overnight to completely dry out before I worked on it any further. By next afternoon, the stummel had dried out and I decided to address the issue of fills over the surface. With a sharp dental tool, I extracted the old and loosened fills and cleaned the area with a cotton swab and alcohol. I masked the stampings on either side of the shank surface with a tape as one of the fills was frighteningly close to the stamping and it was best to take precautions now rather than repent later. Using a mix of CA superglue and briar dust, I filled up the pits over the stummel surface and set it aside to cure. While the stummel fills were set aside to harden, there was one issue that needed attention. The brass band at the shank end (for adornment purpose only) was masking the model/ shape code. I addressed this issue by sanding the band over a piece of 180 grit sandpaper to a width which did not cover the shape code. I checked and confirmed that the shape code is visible and set the band aside for fixing it subsequently.Once the fill had hardened, I first sand the fills with a needle file to roughly match the fill with the rest of the surface. I further sand the entire stummel surface with a 220 grit sandpaper and achieved three aims in the process; firstly, blend the fills with the rest of the surface, secondly, completely remove the lacquer coat and lastly, eliminate the minor scratches and dings from the surface. I was careful to remove the scratches and minor dings from the rim top surface. A couple of slightly deep scratches are still visible, but I shall let them be as is.I followed the sanding by the 220 grit sandpaper with further dry sanding using 400, 600, 800 and wet sanding with 1000 grit sand papers. I completed the polishing cycle by wet sanding with 1500 to 12000 grit micromesh pads. I rubbed a small quantity of “Before and After Restoration Balm” deep in to the briar with my finger tips and let it rest for a few minutes. The balm almost immediately works its magic and the briar now has a nice vibrant appearance with the beautiful grain patterns displayed in their complete splendor. I further buffed it with a horse hair brush and gave a vigorous buff with a microfiber cloth to deepen the shine. The dark brown hues of the stummel with its nearly black grains across the stummel look striking and blend the fresh fills nicely. In fact, to the naked eye, the fills are not made out easily. Now it was time to fix the brass band and refresh the gold lettered stampings as seen before the start of the project. I applied Favicol wood adhesive along the shank end and press fitted the band in to place and held it for a few minutes till the adhesive had cured a bit. Using a metallic gold acrylic paint marker, I coated the stampings on either sides of the shank and after a few minutes, I removed the excess paint with a toothpick. I applied the same process to refresh the stem logo C. With this I come to the final polishing of the entire pipe that removes the very fine scratches that remain and enhance the shine and gloss to the stummel and stem. I first mount cotton buffing wheel that I have earmarked for Blue Diamond, on to my hand held rotary tool and polish the entire pipe. This compound is abrasive enough to remove the very fine minor scratches that remain over the stummel and stem surface while imparting a deep shine to the surface. Next, I mount the cotton buffing wheel that has been earmarked for Carnauba Wax and apply a coat over the stem and stummel surface and buff it till the entire wax has been used up to polish the surfaces. I give a once over buff to the entire pipe with a fresh plain cotton buffing wheel to remove any residual wax while imparting a fine glaze to the stem and stummel surface. I finished the restoration by giving the entire pipe a rigorous hand buffing using a microfiber cloth to raise the shine further. The finished pipe looks amazing with a nice deep dark brown color to the stummel with the contrasting shining bone stem with its dark tissue fiber providing a contrast within the stem surface. This pipe is all set and ready for a long second inning and if the beauty of this pipe tugs at your heart, you may like to let me know in the comments section along with your email address. Here are a few pictures of the completed pipe. P.S.- This is one handsome pipe for sure. In the above pictures, the fills are visible, but in person, these fills are well blended in with the rest of the stummel surface. I did have, and still do, the option to stain the stummel with a dark brown stain but that would be over kill and so I have decided to leave it be. However, if you are interested to make it your own and want it stained, I shall be glad to accommodate your request.

Thank you for sparing your valuable time in reading through the write up thus far and being an integral companion through my journeys through the pipe world.

Praying for you and your loved ones always…