Tag Archives: removing oxidation

Five for the Price of One


Blog by Kenneth Lieblich

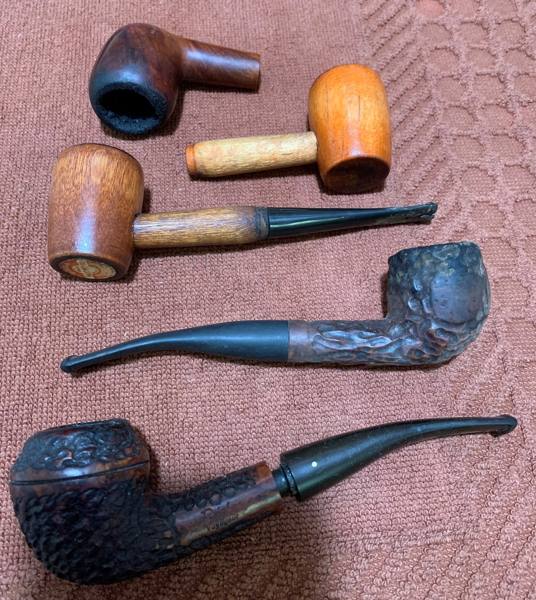
Next on the chopping block is a quintet of pipes. Word has been getting around! My barber’s boss approached me recently about restoring his late grandfather’s pipes. Of course, I was only too happy to oblige. The fellow told me that his grandfather did not have fancy pipes, but he just wanted them to look good. Interestingly, he also asked that I not clean the pipes too much – he wanted some of the olfactory memories to remain. When I got my hands on the pipes, I realized what I was up against. These five pipes were really a mess. Quite frankly, if I had these pipes for myself, I would have tossed some on the firewood pile. But my customer wanted these pipes restored as a nice remembrance of his grandfather – and I completely understand and respect that. Since I restored these pipes all together, I thought I would write up their story altogether too – with a tip of my hat to my customer’s late grandfather.

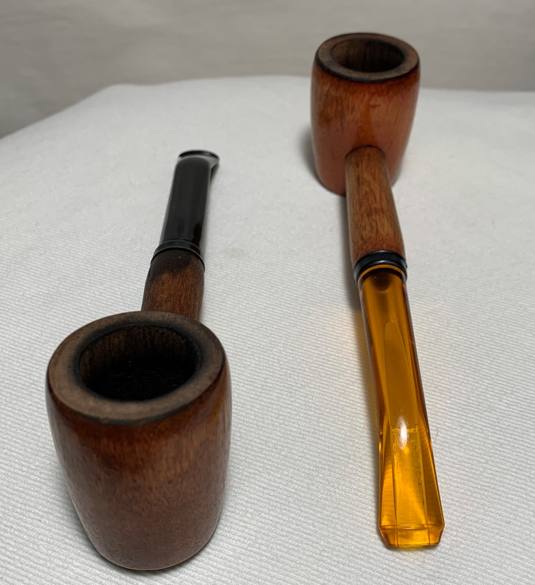
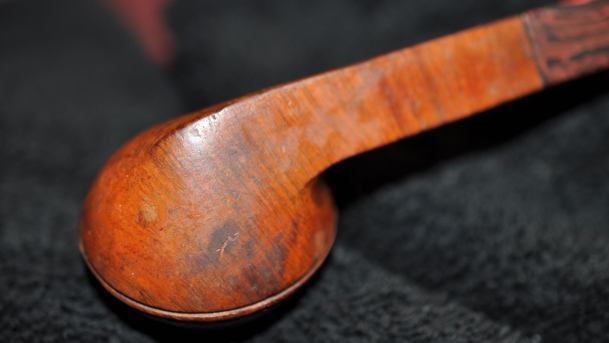
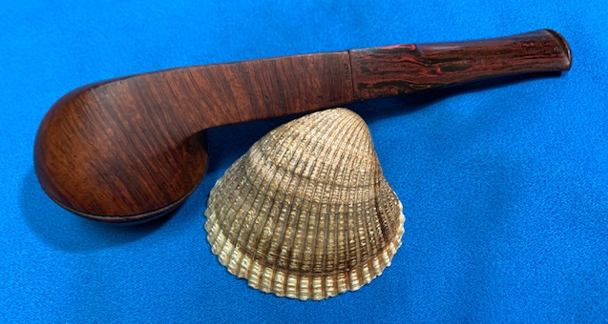
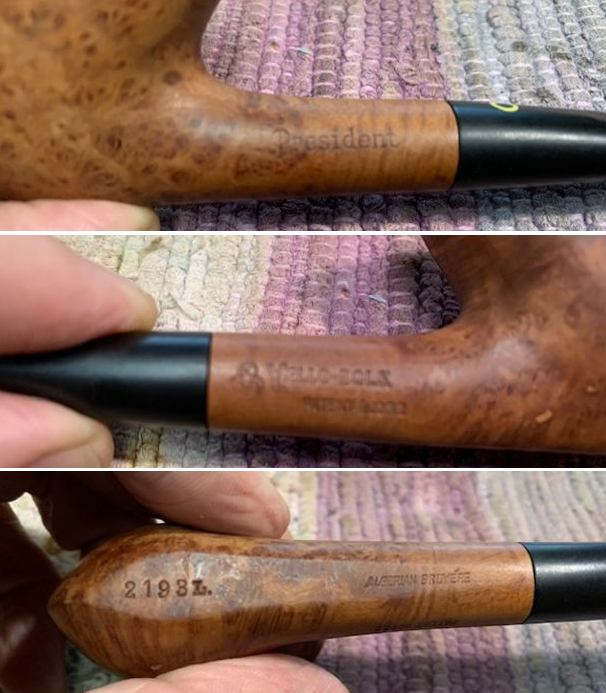
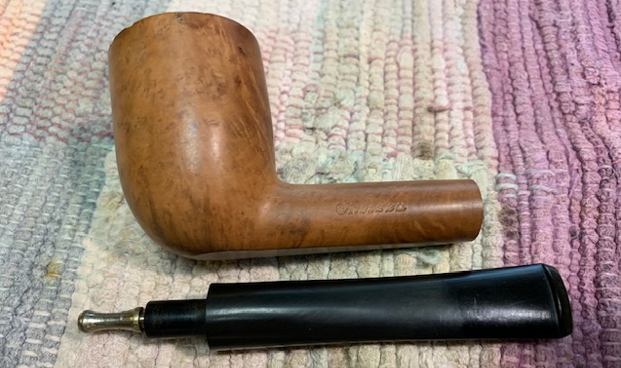
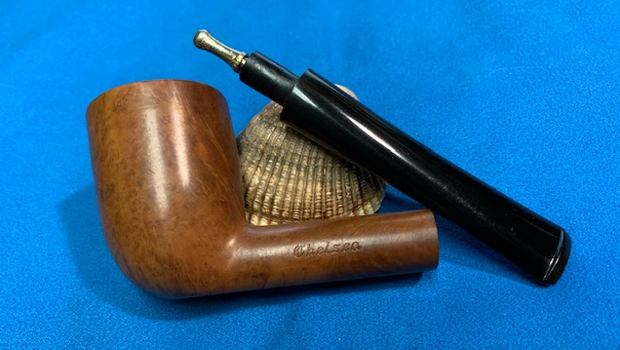
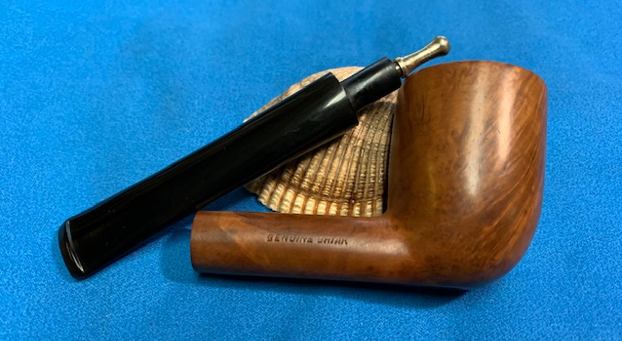
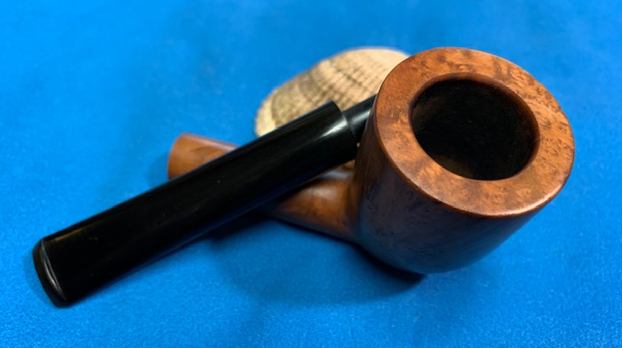
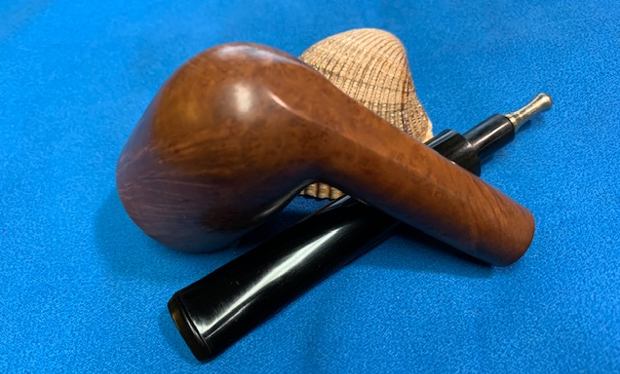
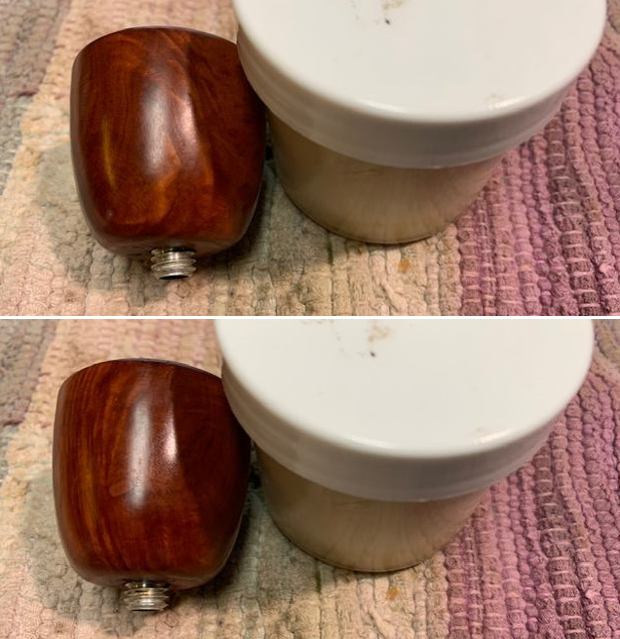
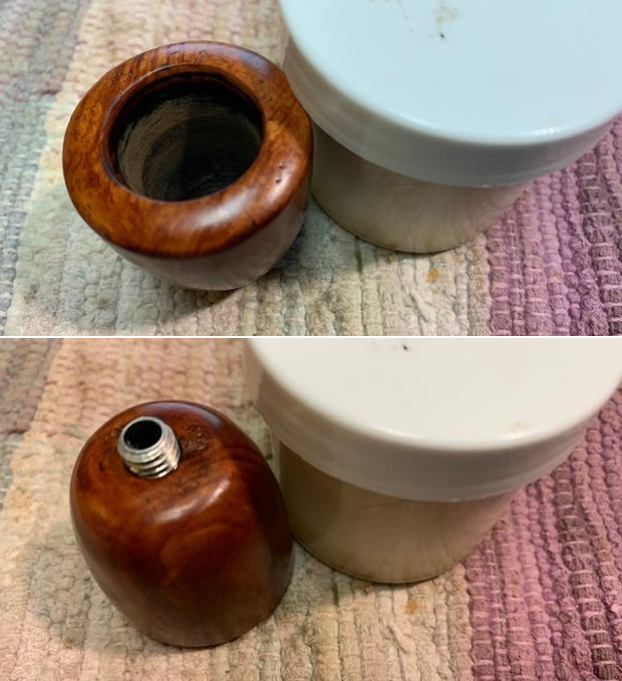
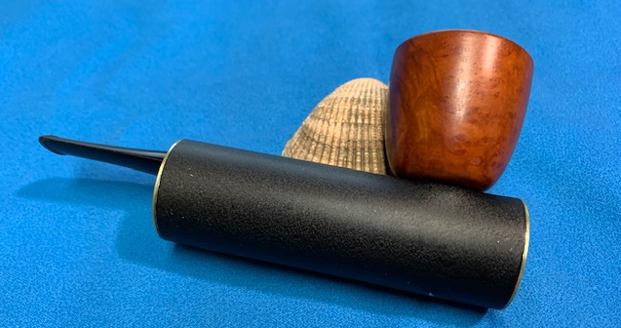
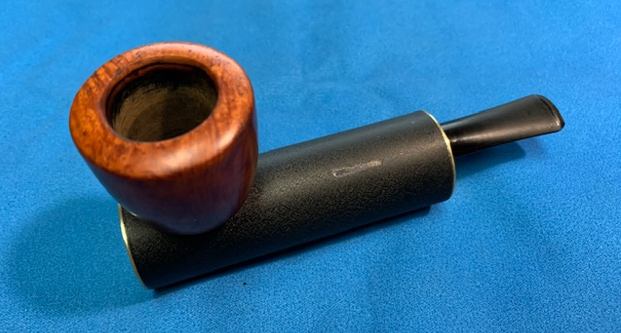
Well, what have we got here? (1) A cherrywood pipe from Missouri Meerschaum, missing its stem; (2) another cherrywood pipe from Missouri Meerschaum; 
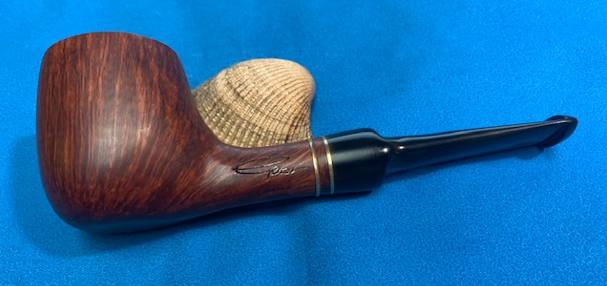
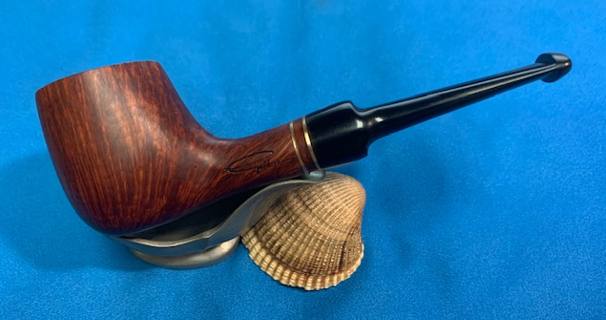
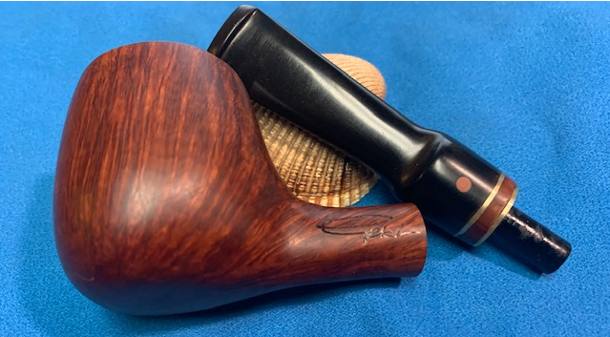
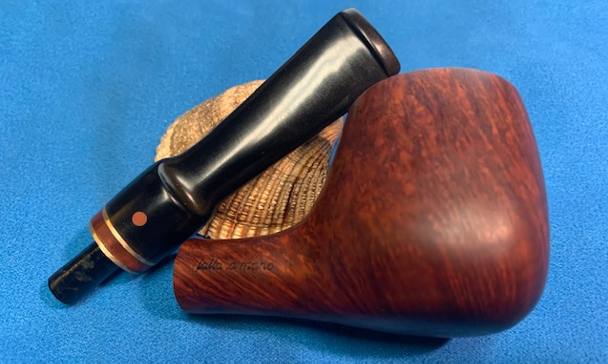
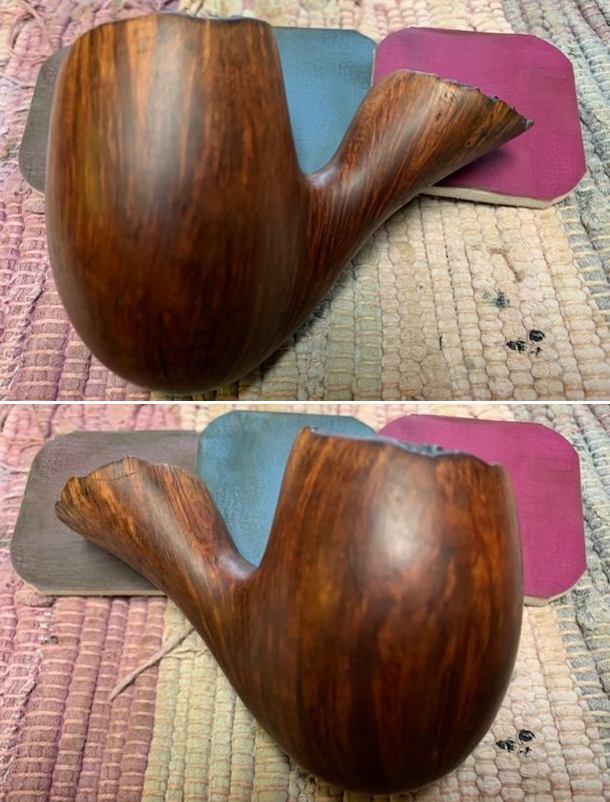
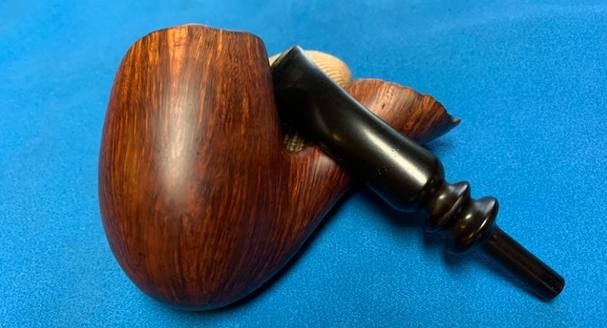
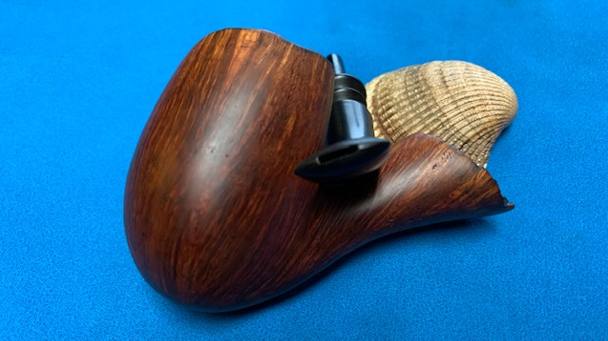
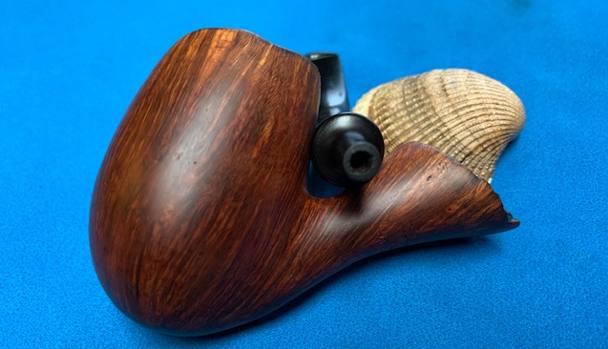
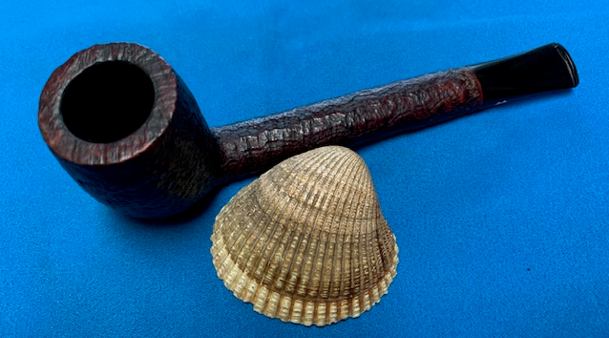
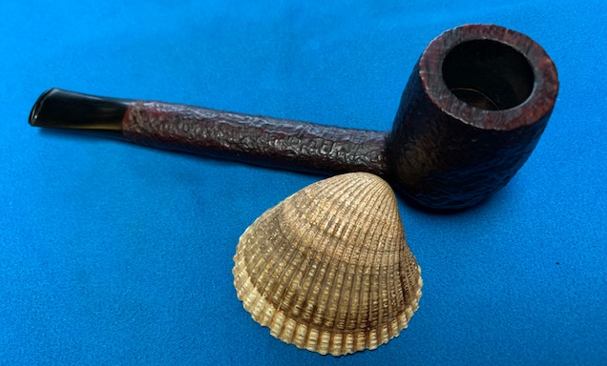
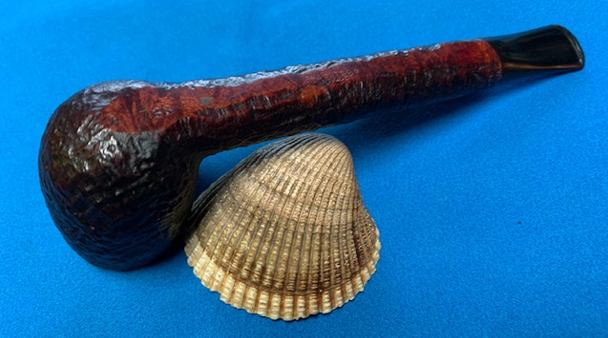
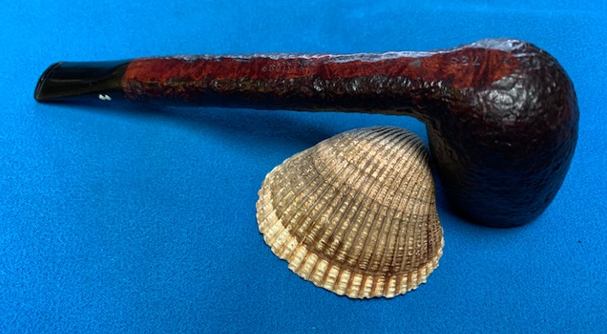
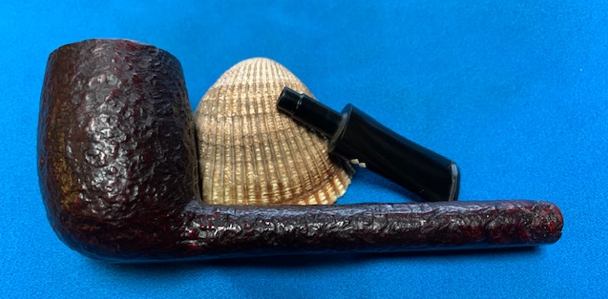
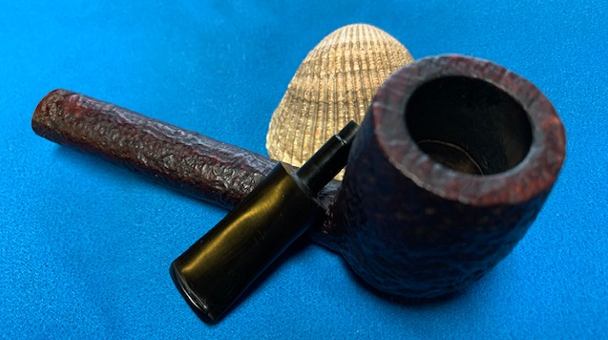
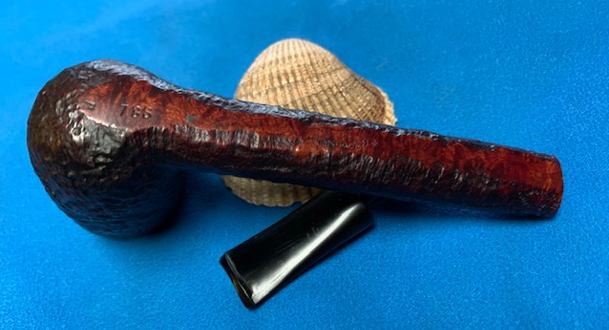
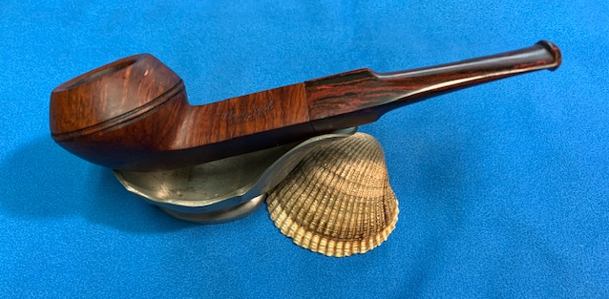
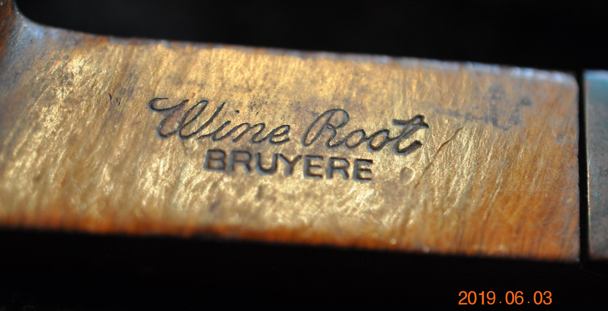
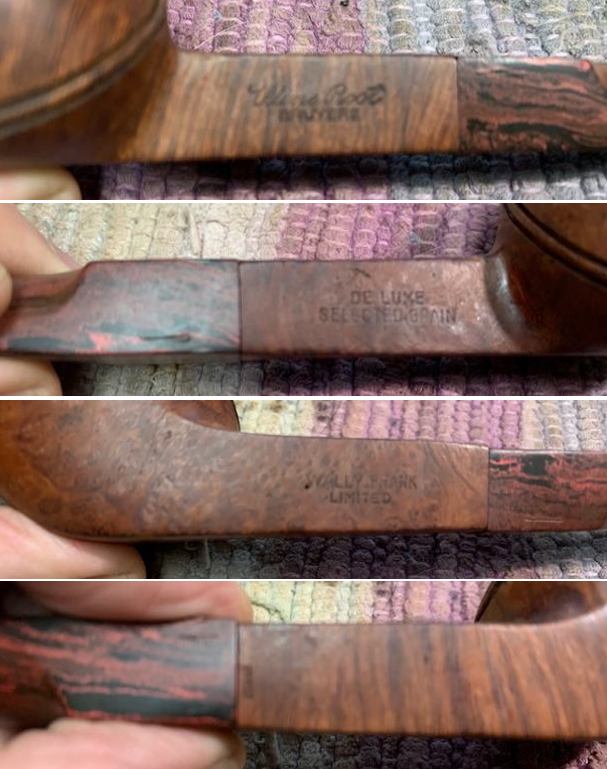
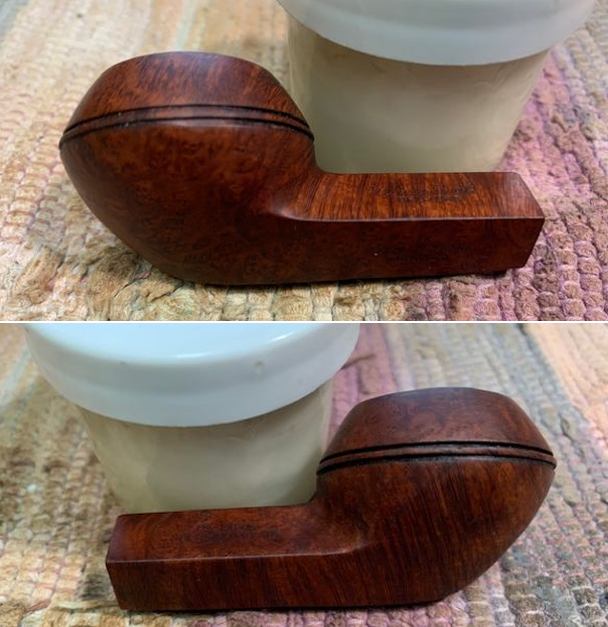
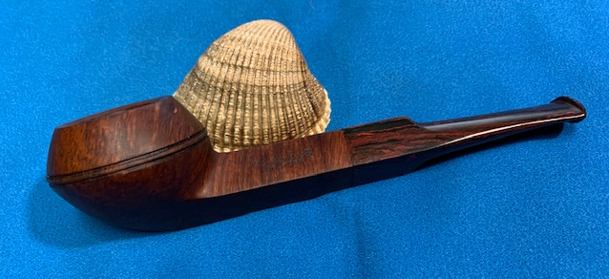
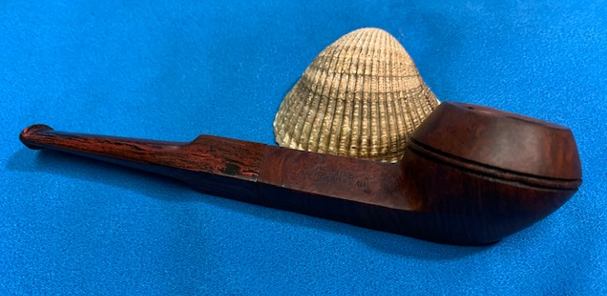
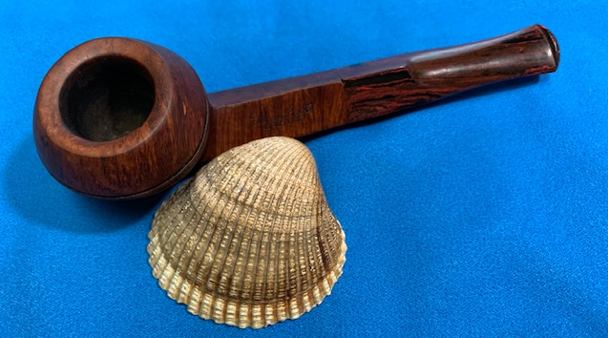
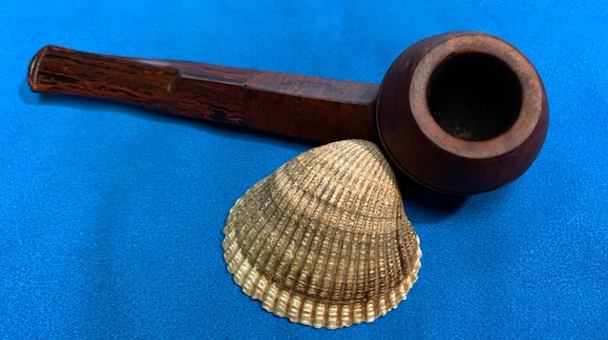
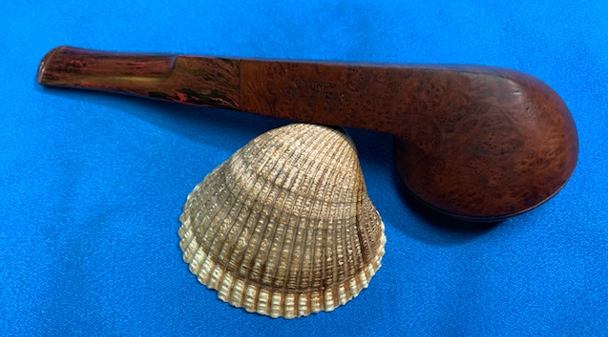
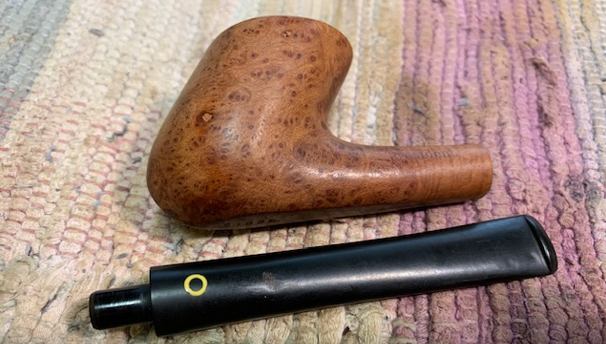
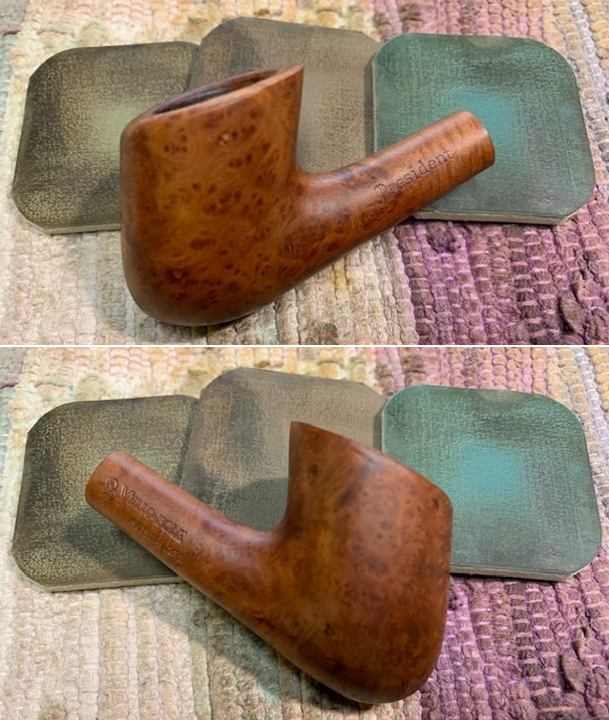
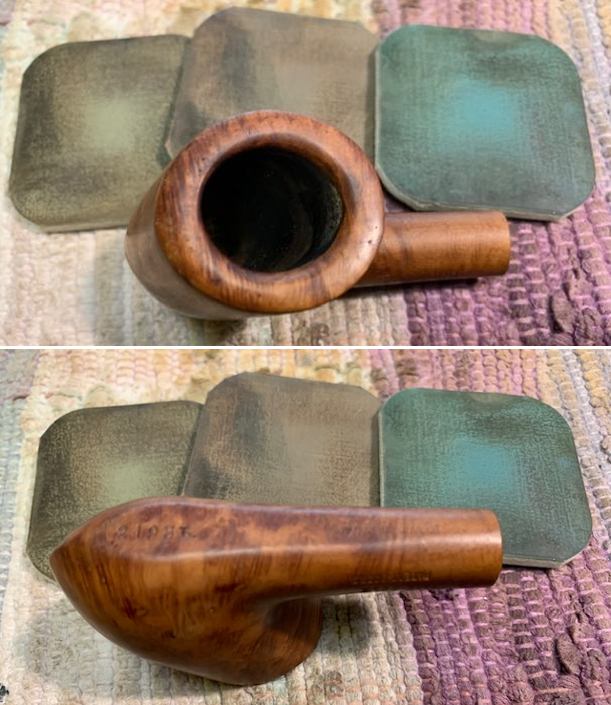
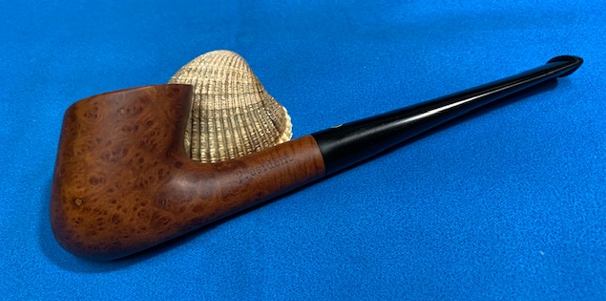
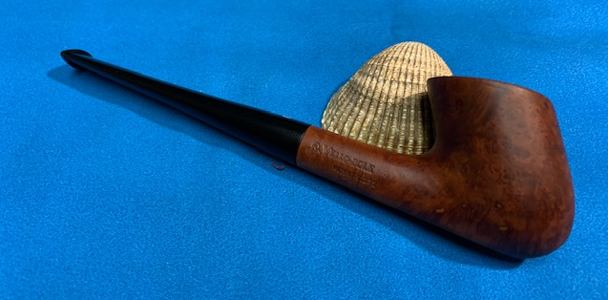
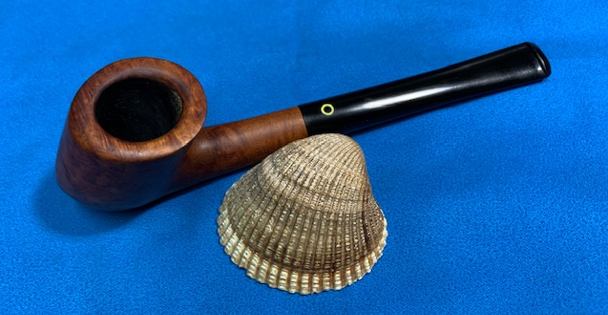
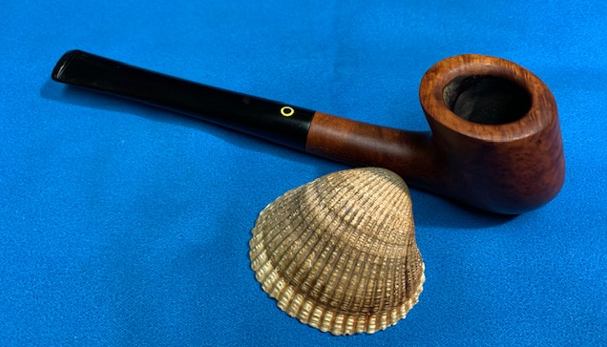
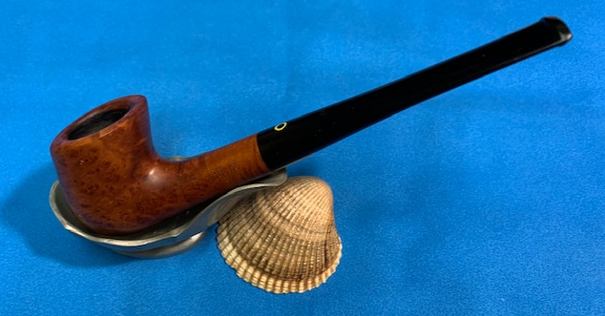
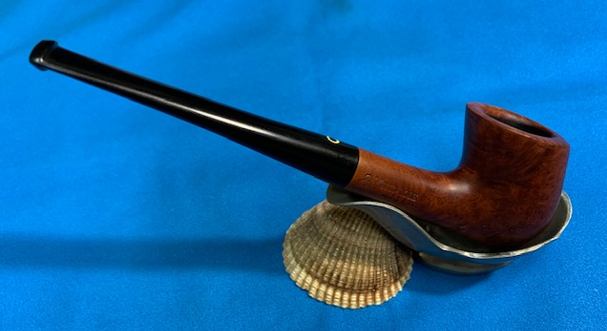
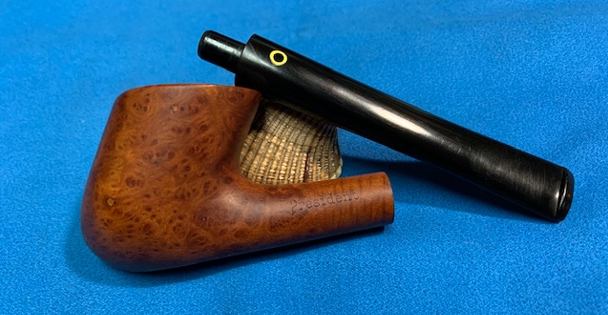
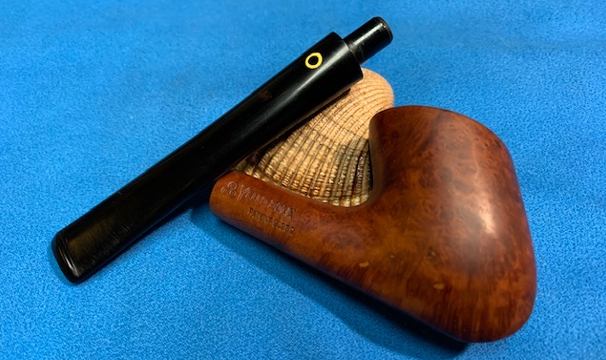
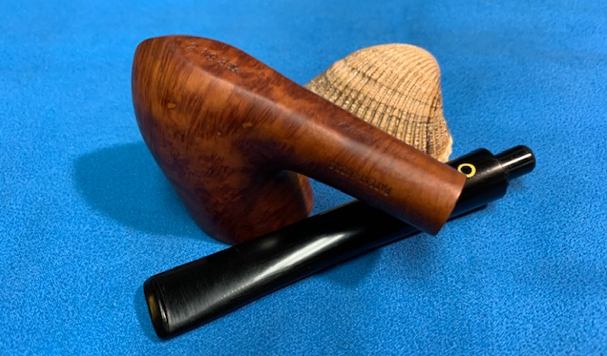
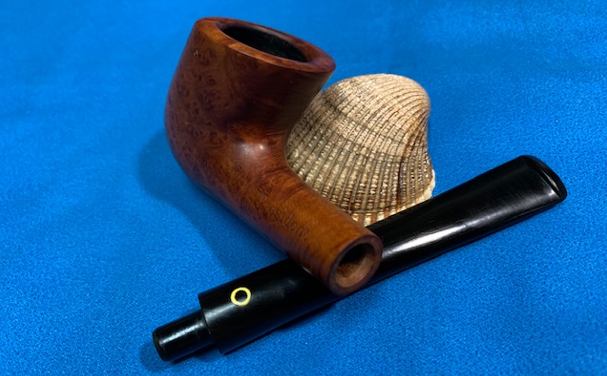
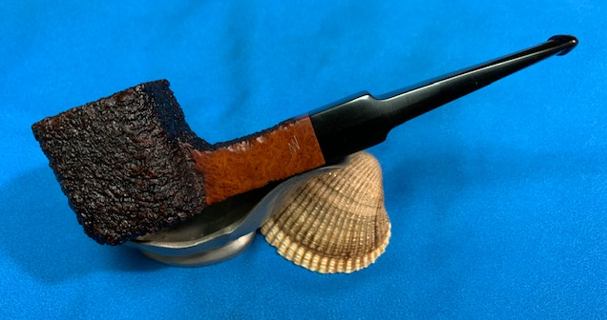
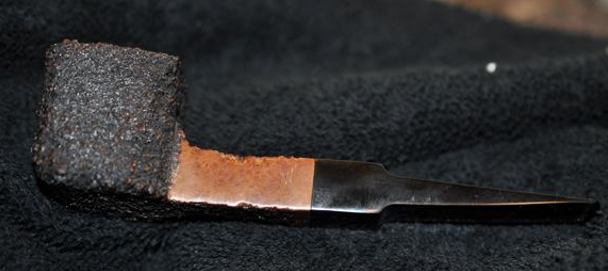
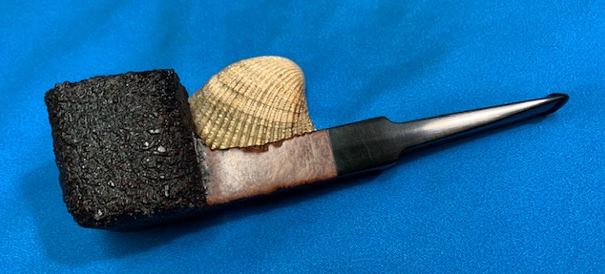
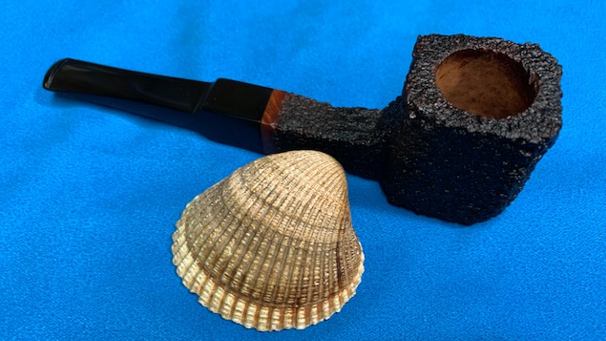
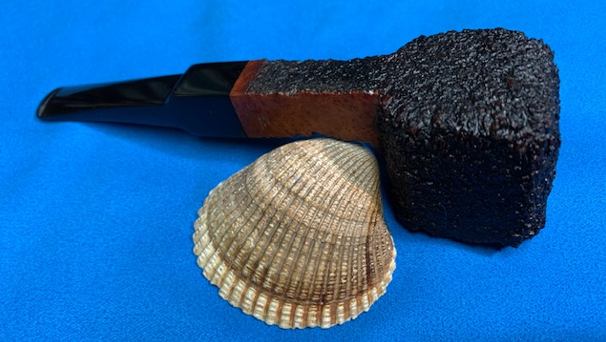
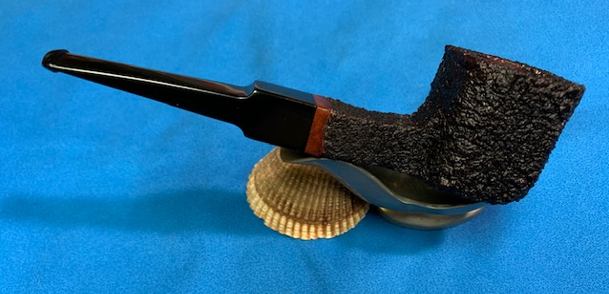
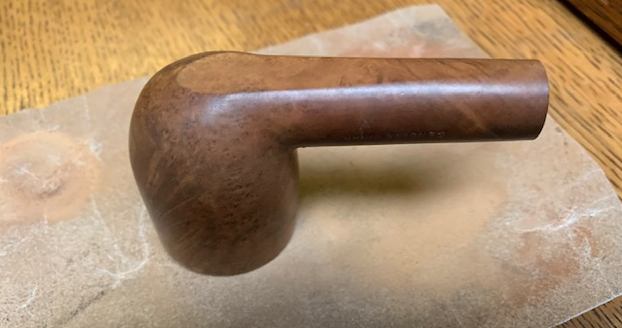
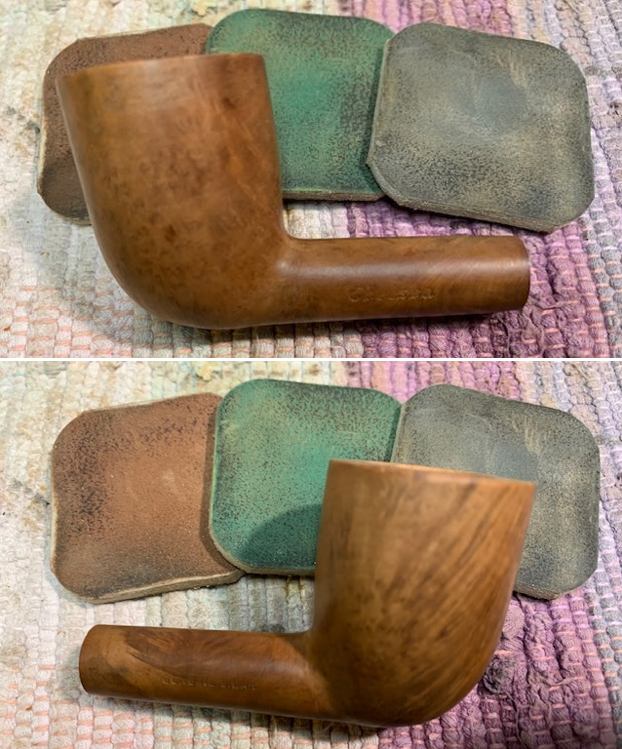
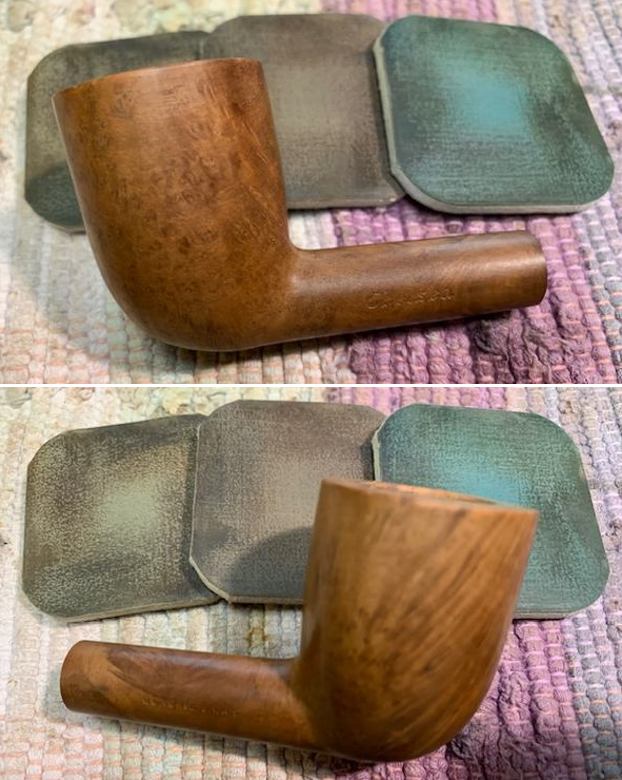
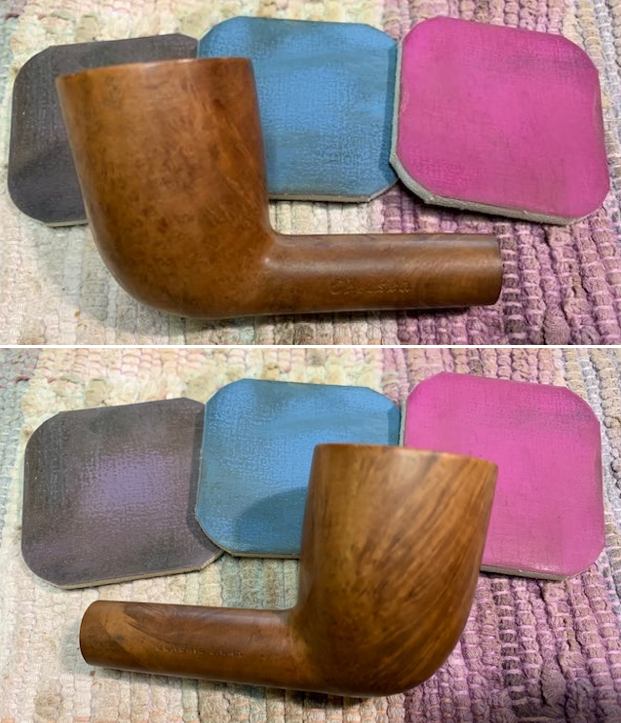
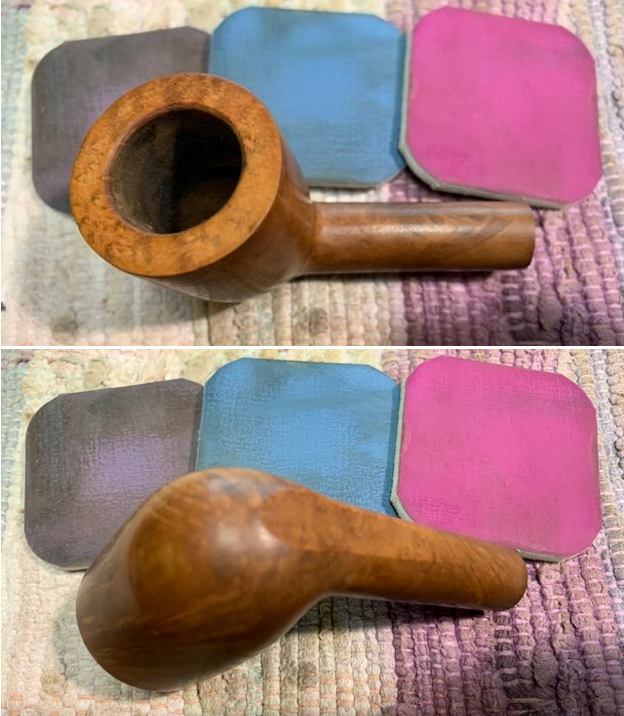
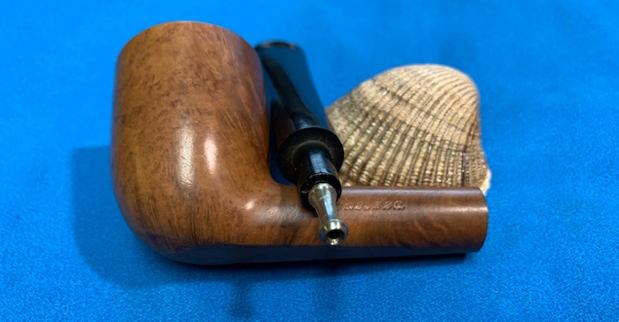
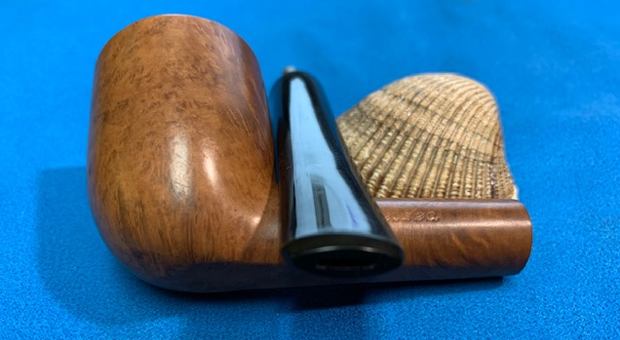
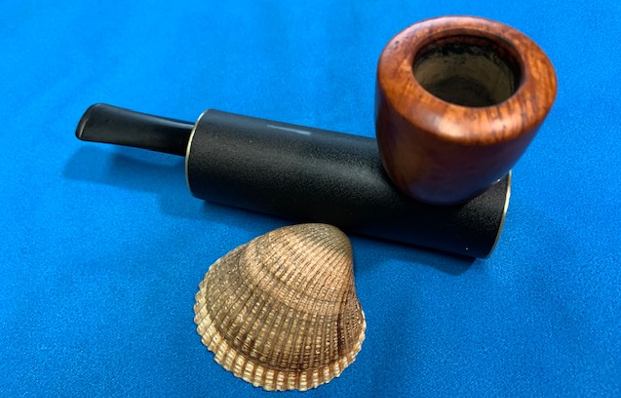
(3) a briar bent pot, marked Château Bruyère 32; 
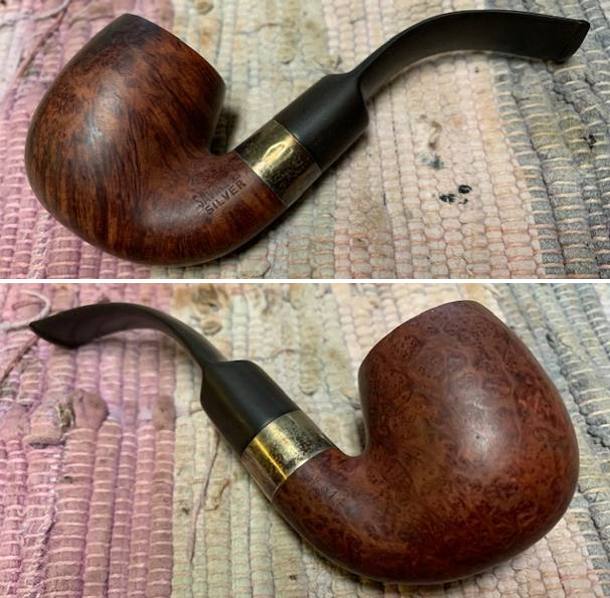
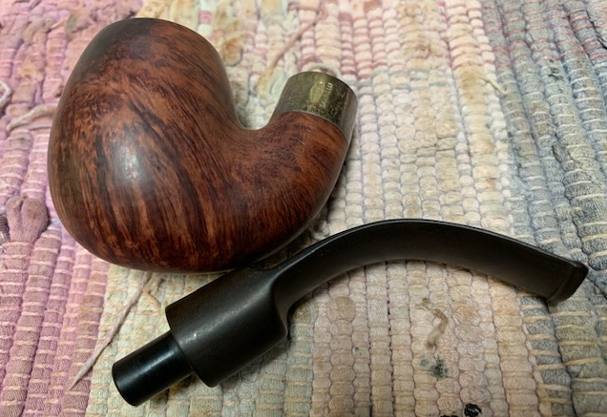
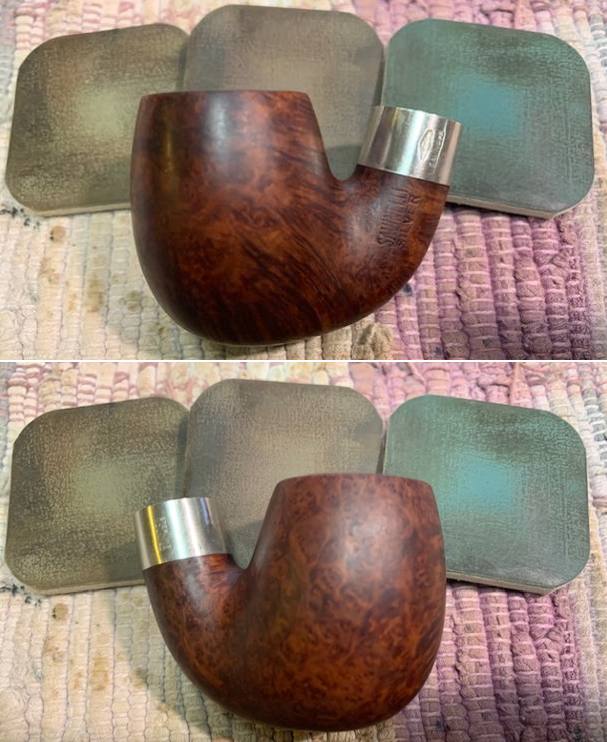
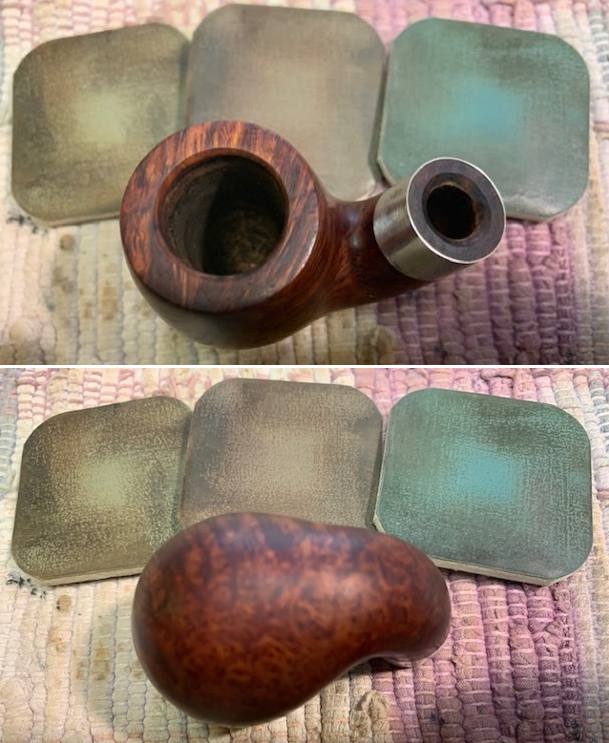
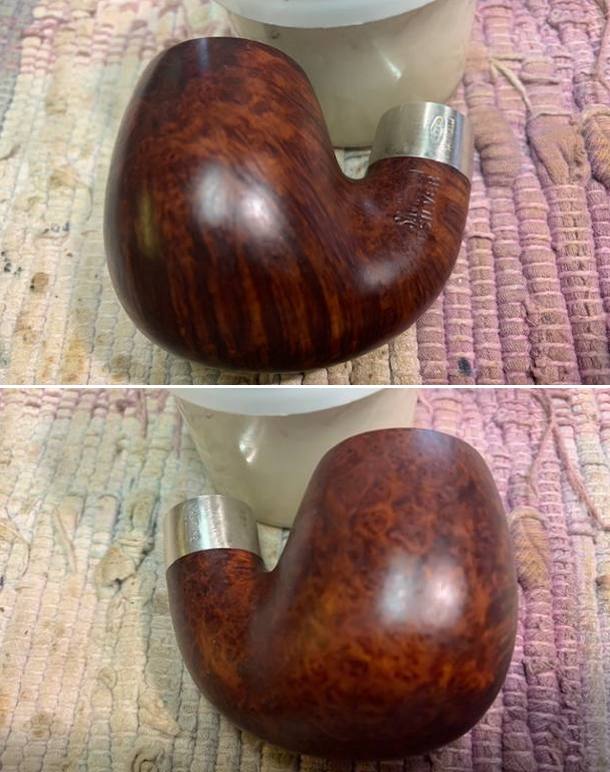
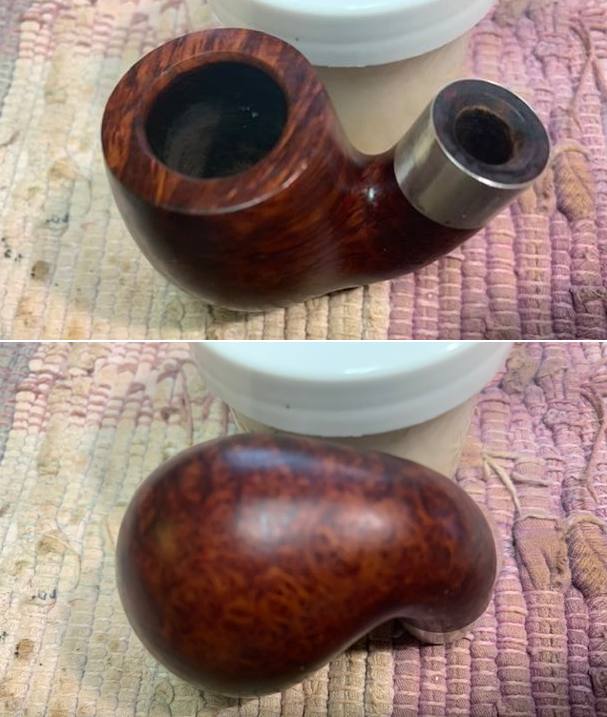
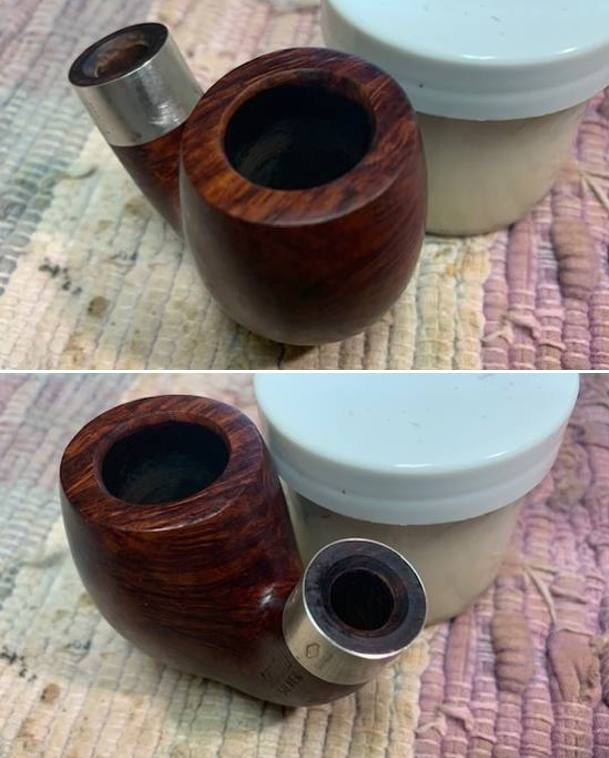
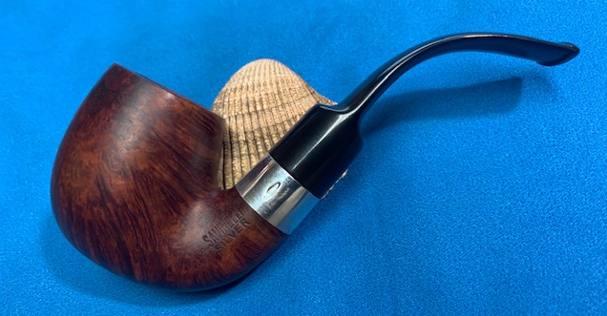
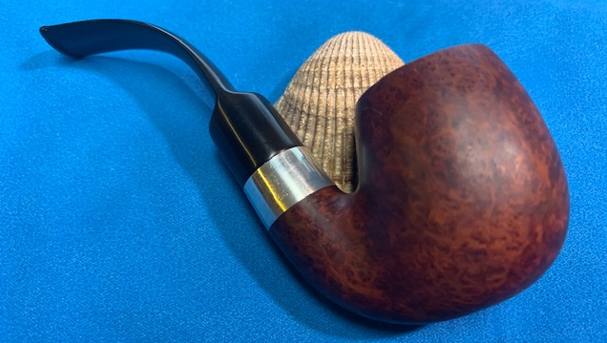
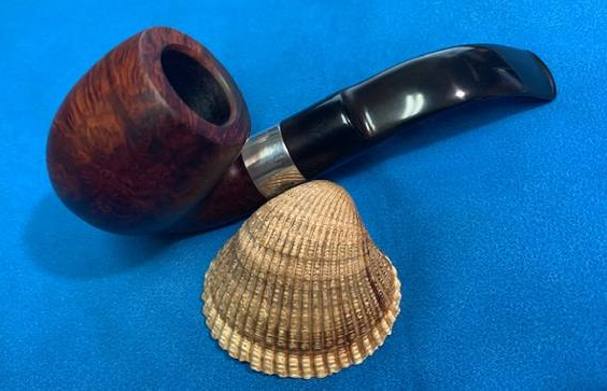
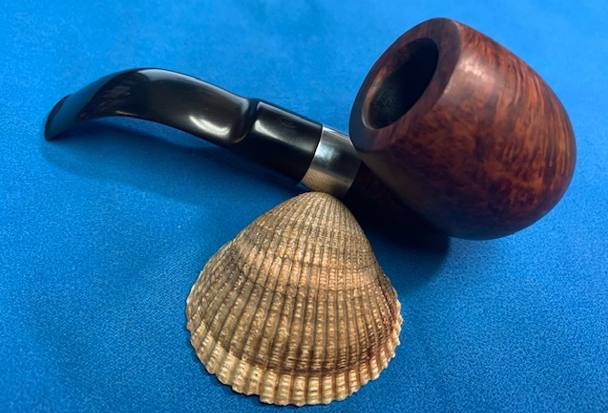
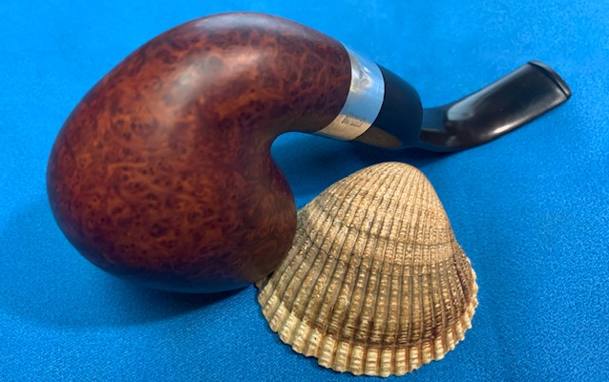
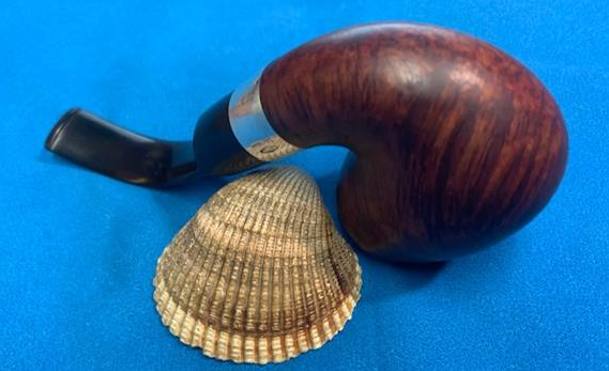
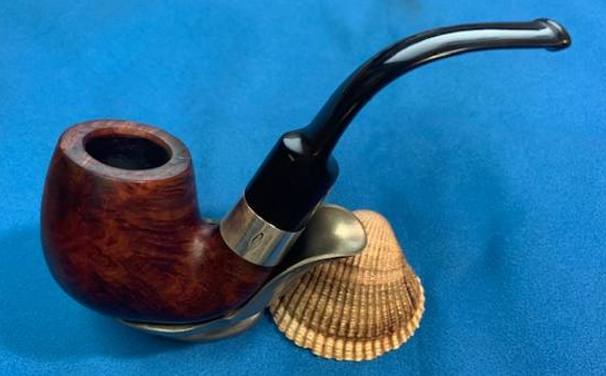
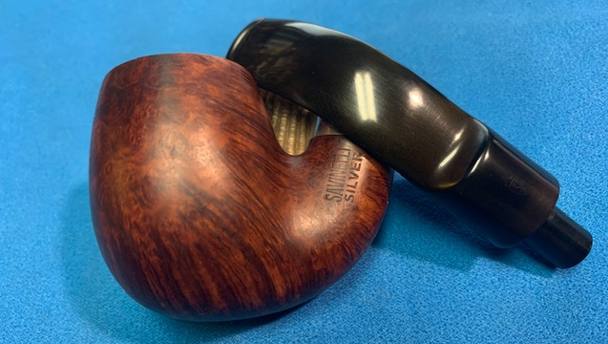
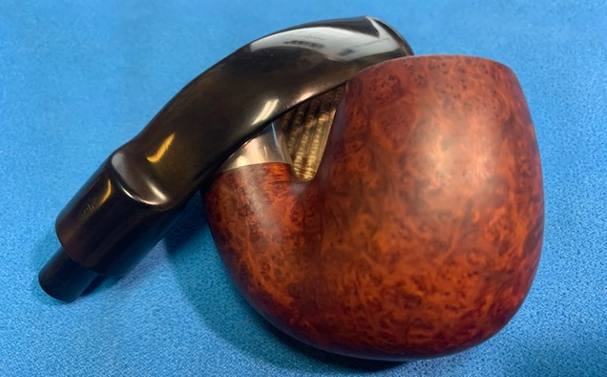
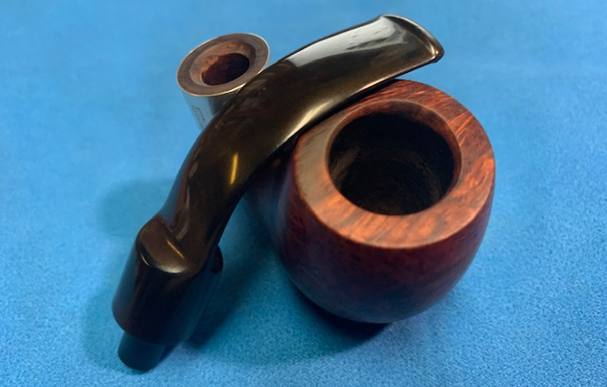
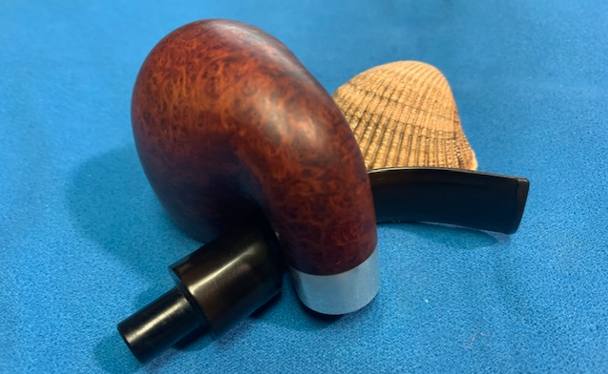
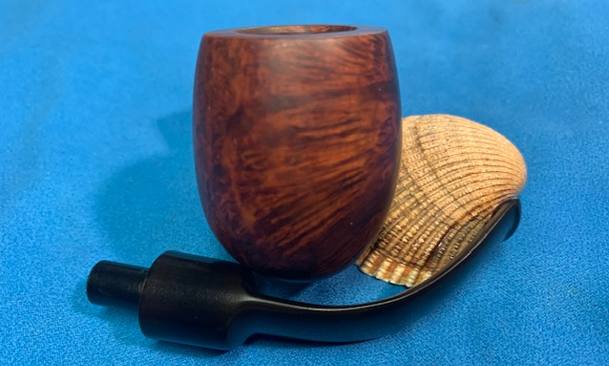
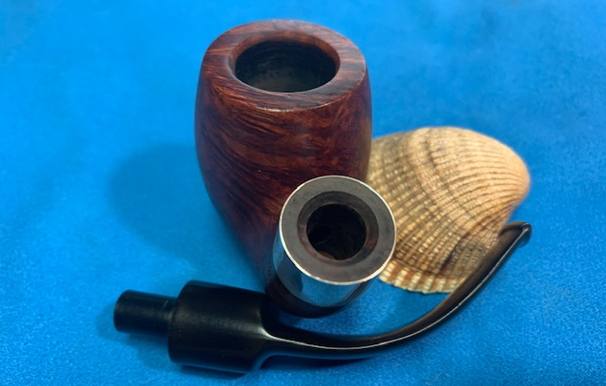
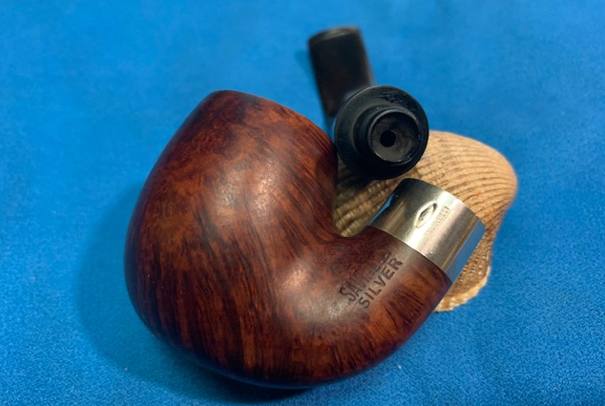
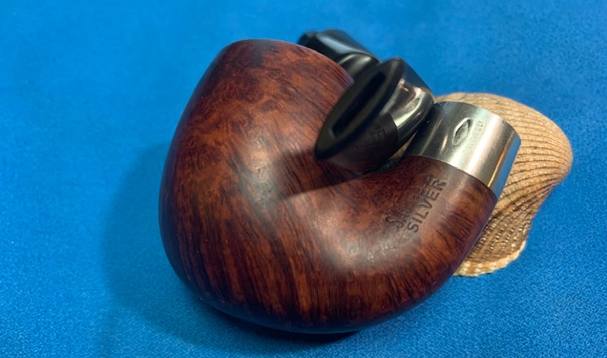
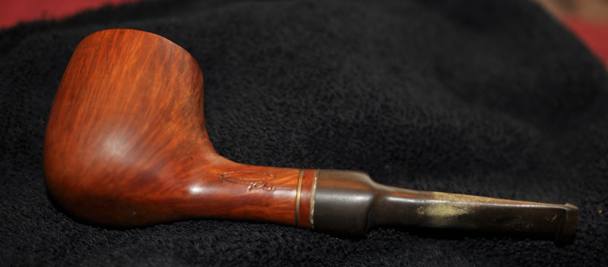
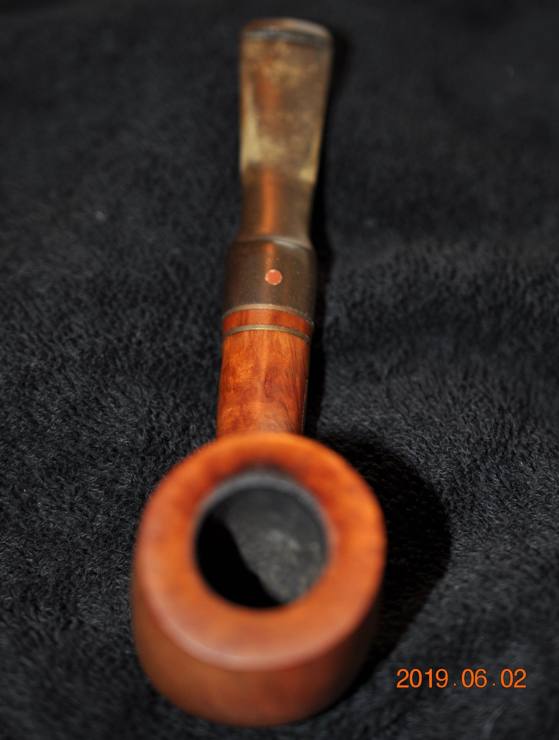
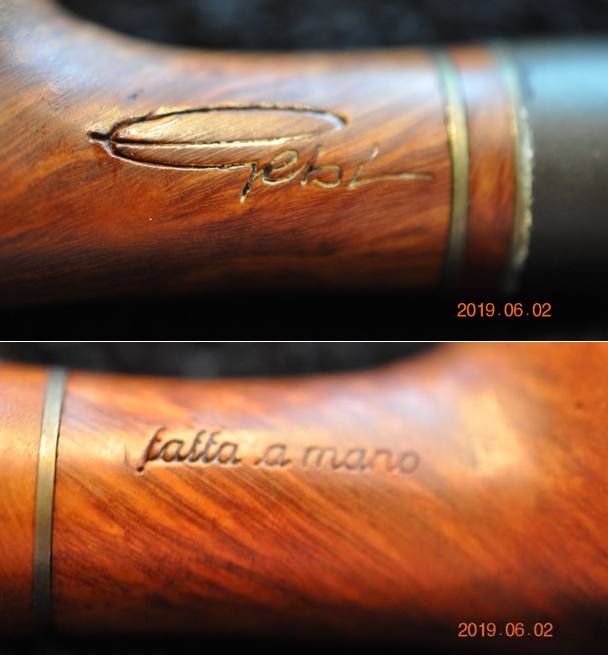
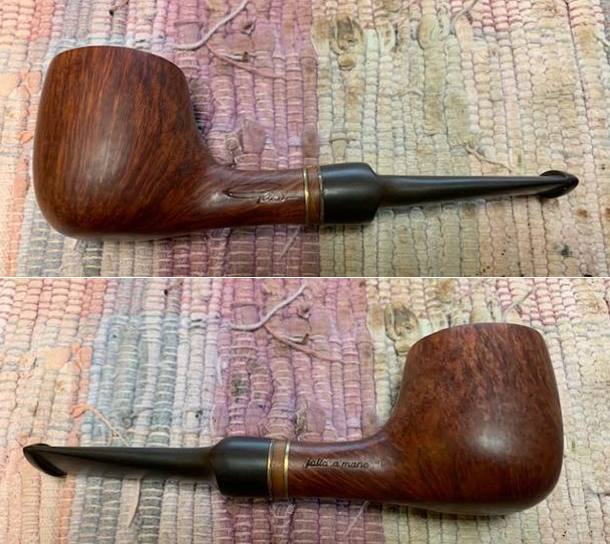
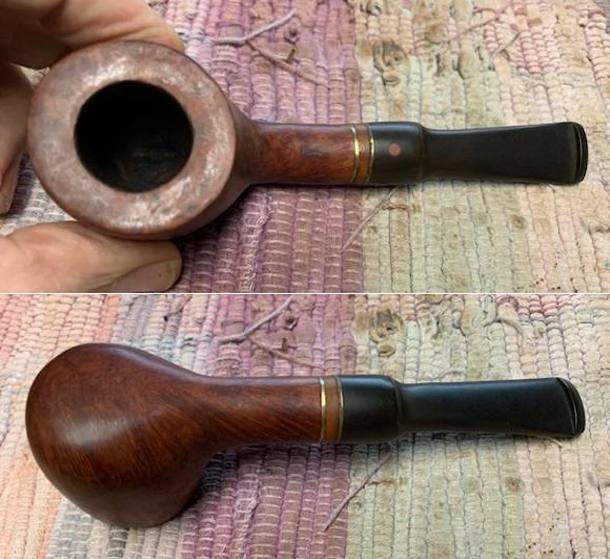
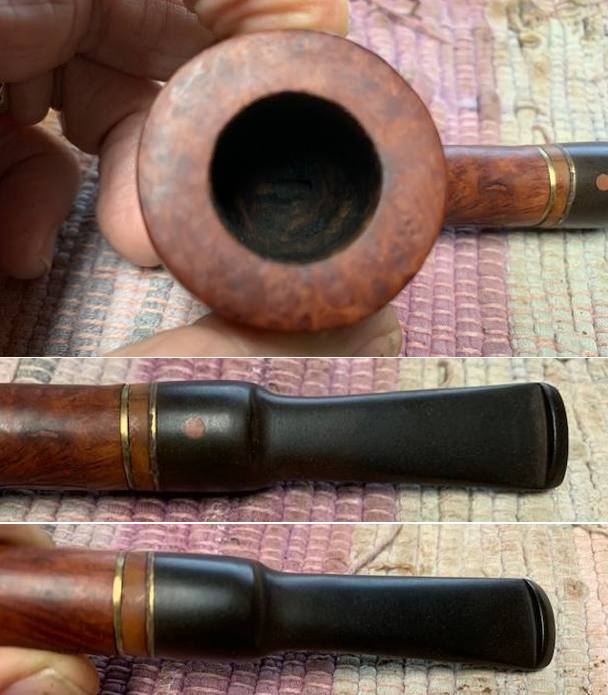
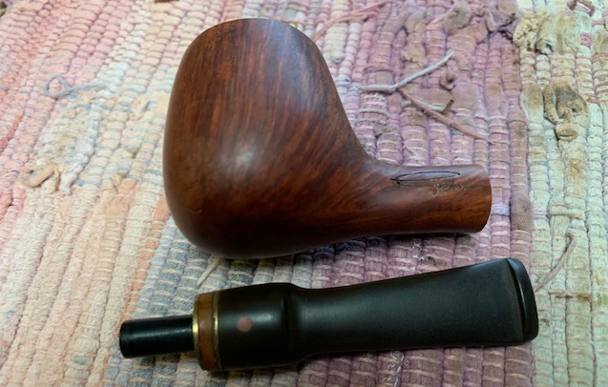
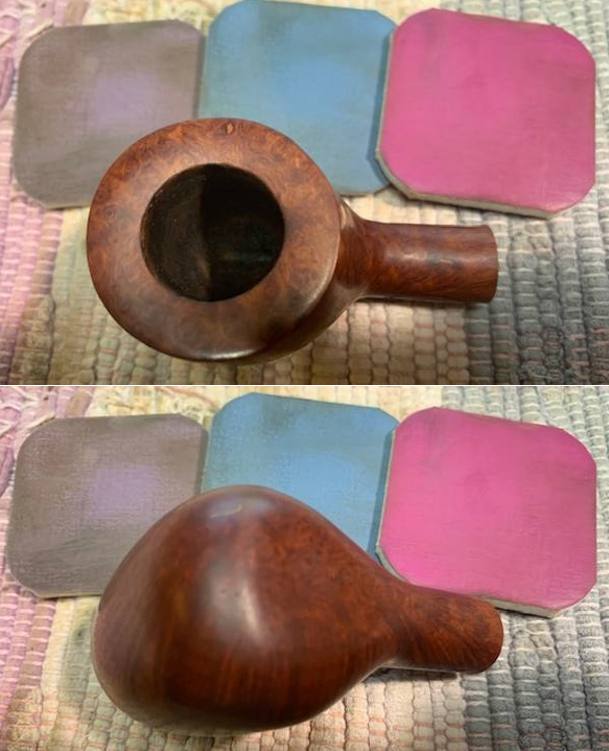
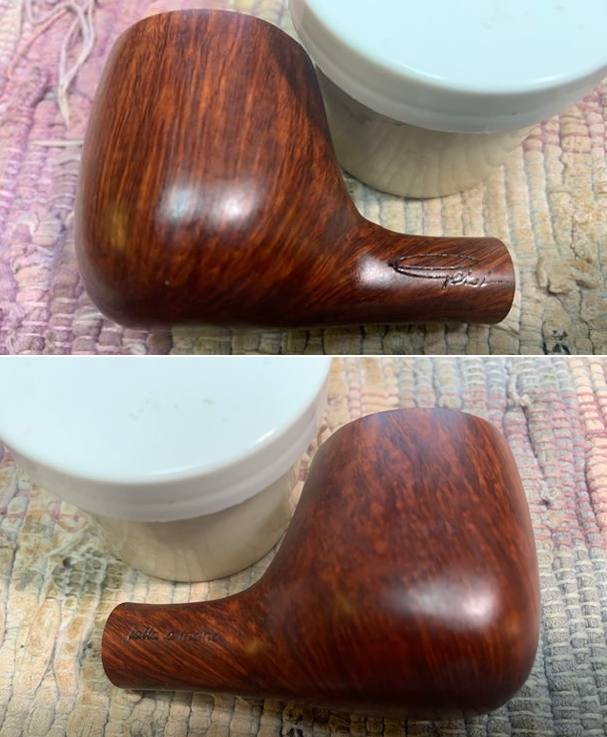
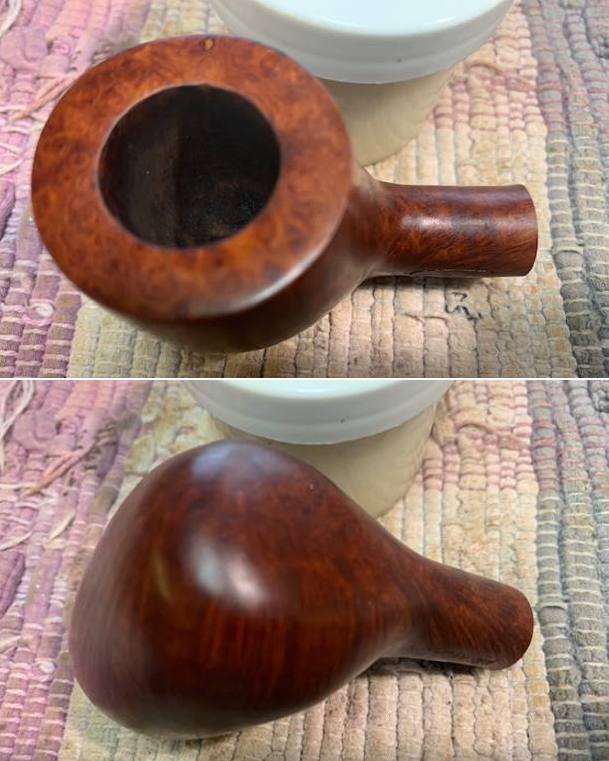
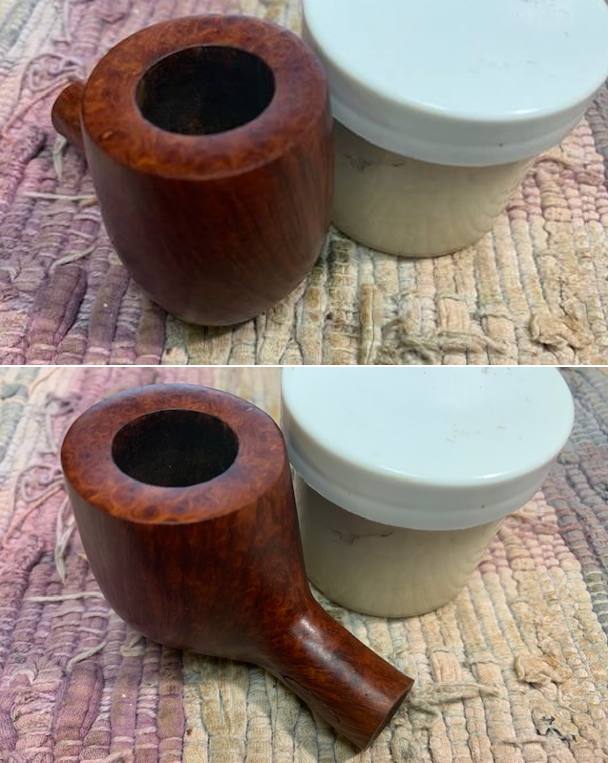
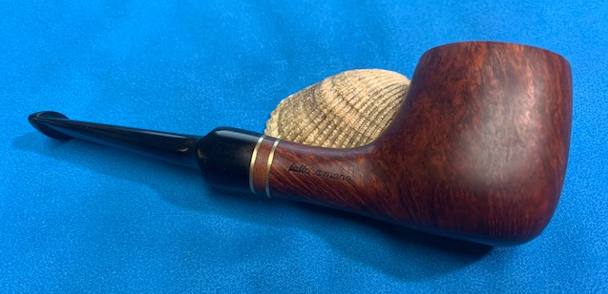
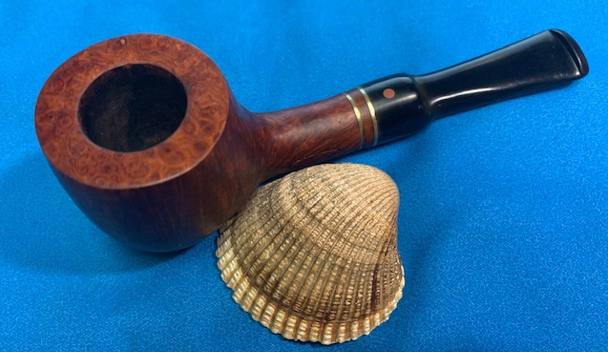
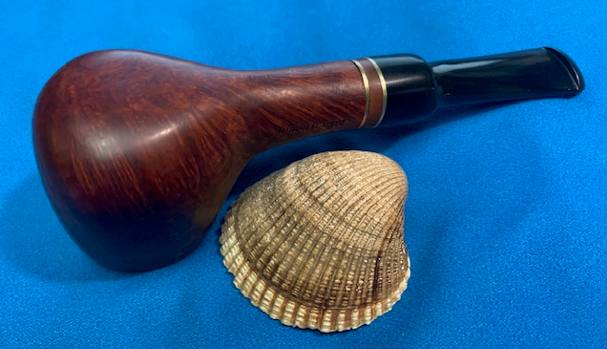
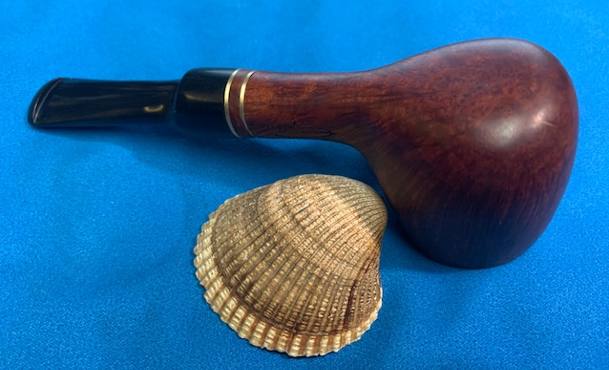
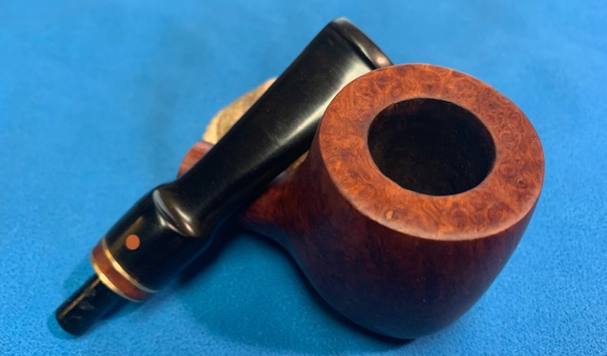
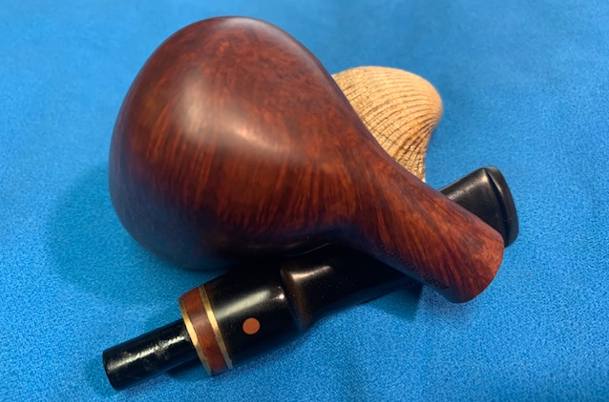
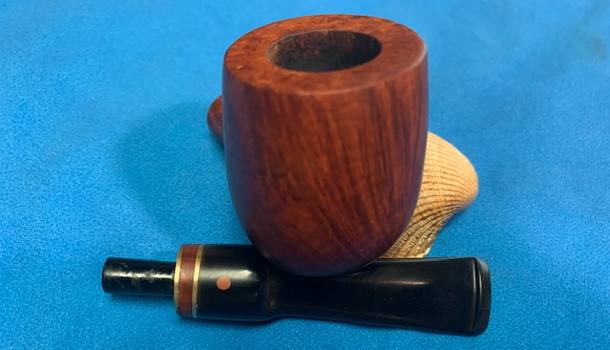
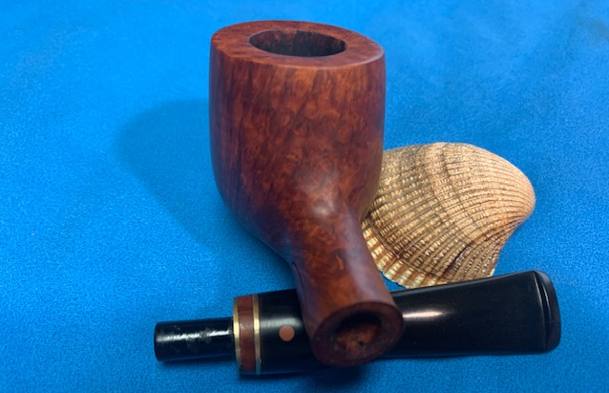
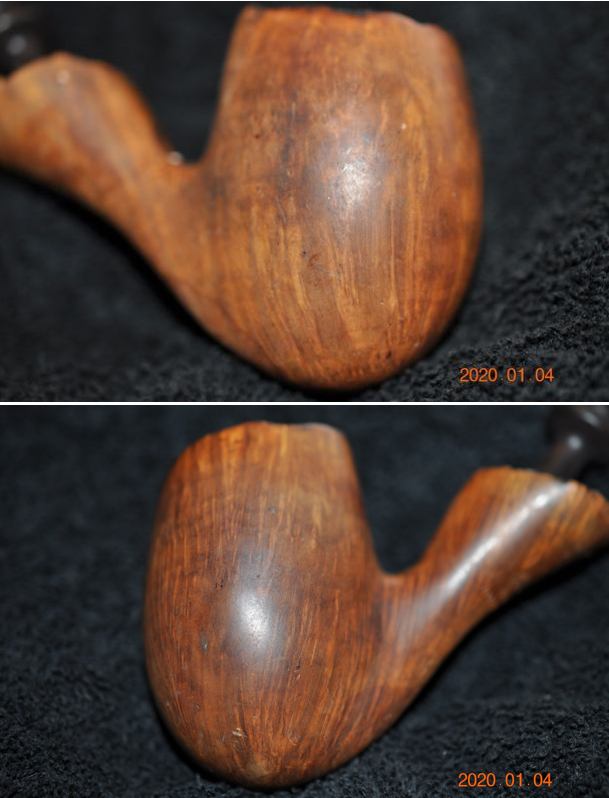
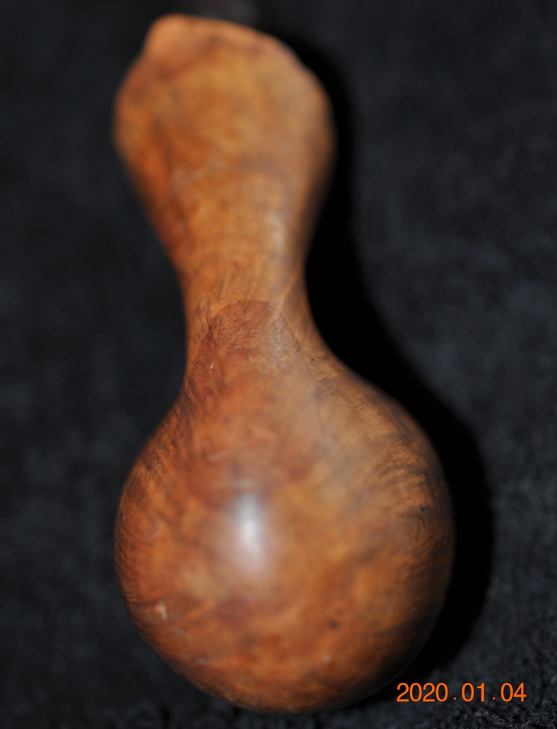
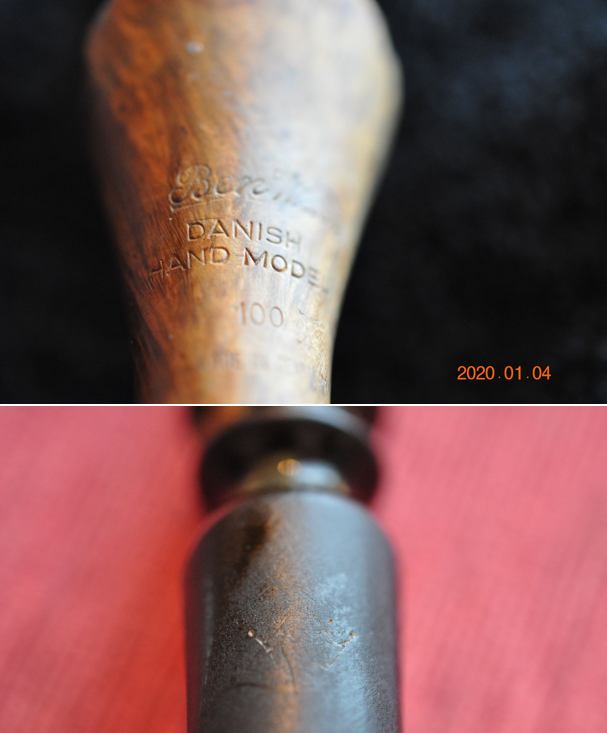
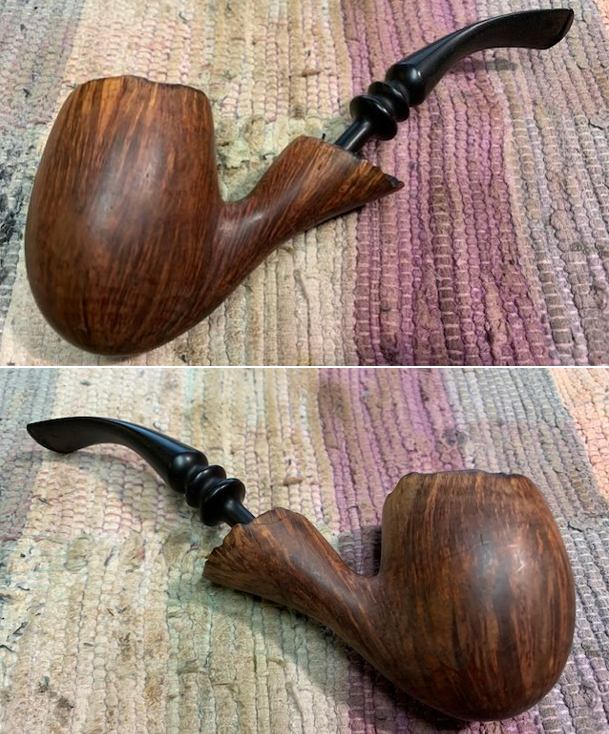
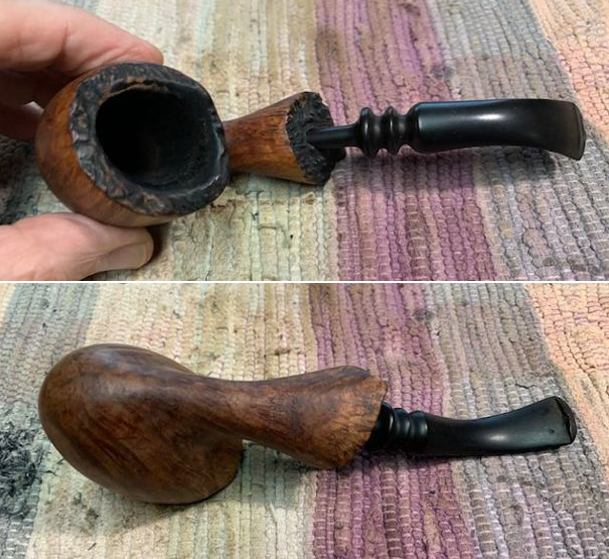
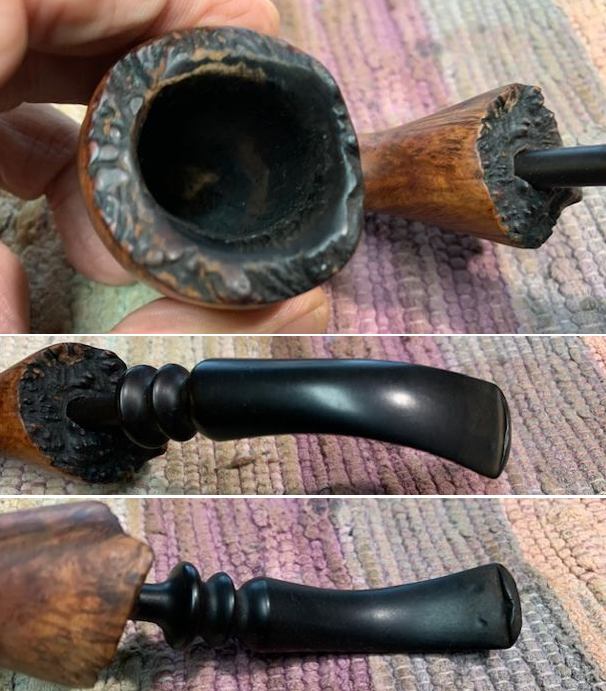
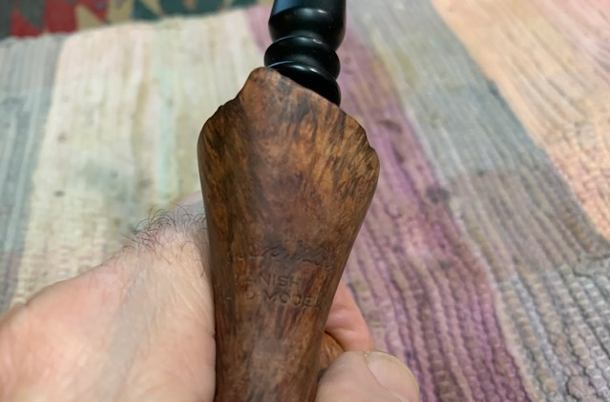
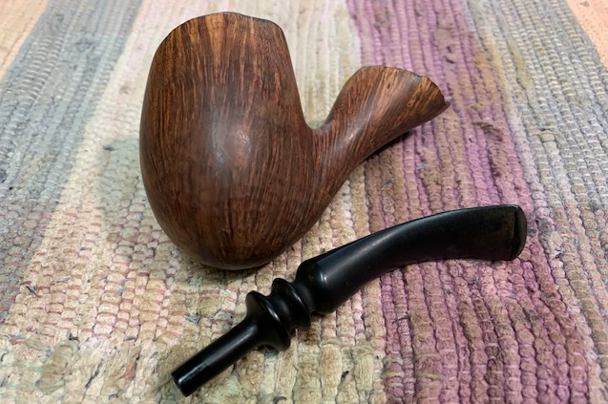
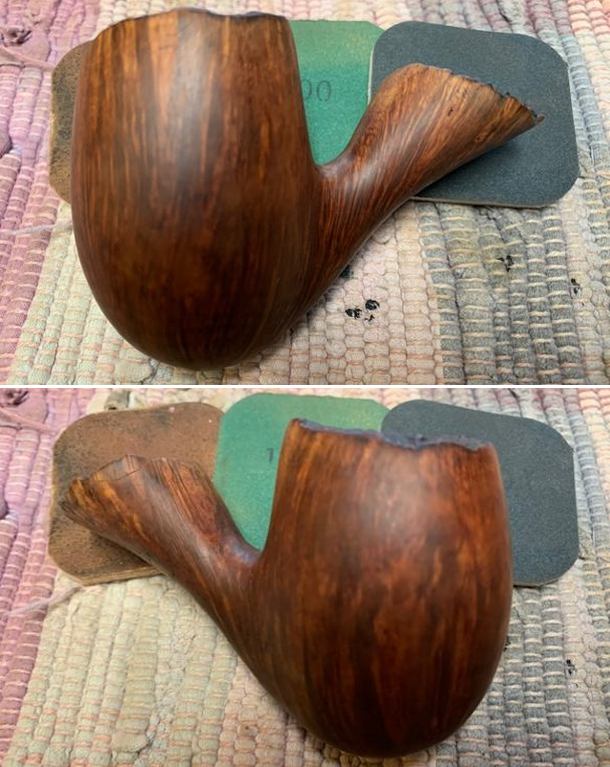
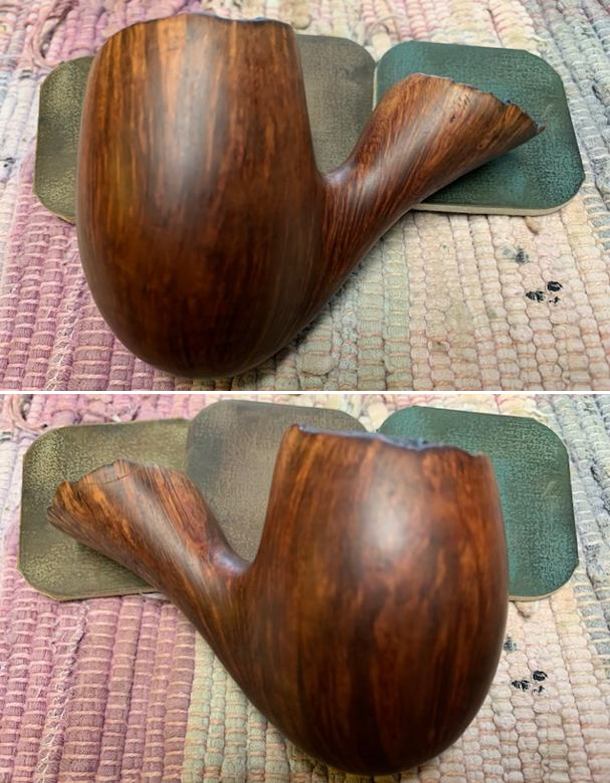
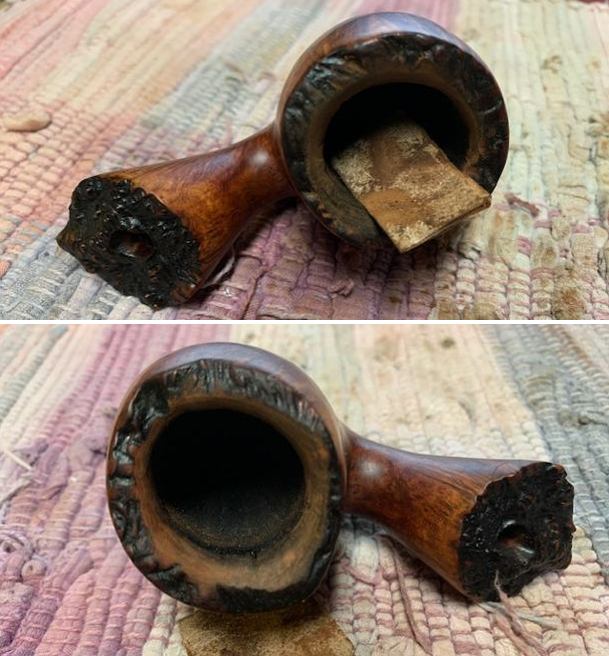
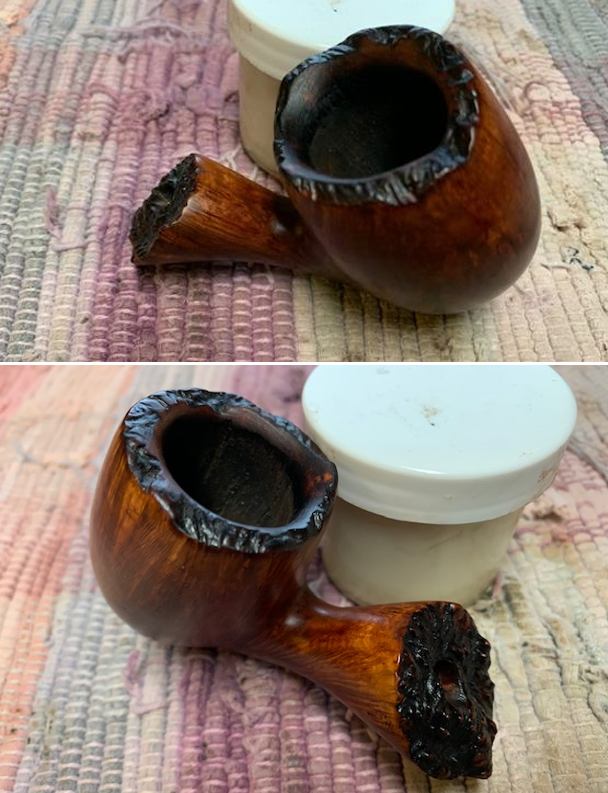
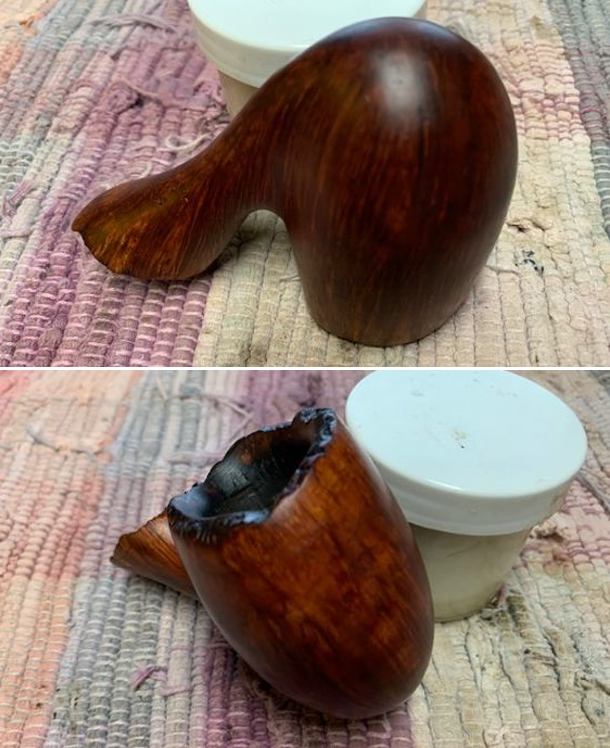
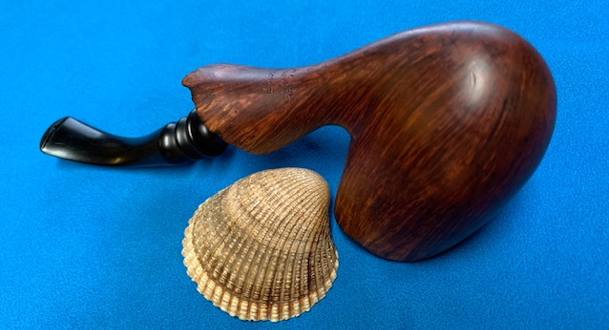
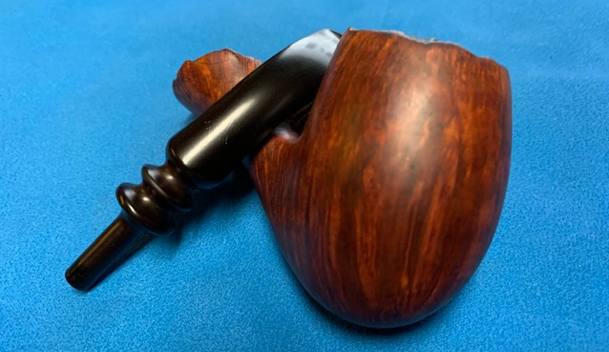
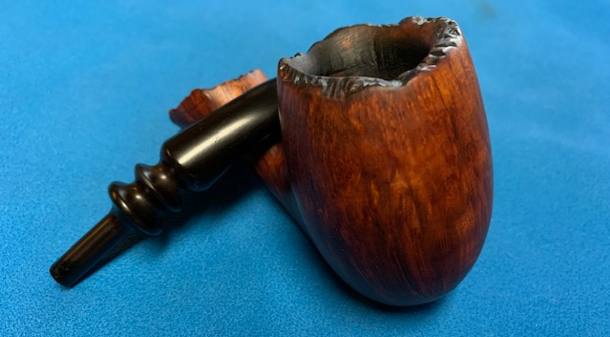
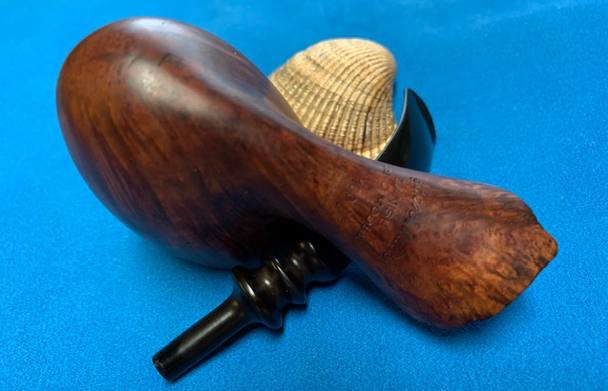
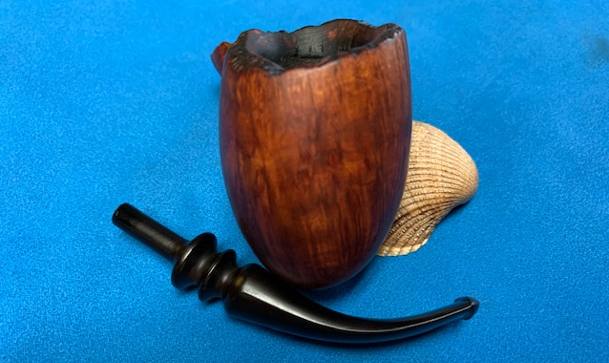
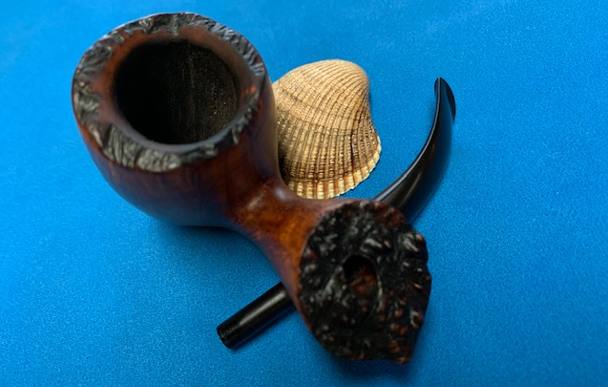
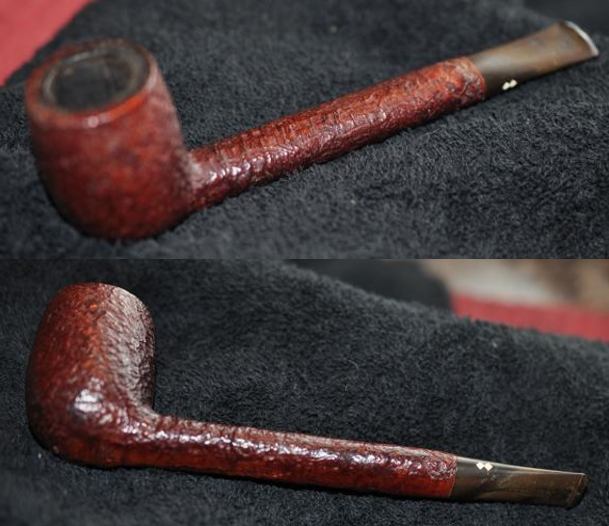
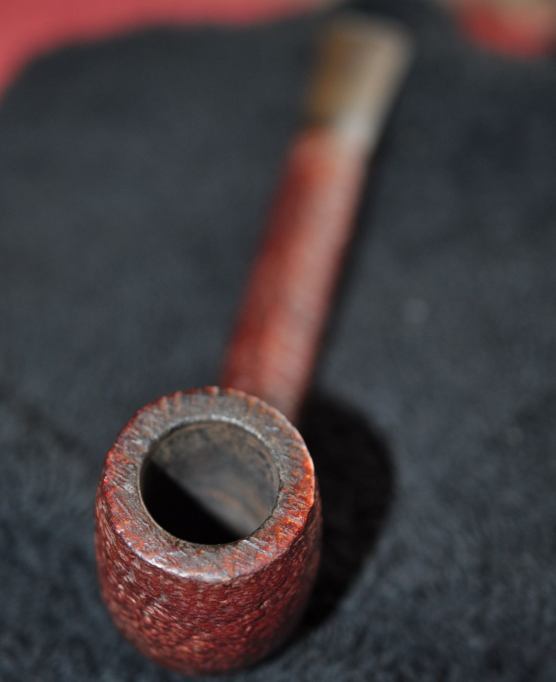
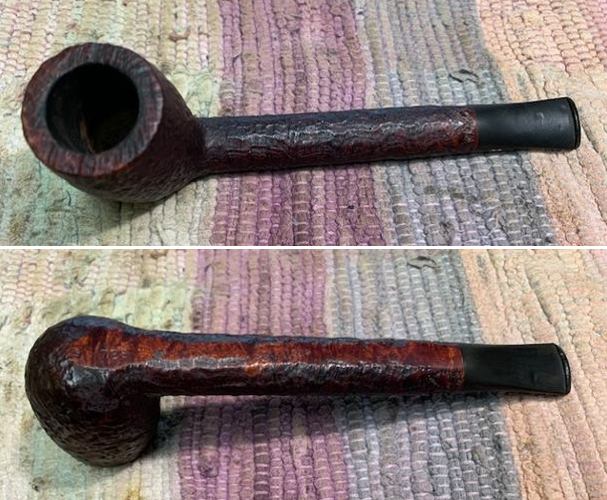
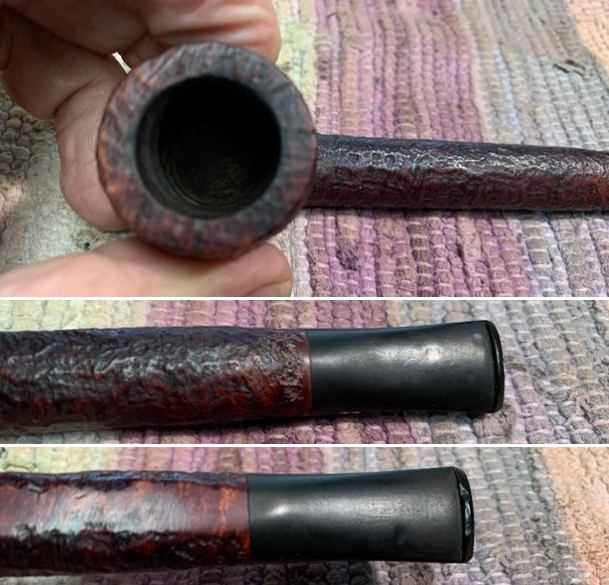
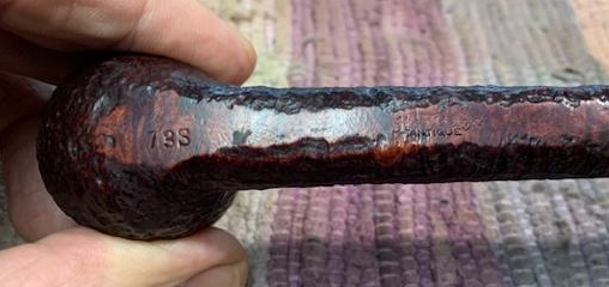
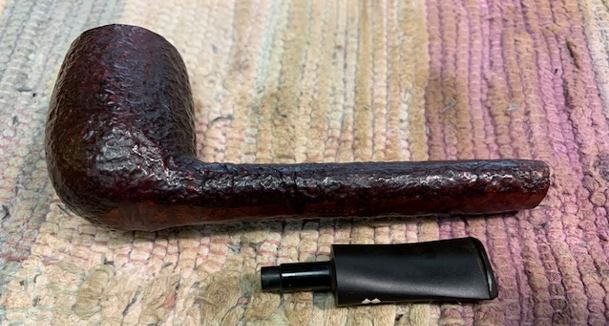
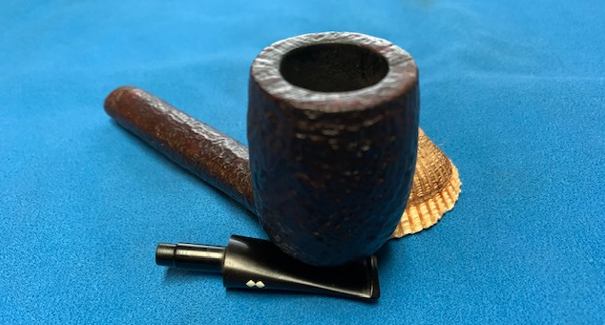
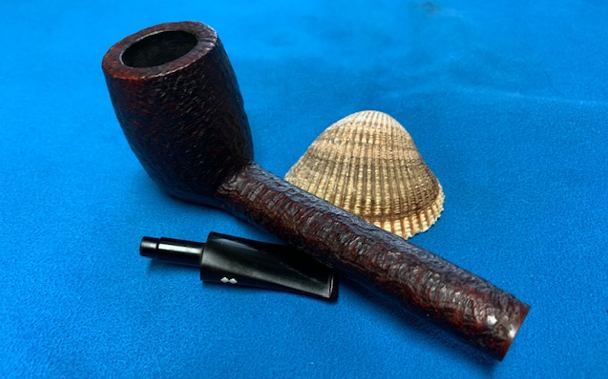
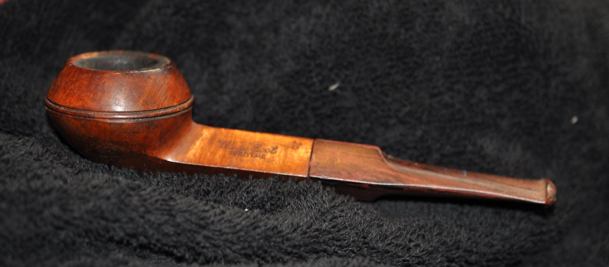
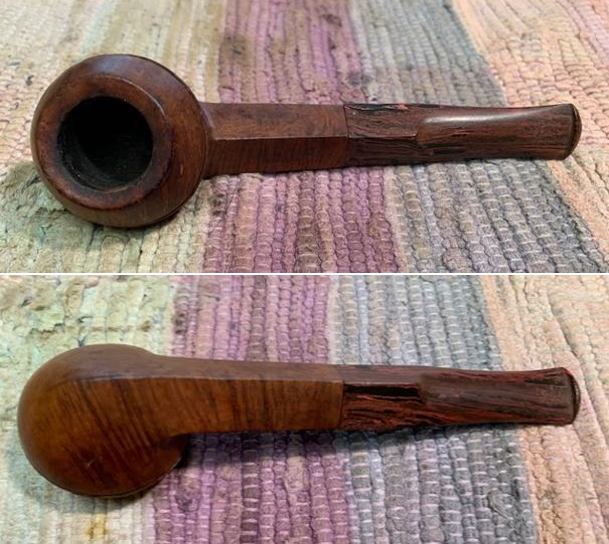
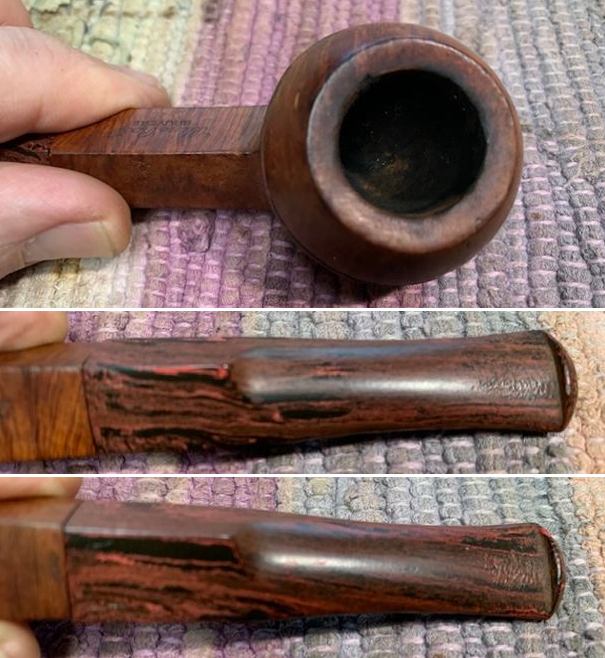
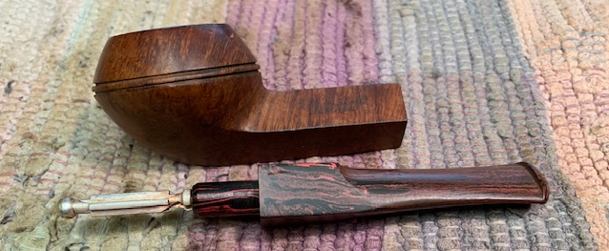
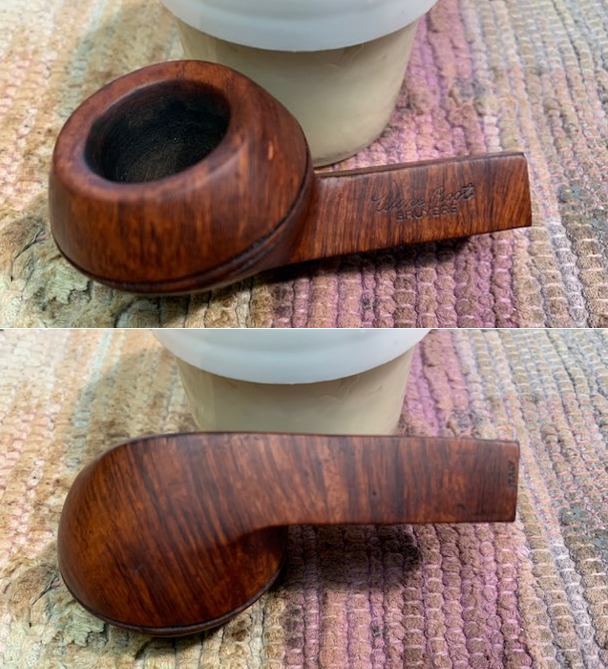
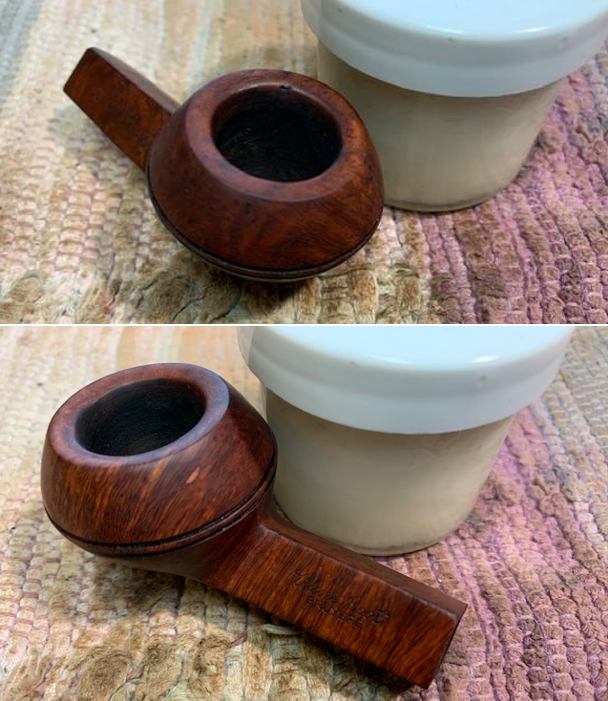
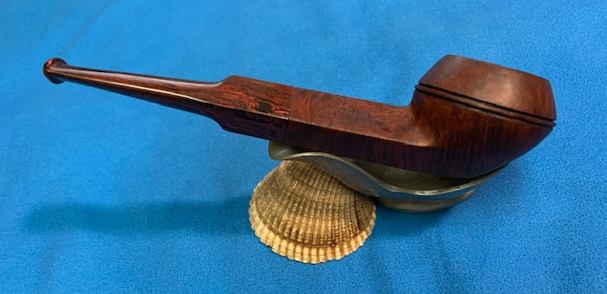
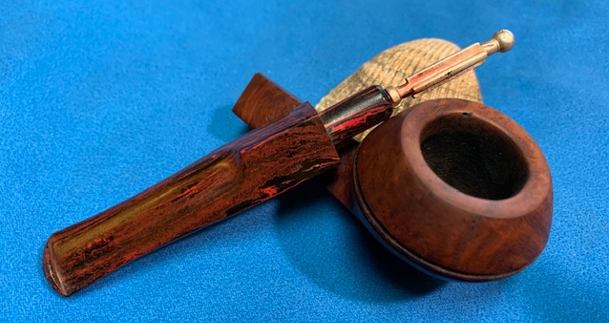
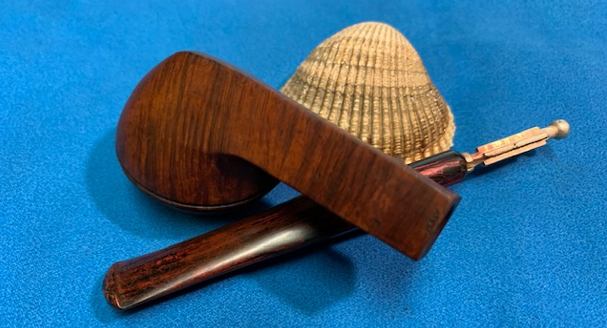
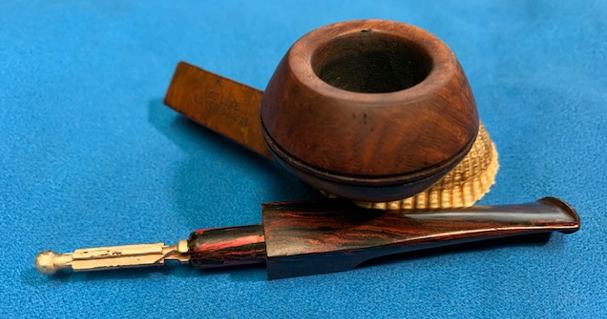
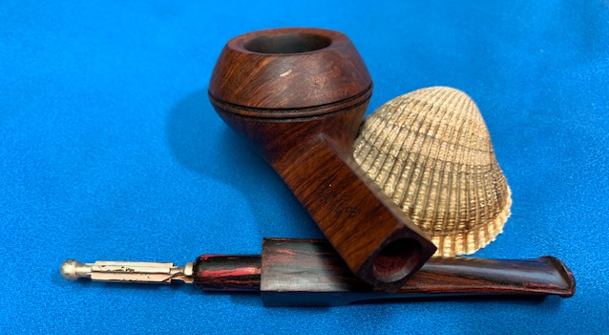
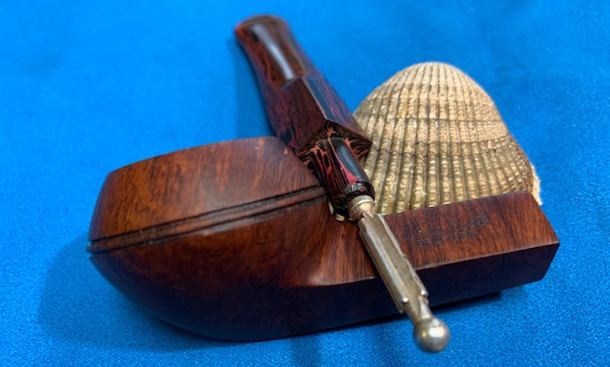
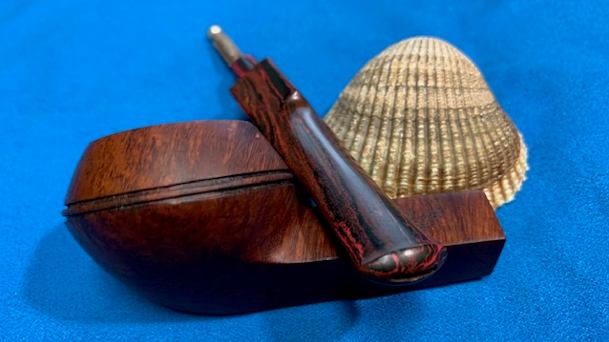
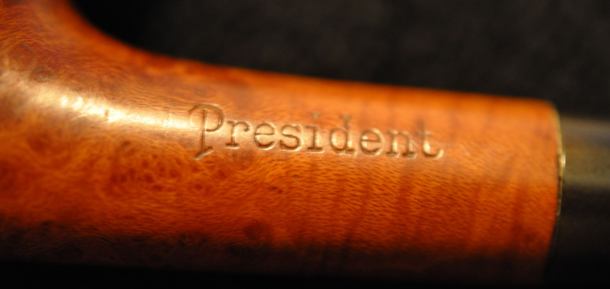
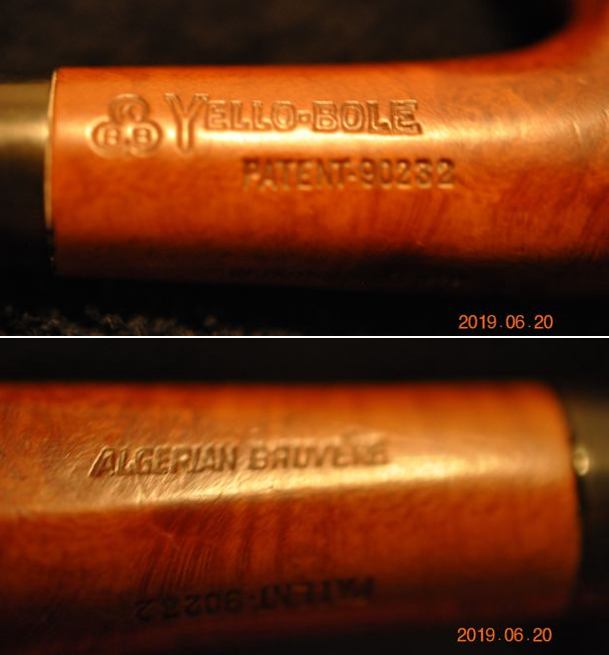
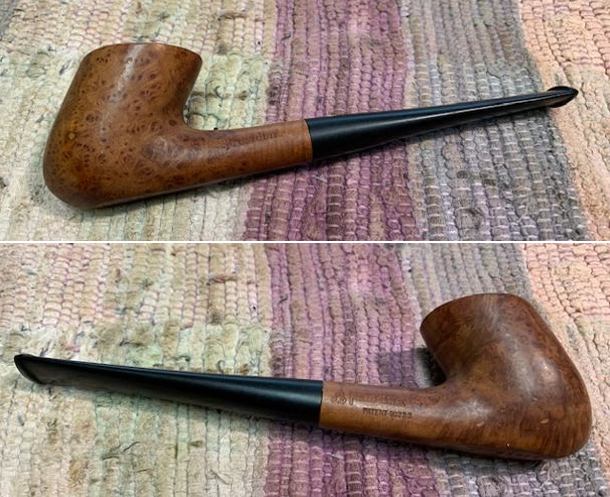
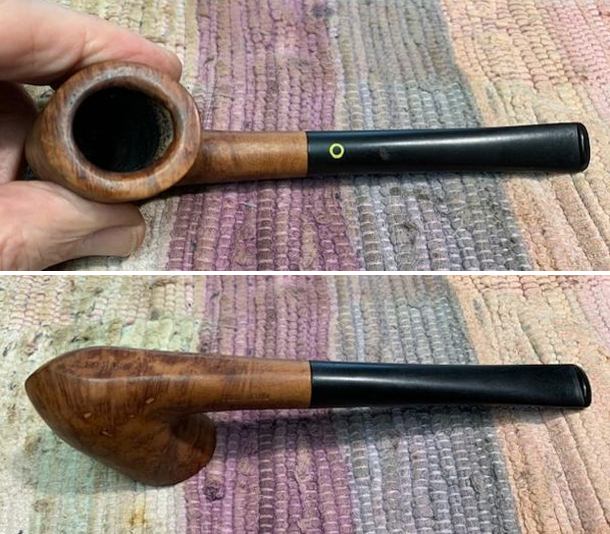
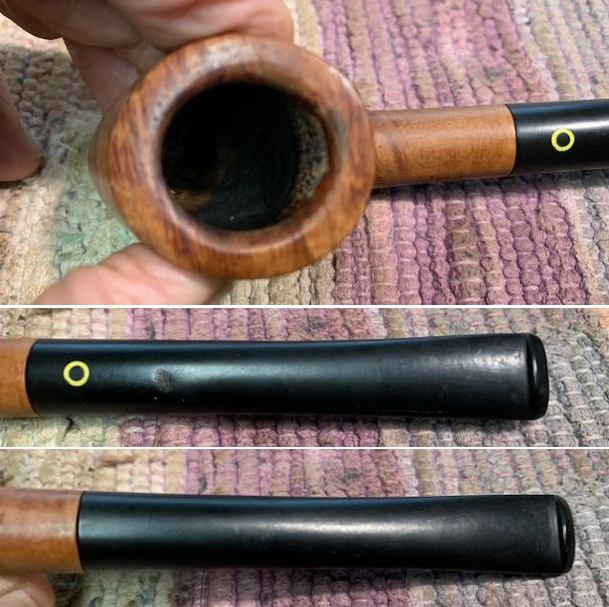
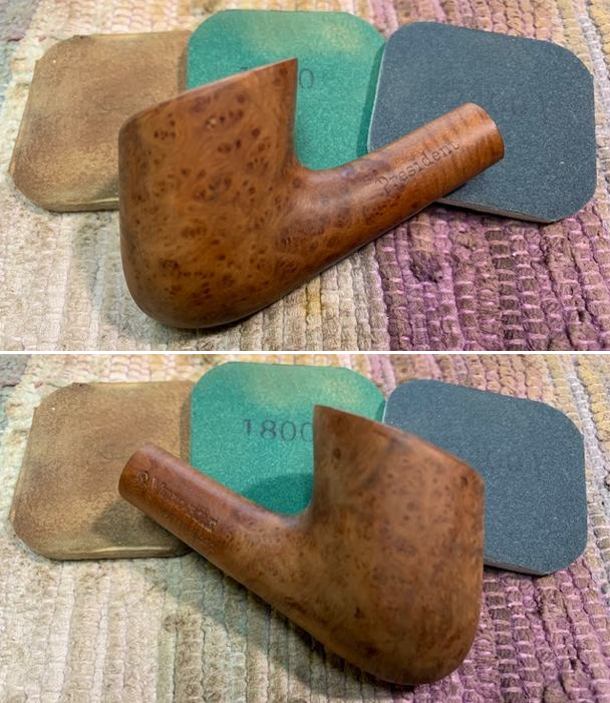
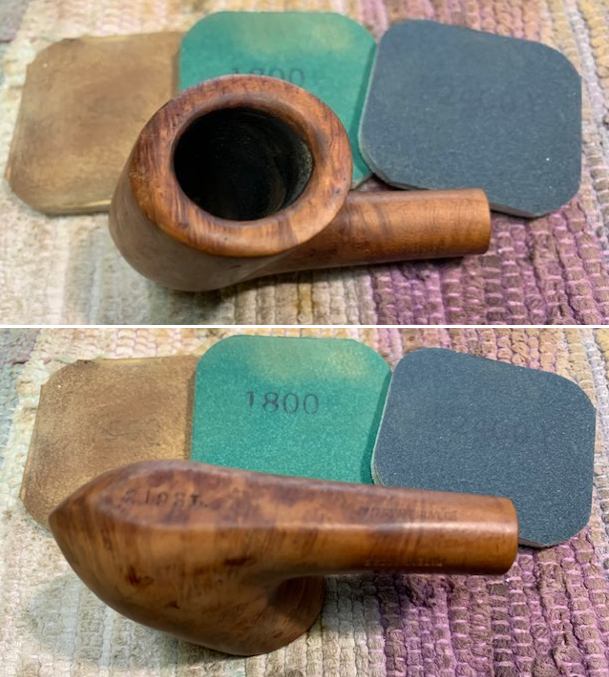
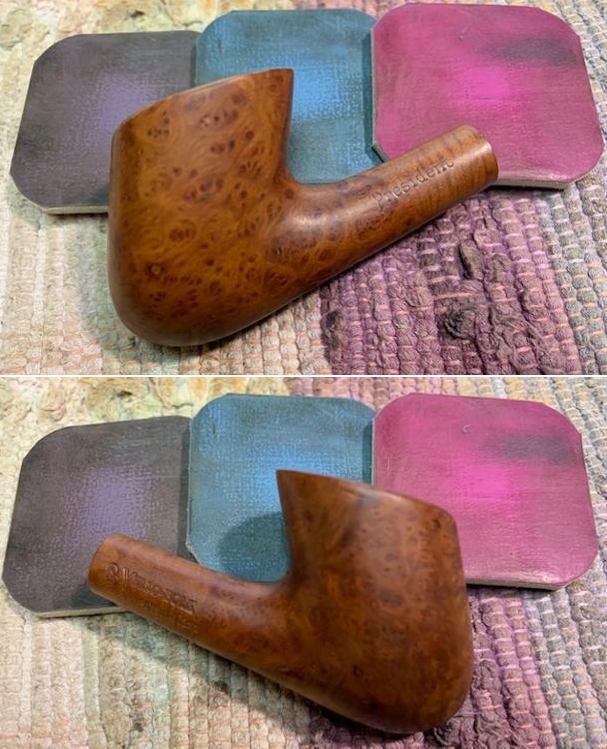
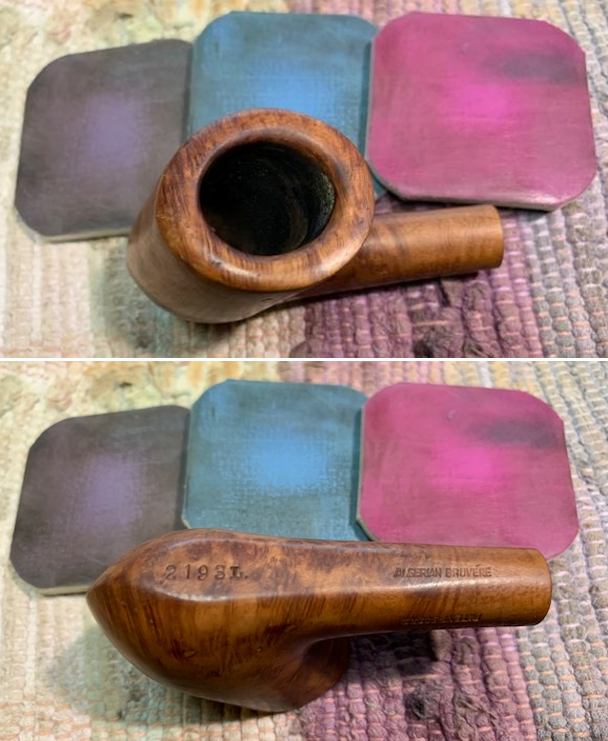
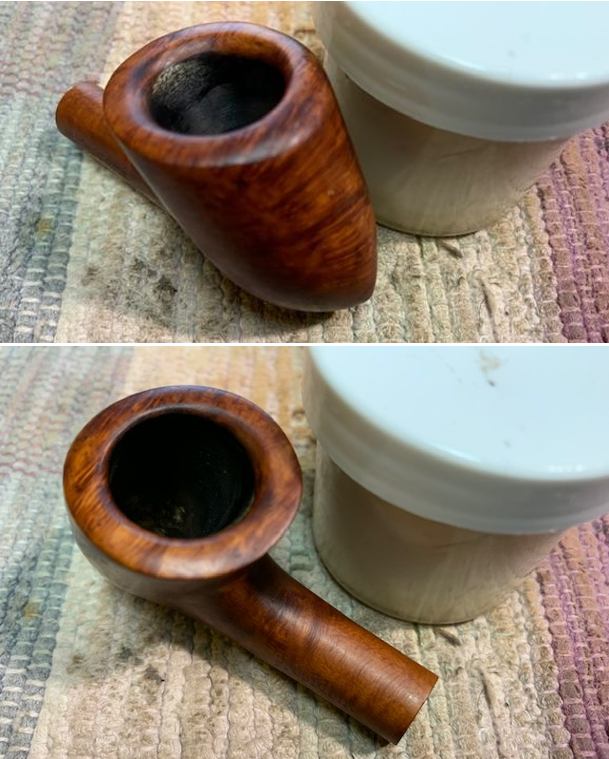
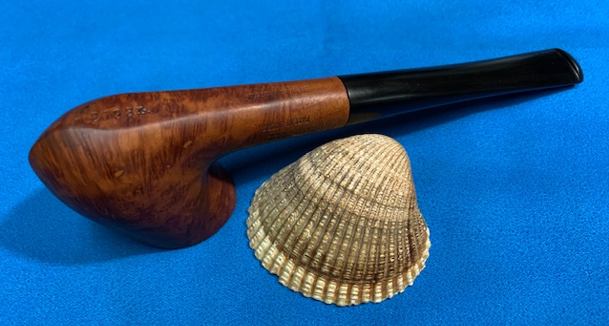
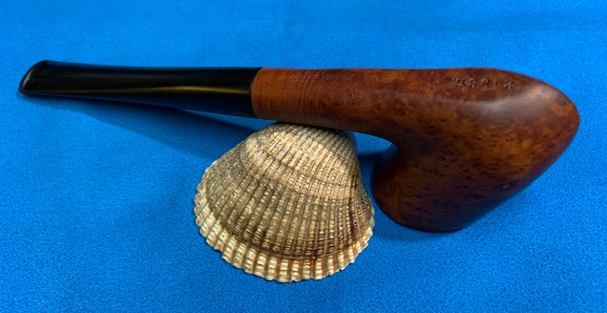
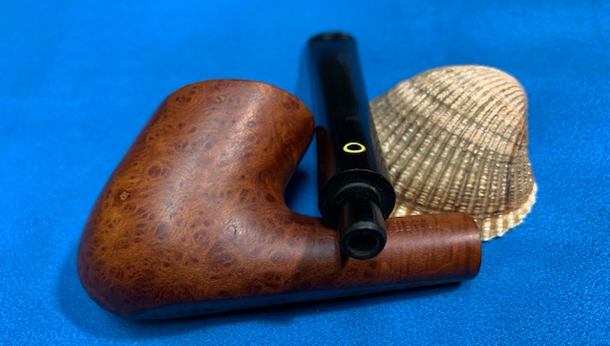
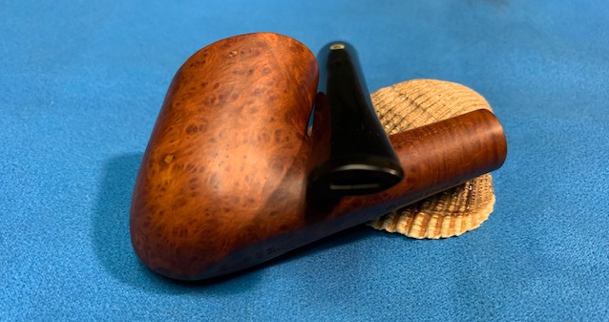
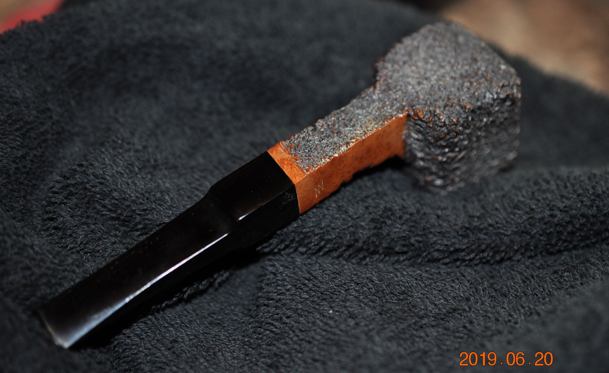
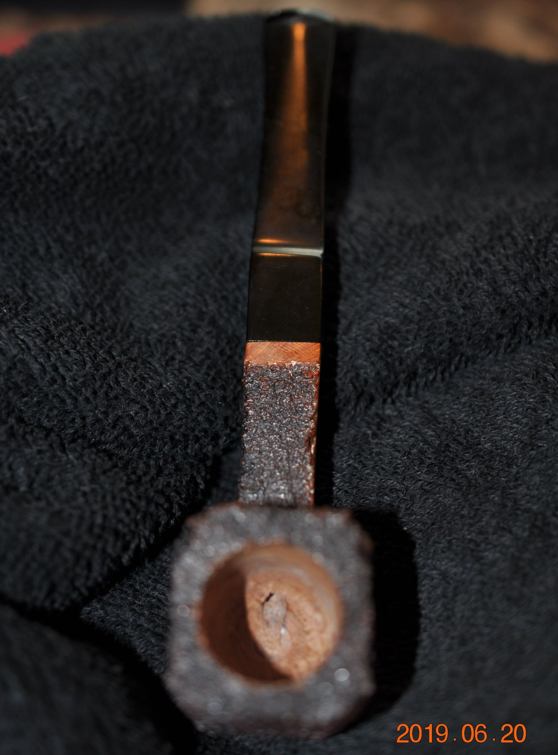
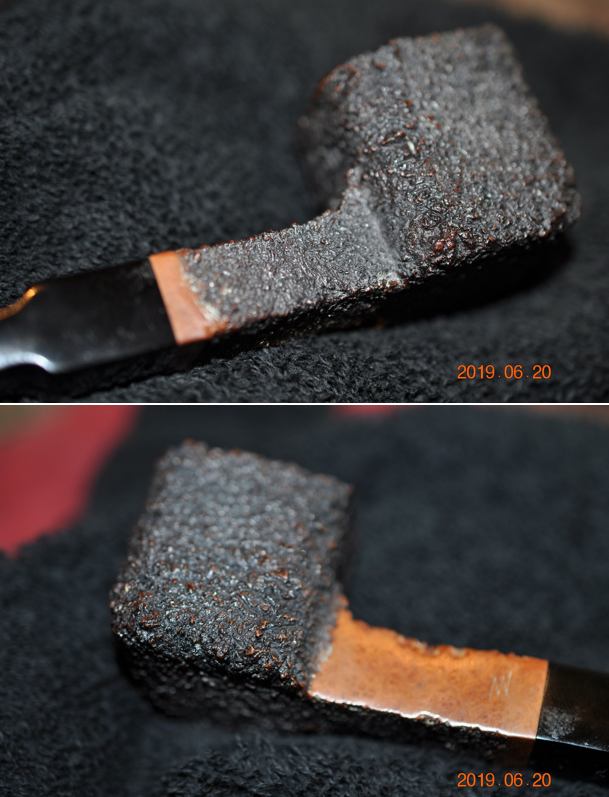
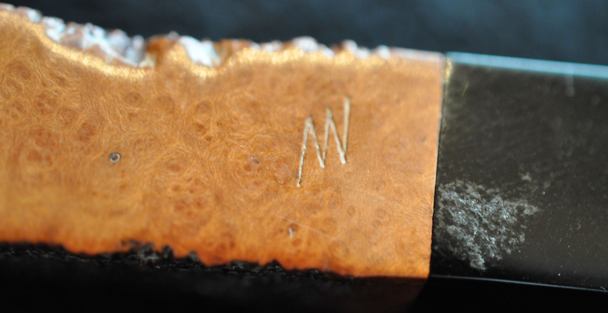
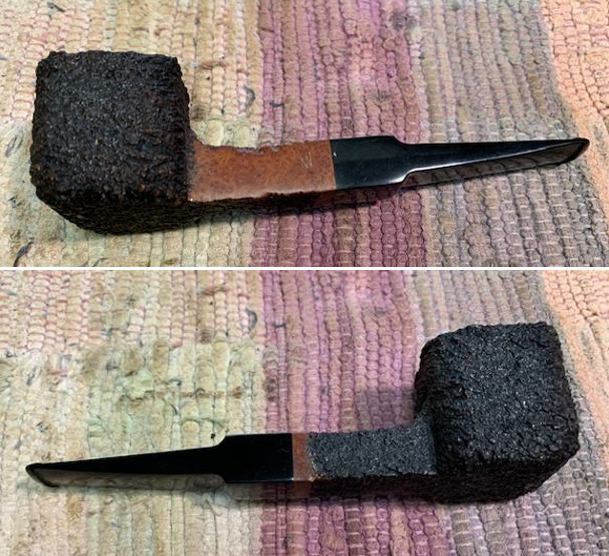
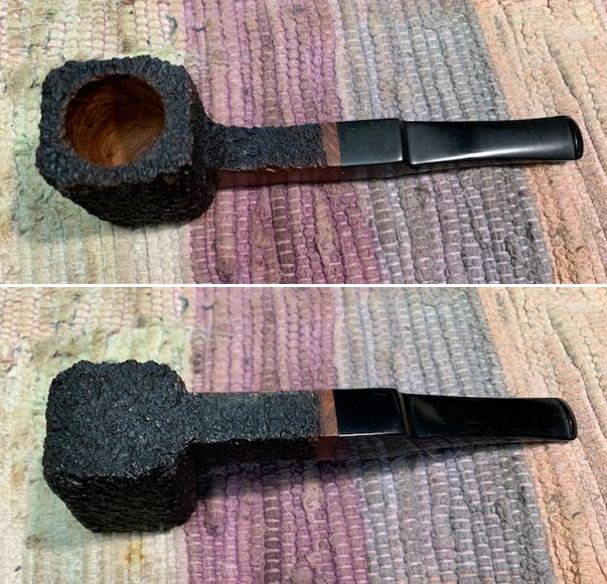
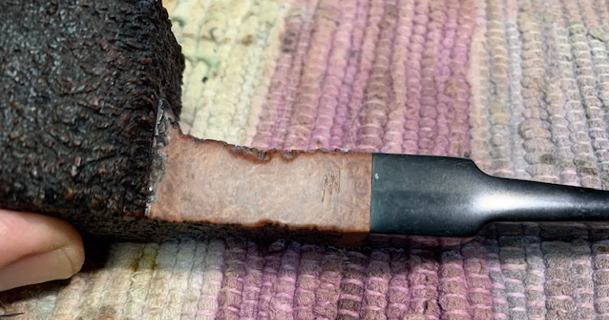
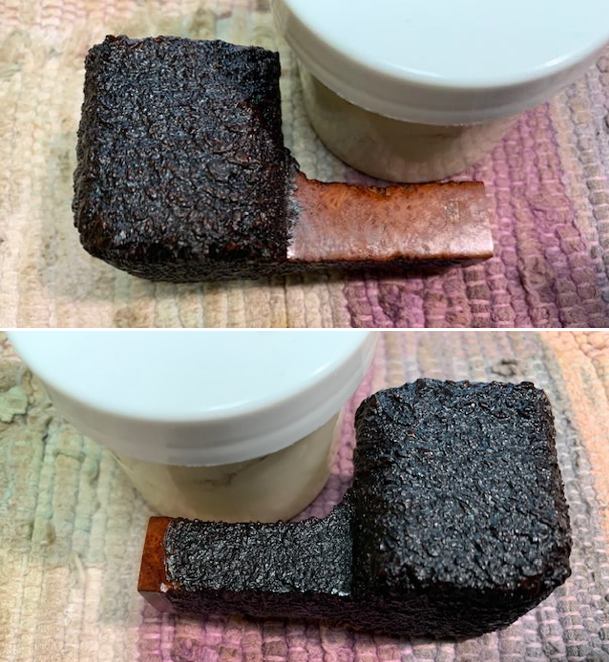
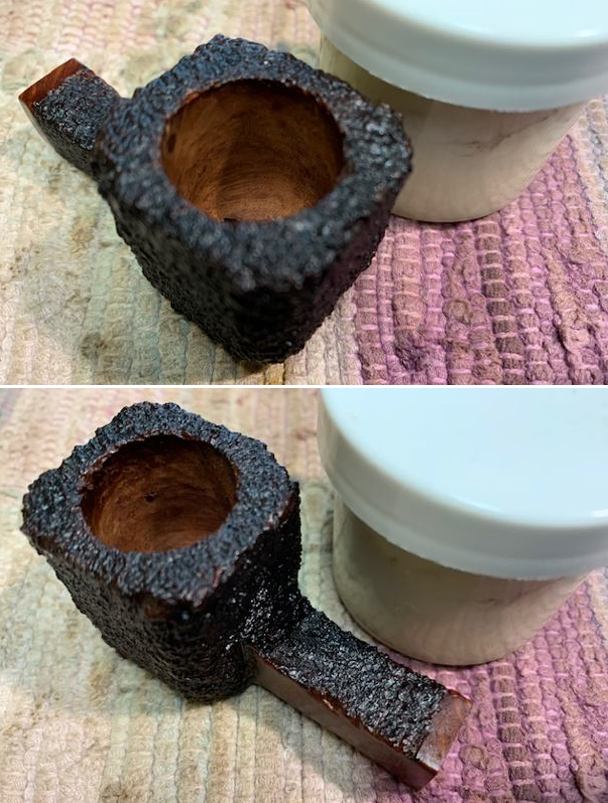
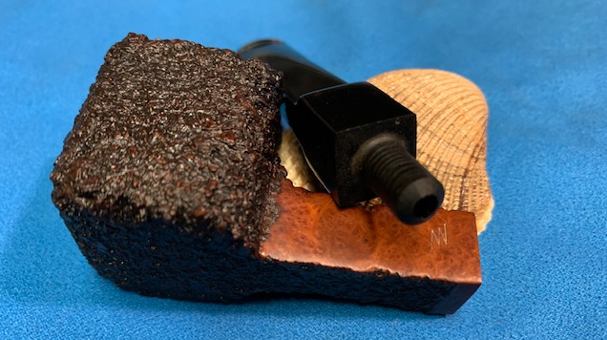
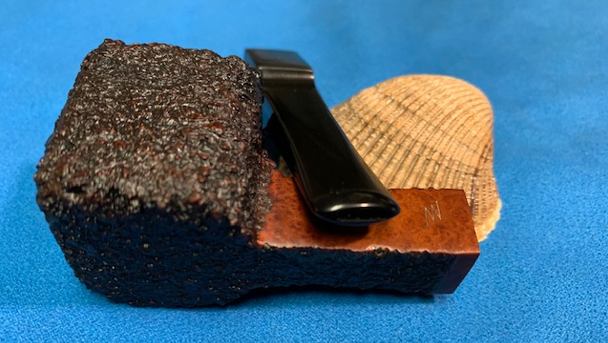
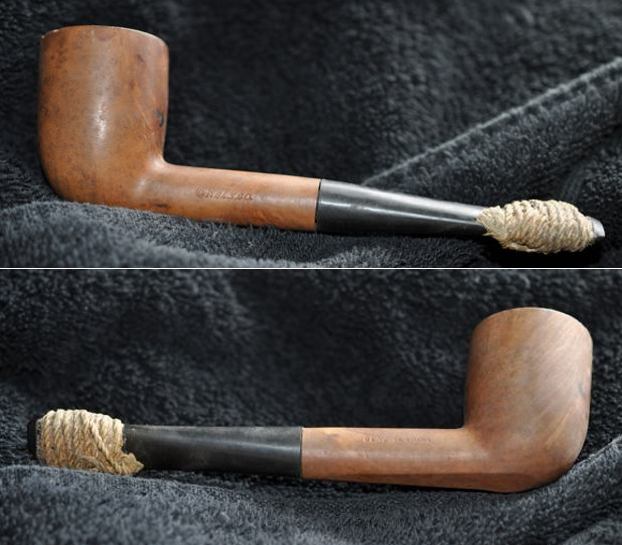
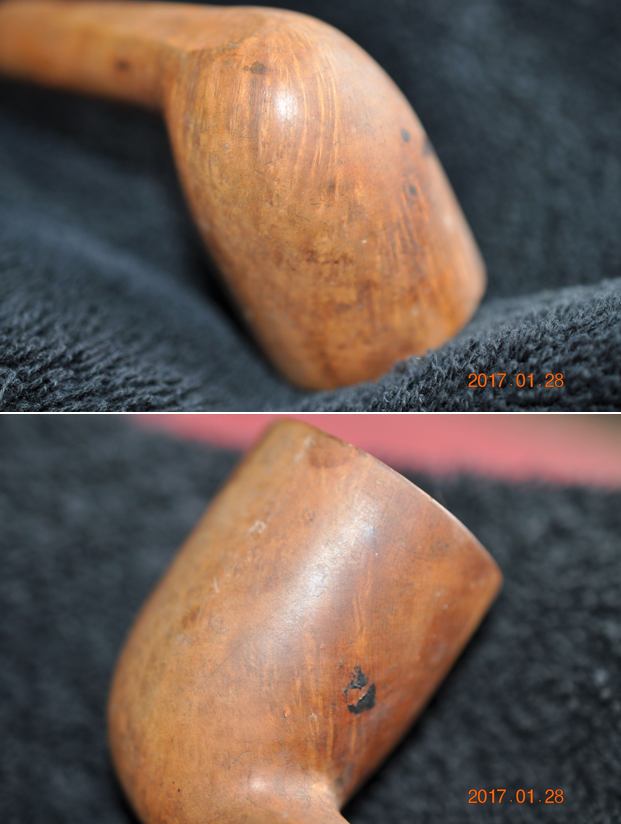
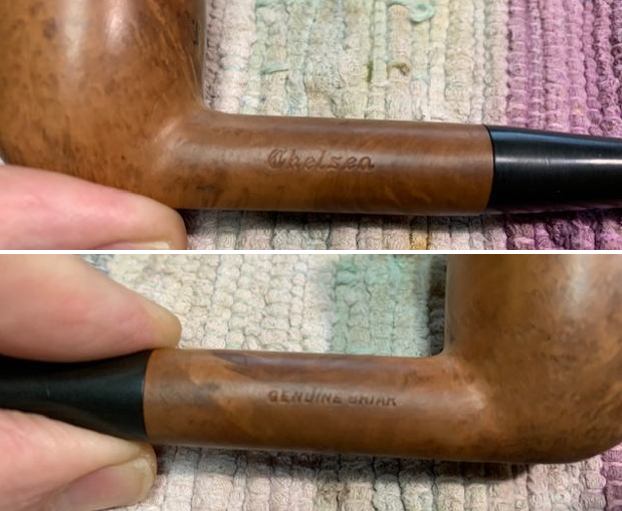
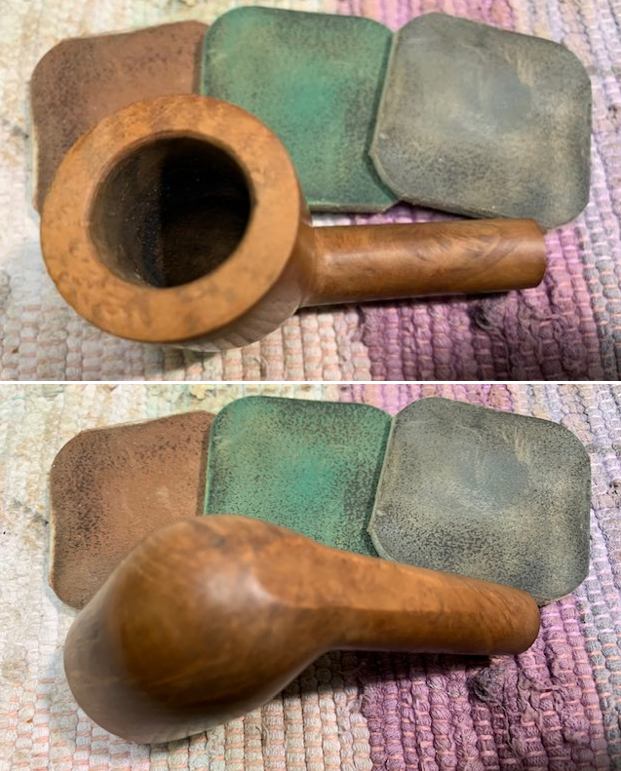
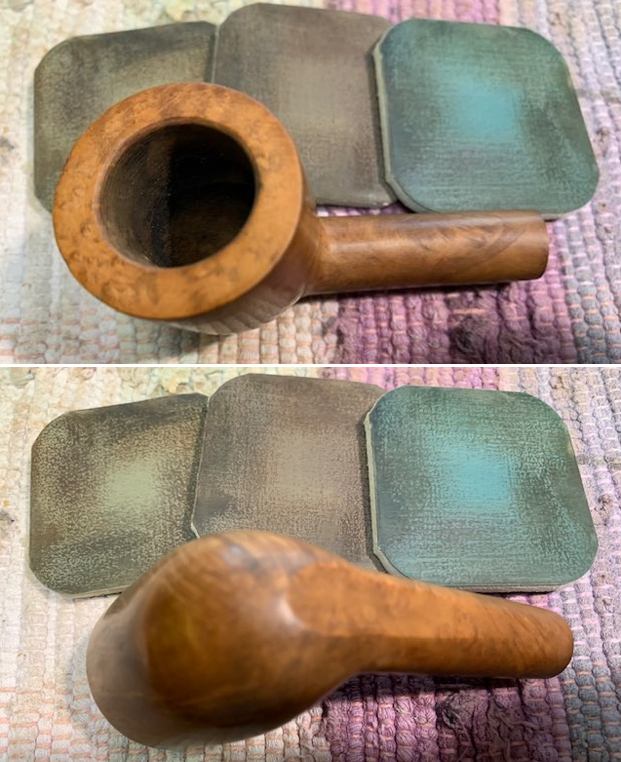
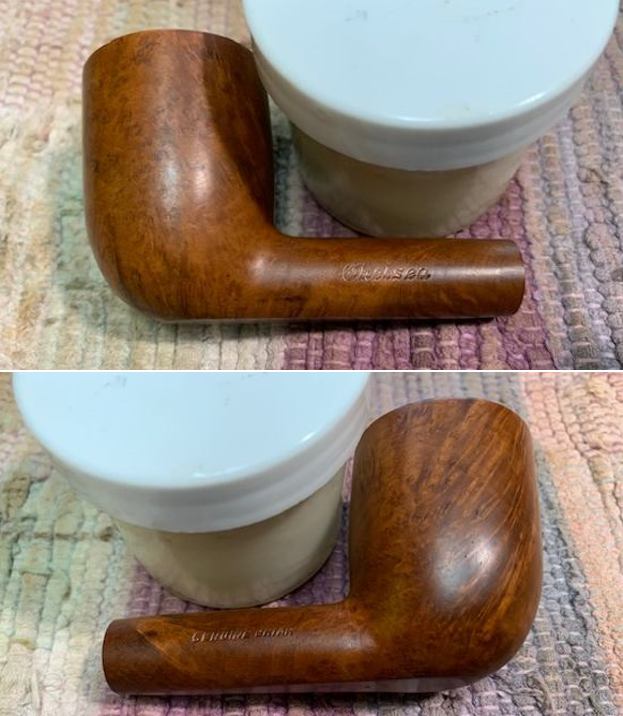
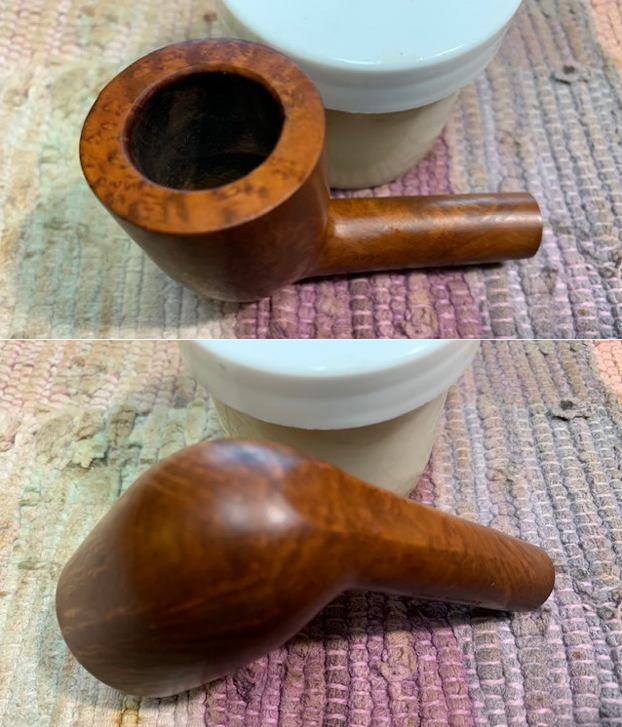
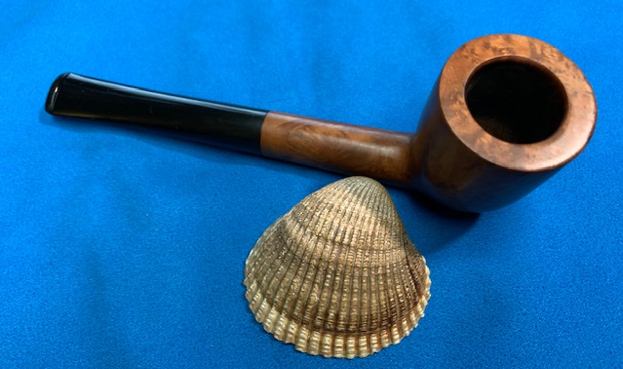
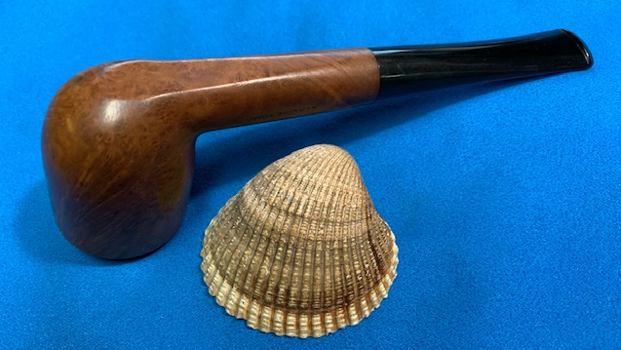
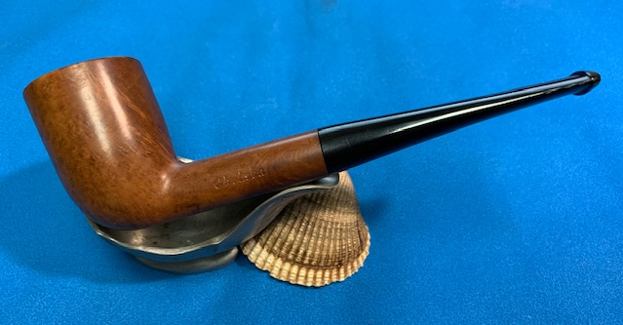
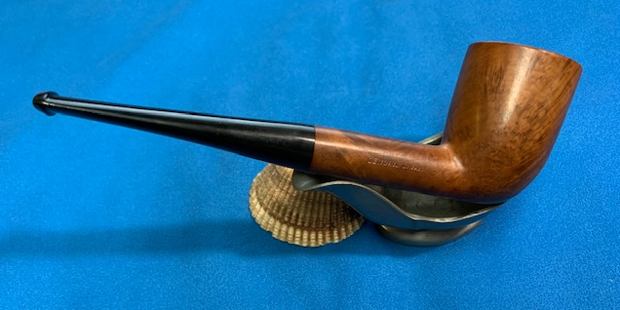
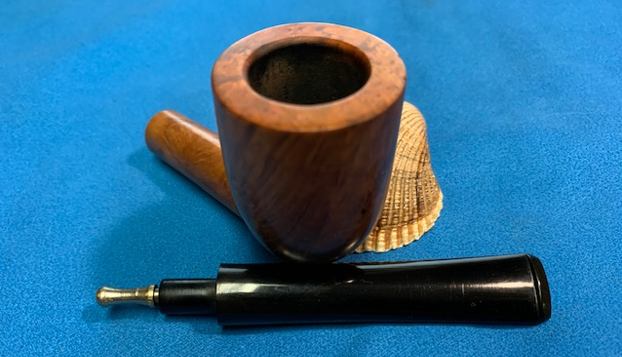
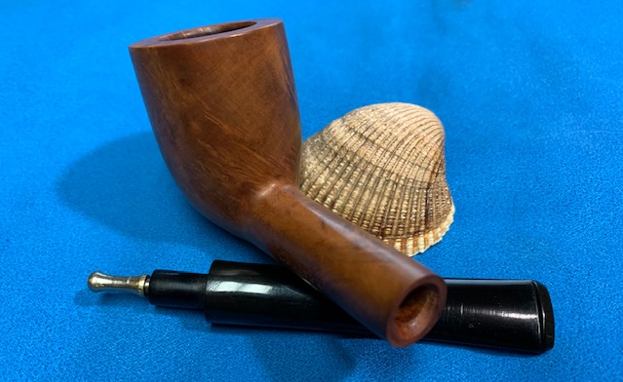
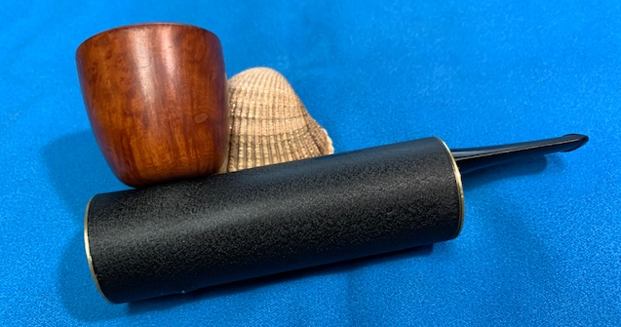
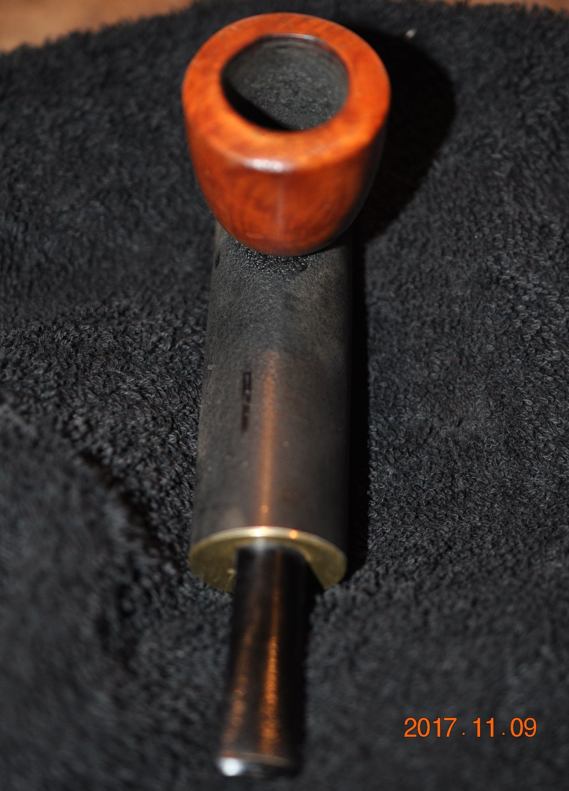
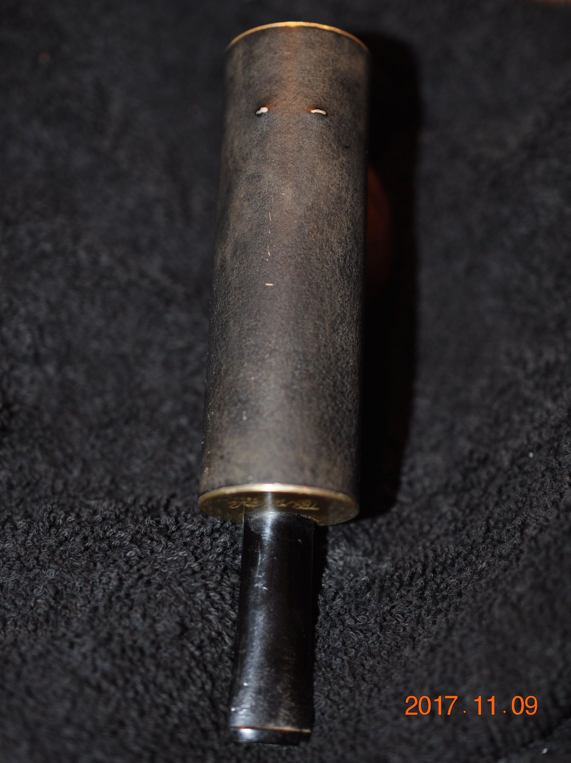
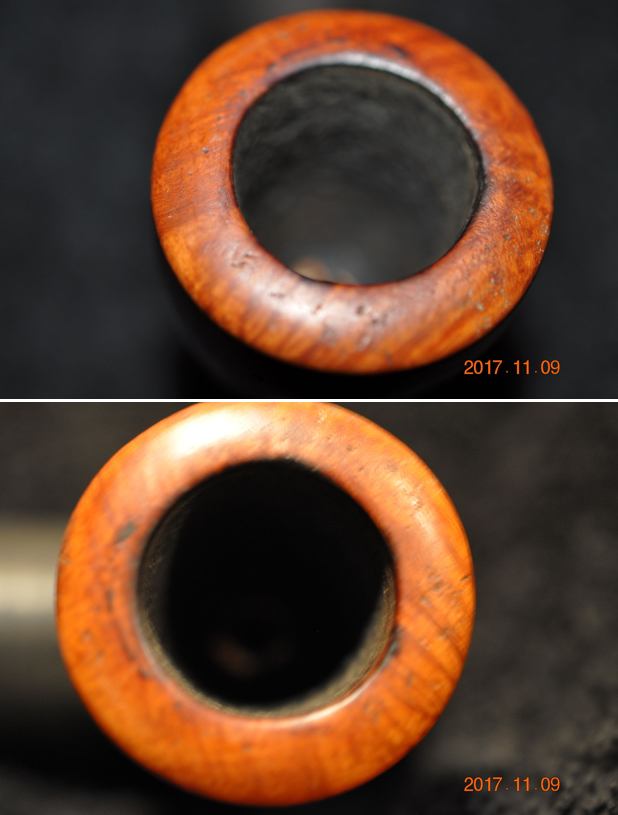
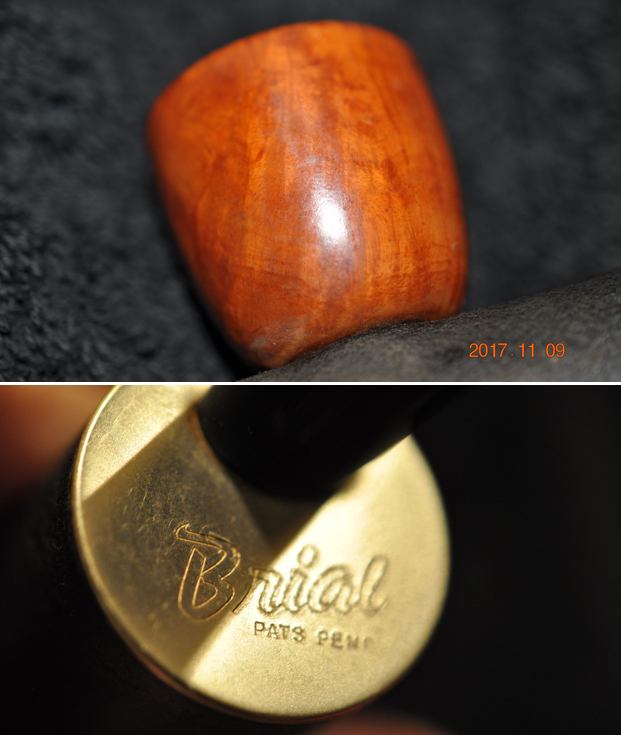
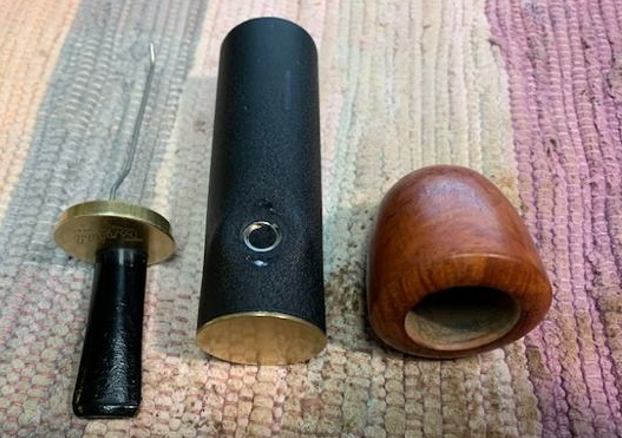
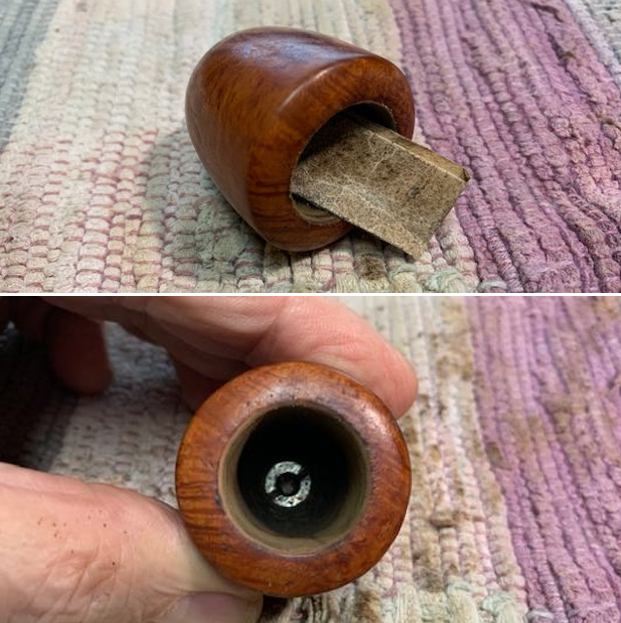
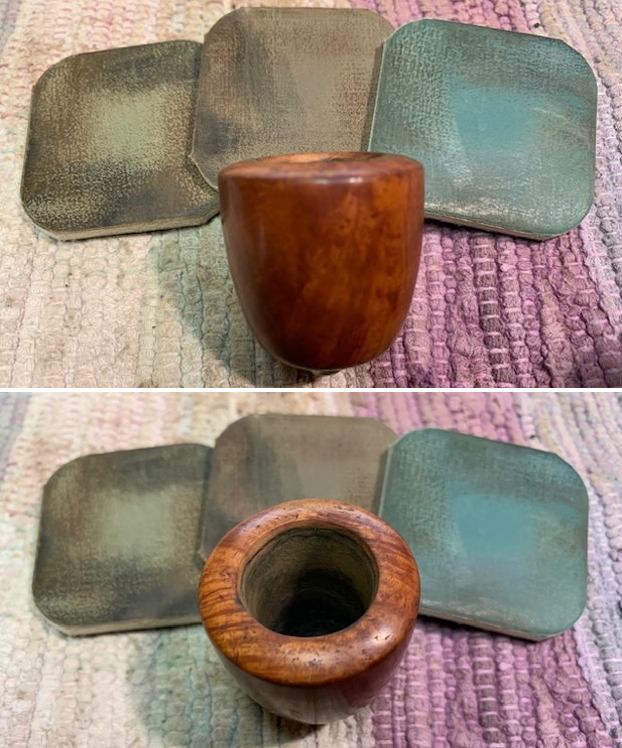
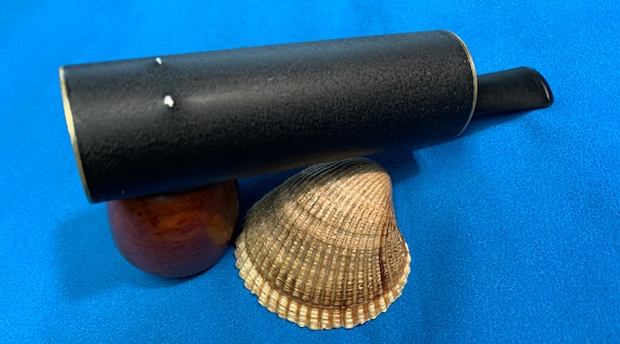
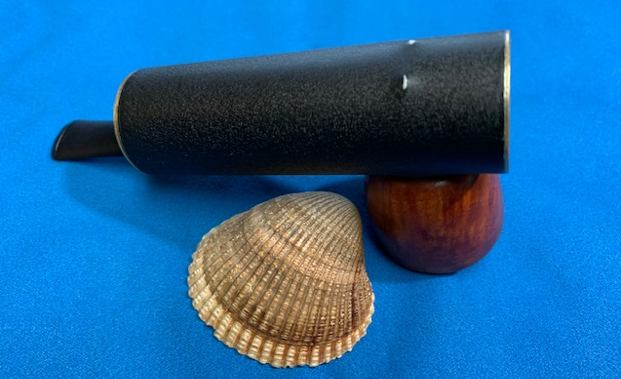
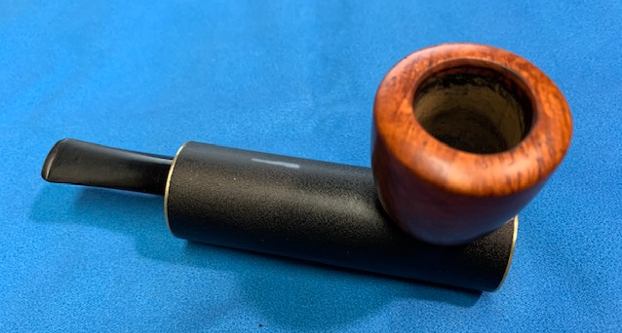
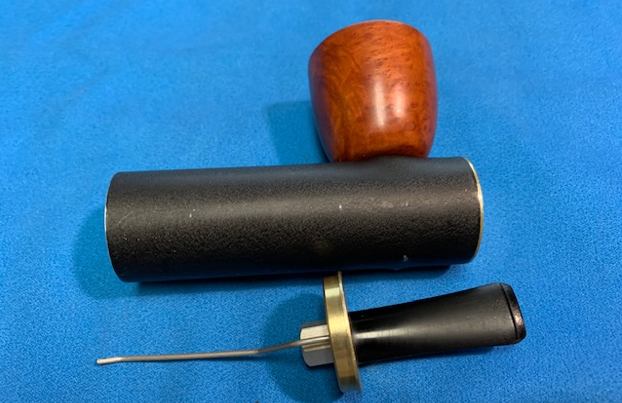
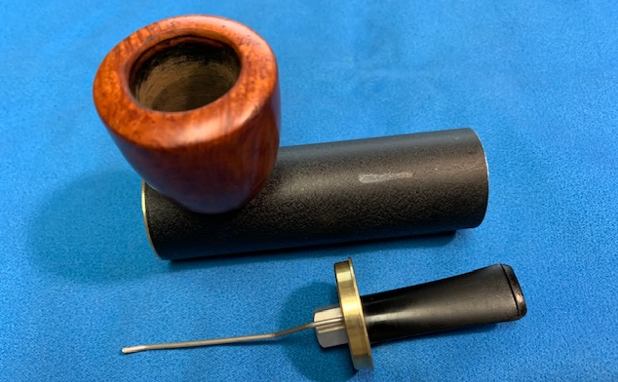
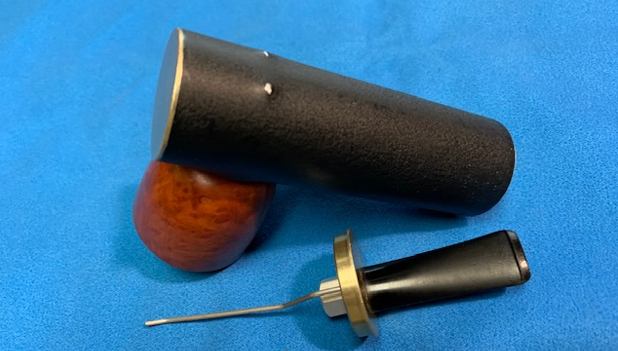
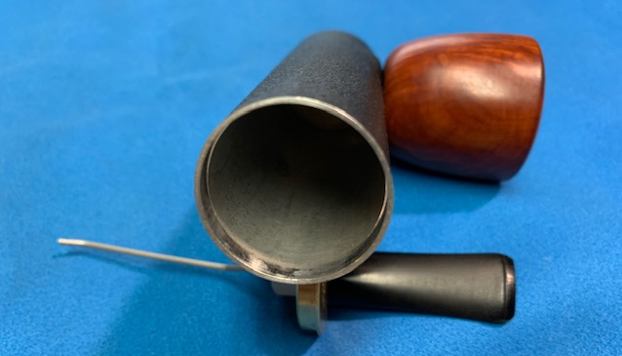
(4) a briar egg, marked Savoy 710, missing its stem; 
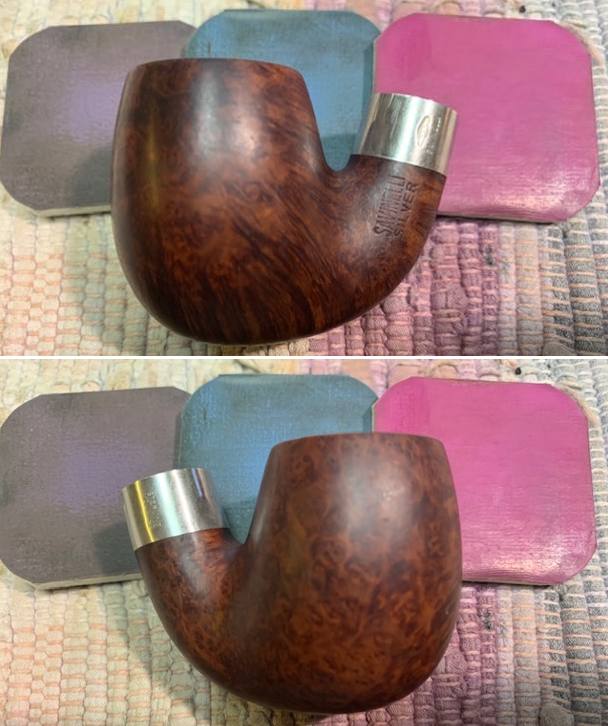
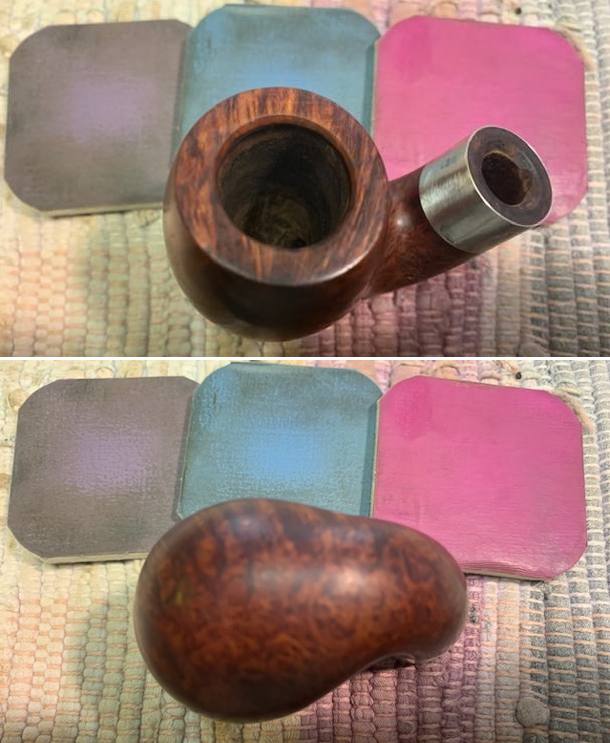
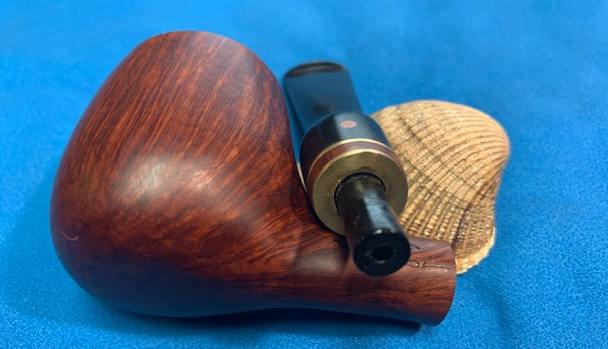
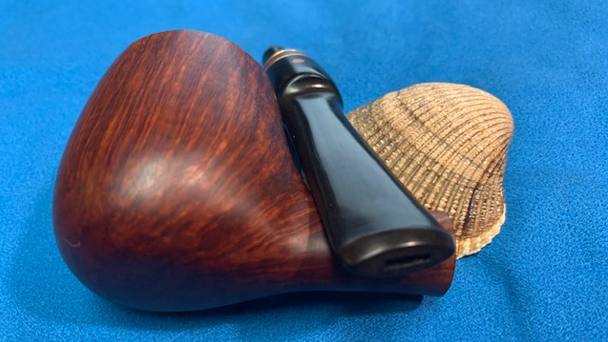
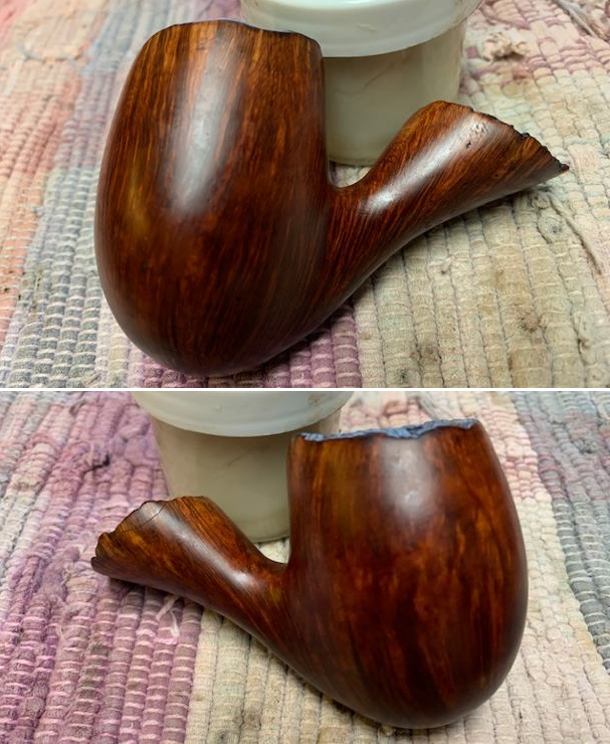
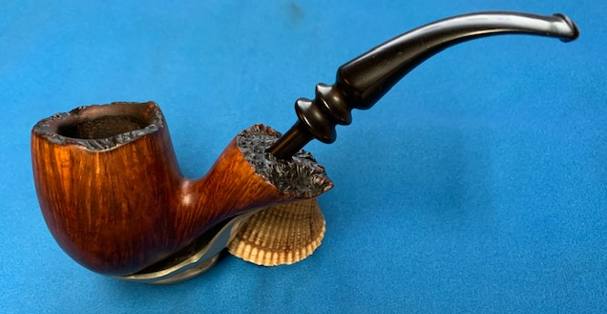
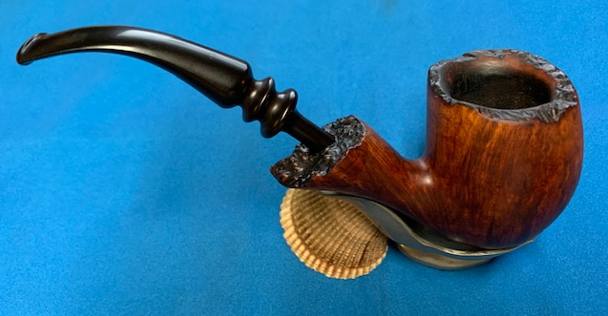
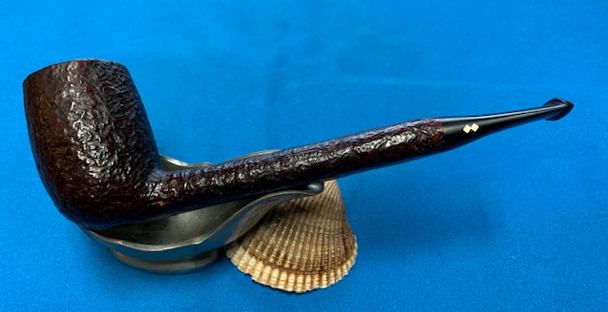
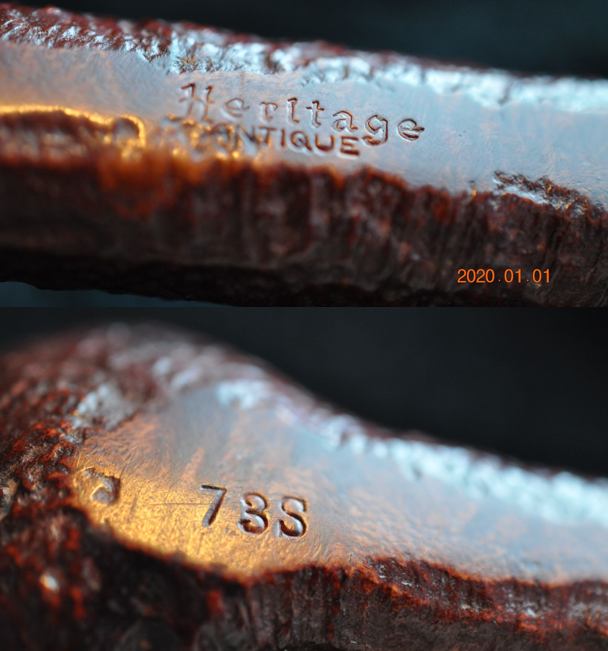
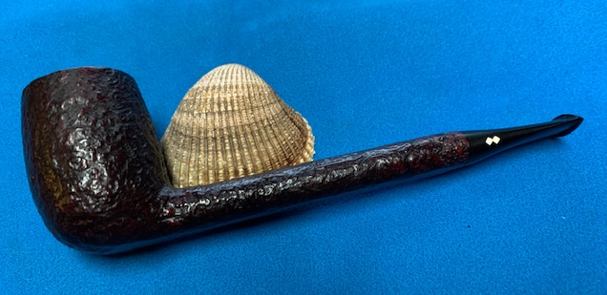
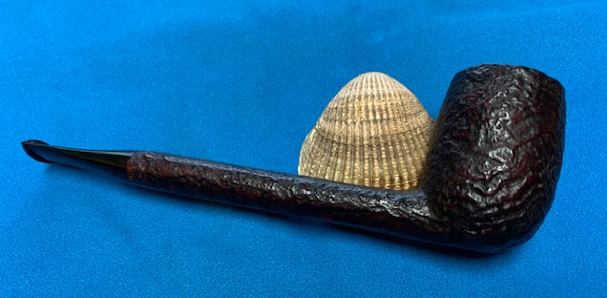
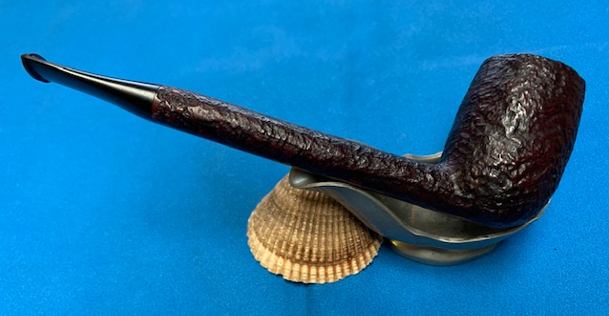
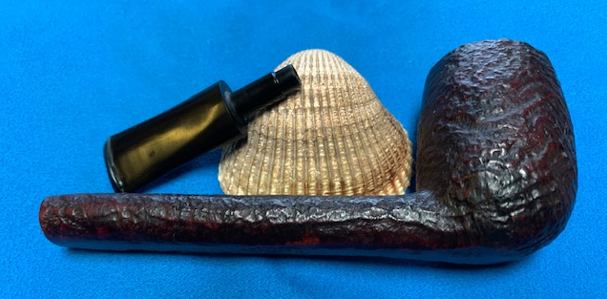
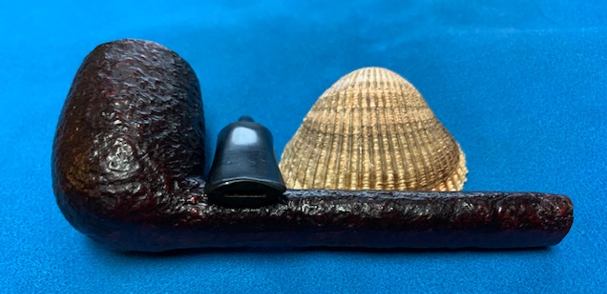
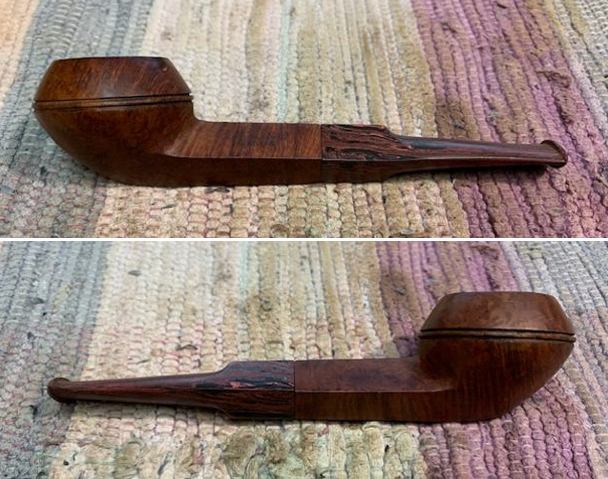
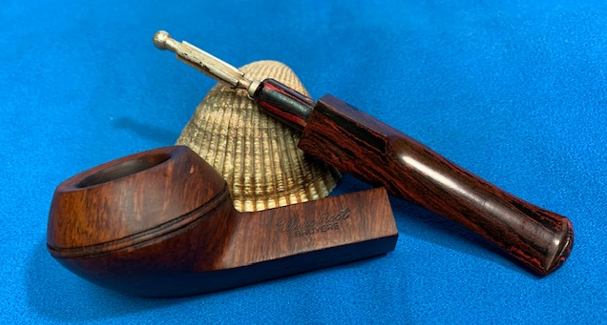
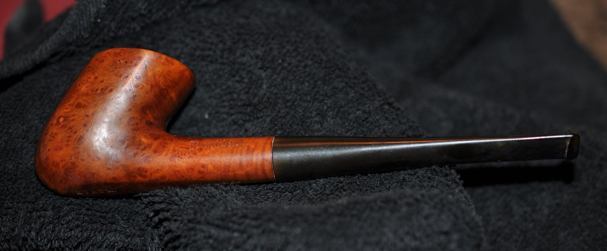
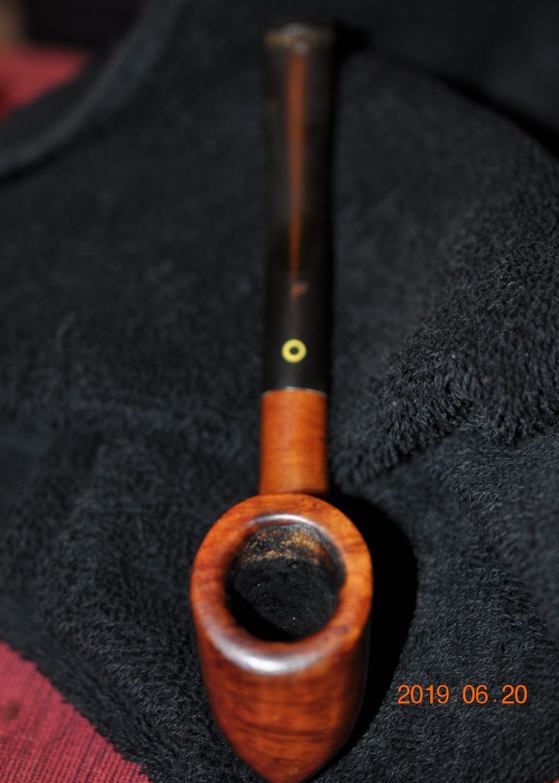
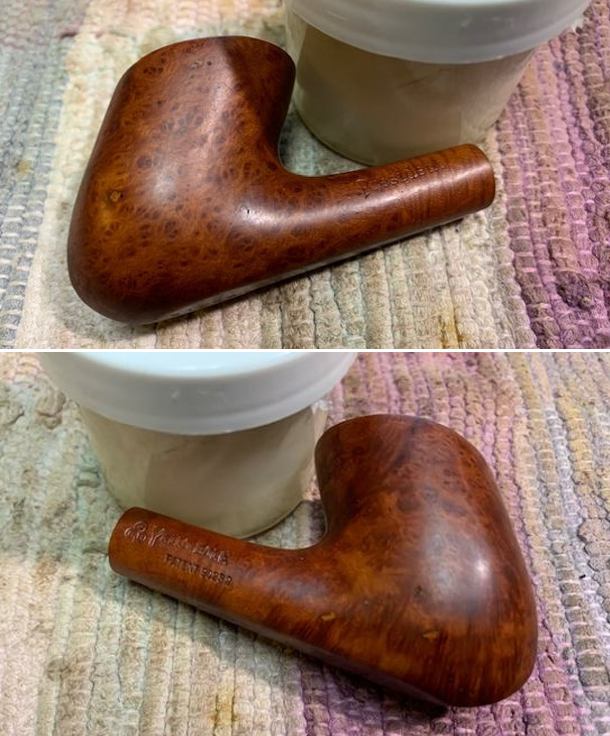
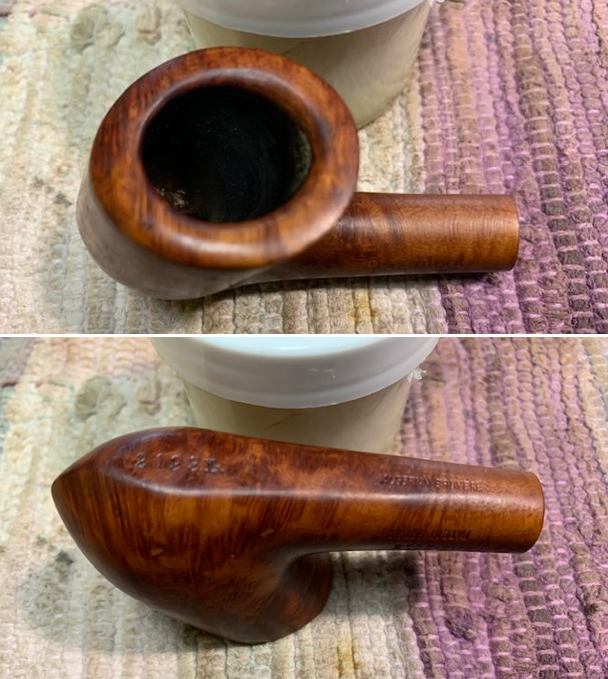
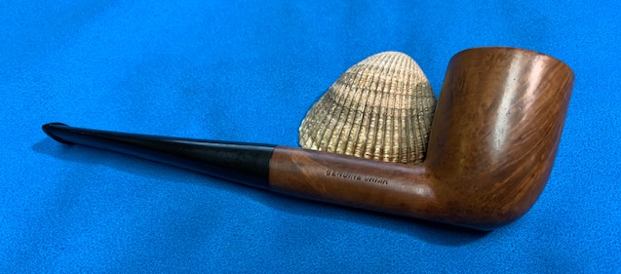
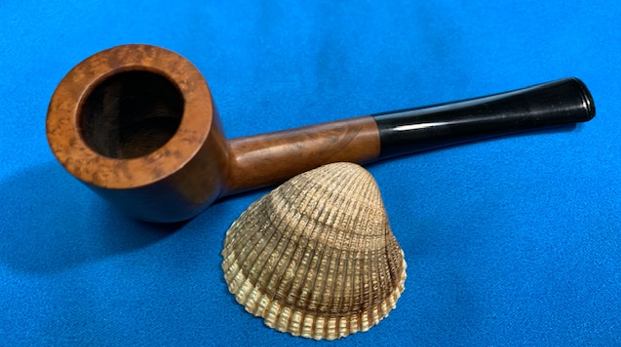
and (5) a Brigham Voyageur 126 bent Rhodesian. 
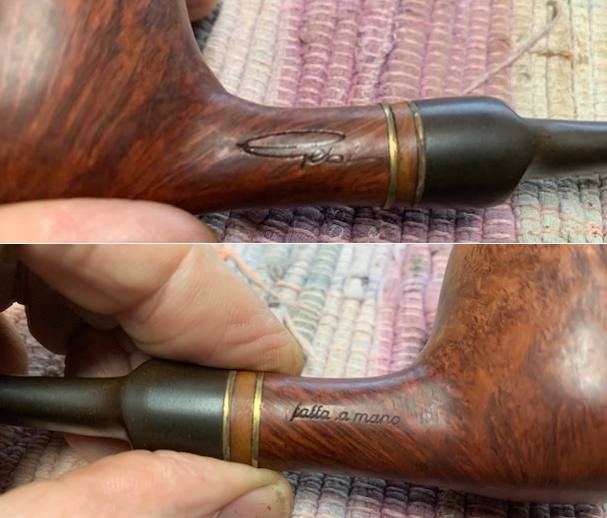
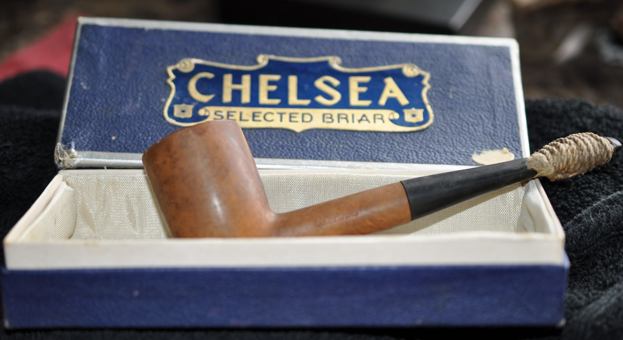
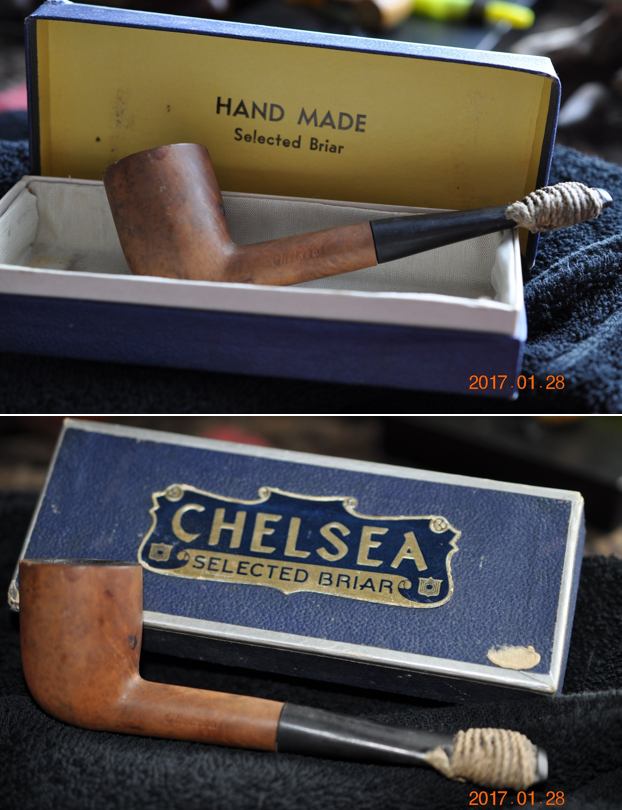
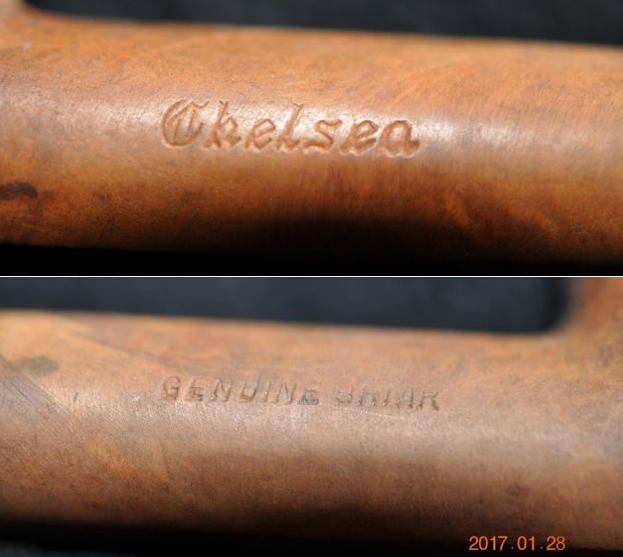
Missouri Meerschaum is, of course, most famous for being the largest corncob manufacturer in the world – although they do make hardwood pipes too. Herb Wilczak and Tom Colwell’s book, Who Made That Pipe? states that Château Bruyère (as its name suggests) is made in France by an unknown manufacturer. Pipedia tells us that Savoy is a brand of Oppenheimer Pipe/Comoy’s, which was also sold by M. Linkman & Co. Finally, Brigham is the famous Canadian pipe manufacturer. The markings suggest that this Brigham was made after the move of production to Italy.

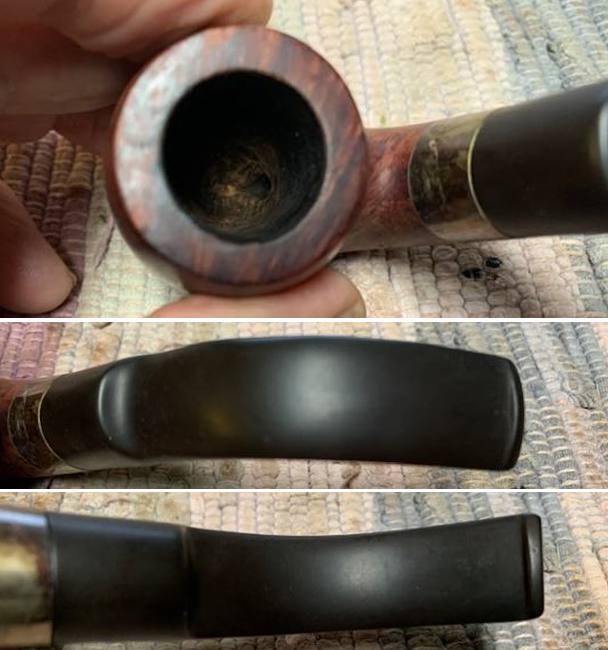
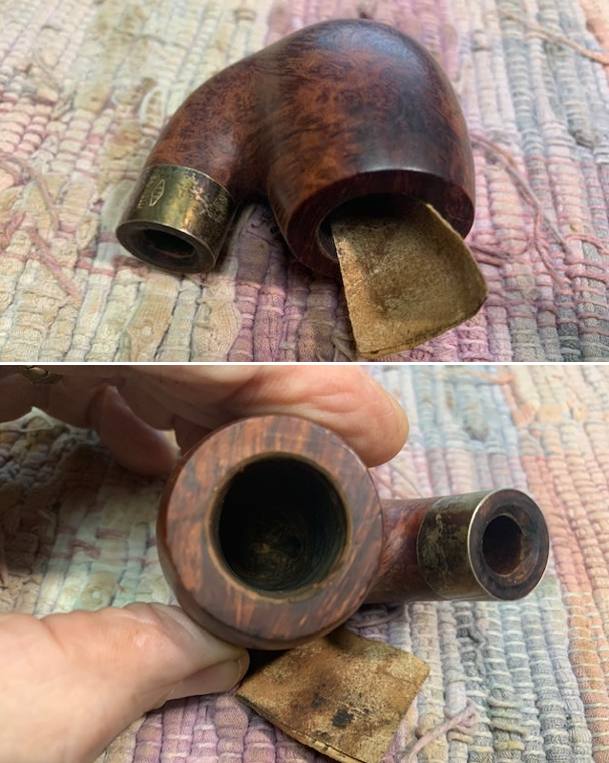
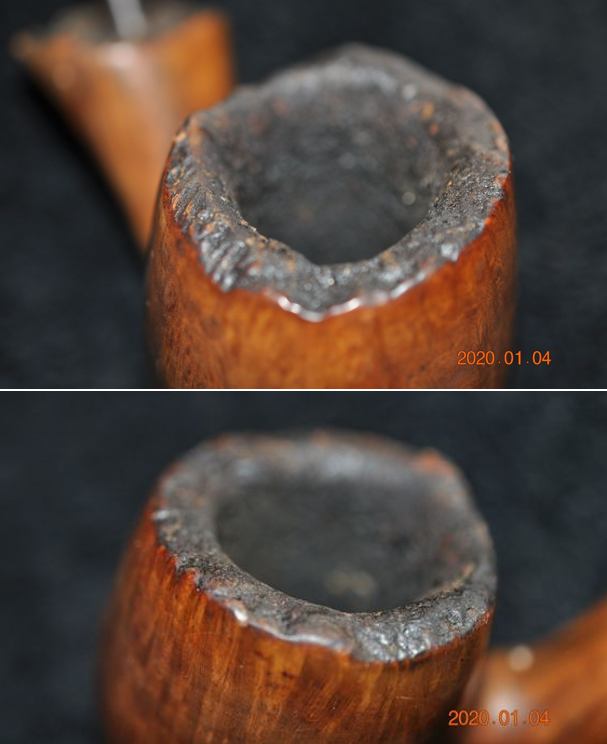
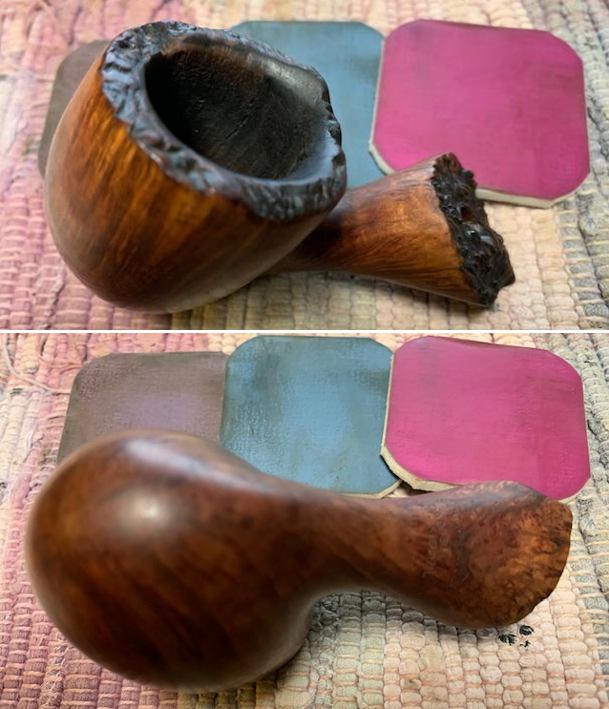
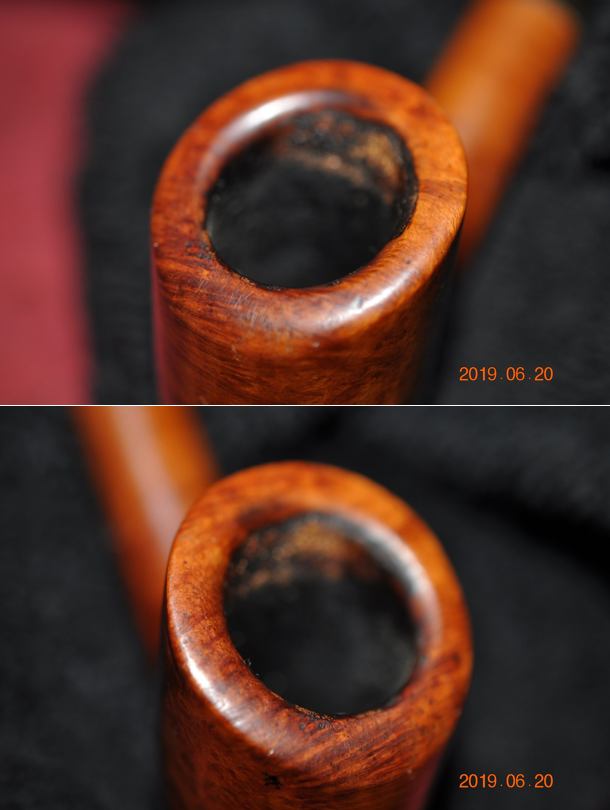
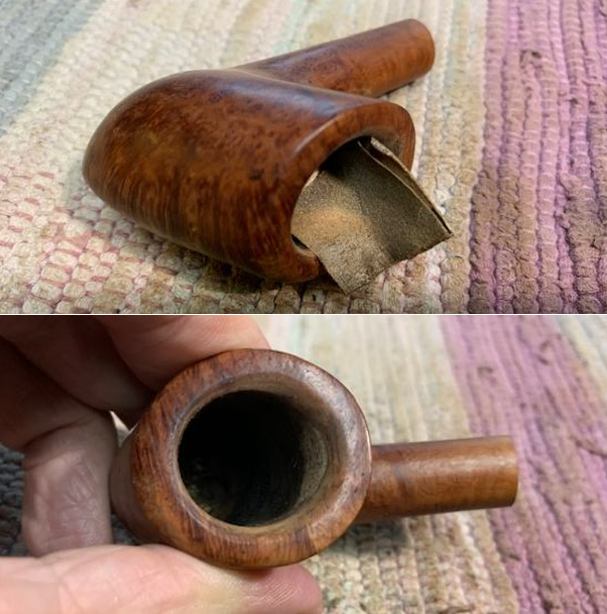
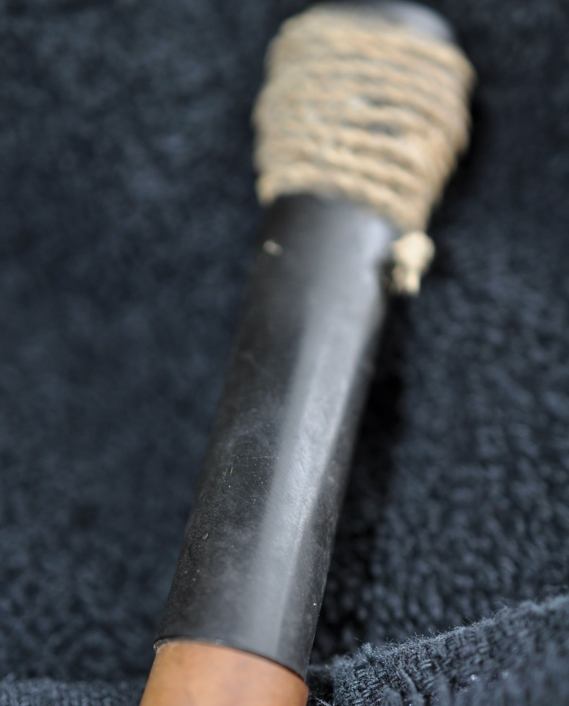
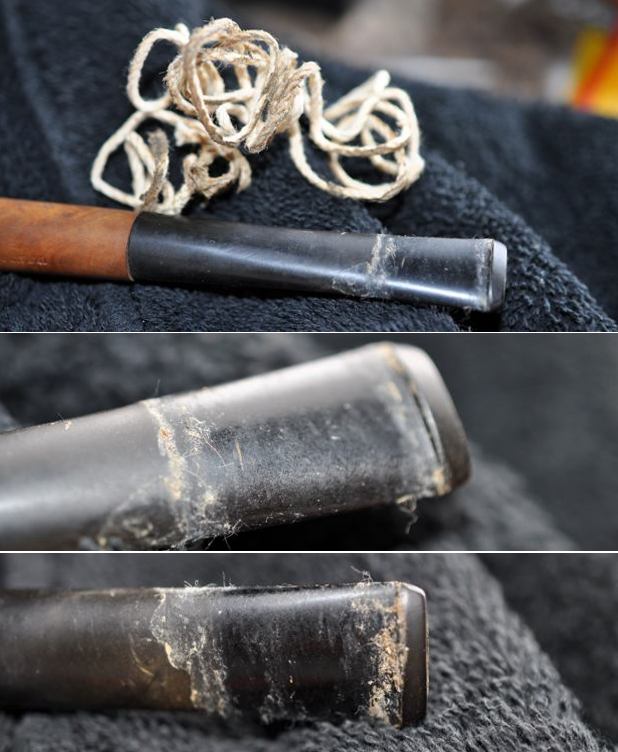
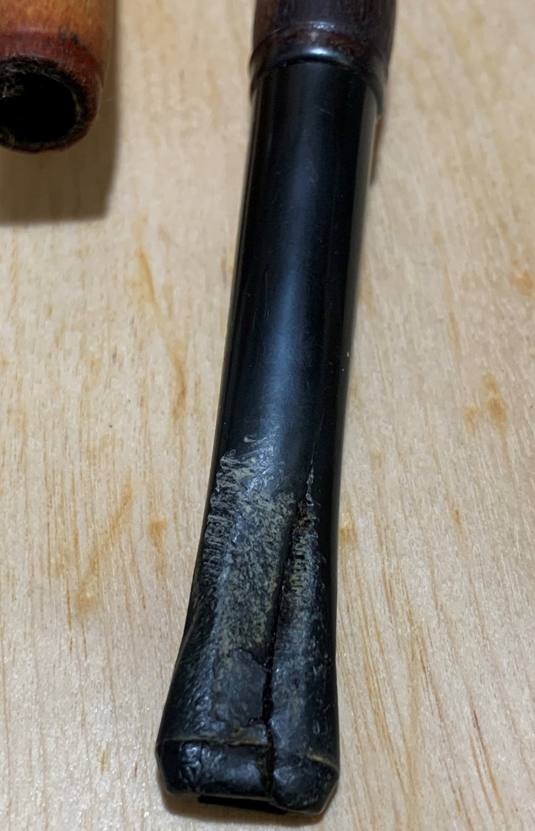
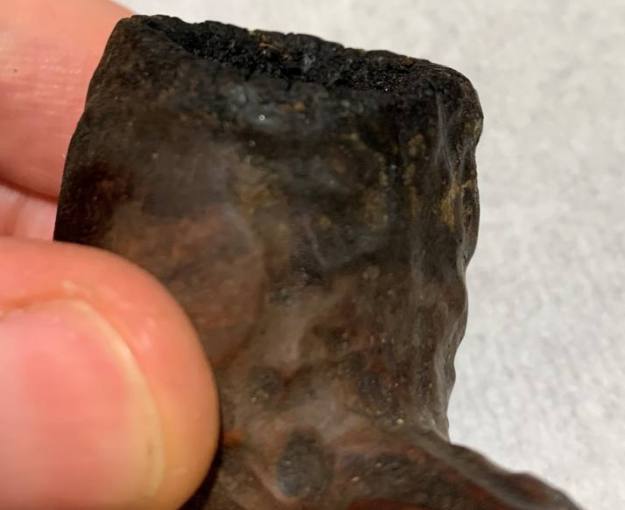
Problems with these pipes? Wow – where to begin? Both cherrywoods needed new stems. After all, one was cracked beyond repair and the other was missing altogether. They had lava and burns all over, and plenty of cake in the bowl. Besides that, the stummels were just a bit grimy. The Château Bruyère was in really bad condition: tons of lava, cake, and serious burning; cracks galore on the rim; but at least the stem had only minor tooth marks and dents. The Savoy would, of course, also need a new stem, but its stummel was also a disaster: some fills; tons of lava and cake; and (worst of all) an enormous burn gouge on the rim. The Brigham was not too bad (compared with the others), but it still had the usual cake and lava. It also looked like the rim had been used to hammer nails! The stems were first on my list. Fortunately, Steve had a couple of new Missouri Meerschaum stems for me to use on the cherrywood pipes. That was the easiest part of this whole restoration! I also had to sculpt a new stem for the Savoy. Stupidly, I forgot to take photos of this procedure, but, suffice it to say, it was tricky getting the tenon to fit correctly and getting the edges of the new stem to match with the existing stummel. 
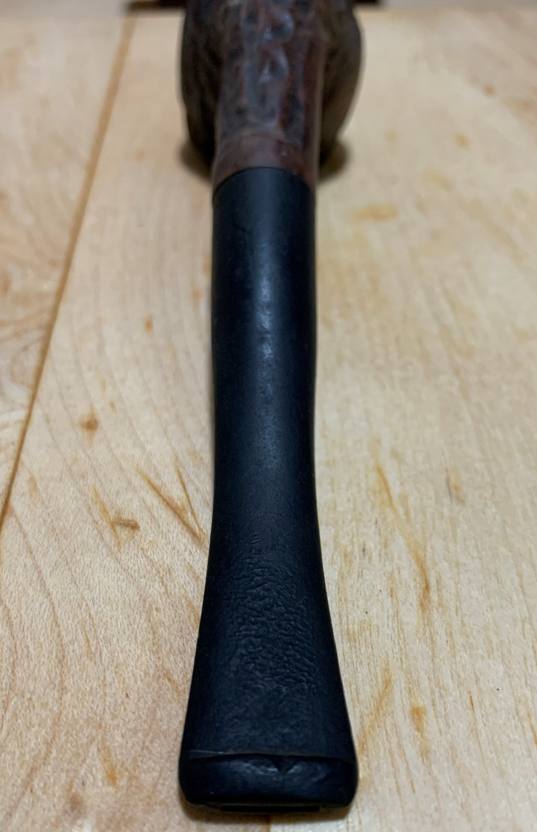
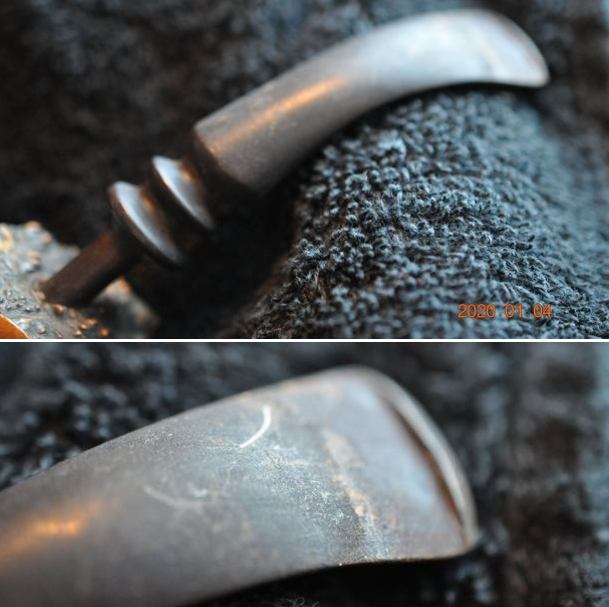
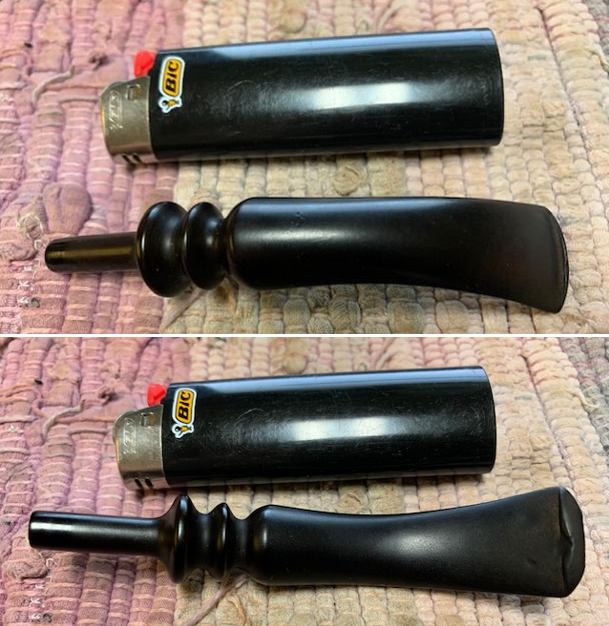
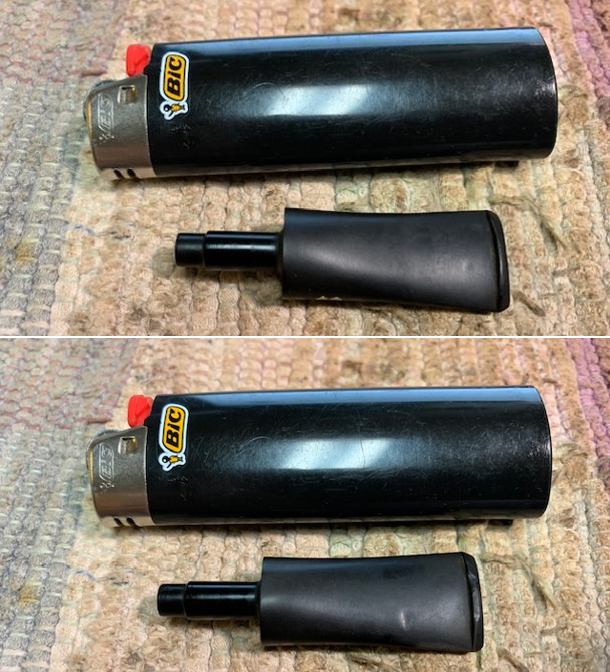
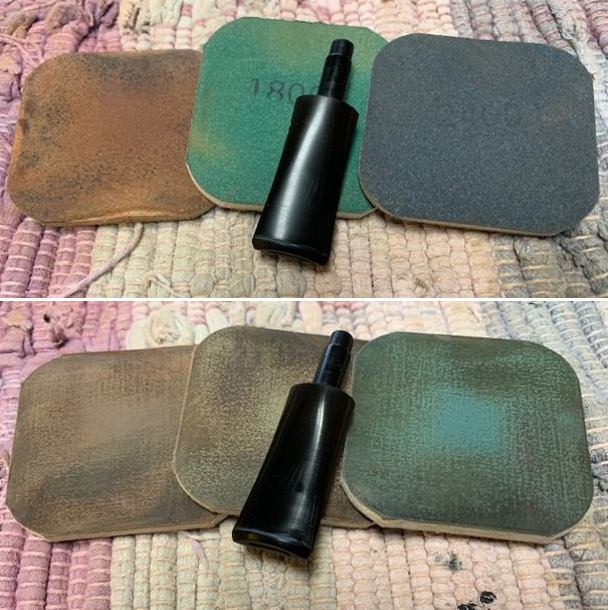
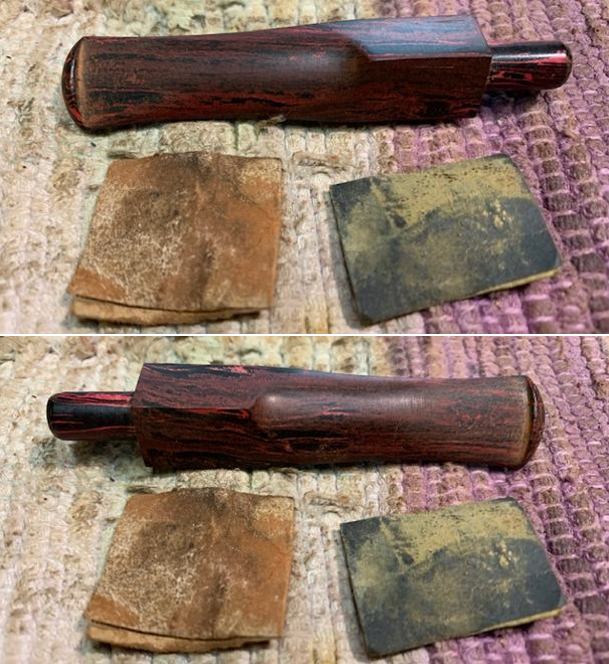
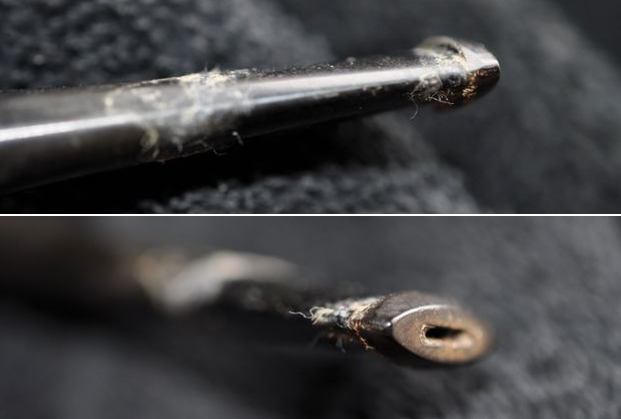
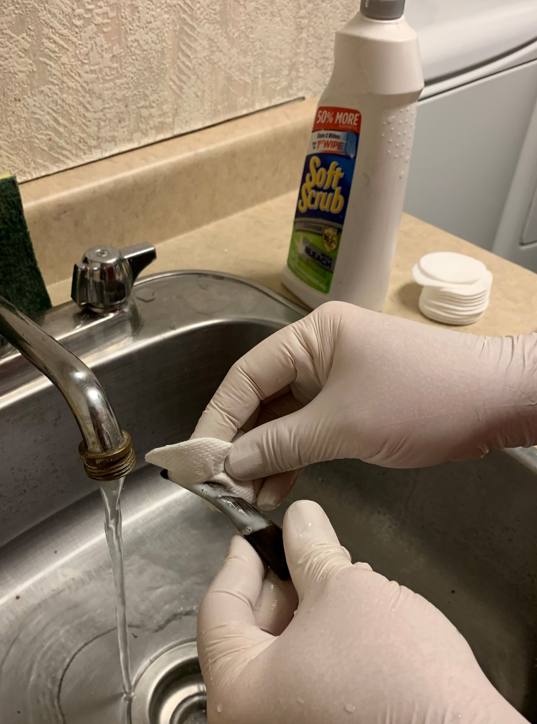
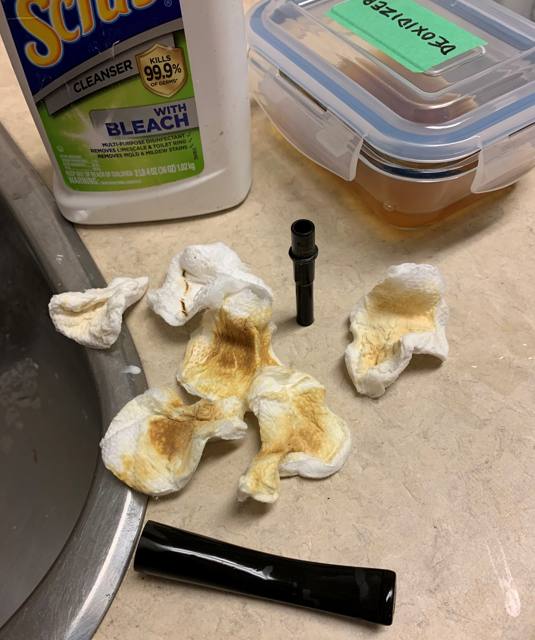
On the two pre-existing stems, I took a BIC lighter and ‘painted’ them with flame in order to lift the tooth marks. This was reasonably successful in raising the dents. Then, I cleaned out the insides of the stems with pipe cleaners and isopropyl alcohol. They were terribly dirty and I went through a large number of pipe cleaners in order to clean them up. Once this process was done, the stems went for an overnight soak in the Before & After Hard Rubber Deoxidizer. The following day, I cleaned all of the de-oxidizing sludge off with alcohol, pipe cleaners, et cetera. The oxidation had migrated to the surface and would be fairly straightforward to remove. I scrubbed vigorously with SoftScrub on cotton pads to remove the leftover oxidation. 
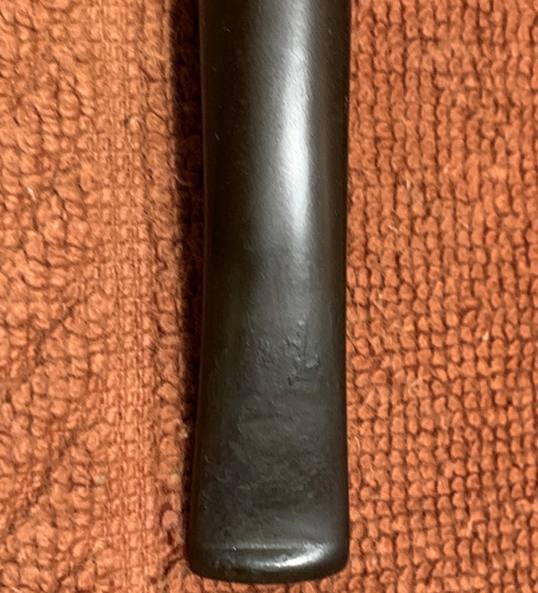
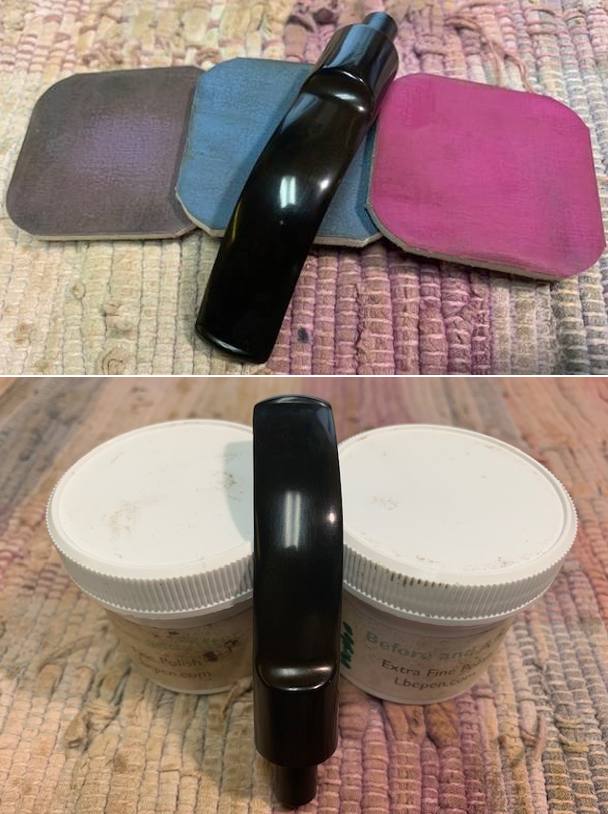
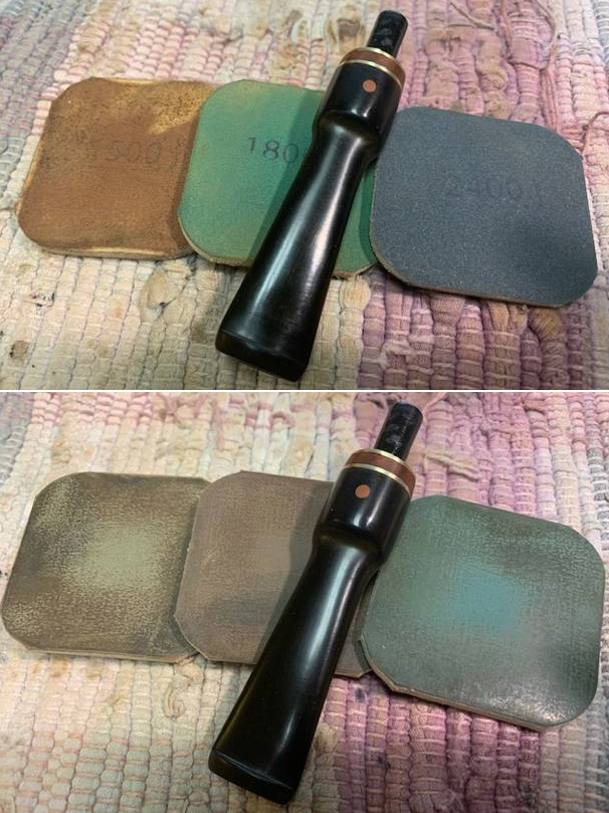
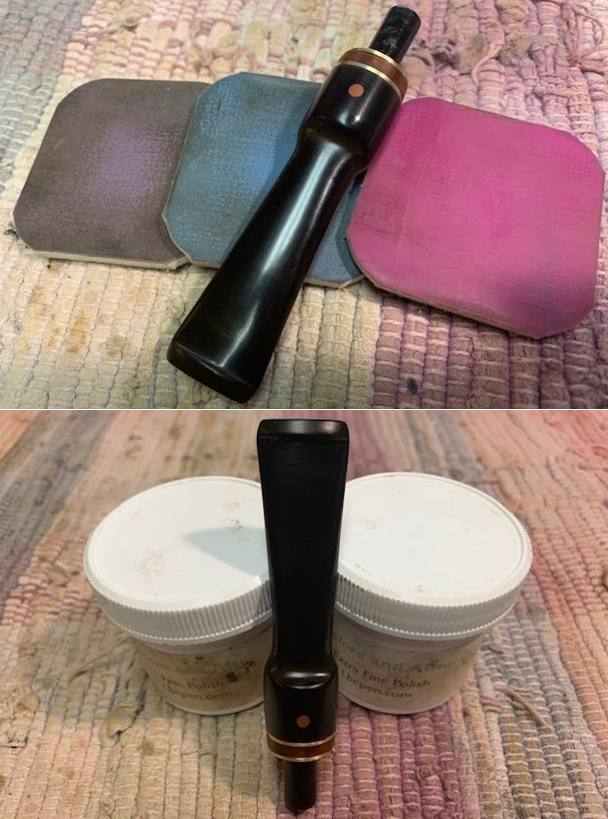
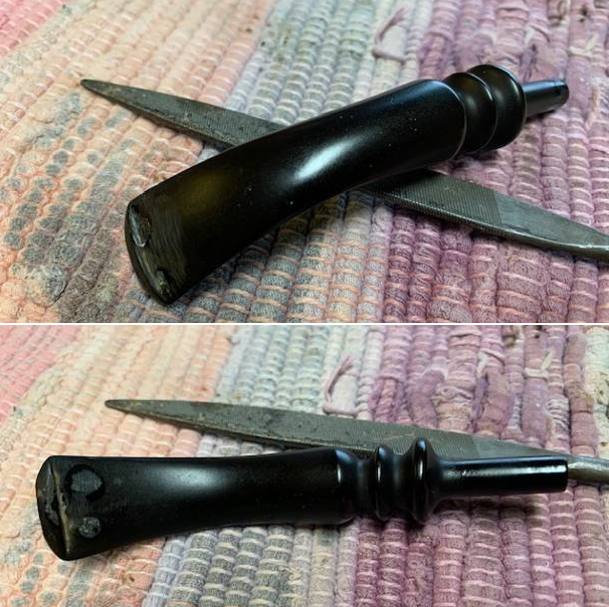
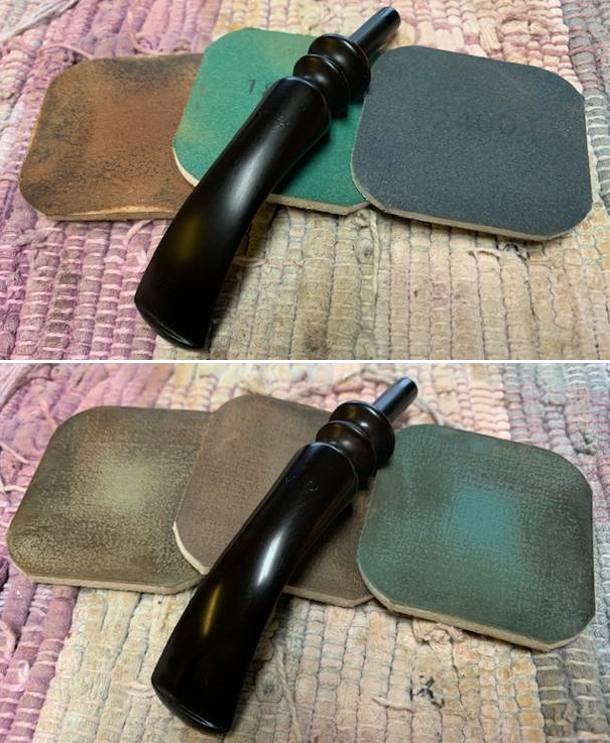
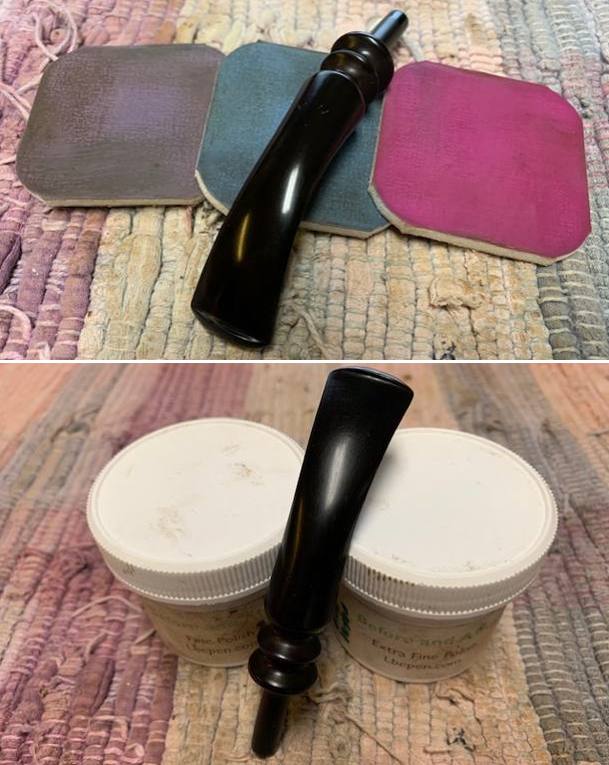
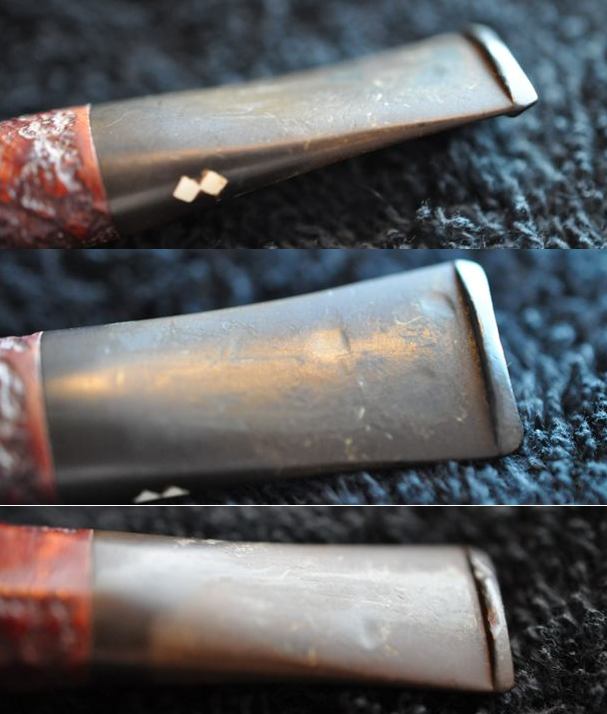
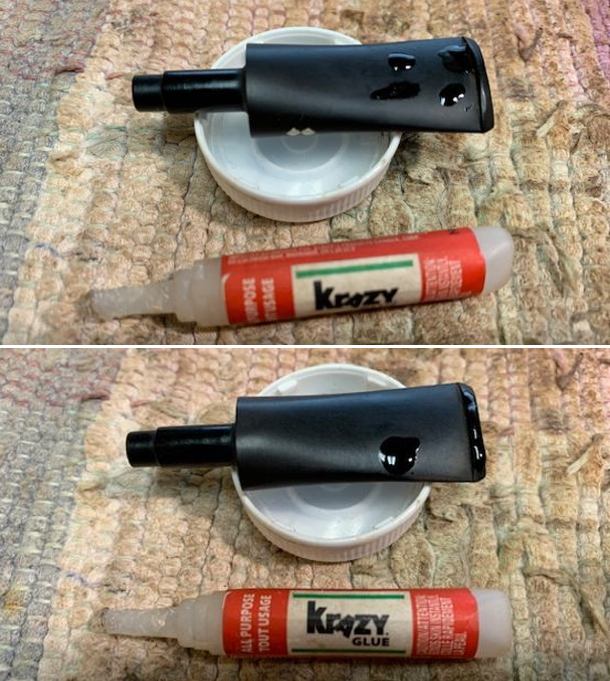
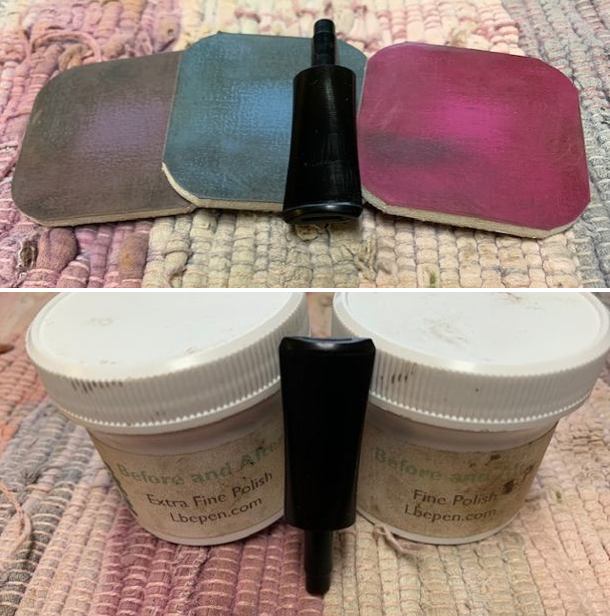
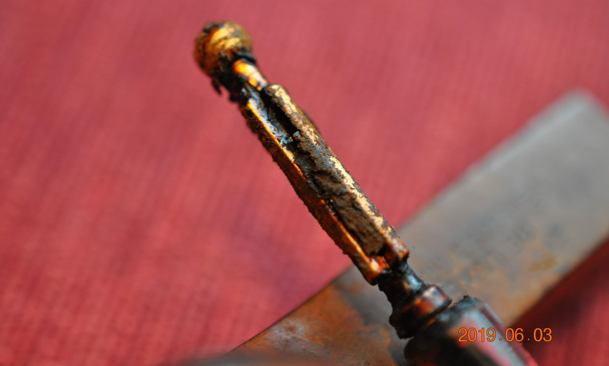
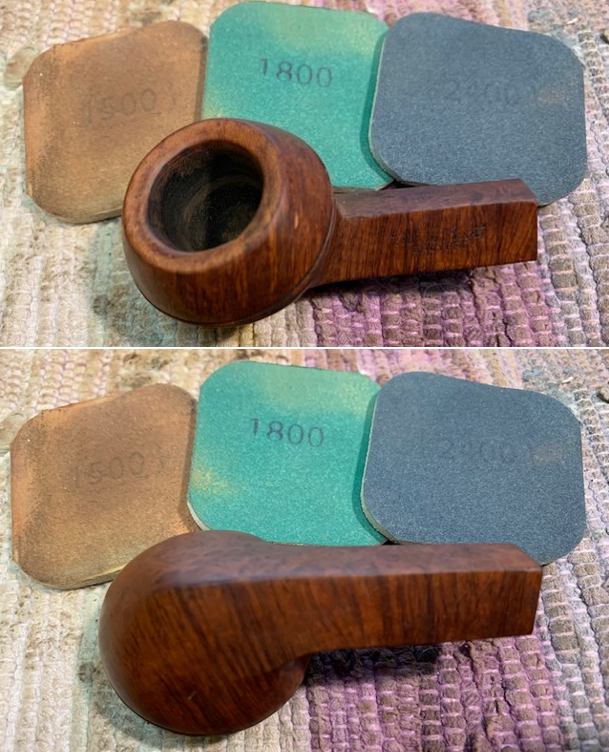
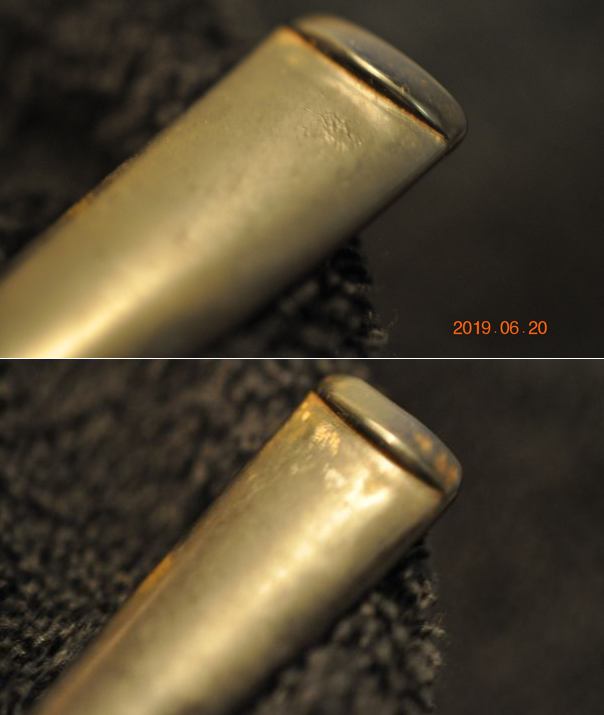
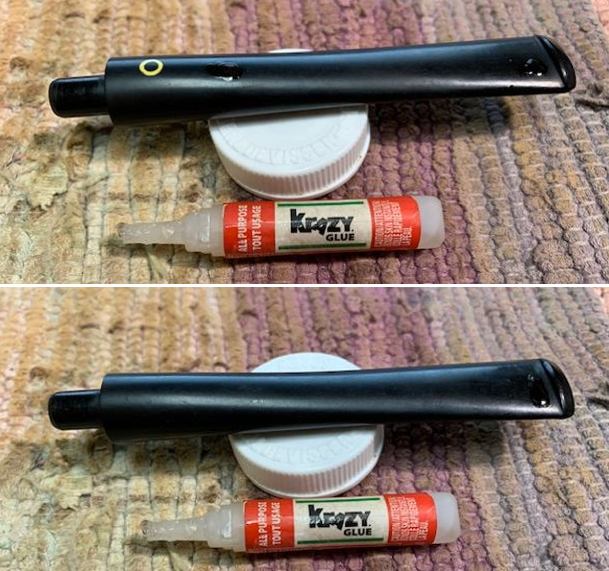
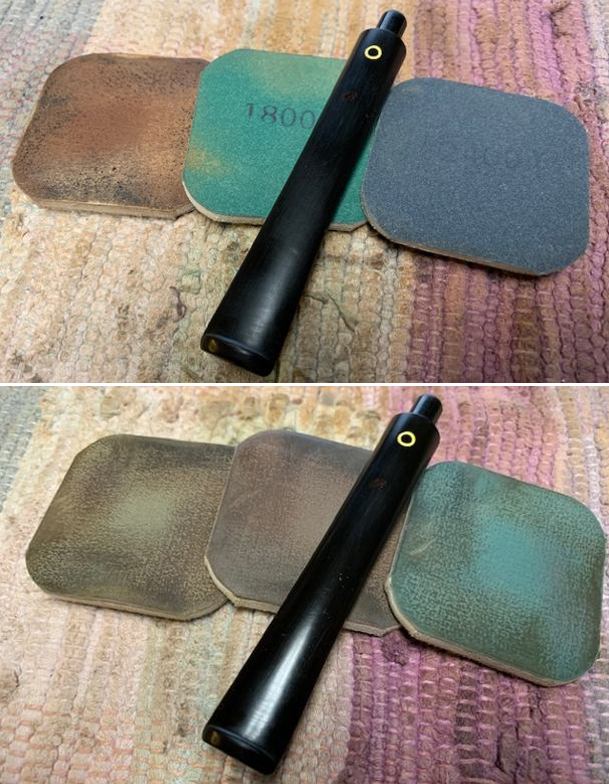
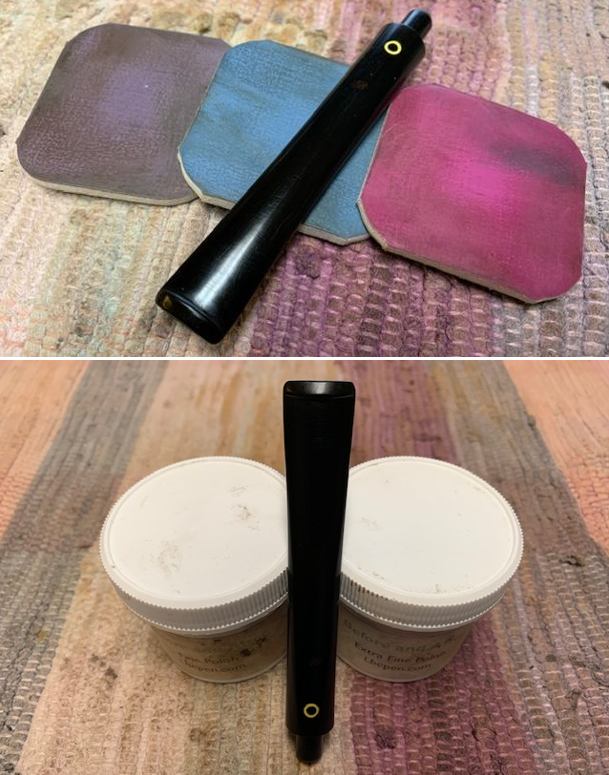
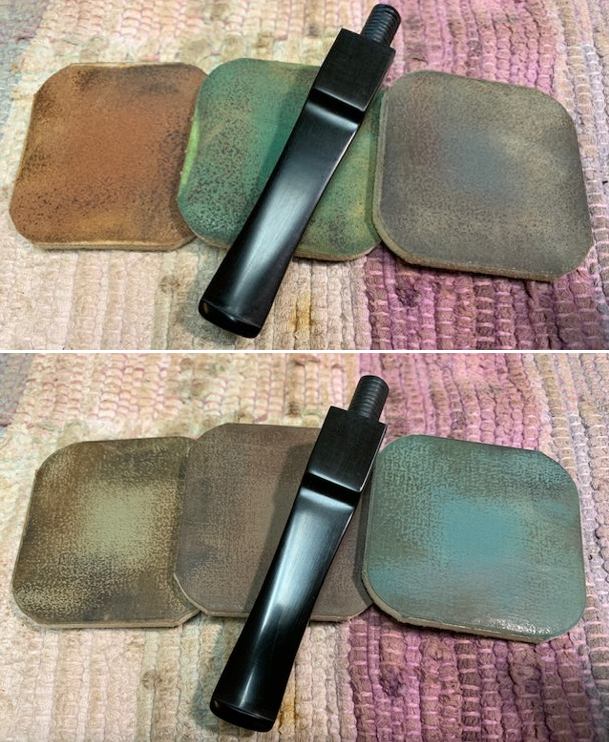
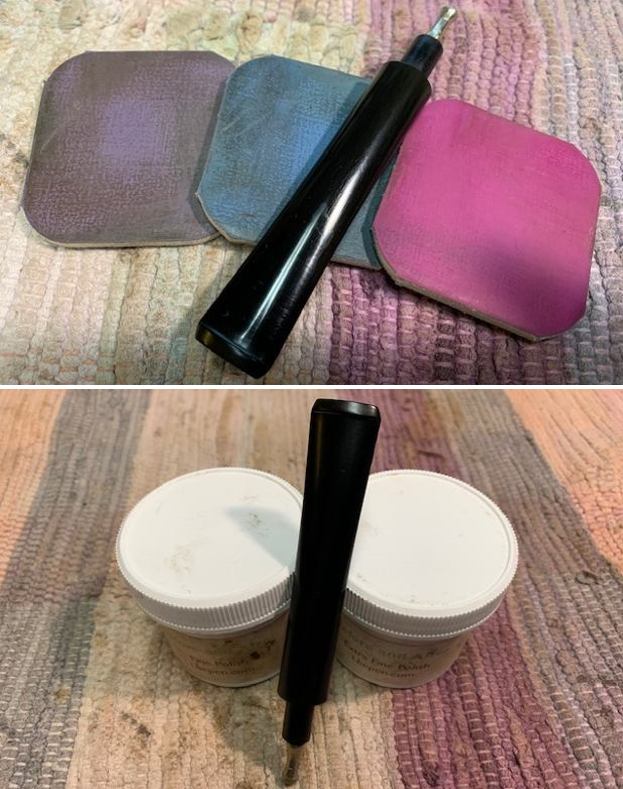
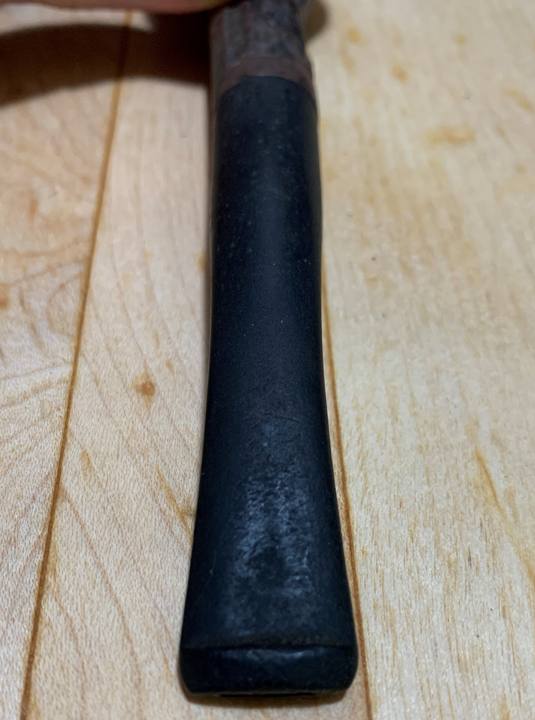
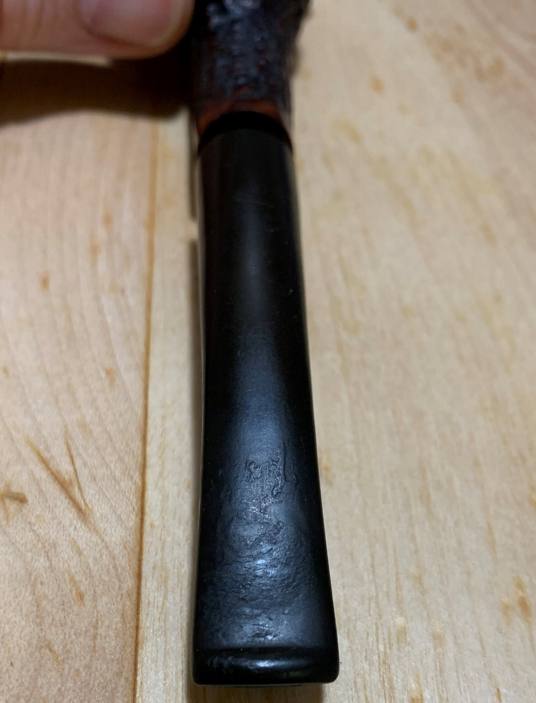
On the Brigham, the tenon had come loose from the stem and needed to be repaired. I used my cyanoacrylate adhesive to sort that problem out and let it set. I also built up the small dents on the Brigham and Château Bruyère stems with cyanoacrylate adhesive and let them fully cure. I then sanded the repairs down with 220-, 400-, and 600-grit sandpapers to meld the repair seamlessly into the stems. This ensured that they keep their shape and look like they should. I then used all nine Micromesh pads (1,500 through 12,000 grit) to bring out the lovely black lustre on the stems. I also used Obsidian Pipe Stem Oil in between each pad scrubbing. 
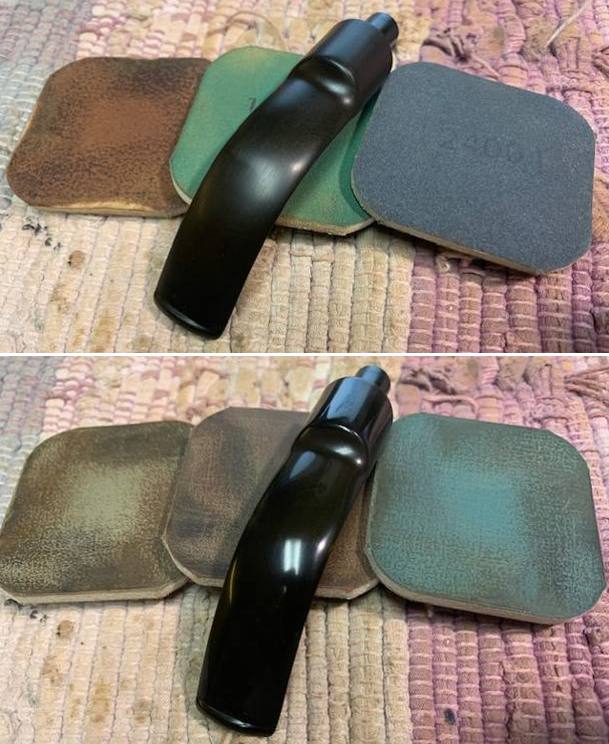
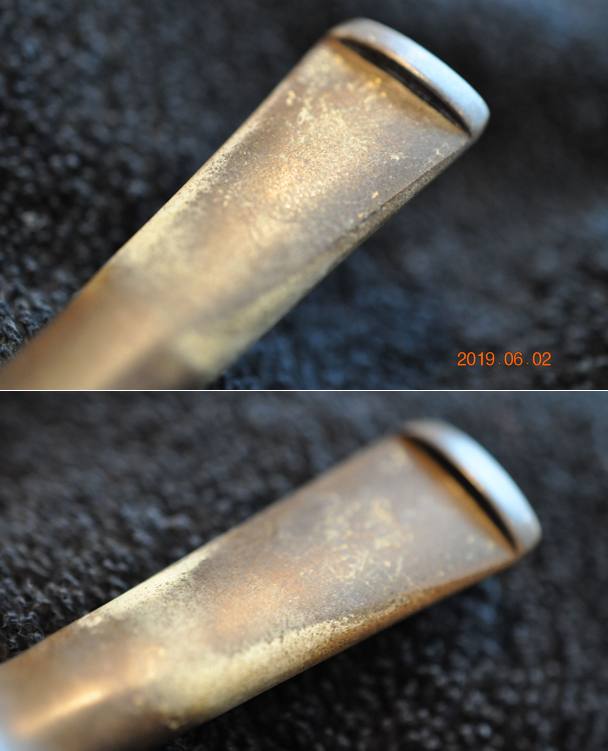
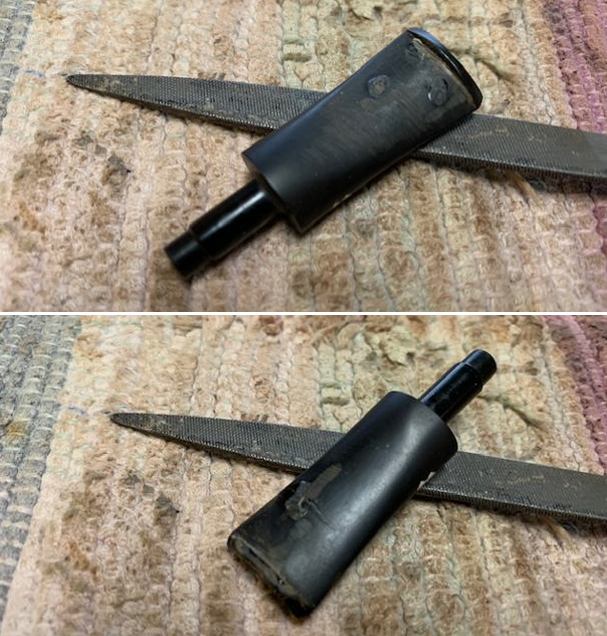
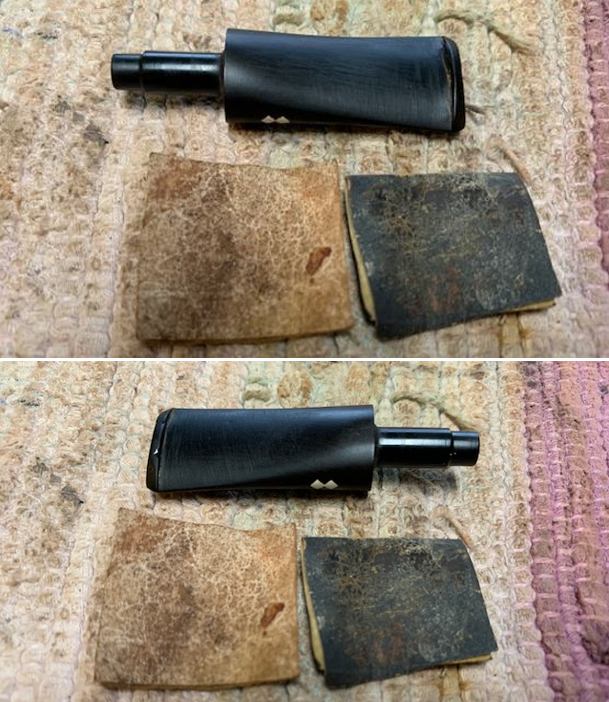
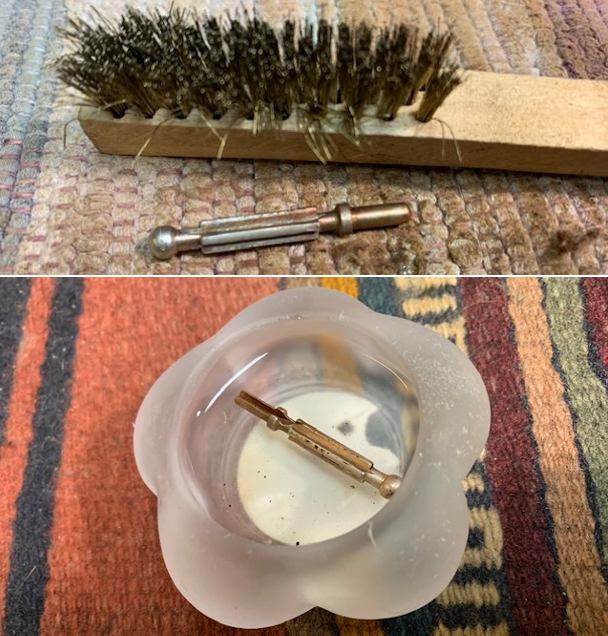
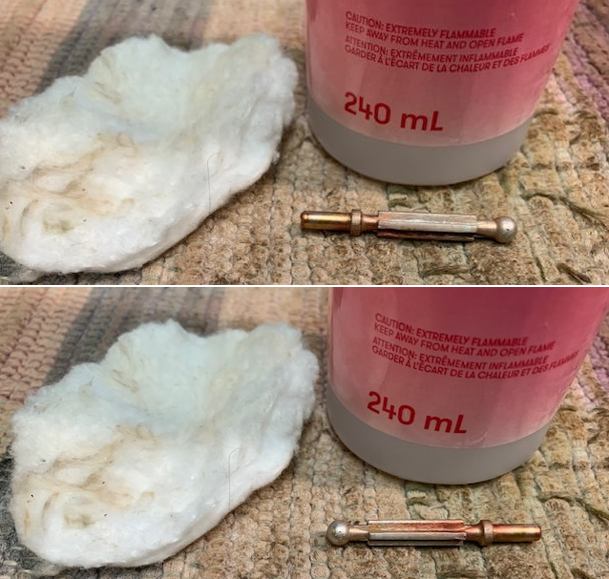
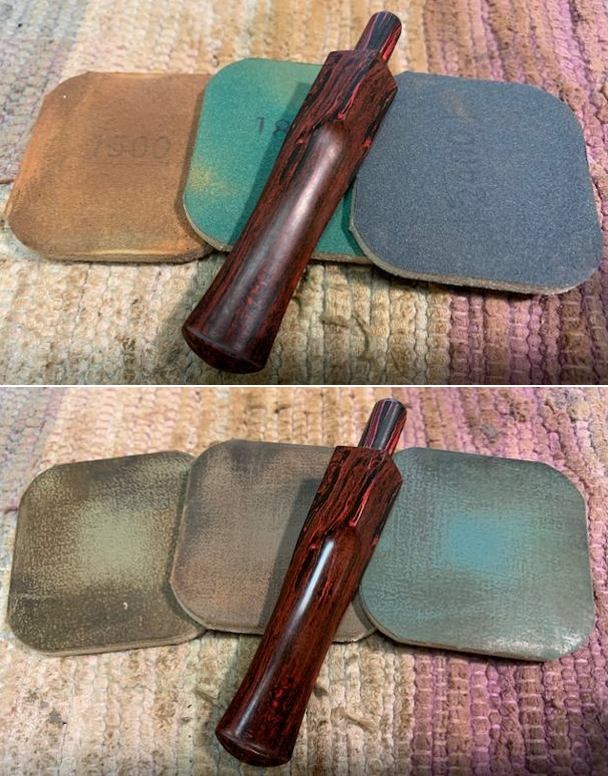
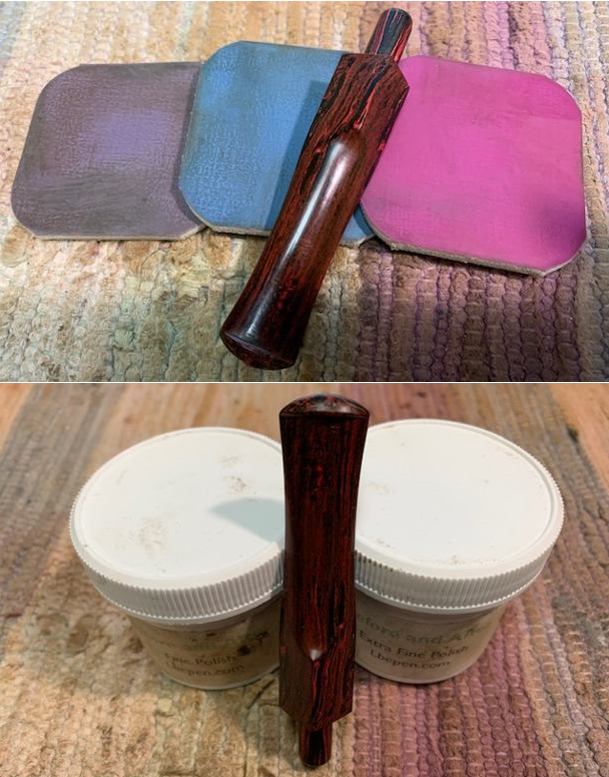
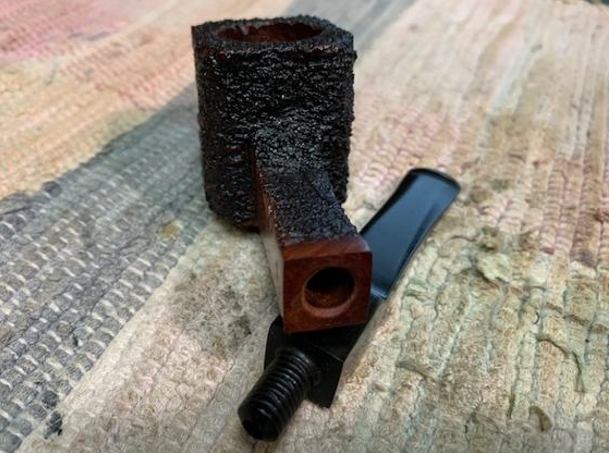
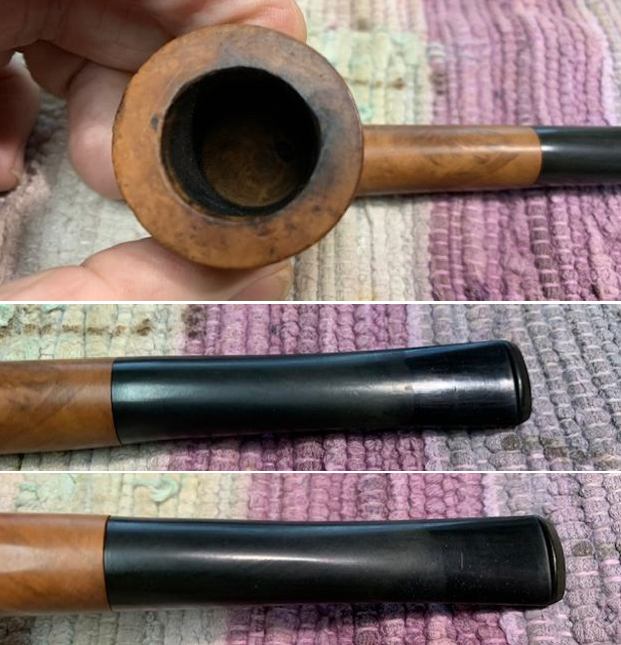
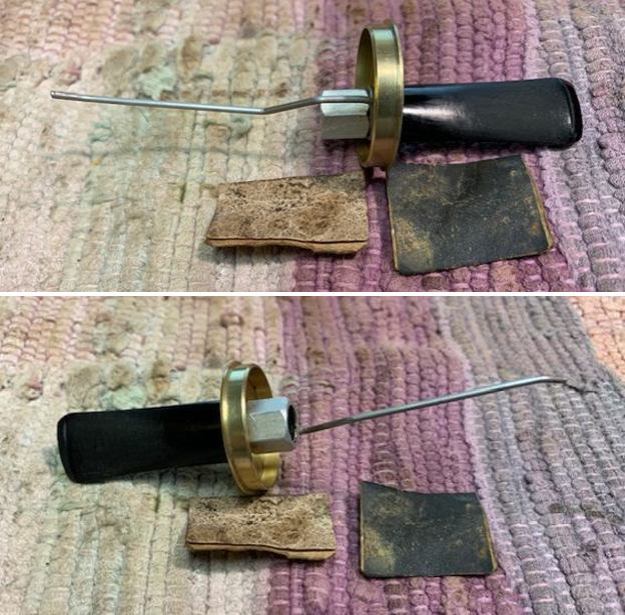
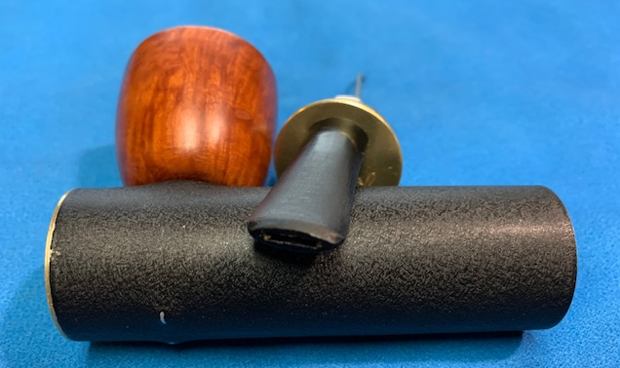
I should make quick mention of the stem I made for the Savoy. I had a blank and an old, spare stem to potentially use. I ended up using the blank because it fit better. Making a new stem is tricky and messy business, and Steve is far better (and more experienced) than I am at it. Basically, I used some 220-grit sandpaper to remove the excess material from the tenon (to ensure it fit into the stummel’s mortise) and from the tenon-end of the stem (to ensure that this end matches the shape and thickness of the shank). Once the basic shape is achieved, I use progressively finer sandpaper (and then the MicroMesh pads) to make the stem look just as it should. In this end, I was pleased with the results and I wish I had photos to show you of the process!All five stummels were a terrible mess: loaded with cake, filth, and an overall yucky feel. They had obviously been thoroughly smoked and enjoyed. Quite frankly, the grandfather must have smoked them until there was no more draw! 
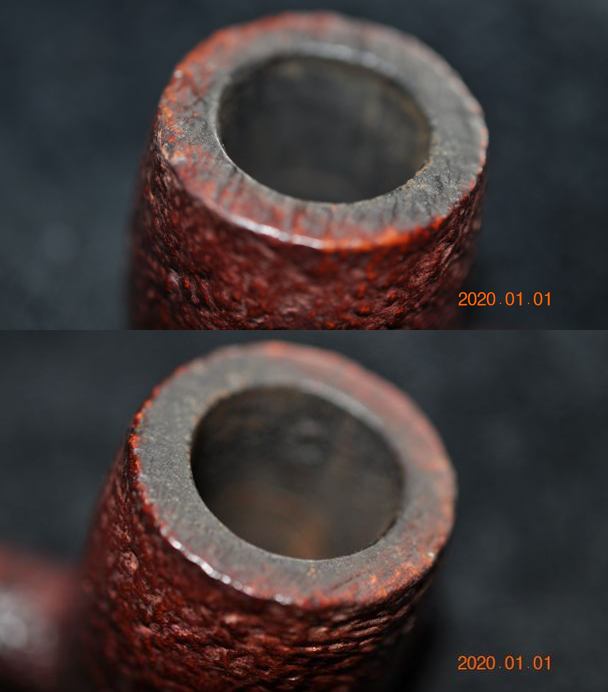
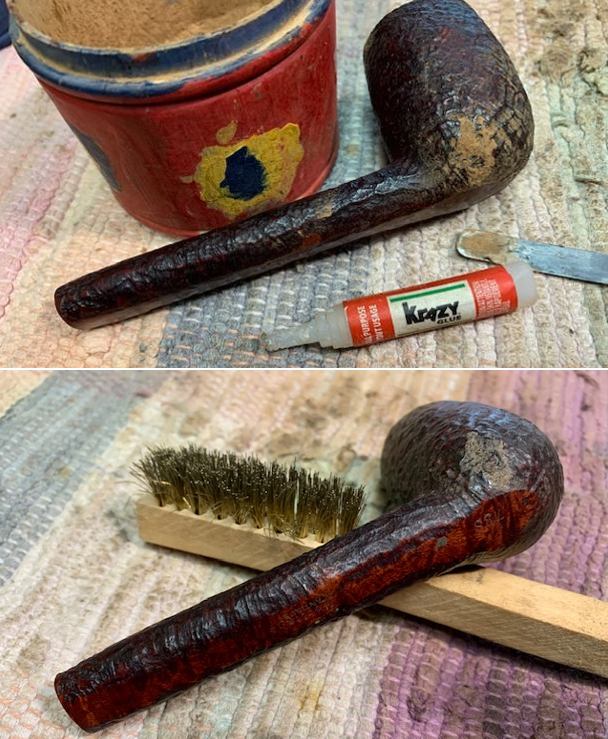
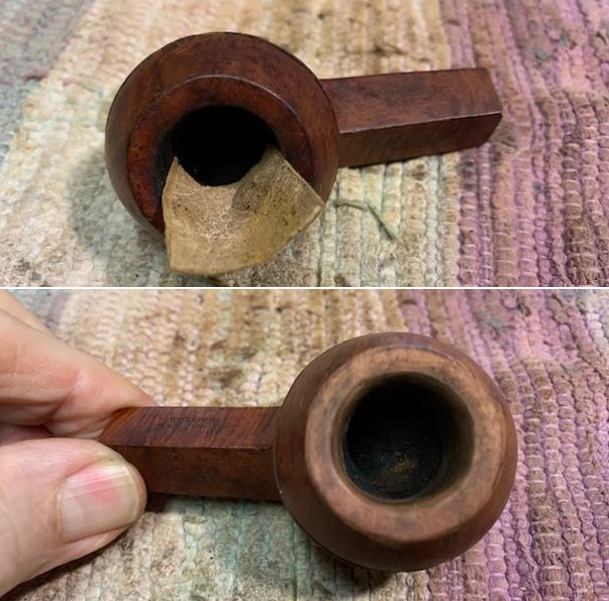
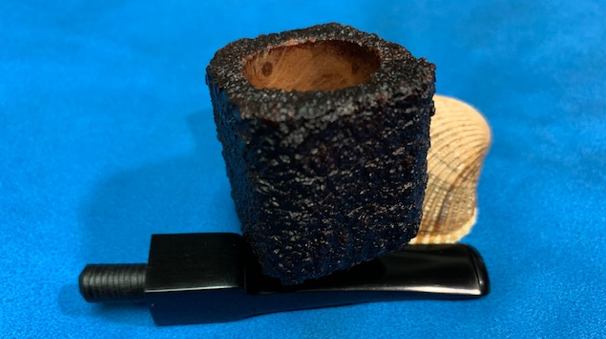
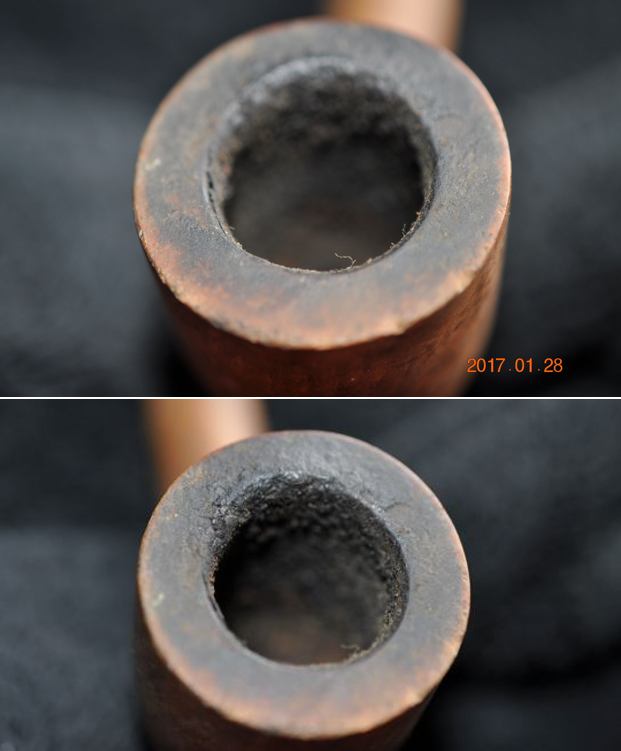
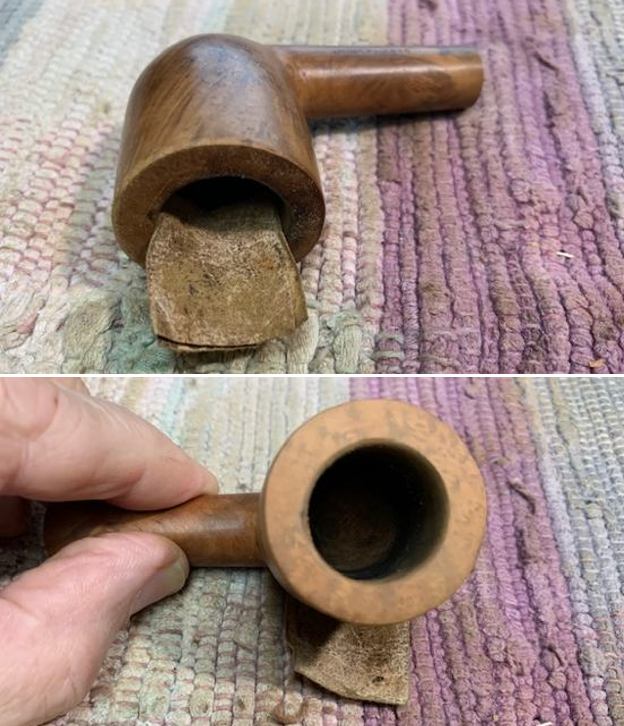
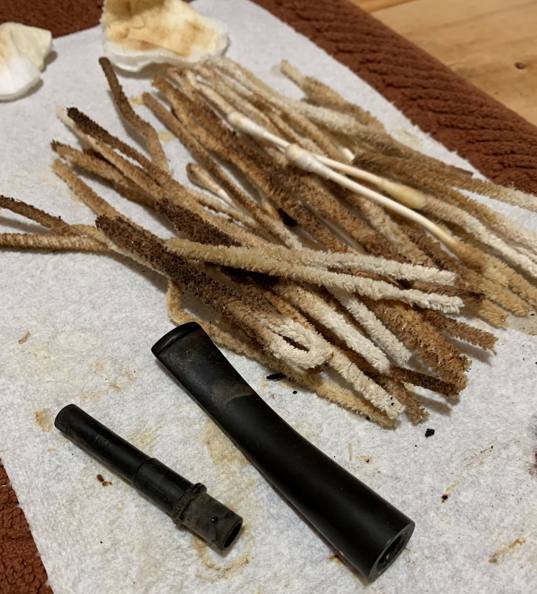
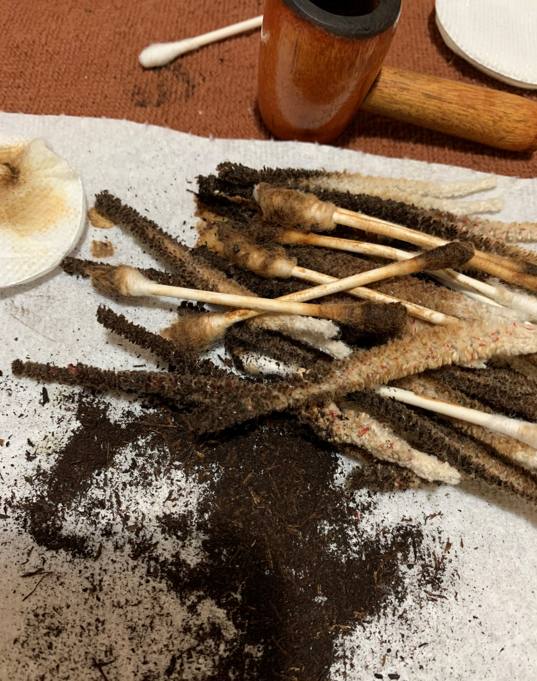
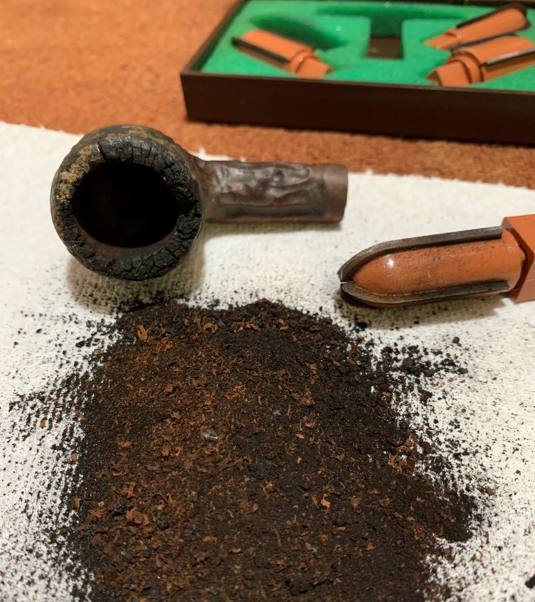
Anyway, I first decided to ream out all of the bowls. I used both the PipNet Reamer and the KleenReem to remove most of the built-up cake – but not all. I didn’t take the cake down to bare briar, as my customer wanted some essence of his grandfather left in the bowls. The one exception to this was the Brigham, and I did ream it completely and brought it down to bare briar. My customer wanted only this pipe to be completely cleaned out. On all five, however, I did clean out the insides of the shanks with Q-tips, pipe cleaners, and isopropyl alcohol. There was a lot of nastiness inside the shanks and it took a lot of cotton to get them clean! 
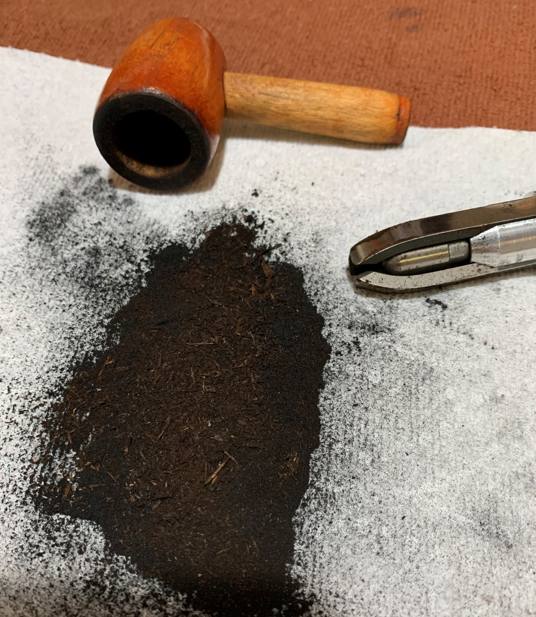
I then moved on to cleaning the outside of the stummels with Murphy’s Oil Soap on some cotton pads and also used a tooth brush to get into the crevasses of the Brigham and the Château Bruyère. I actually soaked the rims in Murphy’s for a while, just to loosen up the lava. I followed that up by cleaning the insides of the Brigham with some dish soap and tube brushes. A de-ghosting session seemed in order for the Brigham. The de-ghosting consisted of thrusting cotton balls in the bowl and the shank, and saturating them with 99% isopropyl alcohol. I let the stummel sit for 24 hours. This caused the oils, tars and smells to leech out into the cotton. Finally, a relatively clean and fresh-smelling bowl emerged. 
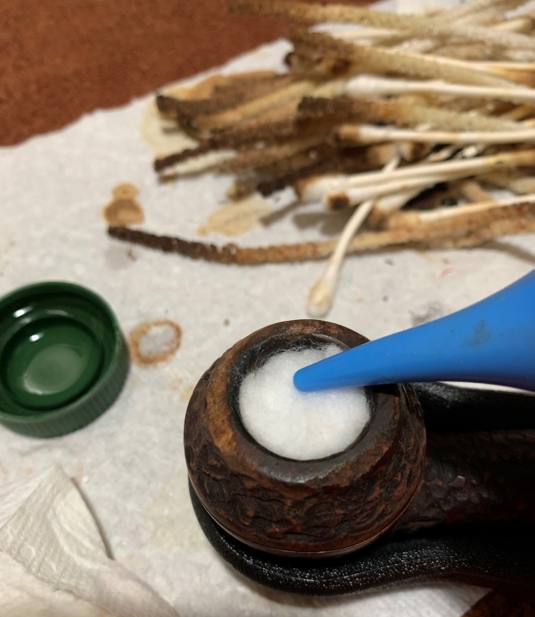
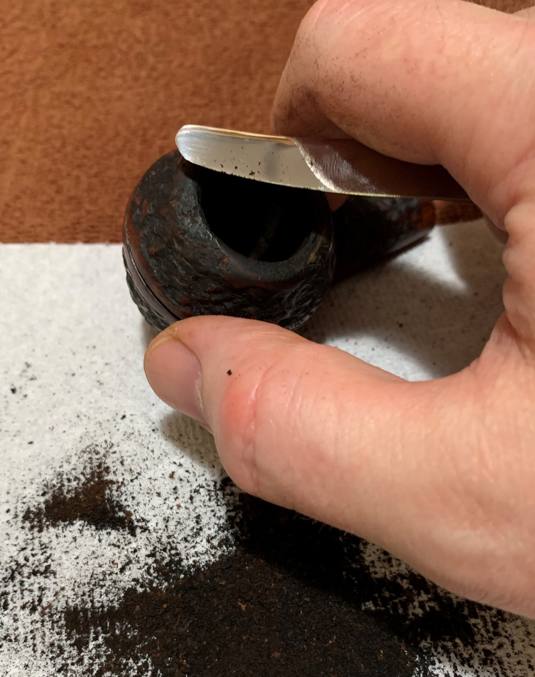
There was a great deal of damage to the rims of all the stummels – and that also needed to be addressed. In order to remove the lingering bits of lava, fix any nicks, and tidy up the look, I “topped” the pipes – that is to say, I gently and evenly sanded down the rims on a piece of 220-grit sandpaper. This effectively removed the lava and the damage, without altering the look of the pipes. However, some needed more attention than others. The two cherrywood pipes were straightforward enough, but a fair amount of work was needed on the other three. 
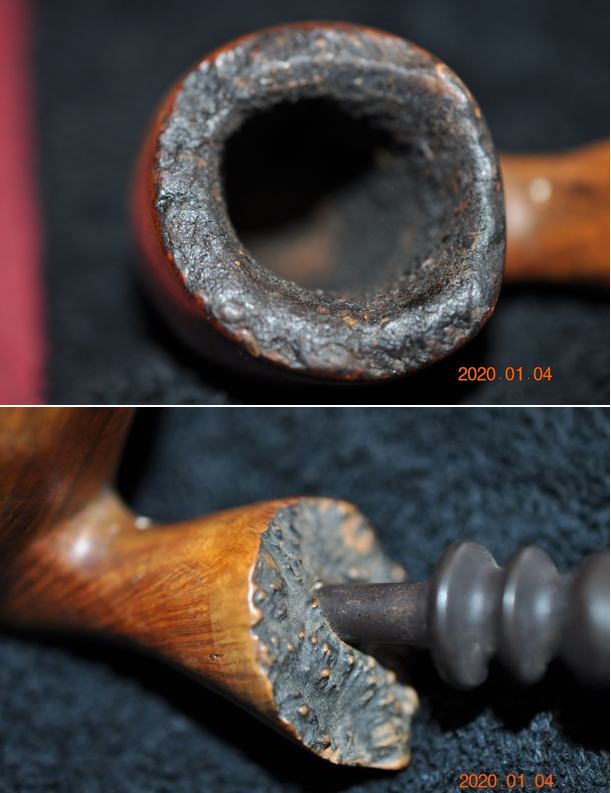
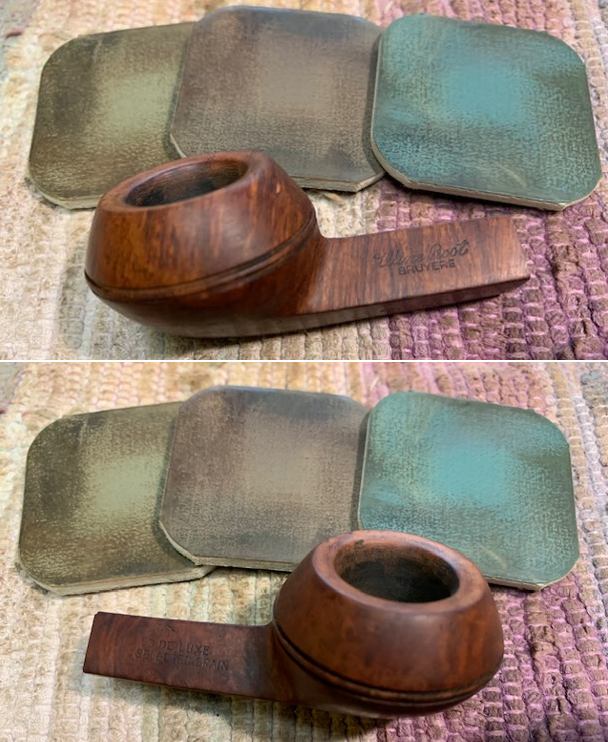
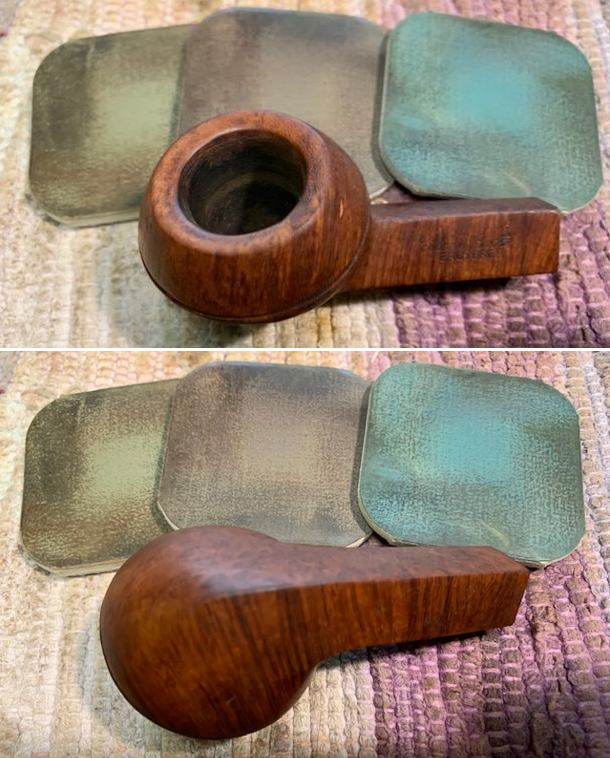
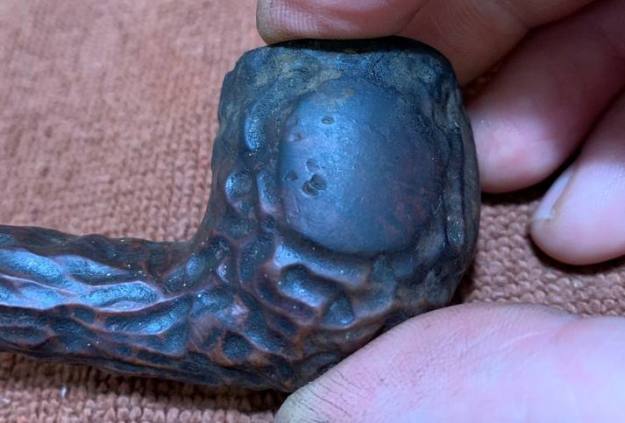
The Château Bruyère, as you will have seen, had fairly horrific damage to the wood of the bowl. There were so many cracks and burns that I was not sure if anything meaningful could be done. I did top the bowl, but stopped before I took too much off. There was no getting around the fact that this pipe was not going to be like new. I was comforted by the fact that this pipe was simply being cleaned up and was not going to be smoked again. I sealed off the cracks with cyanoacrylate adhesive, let them cure, and then sanded them smooth. It made a huge difference.
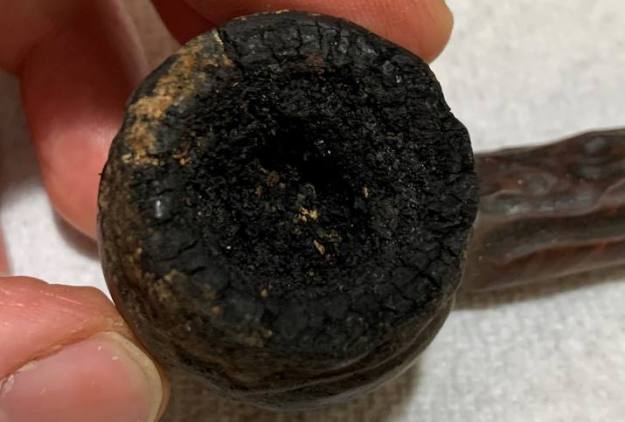
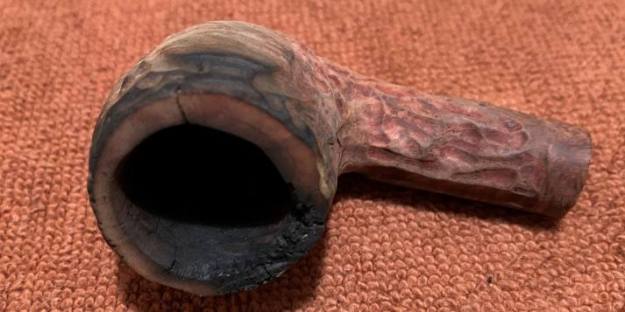
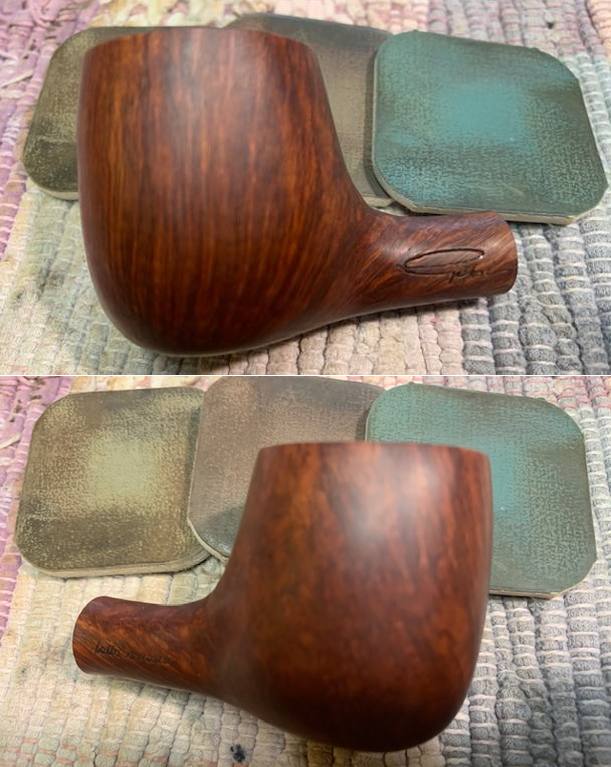
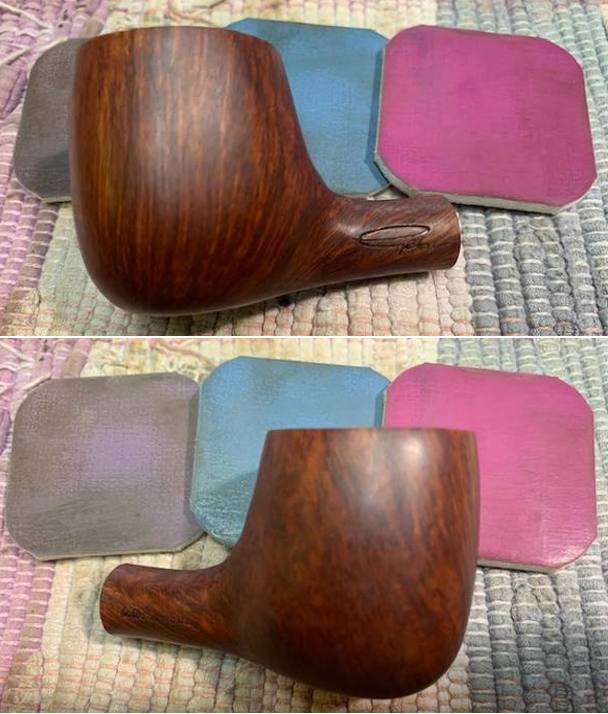
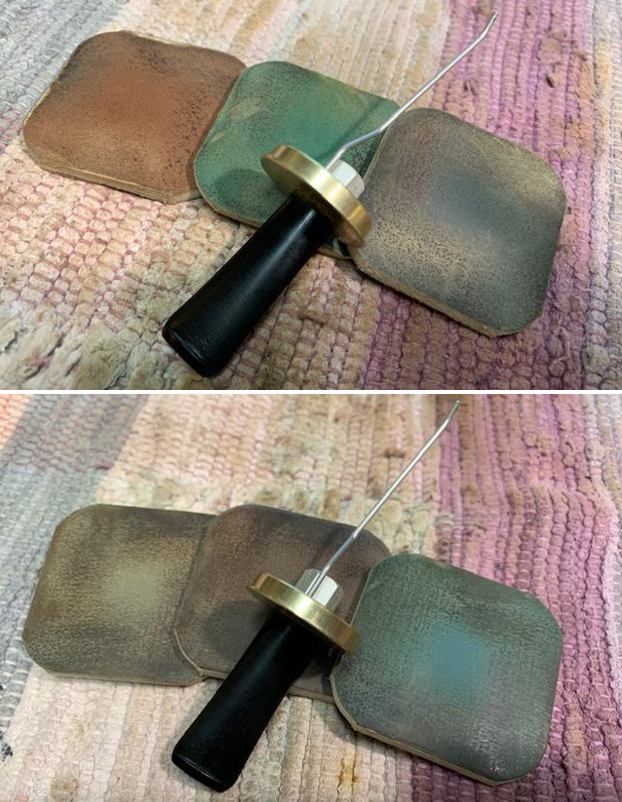
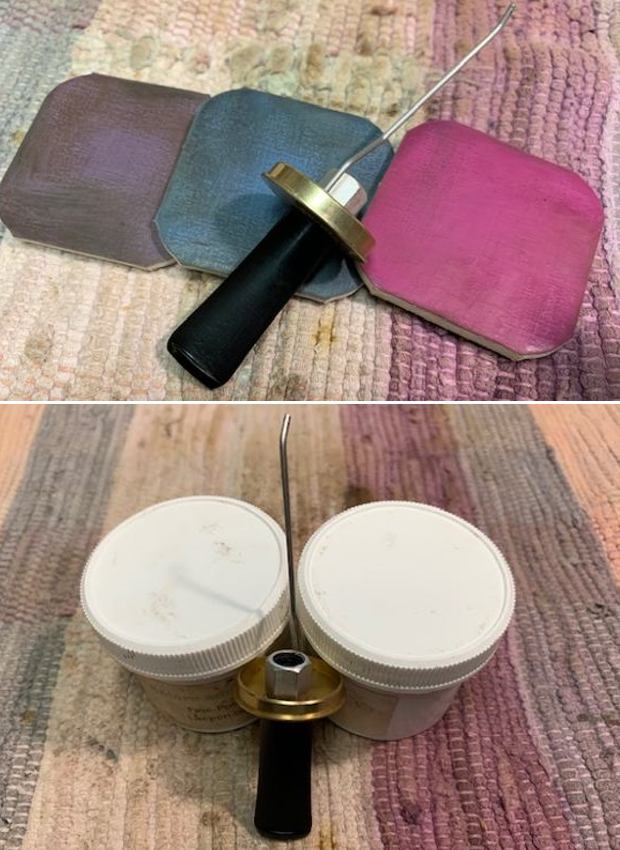
But the Château Bruyère still needed a bit more help: re-staining. In order to create some external beauty to this pipe, I opted for aniline dye. I applied my own mixture of some of Fiebing’s Medium Brown Leather Dye and some Fiebing’s Black Leather Dye. I then applied flame in order to set the colour. Worked like a charm! The pipe looked so much better after this.
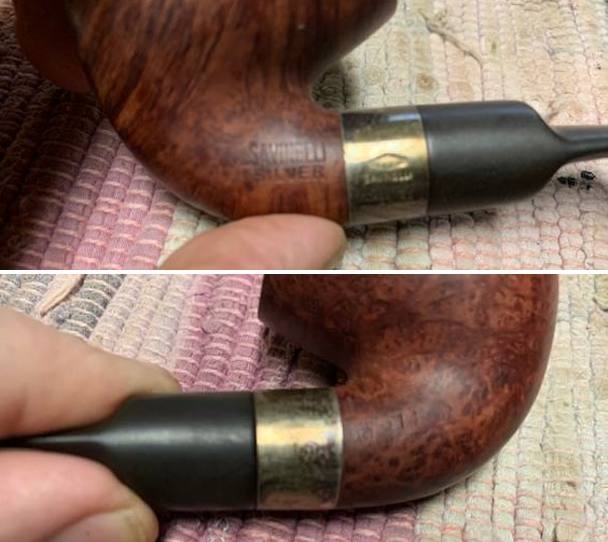
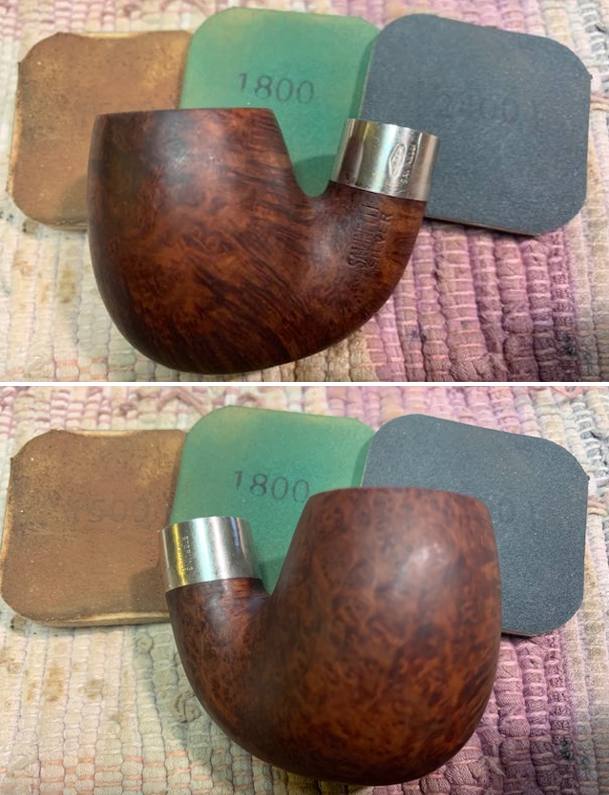
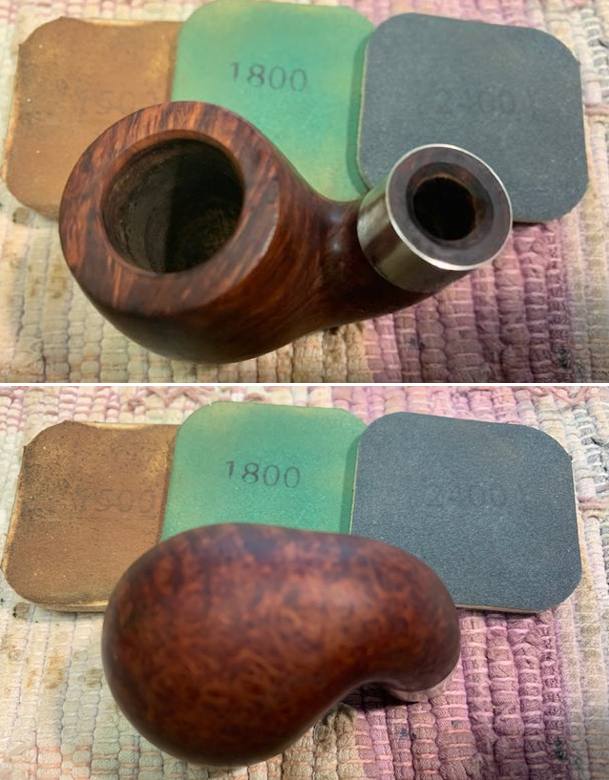
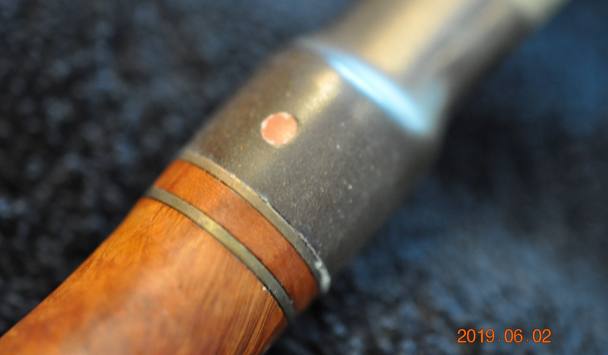
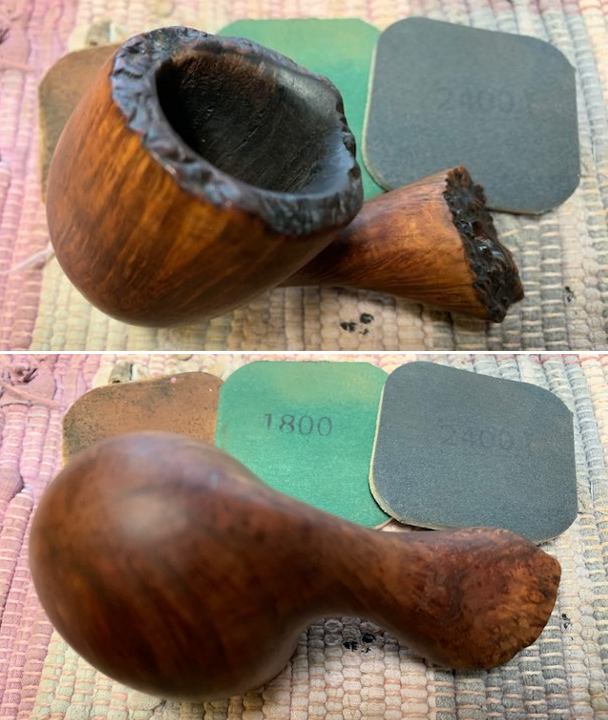
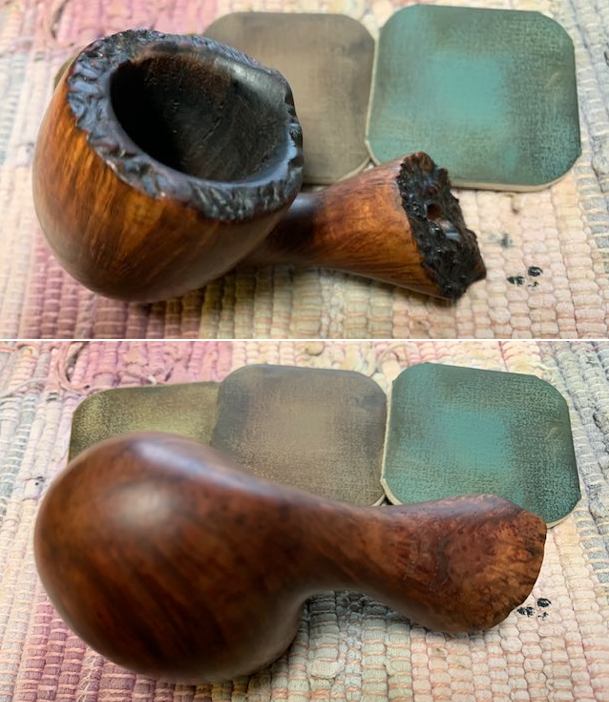
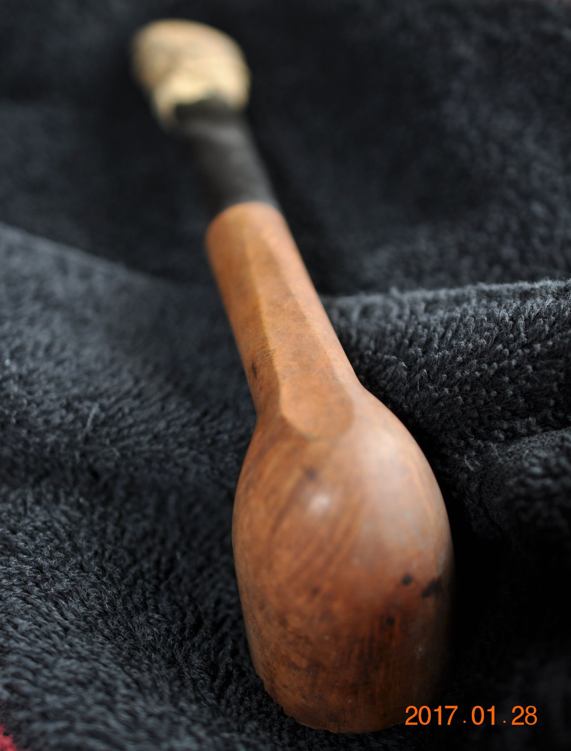
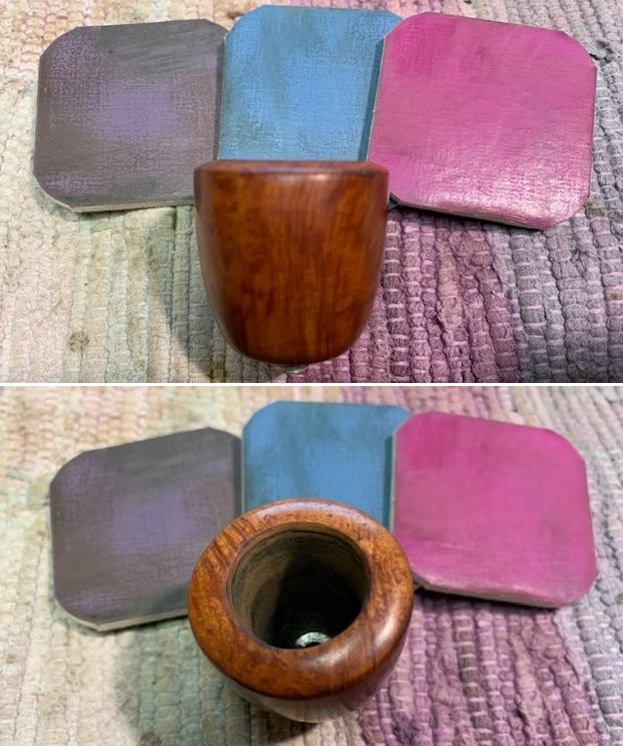
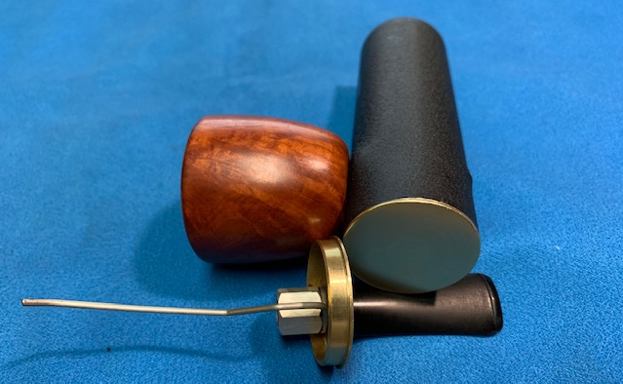
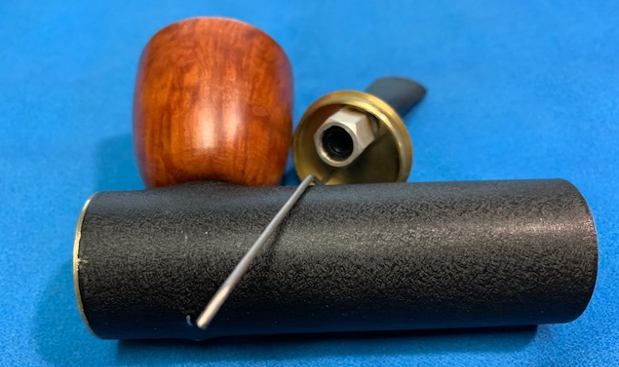
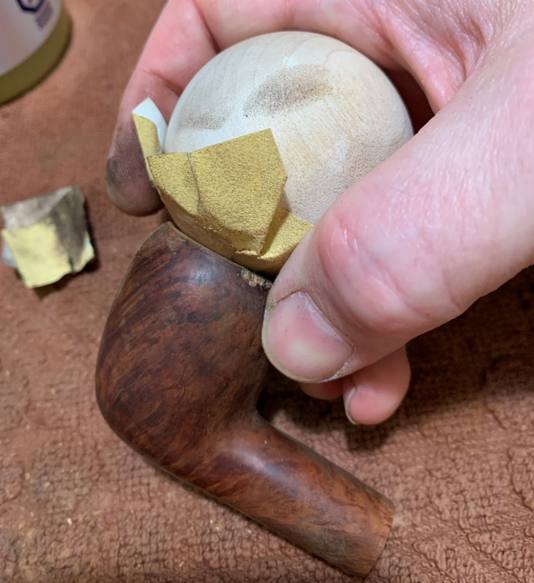
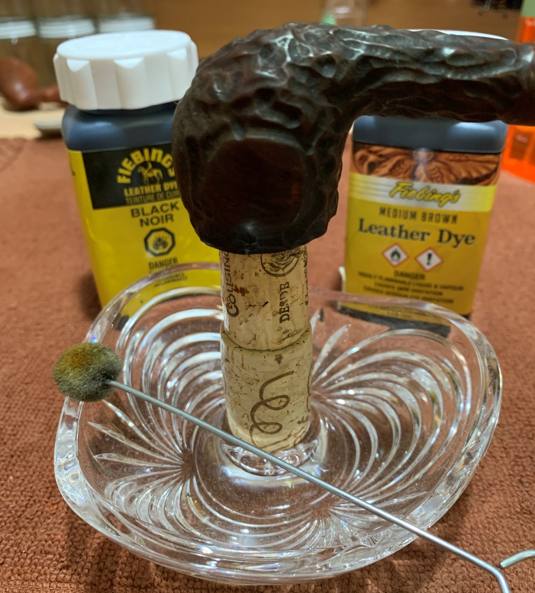
The Savoy had a large valley running along the rim of the bowl (not to mention some considerable burning). A combination of techniques was used to sort this out. I topped the stummel to start, but then I took a solid wooden sphere, wrapped sandpaper around it, and sanded it thoroughly. This was to achieve on the inner part of the rim the same thing that I achieved by “topping” on sandpaper. I then built up the remaining wound with a mixture of briar dust and cyanoacrylate adhesive. I was quite pleased with the results. Finally, I added a brass ferrule to the end of the shank and glued it in place. It gave the pipe a snazzy look. 
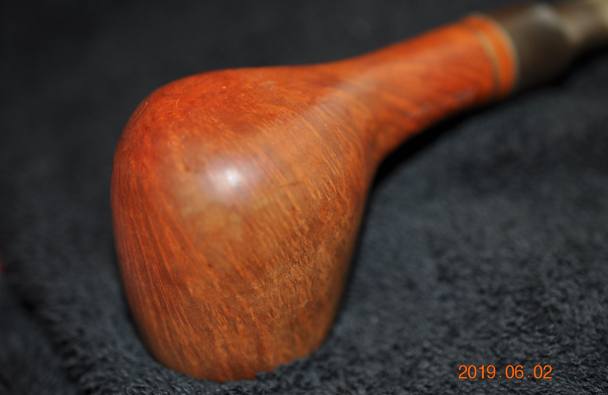
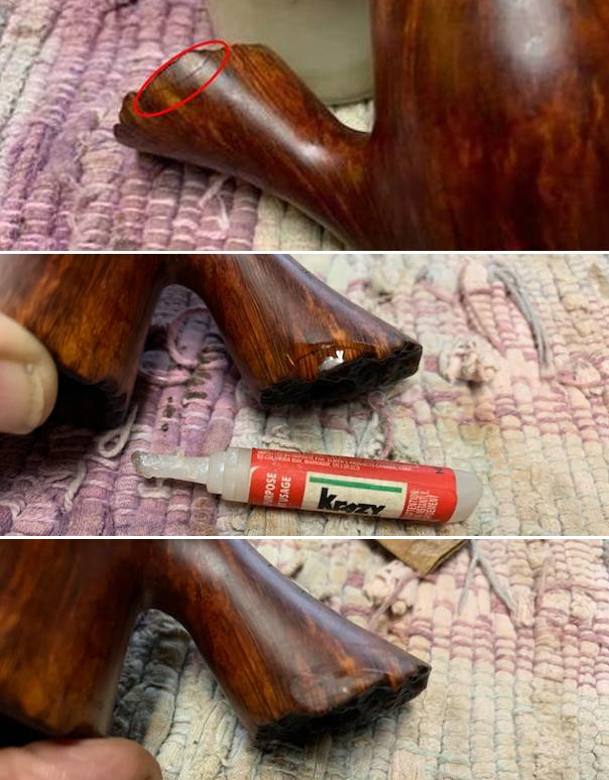
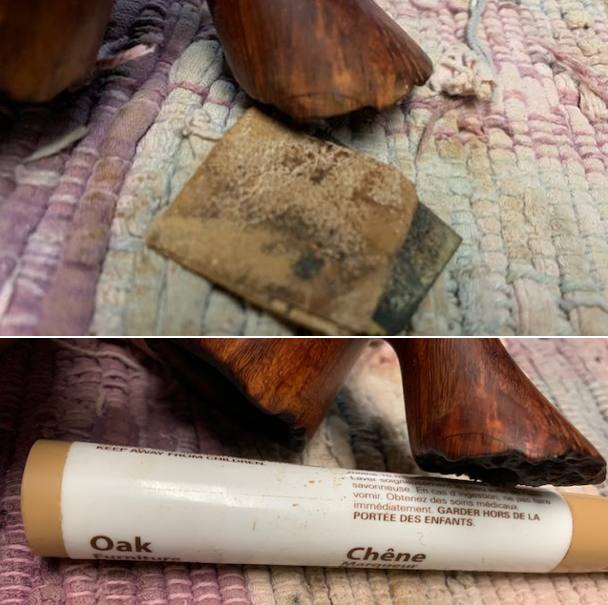
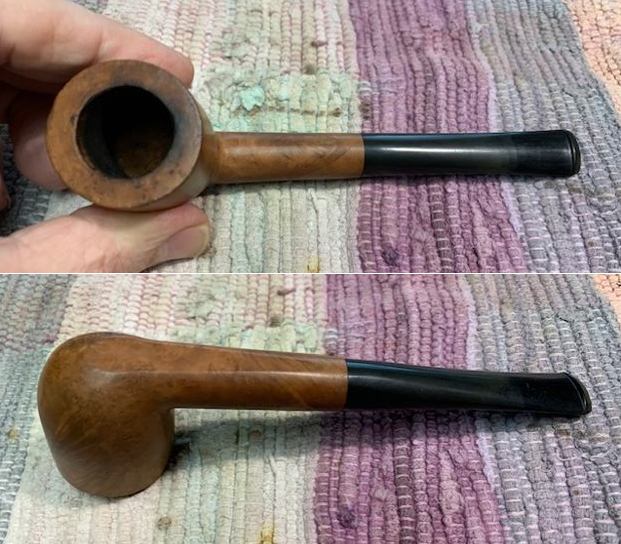
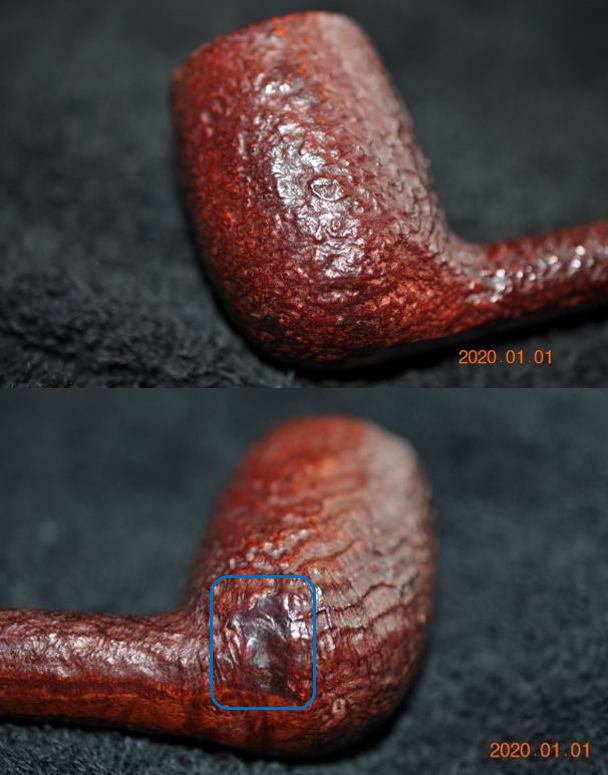
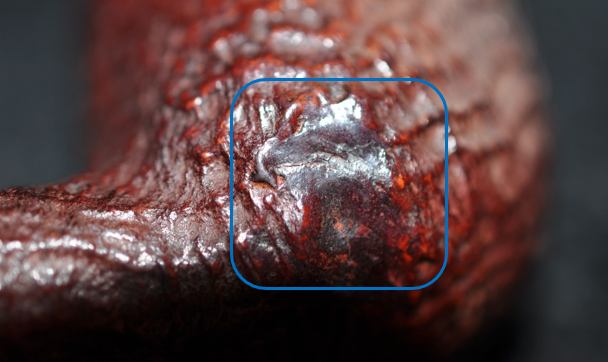
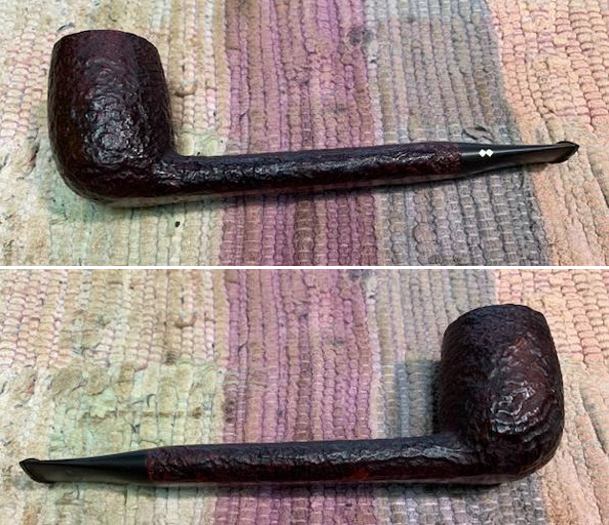
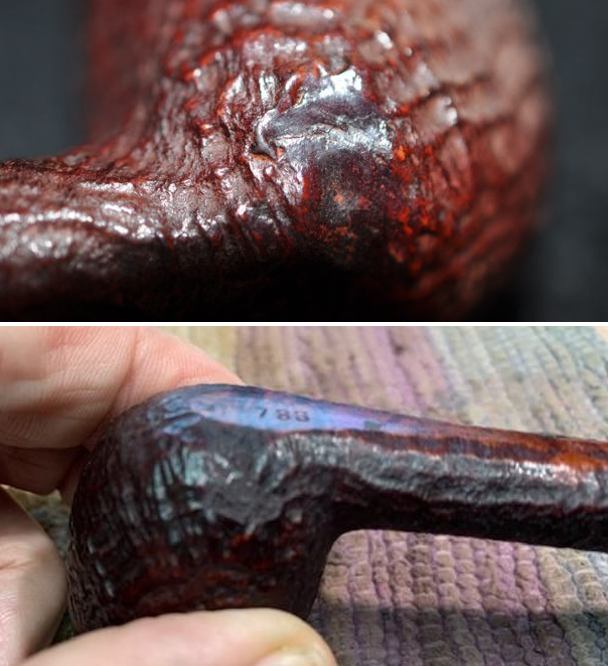
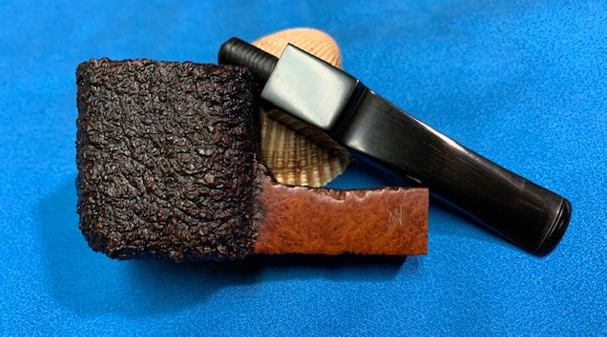
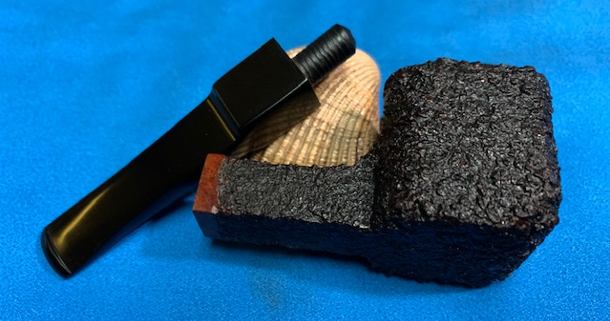
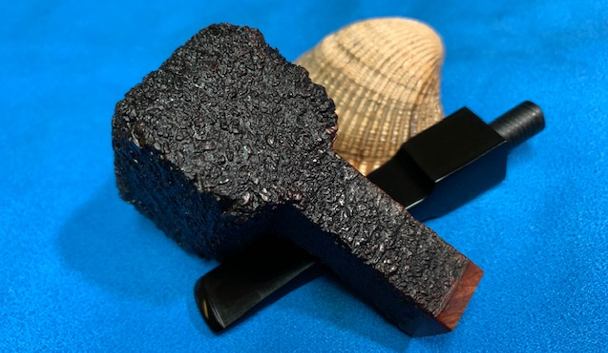
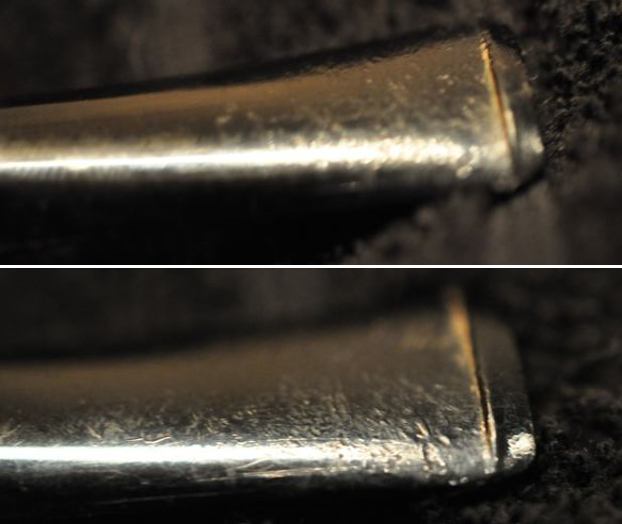
The Brigham was also tricky, but for a different reason. The Brigham had what I like to call a “broken nose”. The front edge was smashed in and would need to be built up. More than that, the repair would need to be rusticated so as to match the original rustication of the pipe. I am always worried about this sort of work because I dread the possibility of not getting the match right. In this case, I topped the Brigham first, but only slightly – just enough to make it neat and tidy. Then I built up the edge with a mixture of briar dust and cyanoacrylate adhesive. Then, I topped it a second time in order to even out the repair with the rim. Finally, I got out my Dremel and used that to rusticate the pipe’s “nose”. The results were quite good. 
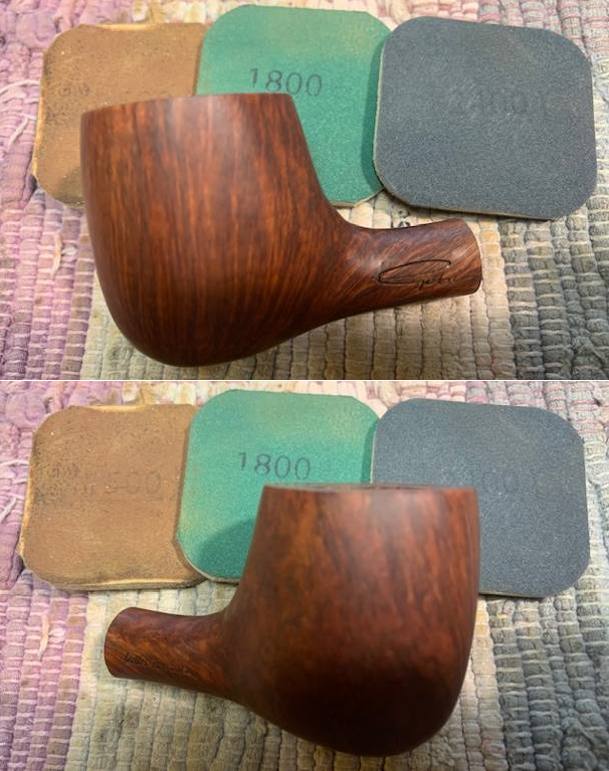
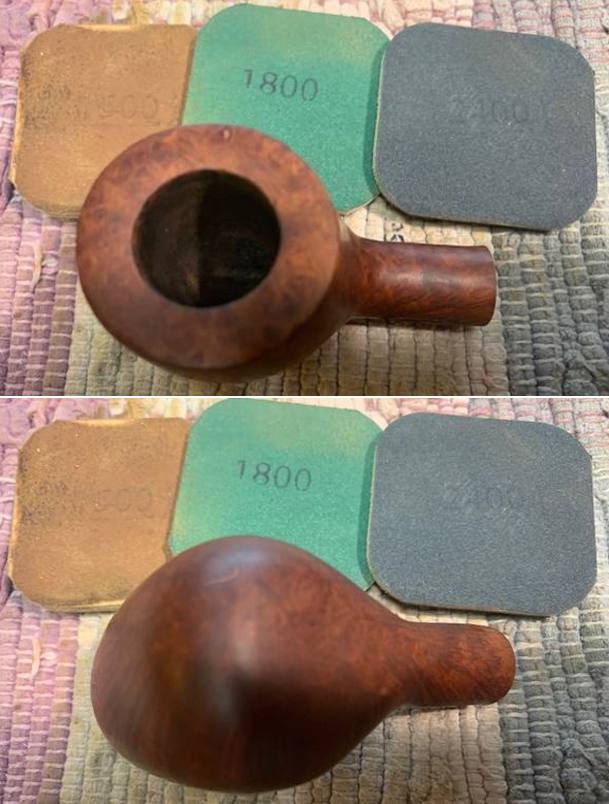
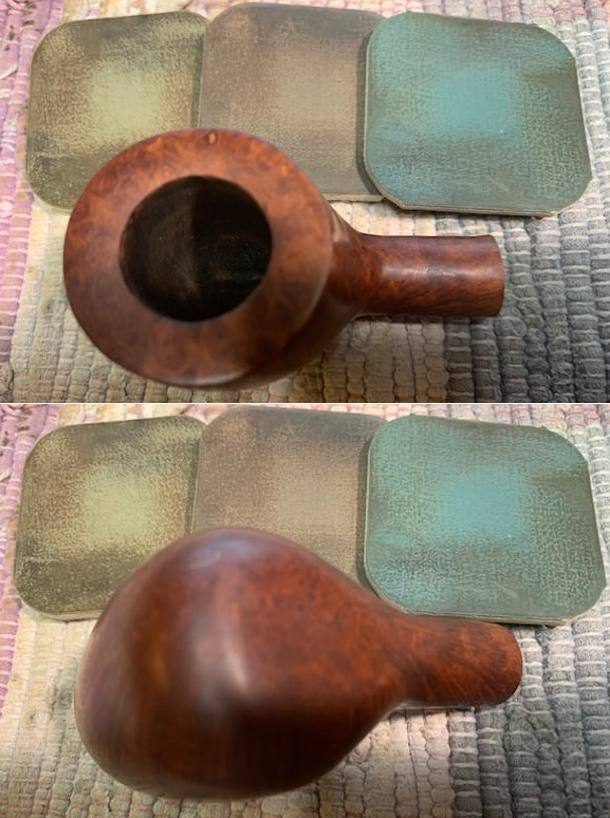
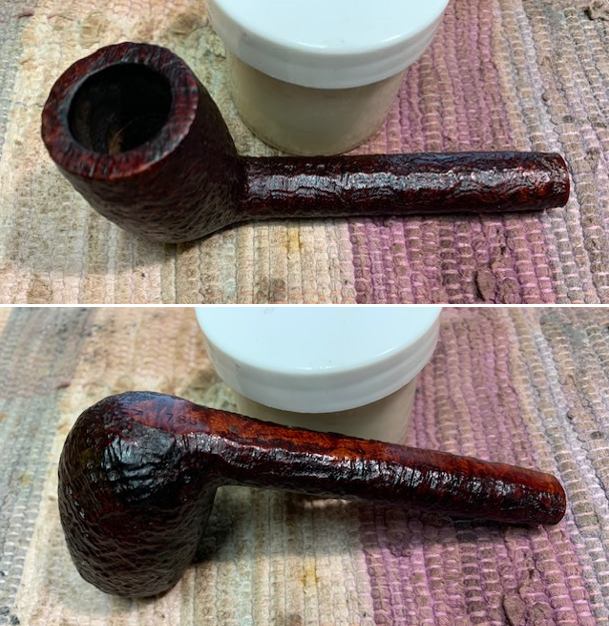
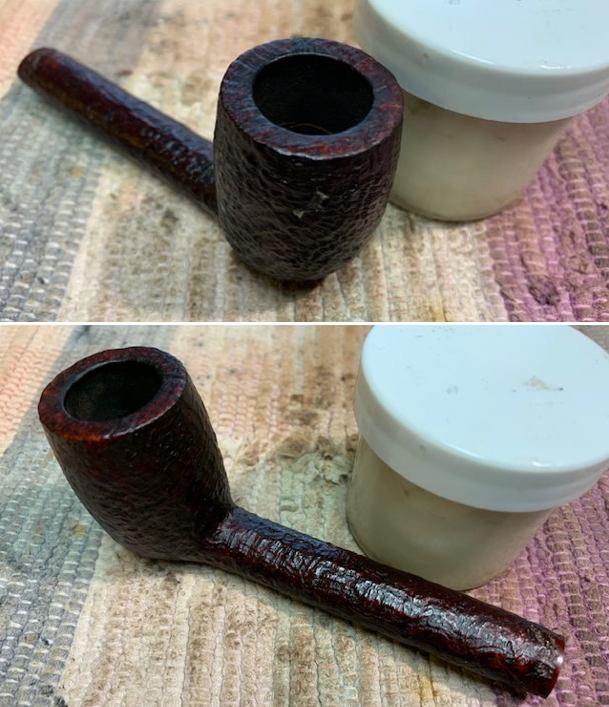
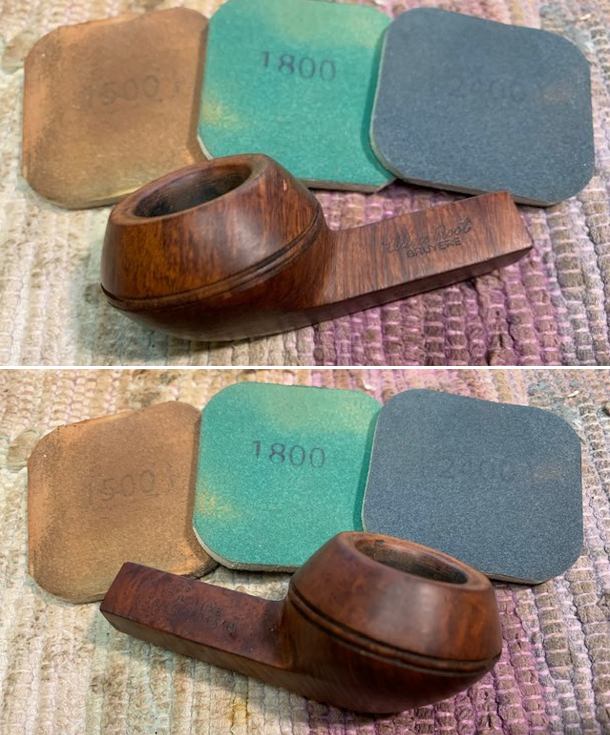
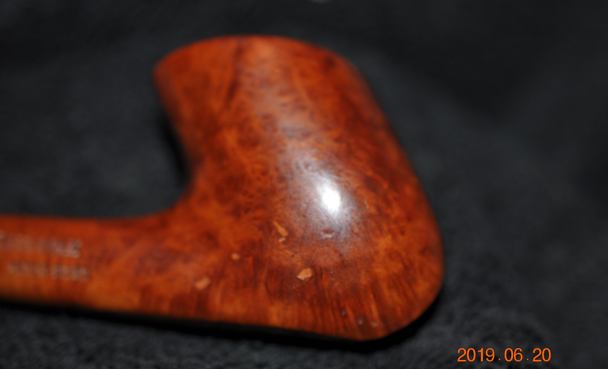
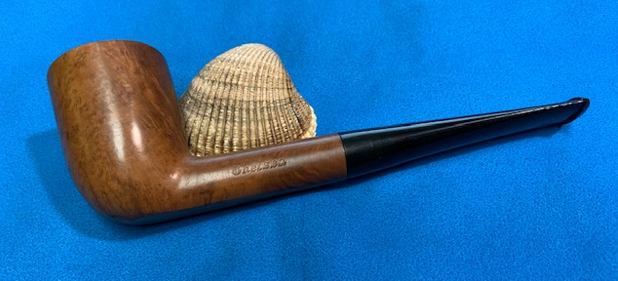
Now, with the damage repaired on all five pipes, it was time to sand down the stummels. Just like the stems, I used all nine Micromesh pads (1,500 through 12,000 grit) to sand everything smooth on the three briar pipes (I did not sand the cherrywoods). A light application of Before & After Restoration Balm brought out the best in the stummels’ grain

Then it was off for a trip to the buffer. A dose of White Diamond and a few coats of carnauba wax were just what these pipes needed to shine (literally and figuratively). The polishing was the cherry on top of a long road of recovery for these five pipes. The pipes began in the hands of a man who clearly loved smoking them. His grandson, honouring his grandfather’s memory, wanted them to look good again – but not so new that the essence of his grandfather was lost. It was my job to make sure that his grandfather was still in those pipes. I know that my customer will enjoy looking at those pipes (and remembering) for many years to come. I hope you enjoyed reading the story of these pipes as much I as I did restoring them. If you are interested in more of my work, please follow me here on Steve’s website or email me directly at kenneth@knightsofthepipe.com. Thank you very much for reading and, as always, I welcome and encourage your comments.

Restoring a Lovely Savinelli Silver 614 Bent Billiard


Blog by Steve Laug

The next pipe I chose to work on was from my box of pipes to restore. Neither Jeff nor I remember where or when we purchased it. Jeff started taking photos of the pipes he worked on in 2016 so we are pretty certain this one came to us before that time. It has some great grain around the sides and shank. It is stamped Savinelli [over] Silver on the on the left side of the shank. On the right side it is stamped with a Savinelli S shield followed by the shape number 614 [over] Italy. It had been cleaned and reamed somewhere along the way by either Jeff or me. I honestly don’t remember when or where we got this pipe. There was a Sterling Silver band on the shank that was stamped with a flattened triangle reading 925 [over] Savinelli. On the right side of the band it is stamped Sterling Mounted. The rim top looked very good and the inner edge of the bowl was slightly out of round. The vulcanite saddle stem was in good condition with light oxidation and light tooth chatter on the top and underside ahead of the button. I took some photos of the bowl to give a sense of the condition of this nice little billiard. The rim top had cleaned up very well with some slight damage to the left side of the inner edge of the bowl. There were nicks in the rim top. The Sterling Silver band was tarnished and worn looking but should clean up very well. The stem surface looked very good with no tooth marks or chatter. There was some light oxidation on the stem.I took photos of the stamping on the sides of the shank and the band on the shank. It is clear and readable as noted above.I removed the stem and took a photo of the pipe to give a sense of the whole. The saddle stem is made of vulcanite. I started my work on the pipe by addressing the damage to the rim top and inner edge of the bowl. I used a folded piece of 220 grit sandpaper to give the edge a slight bevel and minimize the damage on the rim edge. I lightly sanded the rim top with the sandpaper to remove the damaged areas and smooth out the nicks and scratches.I polished the tarnished silver on the band with a jeweler’s cloth to remove the tarnish. The cloth is impregnated with a product that removes tarnish and protects the surface of the Sterling Silver from further tarnishing.I polished the bowl sides and shank with micromesh sanding pads – dry sanding with 1500-12000 grit pads and wiping it down after each pad with Obsidian Oil. I polished it with Before & After Pipe Stem Polish – Fine and Extra Fine. I gave it another coat of Obsidian Oil and set it aside. I rubbed the bowl and shank down with Before & After Restoration Balm. I worked it into the surface of the bowl sides and shank with my fingertips. The product works to clean, enliven and protect the briar. I let the balm sit for 10 minutes and then buffed with a cotton cloth to raise the shine.  I polished the vulcanite stem with micromesh sanding pads – 1500-12000 grit pads. I wiped it down with Obsidian Oil after each sanding pad. I used Before & After Pipe Polish – both Fine and Extra Fine to further polish the stem. I gave it a final rubdown with Obsidian Oil to further protect it and let it dry. There was a faint logo – S shield – on the top of the saddle portion of the stem. This Savinelli Silver 614 Bent Billiard with a Sterling Silver Band and a vulcanite saddle stem. It is a great looking pipe now that it has been restored. I put the stem back on the bowl and carefully buffed the pipe with Blue Diamond on the buffing wheel using a light touch on the briar. I gave the bowl and the stem multiple coats of carnauba wax on the buffing wheel and followed that by buffing the entire pipe with a clean buffing pad. I hand buffed the pipe with a microfiber cloth to deepen the shine. The finished Savinelli Silver Bent Billiard fits nicely in the hand and feels great. Give the finished pipe a look in the photos below. The dimensions of the pipe are Length: 5 inches, Height: 2 inches, Outside diameter of the bowl: 1 ¼ inches, Chamber diameter: ¾ of an inch. The weight of the pipe is 1.83 ounces/52 grams. I will be adding this pipe to the rebornpipes store shortly in the Italian Pipe Makers section. If you are interested in adding this pipe to your collection send me a message or an email. Thanks for reading this blog and my reflections on the pipe while I worked on it. There are many more to come!

A Bit of a Mystery Pipe – a Gebi Fatta A Mano Freehand Pot


Blog by Steve Laug

The next pipe I chose to work on is one that we purchased on 05/21/19 from a fellow in Iowa City, Iowa, USA. It is an interesting pipe and a bit of mystery to us as we cannot find out who the maker was. The pipe is a freehand take on a classic Pot. It is stamped on the left side of the shank and reads Gebi and on the right side it reads “fatta a mano” which means made by hand. We assume it is Italian but cannot find any information on the Gebi logo or the briar dot on the stem top. There was a moderately thick cake in the bowl and some lava overflow and darkening on the back of the rim top and edges. The briar was dirty and dull looking from wear and usage. The stem was oxidized and calcified but there were not any tooth marks or chatter on the stem. Jeff took photos of the pipe before his clean up work. He took some close up photos of the rim top and stem to give a sense of the condition of the pipe when we received it. You can see the cake in the bowl and the lava and darkening on the back of the inner edge and rim top. The stem is oxidized and calcified but there are surprisingly no tooth marks and little chatter on the stem surfaces. The stummel had some beautiful grain around the side and heel of the bowl. Jeff captured that in the photo below.He took photos of the stamping on the shank sides and it was clear and readable as noted above in the first paragraph. Anyone familiar with the brand? The stem has twin brass rings with a piece of briar between them. There is also a coral colour dot on the stem top. It may also be briar but it is hard to tell at this point. I looked in the usual places for information on the brand – Who Made That Pipe, Pipephil.eu and Pipedia with no luck on finding the maker. I did multiple Google searches for the name and variations on it and still found nothing. I wrote a note to Gasparini’s as some suggested it might be one of their pipes. I am still waiting for a reply. If anyone reading this has any ideas leave a comment below.

I turned now to work on the pipe. As usual Jeff had done a great job cleaning this one. It looked amazingly good. The grain really stood out and was very clean. He had reamed the bowl with a PipNet reamer and cleaned up the remnants with a Savinelli Fitsall Pipe Knife. He scrubbed the airway in the shank and stem with alcohol, cotton swabs and pipe cleaners. He scrubbed the exterior with undiluted Murphy’s Oil Soap and rinsed it with warm running water. He dried it off with a cotton towel. He scrubbed the stem with Soft Scrub and then soaked it in a bath of Before & After Deoxidizer to remove the oxidation on the stem. He rinsed it and dried it off. He gave it a light coat of olive oil to preserve it. I took photos of the pipe when I finally got around to working on it. The rim top had cleaned up very well with the lava and darkening removed. The stem surface looked very good with no tooth marks or chatter. There was some light oxidation that remained on the top side of the stem. The brass bands and briar insert on the stem end were tarnished and worn looking but should clean up very well. I took photos of the stamping on the sides of the shank. It is clear and readable as noted above.I removed the stem and took a photo of the pipe to give a sense of the whole. The stem is vulcanite with an extension of brass and briar on the tenon.I started my work on the pipe by polishing the bowl sides and shank with micromesh sanding pads – dry sanding with 1500-12000 grit pads and wiping it down after each pad with Obsidian Oil. I polished it with Before & After Pipe Stem Polish – Fine and Extra Fine. I gave it another coat of Obsidian Oil and set it aside.    I rubbed the bowl and shank down with Before & After Restoration Balm. I worked it into the surface of the bowl sides and shank with my fingertips. The product works to clean, enliven and protect the briar. I let the balm sit for 10 minutes and then buffed with a cotton cloth to raise the shine. I polished the vulcanite stem with micromesh sanding pads – 1500-12000 grit pads. I wiped it down with Obsidian Oil after each sanding pad. I used Before & After Pipe Polish – both Fine and Extra Fine to further polish the stem. I gave it a final rubdown with Obsidian Oil to further protect it and let it dry.      This Gebi fatta a mano (Hand Made) Freehand Pot with a saddle vulcanite stem has brass bands sandwiching a briar band on the saddle portion. It is a great looking pipe now that it has been restored. I put the stem back on the bowl and carefully buffed the pipe with Blue Diamond on the buffing wheel using a light touch on the briar. I gave the bowl and the stem multiple coats of carnauba wax on the buffing wheel and followed that by buffing the entire pipe with a clean buffing pad. I hand buffed the pipe with a microfiber cloth to deepen the shine. The finished Gebi Freehand Pot fits nicely in the hand and feels great. Give the finished pipe a look in the photos below. The dimensions of the pipe are Length: 5 ¾ inches, Height: 1 ¾ inches, Outside diameter of the bowl: 1 ½ inches, Chamber diameter: ¾ of an inch. The weight of the pipe is 2.19 ounces/62 grams. I will be adding this pipe to the rebornpipes store shortly in the Italian Pipe Makers section. If you are interested in adding this pipe to your collection send me a message or an email. Thanks for reading this blog and my reflections on the pipe while I worked on it. There are many more to come!

Restoring a Large Ben Wade Danish Hand Model 100 Freehand


Blog by Steve Laug

The next pipe on the table came to us late in 2019 from a fellow in Los Angeles, California, USA. We have purchased quite a few pipe from him over the years and several Ben Wade Pipe. This is another one of those. Even though the finish was dull and lifeless it showed promise under the grit and grime of the years. On the underside of the shank it was clearly stamped Ben Wade in script [over] Danish[over] Hand Model[over] 100 [over] Made In Denmark. The finish is filthy with grime and oils ground into the smooth briar of the bowl and shank sides. The bowl had a thick cake that overflowed in heavy lava onto the plateau rim top filling in the grooves and valleys of the finish. The plateau shank end was also dirty with dust and debris in the grooves and valleys of the shank. The vulcanite stem was oxidized, calcified, dirty and had some tooth marks and chatter on both sides ahead of the button. Jeff took some photos of the pipe to show its overall condition before he started his cleanup work. He took photos of the rim top and bowl to give a clear picture of the thickness of the cake and the lava on the plateau finish of the rim top. There is dust and debris stuck to the walls of the bowl clearly visible in the photos. He also took photos of the top and underside of the stem to show the chatter and tooth marks. Jeff took photos of the sides and heel of the bowl to give a picture of what the briar around the pipe looked like. There is some stunning grain under the grime.  He took photos of the stamping on the shank. It reads as noted above and is clear and readable. There is the faint remnant of the crown stamp on the top of the stem.   I remembered a bit of history on the brand that thought that the Preben Holm pipes were marketed under the Ben Wade label in the US and imported through Lane Ltd. I turned to Pipedia and read the listing on the brand to refresh my memory and flesh out the knowledge of the brand (https://pipedia.org/wiki/Ben_Wade). I have included a photo from that site that was taken from a Tinderbox advertisement.I quote the portion of the article that summarizes the Danish period of the history of the brand:

Young Copenhagen master pipemaker Preben Holm had made a meteoric career heading a pipe manufacture employing 45 people at the age of 22! But around the turn of 1970/71 he was in major financial difficulties. His US distributor, Snug Harbour Ltd. in New York City, left him in the lurch. Holm had three unpaid invoices on his desk and another large shipment was ready for the USA, when Snug Harbour’s manager told him on the phone that there was no money at all on the account to pay him.

So the Dane went to New York for an almost desperate search for a new distribution partner. He made contacts with Lane Ltd. and met Herman G. Lane in February 1971. Lane Ltd. had no interest in Holm’s serial pipes produced at that time but so much the more in the hand-carved freehands because the hype for Danish freehands and fancies in the States was still on its way to the climax then. The meeting resulted in an agreement to start a cooperation. Lane insisted to improve the quality considerably and in return he assured to be able to sell essentially larger quantities.

Holm went back home to work on new samples with all-new designs and altered finishes for Lane. Both, Lane and Holm, agreed that it would be unwise to sell the pipes under Preben Holm’s name as long as Snug Harbour had a considerable stock of Preben Holm pipes and might sell them pipes at very low prices just to bring in some money.

So on Mr. Lane’s proposal it was determined to use the name Ben Wade belonging to Lane Ltd. Lane spent considerable amounts of money for advertising the new brand in the big magazines– the centerpiece being whole-page ads showing a very exclusive Seven Day’s Set.

The cooperation with Lane Ltd. proved to be an eminent business success for both partners. Within a very short time Ben Wade Handmade Denmark sold in much larger quantities and at higher prices than they had ever dreamed of. And the hype these freehands and fancy pipes caused went on unbroken long after Herman G. Lane deceased. Preben Holm – obviously much more brilliant in pipe making than in pipe business – was in major troubles again in 1986 and had to sack most of his staff. The Ben Wade production was significantly lowered but continued until his untimely death in June of 1989.

Up to now Preben Holm made Ben Wade pipes are cult and highly sought for on the estate markets.

With that information my initial thoughts were confirmed. This pipe was a Preben Holm made Freehand distributed in the US by Lane Ltd under the name Ben Wade. The freehand rage occurred in the late 70s and the pipes were made until Preben’s death in 1989. My guess would be that this pipe was made sometime during that time period and potentially in the late 70s.

Jeff had cleaned up the pipe until it almost did not look like the same pipe. He reamed the pipe with a PipNet Pipe Reamer and cleaned up the remnants with a Savinelli Fitsall Pipe Knife. He scrubbed the exterior of the bowl with undiluted Murphy’s Oil Soap with a tooth brush. He was able to get all of the lava and grime off the rim top and shank end. He rinsed it under running warm water to remove the soap and debris. He cleaned out the inside of the shank and the airway in the stem with alcohol, cotton swabs and pipe cleaners. He scrubbed the stem with Soft Scrub and cotton pads to remove the debris and oils on the stem. He soaked it in Before & After Pipe Stem Deoxidizer. He rinsed it with warm water and dried it off. I took photos of the pipe once I received it.   The rim top had some darkening on the back of the bowl. The beveled inner edge of the rim looked good with some darkening. The rim thinned toward the back of the bowl but was still quite thick. The stem surface looked very good with a few small tooth marks and chatter on both sides near the button. I took a photo of the stamping on the underside of the shank. It is clearer than it appears in the photo and is readable as noted above.I removed the stem and took a photo of the pipe to give a sense of the whole. The stem is turned fancy vulcanite. I started my work on the pipe by polishing the bowl sides and shank with micromesh sanding pads – dry sanding with 1500-12000 grit pads and wiping it down after each pad with a damp cloth. I paused in the polishing to clean up the darkening on the inner bevel of the plateau rim top with a folded piece of 220 grit sandpaper. I was able to minimize the darkening and I like the looks of the rim top.     I rubbed the bowl and shank down with Before & After Restoration Balm. I worked it into the surface of the bowl sides and shank with my fingertips and into the plateau rim top with a horsehair shoe brush. The product works to clean, enliven and protect the briar. I let the balm sit for 10 minutes and then buffed with a cotton cloth to raise the shine.   While I polished the shank I saw a small hairline crack on the right side of the shank at the plateau end. I have circled it in red in the photo below. I decided to pause in the work on the stem and address this issue first. I filled in the crack with a drizzle of CA glue. I let hardened then sanded the area with 220 grit sandpaper to smooth it out and then polished it with micromesh sanding pads. I stained it with an oak stain pen and then gave it a rub of Before & After Restoration Balm. I buffed it with a cotton cloth. I set the bowl aside and turned to work on the stem. I painted the surface of the rim with the flame of  Bic lighter to raise the tooth marks. I was able to raise them quite significantly but there were deeper ones that needed further work. I filled in what remained with clear CA glue and set the stem aside to cure.    Once the glue cure I flattened out the repairs with a small flat file. I sanded them with 220 grit sandpaper to blend them into the stem surface. I started the polishing of the stem with 400 grit wet dry sandpaper. (I failed to take a photo of the sanding process but you can see the result in the polishing photos.)  I polished the vulcanite stem with micromesh sanding pads – 1500-12000 grit pads. I wiped it down with Obsidian Oil after each sanding pad. I used Before & After Pipe Polish – both Fine and Extra Fine to further polish the stem. I gave it a final rubdown with Obsidian Oil to further protect it and let it dry.      This Ben Wade Danish Hand Model 100 Freehand with a fancy, turned vulcanite stem is a great looking pipe now that it has been restored. I put the stem back on the bowl and carefully buffed the pipe with Blue Diamond on the buffing wheel using a light touch on the briar. I gave the bowl and the stem multiple coats of carnauba wax on the buffing wheel and followed that by buffing the entire pipe with a clean buffing pad. I hand buffed the pipe with a microfiber cloth to deepen the shine. The finished Ben Wade 100 Freehand fits nicely in the hand though it is quite large and feels great. Give the finished pipe a look in the photos below. The dimensions of the pipe are Length: 6 inches, Height: 2 ½ inches, Outside diameter of the bowl: 1 ½ inches, Chamber diameter: 1 inch. The weight of the pipe is 2.29 ounces/65 grams. I will be adding this pipe to the rebornpipes store shortly in the Danish Pipe Makers section. If you are interested in adding this pipe to your collection send me a message or an email. Thanks for reading this blog and my reflections on the pipe while I worked on it. There are many more to come! rac

Repairing An Interesting Surprise on a Beautiful Heritage Antique 73S Canadian


Blog by Steve Laug

I have always had an interest in the Kaywoodie Made Heritage Pipe line. I really like the way they are made – both in terms of workmanship and style. They really made some amazing looking pipes and I always try to pick them up when I can. Jeff has also found this to be true so he is on the lookout for this brand in all of his pipe hunts and auction haunts. When this pipe became available to us late in 2019 from a fellow in Los Angeles, California, USA we bought it. It is stamped 73S on the heel of the bowl and Heritage [over] Antique on a smooth panel on the underside of the shank. The pictures of the sandblast showed it was well done. The finish was dirty and there was a thick cake in the bowl. It appeared that the bowl had been lightly reamed before it came to us. There was a lava overflow in the sandblast finish on the rim top that would need to go. There was the Heritage double diamond logo on the left side of the stem. The stem was oxidized and had deep tooth marks on both sides ahead of the button. All totaled it was still a beautiful pipe. We were hooked. Jeff took these photos before he started his clean up work. Jeff took photos of the bowl and rim top to show the condition that I noted in the description above. Even though it is very dirty you can see that the rim top and edges all look very good. The stem photos clearly show the oxidation and tooth marks on both sides. It would need some work. Jeff took photos of the sides of the bowl and heel to show the sandblast finish on the bowl. He also took photos of a strange looking area on the lower right side of the bowl. It appeared that there was a large flaw that had been filled in that area. It was obviously a dark putty and there were some small cracks in the middle area of the fill material. I drew a box around it in the second photo. I have worked on quite a few Heritage pipes and have never seen this before.Jeff took a close up photo of that area to show more clearly what we are speaking of. You can see the tiny cracks in the fill area toward the top of the repair. The patch material is dark and very hard so it should be repairable.The next photos show the stamping that I described in the opening paragraph. It is clear and readable.In other blogs on the brand I have given a bit of history on the Heritage Brand. I have included that here as well for ease of reference. Andrew Selkirk did a great job in researching a link to his work on the blog. Here is the link: https://rebornpipes.com/2014/12/23/refurbishing-a-heritage-heirloom/. I am including a brief summary of what he found in the next two short paragraphs to set the stage for the pipe on my work table.

Heritage pipes were Kaywoodie’s answer to Dunhill. According to one of their brochures, Heritage pipes were made from “briar burls seasoned and cured for up to 8 months,” with only “one briar bowl in over 300 selected to bear the Heritage name.” “Heritage stems are custom fitted with the finest hand finished Para Rubber stems. Mouthpieces are wafer thin and concave.”

The Heritage line began in the early 1960’s, with the trademark issued in 1964. The line was started at the request of Stephen Ogdon, (who worked for Kaywoodie in 1962). Mr. Ogdon had previous experience working for Dunhill, either running the New York store or working for Dunhill North America. Mr. Ogden was made President of Heritage Pipes, Inc., Kaywoodie Tobacco Co.,Inc. and Kaywoodie Products Inc. as well as a Vice President of S.M. Frank & Co. Heritage Pipes were produced from 1964 until 1970 (Source kaywoodie.myfreeforum.org).

Andrew also included a copy of the Heritage brochure that I am also including below (Courtesy kaywoodiemyfreeforum). In going through the models displayed on the page there is not one for the 73S. The closest is the shape 72 Canadian. The brochure has a great write up on the Heritage Antique Line. It reads Rustic Grain Stands out in Rugged Relief. It describes the line as follows:

This pipe is so bold looking, yet so light and smooth smoking. A special sandblasting process exposes a greater surface area on the bowl, giving a cooler, more satisfying smoke. Centuries-old Heritage Antique is strikingly masculine in appearance.

Jeff had cleaned up the pipe with his usual precise work. He reamed the pipe with a PipNet Pipe Reamer and cleaned up the remnants with a Savinelli Fitsall Pipe Knife.  He scrubbed the bowl with undiluted Murphy’s Oil Soap with a tooth brush. He rinsed it under running warm water to remove the soap and grime. The fill on the lower right side of the bowl did not loosen, crack more or fall out. It was solid. The rim top cleaned up very well. He cleaned out the inside of the shank and the airway in the stem with alcohol, cotton swabs and pipe cleaners. He soaked the stem in Before & After Deoxidizer and rinsed it off with warm water. I took photos of the pipe once I received it. Now it was time to work on the pipe itself. The bowl and the rim top looked very good. The inner and outer edges of the rim also looked very good. There was no damage to the edges. The stem surface showed deep tooth marks and chatter on both sides near the button. I took photos of the stamping on the underside shank. The stamping was clear and readable as noted above. I took the stem off the shank and took a photo of the parts of the pipe to show the overall look of the pipe. To me it is a vary British looking sandblast Canadian.I decided to deal with the large filled area on the lower right side of the bowl. It was hard and solid but had some small cracks toward the top of the fill. The first two photos show the filled area before and after cleaning. I roughed it up a little bit with a brush then filled in the cracks and sunken portions of the fill with clear CA glue and briar dust. Once the repair hardened I used a brass bristle wire brush to knock off the loose briar dust and give a bit of texture to the fill. I used the Dremel and a pointed burr to carve grain patterns to match the surrounding areas of the briar. I liked the way it was looking. I mixed a black and a mahogany stain pen into the rusticated surface to match the surrounding colour of the bowl. I was happy with how the repair had blended into the rest of the surrounding briar. I worked some Before & After Restoration Balm into the surface of the briar with my fingertips and a horsehair shoe brush to clean, enliven and protect it. I let the balm sit for a little while and then buffed with a cotton cloth to raise the shine. The following photos show the bowl at this point in the restoration process. I am very happy with the results. I set the bowl aside and turned my attention to the stem. I “painted” the stem with the flame of a Bic lighter to lift the tooth marks. I was able to lift them out significantly. I filled in the remaining dents in the stem surface with clear CA glue and set it aside to cure. I flattened out the repairs with a small file to start the process of blending them into the surface of the vulcanite. I then sanded them smooth with 220 grit sandpaper to further blend them in and started polishing the stem with 400 grit wet dry sandpaper. I polished the vulcanite stem with micromesh sanding pads – 1500-12000 grit pads. I wiped it down with a damp cloth after each sanding pad. I used Before & After Pipe Polish – both Fine and Extra Fine to further polish the stem. I wiped it down with a final coat of Obsidian Oil and set it aside.     The repair on the lower right side of the sandblast Heritage Antique 73S Canadian came out very well and really is unnoticeable. The pipe is a real beauty and the finish and shape are well done and have a classic English look even though this is an American Made pipe. The thin taper vulcanite stem polished up on the buffing wheel with Blue Diamond and had a rich glue. I gave the bowl multiple coats of Conservator’s Wax and the stem multiple coats of carnauba wax on the buffing wheel and followed that by buffing the entire pipe with a clean buffing pad. I hand buffed the pipe with a microfiber cloth to deepen the shine. The finished Heritage Antique Canadian fits nicely in the hand and feels great. Give the finished pipe a look in the photos below. The dimensions of the pipe are Length: 6 inches, Height: 1 ¾ inches, Outside diameter of the bowl: 1 ¼ inches, Chamber diameter: ¾ of an inch. The weight of the pipe is 1.27 ounces/36 grams. I will soon be adding it to the rebornpipes store in the American Pipe Maker section. If you are interested in adding this pipe to your collection send me a message or an email. Thanks for reading this blog and my reflections on the pipe while I worked on it. There are many more to come!

Breathing New Life into a Wally Frank Wine Root Bruyere De Luxe Selected Grain Squat Bulldog


Blog by Steve Laug

The next pipe on the table was purchased on 05/08/19 from an online auction in Cedar Springs, Michigan, USA. Jeff picked it up because we both like Cumberland stems and this little Bulldog had that and some great grain. The pipe is stamped Wine Root [over] Bruyere on the top left side of the shank and  Wally Frank  [over] Limited on the bottom left side. On the top right side it read De Luxe [over] Selected Grain and on the bottom right side it was stamped ITALY. The bowl was heavily caked with a heavy overflow of lava on the beveled rim top. There was some darkening on the outer edge of the rim down the side of the cap toward the back of the bowl. The finish was dirty and oily from the heavy use it had seen. It had a Cumberland push stem and an interesting/odd stinger apparatus in the tenon. The stem was oxidized to the point that the Cumberland was almost hidden. There were tooth marks and chatter on both sides ahead of the button. Jeff took some photos of the pipe before he started his clean up work. The a photo of the rim top show the thick lava coat that flows out of the bowl and over the edge of the bowl. It is hard to know what the edges of the bowl – inner and outer – look like because of the lava and cake. The photos of the stem show the heavy oxidation and tooth marks and chatter on both sides. Jeff took a photo of the stinger apparatus that shows how packed full of debris and tars that the fins around the stinger really are.The next three photos show the grain around the sides of the bowl and heel as well as the placement of the fills on the sides of the bowl. It is a pretty neat looking pipe. The next photo shows the stamping on the top left side of the shank. It was clear and readable. Jeff did not take photos of the other sides of the shank.I turned to Pipedia (https://pipedia.org/wiki/Wally_Frank) to refresh my sense of the history of the brand. I quote below the history that is noted there.

Wally Frank, Ltd. was one of America’s oldest and most respected names in pipes and tobaccos, beginning in the early 1930’s. Wally Frank operated a chain of tobacco stores in New York City (the flagship store was in Lexington Avenue) and had a vast catalog business for pipes and pipe tobaccos. Their numerous private-label pipes were made by many makers, including Charatan, Sasieni, Weber, and many others. Wally Frank, Ltd. also owned the Pioneer brand of meerschaum pipes, made from both Turkish and African meerschaum. In addition to importing pipes, he had many pipes made in his own name and also employed pipemakers like Peter Stokkebye, Svend Bang, and Ed Burak (who later became the owner of Connoisseur). As a result, each Wally Frank pipe must be individually evaluated on its own merit.

Members of Wally Frank’s “The Pipe of the Month Club” received a new pipe in the mail once a month.

In 1952, Wally Frank was on a buying trip in Italy and “discovered” pipe maker Carlo Scotti. Frank liked Scotti’s pipes, but there was the small problem of Scotti’s pipes bearing the same trademark or logo as one of Wally Frank’s pipe lines, the White Bar. The two men decided on creating a new logo for pipes sold in the U.S.: a hole drilled in the stem and with a piece of silver foil inserted in the hole and covered with clear Lucite.

There was no specific information on the line I was working on but the history of the brand was good to be reminded of. Now it was time to work on the pipe.

It may seem that I praise Jeff’s work in cleaning up the pipes I work on a lot! I know I do but he is an indispensable part of the restoration work for me. He has developed a system of cleaning that is quite remarkable and leaves the pipes very clean. It saves me a lot of time so I have no issues saying that! Jeff did a great job cleaning up the pipe as usual. He reamed the pipe with a PipNet reamer and cut back the cake back to the bare briar. He cleaned up the walls with a Savinelli Fitsall Pipe Knife. He scrubbed the interior of the bowl and shank with pipe cleaners, cotton swabs and alcohol to remove the tars and oils. He scrubbed the exterior of the pipe with Murphy’s Oil Soap and a tooth brush to remove the grime from the finish. He worked on the rim top lava and darkening with the soap and tooth brush. He scrubbed the inside of the stem with alcohol and pipe cleaners. He scrubbed the exterior with Soft Scrub and then soaked it in Before & After Deoxidizer. He washed it off with warm water to remove the Deoxidizer. The pipe looked far better when it arrived.    I took some close up photos of the rim top and also of the stem surface. I wanted to show how well it had cleaned up but also to show the damage. The rim top photo looks good but there are some nicks and damage on the top and the beveled inner rim edge. The outer edge is also nicked. I also took close up photos of the stem to show the light tooth marks and chatter on the surface near the button on both sides. The next series of photos show the stamping on the shank sides. The stamping is clear and readable as noted above.I took the pipe apart and took a photo of the pipe. It is a good looking pipe and has some great grain on the side of the bowl. The stinger is very unique and is stained red from the stain on the bowl that has permeated the aluminum.I decided to address the rim top damage first. I used a folded piece of 220 grit sandpaper to the beveled inner edge to minimize the damage to the rim. I think that it is definitely better once I finished. I would polish the flat top of the rim with micromesh and try to minimize the scratching there. The angle of the stem makes topping the bowl seem impractical.   I polished the briar rim top and edges along with the rest of the briar with micromesh sanding pads –dry sanding with 1500-12000 grit pads and using a damp cloth after each pad. I worked some Before & After Restoration Balm into the surface of the briar with my fingertips to clean, enliven and protect the briar. I let the balm sit for 15 minutes and then buffed with a cotton cloth to raise the shine. The photos show the bowl at this point in the restoration process. I set the bowl aside and turned my attention to the stem. I sanded out the tooth marks and chatter with 220 grit sandpaper and was able to remove them from the surface. I started the polishing with 400 grit wet dry sandpaper. I wiped it down with some Obsidian Oil.I decided to try and clean up the stinger next. I used a brass bristle brush to try to clean off the stain on the aluminum. It did very little so I put it in a small alcohol bath for about an hour to see if it works. I worked on it with a cotton pads and alcohol to remove more of the stain. It did not do too much. I then scrubbed the stinger with acetone and removed some more. It did not remove any more so there is a pink tinge that remove. I polished the stem with micromesh sanding pads – wet sanding with 1500-12000 grit sanding pads. I wiped it down after each sanding pad with Obsidian Oil. I polished it with Before & After Pipe Stem Polish – both Fine and Extra Fine. Afterwards I rubbed it down with another coat of Obsidian Oil and let it dry. I am excited to finish restoration of this Wally Frank Wine Root Bruyere De Luxe Selected Grain Squat Bulldog. I put the pipe back together and buffed it with Blue Diamond on the buffing wheel. I gave the bowl and stem multiple coats of carnauba wax. I buffed the pipe with a clean buffing pad to raise the shine and hand buffed it with a microfibre cloth to deepen the shine. It is fun to see what the polished bowl looks like with the polished Cumberland saddle stem. This squat Wally Frank Wine Root Bruyere Bulldog feels great in my hand. It is light and well balanced. Have a look at it with the photos below. The dimensions are Length: 5 ½ inches, Height: 1 ¼ inches, Outside diameter of the bowl: 1 ¼ inches, Chamber diameter: ¾ of an inch. The weight of the pipe is 31 grams/ 1.09 oz. It is a beautiful pipe and one that will be on the American Pipe Makers section of the rebornpipes store soon. If you are interested in adding it to your collection let me know. Thanks for walking through the restoration with me as I worked over this pipe. Thanks to each of you who are reading this blog.

Breathing New Life into a Patented KBB Yello-Bole 2198L President


 Blog by Steve Laug

This pipe was purchased from an antique mall on 04/28/19 in Ogden, Utah, USA. Jeff picked it up because it was such a unique shape. It seems to somehow combine parts of the Skater shape and the Bullmoose’s protruding chin. The grain was nice and it had some fills on the sides of the bowl but not too obvious or obnoxious. The pipe is stamped President on the left side of the shank and KBB in a cloverleaf followed by Yello-Bole [over] Patent – 90232 on the right side of the shank. On the underside at the heel it is stamped with the shape number 2198L and mid shank reads Algerian Bruyere. The bowl had a moderate cake but you could see the yellow Honey Coating that Yello-Bole draw their name from. The finish was dirty and had a lot of nicks and scratches on the rim top and around the bowl sides. The base of the bowl and shank had been flattened to make the pipe a sitter. It had a vulcanite push stem and no stinger apparatus in the tenon or shank and there was no evidence that their ever had been one. The stem was lightly oxidized. There are a burn mark on the top side near the yellow O logo. There were tooth marks and chatter on both sides ahead of the button. Jeff took some photos of the pipe before he started his clean up work. The photos of the rim top show the nicks and scratch on the top and the darkening on the inner edge of the bowl. You can also see the yellow bowl coating on the back side near the top of the bowl above and surrounded by the cake. The photos of the stem show the oxidation and tooth marks and chatter on both sides. They do not show the damage on the top of the stem near the O stamp. The next three photos show the grain around the sides of the bowl and heel as well as the placement of the fills on the sides of the bowl. It is a pretty neat looking pipe. The next series of photos show the stamping on the shank sides and the O logo stamp on the stem top. You can also see the burn mark on the stem top in the photo of the logo. The stamping is clear and readable as noted above. Before I started my work on the pipe I decided to do a bit of work on the Patent Number and the shape number on the heel of the bowl. I remembered that Troy Wilburn, one of our blog writers and good friend of rebornpipes sent me a shape number list for old Kaywoodie and Yello-Bole pipes that is on the blog. I found it very useful and typed it into a chart format. Troy said that he got the data for this from the Kaywoodie Forums. If you have not visited the forums here is the link: http://kaywoodie.myfreeforum.org/ . I decided to post the chart on the blog for easy access. Thank you to the KW forum for the information. Here is the link to the full shape chart information that I have on the site (https://rebornpipes.com/2016/05/07/kaywoodie-yello-bole-shape-numbers/).

I also have included the pertinent sections of the chart on this particular 2193 shape. I remembered that the last two numbers and letter on heel of the bowl were the shape of the pipe. In this case the 93L referred to a shape that KBB called a Large President. I have drawn a box around that stamp number. The 93 is thus the President shape and the L identifies it as a large version of the pipe. Note also that the pipe was only made between 1936-1937 so it is an old timer.Troy also included the following information on the first two digits of the shape number. I quote in full regarding that below.

2-digit prefixes for 4-digit pipes – you might find an odd ball or a rare one that is not on the list.
From the time of the first Kaywoodie until 1938 for Kaywoodie and for Yello-Bole, Kaufmann Brothers & Bondy used a 4-digit number system (plus a letter sometimes) to identify the line and shape number. The 4-digits were not used after 1938. The first two, which we’ll call the prefix, referred to the finish and the second two, the suffix numbers referred to the shape number.

I have identified the section on the chart where this pipe stands. Note that the 21 prefix is missing but the description of the 20 and 22 is identical to the information on this pipe. From that I know that the pipe I am working on should have a push tenon, vulcanite stem. The good news is that I have the original stem.Now it was time to see if I could find anything out about the Patent number. I am assuming it is a US Patent as the pipe is an American brand. The number on the right side of the bowl reads as follows:  Patent – 90232. I turned to the US Patent search site to see what I could find out there. Here is the link to the site: https://patft.uspto.gov/netahtml/PTO/patimg.htm . Unfortunately that patent number takes me to a series of drawings of a new plowshare. At this point the Patent information is a dead end.

It may seem that I praise Jeff’s work in cleaning up the pipes I work on a lot! I know I do but he is an indispensable part of the restoration work for me. He has developed a system of cleaning that is quite remarkable and leaves the pipes very clean. It saves me a lot of time so I have no issues saying that! Jeff did a great job cleaning up the pipe as usual. He reamed the pipe with a PipNet reamer and cut back the cake back to the bare briar. He cleaned up the walls with a Savinelli Fitsall Pipe Knife. He scrubbed the interior of the bowl and shank with pipe cleaners, cotton swabs and alcohol to remove the tars and oils. He scrubbed the exterior of the pipe with Murphy’s Oil Soap and a tooth brush to remove the grime from the finish. He worked on the rim top lava and darkening with the soap and tooth brush. He scrubbed the inside of the stem with alcohol and pipe cleaners. He scrubbed the exterior with Soft Scrub and then soaked it in Before & After Deoxidizer. He washed it off with warm water to remove the Deoxidizer. The pipe looked far better when it arrived.  I took some close up photos of the rim top and also of the stem surface. I wanted to show how well it had cleaned up. The rim top photo looks good but there are some nicks and scratches on the top and the beveled inner rim edge. I also took close up photos of the stem to show the light tooth marks and chatter on the surface near the button and the burn mark on the top near the O logo. I took photos of the stamping on the sides of the shank. You can see that it is stamped as noted above. It is clear and readable.I took the pipe apart and took a photo of the pipe. It is a good looking pipe and has some great grain on the side of the bowl.I decided to address the rim top damage first. I used a folded piece of 220 grit sandpaper to the beveled inner edge to minimize the damage to the rim. I think that it is definitely better once I finished. I would polish the flat top of the rim with micromesh and try to minimize the scratching there. The angle of the stem makes topping the bowl seem impractical.I polished the briar rim top and edges along with the rest of the briar with micromesh sanding pads –dry sanding with 1500-12000 grit pads and using a damp cloth after each pad. I worked some Before & After Restoration Balm into the surface of the briar with my fingertips to clean, enliven and protect the briar. I let the balm sit for 15 minutes and then buffed with a cotton cloth to raise the shine. The photos show the bowl at this point in the restoration process. I set the bowl aside and turned my attention to the stem. I filled in the burn mark on the top and the tooth marks on the top and underside of the stem with clear super glue. I let the repairs cure. Once they had cured I sanded the repairs on the underside and the chatter on the topside with 220 grit sandpaper. I started the polishing with 400 grit wet dry sandpaper. I wiped it down with some Obsidian Oil.   I polished the stem with micromesh sanding pads – wet sanding with 1500-12000 grit sanding pads. I wiped it down after each sanding pad with Obsidian Oil. I polished it with Before & After Pipe Stem Polish – both Fine and Extra Fine. Afterwards I rubbed it down with another coat of Obsidian Oil and let it dry. I am excited to finish restoration of this older KBB Yello-Bole President 2193L pipe. I put the pipe back together and buffed it with Blue Diamond on the buffing wheel. I gave the bowl and stem multiple coats of carnauba wax. I buffed the pipe with a clean buffing pad to raise the shine and hand buffed it with a microfibre cloth to deepen the shine. It is fun to see what the polished bowl looks like with the polished black vulcanite stem. This unique looking KBB Yello-Bole President actually feels great in my hand. It is light and well balanced. Have a look at it with the photos below. The dimensions are Length: 6 ½ inches, Height: 1 ¾ inches, Outside diameter of the bowl: 1 ¼ inches, Chamber diameter: ¾ of an inch. The weight of the pipe is 32 grams/ 1.16 oz. It is a beautiful pipe and one that will be on the American Pipe Makers section of the rebornpipes store soon. If you are interested in adding it to your collection let me know. Thanks for walking through the restoration with me as I worked over this pipe. Thanks to each of you who are reading this blog.

Another Unsmoked Hand Made Mystery Pipe – A Rusticated Panel Pot


Blog by Steve Laug

The next pipe on the table was one of a pair of unsmoked Mystery Pipes. The first was an unsmoked Poker or Cherrywood with a stamped MV, VM or NN logo on the bowl bottom that I cannot interpret. No one seems to be able to identify the maker. When Jeff and I picked this one up it was one of two pipes in a batch of pipes we bought from am online auction in Wilkes Barre, Pennsylvania, USA in March of 2019. It has taken a while for me to work on these. The one pictured below is for sale in the American Pipe Makers section of the rebornpipes store if you want to see a few more photos of it.This second pipe from the pair is a rusticated Panel Pot that is quite nice. It too is unsmoked and it is stamped with the same logo but this time on a smooth panel on the left side of the shank. It is as well made as the previous one. The pipe has a very tight almost cut glass-like rustication that has been stained in dark brown that complements and contrasts with the light brown on the smooth left shank and the band around the other three sides of the shank. The finish was dusty and dirty but other than that it was a clean unsmoked pipe. The bowl and rim looked good and the stem was flawless polished vulcanite that is deceptively shiny. Jeff took photos of the pipe before he cleaned it up. Jeff took photos of the bowl and rim top to show the new condition of the pipe. He also took photos of the stem showing what it looked like on both sides from the shank to the button. It was very clean. The top side had some light oxidation but no marks.The finish on the sides of the bowl and shank is deeply rusticated with a very tight pattern that makes it like cut glass (but not sharp). It is quite pretty.The next photo shows the mysterious seemingly unidentifiable makers mark. Is it an “NN”, an “NV”,  “MV”, “AW”? I am not sure and it seems I have found no one else who knows the mark. Do you? Leave a comment in the box at the bottom of the blog and fill us all in on your thoughts. Thanks.Jeff had done a great job cleaning up the pipe, scrubbing the interior of the shank and stem to remove the dust and debris of time using pipe cleaners and alcohol. He scrubbed the exterior of the pipe with Murphy’s Oil Soap and a tooth brush to remove the dust from the rusticated finish. He scrubbed the exterior of the stem with Soft Scrub and then soaked it in Before & After Deoxidizer. He washed it off with warm water to remove the Deoxidizer. The pipe looked good when it arrived. I took some photos of it before I did my part of the restoration. I took some close up photos of the rim top and also of the stem surface. I wanted to show how well it had cleaned up. The rim top photo looks good and the bowl clean and ready to be smoked. I also took close up photos of the stem to show how clean it looked. There was still a light oxidation on the top side but otherwise it was in good condition.I took a photo of the stamping on the left side of the shank. Any ideas?I removed the stem from the shank and took a photos of the parts. It is a nice looking pipe.The pipe was virtually new so I started my restoration with a simple first step. I worked some Before & After Restoration Balm into the surface of the briar with my fingertips and a horsehair shoe brush to clean, enliven and protect the briar. I let the balm sit for 15 minutes and then buffed with a cotton cloth to raise the shine. The photos show the bowl at this point in the restoration process. I wanted to give some idea of how the shank, though it appeared to be square, was not. It was wider on the left and the top than the bottom. The tenon had some different looking turning marks on it that I would need to smooth out. It is definitely a hand made pipe not machine made.I set the bowl aside and polished the stem with micromesh sanding pads – wet sanding with 1500-12000 grit sanding pads. I wiped it down after each sanding pad with Obsidian Oil. I polished it with Before & After Pipe Stem Polish – both Fine and Extra Fine. I gave it a final coat of Obsidian Oil and set it aside to dry. This Hand Made Rusticated Panel Pot  turned out to be a great looking pipe. The rusticated dark brown finish on the briar is beautiful and the nooks and crannies have taken on depth that is quite stunning around the bowl and shank. I put the pipe back together and buffed it lightly with Blue Diamond on the buffing wheel. I gave the bowl multiple coats of Conservator’s Wax and the stem multiple coats of carnauba wax. I buffed the pipe with a clean buffing pad to raise the shine and hand buffed it with a microfibre cloth to deepen the shine. It is fun to see what the polished bowl looks like with the polished black vulcanite stem. This classic looking No Name Panel Pot feels great in my hand. It is light and well balanced. Have a look at it with the photos below. The dimensions are Length: 5 ½ inches, Height: 1 ½ inches, Outside diameter of the bowl: 1 ¼ x 1 3/8 inches, Chamber diameter: ¾ of an inch. The weight of the pipe is 35 grams/1.23 oz. It is a beautiful pipe and one that I will be putting in the rebornpipes store in the American Pipe Makers section with the Cherrywood Mate. Thanks for walking through the restoration with me as I worked over this pipe. Thanks to each of you who are reading this blog.

A Very Oddly Modified Chelsea Selected Briar Natural Billiard


Blog by Steve Laug

To be honest I think the only reason we picked up this pipe is because the way it was when saw it on Ebay back in 2017. It came from a seller who was in La Mesa, California, USA. It came in a nice blue box with a linen coloured satiny lining. The box was in okay condition and read Chelsea Selected Briar on the cover. The pipe itself was the oddity. The previous owner had wrapped the stem end with string and built his/her own bit protector. The wrapping was quite thick so it looked utterly uncomfortable. It made me wonder if he/she did not have teeth and this was the way the made the pipe a dental bit. LOL! I suppose that we will never know for sure but it is certainly one of the strangest looking ones that we have picked up.Jeff took quite a few pictures of the pipe in the box to give an idea of what the box looked like inside and out. Each of the photos showed the odd string wrapping around the stem. It really made us wonder what was hidden under the string.He took the pipe out of the box to take photos of it to show the condition of the bowl and stem. The briar has natural finish and was stained and very dirty. There were dark spots on the sides of the bowl. The pipe was stamped on the left side of shank and read CHELSEA in an italic script. On right side it read Genuine Briar. It had a great shape to it. The stem did not fit against the shank very well probably because it was dirty inside as well. The bowl was thickly caked and there was a thick lava coat on the rim top. It looked like there was some burn damage on the inner back edge of the bowl but it would become clear once it was cleaned. The stem is dirty and you can see the thickness of the string wrap on the end. I am amazed at how thick it is and to me how uncomfortable! Jeff took some close up photos of the bowl and rim to give a clear picture of the thickness of the cake and the lava overflow on the rim top. You can also see the nicks in the outer edge of the bowl in the photos below. He also took photos of the string wrap to show how rough and thick it really is. I really want to know what is underneath it! The time for the unwrapping was at hand. Jeff cut the string and untwisted it. To our surprise the stem was in perfect condition. There were no tooth marks and no chatter. The only thing on it was debris and a bit of calcification . It would clean up well. It was also obvious that the stem was on the shank upside down. He took some photos of the sides and heel of the bowl. While dirty and nicked the pipe has some great grain. The stamping on the sides of the shank were clear and readable as noted above.The stamping on the pipe pointed me to either an American Made pipe of one Made for Import into the American market. I did a Google search and found other pipes with the same Chelsea stamp and several were made in Italy. Several others said Imported Briar and had what appeared to be Comoy’s shape numbers. I remembered that late in Comoy’s history there had been a link between Lorenzo pipes and them so it could be true that the pipes were made for or by Comoy’s.

I turned to Pipedia and came up empty handed. There was nothing on the brand nor was there anything linking them to Comoy’s. I turned then to Pipephil (http://pipephil.eu/logos/en/logo-c4.html) and the site made a link to Comoy’s on a pipe made for the 1933 Chicago World’s Fair. While it is not definitive, there is a tie it seems. However, there is still a part of me after working on this pipe that will always think that it is American made. The look and feel of it reminds of Bertrams pipes from Washington DC.

Jeff had done a great job cleaning up the pipe as usual. He reamed the pipe with a PipNet reamer and cut back the cake back to the bare briar. He cleaned up the walls with a Savinelli Fitsall Pipe Knife. He scrubbed the interior of the bowl and shank with pipe cleaners, cotton swabs and alcohol to remove the tars and oils. He scrubbed the exterior of the pipe with Murphy’s Oil Soap and a tooth brush to remove the grime from the finish. He worked on the rim top lava and darkening with the soap and tooth brush. He scrubbed the inside of the stem with alcohol and pipe cleaners. He scrubbed the exterior with Soft Scrub and then soaked it in Before & After Deoxidizer. He washed it off with warm water to remove the Deoxidizer. When I finally took it out of the box four years later I was surprised at how good the pipe looked. It was a nice looking pipe now.  I took some close up photos of the rim top and also of the stem surface. I wanted to show how well it had cleaned up. The rim top photo looks good but there is some burn damage on the inner edge at the back of the bowl and all around the inner edge there is darkening. There are some rough areas on the outer edge of the rim all the way around the bowl. I also took close up photos of the stem to show how almost pristine it was thanks to the string wrap it had worn. There were some scratches but they would clean up quite easily.I took photos of the stamping on the sides of the shank. You can see that it is stamped as noted above. It is clear and readable.    I took the pipe apart and took a photo of the parts. It is a good looking pipe and has some great mixed grain on the sides of the bowl. I decided to address the rim top damage first. I lightly topped the bowl on a topping board with 220 grit sandpaper to minimize the damage to the top and inner edge of the bowl. I then used a folded piece of 220 grit sandpaper to give the edge a slight bevel to further minimize the damage to the rim. I think that it is definitely better once I finished. I polished the briar rim top and edges along with the rest of the briar with micromesh sanding pads –dry sanding with 1500-12000 grit pads and using a damp cloth after each pad. I worked some Before & After Restoration Balm into the surface of the briar with my fingertips to clean, enliven and protect the briar. I let the balm sit for 15 minutes and then buffed with a cotton cloth to raise the shine. The photos show the bowl at this point in the restoration process. I set the bowl aside and turned my attention to the stem. It was in such great condition that I polished it with micromesh sanding pads – wet sanding with 1500-12000 grit sanding pads. I wiped it down after each sanding pad with Obsidian Oil. I polished it with Before & After Pipe Stem Polish – both Fine and Extra Fine. This Chelsea Selected Briar Natural Billiard turned out to be a more beautiful pipe than I had expected. The natural finish on the briar is beautiful and the grain pops. I put the pipe back together and buffed it with Blue Diamond on the buffing wheel. I gave the bowl and stem multiple coats of carnauba wax. I hand buffed the pipe with a clean buffing pad to raise the shine and hand buffed it with a microfibre cloth to deepen the shine. It is fun to see what the polished bowl looks like with the polished black vulcanite stem. This classic looking Chelsea Billiard feels great in my hand. It is light and well balanced. Have a look at it with the photos below. The dimensions are Length: 6 inches, Height: 1 ¾ inches, Outside diameter of the bowl: 1 ¼ inches, Chamber diameter: ¾ of an inch. The weight of the pipe is 33 grams/1.16 oz. It is a beautiful pipe and one that will be on the American Pipe Makers section of the rebornpipes store soon. If you are interested in adding it to your collection let me know. Thanks for walking through the restoration with me as I worked over this pipe. Thanks to each of you who are reading this blog.

This one is strangely beautiful – a Smooth Bowled Brial System Pipe


Blog by Steve Laug

This particular style of system pipe always reminds me of the tadpoles we used to catch when I was younger. We would get a jarful and watch them become frogs. The pipe has that same look to me. Or you might compare it to an inflated puffer fish. Either way it is an odd pipe and yet there is something strangely beautiful about it. We purchased this smooth bowled one from an antique mall on 10/28/17 in Bozeman, Montana, USA. I have worked on one other of these Brial pipes and have found them hilariously interesting. The base tube that receives the stem is made to be stuffed with wads of toilet paper or tissue to filter out the moisture in the smoke. The one I had before still had that in it. Fortunately, this did not as it is quite smelly and messy. This one had a fairly thick cake in the bowl  and some dings in the rim top and light lava on the inner edge of the bowl. The briar bowl was dirty with ground in oils and the tubular shank was dusty and dirty as well. The brass coloured ends of the tube were also lightly scratched and dirty. The tube has two small bumps on the bottom that act as feet making the pipe a sitter. The stem had tooth chatter and marks on both sides. I think the stem is a plastic product rather than vulcanite. It is quite different feeling and the marks in it are much like what I have seen on Medico pipe stems. The brass end plate on the stem end of the tube read Brial [over] Pats Pend. When removed there was a nickel nut on the inside holding the stem in place and a wire to wrap the tissue paper filter around. Jeff took these photos before he started his clean up of the pipe. Jeff took some photos of the rim and bowl to give a sense of the cake and lava situation. You can also see the nicks and scratches in the briar. It is still a nice looking piece of briar. The stem is also shown. You can see the tooth marks and chatter on the surface. Even the marks look different than the ones that are in vulcanite or acrylic. Jeff took a photo of the side of the bowl to give a glimpse of the grain on the briar. It is quite nice. He also captured the etching on the brass stem end of the tube. It reads as noted above.I mentioned above about the earlier Brial pipe that I had worked on. I turned to that blog now and reread the information that I had gathered on the brand. Here is the link to the blog if you would like to have a look at it (https://rebornpipes.com/2017/07/17/a-messy-cleanup-on-a-brial-system-pipe/). I quote the section from the blog on the brand itself. It is quite interesting.

I remember when I first started looking at getting a Brial pipe I Googled and found a write up on the brand on the Smoking Metal Website. It was that brief description, the photos and printed advertisement that hooked me and set me on the hunt to acquire one of them. I have included that write up for you. If you wish to read it on the website here is the link – http://www.smokingmetal.co.uk/pipe.php?page=70.

The BRIAL pipe is basically an alloy cylinder to which the briar bowl is screwed through the base of the bowl. The front end is permanently sealed with an alloy endpiece. The cylinder is filled with a tissue to act as an absorption media. This can be tamped in or extracted by means of the probe attached to the mouthpiece plate.

To enable the pipe to stay upright on a table, two dimples have been made in the underside of the cylinder to act as ‘feet’ as shown in my photos.

Brials were available in natural aluminium, brass anodized finish or black… The pipe was patented and manufactured by Salimar Oden in Jefferson Historic District, Muskegon, Michigan. It is believed he continued to market them until his move to Florida in 2000.

Smoking Metal also had a copy of this advertisement sheet on their site. Personally, I love the wording and descriptions on these older advertising flyers. The way they speak of the pipes and what they deliver always gives me cause to laugh. This one is no exception. I include it below. Make sure to give it a read.I posted a note on the Facebook Metal Pipe Smokers Group asking about information on the pipe and potential patent information. One of the members, Cody Easom posted some pictures of a new old stock, unsmoked Brial with the various inserts that came with the pipe. The first photo shows the new pipe with the box and the insert. The second photo shows the insert itself. The third and fourth photos show the inside of the new pipe. Now, the goal is in front of me – to get the old pipe on my table to look like this one. My brother did an amazing job cleaning out the inside of the pipe. He reamed the bowl with a PipNet reamer and took the cake back to bare briar. He cleaned out the inside of the tube/cooling chamber and the airway in the screw in the bottom of the bowl and the stem with pipe cleaners, cotton swabs and alcohol. He scoured out the inside of the chamber with steel wool, cotton swabs and alcohol until the inside shone. He scrubbed the stem with Soft Scrub and soaked it in Before & After Deoxidizer. He rinsed it with warm water to remove the excess Deoxidizer. When I finally brought it to my work table I took photos of the pipe. The black matter chamber is very nice with a few small nicks on the sides. The briar bowl is very nice.    I took some close up photos of the bowl, rim and stem surfaces to show how well it had cleaned up and what would need to be addressed. The bowl looked very good. There was some darkening around the inner edge of the bowl and some burn damage on the back side. The stem had a lot of tooth marks and chatter on both sides and looks very different from its vulcanite counterparts with tooth chatter.I took a photo of the stamping on the brass end of the barrel. It is clear and readable as noted above. The brass is in great condition. I took the pipe apart and took photos of the parts. The first one shows the stem removed from the shank and the wire that holds the tissue filter paper. The others show all the parts. I started my work on the pipe by addressing the darkening and burn damage on the inner edge of the rim. I used a folded piece of 220 grit sandpaper to smooth it out and give it a light bevel. I decided to polish out the nicks and scratches with the micromesh sanding pads and to leave behind what remained as a part of this pipe’s journey. I polished the briar bowl with micromesh sanding pads – dry sanding with 1500-12000 grit pads. I wiped the bowl down after each pad with a damp cloth. The bowl and rim began to take on a rich shine by the end of the cycle. I worked some Before & After Restoration Balm into the surface of the briar with my fingertips to clean, enliven and protect the briar. I let the balm sit for 15 minutes and then buffed with a cotton cloth to raise the shine. The photos show the bowl at this point in the restoration process. I touched up the nicks in the matte black finish of the sides of the barrel with a black Sharpie pen. It worked surprisingly well.I rubbed the finish down with some Before & After Restoration Balm. I worked it into the finish and let it sit for 10 minutes then buffed it off with a soft cloth. It looked really good.With that finished I turned my attention to the plastic/nylon/strange material stem! I sanded out the tooth chatter with 220 grit sandpaper and started the polishing with 400 grit wet dry sandpaper. I spent more time than usual with the wet dry sandpaper as the stem material was very porous looking and I wanted to smooth it out.I polished the stem with micromesh sanding pads – wet sanding with 1500-12000 grit sanding pads. I wiped it down after each sanding pad with Obsidian Oil. I polished it with Before & After Pipe Stem Polish – both Fine and Extra Fine.This is one that I am excited to finish the restoration on. Metal pipes can be a bear and painted ones even more so. But, this Brial Pat Pend System Pipe was actually an exception. I put the pipe back together and gently buffed it with Blue Diamond on the buffing wheel. I gave the bowl and stem multiple coats of carnauba wax. I hand buffed the pipe with a clean buffing pad to raise the shine and hand buffed it with a microfibre cloth to deepen the shine. It is fun to see what the polished bowl looks like with the polished  matte black shank tube and the black stem. This is truly beautiful in a very odd way. It actually feels great in my hand. It is light and well balanced. Have a look at it with the photos below. The dimensions are Length: 5 inches, Height: 2 ½ inches, Outside diameter of the bowl: 1 ½ inches, Chamber diameter: 7/8 of an inch. The weight of the pipe is 50 grams/1.76 oz. It is an interesting pipe and one that will be added to the American Pipe Makers section of the rebornpipes store soon. If you are interested in adding it to your collection let me know. Thanks for walking through the restoration with me as I worked over this pipe. Thanks to each of you who are reading this blog.