Tag Archives: Paresh Deshpande article

Transforming a Dr. Grabow “Omega”


Blog by Paresh Deshpande

“Mirror, mirror on the wall, who is the prettiest of them all?” asked this “Omega”, looking deeply into my eyes!!!!! How I wish I could have promptly replied that it was “YOU”…. but I could not get myself to say so!!!!! It was then that I decided to work on this pipe and make an attempt at its transformation.

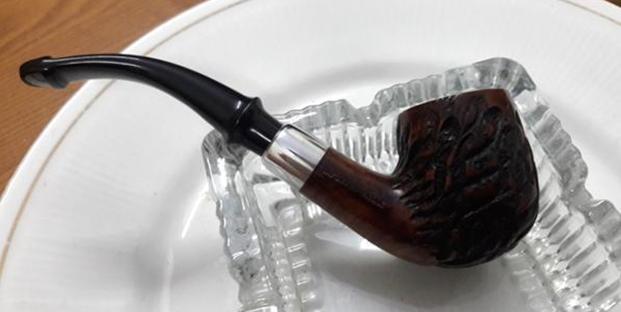
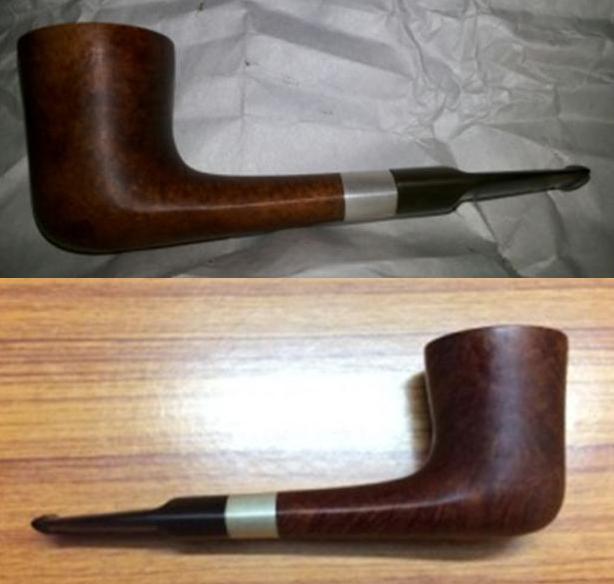
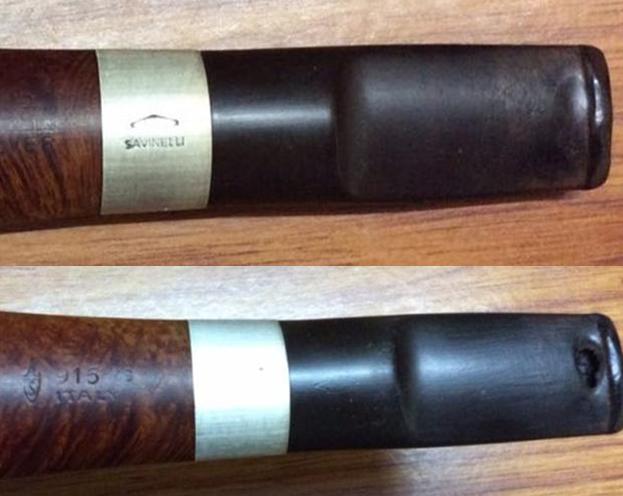
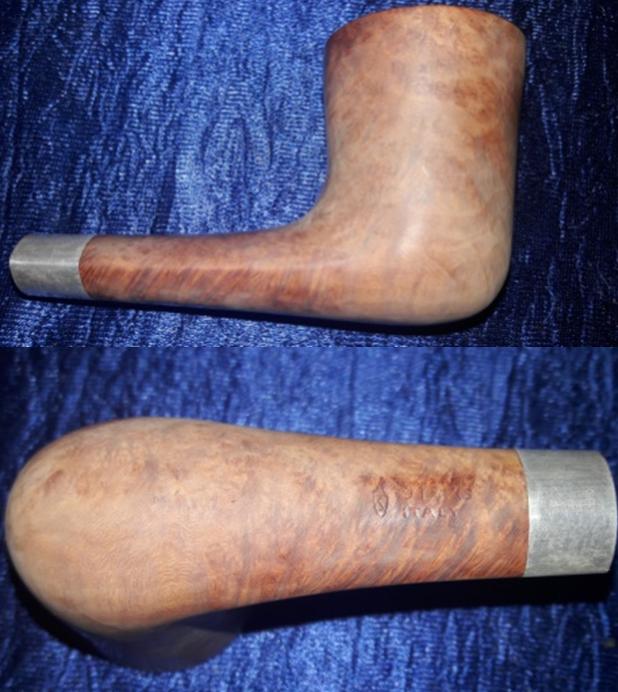
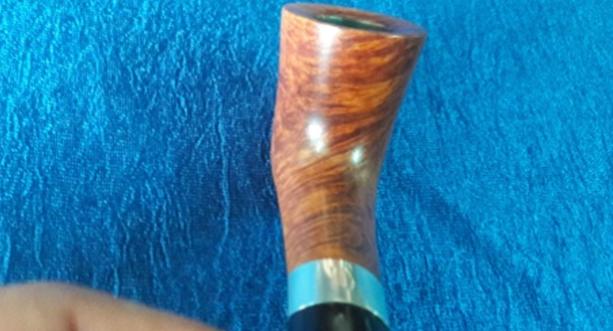
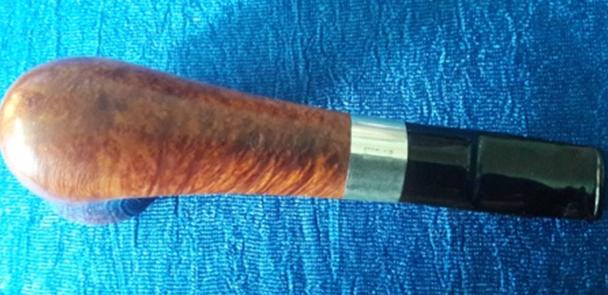
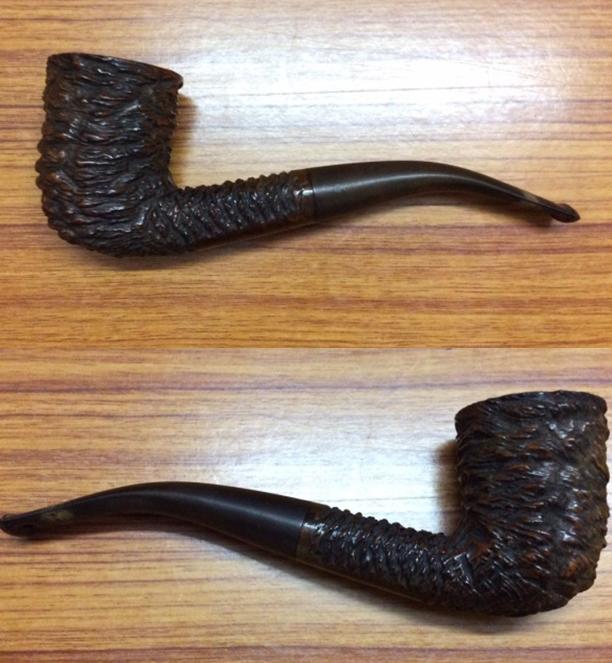
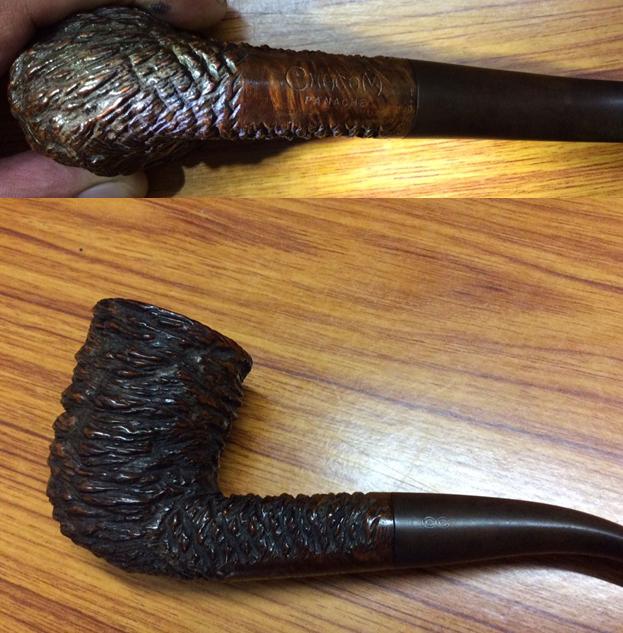
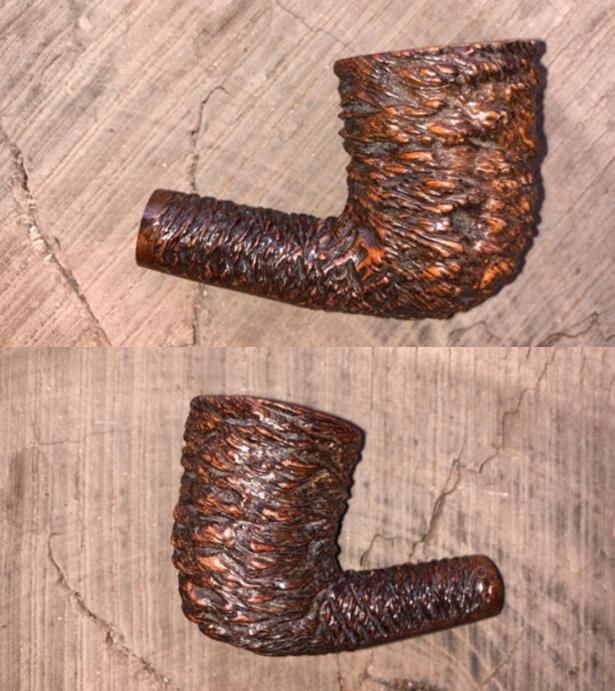
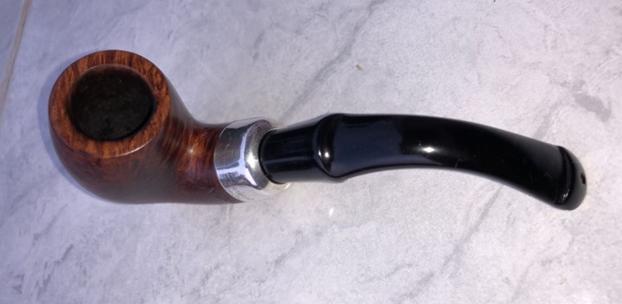
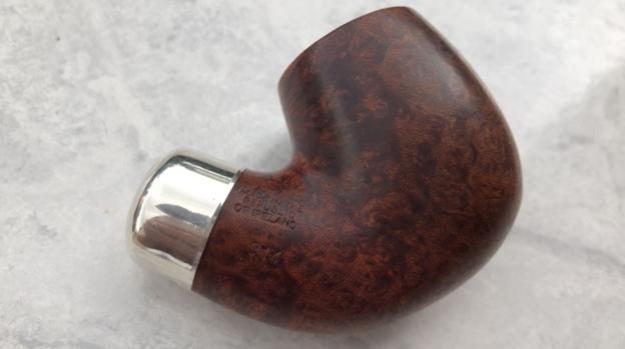
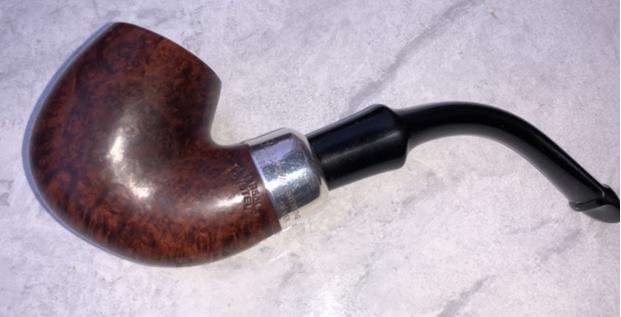
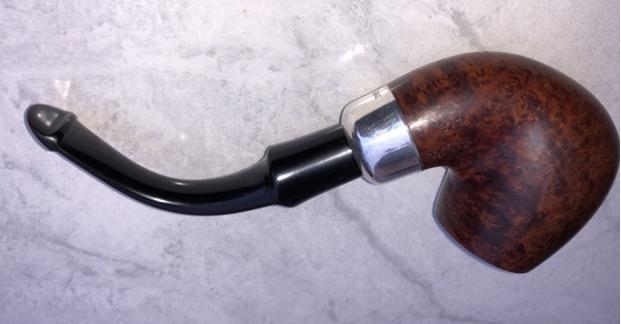
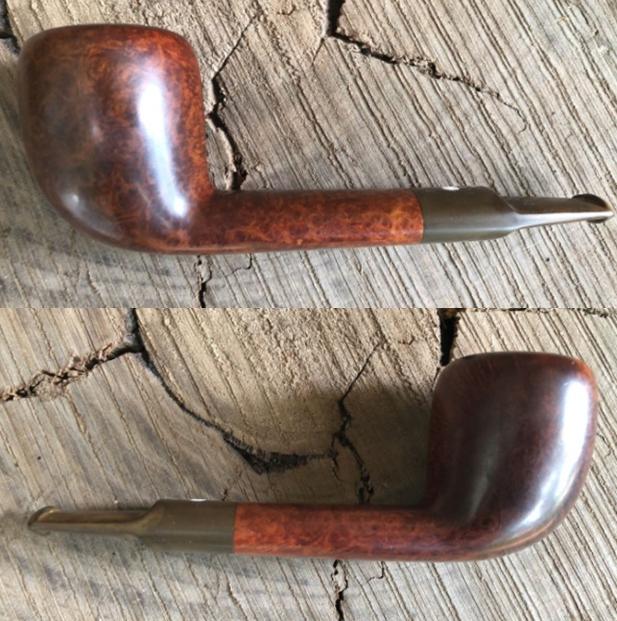
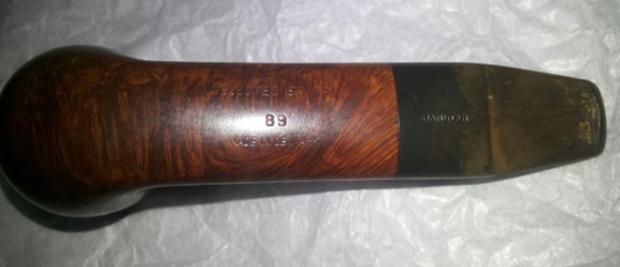
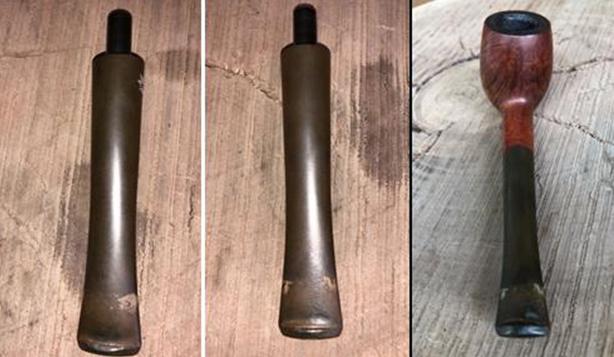
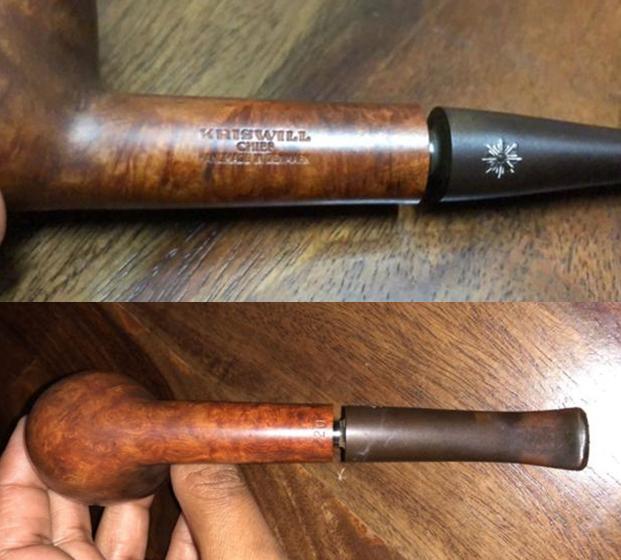
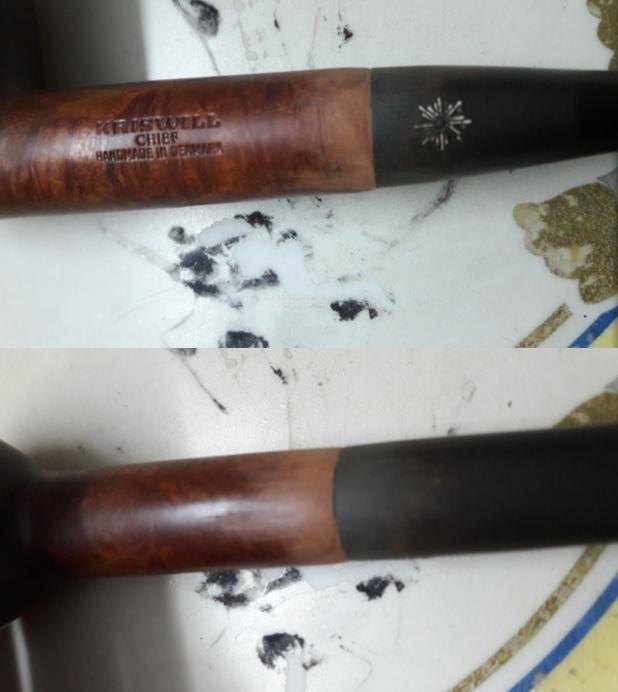
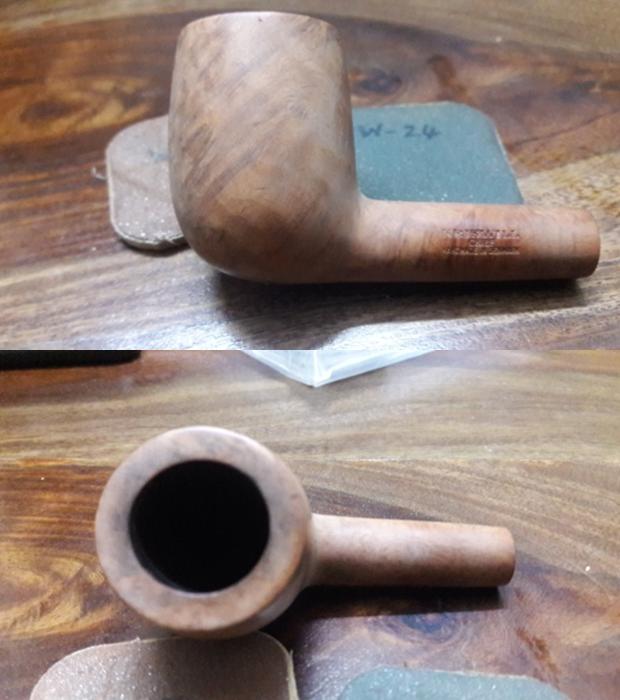
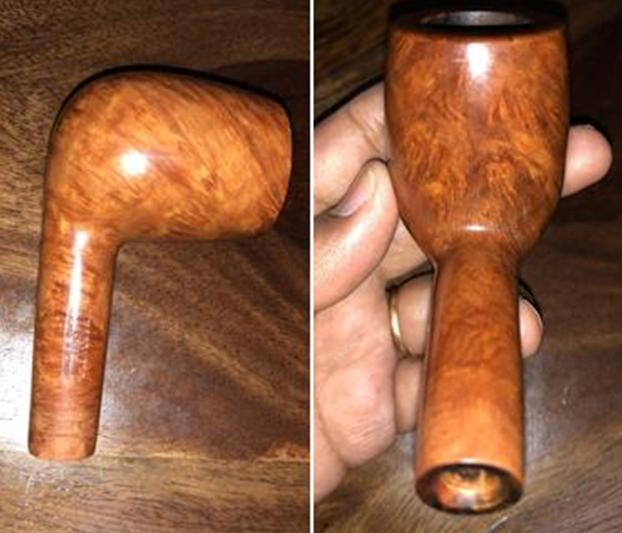
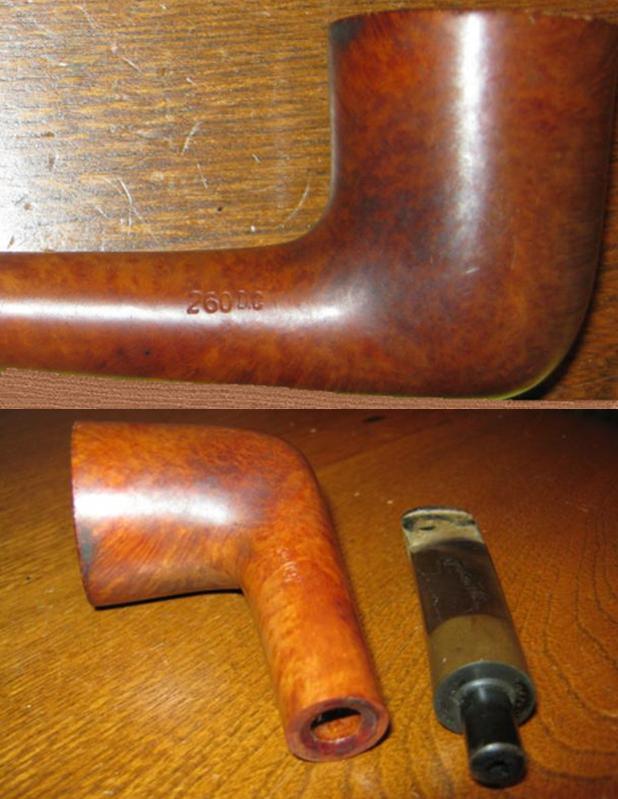
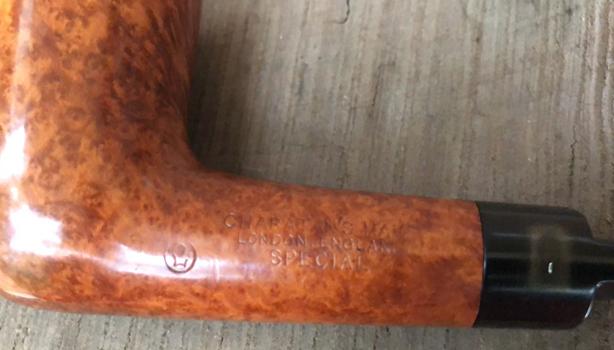
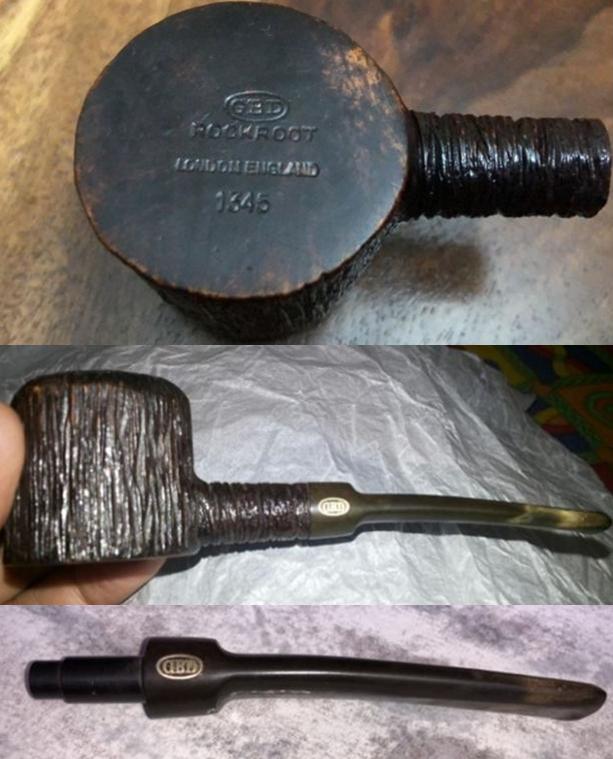
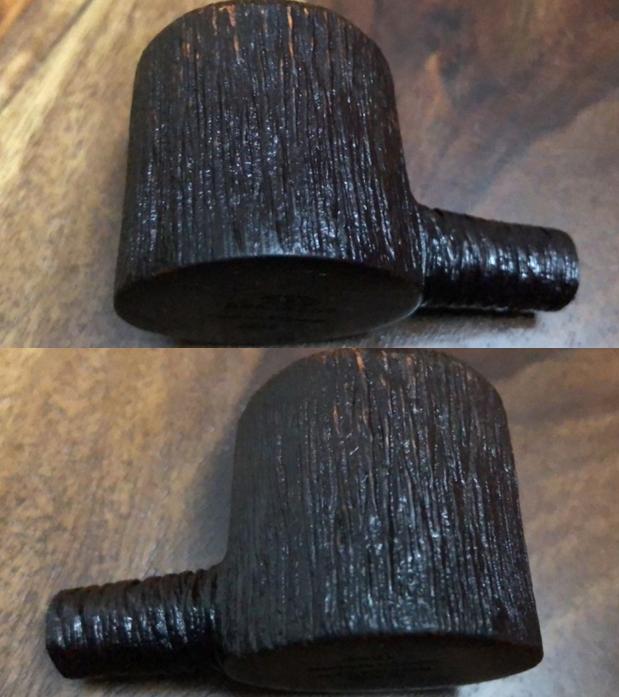
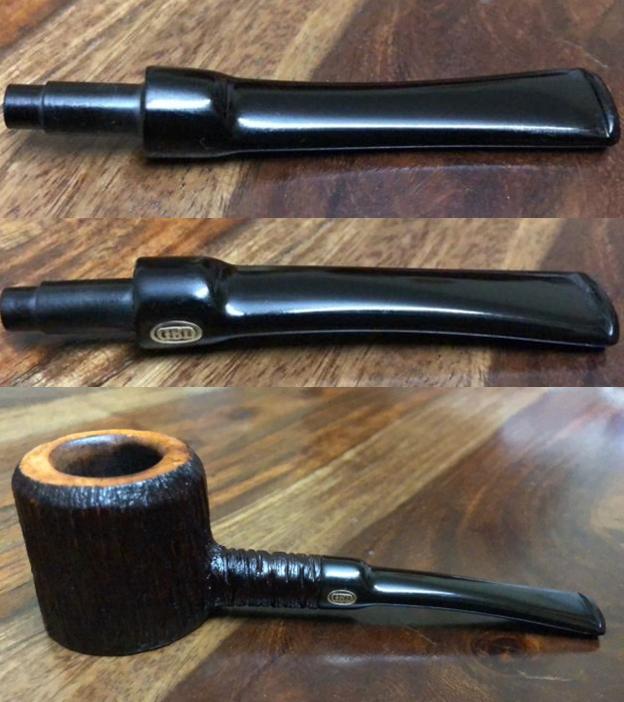
This bent billiards has “OMEGA” stamped on the left side of the shank over “DR. GRABOW” in block capital letters while on the right side it is stamped “IMPORTED BRIAR”. A nickel ferrule adorns the end of the shank and is devoid of any stampings. An “ACE OF SPADES” on the left side breaks the monotonous black of the stem. I searched pipedia.com for information about the brand and try to place the period when this model was introduced by Dr. Grabow. The site has very detailed information about the brand and various models and is a highly recommended read. I have extracted only the relevant portions here:-

Dr. Grabow pipes are the quintessential American brand. Made with care in the Blue Ridge Mountains of North Carolina, this 60-year-old line of inexpensive tobacco pipes is a favorite among new pipe smokers for its consistency and good taste. The famous smoking pipe brand gets its name from the owner Dr Grabow, a general physician who lived in Chicago.

Made in America since the 1930’s, Dr. Grabow tobacco pipes were named after “the good doctor” to help polish the smudged image of smoking a pipe to newly tobacco-leery American public. The line of pipes bearing Dr. Grabow’s name have become one of the best known pipe brands in North America.

The Dr Grabow pipes first began with Louis B Linkman of the M.Linkman and Co of Chicago. The trademark “Dr Grabow” itself actually begun at about 1932 and had the US patent number 1.896,800.

The birth of the Dr Grabow smoking pipe is simple enough. It started off when Dr Grabow himself and his acquaintance Dr Linkman regularly visited the local pharmacist at Brown’s Drug Store in Lincoln Park Chicago.

Dr Linkman was on the lookout for a doctor’s name to Christian an innovative line of pipes in order to mellow out the smoking apparel’s smoggy image. He asked Dr Grabow to allow him to use his name to which he agreed and the name has stuck since then. Linkman continued to manufacture his Dr Grabow pipes until 1953. 

The earliest of these exclusive pipes were stamped both with Linkman’s and Dr Grabow. They included a propeller emblem that was white in color at the top of the mouthpiece.

In 1944 the white propeller emblem was replaced with a white spade, a move that heralded the introduction of Linkman’s new Dr Grabow pipes. All of the newer entries included most of the earlier favorites as well as “TRU-GRAIN” and “SELECT”. Later models of Dr Grabow pipes were described as Imported Briar.

I further searched pipedia.com and found detailed and comprehensive information on the various lines and models of Dr. Grabow through the years and was able to date this Omega to 1975. Here is the link; https://pipedia.org/wiki/Dr._Grabow_Models_(Series,Line)_Names_Through_the_Years

INITIAL VISUAL INSPECTION

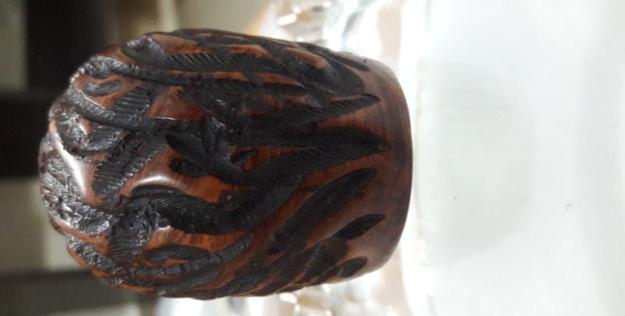
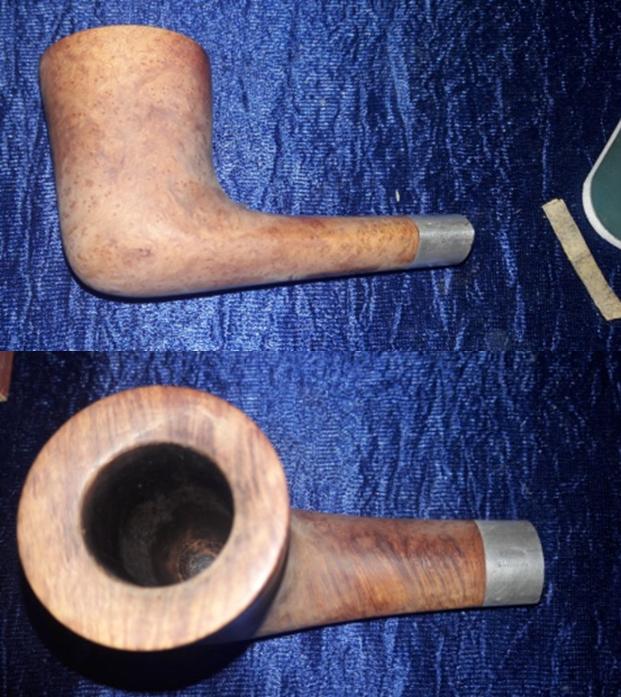
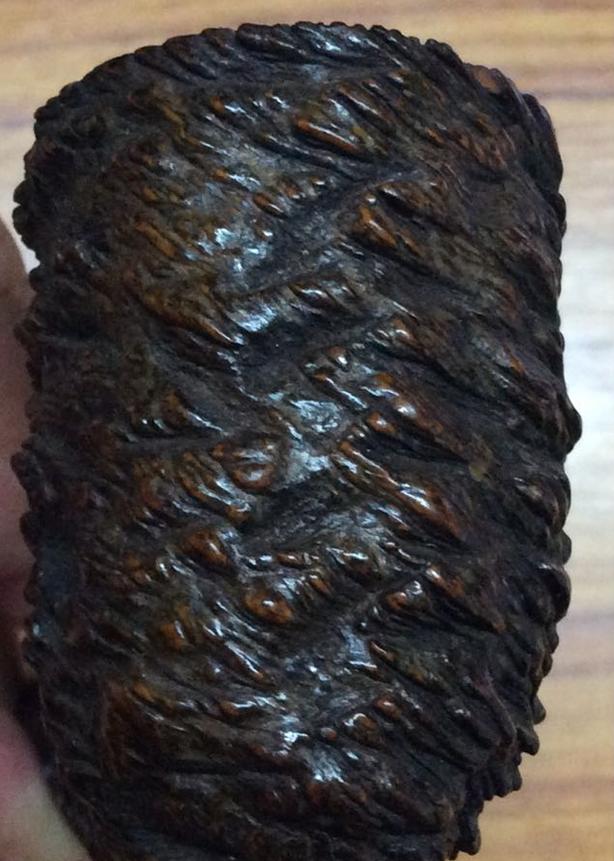
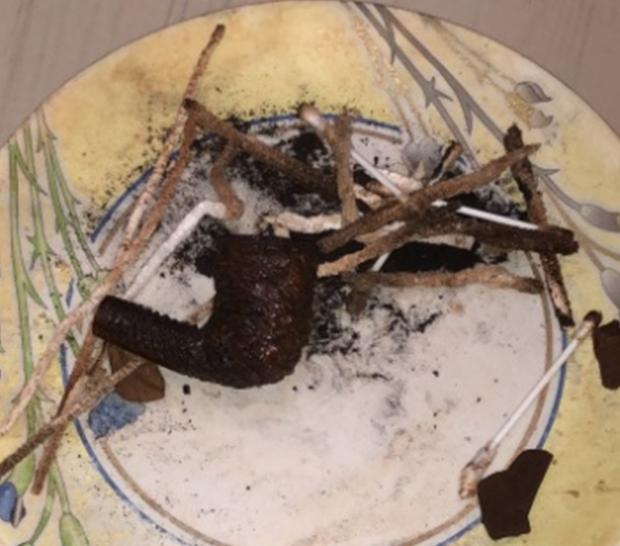
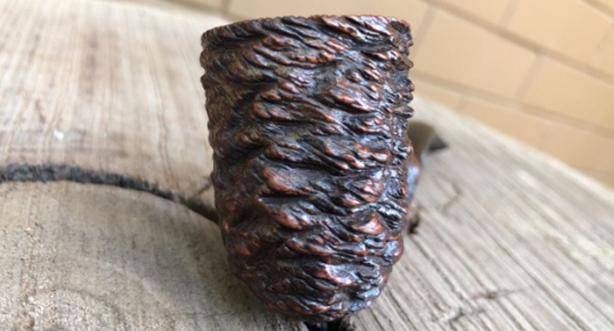
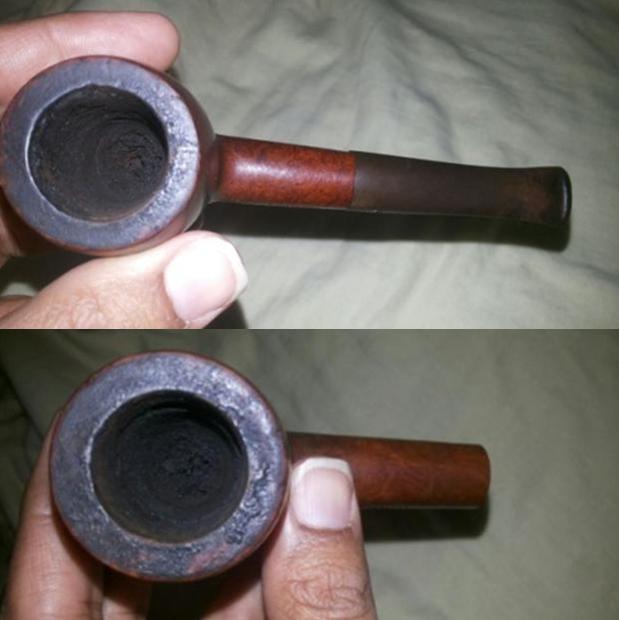
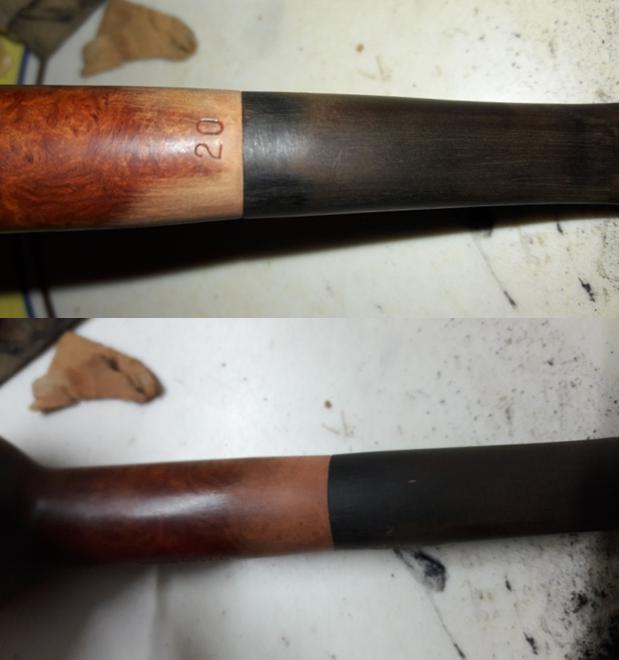
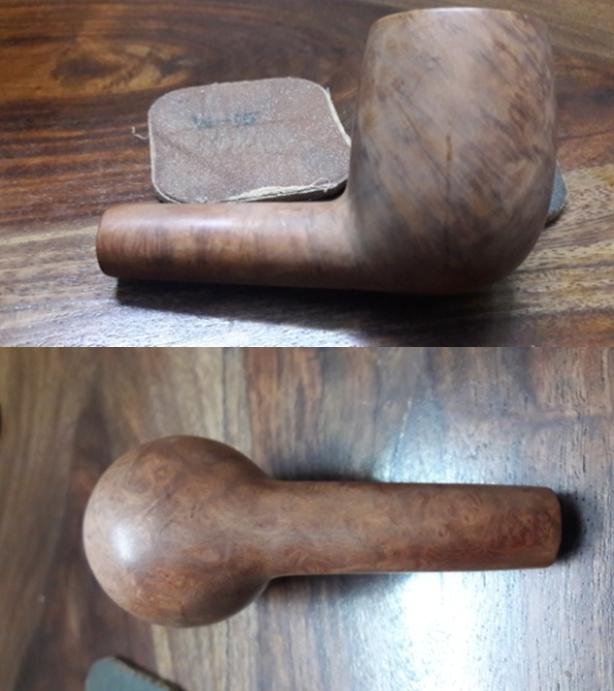
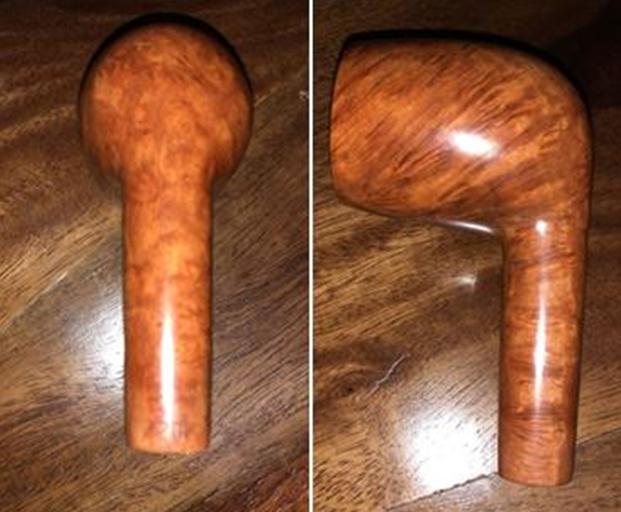
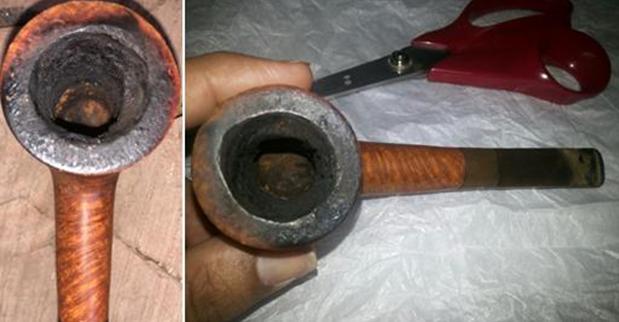
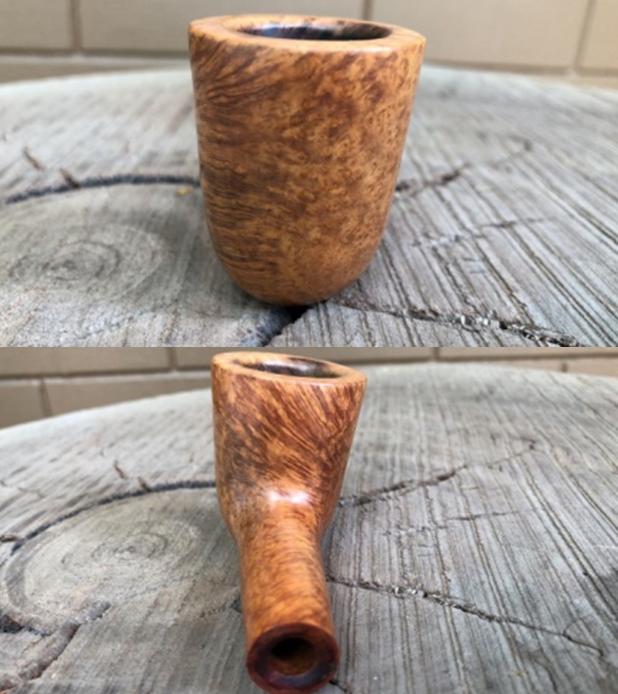
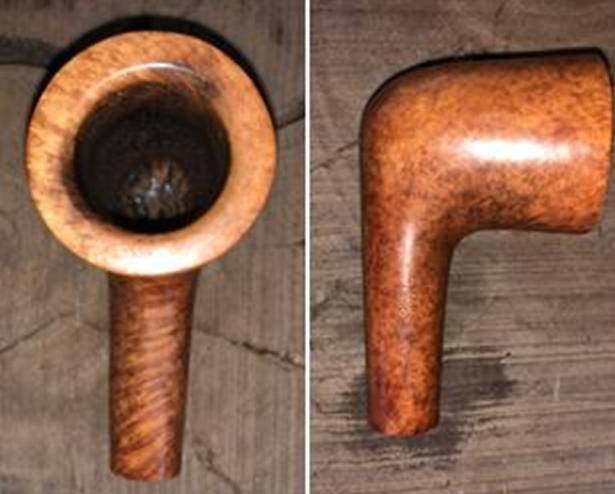
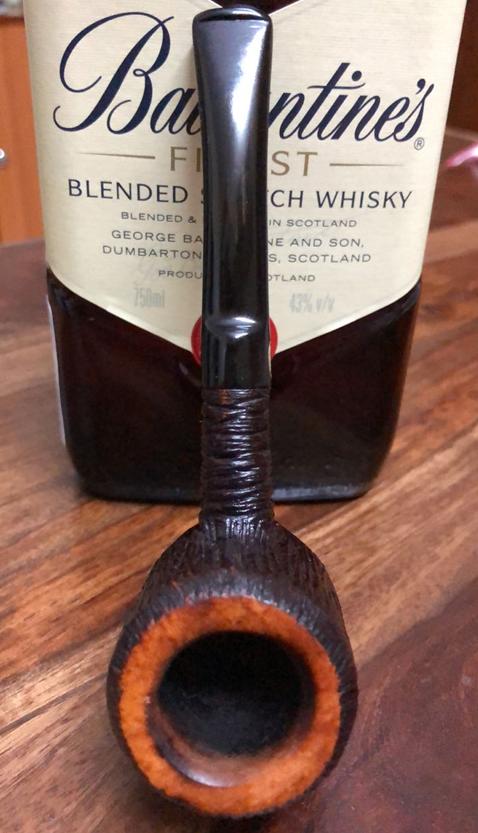
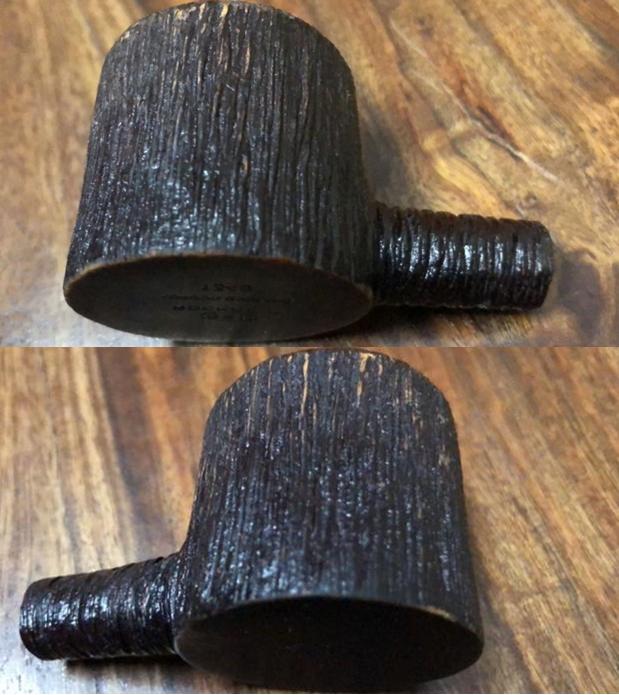
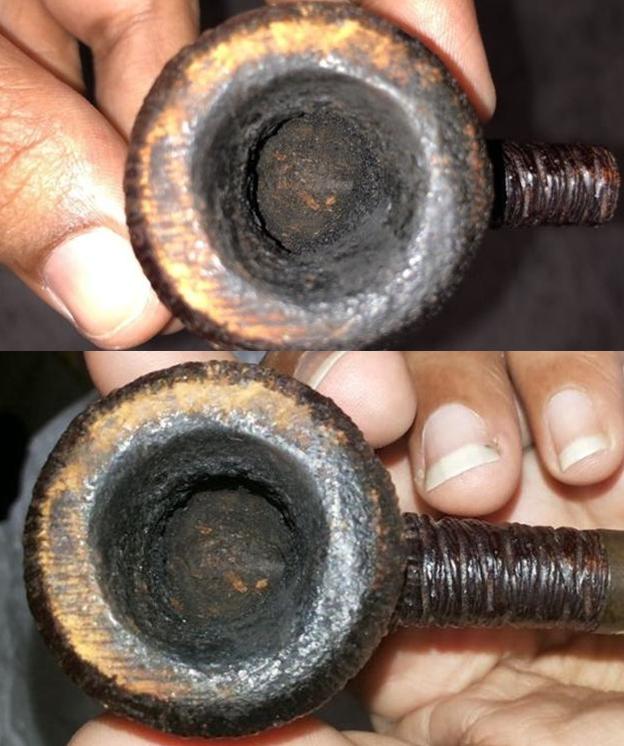
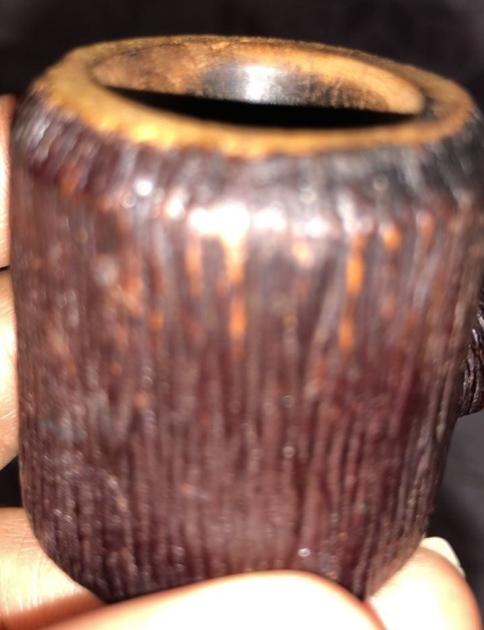
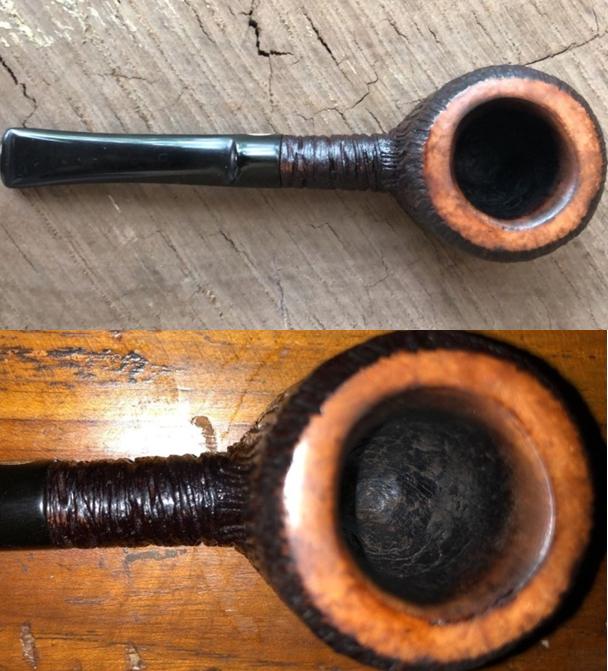
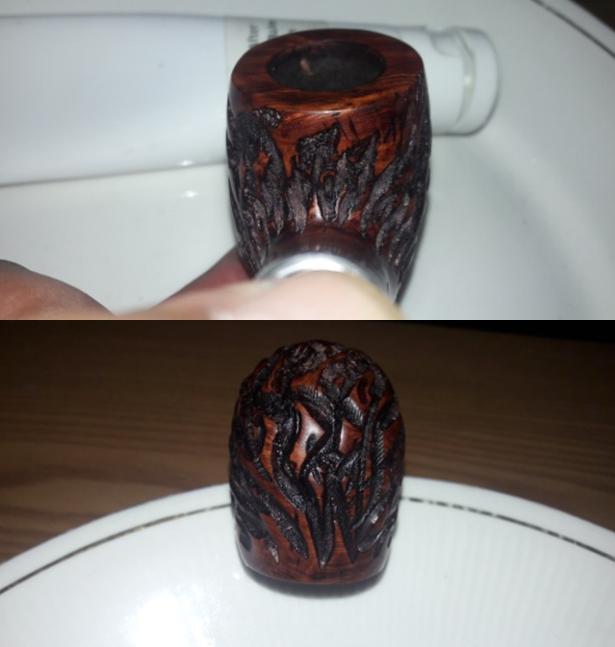
The first thing that struck me like a jolt was the reddish brown/ very dark reddish purple, OMG!!!! I cannot even describe the color of the stain on this pipe; it was that unappealing to the eye to say the least. It just surprises me as to why my grand old man even bought it, if he had indeed bought it. You just feel like turning away from it. To add to its color woes, the stummel is covered in dust and grime of storage from all these years. The stummel has Custombilt like rustication emanating from the joint where the shank and stummel meet and move away from the bottom towards the rim top. Within this rustication we have very fine thin lines. The raised portion of these rustication have the same reddish brown coloration while within these rustication, it has dark color. The shank is plain and devoid of any rustication. There appears to be some kind of coat covering the entire stummel. All said and done, this coloration has to go!!!!! How am I going to do it, I really do not know, but IT HAS TO GO!!!!!! 
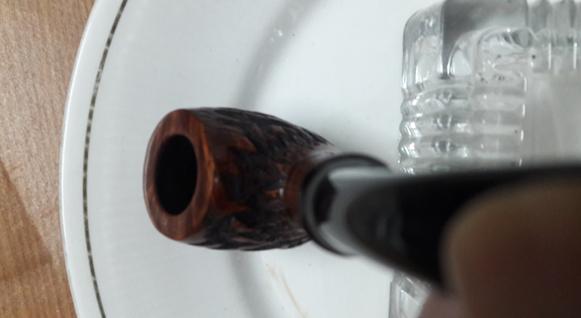
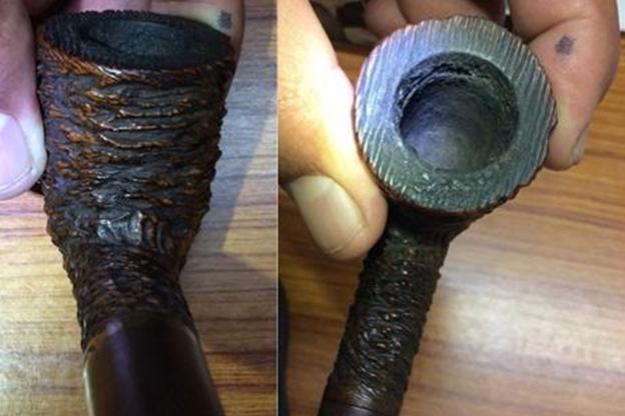
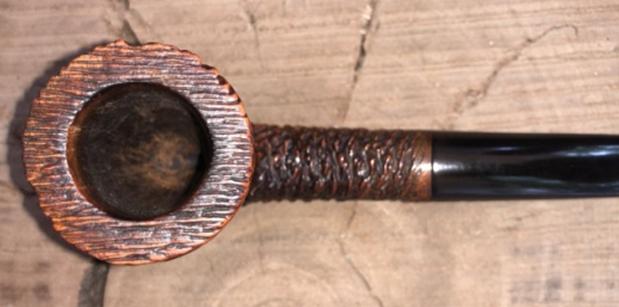
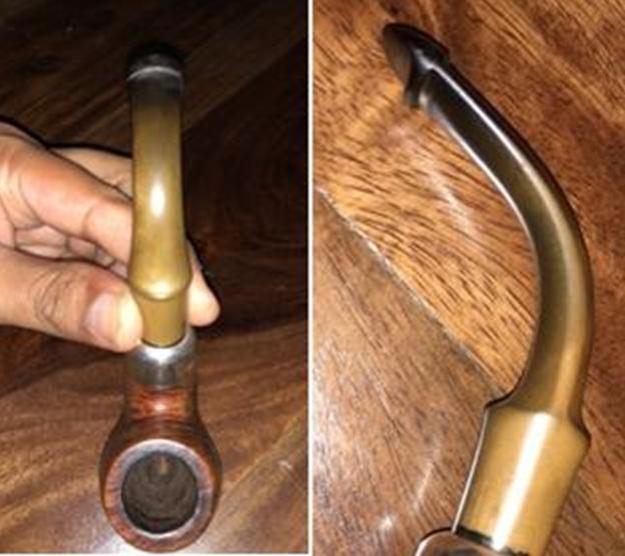
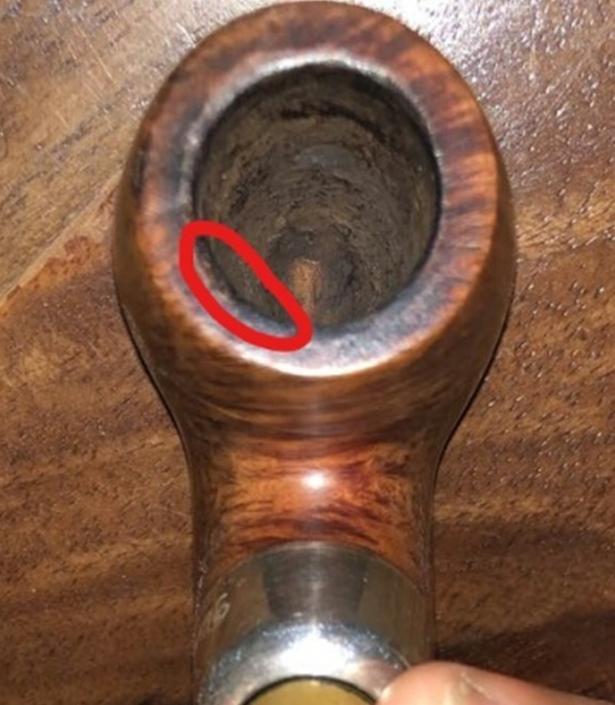
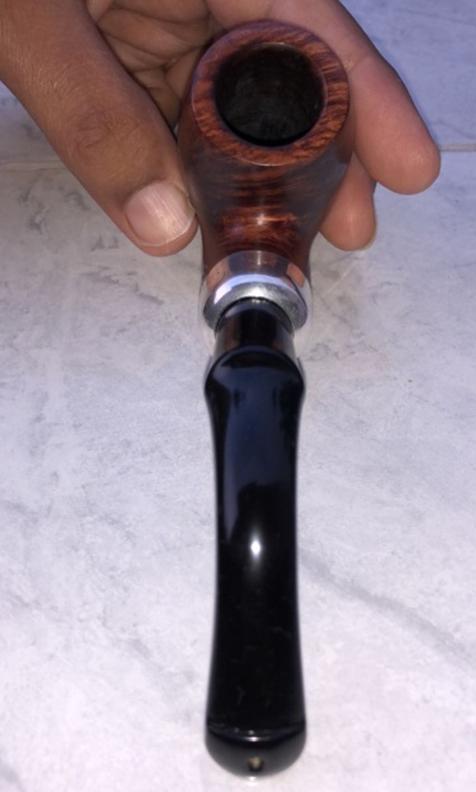
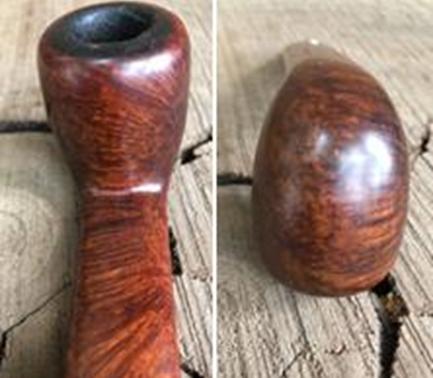
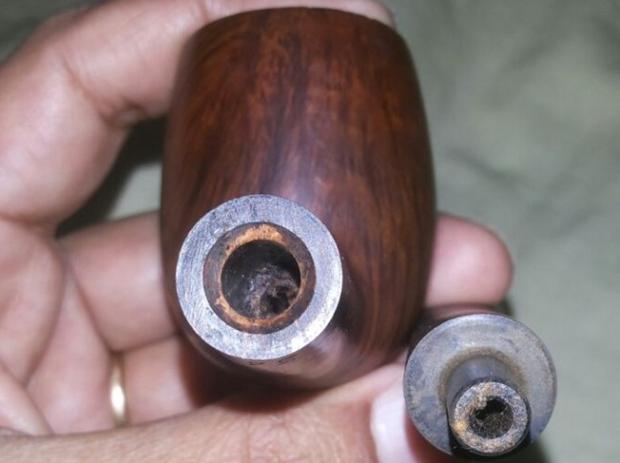
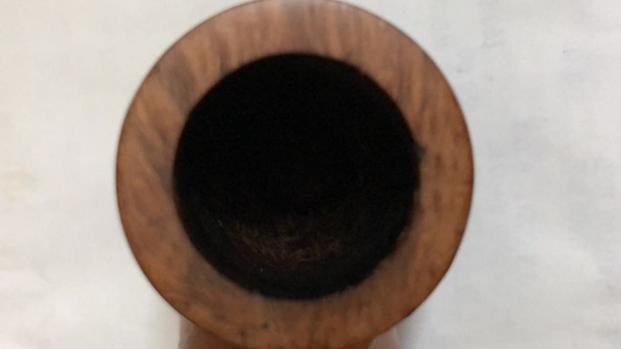
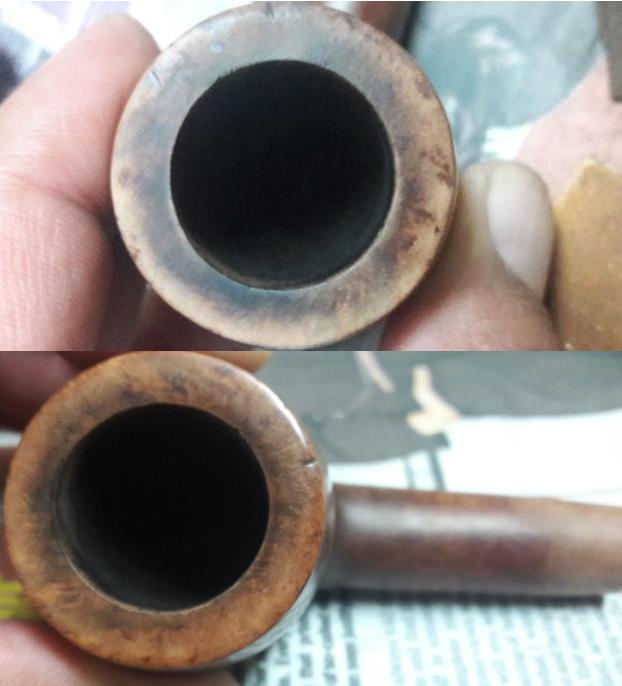
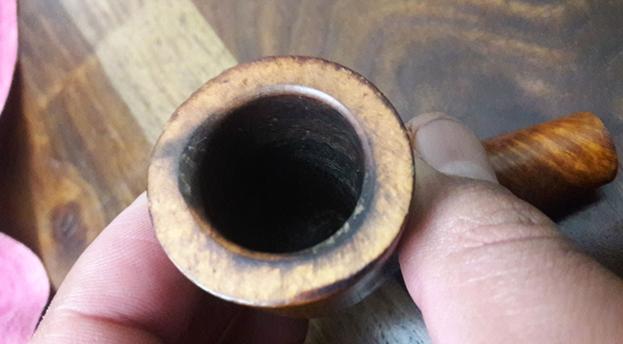
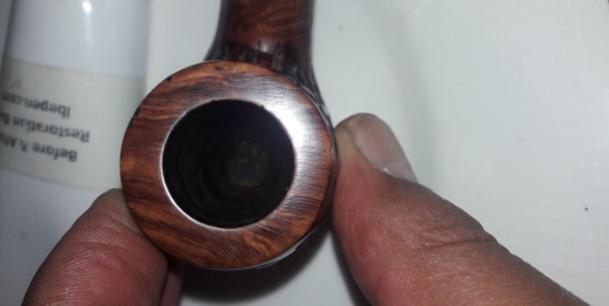
The chamber is lightly caked and has overflow of lava on the rim top. This will have to be cleaned and sanded down if the rim top surface is damaged underneath the overflowing lava. The inner and outer edge has minor dents and dings.
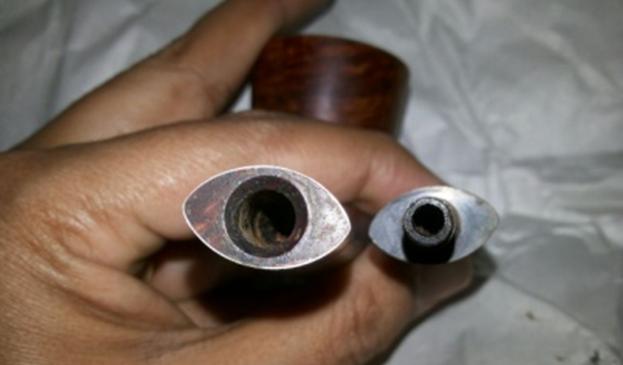
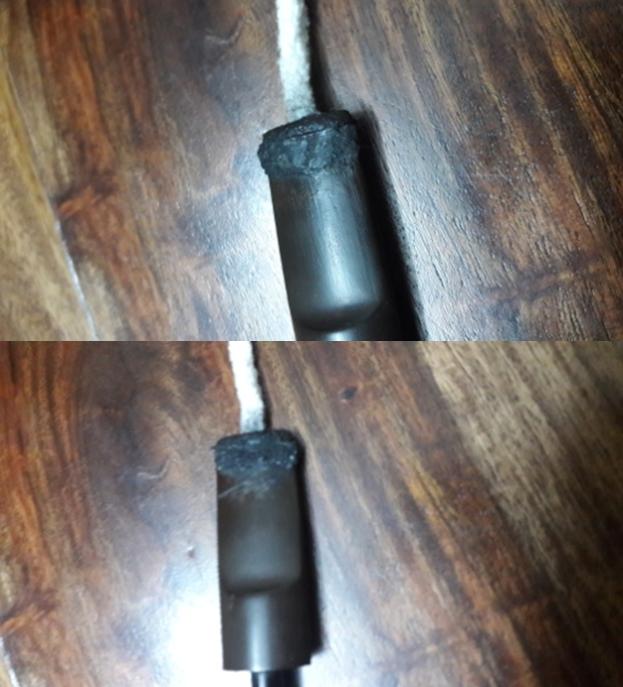
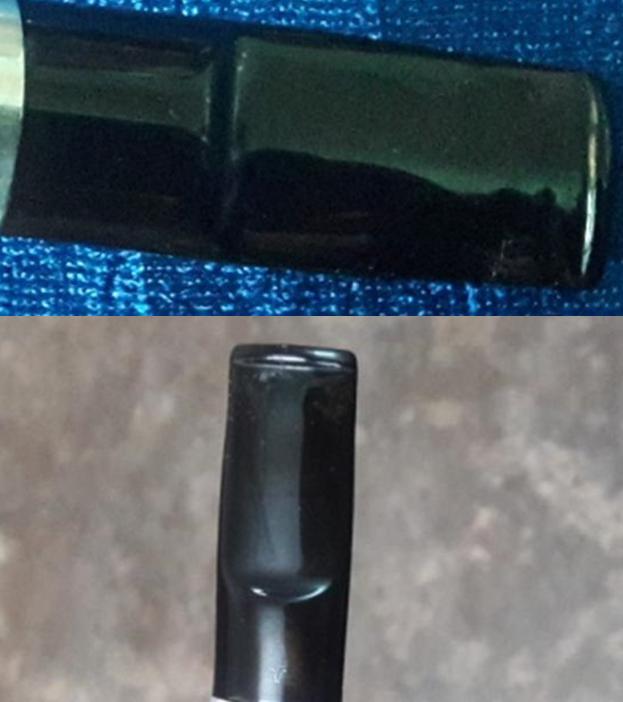
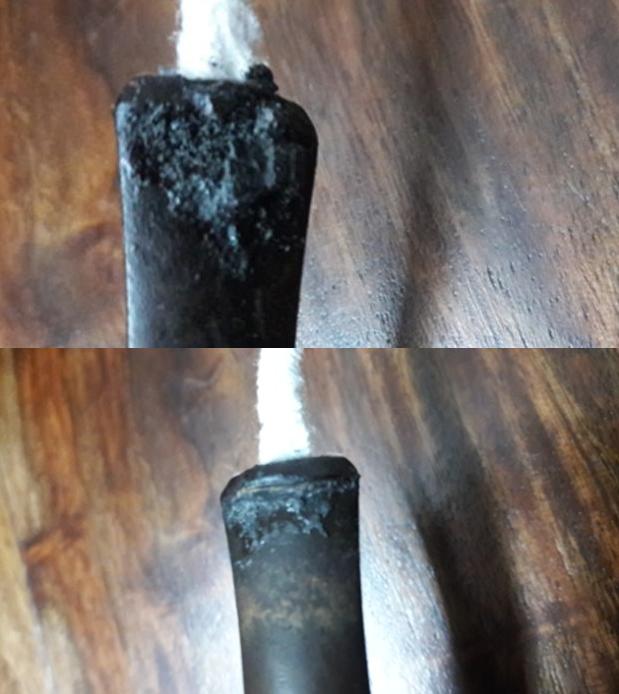
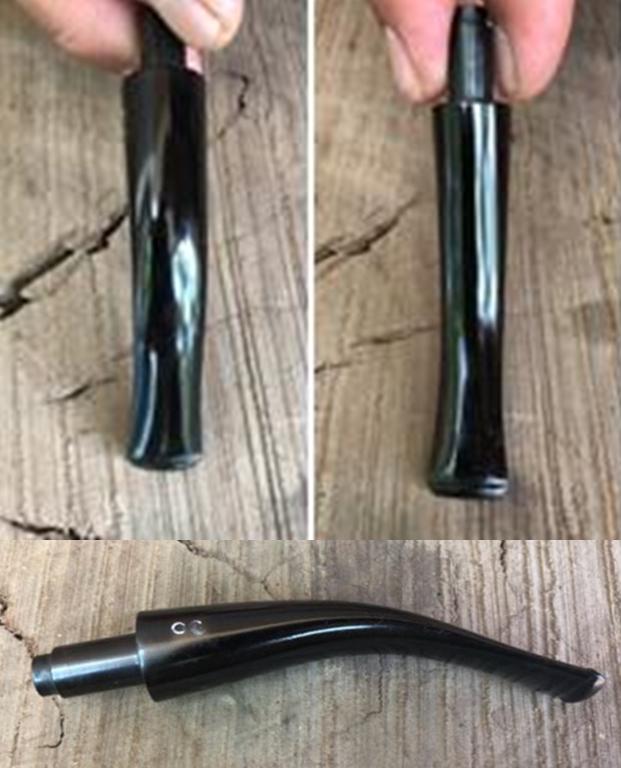
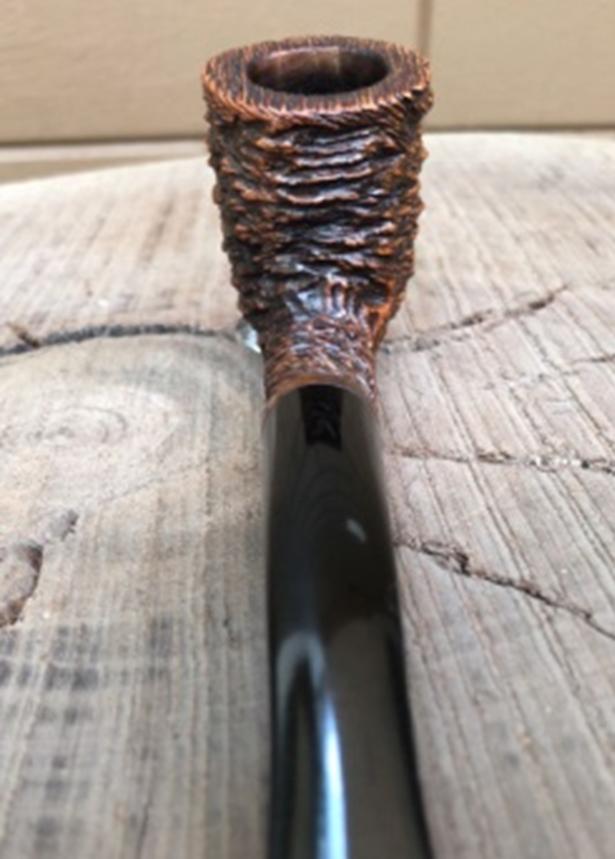
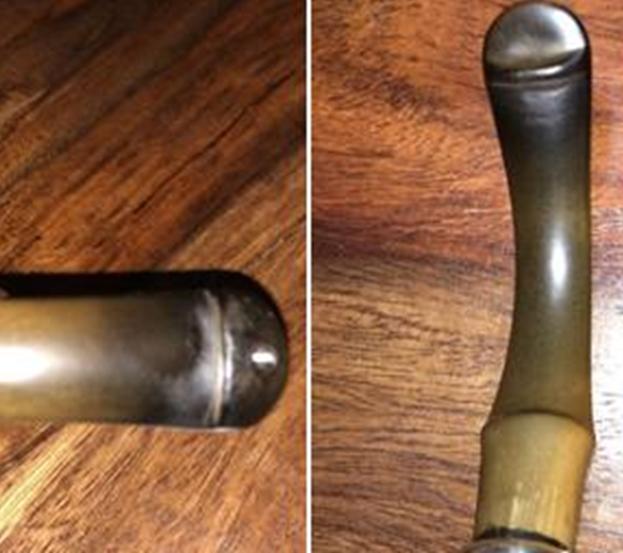
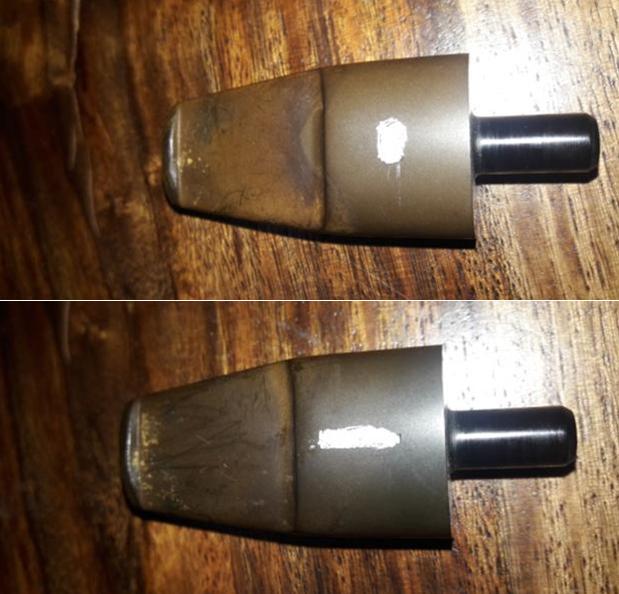
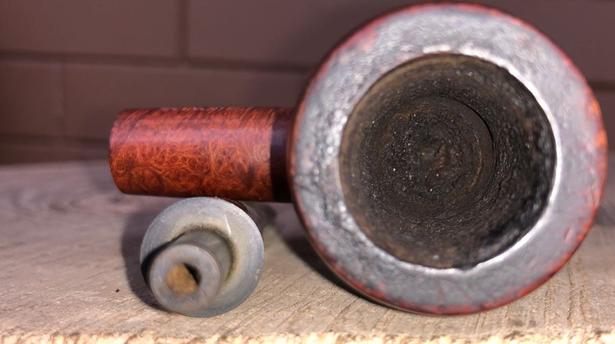
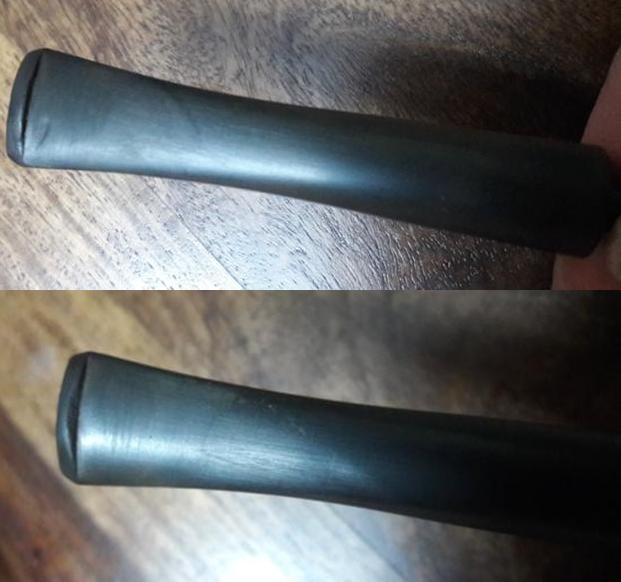
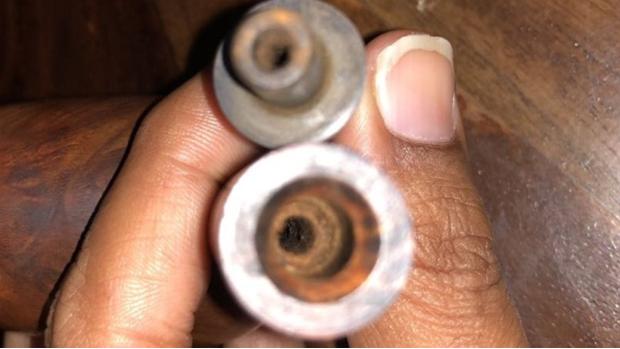
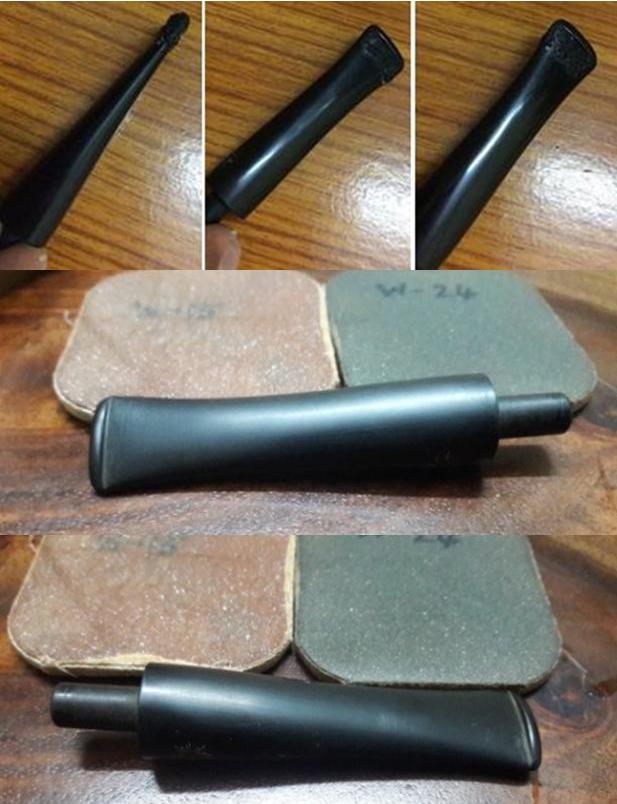
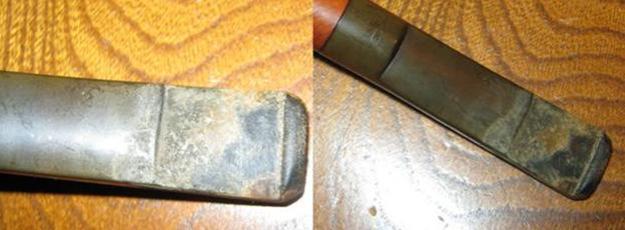
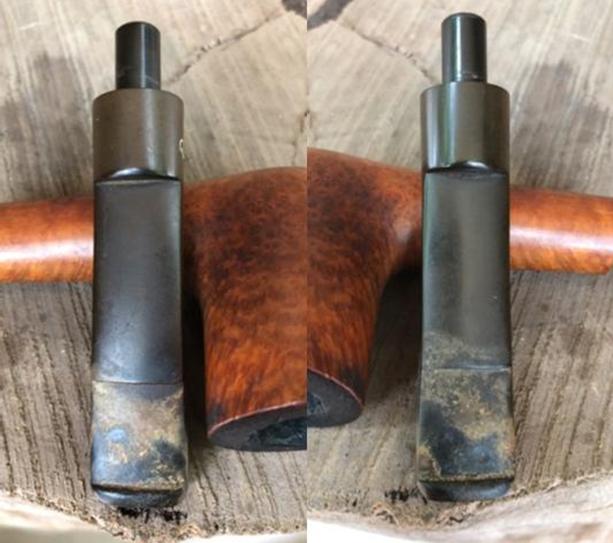
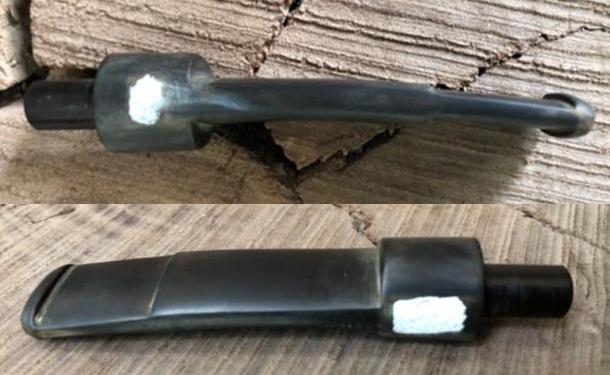
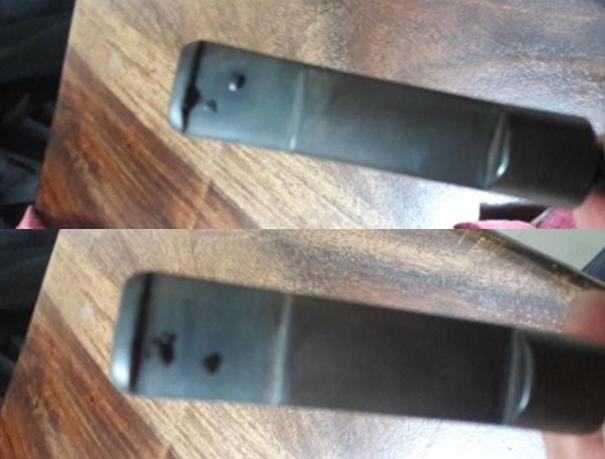
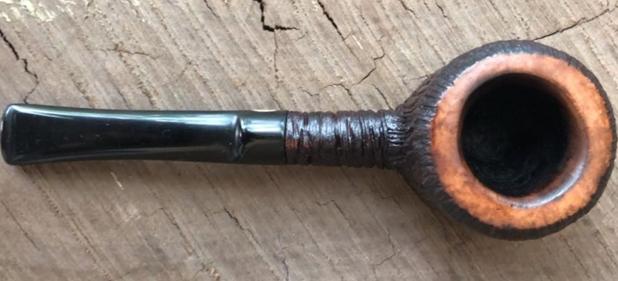
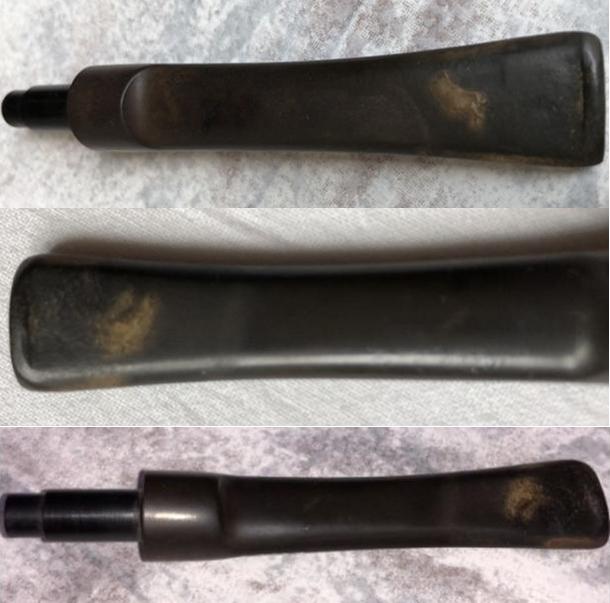
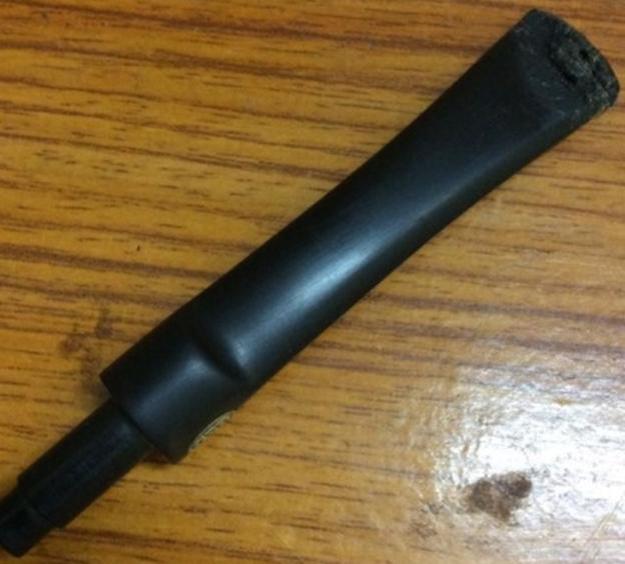
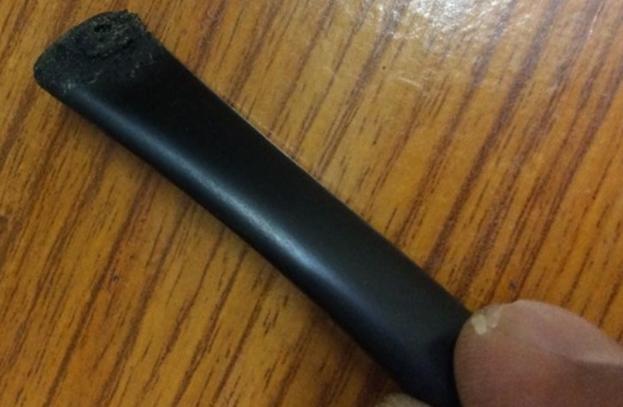
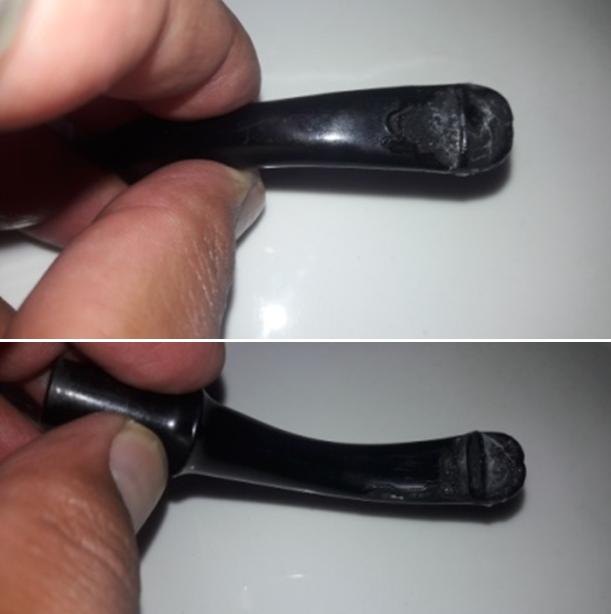
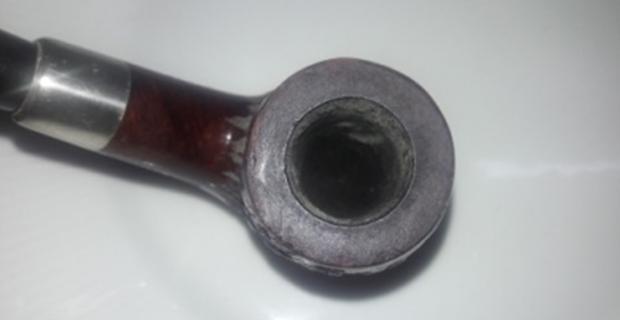
The stem appears to be ebonite and has a plastic feel to it. The stem is a copy of the famed Peterson’s P-Lip button with the difference in the bore being dead center on the end of the button as opposed to being on the top surface. It has extensive damage to the upper and lower surface of the lip. It is peppered with tooth chatter and has one deep bite mark each on both the surfaces. This will have to be addressed.
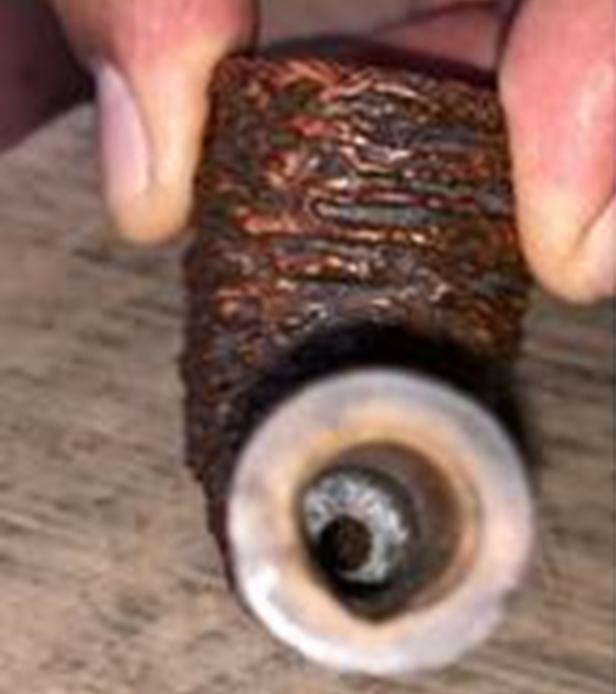
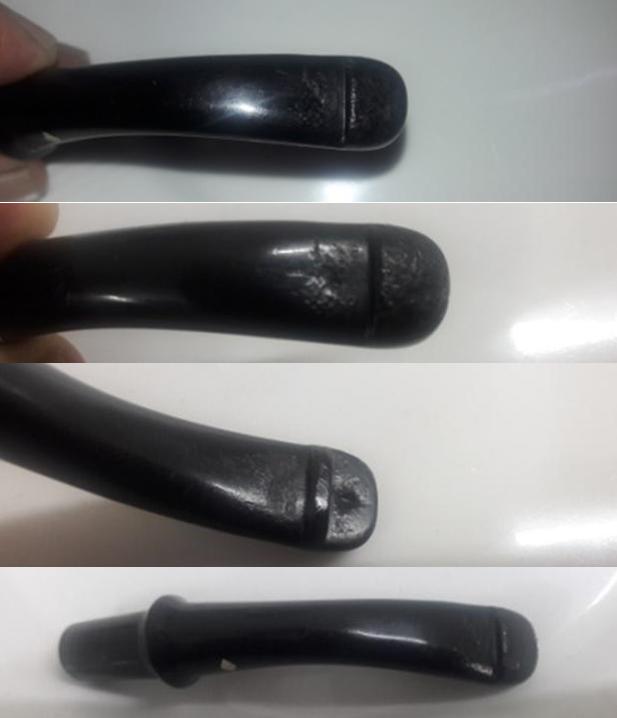
The mortise is relatively clean and air flows freely through the airway in the pipe and shank.
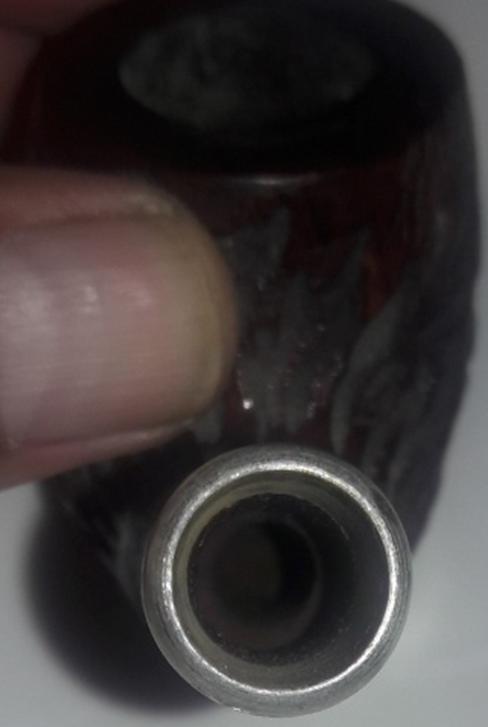
The nickel ferrule has lost its shine and shows minor spots of corrosion. I think it will polish up nicely.
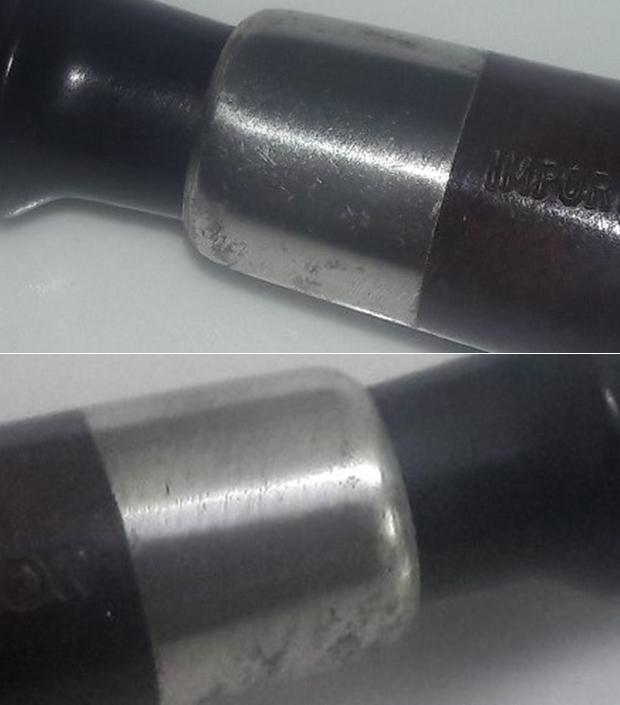
THE PROCESS

I had made a promise to this pipe that I shall make it “the prettiest of them all…” (Well, actually it was like “TRY” really) and thus the first and most logical start point was to address the color of the stummel. To make this pipe attractive, I felt that I should attempt to do the following:-

(a) Highlight the rustications.

(b) Get some shine on the stummel.

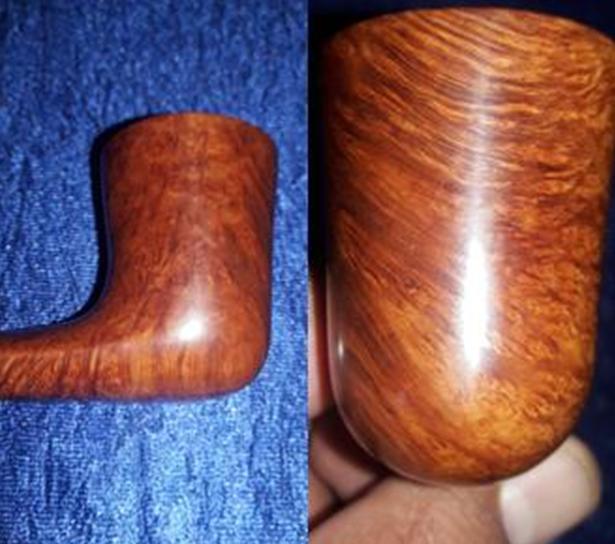
(c) Attempt to reveal the grains on the smooth shank.

(d) Highlight the contrast between the raised portions of the rustication with that of within the rustication.

Having identified what needs to be done, I turned my attention to how it could be done. SWOT analysis dictated that I needed to adopt processes which did not require any stains or coatings of lacquer as I did not have any. Also since I do not have any mechanical equipment, I had to adopt simpler and manual techniques. I decided that the best and easiest course of action for me would be to get rid of the original stain.

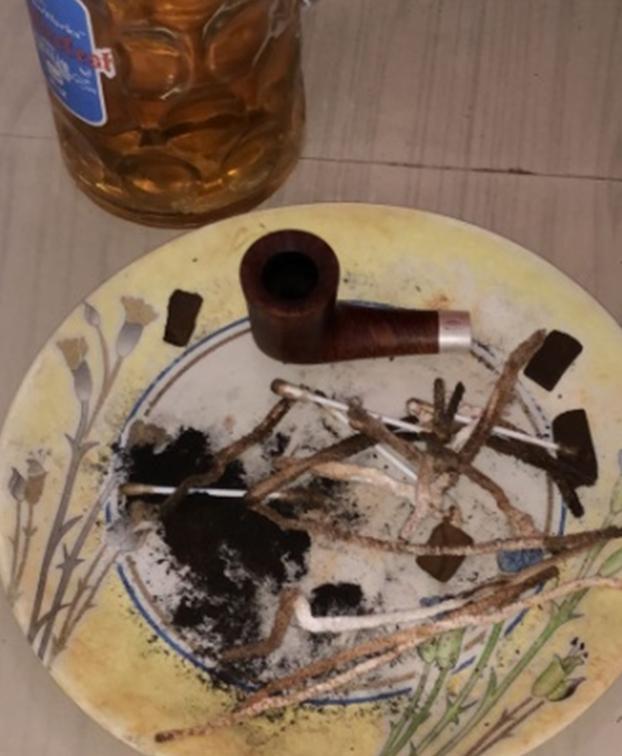
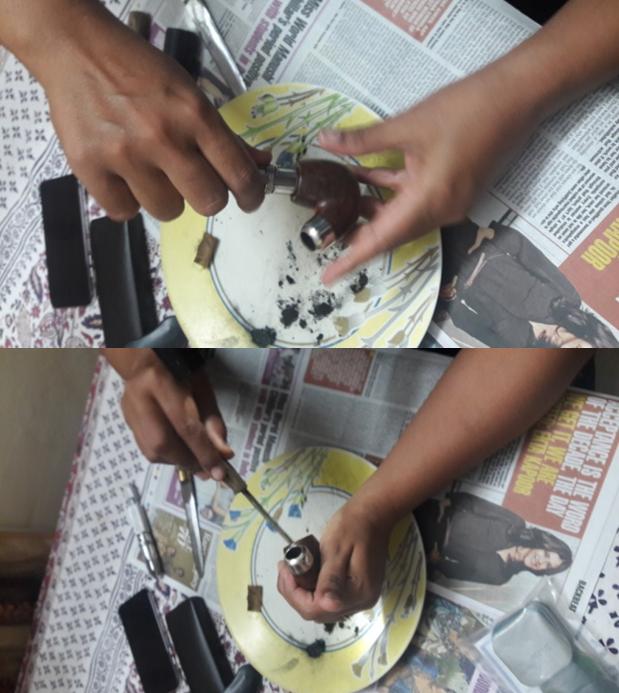
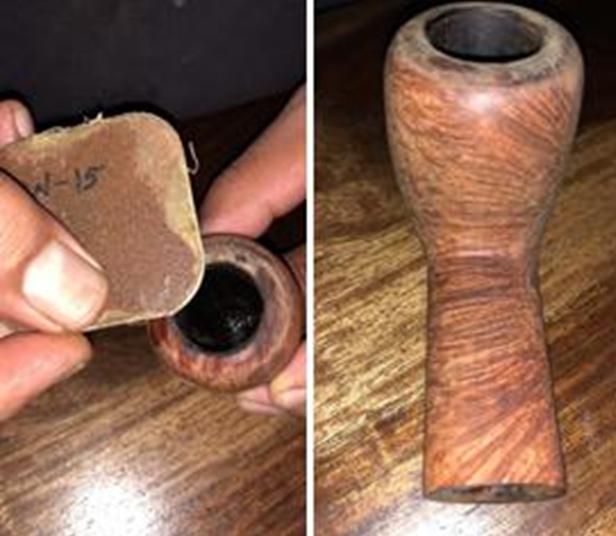
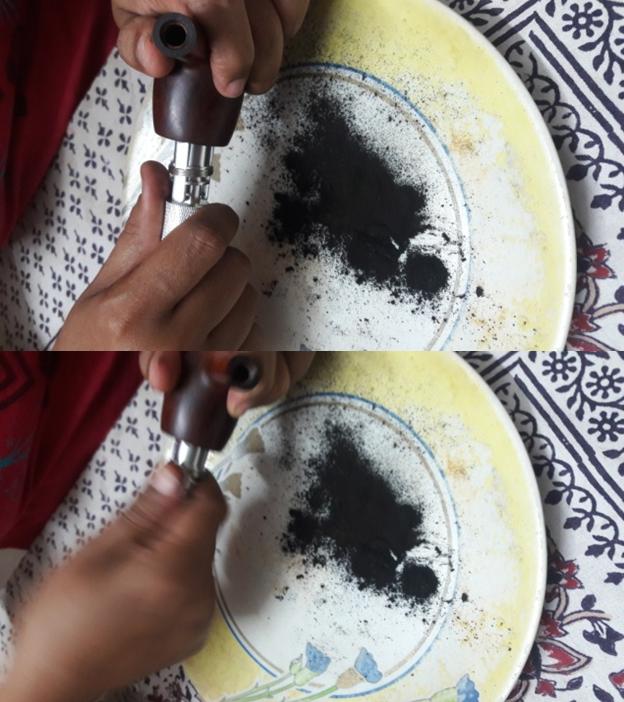
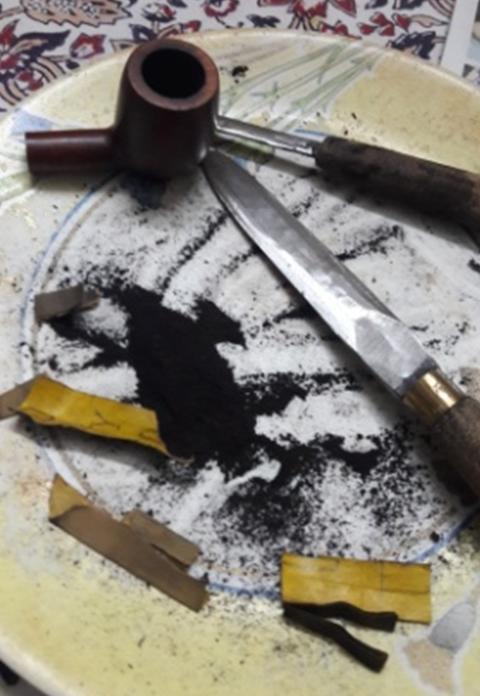
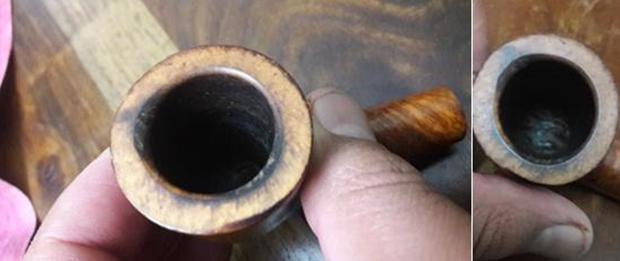
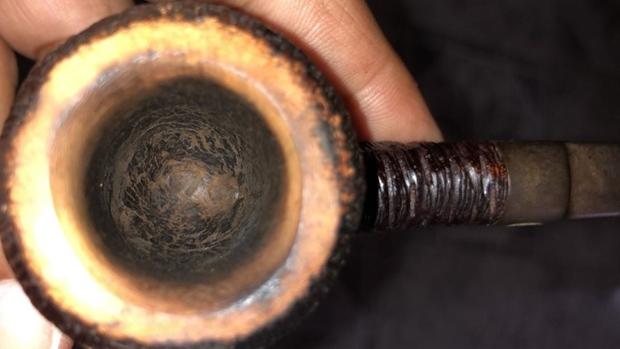
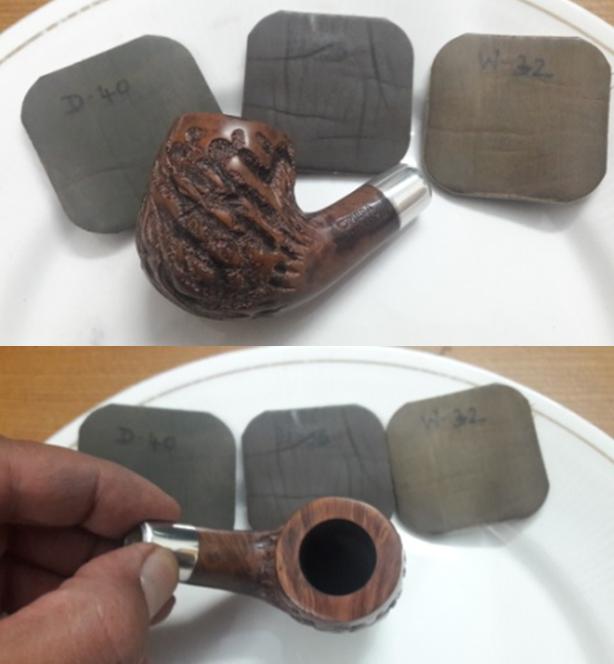
I started by reaming the chamber with a Kleen Reem pipe reamer and fabricated knife. I removed the complete cake from the chamber. I further sanded down the walls of the chamber with a 220 grit sand paper to smooth the walls and took the cake back down to the bare briar. I gently scraped out the little overflow of lava from the rim top. I also cleaned out the mortise and the shank with cue tips and pipe cleaners dipped in alcohol.Once the chamber was cleaned, I turned my attention to the stummel and tried to get rid of the lacquer coating. I started by wet sanding with a 1500 grit micromesh pad and soon realized that it would not work. I tried sanding with 800 grit sand paper without any success. Soon I found myself sanding the stummel with 150 grit sand paper. The lacquer was very difficult to get rid off and after a considerable time, I was finally able to completely remove the lacquer coating. Believe you me, my fingers had started to hurt and sitting at the table for 3-4 hours at a stretch caused cramps in my back. But the end result was pleasing.

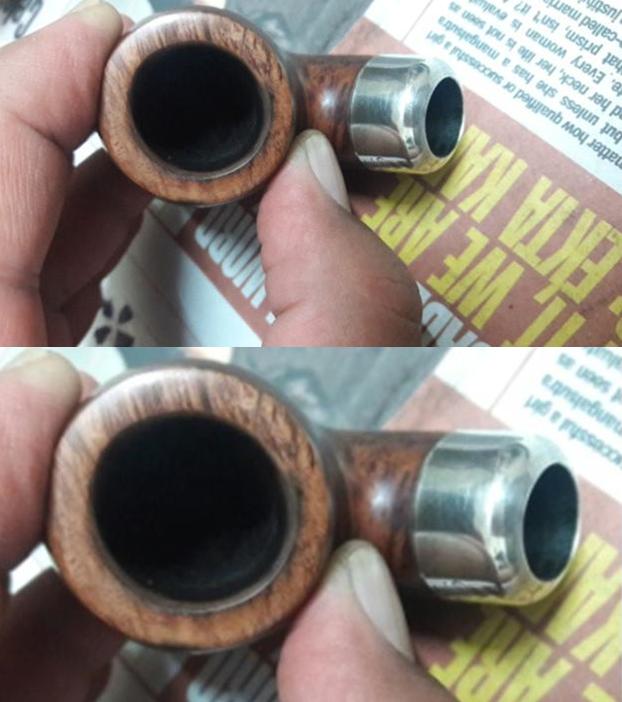
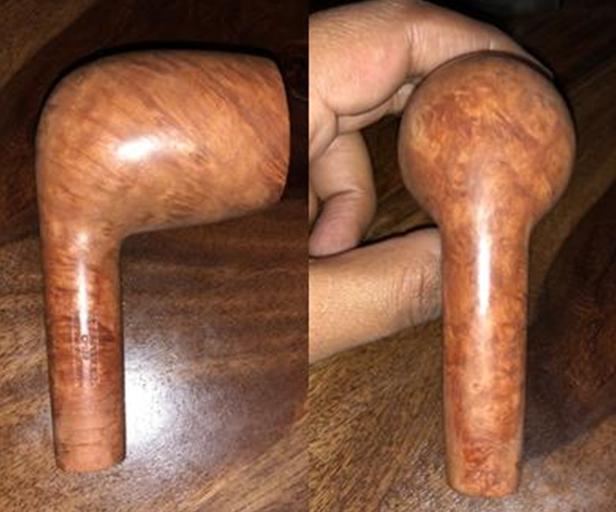
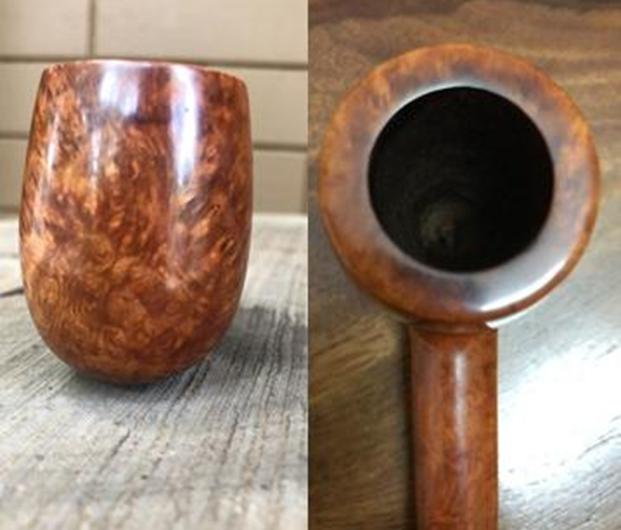
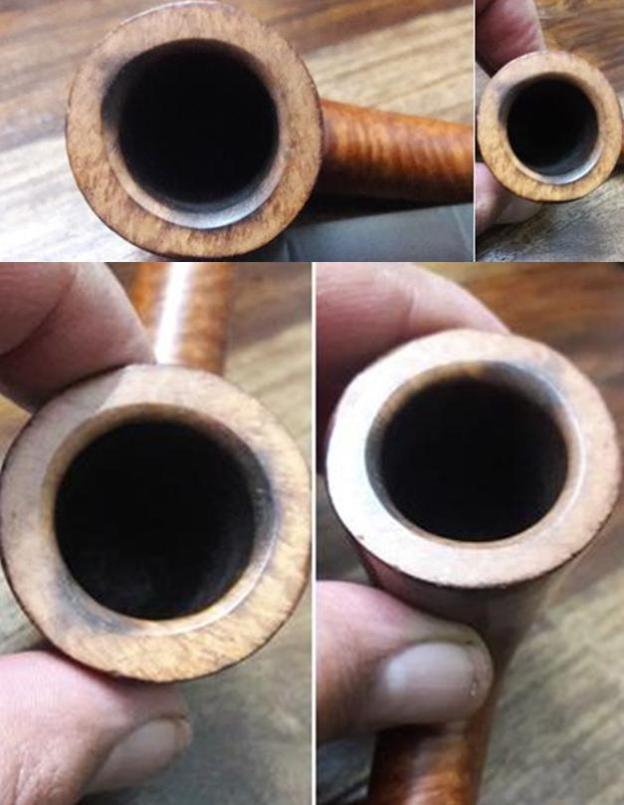
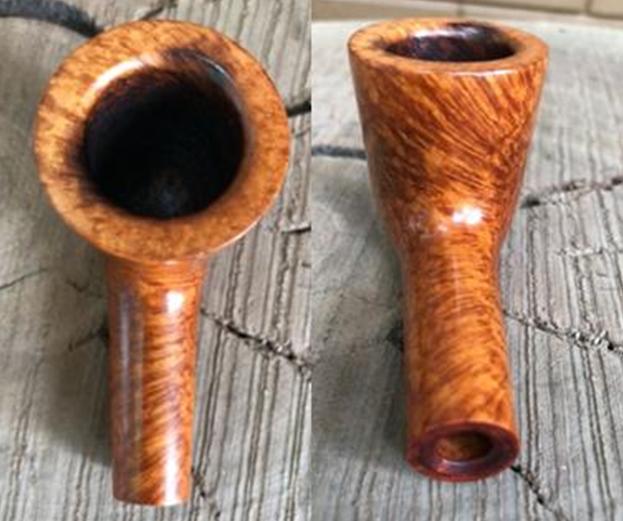
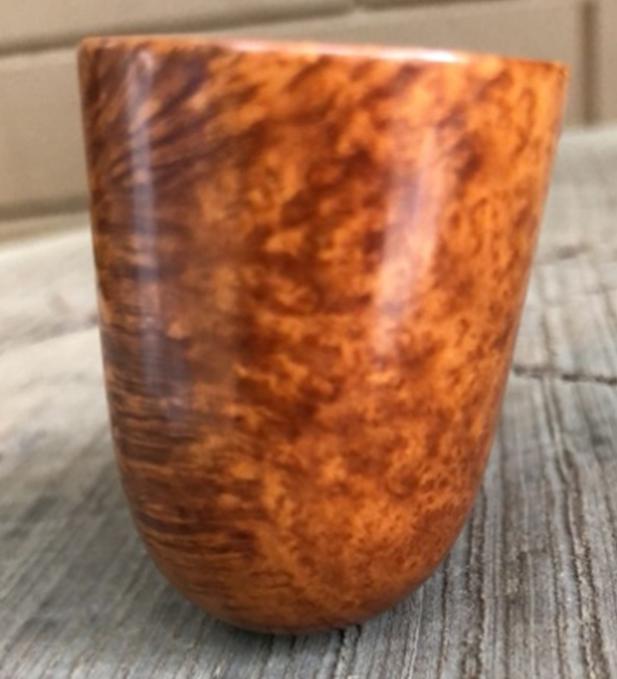
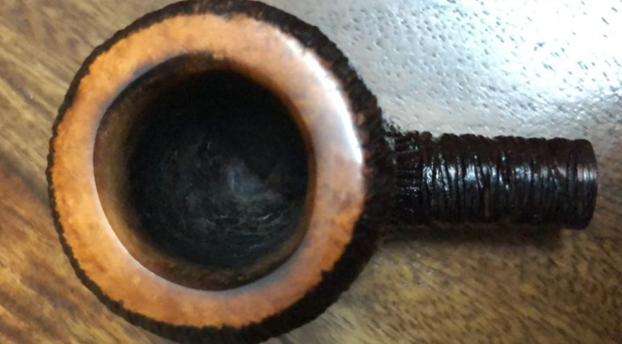
Then began the arduous and time consuming process of sanding the stummel with micromesh pads. I proceeded to sand the stummel with micromesh pads, going through wet sanding with 1500-2400 pads and dry sanding with 3200- 12000 grit pads. I was very pleased with the way the stummel had turned out. I decided that I liked this finish and after further cleaning and polishing, the stummel would look just beautiful. 
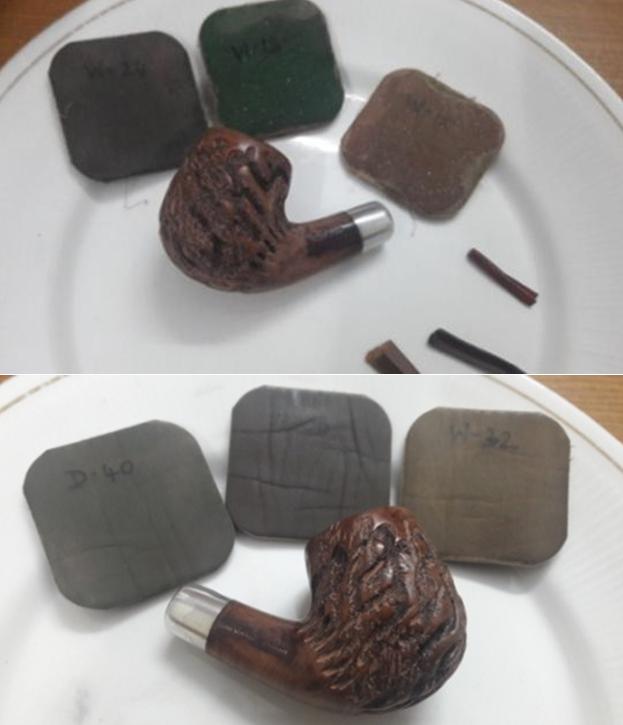
Once I was through with micromesh pads, I cleaned the stummel with undiluted Murphy’s oil soap and tooth brush. I paid special attention to the deep areas of the rustication, thoroughly cleaning it with the brush. I dried the bowl with cotton cloth and paper towels.
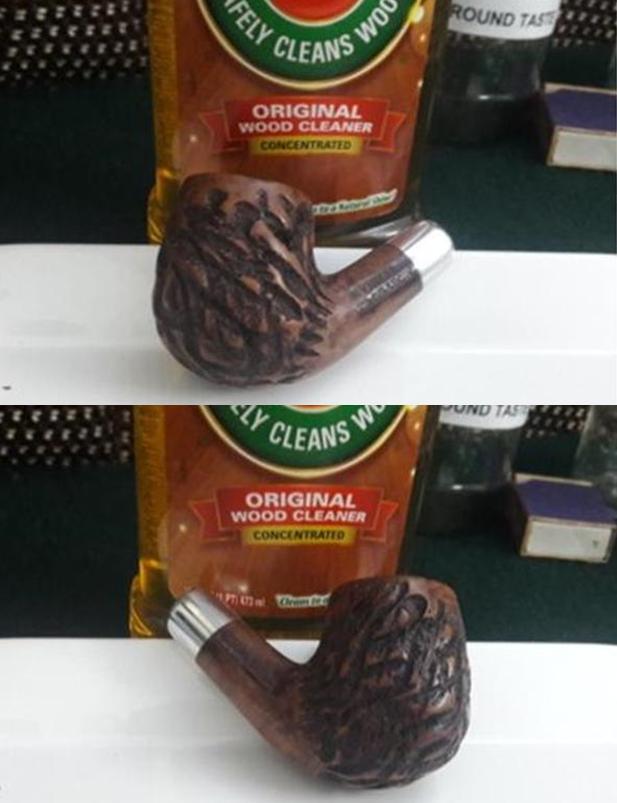
I rubbed “Before and After Restoration balm” in to the stummel with fingers deep into the rustications and let it rest for a few minutes before I buffed it with a horse hair brush. Finally, I polished the stummel with a soft cotton cloth and muscle power!!!! I also polished the nickel ferrule with a jeweler’s cloth. Luckily, the corrosion was superficial and polished up nicely. 
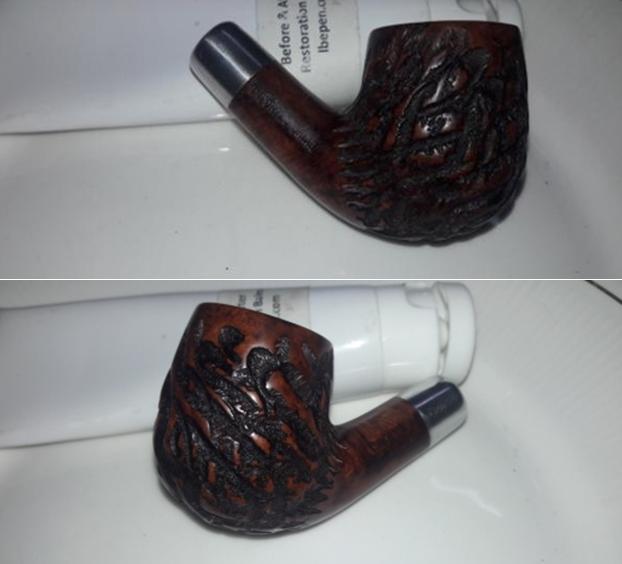
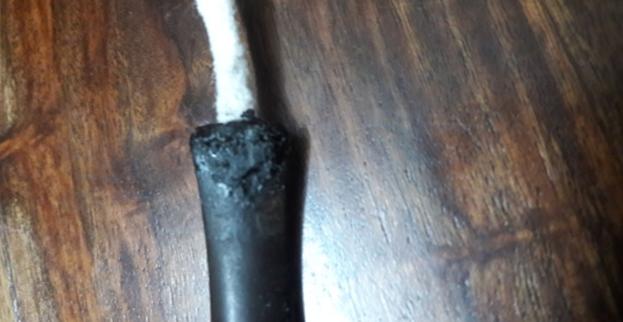
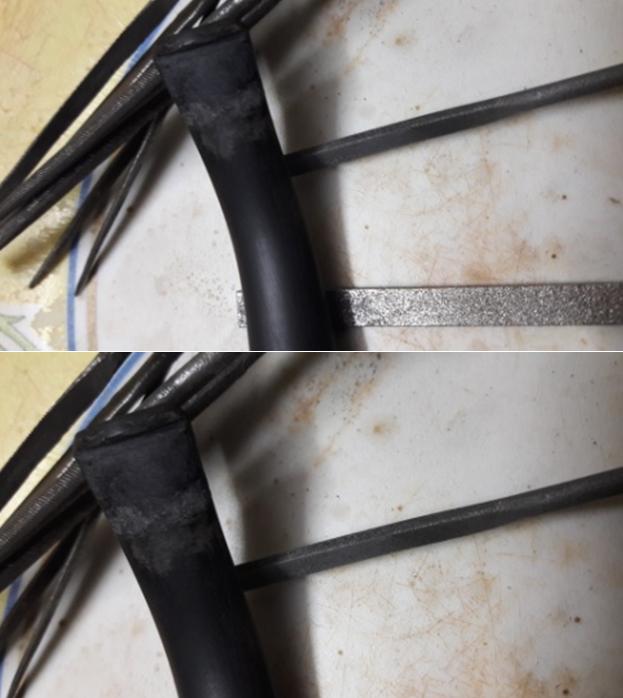
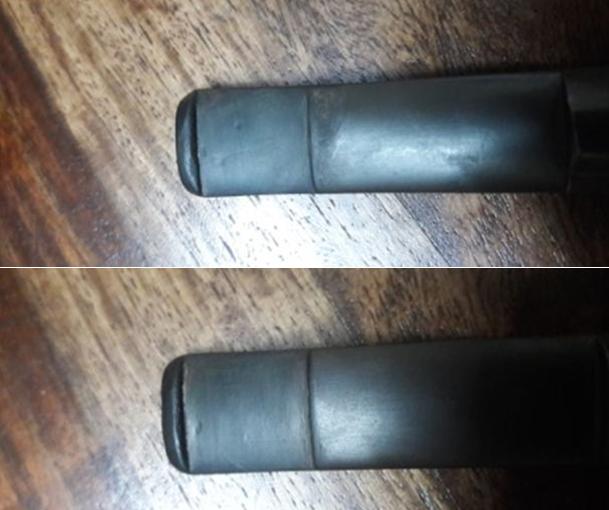
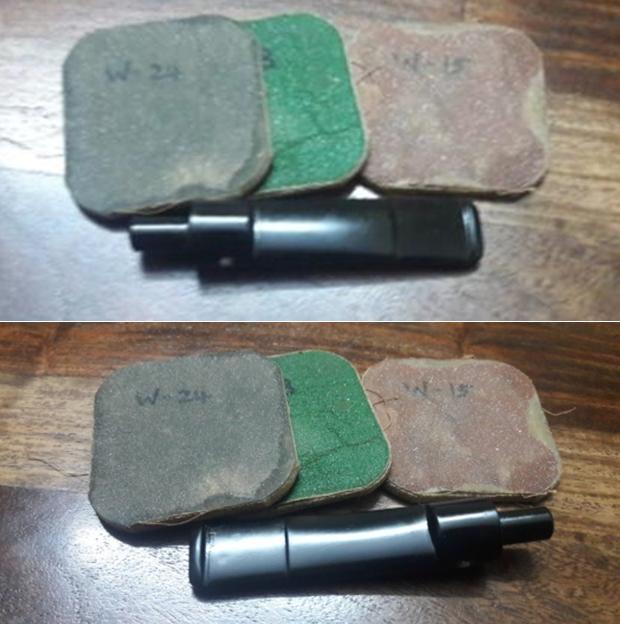
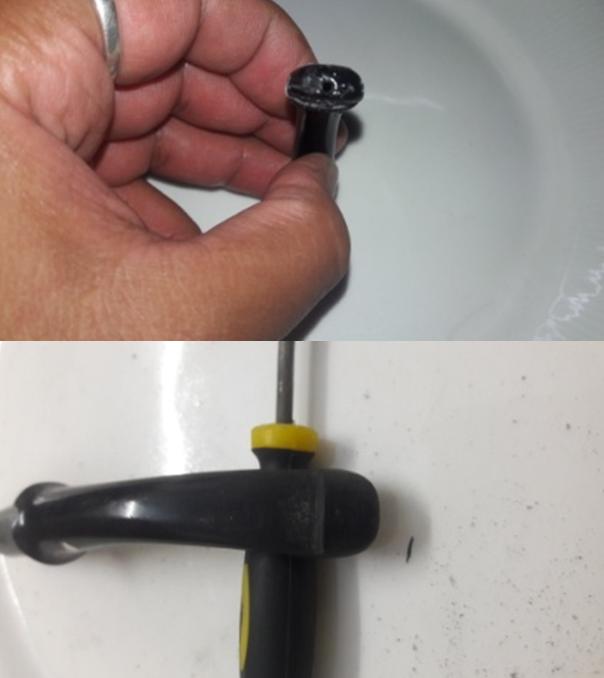
Turning my attention to the badly damaged stem, I start by cleaning it with cotton pads dipped in isopropyl alcohol. I flamed the stem surface with a Bic lighter to raise the tooth chatter. The deeper tooth chatter and bite marks were filled with clear CA superglue. Thereafter began the time consuming process of curing, sanding with flat head needle file, 220 grit sand paper and finally by micromesh pads. In all, I had to repeat the fill and sand procedure thrice before resorting to final polish using micromesh pads. I also cleaned out the internals of the stem with pipe cleaners dipped in alcohol. 
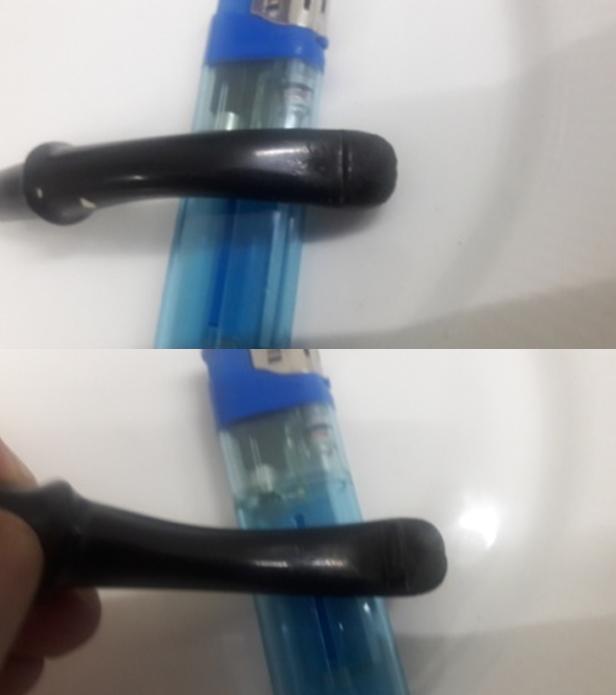
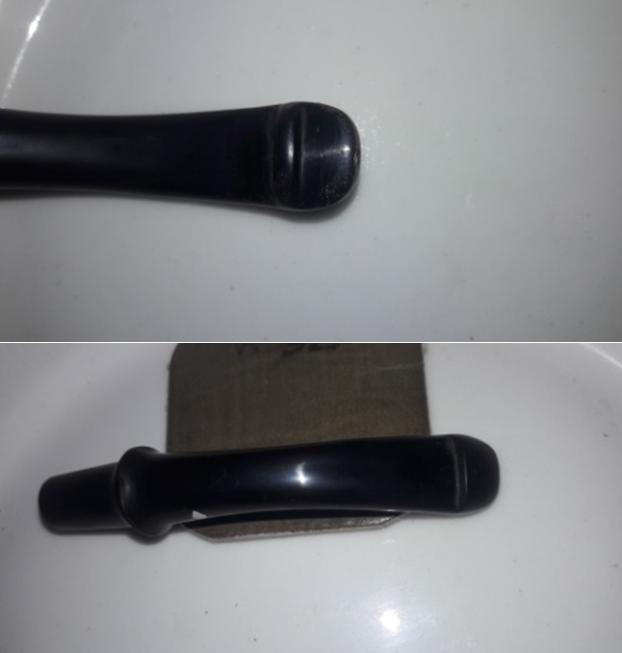
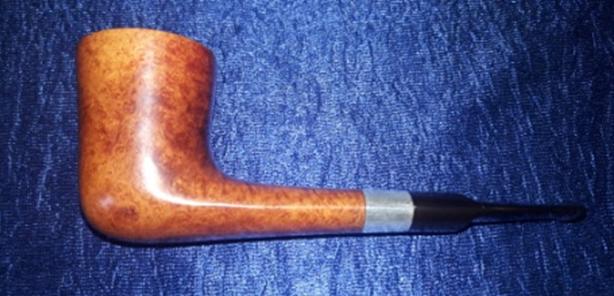
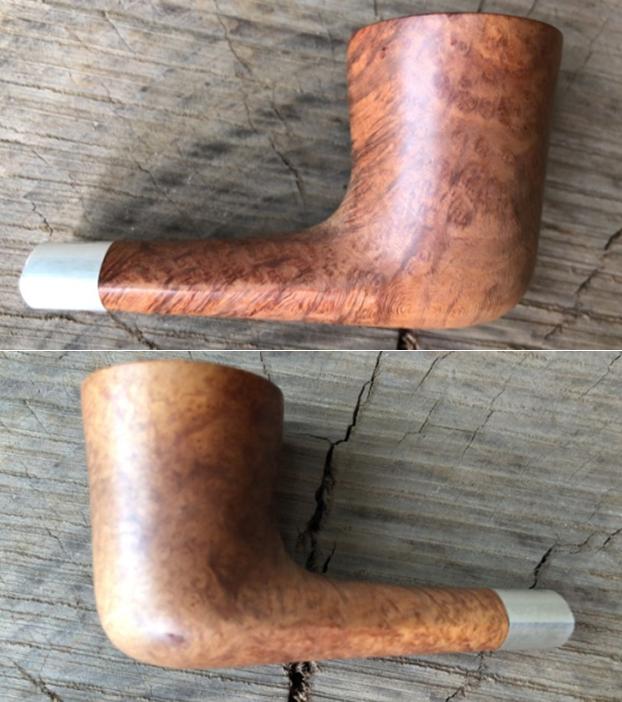
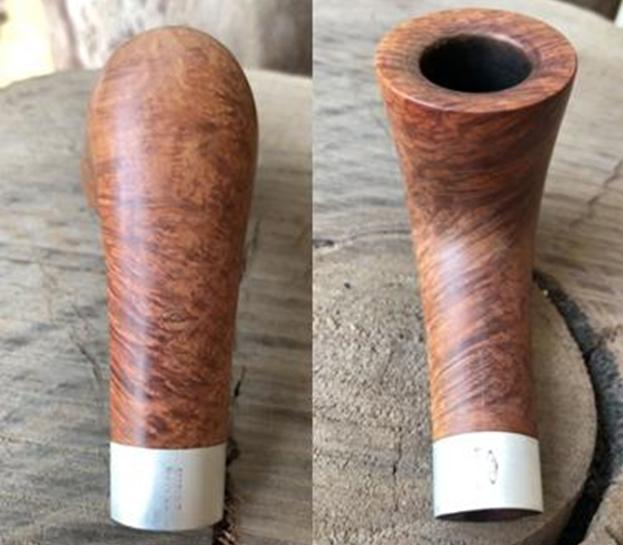
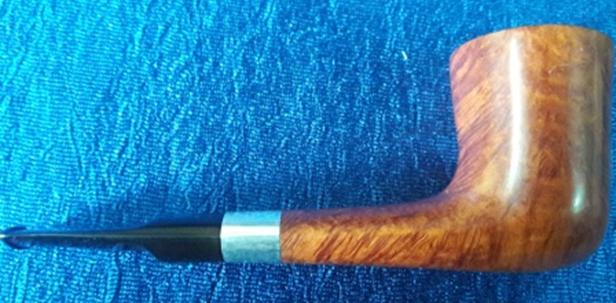
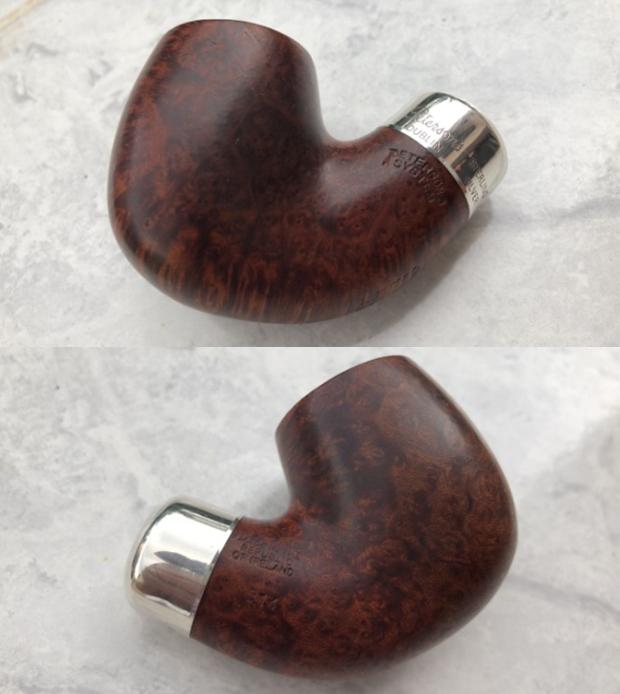
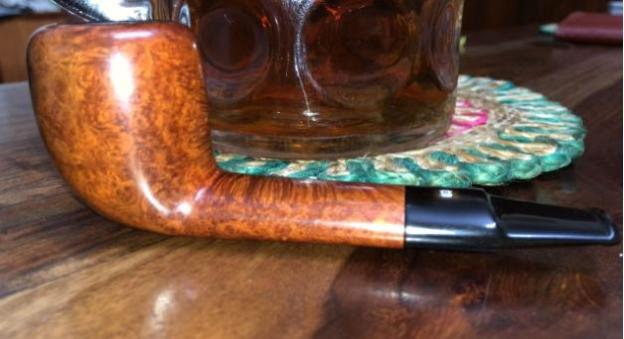
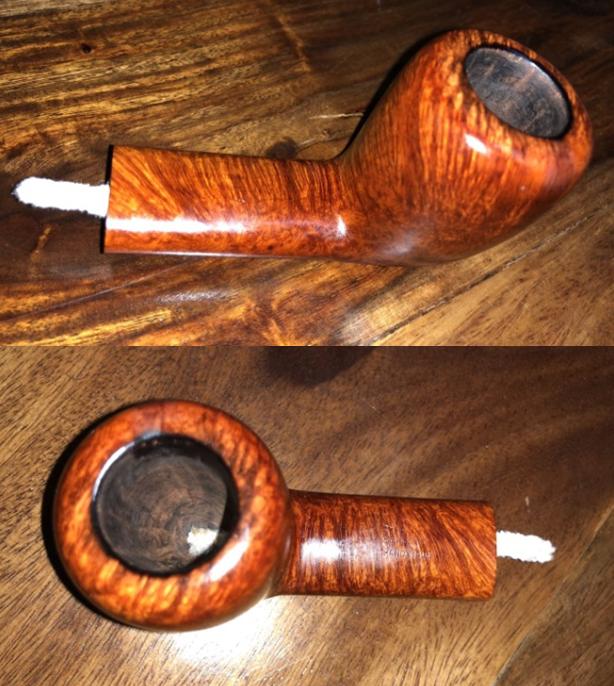
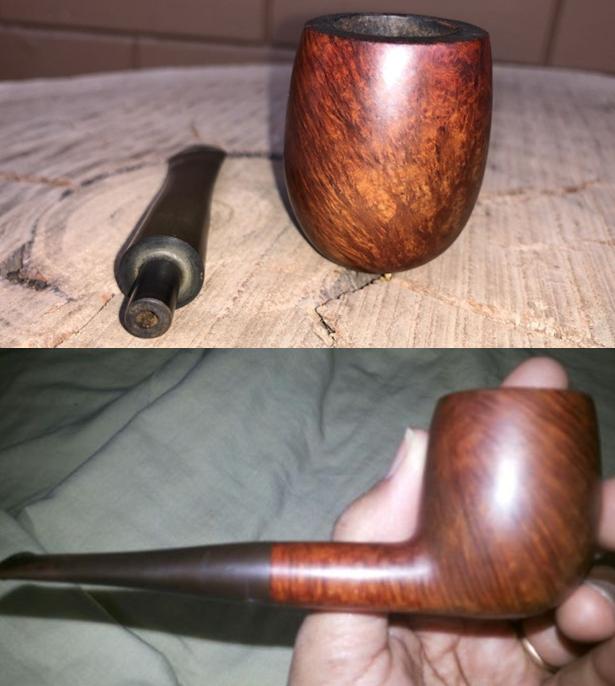
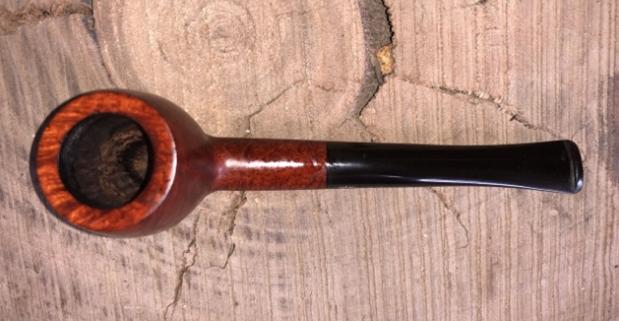
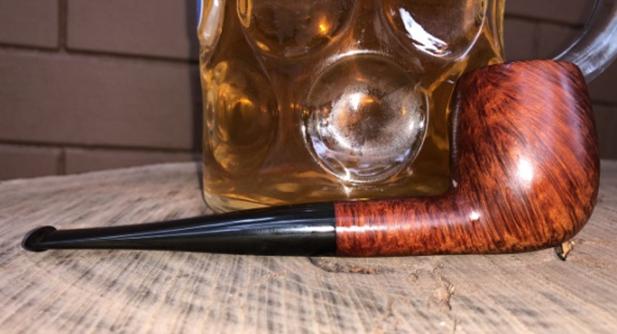
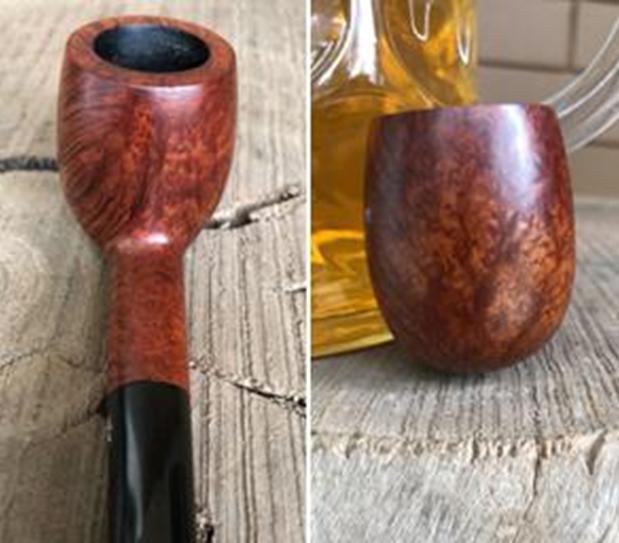
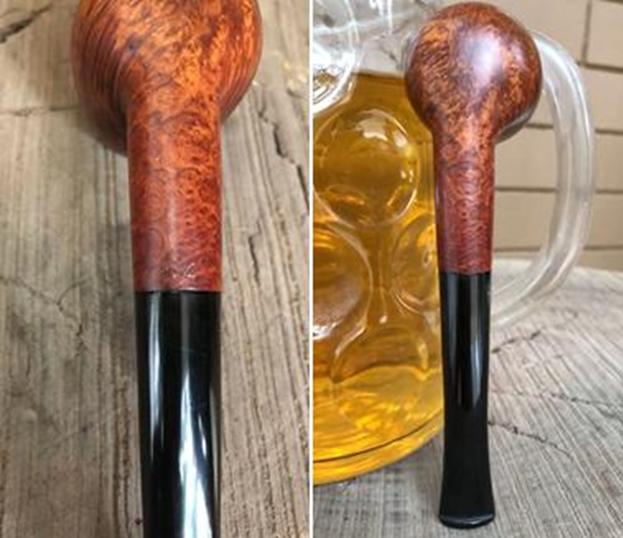
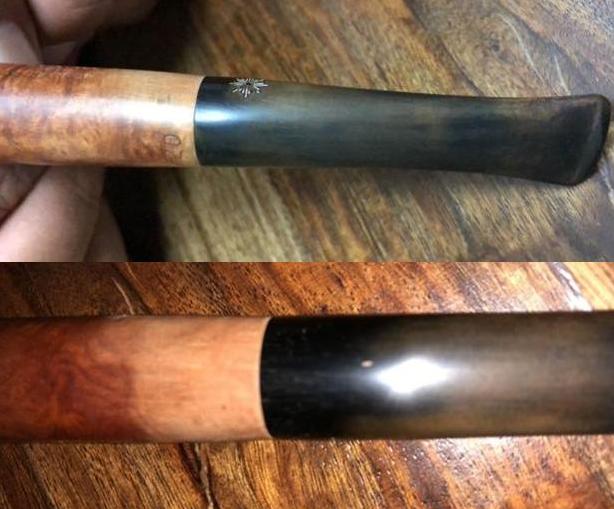
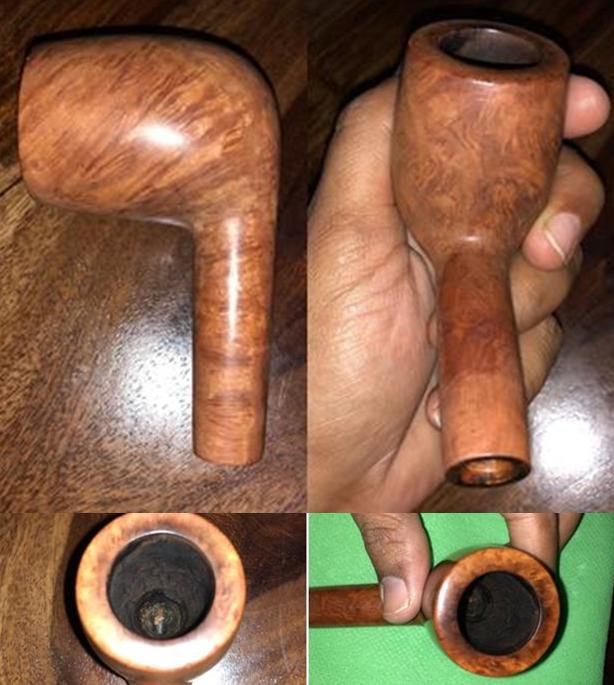
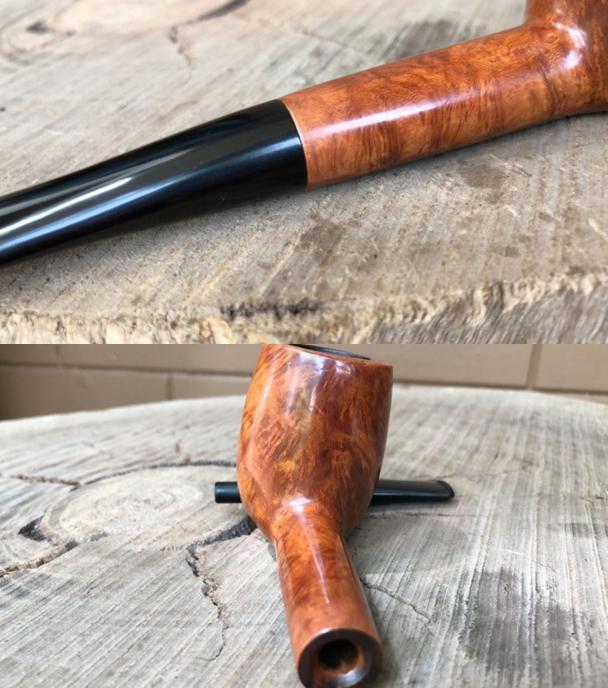
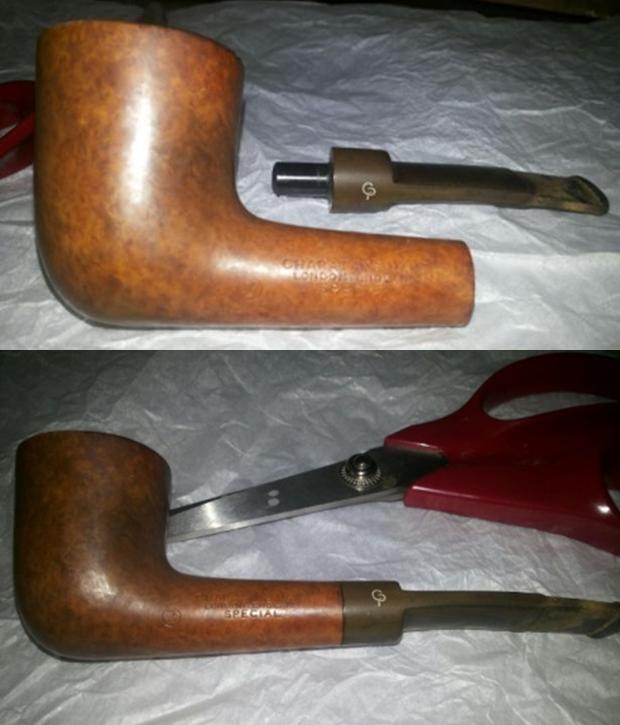
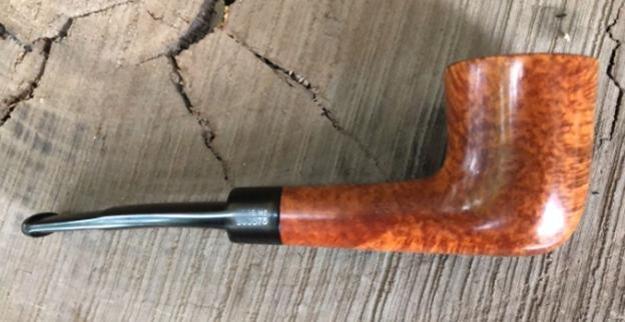
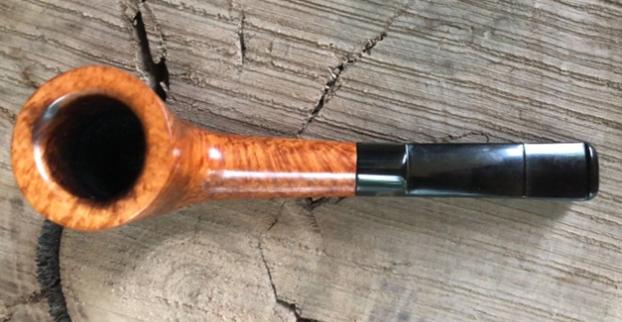
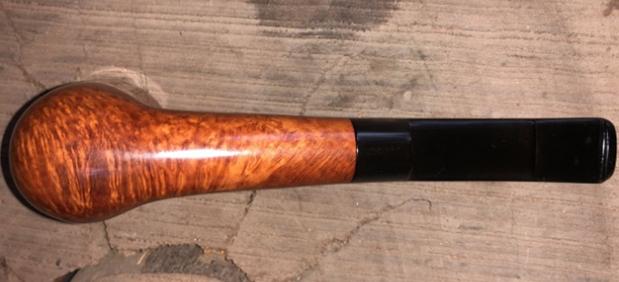
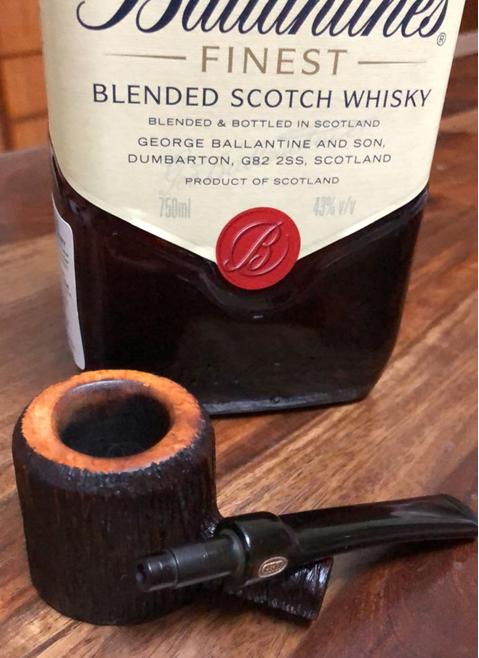
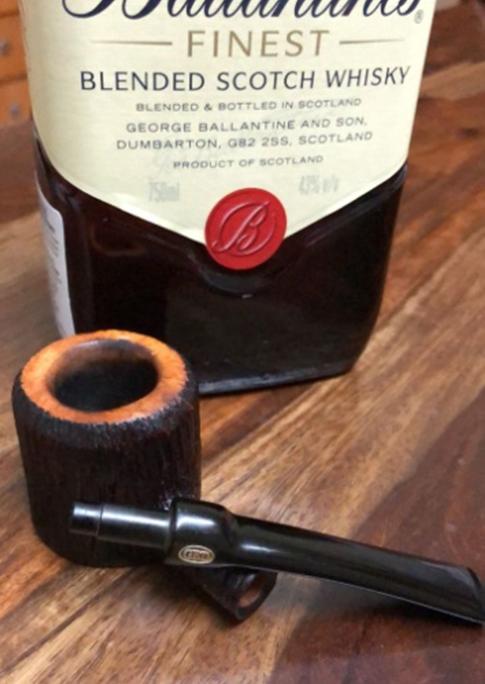
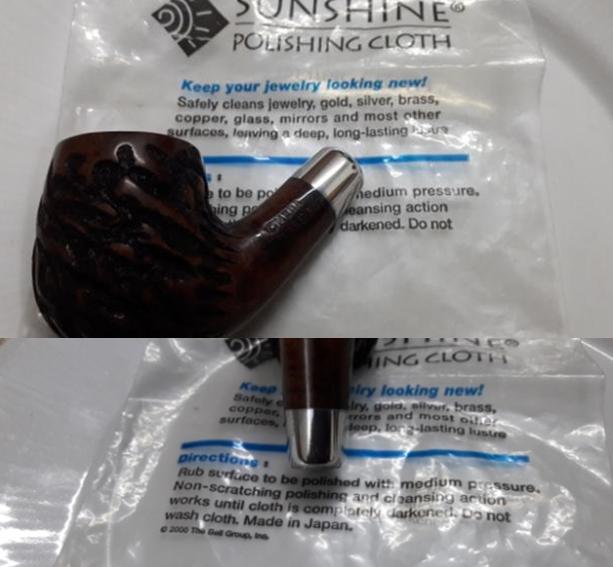
To finish the pipe, I rubbed a small quantity of Halcyon wax II on to the stummel and gave it a nice polish. The pipe now does look stunning. I love the way the pipe has turned out and I can proudly reply back to this Omega “IT’S YOU!!!!!!” The finished pipe is shown below.

Stem Repair on a Savinelli Silver


Blog by Paresh Deshpande

I have been simultaneously working on the stem repair of CHACOM PANACHE #44 (https://rebornpipes.com/2018/08/26/chacom-panache-44/) and this SAVINELLI SILVER. Both the pipes had similar damage to their stems; a gaping hole in the stem exposing airway of the stem. As stated in my write up on the former, I had primarily purchased these pipes to gain hands down experience in major stem repairs and stem reconstruction. That both these pipes were beautiful was an added bonus!!!!!

This fancy Dublin Sav has beautiful mixed grain on the right side of the bowl while the left side has lovely birdseye grain. The front and back of the bowl, lower and upper surface of the shank has nicely packed cross grains. A sterling silver band adorns this Sav and is stamped on the upper surface with “925” in an elongated hexagon over “SAVINELLI”. On the lower surface, this band is stamped as “STERLING” over “MOUNTED”. All stampings are in block capital letters. On top of the oval shank, towards the shank end, it bears the stamp “SAVINELLI” over “SILVER” while at the bottom, it is stamped with Savinelli shield, followed by “915”, followed by size “KS” over “ITALY” in block capital letters. The saddle stem bears the Sav Shield logo on top of the saddle. History of Savinelli pipes is very well documented on pipedia.com, however, due to a very large line up, frequent changes to models, shapes and finishes, I came to a halt when I tried to date this Savinelli. I earnestly request all the knowledgeable veterans of pipe world to share any bits and pieces of information on this pipe.

INITIAL VISUAL INSPECTION

The stummel is covered in oils and tars giving a dull and lifeless appearance to the pipe. There is no heavy build up of cake in the chamber and also overflow of lava on the rim top. However, a slight darkening is seen on the right side of the rim. Some scratches are also seen on the rim top which will need to be addressed. It is the stem which has the maximum damage. A large hole can be seen on the upper surface of the stem near the button end, exposing that portion of the airway. There are two deep bite marks on the upper surface of the stem. The button on both surfaces of the stem has been chewed and will need to be reconstructed.The mortise shows some accumulation of previously smoked tobacco oils and tars, but it is nothing as compared to some pipes which I have seen.The airway is not clogged and will only require minor cleaning.

THE PROCESS

Since I had worked on the stem of the CHACOM simultaneously with that of this Sav, the process and difficulties were the same. I would request those interested in knowing the travesties I encountered and overcoming these, to please read the write up on the stem repair of CHACOM PANACHE #44 (https://rebornpipes.com/2018/08/26/chacom-panache-44/). Here are the progressive pictures of the restoration process. Having finished the stem repair (some imperfections are seen, but cannot be discerned in person), I turn my attention to the stummel. I reamed out the chamber using a Kleen Reem pipe reamer and fabricated knife. I removed the complete cake from the chamber. I further sanded down the walls of the chamber with a 220 grit sand paper to smooth the walls and took the cake back down to the bare briar. I gently scraped out the little overflow of lava from the rim top.I cleaned out the internals of the shank with pipe cleaners and cue tips dipped in isopropyl alcohol. I wiped the inside of the chamber with cotton swabs dipped in alcohol. There was very little amount of cake and the shank was pretty clean too. It appears that though the pipe was well smoked as is apparent from the stem condition, it was well cared for.I cleaned the stummel with undiluted Murphy’s oil soap and a tooth brush. I washed the stummel under running water and dried it using paper towels and soft absorbent cotton cloth. Once the stummel had dried, I felt that the bowl was still appearing dull and lackluster. The grains, though visible, needed to be highlighted. To achieve the desired results, I sanded the stummel with micromesh pads, wet sanding with 1500 to 2400 grit pads and dry sanding with 3200 to 12000 grit pads. The rim top was also sanded down with micromesh pads to remove/ reduce the darkened areas. I wiped the bowl with a moist soft cotton cloth to remove the sanding dust after each pad. The stummel now looks beautiful with the grains on full display. I finished the bowl by rubbing “Before and After Restoration Balm” with my hands and polished it with a soft cotton cloth. The bowl now appears to be alive and the grains pop out and are on display to be enjoyed. This pipe, along with the CHACOM, will always find a place of pride in my collection for being first major stem repair project. The finished pipe is shown below.

Chacom Panache #44


Blog by Paresh Deshpande

I have embarked on a journey into the wonderful, invigorating and leisurely world of pipe restoration and want to try out and address as many issues that one may encounter when dealing with an old, used and also abused pipes. Though there are a large number of old and vintage pipes that I have inherited, I went ahead and purchased two pipes, one is a CHACOM PANACHE # 44 and the other is a SAVINELLI SILVER, for gaining hands-on experience in stem repair. The stems on both these pipes have large gaping hole near the button end, exposing the stem’s airway. I shall be working on the stems of both these pipes simultaneously while the stummel will be worked on separately. The write up on both, though separate, is being uploaded at the same time so as to maintain continuity.

Even though I had purchased this pipe to practice repairing a stem bite-through, what really caught my attention was the beautiful coral like rustication on the bowl and shank which could be seen on some high end pipes from equally higher end brands. Through all the dust and grime, the beautiful contrasting stains between the lighter brown raised rustication and darker hued depressions makes for an eye catching finish. On the smooth surface at the bottom of the shank, it is stamped “CHACOM” in an artistic hand over “PANACHE” in block capital letters. This is followed by the shape number # “44” at the edge of the shank where it meets the stem. The stem bears the double “C” logo stamped on the left side of the stem towards the tenon end.I gleaned following info from Pipedia to know more about the brand of this pipe. It is reproduced below (https://pipedia.org/wiki/Chacom):

1825 : Well before the discovery of briarwood the COMOY family manufactured pipes in the small village of Avignon, near to Saint-Claude, mostly in boxwood for the “Grumblers” of the Army of Napoleon. 1850 : Birth of Henry COMOY, founder of the brand.
1856 : Discovery of briarwood and particularly the special treatment it required for the making of pipes. Saint-Claude becomes the birthplace of briar pipe manufactures and the world capital of pipe-making.
1870 : Henri COMOY, prisoner of war in Switzerland meets his cousins the Chapuis and ruminates the idea of an association.
1879 : Henry COMOY emigrates to London with some of his technicians from Saint-Claude and establishes the first English pipe factory in England H. COMOY & C° LTD. The Saint-Claude factory supplies them with briarwood and pipe bowls.
1922 : After the First World War the association COMOY and CHAPUIS is realised and the Saint-Claude factory becomes CHAPUIS COMOY & Cie.
1924 : Death of Henri COMOY. His sons Paul and Adrien assume the direction of the factories in Saint-Claude and London assisted by their cousins Emile and Louis Chapuis.
1928 : London now able to produce their own pipes, and in order to develop the Saint-Claude factory, the brand CHACOM is created, using the first three letters of the COMOY and CHAPUIS families. Up till 1939 CHACOM was offered only in France, Belgium and Switzerland in order not to embarrass the COMOY pipes which had the same shapes and qualities.
1932 : The world economic crisis reaches Saint-Claude. To weather this problem Chapuis Comoy & Cie joins with another company under the name of LA BRUYERE, forming the biggest pipe concern in the world with 450 workpeople. Big trucks were needed to transfer the briar blocks from the drying shed to the factory.
1945 : After the Second World War CHACOM assumes its entire commercial liberty and launches a complete and modern range of pipes.
1946 : Chacom becomes the principal brand in France and Belgium.
1947 – 1948 : CHACOM, number one in Scandinavia, Germany, then United States…
1957 : In face of the commercial preponderance of the brand CHACOM the company La Bruyère returns to the name of CHAPUIS COMOY & Cie.
1964 : Death of Adrien COMOY. His son Pierre succeeds to him in London. Mr REED is the Chairman and Managing Director in Saint-Claude.
1965 : First French brand named pipe in JAPAN
1971 : Having recovered its independence from COMOYS of London, Yves GRENARD, second cousin of Pierre COMOY, takes over the Direction of Chapuis Comoy & Cie and at the same time the exclusive sale of H. COMOY & Ltd, in France.

 I further searched pipephil.eu for additional information and the same is reproduced below:

The brand Chacom turned up (1934) after fusion of Chapuis-Comoy with La Bruyère. Yves Grenard (†2012), second cousin of Pierre Comoy headed the company from 1971. He was responsible for Chapuis Comoy’s recovering its independance from Comoy. His son Antoine Grenard took over the direction of the company in 2007. Chacom is a brand of Cuty-Fort Entreprises (Jeantet, Vuillard, Jean Lacroix, Ropp …).

INITIAL VISUAL INSPECTION

The bowl is caked but not heavily. The rustication on the rim top is filled with tars oils and grime. The finish is dull with dirt and dust filling the rustication. This will be cleaned with Murphy’s oil soap and hard bristled tooth brush.The mortise is filled with gunk and debris. This will need to need to be cleaned.The stem is heavily oxidized with heavy calcification towards the button end in the bit area. There is tooth chatter and bite marks on the top surface of the stem near the button end. However, the biggest damage can be seen on the lower surface of the stem. There is a large through and through hole in the stem exposing the airway. Thankfully, the top surface is complete with only tooth marks and tooth chatter. This reconstruction will be the biggest challenge since I have never attempted this restoration before. The button is badly damaged and will need to be reconstructed.THE PROCESS

In this restoration project the stem repair posed the biggest challenge. I searched the net, viewed YouTube videos and my most reliable website “rebornpipes.com” and read over each and every blog available on the website on stem repairs and took down notes and the steps involved. I even discussed with Mr. Steve. Now armed with this acquired knowledge, I embarked on my quest to gain knowledge through personal experience.

The first thing I did was to paint the upper and lower surfaces of the stem with the flame of a Bic lighter to raise the tooth chatter to the surface and also raise the edges of the hole to create an even surface. Next, I cleaned the surface of the stem with isopropyl alcohol to get rid of all the dirt, oils and tars from the surface. I also had the internals of the stem thoroughly cleaned using pipe cleaners, cue tips and alcohol.

Once I was satisfied with the cleaning, I smeared a generous amount of Vaseline onto regular pipe cleaners and inserted it into the airway, ensuring the pipe cleaners are fully underneath the hole. This helps in ensuring that the airway remains open. Vaseline coated pipe cleaners prevents the mixture of CA superglue and activated charcoal from percolating down into the airway and clogging the airway.The next step in the process of this repair is mixing of CA superglue and activated charcoal to the consistency of putty filler. Suffice to say that the consistency should be such that it should not be too runny but just sufficient to spread smoothly and evenly over the intended surface. First timers like me, do not worry too much, even I did not understand what should be the ideal consistency (LoL). From the pictures below, it is amply evident that I did not achieve the exact consistency I desired, but no issues, it still worked!!! Since the beginning of my journey into the beautiful and challenging world of pipe refurnishing, I am being faced with problem relating to glue. Maybe the hot temperate climate prevalent here is causing issues or the quality of glue itself is an issue. However notwithstanding the issues of glue, I was able to prepare a mixture of CA superglue and activated charcoal and applied it to the surface. I set it aside to cure overnight.I began by sanding the repaired/ filled areas using a flat needle head. It was not as easy as it seemed because when I began the process, as I sanded down the stem, I observed that the filling crumbled and dislodged from hole. Apparently, the filling was too dry.

I prepared a fresh mixture of CA glue and activated charcoal and applied it to area to be filled. After curing, when I tried to file it down, I realized that shiny dots were visible. On close observation, these tiny dots were air pockets which were trapped during application and subsequent curing. I discussed with Mr. Steve who advised me to fill the spots with glue only. I did so and let it cure for 2 days.I sanded down the fill and realized bigger air pockets were now exposed. It is unfortunate that I did not take pictures of these issues and processes as I was too engrossed and concentrating on getting the filling right.

I again prepared a fresh mixture of activated charcoal and superglue and reapplied it to the stem surface and let it cure for 3 days since I was traveling.For this sanding, I took unusually long time taking frequent breaks to check the progress. I was very deliberate and used light hands. I used less of flat head needle file and more of 180 grit sandpaper. Finally, I was able to achieve a satisfactory fill. I further evened out the fill using 220 grit sandpaper, followed by 440, 600 and 800 grit papers. Now I am satisfied with the results of the fill.With the fill now evened out, I proceeded to sand the stem with micromesh pads, going through wet sanding with 1500-2400 pads and dry sanding with 3200- 12000 grit pads. I rubbed in Extra Virgin Olive oil after every three pads. The stem now has a nice shine to it and No Hole!! However, the finish is not as refined and minor imperfection can be seen in the finish, though not as glaring in person.With the issue of the stem now addressed, I turned my attention to the stummel. Using a Kleen Reem pipe reamer and fabricated knife, I removed the complete cake from the chamber. I further sanded down the walls of the chamber with a 220 grit sand paper to smooth the walls and took the cake back down to the bare briar.I cleaned the internals of the shank and mortise using regular and bristled pipe cleaners dipped in isopropyl alcohol and cue tips. I also wiped the internal walls of the chamber with cotton pads dipped in 99.9 % isopropyl alcohol. I use high proof isopropyl alcohol as it evaporates very rapidly and leaves no traces of odor or liquid behind to ghost your pipe.I cleaned the externals of the bowl with undiluted Murphy’s Oil Soap and tooth brush. Thereafter, the stummel was washed under running water and dried using a paper towel. I observed that the thin, delicate wire rustication on the rim top was still filled with oils and tars. To clean the rim top, I used a 000 grade steel wool with Murphy’s Oil soap to gently scrub out the dirt. I dried it with paper towels and a soft cotton cloth. Once the stummel had dried out, I rubbed a little “Before and After Restoration Balm “deeply into the coral rustication and also into the wire rustication of the rim top. I worked it deep into the rustication with a horse hair shoe brush. I polished the stummel to a deep shine by rubbing it down with a microfiber cloth. The raised portion of the rustication has a light reddish hue which contrasts beautifully with the dark brown coloration of the rest of the stummel. The completed pipe is shown below. Thanks for your valuable time spent in reading my amateurish attempt at pipe restoration.


Peterson’s System #314 Limited Edition


Blog by Paresh Deshpande

Having restored my grandfather’s Pete System # 31, Made in Eire, a few months back (for those who would be interested in reading the write up, here is the link: https://rebornpipes.com/2018/06/01/restoring-my-grandfathers-petersons-system-31-made-in-eire-billiard/), and after I had received my Pete System #307, Made in Eire, duly restored and in pristine condition from Mr. Steve Laug, I have been fascinated by Peterson System pipes. So while surfing eBay, I came across this Peterson System #314. What I found most interesting was the “LIMITED EDITION” stamp under the shank and the sterling silver ferrule!!!!

This Pete is a medium sized pipe with beautiful cross grains extending from the front and back of the bowl along the underside and top of the shank right up to the Sterling Silver ferrule at the shank end. Densely packed, beautiful birdseye adorn the sides of the pipe. The sterling silver ferrule is stamped “Peterson’s” in cursive hand over “DUBLIN” followed by “STERLING” over “SILVER” in block letters. This is followed by three hallmarks. The bowl is stamped on the left side as “PETERSON’S” with a forked “P” over “SYSTEM” in an arch while the right side is stamped with COM stamp of “MADE IN THE” over “REPUBLIC” over “OF IRELAND” in three lines followed by shape number “314”. The bottom of the shank is stamped “LIMITED” over “EDITION”. Yes, there are a large number of stampings on this pipe and all are clear and crisp. However, the stamping on the stem is conspicuous by its absence. It is felt that the more detailed the stampings on a pipe; the easier it is to accurately date it. But believe you me, Gentlemen and Ladies; this set of stampings set me on a wild goose chase!!! The reason for this was that the era of forked “P” in Peterson’s did not correspond with the COM stamp. Also the letter “K” in the silver hallmark date did not match with either the forked P or the COM stamp. Thus, I was unsure about dating this pipe when I spoke to my mentor, Mr. Steve of rebornpipes and he clarified the issue. I was informed that Petersons came out with limited edition pipes to commemorate a particular pipe and this particular specimen was to commemorate the System pipe. He further advised that the Hallmarks would help me date this piece.

With this input, I channeled my energies in that direction. The first thing I did was to check the Hallmarks that were seen on the silver ferrule. The same were as seen in the picture below and I have highlighted the letter “K” which will help in dating.Thereafter, I searched for hallmark charts and the Dublin Assay Office in particular and chanced upon a chart which I found most relevant and have highlighted the letter “K”. Thus, I can safely say that the pipe dates from 1997. It is also pertinent to mention that the now famous “P-LIP” invention by Peterson was in 1898!!!! Thus, could it be possible that this pipe was made by Petersons to commemorate 100 years of this revolutionary invention????? I don’t know!!!!Now that the issue of dating was settled, the forked “P” was still haunting me and led me to search for further inputs on this issue. I came across the under mentioned site and have extracted relevant portion from this site: http://thepetersoncollector.blogspot.com/2010/07/welcome-to-my-new-blog.html

The “Made in Ireland” block format (above) can be another headache in dating Peterson pipes since this stamp was used in the late Patent Era as well as the late 1940s. So for a guide we must take into consideration the style of lettering Peterson used on their pipes. From the start of the Patent Era until somewhere in the early 1930s, Peterson used the “Old Style” lettering that used a forked tail “P” in Peterson.

From then until now, Peterson used the more familiar script “P” (above) intermixed with a plain block letter “P.” Later in the 1970s, Peterson began production of “commemorative” pipes, often referred to as “replica” or “retro” pipes and these will also have the old style lettering but according to the pipes that we own and have seen, most of these will have a small difference in the original forked tail “P”. Again, there appears to be a cross-over with the old style forked tail and the later forked tail P’s (below). However, these commemorative pipes generally have a silver band with hallmarks so one can date these pipes by the hallmark.

Thus, my curiosity regarding the issue of COM stamp, forked P and hallmarks seen on this pipe were all tied up together and I proceeded to the next stage of my restoration process.

INITIAL VISUAL INSPECTION

The bowl is not very dirty but the beautiful grains are all dull and lackluster. However, all the stampings are very distinct, clear and crisp. The bowl has a decent build up of cake inside while the reservoir is completely clogged and filled with tar and gunk. The smell from the bowl was very strong, though sweet and will have to be addressed. Draught hole is clogged and air does not pass freely through it. The rim of the bowl has some overflowed tars, oils and grime but it’s not heavy. This should be easily addressed. However, the inner edge of the bowl has taken some serious beating and needs to be addressed.The stem is heavily oxidized with light bite marks near the lip on both surfaces. Air does not flow easily through the airway and will have to be cleaned. THE PROCESS

Abha started her work of cleaning the chamber by reaming it with a Kleen Reem pipe cleaner and followed it up with my own fabricated pipe knife, scrapping all the cake from the bottom and walls of the chamber. Once she reached the bare briar, she further scrapped the cake from the walls by sanding the chamber with a 220 grit sand paper. This also helps to even out the wall surfaces.Once the bowl was reamed down to its bare briar, it was evidenced that the inner edge of the rim was damaged and also there was a burn mark on the left side of the bowl in the 7 o’clock direction.The best way to tackle this issue was to lightly top the rim on a 220 grit sand paper and create a slight bevel on the inner edge of the rim. I was very deliberate and cautious while working the burn mark and scrapped the burnt briar to expose the solid wood. Once the topping was done and bevel created, I polished the rim top with the micromesh pads, wet sanding with 1500 to 2400 pads and dry sanding it with 3200 to 12000 grit pads. I was very satisfied with the result of this process. I turned my attention to cleaning the internals of the bowl. With regular and hard bristled pipe cleaners dipped in alcohol, I attempted to clean the draught hole and the reservoir. I soon realized that there is a lot more gunk and tars accumulated in the reservoir and hence used a spatula to dig out the oils and tars from it. I gave a thorough wipe down to the insides of the bowl and shank with cotton swabs dipped in isopropyl alcohol.The smell in the bowl was addressed by a salt and alcohol bath. I filled the bowl and shank with kosher salt keeping it slightly below the rim level. I filled it with isopropyl alcohol and left it overnight to do its magic. I usually seal the shank end with a plastic sheet tightly wrapped around a cue tip to avoid the alcohol from oozing out, but in this case since the shank is upturned, there was no need to do so. By next morning the salt is dark colored, more so the shank. I removed all the salt and with a pipe cleaner cleaned the bowl and shank of any residual salts. I blew through the draught hole to dislodge the trapped salts. I wiped the bowl clean and dried the shank and bowl with paper napkins and set it aside to dry for an entire day. By evening, the pipe was nice and dry and all the smells were history.While the bowl was drying, I worked on the stem. I started by flaming the surface of the stem with a Bic lighter. This helps to raise the minor tooth chatter and deeper bite marks to the surface to a great extent. I followed it up with sanding it down with a 220 grit sand paper. I took special care and efforts to enhance the lip and lip edges on both surfaces. To finish the stem restoration, I it with micromesh pads, wet sanding with 1500 to 2400 pads and dry sanding it with 3200 to 12000 grit pads. I wiped it down with Extra Virgin Olive oil in between the pads. The stem is now nice, shining and glossy black.I cleaned the bowl with undiluted Murphy’s oil soap and toothbrush and thereafter rinsed it under warm running water. I took care that water does not enter into the chamber and the mortise. Thereafter I dried the stummel with a paper napkin and a soft cotton cloth. Once the bowl had dried, I rubbed some “Before and After Restoration” balm in to the surface. The transformation is almost immediate. The bowl now has a nice lively sheen to it. I left it to rest for a few moments and then polished it with a soft cotton cloth. To finish, I rubbed a small quantity of PARAGON WAX in to the stummel and polished it by hand using a soft cotton cloth and reattached the stem. This wax was also rubbed on to the stem and polished again. The finished pipe is shown below. I sincerely hope that you have enjoyed reading this write up as much as I enjoyed working on it and writing and researching this pipe.

Restoring a STANWELL # 89


Blog by Paresh Deshpande

This pipe, because of its interesting Dublin shape with a round rim, beautiful grain and it being a STANWELL, had been attracting my attention for some time now. However, I was always relegating its restoration since the condition was far worse and would require a ton of work as well as time to complete it.

After I had finished the pair of KRISWILLS, I could not think of working on any other pipe but this STANWELL!!!!!! And so, here I am with this pipe, admiring the shape, feel of the pipe in my hand and the beautiful grain that could be seen through all the dirt, oils, tars and grime.

A medium sized fancy Dublin with an oval shank, this pipe has beautiful densely packed birdseye grain on either side of the bowl with lovely cross grain extending from the front of the bowl right down the bottom to the shank end. Similarly, the grain extends from the back of the bowl up to the shank end!!!!! The flattish surface of the shank further accentuates the dense grain. No wonder then that this Stanwell is stamped as “SELECTED BRIAR”!!!!!!!! This beauty is stamped “STANWELL” in an inverted arch over “REGD No. 969- 48” over “HANDMADE” on top of the shank while on the bottom of the shank it is stamped “SELECTED BRIAR” over “89” over “MADE IN DENMARK”. The stem is stamped on the top of the saddle with a crown over “S” and on the bottom of the saddle with “HANDCUT”.All the stampings are crisp and easily readable.

I searched the net for information on this brand in general and this pipe in particular. The first site I always visit is Pipedia. I gathered a lot of information about the brand and some important snippets of information are reproduced below:

Stanwell Article from smokingpipes.com

When pipe smokers talk about pipes that are consistently great smokers, exhibit the creative and beautiful designs that exemplify Danish pipemaking and offer the best value in factory produced pipes, they are talking about Stanwell. We hear time and time again, from customers and top pipe makers from around the world, that Stanwell is the best factory produced pipe in the world. Stanwell maintains the most modern pipe making facility in the world and for many years has enjoyed some unique relationships with many legendary Danish pipe makers. In fact, Stanwell occupies a pivotal place in the history of the world-wide popularity of Danish-made pipes.

At the end of the war, briar became available again, so Nielsen began importing his own briar and started making briar pipes to compete with the English manufacturers. It must be remembered that in 1948, England was the single great center for pipe making. Therefore, Nielsen changed the name of his pipes to “Stanwell”, which sounded much more like a proper English name than “Nielsen”. He also created the horse drawn carriage logo for its English connotations. He later changed his own last name from Nielsen to Stanwell, a testament to his devotion to the pipes he made. Stanwell’s relationships with Danish pipe makers goes back to Sixten Ivarsson, who is considered the originator of modern Danish pipe making. Ivarsson was commissioned to design Stanwell shapes. In 1969, the factory was moved a town called Borup, just outside of Copenhagen to be closer to Ivarsson.

Essentially the goal of Stanwell is, and always has been, to produce high quality pipes at a price that is truly within the reach of the common man. In this they have succeeded admirably, offering perhaps more pipe for the money than any other pipe manufacturer in their price range. Stanwell pipe offers exceptional quality at a remarkably affordable price. Today it often seems that there are few options in between low cost, very low quality pipes and the handmade pipes that fetch hundreds of dollars. Stanwell manages to fill this void commendably by offering pipes close to the quality of the handmade with prices that are only slightly higher than drug store pipes.

Stanwell pipes are a must for any pipe collection. The Stanwell name is a cornerstone of Danish pipe making. In owning a Stanwell, you will not only enjoy beautifully styled, great smoking pipe at a great price, you will own a piece of pipe making history.

Now that I have some historical information about the brand, I went ahead with my attempt at dating this pipe. I had read that Mr. Basil Stevens is generally considered an authority on Stanwell pipes and so that was logical start point for me. I gathered some information from a site, https://www.scribd.com/document/45022903/Stanwell-Dating-Pricing-Information-by-Basil-D-Stevens, which I have reproduced from the above site:-

Dating Information:

1) Regd. No. stamping discontinued in late 1960s to very early 1970s. This is the Stanwell trade mark registration. The “48” indicates that the registration was made in 1948. (info rec’d from Jorgen Grundtvig, Managing Director, Stanwell A/S)

3) Up until the early 1960s only the top pipes, e.g. “Hand Cut” had the stem/mouth pieces stamped with the Stanwell logo of a crown over “S”.

6) “Handcut” stamped on black vulcanite stems have not been done since at least the 1970s and possibly earlier. (info from J.G.).

STANWELL SHAPES
Shape “89”
Two versions of this shape number
a) Freehand, oval stem, short oval saddle mouthpiece, by Sixten Ivarsson.
b) Large pot, thin, long saddle mouthpiece.

From the above information that I have gathered and highlighted in blue, I feel that this particular pipe was from the 1960s and is a freehand made by Sixten Ivarsson. Any variation or additional information or any incorrect assessment on my part may please be conveyed through your comments on rebornpipes.com

Armed with this information, I carried out my detailed initial visual inspection of the entire pipe. This assessment helps me in identifying the issues that are seen as well as understand likely issues that may present themselves subsequently while making a mental map of the entire restoration process.

INITIAL VISUAL INSPECTION
The stummel is covered in oils, tars and grime to such an extent that the bowl is very dull to look at with all the grains hidden and sticky to the touch. This will need thorough cleaning. Whether to sand the bowl with micromesh pads to bring to fore the lovely grain will be decided later. The bowl is heavily caked and has large amounts of lava overflow on top of the rim. The internal condition of the bowl and rim will be ascertained only after the cake has been completely reamed out. There is always the fear of possibility of charred rim edges or burn fissures or charred briar inside the chamber of pipes in this condition. However, the entire stummel appears solid to touch from the outside reducing the probability of any of the above possibilities being present.The short oval saddle stem is heavily oxidized with a number of light tooth chatter on both surfaces. The lips on both sides have been chewed off. I had masked both the stampings on the stem with a whitener pen, you could of course use acrylic paint or any other stuff, but I found the whitener pen to be the best option as it helps to fill the letters at a later stage. As expected, the airway is clogged and a test draw was rewarded with debris and carbon dust. This will have to be cleaned.THE PROCESS
The first step that I usually follow is the reaming of the bowl. Using a Kleen Reem pipe tool and my trusty and effective fabricated knife, Abha, my wife, cleaned out the cake from the chamber. To smooth out the inner surface of the chamber and completely remove the last traces of remaining cake, she sanded the inner surface with a 220 grit sand paper. With a sharp knife, very gently scraped the surface of the rim top and removed the accumulated tars, oils and grime.She cleaned the bowl and rim using undiluted Murphy’s Oil soap and a toothbrush. Thereafter, the bowl was washed under running tap water and immediately dried out using paper towels and a soft cotton cloth.

The stummel is now clean and fresh. Inspection of the rim and chamber revealed an intact inner edge and a perfect condition of the inner walls of the chamber. What a relief this was!!!!! The only issue was that the rim top is still blackened and an eye sore. I addressed this issue by sanding the rim and the entire stummel with micromesh pads. I very lightly and briefly wet sanded with 1500 to 2400 pads, gently wiping with a moist soft cloth to remove the dust left behind due to sanding.I dry sanded the rim and stummel using 3200 to 12000 grit micromesh pads. At the end of the dry sanding, I rubbed a small quantity of “Before and After Restoration Balm” with my fingers into the briar. The immediate and incredible transformation that takes place is a worthy reward for all the efforts!!! The bowl now looks fresh and attractive with the grains popping out any which way you look at the briar; it feels somewhat like DIWALI, festival of lights celebrated here in India. I polished off the balm with a soft cloth to a lovely shine. I AM ABSOLUTELY IN LOVE WITH THIS PIPE!!!!!Turning my attention to the stem, I started by sanding the stem with a 220 grit sand paper. I was especially careful around the edges and the stampings. Using the crisp edge of the folded sand paper, I reshaped the buttons and sanded it to even out the surface. Thereafter, I sanded the stem with 320 and 440 grit sand paper. To finish the stem I went through the complete set of micromesh pads, wet sanding with 1500 to 2400 pads and dry sanding with 3200 to 12000 grit pads. I wiped the stem with moist cloth after each pad and rubbed olive oil into the stem after every three pads. I carefully removed excess whitener from the stampings. The stem is now looking nice and shiny with crisp stampings. Having addressed the “appearance” aspects of this beauty, I turned my attention to the “performance” aspect to ensure that this beauty smokes as well as it looks. I thoroughly cleaned the shank internals using shank brush, pipe cleaners, cue tips and isopropyl alcohol. The stem airway was cleaned using regular pipe cleaners and also bristled ones dipped in alcohol. The airway is now clean and the draw is full and open.

To complete the restoration, I rubbed a minute quantity of PARAGON WAX on the stummel and the stem. After a few seconds, using muscle power and a microfiber cloth, I polished the entire pipe to a lovely shine. Can’t wait to load and fire up this stunning piece of briar!!!! The finished pipe is shown below and yes… for the curious reader, the prop is not Beer filled mug, but a Beer mug filled with GREEN TEA!!!!! Thank you for your valuable time spent in reading my amateurish chronicle.

Restoring a Kriswill “Golden Clipper”


Blog by Paresh Deshpande

“………. and now make me handsome and desirable too!!!!!” This is what the sibling of the Kriswill “CHIEF”, the “GOLDEN CLIPPER” appeared to be demanding of me and who am I to refuse this lovely pipe. So here I am with all my enthusiasm to work on this beautiful pipe with mixed grains.

This was one of the pair of Kriswill pipes which was dug out by my younger daughter from the large pile of pipes, the other being Kriswill “CHIEF”. Both these beauties had an issue with their stems. The stem of the “CHIEF” did not sit flush with the shank and appeared smaller in diameter compared to the shank, while the stem of the “GOLDEN CLIPPER” sat flushed with the shank but was larger in diameter than the shank. I addressed this issue in an ingenious way and completed the restoration of the “CHIEF”. For those interested in knowing the issue of stem in detail, process to address it and the complete restoration, please follow the link https://rebornpipes.com/2018/08/04/breathing-new-life-into-a-kriswill-chief-20/. I am sure you will find it an interesting read.

My joys knew no bounds when the “CHIEF’S” stem fit perfectly like a glove in the shank of the “CLIPPER” (the time-consuming, cautious, accurate and nerve-wracking but enjoyable work of matching the stem and shank of the “CHIEF” still fresh in my mind!!!!!!). Here are the pictures of a perfectly matching stem and shank on the CLIPPER.This KRISWILL “GOLDEN CLIPPER” has a medium sized bowl with mixed grain. It is stamped “KRISWILL” over “GOLDEN CLIPPER” over “HANDMADE IN DENMARK” on the left side of the shank. At the bottom of the shank and close to the edge of the shank where it takes the stem, is stamped with number “54”.As I had determined the dating of this pipe, while searching information for the “CHIEF”, from 1970s (the snowflakes stamp on the stem and block letters on the shank were adopted post 1970), I proceeded to carry out a visual inspection of the condition of the pipe in my hand. This helps me map the road to restoring the pipe by identifying the issues involved and identify methods/ options to address the same.

INITIAL VISUAL INSPECTION

The bowl is covered in dust, oils, tars and grime of yesteryear. It is filled with a thick cake and the lava has overflowed on to the rim. I would still say that this bowl is not as heavily caked as I have gotten used to with my grand old man’s pipes. The cake has completely dried out.The rim surface is pock-marked with few minor dents and dings of being banged around. Exact extent of damage, there appears to be some, to the inner edge will be known after the bowl has been reamed down to its bare briar. The outer edge of the rim appears to be in decent condition.The interchanging of stem with the CHIEF ensured a perfect fit of the stem on this pipe and required no matching the fit to the shank end. The stem is, again comparatively to what I have dealt with before, lightly oxidized with light tooth chatter. The lip has been bitten off at one place and will need to be rebuilt and reshaped. There is some calcification seen around the lip on either surface. As I have come to expect, the airway in the stem is blocked and the mortise is clogged with gunk, debris and tars. I will need to clean both to ensure an open draw.The stummel needs to be cleaned. I will have to decide if I should retain the stain finish or polish it to its natural look and match it to its bigger sibling, the “CHIEF”.
THE PROCESS
Abha, my wife, dealt with the cake by reaming the chamber with a Kleen Reem pipe tool and a British Buttner pipe tool. Using the fabricated pipe knife, she further scraped the cake from the bottom of the bowl and also the walls of the chamber. She was especially very careful while reaming with the knife so as not to damage the inner edge of the rim. Once the solid briar was exposed, she further smoothed the walls and removed remaining cake by sanding with a 180 followed by 220 and 600 grit sand paper. Another advantage of this process is the elimination of traces of ghosting to a great extent. She gently scraped the rim top with the sharp edge of the knife and removed the accumulated overflow of lava. Abha followed this by scrubbing the chamber walls with cotton swab dipped in isopropyl alcohol. This removed the fine cake dust, leaving the chamber clean, fresh and smooth. As can be seen from the picture, after the cleaning, the dents and dings are more pronounced and will need to be addressed. Further, if observed closely, there is a small chip to the inner edge which can be seen on the right side in the 3 o’clock direction. I had the following two courses of action to choose from to address these issues:-
(a)        Create a slight bevel on the inner edge to eliminate the inner edge chip.
(b)        Topping the rim on a topping board.

Abha suggested proceeding with the second option since the “CHIEF” was without a bevel and as these were together, she wanted to maintain the similarities as far as possible. I concurred with her since topping will also address the minor dents and dings seen on the rim top. I gently topped the stummel on a 220 grit sand paper, frequently checking the progress.  This is very important since you do not want to lose too much briar and there is always a fear of distorting the proportions of the pipe due to excessive sanding. How much sanding is sufficient, is a question to which the answer can never be quantified. For me the mantra is, topping or sanding should be kept to the minimum and preserve maximum briar even at the cost of very minute dents/ chips being visible.

I topped the bowl just enough to address the dents and dings on the rim surface. The small nick to the inner edge of the rim has also been addressed to a great extent, but not completely. It is barely perceptible in person and acceptable to me. Hence, I left it at that!!I cleaned out the internals of the shank/ mortise and airway using pipe cleaners, cue tips and isopropyl alcohol. Thereafter using undiluted Murphy’s oil soap and tooth brush, I cleaned all the tars, oils, dust and grime from the bowl and washed it under running water. I wiped it down with paper towels and a soft cotton cloth.

Using a brown stain pen (Yes!!! I finally have them, thanks to my guru, Mr. Steve who had diligently packed them with the pipes that he had sent me after repairs, when he learnt that I was unable lay my hands on them), I stained the rim to match the rest of the bowl and set it aside to dry out. In my haste to finish the restoration, I forgot to click pictures of the above mentioned process and the look of the pipe at this stage.

While the stummel was kept aside for drying, I turned my attention to the stem. Starting with the use of Bic lighter, I painted the surface with its flame to raise the tooth chatter and bite marks as much as possible. I scrubbed the stem with a piece of moist Mr. Magic Clean sponge to clean the stem of the calcification. Minor tooth chatter was addressed to a great extent, however, some stubborn and deep bite marks and the bitten off lip stood out like sore thumb!!! Having learnt my lessons and working around the handicap of glue, I spot applied clear CA superglue with a tooth pick and set it aside to cure over night. The next morning, I applied another layer of the superglue and set it aside to cure. The reason I decided to adopt this technique is because the glue I have and available to me is of very thin consistency and hence the layering technique. After 24 hours, I checked the fills and proceeded to sand down the fills and reshape the edge of the button with a flat head needle file to match the surface of the stem. Using a 220 grit sand paper followed by wet 320 grit sand paper, I evened out the fill and removed oxidation from the stem surface. Thereafter, I used micromesh pads, wet sanding with 1500 to 2400 pads and dry sanding with 3200 to 12000 pads. I deeply rubbed a very small quantity of Extra Virgin Olive oil after every three pads. I am pleased with the way the stem has turned out. It is now smooth and shiny.Using normal and bristled pipe cleaners dipped in alcohol, I completely cleaned out the airway in the stem till the pipe cleaners came out nice and clean from the other end. However, when I checked the draw, I found it to be constricted and laborious. It was not a free flowing and open draw. I checked the alignment of the airway in the stem and shank and realized that the airway was not aligned. With a rounded needle file, I file down the tenon hole and the mortise opening in the shank to the point where there are perfectly aligned. Now the draw is full and open.

By this time, the stain on the rim top has dried out and I applied a small quantity of Before and After Restoration balm to the entire surface of the stummel, including the rim top. This product is absolutely fantastic as it freshens up the briar and makes the grain to pop out. Using a horse hair shoe brush, I buffed the bowl. Later, with a soft cotton cloth, I polished it to a nice shine. As a final touch, I rubbed a very small quantity of PARAGON wax on to the stem and the stummel. A few seconds later, using muscle power and a microfiber cloth, I polished the entire pipe to a lovely shine. Here are the pictures of the finished pipe. Hope you enjoyed reading the write up and yes, my apologies for the lack of pictures since I had to catch a flight late in the evening to rejoin my duty station, I forgot to take pictures at this stage as completing the restoration was priority task.

Breathing New Life into a Kriswill “Chief” # 20


Blog by Paresh Deshpande

I had completed the refurbishing of LANE ERA CHARATAN’S MAKE “SPECIAL” and thoroughly enjoyed the process. Apart from preserving memories, the thing that I enjoy the most while refurbishing/ restoring my inherited (and some purchased) pipe collection, is the transformation of the pipe that unfolds before your eyes as you progress. It is something akin to a flower bud that gradually blooms and opens itself in all its beauty for you to feast your eyes upon. This is what I love when I work on a pipe.

While rummaging through the large box with an equally large number of my inherited pipes with my younger 10 year old daughter, she laid her hands on a pair of pipes with “SHINING SUN”, as she liked to call it, on its stem. With the selection of next two projects decided by her, I had a closer look at these pipes. These were a pair of KRISWILLS, one stamped as “CHIEF” and the other as “GOLDEN CLIPPER”. The first thing that struck me was that there was something amiss with the way the stems sat into the shank of each pipe. The “CHIEF” did not have its stem sitting flush with the shank. Also, the shank’s outer diameter appeared larger than that of the stem. The “GOLDEN CLIPPER” had its stem flush with the shank; however the diameter of the stem was larger than that of the shank. The following picture will clarify what exactly I was faced with……

CLIPPER

CHIEF

As I was wondering what could be done to address this issue and surfing the net for buying new/ used original stems for these pipes, Abha, my wife who was having a closer look at both these pipes simply interchanged the stems and surprise of all surprises, the stem that was on the “CHIEF”, sat flushed and perfectly matching with the shank of the “CLIPPER”. However after considerable effort, though the stem that was on the “CLIPPER” sat flushed with the shank of the “CHIEF”, the diameter of the shank was larger than that of the stem. So now what we have is a KRISWILL “GOLDEN CLIPPER” with a perfectly matching and fitting original stem and a KRISWILL “CHIEF” with a fitting, but mismatched stem diameter.

KRISWILL “CHIEF”

KRISWILL “GOLDEN CLIPPER”

I discussed with Abha and it was decided that since the “CLIPPER” has a perfect stem match, I would work on the “CHIEF” and make the shank match the stem. With this decision made, I kept the CLIPPER aside and took the “CHIEF” into my hands.

The CHIEF has a nice, deep bowl and nicely fills the hand. The size, weight and heft of the pipe is just beautiful. Beautiful cross grains adorn the sides and the back of the bowl while the front of the bowl boasts lovely mixed grains of swirls, flame and Birdseye. It is stamped “KRISWILL” over “CHIEF” over “HANDMADE IN DENMARK”. At the bottom of the shank where it meets the stem, is the numeral “20” and yes…. this positioning of the number did cause me a great deal of grief during the process of sanding!!! All the stamps are crisp and clear.I was curious to know about the history, geography and carvers for Kriswill while attempting to date this pipe. While referring to “Pipephil” I came across this information which I have reproduced below verbatim (http://www.pipephil.eu/logos/en/logo-k3.html)

“Kriswill is a brand of Kriswork Briar Trading, in Kolding (Denmark) established about 1955. Some of Kriswill pipes were designed by Sigvard Bernadotte, Swedish prince and brother to the late Queen Ingrid of Denmark. He collaborated with his Danish partner Acton Bjørn. When the company went bankrupt in the late 1970s it was on a level with Stanwell. Dan Pipe Cigar & Company (Hafenstrasse 30 D-21481 Lauenburg/Elbe, Ge) bought the rights to use the name and it is Holmer Knudsen and/or Poul Winsløw who make the Kriswill line. Nørding, on its side, bought the plant and introduced a Kriswell line”.

Prior to 1970 the stampings are in script letters on the shank and on the mouthpiece. The star on the stem and block letters on the shank were introduced from that date on.

While researching for more information on Kriswill pipes on “Pipedia”, I came across this additional information which is reproduced below:

Kriswill was one of the large pipe manufacturers in Denmark during the 1960s and 1970s, and I believe closed around 20 years ago. Their catalog cover read “By Appointment to the Royal Danish Court, KRISWILL, Kriswork Briar Trading, Briar Pipes Hand Made in Denmark.”

Thus, from the above information, it is safe to assume that this pipe is post 1970.

INITIAL VISUAL INSPECTION
As with all other pipes, the CHIEF, too is covered in dust, oils and grime of all past years, though comparatively to a lesser extent. The chamber is heavily caked with lava overflowing on to the top of the rim. A few small dents and dings, though minor, are visible on the outer edge of the bowl. The condition of the inner edge and that of the inner surface of the chamber will be ascertained once the bowl has been reamed and the lava removed from the rim top.The airway in the shank is blocked and air does not flow through the shank. Close observation of the shank revealed presence of debris in the mortise. This needs to be cleared and cleaned. Maybe this will also help in a smooth and snug fit of the stem into the mortise.The stem shows calcification near the button and deep oxidation all along the stem. There are bite marks near the button and some deep tooth chatter. The button has been bitten and will need to be reconstructed.THE PROCESS
Since this would be the first time I would be attempting to undertake the process of adjusting the fit of the tenon and matching the diameter of the shank with that of the stem, I Face timed with Mr. Steve who advised me to, firstly, be very careful during the sanding of the shank so as not to lose too much briar making the shank diameter too small, secondly, he told me to ensure that the entire shank should be sanded such that the taper at the shank end is not abrupt and blends well into the overall shape of the pipe. Thirdly, it is most important to exercise a lot of patience and diligence while working and check very frequently the fit, finish and shape of the shank and the stem.

I started with cleaning the shank of all debris using a dental spatula, pipe cleaners, cue tips and isopropyl alcohol. I was surprised to see the amount of gunk that was removed from the shank. I tried to fit the stem on to the shank. Though the tenon has inched further in to the mortise, a prominent gap is clearly visible between the shank end and the stem.Using a 220 grit sand paper, I very carefully began the process of sanding down the tenon, checking ever so frequently for the fit of the tenon into the mortise. Finally I was able to achieve a perfect fit of the stem and the shank with all the right noises!!!!Now that the issue of fit of the stem into the shank has been addressed, I turned my attention to match the size of the diameter of the shank with that of the stem by sanding down the shank. I started this sanding using a 220 grit sand paper. This process was made difficult and uneven at the bottom of the shank due to the stamped number “20” being very close to the shank end.I took care so as not to sand off the stampings on the shank and stem by masking them. Once I was satisfied with the results of sanding with 220 grit paper, I switched to sanding with a 440 grit sand paper to further blend the shank and stem. Mr. Steve’s advice of being very diligent and frequent checking was always ringing in my ears as I progressed towards the goal of matching the shank with that of the stem. A word of caution for first timers like!!!!!!!! During the process of sanding you may notice a considerable dip at the shank end.This signifies that the sanding of the shank end is excessive and thus sanding needs to be done from further up the shank and a bit over the stem too. This will ensure a seamless joint between the shank and the stem.

Using a 220 grit sand paper, I sanded the shank to match the dip at the shank end and also a little of the stem end, all through taking care of the stampings on the shank and stem. I further evened out the shank and the joint with 600 and 800 grit sand paper. Once I was satisfied with the seamlessness of the joint, I showed it to Abha, my wife and she too approved of the job done. Thereafter, I further blended and merged the entire shank and the stem through the joint using micromesh pads, wet sanding with 1500 to 2400 pads and dry sanding with 3200 through to 12000 pads. I wiped the sanded area with alcohol after each pad to remove the sanding dust. Boy!! Was I pleased with the results, hell YEAH!!!! I shared pictures of the end result with Mr. Steve on What’sApp and he too approved of the seamless joint. Next I turned my attention to the stem and painted the surface of the stem with the flame of a Bic lighter to raise the tooth chatter and minor bite marks. The deeper tooth bites with a mixture of activated charcoal and clear CA superglue and let it cure for 24 hours. Using a flat head file needle, these fills were blended into the surface of the stem. For a better blending of the fill, I further sanded the entire stem with 220 followed by 400 and 800 grit sand paper. This helps to reduce the sanding marks left behind by the more abrasive 220 grit paper. To bring a deep shine to the vulcanite stem, I went through the complete set of micromesh pads, wet sanding with 1500 to 2400 grit pads and dry sanding with 3200 to 12000 grit pads. I wiped the stem with alcohol after each pad and rubbed it down with Extra Virgin Olive oil. The internals of the stem was cleaned out using alcohol and pipe cleaners. The finished stem is shown below.With the stem taken care of, I once again turned my attention to the stummel. The sanded shank was lighter hued as compared to the rest of the stummel. Since I was still awaiting my stain pens, which have been held back in custom clearance for the last 50 odd days and also since I have not yet graduated to use of aniline stains/ dyes, I was contemplating what could be done to blend the finish of the shank with that of the stummel. Being the intelligent of the two, Abha suggested that the bowl could be sanded using micromesh pads to match the finish of the shank.  That decided, Abha reamed the chamber using Kleen Reem pipe tool and with the fabricated pipe, she removed the remaining cake from the chamber.With the same knife, she gently removed all the overflow of lava, oils and tars from the rim surface. She further sanded the interiors of the chamber with a 220 grit sand paper to get rid of the last traces of the remaining cake. She also topped the rim on 220 grit sand paper and evened out all the remaining lava and minor dings and dents that were revealed after the lava was removed.  Using isopropyl alcohol, hard bristle and normal pipe cleaners, she completely cleaned out the internals of the shank.I cleaned the external surface of the bowl with undiluted Murphy’s Oil soap and tooth brush to remove all the grime and dirt and rinsed it under running water. I took care that no water enters the chamber and the shank. Using paper napkins and soft cotton cloth, I completely dried the surface. Thereafter began the entire process of sanding down with micromesh pads as enumerated while working on the shank. I also worked on the rim top to match it with the rest of the bowl. The bowl has some interesting grains and patterns.   I rubbed in some Before and After Restoration balm in to the briar to bring out the shine and enliven the briar. After a few minutes, I rubbed and polished the bowl with a soft cloth. Finally, I finished the pipe by rubbing a small quantity of Paragon wax and polishing it using raw and undiluted muscle power and a microfiber cloth. I am very pleased and happy with the way the complete project has turned out. It was an exhilarating experience to be able to appreciate the transformation and a sense of accomplishment that accompanied it. I must thank Abha and Mr. Steve for walking with me through this project. Here are the pictures of the finished pipe.

Refurbishing a Lane Era Charatan’s Make “Special” # 260 DC


Blog by Paresh Deshpande

The next pipe that caught my attention was a CHARATAN’S which was in the box of pipes which I had received from my Uncle. This Dublin has beautiful birdseye on the sides and beautiful densely packed cross grains on the front and back of the bowl and also along the shank. The bowl delicately flares up towards the rim top and together with a subtle bend to the double step saddle stem, lends this pipe a lovely Dublin shape with a charm and grace that can be seen on a well crafted pipe from this quality brand!!!The pipe is stamped “CHARATAN’S MAKE” over “LONDON ENGLAND” over “SPECIAL” in block capital letters on the left side of the shank. Further towards the bowl on the same side, it is stamped with the letter “L” inside a circle in cursive letter. The right side of the shank is stamped as “260DC”. The left side of the stem is stamped on the saddle with “CP” logo, with the lower half of the “C” embedded within the letter “P”. The right side on the saddle is stamped with “REGD NO” over “203573” I searched Pipedia for more information about the brand and also to try to accurately date this pipe. I have reproduced the details which I could glean from this website:

“In 1863 Frederick Charatan, a Russian / Jewish immigrant, opened a shop in Mansell Street, located in the borough of Tower Hamlets, London E1, where he began to carve Meerschaum pipes.

Charatan was the first brand to make entirely hand-made briars from the rough block to the finished pipe including the stems. The nomenclature “Charatan’s make” refers to this method of production and was meant to differ Charatan from other brands who “assembled” pipes from pre-drilled bowls and delivered mouthpieces.

On the retirement of his father in 1910 Reuben Charatan took over the family business.

In 1950 Herman G. Lane, striving to expand his business in Great Britain, made contacts with the Charatan family. Apparently Lane got a certain influence soon, but it was not until 1955 that Lane Ltd. became the sole distributor for Charatan’s in the United States superseding Wally Frank. This can be documented in a “biography” written for Herman G. Lane titled “Leaves from a Tobaccoman’s Log”.

Thanks to Herman G. Lane’s dedicated labor Charatan became hugely popular in the States. As reported by Ken Barnes in an interview with Rick Newcombe, Reuben Charatan passed away in 1962, and his widow sold the firm to Herman Lane 1 or 2 years after his death [1]. In the early 1960’s Charatan pipes were the first to overstep the $100 Dollar line in US pipe sales. In 1978 Lane’s heirs sold the Charatan company to Dunhill. The Prescot Street factory was closed in March 1982. Thereafter the fame and quality of the make declined.

The pre-Lane period (prior to 1955) and the Lane era pipes (1955 to until sometime between 1979 – 1984) are of primary interest the collector. The Lane era is often quoted as beginning about 1950. Charatan records indicate the DC (Double Comfort) bit was introduced in the 50’s, but some report seeing them in earlier production. Still others indicate they were introduced by Lane in 1960. Regardless, the DC bit is not an accurate way to date a pipe because many Charatan’s were made with regular and saddle type bits throughout the “Lane Era”.

 An excellent article, Dating of Charatans has been translated for Pipedia by Mathias Acciai. This study by Fabio Ferrara of Monterubbiano – Italy is based on more than 2000 old Charatan pipes he studied from the “Basciano stock” purchased by Mario Lubinski – Fermo. This fantastic addition to the Charatan knowledge base is now in English here on Pipedia.

The first step on dating a Charatan is to carefully look to some details:

  1. a) Shape of the mouthpiece
  2. b) marking on the mouthpiece
  3. c) engraving on the shank
  4. d)shape and position of shank engraving/writing

This is because you can make the following conclusions:

a) From 1863 to 1960 the mouthpieces have a normal shape, saddle or tapered. From 1961 they use the ‘Double Comfort’ style still used today. By the way there are some saddle bits (without the double comfort) used in pipes that date after 1960 but these models are always characterized by a X (in the place of the DC) engraved after the shape number on the shank. This means that if a pipe has a tapered mouthpiece instead of a double comfort one, it is definitely a pre-Lane pipe before 1960. While if a pipe has a normal saddle bit stem, it could belong to every era. Nevertheless the pipe is pre 1961 if the shape code does not include an X, and is a pipe from after 1960 if the X is engraved.
Finally any pipe with the double comfort stem is definitely after 1960.

b) The CP logo on the stem is stamped in a different shape according the era it was used. Some differences are less obvious than others, however the glaring differences are detectable in 4 phases. The CP till the 1960 is very fine, the C penetrates the P.
From 1961 to 1977 the CP logo is more pronounced and the C penetrates the P.
From 1980 (approx.) the C does not penetrate the P any more, even though the two letters are joined.
The CP of Dunhill era has a different shape than the one of the French Russell era.

c) Pipes that belong to eras till the 1960 have the engraving ‘CHARATAN’S MAKE LONDON ENGLAND’ in two lines, the shape code is composed by numbers only. The X and the DC appear only on pipes after 1960.

The engraving ‘MADE BY HAND (in caps) -IN-City of London’ in three lines identifies pipes made between 1965 and 1966. The engraving in script font ‘Made by Hand -In-City of London’ on three lines identifies pipes made between 1966 and 1979. The circled £ (Lane) characterizes pipes produced from 1955 to 1980 (approx.)

d) engravings are different in both size and shape, depending on eras.

Identification of a third era pipe (First Lane era, 1961-1965)

Pipes of this period are quite common.

1) The mouthpiece is frequently double comfort, rarely saddle without the double comfort, never tapered. If the stem is not a double comfort but a saddle one, it is characterized by the letter X on the right of the shape code (e.g. 2502X), naturally in this case the letters DC are not displayed.

2) In the CP logo, the C enters the P

3) Presence of £ on the shank (note that from 1955 all the pipe imported in the USA by Lane has it, however that stamping is not synonymous of the Lane era)

4) Presence of the letter DC just after the shape number (e.g. 2502 DC) or of the letter X only if the stem is not a double comfort one

5) Presence in some models of the stamp “MADE BY HAND” on the shank (introduced for the first time in 1958)

6) Presence of the writing “CHARATAN’S MAKE LONDON ENGLAND” in 2 lines

7) The CP logo is thicker than in previous eras. 

From the above information, it can be safely assumed that this particular piece dates from somewhere from 1960 to 1965, that is the first Lane Era, which coincides with the period of the other pipes that belonged to my grandfather. With this information in mind, I moved ahead to the next process in the restoration.

INITIAL VISUAL INSPECTION
I always follow the advice of Mr. Steve given out in his blog on restoration process for novices like me and carry out initial visual inspection of the pipe. This helps a lot in formulating your POA for the restoration.

The bowl is heavily caked with an equally heavy overflow of lava on to the rim top. The outer edge of the rim appears to be intact save for the light charring on the left side in 9 ‘O’ clock direction. However, the inner edge of the rim is a totally different story!!!! Deep extensive charring can be seen on the inner edge in 1 ‘O’ clock direction on the right side and in 8 ‘O’ clock direction on the left side. The internal condition of the bowl and the exact extent of the char can only be ascertained after the process of reaming is completed. The stummel and the shank are covered in grime and dust of these years of use and subsequent storage, giving it a dull and lackluster appearance. This will need to be addressed. Air does not flow easily through the pipe and requires some lung power to do so. The airway in the stem and/ or in the shank is restricted and needs to be cleaned out. The stem is a Double Comfort stem which is correct for the period. Heavy calcification can be seen on the lower half of the DC stem with a few deep bite marks and lot of tooth chatter on both the lower and upper surface. The lip/ button is deformed and will need to be worked upon. All said and done, the major cause of concern which will require maximum attention and work is the rim top, rim inner edge and the extensive charring seen on the right and left inner edge!!!!

THE PROCESS
As usual, Abha, my wife took upon herself the task of reaming the bowl to get rid of all the grime, tars and oils accumulated in the chamber. Using a Kleen Reem pipe tool made short work of reaming and she was able to get rid of the thick cake. She gently removed all the remaining cake crust till she reached the briar using my fabricated knife set and thereafter sanding the chamber with a 220 grit sand paper. Thereafter, using the fabricated knife, I gently scraped and removed all the overflow of lava, tars and oil from the rim top. With hope in my heart and prayer on my lips, I gently scraped the charred wood from the inner edge on both sides till I reached solid briar. The picture below will tell the story of its condition!!!The char marks to the inner edge of the rim on the right side in 1 o’clock direction is the widest followed by the one on left side in 8 o’clock direction. The char on the outer left edge at 8 o’clock direction is not very severe. I decided to top the bowl and create a bevel on the inner edge to address these issues. I Facetimed with Mr. Steve and he too concurred with my POA.

I started by topping the bowl with a 220 grit sand paper till the charred surface on the inner as well as outer edge of the rim was reduced. Using a folded piece of 180 grit sand paper, I gave a slight bevel to the inner edge. However, I was not very pleased to see the results. The charred surfaces stood out like sore thumbs on either sides of the rim.To further mask the charred inner edges, Abha suggested creating a deeper bevel and attempt to conceal the damaged inner edge within this bevel. After viewing the pictures, Mr. Steve also approved of this plan. Thus, I created a deep bevel making sure that the charred surfaces are within this bevel. The inner edge is looking much better and presentable as can be seen in the pictures below. It took me considerable time to complete this stage since I had to frequently check the progress so that I did not end up losing too much surface off the rim top. I, thereafter, cleaned the exteriors of the stummel, rim top and shank with undiluted Murphy’s Oil soap and a toothbrush, taking care that water does not enter into the chamber and the shank. I wiped it down with a soft cotton cloth and kept it aside to dry out. Turning my attention to the stem, I started by masking the “CP” logo and the Regd No. with whitener (pics…..). I painted both the surfaces of the stem with a Bic lighter to raise the tooth chatter and bite marks to the surface. Sanding the stem with 220 grit sand paper, I evened out the surface of the stem. The deeper tooth marks were spot filled with clear CA super glue and set aside to cure overnight. Back to the stummel, I dry sanded the exteriors of the bowl, rim top and the shank with 1500 to 2400 grit micromesh pads and wet sanding with 3200 to 12000 grit micromesh pads. The beautiful birdseye and the cross grains really popped out at this stage!!!!!(PICTUREs…..). Though the darkened areas of the inner edge caused due to charring were very much visible in pictures, in reality it does not look as bad. There is an option to further cover up the darkened areas by staining the complete bowl with a dark stain, I decided not to do so for two reasons, firstly, the pipe looked beautiful in this lighter hues with lovely grains in plain sight and secondly, I DO NOT HAVE THE MATERIAL AND EQUIPMENT FOR THE SAME and also have never tried this technique (this aspect WILL be my agenda during next leave!!!). With that decision made, I rubbed a small quantity of “BEFORE AND AFTER RESTORATION” balm into the briar surface and let it rest for 2-3 minutes for the balm to work its magic. I really feel that this is one product which every pipe smoker should have for routine maintenance of his/ her pipe. This balm infuses fresh breath of life into the briar while forming a protective layer over the briar surface. Using a soft cotton cloth and undiluted (LOL!!!) muscle power, I buffed it to a nice shine. Have a look at the bowl for yourself. With the stummel completed, save for a final polish with PARAGON WAX, I turned back towards working on the stem again. Using a flat head needle file, I sanded the fills to match the stem’s surface. I also worked on the button edge and created a crisp edge. Once I was satisfied, using micromesh sanding pads, I dry sanded the stem with 1500 to 2400 grit pads and wet sanding with 3200 to 12000 grit pads. I wiped the stem with moist cotton swab after every pad and rubbed in Extra Virgin Olive oil after ever three pads (Pictures….). Although I tried to take all care and precautions to preserve the stampings on the stem, I HAVE MANAGED TO OBLITERATE IT!!!!  Can anyone suggest an easy method to restore it???? Indentations are visible though, which is a saving grace!!!!Once I was finished with the stem, I cleaned out the internals of the stem and shank using Isopropyl alcohol, cue-tips, shank brush, regular and bristle pipe cleaners till air flow was open and free. Thereafter, I gave a final polish to the bowl with Paragon wax, rubbing and buffing it with a soft cloth and muscle power till cows came home!!!!!!!! The finished pipe can be seen in the pictures below. Thank you for walking with me on this journey of learning and resurrection of fond memories of my Old Man!!!!!

Restoration of a GBD Rockroot # 1345 Sitter


Blog by Paresh Deshpande

The next pipe that caught my fancy for restoration was a GBD ROCKROOT # 1345. This pipe has beaten Kriswill “Chief”  # 20 and Kriswill “ Golden Clipper” to the finish line, though not decisively since I do not have stain pens and I had to leave the rim top duly sanded to remove all the oils and tars and burn marks. Personally though, I rather liked the look of the contrast the rim provided to the dark coloured pipe bowl, shank and stem. But I have seen other similar GBDs and they all had the nice bowl coloured rim top which also looked beautiful!!!! Hence, my attempt at darkening the rim top. Without darkened rim top!! You decide and suggest please!!!

This pipe has a relatively smaller sized bowl with wire rustications running vertically along the bowl with circular wire rustications run around the shank. This wire rustication runs along the entire rim top. The bottom of the bowl is flat, smooth and bears crisp stampings with ‘GBD’ in oval over ‘ROCKROOT’ over ‘LONDON ENGLAND’ in a straight line over # ‘1345’. The saddle stem has a very subtle and delicate bend with just the lip touching the table top which coupled with the flat bottom of the bowl, makes it a perfectly balanced sitter. A brass oval roundel rim with embossed GBD is embedded in the saddle. This should polish up very nicely. INITIAL INSPECTION
The initial visual inspection of the pipe revealed the following:

The bowl was heavily caked with oils, tars and grime overflowing onto the rim top and down the bowl along the vertical wire rustications. There appears to be some deep charring along the inner edge of the rim on the right hand side in 1’o’clock direction and on the left side in 7’o’clock direction. The extent of the damage to the rim can only be determined after reaming the bowl.The thin wire rustication on the rim top is worn out at certain places. The rest of the rustications along the bowl and shank is filled with dust, oils, gunk and dirt which has been accumulating over the years. Air did not pass through the stem. When the stem was removed from the shank, visual inspection revealed a completely blocked mortise and airway. The stem, too, was slightly blocked.The stem was heavily oxidized with heavy calcification near the lip. There was heavy tooth chatter extending up to an inch from the lip towards the saddle on both sides of the pipe. But thankfully there were no deep bite marks or holes. The lip on both sides has also been chewed out of shape.Dimensions:
Length – 5 inches
Bowl height – 1.5 inches
Bowl depth – 1 1/8th inches
Bowl inner diameter – 7/8  inch
Bowl outer diameter – 1.5 inches

THE PROCESS
As usual Abha, my wife, started work on the bowl while I addressed the stem. Using a Kleen Reem reamer and British Buttner pipe reaming tool, Abha removed most of the thick cake in no time. The reason being a 1 inch deep bowl!!! She had been very careful in avoiding the edges which had the charred marks. While Abha was working her magic on the bowl, I painted the stem with the flame of a Bic lighter to try to lift the light tooth chatter. The lightest of the tooth chatter evened out and the remaining ones were lifted to the surface. I had to sand out the stem to smooth out the tooth chatter. At this point, using a 220 grit paper, I sanded down the stem till the surface felt even and smooth to the touch. I tightly folded a piece of the grit paper and using its edge tried to shape the edges of the lip. Then I applied Extra virgin olive oil to the stem and kept it aside to be absorbed by the stem. And as usual, I just forgot to take pictures of the stem at this stage!!!

Thereafter, I turned my attention to the bowl with hesitation. This was so because the reaming had revealed that the issue of charring was something I had not handled before. I immediately Facetimed  Mr. Steve and sought his advice. It was decided that a smooth surfaced rim, akin to the smooth bottom of the bowl, will add an interesting character to the pipe and will also take care of the charred inner edge of the bowl.

I began with cautiously sanding the inner edges of the bowl to remove as much of the charring as possible. Using Murphy’s oil soap and a hard bristled toothbrush I removed as much of the accumulated tars and lava from the rim top as I could. I lightly topped the bowl on a 220 grit sand paper. The charred portion of the briar came apart in chunks during the topping process. Thereafter, I tried to round off the inner edges of the bowl as much as I possibly could, by creating an inner bevel to cover up and address the charred portion. However, the bowl still remains out of shape.As can be seen, the bowl edge in the 1 o’clock (front right) and 7 o’clock (rear left) directions has moved out too far. I was not too inclined to sand down the other edges to merge with the moved out edges for fear of losing too much briar and further thinning the rim top. Any suggestions whether I should go all out with the inner edge to completely round it or leave it as is are welcome.  Once the bevel was made and I had sanded out as much of the charring as I was comfortable with, I sanded down the rim with micromesh pads, wet sanding with 1500 – 2400 grit and dry sanding with 3200 – 12000 grit. Using a brush and Murphy’s Oil soap, I cleaned the exteriors of the bowl, rim top and shank and rinsed it under running water. The bowl was wiped dry using a cotton cloth and left to dry out overnight. Turning my attention back to the stem, I wiped it down with a soft cotton cloth. On close inspection, I realized that there was one bite mark on both sides which was not raised and also that the lip edge was not defined/sharp. I mixed up activated charcoal powder with clear CA glue (the glue that was available to me here, has a tendency to come off in lumps. Hence I was skeptical about its function in this process) and applied it on both sides of the stem to fill in the bite mark as well as on the tip edge to define it further and set it aside to cure overnight. Next morning, I rubbed some “Before and After Restoration Balm” into the thin wire rustications of the dried out bowl. Every time I use this balm, I cannot help but appreciate how effectively it works to enliven and refresh an old briar bowl. I rubbed a small quantity of balm with my fingers into the thin wire rustications on the bowl and shank and kept it aside for a few seconds. Using a horse hair brush, I buffed the bowl and shank and worked the balm deeper into the closely packed rustication. I rubbed it down with a soft cloth to a bright shine. I had to use a lot of muscle power and time to get the desired shine since I do not have a wheel. I was satisfied with the way the bowl had turned out up to this point in the restoration.Thereafter I turned my attention to the stem. The fill of CA super glue and charcoal powder had cured sufficiently. Using needle files, I started filling away carefully and cautiously restricting the filing only to the filled areas. Using a flat head needle file, I filed away the excess filling and was satisfied with the end result. I used a 220 grit sand paper to further blend in the fill. I further polished the stem using micromesh sanding pads. Wet sanding with 1500 – 2400 grit pads helped reduce the sanding marks left behind by 220 grit papers to a great extent. I wiped it clean and coated the stem with extra virgin olive oil and let it rest for some time. This allows the vulcanite to absorb the oil. Thereafter I dry sanded the stem with 3200 – 12000 grit micromesh pads and applying olive oil after every third pad. The stem is now nice, smooth and shiny. I shared the pictures of the bowl and stem with Mr. Steve for his opinion and advice for further improvement. As is his style, Mr. Steve first appreciated the effort and suggested that a darker stain would look good. Since he was well aware that the stain pens I had ordered did not reach me, he suggested an ingenious and practical way of staining using local and readily available material. He suggested boiling black tea leaves in a little water and making a very strong and thick brew, letting it sit overnight. Using cotton swab/cue tip dipped in this brew, gently apply onto the area that is to be stained.

I followed his advice and applied it to the rim top of the Rockroot. After allowing it to rest for a few minutes, I gently wiped it off with a soft cotton cloth. The results are truly amazing. Mr. Steve further advised me to use regular black boot polish to further stain and bring back the shine to the rim top. The results of this can be seen in the following pictures of the finished pipe.This restoration has been a fantastic journey of learning, trials and frustrations which I enjoyed to the fullest. I cannot thank Mr. Steve enough for his wise, practical and timely advice and sharing his immense wealth of experience so readily with a novice like me. Thanks Steve!!!