Tag Archives: Paresh Deshpande article

COMPLICATING A SIMPLE RESTORATION OF A CUTTY MEERSCHAUM!!


Blog by Paresh Deshpande

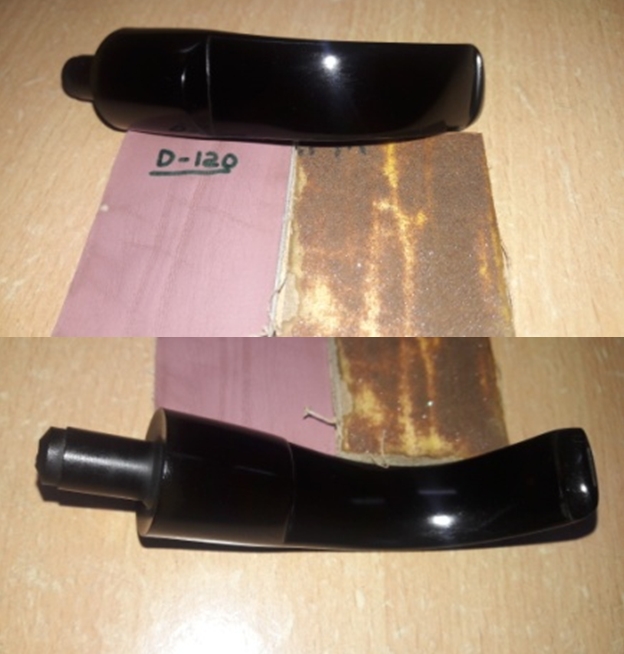
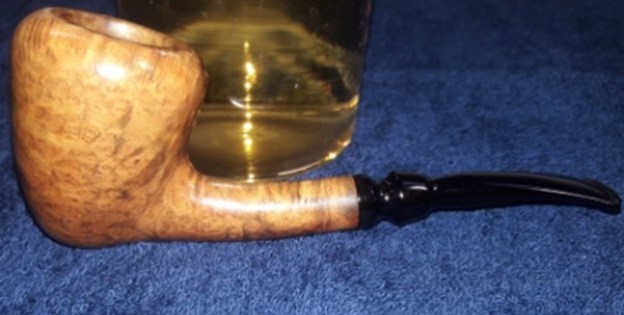
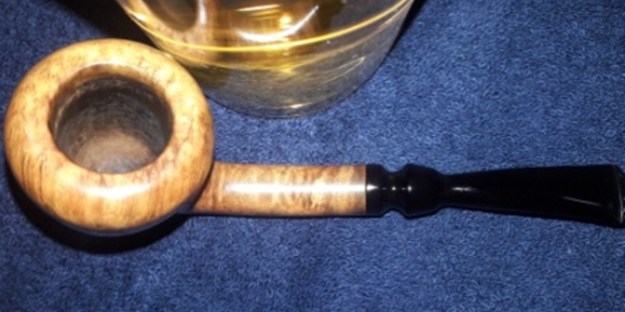
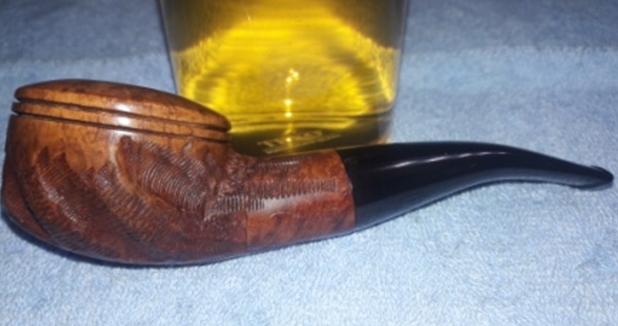
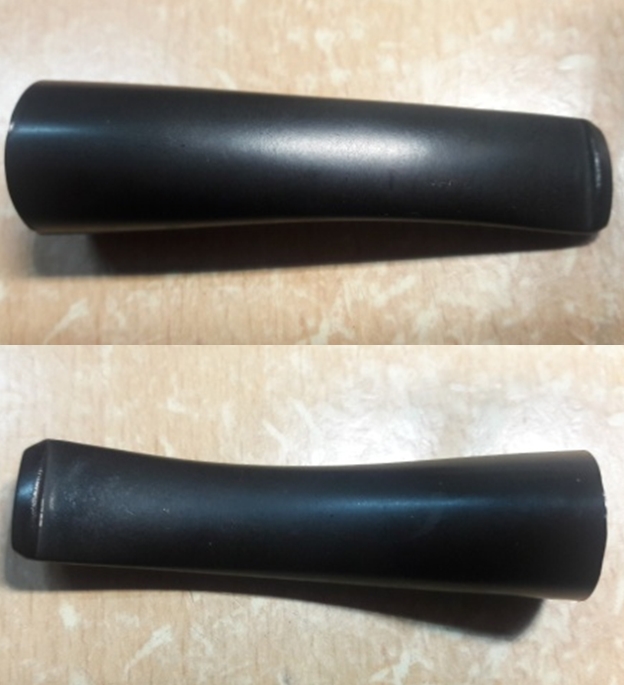
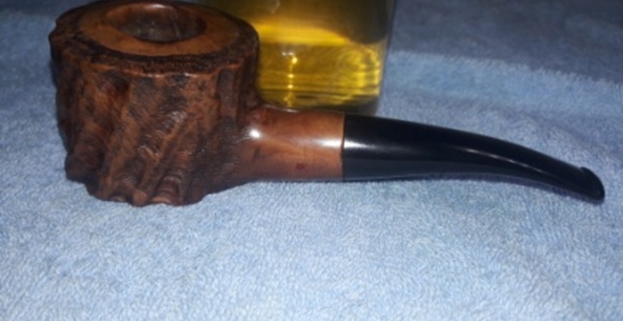
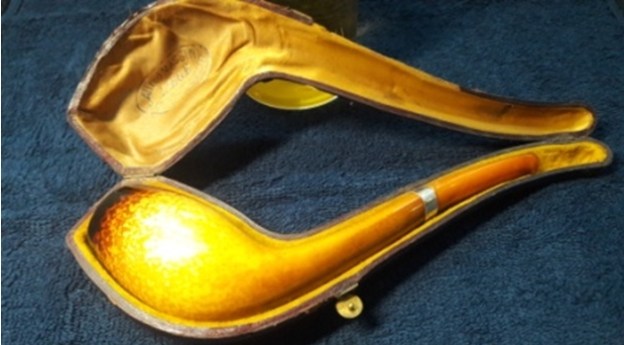
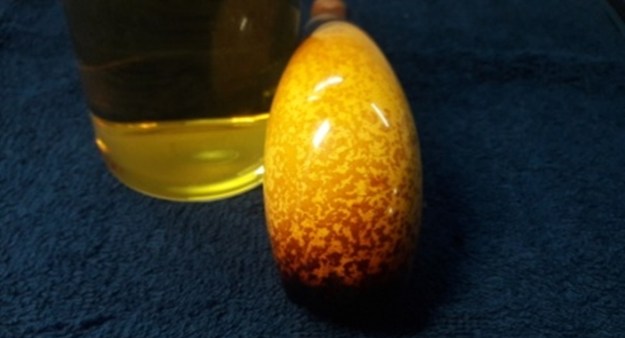
Truth be told, this project which started while my friend and mentor Steve, Jeff and Dal Stanton were visiting us here in May of 2019, had become a mental block for me to work on. I had this meerschaum pipe that came without a stem and I had requested Steve if he could get me one when he came visiting. He brought along a potential stem for either the meerschaum currently on my work table or for an early Ben Wade Fancy cutty, again from my inheritance. In the course of our time here we looked over the stem that he had brought along and tried it on the meerschaum and the Ben Wade. We chose not to use the stem on the meerschaum and it was too large in diameter for the Ben Wade. It was decided that Steve would take the Ben Wade back home to find a suitable stem from his bag of spares (https://rebornpipes.com/2019/05/20/restoring-restemming-an-1851-ben-wade-silver-clad-cutty/) while an amber stem from my spares of odds and ends would be used for the meerschaum. The selected replacement amber stem is shown below.This meerschaum pipe in a Cutty shape, with a forward canted bowl that flows in to the shank, is in its original leather case. In looks alone, it has unparalleled beauty with nice deep egg yolk yellow coloration to the stummel and shank with a black flume to the rim top which extends ½ inch down. The shank is devoid of any stampings and the only stamp seen is on the case. The leather covered wood case is stamped on the inside of the top lid in an oval as “Alfred MASSIN” over “LIEGE” over “R. DELA CATHEDRALE, 56”. On the lower lid, on the outer edge, it is stamped as “A MASSIN, LIEGE”
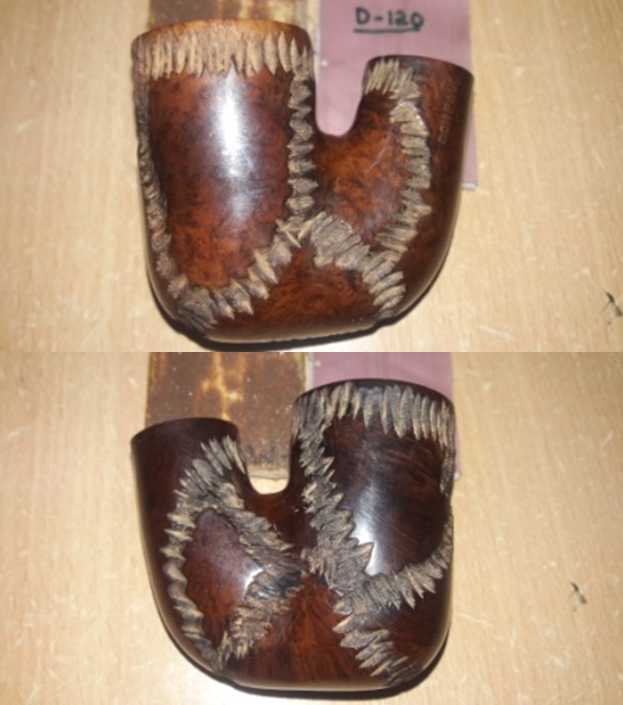
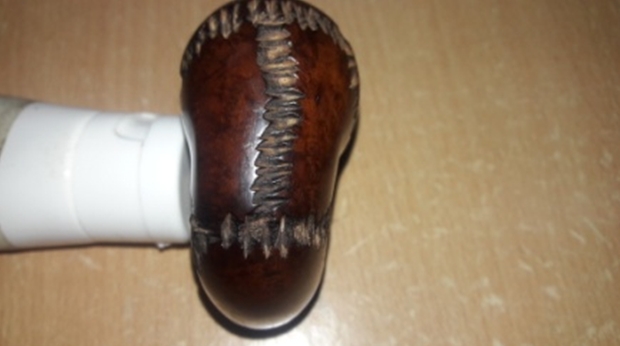
Other than a known fact that Liege is an important economic hub of Belgium, there was no information found on the internet to establish the provenance of this pipe. The only guess that I can afford is that Alfred Massin was/is a tobacconist in Liege, Belgium who either made or bought pipes to be sold under his name. In all probability, the later holds true and this could be a Vienna made meer (famous for making meerschaum pipes).

PART I
Since my esteemed guests were to leave in next couple of days, we prioritized the work that would need to be done while Steve was in town and thus I have departed from my usual process of initial visual inspection. This, I shall be carrying out before I start the Part II of the process.

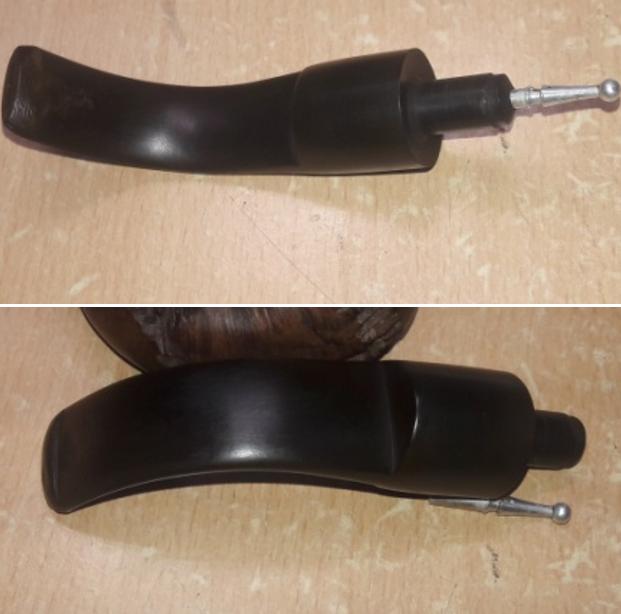
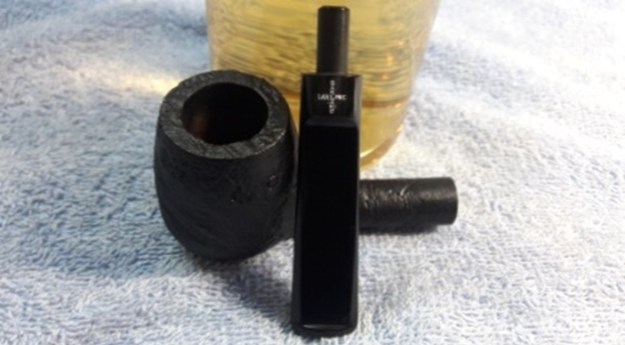
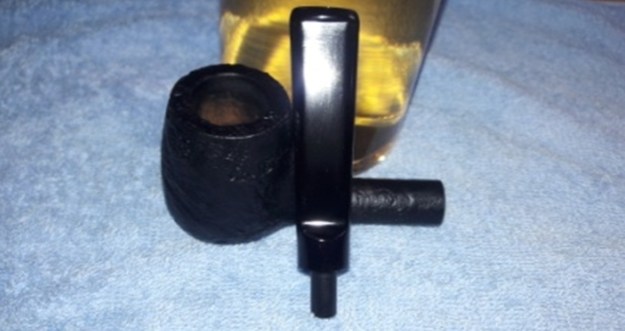
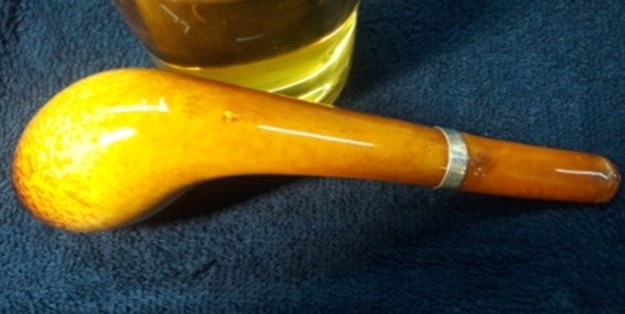
As brought out earlier, the chosen replacement amber stem, though not a perfect fit, had a nice flowing profile that matched the flow of the meerschaum cutty.  More importantly, it sat over the threaded bone tenon in the mortise with an acceptable flawed flush which could be addressed during the course of restoring this beauty. There was a slight difference in the shoulder size of this stem as compared to that of the shank end. It was shorter too, but nothing could be done about it!! The least we could attempt was to make it smoke worthy again and that is what we set about to achieve.Steve suggested that a sterling silver ring should help masking this gap while adding a nice bling to the monotonous profile of the pipe (which by itself is eye catching!!). Steve, Jeff, Abha and I visited many of our city jewelers on a hunt for one such sterling silver ring without any success. At one of the jeweler’s shop, we got a lead to a person who would fabricate one such ring for us and when we reached this shop, it was primitive, small, dingy and not confidence inspiring for sure. But when we saw him work, it was amazing and he excelled in his work. He did not have any complicated and sophisticated instruments for measurements or for fabricating or welding, but he sure made us the perfect ring for the oval shank end at an astonishingly low cost!! And the fit was excellent. His workmanship and skills did leave Steve and Jeff highly impressed. Here are some pictures of the Silversmith in action and the end result. At this stage, Steve and Jeff had to bid farewell to us as their stay had come to an end and I would have to continue this restoration alone.

DISASTER STRIKES AND HOW!!
After we had dropped Steve and Jeff at the airport, I came back to a void as suddenly there was nothing to do, nothing to look forward to!! I decided to continue my work on this pipe by cleaning the internals of the replacement amber stem. But the moment I started to clean, DISASTER struck! I dropped the amber stem to the floor. Everyone in my house looked on with stunned silence as it hit the tiled floor…the stem chipped at the slot end!! Luckily, even though the chip was a large chunk of amber, the stem had not shattered!! It could still be repaired by gluing the piece back. I took a deep breath and tried to insert a pipe cleaner to clean the air way. And lo!! I managed to drop the stem again on the hard floor!! There was a moment of silence followed by a pandemonium with every member in the family contributing to my agony with their barbed comments and advice!! The damage was still controllable with another large chip to the button end, the stem still being intact. I could work on the stem no further and set it aside and called it a day, carefully packing the chipped chunks in a zip lock pouch. I am sure that none of the readers of rebornpipes.com expected me to take pictures of this disaster and if any one does, I am sorry, I did not take any!!

I did not touch the stem or pipe the entire next day.

A new dawn and I did think of working the stem again deciding to glue all the chipped chunks back together. Steve had brought me a few tubes of superglue that he uses and I was looking forward to using it. I requested Abha, my wife, to work her magic and clean out the chamber and shank internals. While she was at it, I carefully removed the chunks from the pouch and got the stem out and laid it out on the dining table. I opened the container and removed the glue. As I was unscrewing the tube cap, my hand slipped, pushed the stem over the table and further crashing down to the floor!! Not a single word from anyone at the table as they simply left save for Pavni, my youngest daughter’s remark, “BUTTER FINGERS!!” She is not the one who would let such a golden opportunity pass by!! I too sat in stunned silence as I couldn’t vent my anger on anyone, but me!! There was nothing that I could do, but assess the damage. The stem was still intact; the damage was again localized to the slot end, albeit this time the breakage was akin to shattering and I could see the beginnings of a fault line on the top surface near the tenon end!! Another crash and the stem will most likely shatter along this fault line. I picked up the stem and the pieces of broken amber (as many as I could collect) and packed them in a zip lock bag and put the pouch away with no further desire to work on this pipe!! Abha, on her part, flatly refused to even touch the pipe and so back it went in to its case where it would be safer than in our hands (read that as my hands!!)

I DID NOT TOUCH THIS PIPE THEREAFTER FOR THE ENTIRE DURATION OF MY LEAVE, TO THE EXTENT, THAT I DID NOT EVEN GET IT BACK TO MY PLACE OF WORK ALONG WITH THE OTHER PIPES!!

PART II

In the month of July 2019, Abha had sent me a huge lot of 40 pipes that she had cleaned up and there at right at the top of the pile was this meerschaum pipe in its case!! I further procrastinated for another 3 months before working on this pipe.

INITIAL VISUAL INSPECTION

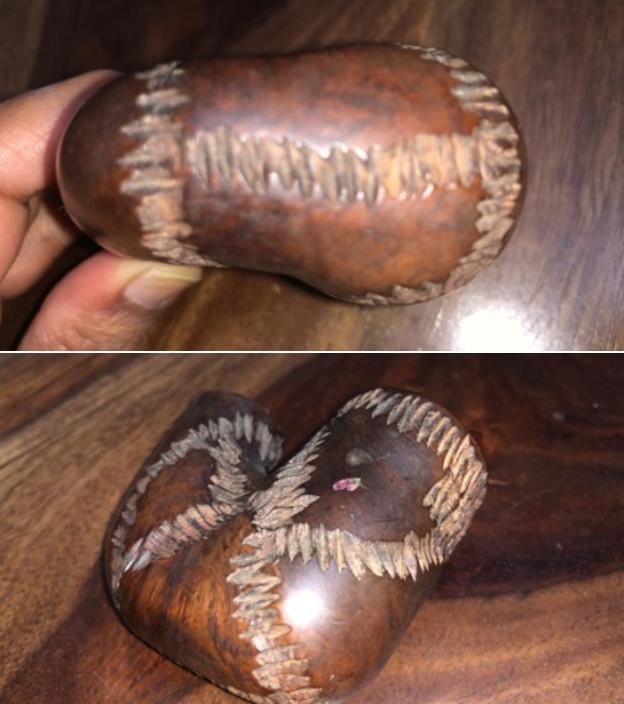
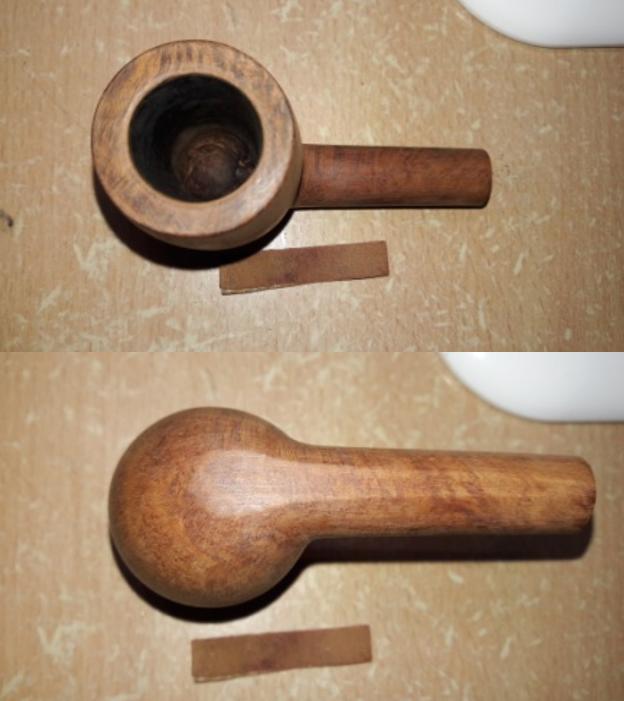
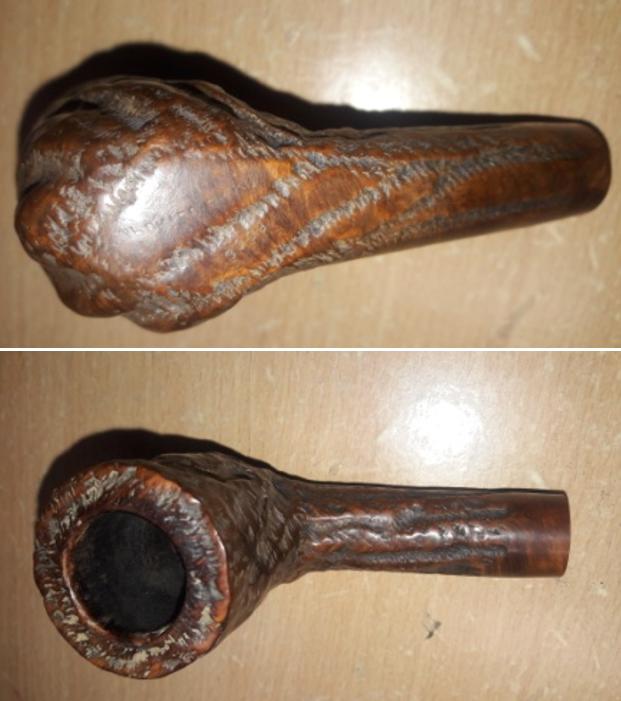
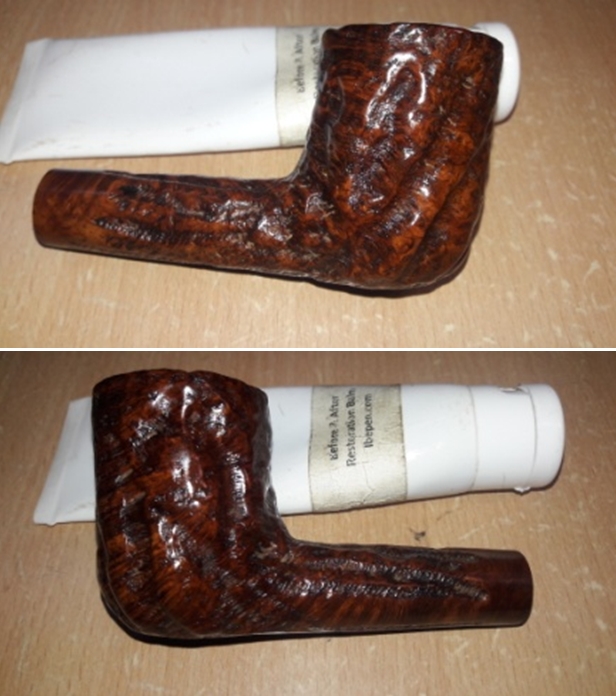
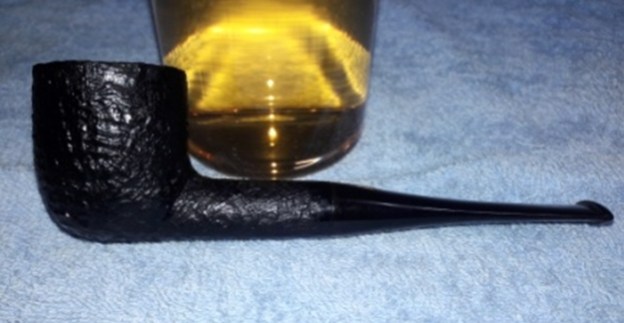
This is how the pipe was received by me. Oh my!! Do I really want to work on it, not really!! My expert workmanship is gloriously on display if you observe closely at the slot end of the stem….LOL!, me and my butter fingers!! 
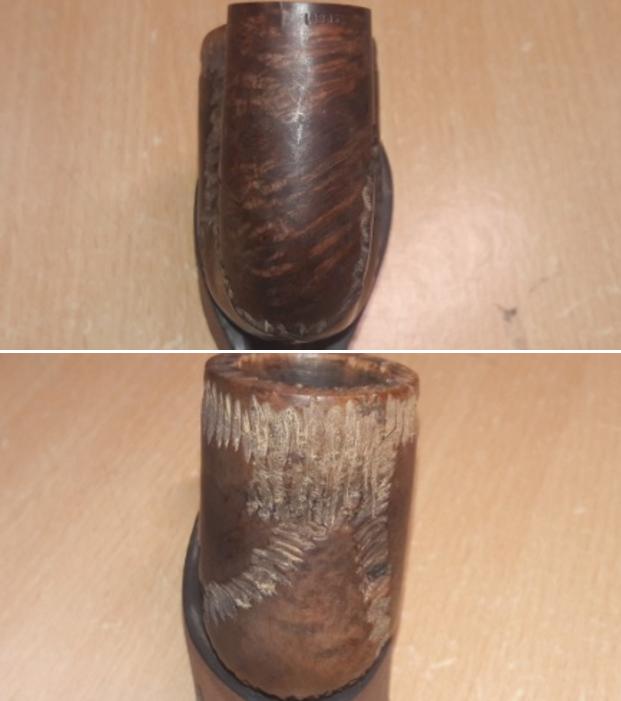
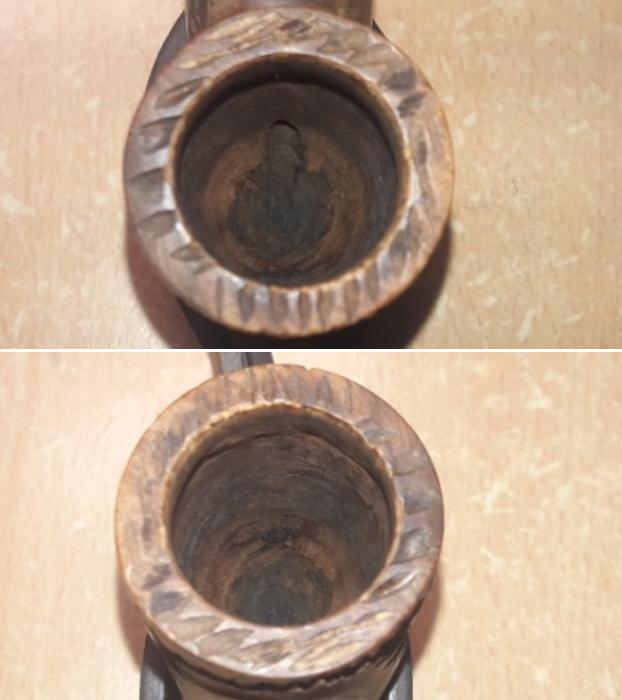
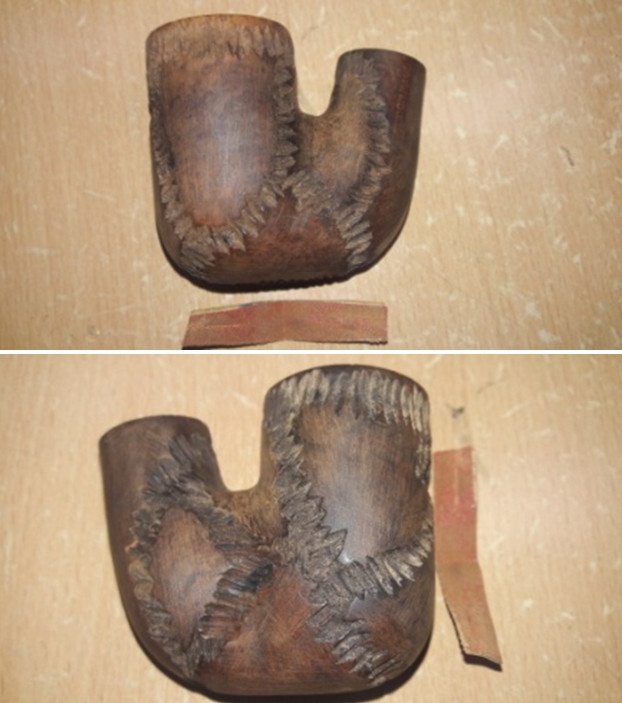
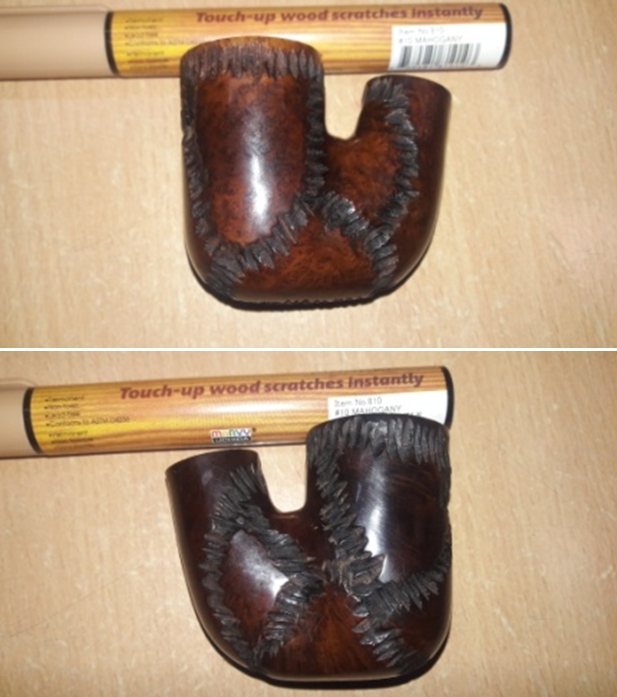
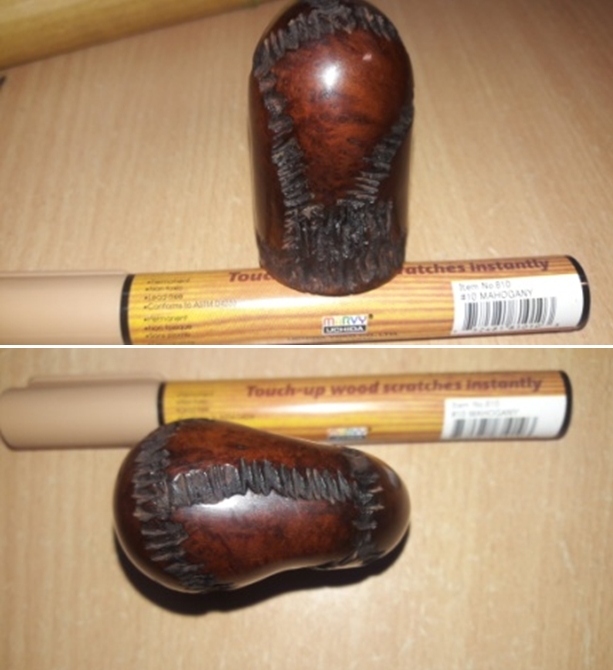
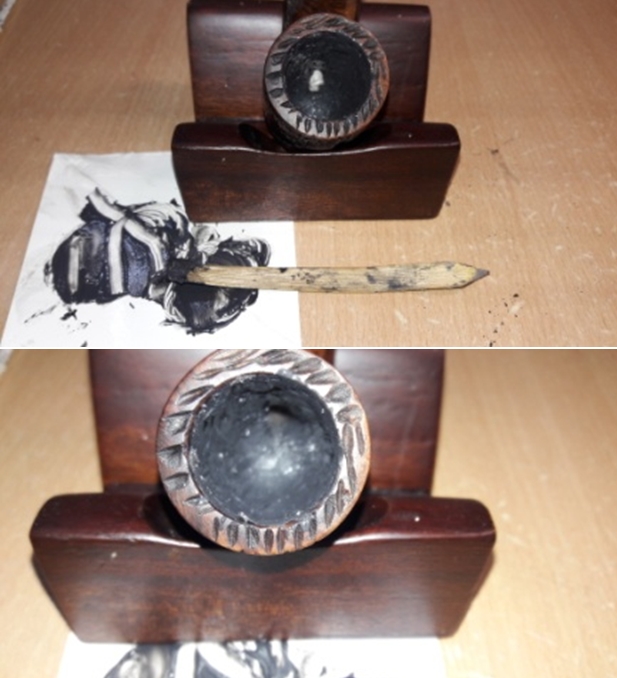
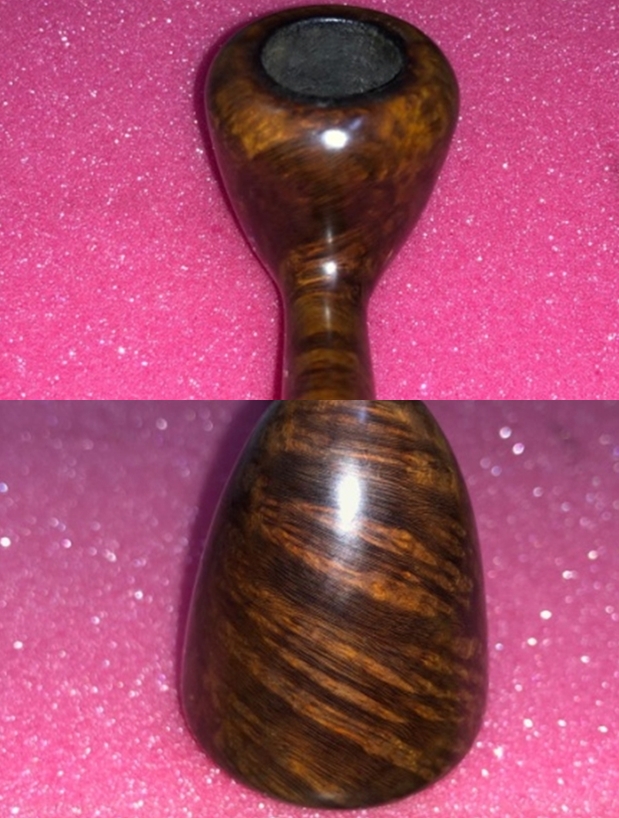
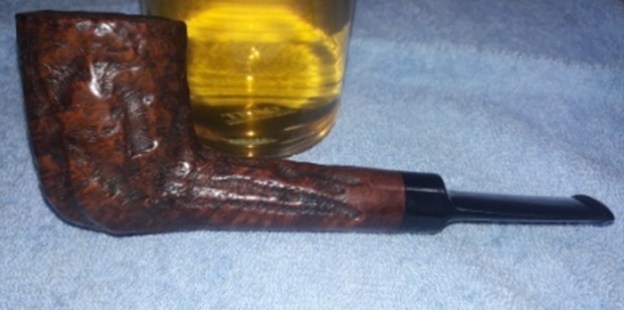
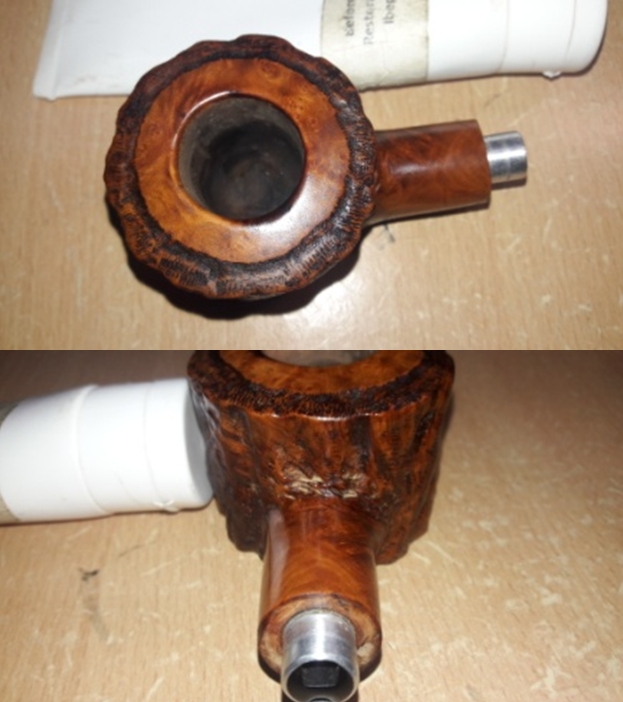
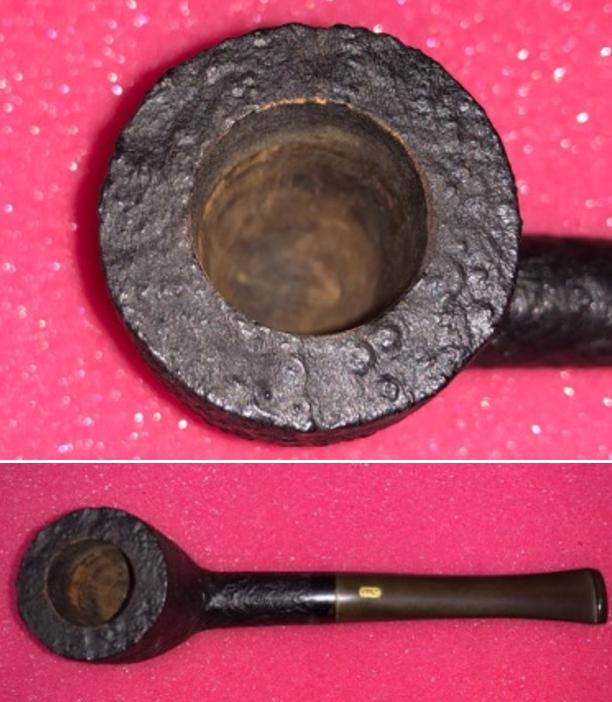
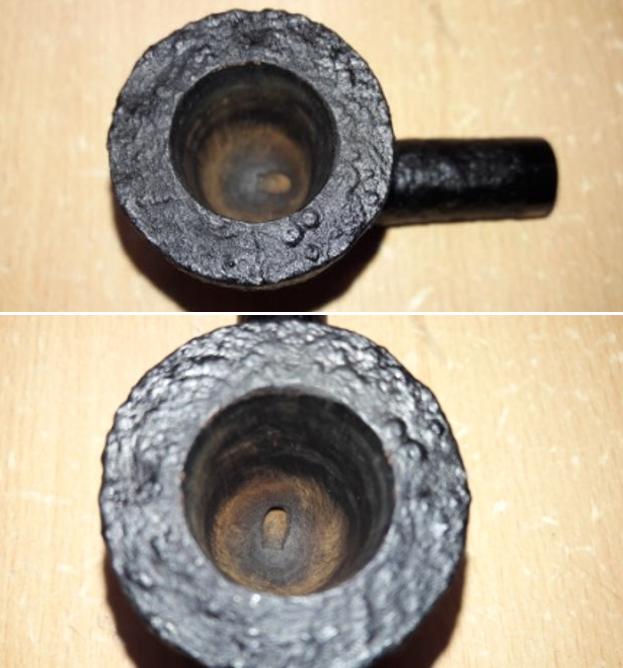
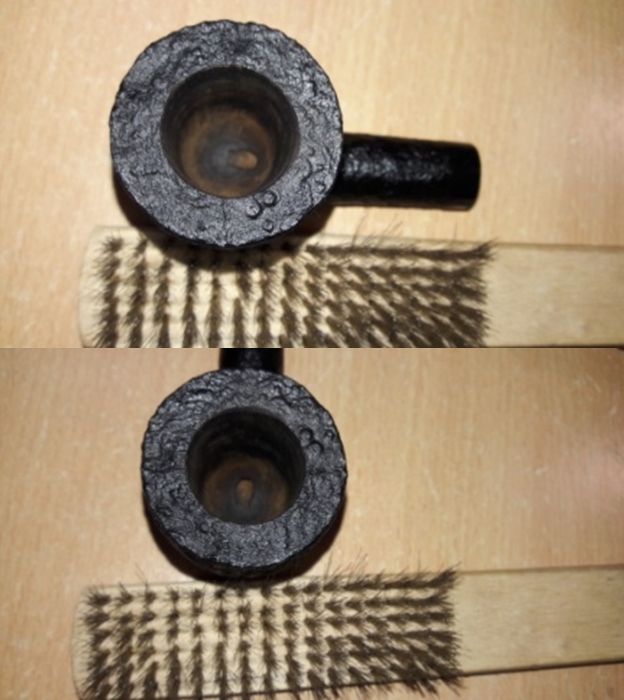
Before the above disaster struck and we finally put the pipe aside, Abha had partially reamed out the thick layer of cake from the chamber. Now on my work table, I would need to completely ream the chamber and clean out the little remaining cake. Unfortunately the rim of this pipe too appears to have been subjected to being banged on the edge of the table to remove the dottle, albeit with a little gentleness, as can be seen from the damage to the inner edge of the rim. The chamber is out-of-round towards the left side in 9 o’clock direction. Overflow of lava can be seen on the rim top surface. In my appreciation, these are not major issues to address.  
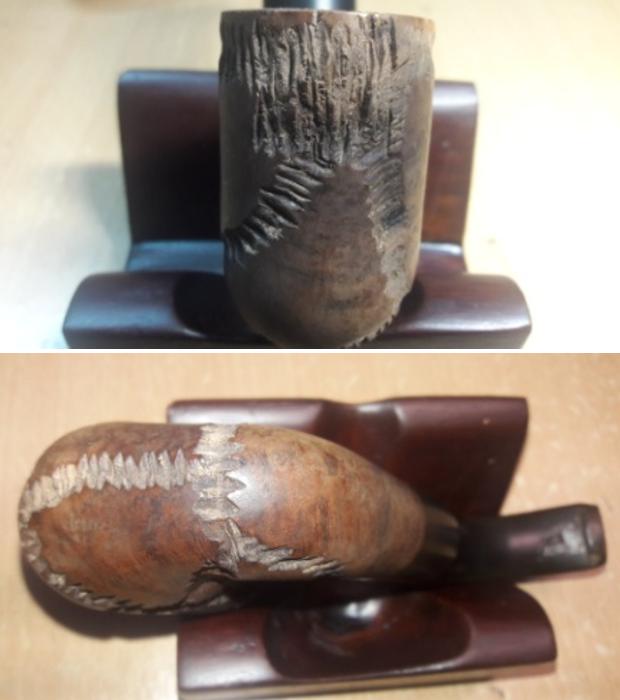
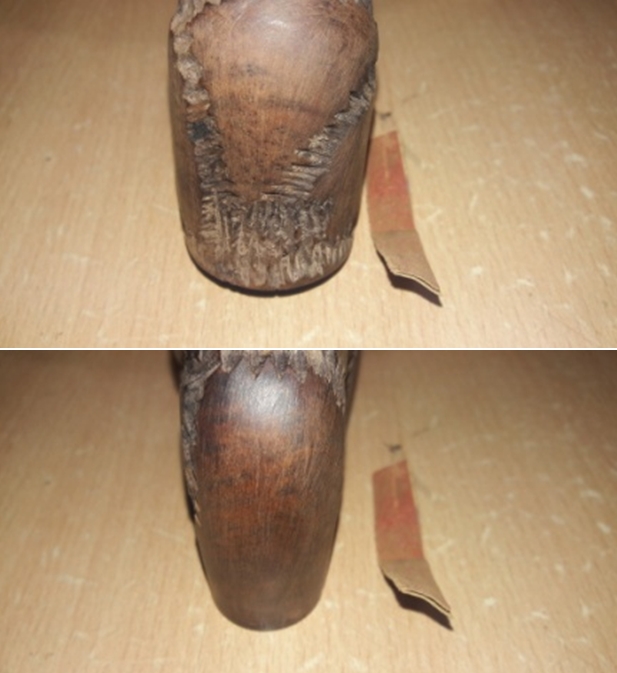
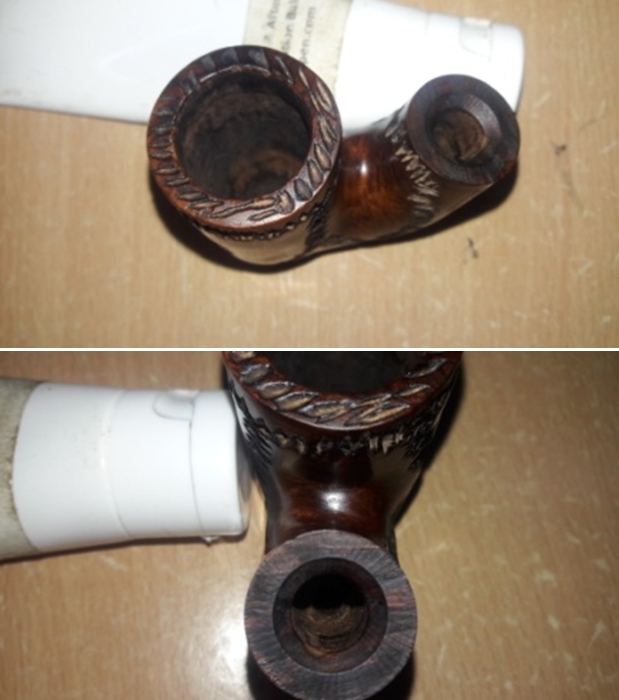
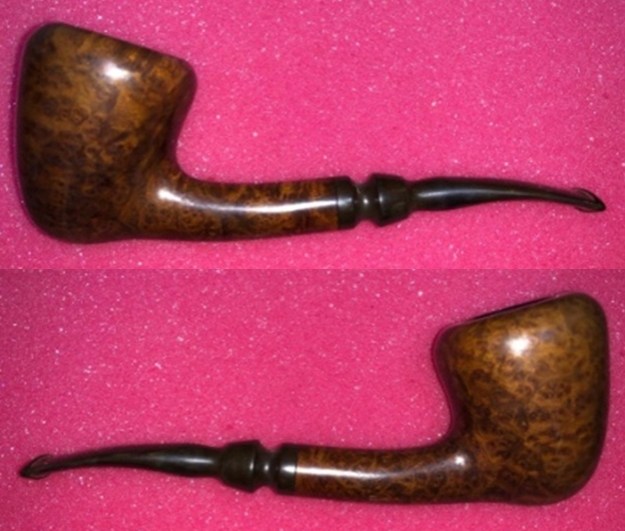
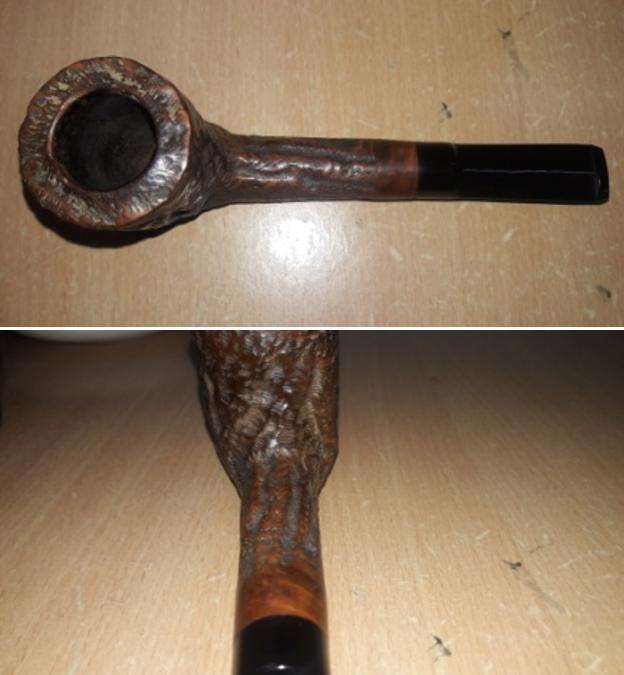
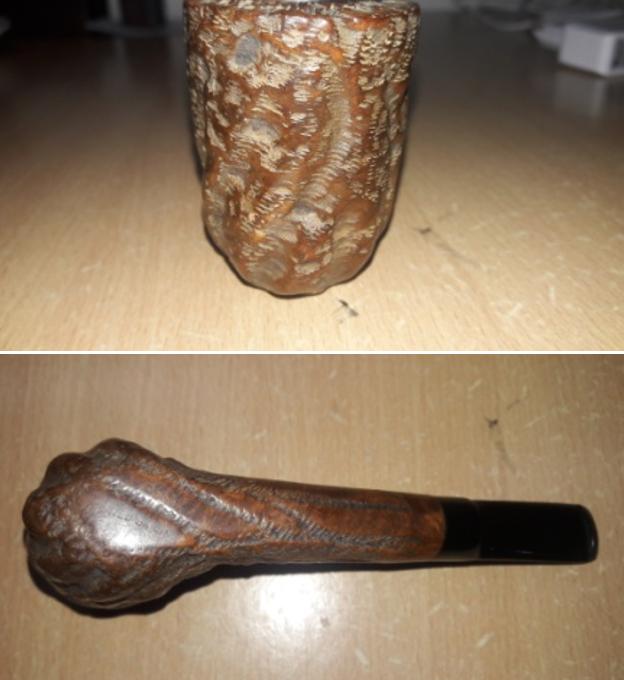
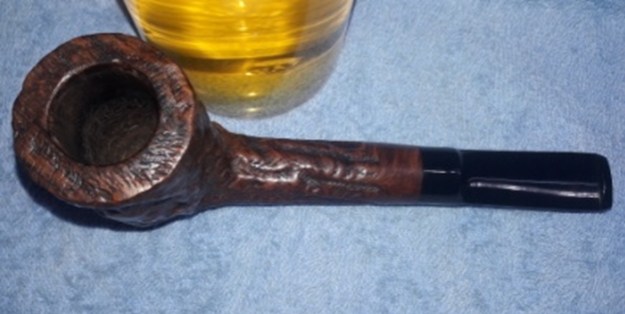
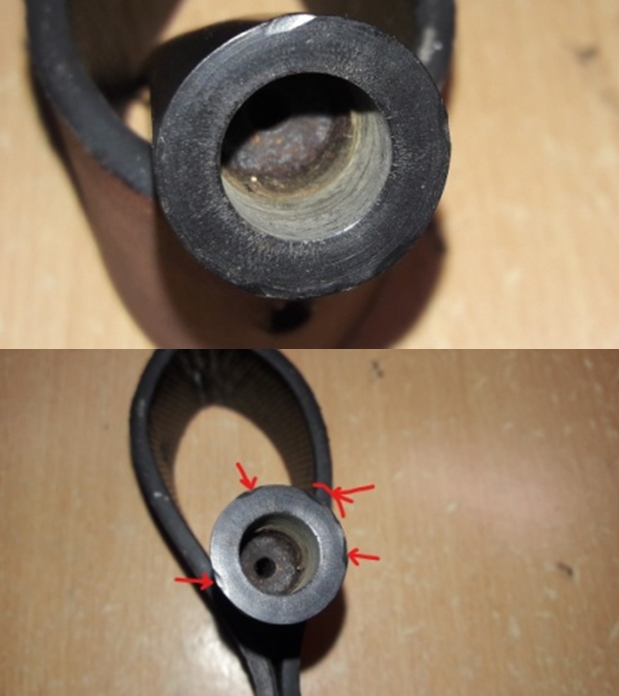
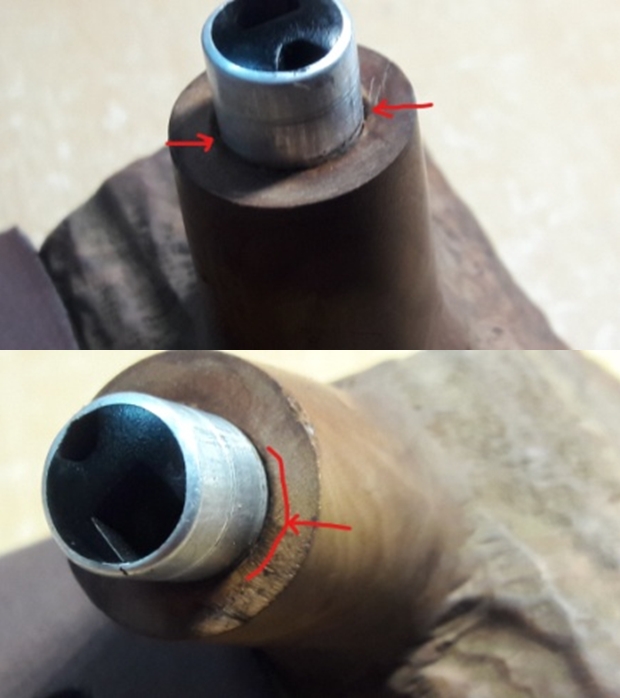
The stummel surface has developed a glorious patina over the years of smoking and I need to preserve it. However, the surface is covered in dust and grime. Numerous scratches can be seen to the front, back and sides of the stummel. The shank top and bottom surface too has numerous scratches. The bottom of the shank appears to have a small fill which has been circled in red. This fill/flaw in meerschaum felt solid on light probing with my pointed dental pick. The threaded bone tenon is fixed in to the shank end over which the replaced Amber stem will get attached. This bone tenon is covered in oils and tars and the shank internals are heavily clogged with accumulation of old and dried gunk making airflow through it laborious and restricted. 
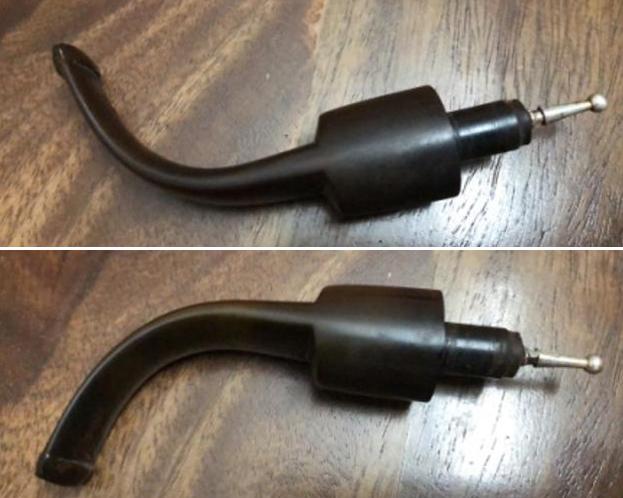
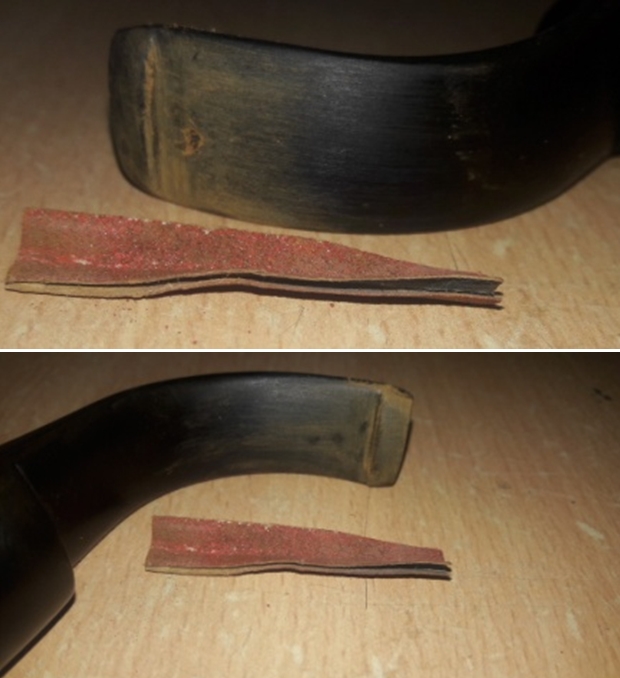
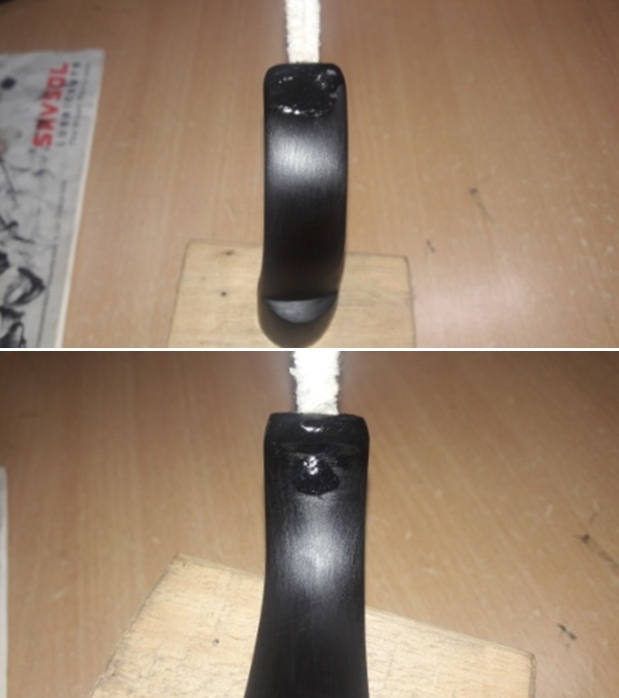
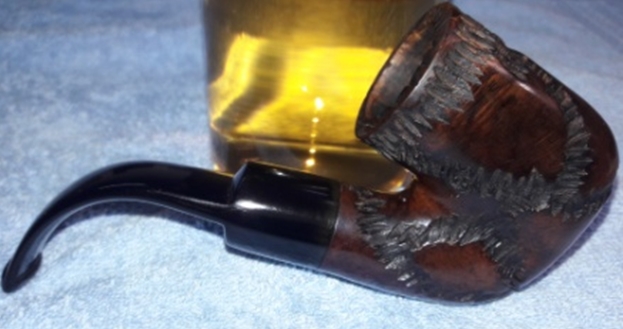
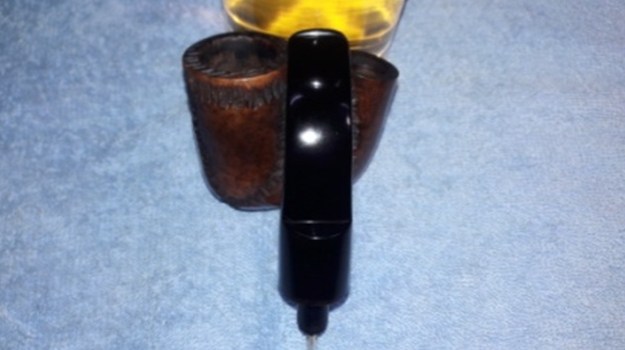
The stem is where my patience, diligence and skills are going to be tested. The following pictures tell the story themselves. The reader will now get a picture as to why this project has been kept pending for the last 5 months! The fault line or beginnings of a crack that I had mentioned earlier are marked in blue circle. Amber stem repair is the most delicate and difficult of all stem repairs and is sure to test my patience and mental robustness. I need to arm myself with as much information on these repairs as possible. The air way can be seen through the broken portion of the stem surface is covered in dried gunk. This will have to be cleaned. The leather covered wooden case is solid with all the hinges and locking mechanism in excellent working condition. The dark brown lining along the edges has come off at certain places and at some places has been completely torn off. The leather covering is in excellent condition, save for heavy accumulation of dust, dirt and grime. The leather has dulled under all this grime and dirt. This should clean up nicely. The satin lining inside the box lid cover has become dirty and stained over the years. However, the markings are still crisp and shining. The gold velvet lining which houses the pipe too has dulled and covered in dirt and grime. The insides and outside of this case should clean up nicely. THE PROCESS PART II
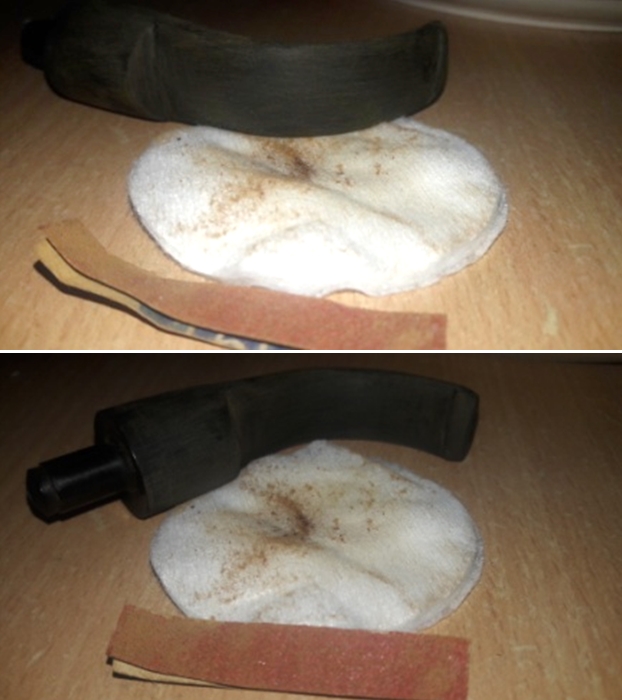
I decided to restart this restoration with the stem repairs. Actually, I wanted to fight the demons in my head as far as this stem repair is concerned. I first discussed this repair with Steve and read all the write ups on Amber stem repairs on rebornpipes.com. This helped me get a fair idea as to how I should be generally going about this project. I carefully removed all the broken bits and pieces of the stem from the zip lock pouch and meticulously laid them out over the broken stem surface, something akin to solving a jigsaw puzzle. I made a mental map of all the pieces and also of the pieces that were missing. The second picture shows the placement of broken pieces of amber, the missing parts and overall intended repairs required.Once this mental map was ready, I moved ahead with first cleaning out the internals of the stem airway. Now, I was cautioned by Steve not to use alcohol to clean the amber stem and so I used plain warm water with pipe cleaners and shank brush. I was cautious when I cleaned tenon end of the stem so as not to stress the developing crack. Steve also had given me a Mantra of going about this project; LESS IS MORE!! Well, this shall be my guideline as I go about repairing the stem and further restoring this pipe. With the stem internals as clean as I could possibly get, I insert a petroleum jelly smeared pipe cleaner in to the stem airway. This prevents the CA superglue from flowing in to it and subsequently clogging the airway. I applied CA superglue over the broken surface of the stem with a toothpick and stuck the broken portions of the stem making sure that they are aligned perfectly. The portion that had missing parts was filled with clear CA superglue. I applied the superglue over the developing crack at the tenon end so it would permeate in to the crack and stabilize it. I set the stem aside for the repairs to cure.
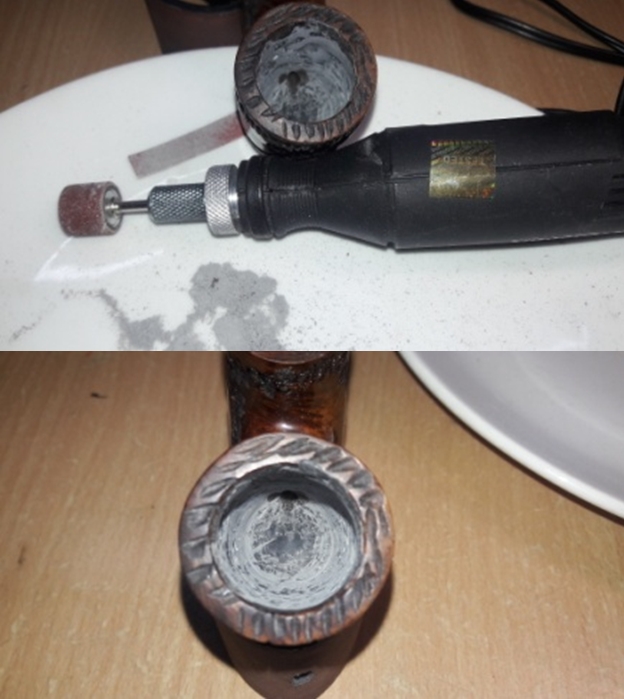
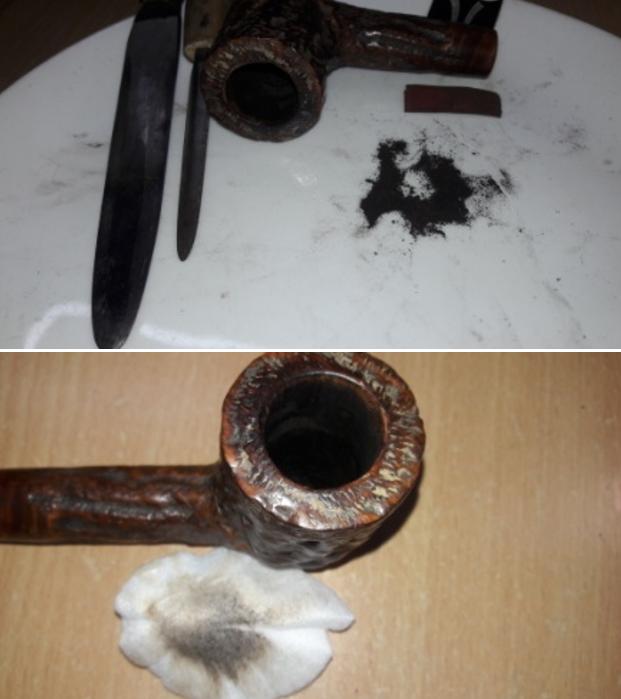
Next I worked on the stummel clearing out all the remaining cake from the chamber using PipNet reamer size head 1 and 2. I used my fabricated smaller knife to remove the cake from areas not reached by the reamer head. To remove the last traces of old cake and even out the chamber walls, I sand the entire chamber with folded piece of 180 grit sand paper. I gently scraped off the lava overflow from the rim top surface with my fabricated knife.

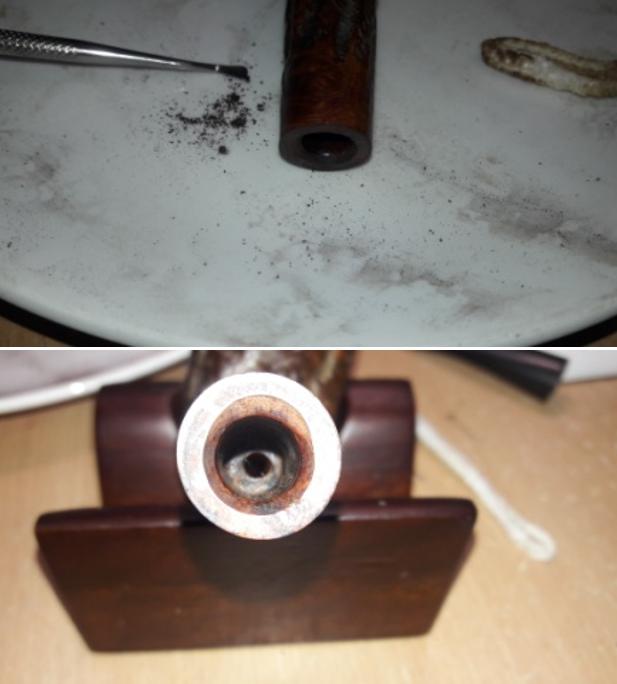
Continuing with internal cleaning, I cleaned out the shank internals and the mortise using hard bristled and regular pipe cleaners dipped in 99.9% isopropyl alcohol. The shank internals were so clogged and dirty that while cleaning at one point I thought that I would never get a pipe cleaner to come out clean!! But eventually I did manage to get a few pipe cleaners to come clean and the shank internals are now nice and clean and fresh. I wiped the threaded bone tenon with a cotton swab and alcohol to remove the dried gunk from the surface. Slowly and surely, progress is being made and I am happy with it.The stem repairs had cured nicely by the next afternoon and so I decided to work the stem. I sand the repairs with a flat head needle file, huge mistake that was!! A small chunk came off the stem. The demons came back to haunt me again. Muttering a prayer for divine intervention, I set about gluing the chunk back on to the stem surface. I again aligned the broken chunk with the surface and applied generous coat of super glue over the complete repairs, including the tenon end repairs and set it aside.  
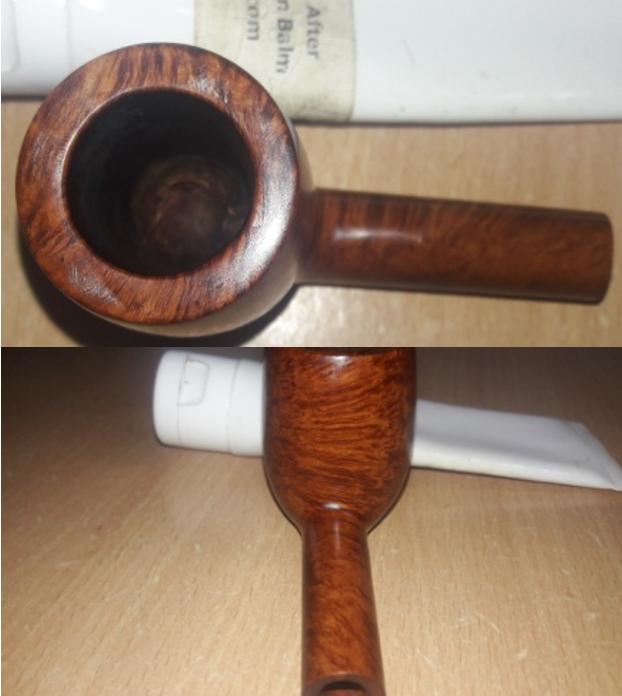
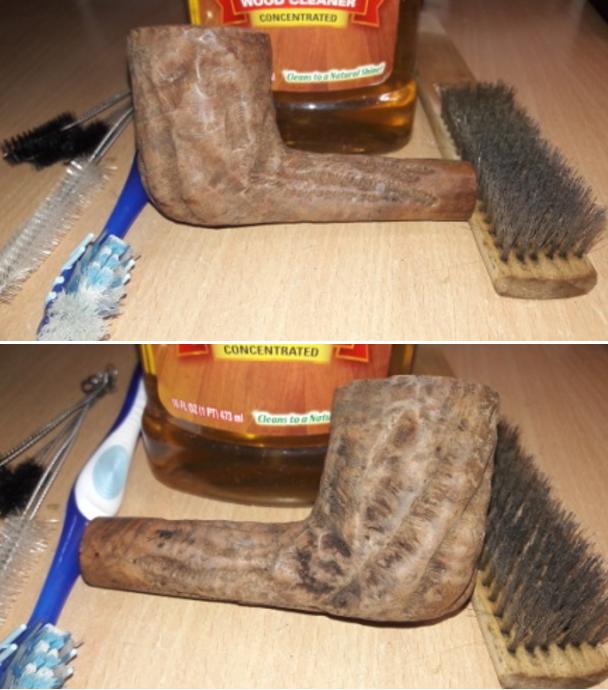
While the stem repairs were set aside to cure, I wiped the stummel surface with a cotton swab and Murphy’s Oil soap. The stummel surface is now free of all the dust and grime. I also cleaned out the last traces of lava from the rim top surface. The stummel and rim top surface now looks dull, but it is clean. I shall bring back the rich shine when I polish it further.    
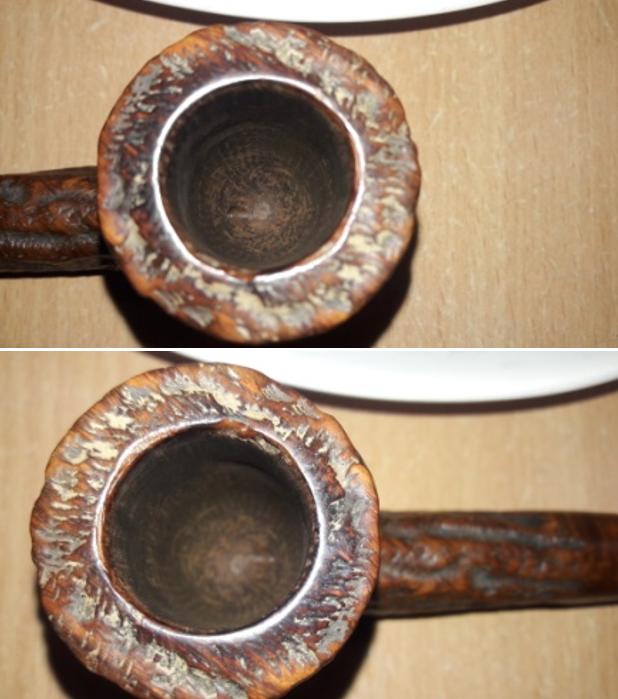
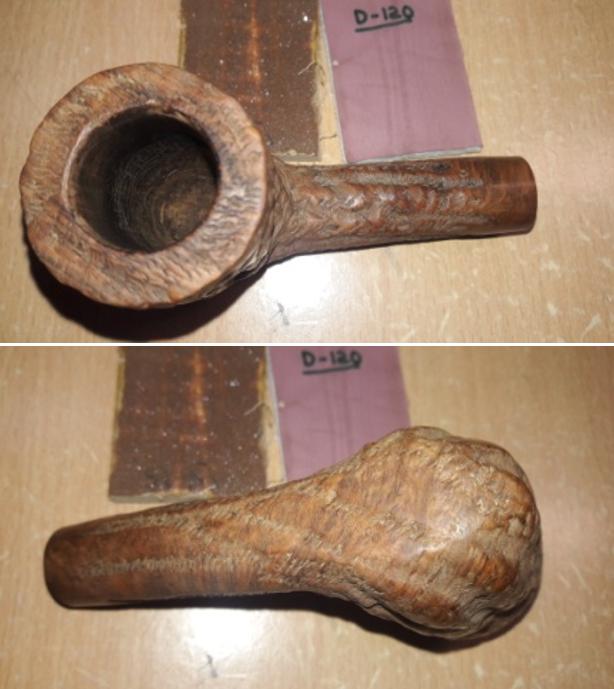
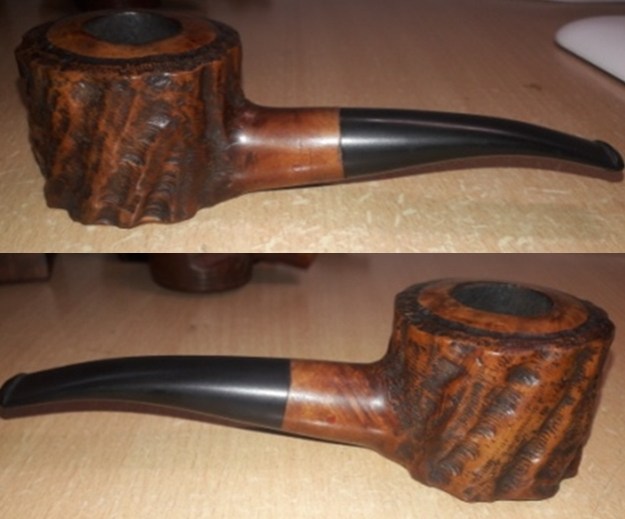
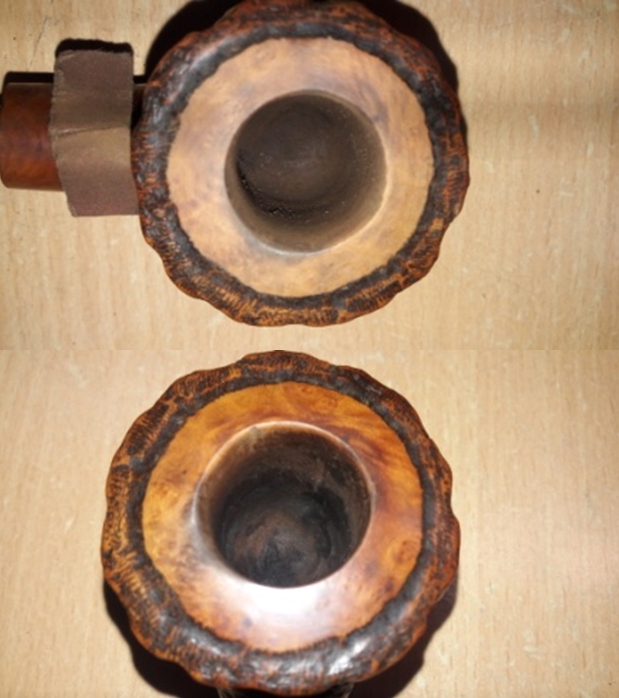
I followed up the external cleaning of the stummel with addressing the issue of uneven and out of round inner rim edge. I created a bevel to the inner edge with a folded piece of 220 grit sand paper. This helps to mask the out of round chamber while addressing the uneven inner rim edge. I could still see one major dent within this freshly created bevel and the only way to address this without further compromising the thickness of the rim was to sand it down at the cost of altering the profile of the beautifully shaped stummel. This was not acceptable to me and I decided to let it be. It shall remain as part of this pipe’s journey till date! Back to the stem repairs!! The glue had shrunk while curing and not wanting to take any more chances, I apply another coat of superglue over the repairs on both upper and lower surfaces of the stem. I set it aside for the night to cure.
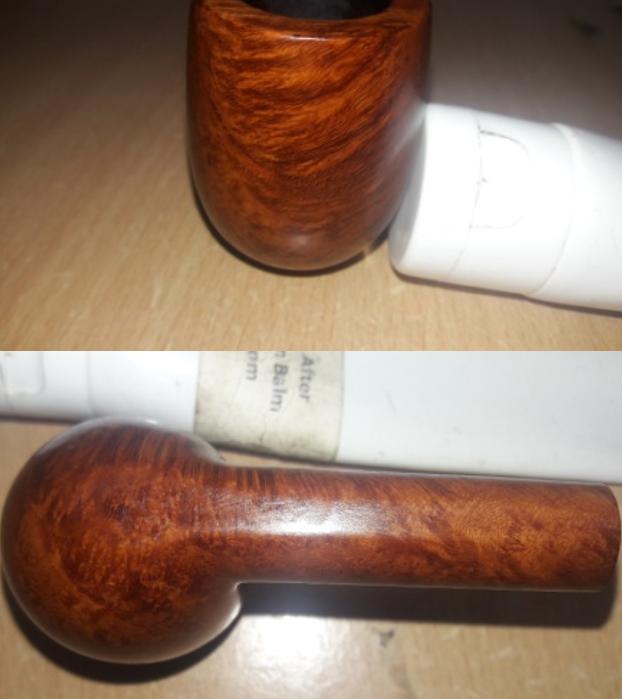
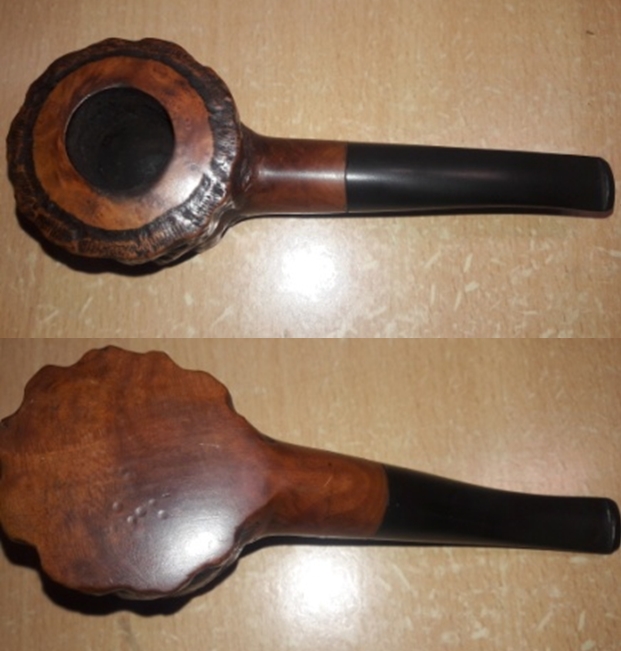
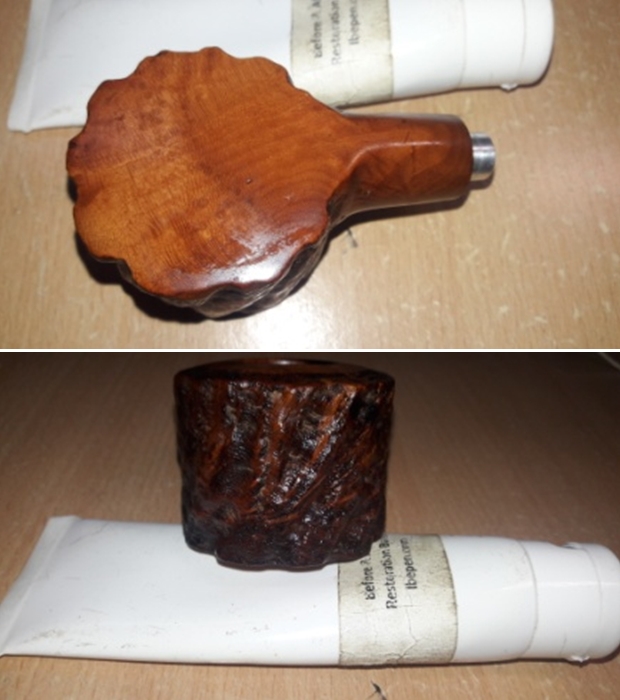
Reaching back for the stummel, I was caught in a conflict; should I sand the stummel with 220 grit sand paper to remove all the scratches to make it look pristine and loose the patina that has developed over the years or preserve the coloration and patina. I decided on the later, after all it is the coloration taken on by the meer over the years which is more important and the existing scratches are a part of its journey through the years, is how I convinced myself!! I polished the stummel surface by dry sanding it with 1500 to 12000 grit micromesh pads. Some minor scratches were also addressed while imparting a nice deep shine to the stummel. The patina was also preserved. All in all, I am pleased with the appearance of the stummel at this stage. Even though the black flume has been lost at places from the rim top surface, it is an easy fix and I shall address it next. 
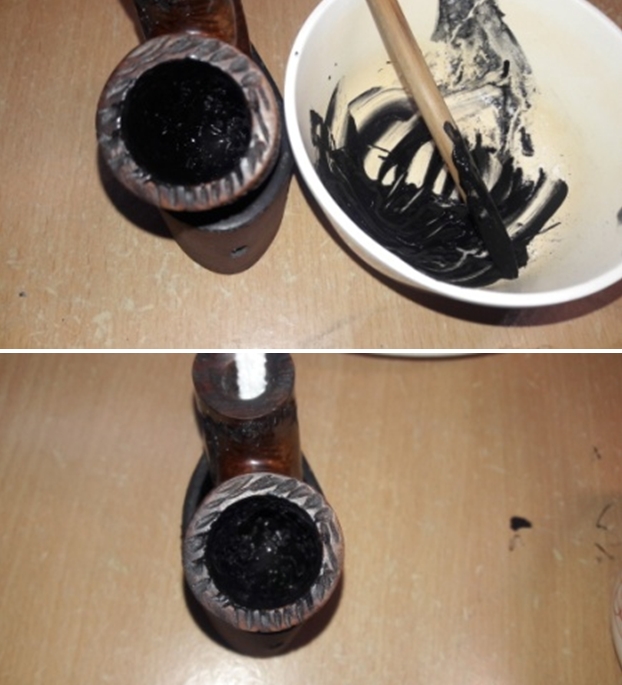
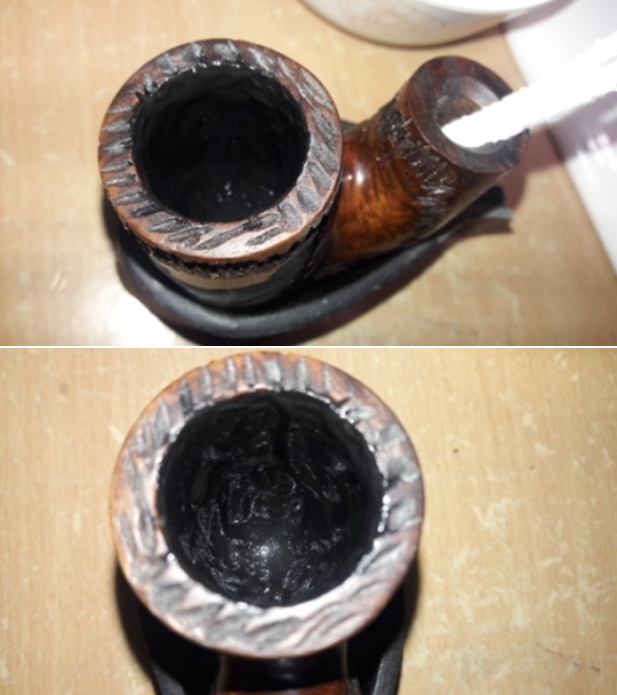
I painted the discolored flume from the rim top surface and adjoining areas with a permanent marker and shall blend it further subsequently.Other than final polish using Blue Diamond followed by Wax, the stummel work is complete. I need to concentrate only on the stem repair now. What followed over next two days and nights is fill, cure and thereafter sand!! I did not get a needle file anywhere near the stem. For sanding, I used 400, 600 and 800 grit sand papers only and completely avoided the coarser grades.   I still found the repairs did show themselves in all their ugliness and sought Steve’s advice on the same. He put my mind to rest by appreciating the repairs while commenting that it’s a repair and can never look like original!! He also suggested I take a look at all the amber stem repairs he had done so far and that in all cases the repairs do show. Such is the humility of this gentleman!! Well, truth be told, I too had no heart to work any further on the repairs and moved ahead with polishing the stem. I wet sand the stem with 1500 to 12000 grit micromesh pads, frequently wiping it with a moist cloth to monitor the progress made. I am satisfied with the appearance of the stem at this stage. Remember the mantra for this restoration…Less is more!! 
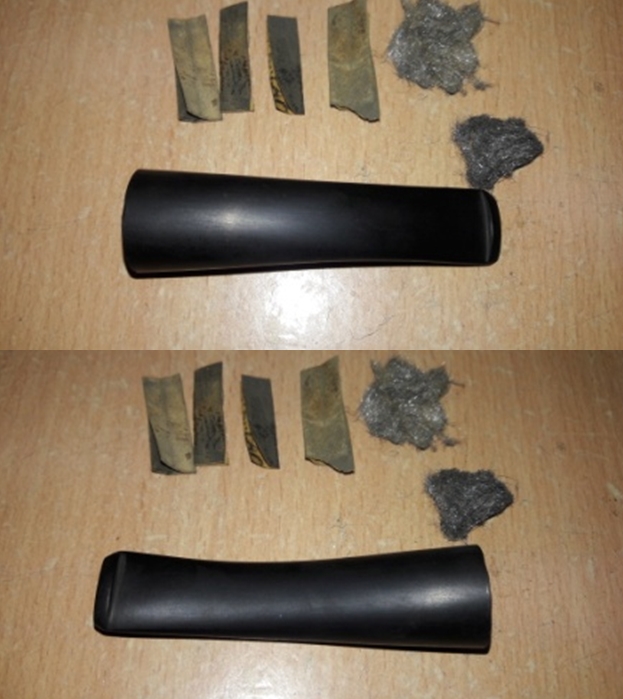
Stummel done, stem done!! All that remained was the original case that housed this pipe. Firstly, I reattached all the dark brown linings that had come loose with superglue. I wiped the brown leather cover with Murphy’s Oil soap on a cotton swab. The color on the swabs should give the readers an idea of how dirty the surface was!! I wanted to further scrub the leather surface, but unsure that I was as to how the leather would hold up to all the scrubbing, I left it at that (remember my mantra… Less is more!!). I cleaned the inner satin and velvet linings of the lid and bottom respectively, with a mild soap in warm water and a soft bristled tooth brush. I was very gentle with this as I had no intention of either tearing the lining or messing up the stampings. I completely dried the lining using paper towels. It now does look nice and rich. With the externals and internals of the case all cleaned up, it remained to rejuvenate the leather. I applied a generous coat of neutral color shoe polish (it is basically wax!) on either surfaces and kept it aside to be absorbed by the leather. Prevalent heat in my part of the country also kept the polish in a semi-liquid state which further helped in absorption. I polished it with a horse hair shoe brush to a nice shine and gave a final buffing with a microfiber cloth.
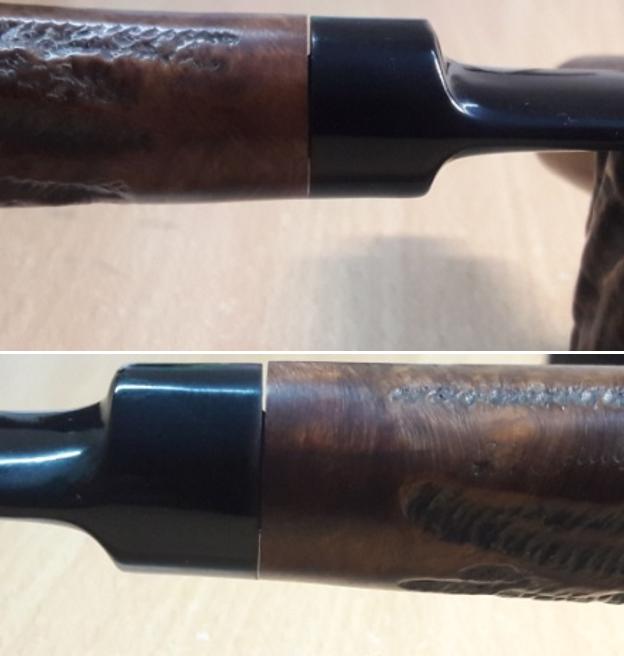
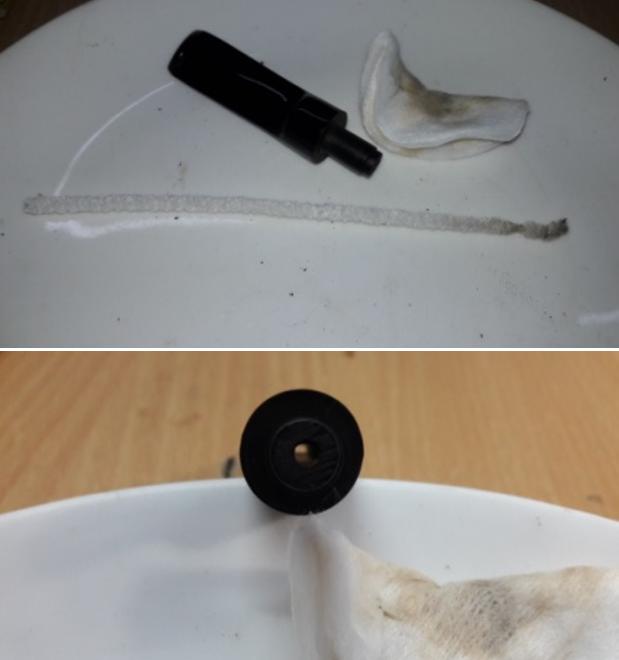
This project was finally nearing completion!! When I attached the stem to the stummel, I realized that the fit is overturned due to all the cleaning of the tenon and the stem. I applied a thick coat of clear nail polish over the threaded tenon and after it had dried, I turned the stem over the tenon. The fit was snug and aligned perfectly. Thank God for such mercies!!
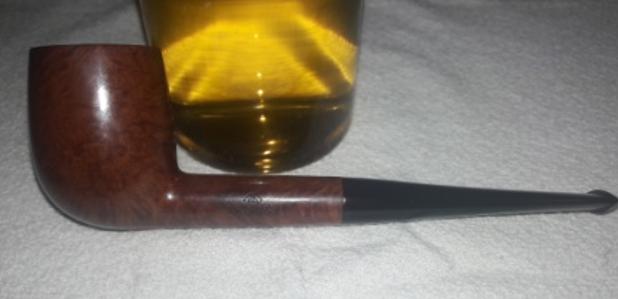
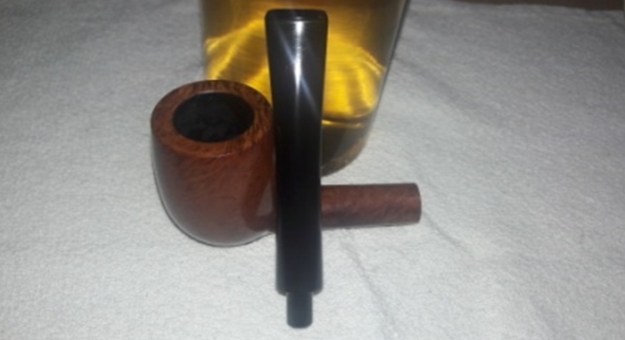
To finish, I re-attach the stem with the stummel. I mount a cotton cloth buffing wheel on to my hand held rotary tool.  I set the speed at lowest power and applied Blue Diamond compound over the stummel and the stem surface. I wiped/ buffed the pipe with a soft cotton cloth to clear it of any leftover compound dust. I then mounted another cotton cloth wheel on to the polishing machine and applied several coats of carnauba wax over the stummel and the stem of the pipe. I finished the restoration by giving the pipe a rigorous hand buffing using a microfiber cloth to raise the shine further. The completed pipe, with its golden hues and aged patina and a dark egg yolk colored amber stem, looks lovely, fresh and vibrant; the photographs speak for themselves. The beauty, size and shape of this pipe, not to mention the challenges and time it took me to get around restoring it, make it one of my favorites and will find a place of pride in my modest collection. If only the pipe could tell some of the stories of its provenance and experiences gathered on the way as it found me…Cheers!! 
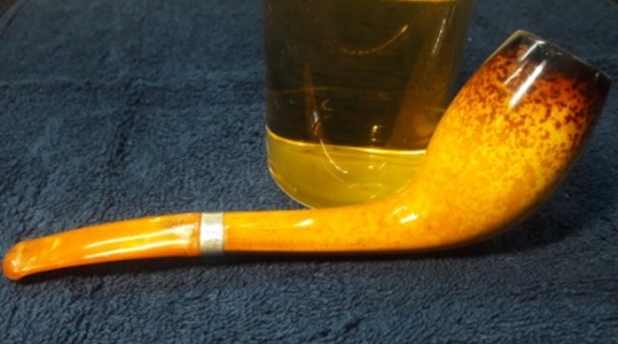
P.S. I did smoke this pipe and enjoyed the fruits of my labor. It’s a fantastic smoke to say the least.

Refurbishing a Tired Looking Oom Paul from Steve’s Grab Box


Blog by Paresh Deshpande

Steve, my friend and mentor, had sent me a pipe lot of 15 pipes for restoration. These assorted pipes were sent to me with an intent that these would provide me with an opportunity to further hone my skills and gain experience in tackling varied issues that one may come across during restoration. Each of these pipes has its own set of issues to address and I look forward to work on each one of this pipe lot. Here is the picture of the pipes as I received it, less the one marked with a cross in red which is a Dunhill Root and restored by Steve for my personal collection.I had worked on a no name straight billiard (marked number 1) from this lot and it turned out to be a beautiful pipe. The next pipe from this lot that I selected to work on is an Oom Paul and is marked with a yellow arrow and numeral 2.This pipe has a nice heft to it and the classic Oom Paul shape lends itself to be clenched comfortably while having your hands free. The stummel is combination of islands of smooth surface formed due to stitches-like rustications crisscrossing the length and breadth of the stummel. It is stamped on the left side of the shank as “Oom Paul” in block capital, increasing in letter size towards the shank end. On the bottom of the shank and very close to the shank end it is stamped as “Israel” in sentence case. There is no stamping on the vulcanite full bent stem.This is the first pipe that I am working on coming from Israel and so to learn more about it, I visited pipedia.org. I searched the link for Israel in Pipe Brands/ Makers and found that Israel has only one pipe factory, The Shalom Pipe factory. Thus it is highly probable that this pipe too came from this factory. No other information was available on the internet that I could research. It does appear to be an ol’ timer though.

INITIAL VISUAL INSPECTION
There is a thick layer of cake in the huge chamber pointing to the fact that this was the previous owner’s favorite pipe. The stitch-like rustications on the rim top surface are filled with dust and dirt and yes, surprisingly without overflowing lava accumulation. The inner and outer rim edges are in decent shape. The condition of the inner walls of the chamber can be only ascertained once the cake has been taken down to bare briar. Thankfully, the chamber has very mild odor which should be eliminated once the chamber and shank internals have been cleaned.The stummel is covered in dirt and grime that gives it a dull and tired appearance. The large smooth paneled surface on the right side of the stummel is considerably darker in appearance as compared to the right side. However, the entire stummel has a solid feel to it. The stitch-like rustications that crisscross the entire stummel are filled with dust and dirt and appear lighter than the smooth surfaces. There are patches of dried oils and grime which has attracted a lot of dust. Through all this dirt and grime, beautiful Bird’s eye and cross grains peek out from the smooth surface. Once the stummel is cleaned and polished, these grains will pop out in all their refined glory. All in all as it stands now, this is one dull and tired looking stummel that requires a lot of TLC!! The mortise has a sump at the bottom that is similar to the Peterson’s System pipes, with the opening for the draught hole well above this sump. The mortise and the sump are clogged with oils and tars. This will need to be thoroughly cleaned.The stem, to put it mildly, is a mess!! Apart from being heavily oxidized, it has deep bite marks on both upper and lower stem surface. Heavy tooth chatter is seen all over the bite zone on both sides of the stem surface. The button has been badly chewed with deep tooth indentations on both sides of the stem. The aluminum stinger is surrounded by a thick layer of accumulated dried oils and tars and could not be dislodged from the tenon end. The tenon end and slot shows heavy accumulation of gunk, making air flow very laborious. All these issues need to be addressed. INITIAL CLEANING BY ABHA……….
Ever since we had an on-the-job learning on initial cleaning and restoration when Jeff and Steve visited us, Abha is enjoying her part of work in restoring pipes (read that as initial cleaning) and is getting better and faster in her chosen field. She reamed out the complete cake and further smoothed out the chamber walls with a folded piece of 220 grit sand paper. She scrubbed out the dried oils, tars and gunk from the mortise with a fabricated dental spatula and further cleaned out the internals of the shank with pipe cleaners and alcohol and cotton buds. She followed the internal cleaning of the shank with external cleaning of the stummel using Murphy’s Oil soap and hard bristled tooth brush and dried it with paper napkins and cotton cloth.

Next she lightly heated the stinger, carefully pulled it out with nose pliers and cleaned out the internals of the stem air way and immersed it in “Before and After Deoxidizer” solution along with the stem of other pipes in line for restoration. Once the stem had soaked overnight, she cleaned the stem under running warm water and scrubbed the raised oxidation from the stem surface using Scotch Brite pad. She further removed the oxidation by scrubbing the stem with 0000 grade steel wool and applied a little olive oil to rehydrate the stem.

ONCE THE PIPE IS ON MY WORK TABLE……
The cleaned up pipes presents a very clear picture of what needs to be done to restore this pipe to a pristine and smokable condition. I really cannot thank Abha, my wife, enough for all the help and support that she extends me in my pursuance of this hobby. A clean pipe also helps in clearly identifying the work that would be required to restore a pipe. The pictures shows the condition of the pipe when it reached me after being cleaned. The stummel is nice and clean with the stitch-like rustications now appearing considerably lighter than the rest of the stummel surface. With the dirt and dust that covered the surface cleaned out, the smooth surfaces on the stummel presents an array of beautiful cross and Bird’s eye grains. The smooth surface on right side of the stummel is considerably darker (circled in red) than the left and will need to be examined closely. However, the stummel is solid to the touch, thereby ruling out a total burn out. I am sanguine that after a nice polish with micromesh pads followed by further wax polish, the stummel would look beautiful and stately. The large deep chamber is nice clean and odorless with minor heat fissures all around the walls. These fissures on the right side (marked in red circle) are likely to be more severe as the outer surface is considerably darkened than the left side of the stummel. I need to explore these heat fissures further to determine the extent of the depth of these fissures. However, I am certain that these are not an all out burn through, but mostly like the beginnings of one. The mortise and sump is spotlessly clean, thanks to a stupendous job done by Abha. As spelled out in my initial appreciation, prima facie it is the stem that has suffered the most damage at the hands of the previous owner. I say prima facie since at this stage, I am not sure about the hidden gremlins in the form of heat fissures which necessitates detailed exploration. The bite zone is peppered with tooth chatter and deep tooth indentations on both sides of the stem. The buttons on both the sides are badly deformed with deep bite marks and signs of presence of deep seated oxidation. I would need to sharpen the edges of the buttons also. I intend to first raise these indentations to the surface by heating and sanding followed by filling it with a mix of activated charcoal and superglue. By sanding to even out the stem fill and remove the deeper oxidation followed by micromesh polishing cycle should add a nice shine to the stem. The aluminum stinger, tenon and slot are nice and clean. THE PROCESS
Firstly, I heat the surface of the stem with the flame of a lighter to raise the tooth indentations to the surface and follow it up with a sanding with a folded piece of 220 grit sand paper. This helped to even out the raised surface, address the tooth chatter and also remove the deep seated oxidation to some extent. I wiped the stem with a cotton swab and alcohol to remove the raised oxidation and the resulting sanding dust. However, the tooth indentations are still prominent. A bite through on the top stem surface is reveled which extends in to the stem airway. I need to address this issue. After this abrasive sanding and alcohol wipe, the stem appears dried out and so I apply a small quantity of Extra Virgin Olive oil to hydrate it.To address the deep tooth marks in the bite zone, button surface and the bite through on the top stem surface, I decided to use a mix of activated charcoal and CA superglue and apply it over the damaged areas. But before that, I insert a regular pipe cleaner smeared in petroleum jelly in to the stem air way. This prevents the mix from seeping in to the air way and blocking it when hardened. I apply a generous coat of the above mix over the damaged surface, including the buttons on either sides of the stem and set it aside overnight to cure. Next, while the stem fills are curing, I sand the entire stummel surface with a piece of 220 grit sand paper. I also work the inner rim edge with the sandpaper to even out the rim edge. This sanding helps in addressing all the minor dents, if any, from the surface while providing a smooth surface for the next stage which is polishing cycle using complete set of micromesh pads. I was especially very careful while sanding the side and bottom of the shank around the stampings, as it is very easy to miss out the stamp and one swipe of the sand paper is enough to ruin/ damage the stampings and it is the stampings on any pipe that I always strive to preserve. The next afternoon, I work the stem as the fills had hardened nicely. With a flat head needle file, I sand these fills to achieve a rough match. I further fine tuned the match by sanding the filled area with a folded piece of 220 grit sand paper pinched between my thumb and forefinger. I followed it up by sanding the entire stem surface using 400, 600 and 800 grit sand papers. This serves to remove the deep seated oxidation and also reduces the sanding marks of the more abrasive sand papers. I also sharpened the button edges with a flat head needle file and the sand papers. I wiped the stem with a cotton swab and alcohol to remove all the oxidation and sanding dust from the surface. I applied a little Extra Virgin Olive oil over the stem and set it aside to be absorbed by the vulcanite.I followed up the sanding regime with micromesh polishing to bring a shine on the stem surface. Since my hand held rotary tool is out for repairs, I could not continue with my experimentation on use of Red Tripoli and White Diamond during the polishing regime. I wet sand the stem with 1500 to 12000 girt micromesh pads. I rub a small quantity of olive oil in to the stem surface to hydrate it and set it aside. The stem looks nice and shinning black.Now that the stem repairs are nearly complete save for final polish with Blue diamond and wax, I could now move ahead with polishing the stummel. To remove the sanding marks and bring a deeper shine, I polished the stummel with micromesh pads, wet sanding with 1500 to 12000 pads. I wiped the surface with a soft cloth at the end of the micromesh cycle. The stummel looks amazing with a deep dark maroon coloration and shine with beautiful grains popping over the stummel surface. The only aspect that stood out like a sore thumb was the light brown surfaces within the stitch-like rustications and the sand dust of micromesh pad has not helped, rather worsened the look. I carefully wipe the rustications with a moistened q-tip. Next, I rub a small quantity of “Before and After Restoration Balm” in to the briar with my finger tips and let it rest for a few minutes. I was diligent while applying the balm in to the stitch-like rustication as this may darken the inside of the rustications. The balm almost immediately works its magic and the briar now has a nice vibrant appearance with the beautiful darkened grain patterns on full display. I further buff it with a horse hair shoe brush. However, my attempt at darkening the insides of the rustications was met with limited success and a few sore spots still stand out. I decided to darken the insides of the stitch-like rustications by using a mahogany stain pen. I diligently ran the stain pen through each and every stitch-like rustication. It was a painstaking work but I am very happy with the results. Now, on to the home stretch!! I very excited to see the result of the final polishing cycle with Blue Diamond and carnauba wax.

To apply the finishing touches, I mount a cotton cloth buffing wheel on to my hand held rotary tool and apply a coat of Blue Diamond to the stummel and the stem to polish out the minor scratches. With a cotton buffing wheel that I use for carnauba wax, I apply a coat of carnauba wax and continue to work on it till the complete coat of wax had been polished out. I mount a clean cotton cloth buffing wheel and give the entire pipe a once over buff. I finished the restoration by giving the entire pipe a rigorous hand buffing using a microfiber cloth to raise the shine further. The finished pipe looks fantastic, the beauty of which is accentuated by its classic shape, size and feel in the mouth. This pipe is all set for a new home and will definitely provide the new owner pipe man/ lady hours of blissful smoke. P.S. At this point, I always share pictures of the completed pipe with Abha, my wife just so she can appreciate the end results of all her hard work put in during her initial cleaning. She loved the natural deep dark brown coloration taken by the stummel. However, she reminded me that I had not addressed the issue of heat fissures in the walls of the chamber which she had brought to my notice.

Hell!!! How did I miss out on this vital functional aspect of a pipe, but miss out, I did!! Thus, I set about addressing this issue.

First and foremost, I took some real close ups of the heat fissures on the right side of the walls. I could definitely see dried and burnt briar in these fissures even though they appeared insignificant. But the darkened stummel surface on the right side pointed to otherwise. To further determine the extent of depth and width of these heat fissures, with a sharp dental probe I scraped out the dead and burnt briar from within these fissures. As anticipated, these fissures were not very deep but deep enough to lead to a burn out sooner than later. Furthermore, my probing the left side fissures also revealed deeper than appearing fissures. This important functional aspect needs to be addressed. I decided to use a coat of JB Weld first followed by a bowl coat of activated charcoal and yogurt. The coat of JB Weld would protect the briar from coming in to direct contact with the burning tobacco while the charcoal and yogurt would insulate the JB Weld from direct contact with the lit tobacco while accelerating the formation of cake which subsequently adds a further protective layer. This was essential for furthering the briar life while providing a lifetime of contentment to the new pipe man/ lady. Now, JB Weld comes in two parts – the ‘Steel’ and the ‘Hardener’ in separate tubes.  As per the directions both are to be mixed in 1:1 ratio and that one has about 4 minutes before the mixture sets.  Before applying the mixture, I insert a petroleum jelly coated pipe cleaner through draught hole to prevent the draught from being smeared with the mix and blocking it when the mix is hardened. I mix JB Weld at 50/50 (eyeballing the quantities, of course) on an index card, mix it well, and apply it as evenly as possible over the complete chamber wall with a sliver of a bamboo frond – it was a bit messy, but mission accomplished successfully.  I set the stummel aside and let it cure overnight.The next afternoon, the mix had hardened and I realized how unevenly the mix was applied!! I did not want the layer of the mix to be too thick, but only as a thin layer. I mounted a 180 grit sanding drum on to my hand held rotary tool and carefully sand down the hardened mix to an acceptable thickness. To be honest, I do not know of any scientific method to determine the thickness and neither do I know of any instrument that would help me in doing so, it was just by touch and feel. Once satisfied, I cleaned the chamber of all the sanding dust and readied it for the next coat of activated charcoal and yogurt.Next, I mixed activated charcoal and yogurt to a thick consistency, neither too runny that it would run down the surface nor too thick that it would not spread out evenly. Again, this was all by feel!! Once I was satisfied with the consistency, I applied it evenly over the layer of JB Weld mixture and set it aside to dry out naturally. Once the bowl coat had dried out and hardened, I cleaned the rim top off all the dust and charcoal yogurt mix with a q-tip. I wiped the stummel with a clean soft cotton cloth and rubbed a small quantity of balm to enliven the briar and hand buffed the stummel with a microfiber cloth to deepen the shine.

The pipe is now truly ready for a long hiatus with a new piper, providing years of service in future. I cannot thank Abha enough for reminding me to address this most important functional aspect.

Thank you all for reading through this longish write up and for the valuable time you have invested in doing so. If any reader is interested in enjoying this pipe as his/ her rotation pipe, feel free to let us know.

Restoring a Beautiful Danish Pipe “MELBY” Acorn


Blog by Paresh Deshpande

This pipe had attracted my attention way back in 2017 when I first saw it on eBay and finally made it to me with a very small price tag, shipping included!! Subsequently as I started working on my inherited pipes under Steve’s guidance, the Barling’s, Dunhills, Peterson’s, Ben Wades, Nordings, Stanwells, Danish FH et al took center stage and the Melby got buried deeper and deeper down in the box. During his visit to India in May this year, Steve, Abha and I went through two of the three big cartons of pipes that I had inherited including a few pipes that I had purchased on eBay in earlier years. The aim of this exercise was to sort out pipes that could be sold and those that are to be added to personal collection. The Melby figured in the list of pipes “TO BE SOLD”!!

Well, after lying in wait for more than two years, the Melby has finally found its way on to my work table now.

This is a beautiful Acorn shaped pipe with a very subtle and delicate upturned bend to an equally delicate and thin shank. The stummel narrows down towards the foot from a nice broad and wide rim top. The pipe ends with a thin fancy vulcanite stem that has a slight bend at the slot end that carries forward the overall delicate profile of the pipe as a whole. The second aspect that struck me was how light the pipe was!!The pipe is stamped vertically towards the shank end bottom as “MELBY” over “MADE IN” over “DENMARK”. There is no other stamping on the stummel. The stem is also devoid of any stampings.The top notch quality of the briar, beautiful shape and overall high quality of finish and design screamed that this pipe had to be work of some really gifted artisan. To know more about this pipe, I visited pipedia.org. Sure enough, there was a mention of this brand under Danish pipes, but sadly nothing more than a mere mention. In my quest to unravel this mysterious brand, I surf the internet and the only reference that I could find out was on an aptly named site “VERY KEEN ON PIPES”. Here is the link to this interesting site; https://vkpipes.com/

Within this site I searched for Melby and here is what I learned; https://vkpipes.com/pipeline/melby/

An extraordinary Danish work! As every proper Danish pipe it’s made of a good briar, shows nice grain and has skillfully designed freehand shape. But the most of all we’re absolutely amazed with its sense of equilibrium – the pipe can surely balance just on its heel (back side of its bottom). Some signs (such as kind of briar) hint it might be a Karl Erik pipe but we don’t have a 100% proof so far.

With this information, I move ahead with my initial visual inspection.

INITIAL VISUAL INSPECTION
The pipe came to us in a very well smoked state, but, I have to admit that it was well taken care of by the previous owner. An even layer of heavy cake build up is observed in the chamber with overflow of lava on the rim top surface, notably at the back. Otherwise, the rim top surface and both inner and outer rim edges are in fairly good condition with slight darkening and unevenness to the inner rim edge. It is pretty strong sweet smelling pipe, I say!! I am not sure if by mere cleaning of the chamber and shank internals that these smells will be eliminated. The smooth stummel surface has beautiful Bird’s eye grain patterns on either sides of the stummel with beautiful densely packed cross grains on the front, back and the shank. The stummel surface has a dirty yellowish orange like stain to the briar that has darkened and dulled out due to accumulation of grime. Once it has been cleaned up, the grains should pop out after a nice polish. The mortise with shank internals is clogged and shows heavy accumulation of oils and tars. The chamber emanates a very strong sweet odor from previous usage. The draught hole is right at the bottom center and should be a great smoker!! The light weight and perfect shape make it a beautiful pipe to clench while you read your favorite book or while tending to your garden!! Reclaiming this piece of briar should be a fun project. The delicate fancy vulcanite stem is deeply oxidized, especially in the nooks and crannies. There are a few deep tooth indentations on either surface of the stem in the bite zone and over the upper button edge. The button edges would need to be sharpened and made crisp. The tenon and the slot show heavy accumulation of dried oils and gunk and the airflow through the stem is laborious.INITIAL CLEANING BY ABHA…
The initial cleaning on this pipe was done by Abha, my wife (she has cleaned up around 40-50 pipes and these have now reached me for further restoration). She reamed out the complete cake and further smoothed out the chamber walls with a folded piece of 220 grit sand paper. She scrubbed out the dried oils, tars and gunk from the mortise with a fabricated dental spatula and further cleaned out the internals of the shank with pipe cleaners and alcohol and cotton buds. She followed the internal cleaning of the shank with external cleaning of the stummel using Murphy’s Oil soap and hard bristled tooth brush and dried it with paper napkins and cotton cloth.

Next she cleaned out the internals of the stem air way and immersed it in “Before and After Deoxidizer” solution along with the stem of other pipes in line for restoration. Once the stem had soaked overnight, she cleaned the stem under running warm water and scrubbed the raised oxidation from the stem surface using Scotch Brite pad. She further removed the oxidation by scrubbing the stem with 0000 grade steel wool and applied a little olive oil to rehydrate the stem.

ONCE THE PIPE IS ON MY WORK TABLE…
The cleaned up pipes presents a very clear picture of what needs to be done to restore this pipe to a pristine and smokable condition. I really cannot thank Abha, my wife, enough for all the help and support that she extends me in my pursuance of this hobby. A clean pipe also helps in clearly identifying the work that would be required to restore a pipe. The pictures shows the condition of the pipe when it reached me after being cleaned. The chamber stills has the strong old odor and would need further intrusive methods to address this issue. The walls are solid without any signs of damage. The inward curving wide rim top surface has a flat smooth ring towards the chamber. The flat inner rim edge is slightly darkened towards the front and left of the stummel and would need to be addressed. The rounded outer rim surface is in perfect condition but shows signs of overzealous cleaning by Abha to remove the overflow of lava from the right and extending to the back side of the rim top. I am amazed at the cavernous size of the chamber. The stummel surface is sans any fills or flaws. A nice polish and the beautiful grains will pop out and will be on display in all their glory. The stummel has lost its old stain and further sanding followed with micromesh pad polishing will further bring out the natural finish of the bowl. Whether to stain it to accentuate the grains or to let it be, I shall decide once the micromesh cycle is complete. I think as the pipe is smoked, over a period of time, the briar will take on some nice dark coloration and patina. I am really looking forward to see the stummel after polish. The mortise and shank internals are also nice and clean now. The seating of the stem tenon in to the mortise is snug and flush with the shank end. The oxidation on the vulcanite stem has been removed, thanks to all the efforts put in by Abha. The slot and stem internals are all clean and fresh. The deeper tooth indentations on the upper and lower surface and on the upper button edge are now clearly visible. I intend to first raise these indentations to the surface by heating and sanding followed, if necessary, by filling it with a mix of activated charcoal and superglue. A bit of sanding to remove the deeper oxidation followed by micromesh polishing cycle should add a nice shine to the stem. THE PROCESS
Firstly, I heat the surface of the stem with the flame of a lighter to raise the tooth indentations to the surface and follow it up with a sanding with a piece of folded 220 grit sand paper. This helps to even out the raised surface, address minor tooth chatter and also remove the deep seated oxidation. I wiped the stem with a cotton swab and alcohol to remove the raised oxidation and the resulting sanding dust. The tooth indentations, though greatly reduced, are still prominent. I need to address this issue. I mix a small quantity of activated charcoal and CA superglue and spot apply it over the visible bite marks. I set the stem aside for the fill to cure overnight. If I had black CA superglue, that is what I would have used in this instance. Next, I start by sanding the entire stummel surface, including the rim top, with a piece of 220 grit sand paper. I also work the inner rim edge with the sandpaper to remove the darkened briar and even out the rim edge. This sanding helps in addressing all the minor dents, if any, from the surface while providing a smooth surface for the next stage which is polishing cycle using complete set of micromesh pads. I was especially very careful while sanding the bottom of the shank around the stampings, as it is very easy to miss out the stamp and one swipe of the sand paper is enough to ruin/ damage the stampings. Before I move to the next stage of polishing the stummel, I decided to address the issue of strong odor in the chamber. To eliminate the ghost smells from the pipe, I decided to treat it with salt and alcohol. I do not use Kosher salt as it is not readily available here and if available, it’s very expensive. I use cotton balls which is an at par substitute as I have realized over the last year or so. I draw out a wick from the cotton and along with a folded regular pipe cleaner; insert it in to the mortise and through the draught hole in the chamber. Thereafter, I pack the chamber with cotton balls to about quarter of an inch below the rim inner edge. I soak the cotton balls with isopropyl alcohol up to the brim. About half an hour later, the level of alcohol has gone down, having being absorbed by the cotton. I top it up once again and set it aside overnight. By next afternoon, the cotton and alcohol has drawn out all the remaining oils and tars from the chamber and mortise and the cotton and alcohol had fulfilled its intended task. I removed the cotton balls and ran pipe cleaners through the mortise to clean out all the loosened tars and gunk. The chamber now smells clean and fresh. I set the stummel to dry out naturally.While the chamber was soaking in the salt and alcohol bath, I worked the stem. The stem fills had cured and with a flat head needle file, I sand these fills to achieve a rough match. I further fine tuned the match by sanding the filled area with a folded piece of 220 grit sand paper pinched between my thumb and forefinger. I followed it up by sanding the entire stem surface using 400, 600, 800 grit sand papers and finally with a piece of 0000 grade steel wool. This serves to remove the deep seated oxidation and also reduces the sanding marks of the more abrasive sand papers. I also sharpened the button edges while sanding. I wiped the stem with a cotton swab and alcohol to remove all the oxidation and sanding dust from the surface. I applied a little Extra Virgin Olive oil over the stem and set it aside to be absorbed by the vulcanite. I followed up the sanding regime with micromesh polishing to bring a shine on the stem surface. Since my hand held rotary tool is out for repairs, I could not continue with my experimentation on use of Red Tripoli and White Diamond during the polishing regime. I wet sand the stem with 1500 to 12000 girt micromesh pads. I rub a small quantity of olive oil in to the stem surface to hydrate it and set it aside. The stem looks nice and shinning black.The stummel had dried out completely and I could now move ahead with polishing the stummel. To remove the sanding marks and bring a deeper shine, I polished the stummel with micromesh pads, wet sanding with 1500 to 12000 pads. I wiped the surface with a soft cloth at the end of the micromesh cycle. The stummel looks amazing with a deep shine and beautiful grains popping over the stummel surface. I shared pictures of the stummel at this stage in restoration with Abha for her opinion as to whether stain it in dark brown or otherwise. Prompt came the response to let it be. She really liked the patterns of grain and the look of the pipe. Also as the pipe is smoked, it will turn dark and develop a nice patina. So, natural finish to the stummel it is!! Next, I rub a small quantity of “Before and After Restoration Balm” in to the briar with my finger tips and let it rest for a few minutes. The balm almost immediately works its magic and the briar now has a nice vibrant appearance with the beautiful darkened grain patterns on full display. I further buff it with a horse hair shoe brush. Unfortunately I just missed out on taking pictures of the stummel at this point in restoration process. But it looks beautiful, I say!!

By the weekend, my rotary tool stabilizer came back after repairs and I could finally move ahead with finishing the pipe. To apply the finishing touches, I mount a cotton cloth buffing wheel on to my hand held rotary tool and apply a coat of Blue Diamond to the stummel and the stem to polish out the minor scratches. With a cotton buffing wheel that I use for carnauba wax, I apply a coat of carnauba wax and continue to work on it till the complete coat of wax had been polished out. I mount a clean cotton cloth buffing wheel and give the entire pipe a once over buff. I finished the restoration by giving the entire pipe a rigorous hand buffing using a microfiber cloth to raise the shine further. This is truly a beautifully crafted pipe with gorgeous grains all around and the feather weight coupled with a large bowl will surely provide a long and leisurely smoke allowing ample time to admire the construction and grains on this pipe. P.S. This pipe was earmarked not for addition to my personal collection but for sale. However, the beautiful grains, the exquisite carving and very light weight coupled with a large chamber for a long and peaceful smoke has me enticed to an extent that I have decided to add it to my rotation. Such is the beauty of this pipe. Now all that remains is to load this bowl with my favorite G.L. Pease Virginia blend and puff contentedly for some time!!

Thanks to all readers of Reborn pipes who have spared a moment of their invaluable time in reading through this write up and as is always, your suggestions and advice are always welcome as this would not only help me but  also help the new pursuers of this art.

Restoring a Barling & Sons # 4899, Made in Denmark


Blog by Paresh Deshpande

I had finished refurbishing a Barling Brandy bowl in a smooth finish and it has found a new piper to carry forward the legacy. The next pipe that I decided to work on is a lovely Brandy bowl shaped Barling pipe in a sandblast finish which was purchased together with the smooth finish that I have mentioned above. The pipe boasts of shallow blasts on the stummel with beautiful patterns. The pipe is stamped on the surface at the bottom of the shank as “B.BARLINGS & SONS” in block capitals over “MADE IN DENMARK” over shape code numeral “4899”. The top of the saddle stem has the trademark BARLING in a cross stem logo. The stampings are all deep and crisp.Having just recently worked on a Barling pipe that bore the COM stamp of Denmark, I was aware of the provenance of this pipe. I reproduce the relevant part of the information gleaned from pipedia.org.

In the late 1970’s production of Barling pipes was shifted to Denmark where Eric Nording manufactured Barling pipes for Imperial. There may have been other factories, but as of this writing, none has been identified. Nording stated that he made approximately 100.000 pipes for Imperial.

Despite these attempts to diversify the line, Barling lost its market. These pipes just weren’t equivalent to the family era pipes.
Finally, Imperial decided to close down the Barling operations entirely by 1980.

Thus from the above, it is safely concluded that the pipe currently on my work table is from the period between late 1970’s to 1980 and given the quality of sandblast, most likely manufactured by other factories in Denmark!!

INITIAL VISUAL INSPECTION
The pipe came to us in a very nice condition having being smoked maybe only a few times. It was lightly smoked and with a thin layer of cake build up in the chamber. The rim top is covered in a minimal overflow of lava with inner and outer rim edges in pristine condition. The chamber has minimum odor and should be addressed once the chamber and shank internals are cleaned up. A simple scrub with a brass bristled brush should suffice to clean the rim top surface.The sandblasted stummel surface has a shallow sandblast with beautiful patterns of mix of Bird’s eye, cross grains and nice swirls to the sides, front and bottom of the bowl respectively. The front of the stummel has a deep pit, likely caused during the sandblasting process where the soft briar was chipped off by the sand particles. The stummel surface is stained black and has a dark lacquer coat that has dulled a bit. The mortise is relatively clean with an easy draw. Running a few pipe cleaners dipped in alcohol should clean up the shank internals. The straight vulcanite saddle stem gradually flares out towards the slot end and is deeply oxidized. Thankfully the stem surface is free of any bite marks or tooth chatter on either surface in the bite zone. The insides of the slot and tenon have very little signs of accumulated gunk. The crossed Barling logo on the saddle top of the stem is crisp and deep.INITIAL CLEANING BY ABHA…
The initial cleaning on this pipe was done by Abha, my wife (she has cleaned up around 40-50 pipes and these have now reached me for further restoration). She reamed out the complete cake and further smoothed out the chamber walls with a folded piece of 220 grit sand paper. She further cleaned out the internals of the shank with pipe cleaners and alcohol and cotton buds. She followed the internal cleaning of the shank with external cleaning of the stummel using Murphy’s Oil soap and hard bristled tooth brush and dried it with paper napkins and cotton cloth.

Next she cleaned out the internals of the stem air way and immersed it in “Before and After Deoxidizer” solution along with the stem of other pipes in line for restoration. Once the stem had soaked overnight, she cleaned the stem under running warm water and scrubbed the raised oxidation from the stem surface using Scotch Brite pad. She further removed the oxidation by scrubbing the stem with 0000 grade steel wool and applied a little olive oil to rehydrate the stem.

ONCE THE PIPE IS ON MY WORK TABLE…
I cannot thank my wife, Abha, enough for all the help and support that she extends me in my pursuance of this hobby. With the initial pipe cleaning at her hands, allows me to move at a nice click with my restoration and repair work on the pipes.

The chamber is odorless and the walls are solid without any signs of damage. The sandblasted rim top surface is intact with an equally undamaged inner and outer rim edge. The chamber and rim top has been nicely cleaned up by Abha. With a draught hole right at the bottom and dead center, this should be a fantastic smoker!! Even though most of the lacquer coat was removed when the stummel was cleaned up by Abha, I could still see remnants of the peeling lacquer coat over some parts of the stummel and the stain has been washed away at a two places. I shall have to remove this coat and thereafter decide on my further course of action. The mortise and shank internals are clean and fresh. This should turn out to be an easy project requiring just a rub down with restoration balm followed by wax polish to bring life back in to the stummel. The oxidation on the vulcanite stem has been greatly reduced thanks to all the efforts put in by Abha. A bit of sanding to remove the deeper oxidation followed by micromesh polishing cycle should add a nice shine to the stem. The stem internals are nice and clean with a free airflow. I would need to refresh the stem logo to make it pop out on the shining black stem once done.THE PROCESS
The first thing I addressed was the lacquer coating that remained on the stummel surface. I wiped the stummel surface with cotton swabs and alcohol. However, the coating persisted. Next I decided to use a stronger solvent. With cotton swabs and acetone, I cleaned the stummel surface. I was able to remove the lacquer coating completely from the surface.Next, I rub a small quantity of “Before and After Restoration Balm” in to the briar with my finger tips and let it rest for a few minutes. The balm almost immediately works its magic and the briar now has a nice vibrant appearance. However, I noticed that my finger tips had blackened with stain which was coming off. I thought that I would let it rest and dry out and thereafter check again. A couple of hours later, I wiped the stummel with a soft cotton cloth and to my chagrin, I noticed that the cloth had blackened at the spots which had come in contact with the stummel surface and the stain had come off from the surface too. I decided to heat the stummel surface with a heat gun and reset the stain. Should this trick fail, I had made up my mind to go the “full Monty” way. I would completely remove the old stain and apply a fresh coat of stain and the works!! And this was supposed to be a simple restoration!!I heat the stummel surface with my heat gun and set it aside to cool down naturally. Half an hour later, the stummel had cooled and I reapplied the “Before and After Restoration Balm”. This time there were no blackened finger tips. What a relief this revelation was!! Now that the stummel was nearly complete, I turned my attention to the stem refurbishing. With a folded piece of a 220 grit sand paper, I sand down the stem surface. I followed it up by sanding it with 400, 600, 800 grit sand papers and finally with a piece of 0000 grade steel wool. This serves to remove the deep seated oxidation and also reduces the sanding marks of the more abrasive sand papers. I wiped the stem with a cotton swab and alcohol to remove all the oxidation and sanding dust from the surface. I applied a little Extra Virgin Olive oil over the stem and set it aside to be absorbed by the vulcanite.I followed up the sanding regime with micromesh polishing to bring a shine on the stem surface. I wet sand the stem with 1500 to 12000 girt micromesh pads. This time around I could not continue with my experimentation that I had spelled out in my previous posts, as due to voltage fluctuations, my hand held rotary tool stabilizer had a burn out and had to be sent for repairs. I rub a small quantity of olive oil in to the stem surface to hydrate it and set it aside.The stem looks nice and shinning black, however, the stem logo is yet to be refreshed and highlighted. With a white fine tipped correction pen, I filled the crossed Barling stamping and once it had dried a bit, with a toothpick, I scrapped off excess of the correction ink. The stamping is now completely refreshed and sits proudly on the top of the saddle.With three pipes on the home stretch and a week long wait later, my rotary tool came back from repairs. I was held up just for this piece of equipment!! To apply the finishing touches, I mount a cotton cloth buffing wheel on to my hand held rotary tool and apply a coat of Blue Diamond to the stummel and the stem to polish out the minor scratches. With a cotton buffing wheel that I use for carnauba wax, I apply a coat of carnauba wax and continue to work on it till the complete coat of wax had been polished out. I mount a clean cotton cloth buffing wheel and give the entire pipe a once over buff. I finished the restoration by giving the entire pipe a rigorous hand buffing using a microfiber cloth to raise the shine further. The finished pipe looks beautiful and is waiting for a new home!!

A Simple Restoration of a BBB “Natural Grain” # 11


Blog by Paresh Deshpande

My pipe cleaning factory back home is churning out pipes galore and these cleaned pipes once they reach me are being liked by people who see them and sales are also improving, though restricted only to local customer, yes, you read it right, without an ‘s’, as only one colleague has been motivated to take up enjoying a pipe!! I am sure more will follow. Those readers who have been following my work on rebornpipes.com are well aware that here in India, pipe smoking culture died its natural death in 1970’s when old pipe shops and tobacconists were pushed out of business by cigarette manufacturers and people got used to the convenience of a ready-to-smoke cigarette. And to add to our woes, there is a ban on importing tobacco!! Well, wish me luck that I am able to revive this culture back here again…

Well, the fourth pipe selected by my colleague from the heap of cleaned up pipes that Abha had sent me, is a well-made British pipe. It’s a classic straight Billiards with tapered stem BBB pipe in a smooth finish. It has nice Bird’s eye grain on either sides of the stummel with tightly packed cross grains to the front, back and on the shank. The pipe is stamped on the left of the shank as “BBB” in a diamond box, in block letters over “NATURAL GRAIN” split on either side of the diamond box. On the right of the shank, close to the bowl end it is stamped with the numeral “11” probably a shape code. The tapered vulcanite stem with an aluminum stinger has the trademark stamp of BBB in a diamond box. However, the stem logo is not a brass logo, pointing to the later/ newer era pipe. The COM stamp is conspicuous by its absence. The stampings are all crisp and prominent. Having a few BBB pipes in my personal collection that once belonged to my grandfather and having a few friends like Steve and Victor Naddeo who collect BBB pipes, the information readily available was sufficient to date this pipe. From discussions with these stalwarts and comparing it with BBBs from my inheritance, it is evident that this pipe is definitely from a newer era, probably 1980s, the dead giveaway being the lack of brass diamond roundel for the stem logo, presence of an aluminum stinger and the grading of Natural Grain!!

With this information, I move ahead with my initial visual inspection.

INITIAL VISUAL INSPECTION
The pipe came to us in a very decent state, to say the least. It was only smoked a couple of times and a thin even layer of cake build up is observed in the chamber. The rim top is covered in places with specs of overflow of lava. Otherwise, the rim top surface and both inner and outer rim edges are in pristine condition.The smooth stummel surface has beautiful Bird’s eye grain patterns on either sides of the stummel with beautiful densely packed cross grains on the front, back and the shank. The bottom surface of the stummel is flattened, making it a sitter. The stummel surface has a natural finish of the briar and the grains should pop out after a nice polish. The mortise with shank internals is relatively clean and the chamber is odorless. The draught hole is at the bottom center and should be a great smoker!! Reclaiming this piece of briar should be an easy chore. The tapered vulcanite stem is clean with very little signs of oxidation seen in the bite zone on either surfaces of the stem. The tenon end along with the detachable aluminum stinger is also clean. The slot does not show any signs of accumulated dried gunk. Air flow through the stem air way is full and free. A couple of pipe cleaners dipped in isopropyl alcohol should freshen up the stem internals.INITIAL CLEANING BY ABHA…
The initial cleaning on this pipe was done by Abha, my wife (she has cleaned up around 40-50 pipes and these have now reached me for further restoration). She reamed out the complete cake and further smoothed out the chamber walls with a folded piece of 220 grit sand paper. She further cleaned out the internals of the shank with pipe cleaners and alcohol and cotton buds. She followed the internal cleaning of the shank with external cleaning of the stummel using Murphy’s Oil soap and hard bristled tooth brush and dried it with paper napkins and cotton cloth.

Next she cleaned out the internals of the stem air way and immersed it in “Before and After Deoxidizer” solution along with the stem of other pipes in line for restoration. Once the stem had soaked overnight, she cleaned the stem under running warm water and scrubbed the raised oxidation from the stem surface using Scotch Brite pad. She further removed the oxidation by scrubbing the stem with 0000 grade steel wool and applied a little olive oil to rehydrate the stem.

ONCE THE PIPE IS ON MY WORK TABLE……
The cleaned up pipes presents a very clear picture of what needs to be done to restore this pipe to a pristine and smokable condition. I really cannot thank Abha, my wife, enough for all the help and support that she extends me in my pursuance of this hobby. A clean pipe also helps in clearly identifying the work that would be required to restore a pipe. The pictures shows the condition of the pipe when it reached me after being cleaned. The chamber is odorless and the walls are solid without any signs of damage. The smooth rim top surface and the inner and outer rim edge are in perfect condition. The mortise and shank internals are also nice and clean now. The seating of the stem tenon into the mortise is snug and sits flush with the shank end. I had noticed a darkened spot on the right side of the shank near and below the stamped numeral 11 (marked in yellow arrow). On close scrutiny, I feel that this spot is not a fill but a minor flaw in the briar since a gentle probing with a sharp dental tool revealed a solid surface. I have decided to let it be. The rest of the stummel surface is sans any fills or flaws. A nice polish and the beautiful grains will pop out and will be on display in all their glory. As the stamping suggests, this is a pipe with natural finish to the briar and I have no intentions to change this!!! I think as the pipe is smoked, over a period of time, the briar will take on some nice dark coloration and patina. I am really looking forward to see the stummel after polish. The oxidation on the vulcanite stem has been removed, thanks to all the efforts put in by Abha. The slot and stem internals are all clean and fresh. The aluminum stinger too is nice and clean. A bit of sanding to remove the deeper oxidation followed by micromesh polishing cycle should add a nice shine to the stem. THE PROCESS
I start this restoration by sanding the entire stummel surface, including the rim top, with a piece of 220 grit sand paper. This helps in addressing all the minor dents, if any, from the surface while providing a smooth surface for the next stage which is polishing cycle using complete set of micromesh pads. To remove the sanding marks and bring a deeper shine, I polished the stummel with micromesh pads, wet sanding with 1500 to 12000 pads. I wiped the surface with a soft cloth at the end of the micromesh cycle. The stummel looks amazing with a deep shine and beautiful grains popping over the stummel surface. I showed the stummel to the new owner and discussed if he wanted me to stain the stummel or preferred it the way it appeared at this stage. I took this opportunity to explain to him that the stummel would darken as he smoked taking on a beautiful dark patina with time and usage. He liked the pipe without stain and thankfully, that’s how it shall remain. Next, I rub a small quantity of “Before and After Restoration Balm” in to the briar with my finger tips and let it rest for a few minutes. The balm almost immediately works its magic and the briar now has a nice vibrant appearance with the beautiful darkened grain patterns on full display. I further buff it with a horse hair shoe brush. Now that the stummel was nearly complete, I turned my attention to the stem. Since there was no damage to the stem and Abha had done a wonderful job of removing the oxidation from the stem surface, I straight up proceed with sanding the stem surface using 400, 600, 800, 1000 grit sand papers and finally with a piece of 0000 grade steel wool and also sharpened the button edges while sanding. This serves to remove the deep seated oxidation and also reduces the sanding marks of the more abrasive sand papers. I wiped the stem with a cotton swab and alcohol to remove all the oxidation and sanding dust from the surface. I applied a little Extra Virgin Olive oil over the stem and set it aside to be absorbed by the vulcanite.I followed up the sanding regime with micromesh polishing to bring a shine on the stem surface. I wet sand the stem with 1500 to 2400 girt micromesh pads. Continuing with my experimentations that I had spelled out in my previous posts, I mount a cotton buffing wheel on my hand held rotary tool and polish the stem with Red Rouge polish as I had read that this polish has grit between 2400 to 3200 grit pads of the micromesh pads. Further, I mount a fresh buffing wheel on the rotary tool and polish the stem with White Diamond polish as it has grit equivalent to 3800- 4000 of micromesh pads. I finish the stem polish by wet sanding with 6000 to 12000 grit pads of the micromesh. I rub a small quantity of olive oil in to the stem surface to hydrate it and set it aside. The stem looks nice and shinning black. I am really happy with this process of stem polishing as the results are excellent while saving me huge amounts of time and effort. To apply the finishing touches, I mount a cotton cloth buffing wheel on to my hand held rotary tool and apply a coat of Blue Diamond to the stummel and the stem to polish out the minor scratches. With a cotton buffing wheel that I use for carnauba wax, I apply a coat of carnauba wax and continue to work on it till the complete coat of wax had been polished out. I mount a clean cotton cloth buffing wheel and give the entire pipe a once over buff. I finished the restoration by giving the entire pipe a rigorous hand buffing using a microfiber cloth to raise the shine further. The finished pipe looks beautiful and is ready to be handed over to the new piper. Hope he enjoys his leisure time with this beautiful and gorgeous looking pipe, smoking his favorite tobacco!! P.S. This is the last of the four pipes that was selected by this gentleman to carry forward the trust posed in the pipe by the previous piper and I am sure that this pipe will provide the new piper many years of happy smokes and will remind him of our association. This was also the most difficult of all the four pipes to let go!! Such is the beauty of this pipe.

Thanks to all readers of Reborn pipes who have spared a moment of their invaluable time in reading through this write up and as is always, your suggestions and advice are always welcome as this would not only help me but also help the new pursuers of this art.

A Fresh Lease on Life for a Barling T.V.F # 911, Made in Denmark


Blog by Paresh Deshpande

My pipe cleaning factory back home is churning out pipes galore and these cleaned pipes once they reach me are being liked by people who see them and sales are also improving, though restricted only to local customer, yes, you read it right, without an ‘s’, as only one colleague has been motivated to take up enjoying a pipe!! I am sure more will follow. Those readers who have been following my work on rebornpipes.com are well aware that here in India, pipe smoking culture died its natural death in 1970’s when old pipe shops and tobacconists were pushed out of business by cigarette manufacturers and people got used to the convenience of a ready-to-smoke cigarette. And to add to our woes, there is a ban on importing tobacco!! Well, wish me luck that I am able to revive this culture back here again…

The next pipe that I decided to work on, well not exactly by choice but out of economic considerations, is a lovely Brandy bowl shaped Barling’s Make pipe in a smooth finish. Through all the dark hues of Oxblood (not sure its Oxblood or Cordovan, as I have used neither in person) and darkened lacquer coat, beautiful mixed grains can be seen all around the stummel. The pipe is stamped on the left of the shank as Barlingin cursive hand over “MAKE” over “INTERNATIONAL” in block letters. On the right of the shank, close to the shank end it is stamped as “T.V.F.” followed by the shape code (???) “# 911” over “MADE IN DENMARK”. The stampings are all crisp and prominent.I had previously worked on a couple of Barling pipes from my inherited pipe collection; here are the links to both the write up,  https://rebornpipes.com/2019/03/26/a-simple-restoration-of-an-early-transition-era-barling-2639/, https://rebornpipes.com/2018/12/10/decking-out-my-grandfathers-battered-pre-transition-barling-1354/   and had researched this brand then. To refresh my memory, I revisited the write ups and also pipedia.org. Here is an interesting excerpt from pipedia.org……

https://pipedia.org/wiki/Barling

In the late 1970’s production of Barling pipes was shifted to Denmark where Eric Nording manufactured Barling pipes for Imperial. There may have been other factories, but as of this writing, none has been identified. Nording stated that he made approximately 100.000 pipes for Imperial.

Despite these attempts to diversify the line, Barling lost its market. These pipes just weren’t equivalent to the family era pipes. Finally, Imperial decided to close down the Barling operations entirely by 1980.

Thus from the above snippets of information, it is safely concluded that the pipe currently on my work table is from the period between late 1970’s to 1980 and most likely carved by master craftsman Eric Nording!!

INITIAL VISUAL INSPECTION
The pipe came to us in a very sorry state, to say the least. It was heavily smoked and a thick layer of cake build up is observed in the chamber. The thin rim top is covered in the thick overflow of lava and is severely damaged due to the repeated hammering it must have received at the hands of the previous owner to remove the dottle. This will need to be worked on.The smooth stummel surface has beautiful grain patterns with a mix of Bird’s eye, cross grains and nice swirls. The stummel surface has a dark lacquer coat that has dulled a bit and appears lifeless due to accumulation of dust and dirt and peeling of the lacquer coating in patches. The mortise is clogged with accumulation of oils and tars making the draw laborious. The straight, broad vulcanite saddle stem is deeply oxidized with bite marks and tooth chatter on either surface in the bite zone. The insides of the slot and tenon have signs of accumulated gunk. The crossed Barling logo on the saddle top of the stem is crisp and deep.INITIAL CLEANING BY ABHA…

The initial cleaning on this pipe was done by Abha, my wife (she has cleaned up around 40-50 pipes and these have now reached me for further restoration). She reamed out the complete cake and further smoothed out the chamber walls with a folded piece of 220 grit sand paper. She further cleaned out the internals of the shank with pipe cleaners and alcohol and cotton buds. She followed the internal cleaning of the shank with external cleaning of the stummel using Murphy’s Oil soap and hard bristled tooth brush and dried it with paper napkins and cotton cloth.

Next she cleaned out the internals of the stem air way and immersed it in “Before and After Deoxidizer” solution along with the stem of other pipes in line for restoration. Once the stem had soaked overnight, she cleaned the stem under running warm water and scrubbed the raised oxidation from the stem surface using Scotch Brite pad. She further removed the oxidation by scrubbing the stem with 0000 grade steel wool and applied a little olive oil to rehydrate the stem.

ONCE THE PIPE IS ON MY WORK TABLE…
The cleaned up pipes presents a very clear picture of what needs to be done to restore this pipe to a pristine and smokable condition. I really cannot thank Abha, my wife, enough for all the help and support that she extends me in my pursuance of this hobby. I proceed to carry out my appreciation of the work that needs to be done on this pipe to restore it.

The chamber is odorless and the walls are solid without any signs of damage. The smooth and thin rim top surface is where all the action is on this pipe with an equally damaged inner and outer rim edge. The front and back of the outer rim edges and top surface has signs of charring. This should be addressed to some extent when I top the rim surface. The mortise and shank internals are nice and clean. Even though most of the lacquer coat was removed when the stummel was cleaned up by Abha, I could still see remnants of the peeling lacquer coat over some parts of the stummel. I shall have to remove this coat and thereafter decide on staining the stummel or otherwise. The stummel surface is sans any fills; however, the left side surface has some damage in the form of dents and dings, probably caused due rough handling of the pipe by the previous owner. The oxidation on the vulcanite stem has been greatly reduced thanks to all the efforts put in by Abha, clearly defining the deeper bite marks and the damage to the button edges on both surfaces of the stem. These tooth marks would be required to be filled with a mix of activated charcoal and superglue. A bit of sanding to match the fill and remove the deeper oxidation followed by micromesh polishing cycle should add a nice shine to the stem.THE PROCESS
The first issue I addressed was that of the stem repairs as this would take the maximum of my time to clean, repair and spruce up the stem. I flamed the damaged button edge and the tooth indentations with the flame of a lighter. This helps the vulcanite to rise to the surface as it has an inherent property to regain its original shape when heated. I sand the stem with a folded piece of 220 grit sandpaper to even out the raised stem surface and address the minor tooth chatter. I mixed superglue and activated charcoal powder and diligently applied it over the deeper tooth indentations in the bite zone on lower stem surface and over the button edge on the upper stem surface and set it aside to cure. With the stem fill set aside to cure, I decided to address the issues on the stummel surface. I start by steaming out the dents and dings from the left side of the stummel. I heated my fabricated knife over a candle flame till hot. I spread a wet Turkish hand towel over the dents and dings on the stummel and placed the heated knife over the hand towel. The resulting sizzle produces steam which in turn expands the briar and evens out the dents. The results are exactly as I wanted them to be.The next stummel issue to be addressed was that of the rim top surface damage. I topped the rim on a piece of 220 grit sand paper, checking frequently till I was satisfied that the charred surface was addressed to a great extent and the rim top surface is nice, smooth and even. The inner edge is still uneven, though much better than before topping, and shall be addressed subsequently.Close observation of the rim top surface revealed remnants of charred inner rim edge on the right side and below it on the same side, a briar flaw (all encircled in red). This flaw, when polished would stand out like a sore thumb and hence I decided to address this by topping the rim top further. A few careful rotations of the rim top on a piece of 220 grit sandpaper and the issue of briar flaw was completely addressed and the charred inner rim edge was further reduced. The rim top looks significantly better at this stage. With a folded piece of a 220 grit sand paper pinched between my thumb and forefinger, I created a slight bevel on the inner edge of the rim top surface. This helped to mask and address the minor charred marks that had remained on the inner rim edge. Continuing with my work on the stummel, I sand the entire stummel surface with a piece of 220 grit sand paper. This helped to address all the minor dents from the surface and removed what little lacquer coating that had remained, while providing a smooth surface for the next stage of micromesh polishing cycle. To remove the sanding marks and bring a deeper shine, I polished the stummel with micromesh pads, wet sanding with 1500 to 12000 pads. I wiped the surface with a soft cloth at the end of the micromesh cycle. The stummel looks amazing with a deep dark shine and beautiful grains all around. I showed the stummel to the new owner and discussed if he wanted me to stain the stummel or preferred it the way it appeared at this stage. I took this opportunity to explain him that the stummel would darken further as I finished with the polishing regime. He liked the pipe without stain and that’s how it shall remain. As a result of all the topping and subsequent polishing, the rim top surface had a lighter hue as compared to the rest of the stummel surface. I matched the rim top surface with the rest of the stummel by staining the surface with a dark brown stain pen. I set it aside for the stain to cure and once I was satisfied, I wiped it with a microfiber cloth. The rim top is now perfectly matched with the rest of the stummel dark coloration. I am very pleased with the blend.Next, I rub a small quantity of “Before and After Restoration Balm” in to the briar with my finger tips and let it rest for a few minutes. The balm almost immediately works its magic and the briar now has a nice vibrant appearance with the beautiful darkened grain patterns on full display. I further buff it with a horse hair shoe brush. Now that the stummel was nearly complete, I turned my attention to the stem repairs. The stem fills had cured completely by this time. With a folded piece of a 220 grit sand paper, I sand down the fills to achieve a rough match with the rest of the stem surface. I followed it up by sanding it with 400, 600, 800 grit sand papers and finally with a piece of 0000 grade steel wool. This serves to achieve a perfect blend of the fills with the rest of the stem surface, remove the deep seated oxidation and also reduces the sanding marks of the more abrasive sand papers. I wiped the stem with a cotton swab and alcohol to remove all the oxidation and sanding dust from the surface. I applied a little Extra Virgin Olive oil over the stem and set it aside to be absorbed by the vulcanite.I followed up the sanding regime with micromesh polishing to bring a shine on the stem surface. I wet sand the stem with 1500 to 2400 girt micromesh pads. Continuing with my experimentation that I had spelled out in my previous posts, I mount a cotton buffing wheel on my hand held rotary tool and polish the stem with Red Rouge polish as I had read that this polish has grit between 2400 to 3200 grit pads of the micromesh pads. Further, I mount a fresh buffing wheel on the rotary tool and polish the stem with White Diamond polish as it has grit equivalent to 3800- 4000 of micromesh pads. I finish the stem polish by wet sanding with 6000 to 12000 grit pads of the micromesh. I rub a small quantity of olive oil in to the stem surface to hydrate it and set it aside. I am really happy with this process of stem polishing as the results are excellent while saving me huge amounts of time and effort. The stem looks nice and shinning black, but there was something that I felt I had missed out. I realized that the stem logo is yet to be refreshed and highlighted. With a white fine tipped correction pen, I filled the crossed Barlings stamping and once it had dried a bit, with a toothpick, I scrapped off excess of the correction ink. The stamping is now completely refreshed and sits proudly on the top of the saddle.To apply the finishing touches, I mount a cotton cloth buffing wheel on to my hand held rotary tool and apply a coat of Blue Diamond to the stummel and the stem to polish out the minor scratches. With a cotton buffing wheel that I use for carnauba wax, I apply a coat of carnauba wax and continue to work on it till the complete coat of wax had been polished out. I mount a clean cotton cloth buffing wheel and give the entire pipe a once over buff. I finished the restoration by giving the entire pipe a rigorous hand buffing using a microfiber cloth to raise the shine further. The finished pipe looks beautiful and is ready to be handed over to the new piper. Hope he enjoys his leisure time with this beautiful and gorgeous looking pipe, smoking his favorite tobacco!! P.S. This is the third pipe that was selected by this gentleman to carry forward the trust posed in the pipe by the previous piper and I am sure that this pipe will provide the new piper many years of happy smokes and will remind him of our association. There is one more pipe which he has selected that I need to work on before I can get back to my choice of pipes to work on!!

I can never thank Abha, my wife, enough who not only supports my hobby of pipe restoration, but actively helps in this work by doing all the dirty work of initial cleaning and providing me a clean platform to work further. It is her work that helps potential buyers to select a pipe for themselves.

Thanks to all readers of Reborn pipes who have spared a moment of their invaluable time in reading through this write up and as is always, your suggestions and advice on my experimentation is always welcome as this would also help the new pursuers of this art.


Restoring the Third Custombilt from My Inheritance


Blog by Paresh Deshpande

This is the third Custombilt pipe that I had brought to my place of work from my grandfather’s collection which I had inherited. I had professed my appreciation and liking for old Custom-Bilt pipes for their large size, shape, hand feel and the rustic looks. However, this one seems to be a Custombilt from a later era which is a surprise for me, more of it when I further research about it.

The Custombilt pipe that is now on my work table is a large Bull moose shaped pipe with a ¾ bent stem, having well defined large vertical rustications with very fine, thin horizontal linear rustications in between. This is a beautifully carved pipe with a classic shape and a thick shank. The stummel is distinctly divided in to two halves by two evenly spaced rings. The cap half is smooth while the lower stummel surface proudly displays the worm rustications. The large smooth rim top surface boasts of some beautiful bird’s eye grains. The worm rustications on this beauty are unlike the large scraggy ones seen on the Custom-Bilt Pot shaped and large Billiard pipes that I had restored in the last few days. The ones on this pipe are more evenly carved and evenly spaced. There is strip of smooth surface at the bottom extending from the shank to the foot of the stummel. The worm rustications extend from the side of this smooth surface on either sides and to the front of the stummel. It is indeed a beautiful looking pipe with a fantastic feel in the hand, beauty of which cannot be justified in words. It is stamped on the left side of the shank as “Custombilt” without a hyphen between the two words, in cursive hand over “IMPORTED BRIAR”, a commonly observed stamp on these pipes. There is no other stamping visible either on the stummel or the stem.To date having worked on 5 or 6 Custombilt pipes and researched each of them, I have a fair idea about dating these pipes based on the stampings seen on them. However, as is always said and emphasized in our pipe community, the mysteries about pipes never end!! The stampings on this pipe has proved this and how! In the cursive Custombilt stamping seen on this pipe, the lower part of C meets, no, originates from the top of the U while the upper portion extends to the left side of the cross of t, the horizontal cross itself barely reaching the next letter o!!

On pipedia.org, there is a brief description of the various stampings as researched by William E. Unger, Jr., PhD, which deals with the study of Custom-Bilt pipes, here is the link to the review of this book (https://pipedia.org/wiki/Custom-Bilt#Other_Comments).

There are three stamps which are shown and serve as a teaser for dating these Custombilt pipes (for more researched examples of stampings, you might consider purchase of a copy of your own!!). Well as of now, I don’t have one and if any one of the reader does, it is requested that the necessary information may please be shared with readers of rebornpipes.com, so that we all could learn and grow together.

With this unresolved mystery as regards dating this pipe (I think it is from later era of Custombilt pipes, even later than the Wally Frank era, but not sure!), I move ahead with my initial inspection.

INITIAL VISUAL INSPECTION
The chamber has a thick and even layer of cake. The condition of the inner walls of the chamber can be determined only after the cake has been completely reamed out down to the bare briar. The draught hole is dead center and at the bottom of the chamber. This should be a fantastic smoker. The slightly outward sloping smooth rim top surface has several minor dents and dings and has darkened surface on the right side. The inner edge of the rim has one bigger and many minor chips all around. This issue should be easily addressed by sanding down with a sand paper. The cap rings are in decent condition with just a couple of small chips towards the left and back of the stummel. As these chips are visible only on very close inspection and affects neither the aesthetics nor the smoking character of this pipe, I might as well let them be.The smooth bottomed stummel feels solid to the touch and makes for a nice fit in the hands of the smoker. The vertical worm rustication with its horizontal thin line rustications within makes for a visual treat. The stummel surface is relatively clean and without any dents, dings or chipped surfaces. The shank end has smooth surfaces on the sides and on top and bottom of the shank. These should polish up nicely and lend a distinct character to the pipe. The upper smooth half of the stummel including the rim top surface has some beautiful straight and bird’s eye grain respectively. This should turn out to be a beautiful and attractive looking pipe, I am sure. The mortise and the shank are clogged with accumulated dried oils, tars and grime and dirt. The draught hole too is constricted due to this accumulation (marked in yellow arrow). The draw is slightly hard and laborious and should ease out once the shank internals are cleaned out.The ¼ bent vulcanite stem is nice and thick at the tenon end and tapers slightly towards the button end. The stem is heavily oxidized in the bite zone due to use of a rubber bit, with heavy tooth chatter on either surfaces of the stem. The button edges including button surfaces are also damaged due to bite marks. The slot and tenon are also covered in dried oils and tars. The stem internals are clogged and would need a thorough cleaning up. THE PROCESS
I started the restoration of this beautiful pipe by first reaming the chamber with size 3 followed by size 4 head of the PipNet pipe reamer. The amount of cake dislodged from the chamber points to the fact that this would have been a favorite of my Grandfather!! With my fabricated knife, I removed the cake from areas where the reamer head could not reach. I followed this reaming with sanding the chamber walls with a folded piece of 220 grit sand paper to completely remove any residual cake. This also helps to smooth the walls of the chamber. I wiped the chamber with a cotton swab and alcohol to get rid of all the carbon dust and expose the bare briar of the chamber. The walls are solid and in good condition. However, the area around the draught hole is slightly charred and a few minor heat lines are visible around it. The heat lines seen around the draught hole are superficial and I address them by further sanding with a folded piece of 220 grit sand paper. I also removed the charred briar around the draught hole by scrapping it with my fabricated knife and the drilling attachment of a Kleen Ream tool. The chamber is now clean and all the issues are addressed to my satisfaction.I followed up the cleaning of the chamber with that of the shank internals. With a dental spatula, I first scrapped out all the accumulated dried crud and cleaned the mortise. The dried gunk so hard and tightly packed that I also had to use a round needle file to dislodge the gunk from within the air way. Using hard and regular pipe cleaners and alcohol, I cleaned the shank internals and the airway. A number of pipe cleaners later, the shank internals are clean and the draw is nice, smooth and even.The internal cleaning was followed by external cleaning of the stummel surface using Murphy’s Oil soap and a hard bristled tooth brush. I also used a brass wired brush to diligently clean out all the dirt and grime from within the worm rustications. With a shank brush and dish washing soap, I thoroughly cleaned the shank internals and the mortise. I dried the bowl with paper napkins and soft cotton cloth. With the stummel set aside to dry out naturally, it was time to move ahead with the stem restoration. I cleaned the stem internals with pipe cleaners and alcohol. With the sharp flat end of a dental tool, I scrubbed the dried out oils and tars from the slot area and also from the tenon end of the stem that seats in the mortise. I cleaned the stem surface with a cotton swab and alcohol.I flamed the bite zone with the flame of a lighter. The heating of the vulcanite raised the tooth chatter to the surface and I followed it with a light sanding with a piece of 220 grit sand paper to even out the surface around the bite zone. Using a flat head needle file, I reshaped and sharpened the button and button edges. This was followed by sanding the entire stem surface with 400 followed by 600, 800 and 1000 grit sand papers to remove the oxidation. I finished the sanding with a 0000 grade steel wool. Using progressively higher grit sand papers helps in a smooth surface while minimizing the sanding marks left behind by the more abrasive sanding papers. I wiped the stem with a small amount of Extra Virgin Olive oil and set it aside to be absorbed by the stem surface. With the stem being set aside to hydrate, I move back to the stummel and sand the smooth rim top surface with a piece of folded 220 grit sand paper. This step took care of the dents and dings on the surface. I also worked the inner edge of the rim with the same piece of sand paper and evened out the numerous dings from the inner rim edge. I wiped the rim top with a moistened cotton swab to remove the resulting sanding dust. Most of the dents and dings on the rim top and edge were addressed thus. Subsequent micromesh polishing will further reduce what little dents and dings that remained. A few minor and insignificant dings that may remain, I intend to let them be as they are a part of this dude’s journey to date.The next evening, I decided to move ahead with polishing and completing the stem. I followed up the sanding regime with micromesh polishing to bring a shine on the stem surface. I wet sand the stem with 1500 to 2400 girt micromesh pads. Continuing with my experimentations that I had spelled out in my previous posts, I mount a cotton buffing wheel on my hand held rotary tool and polish the stem with Red Rouge polish. Further, I mount a fresh buffing wheel on the rotary tool and polish the stem with White Diamond polish. I finish the stem polish by wet sanding with 6000 to 12000 grit pads of the micromesh. I rub a small quantity of olive oil in to the stem surface to hydrate it and set it aside again. I am really happy with this process of stem polishing as the results are excellent while saving me huge amounts of time and effort. With the stem polishing now completed, I moved ahead with micromesh polishing of the smooth surfaces on the stummel (the rim top surface, the smooth portions at the shank end and the bottom of the stummel). I polished the stummel by wet sanding with 1500 to 12000 micromesh pads. The briar stummel is looking really good at this stage of restoration!! Next, I wiped the stummel surface with a moist cloth to remove all the sanding dust left behind by the micromesh pads, paying diligent attention to the areas between the worm rustications. I rubbed a small quantity of “Before and After Restoration Balm” in to the briar with my finger tips and let it rest for a few minutes. The balm almost immediately works its magic and the briar now has a nice vibrant appearance with the beautiful worm rustication patterns on full display. I have been using this balm ever since I embarked on this journey and it is this part of restoration that I always look forward to. I further buff it with a horse hair shoe brush. I mount a cotton cloth buffing wheel on to my hand held rotary tool and apply a coat of Blue Diamond to the smooth surfaces of the stummel and the stem to polish out the minor scratches. The final step in completing this project is to give the entire pipe a nice wax polish. I apply a coat of carnauba wax and continue to work on it till the complete coat of wax had been polished out. I mount a clean cotton cloth buffing wheel and give the entire pipe a once over buff. This step not only removes any excess wax from the surface but also finger prints that inadvertently are left behind. I complete the restoration by giving the entire pipe a rigorous hand buff using a microfiber cloth to raise the shine further. The finished pipe looks amazingly beautiful and is now ready for its long second innings with me… Cheers!!


Restoring a Second Custom-Bilt, a Large Billiard from My Inheritance


Blog by Paresh Deshpande

I have decided that I would now first complete all the Custom-Bilt pipes from my inheritance that I had got along with me to my place of work place and the remaining ones at my home town will be done later. I had professed my appreciation and liking for Custom-Bilt pipes for their large size, shape, hand feel and the rustic looks. The next pipe from the collection which I decided to work on was a huge Custom-Bilt briar pipe. The large size of the bowl, thick shank and large saddle stem, lends this pipe a weight which I particularly enjoy holding in my hand.

The pipe has deep and large vertical worm rustications along the entire length of the shank and height of the bowl. Within these large vertical rustications are very thin, closely stacked horizontal lines which give this pipe its unique appearance and are its trademark!! I absolutely love these pipes. These large rustications continue right up to the outer rim of the bowl. The thick rim top is covered with the same thin, closely stacked lines as seen between the vertical rustications. The worm rustications on the shank are much thin and precise as compared to the ones on the bowl and end about ¾ inch before the shank end giving a semblance of a shank end ring. These thin worm rustications can be seen at the foot of the stummel with smooth portions in between them. It is stamped on the left side of the shank as “Custom-Bilt” with a hyphen between the two words, in cursive hand. The “IMPORTED BRIAR”, a commonly observed stamp on these pipes, is seen in the smooth surface towards the front on the foot of the stummel followed by the number “3038” in the next portion towards the shank end.Having worked on a few Custom Bilt pipes in the past and researched this brand and based on the stampings seen on this pipe, I can say with an amount of certitude, that this pipe is from the period 1938-46. Here is the proof in determining the vintage based on stampings as researched by William E. Unger, Jr., PhD, which deals with the study of Custom-Bilt pipes.With this confirmation as regards to the vintage of this pipe, I move ahead with the initial visual inspection of this pipe.

INITIAL VISUAL INSPECTION
The pipe, as I received in the box, was carefully wrapped in a soft cotton cloth, stummel and stem separate!!! The condition of the stem and the stummel made me wonder if this pipe had been received after restoration/ repair work; it appears in such great condition. I thoroughly checked the entire pipe for any signs of repairs or damages. Fortunately there were none!! Only the stem appears brand new. Could it be a new replacement stem from an authorized store? No way to determine this as there are neither any receipts or documents nor any person in my family who could have confirmed this aspect.

The chamber has a thin layer of cake and does not appear to have been smoked much, may be a few bowls at the max. The condition of the inner walls of the chamber can be determined only after the cake has been completely reamed out down to the bare briar. The draught hole is dead center and at the bottom of the chamber. This should be a fantastic smoker. The thin worm rusticated rim top surface is covered in dust and grime all these years of storage. The outer and inner edges of the rim are in good condition with no damage. The craggy large vertical worm rustication with its horizontal thin line rustications within makes for a visual treat. The large vertical rustications are filled with dust and grime to such an extent that the horizontal lines lying within are barely visible. Same goes for the rim top. Though covered in dust and grime of all these years of storage, these should clean up nicely. I have seen an aluminum shank/ mortise extension fixed inside of the mortise on another very similarly sized and shaped Custom-Bilt from my Grandfather’s collection which I had restored about a year back!! This aluminum shank/ mortise extension (or should it be called a tenon?), was also seen on the previous Custom-Bilt Pot that I had restored just a couple of days back. However, this pipe has no such extension, just regular mortise and stem tenon construction. The mortise shows slight accumulation of oils and crud which has resulted in a slight gap between the stem and the shank end when seated. A thorough cleaning of the shank should address this issue. The wide straight saddle vulcanite stem is in pristine condition and seats with a slight gap in to the mortise with all the right noises. The tenon and the slot are also very clean. A polish with Blue diamond and coat of carnauba wax should suffice to deepen the shine on the stem. THE PROCESS
I started the restoration of this beautiful pipe by first reaming the chamber with my fabricated knife. I followed this reaming with sanding the chamber walls with a folded piece of 220 grit sand paper to completely remove any residual cake. This also helps to smooth the walls of the chamber. How I miss the help of Abha, my wife and Pavni, my youngest daughter who specializes in sanding the chamber walls to a smooth and even surface. I wiped the chamber with a cotton swab and alcohol to get rid of all the carbon dust and expose the bare briar of the chamber. As expected, the chamber is sans of any heat fissures/ lines. I followed up the cleaning of the chamber with that of the shank internals. With a bent dental spatula, I scrapped out the dried gunk from the mortise. Using hard and regular pipe cleaners and alcohol, I cleaned the mortise and the shank internals. A number of attempts and pipe cleaners later, the shank internals are clean and the draw is nice, smooth and even. I tried the seating of the stem in to the mortise and was pleased to note that the fit is now perfect and without any gaps. The internal cleaning was followed by external cleaning of the stummel surface using Murphy’s Oil soap and a hard bristled tooth brush. I also used a brass wired brush to diligently clean out all the dirt and grime from within the worm rustications. With a shank brush and dish washing soap, I thoroughly cleaned the shank internals and the mortise. I dried the bowl with paper napkins and soft cotton cloth and set it aside to dry out completely. With the stummel set aside to dry out naturally, it was time to move ahead with the stem restoration. I cleaned the stem internals with pipe cleaners and alcohol. With the bent flat end of a dental tool, I scrubbed the dried out oils and tars from the tenon of the stem and cleaned it with a cotton swab and alcohol. I wiped the stem with a small amount of Extra Virgin Olive oil and set it aside to be absorbed by the stem surface.While the stem was set aside to hydrate, I worked the stummel, micromesh polishing of the smooth raised surfaces on the stummel. I polished the stummel by wet sanding with 1500 to 12000 micromesh pads. With a moist cotton swab, I carefully wiped off all the sanding dust from within the worm rustications. I am pretty happy with the results!! Next, I rub a small quantity of “Before and After Restoration Balm” in to the briar with my finger tips and let it rest for a few minutes. The balm almost immediately works its magic and the briar now has a nice vibrant appearance with the beautiful worm rustication patterns on full display. I have been using this balm ever since I embarked on this journey and it is this part of restoration that I always look forward to. I further buff it with a horse hair shoe brush. On to the homestretch!! I mount a cotton cloth buffing wheel on to my hand held rotary tool and apply a coat of Blue Diamond to the stummel and the stem to polish out the minor scratches. With a cotton buffing wheel that I use for carnauba wax, I apply a coat of carnauba wax and continue to work on it till the complete coat of wax had been polished out. I mount a clean cotton cloth buffing wheel and give the entire pipe a once over buff. I finished the restoration by giving the entire pipe a rigorous hand buffing using a microfiber cloth to raise the shine further. The finished pipe looks amazingly beautiful and is now ready for its long second innings with me. I only wish it could share with me its life story of the past 70 plus years… Cheers!! P.S. These old Custom-Bilts may not be as elegant, delicate and quaint looking as most of the British pipes like say, Charatan’s, Barling’s, Comoy’s or an old Ben Wade, but there is a certain rustic charm about these pipes that appeals to me the most and of course, not to mention the size!! I am not sure if there are any serious Custom-Bilt collectors in our pipe world, but if any reader of rebornpipes.com is, I would definitely like to connect and share our common love for these magnificent pipes.

As usual, your comments and advice is requested as these will help me in my learning and improvements in future. I express my sincere gratitude to all readers who have dedicated their time to read through the write up and for being part of this journey.


Back to My Inherited Collection – Restoring a Custom-Bilt Pot


Blog by Paresh Deshpande

It’s been a while that I had worked on my Grandfather’s pipe collection and that is what I decided to work on as my next project. I had professed my appreciation and liking for Custom-Bilt pipes for their large size, shape, hand feel and the rustic looks.

The Custom-Bilt pipe that is now on my work table is a large Pot shaped pipe, having the trademark scraggy large vertical rustications and very fine, thin horizontal linear rustications in between. This is a beautifully carved pipe with a unique construction in that the chamber appears to be placed inside the outer casing of the briar wood. However, the chamber is carved from the same piece of briar with a smooth rim top surface that is slightly raised above the surrounding rim surface with thin rustications. The short shank is smooth and extends in to the large smooth foot of the stummel. It is stamped on the left side of the shank as “Custom-Bilt” with a hyphen between the two words, in cursive hand. There are two prominent red dots on either side of the shank with a square symbol on the right side of the shank towards the stummel joint. The IMPORTED BRIAR, a commonly observed stamp on these pipes, is conspicuous by its absence on this one!!Having worked on a few Custom Bilt pipes in the past and researched this brand and based on the stampings seen on this pipe, I can say with an amount of certitude, that this pipe is from the period 1938- 46. Here is the proof in determining the vintage based on stampings as researched by William E. Unger, Jr., PhD, which deals with the study of Custom-Bilt pipes.With this confirmation as regards to the vintage of this pipe, I move ahead with the initial visual inspection of this pipe.

INITIAL VISUAL INSPECTION
The chamber has an even decent layer of cake. The condition of the inner walls of the chamber can be determined only after the cake has been completely reamed out down to the bare briar. The draught hole is dead center and at the bottom of the chamber. This should be a fantastic smoker. The smooth and slightly raised rim top surface has severely charred inner rim edge on the left in 8 o’clock direction and a minor charring on the right side in the 3 o’clock direction, both marked in red circle causing the bowl to appear out of round. The remaining rusticated rim top surface is covered in dust and grime of overflowing lava. The flat bottomed stummel feels solid to the touch and makes for a nice fit in the hands of the smoker. The vertical worm rustication with its horizontal thin line rustications within makes for a visual treat. Though covered in dust and grime of all these years of uncared for storage, these should clean up nicely. The smooth flat bottom of the stummel has a number of perfectly rounded small dings and will need to be addressed. The short and smooth surfaced shank has an aluminum shank/ mortise extension fixed inside of the mortise. I have seen a similar extension on another Custom-Bilt from my Grandfather’s collection which I had restored about a year back!!! This aluminum shank/ mortise extension (or should it be called a tenon?), has two airways, a larger one above a smaller one, both with the same draught hole at the other end. The purpose of these two airways in the same tenon was shrouded in mystery then and to this day, still remains so. Any inputs on this mystery from the esteemed readers will help all other readers in understanding the functional aspects of this dual airway. Both these airways are clogged with oils and tars and dirt from all these years of smoking and storage, making the draw a bit laborious. This draw should even out once the shank extension and shank has been cleaned out.The slightly bent vulcanite stem sits atop the aluminum shank/ mortise extension and is peppered with tooth chatter on either surface of the stem. The edges of the button are slightly damaged due to tooth marks. These issues are not severe and should be easily addressed by sanding. The tenon end of the stem surface is chipped in at number of places with the edges slightly raised (indicated with red arrows). I shall address this issue first by sanding and if required, will fill it with a mix of superglue and activated charcoal. THE PROCESS
I started the restoration of this beautiful pipe by first reaming the chamber with size 3 followed by size 4 head of the PipNet pipe reamer. The amount of cake dislodged from the chamber points to the fact that this would have been a favorite of my Grandfather!! With my fabricated knife, I removed the cake from areas where the reamer head could not reach. I followed this reaming with sanding the chamber walls with a folded piece of 220 grit sand paper to completely remove any residual cake. This also helps to smooth the walls of the chamber. How I miss the help of Abha, my wife and Pavni, my youngest daughter who specializes in sanding the chamber walls to a smooth and even surface. I wiped the chamber with a cotton swab and alcohol to get rid of all the carbon dust and expose the bare briar of the chamber. It was a relief to note that the chamber is sans of any heat fissures/ lines. The next issue that I addressed was that of the charred inner rim edge. With a folded piece of a 220 grit sand paper, the charred surfaces were sanded down till I reached solid briar wood. A bevel to the inner edge would look out of place on this pipe and so it was decided to keep the edges straight. I sand the entire inner rim edge and the chamber with a folded 180 grit sand paper till it matched with the damaged rim edge. The inner rim edge looked good and also the chamber is now nicely rounded. I further sand the entire smooth rim top surface to remove the blackened surface from the charred area and also to get rid of any minor dents/ dings and grime from the surface. I followed up the cleaning of the chamber with that of the shank internals. Using hard and regular pipe cleaners and alcohol, I cleaned the aluminum mortise extension and the shank internals. It was a bit of an exercise to clean the lower of the two air ways as it sloped upwards and posed difficulties in maneuvering the pipe cleaner towards the draught hole. A number of attempts and pipe cleaners later, the shank internals are clean and the draw is nice, smooth and even.The internal cleaning was followed by external cleaning of the stummel surface using Murphy’s Oil soap and a hard bristled tooth brush. I also used a brass wired brush to diligently clean out all the dirt and grime from within the worm rustications. With a shank brush and dish washing soap, I thoroughly cleaned the shank internals and the mortise. I dried the bowl with paper napkins and soft cotton cloth. To expel all the moisture from the shank and the aluminum extension, I blew air through the draught hole and to my chagrin; there were droplets of water that came out from the joint between the shank end and extension (marked with red arrows). This is definitely a sign of leak from the joint. I wiped the area dry and with my sharp dental tool picked the area clean. With a toothpick, I applied clear superglue all around the joint and held it vertical for the glue to seep in to the joint. I was careful to apply a small quantity as I did not want the glue to enter and harden inside of the mortise. I wiped off the extra glue from the shank end as I would disturb the seating of the stem over the aluminum extension. I set the stummel aside for the glue to cure. With the stummel set aside for the glue to cure, it was time to move ahead with the stem restoration. I cleaned the stem internals with pipe cleaners, q-tips and alcohol. With the bent flat end of a dental tool, I scrubbed the dried out oils and tars from the area of the tenon end of the stem that seats on top of the aluminum shank/ mortise extension.I flamed the bite zone with the flame of a lighter. The heating of the vulcanite raises the tooth chatter to the surface and followed it with a light sanding with a piece of 220 grit sand paper to even out the surface around the bite zone. Using a flat head needle file, I reshaped and sharpened the button and button edges. This was followed by sanding the entire stem surface with 400 followed by 600, 800 and 1000 grit sand papers to remove the oxidation. I also evened out the raised indentations from the tenon end caused due to chipping. I finished the sanding with a 0000 grade steel wool. Using progressively higher grit sand papers helps in a smooth surface while minimizing the sanding marks left behind by the more abrasive sanding papers. I wiped the stem with a small amount of Extra Virgin Olive oil and set it aside to be absorbed by the stem surface. While the stem was set aside to hydrate, I worked the stummel, sanding away excess dried glue from the joint between shank end and the aluminum extension. I polished the extension with a piece of 0000 grade steel wool. The next issue that I addressed was the numerous rounded dings from the perfectly flattened foot of the stummel. I decided to steam out these dings since these dings were slightly deeper. I heated my fabricated knife over the flame of a candle till nice and hot. I covered the dings with a thick wet Turkish hand towel and placed the hot knife over it. The sizzling steam that is generated expands the briar and pulled out the dings. I am pretty happy with the results!! I set the stummel to dry out and went ahead with polishing and completing the stem. I followed up the sanding regime with micromesh polishing to bring a shine on the stem surface. I wet sand the stem with 1500 to 2400 girt micromesh pads. Continuing with my experimentation that I had spelled out in my previous posts, I mount a cotton buffing wheel on my hand held rotary tool and polish the stem with Red Rouge polish. Further, I mount a fresh buffing wheel on the rotary tool and polish the stem with White Diamond polish. I finish the stem polish by wet sanding with 6000 to 12000 grit pads of the micromesh. I rub a small quantity of olive oil in to the stem surface to hydrate it and set it aside again. I am really happy with this process of stem polishing as the results are excellent while saving me huge amounts of time and effort. With the stem polishing now completed, I moved ahead with micromesh polishing of the smooth surfaces on the stummel (part of the rim top surface, the short shank and the foot of the stummel). I polished the stummel by wet sanding with 1500 to 12000 micromesh pads.Next, I rub a small quantity of “Before and After Restoration Balm” in to the briar with my finger tips and let it rest for a few minutes. The balm almost immediately works its magic and the briar now has a nice vibrant appearance with the beautiful worm rustication patterns on full display. I have been using this balm ever since I embarked on this journey and it is this part of restoration that I always look forward to. I further buff it with a horse hair shoe brush. There are a few spots where I had missed out on the application of the balm, as would have been observed by some discerning readers in pictures below, but let me assure you that I had reapplied the balm using a q-tip but missed out on taking pictures. On to the homestretch!! I mount a cotton cloth buffing wheel on to my hand held rotary tool and apply a coat of Blue Diamond to the stummel and the stem to polish out the minor scratches.With a cotton buffing wheel that I use for carnauba wax, I apply a coat of carnauba wax and continue to work on it till the complete coat of wax had been polished out. I mount a clean cotton cloth buffing wheel and give the entire pipe a once over buff. I finished the restoration by giving the entire pipe a rigorous hand buffing using a microfiber cloth to raise the shine further. The finished pipe looks amazingly beautiful and is now ready for its long second innings with me. I only wish it could share with me its life story of the past 70 plus years, if only the pipe could tell some of my grand Old man’s stories and recount incidents it had witnessed while I enjoy smoking my favorite Virginia blend in it!! … Cheers!!

A Simple Restoration of a “Jobey Filtersan # 690”


Blog by Paresh Deshpande

I am in a rush to complete as many pipes as I can before Abha, my wife, sends me another batch of 30-40 pipes to restore!! Her pace of completing the initial cleaning of the pipes is very difficult for me to match by completing the remaining restorations aspects of these pipes.

Well, the next pipe that I decided to work on is a straight pot (actually I feel it is cross between a Billiard and a Pot what with the bowl height of a Pot and the width of a Billiard!!),  Jobey Filtersan pipe in a beautiful black stained sandblast finish. The beautiful sandblast patterns can be seen all around the stummel and rim top surface, save for smooth surfaces at the bottom of the shank which bears the stamping on this pipe and the second that forms a band at the shank end. The pipe is stamped “Jobey” in cursive hand over “FILTERSAN” in block letters. Adjacent to these stampings, is another set of stamps in line with the above and reads “FRANCE” over “690”. The stampings are all crisp and prominent. I had previously worked on an interestingly shaped Jobey Original Bent Dublin Sitter; here is the link to write up (https://rebornpipes.com/2018/09/14/jobey-original-t1/), and had researched this brand then. To refresh my memory, I revisited the write up and also included some information from pipedia.org. Here are some interesting excerpts from pipedia.org…

Jobey

English – American – Danish – French… Sadly, solid information about Jobey is scant…

Probably established in England around 1920(?) the brand hiked into the USA later. In the course of time owner, distributor and manufacturer changed repeatedly. As far as is known the following companies have been involved with the brand:

Throughout decades Jobey pipes were mainly sold in the USA, Canada and England but remained almost unknown in continental Europe. The bulk of Jobeys was predominantly made according to classical patterns and mainly in the lower to middle price range. The predominant judgment of the pipe smokers reads: “A well made pipe for the price.” So there is hardly anything very special or exciting about Jobey pipes although a flyer from ca. 1970 assures:

“The briar root Jobey insists upon for its peer of pipes is left untouched to grow, harden and sweeten for 100 years. […] Jobey uses only the heart of this century old briar and only one out of 500 bowls turned measures up to the rigid Jobey specifications.” 99.80% of cull… that makes the layman marveling!

Yet then there are partially really exciting Freehands mainly in the seventies, that Jobey – Weber owned back then – bought from Danish pipe genius Karl Erik (Ottendahl). These pipes were offered as Jobey Dansk – ’70’s pure! (BTW waning sales caused Ottendahl to discontinue exports to the United States in 1987).

In the very same year – obviously only as a ghost brand – Jobey was transferred to Saint-Claude, France to be manufactured by Butz-Choquin.

There must have been an abandonment of the fabrication, because in 2002 the message was spread, the current proprietor of the brand F&K Cigar Co. from St. Louis, MO had recently re-introduced the Jobey very successfully again…

From the above information and correlating the stampings on this pipe, it is safe to conclude that this pipe is definitely post 1987 and made by Butz-Choquin when the brand was transferred to France. With rough idea of the origins of this pipe, I move ahead to the next step in the process of restoration that I follow.

INITIAL VISUAL INSPECTION
The pipe came to us in an excellent condition when compared to most of the pipes that I have worked on till date. It was maybe smoked a couple of times at best. The chamber is in pristine condition with a very thin layer of cake which is soft and crumbling. For Abha, my wife, this should be a breeze to clean. The sandblast rim top has a little dust and tar accumulation. The rim outer and inner edges are in excellent condition and without any damage.The sandblasted stummel surface has beautiful patterns with the cross grains and vertical grains forming a grid pattern. The stummel surface has dulled a bit and appears lifeless due to accumulation of dust and dirt within these sandblast patterns. A small quantity of accumulation of oils and grime is seen in the mortise and a thorough cleaning with pipe cleaners and alcohol should address this issue. The vulcanite stem is lightly oxidized and without any bite marks or tooth chatter on either surface. The tenon is made of plastic and houses a 6mm filter (came with a new filter!!). The insides of the slot and tenon have signs of accumulated gunk. The brass roundel with embossed logo of the pipe brand is intact, albeit oxidized. This should polish up nicely. INITIAL CLEANING BY ABHA…

The initial cleaning on this pipe was done by Abha, my wife (she has cleaned up around 40-50 pipes and these have now reached me for further restoration). She reamed out the complete cake and further smoothed out the chamber walls with a folded piece of 220 grit sand paper. She further cleaned out the internals of the shank with pipe cleaners and alcohol and cotton buds. She followed the internal cleaning of the shank with external cleaning of the stummel using Murphy’s Oil soap and hard bristled tooth brush and dried it with paper napkins and cotton cloth.

Next she cleaned out the internals of the stem air way and immersed it in “Before and After Deoxidizer” solution along with the stem of other pipes in line for restoration. Once the stem had soaked overnight, she cleaned the stem under running warm water and scrubbed the raised oxidation from the stem surface using Scotch Brite pad. She further removed the oxidation by scrubbing the stem with 0000 grade steel wool and applied a little olive oil to rehydrate the stem. She had removed the stinger from the tenon and cleaned it with cotton swabs, pipe cleaners and alcohol.

ONCE THE PIPE IS ON MY WORK TABLE……
Now that the cleaned up pipe is on my work table, I proceed to carry out my appreciation of the work that needs to be done on this pipe to restore it.

The chamber is odorless and the walls are solid without any signs of damage. The sandblast rim top surface is in decent condition with the inner and outer rim edge in excellent condition. I could still see remnants of the accumulated dirt and grime in the sandblasts of the rim top surface (hope Abha does not read this post!!). I shall remove this crud with a soft brass wired brush. The mortise and shank internals are nice and clean. The stummel is nice and clean. Once the stummel was cleaned up by Abha, I could see a small crack on the left side of the shank close to the smooth briar band at the shank end (marked in red circle). I probed it with my dental tool and found it to be solid without any give. I think this could be a flaw in the briar. However, to ally my worst fears, I shared the pictures of this flaw with Steve for his opinion and to my great relief, he concurred with my assessment. I would just fill it up with a drop of superglue and use a black sharpie marker to mask this flaw. There is, in fact, not much work to be done here save for some spit and polishing to make it nice and shiny again. The oxidation on the vulcanite stem has been greatly reduced, thanks to all the efforts put in by Abha. A bit of sanding to remove the deeper oxidation followed by micromesh polishing cycle should add a nice shine to the stem.THE PROCESS
The first issue I addressed was that of the flaw that I had observed during my inspection of the stummel. I spot filled the flaw with a drop of superglue and set it aside to enter in to whatever gaps that may exist internally and harden.While the shank fill was curing, I sand the stem with a folded piece of 220 grit sandpaper and followed it up by sanding it with 400, 600 and 800 grit sand papers. This serves to remove the deep seated oxidation from the stem surface and also reduces the sanding marks of the more abrasive sand papers. I wiped the stem with a moist cloth to remove all the oxidation from the surface.I followed up the sanding regime with micromesh polishing to bring a shine on the stem surface. I wet sand the stem with 1500 to 2400 girt micromesh pads. Continuing with my experimentation that I had spelled out in my previous post on ROPP REPORTER # L-83 pipe, I mount a cotton buffing wheel on my hand held rotary tool and polish the stem with Red Rouge polish as I had read that this polish has grit in between 2400 to 3200 grit pads of the micromesh pads. Further, I mount a fresh buffing wheel on the rotary tool and polish the stem with White Diamond polish as it has grit equivalent to 3800- 4000 of micromesh pads. I finish the stem polish by wet sanding with 6000 to 12000 grit pads of the micromesh. I rub a small quantity of olive oil in to the stem surface to hydrate it and set it aside. I am really happy with this process of stem polishing as the results are excellent while saving me huge amounts of time and effort. The shank fill had cured in the intervening period and I sand the excess superglue with a worn out piece of 220 grit sand paper. I further mask it with a permanent black marker. The fill should be impossible once the stummel has been polished and buffed.Next, with a soft bristled brass wired brush, I gently scrub the sandblasted surface of the rim top and dislodged the dried up gunk. The rim top surface is now nice and clean and the stummel is prepped for the next stage in the restoration.Next, I rub a small quantity of “Before and After Restoration Balm” in to the briar with my finger tips and let it rest for a few minutes. The balm almost immediately works its magic and the briar now has a nice vibrant appearance with the beautiful black sandblast patterns on full display. I further buff it with a horse hair shoe brush. With the stem well hydrated at this point with absorption of olive oil, I wiped it dry with a paper napkin and removed any excess oil from the stem surface. I applied a small quantity of “Before and After Extra Fine” stem polish and rubbed it deep in to the vulcanite stem. This polish, purportedly, is supposed to remove the finer sanding marks left behind by the abrasive grit papers.Now, on to the homestretch!! I mount a cotton cloth buffing wheel on to my hand held rotary tool and apply a coat of Blue Diamond to the stummel, shank extension and the stem to polish out the minor scratches.With a cotton buffing wheel that I use for carnauba wax, I apply a coat of carnauba wax and continue to work on it till the complete coat of wax had been polished out. I mount a clean cotton cloth buffing wheel and give the entire pipe a once over buff. I finished the restoration by giving the entire pipe a rigorous hand buffing using a microfiber cloth to raise the shine further. The finished pipe looks beautiful and should be an ideal combination with a black suit or a black tuxedo!! P.S. This pipe has already found a new piper to carry forward the trust posed in him by the previous piper and I am sure that this pipe will provide the new piper many years of happy smokes and will remind him of our association.

I cannot thank Abha, my wife, enough who not only supports my hobby of pipe restoration, but actively helps in this work by doing all the dirty work of initial cleaning and providing me a clean platform to work further.

Thank you all readers of rebornpipes who have spared a moment of their invaluable time in reading through this write up and as is always, your suggestions and advice on my experimentation is always welcome as this would also help the new pursuers of this art.