Tag Archives: Bowls – refinishing

Recommissioning a Bulldog: Amphora X-tra 724-644 of Amphora Holland


Blog by Dal Stanton

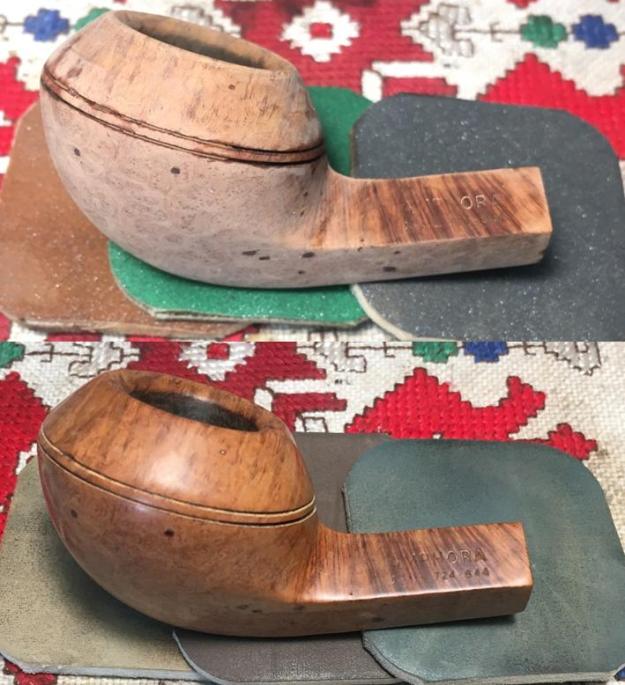
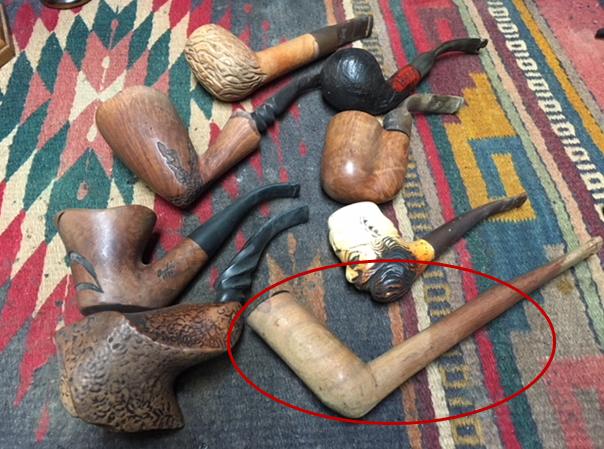
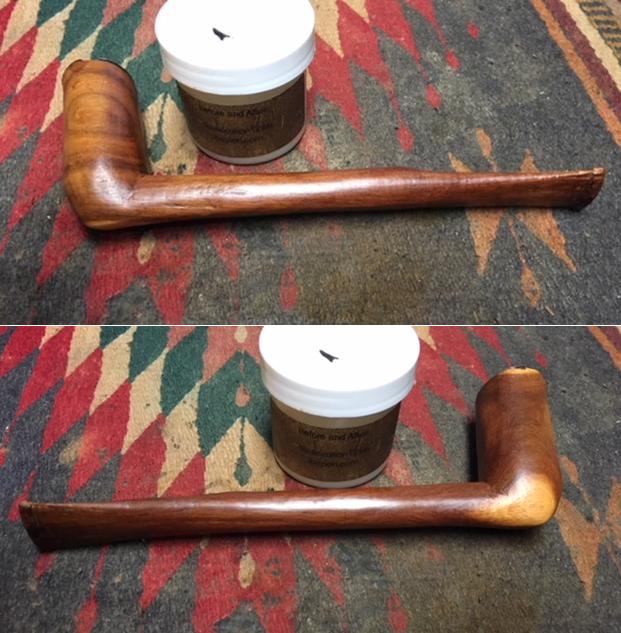
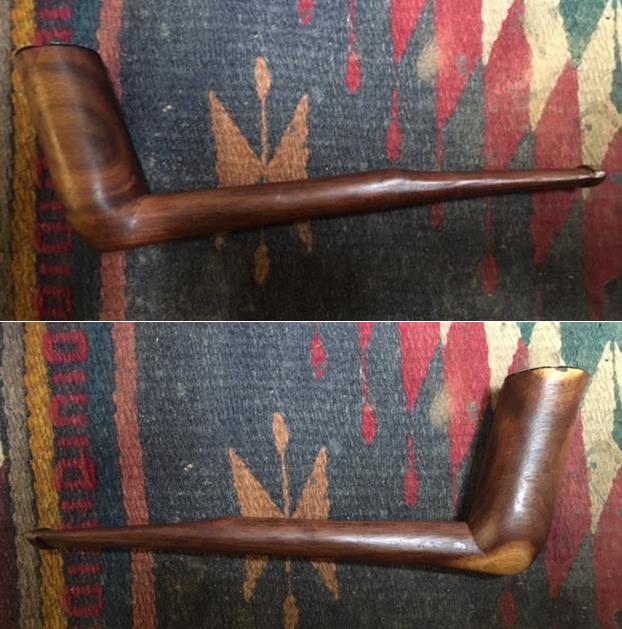
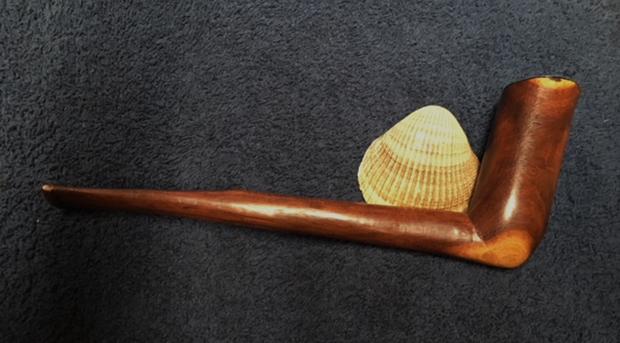
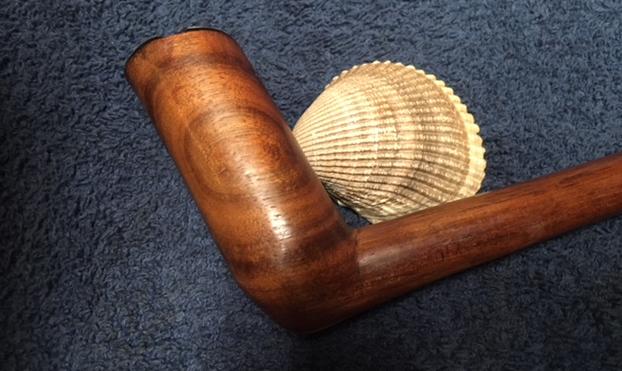
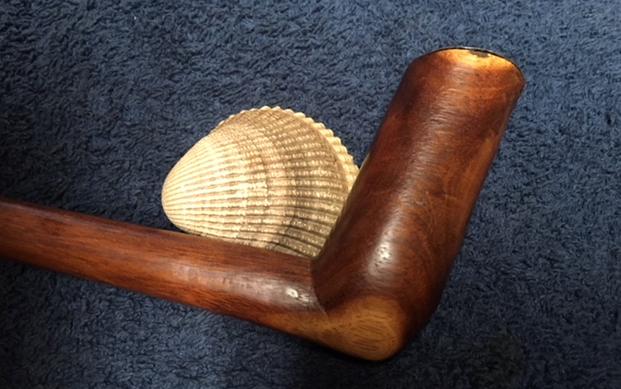
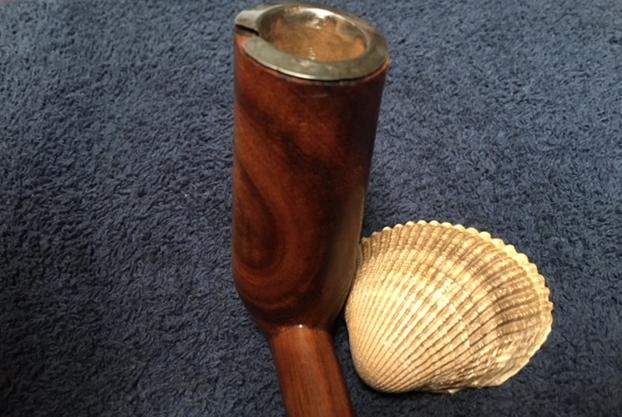
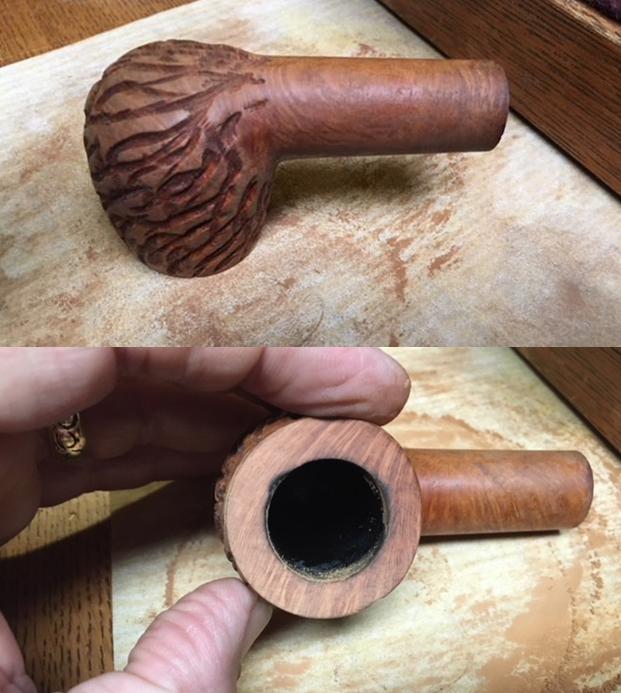
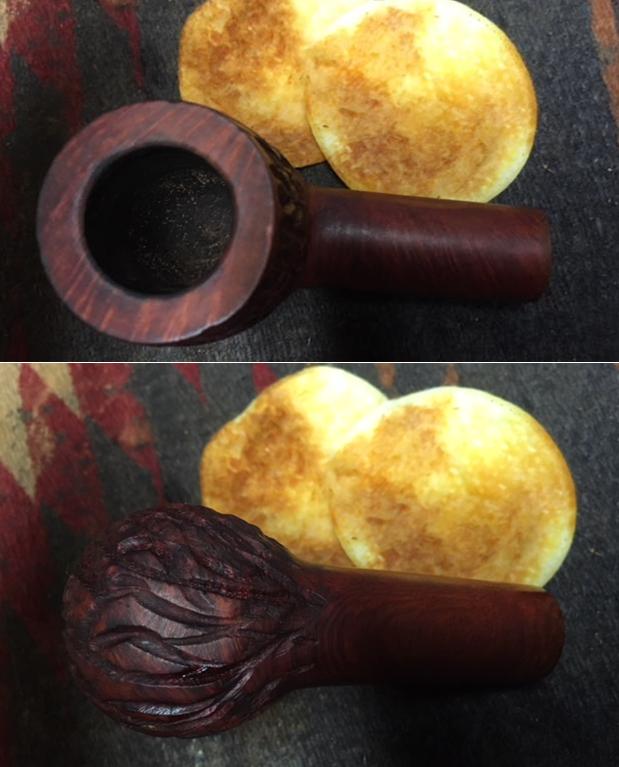
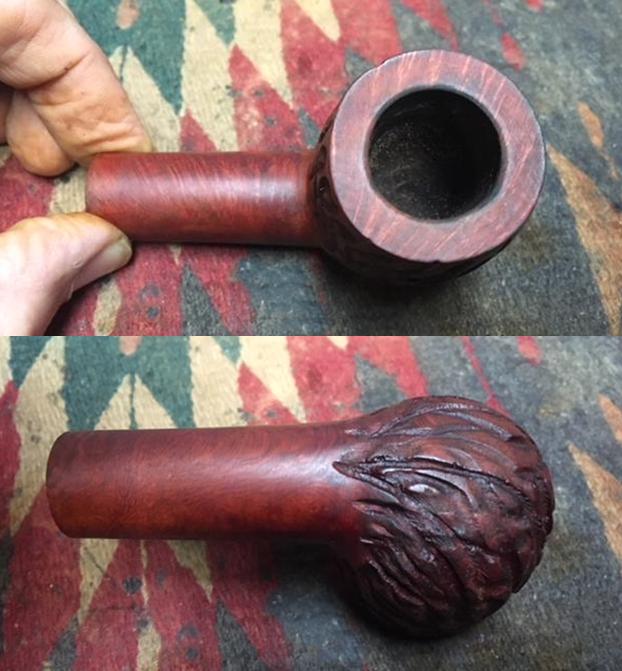
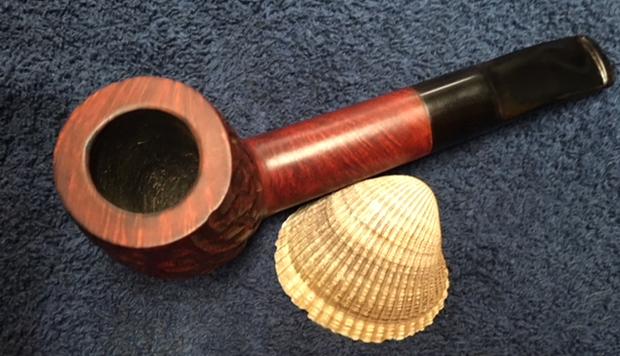
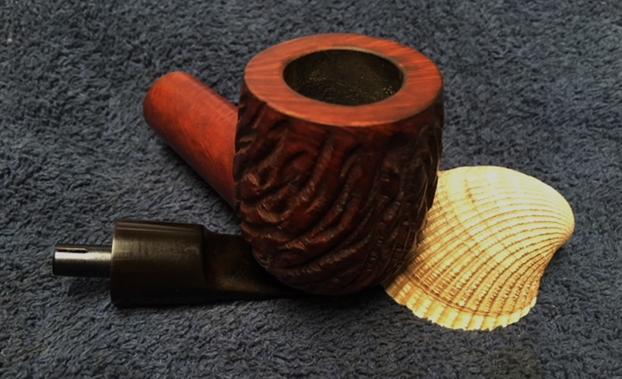
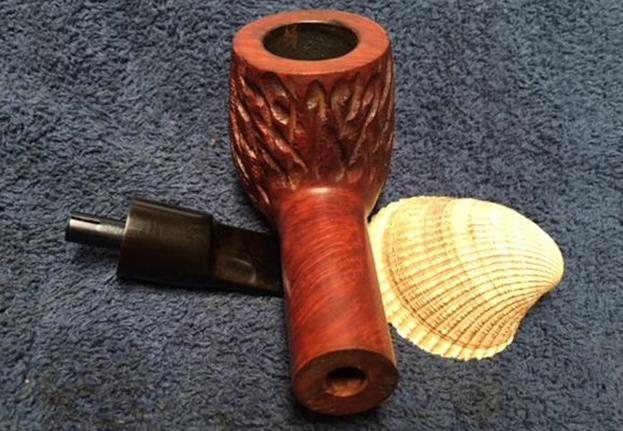
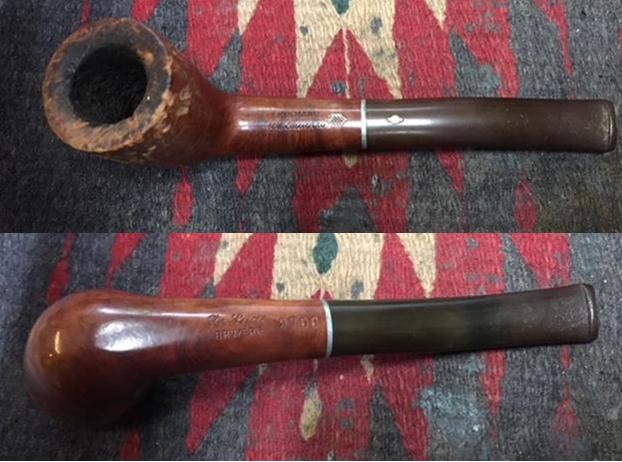
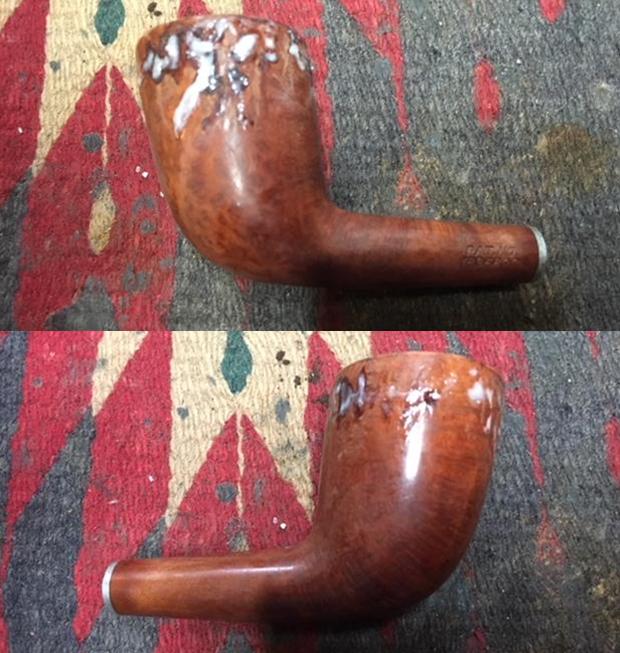
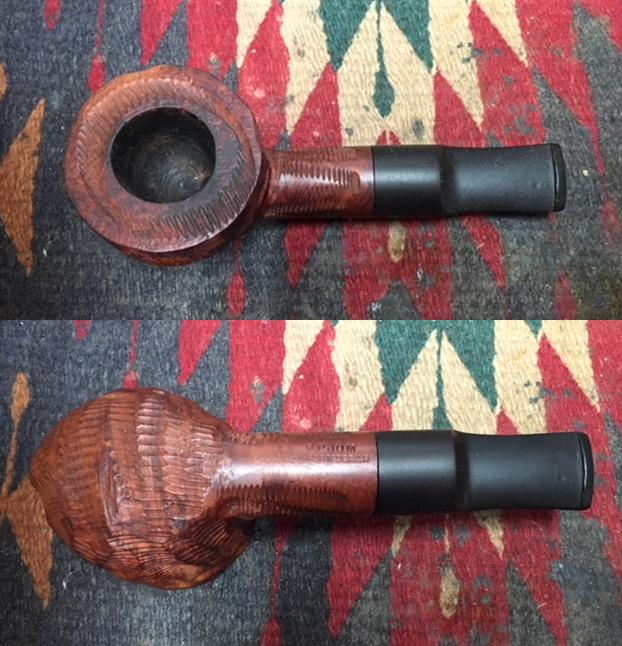
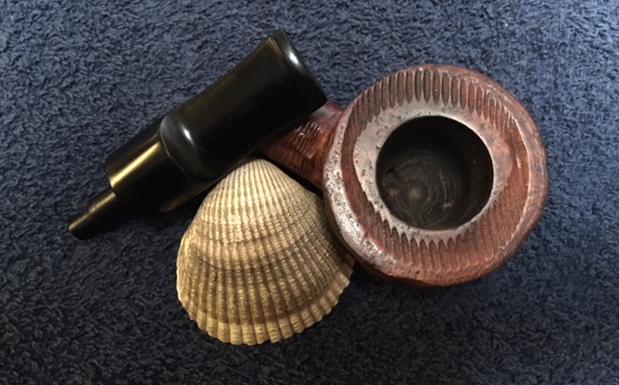
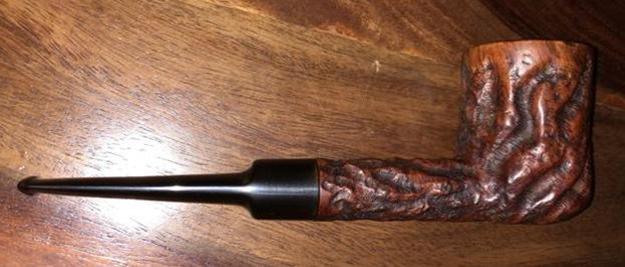
Last year, while in the US for several months, I landed the largest haul of pipes in my pipe collecting history – which isn’t that ancient!  It was called the Lot of 66 by the eBay seller who represented a non-profit in Texas that sold donated items to help people in need.  Just by the cursory look in the picture below I was very interested in turning these pipes around to benefit our very precious people in need, the Daughters of Bulgaria.  The world is full of broken people experiencing a plethora of painful and often, dehumanizing conditions.  Sometimes all of our efforts seem like a drop in the bucket, but I suppose if a lot of people added their ‘drops’ it might, and often does make a difference, one life at a time.  Well, I won the Lot of 66 on the eBay auction block and thanks to a very patient wife, the Lot of 66 made it back home to Bulgaria where each pipe, one pipe at a time, makes it to my worktable and is recommissioned – hopefully, better than new!   The Amphora X-tra, quarter bent Bulldog of Holland is the next pipe on my worktable.
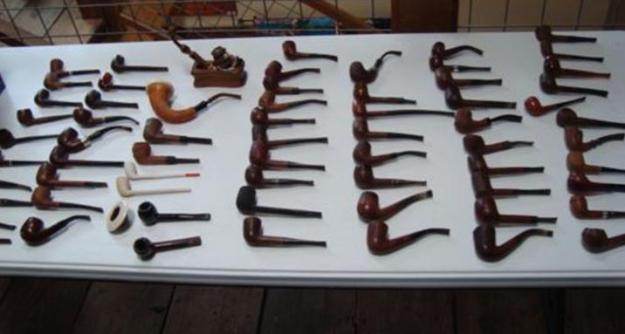
In Bulgaria, I took the Amphora Bent Bulldog out of the ‘Help Me!’ Basket when Taylor saw this pipe, along with two others that he commissioned already restored, a Savinelli Oscar and an Italian Custom Shape.  I allow pipe people to commission pipes from my ‘Help Me!’ Basket which I have listed on The Pipe Steward website in the section, For ‘Pipe Dreamers’ Only!   I’m amazed how many ‘Pipe Dreamers’ there are out there!  This Bent Bulldog is the last of three Taylor has commissioned and is destined as a gift for a friend who is to be married!  Here are the pictures. 
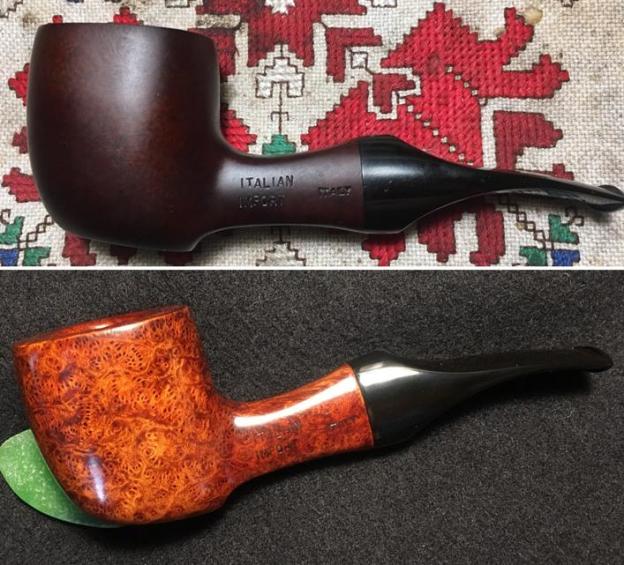
There is precious little information in my usual go-to sites on the internet about Amphora.  Pipedia’s small article said this:

Amphora pipes are made in Holland by the Jos. Gubbels organization, the same company which makes the very well known and loved Amphora Pipe Tobaccos. The pipes are produced in relatively small numbers to a high standard and not commonly found.

The Royal Dutch Pipe Factory Elbert Gubbels & Sons B.V. is the only manufacturer of briarroot tobacco pipes in the Benelux countries where pipes of high quality are made under the brands Big Ben, Hilson, Royal Dutch and Amphora. They also supply numerous smokers’ accessories of high quality.

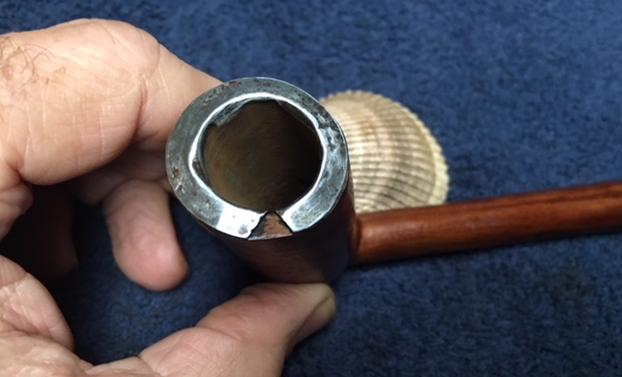
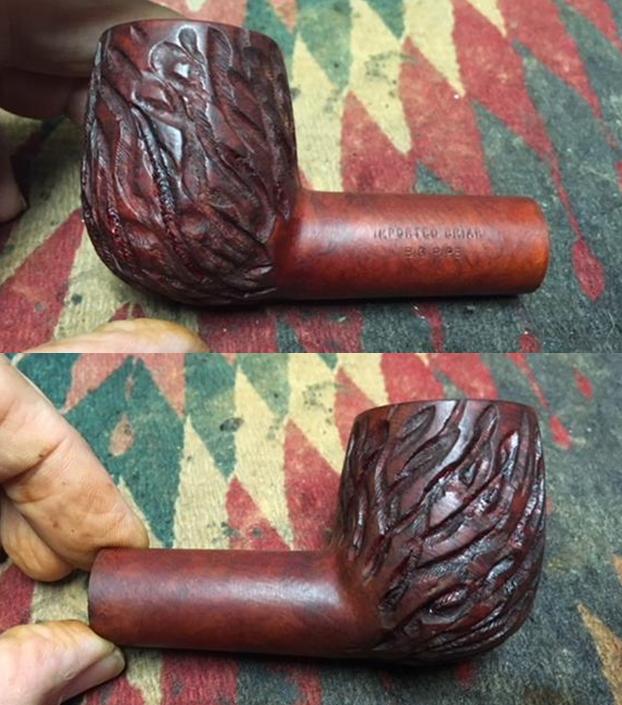
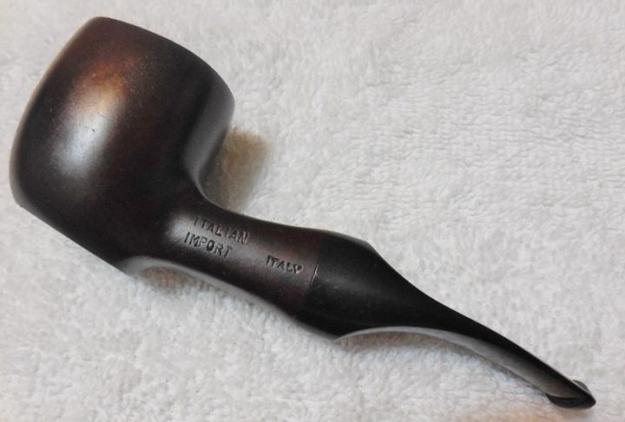
There also was pictured an Amphora Bulldog with the same nomenclature as the one on my worktable but of the blasted variety (courtesy of Doug Valitchka):What I see in this picture above is that there is an ‘A’ stamping on the stem.  The Amphora before me now has a fading whisper of an Amphora ‘A’ stamping.  It is very weak and I’m doubtful if I can save it let alone improve it.The only additional information added by PipePhil.eu about Amphora was that it’s mother company, The Royal Dutch Pipe Factory, referenced above, went bankrupt in 2012.

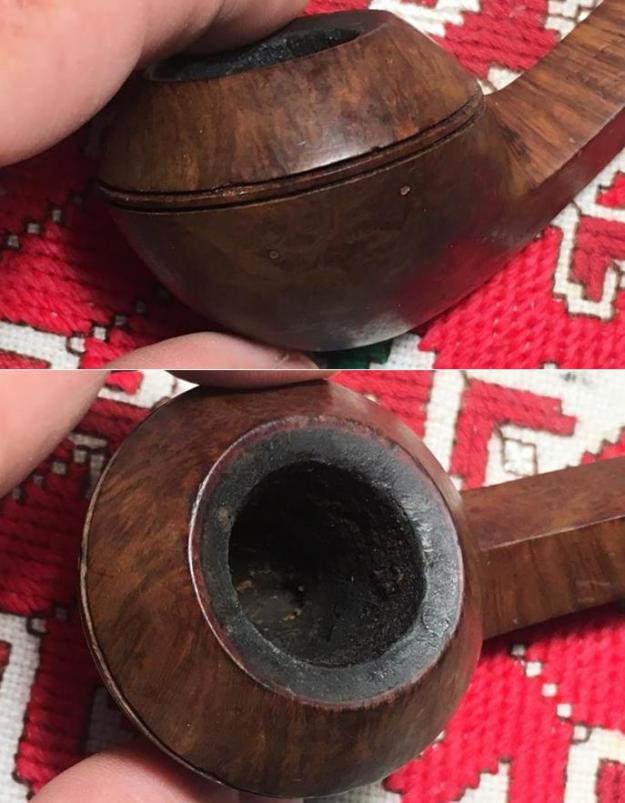
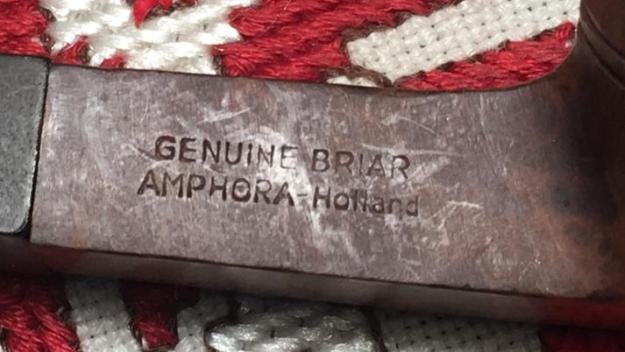
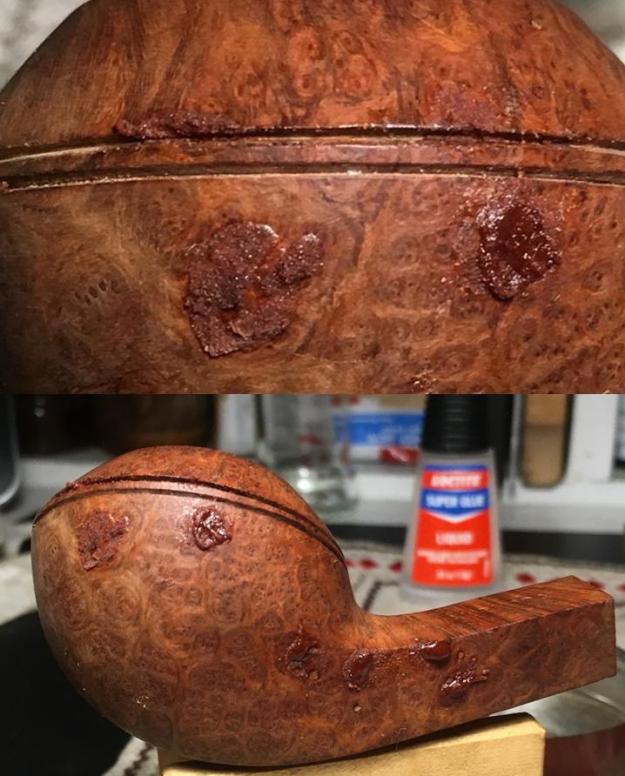
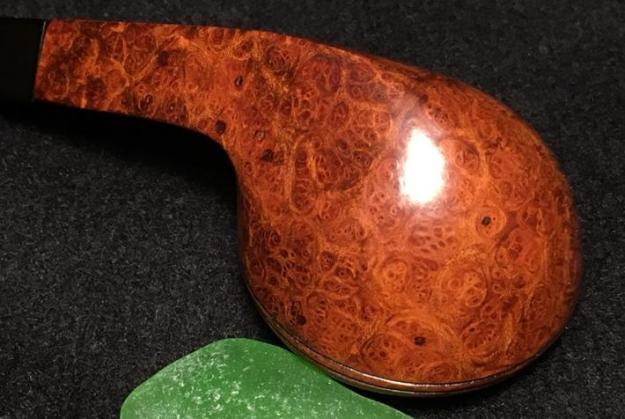
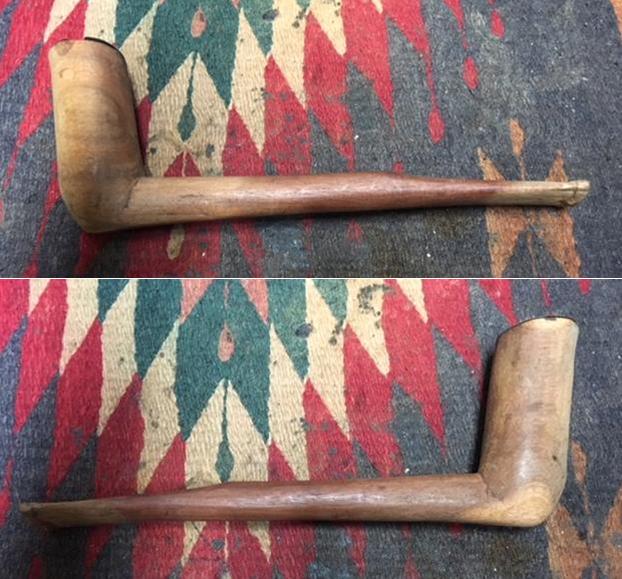
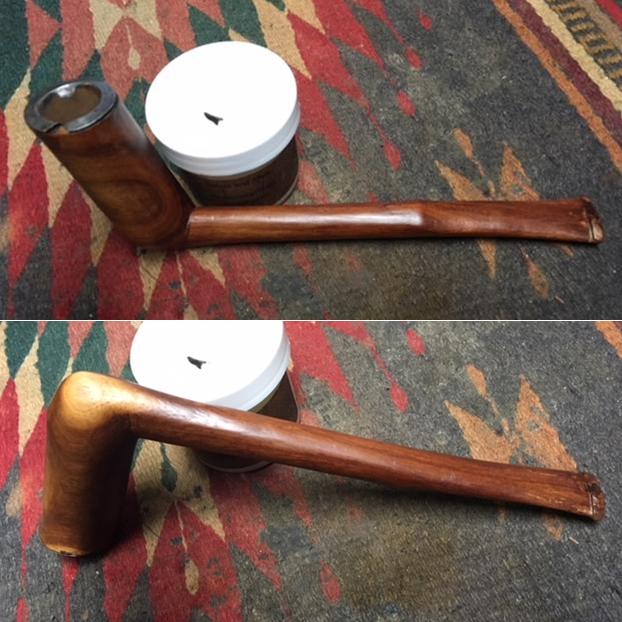
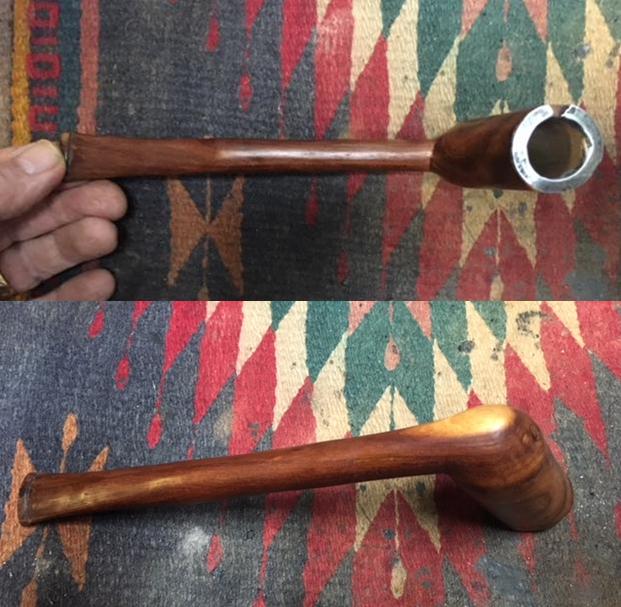
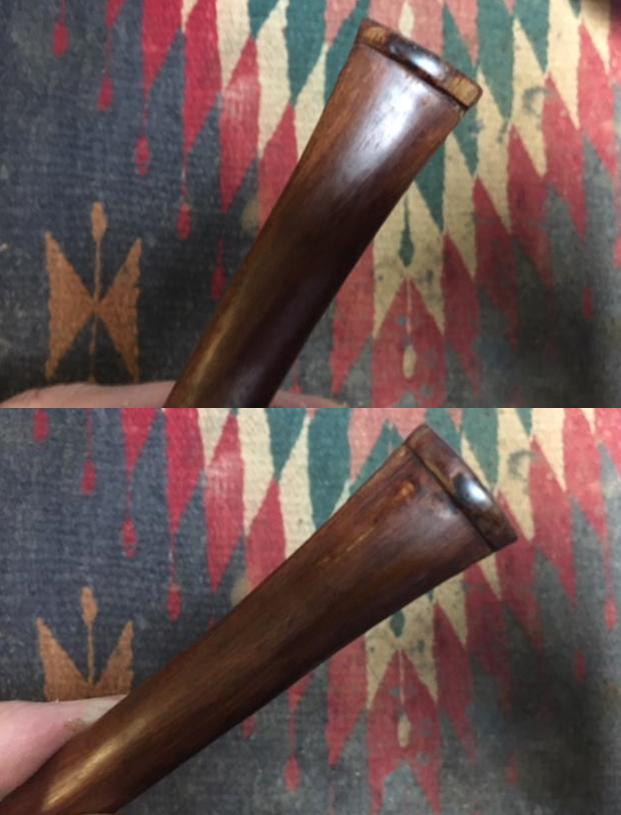
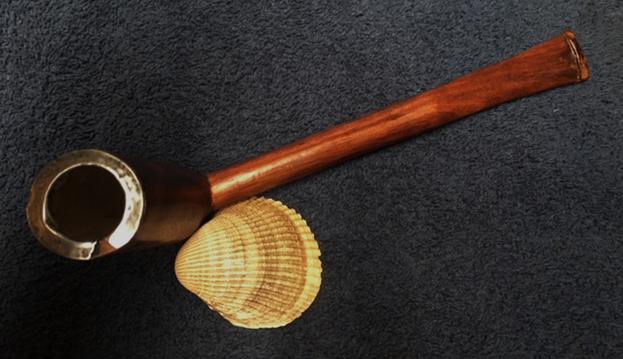
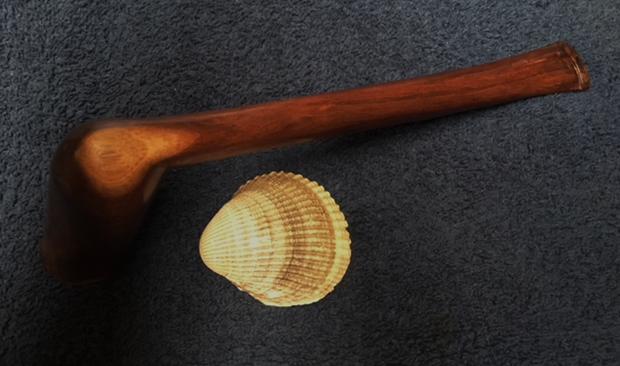
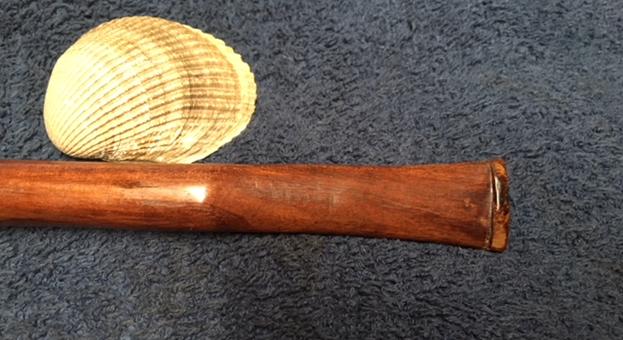
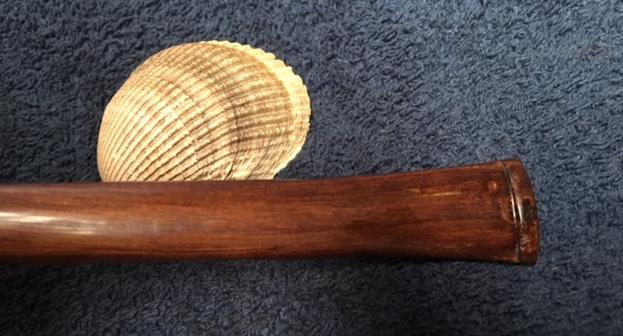
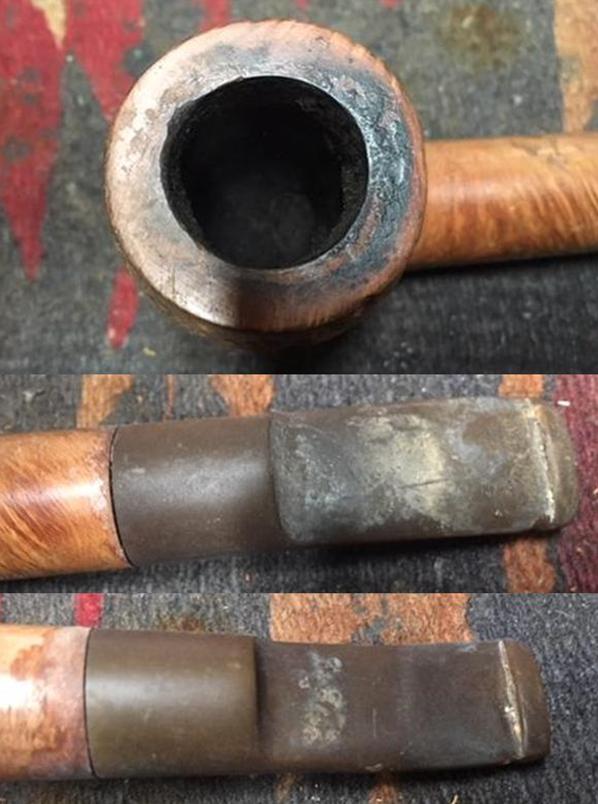
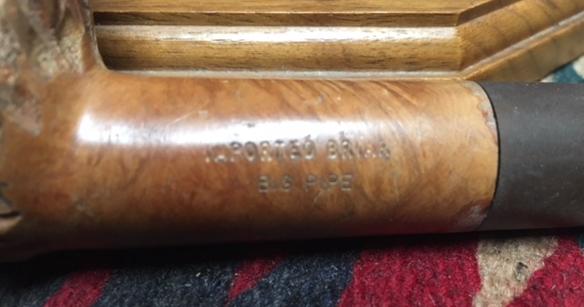
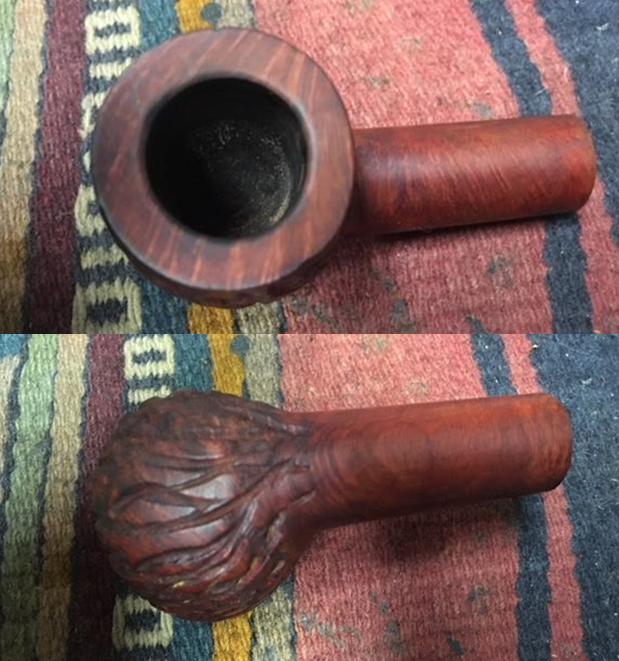
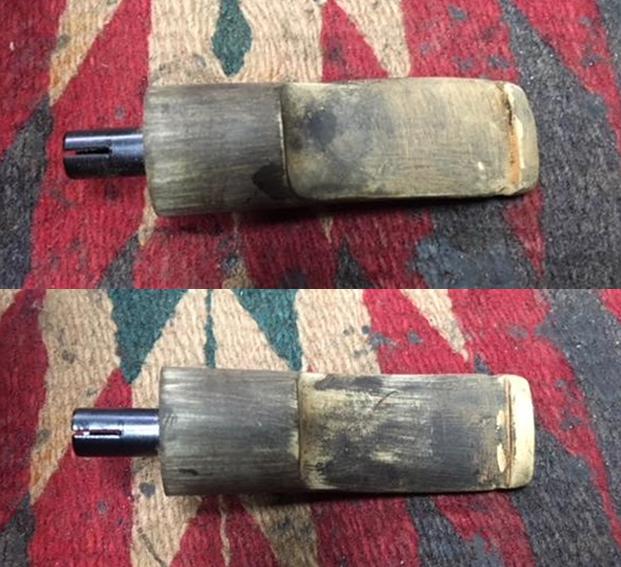
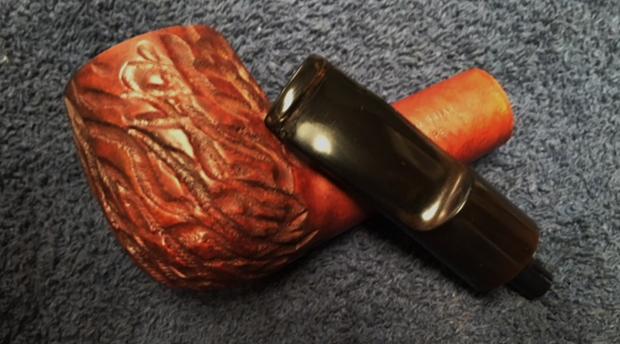
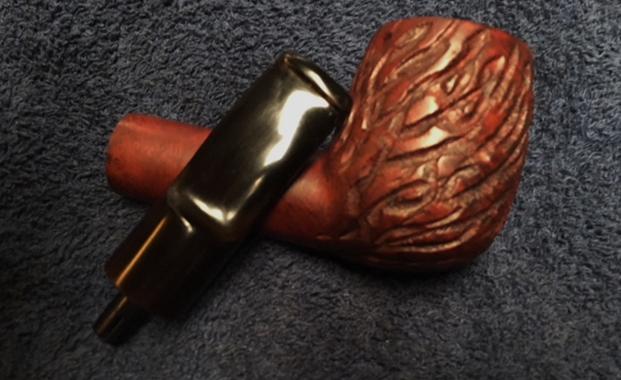
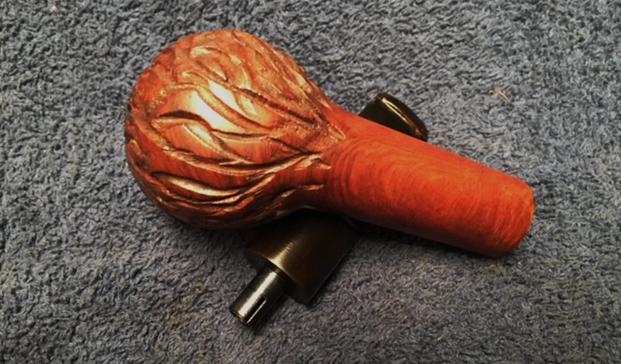
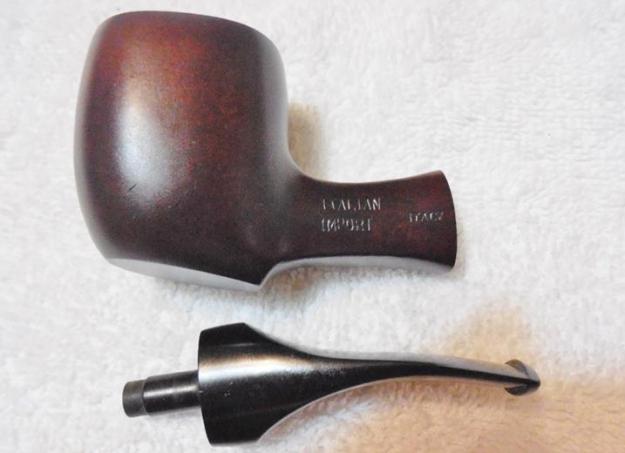
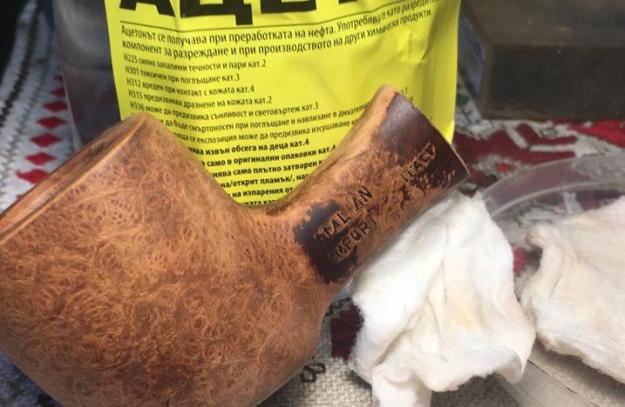
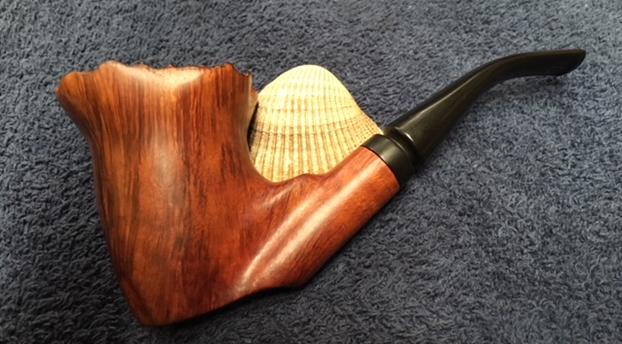
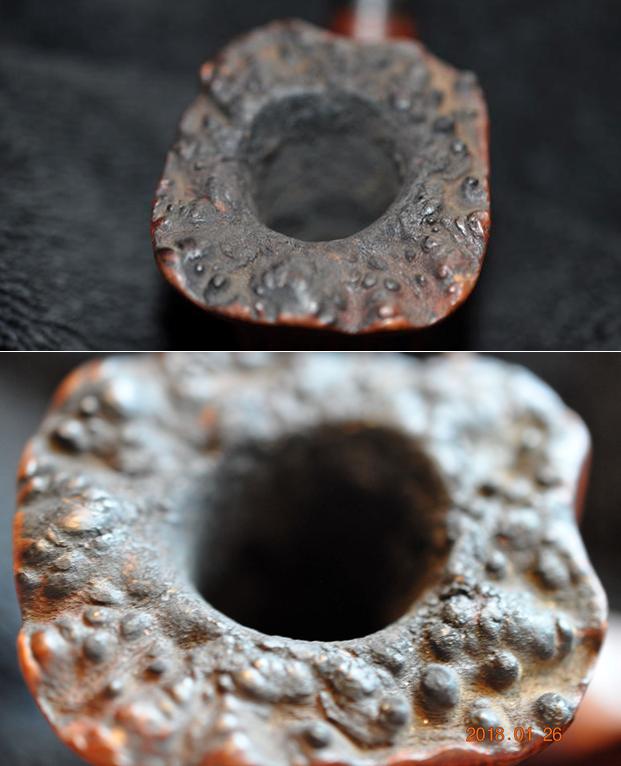
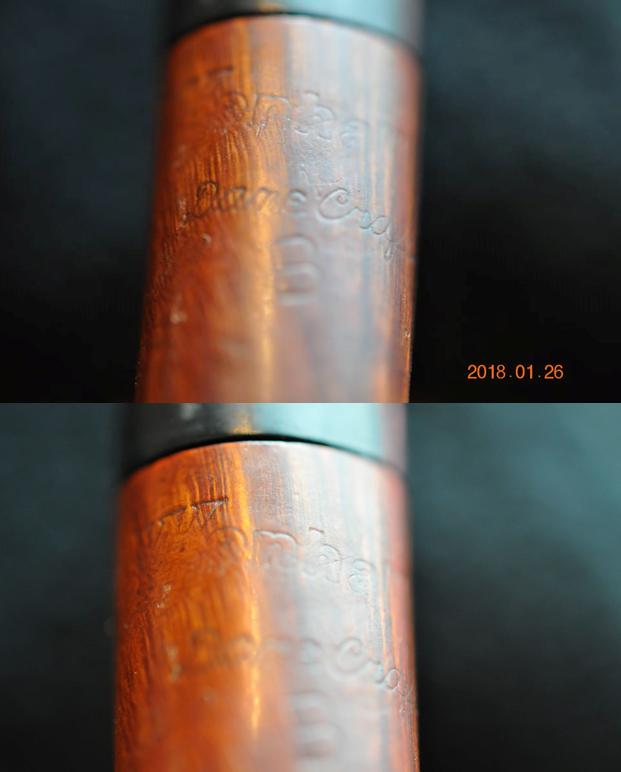
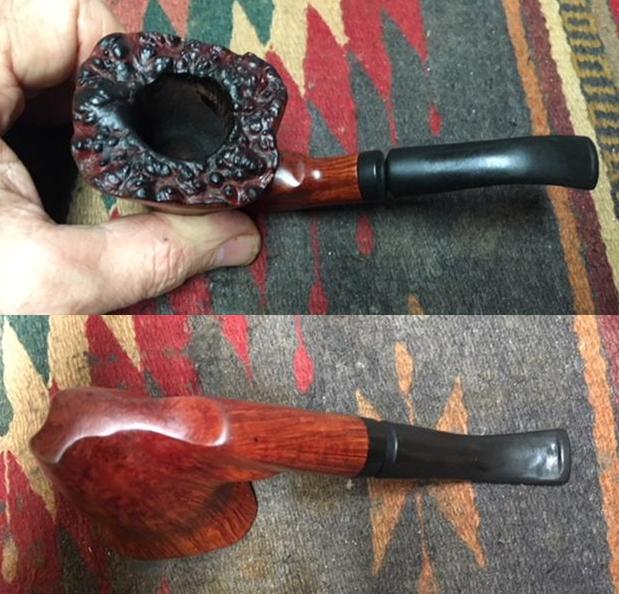
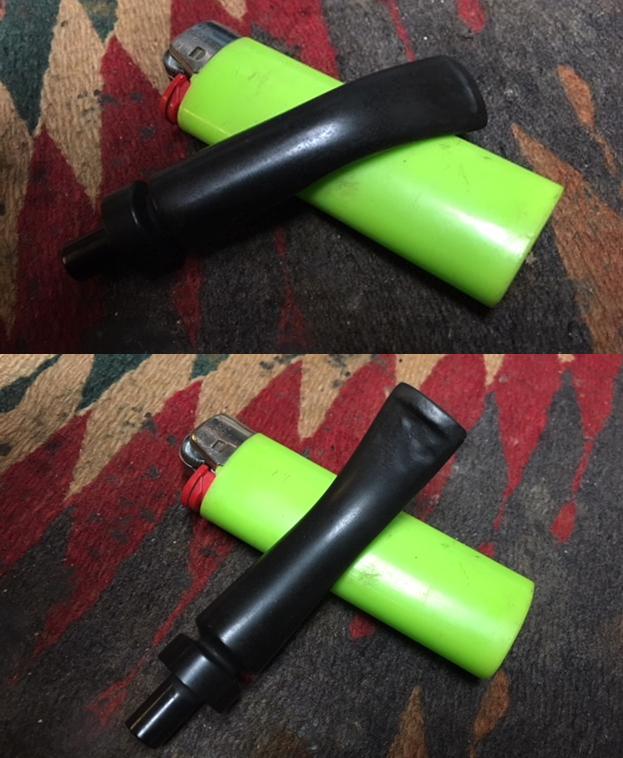
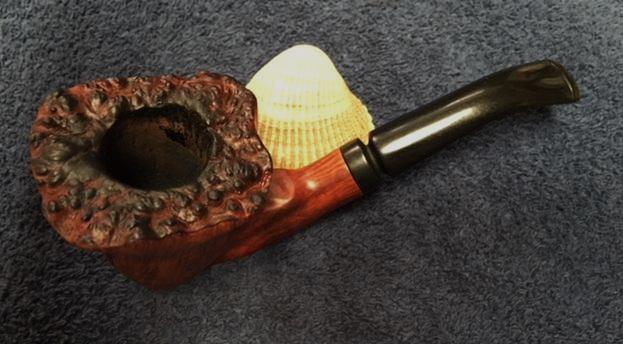
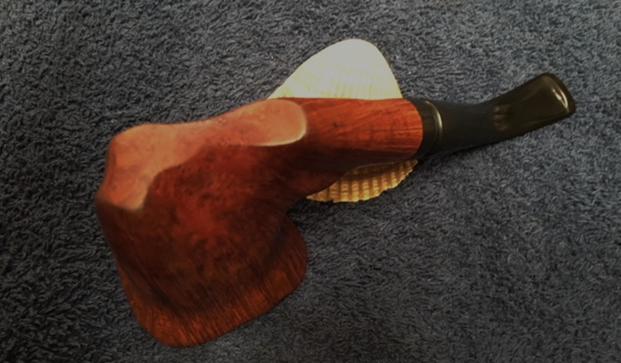
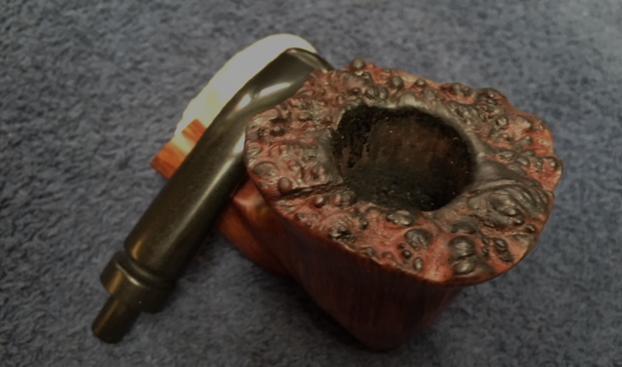
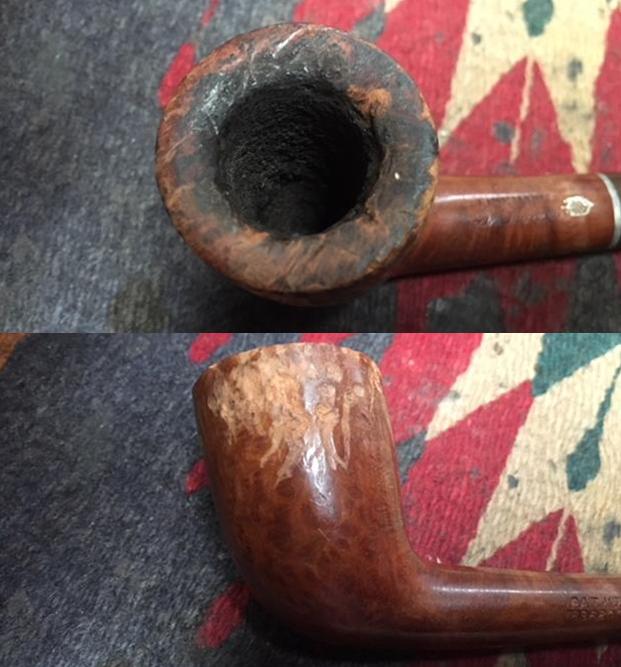
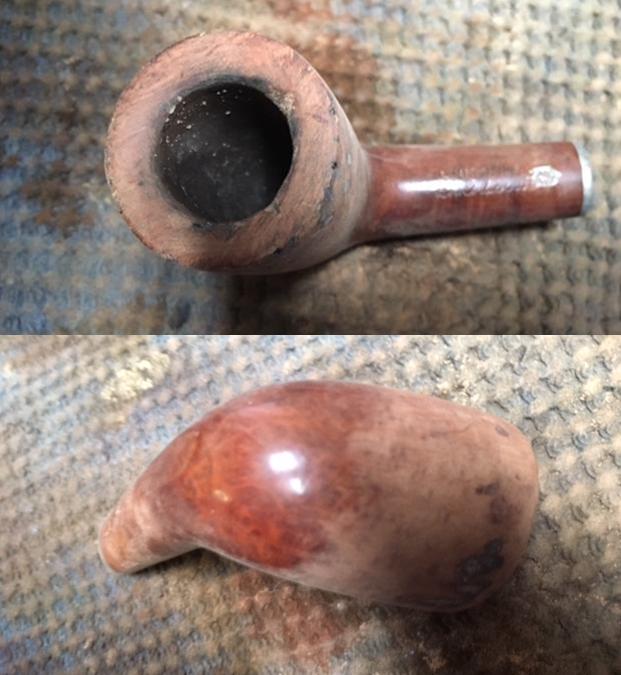
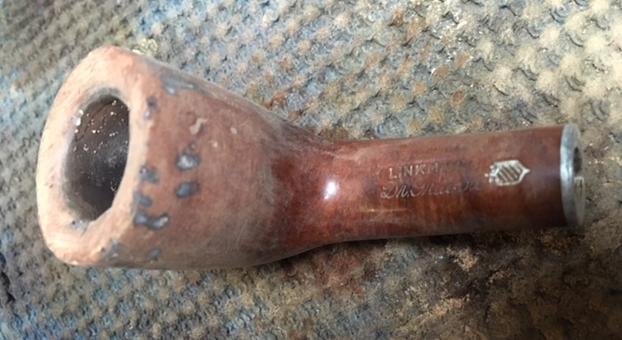
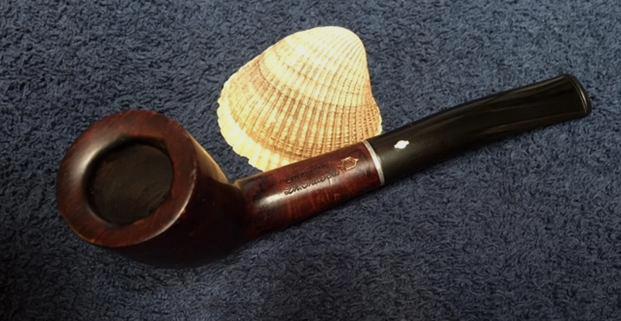
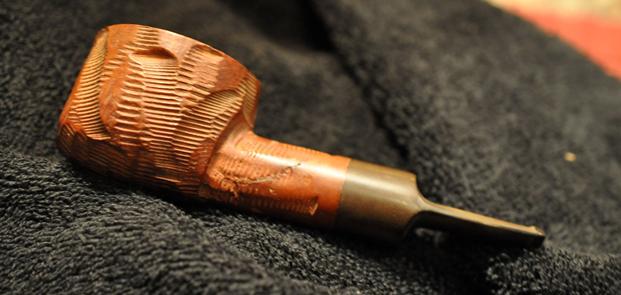
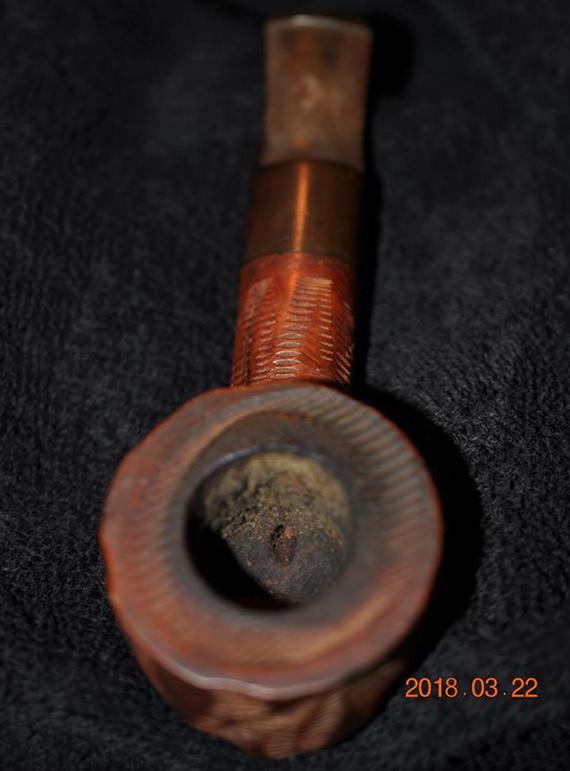
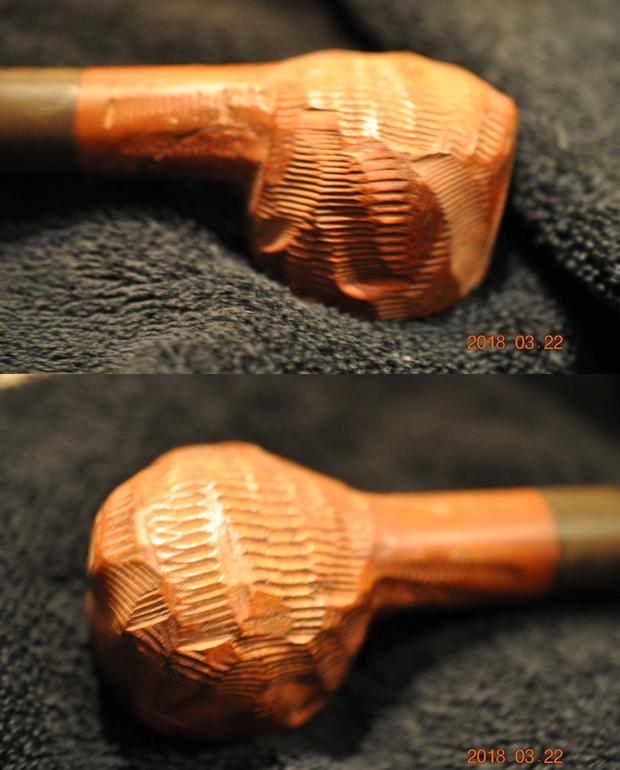
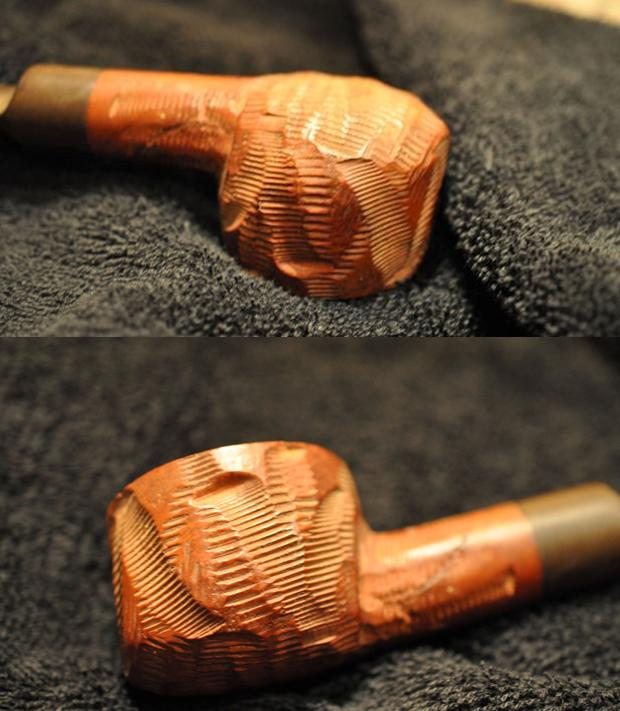
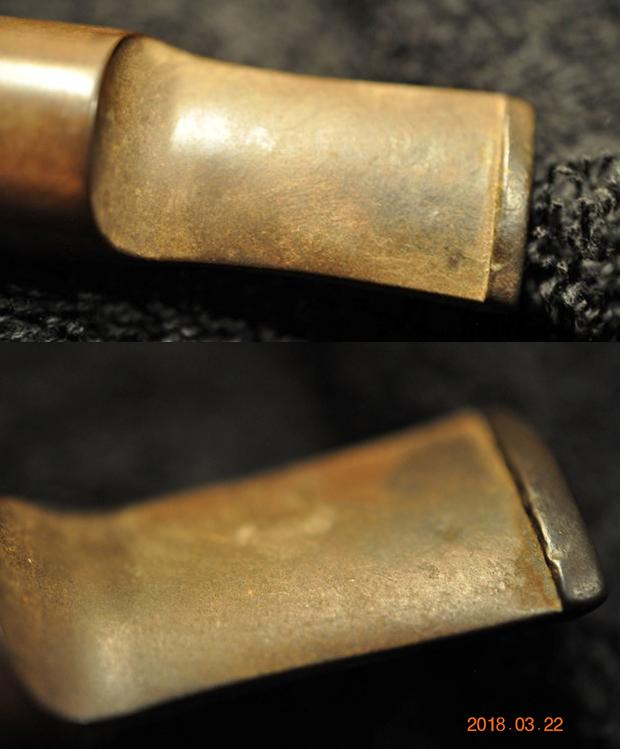
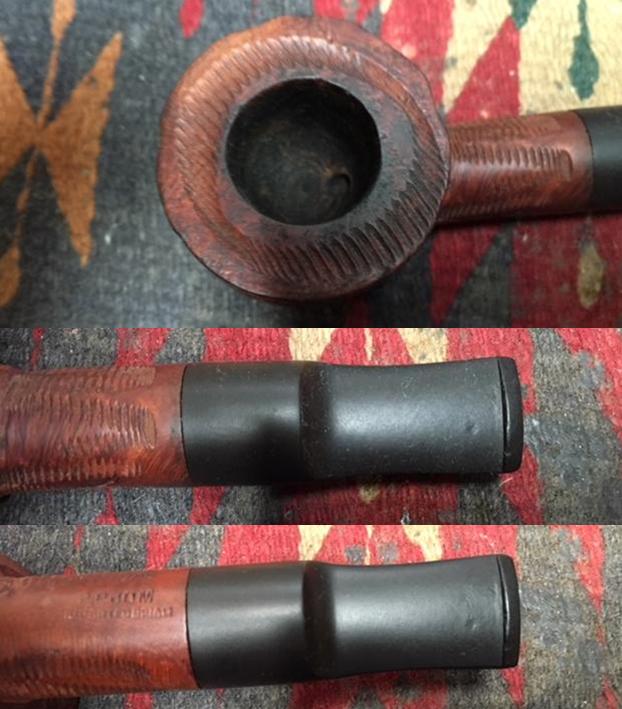
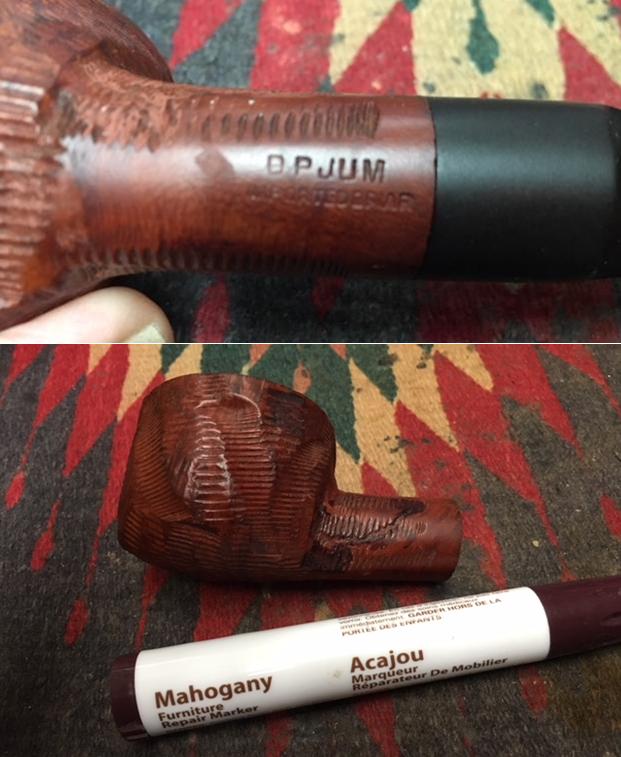
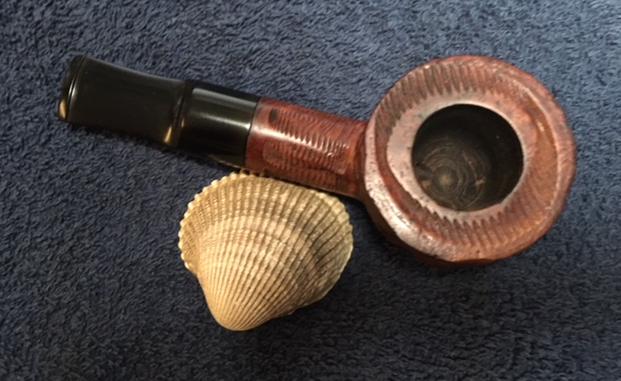
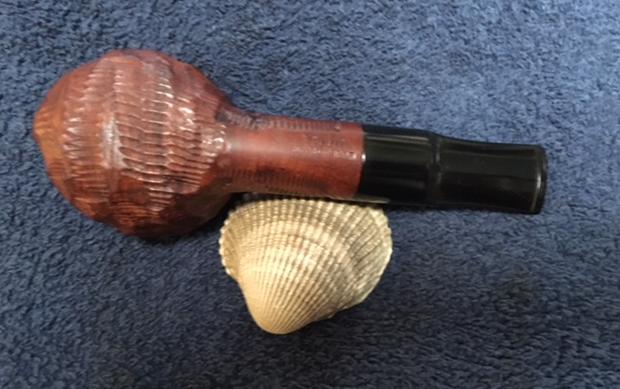
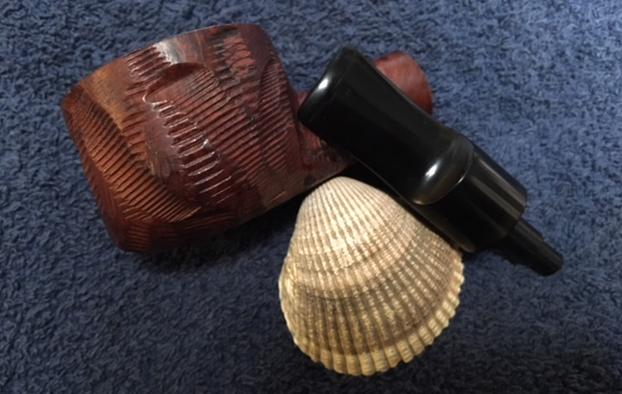
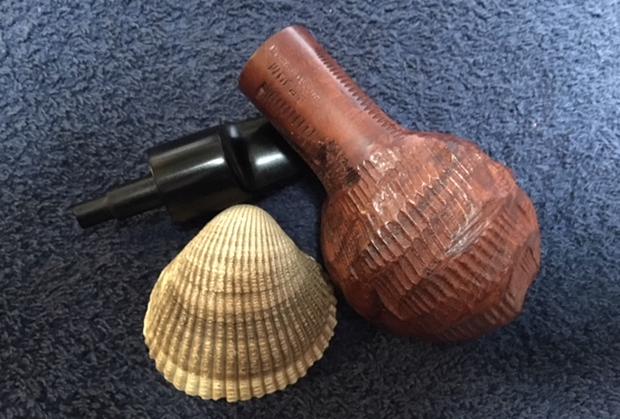
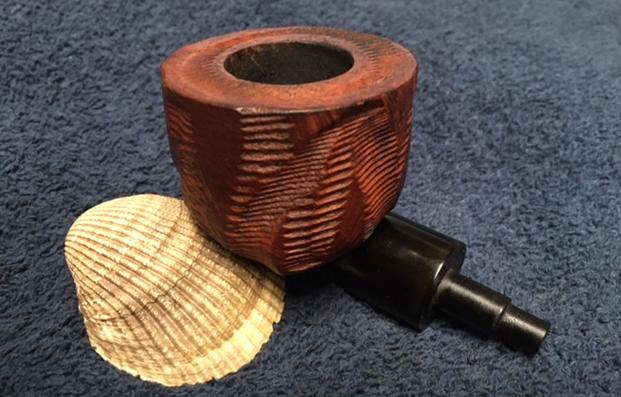
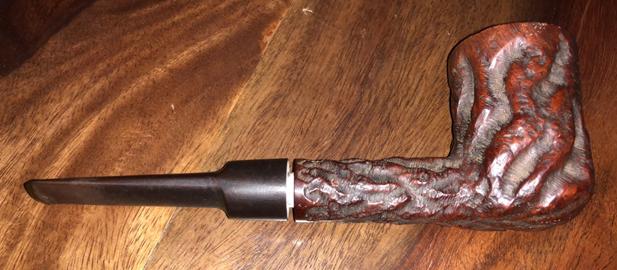
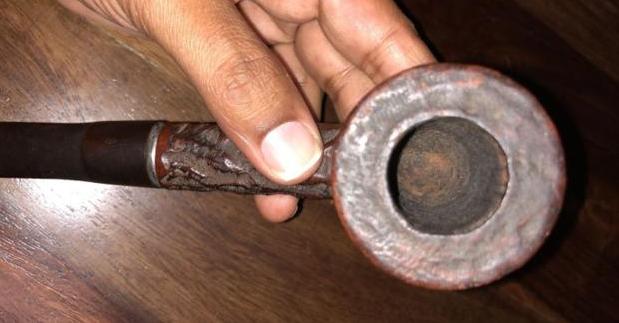
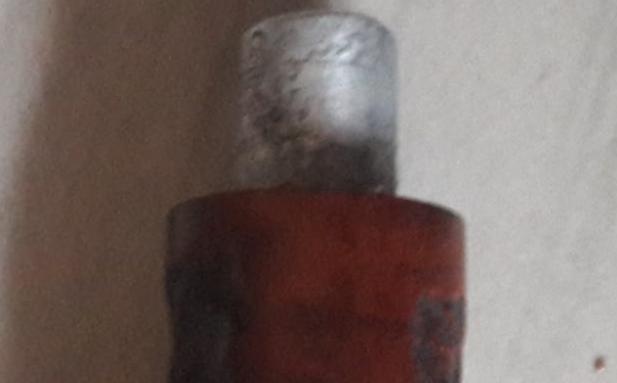
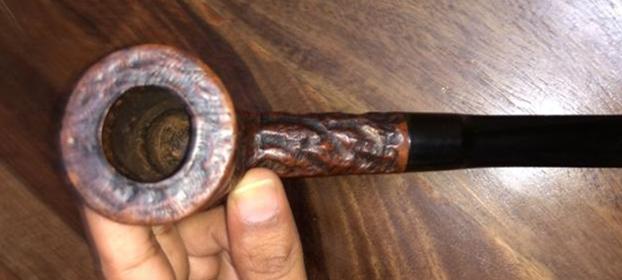
The Bulldog before me has the nomenclature on the left shank, ‘AMPHORA’ over ‘X – tra 724-644’. On the right side of the shank it reads, ‘GENUINE BRIAR’ over ‘AMPHORA HOLLAND’.  The general condition of the pipe is dirty and it has a lot of nicks, bumps and dents.  The cake in the chamber is moderate.  The dome of the Bulldog is in good shape, but the double rings separating the dome and the lower bowl has some chips and dents.  There are also several small fills isolated on the left, lower side of the bowl that need a closer look.  The stem has oxidation, but the bit has little tooth chatter.  I begin the restoration of this Amphora X-tra quarter bent Bulldog by adding the stem to the Before and After Deoxidizer along with other stems in queue.   I leave the stems in the bath for several hours and then I fish the Bulldog’s stem out.I wipe the Deoxidizer off (didn’t take pictures of this!) with a cotton pad and light paraffin oil (mineral oil in Bulgaria).  The deoxidizer did a good job.  After the stem dries, I look for the ‘A’ stamping on the stem.  It remains only a phantom and I’m afraid it will disappear into oblivion.  It is impossible to see without a strong light and glare.  I’m afraid it’s a lost cause.
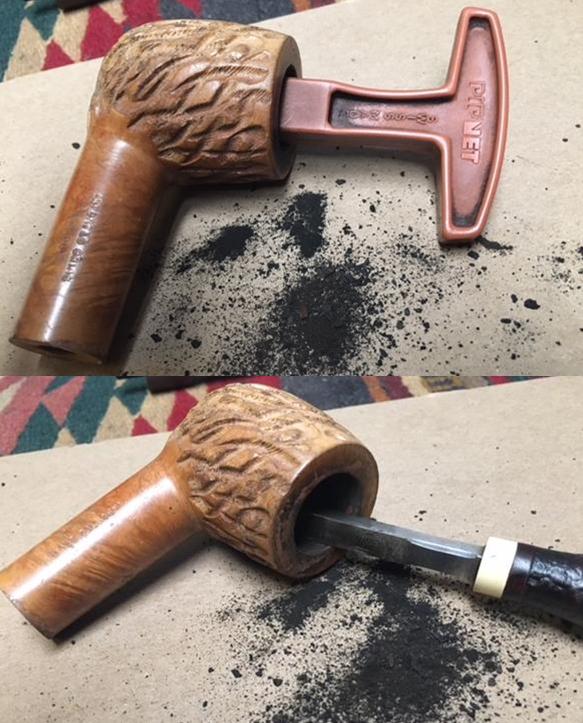
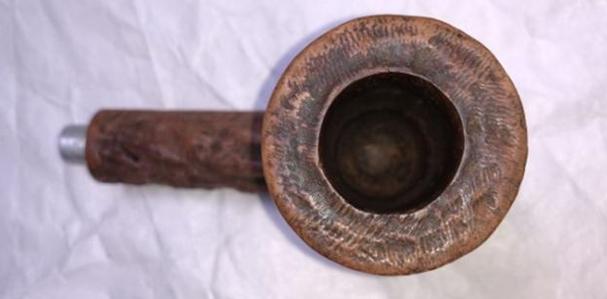
Turning now to the stummel, I ream the chamber to remove the layer of cake to go down to fresh briar.  To do this I use the Pipnet Reaming Kit.  I start with the smallest blade and use only 2 blades of the 4 available to me.  I then switch to the Savinelli Fitsall Tool to scrape the chamber walls to fine-tune the reaming job.  Finally, I sand the chamber removing additional carbon left over and getting down to the fresh briar.  To do this I wrap a piece of 240 sanding paper around a Sharpie Pen.  I finish by wiping the chamber with a cotton pad wetted with isopropyl 95%.  The chamber walls look good – I don’t see any cracks or heat fissures.  The pictures show the progress. 
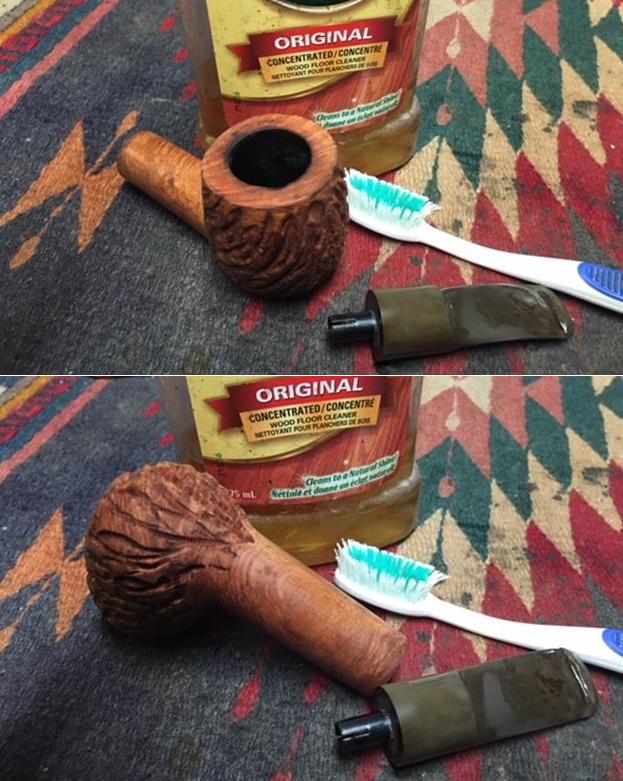
Now, to clean the external briar surface I use undiluted Murphy’s Oil Soap and a cotton pad.  I also employ a tooth brush to scrub the surface around the dome rings and I use a sharp dental probe to scrape the muck out of the twin dome rings going around the circumference.  There is some light lava on the slanted rim which I scrub with a brass brush and scrape with a pin knife.  It cleans up well.  There remains darkened briar around the rim which I will need to sand.
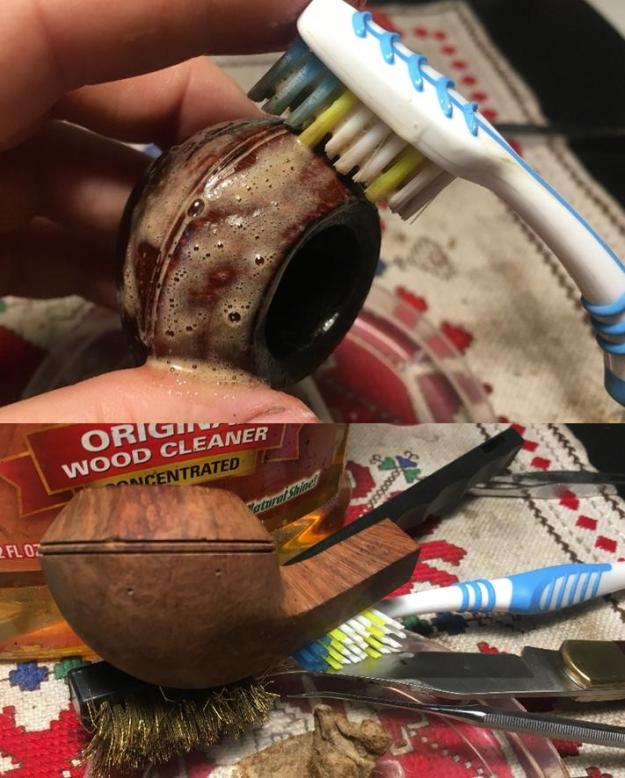
After the cleaning the stummel, I again check the fills that riddle the left side of the stummel.  I use a dental probe to test the fills.  The larger ones are soft from the moisture and I dig the fills out with the probe.  The smaller fills seem to be good, so I’ll leave them.  
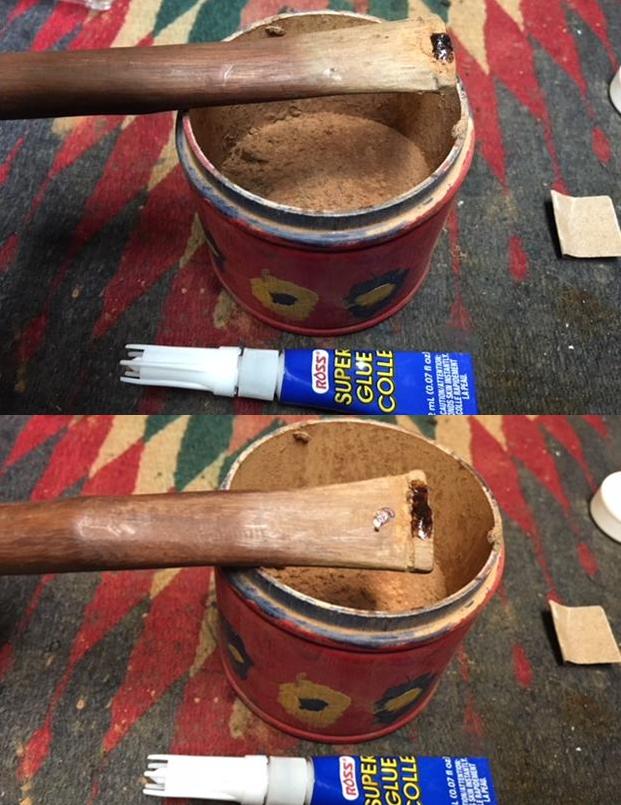
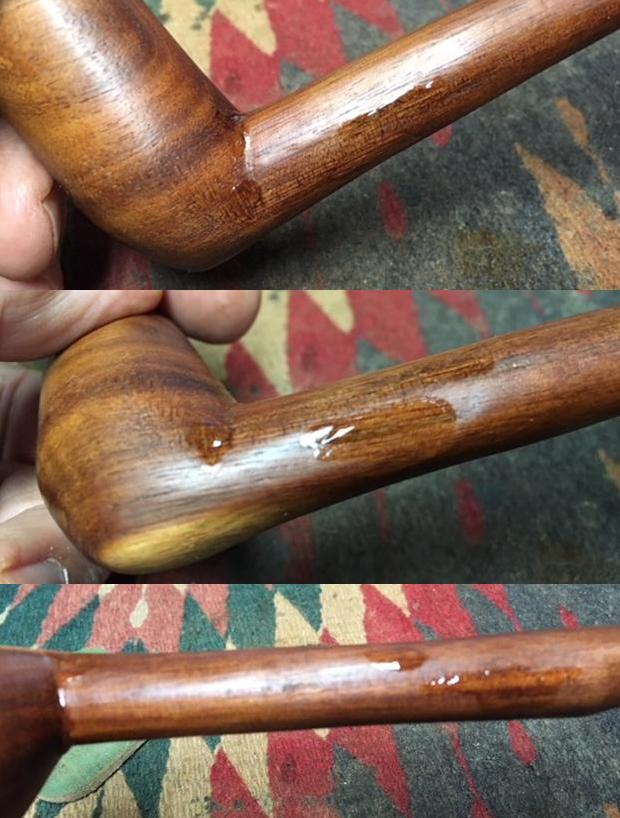
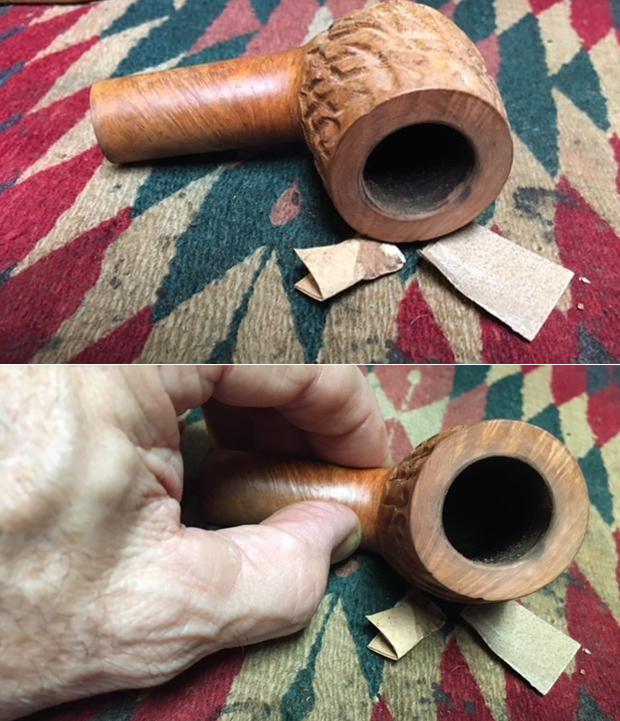
There’s a lot of patching to do.  To do all the stummel patching together, I look at the damaged areas of briar that have been chipped from the dome ring ridges.  I take pictures focusing on these areas to get a better look.  The first picture is the front of the stummel – a large chip is taken out of half of the center ring.  The next picture shows that there are two chips on the left side of the stummel.  I’ll patch the dome ring chips and the fills together using a putty mixture of CA glue and briar dust.  
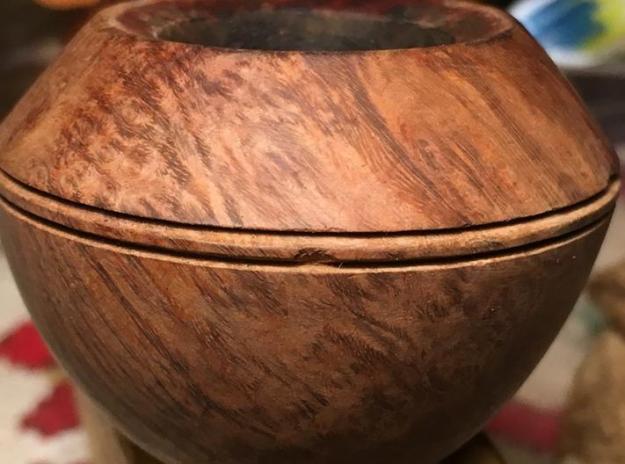
While I think about how best to approach these patches, I first clean the internals of the stummel using pipe cleaners and cotton buds dipped in isopropyl 95%.  It gave some resistance, but eventually the pipe cleaners and cotton buds prevail.  Later, I’ll also do a kosher salt and alcohol soak to clean more thoroughly.
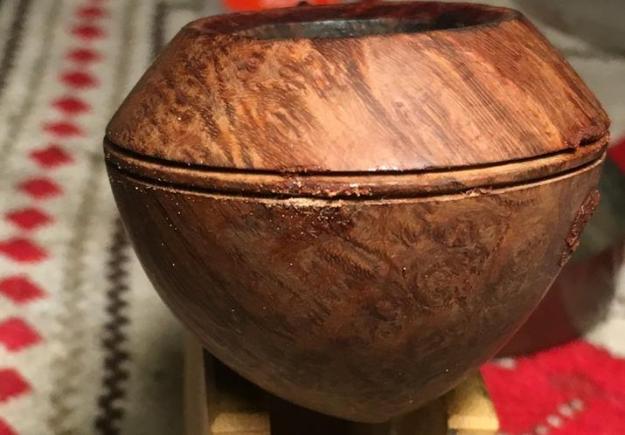
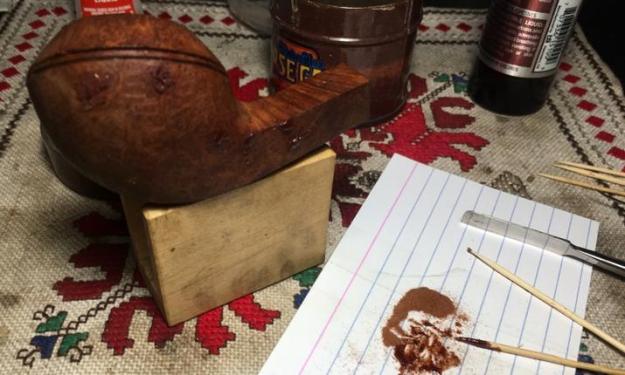
To patch the chips in the ring, after wiping the area with alcohol, I apply a thick CA glue and briar dust putty to damaged areas.  I mix thick CA glue and briar dust together until the putty reaches the viscosity of molasses and then I use a toothpick and a dental spatula to apply the putty. With the help of the dental spatula I make sure the troughs of the dome rings stay clear of putty – not an easy task!  With the fills, I apply putty to the holes as mounds and let the putty cure. It looks like a mess now, but I’m hoping it cleans up nicely when I sand the patches down tomorrow!  I let the patches cure overnight. 
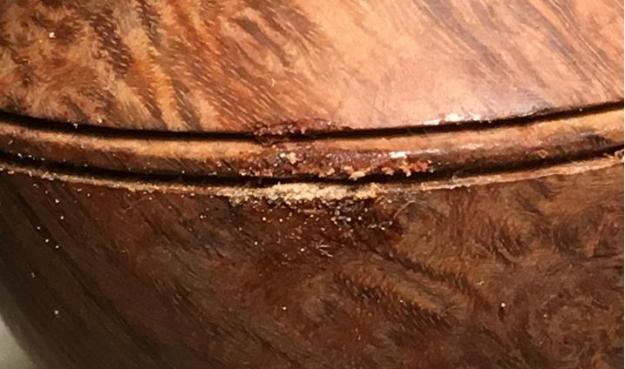
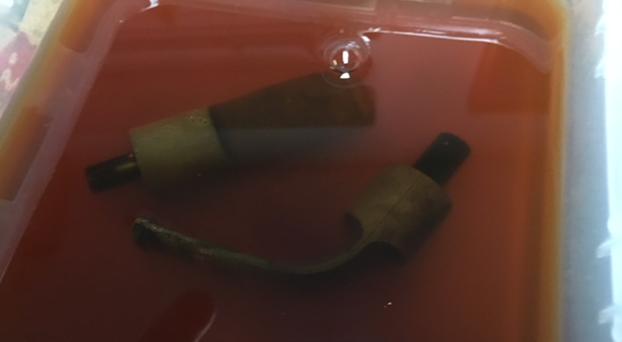
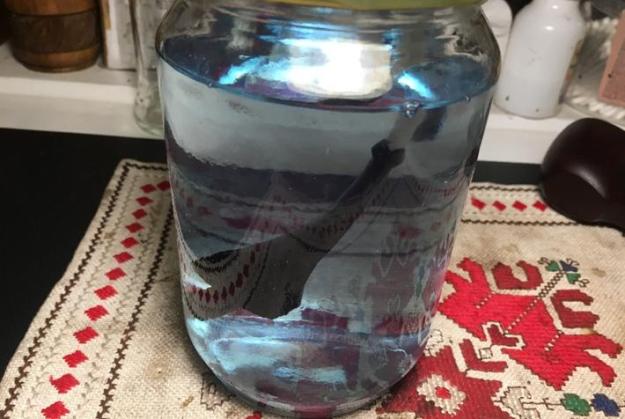
Before I turn out the lights, the patches have set enough to handle.  I clean the stummel internals further with a kosher salt and alcohol soak.  I form a wick by twisting and pulling a cotton ball and then pushing it down the mortise and airway using a stiff straight piece of wire.  I then set the stummel in an egg crate to stabilize it and fill the bowl with kosher salt which leaves no taste.  I then fill the bowl with isopropyl 95% until is surfaces over the salt.  I now turn out the lights.

The next morning the soak has done the job.  The salt and wick are discolored showing the further absorption of tars and oils from the internal briar.  I dump the expended salt in the waste and clean the salt using paper towel.  I then finish by wetting a pipe cleaner and cotton bud with alcohol and run them through one more time.  Internals are clean for the next steward! 
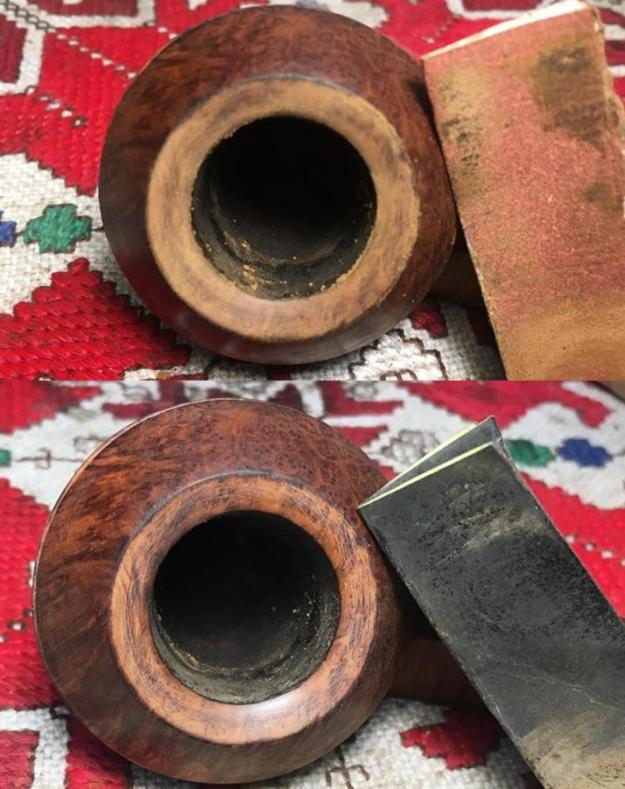
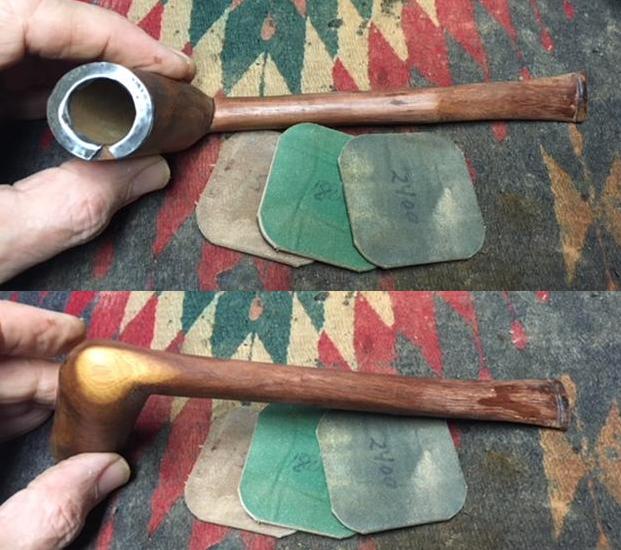
Now working on a clean pipe, I look at the cured patches.  I start with the front chip on the dome ring.  Using a flat needle file, I go to work on filing down the patches to the briar surface.  I’m careful to keep the file on the patch mounds and not to impact surrounding briar.  Then switching to 240 grit, I lightly feather sand the area bringing the patch to the briar surface.  To sharpen the trough and remove excess patch, I fold a piece of 240 paper and fit it in the groove of the trough and sand (first picture below).  I then use a sharp dental probe to clean the debris out of the trough.  It looks good.  I then move to the left side of the dome ring and do the same with the two chip patches.  I take pictures of the process.  
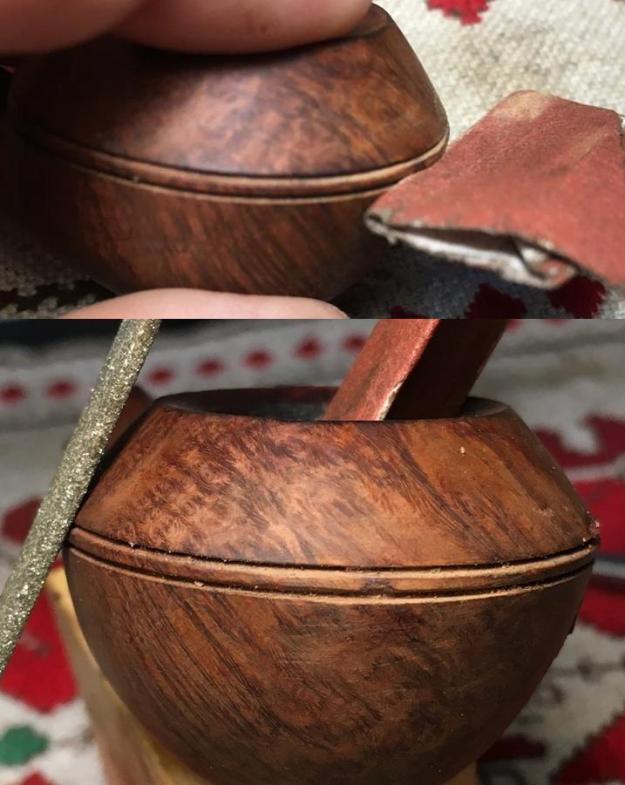
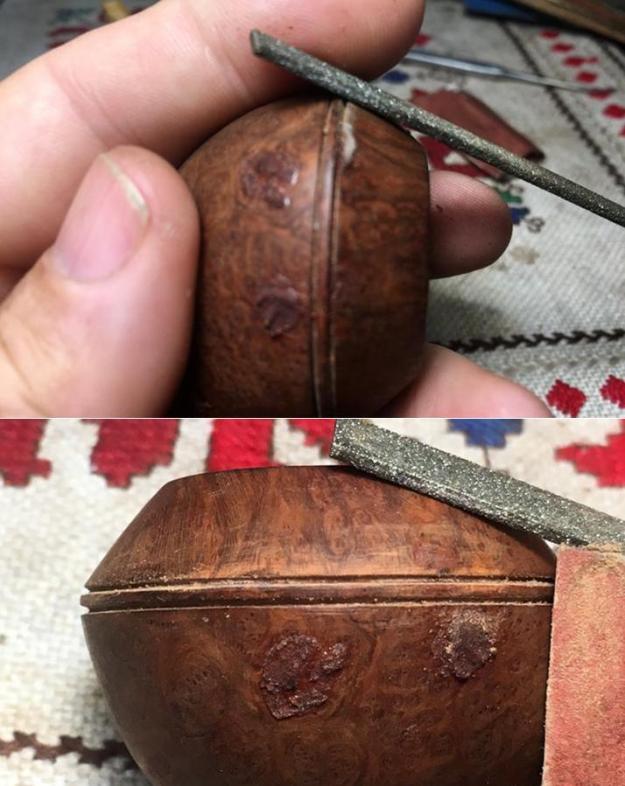
Next, I go to work on the fill patches on the side of the stummel.  With these many patches, it looks like a construction zone!  I use the flat needle file to bring the patches down to the briar surface.  Then, using 240 grade paper, I continue to sand and blend the patches with the briar surface.  I move from patch to patch until they are all down to the briar surface.  Again, I chronicle the filing and the 240 grade paper patch sanding.  
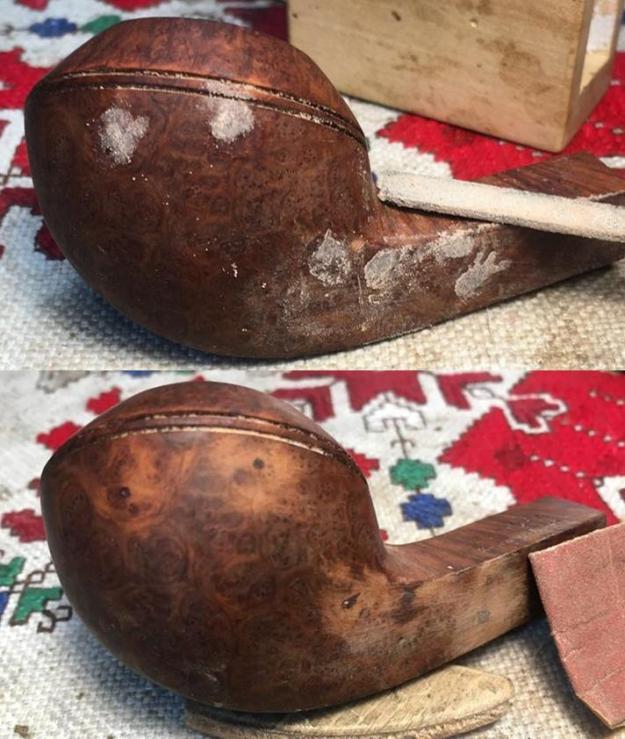
Now I switch to 600 grade paper focusing first on the dome ring chips – first in the front.  I sand the area and I also, like with 240 paper, fold it in half and insert the fold into the trough of the ring and sand back and forth like a hand saw.  This addresses smoothing of the sides of the troughs which form the center dome ring.  Next, I move to the left side dome ring patches and do the same. Again, I use a sharp dental probe to ‘plow out’ the troughs removing the left-over debris.  I travel the entire circumference of the dome ring troughs.  I sand the entire ‘construction zone’ of patches with 600 grade paper which erases the scratches left by the 240 grit paper and blends the patches. Looking again at the beveled rim which angles toward the chamber.  It is darkened from minor scorching and I use a rolled piece of 240 grit paper to clean it.  I follow using a rolled piece of 600 paper to smooth and erase the 240 grit scratching.  
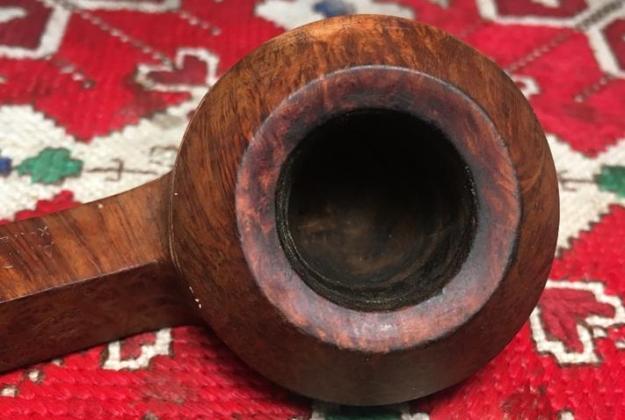
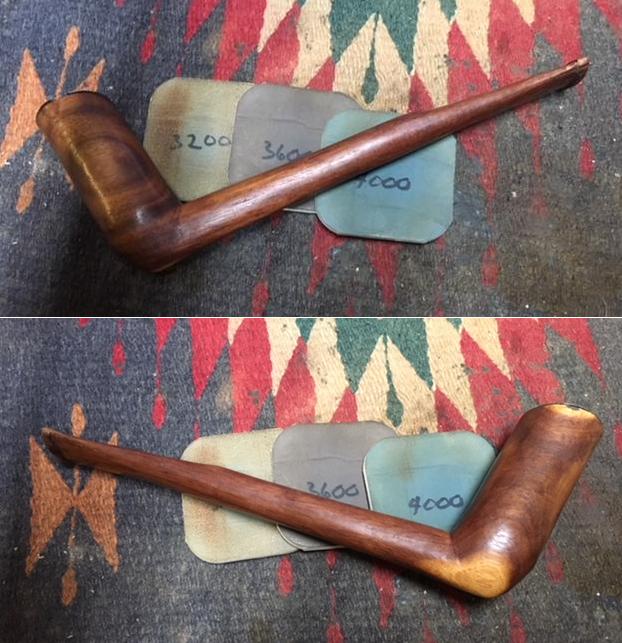
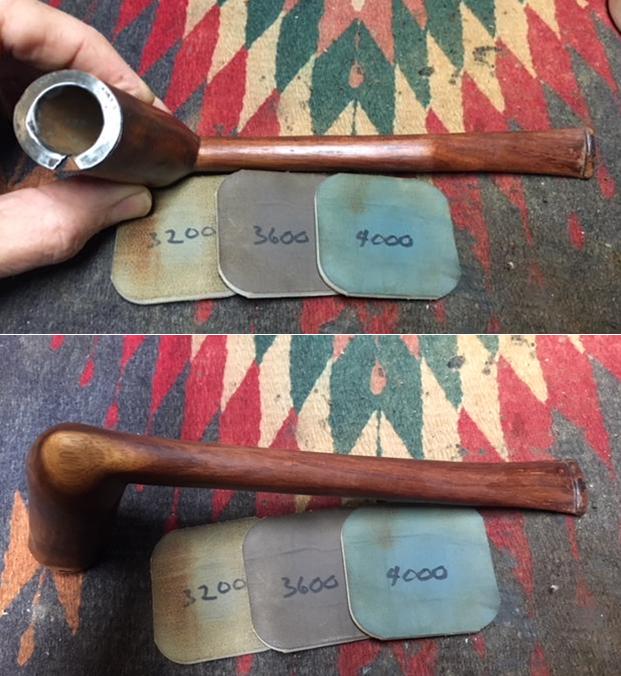
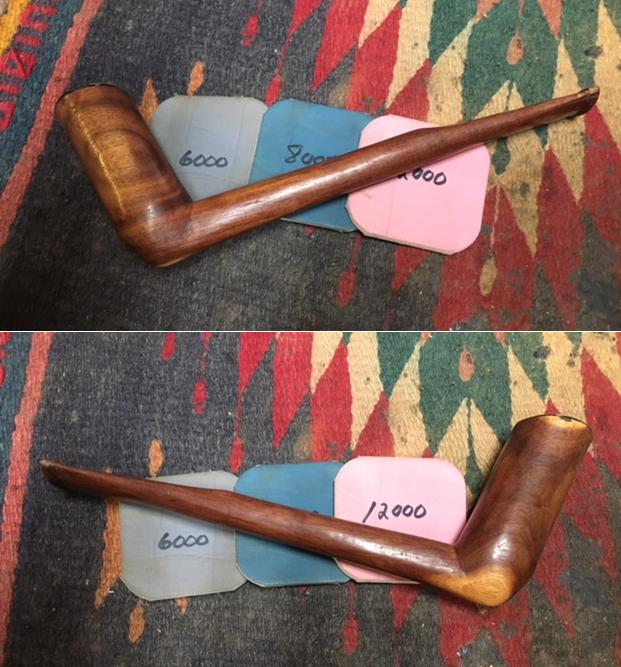
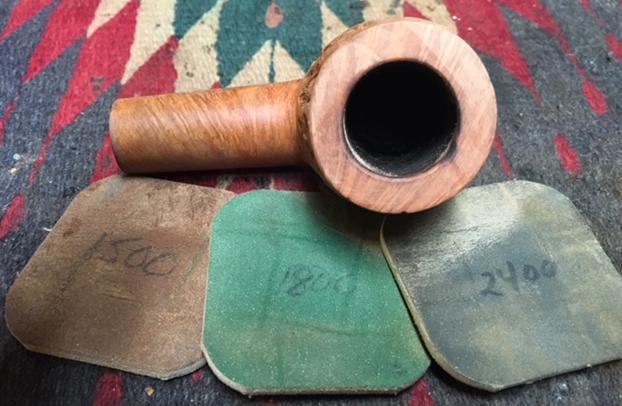
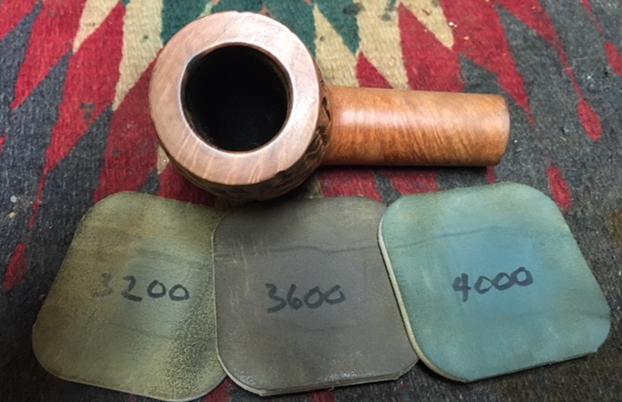
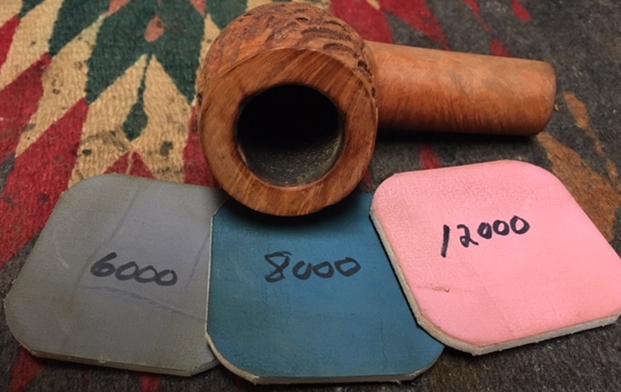
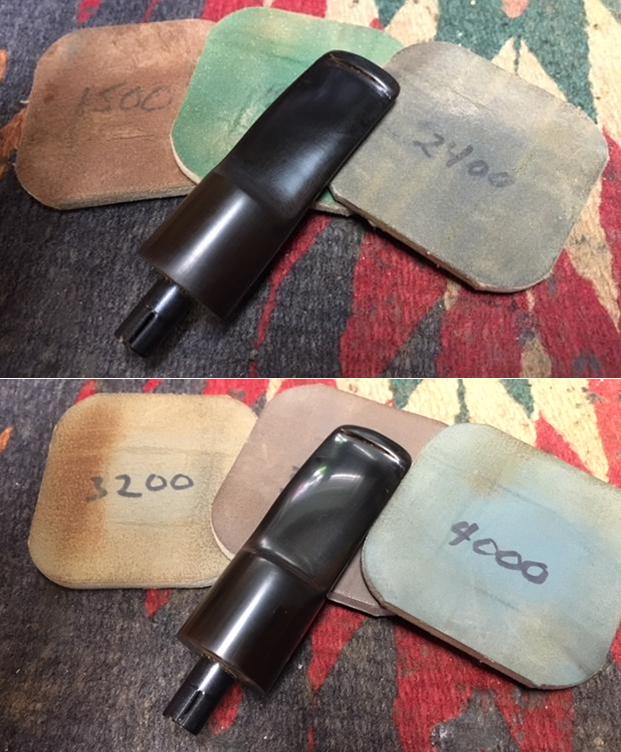
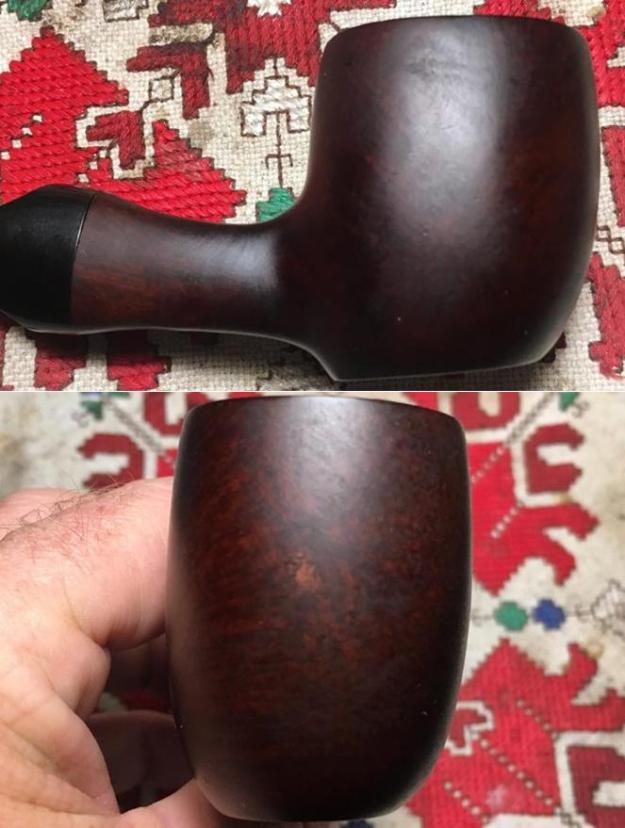
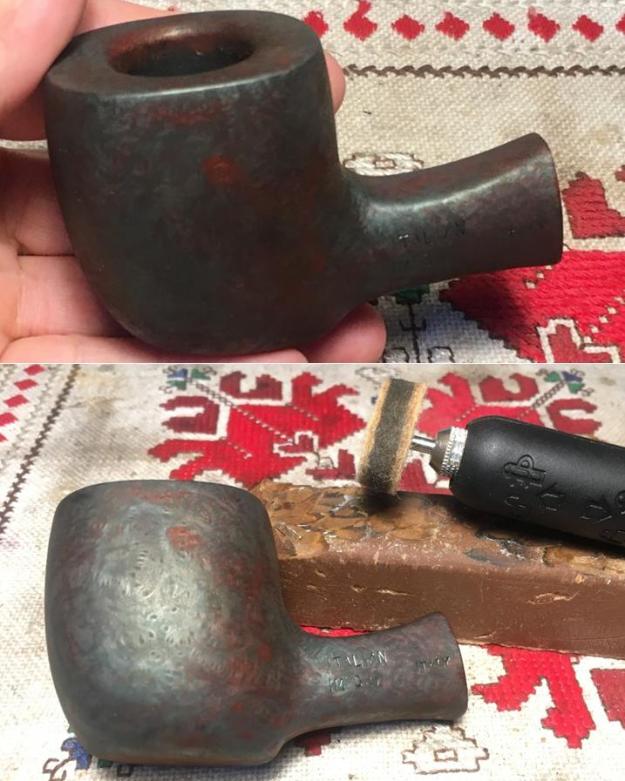
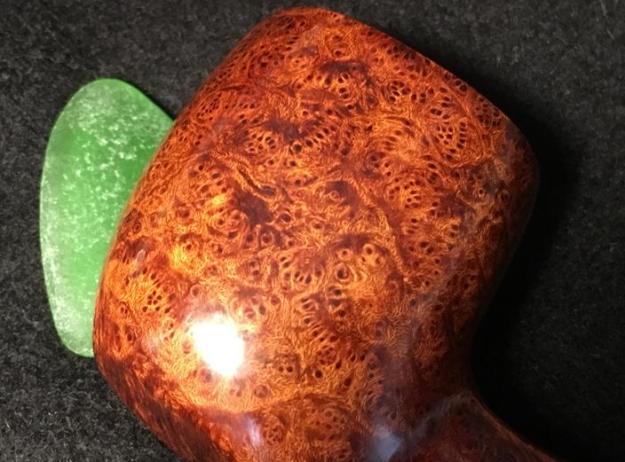
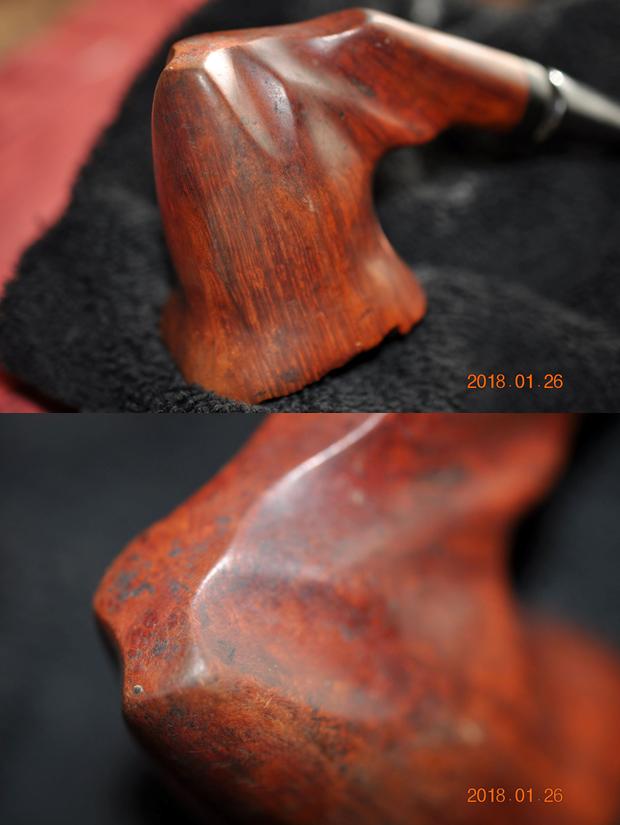
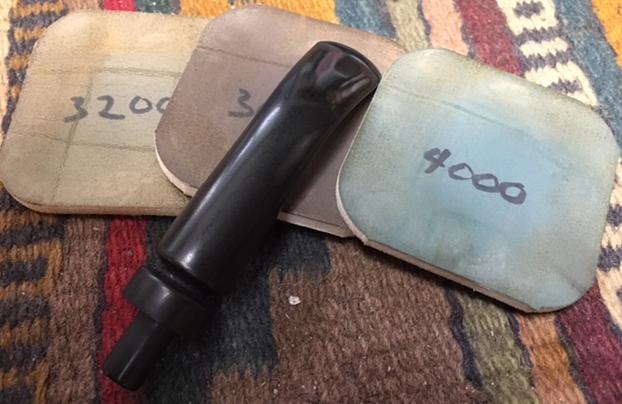
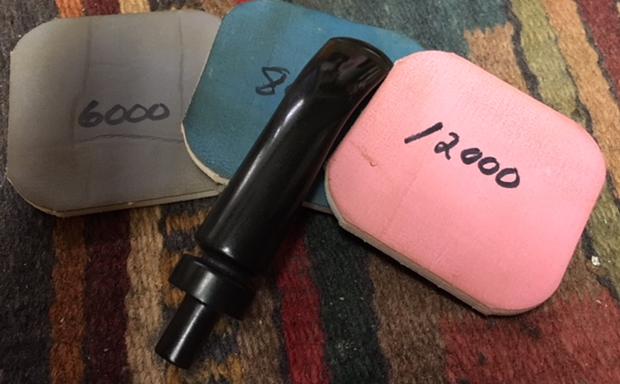
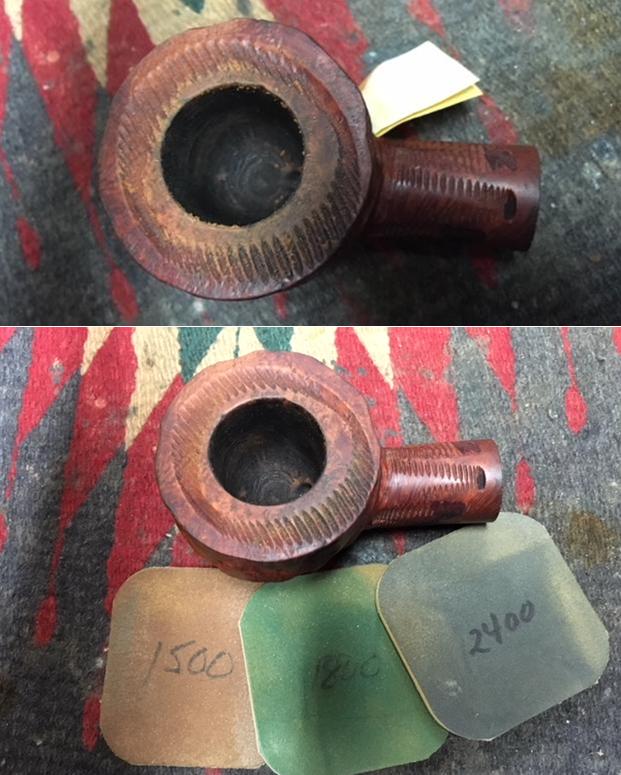
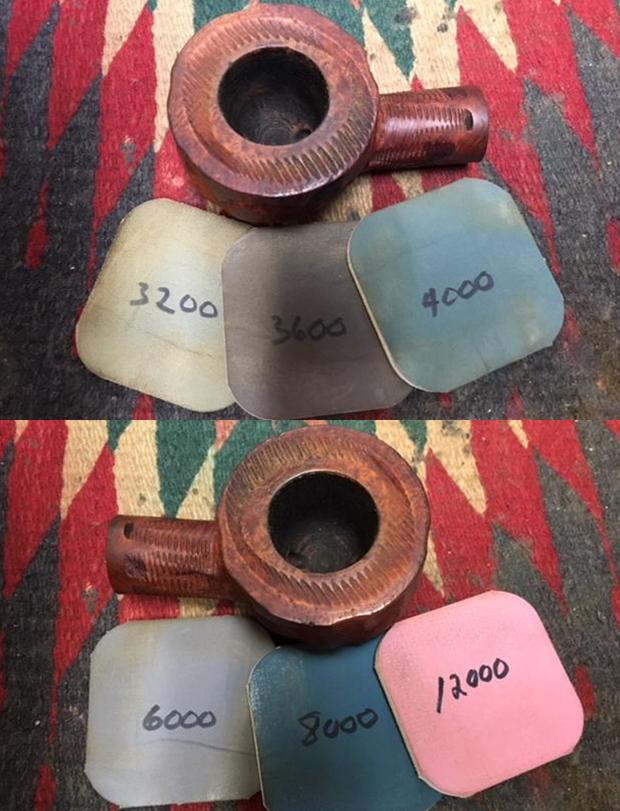
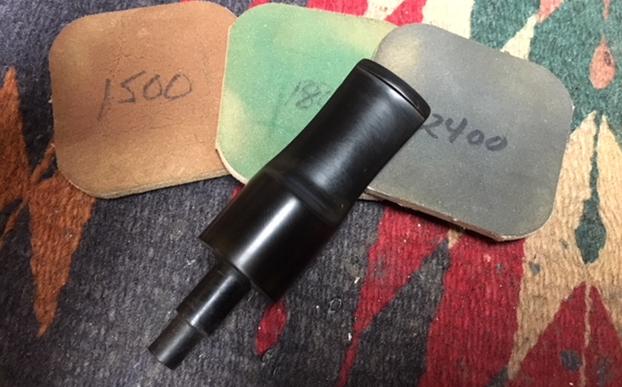
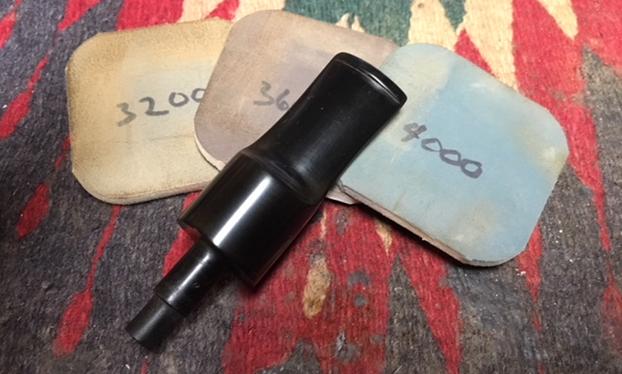
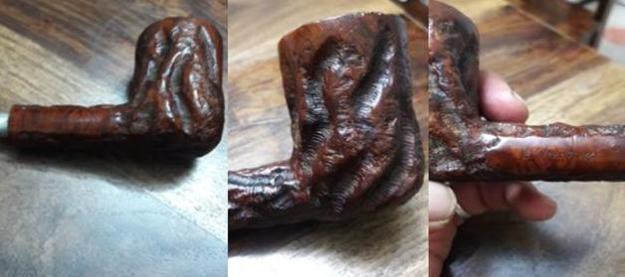
Now, looking to the stummel, it has many scratches and dents, especially on the dome – I take a few pictures to get a closer look.  The question in my mind is, do I go the path of more disruption to the briar, starting with sanding sponges or do I start more conservatively using the micromesh pads?  I decide conservatively – I can always strategically back track if I see too many dents and scratches being left behind.  For now, I start with wet sanding using micromesh pads 1500 to 2400.  I follow this by dry sanding with pads 3200 to 4000 then 6000 to 12000.  Throughout, I’m careful to avoid the nomenclature on both upper, diamond shank sides.  
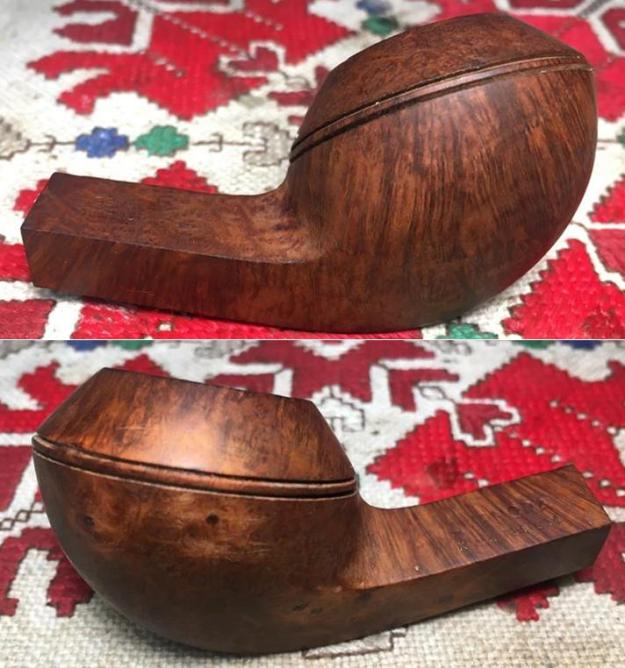
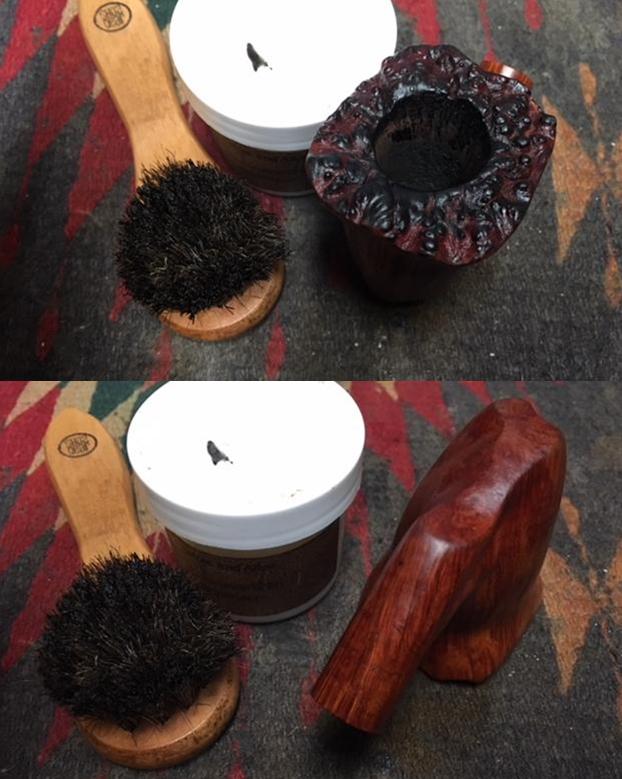
After completing the micromesh sanding, I again take the sharp dental probe and carefully scrape out the dome rings to remove any debris that has collected – and there is some!  I move around the dome in both troughs and then follow by sweeping the rings out with a bristled tooth brush.
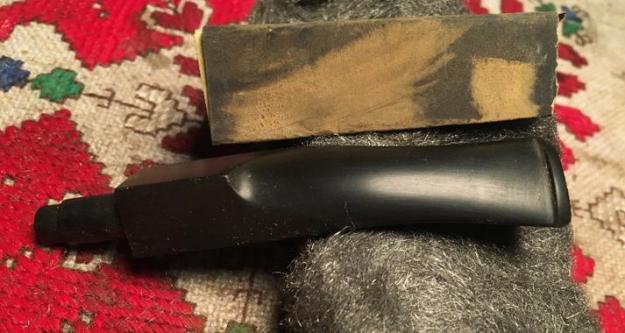
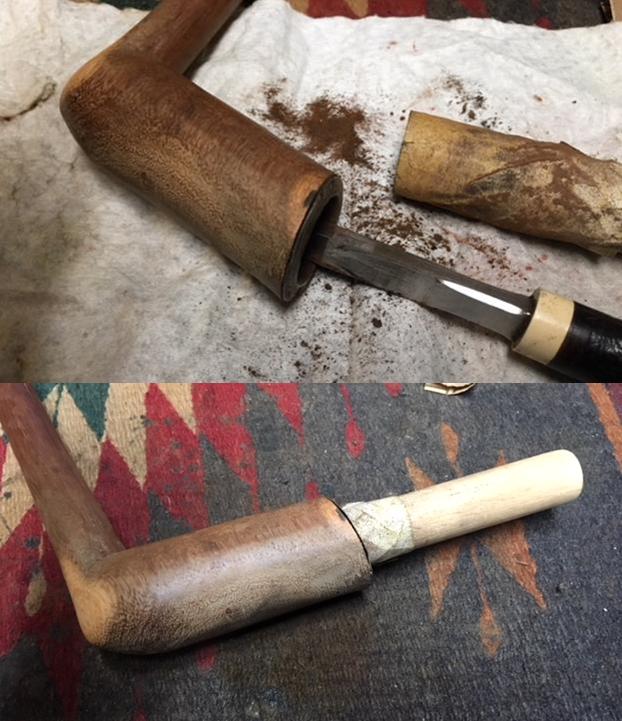
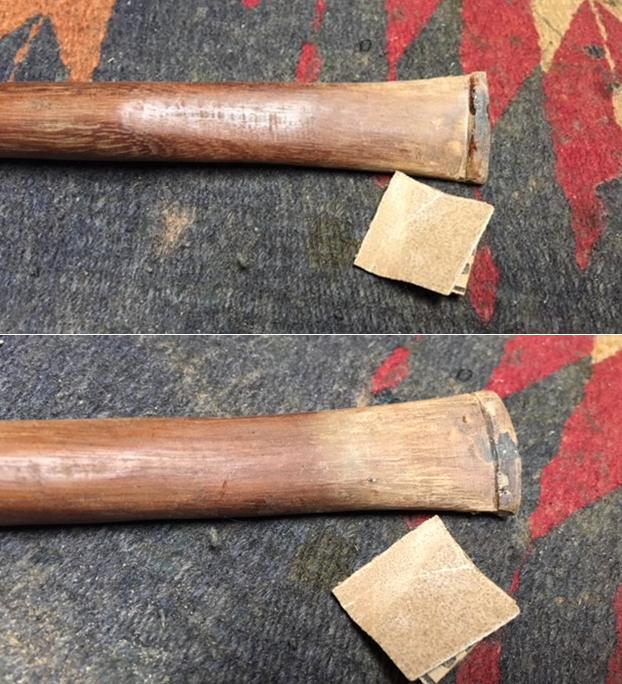
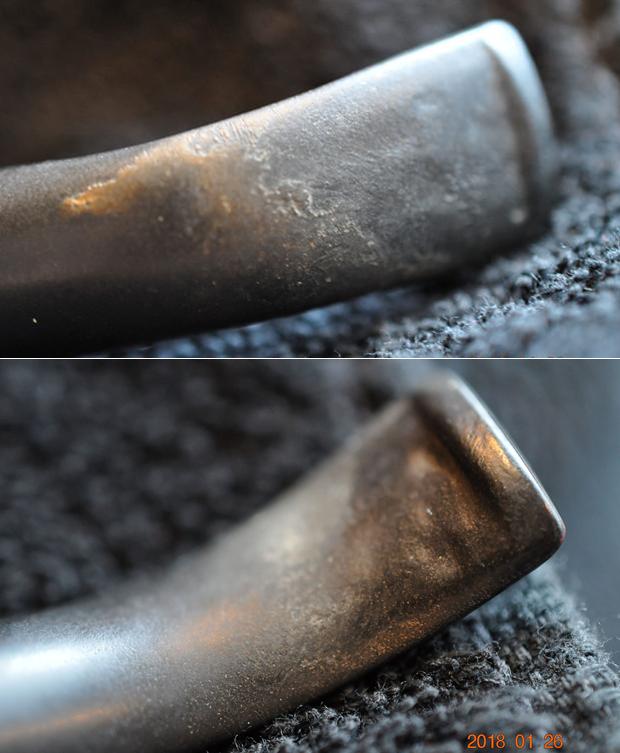
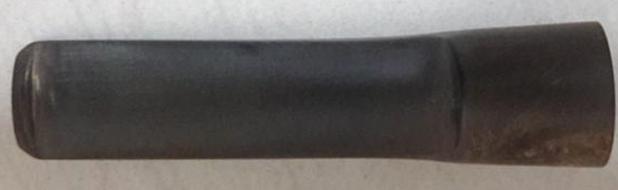
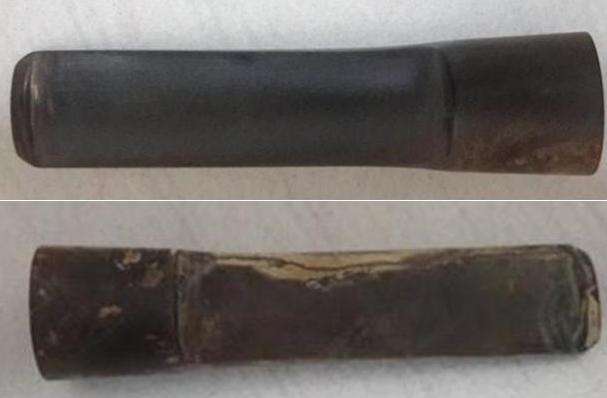
I now need to catch the stem up with the stummel.  I take a few pictures of the upper and lower bit area and there are minor dents on it and the button has some compression.  I’ll heat the vulcanite to raise these dents which should result in easier sanding.  
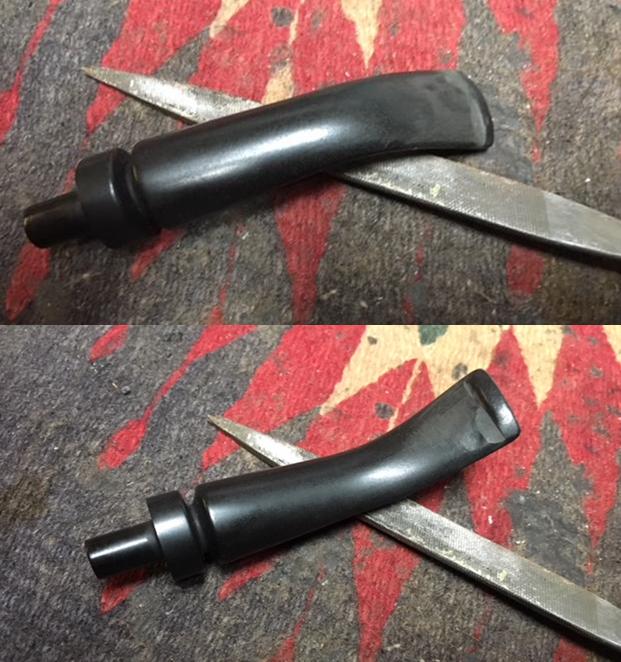
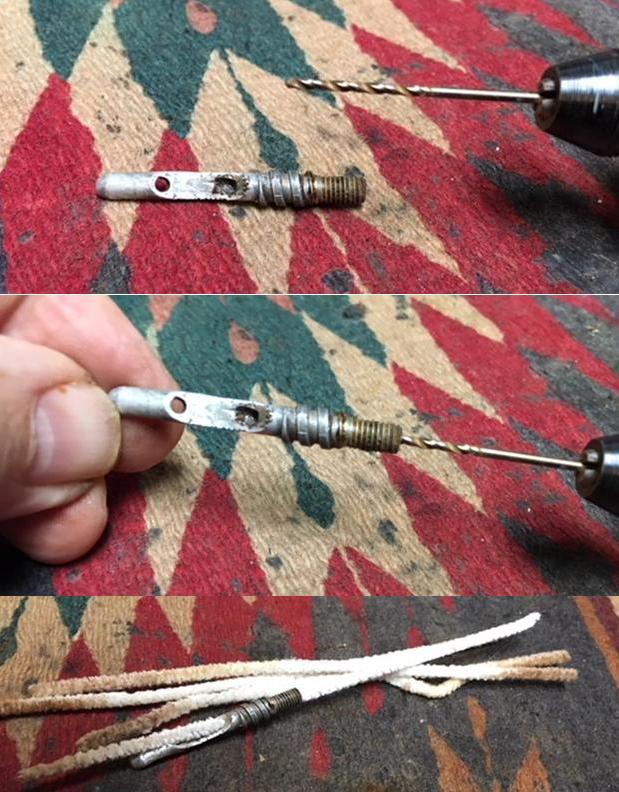
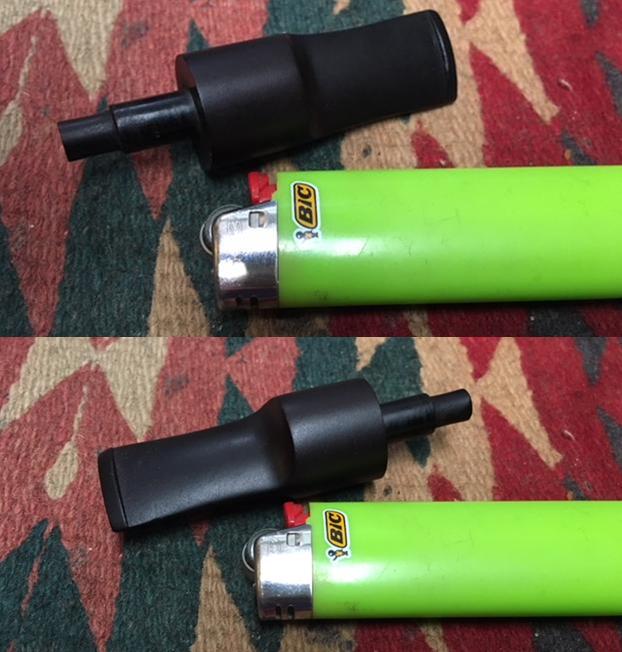
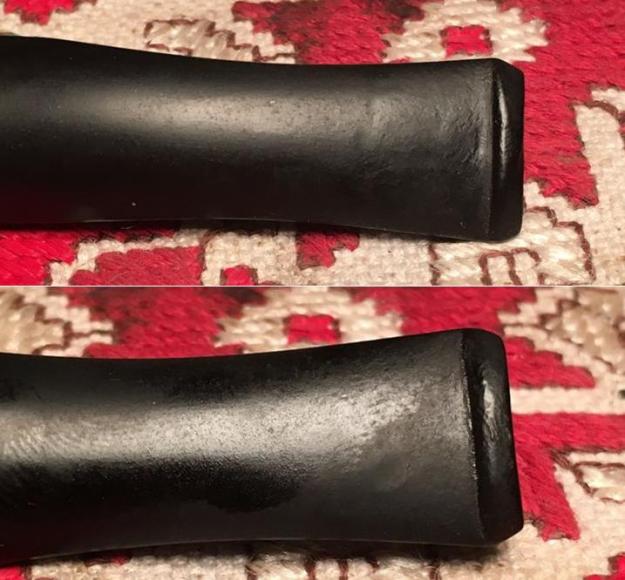
To start, I use a cheap Bic lighter and paint the bit and button with flame to heat and to expand the vulcanite.   This works well.  I then use 240 grit paper to sand the dents.  I use the flat needle file as well to sharpen the button – to make it crisper.  After using the 240 paper, I employ 600 grade paper to erase the scratches of the 240 paper.  Finally, I sand/buff the entire stem with 0000 steel wool. 
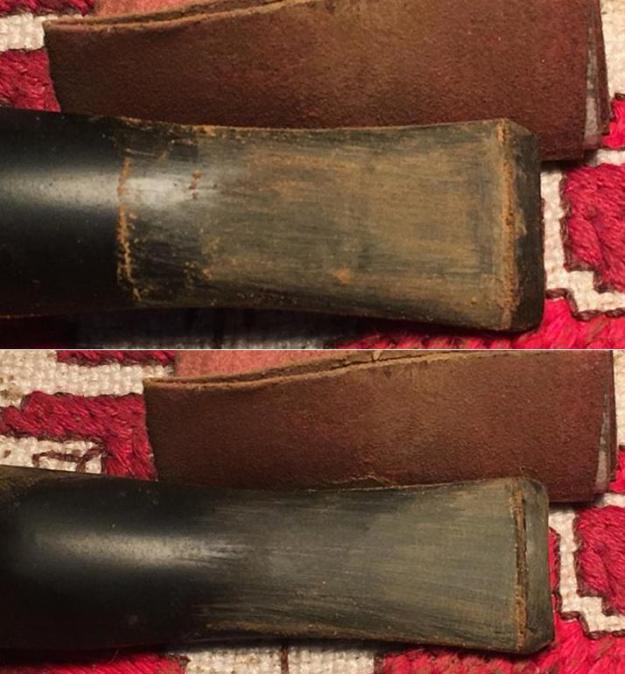
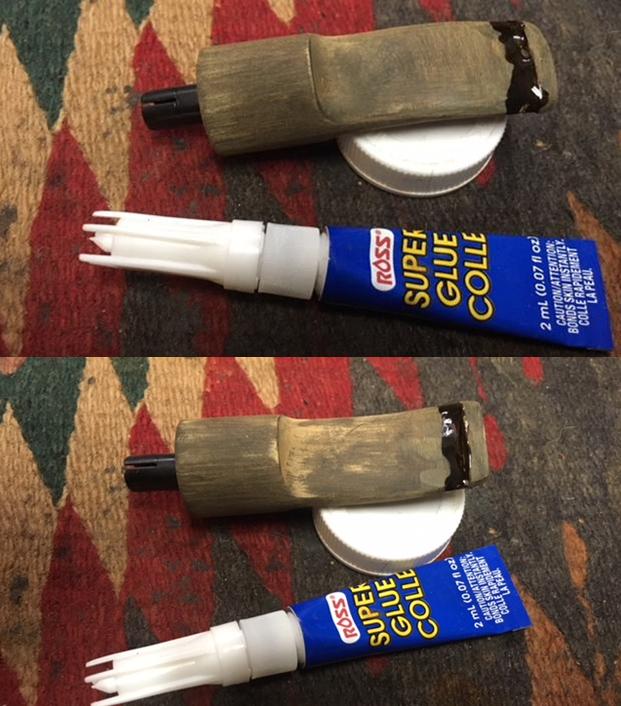
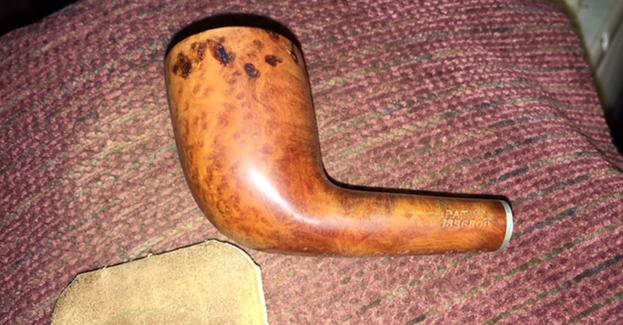
Looking back to the stummel, I have been thinking about how to proceed. From the earlier pictures, the original color motif on this Amphora X-tra Bulldog was lighter – tending toward natural briar but not quite.  With the fill patches I’ve done, I want to darken the color to mask these.  When I look at the patches again, I notice that the smaller fills that I did not deal with earlier – thinking that they were ok, had hollowed out.  Ugh.  I get the dental probe and excavate additional older fill material.  I’ve had detours before, and I’ve just started another.  With three additional holes to fill, the good news is that it is localized and shouldn’t take too long.  After cleaning the new holes, I spot drop regular CA glue into each and utilize an accelerator to quicken the process. 
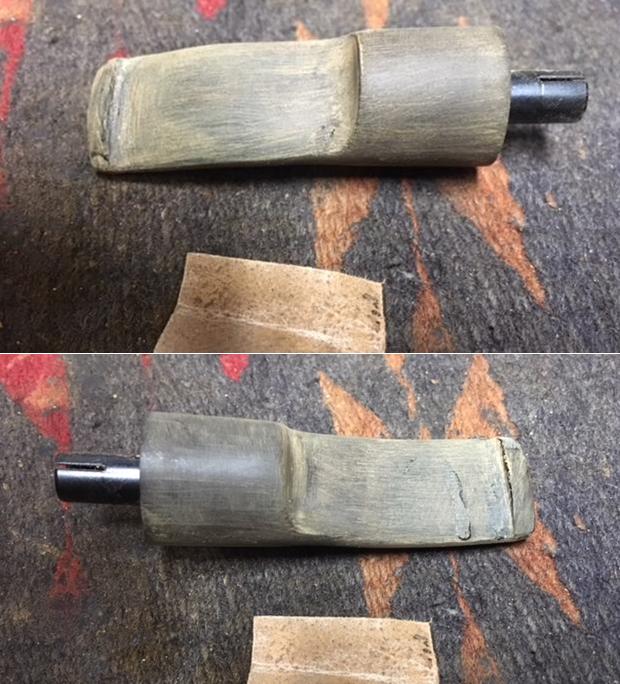
To shorten this description, suffice it to say, I filed/sanded the patches down and I repeated the full micromesh pad process of 9 pads to complete the detour pictured next!
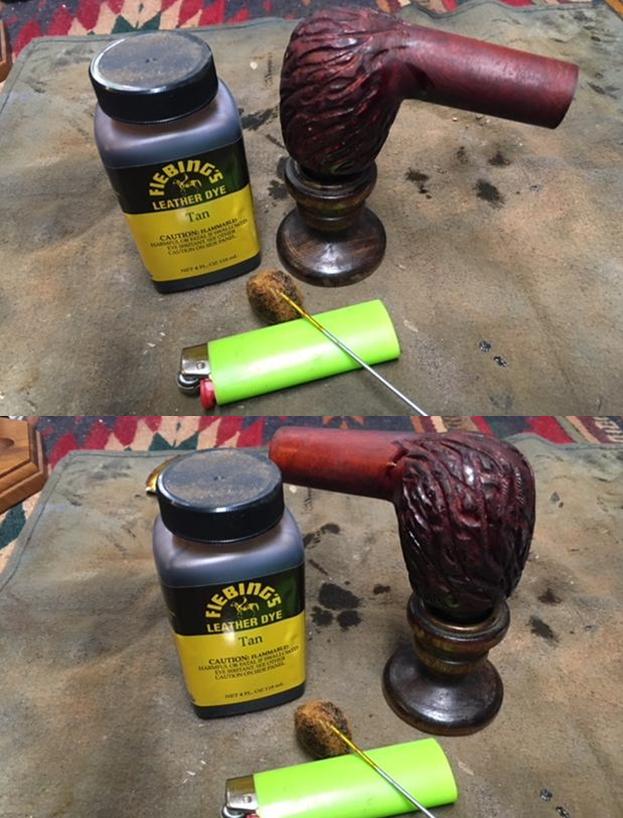
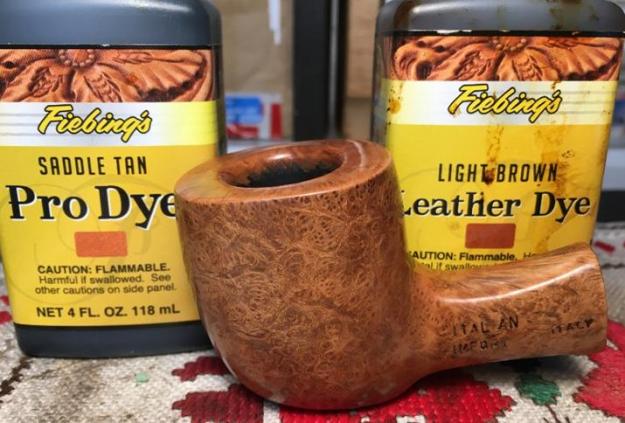
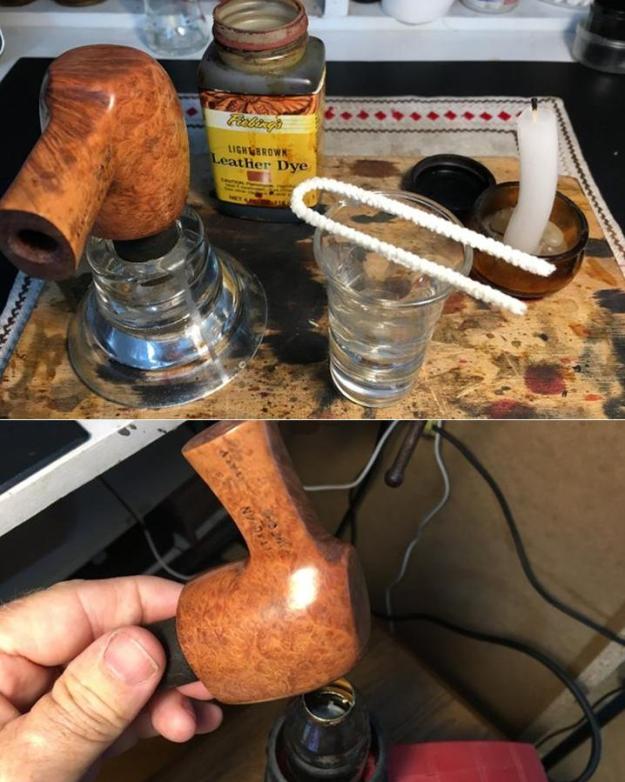
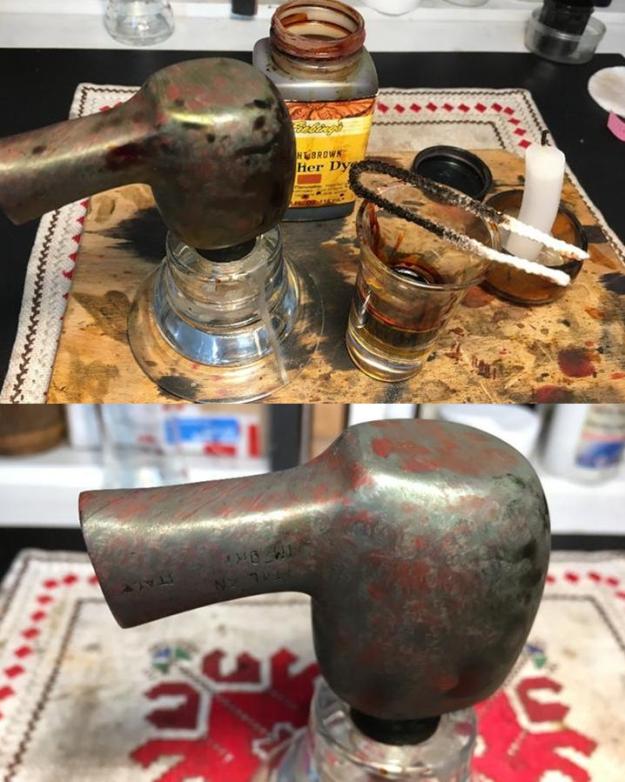
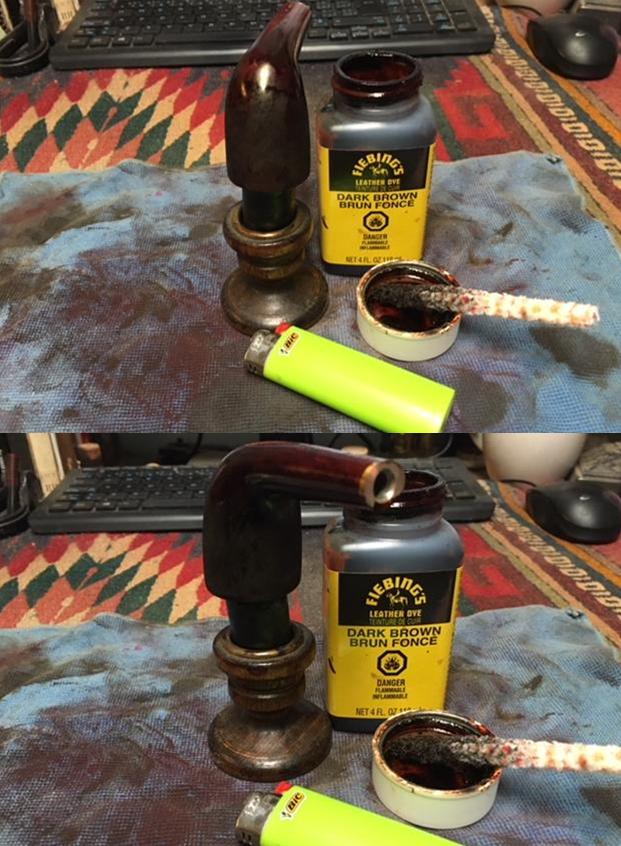
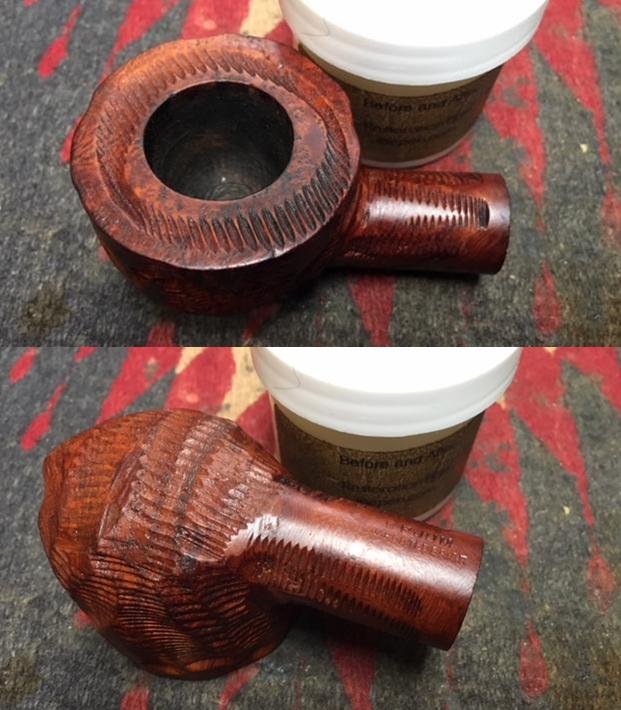
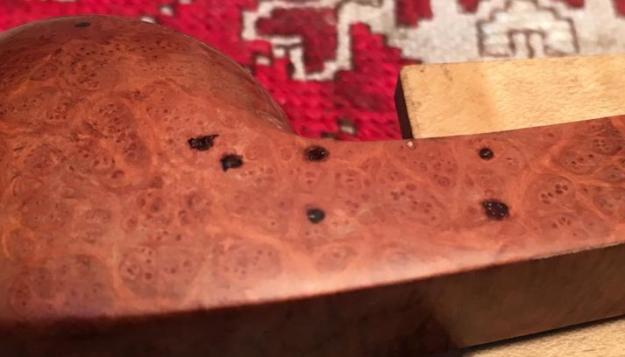
To mask the orchard of patches on the left side of the stummel and shank, I will use Fiebing’s Dark Brown Leather Dye to darken the hue.  As an aniline dye, alcohol based, I can and plan to wipe the stummel down with alcohol to lighten the dye if I choose.  I will start darker and lighten if needed so that the patch of patches will be masked.  Even so, I like the look of a darker Bulldog – it has more of an ‘Olde World’ feel to it.  I transform my worktable to the stain table, bringing out the tools necessary.  I mount the Bulldog’s stummel on a cork to act as a handle.  I wipe the stummel down with alcohol to make sure it’s clean.  I then heat the stummel with a hot air gun which acts to expand the grain and making the grain more receptive of the dye.  After the stummel is heated well, I use a folded pipe cleaner to apply the dye to the stummel.  After thoroughly covered, I light or flame the wet aniline dye and the alcohol immediately flames off setting the dye in the briar.  After a few minutes, I repeat the process again by applying another coating of dye and then flaming it.   I set the stummel aside to rest for several hours. 
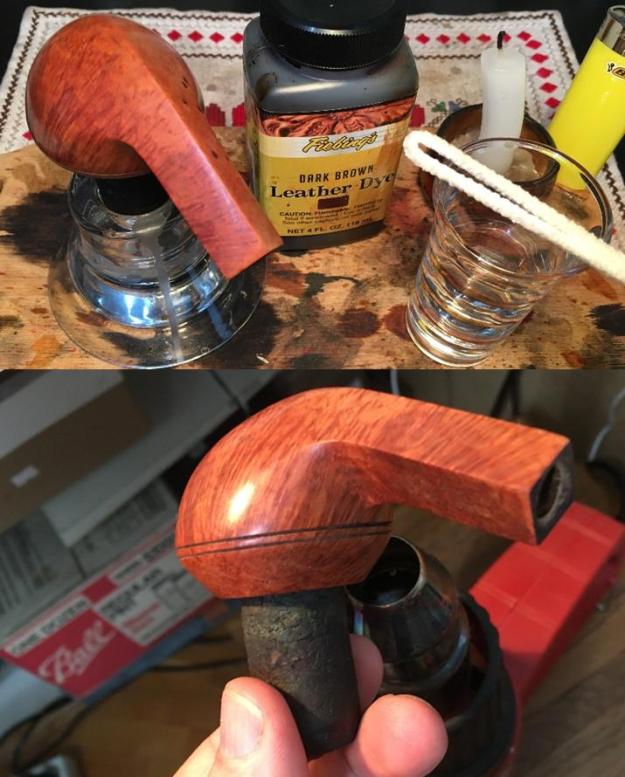
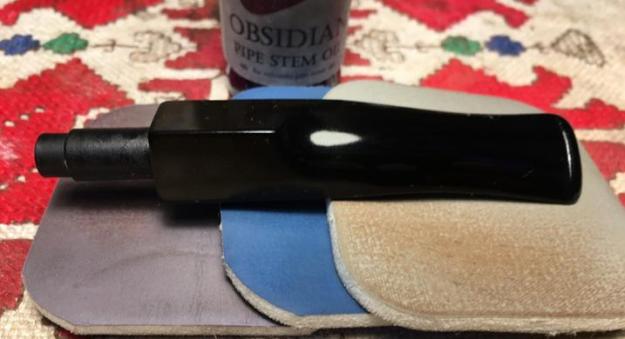
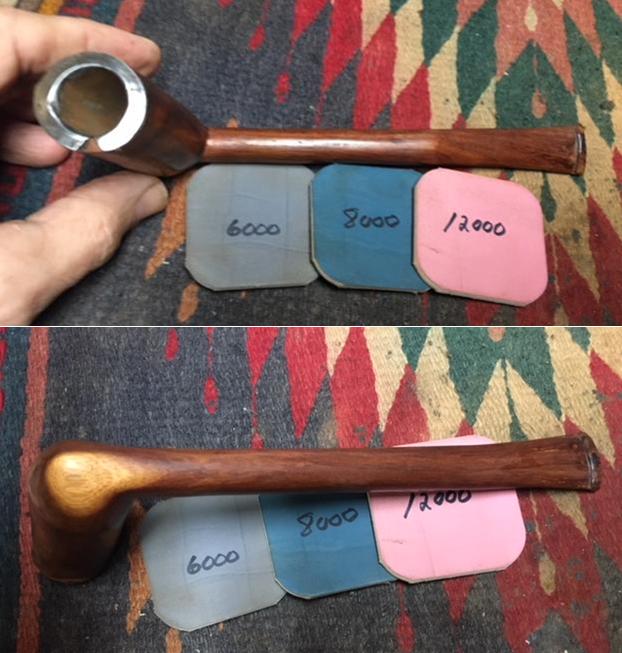
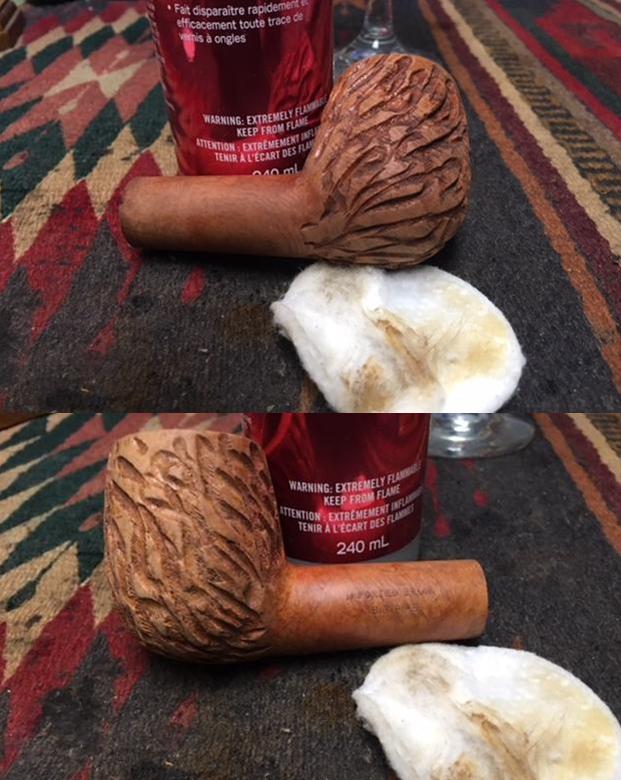
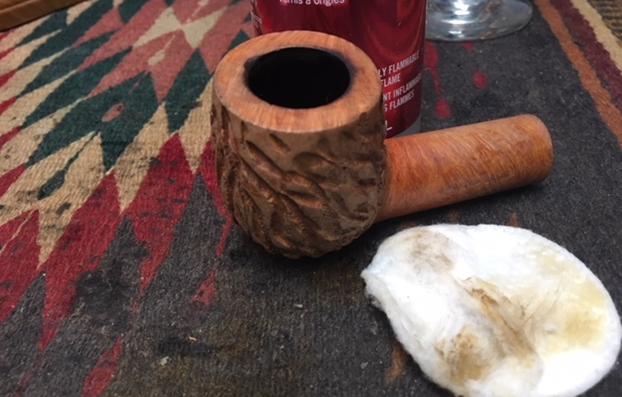
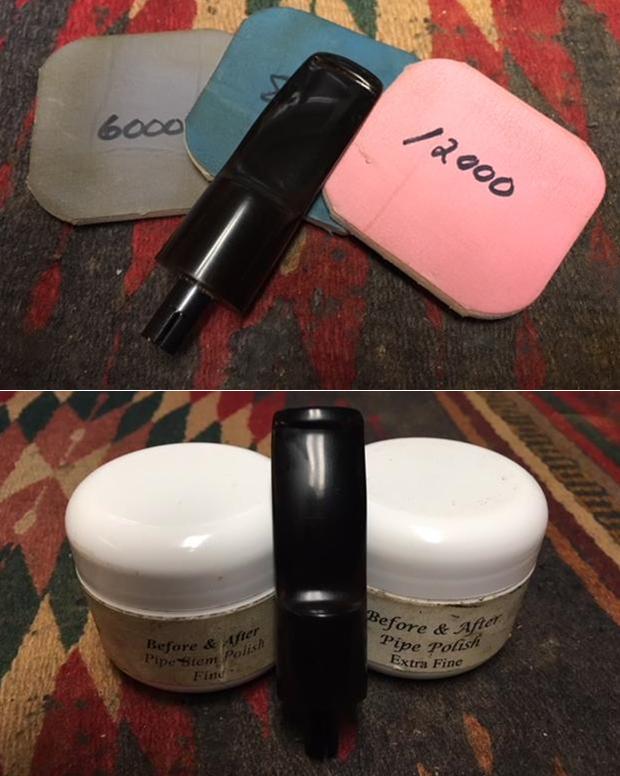
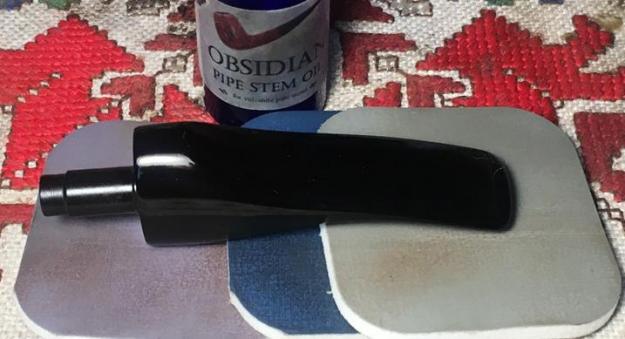
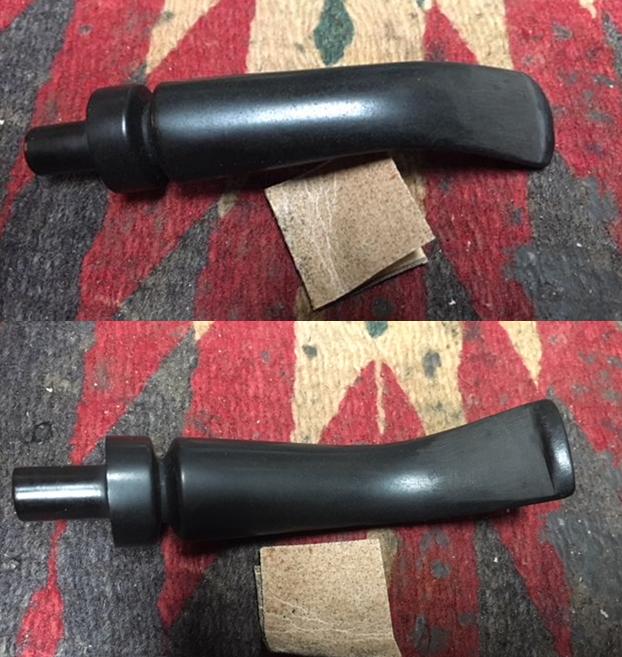
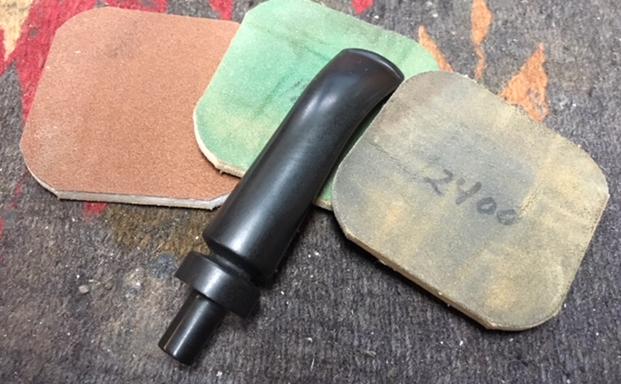
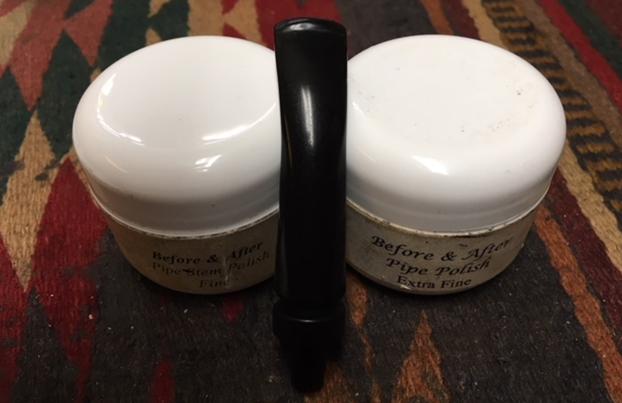
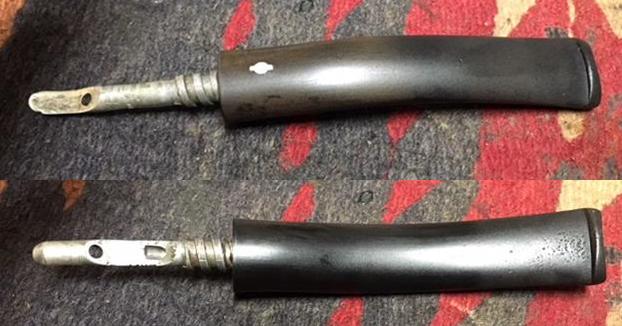
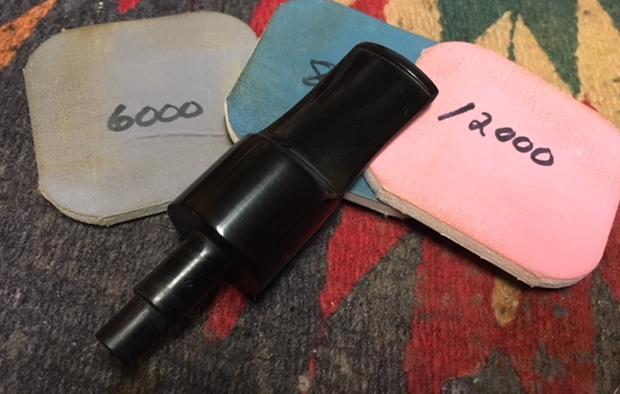
Turning to the stem, using micromesh pads 1500 to 2400 I wet sand the stem.  I follow by dry sanding with pads 3200 to 4000 and 6000 to 12000.  After each set of 3 pads I apply a coat of Obsidian Oil to revitalize the vulcanite stem.  The ‘A’ stem marking that was existent before is no longer.  There was nothing left to salvage by the time it reached my worktable. 
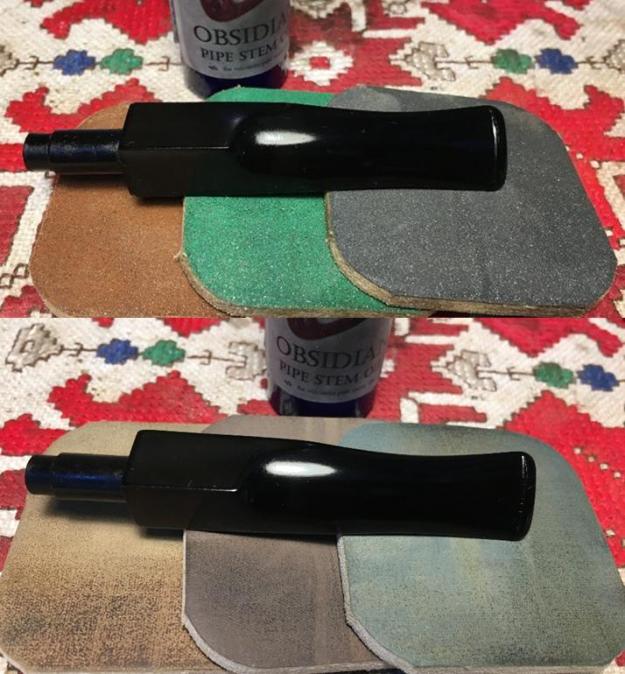
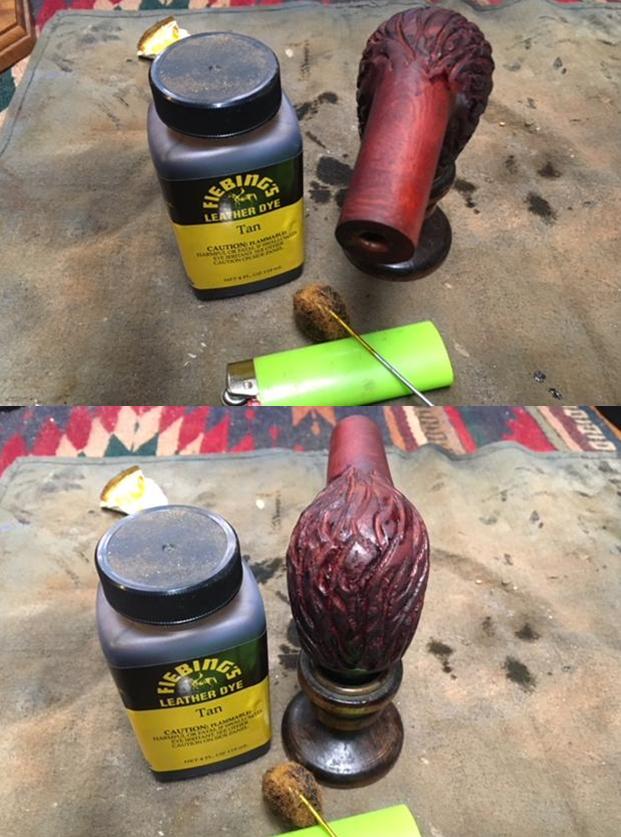
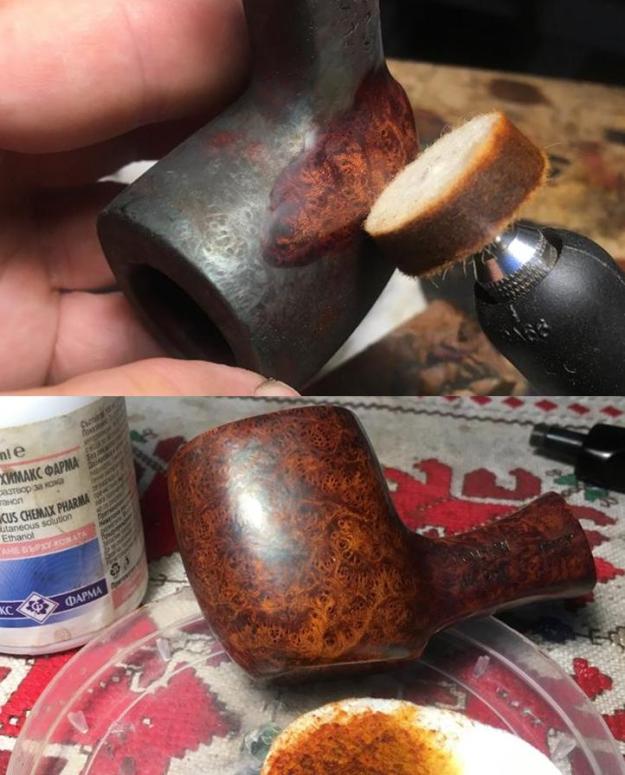
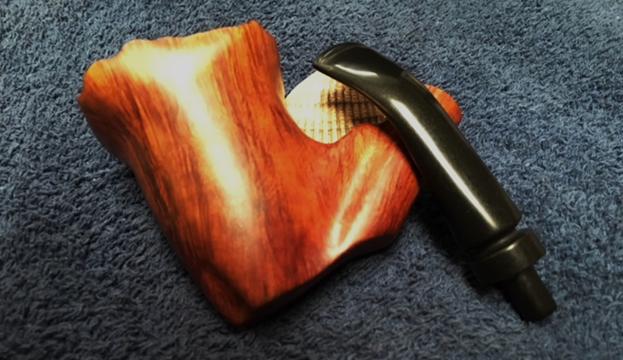
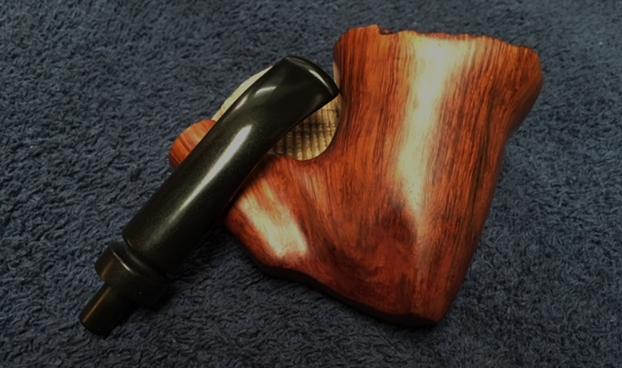
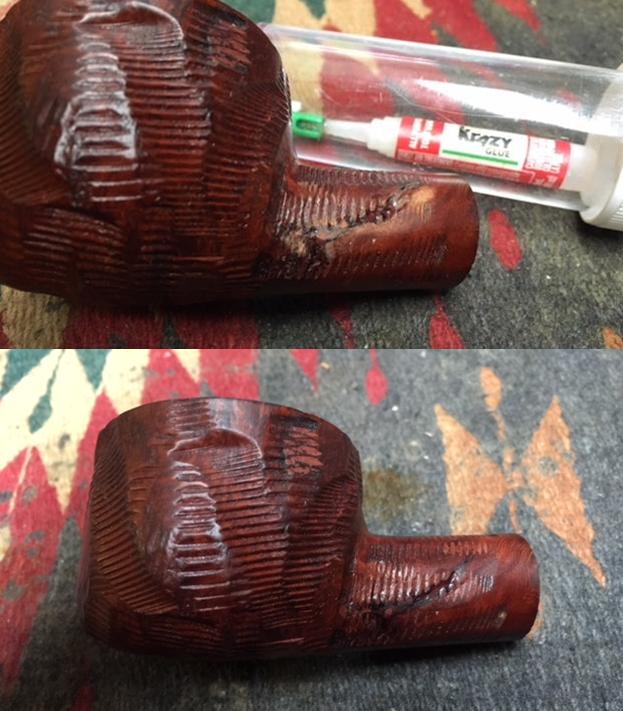
Now, time to unwrap the dye-flamed stummel.  It’s been resting for several hours after applying Fiebing’s Dark Brown Leather Dye.  To unwrap the crust to reveal the grain, I mount a new felt buffing wheel on the Dremel and set it almost to the slowest speed.  I apply the coarser compound, Red Tripoli to the stummel using a methodical section by section approach – not applying too much pressure on the wheel but allowing the speed, the felt wheel and the Tripoli to do the work.  With my wife’s help, because I don’t have three hands, she took a few pictures to show the Tripoli at work unwrapping.  To finish up the Tripoli, to get to the tight places next to the shank, I changed over to a cotton cloth buffing wheel which was able to reach into the crook.  The ‘unwrapping’ is pretty amazing to see the grain emerge and to discover how the leather dye was received.
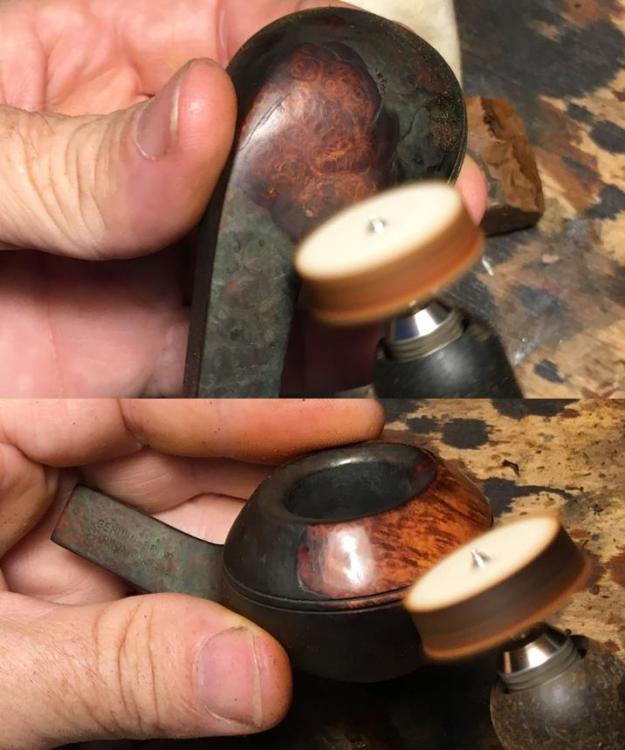
After completing the Tripoli, I wet a cotton pad with alcohol and lightly wipe the stummel.  I do this not so much to lighten the dyed finish, because I like the brown hue a lot, but to blend the fresh dye on the briar surface.
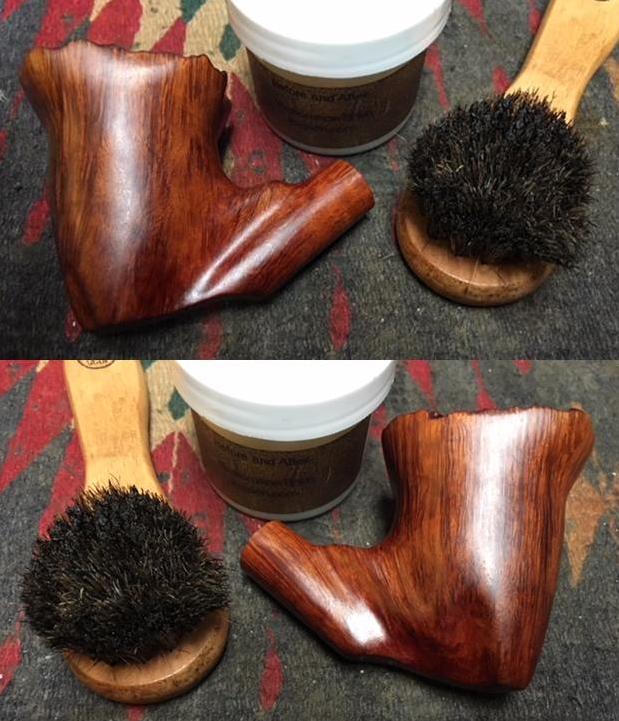
I then mount the cotton cloth buffing wheel dedicated to Blue Diamond compound and increase the Dremel to 40% full power.  I join stem and stummel and apply Blue Diamond compound to the entire pipe.  When finished, I wipe the pipe with a felt cloth not so much to buff but to remove the compound dust from the surface in preparation for the carnauba wax.  Changing to another cotton cloth wheel, leaving the speed the same, I apply a few coats of carnauba wax to stem and stummel.  I then give the pipe a rigorous hand buffing with a microfiber cloth to raise the shine.

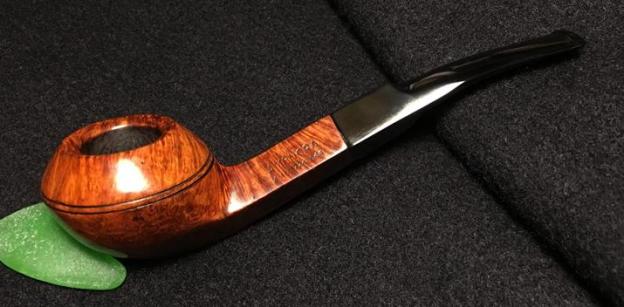
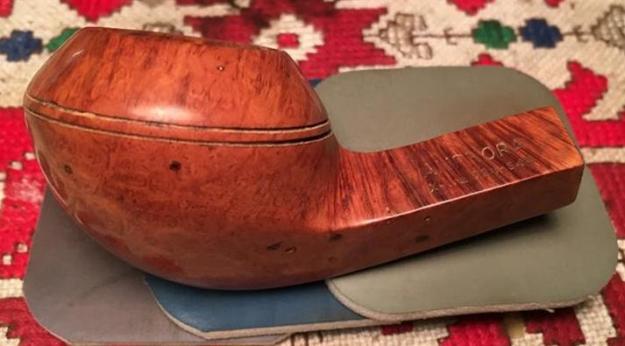
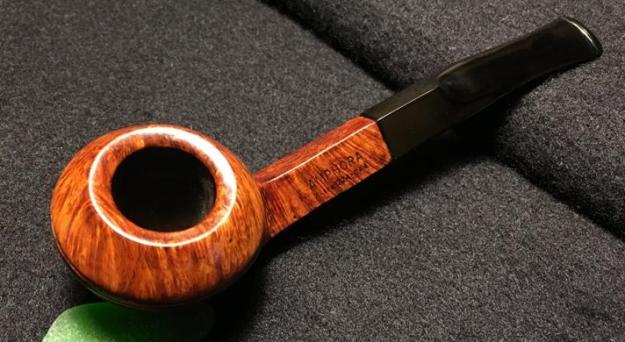
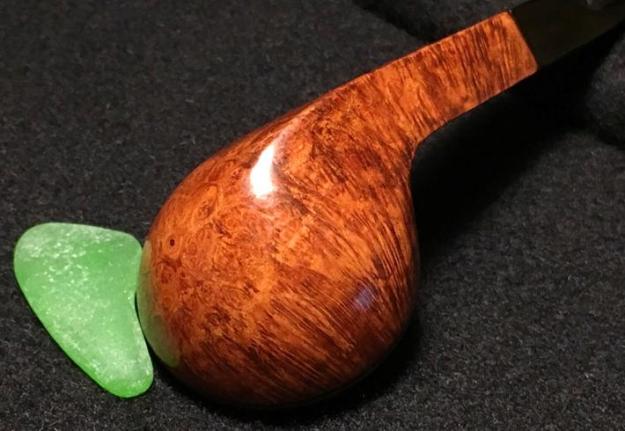
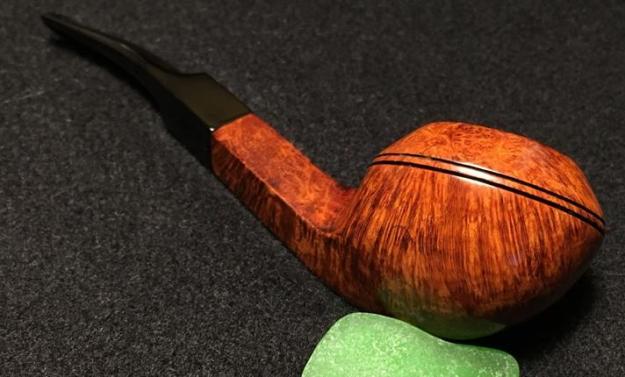
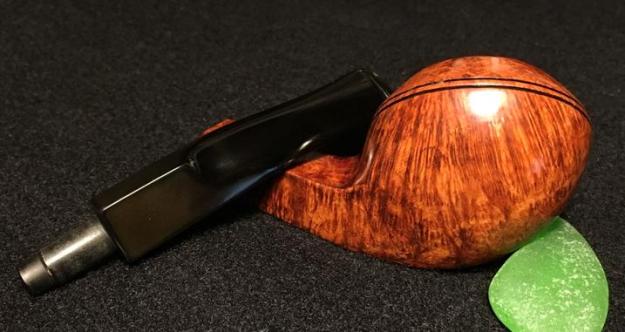
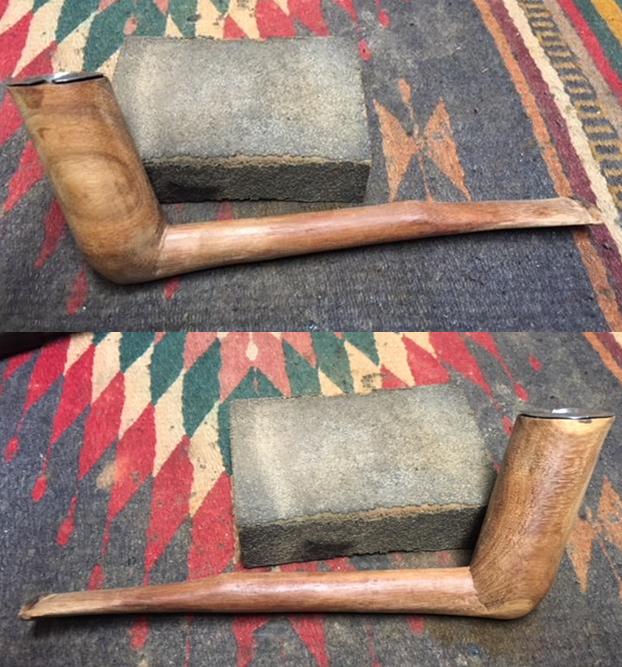
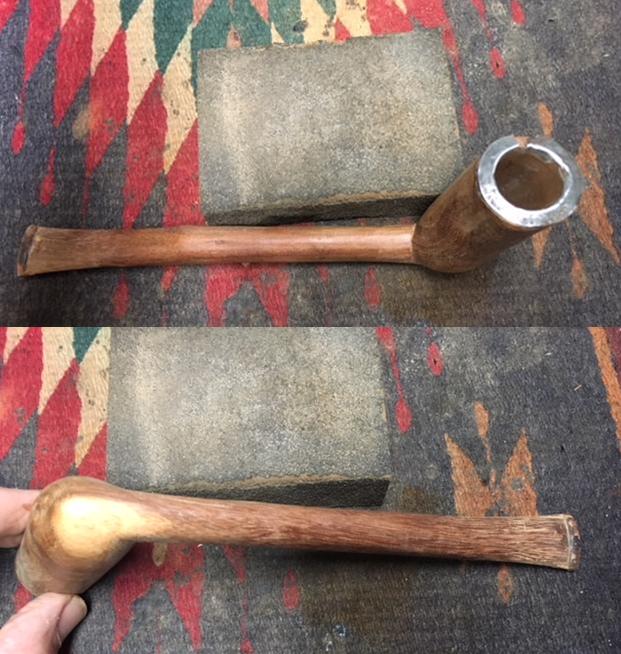
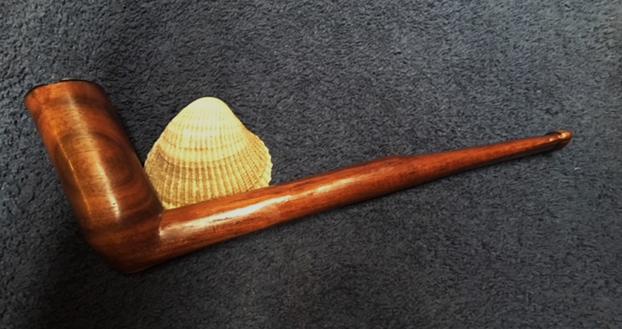
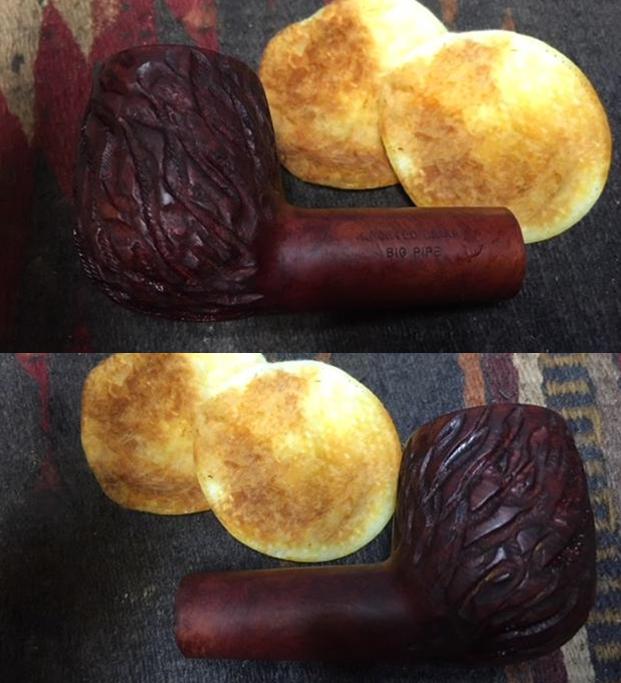
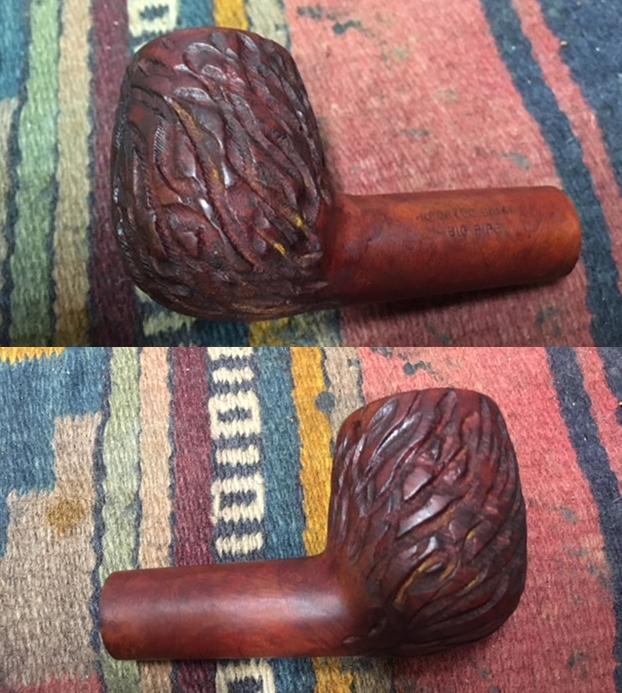
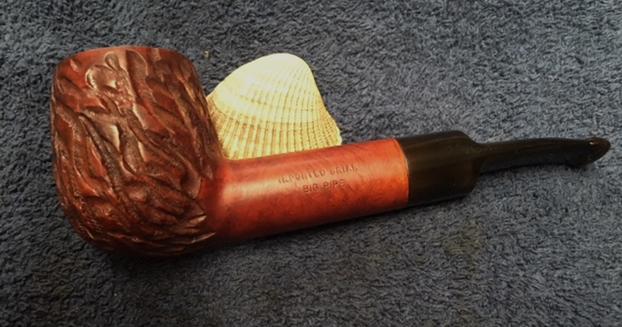
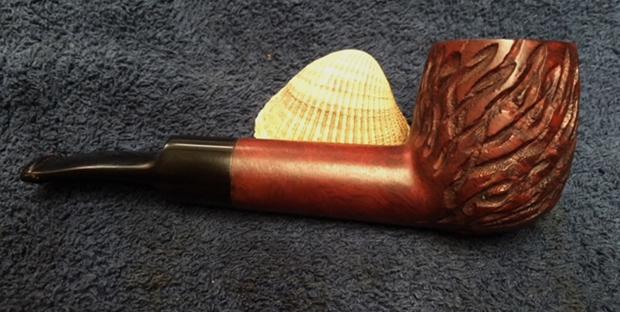
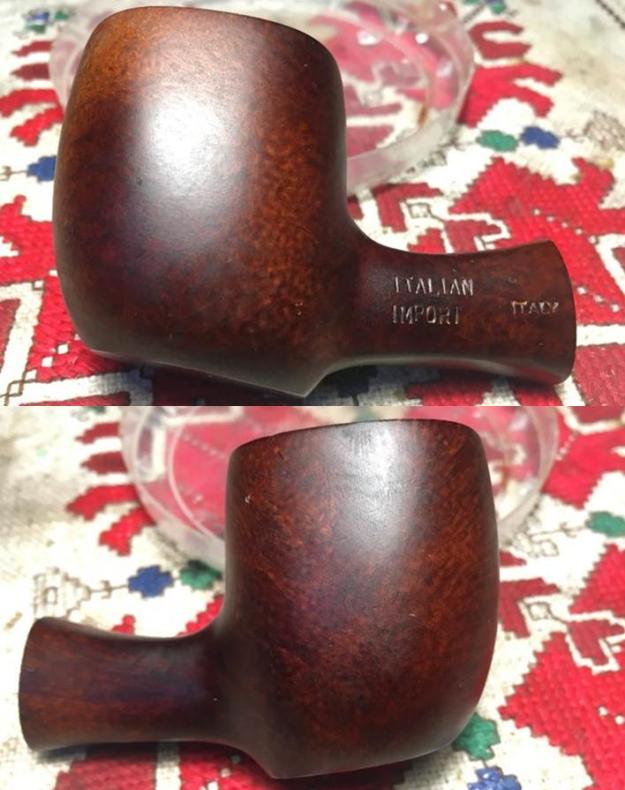
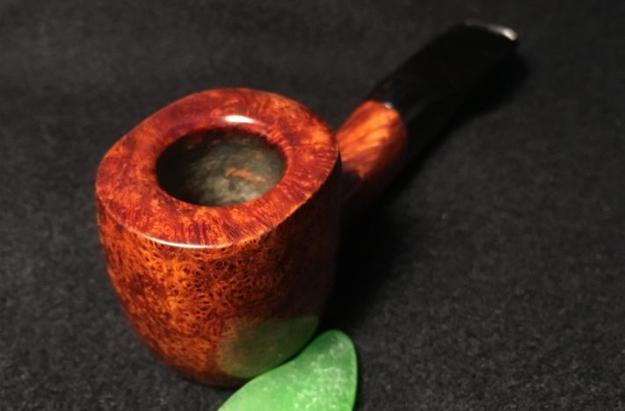
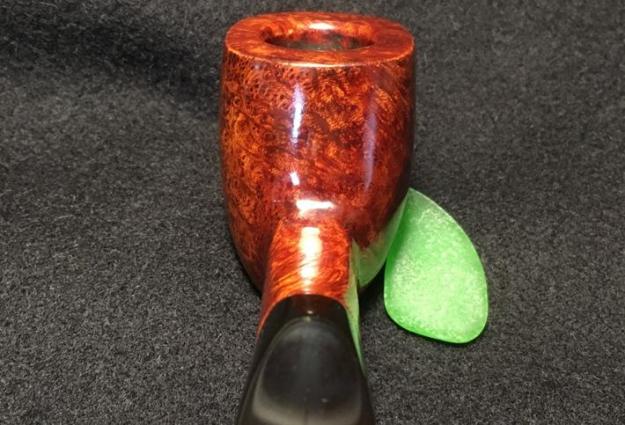
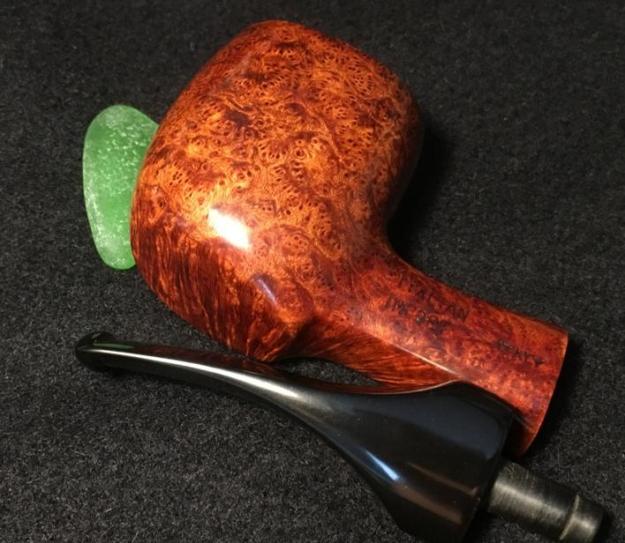
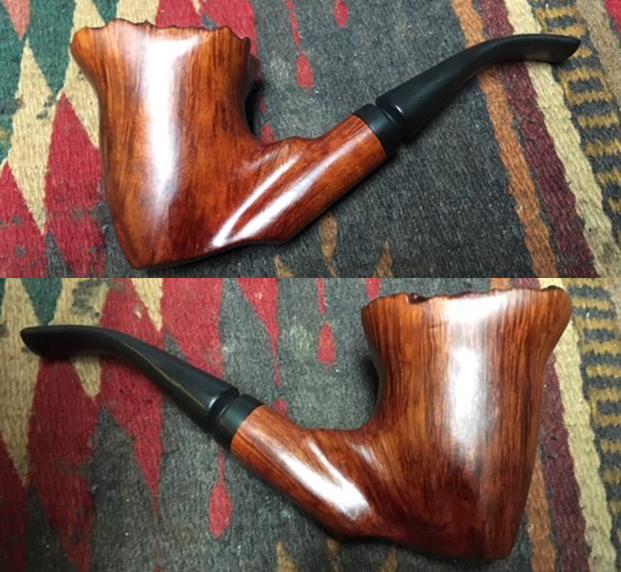
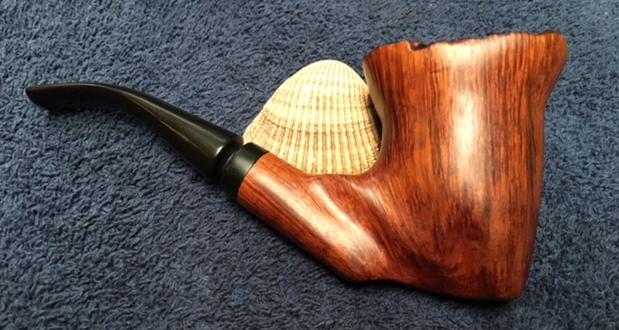
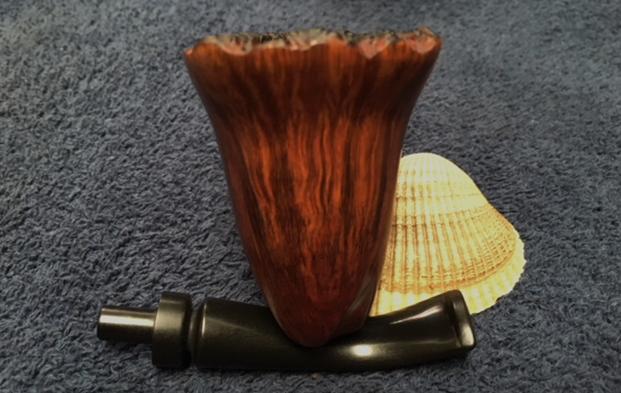
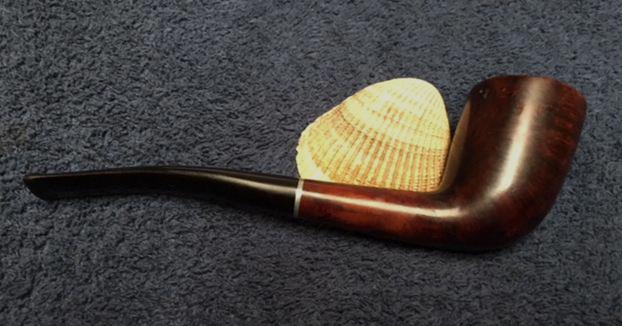
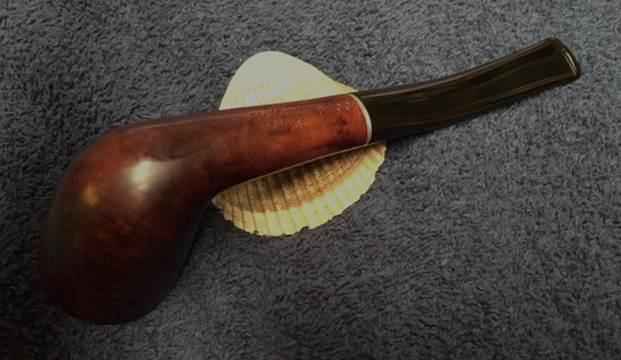
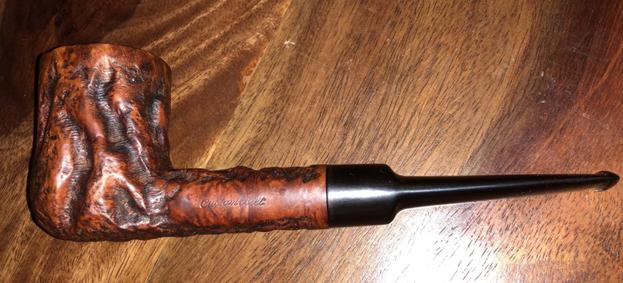
Oh my, he looks good!  The iconic Bulldog shape reminds one of the small, stout four-legged friend from whence this name comes.  This quarter bent Amphora X-tra 724-644 of Holland came out very well.  The dome ring repairs are invisible and the patch of patches on the lower left side of the bowl has blended well with the darker leather dye.  The briar grain is nice.  The straight grain seems to pour out over the Bulldog’s dome and is joined by bird’s eye grain bubbling like foam on a frosted mug – the dome is eye catching and pulls one’s attention to the pipe.  This Amphora X-tra is ready for a new steward!  Taylor saw the potential of this Bulldog when he commissioned it for his friend’s wedding gift (see For ‘Pipe Dreamers’ Only).  He will have first dibs on it when it goes into The Pipe Steward Store.  This pipe along with the other 2 that Taylor commissioned and acquired benefit the Daughters of Bulgaria – women and girls who have been trafficked and sexually exploited.  Thank you for joining me!

New Life for a Homemade Pipe – the second of Anthony’s Dad’s Pipes


Blog by Steve Laug

A few weeks back I received an email from Anthony, a reader of rebornpipes asking if I would be willing to help him clean up his Dad’s pipes. He wrote; “I have a few pipes (8 or so) that haven’t been smoked in 15 years. They were my dad’s. I would like to get someone to restore them”. We chatted back and forth via email and the long and short of the story is that I have eight of his Dad’s pipes in my shop now to work on. The photo below shows the mixture of pipes that he sent me. There are some interesting shapes and most are very dirty and have very little if any of the original finish left on the briar. All have an overflow of carbon on the rim top and all have damaged stems and buttons. They will need a lot of TLC to bring life back to them but it should be fun to give it a go. I went through the pipes and assessed their condition and contacted him and got the go ahead to proceed on the lot.The second pipe I chose to work on was the homemade alternative wood one in the lower right side of the photo. I have circled in red. It could be walnut or possibly mahogany but I am not sure. It is a single unit from bowl to button with a wooden stem. The bowl is a tall stack. Whoever carved it line the bowl with metal (looks like sheet metal). It was shaped into a cone and inserted into the bowl. It goes to the bottom of the bowl. In the bowl bottom is the airway entering the airway below that comes from the shank. It is quite large and has some very interesting grain. The metal rim top has a piece missing but it looks like it was made this way. It is dented and dinged from being knocked about. The bowl has some cake and some oxidation and grime from sitting for the years. The wooden stem is heavily chewed and has some damage on both sides around the button. There are pieces of the wood missing on the top and bottom and some deep tooth marks and gouges on both sides. It will need to be reshaped and rebuilt. The mouthpiece end is also lightened and worn. Like the other pipes in this collection the finish is all but gone – it is faded and lightened from sun exposure and possibly weather. I took photos of the pipe to show its overall condition when it arrived at my work table. I took some close up photos of the bowl, rim top and the stem to show what I was going to be dealing with on this pipe. The rim top was hammered sheet metal that formed the top edge of a metal bowl insert that went to the bottom of the bowl. It was pitted and tarnished as well as having a fair bit of tar in the pits. There was a triangular piece missing from the rim top that looks like it was made that way. It is a long the seam of the bowl liner. The wooden, integral stem was in pretty rough condition. There was a lot of chewing damage to the surface of the stem and button. There were tooth marks on both sides of the stem and button and some deep chunks out of the top and underside of the button. You can also see the damage to the wood from being wet from saliva. This old pipe had obviously been one of Anthony’s Dad’s favourites.I like working on clean pipes so I decided to clean up both the inside and outside of the bowl and shank. I reamed it with a Savinelli Fitsall pipe knife as the bowl is very narrow and deep. It is lined with metal all the way down so I did not want to risk damaging the metal so I used the knife to gingerly work over the interior until it was clean. I wrapped a piece of dowel with 220 grit sandpaper and sanded out the inside of the bowl to remove the remnants of cake and debris on the walls of the bowl. I repaired the deeper tooth marks on the chewed stem end and button with super glue and briar dust. I rebuilt the chewed and damaged button and opened the airway with an awl and needle file. Once I was happy with the repairs I set it aside to let the glue cure. It did not take too long as we are having a bit of a heat wave here in Vancouver.I reshaped the button edge and surface of the stem with a needle file to clean up the look and feel of the button and the stem. Once the shape was right I filled in some of the remaining spots on the button surface and the stem surface with glue.I sanded the surface of the stem and button with a folded piece of 220 sandpaper to smooth out the repairs and further reshape the stem. It was starting to look a lot better, but more sanding and shaping was required.I did a bit more shaping work with the sandpaper and then sanded the entire pipe with a medium and a fine grit sanding sponge. I wanted to remove some of the roughness of the wood that came with the damage. As I sanded more and more of the interesting grain became visible. This was a nice looking pipe.I used a small hammer to tap out the damage on the metal rim. You can see how clean the bowl is in the photo below.Instead of scrubbing the already water damaged pipe with Murphy’s Oil Soap and rinsing it, to clean the wood with Before & After Pipe Balm. I rubbed it into the surface of the wood with my finger tips and worked it into the grain. The product did its magic and enlivened, cleaned and gave the wood a rich glow. I still had more work to do repairing some of the damaged areas but the pipe was beginning to take on the look it must have had when Anthony’s Dad either made it or bought it. The photos show what it looked like at this point. With the finish clean I could see some of the damaged areas on the bowl/shank joint and the shank itself. I wiped those areas off with alcohol on cotton pads and filled in the damaged spots with clear super glue.I smoothed out the repairs with 220 grit sandpaper to blend them into the surface of the bowl and shank. I repeated the process with 600 grit sandpaper to further smooth out the scratches. I polished it with 1500-2400 grit micromesh sanding pads and wiped it down with a damp cloth after each pad. I took photos of the pipe at this point to get an idea of where things stood now. I find that looking at photos highlights things that I don’t see up close. I buffed it with Blue Diamond on the buffing wheel to see where things stood after the buffing. I took the following photos. The first four photos show the overall look of the pipe. These are followed by some close up photos of the stem at this point in the process. It is really becoming a beautiful looking pipe. I polished the pipe with the rest of the micromesh sanding pads – 3200-120000 grit pads. I wiped the pipe down with a damp cotton pad after each pad. Once I had finished the polishing with the micromesh I wiped the pipe down with a light coat of olive oil. I polished the pipe with Blue Diamond to polish out the remaining small scratches. I gave the pipe multiple coats of carnauba wax and buffed the pipe with a clean buffing pad to raise the shine. I hand buffed it with a microfiber cloth to deepen the shine. The pipe polished up pretty nicely. The finished pipe is shown in the photos below. This is second of eight pipes that I am restoring from Anthony’s Dad’s collection. I am looking forward to hearing what Anthony thinks once he sees the finished pipe on the blog. Once I have the remaining six pipes finished I will pack them up and send them back to him. It will give him opportunity to carrying on the trust from his Dad. The dimensions are Length: 8 inches, Height: 3 inches, Outside diameter of the bowl: 1 1/8 inches, Chamber diameter: 5/8 inches. Thanks for walking through the restoration with me as I worked over this pipe from Anthony’s Dad’s collection. Six more will follow this restoration. Keep an eye out for them because there are some unique pipes in the lot.   

Resurrecting a BIG PIPE Lovat – the first of Anthony’s Dad’s Pipes


Blog by Steve Laug

A few weeks back I received an email from Anthony, a reader of rebornpipes asking if I would be willing to help him clean up his Dad’s pipes. He wrote; “I have a few pipes (8 or so) that haven’t been smoked in 15 years. They were my dad’s. I would like to get someone to restore them”. We chatted back and forth via email and the long and short of the story is that I have eight of his Dad’s pipes in my shop now to work on. The photo below shows the mixture of pipes that he sent me. There are some interesting shapes and most are very dirty and have very little if any of the original finish left on the briar. All have an overflow of carbon on the rim top and all have damaged stems and buttons. They will need a lot of TLC to bring life back to them but it should be fun to give it a go. I went through the pipes and assessed their condition and contacted him and got the go ahead to proceed on the lot. So I have begun.The first pipe I chose to work on was actually the first one that I removed from the mailing envelope he sent them in. It is shown above in the photo of the lot. It is the top pipe of the left column circled in red. It has a carved rustication around the bowl and a smooth thick shank. It is a large, thick shank, rusticated Lovat. It is stamped on the left side of the shank Imported Briar over BIG PIPE. The rim top has some overflow of lava and darkening. There is a thick cake in the bowl that is flaking and peeling from the walls of the bowl. The stem is heavily chewed and has some damage on both sides around the button. It will need to be reshaped and rebuilt. There is some water damage around the shank at the stem, though it is heavier on the underside of the stem. The finish is worn out and there is a lot of dust and debris in the grooves of the rustication. I took photos of the pipe to show its overall condition when it arrived at my work table. I took some close up photos of the rim top and the stem to show what I was going to be dealing with on this pipe. The rim top had a thick cake of lava overflowing from the bowl over the back half. The inner edge of the rim was damaged with a burn on the right side toward the front of the bowl make the bowl out of round. The outer edge of the rim looked to be in good condition. The stem was in pretty rough condition. There were tooth marks on both sides of the stem and button and some deep chunks out of the sides of the stem at the sharp edge of the button. The fit against the shank had a gap because of the dirtiness of the shank. You can also see the water damage to the briar at the stem/shank joint.I took a close up photo of the stamping on the left side of the shank. It is dirty but it is readable and says Imported Briar over Big Pipe.I like working on clean pipes so I decided to clean up both the inside and outside of the bowl and shank. I reamed it with a PipeNet reamer and took back the cake to bare briar. I started with the third cutting head and worked up to the largest cutting head and cleaned the bowl. I used a Savinelli Fitsall Pipe Knife to scrape away the remnants of cake and clean up the walls. I scrubbed the bowl and the stem with a tooth brush and Murphy’s Oil Soap to remove the grime in the grooves of the rustication and clean off the grime and mess on the smooth portions. I also scrubbed the water damaged areas to remove the marking in those areas. I rinsed the bowl under warm running water to remove the debris and the soap. I scrubbed it with the tooth brush until the surface was clean and debris free. I took photos of the pipe after the cleanup. I scrubbed the lava build up on the rim and was able to remove the majority of it with the soap and brush. I removed the stem from the shank of this pipe and from another of Anthony’s Dad’s pipes and dropped them in the bath of Before & After Pipe Deoxidizer to break up the oxidation on the surface. It was fascinating to note that the tenon on this stem was metal and seemed to have been made for a filter.Once the briar dried there were shiny spots on it where the original finish still clung to the wood. It appeared to be varnish or some shiny substance and it was streaky and uneven so it needed to go. I wiped the bowl and shank down with acetone on cotton pads to remove the remaining varnish finish. Now that the bowl was clean and the stem was soaking it was time to start working on the rim top and the burn damage on the front right inner edge. I topped the bowl on a topping board with 220 grit sandpaper to remove some of the burn damage and the nicks and dents in the rim top.I worked over the inner edge of the rim with folded 220 and 240 grit sandpaper to give it a bit of a bevel and remove more of the damage area. The next two photos give a clear picture of how the pipe looked at this point in the process.I polished the rim top with 1500-12000 grit micromesh sanding pads – wet sanding with 1500-2400 grit pads and dry sanding with 3200-12000 grit pads. I wiped the rim down after each pad with a damp cloth to remove the debris. There were some red tints in the briar and I wanted to leave the briar light in colour. I used a tan aniline stain to bring out the red tones in the briar. I applied the stain with a dauber, flamed it and repeated the process until all of the grooves and carvings were evenly stained. To make the stain more transparent and spread it evenly around the briar I wiped the briar down with alcohol and cotton pads. Doing this thins the stain and makes the grain shine through more clearly. I let the briar dry and took photos of the pipe at this time in the process. It is starting to look really good and the grain is showing through the rustication pattern. I used an oak stain pen to fill in the rustication patterns and fill in the light spots in the pattern. I wanted to have a bit of contrast between the smooth briar and the rustication and this would provide it without being too much. I removed the stem from the Before & After Deoxidizer after it had been soaking overnight. I rinsed it down with warm water and blew air through it to clean out the mixture from the airway. The oxidation was at the surface and almost like a dust. The next two photos show the oxidation and the tooth marks and areas that needed to be repaired near the button. I wiped down the oxidation, cleaned out the tooth marks and dents with a cotton swab and alcohol. I dried off the stem and filled in the marks on the surface of the button and the tooth marks in the stem ahead of the button.I smoothed out the repairs with 220 grit sandpaper to blend them into the surface of the stem. I repeated the process with 600 grit sandpaper to further smooth out the scratches.I polished the stem with micromesh sanding pads – wet sanding with 1500-2400 and dry sanding with 3200-120000 grit pads. I wiped the stem down with Obsidian Oil after each pad. I polished it with Before & After Pipe Polish – both Fine and Extra Fine. I gave it a final coat of Obsidian Oil and set it aside to dry. I the polished stem and bowl with Blue Diamond to polish out the remaining small scratches. I gave the bowl multiple coats of Conservator’s Wax and the stem several coats of carnauba wax and buffed the pipe with a clean buffing pad to raise the shine. I hand buffed it with a microfiber cloth to deepen the shine. The pipe polished up pretty nicely. The finished pipe is shown in the photos below. This is first of eight pipes that I am restoring from Anthony’s Dad’s collection. I am looking forward to hearing what Anthony thinks once he sees the finished pipe on the blog. Once I have the other seven pipes finished I will pack them up and send them back to him. It will give him opportunity to carrying on the trust from his Dad. The dimensions are Length: 6 inches, Height: 2 inches, Outside diameter of the bowl: 1 1/2 inches, Chamber diameter: 7/8 inches. Thanks for walking through the restoration with me as I worked over this pipe from Anthony’s Dad’s collection of pipes. Seven more will follow this restoration. Keep an eye out for them because there are some unique pipes in the lot. 

An Interesting Shape and an Amazing Transformation – An Italian Custom Shape


Blog by Dal Stanton

There are times a pipe gets your attention just because it has an interesting twist, a surprising shape, or it is just different.  This one falls under this category.  I remember acquiring this pipe when my wife and I were in the US for several months and we joined our son and daughter-in-law for Christmas in Dearborn, Michigan – just a stone throw from Detroit, a new, vibrant city in many ways.  It was December 30th and I was sitting next to the blazing fireplace in their beautiful home that was built by well-known icon, Henry Ford.  From this home, back during those turbulent years, Henry Ford and his press secretary would air their radio broadcasts that reached the entire country.  A very nice place to celebrate Christmas.  I was tooling through the eBay offering on the app in my iPhone and saw this interesting looking pipe. I think what attracted me to the pipe was the stout, get-a-hold-of-me bowl and the shank/stem shape.  The shank flared out from the bowl and rose to the fancy stem, and then the stem tapered away with a gentle bend.  It was marked with a non-descript ‘Italian’ over ‘Import’ and to the right ‘Italy’.  The pipe looked newer and the seller said it had been lightly smoked.  I won the auction and with free shipping, I was pleased with my unique looking acquisition.  The Italian Custom Shaped pipe made it back to Bulgaria with me and waited patiently in my ‘Help Me!’ basket until a fellow colleague saw him along with two other pipes.  The shape also attracted Taylor’s attention.  Taylor commissioned the Italian Custom along with another Italian, a Savinelli Oscar which I found in Athens, Greece.  I already restored the Oscar and Taylor and I enjoyed a few bowls together for that inaugural smoke on my Man Cave – 10th floor balcony!  In queue also for Taylor is an Amphora Bent Bulldog of Holland.  Taylor has started his collection of pipes and I’m glad to add to it!  Of course, each pipe I restore for Taylor benefits the Daughters of Bulgaria, women and girls who have been trafficked and sexually exploited.  Thanks Taylor!  When I get the Italian Custom on my worktable, I take a few more pictures to take a closer look. The pipe is in good condition.  There is very little cake in the chamber and little tooth chatter.  I do detect some oxidation on the upper side of the stem.  The finish on the briar stummel is dark and cloudy.  The question that comes to mind is the dark finish hiding fills in the briar – what is being intentionally masked?  I look and see one apparent fill on the front of the bowl, but no others are obvious.  I’ll look forward to simply cleaning the bowl and to see if removing the grime will brighten up the finish.  There are normal nicks and small dents on the briar surface.  I begin the restoration of the Italian Custom for Taylor by putting the stem in an OxiClean bath to rise the light oxidation from the vulcanite.  I leave it in the bath overnight.While the stem is soaking, I turn to the stummel.  The cake is very light, but I want to clean it out for a fresh start.  I use the Pipnet Reaming Kit to do the job.  I only use two blades and follow with using the Savinelli Fitsall tool to scrape the walls of the chamber.  I then sand the chamber using a piece of 240 grit paper wrapped around the Sharpie Pen.  Finally, I wipe the fire chamber using a cotton pad wetted with isopropyl 95%.  The chamber looks good – no problems detected. Now, to clean the external briar I use undiluted Murphy’s Oil Soap to clean using a cotton pad.  I take a couple of pictures to mark the beginning point – I want to compare before and after the cleaning.  I clean with Murphy’s and a cotton pad and when finished I rinse the stummel with tap water.  Well, I can tell that the surface is cleaner, but the finish is not improved.  It remains a dull and not very exciting, and I wonder again if the briar underneath the finish is in bad shape and if the dark stain was intentional to cover the imperfections… I switch now to the internals of the stummel.  Using pipe cleaners and cotton buds I clean the mortise and the airway.  As I was cleaning the mortise and airway, I began to take note that the pipe cleaners and cotton buds were coming out with a reddish hue.  It appears that the stain used to color the stummel was also in the internals – that I don’t think is a good situation.  I wouldn’t want to be smoking a pipe with the normal moisture that happens in the pipe mixing with the heated stain….  Not on my watch!  I decide to put the entire stummel into an alcohol soak to clean and to remove the stain residing in the mortise and airway walls.  Time to turn out the lights.The next morning early, I get up with the birds and look at the two bottles on my workbench – one an alcohol bath and the other an OxiClean bath.  I decide to fish the stummel out of the alcohol bath and have a look.  The dark stain on the stummel weathered the alcohol bath and I run a cotton bud in the mortise to see if there was any color.  There wasn’t.  The primary purpose of the alcohol bath was accomplished.  Next, I fish the stem out of the OxiClean bath and take a few pictures to show the raised oxidation.  I adjust the aperture on the second picture to reveal better what I can see with the naked eye.  I then take the stem to the sink and wet sand the raised oxidation with 600 grit paper and following this with 0000 grade steel wool.  The minor tooth chatter I detected earlier on the bit was removed during the process of removing the oxidation.  The fancy stem looks good.I look back to the stummel.  The overnight alcohol bath lightened the finish slightly, but it is not to my liking. The fogginess of the finish is the problem – I like to view the grain not fuzz.  The stummel also has normal signs of wear – bumps, small scratches and some small dents.To remove the finish and nicks and dents I use sanding sponges.  Starting first with a coarser sponge I sand the stummel staying clear of the nomenclature stamping on the shank.  To guard the stamping from the sanding, I apply acetone with cotton pads to remove the finish.  It takes a while to break down the finish, but it eventually does the job.  I follow the coarse sponge with a mid-range sponge and then finish with a light grade sponge.   The pictures show the sponge sanding process. With the use of micromesh pads, I then wet sand the stummel using pads 1500 to 2400. Following this, I dry sand using pads 3200 to 4000 and 6000 to 12000.  Pray tell!  Look what was hiding beneath all the fuzzy, foggy finish!  The grain is coming out nicely!  I feel like I’m on a roll with this pipe – just a makeover, no major issues!  These easier projects are nice when they come.  I have been thinking about the finish.  I want to bend the tint of the stummel to the original darker brown, but I don’t want to go real dark.  I’ve been going back and forth in my mind about using Fiebing’s Saddle Tan Pro Dye, which would keep it closer to the natural briar color I’m seeing now.  Or, I’ve also considered Fiebing’s Light Brown Leather Dye that would cast the hue in a brown direction.  Both dyes are aniline based, or alcohol, and gives the flexibility of lightening either dye by wiping the dyed surface with an alcohol wetted cotton pad.  I decide on Fiebing’s Light Brown because it will be in the same scheme as the original color. After getting all the setup tools out and mounting the stummel on a cork to serve as a handle, I wipe the bowl down with alcohol to assure that it is clean.  I then heat the stummel over a hot air gun which expands the briar grain thus making it more receptive to the dye.  I then apply Fiebing’s Light Brown Leather Dye to the stummel using a folded pipe cleaner.  I make sure that the entire surface is covered.  I then flame the wet aniline dye which combusts the alcohol in the dye setting the pigment in the grain.  After a few minutes, I repeat applying more dye to the stummel and then firing it.  I set the stummel aside to allow it to rest – thus helping to ensure that the dye will not later come off on the hands when the newly restored stummel is heated up during use.  The pictures show the staining progress. While the newly stained bowl rests, I return to the stem.  Using micromesh pads 1500 to 2400 I wet sand the stem.  Following this, I dry sand using pads 3200 to 4000 then 6000 to 12000.  After each set of three pads, I apply a coat of Obsidian Oil to reinvigorate the vulcanite.  The stem looks great!  It’s been several hours since I dyed the Italian Custom’s stummel and it’s time to unwrap the bowl!  I like this part because it is always a question as to how the grain receives the dye.  I mount a felt buffing wheel onto the Dremel dedicated for use with Red Tripoli compound.  I set the speed to the slowest and I first purge the buffing wheel with the Dremel’s adjustment wrench – cleaning the wheel of old compound.  I then use the Tripoli and the felt wheel to ‘unwrap’ the fired dye crust revealing the briar beneath. I take a picture of the ‘unwrapping’ – and my, what a kaleidoscope of grain is revealed!  I’m amazed at what I see!  After I complete the ‘unwrapping’ with Tripoli compound, I wet a cotton pad with alcohol and lightly wipe the dyed surface of the stummel.  My goal is not so much to lighten, because I like the shade of browns I’m seeing.  The purpose is to blend the dye more evenly over the surface and remove any excess dye on the surface. I follow by applying Blue Diamond to the reunited stem and stummel.  To do this I mount a cotton cloth buffing wheel to the Dremel and increase the speed of the Dremel to about 40% full power.  After the compounds are completed, I give the pipe a wipe down with a felt cloth to remove the compound dust from the surface.  I then finish by applying a few coats of carnauba wax with another cotton cloth buffing wheel mounted to the Dremel at the same speed.  Then I give the entire pipe a brisk hand buffing with a microfiber cloth to raise the shine more.

When I began the restoration of the Italian Custom Shape, my expectations of what this pipe might look like at the end in no way matched the result.  The briar on this pipe is a brilliant kaleidoscope of grain swirls, circles and tunnels.  It is mesmerizing to look at what was hidden underneath the old finish – God’s beauty in creation.  Not an old pipe, it appears that the manufacture simply aimed to produce an interesting shape without an appreciation for what this pipe could be and what it now has become.  This Italian Custom was commissioned by Taylor and he will have first dibs on it when I place it in The Pipe Steward Store.  This pipe will benefit the Daughters of Bulgaria – helping women and girls who have been trafficked and sexually exploited.  This pipe earns a ‘before and after’ shot – what a transformation! Thanks for joining me!   

New Life for a Wenhall Dane Craft B Freehand


Blog by Steve Laug

Jeff has developed quite an eye for interesting pipes and this one is no exception. He picked this up from a guy in Texas who was selling some of his Grandfather’s pipes. This was one of the cleaner ones in the lot. The freehand shape and the unusual stem combination caught his eye I am sure. It is an unusual piece with some grooves and twists in the shank that make it very comfortable in the hand. It has some nice straight grain on the bowl sides and shank. The rim top is plateau and is rectangular in shape. The stem is different in that it is one that I would expect on a Danish Made Celius pipe or possibly some of the British style Hardcastle freehands. The chairleg style stem seems to be made of high quality vulcanite as it is not oxidized. The pipe is very dirty but you can see the beauty through the grime. Jeff took some photos of the pipe before he worked his magic in the cleanup process. Jeff took some close up photos of the bowl top and the side of the bowl to give an idea of the filthy condition the pipe was in when he received it. I am sure glad that this was one that he worked on. The bowl has a thick cake and the plateau rim top is almost filled in with the lava overflow and grime of the years. The finish is speckled with debris and grime deep in the finish. The next series of photos capture the stamping. The stamping is faint on the edges but together you can see that it reads Wenhall over Dane Craft over the letter B. The last photo in this series shows the fit of the stem to the dirty shank. There is a gap that should disappear with cleaning. The stem was pretty worn, but it was thick enough that I would be able to reshape it easily enough with heat, files and sandpaper. The button was worn down and would need to be reshaped. There was a calcification on the surface of the stem and some minor oxidation.In the back of my mind I remembered a connection between Wenhall and Karl Erik pipes. I could not remember the details of the connection but I remembered there was one. I tell you what even that is pretty good for this old bird. I looked it up on the pipephil pipes, logos and stampings website and found nothing on that site. I turned to Pipedia and looked it up in the Pipe Makers list that is included there. I found the link to Wenhall pipes that I was looking for. Here is the link, https://pipedia.org/wiki/Wenhall. It was a short article but it made a lot of connections to names that I was familiar with from working on pipes. I include the majority of the article because of the pertinent information that it provides.

Wenhall Pipes Ltd. was a distribution company out of New York City.

By the end of the 1970’s Wenhall approached Michael Kabik and Glen Hedelson, at that time operating from a farm house in Glen Rock, Maryland to create a line of freehands called Wenhall. The situation was favorable, because Kabik & Hedelson had ended their cooperation with Mel Baker of Tobak Ltd. to produce the famed Sven-Lar freehands shortly before.

Upon Wenhall’s offer the partners got a bank loan and set up a studio of 2000 square feet in a fairly new industrial park in Bel Air, Maryland and took on the name Vajra Briar Works. Wenhall initially wanted 500 pipes a week! But Kabik & Hedelson doubted that they could move that much product and told them they would produce 250 pipes per week. Happily, some of the old crew from Sven-Lar joined them at Vajra Briar Works, and thus they rather quickly met the production demands.

Furthermore during this time, Wenhall requested to create a line of pipes consisting of 12 different shapes. The line was called “The Presidential” and, while they repeated the same 12 shapes for this series, each one was freehand cut. Although they came up with interesting designs, mainly developed by Hedelson, especially Kabik was never really happy with the line or the concept, but, by this time, they had nine people on full-time payroll.

The stint with Wenhall lasted a couple of years, at which time they asked them to join Wenhall in a move to Miami, Florida. But by this time Kabik and Hedelson felt very uncomfortable with the owners of Wenhall and decided that they’d rather close the shop than make the move. Time proved that decision very wise, as Wenhall folded shortly after the move. All the same they had to close Vajra, but scaled down to the two of them and moved the operation to the farm house Glen was currently living in.

I could see the link to Michael Kabik and Glen Hedelson and the Svenlar line of pipes that I have worked on in the past. The problem was that these were American made pipes and I was pretty sure that they would have been stamped accordingly. Even though were Danish style I don’t know if they would have stamped their pipes Danish Craft. The next short paragraph made the link to Karl Erik that I was looking for.

Presumptively for a shorter period only Wenhall had pipes made in Denmark by Karl Erik. (BTW K.E. Ottendahl ceased all sales to the USA in 1987.)…

The article went on to tie the pipes to some Italian makers as well. I stopped reading at this point and tried to summarize what I had found out so far. I knew that the pipe I held in my hand was made between the late 1970s and 1987. It possibly could have been made by Michael Kabik and/or Glen Heldelson or even by Karl Erik. Something about the flow of the shape and the way the bowl flows with the grain reminds me a lot of Karl Erik pipes that I have worked on. Either way the pipe is between 31-39 years old and in great condition for an older piece.

Jeff had reamed the bowl with a PipNet pipe reamer and followed up with a Savinelli Fitsall pipe knife to remove the cake. He scrubbed out the mortise and the airway in the shank and the stem with alcohol, cotton swabs and pipe cleaners. He scrubbed the exterior of the bowl, rim, shank and stem with a tooth brush and Murphy’s Oil Soap to remove the oils and tars on the bowl, rim and shank. He rinsed it under running water. He dried it off with a soft cloth. The lava mess on the rim was thoroughly removed without harming the finish underneath it. Without the grime the finish looked really good. He soaked the stem in Before and After Pipe Stem Deoxidizer. He rinsed it under running water and dried it off with a clean cloth. He cleaned out the airway with pipe cleaners and alcohol. When it arrived here in Vancouver it did not even look like the same pipe it was so clean. I forgot to take photos of the pipe to show its condition before I started my work, but took some right after I had rubbed in some Before and After Restoration Balm and before I buffed it.  Jeff had been able to get the grime and lava out of the plateau on the rim top and it looked pretty incredible. There was some darkening on the high spots on the plateau and lighter brown colouring in the valleys and crevices. The stem looked amazingly clean. The tooth marks and chatter were very visible and would need to be addressed. I took close up photos of both the rim top and the stem.I worked some Before & After Restoration Balm into the grooves and crevices of the plateau rim top and the smooth finish of the bowl and shank with my fingers and a horsehair shoe brush. I want the product to go deep into the finish because it works to clean, enliven and protect the briar. Once I was confident that it was deeply worked into the blast I wiped it off and buffed it with a soft cloth to polish it. The pipe really began to have a rich shine. I took some photos of the bowl at this point to mark the progress in the restoration. The grain really stands out in the photos below. I set the bowl aside and turned to work on the stem. I painted the tooth marks on the surface of the stem with the flame of a Bic lighter and was able to raise the dents on both top and bottom sides to the point that sanding the stem would remove the remaining damage.I sharpened the edge of the button and cleaned up the angles of the button with a needle file. I would need to sand out the stem to smooth things out but the edges of the button were very sharp and renewed.I smoothed out the remaining tooth marks and file marks with 220 grit sandpaper and blended them into the surface of the stem. It did not take too much sanding to do the work and after I polish the stem they will be invisible.I polished the vulcanite stem with micromesh sanding pads – wet sanding it with 1500-2400 grit pads and dry sanding with 3200-12000 grit pads. I wiped it down with Obsidian Oil after each sanding pad. I polished it with Before & After Pipe Polish – both the Fine and Extra Fine polishes. I gave it a final coat of oil and set it aside to dry. I polished bowl and the stem with Blue Diamond to polish out the remaining small scratches. I gave the bowl and the stem multiple coats of carnauba wax and buffed the pipe with a clean buffing pad to raise the shine. I hand buffed the pipe with a microfiber cloth to deepen the shine. The pipe polished up pretty nicely. The medium brown stain worked really well with the black vulcanite stem. The darkened plateau really sets of the pipe and gives it a unique look. The finished pipe is shown in the photos below. The dimensions of the pipe are Length: 5 1/2 inches, Height: 2 1/2 inches, Outer diameter of the bowl: length is 2 inches and width is 1 ¾ inches, Chamber diameter: 7/8 inches. This unique freehand is heading to India with the three of Paresh’s Grandfather’s pipes that I repaired and restored. I will pack the pipes up and send them back to India this week after I give the bowl a bowl coating to the repaired Barling. I look forward to hearing what he thinks of the lot of them once he gets to load them with his favourite tobacco and enjoy them. Thanks for walking through this restoration with me as I worked over this beauty. 

Working on Paresh’s Grandfather’s Barling’s Make Ye Olde Wood Fossil 271


Blog by Steve Laug

As I mentioned in my previous blog, Paresh, my friend in India reached out to me over Whatsapp to talk about a few more of his Grandfather’s pipes. He was confident in working on many of them but there were a few that he wanted me to try my hand on. His wife Abha would ream and clean them for me so I would be able to start with a relatively clean pipe. The third pipe was a sandblast Barling’s Make billiard with a vulcanite stem. It was another pipe that was in rough condition when Paresh and Abha started working on it. They reamed the thick hard cake with a KleenReem pipe reamer and clean up the exterior of the bowl with Murphy’s Oil Soap. They also cleaned the interior with alcohol, cotton swabs and pipe cleaners. The pipe was in very rough condition. There were cracks in the bowl on the front and the left side. The rim was beat up and out of round. It had been reamed with a knife sometime in its life. The stamping on the underside of the bowl and shank read Barling’s in an arch over Make over Ye Olde Wood. Next to that was the shape number 271. Further down the flattened shank it was stamped with an EL followed by Made In England, Fossil and T.V.F. The stem was lightly oxidized and had some tooth chatter and marks on both sides. It had a faint Barling’s cross logo on the top. I took photos of the pipe to show its condition when it arrived. I took some close up photos of the damage on the bowl to give a better idea of what I was working with on this pipe. The rim top was a real mess with nicks, chips and damage under a coat of tars. The bowl was out of round but workable. There were two cracked areas – one on the front of the bowl from the rim down and one on the left side from the rim down. Paresh and Abha had reamed the bowl for me so the inside was quite clean. The stem was in pretty decent shape with a few tooth marks and chatter on both sides of the stem near the button and some oxidation. The bowl was a real mess and it would be a challenge. I took photos of the stamping on the underside of the shank. As noted above it reads Barling’s in and arch over Make and the Ye Olde Wood over 271 on the bottom of the bowl. The shank is stamped EL followed by Made in England, Fossil and T.V.F.I decided to clean up the remaining thin cake in the bowl to get back to bare briar. I wanted to see the extent of the damage on the walls of the bowl interior before I addressed the damage on the outside of the bowl. I used a Savinelli Fitsall pipe knife to scrape away the remaining cake. Once it was clean, I sanded the inside of the bowl with a piece of dowel wrapped with 220 grit sandpaper to smooth out the bowl walls and the inner edge of the rim.To clean up the rim top and remove the serious damage on that portion of the pipe I topped it with 220 grit sandpaper on a topping board. I remove the damage portion and flattened the top of the rim. I would need to repair the cracks in the rim top and then rusticated it to match the finish on the bowl.I wiped down the surface of the briar with alcohol on a cotton pad to clean off the grime. I drilled tiny pin holes at the end of each crack on the exterior of the bowl in hopes of stopping the spread of the crack. I filled in the damaged areas around the bowl and on the rim with briar dust and clear super glue. At this point in the process the repairs appear quite crude. Lots of work still remains to blend them into the sandblast finish of the bowl. I used a brass bristle tire brush to work over the repaired areas on the front and side of the bowl. I wanted to clean up the rough edges of the repair and try to blend it into the finish around it. The bristles are stiff enough to remove the edges and I think works well to blend it into the surface of the surrounding sandblast. I lightly topped the bowl again to smooth out the roughness of the repairs on the rim surface.I used some small burrs on my Dremel running at a slow speed of 5 to try to recreate the look of the sandblast on the rim top. It took a bit of doing but I think it gives the rim top a better look than the smooth finish. I blended a walnut and a Maple stain pen to approximate the mottled finish on the rest of the bowl. It worked pretty well I think. I will show full photos shortly. To fill in the cracks on the inside of the bowl and to protect it from burn out or further cracking I mixed up some JB Weld. It dries hard, is heat resistant and when dry is inert and does not gas off or breakdown (according to all I have been able to read). I used a dental spatula to apply it to the inside of the bowl. Once it cures for a day I will sand it out and remove the majority of it other than what will remain in the damaged areas. I wiped off the rim top with a cotton pad and alcohol to remove the small drops of JB Weld that were on the surface and restained the rim top and the repaired areas on the side and front of the bowl. I will still need to buff the bowl and wax it but it is getting very close to the look I am aiming for with this repair. I worked some Before & After Restoration Balm into the grooves and crevices of the sandblast finish with my fingers and a horsehair shoe brush. I want the product to go deep into the finish because it works to clean, enliven and protect the briar. Once I was confident that it was deeply worked into the blast I wiped it off and buffed it with a soft cloth to polish it. The pipe really began to have a rich shine. I took some photos of the bowl at this point to mark the progress in the restoration. I set the bowl aside and went to work on the stem. I cleaned the inside of the stem with pipe cleaners and alcohol. Once the stem was clean I checked it with a light for more potential problems inside. It was clear and spotless. I sanded the stem surface with worn 220 grit sandpaper to break up the oxidation (carefully avoiding the stamping on the top of the saddle).I filled in the tooth dent on the top of the button on the top side of the stem and the two tooth dents on the underside with clear super glue.Once the glue hardened and cured I filed the repairs flat and reshaped the button with 220 grit sandpaper. I worked over the surface of the stem again with the sandpaper to blend in the repairs.I polished the vulcanite stem with micromesh sanding pads – wet sanding it with 1500-2400 grit pads and dry sanding with 3200-12000 grit pads. I wiped it down with Obsidian Oil after each sanding pad. I rubbed the stem down with Before & After Pipe Polish – both Fine and Extra Fine to polish out the scratches. I gave it a final coat of oil and set it aside to dry. I avoided the stamping on the top of the saddle. There is still some oxidation there that I left because I did not want to damage the stamp. It is a nice looking stem nonetheless. I carefully polished bowl and the stem with Blue Diamond to polish out the remaining small scratches. I gave the bowl multiple coats of Conservator’s Wax and the stem multiple coats of carnauba wax and lightly buffed the pipe with a clean buffing pad to raise the shine. I hand buffed the pipe with a microfiber cloth to deepen the shine. The pipe polished up pretty nicely. The transparent mixed brown stain worked really well with the black vulcanite stem. The sandblast finish looked really good. The finished pipe is shown in the photos below. The dimensions of the pipe are Length: 5 1/2 inches, Height: 1 3/4 inches, Outer diameter of the bowl: 1 1/4 inches, Chamber diameter: ¾ inches. This is the third of the three of Paresh’s Grandfather’s pipes that he sent me to finish. I will pack the pipes up and send them back to India this week after I give the bowl a bowl coating. I look forward to hearing what he thinks of them once he gets to load them with his favourite tobacco and carry on the pipe man’s legacy of his Grandfather. Thanks for walking through this restoration with me as I worked over this beauty. 

Working on Paresh’s Grandfather’s Linkman’s Zulu


Blog by Steve Laug

As I mentioned in my previous blog, Paresh, my friend in India reached out to me over Whatsapp to talk about a few more of his Grandfather’s pipes. He was confident in working on many of them but there were a few that he wanted me to try my hand on. His wife Abha would ream and clean them for me so I would be able to start with a relatively clean pipe. The second pipe was a Linkman Zulu with a vulcanite stem. It was in rough condition when Paresh and Abha started working on it. They reamed the thick hard cake with a KleenReem pipe reamer and clean up the exterior of the bowl with Murphy’s Oil Soap. They also cleaned the interior with alcohol, cotton swabs and pipe cleaners. The pipe was in very rough condition. The sides of the bowl, the rim top had been beaten up heavily. There were gouges all over the sides and rim top of the bowl. It was a mess and it was very dirty. The stamping on the shank read Linkman’s over Dr Grabow with a silver shield next to the stem/shank junction. On the underside of the shank it was stamped De Luxe over Bruyere with a shape number 9700. On the left side of the shank it was stamped PAT. No. 1896800. The stem was oxidized but in decent condition. I took photos of the pipe to show its condition when it arrived. The tenon is the patented threaded Linkman shovel stinger apparatus. It is a single unit rather than an inserted stinger as in later models. The top of the stem has a Linkman propeller logo.I took some close up photos of the damage on the bowl to give a better idea of what I was working with on this pipe. The rim top was a real mess with nicks, chips and damage under a coat of tars. Paresh and Abha had left the cake in the bowl to me to work on because of the other damage to the pipe. The stem was in pretty decent shape with a few tooth marks and chatter on both sides of the stem near the button and some oxidation. The bowl was a real mess and it would be a challenge. I took photos of the stamping on the top, bottom and left side of the shank.I checked some of my usual sources to get some information on the brand and how it fit into the Linkman/Grabow hierarchy. The first link I checked was the Pipephil logos and stampings site. I include the link as follows http://www.pipephil.eu/logos/en/logo-l4.html. I quote as follows.

The M. Linkman and Co. was established by Louis B. Linkman and August Fisher in 1898. The company closed down in the 1950s and the Dr Grabow branch was sold to Henry Leonard and Thomas Inc.

I then went to the Pipedia website to get some more details and information. There was also a photo of Linkman that I thought added a nice touch to the work I was going to do on this pipe. Here is the link from the site if you want to check it out in full. https://pipedia.org/wiki/M._Linkman_%26_Co.

The name is often said to stand for Mary Linkman & Company. Mary Linkman was the mother of Louis B. Linkman, originator of the Dr. Grabow pipe. This Chicago company produced meerschaums and briars both.

BACK IN 1898, two ambitious young men reached the momentous decision to go into business for themselves. They were Louis B. Linkman and August Fisher. From the time they were in knee pants they had worked for a pipe jobber in the mid-west.

Diligently saving a portion of their earnings, they accumulated a few hundred dollars, and in 1898 formed a partnership under the name of M. Linkman & Company. They opened a small shop on Lake Street, Chicago, employed two additional people, and started to manufacture pipes. {The article never mentions what the “M” stood for, or the reason for the name chosen.}

In 1890 {? — 1899, perhaps?} another young man, Anton Burger, who had also been employed by a pipe jobber in the mid-west, approached them and was taken in as a partner. M. Linkman & Company proceeded as a partnership; the business developed rapidly through the untiring efforts of these men in producing quality pipes and rendering good service to their customers.

The business continued to grow, and in 1907 M. Linkman & Company was incorporated with Louis B. Linkman as president, August Fisher, vice-president, and Anton Burger, secretary and treasurer. In 1914, Richard J. Dean, who had joined the firm in 1911 was appointed general sales manager.

The business was growing and expanding rapidly, and the executives soon realized the quarters in the Wells Street Bridge Building were inadequate, so in 1922 Linkman built a modern three-story reinforced concrete building at the corner of Fullerton Avenue and Racine, housing one of the most complete and modern pipe plants in America.

I finished by doing a Google search to find the US Patent Search site so that I could see if there was a patent document on file there for this patent number. http://patft.uspto.gov/netahtml/PTO/srchnum.htm. I entered the patent number and found a patent filed by L.B. Linkman for the pipe on April 11, 1932 and granted on February 7, 1933. I include that below. I decided to clean up the bowl interior before I addressed the damage on the outside of the bowl. I reamed the bowl with a PipNet pipe reamer starting with the smallest cutting head and working up to the second head which was the same size as the bowl. I reamed the cake back to bare briar to see if there was any internal damage to the bowl. I sanded the inside of the bowl with a piece of dowel wrapped with 220 grit sandpaper to smooth out the bowl walls and the inner edge of the rim. I sanded the rim top with a folded piece of 220 grit sandpaper to smooth out the damage and reshape the inward bevel on the rim. I wiped down the surface of the briar with alcohol on a cotton pad to clean off the grime. I filled in the damaged areas around the bowl and on the rim with briar dust and clear super glue. I sprayed it with an accelerator (that is why it appears white in the following photos). The extent of the damage is very clear in the photos below. I started to sand the bowl with 220 grit sandpaper to begin to smooth out the repairs. It would take a lot of sanding to smooth out the filled areas. The patches were rock hard. The photos that follow show the progress of the sanding. I polished the sanded briar with micromesh sanding pads – wet sanding with 1500-2400 grit pads and dry sanding with 3200-12000 grit pads. I wiped the bowl down with a damp cotton pad after each sanding pad. The briar took on a shine and the filled spots though dark were better than all of the damage present before. To help hide the repairs on the bowl I decided to stain it with a dark brown aniline stain. I applied the stain with a folded thick pipe cleaner, flamed it and repeated the process until I was pleased with the coverage on the bowl. The photos below tell the story. Once the stain had dried, I wiped the bowl down with alcohol to make it a bit more transparent without making the repairs stand out. It is a tricky balance to work out as too much transparency reveals all of the blemishes while not enough makes it opaque and lacklustre. Once I polish the pipe I will know if I did enough or too much… time will tell. I forgot to take a photo of the stem before I put it in the Before & After Deoxidizer overnight and forgot about it. Today after lunch I remembered it and took it out of the mix. I wiped off the excess and ran it under warm water to rinse off the mixture. I was unable to run water through the stem so I dried it off to have a look. It looked better but it was absolutely plugged tight. That generally means there is something like a pipe cleaner broken in the stem but I would need to take it apart to tell for sure.I tried several different ways of opening the airway. I tried to push stiff pipe cleaners through the stem from the button. By measuring the length of the pipe cleaner with the stem I could see that the blockage was in the stinger itself. I tried pushing a straightened paper clip through the blockage from both ends – the button and the airway in the stinger. Nothing worked. I heated the stinger and tried again with the paper clip and again no luck. It was time to move forward. I heated the stinger with a lighter to loosen the tars holding it in place. Since it was a 1930 era pipe I figured it would be a threaded end the stem. Sure enough, once it was heated I unscrewed from the stem.

The photo below shows the culprit – a really stinky broken off pipe cleaner jammed in the stinger. The pipe cleaner was almost the length of the stem as well so it was clear that I was merely sliding by the jam with the stinger in place. With a pipe cleaner that old and worn I was worried I would just break off more in the stinger. I heated the stinger with the lighter and then carefully wiggled the pipe cleaner free of the stinger. The second photo shows the culprit freed from the stinger. You can also see that some of the fluff on the cleaner had come off inside the stinger and left it plugged. I could still not blow air through the stinger. (I have circled the ‘fluffless’ pipe cleaner end in the second photo below.)I tried to push through the clog with the paper clip pictured above, twisting it into the threaded end but was not able to break through. That left only one option for me. I chucked a 1/16 inch drill bit in my Dremel, set the speed to 5 and slowly worked my way through the rock hard plug. It took some doing to work it through the plug but I worked it back and forth until the airway was clean and I could blow air through it. I ran pipe cleaners soaked in alcohol back and forth through the stinger and removed all of the grit and tar that had built up around the plug. It was pretty nasty stuff. But after it was said and done I had a clear and clean stinger. I cleaned out the inside of the stem with pipe cleaners, cotton swabs and alcohol. Once the stem was clean I checked it with a light for more potential problems inside. It was clear and spotless.I lightly greased the threads on the stinger and turned it back into the cleaned stem. I aligned it with the mortise in the shank. The stem was getting there. I still needed to work on some oxidation but it looked a lot better and I could blow through it easily. I polished the vulcanite stem with micromesh sanding pads – wet sanding it with 1500-2400 grit pads and dry sanding with 3200-12000 grit pads. I wiped it down with Obsidian Oil after each sanding pad. (I polished the metal stinger as well at the same time.) I gave it a final coat of oil and set it aside to dry. After staining the briar and wiping it down with alcohol, I touched up the repaired areas with a Black Sharpie Pen and blended in by rubbing it. I have been using Before & After Restoration Balm after staining to further blend and clean the briar. The product works to clean, enliven and protect the briar. I hand rubbed it with my fingers, working it into the exterior of the pipe. I wiped it off and buffed it with a soft cloth to polish it. The pipe really began to have a rich shine. I took some photos of the bowl at this point to mark the progress in the restoration. I carefully polished bowl with 3200-12000 grit micromesh sanding pads. I polished the stem with Blue Diamond to polish out the remaining small scratches. I gave the bowl multiple coats of Conservator’s Wax and the stem multiple coats of carnauba wax and lightly buffed the pipe with a clean buffing pad to raise the shine. I hand buffed the pipe with a microfiber cloth to deepen the shine. The pipe polished up pretty nicely. The transparent dark brownish red stain worked really well with the black vulcanite stem. The finished pipe is shown in the photos below. The dimensions of the pipe are Length: 6 inches, Height: 1 3/4 inches, Outer diameter of the bowl: 1 1/4 inches, Chamber diameter: ¾ inches. This is the second of the three of Paresh’s Grandfather’s pipes that he sent me to finish. I will set it aside and when the others are finished I will pack them up and send them back to India. I look forward to hearing what he thinks of it once he gets to load it with his favourite tobacco and carry on the pipe man’s legacy of his Grandfather. Thanks for walking through this restoration with me as I worked over this beauty. 

Restoring a Unique Comoy’s Pebble Grain 603 Modern Bent Poker


Blog by Dal Stanton

When I saw this pipe on the eBay auction block, I wanted it!  I was drawn initially by two factors – first, it was a Comoy’s Pebble Grain.  Secondly, I had never seen a Comoy’s with this shape – a very nice Bent Poker and classy to boot!  Or was it a Poker?  The seller’s tagline said: Details about Comoy’s Pre-Cadogan Pebble Grain Lightweight OOM Paul 609 Made In England.  Uh, Oom Paul?  Here is what I saw: Despite the confusing information which I decided I would sort out later, I was able to dodge last second bidders and land this beautiful, blasted Comoy’s Pebble Grain Bent Poker.  This Comoy’s has been in my ‘Help Me! Basket’ here in Bulgaria for some time waiting to unravel the confusion.  Now, fast forward to a recent visit to Bulgaria of my wife’s sister and her husband, Sarah and Greg.  It was great having family visit!  As is often the case, when people visit, they know about my sideline activity of restoring pipes for the Daughters of Bulgaria and often, people visiting our home are interested in the process of restoring, etc.  And VERY OFTEN, people desire to help the Daughters, too, and go through the MANY pipes I have in the ‘Help Me!’ basket and pick out a special pipe for them that will also benefit the Daughters.  Well, Greg caught the bug and wanted to choose ‘a’ pipe for himself which became two pipes because he couldn’t decide between the two!  He chose this Comoy’s as well as a K&P Peterson’s Republic of Ireland – both now in the queue for restoration to benefit the Daughters.  Thanks, Greg!

The one thing the eBay seller had right about this Comoy’s is that it is Pre-Cadogan, which means that it is pre-1981 the year of the merger.  The origins of Comoy from Saint-Claude, France, started in the 1820s by Francois Comoy.  His son, Henri, started the London extension of the Comoy name in 1879 with not much more than the tools of his trade – making pipes.  He is cited by Pipedia as being the author of the appellation, “London Made”.  In 1929 the company merged with the macro-concern, Oppenheimer Pipes.  With this, albeit brief history, Pipedia’s describes the present summation:

Comoy’s remained a family owned company until it was finally taken over by Cadogan Investments during the early 1980’s. Cadogan have continued to manufacture Comoy pipes to the present day and, under Michael Adler, the Comoy brand is their flagship and efforts are being made to once more re-instate the well-known quality of the brand.

Time to sort out the confusion.  I did a simple Google search for a Comoy’s pipe shapes chart which brought me PipePages.com where I found the actual shape 603 (not 609 on the eBay block), described as a ‘Modern – Bent Poker’.  The page provided information associating the Comoy’s pipe chart with the corresponding 1975 Comoy’s of London Catalog which I looked at.  The 603 is on the right, second down in the chart below.  I remember 1975!  I was in college, driving my red ‘68 VW Bug, Gerald Ford was President of the US, and it was the year Jaws hit the cinema (I think!). The catalog described the Pebble Grain line’s qualities and also provided a price list that I found interesting to see how the various Pebble Grain line shapes ranked in monetary value in 1975 – not a cheap pipe! It was tied for second in value with Comoy’s Golden Grain, behind number 1 – Comoy’s Diplomat line (See below). With the confusion dispensed, I take the 1975 Comoy’s Pebble Grain, Modern – Bent Poker, to the worktable and take additional pictures to get a closer look at this classy Comoy’s Pebble Grain Modern Poker. The heel of the Poker contains the nomenclature: ‘COMOY’S’ over ‘PEBBLE GRAIN’ over ‘MADE IN LONDON’ over ‘ENGLAND’ over ‘603’, the shape number.  According to Pipedia’s article, A History Of Comoy’s and A Guide Toward Dating the Pipes, the ‘Made in London England’ was used after WW2.  According to the same article, the ‘Inlaid C’ which this Poker has, was stopped with the Cadogan era in 1981.  So, this Comoy’s is placed after WW2 to the 1970s – the 1975 Comoy’s catalog siting seems to be confirmed.  I found this information about the inlaid C interesting:

“C” was first inlaid in the side of the mouthpiece around 1919. This was a complex inlay needing three drillings. First, a round white inlay was inserted, then the centre of the white was drilled out, and a smaller round black inlay was inserted. Finally, another drilling was made to remove the open part of the “C,” and an even smaller black inlay was inserted. This inlaid “C,” known as the “three-piece C,” was continued until the Cadogan era in the 1980s. However, the “C” in the 1920s and early 30s is much thinner and more delicate than the one post-war. Cadogan first changed the “C” to a single drilling with an inlay that had the “C” in the centre, and more recently it became a laser imprint. I have a cased pair of early 1920’ “Par Excellence” where the “C” is on top of the mouthpiece.

The picture above shows the ‘three-piece C’ detected by the drilling if you look closely.  Very cool!

The condition of the Comoy’s Pebble Grain ¾ Bent Modern Poker is pretty good.  The blasted finish is exceptional, which seems to be a hallmark of the Comoy’s name.  The surface is dirty and needs to be cleaned.  The rim has significant lava flow over it and the chamber is sporting some moderate cake buildup.  The stem has a good bit of tooth chatter but no dents that I detect.  The oxidation is deep.  I want to keep my eye that – not to progress too far finishing the stem and discover oxidation!  That is not fun.  I begin the restoration of the Comoy’s Pebble Grain by first cleaning the internals with pipe cleaners and isopropyl 95%.  I then add the stem to a Before and After Deoxidizer bath along with other stems.  After some hours, I fish out the Comoy’s stem and after allowing it to drain a bit, I wipe off the raised oxidation using cotton pads and light paraffin oil, Bulgaria’s version of mineral spirits.  The oxidation wipes off and then I buff the stem clean with the cotton pad. I run a pipe cleaner through the stem to rid the airway of Deoxidizer fluid. I follow the Deoxidizer bath by applying Before and After Fine Polish and then Extra Fine Polish to further remove oxidation and revitalize the vulcanite stem.  I put a little of the polish on my finger and work it into the vulcanite until it has absorbed well. I do the same with the Extra Fine Polish.  I wipe off each application with a cotton pad.  I take a close look and I can still see the deep greenish haze of oxidation – ugh!  Instead of immediately turning to sanding, I decide to utilize the method I’ve used in the past – an OxiClean bath.  I cover the Comoy’s ‘C’ with petroleum jelly to protect it and I put the stem in the bath with a pipe cleaner inserted in it for easier retrieval.  I leave the stem in the OxiClean bath over nite. With the stem soaking, I turn to the Comoy’s Poker stummel.  I begin by reaming the chamber to remove the moderate carbon cake buildup.  Uncovering fresh briar enables me to examine the chamber walls for cracks or crevices. Using the Pipnet Reaming Kit, I start with the smallest blade after putting paper towel down to ease on cleanup.  I use 3 of the 4 blades available to me in the Pipnet Kit – I’m surprised how large the bowl is for a smaller sized pipe.  I then scrape more carbon out of the chamber using the Savinelli Fitsall tool which is great for getting hard to reach places.  Using a Sharpie Pen, around it I wrap 240 grit paper and sand the fire chamber to expose the fresh briar.  I finish with cleaning the chamber of carbon dust with a cotton pad wetted with isopropyl 95%.  The chamber has no cracks or crevices upon inspection. Next I attack the lava flow on the rim and cleaning the stummel surface.  I use undiluted Murphy’s Oil soap with cotton pads to do the cleaning.  The rim requires the use of a brass brush which doesn’t harm the briar.  I then rinse the stummel using cool tab water careful to keep water out of the internals.  The Murphy’s cleaned the surface well – it was grimy and the old finish was lightened at different places – especially around the rim.  I take a few pictures below to show what I’m seeing. I like working on a clean pipe so I decide to do the dirty work now.  Using pipe cleaners and cotton buds dipped in isopropyl 95%, I work on cleaning the mortise and draft hole.  I find the internals pretty dirty but finally the pipe cleaners and buds are coming out fairly clean.  I like to make sure the internals are clean so I will also use the more subtle approach – kosher salt and alcohol soak.  I use kosher salt because, unlike iodized salt which leaves a taste in the wood, kosher does not.  I fill the chamber with salt and cover the top and give it a shake to move the salt around.  Then I use a cotton ball to create a wick by stretching and twisting it.  I stuff it down the mortise and place the stummel in an egg carton for stability.  Using a large eyedropper, I then fill the chamber with isopropyl 95% until it surfaces over the salt.  After a few minutes, I will top the alcohol again.  The night is late, I leave the stummel to soak over nite and I call it a day. The next morning before heading out for my workday, I need to tend to the kosher salt and alcohol soak.  The salt was discolored and the wick was wonderfully colored – it did the job that was asked of it!  I dump out the used salt in the waste basket and wipe the bowl with paper towel and a bristled brush to remove the leftover salt.  I also blow through the mortise to purge any left over salt in the mortise.  I finish by running a few pipe cleaners dipped in isopropyl 95% through the airway and I’m satisfied.  The bowl is clean!I also fish the Comoy’s stem out of the OxiClean bath.  The bath has raised more oxidation from the vulcanite.  I adjust the aperture on the iPhone camera to show better what I’m able to see with the naked eye.I attack the oxidation by wet sanding with 600 grade paper.  When it’s time to head to work, I’m still not satisfied that the oxidation was conquered and will continue tonight!I continue working on the oxidation when I return in the evening.  I continue sanding using 600 grade paper but change to dry sanding.  I also utilize a disc I fashioned to wedge up to the shank end of the stem to avoid the sanding creating a ‘shoulder’ on the stem – a rounding of the edge. I think I’m making progress.  I follow the 600 paper by buffing the stem with 0000 grade steel wool.  Through out I take a very light approach to sanding on the Comoy’s 3 piece ‘C’, though since it is an inlay, it’s not fragile – at least that is my hope!  At this point, I’m feeling better about the oxidation being subdued for the most part!Now, taking a close look at the bit area to determine tooth chatter needing to be taken care of, I see that the work dealing with the oxidation has almost cleared all the chatter.  There is still a little that will easily sand out.  I take pictures of the minor issues and then use 470 grade paper on the upper and lower bit areas removing the chatter.  I then return to 600 grade paper then 0000 steel wool to erase the tracks of the coarser papers.  The pictures show the progress. Next, using micromesh pads, I wet sand the stem using pads 1500 to 2400.  Following this I dry sand using pads 3200 to 4000 then 6000 to 12000.  Following each set of 3 pads, I apply Obsidian Oil which the vulcanite drinks up.  I think that stems require more time than any other part of the restoration process – they take lots of patience and this Comoy’s stem looks good – he’s really popping! Turning to the Pebble Grain Poker stummel, I’m looking forward to seeing how he will shape up!  The Comoy’s Pebble Grain blasted finish is second to none in my opinion – the three-dimensional perspective of the grain revealed in the blasting process gives a different kind of enjoyment.  I love to see the grain emerge in smooth briars, but a quality blasted surface, as this Comoy’s is, gives a unique grain look and touch all in one package.  Earlier when I cleaned the stummel with Murphy’s Soap, I felt like it lightened the finish at places.  With this classic pipe I want to keep it as close to the original as I can – only refreshing it where its tired.  I reached out to Steve with all his rebornpipes experience to get his input which was helpful as expected!  The working plan is to touch up areas that are worn more and exposed briar is showing.  This is especially true of the outer rim lip – through wear, the finish is thin.  I take a few pictures to mark the start. With a Cherry dye stick, which seems to be a good, subtle match, I touch up the rim as well as a few spots around the base of the shank and on the shank end.  I then apply Before and After Restoration Balm, Steve’s suggestion, by placing Balm on my fingers and working it into the crevices of the Comoy’s Poker blasted finish.  The Balm starts off more liquidy then firms up into a wax-like substance that continues to be supple.  It takes a few applications to my finger to cover the surface well.  I set it aside for a while to allow the Balm to do its thing!  I take a picture with the Balm on the stummel.  After about ten minutes, I wipe the Balm off with a cotton cloth towel until it start shining up.  I’m very pleased with the results – the Balm brought the blasted briar to a rich brown hue with the light reddish flecks that give the briar surface depth and character.I reunite the stem to the Modern Poker stummel and mount a cotton cloth buffing wheel dedicated to White Diamond compound to the Dremel.  With the speed set at the lowest for the Dremel, I apply the compound to the stem to bring out the gloss.  I don’t press hard on the wheel but allow the speed, the wheel and the compound to do the work.  After completing the application of compound to the stem, I mount a cotton cloth wheel on the Dremel to apply Carnauba wax to both the blasted stummel and stem.  What I have grown to enjoy is the up close and personal approach that I have developed with the Dremel.  I am able to apply the carnauba wax by changing the orientation of the wheel to correspond to the terrain of the blasted surface.  This allows me to apply the wax strategically and to avoid too much or too little.  After completing a couple of applications of the wax, I give the Comoy’s Poker a rigorous hand buffing with a mircromesh towel dispense any leftover wax and to raise the shine.

Oh my!  What a classic presentation of this Made in London England, Comoy’s Modern ¾ Bent Poker.  The blasted surface is beautiful – I love the 3 dimensional perspective of the grain.  The process of blasting is different from rustification.  When I started restoring pipes it took me a while to figure this out.  The blasting technique, which Comoy’s has certainly perfected over the years, gently removes the soft wood and leaves the contours of the harder wood of the grain peeks.  This leaves an intricate mosaic of grain pattern to enjoy by sight and by touch as one enjoys his (or her) favorite blend.  This vintage Comoy’s Pebble Grain 603 Bent Modern Poker is a keeper and I’m reluctantly giving him up!  A unique addition to anyone’s pipe collection.  Since Greg commissioned the Poker, he has first dibs on it when I put it into The Pipe Steward Store.  This Comoy’s Pebble Grain benefits the work of the Daughters of Bulgaria – helping women and girls who have been trafficked and sexually exploited.  Thanks for joining me!

Breathing New Life into a B.P. Jum War Club


Blog by Steve Laug

In one of the boxes of pipes that my brother Jeff sent me was a large, hefty carved pipe that was stamped BP Jum. It had a carved finish very similar to the carving on Custombilt pipes made by Tracy Mincer. The shape is also similar to the CB pipes. It is a large pipe – 5 ½ inches long, 1 ½ inches tall, outside wall diameter 2 inches and the chamber diameter 1 inch. The shank diameter is 7/8 inches. The stem is 2 ¼ inches long. The briar was very dirty with grit and grime in the depths of the carvings. The rim top was also dirty with lava and tars in the carving of the rim. There was cake built up on the walls of the bowl. The briar has a log of putty fills underneath the rustication with a large one on the left side of the shank. The stem was oxidized and dirty and there were tooth marks and chatter on both the top and underside of the stem near the button. The internals of the both the airway in the stem and shank and the mortise were very dirty with tars and oils. Jeff took photos of the pipe before he started his cleanup work on it. Jeff took photos of the rim top and inside of the bowl to show the condition. You can see the cake – not terribly thick but still visible and flaking nonetheless. It was not hard but was flaky and soft. He also took photos of the sides and underside of the bowl and shank. I have included those here. There was a smooth portion of briar on the underside of the shank that was stamped BP JUM over IMPORTED BRIAR. There were fills in the shank that are visible in the photo below.He took photos of the stem to show the tooth marks and the oxidation on the stem.I did some research to try to find out information on the BP Jum brand. There was a lot of conjecture as to whether the brand was made by Tracy Mincer of Custombilt fame. There is no definitive proof other than the common shapes, sizes and look of the pipes. Bill Unger, of Custombilt fame and author of a history of the brand, mentions BP Jum but cannot definitively connect the two. So the maker remains a mystery that is still unsolved. Do any of you reading this have information on the brand? Send me a message or an email if you can help. Thanks ahead of time.

Jeff had reamed the bowl with a PipNet pipe reamer and followed up with a Savinelli Fitsall pipe knife to remove the cake. He scrubbed out the mortise and the airway in the shank and the stem with alcohol, cotton swabs and pipe cleaners. He scrubbed the exterior of the bowl, rim, shank and stem with a tooth brush and Murphy’s Oil Soap to remove the oils and tars on the bowl, rim and shank. He rinsed it under running water. He dried it off with a soft cloth. The lava mess on the rim was thoroughly removed without harming the finish underneath it. Without the grime the finish looked good. The stem would need to be worked on. I took photos of the pipe to show its condition before I started my work on it.   I took close up photos of the rim top that shows the clean bowl and the small nicks and dents in the smooth portion of the finish. The stem was clean and Jeff had used Before & After Deoxidizer to soak and remove much of the oxidation. He rinsed out the inside of the stem and rinsed off the exterior as well. The photos of the stem show the tooth marks and chatter on both sides.The BP JUM stamp is very clean. You can see the putty fills on the left side of the photo as well as on the shank sides and the bowl itself. I used a Mahogany stain pen to touch up all of the fill areas on the pipe and blend them into the texture of the briar.I used a folded piece of 220 grit sandpaper to sand out the nicks and damage on the smooth parts of the rim. I polished them with micromesh sanding pads – wet sanding with 1500-2400 grit pads and dry sanding with 3200-12000 grit pads. I wiped the rim down after each sanding pad to remove the sanding dust. I rubbed the bowl down with Before & After Restoration Balm to deep clean the briar and particularly the sanded areas. The product works to clean, enliven and protect the briar. I hand rubbed it with my fingers and wiped it off with a soft cloth. I buffed the bowl with a horsehair shoe brush to polish it. The briar really began to have a rich shine. I took some photos of the bowl at this point to mark the progress in the restoration. I used clear super glue to fill in the large fill on the left side of the shank. I scored it with a knife to match the marks in the rustication. I stained the fill with a mahogany stain pen to match the briar and rubbed the area down with the balm to blend it.I waxed the cleaned and polished bowl with Conservator’s Wax and worked it into the rusticated finish. I buffed it with a shoe brush and a soft cloth. The bowl is finished other than the final buffing that I will do once the stem is finished. I set the bowl aside and turned my attention to the stem. I used a Bic lighter to paint the tooth marks with the flame and try to lift them. I was able to remove the lighter tooth chatter and lift the deep tooth marks partially. I sanded the stem and the surface of the button with 220 grit sand paper to remove the remaining tooth marks and reshape the surface and edges of the button. There were two tooth marks that were too deep and did not lift when heated. I filled them in with clear super glue. Once it had cured I sanded it down with 220 grit sandpaper to blend it into the surface of the vulcanite. I polished the stem with micromesh sanding pads – wet sanding with 1500-2400 grit pads and dry sanding with 3200-12000 grit pads. I wiped the stem down after each pad with a damp cloth to remove the sanding dust. I used the Before & After Pipe Polish to remove the small minute scratches left in the vulcanite. I finished by wiping the stem down with a final coat of Obsidian Oil and set it aside to dry. I polished the stem and bowl with Blue Diamond to polish out the remaining small scratches. I gave the bowl multiple coats of Conservator’s Wax and the stem several coats of carnauba wax and buffed the pipe with a clean buffing pad to raise the shine. I hand buffed it with a microfiber cloth to deepen the shine. The pipe polished up pretty nicely. The finished pipe is shown in the photos below. It is an interesting looking pipe that may have been carved by Tracy Mincer. It certainly bears a lot of resemblance to Custombilt/Custom-Bilt pipes.The dimensions are Length: 5 ½ inches, Height: 1 1/2 inches, Outside diameter of the bowl: 2 inches, Chamber diameter: 1 inch. I will be adding it to the rebornpipes store shortly. If you are interested in adding it to your collection email me at slaug@uniserve.com or send me a message on Facebook. Thanks for walking through the restoration with me as I worked over this BP Jum.


Restoring my grandfather’s Custom-Bilt pipe


Blog by Paresh Deshpande

Now that the WDC Bulldog with Bakelite stem and gold band has been sent to Mr. Steve along with one Linkman’s with Pat Number and one Barling Ye Olde Wood, I suddenly feel relieved off the pressure of messing up with the restoration of these sentimentally valuable old pipes of my grandfather. It always pays to have someone experienced to fall back on in case something goes awry, the way it did with the WDC mentioned above. I am sure that those of who have previously read about the restoration of the Pete System # 31 will be curious to know what exactly went wrong with the WDC that I have mentioned it twice!!! Well, I definitely intend to share this story with you, but all in good time!!!!!

The next pipe from the collection which I decided to work on was a huge Custom-Bilt briar pipe. The large size of the bowl, thick shank and large saddle stem, lends this pipe a weight which I particularly enjoy holding in my hand.The pipe has deep and large vertical rustications along the entire length of the shank and height of the bowl. Within these large vertical rustications are very thin, closely stacked horizontal lines which give this pipe its unique appearance and are its trademark!!! I absolutely loved this pipe. These large rustications end half a centimeter below the outer rim of the bowl giving it the semblance of a rim cap. The rim top is covered with the same thin, closely stacked lines as seen between the vertical rustications.The pipe is stamped on the left side of the shank as “Custom-Bilt” on a plane surface. There is also a five-pointed star on the right side of the shank where the shank and stem meet (this star was revealed later after cleaning the pipe!!!).I searched the internet for information in order to date this pipe. Pipedia has  a lot of information about this pipe and just typing in Custom-Bilt in the search bar of the site will reveal the required information. There is an interesting review given by Richard Esserman  on a book written by   William E. Unger, Jr., PhD, which deals with the study of Custom-Bilt pipes. The author authoritatively states, after a lot of research and study that the stamp as seen on this particular pipe dates it from between 1938 – 1946!Initial inspection of the pipe revealed the following:

There is a thick layer of cake in the bowl. Though the cake appears thin, the sheer size of the bowl makes it appear so.The rim is covered in the overflow of lava, dirt and grime. The outer edge of the rim appears to be in good condition with no damage. The condition of the inner edge will be determined only after removing the cake.

The large vertical rustications are filled with dust, oils, dirt and grime to such an extent that the horizontal lines lying within are barely visible. Same goes for the rim top.  The stem is firmly stuck to the shank and will not budge. However, there is only one light bite mark below and above the stem near the lip. This is a big surprise since all the other pipes are heavily chomped up!THE PROCESS

Before I could start the work of cleaning the pipe, I kept it in the freezer overnight so as to separate the stem from the shank. Come morning, I removed the pipe from the freezer and tried to remove the stem, but it still did not budge! I let it rest outside for an hour and after applying considerable force, the stem came free, revealing an aluminum tenon fixed permanently into the shank.My first impression was that of having broken and ruined the stem. Further examination of this protrusion confirmed two airways, a larger one above a smaller one, both with the same draught hole at the other end.There is also a gap between the end of this aluminum protrusion and the airway hole inside the stem. This gap is covered in oils, tars and gunk. My guess is that the smoke drawn is swirled and the turbulence results in a cool and dry smoke. Any confirmed inputs will be highly appreciated.Using a Kleen Reem pipe tool, Abha, my wife removed all the thick cake from the bowl. She further cleaned the bowl down to the bare briar using a knife that I have especially fabricated for cleaning pipes. It may not be as classy as a Savinelli Fitsall knife, but performs efficiently to our satisfaction.A sanding down of the insides of the bowl by a 220 grit sand paper made the inner surface of the bowl nice and smooth. Abha had sanded down the inside of the bowl down to its briar. On close scrutiny of the insides of the bowl, I saw what appeared to be cracks in the bowl and that had me in sweats!!! Immediately forwarded pictures of the same to my mentor and Guru, Mr. Steve who laid my fears to rest by assuring these were not cracks and that further sanding should take care of these things. These lines which appeared like cracks disappeared after sanding down with a 220 grit sand paper.Thereafter, using Murphy’s oil soap ( undiluted ) and a hard bristled toothbrush on the exterior of the bowl, shank and rim, the pipe was thoroughly cleaned and rinsed under running tap water. I immediately wiped it down with a soft cloth. The long vertical rustications and the horizontal lines within were now clean and the briar looked clean and solid. I then left the briar to dry out. This product, I find to be very easy to use and the results are really amazing. The briar takes on a new look and a new shine. While the briar was drying out, I turned my attention to the stem. Since there is only one small, light bite mark on both the sides of the stem near the lip, I felt that it can be addressed by holding it over a Bic lighter and during sanding down using a 220 grit paper followed by micromesh sanding pads. Since there is no stamping on the stem, the work progressed relatively faster. After a 220 grit sanding, I wet sanded it with 1500 – 3200 micromesh sanding pads and dry sanded with 3400 – 12000 grit sand paper. In between each micromesh pad, I wiped it down with extra virgin olive oil, which I find is a perfect substitute for Obsidian oil which is not available in India and olive oil also tastes great! The stem is now nice and shiny. However, the light bite marks on both upper and lower sides can still be seen even after the using the Bic lighter and the sanding down process. This should have been addressed right at the beginning by either filling it with black super glue (which I do not have) or by using activated charcoal as suggested by my Guru, Mr. Steve. Well, this was a lesson learnt during this project.

Once the briar had dried out completely, I rubbed in Before and After Restoration Balm deep into the rustications as well as the rim top. The bowl was then wiped vigorously with a soft cloth and buffed with a horse hair shoe brush. The result is very pleasing and satisfying to the eyes! I am happy with this progress. This balm is a fantastic product for infusing a new life into the briar and giving it a new lease of life.While on a FaceTime call with Mr. Steve, I had conveyed that I do not have a buffing wheel and other waxes. He advised me to use boot wax which is readily available with us, it being an inescapable requirement in my profession and believe you me, it works wonders. I can rely on his vast experience to come up with such simple, uncomplicated and practical solutions, specifically tailor-made for you. Thank you, Sir.

The finished pipe is as shown below. I enjoyed working on this large Custim-Bilt pipe belonging to my grandfather. There are still a number of pipes which I have to work on and the next one is an old Stanwell, de-Luxe # 482 with Regd number 969-48 and a KRISWILL “CHIEF” #20. I have to work really hard and fast so as to complete as many pipes as possible before my leave ends!!!!