Author Archives: rebornpipes

New Life for a Broken Nording Danmark F Freehand


Blog by Steve Laug

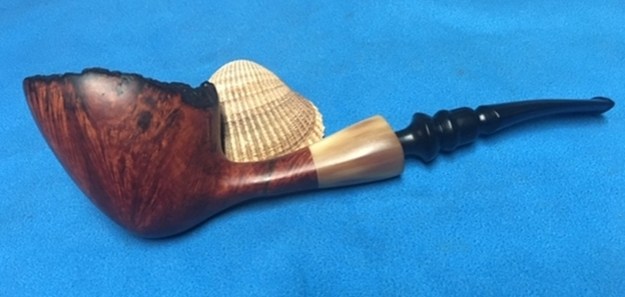
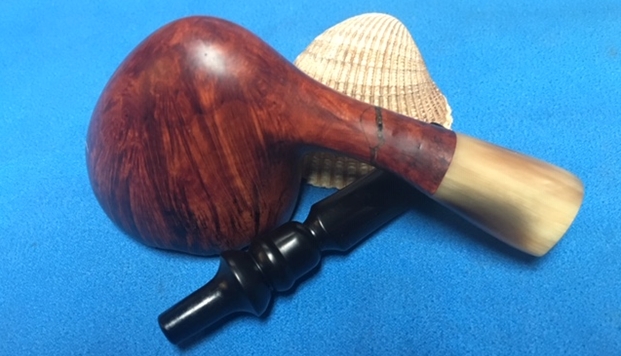
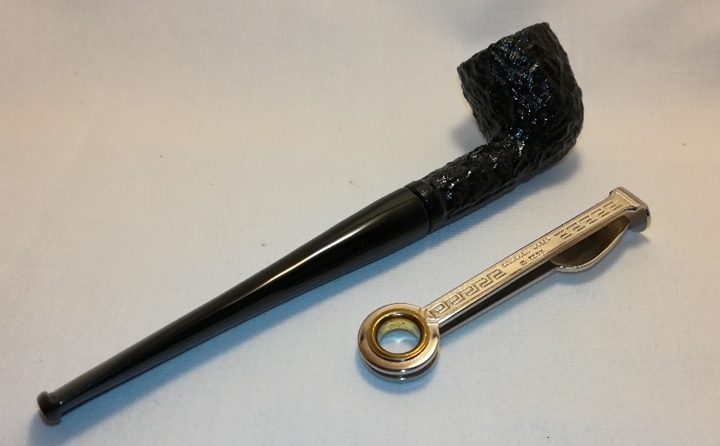
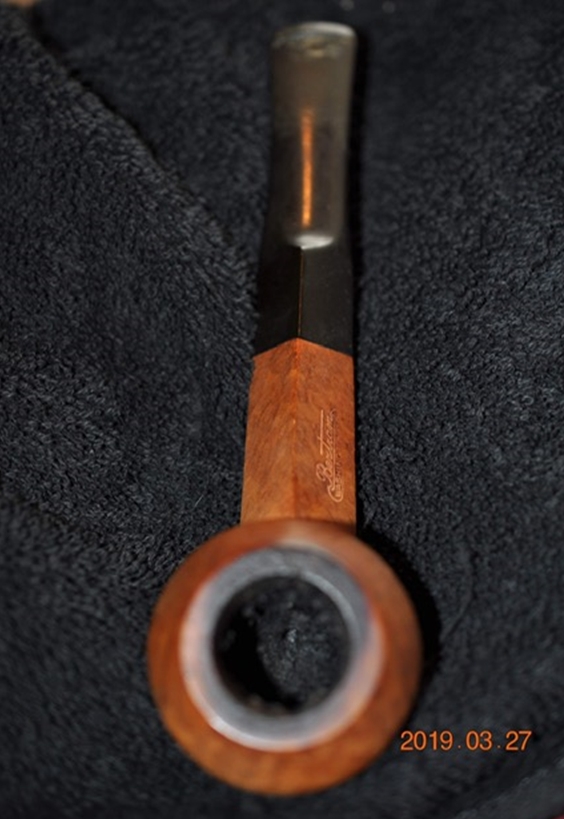
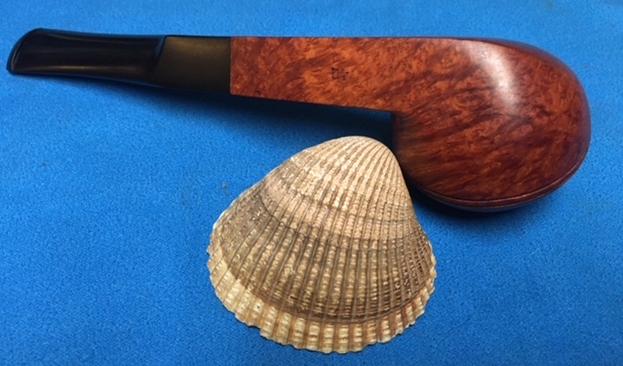
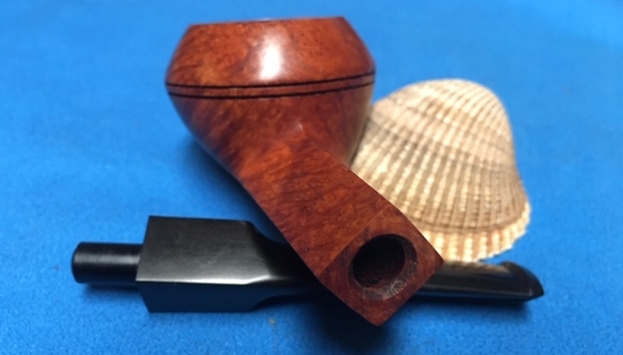
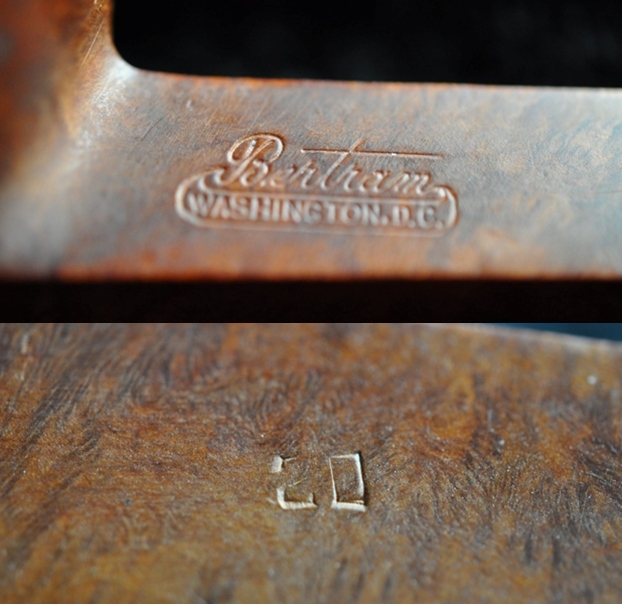
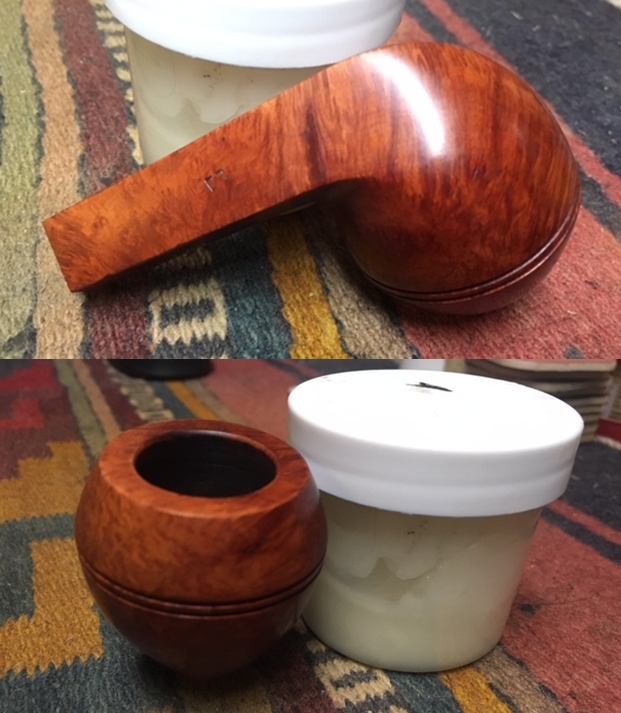
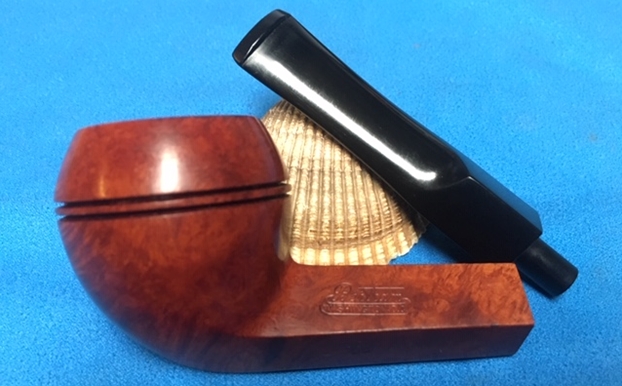
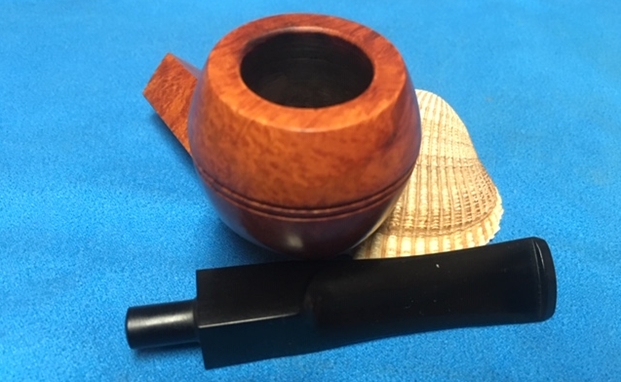
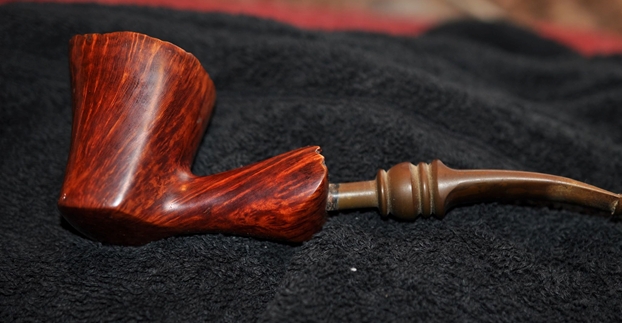
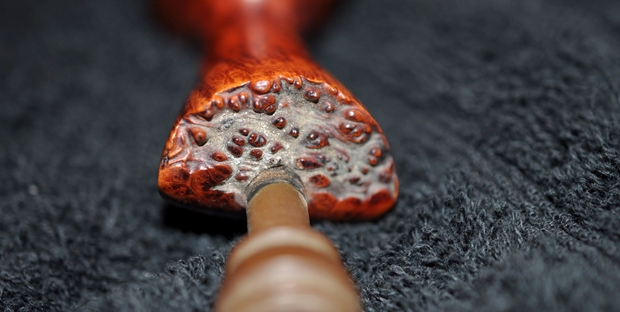
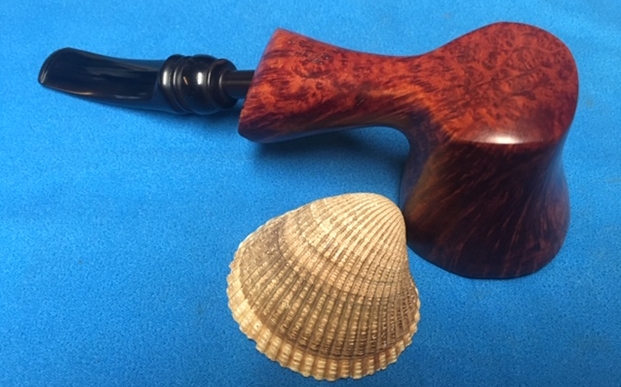
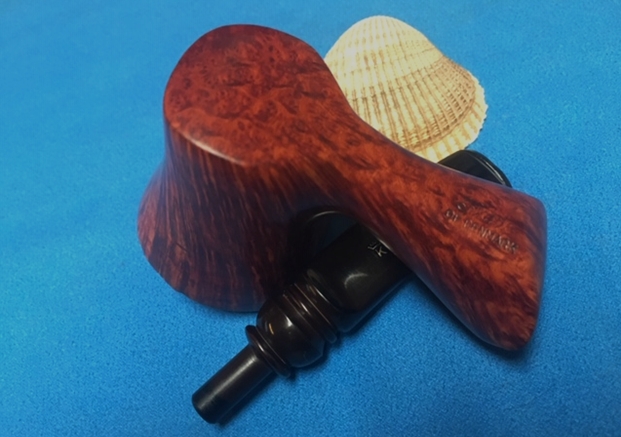
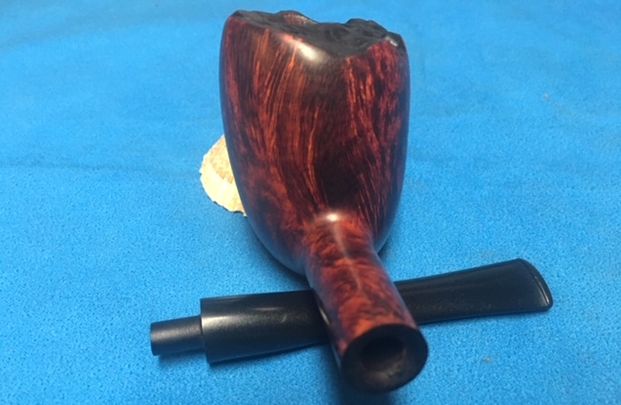
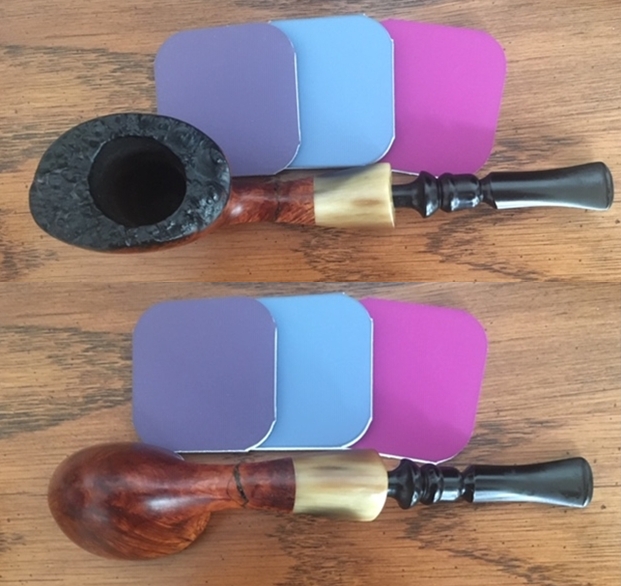
In one of the bags of parts Jeff purchased there was a bowl and there was a piece of shank with a stem in place. We took all the parts out of the bag and were able to see that these two parts actually went together. The shank piece is stamped on the underside as follows: F over NORDING over DANMARK near the horn extension/shank union. The bowl shape follows the grain of the block of briar very well. The break in the shank was not a clean one – it was a mess. The inside of the airway was plugged with lava and tar. Someone had tried to repair the two parts by gluing them together with epoxy. As expected the repair did not hold. Jeff took photos of the pieces to show the extent of the damage to the pipe – it really was a stunning pipe originally. The shank was thin but the briar was thick enough. The nice piece of striated horn that made a shank extension was in excellent condition. There was a steel tube in the end of the horn where the stem sat in place to protect it from splitting when the stem was repeatedly inserted. The turned fancy stem was in good condition with some tooth marks on both sides but otherwise it was undamaged. There was a thick cake in the bowl and a heavy overflow of lava on the rim top.
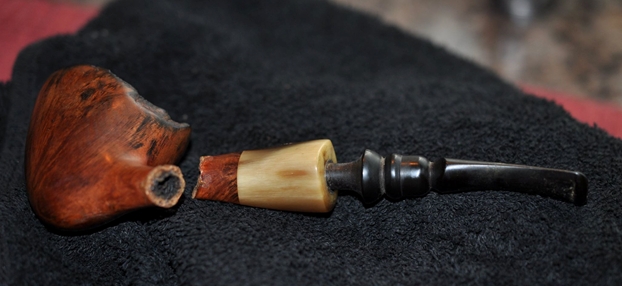
The next series of photos shows the two parts of the shank and the thick buildup of tars and oils in the shank interior and the broken briar around the shank. 
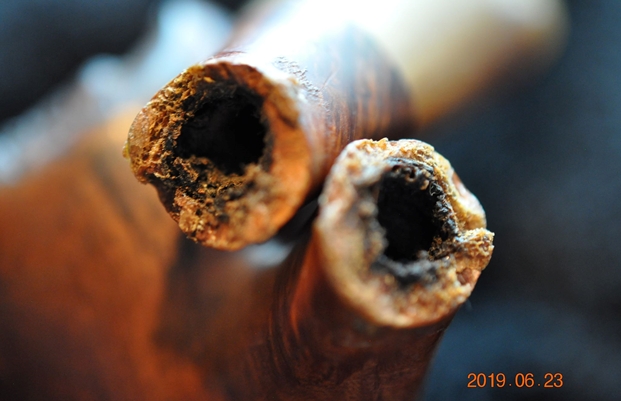
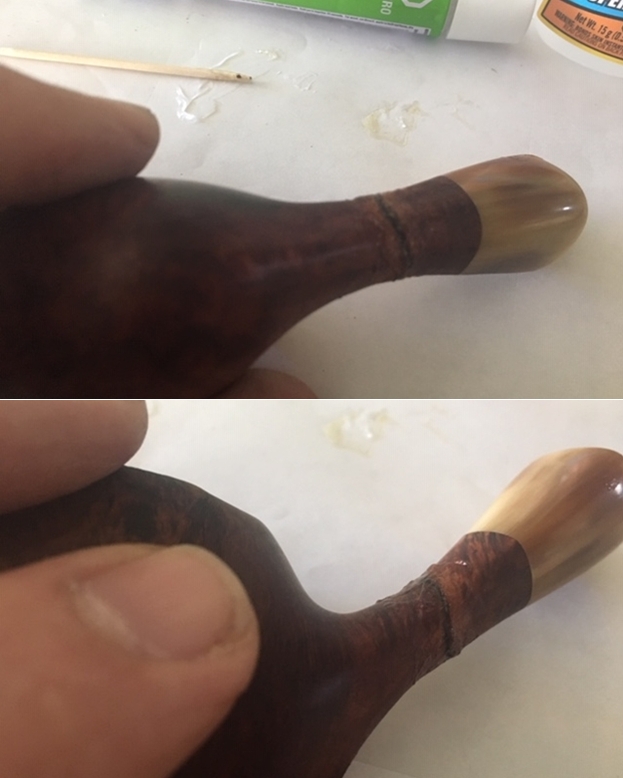
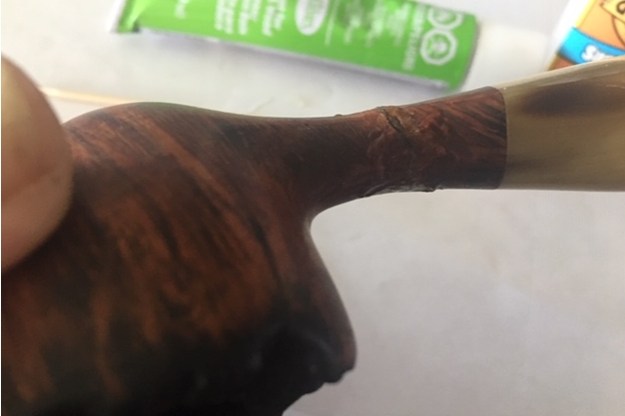
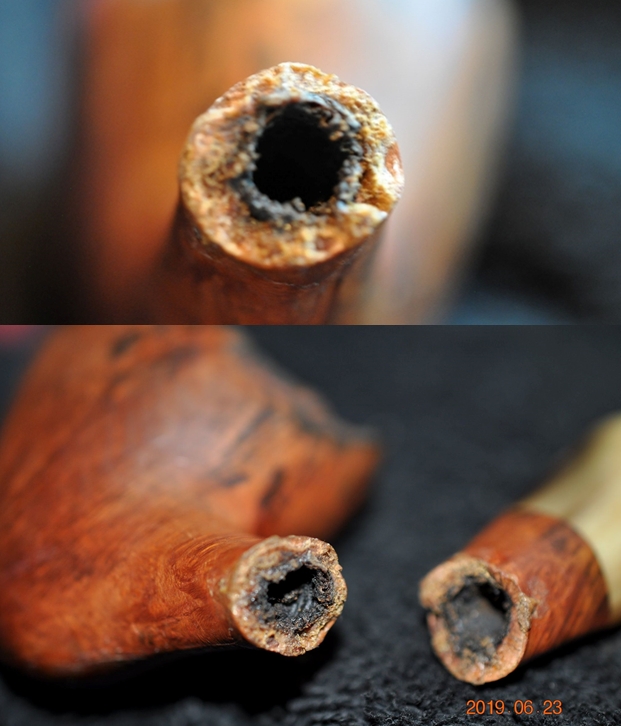
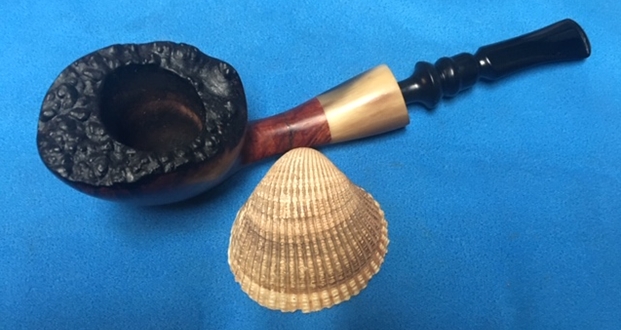
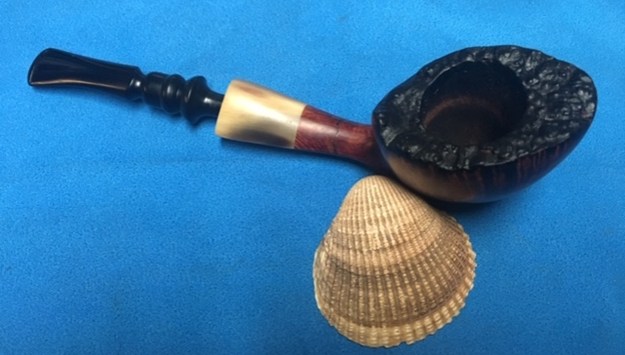
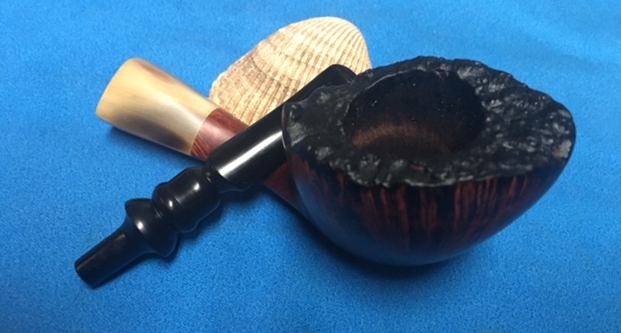
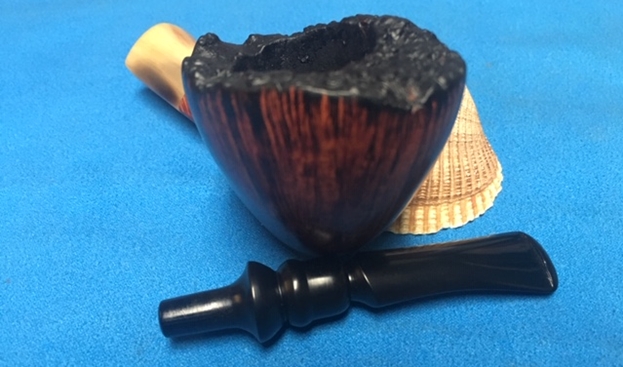
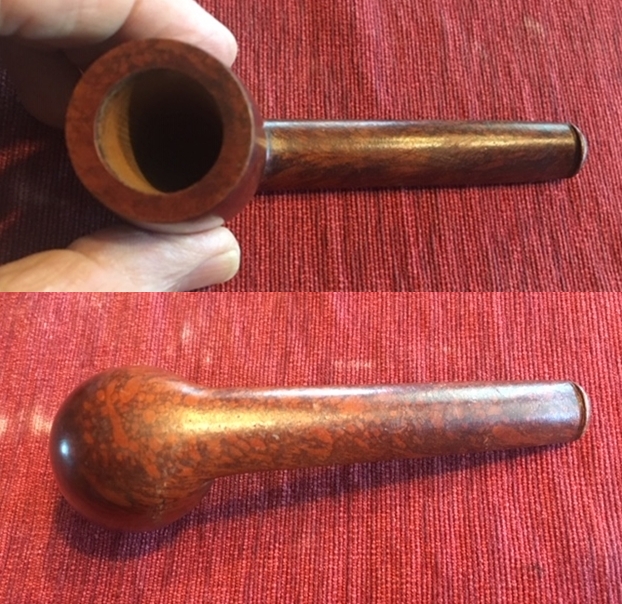
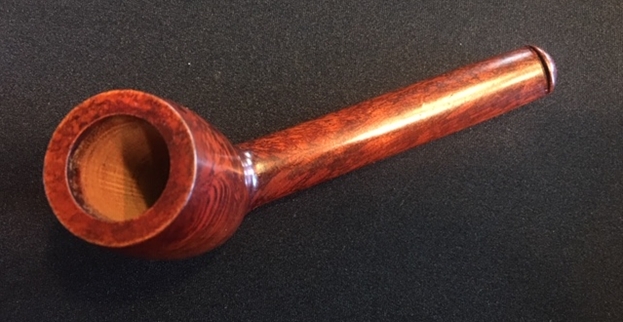
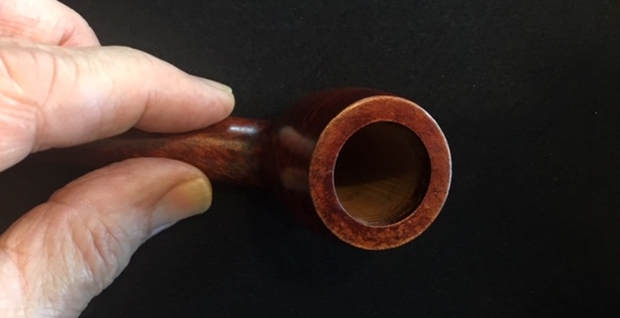
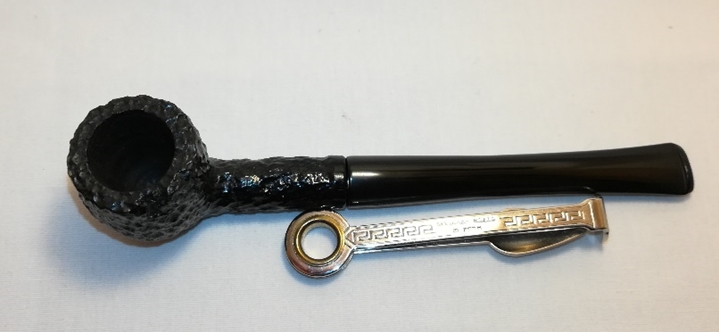
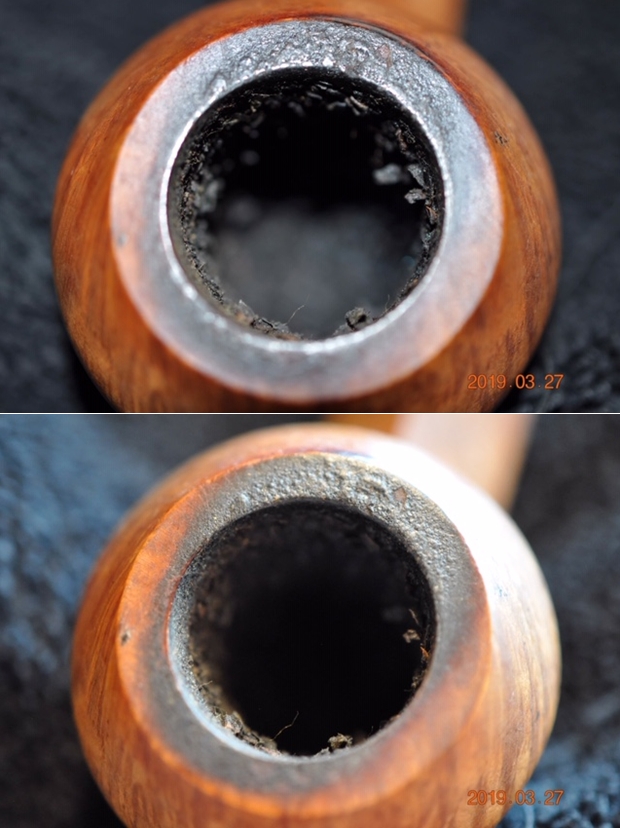
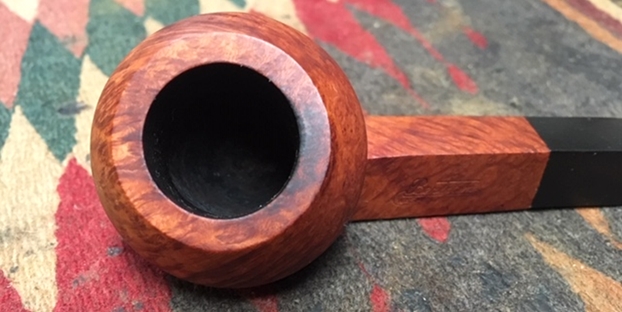
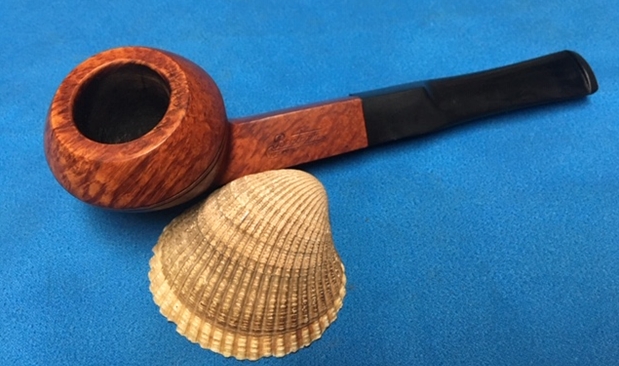
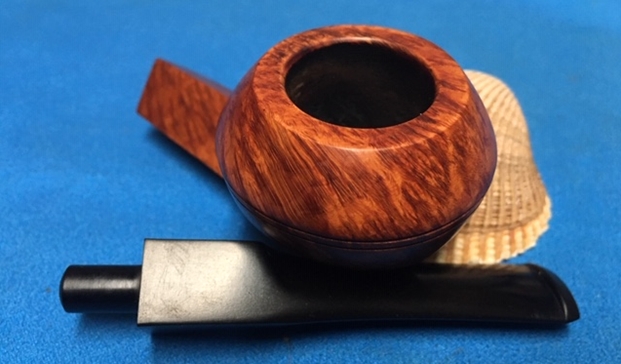
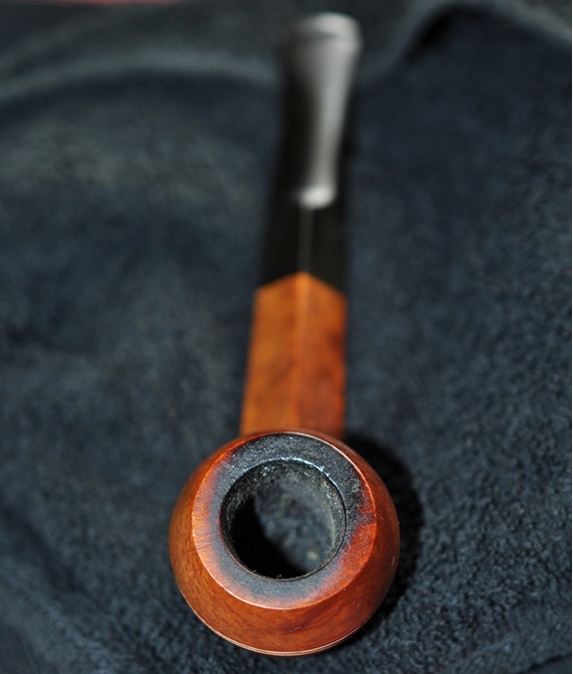
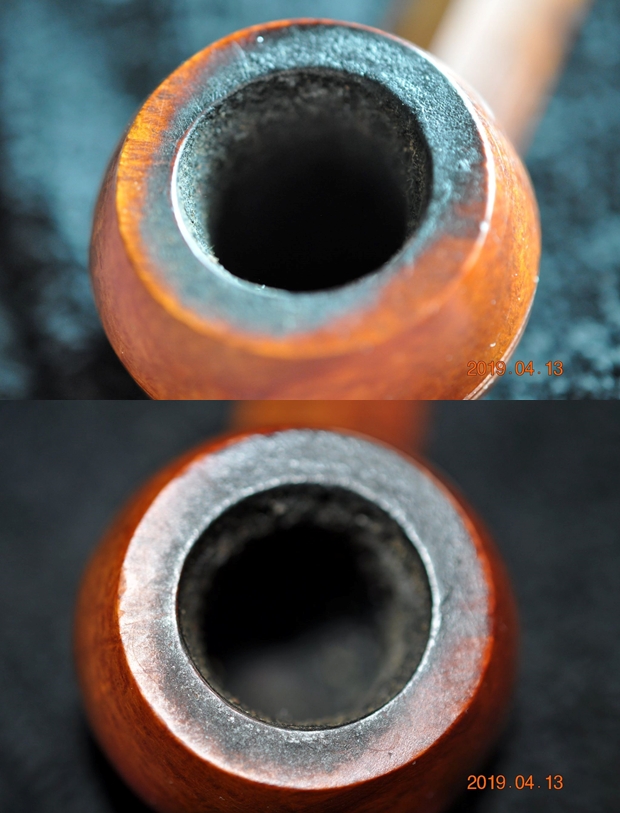
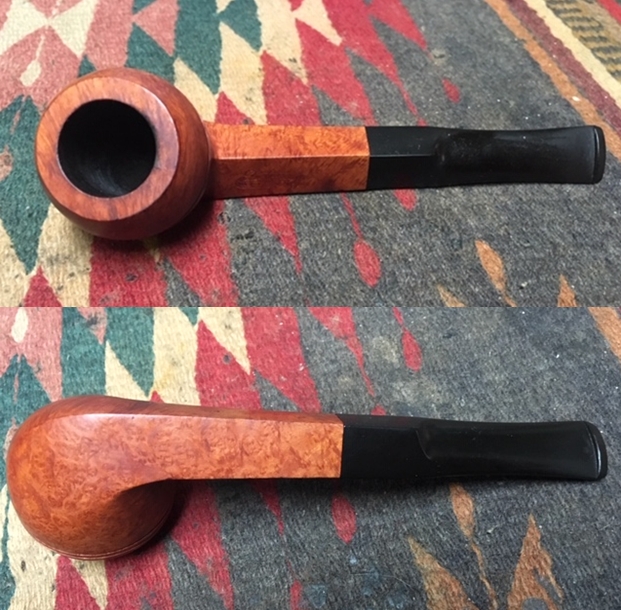
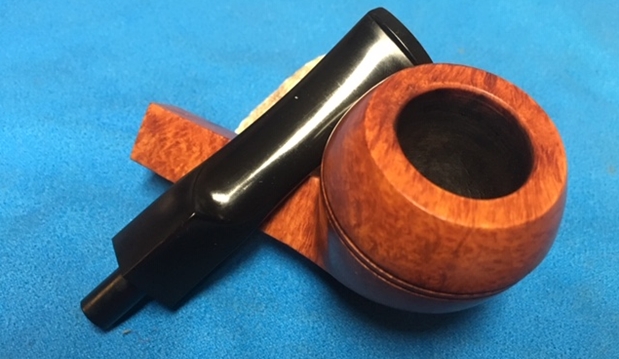
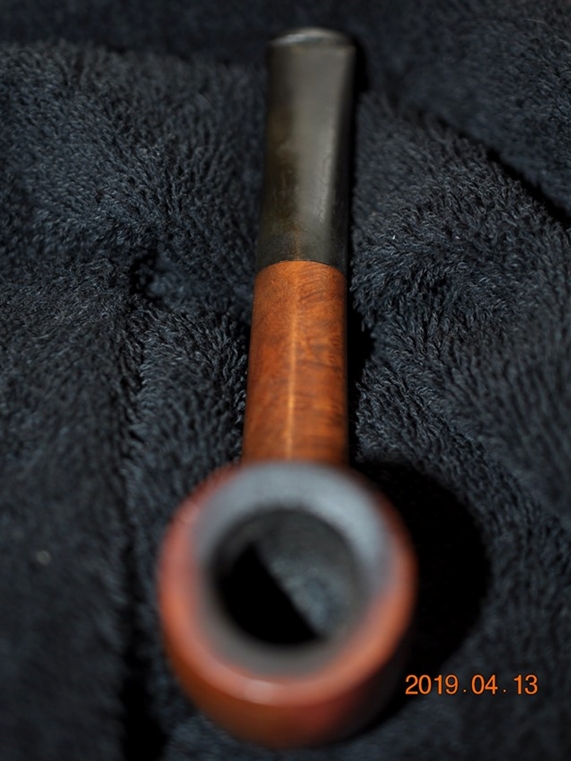
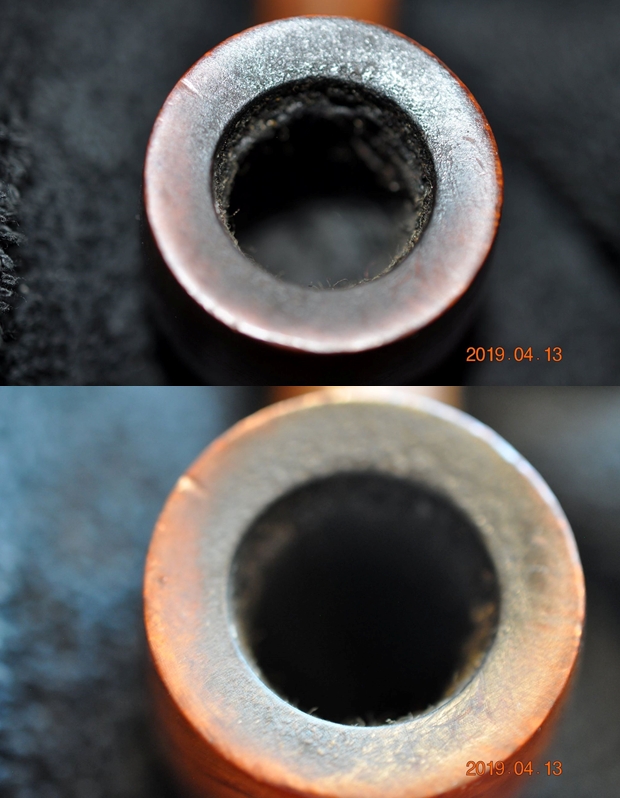
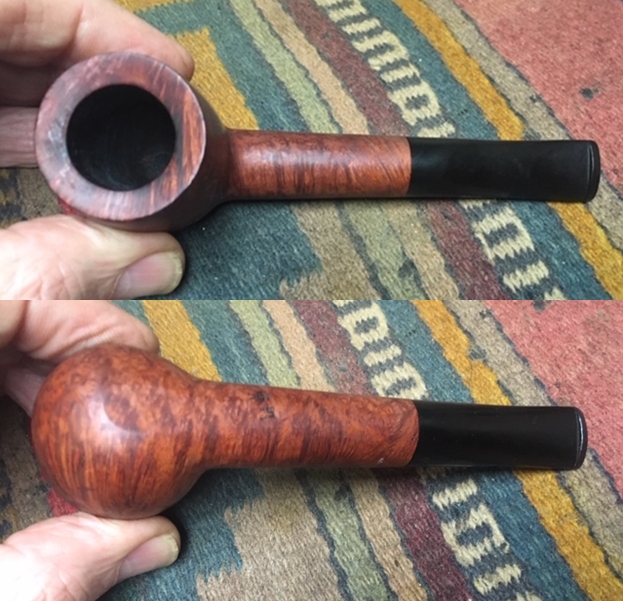
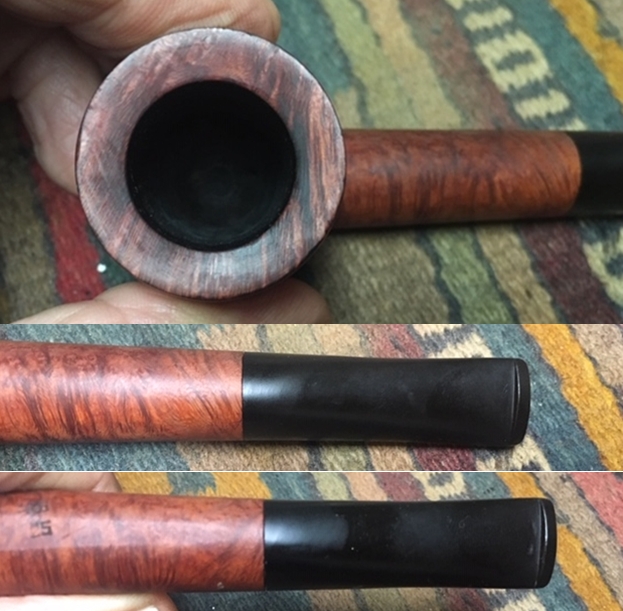
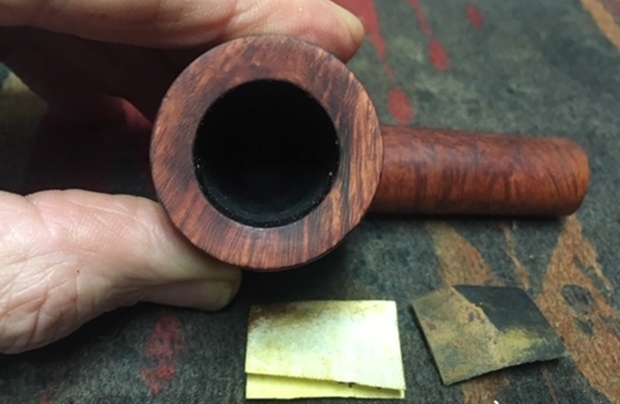
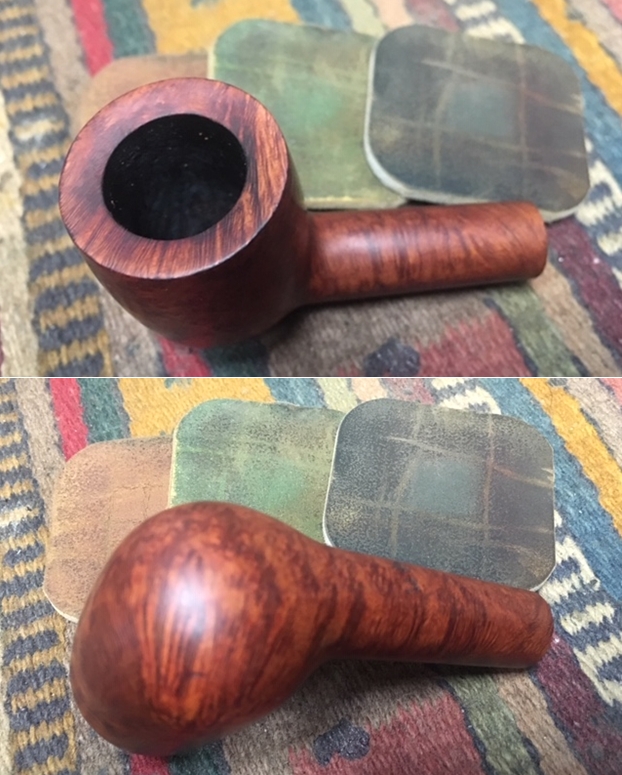
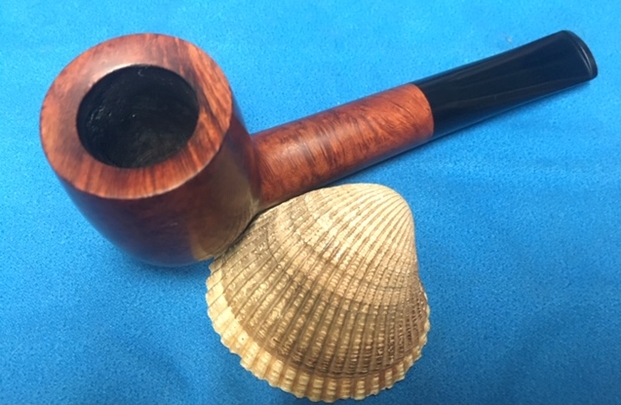
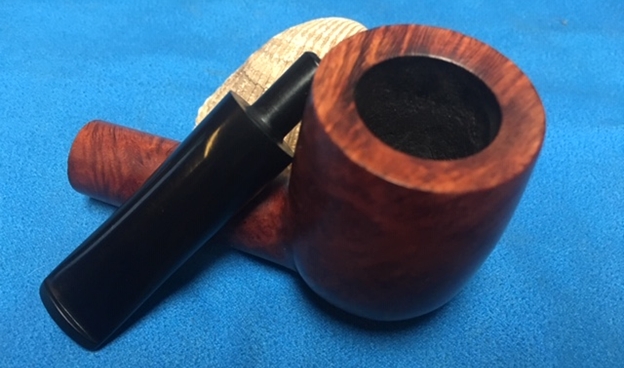
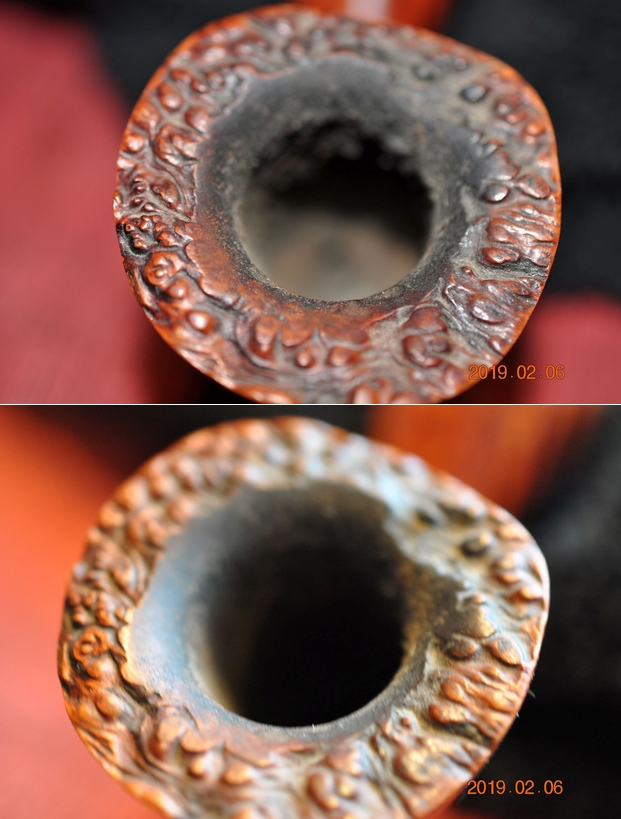
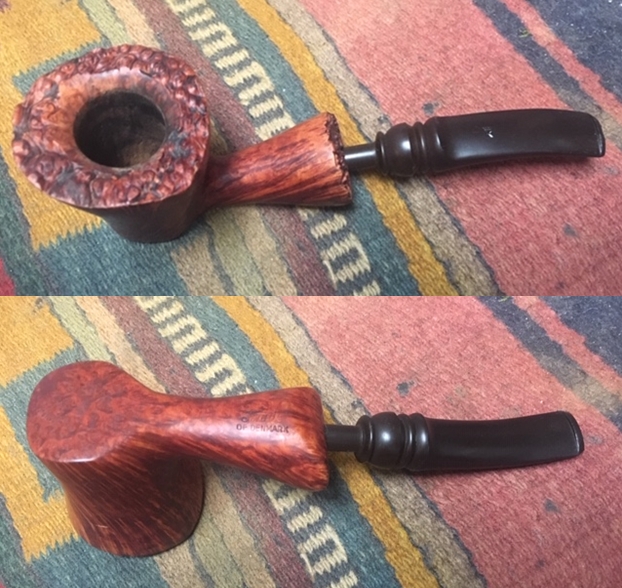
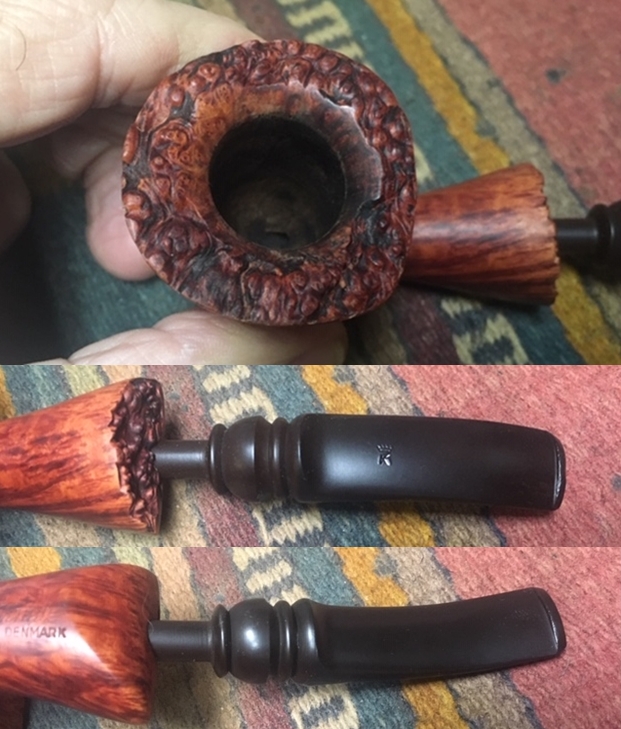
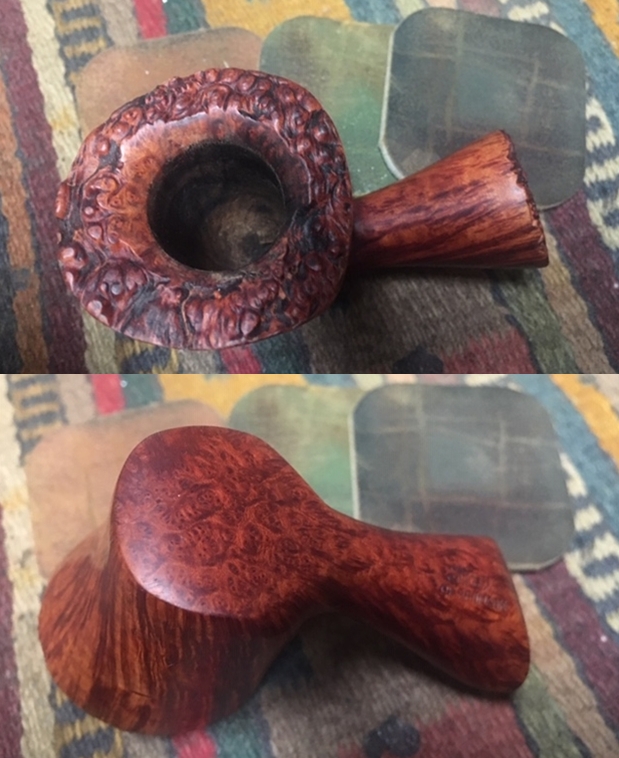
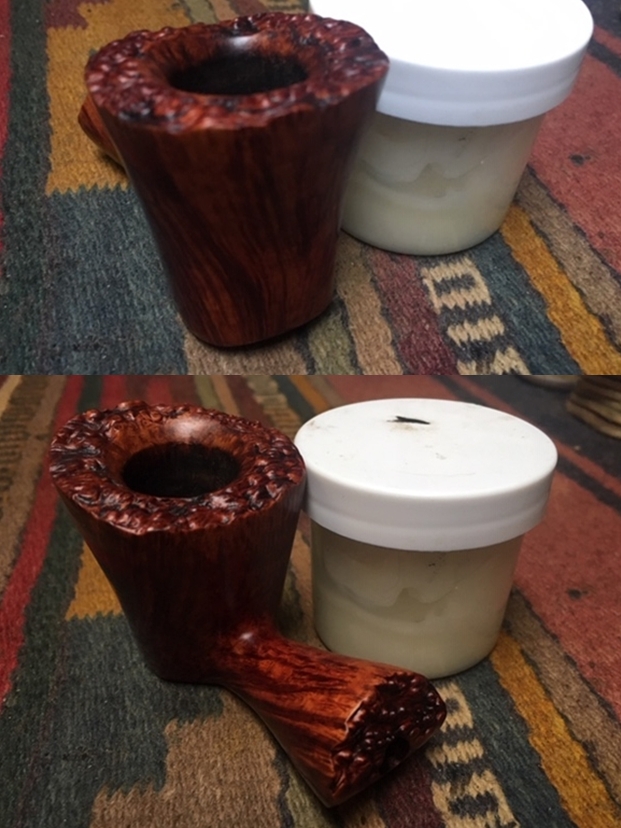
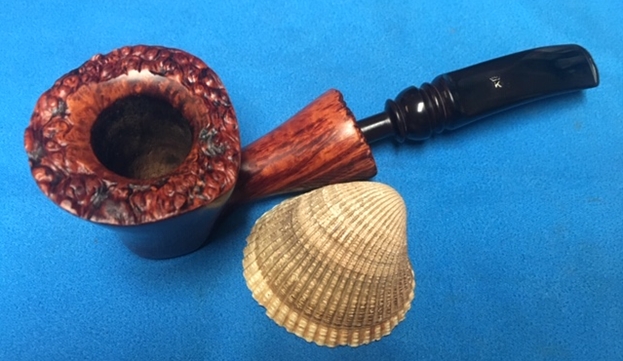
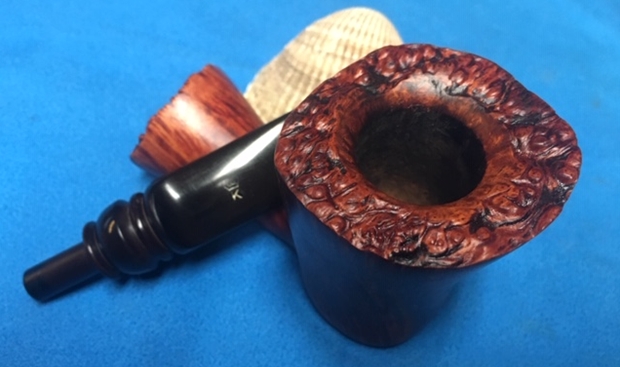
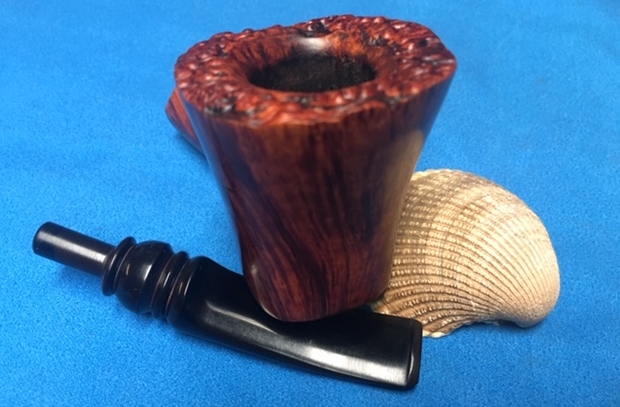
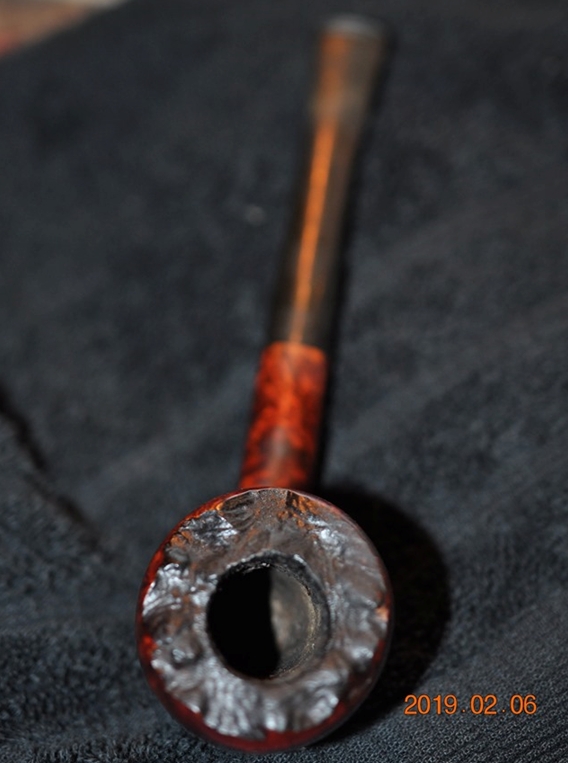
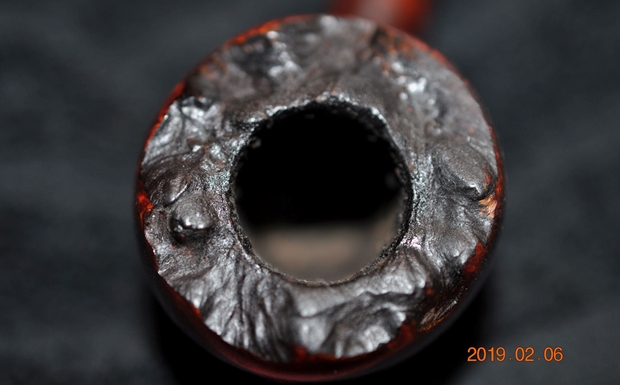
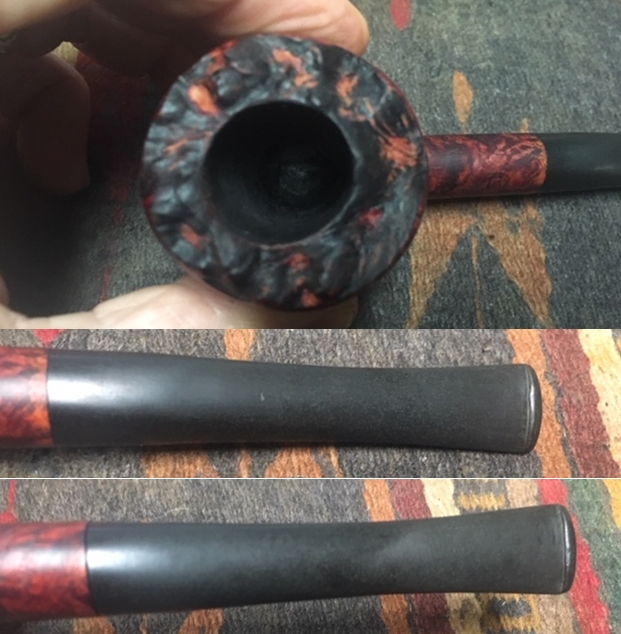
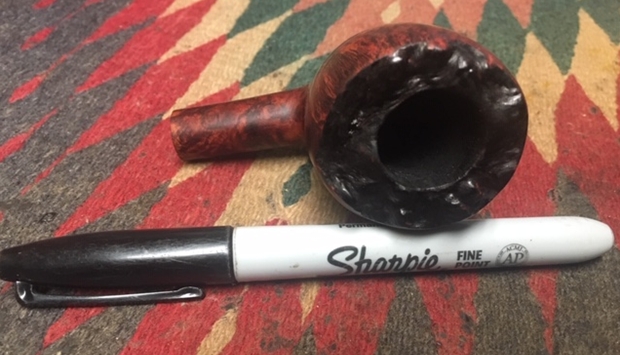
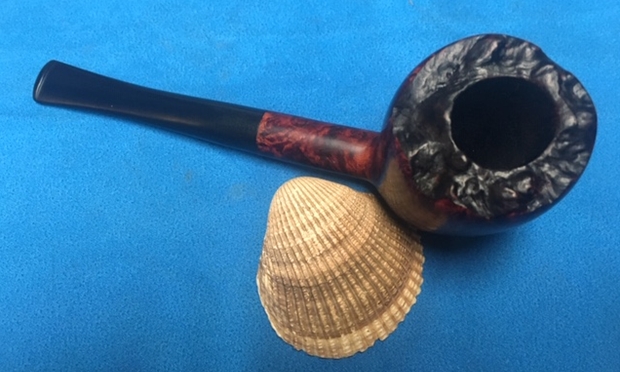
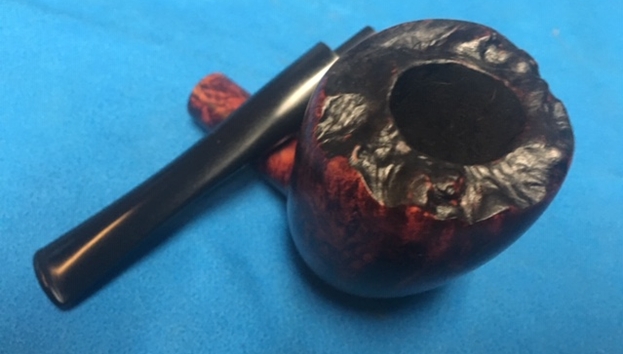
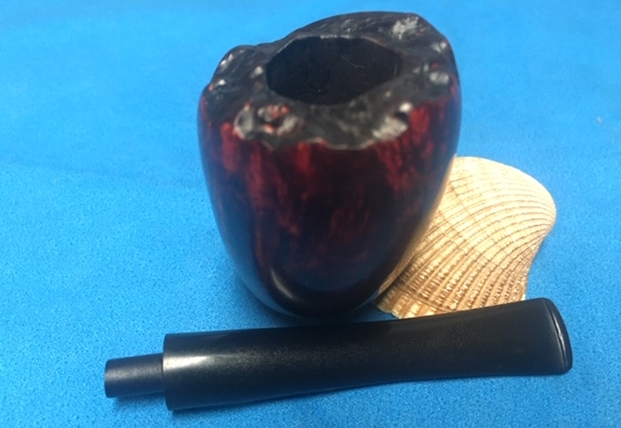
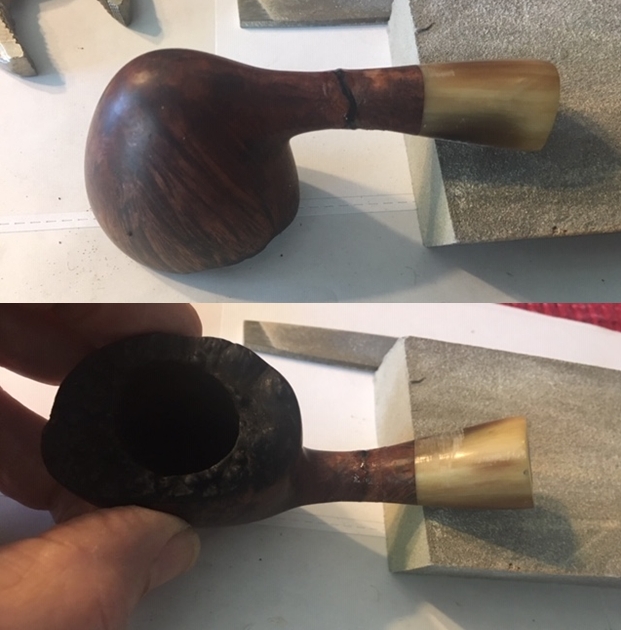
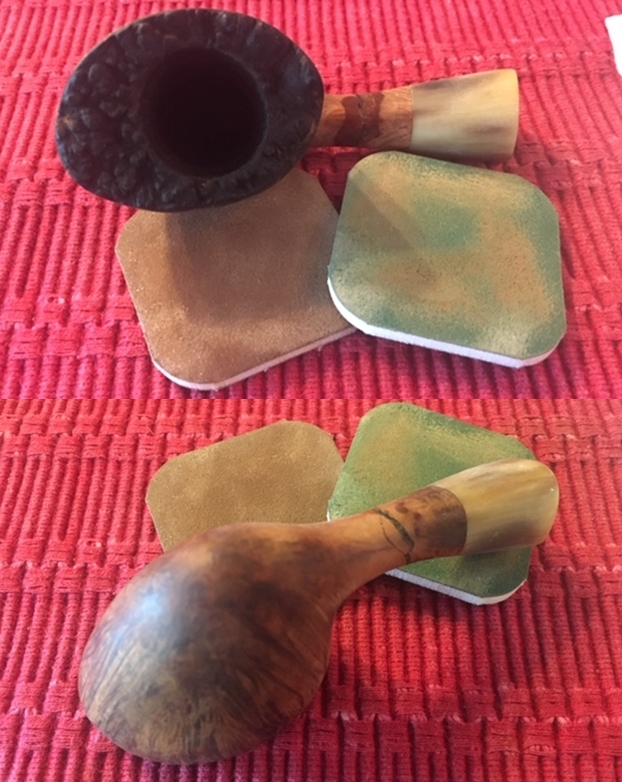
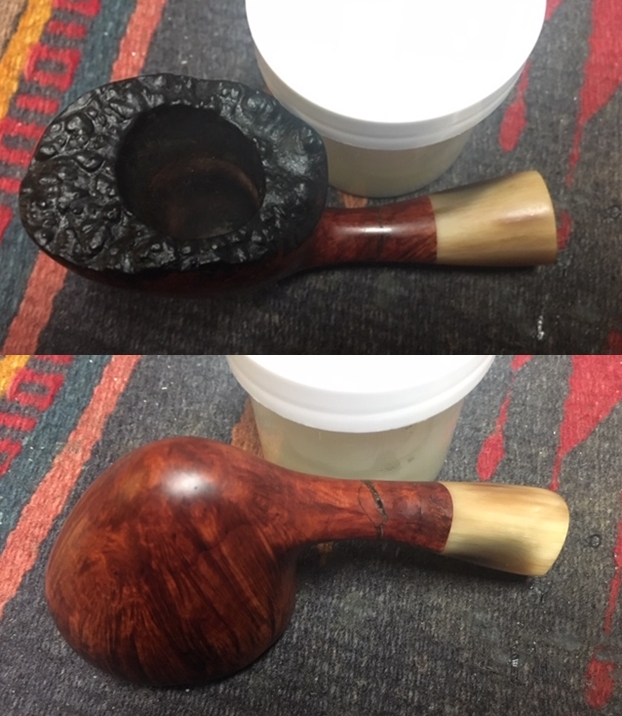
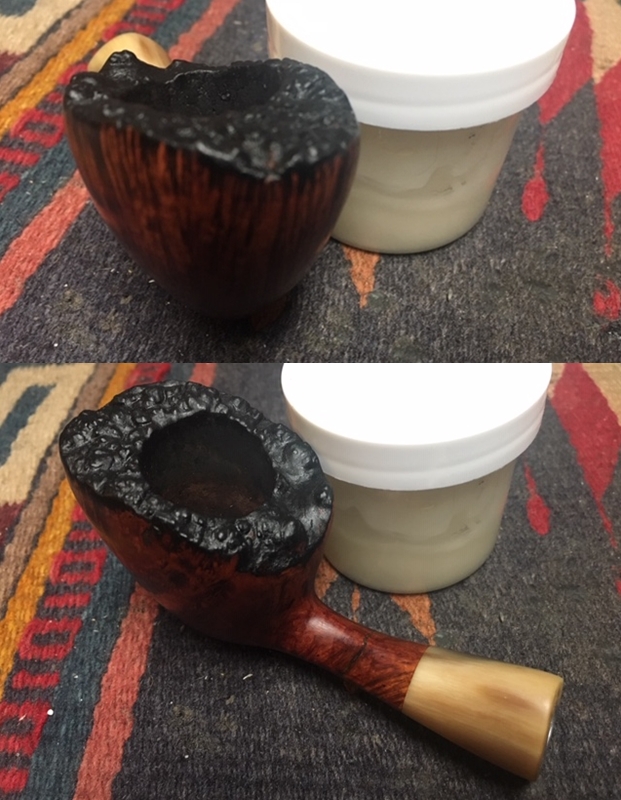
The next photos show the rim top and the thick cake in the bowl and the lava build up on the plateau top. The valleys and high spots are almost filled smooth with lava.
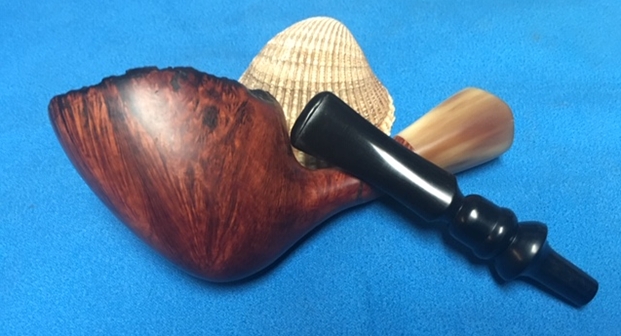
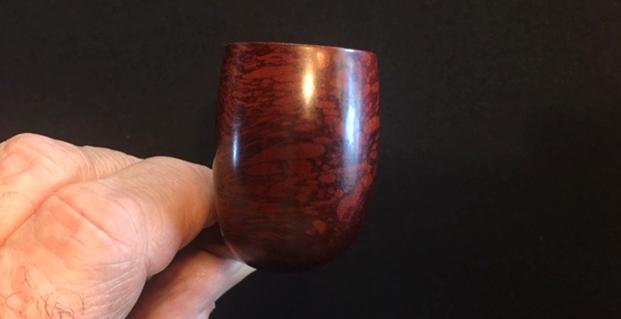
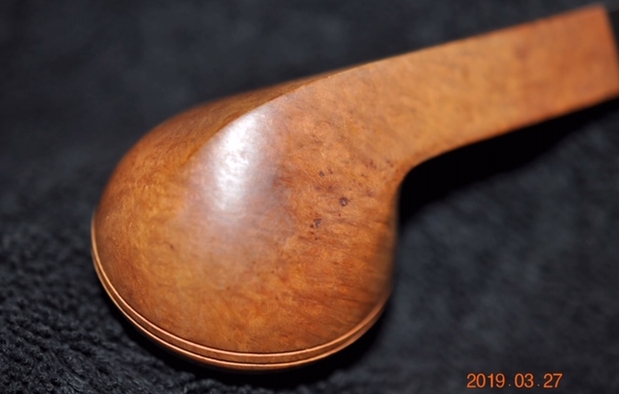
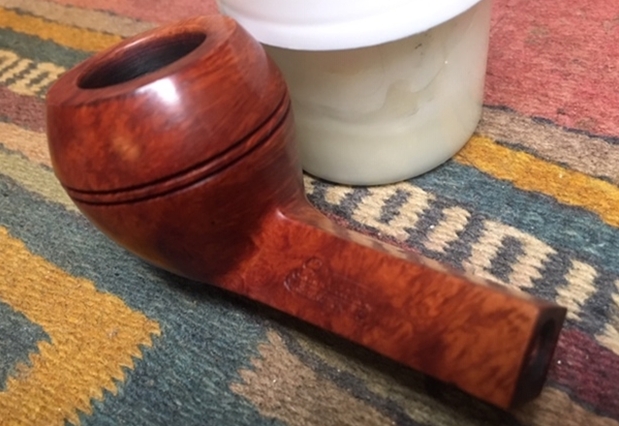
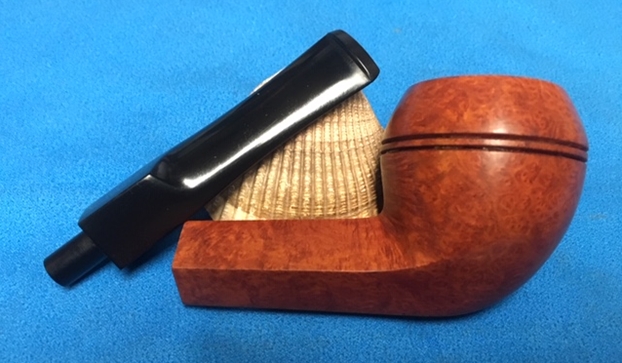
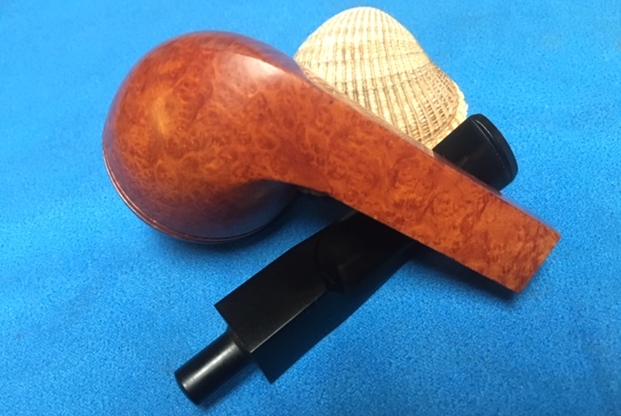
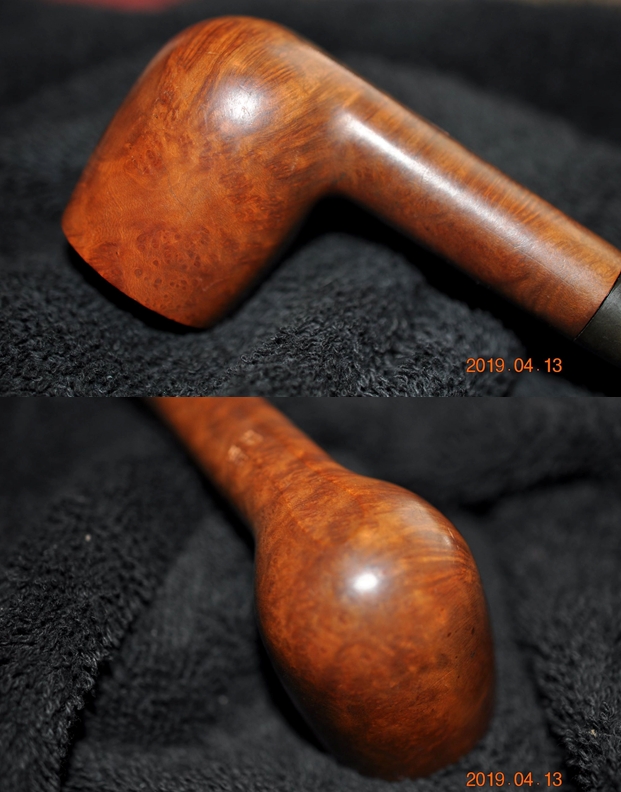
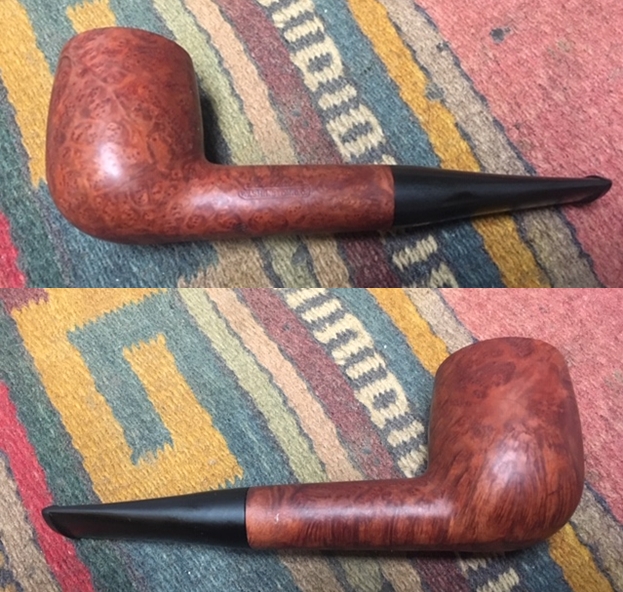
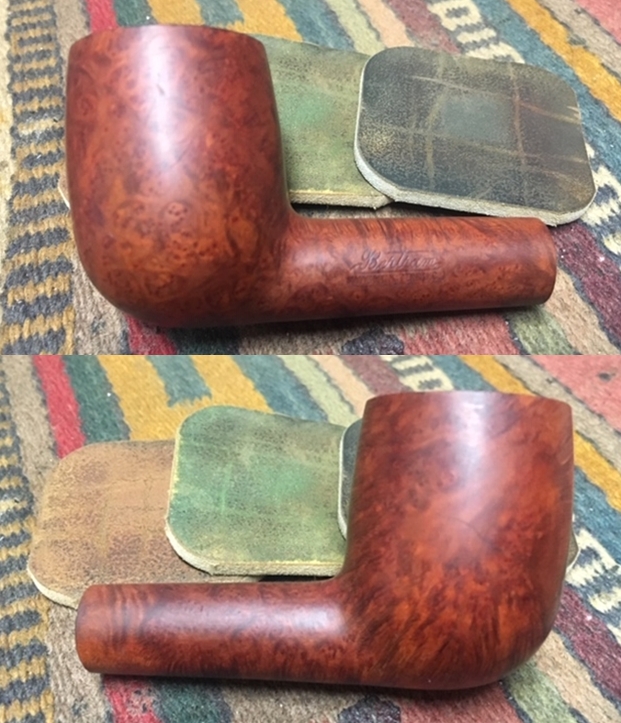
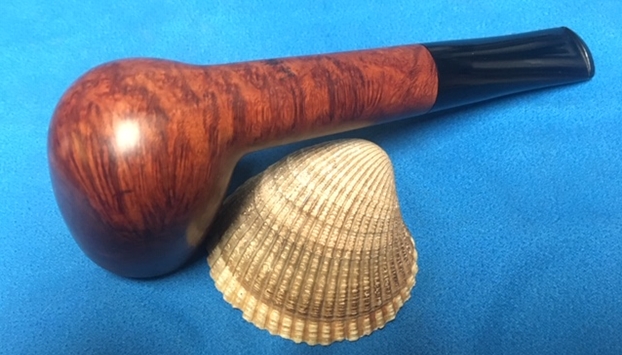
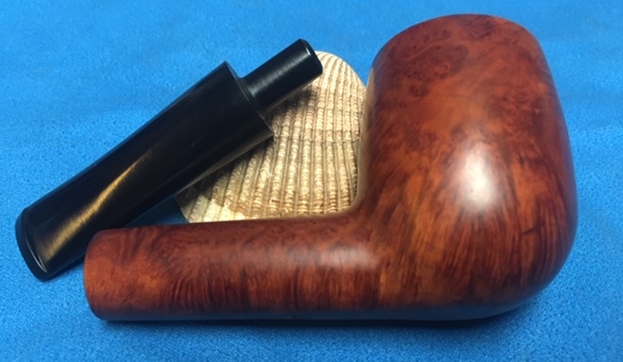
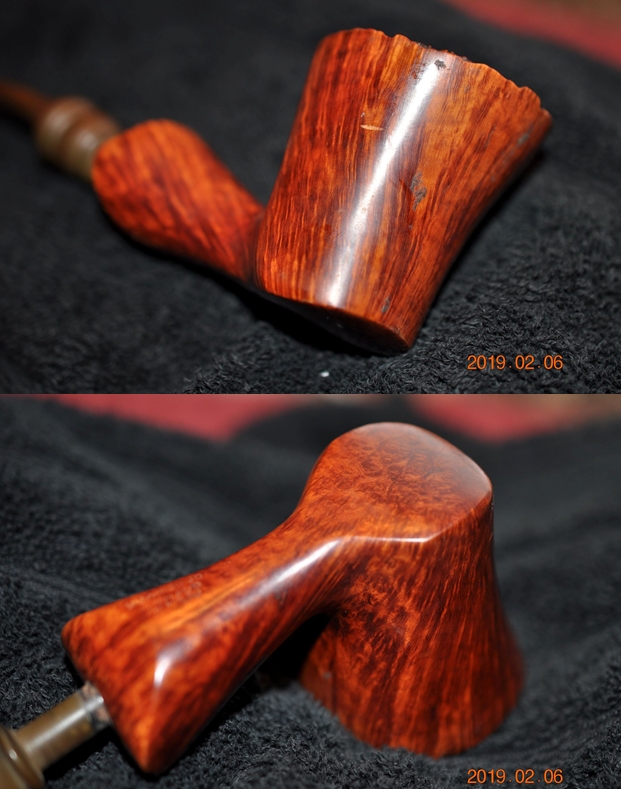
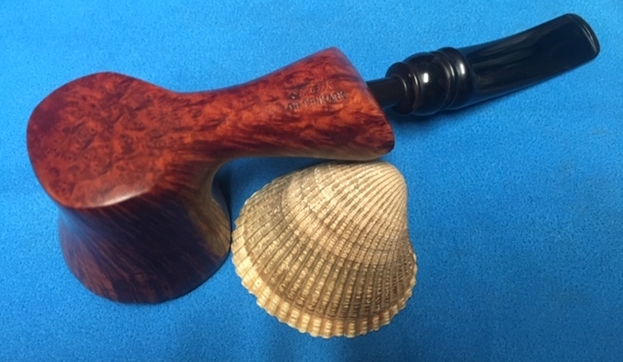
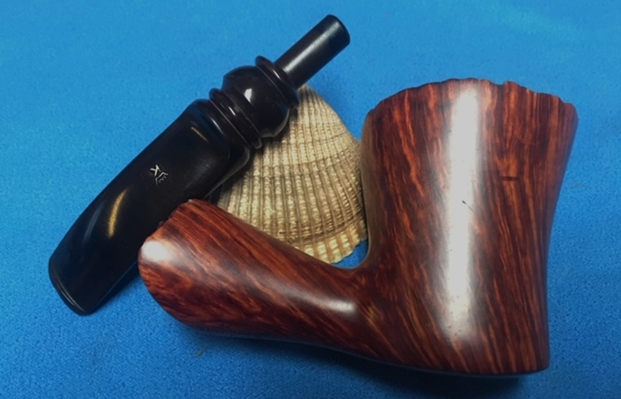
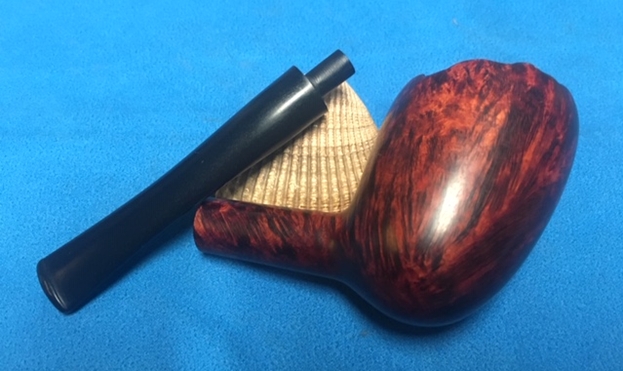
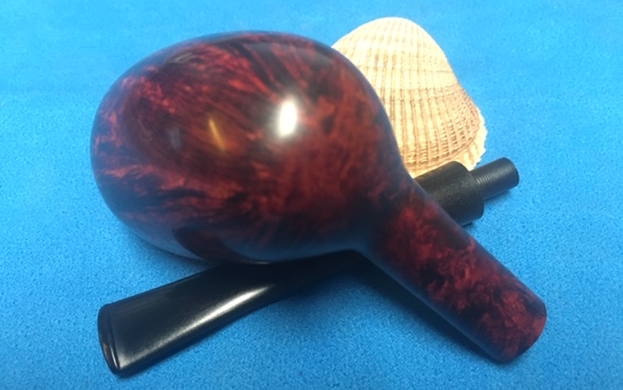
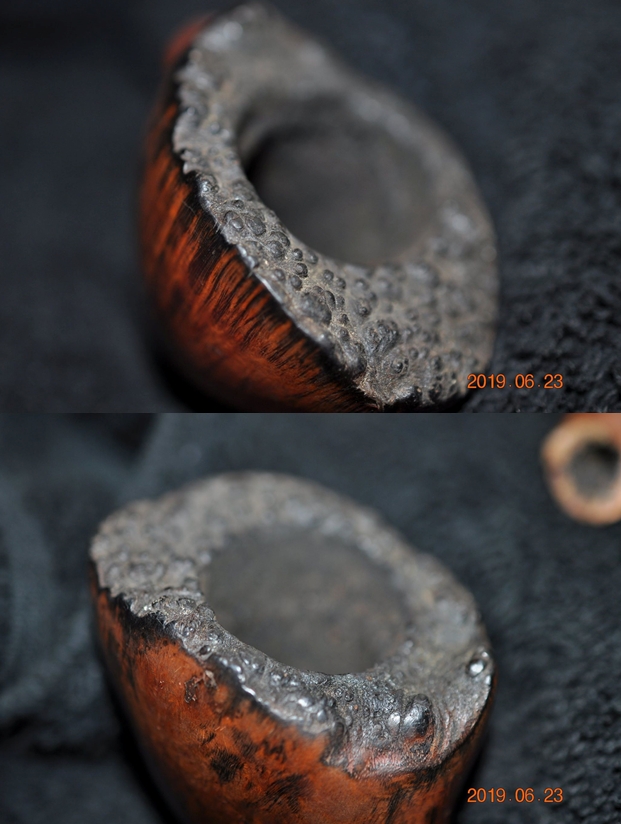
Jeff also took photos of the sides and heel of the bowl to show the grain on the pipe. The finish is very dirty but the grain is quite beautiful. There are nicks and dents in the briar.
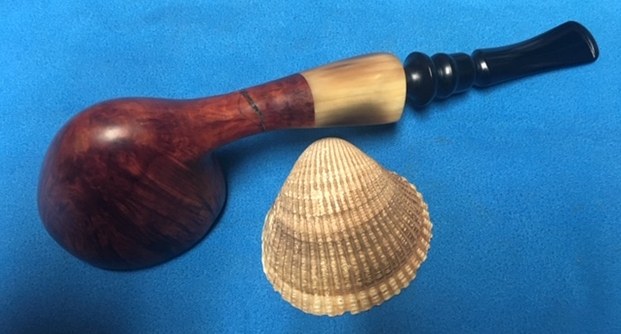
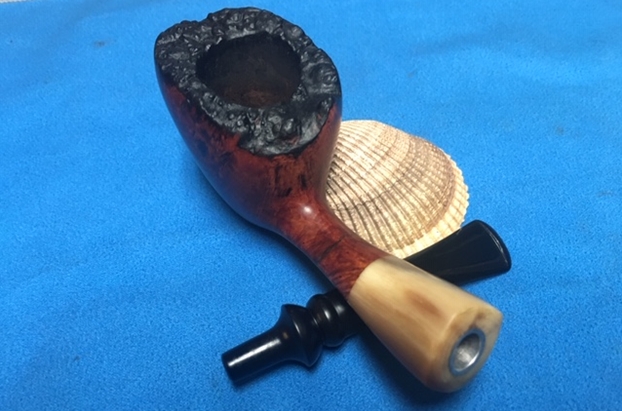
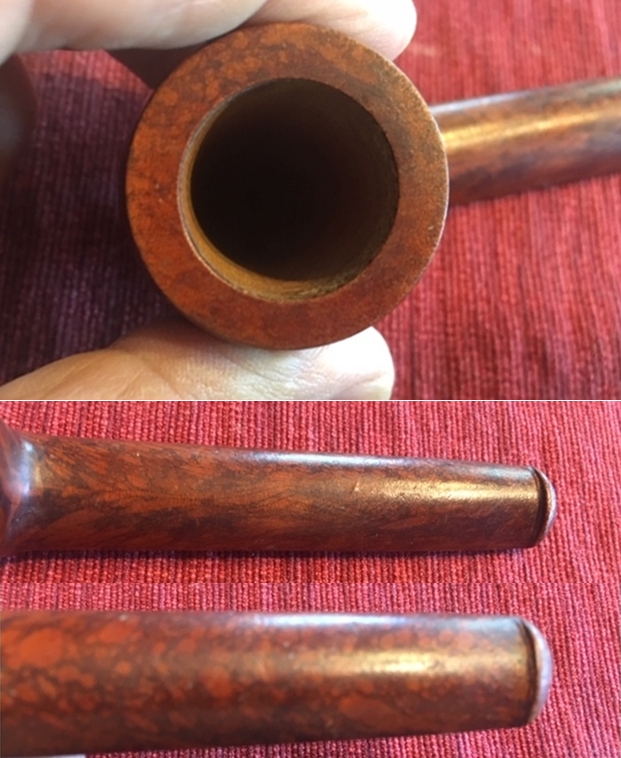
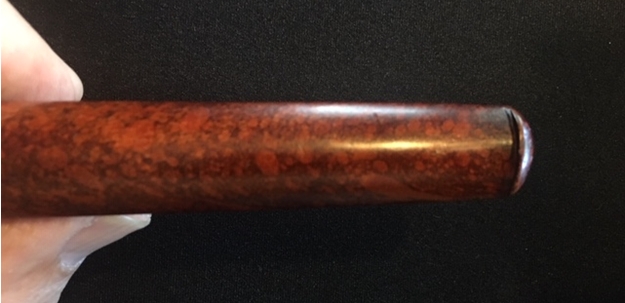
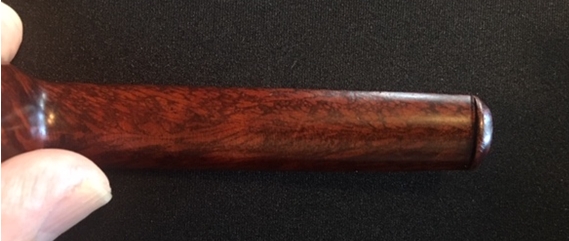
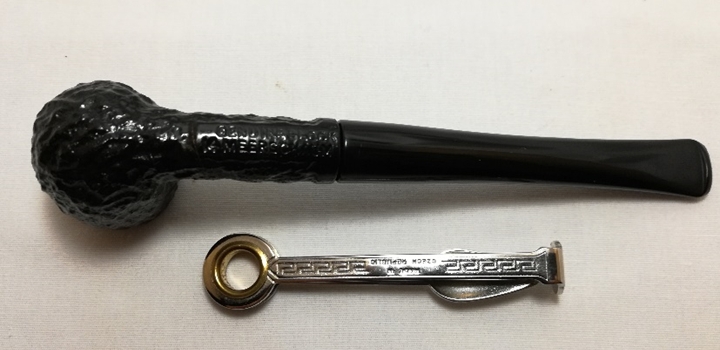
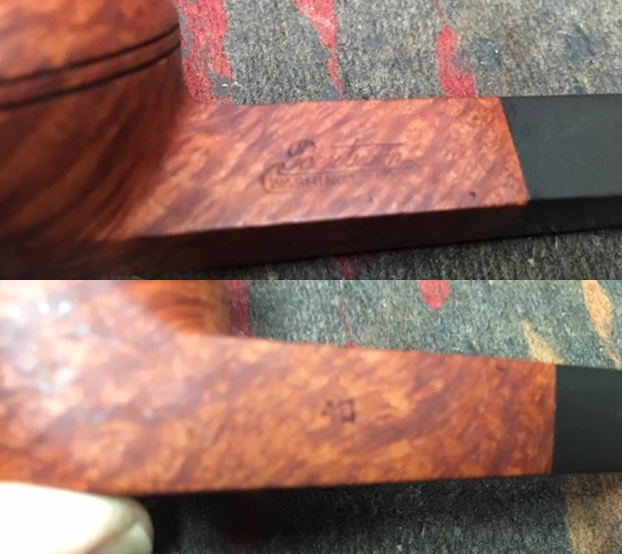
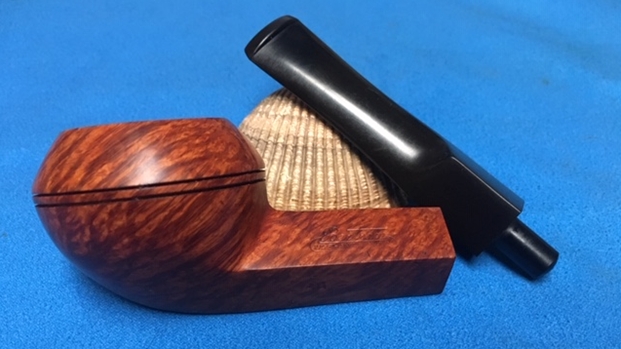
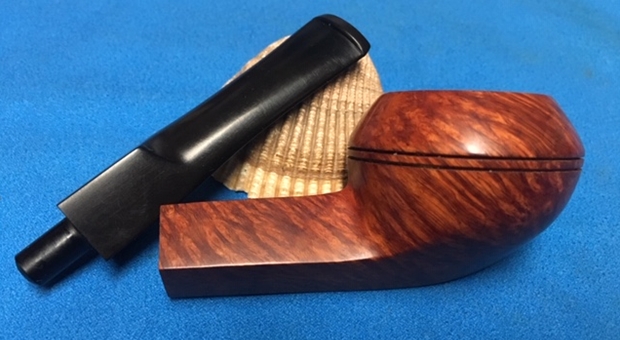
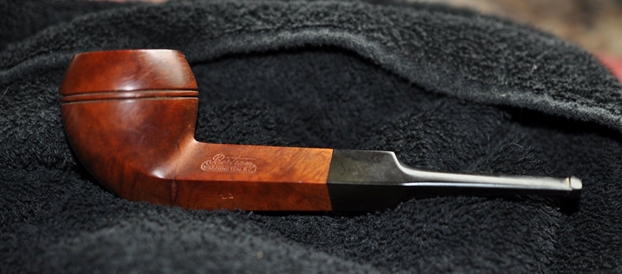
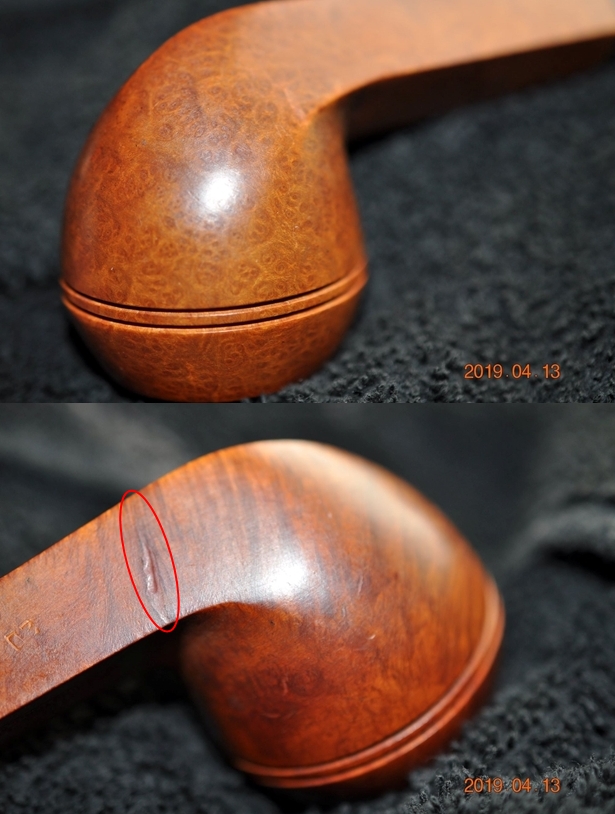
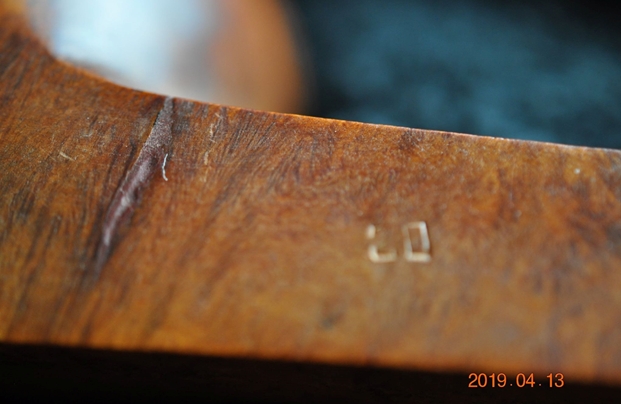
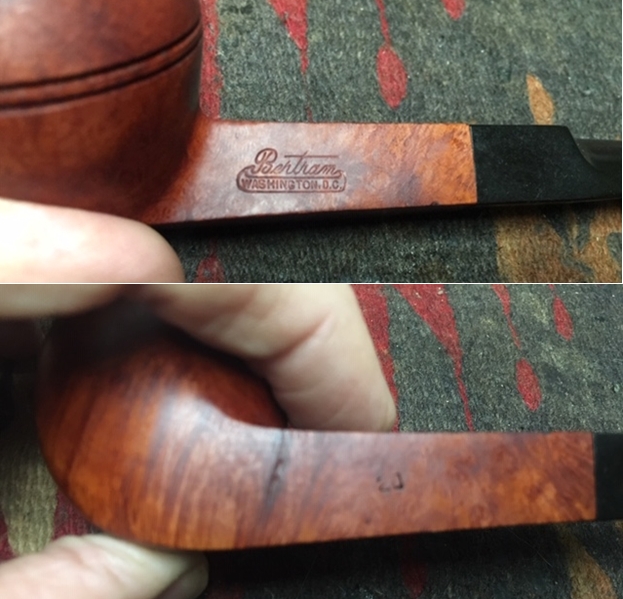
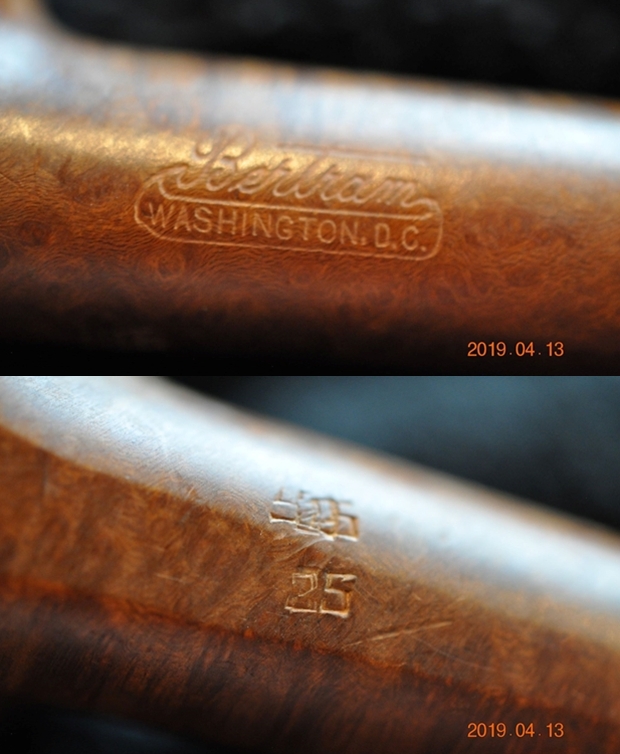
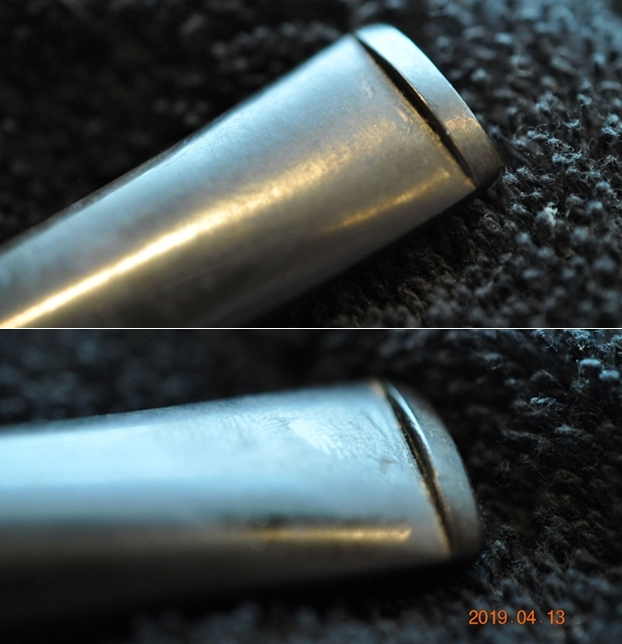
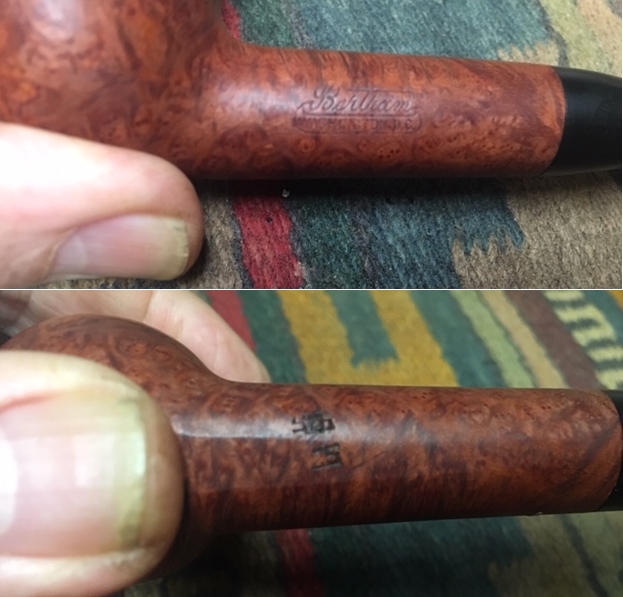
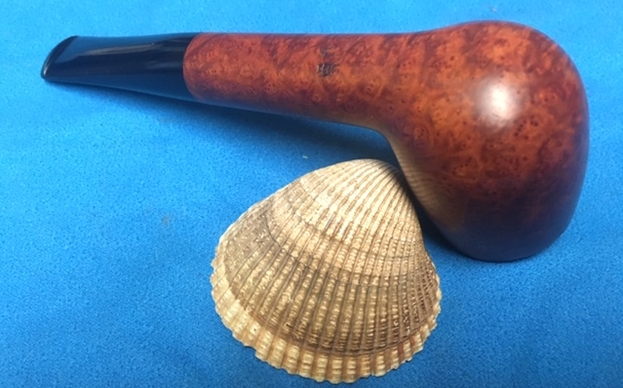
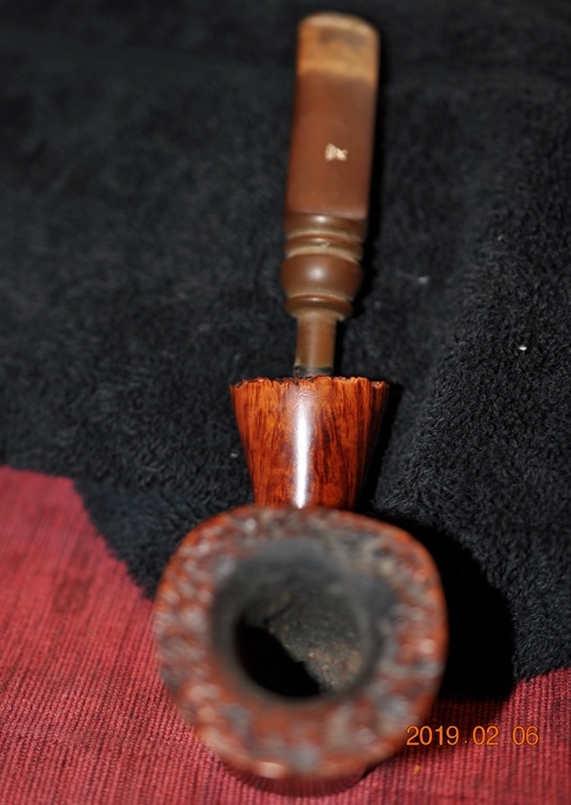
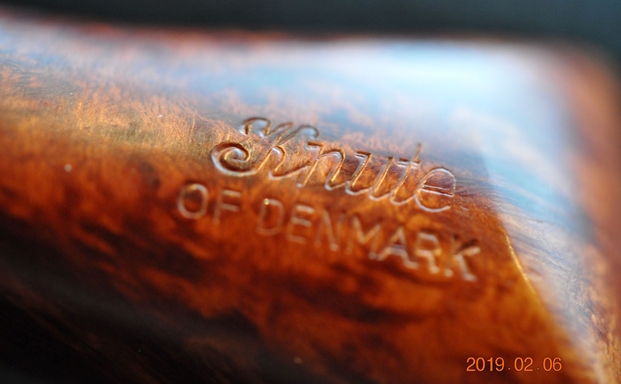
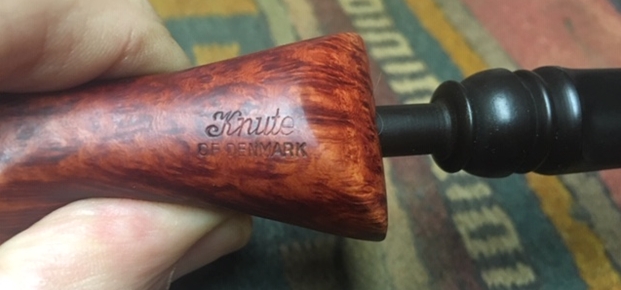
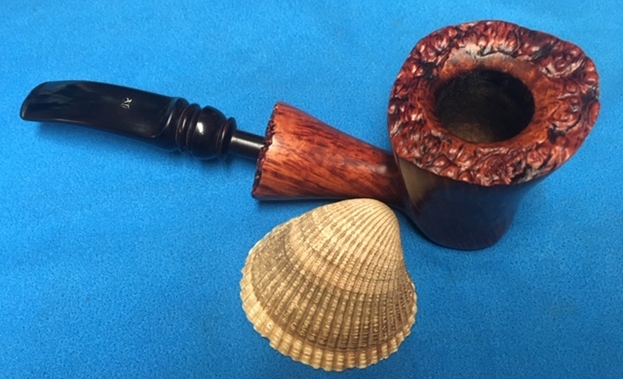
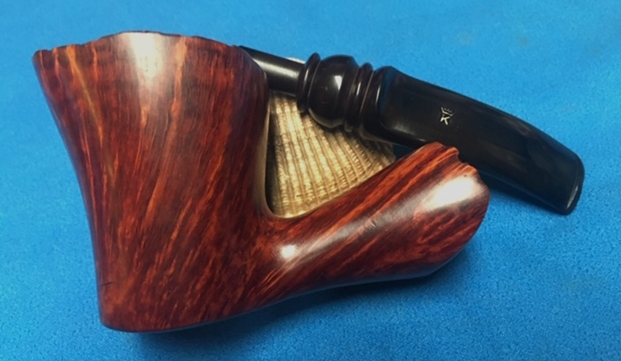
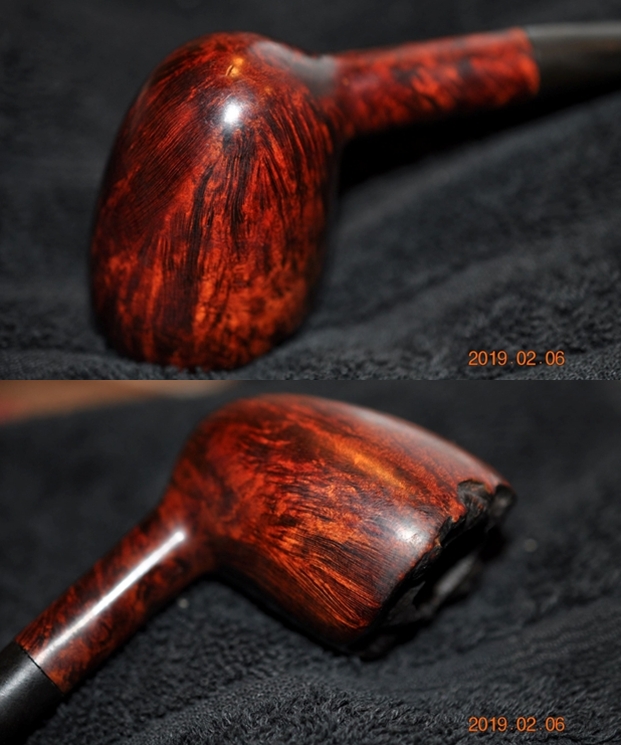
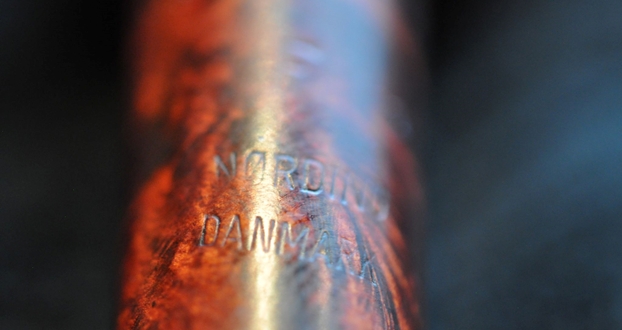
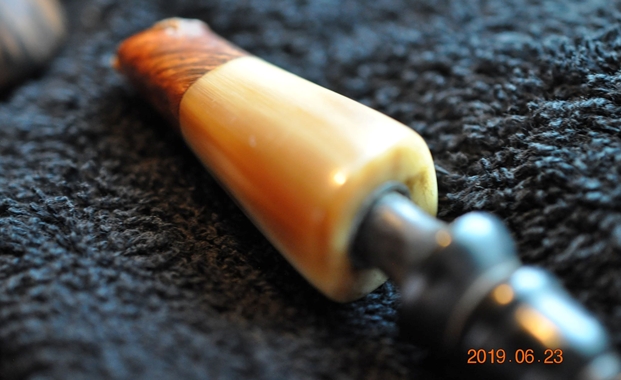
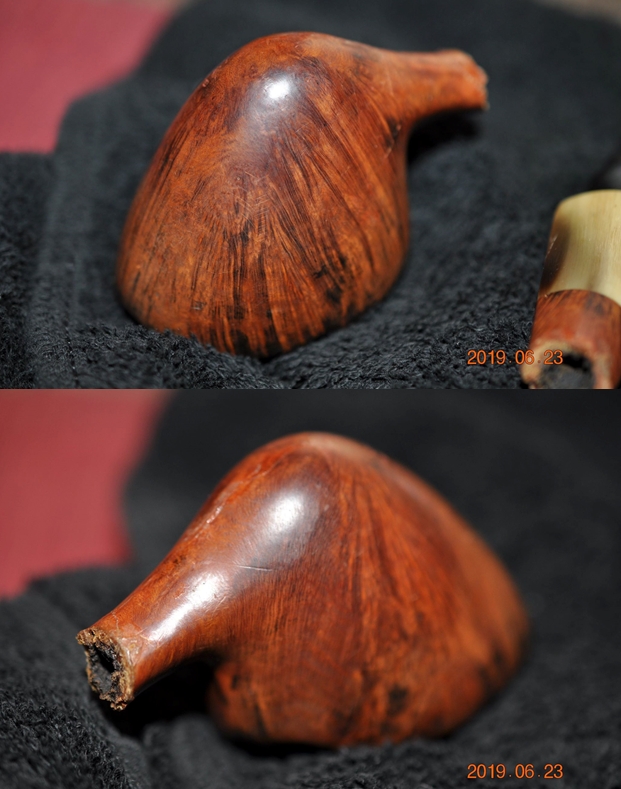
The stamping on the shank portion of the broken pipe is readable but worn. The joint between the shank and the horn extension is very good – solid. The metal tube in the shank end provided the internal strength to hold this joint tight. It is interesting to note that the shank broke just ahead of the tube inside the shank. 
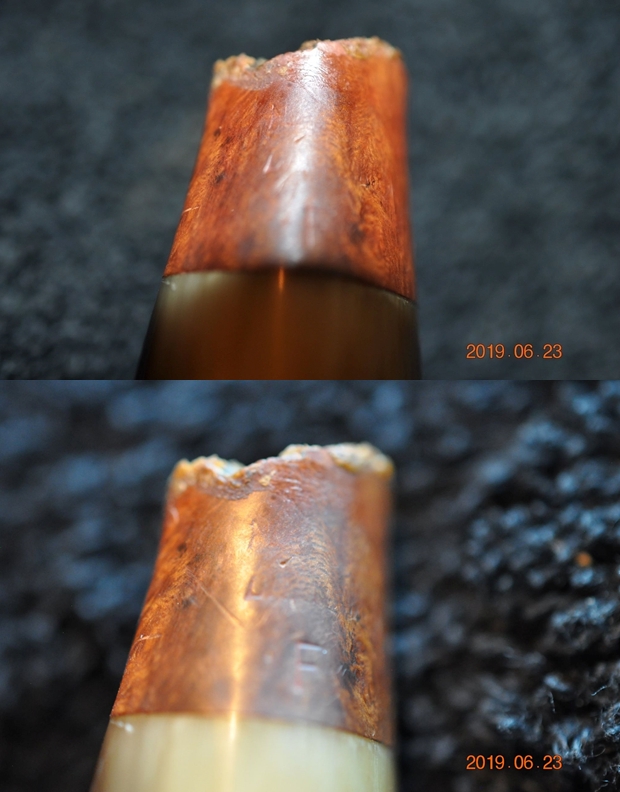
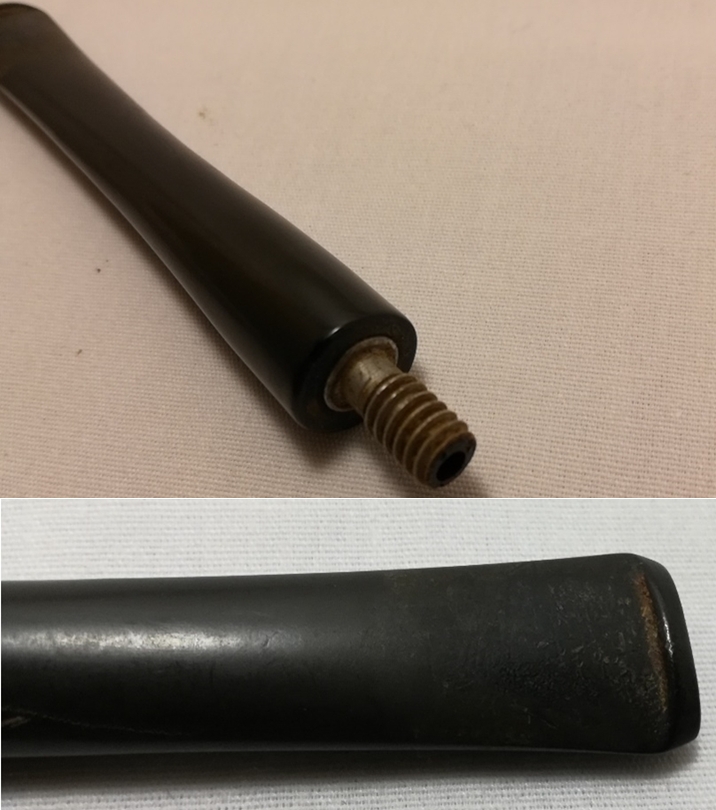
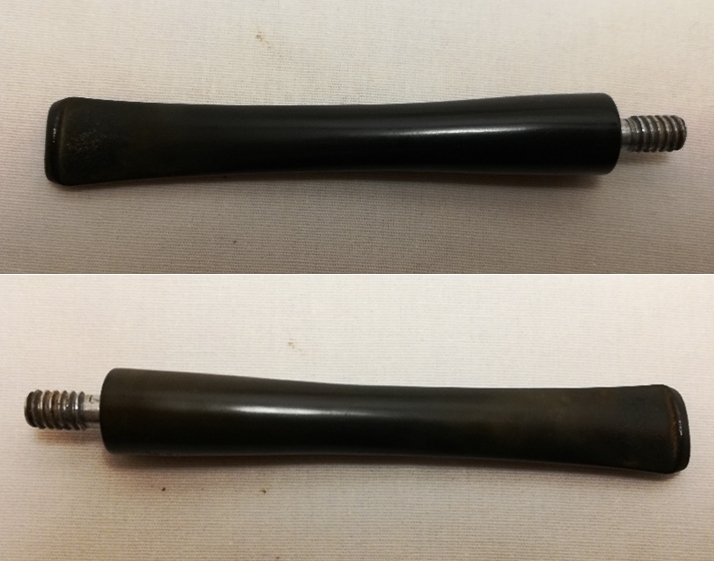
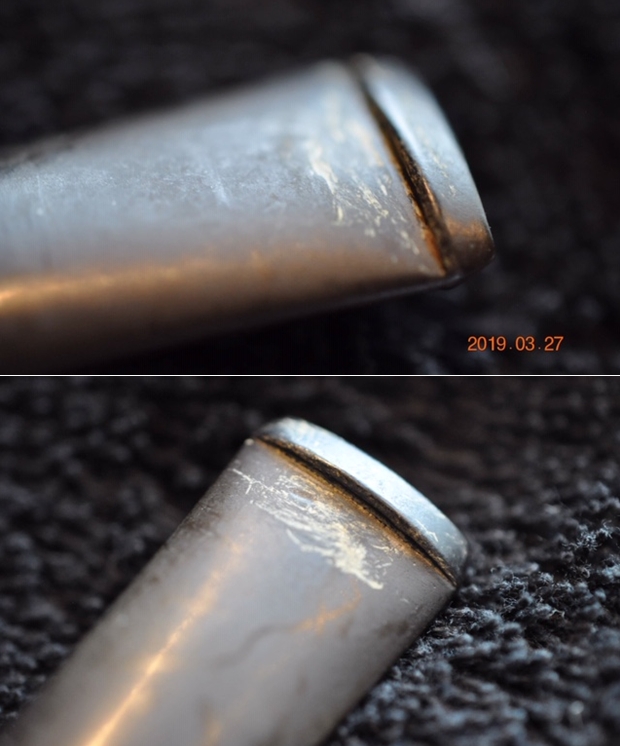
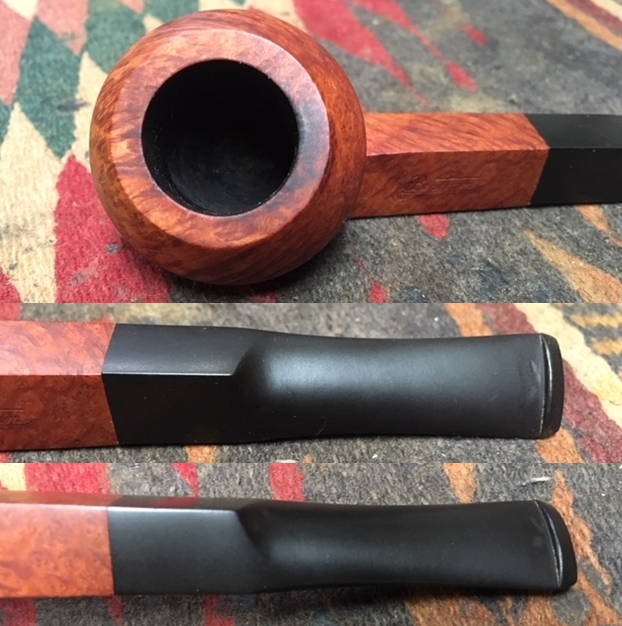
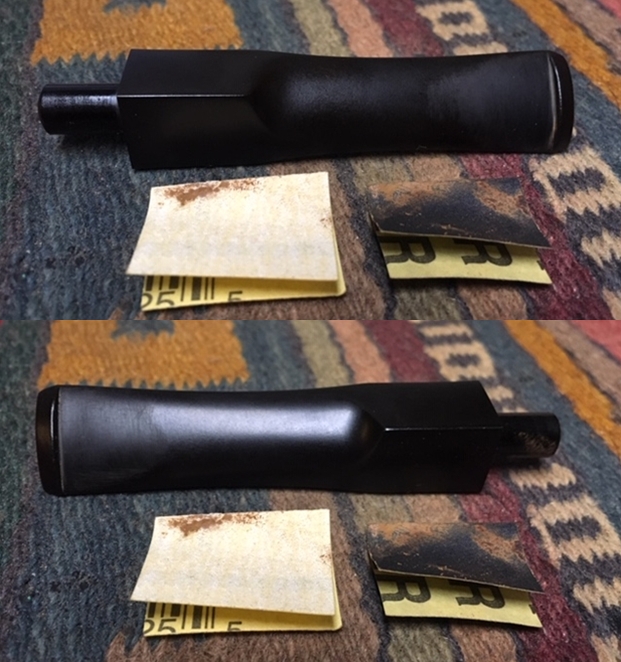
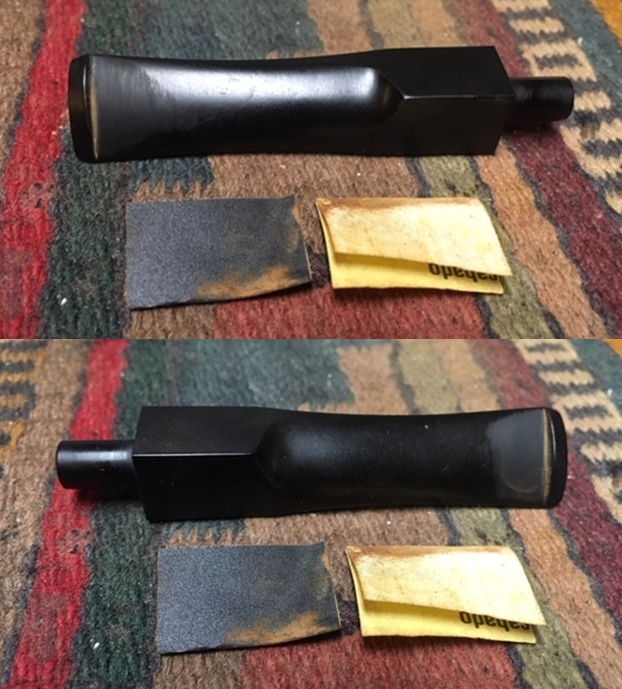
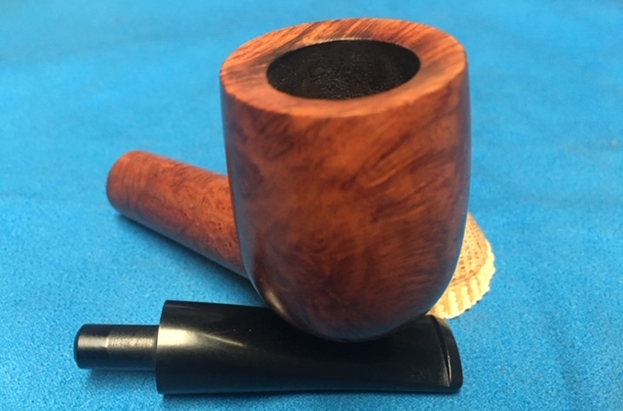
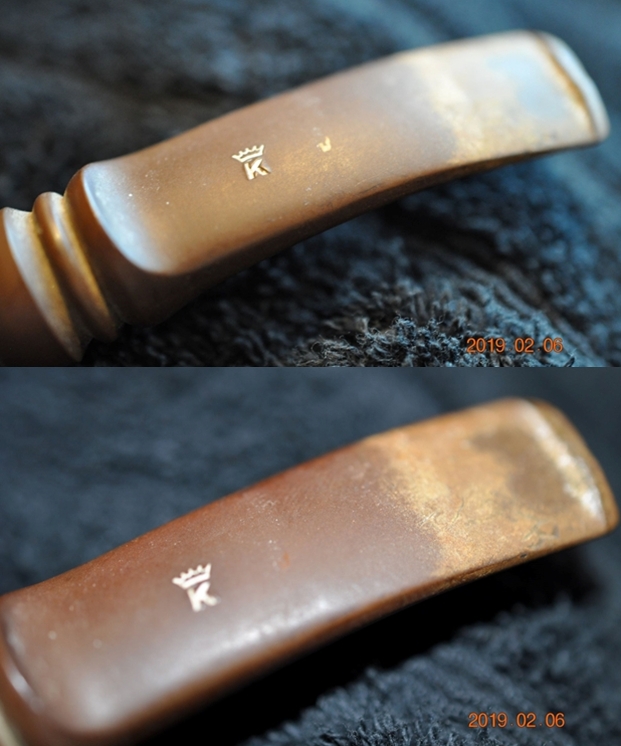
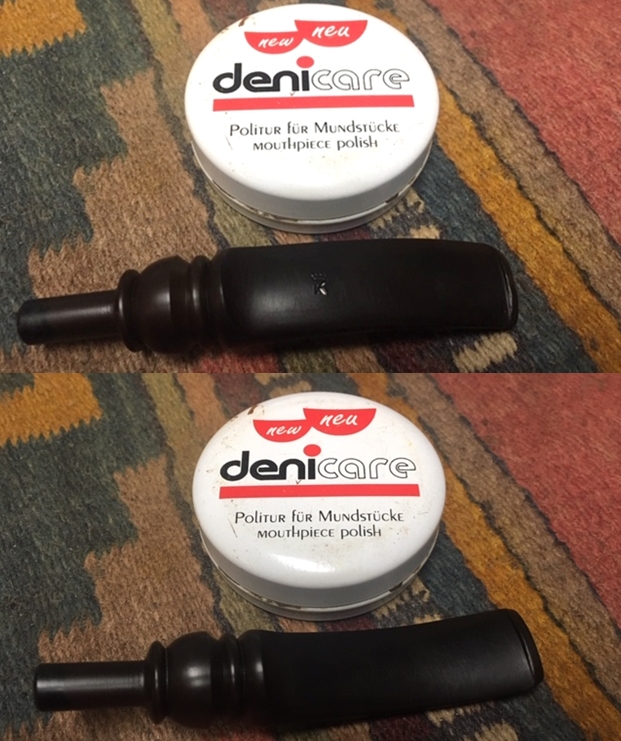
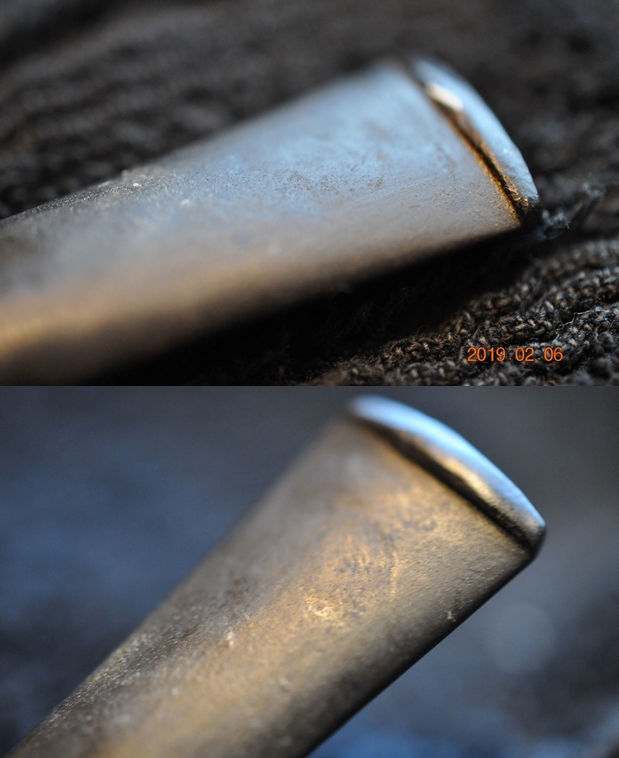
The stem appeared to be in good condition. The button was worn with tooth marks on the topside. There was some oxidation and wear on the surface near the button.
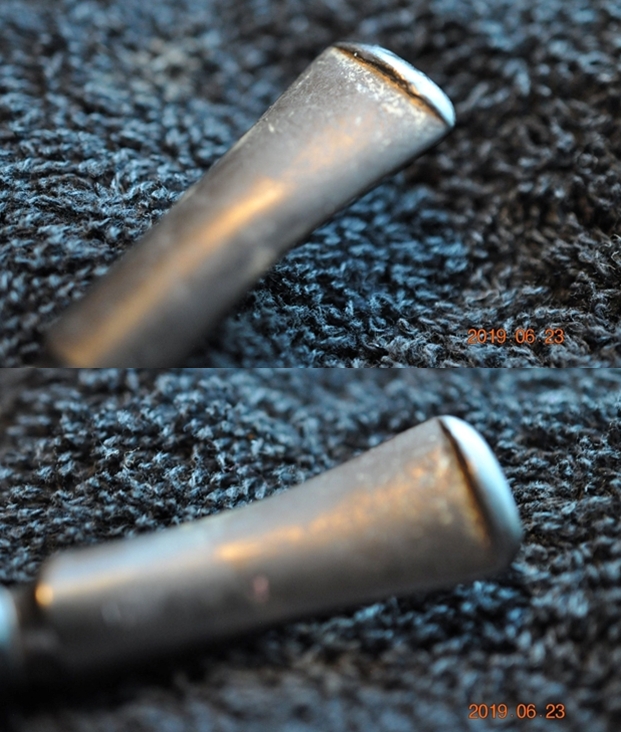
Jeff reamed the bowl and cleaned up the plateau top with Murphy’s Oil Soap and a tooth brush. He scrubbed it until it was clean. He cleaned out the inside of the two parts of the shank with pipe cleaners, cotton swabs and alcohol until the airway was clear. He cleaned up the broken ends of the shank with a tooth brush and the soap. He rinsed off the bowl and shank and the airway with warm water. He dried it off and set it aside. He cleaned up the stem and let it soak in a bath of Before & After stem deoxidizer. He took it out of the bath and rinsed it off and cleaned out the airway with pipe cleaners and alcohol. When I arrived he showed me the parts. They were incredibly clean. I was excited to get started on the repair of the broken shank… so much so that I forgot to take pictures of the cleaned up parts of the pipe.

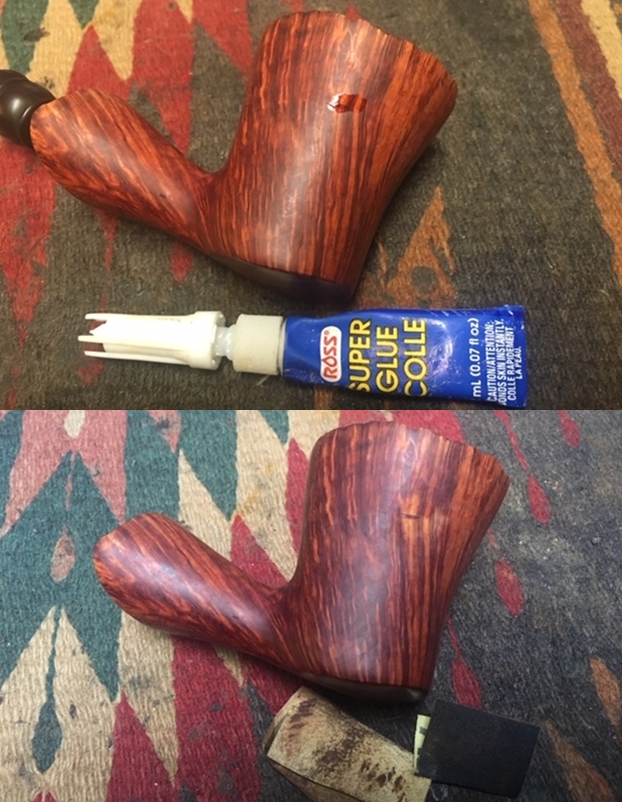
I picked up some tubing at Hobby Lobby and cut off a piece that was close to the length I needed to join the two parts of the shank together. I used a Sawsall blade and a hacksaw to cut a length from the tube. I used a metal rasp to flatten the end of the piece of tube and shorten it enough to fit into the two parts of the shank. I used the small blade on a pocket knife to open up the airway in the bowl end of the shank and to flare the end of the tube in the stem end of the shank.
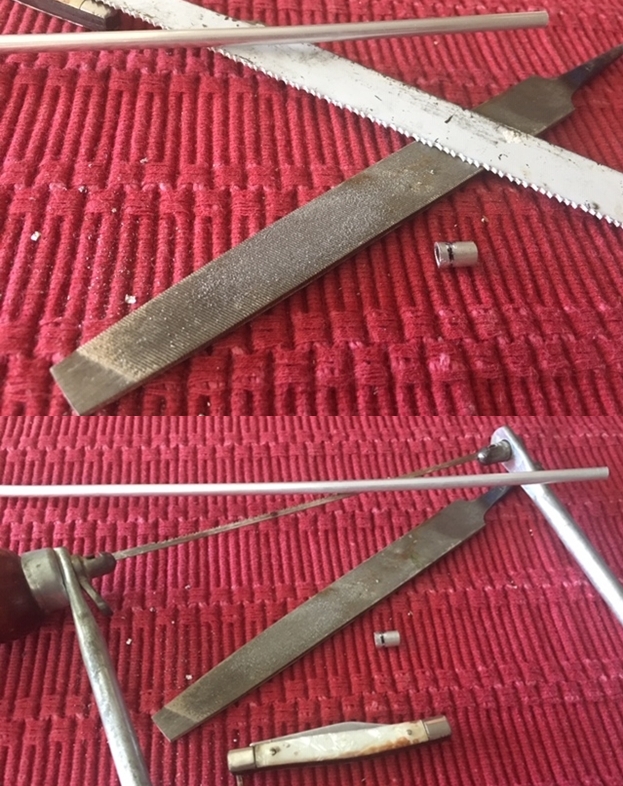
I used the hacksaw to rough up the surface of the tube so the glue would have a surface to bond to between the briar and the tube. I used some Testor’s Metal and Wood Glue to insert the tube into the bowl end of the shank. I used a tooth pick to press the glue into the area around the tube. I filled in the remainder of the gap with clear Gorilla glue.
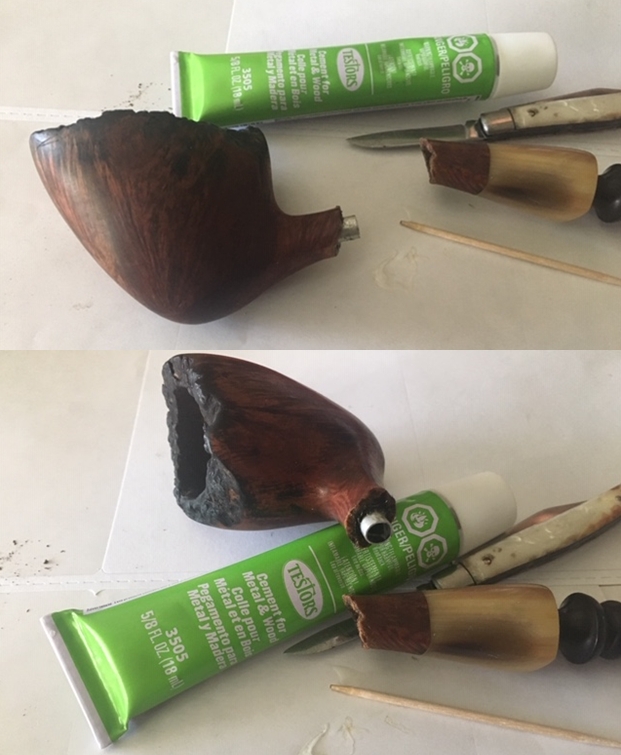
I used the tooth pick to put Gorilla Glue on the open ends of each piece of the shank. I coated the tube with some glue as well. I aligned the two parts and pressed the pieces together. I held them tightly in place until the glue set and the two parts were bound together. I filled in the repaired area with Gorilla Glue to smooth out the repair. I set the bowl aside to let the repair cure. 
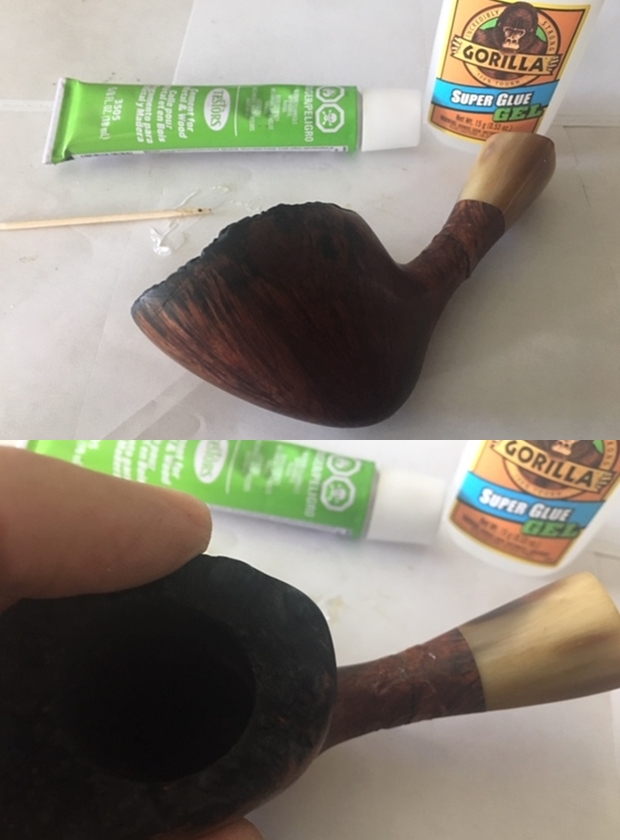
Once the glue had cured and the shank was solid, I smoothed out the repair a medium and fine sanding block. 
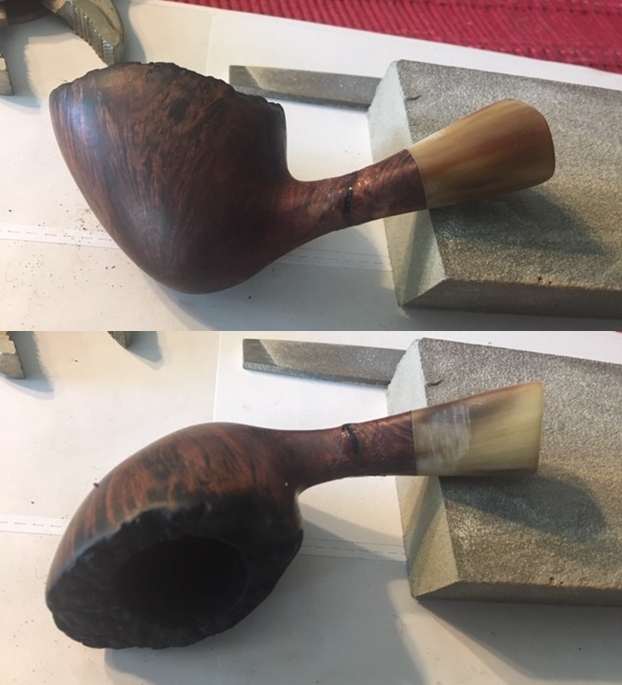
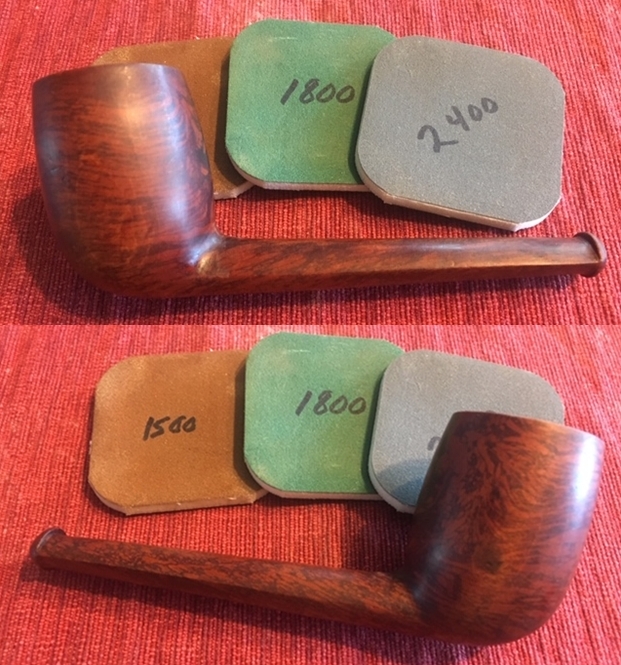
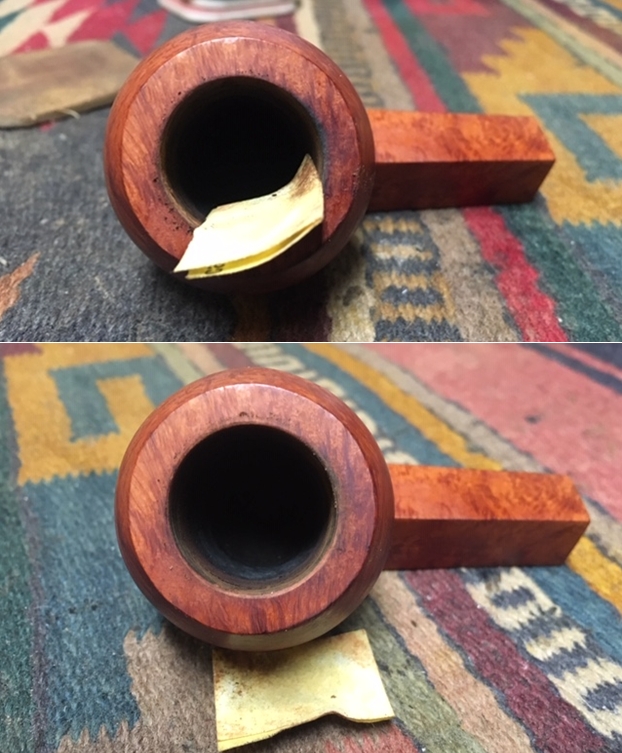
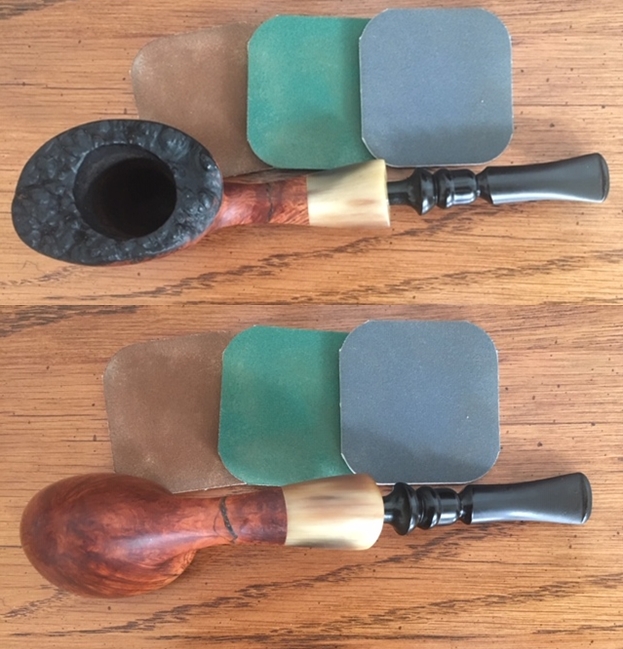
I sanded the repaired area and glue with 1500 and 1800 grit micromesh sanding pads to remove the excess glue. I smoothed out the finish. 
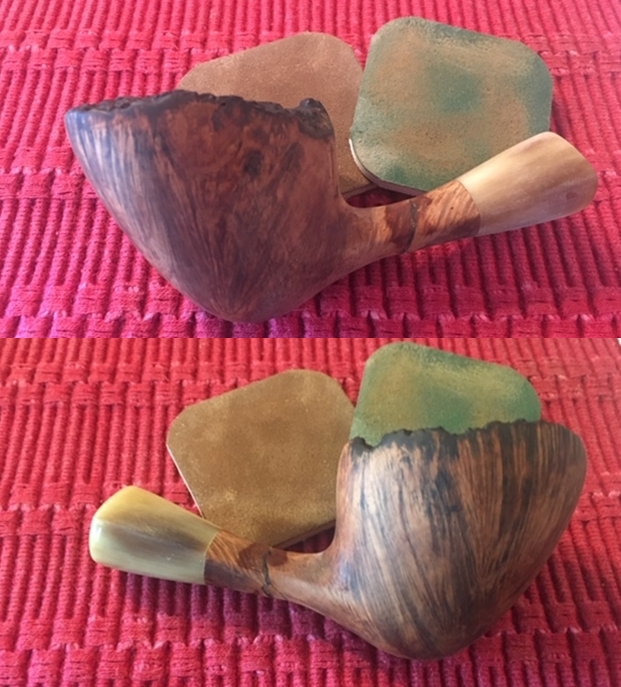
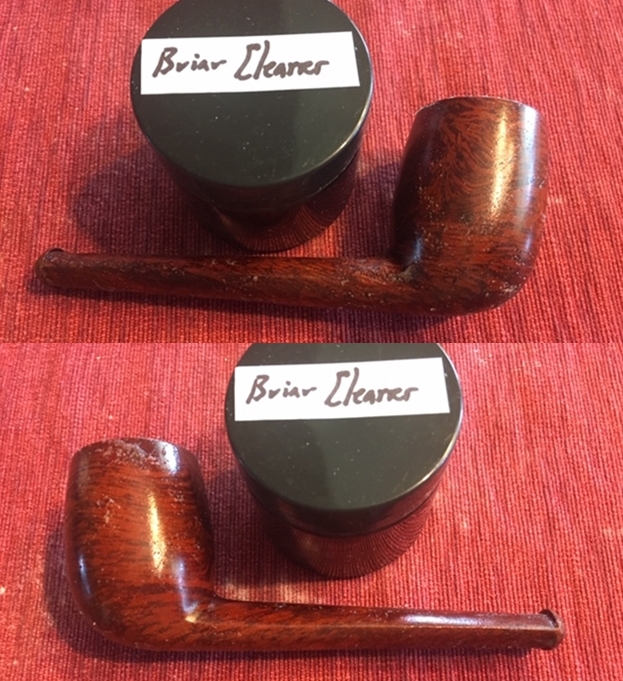
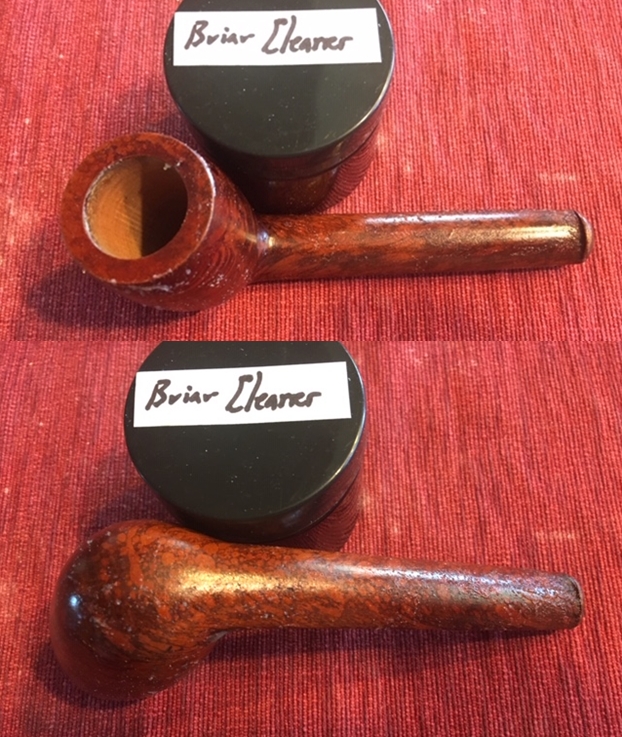
I decided to use Mark Hoover’s Briar Cleaner at this point in the process to clean off the briar. It works to remove the dust and debris in the briar and leaving behind a clean piece of briar. 
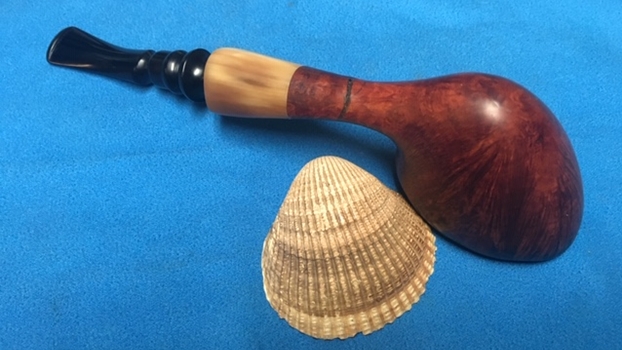
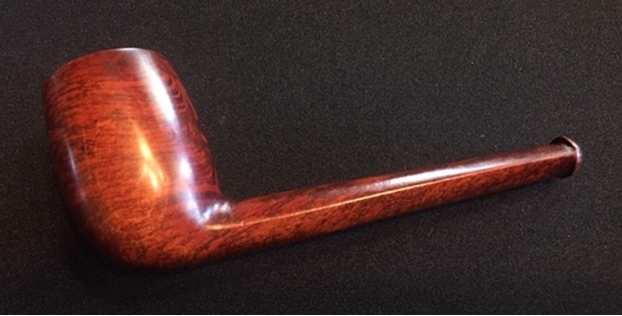
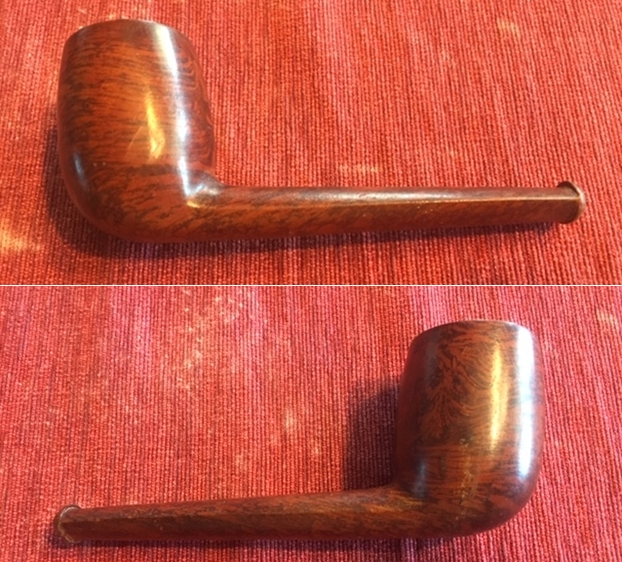
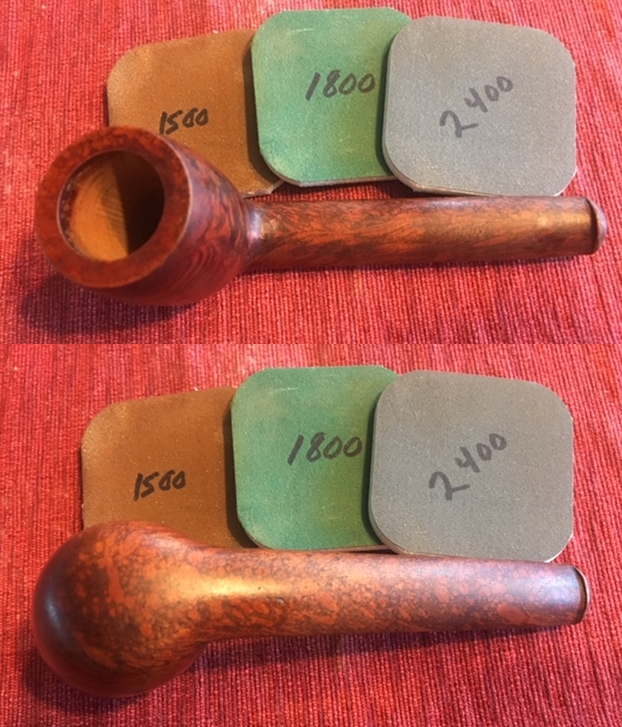
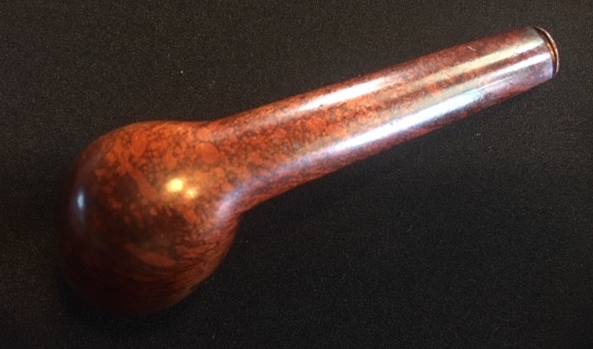
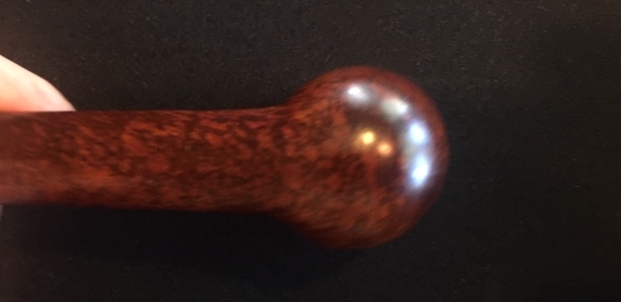
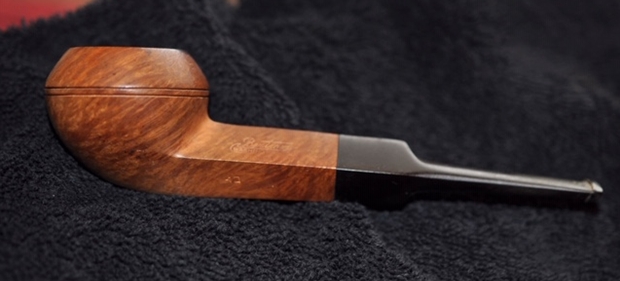
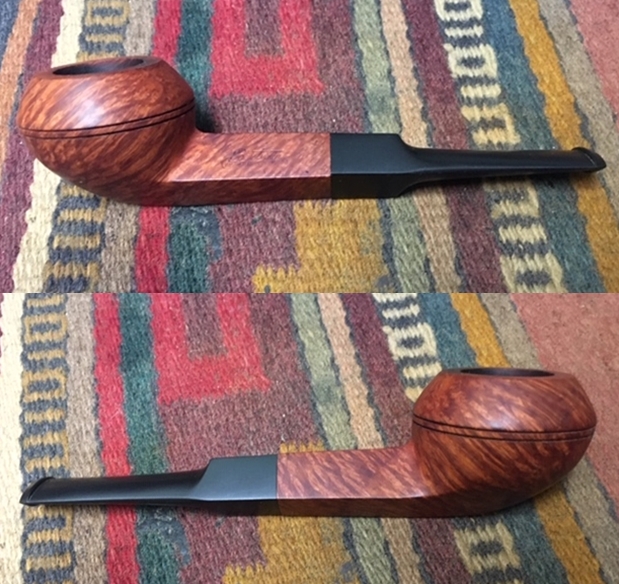
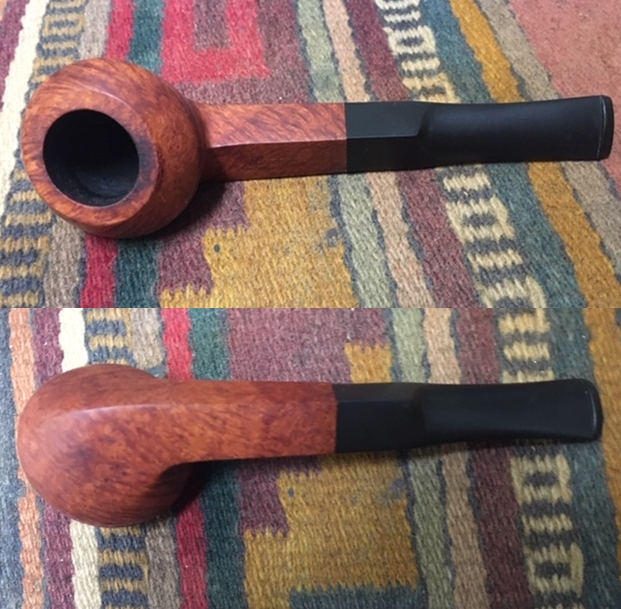
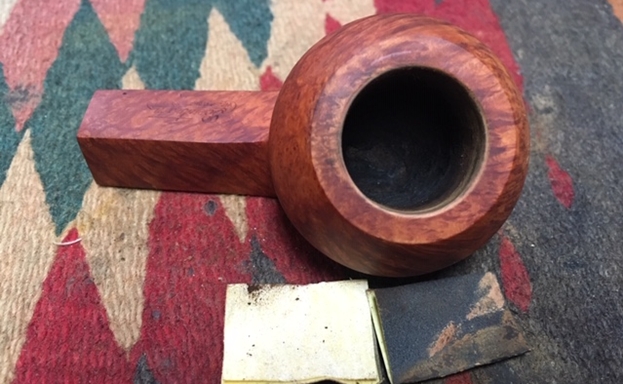
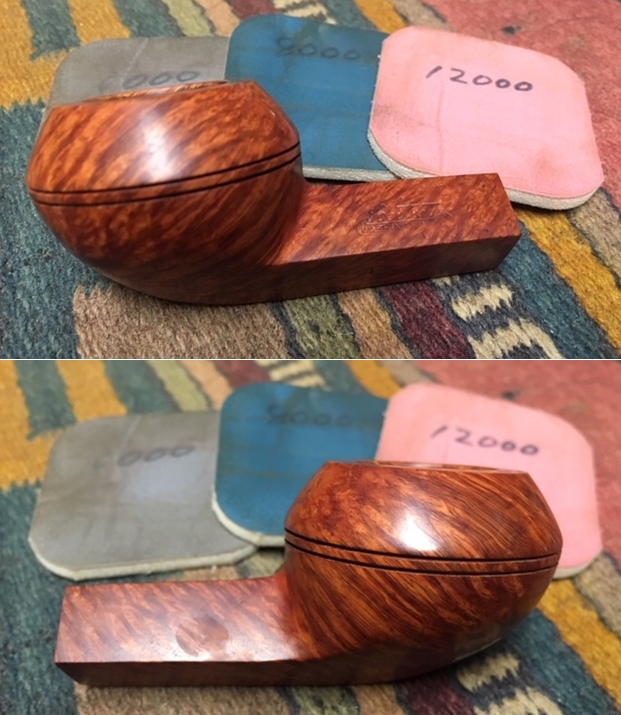
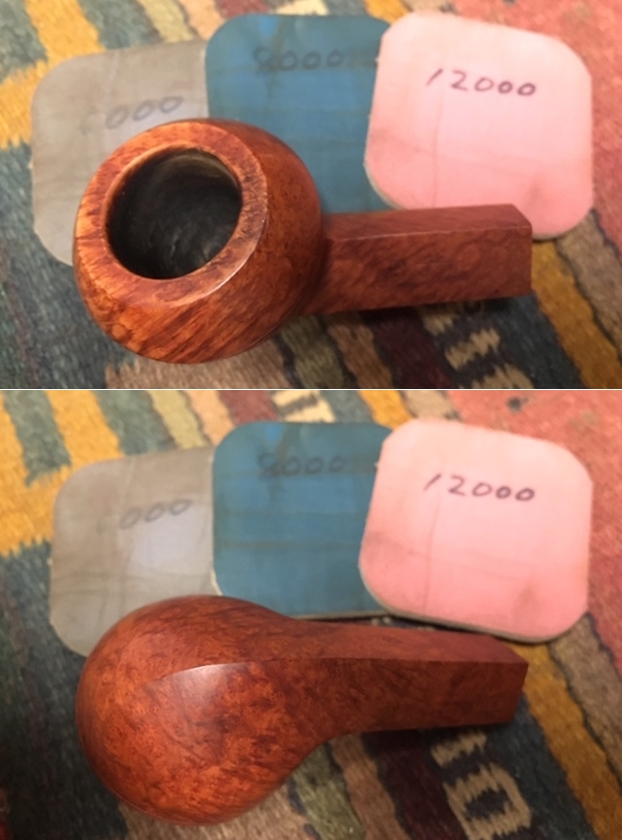
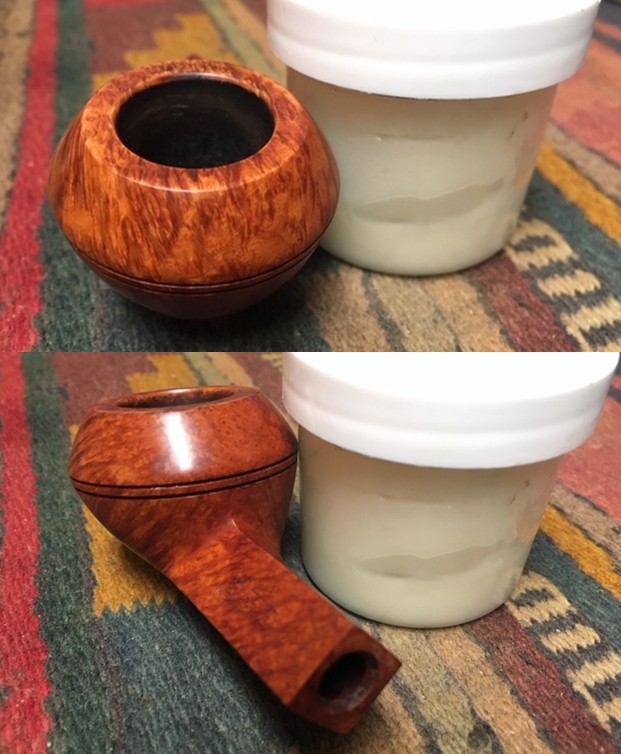
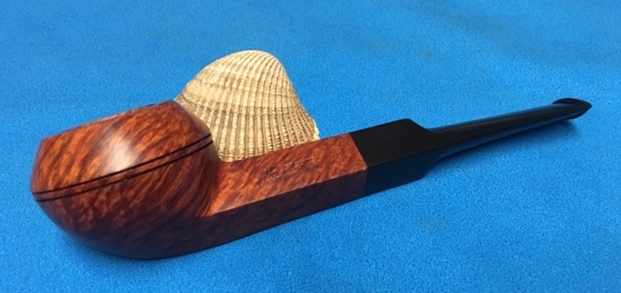
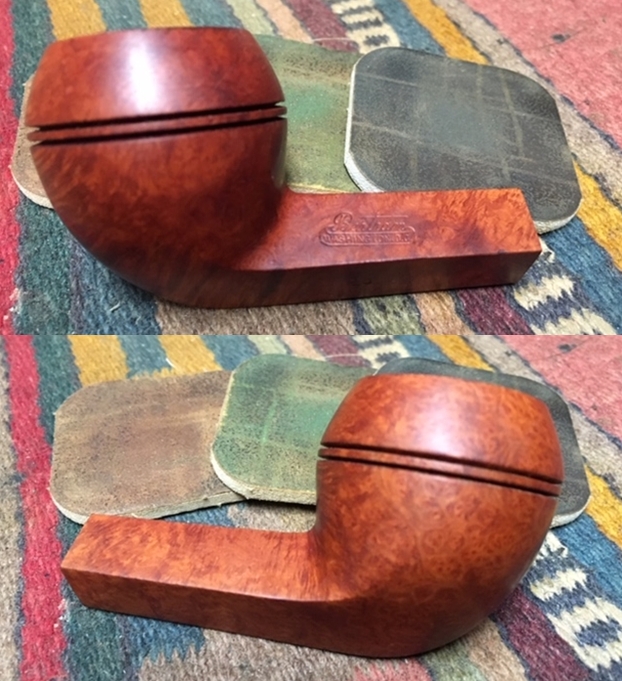
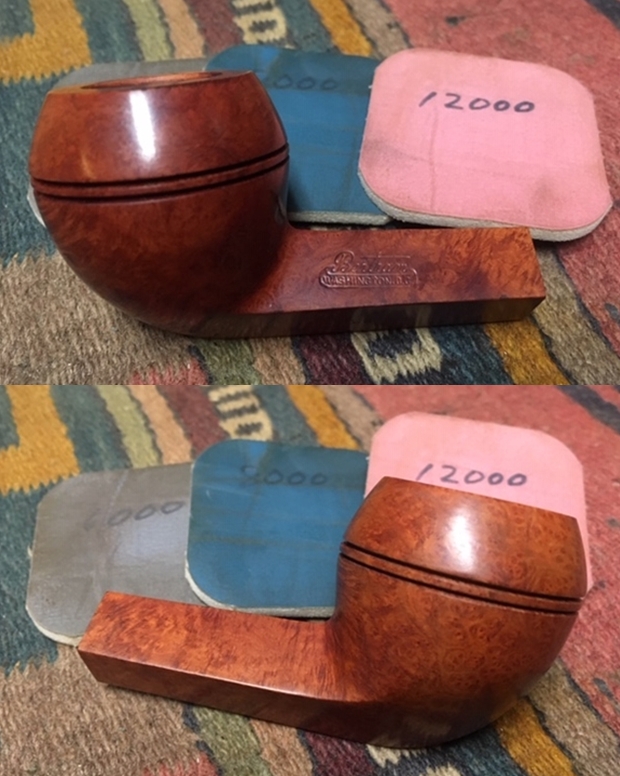
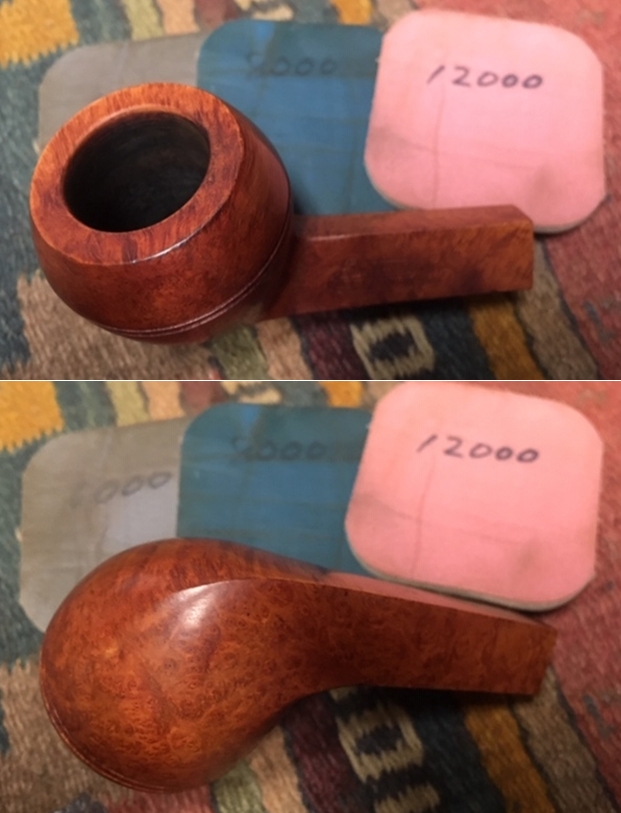
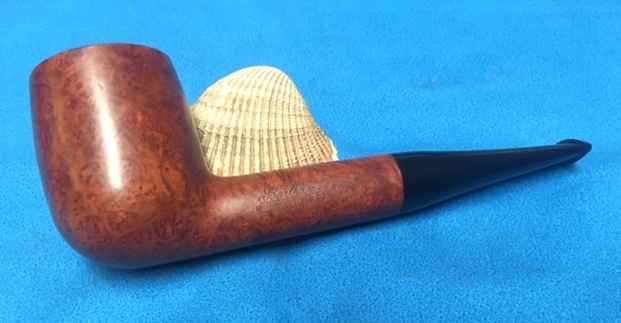
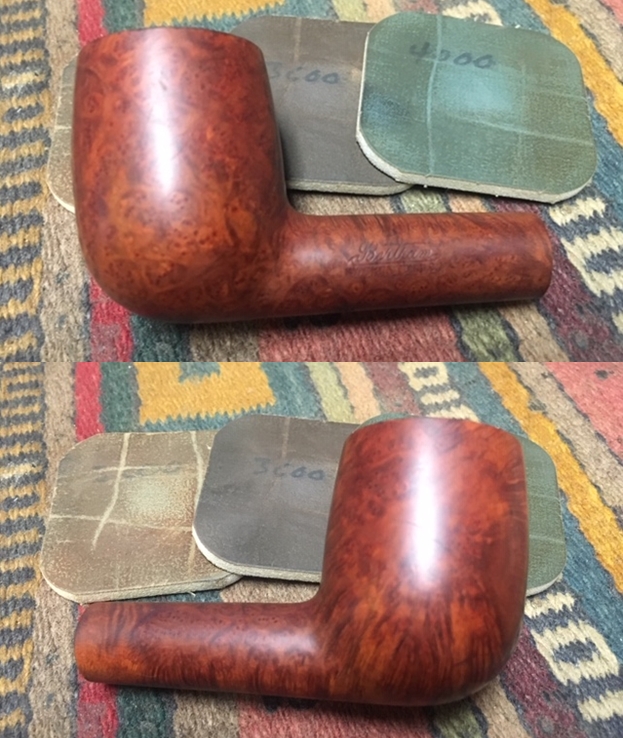
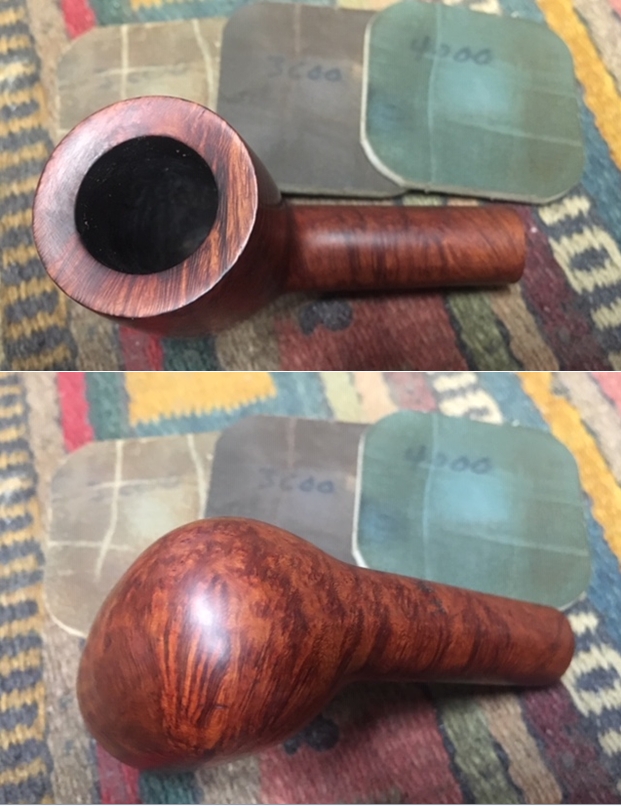
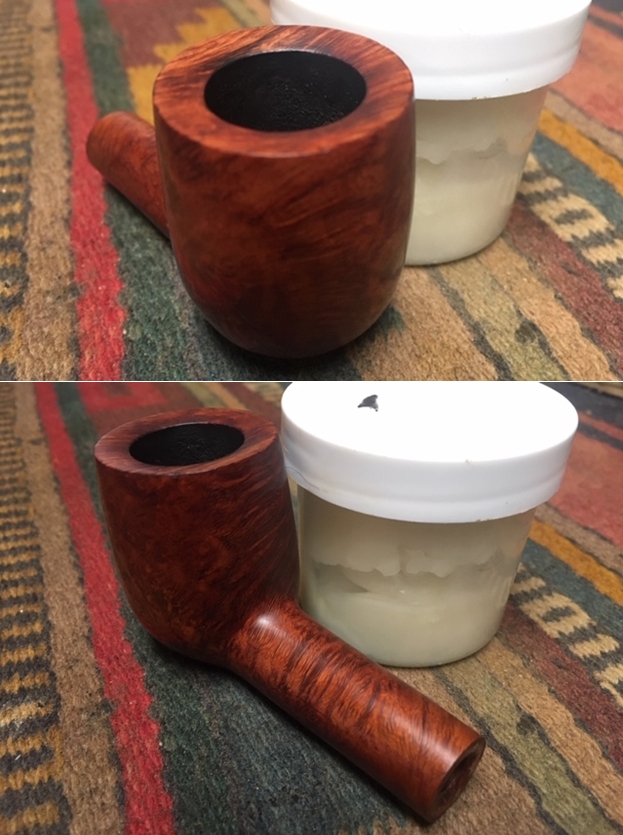
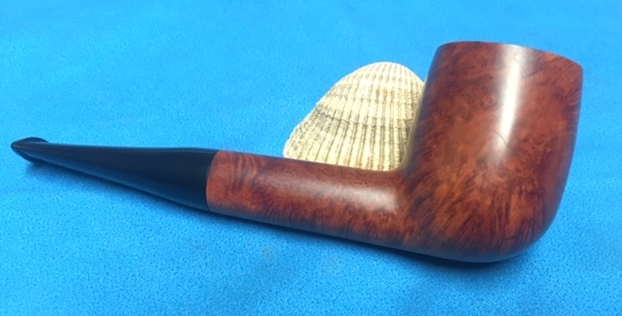
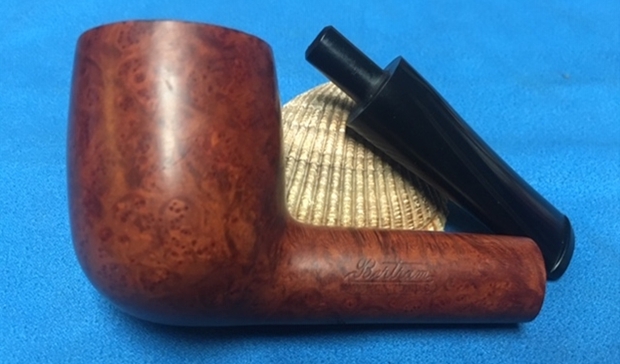
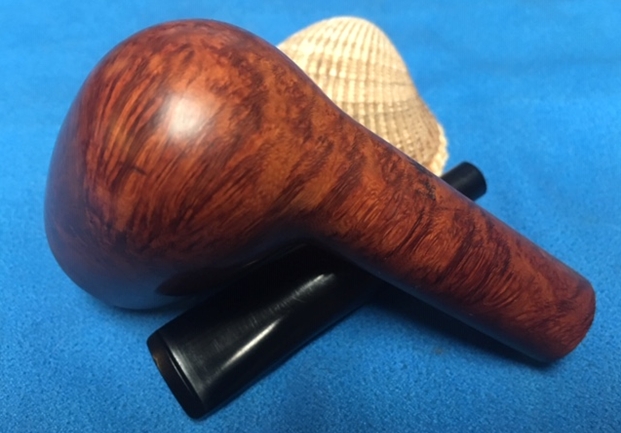
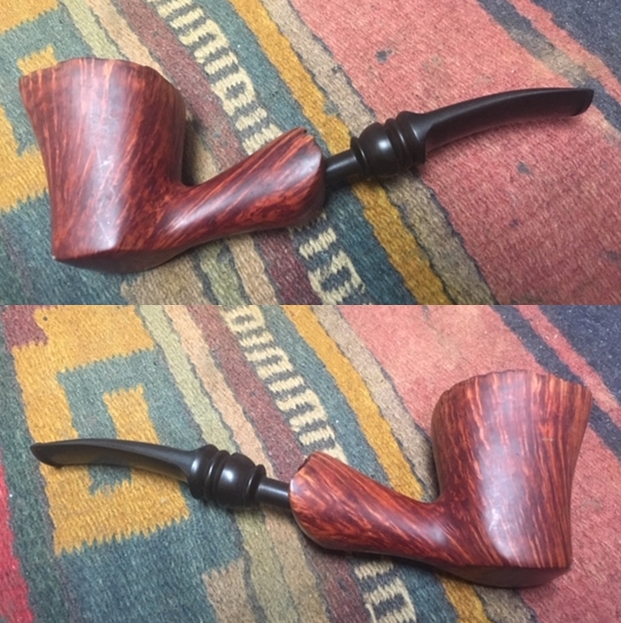
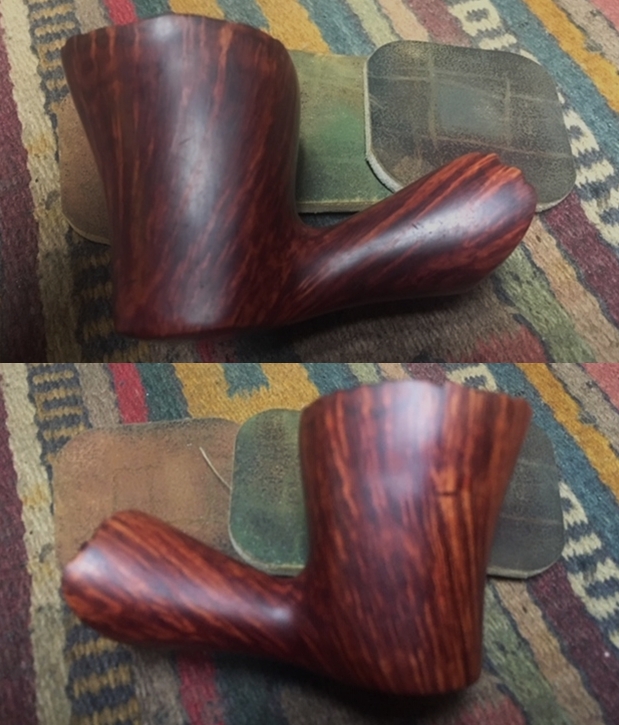
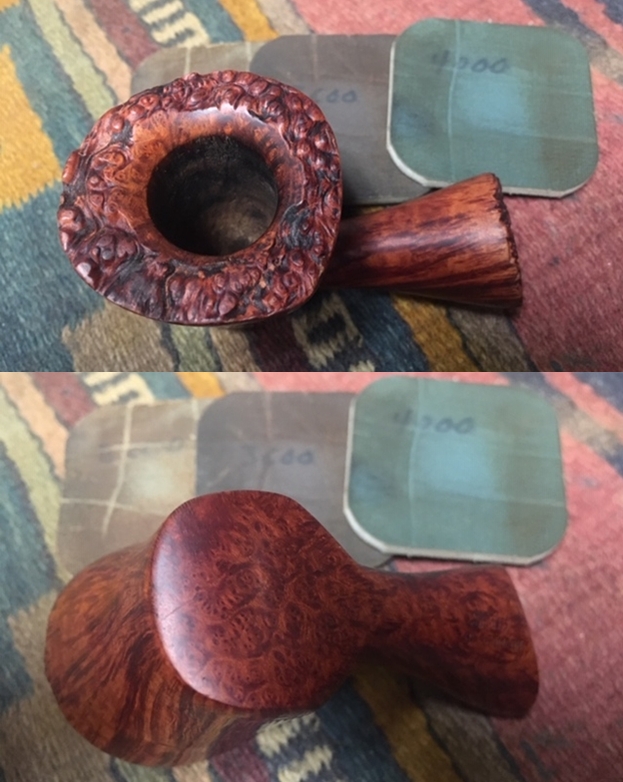
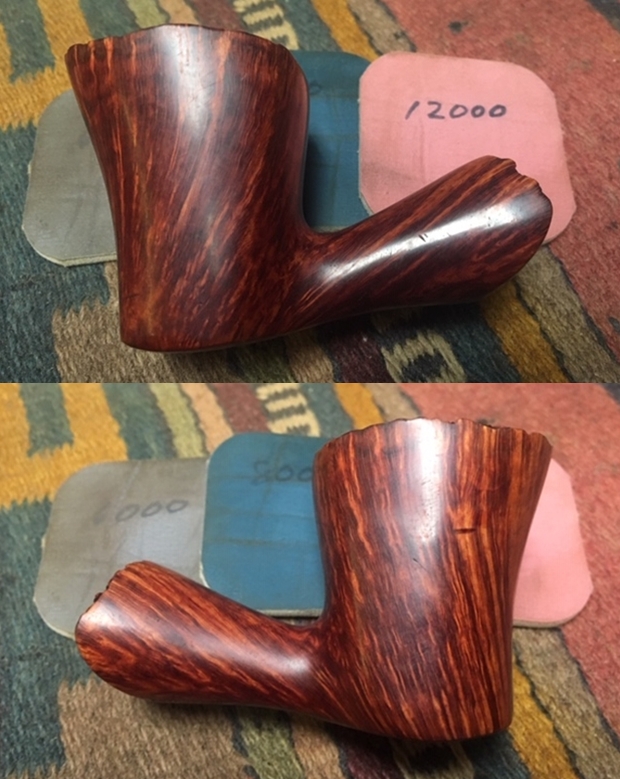
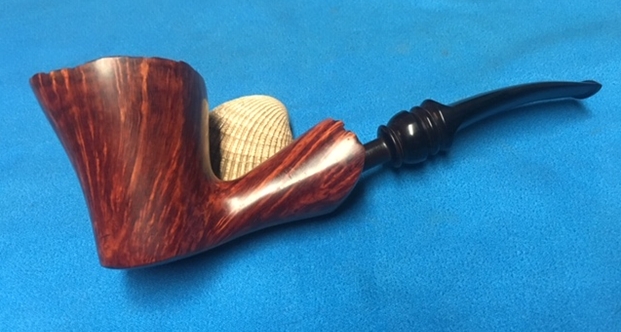
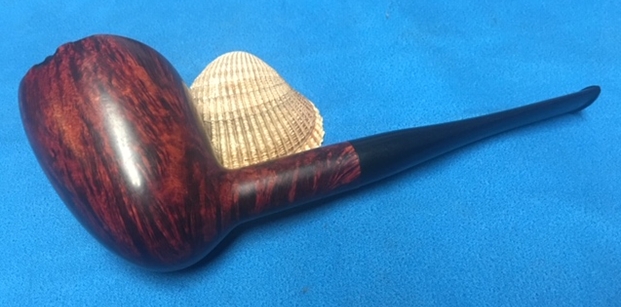
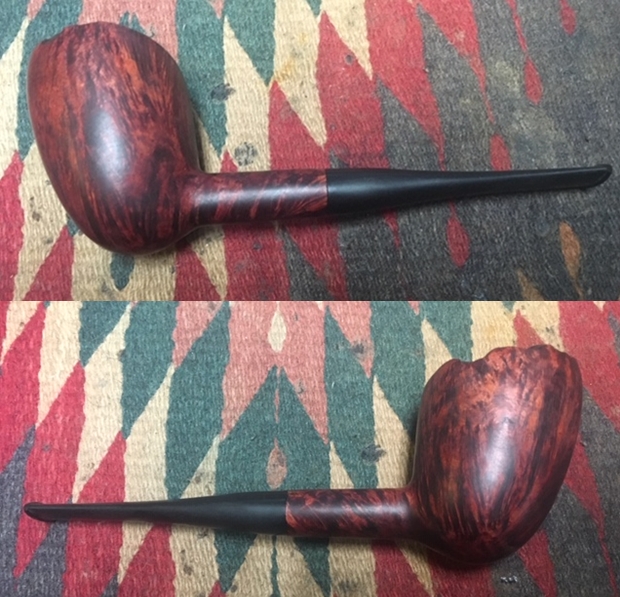
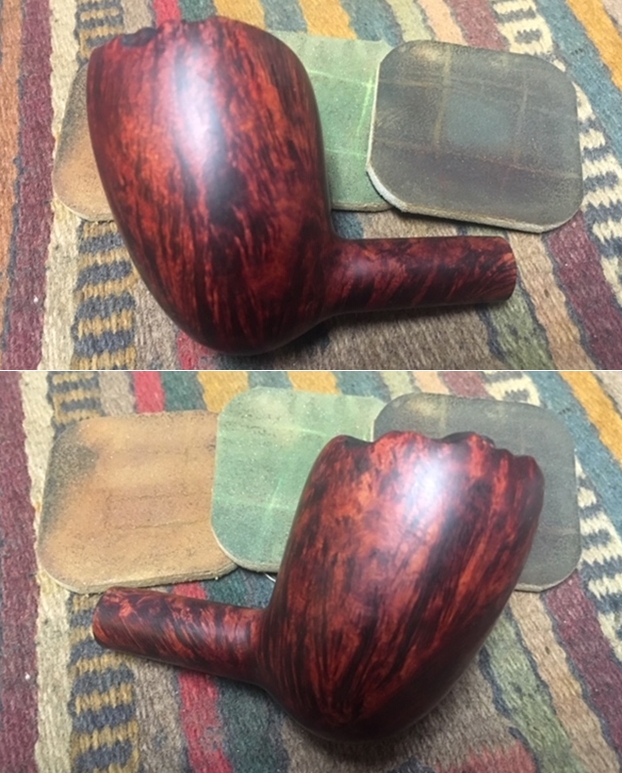
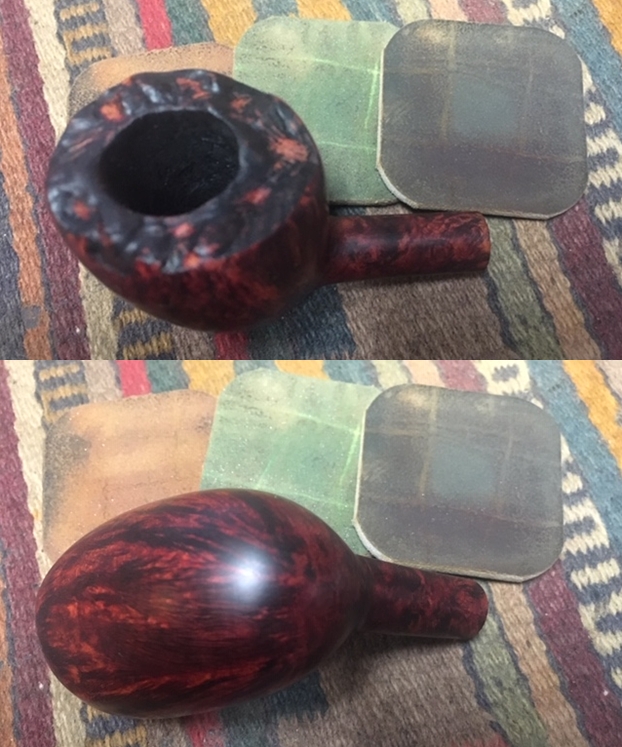
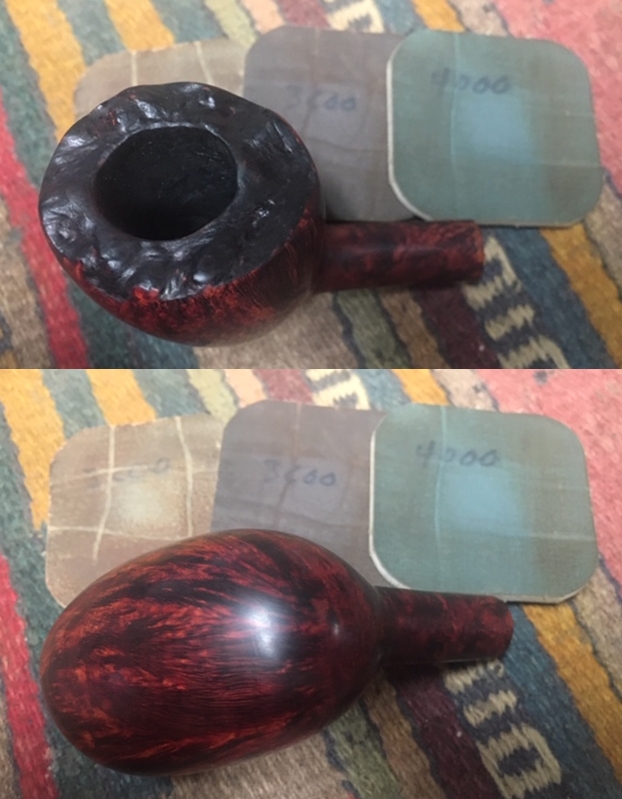
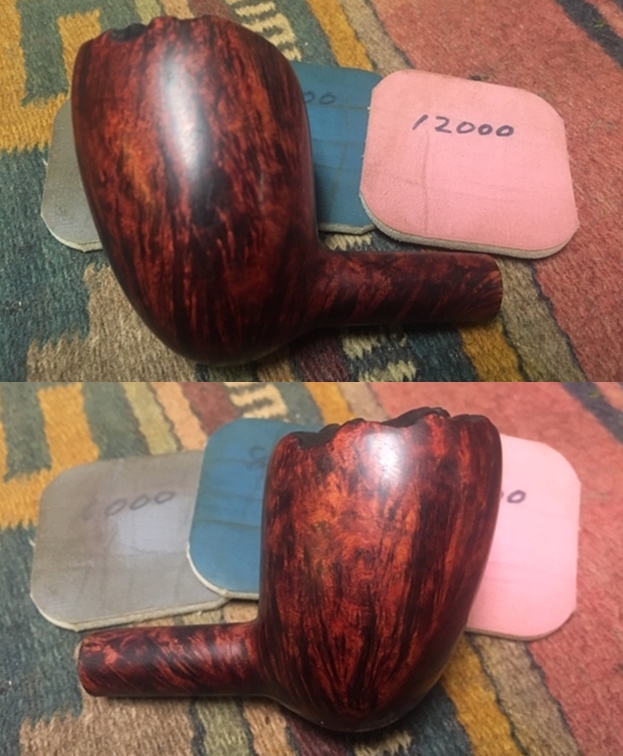
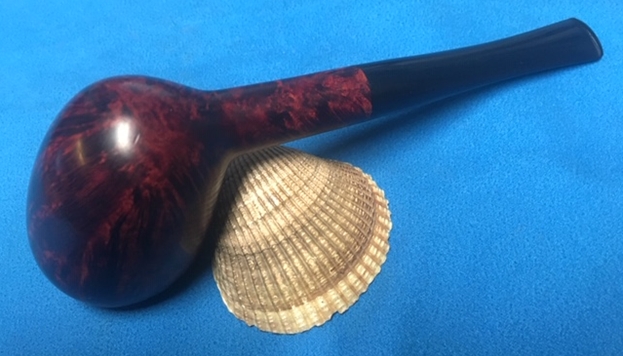
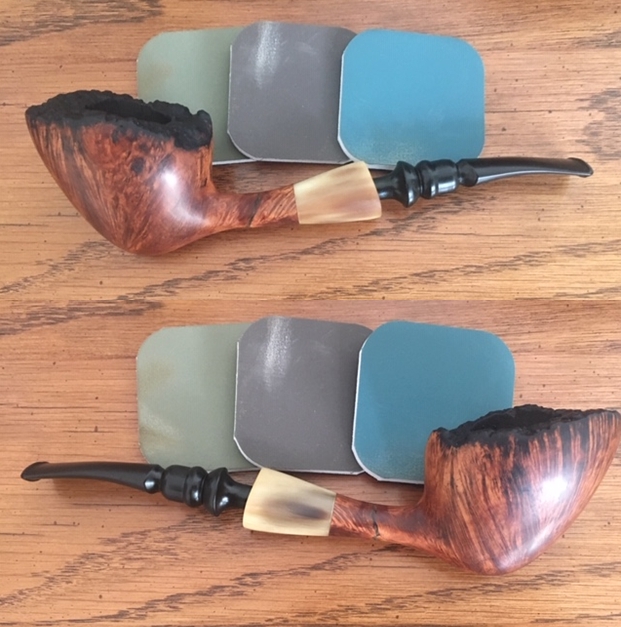
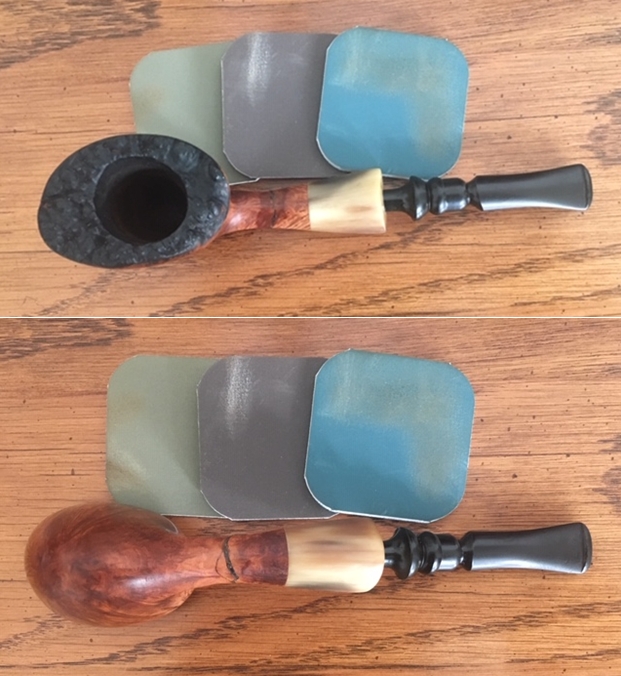
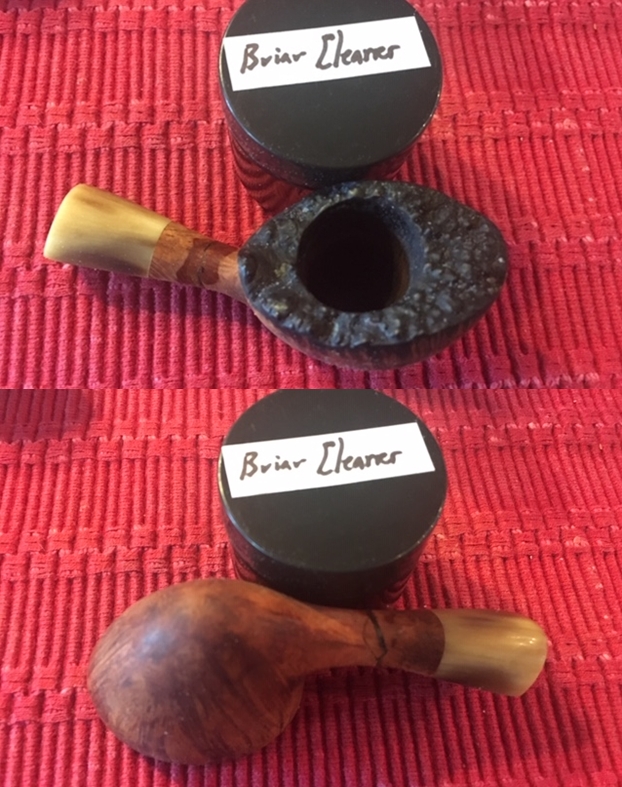
I polished the bowl and horn shank extension with micromesh sanding pads – wetsanding with 1500-12000 grit sanding pads. I took photos of the pipe at this point in the process. It is a nice looking pipe for sure. 
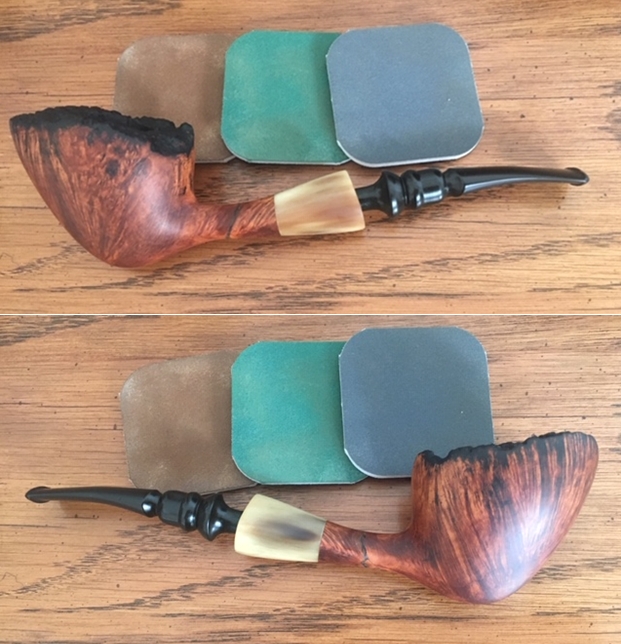
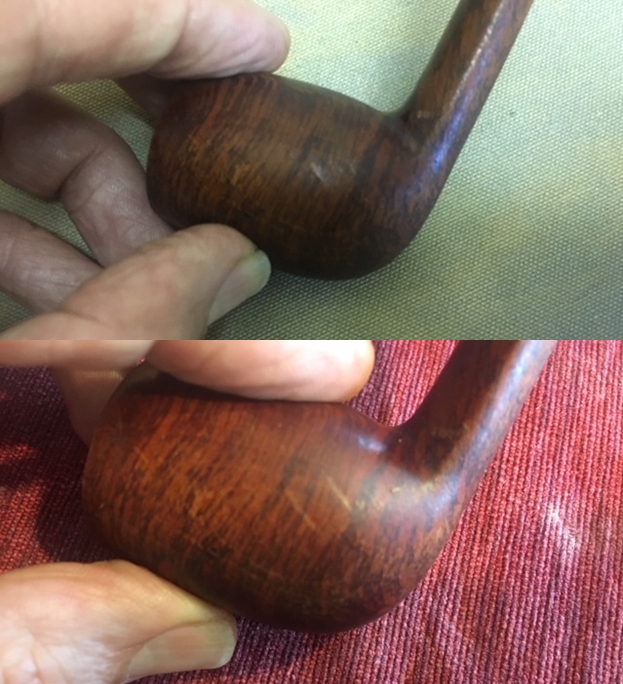
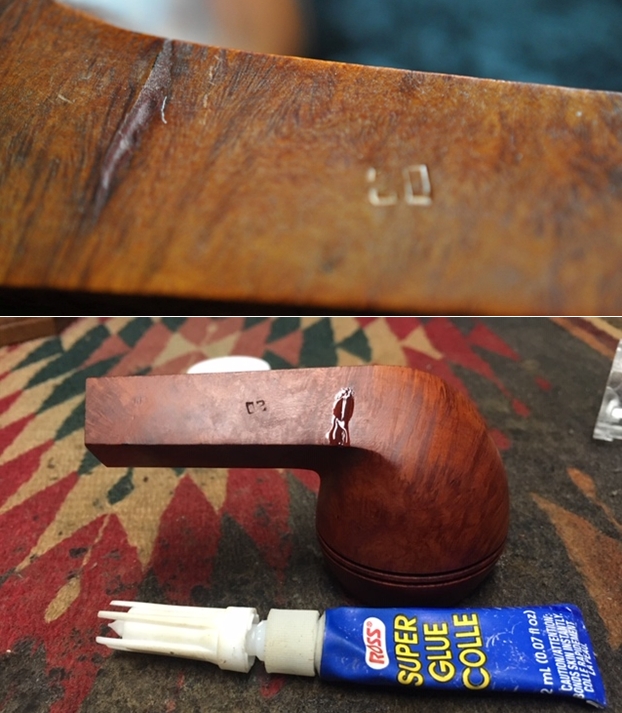
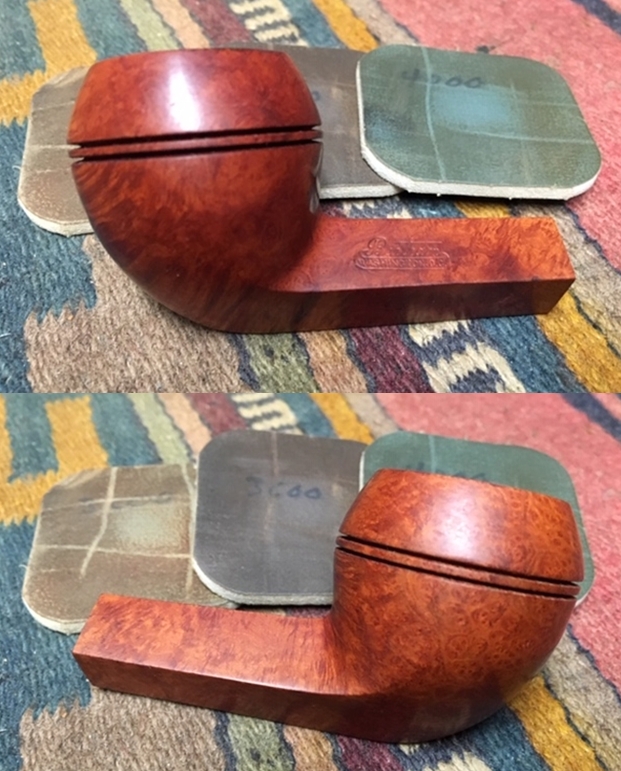
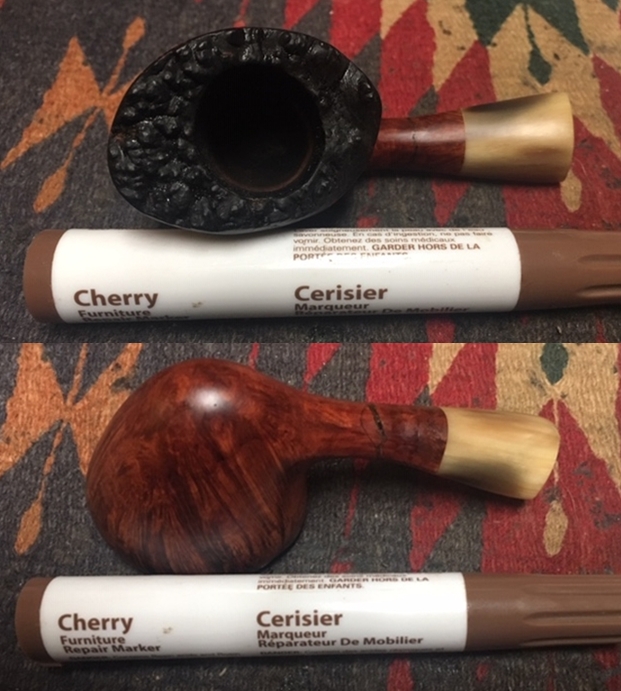
At this point in the process I brought the pipe back to Vancouver. I sanded the repaired area with a folded piece of 220 grit sandpaper to blend it into the surrounding briar. I wanted to remove some of the darkened area around the repair so that I could polish it further and restain the shank to match the rest of the pipe.
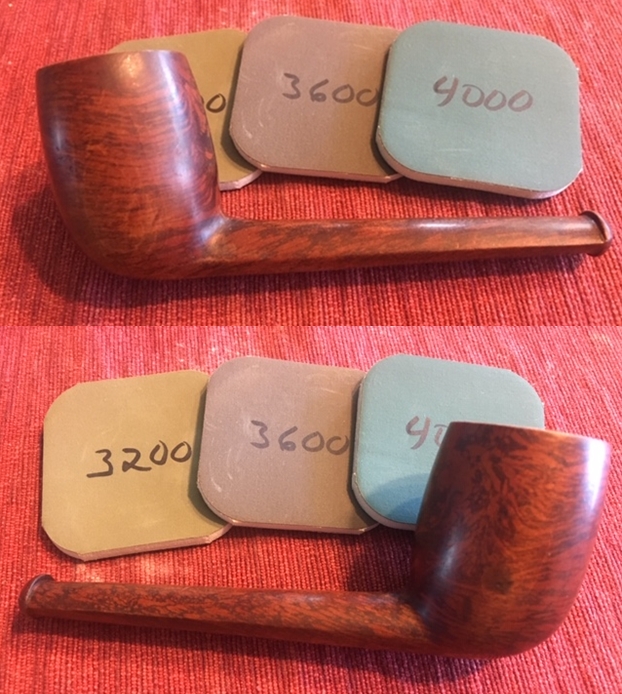
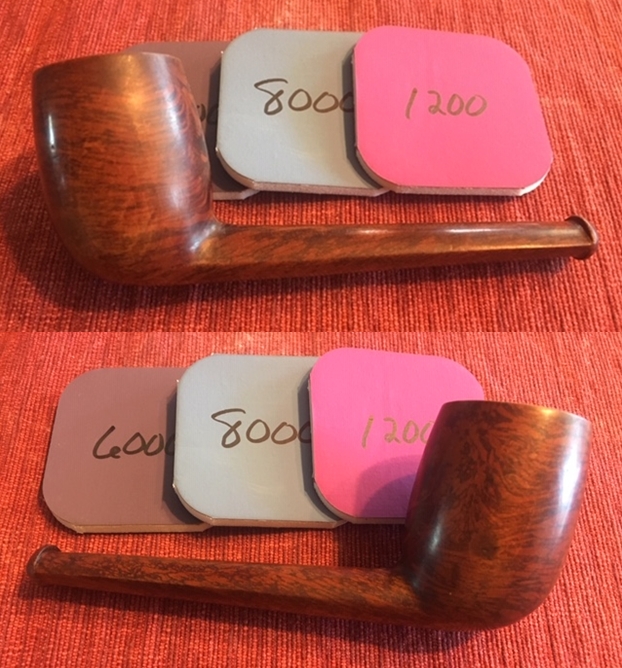
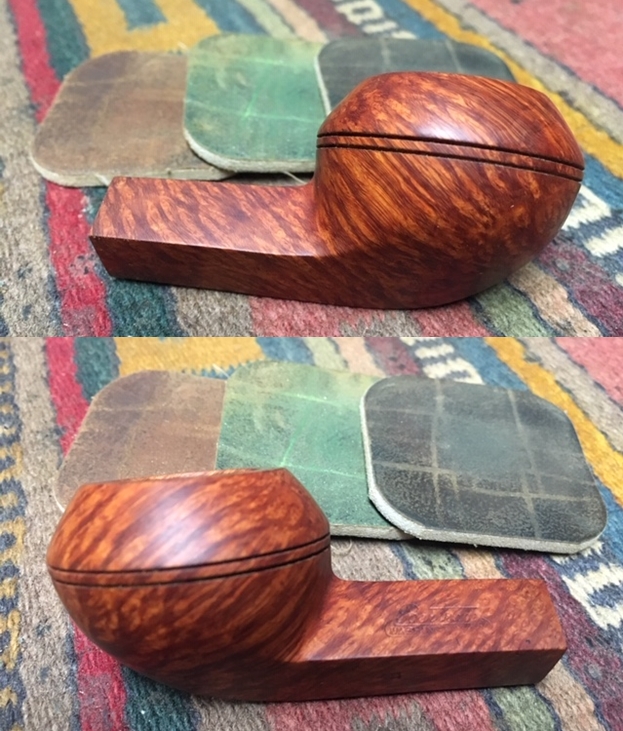
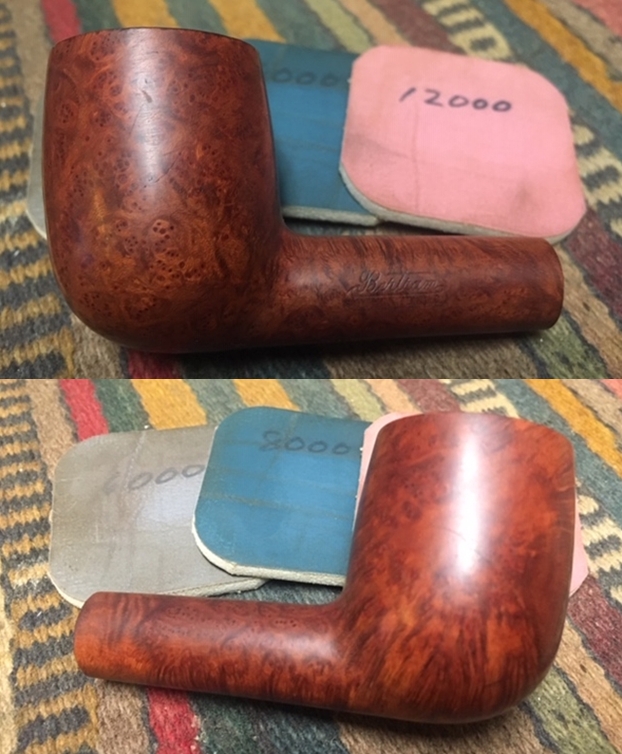
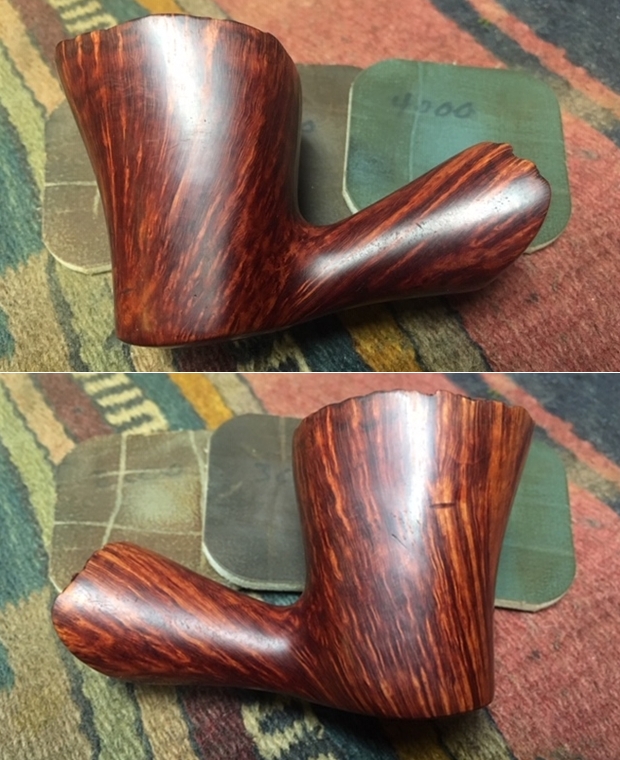
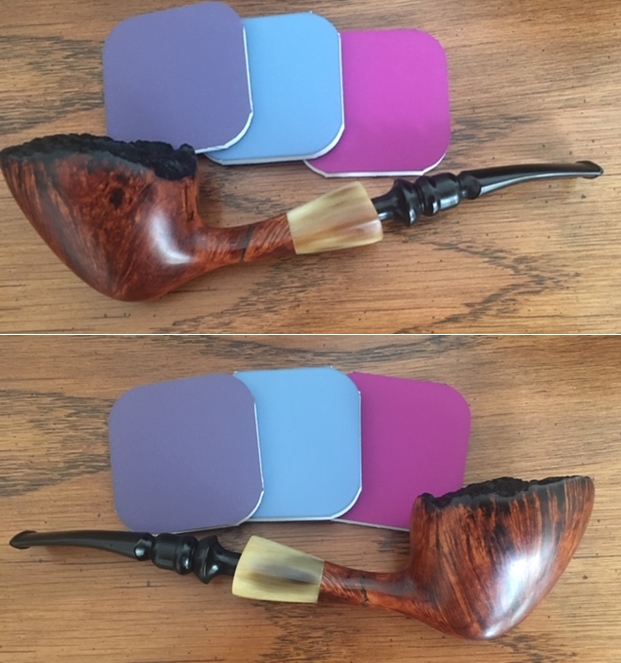
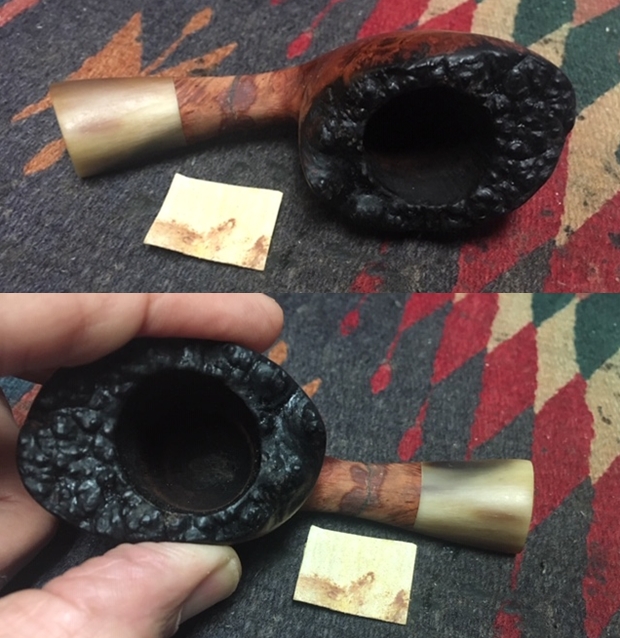
I polished the repaired area with micromesh sanding pads – wet sanding with 1500-2400 grit pads to polish out the sanding scratches. I polished it further with 3200-12000 grit pads. Once it was smooth I stained it with a Cherry stain pen to blend it into the rest of the pipe. The photos tell the story of the repair. 
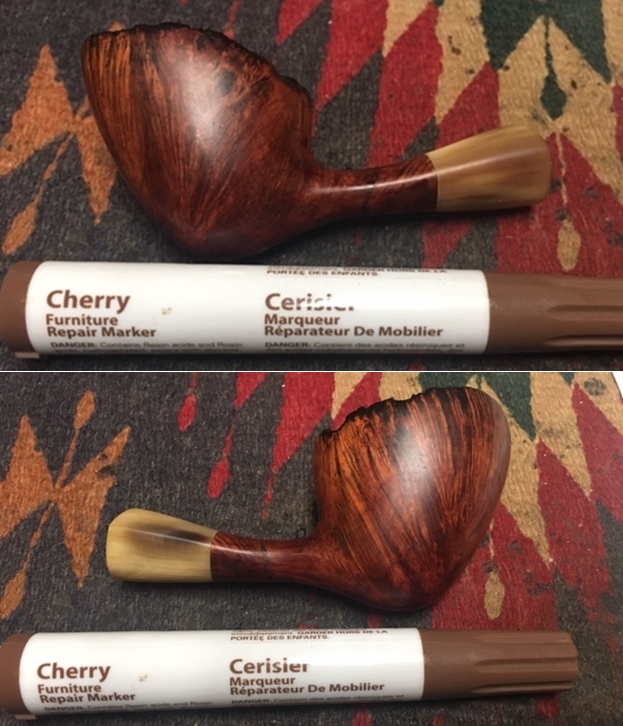
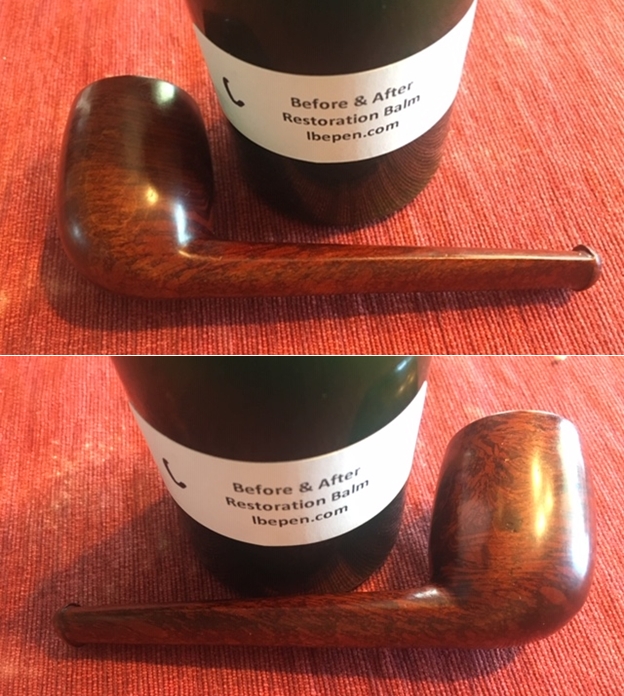
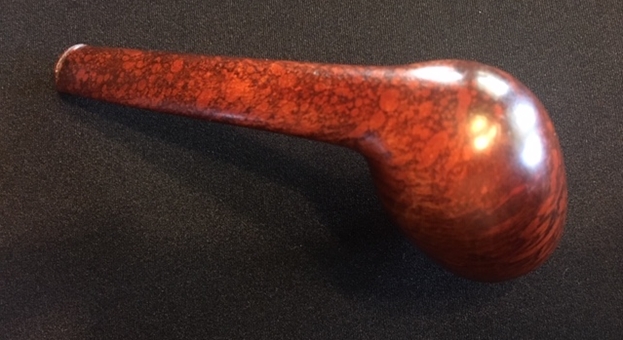
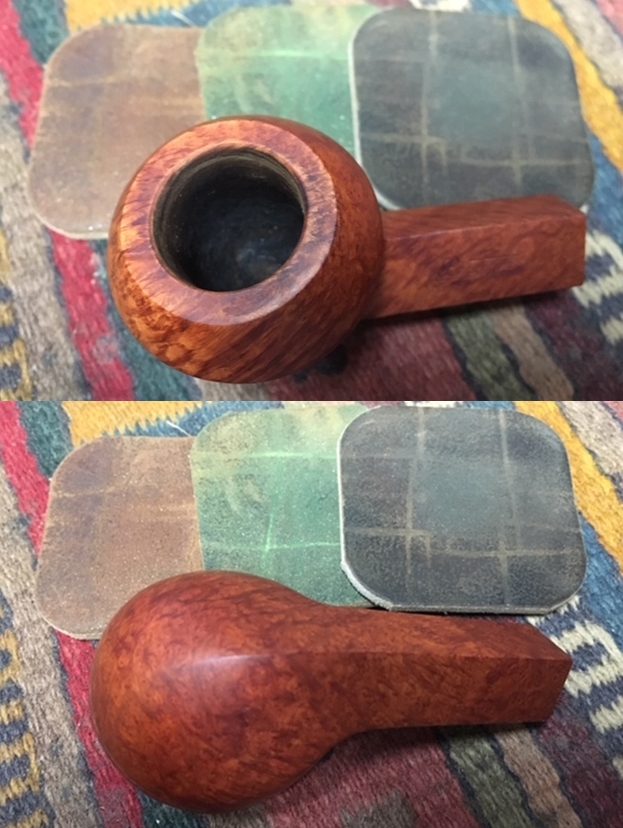
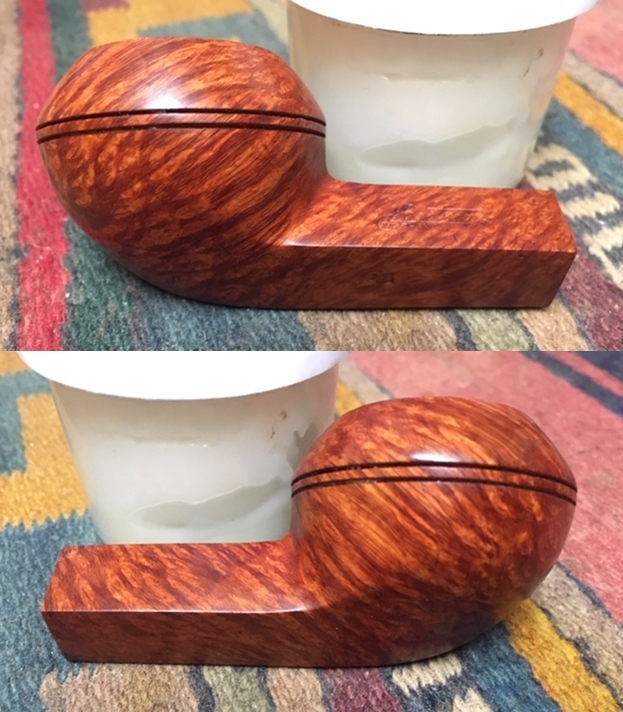
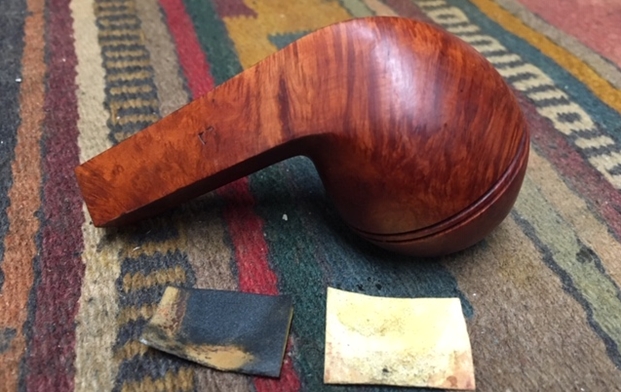
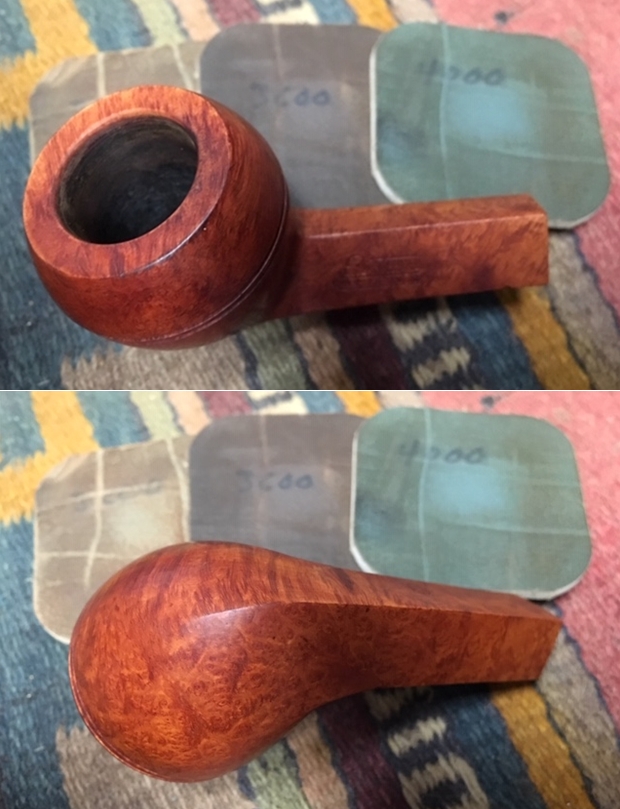
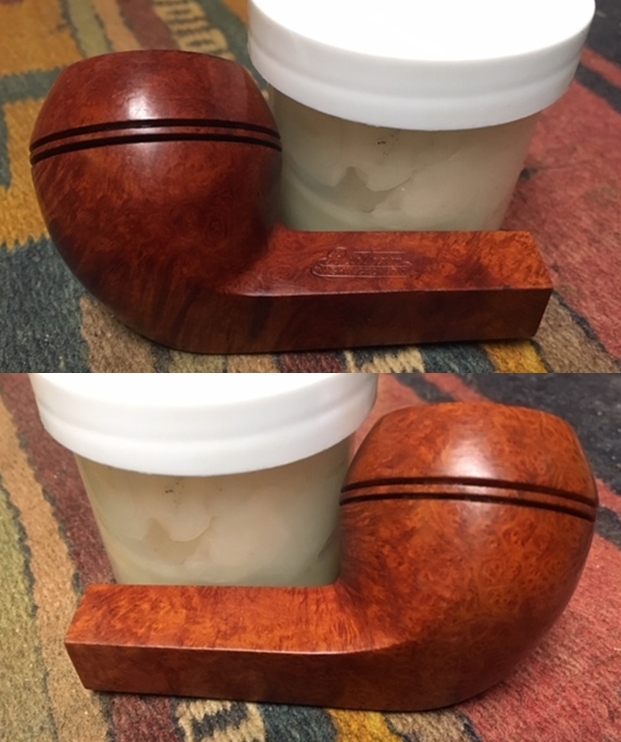
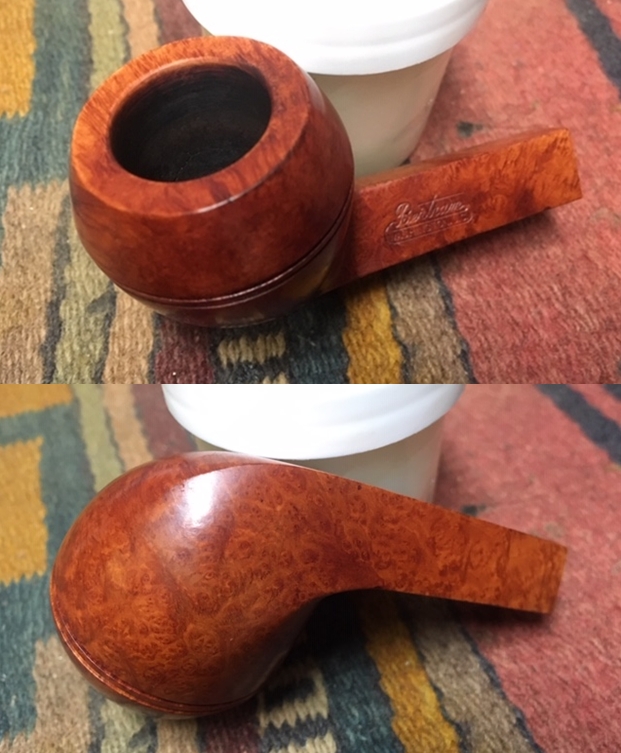
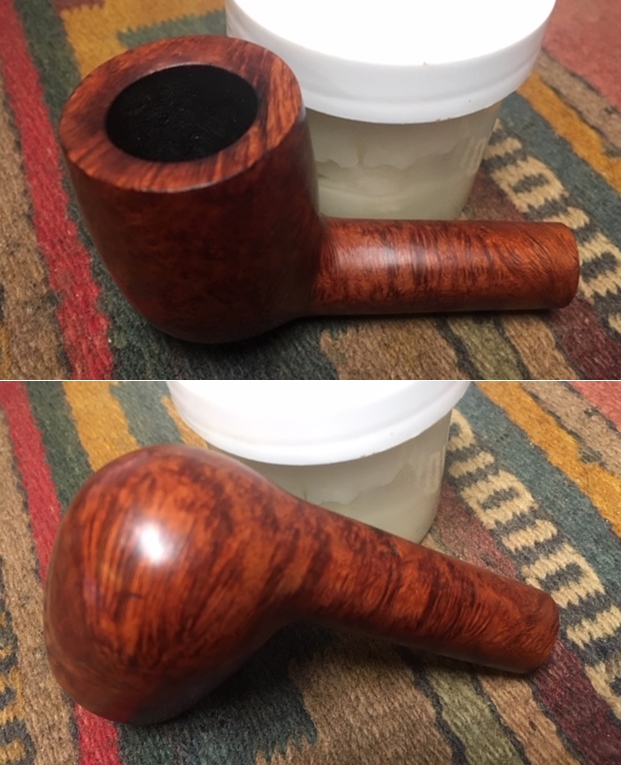
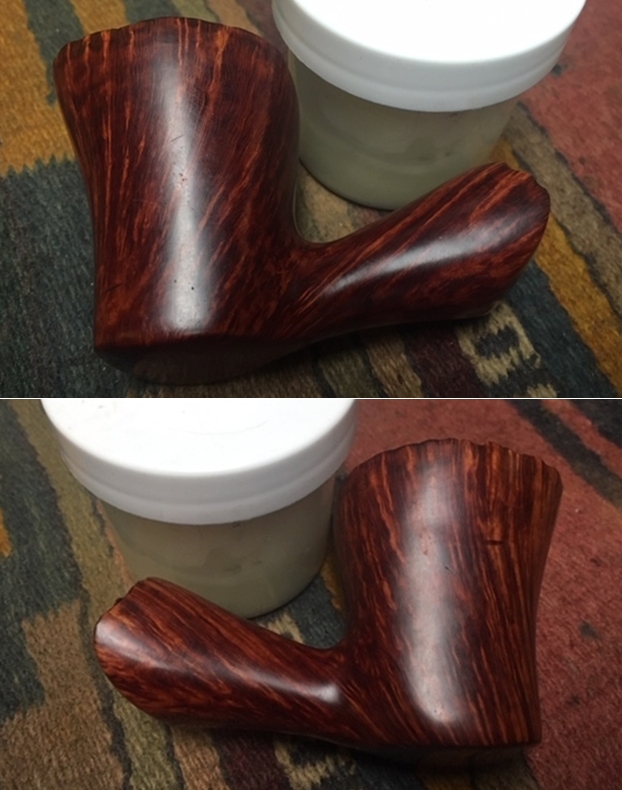
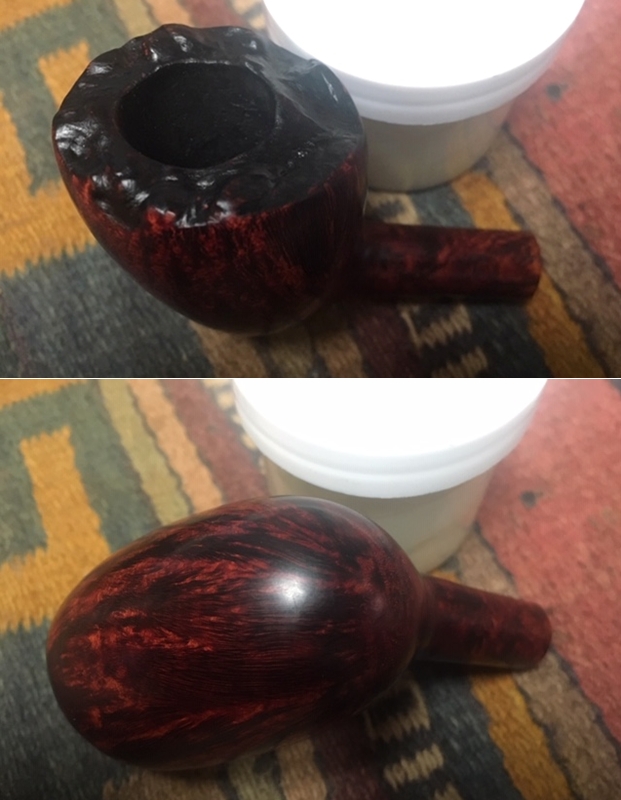
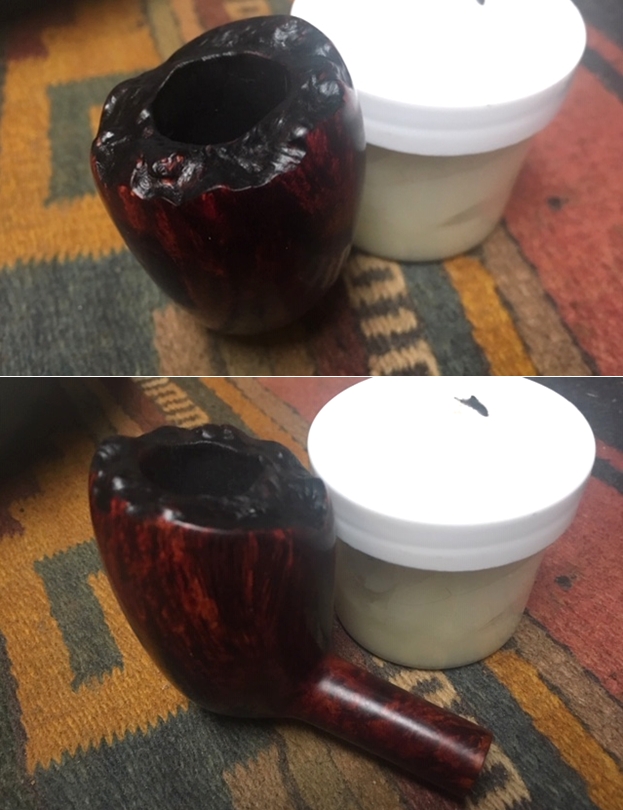
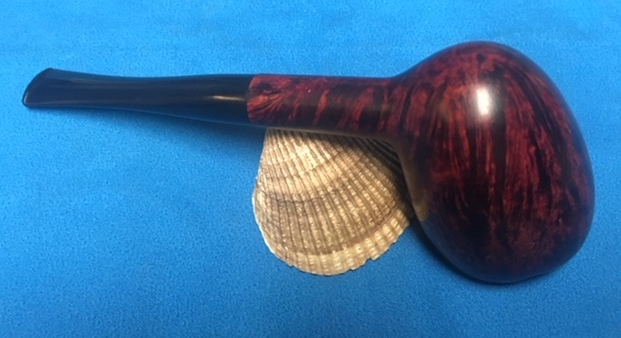
I rubbed the bowl and shank down with Before & After Restoration Balm. I worked it into the briar and set it aside to dry. Once the Balm had been doing its work for a while I buffed it down with a microfiber cloth. The Balm cleaned, protected and enlivened the briar. The repaired shank was looking very good at this point in the process. 
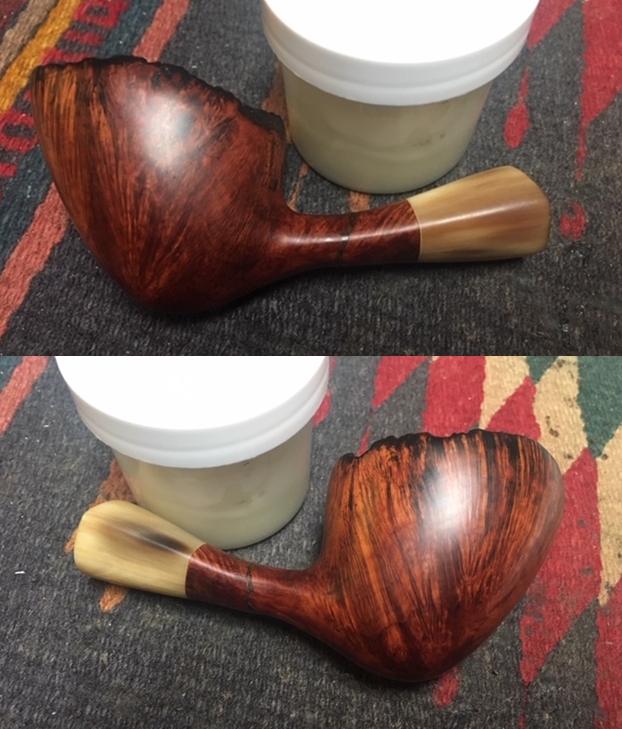
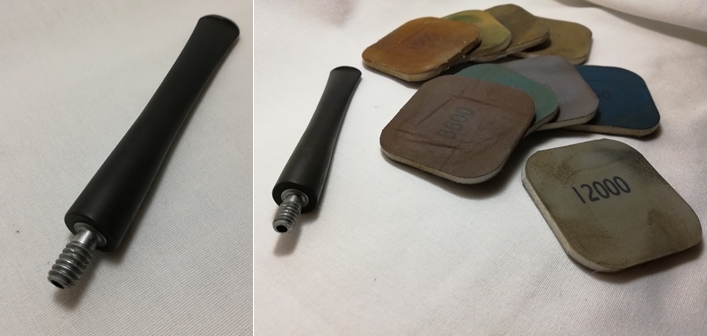
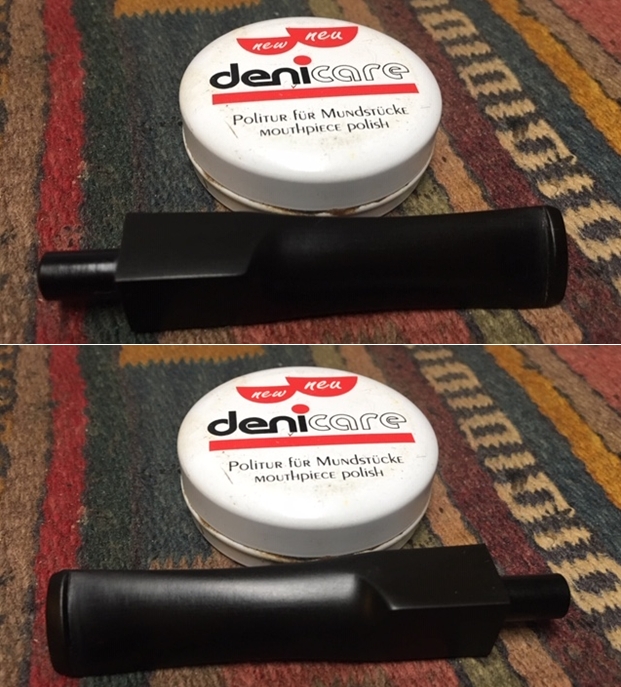
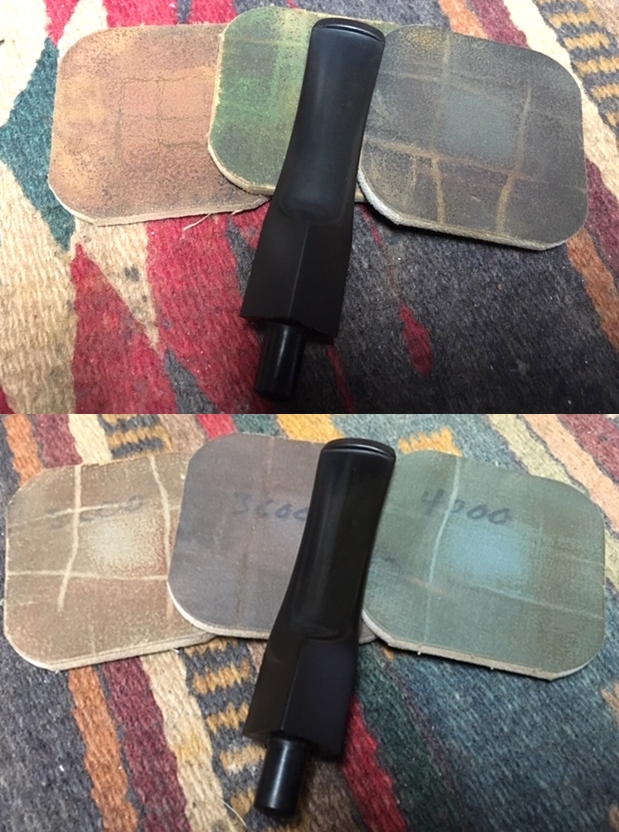
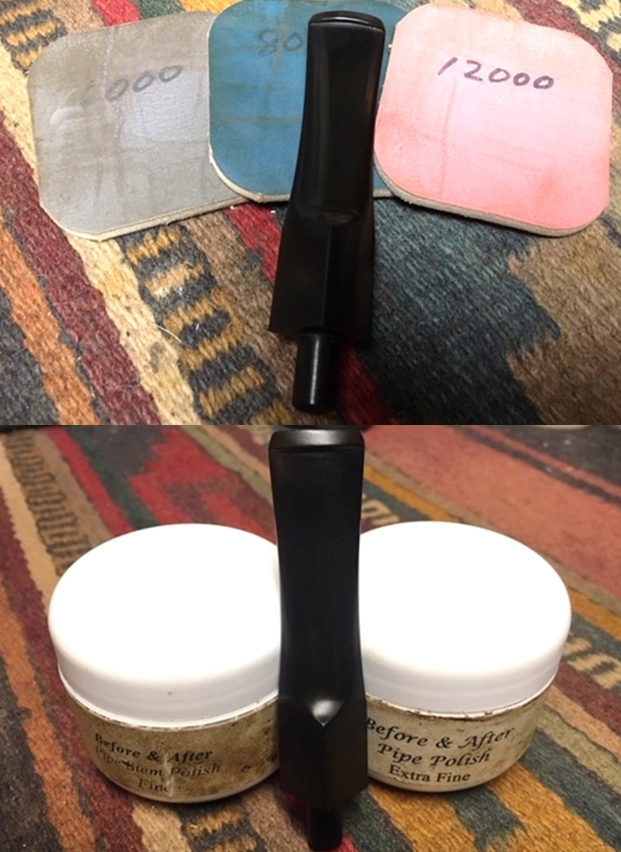
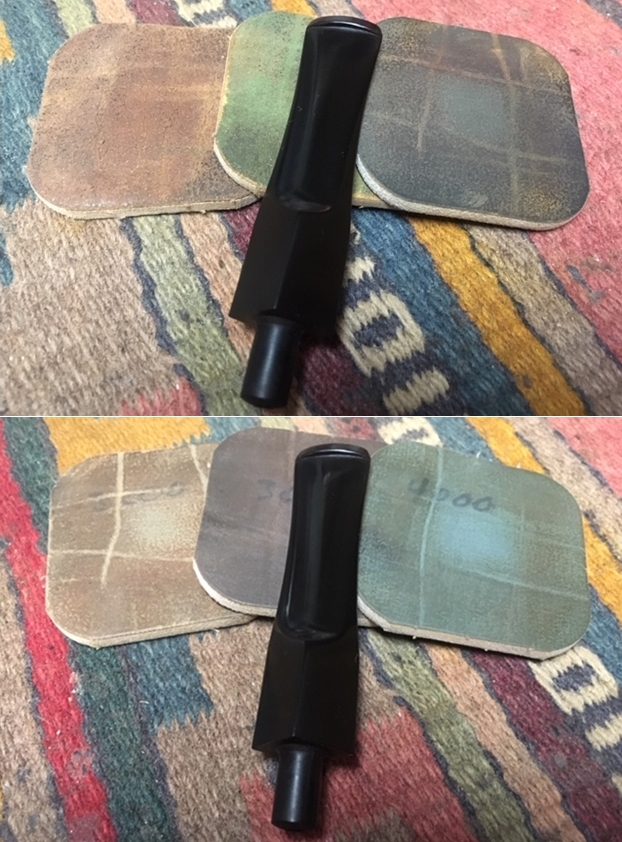
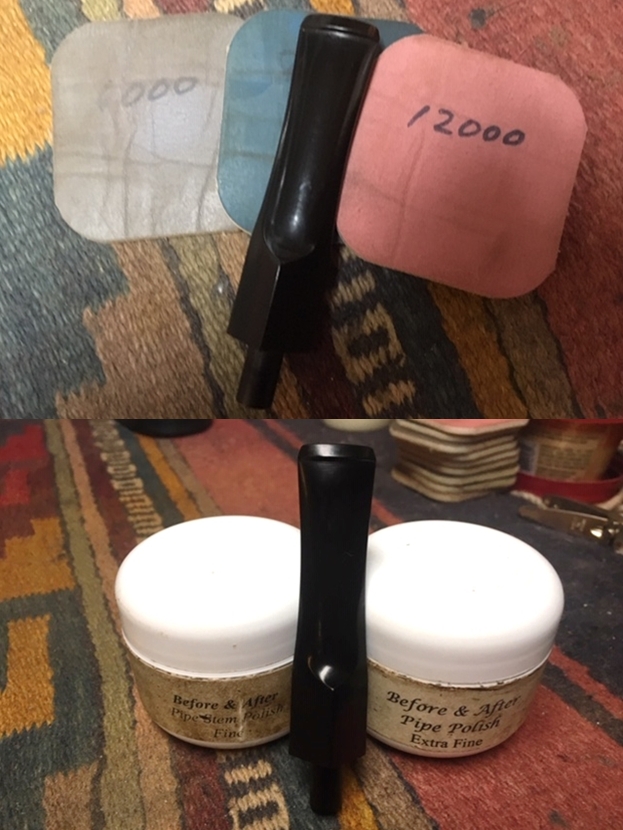
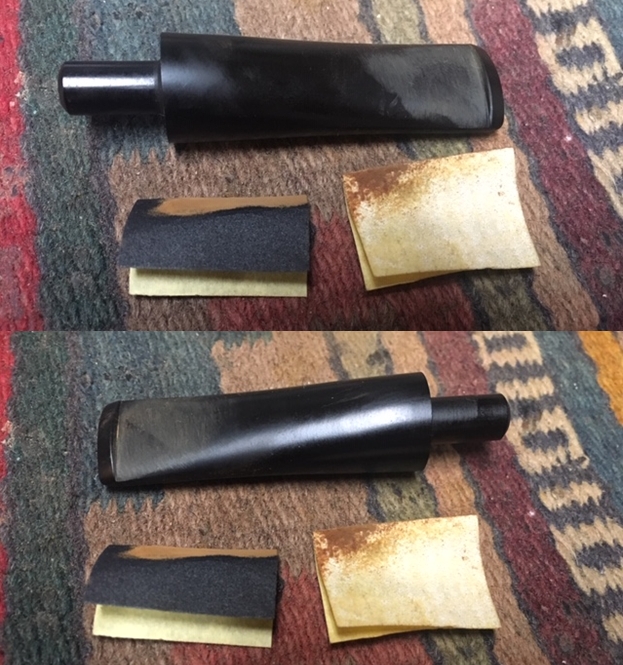
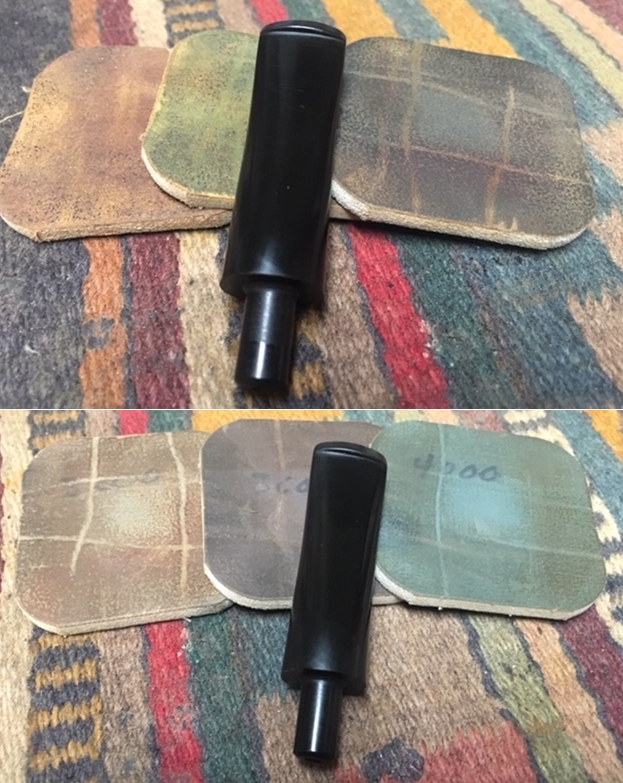
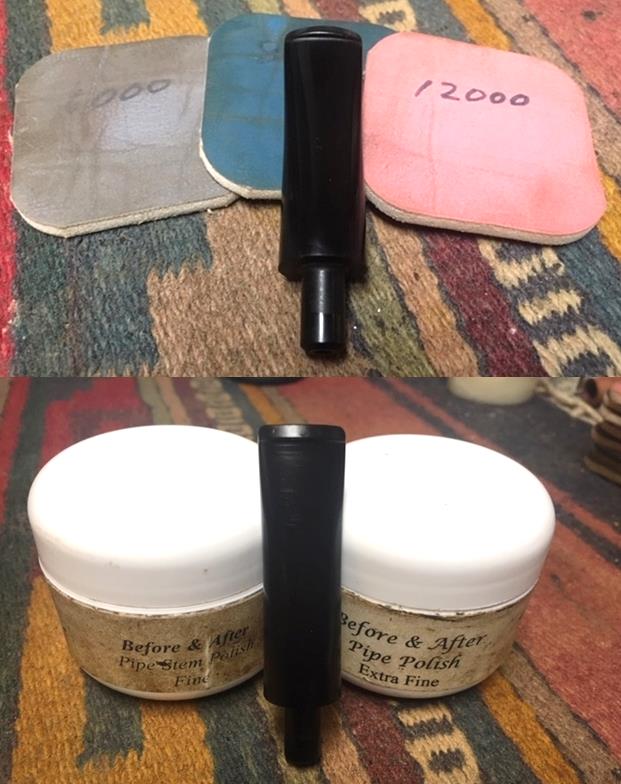
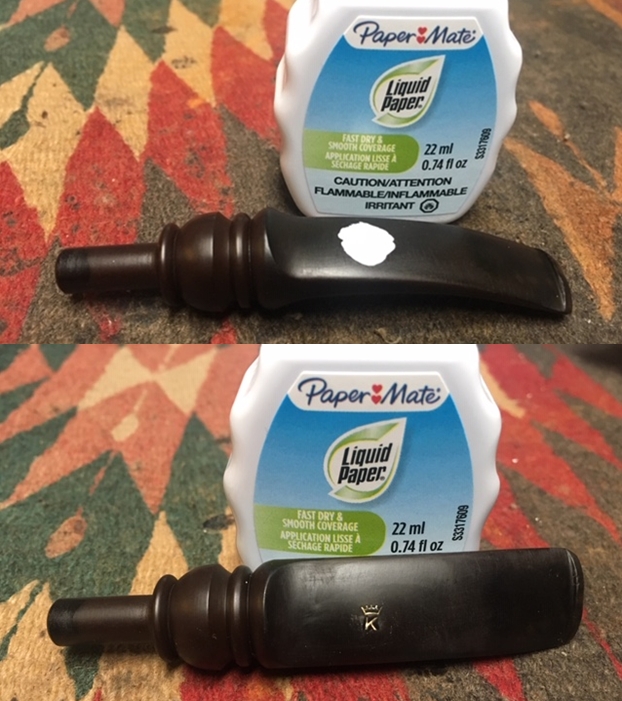
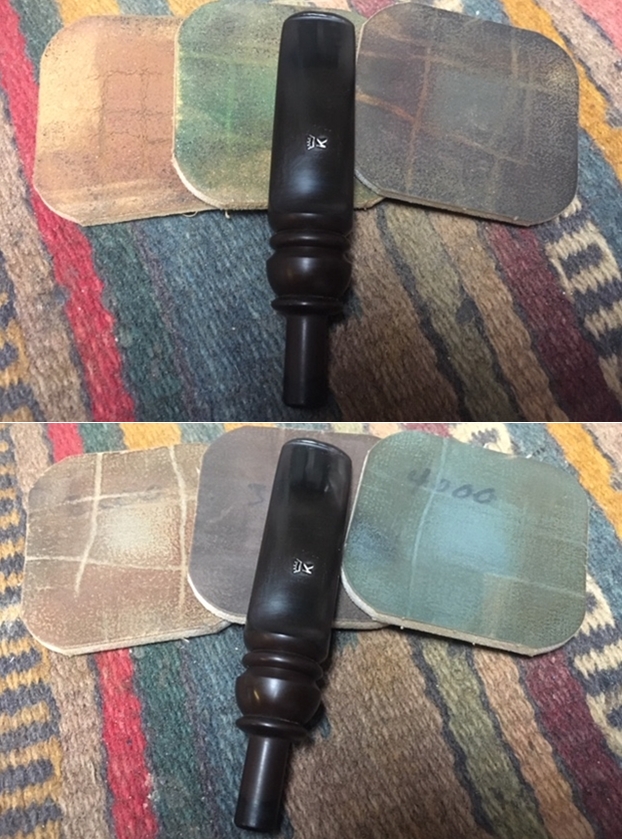
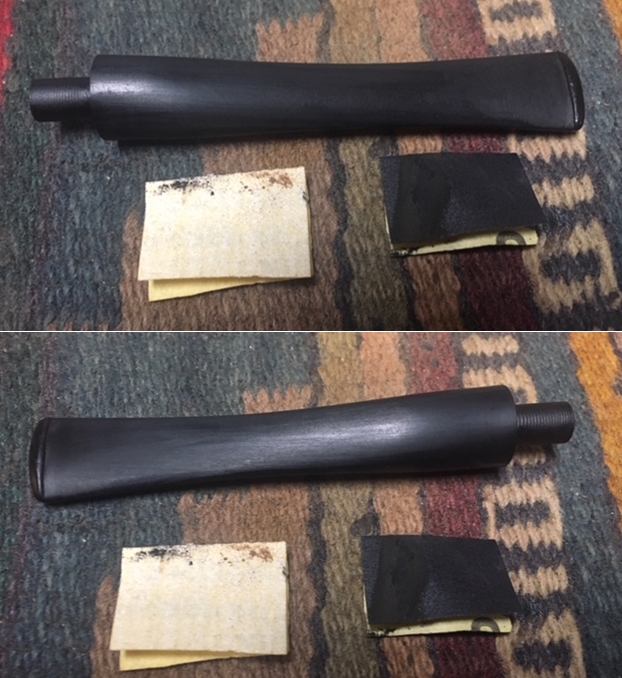
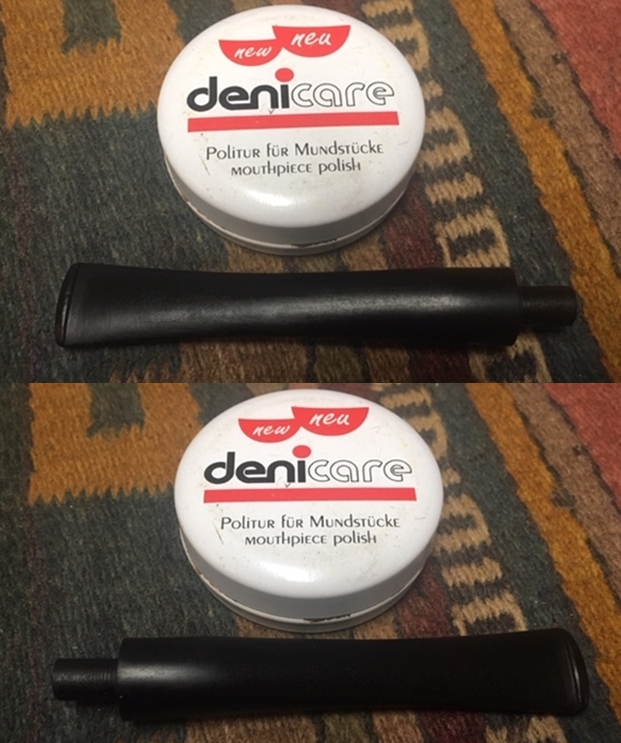
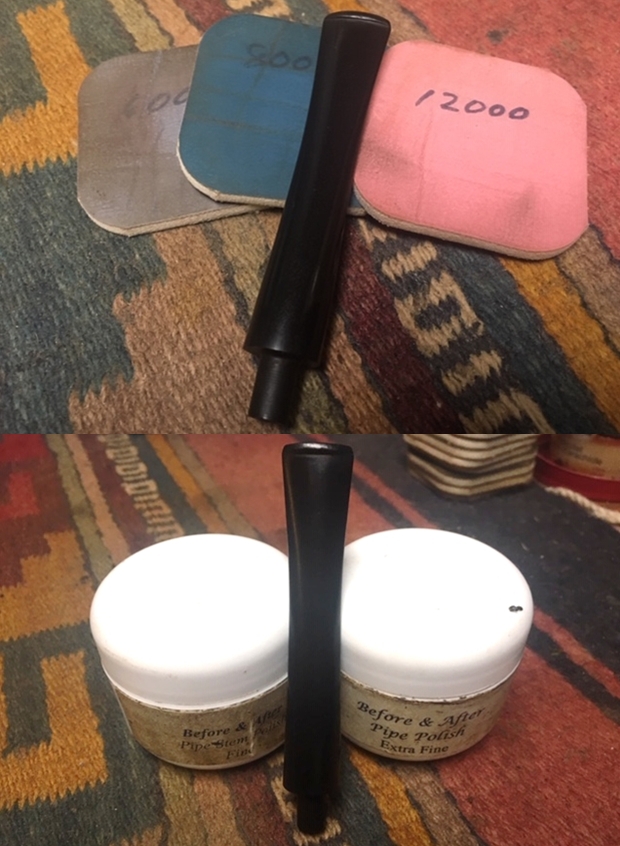
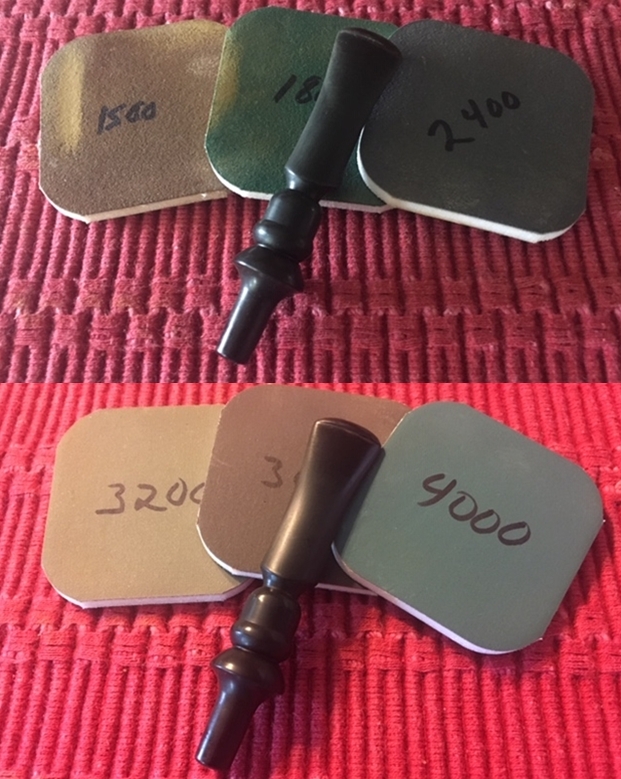
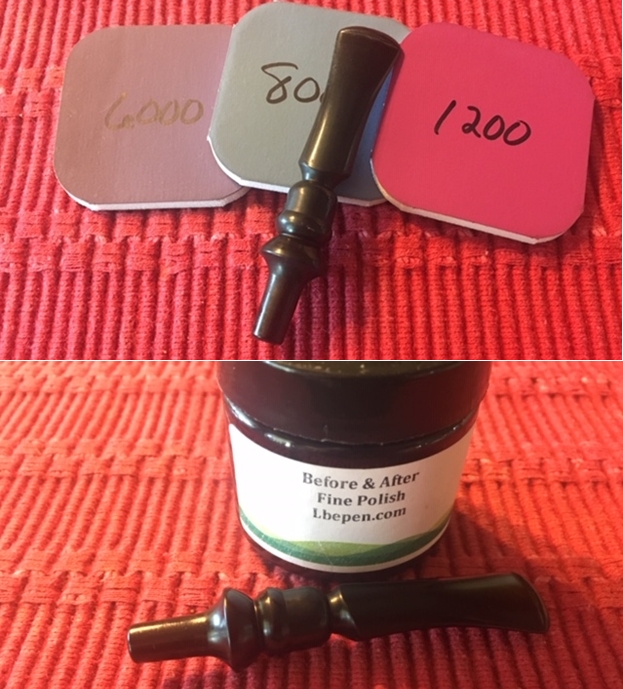
I cleaned the pipe stem with a new version of Mark Hoover’s Before & After Restoration Balm that he had designed to work well on both the briar bowls and the vulcanite stems. I rubbed it into the surface of the stem with my fingertips and buffed it off with a microfibre cloth. I polished the stem with microfibre pads – wetsanding with 1500-12000 grit pads. I wiped it off with Obsidian Oil after each sanding pad. After the 12000 grit pad I polished it with Before & After Fine Polish and gave it a final coat of Obsidian Oil. 
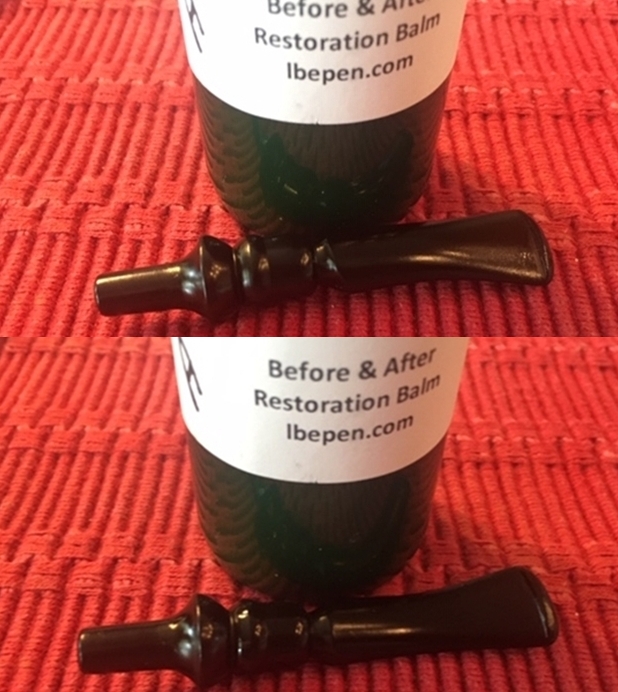
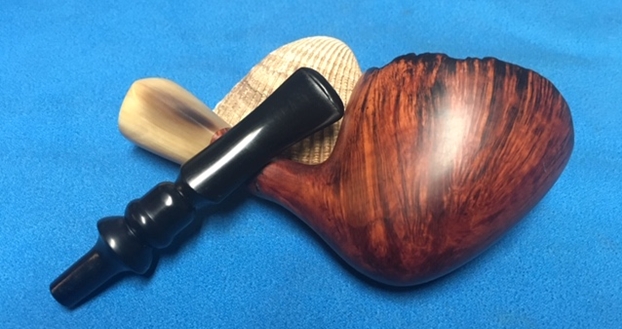
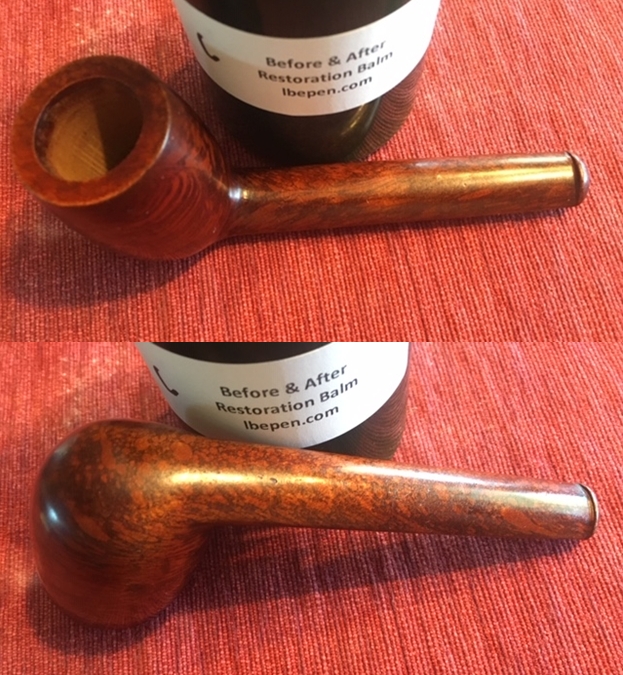
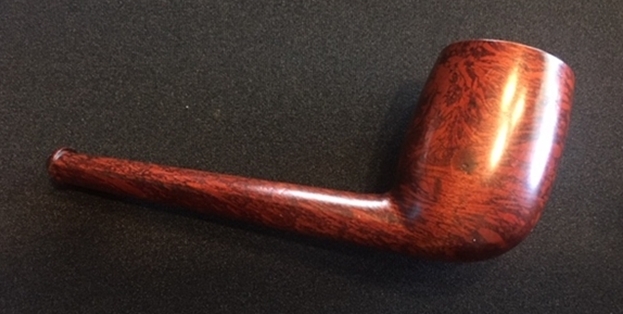
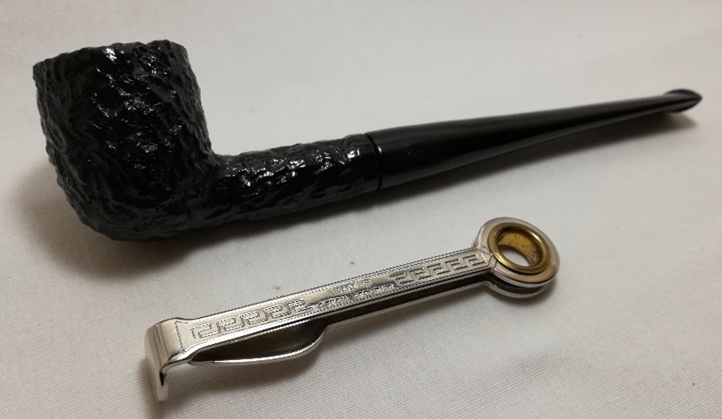
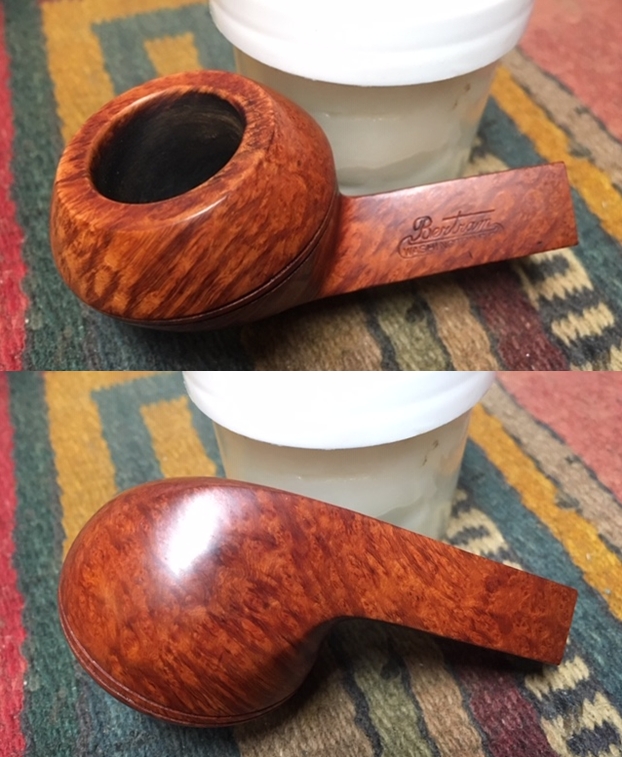
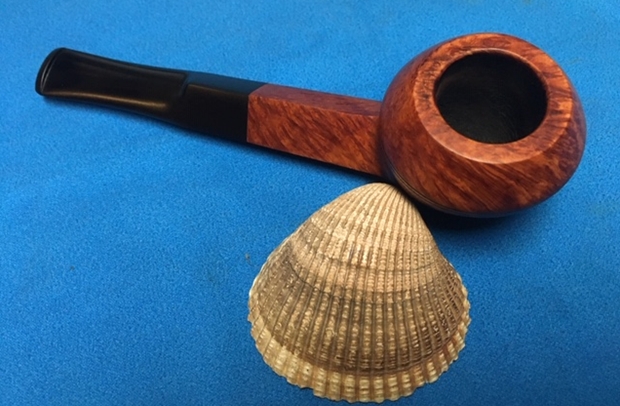
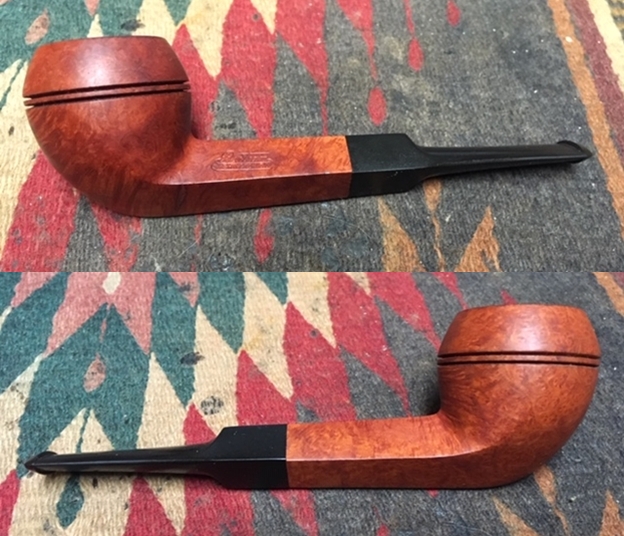
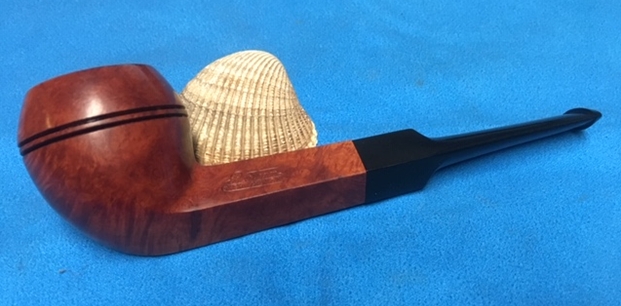
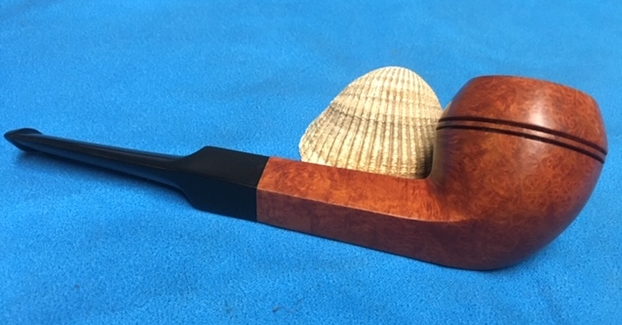
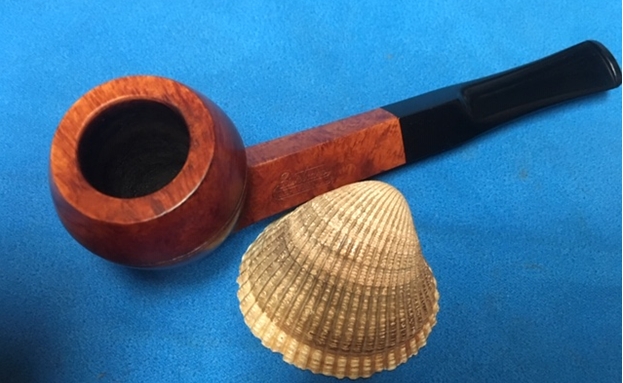
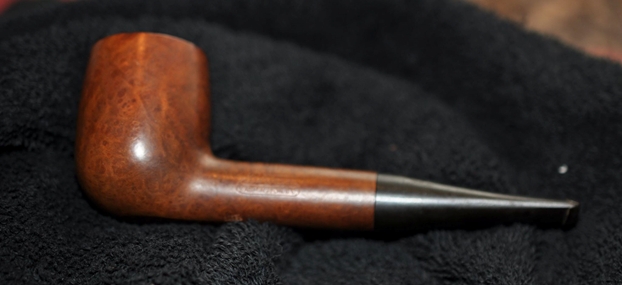
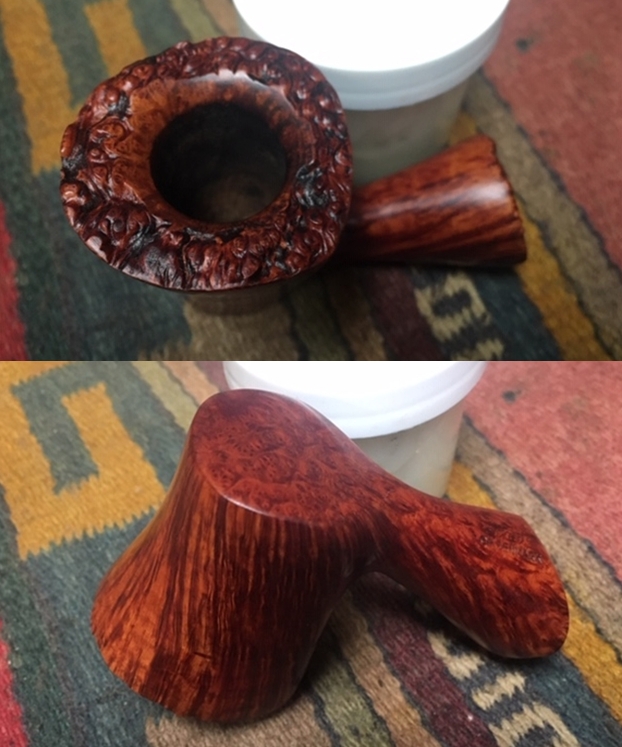
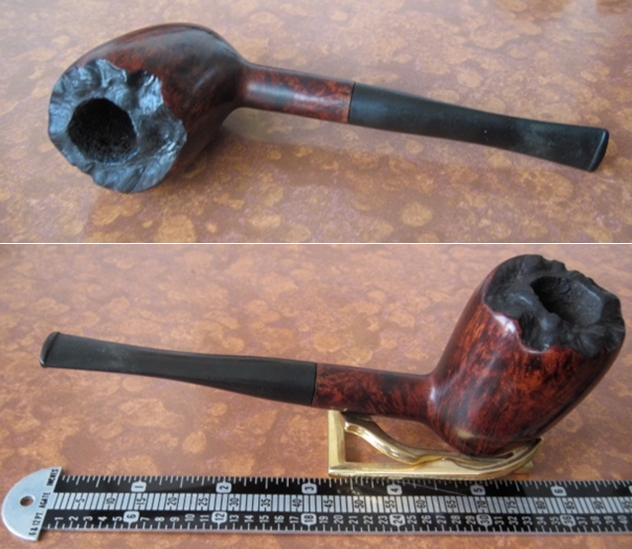
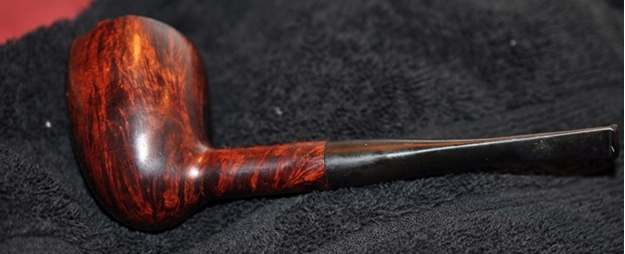
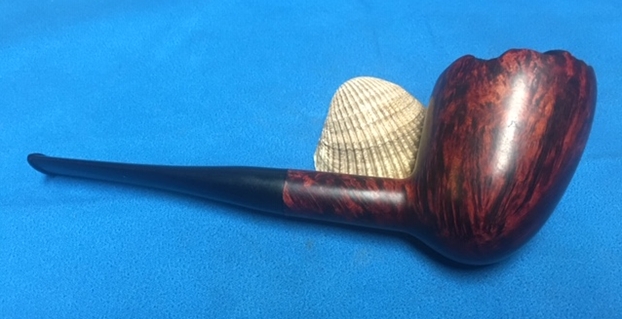
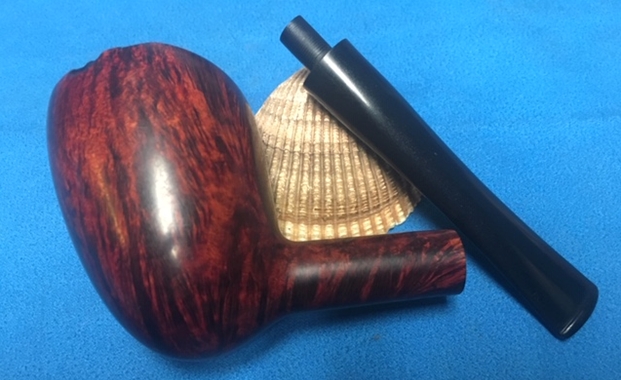
I put the stem back on the pipe and took the pipe to the buffer. I carefully buffed the bowl and stem with Blue Diamond to polish the briar and the vulcanite. I wanted to get a shine but not risk damaging the pipe by having it fly off the wheel. Blue Diamond does a great job on the smaller scratches that remain in both briar and vulcanite. I gave the bowl and the stem several coats of carnauba wax and buffed the pipe with a clean buffing pad to raise the shine. I hand buffed it with a microfiber cloth to deepen the shine. The pipe polished up really nicely with a great contrasting stain look to the briar. The finished pipe is shown in the photos below. This is a beautiful Eric Nording F Freehand – the fancy turned stem and the horn shank extension give the pipe a great look. The polished black vulcanite stem looks really good with the rich browns standing out in the grain and the blacks of the plateau rim. The dimensions of the pipe are Length: 7 inches, Height: 2 inches, Outside diameter of the bowl: 1 ½ inches wide and 2 inches long, Chamber diameter: 7/8 of an inch. This pipe is truly a rebornpipe. The shank repair and inside tube that binds it together should last a long time. Thanks for walking with me through the repair and the restoration of this beauty!

Rejuvenating an All Briar Oval Shank Billiard


Blog by Steve Laug

The next few blogs I am writing are about pipes that I worked on with Jeff on a recent visit to Idaho for my Father’s 91st birthday. The first of these was a pipe that came from one of the pipe lots Jeff picked up on his travels. It was a group of old, unsmoked pipes form the early 1900s. The pipe I am working on now is an all briar pipe with the stem part of the shank. It bears no stamping or identifying marks at all. The briar is quite nice with a mix of grain around the sides and shank. The rim top is perfect and there is no damage to the inner or outer edges of the bowl. The bowl itself was unsmoked and very clean. The finish was dirty and somewhat lifeless. There were dent marks mid bowl on the left side and nicks in the briar on the right. The briar bit was flawless with no tooth damage or marks. I took the following photos to show what pipe looked like before I started. It is a very striking little all briar pipe. I took some close up photos of the bowl top and the solid briar shank and stem combination. The rim top is perfect and smooth – a little dusty but otherwise clean. The shank/stem combination is flawless. There are some small nicks in the shank but otherwise the shank and stem are perfect.I received a package with some more Restoration Balm from Mark Hoover while I was in Idaho. He included a sample of a new product that he was experimenting with called Briar Cleaner. It is to be used prior to scrubbing (possibly instead of scrubbing) and to be followed up with the Balm. I decided to give it a try on the pipes I was working on with Jeff. I rubbed the Briar Cleaner into the bowl and shank with my finger tips and scrubbed it off with a cotton pad. It left behind some grit that I would need to deal with but otherwise lifted dirt and grime from the grain. I am still not sure if it a necessary extra step for me or not but I am working with it on the next few pipes. The photos below show the pipe after cleaning with the product. I wiped it down with a wet cotton cloth and prepped the briar for steaming out the dents on the left side of the bowl. I heated a steam iron and wetted a cotton cloth. I put the wet cloth on the dent in the side of the bowl. I put the hot iron on the wet cloth and the steamed the dents out of the briar. I repeated it until the steam had lifted the dents to the surface. Once I had steamed out the dents in the briar I polished the bowl with micromesh sanding pads. I had ordered several sets of them before I left Canada and had them shipped to Idaho to arrive while I was there. I wet sanded with 1500-12000 grit pads and wiped the bowl down with a damp cloth after each sanding pad. I rubbed some Before & After Restoration Balm into the one piece All Briar pipe. I worked it into the grain with my finger tips and let the bowl sit while the Balm did its work on the briar. Once it had been sitting for a few moments I buffed it off with a soft cotton cloth. The photos show the bowl after the Balm had worked. I finished the pipe by buffing it with a microfiber cloth to raise a shine in the briar. The briar came alive with the buffing and the grain just popped. The finished pipe is shown in the photos below. It is a petite pipe measuring 4 ½ inches in length, 2 inches in height. The outside diameter of the bowl is 1 ¼ inches and a chamber diameter of ¾ of an inch. The briar shows some cross grain, birdseye and flame grain around the bowl. It is a beautiful little All Briar Billiard that is going to be a fun pipe to break in and enjoy. Thanks for reading the blog. Keep an eye open for the next few blogs that follow showing the other pipes that I worked on while I was in Idaho. Enjoy.

Family Relic: My Great Grandfather’s Meer Pipe


Blog by Kumayl Rashid

Kumayl tells the story of how I met him and my invitation to him to write a blog on the pipe that he wanted to restore as a part of his heritage. I do not need to repeat any of that for the readers as he does a great job introducing the pipe and himself. I am glad to welcome him to the rebornpipes family with this first blog that he has written for us. Give it a read and you will get a sense of the man and his work. Welcome Kumayl. It is a pleasure to have you here. – SteveDifferent views of the pipe (post-restoration).

June 27, 2019:

Some background and an apology – It was July 2017 that I met Steve. He was kind enough to carve some time out of his day to educate me (in person!) on pipes and the art of restoration. I had recently come into the possession of my great grandfather’s pipe – a beautifully rusticated, black meerschaum. Steve kindly requested that I write a short piece about the pipe’s history and I gladly accepted. I did some research and put together a few paragraphs before work and school dominated my life. Well, two years have passed by way too quickly and needless to say, I didn’t submit that article. An apology to Steve for taking so long, but hopefully you appreciate this little bit of family and pipe history. As I already wrote a good chunk of the article two years ago, I kept any time references relative to July 2017. Note, this isn’t too much of a restoration article as it is a history lesson. Enjoy!

July 2017:

I only recently got into pipe smoking, collecting, and minor restoration and it didn’t take long before I learned that my great grandfather (paternal grandmother’s father or, father’s mother’s father) was also a pipe smoker. It came up in a conversation with my parents where my father was reminiscing memories of his grandfather. The whereabouts of any of his pipes, if they still existed, were unknown. The only logical step was to visit my great uncle – family historian, storyteller, and keeper of relics.

I went over to my great uncle’s place to inquire about the existence of any of my great grandfather’s pipes. Almost immediately upon asking, my great uncle lead me through his humble rancher to a bedside table. A small black pipe, in all its glory, lay there among assorted knick-knacks; set aside, but seemingly never completely forgotten. I held the pipe in my hands, lost for words. Knowing my great grandfather had held and smoked this very pipe was astounding to me. I hadn’t had the pleasure of meeting him but was always reminded of his mannerisms and life story. My great grandfather was Hassanali Nasser Virji – son of a merchant prince, heir to a business empire, businessman, first Mayor of Mwanza, pioneer, and an immigrant. Born in Bagamoyo (the then capital of German East Africa) on November 3, 1905, he spent the greatest portion of his life in Mwanza, later becoming the first mayor of the town in 1957. He immigrated to Vancouver, BC with his family in 1977. He passed away just three years later on December 29, 1980.(Left) My great grandfather wearing the mayoral collar, circa 1957. (Right) A headshot from later in life, date unknown.

Once my running mind had returned to the present, I continued to marvel at the pipe – its in-hand feel and rustication. As habit now has it, I inspected it for any possible markings or indication of manufacturer and origin. On the bottom of the shank was inscribed “GENUINE block meerschaum 14”. There was a faded inscribed logo on the side of the stem, which I gathered could represent an elephant. Perhaps the most astonishing thing about the several-decade-old pipe was its condition. Apart from some oxidation of the stem, it was perfect. The exterior of the meerschaum bowl still held a shine with no chips or cracks to be seen. The inside of the bowl was clearly used, but still smooth and free from any debris. It was clear that my great grandfather cared for this pipe meticulously. From a very particular man who often preached to his children things like “a place for everything and everything in its place”, this was no surprise.(Top) Inscription on the bottom of the shank. (Bottom) The pipe bowl in pristine condition.

The feeling of holding this family relic, that was seemingly frozen in time, was absolutely indescribable. After showing so much interest in the pipe, my great uncle passed the trust on to me. To this day, my great grandfather’s pipe is one of my most prized possessions.

After I was made the next steward of the pipe, I had to find out more about it. As soon as I got to a computer, I searched through some of the trusty reference sites that Steve had provided me – pipedia.org and pipephil.eu. A few clicks and I was able to postulate that the pipe was most likely a Kiko Countryman – this, based on some similarities of posted pictures, descriptions, and most notably the elephant logo. Kiko was a brand of Amboseli Pipes from the Tanganyika Meerschaum Corporation.

Tanganyika was the mainland part of modern-day Tanzania and was a colony of German East Africa from 1885-1916. In 1916, during World War 1, the territory was seized by the United Kingdom and placed under British rule. It wasn’t until December 9, 1961, that Tanganyika gained independence from the United Kingdom and was named Tanzania (later merging with Zanzibar to form the United Republic of Tanzania). It’s in this territory that the Tanganyika Meerschaum Corporation was formed in 1955 after a Kenyan businessman discovered a meerschaum mine close to Mount Kilimanjaro. This meerschaum deposit along with a few others were all in the Amboseli region at the foot of Mt. Kilimanjaro.

The meerschaum mined from this area is usually brown, black or yellow, is tougher, less porous, and considered to be of a lower quality compared to the Turkish variety. East African meerschaum was exported worldwide for use in the pipe industry. A subsidiary, Amboseli Pipes (also referred to in some sources as the Kilimanjaro Pipe Company Ltd.) produced several brands: Caveman, Countryman, Huntsman, Hillbilly, Kiko, Kilimanjaro, Kudu, Makonde, Merlin, Sportsman, Townsman, and others. Each sub-brand sharing or carrying unique animal logos (elephant, rhinoceros, bird, antelope to name a few).(Top) Faded elephant logo. (Bottom) A profile shot of the pipe used to compare with online sources.

After comparing pipe descriptions, pictures, and the logo found on my great grandfather’s pipe, I settled on the hypothesis that it was a Kiko Countryman (perhaps model #14, from the number found on the shank). Kiko literally means “pipe” in Swahili (Tanzania’s national language). The Tanganyika Meerschaum Corporation was eventually closed after an attempt to keep it running by a Belgium firm. East African meerschaum has been used in pipe manufacturing as recently as 2001 according to Pipedia. For more history and background, I highly recommend checking out Pipedia’s writeup at the following link: https://pipedia.org/wiki/Kiko.Some pictures of the pipe, pre-restoration. Note the slight oxidation (brown tint) on the mouth-end of the stem.

After completing my research, I picked up the pipe once again, now with a greater appreciation of its origins and perhaps rarity (though it remains priceless to me). It was a truly special piece as it was mined, manufactured, and likely purchased in my family’s native Tanzania. At this point, I was torn as to whether I wanted to touch the pipe at all considering its history, meaning, condition and how pristine it looked for its age. However, the stem was showing some age, so that’s where I decided to focus my restoration efforts.The disassembled pipe. This was my first encounter with a threaded tenon system.Close-up details of the buildup and oxidation on the tenon and stem, respectively.

As with previous stem restorations I’d done, I started with sanitization – some bristle pipe cleaners dipped in 91% alcohol did the trick. I ran the soaked pipe cleaners through the stem until one came out near white. I then cleaned the threaded tenon system with a medium bristle toothbrush and some more alcohol just to get rid of any debris and minor buildup. The next step was to clean the outside of the stem with cotton pads and yet more alcohol. This gets rid of any dirt adhered to the surface.The stem, post-sanitization. Oxidation still present.

It was then time to soak the stem in a solution of oxi-clean and warm water to loosen up the oxidation. After a 30-minute soak and one more pass through with a pipe cleaner, the stem was ready for sanding.(Left) The stem after an oxi-clean soak; uniform, matte black finish. (Right) Micro-Mesh sanding pads.

I turned to my trusty Micro-Mesh sanding pads. I worked through from a 1,500 to a 12,000-grit pad, sanding the stem while trying to avoid removing the elephant marking completely. Patiently working through all the pads ensures a deep shine that’ll last. A quick wipe/buff with a dab of oil (I had almond oil on hand) and a microfiber cloth and the stem was nearly finished.

At this point, I attempted to re-ink the elephant logo using some fine implements (toothpick and a sewing needle) and some white acrylic paint. Unfortunately, even though the logo was still visible, it’s far too shallow to re-ink given my very limited experience.The finished and re-assembled stem. The shallow elephant logo can still be made out.

That’s all there was to the restoration aspect of this pipe. I reassembled the pipe and gave it a quick wipe with a microfiber cloth. Finished pipe.

I still have mixed feelings about actually firing it up. Perhaps on my great grandfather’s birthday and/or death anniversary, I will honour his memory with a smoke (likely an English blend as he would’ve enjoyed) through this great little meer pipe. I’m currently looking into getting a display case for the pipe so that I can have it out for my family to view and enjoy. The pipe will stay with me from here on out and will be passed down along with my great grandfather’s autobiography for generations to come. Finished pipe.

Web Sources: pipedia.org, pipephil.eu, wikipedia.org

An Estate Experience: Uncovering A Superb Smoking Preben Holm


Blog by Norman Skiba

Where do I begin?  As a few of you know from recent posts here on Steve’s website, I am a huge Preben Holm fan.  I have had many of his in all shapes and forms as such.   Massive ones, larger ones and some that had an elegance to their medium to larger size.  Steve has two straight Preben’s that he has redone that are real beauts and I wish I had one of them – even though I am not a straight pipe kind of guy but more into the bents.  (Not a hint Steve, but a compliment to you and Preben.  See: https://rebornpipes.com/2016/09/05/restoring-a-pair-of-preben-holm-deluxe-walnut-pipes/.  Boy I like these pipes!!!)   Recently I found 2 rather conservative Preben pipes – one still in the Danish style and tradition and the 2nd was ultra-conservative for Preben.  Shorter and a smaller bowl with no plateau at all.  The first had no plateau on top and nice plateau at then end of the shank.  The larger pipe was so unique in my eyes that I bought it.  Smokes wonderfully.  I am very happy I bought it.  The ultra-conservative 2nd pipe I just received was one nightmare of an experience.  This one was unlike any other Preben I have ever seen in my life.  I wanted it and bought it.  So – – –

I get the pipe and am excited to see it in person.  I knew the specs, however there is nothing like having it ‘in hand’.  Shorter and smaller and lighter – as expected and looked nice.  This was from a major pipe retailer and this is where the nightmare begins as such.   I tried to remove the stem to clean it before lighting a bowl.  It was as though the stem was crazy glued to the shank.  I immediately called the seller and they kind of sing-songed their way around the issue.  Finally they said they would take it back but i had to pay for return shipping with insurance etc. Are you crazy?  You guys sent a pipe that has a serious issue and you won’t issue a call tag/return shipping tag.  Your expert ‘Estate’ department people never quality controlled the pipe.  That was the first thing they should have noticed.  This pipe never should have been sent out.  At least not without fixing it.  This had a saddle bit and with a fine shank and a stem that needed channel locks properly protected from the teeth was the only was to get it done, and even that was a nightmare.  I did not want to snap the stem or shank. I looked carefully prior to trying to remove it with a tool instead of the fingers/hands, and I see a semi-circle swirl that was twisted under the shank and along the thicker part of the stem where it meets the shank just above the tenon –  there were plier teeth marks on it and also major scratches from slipped pliers or whatever that the previous owner probably used to try to remove it.  That is why he sold it/dumped it off.  The ‘Estate’ team missed all of these marks and damages.  (Maybe they were the ones that did it and not the owner.)  You can see by now i am furious!!!  So I carefully and protectively removed the stem with 40,000 gray hairs more from this experience.   I did not want to snap anything. I got it off but it was impossible to get it back on without the aid of the channel locks.  So I decided the next morning to try a bowl or two to see how it smoked.  WOW!!! Easily from the first puff it was one of the top 3 pipes I have ever smoked!  No B.S. I did a 2nd bowl and Wow! the same thing.  So I decided to let it cool and then re-remove the stem and to try to sand the inside of the shank down to see if I could fix this myself.

I removed the stem ever so carefully with the channel locks and tried a rough paper-backed piece of wood sand paper rolled up just so it would fit tightly into the shank and twist.   I do not know the grit but the twisting soon ripped the piece and it broke off.  I tried this twice with another break off and pulling the pieces left in the shank out by the little bit left sticking out of the shank.  I then went to some metal oxide metal sandpaper with a cloth backing – super fine, and again do not know the grit number.  It took a few attempts to get the proper length rolled up to fit inside – just barely.  I twisted the sandpaper many times and tried the stem and it took a number of these attempts to see any progress, but it was very tough and the last quarter inch or more was still tight and frozen.  So I tried it some more.  I also used a number of newer pieces since they got a bit messed up in the twisting action.  I also did a push and pull (in and out action) of the rolled sandpaper instead of the twisting it in the shank.  The last bit I tried was to sand the stem which i did not want to do at all, but ended up maybe doing 5 rotations with the fine sandpaper and tried it and it worked.  Better to take off a little at a time than too much.  You cannot put it back as such.   I cleaned it and smoked a 3rd bowl and it was Heaven.  That night I took it apart – sans tools – and it seemed to work out nicely.

So I uncovered a super fine smoking Preben and also one extraordinarily unique Preben in the context of his ‘wild’ style.  The style is so unlike me that it is weird in a sense; but I like it.  The smoke is incredible.  The fix was stressful in regard to the potential for snappng of the stem or shank; but the fix was rather easy – just a bit tedious.  I was careful to not scratch the briar at all.  So how and why did the ‘Estate’ team drop the ball, let it go ‘out of house’, and sell it for the price they did and then ho-hum the serious issue.  In 50 years I have never had to remove a stem with anything other than my 2 hands.  That is absolutely insane.  It is past a mistake.  I will never buy another pipe from them no matter what Preben they may have.  This major faux pas just broke my trust in them.  And in old age – ‘tudes’ just don’t make it with me.  They never did. 

So – despite the frozen stem to shank dynamic, this Preben is a real winner. It is an upretentious little pipe, with subtle lines and shape possessing the ‘Power of the Smoke’. I cannot wait to try it again later in the week. One lovely little pipe. As John Coltrane would say: ‘A Love Supreme!’ (By the way did you know that Charlie Mingus smoked Balkan Sobranie No. 759 Black Label?) It makes one wonder what would Preben have done had he lived longer? Preben seems to have touched the briars with his Spirit. This is one element of what makes a Preben a Preben. His pipes are a magical connection to the past.

Restoring a Beautiful Bertram Tiger Grain Bulldog 40


Blog by Steve Laug

It you have not read the previous blogs I have posted on this brand give them a read to get some background on the pipes in this lot. If you have not been hit with a box I am sure you have a hard time understanding how overwhelming it feels to look at the 200+ pipes that need to be restored. It is mind boggling for sure – but there is only one way to move ahead – 1 pipe at a time. I could not do it without Jeff’s help doing the clean up on the lot. If I had to do it all by myself it would be more than I handle moving through this many pipes. From his cleaned pipes I get to choose what I want to work on. Doing the work this way we have already cleaned about 70 pipes and I have restored around 40 of them. We are getting there slowly but surely.

This time I chose another Bertram Bulldog to work on. It has a diamond shank and a diamond saddle vulcanite stem. It has grade 40 number stamped on the left underside of the shank. The briar has some really interesting grain – almost tiger grain. It is beautiful. The exterior of the bowl looked good. Unlike the previous Bulldog this one either has no fills or they are well place and hidden. The bowl had a thick cake in the chamber with shards of tobacco stuck to the walls. The rim top had some darkening all around the bowl and thick lava overflow on the back top. It was hard to know what the inner edge of the bowl edge of the bowl looked like until the cake and lava were gone. The stem had some oxidation and tooth marks and chatter near the button on both sides. Jeff took some photos of the pipe before he began his cleanup work on it. Jeff took close-up photos of the bowl and rim to capture the condition of the pipe when it arrived. The rim top had a thick coat of lava and the bowl had a thick cake. You can see from the photos why it was hard to tell the condition of the inner edge of the rim.The picture of the bowl sides and the heel give a clear picture of the grain around the heel and the sides of the bowl. The bowl looks very good – maybe a small fill on the bottom right side of the bowl but cleaning will tell for sure. I am looking forward to seeing what is under all of the grime. The grain looks very interesting in these pictures and should look amazing when cleaned and polished.The next photos capture the stamping on the left side of the shank. You can see the Bertram Washington, D.C. stamp on the upper left side of the diamond shank and the grade 40 stamp on the left underside of the shank.The next two photos show the stem surface. They show the calcification, oxidation and the chatter on both sides near the button. There are light tooth marks on the stem near the button. There is some wear on the button edge.With each of the blogs that I have written on the Bertrams that I have worked on I have included the following information. If you have read it in past blogs, you can skip over it. If you have not, I have included the link to Bertram history and information. I would recommend that if you don’t know much about them take some time to read the background. I include a link to the write up on Pipedia (http://pipedia.org/wiki/Bertram). Bertram pipes were based out of Washington DC. They were popular among famous politicians and celebrities of the time. They made many products for them from FDR’s cigarette holders to Joseph Stalin’s favorite pipe. They were considered some of the best America had to offer till they finally closed their doors in the 70s. Bertram graded their pipes by 10s and sometimes with a 5 added (15, 25, 55 etc.), the higher the grade the better. Above 60s are uncommon and 80-90s are quite rare. I have worked on one 120 Grade billiard. I have several blogs that I have written on rebornpipes that give some history and background to Bertram pipes. (https://rebornpipes.com/2015/06/16/an-easy-restoration-of-a-bertram-grade-60-217-poker/).

I have included the following link to give a bit of historical information on the pipe company. It is a well written article that gives a glimpse of the heart of the company. http://www.streetsofwashington.com/2012/01/bertrams-pipe-shop-on-14th-street.html#

From this information I learned that all of these Bertrams were made before the closure of the shop in the 1970s. This Bertram Bulldog is the first of this squat Bulldog style that I have worked on. This pipe has a grade 40 which I think is a reflection on the beautiful grain.

Jeff is methodical in his cleaning regimen and rarely varies the process. He reamed the bowl with a PipNet pipe reamer and followed up with a Savinelli Fitsall pipe knife to remove the cake. He scrubbed out the mortise and the airway in the shank and the stem with alcohol, cotton swabs and pipe cleaners. He scrubbed the exterior of the bowl, rim, shank and stem with a tooth brush and Murphy’s Oil Soap to remove the oils and tars on the rim and the grime on the finish of the bowl. He rinsed it under running water. He dried it off with a soft cloth. He was able to remove lava build up on the rim top and you could see the great condition of the beveled rim top and edges of the bowl. He soaked the stem in Before & After Deoxidizer to remove the oxidation. I took photos of the pipe before I started my work on it. I took a close up photo of the rim top to show the condition of the bowl and rim after Jeff had cleaned up the grime and lava. Without the lava the rim looked very good with some darkening at the rear. The inner edge was a little rough on the back edge; otherwise it was in great condition. The stem photos show that the light oxidation is gone. The stem is in excellent condition with some light tooth marks and chatter on both sides near the button.I took photos of the stamping to show how it looked after the cleanup. The Bertram Washington DC is clear and readable though a bit faded on the right side of the stamp. The Grade 40 stamp is deep and clear.I cleaned up the darkening on the rim and smoothed out the damage on the back inner edge with a folded piece of 220 grit sandpaper. I cleaned up the sanding marks with 400 grit wet dry sandpaper. The first photo shows the rim when I started. The second shows the clean up of the inner edge and the darkening on the rim top. The third photo shows the finished rim top. I polished the bowl and rim top with micromesh sanding pads – wetsanding it with 1500-12000 grit pads. I wiped the bowl down with a damp cloth after each pad to remove the sanding debris. The grain began to stand out. After the final sanding pad I hand buffed it with a cotton cloth to raise a shine. I worked some Before & After Restoration Balm into the finish of the briar with my fingertips to clean, enliven and protect it. I let the balm sit for a little while and then buffed with a cotton cloth to raise the shine. The Restoration Balm really makes the grain stands out beautifully. The rich tiger grain really pops on this beauty! If you have not tried some why not give it a try. I sanded out the small tooth marks and chatter next to the button on both sides of the stem with a folded piece of 220 grit sandpaper. I sanded the stem with 400 grit wet dry sandpaper to remove the scratches. I polished it with Denicare Mouthpiece Polish to scrub out the scratches. I wiped it down with some Obsidian Oil and set it aside to dry. I polished out the sanding scratches with micromesh sanding pads – wetsanding it with 1500-12000 grit pads. I wiped the stem down with Obsidian Oil after each pad. I polished it with Before & After Pipe Polish – both Fine and Extra Fine and gave it a final coat and set it aside to dry. Jeff and I are gradually working through this 200+ lot dealing with each of the challenges they present one at a time. This one is Bertram’s take on a classic diamond shank straight Bulldog shape. It has probably the most stunning grain of any of the Bertrams I have worked on. I would call it a tiger grain. I put the stem and bowl back together and buffed the pipe with Blue Diamond on the buffing wheel. I polished the briar and the minute scratches still in the vulcanite of the stem until there was a rich shine. For a Bertram Grade 40 this pipe is quite stunning. I cannot find any sign of visible fills. It has a saddle stem on a diamond shank. The finish really has some interesting grain on a proportionally well carved pipe. Once I buffed the pipe the briar came alive and the swirling tiger grain popped with polishing. The black vulcanite stem had a rich glow. The finished pipe is well shaped Bulldog. This is another Bertram that feels great in the hand sits right in the mouth. Have a look at the finished pipe in the photos below. The dimensions are Length: 5 3/4 inches, Height: 1 1/2 inches, Outside diameter of the bowl: 1 1/2 inches, Chamber diameter: 3/4 of an inch. This is one that will stay with me for a while. The grain is captivating. Thanks for walking through the restoration with me as it was a pleasure to work on.

What Is It About A Preben?


Blog by Norman Skiba

For 50 years now I have been enjoying and observing that there is something special and magical about Preben Holm pipes. I have always loved his pipes.  Looking back, I can say that I have owned more Preben Holm pipes than any other pipe maker – period.  Overall, they are unique; some wild and some are quite tame and reserved, by his standards.

To me – there is something that I have struggled, and still fail, to describe regarding the overall smoking experience of a Preben Holm pipe.  I have mostly had fine to superb smoking Preben’s, and I have had a few that were ok, and also a few rare ones that just had issues: predominantly a bad gurgling.  Yet even the few bad or not-so-good ones all had this Quality and taste and smoking experience across the board with the best of them.  There is a consistency there that I struggle to explain.  This character/taste/sensory experience that makes it a Preben.  After a week of straight meerschaum smoking I had a bowl this morning in a Preben and it was marvelous.  I look forward to another bowl out of the Preben tomorrow before I head out to the top vineyard to get my nets on.  (I did the side vineyard after the bowl this morning.)  So, again, these experiences make me wonder and question just what it is that makes the Preben’s so unique?  What is it about the nature of the briar he uses that are so different and special unlike any other pipe maker.   And no, I am not just talking about Danish pipe makers.  I mean all others that I have ever smoked or owned.  There is something about his pipes that make me still love the pipe and pipe smoking (with my favorite tobacco as a partner in all of this), and briar.  After all of these years I still cannot put my finger on that special dynamic.  Yet I am in awe when I light up one of his pipes.  They are not only beautiful in so many ways; but they smoke so sweetly and with a subtlety to them.  So, what is it about a Preben?

Restoring a Beautiful Bertram Long Shank Bulldog 20


Blog by Steve Laug

It you have not read the previous blogs I have posted on this brand give them a read to get some background on the pipes in this lot. If you have not been hit with a box I am sure you have a hard time understanding how overwhelming it feels to look at the 200+ pipes that need to be restored. It is mind boggling for sure – but there is only one way to move ahead – 1 pipe at a time. I could not do it without Jeff’s help doing the clean up on the lot. If I had to do it all by myself it would be more than I handle moving through this many pipes. From his cleaned pipes I get to choose what I want to work on. Doing the work this way we have already cleaned about 70 pipes and I have restored around 38 of them. We are getting there slowly but surely.

This time I chose a Bertram Bulldog to work on. It has a long, diamond shank and a diamond saddle vulcanite stem. It has grade 20 number stamped on the left underside of the shank. The briar has a mix of grains – straight, flame and birdseye. The exterior of the bowl looked really good. There was on large fill on the left underside of the shank near the bowl/shank junction that was chipped and rough. The bowl had cake in the chamber and the rim top had some darkening and lava overflow. It was hard to know what the inner edge of the bowl edge of the bowl looked like until the cake and lava were gone. The stem had some oxidation and tooth marks and chatter near the button on both sides. Jeff took some photos of the pipe before he began his cleanup Jeff took close-up photos of the bowl and rim to capture the condition of the pipe when it arrived. The rim top had a thick coat of lava and the bowl had a thick cake. You can see from the photos why it was hard to tell the condition of the inner edge of the rim.The pictures of the bowl sides and the heel give a clear picture of the grain around the heel and the sides of the bowl. Other than the one obvious large fill the bowl looks very good. I am looking forward to seeing what is under all of the grime. The large fill /flaw is visible in the second photo below. I have circled it in red so it easy to identify. The next photos capture the stamping on the left side of the shank. You can see the Bertram Washington, D.C. stamp on the upper left side of the diamond shank and the grade 20 stamp on the left underside of the shank. The photo below captures the nature of the flaw and damaged fill that I had noted above with the red circle. It is on the left underside of the diamond shank.The next two photos show the stem surface. They show the calcification, oxidation and the chatter on both sides near the button. There are light tooth marks on the stem near the button. There is some wear on the button edge.

With each of the blogs that I have written on the Bertrams that I have worked on I have included the following information. If you have read it in past blogs, you can skip over it. If you have not, I have included the link to Bertram history and information. I would recommend that if you don’t know much about them take some time to read the background. I include a link to the write up on Pipedia (http://pipedia.org/wiki/Bertram). Bertram pipes were based out of Washington DC. They were popular among famous politicians and celebrities of the time. They made many products for them from FDR’s cigarette holders to Joseph Stalin’s favorite pipe. They were considered some of the best America had to offer till they finally closed their doors in the 70s. Bertram graded their pipes by 10s and sometimes with a 5 added (15, 25, 55 etc.), the higher the grade the better. Above 60s are uncommon and 80-90s are quite rare. I have worked on one 120 Grade billiard. I have several blogs that I have written on rebornpipes that give some history and background to Bertram pipes. (https://rebornpipes.com/2015/06/16/an-easy-restoration-of-a-bertram-grade-60-217-poker/).

I have included the following link to give a bit of historical information on the pipe company. It is a well written article that gives a glimpse of the heart of the company. http://www.streetsofwashington.com/2012/01/bertrams-pipe-shop-on-14th-street.html#

From this information I learned that all of these Bertrams were made before the closure of the shop in the 1970s. This Bertram Bulldog with a long shank is the first of this style that I have worked on. This pipe has a grade 20 which I am sure takes into account the large fill that is present on the shank.

Jeff is methodical in his cleaning regimen and rarely varies the process. He reamed the bowl with a PipNet pipe reamer and followed up with a Savinelli Fitsall pipe knife to remove the cake. He scrubbed out the mortise and the airway in the shank and the stem with alcohol, cotton swabs and pipe cleaners. He scrubbed the exterior of the bowl, rim, shank and stem with a tooth brush and Murphy’s Oil Soap to remove the oils and tars on the rim and the grime on the finish of the bowl. He rinsed it under running water. He dried it off with a soft cloth. He was able to remove lava build up on the rim top and you could see the great condition of the beveled rim top and edges of the bowl. He soaked the stem in Before & After Deoxidizer to remove the oxidation. I took photos of the pipe before I started my work on it. I took a close up photo of the rim top to show the condition of the bowl and rim after Jeff had cleaned up the grime and lava. Without the lava the inward bevel on the rim looked very good with slight darkening at the rear. The inner edge was in great condition. The stem photos show that the light oxidation is gone. The stem is in excellent condition with some light tooth marks and chatter on both sides near the button.I took photos of the stamping to show how it looked after the cleanup. The Bertram Washington, DC is clear and readable as is the Grade stamp 20.The damaged fill/flaw on the underside of the diamond shank was the only significant issue with the pipe. I wiped it down with alcohol on a cotton swab then filled it in with clear super glue. Once the repair had cured I sanded it smooth with 220 grit sandpaper and with 400 grit wet dry sandpaper. It is fascinating to see that the fill or flaw follows the pattern of the grain perfectly and once it was sanded it blended in well with the grain on that portion of the bowl. I cleaned up the darkening on the rim and smoothed out the damage on the back inner edge with a folded piece of 220 grit sandpaper. I cleaned up the sanding marks with 400 grit wet dry sandpaper.I polished the bowl and rim top with micromesh sanding pads – wetsanding it with 1500-12000 grit pads. I wiped the bowl down with a damp cloth after each pad to remove the sanding debris. The grain began to stand out. After the final sanding pad I hand buffed it with a cotton cloth to raise a shine. I worked some Before & After Restoration Balm into the finish of the briar with my fingertips to clean, enliven and protect it. I let the balm sit for a little while and then buffed with a cotton cloth to raise the shine. The Restoration Balm really makes the grain stands out beautifully. If you have not tried some why not give it a try. I sanded out the small tooth marks and chatter next to the button on both sides of the stem with a folded piece of 220 grit sandpaper. I sanded the stem with 400 grit wet dry sandpaper to remove the scratches. I polished it with Denicare Mouthpiece Polish to scrub out the scratches. I wiped it down with some Obsidian Oil and set it aside to dry. I polished out the sanding scratches with micromesh sanding pads – wetsanding it with 1500-12000 grit pads. I wiped the stem down with Obsidian Oil after each pad. I polished it with Before & After Pipe Polish – both Fine and Extra Fine and gave it a final coat and set it aside to dry. Jeff and I are gradually working through this 200+ lot dealing with each of the challenges they present one at a time. This one is Bertram’s take on a classic long shank straight Bulldog shape. I put the stem and bowl back together and buffed the pipe with Blue Diamond on the buffing wheel. I polished the briar and the minute scratches still in the vulcanite of the stem until there was a rich shine. For a Bertram Grade 20 this pipe is quite stunning. I cannot find any sign of visible fills. The grain is sporadic but pretty. It has a saddle stem on a diamond shank. The finish really has some interesting grain on a proportionally well carved pipe. Once I buffed the pipe the briar came alive and the mixture of grain popped with polishing. The black vulcanite stem had a rich glow. The finished pipe is well shaped long shank Bulldog. This Bertram feels great in the hand sits right in the mouth. Have a look at the finished pipe in the photos below. The dimensions are Length: 6 inches, Height: 2 inches, Outside diameter of the bowl: 1 1/2 inches, Chamber diameter: 3/4 of an inch. Maybe this shape speaks to you and you want to add it to your collection. If you are interested let me know as I will be adding it to the store soon. Thanks for walking through the restoration with me as it was a pleasure to work on.

Restoring a Beautiful Bertram Lumberman 50/25 from the Bertram Lot


Blog by Steve Laug

It you have not read the previous blogs I have posted on this brand give them a read to get some background on the pipes in this lot. If you have not been hit with a box I am sure you have a hard time understanding how overwhelming it feels to look at the 200+ pipes that need to be restored. It is mind boggling for sure – but there is only one way to move ahead – 1 pipe at a time. I could not do it without Jeff’s help doing the clean up on the lot. If I had to do it all by myself it would be more than I handle moving through this many pipes. From his cleaned pipes I get to choose what I want to work on. Doing the work this way we have already cleaned about 70 pipes and I have restored around 38 of them. We are getting there slowly but surely.

This time I chose a Bertram Lumberman to work on. It has a short, round shank and a tapered vulcanite stem. It has grade 50 number stamped on the left side of the shank and crossed out with a 25 stamped over the top. That too has been crossed out and there is a Grade 25 stamped below it on the underside of the shank. The briar has a mix of grains – straight, flame and birdseye. The exterior of the bowl looked really good. The bowl had cake in the chamber and the rim top had some darkening and lava overflow. It was hard to know what the inner edge of the bowl edge of the bowl looked like until the cake and lava were gone. The stem had some oxidation and tooth marks and chatter near the button on both sides. Jeff took some photos of the pipe before he began his cleanup work on it. Jeff took close-up photos of the bowl and rim to capture the condition of the pipe when it arrived. The rim top had a thick coat of lava and the bowl had a thick cake. You can see from the photos why it was hard to tell the condition of the inner edge of the rim.The pictures of the bowl sides and the heel give a clear picture of the grain around the heel and the sides of the bowl. It was hard to see any fills in the briar. I am not sure why it is restamped with a 25. I am looking forward to seeing what is under all of the grime.The next photos capture the stamping on the left side of the shank. You can see the overstamped grade 50 and 25 over the top on the left side of the shank. You can see that is also crossed out. The second photo shows another 25 stamped below it on the underside of the shank. The next two photos show the stem surface. They show the calcification, oxidation and the chatter on both sides near the button. There are light tooth marks on the stem near the button. There is some wear on the button edge.With each of the blogs that I have written on the Bertrams that I have worked on I have included the following information. If you have read it in past blogs, you can skip over it. If you have not, I have included the link to Bertram history and information. I would recommend that if you don’t know much about them take some time to read the background. I include a link to the write up on Pipedia (http://pipedia.org/wiki/Bertram). Bertram pipes were based out of Washington DC. They were popular among famous politicians and celebrities of the time. They made many products for them from FDR’s cigarette holders to Joseph Stalin’s favorite pipe. They were considered some of the best America had to offer till they finally closed their doors in the 70s. Bertram graded their pipes by 10s and sometimes with a 5 added (15, 25, 55 etc.), the higher the grade the better. Above 60s are uncommon and 80-90s are quite rare. I have since worked on a 120 Grade billiard. I have several blogs that I have written on rebornpipes that give some history and background to Bertram pipes. (https://rebornpipes.com/2015/06/16/an-easy-restoration-of-a-bertram-grade-60-217-poker/).

I have included the following link to give a bit of historical information on the pipe company. It is a well written article that gives a glimpse of the heart of the company. http://www.streetsofwashington.com/2012/01/bertrams-pipe-shop-on-14th-street.html#

From this information I learned that all of these Bertrams were made before the closure of the shop in the 1970s. This Bertram Lumberman is another one of the several that I have worked on from the collection. Here is a link to the blog on another Lumberman I restored. It has a longer shank but is also the same shape (https://rebornpipes.com/2019/06/14/a-bertram-50s-lumberman-pipe-from-the-bertram-lot/). This pipe has a crossed out grade 50 and is marked with a 25 grade stamp. Looking at the grain, I am not sure how Bertram arrived at the quality stamp on this pipe.

Jeff is methodical in his cleaning regimen and rarely varies the process. He reamed the bowl with a PipNet pipe reamer and followed up with a Savinelli Fitsall pipe knife to remove the cake. He scrubbed out the mortise and the airway in the shank and the stem with alcohol, cotton swabs and pipe cleaners. He scrubbed the exterior of the bowl, rim, shank and stem with a tooth brush and Murphy’s Oil Soap to remove the oils and tars on the rim and the grime on the finish of the bowl. He rinsed it under running water. He dried it off with a soft cloth. He was able to remove lava build up on the rim top and you could see the great condition of the beveled rim top and edges of the bowl. He soaked the stem in Before & After Deoxidizer to remove the oxidation. I took photos of the pipe before I started my work on it. I took a close up photo of the rim top to show the condition of the bowl and rim after Jeff had cleaned up the grime and lava. Without the lava the inward bevel on the rim looked very good with slight darkening at the rear. The inner edge was in great condition. The stem photos show that the light oxidation is gone. The stem is in excellent condition with some light tooth marks and chatter on both sides near the button.I took photos of the stamping to show how it looked after the cleanup. The Bertram Washington DC is clear and readable as is the overstamped 50/25. The second photo shows the grade 25 stamp on the underside of the shank.I cleaned up the darkening on the rim with a folded piece of 220 grit sandpaper. I cleaned up the sanding marks with 400 grit wet dry sandpaper.I polished the bowl and rim top with micromesh sanding pads – wetsanding it with 1500-12000 grit pads. I wiped the bowl down with a damp cloth after each pad to remove the sanding debris. The grain began to stand out. After the final sanding pad I hand buffed it with a cotton cloth to raise a shine. I worked some Before & After Restoration Balm into the finish of the briar with my fingertips to clean, enliven and protect it. I let the balm sit for a little while and then buffed with a cotton cloth to raise the shine. The Restoration Balm really makes the grain stands out beautifully. If you have not tried some why not give it a try. I sanded out the small tooth marks and chatter next to the button on both sides of the stem with a folded piece of 220 grit sandpaper. I sanded the stem with 400 grit wet dry sandpaper to remove the scratches. I wiped it down with some Obsidian Oil and set it aside to dry. I polished out the sanding scratches with micromesh sanding pads – wetsanding it with 1500-12000 grit pads. I wiped the stem down with Obsidian Oil after each pad. I polished it with Before & After Pipe Polish – both Fine and Extra Fine and gave it a final coat and set it aside to dry. Jeff and I are gradually working through this 200+ lot dealing with each of the challenges they present one at a time. This one is Bertram’s take on a classic Lumberman shape. I put the stem and bowl back together and buffed the pipe with Blue Diamond on the buffing wheel. I polished the briar and the minute scratches still in the vulcanite of the stem until there was a rich shine. For a Bertram Grade 25 this pipe is quite stunning. I cannot find any sign of visible fills. The grain is sporadic but pretty. It has a tapered stem on a thick shank. The finish really has some interesting grain on a proportionally well carved pipe. Once I buffed the pipe the briar came alive and the mixture of grain popped with polishing. The black vulcanite stem had a rich glow. The finished pipe is well shaped short shank Lumberman. This Bertram feels great in the hand sits right in the mouth. Have a look at the finished pipe in the photos below. The dimensions are Length: 5 inches, Height: 1 3/4 inches, Outside diameter of the bowl: 1 ¼ inches, Chamber diameter: 3/4 of an inch. Maybe this shape speaks to you and you want to add it to your collection. If you are interested let me know as I will be adding it to the store soon. Thanks for walking through the restoration with me as it was a pleasure to work on.

Breathing Life into a Knute of Denmark Freehand


Blog by Steve Laug

I chose the next pipe to work on from some that Jeff and I recently purchased from a guy in Illinois. There were some nice pipes in the assortment from a variety of ranges. The pipe on my worktable comes from that collection. This one is a beautifully grained Knute Freehand with a turned vulcanite stem. The rim top and shank end are plateau and have been selectively darkened in the grooves and valleys. The shape follows the grain of the block of briar very well. It is stamped on the underside of the shank Knute of Denmark. There is no other stamping on the pipe. The pipe is shaped to sit nicely on a desk or table top. The stem is stamped with a Crown over the letter K on the top. The pipe was very dirty with a thick cake in the bowl and some lava overflowing on to the plateau rim top. It was hard to know what the inner edge of the rim looked like because of the lava and cake. Other than being dirty the finish appeared to be in good condition. The stem was oxidized and had come calcification where a pipe Softee bit had been. There was some tooth chatter and marks on both sides of the stem at the button. Jeff took photos of the pipe before he started working on it so I could see what he was dealing with. He took photos of the rim top to show the thick cake in the bowl and the overflow of lava. The cake is thick and hard and the lava overflows into the plateau. The bowl is a real mess but it must have been a great smoking pipe. He also took a photo of the dusty plateau at the shank end. The next photos show the sides and heel of the bowl to give a clear picture of the beauty of the grain around the bowl of the pipe. Under the grime there is some great grain peeking through. Jeff took a photo of the stamping to capture the clarity of it even under the grime. The stamping reads Knute in script over of Denmark running horizontally along the underside of the shank.The stem looked dirty and oxidized with the calcification left behind by a pipe Softee bit. The bite marks and tooth chatter on the stem was light and should not take too much work to remedy. The Crown over K logo looked good at this point. Hopefully the cleanup will preserve it well. Before I started my work on the pipe I wanted to remind myself of the provenance of the pipe. I remembered that it was linked to Karl Erik as the earlier pipe I worked on was. I wanted to know where this pipe fit into the Karl Erik lines so I turned to the first of two sites that I always check to gather information on a brand. I turned first to Pipedia (https://pipedia.org/wiki/Karl_Erik). There it is clearly identified and linked to Karl Erik Ottendahl. It is designated as a second and frequently having rustication. For some reason this beauty does not have any rustication and it is a great piece of briar.

I turned to the second information site – Pipephil’s (http://www.pipephil.eu/logos/en/logo-k3.html) got a quick overview on the brand once again connecting it to Karl Erik.Pipedia also had this great picture of Karl Erik Ottendahl and I decided to include it here as a reminder of the artisan who first carved and released this pipe. Reminded of the tie to Karl Erik I knew a bit about the pipe at hand. I turned to address the pipe itself. Jeff cleaned up the pipe for me. He reamed the bowl with a PipNet pipe reamer and cleaned it up with a Savinelli Fitsall Pipe Knife. He scrubbed the exterior with Murphy’s Oil Soap and a tooth brush to clean off the grime off the finish and the heavy overflow of lava on the rim top. The cleaning had removed some of the black stain on the rim top. He cleaned up the internals of the shank, mortise and stem with pipe cleaners, cotton swabs and alcohol to remove all of the oils and tars in the pipe. He soaked the stem in Before & After Deoxidizer and was able to remove much of the oxidation. When it arrived here in Vancouver it was a clean pipe and I knew what I had to work with. I took photos of it before I started my part of the restoration. I took photos of the rim top and the stem to show their condition once it arrived in Canada. Jeff was able to clean up the incredibly thick cake and lava overflow that was shown in the rim and bowl photos above. The plateau and the inner bevel to the rim look really amazing. He was also able to get rid of the grime and grit in the surface of the briar. The rim top and edges looked very good. The stem looked very good and was much cleaner. There was light tooth marks and chatter on both sides near the button. The white paint in the stamping had been removed by the soak and cleaning but the stamp was still good so I could repaint it.I have noticed on some repairs that folks don’t pay much attention to the stamping when they are restoring a pipe. To me this is a critical part of the restoration to leave undamaged as it is the only link we have to who made the pipe. I took a photo of the stamping on the underside of the shank to show that it was very readable and undamaged by the cleanup work.There was a small cut in the briar on the right side of the bowl mid bowl that I would take care of first. I filled in the cut with a small drop of super glue. Once it cured I sanded it out with a worn piece of 220 grit sandpaper and polished the scratches left behind with 400 grit wet dry sandpaper.I started polishing the briar with micromesh sanding pads. I wet sanded it with 1500-12000 grit pads. I wiped the bowl down after each pad with a damp cloth. The bowl began to take on a rich shine and grain was beginning to stand out. I wet sanded with all of the pads and wiped the bowl down after each pad with a soft cloth. I rubbed the bowl and shank down with Before & After Restoration Balm to deep clean the finish on the bowl and shank. The product works to clean, enliven and protect the briar. I worked it in with my fingers to get it into the briar. I used a horsehair shoe brush to work it into the plateau top and shank end.  After it sat for a little while I wiped it off and buffed it with a soft cloth. The briar really began to have a rich shine. I took some photos of the bowl at this point to mark the progress in the restoration. It is a beautiful bowl. I set the bowl aside and worked on the stem at this point in the process. I sanded tooth chatter and the remaining oxidation on the stem with folded pieces of 220 to remove the marks and the light brown colouration on the stem surface. I sanded them with 400 grit sandpaper until the marks were gone and the oxidation was gone. I wiped it down with Obsidian Oil. I rubbed the stem down with Denicare Mouthpiece Polish and a cotton pad to remove remnants of oxidation and to further blend in the sanding. The stem was showing some promise at this point in the process. I used a liquid paper to touch up the stamping on the top side of the fancy saddle stem. I rubbed it into the stamp and set it aside to dry. I polished off the excess white product and left the remainder in the stamp itself.I polished the stem with micromesh sanding pads – wet sanding with 1500-2400 grit pads and dry sanding with 3200-12000 grit pads. I wiped the stem down after each pad with a damp cloth to remove the sanding dust. I used the Before & After Pipe Polish to remove the small minute scratches left in the vulcanite even after the micromesh regimen. I finished by wiping the stem down with a final coat of Obsidian Oil and set it aside to dry. I put the stem back on the pipe and took the pipe to the buffer. I buffed the bowl and stem with Blue Diamond to polish the briar and the vulcanite. Blue Diamond does a great job on the smaller scratches that remain in both. I gave the bowl and the stem several coats of carnauba wax and buffed the pipe with a clean buffing pad to raise the shine. I hand buffed it with a microfiber cloth to deepen the shine. The pipe polished up really nicely with a great contrasting stain look to the briar. The finished pipe is shown in the photos below. This is a beautiful Karl Eric Freehand – the fancy turned stem and plateau shank end give the pipe a great look. The polished black vulcanite stem looks really good with the rich browns standing out in the grain. The dimensions of the pipe are Length: 6 1/2 inches, Height: 2 inches, Outside diameter of the bowl: 1 3/4 inches, Chamber diameter: 3/4 of an inch. This is another pipe that I will be putting it on the rebornpipes online store shortly, if you are interested in adding it to your collection. Thanks for walking through the restoration with me on this beauty!

Rejuvenating a Nording Danmark F Freehand


Blog by Steve Laug

It was time to turn back to one of the pipes that Jeff and I recently purchased. We bought some pipes from a guy in Pennsylvania. There were some nice pipes in the assortment from a variety of ranges. The next pipe on my worktable comes from that collection. This one is a straight, thin shank Freehand with a quality vulcanite stem. The rim top is plateau and is stained black. The shape follows the grain of the block of briar very well. It is stamped on the underside of the shank F over NORDING over DANMARK near the stem shank union. There is no other stamping on the pipe. The stem does not have the expected Nording N anywhere on the sides or top. The pipe was very dirty with a thick cake in the bowl and some lava overflowing on to the plateau rim top. It was hard to know what the inner edge of the rim looked like because of the lava and cake. Other than being dirty the finish appeared to be in good condition. The stem was lightly oxidized and had come calcification where a pipe Softee bit had been. There was some light tooth chatter and tooth marks on both sides of the stem at the button. I have included the photos that the seller sent to me – the entire pipe and also of the stamping. I am including them to give an idea of what Jeff and I saw when we were deciding to purchase the pipe. We had the pipe lot shipped to Jeff in Idaho so he could do the cleanup on them for me. He took photos of the pipe before he started working on it so I could see what he was dealing with. I am including those now. He took a photo of the rim top to show the thick cake in the bowl and the overflow of lava. The cake is thick and hard and the lava overflow is in the plateau. The bowl is a real mess but it must have been a great smoking pipe.The next photos show the sides and heel of the bowl to give a clear picture of the beauty of the grain around the bowl of the pipe. Under the grime there is some great grain peeking through. Jeff took photos of the stamping to capture the clarity of it even under the grime. The stamping is faint but readable. Holding the pipe stem down the stamping is F over NORDING over DANMARK.The stem looked dirty and oxidized with the calcification left behind by a pipe Softee bit. The bite marks and tooth chatter on the stem was light and should not take too much work to remedy. The light oxidation was another issue that would need to be addressed.Before I started my work on the pipe I wanted to learn more about where this pipe fit into the Nording lines so I turned to the first of two sites that I always check to gather information on a brand. I turned first to Pipedia (https://pipedia.org/wiki/N%C3%B8rding). Nording’s were exclusively freehand shapes, graded from A, B, C, D, up to its highest grade, extra. Later an “F” grade was added—less expensive than the “A.” I could find no other information on the rest of the stamping on the pipe.

I did find a great collage of photos of Erik Nording.I turned to the second information site – Pipephil’s (http://www.pipephil.eu/logos/en/logo-n2.html) did not find any more helpful information on the Nording Danmark stamp.

Armed with the information on the F stamp being added at a later time I knew a bit about the pipe at hand. I turned to address the pipe itself. Jeff cleaned up the pipe for me. He reamed the bowl with a PipNet pipe reamer and cleaned it up with a Savinelli Fitsall Pipe Knife. He scrubbed the exterior with Murphy’s Oil Soap and a tooth brush to clean off the grime off the finish and the heavy overflow of lava on the rim top. The cleaning had removed some of the black stain on the rim top. He cleaned up the internals of the shank, mortise and stem with pipe cleaners, cotton swabs and alcohol to remove all of the oils and tars in the pipe. He soaked the stem in Before & After Deoxidizer and was able to remove much of the oxidation. When it arrived here in Vancouver it was a clean pipe and I knew what I had to work with. I took photos of it before I started my part of the restoration. I took photos of the rim top and the stem to show their condition once it arrived in Canada. Jeff was able to clean up the incredibly thick cake and lava overflow that was shown in the rim and bowl photos above. You can see the spots where the black stain had been removed from the plateau top. He was also able to get rid of the grime and grit in the surface of the briar. The inner edge of the bowl was in very good condition and was smooth to the touch. There appears to be some roughening at the back of the inner edge but it is actually part of the plateau. The rest of the rim top and edges looked very good. The stem looked very good and was much cleaner. There was light tooth marks and chatter on both sides near the button.I decided to start with polishing the briar with micromesh sanding pads. I wet sanded it with 1500-12000 grit pads. I wiped the bowl down after each pad with a damp cloth. The bowl began to take on a rich shine and grain was beginning to stand out. I paused in the polishing with micromesh pads after using the 1500-2400 grit pads. I used a Black Sharpie pen to touch up the black plateau top. It did not take too much work to get it looking like new.I went back to polishing the briar with 3200-12000 grit pads. I wet sanded with all of the pads and wiped the bowl down after each pad with a soft cloth. I rubbed the bowl and shank down with Before & After Restoration Balm to deep clean the finish on the bowl and shank. The product works to clean, enliven and protect the briar. I worked it in with my fingers to get it into the briar. I used a horsehair shoe brush to work it into the plateau top.  After it sat for a little while I wiped it off and buffed it with a soft cloth. The briar really began to have a rich shine. I took some photos of the bowl at this point to mark the progress in the restoration. It is a beautiful bowl. I set the bowl aside and worked on the stem at this point in the process. The more I work on the stem I believe it is a replacement stem. I don’t think I will ever be sure but it is just a feeling I have about it. It is a well done replacement if it is one. I sanded tooth chatter and the remaining oxidation on the stem with folded pieces of 220 to remove the marks and the light brown colouration on the stem surface. I sanded them with 400 grit sandpaper until the marks were gone and the oxidation was gone. I wiped it down with Obsidian Oil. I rubbed the stem down with Denicare Mouthpiece Polish and a cotton pad to remove remnants of oxidation and to further blend in the sanding. The stem was showing some promise at this point in the process. I polished the stem with micromesh sanding pads – wet sanding with 1500-2400 grit pads and dry sanding with 3200-12000 grit pads. I wiped the stem down after each pad with a damp cloth to remove the sanding dust. I used the Before & After Pipe Polish to remove the small minute scratches left in the vulcanite even after the micromesh regimen. I finished by wiping the stem down with a final coat of Obsidian Oil and set it aside to dry. I put the stem back on the pipe and took the pipe to the buffer. I buffed the bowl and stem with Blue Diamond to polish the briar and the vulcanite. Blue Diamond does a great job on the smaller scratches that remain in both. I gave the bowl and the stem several coats of carnauba wax and buffed the pipe with a clean buffing pad to raise the shine. I hand buffed it with a microfiber cloth to deepen the shine. The pipe polished up really nicely with a great contrasting stain look to the briar. The finished pipe is shown in the photos below. This is a unique Nording for me – the thin stem and straight shank give the pipe a different look. The polished black vulcanite stem looks really good with the reds and blacks standing out in the grain. The dimensions of the pipe are Length: 6 inches, Height: 2 1/4 inches, Outside diameter of the bowl: 1 5/8 inches, Chamber diameter: 3/4 of an inch. This is another pipe that I will be putting it on the rebornpipes online store shortly, if you are interested in adding it to your collection. Thanks for walking through the restoration with me on this beauty!