Blog by Steve Laug
Last week I received a text from Robert about restoring three pipes his brother had found in Eastern New York. There were two Kaywoodies and a Churchill. The Kaywoodies included a small apple stamped Campus and an octagonal pipe stamped Kaywoodie Standard. The Churchill was a 999 Pot shaped pipe. He sent along two photos of the pipes. You can see the condition of the three pipes. They are dirty and worn. The last pipe in the photo, the Campus has what appears to be a broken shank and a potential repair. It looks to be poorly done. Robert said that he was fairly certain that the stem was glued onto the shank with the repair.
 On Saturday he brought the pipes by for me to look at. I now had three more pipes to clean up and repair. The Churchill 999 Pot and the Kaywoodie Standard Oxagonal 44 Apple were dirty but were in good repair. I had finished the little KW Campus repair and the pipe looked good (https://rebornpipes.com/2024/04/21/repairing-and-restoring-a-kaywoodie-campus-apple/). I also cleaned up the second Kaywoodie, the Octagonal Apple and it looked good. Here is the link to that blog (https://rebornpipes.com/2024/04/22/restoring-a-kaywoodie-standard-octagonal-44-apple/). There was a moderate cake in the bowl with tobacco debris. There was a coat of lava on the rim top that was quite thick and the inner edge showed some damage. The outer edge looked very good. The finish was dirty but otherwise showed some nice grain underneath. The stamping on the pipe is very simple. On the left side of the shank it is stamped Churchill’s arched over 999 with Imported Briar underneath. The stem was very oxidized and there was light tooth chatter on both sides ahead of the button. The stem was also plugged with tars and debris in the slot and airway was narrowed down.
I have worked on several Churchill pipes over the years and have done research on the brand when I worked on them. Here is a link to one of them that I had worked on. Here is the link to the blog (https://rebornpipes.com/2013/09/08/churchills-bent-pot/). I am including that information below. I am fairly certain that the pipe came from Churchill’s Tobacco Shop in Norwich, England. I found the following information on the Pipes and Logos website http://pipephil.eu/logos/en/logo-c4.html On the site there is a small paragraph which I have copied as follows: “Churchill’s Tobacco shop is situated in St Andrew’s Street at the corner of Bridewell Alley in Norwich, England. The shop was next to a church and at the bottom of two hills, and that’s how it became “Churchill’s”. Former manager: John Elvin (retired on May, 31 2008). Current owner (2008): Keith Garrard.” I have included these pictures from that website as they show the stamping on both the shank and stem that is identical to the pipe that I have just refurbished.
 According to the Churchill’s website it is the last remaining specialist tobacconist in Norwich, originally standing at 32 St Andrews Street for over 23 years. http://www.churchillsofnorwich.com/index.php?_a=viewDoc&docId=1 The site also notifies the shop’s clients that Keith Garrard, who had a wealth of knowledge and was an avid pipe and cigar smoker himself, passed away on 23rd March 2012. His wife Coral continues to maintain the business in his honour.
I took photos of the pipe when I brought it to the worktable. I wanted to show the general condition of the pipe before I started my work on it. You can see the cake in the bowl and the lava on the rim top. The rim top appears to be good under the lava. The stem is dirty and heavily oxidized as noted and light tooth marks are on the top and underside ahead of the button. 
 I took some close up photos of the rim top and the stem surface. I wanted to show the condition of both more closely. The rim top and the inner and outer edges of the bowl heavily cake in lava and you can see the marks on the inner bowl edge. I also took close up photos of the stem to show the oxidation and the light tooth marks on the stem surface.
  I took a photo of the stamping on the left side of the shank and it is clear and readable. It is stamped as noted above. I removed the stem for the shank and took a photo of the bowl and stem to give a picture of what it looked like.
  Now it is time to clean up the pipe. I reamed the bowl with a PipNet pipe reamer and the second cutting head. It cleaned up most of the cake. I used a Savinelli Fitsall Pipe Knife and cleaned up the remaining cake leaving bare briar. I sanded the bowl walls with 220 grip sandpaper wrapped around a piece of dowel. I smoothed out the bowl walls and they looked very good. There was no heat damage or checking on the walls.
 I scrubbed the exterior of the bowl and shank with a tooth brush and undiluted Murphy’s Oil Soap. It works exceptionally well to remove unwanted oils from the briar and also the grime on the rim and the bowl sides. I rinsed it in warm water while scrubbing with the tooth brush. The pipe looks very good at this point. The rim top is clean enough to know the condition it is in and what I need to do to deal with it. There are scratches and nicks on the rim top and they are very visible now that the lava has been removed.
 I scrubbed out the shank and the stem with pipe cleaners, cotton swabs and alcohol.
 I gently topped the bowl to remove the damage on the rim top and to minimize it on the rear edge where the most damage was. I used a topping board and 220 grit sandpaper.
 There was some damage and wear on the front outer edge of the bowl. Built it up with CA glue and briar dust to fill in the damage. I smoothed out the damage with 220 grit sandpaper and reshaped it to follow the flow of the bowl. I sanded it further with 320 grit sandpaper to smooth out the repair. It really started to look very good.
 I touched up the stain on the rim top and on the front of the bowl with a Walnut stain pen. It is a little streaky at this point. It will work better when I finish the sanding and polishing of the rim and bowl.
 I sanded the bowl and rim top to clean up the damage and repairs to the edge and start the polishing of the bowl. I used 320-3500 grit sanding pads. I wiped the bowl down with a damp cloth after each pad. It really began to take on a shine.
 I polished the briar with micromesh sanding pads – dry sanding with 1500-12000 grit pads. I wiped it down after each sanding pad with a damp cloth to remove the sanding debris on the surface.


 I rubbed the bowl down with Before & After Restoration Balm. I worked it into the surface of the briar with my fingertips to clean, enliven and protect it. I let the balm sit for a little while and then buffed with a cotton cloth and shoe brush to raise the shine.

 I set the bowl aside and turned to address the stem issues. I scrubbed the stem oxidation with Soft Scrub and cotton pads. I was able to remove the majority of the oxidation. Then, I sanded it with a folded piece of 220 grit sandpaper. It looked much better at this point.
 To remove the remnants of oxidation from the vulcanite I sanded it with 320-3500 grit sanding pads. I wiped it down after each sanding pad with a damp cloth. By the final 3500 grit sanding pad the rim top had a shine.
 The stem was in good condition so I polished the vulcanite with micromesh sanding pads – 1500-12000 grit pads. I wiped it down with Obsidian Oil after each sanding pad. I used Before & After Pipe Polish – both Fine and Extra Fine to further polish the stem. I gave it a final coat of Obsidian Oil and set it aside to dry.
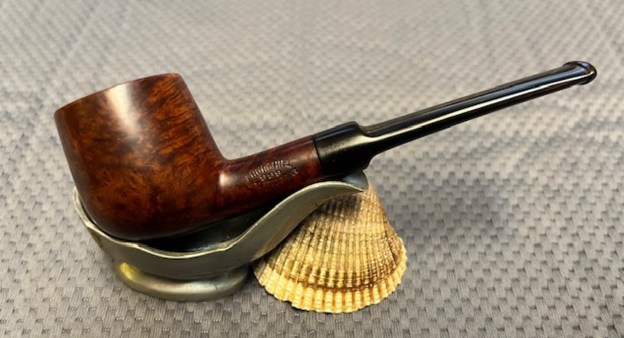
 This Churchill 999 Imported Briar Pot cleaned up really well and looks very good. The Before & After Restoration Balm brought the colours and grain out in the smooth finish on the pipe. It works well with the polished vulcanite taper stem. I put the stem back on the bowl and carefully buffed the pipe with Blue Diamond on the buffing wheel using a light touch on the briar. I gave the bowl and the stem multiple coats of carnauba wax on the buffing wheel. I followed that by buffing the entire pipe with a clean buffing pad. I hand buffed the pipe with a microfiber cloth to deepen the shine. The finished Churchill 999 Pot fits nicely in the hand and I think it will feel great as it heats up with a good tobacco. Give the finished pipe a look in the photos below. The dimensions of the pipe are Length: 5 ¼ inches, Height: 1 ½ inches, Outside diameter of the bowl: 1 ¼ inches, Chamber diameter: 7/8 of an inch. The weight of the pipe is 1.13 ounces/32 grams. I know Robert is going to enjoy this last pipe of the three once I return them to him. Thanks for reading this blog and my reflections on the pipe while I worked on it.


