Blog by Kenneth Lieblich
What a handsome pipe! I found this PRE-republic-period Peterson System 359 at a local antique shop and I was charmed by it right away. It’s a handsome devil and the look of it gives one a feeling of comfort. It is satisfying and comfortable in the hand – like a mug of tea. There was a lovely patina on this old timer and I really wanted to get this into the hands of Peterson lover.
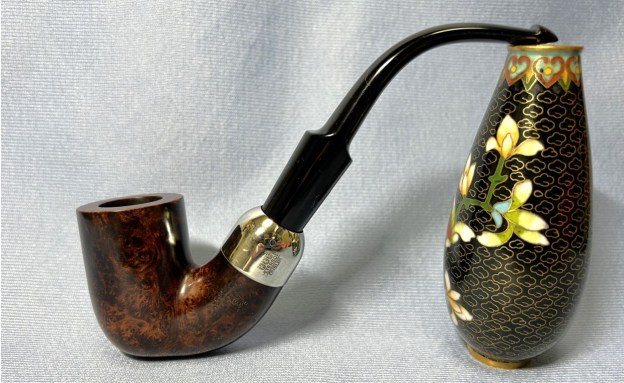
 Let’s have a closer look. This Peterson 359 pipe has the classic “System” look: bent shape, nickel mount, and tapered, army-style stem. Of course, it also had the traditional Peterson P-lip stem. The markings on the left side of the shank are Peterson’s [over] System [over] ③ [over] 359. The underside of the shank showed Made in Ireland in a circle. The nickel mount on the shank had K&P (in shields) [over] Peterson [over] Dublin. There were no markings on the stem.
 The Peterson System pipes are well-storied among Peterson collectors/admirers. I took the opportunity to read the article on Pipedia, specifically about the System pipes, by Jim Lilley. There is lots of good information there and I encourage you to read it: https://pipedia.org/wiki/A_closer_look_at_the_famous_Peterson_Standard_System_Pipe.
 Having seen that the words “Made in Ireland” were in a circle, I knew that I was dealing with an older pipe. Precisely how old would require some elementary research. The main Pipedia article on Peterson included a few interesting lines:
“Charles Peterson applied for a patent for an improved tobacco pipe on the 8th of August 1890. He was awarded patent number 12393 on the 16th of June 1891 for Great Britain and Ireland. This came to be known as the famous ‘System Pipe’ patent.”
“Later they stamped their pipes with “Made in Ireland” in a circle format 1945-1947…”
This is awfully helpful in dating this pipe. I can comfortably say that this pipe dates from 1945 through 1947, that is to say, just short of 80 years (at the time of writing).
As usual, I also owe a debt of gratitude to Mark Irwin of Peterson Pipe Notes. He has a very interesting article on the various System shapes and I highly recommend having a look: https://petersonpipenotes.org/146-a-guide-to-system-shapes-1896-2019-part-1-the-300-shape-group/. Here is a screenshot of the relevant bit: In addition, Mark has an article on an older 359 that he picked up: https://petersonpipenotes.org/tag/peterson-359-system/.
On to the pipe itself: the stem was in average condition – not especially dirty, but it had been well used. It had a few dents. The bowl was moderately dirty and had quite a bit of lava and plenty of cake. Aside from some small fills, the outside of the bowl was very nice. The nickel mount was in good shape – only some very slight dents. 


 To work! The stem was first on my list – and I couldn’t get it out of the mortise! I grabbed the heat gun and gently warmed up the goo inside until it had softened enough to let go of the stem. I wiped the outside down with Murphy’s Oil Soap on some cotton pads. I also took a BIC lighter and ‘painted’ the stem with its flame to lift the few bite marks and dents. Sadly, however, this did not do much. Then I cleaned out the inside with pipe cleaners and isopropyl alcohol.

 I used some SoftScrub on the outside of the stem to remove some oxidation. Then, the stem went for an overnight soak in the Pipe Stem Oxidation Remover. The following day, I cleaned the de-oxidizing mess off with alcohol, pipe cleaners, et cetera. The oxidation had migrated to the surface and would be fairly straightforward to remove. I scrubbed again with SoftScrub on some cotton pads to remove the leftover oxidation.
 I built up the dents on the stem with black cyanoacrylate adhesive and let them cure. I then sanded the adhesive down with some sandpaper to level out with the stem. I then used all nine Micromesh pads (1,500 through 12,000 grit) to polish it and highlight the black lustre. I also used Obsidian Pipe Stem Oil in between each pad scrubbing.

 Moving on to the stummel, I first decided to ream out the bowl. I used the PipNet Reamer to remove the built-up cake and followed that with 220-grit sandpaper taped to a dowel to eliminate as much as possible. I took the chamber down to bare briar to ensure there were no hidden flaws in the wall. Fortunately, there were none.
 I used cotton rounds and some Murphy’s Oil Soap to scrub the outside of the stummel and a toothbrush with Murphy’s for the lava on the pipe’s rim.
 I took a close look at the rim. In order to save as much of the rim as possible, I used a piece of machine metal to very delicately scrape away as much lava as I could. I do this before automatically jumping to my topping board. This worked well.
 I then proceeded to clean out the insides of the shank with Q-tips, pipe cleaners, and lemon-infused isopropyl alcohol. There was quite a bit of filth inside this stummel, and it took a fair amount of cotton to get it clean. I followed that up by cleaning the insides with some dish soap and tube brushes.
 I decided to de-ghost the pipe in order to remove any lingering smells of the past. I thrust cotton balls into the bowl and the shank and saturated them with 99% isopropyl alcohol. I let the stummel sit overnight. This caused any remaining oils, tars and smells to leach out into the cotton. The bowl was nice and clean after this.
 There were a couple small fills and nicks around the bowl. I opted to leave them as they are – they are minor and are part of the history of this pipe. I felt that I had interfered enough and didn’t want to interfere anymore. Then, I used most (but not all) of my Micromesh pads on the stummel to finish it off. This included buffing up the nickel mount to a beautiful shine with my jewelry cloth. I also applied some Before & After Restoration Balm and let it sit for 20 minutes to do its magic. It adds that certain je ne sais quoi to the wood.

 Then it was off to the bench polisher! A dose of White Diamond and a few coats of carnauba wax were just what this pipe needed. Boy-oh-boy, this is one good-looking pipe! I’m pleased with the results.
 This Peterson Standard System 359 looks fantastic again and is ready to be enjoyed by its next owner. I am pleased to announce that this pipe is for sale! If you are interested in acquiring it for your collection, please have a look in the Ireland pipe section of the store here on Steve’s website. You can also email me directly at kenneth@knightsofthepipe.com. The approximate dimensions of the pipe are as follows: length 5⅞ in. (149 mm); height 4⅛ in. (105 mm); bowl diameter 1⅓ in. (33 mm); chamber diameter ¾ in. (19 mm). The weight of the pipe is 1⅞ oz. (55 g). I hope you enjoyed reading the story of this pipe’s restoration as much as I did restoring it. If you are interested in more of my work, please follow me here on Steve’s website or send me an email. Thank you very much for reading and, as always, I welcome and encourage your comments.


