Blog by Paresh Deshpande
Stanwell pipes have always been one of my favourites and I seldom miss an opportunity to lay my hands on one whenever I come across a good deal, especially the older early era ones. These are some of the best factory-made pipes coming out of Denmark. Most of the Readers are more than aware of the history of these pipes; however, I feel it is prudent to reintroduce a brief history of this brand to refresh the memory. Pipedia.org (https://pipedia.org/wiki/Stanwell) has an excellent compilation of the brand’s history, picture gallery, various lines etc and a few important pieces of information has been produced from this site.
When pipe smokers talk about pipes that are consistently great smokers, exhibit the creative and beautiful designs that exemplify Danish pipemaking and offer the best value in factory produced pipes, they are talking about Stanwell. We hear time and time again, from customers and top pipe makers from around the world, that Stanwell is the best factory produced pipe in the world. During WWII, Danish pipe smokers could no longer buy the English made briar pipes they preferred to smoke. In 1942, because of the unavailability of English pipes and raw briar, Poul Nielsen began making pipes from beech wood for Danish customers. At the time, Poul was managing a company called Kyringe, which made various wood products.
At the end of the war, briar became available again, so Nielsen began importing his own briar and started making briar pipes to compete with the English manufacturers. It must be remembered that in 1948, England was the single great center for pipe making. Therefore, Nielsen changed the name of his pipes to “Stanwell”, which sounded much more like a proper English name than “Nielsen”. He also created the horse drawn carriage logo for its English connotations. He later changed his own last name from Nielsen to Stanwell, a testament to his devotion to the pipes he made. Stanwell’s relationships with Danish pipe makers goes back to Sixten Ivarsson, who is considered the originator of modern Danish pipe making. Ivarsson was commissioned to design Stanwell shapes. In 1969, the factory was moved a town called Borup, just outside of Copenhagen to be closer to Ivarsson.
Stanwell relies on designs from the great Danish pipe makers, from Sixten Ivarsson to Jess Chonowitsch from which they create their hundreds of shapes. Since most sandblasting for Danish pipemakers is done at the Stanwell factory (Stanwell has a reputation for excellence in sandblasting that is used by many, many Danish carvers from Poul Winslow to Jess Chonowitsch), many of the pipes that they sandblast are then observed and used as starting points for Stanwell shapes with the consent of the original carvers. This interesting and unusual symbiotic relationship gives Stanwell the opportunity to offer hundreds of unusual and interesting shapes at an affordable price. Once a new shape is established and hand carved, it is then reproduced using a lathe. Following the initial carving of the pipe which is done by machine, all other processes are done by hand, from the final sanding and staining to the application of the wax finish. There are approximately 120 manual steps to Stanwell’s pipe making process. The Stanwell factory is arguably the most efficient pipe operation in the world. It is this efficiency that has made Stanwell so remarkably price competitive and able to offer pieces of superior quality to those created by other large factories.
Essentially the goal of Stanwell is, and always has been, to produce high quality pipes at a price that is truly within the reach of the common man. In this they have succeeded admirably, offering perhaps more pipe for the money than any other pipe manufacturer in their price range. Stanwell pipe offers exceptional quality at a remarkably affordable price.
Stanwell pipes are a must for any pipe collection. The Stanwell name is a cornerstone of Danish pipe making. In owning a Stanwell, you will not only enjoy beautifully styled, great smoking pipe at a great price, you will own a piece of pipe making history.
Pricing on top models – mid to late 1980s
- Golden Contrast 600 DKK.
- Silver S 600 DKK.
- Hand Cut, sandblasted 1200 DKK.
- Hand Cut, smooth 1500 DKK.
Another important aspect of Stanwell pipes is the determination of designers of a particular pipe that is well documented with the help of shape numbers. This pipe has the shape number #214 and from a visit to the under mentioned site it is determined that this pipe is classified as a freehand but without any designer specified.
https://pipedia.org/wiki/Stanwell_Shape_Numbers_and_Designers
- 210 Sixtus, with hexagon stem and mouthpiece, brass ring, Pot by Tom Eltang.
- 211 Sixtus, with hexagon stem and mouthpiece, brass ring, Freehand by Tom Eltang.
- 212 Sixtus, with hexagon stem and mouthpiece, brass ring, Freehand by Tom Eltang.
- 213Sixtus, with hexagon stem and mouthpiece, brass ring, Freehand by Tom Eltang.
- 214 Freehand, slightly bent, square stem and mouthpiece.
- 215 Freehand, slightly bent, triangular stem, saddle mouthpiece by Poul Ilsted.
- 216 Zulu with tapered stem, by Tom Eltang.
This pipe came to me from eBay.com as one of the lot of four pipes, three Stanwells and one Vauen pipe in a pipe bag, from a Germany based Seller. The following pictures were uploaded by the seller with no description at all and based on which I had made my decision to purchase it. Once these pipes reached me here in India, I was aghast to note that each of the pipes had one or the other serious major damage which will be brought out as I work on each of these pipes. This was another sour deal on eBay!!
The first pipe from this lot that I decided to work on is what I consider being a variation of the horn shape but described as a freehand in Stanwell’s shape charts as brought out before and is from the late 1980s. It is stamped as “STANWELL” over “MADE IN DENMARK” over “ROYAL SILVER” on the left panel of the square shank while the right panel is stamped with the shape number “#214”. The stem bears the trademark “S” with a crown in silver. 
 Initial Visual Inspection
This horn shaped Stanwell has many things going in its favor; be it the shape that is eye-catching with paneled surfaces, a size that feels perfect to hold, light weight, quality acrylic stem and capable of housing a 9 mm filter for those who prefer them. A thick layer of cake is seen in the chamber. The rim top and edges are clean with no lava overflow or evident signs of charring. The four paneled stummel is clean and the reddish hued stain makes it a looker! However, I have noticed a darkened spot (encircled in yellow) over the front panel towards the foot and that could potentially be bad news (read a burnout). The mortise has minute traces of old oils and tars, but the airflow is smooth and open. The thin white metallic band (or is it silver?) at the shank end lends the pipe a classy bling. The acrylic black stem is in good condition. The tenon housing for 9 mm filter is clean and so it the horizontal slot. Overall, save for the dark spot over the stummel surface, the condition of the pipe is good.

 Detailed Visual Inspection
The chamber has a thick, hard and uneven layer of cake. The upper portion of the cake is slightly thicker than at the heel. I am curious to know the condition of the chamber walls, more so the area corresponding to the dark area observed over the stummel surface but that will have to wait till the cake is removed and the walls are exposed. The inner edge is uneven (encircled in green) but not charred. This could be a result of reaming using a sharp knife edge. The rim top surface is clean with no damage or crud accumulation. The stummel has been carved out of a beautiful piece of briar and in true quality assurance that Stanwell is so well known for. The four panelled stummel with square shank has cross grains on either side with mixed grain to the front and aft of the surface. The surface is clean and sans any dents or dings and grime. The red stain with a shank end band contrasts beautifully with the black acrylic stem. The only cause of concern is the dark area seen to the front of the stummel and is highlighted by an encircled yellow. The spot within this darkened area (encircled in orange), so to speak, is the eye of the damaged area. Now, this could just be a darkening of the surface due to a burning cigarette placed in proximity of the pipe or it could be the beginning of through burnout and the clue for the exact reason lies within the chamber walls. However, the dark area feels no different from the rest of the surface…or not? The mortise is clean with just minor traces of old dried oils and tars over the mortise walls. The square silver (?) band at the shank end is dull and would benefit from a nice polish.

 The square faced acrylic stem contrasts with the red stained stummel surface adding an attractive eye candy affect to the overall appearance of the pipe. The buttons in particular and the bite zone in general, is sans any tooth indentations or scratches. The tenon houses a 9 mm filter and shows minor accumulation of oils and grime, ditto for the horizontal slot. The stem logo of silver letter S with a crown atop is slightly oxidized, but otherwise in pristine condition.
 The Process
The first step in restoring this particular pipe was the cleaning of the chamber. I began the process of refurbishing this pipe by reaming the chamber with a PipNet reamer tool, using the first and second head. Using my fabricated knife; I further took the cake down to the bare briar. That the cake was thick and hard made this cleaning a lot difficult and a long drawn affair. With a folded piece of 180 grit sandpaper, I took the cake down to the bare briar and also smoothened the chamber walls. A final wipe with a cotton swab moistened with isopropyl alcohol removed the carbon dust from the chamber. I had expected that any damage to walls of the chamber would reveal itself at this stage. However, I could not decipher any prominent damage corresponding with the dark area seen on the outer surface. I decided to subject the chamber to a cotton and alcohol bath in the hope that the damage, if any, would reveal itself in the form of seepage of the alcohol or deep heat lines/ fissures. Moving on to deeper cleaning of the chamber and the mortise in an attempt to highlight any damage to the chamber walls… I subjected the chamber to a cotton and alcohol bath. I draw out a wick from the cotton and along with a folded regular pipe cleaner; insert it in to the mortise and through the draught hole in to the chamber. Thereafter, I pack the chamber with cotton balls to about quarter of an inch below the rim inner edge and soak the cotton balls with isopropyl alcohol up to the brim. About half an hour later, the level of alcohol had gone down, having being absorbed by the cotton. It was here that I anticipated seeing seepage to the front of the stummel through what I have assumed to be a burnout. However, this did not happen. Also even at this stage I did not feel any give in the briar in the darkened area as compared to the rest of the stummel surface. I topped it up once again with alcohol and set it aside overnight. By next afternoon, the cotton and alcohol had drawn out all the remaining oils and tars from the chamber and mortise, fulfilling its intended task. I removed the cotton balls and ran pipe cleaners through the mortise to clean out all the loosened tars and gunk. I set it aside to dry out naturally.
 Next, I decided to clean the exterior surface of the stummel. I had also hoped that further cleaning of the stummel would reveal the extent of damage or otherwise lurking beneath the darkened area. I used a hard bristled tooth brush and Murphy’s oil Soap, to scrub the stummel, chamber walls and rim top. I washed the stummel under running warm water with anti oil dish washing detergent till the stummel surface was clean. I simultaneously cleaned the shank internals with the detergent and hard bristled shank brush and dried it using paper towels and soft cotton cloth.

 At this stage in restoration, I still could not fathom the nature and cause of the dark area. I was still not clear if the dark spot was an indicator of the beginning of a burnout or was it just a superficial darkening of the surface. I turned to Steve to seek his advice and sent him pictures of the suspected damaged area. He enquired if the spot was a little soft to the feel or did it sound any different when tapped with finger nail as compared to the rest of the surface. I tried and couldn’t notice any change. Here Steve suggested that I thoroughly clean the darkened spot with oxalic acid. If it is just a superficial burn, oxalic acid would lighten it and reveal the exact condition and that is exactly what I did. When I was done with this step, I shared pictures of the result with Steve. He pointed out that it appeared that the center of the dark spot (encircled in red) maybe damaged and to confirm the same by tapping the area with a screw driver or some such hard tool.
 As discussed with Steve, I tapped the suspected damaged area, lightly at first and then a bit more firmly and the briar gave way leaving behind a gaping hole. I used a needle file to remove the charred briar from around the burned out spot. I continued to remove the charred briar around using rounded needle file till I reached solid intact hard wood. Now that all the charred briar wood was removed, it was necessary to smooth out the edges of the burned out area to ensure an even round hole for a snug fitting briar plug. I fine tuned the rounded hole at the foot of the stummel using 180 grit sandpaper wound around a thin bamboo dowel.
 Next, I cut a suitably sized block of briar to be shaped into a plug using a small hacksaw blade.
 Using a sanding drum mounted on a rotary tool, I roughly shaped the plug that would fit into the foot of the stummel. I deliberately left the top of the plug duly flanged (indicated with blue arrows). The general idea was to push the plug from inside the chamber to the outside so that the plug flanges will sit over the remaining intact heel of the chamber forming a new heel with the rest of the plug protruding outwards of the foot of the stummel.
  With the rough shape of the plug completed, I began the process of fine tuning the fit of the plug to seat snugly in to the hole at the foot of the stummel. Using a flat head needle file and a folded piece of 180 grit sandpaper, I sand down the plug and its flanges checking frequently for the fit in to the hole. I avoided further sanding of the plug once I reached the stage where with a tap of a small hammer, the plug sat firmly in to the hole with no gaps. The plug flanges are also covering the hole at the heel of the chamber (indicated by yellow arrows).
 To fix the briar plug in to the heel of the chamber, I decided to apply a layer of JB Weld to the bottom of the entire heel. J B Weld is a two-part epoxy Cold Weld that consists of two parts; hardener and steel which are mixed in equal parts in a ratio of 1:1 with hardening time of 5-6 minutes and complete curing time of 6-8 hours. I poured the contents of the two tubes and mixed it well. With a flat bamboo frond, I applied this mix over the heel of the chamber from inside. I turned the bowl over and filled the minor gaps between the briar plug and the adjoining stummel surface with the J B Weld mix and set the stummel aside for the epoxy to cure overnight.
  By evening when I continued my work on this pipe, the J B Weld had cured completely. Using my hand held rotary tool mounted with a 150 grit sanding drum, I sand down the plug from the foot (outside) and heel (inside) of the stummel and achieved a rough match with the surrounding surface. I further matched the plug with the rest of the stummel foot with a flat head needle file. I perfectly matched the plug with the rest of the surrounding surface, both inside and out, by sanding with a folded piece of 180 grit sandpaper. The plug is now flush with the foot of the stummel while the flanges of the plug provide additional support to the plug from within the chamber.
  I had reached that stage in restoration where an important decision was required to be taken which would affect the aesthetics of the pipe. To blend in the repair, I had an option of staining the entire pipe red or to rusticate only the front panel of the stummel right up to the shank end and further stain this rusticated panel in contrasting black/ dark brown. I discussed this step with Abha and she was of the opinion that a perfect geometrical pattern does go with the flow of the shape and recommended a complete rustication of only the front panel followed by the contrasting stain.
To rusticate, I firmly held the stummel in my left hand and with my right hand and began gouging out the briar. The technique is to firmly press the pointed four prongs of the modified Philips screwdriver into the surface, rotate and gouge out the removed chunk of briar. I worked diligently till I was satisfied with the rustications and the appearance of the stummel. I cleaned the debris off the rusticated surface with a brass wired brush. The high points in the rustications were lightly sanded down using a piece of 220 grit sandpaper. Next, I polished the stummel using micromesh pads, wet sanding with 1500 to 12000 grit pads. I also polished the high spots in the rustication with the micromesh pads. I wiped the bowl with a moist cloth after each pad to clean the surface. I rubbed a small quantity of “Before and After Restoration Balm” into the briar with my finger tips but not in to the rusticated surface. The balm almost immediately works its magic and the briar now has a nice vibrant appearance over the smooth surface with the beautiful grain patterns on full display on the smooth surface of the stummel. I further buffed it with a horse hair shoe brush. The rusticated part of the stummel is now ready for a fresh coat of stain.
 I had decided to stain the rusticated surface with a black dye which would contrast beautifully with the red of the rest of the smooth surface. I heated the rusticated portion with my heat gun to open up the pores on the stummel so that the stain is well absorbed. I used Fiebing’s aniline black leather dye and liberally applied it over the heated surface, flaming it with the flame of a lighter. This helps in the setting of the stain in the grain of the briar. I ensured that every inch of the rusticated surface was coated with the dye while the smooth surfaces are not stained. I set the stummel aside for a day to set the dye into the briar surface.
 Once the stain had set, to highlight the contrast of the high points in the rustication, I lightly sanded the high points with a worn out piece of 180 grit sandpaper followed by dry sanding with 1500 to 12000 grit micromesh pads to polish the high points. I rubbed a small quantity of “Before and After Restoration Balm” with my finger tips deep into the nooks and crannies of the rustications as well as the smooth surface and let it rest for a few minutes. With this, save for the final polish, the stummel repairs and refurbishing are now complete.
 It was now time for me to work on the stem. Using thin shank brushes and anti-oil dish washing soap, I cleaned the stem airway. I have modified this process of cleaning the stem airway by doing away with pipe cleaners and alcohol as it saves me a ton of pipe cleaners, which is a precious commodity for me here in India. I continued this cleaning till only white clean foam came out of the stem airway, indicating that the airway was nice and clean. I ran a couple of pipe cleaners dipped in alcohol through the airway to dry it out and make sure that there are no traces of soap and gunk hidden in the airway.
 Next, I progressed to wet sanding the entire stem surface with 800, 1000, 1500 and 2000 grit sand papers. I rubbed a small quantity of EVO into the stem surface and set it aside for the vulcanite to absorb and hydrate.
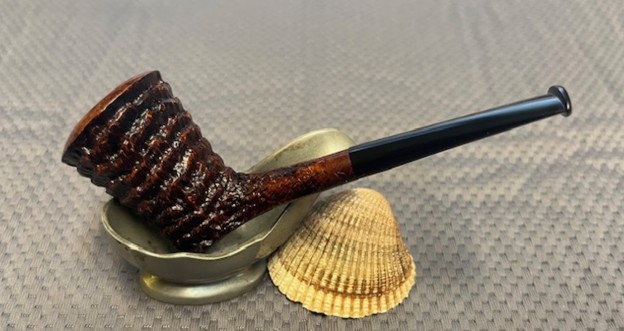
 To complete the restoration, I mounted a cotton cloth buffing wheel on to my hand-held rotary tool and polished the stem with Blue Diamond compound. This compound helps to remove the minor scratch marks that remain from the sanding. I followed the Blue Diamond polish by applying several coats of Carnauba Wax with a cotton cloth buffing wheel dedicated to Carnauba Wax. I finished the restoration by giving the entire pipe a rigorous hand buffing using a microfiber cloth to deepen the shine further. The finished pipe looks amazingly beautiful and has been transformed from being a write off to being one that is now ready to provide years of happy smokes to one of my club member who had commissioned this beauty! The Pipe Gods are being very kind to me now-a-days and pray that they continue to be so. Following are the pictures of the restored pipe.


 P.S. The last functional aspect which I addressed was to protect the repairs to the heel of the chamber. I mixed activated charcoal and yogourt to a consistency which allows for an easy and even spread and evenly applied it on the inner walls and heel of the chamber. This coating helps in preventing the epoxy at the heel of the chamber from coming into direct contact with the burning tobacco, a sort of insulation and assists in quicker formation of a cake. I set it aside to dry out naturally for a week before it makes its way to my friend.
 This was an interesting project that was labor intensive involving long man hours but equally satisfying one. I appreciate all esteemed readers who have dedicated their time in reading this article and thus joining me along on this journey of bring back pipes that are deemed to be lost case!