Blog by Steve Laug
Last week I received a text from Robert about restoring three pipes his brother had found in Eastern New York. There were two Kaywoodies and a Churchill. The Kaywoodies included a small apple stamped Campus and an octagonal pipe stamped Kaywoodie Standard. The Churchill 999 Pot shaped pipe. He sent along two photos of the pipes. You can see the condition of the three pipes. They are dirty and worn. The last pipe in the photo, the Campus has what appears to be a broken shank and a potential repair. It looks to be poorly done. Robert said that he was fairly certain that the stem was glued onto the shank with the repair. 
 On Saturday he brought the pipes by for me to look at. The Churchill 999 Pot and the Kaywoodie Standard Oxagonal billiard were dirty but were in good repair. The one that got my attention was the little Campus with the cracked shank. I looked it over carefully and Robert was correct it appeared that the stem had been glued in the shank and it was overclocked. The repair was odd. It appeared that half of the shank that fit the depth of the metal threaded insert had cracked completely off. It had been repaired with what appeared to be white wood glue. It did not fit well and there were gaps on the top and bottom side as shown in the photos. There was also a moderated cake in the bowl with tobacco debris. There was some lava on the rim top that was quite thick but the inner and outer edge looked very good. The finish was dirty but otherwise showed some nice grain underneath. The stem was overclocked and dirty with light tooth chatter on both sides ahead of the button.
 I have seen other Kaywoodie Campus pipes but other than a faint memory was not clear where they fit in the line and when they were made. I turned to Pipephil’s site to refresh my memory and see what he had on the brand (http://www.pipephil.eu/logos/en/logo-kaywoodie-1.html). I did a screen capture of the pertinent section and have included the side bar information below the photo.
 The Campus Kaywoodie line was introduced in 1957 and these pipes do not bear the 2 digit shape code. Campus and Colt series are Kaywoodies smallest pipes (to be smoked between two classes). Although the Campus pipes have a Synchro Stem like screw-in attachment, the stinger itself is not of the Drinkless type (see enlarged view #2 – http://www.pipephil.eu/logos/en/lightbox/images/next.png)
I learned that the line was introduced in 1957 and did not have any shape numbers. The pipes were designed on the small side to give a quick smoke between classes on campus. The tenon/stinger was not a typical Drinkless type but the fit to the stem was the same threaded type of attachment. From that I knew that I was working on an older pipe.
Now it was time to work on the pipe. I started my work on the pipe by seeing if I could loosen the stem from the shank. I used a cotton swab to push acetone into the cracked area and the metal fitment on the shank. I repeated the process then soaked a cotton pad and wrapped it around the shank connection. I let it sit for 30 minutes while I worked on another pipe. I once again tried to turn the stem on the shank and it easily came free of the shank. The threads were very dirty but I could see no glue visible on the threads. I took some pictures of the shank repair at this point in the process. You can see how the white glue that filled in the cracks around the shank had begun to dissolve showing the damage clearly in the shank fit.
 I soaked the crack with more acetone using a q-tip. It did not take much for the broken piece to come free of the shank. I took a photo of the pipe at this point. You can see the cracked portion still glued to the metal insert in the shank. You can also see the grime in the threads of the tenon and in the ridges on the insert. It is dirty.
 I soaked the broken piece of briar in a small bowl of acetone to loosen the briar from the metal shank insert. It did not take long for the glue to soften on the shank piece and it floated free of the metal insert. I cleaned up the broken pieces of the briar and glued it in place on the shank. I pressed the parts together until the glue set.
 Once the repair cured I cleaned up the shank insert and painted the surface with wood glue then pressed it into the shank end. I let it sit until the glue hardened.
 I filled in the divots and cracked areas in the shank end with clear CA glue and briar dust to build up a smooth surface on the shank end. I sanded the repairs with 220 grit sandpaper to smooth out the surface.
 I used a rasp to reduce the size of the metal insert edge and the high spots on the briar of the shank in preparation for fitting it with a repair band to bind everything together. I sanded out the file marks on the briar. Once I had it smooth enough for fitting the band I fit the band on the shank end and heated it with the flame of a lighter. I pressed it against a hard surface to push it fully onto the shank end. I took photos of the newly fitted band on the shank and it looked very good.

 Now it is time to clean up the pipe. I reamed the bowl with a Savinelli Fitsall Pipe Knife and took the cake back to bare briar. I sanded the bowl walls with 220 grip sandpaper wrapped around a piece of dowel. I smoothed them out and the bowl walls looked very good. There was no heat damage or checking on the walls.
 I scrubbed out the shank with pipe cleaners, cotton swabs and alcohol. I had already done this to some degree when I had the pipe in parts earlier but I wanted to clean it up further. I also swabbed out the inside of the bowl with a folded pipe cleaner to remove the dust. I cleaned out the inside of the stem with pipe cleaners and alcohol.
 Quite awhile ago now, Mark Hoover of Before & After Restoration Balm fame sent me a sample of his briar cleaner. When it arrived it had leaked all over the package so there was very little left in the bottle. It was a mess to clean up so I just set it aside where it has been sitting for several years now. I thought I might as well scrub the briar with it. I scrubbed it down with a tooth brush and rinsed it off with some warm running water. I dried it off with a soft cloth. It looked much better.
 I touched up the stain on the rim top and around the end of the newly place band with a Cherry stain pen.
 I polished the briar with micromesh sanding pads – dry sanding with 1500-12000 grit pads. I wiped it down after each sanding pad with a damp cloth to remove the sanding debris on the surface.


 I rubbed the bowl down with Before & After Restoration Balm. I worked it into the surface of the briar with my fingertips to clean, enliven and protect it. I let the balm sit for a little while and then buffed with a cotton cloth and shoe brush to raise the shine.

 I set the bowl aside and turned to address the stem issues. To address the scratches and marks in the surface of the vulcanite as well as some residual oxidation. I sanded it with 320-3500 grit sanding pads. I wiped it down after each sanding pad with a damp cloth. By the final 3500 grit sanding pad the rim top had a shine.
 The stem was in good condition to I polished the vulcanite with micromesh sanding pads – 1500-12000 grit pads. I wiped it down with Obsidian Oil after each sanding pad. I used Before & After Pipe Polish – both Fine and Extra Fine to further polish the stem.
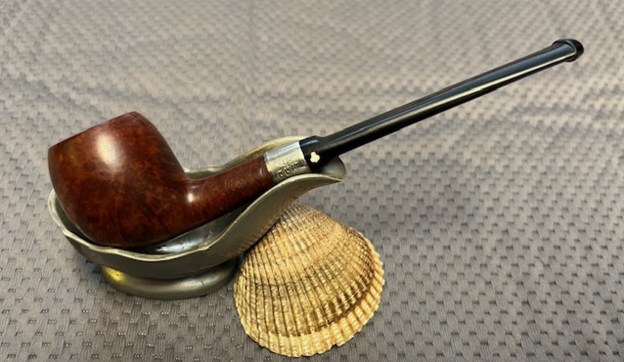
 This Kaywoodie Campus Saddle Stem Apple cleaned up really well and looks very good. The Before & After Restoration Balm brought the colours and grain out in the finish on the pipe. It works well with the polished vulcanite saddle stem. I put the stem back on the bowl and carefully buffed the pipe with Blue Diamond on the buffing wheel using a light touch on the briar. I gave the bowl and the stem multiple coats of carnauba wax on the buffing wheel. I followed that by buffing the entire pipe with a clean buffing pad. I hand buffed the pipe with a microfiber cloth to deepen the shine. The finished Kaywoodie Campus Saddle Stem Apple fits nicely in the hand and I think it will feel great as it heats up with a good tobacco. Give the finished pipe a look in the photos below. The dimensions of the pipe are Length: 5 ½ inches, Height: 1 ¼ inches, Outside diameter of the bowl: 1 inch, Chamber diameter: ¾ of an inch. The weight of the pipe is .81 ounces/23 grams. I know Robert is going to enjoy this pipe once I return it to him with the other pipes he dropped off. Thanks for reading this blog and my reflections on the pipe while I worked on it.


 m
m


