Early this morning I received an email from Joris about posting a restoration on rebornpipes. I wrote back and this is what he sent me. It is a great restoration and one that is only fitting to share with our global restoration community of rebornpipes. Welcome Joris. Thanks for your work and your post.
Blog by Joris De Sutter
Hi everyone. I’m a pipe restorer from Flanders, the northern half of Belgium, where I live in the beautiful town of Brugge (Bruges). It’s only once in a while that I restore old pipes to their former glory. I’m a bit of a Canadian and Lumberman fan and within those shapes I tend to specialize in the French brand Butz-Choquin. So when purchasing the pipes I like, occasionally other shapes are present in those lots. This particular pipe was one of those. 

 I picked up this rather big billiard from a French second hand website, together with four other promising briars. They apparently all formerly belonged to the same gentleman, judging from the identical signs of use. And boy: they were used! The current pipe shows this quite clearly…

 The general shape of the pipe is a really handsome Billiard. It was apparently one of the favorite pipes of its previous owner. He seems to have loved his pipes, but perhaps not to the level that he really cared for them. What a mess! How does one even reach such a thick cake build up in the chamber? The dirty bowl with those black patches of grime around it? The heavily oxidized stem with all that calcification? I wonder how one is able to let it come to that. Didn’t the previous steward have the need to clean his pipe once in a while? Whatever. I did notice the extraordinary pipe underneath all that muck.
The markings on this pipe are quite standard for a Butz-Choquin. On the left side of the shank is the standard curved Butz-Choquin logo. Just underneath this logo the name of the series appears in all capitals : PRELUDE. And then in the lower right hand corner is the word Extra at an angle. This Extra stamping indicates that the wood of this pipe has no flaws and there are no fills present. This was indeed the trigger for me to purchase this pipe despite its sorry state.  At the same height on the stem there is an engraving of the two BC letters forming the Butz-Choquin abbreviation. They were once filled white, but now only a hint of this remains at the bottom of the B. The letters themselves are however quite deep enough to allow for a full restoration. From the 1970’s onward, Butz-Choquin used an acrylic round insert on her stems for the higher end pipes they produced. If this pipe would have been made in the seventies or later, it surely would have had that acrylic insert on its stem. Since it is not present, I’m assuming this pipe dates from the 1960’s.
  The shape number on the right side of the stem reads 1398. On top of that it reads ST CLAUDE – FRANCE. Finally underneath the shape number is an A. I can only speculate on this solitary A, but since this pipe is clearly top of the line I suspect it to indicate just that.
The Butz-Choquin brand is one of the oldest in France. Most people unfortunately associate it with cheap basket pipes. They did indeed make plenty of those, but likewise they also made really good high quality pipes and those were sold at accordingly high prices.
The bowl is always first on my list. If the bowl turns out to be too far gone to justify a full restoration, then why would I still put some effort in the stem? I start by taking my own manufactured reaming knife and carefully scrape the top rim of the bowl. There is quite some lava coming off of it.  Now the most daunting part: addressing the very thick cake in the bowl. This took me about an hour, carefully scraping away all that carbonized tobacco till the briar became visible again. I do own the commonly available reaming tools, but I hardly ever use them anymore. My own tool turns out to be just the perfect reamer. The picture hardly illustrates the amount of carbon cake that came out of the bowl. That mountain was almost as high as it is wide!
  Not shown in the pictures is the condition of the briar underneath. It was excellent! No heat fissures, no burns.
From here, I always open up the draught hole. I like my pipes to have a 4mm draught hole. Most BC pipes are drilled at 4mm, but since this pipe was so extensively smoked, there must be a lot of tars in there. Drilling those out before further cleaning helps a lot. I have two drill bits for this. One has a tapered tip, while the other is a standard, although very long, 4mm straight drill.  First the one with the tapered tip. I clamp the drill bit in my bench vise and then carefully turn the bowl by hand. Never ever use a power drill for this. The tapered drill bit is ideal to find the way through possible clogging inside the draught hole. If the straight bit would be used before the tapered bit, the clogging could steer the straight bit into the briar.
  After clearing the draught hole, a dentist tool is used to scrape away hardened tars from inside the mortise.
  And then both bowl and stem go into the water. I use an oil based black soap to clean the stummel and stem inside out. Some drops of soap on the bowl and stem, and then an old tooth brush together with some effort cleans both parts.
 A piece of very fine steel wool is used to remove the last remaining lava from the bowl’s top rim. Luckily it revealed that the previous owner didn’t knock his pipes on hard surfaces to remove ash and dottle.
 While I still have that piece of steel wool at hand, I use it to remove the calcification from the stem and already some of the oxidation. The biggest part of oxidation removal will follow later. I can now already notice to my relief that there are no tooth marks on the stem, apart from a small notch like indentation on the upper part of the button.
 To finish off the wet part of the cleaning, I have some fine round plastic bristle brushes. I use them to roughly clean out the insides of both stem and shank. This will make the process of deep cleaning later a lot easier since the water will already soften the tars a little bit.
 I let the stummel dry a bit and then proceed into the preparations of deep cleaning it. For this I use two main ingredients: isopropyl alcohol and paper towels. Notice the absence of cotton wool or salt? I used to do this with cotton wool in the past, as is shown on this blog and others, but found that my own method yields far better results.
  From the paper towel, I turn a corner of the towel into a wick. I turn this wick into the draught hole from the mortise and make sure it extends into the chamber. Then I slightly turn it into the other direction and push onto it. This way it will also fill the mortise completely. I then cut the excess that sticks out of the mortise.
  Then I make a small wad of the same towel and put it at the bottom of the chamber covering the small bit of the wick that protrudes from the draught hole into the chamber. Now I put the isopropyl alcohol onto the wad in the chamber until the wad is completely drowned, but not much more than that. This amount of alcohol is sufficient to percolate into the wick and do its work.
 Is it necessary to completely fill the chamber with cotton wool (or salt for that matter) to have the chamber also deep cleaned with the alcohol? I have done some experimentation on this in the past and found that the deep cleaning with alcohol is mostly important for the draught hole, not so much for the chamber. The reason is quite simple: While smoking your tobacco, the oils, tars and other volatile components of the tobacco will either get burned or lower down with the smoke. They will hardly stick to the chamber’s walls due to the heat and the cake build up. They will however primarily condensate in the draught hole.
 The result after some three hours of soaking. The wick end has turned into a nice brown colour. The wad in the chamber however remains white. Let’s see what happens when the wick gets removed.
 Wow! The wick part that was inside the draught hole has turned to black! Lots of tar have been removed. The new wick that is present in the picture is then used to immediately turn it inside the pipe again. Since the previous wick has been soaking in alcohol for three hours, the draught hole is still moist with it. The new wick can then easily take up another load of softened tars. So stick it in, turn and turn and pull it out. Look at the blackness that came out on that second wick in the following picture.
  A third wick is then prepared to put inside. This time the alcohol treatment of three hours is repeated. The following picture shows the result of that third wick. Not so black as the first one. And the fourth wick cleans up a bit more after it.
  This continues until the wick comes out without muck on it. With this pipe I had to do four full alcohol soaks of three hours. That means eight wicks in total, of which the bottom wick shows that it came out clean.
 Don’t I use normal pipe cleaners then? Sure, but not for this deep cleaning itself. Sometimes in between I enter a normal pipe cleaner soaked in alcohol to check on the remaining work. But other than that I use normal pipe cleaners primarily for the stem, not so much on the stummel.
To finish off the work on the insides of the stummel, I sanded the inside of the chamber with a piece of 220 grit sand paper wrapped around a dowel. I prefer doing that step of the process after the deep cleaning of the draught hole to avoid the black grinding dust to stick onto the tars and thus worsening the cleaning afterwards.  That’s all for the stummel for now. Let’s first give the stem some attention. The outside of the stem was already washed with the black soap and a light scrubbing with the fine steel wool. Before I start to clean it any further, I decided to improve its mortise end by giving it a tapered air inlet. This will reduce turbulence during smoking so that the pipe doesn’t have the tendency to gurgle.
  Then the insides can be cleaned. I used two types of pipe cleaners. One hard type and a soft type. Starting with the hard one soaked in isopropyl alcohol. Some blackness came out of there, but much less than I anticipated.
 I then cut of the black part of the pipe cleaner, soaked the remaining cleaner in alcohol and entered it again in the stem. It now came out a lot cleaner already. Time to finish it off with the soft pipe cleaner. It came out clean! Quite amazing when compared to the state of the stummel. I guess the previous owner must have at least used some pipe cleaners once in a while.
 Once this process was done, it was time to address the outside of the stem. I don’t use any liquid pipe stem oxidation remover. I only use micromesh sanding pads. It will take a bit more effort, but the end result is just as good. I always use these micromesh pads with water.
  The first pad is the most important one. That’s the one which will remove most of the oxidation. Look at the colour of the water before and after that first pad…
 The following pads then follow in quick succession with clean water. After the last pad the stem almost looks as good as new.
  I then proceed to the buffer. I don’t have the need for a semi-professional buffing station with large cotton wheels and variable speeds. Would be nice, but a bit of an overkill for my needs. So this simple old Philips power drill will do. A small cotton wheel is fitted and white diamond buffs the stem to a bright shine.
 Time to restore the two BC letters on the stem. I paint the area carefully and let it fully set before proceeding. The BC ultimately emerged from the restoration quite satisfactory. After this I oil the stem with some mineral oil and let it sit a few hours before hand buffing with a microfibre rag.
  Back to the stummel. The washing and cleaning had left the outside quite dull. To address this, I use special micromesh pads for wood working. The first one is a 1200 grit pad. This is followed by a 2000 and finally a 3000 grit pad.
 The bowl begins to take a shine and the grain begins to pop into view showing all its glory. To end work on the stummel it needs a carnauba finish. For this I have fitted a felt wheel on my power drill. I have found that a felt wheel is better at transferring the wax onto the pipe.
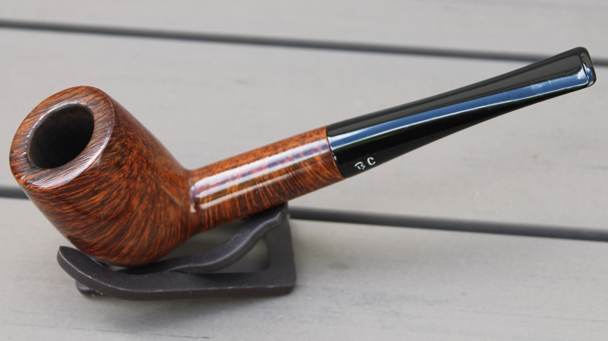
 The dimensions of this beautiful Butz-Choquin Billiard are as follows: length 165 mm/6 ½ inches; height 60 mm/2 ½ inches; bowl diameter 40 mm/1 ½ inches; chamber diameter 21 mm/ ¾ of an inch. The weight of the pipe is 58 grams/2.04 ounces. I hope you enjoyed reading the story of this restoration as much as I did in the work itself and writing it down. Thank you very much for reading and I welcome and encourage your comments.


