Monthly Archives: April 2020

How Estate Pipes Changed the Collecting World  


Blog by Robert M. Boughton, P.I.

Copyright © Reborn Pipes and the Author except as cited
https://www.roadrunnerpipes2k.com/
https://www.facebook.com/roadrunnerpipes/
Member, North American Society of Pipe Collectors


O hell! what have we here?
A carrion Death, within whose empty eye
There is a written scroll!  I’ll read the writing.
‘All that glisters is not gold;
Often have you heard that told:
Many a man his life hath sold
But my outside to behold:
Gilded tombs do worms enfold.
Had you been as wise as bold,
Young in limbs, in judgment old,
Your answer had not been inscroll’d:
Fare you well; your suit is cold –

Cold indeed, and labor lost.’

— Shakespeare, The Merchant of Venice, Act 2, Scene 7, 1596 (original editions)

INTRODUCTION
An English historian of pipes in general and Alfred Dunhill  Ltd. of London in particular, the late John C. Loring, dated the beginning of estate pipe collecting to 1976.  That was the year Dunhill acquired Lane Ltd., which included Charatan pipes.  It also marked the first noticeable blip, on the pipe world radar, of avid collectors in the U.S. starting to seek older, used English pipes that were rarer and could be repaired for reborn enjoyment.  The birth of estate pipe collecting, with its attendant lust for uncommon and valuable specimens, created a market that was susceptible to fraud on a new, sophisticated level.

Thus arrived on the scene the simultaneous phenomena of collectors who recognized the potential value of estate pipes and the intrepid craft folks who filled the need for independent, skilled workers, or pipe restorers, as they came to call themselves, to repair and clean all of the old pipes being snatched up in more and more amazing numbers.  Of course there were also the scam artists and other opportunistic ne’er-do-wells, that ubiquitous element of every business enterprise, who found in the appetite for used but “collectible” pipes an abundance of buyers ignorant of the knowledge needed to distinguish the legitimate from the fakes.

Limited at first to pipes from England due to their perceived superiority to those from other countries, in time the used pipe craze spread to estates from around the world.  The trend saw its heyday in the first decade, continuing into the mid second, of the new millennium.

Aristotle is often cited as the first person to expound the notion that nature abhors a vacuum, when in fact he was a plenist, or a believer that there can be no occurrence of a vacuum in nature.  His basic reasoning was that space is filled with bodies, even if most of them are molecular, and therefore can have no empty area.  The great Greek philosopher and polymath was so contemptuous of the idea of a natural vacuum that he made a deliberate joke, in Physics, Book IV, Part 8: “But even if we consider it on its own merits the so-called vacuum will be found to be really vacuous.”  LOL!  Modern physics recognizes that nature indeed cannot tolerate a vacuum – but only so far as to force whatever happens to be nearby any such anomaly to be sucked in to fill it the same instant.  In that sense, old Aristotle was half right, considering that an empty space appearing in nature must be filled in less than a nanosecond.  At any rate, pipe restorers, qualified or otherwise, as well as forgers, filled the new figurative vacuum made by the Great Estate Pipe Rush.

THE BIRTH OF ESTATE PIPES
The blooming of the estate pipe collecting hobby mushroomed into a full-blown industry that epitomized certain aspects of capitalism as contemplated in An Inquiry into the Nature and Causes of the Wealth of Nations, published 200 years earlier just two months before the Declaration of Independence.  There was then and remains the principle of supply and demand with its buyers, sellers and middlemen.  The prices were set only by the depths of the pockets of the buyers and their much shallower knowledge of what constituted a rare Dunhill.

Loring, whose research into the darkest hour of estate pipe history identified the birth of used pipe collecting, died October 7, 2009 in Chicago.  In a memorial on PipesMagazine.com, Kevin Godbee wrote that Loring possessed “an encyclopedic knowledge of Dunhill Pipes and other tobacciana.”  In “The 1980s Fake Dunhill,” first published in the Winter-Spring 2005 issue of The Pipe Smoker’s Ephemeris, Loring wrote of how, while Dunhill acquired Lane and Charatan:

“…on the other side of the Atlantic a strange new hobby was developing, ‘used briar pipe collecting,’ with Dunhill pipes the crown jewels of those pioneer American collections.  Soon there were pipe shows, mail order lists, evenings on the telephone in ‘hot pursuit’ and even excursions to England to salvage previously smoked pipes from the dustbins.  Hundreds, even thousands of dollars were paid for used, quickly renamed ‘Estate’ Dunhills with premium prices being paid for the largest and oldest.”

Courtesy Loring’s Dunhill Collection, Pipedia

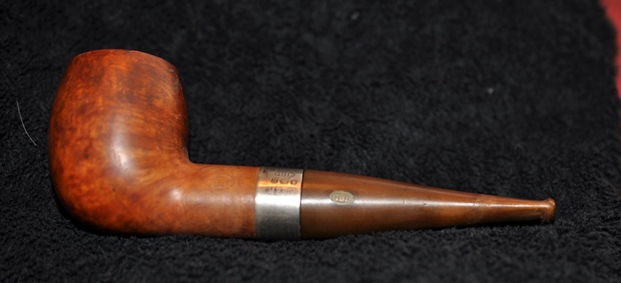
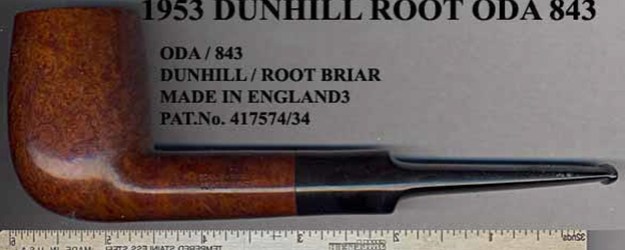
Note that Loring splits the popularity of estate pipes in two parts, large and old, but emphasizes the bigger ones by nature of the definite if understated order of the above reference, which lumps both together as rare.  Even if Loring were not a good enough writer for the placement of his modifiers to be significant, he goes on to explain the special nature of “oversized” pipes.  “Magnums were viewed as ‘one of a kind’ rarities that could be counted on one hand, maybe two at best,” Loring wrote.  The ODA shown here from Loring’s personal collection that sold at auction after his death, with its exquisite bird’s-eye, is a fine example of a magnum.

THE RISE OF COUNTERFEITS
With the Lane-Charatan takeover, some of the pipe makers from the two manufacturers consumed by Dunhill lost their jobs.  During the early 1980s, as the factories of the three companies were consolidated into one, many more layoffs were made.  The market for estate Dunhills in the U.S. continued to escalate.  A few unemployed and bitter pipe makers in England, able and willing to abscond with tools of all kinds – including those used for shaping, finishing and stamping nomenclature on the completed products, as well as stummels abandoned for flaws or left unfinished and  even raw briar blocks – did so.

“And at work’s-end,” Loring wrote, “employed and unemployed still met at the pub to dwell on the injustice of it all.”  These conditions – angry, jobless pipe carvers on one side of the Atlantic and wealthy collectors on the other – created what Loring called “our own perfect storm.”

Dunhills have never been easy to date much less make it through the rest of the Byzantine nomenclature.  Even Loring admits the task can be impossible for anyone, no matter how knowledgeable of Dunhill markings.  Then there’s the fact that back in the day, meaning the 1980s, early Dunhill catalogs were not as available as they later became, which was never on par with Sears or LL Bean.  And of course, the World Wide Web was not up and running until the following decade, although the ARPA net allowed computers to connect to each other with a virtual “handshake” and transmit batches of data using Transmission Control Protocol/Internet Protocol (TCP/IP) machine language.  In other words, identifying a fake pipe, in particular one made by a disgruntled former Dunhill carver using real Dunhill wood and tools but changing or fabricating certain nomenclature to make them appear almost priceless, was beyond the means of most serious collectors of the day.

As it happened, one of those very leading collectors, an American whose name is remembered by some old-timers of our society who refuse to utter or record it in print, highlighted the top British pipe show of 1984 with his collection of 30 stunning examples.  Loring recorded that they included “four near magnum sized Shells bearing extremely rare or previously unknown shape numbers; three smooth finished “LC” shapes, two Roots and a Bruyere, one bearing a previously unknown shape number; three extremely rare un-smoked ODAs , a Bruyere and a Shell 844 and an 824 Shell; a number of sought after ODA shapes in a variety of finishes, many unsmoked; and two awesome supposedly pre-WWII Canadians both upwards of 9 inches long with 5¾ inch shanks, a Bruyere with a small, 1¾ inch tall bowl and a Shell with a magnum sized, 2¾ inch tall bowl.”

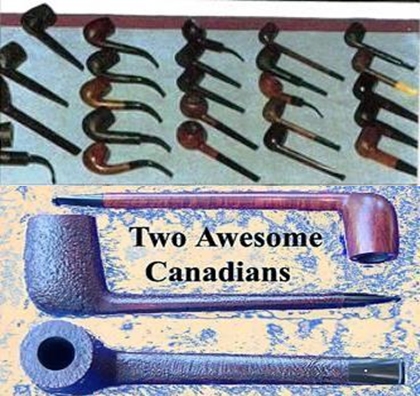
Most of the infamous 1984 “Dunhills,” courtesy J. Loring

To cut to the chase, most of these pipes, if not all of them, were bogus in that they were not made by Dunhill but rather were tweaked as far as the nomenclature was concerned or cobbled together using spare parts, as it were, however skillful or “authentic” the cobbling.

The suspicions of some collectors were piqued by the too good to be true aspects of the fabulous forgeries.  Consider Loring’s repeated references to “extremely rare or previously unknown shape numbers” and “unsmoked” pipes.  Had avarice not gotten the better of the collectors who fell victim to the scam, “Thousands upon thousands of dollars and pipes” would not have been exchanged during the infamous incident that took place over a period of only two or three days.

It is important to remember about the 1980s fake Dunhills that of the 50-75 total pipes involved in the overall debacle on both sides of the Pond in which, by Loring’s estimation, perhaps hundreds of thousands of dollars were paid for technically bogus pipes, “in almost all cases,” they were excellent in terms of craftsmanship and were “akin to top quality 1980s English Dunhill alternatives such as Ashton or Upshall.”  The photo below from Loring’s collection shows two supposed World War II-era pipes, both magnums about eight inches long and each a beautiful Dunhill pipe – if only each had been manufactured in the Dunhill factory and not stamped with outrageous nomenclature.  The shape codes HB and HP have come to be known as existing only on fakes.

“In short,” Loring cautions with classic, subdued British humor and style, “if on the way to writing a two thousand dollar check you find that the shape stamped on the pipe you are fondling doesn’t comport to catalog examples or is otherwise unknown, stay your pen for further examination.”

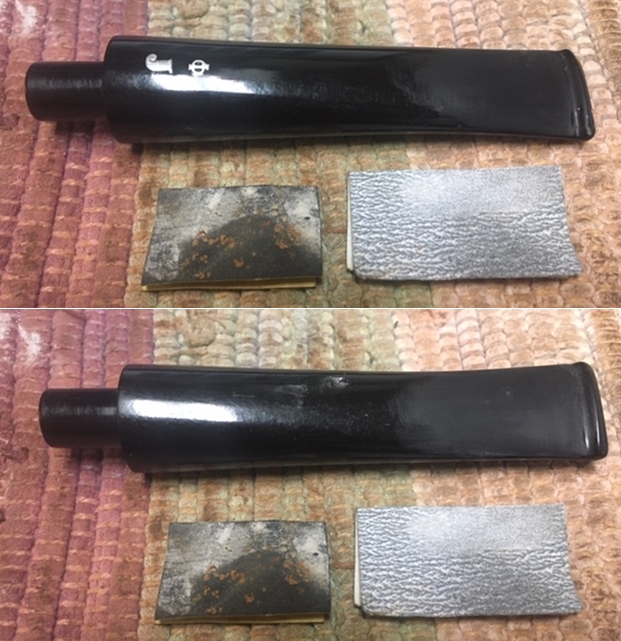
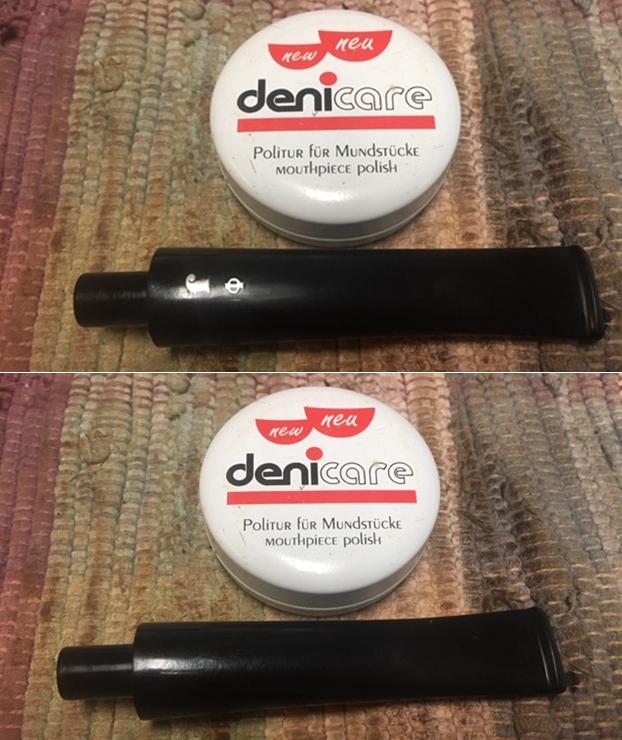
Another way to identify pipe forgeries is the nomenclature, no matter how subtle the discrepancy may seem.  Loring’s most basic rules of thumb in spotting a fake are to be discerning of every detail and to trust your instincts.  The following examples are brilliant.  The problem with the two pipes in the one photo is harder to spot, and I took the liberty of editing the very bluish original from the web page so that it appears closer to natural pipe brown.  The issue in this picture is not the HLP on the top and the HB on the bottom (well, those are no-nos, to be sure), but the uneven stamp marks, as the un-removable type suggests.  Otherwise the two lines of markings are perfect for WWII-era pipes and indicate that the stamp used may have been “lifted” from Dunhill.  The egregious error in the other pic should be apparent to anyone who is at all familiar with Dunhill.  Take a look and see if you can spot the sign of serious trouble that should set off bells and whistles in the shot of the lone stamp.All done?  Everything considered, the only glaring annoyance is the word SHELL on a smooth finish pipe.  Loring identified three examples including the one above that appear to have been marked with a real Dunhill pre-1937 stamp “in the hands of an illiterate.”  ROFL.

The absence of the World Wide Web at the time of the 1980s Dunhill fiasco explains in some small part how experts were misled by imitations.  So how has the Web made things worse for everyone else in the intervening 30-plus years?

THE SPINNING OF A WEB OF FRAUD
I will begin this section with the bottom line: Internet fraud, intentional or otherwise – and whether or not it will ever become a crime that can be prosecuted in a viable, systemic manner, much less eradicated – is here to stay for the foreseeable future.  The solution, therefore, would seem to fall in educating consumers as to the dangers that exist on a very real and frequent basis.

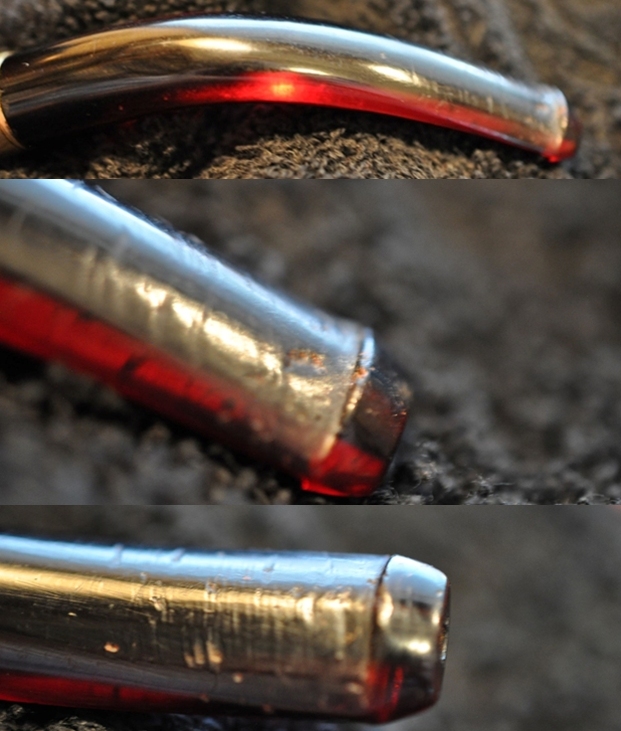
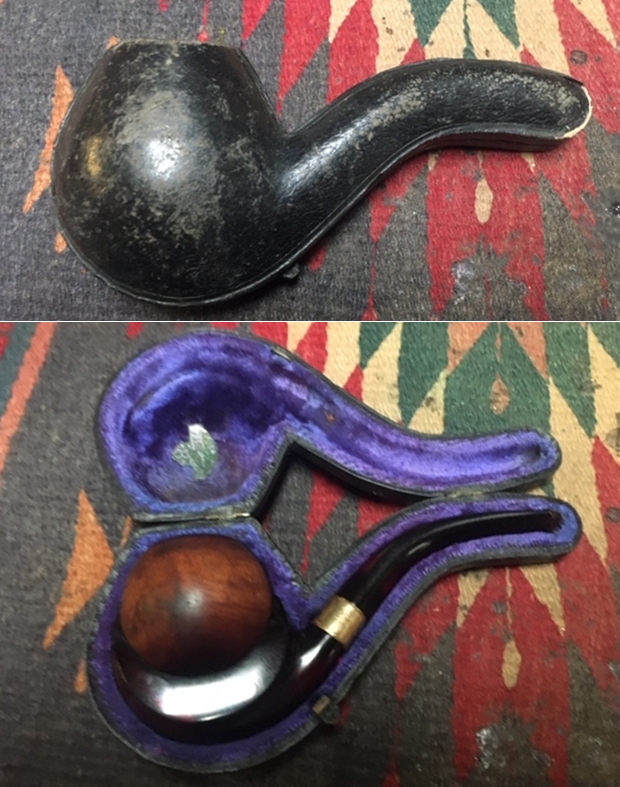
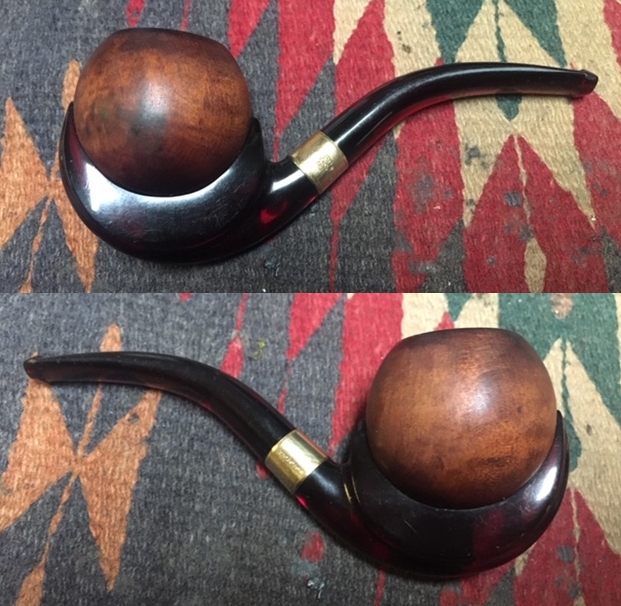
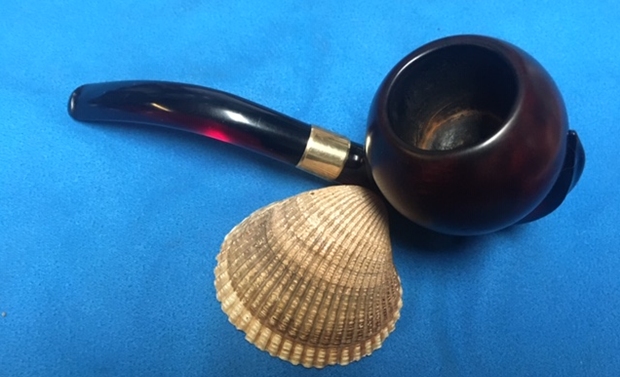
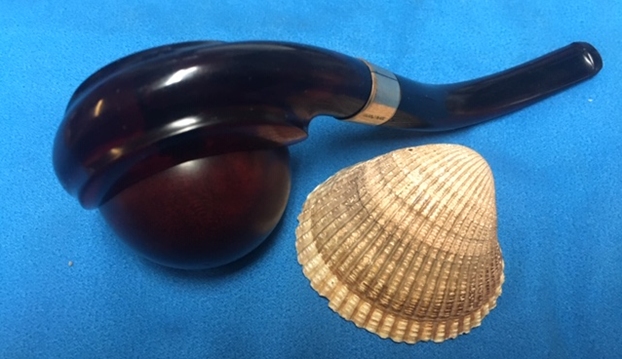
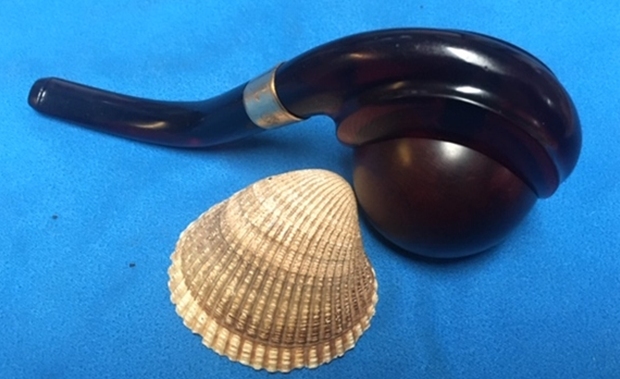
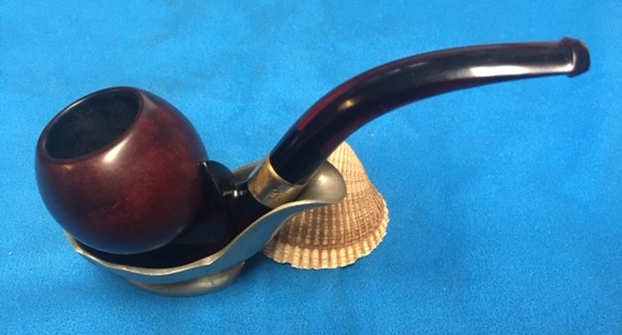
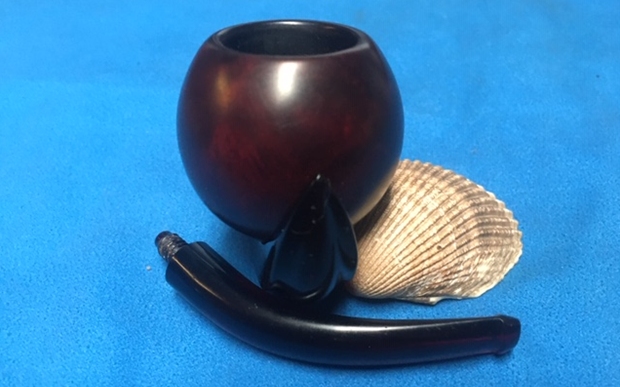
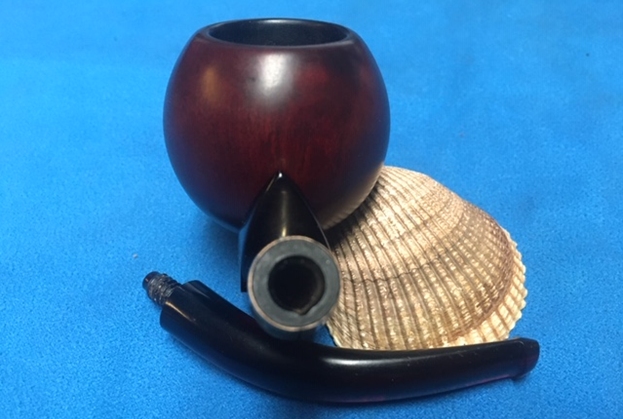
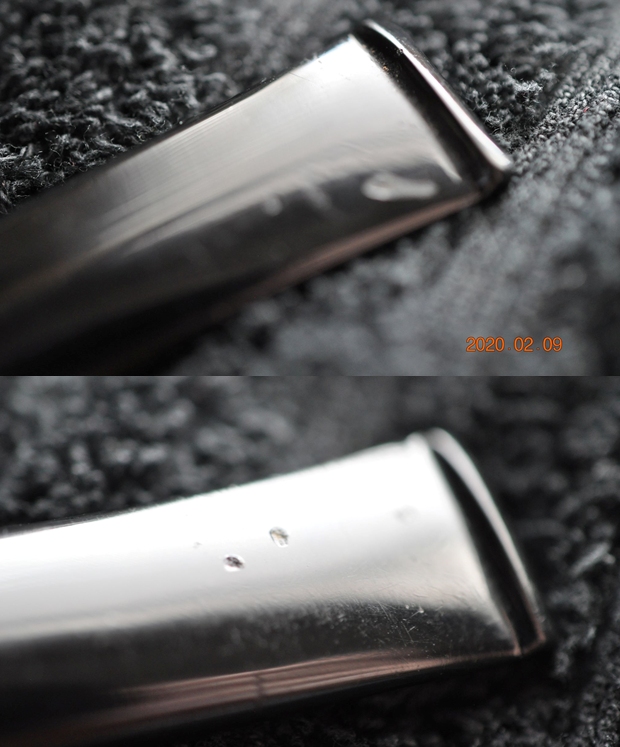
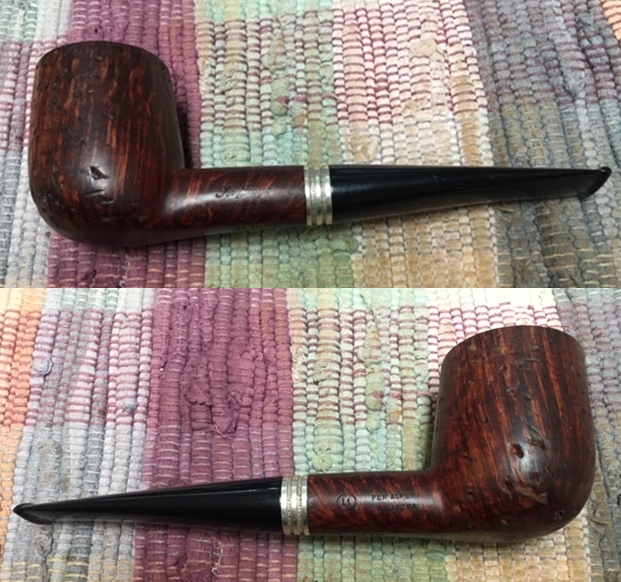
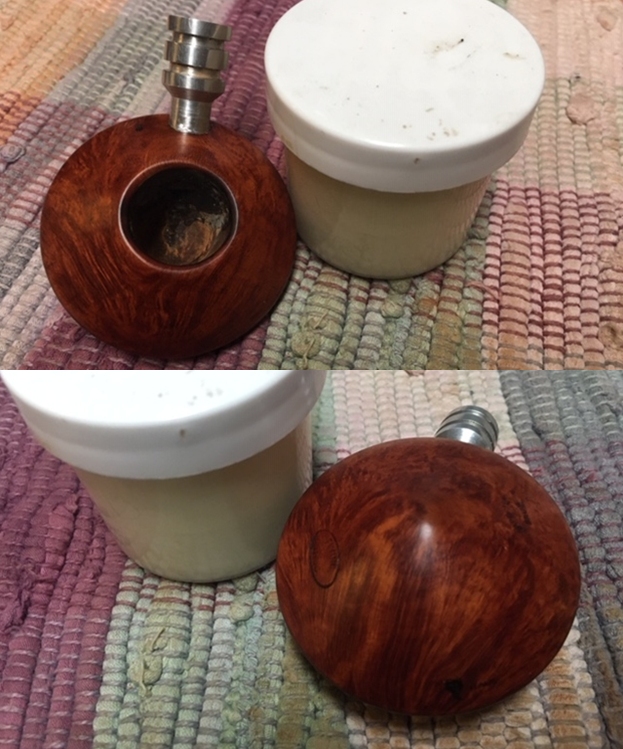
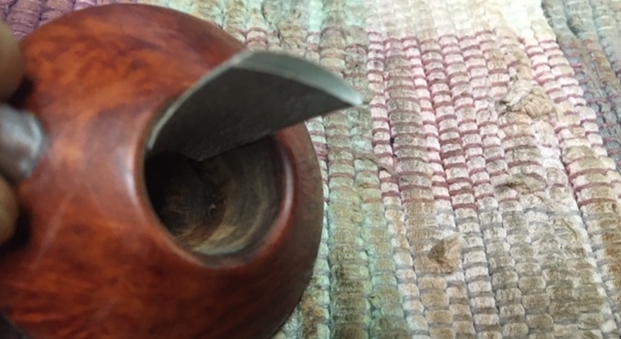
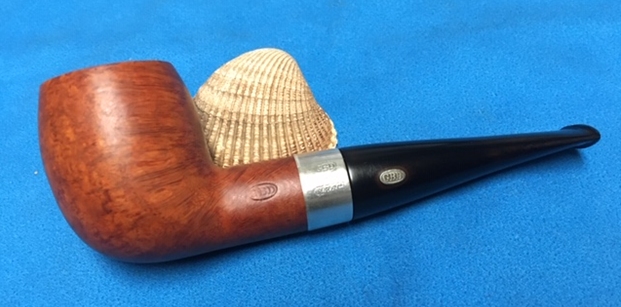
By way of an example of fake pipes that can be found on the internet, the cautionary tale of an alleged Dunhill “Bijou” 401 pot, Patent Number 417574/34, will illustrate how the Dunhill scandal still haunts us and also provide a smooth transition into the modern phase of pipe forgeries.  I came across this one, offered on consignment for just under $1,000, on a very respected and reputable online site a while back.  The seller alleged the pipe dated to the 1920s or ’30s, as I recall.  I’m sure if the gentleman reads this he won’t mind that I omitted his credit for the following photos.  From a distance, even without the White Spot that appears to be on the top of the stem in closer shots, the pipe looks OK, at least. 
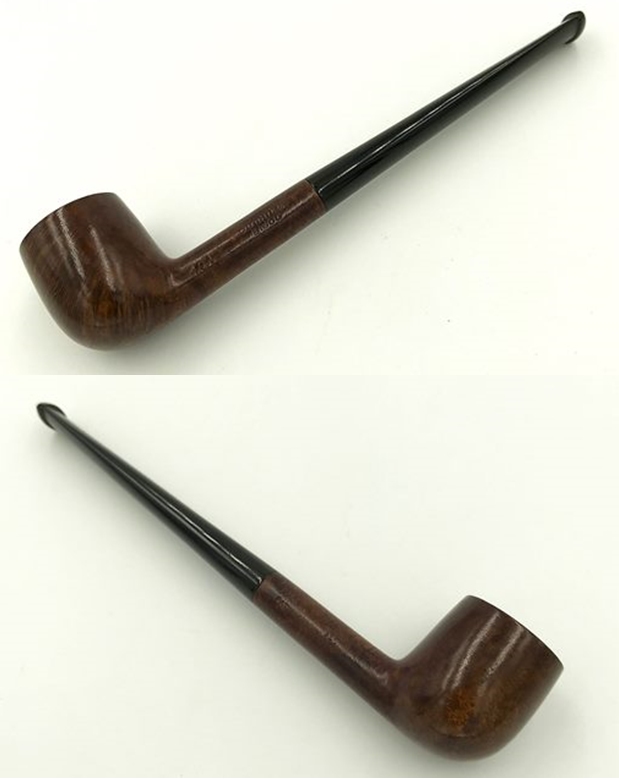
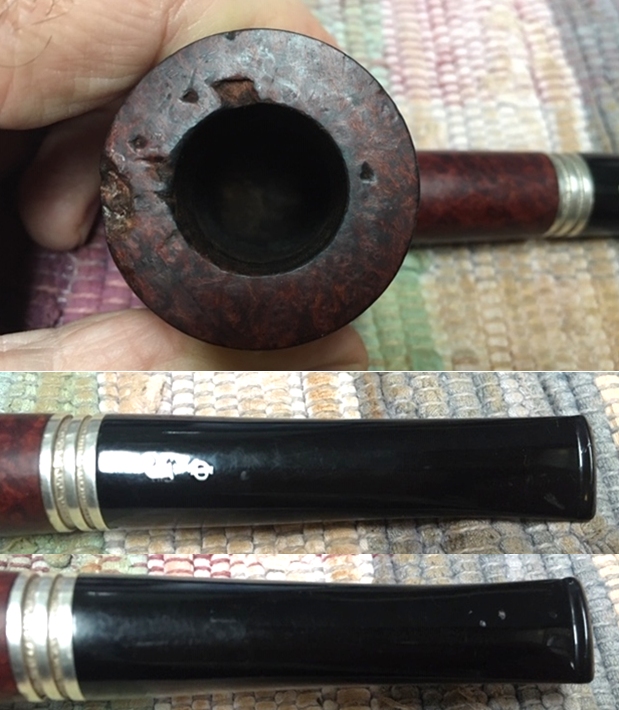
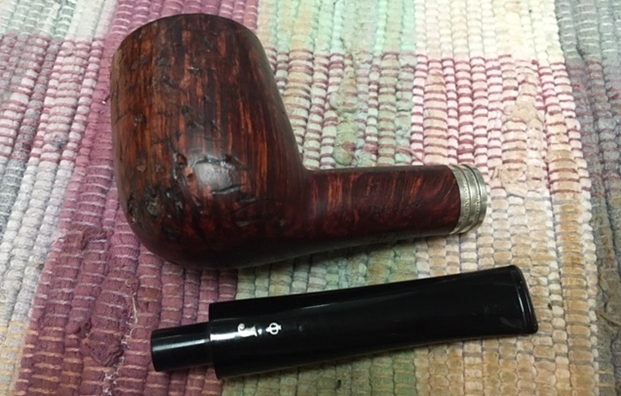
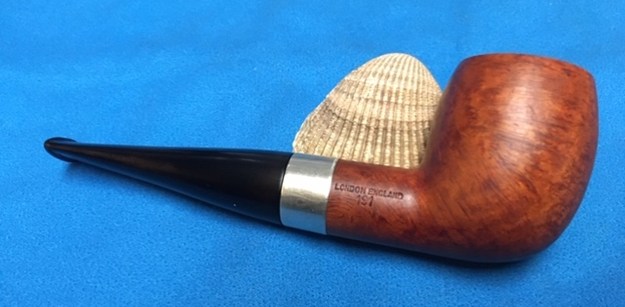
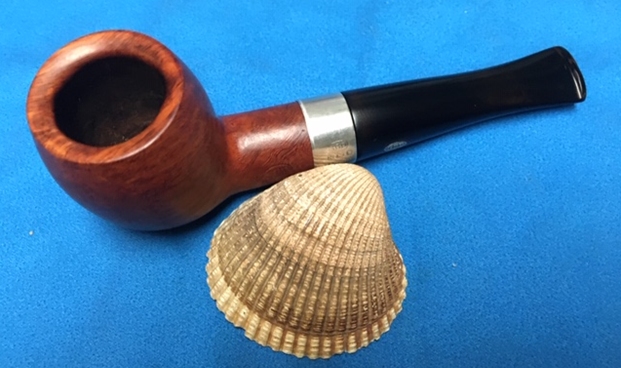
But something struck me as – well – just plain off with the first look, and in particular the name, Bijou, which rang a bell, although not yet any whistles.  I had to save the pics provided to my computer to view them in large enough format for air raid sirens to go off.  Everything was wrong with this so-called little jewel, from downright cheesy and double stamping to the runny stain job and, as Loring warned, an off-round, somewhat fuzzy White Spot.Furthermore, although in some rare instances the given patent number could have traced as far back as the 1920s, without a DUNHILL over LONDON stamp, the raised 4 after ENGLAND signifies the pipe would have been made in 1964, had Dunhill been involved at all in the manufacture of this knockoff.  (See Pipephil in Sources below.)

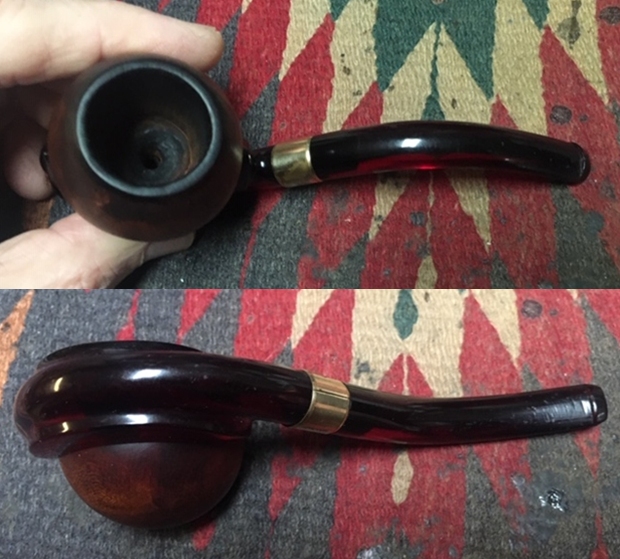
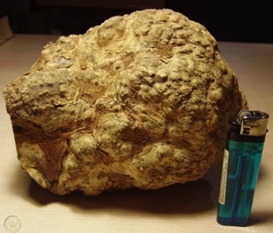
At last I remembered where I had heard of Bijou in relation to Dunhill.  It was Alfred Dunhill’s invention of the first handheld thumb-flick lighter in the late 1920s, which he called the Bijou.  I could find no strong evidence of any Dunhill Bijou pipe ever being made.  The letters GT in the photo below are the original owner’s monogram.

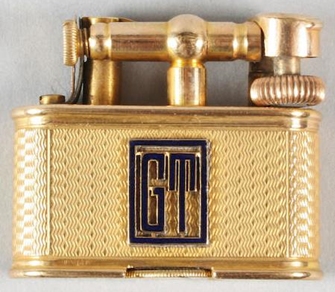
1928 Bijou-A 9-ct. gold lighter, courtesy Worthpoint

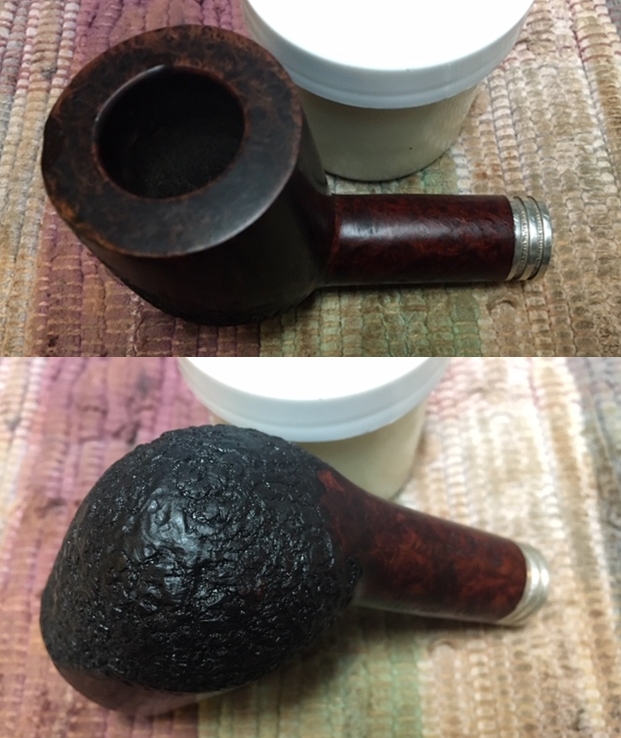
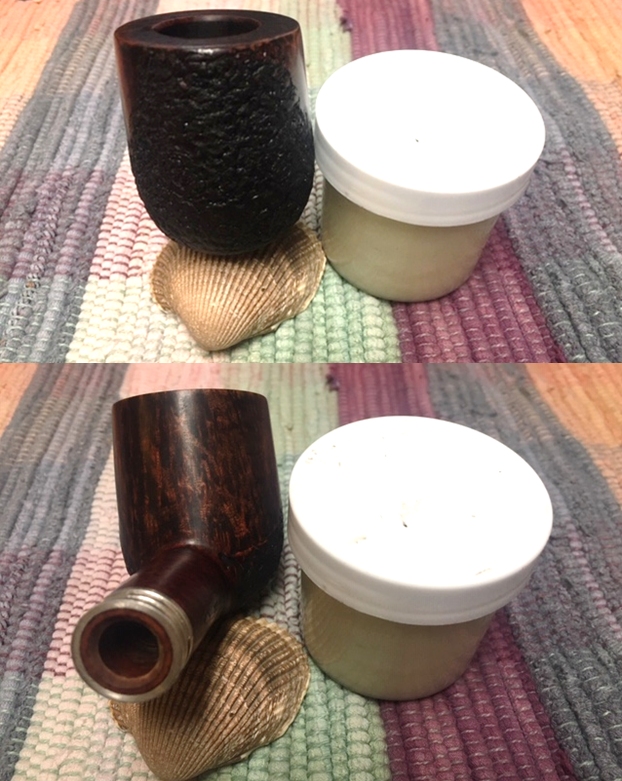
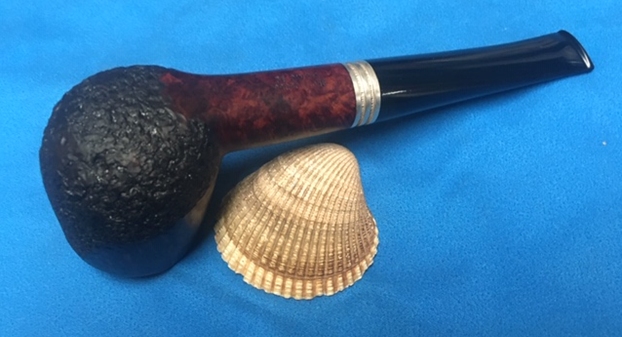
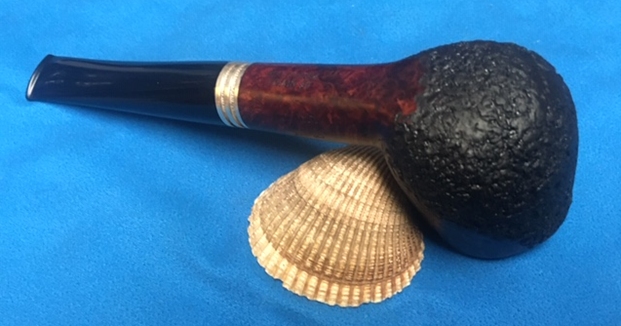
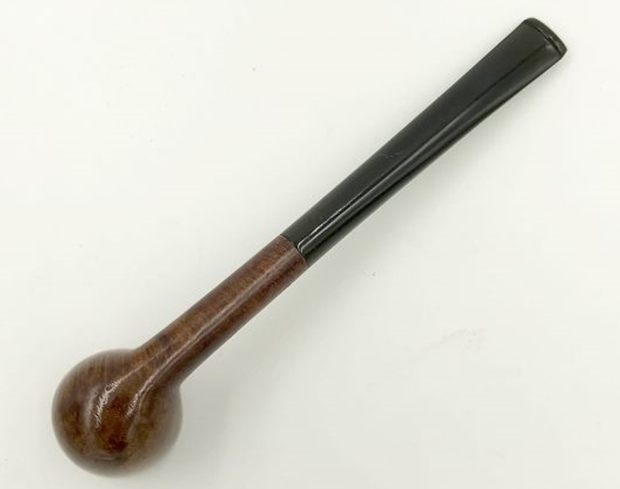
I emailed my concerns to the address listed for the site and to my surprise heard back immediately from the owner that he was looking into the matter.  Within 24 hours, experts confirmed that Dunhill never made a Bijou line, and the pipe indeed was a forgery.  It was removed from the website, and the pipe’s owner was notified of its true nature.The owner of the Bijou provided ample photos of the pipe for its proper identification, and there is no reason to suspect he intended to pass it off as a genuine Dunhill with any disingenuousness.  Here is another, lighter, shinier version of the same pipe, this one called a Dunhill 401 Root Briar Patent Number 417574/34 pot, found on eBay, with only the one picture and nothing but a distant angle on the White Spot to assume its authenticity.  This and the Bijou are the only 401 shapes I can find.Now, indulge me with a final Dunhill photo showing two pipes.  Both are supposed to be very rare #848 ODA magnums, but only one is the real thing.  The other appears to date back to the 1980s scandal, demonstrating how that scourge is not yet behind us.  Can you tell which is which?  Dunhill experts will have no trouble, but if you found the fake on eBay as the knowing buyer in this case did, would you?  The answer is here,* but I recommend the first Youtube video in the Sources for the full story.

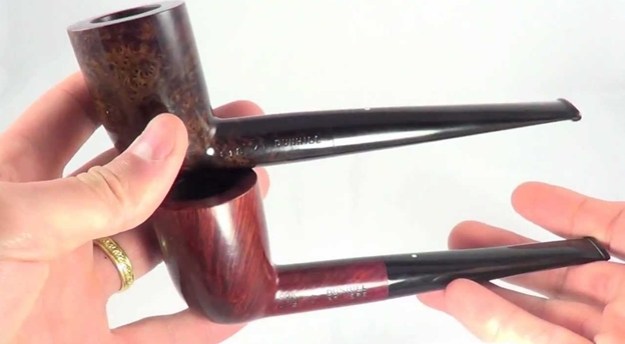
Courtesy Pipehub, YoutubeBen Rapaport, a respected U.S. antiquities historian and columnist, wrote a comprehensive article about the history of pipe counterfeiting, called “The Age of Steal,” for Pipes and Tobaccos Magazine online.  Rapaport prefaced his detailed reporting of fraudulent activities in the pipe world with a note that they may not be “classified as theft in the literal sense [but] are, in my opinion, theft in the figurative sense.”

With the beginning of eBay’s real success as an online auction site in the mid-1990s, Rapaport claimed, “there suddenly appeared a pixel-and-byte tsunami, or maybe a torrent, of instant tobacco treasures for sale.”

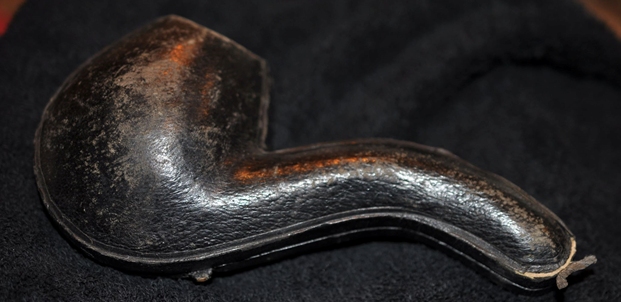
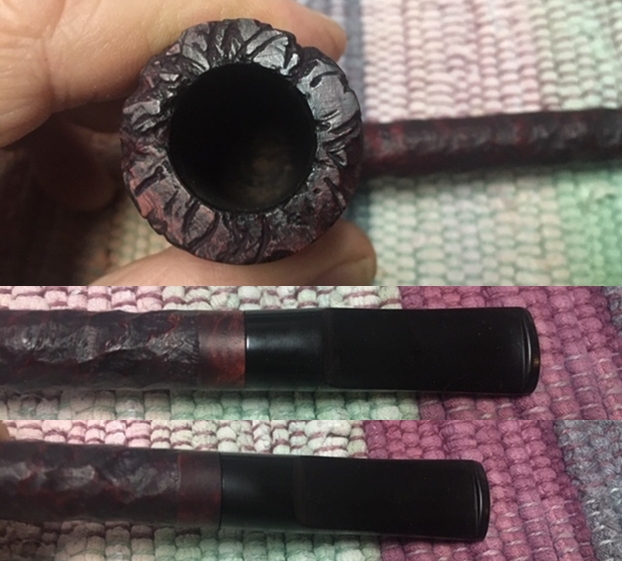
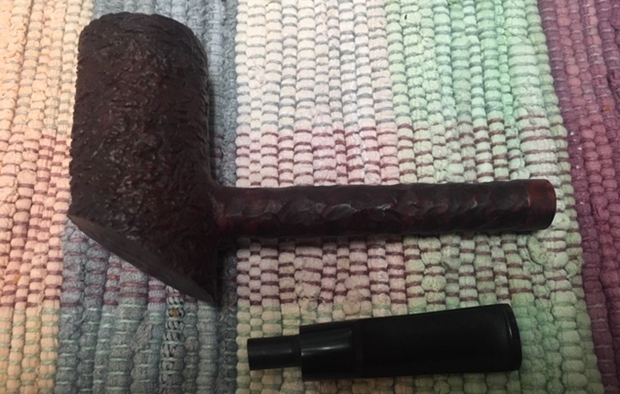
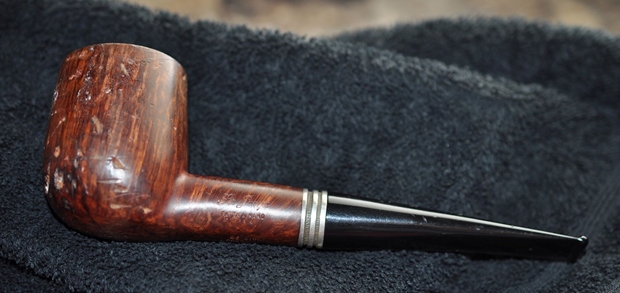
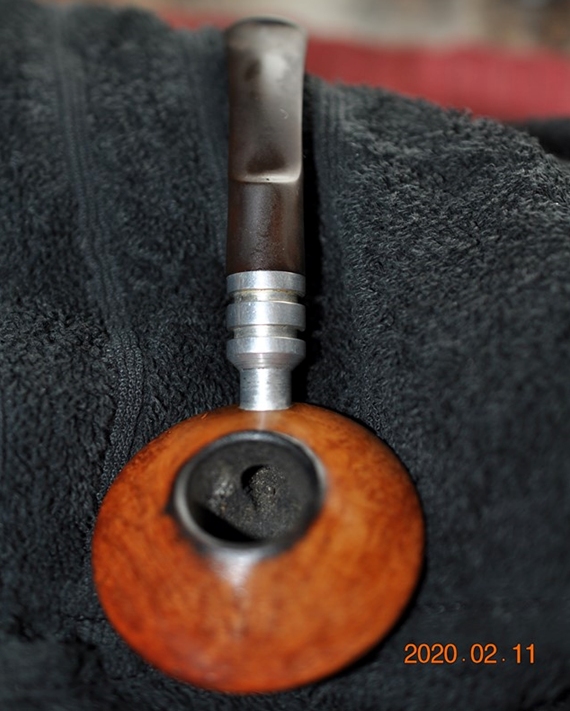
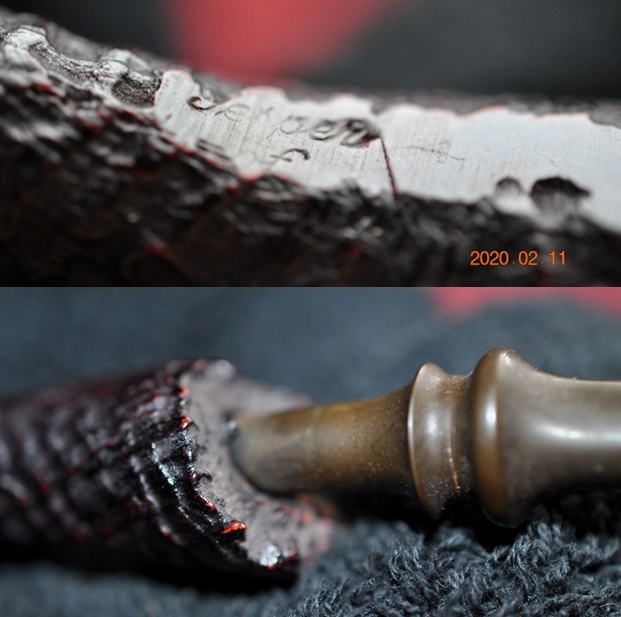
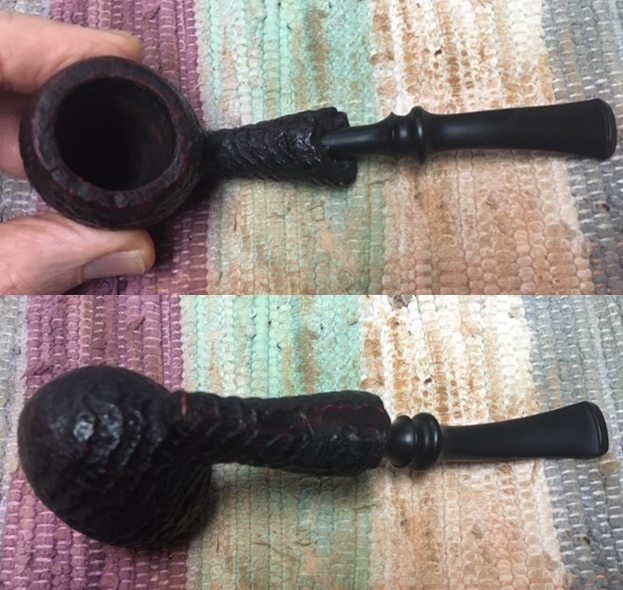
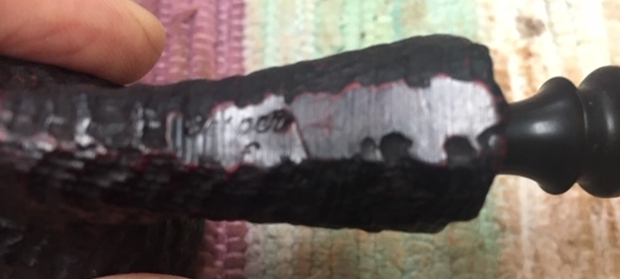
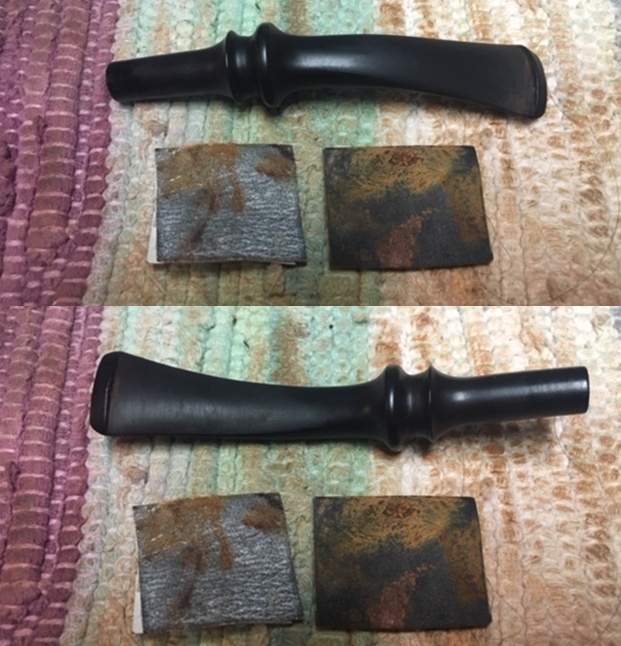
The fraudulent cyber pipe business is now out of control, running the gamut from established old name brands, antique or otherwise, to contemporary makers and even artisan carvers.  The vast majority of pipes I’ve bought on eBay over the years have been more or less just what they were represented to be, with only two exceptions, one of which was supposed to be a KB&B Rocky Briar salesman sample.  Salesman samples were miniature, scale versions of regular sized pipes carried by – you guessed it, salesmen – in the early 20th century to show prospective buyers an idea of what they would get.  By nature of the time period in which they were used, salesman samples are now antiques or near the mark.  When I opened the package that arrived in the mail and removed the pipe, even taking into consideration its tininess, I found a corruption of pipe making that seemed to be crafted of balsa.Examining the little monstrosity, I was at once alarmed by its color, which I call Chinese red, and the tacky (as in sticky and uneven) looking coat of stain, or whatever was used to cover the cheap, ultra-light wood I later concluded was something along the lines of paulawney.  A closer look revealed just plain sloppy nomenclature, regardless of age, in particular an uneven Reg. US Pat. No. 298978.  Since there were two each of the numbers 8 and 9, I examined them, and they didn’t match, as shown in the following photo which is compared to one of Steve Laug’s that shows a real, crisp Rocky Briar imprint.
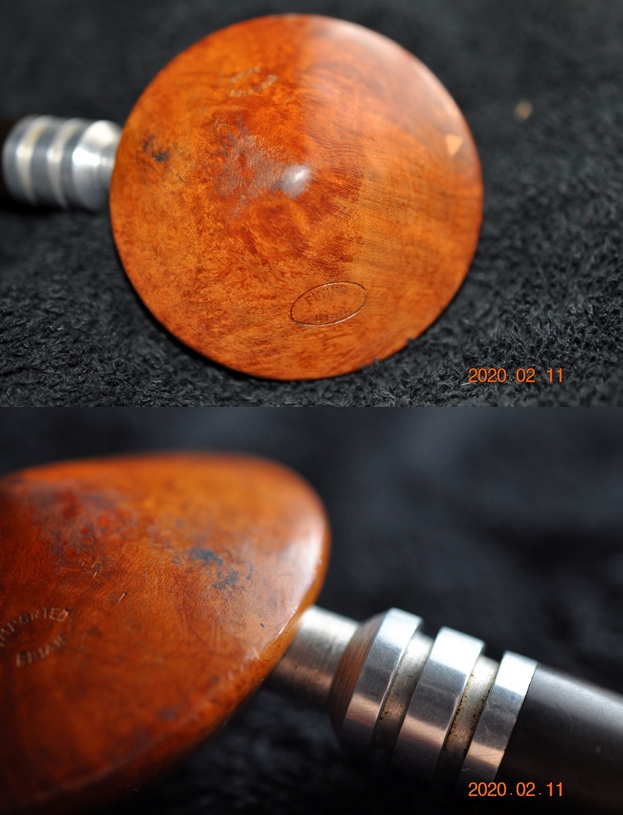
As if there were any doubt as to the pipe’s fraudulence, it lacks the shape number on the right side of the shank.
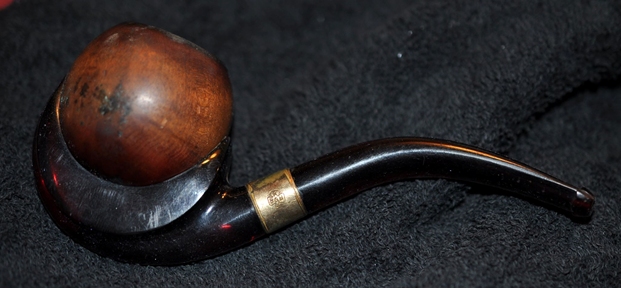
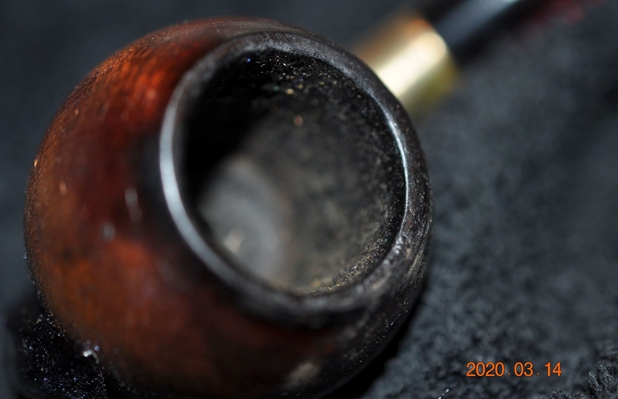
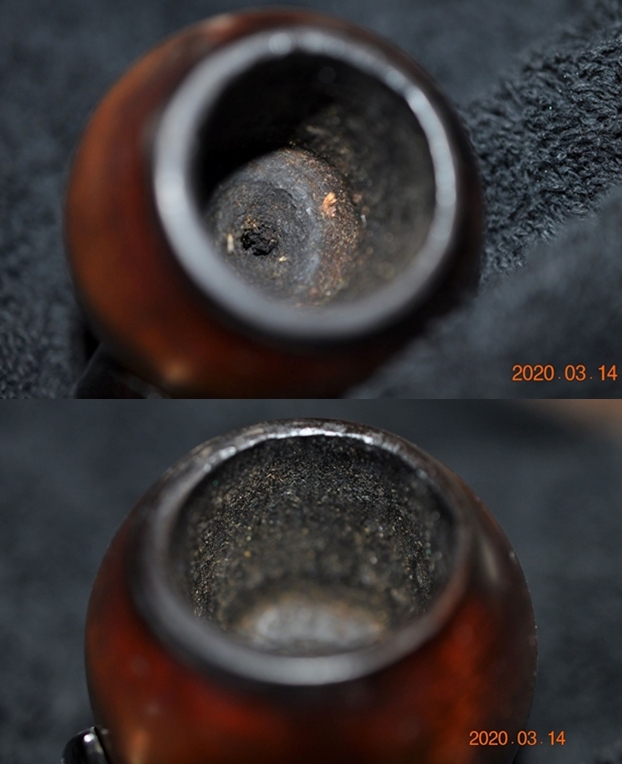
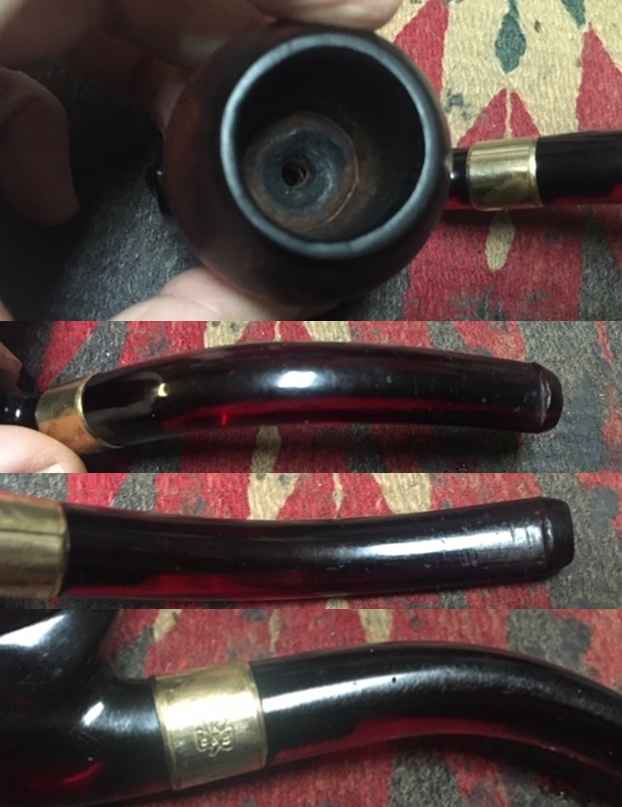
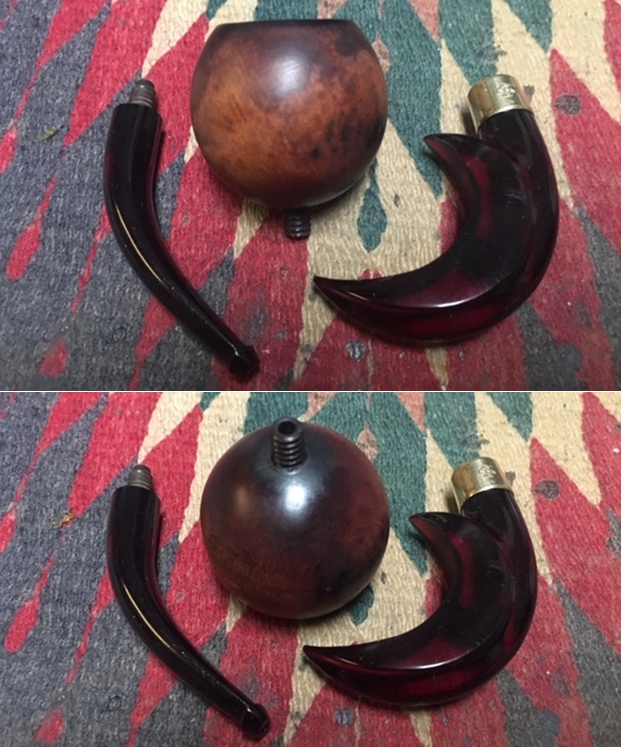
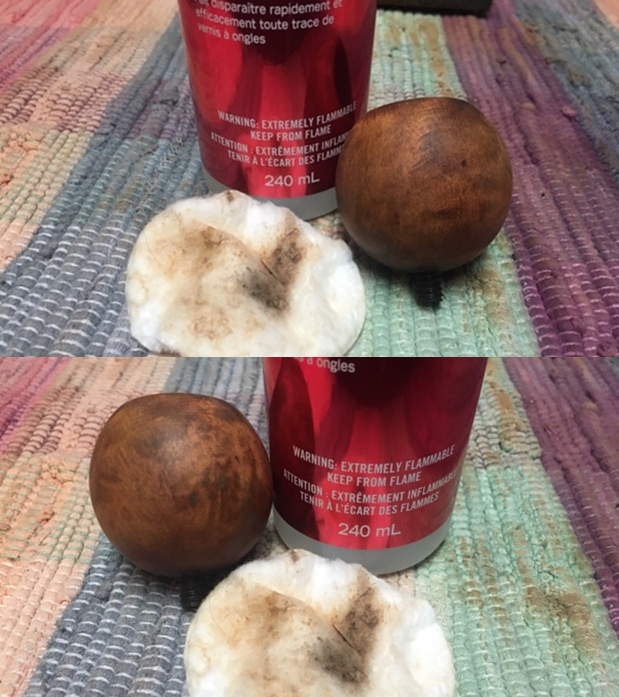
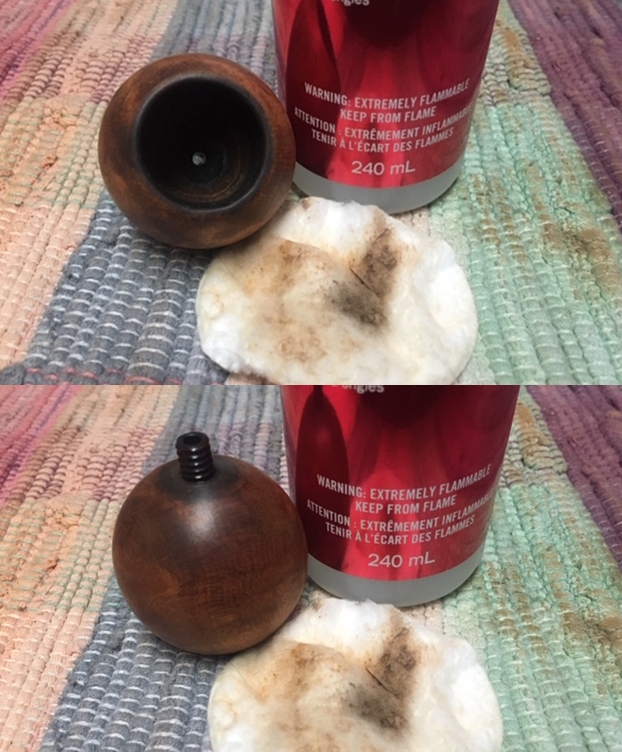
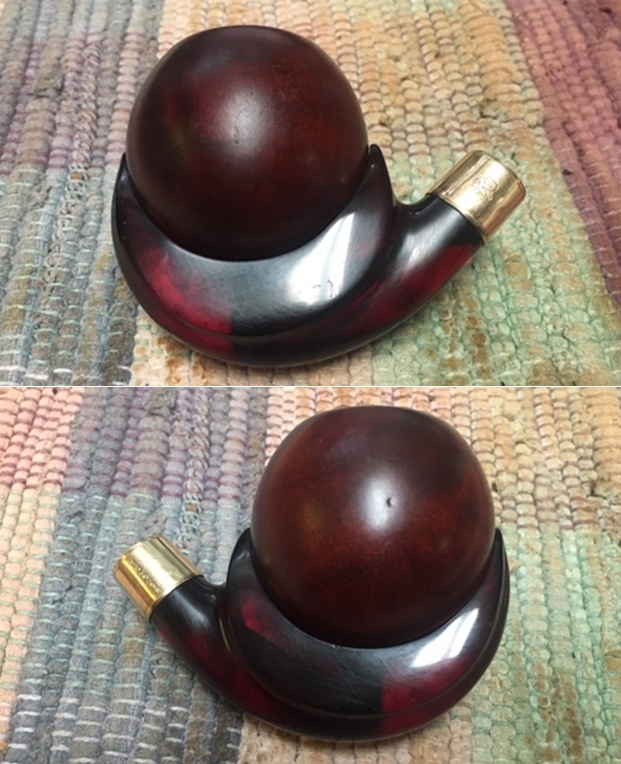
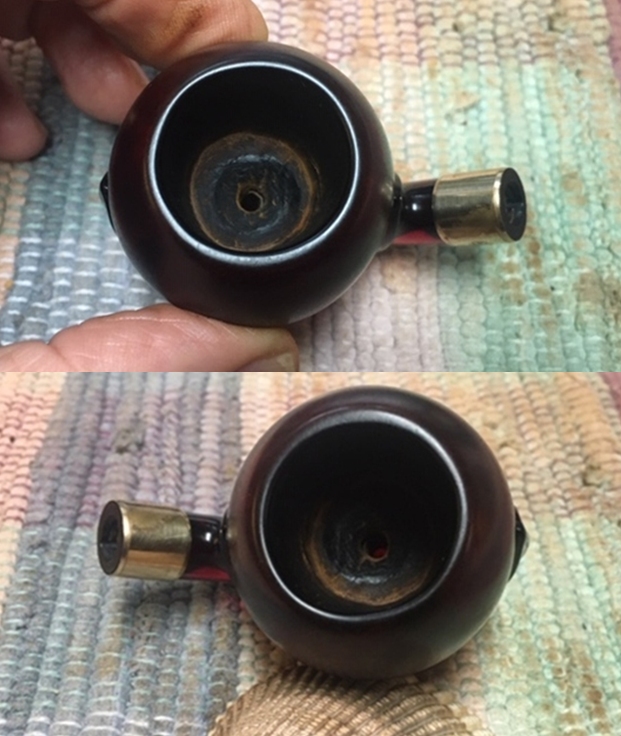
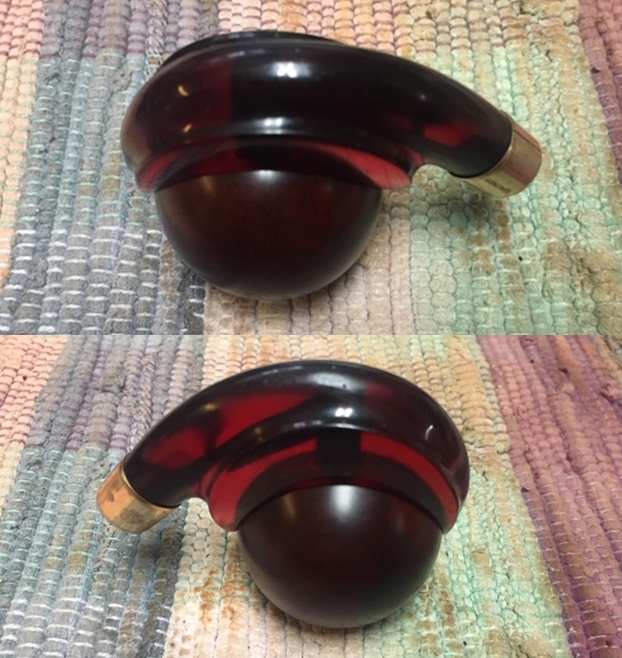
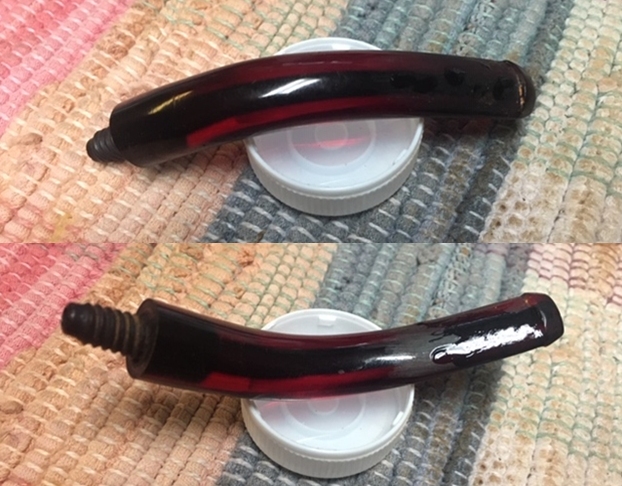
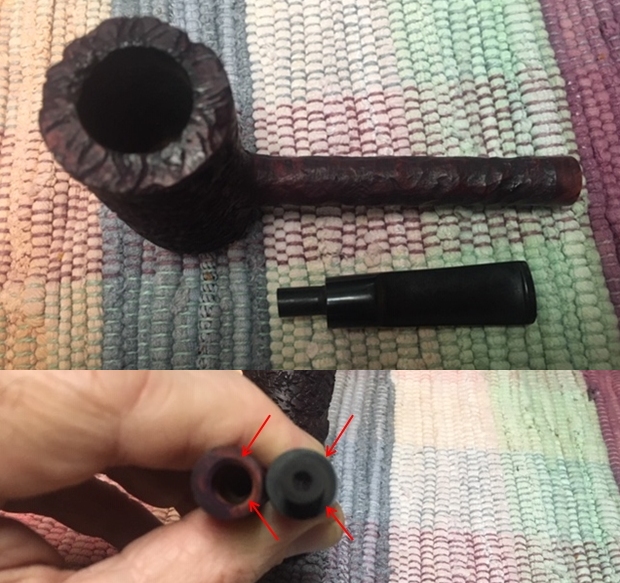
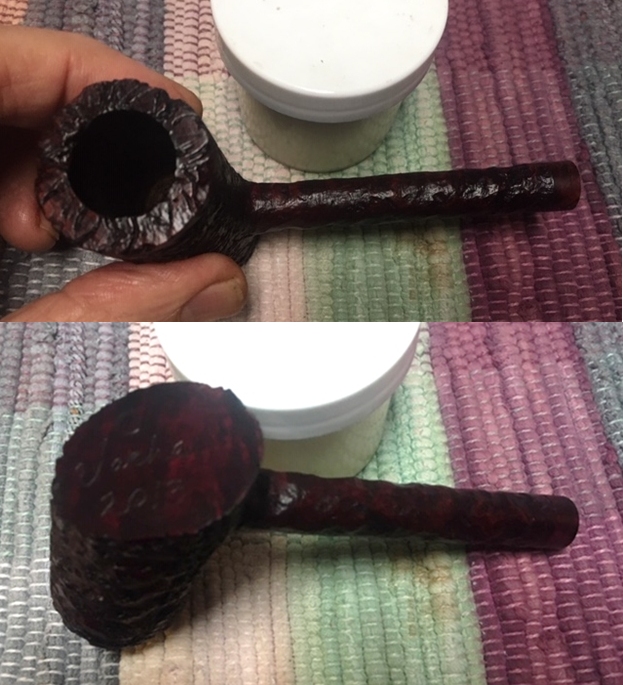
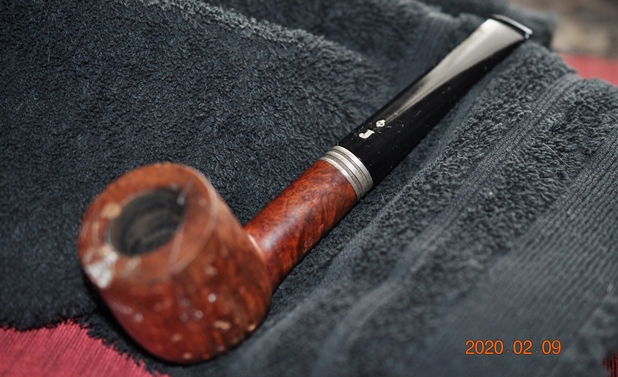
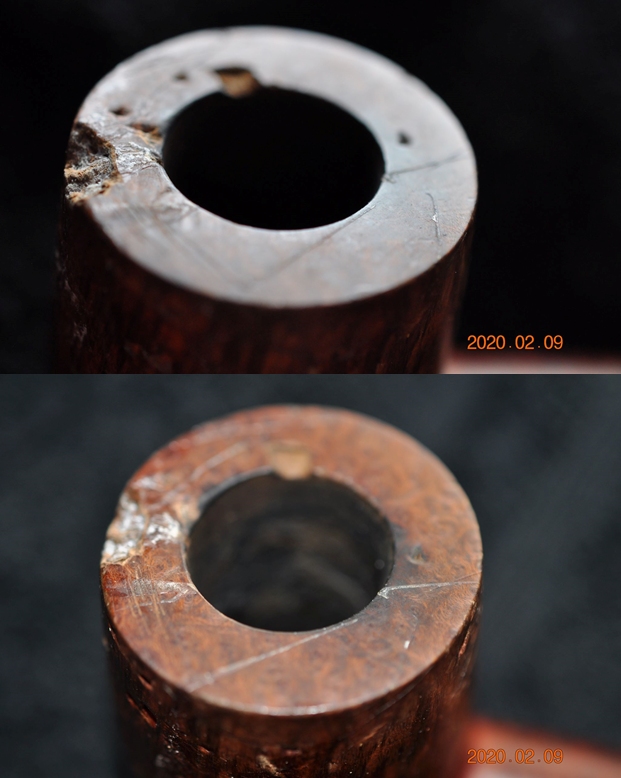
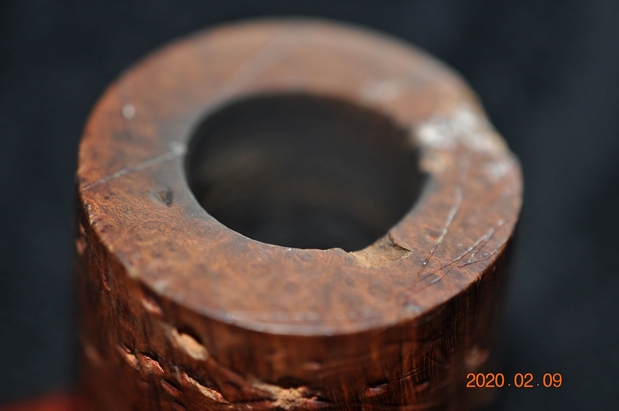
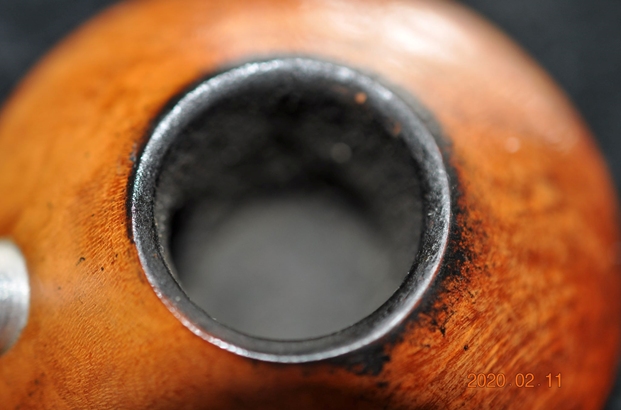
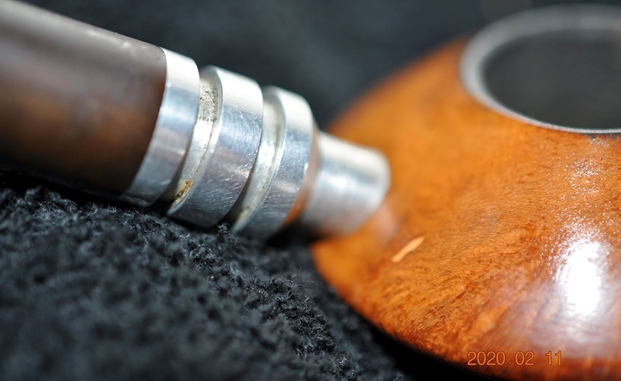
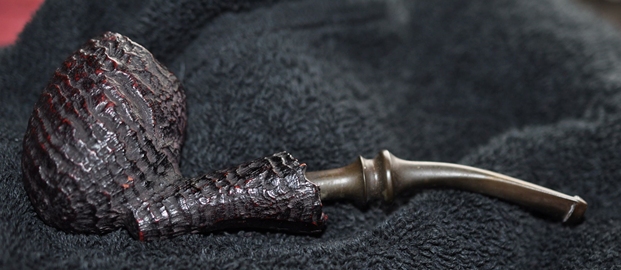
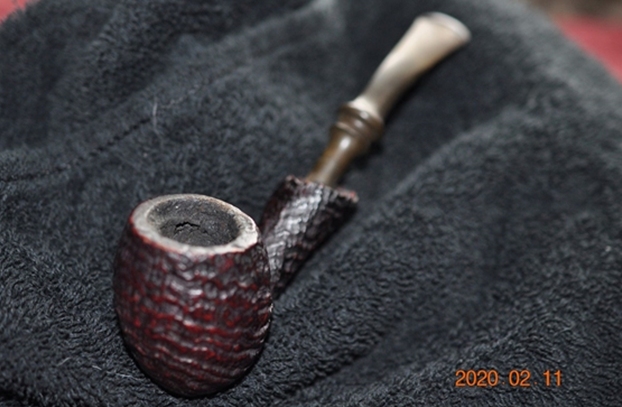
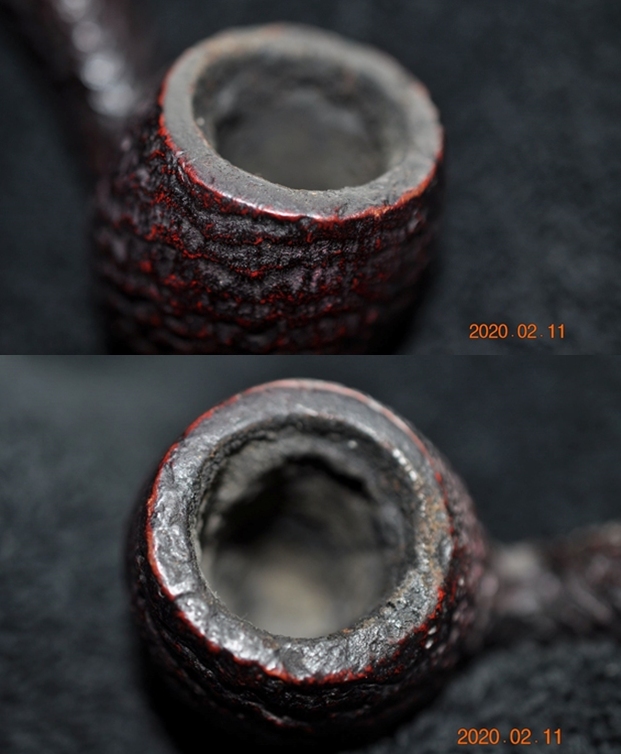
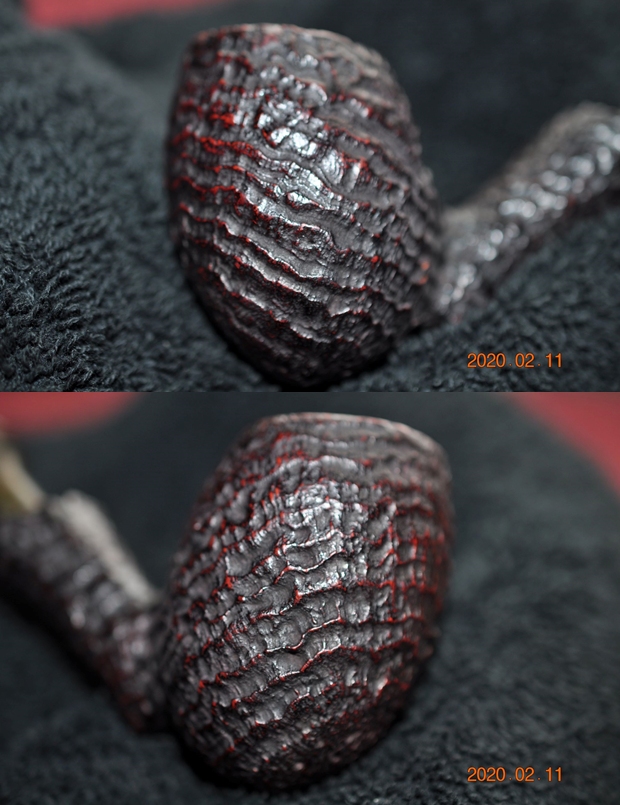
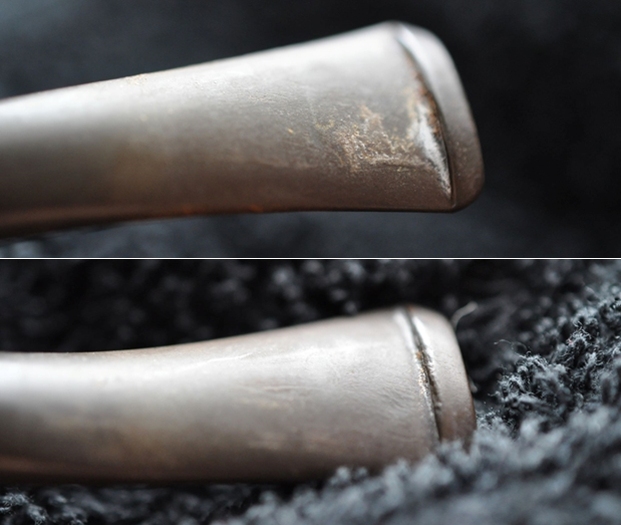
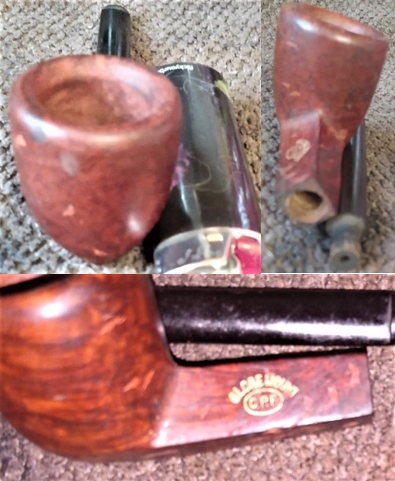
The other fake pipe was a CPF Globe Mount, a recent eBay purchase.  The wood is also very light and soft, but more substantial than the KB&B Rocky Briar.  Based on the light color of the shank opening and scratches, and the reddish tinge of the sanded chamber, I suspect it’s Chinese red cedar.  The stem, an obvious mismatch, is plastic. Each of these pipes cost the same or less than return postage would be, and so I kept them.  But it’s important to be sure that returns of online estate pipe purchases are guaranteed by the seller, especially if it’s a substantial investment.  Both of the above pipes were so protected, if I wanted to punish the sellers at my expense!

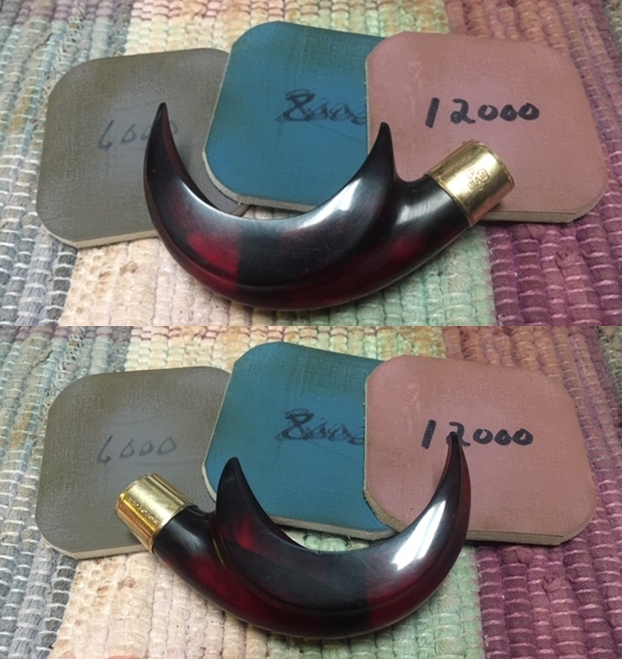
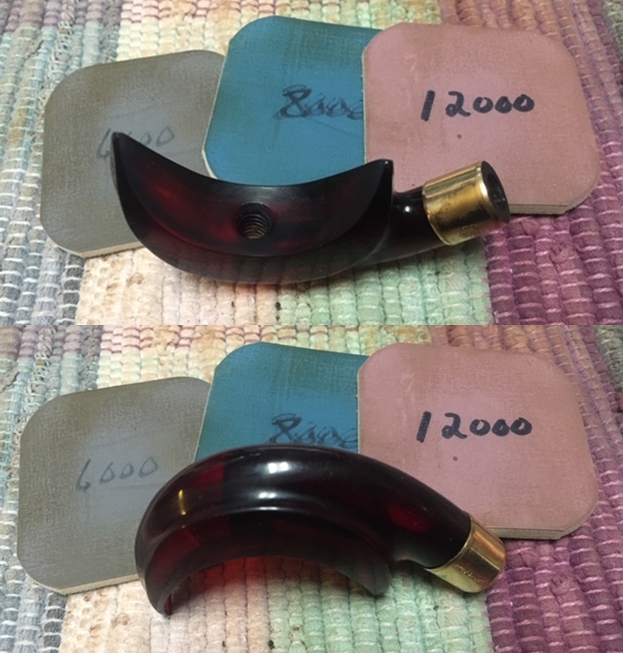
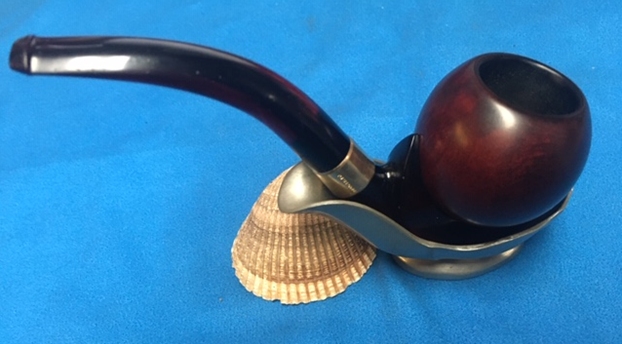
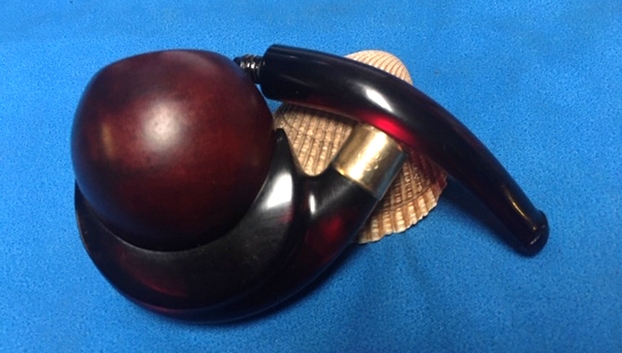
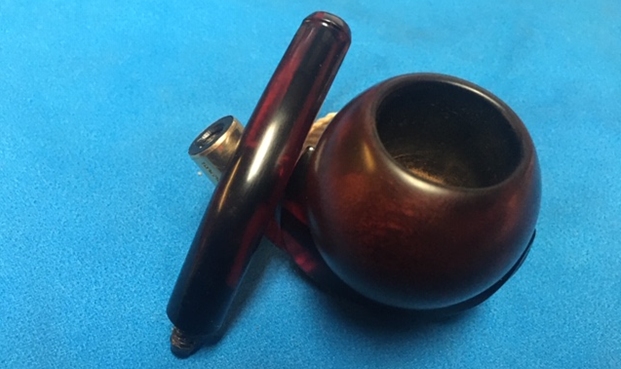
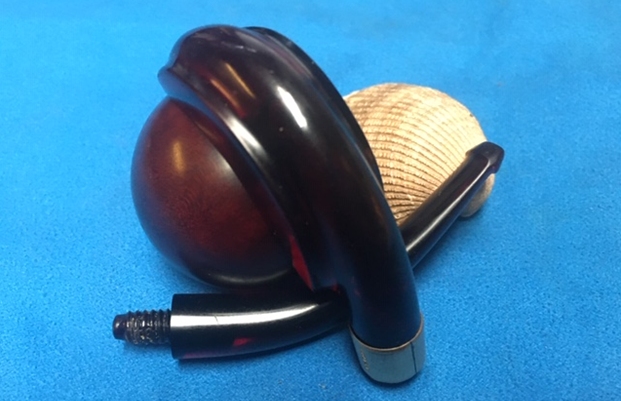
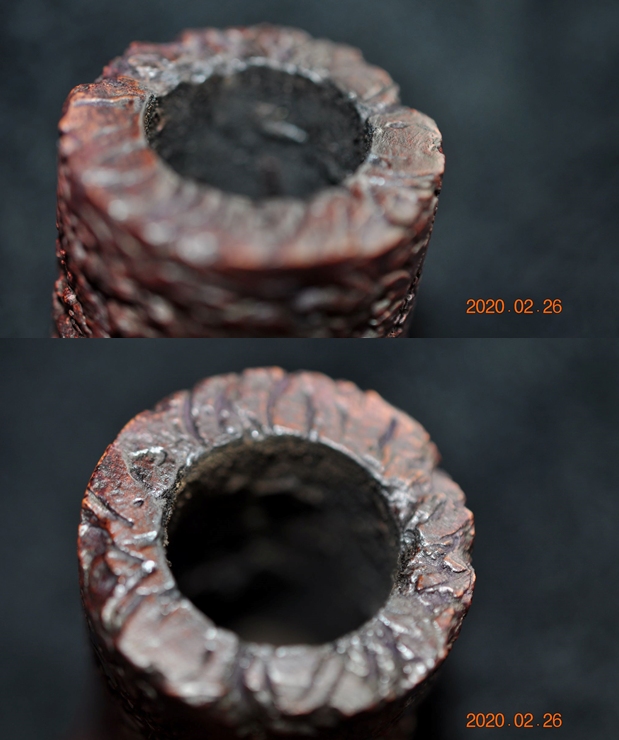
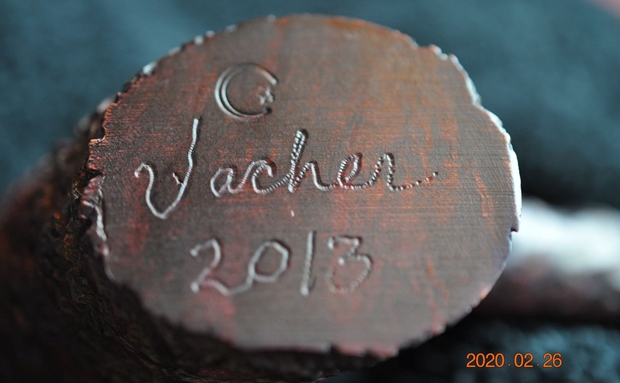
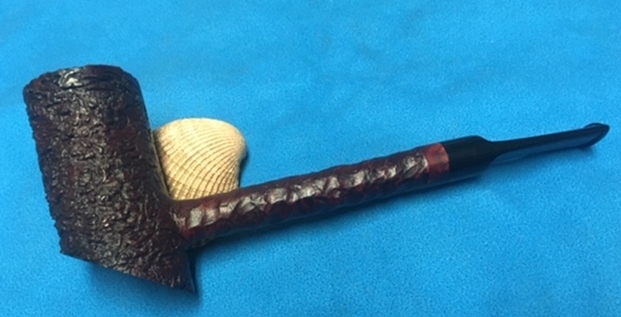
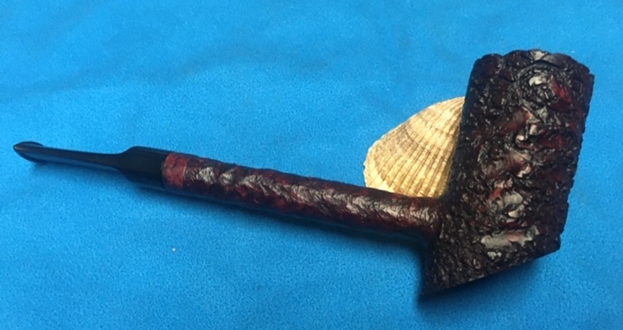
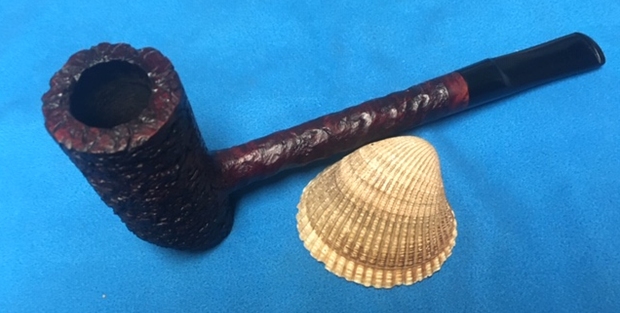
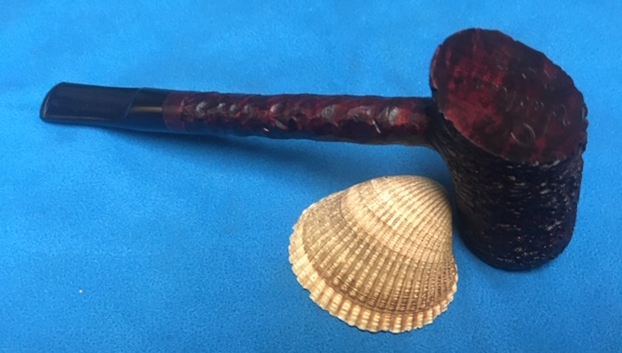
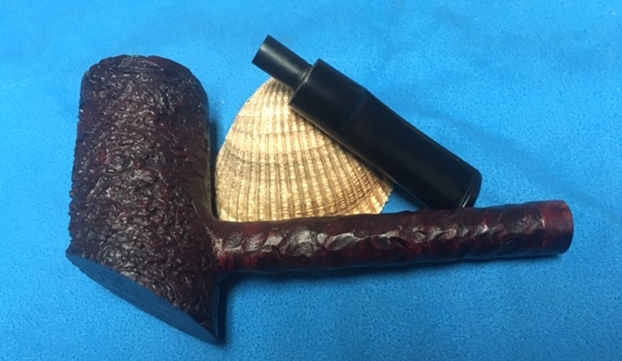
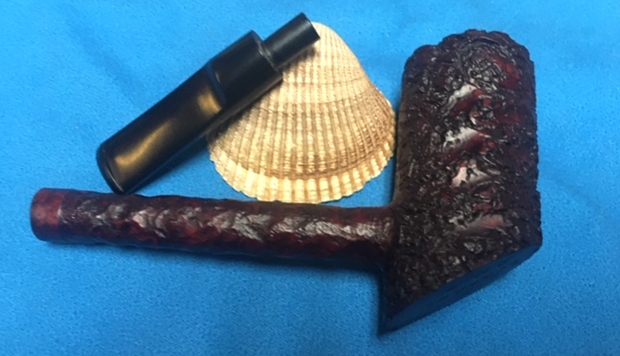
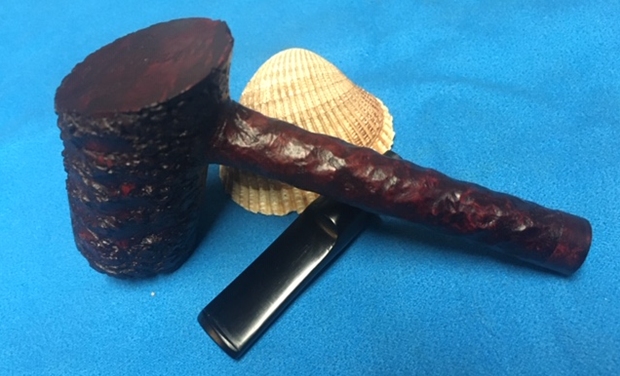
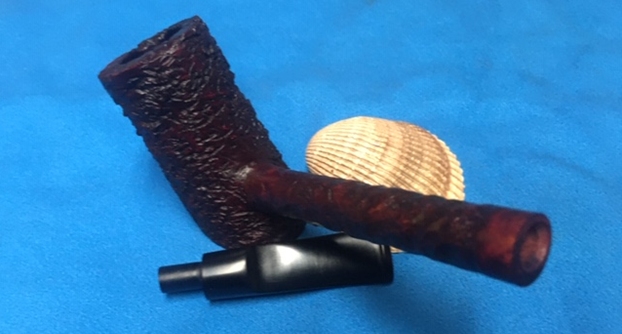
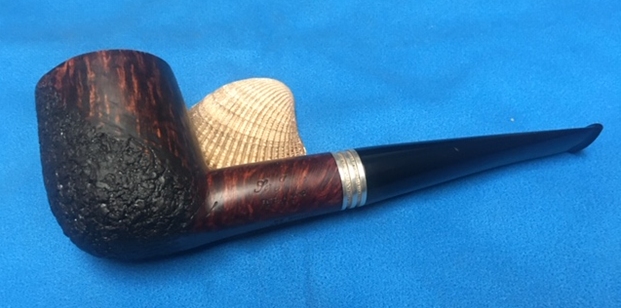
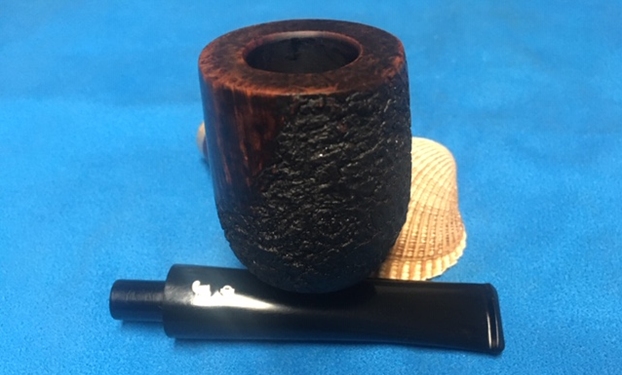
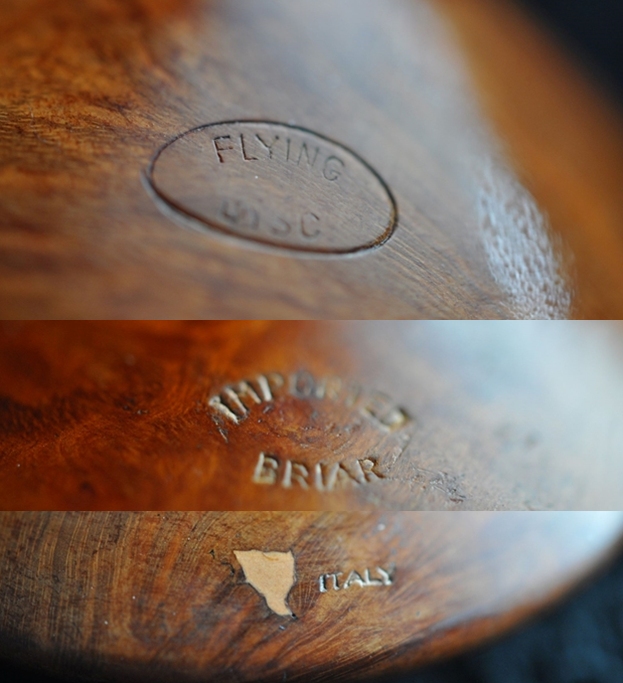
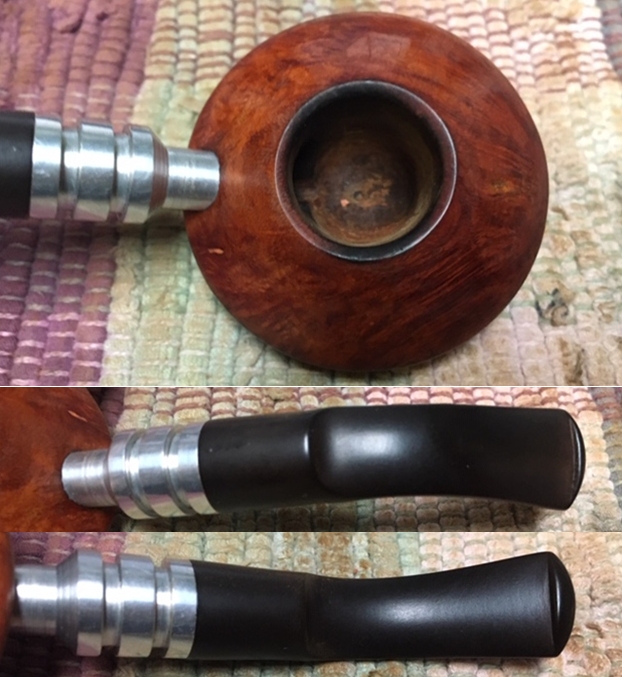
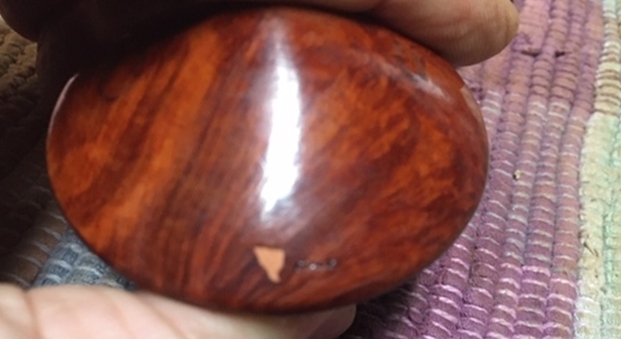
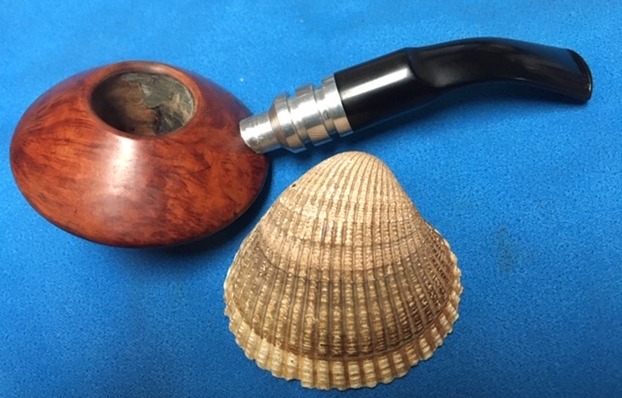
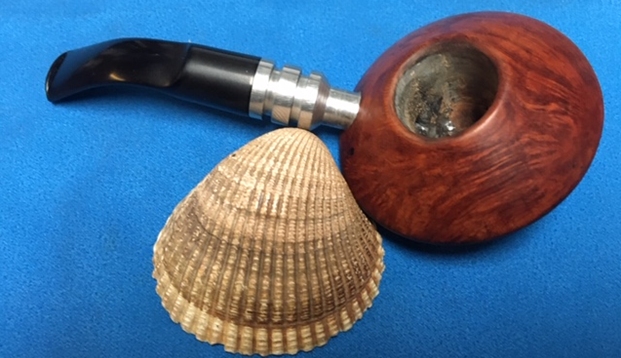
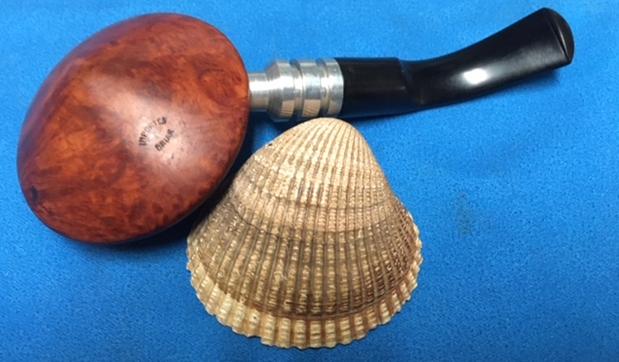
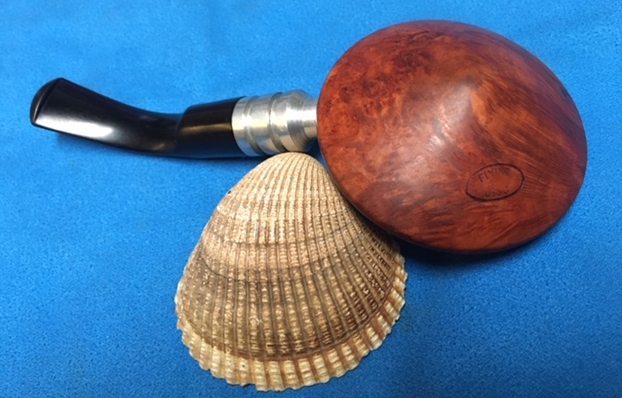
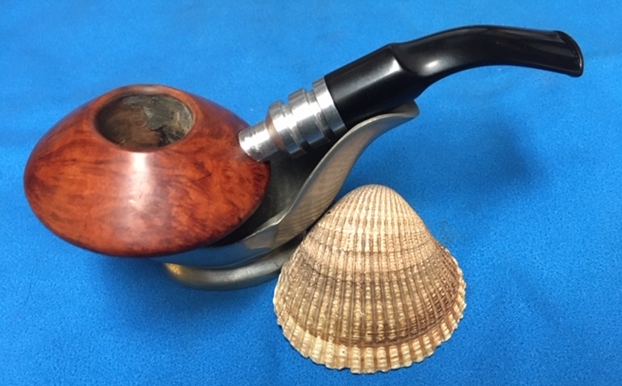
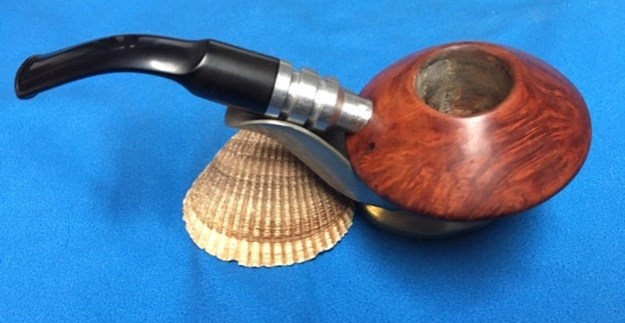
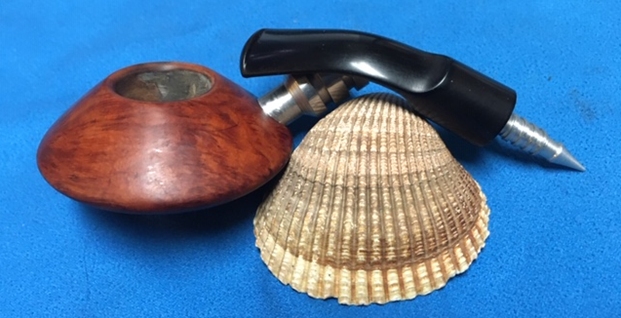
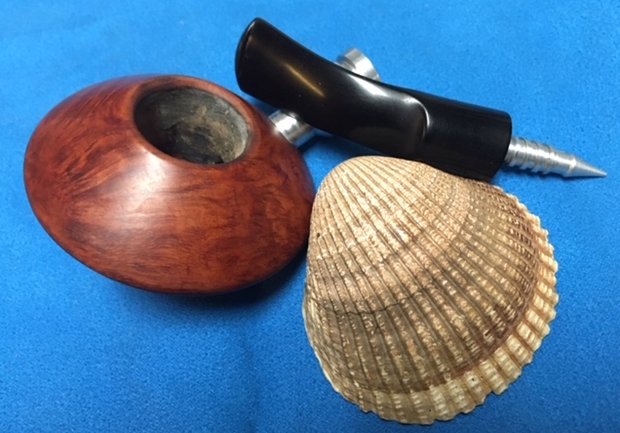
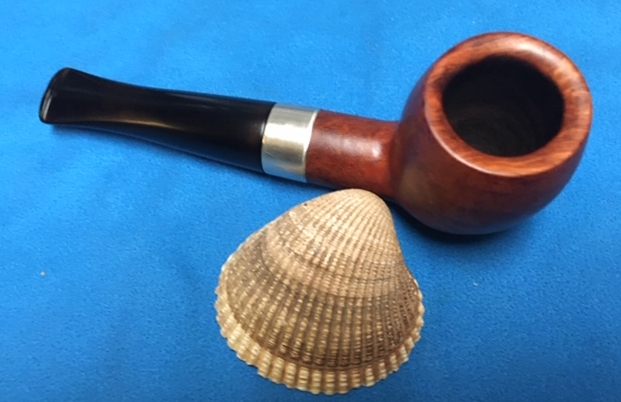
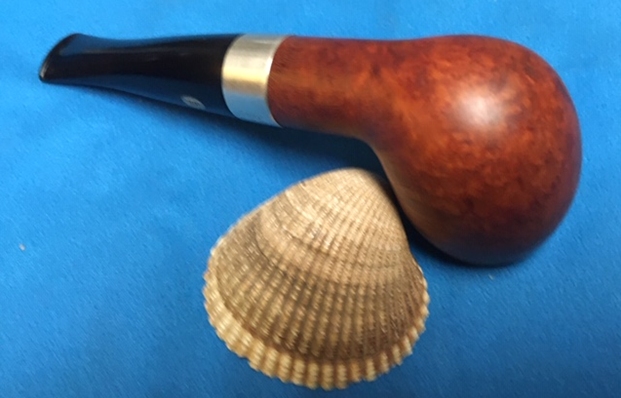
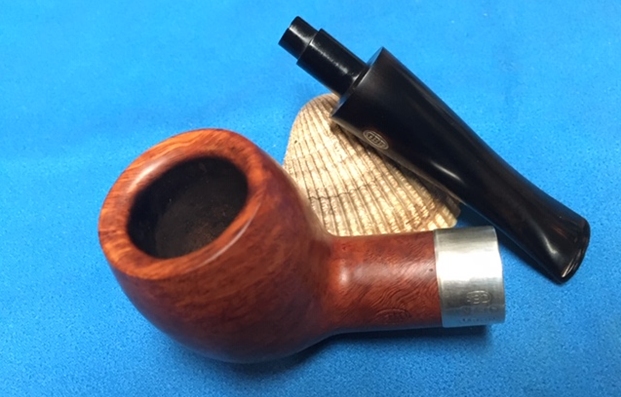
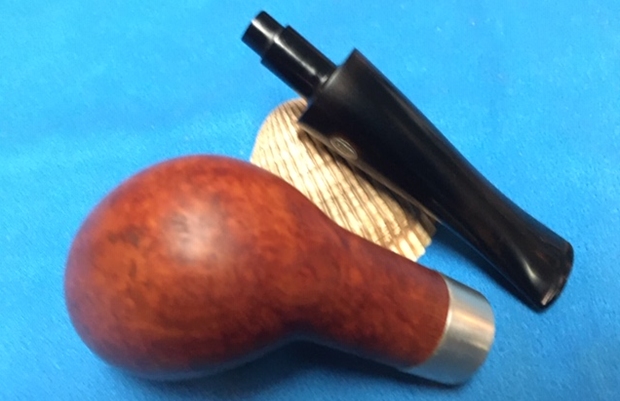
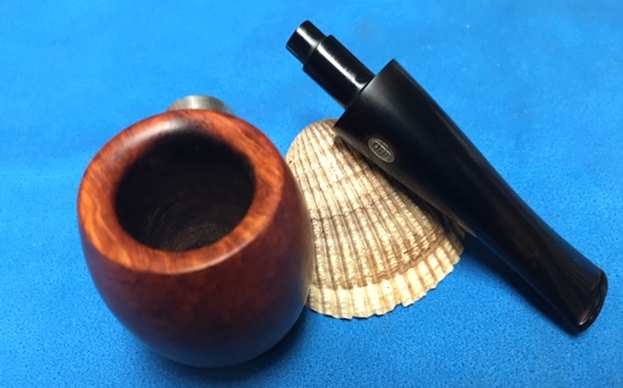
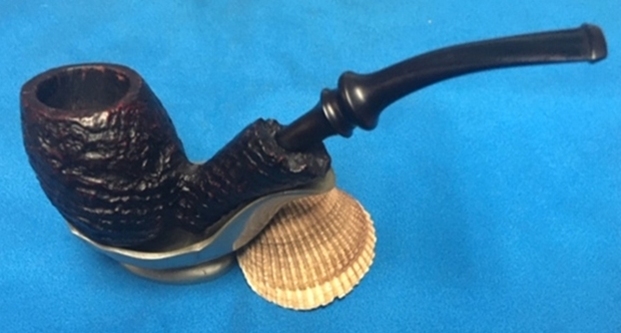
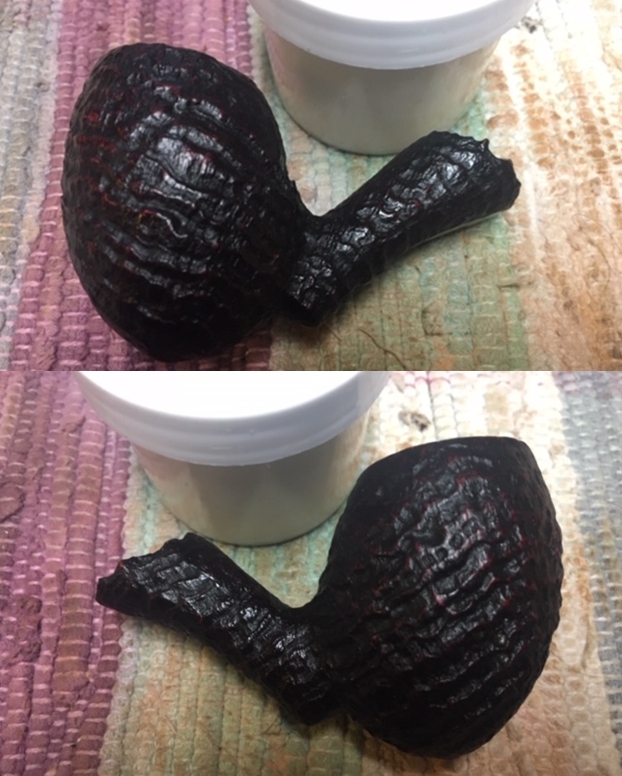
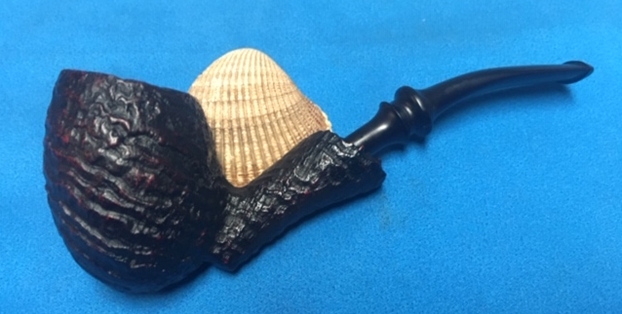
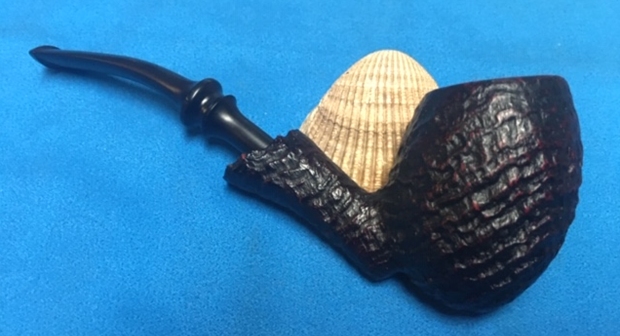
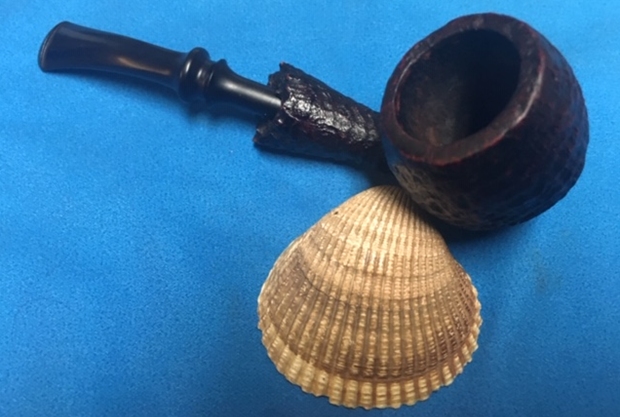
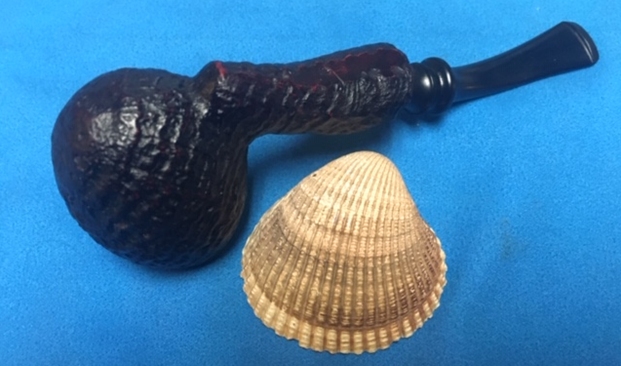
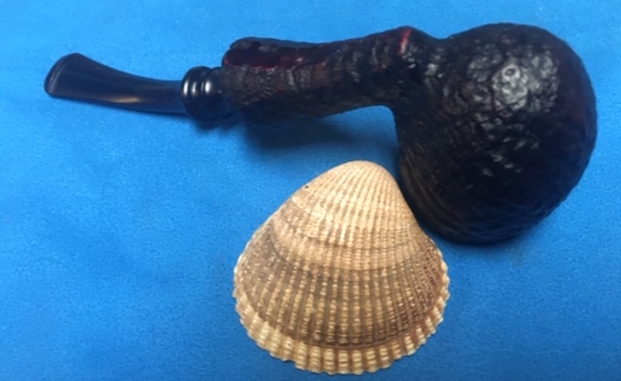
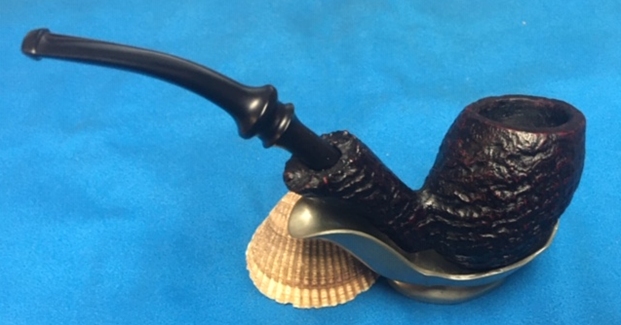
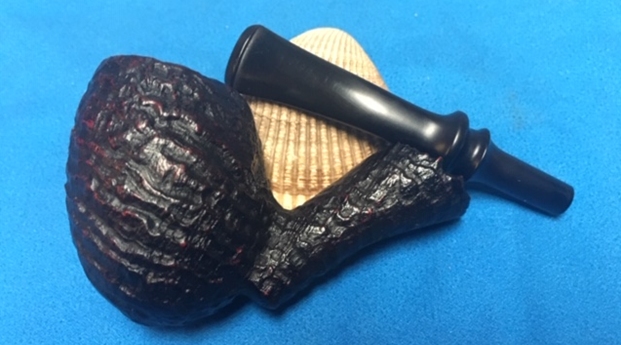
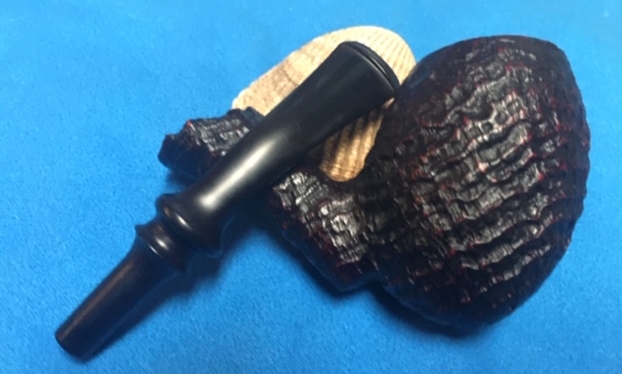
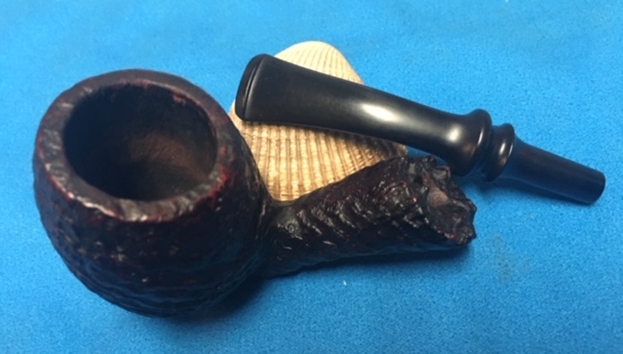
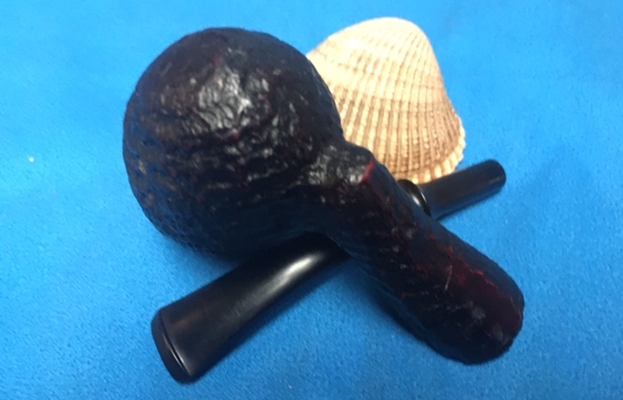
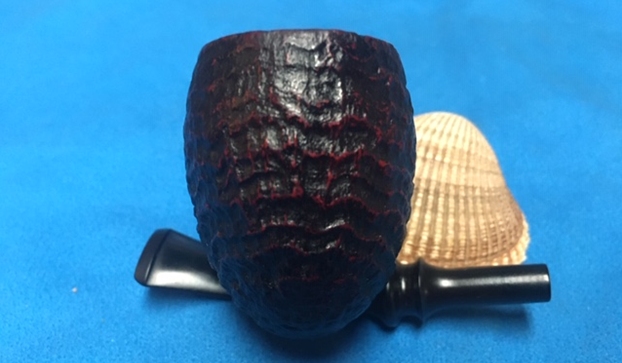
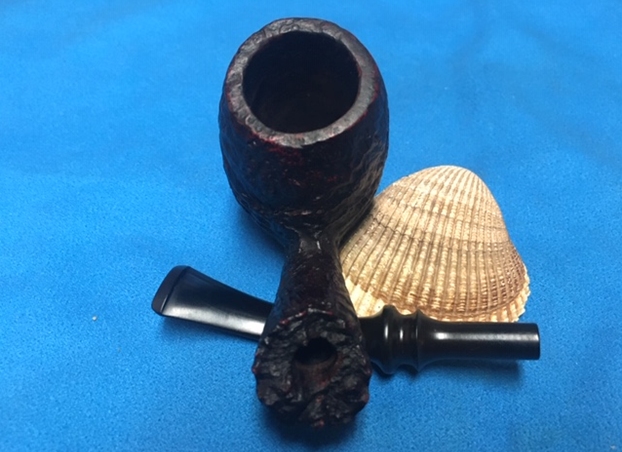
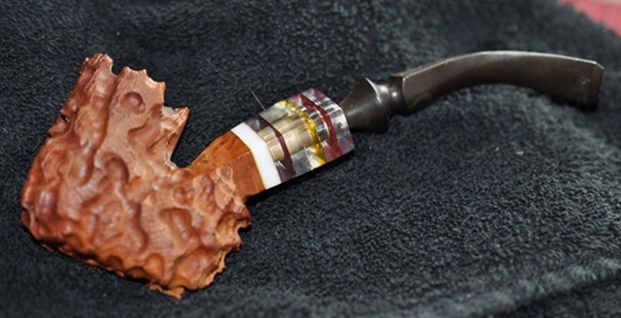
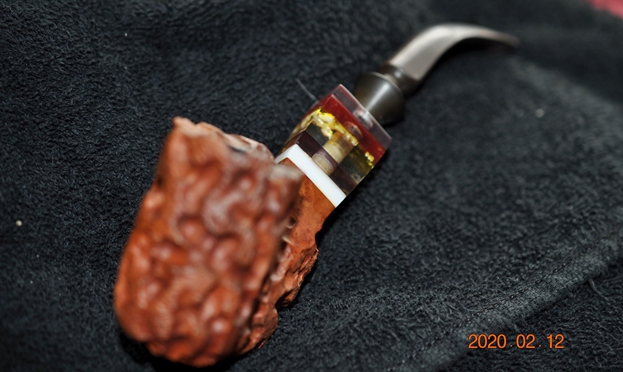
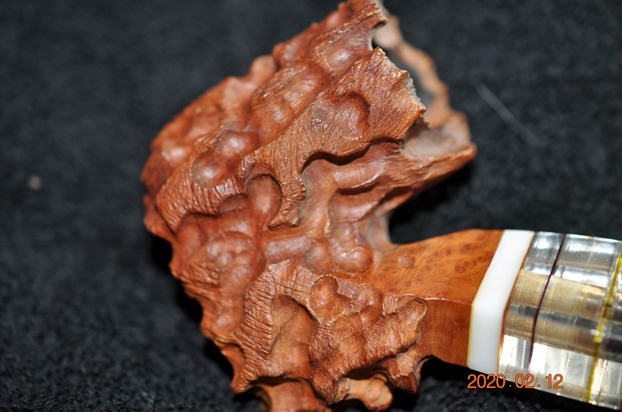
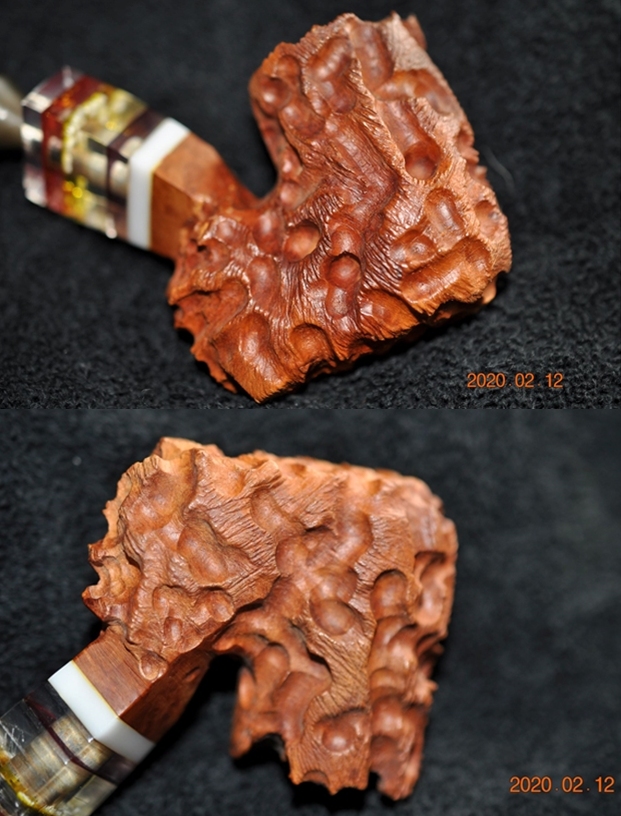
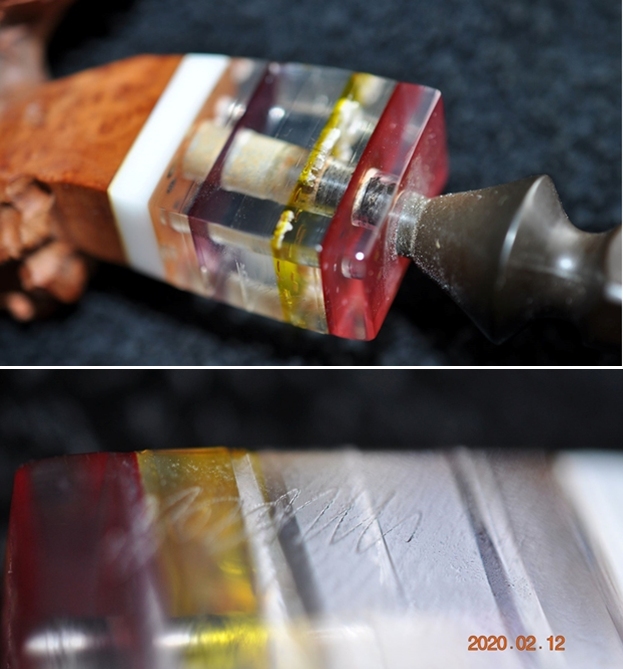
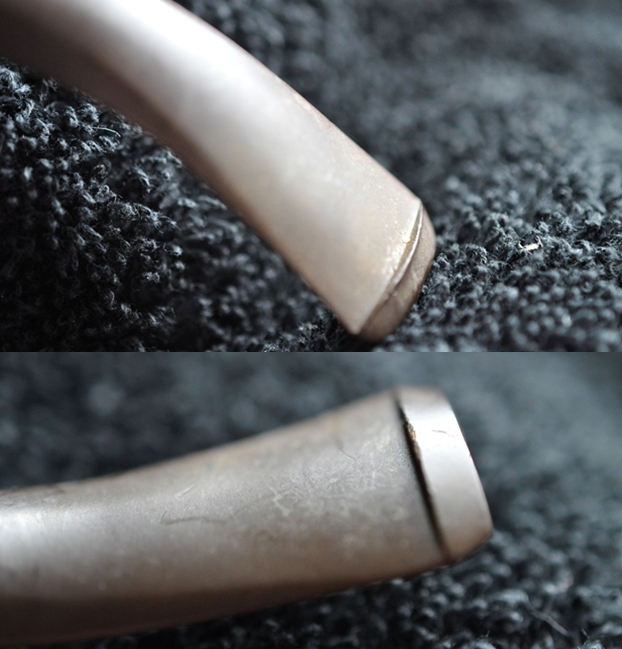
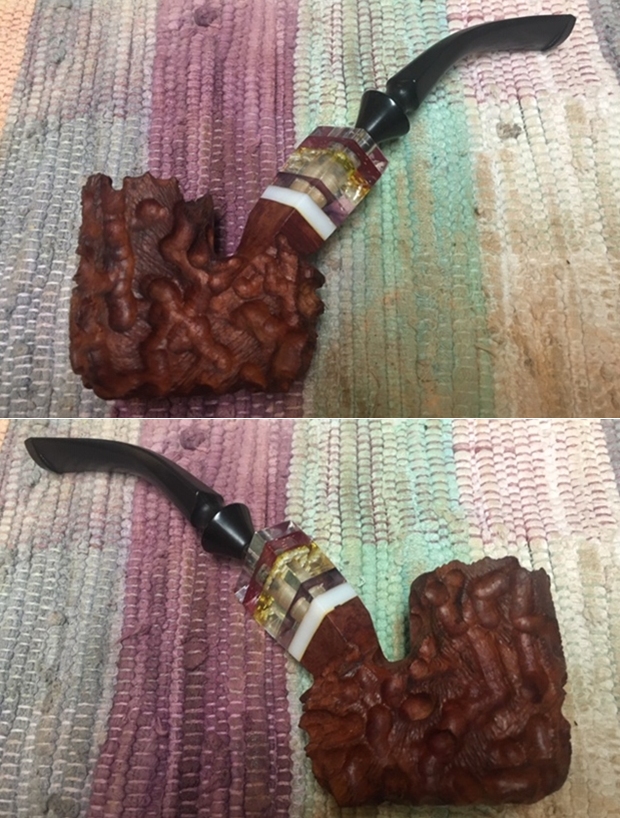
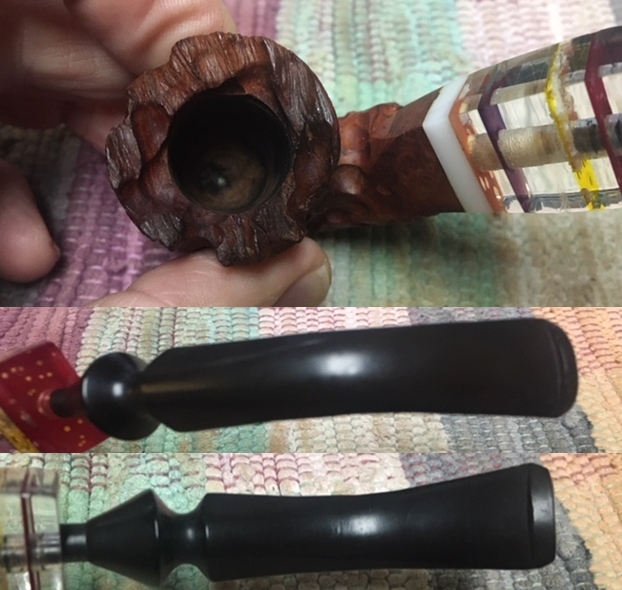
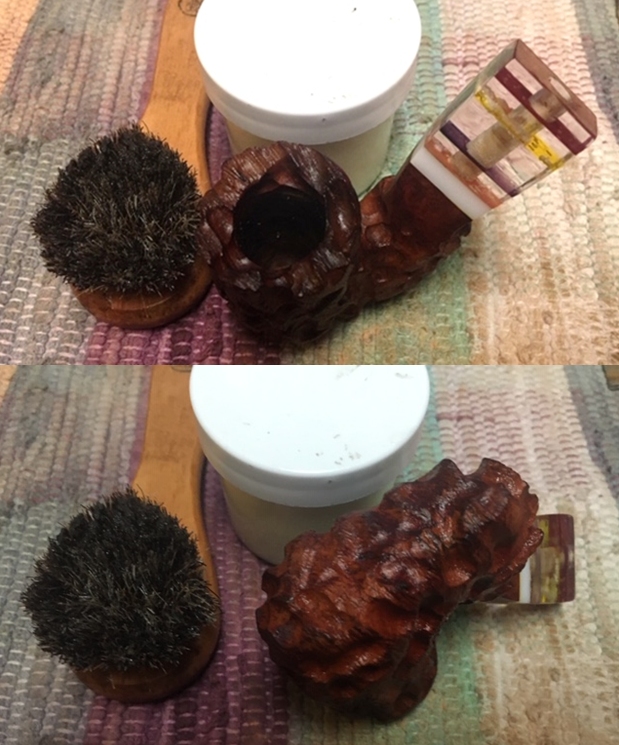
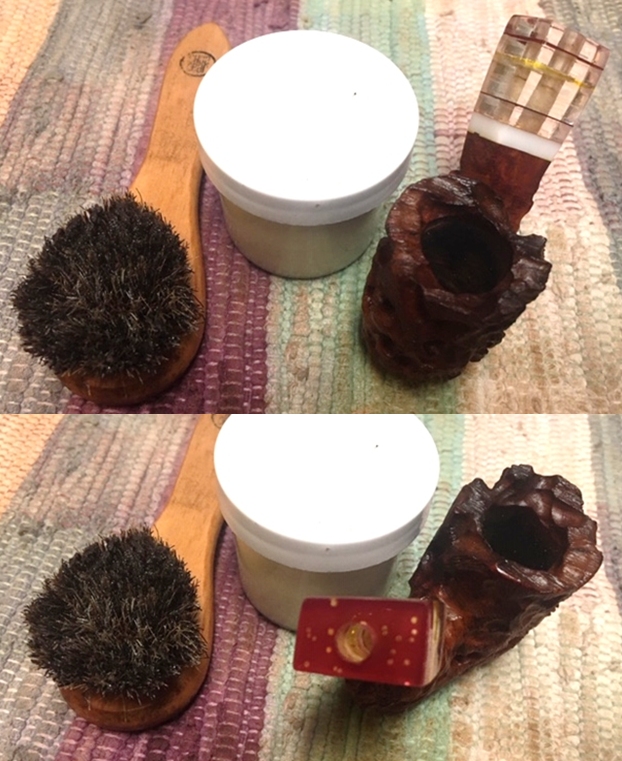
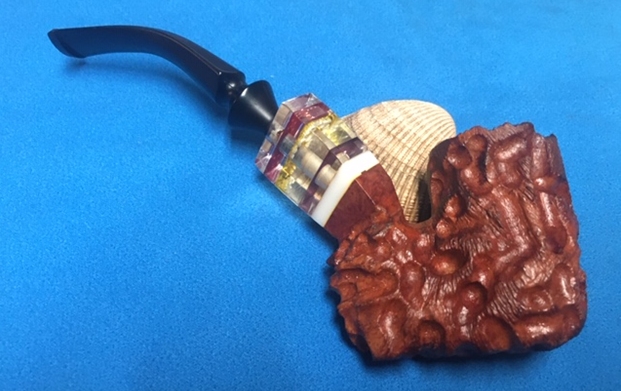
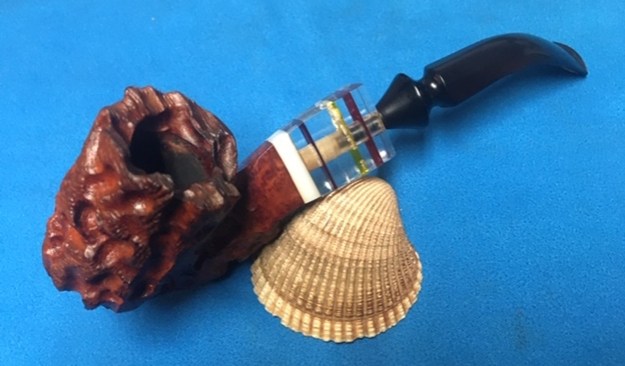
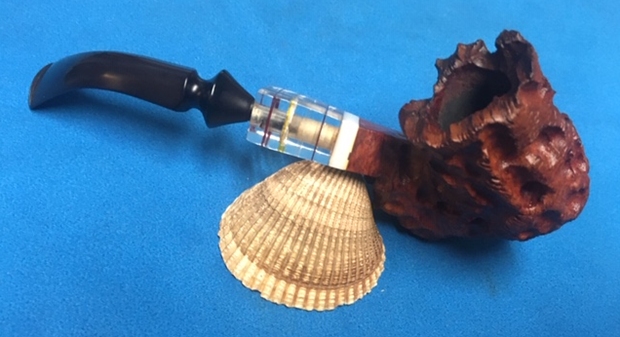
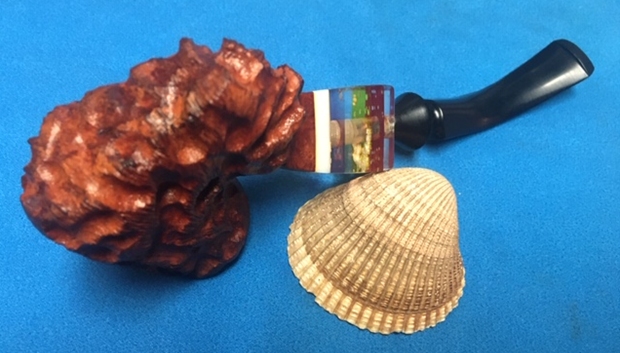
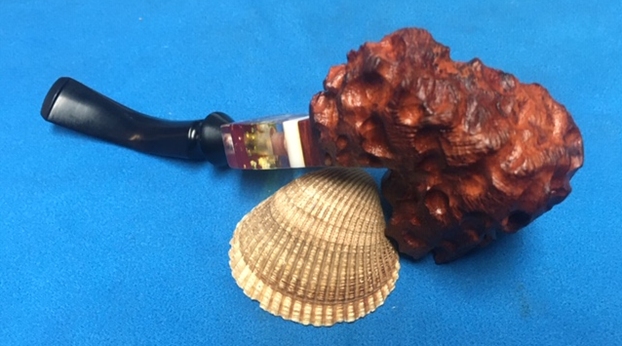
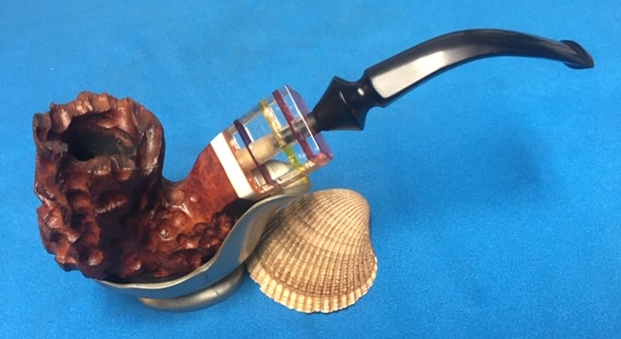
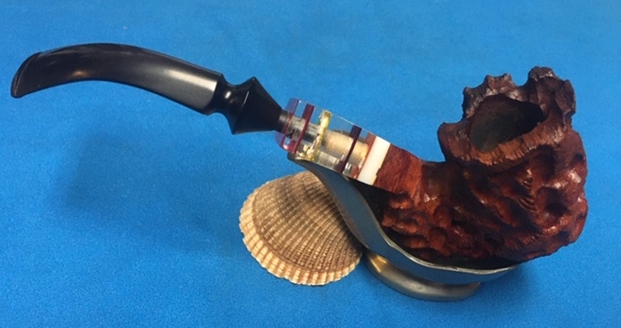
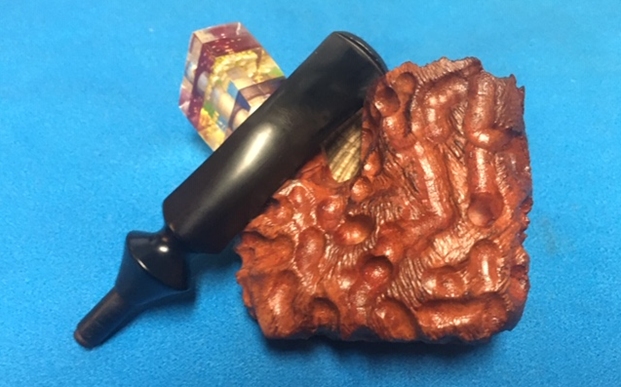
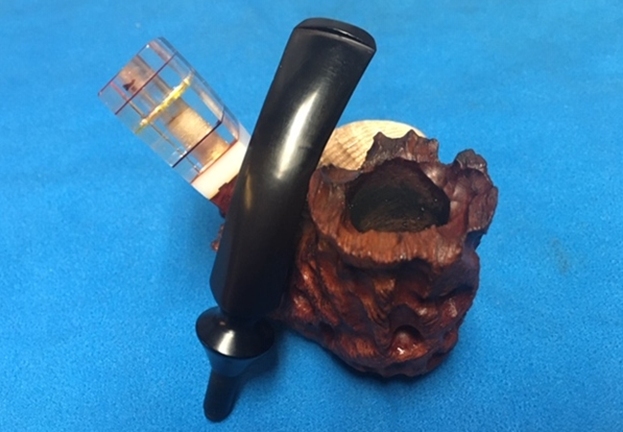
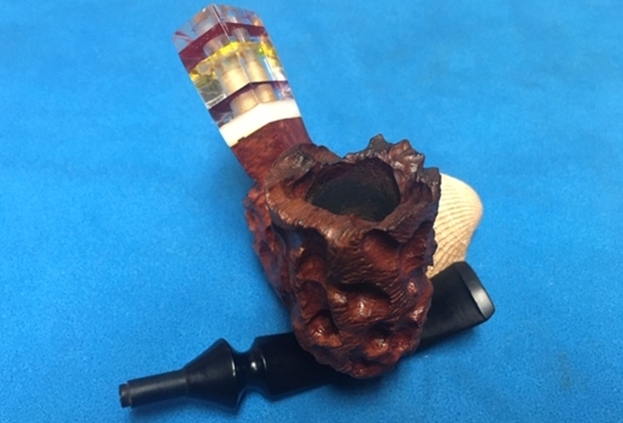
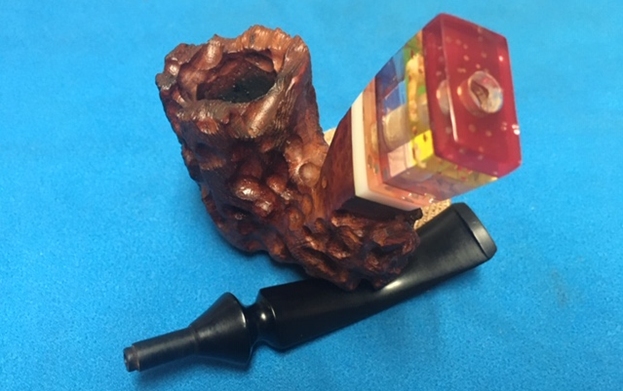
Capitello was founded in Italy by Enzo Galluzzo, the former official carver for Caminetto who had worked at Castello and Ascorti.  Although the business lasted only from c. 1982-1991, Galluzzo produced some of the most astounding, creative pipes in a short but brilliant run.  I have an interesting story about some shameful Capitello counterfeits I discovered on eBay and did my best to have removed.  To understand why the fakes were so preposterous, it is important to see a few real Capitello pipes.  Following are, in order, a wax drip Gotico from Pipephil, a rustic Gotico courtesy of a reputable eBay seller, an Airecchio from Haddock’s Pipes and a Jonico from my own collection.

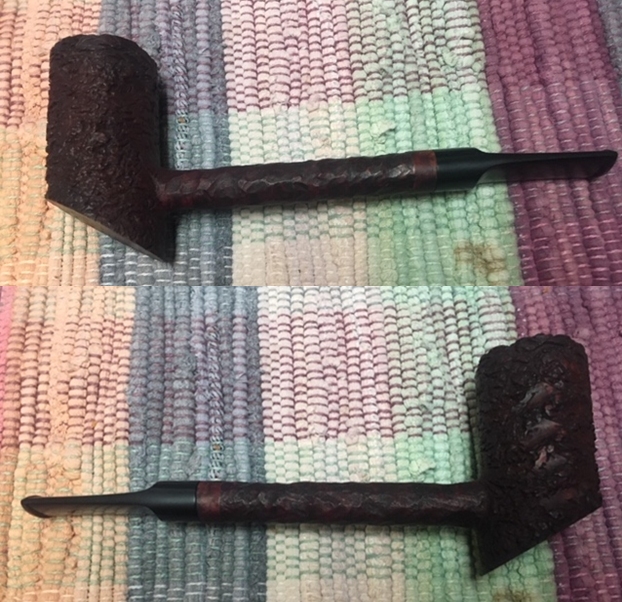
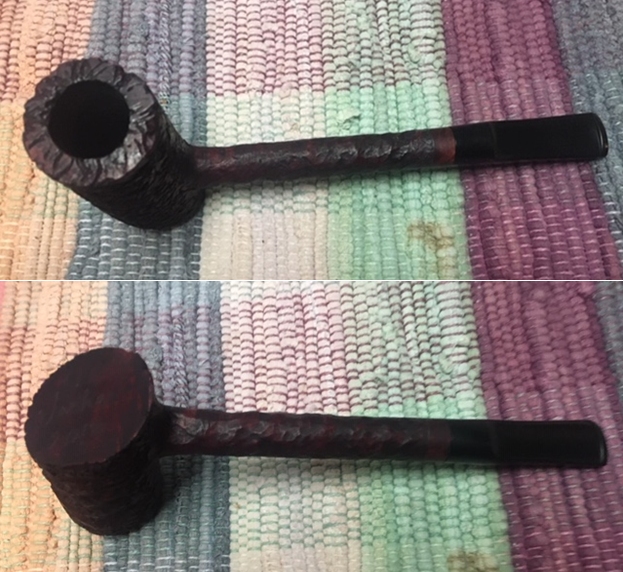
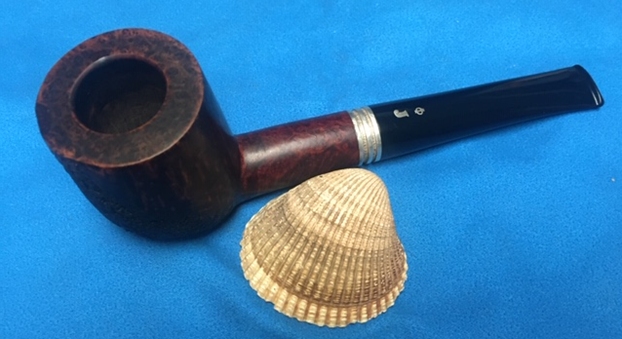
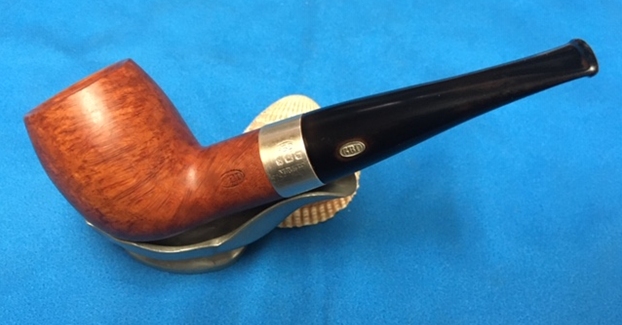
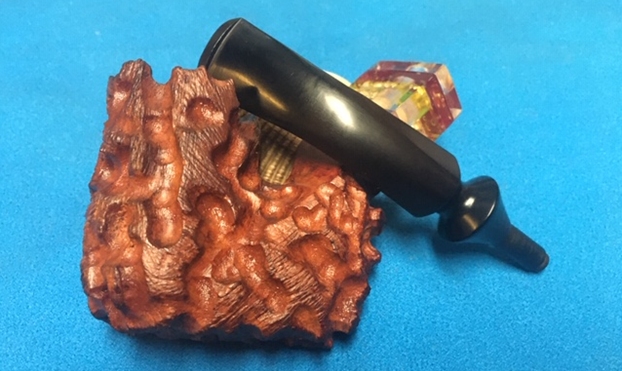
Now, have a gander at the best of the counterfeits.
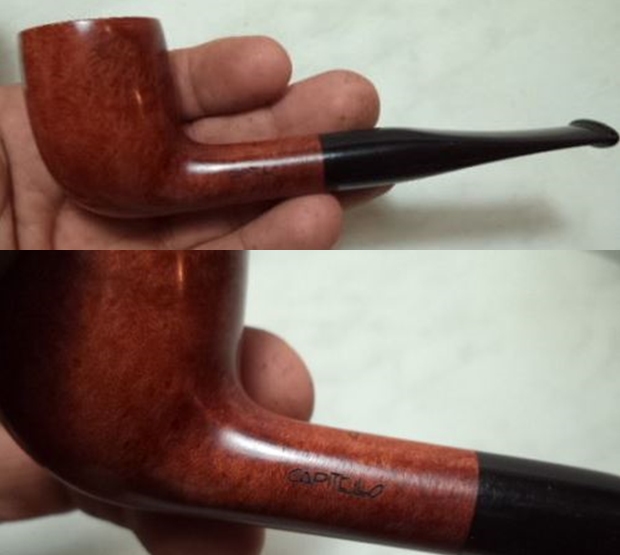
The very small, bland billiard is supposed to be new and unsmoked, a rarity, but note the absence of the genuine stem mark, and the use of all caps in the name Capitello, among other problems that a simple check of Pipephil would illuminate for anyone not familiar with the brand.
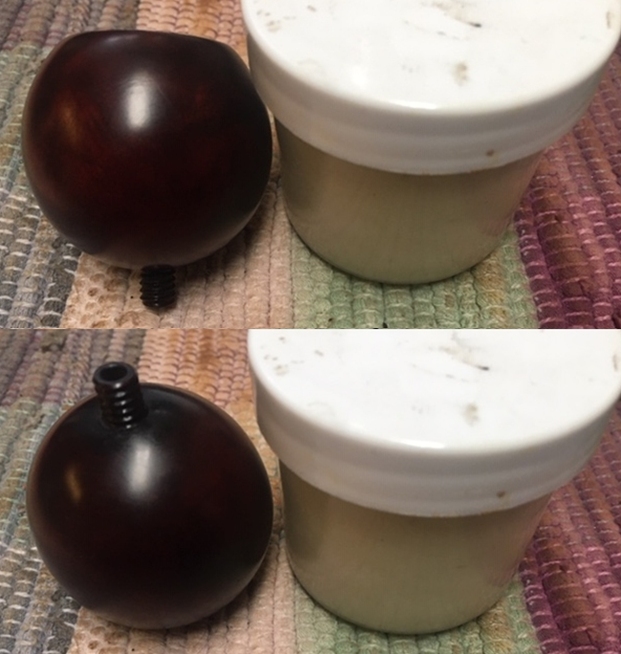
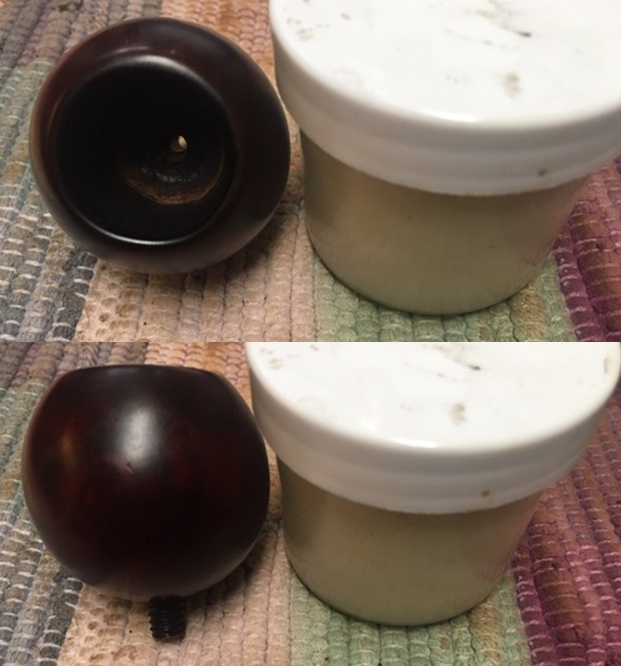
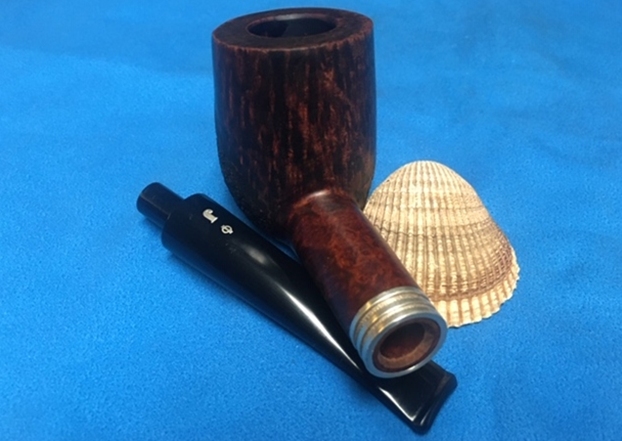
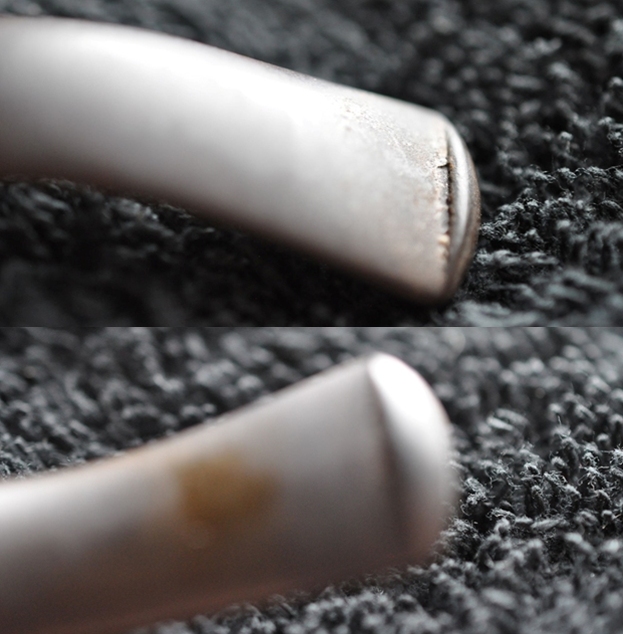
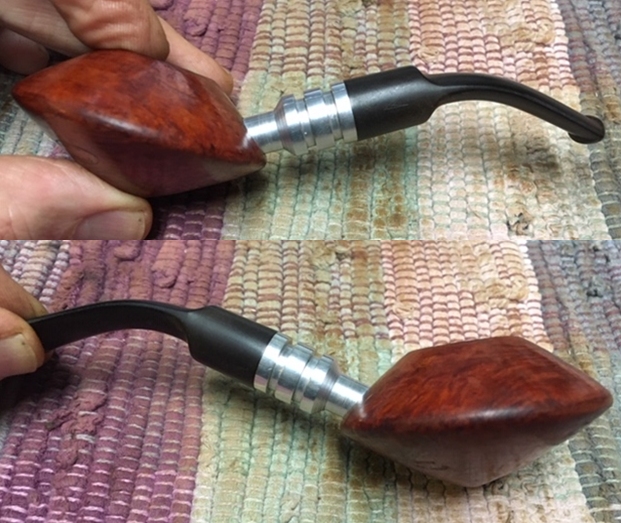
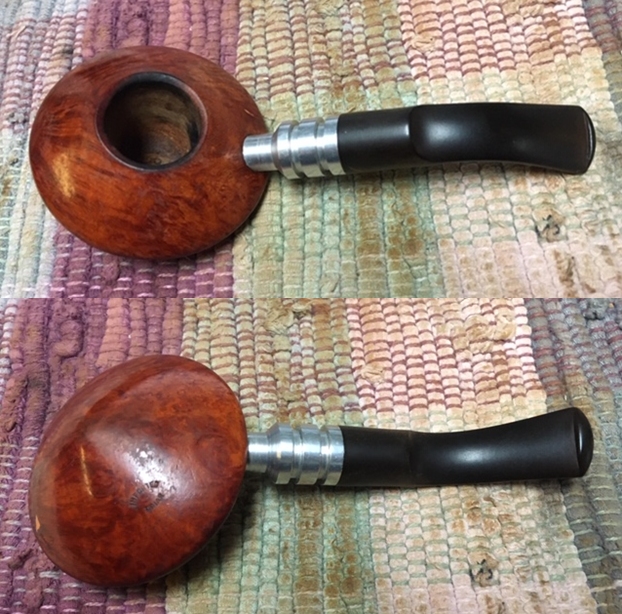
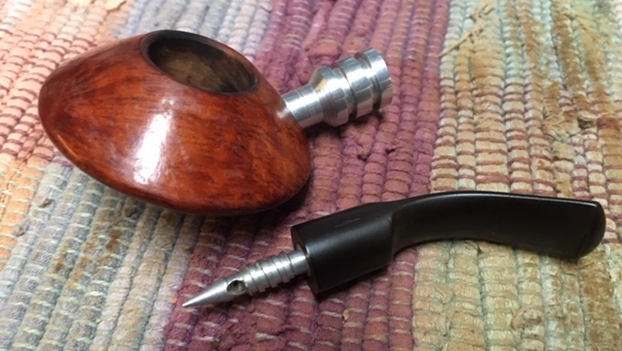
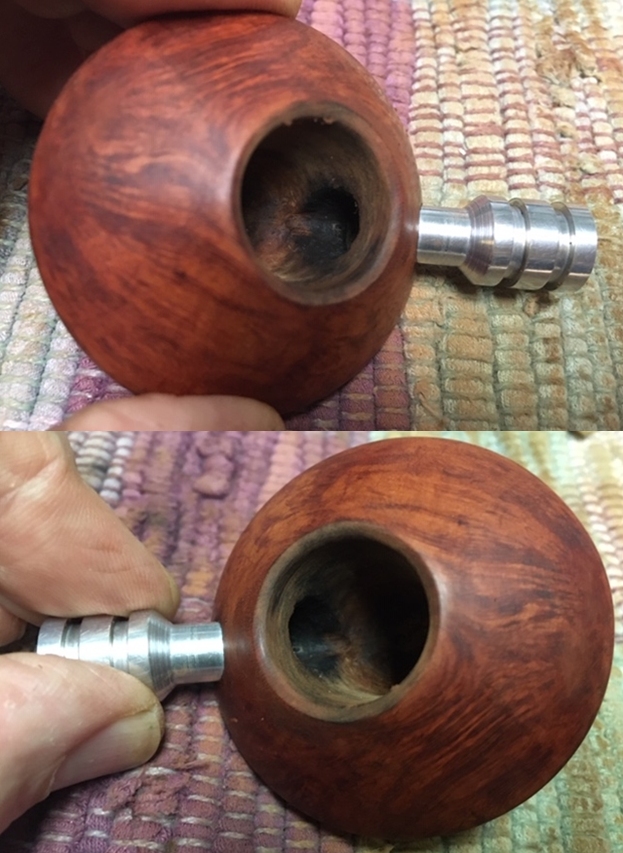
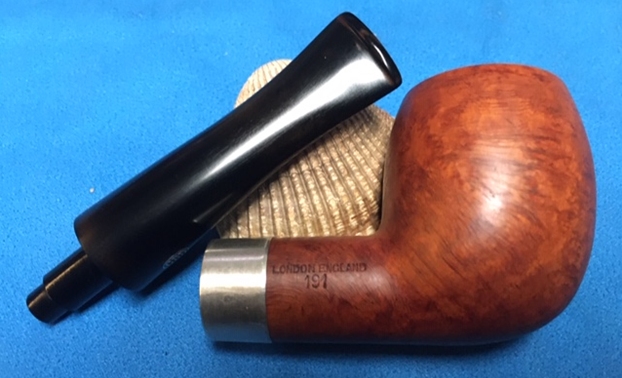
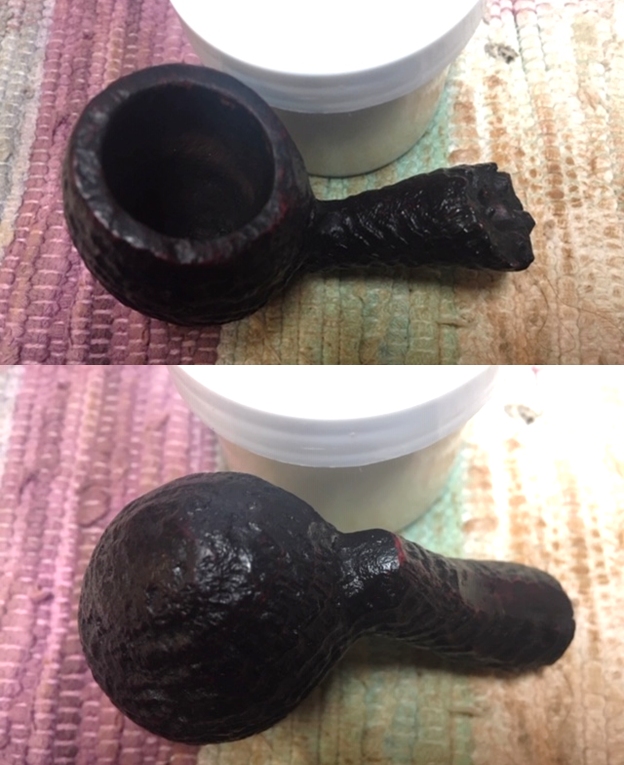
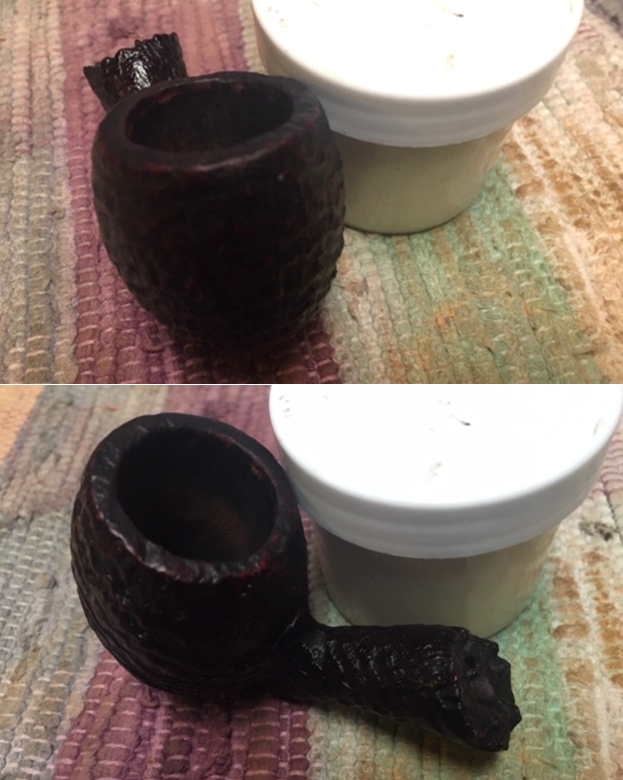
There are more, hideous black “dress” style pipes that Capitello never made, with the same ridiculous nomenclature, but here is the worst offender, something that doesn’t even pretend to have Capitello nomenclature.  Capitello also never used metal bands, even good ones.In light of the brazen fraud, I gave the seller, who was registered in the UK, a friendly chance to retract the offers.  When he replied with a rude note, a friend and I reported him to eBay, and I went so far as to file an online criminal complaint with Scotland Yard.  I never heard how that turned out, but I hope they at least rattled his cage.  I learned that the seller has a terrible reputation and is named in the second Youtube video in my Sources.  I recommend it as an excellent guide to spotting big name forgeries.

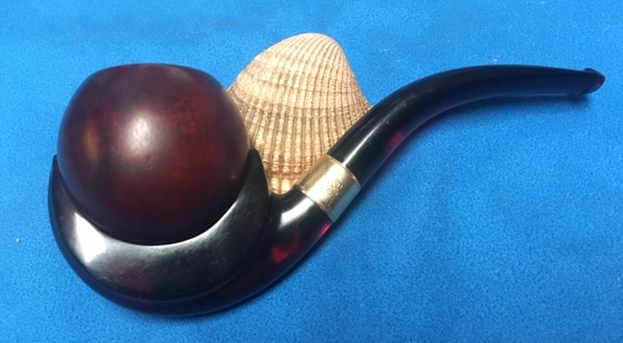
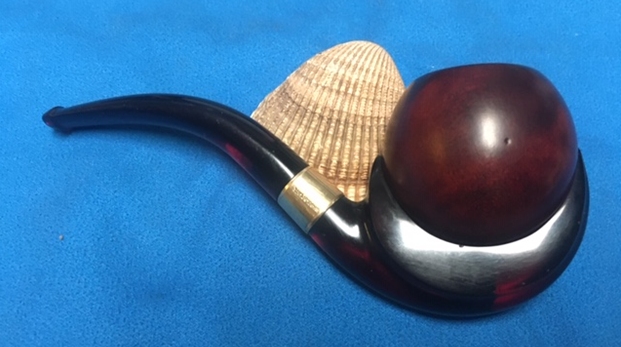
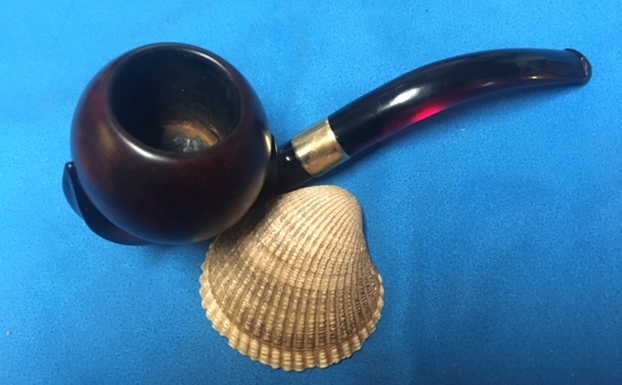
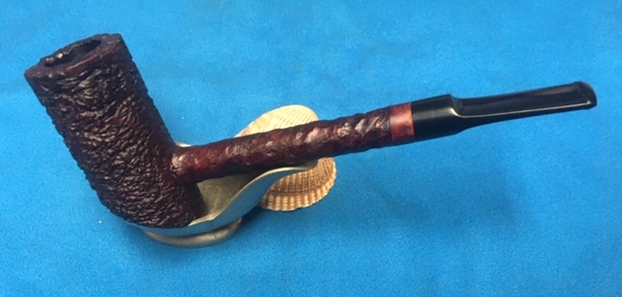
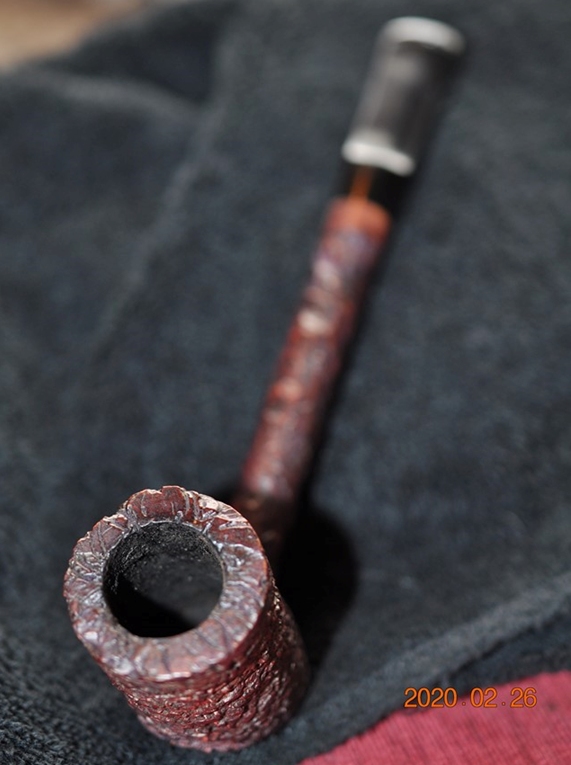
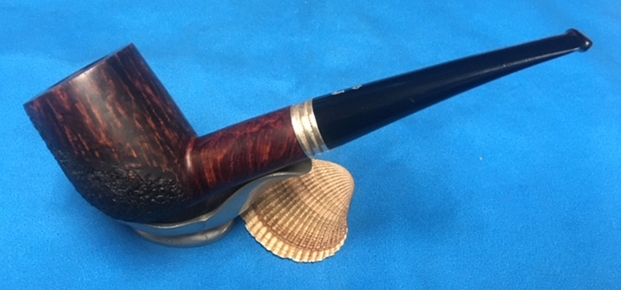
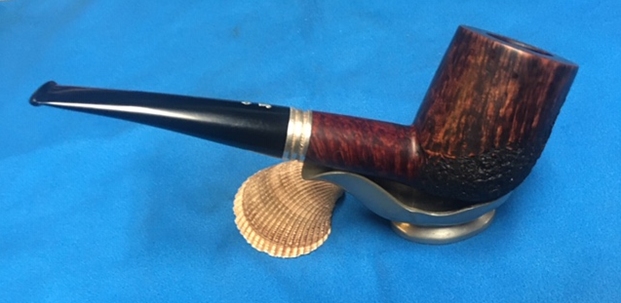
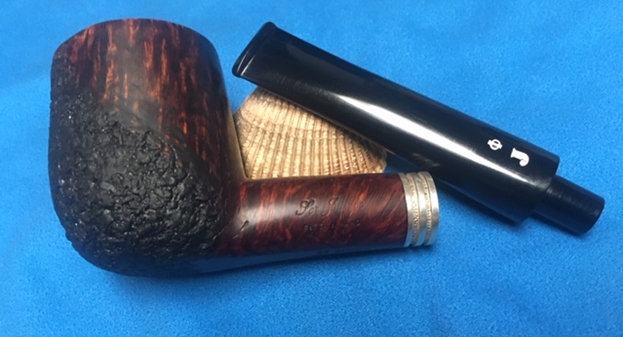
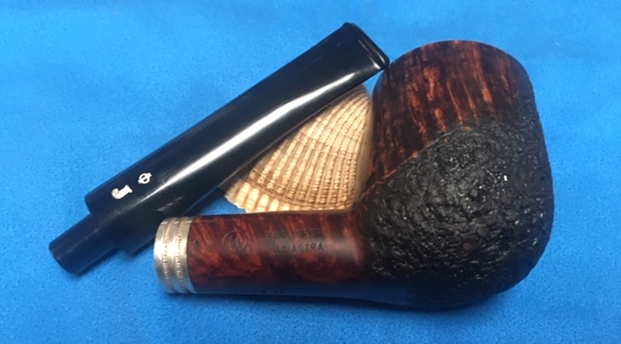
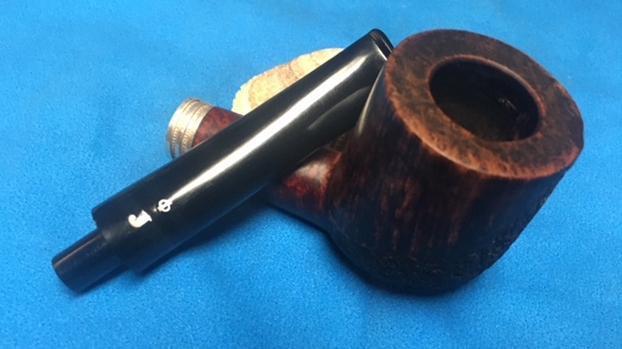
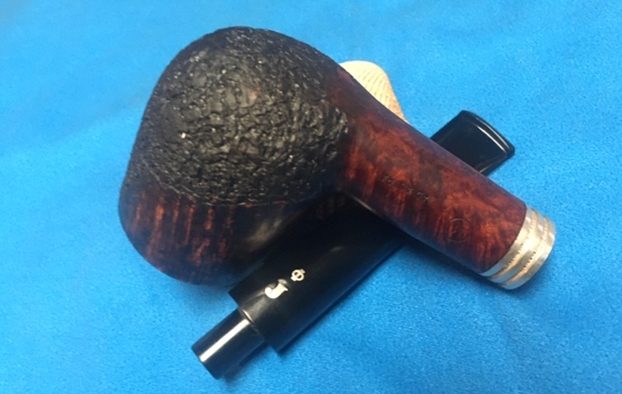
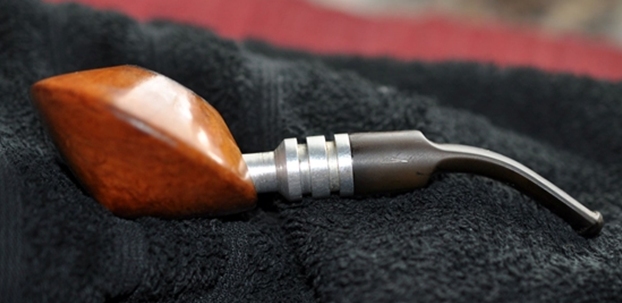
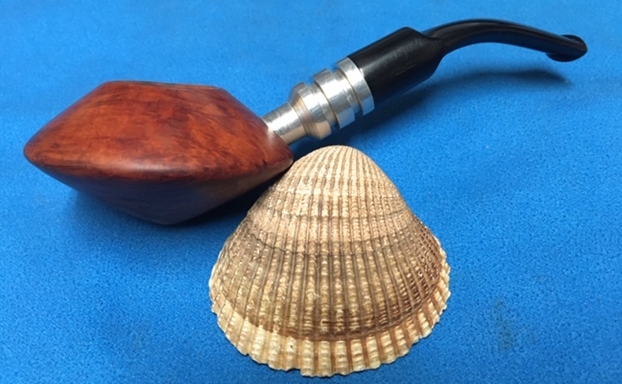
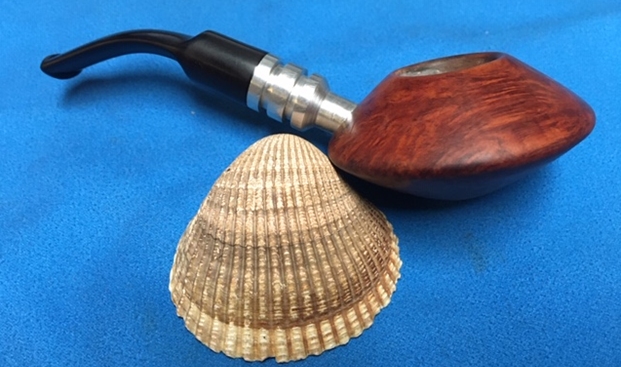
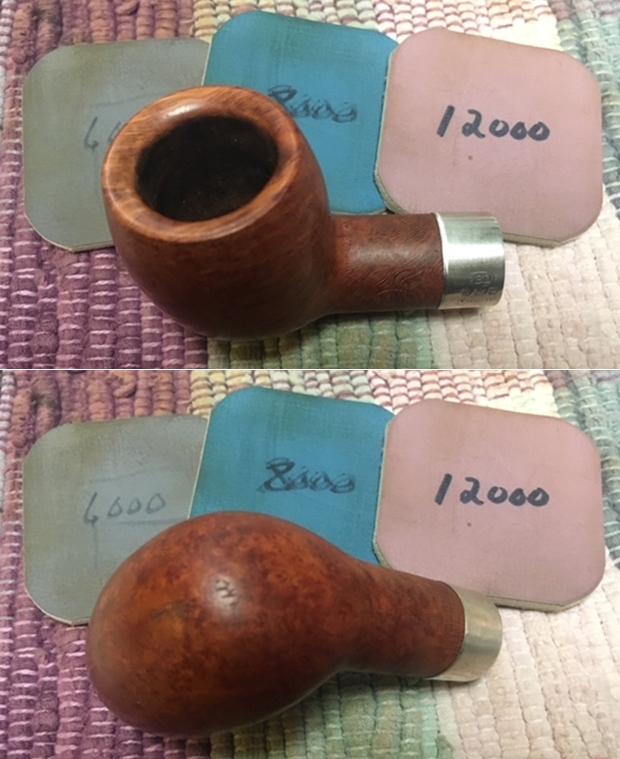
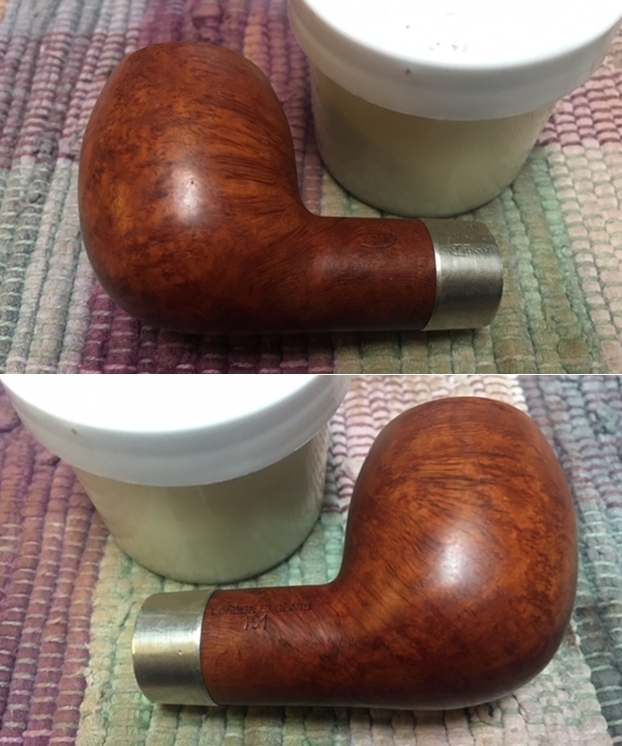
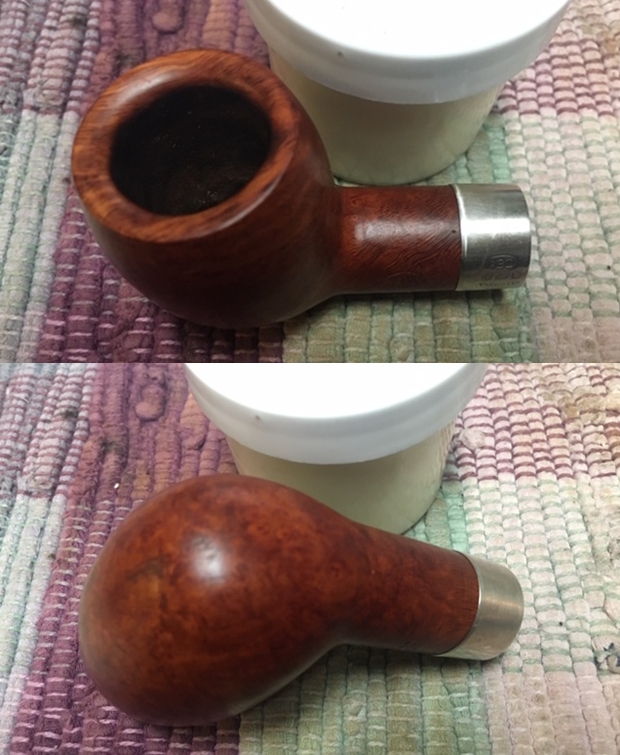
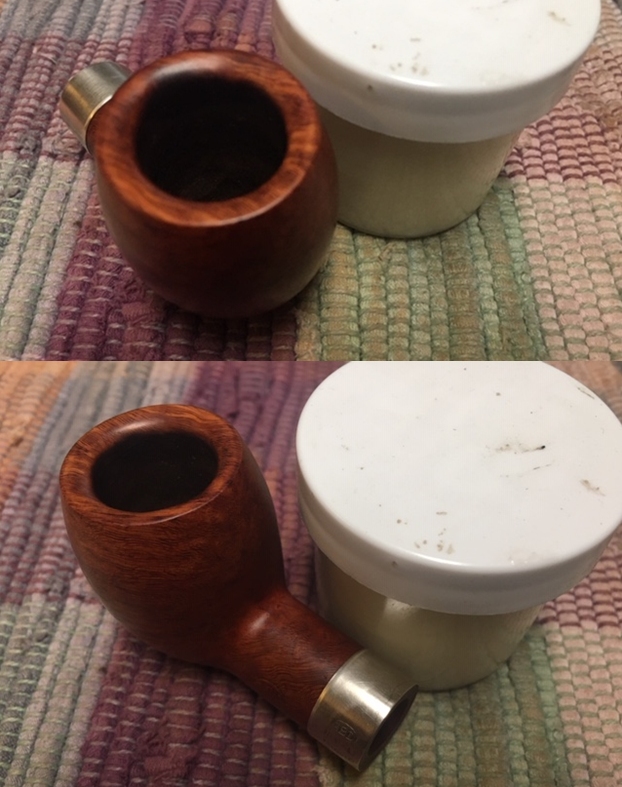
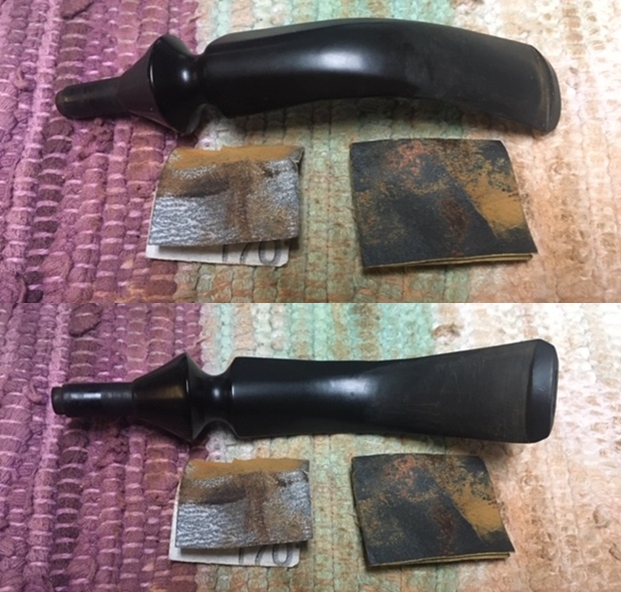
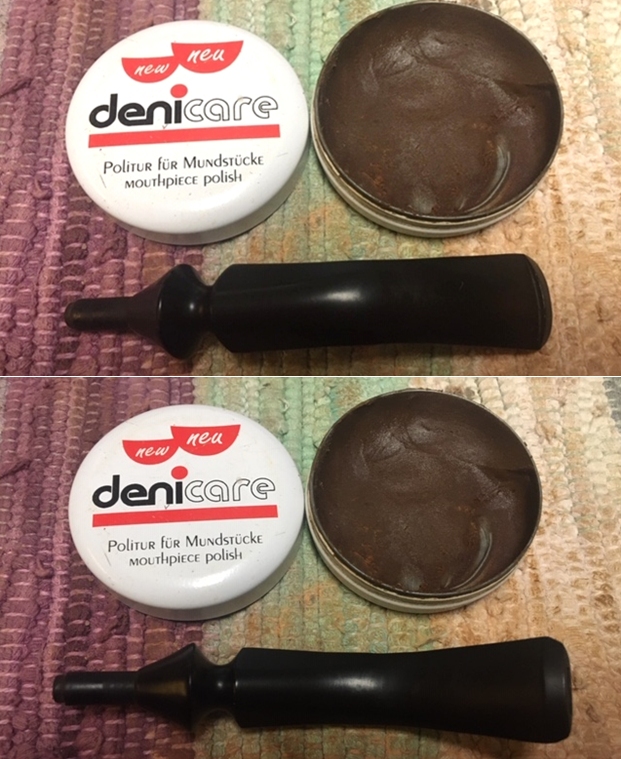
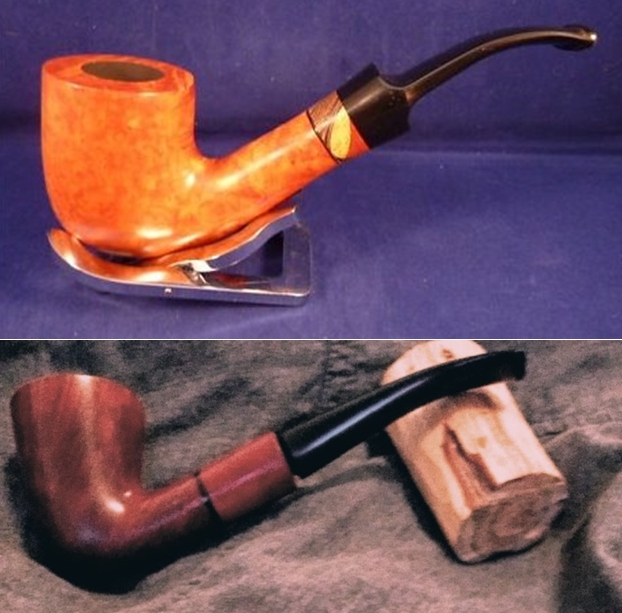
To end this section, I’ll show a couple of fake artisan pipes, both by Tom Eltang, the respected Danish carver.  I don’t have more than one photo each of the pipes or details of what is wrong with them, but they demonstrate how careful we need to be when buying anything online.* The top, chestnut-colored pipe is the fake.  Real Dunhill ODA pipes had lighter Root or Bruyere finishes.

CONCLUSION
To be sure, the great majority of online sellers, eBay or elsewhere, are not frauds.  The biggest abuse now is the outrageous over-pricing, mostly for Medicos and Dr. Grabows, which sellers seem to regard as the Holy Grail.  I remember the good old days when I had multiple lots of nine-12 pipes coming in the mail all the time, and all of them had good pipes as well as some little treasures in them.  While it was only natural that sellers would catch on, they seem to have over-reacted to the point where they are now paying their sources so much for garbage, more or less, that they are willing to go without selling their pipes at all unless they recoup their investments that were idiotic in the first place.  Not being collectors or restorers themselves, for the most part, they don’t understand what goes into repairing and sanitizing pipes for a business and being able to make a living, or even a reasonable extra income.

This blog is supposed to be more about the dangers of buying fake high-end pipes that are expensive as opposed to some lower-priced examples I showed by way of illustrating how far forgers will go to defraud collectors for a buck, so to speak.  The big names in pipe forgeries, other than Dunhill, include Radice, Sasieni, Peterson, Comoy’s and on and on.  Check out the second Youtube video in the Sources for an excellent guide on that subject.  For purposes of a summary, I’ve made some notes on how to avoid the snares these scoundrels will set.

  • Don’t be an easy mark. Take advantage of the wealth of information available online and at your local tobacconist!
  • Watch out for rare/unsmoked Not many collectors buy pipes to put them on the shelf and not enjoy them.
  • Scrutinize the nomenclature, and compare it to online sites like Pipephil.com. This means everything about the stampings on the pipe: the positioning, size, crispness and shape number.
  • Look at the finish. Is it the same style and color as examples of the real thing you find elsewhere online, e.g., smooth/rustic and light or dark brown?  Is the stain even and not tacky or runny?
  • Be sure the seller has an excellent history of top feedback.
  • Be sure there are plenty of pictures showing every angle and all of the nomenclature clearly. Don’t be afraid to ask the seller for more if you need them, and if he doesn’t provide them, don’t bid on the pipe!
  • Be absolutely sure returns are accepted.
  • Are there many bidders already? If not, why?
  • TRUST YOUR INSTINCTS! IF THE DEAL SEEMS TOO GOOD TO BE TRUE, IT PROBABLY IS!

Concerning newer estate pipes that are still in production and not rare, always check at sites such as Smokingpipes.com to see if you can find one that’s identical or similar but brand-new for the same price or less.

There is much resistance in the pipe world to the idea of counterfeits.  I believe I have presented, in this relatively outline form, enough evidence to dispel the notion that they don’t exist.  Books could be written on the subject.

In recent years, I have noticed a marked decrease in estate pipe sales by those who buy and restore them for resale, not just my own but those of friends.  The unfortunate fact is that the few crooks – or in some cases simple fools – who take advantage of buyers’ ignorance give the estate pipe business a bad name.  In most cases, great deals for used pipes that are hard to come by and have been restored to excellent condition – and sanitized for immediate use – can be found, if you only look for them.

SOURCES
http://loringpage.com/pipearticles/80s%20Fakes.htm
http://classics.mit.edu/Aristotle/physics.4.iv.html
https://pipesmagazine.com/blog/pipe-news/john-c-loring-legend-in-the-pipe-collecting-world-dies/
https://pipedia.org/wiki/John_C._Loring
https://pipedia.org/wiki/Loring%27s_Dunhill_Collection
http://www.pipephil.eu/logos/en/dunhill/cledat-en1a.html
https://www.youtube.com/watch?v=-M0-DlI6D3o
https://www.youtube.com/watch?v=0JNnjSS4x64
https://rebornpipes.com/2017/09/26/the-brief-shining-history-behind-an-italian-dublin-and-its-easier-than-usual-refurbish/
https://pipesandtobaccosmagazine.com/2011/06/the-age-of-steal/
https://www.archaeologicalconservancy.org/wpfb-file/8-3fall04singleslr-pdf/

Free PDF download available

Beginning again – a KB&B Bakelite Blueline Cup and Ball Pipe


Blog by Steve Laug

Jeff picked up this interesting Cup and Ball or Claw and Ball pipe somewhere along his hunts or in an auction. It is quite unique. I have worked on a lot of KB&B pipes but never one like this. It is stamp on the inside of the case with the KB&B Cloverleaf and Bakelite in the centre. Underneath it appears to read Blueline. The gold band on the shank end is also stamped with the KB&B Cloverleaf as well as what looks like 12K Gold Plate. Both the base of the pipe and the stem are Bakelite. The stem has a bone tenon that screws into the Bakelite shank. It came in a black leather covered case lined with blue velvet fabric. The only marking on the case was what I mentioned above. The case has a brass clasp on the front and brass hinges on the back. It was obviously custom made for this pipe.Jeff opened the case and this was what the pipe that was inside looked like. It was a very unique looking pipe that is for sure but it was also very dirty. The base, shank and stem were rich red coloured Bakelite. The exterior of the bowl was very dirty and had tars and oils ground into the finish and sticky spots on the finish. Looking at the top of the bowl you can see the cake and how much lava had overflowed onto the rim top. I am sure once it was out of the case it would become clear how dirty it really was.Jeff took it out of the case to have a better look at the condition of the pipe. It was a very interesting looking rendition of a Ball and Cup pipe – at least that is what I would call it. It looked like it would cleanup really well and look great when finished. The hardwood bowl (cherry or maple) had some colour from either being filthy or from age. Cleaning would reveal the facts! He took some close-up photos of the bowl and rim top. There was a very thick cake in the bowl that was hard and uneven and had lots of flakes of tobacco debris stuck to the walls. The lava overflowed down the outside of the ball on several sides. The edges of the bowl looked to be in pretty good condition at this point. Jeff took photos of the sides of the bowl to show the grain and condition of the finish around the bowl. These photos also lead me to conclude that the bowl is not briar… perhaps Cherry or Maple.In terms of stamping the only identifying marks on the pipe were those on the case on the gold band on the shank. Jeff captured those marks in the next set of photos. The logo on the inside lid of the case was worn and dirty so he included two photos of that. I also found a similar lid logo online and have included it as well for comparison sake. Jeff took photos of the KB&B Cloverleaf and the 12K Gold Plate stamp on the band.He took photos of the ball and the stem off the shank/base. The ball and the stem both are threaded and are screwed into the base. It was filthy with oils and tars. The internals of the pipe were in as bad a condition as the inside of the bowl and airway.Jeff took photos of the stem to show the general condition of the stem shape. The curve is graceful and the curve great. The photo shows the profile of the stem. He took photos of the top and underside of the stem to show the damage and bite and scratch marks on both sides up the stem from the button.I remembered that one of the contributors to rebornpipes, Troy Wilburn had done a lot of work on older KB&B pipes so I turned to one of his blogs on rebornpipes on a Blueline Billiard that he restored (https://rebornpipes.com/tag/kbb-blue-line-pipes-with-bakelite-stems/). As expected Troy had done a great job digging into the Blueline brand and potential dates. I quote from his blog the following sections.

I was thinking after some initial research that these pipes were from around 1910 – early 1920s. Seems it’s a little older than I thought. I got this info from a Kaywoodie and early KBB collector who has had several Blue Lines.

Your pipe is made by Kaufman Brothers and Bondy, or KB&B, which later (1915) created the Kaywoodie line we all know. But this pipe is Pre-Kaywoodie, as they were making pipes under the KB&B branding from about 1900 to 1914. Bakelite was invented in 1907, so this pipe was likely made from 1908 to 1914, as the Bakelite was quite the technological wonder of the time, and was used in many products (still in use today). These “Blue Line Bakelite” pipes are rare pieces, seldom seen.”

Having seen the before pictures on this pipe I was looking forward to what it would look like when I unpacked the most recent box Jeff sent to me. The pipe was present in the box and I took it out of the box to see what work awaited me when I removed it from the case. I put the case on my desk and opened it to see what was there. I opened the case and took a photo of the pipe inside.I was astonished to see how clean the pipe was. The bowl clean and the Bakelite base and stem looked very good. Even the gold band looked better. Now it was time to take it out of the case and have a look at it up close and personal. I took photos of the pipe as I saw it. Jeff had done an incredible job in cleaning up this pipe. He had reamed the bowl with a PipNet Pipe reamer and cleaned up the remaining debris with a Savinelli Fitsall Pipe Knife. He also scraped the thick lava on the rim top. He scrubbed the exterior of the bowl with Murphy’s Oil Soap and a tooth brush to remove the grime on the bowl and rim. He cleaned out the interior of the bowl base and stem with pipe cleaners, cotton swabs and alcohol until they came out clean. The rim top looked incredible when you compare it with where it started. There is some slight darkening on the inside edge of the bowl. He cleaned the base and stem with Soft Scrub to remove the grime on the exterior and cleaned out the airway with alcohol, cotton swabs and pipe cleaners. I included a photo of the KB&B Cloverleaf on the gold plated band.I unscrewed the bowl and the stem from the base and took photos of the parts. The bowl and stem both had threaded connectors. The bowl was metal and the stem was bone.I stripped the spotty finish off the bowl with acetone. I know for some this is a no-no for old pipes but honestly this finish was very rough. I would restain it as close to the original aniline as I could but there was damage that needed to remove the stain and finish to address. I followed that by sanding the bowl with a medium and a fine grit sanding sponge. The bowl was looking better and the dark spots turned out to be oils and not burn marks! Whew! I polished the bowl with micromesh sanding pads – dry sanding with 1500-12000 grit pads and wiping the bowl down after each pad with a damp cloth. Note the developing shine on the wood. I went through my various stains and chose a Tan aniline stain for the bowl. It is a nice coloured stain that is close to what was original and will give me some coverage over some of the dark spots on the sides of the bowl. I applied the stain and flamed it with a lighter. The flaming burns off the alcohol and sets the stain in the wood. I repeated the process until I was happy with the coverage.I set the bowl aside to let the stain cure and turned my attention to the base. The band was loose so I removed it for the first round of pads. I polished the Bakelite with micromesh sanding pads to remove the scratching and bring out a shine. I dry sanded with 1500-12000 grit pads and wiped it down with a cloth I use that has Obsidian Oil impregnated in the fibres. It works well to remove the dust. I paused the polishing to glue the gold band on the shank end. I put some white all-purpose glue on the Bakelite and pressed the band in place on the shank. I wiped the excess glue off with a damp cloth. I let the glue dry for a short time.When it had set I continued polishing with the micromesh pads. I set the base aside and went back to the bowl. I buffed out the newly stained bowl with Blue Diamond to bring out a shine. The colour is opaque enough to hide the dark spots and transparent enough to show some grain in the sunlight. I like it!I rubbed Before & After Restoration Balm into the wood with my fingertips to clean, enliven and preserve the newly stained bowl. I find that it adds a depth to the polish that I really have come to appreciate. All that remains at this point is to wax and polish the bowl. With the bowl and the base finished it was time to put them back together. I would still need to buff and wax both but the project was coming to an end. All that remained was to finish the stem work. I set the base and bowl aside and turned to address the issues with the stem. I used a clear CA glue to fill in the gouges across the stem from the button forward an inch on both sides. I also filled in the deep tooth marks on both at the same time.I smoothed out the repairs with a folded piece of 220 grit sandpaper. I started the polishing with a folded piece of 400 grit wet dry sandpaper.I rubbed the stem down with Denicare Mouthpiece Polish. It is a gritty, red paste with the consistency of red Tripoli. I find that it works well to polish out scratches and light marks in the surface of the stem. I polished it off with a cotton pad to raise the shine.I polished the stem with micromesh sanding pads – dry sanding with 1500-12000 grit sanding pads. I wiped it down after each sanding pad with a cloth containing some Obsidian Oil. I finished polishing it with Before & After Pipe Stem Polish – both Fine and Extra Fine and buffed it off with a cotton cloth. I gave it a coat of Briarville’s No Oxy Oil to preserve and protect it. I put the hardwood bowl and Bakelite Base stem back together again and carefully buffed it with Blue Diamond polish on the buffing wheel. I gave the bowl, base and stem multiple coats of Carnauba wax on the buffing wheel. I hand buffed the entirety of the pipe with a microfiber cloth. The pipe was alive now and looked great to me. It has a great feel in the hand that is very tactile and the colouring on the bowl should develop more deeply as the pipe is smoked. The finished pipe is shown in the photos below. The dimensions of the pipe are Length: 5 1/2 inches, Height: 2 1/4 inches, Outside diameter of the bowl: 1 1/4 inches, Chamber diameter: 7/8 of an inch. This older KB&B Blueline Cup and Ball pipe is a beauty and the Bakelite looks great with the newly stained bowl. It is one of those old timers that will be staying in my KB&B collection. It will be a great addition to my collection of old pipes. Thanks for reading this blog and my reflections on the pipe while I worked on it.

Now for a bit of a Break – a Vacher Long Shank Cherrywood Poker


Blog by Steve Laug

The next pipe on my worktable is a long shank Cherrywood or Poker. It is a tall pipe with an angled heel that makes it a sitter. It is well balanced so it is a very stable sitter. The finish is a unique mix of rustication patterns. The left side of the bowl (shown in the first photo) is a tight patterned rustication. The right side has some angled grooves across the pattern that is quite unique. The shank rustication is a much looser rustication and again some of the grooves so it is very different from the rest of the bowl. The briar is stain with some black undercoat and an oxblood top coat. The pipe has a smooth heel on the bowl and a smooth band around the shank. The saddle stem is vulcanite that has some light tooth chatter and marks at the button. The bowl has a moderated cake and the inner edge of the rim has some darkening. The rim top itself is quite clean. The stamping is the logo for Laughing Moon Pipes – a crescent moon and a star. Under that is Vacher signature and the number 2013. The pipe is dusty but otherwise in good shape. Jeff took the following photos before he started his cleanup work on the pipe. He took close-up photos of the bowl and rim top from various angles to capture the condition of the bowl and rim top edges. You can see the clean rim top free of lava and just a bit dusty. There is also some darkening around the inner edge of the bowl. The rustication on the rim is another different style pattern from the rest of the pipe. Very unique.He took photos of the sides and heel of the bowl to show the unique and rugged rustication patterns around the bowl. It is craggy and random looking. You can see the dust and debris in the finish. Jeff took a photo of the stamping on the flat, smooth heel. It has the Laughing Moon Pipes logo at the top and underneath it bears Vacher’s signature and the number 2013 which could be the year of manufacture or something else…The next two photos show the top and underside of the stem. The oxidation and the tooth marks on both sides near the button are visible in the photos. When the pipe arrived I knew I had worked on pipes from Vacher and Laughing Moon Pipes in the past but I could not find them on the blog. That was strange – maybe age playing a trick on me? Ah well! I instead turned to Pipephil (http://www.pipephil.eu/logos/en/logo-v1.html) to see if he included a quick summary of information on the brand. I was not disappointed. I have included  a screen capture of the pertinent section. From there I learned a few things.

The pipe maker was Robert Vacher who had worked with Brian Ruthenberg in his early days. I also learned that his pipe were stamped with 4 digit numbers. The first 2 digits was the pipe number in the year. The last 2 digits was the year of manufacture. Interestingly that made the pipe on my table the 20th pipe made in 2013 if I am interpreting it correctly.I turned to Pipedia for more information on Robert Vacher and the Laughing Moon Pipes that he carved (https://pipedia.org/wiki/Laughingmoon_Pipes). The site had a great writeup by Vacher himself taken from his Ebay store. The thing that stood out to me was his mission statement which I quote below:

MISSION STATEMENT: I believe that EVERYONE who desires to smoke a handcrafted pipe should be able to buy one regardless of their station in life. There is no reason why the janitor in a highrise should not be able to smoke the same pipe as the owner of that building. My pipes are made for, but not limited to, the people who make up the backbone of this world. The people who get up every day and get the job done. I just want you to know that when I make YOUR pipe, I made it with YOU in mind. So in the future, as in the past, I will make super-affordable pipes for those who enjoy them.

The article also includes the following information on the maker as well as his email address should you desire to contact him.

Robert Vacher
477-700 Laura Lane
Litchfield, California 96117  USA
E-mail: rvacher@citlink.net

Now it was time to look at the pipe up close and personal. I had just finished reworking the dog chewed Ser Jacopo so I was looking for something more like a simple restoration that needed little work. The Vacher appeared to be that  pipe . Jeff had done an amazing job in removing all of the cake and the thick lava on the rim top. He had reamed the bowl with a PipNet Pipe Reamer and cleaned up the remnants with a Savinelli Fitsall Pipe Knife. He took the cake back to bare briar so we could check the walls for damage. He scrubbed the exterior of the bowl with Murphy’s Oil Soap and a tooth brush to remove the grime on the bowl and rim and was able to remove the dirt. He cleaned out the interior of the bowl and shank with pipe cleaners, cotton swabs and alcohol until they came out clean. He cleaned the stem with Soft Scrub to remove the grime on the exterior and cleaned out the airway with alcohol, cotton swabs and pipe cleaners. I took some photos of the pipe as I saw it. To show how clean the rim top and stem really was I took a close-up photo of the rim and stem. The bowl was clean and cake free. The rim top is very clean with no residual grime in the groves of the rustication. The inner edges of the bowl look good. The black vulcanite saddle stem cleaned up nicely. The surface had some light tooth marks but the button edge looked really good.I took a photo of the stamping on the smooth heel of the bowl. You can see the Laughing Moon Pipes logo, Vacher’s name and the numbers.I removed the stem from the bowl and took photos of the parts. The vulcanite saddle stem worked really well with the thin pencil shank. Take particular note of the stem and tenon in both photos. The distance from the edge of the stem to the side of the tenon is different on both sides. It is definitely narrower on the right and underside which made it clear that the shank drilling was not quite round. I took a photo of the end of the shank and end of the stem to show the same thing. I have identified the thinner side of the shank and stem with red arrows in the 3rd photo below. The bowl looked very good so I did not need to do any further work on it. I rubbed the bowl and shank down with Before & After Restoration Balm to deep clean the finish on the bowl and shank. The product works to clean, enliven and protect the briar. I worked it in with my fingers and with a horse hair shoe brush to get it into the deep nooks and crannies of the rusticated finish on the rim and bowl sides. I let it sit for 30 minutes to let it do its magic. I buffed it with a soft cloth. The briar really began to have a rich shine. I took some photos of the bowl at this point to mark the progress in the restoration. The bowl was finished so I set it aside and turned my attention to the stem. I sanded out the tooth marks on both sides of the stem with a folded piece of 220 sandpaper and started polishing with 400 grit wet dry sandpaper.I rubbed the stem down with Denicare Mouthpiece Polish – a red gritty paste a lot like Tripoli to polish it after the 400 grit sandpaper. I rub it on with my fingertips and work it into the vulcanite and buff it off with a cloth. It does a great job before I polish it further with the micromesh pads.I polished the stem with micromesh sanding pads – dry sanding with 1500-12000 grit sanding pads. I wiped the stem down after each sanding pad with a cloth containing some Obsidian Oil. I finished polishing it with Before & After Pipe Stem Polish – both Fine and Extra Fine and buffed it off with a cotton cloth. I gave it a final rub down with Briarville’s No Oxy Oil to preserve and protect the vulcanite stem. I put the bowl and stem back together again and lightly buffed the bowl and the stem with Blue Diamond on the buffing wheel. I used a soft touch on the rusticated bowl so as not to fill in the valleys and crannies with the product. I gave the bowl several coats of Conservator’s Wax and the stem several coats of carnauba wax. I carefully buffed the entire pipe with a clean buffing pad to raise the shine. I finished buffing with a microfiber cloth to deepen the shine. The finished pipe looks very good. The rusticated finish is deep and rugged with a great look and feel in the hand. It is comfortable and light weight. The finished American Made Vacher is shown in the photos below. The dimensions of the pipe are Length: 6 ½ inches, Height: 2 ½ inches, Outside diameter of the bowl: 1 ¼ inches, Chamber diameter: 5/8 of an inch. This great looking rusticated Cherrywood Poker turned out very well. It should be a great pipe. It will make someone a great smoking pipe. I will be putting it on the rebornpipes store shortly. If you are interested let me know. Thanks for reading this blog and my reflections on the pipe while I worked on it.

Operation Rescue – “My Dog Ate my Ser Jacopo L1 Billiard!”


Blog by Steve Laug

When Jeff showed me the next pipe on the table we went back and forth about buying it or just leaving it with the seller. It was a really nice Ser Jacopo L1 Billiard at some point in its life but that time had passed. It had literally become a chew toy for someone’s dog. The bowl was in very rough shape and had deep tooth gouges around the bowl with chunks of briar missing on the rim and top. The bowl was really damaged to the point of being questionable. The shank interestingly was free of bite marks and the stem had less bite marks than some of the stems I have worked on from pipemen who chew their stems. For me the question was whether or not I wanted to work on it. There was no doubt that the pipe would be a challenge but was it a challenge I wanted to take on. That was the question we weighed before moving ahead with the buy.

After spending time talking about it we decided to pick up the pipe and see what I could do with it. When Jeff got it the story became even sadder!  The bowl had amazing straight grain around the sides and it appeared to have been barely smoked. It looked as if maybe a bowl or two had been enjoyed before the dog got a hold of the pipe and did the massive damage that showed when we saw it. The bowl had some darkening but there was no cake in the bowl. It smelled smoky but otherwise was very clean. Jeff would still clean up the pipe before he sent it on to me that way I would be able to just pick it up and see what I could do with it. Jeff took the following photos before he started his cleanup work on the pipe. Just look at the damage! Oh my; the pipeman or woman must have just wept after the initial shock or anger when he or she saw the pipe dangling from the dog’s mouth. He took close-up photos of the bowl and rim top from various angles to capture the gnawing damage to the bowl and rim top edges. You can see the large bite marks and chunks of briar missing on both the inner and outer edges. The largest chunk is on the front of the bowl and the inner edges damage is on the right side. You can also see the damage to the sides of the bowl. Jeff took photos of the sides and heel of the bowl to show the both the extent of the damage to the bowl and the amazing grain around the bowl. It really is a shame that this poor pipe suffered this fate. Jeff took photos of the stamping on sides of the bowl. On the left side it reads Ser Jacopo over Fatta A Mano over In Italia. On the right side it reads L1 in a circle Per Aspera Ad Aspera. On De Divina Proportione. All the stampings are very readable and clear. He took a photo of the inlays on the tapered stem top. The silver J with an I and a circle. The next two photos show the top and underside of the stem. Notice the few tooth marks on both sides. It is not as bad as it could be. I wanted to know a bit more about the pipe in hand. I knew a little of the history of the brand but I wanted to understand the stamping on the shank sides and underside so I turned first to the Pipephil website (http://www.pipephil.eu/logos/en/logo-s5.html). Interestingly the first pipe they had a photo of was similar to the one that I had. It is stamped similarly on the left side of the shank with the Ser Jacopo over Fatta a Mano but the one I have also was stamped In Italia under that. The right side of mine is stamped with the L1 in a circle and the Per Aspera Ad Astra followed that. Mine also was stamped on the underside of the shank and read: De Divina Proportione. The one I am working on also had a band on the shank and the stem stamp was different as well. I also learned the L1 stamp stood for a pipe with acceptable grain. I have included a screen capture of the  pertinent information.Once I had that material digested a bit I turned to Pipedia to understand more about the stamping on the pipe (https://pipedia.org/wiki/Ser_Jacopo). I am including the information on that below. The standard nomenclature found on Ser Jacopo pipes is as follows: Ser Jacopo Fatta A Mano In Italia Per Aspera Ad Astra.

Fatta A Mano translates to “Made By Hand”. Per Aspera Ad Astra is a Latin phrase found on Ser Jacopo pipes and is the Ser Jacopo motto. It translates to “To the Stars Through Travails”, meaning that success comes through hard work. In the Summer 1997 Pipes and Tobaccos article Giancarlo Guidi translated this as “through a difficult way until the stars are reached”.

All that remained was to find out what the De Divina Proportione on the underside of the shank meant. I turned to wikipedia (https://en.wikipedia.org/wiki/Divina_proportione) for what I assumed referred to Divine Proportion or the Golden Ratio. I quote from there a good summary.

Divina proportione (15th century Italian for Divine proportion), later also called De divina proportione (converting the Italian title into a Latin one) is a book on mathematics written by Luca Pacioli and illustrated by Leonardo da Vinci, composed around 1498 in Milan and first printed in 1509.[1] Its subject was mathematical proportions (the title refers to the golden ratio) and their applications to geometry, to visual art through perspective, and to architecture. The clarity of the written material and Leonardo’s excellent diagrams helped the book to achieve an impact beyond mathematical circles, popularizing contemporary geometric concepts and images.

Now I had a clear idea of the meaning of the stamping. The Golden Ratio refers to the mathematical proportions of this particular pipe fitting that Ratio. It is seriously a beautiful pipe and now I am even sadder at the damage that was done. That motivates me to try to bring it back to some semblance of beauty.

Now it was time to look at it up close and personal. Jeff had done an amazing job in removing all debris and bits of broken briar from the finish. He had done a quick reaming of the bowl with a Savinelli Fitsall Pipe Knife. He scrubbed the exterior of the bowl with Murphy’s Oil Soap and a tooth brush to remove the grime the grime and dirt on the finish so the pipe was clean – damaged but clean. He cleaned out the interior of the bowl and shank with pipe cleaners, cotton swabs and alcohol until they came out clean. The rim top looked quite daunting with the missing chunks of briar but it too was clean. He cleaned the stem with Soft Scrub to remove the grime on the exterior and cleaned out the airway with alcohol, cotton swabs and pipe cleaners. I took some photos of the pipe as I saw it when I brought it to the work table. To show how the rim top and stem looked at this point I took a close-up photo of the rim and stem. The bowl was clean and the damage to the inner edge and the rim top was very visible. It was a mess! The black acrylic stem was saved from major dog chomping. There are just a few tooth marks on both sides of the stem that could be addressed fairly easily.I removed the stem from the bowl and took photos of the parts. I chose the left side of the bowl as really both sides were equally damaged. This is truly a sad sight to see as the great grain on the bowl shows up nicely under the damage.I had been thinking about what to do with the finish since first seeing the photos. I had decided I would rusticate it but was undecided as to what extent I would go in the process. I wanted to retain the original shape and intent of the pipe while working out the damages. I started by using three different burrs on the Dremel – a ball, a cone and cylinder. Each one gives a slightly different finish. I worked them one after another to seek to blend in the tooth marks as much as possible. I also decided to rusticate the worst areas – the base and part way up each side of the bowl and the entire bowl front. The photos show this first step. I decided to let that rustication pattern sit with me for awhile and not add more to it. I just wanted to think about it for a  while. I decided then to patch the bite marks in the upper part of each side and the entire back of the bowl. I also wanted to repair as much of the rim top and edge damage as I could. I used clear super glue and briar dust to patch the many tooth marks around the bowl. The photos show the freckled sides. I built up the damaged front outer edge and the deep marks on the top of the rim with super glue and briar dust. These took some layering to do the job. I looked over the rustication some more and was not completely satisfied with the coverage of the existing rustication or the distance I came around the sides of the bowl. I decided to use a tool that a reader of rebornpipes made for me for rusticating. You can see it in the photos. It is essential a group nails bound together in a handle and with a clamp to give me multiple points to rusticate with. The way it works is to press it into the briar and twist it. You move across the briar until it is “randomly” covered. Once I was happy with the coverage I knock off the debris left behind with a brass bristly brush. I like to knock it down and smooth it out to give it an old leather like look to the rustication. I left the rustication and turned to address the damage to the rim top. I topped the rim with 220 grit sandpaper on the topping board. Once it was smoother and flatter I filled in the divots and holes in the rim top and edges with briar dust and super glue once more. Once I finished I topped it once more to smooth out the repaired areas.With that finished for the moment I turned to sanding the smooth portions of the bowl. I used my Dremel and sanding drum to flatten out the repaired areas first. I followed up by sanding them with 220 grit sandpaper. The photos below show the bowl at this point in the process. Note that there was no damage to the shank so I left it as is and would match the stain to that once I stained the repaired area. I was pretty happy with the way it was looking. I was ready to stain the undercoat on the bowl. I decided to use a black aniline stain for the rusticated part of the bowl and for the undercoat on the smooth sides and rim top. Black does a great job hiding the kind of repairs that I had to do with this briar. I applied the stain and flamed with a lighter. I repeated the process to ensure the coverage was thorough. I flamed it again and set it aside to dry while I had some dinner.I took photos of the bowl at this point to show the coverage of the black stain on the rustication and the undercoat on the smooth areas. After dinner I wiped down the smooth areas with isopropyl alcohol on a cotton pad to make them more transparent and show the grain. I then gave the smooth areas a coat of Mahogany stain using my stain pens to get into the transition areas and control the flow better. The combination of the black undercoat and the Mahogany matched the original shank colour! When that coat of stain had cured I polished the smooth portions of the bowl with micromesh sanding pads. One of the pains of this process is all the flaws show up in the initial sanding. You can see my repairs in some spots but hopefully they bill disappear a bit in the polishing. I was really happy with the right side of the bowl. The repairs virtually disappeared in the staining and sanding. I worked on the left side a little more. I sanded the offending areas of the transition with 400 grit wet dry sandpaper and restained the area. I worked through all of the micromesh pads another time on that area. I was happy with the finished looked at this point. I rubbed the finish down with Before & After Restoration Balm. I worked it into the smooth areas on the bowl and rim top with my fingertips and the rusticated areas with a horsehair shoe brush. The product cleans, protects and enlivens the briar. I let it sit for about 30 minutes and buffed it off with a cotton cloth. The photos below show the bowl at this point… it is a far cry from the dog eaten bowl that I started with — at least I think it is ;). I set the bowl aside and turned to the stem to address the issues that were on the top and underside. I filled in the tooth marks on the stem with clear super glue. I generally overfill them a bit so that it takes into account the shrinkage that occurs as the repair cures.Once the repairs had cured I sanded them smooth to start to blend them in with the surround acrylic of the stem. I sanded the repairs on both sides with a folded piece of 220 sandpaper and started polishing with 400 grit wet dry sandpaper.I rubbed the stem down with Denicare Mouthpiece Polish – a red gritty paste a lot like Tripoli to polish it after the 400 grit sandpaper. I rub it on with my fingertips and work it into the vulcanite and buff it off with a cloth. It does a great job before I polish it further with the micromesh pads.I polished the stem with micromesh sanding pads – dry sanding with 1500-12000 grit sanding pads. I wiped the stem down after each sanding pad with a cloth containing some Obsidian Oil. I finished polishing it with Before & After Pipe Stem Polish – both Fine and Extra Fine and buffed it off with a cotton cloth. The next steps in this restoration were ones that I have been looking forward to. I was glad to reunite the bowl and stem and see what the finished pipe looked like. I polished the silver with a jeweler’s cloth and buffed the bowl and the stem with Blue Diamond on the buffing wheel. I used a light touch on the rusticated portion as I did not want to fill in the rustication with the product. I gave the bowl multiple coats of Conservator’s Wax and the stem multiple coats of carnauba wax. I carefully buffed the entire pipe with a clean buffing pad to raise the shine. I finished buffing with a microfiber cloth to deepen the shine. The finished pipe looks a lot better than dog chewed pipe that I started with. I am happy with the finished look at this point. While the repairs to the smooth areas show a bit they are smooth. The leather like rustication works well with the finish on the bowl in my opinion. The finished Ser Jacopo L1 Billiard is shown in the photos below. The dimensions of the pipe are Length: 6 ½ inches, Height: 2 ¼ inches, Outside diameter of the bowl: 1 ½ inches, Chamber diameter: ¾ of an inch. This should be a great pipe once it is broken in. The rustication on the base and front give it a very tactile feel that should only be better as it heats up during a smoke. This one will go on the rebornpipes store shortly. If you are interested in it let me know. Thanks for reading this blog and my reflections on the pipe while I worked on it.


Bringing to Life a Unique Kaywoodie Natural Burl 33 – Another Legacy Pipe of a Great Grandfather


Blog by Dal Stanton

This is the second of 3 of Paw’s pipes that Joe sent to me from Athens, Greece, where he and his wife, Hannah, live and work.  Paw is Hannah’s great grandfather who left behind several pipes that Joe has asked me to restore for the family.  Paw, also known as, ‘2-Page Sam’ by those who knew him as a salesman of over 40 years of the tobacco giant, Brown & Williamson Tobacco, Corp, has a fascinating story that was described in an article in B&W’s company magazine that I included in the write up of Paw’s Medico Apollo Brylon, which I just completed that turned out well (See: Another Legacy Pipe of a Great-Grandfather: Challenges Working with ‘Brylon’ on a Medico Apollo).  Next, two Kaywoodies remain to be restored – a Kaywoodie “500” and the one on my worktable now, a Kaywoodie Natural Burl 33.  Here are pictures to take a closer look. The nomenclature is on the underside of the shank’s smooth briar panel with ‘KAYWOODIE’ (as most of it is not legible as the upper half of ‘Kaywoodie’ bleeds into the craggy rusticated landscape) [over] ‘Natural Burl’ in fancy cursive script. To the left of the nomenclature is stamped the Kaywoodie shape number of 33.  In Pipedia’s listings of Kaywoodie shape numbers, 33 is listed as: “Large apple, rounded top” that was used as a shape designator from 1937 to 1972.The dating indicators of this Kaywoodie are good.  The Natural Burl has a 4-holed stinger which were phased out at the end of the 1950s, though they still show up some in the 60s according to Pipephil.eu’s discussion about Kaywoodie’s stinger evolution.  The inlaid white shamrock also points to an earlier period.I found nothing specific in Pipedia or Pipephil.eu about Kaywoodie’s ‘Natural Burl’ line.  Expanding my search, I did find very helpful anecdotal information in a February, 2013, thread by ‘kwguy’ on a Kaywoodie discussion group on Tapatalk.com:

Natural Burls are in the catalogs from 1957 to 1962. They were $4.00 when they first came out and $5.00 by the time they were discontinued.  They were basically a stained version of the Coral White Briar, which also debuted in 1957.  The overall rough texture was described in the catalogs as having a rough texture like the outside of the burl.  The rough texture in theory would create more surface area for a cooler feeling bowl.  Carving of this type was done on bowls of less desirable grain and with excessive surface imperfections.  On the lower side of the quality scale, Natural Burls would have had the white cloverleaf.  There may have been the occasional higher grade pipe that was downgraded during production and hence would have the round logo, but I think you’ll mostly see them with the white logos.

Based upon the information of this thread, the Natural Burl Apple before me dates from 1957 to 1962, when they were featured in Kaywoodie catalogs. I looked for a catalog during this period online, but unfortunately, I was unable to find one.  The rusticated or carved surface theoretically provides a cooler feeling bowl.  This pipe fits Sam’s low budget approach to his pipes.  When the Natural Burl Apple first hit the market, it was in a working man’s modest budget range, $4!  I’m hopeful that after I’ve completed working on Paw’s vintage Kaywoodie it will look like a million bucks!

The above thread from ‘kwguy’ also mentions that the ‘Natural Burl’ line was featured in Kaywoodie catalogs from 1957 to 1962.  There are Kaywoodie catalogs and adds referenced on Pipedia and the Chris Keene Directory of Pictures, but I could find nothing in these ‘go-to’ places for catalogs or listing between 57 and 62.  Emails to Steve and rebornpipes contributor, Al Jones, also came up empty.  However, Al encouraged me to reach out to Bill Feuerbach, the current president of S.M. Frank with Kaywoodie production in New York.  Al said that Bill had always been helpful and had seemed to enjoy providing info.  Nothing like going to the top of the pipe food chain!  I sent a note to Bill through the S.M. Frank website as well as to the ‘kwguy’ in the Natural Burl thread with the hope of getting a response and perhaps a historical Natural Burl add!

Al’s suggestion to me paid off!  In a few days I received a response from Bill Feuerbach, president of S.M. Frank since taking over the role from his father in 1990 as the fourth generation of Feuerbachs overseeing the company.  Bill’s note to me:

Dal 

I’d love to be able to help you out with that. I’ve looked through what I have at the shop and most of those catalogs are later 60’s to later 70’s.  I’m sure I’ll have those older catalogs from that range at home.  I’ll try and check tonight.

Best regards

Bill

After arriving home that night, Bill sent an additional note that he hadn’t found anything at his home and would redouble his efforts the following day at the shop to find the sought after ’57 to 62’ catalog pages.  Then, this note came in and the treasure hunt ended with success!

Dal

Success!!  I found the catalogs at home.  They were in a storage tub in the downstairs closet. Funny I don’t remember putting them there. It’s probably been 4 years since I referenced them. It is hell getting old, CRS is kicking in.

Anyway, I’ve attached three images from the 1958, 1960 and 1962 catalogs.  I was only using my phone to take pictures and it was difficult not to get any flash or glare.  Are they ok?  You can tell the year by the retail prices for the Natural Burl.

1958- $4.00

1960- $5.00

1962- $5.95

Let me know when you’ve posted this and the link. I’d like to take a look.  If you have any other questions let me know. If in the future you need other images from the catalogs, let me know.

Best regards

Bill

The images Bill sent were great depicting the Kaywoodie presentation of the Natural Burl line.  Both the 1960 and 1962 pages, second and third below, showcase the Large Apple on my worktable.  The pictures and descriptions are great helping to wrap Paw’s pipe in its historical context! I appreciated the help of Bill Feuerbach, president of the S. M. Frank Co. & Inc. based in New Windsor, New York.  The Frank website not only showcases the Kaywoodie, Yello-Bole and Medico brand lines, but has other interesting information as well.  In my email response to Bill, I offered to digitize the ‘treasure tubs’ of Kaywoodie catalogs and adds if I only lived a bit closer to his neighborhood!  Oh my….

As I was waiting for word from Bill before he found the catalogs, I reread the Pipedia article on the S.M Frank Co. and discovered at the bottom of the article a reference to Brian Levine’s interview of Bill on the Pipes Magazine Radio Show.  I tuned in to learn more about Bill and the Kaywoodie name.  I was interested to hear in the interview that not only is Bill the CEO of the company, but he is an accomplished freehand pipe maker himself, likes single malts and owns and enjoys pipes in his rotation other than Kaywoodies!  It was a great interview and I encourage readers to tune in too!

The name for this Kaywoodie series, ‘Natural Burl’, harkens back to a pipe’s origins – or at least its bowl.  The Natural Burl adds above from Bill describe the ‘rugged, weather-carved briar’ that breathes more because of the increased surface of the bowl.  Briar comes from a bush-like plant that grows in arid lands.  The Kaywoodie motif focuses on the rough state of the burl in its natural form sporting rusticated or carved bowls to emulate a natural harvested burl.  The burl is the base of the briar bush that is cut into blocks, each becoming the raw material for fashioning each unique bowl. I found this example online of the burl texture which looks very much like the pipe on my worktable! This interesting information was added about the process at the WorthPoint site:

The mother of briar is Erica Arborea, an evergreen bush / tree, that grows in all forests of the Mediterranean area, preferring acid soils (Cyprus, Greece, Italy, Spain, France, Portugal, Morocco, Algeria- these are the countries where it is found). The bush has a typical height of 3 – 12 feet. But not the visible parts are the wanted ones, the ball-like roots are the pipe makers desire. These are the raw material for the briar wood, which is cut in blocks (plateaux and ebauchons) by real specialists. After a long process of boiling them in clear water and drying periods, these briar blocks will be ready for the experienced hands of a pipe maker.

With a deepened understanding and appreciation for Paw’s Kaywoodie on my worktable, I look more closely at the issues it brings from its years of service. As one would expect, the craggy Burl bowl is full of grime.  The chamber has thickening cake as you go down toward the floor.  This needs to be cleaned out as well to inspect the chamber wall and to give the briar a fresh start. The rim has evidences of Sam’s penchant for knocking the stummel on the back side of the rim.  It is worn and tapers away from the chamber. The rim was fashioned to be somewhat rough complementing the craggy bowl motif, but there is a large chip or divot out of the rim that will need to be filled and then blended. The bowl itself, along with the rim, is faded and skinned up.  I suspect that the original finish bent toward a light brown, but it is now thin and will need refreshing with new dye to blend the rim and bowl.  The 1962 add above describes a ‘2-tone brown finish’ characterizing the ‘Natural Burl’ line.  This is helpful information that hints at the depth of the final finish.The stem is in rough shape.  The oxidation is thick and deep.  The bit has calcium caked on it and some lower tooth compressions – not as bad as I’ve seen on Paw’s previous pipes! The stem orientation is also over-clocked which is a normal phenomenon with Kaywoodie screw in stems that happens over years of use with repeated loosening and tightening.  This will need to be adjusted as well. I begin the restoration of Paw’s Kaywoodie Natural Burl Large Apple by addressing the severe oxidation in the stem.  Before placing the stem in a soak of Before & After Deoxidizer, I get a head-start on removing the oxidation by pre-sanding the stem.  I use both 240 grade sanding paper and 000 grade steel wool to sand the stem to remove as much oxidation and caked calcium as possible.  The nickel 4-hole stinger also is cleaned up with the steel wool.After the sanding, the stem joins other pipes in the queue in a soak of Before & After Deoxidizer. After a few hours, the Kaywoodie’s stem is extracted from the Deoxidizer and after draining, I squeegee the liquid off the stem with my fingers.  I then run a pipe cleaner wetted with isopropyl 95% through the airway to clear the Deoxidizer.  Using a cotton pad and alcohol, the stem is wiped to remove the raised oxidation resulting from the soak.After cleaning the stem, paraffin oil is applied to help condition the vulcanite.  I put the stem aside to absorb the oil.  The stem looks great compared to where it started. It’s cleaning up nicely.Next, I turn the attention to the stummel.  I begin by reaming the Kaywoodie’s chamber to remove the cake.  Using the Pipnet Reaming Kit, I use two of the four blade heads available in the Kit.  I don’t know how long this cake has been waiting to be removed, but it is as hard as a brick.  I’m careful not to force the blades beyond their torque endurance level – simply allowing the scraping action to wear away the brick cake.  When both blades do what they can, the Savinelli Fitsall Tool continues the scraping of the chamber walls. Finally, to remove the last remaining carbon remnants, a 240 grade sanding paper is wrapped around a Sharpie Pen to sand the chamber getting down to fresh briar. After wiping the chamber with a cotton pad wetted with alcohol, and inspection reveals a perfectly healthy chamber.  The picture on the 10th floor Man Cave balcony where I’m working, does not allow a very good picture of the chamber, but it looks good.  Moving on.Next, using undiluted Murphy’s Oil Soap, I go to work on the wonderfully craggy but grime-filled surface of the Natural Burl bowl.  I use a cotton pad a bit, but transfer to using a bristled toothbrush which gets into the nooks and crannies of the landscape much more effectively.Next, after transferring the bowl to the kitchen sink, I continue to clean the surface and use shank brushes and liquid anti-oil dish soap and warm water to work on the internals.  After rinsing thoroughly, back on the worktable I take some pictures of the results.  The cleaning has totally removed what was left of the old finish – not unexpected.  The cleaning reveals some white fills on the right side of the stummel which are fully embraced in the craggy landscape cover and seem to be solid after testing them with a sharp dental probe.Next, I focus again on the internal cleaning using pipe cleaners and cotton buds wetted with isopropyl 95%.  Cleaning Kaywoodie pipes tends not to be easy.  Working through the threaded metal shank facing makes access to the mortise difficult.  Along with pipe cleaners and buds, the full arsenal added the use of shank brushes, and a dental spoon to scrape the mortise walls.  After quite a bit of time and effort, the buds start to emerge lighter and a cease fire is called. I’ll continue the cleaning later with a kosher salt and alcohol soak to work through the night to further clean and freshen the internals of the Kaywoodie stummel.Turning now to the rim, the next step is to fill the divot, or perhaps, the crater on the rim.  I go along with the ‘rough’ motif of this Kaywoodie Natural Burl.  The rim is rough and the only repair I plan for the stummel is this divot.  The damage of Paw’s knocking will remain – it simply adds to the rough rustic look and will be a remembrance of Paw when it is put into service by the family.I place a small mound of briar dust on the mixing palette that I’ve covered with scotch tape for ease of cleaning.  Next to the briar dust a small amount of BCI Extra Thick CA glue is puddled.Using the toothpick, briar dust is pulled into the glue and mixed as it is added.  As more is added, the resulting briar dust putty thickens.  When it reaches the thickness of molasses, with the toothpick the putty is troweled to fill the rim divot.With the briar putty applied, I place the stummel aside for several hours for the putty to cure.Turning now to the stem, the upper bit is in good shape after the ‘pre-sanding’ that was done before putting the stem into the Deoxidizer.  The lower bit, pictured below, has some compressions and a button bite compression that need addressing.I start by using the heating method with a Bic lighter.  Using the flame of a Bic lighter, I paint the bit using a back and forth motion heating the vulcanite.  As the vulcanite heats, it also expands to regain the disposition of the stem before the compressions were made by Paw.  The picture below is after the heating and the process has helped the bit compressions so that only sanding should be needed to remove the damage.  However, the button is still in need of additional steps.To fill the button lip bite, after wiping the area with alcohol to clean it, I spot drop black CA glue on the compression and put the stem aside for the patch to cure.The patch on the rim is now ready for filing.  I use both the flat and half-rounded needle files to remove the excess putty and to shape the internal curve of the rim. I put a stop on sanding and further cleaning the rim because the hour is late, and through the night I want to use a kosher salt and alcohol soak to advance the cleaning of the internals of the stummel.  I first fashion a cotton ball into a ‘wick’ by pulling and twisting it.  It is then inserted down the mortise into the airway with the help of a stiff wire. The wick helps to draw out the latent residue of tars and oils.The bowl is then filled with kosher salt, which leaves no aftertaste as with regular iodized salt.  After placing it in the egg carton to keep it stable, I then fill the chamber with isopropyl 95% until it surfaces over the salt. After a few minutes, as the alcohol is drawn into the stummel, the alcohol is topped off and it is set aside to work through the night. The next morning, the salt and wick are slightly soiled which hopefully means that the internals are already clean from earlier. After dumping the expended salt and wiping the bowl with a paper towel, I blow through the mortise to make sure all the salt crystals have been dislodged. To make sure that the internals are clean, and nothing has been left behind after the soak, I use only one pipe cleaner and cotton bud as confirmation of the cleaning. Moving on.I return now to the rim.  I plan to apply a fresh color to the stummel and the only preparation for applying the new stain to the stummel is on the rim.  I plan to leave it in the rough motif of the Natural Burl line, but I want the rim cleaned.  I lightly sand the internal rim edge as well as lightly around the rough external rim edge as it transitions into the Burl landscape.  I’m looking for ‘rough’ and ‘rustic’ but ‘fresh’ to give this unique Kaywoodie a fresh start.I follow the 240 paper with 600 grade paper with the same approach – keep the rustic but refresh the rim.Before moving to the next step, I notice that the nickel shank facing after the cleaning had not been spruced up.  A quick revolution of 000 steel wool takes care of this.  This is the only bling this Kaywoodie has and I’m making the most of it!As I think about applying a fresh color to Paw’s Kaywoodie, I have only one picture of another Natural Burl online and it is no help in hinting at the original 2-toned brown coloring Kaywoodie used.  The best clue I have is on Paw’s pipe. The smooth briar panel on the underside of the shank holding the nomenclature holds a clue.  To guard the stamping on the panel I’ve not sanded it – only cleaned with the rest of the stummel.  I’m guessing that the coloring of the panel leans toward a light brown.  I’m thinking that Kaywoodie’s approach was straightforward with this less expensive line of pipes.  Yet, the craggy surface now is so dry and bare, showing pristine briar, that applying even a light brown dye will probably darken considerably as the thirsty briar drinks it in.Looking at the craggy landscape in the picture above brings the next question in my mind about applying a new finish.  My normal way of staining with aniline dye is to flame it to combust the alcohol which encourages a deeper embrace of the dye by the briar grain.  My normal follow-up to this is then to apply compounds to remove the crusting the combustion creates and to further shine the surface with the fine abrasives of Tripoli and Blue Diamond compounds.  The roughness of this stummel causes me to question my normal approach.  My concern is that if compounds are used on this craggy rough surface, I will forever be trying to clean out the compound residue lodged in the rough surface!  I think I can utilize buffing wheels on the Dremel without too much problem, but without compounds.  I decide in the end to apply a dye wash instead of flaming the dye because of this concern.

After wiping the stummel down with a cloth and alcohol to clean it the best I could, the stummel is heated with the hot air gun to open the briar.Then, with the use of a folded pipe cleaner, the surface is painted with Fiebing’s Light Brown Leather Dye.  I make sure the dye is getting into all the cracks, crevasses, nooks and crannies.  The rim also receives the dye.After the dye is applied, the stummel is set aside to rest for several hours before continuing with the next steps of finishing.  This ‘rest’ helps the new dye to stabilize in the briar.Turning back to the stem, the patch applied to the lower button lip is cured and I use a flat needle file to remove the excess patch material and to shape and refresh the button lip.  I also file the bit area to remove any residual tooth compression.Flipping over to the upper bit, I file residual compressions as well as refresh the button lip.  Refreshing the button lip is helpful to allow a better ‘hang’ grip of the pipe without biting and clenching, and extreme chewing!Continuing now with 240 grade sanding paper on the upper side, the file scratches are removed, and the button is smoothed further.  The same is done on the lower bit and to further blend the button patch.   I expand the 240 sanding to the entire stem to make sure that residual oxidation has been addressed. Following the 240 sanding, I wet sand the entire stem with 600 grade paper and follow with applying 000 steel wool. The nickel stinger is also a benefactor of the steel wool polishing again.Moving on, the full regimen of 9 micromesh pads are applied by first wet sanding with pads 1500 to 2400 and dry sanding with pads 3200 to 4000 and 6000 to 12000.  Between each set of 3 pads, Obsidian Oil is applied to condition the vulcanite and to guard against oxidation. I love the glossy pop of newly micromeshed vulcanite! I had observed earlier that the Kaywoodie screw in stem was over clocked a few degrees.  This happens over time with tightening and loosening.To correct this problem and to bring the stem back to an accurate orientation, a Bic lighter is used to heat the nickel 4-hole stinger.  Since the stinger is gripped by the vulcanite of the stem, the goal is to warm the stinger so that the vulcanite gripping the stinger heats and loosens its grip allowing the stinger to rotate. After heating the stinger, I quickly re-screw the stem into the threaded shank facing and when it tightens to the orientation pictured above, I continue to apply clockwise pressure and the heated vulcanite releases its grip and it allows me to turn the stem one full revolution to line it up correctly.  I had to heat the stinger twice as the first try did not loosen the grip.  After lining the stem orientation correctly, I leave the stem in place and as the vulcanite cools, the grip on the stinger is re-engaged holding the stem again in the proper orientation.Time to address the dyed stummel.  It has been resting for several hours to help stabilize the dye in the briar.I use a cotton pad wetted with alcohol to wipe down the dyed stummel.  I do this to remove excesses of dye on the surface and to lighten and blend the new dye.Next, I mount a cotton cloth buffing wheel onto the Dremel and simply buff the stummel.  I do not use any compounds so that the compound dust does not fowl up the surface getting lodged in the plethora of hiding places on the Burl surface causing me to have to clean it!  The Dremel is a great tool for getting into the nooks and crannies of the Natural Burl landscape. I’m able to rotate and move up and down ridges and to reach into crevasses.  The newly dyed surface responds well to the buffing wheel.  The coloring of the wheel shows that new dye is leeching out of the surface.  The more I’m able to remove now, less likely to come off on hands later!Next, I use the 1500 grade micromesh pad and lightly sand over the Burl surface.  The aim is to ‘scalp’ the peaks of the mountain tops on the craggy surface to lighten them.  The lightening of the peaks creates more contrast and depth definition to the landscape.  I follow the scalp sanding by running the Dremel’s buffing wheel over the surface again.  This, I believe, achieves the ‘2-toned’ look of Kaywoodie’s design for the ‘Natural Burl’ line.In the homestretch – next, I mount another buffing wheel onto the Dremel setting the speed at about 40% full power.  After reuniting the Kaywoodie’s stem and stummel, Blue Diamond compound is applied to the rim and smooth briar surface on the underside and end of the shank.  The compound is also applied to the stem.  After applying the Blue Diamond compound, the pipe is buffed with a felt cloth to remove the compound dust from the areas on the stummel and from the stem.  Next, another cotton cloth buffing wheel is mounted and set at the same speed and carnauba wax is applied to the entire pipe.  I’m careful to apply with a very light touch of wax to the Natural Burl surface not to allow wax to build up in the crannies.  Wax is applied to both stummel and stem and then the pipe receives a rigorous hand buffing with a microfiber cloth to raise the shine.

Wow!  I’m very pleased with how this Kaywoodie Natural Burl Apple shaped up.  The brown craggy finish is flecked with shade differences that give it a depth and warmth – a rustic knobby feel.  I always enjoy the contrast nuances that the coalescing of rough and smooth briar creates. The smooth briar underside and shank ring alongside of the Burl texture is nice.  I’m amazed that this pipe occupied the lower shelf on Kaywoodie’s offerings back in the day when Sam chose it and added it to his rotation of pipes.  The TLC it has received has enhanced the briar presentation with this unique Natural Burl finish. I appreciate the collaborative help from Bill Feurbach who even as the president of the S.M. Frank Co., was not hindered from helping with the recommissioning of this one vintage Kaywoodie – a pipe man at heart.  Thanks, Bill!  I like the Natural Burl a lot and I trust that Joe likes it too.  Paw’s Kaywoodie Natural Burl 33 – Large Apple, that was put into production in the mid-50s/early 60s, is a venerable 60-year-old(!), and is starting a new lifetime in the loving care and stewardship of Paw’s family.  Adding frosting to the Kaywoodie cake, Joe’s commissioning of this restoration of Paw’s Natural Burl also benefits the Daughters of Bulgaria – women and girls who have been trafficked and sexually exploited.  Thanks for joining me!

Next on the table – A Strange Saucer Shaped Pipe Stamped Flying Disc


Blog by Steve Laug

The next pipe on my worktable is a really different one! I am not sure where Jeff picked this one up but it is different. It is shaped like a little flying saucer. I have never seen one like this in all of my restorations. I have seen squashed Tomato shaped pipes that are almost disk shaped but nothing like this one. It has a pretty normal sized bowl on it and it was well smoked. The pipe had thick peeling varnish coat on the bowl that looked rough and there were a few fills around the bowl. It was another dirty pipe with a briar bowl, and aluminum stationary shank and screw in vulcanite stem. There was something uniquely charming about this strange little pipe. The bowl is heavily caked and the beveled rim has lava overflow and may have some damage. Hard to tell with the cake. There appears to be damage internally around the entrance of the airway into the bowl as it is a large cavern. The stamping on the heel of the bowl was interesting as it was all over the bowl. It read Flying Disc in an oval in one spot, Imported briar in another and next to a large fill it was stamped Italy. The vulcanite stem was oxidized and there was light tooth chatter on both sides near the button. It was also under turned and would not align properly in the shank. Jeff took the following photos before he started his cleanup work on the pipe. He took close-up photos of the bowl and rim top from various angles to capture the condition of the bowl and rim top edges. You can see the lava overflow and debris the edges of the bowl an on the rim top. You can see the thick cake in the bowl. This was a dirty pipe for sure but it must have been someone’s favorite judging from the condition of the bowl! Jeff took photos of the sides and heel of the bowl to show the grain around the bowl and the condition of the finish. You can see the peeling varnish as well as the fills in the photos. Jeff took a photo of the stamping on the heel of the bowl. You can see the various stamping clearly and they read as noted above. Note the large fill next to Italy is a pink putty.The next two photos show the top and underside of the stem. The oxidation, calcification and the light tooth chatter on both sides near the button are visible in the photos. I did a search on Pipephil and came up with nothing on the brand. I searched the brand online and came up with a link to a discussion on the pipe on Pipesmagazine forum. I am including that link and the original and concluding post (https://pipesmagazine.com/forums/threads/who-made-that-pipe.46221/). I am also including a photo of the pipe the questioner on the forum spoke of.…There are more than one of these flying disc shaped UFO pipes around. Some are stamped “Jet Set” on the left side of the vulcanized bit (see pic), & some have the Mastercraft logo there instead (pic from Pipephil). Jet Set is listed as one of the seconds for Mastercraft; Mastercraft being owned by Lane Ltd. On the bottom of the bowl stamped inside an oval is “Flying Disc”. Other stampings are “Italy” & “Imported Briar”…

…Lorenzo didn’t go into business as a brand until 1946. Using Google Translator (since I don’t speak French) the translation can sometimes be rough, but here is the confirmation that these Jet Pipe pipes were made by Lorenzo for Mastercraft:

“Both Jet Pipe pipes were manufactured by Lorenzo for the brand Mastercraft in the 60’s as well as pipes sparkless in this chapter pipes cigarette.”

It is pure speculation on my part then that Lorenzo either acquired Jet Pipe after making pipes for them or registered the name Jet Set and designed the Flying Disc pipe on their own for Mastercraft. Either way, Lorenzo is the maker of the Flying Disc pipe.

It became clear that the pipe had been made for Mastercraft in the US by Lorenzo. It probably was made in the 1960s. It reminded me of something from my childhood limited television cartoon watching – the Jetsons!

Now it was time to look at it up close and personal. Jeff had done an amazing job in removing all of the cake and the thick lava on the rim top. He had reamed the bowl with a PipNet Pipe Reamer and cleaned up the remnants with a Savinelli Fitsall Pipe Knife. He took the cake back to bare briar so we could check the walls for damage. He scrubbed the exterior of the bowl with Murphy’s Oil Soap and a tooth brush to remove the grime on the bowl and rim and was able to remove the lava and dirt. He cleaned out the interior of the bowl and shank with pipe cleaners, cotton swabs and alcohol until they came out clean. The rim top looked amazing when you compare it with what it looked like before he started. He cleaned the stem with Soft Scrub to remove the grime on the exterior and cleaned out the airway with alcohol, cotton swabs and pipe cleaners. I took some photos of the pipe as I saw it. To show how clean the rim top and stem really was I took a close-up photo of the rim and stem. The bowl was clean and cake free. The rim top is very clean with no residual lava in the sandblast finish. The inner edges of the rim show some darkening on the right and the left side. The black vulcanite stem looks cleaned up nicely. The surface had some light tooth marks but the button edge looked really good.I took photos of the stamping on the under side of the bowl. They are literally all around the bowl bottom. You can see that from the photos below. I removed the stem from the bowl and took photos of the parts. The “plumbing” on this pipe is quite unique. Look at the stinger apparatus that extends through the aluminum shank.Now it was time to start addressing issues with this pipe. I sanded the exterior of the bowl with 1500 grit micromesh sanding pads to remove the peeling varnish from the bowl. I worked on the rim edge a bit and paused as I examined the cavernous entry of airway into the bowl. It was badly burned and enlarged. I wonder if the metal stinger tip heated too much and burned the surrounding airway. I took two photos to try to capture the large cavernous opening.As I examined the area I had very few choices in terms of addressing the issue. I could carve and insert briar, glue it in place and hope that the burnout would not reoccur. The other option would be to build up the area with some JB Weld which dries inert and is basically burn proof and would preserve the airway area from further damage. I chose to use the JB Weld repair. I mixed a batch of the resin and hardener and inserted a Vaseline greased pipe cleaner in the airway so as not to close it off during the repair.I applied the mixture to the surface area around the pipe cleaner with a dental spatula. I pressed it into the cavernous pit. I knew that I would need to do this several times as it was a deep pit. I gave the first coat to the wall of the bowl and set the bowl aside overnight.This morning I filled in a few spots where the repair shrunk as it cured. The entrance to the bowl is now the size of a pipe cleaner. Once it has cured I will sand it smooth and even out the back of the bowl. I set the bowl aside and had some lunch!Once the repair had hardened to touch I worked on the underside of the bowl. There was a large pink fill next to the Italy stamp. It was damaged and hard so I picked it out with a dental pick and cleaned up the edges until all of it was gone. I wiped it out with a cotton swab and alcohol and then filled it in with a mix of clear super glue and briar dust. I know that Dal mixes the two into a putty and presses them in place. I have never succeeded in getting his putty mixture as it always hardens to quickly. Instead I layer the mix into the area to be filled. I start with glue, then briar dust pressed in with a dental spatula, then another layer of glue and some more dust. I finish it with a top layer of glue and let it dry.Once the repair has cured I used a needle file to flatten it as much as possible to the surface of the briar. I followed up by sanding it with a small corner of folded 220 grit sandpaper to blend it into the surrounding briar. Once it was smooth I buffed it lightly with 1500 grit micromesh and then stained it with  an Oak Stain pen to blend it into the bowl. At this point in the process I set the bowl aside for awhile to let the bowl cure some more and turned my attention to the stem. The first issue with the stem was the fact that it was under-turned almost a quarter turn. I removed the stem and heated the metal stinger with the flame of a Bic lighter. The heat softens the glue holding the stinger in the stem. After a few minutes I screwed the stem back in the shank and corrected the under-turned stem. Once I had it aligned I set it aside and let it cool off while in place.I moved on to addressing the remaining oxidation on the stem and the tooth chatter and marks. I sanded out the tooth marks on both sides of the stem with a folded piece of 220 sandpaper and sanded out the remaining oxidation. I started polishing with 400 grit wet dry sandpaper. I rubbed the stem down with Denicare Mouthpiece Polish – a red gritty paste a lot like Tripoli to polish it after the 400 grit sandpaper. I rub it on with my fingertips and work it into the vulcanite and buff it off with a cloth. It does a great job before I polish it further with the micromesh pads.I polished the stem with micromesh sanding pads – dry sanding with 1500-12000 grit sanding pads. I wiped the stem down after each sanding pad with a cloth containing some Obsidian Oil. I finished polishing it with Before & After Pipe Stem Polish – both Fine and Extra Fine and buffed it off with a cotton cloth. I gave it a final rub down with Briarville’s No Oxy Oil to preserve and protect the vulcanite stem. I set the stem aside and went back to work on the bowl. The bowl looked very good so I did not need to do any further work on it. I rubbed the bowl and shank down with Before & After Restoration Balm to deep clean the finish on the bowl and shank. The product works to clean, enliven and protect the briar. I worked it in with my fingers and with a horse hair shoe brush to get it into the deep nooks and crannies of the sandblast finish on the rim and bowl sides. I let it sit for 10 minutes to let it do its magic. I buffed it with a soft cloth. The briar really began to have a rich shine. I took some photos of the bowl at this point to mark the progress in the restoration. I sanded out the bowl with 220 grit sandpaper and a sanding drum on my Dremel to smooth out the walls on the bowl. With that finished the pipe was complete. I put the bowl and stem back together again and buffed the bowl and the stem with Blue Diamond on the buffing wheel. I gave the bowl and the stem several coats of carnauba wax. I carefully buffed the entire pipe with a clean buffing pad to raise the shine. I finished buffing with a microfiber cloth to deepen the shine. The finished pipe looks very good. The disc shaped pipe has a different feel in the hand. It is comfortable and light weight. The finished Flying Disc pipe is shown in the photos below. The dimensions of the pipe are Length: 5 inches, Height: 1 ½ inches, Outside diameter of the bowl: 2 ½ inches, Chamber diameter: ¾ of an inch. This unique looking Flying Disc/UFO pipe turned out very well. It should be a great pipe if the way it arrived to us was any indication. This one will go on the rebornpipes store shortly. If you are interested in it let me know. Thanks for reading this blog and my reflections on the pipe while I worked on it.

Next on the table – a 1948 MR&Co GBD 191 Chubby Billiard


Blog by Steve Laug

The next pipe on my worktable is an older GBD Chubby Billiard that Jeff and I picked up in a recent purchase of pipes. I have always loved older GBD pipes and the thick shank ones always have my attention. The pipe had some beautiful grain shining through the dust grime ground into the smooth finish. The finish was dull and lifeless and very dirty from sitting around. There was a thick cake in the bowl with lava flowing out of the bowl and over the beveled rim top. The cake and lava was thick enough that it was hard to know what the inner edge of the rim looked like. The pipe was stamped on both sides of the shank. The left side bore the GBD Oval logo stamp and nothing else. The right side read London England over the shape number 191. The tarnished band on the shank is Sterling Silver and bears the GBD Oval logo with three hallmarks underneath. There is also the MR&Co stamp below the hallmarks on the band. The thick tapered stem bore the GBD Oval Brass Roundel and was heavily oxidized and there was light tooth chatter and tooth marks on both sides near the button. The button surface also had some deep tooth marks that would need to be addressed.  Jeff took the following photos before he started his cleanup work on the pipe. He took close-up photos of the bowl and rim top from various angles to capture the absolutely filthy condition of the bowl and rim top edges. It is caked with a thick cake with tobacco debris in the bowl and the rim top is beveled but that can hardly be seen in the debris and overflow that has filled in the top. This was a dirty pipe for sure but it must have been a favourite of the pipeman who had held it in trust before it came to us. The next photos of the sides and heel of the bowl show the beautiful smooth mix of birdseye and cross grain around the bowl. It is quite stunning and you can see the grime and grit that is ground into the finish on the bowl sides. Did I say that this pipe was dirty? Perhaps that was a bit of an understatement. Jeff took photos of the stamping on the shank. The left side has the standard GBD Oval stamped into the briar. There is nothing else on the briar of the left side. The right side reads LONDON ENGLAND over 191 which is the shape number. He also took a photo of the band on the shank with its stamping as well as the GBD Oval Roundel on the left side of the stem. The next photos show a top view of the thick tapered stem as well as the top and underside. The oxidation, calcification and tooth marks and chatter on both sides near and on the button are visible in the photos. When the pipe arrived I turned to Pipephil (http://www.pipephil.eu/logos/en/logo-gbd.html) to see if he could help me with the MR&Co stamp on the shank band. There was some quick information the top of the page so I did a screen capture of the section and have included it below. It gave me the name behind MR&Co which I already knew – Marechal & Ruchon Cie. It simply said that MR&Co first, the CJ Verguet Freres owned GBD from 1903 to 1970 and manufactured the pipes in the St. Claude, France plant. I needed more specific information so I would do some more reading.I turned to Pipedia for more information MR&C – Marechal Ruchon & Cie. There was a specific listing for the company so I turned there https://pipedia.org/wiki/Marechal_Ruchon_%26_Cie.). I quote in full:

Marechal Ruchon & Cie. was a company owned by Auguste Marechal and Ferdinand Ruchon (“& Cie” is the french equivalent of “& Co”) which owned the GBD brand from the end of the 19th century until 1902 when they sold Marechal, Ruchon & Cie. to Oppenheimer Pipe, which in turn changed the name of the company to Marechal, Ruchon & Co., Ltd.. Upon the creation of Cadogan, however, the brand was no more, remembered only in the name of the GBD Marcee pipes made until just after the Second World War. For more information see GBD.

Since the GBD pipe that I was working on bore the MR&Co stamp in a extended rectangle with pointed ends that helped me know that it was made after MR&Cie sold the company in 1902 to Oppenheimer Pipe in 1902 who changed the name to Marechal, Ruchon & Co., Ltd. The stamp from that time forward matches the one on the GBD on my table.

I turned to the article on Pipedia on GBD itself and found some interesting additional information (https://pipedia.org/wiki/GBD). I quote:

…Meanwhile the GBD name was well established and thus retained. August Marechal and Ferdinand Ruchon led the firm into the 20th century. They were in charge of the company for more than 50 years….

This means that MR&Co led the firm from 1902-1970. Now I felt like I was on my way to dating this pipe and I have not even looked at the silver hallmarks yet.

I decided to turn to the hallmarks at this point. I knew that the marks were clear and read as follows from right to left. There was a Leopard’s Head without a Crown, a prancing or rampant Lion and the letter N. Each of them was in a square cartouche.

I turned to an internet site on British Silver Hallmarks to unpack the meaning of each of the hallmarks (https://www.925-1000.com/british_marks.html). The first screen capture below picks up the information on the Silver Standard Marks. The Rampant Lion is shown in letter A. It informed the buyer that the silver was Sterling .925.The second screen capture shows the Leopard Heads that were often on silver from London. They are the City Marks and I captured only the London section. The Leopard on this band is the one without the crown. The information on the screen capture is clear that the uncrowned Leopard was on silver from 1822 to the present.Now I knew the first two hallmarks on the band – It was a London Made Silver band made after 1822 and it was .925 Sterling. Now it was time to narrow down the dates on the band. I turned to another webpage that gave me the letter codes so that I could pin down the date on this pipe from that site (https://www.silvermakersmarks.co.uk/Dates/London.html). The large chart on that site covers the time period from 1544-2024. I include a screen capture of the section from 1698 to 1974 as it includes the stamp I am interested in.I have to thank John Fetter on the Facebook Tobacco Pipe Restorers Group for helping me nail this down. I posted the stamping on the shank band on the group with a potential date I was looking at and he posted a more accurate read. He included a photo of a pipe that he was waiting for from 1955 with similar hallmarks other than the “N” stamp that I have inserted below.I also checked the site for the 1948 date that he surmised and found that it matched perfectly to the stamping on the band on my pipe. I have included a screen capture of the section on the chart with the 1948 N stamp.

Now I knew that I was dealing with a GBD pipe made when Oppenheimer owned the company and operated as Marechal, Ruchon & Co. It was made in 1948 and bore the City of London mark in a band of .925 Sterling Silver. This was an old timer – 72 years old, just 7 years older than I am!

Now it was time to look at it up close and personal. I know I have said this before but I have to tell you this again. Jeff does an incredible job when he cleans these pipes. I know for a fact that I could not work on so many pipes without his cleanup work. He saves me an amazing amount of time with what he does. I receive these pipe cleaned and ready to work on with my part. I am very thankful for his help. He is a major part of rebornpipes.

This pipe was nothing short of looking like a completely different pipe! He had a real job in removing all of the cake and the thick lava on the rim top. He had reamed the bowl with a PipNet Pipe Reamer and cleaned up the remnants with a Savinelli Fitsall Pipe Knife. He took the cake back to bare briar so we could check the walls for damage. He scrubbed the exterior of the bowl with Murphy’s Oil Soap and a tooth brush to remove the grime on the bowl and rim and was able to remove the lava and dirt. He cleaned out the interior of the bowl and shank with pipe cleaners, cotton swabs and alcohol until they came out clean. The rim top was clean when you compare it with what it looked like before he started. There was still some darkening on the top and inner edge of the bowl. There was one burned area toward the back of the inner edge and top.  He cleaned the stem with Soft Scrub to remove the grime on the exterior and cleaned out the airway with alcohol, cotton swabs and pipe cleaners. I took some photos of the pipe as I saw it. To show how clean the rim top and stem really were I took a close-up photo of them both. The bowl was clean and cake free. The rim top is very clean with no residual lava on the surface of the inward beveled rim top. There was some darkening in the finish on the top and the inner edges of the bowl. The black vulcanite tapered stem cleaned up nicely. There were still some deep spots of oxidation around the shank end and in the crease of the button. The surface had some light tooth marks and the button edge had a deeper mark on each side.I took photos of the stamping on both sides of the shank. You can see that it is very readable and clear on both sides.I removed the stem from the bowl and took photos of the parts. The taper vulcanite stem has the older style stepped down tenon end that extended beyond the end of the mortise into the first part of the airway.I started my part of the restoration by addressing the issues that remained on the rim top. I used a folded piece of 220 grit sandpaper to clean up the inner edges of the bowl and also sand the smooth portion of the inward bevel on the top. I worked it over to minimize the burn mark on the rear inner edge and remove the darkening from the rest of the edge and the rim top. I started the polishing with 400 grit wet dry sandpaper. I am happy with the results thus far. It definitely is an improvement. I would be able to polish it and blend it into the natural finish of the bowl.I polished the briar with micromesh sanding pads – dry sanding with 1500-12000 grit pads. I wiped the bowl down after each pad with a damp cloth. The grain really began to stand out and the finish took on a shine by the last sanding pad. The photos tell the story! The bowl looked very good. There were a few war wounds that I decided to leave in the briar as they were part of the story of the pipe. I rubbed the bowl and shank down with Before & After Restoration Balm to deep clean the finish on the bowl and shank. The product works to clean, enliven and protect the briar. I worked it into the smooth finish on the bowl with my fingertips. I let it sit for 10 minutes to let it do its magic. I buffed it with a soft cloth. The briar really began to have a rich shine and grain began to come alive in the finish. I took photos of the bowl at this point to mark the progress in the restoration. The bowl was finished so I set it aside and turned my attention to the stem. I sanded out the deeper oxidation that still remained in the vulcanite and the tooth marks on both sides of the stem with a folded piece of 220 sandpaper. I also reshaped the button surfaces with the sandpaper at the same time. I started polishing with a folded piece of 400 grit wet dry sandpaper.I rubbed the stem down with Denicare Mouthpiece Polish – a red gritty paste a lot like Tripoli to polish it after the 400 grit sandpaper. I rub it on with my fingertips and work it into the vulcanite and buff it off with a cloth. It does a great job before I polish it further with the micromesh pads.I polished the band with some tooth paste – rubbed it on with my fingertips and rubbed it off with a cotton pad. It really shone and gave a bit of pop to the shank and stem.I polished the stem with micromesh sanding pads – dry sanding with 1500-12000 grit sanding pads. I wiped the stem down after each sanding pad with a cloth containing some Obsidian Oil. I finished polishing it with Before & After Pipe Stem Polish – both Fine and Extra Fine and buffed it off with a cotton cloth. I gave it a final rub down with Briarville’s No Oxy Oil to preserve and protect the vulcanite stem. I put the bowl and stem back together again and buffed the bowl and the stem with Blue Diamond on the buffing wheel. I used a soft touch on the sandblast bowl so as not to fill in the blast with the product. I gave the bowl and the stem several coats of carnauba wax. I carefully buffed the entire pipe with a clean buffing pad to raise the shine. I finished buffing with a microfiber cloth to deepen the shine. The finished pipe looks very good. The grain patterns around the bowl are very nice and the chunky shape of the bowl and shank look great. The pipe feels great in the hand. It is comfortable and light weight for a pipe of its size. The finished GBD 191 London England Chunky Billiard is shown in the photos below. The dimensions of the pipe are Length: 5 ¼ inches, Height: 2 inches, Outside diameter of the bowl: 1 ¼ inches, Chamber diameter: ¾ of an inch. This 1948 GBD Billiard turned out very well. It should be a great pipe. This one will be joining my collection of older GBD pipes. Thanks for reading this blog and my reflections on the pipe while I worked on it.


Next on the table – an uncommonly beautiful sandblast Jesper of Denmark


Blog by Steve Laug

The next pipe on my worktable is an interesting smaller sandblast egg-shaped Freehand with a fancy vulcanite stem. The pipe had some beauty shining through the dust and debris in the valleys of the deep and rugged sandblast finish. The blast continued up the shank to the plateau finished shank end. The finish was dull and lifeless and very dirty from sitting around. There was a thick cake in the bowl with lava flowing out of the bowl and over the rim top. The lava had filled in the sandblasted finish on the rim top. The cake and lava was thick enough that it was hard to know what the inner edge of the rim looked like. The stamping on the shank appeared to read Jesper of Denmark but the major part of the second line was hidden in the sandblast. The fancy stem was oxidized and there was light tooth chatter on both sides near the button. Jeff took the following photos before he started his cleanup work on the pipe. He took close-up photos of the bowl and rim top from various angles to capture the condition of the bowl and rim top edges. You can see the lava overflow and debris in the sandblasted rim top. You can see the thick cake in the bowl. This was a dirty pipe for sure but it must have been a favourite of the pipeman who had held it in trust before it came to us. He took photos of the sides and heel of the bowl to show the beautiful deep and rugged sandblast around the bowl. It is quite uniform and you can see the dust and debris in the finish. It is an good looking sandblast. Jeff took a photo of the stamping on the shank. It looks like it reads Jesper of…the “Denmark” portion of the stamp is lost in the sandblast below it. The line at the end of the “r” is a deep carved line in the smooth panel. The second photo below shows the plateau shank end.The next two photos show the top and underside of the stem. The oxidation, calcification and the light tooth chatter on both sides near the button are visible in the photos. When the pipe arrived I turned to Pipephil (www.pipephil.eu/logos/en/logo-j2.html) to see if he included not only information on the Jesper of Denmark brand. Sure enough he quick information for me that identified the designer/carver as Jorgen Larsen.I turned to Pipedia for more information on Robert Eugene (Mic) Burns and the Micoli line of pipe that he carved (https://pipedia.org/wiki/Jesper_of_Denmark). The site confirms that the pipes were designed by Jorgen Larsen. Interestingly Pipedia included a photo of a catalogue page featuring Jesper of Denmark pipes and a picture of the carver himself. The catalogue page came through Doug Valitchka. Now it was time to look at it up close and personal. Jeff had done an amazing job in removing all of the cake and the thick lava on the rim top. He had reamed the bowl with a PipNet Pipe Reamer and cleaned up the remnants with a Savinelli Fitsall Pipe Knife. He took the cake back to bare briar so we could check the walls for damage. He scrubbed the exterior of the bowl with Murphy’s Oil Soap and a tooth brush to remove the grime on the bowl and rim and was able to remove the lava and dirt. He cleaned out the interior of the bowl and shank with pipe cleaners, cotton swabs and alcohol until they came out clean. The rim top looked amazing when you compare it with what it looked like before he started. He cleaned the stem with Soft Scrub to remove the grime on the exterior and cleaned out the airway with alcohol, cotton swabs and pipe cleaners. I took some photos of the pipe as I saw it. To show how clean the rim top and stem really was I took a close-up photo of the rim and stem. The bowl was clean and cake free. The rim top is very clean with no residual lava in the sandblast finish. The inner edges of the bowl look good. The plateau shank end also looks good. The black vulcanite fancy stem looks cleaned up nicely. The surface had some light tooth marks but the button edge looked really good.I took a photo of the stamping on the under side of the shank. You can see the name Jesper and the word “of” on the smooth panel.I removed the stem from the bowl and took photos of the parts. The fancy vulcanite stem worked really well with the sandblast egg shape and plateau shank.The bowl looked very good so I did not need to do any further work on it. I rubbed the bowl and shank down with Before & After Restoration Balm to deep clean the finish on the bowl and shank. The product works to clean, enliven and protect the briar. I worked it in with my fingers and with a horse hair shoe brush to get it into the deep nooks and crannies of the sandblast finish on the rim and bowl sides. I let it sit for 10 minutes to let it do its magic. I buffed it with a soft cloth. The briar really began to have a rich shine. I took some photos of the bowl at this point to mark the progress in the restoration. The bowl was finished so I set it aside and turned my attention to the stem. I sanded out the tooth marks on both sides of the stem with a folded piece of 220 sandpaper and started polishing with 400 grit wet dry sandpaper.I rubbed the stem down with Denicare Mouthpiece Polish – a red gritty paste a lot like Tripoli to polish it after the 400 grit sandpaper. I rub it on with my fingertips and work it into the vulcanite and buff it off with a cloth. It does a great job before I polish it further with the micromesh pads.I polished the stem with micromesh sanding pads – dry sanding with 1500-12000 grit sanding pads. I wiped the stem down after each sanding pad with a cloth containing some Obsidian Oil. I finished polishing it with Before & After Pipe Stem Polish – both Fine and Extra Fine and buffed it off with a cotton cloth. I gave it a final rub down with Briarville’s No Oxy Oil to preserve and protect the vulcanite stem. I put the bowl and stem back together again and buffed the bowl and the stem with Blue Diamond on the buffing wheel. I used a soft touch on the sandblast bowl so as not to fill in the blast with the product. I gave the bowl several coats of Conservator’s Wax and the stem several coats of carnauba wax. I carefully buffed the entire pipe with a clean buffing pad to raise the shine. I finished buffing with a microfiber cloth to deepen the shine. The finished pipe looks very good. The sandblast is deep and rugged look and feel in the hand. It is comfortable and light weight. The finished Jesper of Denmark Freehand is shown in the photos below. The dimensions of the pipe are Length: 5 ½ inches, Height: 2 inches, Outside diameter of the bowl: 1 ¼ inches, Chamber diameter: 7/8 of an inch. This great looking sandblast egg turned out very well. It should be a great pipe. There is something about this one that interests me. While I don’t have many freehand pipes this one may well stay with me. I will keep you posted. Thanks for reading this blog and my reflections on the pipe while I worked on it.

Refurbishing An Inherited Charatan’s Make Deluxe “Special ‘S’ ”


Blog by Paresh Deshpande

The next pipe that caught my attention was a CHARATAN’S which was in one of the three very large boxes of pipes which I had inherited. Working on these inherited pipe is what I love the most because of the intrinsic connect I have with these pipes and the fact that once I pass away, these will be passed on to my kids as remembrance that their father had worked on restoring each of these vintage and priceless collection of pipes.

This Dublin had beautiful densely packed cross grains on the sides and also along the shank with some stunning bird’s eye grains to the front and back of the bowl. The bowl delicately flares up towards the rim top and together with the straight tapered vulcanite stem, lends this pipe a lovely Dublin shape with a charm and grace that can be seen on a well crafted pipe from this quality brand!! The overall large size of the pipe in general and the stummel in particular, lends this pipe a nice heft and fills up the palm nicely.The pipe is stamped as “CHARATAN’S MAKE” over “LONDON ENGLAND” over “DELUXE” over “SPECIAL” in block capital letters on the left side of the shank. It is also stamped with the letter “S” just forward of “SPECIAL” after letter L. The left side of the tapered stem is stamped with “CP” logo, with the lower half of the “C” embedded within the letter “P”. The stem logo is very delicate but crisp. The stampings on this pipe are crisp and easily readable. I searched Pipedia for more information about the brand and also to try and accurately date this pipe. Here is the link for the readers interested in history of Charatan’s and also in viewing a 1951 catalog (https://pipedia.org/wiki/Charatan).

In 1863 Frederick Charatan, a Russian / Jewish immigrant, opened a shop in Mansell Street, located in the borough of Tower Hamlets, London E1, where he began to carve Meerschaum pipes.

Charatan was the first brand to make entirely hand-made briars from the rough block to the finished pipe including the stems. The nomenclature “Charatan’s make” refers to this method of production and was meant to differ Charatan from other brands who “assembled” pipes from pre-drilled bowls and delivered mouthpieces.”

Here is another link from the same page which takes the readers to an absolutely well researched page on Dating of Charatan’s (https://pipedia.org/wiki/Dating_of_Charatans).

I have reproduced the relevant portions which had helped me in roughly dating this pipe.

The first step on dating a Charatan is to carefully look to some details:

  1. a) Shape of the mouthpiece
  2. b) Marking on the mouthpiece
  3. c) Engraving on the shank
  4. d) Shape and position of shank engraving/writing

This is because you can make the following conclusions:

  1. a) From 1863 to 1960 the mouthpieces have a normal shape, saddle or tapered. From 1961 they use the ‘Double Comfort’ style still used today. By the way there are some saddle bits (without the double comfort) used in pipes that date after 1960 but these models are always characterized by an X (in the place of the DC) engraved after the shape number on the shank. This means that if a pipe has a tapered mouthpiece instead of a double comfort one, it is definitely a pre-Lane pipe before 1960. While if a pipe has a normal saddle bit stem, it could belong to every era. Nevertheless the pipe is pre 1961 if the shape code does not include an X, and is a pipe from after 1960 if the X is engraved.
    Finally any pipe with the double comfort stem is definitely after 1960.
  2. b) The CP logo on the stem is stamped in a different shape according the era it was used. Some differences are less obvious than others; however the glaring differences are detectable in 4 phases. The CP till the 1960 is very fine, the C penetrates the P.

From 1961 to 1977 the CP logo is more pronounced and the C penetrates the P.

I visited rebornpipes for clarification on the following issues which did not find mention on pipedia.org:

(a) The lack of shape code on this pipe.

(b)  Grading/ hierarchy of this pipe in the line of Charatan’s offering. The relation between “DELUXE” and “SPECIAL” also did not find any explanation on pipedia.org.

(c) Lastly, the significance of the letter “S”!

There is a very informative article that Steve had re-blogged on Charatan’s Models & Shape Information for the Collector. Here is the link for this article; (https://rebornpipes.com/2018/08/22/charatan-models-shape-information-for-the-collector/).

I have reproduced relevant information from the above link

Charatan’s make “Apprenticeship” standard shape grades
Special
Relief Grain (tan)
Relief Grain (dark)
Belvedere
Perfection  

From the above information, I assume that this particular piece dates from prior to 1960. The reason why I am not sure is that there is no shape code anywhere on the shank and the presence of the letter “S” without numerals 100, 200 etcetera, finds no explanation in all the eras that I read through. The stamp of “DELUXE” finds no explanation anywhere that I had searched. Well, the grey areas with respect to dating and grading this piece are too many and as always, may I request our esteemed readers to share any information that they have for the benefit of our piper community.

INITIAL VISUAL INSPECTION
The bowl is heavily caked with an equally heavy overflow of lava on to the rim top. The rim top surface has darkened   considerably. The inner and outer rim edges appear to be damaged with a number of dents, dings and chipped edges, caused probably by banging the rim top against a hard surface to rid the chamber of all the dottle. The internal condition of the bowl can only be ascertained after the process of reaming is completed.The stummel and the shank are covered in grime and dust from years of use and subsequent storage, giving it a dull and a lackluster appearance. The stummel surface has taken on a nice patina which I intend to preserve. Through all the dirt and grime, beautiful bird’s eye grains peek out from the front and back of the stummel while tightly packed cross grains are seen to the sides and over the shank. A nice clean and polish will further accentuate this play of grains over the stummel surface. Air did not flow easily through the pipe and required some lung power to do so. The mortise is clogged with oils, tars and grime of all the yesteryear. This needs to be cleaned out.The stem is tapered vulcanite that is heavily oxidized. Heavy calcification can be seen on either stem surfaces in the bite zone. Apart from the calcification, both the upper and lower surfaces has a mysterious grey black patch extending for about an inch from the button edge. This, I suppose, would have to be some sort of a repair patch. Well, I shall get a closer look at it during the process of stem repairs. The horizontal slot and the tenon end are clogged with residual oils and tars and gunk, making air flow through the stem, laborious.All said and done, this pipe is in great condition given its appreciated age and the ruthless handling that it had survived at my grand old man’s hands. The large size, perfect heft, beautiful grains and the mysteriousness that surrounds its stamping, makes for an interesting project.

INITIAL CLEANING BY ABHA…
The initial cleaning on this pipe was done by Abha, my wife (she has cleaned up around 40-50 pipes and these have now reached me for further restoration). She reamed out the complete cake and further smoothened out the chamber walls with a folded piece of 220 grit sand paper. She further cleaned out the internals of the shank with pipe cleaners and alcohol and cotton buds. She followed the internal cleaning of the shank with external cleaning of the stummel using Murphy’s Oil soap and hard bristled tooth brush and dried it with paper napkins and cotton cloth.

Next she cleaned out the internals of the stem air way and immersed it in “Before and After Deoxidizer” solution along with the stem of other pipes in line for restoration. Once the stem had soaked overnight, she cleaned the stem under running warm water and scrubbed the raised oxidation from the stem surface using Scotch Brite pad. She further removed the oxidation by scrubbing the stem with 0000 grade steel wool and applied a little olive oil to rehydrate the stem. This time around she clicked a few pictures of the processes… ONCE THE PIPE IS ON MY WORK TABLE…
The cleaned up pipes presents a very clear picture of what needs to be done to restore this pipe to a pristine and smoke worthy condition. I really cannot thank Abha, my wife, enough for all the help and support that she extends me in my pursuance of this hobby. A clean pipe also helps in clearly identifying the work that would be required to restore a pipe. The pictures shows the condition of the pipe when it reached me after being cleaned. The stummel is solid without any flaws or fills. There are no dents or dings or chips to the stummel surface. The briar has taken on a nice deep colored patina which I shall endeavor to preserve. A nice polish and the beautiful grains should pop out and be on display in all their glory. The briar feels really solid and of high quality and the craftsmanship is also top notch. The smooth rim top surface is where the maximum damage is on this pipe. The outer rim edge is peppered all around with dents and dings and chipped edges. However, the damage to the outer edges in a 6 o’clock and 12 o’clock directions (both enclosed in red circles) is the most severe. The inner edge is also not spared of similar damage which is most severe in the 6 o’clock and 9 o’ clock directions. The rim top surface has considerably darkened around the inner edge; however, thankfully it is not charred. These issues will need to be attended to. The chamber has strong ghost smells. The thick chamber walls are solid without any signs of damage. The mortise and shank internals are also nice and clean now. The seating of the stem tenon into the mortise is snug and sits flush with the shank end.The oxidation on the tapered vulcanite stem has been removed, thanks to all the efforts put in by Abha. The slot, tenon end and stem internals are all clean and fresh. The large patch of grey on either surfaces of the stem is the only eyesore on this high quality vulcanite stem. If these are repair patches, then I must concede that though they are not aesthetically pleasing to the eye they are but rock solid!! I intend to sand them down to the vulcanite surface and if damaged, repair it using mix of activated charcoal and clear CA superglue which blends perfectly in to the surrounding stem surface.THE PROCESS
I start the refurbishing of this pipe with the stem repairs. With a folded piece of 220 grit sand paper, I sand down the grey patch from either surfaces of the stem. True enough, as anticipated, the bottom of the patch revealed a hole at the button edge. My guess is that it had been a through hole as a similar hole was revealed on the lower stem surface too.While I was sanding the patch, simultaneously, I worked the entire stem surface with the same piece of sand paper. I was very diligent and careful with the sanding around the stem logo. I further sand the entire stem with a 0000 grade steel wool. This helps to even out the deep scratches caused by the coarser grit sand paper. I wipe the stem with Murphy’s Oil soap on a cotton swab. This helps to clean the surface of all the dust and loosened residual oxidation from the stem surface. Once the stem surface is ice clean and dry, I insert a regular pipe cleaner coated in petroleum jelly through the slot end in to the airway. This prevents the glue from seeping into the airway and blocking it while helping in the smooth extraction of the pipe cleaner once the mix has cured. Thereafter, I mix a small quantity of activated charcoal and superglue and apply it over the holes and set the stem aside to cure. With the stem fill set aside to cure, I decide to address the issues on the stummel surface. I start by addressing the rim top surface damage. I top the rim on a piece of 220 grit sand paper, checking frequently till I am satisfied that the darkened surface is addressed to a great extent and the rim top surface is nice, smooth and even. The inner and outer edges are still uneven, though much better than before topping, and shall be addressed subsequently. The following pictures show the progress being made and improvements to the inner and outer rim edges. At this stage in refurbishing, I realize that the odors from the chamber are still strong and hence decide to address the issue of ghost smells by subjecting the chamber to a salt and alcohol bath. I wrap some cotton around a folded regular pipe cleaner, keeping the tip of the pipe cleaner free of wrapped cotton as this would be inserted through the draught hole in to the chamber. This would form the wick for the shank. I tightly pack the chamber with cotton balls and fill it with 99% pure isopropyl alcohol using a syringe and set it aside. By next day, the cotton and alcohol had drawn out the tars and oils from the chamber and max from the shank. With tools at my disposal, I scrap out the entire loosened gunk from the mortise and the airway leading to the draught hole. The stummel now smells fresh and is thoroughly clean. With a folded piece of a 220 grit sand paper pinched between my thumb and forefinger, I create a slight bevel on the inner and outer edges of the rim top surface. This helps to mask and address the minor dents and dings that had remained on the rim edges after topping. I am careful so as not to alter the profile of the stummel by excessive topping or creation of the bevels. I am pretty pleased with the appearance of the rim top and edges at this stage. This is followed up with the micromesh polishing cycle. I dry sand the stummel going through with 1500 to 12000 grit pads. I wipe the stummel with a moist cloth after every three pads as this helps firstly, to remove the sanded dust and secondly, gives an idea of the progress being made and areas which need more attention. The stummel has taken a beautiful sheen and looks good. Discerning readers must have noted that I did not sand the stummel surface with a sand paper and have resorted to dry sanding with the micromesh pads. This is done so as to maintain the old patina which I want to preserve. I rub some “Before and After” restoration balm over the stummel surface with my fingers. This product has been developed by Mark Hoover and it helps to enrich and enliven the briar. For me it is an absolute “must have” item in my list of items for pipe restorations. I rub this balm in to the briar and set it aside for some time. The transformation is almost immediate and the stummel positively looks amazing. With the stummel nearly completed, I turn my attention back to the stem. The fill has cured nicely and with a flat head needle file, I sand the fill to achieve a rough match with the surrounding surface. To achieve a perfect match, I sand the stem with a 220 grit paper, progressively moving to 600 and 800 grit sand papers. As expected, a clean and neat looking stem stared back at me. I rub a little Extra Virgin Olive oil into the stem surface to hydrate it and set it aside to be absorbed in to the vulcanite. Unfortunately, I missed out on taking pictures of this step. Suffice to say, I am very happy with the blending of the fill with the rest of the stem surface. I highlight the stem logo by filling it with a whitener pen and once it has dried, I carefully wipe out the excess with a cloth. The logo is now crisp and prominent.I finish the stem reconstruction by polishing the stem with micromesh pads, wet sanding with 1500 to 12000 grit pads. I apply a small quantity of Extra Virgin Olive oil to the vulcanite stem and rub some “Before and After” restoration balm before setting it aside.To apply the finishing touches to the pipe, I mount a cotton cloth buffing wheel on to my hand held rotary tool and apply a coat of Blue Diamond to the stummel and the stem to polish out the minor scratches. With a cotton buffing wheel that I use for carnauba wax, I apply a coat of carnauba wax and continue to work on it till the complete coat of wax had been polished out. I mount a clean cotton cloth buffing wheel and give the entire pipe a once over buff. I finish the restoration by giving the entire pipe a rigorous hand buffing using a microfiber cloth to raise the shine further. The finished pipe looks beautiful and is ready to join my collection of the British pipes that I have inherited. The finished pipe looks robust yet elegant, the pictures speaking for themselves. P.S. First, this pipe bears some of the strangest stampings that I have come across on a Charatan’s to date. The absence of shape code, presence of both Deluxe and Special stamping and the letter S without any numeral like 100, 200 etc is truly baffling. I would be singularly thankful if any of the esteemed readers can shed some light over this aspect.

Thanks to all readers of rebornpipes who have spared a moment of their invaluable time in reading through this write up and as is always, your suggestions and advice are always welcome as this would not only help me but may also help the new pursuers of this art.


A surprise for me – a very rugged Oom Paul that looked like a Micoli and was!


Blog by Steve Laug

The next pipe on my worktable is very recognizable if you have been around for a while. There is only one original for this style and that is Micoli. The artisan behind the Micoli pipes is an American carver named Robert Eugene (Mic) Burns. I have worked on several Micoli pipes in the past but I have also worked on knockoffs or imitations of his work. When Jeff showed me the photos of this one I was not certain if it was an original Micoli or a knockoff. I would not be able to know until I had thoroughly examined it for his signature. The pipe was in overall good condition with dust and debris in the deep rustication craters. The shank extension is a stacked acrylic with lines of colour between the layers. It is rectangular and joins a rectangular shank that is tweaked to one side and set at an angle. The finish was dull and lifeless and a little dirty from sitting around. There was a medium cake in the bowl and some darkening around the inner edge of the rim. There also appears to be some tars and debris in the rustication of the rim top surface. The stamping on the shank was not visible though Jeff thought there may be some on the acrylic extension. The fancy stem was oxidized and there was light tooth chatter on both sides near the button. Jeff took the following photos before he started his cleanup work on the pipe. Jeff took a close-up photo of the bowl and rim top to capture the condition of the bowl and rim top edges. You can see the dust and debris in the rugged surface. There is some darkening around the inner edge of the rim but the edges look very good. You can also see the moderate cake in the bowl.He took photos of the sides and heel of the bowl to show the unique rustication that is on the bowl. There are deep worm trails randomly around the bowl and the high spots are also rusticated with lines and texture. It is an interesting and unique looking finish. Jeff took photos of the acrylic shank extension to show me in two of the  photos there appeared to be scratching that looked like a signature to me. I would need to confirm it once I had the pipe  in hand it looked suspiciously like a  Micoli signature. It was certainly unique enough to fit in the stable of his pipe that was for sure. The next two photos show the top and underside of the stem. The oxidation and the light tooth chatter on both sides near the button are visible in the photos. When the pipe arrived I turned to Pipephil (http://www.pipephil.eu/logos/en/logo-m5.html) to see if he included not only information on the brand  but also a picture of the Micoli signature on the pipes. Sure enough he had a photo of the signature and it matched the signature on the acrylic in the pipe I was working on. So I knew it was indeed a Micoli made pipe. I have included a screen capture of the pertinent section below.I turned to Pipedia for more information on Robert Eugene (Mic) Burns and the Micoli line of pipe that he carved (https://pipedia.org/wiki/Micoli). I quote it below.

Micoli or “Mic” as he is called by family and friends, has acquired the reputation of being one of the best American pipe makers. He is appreciated by the most prominent of collectors. Educated in the arts, He started this adventure in 1968. His craftsmanship and artistry were dedicated to over twenty years of full time pipe making, with no two alike. In the last twenty years plus he has been partially retired and limits carving to a few pipes a month. ​He has continued sculpting animals and other subjects from brair and other rare woods. Micoli is now 72 years old.​

The signature of Burns’ work is the specific way of rustication he worked out using a Dremel power tool. (The Dremel had been introduced to pipemaking by Teddy Knudsen.)

Burns/Micoli also made the E. Oslo pipes. These can be considered his entry-level pipes as he did not carve these from scratch but rather purchased run-of-the-mill standard shapes from Italian and English pipe makers, such as Savinelli and Comoy’s, and dremeled his signature magic on them.

Interestingly Pipedia also had two photos of a similar pipe to the one that I am working on that would have confirmed that the one I had was a Micoli had I taken time to have a look before. I am including the photos below.Now it was time to look at it up close and personal. Jeff had great job in cleaning up this Micoli and that in itself was a trick given the deep rustication around the bowl. He had reamed the bowl with a PipNet Pipe Reamer and cleaned up the remnants with a Savinelli Fitsall Pipe Knife. He took the cake back to bare briar so we could check the walls for damage. He scrubbed the exterior of the bowl with Murphy’s Oil Soap and a tooth brush to remove the grime on the bowl and rim and was able to remove much of the grime and dirt. He cleaned out the interior of the bowl and shank with pipe cleaners, cotton swabs and alcohol until they came out clean. The rim top looked much better when you compare it with where it started. He cleaned the stem with Soft Scrub to remove the grime on the exterior and cleaned out the airway with alcohol, cotton swabs and pipe cleaners. I took some photos of the pipe as I saw it. To show how clean the rim top and stem really was I took a close-up photo of the rim and stem. The bowl was clean and cake free. The rim top is quite clean and the inner edges of the bowl good. The acrylic shank extension also looks good. The black vulcanite fancy stem looks very good. The surface had some light tooth marks but the button edge looked really good.I took a photo of the signature on the acrylic shank. It indeed reads Micoli. The signature is scratched into the acrylic surface and is clear like the material so capturing it with the photo was a trick!I removed the stem from the bowl and took photos of the parts. The stem was very tight in the shank and would need to be worked on to get a snug but better fit. I decided to see if I could remove any more of the darkening on the rusticated rim top. I used a brass bristle brush to work over the top and clean out the deep grooves. I was able to remove a little bit more of the darkening.The bowl looked very good so I did not need to do any further work on it. I rubbed the bowl and shank down with Before & After Restoration Balm to deep clean the finish on the bowl and shank. The product works to clean, enliven and protect the briar. I worked it in with my fingers and with a horse hair shoe brush to get it into the deep rusticated areas on the rim and bowl sides. I let it sit for 10 minutes to let it do its magic. I buffed it with a soft cloth. The briar really began to have a rich shine. I took some photos of the bowl at this point to mark the progress in the restoration. It is a very unique finish. The bowl was finished so I set it aside and turned my attention to the stem. I sanded the tenon down slightly and cleaned out the shank a little more to get a good fit. Once that was done I sanded out the tooth marks on both sides of the stem with a folded piece of 220 sandpaper and started polishing with 400 grit wet dry sandpaper.I rubbed the stem down with Denicare Mouthpiece Polish – a red gritty paste a lot like Tripoli to polish it after the 400 grit sandpaper. I rub it on with my fingertips and work it into the vulcanite and buff it off with a cloth. It does a great job before I polish it further with the micromesh pads.I polished the stem with micromesh sanding pads – dry sanding with 1500-12000 grit sanding pads. I wiped the stem down after each sanding pad with a cloth containing some Obsidian Oil. I finished polishing it with Before & After Pipe Stem Polish – both Fine and Extra Fine and buffed it off with a cotton cloth. I gave it a final rub down with Briarville’s No Oxy Oil to preserve and protect the vulcanite stem. I put the bowl and stem back together again and buffed the stem with Blue Diamond on the buffing wheel. I used a soft touch on the extension so as not to damage the signature. The bowl was just too deeply rusticated to buff with Blue Diamond. I gave the bowl several coats of Conservator’s Wax and worked it into the deep rustication with the shoe brush. I buffed the stem with carnauba wax. I carefully buffed the entire pipe with a clean buffing pad to raise the shine. I finished buffing with a microfiber cloth to deepen the shine. The finished pipe looks very good. It has a very tactile feel in the hand from the deep rustication. It is comfortable and light enough to be a clencher should you choose to use it that way. The finished Micoli is shown in the photos below. The dimensions of the pipe are Length: 5 ½ inches, Height: 2 ¼ inches, Outside diameter of the bowl: 1 ¼ inches, Chamber diameter: 5/8 of an inch. This highly collectible Micoli Rustic turned out very well. It should be a great pipe. It is one that I will be putting on the rebornpipes once I figure out a price for it. Contact me if you are interested. Thanks for reading this blog and my reflections on the pipe while I worked on it.