Tag Archives: super glue

My Future Daughter-in-Law Commissions a Sculpted Bent Billiard as a Gift for Her Father


Blog by Dal Stanton

When your son brings home (to Bulgaria!) a young woman for you to meet, you know it’s serious.  That’s what happened this past Christmas!  Our son, Josiah, who lives in St. Louis, Missouri, brought Katie, who lives in Chattanooga, Tennessee, to Sofia to meet Mom and Dad – no pressure on her!  They met in college and after graduation, they stayed in touch as friends, Josiah ending up in St. Louis where he finished his master’s degree and is now a counselor.  Katie stayed in Chattanooga and works on staff with youth in a church.  Our daughter and husband also made the trip to Sofia from Nashville for a quintessential Bulgarian Christmas.  The family was together at the Sofia Airport when Josiah (center) and Katie (flowers 😊) arrived from the US.  Johanna and Niko had arrived a few days earlier – ready to celebrate Christmas!

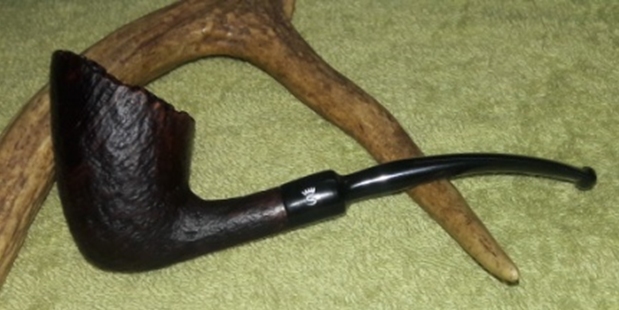
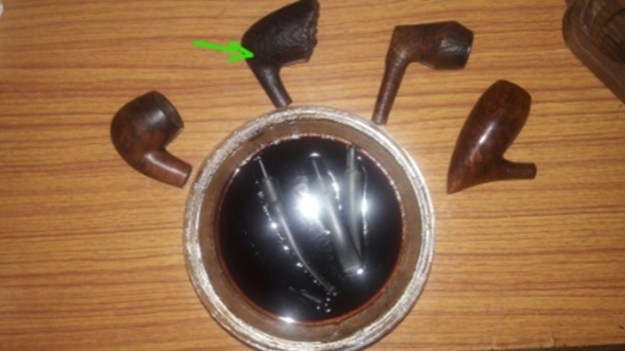
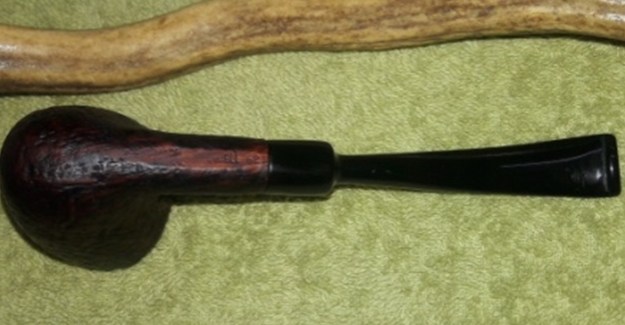
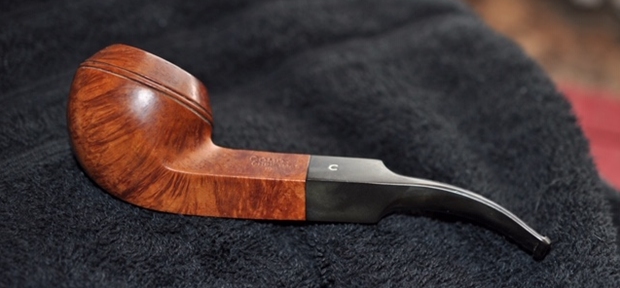
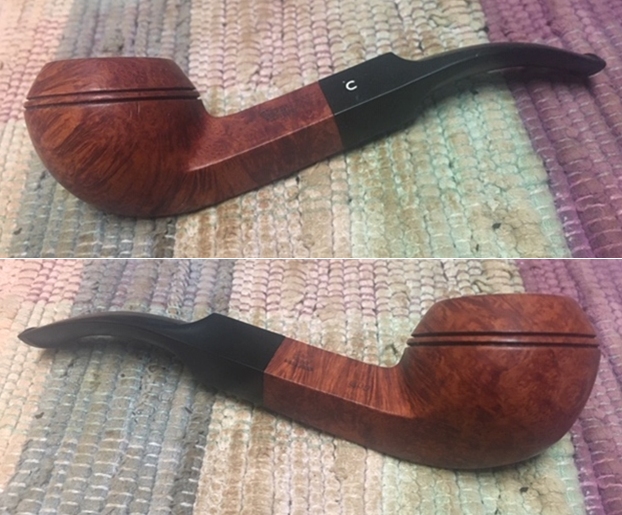
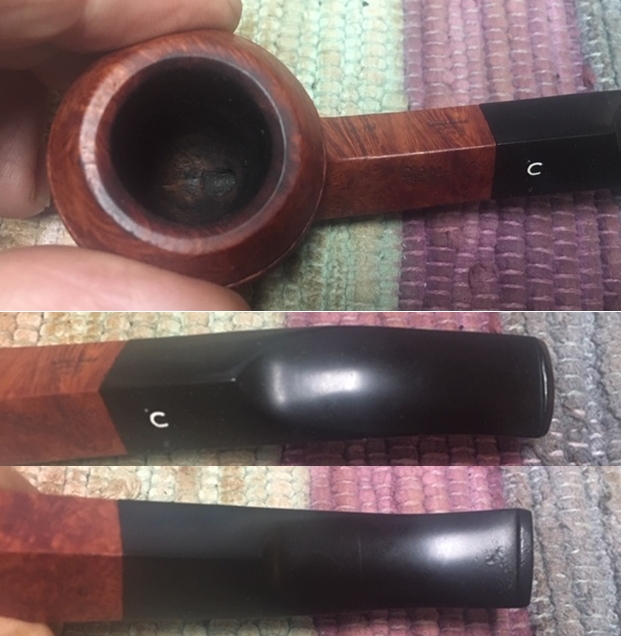
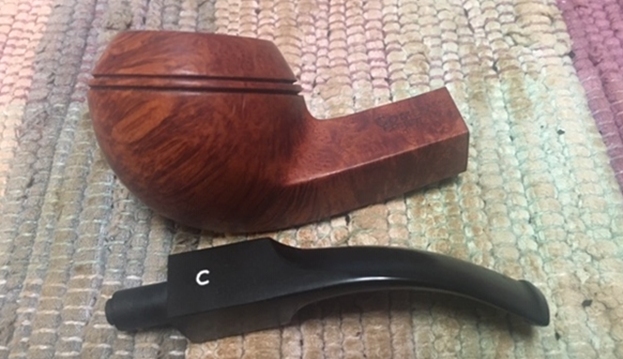
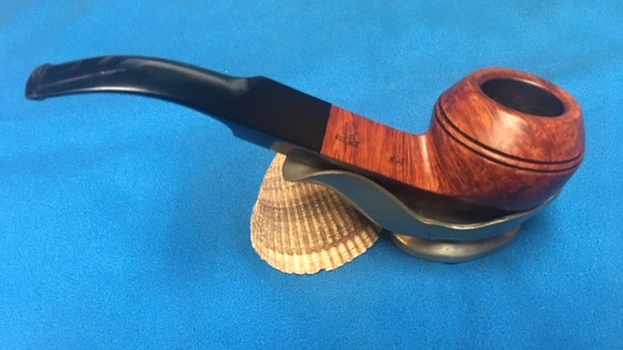
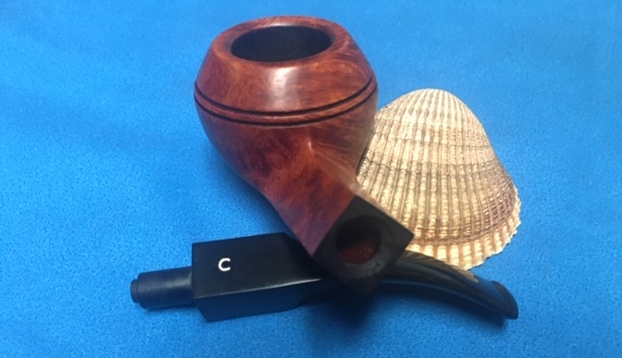
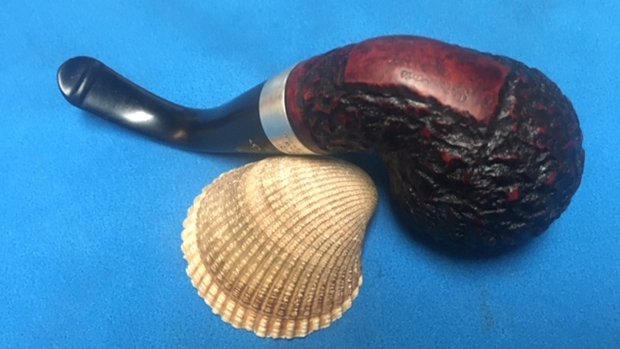
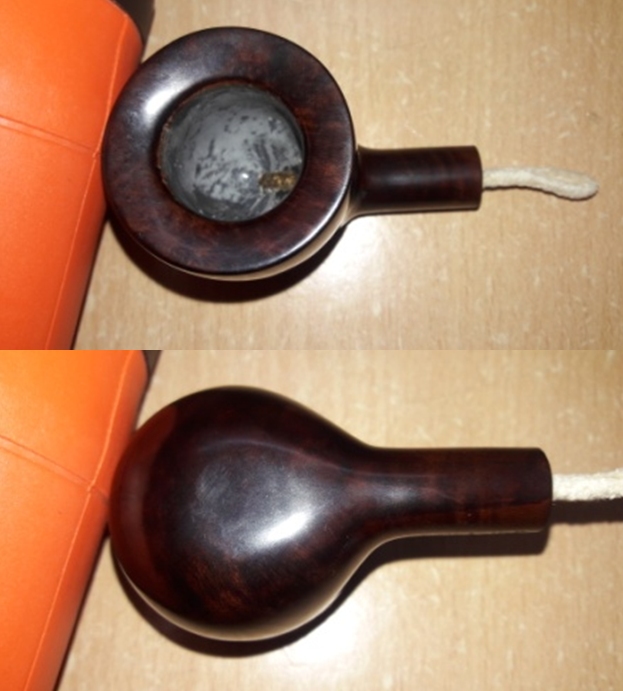
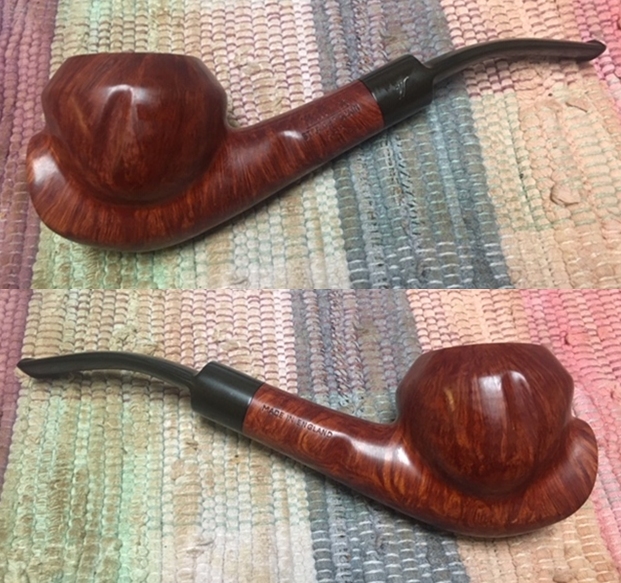
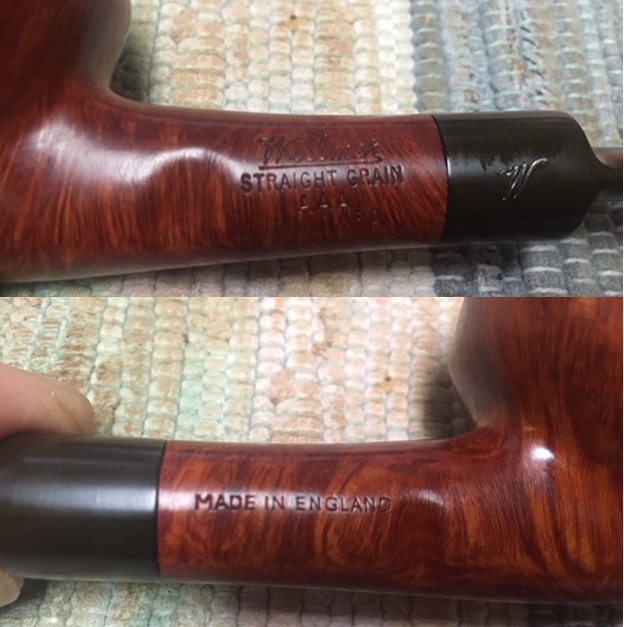
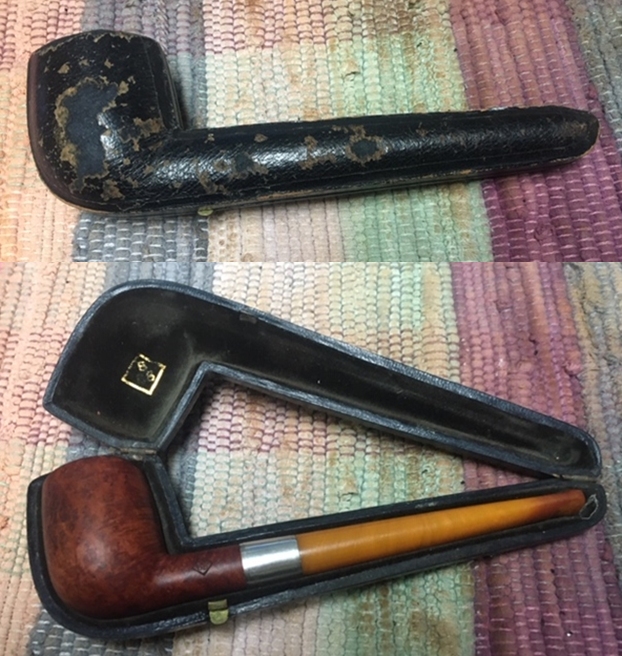
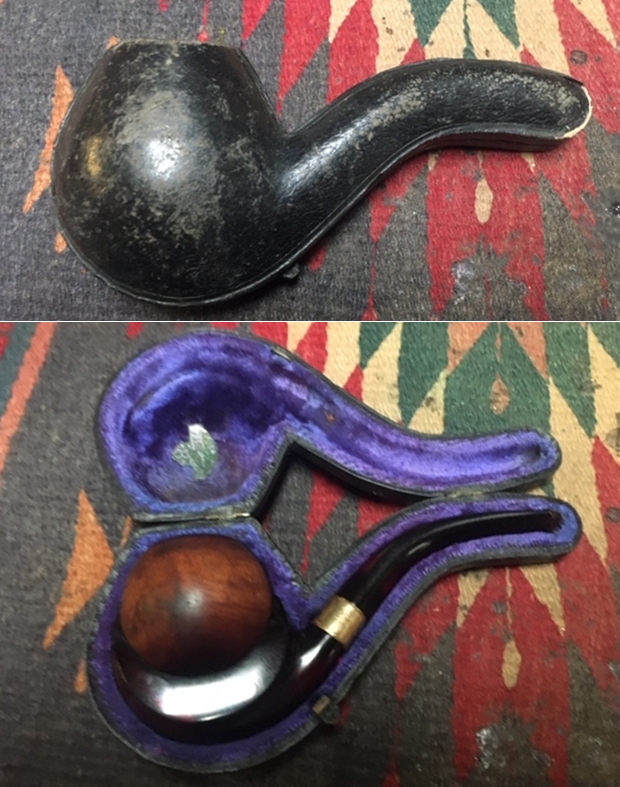
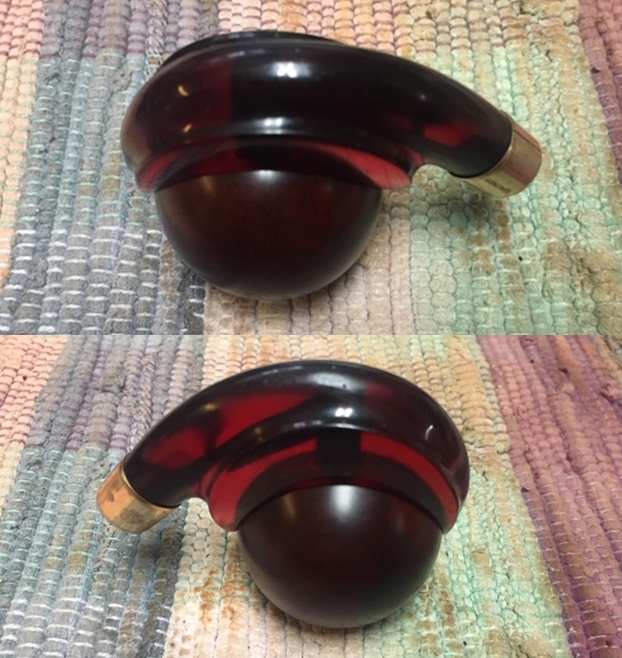
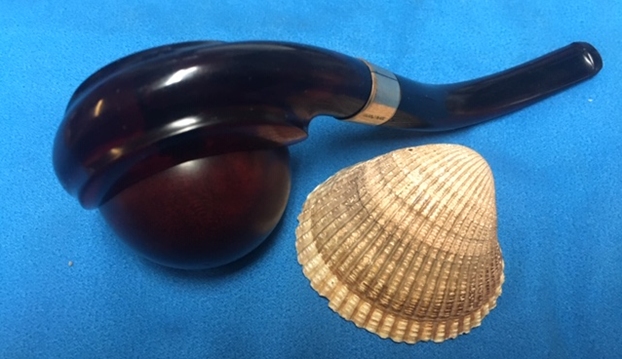
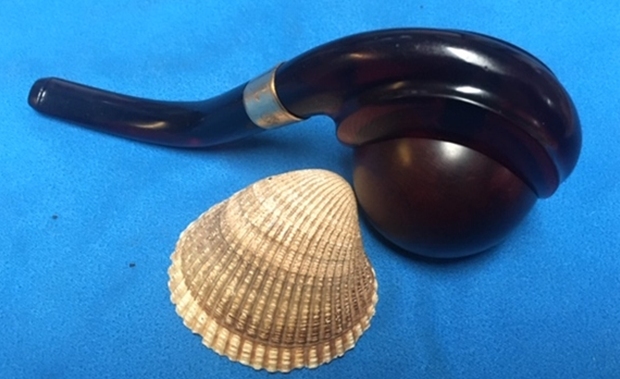
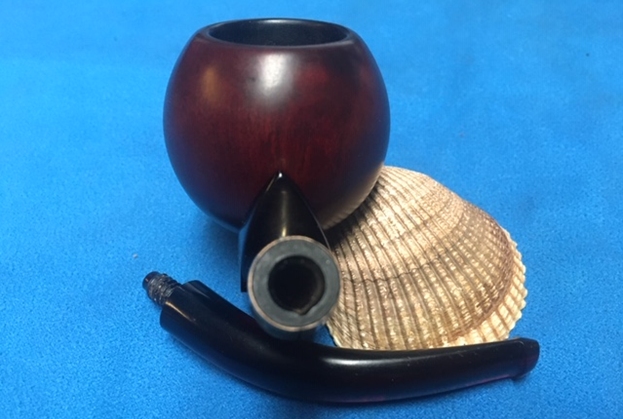
As you would expect, we had limited time with our kids, and we packed it as full as we could!  What Christmas celebration would be complete without including snow, riding gondolas and skiing in Bulgaria’s beautiful Pirin Mountains and spending time together as a family AND getting to know the young women who would become our future daughter-in-law in August.  The time with our kids went too quickly, but before they left, Katie’s future father-in-law was an interesting character with the moniker, The Pipe Steward, and she was interested in finding a special pipe she could commission from The Pipe Steward to give to her father as a gift for his birthday.  Unlike most people who go through the virtual ‘Help me!’ baskets in the online collection I call, For “Pipe Dreamers” Only!, Katie was able to go through the physical boxes of my inventory to find the perfect pipe that called her name for her father.  What added to the experience was that Katie knew that the pipe she chose would benefit the Daughters of Bulgaria!  The pipe that got Katie’s attention after listening to many, many pipes, was a very hopeful Sculpted 3/4 Bent Billiard with only the marking, ‘IMPORTED Briar’ on the left shank flank which I had acquired from the Lot of 66 – a huge Lot of pipes that came from a non-profit in Georgetown, Texas, called the Caring Place.  Here are some of the original pictures I took when the Lot of 66 arrived. 
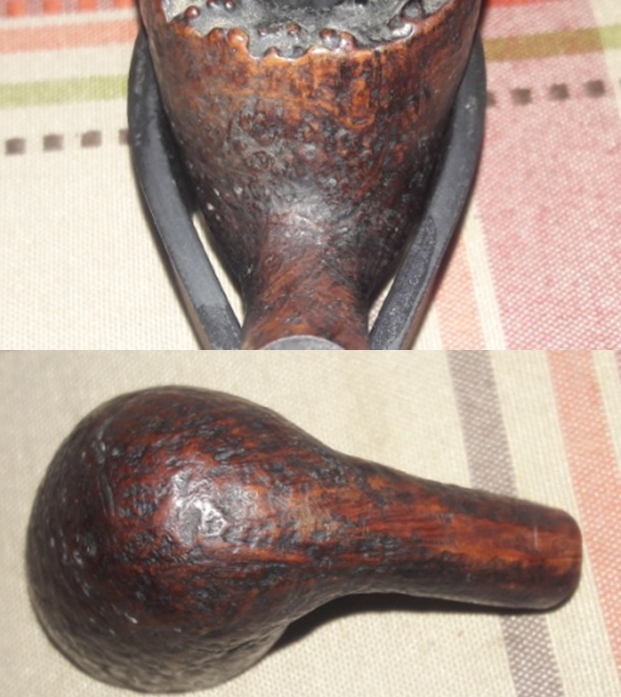
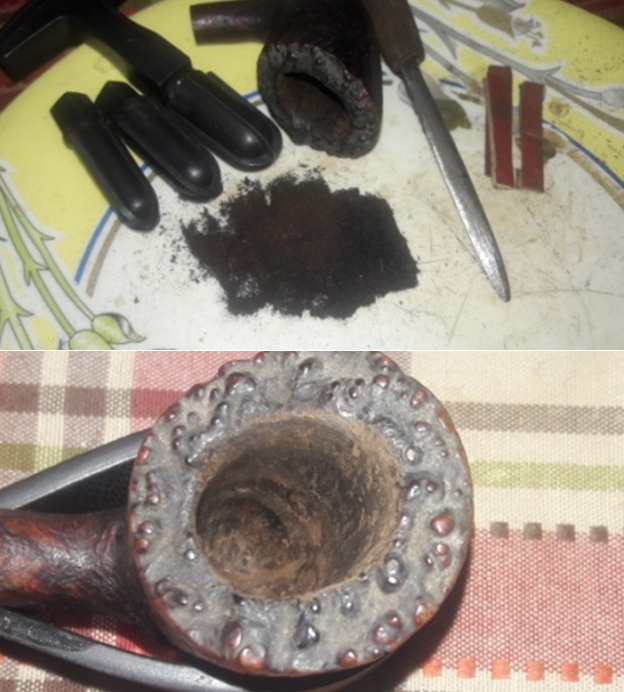
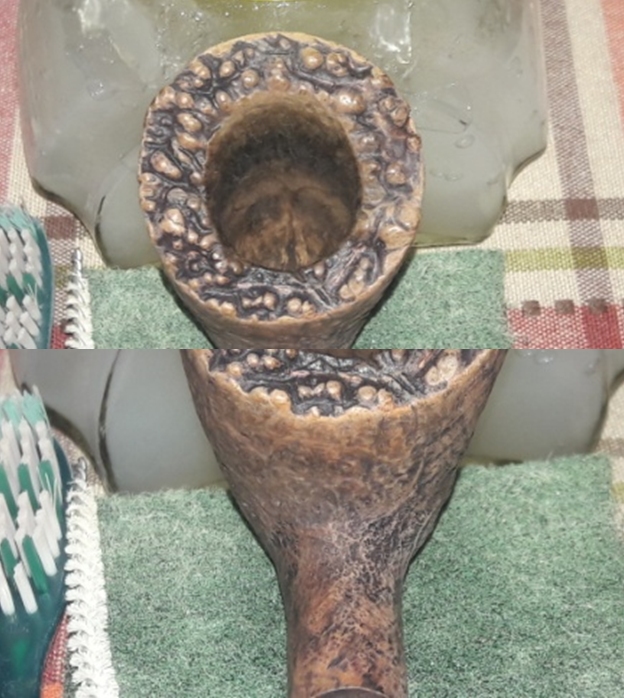
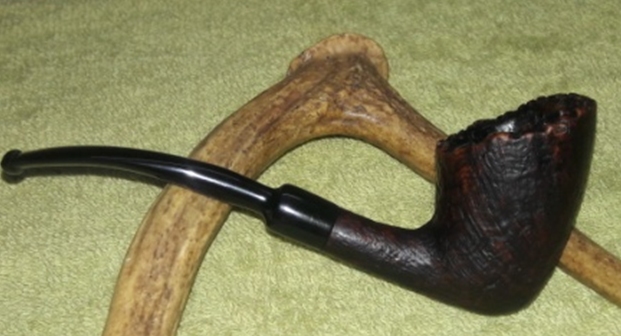
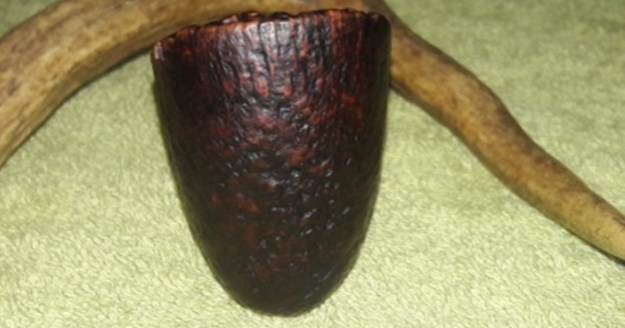
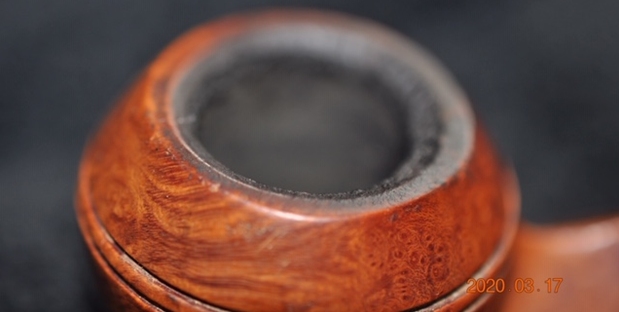
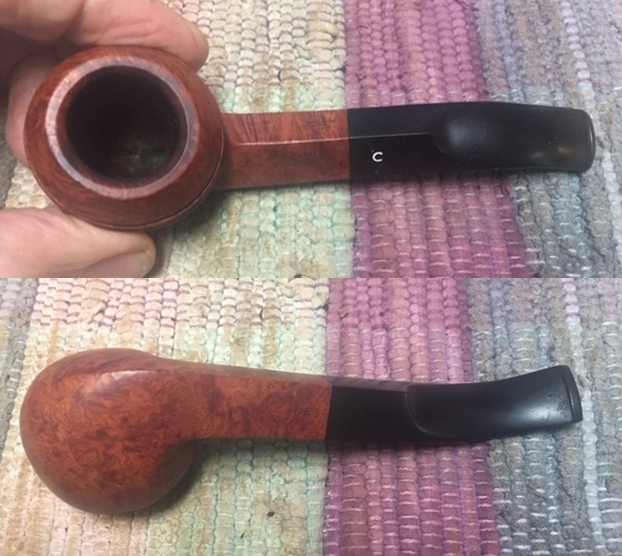
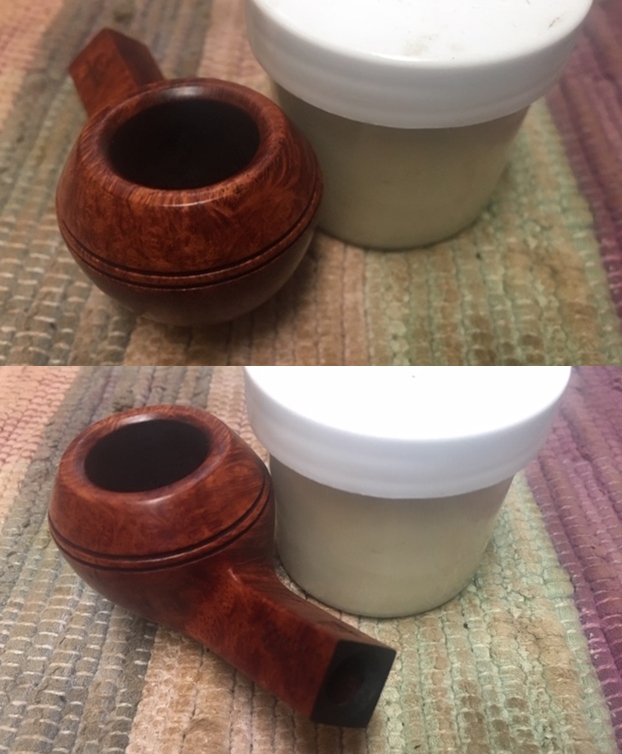
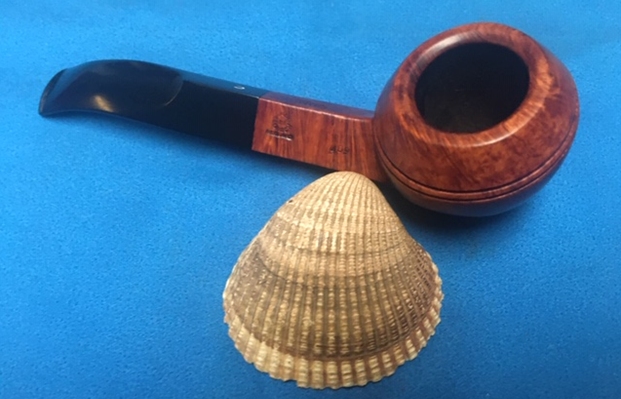
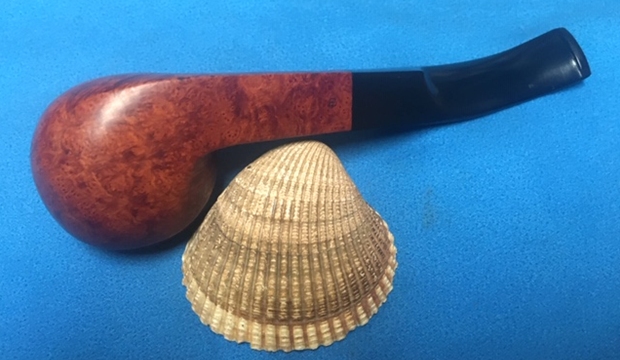
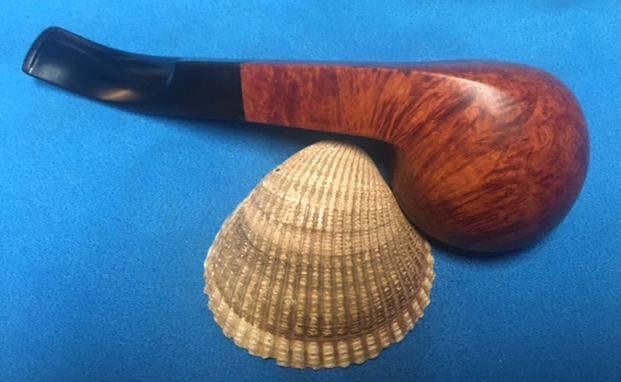
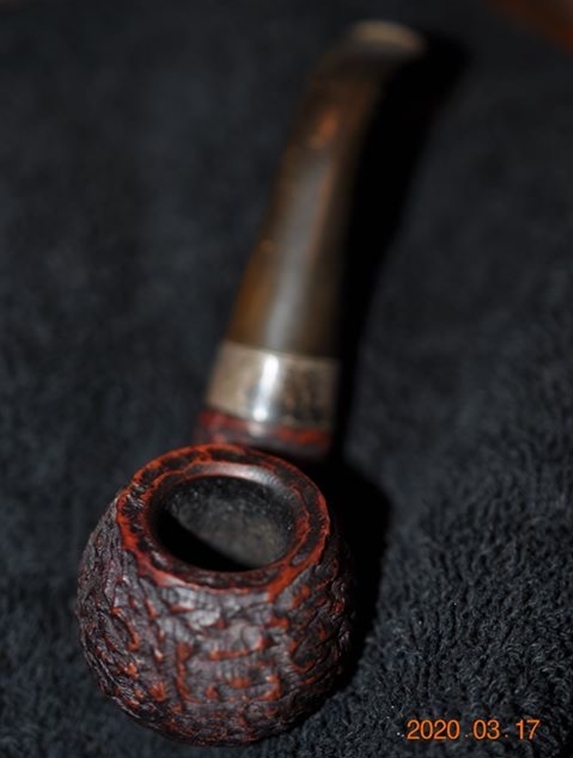
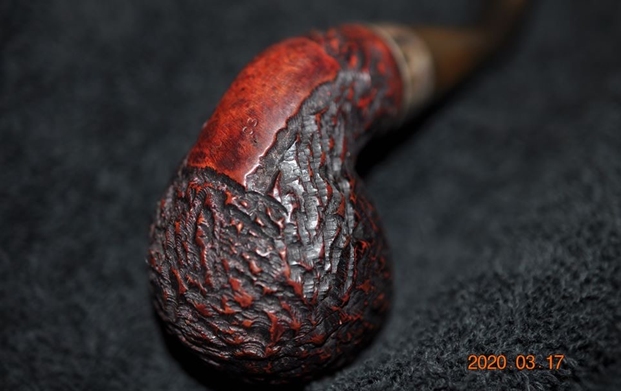
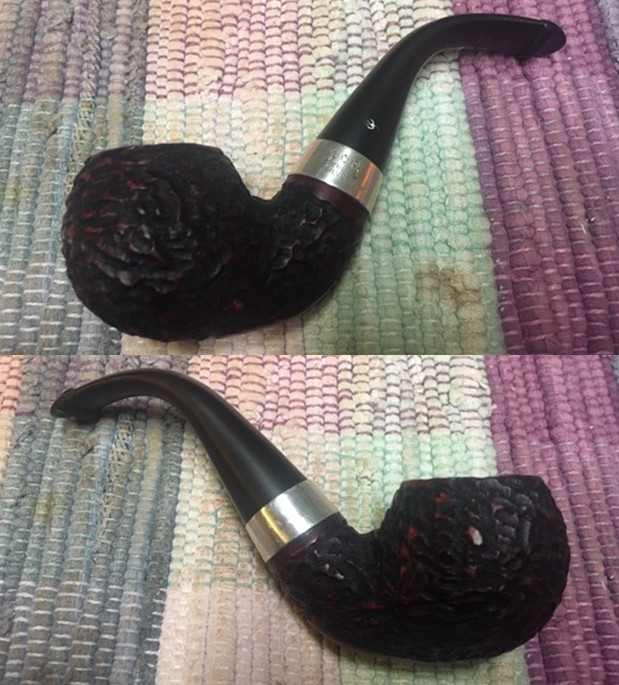
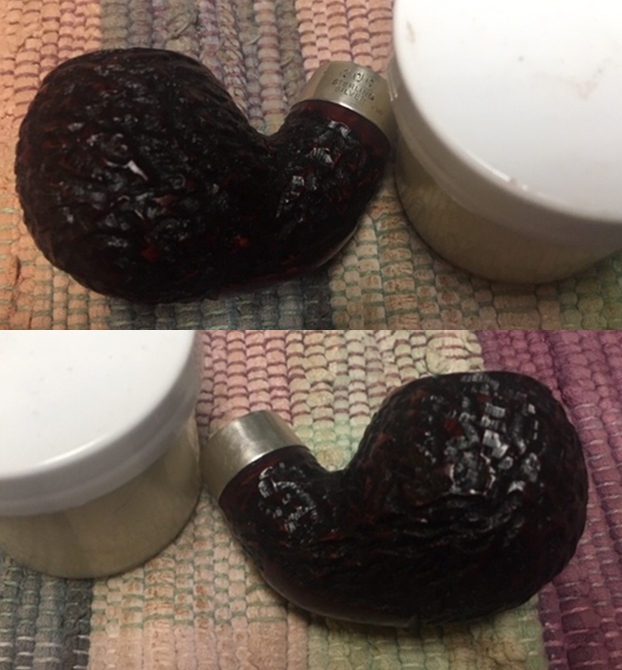
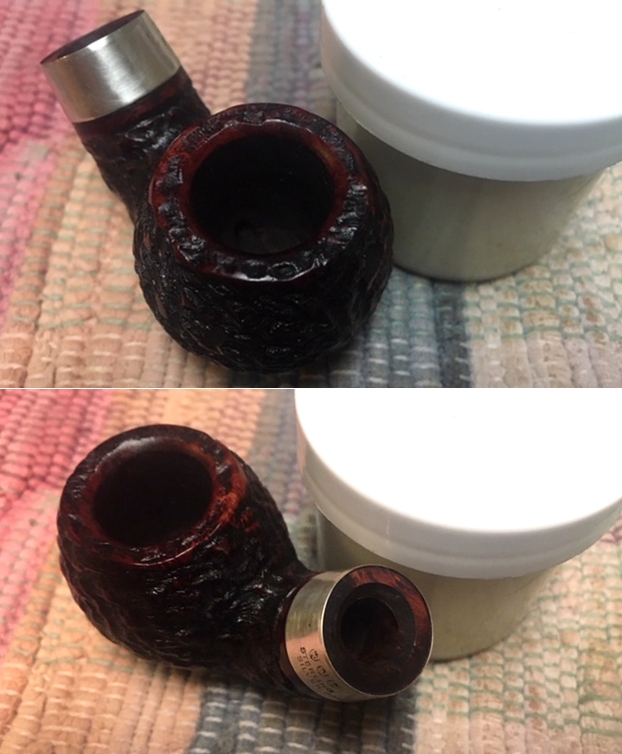
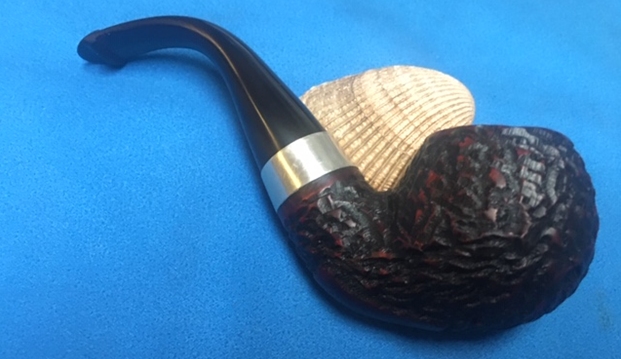
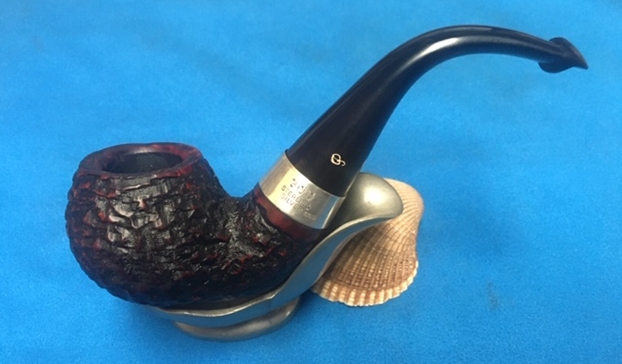
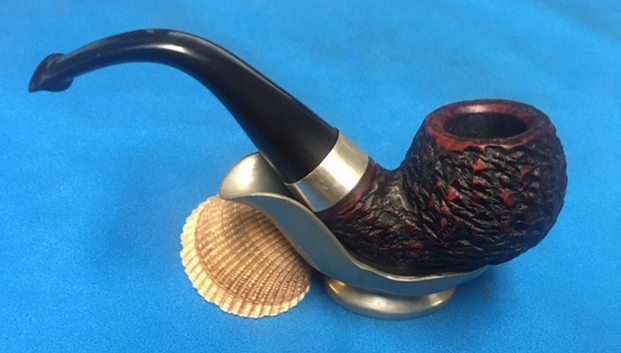
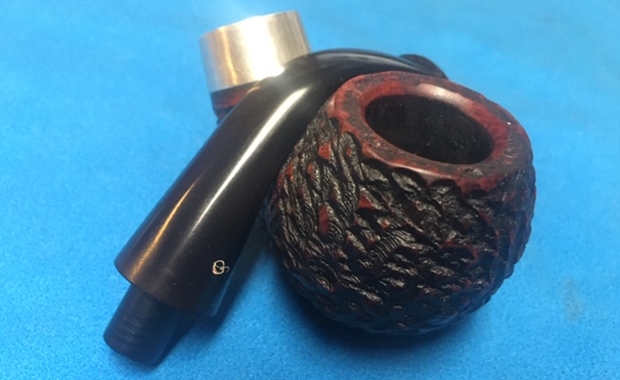
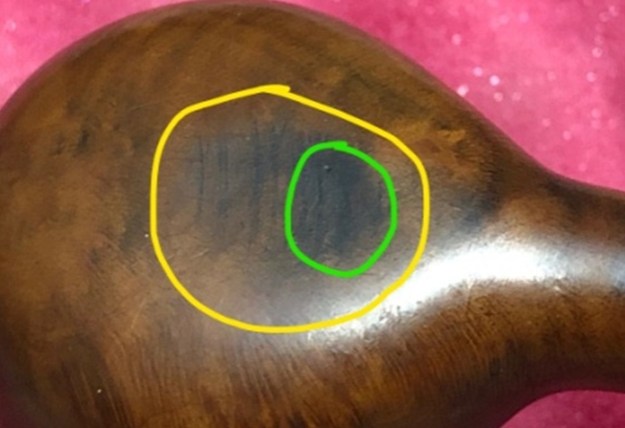
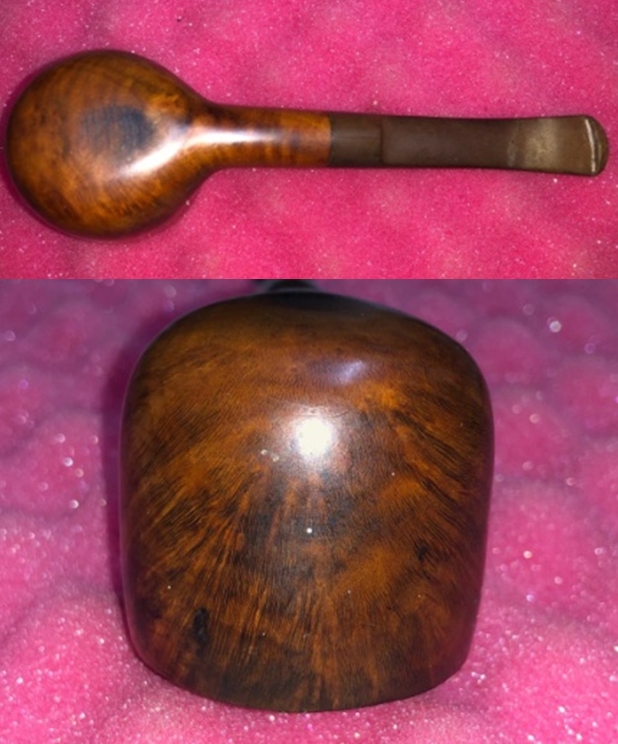
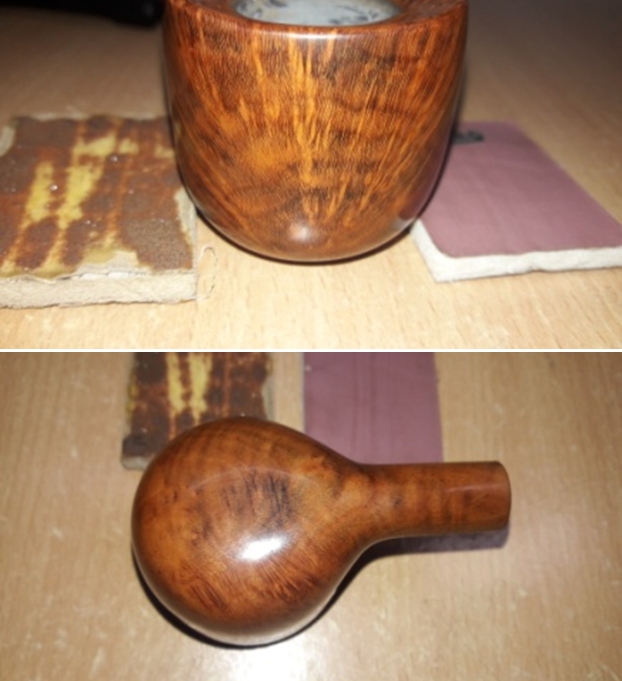
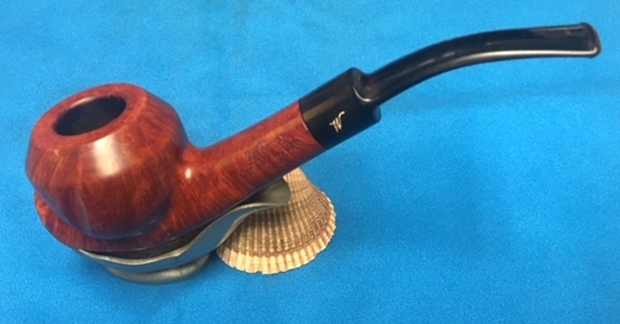
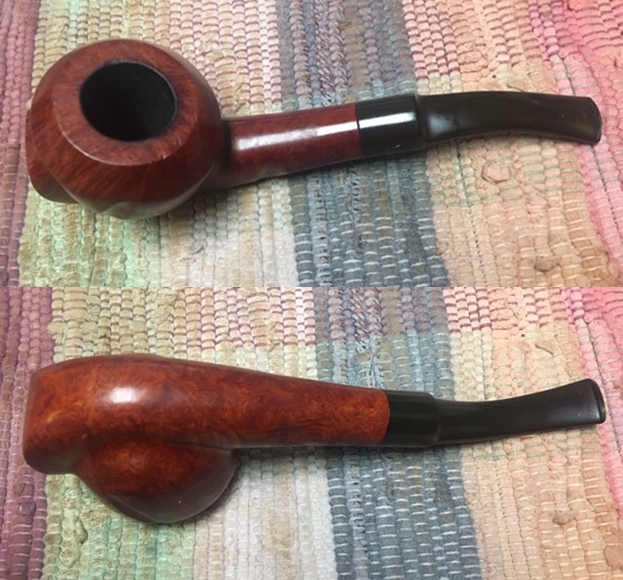
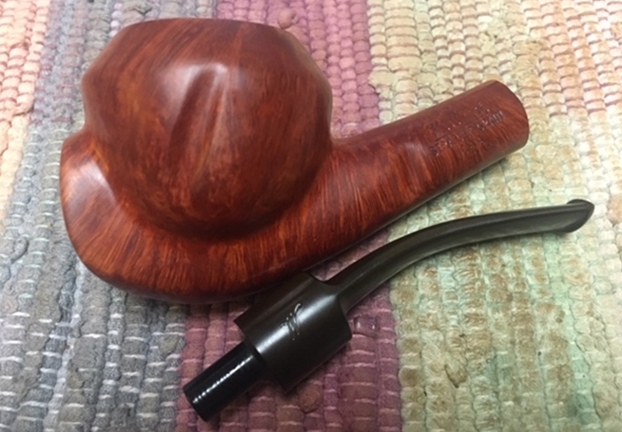
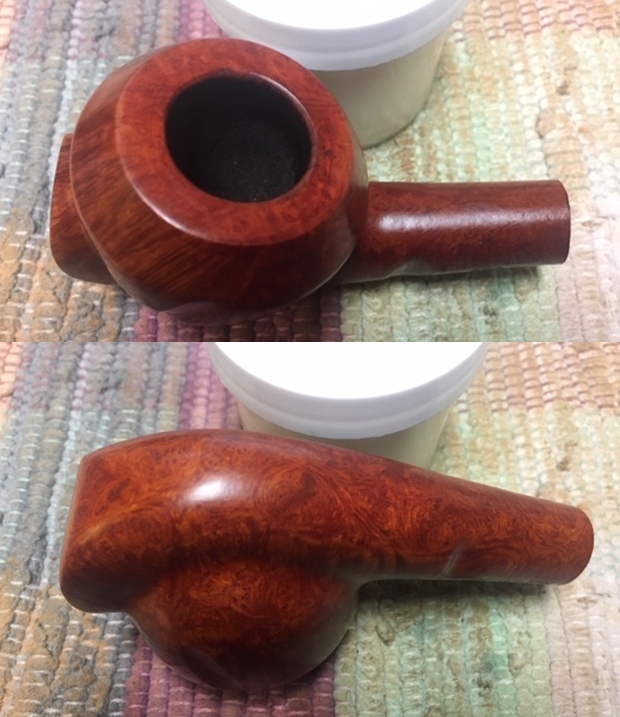
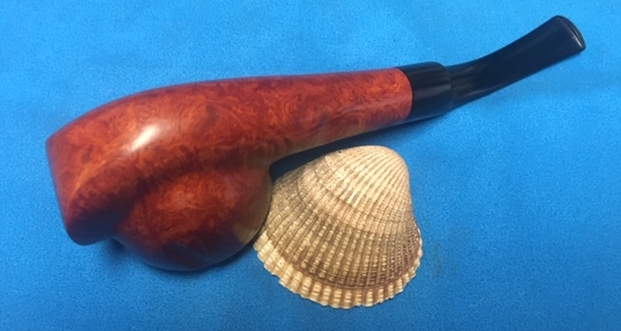
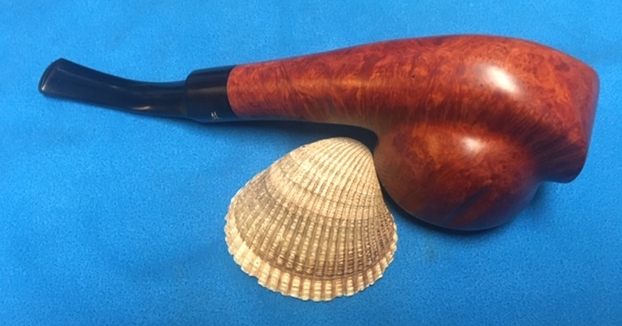
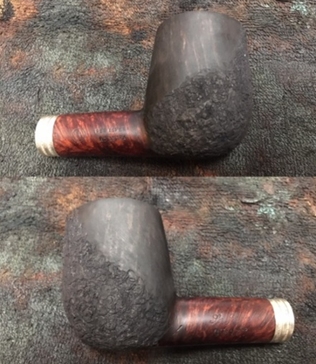
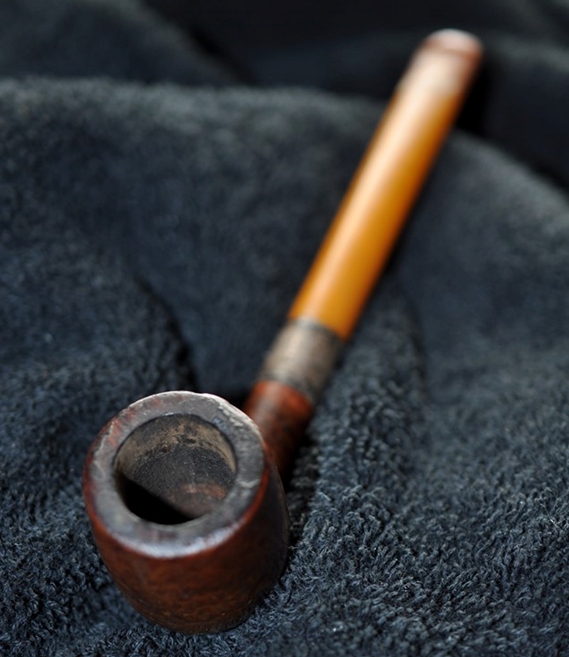
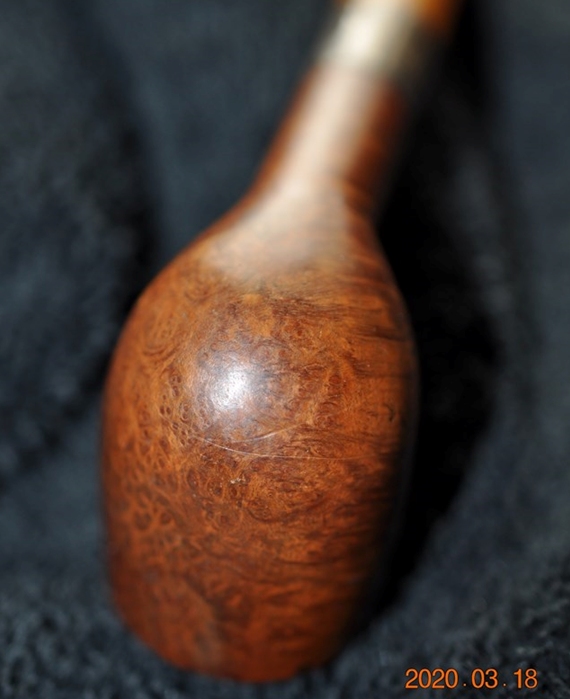
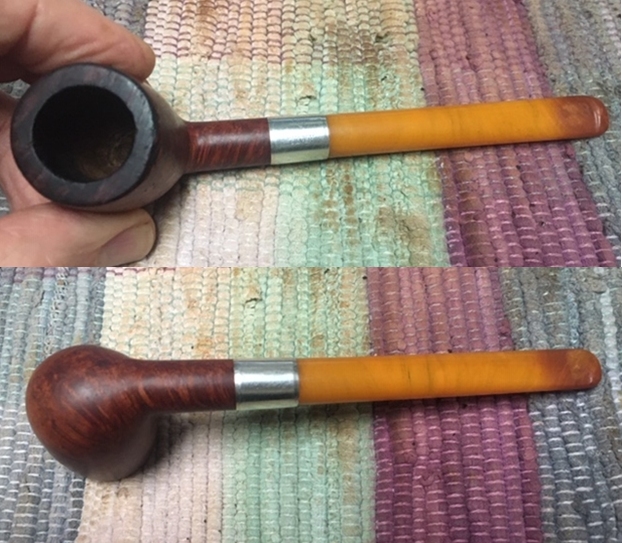
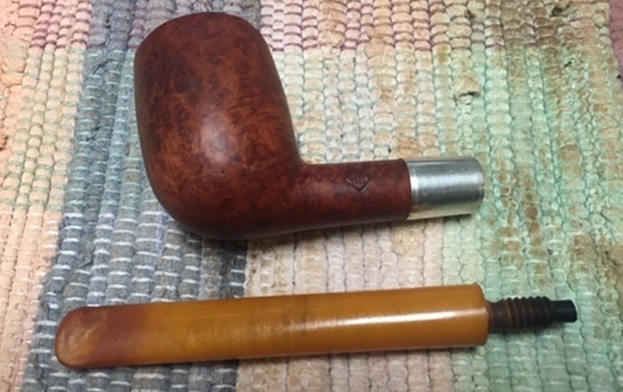
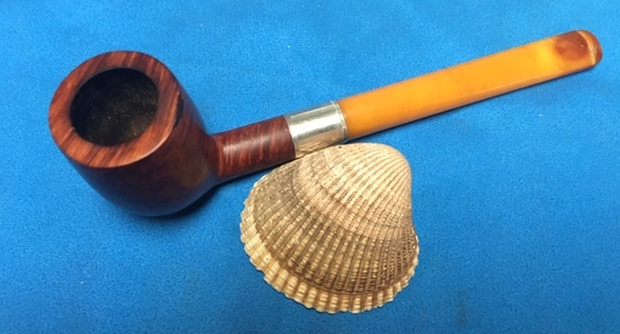
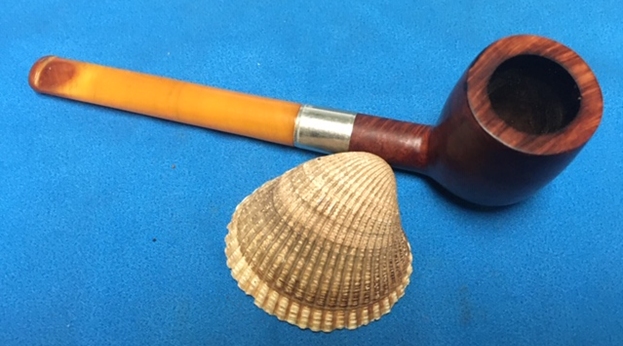
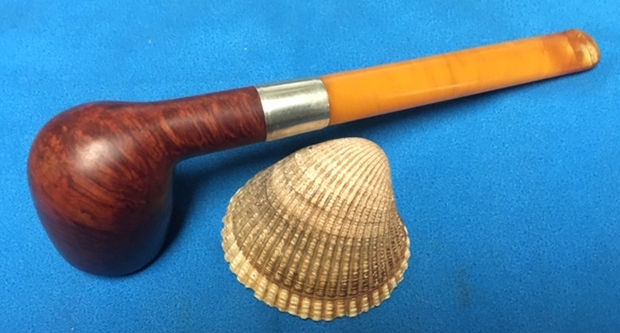
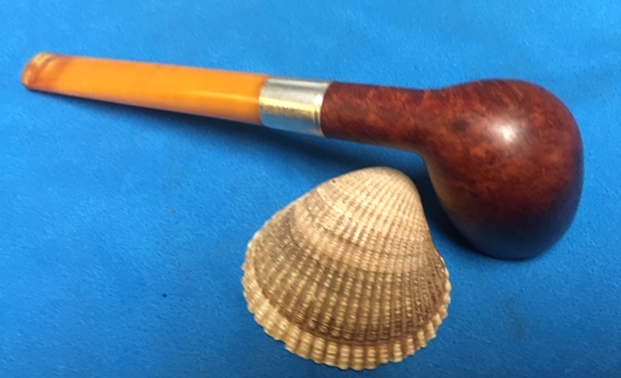
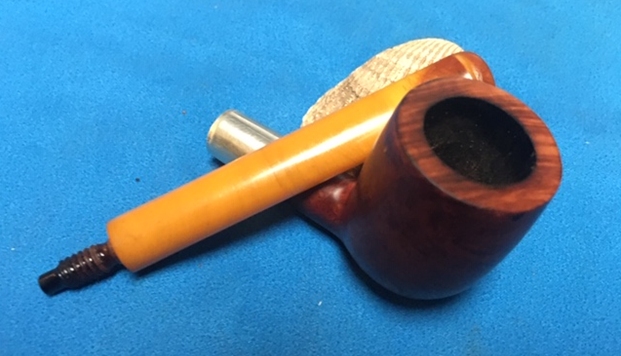
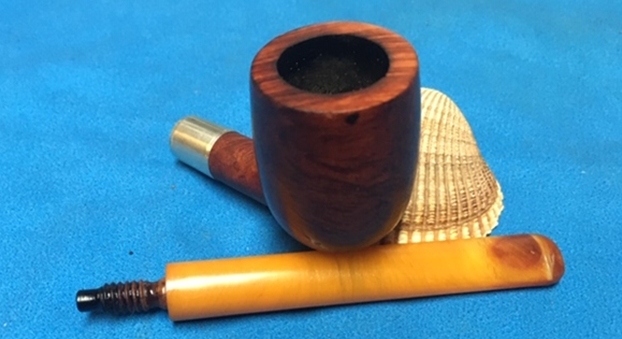
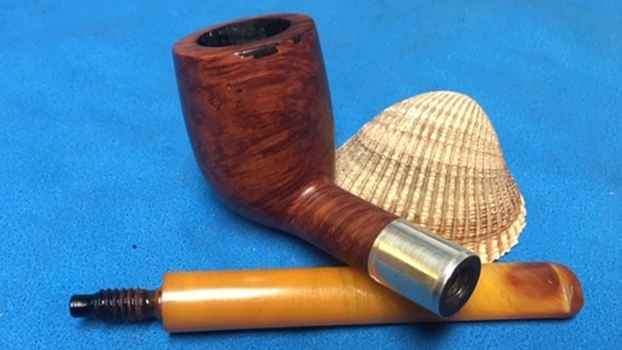
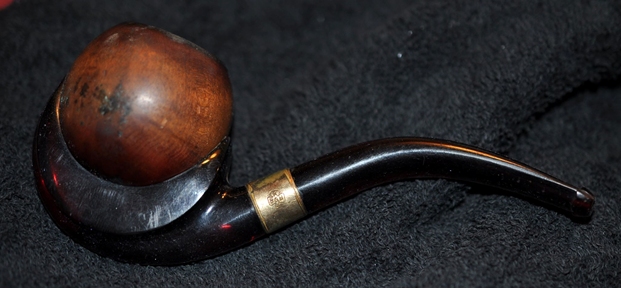
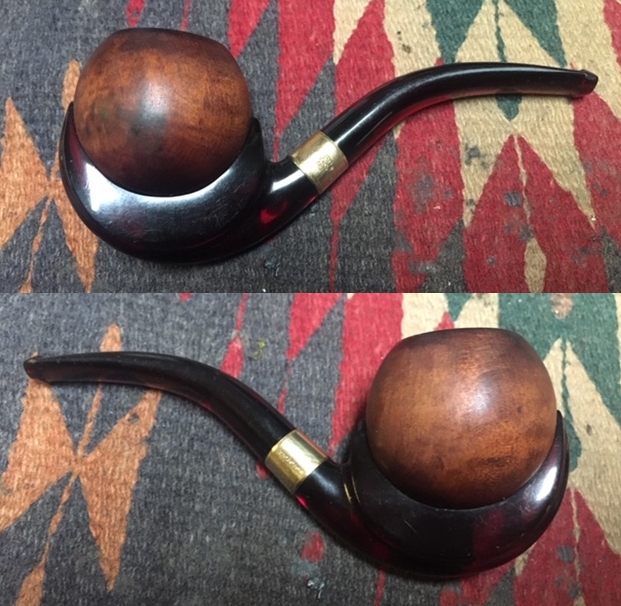
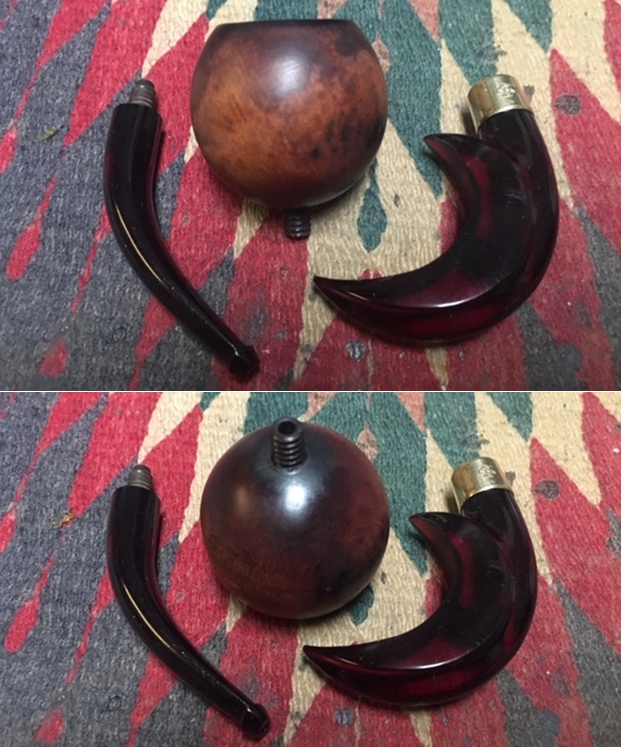
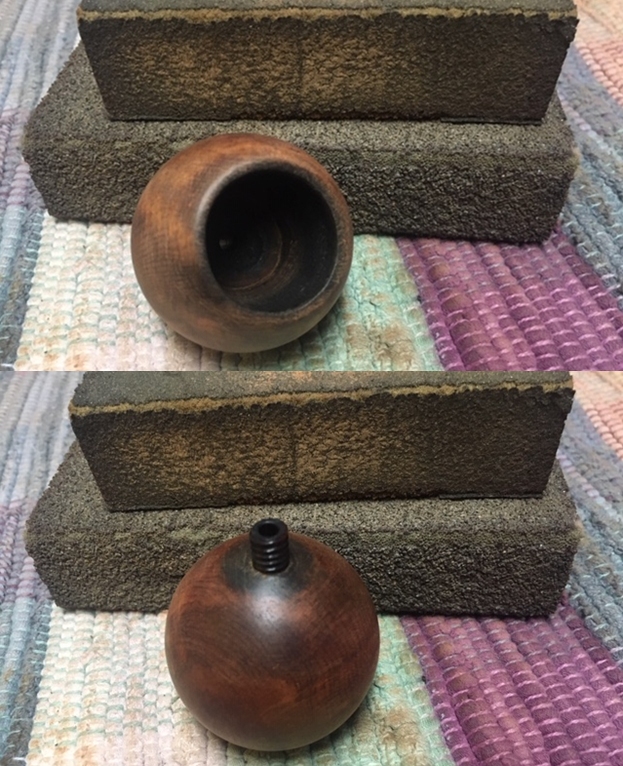
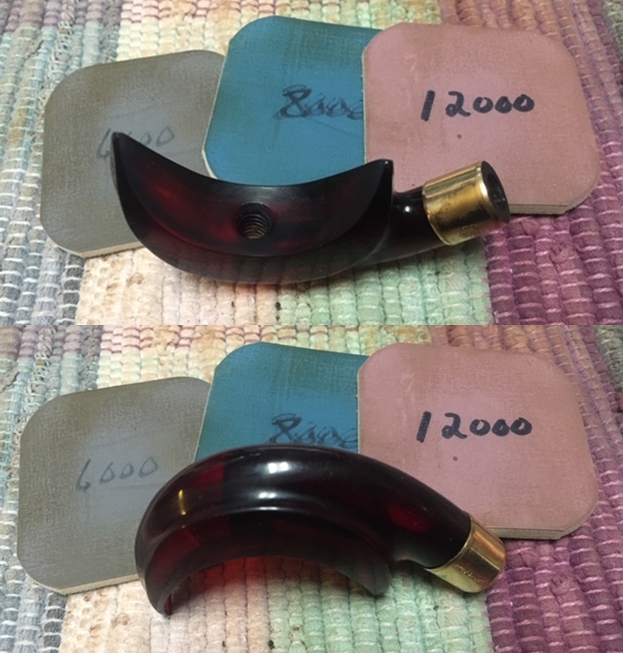
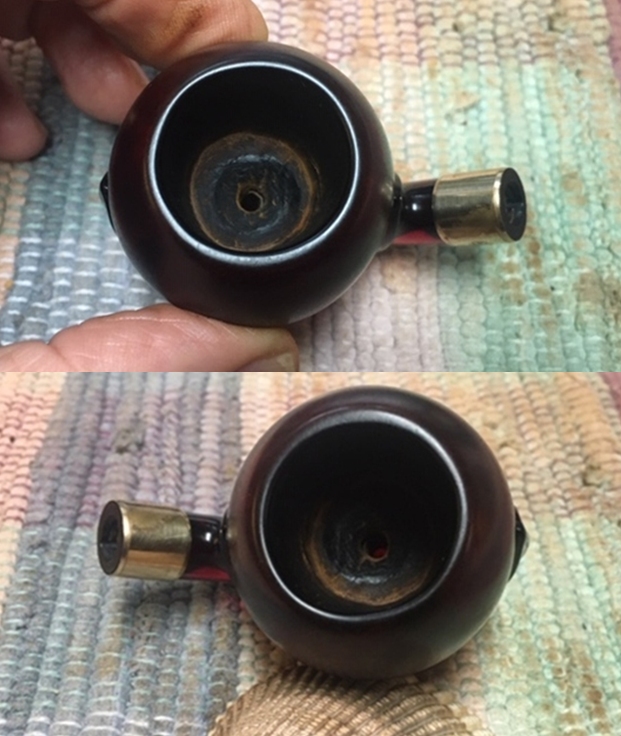
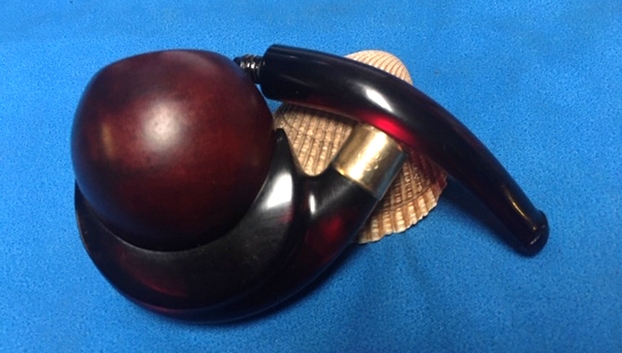
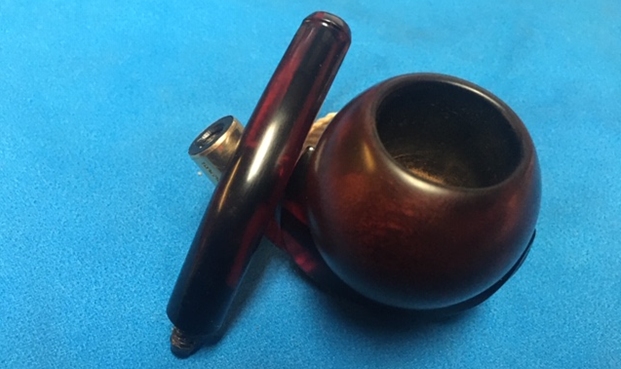
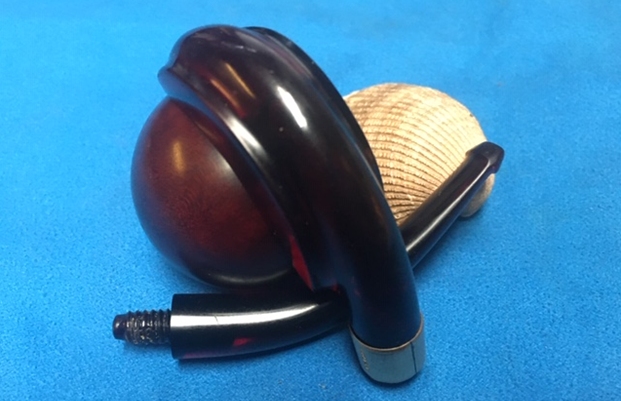
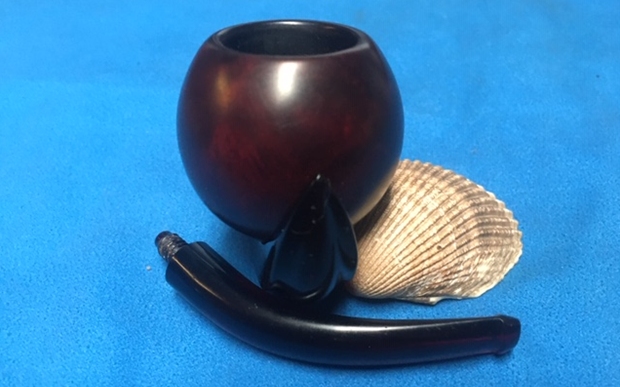
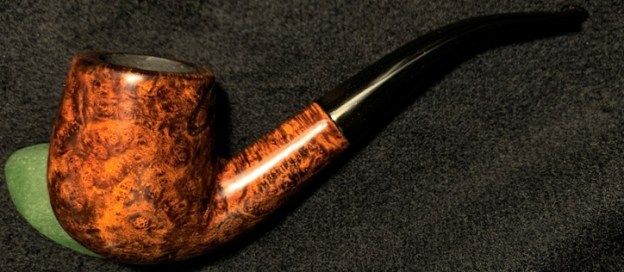
Christmas is now, long gone, our world has changed by the covid-19 pandemic, the kids are in the US navigating life, and  Katie’s pipe for her father is now on my worktable.  I take a closer look at the Sculpted Bent Billiard with some pictures.  There is genuinely nice briar grain lurking beneath the darkened, tired finish – many bird’s eye formations draw my attention.  The upper bowl surface is darkened in comparison to the other briar landscape indicating potential overheating problems which may be revealed when the chamber is cleared of the cake.
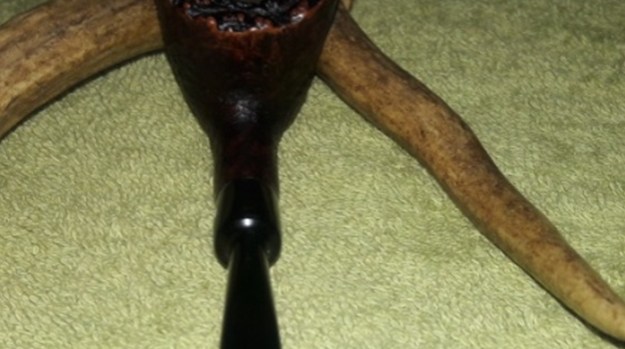
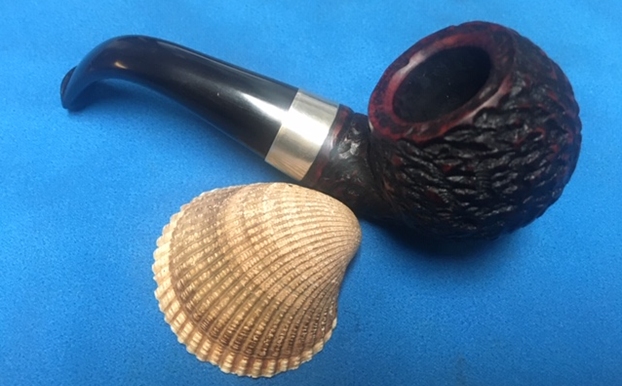
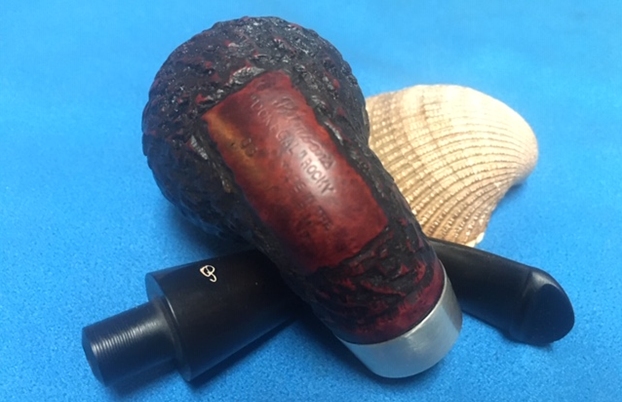
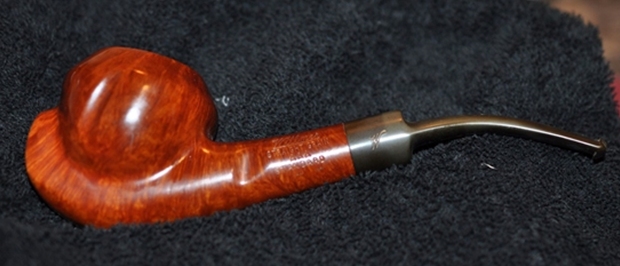
The rim is in rough shape with thick lava flow and nicks and skinned edges – it’s been a well-used pipe!
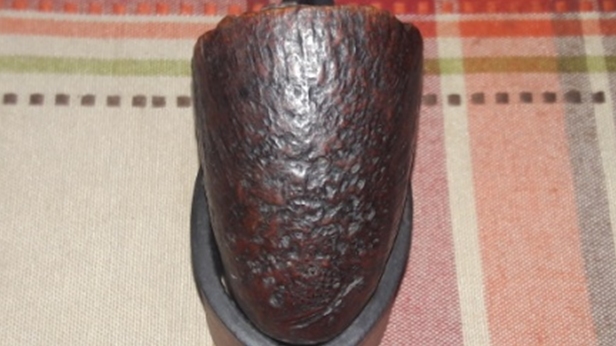
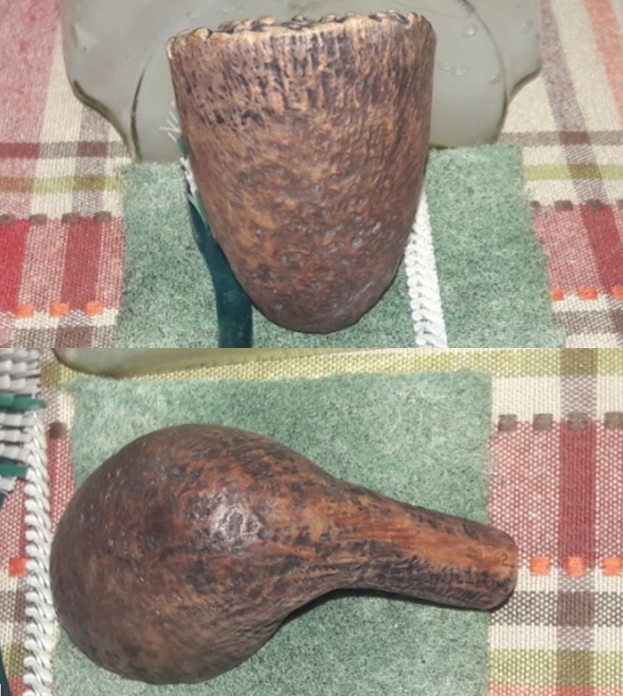
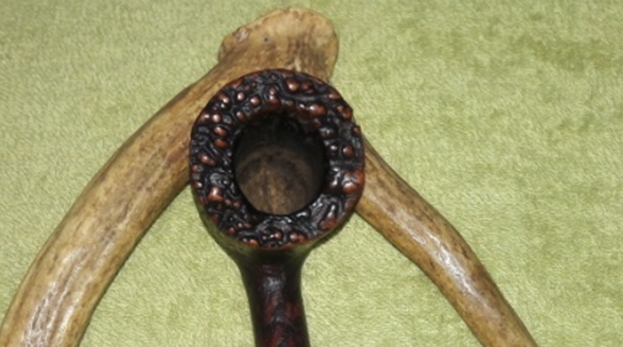
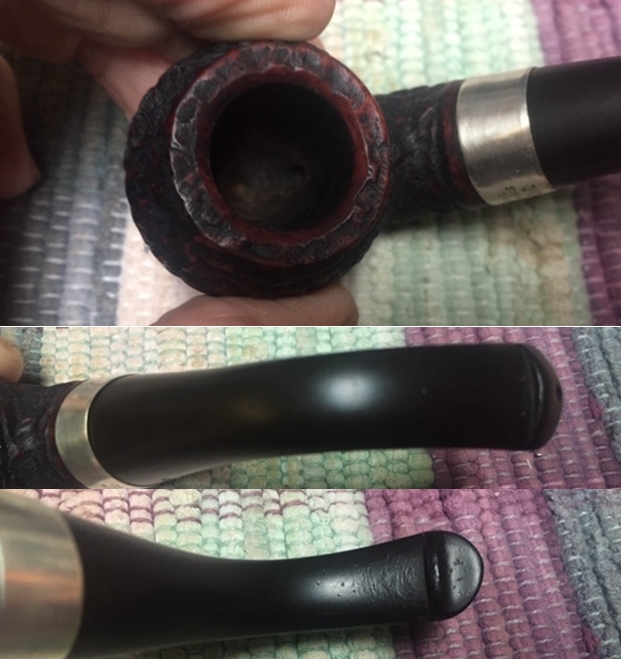
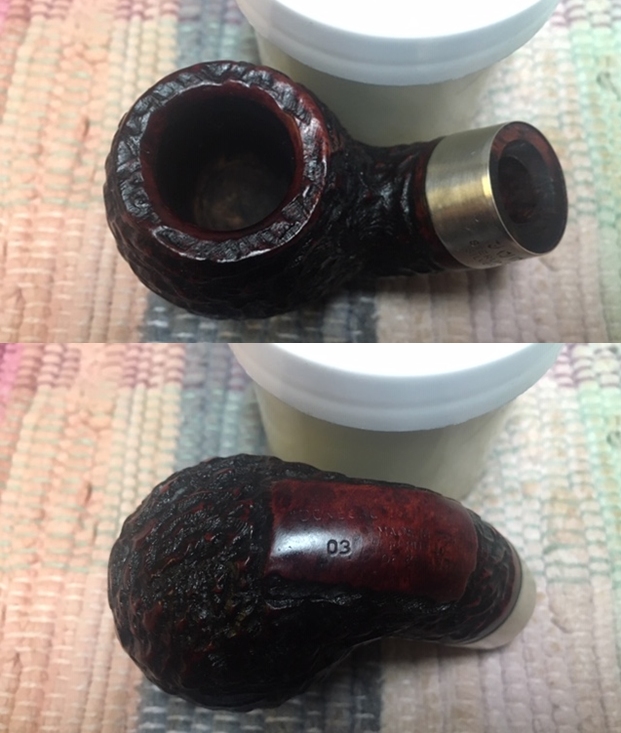
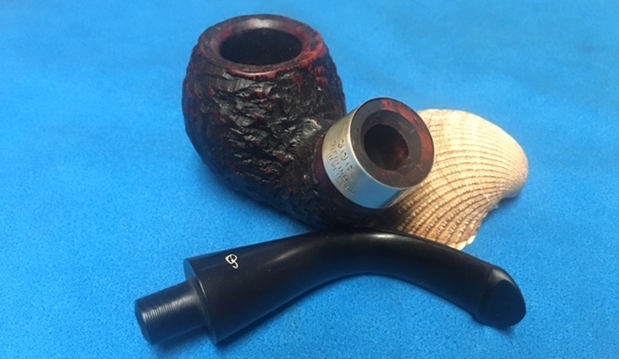
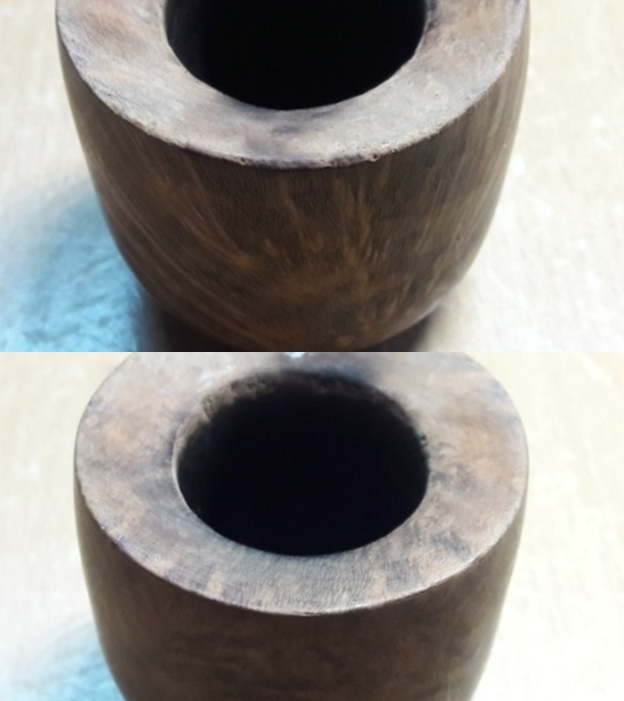
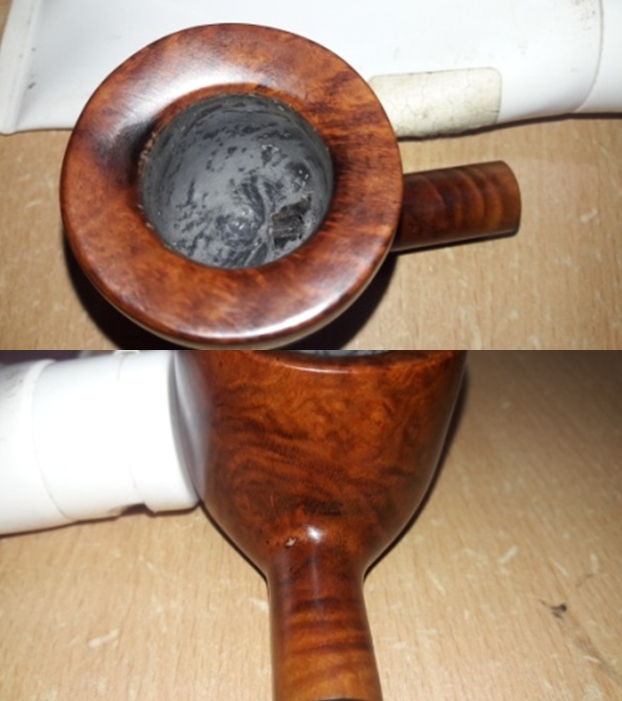
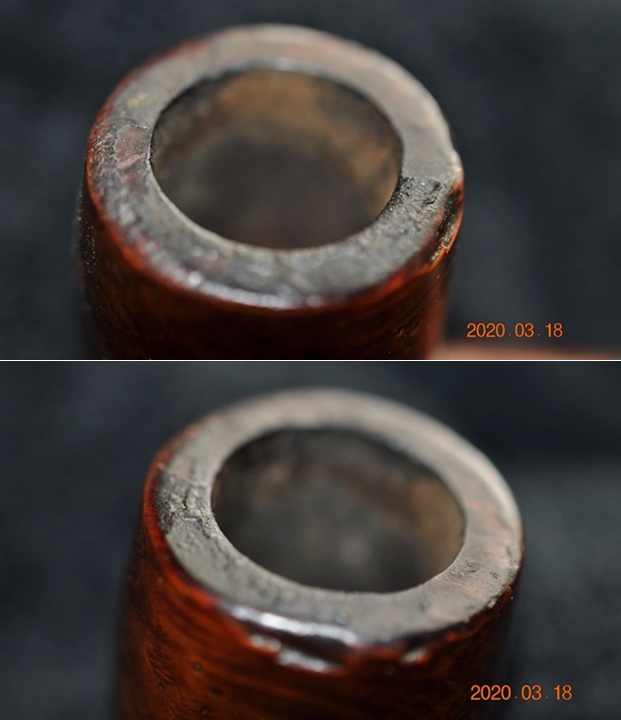
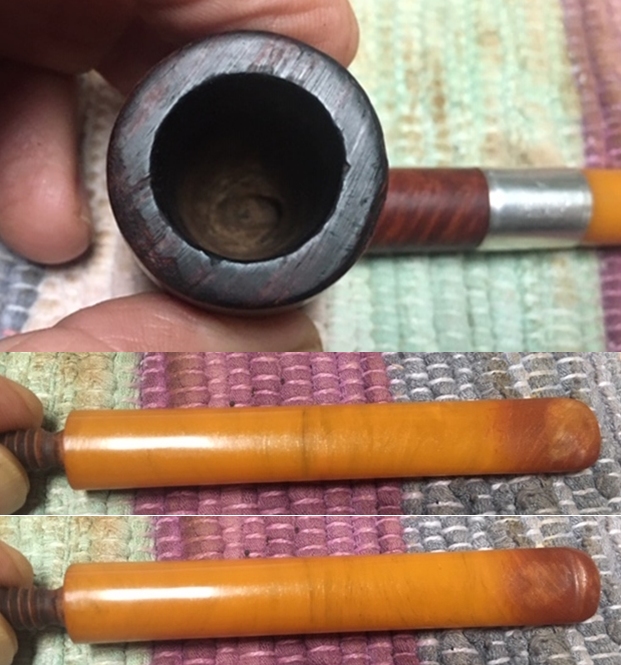
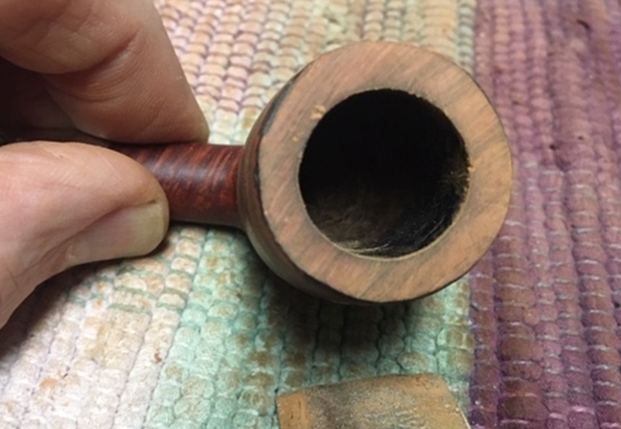
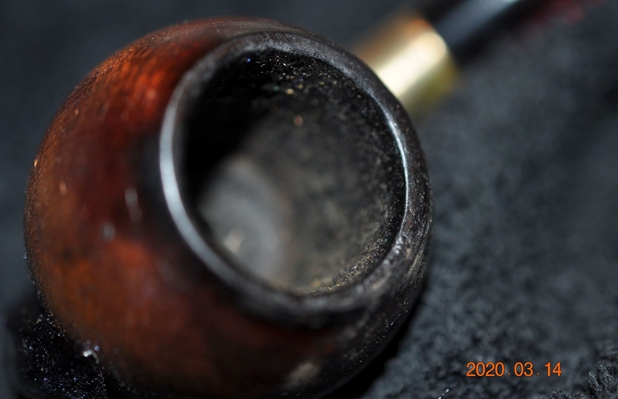
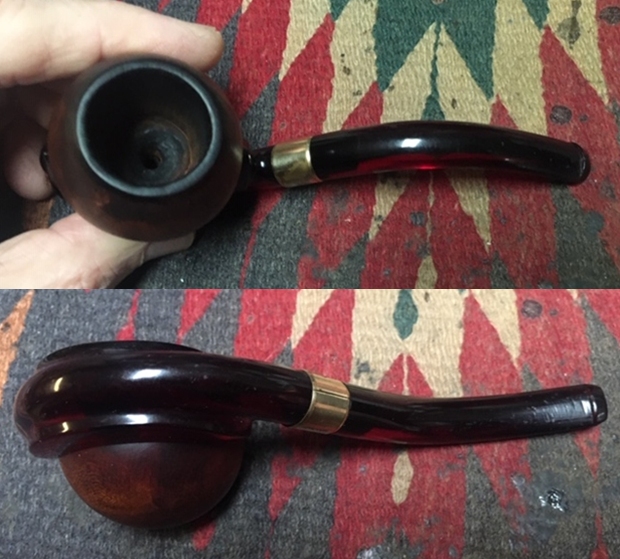
The picture doesn’t show the thick carbon cake buildup that I can see with the eye.  The chamber closes and narrows as you move toward the chamber floor.
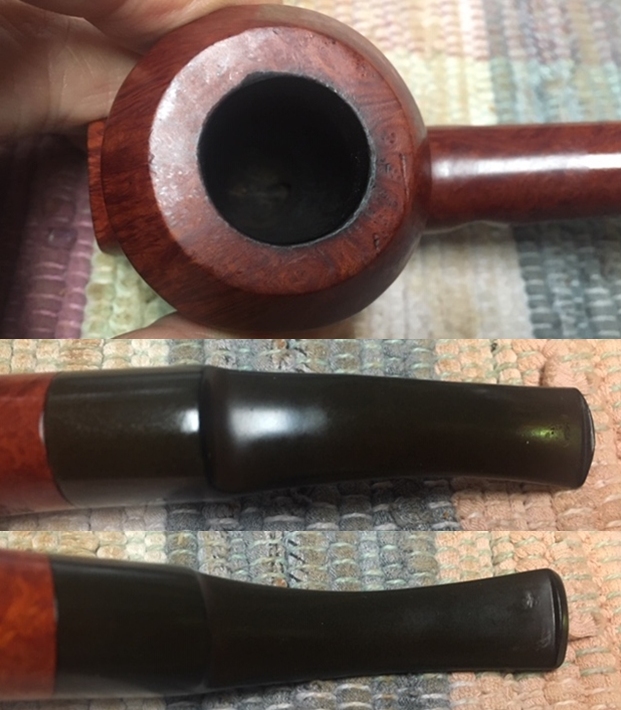
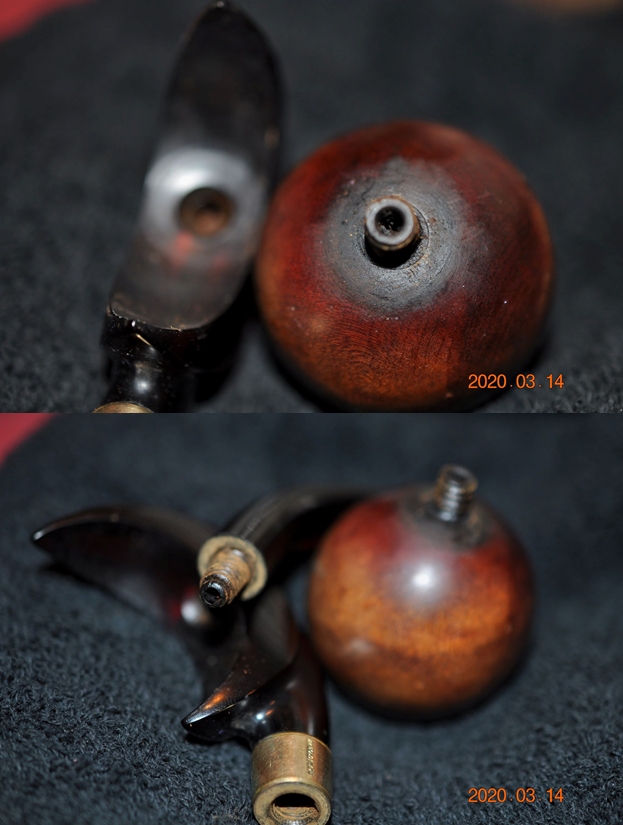
The mortise is too loose so that the tenon has no grab.  This needs to be addressed and tightened.
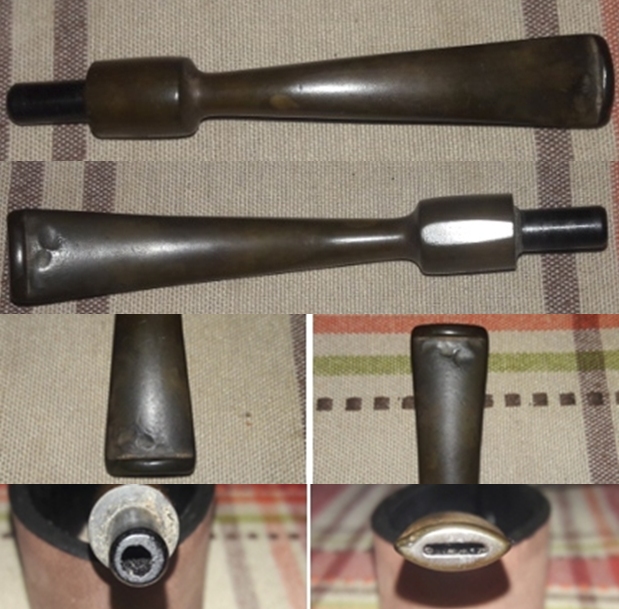
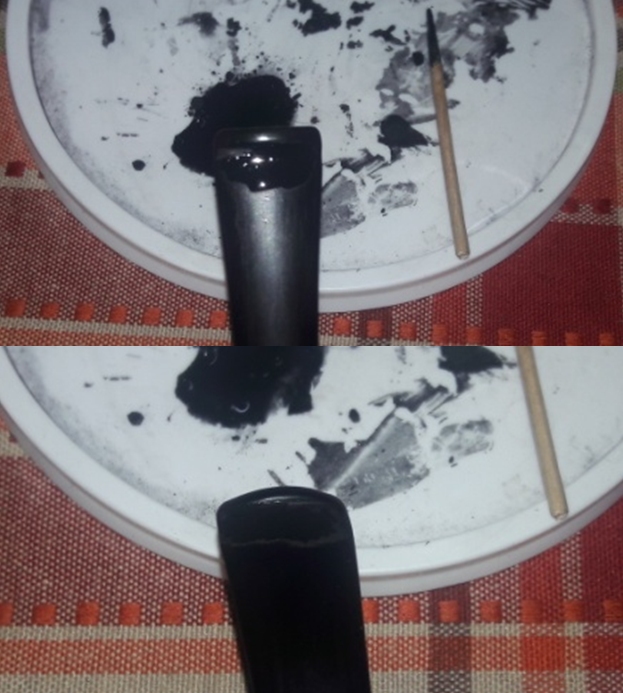
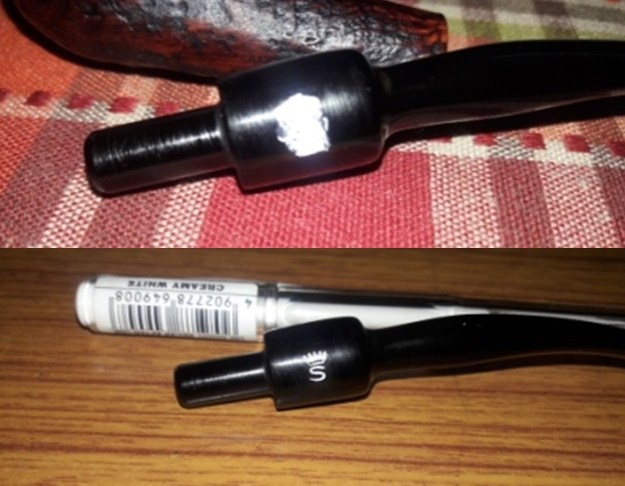
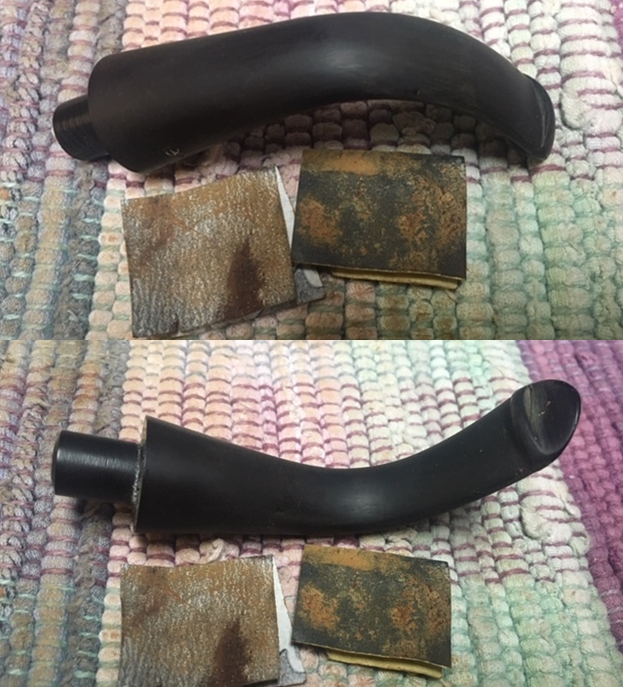
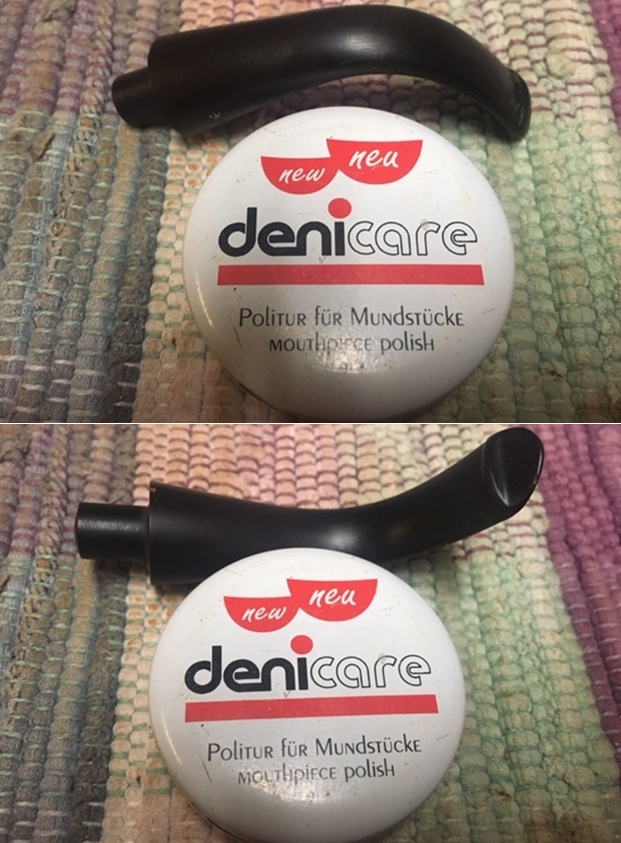
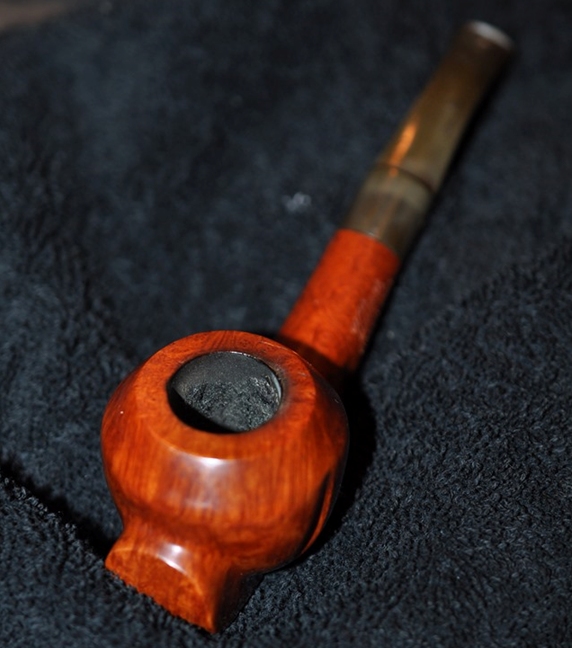
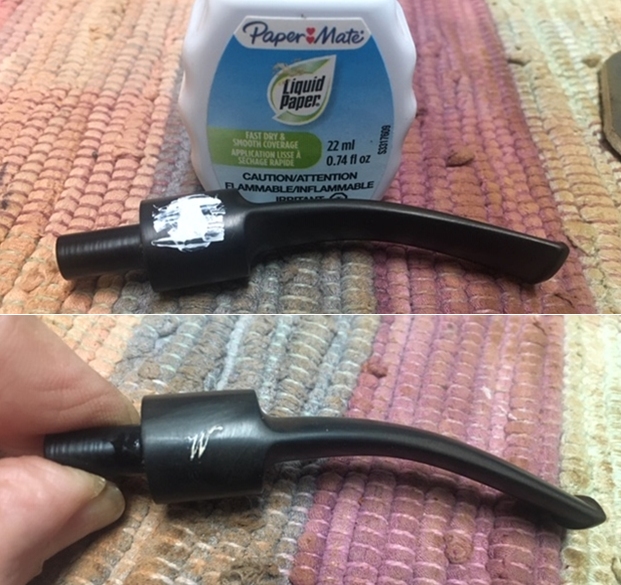
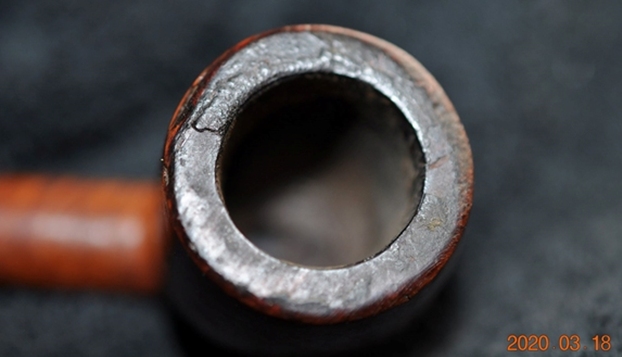
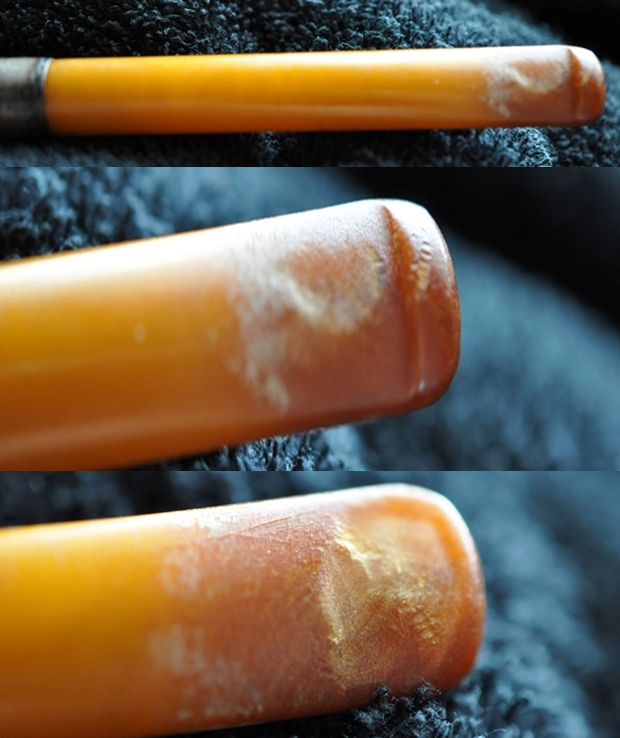
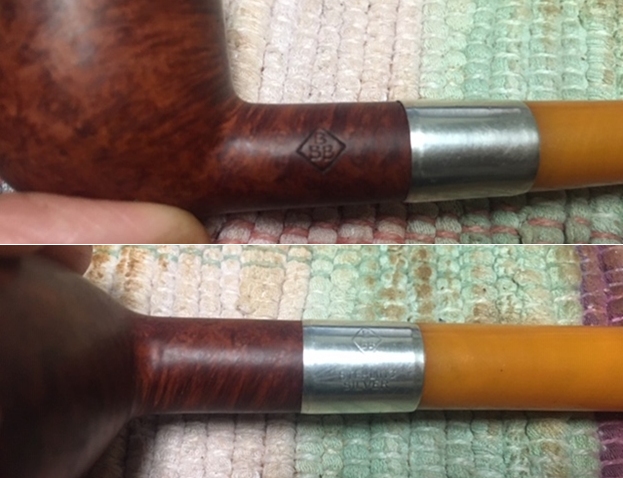
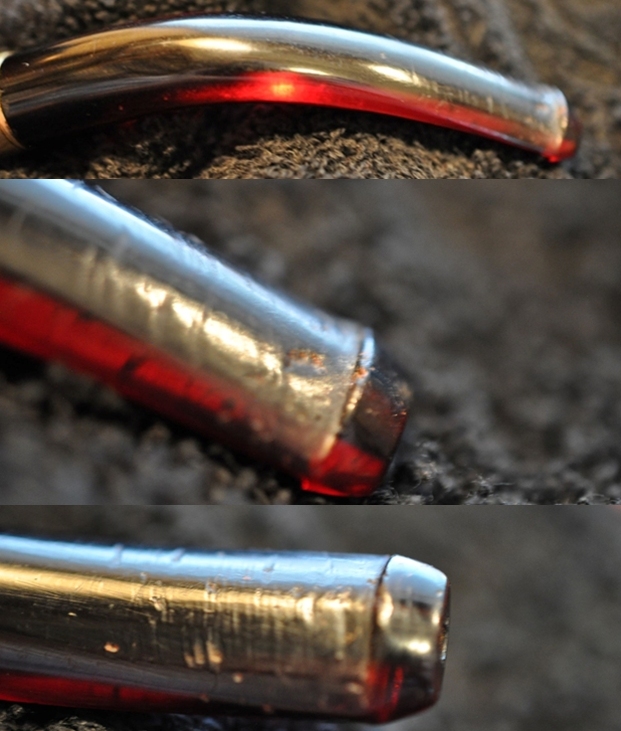
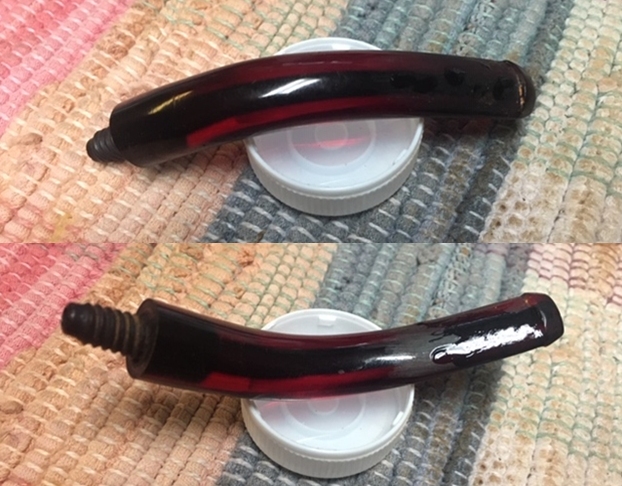
The stem has deep oxidation and calcium buildup on the bit area. The button needs refreshing.
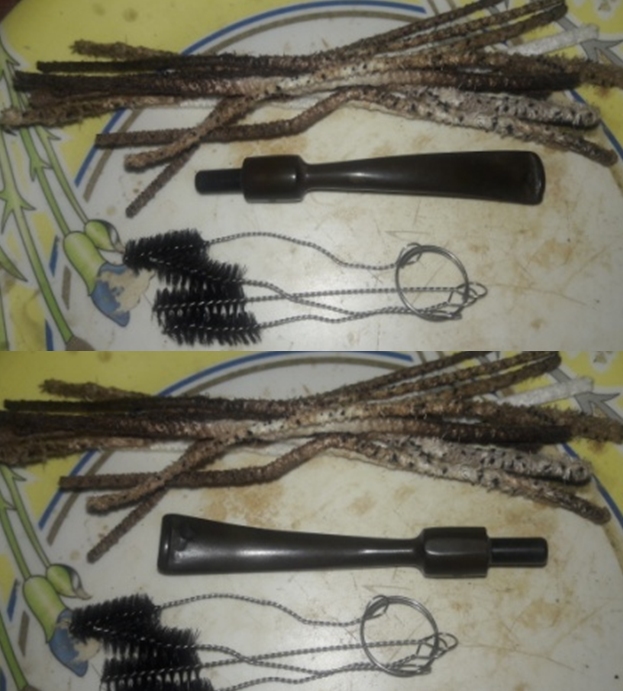
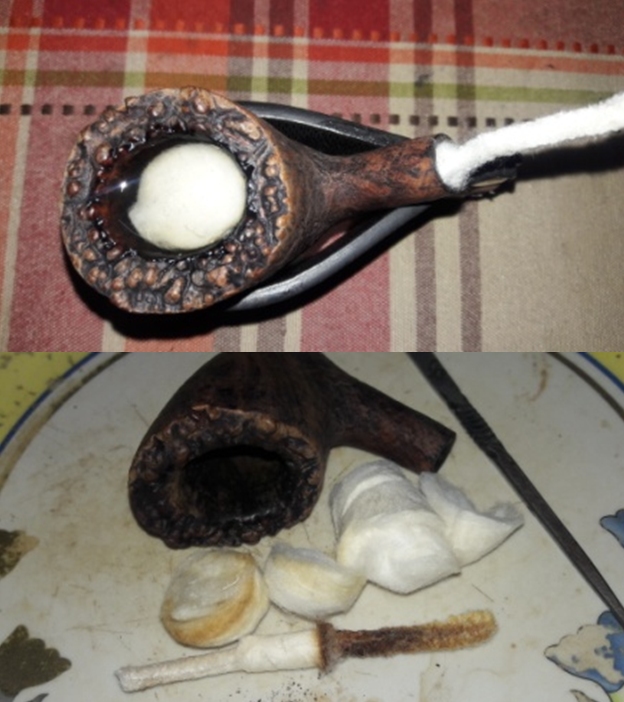
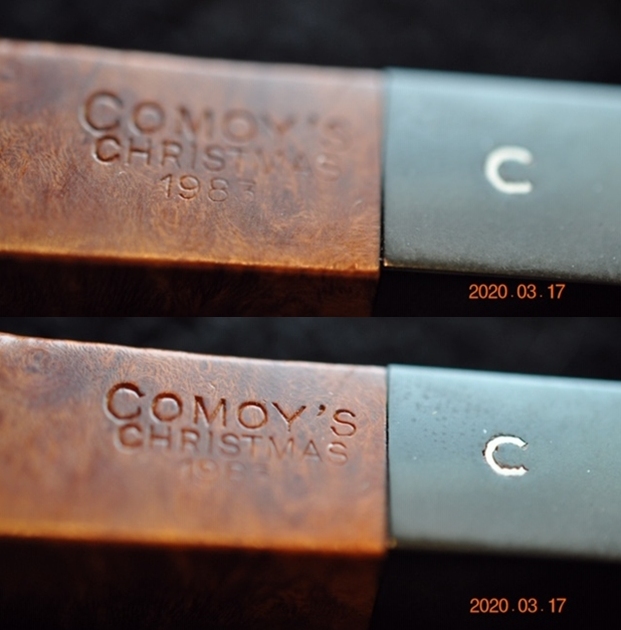
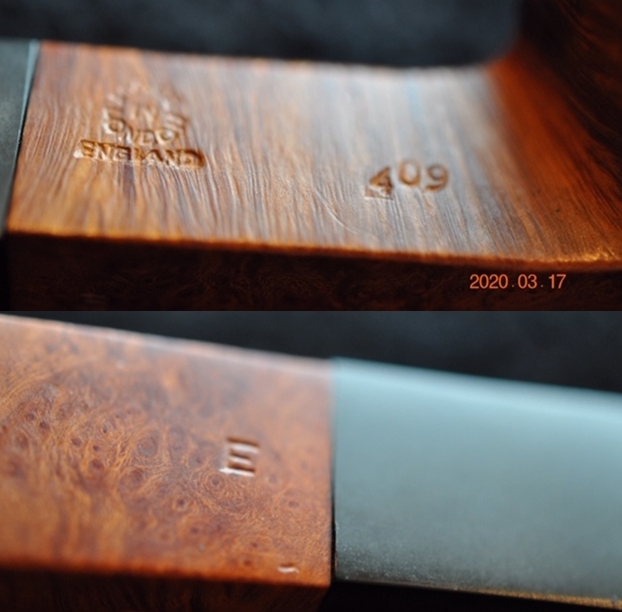
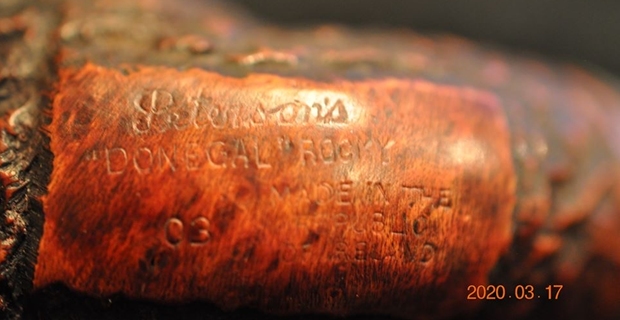
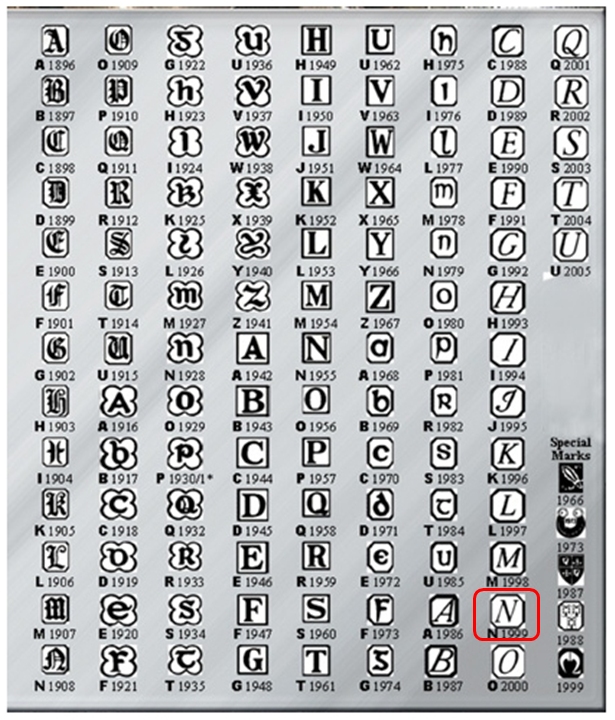
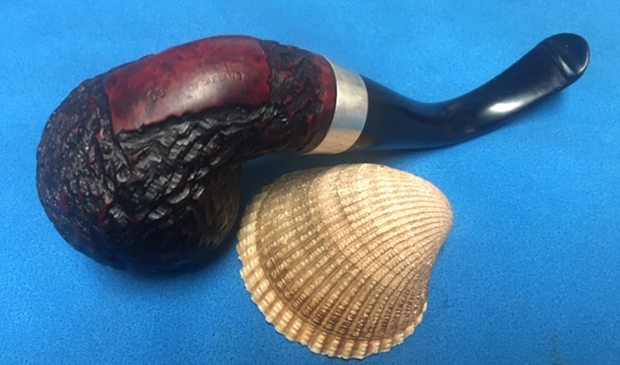
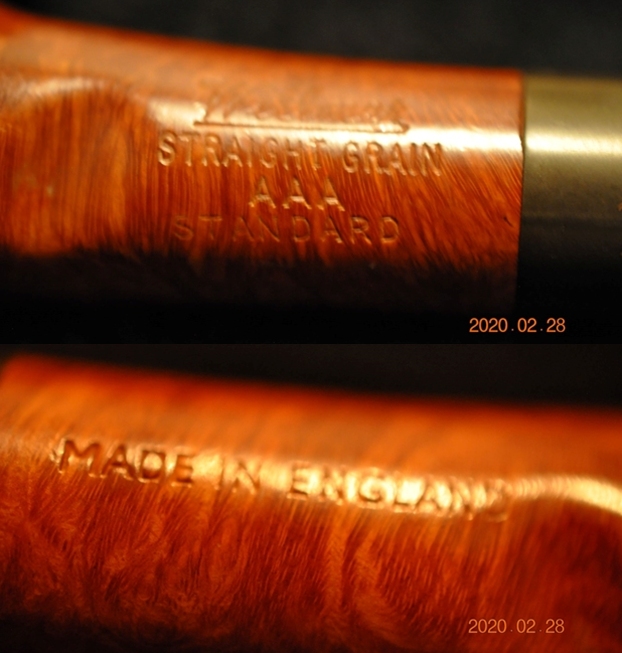
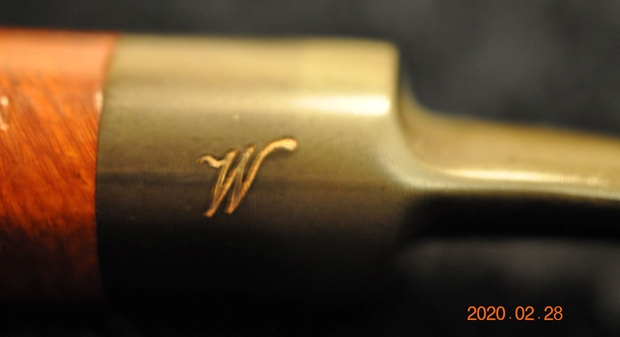
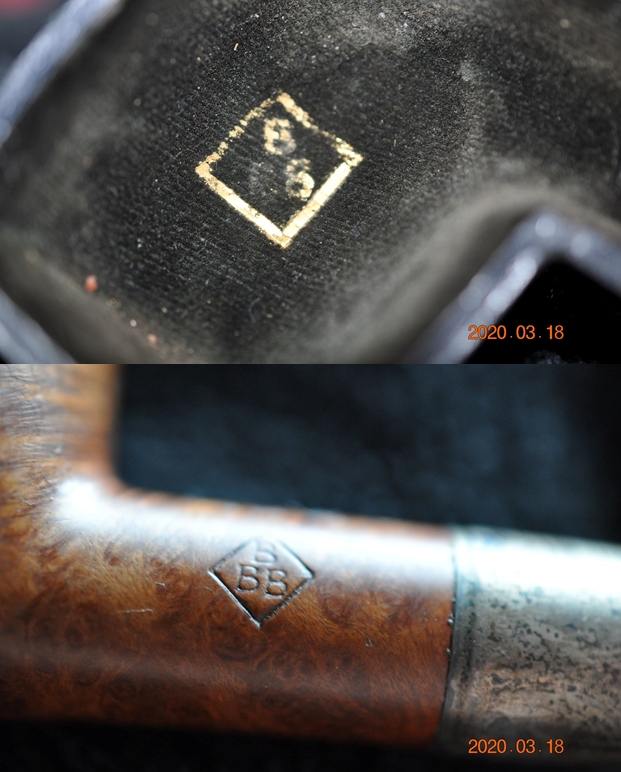
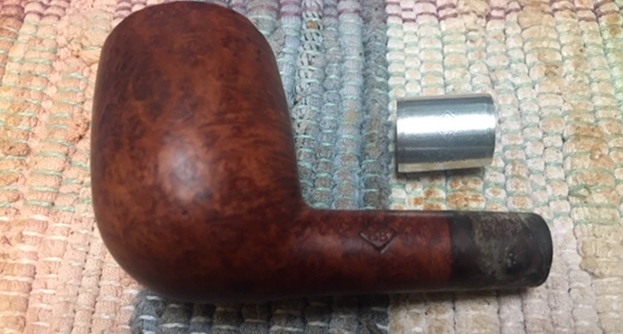
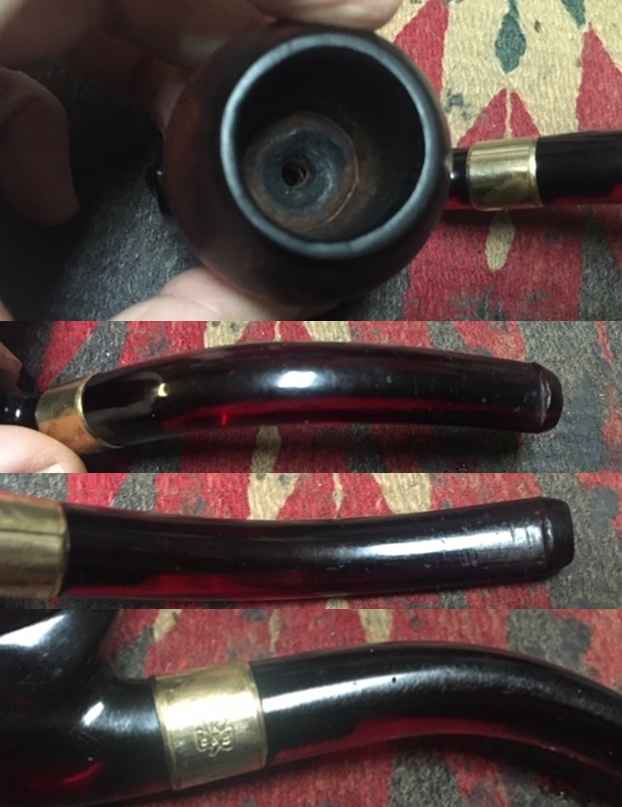
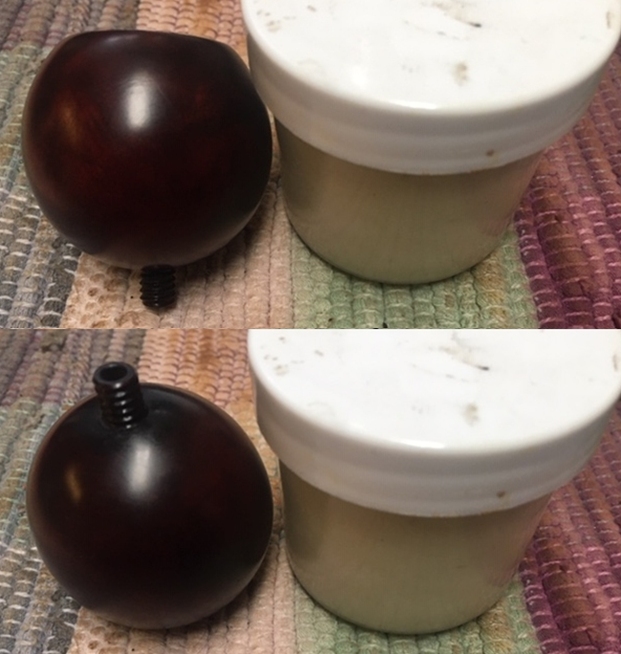
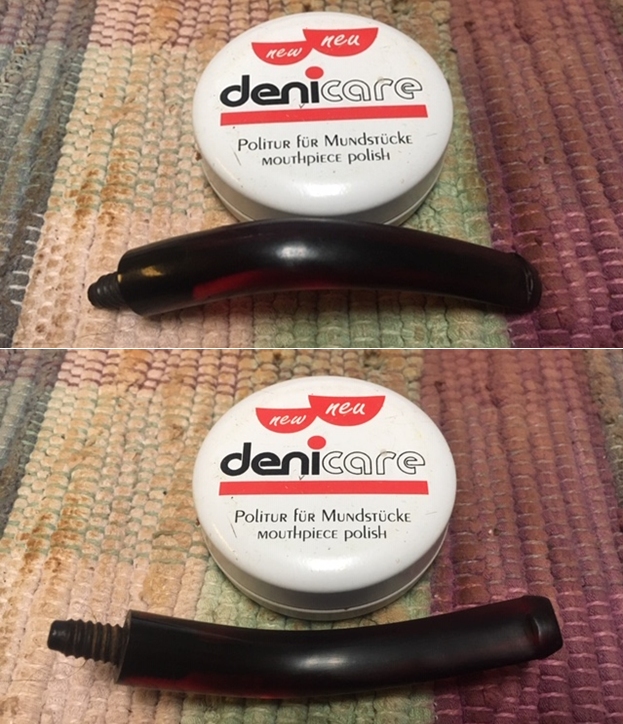
The nomenclature is thin with only ‘Imported Briar’ on the shank.  The spelling of briar probably indicates this to be a US manufactured pipe.  To begin the restoration of Katie’s pipe, the stem’s airway is cleaned with a pipe cleaner wetted in isopropyl 95%.
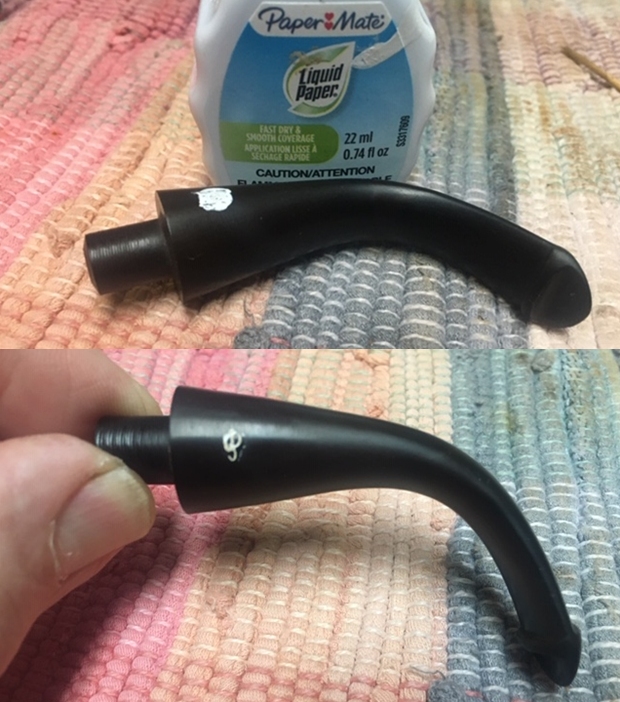
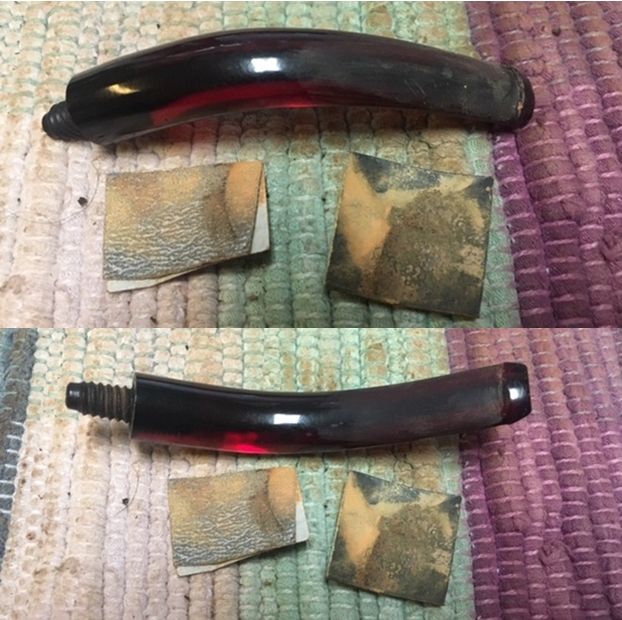
With the oxidation being so deep and with the calcium buildup, I get a head start on removing the oxidation using 000 grade steel wool along with a ‘Soft Scrub-like’ product I can get here in Bulgaria. This helps with the cleaning before putting the stem into the soak.The next step is to give the stem a soak in Before & After Deoxidizer that does an adequate job of removing oxidation that isn’t too deep.  The stem joins other stems and pipes in the queue.  I let it soak for several hours.After removing the stem from the Deoxidizer, I let the liquid drain and I squeegee the stem with my fingers.  I then use cotton pads wetted with isopropyl 95% to wipe the stem removing raised oxidation.  I clear the fluid from the airway with a few pipe cleaners also wetted with isopropyl 95%.To help condition the vulcanite stem, paraffin oil is applied with a cotton pad.  Paraffin Oil is a mineral oil.  I then put the stem aside to give time for the oil to be absorbed.
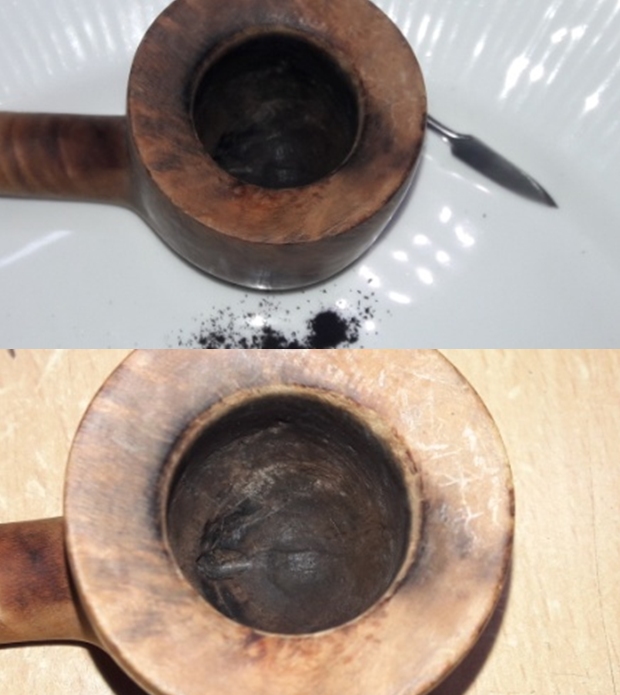
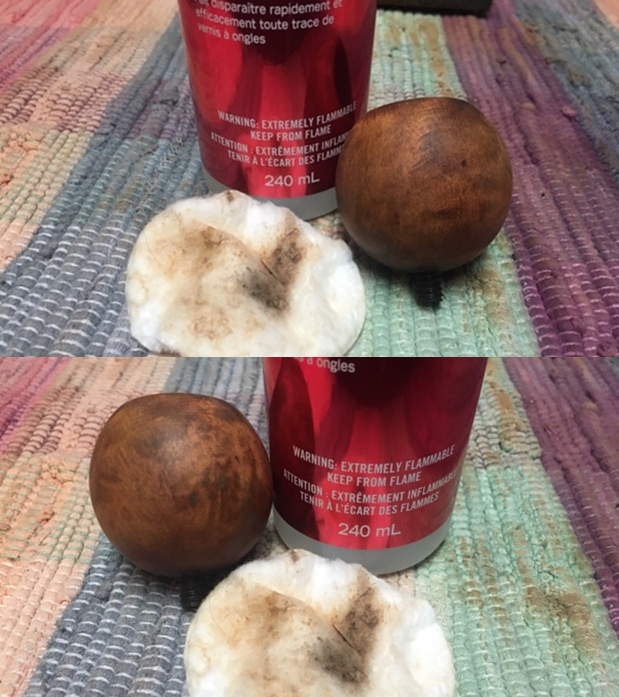
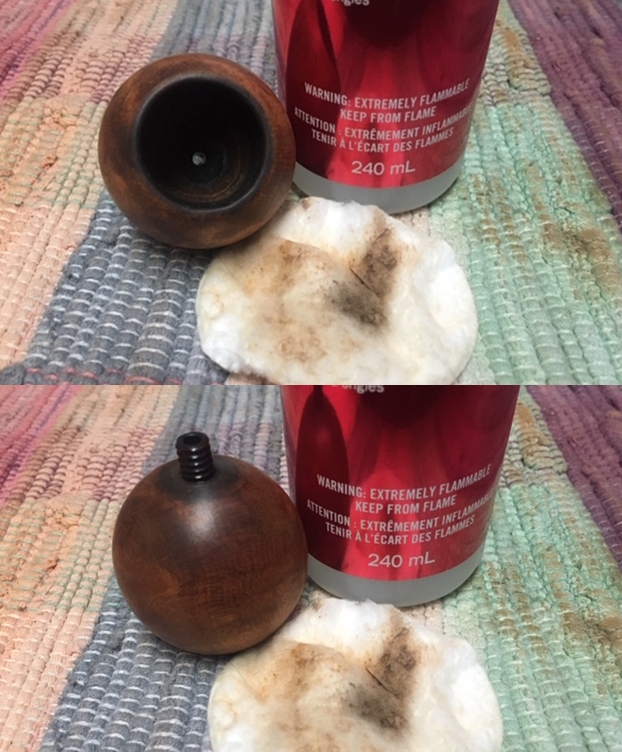
Next, turning to the bowl, I use the Pipnet Reaming Kit to start clearing the hard, thick carbon cake from the chamber. I use 3 of the 4 blade heads available in the kit to ream the bowl.  I follow the reaming tool by scraping the chamber wall with the Savinelli Fitsall Tool.  I finish by sanding the chamber with 240 paper wrapped around a Sharpie Pen. 
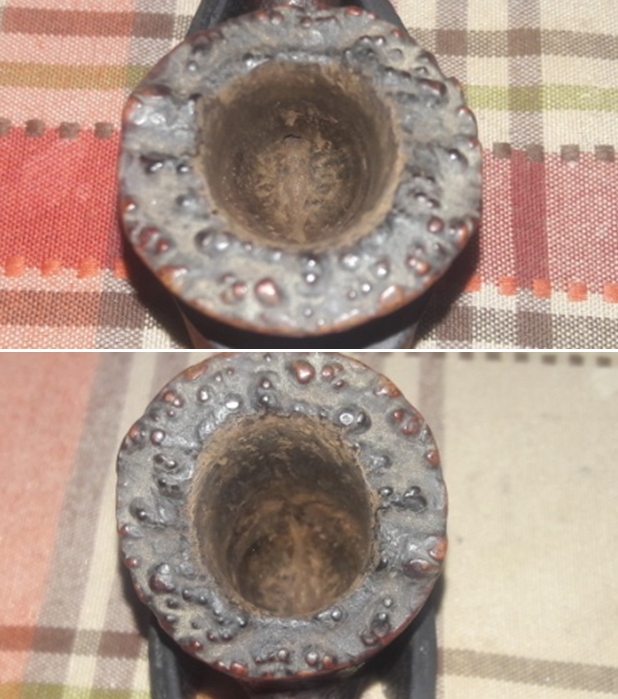
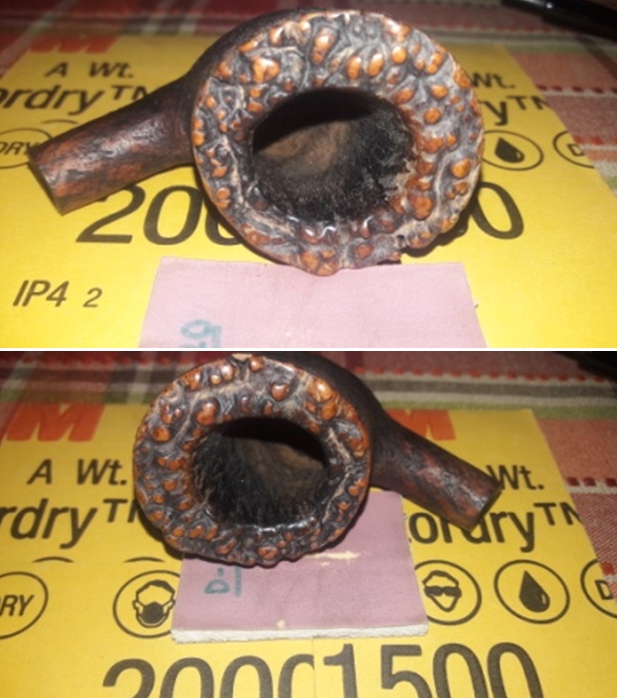
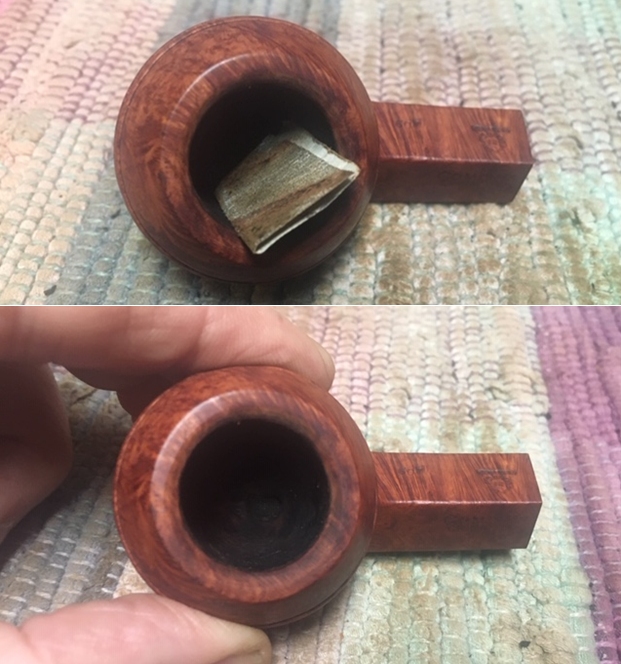
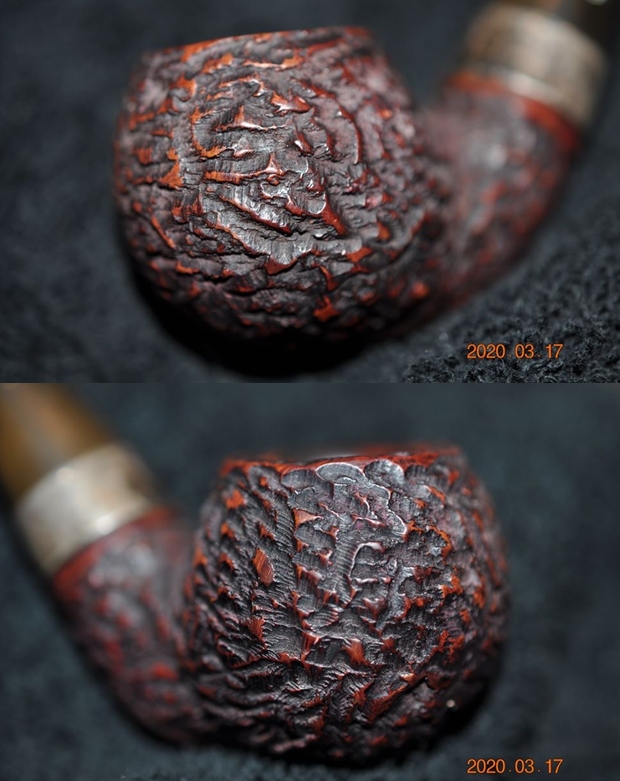
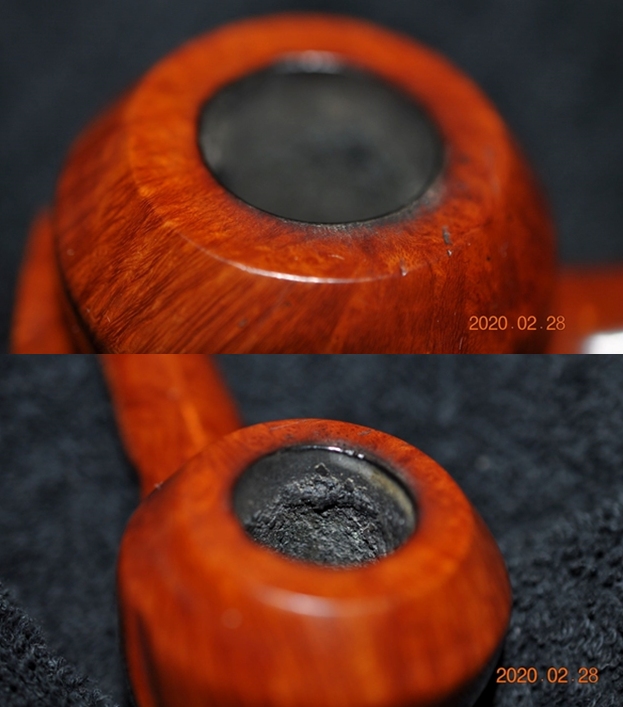
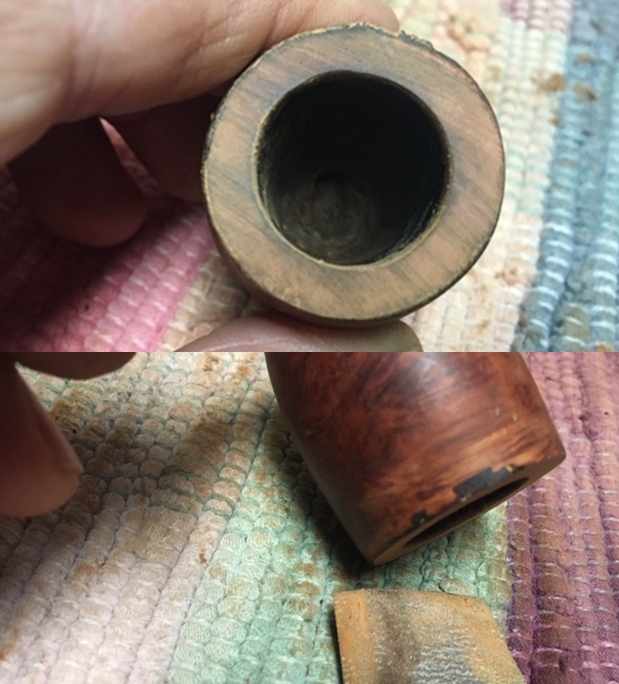
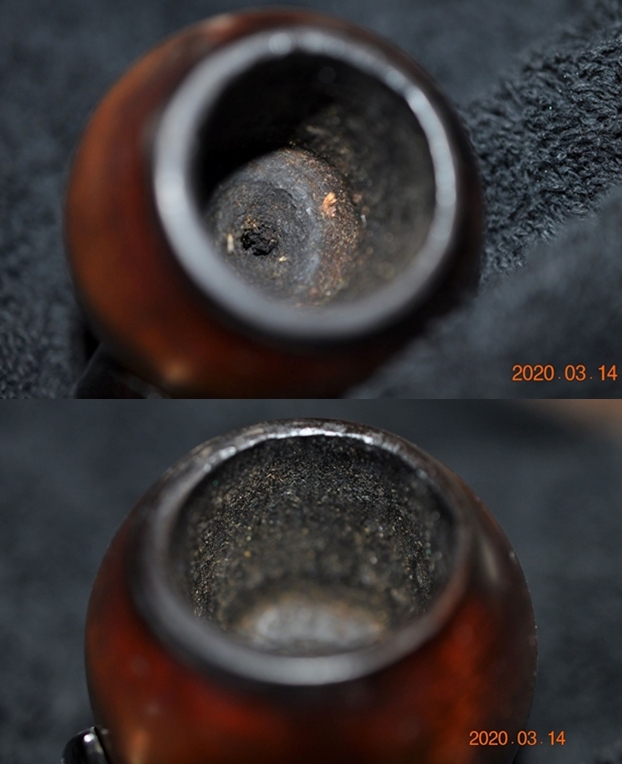
After wiping the chamber with a cotton pad wetted with alcohol, I discover what appears to be some heating damage on the upper backside of the chamber – behind the sculpting.  There is a hole with a crevasse cutting to the left from the deep pit.  This will need attention after the cleaning of the stummel is completed.Next, I continue with the cleaning of the external surface using undiluted Murphy’s Oil Soap on a cotton pad.  I also utilize a brass bristled brush to work on the lava covered rim.  Brass does not damage the briar and adds some cleaning power.  I transport the pipe to the kitchen sink and continue the cleaning using shank brushes and anti-oil dish soap. With the brushes the mortise is scrubbed.  After a thorough rinsing, the bowl is back on the worktable.
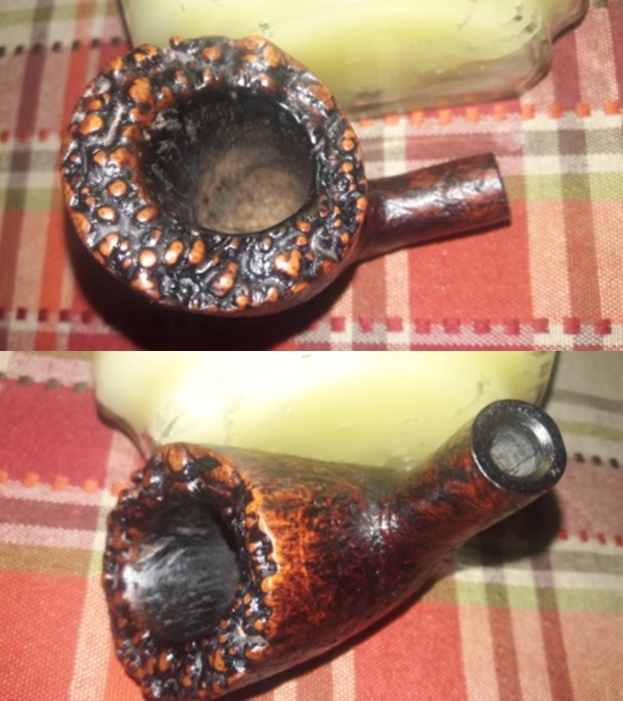
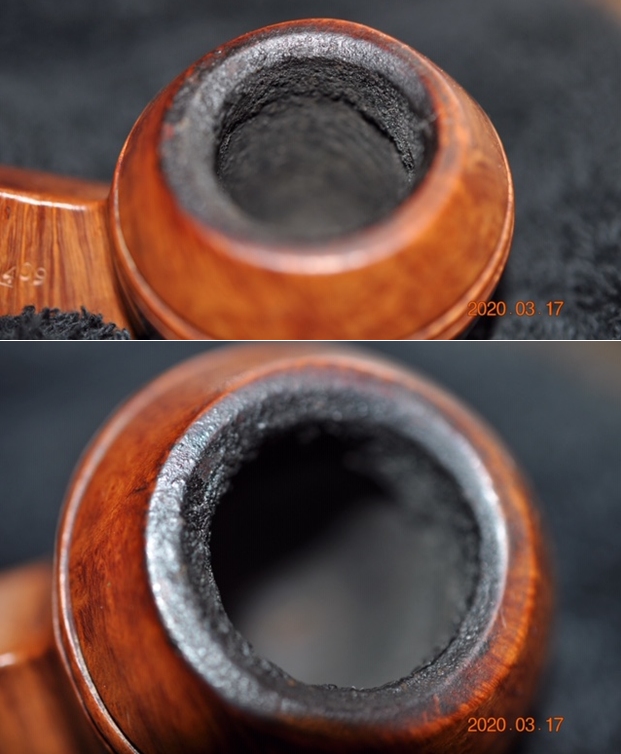
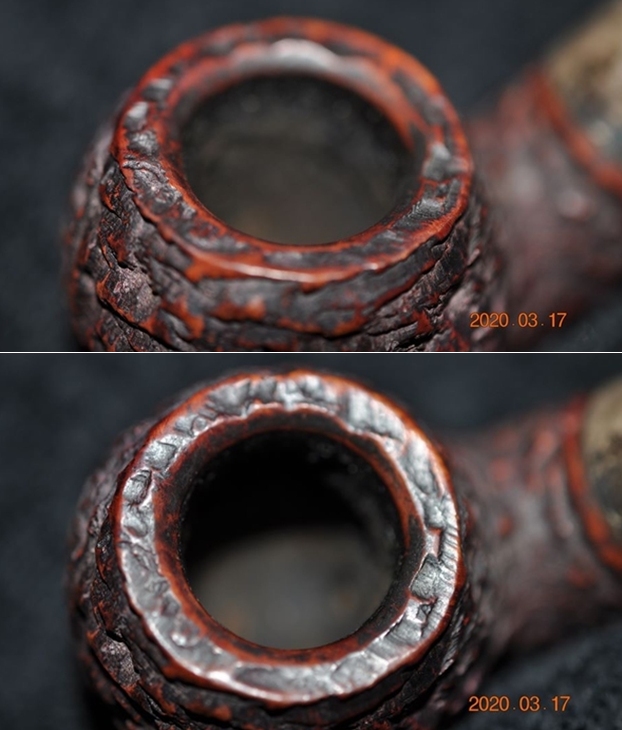
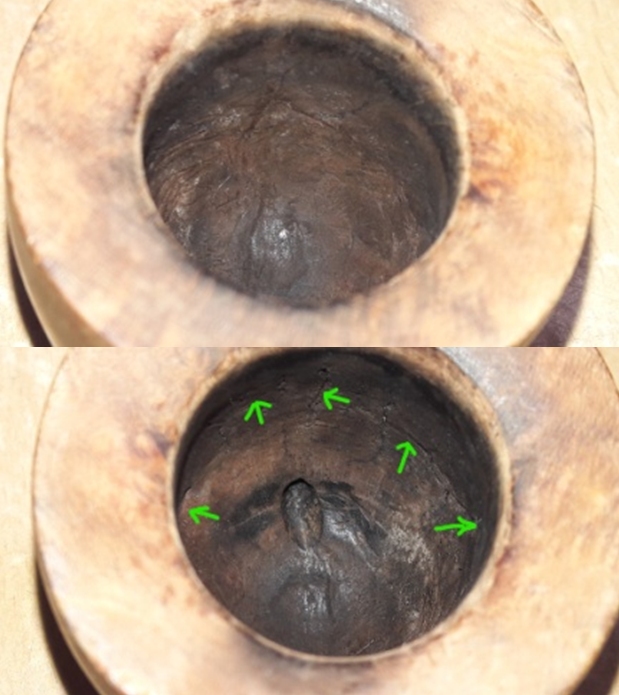
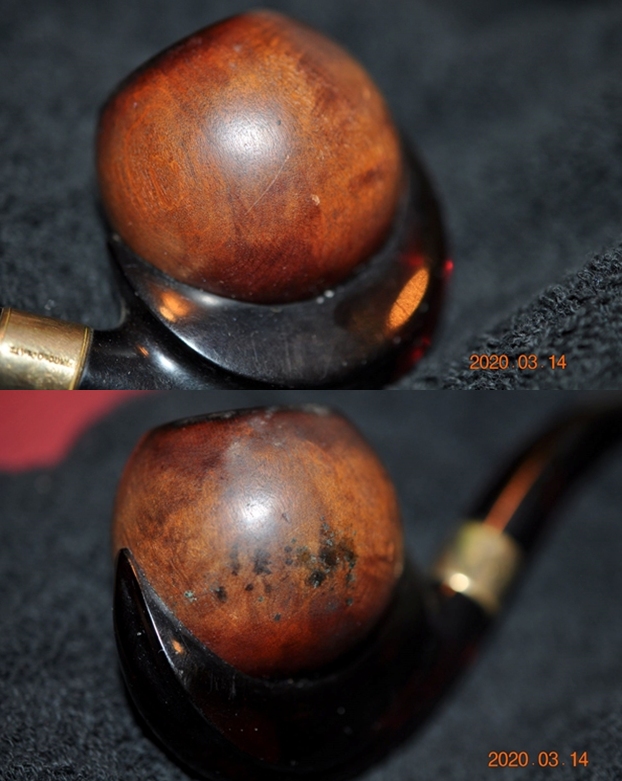
The rim cleaned up revealing the internal edge burn damage from lighting practices on the right side of the bowl.  This will be addressed later.
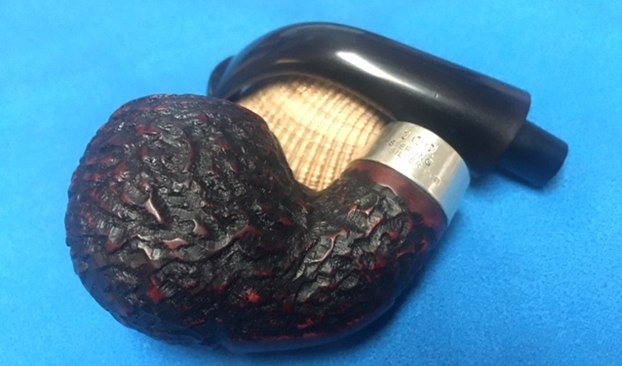
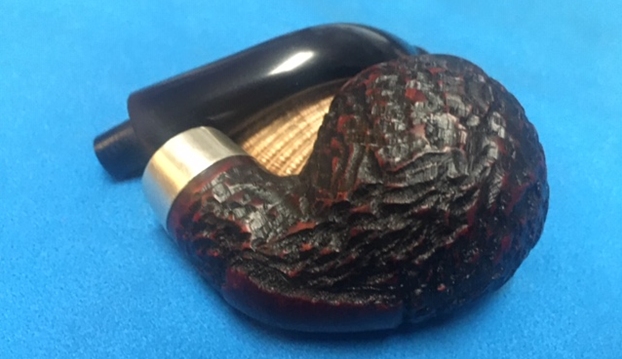
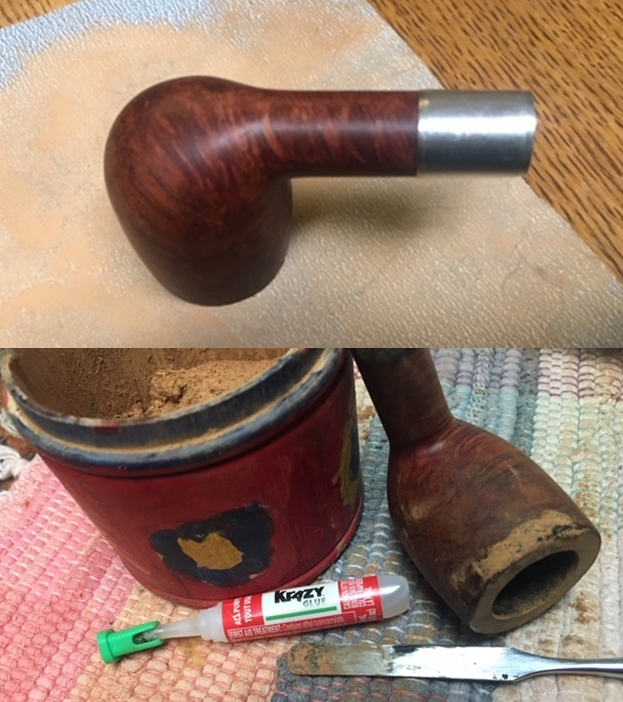
The bigger surprise comes after inspection of the sculpted area.  The center of the sculpting is a filler.  The question is, was the sculpting used to hide an imperfection in the briar itself or to blend a repair possibly caused by a burn-through?  I don’t believe it’s a burn through, but the fill corresponds to the hole in the chamber.Using a dental probe, it doesn’t take much to clean the hole and to complete the tunnel passageway to the chamber.  Daylight is now visible looking from the inside.  Ugh. There appears to be a lateral crack that the sculpting has incorporated.  This pipe falls into the ‘Dreamer’ category but is not beyond hope!  The briar surface is nice, and this challenge I hope does not create too much of an obstacle. Continuing with the cleaning regimen, I return to cleaning the internals using cotton buds and pipe cleaners wetted with isopropyl 95%.  I discover that a couple pipe cleaners and one cotton bud are all that is needed.  The internals are clean.
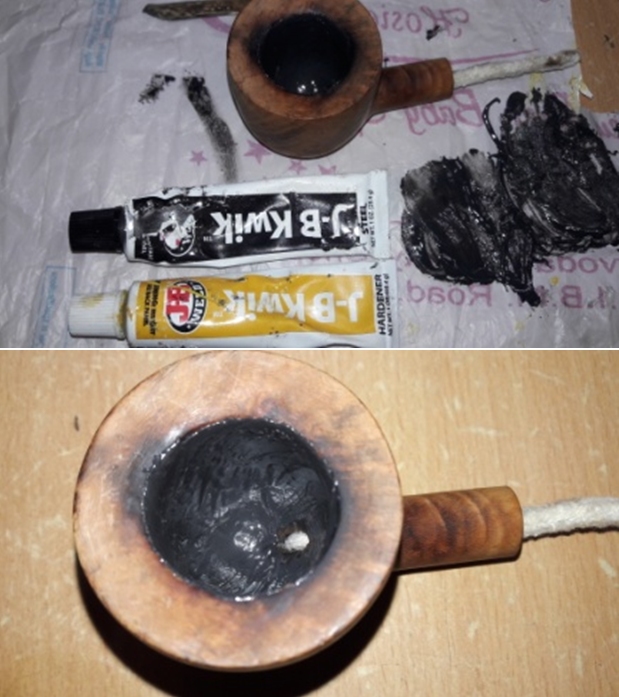
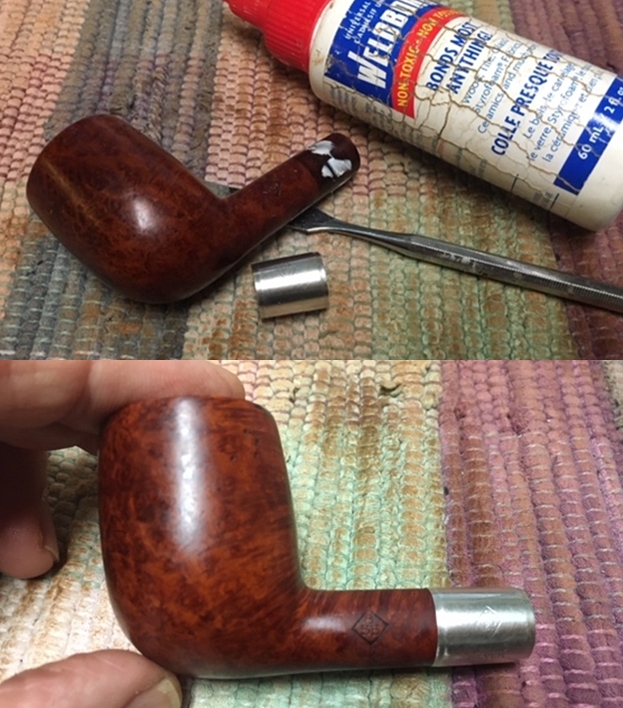
My approach to repairing the hole in the stummel is to first start with applying briar dust putty to the external briar side.  I don’t push the putty through into the chamber but leave a gap that will be filled with JB Weld on the internal fire side. Using burrs with the Dremel, I’ll ‘re-sculpt’ the external surface to blend the patch. Working on a plastic disk as a mixing palette, scotch tape helps with an easy cleanup. After cleaning the area with alcohol, I begin by mixing briar dust with BSI Extra Thick Maxi-Cure CA glue using a toothpick.  I draw briar dust into the puddle of glue until the thickness is that of molasses.  I then use the toothpick to trowel the putty to the hole.  I press the putty into the hole partially to fill it.  I use an accelerator to quicken the curing and to hold the patch in place. After the briar dust putty is fully cured, the next step is to apply JB Weld to the internal fracture and crevasse.  JB Weld is heat resistant and works well has a chamber repair.  I mix equal parts of the ‘Steel Resin’ and the ‘Hardener’ and then mix with a toothpick.  The mixed epoxy begins to harden in about 4 minutes giving plenty of time to apply the Weld to the hole and to the crevasse running from it.  After applied, I set the stummel aside for some hours for the patch to cure. 
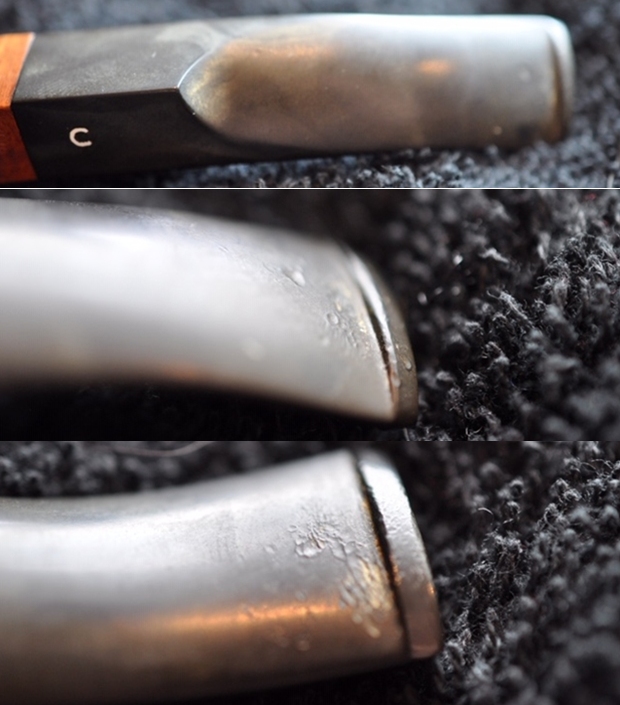
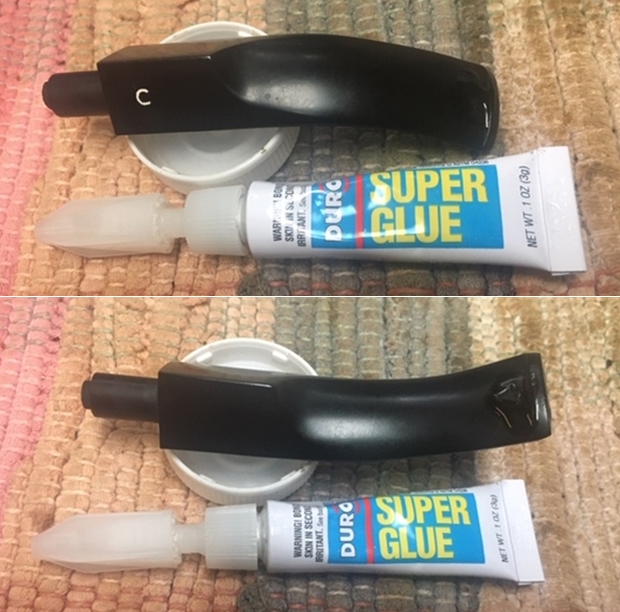
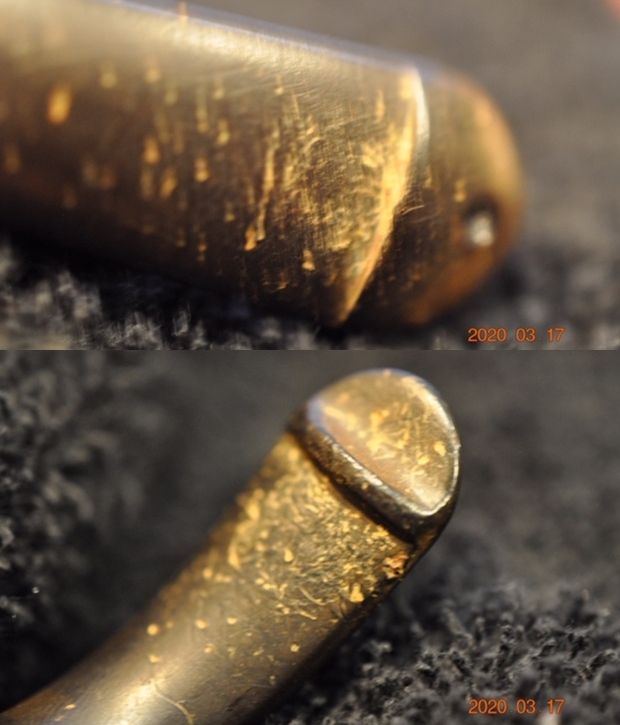
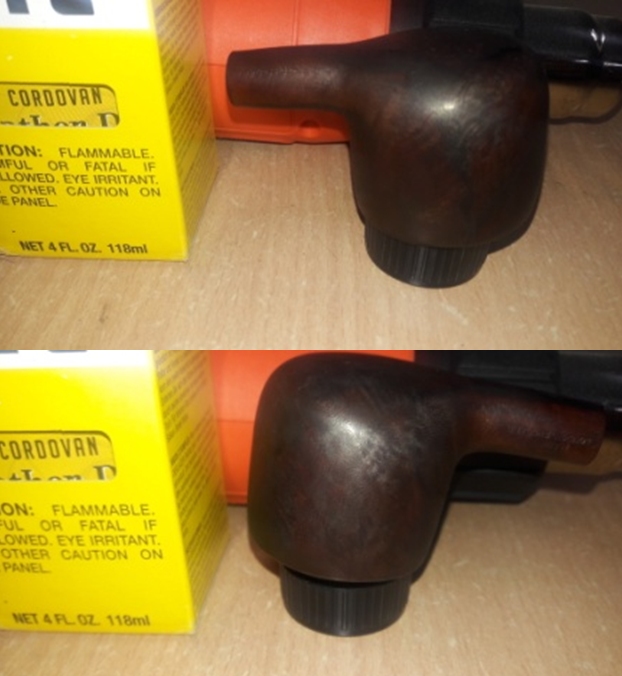
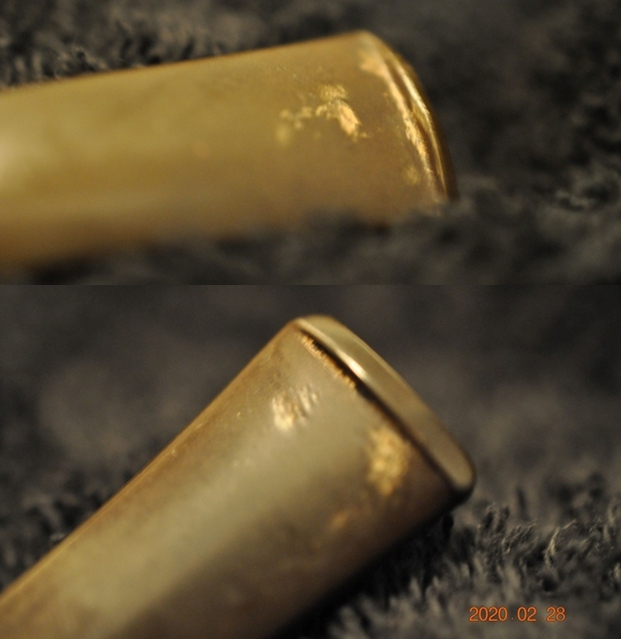
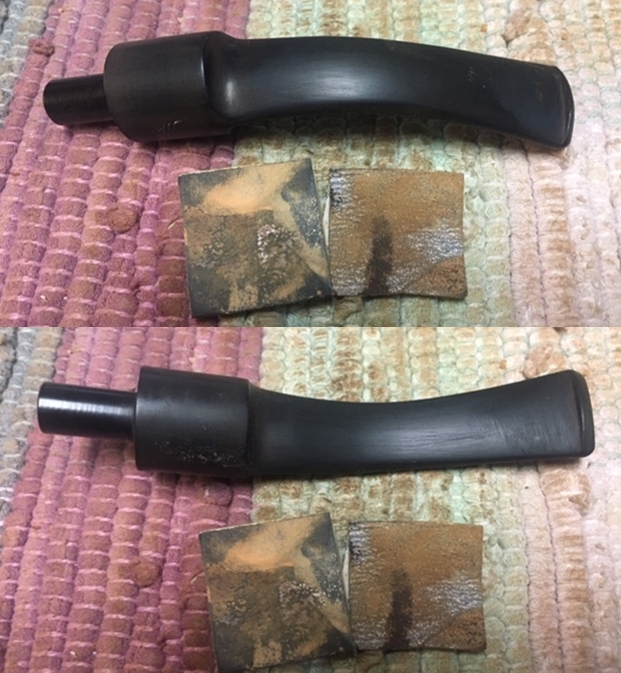
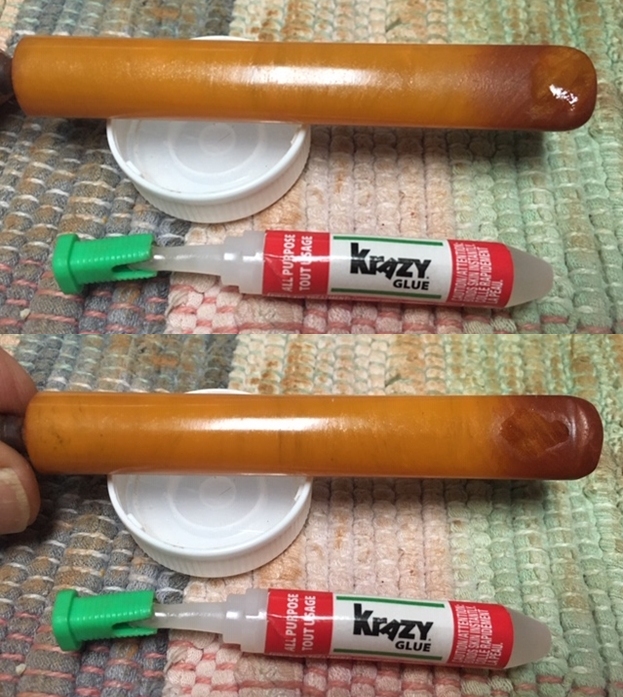
Switching my focus now to the stem, to expand the tooth compressions on the upper and lower bit, I first use the heating method.  Using a Bic lighter, I paint the bit with the flame thereby warming and expanding the rubber compound, vulcanite.  I take before and after pictures to show the comparison on the upper and lower. 
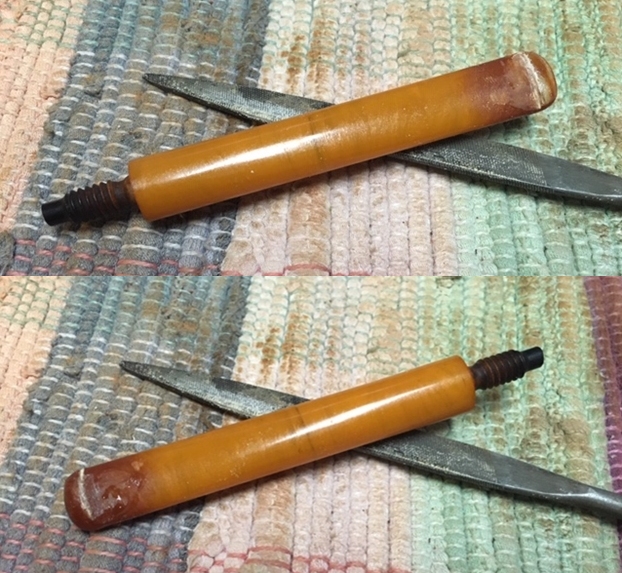
The heating method may have helped some, but not enough to avoid using Black CA glue to spot drop patches on the upper and lower bit.  After applying the CA glue, I put the stem aside for the patches to cure.With the stem on the side curing, I turn again to the stummel. The JB Weld patch has fully cured. To remove the excess epoxy and to smooth the chamber wall, I mount a sanding drum to the Dremel.  It does a quick and good job. I then sand and smooth the chamber patch using 240 grade paper wrapped around a Sharpie Pen.  The patch looks good conforming exactly to the hole and crevasse it filled. The rim has sustained a good bit of damage on the right inner edge.  My first thought was to top the stummel at this point to remove the damage.  After a second thought, this would remove a good bit of briar real estate from the rim.  Instead, I decide to rebuild the inner edge using briar dust putty then after the patch cures to top and sand the rim. I first remove all the residual carbon from the surface from the lighting damage that caused the problems.  I brush the area with the brass wired brush as well as sand it with 240 paper getting down to fresh briar.This picture shows the damage to the rim well and the area needing to be rebuilt.I mix briar dust with Extra Thick CA glue by gradually pulling briar dust into the puddle until it reaches the thickness of molasses.  Then the briar putty is applied with the toothpick to the inside of the lip to build up toward the rim and in toward the chamber.  I use an accelerator to quicken the curing process. 
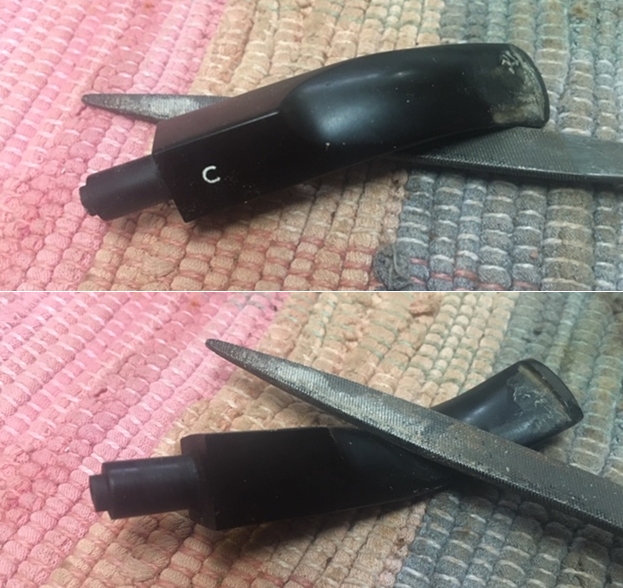
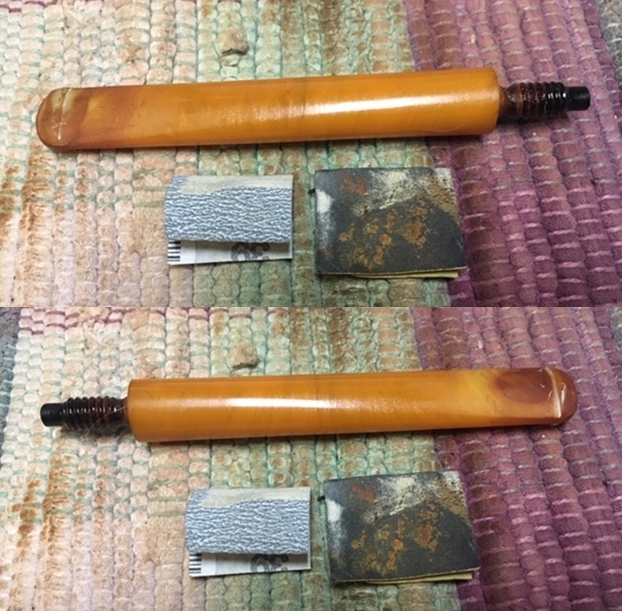
Allowing the rim patch to thoroughly cure, I turn back to the stem filing and sanding the black CA glue patches on the upper and lower bit.  I use the file to refresh and redefine the button.  The sanding is expanded to the entire stem to remove vestiges of oxidation.
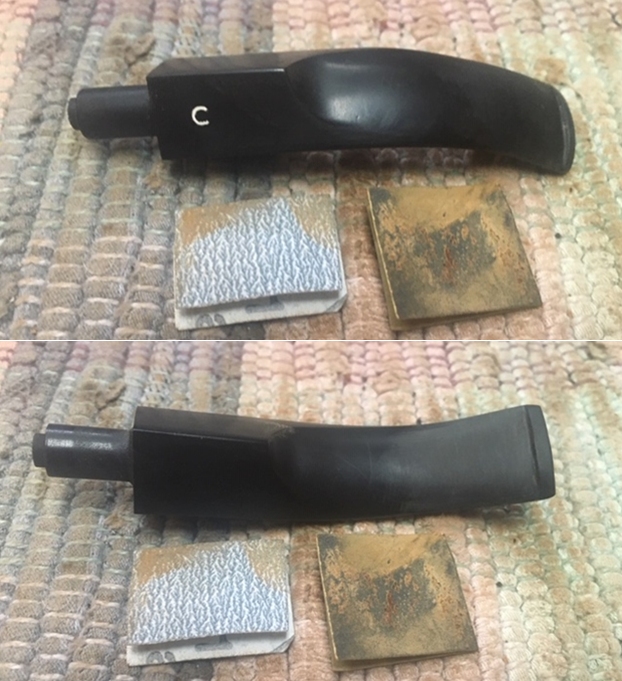
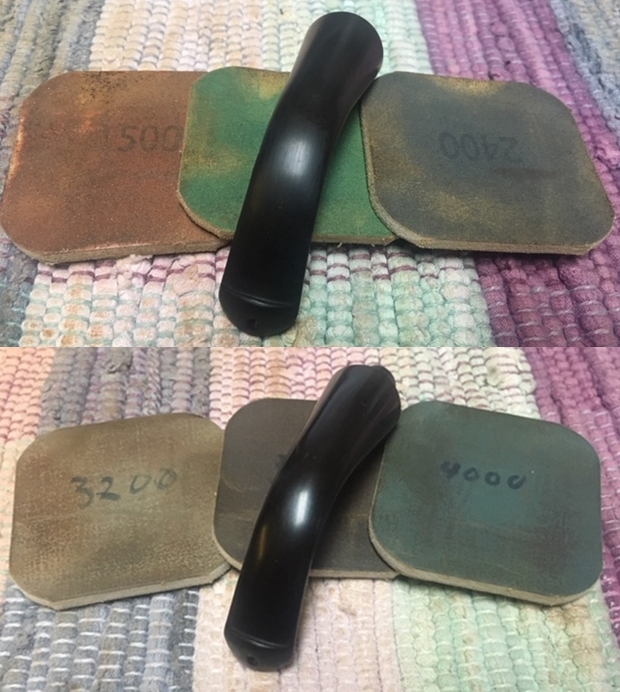
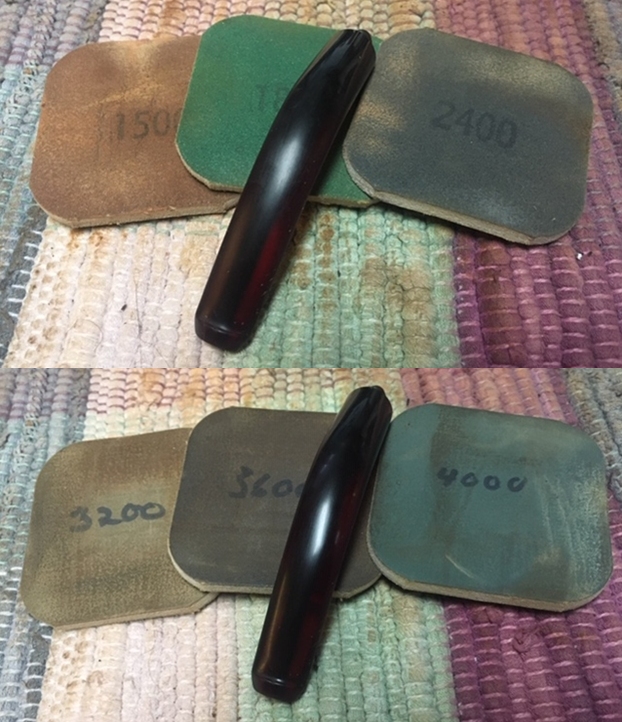
Following the 240 sanding paper, the stem is wet sanded with 600 grade paper followed by applying 000 grade steel wool.  The stem is shaping up nicely.The rim briar dust putty rebuild is fully cured and using the sanding drum mounted onto the Dremel, I begin removing the excess patch material on the internal chamber wall.  The goal is to restore a rounded chamber. 
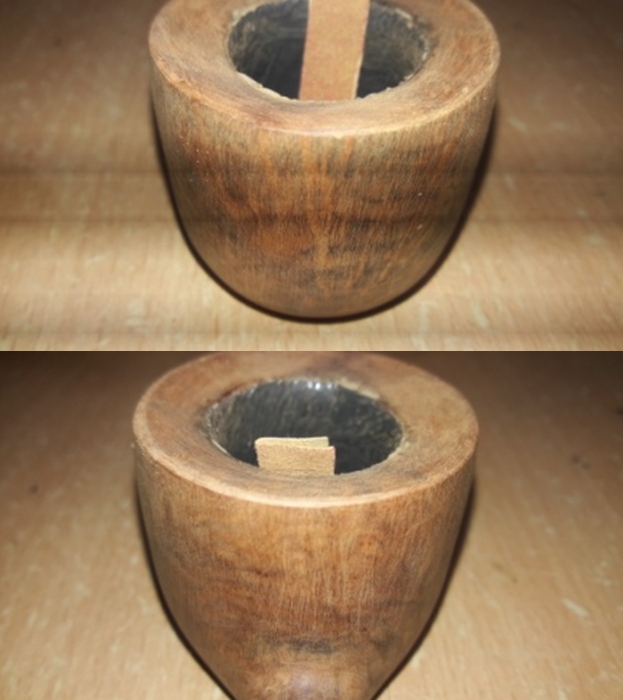
Next, the excess patch material is removed from the rim top.I also smooth out the external hole path in the sculpted area. With the excess patch material removed from the rim, I then take the stummel to the topping board.  I removed the excess first so that the topping will be more balanced and not get pushed off or out of balance because of the different level of surface. I start first with 240 sanding paper on the chopping board. After some rotations on the board, the ‘roundness’ or lack of, of the chamber becomes more distinct. I return to the sanding drum on the Dremel to continue to round the chamber wall and rim edge.  This goes slowly to make sure not to take too much off!  I also use 240 sanding paper rolled to clean the outer and inner edges of the rim.   It’s looking good.After changing the topping board to 600 grade paper, the stummel is rotated several more times.  I like what I see.  The rim rebuild patch looks good and the rim’s balance has been restored without great loss of briar off the top of the bowl.Before continuing with sanding the stummel, I attach a burr to the stummel to shape the sculpting.  I try to match some swings and swirls but dipping in and out with the burr is pretty random.  At the end, I think it looks good.I plan to apply a light brown dye to the stummel.  To clean the surface and to help to lighten the dark spots caused by heating, especially near the rim, I apply sanding sponges. I usually use 3 sanding sponges – coarse, medium and light to finish.  I add a coarser sponge to this regimen with a total of 4 sanding cycles. 
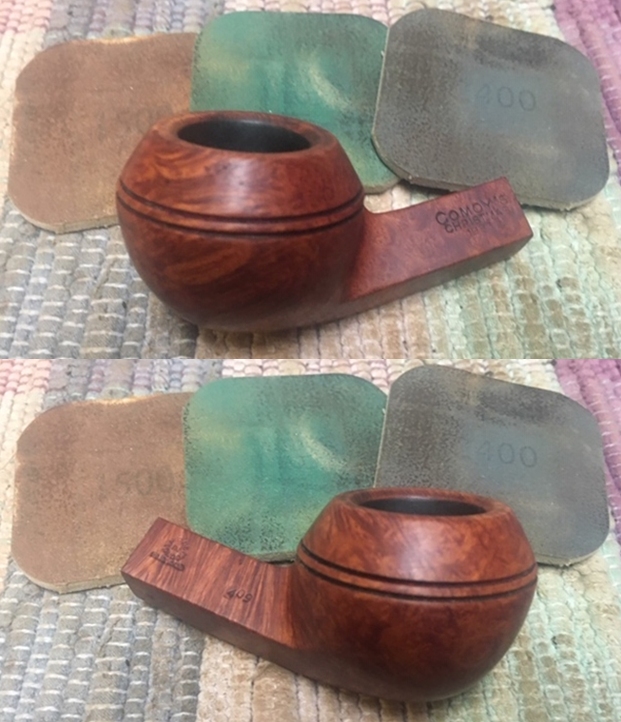
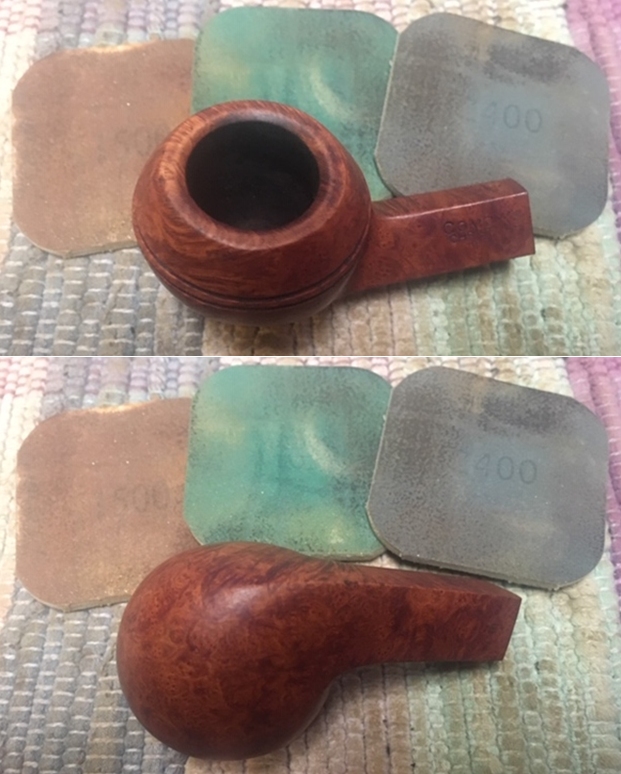
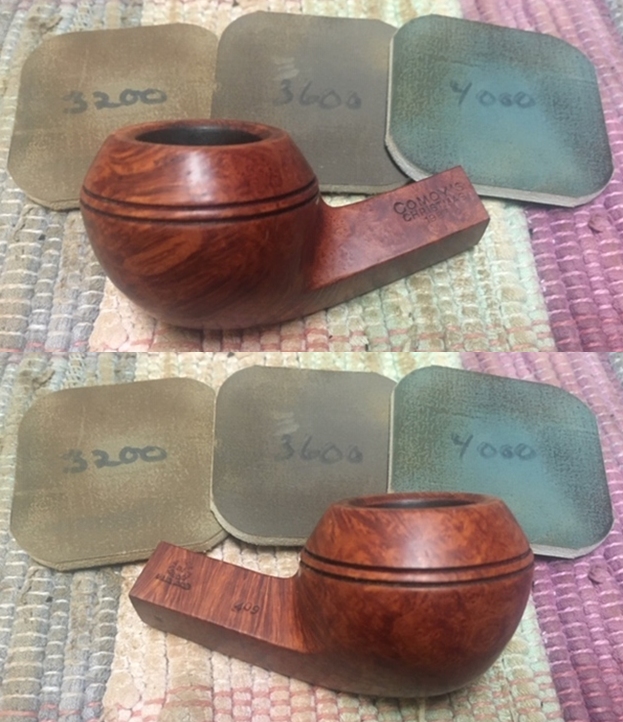
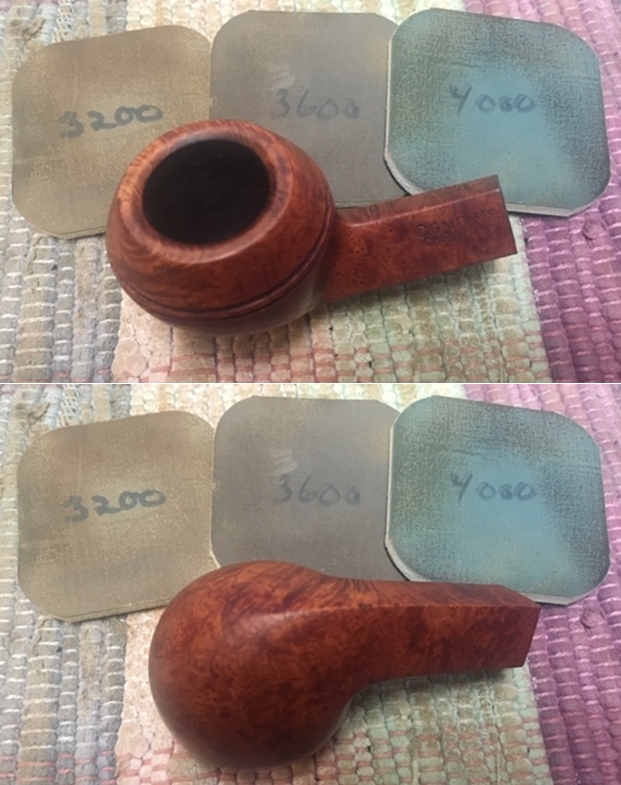
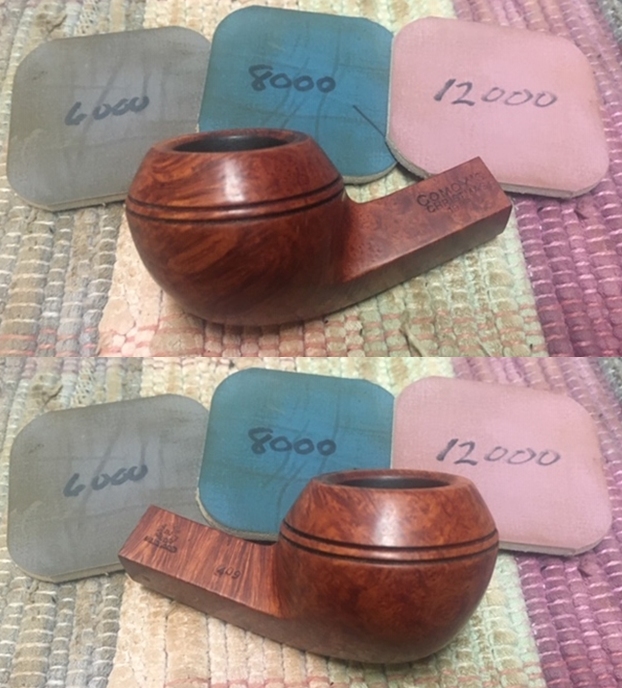
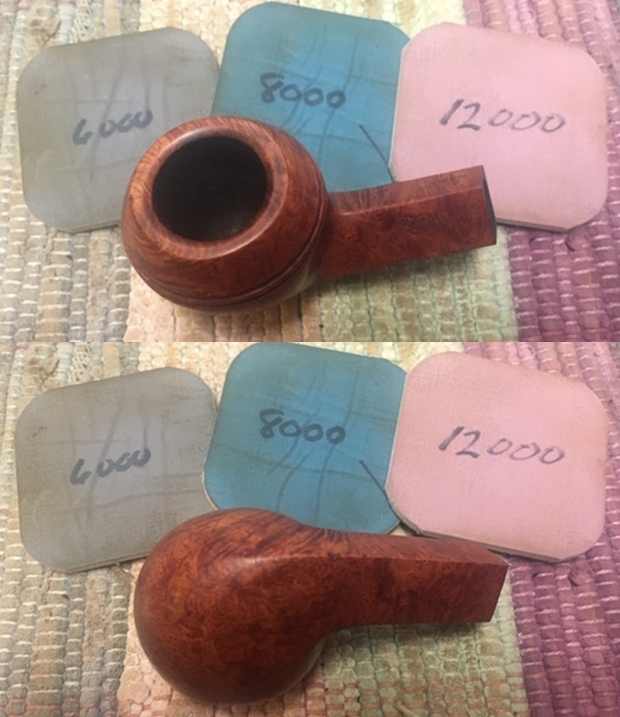
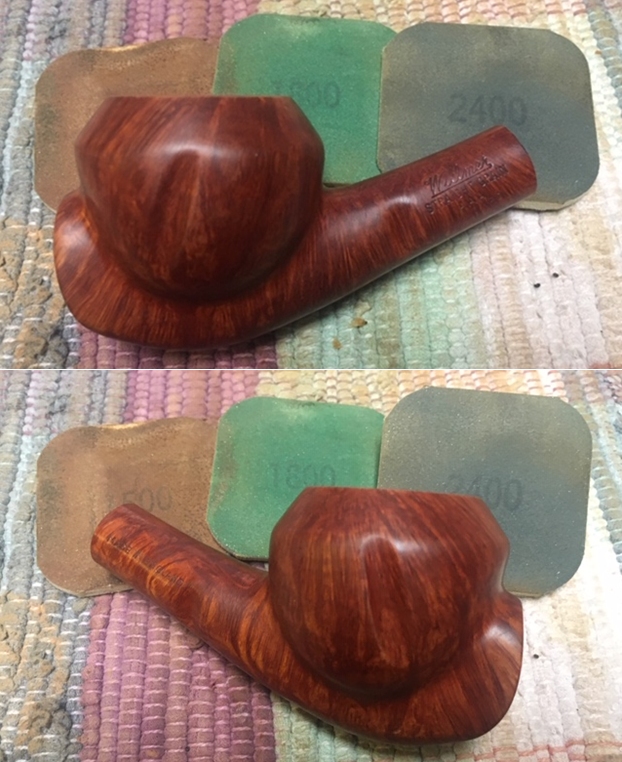
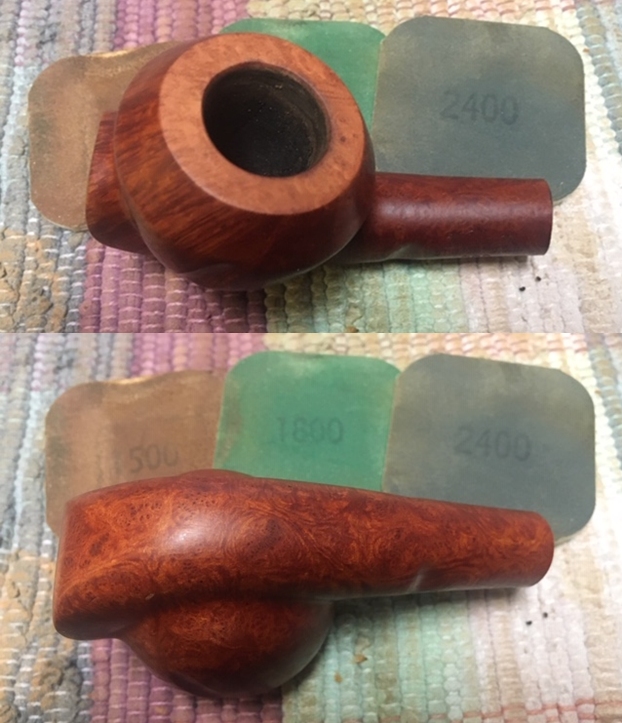
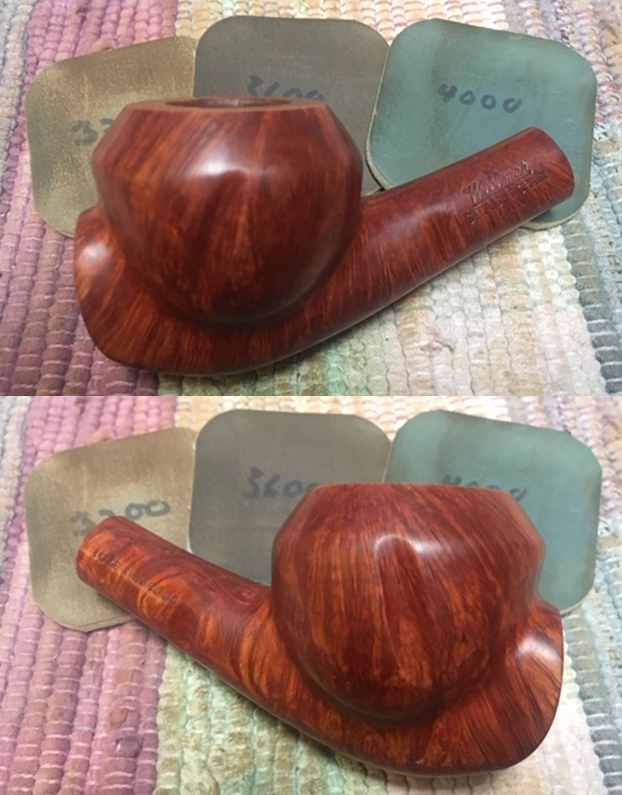
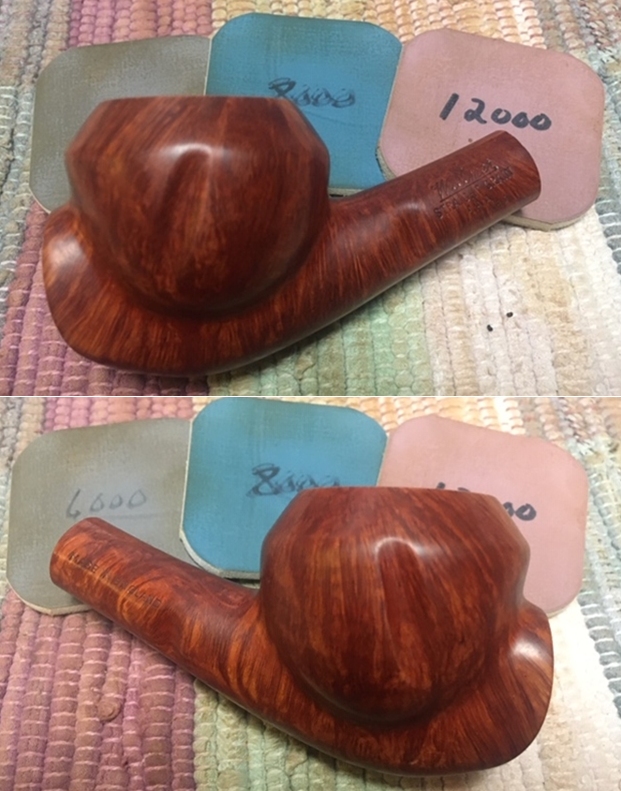
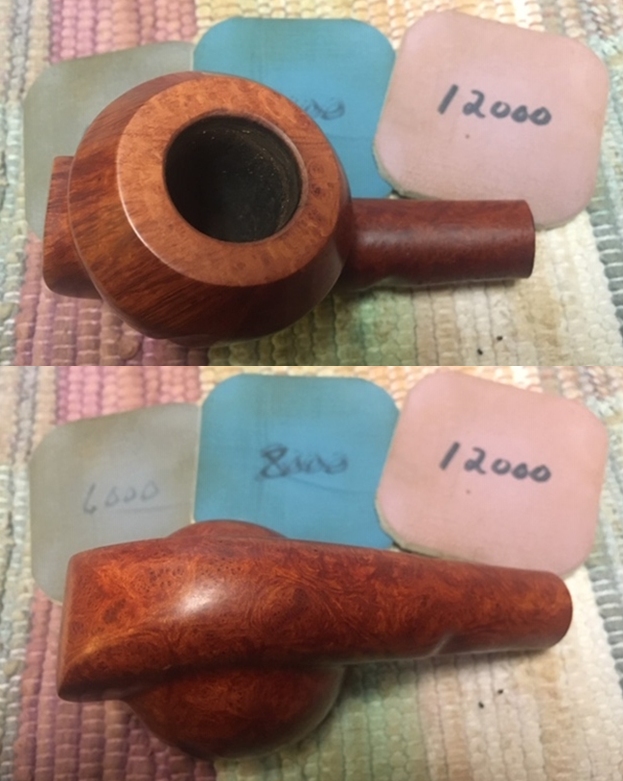
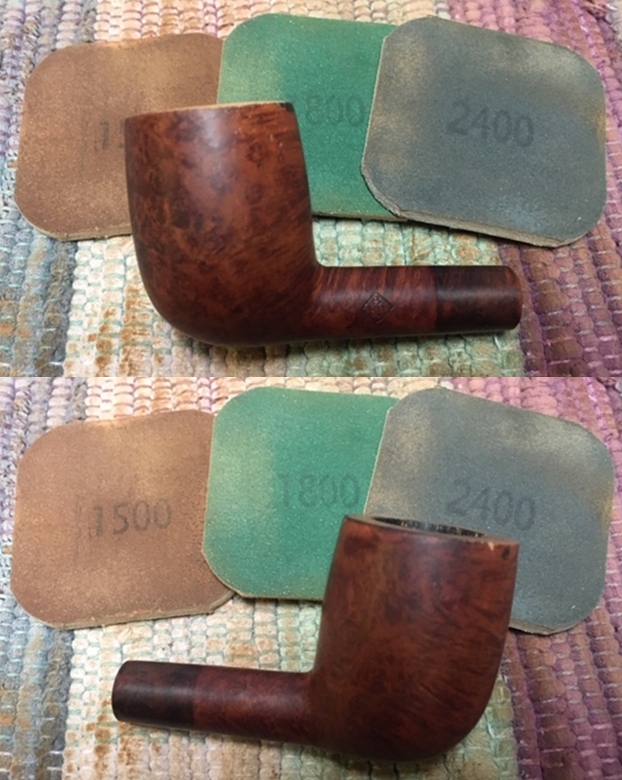
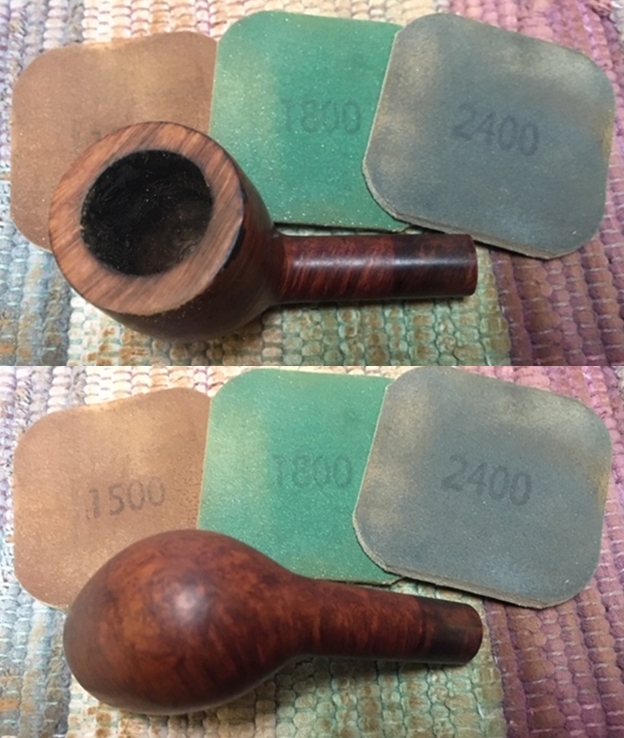
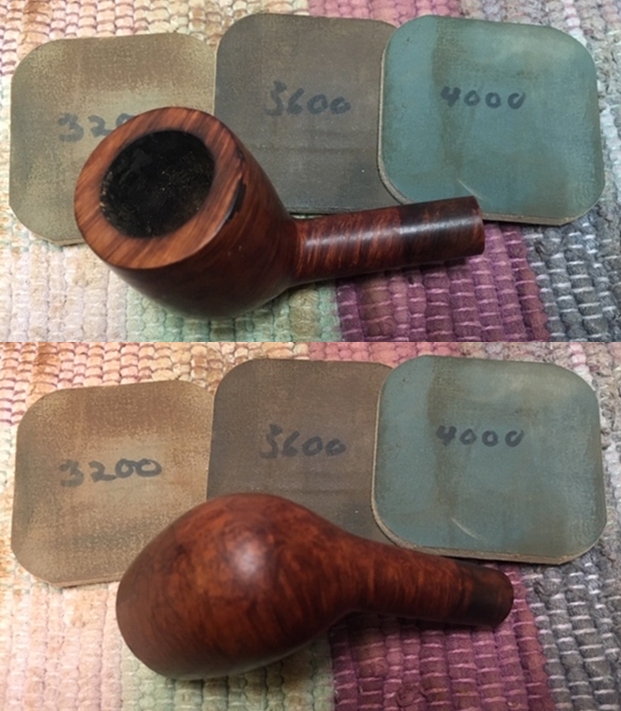
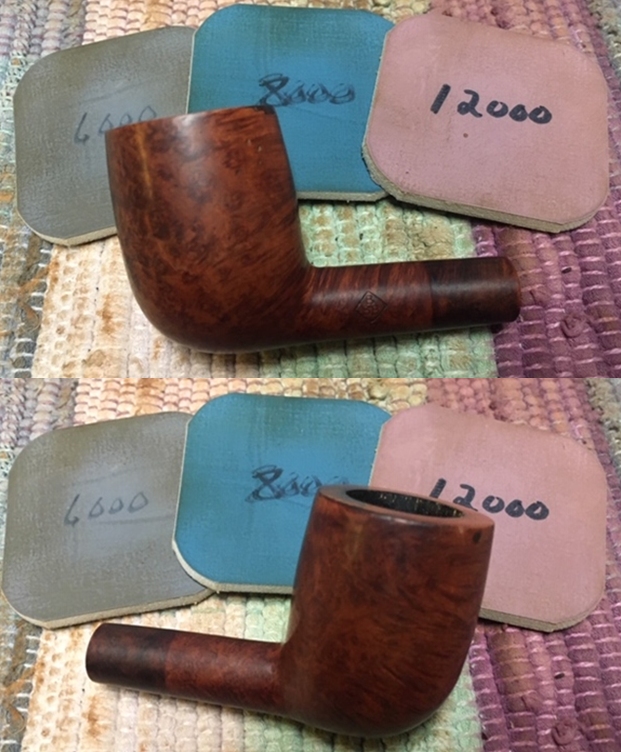
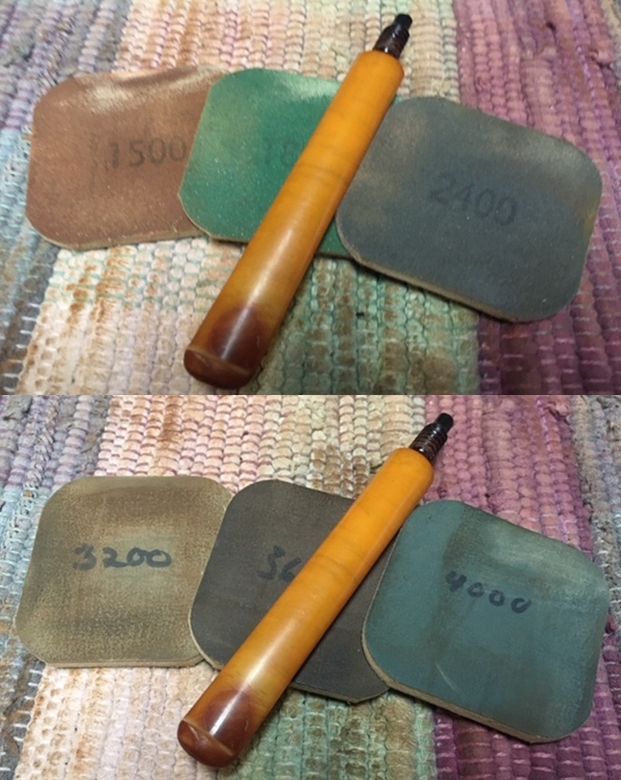
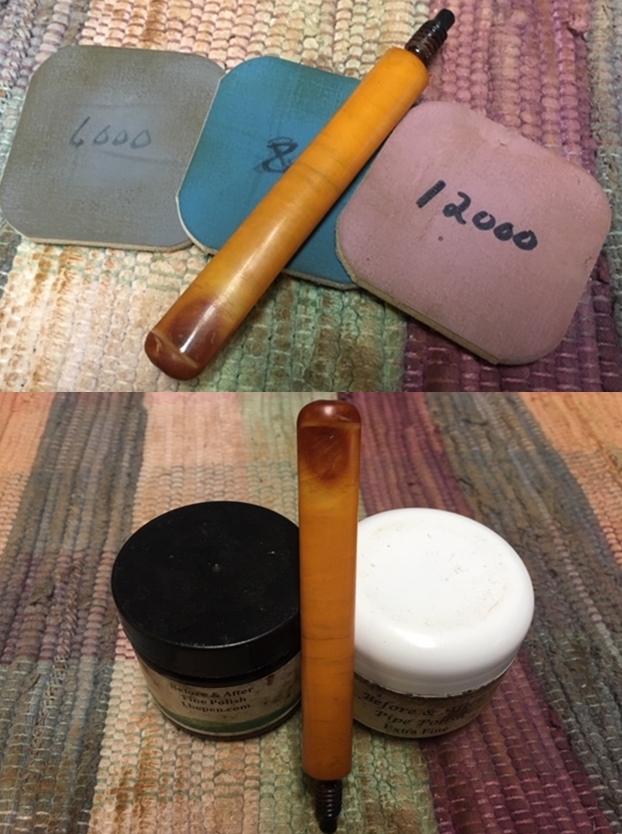
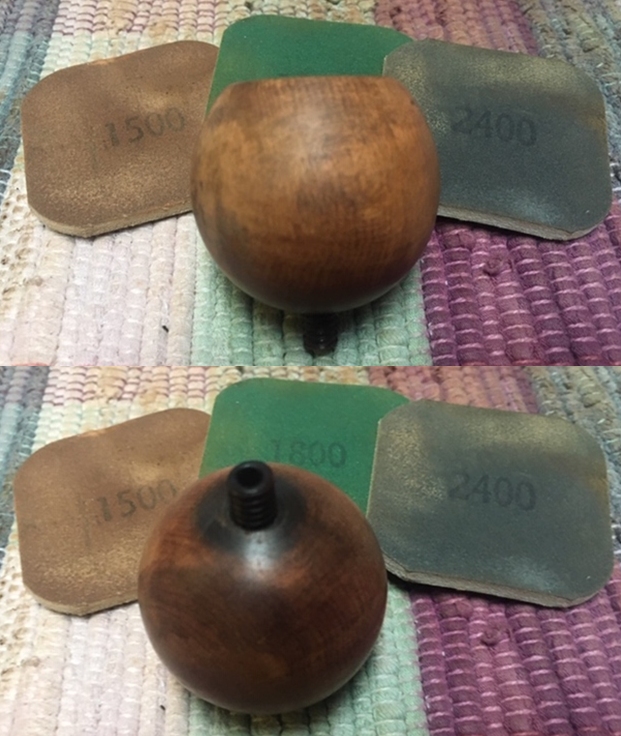
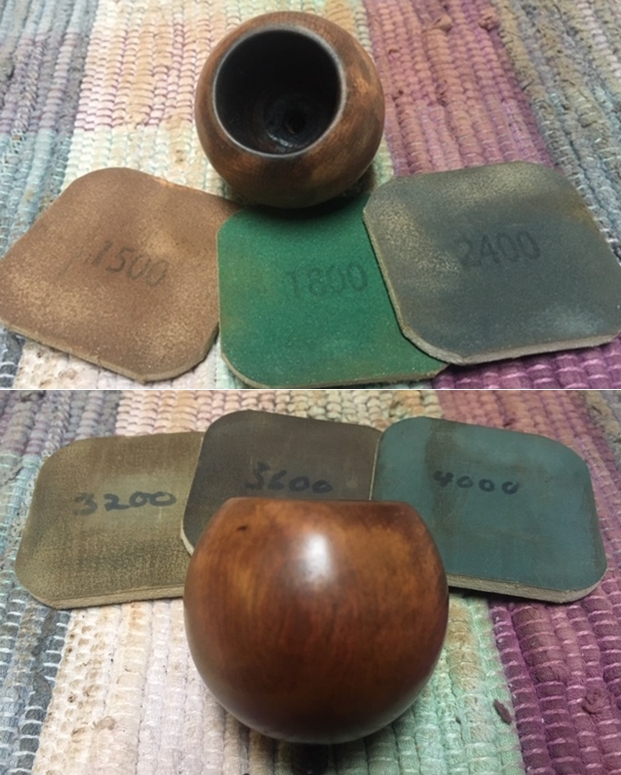
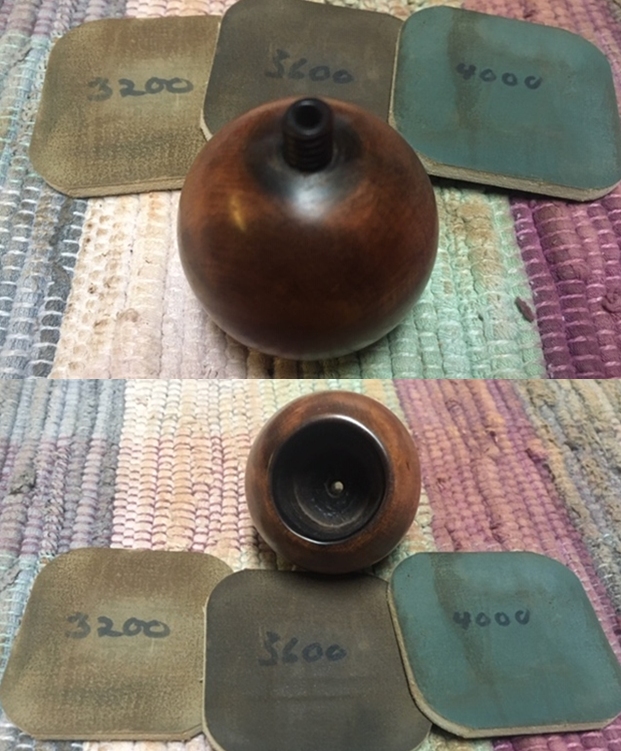
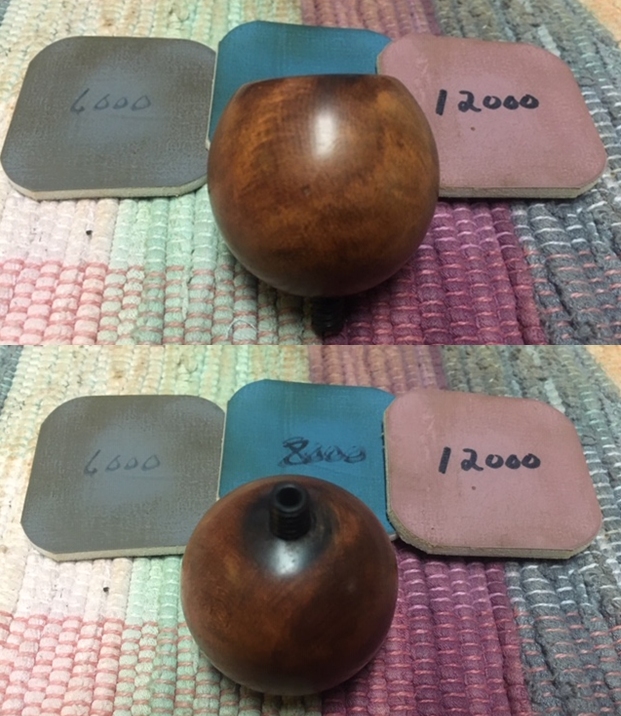
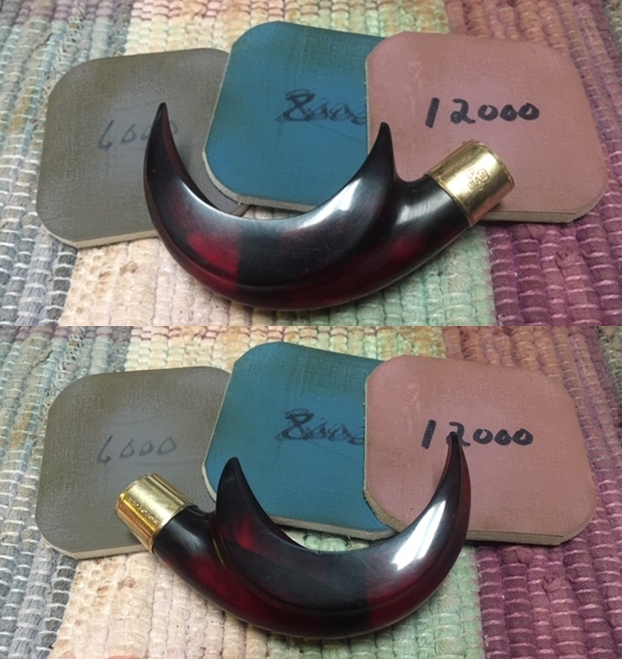
The grain has started to emerge.  I continue by using the full regimen of micromesh pads.  Starting with pads 1500 to 2400 I wet sand.  Following this, dry sanding with pads 3200 to 4000 and 6000 to 12000 bring out the latent grain in the briar.  I’m liking the appearance of several bird’s eye swirls. The grain is lively and expressive. 
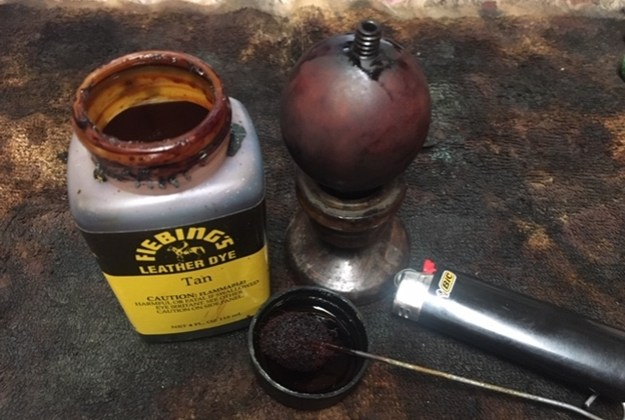
The stummel still shows darkened areas from charring and heating. This is especially on the rim and near the top of the bowl.  I decided early on with the repairs and the briar blemishes, that I would apply Fiebing’s Light Brown Leather Dye to the briar surface.  I assemble the dying module on my work desk.
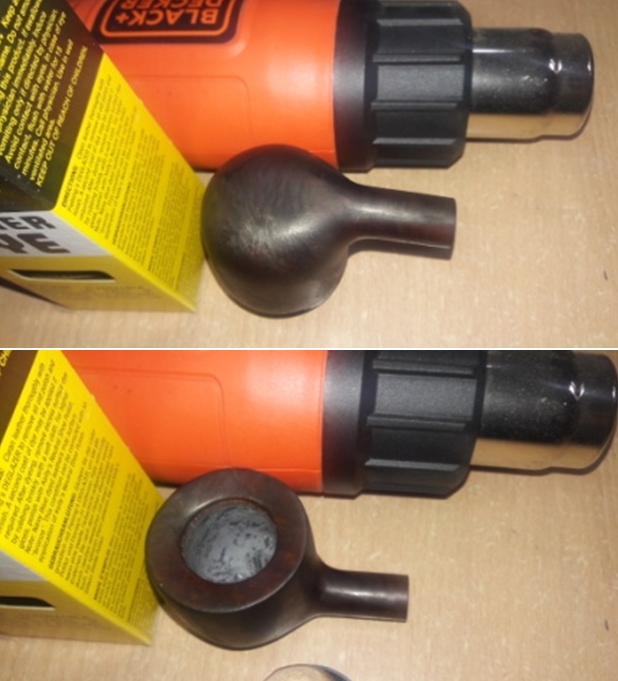
I begin by heating the stummel with a hot air gun.  The gun heats and expands the briar helping it to be more receptive to the dye.  I then paint the stummel with the aniline dye using a folded pipe cleaner and with each section, I ‘flame it’ by lighting it with the lit candle with the result that the alcohol in the dye combusts leaving behind the dye pigment.I thoroughly apply the dye and fire it making sure the entire stummel has been covered.  The stummel is then set aside for several hours to ‘rest’.  This allows the new dye to be absorbed into the briar grain.
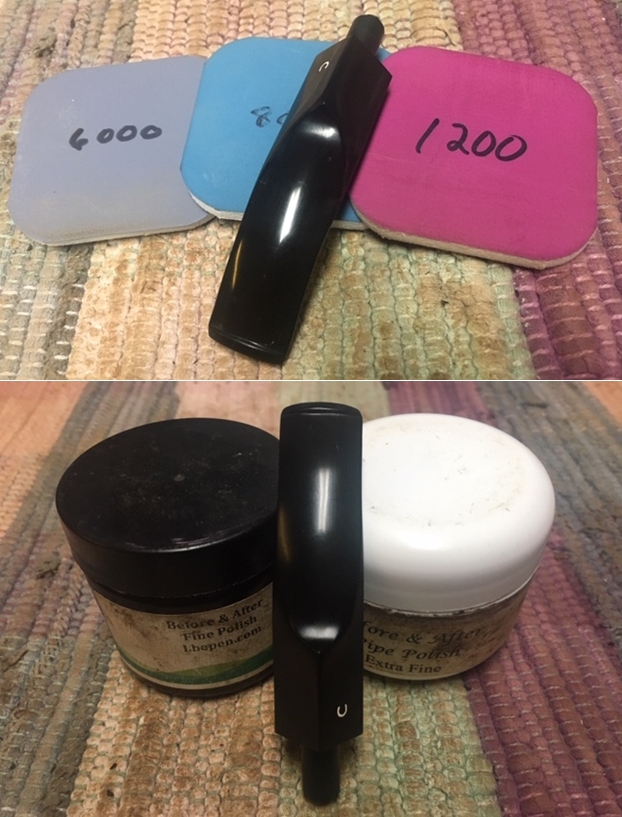
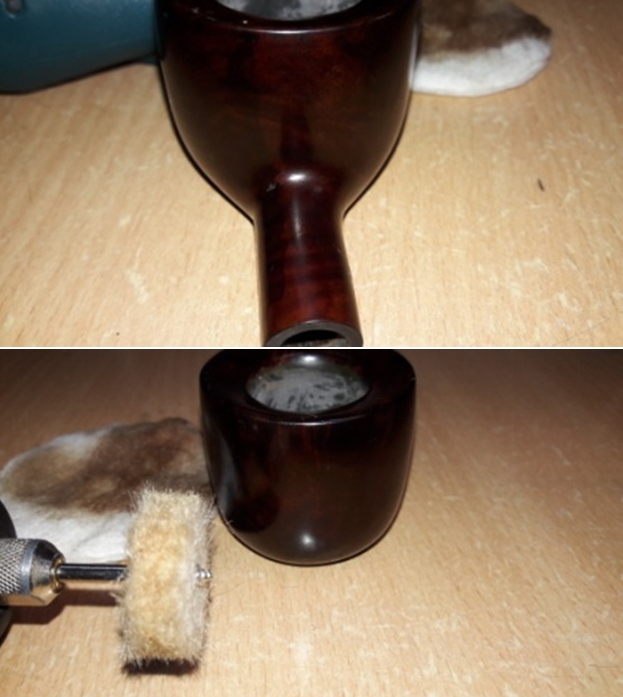
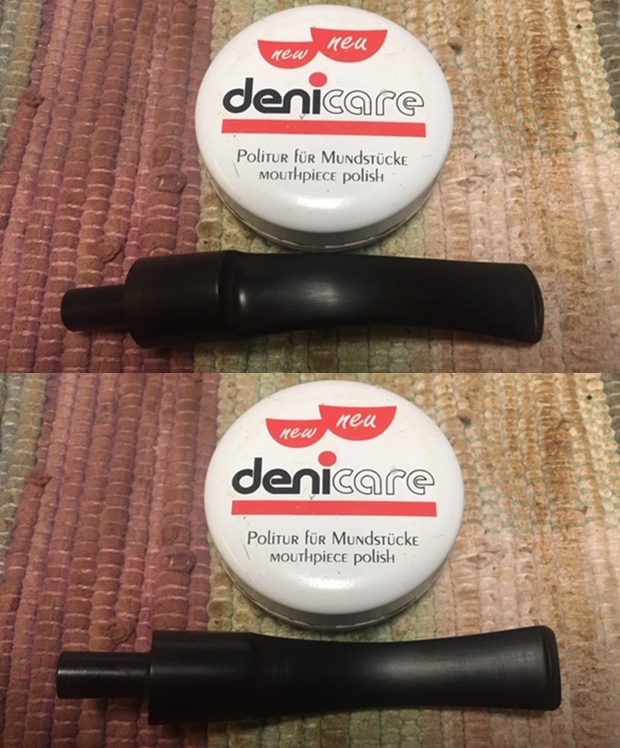
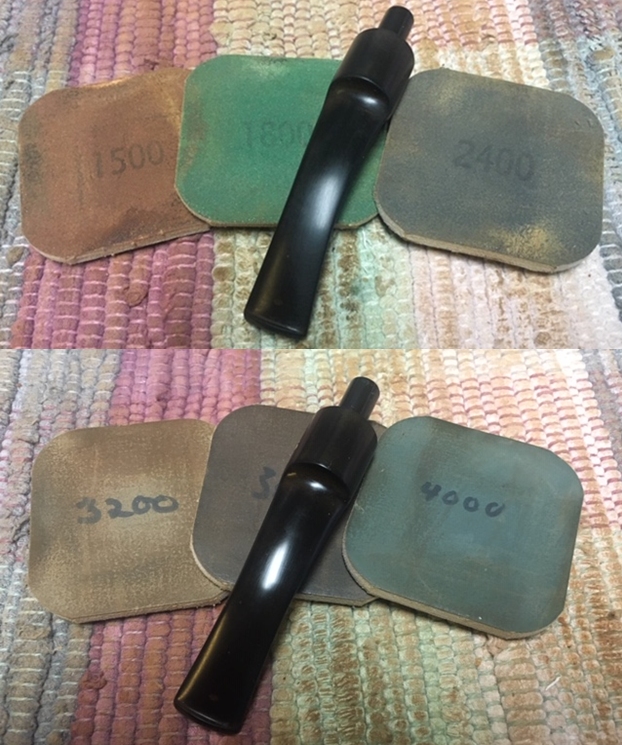
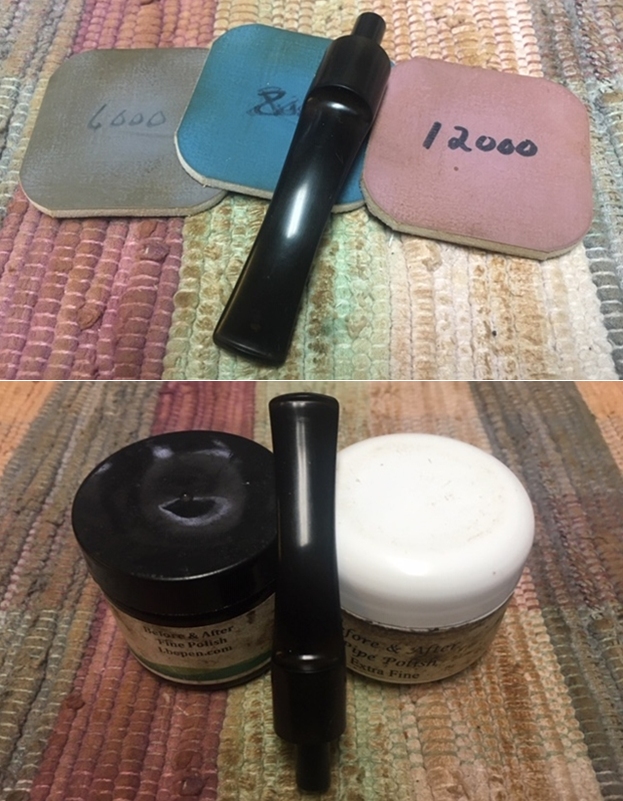
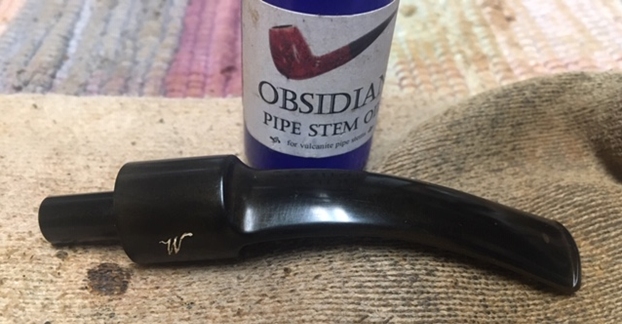
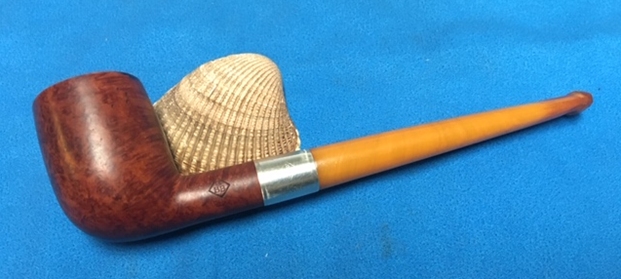
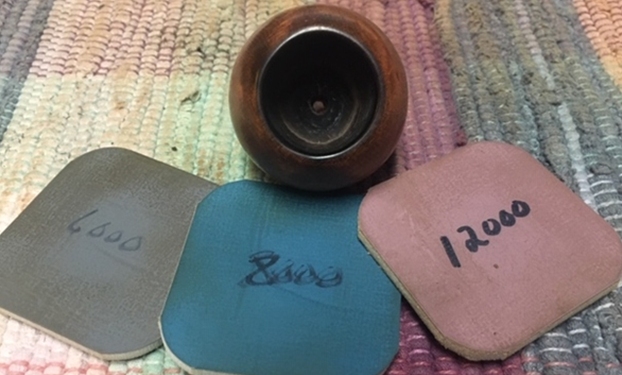
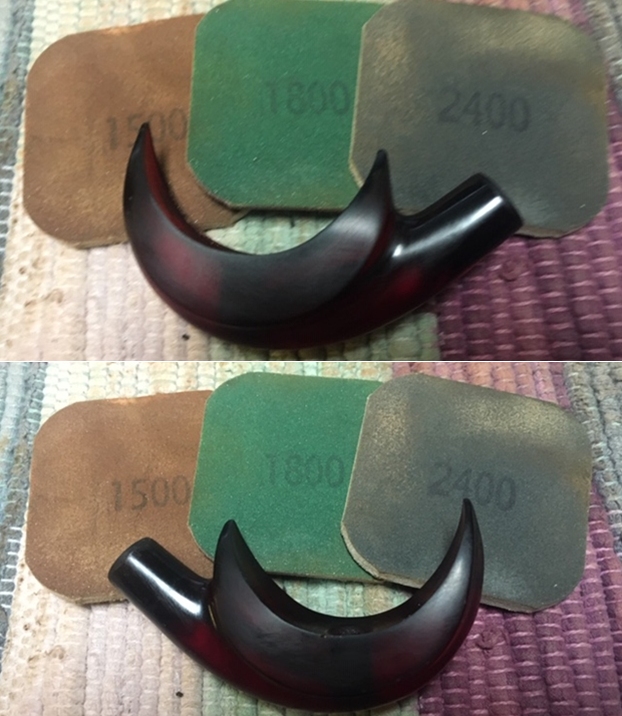
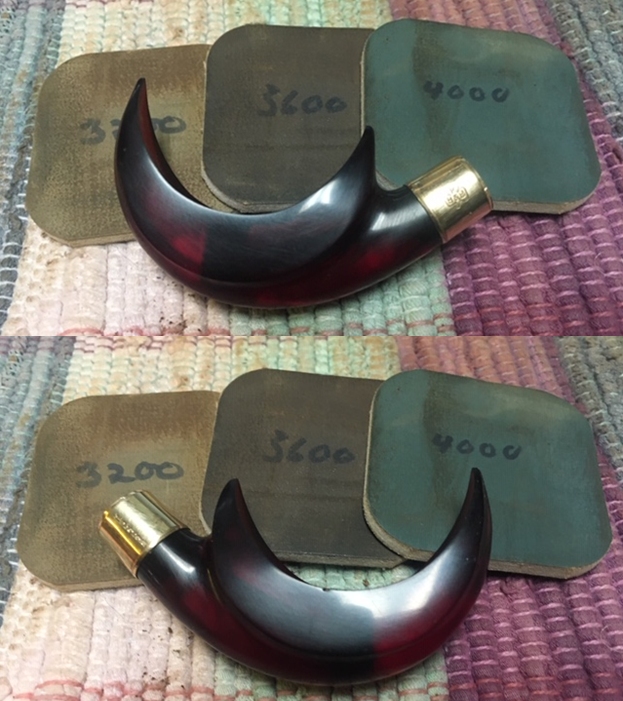
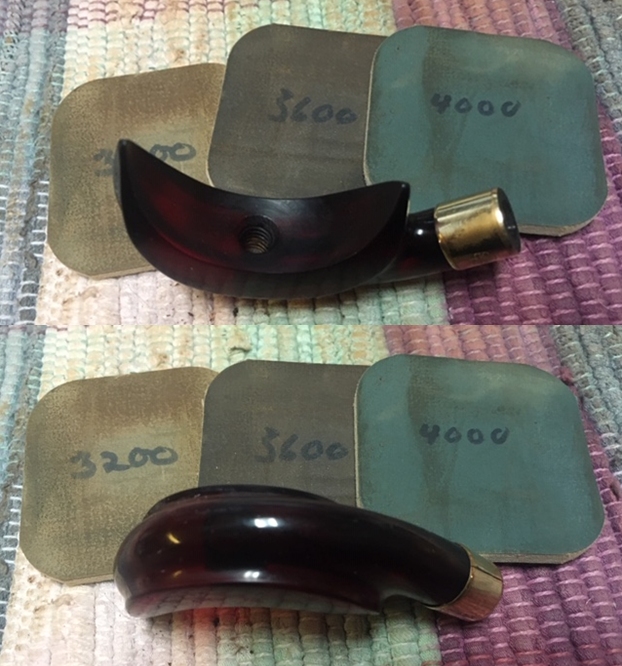
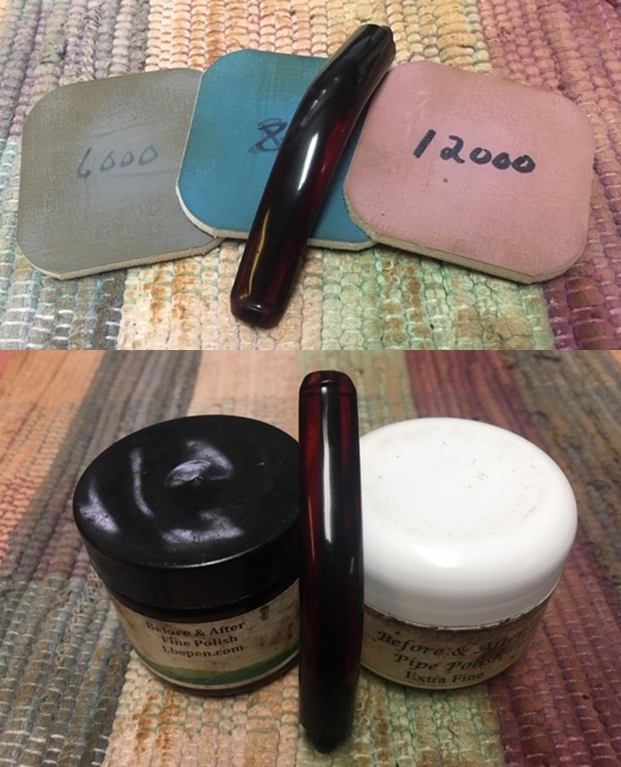
With the stummel resting, I turn again to the stem.  I apply the full regiment of micromesh pads by wet sanding with pads 1500 to 2400 and dry sanding with pads 3200 to 4000 and 6000 to 12000.  Between each set of 3 pads, Obsidian Oil is applied to help condition the stem and to protect from oxidation. 
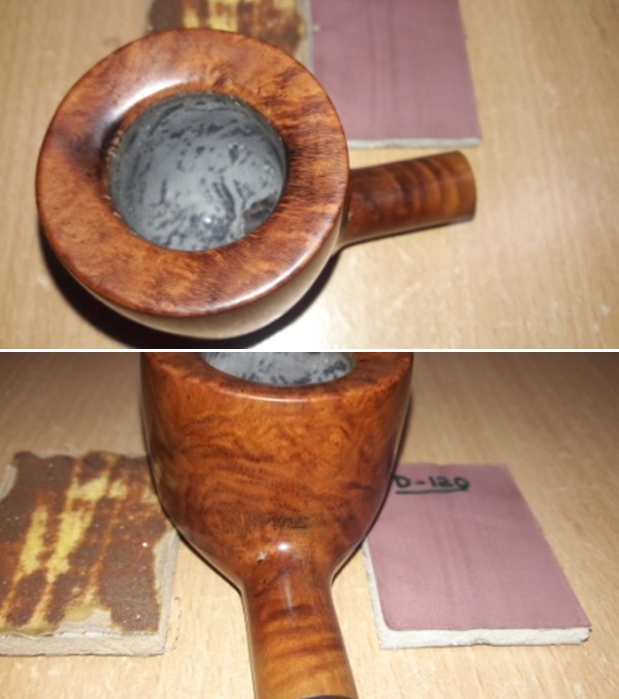
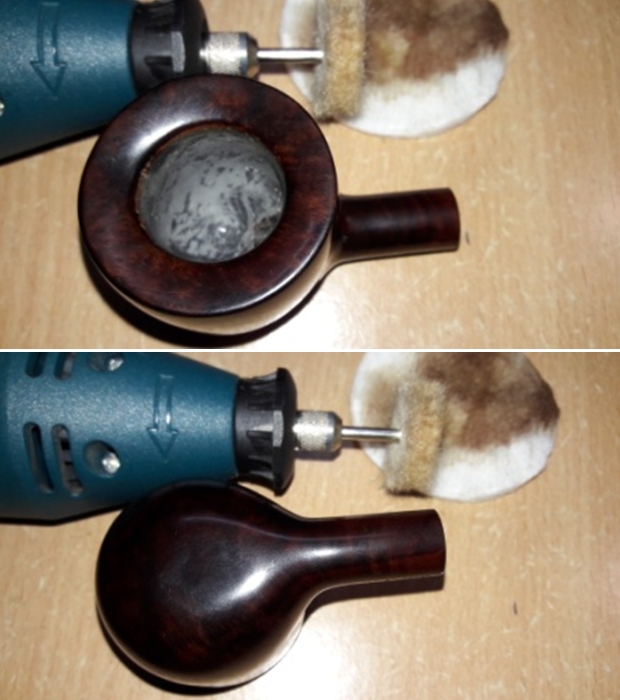
The newly dyed stummel has been resting for several hours and it’s time to ‘unwrap’ the fire crusted shell.  I use a felt buffing wheel mounted on the Dremel at the lowest speed.  Using the felt wheel Tripoli compound is applied to the stummel surface.Next, I wipe the stummel with a cotton pad wetted with alcohol not so much to lighten but to remove excess dye ‘clumped up’ that was missed through the buffing process.Next, I reunite stem and stummel and apply (stem attachment not shown!) and apply Blue Diamond compound.  With a cotton buffing wheel attached to the Dremel, the speed is set at approximately 40% full power and the compound is applied to pipe.  After applying the compound, a felt cloth is used to wipe/buff the pipe to remove any compound dust in preparation for adding wax.
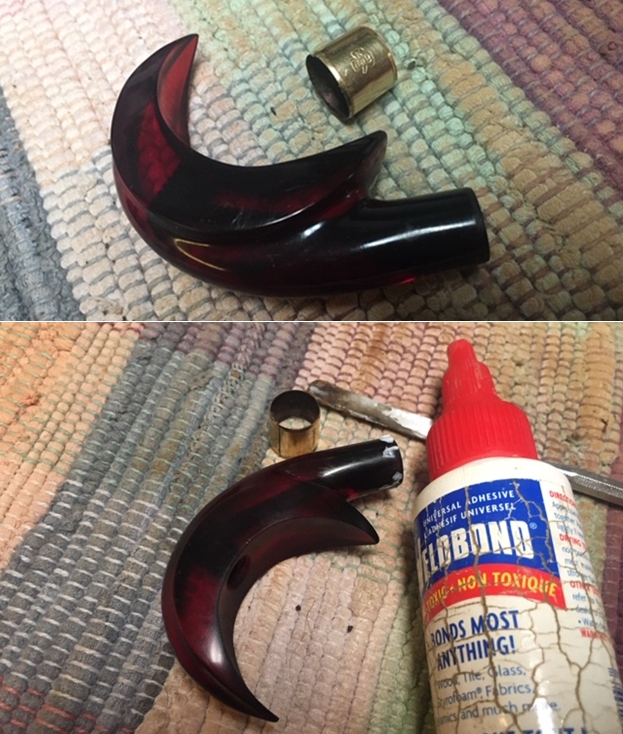
I had observed earlier that the stem was loose.  There is too much play with the mortise fitting.  To remedy this, I use the smooth end of a drill bit, one-step larger than the airway diameter.  I then heat the mortise carefully with a Bic lighter to warm the vulcanite making it more supple.  As the mortise heats, I gently insert the larger drill bit into the airway expanding the diameter of the tenon as I go. The procedure works well.  The mortise-tenon fit is snugger as it should be.Next, just to help guard against dye leeching when the pipe is first put into service, I reheat the stummel and wipe it well with a cotton cloth.  This emulates the heating when the pipe is first put into service.  Sometimes, newly dyed stummels will leech the dye when they are first used coloring the new steward’s fingers – in this case, Katie’s father!  I don’t want this to happen!With the repair having been done to the upper chamber with the filling of the hole with JB Weld, a protective coating of natural Bulgarian yogurt and activated charcoal will help initiate a layer for a carbon cake to develop.  The normal healthy cake width for a chamber is the width of a US dime.  Not much, but this helps to guard the briar in the fire chamber.  I add the charcoal to a small amount of natural yogurt.  Sour cream can also be used.I add charcoal until the mud mixture will not drip off the pipe nail but remains firm.After putting a pipe cleaner in the airway to guard the draft hole from being obstructed, I then trowel the mud into the chamber and cover the chamber wall thoroughly.  The hour is late, so I put the stummel aside for the mud to dry through the night. 
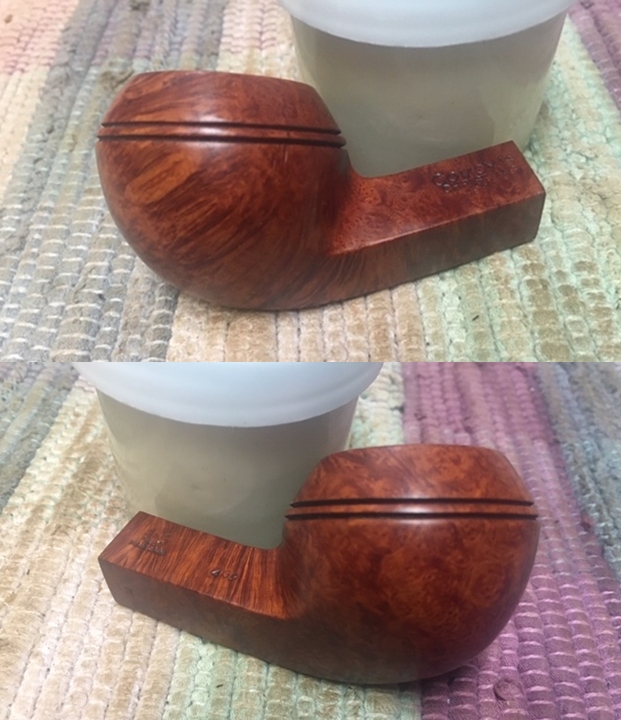
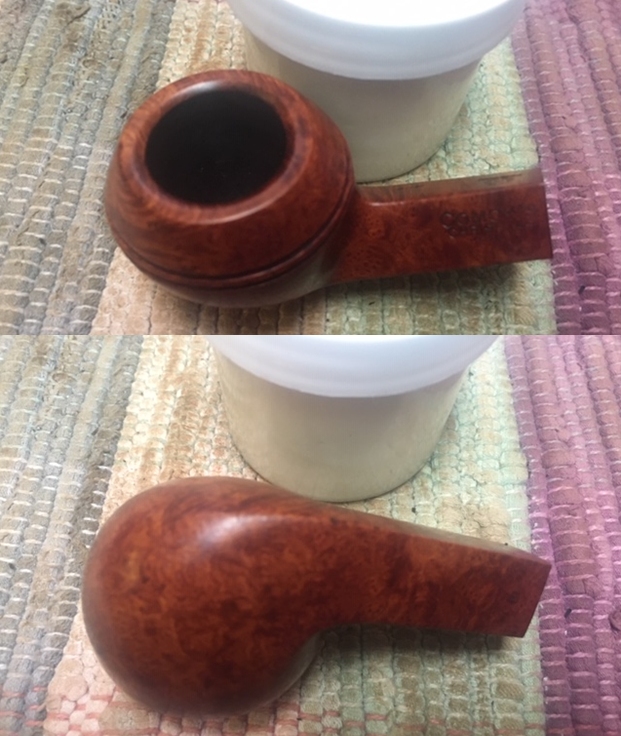
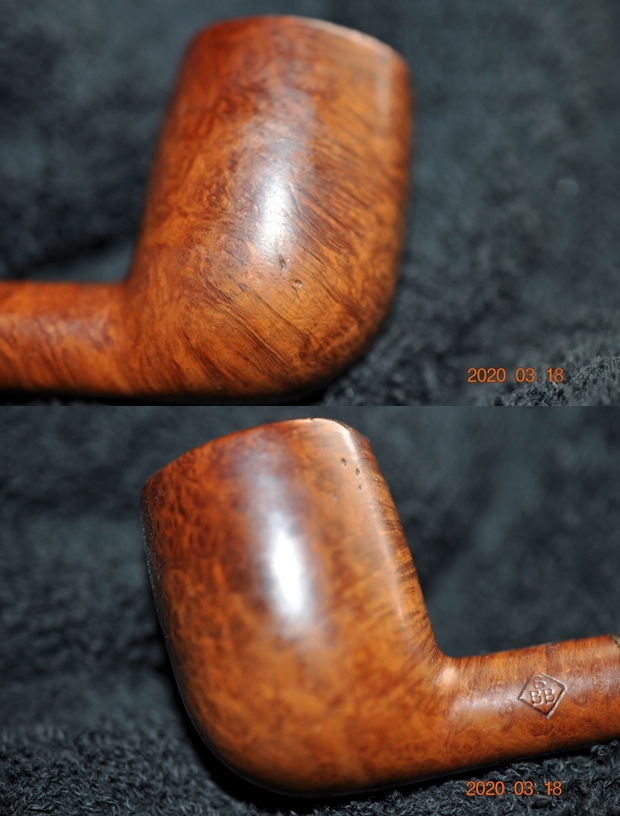
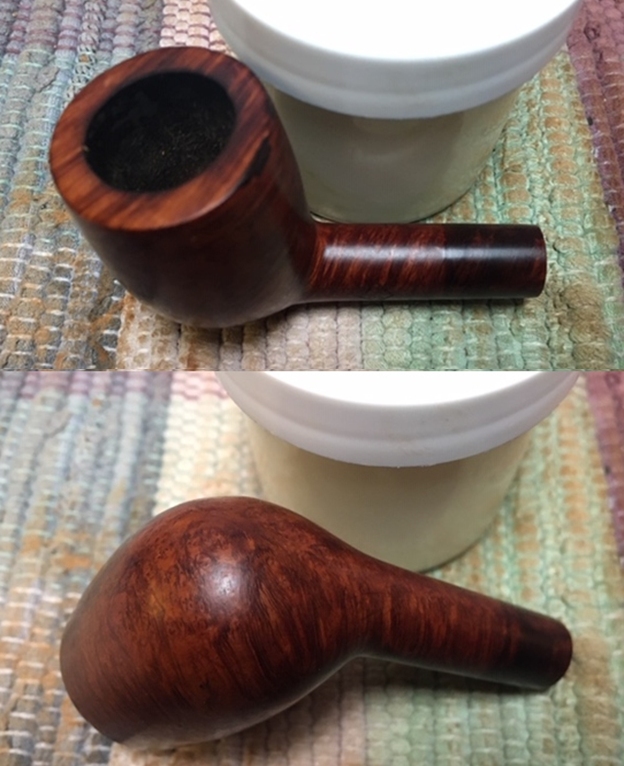
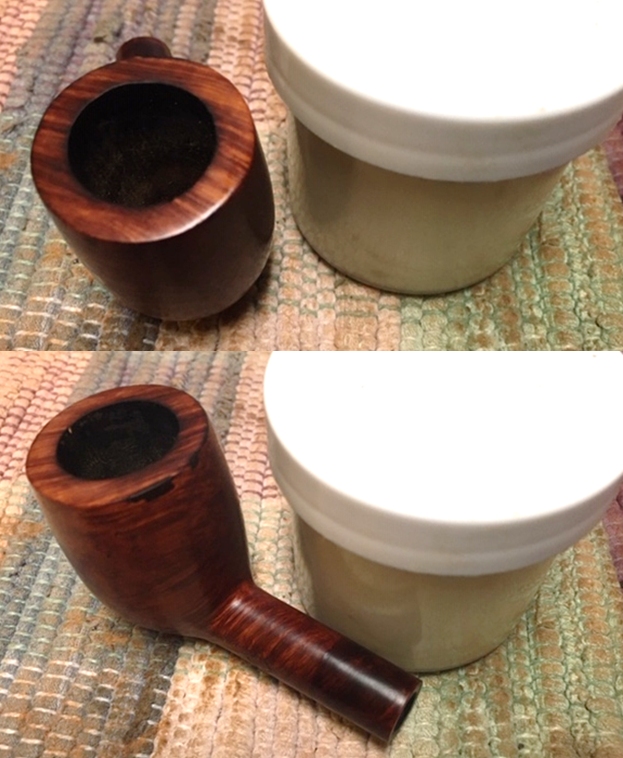
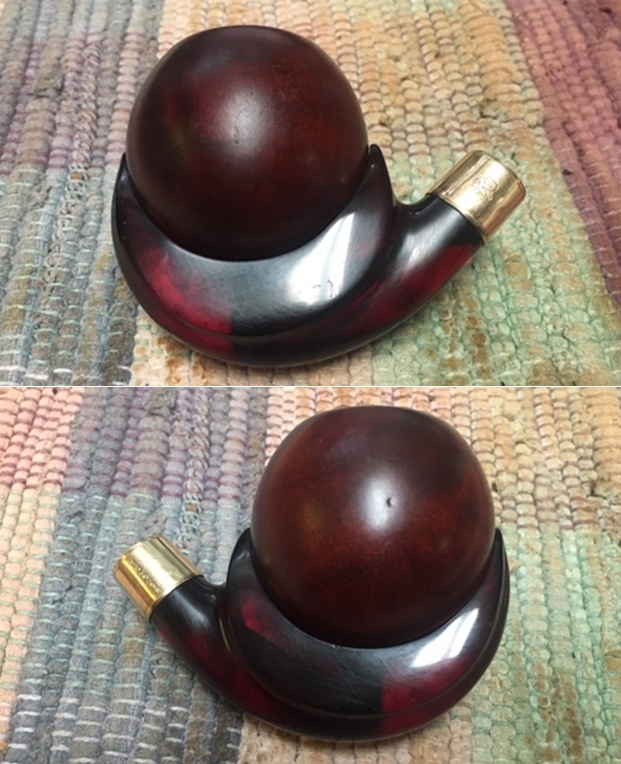
The next day, after rejoining stem and stummel, carnauba wax is applied to the entire pipe.  Another cotton cloth buffing wheel is mounted on the Dremel for this purpose and the speed is maintained at 40% full power.  After the application of a few coats of wax, the pipe is given a rigorous hand buffing with a microfiber cloth to remove any excess wax and to raise the shine.
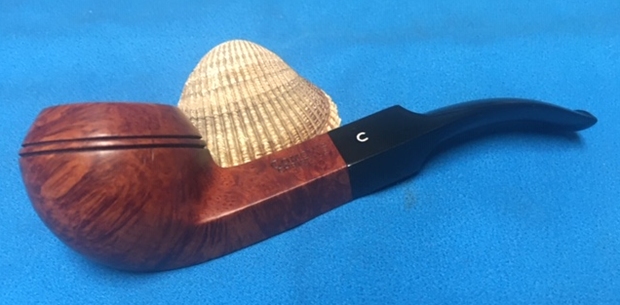
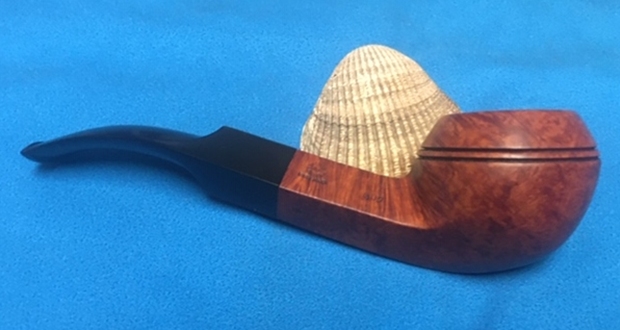
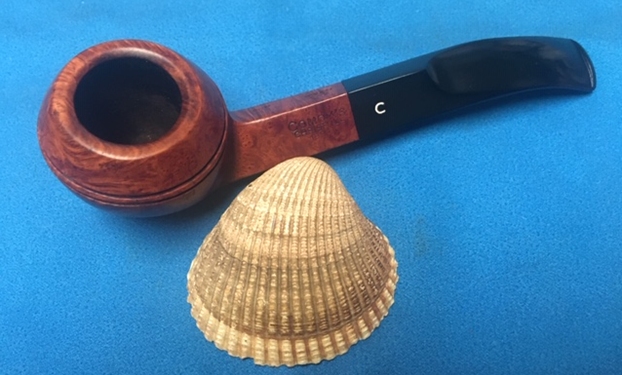
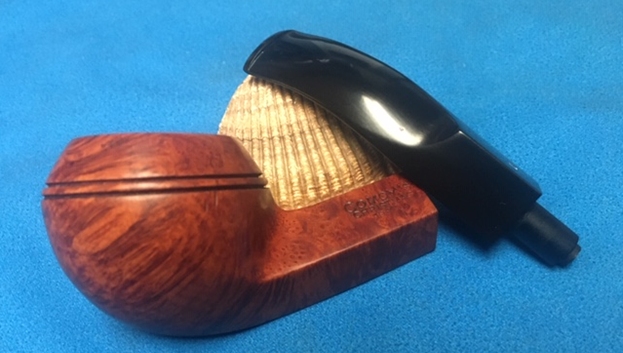
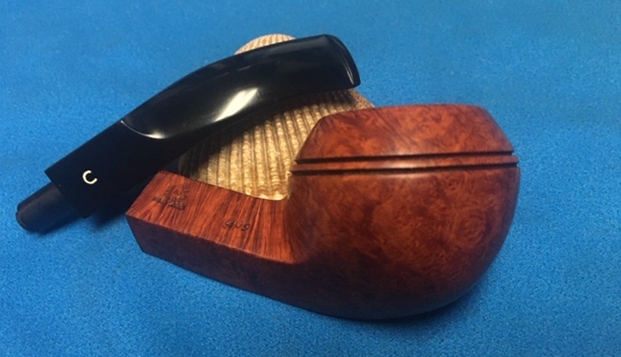
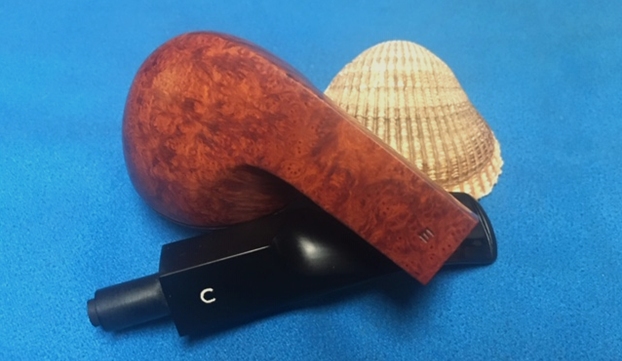
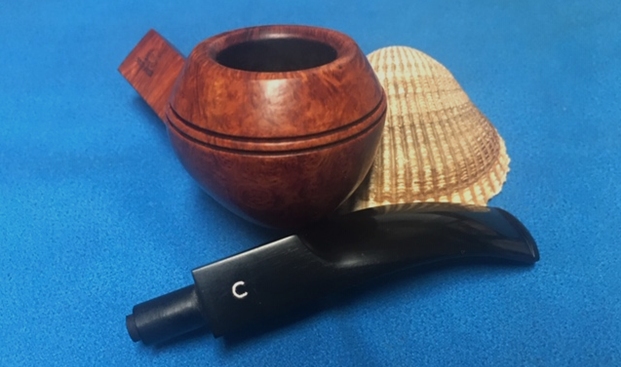
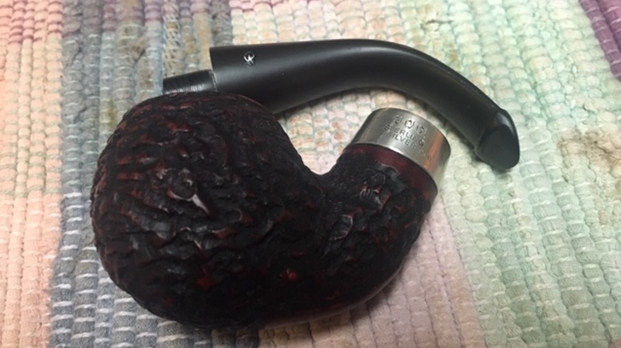
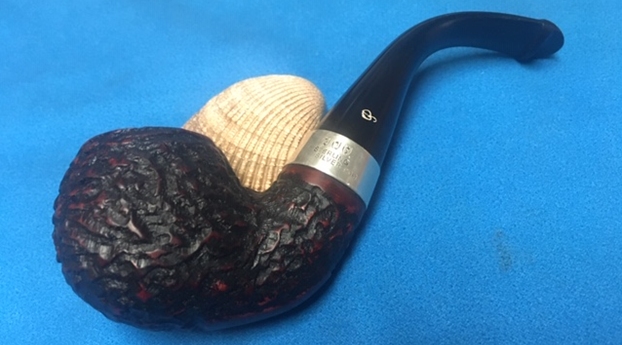
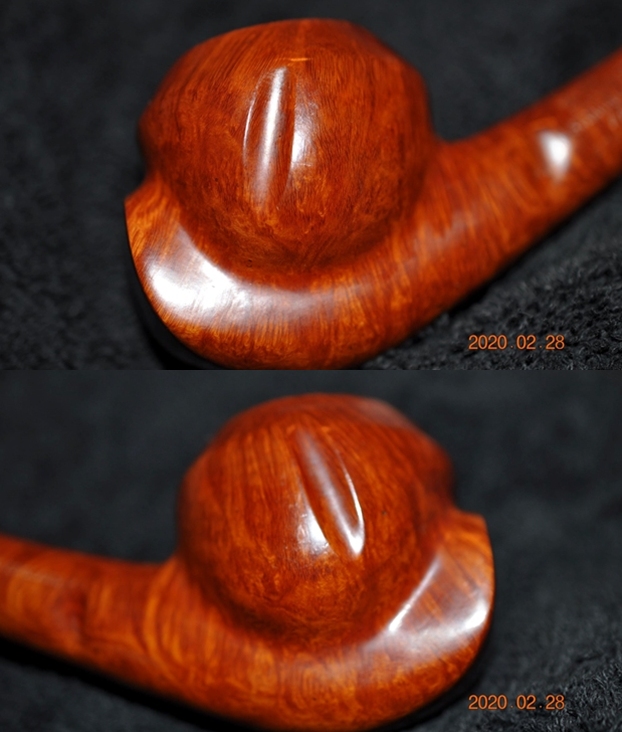
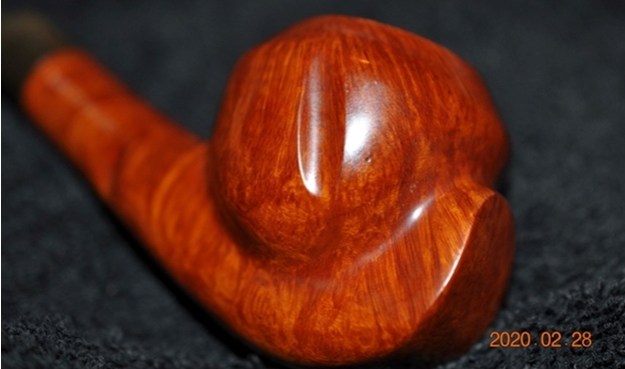
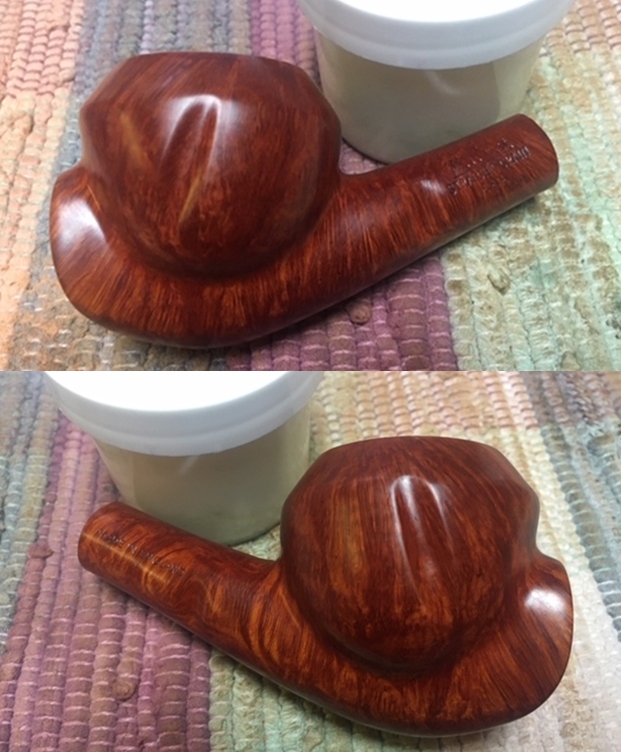
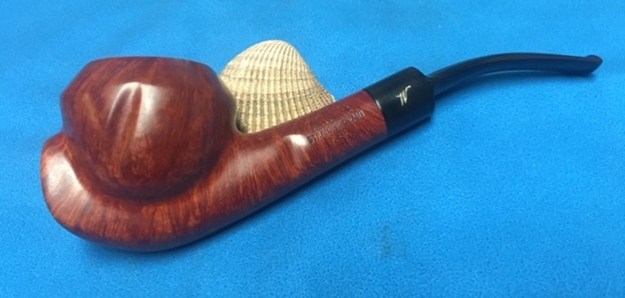
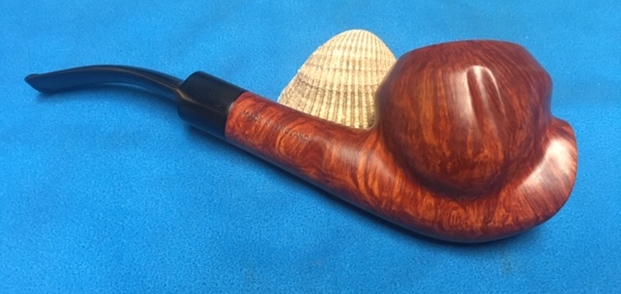
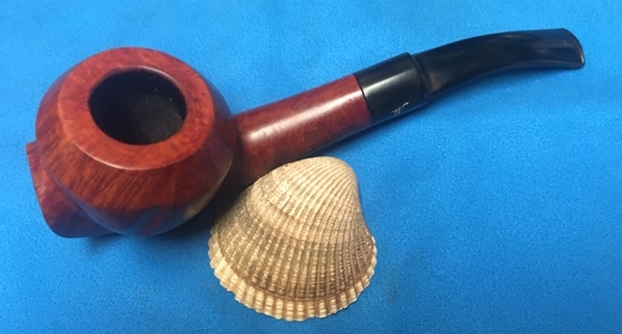
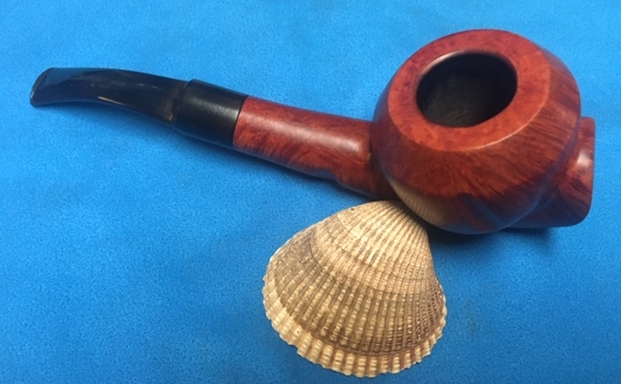
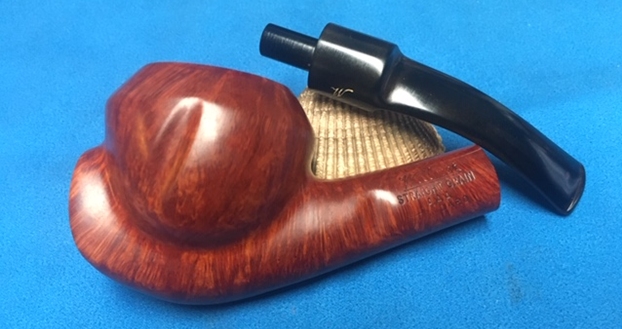
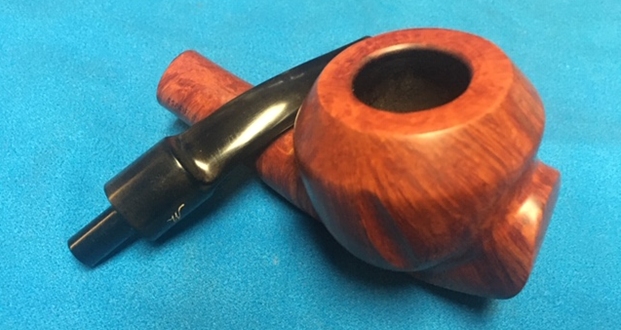
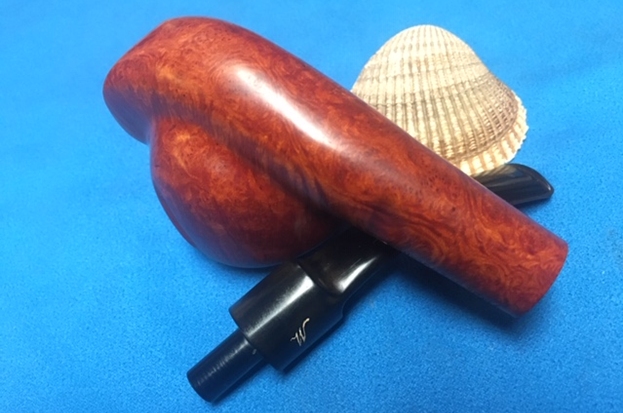
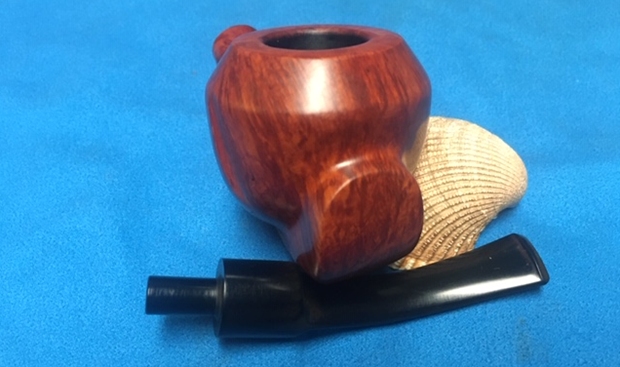
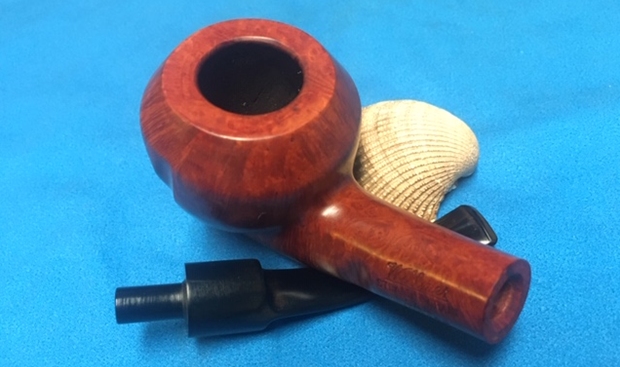
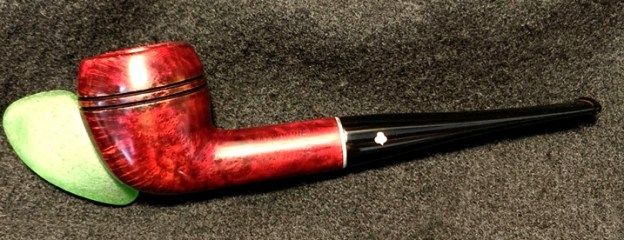
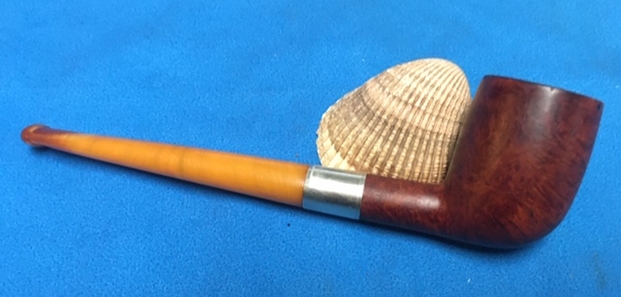
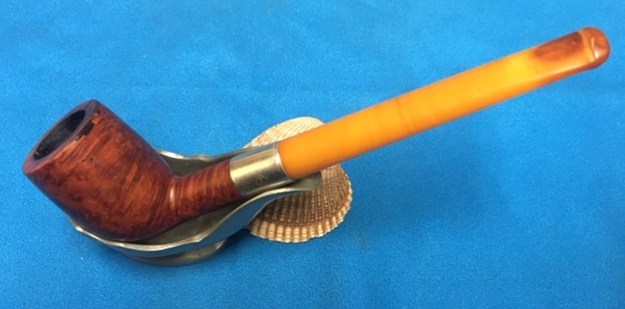
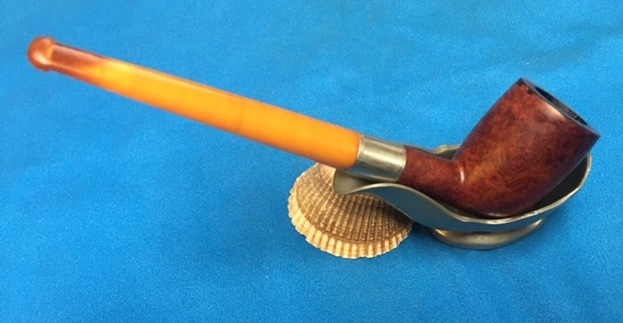
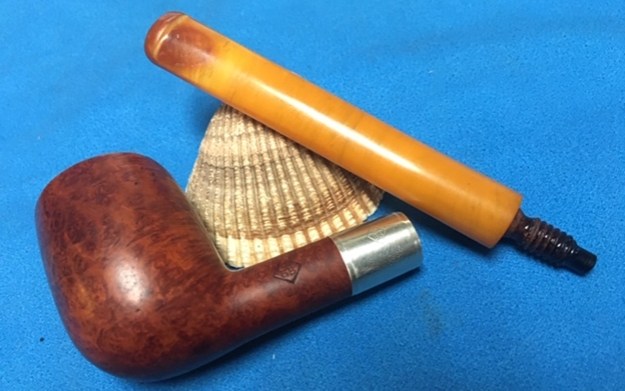
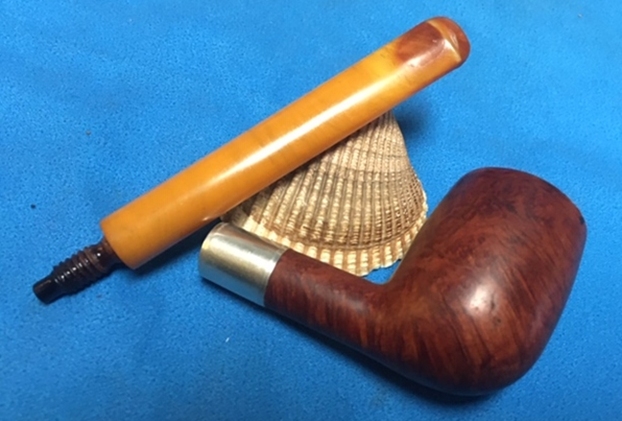
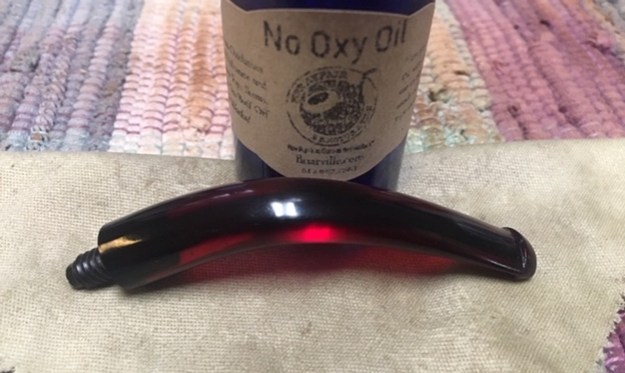
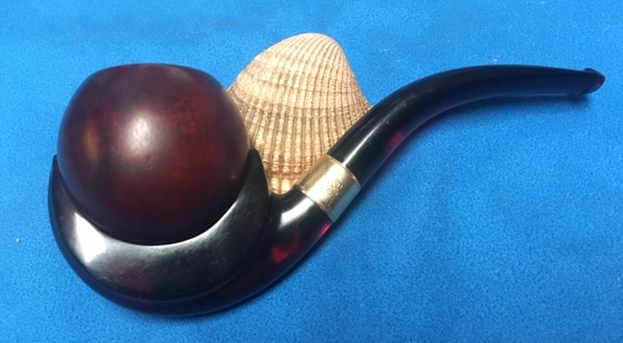
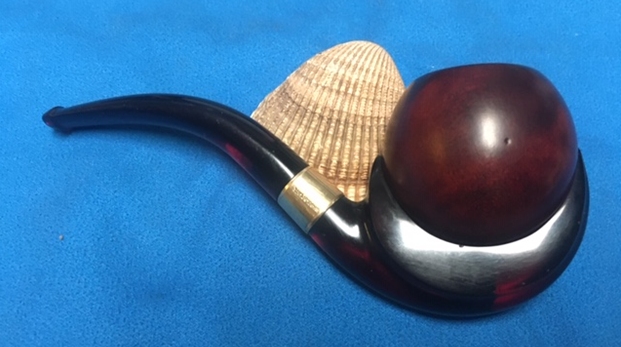
Wow!  This Sculpted 3/4 Bent Billiard had some issues to work through.  The hole repair and the rim were the largest challenges and I’m pleased with how these repairs turned out.  The briar grain is fun and expressive and really made an appearance through the dying and buffing process.  I’m pleased and I trust that my future daughter-in-law, Katie, will be pleased as well as she gives this pipe to her father as a gift for his birthday.  What makes this gift even more valuable is that this pipe benefits the Daughters of Bulgaria – women and girls who have been trafficked and sexually exploited.  Thanks for joining me!

Back To Working On My Inheritance; A Stanwell # 62 Freehand


Blog by Paresh Deshpande

Being on leave that has been compulsorily extended by 40 days due to the virus pandemic being rampant and the country under a lock down was a blessing in disguise. I have enough time to spend with my daughters, catch up on some reading and most importantly, get working on some pipes!! The only downside to the last activity was that I have left behind at my place of work, most of my tools and paraphernalia that I use for restoring pipes. This greatly restricts the types of repairs that I can undertake at the moment. With these limitations, I rummaged through the pile and chose this inherited Stanwell as my next project on the premise that it would be a simple ‘refurbishing only’ task.

This large sandblasted freehand pipe with plateau rim top is stamped on the smooth underside of the shank from the foot towards the shank end as “HAND MADE” over “MADE IN DENMARK” in block capital letters followed by “STANWELL” in an inverted arch. Towards the shank end is the shape code/ model number “62”. The silver “Crowned S” adorns the left side of the vulcanite stem. The stampings on the stummel have worn off in the first half from the foot towards the shank end and can be seen in bright light and under magnification.There is adequately detailed and informative material available on both pipedia.org and pipephil.eu on the brand; however, I was keener to know the exact dating and correlate the pipe details with the shape code. Basil Stevens is considered an authority on all things Stanwell and on surfing the net, I came across this site which gives out pointers to dating a Stanwell pipe; here is the link https://www.scribd.com/document/45022903/Stanwell-Dating-Pricing-Information-by-Basil-D-Stevens.

I reproduce the relevant pointers which help in dating the Stanwell on my work table:-

Dating Information:

  1. Block letter stamp “Silver S” used until late 1960s and then changed to script.
  2. Up until the early 1960s only the top pipes, e.g. “Hand Cut” had the stem/mouth pieces stamped with the Stanwell logo of a crown over “S”.

The last bit of curiosity in my mind was to link the model number on my Stanwell to the description of the shape and designer, if possible. Again pipedia.org has a section on “Stanwell Shape Numbers and Designers” and sure enough, 62 finds a mention, here is the link

(https://pipedia.org/wiki/Stanwell_Shape_Numbers_and_Designers).

I quote and reproduce the relevant information:-

  • Two versions of this shape number
  1. a) Liverpool, medium size.
  2. b) Freehand, Plateau top, saddle mouthpiece, by Sixten Ivarsson.

Thus from the above, it is amply evident that the pipe now on my work table is a Freehand pipe from the late 1960s designed by Sixten Ivarsson!!

Now on to restoring this Stanwell Freehand pipe with a delicate vulcanite saddle stem……..

Initial Visual Inspection
This medium sized sandblasted freehand pipe has a good heft and nicely fills the hand. Like most of the pipes from my inheritance; this too has a thick layer of cake in the chamber with overflow of lava on the plateau rim top. The cake is dry and hard. The inner rim edge appears sans any damage and this would only be confirmed once the chamber has been reamed. The condition of the walls of the chamber can be commented upon once the cake has been taken down to the bare briar. However, the external surface of the stummel feels and looks solid and hence I do not foresee any major issues surprising me later in the course of restoration. The ghost smells are very strong in the chamber. As is commonly seen on sandblasted pipes with some age on them, the crevices are always filled with dust, dirt, oils, tars and grime from all the years of smoking and storage. This one is no exception to this observation. The grooves of the sandblast are filled with dust and grime. The fact that the textured patterns of the rustications are dusty and filled with dirt is accentuated more due to the contrast of dark and medium brown stains on the stummel and the shank. The briar looks lifeless and bone dry and has taken on black dull hues. The mortise is full of oils, tars and gunk and the air flow is restricted. Through all the dirt, dust and grime, beautiful sandblast patterns can be seen and appreciated. The delicate vulcanite saddle stem is beautifully contoured to match the flow of the pipe with a smooth surface at the bottom of the saddle contiguous with that of the shank. The stem is heavily oxidized with a couple of deep tooth indentations on both the upper and lower stem surface in the bite zone. The lip edge on either surface has bite marks. These repairs should be easy. The tenon and horizontal slot is covered in dried oils, tars and gunk. The stem air way too appears to be clogged as the air flow through the stem is laborious to say the least. The stem logo of the letter ‘S’ with a crown on top is crisp and deep.The Process
The process of refurbishing this pipe started with the cleaning of the stem. Abha, my wife, cleaned the stem air way with regular and bristled pipe cleaners dipped in 99.9% pure isopropyl alcohol. She further cleaned the stem internals with thin shank brushes and dish soap to remove the stubborn and thick gunk from within the airway. The heap of pipe cleaners and their appearance tells a sordid story. With my sharp fabricated knife, she scraped off all the dried tars and gunk from the tenon end.Once the stem internals had been cleaned, I gently sand the stem surface with a used piece of 220 grit sand paper and immersed it in “Before and After Deoxidizer” solution along with the stem of other pipes in line for restoration. This solution has been developed by Mark Hoover and works to draw out all the deep seated oxidation from the surface making it’s subsequent cleaning and polishing a breeze. I would definitely recommend this product as it saves on to time and efforts. It has been our experience that before immersing the stem in to the stem deoxidizer, light sanding of the stem with a folded piece of 220 grits sand paper loosens the oxidation a bit and helps get fantastic end results. The pipe has been marked with a green arrow for easy identification.Simultaneously, while Abha was working on the stem, I reamed the bowl with a Castleford pipe reamer using the first three head sizes. Using my fabricated knife, I cleaned the cake from areas which could not be reached by the reamer heads. I used a 220 grit sand paper, pinched between my thumb and forefinger, to sand the inner walls of the chamber. Once I had reached the bare walls, I wiped the chamber with a cotton pad dipped in isopropyl alcohol. This removed all the residual carbon dust and also allowed a clear inspection of the walls. The walls of the chamber are nice and solid with no signs of heat fissures or cracks. The inner rim edge shows no charring or chipping. The ghost smells are still strong and all pervading. Hopefully these smells will be exorcised once the shank and mortise are thoroughly cleaned! I cleaned the mortise and shank walls using q-tips, shank brush, regular and hard bristled pipe cleaners dipped in isopropyl alcohol. I scraped the walls with a dental tool and removed the entire accumulated gunk. I shall further clean it with a shank brush and liquid dish soap once I clean the stummel surface. The strong smells still persist though the mortise is nice and clean as can be seen in pictures.With the bowl internals clean, I move to clean the exterior of the stummel. I generously applied “Briar Cleaner”, a product that has been developed by my friend Mark Hoover, to the external surface of the bowl and the plateau rim top surface. It works similar to Murphy’s oil soap and needs to be applied to the stummel surface and set aside for 5- 10 minutes. The product pulls out all the dirt and grime to the surface making further cleaning easy. I am quite happy with this product. I used a hard bristled tooth brush to scrub the stummel and rim top with the solution. After the scrub with Briar cleaner solution, I washed the stummel under running warm water with anti oil dish washing detergent till clean and dried it using paper towels and soft cotton cloth. I deliberately cleaned the plateau rim top with Scotch Brite pad and set the stummel aside to dry out naturally. I simultaneously cleaned the shank internals with the detergent and hard bristled shank brush. The stummel surface has cleaned up nicely with the intricate sandblast patterns on full display. The ghost smells in the chamber were still quite strong and hence I decided to address this issue. To eliminate the ghost smells from the pipe, I decided to treat it with salt and alcohol. I do not use Kosher salt as it is not readily available here and if available, it’s very expensive. I use a cotton ball which is an at par substitute as I have realized over the last year or so. I draw out a wick from the cotton and along with a folded regular pipe cleaner; insert it into the mortise and through the draught hole into the chamber. Thereafter, I pack the chamber with cotton balls to about quarter of an inch below the rim’s inner edge. I soak the cotton balls with isopropyl alcohol up to the brim. About half an hour later, the level of alcohol goes down, having been absorbed by the cotton. I top it up once again and set it aside overnight. By next morning, the cotton and alcohol has drawn out all the remaining oils and tars from the chamber and mortise, fulfilling its intended task. I removed the cotton ball and ran pipe cleaners through the mortise to clean out all the loosened tars and gunk. The chamber now smells clean and fresh. I set the stummel to dry out naturally.The next morning, Abha removed the stems that had been soaking in the deoxidizer solution overnight. She cleaned the stem and the stem airway under running warm water and scrubbed the raised oxidation from the stem surface using a Scotch Brite pad and the airway with thin shank brush. She further removed the oxidation by scrubbing the stem with 0000 grade steel wool and applied a little olive oil to rehydrate the stem.The deep tooth indentations are now clearly visible. Since I did not have a lighter to heat and raise these indentations to the surface (my preference to use it for this purpose), I used a lit match stick instead. I have experimented with a lit candle also and the results of both these alternatives are equally good; however, one has to be doubly careful as the heat from a candle flame is more intense as compared to a match stick or a lighter. These tooth indentations were raised to the surface to some extent due to the heating; however, it would require a fill to complete the repairs.I prepared a mix of CA superglue and activated charcoal and carefully applied it over the damaged bite zone on both surfaces and lip and set it aside for curing overnight. I had applied this mix in sufficient thickness which would help during the filing and sanding to match the fills with the stem surface.While the stem was set aside for the fills to cure, I decided to polish the raised portions of the plateau rim top surface. The polished lightened and shining raised portion should be a nice contrast to the surrounding rim surface. I dry sand the raised portions with 1500 and 2000 grit sand papers (1500 to 2400 grit pads have worn out) followed by dry polishing with 3200 to 12000 grit micromesh pads. I like the appearance of the rim top at this stage. Next, I rubbed a small quantity of “Before and After Restoration Balm” in to the briar with my fingertips, working it deep in to the sandblasts and let it rest for a few minutes. I generously rubbed the balm in to the plateau rim top surface. The balm almost immediately works it’s magic and the briar now has a nice vibrant appearance with the beautiful sandblast patterns displayed in their complete splendor. The contrast of the dark browns of the raised sandblast with the dark black of the rest of the stummel added an interesting dimension to the appearance of the stummel. The most interesting aspect was the appearance of the plateau rim top which may be insufficiently described in words and be rather seen in person. I further buffed it with a horse hair brush. I set the stummel aside and worked on the stem. The stem fills had cured nicely and using a flat head needle file, I sanded the fill to achieve a rough match with the surrounding stem surface. I further sanded the stem surface with a folded piece of 220 and 320 grit sand papers to further blend in the repairs and followed it with wet sanding the entire stem with 1500 to 12000 grade micromesh pads. I wiped the stem with a moist cloth to remove the dust and monitored the progress being made after every three grit pads. The stem polished up nicely and had a rich deep black shine to it. I applied a little Extra Virgin Olive oil to rehydrate the vulcanite and set the stem aside. I refreshed the stem stamping with a white correction pen. The end result shows a perfectly refreshed stem logo.To complete the restoration, I mounted a cotton cloth buffing wheel on to my hand held rotary tool and applied several coats of carnauba wax. I finished the restoration by giving the entire pipe a rigorous hand buffing using a microfiber cloth to raise the shine further and remove any residual wax from in between the sandblasts. The finished pipe looks amazingly beautiful and is now ready for its long second innings with me. I only wish it could share with me it’s life story of the past years while I enjoy smoking my favorite Virginia blend in it or maybe an English blend or maybe just keep admiring it!! P.S. This and the subsequent restoration that I have lined up are all simple and straight forward projects, however, I would assure the readers that each one is unique and each project is interesting.

In these troubled times when at one point in time the world wide call was for mankind to come closer, it is now necessary to maintain and observe social distancing. I wish that we maintain physical distance to prevent the spread of the virus but let’s bond together mentally, emotionally and spiritually.

I wish to thank each one for sparing their valuable time to read through this write up and praying for the health and safety of entire mankind. Stay home…stay safe!!

Life for a Comoy’s Christmas 1983 Bent 409 Bulldog


Blog by Steve Laug

The next pipe on the table came to us from one of Jeff’s pipe hunts not far from where he is located. It is a Comoy’s 409 Bulldog that is in decent condition. It is stamped Comoy’s Christmas 1983 on the top left side of the diamond shank. On the right side it is stamped with the Comoy’s circular COM stamp Made in London in a circle over England. That is followed by the shape number 409. On the right underside it is stamped with the letter E near the stem/shank junction. The stamping is clear and readable. The pipe has a medium brown finish and some amazing grain that the shape follows well. The finish was very dirty with grime ground into the grain around bowl sides. The bowl had a thick cake in the bowl and some lava overflow on the top and the beveled inner edge of the top. There was darkening on the briar around the inner beveled edge of the rim. The stem was dirty, oxidized and calcified. There was light tooth chatter and marks on the stem near the button on both sides. The stem has the inset C logo of Comoy’s on the top left side of the diamond saddle stem. Jeff took photos of the pipe before he cleaned it up. Jeff took photos of the rim top to show the thick cake in the bowl and the lava overflow on the top and beveled inner edge of the rim. The photos show the rim top and bowl from various angles. Jeff took some photos of the bowl sides and heel to show the nice grain that was on this bowl. It is a quite beautifully grained pipe. The stamping on each side of the diamond shank is shown in the photos below. They look very good and readable. You can also see the inset C logo on the top left side of the diamond stem. The stem was a very good fit to the shank. It was oxidized, calcified and had debris stuck to the surface of the vulcanite. There was tooth chatter and marks on both sides of the stem and on the button surface.  I knew that I was dealing with a 1983 Comoy’s 409 Bulldog that was specially made as a Christmas Pipe. I turned to work on the pipe itself. Jeff had done a great job cleaning up the pipe as usual. He reamed the pipe with a PipNet reamer and cut back the cake back to the bare briar. He cleaned up the walls with a Savinelli Fitsall Pipe Knife. He scrubbed the interior of the bowl and shank with pipe cleaners, cotton swabs and alcohol to remove the tars and oils. He scrubbed the exterior of the pipe with Murphy’s Oil Soap and a tooth brush to remove the grime from the finish. He worked on the rim top lava and darkening with the soap and tooth brush. He scrubbed the inside of the stem with alcohol and pipe cleaners. He scrubbed the exterior with Soft Scrub and then soaked it in Before & After Deoxidizer. He washed it off with warm water to remove the deoxidizer. The pipe looked far better. I took photos of the pipe when I received it before I started working on it. I took photos of the bowl and rim top as well as the stem to show how clean they were. You can see the darkening on the inner edge of the rim and the top.  The stem looks clean of oxidation and the tooth marks and chatter are very clear in the photos.I took photos of the stamping on the sides of the shank. The stamping is clear and readable as noted above.   I took a photo of the pipe with the stem removed to show the overall look of stem, tenon and profile of the pipe.I decided to start my work on the pipe by addressing the darkening on the rim top and beveled inner edge. I used a folded piece of 220 grit sandpaper to work on the finish to remove the darkening on both. It took a bit of work but I was able to remove the majority of it and the end product looked much better.   I polished the briar with micromesh sanding pads – dry sanding with 1500-12000 grit pads and wiping the bowl down with a damp cloth after each pad. I rubbed the briar down with Before & After Restoration Balm. I worked it into the briar with my fingertips. The product works to clean, enliven and preserve the briar. I let it sit for 10 minutes while I worked on the stem. After the time passed I buffed it with a cotton cloth to deepen the shine. The briar really comes alive with the balm.  I set the bowl aside and turned my attention to the stem. Some of the tooth marks were deep – fortunately small but deep on both sides. I filled in the divots with clear super glue and set the stem aside to dry while I took my dog for a walk. When I got back I used a needle file to sharpen the edge of the button and flatten the repairs. I sanded out the repairs on both sides of the button surface and stem with 220 grit sandpaper to blend them into the surface. I began polishing the stem with 400 grit wet dry sandpaper.I polished the vulcanite with micromesh sanding pads – 1500-12000 grit pads. I wiped it down with Obsidian Oil after each sanding pad. I used Before & After Pipe Polish – both Fine and Extra Fine to further polish the stem.   This Comoy’s Christmas 1983 Bulldog is a real beauty. The Medium Brown stain highlights some great grain around the bowl sides and the heel. The finish on the pipe is in excellent condition and the contrasting stains work well to highlight the grain on the pipe. The polished black vulcanite saddle stem adds to the mix. With the grime and debris gone from the finish and the bowl it was a beauty and is eye-catching. I put the stem back on the bowl and buffed the pipe with Blue Diamond on the buffing wheel. I gave the bowl and the stem multiple coats of carnauba wax on the buffing wheel and followed that by buffing it with a clean buffing pad. I hand buffed the pipe with a microfiber cloth to deepen the shine. The finished Bent Bulldog 409 is quite nice and feels great in the hand. Give the finished pipe a look in the photos below. I can only tell you that like the other pipes I am working that it is much prettier in person than the photos capture. The dimensions of the pipe are Length: 5 ¼ inches, Height: 1 ½ inches, Outside diameter of the bowl: 1 ½ inches, Chamber diameter: ¾ of an inch. Thanks for walking through the restoration with me as I worked over another beautiful pipe. This pipe will be added to the British Pipe Makers section of the rebornpipes store soon. If you want to add it to your collection send me an email or a message! Thanks for your time.

New Life for a Peterson’s Republic Era “Donegal” Rocky Bent Apple 03


Blog by Steve Laug

The next pipe on the table came to us from one of Jeff’s pipe hunts or auctions. It is a rusticated Peterson’s “Donegal” Rocky 03 Bent Apple. The rusticated finish is quite nice with at that classic Peterson’s rustication pattern. The pipe was very dirty, with grime and dust deep in the grooves of the rustication. The bowl had a thick cake in the bowl and surprisingly only dust on the rusticated rim top. There was darkening on the briar and a little lava on the inner edge of the rim. The pipe is stamped on a smooth panel on the underside of the shank and reads Peterson’s “Donegal” Rocky with the shape number 03 ahead of that. It is also stamped Made in the Republic of Ireland. On the oxidized Sterling Silver band it is stamped K&P in shields over Sterling Silver there are three hallmarks below and to the left of that. The hallmarks are: 1. a seated woman (Hibernia) – the city stamp for Dublin, 2. Harp – the mark for the quality of the silver, 3. a slanted uppercase N – the date identification of the pipe. The stamping is clear and readable on the pipe. The stem was dirty and oxidized. There were tooth marks and chatter on the stem near the button on both sides and some on the surface of the button as well. There was the Peterson’s “P” on the left side of the taper stem. Jeff took photos of the pipe before he cleaned it up. Jeff took photos of the rim top to show the cake in the bowl and the relatively clean rim top and beveled edge. The photos show the rim top and bowl from various angles.Jeff took some photos of the bowl sides and heel to show the rustication that was on this bowl. It is a quite beautifully crafted pipe. The rustication is quite dirty. The stamping on the underside of the shank read as noted above. The photo shows that they are very clear and readable. The stamping on the silver is also readable. The P on the left side of the stem is in good condition. The stem was a very good fit to the shank. It was oxidized, calcified and had debris stuck to the surface of the vulcanite. There was light tooth chatter and marks on both sides of the stem and on the button surface.  I am including the information from Pipedia’s article on Peterson pipes. It is a great read in terms of the history of the brand (https://pipedia.org/wiki/Peterson). I have included a bit of the pertinent history here.

1950 – 1989 The Republic Era  – From 1950 to the present time, the stamp for this era is “Made in the Republic of Ireland” in a block format generally in three lines but two lines have been used with or without Republic being abbreviated.

During the 1950’s and 60’s the Kapp & Peterson company was still in the ownership of the Kapp family. However 1964 saw the retiral of the company Managing Director Frederick Henry(Harry) Kapp.

I turned then to deal with the Hallmarks. I turned to Pipephil’s site for his quick reference charts on the Peterson’s Hallmarks (http://www.pipephil.eu/logos/en/infos/hallmark-dublin.html). I have included the pertinent charts below. The first chart defines the first two hallmarks on the Sterling Silver Band. The Hibernia/Lady is the Dublin Town Mark. The Harp identifies the fineness of the metal.The second chart pins down the date that this particular pipe was made. The slanted N mark identifies the pipe as being made in 1999. I have drawn a red box around the N on the chart below.With that information in hand I knew what I was dealing with in terms of the stamping and the age of this pipe. I knew from the information that the pipe was made during the Republic Era between 1950 and 1989. Pipedia then qualifies the dating as follows: From 1950 to the present time, the stamp for this era is “Made in the Republic of Ireland”. I was wondering how a pipe stamped Republic of Ireland and 1999 fit! I guess the “present time” stamp qualifies that.  Now it was time to work on the pipe.

Armed with that information I turned to work on the pipe itself. Jeff had done a great job cleaning up the pipe as usual. He reamed the pipe with a PipNet reamer and cut back the cake back to the bare briar. He cleaned up the walls with a Savinelli Fitsall Pipe Knife. He scrubbed the interior of the bowl and shank with pipe cleaners, cotton swabs and alcohol to remove the tars and oils. He scrubbed the exterior of the pipe with Murphy’s Oil Soap and a tooth brush to remove the grime from the finish. He scrubbed the inside of the stem with alcohol and pipe cleaners. He cleaned the oxidized silver with Soft Scrub and buffed it off with a soft pad. He scrubbed the exterior with Soft Scrub and then soaked it in Before & After Deoxidizer. He washed it off with warm water to remove the deoxidizer. The pipe looked far better. I took photos of the pipe when I received it before I started working on it. I took photos of the bowl and rim top to show how clean it was. The rim top and edges look very good. The stem looks clean of oxidation and there are light tooth marks and chatter on both sides of the stem.I took a photo of the pipe with the stem removed to show the overall look of stem, tenon and profile of the pipe. It is a great looking pipe.I rubbed the briar down with Before & After Restoration Balm. I worked it into the briar with my fingertips and a horse hair shoe brush to get it into the deep crevices of the rustication. The product works to clean, enliven and preserve the briar. I let it sit for 10 minutes while I worked on the stem. After the time passed I buffed it with a cotton cloth to deepen the shine. The rustication came alive with the balm. I set the bowl aside and turned my attention to the stem. There were some deep marks on the left side of the stem at the bend. I filled them with clear super glue and set it aside to cure. Once it was cured I sanded the stem to blend the repairs into the rest of the surrounding vulcanite.I sanded out the tooth marks and chatter on both sides of the button surface and stem with 220 grit sandpaper and began the polishing with 400 grit wet dry sandpaper.I rubbed the stem down with Denicare Mouthpiece Polish – a red, gritty Tripoli like substance that is a paste. I rubbed it into the surface of the stem and polished it off with a cotton pad. I have found that is a great intermediary step before polishing with micromesh pads. I am not sure what I will use once the final tin I have is gone!I touched up the P stamp on the left side of the stem with Paper Mate Liquid Paper and once it dried I scraped off the excess. The P stamp definitely looks better at this point.I polished the stem with micromesh sanding pads – 1500-12000 grit pads. I wiped it down with Obsidian Oil after each sanding pad. I used Before & After Pipe Polish – both Fine and Extra Fine to further polish the stem. This Republic Era Peterson “Donegal” Rocky 03 Bent Apple is a nice looking pipe. The rustication and mixed stain around the bowl sides and shank really stand out with the polishing. The finish on the pipe is in excellent condition and the contrasting stains work well to give some contrast to the rusticated finish of the pipe. The polished black vulcanite P-lip taper stem adds to the mix. With the grime and debris gone from the finish and the bowl it is really is eye-catching. I put the stem back on the bowl and buffed the pipe with Blue Diamond on the buffing wheel, carefully avoiding the stamping on the shank and using a light touch on the rusticated bowl and shank. I gave the bowl multiple coats of Conservator’s Wax by hand and the stem multiple coats of carnauba wax on the buffing wheel and followed that by buffing it with a clean buffing pad. I hand buffed the pipe with a microfiber cloth to deepen the shine. The finished Bent Apple is quite nice and feels great in the hand. Give the finished pipe a look in the photos below. I can only tell you that like the other pipes I am working that it is much prettier in person than the photos capture. The dimensions of the pipe are Length: 5 inches, Height: 1 ½ inches, Outside diameter of the bowl: 1 ¼ inches, Chamber diameter: ¾ of an inch. Thanks for walking through the restoration with me as I worked over another interesting pipe. This Peterson’s “Donegal” Rocky will be added to the Irish Pipe Makers section of the rebornpipes store soon. If you want to add it to your collection send me an email or a message! Thanks for your time.

A New Lease On Life For A No-Name English Make Large Pot


Blog by Paresh Deshpande

I had purchased this pipe lot of two unmarked beautiful looking pots on eBay with the intention of either selling or gifting. The price was very low and from the pictures, the pipes screamed quality and appeared solid. Here are a couple of pictures of this pair that were posted by the seller. Once the pipes were delivered home (my work place is away from where my family resides), Abha my wife, checked them out and informed me of the following;

(a) Both pipes are similar with only difference being in the size, one is large Pot while the other is a medium.

(b) The only stamping seen is on the right side of the shank and reads “MADE IN” over “LONDON, ENGLAND”. The stem is devoid of any stampings. The overall feel of the pipe is that of high quality.

(c) Both pipes have a darkened spot each, the larger one has it on the heel and the other on the bottom left side of the stummel.

The last piece of information was something that troubled me. I had seen a dark spot on the heel of one pipe, but it appeared to be a smear of grime and dirt. Here are the pictures of the spots that Abha had sent me. It definitely appeared to be the beginnings of a burn out!!Truth is, after the initial surprise of being misinformed by the seller on eBay had subsided, I did not find these damages very alarming and I felt that these two beauties still had many years of smoke left in them with some minor repairs. The matter rested till I received about 40 pipes that Abha had sent me duly cleaned for my part of refurbishing. Both these pipes were part of that parcel that I had received.

I decided to work on the larger pot first. The pipe has a beautiful mix of swirls and cross grains. In fact, the USP of the stummel lies in the solid hand feel and robustness of the build. The quality of briar is top notch and without any fills at all on this piece. It is stamped on the right side of the shank as “MADE IN” over “LONDON, ENGLAND”. The high quality vulcanite saddle stem is sans any stampings.There are not very many clues that can point me towards the provenance of this pipe. The only fact that can be established is that this is a London made pipe. The build quality, the shape and stem type reminds me a lot of Charatan’s pipe, most notably their Belvedere line. In fact, I do have a Charatan’s Make BELVEDERE pot shaped pipe that I had received as part of my Mumbai Bonanza and the similarities are striking. Also, while surfing the net, I came across a MOUNTBATTEN pot which again resembled the pipe on my work table. Here are pictures of both these pipes, the first two are of the Mountbatten and the next two are that of Belvedere pot. With Mountbatten being a Charatan’s second and observing the similarities between these three pipes, it may be surmised that there is a possibility that the pipe presently on my work table is made by Charatan’s for some pipe shop, which was not uncommon in the past. Any confirmed input to either support or refute my assumption is most welcome.

Initial Visual Inspection
The chamber has a thick even layer of cake with heavy lava overflow over the inward sloping rim top surface. The deposition of heavy lava overflow is predominantly seen on the backside of the rim surface in 6 ‘O’ clock direction. A number of dents and dings are seen on both outer and inner rim edges. I suspect charring to the inner rim edge in 1 ‘O’ clock and likely in the 6 ‘O’ clock direction. The extent of the charring and the condition of the walls of the chamber can be ascertained only once the cake has been taken down to the bare briar. The foot of the stummel did show the sign of beginnings of a burn out that was considerably darker towards the draught hole (encircled in green) and extending outwards away from the draught hole half way across the foot. The damage to the heel and the resulting severity of the burn out will be confirmed after reaming. There are some very strong ghost smells to the chamber which will need to be addressed. The stummel is covered in oils, dust and grime giving it a dull and lackluster appearance. The stummel feels solid and well carved and nice mixed grains can be observed all over the surface through all the grime. There is not a single fill anywhere on the bowl. Other than the charring observed at the foot of the stummel, the stummel has a robust and solid feel. The mortise is cleaned and clogged with the accumulation of old and dried oils, tars and gunk. This will need to be cleaned. The vulcanite saddle stem is heavily oxidized with signs of calcification on either surface of the stem about an inch from the button edges. There is no serious tooth chatter or indentation or button damage to the stem. The tenon end and horizontal slot shows signs of accumulation of old oils, tars and gunk. The high quality vulcanite stem should clean up nicely.Initial Cleaning By Abha…
The initial cleaning on this pipe was done by Abha, my wife (she has cleaned up around 40-50 pipes and these have now reached me for further restoration). She reamed out the complete cake and further smoothed out the chamber walls with a folded piece of 220 grit sand paper. She further cleaned out the internals of the shank with pipe cleaners and alcohol and cotton buds. She followed the internal cleaning of the shank with external cleaning of the stummel using Murphy’s Oil soap and hard bristled tooth brush and dried it with paper napkins and cotton cloth.

Next she cleaned out the internals of the stem air way and immersed it in “Before and After Deoxidizer” solution along with the stem of the other pot in line for restoration. Once the stem had soaked overnight, she cleaned the stem under running warm water and scrubbed the raised oxidation from the stem surface using Scotch Brite pad. She further removed the oxidation by scrubbing the stem with 0000 grade steel wool and applied a little olive oil to rehydrate the stem.Once The Pipe Is On My Work Table…
Now that the cleaned pipe is on my work table, I proceed to carry out my appreciation of the work that needs to be done on this pipe to restore it. The cleaned up pipe presented a clearer picture about the actual condition and the work required on this pipe. Here is how the pipe reached me. The stummel was clean and free of any accumulated grime. As observed earlier, there is not a single fill anywhere on the stummel. The only cause of concern is the darkened spot over the foot of the stummel. I felt the spot for softness with my nail and it appeared sufficiently solid, thus confirming that it’s not an all out burned heel. Rest of the stummel feels solid and robust to the touch. This piece of briar should polish up nicely. I was eager to understand the extent of burn out in the heel of the bowl. True enough, I could make out a dark patch just in front of the draught hole approximately at the center of the heel (marked in yellow). The chamber shows a few vertical minor heat lines all along the front of the walls emanating from the dark patch and further branching out horizontally to either side. The entire heel of the bowl appears dark and when seen in conjunction with the foot darkening, this issue needs to be investigated and addressed. The inward sloping rim top surface is in decent condition with the inner rim edge showing slight deformation and darkening in 6 o’clock and 1 o’clock direction (circled in red). The outer rim edge show few dents and dings. Thus, I would need to address issues of the darkened heel, inner rim edge and dents and dings to the outer rim edge. The mortise and shank is nice and clean. The ghost smells are history and reflects the thoroughness with which Abha cleans the internal and external of the pipe.The stem had cleaned up nicely and is in pristine condition. Whatever, little oxidation remains, will need to be removed by sanding with a folded piece of 220 grit sand paper and follow it up with polishing with micromesh pads. The Process
The first issue on the agenda that I decided to tackle was to address the dark patch to the heel observed just in front of the draught hole and correspondingly to the foot of the stummel. The black patch is bounded by the yellow arrows and the alignment of the web of these minor heat fissures is indicated by the green arrows. With a pointed dental tool, I scraped the black patch in the heel of the chamber and completely removed the dead charred briar from the surface till I reached solid intact briar. Thereafter, I removed the charred briar from the heat fissures till I had reached solid briar. Once the dead and charred briar was removed, there was a need to give a protective coat over the surface to avoid direct contact of the briar with the burning tobacco as the thickness from these damaged areas were slightly reduced. I would achieve this by coating the walls of the chamber with J B Weld mix. I preceded the stummel repairs first by coating the walls of the chamber with a slightly thick layer of J B Weld. J B Weld is a two-part epoxy Cold Weld in two tubes; hardener and steel which are mixed in two equal parts (ratio of 1:1) with hardening time of 5-6 minutes and complete curing time of 6-8 hours. I poured the contents of the two tubes and mixed it well. I inserted a petroleum jelly coated regular pipe cleaner through the draught hole to prevent it from getting blocked due to the J B Weld mix. I applied this mix, as evenly as possible, over the entire chamber wall surface. I worked fast to ensure an even coat over the chamber walls before the weld could harden. I set the stummel aside for the application to harden and cure overnight.While the J B Weld coat was curing, I worked the stem by first sanding it down with a folded piece of 220 grit sand paper. This step addresses the twin issues of removing residual stubborn oxidation and also smooth out the minor tooth chatter from the bite zone. I wiped the stem with Murphy’s Oil soap and cotton swab to remove the resulting sanding dust. I rubbed in a small quantity of EVO in to the stem and set it aside to rehydrate.Turning my attention back to the stummel, I sand the entire stummel surface with a folded piece of 220 grit sand paper to remove the minor dents and dings from the surface. This also helped to lighten the darkened spot from the foot of the stummel. Staying with the stummel repairs, the next issue I addressed was that of the damage to the rim top surface. The rim top surface is sloping inwards, making topping impossible without compromising the profile integrity. To address the issue of darkened rim surface, I sand it with a folded piece of 220 grit sand paper pinched between my thumb and fore finger, moving along in the direction of the surface profile. Simultaneously, I addressed the issue of charred inner rim edge and the dings and chips to the outer edge, by creating a slight bevel to both the rim edges. I am happy with the appearance of the stummel at this stage. I switch back to the stem and further sand it with 400, 600 and 800 grit sand paper. I wiped the stem with cotton pad dipped in alcohol to remove the resultant dust. I rubbed some extra virgin olive oil into the stem and set it aside to be absorbed. I polished the stem with micromesh pads, wet sanding with 1500 to 12000 grit pads. I rubbed a little extra virgin olive oil in to the stem at the end of all the micromesh pads. I finished the polishing of the stem by rubbing a small quantity of Paragon wax and giving it a final polish with a soft cotton cloth. The stem is now nice, smooth and shiny. With the stem polishing completed, I moved ahead with completing the stummel repairs. The J B Weld coat had hardened considerably by this time. I mount a sanding drum on to my hand held rotary tool and setting the speed to half of the full RPM, I sanded the excess coat from the chamber walls. To further fine tuned and keep the coat to a minimum thickness, I further sanded the coat with a 150 grit sand paper till I had a coat of a thickness that was just sufficient to protect the briar underneath. Here is how the chamber appeared at this stage. I polished the stummel with micromesh pads, wet sanding with 1500 to 12000 pads. I wiped the surface with a soft cloth at the end of the micromesh cycle. The stummel looks amazing with a deep shine and beautiful grains popping over the stummel surface. However, the dark rim surfaces in 1 o’clock direction and the dark spot at the foot of the stummel do not present a visually appealing picture. I had the option of either masking them under a darker stain or to let them be. I shall decide after I am done with polishing with Blue Diamond, hoping that this would further lighten these spots. I followed up the polishing by applying “Before and After Restoration” balm. This balm protects and enriches the briar surface and is highly recommended for use in any restoration of briar pipe. I rubbed it deep in to the stummel surface and set it aside to be absorbed for 20 minutes. I was pleased by the appearance of the stummel, less the dark spots on the rim edge and on the foot of the stummel. I mounted a cotton cloth buffing wheel on to my hand held rotary tool and applied a coat of Blue Diamond to the stummel, hoping to see a slight change in the appearance of the dark spots. However, these spots are still prominent and will need to be masked. Here are the pics of the pipe at this stage. I decided to stain the stummel with a Cordovan stain in the hope that it would help in a nice blending of the dark spots with the rest of the stummel. I heated the stummel surface with my heat gun to open up the pores on the stummel so that the stain is well set. I dipped a folded pipe cleaner in Fiebing’s Cordovan leather dye and liberally applied it over the heated surface, flaming it with the flame of a lighter as I went ahead to different self designated zones of the surface. This helps in even application and in the setting of the stain in the grain of the briar. I set the stummel aside for the stain to set into the briar. The next afternoon, I mounted a felt cloth buffing wheel on to my hand held rotary tool and using Red Tripoli proceeded, as my dear friend Dal Stanton likes to say “unwrap the coat of stain to reveal the grain” from the stummel surface. I set the tool at its slowest speed, again my recent experience while working on Steve’s pipe came in handy and the damage that can be caused due to heating while using the felt buffing wheel still fresh in my memory; I began to peel off the stain from the stummel surface first. The stain peeled out gradually. This was followed with wiping the stummel with a cotton swab and alcohol to lighten the stain a little as it was too dark for my liking. This also helped in cleaning the surface of all the residual stain and highlighting the grains. I set the stain by again heating the stummel surface with the heat gun. This is an essential step as, if missed, there is a possibility of the stain running down the hands of the smoker who decides to carry forward the trust in this pipe. To apply the finishing touches, I mounted a cotton cloth buffing wheel on to my hand held rotary tool and applied a coat of Blue Diamond to the stummel and the stem to polish out the minor scratches. Next, I mounted a cotton cloth buffing wheel and setting the speed to ¼ of the full power, I applied a thick coat of carnauba wax over the stummel and the stem. I worked the complete pipe till the time all the wax was absorbed by the briar. The pipe now boasted of a beautiful and lustrous shine. I vigorously rubbed the pipe with a microfiber cloth to deepen the shine and also to clean away any residual wax that had been left behind. I am very happy with the way this beauty has turned out. P.S. There was only one more issue that needed to be addressed and one that could not be ignored, being a functional issue. After I had protected the heel of the stummel and the walls of the chamber with a coat of J B Weld, it was necessary to prevent this coat from coming in to contact with the burning tobacco. I addressed this by mixing activated charcoal and plain yogurt to a thicker consistency, just enough that it would spread easily and applied it evenly all along the chamber walls after inserting a folded pipe cleaner through the draught hole to keep it open. Once dry and set, this will not only protect the walls but also aid in faster buildup of cake.I wish to thank all readers for sparing their valuable time to read through this write up.


Refreshing a Beldor Studio Mini Churchwarden Paneled Apple of Saint Claude


Blog by Dal Stanton

The Beldor Studio on my worktable now came to me from what I call the French Lot of 50.  I was tipped off by a fellow pipe man friend in Romania who acquired a L. J. Peretti Oom Paul from me.  He saw 5 different lots of pipes on the French eBay auction block and sent me a note. My thinking is that one of the Lots might be a good addition to my online collection, For “Pipe Dreamers” Only!, where pipes may be commissioned by those who can see the potential of unrestored pipes.  The different lots were from the same seller in Paris and his approach to selling these lots was like throwing bloody chum in shark infested waters!  Each lot was in a pile of pipes with different angles of the pile pictured in the lot’s listing.  Studying each of the piles was exhilarating trying to see markings on the pipes and characteristics that might reveal treasures in the mix.  I finally chose to bid on one of the French Lots because it had a very interesting Cutty shape (Restoration here: A Cutty Tavern Pipe – Recommissioning a Historical Classic as a Gift for a Steward of History) sprawled across the top of the pile and several other very, very interesting candidates.  The other characteristic of the French Lot of 50 that drew my attention were several pipes brandishing horn stems – very much pointing toward WW2 and post era pipes when rubber was scarce, and horn became a predominant replacement for stems.  With some effort, I found the Beldor Studio buried in the middle of the pile – one arrow on the inverted stummel and the other on the end of the stem barely visible.  I bid on the French Lot of 50 and the bid prevailed.  It did not take long for the package to come from Paris reaching me in Sofia, Bulgaria.When the pipes arrived, I did my normal cataloging of each pipe and promoting their arrival on various Facebook Pipe groups and many of these pipes have already been restored and with new stewards.  The Beldor Studio was waiting for Daniel to find in the online collection, For “Pipe Dreamers” Only!  I received Daniel’s inquiry about commissioning the Beldor and he identified himself as the son of a colleague and acquaintance of mine in Pennsylvania!  Daniel expressed his enjoyment of reading the write ups on the restoration of pipes and that he was interested in the Beldor Studio.  I sent this description of the Beldor to help Daniel with his decision:

I appreciate your interest!  The pipe you are interested in is a sweet pipe.  I called it a small Churchwarden, or it could possibly be categorized as a ‘Pencil Stem Panel’.  It’s a petite size and the paneled bowl is very nice.  I haven’t worked on a pipe with this marking before so I can’t say at this point anything about the collectability of a ‘Beldor Studio’ so we’re looking primarily at the pipe itself.

I’m glad that in the end, after giving Daniel an estimate of the final valuing of the pipe, he agreed and the Beldor Studio went into The Pipe Steward queue of pipes that benefit the Daughters of Bulgaria – women and girls who have been trafficked and sexually exploited.   Here are pictures of the Mini Churchwarden or Pencil Stem that got Daniel’s attention with a measurement of 7 1/2 inches in length and the bowl height of 1 1/8 inches.The only markings on the pipe are on the left shank flank with these stampings: ‘BELDOR’ [over] ‘STUDIO’.  The stem is stamped with a circle.This is one of those frustrating pipes that are seen in many places on the internet for sale, but not much is known.  The nomenclature on the Beldor Studio gives no indication of country of manufacturer (COM) but it becomes evident that the origins are French and from the pipe making center, Saint Claude.   Pipephil.eu confirms the French origins.  The lettering of ‘Beldor’ is the same with the circle stem stamp being the same.Pipedia only confirms a French origin and adds different lines with the Beldor name: Maker unknown; series: De Luxe, Golf, Western.  The Saint Claude origin in France simply comes from a Beldor pipes that are listed for sale on various sites with the nomenclature on these pipes include Saint Claude.  Here is one such example (LINK):I searched for some connection to an actual manufacturer in Saint Claude and could find none.  As a ‘hail Mary’ I sent some emails to pipe shops located in Saint Claude to see if any might have more information.  We’ll see what if I receive any helpful responses!  I did confirm the Beldor ‘Studio’ as the specific line for the Mini Churchwarden with this offering on a French eBay listing that described the center pipe as “BELDOR STUDIO BRUYERE SAINT CLAUDE”.I now take a closer look at the pipe on my worktable.  I like the petite panel bowl mounted on the pencil stem.  It has Churchwarden proportions but on the miniature.  The diminutive bowl would work well when one doesn’t have a lot of time to enjoy a bowl.  For me, I’m not a strong, nicotine ‘kick in your pants’, tobacco person, but I do like trying stronger tobaccos but in smaller portions.  This bowl would be perfect for this.  The former steward used this pipe as the chamber indicates some cake build up.  The beveled paneled rim has a heavy lava flow caked on it and this needs to be cleaned and refreshed.The hexagonal paneled apple bowl is very attractive.  It is dirty with grime and reveals normal scratches and scuffs from wear but reveals some genuinely nice grain. The pencil stem has some oxidation and tooth chatter on the bit.To begin the recommissioning of this Beldor Studio Mini Churchwarden, I remove the stinger and put aside for safe keeping.  I’m not a stinger fan but I’ll clean it and replace it to send to the new steward to decide what to do with itNext, using one pipe cleaner wetted with isopropyl 95%, the stem’s airway is clean.I then add the Beldor Studio stem to a soak of Mark Hoovers ‘Before & After Deoxidizer’ (www.ibepen.com) along with several other pipes in the queue.After a few hours soaking in the Deoxidizer, the Beldor stem is removed from the Deoxidizer and after squeegeeing the liquid off the pipe with my fingers, I use cotton pads wetted with isopropyl 95% to wipe away the raised oxidation.  A few pipe cleaners wetted with isopropyl 95% are also used to clear away Deoxidizer from the airway.To help condition the vulcanite stem, paraffin oil is applied and rubbed into the surface.  The stem is put aside to allow the oil to be absorbed. Turning now to the paneled bowl, I start by reaming the small chamber.  I use only the smallest blade head in the Pipnet Reaming Kit to clear the cake.  Following this, the Savinelli Fitsall Tool scrapes further on the chamber walls.  Finally, I sand the chamber with 240 grade paper wrapped around a Sharpie Pen. After wiping the chamber with a cotton pad, the chamber appears to be healthy – no heating problems detected.Transitioning now to the externals of the stummel, the picture above shows the thick lava flow caked on the rim that needs to be cleaned as well as the entire bowl.  Using undiluted Murphy’s Oil Soap, I begin using a cotton pad to scrub the stummel’s surface as well as the rim.  The rim also requires the brass bristled brush and the sharp edge of my Winchester pocketknife.  I use the knife’s edge carefully to scrape the black on the rim.  The brass brush also helps as the lava starts to break apart.  In time, I move to the kitchen sink to continue the cleaning using shank brushes and anti-oil liquid dish soap to work on the mortise internals.  After a thorough rinsing with warm water, I go back to the worktable and take a picture showing the results of the cleaning.The rim cleaned well but the front left rim panel section has a burn scar that will require additional attention.Another result of the cleaning was to reveal a thin finish on the Beldor stummel.  The next three pictures show blotches of shiny and dull areas.  The shiny indicates old finish hanging on, whereas the dull is raw briar.  The second picture shows a small fill that may need to be addressed. While I am focused on the residue of the old finish, I decide to address it now.  I first used alcohol and a cotton pad to see if it would break down the residue of finish. It did not.  I then use acetone first with a cotton pad, which worked but slowly.  Next, I used acetone with the gentle abrasion of 000 steel wool. This did the trick.  I was able to remove all the old finish which is a good starting point.  I take a couple of pictures to show the clean stummel. Backtracking now in my normal cleaning cycle, I now focus on the internal cleaning of the mortise and airway.  I use only one pipe cleaner and cotton bud wetted with isopropyl 95% to discover that the internals are clean.  I move on!Earlier I identified a fill on the right side of the stummel.  Using a sharp dental probe, I test the fill and find that it has shrunk and unstable.  I dig out the old fill to apply a new patch to the pit.After wiping the area with alcohol to clean it, using regular CA glue, I spot drop some glue on the pit.  I then cover it with briar dust that helps blend after the sanding of the patch area.  I put the stummel aside to allow the patch to cure.With the stummel on the sideline, I turn to the Mini Warden stem which is in particularly good shape.  There is almost no tooth chatter on the bit.  There is one small compression on the upper bit that needs addressing.I also detect some oxidation remaining on the end of the stem on the shank side. Using 240 paper, the upper and lower bit is sanded to remove any lasting tooth chatter and the one compression.The 240 paper is also deployed on the end of the stem where oxidation was detected.  I’m careful to avoid the Beldor ‘O’ stamping on the stem.To be on the safe side, I cover the stem stamping with masking tape to protect it.  Next, 600 grade paper is used to wet sand the entire stem.  Following this, 000 steel wool finishes further.Next, the full regimen of micromesh pads is used on the stem.  To begin, I wet sand with pad 1500 to 2400 and follow with dry sanding with pads 3200 to 4000 and 6000 to 12000.  Between each set of three pads, Obsidian Oil is applied to the stem to condition it and to protect it from oxidation in the future.To further condition the stem and to work on the area of the Beldor ‘O’ stem stamping to clean it up after it having been covered to protect from sanding, I use Before & After Fine and Extra Fine Polishes. Starting with the Fine polish, I apply it on the stem after putting a small amount on my fingers. I work it into the vulcanite and allow it to absorb for 15 to 20 minutes. After this time, I wipe off the excess polish with a paper towel, continuing to work the polish in as I do this. Next, in the same way, the Extra Fine Polish is applied.  After 20 minutes, the excess is removed, and the stem is buffed with a microfiber cloth.Turning again to the stummel, the small patch on the right panel has cured.I first use a flat needle file to file down the patch mound then it is further smoothed and blended with 240 grade sanding paper.Next, I address the dark scorched areas of the rim.  The internal edge of the rim is a ring of black from the burning.  The next two pictures show the condition of the rim. I use the 240 paper to clean the rim and to blend the different contours.  The rim is beveled and tapers downward toward the chamber.  I go with this bevel to help mask and blend the burn mark that is on the front left panel. I follow with 600 grade paper further smoothing and blending.With the sanding and blending utilizing the tapering of the rim, the rim definition has been blurred.  To redefine the hexagonal rim, I do a light topping using only 600 grade paper.  The picture below shows how the rim was reestablished and a defined bevel line.  I like it!Next the stummel is sanded with the full regimen of micromesh pads from 1200 to 2400, which is wet sanded, then dry sanded from 3200 to 4000 and then 6000 to 12000. Next, to tease out the rich briar hues, Before & After Restoration Balm is used.  After applying some on my fingers, the Balm is worked into the surface starting with a cream-like texture then gradually thickening after it is worked into the briar. After applied, I put the stummel aside for a few hours for the Balm to do its thing.  The picture below is of this period.  Afterwards, the stummel is buffed with a microfiber cloth to remove the excess Balm and to raise the shine.With the stem and stummel reunited, Blue Diamond compound is applied to the entire pipe with a cotton cloth buffing wheel set at about 40% full power on the Dremel.After the application of the compound is finished, the pipe is buffed with a felt cloth to remove the compound dust that is left behind.Before applying wax, I have a couple additional projects to do.  The shank on this Mini Churchwarden is very thin and makes me nervous about it being cracked.  To guard the shank as well as add a bit more class to this sharp looking pipe, I fit the shank with a brass shank cap. The cap acts as a band as well as curling over the shank facing to serve as a spacer. I find a fitting that will work.  I apply a small amount of CA glue to the inside of the fitment and use a toothpick to paint the inside circumference of the ring. After placing the cap partially over the shank to start it, I use the stem itself, to press the cap into place.  This serves to create the perfect symmetry with the shank cap butting against the stem facing.  This helps close any gaps that may exist between the two.  The shank cap looks great – I like it! The next project is to try to fill the ‘O’ stem stamp with white acrylic paint to freshen it.  My concern is that the stamping is no longer defined enough to hold a full circle.I place white acrylic paint over the stamping and spread the paint with a toothpick.I then tamp the wet paint with a cotton pad to remove the excess and quickening the drying process.I then use a toothpick’s flat edge to gently scrape the dried paint to achieve an almost whole ‘O’.  It looks good.I use 000 steel wool to clean up the stinger and reinsert it into the nickel tenon.  Tarn-X Tarnish Remover gives a new shine to the brass shank cap.  I use the cotton pad to apply the polish.Finally, with the full ensemble united, I apply carnauba wax with the Dremel.  Using another cotton cloth buffing wheel with the Dremel set at 40% of full power, wax is applied to the stem and stummel.  Afterwards, I use a microfiber cloth to give the pipe a rigorous hand buffing to raise the shine.I am pleased with the results of this Beldor Studio Mini Churchwarden.  The hexagonal paneled bowl gives an elegant presentation as it is mounted on the subtly curved pencil stem.  I like the brass shank cap – it adds a bit of class to a very nicely flowing pipe.  Daniel commissioned this pipe and he will have the first opportunity to acquire it from The Pipe Steward Store.  This pipe benefits the Daughters of Bulgaria – women and girls who have been trafficked and sexually exploited.  Thanks for joining me!

Cleaning up a Willmer Straight Grain AAA Standard Cup and Saucer


Blog by Steve Laug

The next pipe on the table is a shape I would call a cup and saucer or at least Willmer’s take on this shape. The pipe is stamped on the left side of the shank Willmer in script over Straight Grain over AAA over Standard. On the right side of the shank it is stamped Made in England. It is a bent cup and saucer shaped smooth briar with vulcanite saddle stem. The pipe was dusty and dull looking but had great grain around the bowl and rim. The rim top is smooth and there was some darkening and damage to the inner edge of the bowl. There was a thick cake in the bowl. The finish was in great condition under grime ground into the sides and shank. The saddle vulcanite stem was oxidized and had light tooth marks and chatter on both sides near the button. Jeff took the following photos before he started his cleanup work on the pipe. He took close-up photos of the bowl and rim top from various angles to capture the condition of the rim top and edges of the bowl. There was a little darkening around the inner edge and heavier along the back edge of the bowl. There are some scratches on the top and outer edge of the bowl as well. You can also see the cake in the bowl.He took photos of the sides and heel of the bowl to show the condition of the finish and the grain around the bowl. The pipe has some stellar grain around the bowl and shank and the carver maximized the lay of the grain with the shape of the pipe. Jeff took photos of the stamping on the sides of the shank. It reads as noted above and is clear and readable.  He also took a photo of the Willmer “W” on the left side of the stem. The next photos show the top and underside of the stem. You can see the light tooth marks right next to the button edge.I turned to Pipephil to get a quick review of the Willmer Company as it had been a long time since I had worked on one (http://www.pipephil.eu/logos/en/logo-w3.html). I quote the side bar from the site bellow.

Willmer is a brand of H. Willmer & Son Ltd. The factory closed down about 2006-07 after more then 60 years activity and two generations of makers. Gradings until the 1980s (ascending): BA, A, AA, and AAA. After this date Willmer introduced the AAAA and AAAA PRESENTATION as top grades.

The pipe I was working on has a AAA stamping on it which if the pipe came from pre-1980s was the top of the line. If it was later pipe it close to the top of the line.I turned to Pipedia to get more information on the brand (https://pipedia.org/wiki/Willmer). The first paragraph dispelled of the belief that Willmer had been a carver for Charatan in his own words. I quote a portion of the article to give a sense of the history of the brand.

Willmer was founded in London. According to the website, which doesn’t exist anymore because the Willmer factory has been closed in 2006/07, the firm was in business “for more than 60 years” by 2003. Willmer was homed then in Southend-on-Sea, Essex, so not far from the Cadogan plant.

When Willmer first started, they definitely strived to compete with brands in the high-end market. Due to the excellent quality of the pipes Willmer was frequently asked to produce private label pipes for England’s best renowned pipe retailers. So many pipes are not easily recognized as Willmers for stamped under the name of the respective shop. Willmer’s own pipes were stamped “Willmer – Made in England” and showed a sweeping “W” in white or gold on top or left side of the stem. The earlier grading had AAA as top grade followed by AA, A, AB etc.

Sometime in the 1980’s, Willmer went through some major changes. The move to Essex was already mentioned above. They continued making highly respectable freehands – often copying some of the stunning Charatan shapes of days gone by. The grading was altered. What used to be an AAA now became the additional name “Presentation” and was stamped with AAAA. Funny enough, the forth A was often larger than the three before. The other grades were changed accordingly.

Now it was time to look at it up close and personal. Jeff had done his usual thorought job in removing all of the cake in the bowl and the lava on the rim top. He had reamed the bowl with a PipNet Pipe Reamer and cleaned up the remnants with a Savinelli Fitsall Pipe Knife. He took the cake back to bare briar so we could check the walls for damage. He scrubbed the exterior of the bowl with Murphy’s Oil Soap and a tooth brush to remove the grime on the bowl and rim and was able to remove the lava and dirt. He cleaned out the interior of the bowl and shank with pipe cleaners, cotton swabs and alcohol until they came out clean. He cleaned the stem with Soft Scrub to remove the grime on the exterior and cleaned out the airway with alcohol, cotton swabs and pipe cleaners. I took photos of the pipe before I started my part of the work. To show the damage to the inner edge of the rim and the rim top I took a close-up photo. You can see it on the right inner edge and the back edge of the bowl. The vulcanite stem had some tooth marks on both sides and there was some oxidation remaining.I took a photo of the stamping on both sides of the shank. It clearly read what was noted above. The “W” stem on the left side of the saddle stem is also readable.I removed the stem from the bowl and took photos of the parts. It really is a great looking pipe.I started my part of the restoration by addressing the damage to the rim top and inner edge of the bowl. I topped the bowl on a topping board with 220 grit sandpaper. I worked over the inside edge of the bowl with a folded piece of 220 grit sandpaper.I polished the newly topped rim and the rest of the bowl with 1500-12000 grit micromesh sanding pads. I wiped the bowl down with a damp cloth after each sanding pad to remove the dust and debris. I stained the rim with a Maple Stain Pen to blend the repaired and polished rim into the rest of the bowl.I rubbed the bowl and shank down with Before & After Restoration Balm to deep clean the finish on the bowl and shank. The product works to clean, enliven and protect the briar. I worked it in with my fingertips into finish on the bowl and shank. I let it sit for 10 minutes to let it do its magic. I buffed it with a soft cloth. The briar really began to have a rich shine. I took some photos of the bowl at this point to mark the progress in the restoration. The bowl was finished so I set it aside and turned my attention to the stem. To address the oxidation and the tooth marks on the stem surface I sanded it with 220 grit sandpaper to blend in the tooth marks and to break up the oxidation. I started the polishing with 400 grit wet dry sandpaper.I started polishing the stem with Denicare Mouthpiece Polish – a red gritty paste that feels a lot like Tripoli. I find that it works well to polish out some of the more surface scratches in the vulcanite left behind by the 400 grit wet dry sandpaper. I rub it into the stem surface with my fingertips and buff it off with a cotton pad.I touched up the “W” stamp on the stem with PaperMate Liquid Paper. I pressed it into the stamp in the vulcanite with a tooth pick. Once it dried I scraped off the excess fill with the tooth pick and with micromesh sanding pads.I polished the stem with micromesh sanding pads – dry sanding with 1500-12000 grit sanding pads. I wiped the stem down after each sanding pad with a cloth containing some Obsidian Oil. I finished polishing it with Before & After Pipe Stem Polish – both Fine and Extra Fine and buffed it off with a cotton cloth. I wiped it down with a final coat of Obsidian Oil and set it aside to dry. This is a unique pipe and it is the first one I have worked on like this. It is a beauty. I put the bowl and stem back together again and buffed the bowl and the stem with Blue Diamond on the buffing wheel. I gave the bowl and the stem several coats of carnauba wax. I carefully buffed the entire pipe with a clean buffing pad to raise the shine. I finished buffing with a microfiber cloth to deepen the shine. The finished pipe looks very good. The grain is quite beautiful a mix of straight and flame around the bowl sides and birdseye on the rim top and heel. The pipe feels great in the hand. It has an interesting shape that fits well in either the right or left hand. The finished Willmer Straight Grain AAA Standard is shown in the photos below. The dimensions of the pipe are Length: 6 ½ inches, Height: 2 inches, Outside diameter of the bowl: 2 inches, Chamber diameter: ¾ of an inch. This great looking Willmer Cup and Saucer pipe turned out very well. It should be a great pipe. It will be going on the rebornpipes store shortly if you are interested in adding it to your collection. Thanks for reading this blog and my reflections on the pipe while I worked on it.

Renewing Paw’s Kaywoodie “500” Round Shank Bulldog – The Third Pipe of a Great Grandfather’s Legacy


Blog by Dal Stanton

This Kaywoodie “500” is the final of three pipes Joe sent.  It belonged to Paw, Joe’s wife’s great grandfather.  I’ve enjoyed learning about Paw, or ‘2-Page Sam’, the name given to him by his fellow workers of Brown & Williamson Tobacco, Corp, founded in the 1800s in Winston-Salem, North Carolina. In the restoration of the first of three, a Medico Apollo Brylon (See: Another Legacy Pipe of a Great-Grandfather: Challenges Working with ‘Brylon’ on a Medico Apollo) an article in the B&W Tobacco, Co.’s company magazine, Pipeline, Sam’s 43-year career was showcased and it described how he became known as ‘2-Page Sam’.  As a salesman for the tobacco company, Sam’s daily goal was to secure enough orders from clients he would visit, ‘Ma & Pa’ establishments mostly, to reach page two of the order book for the day.  This company-wide work ethic, along with how the article captures Sam’s sincere respect for people – his fellow M&W employees and supervisors as well as the normal working-class people he sold to that made his livelihood possible.   Joe sent the picture on the left, below, of Sam among fellow employees of B&W.  I’m not sure which one is Sam but, my guess is the top, fourth man from the left!  The picture on the right is Sam (standing on the right) – capturing a moment in an age long gone.The second of Sam’s pipes that I just restored (See: Bringing to Life a Unique Kaywoodie Natural Burl 33 – Another Legacy Pipe of a Great Grandfather) was a rarer, Kaywoodie ‘Natural Burl’ 33, Apple shape.  It turned out very, very well and even included the collaborative help of Bill Feuerbach, Kaywoodie’s – or more correctly, S. M. Frank Co.’s, president, the holding company of Kaywoodie, Medico and Yello Bole.  The last of the three is on the worktable now, the Kaywoodie “500” IMPORTED BRIAR US Pat. 2808837 50C.  Here are a few pictures to take a closer look. The nomenclature on both sides of the shank is clear.  The left flank is stamped KAYWOODIE [over] “500” [over] IMPORTED BRIAR [over] PAT. 2808837.  The right side of the shank is stamped with the Kaywoodie shape number, ‘50C’.  The stem holds the classic inlaid Kaywoodie shamrock or clover. The first interesting aspect about this Kaywoodie is the shape designation.  When I first saw pictures of the pipe that Joe sent, I made the immediate identification of the shape to be a compact Rhodesian.  When I looked up the Kaywoodie shape number in the extensive list provided by kwguy originally in the Kaywoodie forum listed also in Pipepedia’s listing, the description surprised me:

50C Small bulldog, round shank 1960-1963

My main pipe shape ‘go to’ is Bill Burney’s Pipedia’s Pipe Shapes  where the debate is described:In deference to Kaywoodie, I’ll call Paw’s pipe a small Round Shank Bulldog.  What was also helpful is that the short period that the Round Shank Bulldog was in production is small – 1960 to 63.  Pipephil.eu’s comments on Kaywoodie’s
500 and 600 series were that they were cheaper, low-end pipes that ran through the period: 1959 – 1967.  It’s probable that Paw’s Kaywoodie “500” Round Shank Bulldog which isolates it as a “500” that was marketed between 60 to 63, cost him $5.95.  The 1962 Kaywoodie catalog page that Bill Feuerbach provided to include in the restoration write-up of Paw’s Kaywoodie Natural Burl, also included an ‘All New Kaywoodie “500”’ advertisement.  Bill’s explanation of the page below indicated that the cost of the pipe, $5.95, identified it as the 1962 catalog which would have encompassed the 1960 to 1963 timeframe of the round shank Bulldog production. The Kaywoodie “500” add also touts a “Syncro-Lok Stem” and a “New Miracle Finish” which lasts for years.  The “Syncro-Lok Stem” was a component part of the US Pat. 2808837 which is stamped as part of the “500” nomenclature.  According to Pipedia’s Kaywoodie article, the 1957 Pat. 2808837 applies specifically to the metal on metal fittings developed by Kaywoodie (Picture below courtesy of Doug Valitchka).  It was interesting for me recently to hear Bill Feuerbach, president of S. M. Frank Co., describing the era of Kaywoodie’s metal fitments coming to a close in his January, 2016, interview with Brian Levine on the  Pipes Magazine Radio Show.  Some reasons discussed were the changing landscape of pipe smokers where ease of cleaning and the fact that today’s pipe smoker, representing a younger generation, is not using the pipe as rigorously as those of earlier generations.  The other primal reason that Bill gave were the economics – the company that had manufactured these parts for Kaywoodie no longer was in business and finding a replacement ended up not making economic sense. With a better understanding of the Kaywoodie “500” on my worktable, I now take a closer look at the Bulldog’s issues.  The cake in the chamber is not thick in the upper chamber, but tightens toward the floor of the chamber. The rim is classic ‘2-Page Sam’ as it has sustained Sam’s rushed knocking damage on the aft quadrant of the rim – but it’s not severe.  As with the other 2 pipes, and with Paw’s Kaywoodie “500” Long Shank Billiard that I restored for Joe last year, this “500”’s rim will also carry these marks in remembrance of Paw. The internal edge of the rim has a large divot which I will repair.  The rest of the rim shows some grime and nicks on the external edge which one would expect.  The finish on the “500” series to me is not preferred.  In the Kaywoodie “500” add above it describes the finish as a “New Miracle Finish” which lasts for years.  As with the other “500”, to me the acrylic-like finish is not as attractive as a natural briar shine.  The ‘candy apple’ shine I will remove in order to reveal better the grain beneath.  The stem is thick with deep residual oxidation and the bit is caked with calcium deposits.  There is tooth chatter, but the button seems to be in good shape.One last issue is that the Kaywoodie screw in stem is slightly under clocked.  This will need a small adjustment and may even correct itself through the cleaning.  With the help of my mouse and box of matches, I’m able to show the stem’s orientation.To begin the restoration of the last of Paw’s pipes, I start by working on the stem. I first clean the internal airway with pipe cleaners wetted with isopropyl 95%.  In order to reach through the tight quarters of the 3-hole stinger, a shank brush is used to help clean.To get a jump on dealing with the oxidation and calcium deposits, I take the stem to the kitchen sink and use a Soft-Scrub-like product here in Bulgaria called CIT.  Using 000 steel wool, I scrub the stem with the CIT cleaner.  The results look good, but I’ll probably use 240 sanding on the stem after seeing how the soak with Before & After Deoxidizer goes.The Kaywoodie “500” stem then joins other pipes in the queue for a soak in the Deoxidizer. After a few hours in the soak, the Kaywoodie’s stem is taken from the Deoxidizer and drained of the excess fluid to save it for future use!  After I squeegee the liquid with my fingers, I again use a pipe cleaner wetted with isopropyl 95% to clear the remaining Deoxidizer from the stem’s airway and a cotton pad, wetted with alcohol, is used to wipe away oxidation raised by the soaking process.Then, to condition the vulcanite stem, paraffin oil, a mineral oil, is applied to the stem and set aside to absorb.Turning to the Kaywoodie “500” Bulldog stummel, the chamber has cake that thickens as it moves toward the chamber floor.  To remove this cake buildup, the smallest blade of the Pipnet Reaming Kit goes to work on the small chamber.  After using only this blade head, the Savinelli Fitsall Tool is employed to further scrape the chamber walls removing more carbon cake buildup.  Next, using 240 grade paper wrapped around a Sharpie Pen, the last vestiges of carbon are removed from the chamber wall.  After wiping the chamber with a cotton pad wetted with alcohol to clean the carbon dust residue, an inspection reveals a healthy chamber. Transitioning now to the external cleaning, the rim has some darkening from lighting and light lava flow. The stummel has normal grime. The second picture below shows the shininess of the acrylic-like finish.  I’m interested to see how the finish holds up through the cleaning.Undiluted Murphy’s Oil Soap is used on a cotton pad to begin the external cleaning.  A brass wired brush is also used to clean the rim.  After some cleaning, the stummel is taken to the kitchen sink where with shank brushes and anti-oil liquid dishwashing soap is used to clean the mortise and airway using warm water.  After a good scrubbing, the stummel is rinsed thoroughly and after returning to the worktable, I take a picture to show the results of the cleaning.Next, returning to cleaning the internals, I use cotton buds with pipe cleaners wetted with isopropyl 95% to do the job.  The metal threaded shank insert is small, and this makes it difficult for the cotton buds to exit with their buds!  The buds are pulling off the sticks in the close quarters and that makes retrieval difficult.  I discover in the end, if I ‘unscrew’ the buds when extracting them, the threads help instead of grabbing the buds.  This makes cleaning a bit slower.  A small dental spoon is helpful is scraping the mortise walls and excavating old tars and congealed oils.  Another helpful technique was folding two bristled pipe cleaners and twisting the ends together.  This provides the action of 4 pipe cleaners in the mortise at one time enhancing the cleaning action.  In time, the buds are coming out lighter and I transition to cleaning with a kosher salt and alcohol soak.The hour is late, and I’ll let the soak go through the night.  Kosher salt and isopropyl 95% are used for the soak and this method of cleaning helps to freshen the internals for the new steward.  I first fashion a ‘wick’ by pulling and twisting a cotton ball.  It is then inserted and guided down the mortise and airway with the aid of a stiff wire.The chamber is then filled with kosher salt, which leaves no aftertaste, and placed in an egg carton for stability.  Using a large eyedropper, the chamber is then filled with isopropyl 95% until surfacing over the salt.  After a time, the alcohol is absorbed, and I top the bowl off once more with alcohol and turn out the lights.The next morning, I discover that the salt and wick have soiled little which usually is a good indicator that last night’s cleaning was effective.  After tossing the expended salt in the waste and clearing the salt from the stummel with the use of paper towel and by blowing through the mortise, I use a few more pipe cleaners to complete the internal cleaning.Next, I take another look at the stummel surface and finish.  As with Paw’s Kaywoodie “500” I restored for Joe last year, the candy apple shine of the acrylic-like Kaywoodie finish lingers.  My preference is to remove the finish and to get down to the natural briar.Another reason for removing the old finish is the fact that it’s already been removed on the rim from Paw’s knocking on the back side of the rim.  Raw briar is already exposed here but the wear on the rim edge also shows where the finish is either gone or very thin.The most efficient way I found to remove the Kaywoodie “500” finish from my previous experience is with acetone.  Starting with cotton pads I incessantly rub the surface with the cotton pads wetted with acetone.  From the very beginning, the red dye begins to show on the cotton pads as the acetone breaks down the old finish.The next picture shows the progress on the stummel surface.  The shiny surface indicates old finish hanging on.  Next to it, you can see splotches of dull surface – the goal!The progress is slow with the cotton pads, so I transition to utilizing 000 steel wool wetted with acetone.  This does the trick as the following pictures show.  I’m amazed at the grain that I can now see, and it’s not half bad!  Even though I do not prefer the thick acrylic-like finish, the upside of it at this point is that it has successfully protected the stummel’s surface from damage.  Most of the nicks and scratches that could be seen before were superficial damage to the finish shell and not to the briar.  As I inspect the stummel, I’m seeing a practically pristine surface. Before moving further with the stummel’s finishing, the divot on the rim needs attention.  It’s located on the internal edge just in front of Paw’s skinned rim backside.  It’s small but filling it will provide a better rim presentation.I fill the divot by mixing a very small amount of thick CA glue with briar putty.  After placing both the briar dust and glue on the mixing palette, I use a toothpick to draw the briar dust into the glue until it reaches the thickness of molasses at which time I apply it to the divot. I use an accelerator to quicken the curing time of the patch.  I next use both flat and half-round needle files to remove the excess briar putty patch.After doing the primary removal with the needle files, 240 grade sanding paper finishes the patch blending at this point.With the 240 paper in hand, I do a quick internal rim edge sanding.  There is a dark ring remaining on most of the internal rim that is cleaned up.Taking a close look at the rims condition, there are nicks throughout the external rim’s edge.  There are also pits here and there which need cleaning.I decide to do a very gentle cosmetic topping of the stummel to clean the rim and give it a fresh definition.  Using the chopping board for my topping board, I first place 240 grade paper on it.  With the stummel inverted, I give the bowl a few rotations and check. Then, after a few more rotations, I’m satisfied.  I’m not concerned with Paw’s aft knocking damage – that remains.  I’m concerned that the rest of the rim enjoys fresh rim lines.  This is especially with a Rhodesian and Bulldog – the twin dome lines that encircle the bowl give these pipes their unique shapes. Then, switching to 600 grade paper on the topping board, the stummel goes a few more rotations to smooth things out further.Next, I use sanding sponges to further erase minuscule nicks and scratches and to start the process of coaxing out the grain that has been waiting beneath the heavy finish.  Starting the sanding with a coarse sponge is followed with a medium then light grade sponge. I avoid the nomenclature except with the final sponge. HOLD THE PRESS! – At this point I had moved into the process of applying the full regimen of micromesh pads to the “500” and Steve had published a really good write up on rebornpipes that caught my attention which I was reading as I sanded (See: Operation Rescue – “My Dog Ate my Ser Jacopo L1 Billiard!”).  He described the process of applying rustication, a skill that I’ve not had too much experience with, and I was very interested in the processes he described.  One of these processes that dovetailed with my current musings about the Kaywoodie “500” on my table was the staining process.  Steve described in his write-up using a black undercoat stain followed by a mahogany on the smooth briar parts of his project (See picture).  He also described the reasoning and the other micro steps leading into and out of this process. The motif of the Kaywoodie “500” series is obviously red, but the grain underneath is dark to stand out in contrast to the light wood.  Last year when I restored Paw’s other Kaywoodie “500” I had used a dark brown undercoat followed by an Oxblood overcoat.  This achieved results that emulated very well the “500” red theme.  The question in my mind after reading Steve’s write-up was the use of black versus dark brown.  I sent Steve an email with that question that resulted in several emails back and forth where Steve responded to more questions raised about how his approach to undercoat staining was different than what I had done and probably, much more effective in creating the affects desired.  Without repeating the full email chain, the process difference that I’m trying out with the Kaywoodie “500” from Steve’s input is to move the undercoating process before the micromesh process and to focus more on the undercoat process of removal of the excess dye.  So, now you know why the presses are on hold!

Therefore, I stop the micromesh process mid-stream and plan to insert Steve’s approach to provide an undercoat and see how it goes!  Regarding the question of the use of black or dark brown for the undercoat, Steve saw no difference in the two.  I understand why now – the point of an undercoat is to darken the grain threads for the most part and in his approach, the undercoat is, in large measure, removed but for these effects.  I decide to apply Fiebing’s Dark Brown Leather Dye as the undercoat.  I assemble on my desktop the needed components.  With spring in full swing here in Sofia, I’m working on my 10th floor Man Cave balcony and enjoying the views while I work.  To begin, after wiping the bowl with alcohol to clean it, I warm the stummel with a hot air gun (inside again for a few minutes).  This warms the briar with the result of opening the grain to be more receptive to the dye.  Then, back on the Man Cave, I use a folded pipe cleaner to paint the aniline dye onto sections of the briar surface.  While still wet, the lit candle ‘flames’ the dye.  The flame combusts the alcohol in the dye leaving behind pigmentation in the grain.  I cycle around the bowl painting and flaming twice to make sure the coverage is thorough.  I then put the stummel aside for the initial undercoat to dry.  The following pictures show the dense appearance of the flamed surface.Turning now to the stem, there is very little chatter on the bit. The lower side pictured in the second picture only has a small button compression that I will address.Deep oxidation is still hanging on especially on the shank side of the stem.  The lighter exposure of the picture helps to show what I can see with the naked eye.To address the lower bit button compression, I use the heating method of expanding the vulcanite, a rubber compound.  With the flame of a Bic lighter, the bit is painted and as the vulcanite heats, the dent hopefully reclaims lost territory.  The result is good.  Only sanding will be necessary.The flat needle file is used to freshen the button and 240 grade paper sands the bit, and the minor chatter is erased.I expand the 240 sanding to the entire stem to address the latent oxidation.  I do not relish the thought of the oxidation emerging during the later polishing stages.  I use a plastic disk I fabricated for this purpose that I pinch up against the stem facing to guard against shouldering the edge of the stem.  The disk works well to maintain a crisp facing.Next, the entire stem is wet sanded with 600 grade paper followed by an application of 000 grade steel wool.  The 3-hole stinger also receives attention from the steel wool.The stem is now ready for the full regimen of micromesh pads beginning with wet sanding using pads 1500 to 2400 and followed by dry sanding with pads 3200 to 4000 and 6000 to 12000.  Between each set of 3 pads, Obsidian oil is applied to condition the stem and to guard against future oxidation setting in.  The Kaywoodie “500” stem looks great. Turning again to the stummel, per Steve’s description I use 430 grade paper to sand off the dried excess undercoat.I combine the sanding with wiping the stummel with a cotton pad wetted with alcohol.  This helps to remove the excess and to allow the grain to come through more.At this point I transition to applying the full regimen of micromesh pads from 1500 to 12000 in 3 pad increments – 1500 to 2400, 3200 to 4000, and 6000 to 12000.  The point of the undercoat is darkening and giving greater definition to the grain.  The progression of the micromesh process shows this to be the case. Next is the overcoat staining with the new red aniline dye I acquired.  I’m hoping to get close to the Kaywoodie “500” red finish hue.  I used Fiebing’s Oxblood as the overcoat last time.  I approach this overcoat stain as if it were the first coat.I begin by heating the stummel with the hot air gun to open the briar’s receptivity to the dye.Next, using a folded pipe cleaner, I paint the red dye on the stummel.  I discover at the first attempt to flame the dye with the lit candle, that there wasn’t enough alcohol content in it to combust.  The application of the dye transitioned into a dye wash – hmm.  I paint the dye on to get a thorough coverage.  I repeat the process once more to make sure all was covered well with the dye. Afterwards, I set the dye aside to dry.  I’m a bit concerned at this point that the red dye may not have enough resonance or depth in it.  It seems to light or pale at this point.I decide to unwrap the finish using Blue Diamond compound and a cotton cloth buffing wheel on the Dremel.  The Dremel is set at about 40% full power.After removing the dye excess my concerns were confirmed.  The new red dye mixture that I used was not ‘grabbed’ by the grain to create much of a red tent over the dark brown undercoating.  I take a quick picture on the black cloth I normally use for the finish shots at the end of the restoration to see what the camera might see.  The finish looks great – the grain looks great, but the color of the Kaywoodie “500” is falling short of expectations. Last time I worked on Paw’s other Kaywoodie “500”, I used an Oxblood over dark brown and it turned out well.  I know my processes have changed up somewhat, but I have a foundation of dark brown undercoating that has been brought down to a darkened grain presentation.  On top of that, the red dye added something… and now, Fiebing’s aniline Oxblood Leather Dye on top of that.  The only thing I do to prepare the surface for the Oxblood is to wipe it well with a cotton pad wetted with alcohol.  Interestingly, almost no dye residue came off after the red wash.  Now using Fiebing’s Oxblood, I apply the dye, flame it, and set the stummel aside to rest for several hours – overnight.  Even at this ‘raw’ state, I can see a marked difference in the dye’s resonance.The next morning, the fire-dyed stummel is ‘unwrapped’ using my normal process, with a felt buffing wheel and Tripoli compound with the Dremel set at the slowest speed.  I take a picture midstream to show the contrast between the flamed shell and the unwrapped briar surface.  The difference is marked.  As the surface is unwrapped, I purge the felt wheel many times during the process by running the felt wheel against the edge of the lapboard I’m working on.  This keeps the felt wheel cleaners and more supple.  The picture below shows the caking on the wheel that happens as the wheel does the plowing. I follow by wiping the stummel with a cotton pad wetted with alcohol.  This lightens the finish some but helps to remove excess dye build up and help to blend the finish.Next, after changing to a cotton cloth buffing wheel set at about 40% full power and after reuniting stem and stummel, Blue Diamond compound is applied to the entire pipe. Tripoli is a coarser abrasive and Blue Diamond is finer, and less abrasive as the fine sanding is completed. After completion, I use a felt cloth rag to buff/clean the pipe of compound dust in preparation for the application of wax.In the homestretch – after changing the cotton cloth buffing wheel and leaving the speed of the Dremel at 40%, carnauba wax is applied to the entire pipe – stem and stummel.  Following this, the pipe is given a rigorous hand buffing with a microfiber cloth to raise the shine.After some twists and turns trying out new processes and a new dye, I’m pleased with the results.  I believe the undercoating advice that Steve provided certainly deepened the signature of the darker grains.  Paw’s Kaywoodie “500” 50C Round Shank Bulldog is looking good with a classy, sharp presentation, and I believe the Oxblood works well to bring out the deeper red tones of the Kaywoodie “500” series.  Paw’s signature remains on the back side of the rim with the shadow of Paw’s penchant for knocking and a reminder of the man he was as ‘2-Page Sam’.  It was a privilege bringing life back to this Kaywoodie “500” for Joe and Hannah and preserving a great grandfather’s legacy to his family. Moreover, Joe’s commissioning of this restoration benefits the Daughters of Bulgaria – women and girls who have been trafficked and sexually exploited. Thanks Joe!, and thanks to all, for joining me!

New Start for an older BBB Best Ambroid Cased Billiard


Blog by Steve Laug

Jeff and I picked up this older BBB Cased Billiard in a group of pipes we purchased not too long ago. It is quite unique. I have worked on a lot of BBB pipes over the years as they are one of my favourite brands and I have quite a few in my collection. This one is a bit different in that it has very little that gives a clue to its age. It is a nice briar with a silver band that is stamped with BBB in the Diamond and Sterling Silver. There were no hallmarks on the band to pin down a date.  It is stamped on the inside of the case with the BBB Diamond logo. The left side of the shank itself is stamped with the BBB Diamond logo. The stem in golden Ambroid and has a bone tenon that screws into the briar shank. It came in a worn black leather covered case lined with black chamois. The case has a brass clasp on the front and brass hinges on the back. It was obviously custom made for this pipe.Jeff opened the case and this was what the pipe that was inside looked like. It was a nice looking classic billiard that is for sure but it was also very dirty. The bowl and shank were a rich medium brown that was very dirty. The stem was golden Ambroid material. The exterior of the bowl was very dirty and had tars and oils ground into the finish and sticky spots on the finish. There was a chip missing on the outer edge at the back of the bowl. The rim top was a mess with lava overflowing out of the thick cake in the bowl. I am sure once it was out of the case it would become clear how dirty it really was.Jeff took it out of the case to have a better look at the condition of the pipe. It was a very classic billiard with a silver band and golden stem. It looked like it would cleanup really well and look great when finished. The finish on the briar bowl looked like it would be great once it was clean. He took some close-up photos of the bowl and rim top. There was a thick cake in the bowl that was hard and uneven. The lava overflowed over the rim top but it looked like the inner edge of the bowl was in good condition. The outer edge had some large nicks and gouges – chunks of briar missing on the back edge. Jeff took photos of the sides of the bowl and heel to show the grain and condition of the finish around the bowl. The pipe has some great grain around the sides. In terms of stamping the only identifying marks on the pipe were the gold BBB Diamond logo on the inside of the case lid, the same stamped on the left side of the shank and again on the silver band. Jeff captured those marks in the next set of photos. The logo on the inside lid of the case was worn and but still readable. Jeff took photos of the stamping on the left side of the shank and the band. He took photos of the stem off the shank/base. The stem has a threaded bone tenon that was filthy with oils and tars. The internals of the pipe were very dirty.Jeff took photos of the stem to show the general condition of the stem shape. The Ambroid stem is well gnawed on both sides around the button. The first photo shows the profile of the straight narrow stem. He took photos of the top and underside of the stem to show the damage and bite marks on both sides up the stem from the button.In 2009 Briar Books Press published a reprint of the 1912 BBB Catalogue No.XX from Adolph Frankau & Co, Ltd.London, E.C. I purchased a copy of the book when it came out and enjoyed reading through it and dreaming about the various pipes that were pictured there. I remembered that there was a section of pipes in the catalogue –Section E called pipes in Cases and it had individually cased pipes with Ambroid stems. I turned to that section in the catalogue and read through the various descriptions and looked at the pictures and sure enough I found this pipe. The only variation was that the one in the drawing had hallmarks on the silver but the rest was identical including the case and stamping on the lid. The top pipe on the right side of the page photo below looks like the one that I am working on.It is described in the title of the page a Best Ambroid Briars Silver Mounted in Cases and available in a variety of sizes. Now I knew the pipe I was working on and that there was at least some variation of it available in the 1912 BBB Catalogue.

It was time to work on it now and do my part of the restoration. I took the leather case from the box that Jeff had shipped to me and brought it to the work table. I opened it up and took photos of the case and the pipe in the case before taking it out and examining it thoroughly to see what I needed to do. You can see the definite similarity between this pipe and the on in the drawing on the top right of the photo above.The pipe looked very clean. The bowl had been reamed back with a PipNet reamer and cleaned up with a Savinelli Fitsall Pipe Knife. The internals of the shank and stem had been cleaned with alcohol, cotton swabs and pipe cleaners. The exterior of the bowl had been scrubbed with a tooth brush and undiluted Murphy’s Oil Soap. The silver band had been cleaned and the tarnish removed. The stem was clean and the damage to the Ambroid was very visible and ready to repair. Jeff had done his usual great job on the clean up. I took photos of the pipe before I started my part of the work. I took some close up photos of the bowl and rim top as well as the stem to show the areas that I would need to address. You can see the that the bowl and rim are very clean. The inner edge of the rim has some damage as do the top and outer edge. There is general darkening to the rim top and scratches and nicks on the surface. The stem is also very clean and the gouges on the top and underside near the button are visible and ready for repair.I took a photo of the stamping on the left side of the shank. I also wanted to show that the band had turned on the shank so that the BBB Diamond was now on the topside so I took a second photo to capture that. I would need to realign the band and glue it in place.I unscrewed the stem from the shank and took photos of the parts. The bone tenon that connects the stem to the shank is visible.I decided to begin my part of the restoration by addressing the issues with the rim top and edges. I topped the bowl with 220 grit sandpaper on the topping board to smooth out the damage on the rim top and the immediate damage on the inner and outer edges. Once I had it smooth I used clear super glue and briar dust to repair the deep gouges in the back outer edge of the bowl. I took a photo of the rim top at this point to show how good the inner edge and top looked. You can also see the repair on the back outer edge of the bowl that still needs to be sanded. I sanded the repair with a folded piece of 220 grit sandpaper to blend it into the surrounding briar and then took a photo of the bowl looking down at the edges. I am happy with the state of the rim and edges at this point in the process. I removed the band from the shank before moving on to  polish the briar with micromesh sanding pads. I sanded the old glue off the shank to make it smooth for the refit. I polished the bowl, rim and shank with 1500-12000 grit micromesh pads wiping it down between pads with a damp cloth. The way in which the rim top colour was blending in with the rest of the briar was perfect and would not need to be stained. I worked some Before & After Restoration Balm into the briar with my fingertips to clean, enliven and preserve the briar. I find that it adds a depth to the polish that I really have come to appreciate. All that remains at this point is to wax and polish the bowl. The bowl looked very good at this point. I was able to preserve the old patina and through polishing blend the rim top into the rest of the finish. It was time to put the band back in place. I used a dental spatula to apply all-purpose white glue to the shank and aligned the band and pressed it in place. I wanted the BBB Diamonds on the shank and band to match as I had seen in photos on line. I wiped away the excess glue with a damp cotton pad.I set the bowl aside and turned to address the issues with the stem. I used a clear CA glue to fill in the deep tooth marks on both sides of the stem and to rebuild the button. I had to layer the glue and let it harden between applications to get a smooth fill on the stem.Once the repairs had cured I used a needle file to cut the sharp edge of the button and to smooth out the repairs.I smoothed out the repairs with a folded piece of 220 grit sandpaper. I started the polishing with a folded piece of 400 grit wet dry sandpaper.I polished the stem with micromesh sanding pads – dry sanding with 1500-12000 grit sanding pads. I wiped it down after each sanding pad with a cloth containing some Obsidian Oil. I finished polishing it with Before & After Pipe Stem Polish – both Fine and Extra Fine and buffed it off with a cotton cloth. I put the bowl and stem back together and carefully buffed the pipe with Blue Diamond polish on the buffing wheel. I gave the bowl and stem multiple coats of Carnauba wax on the buffing wheel and buffed it with a clean buffing pad. I hand buffed the entirety of the pipe with a microfiber cloth. The pipe was alive now and looked great to me. The patina of the older BBB shines through and the repaired Ambroid stem – though far from it pristine beginnings – looks very good.  This pipe is well balanced feels great in my hand. The finished pipe is shown in the photos below. The dimensions of the pipe are Length: 6 inches, Height: 1 ¾ inches, Outside diameter of the bowl: 1 ¼ inches, Chamber diameter: ¾ of an inch. This older BBB Best Ambroid Cased Briar pipe is a beauty and the Ambroid Stem, Sterling Silver Band and old patina briar look stunning together. It is an old BBB pipe so of course it is one that will be staying in my BBB collection. It will be a great addition to my collection of that classic English Brand. Thanks for reading this blog and my reflections on the pipe while I worked on it.

Beginning again – a KB&B Bakelite Blueline Cup and Ball Pipe


Blog by Steve Laug

Jeff picked up this interesting Cup and Ball or Claw and Ball pipe somewhere along his hunts or in an auction. It is quite unique. I have worked on a lot of KB&B pipes but never one like this. It is stamp on the inside of the case with the KB&B Cloverleaf and Bakelite in the centre. Underneath it appears to read Blueline. The gold band on the shank end is also stamped with the KB&B Cloverleaf as well as what looks like 12K Gold Plate. Both the base of the pipe and the stem are Bakelite. The stem has a bone tenon that screws into the Bakelite shank. It came in a black leather covered case lined with blue velvet fabric. The only marking on the case was what I mentioned above. The case has a brass clasp on the front and brass hinges on the back. It was obviously custom made for this pipe.Jeff opened the case and this was what the pipe that was inside looked like. It was a very unique looking pipe that is for sure but it was also very dirty. The base, shank and stem were rich red coloured Bakelite. The exterior of the bowl was very dirty and had tars and oils ground into the finish and sticky spots on the finish. Looking at the top of the bowl you can see the cake and how much lava had overflowed onto the rim top. I am sure once it was out of the case it would become clear how dirty it really was.Jeff took it out of the case to have a better look at the condition of the pipe. It was a very interesting looking rendition of a Ball and Cup pipe – at least that is what I would call it. It looked like it would cleanup really well and look great when finished. The hardwood bowl (cherry or maple) had some colour from either being filthy or from age. Cleaning would reveal the facts! He took some close-up photos of the bowl and rim top. There was a very thick cake in the bowl that was hard and uneven and had lots of flakes of tobacco debris stuck to the walls. The lava overflowed down the outside of the ball on several sides. The edges of the bowl looked to be in pretty good condition at this point. Jeff took photos of the sides of the bowl to show the grain and condition of the finish around the bowl. These photos also lead me to conclude that the bowl is not briar… perhaps Cherry or Maple.In terms of stamping the only identifying marks on the pipe were those on the case on the gold band on the shank. Jeff captured those marks in the next set of photos. The logo on the inside lid of the case was worn and dirty so he included two photos of that. I also found a similar lid logo online and have included it as well for comparison sake. Jeff took photos of the KB&B Cloverleaf and the 12K Gold Plate stamp on the band.He took photos of the ball and the stem off the shank/base. The ball and the stem both are threaded and are screwed into the base. It was filthy with oils and tars. The internals of the pipe were in as bad a condition as the inside of the bowl and airway.Jeff took photos of the stem to show the general condition of the stem shape. The curve is graceful and the curve great. The photo shows the profile of the stem. He took photos of the top and underside of the stem to show the damage and bite and scratch marks on both sides up the stem from the button.I remembered that one of the contributors to rebornpipes, Troy Wilburn had done a lot of work on older KB&B pipes so I turned to one of his blogs on rebornpipes on a Blueline Billiard that he restored (https://rebornpipes.com/tag/kbb-blue-line-pipes-with-bakelite-stems/). As expected Troy had done a great job digging into the Blueline brand and potential dates. I quote from his blog the following sections.

I was thinking after some initial research that these pipes were from around 1910 – early 1920s. Seems it’s a little older than I thought. I got this info from a Kaywoodie and early KBB collector who has had several Blue Lines.

Your pipe is made by Kaufman Brothers and Bondy, or KB&B, which later (1915) created the Kaywoodie line we all know. But this pipe is Pre-Kaywoodie, as they were making pipes under the KB&B branding from about 1900 to 1914. Bakelite was invented in 1907, so this pipe was likely made from 1908 to 1914, as the Bakelite was quite the technological wonder of the time, and was used in many products (still in use today). These “Blue Line Bakelite” pipes are rare pieces, seldom seen.”

Having seen the before pictures on this pipe I was looking forward to what it would look like when I unpacked the most recent box Jeff sent to me. The pipe was present in the box and I took it out of the box to see what work awaited me when I removed it from the case. I put the case on my desk and opened it to see what was there. I opened the case and took a photo of the pipe inside.I was astonished to see how clean the pipe was. The bowl clean and the Bakelite base and stem looked very good. Even the gold band looked better. Now it was time to take it out of the case and have a look at it up close and personal. I took photos of the pipe as I saw it. Jeff had done an incredible job in cleaning up this pipe. He had reamed the bowl with a PipNet Pipe reamer and cleaned up the remaining debris with a Savinelli Fitsall Pipe Knife. He also scraped the thick lava on the rim top. He scrubbed the exterior of the bowl with Murphy’s Oil Soap and a tooth brush to remove the grime on the bowl and rim. He cleaned out the interior of the bowl base and stem with pipe cleaners, cotton swabs and alcohol until they came out clean. The rim top looked incredible when you compare it with where it started. There is some slight darkening on the inside edge of the bowl. He cleaned the base and stem with Soft Scrub to remove the grime on the exterior and cleaned out the airway with alcohol, cotton swabs and pipe cleaners. I included a photo of the KB&B Cloverleaf on the gold plated band.I unscrewed the bowl and the stem from the base and took photos of the parts. The bowl and stem both had threaded connectors. The bowl was metal and the stem was bone.I stripped the spotty finish off the bowl with acetone. I know for some this is a no-no for old pipes but honestly this finish was very rough. I would restain it as close to the original aniline as I could but there was damage that needed to remove the stain and finish to address. I followed that by sanding the bowl with a medium and a fine grit sanding sponge. The bowl was looking better and the dark spots turned out to be oils and not burn marks! Whew! I polished the bowl with micromesh sanding pads – dry sanding with 1500-12000 grit pads and wiping the bowl down after each pad with a damp cloth. Note the developing shine on the wood. I went through my various stains and chose a Tan aniline stain for the bowl. It is a nice coloured stain that is close to what was original and will give me some coverage over some of the dark spots on the sides of the bowl. I applied the stain and flamed it with a lighter. The flaming burns off the alcohol and sets the stain in the wood. I repeated the process until I was happy with the coverage.I set the bowl aside to let the stain cure and turned my attention to the base. The band was loose so I removed it for the first round of pads. I polished the Bakelite with micromesh sanding pads to remove the scratching and bring out a shine. I dry sanded with 1500-12000 grit pads and wiped it down with a cloth I use that has Obsidian Oil impregnated in the fibres. It works well to remove the dust. I paused the polishing to glue the gold band on the shank end. I put some white all-purpose glue on the Bakelite and pressed the band in place on the shank. I wiped the excess glue off with a damp cloth. I let the glue dry for a short time.When it had set I continued polishing with the micromesh pads. I set the base aside and went back to the bowl. I buffed out the newly stained bowl with Blue Diamond to bring out a shine. The colour is opaque enough to hide the dark spots and transparent enough to show some grain in the sunlight. I like it!I rubbed Before & After Restoration Balm into the wood with my fingertips to clean, enliven and preserve the newly stained bowl. I find that it adds a depth to the polish that I really have come to appreciate. All that remains at this point is to wax and polish the bowl. With the bowl and the base finished it was time to put them back together. I would still need to buff and wax both but the project was coming to an end. All that remained was to finish the stem work. I set the base and bowl aside and turned to address the issues with the stem. I used a clear CA glue to fill in the gouges across the stem from the button forward an inch on both sides. I also filled in the deep tooth marks on both at the same time.I smoothed out the repairs with a folded piece of 220 grit sandpaper. I started the polishing with a folded piece of 400 grit wet dry sandpaper.I rubbed the stem down with Denicare Mouthpiece Polish. It is a gritty, red paste with the consistency of red Tripoli. I find that it works well to polish out scratches and light marks in the surface of the stem. I polished it off with a cotton pad to raise the shine.I polished the stem with micromesh sanding pads – dry sanding with 1500-12000 grit sanding pads. I wiped it down after each sanding pad with a cloth containing some Obsidian Oil. I finished polishing it with Before & After Pipe Stem Polish – both Fine and Extra Fine and buffed it off with a cotton cloth. I gave it a coat of Briarville’s No Oxy Oil to preserve and protect it. I put the hardwood bowl and Bakelite Base stem back together again and carefully buffed it with Blue Diamond polish on the buffing wheel. I gave the bowl, base and stem multiple coats of Carnauba wax on the buffing wheel. I hand buffed the entirety of the pipe with a microfiber cloth. The pipe was alive now and looked great to me. It has a great feel in the hand that is very tactile and the colouring on the bowl should develop more deeply as the pipe is smoked. The finished pipe is shown in the photos below. The dimensions of the pipe are Length: 5 1/2 inches, Height: 2 1/4 inches, Outside diameter of the bowl: 1 1/4 inches, Chamber diameter: 7/8 of an inch. This older KB&B Blueline Cup and Ball pipe is a beauty and the Bakelite looks great with the newly stained bowl. It is one of those old timers that will be staying in my KB&B collection. It will be a great addition to my collection of old pipes. Thanks for reading this blog and my reflections on the pipe while I worked on it.