Tag Archives: staining

Jen’s Trove No. 5: Recommissioning a Mehaffey Cutty 6


Blog by Dal Stanton

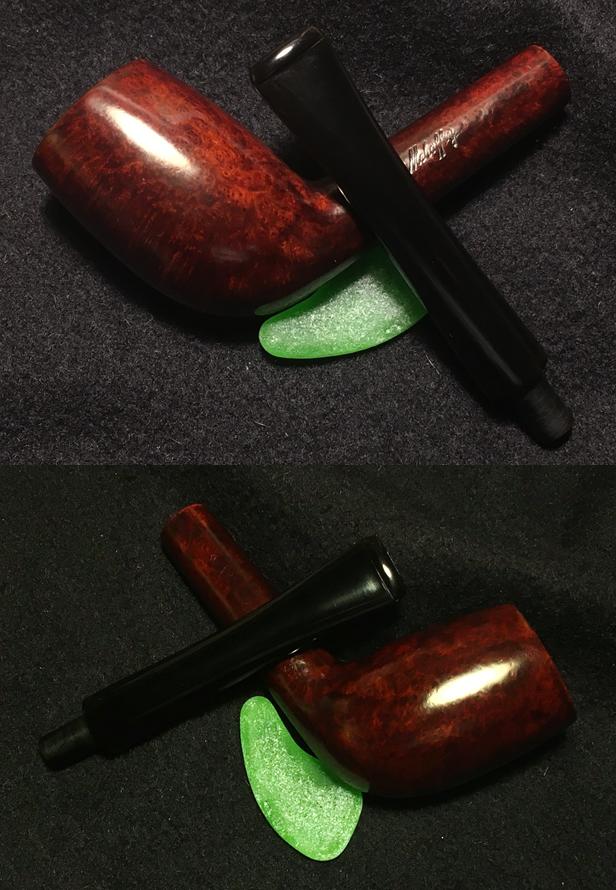
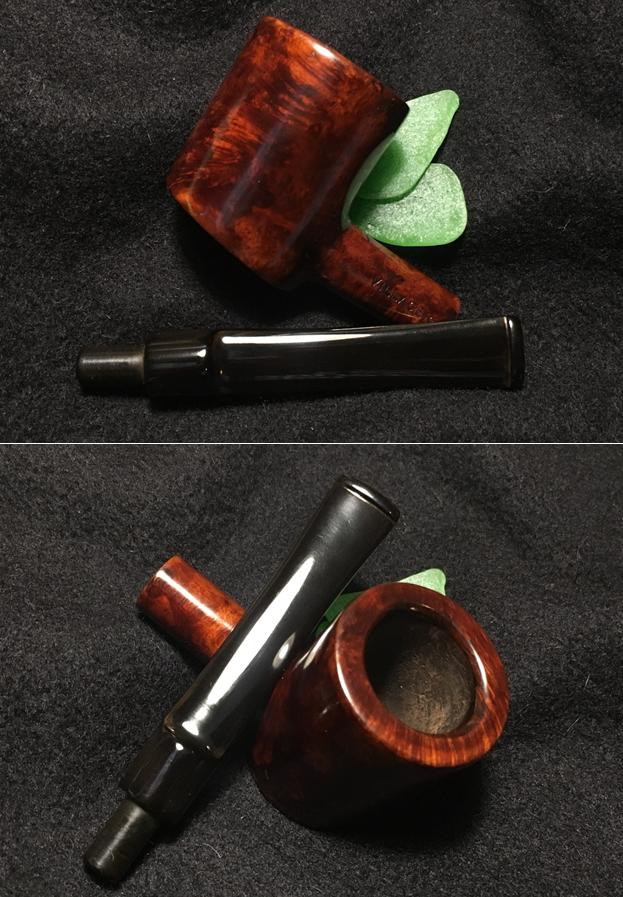
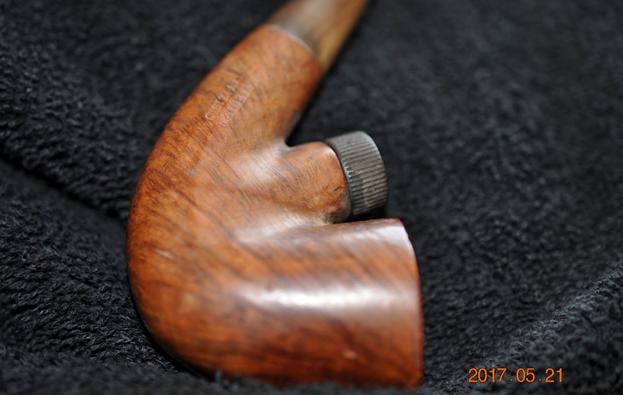
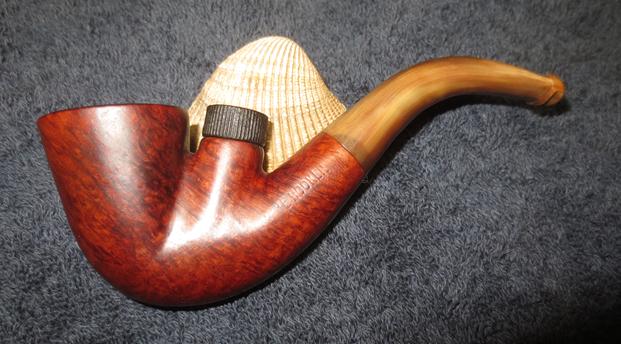
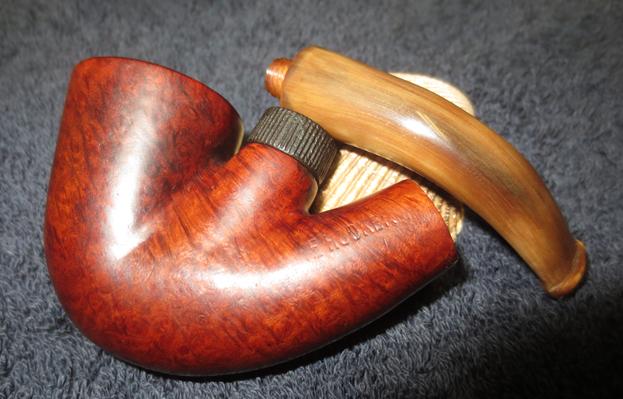
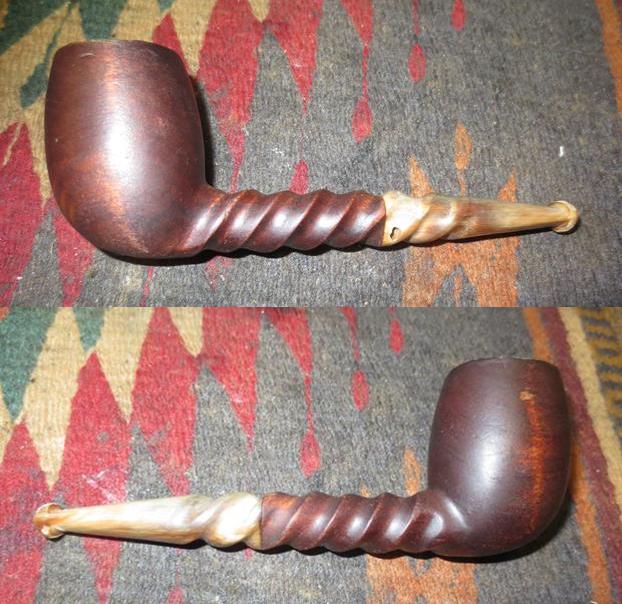
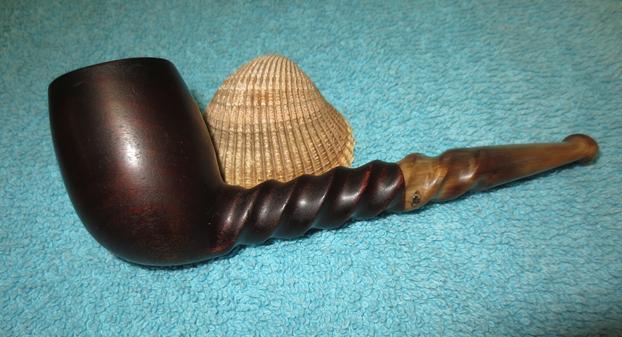
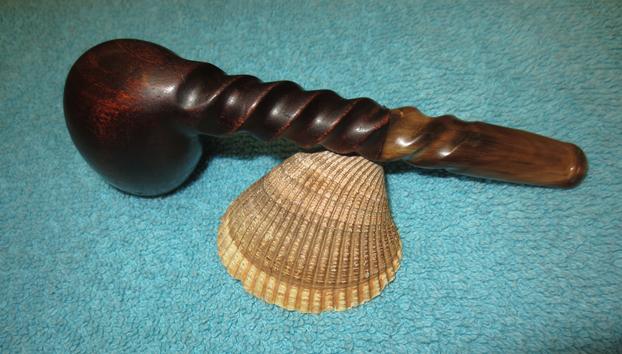
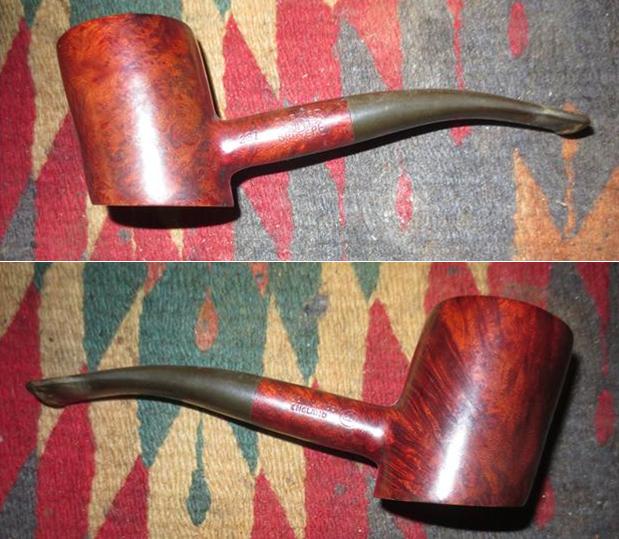
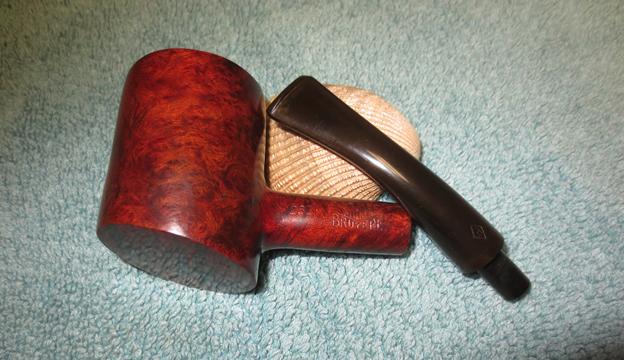
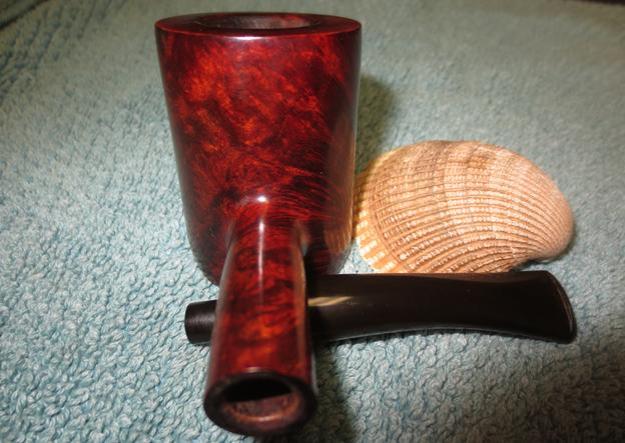
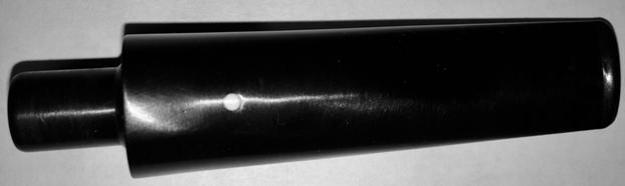
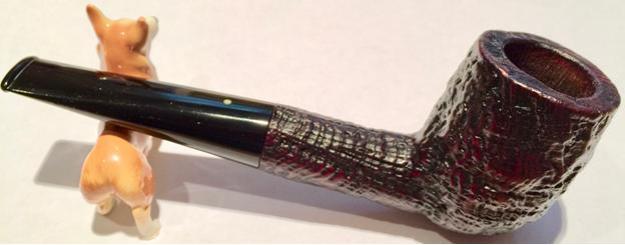
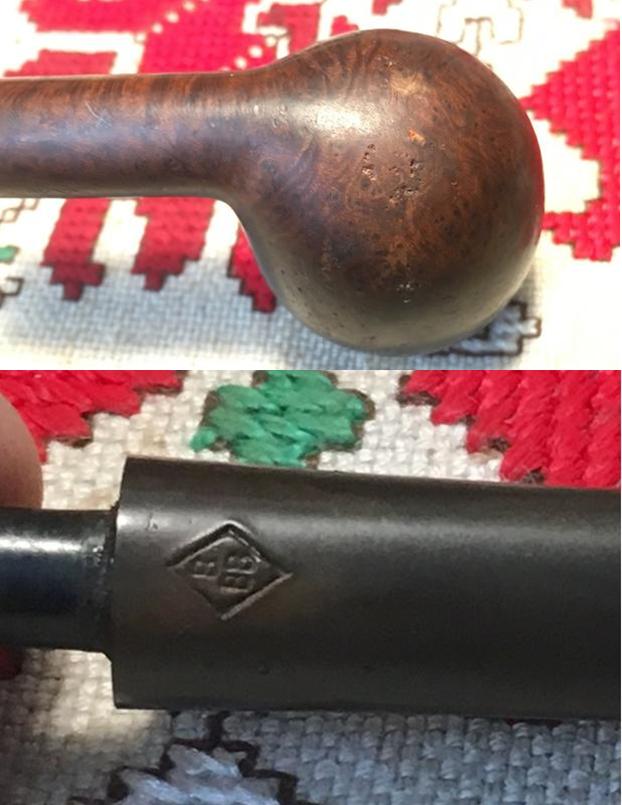
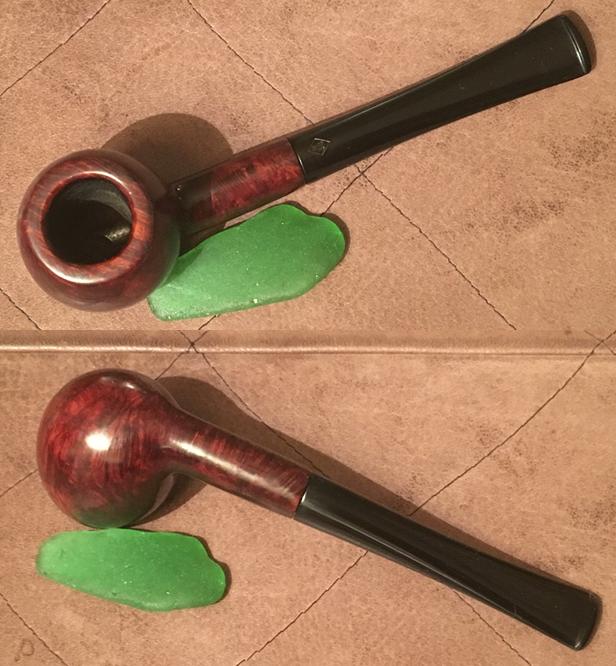
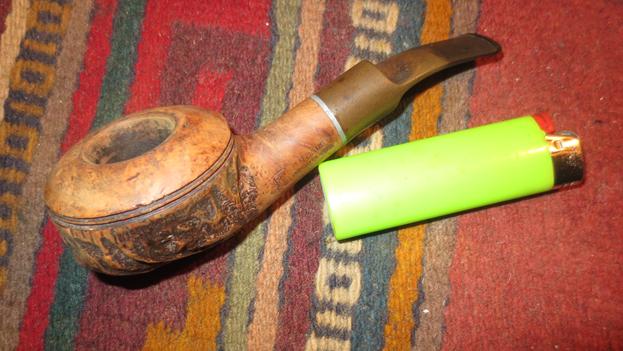
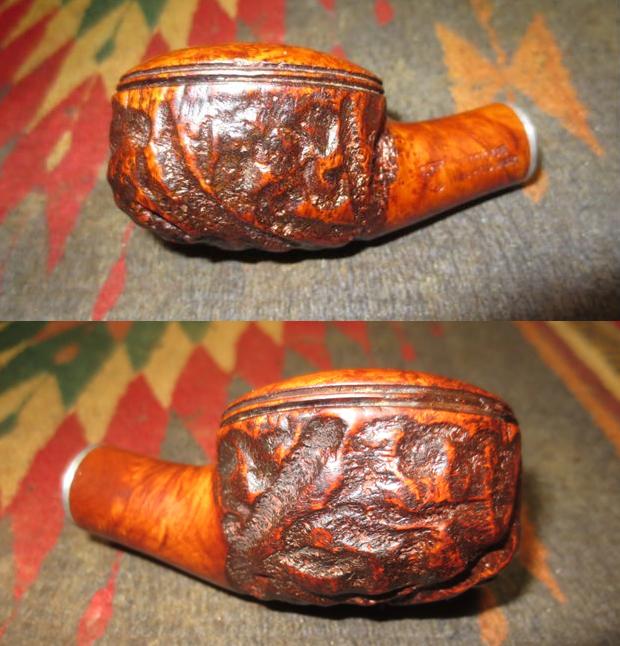
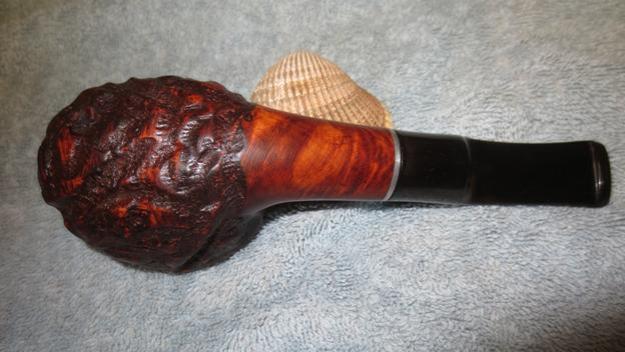
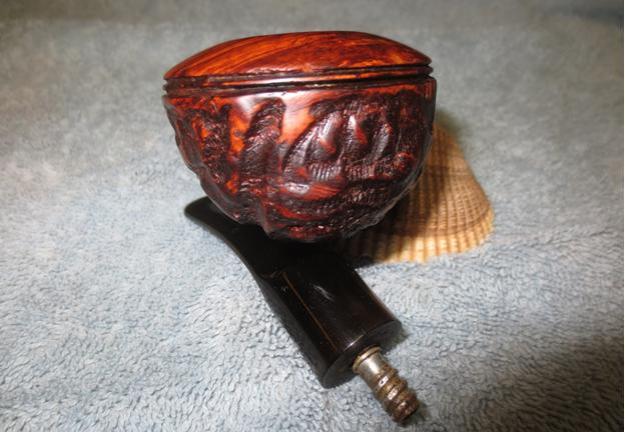
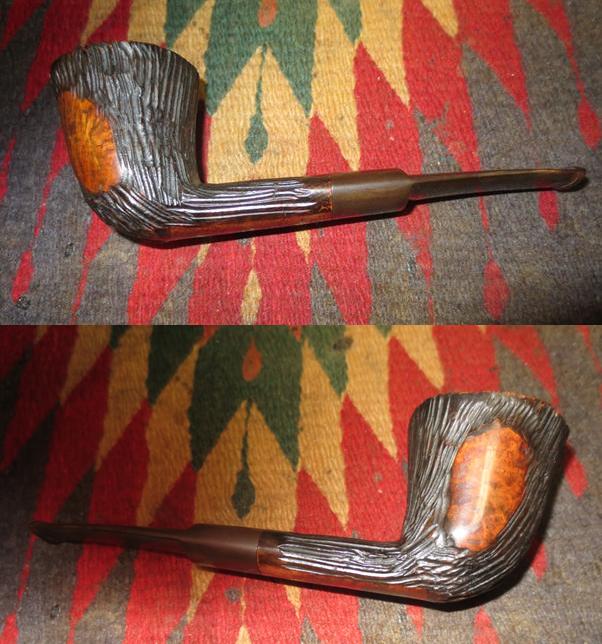
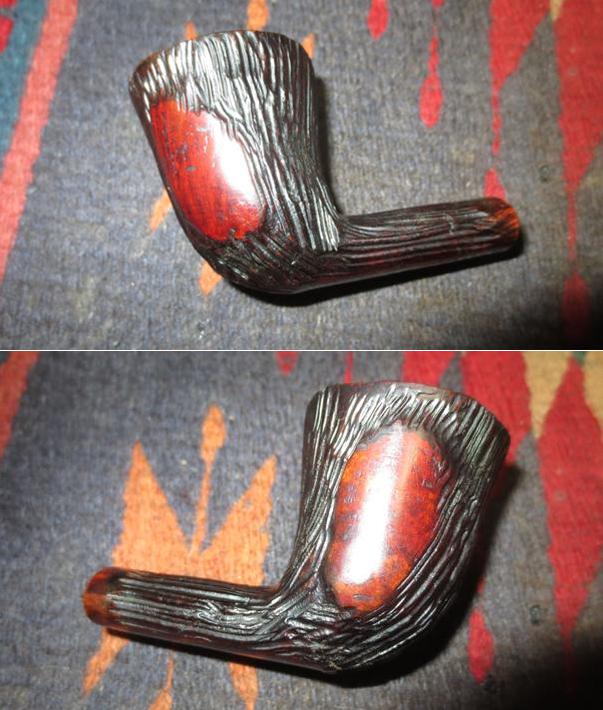
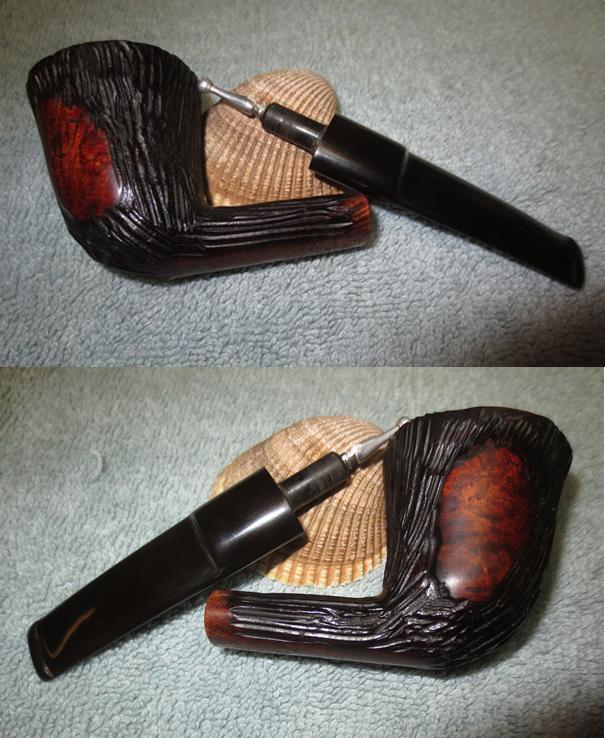
When I first saw this pipe on eBay, what drew my attention was the canted bowl.  I wasn’t sure then what shape it was, and when Jen recently pulled it out of the “Help Me!” basket to add to her trove of pipes she was collecting for restoration to give as gifts to men in her family, I still didn’t know.  After pulling it out on my work table, I took another look and started looking at my ‘go to’ sites for shapes charts.  My thinking was, “Chimney” because of the taller than usual bowl that can be canted, but “Cutty” was also in the running mainly because of the forward canted bowl.  When I sent my thoughts about the shapes and a picture to Steve for his input, his verdict was a ‘Cutty’ shape.  The forward canted bowl was the clincher and that my pipe’s bowl was tall, but not reaching ‘Chimney’ proportions.  Here is what I saw on eBay and what I sent to Steve:
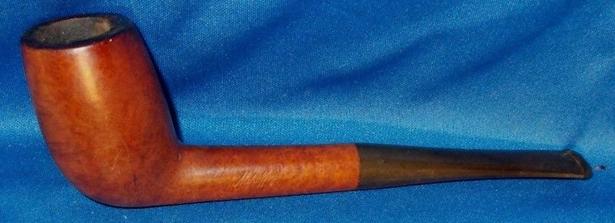
I enjoyed TobaccoPipes description of this very old pipe shape having its genesis in the clay world:As far as we can tell, the Cutty is the oldest pipe shape that is still available today.  

 As early as the 16th century, pipe smokers would settle in at their favorite tavern and–if they had a high enough social status–would pull out a long clay pipe, almost always a Cutty shape.  This shape was common because it was easy to craft in the molds used for clay pipes (William Goldring, The Pipe Book: A History and How to: 1973).  

Clay Cutty pipes, up until about a century ago, always included a “spur” or “boot” of extra material at the bottom of the bowl.  When smoking the same clay pipe all day long, the bowl tends to get pretty hot.  The spur allowed the smoker to grasp the base of the pipe without burning his hand.  Today, some Cutty’s keep the spur attachment, but not many.

A modern example of a Cutty pipe is the Savinelli Petite 402 model.

 Like the Dublin family this pipe falls in, the Cutty has a conical shaped chamber, which means the diameter of the chamber tapers down the closer you move to the bowl.  The largest difference between a Dublin and a Cutty is that while a Dublin has evenly thick chamber walls that move down the bowl, the Cutty has more of a rounded shape, in some ways resembling an Egg.  As pointed out by G.L. Pease, the Cutty has an exaggerated forward cant, originally purposed to keep the heat and smoke away from the smoker’s face.  

Typically, Cutty pipes have a very slight bent stem, but this is not a strict qualification. In many instances, we see modern Cutty with straight stems and deep bent stems.

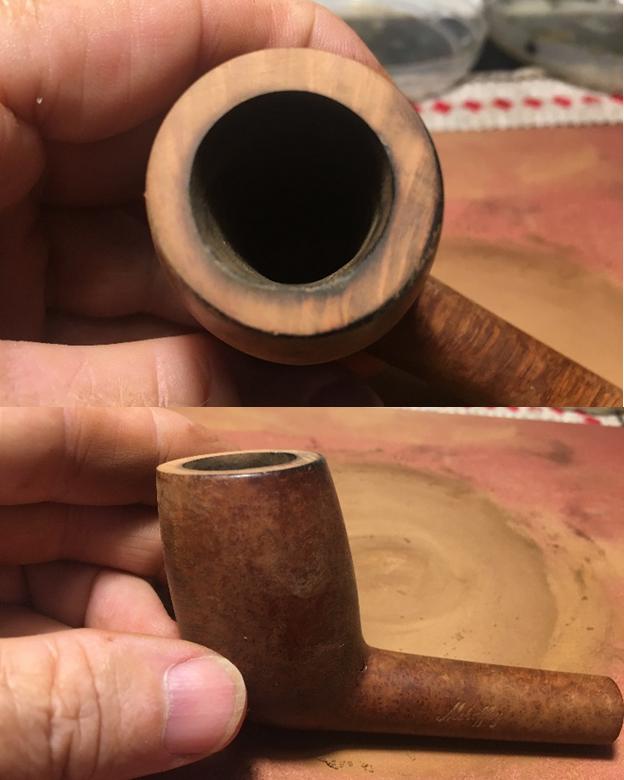
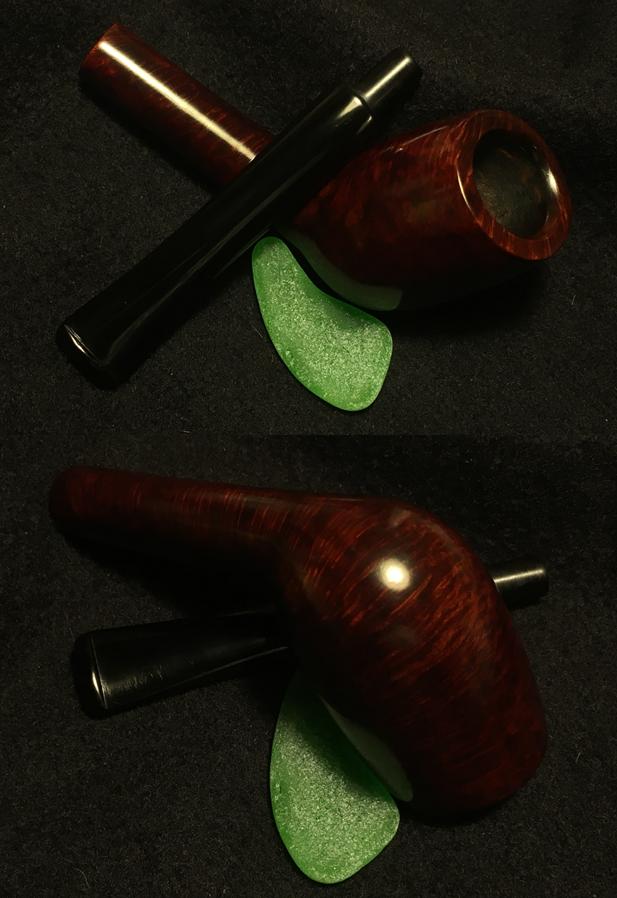
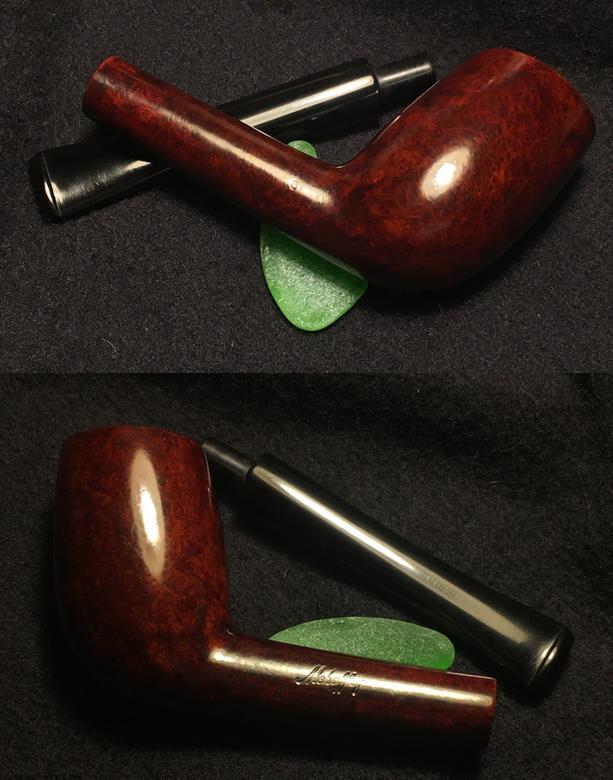
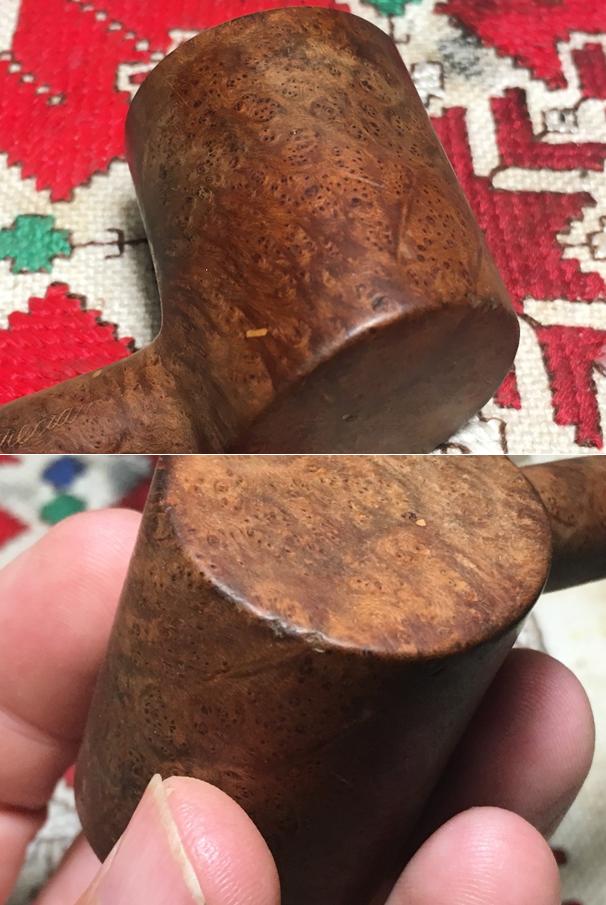
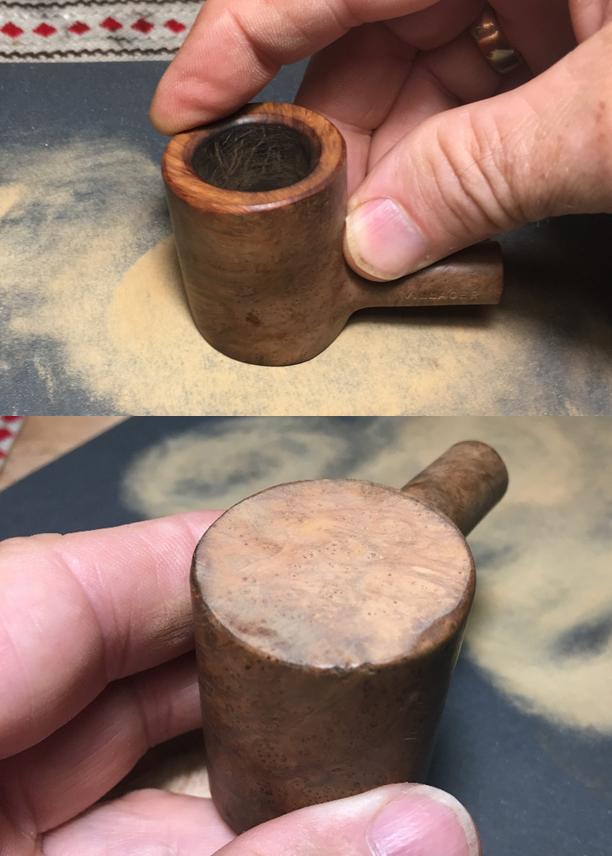
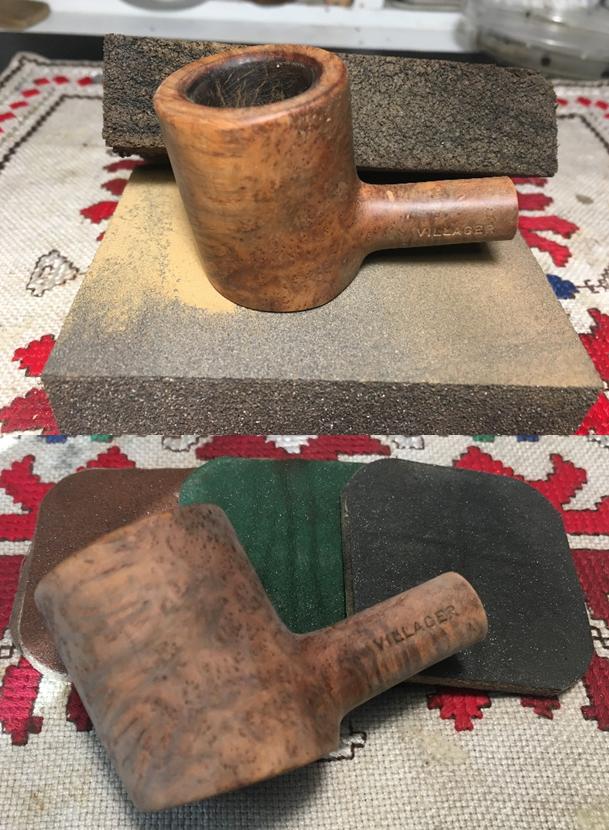
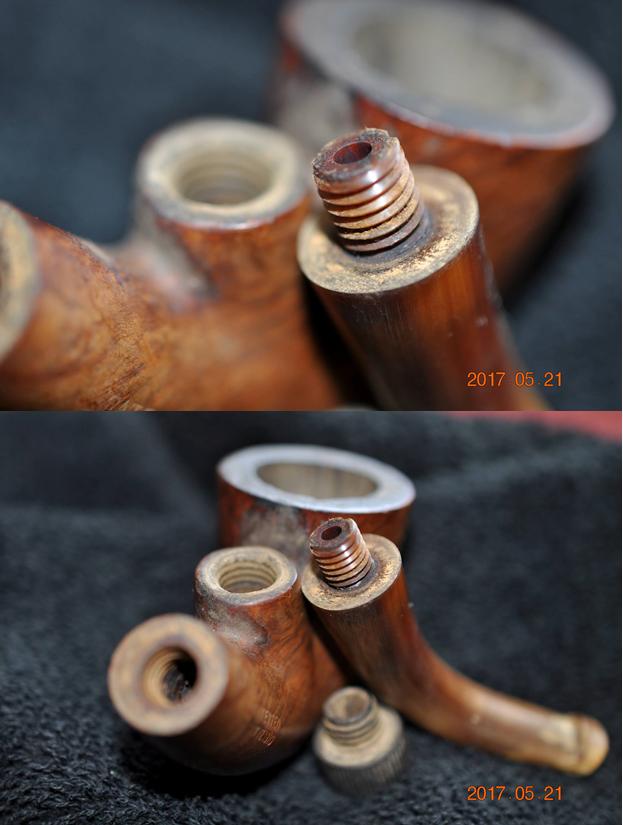
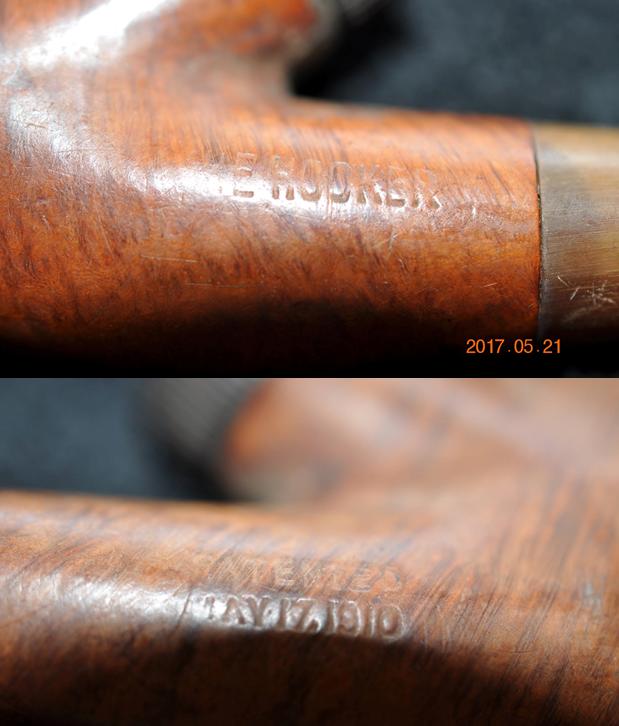
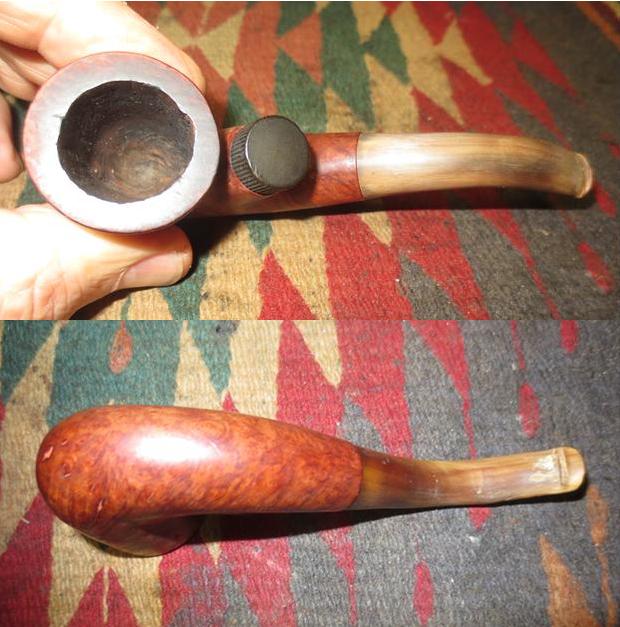
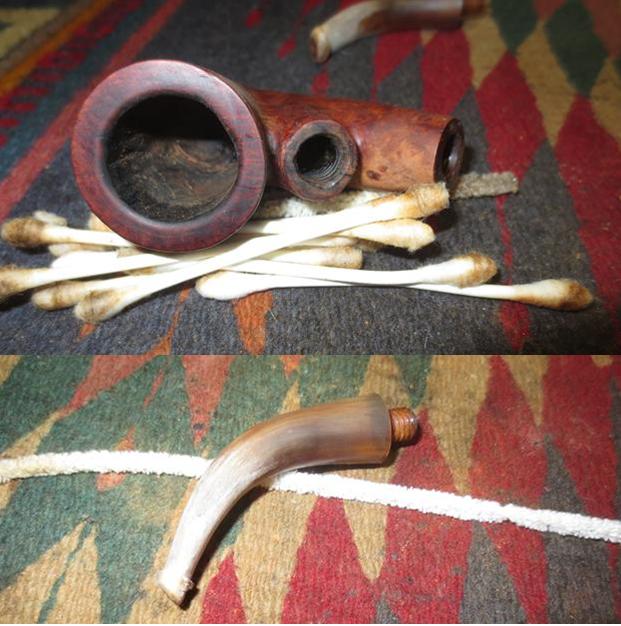
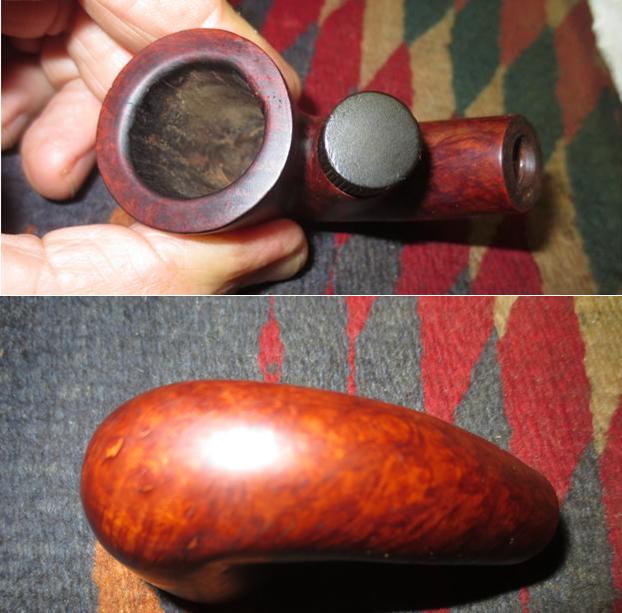
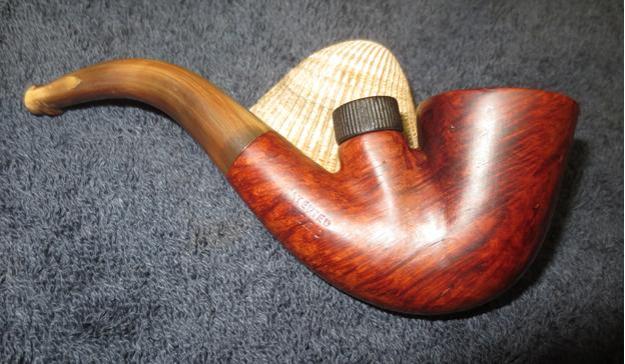
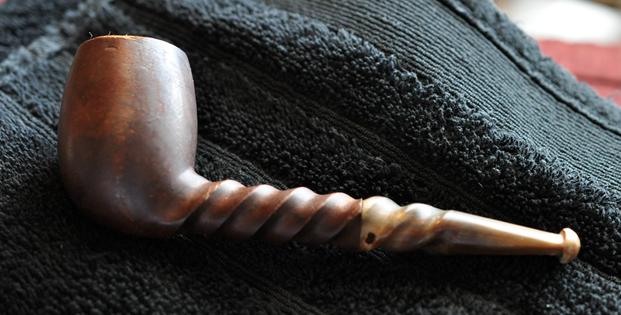
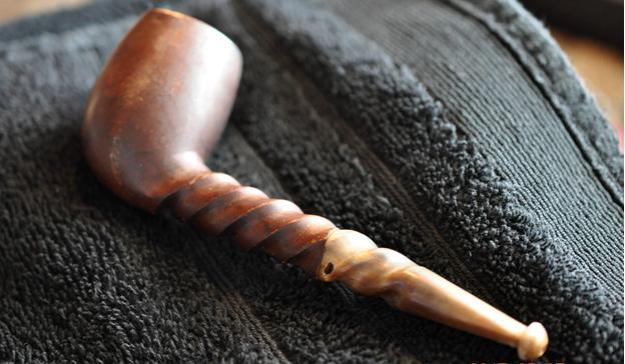
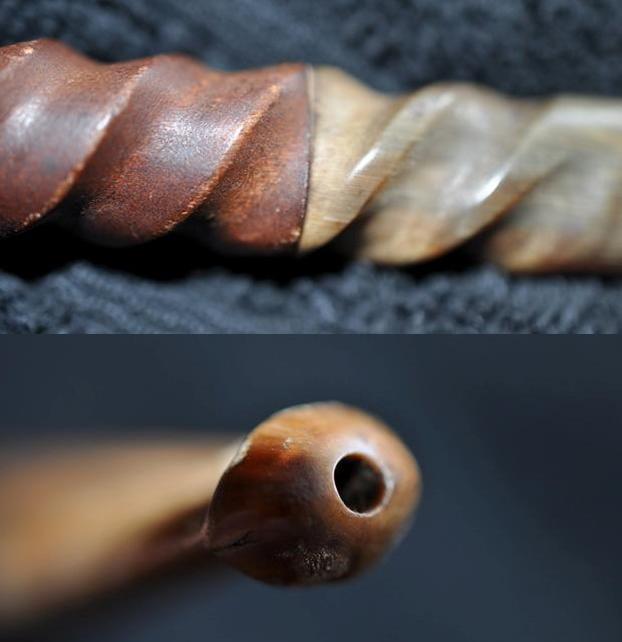
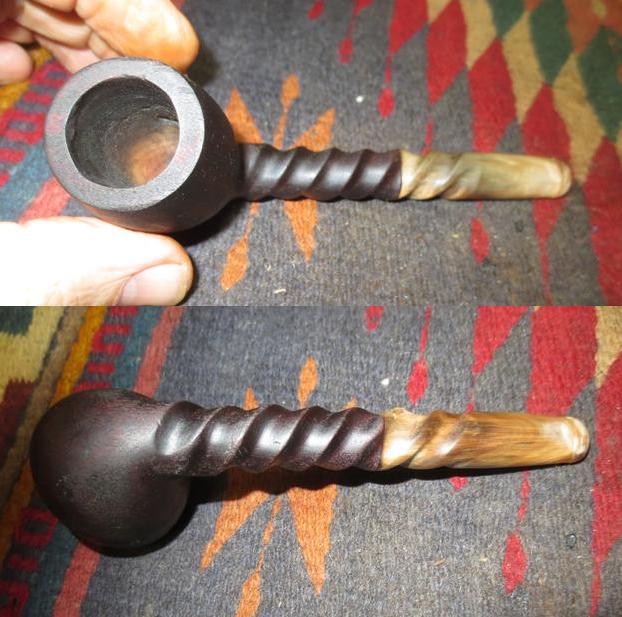
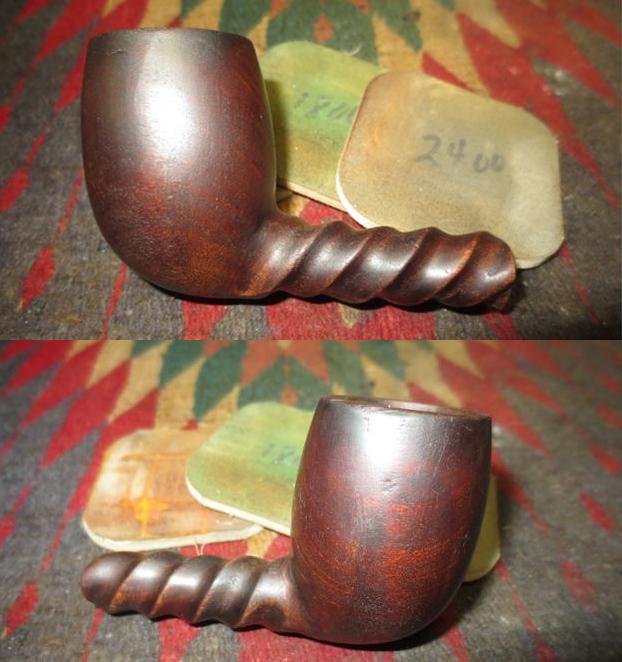
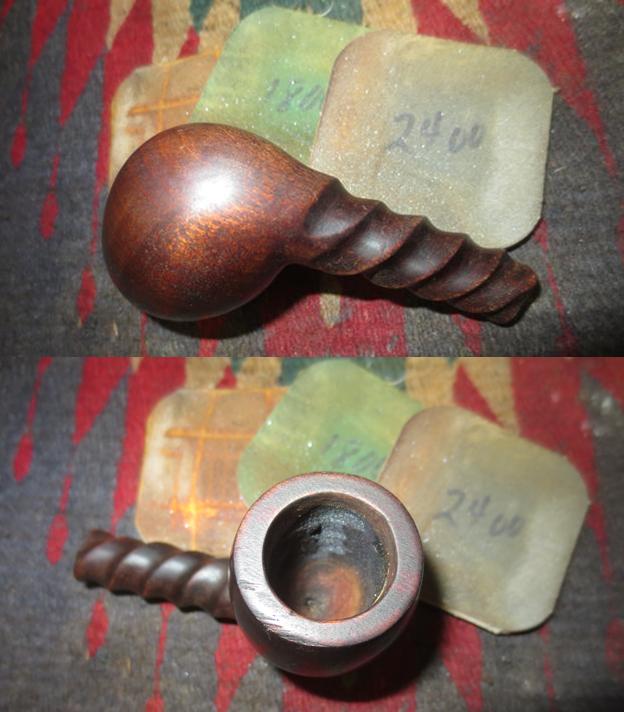
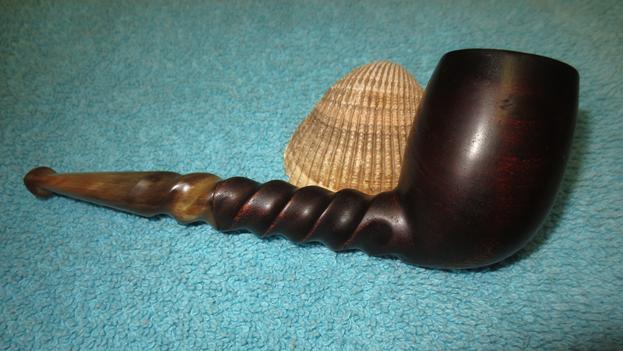
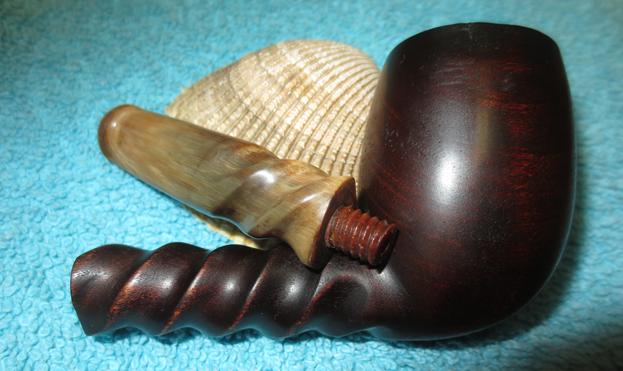
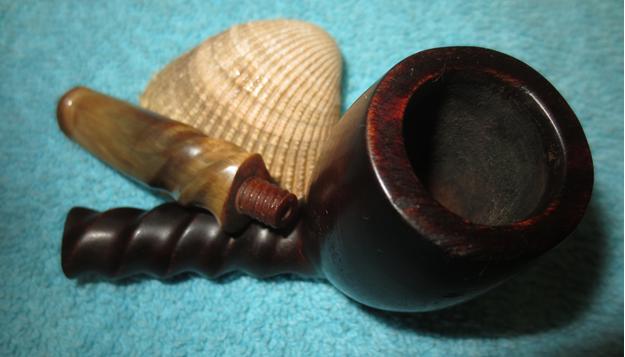
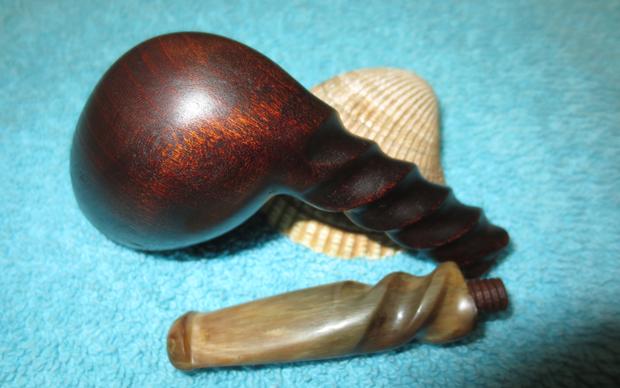
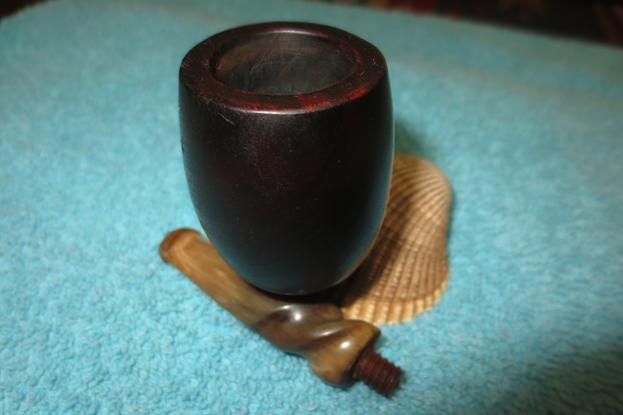
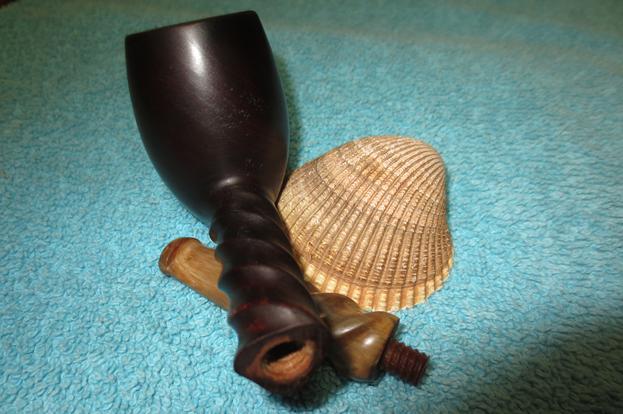
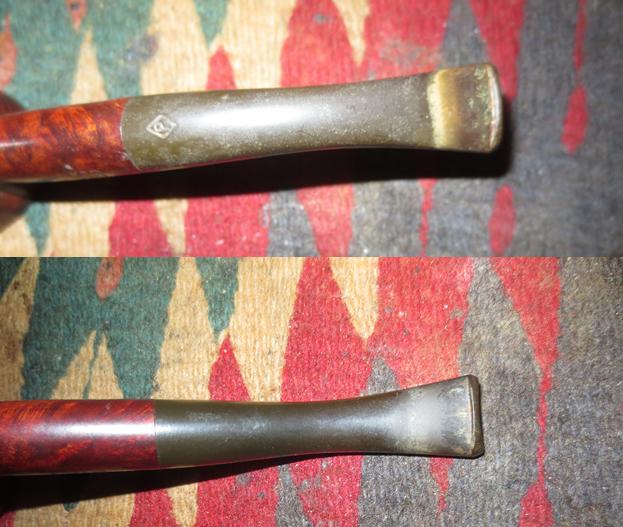
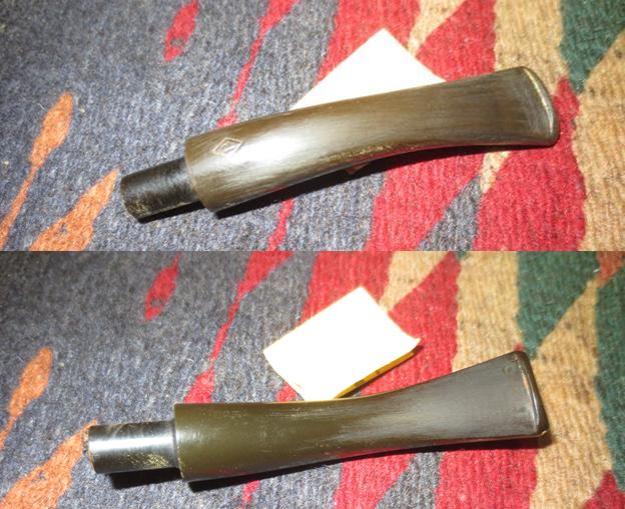
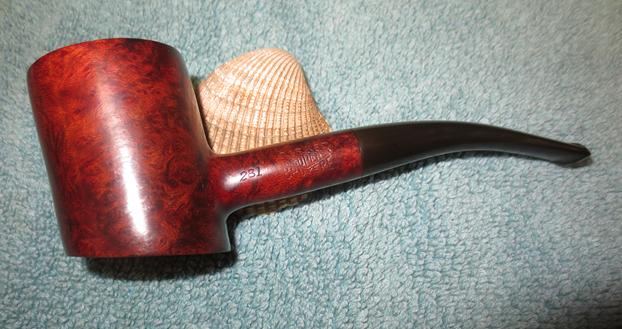
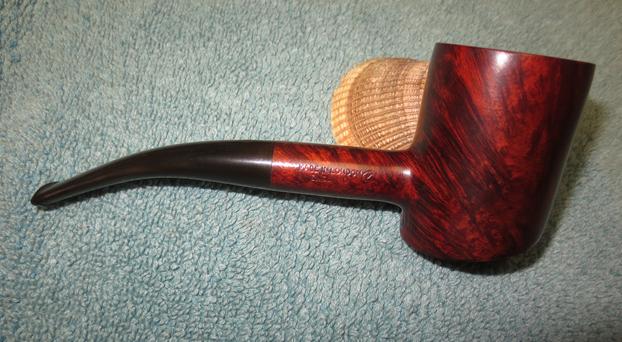
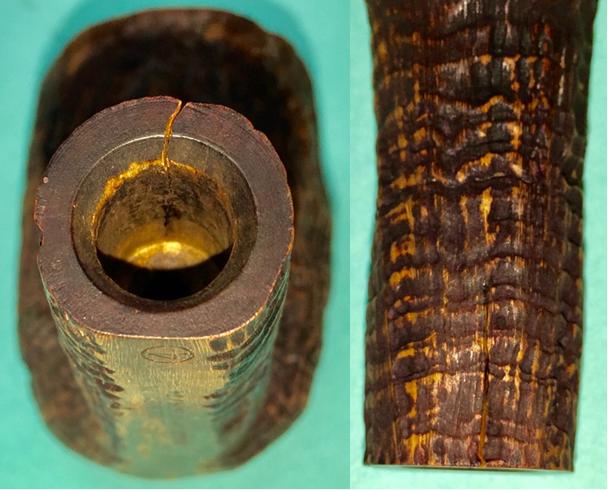
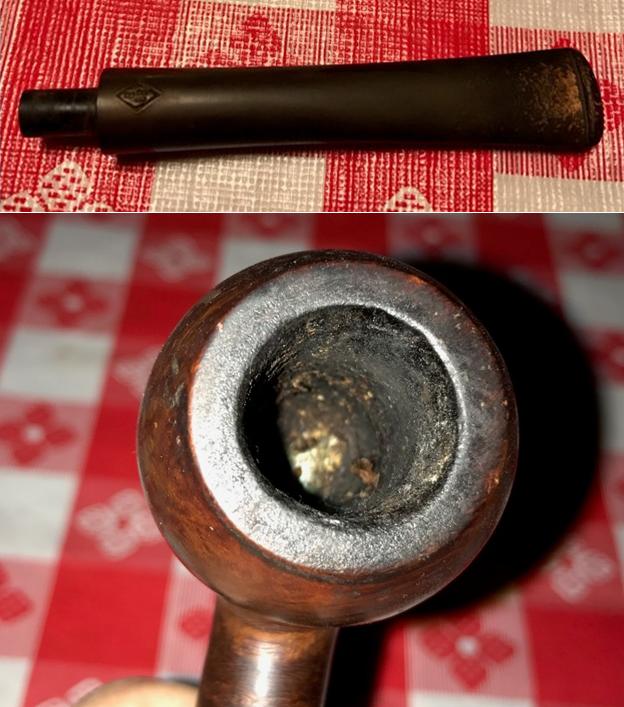
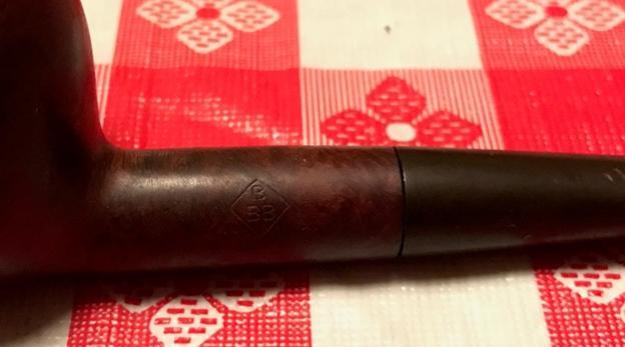
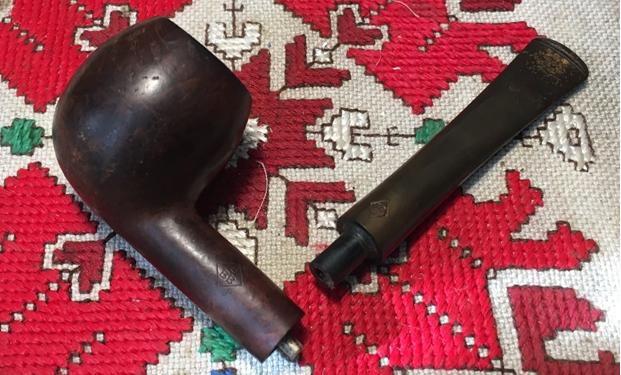
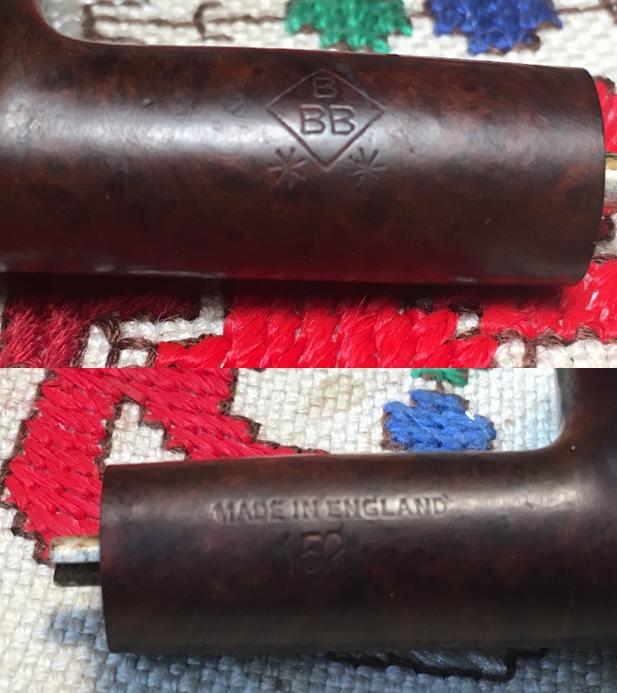
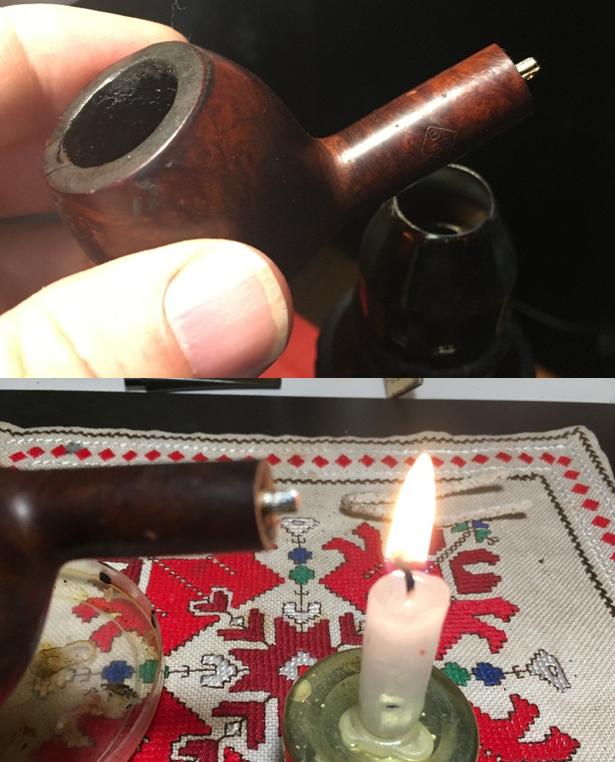
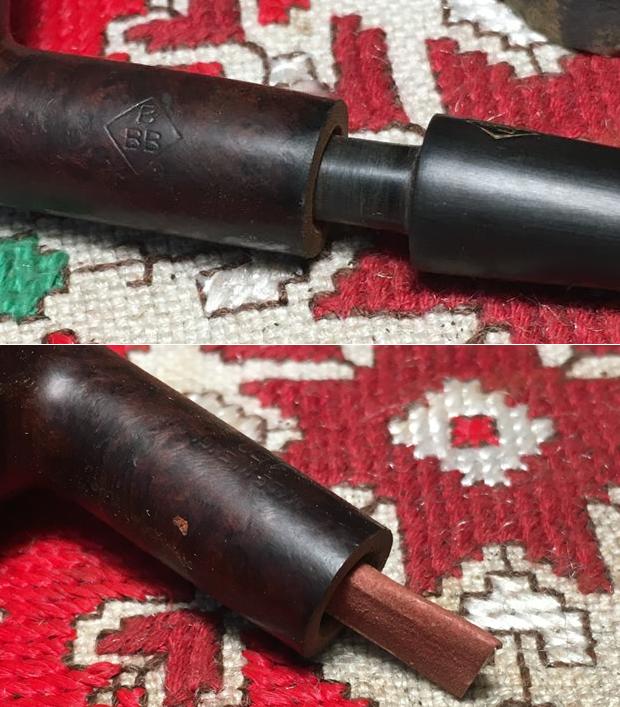
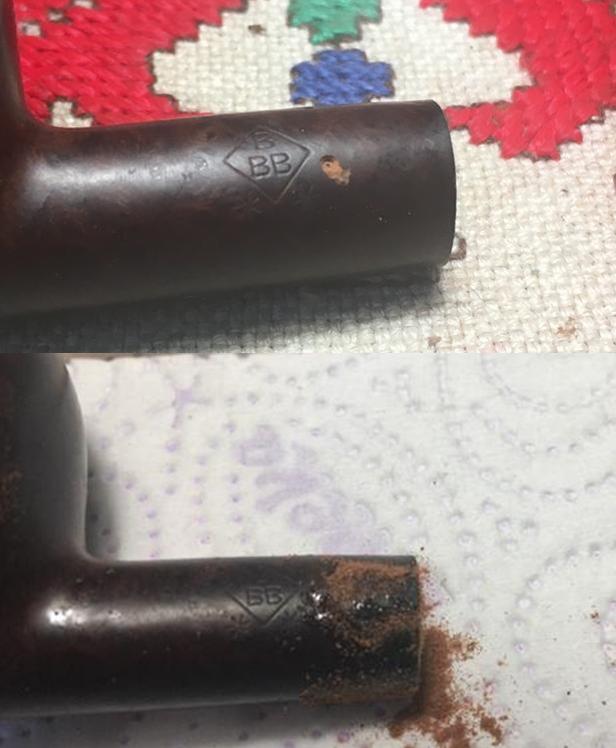
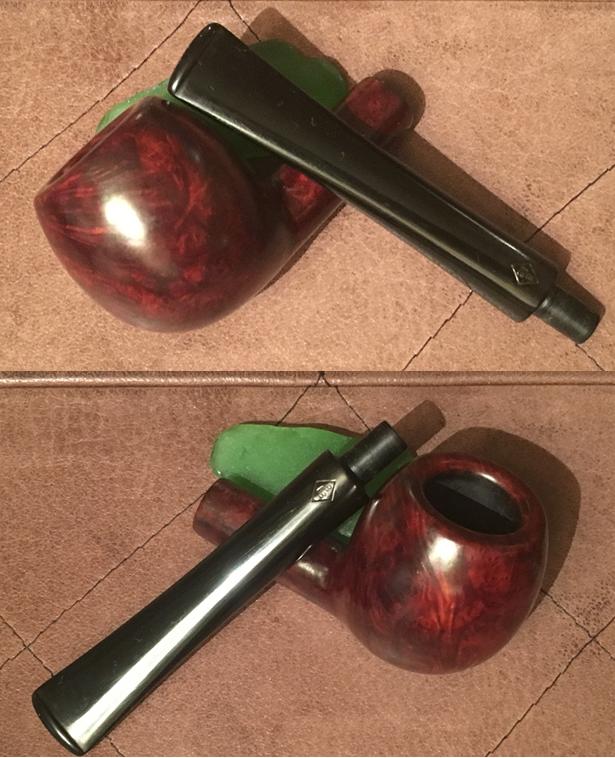
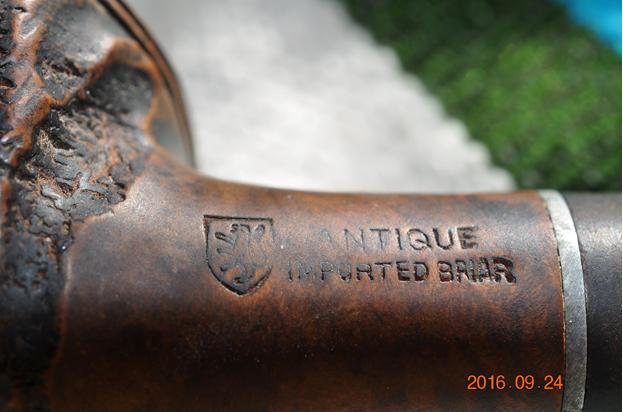
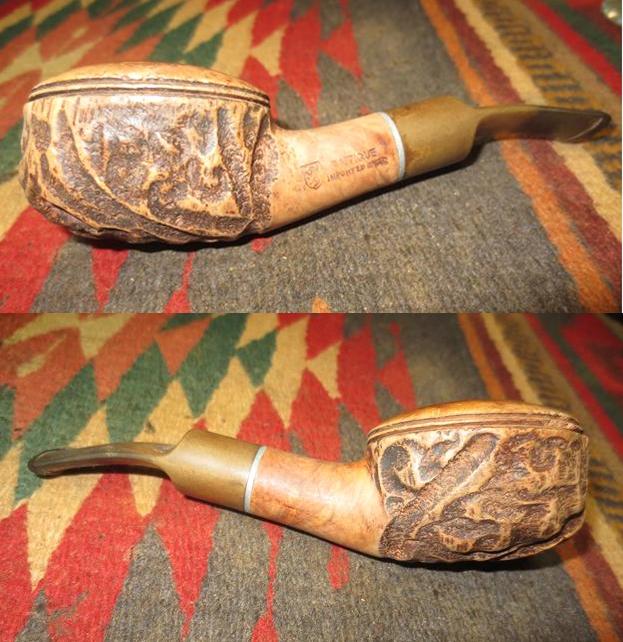
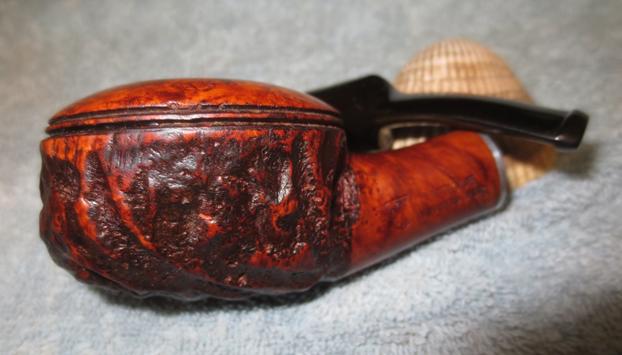
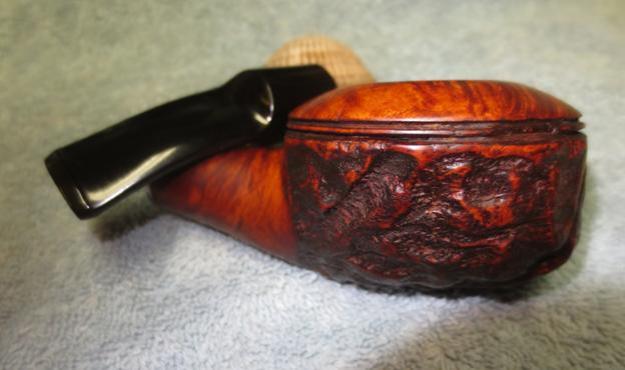
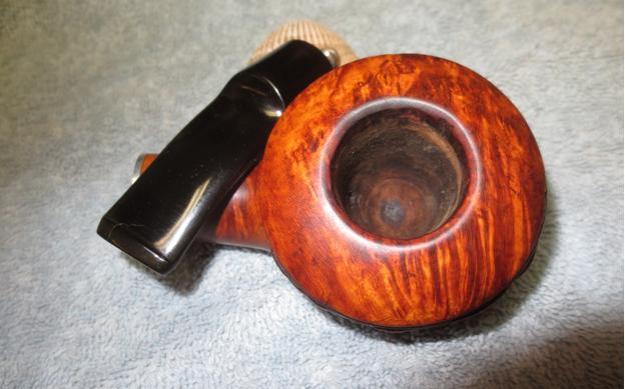
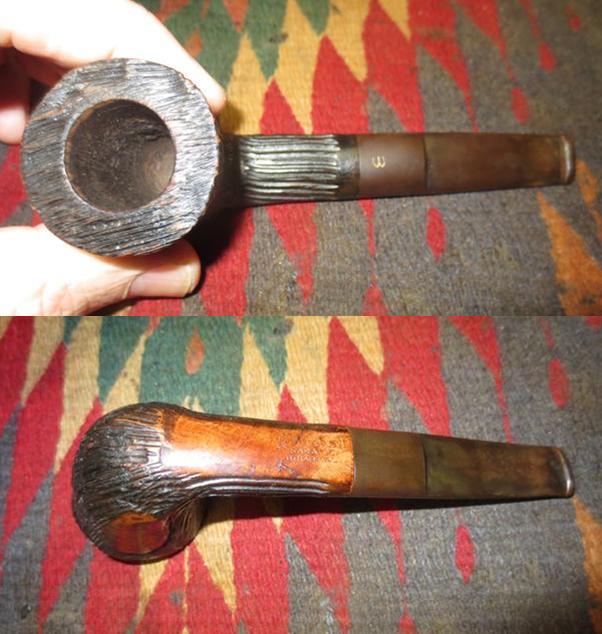
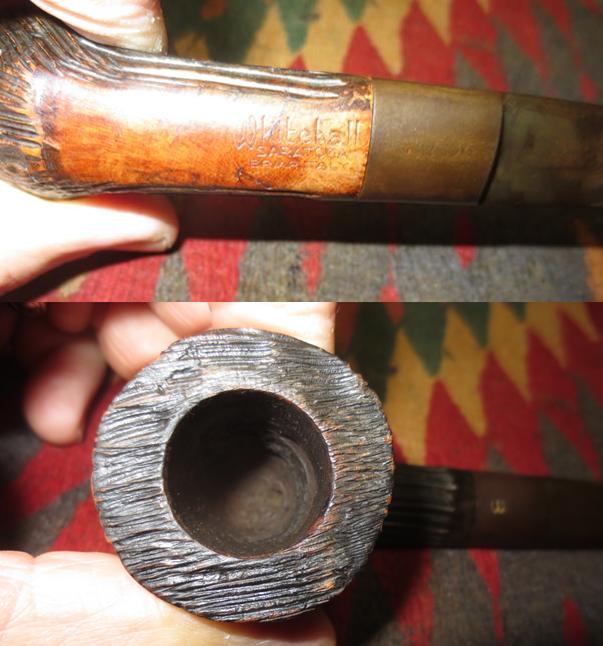
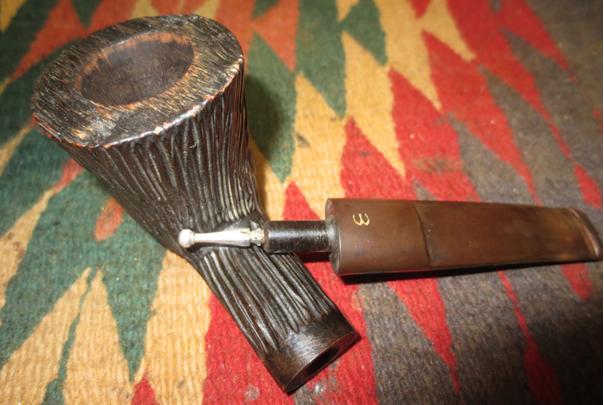
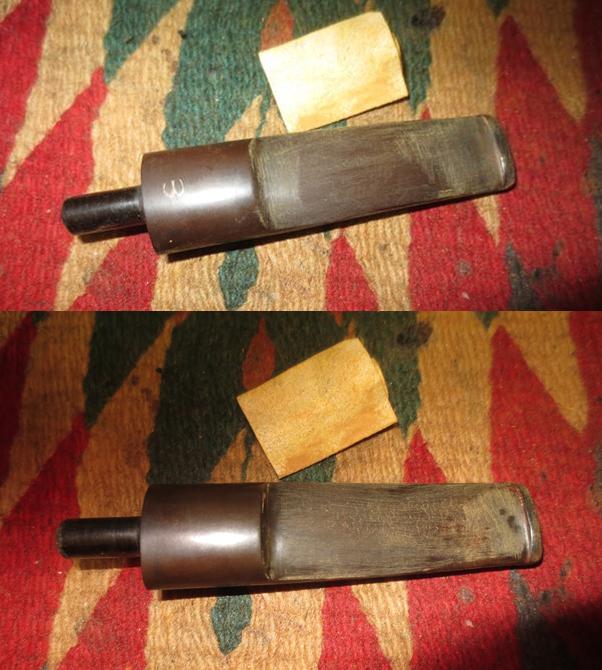
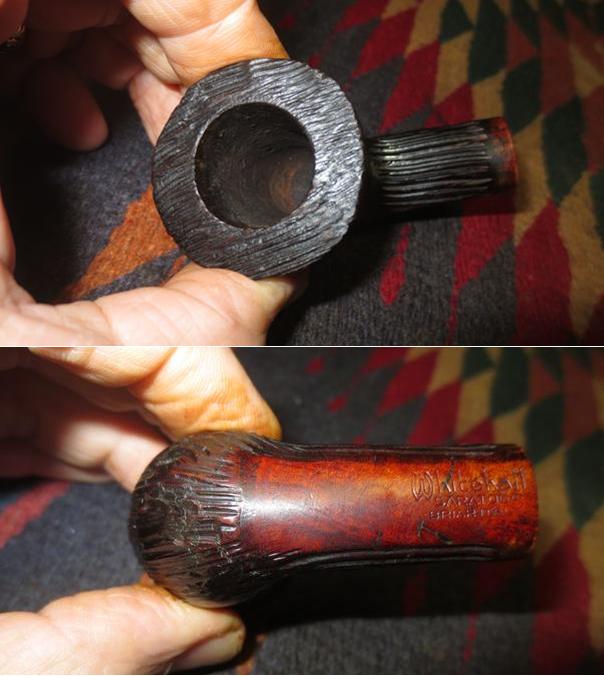
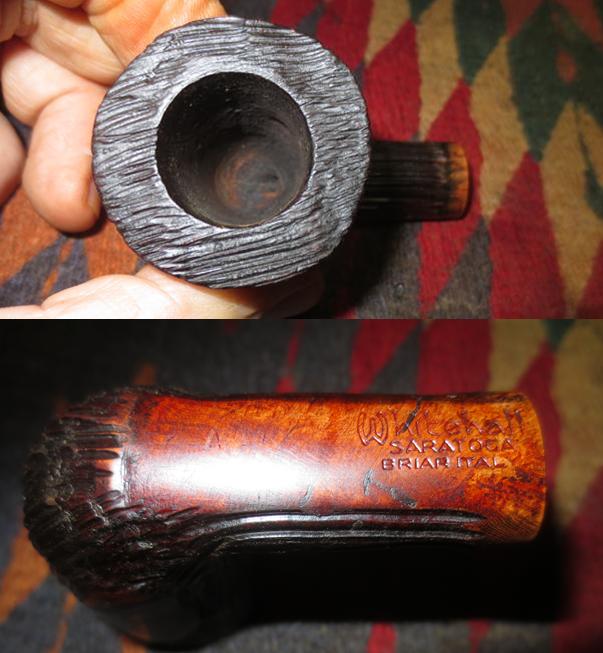
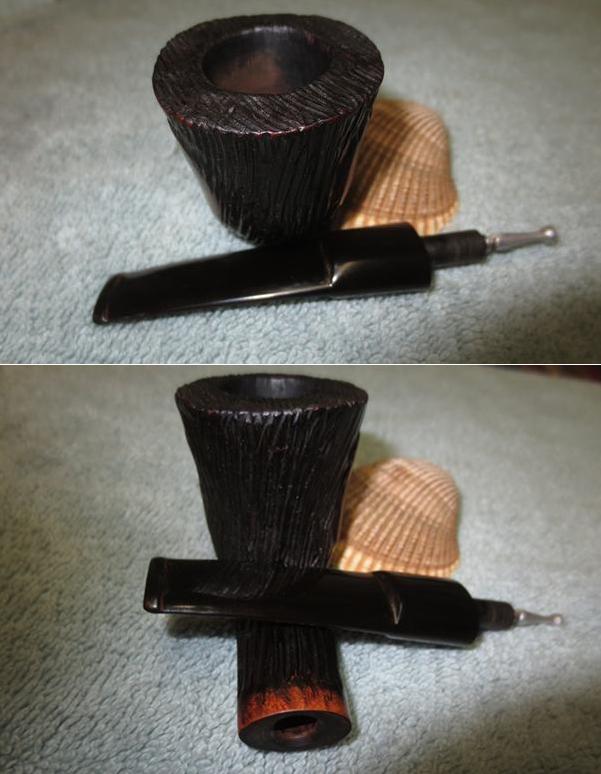
On my work table, I took these additional pictures to fill in the gaps and show some of the needs. The stamping on the left side of the shank reads ‘Mehaffey’ [over] ‘6’.  The right side of the shank also has the number ‘6’ stamped – I assume this is the shape number.  While one can find Mehaffey pipes on the internet, unfortunately, the one factoid that is repeated in many places can be found in Pipedia’s single reference to this pipe maker:

E.A. Mehaffey operated a pipe & tobacco shop in Wheaton, Maryland. He used to make pipes for many years but as legend has it, his house tobacco mixtures were much more prestigious than his pipes. Mehaffey was in business up to the 1980’s.

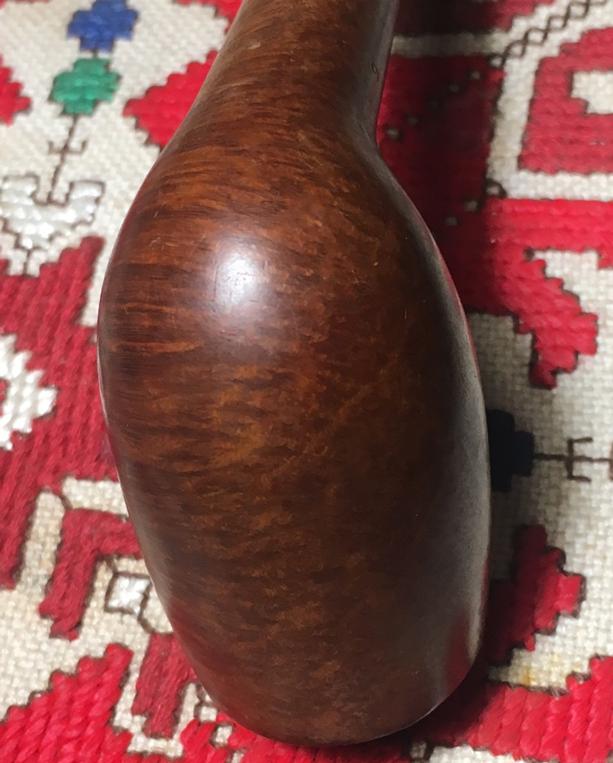
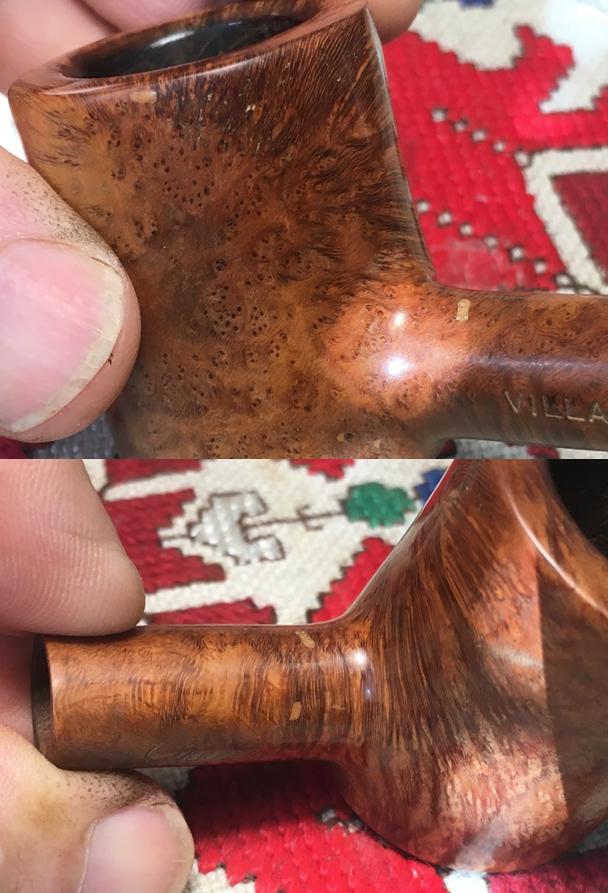
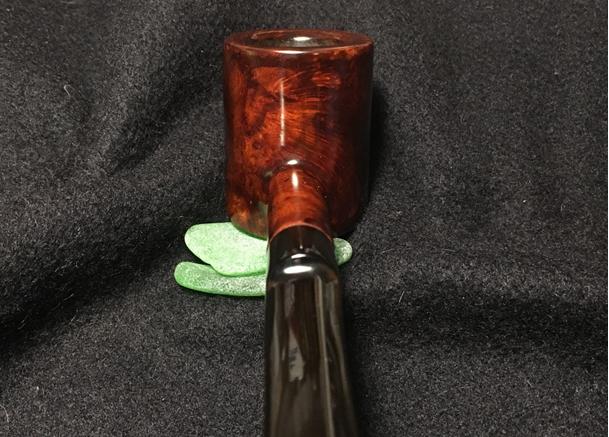
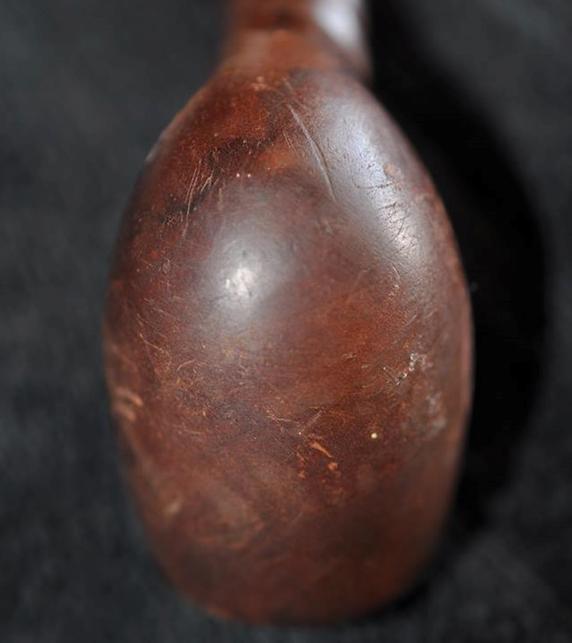
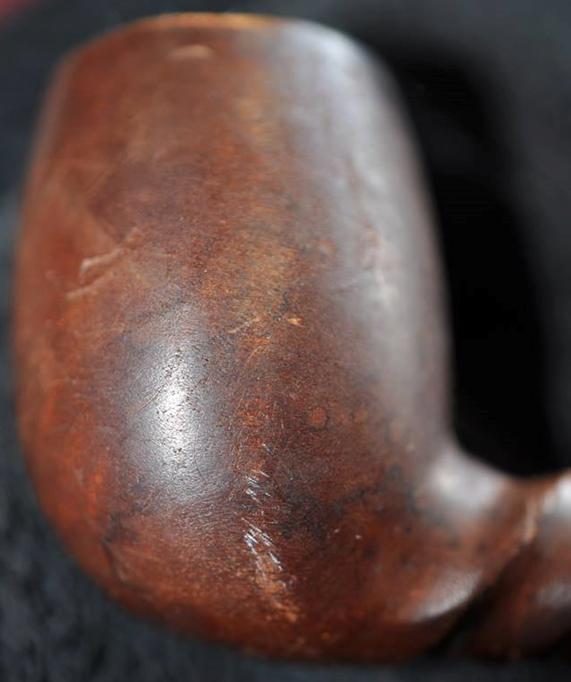
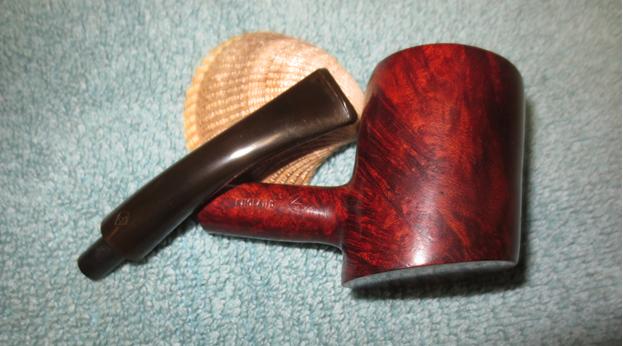
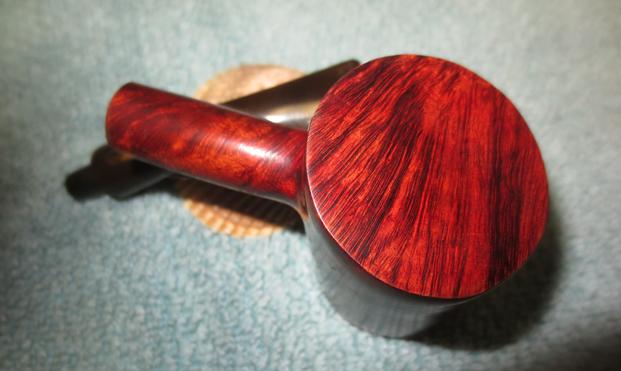
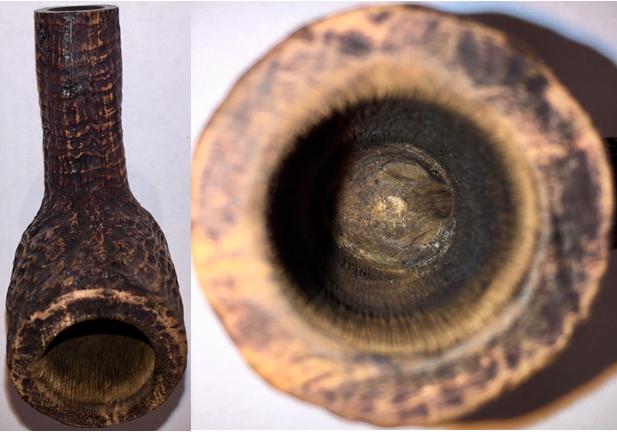
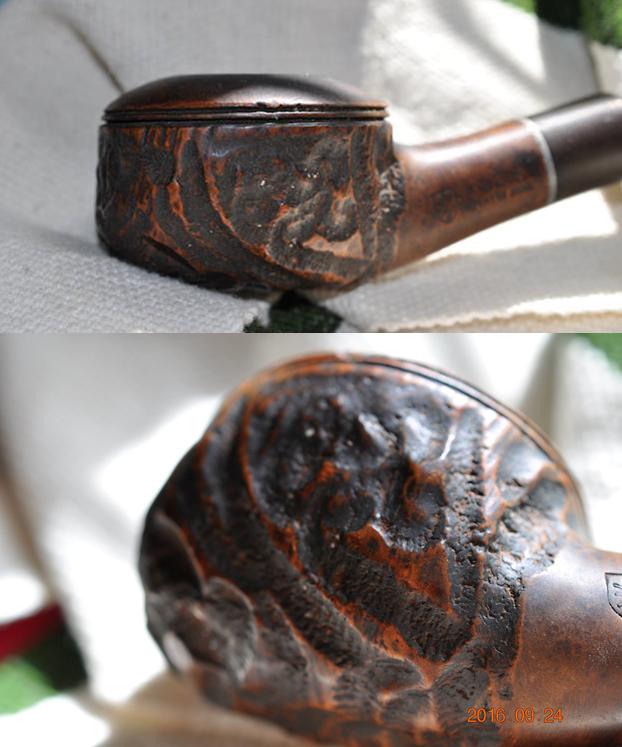
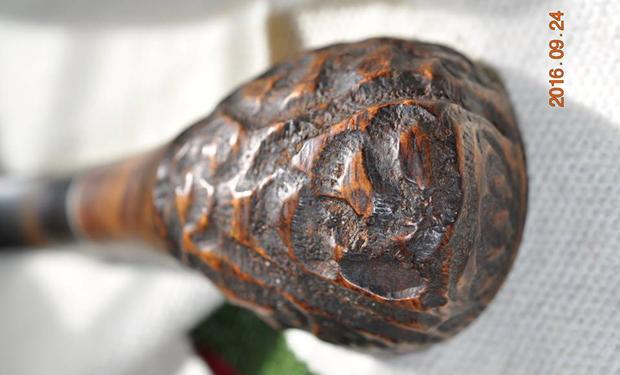
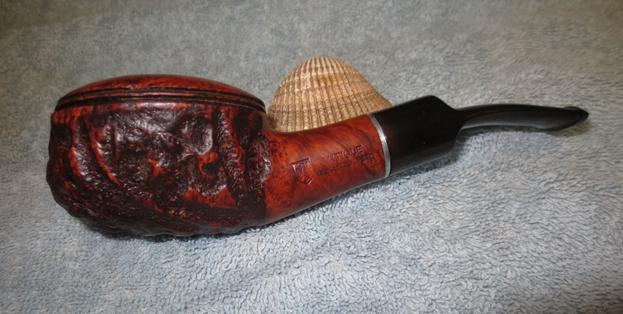
While this statement does not engender enthusiasm for E. A. Mehaffey’s pipe production, the Cutty before me boasts a very attractive, large piece of briar.  With the taller than usual bowl, both sides of the bowl showcase tight bird’s eye grain patterns, which offer a perpendicular disposition toward the grain.  On both the front and the back of the bowl, as one might expect, horizontal grain is evident – the parallel perspective of the grain.  If one thinks of a rope as grain, the horizontal grain is looking at the side-length of the rope.  Whereas, the bird’s eye grain is looking at the ends of the rope ends after they are cut.  This is a beautifully styled and positioned Cutty shape with this fine piece of briar.  Complementing the forward canted bowl, the long shank and tapered stem adds to the perception of styled length.  I’m liking it! 
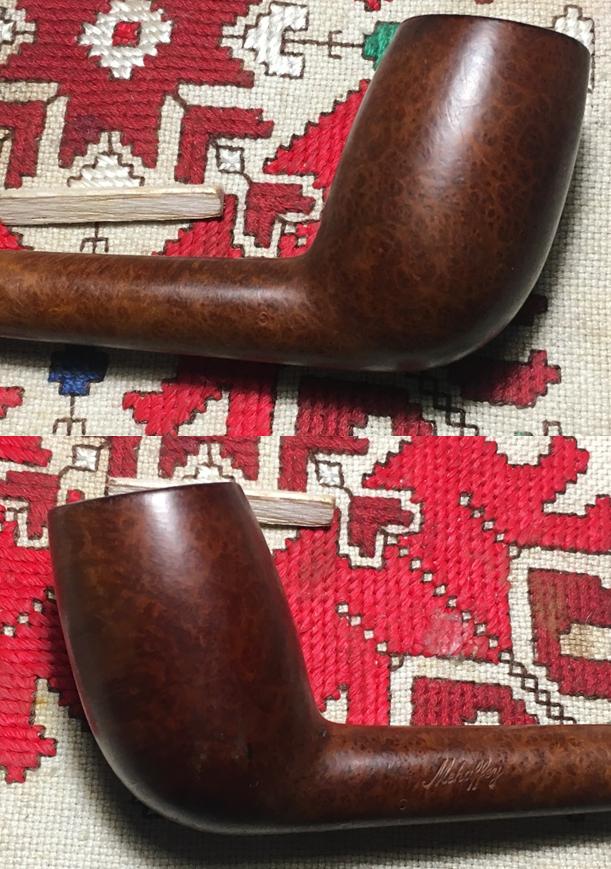
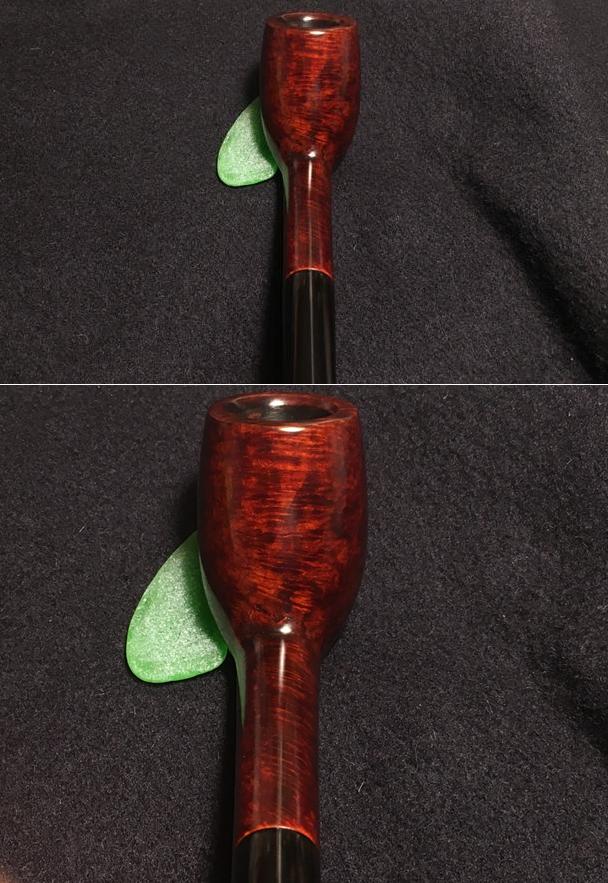
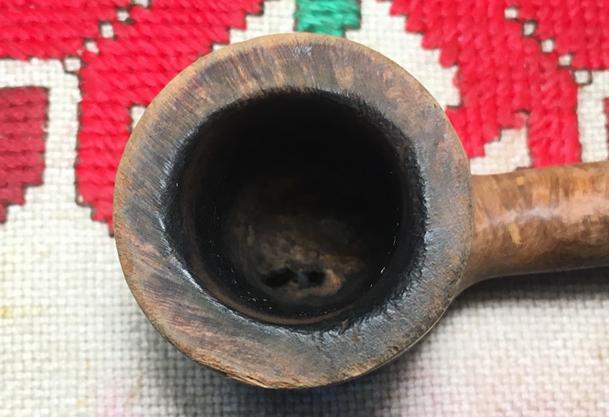
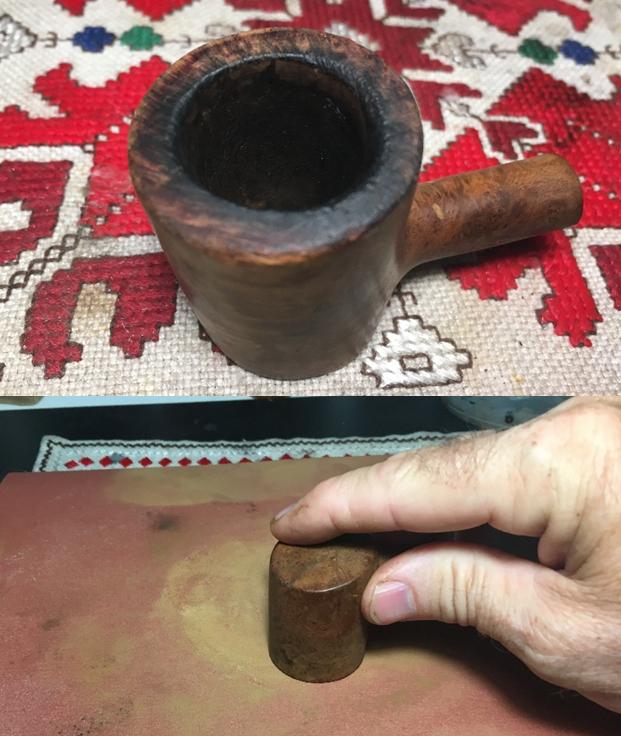
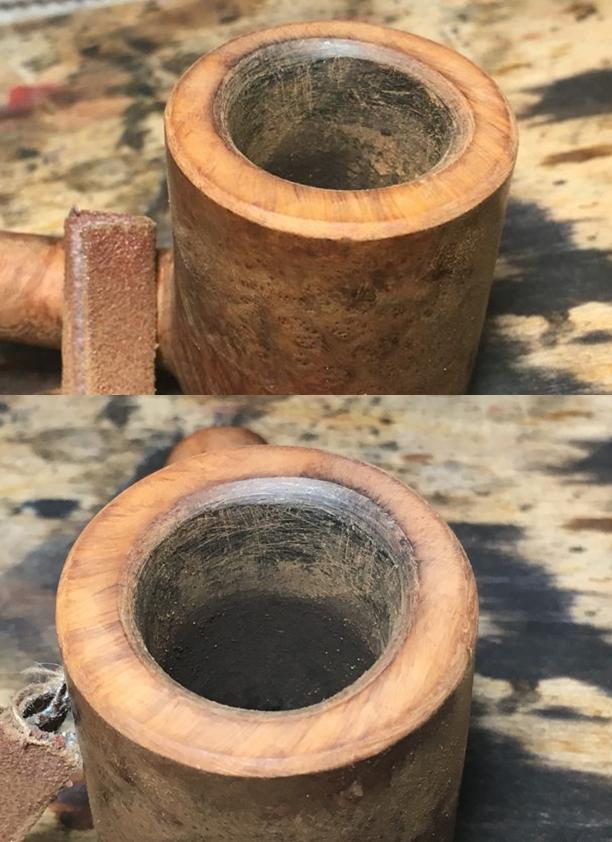
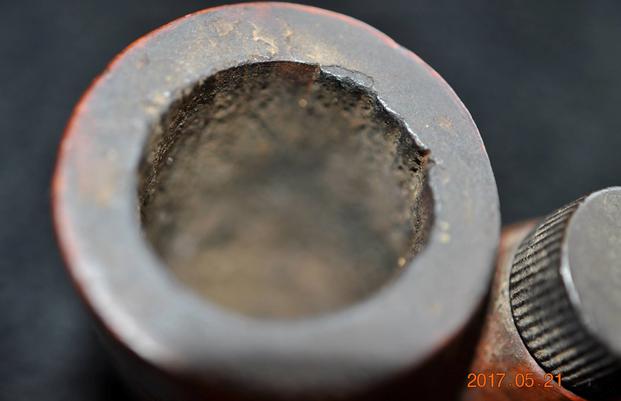
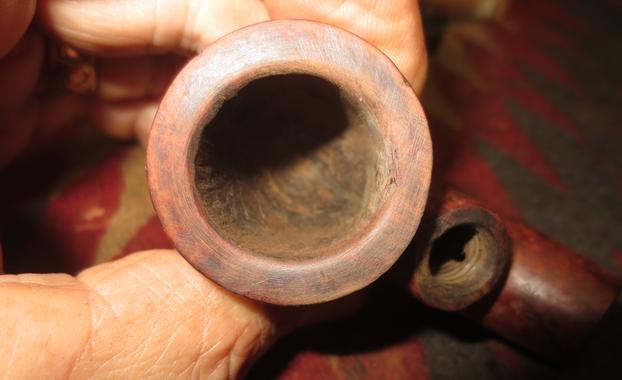
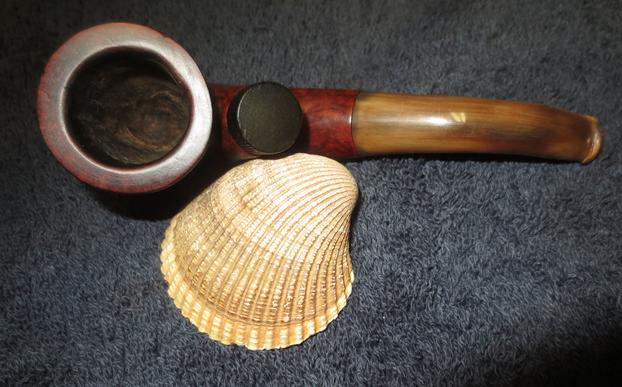
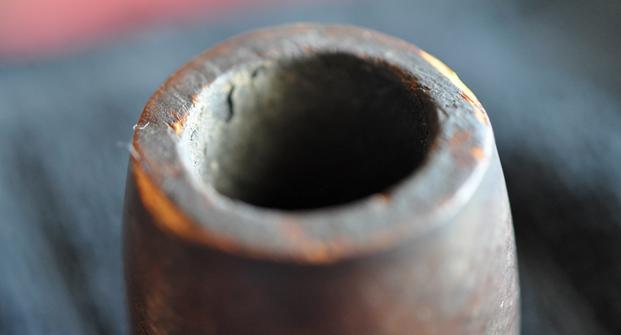
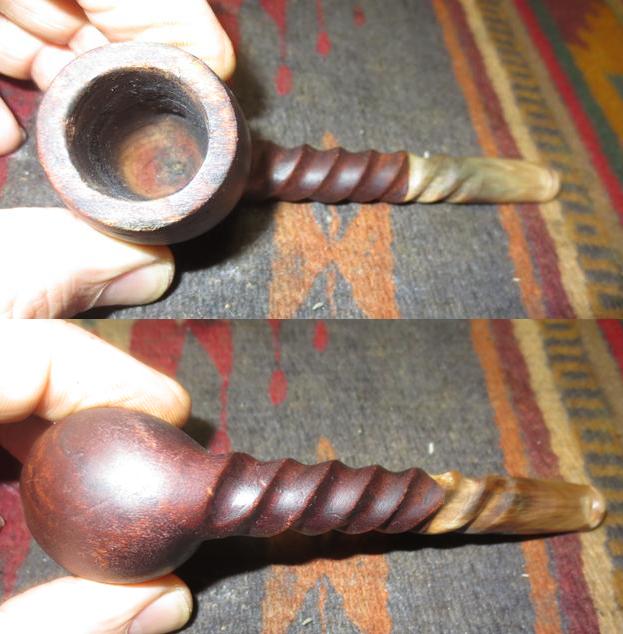
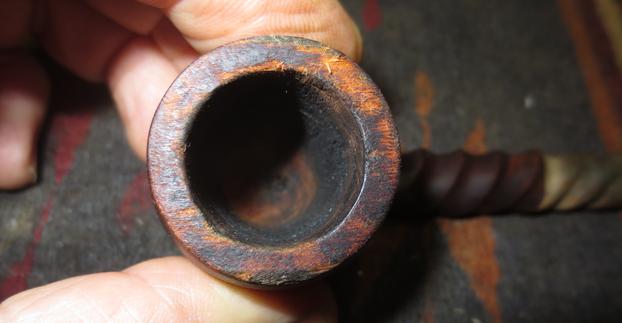
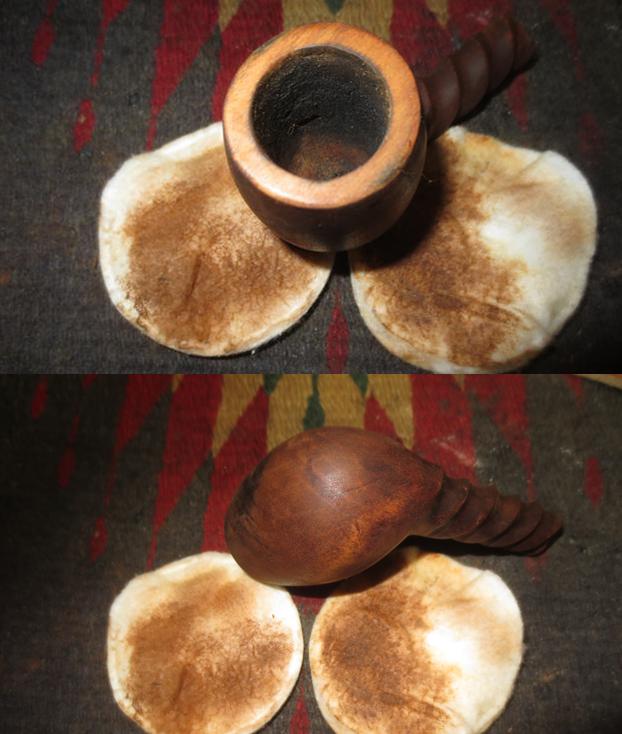
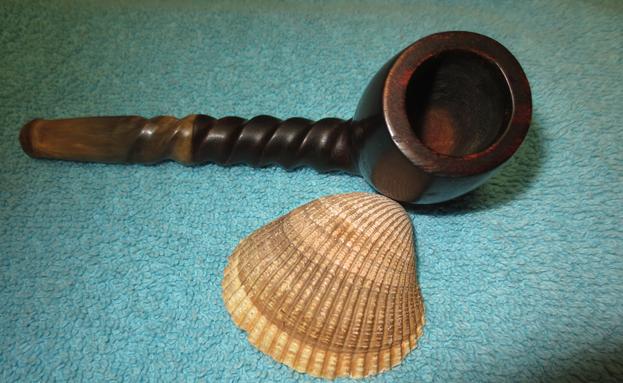
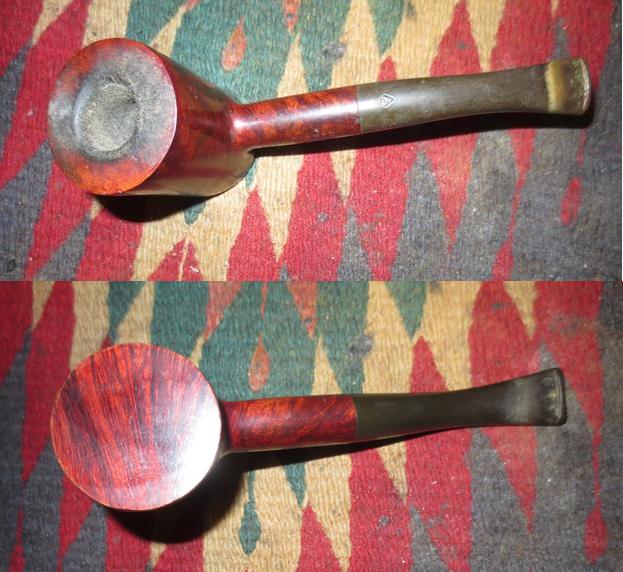
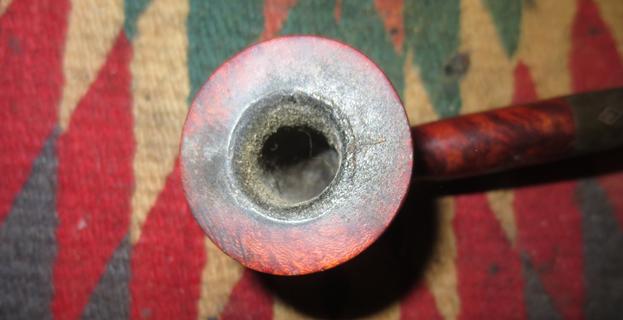
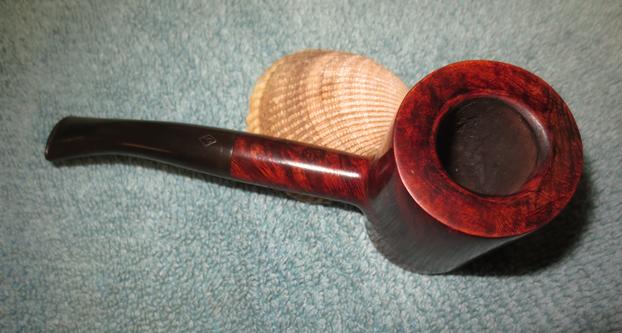
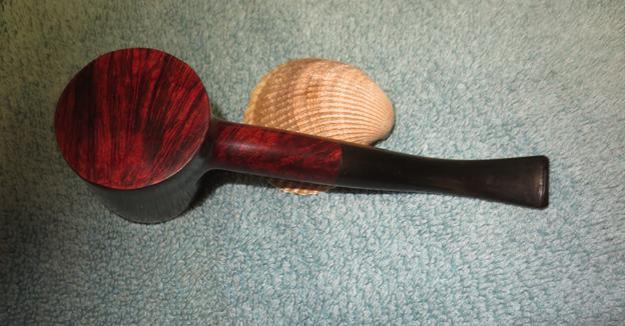
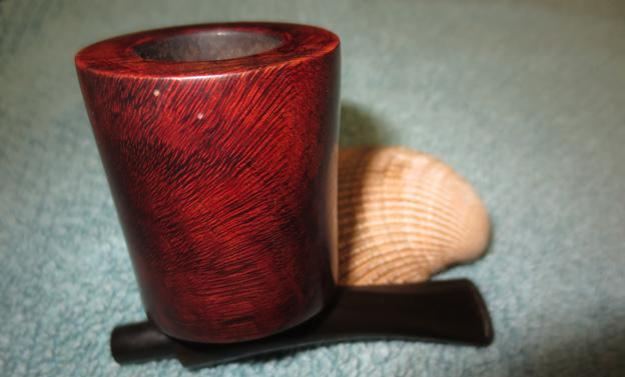
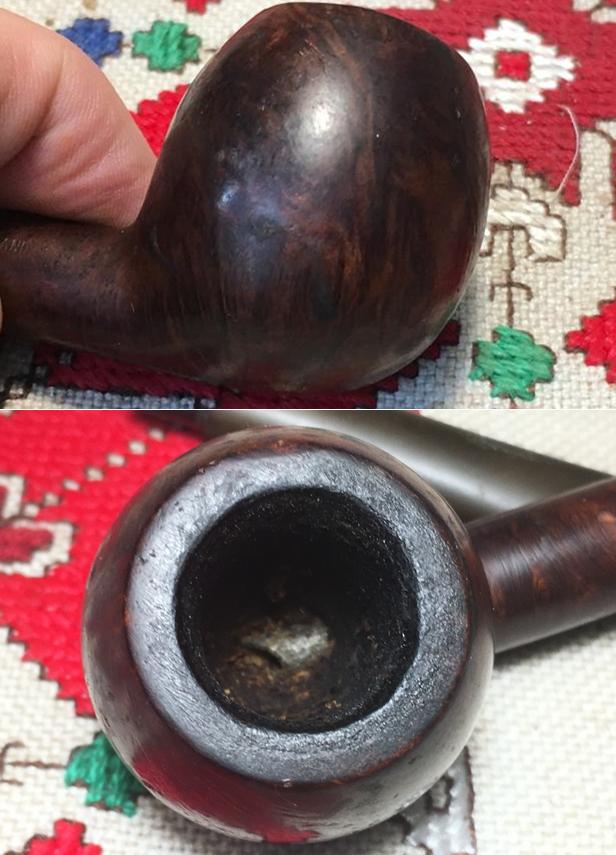
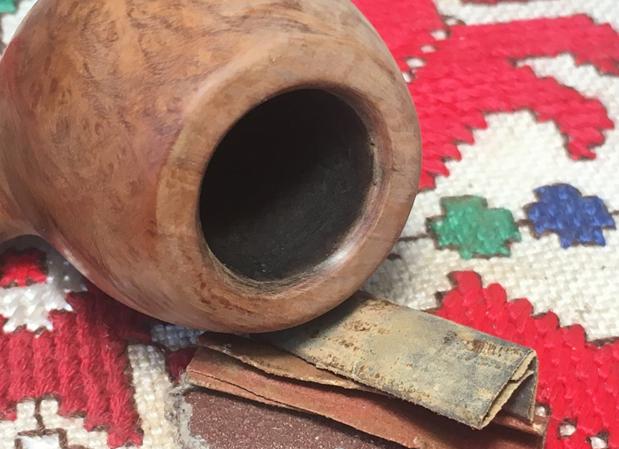
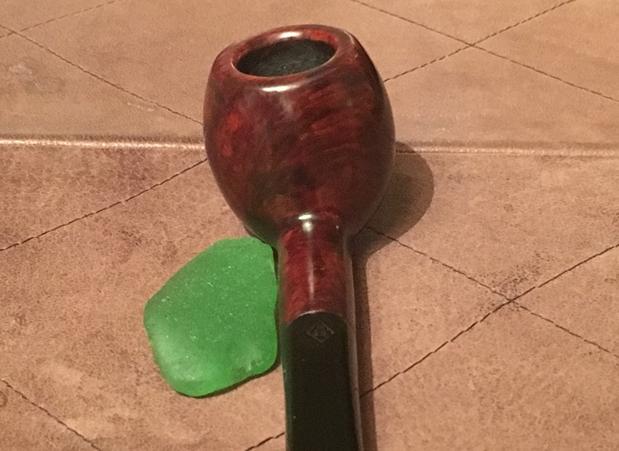
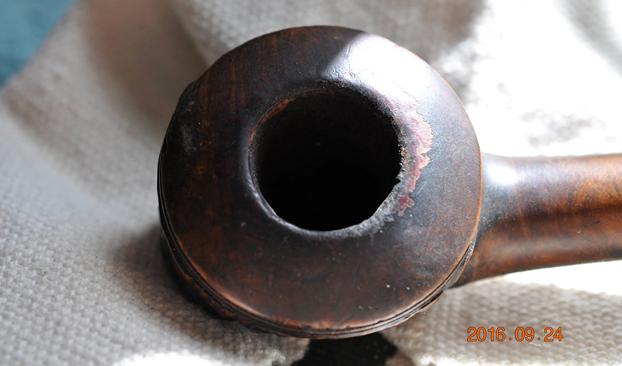
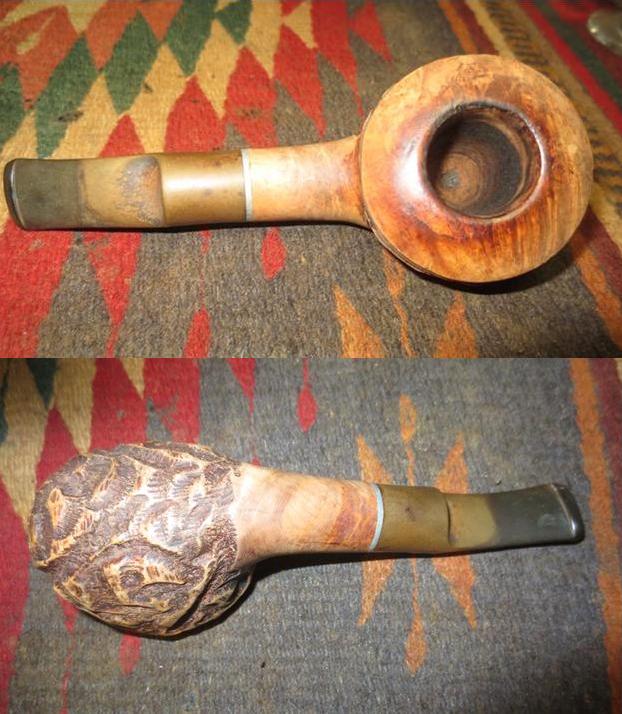
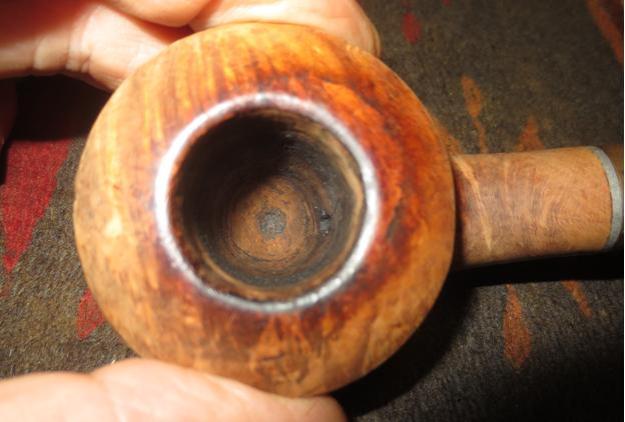
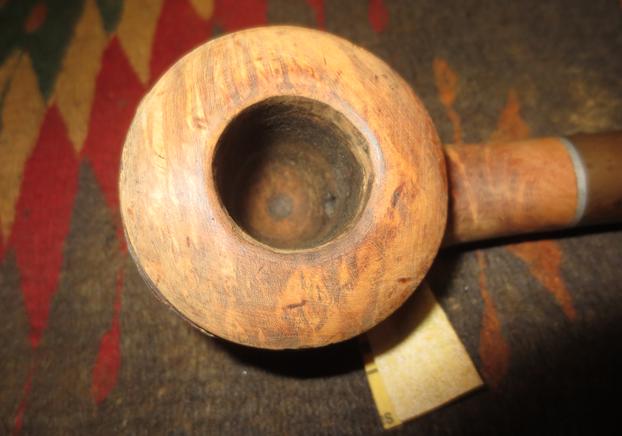
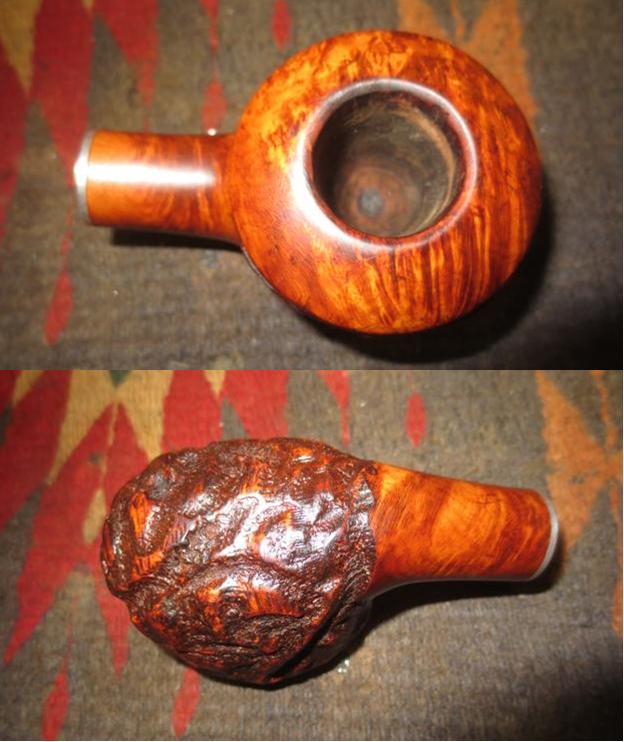
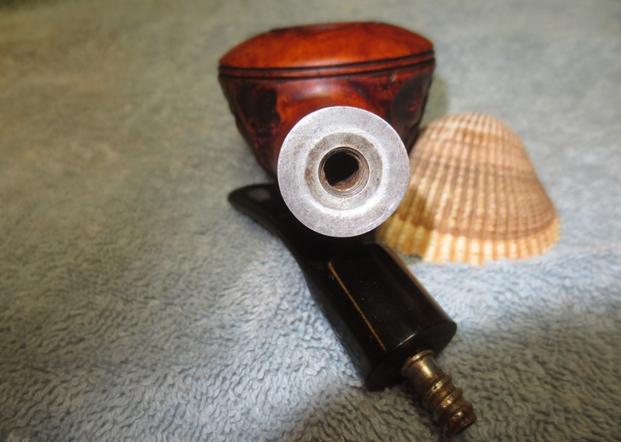
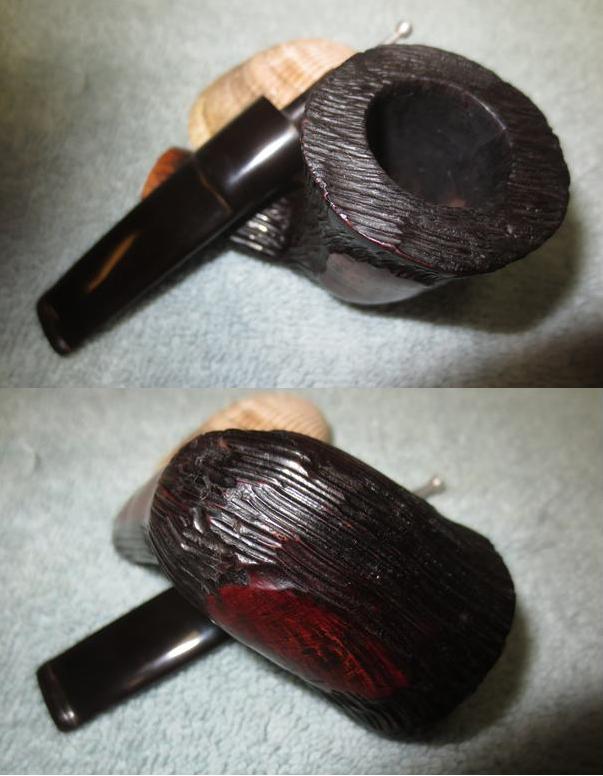
Looking at the pipe, the needs start with a moderate build-up of carbon cake in the chamber which needs to be removed down to the fresh briar.  The rim has lava flow and black crusting which needs removal.  I see no fills on the stummel. 
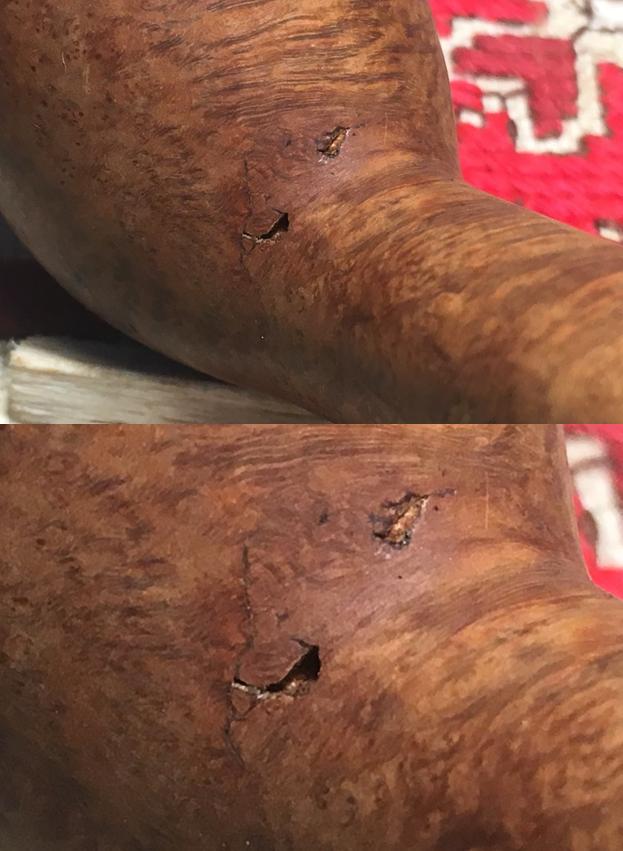
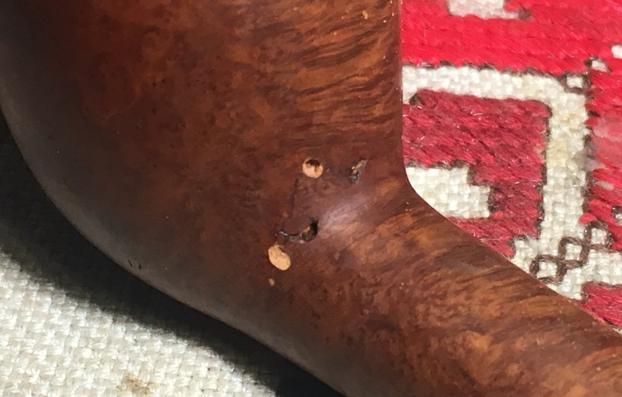
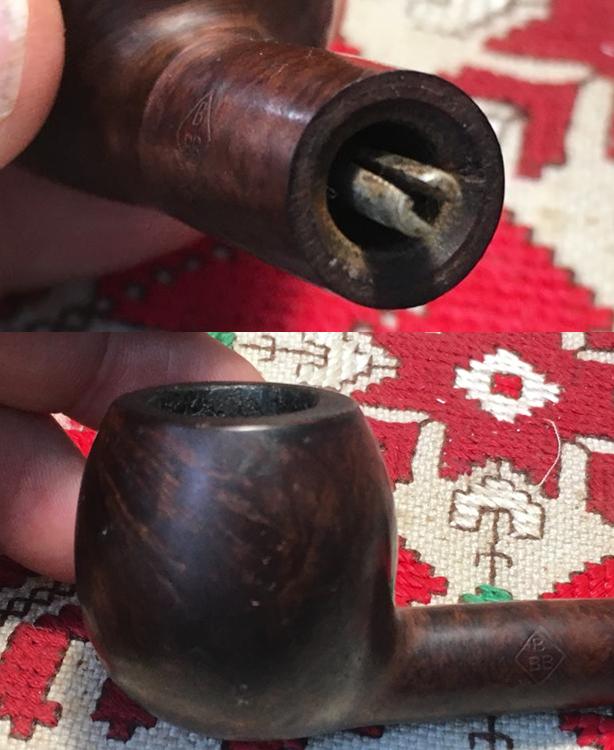
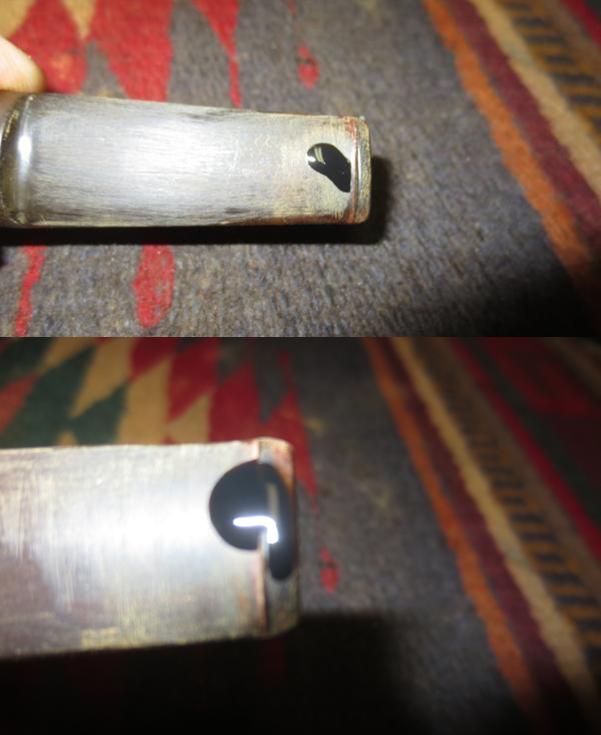
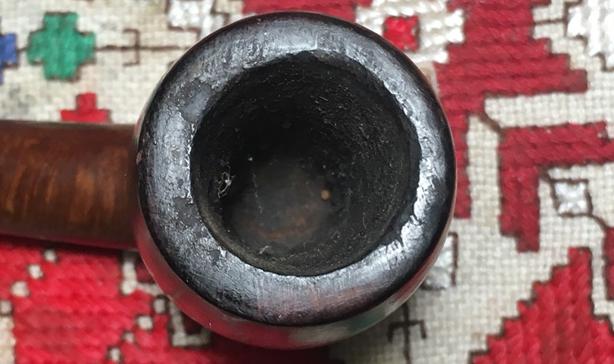
One area of problem is at the upper junction of shank and bowl.  There are what appear to be two punctures and what appears to be a crack running perpendicularly off the left puncture.  It is difficult to guess what caused these.  I will probe the holes to make sure they are only superficial and make sure the crack is not growing.
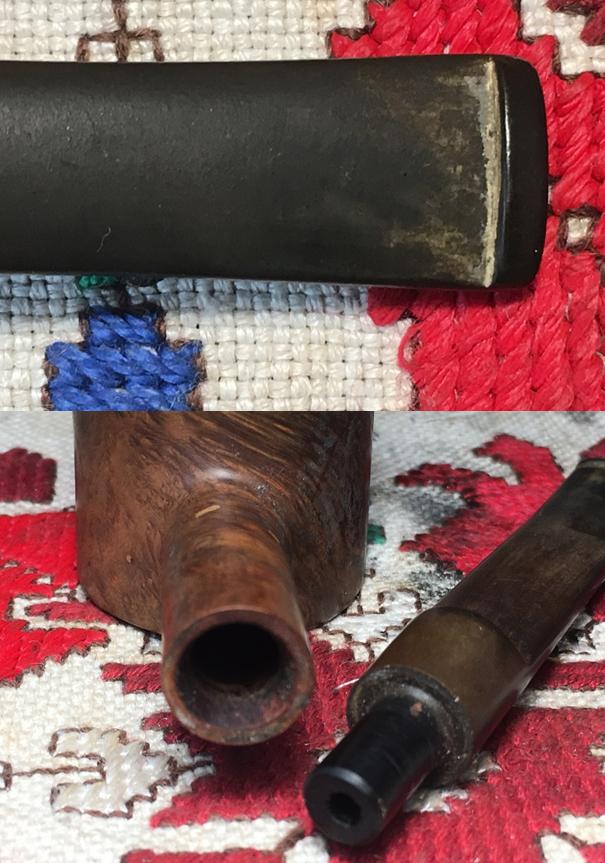
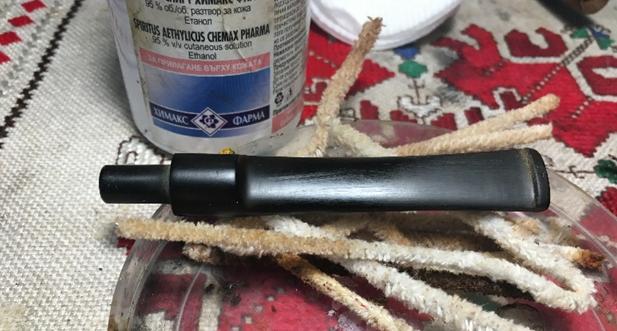
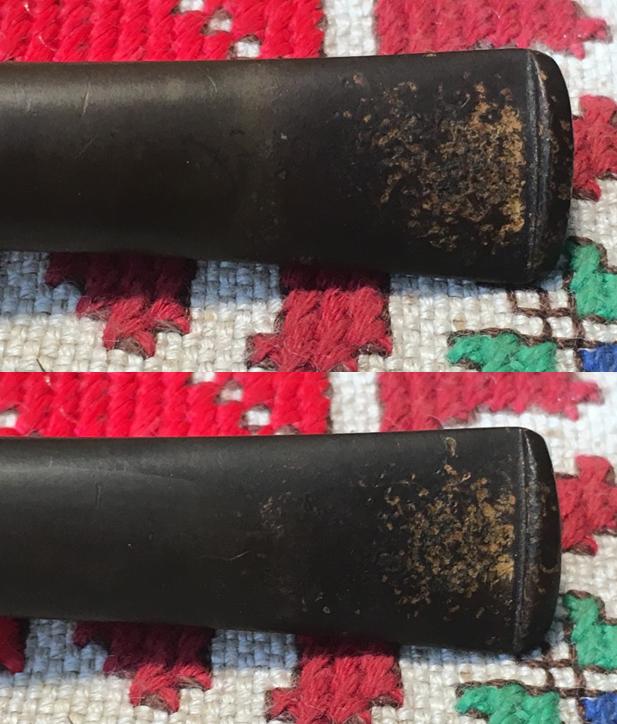
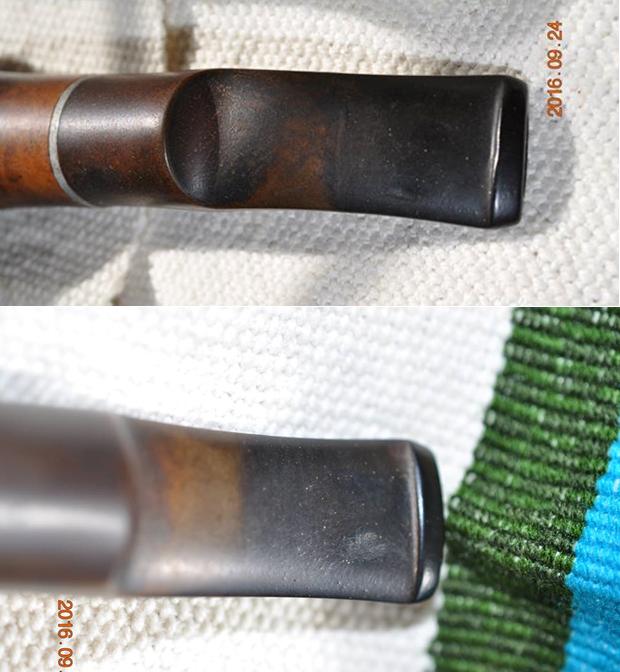
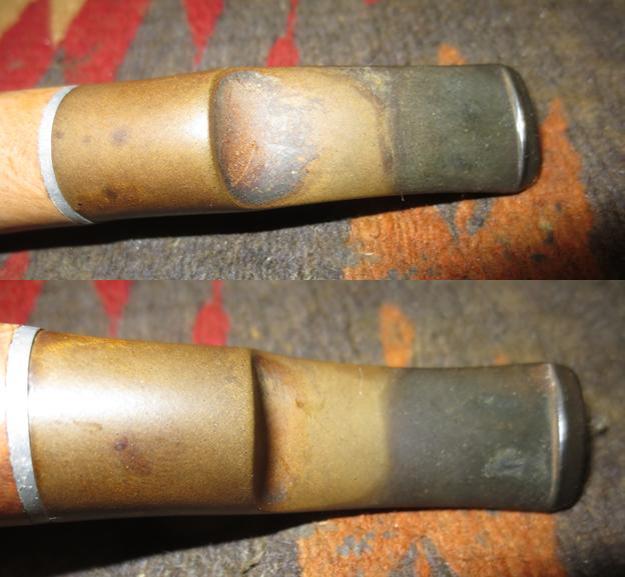
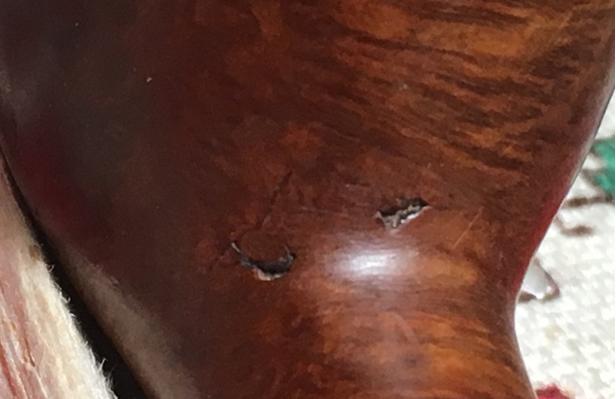
The tapered stem has mild oxidation and a good bit of tooth chatter on the upper and lower bit. 
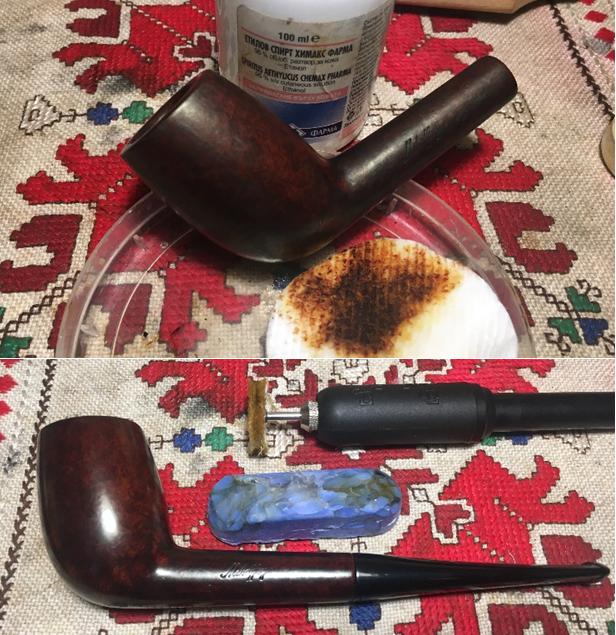
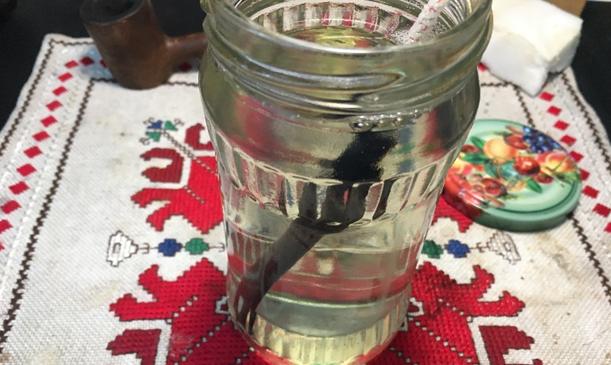
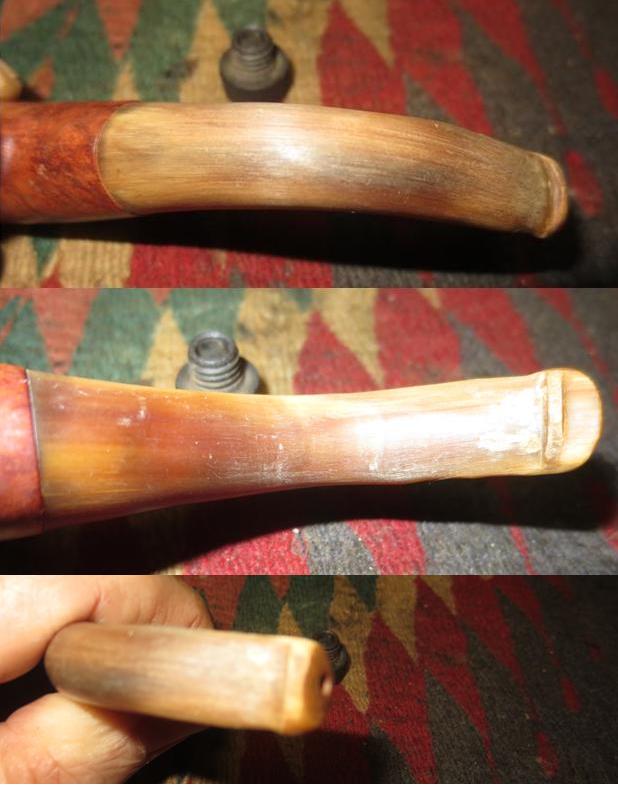
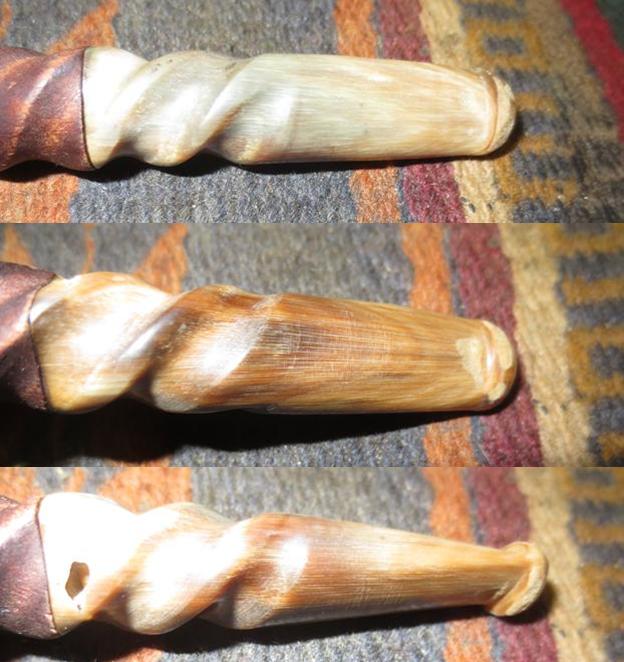
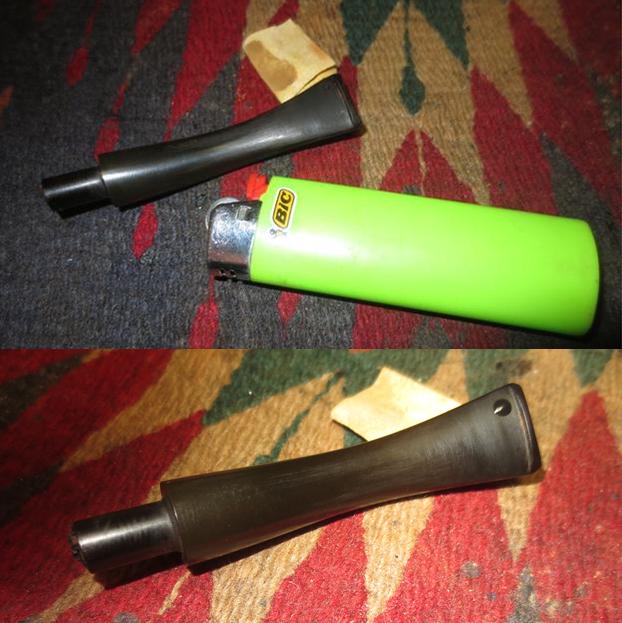
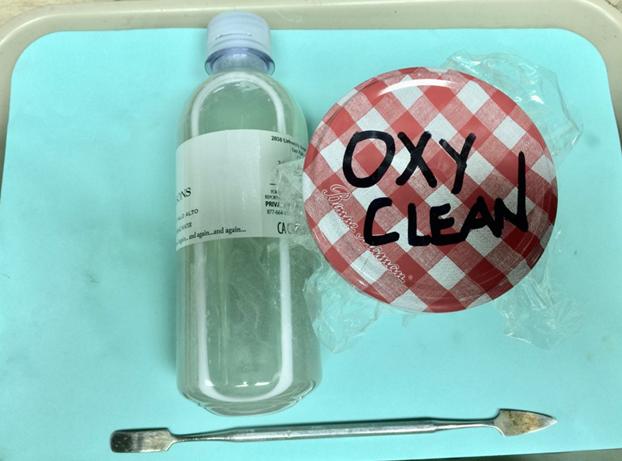
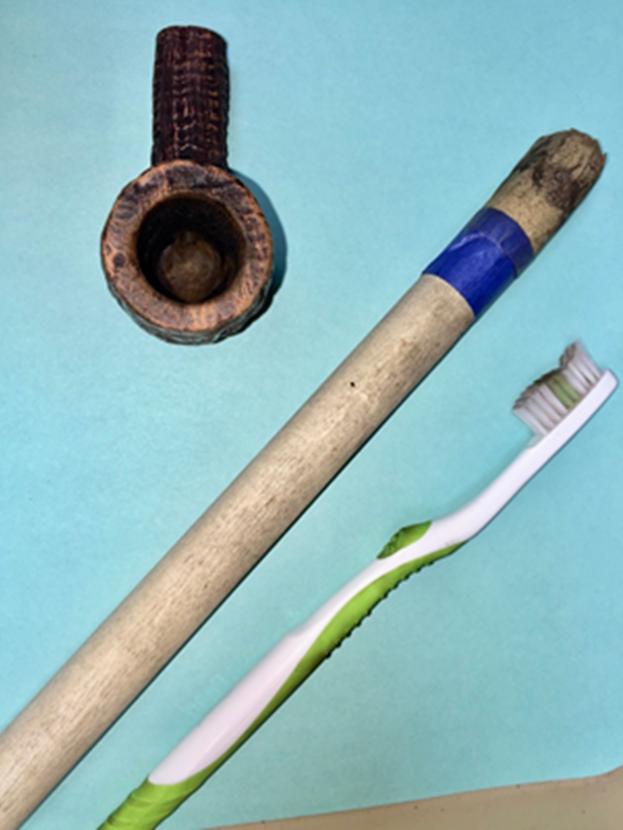
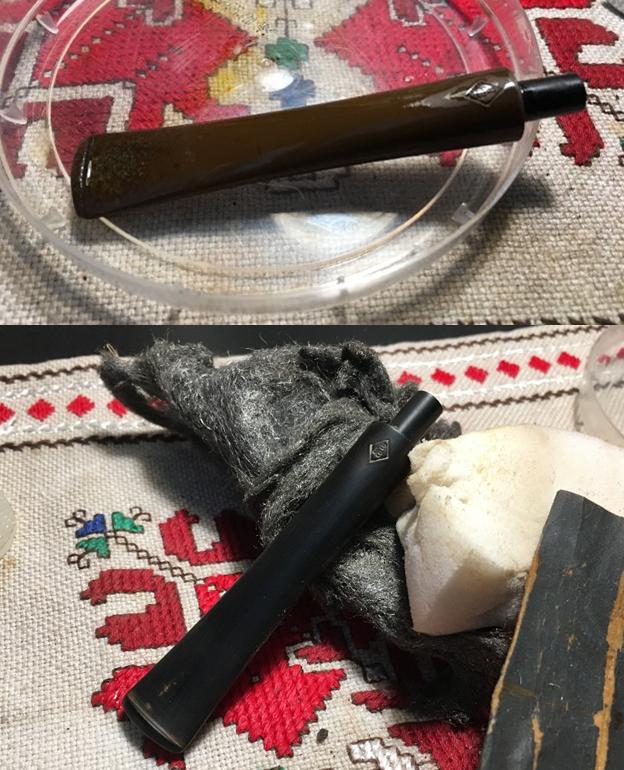
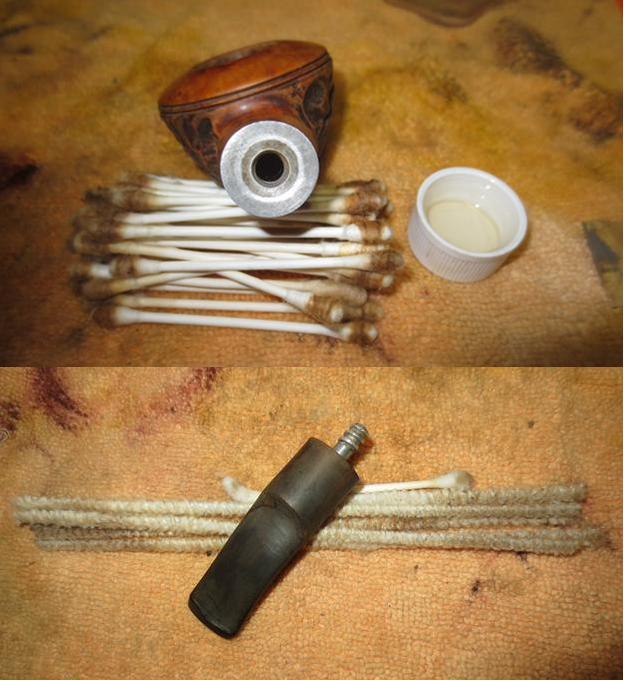
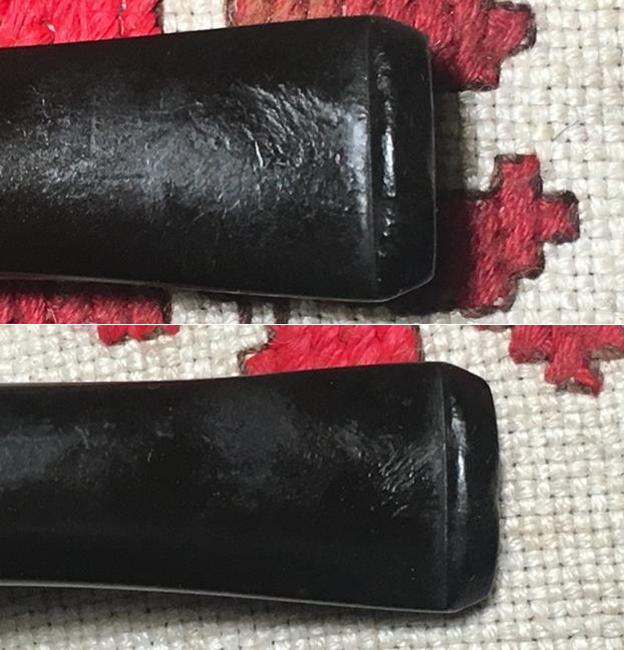
I begin the recommissioning of this Mehaffey Cutty by plopping the stem into the Oxi-Clean bath to soak and to raise the oxidation from the vulcanite. 
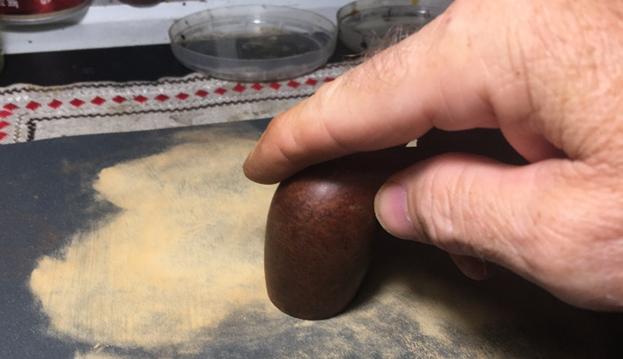
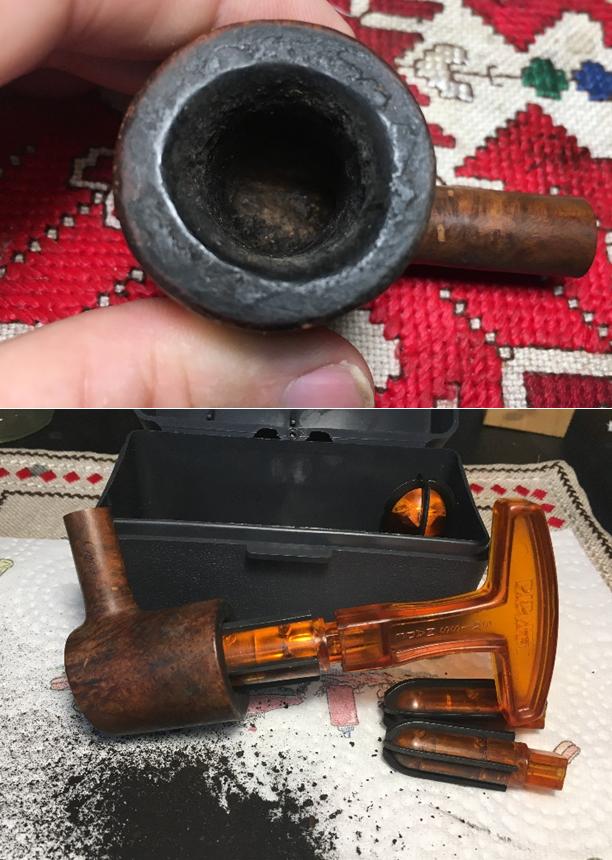
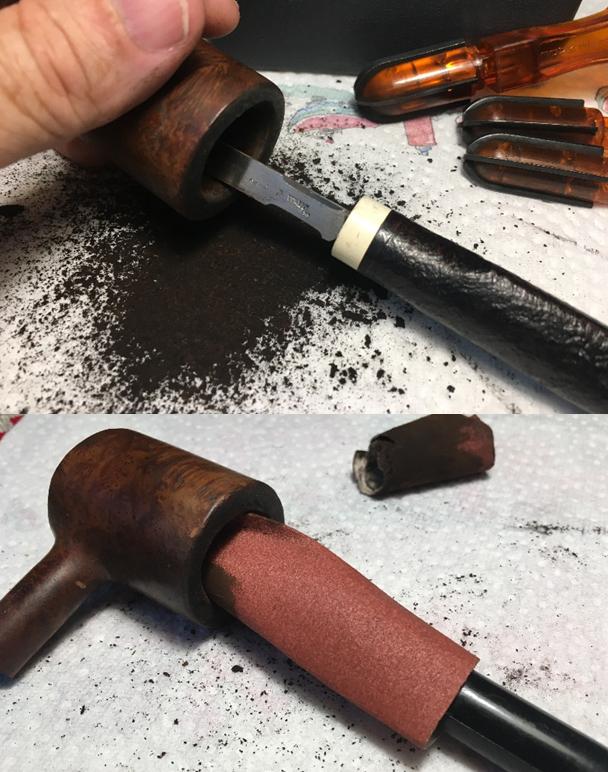
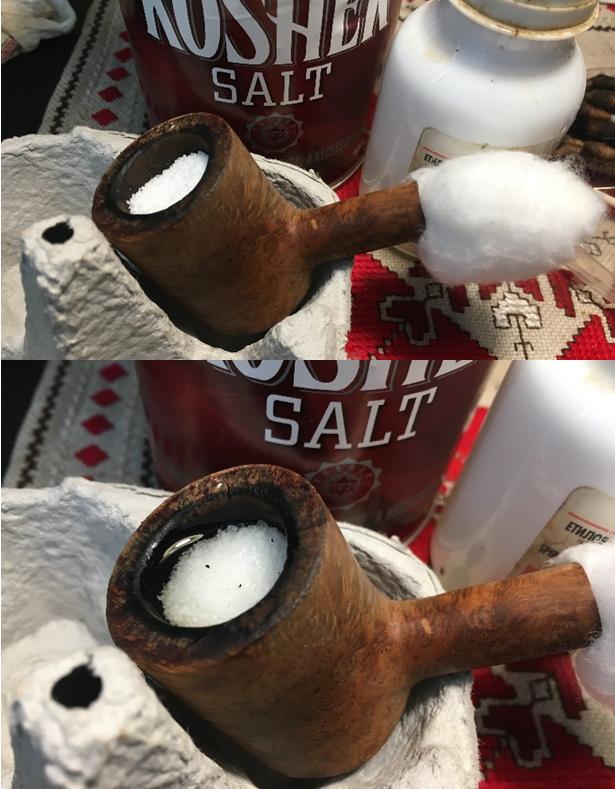
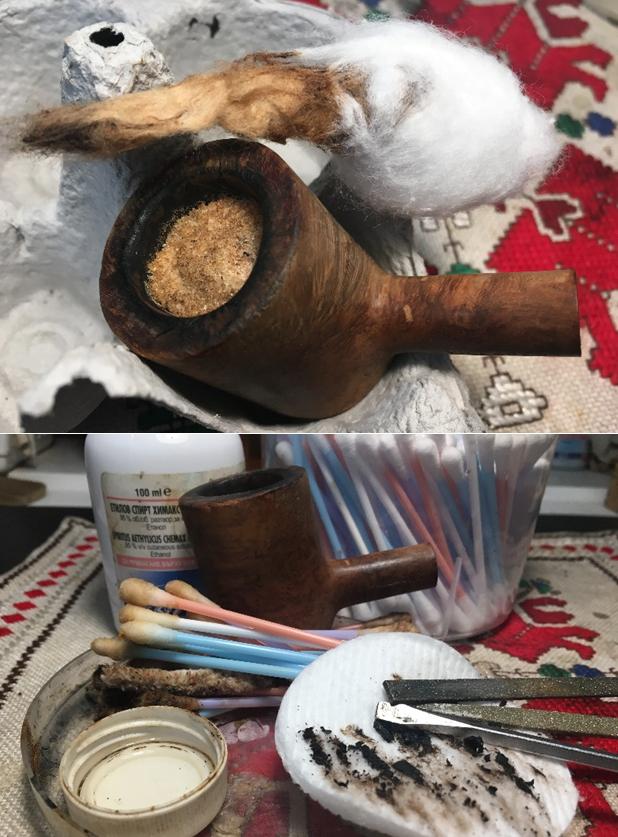
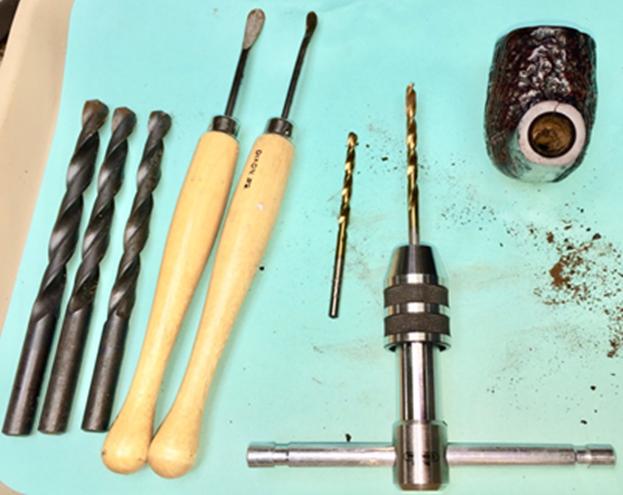
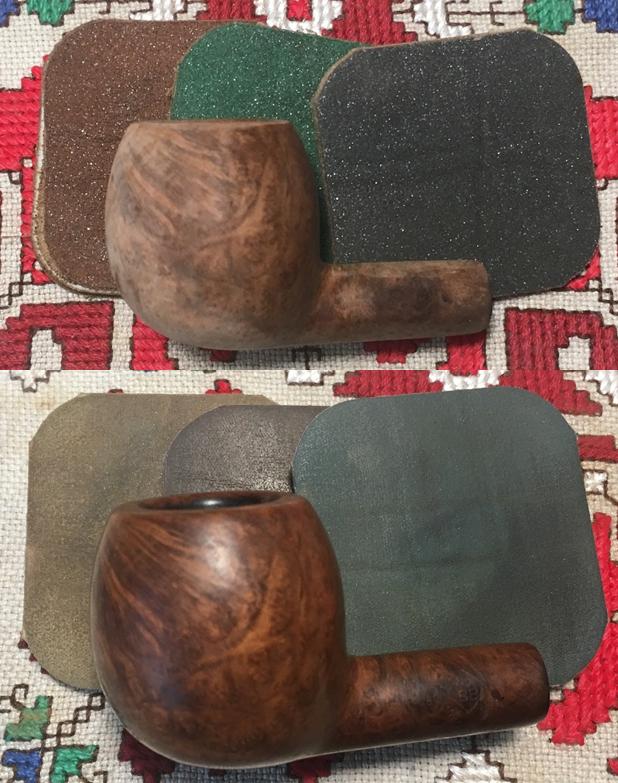
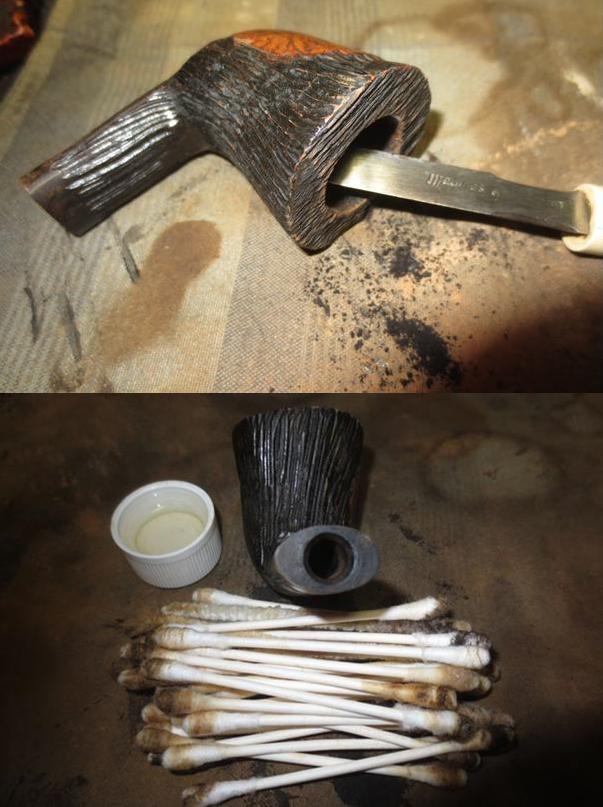
Using the Pipnet Reaming Kit, I address the cake in the bowl.  After spreading paper towel to catch the exhumed carbon, I use the smallest blade first.  I realize very quickly that the smallest will be the only reaming blade I use and switch to using the Savinelli Pipe Knife.  The conical chamber narrows toward the base so the Savinelli Pipe Knife does the job.  After removing the carbon cake, I wrap a piece of 240 grit sanding paper around a Sharpie Pen and sand the chamber.  Following this, I clean the chamber using a cotton pad wetted with alcohol to remove the carbon dust.   
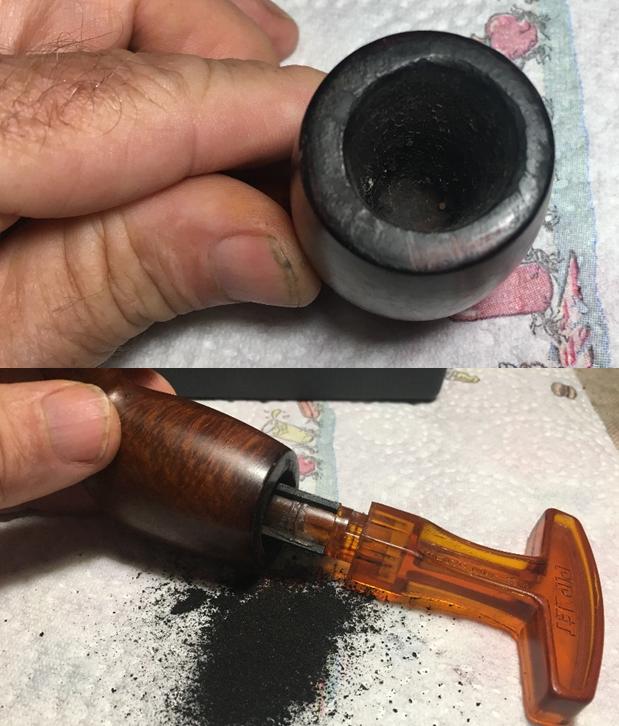
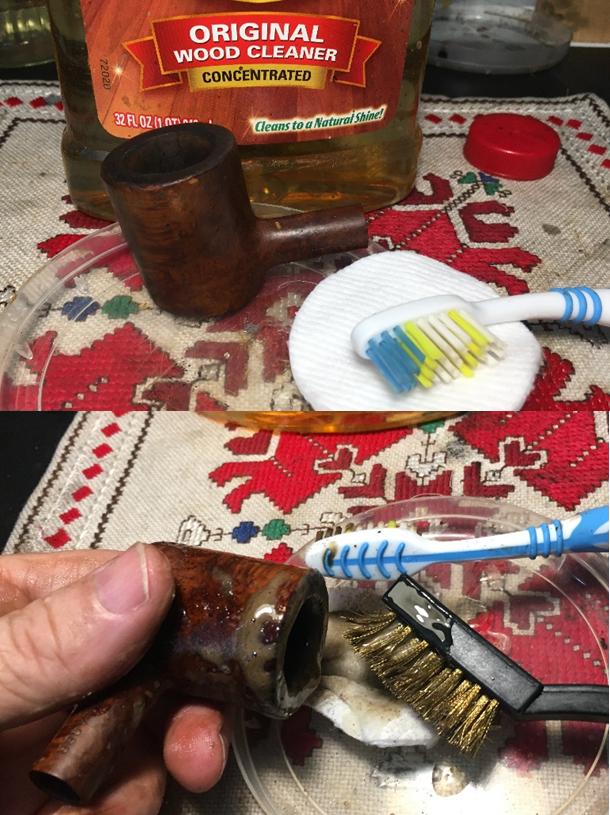
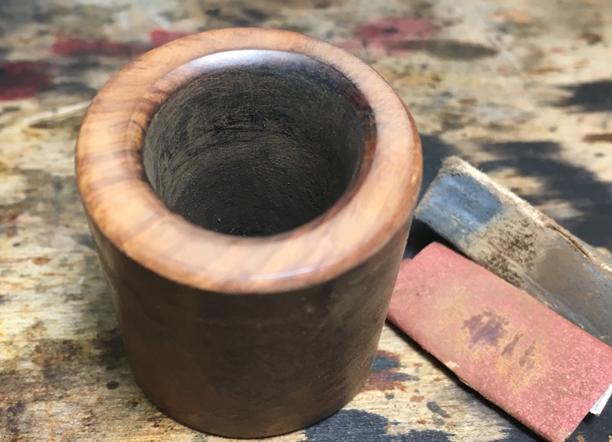
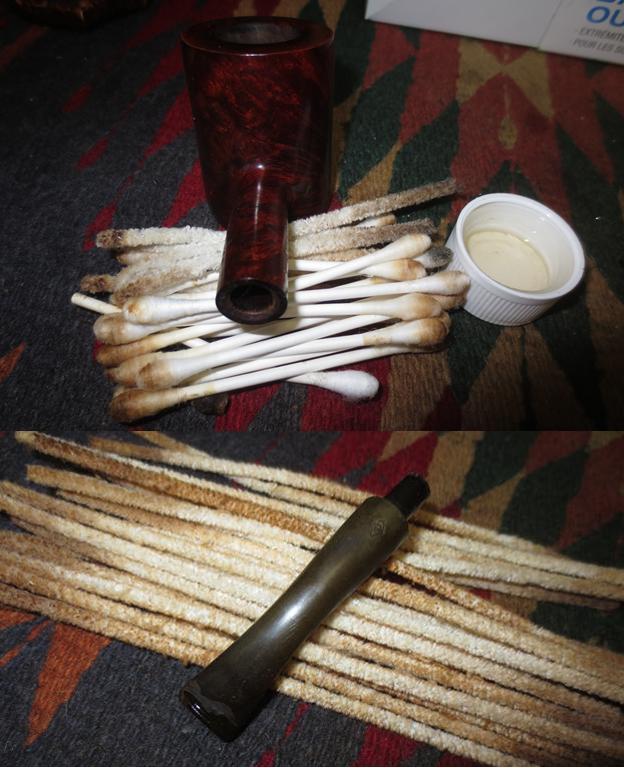
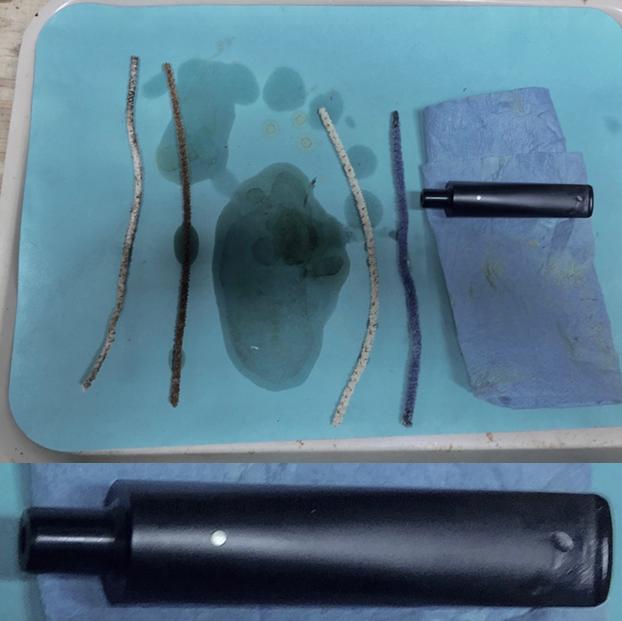
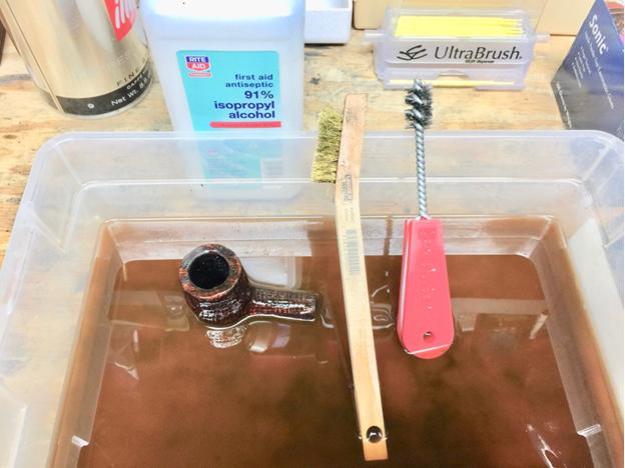
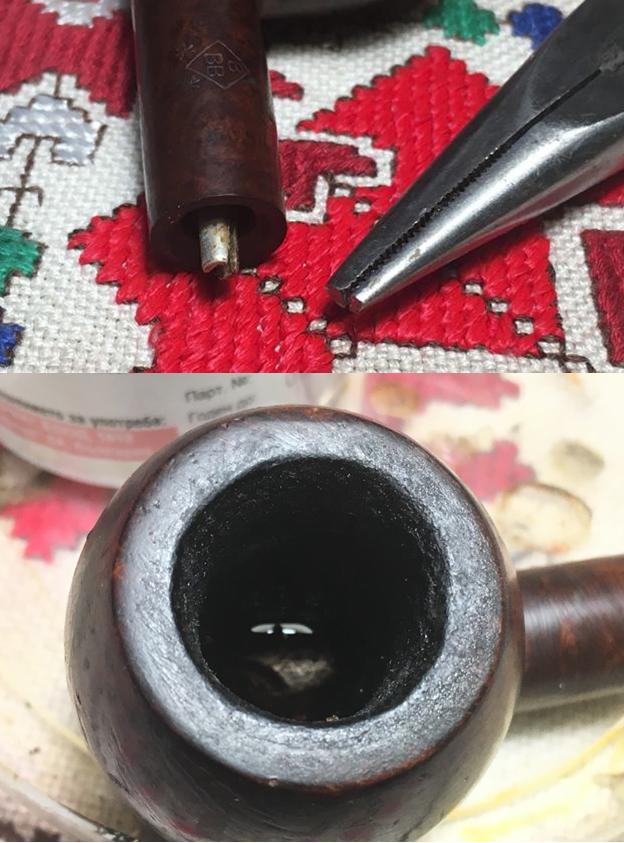
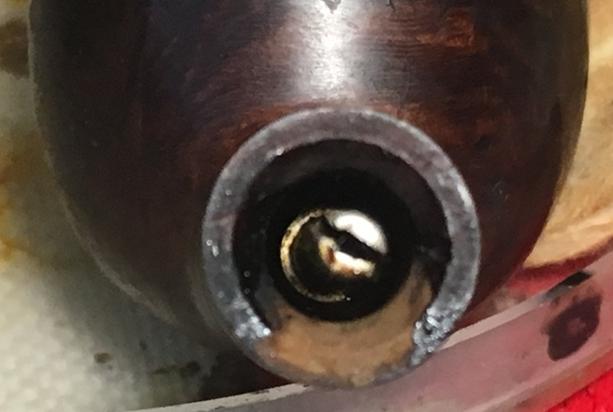
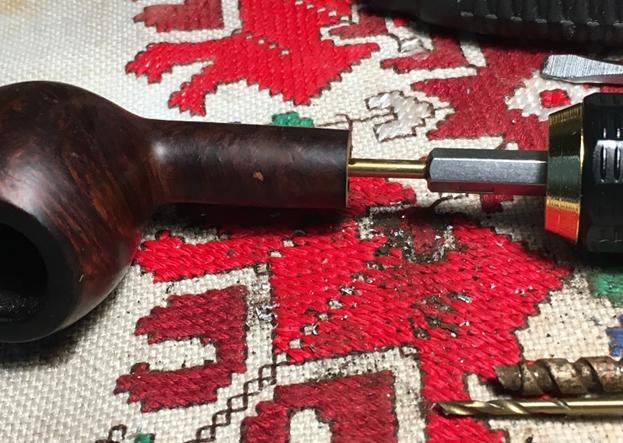
While I want to start on the external briar, I like to take care of the dirty stuff first!  Using cotton swabs and pipe cleaners wetted with isopropyl 95% and go to work on the internals.  I like working on a clean pipe.  I discover that a metal tube is providing the airway through the long shank.  With the use of a long, bristled brush I’m able to clean the internals of the mortise very quickly.  Not bad!
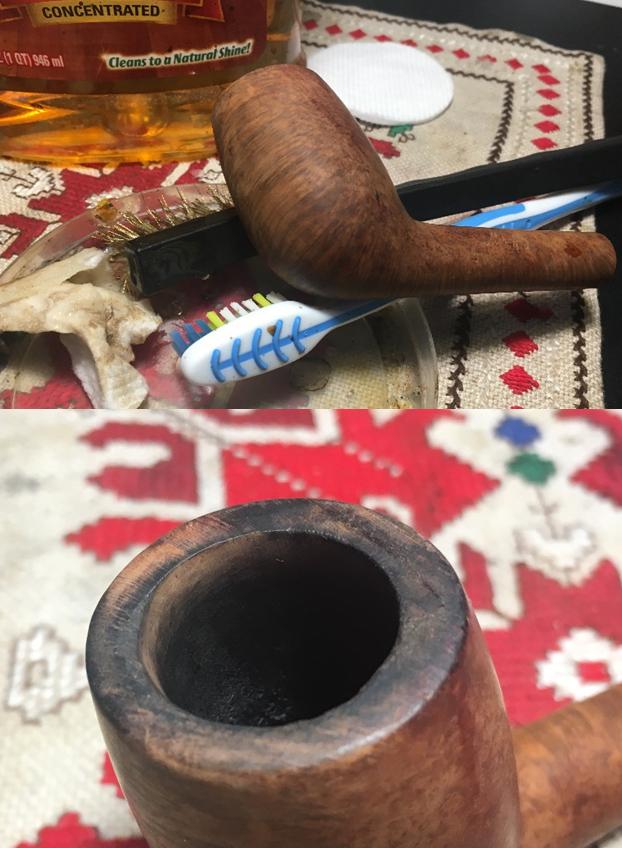
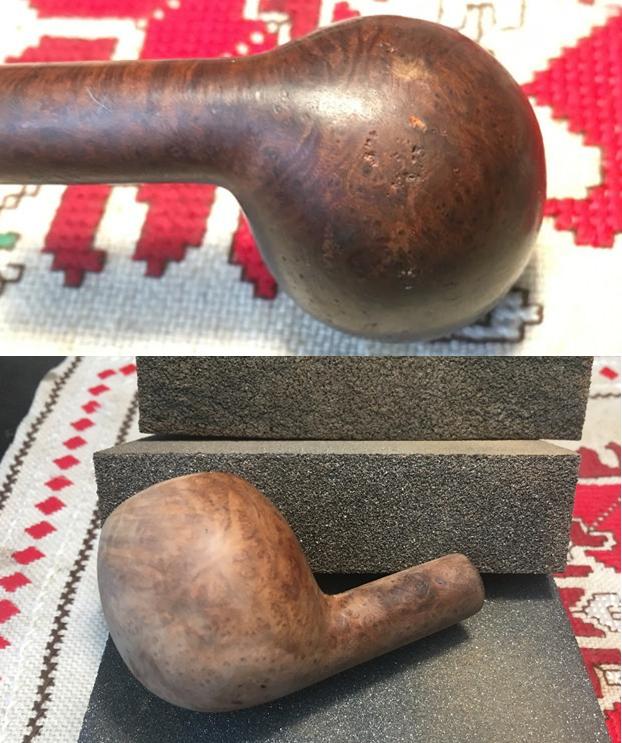
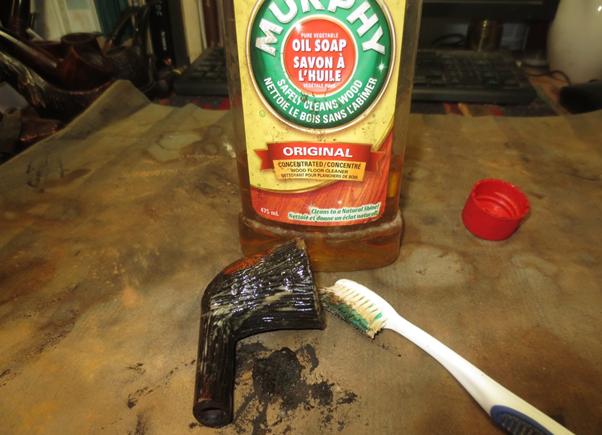
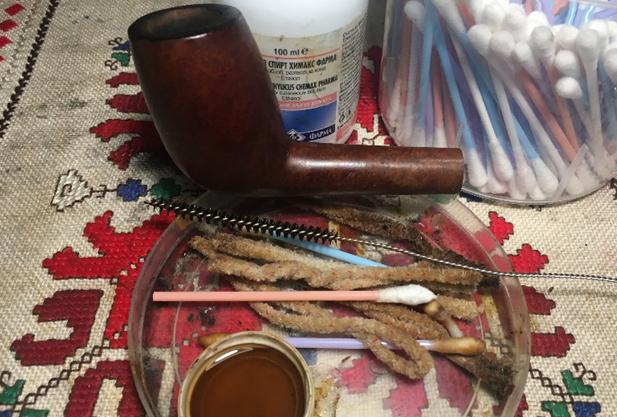
Now to the external briar surface.  I use undiluted Murphy’s Oil Soap with cotton pads and a bristle tooth brush to clean the bowl of the grime.  I also work on the rim using a brass bristled brush.  With a cleaned up stummel, I take another close look at the rim.  I love the tight canted look of the bowl and I hate the thought of removing any briar real estate from the profile of this Cutty.  Yet, I’ll need to remove some, just enough to remove the damaged briar and to restore fresh lines.  
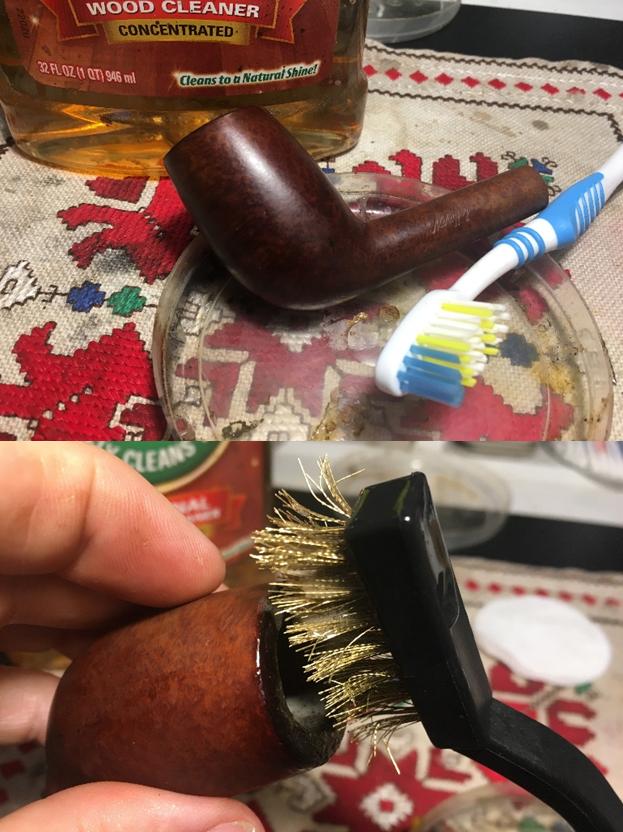
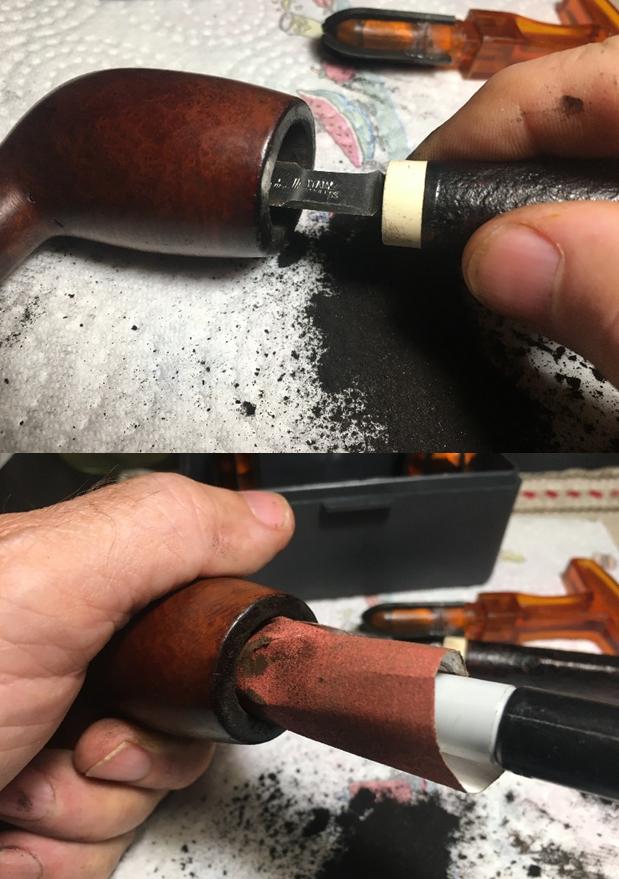
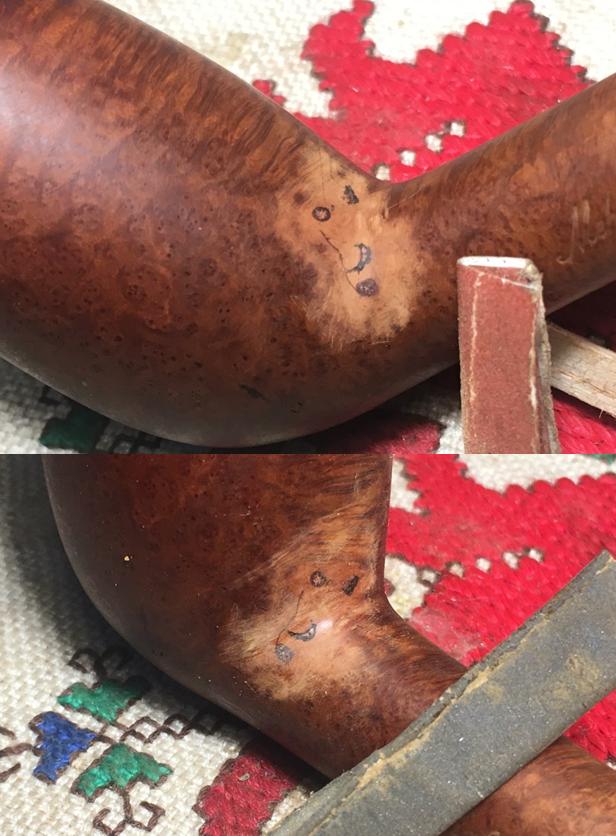
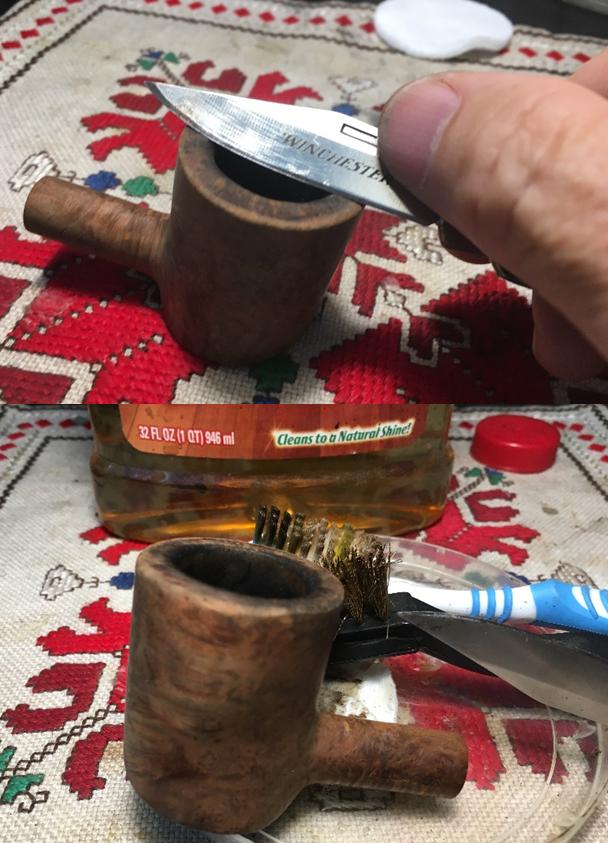
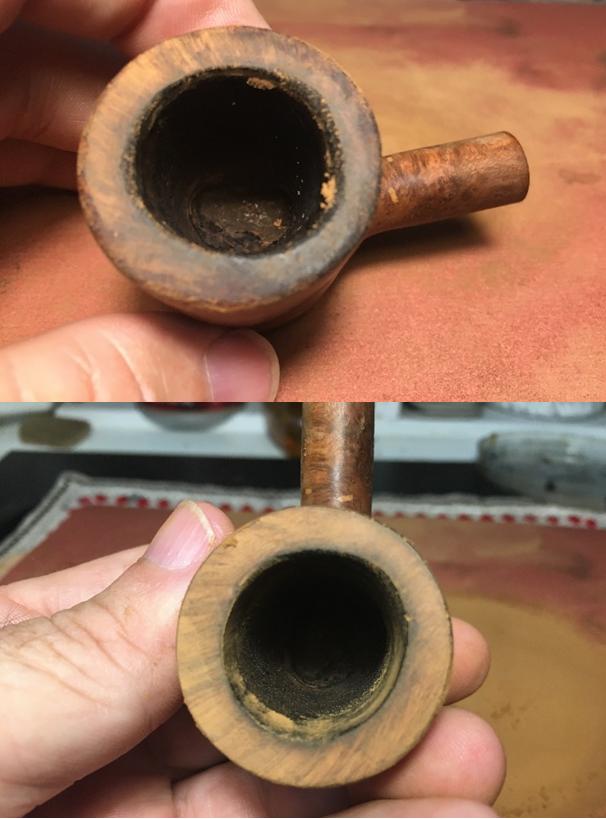
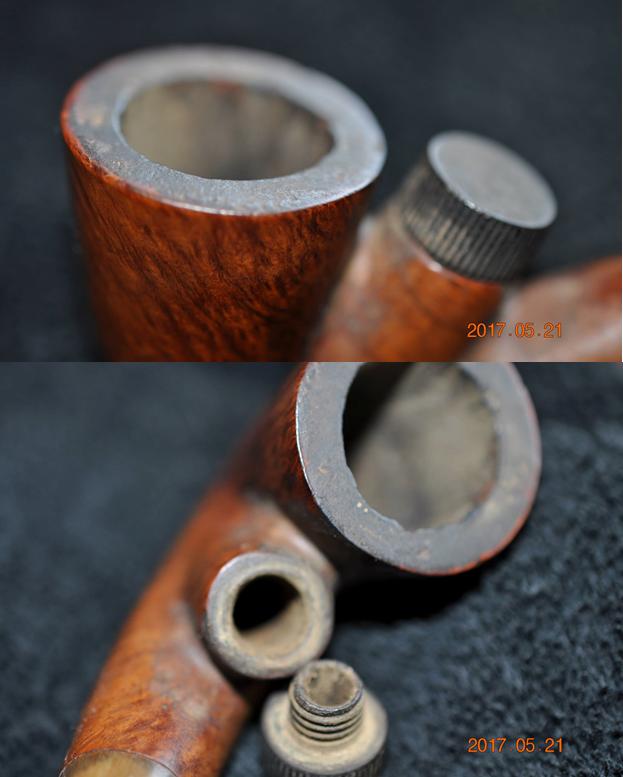
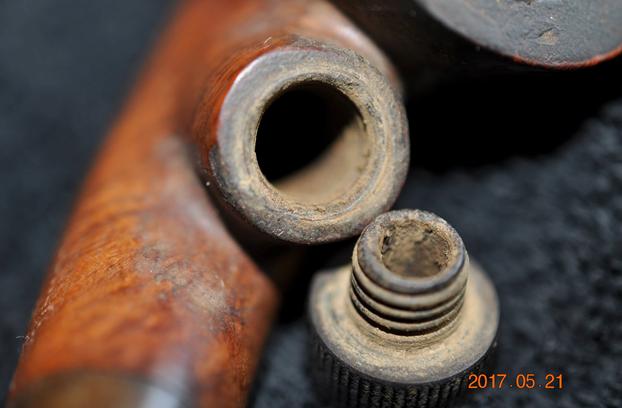
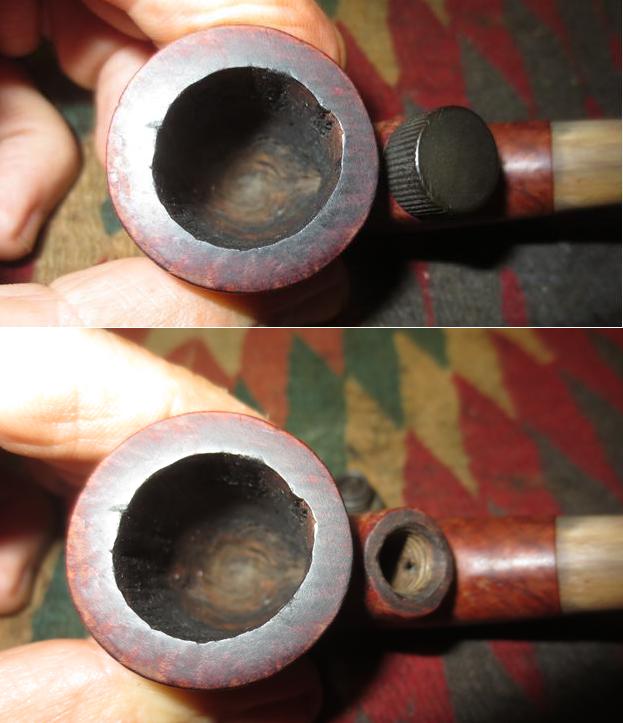
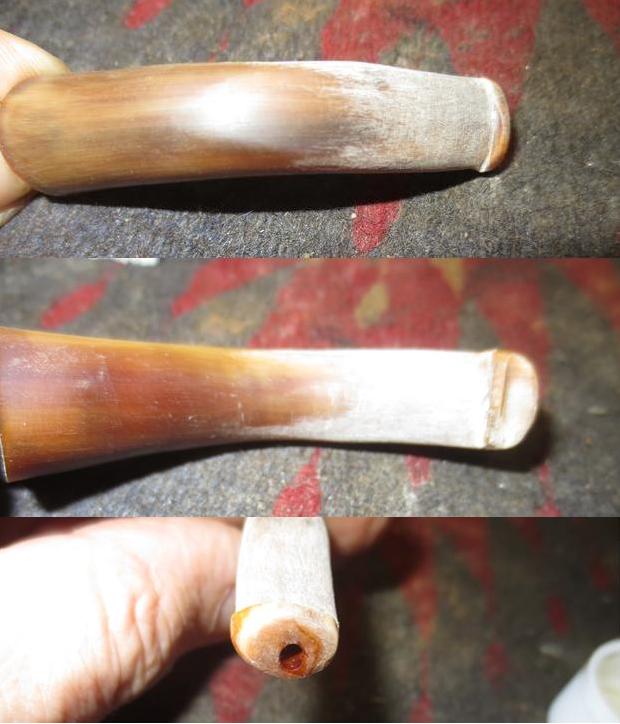
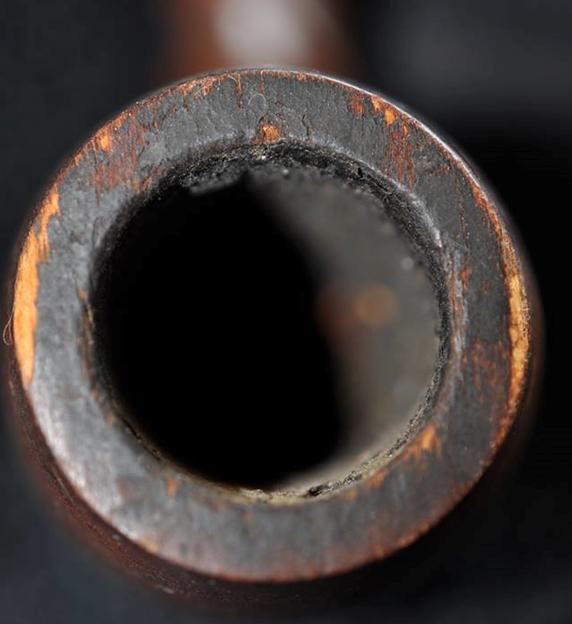
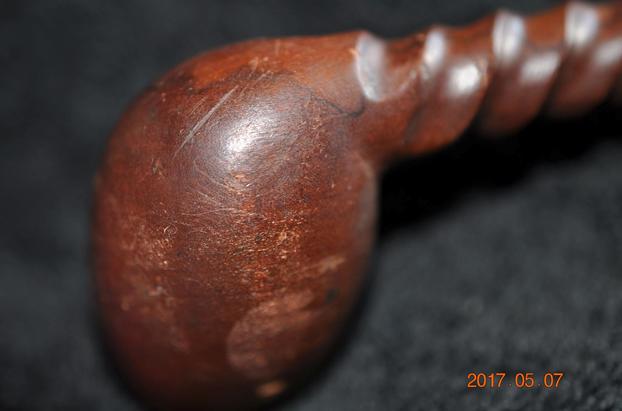
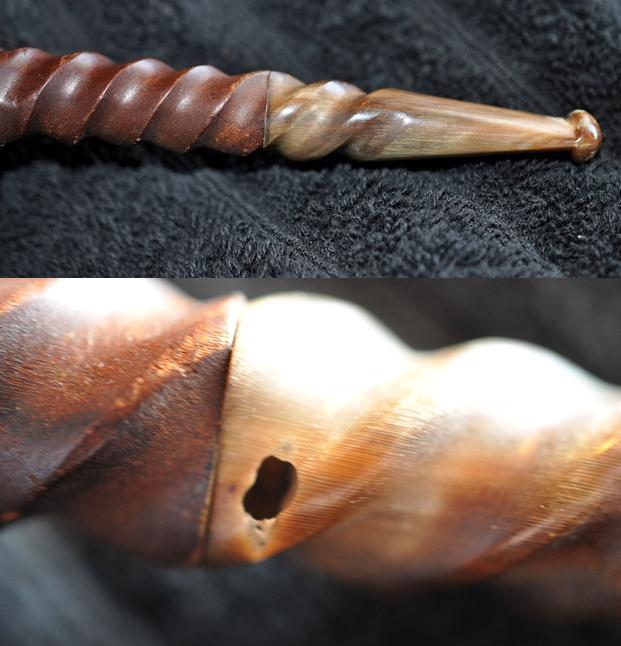
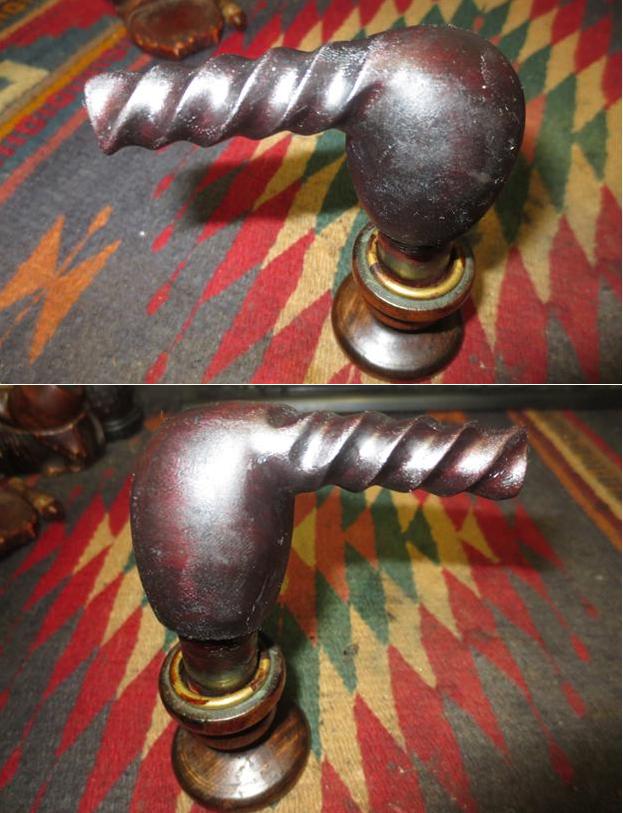
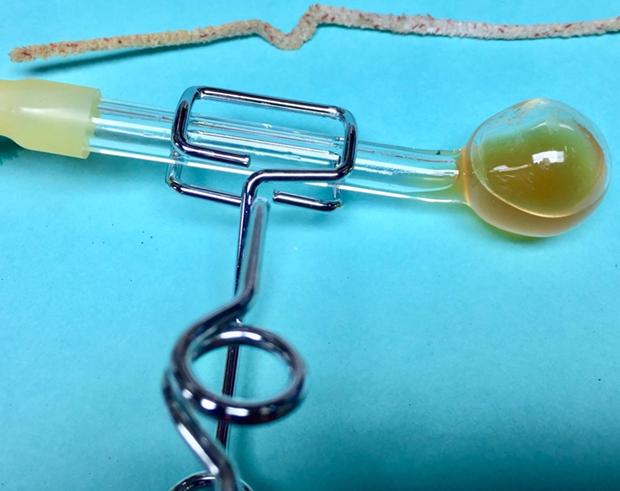
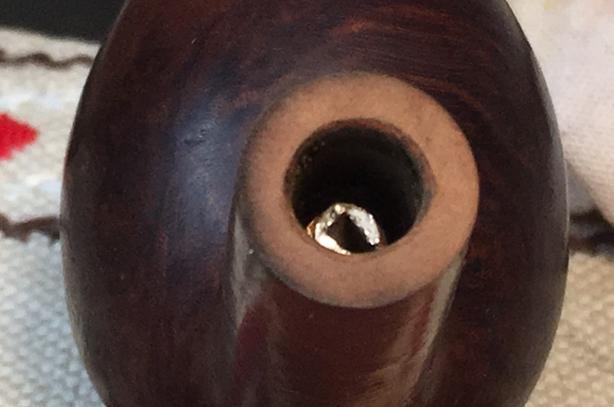
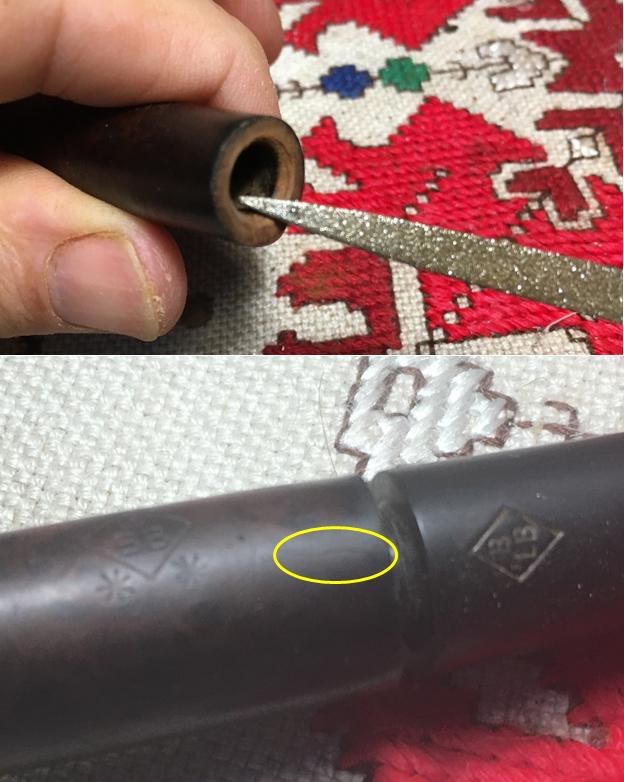
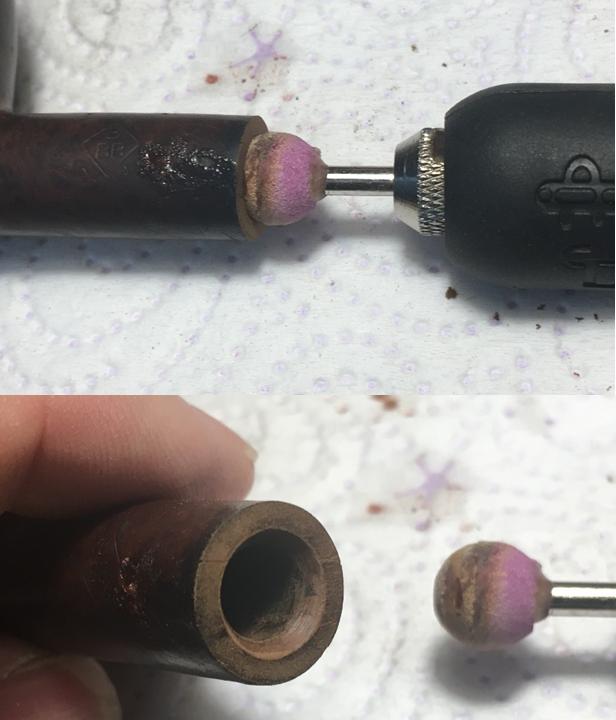
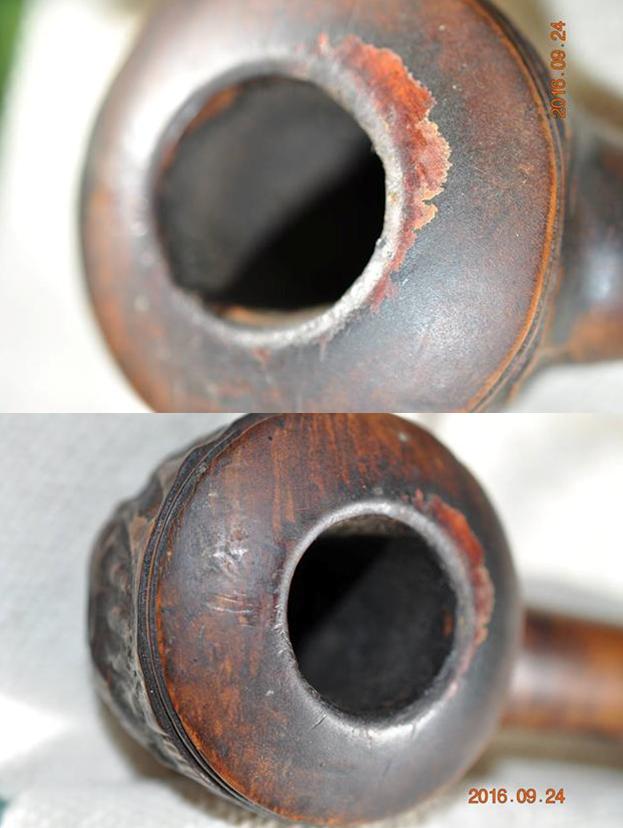
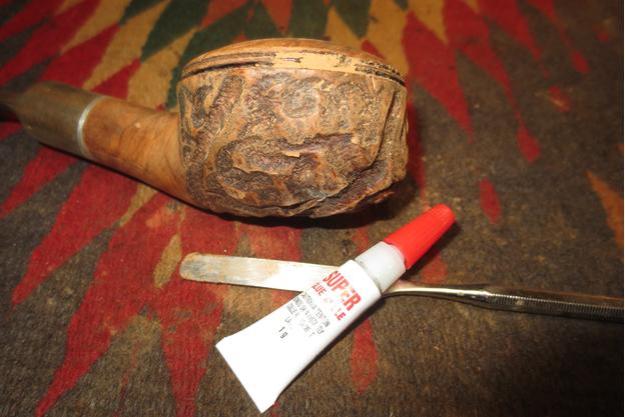
I look again at the problems at the upper junction of the shank and bowl.  I first use a sharp dental probe to clean out the holes of collected debris.  I’m careful with the hole on the left, looking at it very closely it appears to be prone to crumble.  As I look at the crack running to the left of this more fragile problem area, the question in my mind is whether to do a full crack repair, drilling ‘back-holes’ on either side of the crack to block any possibility of the crack enlarging.  Or, avoiding the added trauma to the briar by drilling, would simply laying a line of thin CA glue seep into the crack and sufficiently close it down?  I sent these questions and the second and third picture below to Steve for his input. 
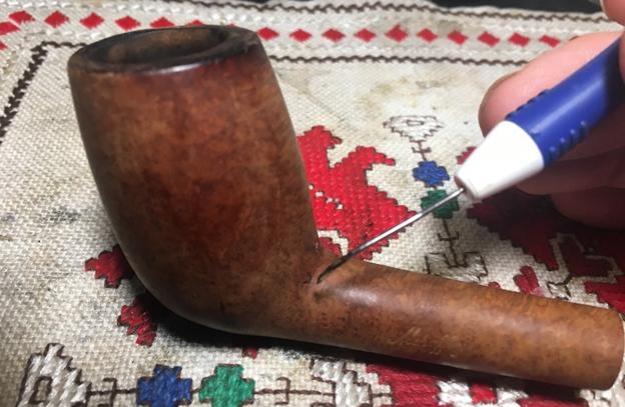
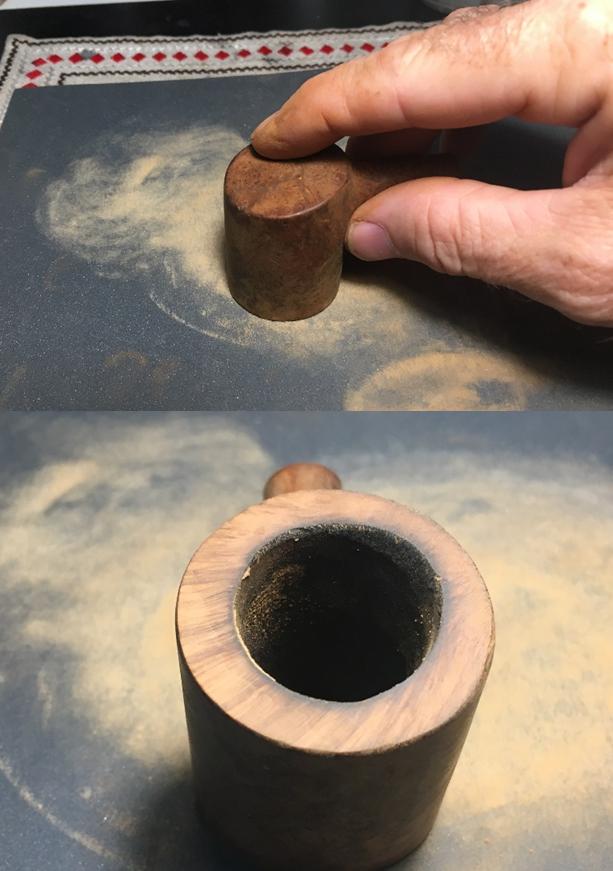
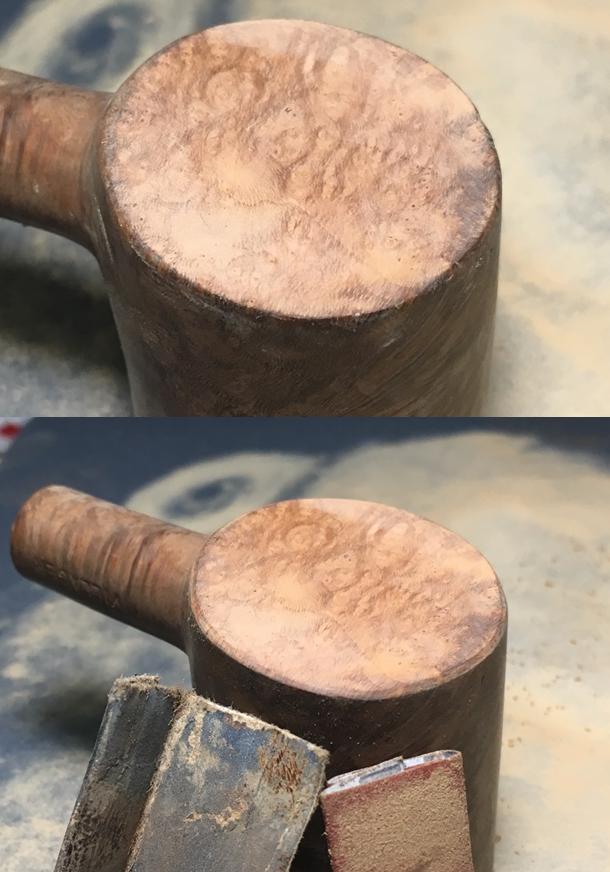
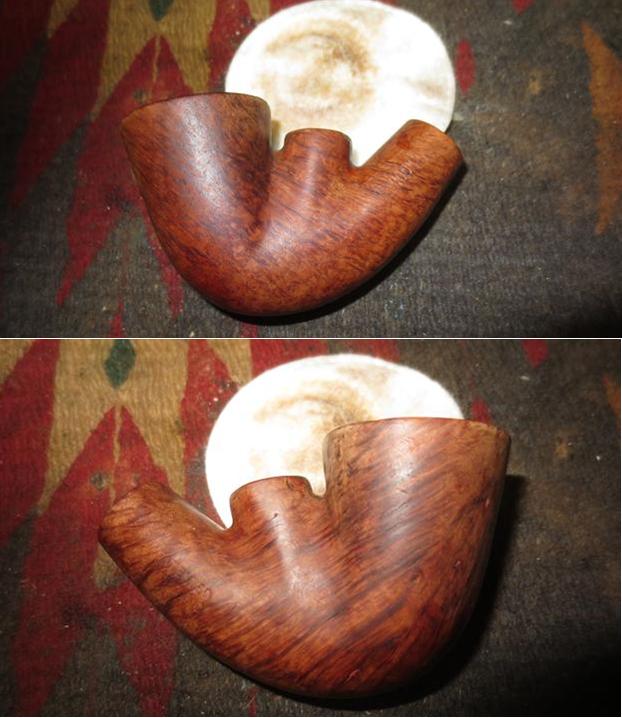
While I wait for Steve’s response, I’ll focus now on the rim repair.  I begin by using 240 grit sanding paper on a chopping board to create my topping board.  Before putting paper on the board, I invert the stummel on the board and eyeball it free standing.  I want to make sure that I top it keeping the angle of the rim parallel to the board.  Damaged, scorched wood tends to be softer.  I have learned by unfortunate experience that it’s easy to start angling into the softer wood and be left with an angled rim plane.  Not pretty!  As I free stand the inverted stummel, I discover there is a rock – the rim is already dipping.  I determine by looking at which part of the rim is healthy, which part of the rim needs to guide the topping while not dipping into the worn area – softer part of the rim. The pictures that follow show the progression of the topping.  Notice the first picture is only after a few rotations on the topping board staying on the healthy part of the rim.  The dark areas are lower and so don’t engage the paper.  As the topping progresses in the subsequent pictures, the dark areas gradually are engaged by the sanding paper as the rim moves toward the paper at the different points.  The final picture shows switching to 600 grit paper to smooth the topping.  The rim plane looks good and is level! Now I remove the damaged briar on the internal rim’s edge and create an internal bevel to balance the look of the rim – blending the damaged area with the healthier area. In the first picture below, the damaged area is in the 2 to 3 o’clock area.  A bevel looks good too by creating lines that, to me, are classy.   Using a rolled-up piece of 120 grit sanding paper I fashion the internal bevel.  Then I follow with rolled pieces of 240 grit and 600 grit papers to smooth the bevel.
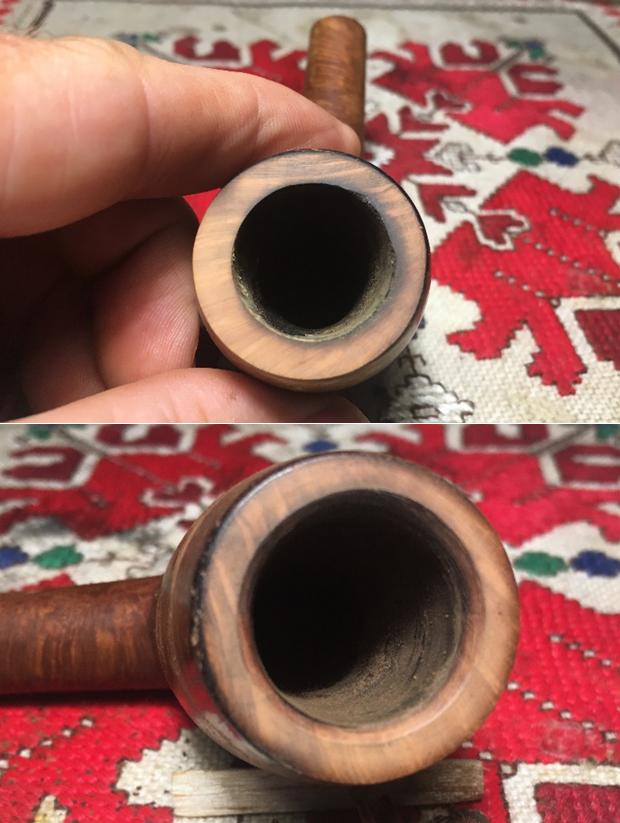
After the internal bevel is completed, I take a look at the external edge of the rim.  It also has some heat damage and has a dark ring.  I use 240 grit paper rolled and create a gentle bevel around the outer edge.  I don’t need much – just enough to clean up the briar. I follow the 240 grit paper with 600 grit.  The rim looks good.
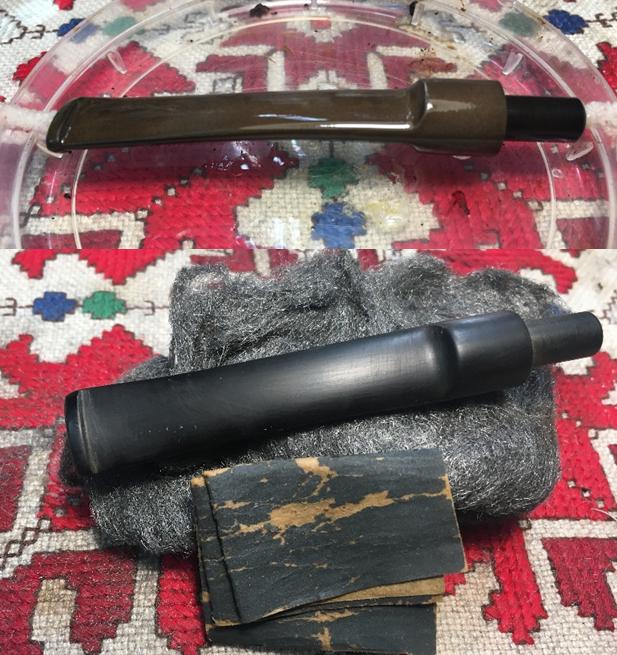
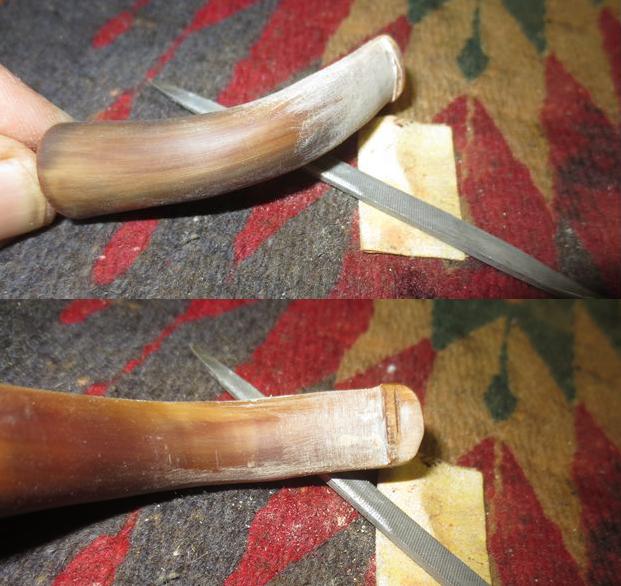
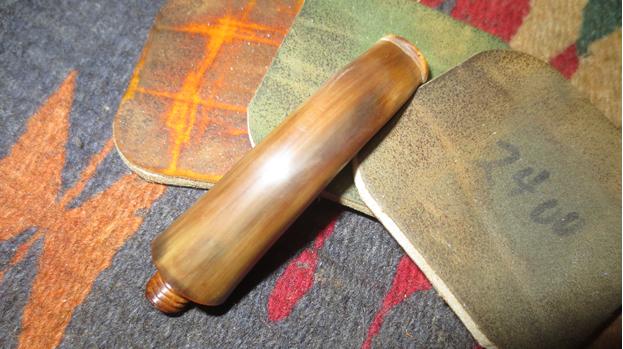
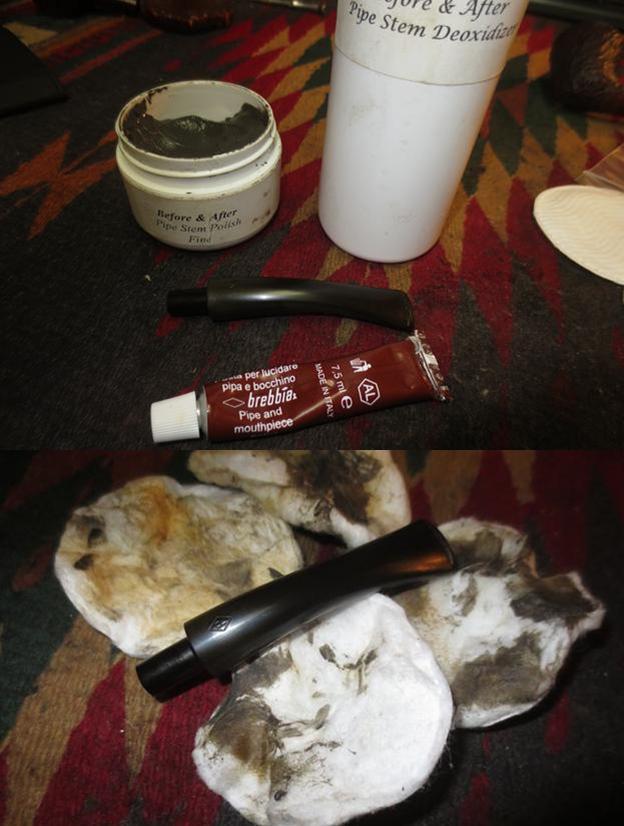
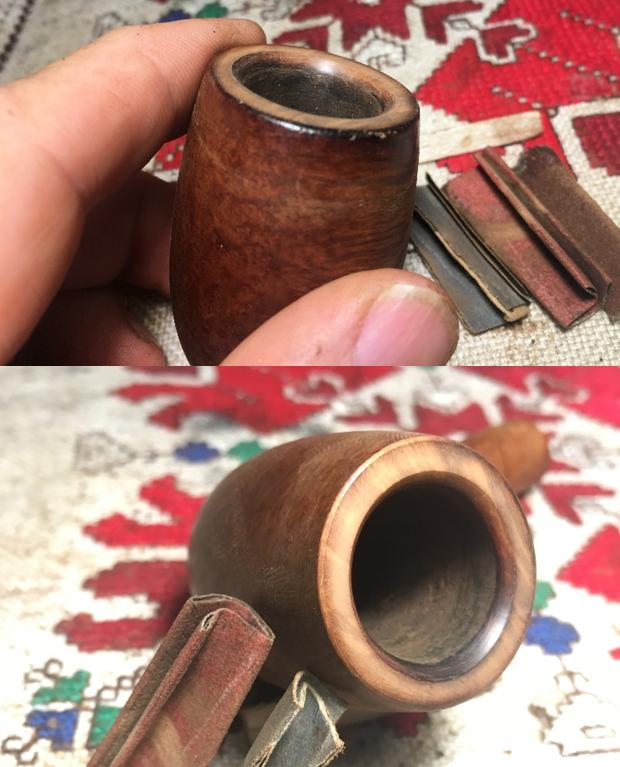
I put the bowl aside for a time and take the stem out of the OxiClean bath.  The oxidation has risen to the surface.  I reconnect the stem and stummel placing a plastic disc between the two.  I do this to avoid shouldering the stem by rounding the shank edge of the stem.  I use 600 grit paper and wet sand the stem in warm water.  I follow this by using 0000 steel wool to buff out the sanding lines and shine the stem.
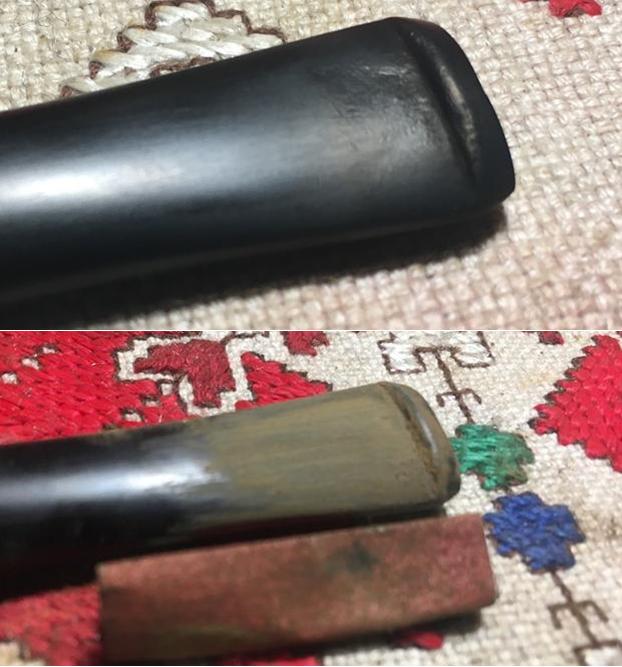
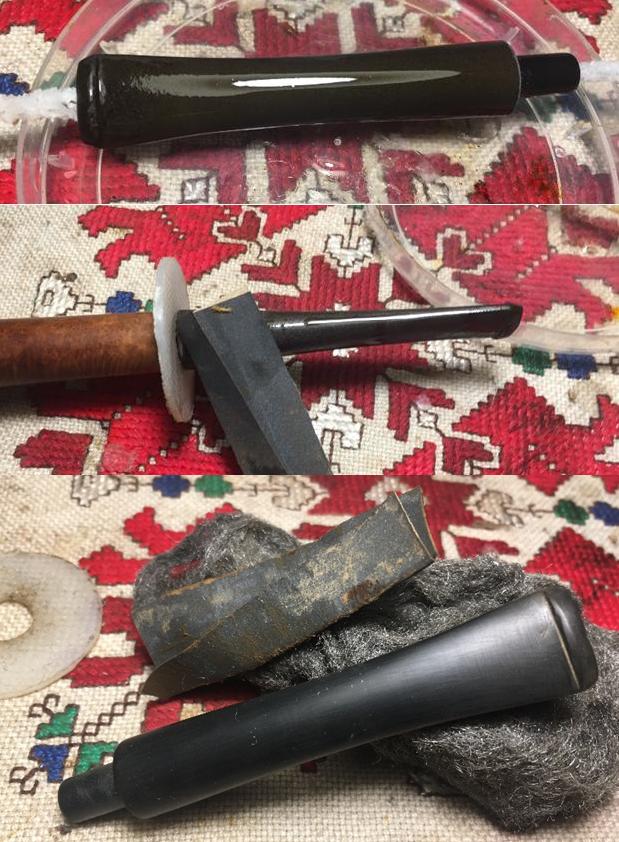
Turning now to the tooth chatter and tooth dents, I start with the upper bit.  The tooth static is not serious and I sand it out using 240 grit paper.  I also sand out a slight dent on the button lip.  I then erase the 240 grit lines using 600 grit paper followed by 0000 grade steel wool.  The upper bit looks good. 
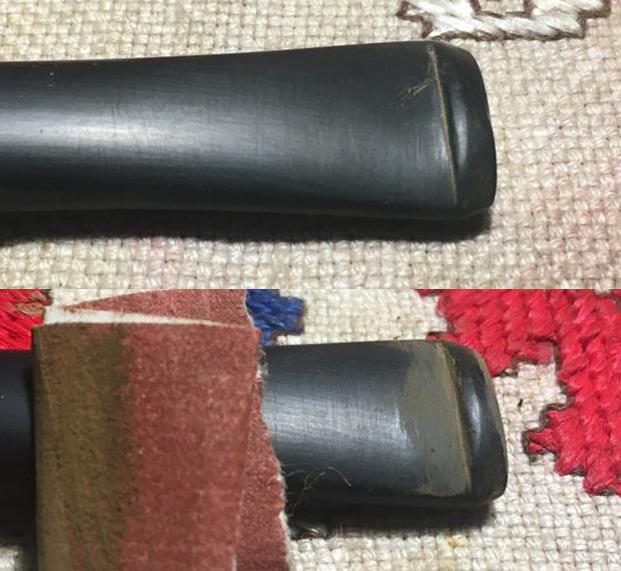
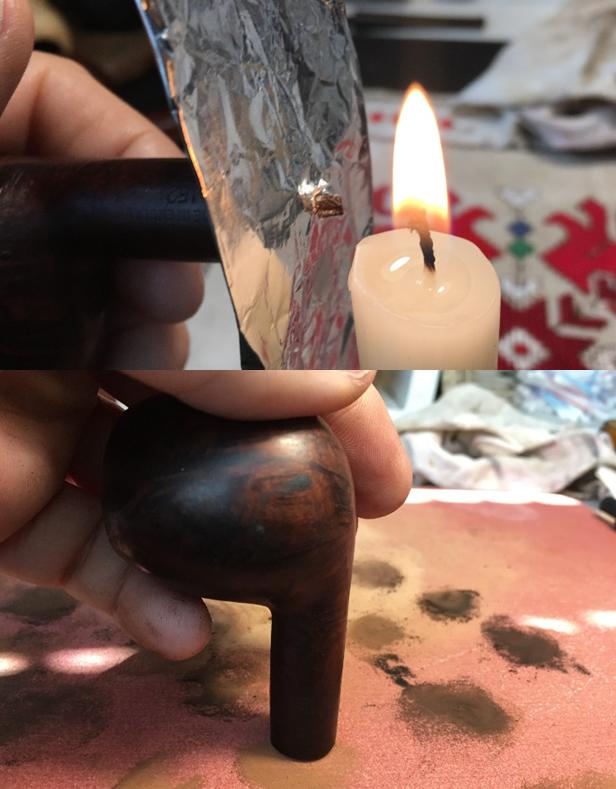
The lower bit is a bit more problematic with a significant tooth dent in the center of the bit.  It also has significant tooth chatter and a small dent on the button.  I use the heating method by lighting a candle and I pass the affected area over the flame – I keep the stem moving back and forth over the flame.  This heats the vulcanite and the expansion of the rubber seeks its original shape.  This method works well.  The damaged area did expand so that I am able to sand out the rough areas using 240 grit paper, then 600 to remove the scratch traces of the 240, then 0000 grade steel wool to buff our the remainder of the 600 residue marks and shine the stem.  I also sand out the dent on the button. 
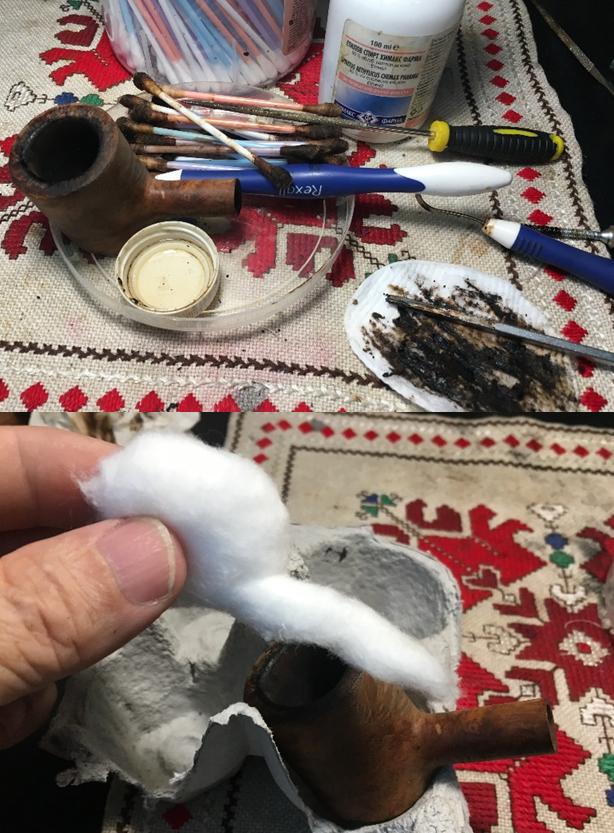
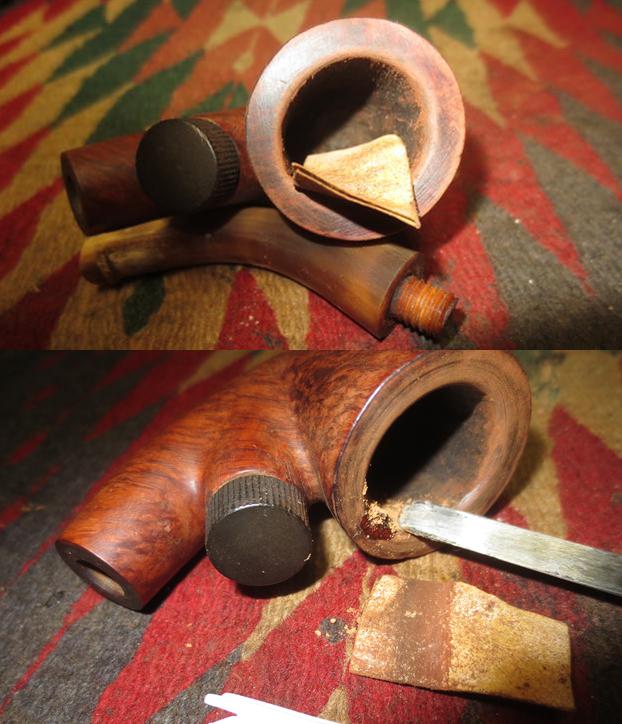
I receive word back from Steve about the approach to the stummel problems.  His recommendation to do the full ‘surgery’ on the crack by drilling holes at the end points of the crack and filling these along with the holes together is the strategy.  As I was already aware, Steve urged caution around the left hole that appears up close to be crumbling.  The first picture below shows two arrows pointing to the end of the crack where I will drill holes.  The carrot in the middle is marking the obvious area of concern.  I want to keep this area intact so that I can fill it with a putty made from briar dust and CA glue.  First, I use the sharp dental probe to mark the points for the drill – creating a guide hole so that I don’t create unintended rustification!  I utilize a magnifying glass to do this!
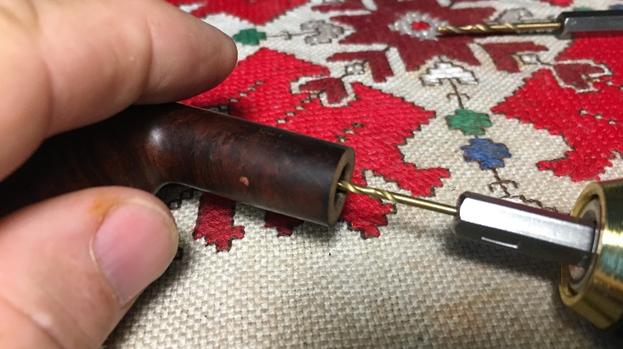
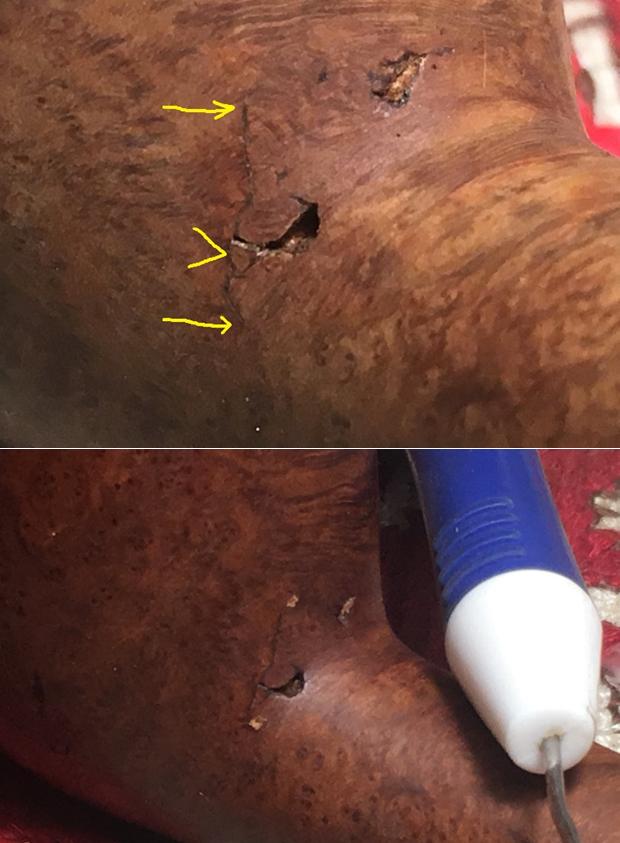
Historically, it hasn’t been easy to drill these holes with precision.  Using a handheld Dremel with a 1mm drill bit mounted in the hand extender (the cable extension) needs a steady hand!  I decide to try something different.  I attach the Dremel hand extender to a miniature vice.  If I stabilize half of the equation that improves my odds!  With the drill stationary, I can bring the stummel to the drill with more control.  With Dremel readied with a 1mm drill bit, I put my plan in motion.  The first hole I do, the lower one, I had a little wobble so the hole wasn’t as crisp as hoped.  The upper hole was much better.  Of course, the drilling does not go through to the internals!  The depth is only a few millimeters. Overall, this was a better setup. 
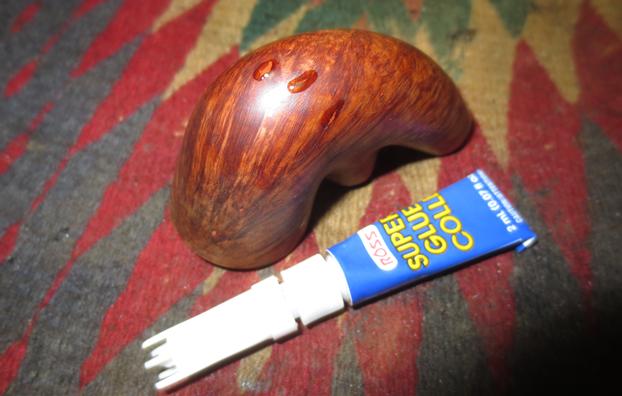
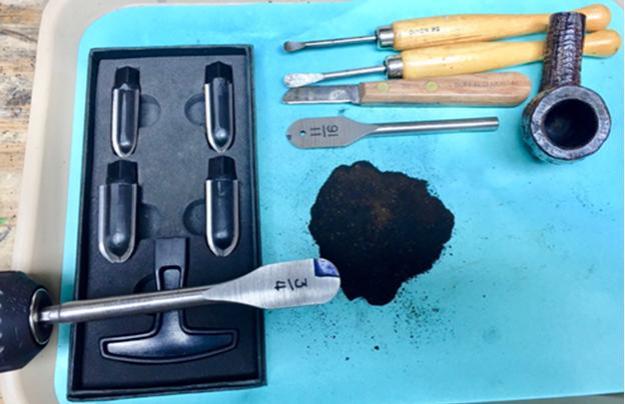
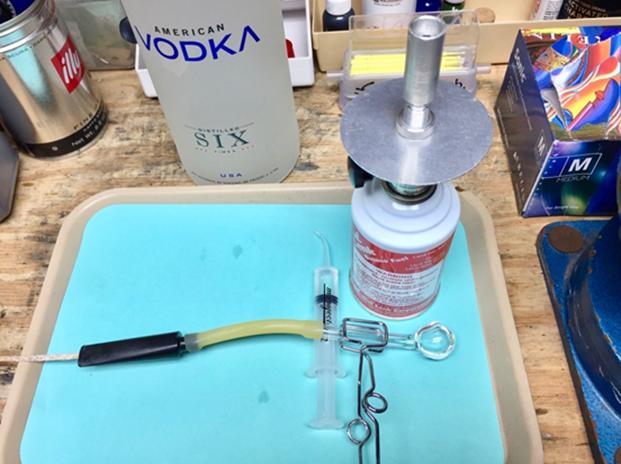
With holes drilled, I mix briar dust and Special ‘T’ thick, CA glue to form a putty to fill the drill holes as well as the holes.  I scoop a small mound of briar dust on a plastic lid and next to it I make a puddle of CA glue.  I gradually mix the dust into the CA glue until I arrive at the viscosity I desire – I want it to be a bit on the wet side so that the putty will better penetrate the holes, cracks and crevices.  I use a dental spade tool to tamp the putty down while I spread it over the damaged area.  I place more than needed so that when I sand the patch mounds down, they will blend well.  The day has turned to night, and it’s time to turn out the lights!
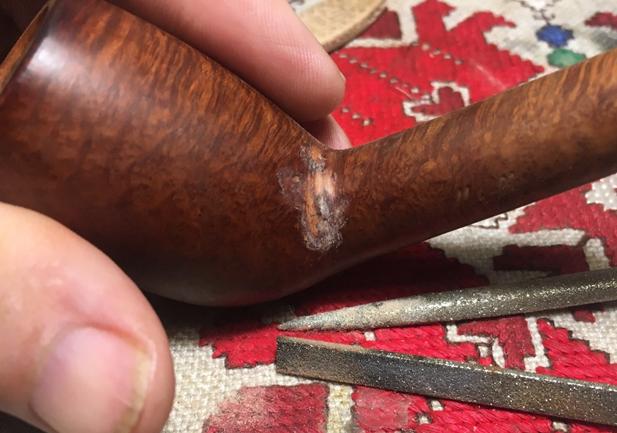
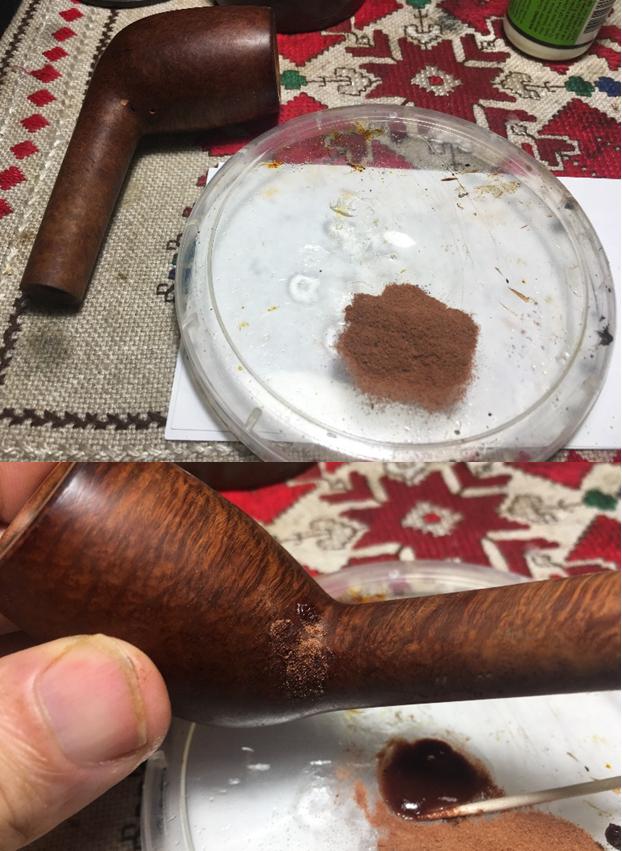
Having cured overnight, I’m ready to file and sand the briar dust putty patch.  Using first flat and rounded needle files I slowly and gradually file the patch mounds down so that they are very close to being level with the briar surface. The aim is to keep the files on the patch material and not on briar.  For the fine tuning, I use 240 grit paper to bring the patch flush with the surface, aiming to remove putty from the unaffected surface area – blending the patch.  I take some pictures to show the file progressing. 
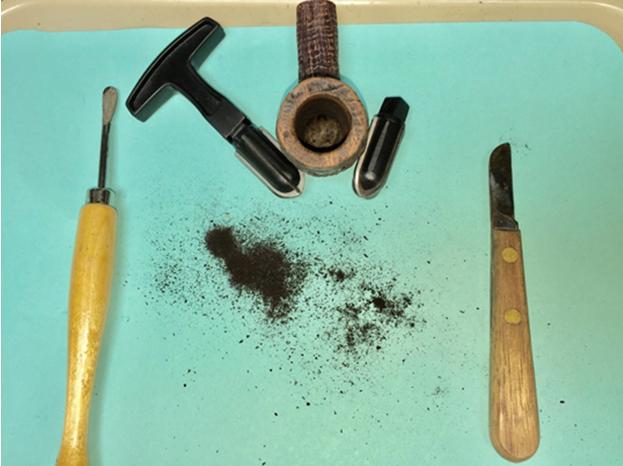
Next, I use 240 grit sanding paper to take the patches down to the briar surface and remove superfluous briar putty from the briar surface.  I roll the paper into more of a roll, and move it in a circular motion over the patch material.  The briar putty is easy to distinguish from briar in that it sands up into a white powder whereas briar doesn’t.  The first picture below shows this well.  I take pictures to show the 240 grit paper progress.  When I come to the place where only the filled patches remain, flush with the briar surface, I then switch to 600 grit sanding paper and smooth out the surface further.  The patches come out very well.  The pictures show the progress. 
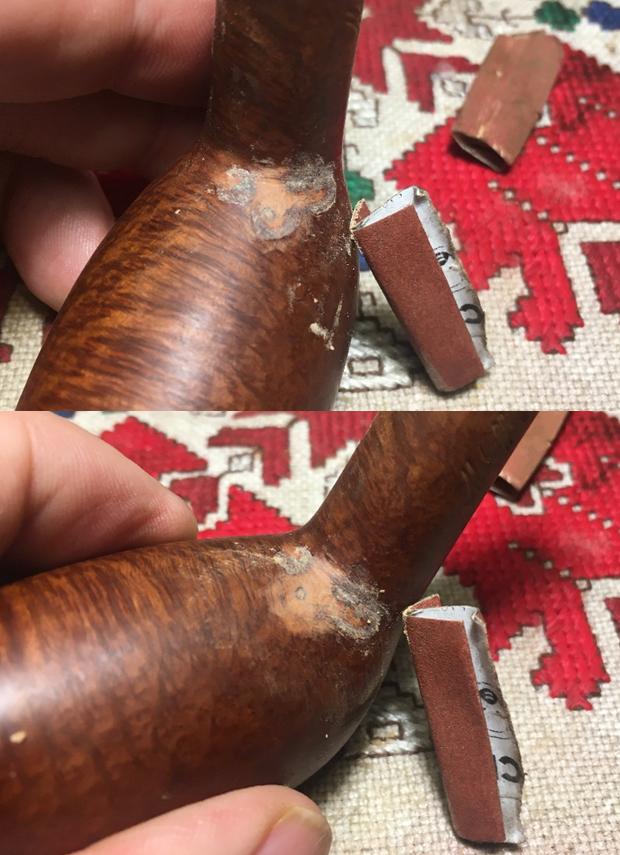
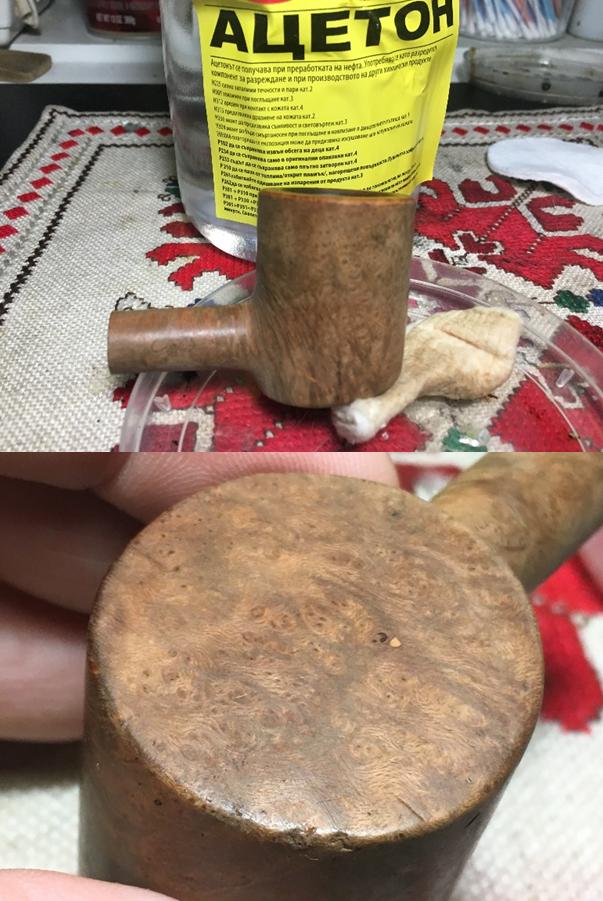
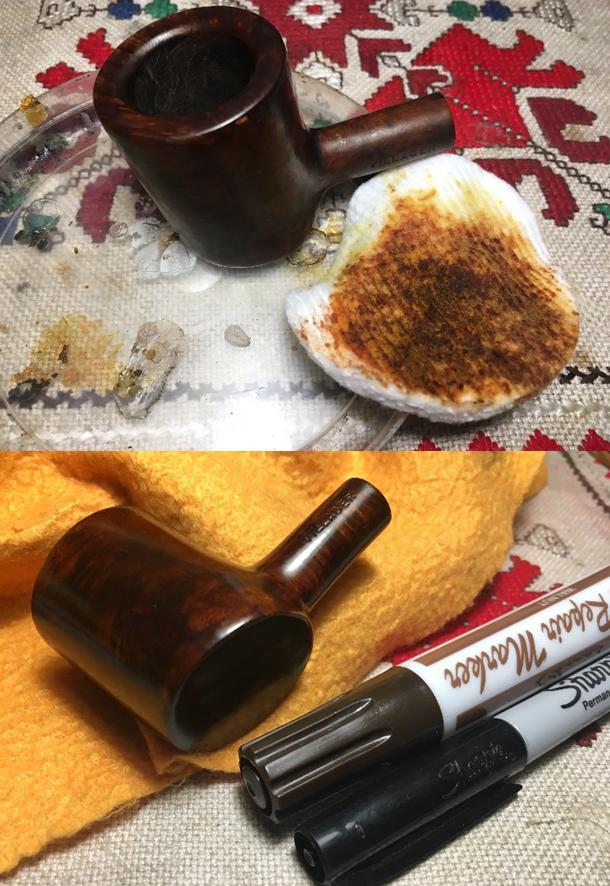
During the repair, I was thinking about the next steps for finishing the stummel.  With the rim repairs, darker scorched areas around the rim, and the crack/holes repair on the stummel surface, I decide to darken the finish on the Mehaffey Cutty to blend these areas more effectively.  Again, with aniline dyes (alcohol based), the opportunity to lighten the hue is an option by wiping the surface with alcohol.  To prepare the surface, I decide to remove the old finish with acetone and cotton pads so that the staining process will have more uniform results.  The acetone removes the old worn finish very quickly and now I’m down to the raw briar.
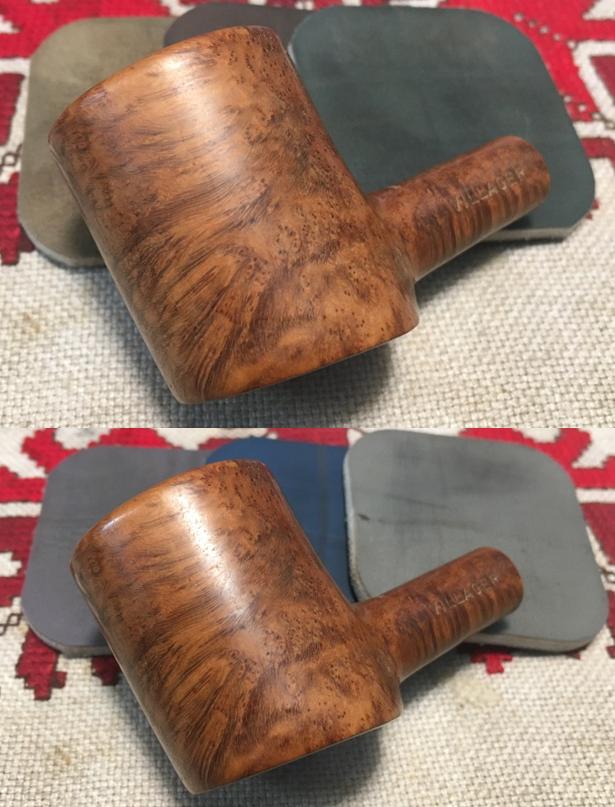
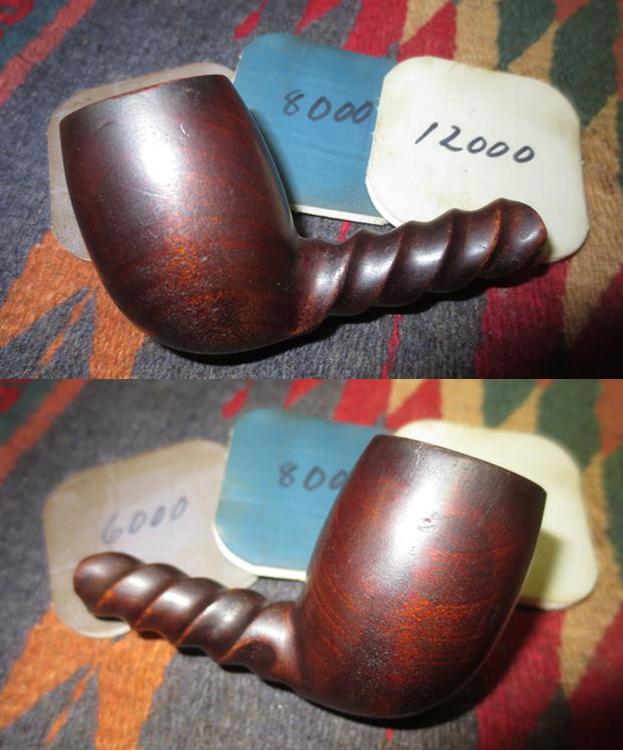
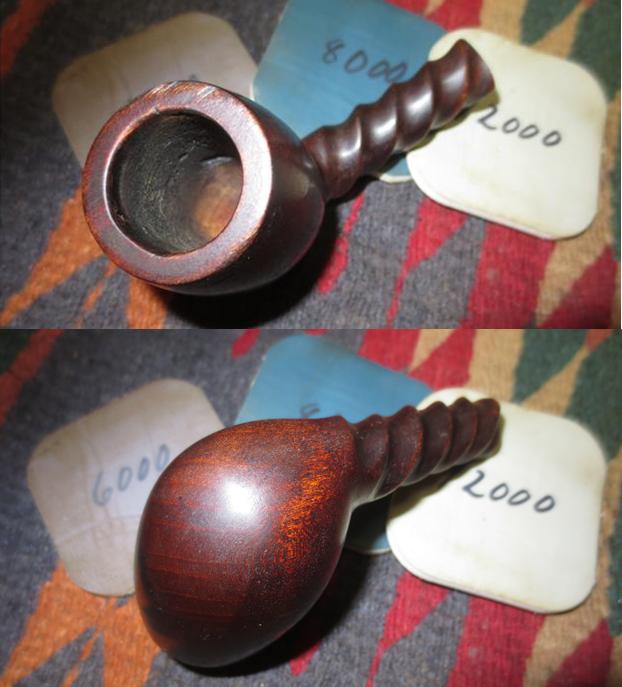
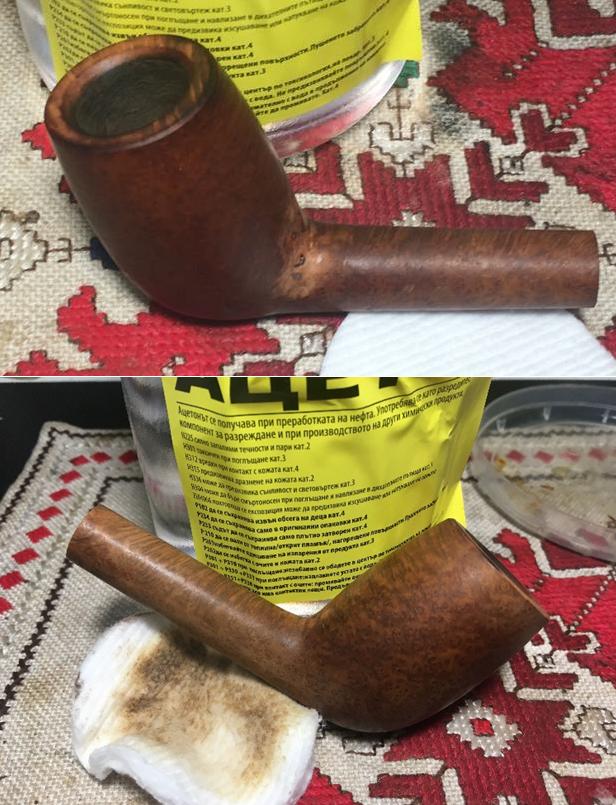
The briar surface is in good shape so I begin with using a light grade sanding sponge to smooth out the nicks.  After the sanding sponge, I wet sand using micromesh pads 1500 to 2400.  Following the wet sanding, I dry sand using micromesh pads 3200 to 4000 then 6000 to 12000.  Oh my.  What emerges through the micromesh cycles is an extraordinary piece of briar works.  Mehaffey may not have been known for his pipes, but I have little doubt that when this Cutty was on the Mehaffey shelf with a price tag on him, it was an upper shelf pipe being offered.  Other than the repair work done, there are no imperfections or fills of any sort that I can discern, and the grain…, oh my! 
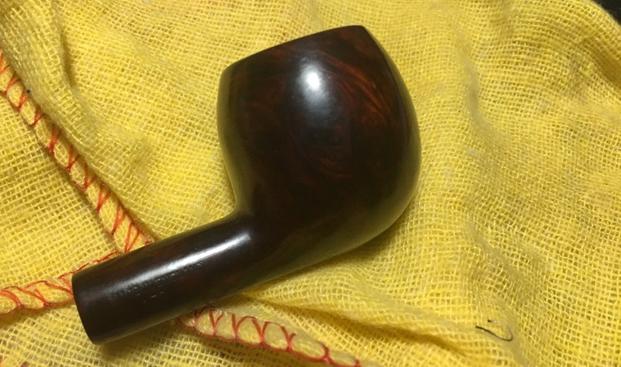
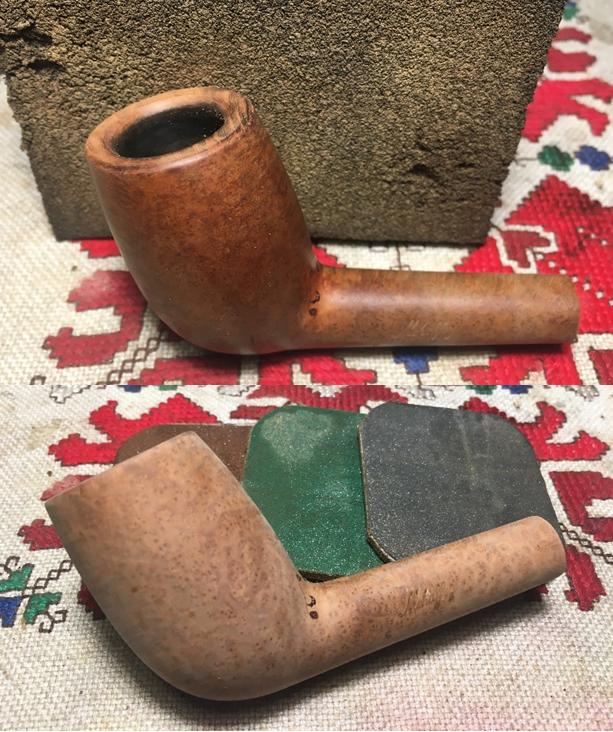
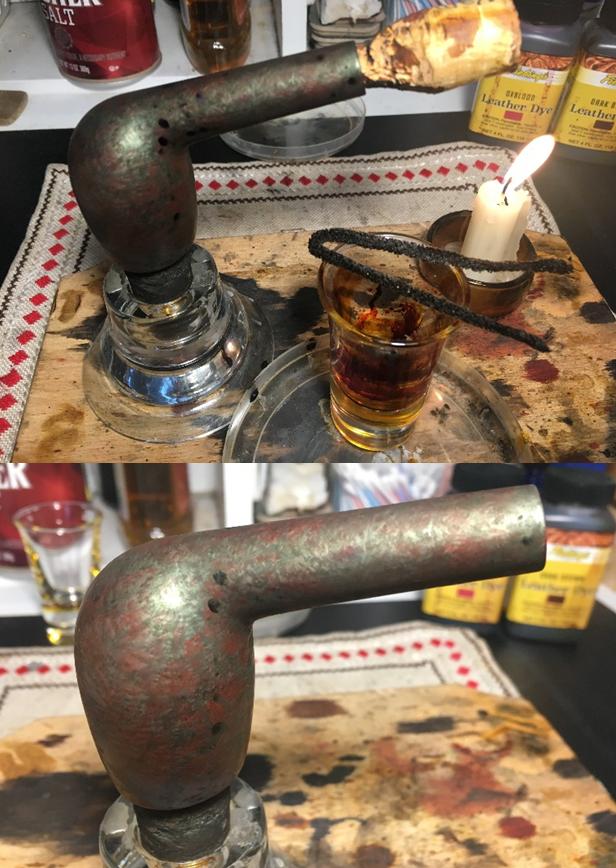
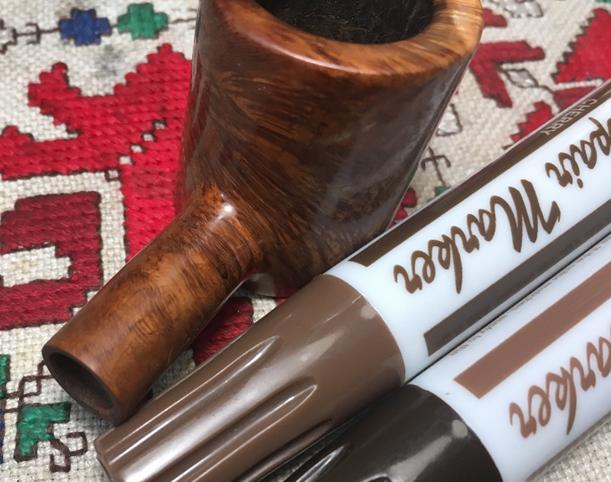
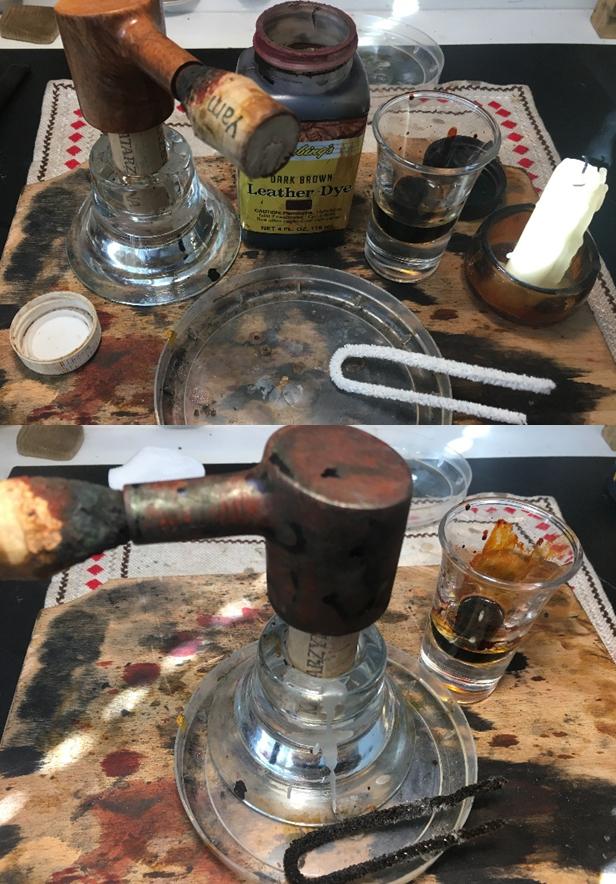
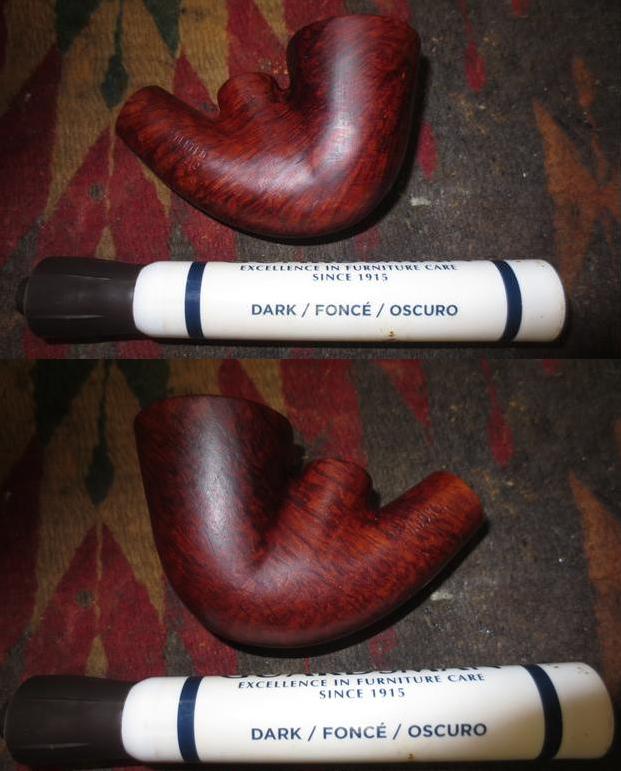
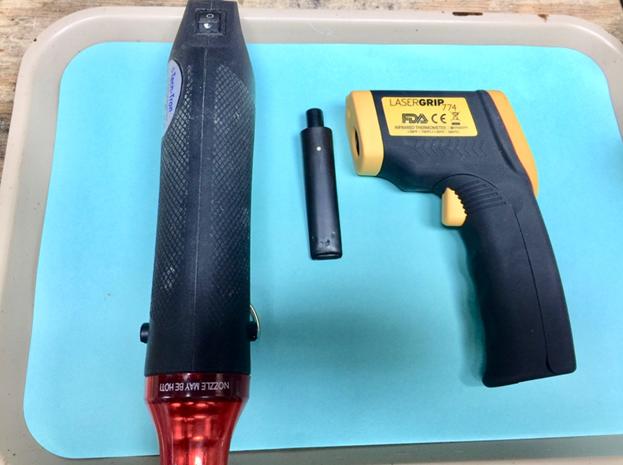
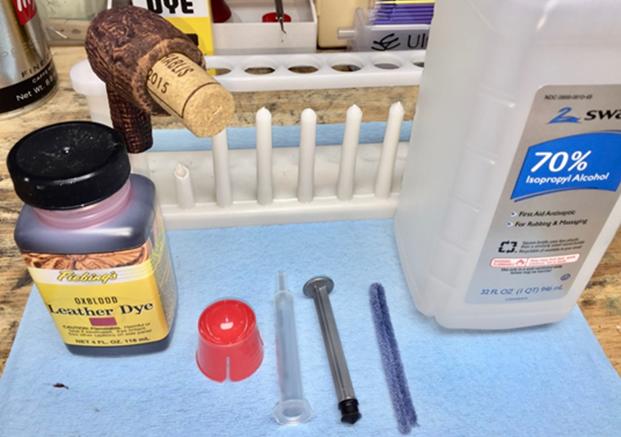
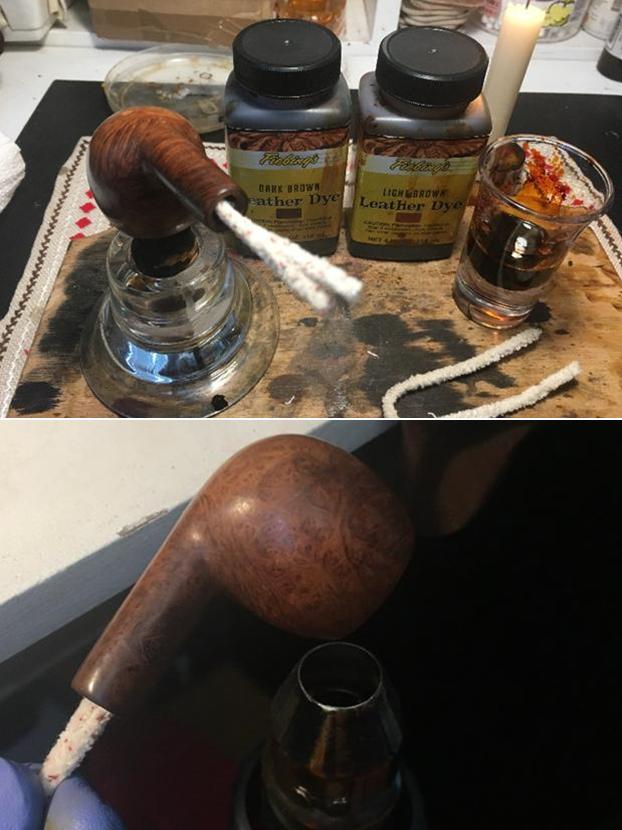
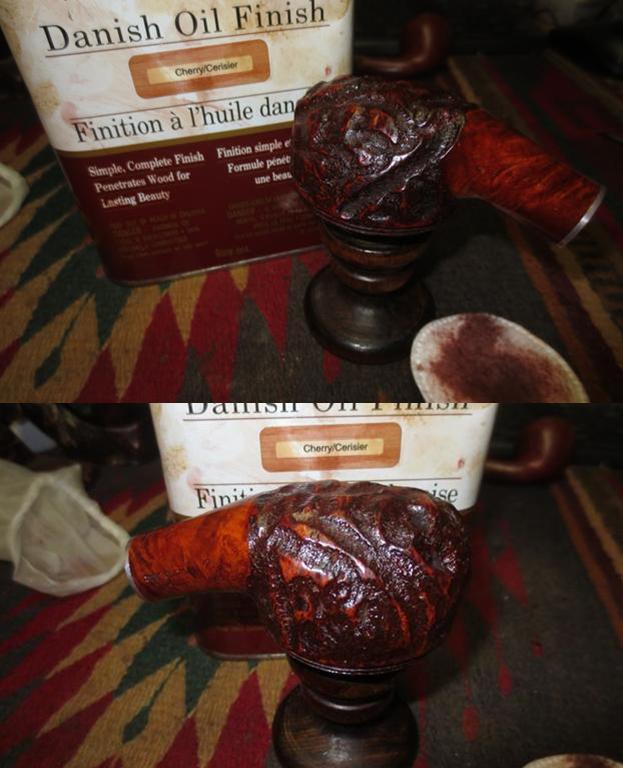
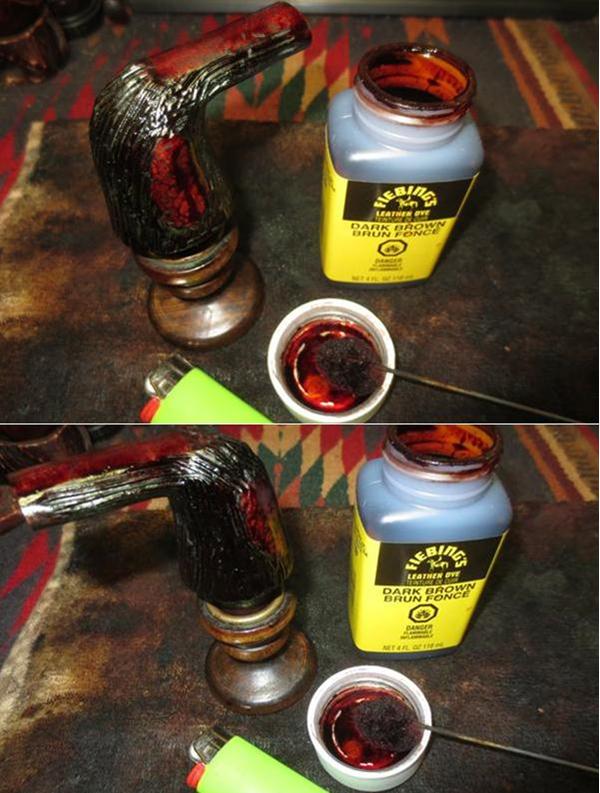
I continue to work on the beautiful Cutty stummel now to apply the stain.  I decide to mix 1 to 1 ratio of Fiebing’s Dark Brown Leather Dye to alcohol.  During the micromesh process, I also decide to add a pinch – just a pinch, of Fiebing’s Oxblood Leather Dye to add a little rich attitude to this proud Cutty! I take a picture of the staining set-up, then wipe the stummel down with alcohol to clean the surface.  With a large eye dropper, I mix the dyes in a shot glass. I then warm the stummel using the hot air gun, expanding the grain and making it more receptive to the dye.  After warmed, I liberally apply the dye over the stummel, using a cork inserted into the mortise as a handle.  After I achieve full coverage, I fire the wet dye using a lit candle which immediately burns off the alcohol in the dye, setting the stain in the grain.  After cooling a few minutes, I repeat the process and set the stummel aside to rest for several hours.  The pictures show the staining process. 
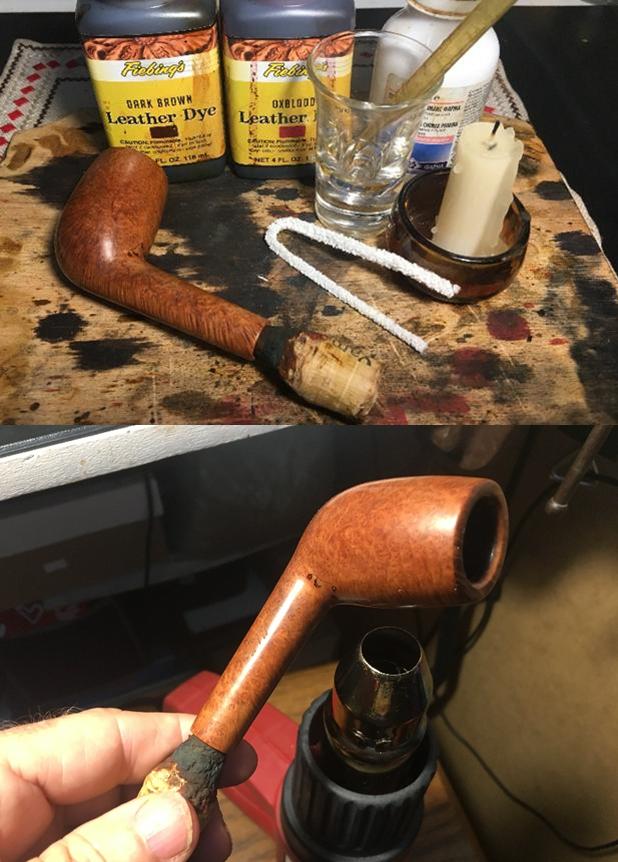
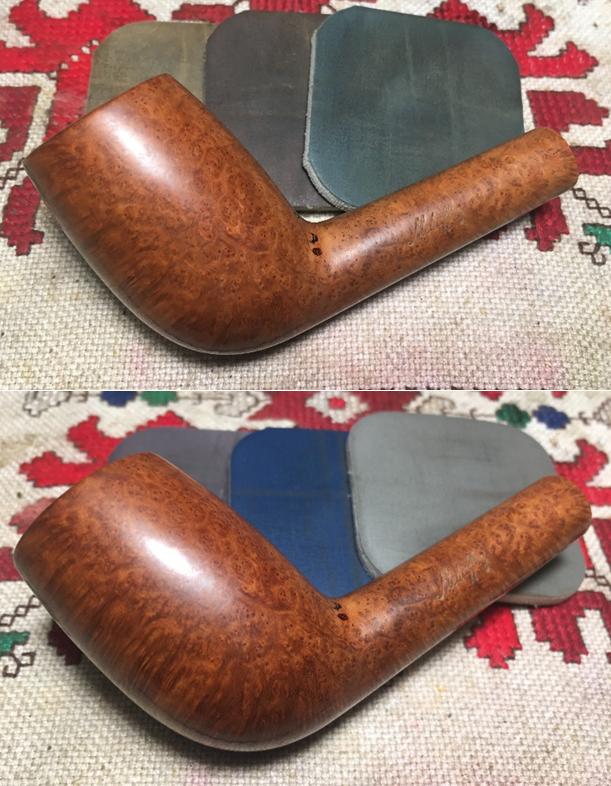
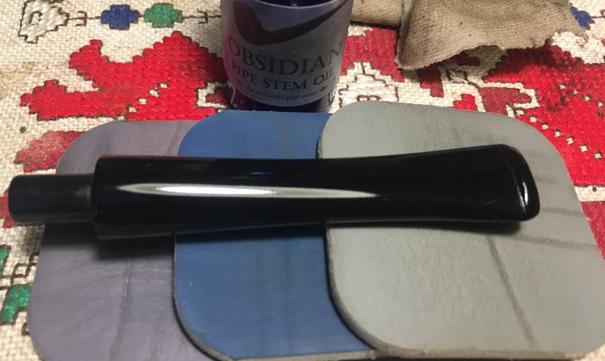
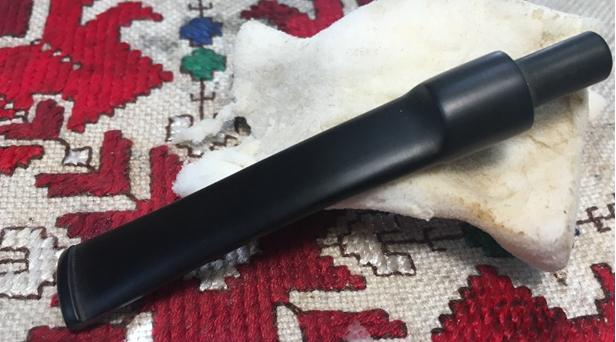
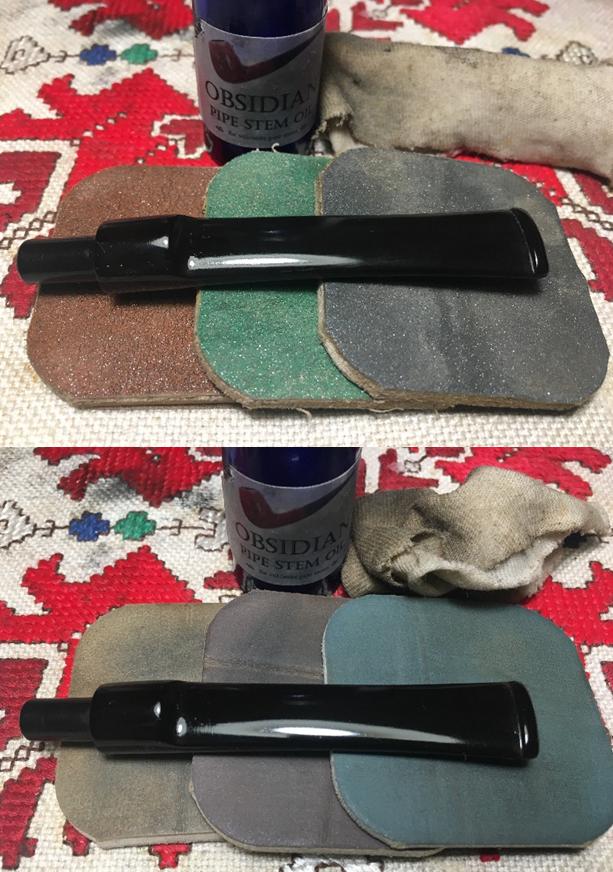
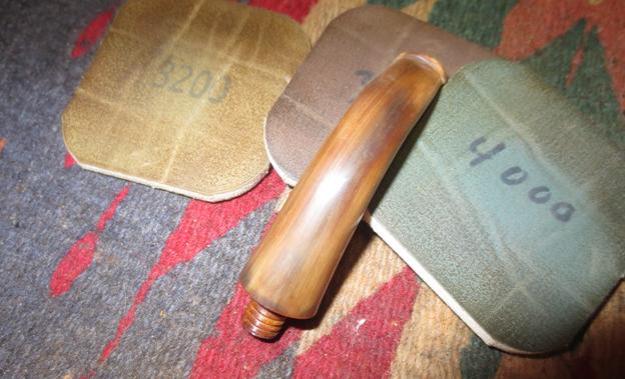
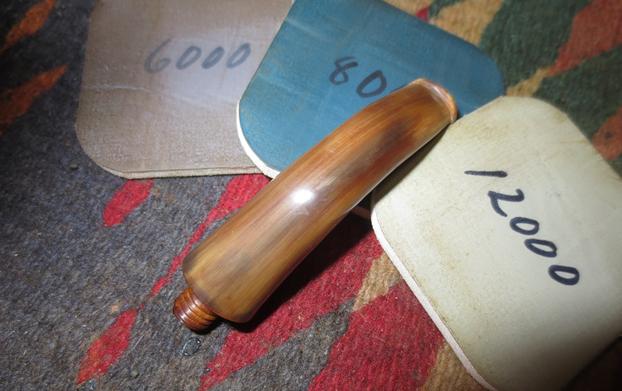
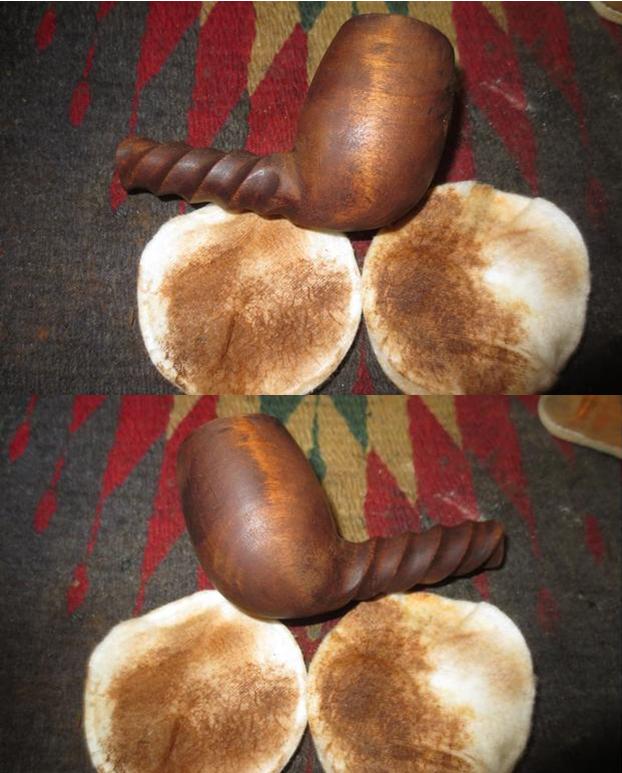
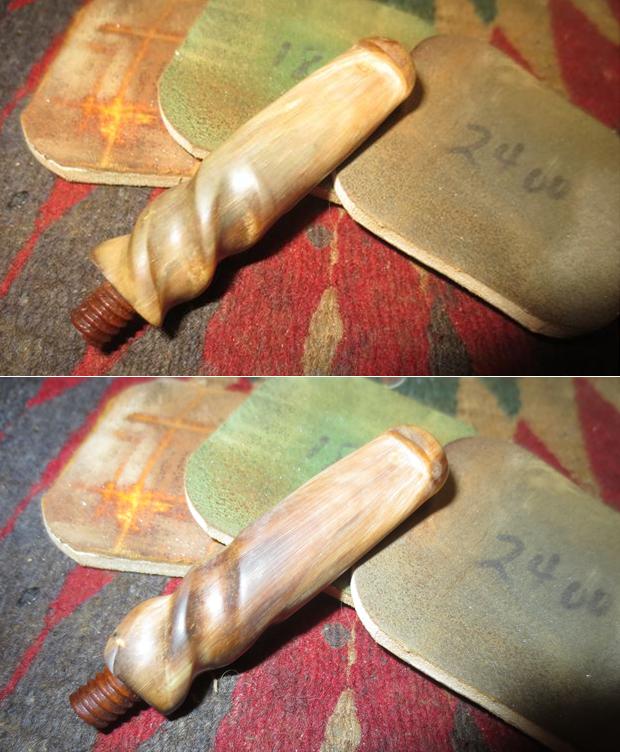
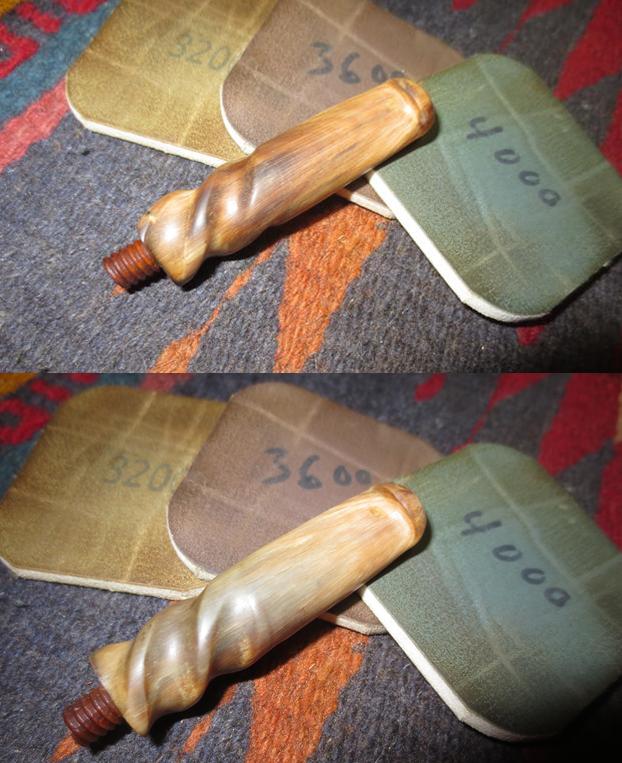
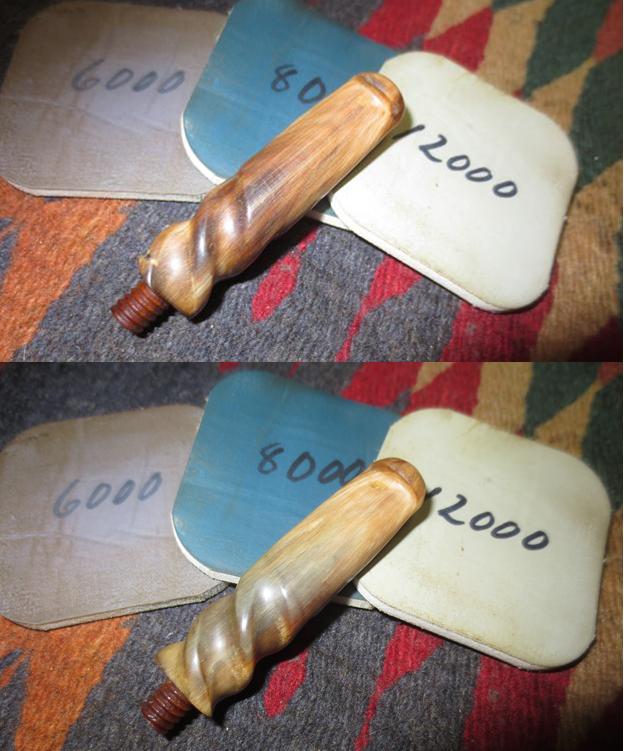
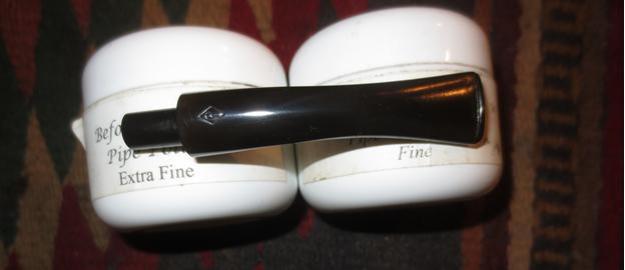
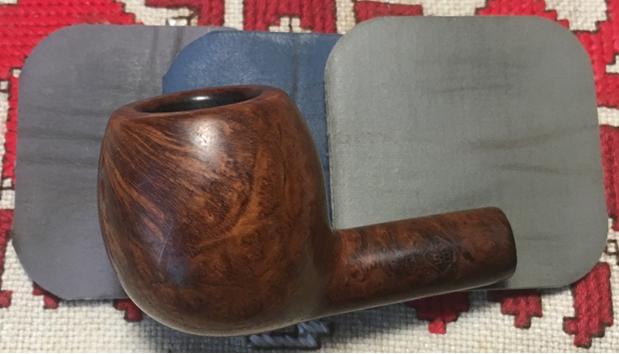
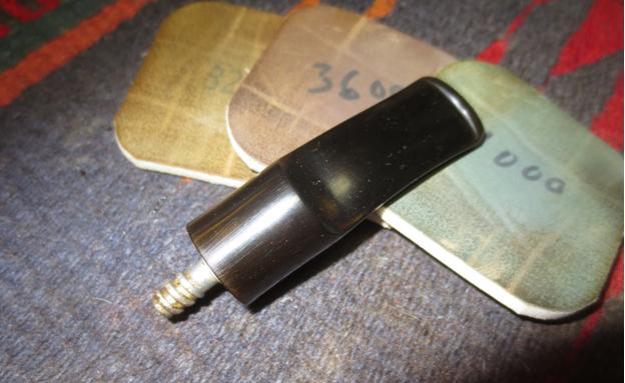
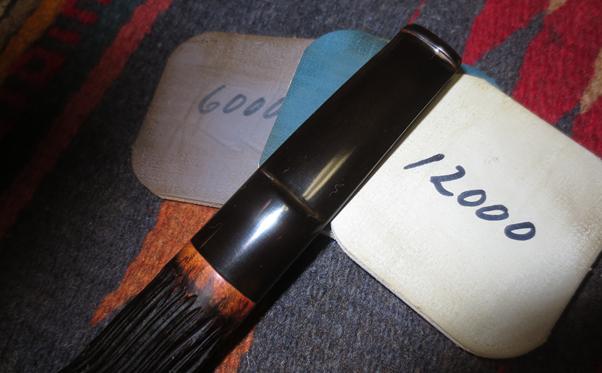
With the newly stained bowl resting, I take up the stem to complete the sanding process.  Using micromesh pads 1500 to 2400, I wet sand the stem.  I follow this with dry sanding using pads 3200 to 4000 then 6000 to 12000, applying Obsidian Oil after each cycle of three to help the vulcanite regain luster and vitality.  I love that vulcanite pop! I set the stem aside to dry. 
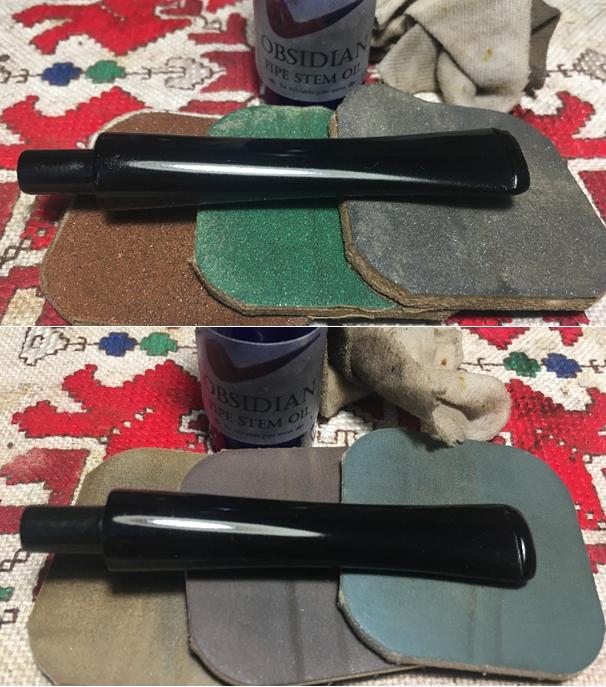
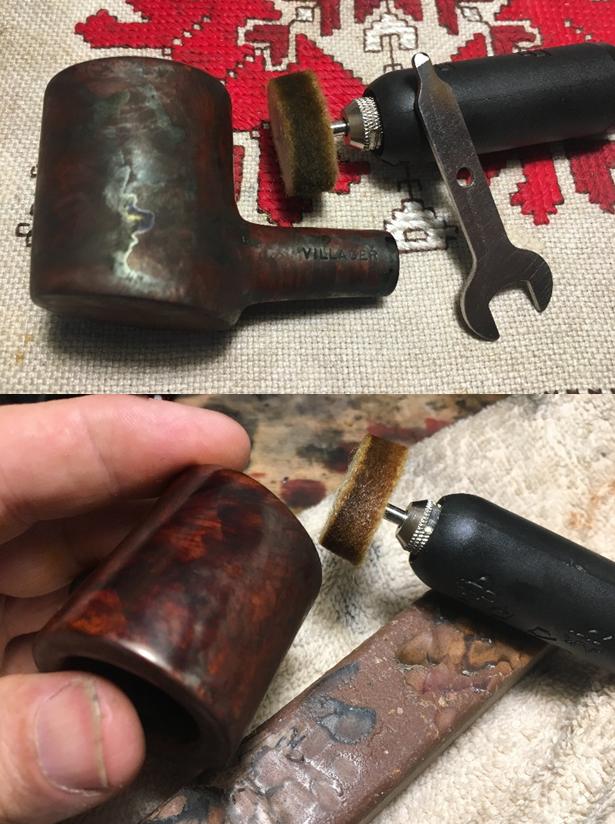
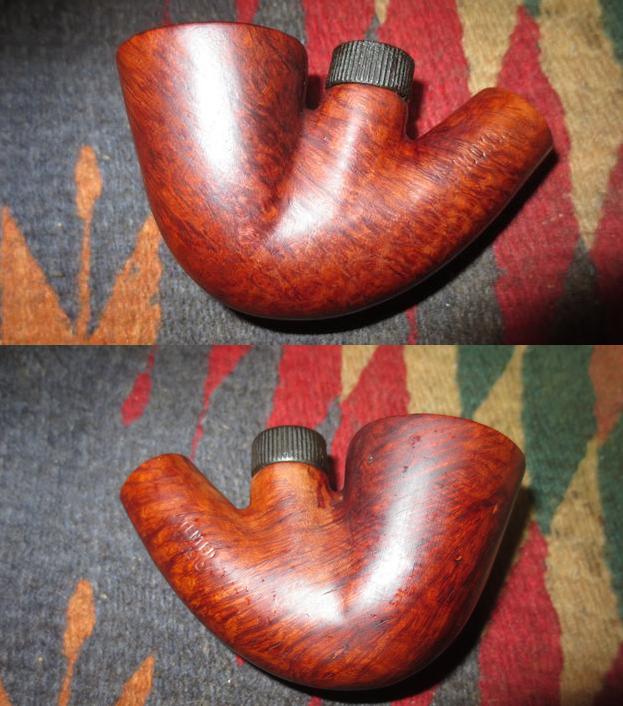
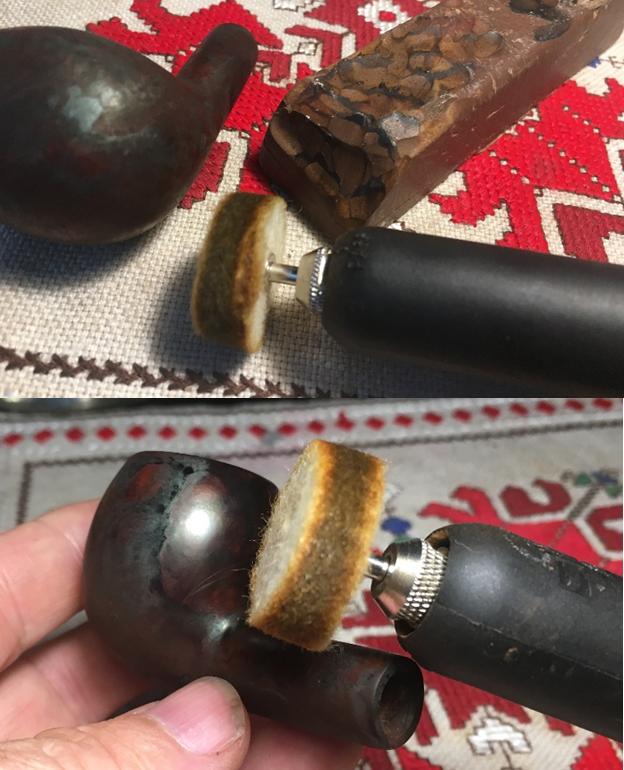
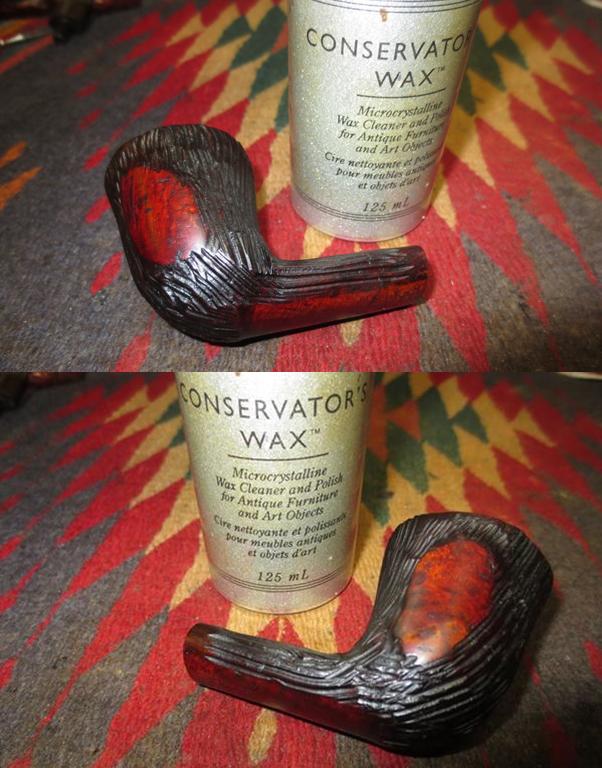
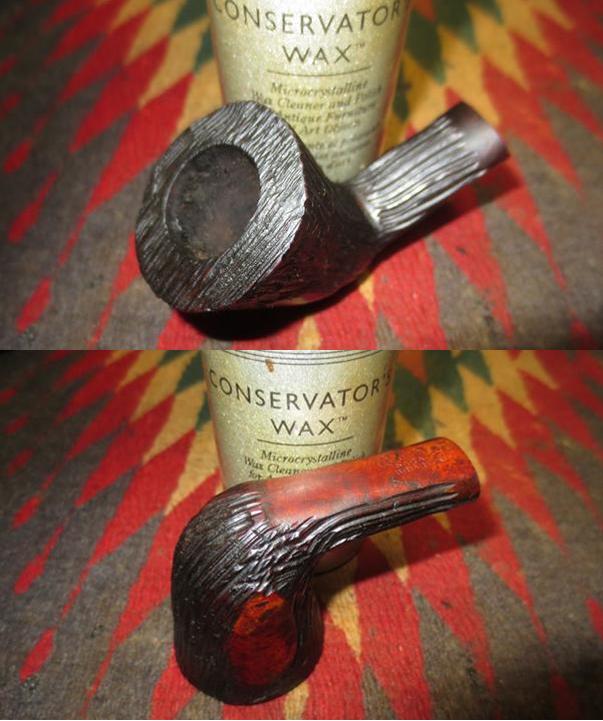
Time to unwrap the stained Mehaffey Cutty and see the results.  I mount a felt buffing wheel on the Dremel and set the speed at the slowest.  After purging the wheel with the Dremel’s metal tightening wrench, using Tripoli compound, I apply the more abrasive compound by moving the wheel in a circular motion over the surface removing the fired crust.  After completing application of Tripoli, I wet a cotton pad with isopropyl 95% and wipe the surface down to blend the dye evenly over the briar.  I then mount the cotton cloth buffing wheel on the Dremel and add speed up to 2, with the fastest being 5.  I then apply a lesser abrasive compound, Blue Diamond, in the same fashion as the Tripoli compound.  When I complete applying Blue Diamond to the stummel, I reunite the stem and stummel and use Blue Diamond on the tapered stem.  I complete the application of compounds by hand buffing stem and stummel with a soft felt cloth to remove the compound dust from the surface in preparation for applying carnauba wax.  The pictures show the progress – looking very, very nice! 
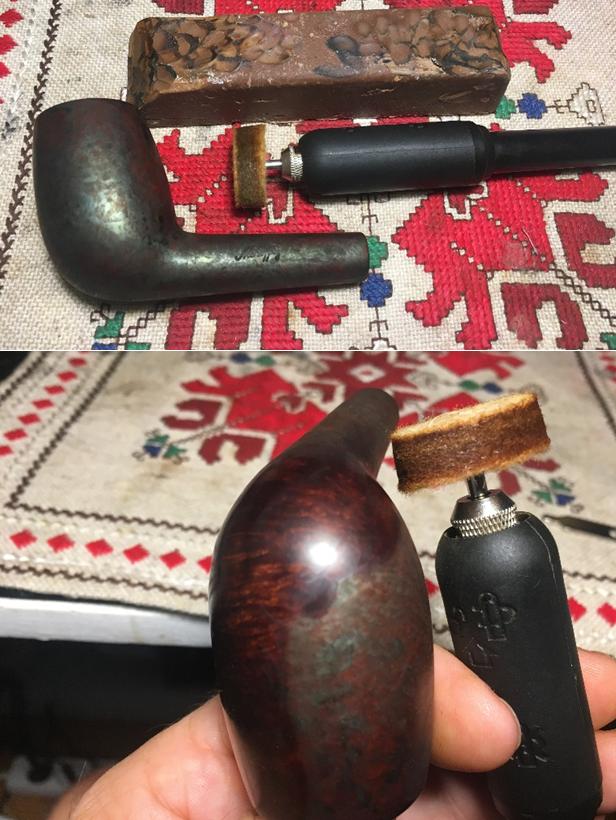
With the finish line in sight, I mount a cotton cloth wheel on the Dremel for carnauba wax and I apply it to stem and stummel at the same speed.  After applying several coats of wax, I mount a clean cotton cloth wheel and further buff the surface to make sure the wax has deiminated into the briar and increase the shine.  I then rigorously hand buff the Cutty with a microfiber cloth.

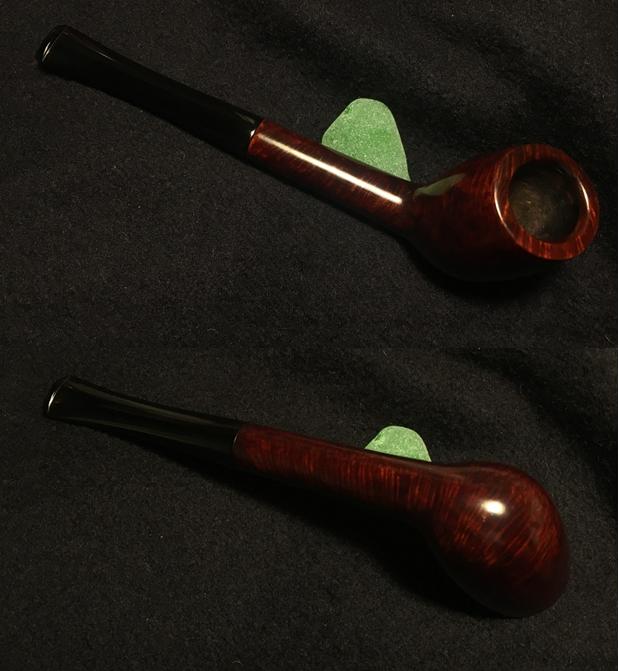
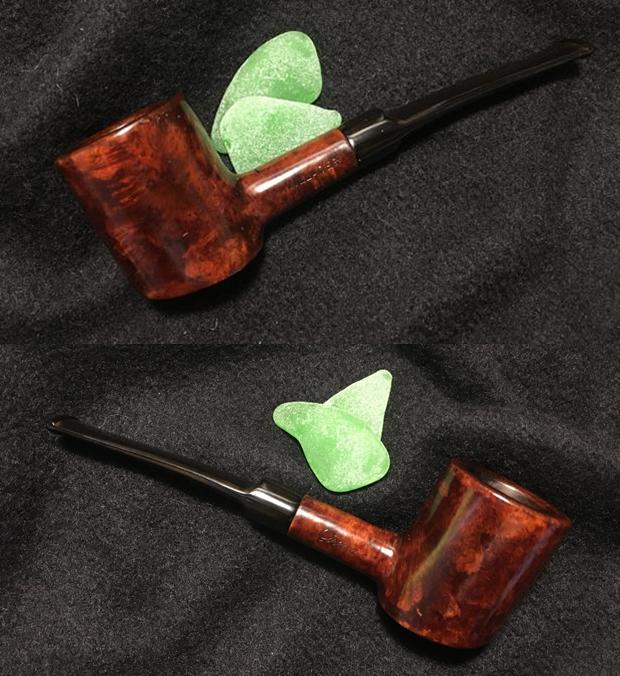
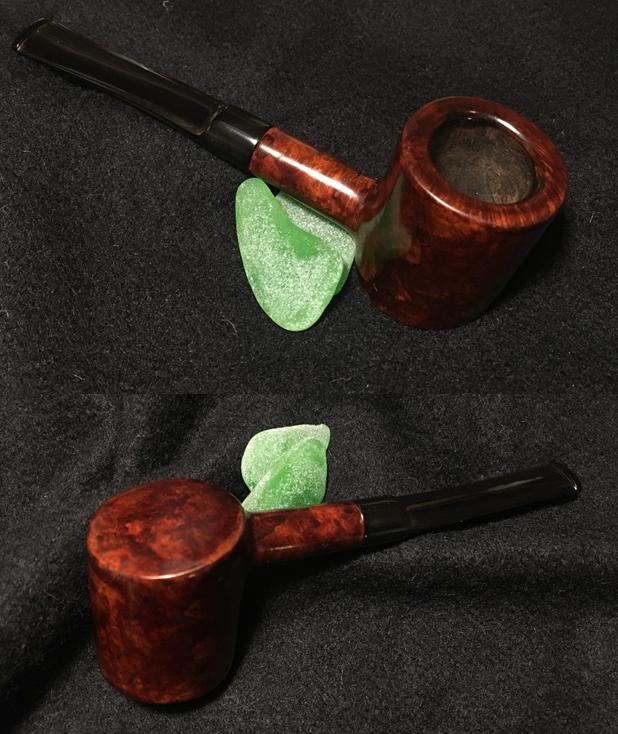
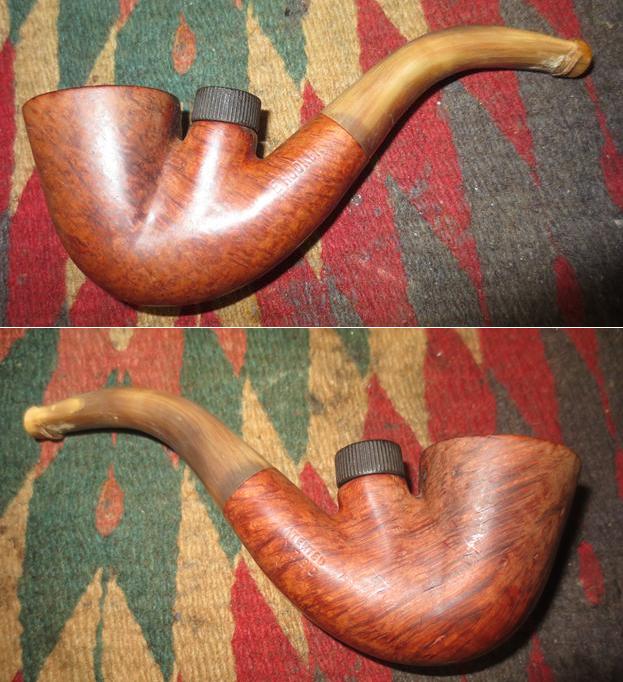
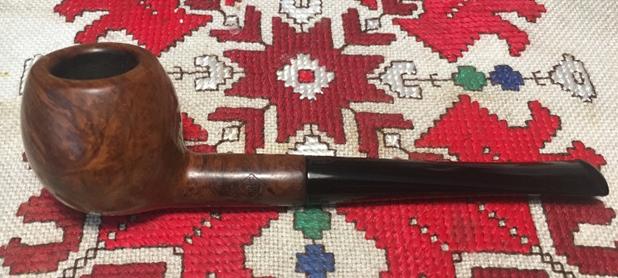
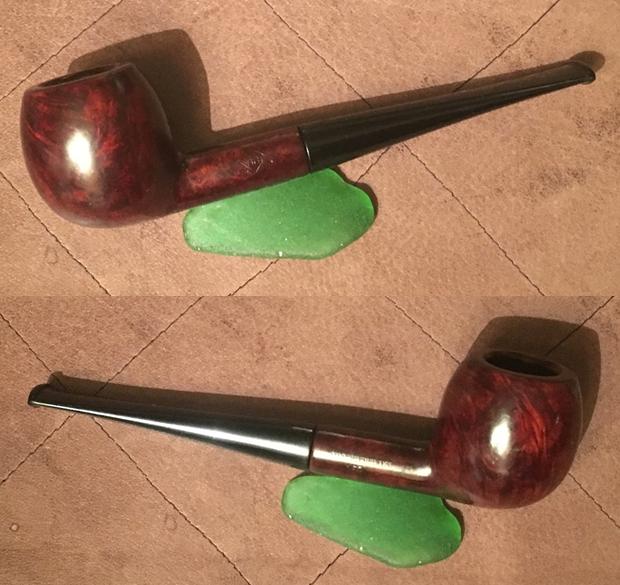
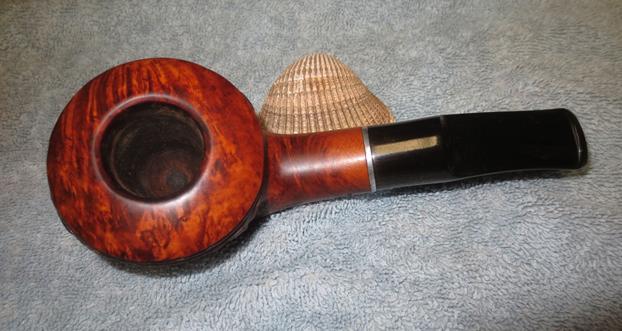
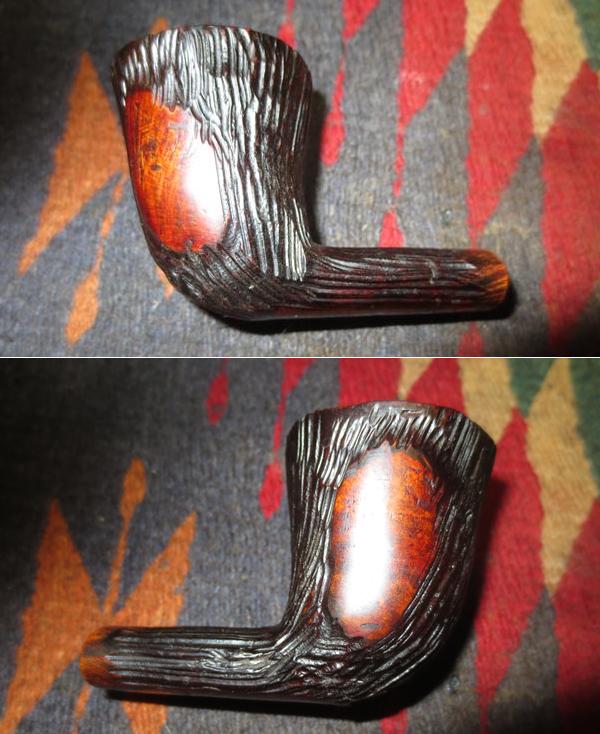
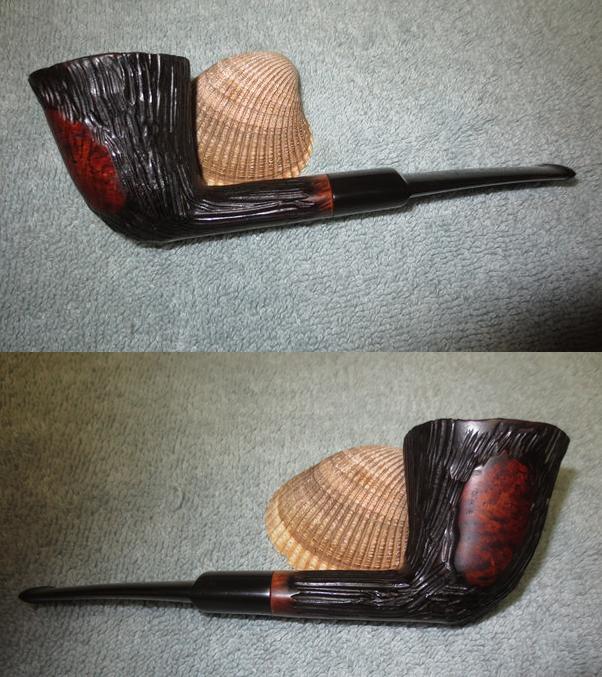
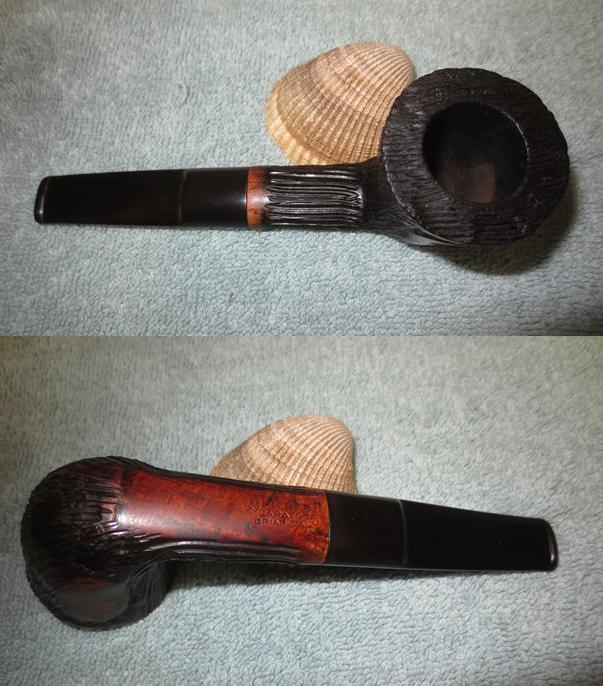
I’m pleased with the results.  This Mehaffey Cutty with the canted bowl is complemented well with the shade of the finish – a rich deep brown and I can see the slight accent of the Oxblood I added to the mix.  The grain is a showcase of bird’s eye and horizontal flow.  The crack and hole repair is all but invisible.  I think Jenny will be pleased to give this Cutty to a special member of her family.  Her gift becomes a help to benefit our work here in Bulgaria with the Daughters of Bulgaria.  Thanks Jenny!  For more about this and why I do what I do, check out my blog, The Pipe Steward.  Thanks for joining me!

Addendum: In case anyone noticed, I forgot to clean the internal airway of the stem!  Rest assured it will be done before a new steward packs his first bowl!

Jen’s Trove #5: A ‘Savinelli’? Villager Grecian Poker Rescued


Blog by Dal Stanton

When Jenny fished this iconic shaped Poker out of my ‘Help Me!’ basket, her time of consideration was very short.  She added it to her Trove of pipes that she asked me to restore to gift the men her family when she returns to the US at summer’s end.  She has worked here in Bulgaria with us for the past few years and she will be missed!  All her Trove pipes benefit the work we do with the Daughters of Bulgaria, women and girls who have been sexually exploited and trafficked in Europe.  I really like the Poker shape.  It always elicits a ‘down home’ Mark Twain feel for me – I can easily imagine a vintage gathering of card players sitting around a poker table, dealing hands on a riverboat, and one old crust chewing on his ‘Poker’ as he considers his hand.  Taking a puff, then placing the sitter on the table, he changes 2 cards in hope of his fortune changing!  All that by looking at this pipe?  For me, yes!  This Poker got my attention on the eBay auction block and it’s now on my work table here on the 10th floor of our former Communist apartment ‘blok’.  Here is what I see. On the left side of the shank is stamped ‘Villager’ and on the right, ‘Grecian’ in a cursive script. The only reference to a ‘Villager’ in Herb Wilczak and Tom Colwell’s, ‘Who Made That Pipe?’ is to the renown Italian name, Savinelli.  While Savinelli does boast a Poker shape in its Shapes Chart I found in Pipedia, this Villager is lacking some of the usual indicators of the Savinelli brand (Savinelli stamping, stem shield, etc.).  Neither is ‘Villager’ included in the extensive list of Savinelli made sub-brands, seconds & order productions in Pipedia’s Savinelli article.  I’m dubious of the Savinelli origin of this Poker, yet I was not able to find an example of a Savinelli ‘Villager’ line to compare.  The only other marking is on the right side of the shank, ‘Grecian’.  I’m assuming this is pointing to ‘Grecian Briar’ which I’ve seen marked on pipes’ right shank sides.  After searching the ‘Villager Grecian’ together, I come up with nothing that helps to identify or disqualify (Savinelli) the origins of this Poker.  I would welcome any leads!  The one thing I can deduce with great certainty about this Villager Poker, is that it was a well-loved and smoked pipe!  But it needs help!

There is heavy build-up of carbon cake in the chamber and the rim is well-crusted from lava and oils.  The back-left side of the rim appears to have borne the brunt of the former stewards lighting activities – it is burned and the internal rim shape is out of round because of it.  The stummel has normal grime coverage and sports a few small fills which have lightened over time and needing attention. The ‘seat’ of this Poker has been used and shows some wear.  The stem has heavy oxidation and has been chewed on a bit and will need work.  I’m anxious to recommission this Villager Poker for Jenny’s menfolk!

I begin by placing the stem into the OxiClean bath to raise the oxidation.  I let it stew for several hours. Starting on the stummel, I use the Pipnet Reaming Kit to remove the heavy cake from the chamber.  I will not be able to inspect the chamber wall for integrity until this is done.  I take another picture of the chamber to mark the progress. After putting down paper towel to shorten the cleanup, I employ the smallest blade first then use the next two larger sizes.  To fine tune the ream, I then utilize the Savinelli Pipe Knife to remove more carbon.  After this, I roll up a piece of 240 grit paper around a Sharpie Pen and sand the chamber removing more carbon build up seeking a fresh briar surface.  Finally, I wipe the chamber out with a cotton pad wetted with isopropyl 95% to remove the carbon dust.  I do not see any problems with the internal fire chamber’s integrity.  The pictures show the progress. With Murphy’s Oil Soap, I begin working on cleaning the rim and stummel of the grime and oils.  I use cotton pads and a bristled tooth brush to work around the stummel and rim.  Into the scrubbing, I also use a brass bristled brush on the rim – this will not damage the wood.  After rinsing off with warm tap water, I use the flat edge of my Winchester Knife to scrape more carbon off the rim surface.  After rinsing off again with warm tap water, I look at the rim condition.  I am left without any question regarding the need to top this Poker to remove the damaged briar and repair the inner-rim roundness.   Pictures show the progress. Before I move to the external stummel repairs, I turn to the internal cleaning.  I use cotton swabs and pipe cleaners dipped in isopropyl 95% to do the job.  I also utilized needle files and a small flat head screw driver to scrape the sides of the mortise to remove the plethora of tars and oil that have built up.  After some time doing this, and with other commitments with my life on the horizon, I decide to utilize a salt/alcohol soak to continue to wage war even though I’m off doing other things!  I use Kosher Salt, which does not leave an after-taste unlike iodized salt, to fill the bowl and after covering the bowl with my palm, I give the stummel a few shakes to displace and settle the salt.  Then, I stretch and twist a cotton ball to form a wick which is inserted and pushed down into the mortise using a piece of metal coat hanger.  As a wick, it acts to draw out the oils and tars as the alcohol and salt interact.  I then place the stummel in an egg carton to stabilize it and position it at a slight angle and fill the bowl with isopropyl 95% until is surfaces over the salt.  I wait a few minutes as the alcohol is drawn into the mortise and top the alcohol again. The Trojan Horse strategy commences.  Returning several hours later, the salt is discolored and the wick shows the fruit of its labors.  I toss the expended salt in the waste, clean the bowl with paper towel, and use long bristled brushes to rid the mortise of left-over salt crystals.  I return to using cotton swabs and pipe cleaners to complete the internal cleanup job.  Surprisingly, I am still scraping gunk off the mortise walls with small flat edged tools!  This stummel is a nasty little bugger.  Finally, the gunk is removed and cotton swabs are coming out clean.  Mission accomplished!  Pictures show the gunk removal. Turning now to the stem, I remove it from the Oxi-Clean bath and the oxidation has been effectively raised on the vulcanite surface.  Using 600 grade sanding paper, I wet sand the stem removing the mother share of the oxidation.  I follow with 0000 steel wool and then Mr. Clean Magic Eraser to finish the oxidation removal.  Pictures show the process. Using pipe cleaners, I now attack the internals of the stem.  Dipping pipe cleaners in isopropyl 95%, it did not take long before the airway was clean.  The picture shows the results.Turning now to the stummel, I take another closer look at the rim.  The damaged wood needs to be removed and the rim repaired.  I take 240 grit paper and put it on a chopping board to form my topping board.  Inverting the stummel, I rotate it over the paper taking off only as much briar as is needed to refresh the rim.  I check the progress often to make sure I’m not dipping into softer damaged wood – keeping the top true.  I take some pictures to show the progress.  The 4th picture below shows the thinner area at the 2 o’clock section of the rim because of the scorching.  I finish with the 240 grit paper, and I follow by topping it lightly with 600 grit paper.  To shape a more balanced and rounded rim, I create an angled internal bevel of the rim using 120 grit paper.  My aim is to create a bevel that evens out and blends with the angle created by the damaged area as much as possible.  I also create a bevel on the external rim edge to take away damage as well as encourage more balance.  I follow up the 120 grit paper by using 240 and 600 on both the internal and external rim bevels.  I think the beveling looks good and succeeds in masking the problem areas on the rim.  The pictures show the rim restoration. With the rim repair complete, I look to the stummel.  With all the wear nicks and cuts that this loved Poker has endured, I decide to remove the old finish to get down to the natural briar.  To do this I use cotton pads wetted with acetone and work on the surface.  The acetone works very efficiently and the finish comes off easily.  As I inspect the heel of the stummel, I see nicks on the edge.  I decide to lightly ‘top’ the bottom of the stummel with 600 grit paper. I am surprised by how ‘not flat’ the bottom is as I top it.  After finishing the topping of the seat of this sitter, I used rolled-up 240 and 600 grit papers respectively to bevel the bottom edge very lightly.  This removed some remaining dents on the edge that the bevel did not remove.  It looks good.  The pictures show the progress. Next, using a medium grade sanding sponge I sand the stummel removing the nicks and cuts.  I follow using a light grade sanding sponge.  Looking at the fills on the stummel, I dig at them with a sharp dental probe to see if they are solid.  They seem good, but I’ll need to darken them later.  I move directly into the micromesh pad cycles.  Using pads 1500 to 2400 I wet sand the stummel.  Following this, I dry sand with pads 3200 to 4000 then 6000 to 12000.  I take pictures showing the progress of bringing out the briar grain on this venerable Villager Poker.  This part is one of my favorites in restoring pipes – seeing the grain emerge with the hidden beauty displayed! At this point, I take cherry and walnut stain markers and touch up the lighter fills so that they will blend better.  After touching up, I lightly feather dabbed the stained fills with a cotton pad with a lightly wetted with alcohol.  This blended the fills more.  The pictures show the progress. To cover the repairs and to blend increasingly a darkened part of the rim that had been scorched, I decide to go a bit darker in the staining of the stummel.  Yet, I want to keep it lighter.  To do this I mix at a 50% ratio Fiebing’s Dark Brown Leather Dye and alcohol in a shot glass.  I want to start a bit darker, but have the option to lighten it by wiping the finish down with alcohol and cotton pad.  After I mix the dye, I fit a cork in the shank to act as a handle.  I first warm the stummel using a hot air gun to open the grain to receive the dye.  Using a folded over pipe cleaner, I apply dye to the stummel thoroughly, aiming for complete coverage.  I then ‘fire’ the stummel using a lit candle.  This burns off the alcohol in the dye and sets the stain in the grain.  After a few minutes, I repeat the process and then set the stummel aside to rest.With the stained stummel resting, I turn to the stem.  Using micromesh pads, I wet sand the stem using pads 1500 to 2400.  Then I dry sand using pads 3200 to 4000 then 6000 to 12000.  After each cycle, I apply Obsidian Oil to the stem to revitalize the vulcanite.  When completed, I set the stem aside to dry. The pictures show the progress. Turning again to the stummel, it is time to ‘unwrap’ the fire crusting to reveal the grain.  Using a felt buffing wheel mounted on the Dremel, set at the slowest speed, I first purge the wheel using the Dremel’s metal adjustment wrench against the felt surface.  This removes old compound and restores suppleness to the wheel.  Then, I apply the abrasive compound Tripoli to the surface by rotating the buffing wheel methodically over sections at a time, removing the fire crusting.  After completing the Tripoli cycle, I wet a cotton pad with alcohol and wipe down the stummel.  I do this primarily to blend the dye more evenly over the surface. I don’t rub too much because I do not want to lighten the hue – it looks good.  I then mount a cotton cloth buffing wheel on the Dremel, increase the speed a bit, and apply a slightly less abrasive compound to the surface, Blue Diamond. After the Blue Diamond compound, I buff the stummel with a felt cloth to remove the compound dust from the surface.  I also notice that the fills that I had colored earlier had lightened again through the staining process and the alcohol wipe down (see third pictures below).  I touched those up again with a black sharpie pen and a dark stain stick.  The pictures show the progress. I reunite the Villager Poker’s stem and stummel to apply wax.  With the cotton cloth buffing wheel dedicated to applying carnauba wax mounted on the Dremel, I apply several coats over the stummel and stem surface.  I follow this with a clean cotton cloth buffing wheel on the Dremel and then a rigorous hand buffing with a microfiber cloth to raise the shine more.

The only direct identification of the name, ‘Villager’, pointed to a pipe bearing the Italian name, Savinelli.  I was dubious that this Villager Grecian Poker rose to the quality one expects from Savinelli craftsmanship.  Yet, I am very pleased with how this iconic Poker cleaned up.  The rich depth of the briar tones and the variety of grain movement makes this ‘Ole Boy Poker’ a keeper and ready for his next steward, who will enjoy him as much as the last.  Jen’s gifting this Villager Poker to one of her menfolk benefits the work we do with the Daughters of Bulgaria.  For more information about this and my other restorations, take a look at my blog, The Pipe Steward.  Thanks for joining me!

Jen’s Trove No. 4 – Reclaiming a Kaywoodie ‘Flame/Super Grain’ #11 Large Billiard


Blog by Dal Stanton

I think the reason this Kaywoodie stood out to Jen as she was rummaging through my baskets and boxes of ‘Help Me!’ pipes, was the ‘fancy stem’ and the strong, full look of the stummel.  The grain is impressive and it will clean up nicely.  Jen is leaving Bulgaria soon after working with us for a few years.  She’s taking a trove of pipes back to the US to give to the men in her family.  For her too, is the fact that each pipe she purchases will benefit our work with the Daughters of Bulgaria – helping women and girls who have been trafficked in Europe and sexually exploited.  This is the second Kaywoodie she has chosen.  The first was a beautiful Kaywoodie Author (See: LINK) that needed extensive rim repair.  The Kaywoodie now on the work table got my attention too, on the eBay auction block from a seller in North Carolina.  After Jenny rescued it from the basket, I take some pictures of the Kaywoodie she chose. Generally, the pipe is in pretty good shape other than normal time wear and tear issues, but the stem bit might need some work.  The rim and fire chamber are both in good shape, but in need of cleaning and the removal the light carbon cake to bring it to fresh briar for a new start.  In the picture immediately above shows two fills – one filled and one emptied.  The hole looks like a drill hole and I first suspected it was part of a cracked shank repair, but no cracks are evident.  Only these two fills on the stummel will need to be refilled and I’ll see if the other needs to be replaced.  The ‘Fancy Stem’ (I spent time trying to find a name for this type of stem and this is what I came up with via Steve’s assistance!) has serious tooth dents on the upper button lip and a significant dent and chatter on the lower bit.  I also detected that the classic Kaywoodie Synchro-Stem threaded tenon is underclocked a bit – which over time, I discovered, is a normal happening with metal threaded tenons (See from Reborn Pipes: About Stem/Bit Shapes).The nomenclature on the sides of the shank are in bad shape – almost warn off and beyond history’s grasp.  I had to take several looks at the stamping with a magnifying glass at different angles of light – lamp light and sunlight outside on my ‘Man Cave’ balcony on the 10th floor of our former Communist Blok apartment building.  What I can decipher with much effort, is a phantom “Kaywoodie” [over] “***in” offset to the far right of the Kaywoodie stamping above it (under the ‘-die’).  On the shank’s right side, I make a guess at ‘11’ which is a shape number.  These two pictures try to show what I can barely see!  I mark with yellow pen where the ‘K’ starts of Kaywoodie and I underline the ‘***in’ and the 11 in the second picture.With a passion to understand as much as I can about the provenance of the pipes I restore, I know that I’m on a steep learning curve with this only being my second Kaywoodie.  I’ve benefited much from Troy’s expertise, of Baccy Pipes, with Kaywoodie pipes and his help on this Kaywoodie.  I’ve picked up some of the markers that help establish a Kaywoodie’s identity.  The first thing to look at is, what is the “***in” refer to?  Identifying the Kaywoodie line, at least partially, can help place a pipe.  It did not take long as I search Pipedia for a listing of the names of the Kaywoodie lines (see LINK).  What I found is that throughout the years, Kaywoodie has put forward several lines with the word “Grain” making sense of my mystery “***in”:  Straight Grain, Super Grain, Flame Grain, Bird’s Eye Grain, Relief Grain, and Custom Grain – were the Kaywoodie lines that I cataloged from Pipedia.  My next step was to go to the Kaywoodie section of Pipe Phil’s inventory of examples and to see if I could find an example of what appears to be the same script style for the ‘Kaywoodie’ [over] ‘*** Grain’ in cursive, simply to visualize.  The only example I found of the same script for both ‘Kaywoodie’ and ‘Grain’ was this Flame Grain, Meerschaum from the 1947 catalogue that Kaywoodie produced.  A close look of the script follows in picture two.  I think this is a pretty good visual match of the nomenclature style.So, I think it’s safe to say that the Kaywoodie before me was a line suffixed by ‘Grain’.  I don’t know how rare or common the use of the cursive script was with Kaywoodie ‘Grain’ lines, but it could possibly help in identification if one knew.  Another concrete marker I identified was the shape number, ‘11’ which is identified as a ‘Large Billiard’ in the Pipedia Kaywoodie Shapes Guide.   This description seems to be right on with the Kaywoodie before me – a handful of wonderful Billiard briar!  The other marker that I was aware of was the iconic Kaywoodie stem shamrock or club.  From PipePhil.eu, I found this concise description that indicates that the black shamrock in the white dot started to emerge on pipes since 1937:

The cloverleaf logo: the round logo (black cloverleaf in white circle or white cloverleaf in black circle) was first used in 1937. Up until the late 40’s this logo was used on all of the upper grades pipes. The concomitant use of the plain white cloverleaf and the disk inlaid logo continued until the early 80’s.

Up until the late 1940’s/early 50’s, the logo was on top of the stem. After that the logo was moved to the side of the stem (exceptions exist).

The other solid marker that I investigated was the No. ‘11’ shape number.   In Pipedia’s Kaywoodie Shapes Number section, shape number 11 is described:

Shape # Description Years Produced
11 Large billiard 1935-1972

Troy later sent me another helpful link from Kaywoodie My Free Forum that allowed me to see all the Kaywoodie Billiard offerings with the comparison of 2 and 3-digit shape numbers.From the same Forum article, the center column reflects the 2-digit system employed from 1927 to 1972, when the system was changed to a 3-digit system when pipe production (for Kaywoodie, Yello-Bole and Medico) was moved to the Medico factory in Richmond Hill Queens NY as plans for new plant were in process.  The left-hand column above was the 3 digit numbers used during this period for all Kaywoodie and Medico pipes, from 1972 to 1980.  The same article indicated that the 2-digit numbers were only for Kaywoodies produced in the US – that Kaywoodie of London to Cadogan had their own three-digit system.

I took my search for a Kaywoodie ‘Something Grain’, shape #11 to the latest Kaywoodie Catalog that would have a representation of the #11 Billiard at Chris’ Pipe Pages that is consistent with the older Kaywoodie catalogues leading up to it (See: LINK).  See the 5th pipe down on the left:That is the Large Billiard stummel on my work table.  There is one thing that doesn’t line up. The Fancy Stem. I spend extensive time trying to find the No. 11 with a fancy stem flipping through all the Kaywoodie catalogs (referenced above) and found no specimen – not even on another shape.  During this exploration, I sent my forensic findings and some pictures to Troy whose experience with Kaywoodies is extensive.  I wanted to know what I might be missing.  After an enjoyable time of communicating back and forth – pipe restorers’ cyber fellowship, Troy’s experience with Kaywoodie pipes cut through my fog quickly.  Regarding the nomenclature of the Kaywoodie Jenny chose as part of her trove, I’ll let Troy’s observations conclude this Kaywoodie origins adventure!  Thanks Troy!

if the shank is straight then the only thing I can think of is someone took a pre-1972 #11 and re-stemmed it with a 1970’s type quarter bent stem.  If that is the case then it’s a 1955-1972 #11 Flame Grain with a different stem…. Or it could be a Super Grain (1955-1972) with a later Flame Grain type stem.

With a better understanding of this Kaywoodie in front of me, I start the restoration by reaming the fire chamber.  Since the cake is so thin, I use the Savinelli Pipe Knife to do the job.  After spreading out paper towel to catch the carbon, I employ the knife and it makes short work of the cake.  I follow by sanding the fire chamber with a coarse 120 grade paper, then a 240 grade paper – in both cases wrapped around a Sharpie Pen.  I finish by wiping the bowl with cotton wetted with isopropyl 95% to remove the residue carbon dust.  The pictures show the initial clean up.

Next, using undiluted Murphy’s Oil Soap I address the grime on the stummel using cotton cloth pads.  After scrubbing, I rinse the soap off the stummel with cool tap water, not allowing water in the internals. While the stummel is still wet, I probe the fill on the left side of the shank to see if it had softened and might come out.  It was solid.  The pictures show the progress. I now turn to cleaning the stummel internals because I like working on clean pipes.  Using pipe cleaners and cotton swabs dipped in isopropyl 95%, I go to work.  The internal gunk is thick – I use a curved, spaded dental probe to scrape the sides of the mortise and I remove a lot of old tars and oil built up. After some time working like this, I decide to switch tactics and use a retort to clean the internals and make more efficient headway!  After setting up the system, putting a cotton ball in the bowl, and lighting a candle to heat the alcohol in the capped test tube, the alcohol heats and eventually boils.  When it boils, the expansion forces the hot fluid into the stummel.  Much of the alcohol is initially absorbed into cotton ball so I replenish the alcohol and continue the process.  The rhythm of boil, expansion and then removing from the flame and tipping the stummel so that the expanded alcohol runs back into the test tube, is repeated several times. I pour off the first cycle into a Lord of the Rings commemorative shot glass to compare.  I refill the test tube with alcohol, and continue several more cycles, pouring out the expended alcohol in another shot glass and refilling with fresh alcohol for a 3rd and final cycle.  There is a gradual lightening of the expended alcohol as I picture all three for comparison.  After finishing use of the retort, I finish up again using pipe cleaners and cotton swabs.  The pictures show the progress. Looking at the stummel surface, the old finish does not look uniform so I use cotton pads and wipe down the stummel with acetone to remove vestiges of the old finish.  The acetone worked very quickly.  I again look at the suspect fill on the left side of the shank, and this time I detect a gap on the edge of it. I use the sharp dental probe to remove the old fill. Looking now more closely at the rim, there is a dark ring around the external edge simply indicating wear.  I take a picture of the right side of the rim that shows more wear.  To freshen the rim lines, I decide to lightly top the KW Billiard.  Using a chopping board topped with 240 grit paper I evenly rotate the inverted stummel, checking to make sure I’m staying true. After making sufficient progress with the 240, I switch to 600 grade to smooth further the top surface.  The pictures show the topping progress. With the topping completed, I fine tune the rim freshening by beveling the internal edge of the rim.  I use 120 grit paper rolled tightly to cut the initial angle of the bevel.  I follow the 120 with a rolled piece of 240, then 600.  To me an internal bevel adds class to a stummel.  This #11 Large Billiard stummel looks good.  I also lightly sand around the edge external rim.  This softens the lines.  The pictures show this rim fine-tuning process.To address the small holes on the left side of the shank, using a toothpick, I drop fill the holes using HOT STUFF Special ‘T’ – thick CA glue.  I put a little CA glue on close to the end of the toothpick and allow gravity to run it to the tip to allow a surgical application of the glue.  After applying the thick CA glue, I spray it with an accelerator to cure it more rapidly.  In a few minutes, using a flat needle file then a rolled-up piece of 240 grit paper, I bring the CA patch mound down to the briar surface. I finish by using a rolled-up piece of 600 grit paper to smooth the patches more and blend.  The pictures show the process. To prepare the stummel for sanding, to preserve what is the precious little of this Kaywoodie’s nomenclature, I cut small pieces of masking tape to cover the remnants.  First using a medium grade sanding sponge, I sand the stummel gently removing very small nicks and pits to smooth the stummel.  I follow with a light weight sanding sponge.  Using strategically placed thumb and fingers the masking tape guards did the job.Now to the micromesh pad cycles to bring out the grain on this already attractive Kaywoodie Large Billiard.  Using pads 1500 to 2400 I wet sand the stummel, followed by dry sanding with 3200 to 4000 and then 6000 to 12000 – throughout, guarding the nomenclature.  I am impressed by the quality of the briar grain emerging in the Kaywoodie Large Billiard.  The pictures show what I’m seeing. Putting the stummel aside, it’s time to tackle the Fancy Stem.  Using pipe cleaners dipped in isopropyl 95% I work on the internals.  I also employ the use of long wired brushes that more easily work up into the Kaywoodie 3-hole stinger/tenon system.  Following this, I use a brass bristle brush on the exterior of the stinger/tenon and finish with shining it with 0000 steel wool.With stem internals clean, I look again at the work needed on the upper and lower bit.  The upper button area has tooth chatter but more significant is the compression on the button lip that may need rebuilding.  Looking at the upper lip from the slot side, the lip has a dent that compresses toward the slot.  The lower bit has a significant tooth dent and chatter.  The lower button lip is in better shape.  I take some pictures to mark the problem areas. I decide to use the heating method first to see if this will minimize the damage.  By heating the vulcanite over a flame, the expansion of the rubber will seek out its original shape – at least in part.  I’ll give it a try, then move to sanding and filling.  With a candle lit, I pass the button area over the flame – back and forth several times.  The technique helps on the lower bit but not sufficiently.  The upper bit, button repair was not helped much.  So, using 240 grit paper, I work on the lower and upper bit. Using a flat needle file, I also try to remove dents from the upper button lip.  Pictures show the progress. The first pictures below show the sanding/filing progress on the upper lip.  I’m not satisfied with the results as I will need to remove more of the button than I want to remove the dents.  I wanted to see if I could repair the lip without rebuilding the lip, but this will not be possible.  I’ll need to mix activated charcoal powder with CA glue to rebuild the upper button lip and fill the dent on the lower bit.I open one capsule of activated charcoal and mix it with Hot Stuff Special ‘T’ CA glue. This CA glue is extra thick.  After cleaning the patch areas with a cotton ball and isopropyl 95%, I place a small puddle of ‘T’ CA glue on an index card, and use a toothpick as a mixer and trowel. After reaching a molasses-like viscosity with the mixture, I apply the mixture to the dent and the upper button lip.  I apply more mixture than necessary to enable later sanding down, shaping and blending the patches.  To shorten the curing time for the patches, I spray each with an accelerator.  The pictures show the progress. Back to filing and sanding.  Using a flat needle file, I file the patches down.  I follow by using 240 grit paper to fine tune bringing the lower bit dent patch down to surface level.  I blend the patch further using 600 grit paper. I do the same with the lower button lip.  After shaping the bit with the flat needle file, I use 240, 600 grit papers. The process with the button is a gradual filing, sanding and shaping until the button emerges and looks balanced.  Pictures show the progress. Above the slot, during the sanding, I notice a pinhole – what appears to be a small air pocket.  There are also very small air pockets on the upper button lip repair.  This is normal and I use a toothpick and drop-fill the hole with CA glue. I then paint a thin coat of CA glue over the button lip to fill the air holes.  I quickly spray the glue with an accelerator to shorten the curing.  I then finish the button sanding out the air pocket fills. I complete this phase of repair by using 0000 steel wool to the upper and lower bit.   The lower bit patch will blend more as I polish the stem.  The button looks good.  The pictures show progress. With the repair to the bit completed, I now turn to the Fancy Stem.  Even though there is no oxidation, I use 0000 steel wool to buff the entire stem to remove many small nicks and scratches on the surface.  I then begin the micromesh pad process by wet sanding with pads 1500 to 2400.  I follow by dry sanding with pads 3200 to 4000 then 6000 to 12000.   After each cycle, I apply Obsidian Oil to revitalize the vulcanite.  The Fancy Stem is looking good.  The pictures show the progress. I again take the stummel after completing the stem sanding.  During the stem work, I had in the back of my mind the consideration of the next step working with the Kaywoodie ‘Flame/Super Grain’ stummel.  The stummel’s natural briar color is dark and rich with grain flow – horizontal, bird’s eye and flame.  My idea is to add some pop to the grain by staining the stummel with a light brown dye.  This will not darken the stummel, but perhaps it will lighten the softer wood grains.  We’ll see!  I take a few pictures of the stummel to mark the progress.  Using a cotton pad wetted with isopropyl 95%, I wipe the stummel down to assure it’s clean. I use a cork inserted into the bowl to use as a handle and I warm the stummel using the heat gun to warm and expand the grain helping it to be more receptive to the dye.  I then apply a generous amount of Fiebing’s Light Brown Leather Dye to the stummel using a folded pipe cleaner.  When covered thoroughly with dye, I ‘flame’ the stummel with a lit candle which immediately burns off the alcohol in the aniline based dye.  This sets the hue in the grain.  After a few minutes, I repeat the process again and then set the stummel aside to rest.  The pictures show the process. After several hours, the stummel is ready to ‘unwrap’.  Using the Dremel, mounting a felt buffing wheel, at the slowest speed, I apply Tripoli compound to the surface to remove the fired crust.  I take a picture to show the contrast from the crust, and the emerging grain.  After the Tripoli, I lightly wipe the stummel with a cotton pad wetted with isopropyl 95% to blend the dye further.  After this, using a cotton cloth buffing wheel mounted on the Dremel, and notching up the speed to ‘2’ (fastest is 5), I apply the slightly less abrasive compound, Blue Diamond.  I love to see the rich tones of the briar grain emerge during this process.   Before I apply the carnauba wax to the stummel, I have a couple of corrections to apply.  The first is to correct the under-clocked stem.  Using a lit candle, I heat the metal tenon so that the vulcanite loosens its grip and I quickly screw the tenon in until it tightens and I apply pressure carefully to advance the stem.  I repeated the heating process a few times until I reached the desired stem position.  The pictures show the process. The second thing I wanted to do before applying the carnauba wax was to coat the fire chamber with pipe mud.  I have this tutorial bookmarked on Reborn Pipes here: LINK.  I noticed minor heat fissures in fire chamber earlier which is shown in the first picture below.  Applying a coat of pipe mud will simply coat the chamber, filling the fissures, and provide the foundation for a new cake to develop.  To create the pipe mud, I use a mixture of cigar ash (thanks to my colleague, Gary!) and water.  I make sure that the cigar ash is finely ground using the flat end of a pipe nail and I remove any solid debris.  I put ash in a shot glass and water in a small bottle and I add water using a large eye-dropper and mix with the pipe nail until I achieve a paste like viscosity.  I then use a pipe cleaner to paint the mud to the chamber wall and tamp it using the spoon end of the pipe nail tool.  I’ll wait about an hour for the mud to fully set up.  The pictures show the process. Now for the home stretch.  With stummel and stem reconnected, I apply several coats of carnauba wax to the Large Billiard stummel of this Kaywoodie Flame/Super Grain.  I use a cotton cloth buffing wheel mounted on the Dremel at the same speed (2) and methodically apply the carnauba using the sheen reflection on the surface to guide my application.  After applying carnauba, I change to a clean cotton cloth buffing wheel and go over the surface again to bring out the shine and more fully blend the wax.  Finally, I hand buff the pipe with a microfiber cloth to raise the shine more.

While we don’t know with 100% certainty whether this Kaywoodie #11 Large Billiard is a Flame Grain or a Super Grain, I believe the grain is a cut above the norm looking at its quality.  It has a beautiful flow of grains and is quite attractive.  The Large Billiard fills the hand well with an interesting, tapered Fancy Stem, that probably came later and is not original with the older #11 stummel.  I’m happy to provide this Kaywoodie to add to Jenny gift trove as she goes back to the US.  Jen’s purchase benefits the Daughters of Bulgaria, our work here in Bulgaria with women and girls sexually exploited and trafficked.  For more information about this work, take a look at The Pipe Steward.  Thanks for joining me!


Restoring a Unique Horn Stem W.E. Hooker System Pipe


Blog by Steve Laug

Another one of the pipes found on the Virtual Pipe Hunt in Montana was this interesting old piece. It is an oddity and I was sure when we found it that it was another example of the eternal hunt for the dry, perfect smoke. I joking call it a camel pipe for the humps it has from a side view. This old timer is stamped on the left side of the shank with the words W.E. Hooker and on the right side of the shank it is stamped Patented over May 17, 1910. The pipe was in pretty rough shape at first glance with wear and tear to the finish and the rim caked with lava flowing over to the top. The inner edge of the bowl was out of round and there was some damage to the surface. There were some small sandpits on the right side of the bowl and on the top of the shank. The vulcanite cap in the middle of the shank perplexed me a bit so I was curious what we would find beneath the cap. The stem was horn and it had a lot of tooth damage to the top and underside at the button as well as some significant damage to the button itself and the edges around it. It looked as if someone had taken a knife to it and done some whittling on the horn. It had originally had what looked like a faux P-lip as the airway left the button on the end rather than the top. It was going to be a fun one to clean up.My brother Jeff took quite a few photos of the bow from various angles to give an idea of the overall condition of the pipe.The function of the cap on the top of the shank intrigued me and the overall airflow of the pipe was a mystery. When I put a pipe cleaner in the shank it came out in the sump under the cap. There were two other holes in the sump – one at the top front that connected to the airway as it entered the bowl and one at the top back that went back into the shank and the stem. When I pushed a pipe cleaner through the stem it stopped at the bottom of the sump under the cap. Now I really wanted to know how this worked. I Googled W.E. Hooker tobacco smoking pipe and came up with a patent number 958,398. The inventor was a William E. Hooker of Buffalo, New York. He filed the patent October 13, 1909 and it was patented on May 17, 1910 (just like the stamping on the right side of the shank). I have copied that information below. Note the airflow in the diagram accompanying the patent, I have inserted red arrows how it flowed through the pipe.

I have included the complete text of the patent below. It explains the letters A-H in the above diagram.

W.E. HOOKER- TOBACCO SMOKING PIPE.

APPLICATION FILED OCT. 13, 1909.

Patented May 17, 1910.

PHOTOLITHOGRAPHER: WILLIAM  E. HOOKER, OF BUFFALO, NEW YORK.

TOBACCO-SMOKING- PIPE.


Specification of Letters Patent.

Application filed October 13, 1909. Serial No. 522,496.

To all whom it may concern:

Be it known that I, WILLIAM E. HOOKER, a citizen of the United States, residing at the city of Buffalo, in the county of Erie and State of New York, have invented a new and useful Tobacco-Smoking Pipe, of which the following is a specification.

My invention relates to certain improvements in a tobacco smoking pipe and I do hereby declare the following to be a full, clear, and exact description of my invention such as will enable others skilled in the art to which it appertains to make and use the same, reference being had to the accompanying drawings and to figures and letters of reference marked thereon, which form a part of this specification.

The objects of my improvements are: First: To provide a chamber or receptacle wherein can be collected all the moisture, nicotine and other foul secretions usually present in a tobacco smoking pipe and prevent the said moisture, nicotine and foul secretions from reaching the mouth of the smoker by means of the aforesaid chamber or receptacle and smoke channels, thereby insuring a clean and sanitary smoke. Second: By means of this chamber or receptacle and smoke channels and drainage channels, to prevent all moisture or saliva that might collect in the pipe stem from flowing into the pipe bowl. Third: To provide ample and easy facilities and means for cleaning the pipe. I attain these results by the position and location in which the nicotine receptacle or chamber and the smoke and drainage channels, are constructed or drilled in the pipe bowl, as illustrated in the accompanying drawings and which forms a part of this specification.

The accompanying drawing is a central vertical longitudinal section of my pipe embodying my invention.

A is an ordinary pipe bowl. B is a chamber or receptacle, for the purpose of collecting nicotine, moisture and other foul secretions, situated between the pipe bowl A and the pipe stem H, in a vertical position and parallel with the pipe bowl A, with an opening at the top. I prefer to have said chamber or receptacle in a vertical position as indicated and parallel with the pipe bowl, to insure the best results with my invention, although it is not absolutely essential that the chamber or receptacle aforesaid, should be nearer to the pipe bowl than to the pipe stem, but the vertical position and location of the chamber or receptacle is essential and necessary. This chamber or receptacle in the position or location described, serves as a collector of all moisture, nicotine and foul secretions which might flow through channels D and E and also has for its purpose the conveying of smoke from channel D to channel E. The opening at top of the aforesaid chamber permits of the easy cleaning of the nicotine and moisture chamber B, and the smoke channels D and E.

C is the well or socket, into which the mouth-piece or stem H fits and also serves as a smoke conductor from channel E, to stem H and as a conductor of any moisture or nicotine which might collect in said well, to the bottom of chamber or receptacle B, through channel F.

D is a smoke channel leading from the bottom of pipe bowl A to the top of chamber or receptacle B and serves as a smoke passage to convey the smoke from the bottom of pipe bowl A to the top of chamber B, thence across said chamber B into and through smoke channel E into the well C and thence to the mouth of the smoker through stem H.

E is a smoke channel leading from the top of chamber B into well or socket C and terminating midway between the end of well or socket C and where the pipe stem or mouth piece H enters said well or socket, and is a conductor of smoke from top of chamber B to the well.

F is a drainage channel to convey saliva, moisture, nicotine and foul secretions which might form in the well or socket C, from said well to the bottom of chamber or receptacle B. By the particular position and location of this drainage channel F, any moisture, saliva, nicotine or secretions, which might form and collect in said well or socket C, pass through this drainage channel and into the bottom of the chamber or receptacle B, and a free and unobstructed draft is thus obtained.

G is a cap which can be removed and it screws into the top of chamber B, to close opening of said chamber and can be easily removed for the purpose of cleaning chamber B and smoke channels D and E.

H is a pipe-stem or mouth piece.

I am aware that prior to my invention, Patented May 17, 1910. tobacco smoking pipes have been made with nicotine chambers or receptacles. I therefore do not claim the invention of a nicotine receptacle; but having thus fully described my invention, I claim: In a tobacco smoking pipe, a moisture or nicotine receptacle, situated or located between the pipe bowl and pipe stem

 or mouth piece, in a vertical position and parallel with the pipe bowl, having an opening at the top of said moisture or nicotine receptacle or chamber, with two smoke channels entering said receptacle or chamber at the top and a drainage channel entering said receptacle or chamber at the bottom as substantially set forth herein and for the purposes specified. In testimony whereof, I have hereunto subscribed my name in the presence of two witnesses, this 11th day of October, 1909. WILLIAM E. HOOKER. Witnesses: Himmler BOWEN, CHAUNCY W. ABBOTT.

Now, I had it in the words of the inventor himself – he designed a different kind of sump vertically in line between the bowl and the stem. That made his invention different from the sump in a Peterson System pipe designed to accomplish the same thing. This is truly a complicated piece of tobaciana.

My brother took close up photos of various angles showing the grain of the pipe, the structure and the pipe taken apart. These give a clear picture of what we would have to deal with in the restoration process. The rim top photo shows the cake in the bowl and the overflow of lava on to the rim top. You can also see the damage to the inner edge of the bowl at the back of the pipe.The next series of photos show the hard rubber cap on top of the entrance to the sump on the shank. It is threaded and can be removed by unscrewing it from the briar shank. The horn stem was held onto the shank by a threaded bone tenon that screwed into the threaded mortise in the briar. Both threaded portions were in excellent condition. The second photo below shows the view of the pipe with the three openings showing from the shank to the bowl.The stamping on both sides of the were faint but readable. As mentioned above the left side read W.E. Hooker and the right side read Patented over May 17,1910. I was dealing with an old pipe.The horn stem had tooth chatter and tooth marks as well as some nicks from a knife that had been used to try and reshape the stem. The next photos tell the story. Jeff did a pretty thorough job cleaning this old timer up. The finish was really rough and dirty and the cake in the bowl foretold a very dirty interior. He reamed the bowl with a PipNet reamer and took the cake back to briar. He cleaned the interior of the bowl with alcohol, cotton swabs and pipe cleaners. He worked through the various channels and airways in the shank and the stem until they were clean. I took the photos below to show the condition of the pipe when it arrived in Vancouver, clean and ready for me to work on. I took a close up photo of the bowl with the sump cap on and off. Note the nicks out of the inside edge of the bowl leaving it out of round.I took some photos of the stem to show the cleanness of the horn and the damage to the various parts – sides near the button, the button surface and the stem next to the button on the top and underside.I worked on the inner edge of the bowl to smooth out the damaged areas and even out the rim top. I wanted to work as much as possible to bring the bowl back into round. Once I had sanded the edge I mixed some putty of clear super glue and briar dust to build up the back edge of the rim. Fortunately the damage did not go deep into the bowl but was concentrated at the top.I sanded the repaired area with 180 and 220 grit sandpaper and took the following photo. I still needed to do more sanding but the rim top is taking shape.I wiped down the bowl and rim with cotton pads and alcohol to remove the sanding debris and any remaining finish on the bowl. I did that in preparation for repairing the filled areas on the right side of the bowl and the top of the shank. I put drops of clear super glue in the fills and sandpit areas on the bottom of the bowl and right side. Once they had dried I put some in the sandpits on the top of the shank near the stem shank junction. I sanded the repairs smooth with 220 grit sandpaper and blended them into the surface of the surrounding briar. I wet sanded the areas with 1500-2400 grit micromesh sanding pads. I used the needle file to reshape the stem edges and button and smooth out the damage that had been caused by the knife. I smoothed out the flow of the P-lip style button and recut the ledge on the underside of the stem.I cleaned the airways in of the pipe and stem with pipe cleaners and alcohol. I cleaned out the sump area with cotton swabs and alcohol. There was still some sludge in the bottom of the sump that came out with coaxing. I cleaned out the mortise as well for good measure.I continued to reshape the stem some more with 220 grit sandpaper. I really wanted to have it smooth to touch and closer in appearance to what it must have looked like when it left the factory. When I was done with the sanding the shape was looking much better.I touched up the repaired areas of the bowl and rim with a dark brown aniline stain pen. The colour matched perfectly with the existing stain. I wiped the bowl down with a light coat of olive oil and took the following photos to show where things stood at this point in the process. With the bowl finished I went to work polishing the stem with micromesh sanding pads – I wet sanded with 1500-2400 grit pads and dry sanded with 3200-12000 grit pads. I rubbed the stem down with Obsidian Oil after each pad. It is always amazing to me to see the horn begin to develop a deep glow and shine. I polished the hard rubber sump cap with the micromesh once I finished the stem. I buffed the pipe and stem with Blue Diamond on the buffing wheel to remove any minute scratches that remained in the stem and the briar. I gave the pipe multiple coats of carnauba wax and buffed it with a clean buffing pad to raise a shine. I hand buffed it with a microfiber cloth to deepen the shine on the briar and horn. The finished pipe is shown in the photos below. I am really having a bit of a dilemma with these old pipes – in all of my time refurbishing and restoring old pipe I have never seen pipes like these… I am so tempted to hang on to the lot of the old C.P.F. pipes and the rest that come from that era as I probably will never see them again… ah well definitely a first world problem. Time will tell. Thanks for coming with me on this interesting old restoration. It was a fun one to work on.

Bringing an older 1890s Era Spiral Shank Horn Stem Billiard back to Life.


Blog by Steve Laug

My brother Jeff visited an antique mall in Montana on one of his recent trips and found a lot of older pipes from the 1890s era. There were CPF, WDC and other older brand pipes with amber and horn stems. I wrote about how we used Apple Facetime so that I could be present on the hunt. It was an amazing time “in the shop” for me. The link to the blog on this hunt follows: https://rebornpipes.com/2017/04/26/a-virtual-pipe-hunt-a-new-way-to-experience-the-joy-of-a-pipe-hunt/. The first pipe that I chose to work on from the hunt was the one picture below. My brother took the following pictures of the pipe before he cleaned it up to send to me for finishing. It is a unique and interesting old pipe. The spiral shank continues through the horn stem. The finish on the bowl was worn and tired but the spiral shank and stem were undamaged. There was one deep “worm hole” in the left side of the stem in the bottom of a spiral that would need to be repaired but otherwise it was in pretty decent shape.The photos show the overall condition and look of the pipe. Whoever carved it remains a mystery as there is no stamping on the shank or bottom of the bowl. It is unmarked so it is one of those unknown pipes. The difference is that this is not a homemade pipe it has the marks of a good pipemaker and the drilling is perfect from the stem forward. The bowl was lightly caked and the rim had a tarry overflow on the top. The inside edge of the bowl was in great shape as far as I could see from the photos. The outer edge of the top had been knocked about enough that there was some damage and wear to it. The next two photos show the rim top and bowl. The finish on the outside of the bowl is worn and there are a lot of dents and dings in the surface of the wood. The photos lead me to wonder what kind of wood the pipe is made of because of the way the damaged rim looks. The next photos show the condition of the stem and the drilling in the button. The spiral continues from the shank through the stem seamlessly. The second photo shows the worm hole in the horn stem. It is deep but clean and the areas around it are undamaged. The junction of the stem and the shank is very tight and clean. The transition from wood to horn is smooth to the touch. The last photo shows the orific button on the end of the stem. It is clean, round and centered in the end of the crowned button. This older style button helps me date this pipe as early as I do above. My brother did his usual job reaming and cleaning the pipe. He reamed the bowl with a PipNet reamer and cleaned it with a Savinell Fitsall Pipe Knife. He scrubbed the internals with alcohol, cotton swabs and pipe cleaners to remove the grime in the mortise, shank and airway in the stem and shank. He scrubbed the exterior with Murphy’s Oil Soap and was able to remove all of the grime on the bowl sides and rim. The pipe came to me in great condition. I took a close up photo of the rim top and stem to show their condition more closely. The rim top was worn and there were some spots on the edges that had slivered. The rim would need to be topped to smooth things out and remove the damage.The stem photos show the tooth damage on the top and underside at the button and the “worm hole” in the left side near the shank.I wiped down the area around the hole in the left side of the stem with a cotton swab and alcohol and dried it off. I layered in several fills of clear super glue into the hole. As each layer dried I added more glue to the top of the hole repair. I continued until the file was slightly overfilled then sanded the areas smooth.Billiard16
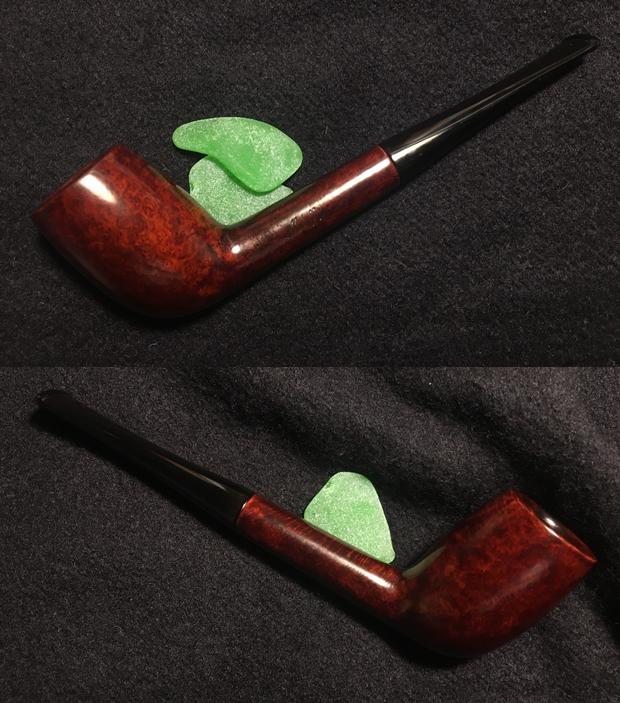
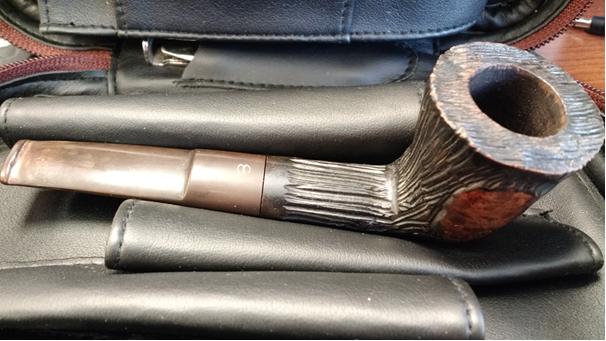
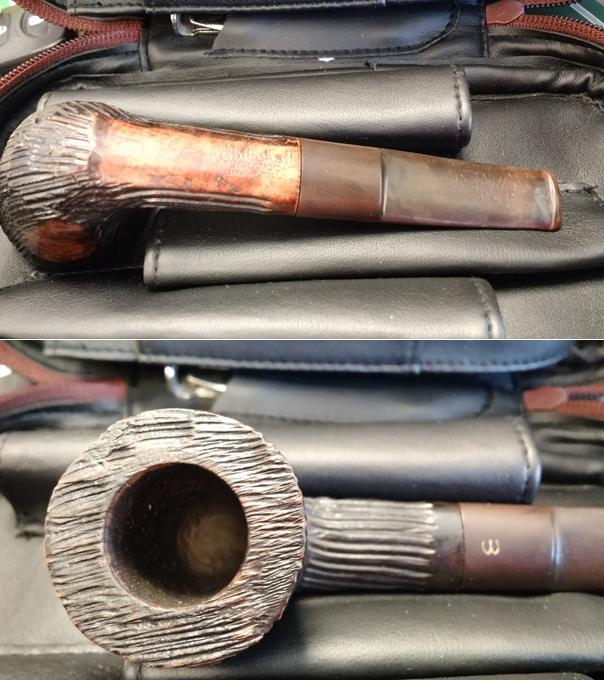
While waiting for each layer of glue to dry I worked on the rim top. I topped it lightly with 220 grit sandpaper on a topping board to smooth out the damage to the rim. I took enough of the damage off to leave the rim top smooth to the touch.
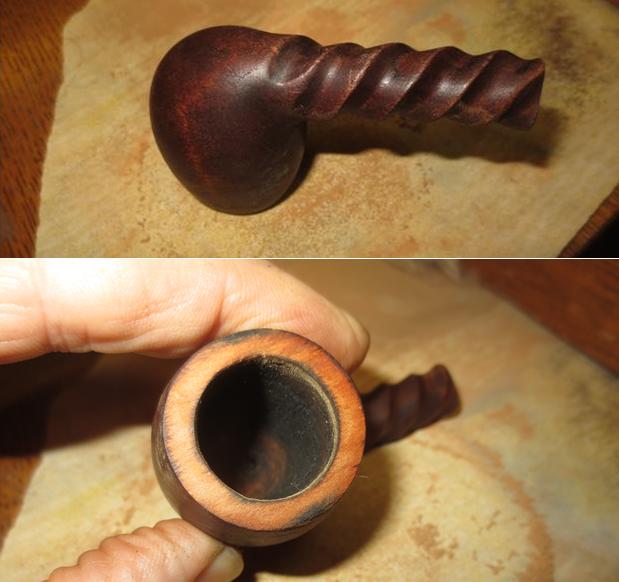
I wiped down the bowl with acetone on a cotton pad to remove all of the finish that remained on the bowl. I kept wiping it down until no more stain would come off and the bowl was clean. I could see once it was clean of the stain that the wood was not briar. I was dealing with what appeared to be walnut. It was extremely light weight and the grain was very different from what I expected once the stain was gone. I restained the pipe with dark brown aniline stain and flamed it to set the stain deep in the grain of the wood. I repeated the process until the coverage is acceptable.I put the stem back on the shank and hand buffed the stain with a soft cloth to show what the pipe looked like at this point in the process. The first photo and the last show the repair to the hole in the stem. It is smooth once again. I polished the bowl with 1500-12000 grit micromesh sanding pads. Each successive grit made the walnut bowl shine more and made the stain more and more transparent. I polished the horn stem with micromesh sanding pads – wet sanding with 1500-2400 grit pads and dry sanding with 3200-12000 grit pads. I rubbed the stem down with Obsidian Oil after each pad and when I finished the last pad I gave it a final coat of oil and let it sit and dry. I turned the bone tenon on the stem into the threaded mortise on the shank. I buffed the pipe with Blue Diamond on the buffing wheel to raise a shine. I gave the bowl and stem multiple coats of carnauba wax and buffed it with a clean buffing pad to raise the shine. I hand buffed the pipe with a microfibre cloth to deepen the shine. In the first photo you can see the repair on the lower portion of the horn stem. It is a slightly darkened spot but it is smooth to the touch. Do any of you recognize the style or work on this old pipe? Can you tell me any information regarding the maker or the era? Do you think I am in the ball park with a late 1890s date? What do you think? Thanks for the help ahead of time and thanks for walking with me through this restoration.

Restoring a Beautiful Parker Super Bruyere Cherrywood 287


Blog by Steve Laug

The next pipe on the work table comes from the estate lot that I received from a local pipe shop. It originally belonged to an old customer whose wife brought them back to the shop after his death. I am cleaning them up and selling them for the shop. This one is a beautiful little Parker Cherrywood. It is significantly more petite than the sandblast version that I restored earlier (https://rebornpipes.com/2017/06/17/parker-super-briarbark-cherrywood-809/). The stamping on the left side of the shank reads Parker over Super in a diamond over Bruyere.To the left of that is the shape number 287. On the right side of the shank the stamping reads Made in London over England and the number 4 in a circle denoting the group size.There is no date stamp next to the D in England.When I brought the pipe to the table it was obviously one of the old pipeman’s favourite smokers. The finish was dull and dirty and the stem oxidized with some calcification and buildup around the button area forward and a few minor tooth marks.I took a close up photo of the rim top and bowl to show the lava overflow onto the rim top and the thickness of the cake in the bowl. I find that the cake in these older pipes is like concrete. It is very hard and takes a lot of effort to break it down when reaming the bowl. I also took some photos of the stem to show the condition of the end near the button before my work began. The hard cake in the bowl demanded a bit different reaming strategy. I needed to use multiple pipe reamers to remove it. I started the reaming process with a PipNet reamer using the smallest head and working my way up to the largest one that could take the cake back to bare briar walls. I finished the reaming with a Savinelli Fitsall pipe knife and a KleenReem pipe reamer. I used the drill bit from the end of the KleenReem reamer to clear out the airway between the mortise and the bowl. It was almost clogged with a buildup of tars and oils that had hardened there. The pipe had been smoked to a point where it must have been like sucking on a coffee stirrer and having a thimble of tobacco in the chamber. It was definitely a favourite and obviously a good smoking pipe.With the bowl reamed, I turned my attention to working on the stem. I sanded the stem to remove the calcification around the button and smooth out some of the tooth marks. I also broke up some of the oxidation on the rest of the stem with the 220 grit sandpaper.I “painted” the stem end with a Bic lighter to raise the tooth dents on the surface of the stem. It did not take too much work to raise all but one of them. What remained of the sole dent was a small divot. I wiped down the stem with alcohol and filled in the divot with a drop of black super glue. I set the stem aside so that the glue would cure.I scrubbed the rim top with cotton pads and saliva to remove the tarry buildup there. It took a lot of elbow grease but I was able to remove all of it. There was some burn damage to the front inner rim edge from consistently lighting it in the same place. I remove the damage by blending it into the rest of the rim bevel with a folded piece of 220 grit sandpaper. I restained the edge and the rim top to blend in with the rest of the bowl using a medium and a dark brown stain pen. I mixed the stains on the rim surface and rubbed it in with a soft cloth. I gave it a light coat of Conservator’s Wax to further blend in the stain on the rim. The photos below show the rim top after the stain and after the waxing.With the pipe’s externals cleaned and polished I turned my attention to the internals of the mortise and airway in the shank and the stem. I scrubbed them with alcohol, cotton swabs and pipe cleaners until they were clean.I decided to work on the oxidation on the stem using a combination of the Before & After Stem Deoxidizer and Polish and Brebbia Mouthpiece Polish. I applied the Deoxidizer and Polishes with cotton pads to scrub the surface of the stem. I was able to remove the oxidation without doing any damage to the Parker Diamond stamp on the top of the stem. I buffed the pipe and stem with Blue Diamond on the buffing wheel and then gave the entire pipe multiple coats of carnauba wax. I buffed it with a clean buffing pad to raise the shine and hand buffed it with a microfibre cloth to deepen the shine. The finished pipe is shown in the photos below. It is a beautiful pipe that fits well in the hand. The dimensions of the pipe are; Length: 5 ½ inches, Height: 1 ¾ inches, Outer diameter of the bowl: 1 ½ inches, Chamber diameter: ¾ inches. It will soon be available on the rebornpipes store. If you are interested in adding it to your collection email me at slaug@uniserve.com or send me a private message on Facebook. Thanks for looking.

Stem Button TIME SAVER on a 1940’s Dunhill LB


Blog by Henry Ramirez

I was ghosting through Ebay listings looking for a cracked shank to experiment with when this old classic appeared.  The auction was won for a song because in addition to a cracked shank, the year stamping had been buffed off the shank. The usual whole lotta cake and dented stem story.I started with the stem, which was really in great shape.  I have come to love the stumpy profile of the patent LB’s with their constricted contour button.  An Oxyclean bath was followed by an isopropyl alcohol scrubbing with a shank brush and pipe cleaners. I wanted to use heat to raise the bite marks as much as possible to not only decrease my work load but to minimize the inclusion of foreign filler. To this end I also wanted to learn the proper temperature needed to reproduce my results consistently.

Using a heat gun, I took my time and warmed up the vulcanite until my nose told me it was getting close to burning.  If that happens the surface becomes a porous charred stinky mess!  I quickly used a laser temperature gun to obtain a surface reading of 275 degrees F.  Amazing how quickly the surface cooled off once the heat was removed.I was not impressed by the amount of rebound and it looked like filling and filing was in my future.

Having nothing to lose, I pressed my wife’s oven into service, knowing that I could set the temperature substantially higher than previous attempts without fear of ruination. I set the oven temperature at 265 degrees F to have a 10 degree safety zone and watched as the whole stem “stretched out”.  This was more like it! The dents were now depressions that needed the light to shine just so to be seen.  Little CA and polishing was needed.

I should mention that these values are for older Dunhill vulcanite only.  The composition of vulcanite has changed over the years, according to some posts I’ve read, and I’ve noticed it in the depth of polish ability.Now it was the time to clean and evaluate the briar. While I ream the mortise and bowl I am wishing that I had Steve’s magical Savinelli Pipe knife. Boy, those things are rarer than hen’s teeth and this old cake is super hard. That is followed by total immersion in an isopropyl bath with various scrub brushes stripping the briar. I couldn’t save the original finish because the shank crack needed to be clean and open as much as possible for the bonding. One of the perks of the alcohol bath is that after the bowl dries out, if there is any residual cake stuck to the chamber walls, it shrivels up and is easily removed.The shank crack was now very evident but the year stamping was not.Getting back to the stem, I wanted to know if the alcohol retort was worth the hassle.  I had been as meticulous as possible with the pipe cleaners and cold alcohol.  The color of the used alcohol in the distillation flask tells the story, close but no banana! I could now address the cracked shank.  I had previously repaired such a problem using a micro-screw and bonded dental composite resin.  I was concerned that threading the screw into old dry briar could start micro-fractures and crazing.

This time I elected to drill a channel spanning the crack and passively bond a post fabricated from longitudinal glass fibers encompassed in a strong composite resin matrix.  This would also provide some flex in the repair to accommodate the dimensional changes that briar goes through because of temperature changes during smoking.

At this time I also drilled a post hole at the end of the crack to prevent further spidering.  Because the crack was significantly wide I made sure to introduce my resin with a size 06 endodontic file.  I had planned to use a C clamp to close the gap but I chickened out when finger pressure did nothing.  Not sure how to make briar temporarily more flexible….

After filling the post hole and cementing the fiber post with dual cure composite resin, I trimmed off the post and blacked out the white resin with black CA.

Before beginning to start the staining process I wanted to open the pores of the cellulose to not only gain greater absorption of the dye but also improve the briar’s capacity to absorb tars for a sweeter smoke.  I had noticed such a phenomenon with the Missouri Meerschaum corn cob pipes.

I found that this particular wheel had already been invented by the folks who refinish wooden decks.  I tracked down some relatively non-toxic materials which did the job and whose run off wouldn’t hurt plants.

Sodium percarbonate does the cleaning and oxalic acid removes the smear layer, thus opening up the wood’s pores.  Looking around online for a source I realized that I already had both chemicals in the laundry room!  Oxyclean is the percarbonate and states on the container that it’s great for wood decks, siding and lawn furniture.  Bar Keeper’s Friend has oxalic acid as its active ingredient and states on the container that it works on teak wood.Indeed after scrubbing with both and rinsing with water, I noticed that the chamber’s surface looked and felt less dense.Now it was time to stain the briar with Oxblood diluted 50% with isopropyl alcohol in two coats, both flamed with the micro-torch.I was lucky that the original black stain in the depths of the blast remained.An overlay stain of light brown was applied in 2 coats.After a rub down with an old t-shirt to remove any xs dye, I applied 2 coats of Halcyon wax.  A quick buff on the lathe and then a hand strapping with a shoe bristle brush brought the shine up.  I want to mention that my wife gifted me her silver brush which is narrow and has long soft bristles which easily accesses the crotch of the pipe without fear of collision. This has proved most useful on bent pipes.Another very helpful tip came from a pipe maker’s blog about dead-faced files to add crispness to the button area.  They are the dead faced nut seating file by Stewart MacDonald, a luthier’s supply house and the pillar files which have the dead side on the edge from OttoFrei, a clock makers source.Well I’m now satisfied with the pipe but not finished. They say we abandon these projects because we reach a point where better becomes an enemy of good. Boy that was fun and I hope to share more adventures with these fabulous old pipes!  Regards, Henry


A difficult trust: Gift of a Grandfather – A BBB Double Star Made in England


Blog by Dal Stanton

When I study the venerable pipe on my work table, it is not a glamorous display of briar and silver bands.  Some might call it a basket pipe.  The two stars imprinted on the shank were an indication of a working man’s pipe – not high quality, but among those pipes accessible to normal, if not common, people who work, live, love and as is the case with us all, die.  This unremarkable Apple shaped, BBB [diamond over] Double Star, MADE IN ENGLAND [over] 152, is remarkable because of the story it represents.   I enjoy restoring ‘estate’ pipes because they were left to others and these pipes carry with them stories and memories of loved ones who once befriended and valued them.  Greg heard from my son, Josiah, who are college buddies, that Josiah’s old man (my words not theirs!) restored ‘old’ pipes.   This ‘old’ pipe came to Greg from his grandfather through his mother.  Josiah’s email came to me asking what I could do with these pictures from Greg. My understanding is that Greg was a bit reluctant at first to send his pipe off to Bulgaria to be restored, but after Josiah directed him to some of the restorations I’ve done, he felt he could trust me with the heirloom that had come to him.  Knowing that this pipe was from his grandfather I asked that Greg send me information about his grandfather so that I not only could place the pipe better in history, but Greg’s grandfather as well.  This is the letter he sent me:

Hi Mr. Stanton,

Thank you so much for agreeing to restore my grandfather’s pipe. I am sorry for the delay in getting you the below information, but it’s been a crazy couple of weeks.

My mother inherited the pipe from my grandfather when he passed away in 1998. I saw it in the china cabinet one day and asked her if I could have it, since I had taken up pipe smoking. She kindly agreed. She doesn’t really know when my grandfather got the pipe, but she said he must have bought it in Hong Kong.

My grandfather was from Hong Kong, and only emigrated to the United States in the 1980s. He was a malaria inspector for the Hong Kong government for his entire working career. He must have gotten the pipe at the latest in the late 1940s or early 1950s, as my mother remembers him having it when she was a child. He never smoked the pipe when I knew him, but from its condition, I assume it was well used at an earlier period in his life.

Having graduated from the University of Georgia Law School in Athens, Georgia, passed his bars and currently serves as a law clerk to a federal magistrate judge in Augusta, Georgia, AND as a young married man, I can understand why Greg “took up” smoking pipes!  Pipes are wonderful companions for blooming attorneys!  His letter concluded with an agreement to the cost of the restoration would benefit our work with the Daughters of Bulgaria!  Thank you, Greg!

The information Greg received from his mother was invaluable for placing this BBB in time and space.  Pipedia’s article about BBB is helpful.  BBB in the mid-1800s originally stood for “Blumfeld’s Best Briars”, but after the death of Blumfeld, the Adolph Frankau Company took over the company and BBB gradually became “Britain’s Best Briars”.

The “BBB Two Star” rating also is referenced in the same article in a discussion of quality descriptors for BBB pipes:

In the Thirties, the top-of-the-range one becomes “BBB Best Make” with alternatives like “Super Stopping” and “Ultonia Thule”. The BBB Carlton, sold with the detail with 8/6 in 1938, is equipped with a system complicated out of metal, system which equipped the BBB London Dry too. Blue Peter was not estampillées BBB but BBB Ultonia, and the BBB Two Star (* *) become the bottom-of-the-range one. 

When Greg’s pipe arrived in Bulgaria, thanks to a visitor’s willingness to carry it across the Atlantic and European continent, I unwrapped it and put it on my work desk and took these pictures to fill in the gaps. At PipePhil.eu an example of the BBB Two Star marking is pictured along with the stinger/tube style extending into the chamber as Greg’s grandfather’s BBB does ( as seen above).In Pipes Magazine, I found a thread discussing the dating of the BBB Two Star.  One threader’s opinion, ‘jguss’ corroborates Greg’s mother’s recollections:

My guess is that the Two Star line started at the end of WWII; the first mention I’ve found so far is dated 1945, which at least gives a tpq (that is, an approximate dating). I know the line lasted at least into the early sixties.

It is not too difficult to speculate about the provenance of Greg’s pipe.  During WW2, briar became a scarce commodity throughout Europe and pipe manufacturing companies made do with what they could acquire.  Two Star BBBs would be lower end but more than likely during this time, a very close second when rations were short.  Added to this backdrop is the origin of our story in Hong Kong.  Hong Kong, a British holding since 1841 (see LINK), lost control of Hong Kong during WW2 to Japan in 1941 during the Battle of Hong Kong.  Undoubtedly, Greg’s grandfather would have experienced this first hand.  When Japan unconditionally surrendered in 1945, the British regained control of Hong Kong, but to counter Chinese pressures to control Hong Kong, reforms were introduced that broadened and increased the stake of local inhabitants of Hong Kong:

Sir Mark Young, upon his return as Governor in early May 1946, pursued political reform known as the “Young Plan“, believing that, to counter the Chinese government’s determination to recover Hong Kong, it was necessary to give local inhabitants a greater stake in the territory by widening the political franchise to include them.[19] (Link)

During the years following the Second World War, the same article describes unprecedented economic development which resulted in the economic powerhouse that Hong Kong became.  This period would have been while Greg’s grandfather was working as a malaria inspector for the government of Hong Kong and during which he acquired this BBB Two Star.  The smaller Apple shape would have served him well as he performed his inspection duties but given the ‘stem forensics’ pictured above, he probably chewed on it a bit as well while he worked!

With a greater sense of the story that this BBB Two Star tells, from England, to Hong Kong, to America, and now to Bulgaria, I’m anxious to restore this precious family gift from Greg’s grandfather.  At Greg’s request, he’s hoping for a pipe that is as good as new and ready for a new lifetime of service.  Yet, with all restorations, undoubtedly there will be some marks and blemishes remaining – these an ongoing testament to the memory of those who those who went before.

The first order of approach is with the stinger.  When the pipe arrived, the stinger was already separated from the stem.  The stinger extends from the stem through the mortise into the chamber itself through a metal tube air draft hole.  Using a pair of plyers, I wrap a piece of cloth around the end to pull gently to dislodge the stinger from the mortise.  I can see in the mortise that there appears to be a metal sheath that the stinger is lodged in – at least, that is what it appears to be.  The stinger is not budging and I do not want to break the stinger off.  To try to loosen things up, I pour some isopropyl 95% in the chamber to allow it to soak into the draft hole.  Hopefully, in time, this will loosen the stinger. The alcohol soak did not work.  In fact, a few weeks have transpired since writing the words above.  This stinger has given me quite the challenge.  In the back of my mind constantly, is the concern that I not leverage too much pressure pulling on the stinger.  I’m concerned about damaging the shank.  After soaking the internals for some time with alcohol, I pulled with plyers hoping to break the grip.  I also attempt heating the stummel with a heat gun in hope of dislodging the stinger.  I also heat the protruding part of the stinger with a candle, hoping that this would break the bond.  It did not.   I also was concerned about the candle flame close to the briar while trying to heat the stinger.  I craft a tinfoil shield, but this was not successful.  Unfortunately, I singed the end of the shank and had to remove the damage by ‘topping’ the shank end, which leads to a bit of work lining up the stem and shank later.  As you might expect, the protruding end of the stinger did not hold up under the pressure and eventually broke off. After the stinger protrusion broke off, and after a second email to Steve for input, I’m at the point of using a drill bit in another attempt to remove the bonded stinger.  Starting with a very small bit, I hand turn the bit to allow the drill to find the center of the stinger and gradually, remove the stinger introducing the next larger drill bit.  The end of the broken stinger begins at about 1/4-inch-deep into the mortise.  Unfortunately, this method is not working either because the drill bit will not bite into the metal and remain straight.  At the end of the stinger slot that I’m boring into with the drill bit, my efforts are flummoxed by the stinger’s design.  It has a slanted metal airflow deflector that causes the drill bit to veer off mark.  After breaking the end of the drill bit in the slot (ugh!), and digging it out with needle nose pliers, I sit and begin to think I was facing failure.  Nothing was working.  I’m introducing more problems to the restoration as I try unsuccessfully to solve the stuck stinger problem.  I can’t move forward and I’m stuck and begin to compose an apology letter to Greg in my mind.  UNTIL, on a fancy, I insert a small flat head screw driver into the slot at the end of the broken stinger 1/4-inch-deep in the mortise and I twist it gently counter-clockwise, and it snaps.  Suddenly, it was loose and I easily extract the ‘middle’ of Grandpa’s old stinger – I’m sure he was the last one to see this artifact!  I see daylight through the mortise and I’m hoping that it might also be a metaphoric ‘light at the end of the tunnel’!  I’ve not forgotten that the other end of the stinger remains lodged in the draft hole tube at the foot of the chamber.  Thankfully, a larger drill bit was the perfect size and it reaches into the mortise and hand turning the bit, it clears the rest of the stinger shrapnel.  Finally!  Oh my….  I’ll be saving the stinger debris for Greg.  This BBB will continue without difficulty stingerless.  The pictures show the results. In the interest of full disclosure, these words are coming weeks after.  Why the hiatus?  Life’s normal twists and turns, work, some wonderful travel to Crete for an organizational conference, to Athens (not in Georgia) for a consultation on the Eastern Orthodox Church, AND my growing frustration with Greg’s grandfather’s pipe’s restoration as more complications arrived!  I’ll try to catch you up to the present:

With the stinger removed, I was anxious to continue the restoration with a ‘normal’ pattern – the stem goes into the Oxi-Clean bath to deal with the oxidation in the stem.  After some hours, the stem is removed from the bath and I wet sand with 600 grade sanding paper removing the raised oxidation followed by 0000 steel wool. To clean and protect the BBB stamping on the stem, I use a non-abrasive Mr. Clean ‘Magic Eraser’ sponge.  The pictures show the progress.The next step is to re-seat the tenon into the mortise.  After the arduous process of removing the stinger, and after singing the shank end with a candle flame, and after ‘topping’ the shank to remove the damaged briar, the tenon and mortise needed to be re-wedded with the new realities.  The tenon was too large for full insertion into the shank.  Using a combination of reducing the tenon size with sanding paper and steel wool, sanding and filing the throat of the mortise, and using a rounded needle file to cut a new internal mortise openning bevel to accommodate the broader tenon base, I patiently, slowly, methodically worked to re-seat the tenon in the mortise which included working and then testing the new fit – GENTLY!  I suppose the fact that I said to myself, ‘Dal, careful, don’t crack the shank’, at least a 1000 times only made the sinking feeling more intense when I heard the sickening sound during what proved to be my last, ‘gentle testing’ of the tenon inserted into the mortise.  The hairline crack is pictured below that I took only a day ago – I couldn’t bear to take it then, when it happened.  I was sickened and put Greg’s pipe aside.  I needed some time to work through my own sense of failure of the trust given me to restore this family heirloom.  Now, after several weeks, I’ve regrouped and have taken up Greg’s pipe again.  The travels that I described above during this time in some ways felt more like Jonah running from Nineveh not wanting to face the scene of his calling and his sense of failure!  Though, my trip did prove beneficial – I sold some of my finished pipes to colleagues to benefit and raise the awareness of the Daughters of Bulgaria that The Pipe Steward supports.  I’ve included my Nineveh travels below for you who may not be familiar with ‘my world’, the Balkans – Sofia to Crete to Athens and back. Before moving forward, I needed to repair the cracked shank.  With the help of a magnifying glass, I locate the terminus of the crack and mark it by creating an indentation with a sharp dental probe.  The arrow to the left below marks this.  Using the Dremel tool, I mount a 1mm sized bit and drill a hole at that point – but not going through!  This hole acts like a controlled back-fire to stop the progress of a forest fire.  This will not allow the crack to continue creeping.  With the use of a toothpick, I spot-drop Hot Stuff CA Instant Glue in the hole and along the line of the crack which I expanded microscopically by partially inserting the tenon into the mortise.  This allows the CA glue better penetration to seal the crack.  I remove the stem immediately after the application of CA.  With the CA glue still wet, I apply briar dust to/in the hole and along the crack to encourage better blending.  The pictures show the progress. After some hours allowing the CA glue to cure on the shank repair, using a round grinding stone bit mounted on the Dremel, I reestablish an adequate and uniform internal bevel on the end of the shank to accommodate the base of the tenon when it is fully inserted into the mortise.  My theory is this is what caused the crack – lack of a sufficient internal bevel giving room for the slightly enlarged tenon as it merges with the stem proper.  With the Dremel engaged at the slowest setting, I’m careful to apply minimal pressure as I rotate the ball a bit to make sure it’s centered.  It looks good – the pictures show the progress.Due to a lapse of sorts and the intensity of my focus on re-seating the stem again without re-cracking the shank, I failed (or perhaps, had little desire) to take any pictures.  The short of it is, the stem and stummel have been reunited after some difficult times.  Also, not pictured are some of the basic steps: reaming the fire chamber of carbon cake buildup, cleaning the internals of the stummel and stem with cotton swabs and pipe cleaners wetted with isopropyl 95%, and cleaning the externals of the stummel with Murphy’s Soap.  Again, picking up the trail, pictured below is the micromesh pad process with the stem.  Using pads 1500 to 2400, I wet sand the stem, followed by dry sanding with pads 3200 to 4000 and then 6000 to 12000.  I follow each cycle with an application of Obsidian Oil to revitalize the vulcanite.  The stummel surface shows quite a bit of pitting in the first picture shown again below.  The rim also shows nicks. On the larger pits shown below on the heel of the stummel, I spot-fill with a toothpick using CA glue and shorten the curing time by using an accelerator spray on the fills.  After filing and sanding the fills to the briar surface, using a progression of 3 sanding sponges from coarse, medium to light, I work out most the remaining pitting over the stummel surface.  Using 600 grit paper on the chopping block, I also give a light topping to the rim to remove nicks and create fresh lines for the rim.  Following the topping, I introduce an internal bevel to the rim, first using a coarse 120 paper rolled tightly, then with 240 and 600.  The internal rim bevel to me, always adds a touch of class but also helps create softer lines which enhances this Apples shape.  The pictures show the unhindered progress! I now take micromesh pads 1500 to 2400 and wet sand the stummel followed by dry sanding with micromesh pads 3200 to 4000 and then 6000 to 12000 taking a picture after each set to mark the progress.  I am careful to guard the BBB nomenclature on the shank sides.  As I move through these cycles, I realize that I have been so wrapped up in the technical aspects of this restoration for Greg, that I failed to see the beauty of this diminutive Apple shape.  The grain that emerges from Grandpa’s old timer is truly beautiful. Flame grain and swirls, with a few bird’s eyes accenting the whole – totally eye-catching for a Two Star sub-mark BBB I would say! To see the big picture to help determine the next steps, I reunite stem and stummel and stand back and take a good look.  This BBB Made in England is looking real good – in spite of everything!  I can see by the way the BBB Apple naturally sits on the surface, leaning slightly like a listing ship, but remaining upright, provides some clues regarding the significant pitting on the heel of the stummel – just off center. Greg’s grandfather undoubtedly and conveniently placed his pipe on a table or counter surface, or perhaps on a nearby crate, as he made his rounds as a malaria inspector for the province of Hong Kong.  The original BBB coloring leaned toward the favored darker hues of English pipe makers and client proclivities. I decide not to go that dark, but to stain the stummel using a light brown base with a touch of dark brown to tint it down that track a bit.  This will make for better blending, especially for the darker briar around the nomenclature on the shank.  Using Fiebing’s Light Brown Leather Dye as the base, I add a touch of Fiebing’s Dark Brown.  Using a folded pipe cleaner in the shank as a handle, I begin by warming the stummel with a hot air gun to expand the briar making it more receptive to the dye.  After heated, I apply the dye mixture to the stummel generously aiming for total coverage.  I then fire the wet stummel with a lit candle igniting the aniline dye, burning off the alcohol and setting the pigment in the grain.  After a few minutes, I repeat the process concluding with firing the stummel.  I put the stummel aside to rest for several hours.  The pictures show the staining process – yes, you can see my blue fingers – I’ve started wearing latex gloves when I’m staining. After some hours, I’m looking forward to ‘unwrapping’ the fired stummel to reveal the stained briar beneath.  Using a felt buffing wheel mounted on the Dremel, set at the slowest speed, I use Tripoli compound to remove the initial layer.  Moving in a methodical, rotating pattern, I work my way around the stummel not apply a great deal of down-pressure on the wheel, but allowing the RPMs of the felt wheel and the compound to do the work. After removing the crusted layer with Tripoli, I wipe the surface with a cotton pad wetted with isopropyl 95%.  I do this not so much to lighten the finish, but to blend and even out the stain over the surface.  Following this, I mount a cotton cloth wheel on the Dremel, increase the speed slightly, and apply Blue Diamond – a slightly less abrasive compound.  After both compounds, I use a clean towel to hand buff the stummel to remove excess compound dust before applying the wax.  Pictures show the progress. Reattaching the stem and stummel, I apply several coats of carnauba wax to both.  Using a cotton cloth wheel, I set the speed of the Dremel to 2 with 5 being the fastest, I apply the carnauba and I like what I see.  With the carnauba wax applied, I mount a clean cotton cloth buffing wheel on the Dremel and again buff the stummel and stem.  Finally, I apply a rigorous hand buff using a micromesh cloth to raise the shine more.

This BBB Double Star Apple has come a long way from England to Hong Kong to the US to Bulgaria, and now it’s ready to return to its new steward.  This restoration was a bit bumpy, but then, so is life.  I’m glad to help give this pipe a new lifetime and I hope Greg not only enjoys it, but that it provides a special connection with his past.  I’m sure Grandpa would be proud.  Thanks for joining me!

Breathing Life into an Antique Imported Briar Bull Moose


Blog by Steve Laug

There is something about these older Mincer style pipes that grabs my attention. I am drawn to their rustic appearance and feel in the hand. This one was a Bullmoose shape – though the “nose” on it is much more conservative than many of these that I have seen. The stamping on the left side of the shank is a standing lion inside of a shield and next to that ANTIQUE over Imported Briar. I have searched on the web and in my books for this logo and cannot find it but I did find a listing for the ANTIQUE in Who Made That Pipe for a company called Heritage Pipes Inc. NYC. The company is to be distinguished from the Heritage line made by Kaywoodie as a high end alternative to Dunhill pipes. I have looked for information on the company online but so far have not found any. Anyone have any information on the brand?

My brother took photos of the pipe before he cleaned it up. I have included those photos below. It is an interesting pipe.The next photos of the pipe show the damage on the rim top. The three different photos show the damaged areas from different angles. The rim top looked like it was damaged on the inner and outer edges of the bowl. The top looked like the finish was peeling but I would know more about it once I had it in hand. He took photos of the rusticated bowl sides. The smooth portions show grain. The double rings around the bowl cap have nicks and chips out of the top and bottom edges of the rims as well as the centre spacer. The next photo shows the stamping on the left hand side of the shank. Metal shank insert that separates the stem from the shank is oxidized.The stem is oxidized and has tooth chatter and tooth marks on both sides near the button. It is also overclocked making the stem sit crooked in the shank.My brother reamed the bowl with a PipNet reamer and cleaned out the insides. Pipes with the threaded metal mortise hold a lot of grime and tars so I will need to clean it further. The exterior was scrubbed with Murphy’s Oil Soap and a tooth brush and the grime and deteriorating finish was removed completely. The stem oxidation came to the surface in the cleaning. The next four photos show the condition of the pipe when I received it. I took a close up photo of the rim to show what it looked like when it arrived. Fortunately the areas on the rim that looked like flaking in the early photos was only lava buildup and it was gone. I breathed a sigh of relief when I saw that.The next two photos show the stem. The tooth chatter was lighter on the top of the stem than the underside. There were two deep tooth marks on the underside. The button edge on the topside was dented from teeth as well.I took the stem off the shank and was surprised that the conical stinger apparatus was gone. I heated the metal tenon with a lighter until the glue softened and twisted the stem around in the mortise until it lined up straight on the shank.I sanded the rim top and the inner beveled edge of the bowl with 220 grit sandpaper to remove the damage and the darkening. It did not take too much work to smooth out the dents and nicks and clean out the darkened inner edge of the bowl.To repair the chip out of the ring around the cap on the bowl on the right side I filled in the gap with briar dust and put drops of clear super glue on top of the dust. I used a dental spatula and a knife to recut the twin rings around the cap. Once it dried I sanded the repaired area on the ring and the rim top with a medium and fine grit sanding sponge and with 1500-6000 grit micromesh sanding pads to smooth out the scratches left behind by the paper.I cleaned out the inside of the mortise and the airway in the shank and stem with pipe cleaners, cotton swabs and alcohol until the cleaners came out white.I sanded the stem with 220 grit sandpaper to remove the oxidation and then used black super glue to fill in the tooth marks on the top edge of the button and the underside of the stem.When the glue dried I sanded the stem with 320 grit sand paper and polished it with micromesh sanding pads. I wet sanded it with 1500-2400 and dry sanded it with 3200-12000 grit pads. I rubbed the stem down after each pad with Obsidian Oil. After sanding it with the 4000 grit pad I buffed it with red Tripoli on the buffing wheel then finished polishing it with the final three grits of micromesh. I gave it a final coat of oil and set it aside to dry. I stained the bowl with Cherry Danish Oil and wiped it down to give it a shine. I wanted to highlight the red colours in the briar. The colour came out really well and the grain shines through on the rim and the smooth portions of the bowl and shank. I buffed it lightly with a shoe brush. The photos below show the staining and the finished bowl. I buffed the stem some more with red Tripoli and with Blue Diamond on the buffing wheel to polish out the oxidation that still remained at the junction of the stem and shank. I gave the stem multiple coats of carnauba wax and gave the bowl several coats of Conservator’s Wax. I buffed the bowl with a clean buffing pad to raise the shine and hand buffed it with a microfibre cloth to deepen the shine. The dimensions on the pipe are Length: 5 1/2 inches, Height: 1 1/2 inches, Outer diameter: 2 inches, Chamber diameter: 7/8 inches. The finished pipe is shown in the photos below. It really is a nice looking older piece of pipe history and should make a great addition to someone’s pipe rack. It will go on the rebornpipes store shortly. If you would like to purchase it contact me via private message on Facebook or through my email at slaug@uniserve.com. Thanks for looking.


New Life or an Oval Shank Whitehall Saratoga Dublin


Blog by Steve Laug

Not long ago I received and email from Dave, a reader of the blog, asking about a couple of pipes that he had picked up. This is the second of the two pipes – the Whitehall Saratoga. I have included part of his email below. He gives his assessment regarding the pipes and what he wanted done.

Steve… I have recently been gifted 2 estate pipes that I would love to have reincarnated by your hands? I am not sure of the cost and wanted to speak with you first… The 2 pipes in question are not in bad shape, just have some age, cake and minimal wear; one is a Whitehall rusticated with saddle stem and the other a Pear shaped Dr. Grabow Westbrook… I have attached some images with this email so that you have some idea of how they look. If you need additional images please let me know. Thank you for your time and consideration.

Regards, Dave The pipe was in pretty decent shape over all. The rim was dirty but the inner and outer edges were in good shape. The finish was worn and dirty but the carved striations looked good. The smooth patches around the shank, the underside and the two panels on the bowl sides were scratched but otherwise clean. The stem was oxidized and had some deep tooth marks on both the top and underside near the button. The W stamp on the top of the saddle was faint and worn. I would need to be careful in cleaning the oxidation not to damage the logo stamp. The photos below show the condition of the pipe when I received it. I took a close up photo of the stamping on the shank. The stamp is clearly legible and reads Whitehall over Saratoga over Briar Italy. The second photo shows the rim and bowl condition. There was still a light cake that would need to be scraped out but it was really quite nice.I took photos of the stem. It is hard to see the tooth dents in the photos below but they are present. There was a W on the top of the saddle stem that was a decal and it was coming off. The button is worn from use. The oxidation is quite deep.When I took the stem out there was a small stinger in the tenon. It was dirty but was easily removed and would be polished and put back in place.I sanded the stem with 220 grit sandpaper to break up the oxidation on the stem and reshape the button. I sanded out the shallower tooth marks to remove them. I wiped down the stem and repaired the deeper marks with black super glue. I set the stem aside to let the repairs cure. I turned my attention to the bowl. I scrubbed it with a tooth brush and Murphy’s Oil Soap to remove the grime from the grooves in the briar on the bowl and rim. I rinsed the bowl down with warm water and dried it off with a towel. The freshened pipe is shown in the photos below. I reamed out the bowl to remove the last of the cake with a Savinelli Fitsall Pipe Knife. It did not take too long to smooth out the remnants of the cake in the bowl. I scrubbed out the mortise and the airway in the shank and stem with pipe cleaners, cotton swabs and alcohol to remove the tars and oils. I went through a lot of pipe cleaners and cotton swabs before they came out clean.I restained the bowl with a dark brown aniline stain and flamed it with a lighter. I repeated the process until the coverage was even and I was happy with the results. I wiped down the bowl with alcohol on cotton pads to lighten the stain and make the contrast between the rusticated part and the smooth ones more obvious. I gave the pipe a coat of Conservator’s Wax and buffed it with a shoe brush to give it a shine and check out what the colour looked like. I took some photos of the polished bowl to show how it looked at this point in the process. The pipe is beginning to look really good. I sanded the top of the shank to remove the dark colour and make it more transparent at the stem shank junction. Note the nicks in the smooth portions of the bowl and shank. They are deep so I will not be able to sand them out. They actually act like marks of history of the journey of this pipe. It was not quite right. I wanted a little more red in the finished briar. I wiped the bowl down with alcohol on a cotton pad to remove the wax so I could do a bit of a contrast stain. For the second coat I rubbed down the bowl with a coat of Cherry Danish Oil to highlight the red colour in the briar. The combination of stains gives a nice contrast look to the pipe. I polished it with a soft cloth and took photos of the finished bowl. I set the bowl aside and turned my attention to the stem. I talked with Dave regarding the W decal on the saddle and we decided to remove it as it was worn and kept me from removing the oxidaiton on the saddle while trying to protect it. I resanded the with 220 grit sandpaper to remove the oxidation and the remnants of the decal. I polished it with micromesh sanding pads. I wet sanded it with 1500-2400 grit pads and rubbed it down with Obsidian Oil between each pad. I dry sanded it with 3200-12000 grit pads and repeated the oil treatments. I buffed the stem with red Tripoli on the buffing wheel and followed that with Blue Diamond polish. I gave the stem several coats of carnauba wax and polished it by hand. I buffed the stem with Blue Diamond to polish out some of the minute scratches in the surface. I gave the stem several coats of carnauba wax to protect and give it a shine. I hand waxed the bowl with Conservators Wax and buffed the bowl and stem with a clean buffing pad to raise the shine. I hand buffed it with a microfibre cloth to deepen the shine. The finished pipe is shown in the photos below. I will be packing it up soon and sending it back to Dave so he can fire up a bowl and give this beauty a smoke. Thanks for looking.