
Blog by Steve Laug
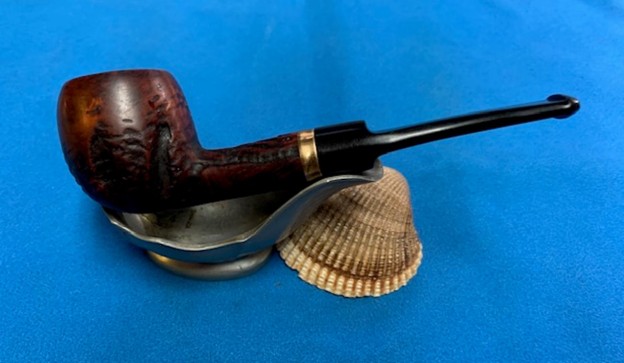
The next pipe I have chosen is large, tall bent stack with a poorly fit long Churchwarden stem. The diameter of the shank is not even close to the stem diameter. It appears to me that someone had added the stem solely to create their own long stem smoke. The shank end was a bit damaged on the on the face of the stem. I would need to do something to deal with that when I worked on it. This particular pipe had a very dirty/grimy finish but had some nice grain around the bowl sides and shank underneath the dark reds and black stem. It came to us from a fellow in Copenhagen, Denmark on 01/26/2023. This Bent Stack was stamped on the underside of the shank and read JSP. There were no other stamps on the shank sides. The pipe was in filthy condition when he brought it to the table. The finish was dirty with oils and grime ground into the briar sides and rim. The bowl had a thick cake and some darkening on the inner edge of the rim. There was some light lava on the rim top. The misfit stem was dirty but there was no oxidation or calcification on it. There were light tooth marks and chatter on the top and underside on and near the button. There was not a logo stamped on the stem. The diameter of the shank was significantly larger than that of the stem. Jeff took photos of the pipe before his cleanup work. They tell the story and give a glimpse of the promise that we see in this pipe.
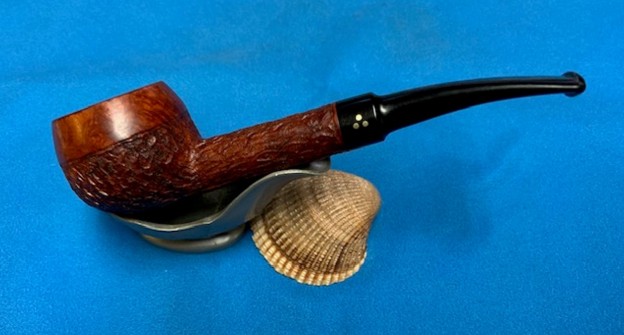
 Jeff took photos of the rim top and stem to show the general condition of the pipe. The bowl showed some moderate cake and some darkening on the inner edge. The rim top looked quite clean with small specks of lava on the surface. The photos of the stem show the light tooth marks and chatter on both sides near the button.

 Jeff took some photos of the bowl sides and heel to show the grain showing through the black and red stain that was around this bowl. It is a nice looking pipe.
 He took a photo of the underside of the shank to show the stamping. The stamping is readable in the photo below and is as noted above.
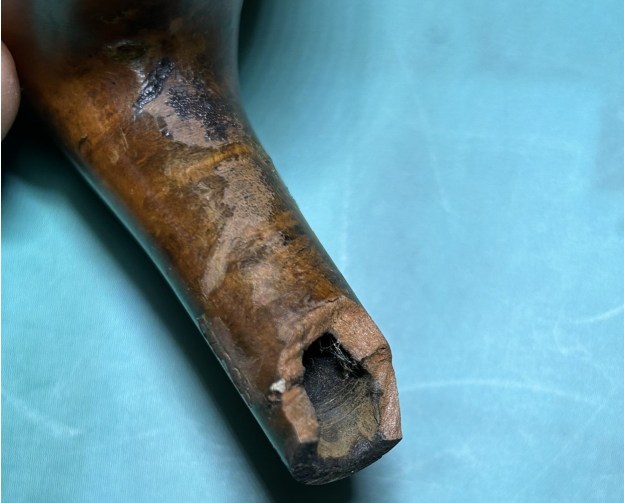
  He took a photo of the fit of the stem against the shank end. You can see the difference in the diameter of the stem and the shank as well as some of the nicks and marks in the shank end.
  I turned to a blog I wrote recently about a JSP pipe. That one was a Bamboo shank poker that was quite beautiful. Here is the link to that blog (https://rebornpipes.com/2023/07/13/restoring-an-american-made-jsp-7-bamboo-shank-poker/). I quote from that blog now in the section on the background to the brand.
I turned to Pipedia to have a look at the history of the brand. I was pretty sure it was made by Joel Shapiro but needed confirmation (https://pipedia.org/wiki/JS_Pipes). Here is the information from the article.
Welcome to JS Pipes! http://www.jspipes.com
Let me introduce myself. My name is Joel Shapiro, and I live in Rancho Cordova, California. I offer a limited number of handmade briar pipes for sale.
The type of briar (Grecian, Italian, etc.) will be noted for each pipe made, along with further details concerning stem type (ebonite, lucite, cumberland, etc.) and shank extensions. A complete size description will be included with each pipe posted for sale.
I do not fill any flaws in the briar, so the buyer will see exactly what is offered with nothing to hide. All pipes are finished with a buffed in coat of carnauba wax over the stain. Stains are all alcohol based and will not seal the wood, so won’t alter the smoking experience or the breathing qualities of the briar.
In addition, I also offer a unique tamper design. My tampers are hand turned from quality hardwoods and the foot is cut at an angle to aid in mounding the tobacco and keeping the ember banked. I have found that this design results is fewer relights for a more enjoyable smoke. I can make these in any custom size and in most hardwoods, including some exotics. If you’d like a custom size (for very large pipes for example) or material, please contact me at jspipes@jspipes.com. All tampers are priced at $24.95, unless the material chosen is particularly expensive or difficult to work.
If you’d like to buy a pipe or tamper, but prefer to pay by money order or check, please e-mail (jspipes@jspipes.com) for my mailing address.
Would you like an email when new pipes are posted? Send me an e-mail and request to be on the JS Pipes mailing list! jspipes@jspipes.com
Jeff had done a great job cleaning up the pipe as usual. He reamed the pipe with a PipNet reamer and cut back the cake back to the bare briar. He cleaned up the walls with a Savinelli Fitsall Pipe Knife. He scrubbed the interior of the bowl and shank with pipe cleaners, cotton swabs and alcohol to remove the tars and oils. He scrubbed the exterior of the pipe with Murphy’s Oil Soap and a tooth brush to remove the grime from the finish. He worked on the rim top lava and the darkened spots with the soap and tooth brush. He scrubbed the inside of the stem with alcohol and pipe cleaners. He scrubbed the exterior with Soft Scrub and then soaked it in Briarville Pipe Stem Deoxidizer. He washed it off with warm water to remove the Deoxidizer. The pipe looked far better when it arrived. I went through my can of stems until I found the one that fit the angles and the diameter of the shank. I used a Dremel and sanding drum and a file to reduce the diameter of the tenon on the new stem to fit the shank.
 Now it was time to deal with the damage on the shank end. I decided to use a thin brass band to provide a smooth base for the new stem to sit against. I gave the shank end a thin coat of white all-purpose glue and spread it with a tooth pick. I pressed the band in place on the shank and wiped off the excess glue. The end was smooth and the bit of brass gave the pipe a touch of bling that was perfect. I took photos of the newly fitted band and have included them below.

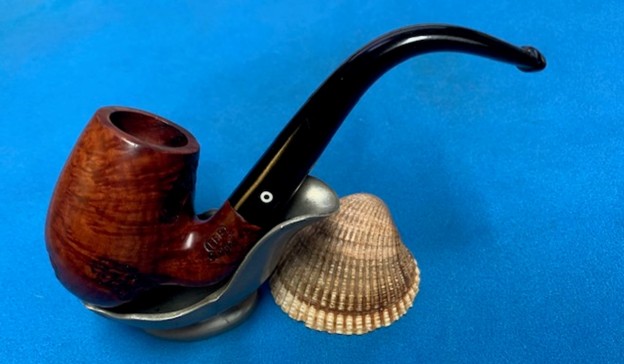
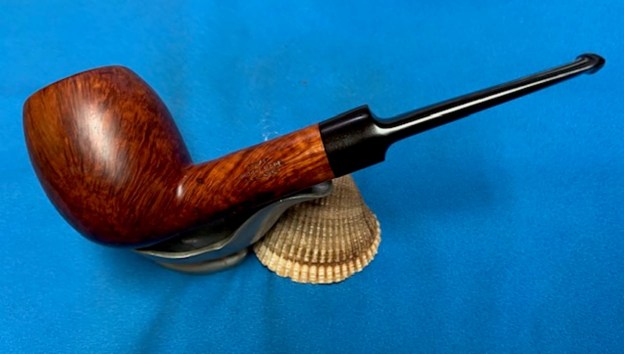
 With the band in place on the shank I fit the stem in the shank and took photos of the new look. I still needed to polish the new stem but I wanted to give a sense of the whole with the photos. Have a look.
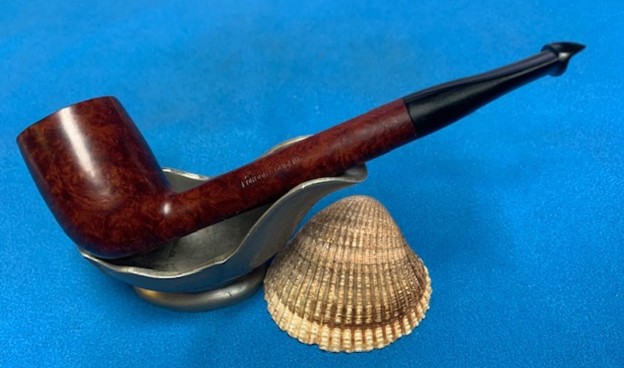
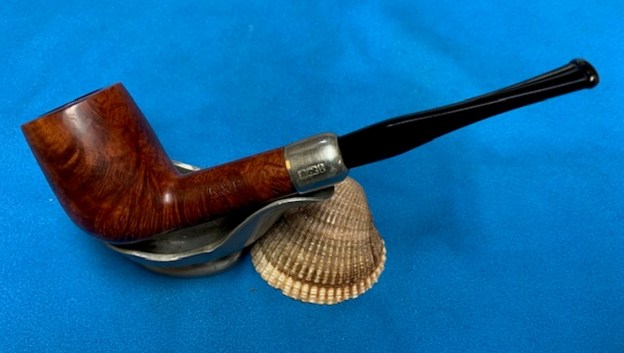
 I took a close up photo of the rim top and bowl along with the stem to show their general condition. The rim top looked good and the stem was in good condition as well without tooth marks or chatter on either side.
  I took a photo of the stamping on the underside of the shank. The JSP stamp is clear and readable.
 I set the stem aside and turned my attention to the bowl. I wiped the bowl down with isopropyl alcohol on a cotton pad to make the stain a bit more transparent so the grain showed through.
 I polished the bowl and shank with micromesh sanding pads – dry sanding with 1500-12000 grit pads. I wiped down the bowl after each pad with a damp cloth to remove the sanding debris.


 I used a Mahogany stain pen to touch up the rim top to match the rest of the bowl. The rim matches the colour in the rest of the bowl and shank perfectly.
 I worked some Before & After Restoration Balm into the surface of the bowl and shank with my fingertips to clean, enliven and protect the briar. I let the balm sit for 15 minutes and then buffed with a cotton cloth to raise the shine. The photos show the bowl at this point in the restoration process.

 I set the bowl aside and worked on the stem. I polished the stem with micromesh sanding pads – wet sanding with 1500-12000 grit sanding pads. I wiped it down after each sanding pad with Obsidian Oil.
 I finished polishing the stem with Before & After Pipe Stem Polish – both Fine and Extra Fine. I wiped the stem down with a final coat of Obsidian Oil and let it sit and absorb into the vulcanite.
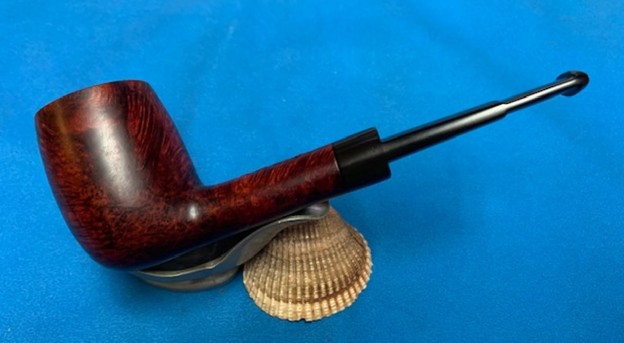
 I am excited to finish this JSP “Joel Shapiro” Briar Stack with Vulcanite taper Stem. I put the pipe back together and buffed it with Blue Diamond on the buffing wheel. I gave the bowl and the stem multiple coats of carnauba wax. I hand buffed the pipe with a clean buffing pad to raise the shine. It is fun to see what the polished bowl looks like with beautiful mixed grain all around it. Added to that the polished black vulcanite stem combined with the bowl made a stunning pipe. This smooth JSP Joel Shapiro Stack is great looking with its new stem and the pipe feels great in my hand. It is light and well balanced. Have a look at it with the photos below. The dimensions are Length: 5 ½ inches, Height: 2 ½ inches, Outside diameter of the bowl: 1 1/8 inches, Chamber diameter: ¾ of an inch. The weight of the pipe is 39 grams/1.38 ounces. It is a beautiful pipe that I will soon be putting on the rebornpipes store in the American (US)Pipe Makers Section. If you are interested in adding it to your collection send me an email or a message. Thanks for walking through the restoration with me as I worked over this pipe. Thanks to each of you who are reading this blog.
As always, I encourage your questions and comments as you read the blog. Thanks to each of you who are reading this blog. Remember we are not pipe owners; we are pipe men and women who hold our pipes in trust until they pass on into the trust of those who follow us.


