Tag Archives: restaining a bowl and rim

Nice find in Plovdiv, Bulgaria – Denicotea Deluxe Curling Bruyere Extra


Blog by Dal Stanton

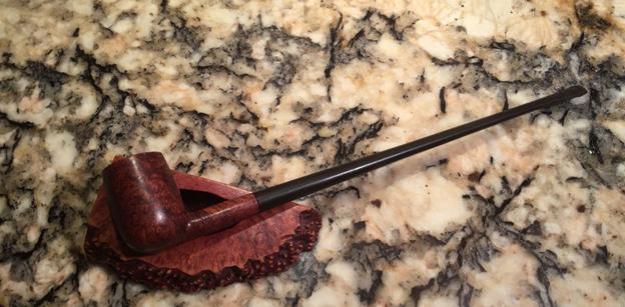
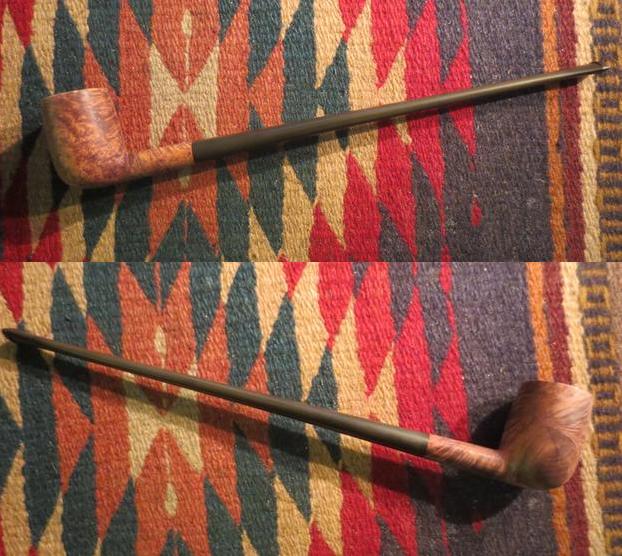
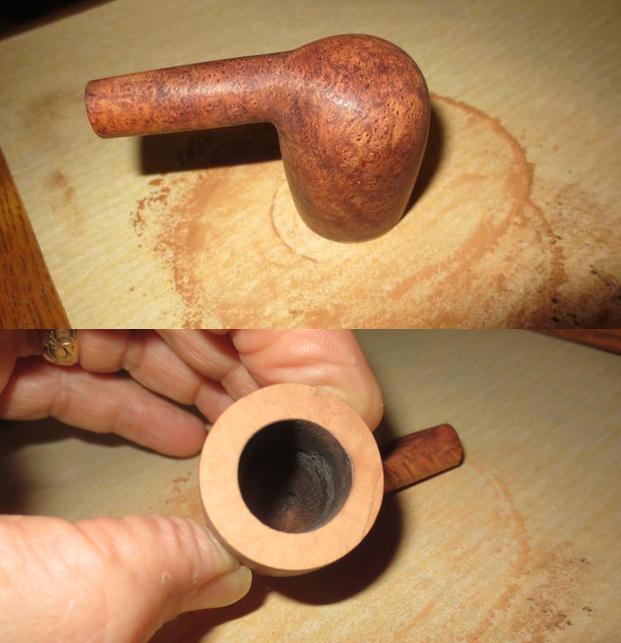
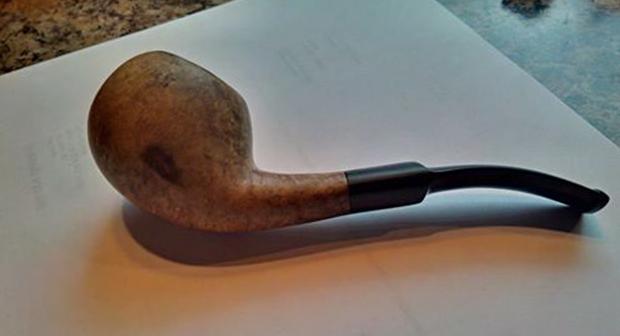
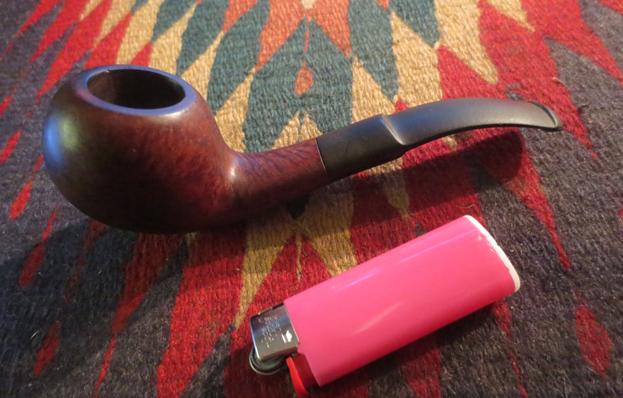
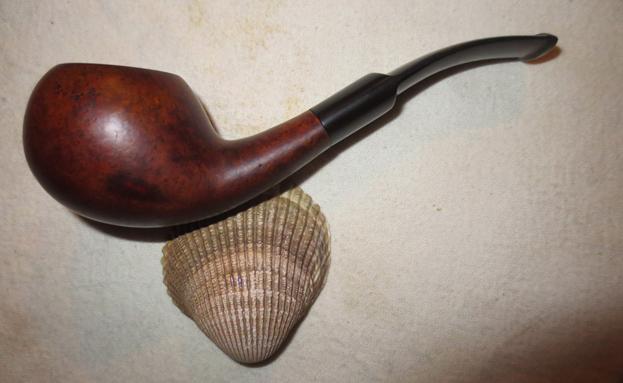
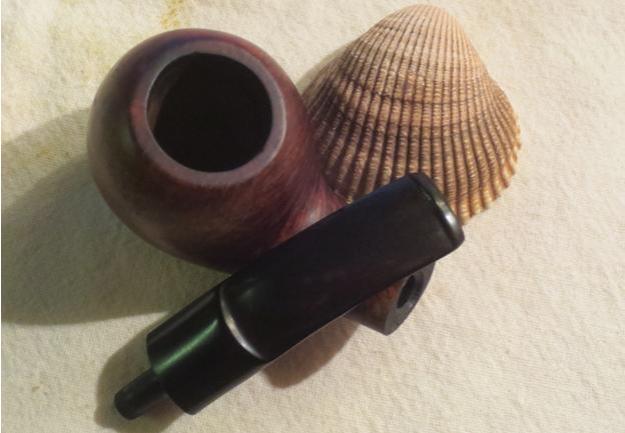
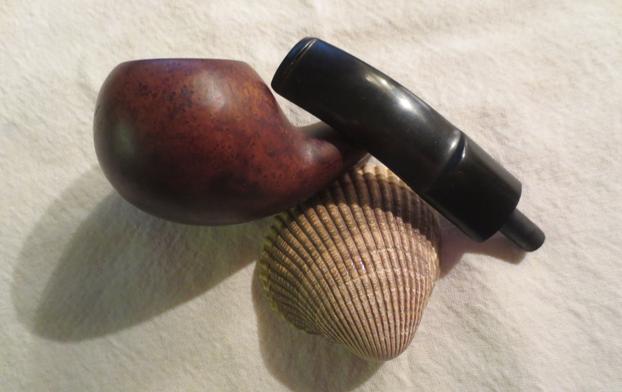
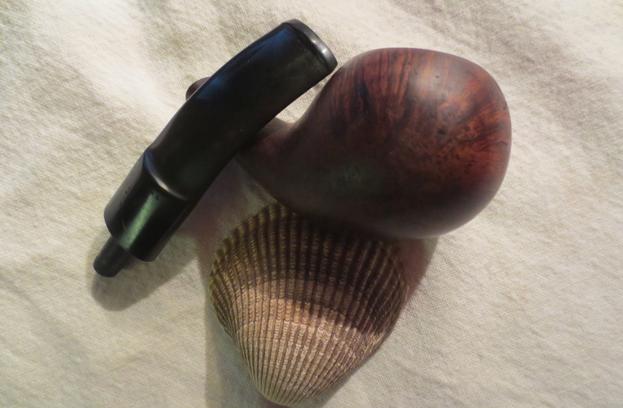
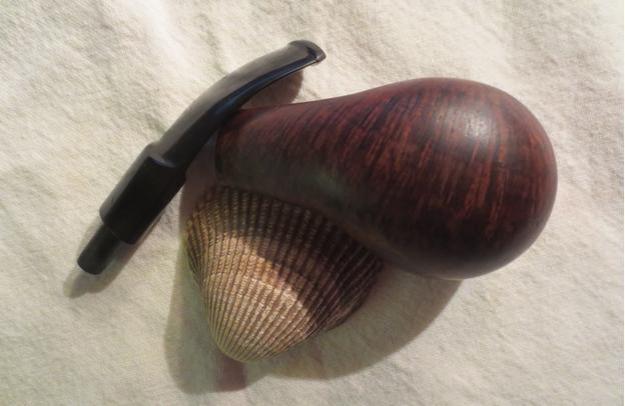
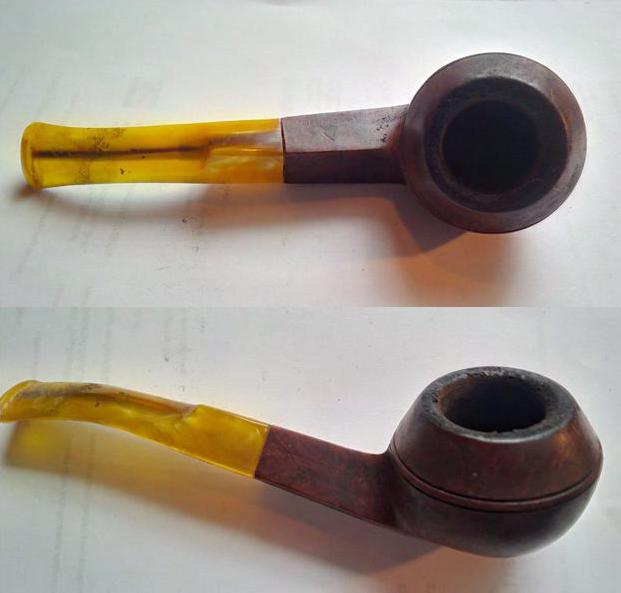
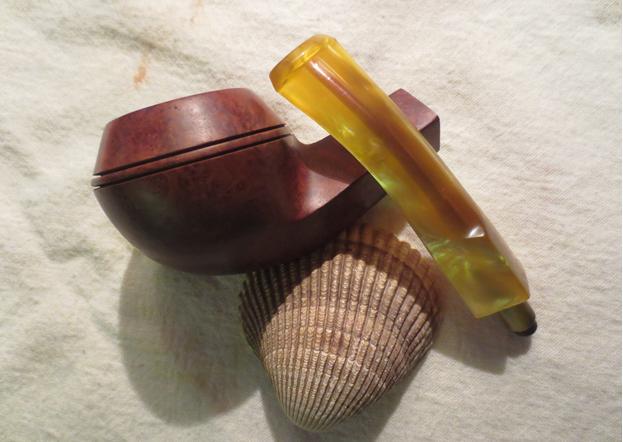
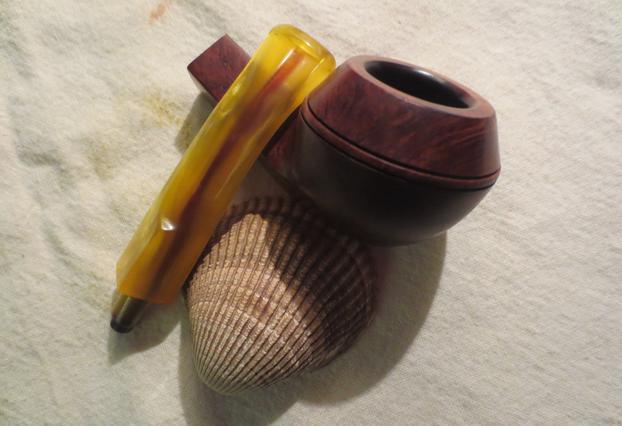
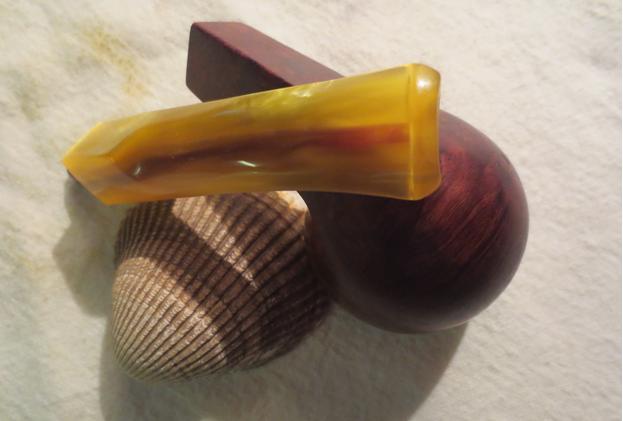
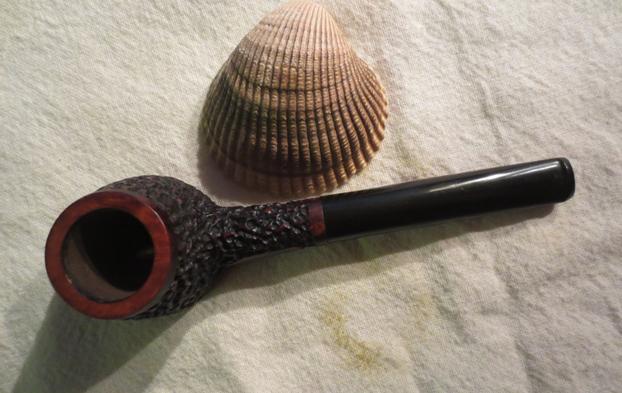
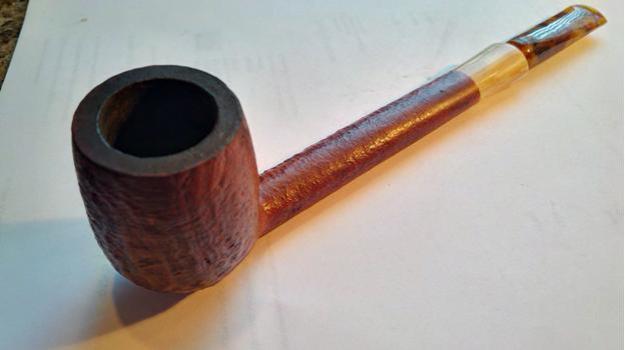
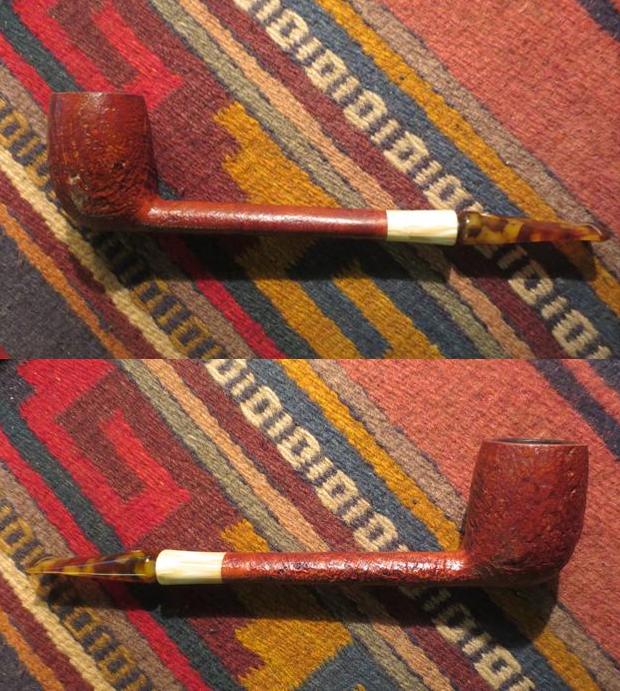
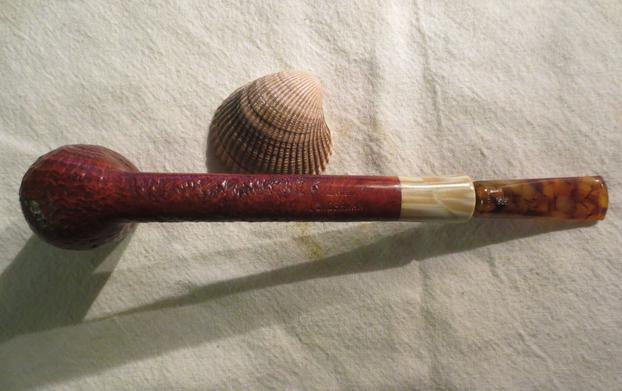
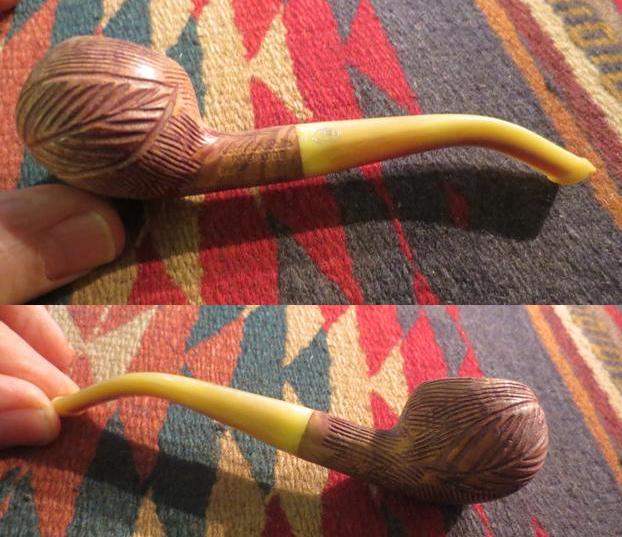
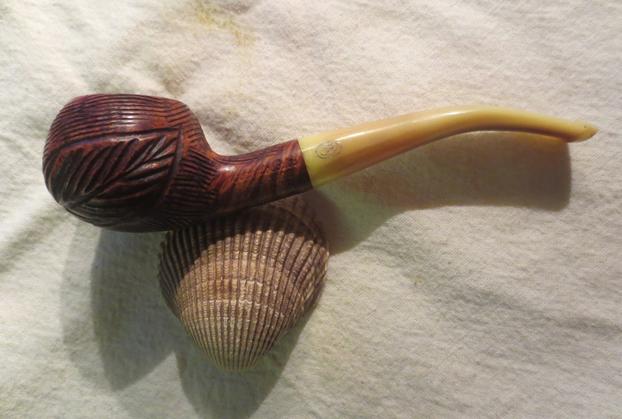
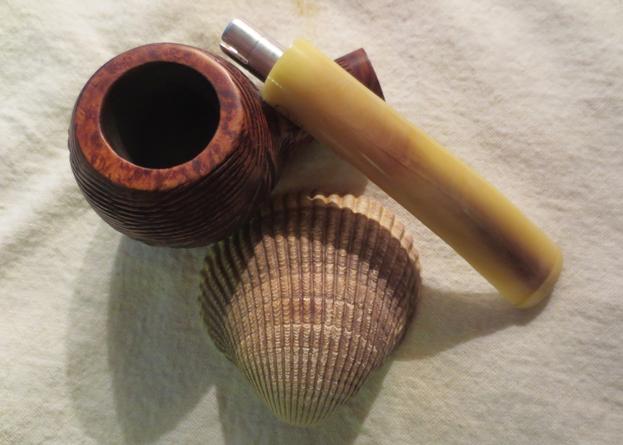
In my last post restoring the Jeantet Fleuron (Link), I mentioned my recent pipe hunting expeditions during our R&R travels in Bulgaria with our daughter and son-in-law visiting from Denver, Colorado.  Jordan, my son-in-law, is a blooming pipe man and was my eager accomplice as we dipped in and out of antique shops we found.  One of those ‘dips’ unfolded in one of the longest inhabited cities in Europe and the world (since 5000BC!) – Plovdiv, Bulgaria, which enabled me to land the Denicotea Deluxe Curling before me now.  Since my field shape identification skills are still in development, when I first saw the pipe in the display case, I thought it was from the Canadian family – the longish shank and the long saddle stem got my attention.  Since the antique shop was situated in Old Towne, Plovdiv, in the shadow of the historic Thracian settlement (to the Romans, they were the ‘Barbarians’) the lady with whom I negotiated was pretty tough – I assume because her overhead expenses were more due to her classic location!  So the deal we struck was not as good as I was hoping, but with new pipe in hand, I took these initial pictures outside the antique shop with ancient cobblestone as a backdrop.de1 de2 de3 de4After just finishing the Jeantet Fleuron and my research zeroing in on French pipe making mecca, Saint Claude, I was anxious to start my work on this Denicotea Deluxe Curling, a name also ‘claimed’ by Saint Claude, according to one of my sources in that research. Here’s where the confusion began.  The source, a pipe shop of Saint Claude, La Pipe Rit, stated on their home page:

On our website, you will find pipes from Saint Claude made by the most famous brands, such as EoleChacomBayard, Butz-ChoquinDenicoteaJeantet and Ropp. The works of Saint Claude’s craftsmen are also present, for example, the unique handmade pipes created by Pierre Morel. You will also discover pipes from all over the world through VauenBig Ben, DunhillL’anatraPetersonPorscheSavinelliStanwellViprati and meerschaum pipes as well.  (La Pipe Rit)

This blurb led me to the assumption that the name Denicotea was claimed by Saint Claude, but when I started my digging on the Denicotea Curling on Pipedia I found, what many of you already know, Denicotea is a German enterprise.  Pipedia says of Denicotea,

Brand founded in 1932 in Cologne, Germany, by Willy Heineberg. Denicotea is actually the name of a silica gel filter, cigarette holders and care products for pipes and cigarette holders. They also introduced the brands Aldo Morelli, Adsorba, Wessex. (Link)

Pipephil confirms this information and adds that pipes were also manufactured by an English third party and marketed under the Denicotea brand. (Link).

So, at this point in my research I’m wondering what the French connection is – assuming that both sources were correct?  I dug a lot (learned a lot too!) looking at Pipedia and other sources seeking to confirm another ‘sighting’ of the name Denicotea in Saint Claude but found none.  The most plausible hypothesis that I was cultivating was that perhaps Willy Heineberg, who was born actually in Metz, France, had connections with Saint Claude before moving across the Rhine River into Germany (Metz and Cologne are relatively close) to establish the Denicotea operation.  I discovered that Willy Heineberg was born a Frenchman (though his surname appears to be of a German-Jewish lineage – see: Link) when I unearthed an interesting letter he wrote on July 31, 1951, to the director of the CIA, General Walter Bedell Smith, seeking help for the rebuilding of a French village raised by the Nazis during WWII – Saint-Die’.  Heineberg references in this letter that he was born in Metz, France, nearby Saint-Die’ and therefore wanted to help his compatriots.  At the time of writing, his letterhead placed him in NYC on 41 Park Avenue – the tobacco business must have been going well! (See the letter here: Link – in the letter he references at least one other tobacco mogul of RJ Reynolds along with other ‘who’s who’ of his day)

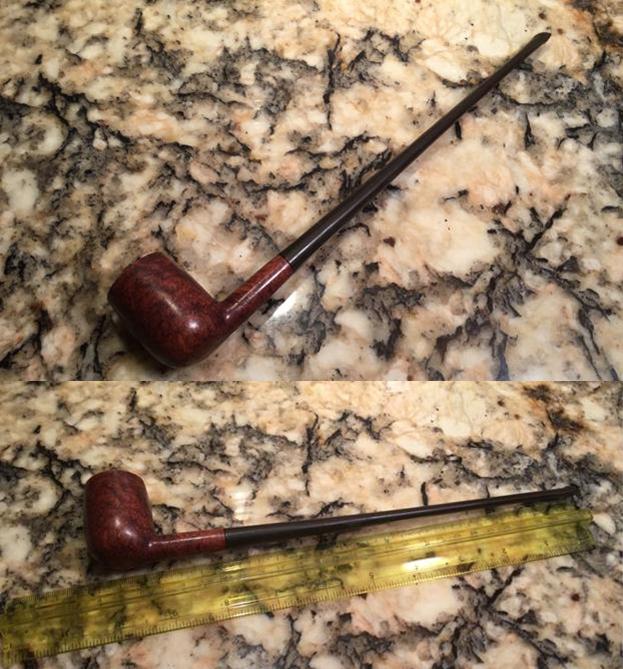
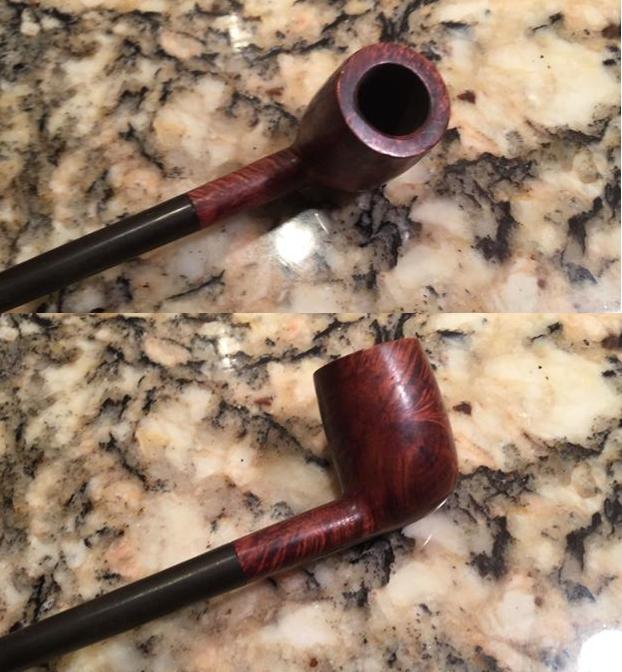
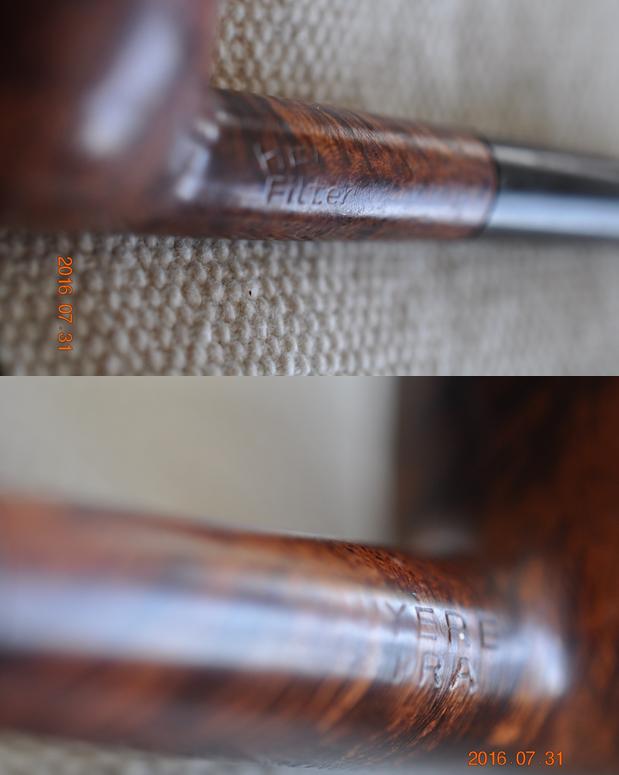
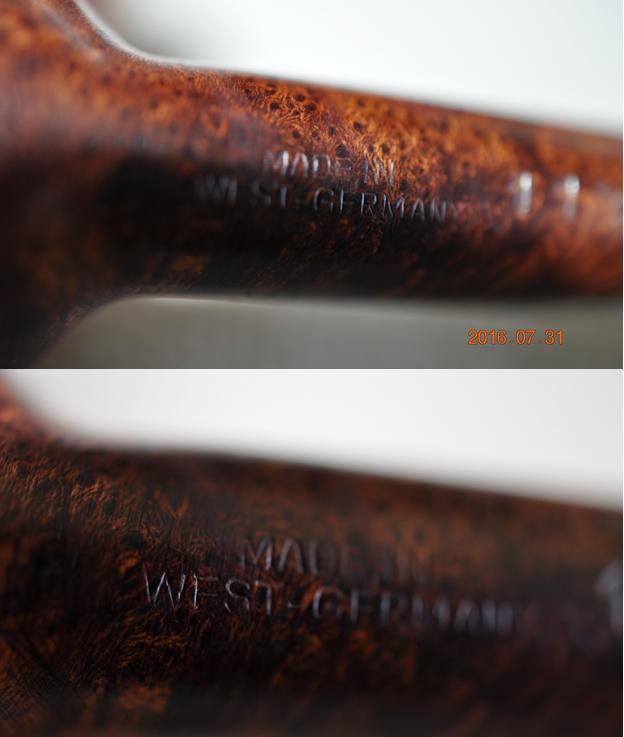
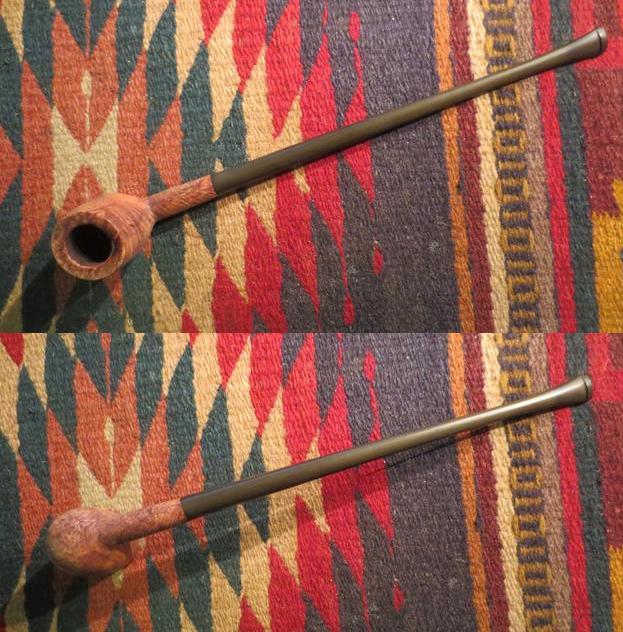
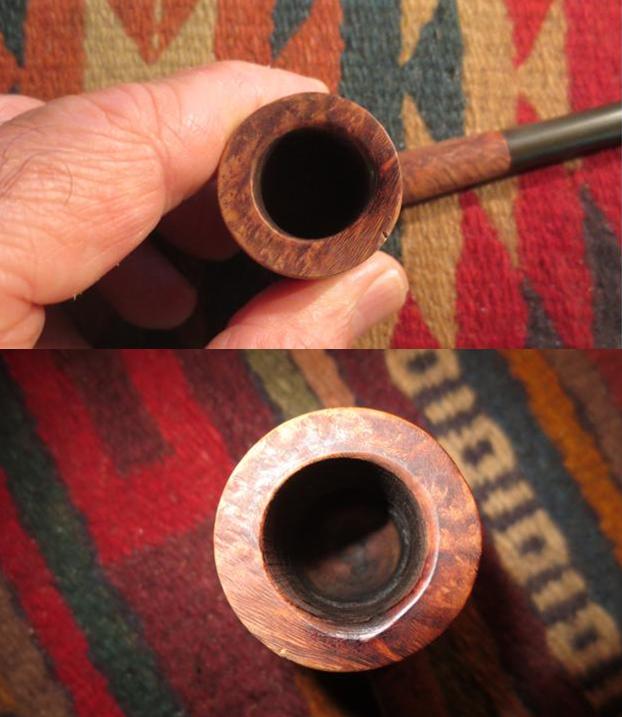
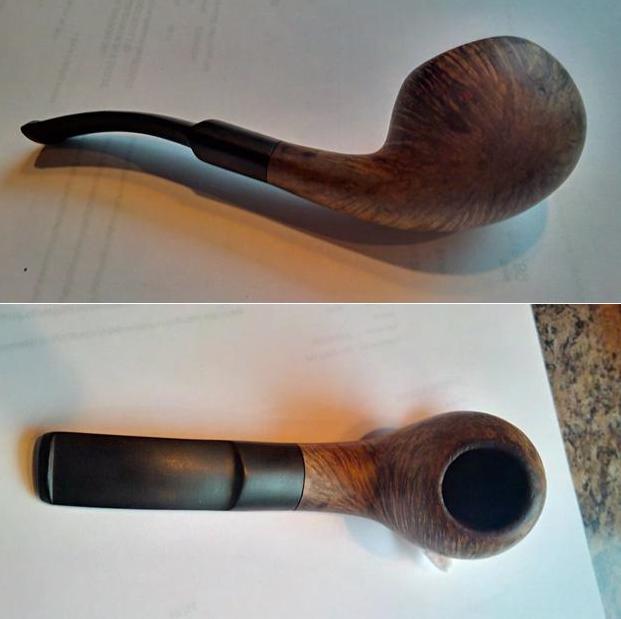
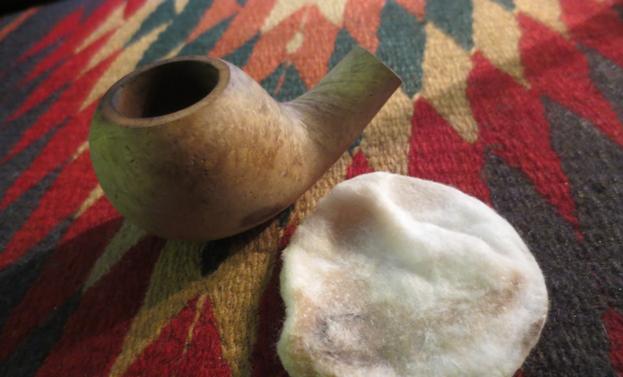
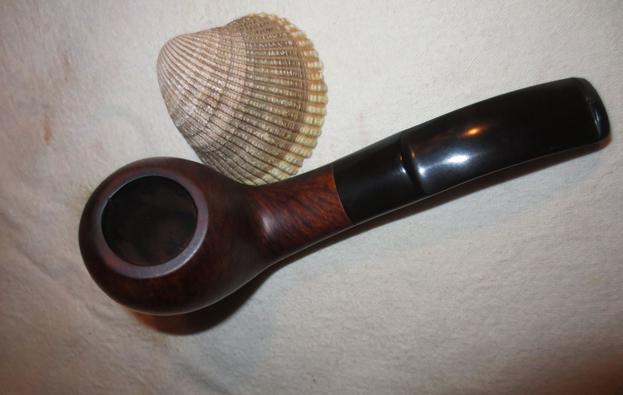
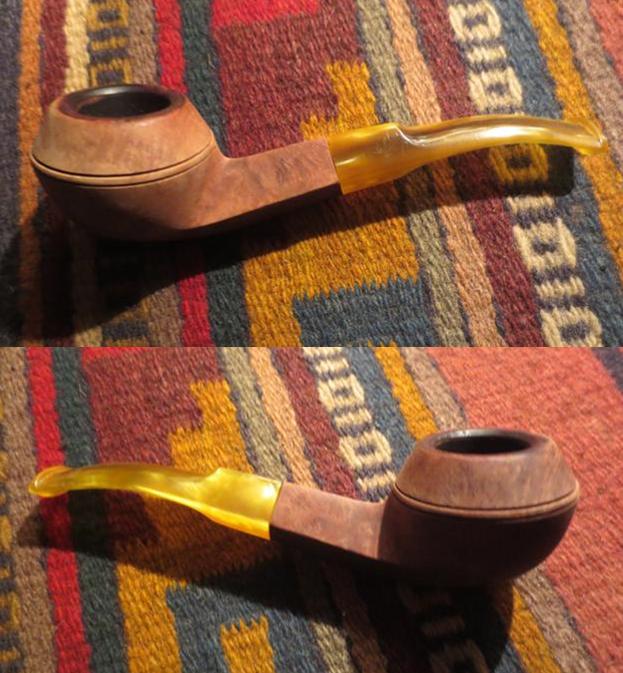
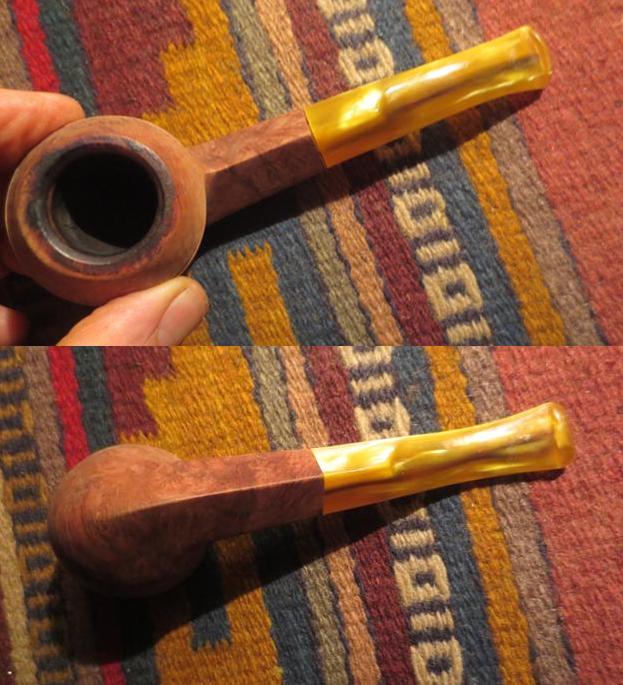
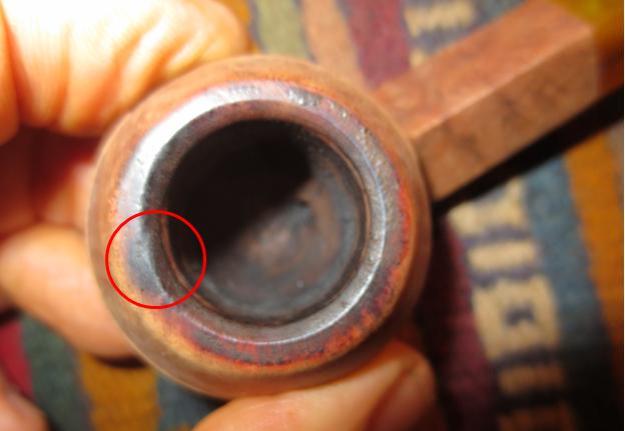
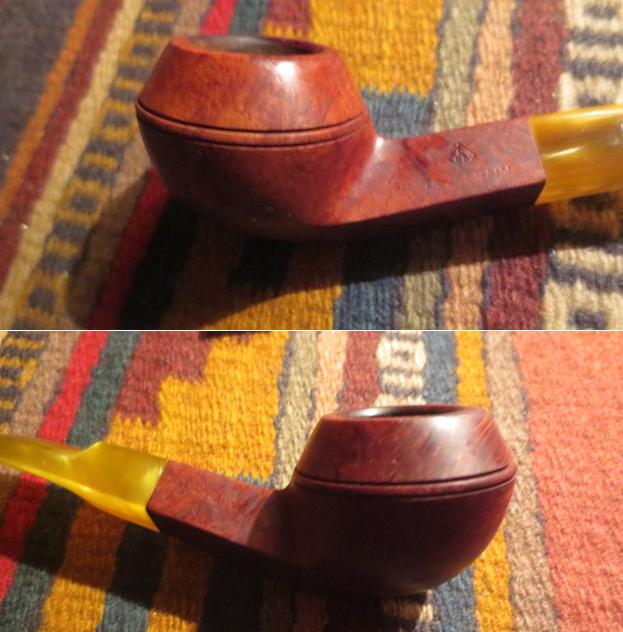
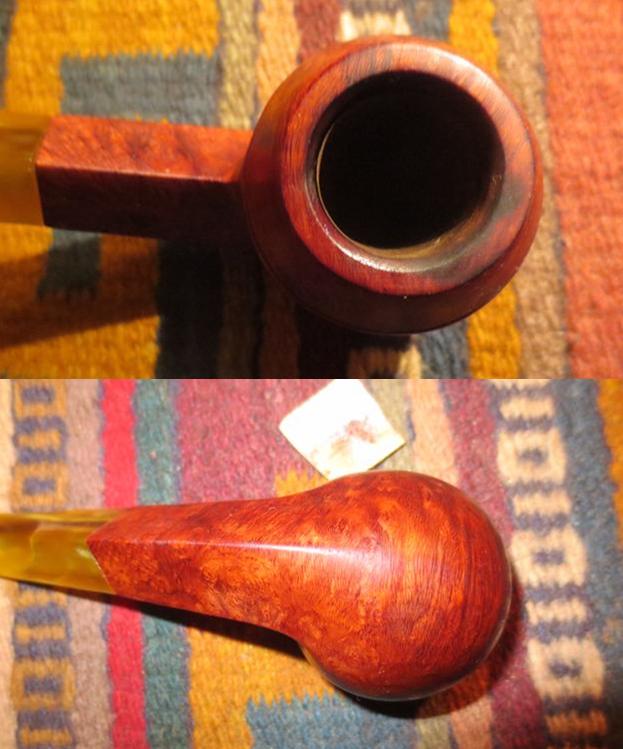
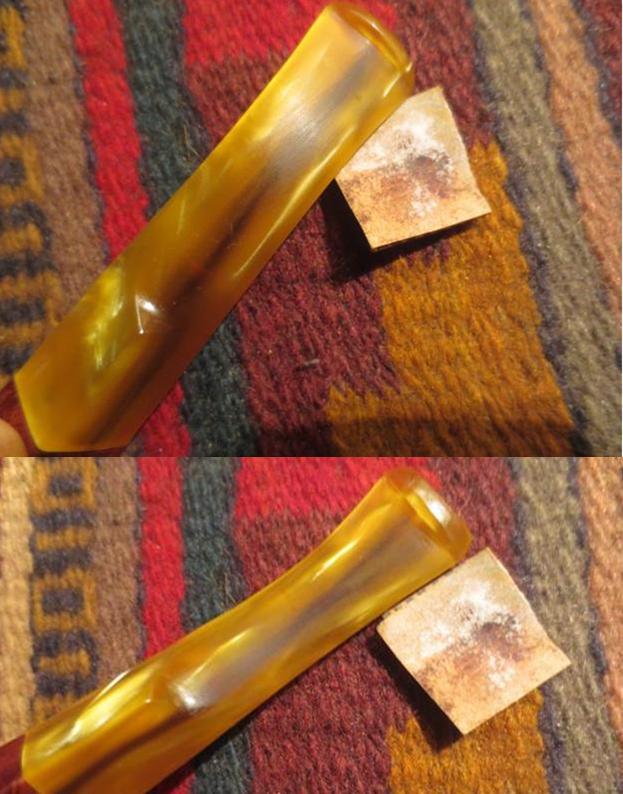
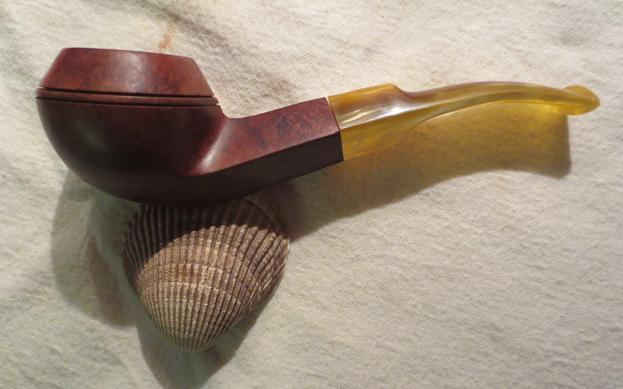
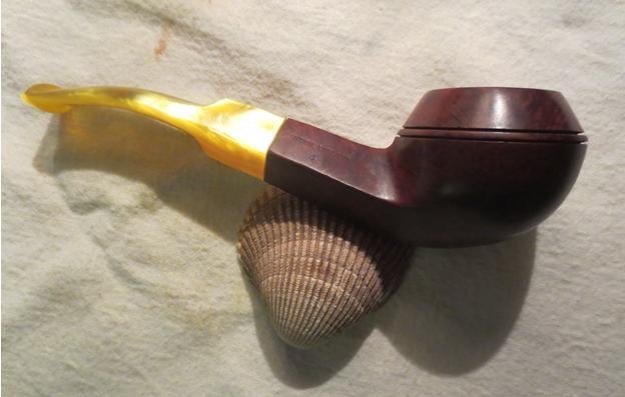
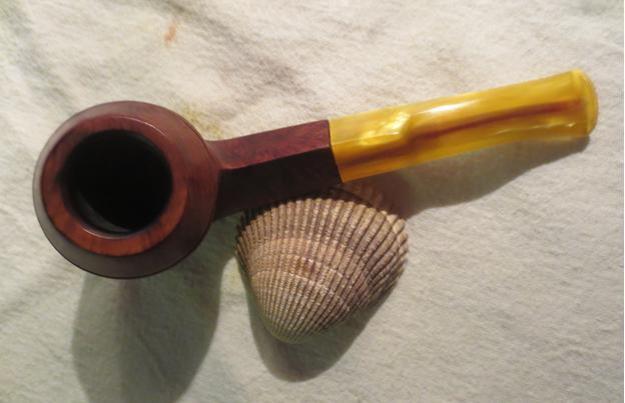
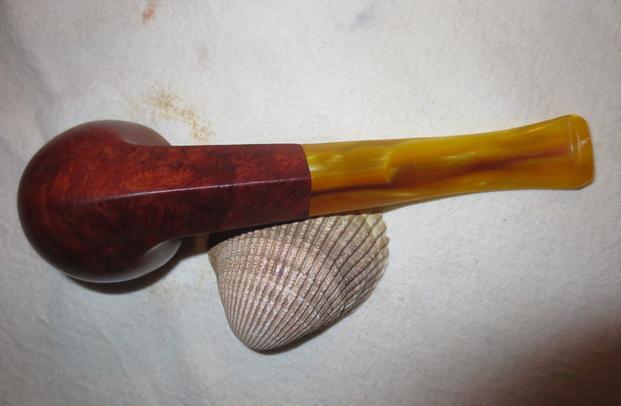
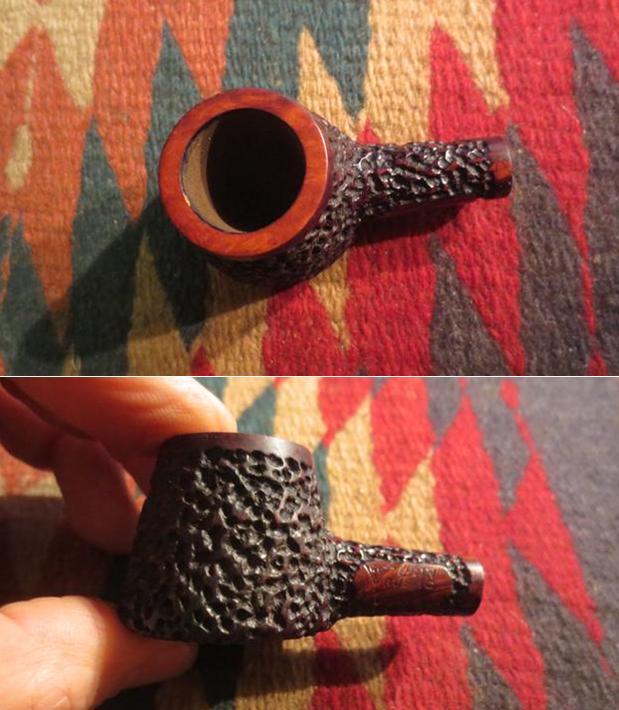
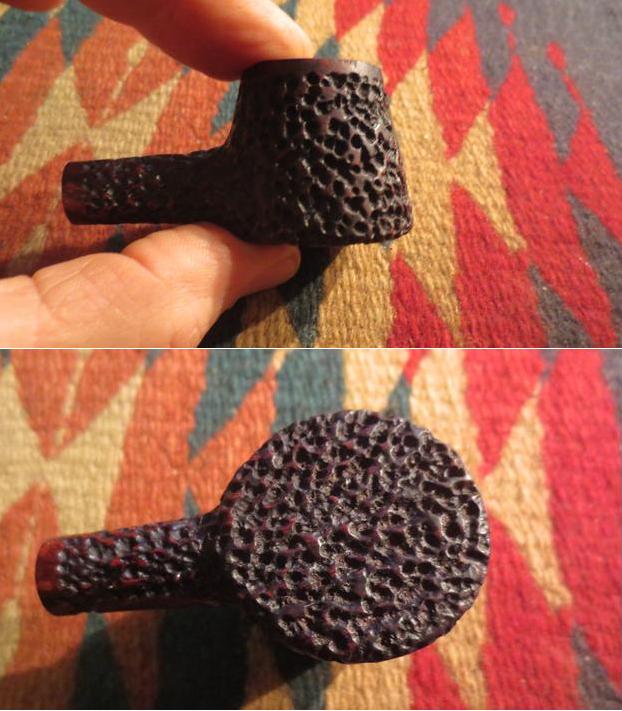
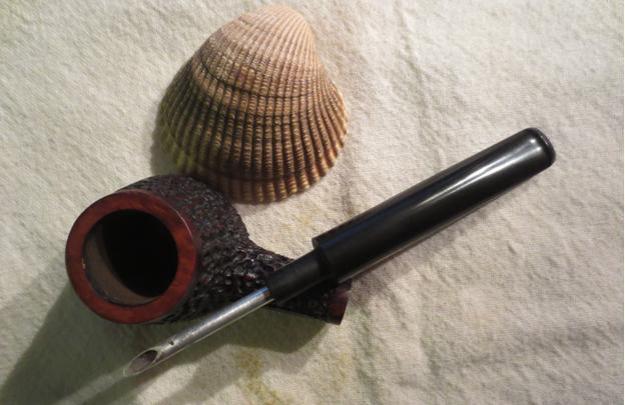
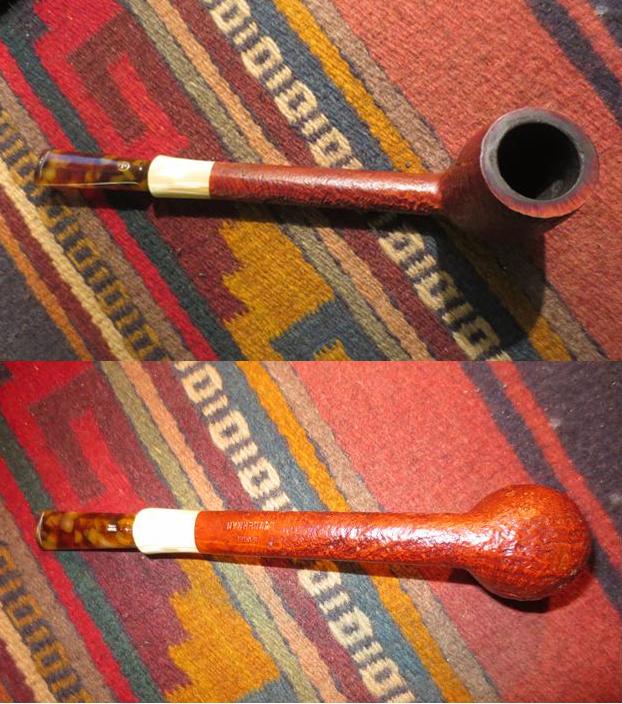
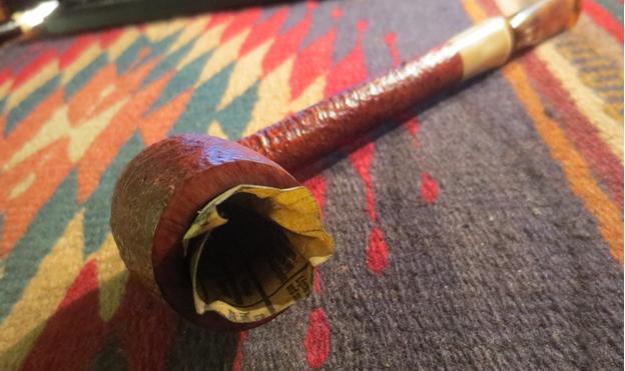
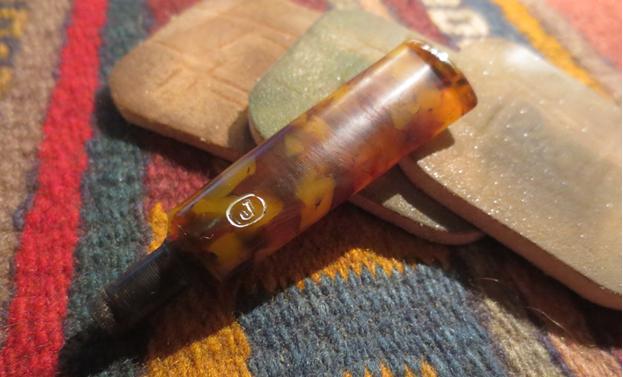
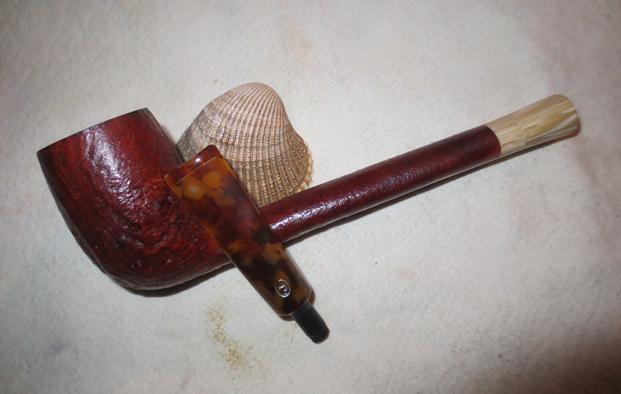
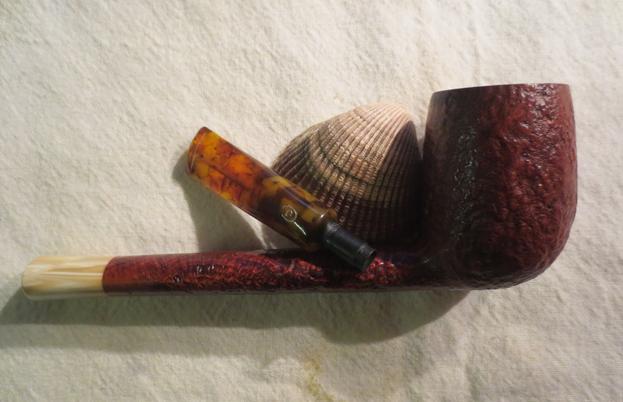
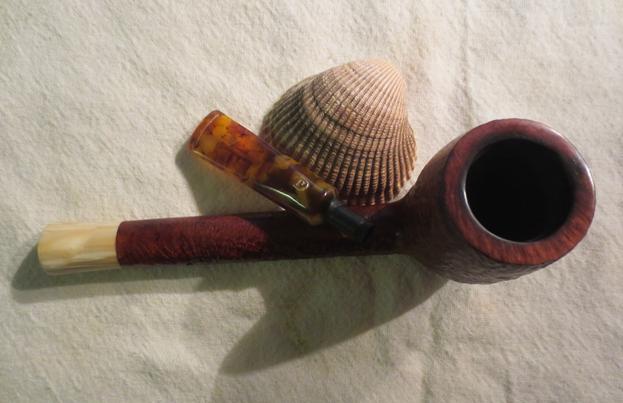
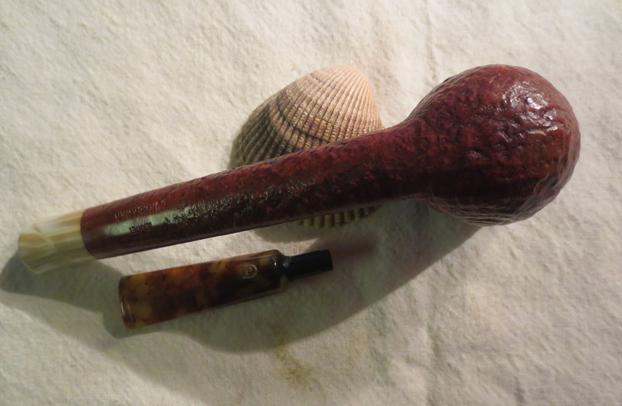
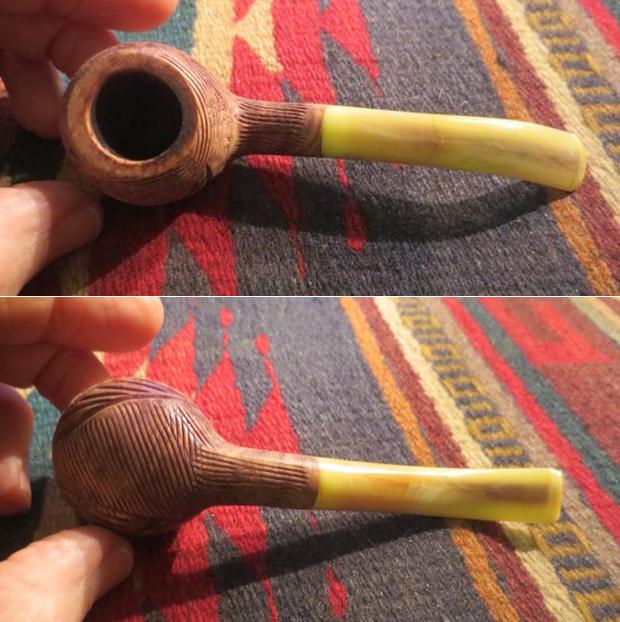
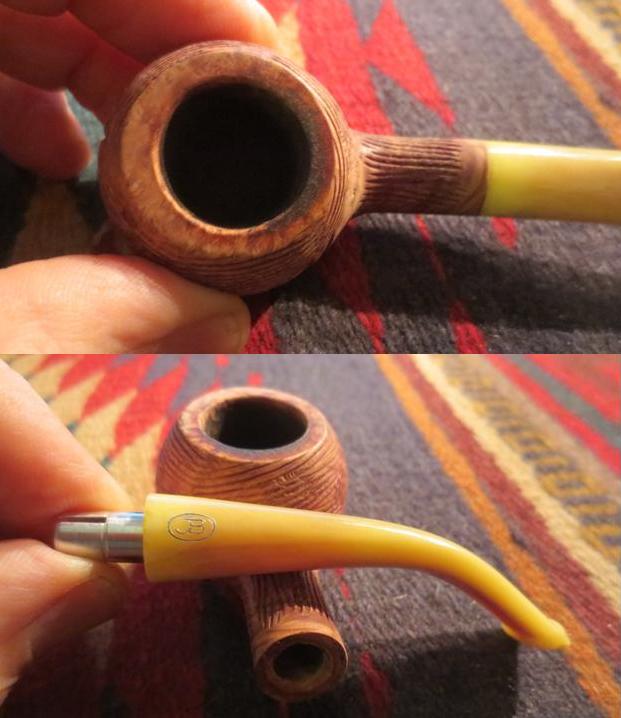
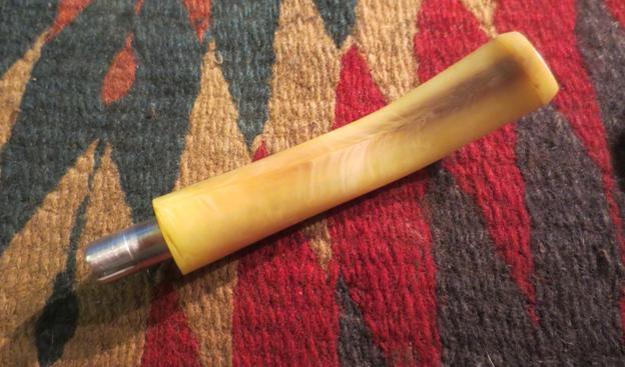
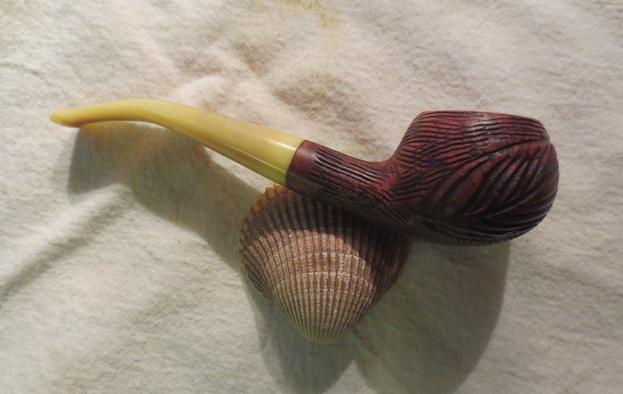
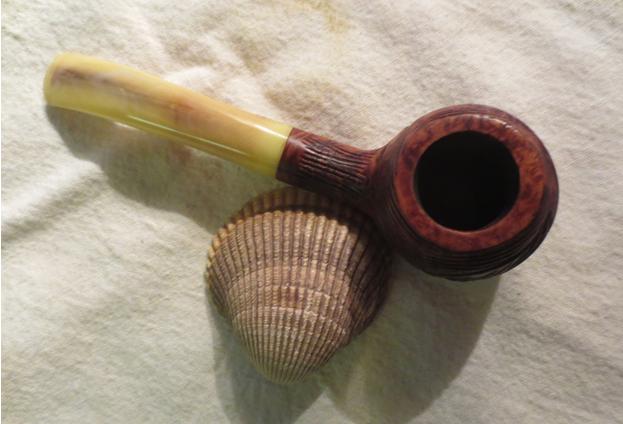
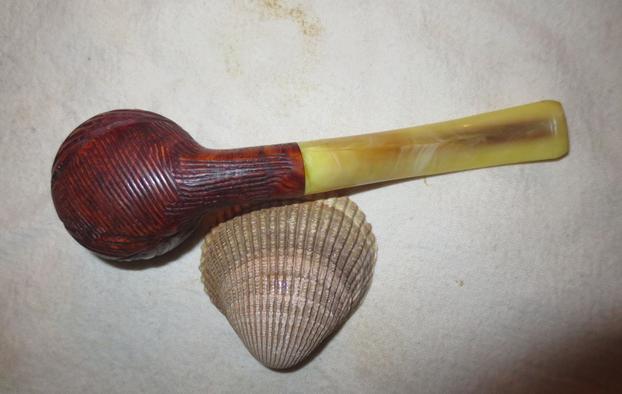
My research on Denicotea pipes was not terribly fruitful – one mostly finds information about their filter and accessory lines of production.  Notwithstanding, I’m looking at this Denicotea, not from Saint-Claude, yet very handsome and I’m attracted to the long saddle stem of this classic billiard – my revised shape identification.  On the left side of the shank is an arched Denicotea over De Luxe.  The right side is Curling over Bruyere Extra.  A shape number is pressed on the bottom of the shank which I believe is 118 or possibly 119 – not sure.  The saddle stem has a very faint, warn stamped D ensconced in a circle.  I hope to bring this fading stamp back from the edge of oblivion with some acrylic paint applied – we’ll see if there’s enough imprint to hold the paint.  The bowl is in good shape with some minor nicks and scrapes on the bottom.  There is some crusty cake build up in the fire chamber and the rim has some nicks and lava flow on it but it appears minor and in good shape.  The stem has significant oxidation but very little tooth chatter to worry about.  I take some additional pictures on my work table after returning home to Sofia.de5 de6 de7 de8de9
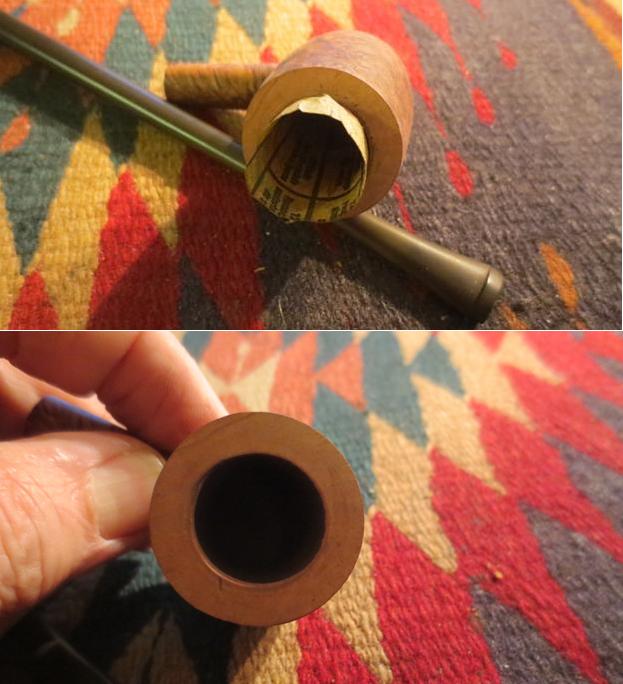
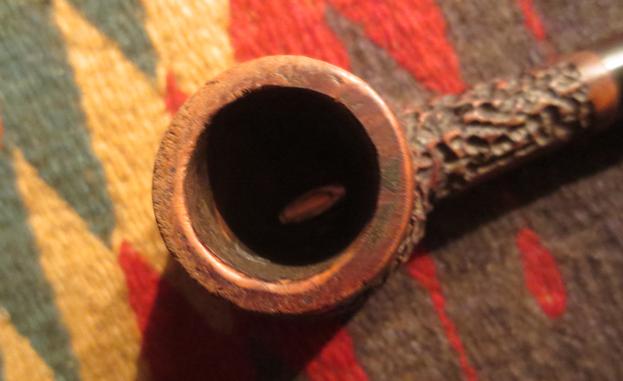
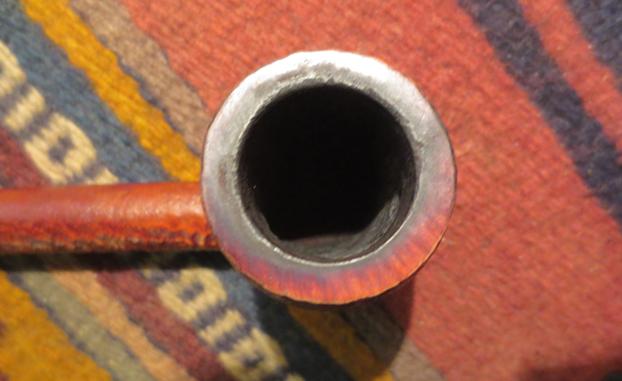
I remove the stem and deliver it to the Oxi-clean bath to begin raising the oxidation from the vulcanite stem.  When I remove the stem and examine the mortise, I’m not sure what I see.  Has the tenon become dislodged from the stem and now unceremoniously implanted in the mortise or does this pipe by design have a vulcanite filter extension coming out of the mortise?  I also see what appears to be an old used filter jammed pretty snuggly in the mortise and I cannot remove it with my fingernails.  I also try to remove it with tweezers and after scraping at it a bit, I discover that what I thought was an old used filter is metal – I haven’t seen anything like this before.  It appears to have an airway slot on the lower portion of the metal ‘insert’. After trying unsuccessfully to pull the metal object out with my fingernails and gently trying to coax it out with my Buck knife, I decide to dip the mortise end in alcohol hopefully to loosen things up. After some careful prying so as to not damage the vulcanite ‘tenon’ in the mortise, what emerged was not anything I was expecting.  I have no idea what kind of internal stinger contraption I’m looking at.  After I clean it up the only thing I can think of is some clever internal stinger system that Denicotea came up with seeking that ever elusive cooler, dryer smoking experience.  I’m still not sure if the tenon has dislodged from the stem and is stuck in the mortise or if what I’m looking at is by design. de10 de11Taking my questions back to the internet, it didn’t take long to figure things out.  Pipephil’s entry for Denicotea (Link) has a picture showing a shape almost identical to the Curling and the mortise has the same vulcanite insert.  When I Googled for images, I saw other Curling styles with the same design.  With one particular entry from eBay, the metal insert I dislodged looks very familiar to the object in the Denicotea advertisement pictured below – it appears to be part of a filtration system which wedges up against an elongated filter of sorts that fits in the broad/long stem.  The very next thought that came to mind was that I hadn’t thought to look into the stem for a filter before dropping it into the Oxy-clean bath!  I’m not sure what I will do with the insert, but it does appear to serve as an air restrictor that would be helpful for use without a filter.  Any feedback on this would be appreciated! de12 de13
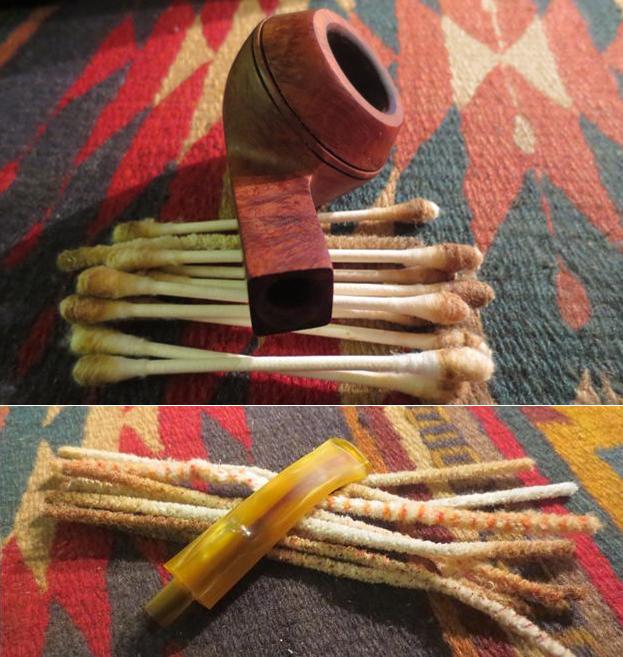
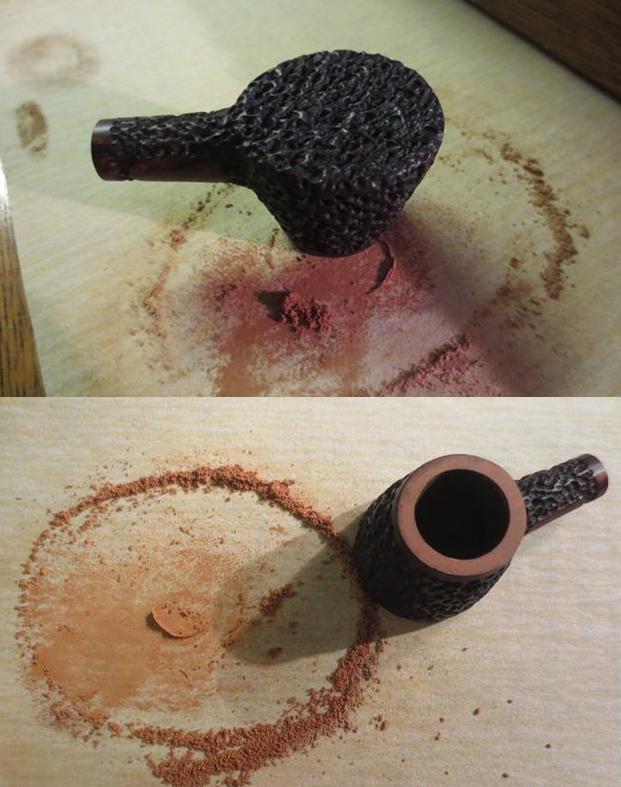
With the object removed, I take my new Savinelli pipe knife to ream the bowl on my 10th floor balcony ‘Man Cave’.  This is where I’m able to smoke my pipes (door sealed) with my wife’s blessings.  With it being a beautiful fall day in Bulgaria, I’m happy to work there.  I can see why Steve enjoys using his Savinelli pipe knife – it takes the cake off very well and allows for a more delicate and selective approach when needed.  After reaming, I use 240 grit paper and clean and smooth the chamber walls further.  I like to work on clean pipes so I take pipe cleaners and Q-tips dipped in isopropyl 95% and go to work on the internals of the stummel.  After several Q-tips the mortise was not coming clean.  With Q-tips I detect an internal ridge inside the mortise created by the vulcanite inserted to the mortise.  I’m thinking that this design is a natural gunk collector which makes cleaning more of an on-going challenge.  I decide to hold off on more Q-tips and try the salt and alcohol technique I’ve read in other blogs (See at DadsPipes).  I use ‘all natural’ non-iodized Himalayan salt that I can find on the store shelves in Bulgaria. Why non-iodized?  I asked Charles Lemon at DadsPipes, why he used kosher salt?  His reply was that it was not ionized – that the ionization could leave an iodine taste when smoking the pipe.  I twist an unraveled cotton ball into the mortise to plug up that end.  I stabilize the stummel on the pipe stand and fill the bowl with salt.  Then I carefully add alcohol 95% to the bowl until I see it emerge at the top layer of salt.  It’s getting late so I let it soak overnight. de14 de15
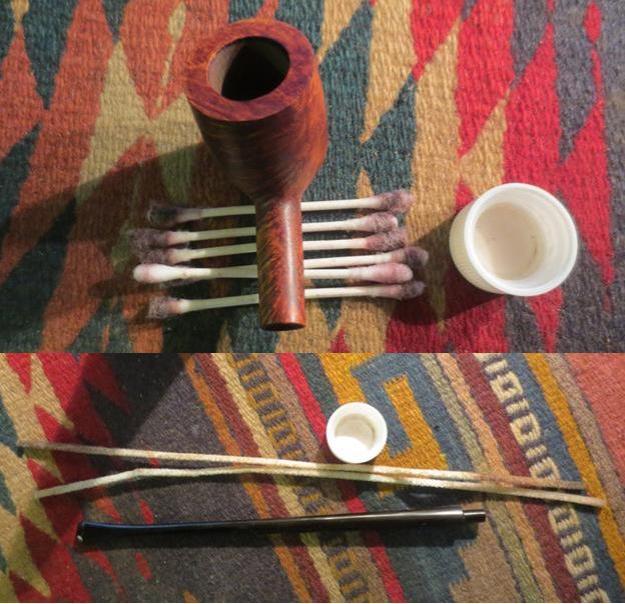
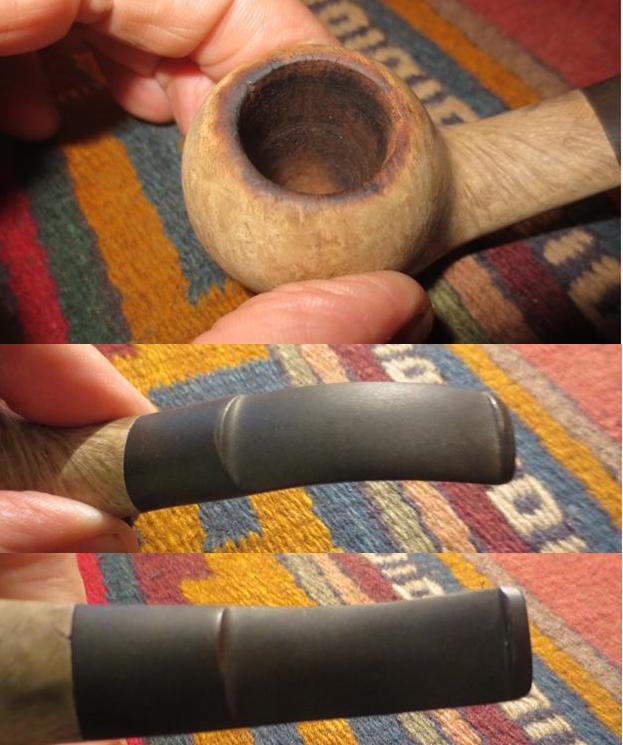
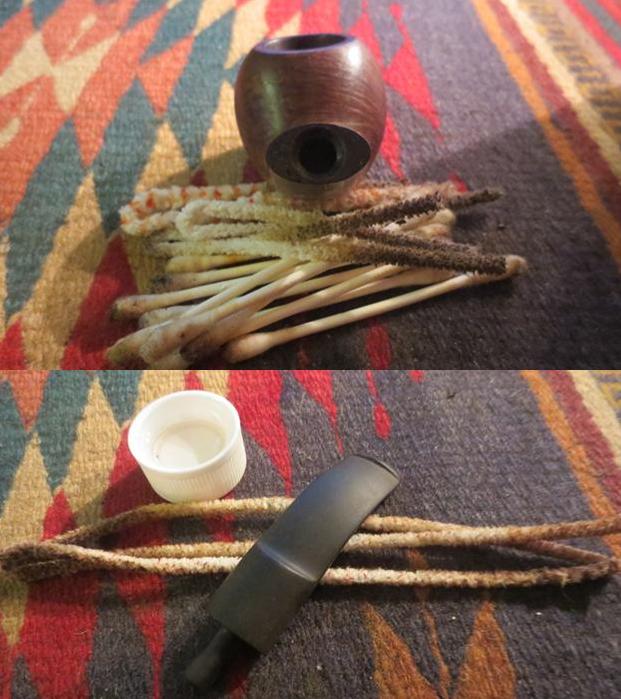
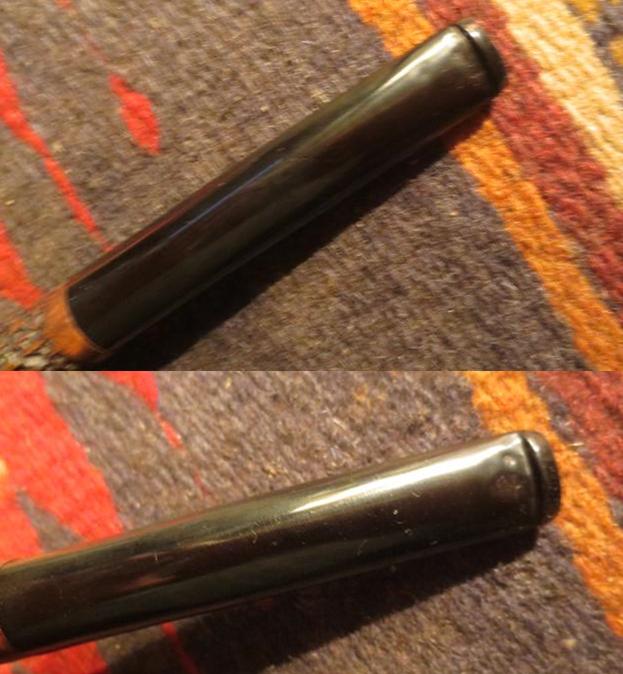
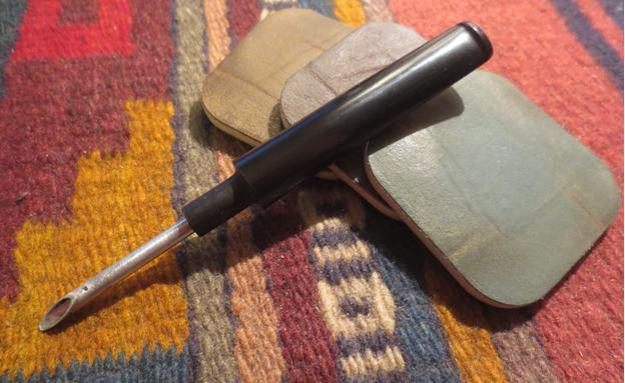
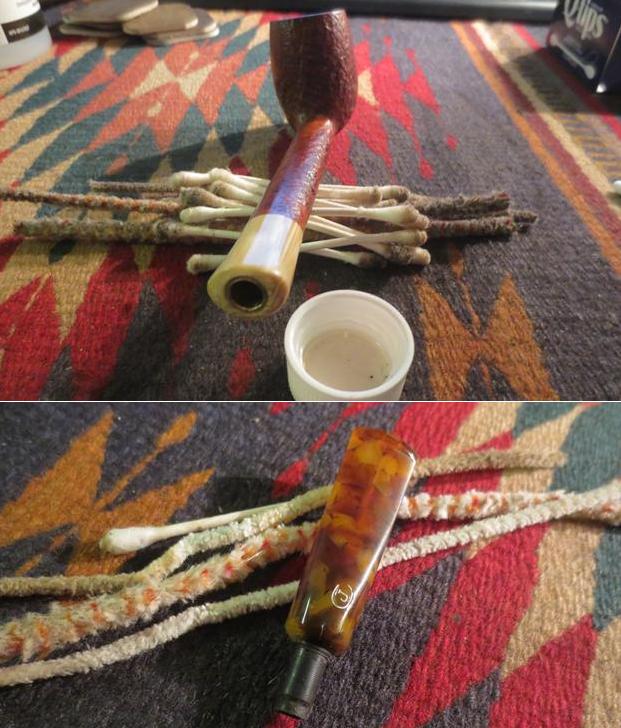
While the salt and alcohol does its thing, I fish the saddle stem out of the Oxy-clean bath.  My first instinct is to look down the throat of the stem to see if a long Denicotea stem filter is lying in wait.  To my chagrin, it is.  I take pictures to commemorate my discovery and then begin to wet sand the stem’s oxidation with 60 grit paper then with 000 steel wool.  I’m careful to avoid the stamped ‘D’ area of the stem, but when I look at the area of the D stamp my concern grows because it looks like the Oxi-clean bath itself caused some further deterioration.  I now realize that I should have covered the area with Vaseline to protect it…. learning one mistake at a time….  The oxidation on the stem has been minimized and I take pictures to show the progress.  Turning to the lodged stem filter, I use a dental probe to pull up on the filter while pushing from the button end with a pipe cleaner.  The surgery is successful and what looks like a charcoal filter emerges from the long saddle stem.  An economic theory starts forming in my mind about Denicotea pipes – could they be designed, produced and exist primarily for the filters Denicotea produces?  It makes economic sense.  A pipe is sold once and its profit is finite.  While filters made for that pipe are a continuous revenue stream.  Could my theory hold water? de16 de17With stem free of old filters, I clean the airway up with Q-tips and pipe cleaners dipped in isopropyl 95%.  After using a few Q-tips I simply rolled large cotton ball pieces to clean the inside of the large stem using tweezers.  It did not take long.de18 de19
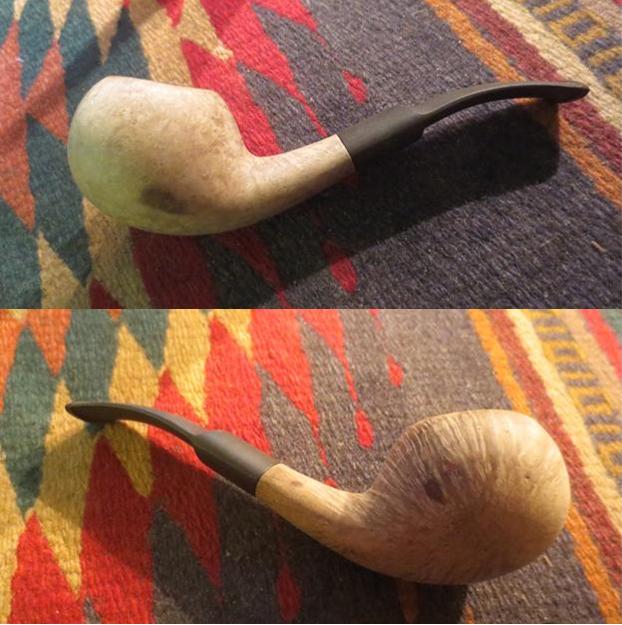
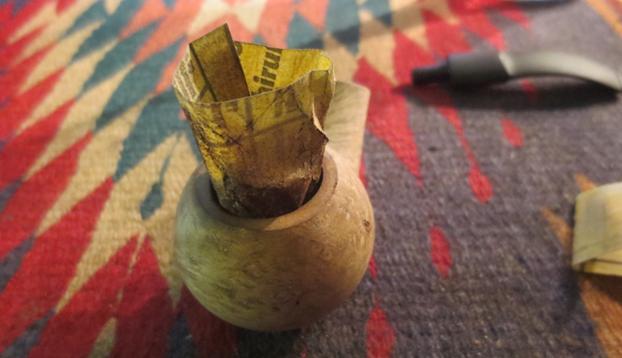
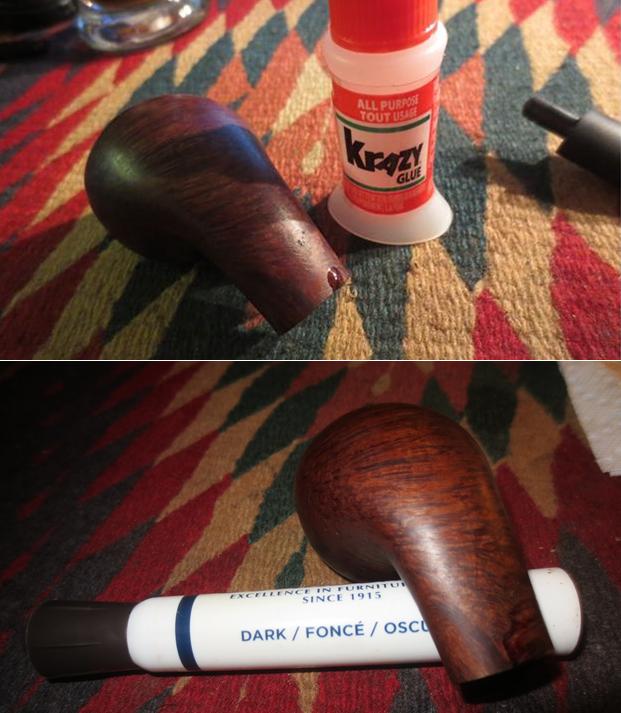
The next day I dump the salt out of the bowl and wipe out the bowl with a paper towel to remove any left-over salt residue.  I returned to the Q-tip therapy to find out if the salt/alcohol soak had an impact on the gunk in the shank.  I discover residue so I expend several more Q-tips but finally get to the bottom of the gunk build-up in the shank and turn to the external bowl clean up.  To clean up the lava flow on the rim and the bowl surface I use Murphy Oil Soap undiluted with a cotton pad.  After the Murphy Oil Soap scrub I rinse the stummel with cool tap water careful not to allow water into the mortise or bowl.  The rim and bowl cleaned up nicely allowing me to see more clearly the wood and problem areas.  The rim has a burn mark just over the shank junction.  It looks like the previous owner drew the flame over the back side of the rim when lighting the tobacco.  I used a brass brush, which will not scratch the briar, with alcohol on that spot to see if it would remove the burn but it did not.  As I work on the burn, I see that it has burned ‘into’ the rim as well and because of this the inner bowl rim is slightly out of round – I need to correct this.  The stummel is showing attractive fire grain and some birds eye – I like the potential.  With a close inspection of the finish, I detect some blotches and what I call ‘candy apple shine’ spots.  The finish is worn.  I decide to remove it to get down to the bare briar.  I use cotton pads with acetone to do the job.  After removing the finish, I cut a slight bevel on the inner rim to regain round and remove the burn damage.  I use 120 grit paper rolled up tightly for the initial bevel followed by 240 then 600 to smooth it. I take pictures to show the progress, and yes, the picture below is ‘Acetone’ in Cyrillic!de20 de21 de22 de23
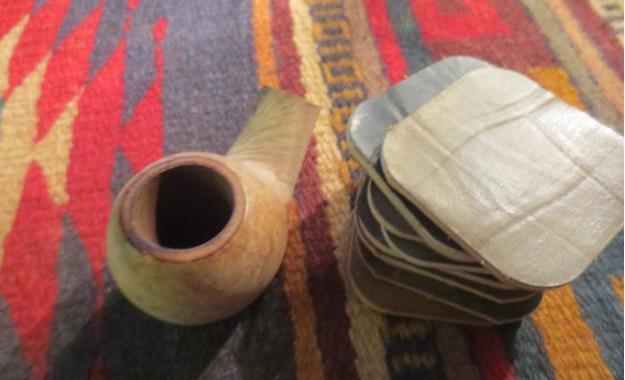
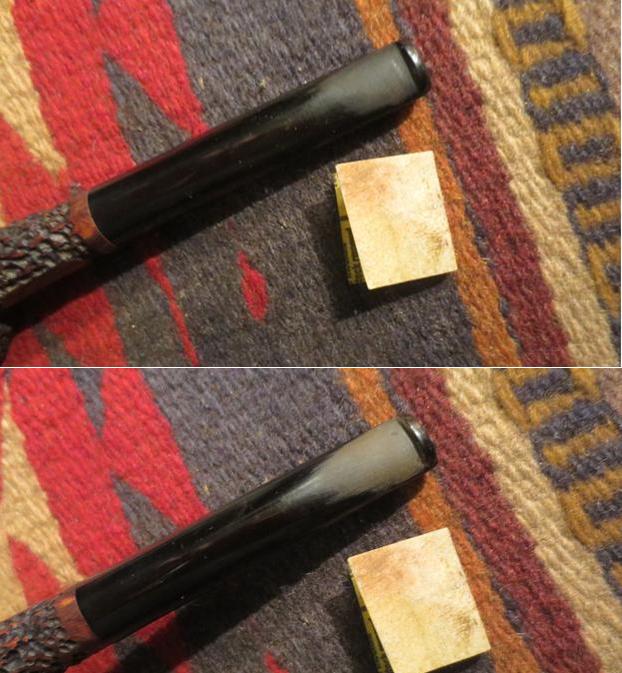
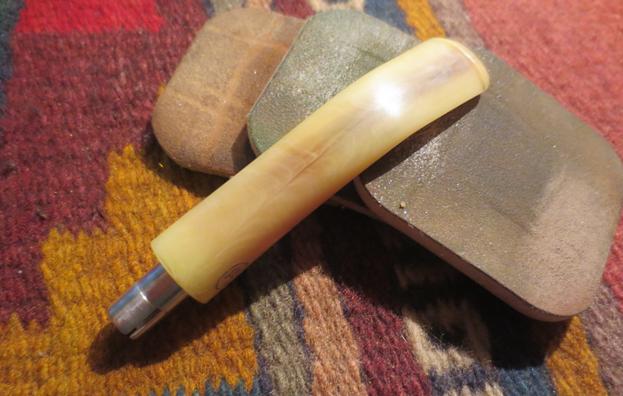
To remove the light nicks and cuts on the stummel I use a medium grade sanding sponge and follow with a fine grade sanding sponge.  I then take a cotton pad with alcohol and wipe down the stummel to clean it from the sponge sanding residue.  I do this to take a closer look at the surface for fills or blemishes that need attention before I move on to the micro-mesh sanding.  I do find some pitting on the surface that I address with sanding sponges directly. I rejoin stummel and stem to assess the progress.  After taking a close up look at the stem after purging the oxidation with an Oxi-clean bath and sanding, I see no teeth chatter that needs to be addressed.  I also take another look at the Denicotea circle-D stamp on the stem to see if it can be salvaged.  Unfortunately, only the right portion of the circle is barely viable along with a very faint D.  Applying acrylic paint would only highlight the fact that it’s not all there, so I decide to finish the stem trying to salvage the remnant stamp as is.de24 de25 de26
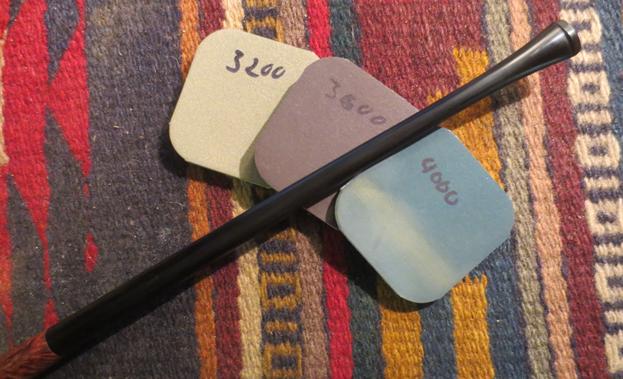
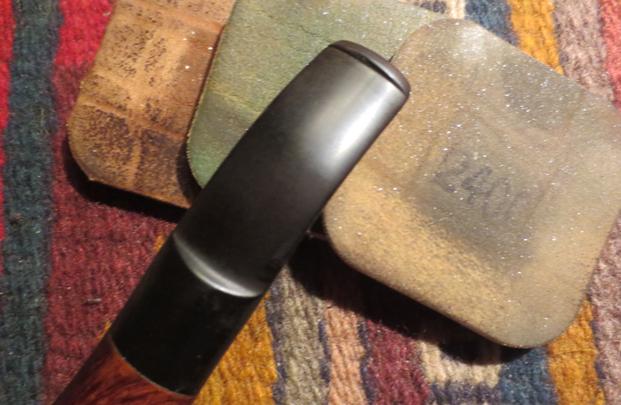
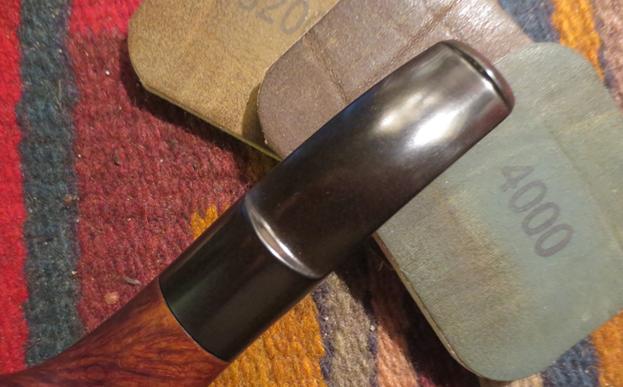
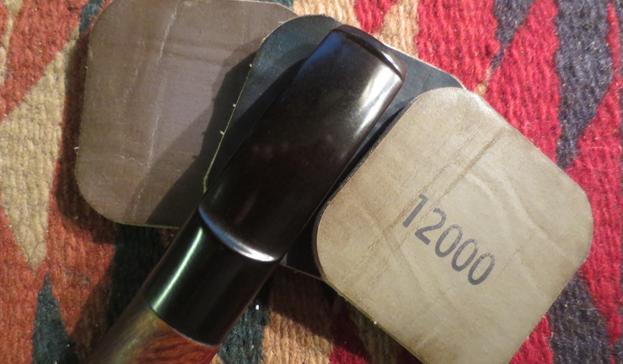
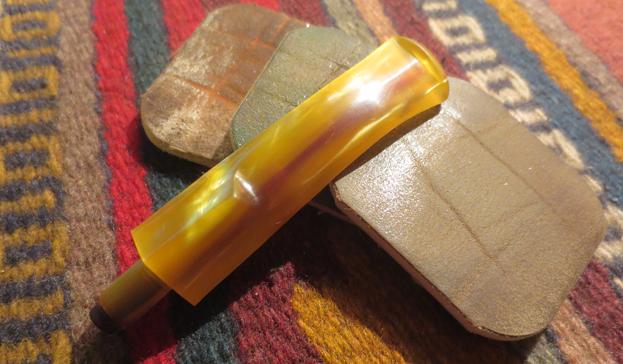
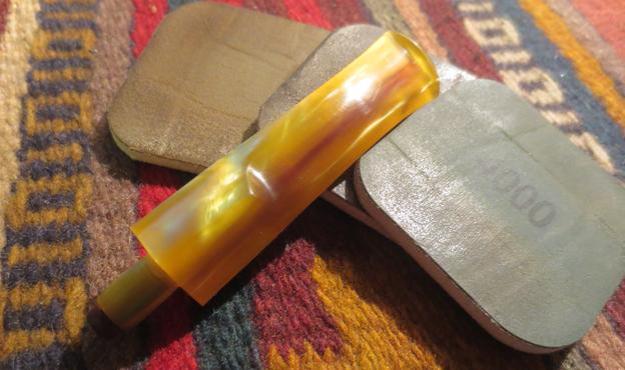
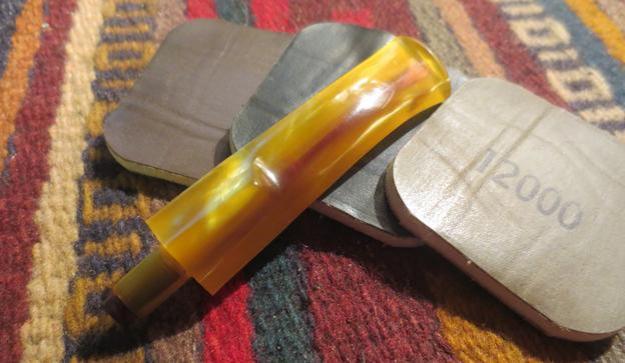
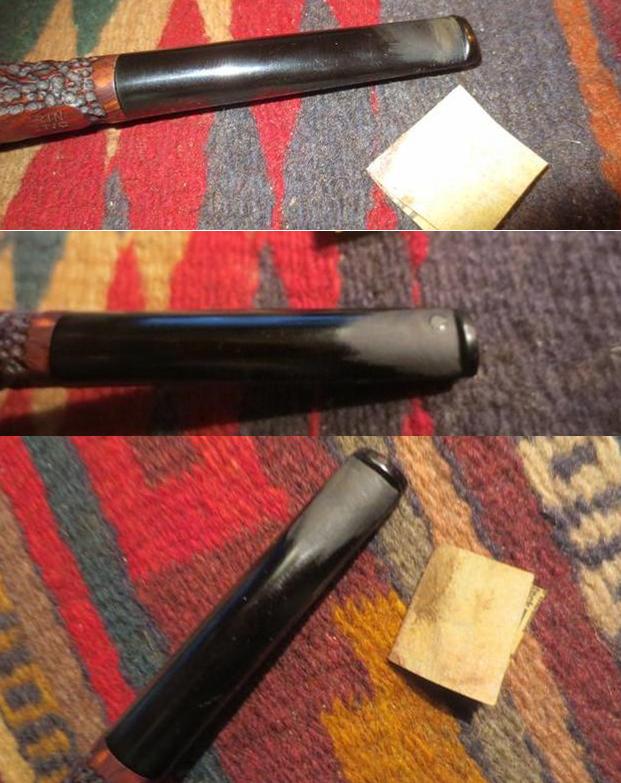
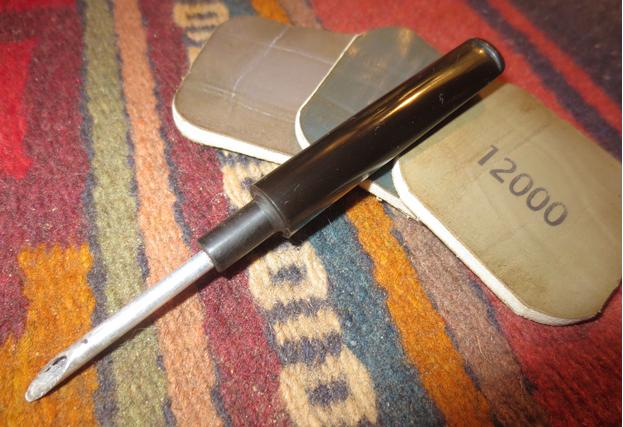
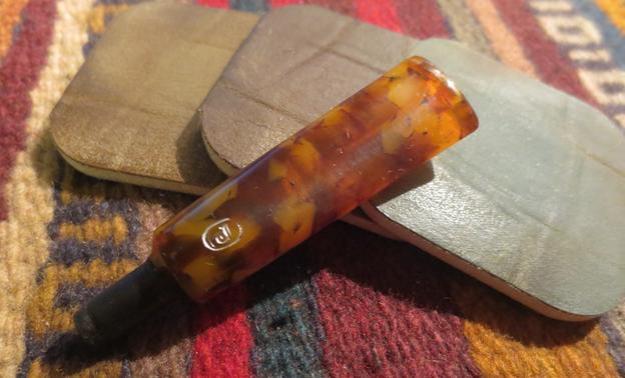
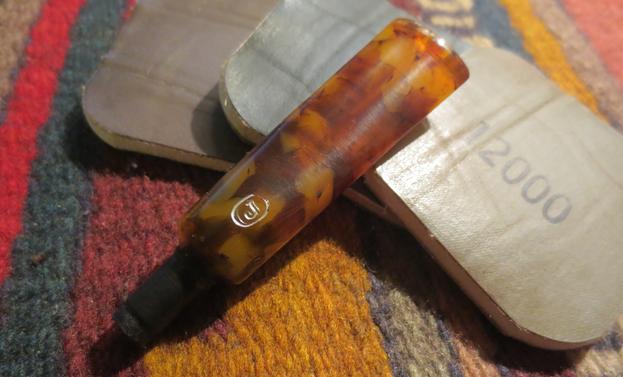
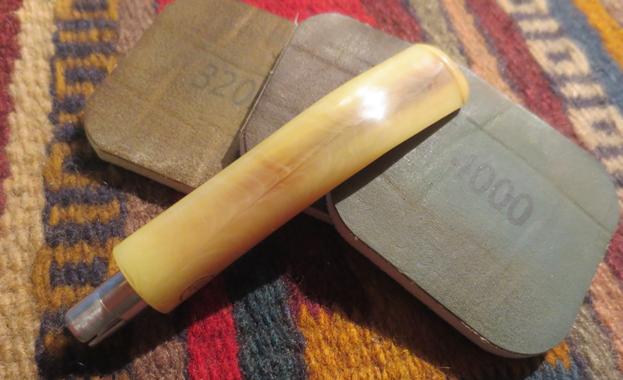
Using micro-mesh pads 1500-2400, I wet sand the stem attached to the stummel and follow by applying Obsidian Oil. With pads 3200 to 4000, then 6000 to 12000, I dry sand the stem and apply Obsidian Oil after each set of 3.  I never tire watching the shine make an appearance during the micromesh process!  I take pictures to show the progress and set the stem aside to dry.de27 de28 de29
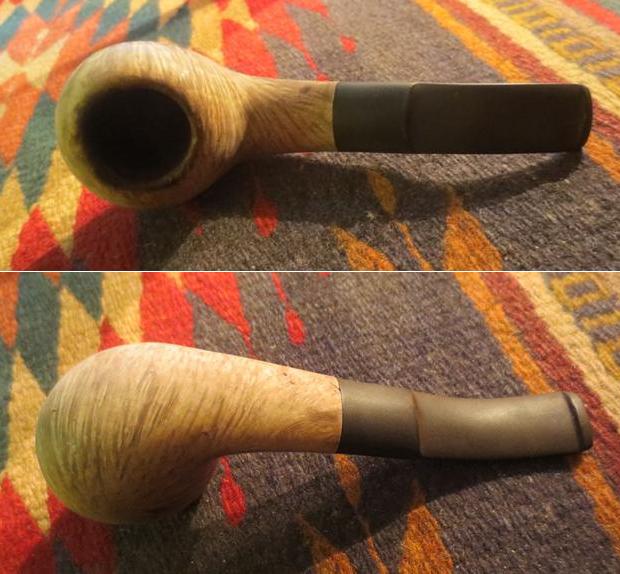
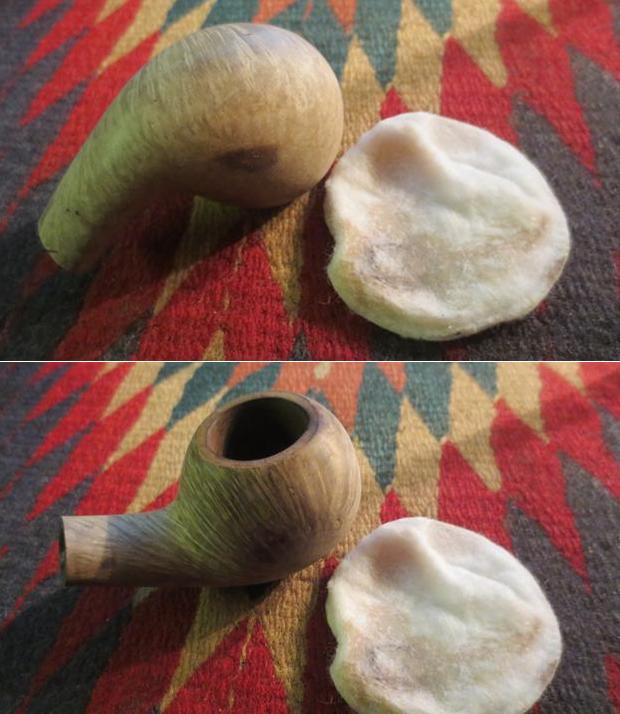
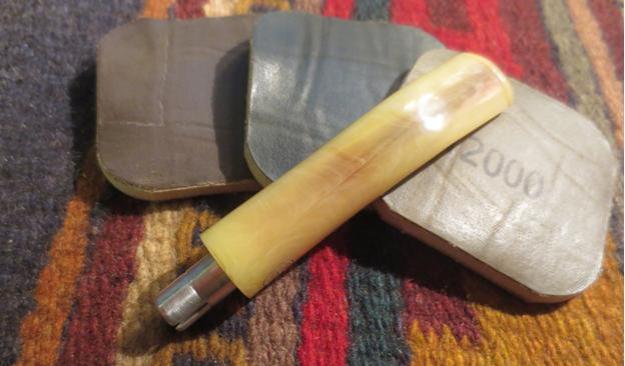
Turning to the bowl, I begin preparing the surface finish by wet sanding using micromesh pads 1500 to 2400 followed by dry sanding with micromesh pads 3200-4000 and 6000-12000.  I’m liking very much the briar’s grain movement on this bowl.  I document the progress at each step.de30 de31 de32
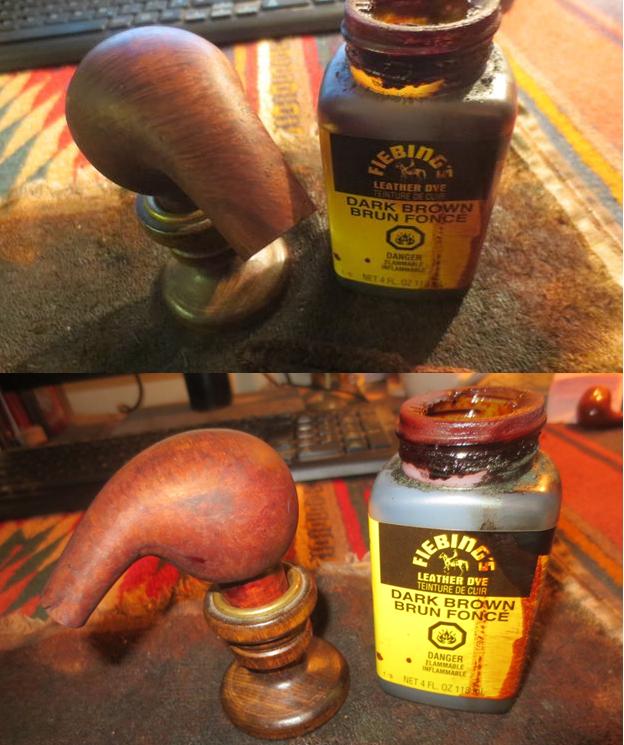
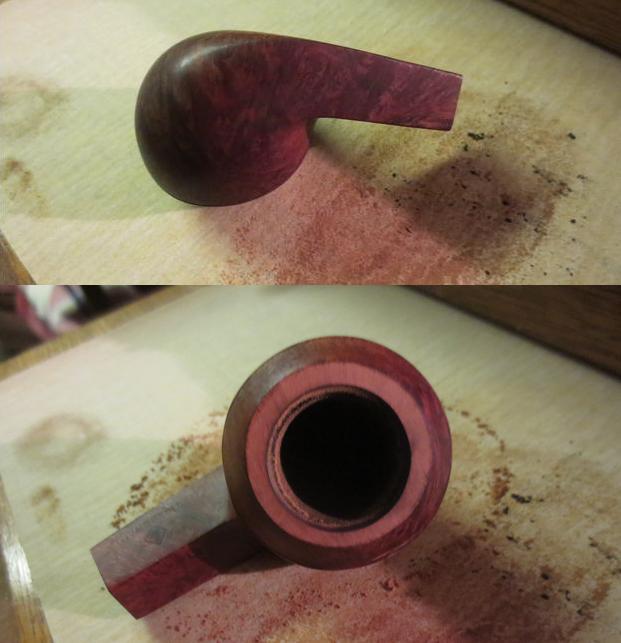
I started this restoration with the idea of experimenting with a staining technique I read in one of Steve’s restores – I’m not sure which one as I’ve read so many!  He used a black dye followed by a rub down with alcohol.  The purpose was to set the dark hue in the veins of the grain and then lighten the backdrop briar – Steve didn’t describe it quite like this but this is what recorded in my memory!  He then followed with another die hue to cast the contrast. I would like to try the same by first setting the dark hue with a dark walnut Italian aniline stain I found here.  I will follow this with a new arrival with my daughter and son-in-law from the States, Fiebing’s Oxblood Leather Dye.  I’m looking for the rich, deep reddish, burgundy hues in the briar that hopefully is subtle – I like this classic look even though it would be a total change in the color scheme of this Denicotea billiard, I hope it will dress it up nicely.  I give the stummel a quick wipe down with a cotton pad and alcohol to rid the surface of any possible residue leftover from the micromesh sanding.  I mount the inverted corked stummel on the candle stick holder and decide to try another technique I read recently from one of Steve’s postings of warming the briar first before applying the stain.  I do this with an air gun then, after putting on throw-away poly vinyl gloves, with a cotton dauber I apply the dark walnut dye generously to the inverted bottom and allow the die to saturate the stummel. I pick up the candle stick and rotate the stummel and make sure I daub die into the inverted rim.  After the surface is adequately covered I ‘flame’ the surface by lighting the wet dye with a butane lighter.  The alcohol in the die burns off very quickly to set the hue in the briar. I follow by wiping the stummel surface with alcohol and cotton pads to lighten and blend the initial dark walnut stain.  I repeat the process with Fiebing’s Oxblood Leather Dye diluted about ¼ with alcohol.  I complete the second application by flaming the dye which sets the oxblood over the dark walnut hue in the briar.  After taking pictures to show progress, I put the stummel aside allowing the stain to rest overnight.  I look forward to seeing how my experiment turns out when I return to the project tomorrow!de33 de34 de35
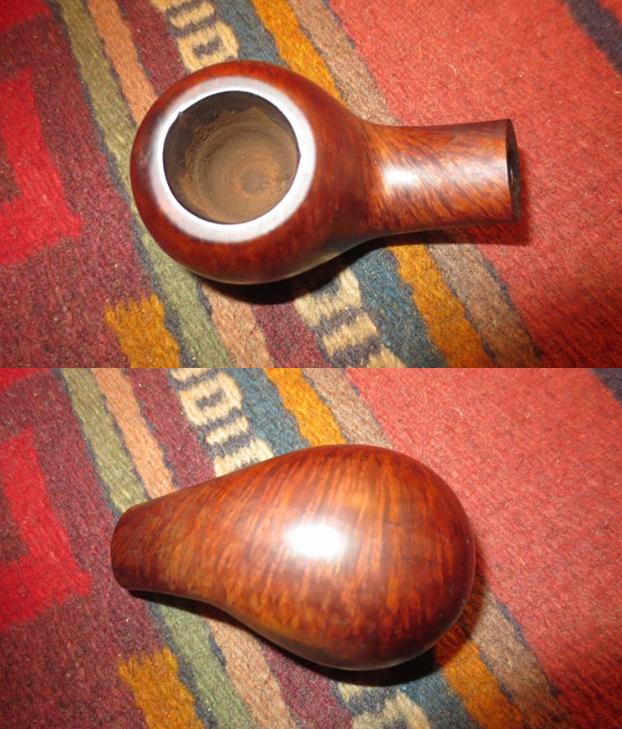
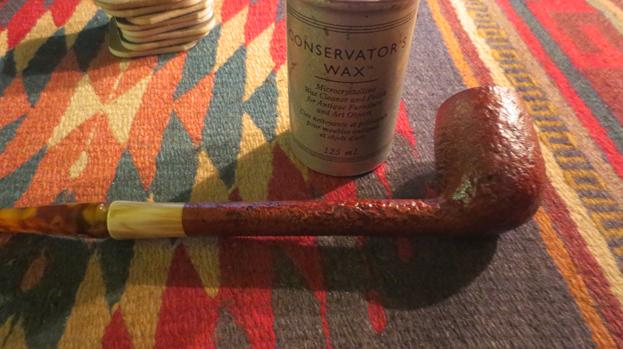
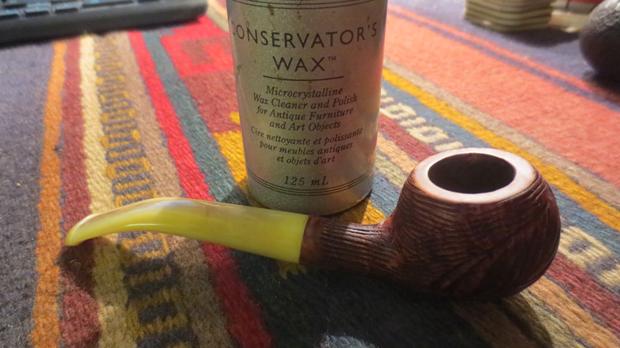
I really enjoy witnessing the initial revelation of the briar surface after the staining process.  This pipe was no exception.  I take my compact Dremel tool (a wonderful friend when workshop space in not available!) with a felt wheel and apply Tripoli to the final flamed Oxblood surface I completed the night before.  I use the lowest speed and do not apply a great deal of pressure to the felt wheel as I consistently move it over the stummel surface.  I allow the speed of the wheel and the compound to do the work.  The briar is emerging as I buff with the Tripoli.  I love the mosaic of grain design that emerges as I work over the stummel surface.  I follow the Tripoli compound with Blue Diamond, also using a felt wheel with the Dremel speed set to the lowest RPM.  After completing the Blue Diamond, I attach a cotton cloth wheel to the Dremel and increase the speed by one number and apply several applications of carnauba wax to both stummel and the rejoined saddle stem.  Through trial and error, I’ve been able to develop a technique for applying the compounds and carnauba wax that works well for me – in my compact 10th floor work station.  Under a bright light, with the sheen of the stummel surface my focus, I am able to see the application of the compound and how it disburses over the briar with the different wheels.  I am able to identify compound or wax that hasn’t integrated into the surface – it appears as a thick ripple, and I’m able to revisit it with the wheel rotation to work in more thoroughly what has been ‘left-behind’.  This works especially well with the carnauba wax which disburses with the heat of the wheel’s rotation.  I can see the wax liquefy and am able to spread it over a portion of the surface.  After applying several applications of carnauba wax, I Dremel buff the entire stem and stummel surface with a clean cotton wheel and complete the process with a rigorous hand-buff with a clean microfiber cloth to raise the shine more.

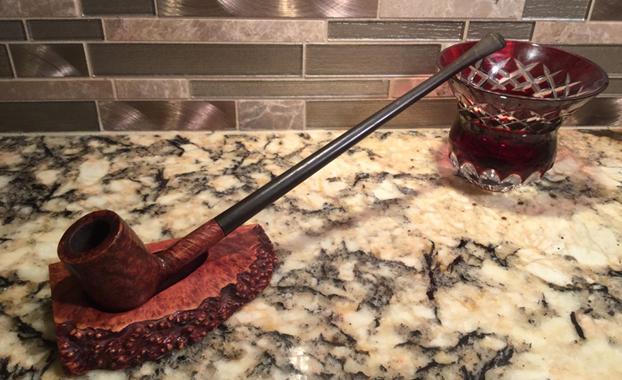
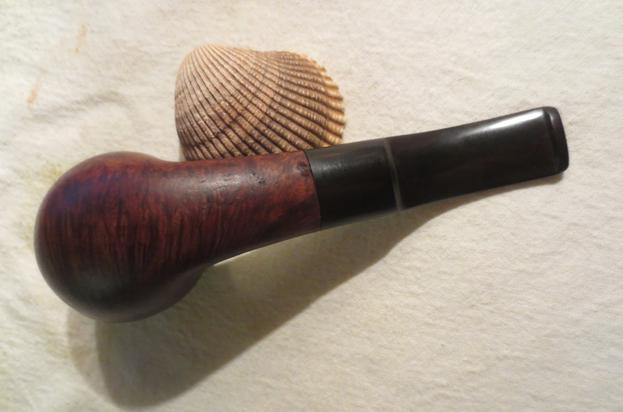
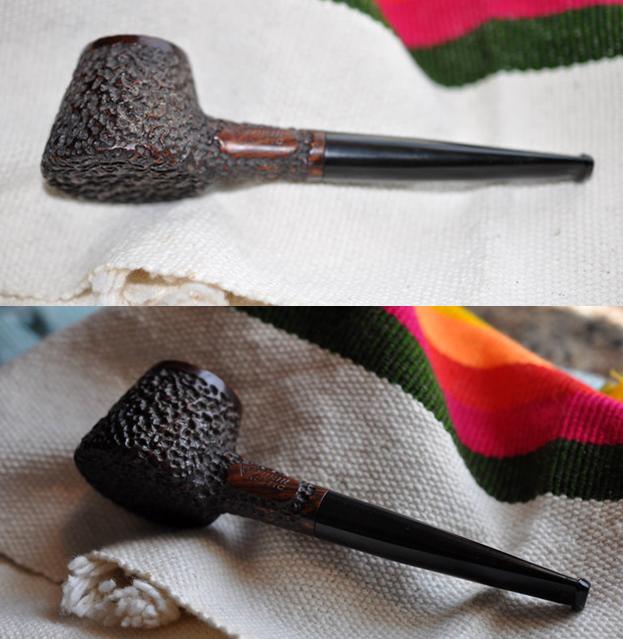
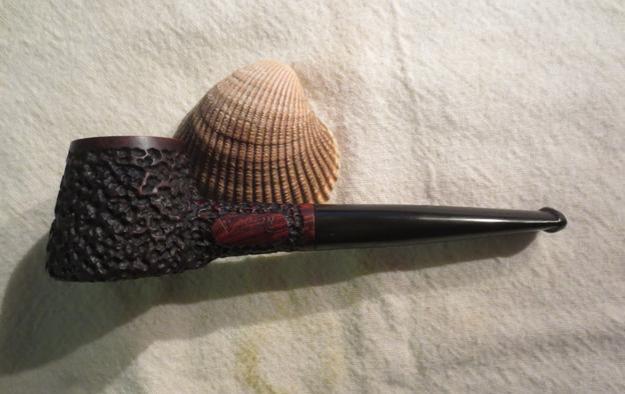
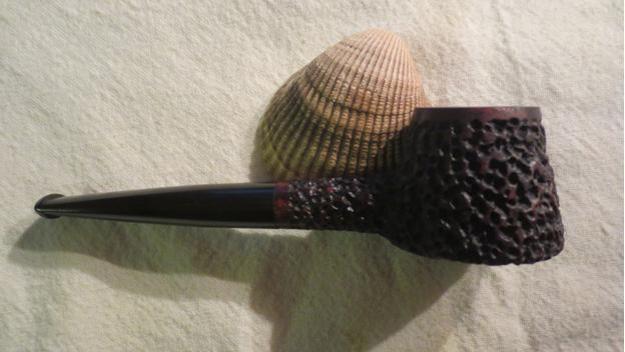
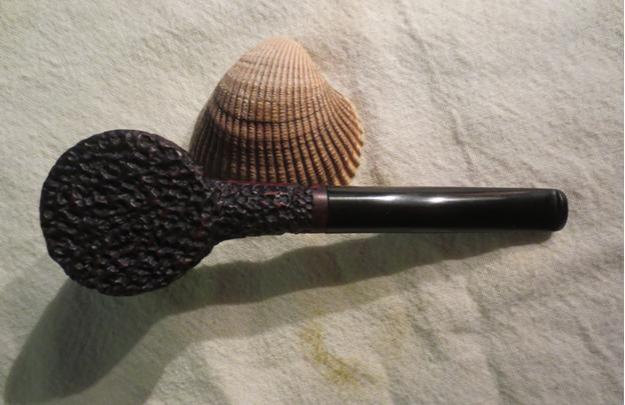
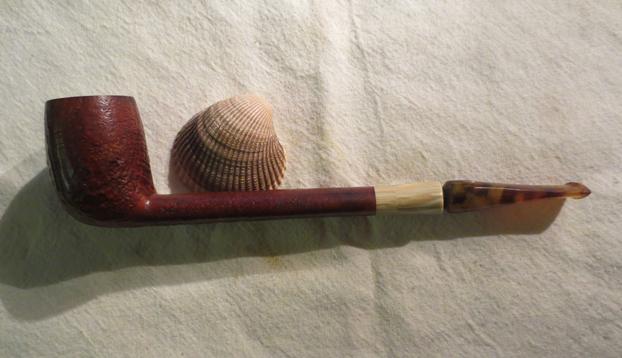
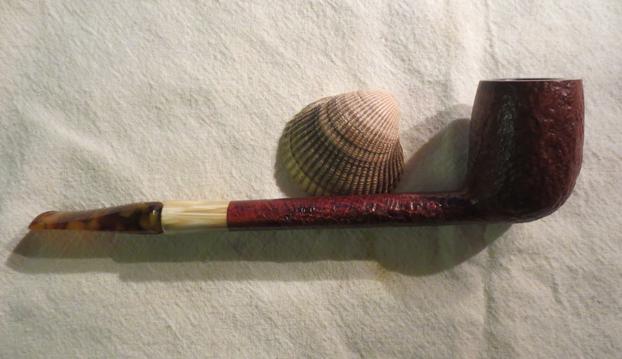
I am thoroughly pleased with the rich, deep hues the stains contributed to the beautiful briar grain of this Denicotea DeLuxe Curling Bruyere Extra.  I’m not sure the pictures below capture the depth of grain that I can appreciate with the naked eye.  The color and the shape bring to mind what could be a pleasing match for a classic smoking jacket one might see donned by the Earl of Grantham, Robert Crawley, as he retires to the smoking room at Downton Abbey.  ‘Classic’ is the one word that keeps coming to mind about this pipe!  One question that remains for me is what to do with the internals of the filtration system – any thoughts on that would be appreciated.  As I shared with my last post, my wife has lovingly put her foot down! This pipe will reluctantly head to eBay or, if you have an interest in adding this classic shape to your collection, let me know.  Thanks for joining me!de36 de37 de38 de39 de40 de41 de42 de43 de44

A Heibe Filter Bruyere Extra 1132 Churchwarden Made in West Germany


Blog by Steve Laug

Looking at the stamping on this older churchwarden pipe I can distinguish HEI__ on the left side of the shank over FILTER. From what I can see looking at it under a bright light with a lens it looks to me like the stamping is HEIBE. On the right side of the shank it is stamped Bruyere over Extra. On the underside of the shank it is stamped Made in West Germany followed by the number 1132. The pipe is 10 ½ inches long and the bowl is 2 inches tall. The diameter of the chamber is 5/8 inches. The finish was in decent shape with some scratching and the pipe is dirty. The rim was damaged and the bowl had a burn mark on the inside edge of the inner rim. The bowl was out of round and the top of the bowl was also damaged. The stem was oxidized and the pipe smelled foul. The next series of photos with the granite/marble counter top were taken by the eBay seller and show the overall state of the pipe.h1According to Pipedia, Heibe pipes were made by the company of the same name, owned in turn by Erich Heikaus, KG, in Bergneustadt, Germany. The trademark for the Heibe name was first filed on March 9, 1966 and registered on January 14, 1967. The sole trademarked line name of Heibe is the Heibe Goldpoint, which was applied for in 1970 and granted on May 31, 1972. Pipes have been seen stamped both “Germany” and “West Germany”, showing that the Heibe Company continued to make pipes after 1990, but these pipes appear to no longer be in production. https://pipedia.org/wiki/Heibe h2 h3The next photos are close ups of the pipe. They show the condition of the rim and the grain around the sides of the bowl.h4 h5My brother reamed the bowl cleaned up and scrubbed the exterior of the bowl and stem. He took some photos of the pipe after he cleaned it. h6The next photos show the stamping on the pipe. The first one shows the underside of the shank with the shape number and West Germany. The left side shows the brand over the word Filter. The right side shows the name Bruyere Extra.h7 h8 h9The next two photos show the beautiful grain on this pipe. The spots and streak on the second photo were just grime on the pipe. When I received it those were gone.h10 h11The next photo shows the damage to the rim top. There outer edge shows damage and the inner edge bevel is rough and looks like it did not belong originally. There is clearly a burn mark at the back side of the inner rim. There are a lot of dings and dents on the rim edge.h12When the pipe arrived in Vancouver I took the next four photos to show what it looked like before I started on it. My brother did a great job cleaning up the surface of the bowl. He was able to scrub off the finish and the grain just pops.h13 h14The next photo shows the rim after my brother cleaned it up. The dents and dings on the out edge are visible. The burn mark at the back of the inner rim is very clear. It is not deep but it is present. The bowl will need to be topped.h15I topped the bowl on the topping board with 220 grit sandpaper. It took some time to remove the inner rim damage. I sanded and checked constantly to make sure I did not sand too far. The second photo shows the topped bowl and the cleaned rim edge.h17I sanded the inside of the bowl with the rolled sandpaper to smooth out the inner edge of the bowl. The second photo below shows the fresh edge of the bowl.h18I sanded the rim top with 1500-4000 grit micromesh sanding disks until the scratches were gone. I restained the rim with a dark brown stain pen to blend it into the colour of the bowl. h19I cleaned out the mortise and airway in the shank with cotton swabs, pipe cleaners and alcohol. It appears that the bowl was dip stained as the cotton swabs came out with a red stain and no tars or oils. I cleaned the stem with pipe cleaners with and alcohol.h20I used my new micromesh sanding pads on the stem and it made short work of removing the oxidation. I forget how quickly new micromesh pads remove oxidation and polish the vulcanite. I sanded it with 1500-12000 grit sanding pads – wet sanding with 1500-2400 and dry sanding with 3200-12000 grit pads. I rubbed the stem down with Obsidian Oil after each set of three pads. I set the stem aside to dry after the last rub down.h21 h22 h23I buffed the bowl and stem with Blue Diamond on the buffing wheel to polish the scratches. It always amazes me how much different the pipe looks after buffing. I buffed it with several coats of carnauba wax to protect the vulcanite and bowl. I buffed it with a clean buffing pad to raise the shine and then by hand with a microfibre cloth to add depth. The photos below show the new restored German Churchwarden. It is a beauty. Thanks for looking.h24 h25 h26 h27 h28 h29 h30

 An easy restore on a smooth Jobey Extra Underslung Pipe


Blog by Steve Laug

I think that the shape of this one is what caught my brother’s eye when he saw this Jobey. He has introduced me to some neat looking Jobey’s that have great grain, shape and stem work. The Jobey Link tenon system is a breeze to replace and repair as it screws into the shank and is pressure fit into the stem. This one has some great grain on it all the way around – birdseye on the sides and cross grain on the front, back and the top and bottom of the shank. It was in decent shape with just a few dings in the left side of the bowl. The rim was lightly tarred and the cake in the bowl was not very thick. The finish was faded in spots. The stem was in great shape other than the usual tooth chatter on the top and underside near the button. There were no deep tooth marks. The link system was undamaged.  extra1 extra2The next two close up photos show the stamping and the condition of the rim. The stamping is simply Jobey in script over Extra. The E on Extra is faint. The Jobey medallion on the stem is in great shape. The inner edge of the rim shows some buildup of tars and oils.extra3As usual my brother cleaned up the pipe before sending it to me. I am getting spoiled as he is doing a lot of the hard clean up. He reamed the bowl with the PipNet reamer and scrubbed the exterior with Murphy’s Oil Soap and a soft tooth brush. He rinsed of the soap with running water. He cleaned out the airway in the stem and the shank and the mortise with cotton swabs, pipe cleaners and alcohol. When it arrived in Vancouver I took the following photos.extra4 extra5The next photo shows the bowl and the rim after he had cleaned it up. It was in excellent shape.extra6The next two photos show the tooth chatter on the stem and a light oxidation that was over the surface of the stem.extra7I tried to steam the dents out of the side of the bowl with a damp cloth and a hot knife and was able to lift quite a few. There were three of them with rough edges that I lifted some but was not able to smooth them out with steam. I used some drops of clear super glue to fill in the spots on the bowl side. Once the glue dried I sanded it with 220 grit sandpaper and then with 1500-4000 grit micromesh sanding pads.extra8I restained the areas on the bowl that had lightened from sanding with a combination of light, medium and dark stain pens and a little bit of black Sharpie pen. I gave the entire bowl several coats of dark brown aniline stain mixed 50/50 with isopropyl alcohol. I flamed it and repeated the process until I had an even coverage. I set the bowl aside to dry. I was sure that I would need to do some more touch ups to blend the stain well but I wanted the stain to set.extra9 extra11 extra12I sanded the tooth chatter off the stem with 220 grit sandpaper and was able to smooth out all of the tooth marks.extra10I polished the stem with micromesh sanding pads – wet sanding with 1500-2400 grit pads and dry sanding with 3200-12000 grit pads. I rubbed the stem down with Obsidian Oil after each set of three pads. After the final rub down I let the stem dry.extra13 extra14 extra15I buffed the pipe with Blue Diamond after the stain had cured and gave it multiple coats of carnauba wax. I buffed it with a clean buffing pad to raise the shine and then by hand with a microfiber cloth to deepen the shine. The pipe is really a beauty and the stain and shine make the grain stand out. This one will also be going on the store so if you are interested in adding it to your collection let me know via email, message or a comment on the blog. Thanks for looking.extra16 extra17 extra18 extra19 extra20 extra21 extra22 extra23

Spotlight: Ladies Pipes, Part 6/7, an Albertson Baby Bent Brandy


Robert M. Boughton

Member, International Society of Codgers
Member, North American Society of Pipe Collectors
Member, Facebook Gentlemen’s Pipe Smoking Society
https://www.facebook.com/roadrunnerpipes/
http://about.me/boughtonrobert
Photos © the Author except as noted

Pipe: a primary masculine symbol with authoritarian overtones but also indicative of reliability and contentment.
— The Dictionary of Visual Language, 1980, by Philip Thompson and Peter Davenport

INTRODUCTION
Never before or since has a definition been more right in both parts yet presupposed in the one as that stated above.  Nobody who enjoys and defends the pleasures derived from placing tobaccos into instruments known as pipes, igniting the leafy concoctions and drawing the resulting flavorful smoke into the mouth to taste, contemplate and above all savor, in most cases without inhaling, would deny the latter point.  But the former – which should be noted uses the strict adjective primary, meaning before all else in importance, rather than the more lenient adverb primarily, or for the most part – affirms the societal perception that no normal woman should want to partake of the same practice.  After all, why on God’s green earth would any decent _________ (insert little lady, gal, chick, babe, bird, girl, lass or whatever term comes to mind and makes most women grit their teeth) want to trespass on what might be the last bastion of manly domination on the planet?

The source of the definition – printed once in hardback and then again, in 1983, in softcover, both times by British publishers – is an excellent collection of iconic symbols assembled with scientific soundness.  Its authors called it “The Dictionary of Graphic Clichés,” a far more apt title than that which they were compelled to choose by the original publisher, under the false notion that the book should have a more agreeable name.  This decision may very well be the reason the astute study has been out of print for 33 years.  Nevertheless, used hardbacks still start at $469 and paperbacks at $96 on Amazon, suggesting a work of genuine and lasting significance.  But the likelihood of many takers at those prices is more doubtful than that the book would still be generating far more royalties if it continued to be available in general circulation at a reasonable cost to the average consumer.

The truth is thalbert1at many more women than may ever be known are as devoted to pipes and the blissful indulgence of those wonderful devices’ every facet: the astonishing variety of makers, shapes, styles, materials and sizes; the like availability of diverse tobaccos for every taste, and tobacciana.  Women are just as prone as men to the same acquisition compulsion in these categories.  Female artisans craft pipes, for their own use or sale.  The owner of my favorite local tobacconist is a woman.  Clubs and other associations exclusive to females devoted to the overall shared and altogether personal experience of pipes can be found in every corner of the world.

Indeed, searching online for this last aspect of pipe equality yields the greatest proof of the ubiquitous presence of female connoisseurs, who seem to avoid the male-dominated and likewise -biased haunts of the mainstream pipe establishment, and for good reason.   Only one woman is a member of my pipe club.  I know of but a single woman on the membership roster of the Smokers Forums UK, although old-timers recall in a vague way a past when there were “some more.”   And Jeff Knoll of the North American Society of Pipe Collectors reported, as I recall, that of the 1000+ members of the NASPC, only 10 are not men.  That’s about one percent, a woeful ratio.

I embarked upon my seven-part series of blogs last May 4.  My specific intentions were two-fold: to reveal and give recognition to the far greater number of women pipe smokers than is acknowledged by most of those who are, and no one disputes in all probability will remain, in the majority, and to promote acceptance of the formidable minority.  My more general desires were to foster an exploration and discussion of the contributions women make to the relaxing activity/hobby; to open a dialog between the segregated camps.  A side story that crossed my perhaps naïve mind was the idea of discovering possible differences in approach to pipes between their male and female devotees that might be of interest to all involved in the activity that is, after all, a love affair of sorts.  With one installment after this left before the series is complete, I believe I have gone still further than I expected but hope to wrap up some loose pieces before the end, whether most of my readers, or lack thereof, like it or not.

The sixth installment will show the refurbishing of a small Albertson easy bent sandblasted brandy from Belgium.  Hard information on the Albertson line is difficult to come by to an inordinate degree.  Through an incredible stroke of good fortune, I happened upon a font of factual information on the pipe’s real origin.  First I had to navigate past Pipephil and Pipedia, whose sketchy claims proved to have little substance and were parroted throughout the cyber world.

Pipephil describes Albertson as a brand “made at Hilson’s Factory,” then in the Hilson description refers readers to Albertson as a second.  About Hilson, Pipephil’s entry is muddled but notes its genesis was in 1846, when a German pipe crafter named Jean Knödgen started producing clay pipes in the town of Bree, Belgium.  As it turns out, that limited intel is about all that is accurate.  Jean Hillen, Knödgen’s son-in-law, bought and ran the business until his two sons took over.   After World War II, when briar was scarce, Albert Hillen, the brother in charge of production, created Hilson (a combination of Hillen and son).  Although I anticipate the exact time period in which Albertson pipes were made, from the one person who would know beyond a doubt, I do not expect it to arrive any time soon.  I suspected its name also was formed from a combination, of Albert and son, and later confirmed the guess.  With the Hilson brand, Hillen became independent of other countries, taking full control of pipe production.

Here’s the scoop, based upon the singular knowledge and much appreciated contribution of Arno van Goor, a Dutch pipe smoker and historian.**  The patriarch of the family-run pipe giant known today as E. Gubbels B.V., Johannes Henricus Gubbels, began in 1870 with a modest mercantile business in Roermond, a town in the southeastern area of the Netherlands.  Gubbels’ first products were diverse and included umbrellas, walking canes, toys and smoking accessories.  Knödgen was one of Gubbels’ suppliers of the last category.

Johannes Gubbels died in 1911, and his second wife carried on the business until 1924, when their two children, Antonia and Elbert, established A&H Gubbels, a wholesale trader specializing in pipe accessories.  After World War II, as the sole owner of the family business and because of the scarcity of supplies as well as the impossibility of importing them, Elbert did as Hillen had before him, going independent in every respect.

With the informal name EGRO (for Elbert Gubbels Roermond), Gubbels had no brand name.  Then, in 1956, when Gubbels bought De Rijk & Zonen of Amsterdam – a small company that was floundering – Gubbels not only acquired a brand but more machines than the two he had and more employees than the three.  But the most significant changes were his decision to convert from a wholesale to an export business with a very popular brand of pipes at the time, known as Big Ben.  The Big Ben pipes had been made in England and sold by De Rijk, and Gubbels began producing them as his own brand.  The result was an exponential increase of sales in Europe, the USA and Canada.

At the same time, Hillen’s Hilson brand faced severe financial problems despite its high reputation and value as far as the cost to consumers was concerned. When Gubbels bought Hilson, he was able to move into a bigger factory. To the Hilson and Big Ben lines was added a very small nose-burner called the Pipo, designed by one of Elbert’s two sons named Alfons who was then in charge of production. The Pipo, although an unknown style of pipe at the time, was highly successful and sold worldwide. By 1972, Queen Juliana of the Netherlands bestowed upon Gubbels the honored title “Royal,” and the house of Gubbels became Elbert Gubbels en Zonen – Koninklijke Fabriek van Tabakspijpen (Elbert Gubbels and Sons – Royal Dutch Pipe Factory).

After increasing its production and sales at a steady rate through the 1970s, the demand for the “luxury items” fell, and so did Gubbels’ Royal Dutch Pipe Factory (RDPF) as investors backed out.  One of the biggest misconceptions online and elsewhere is that Gubbels and the RDPF were separate entities.  On March 3, 2012, De Limburger daily newspaper in Maastricht, Netherlands reported the bankruptcy of that name, and the “news” that the last pipe-maker in the Netherlands was out of business echoed on pipesmagazine.com, and thence round the world.

It seems the rumors of the death of the venerable pipe-maker were greatly exaggerated.  Yes, the Gubbels-RDPF name was gone, but the family persevered with capital of its own, reducing the company staff from 28 to 20 employees.  Today, and not just according to the masthead of the History page of its own website, “E. Gubbels B.V. in the Netherlands, established in 1870, is a globally acclaimed and leading manufacturer of fully hand-made briar-root tobacco pipes.”

RESTORATIONalbert3 albert4 albert5 albert6 albert7The little brandy could have been touched up and cleaned much faster if I had felt like leaving well enough alone.  Of course, I did not.  A close look at the photos above shows two minor scrapes, one on the middle front of the bowl and the other near the bottom, that cut to the wood and gave me an idea.  The refurbish therefore began with a long soak, about five hours, in Everclear.  I have some black sandblast and rustic pipes that I love the way they are, but for the most part, in restoring at least, I prefer to end up with some of the natural rusty color of the briar showing, but not because of dings and whatnot.albert8When the initial stripping was finished, I was not surprised to see much of the black stain still holding tight.  I rubbed off the alcohol and some more of the blackness with some small cotton gun cleaner squares and swabbed the chamber with more, then went at the surface of the stummel with 150- and 220-grit sandpaper.  While I was at it, I ran an alcohol-soaked cleaner through the bit, which shows how well-used was the dainty pipe.  Even after that, a second Everclear soak was in order.albert9 albert10 albert11 albert12Repeating the aftermath of the previous alcohol strip, except for using super fine “0000” steel wool instead of paper, I eliminated more of the old black stain.  The next pictures don’t show the focused work I did on the crevices.albert13 albert14 albert15A few choice turns of the Senior Reamer in the chamber followed by 220-grit paper made the retort easy after the two soaks in Everclear, the more serious paper work in the chamber and several regular cleaners as well as the wire brush type through the shank.albert16albert17To re-stain the stummel, I used Lincoln Marine Cordovan, or dark maroon, alcohol-based boot conditioner.  You know I flicked my Bic to flame out the alcohol.  Afterward I buffed the residual char off with a micro mesh pad of some high number and used the steel wool to take off the excess stain to the point where I was happy. albert18 albert19 albert20 albert21While the Halcyon II wax soaked in, I considered the bit with its peculiar stinger that seemed to be designed for extra use as a tobacco pick. The peculiarity is the same as those in Dunhill pipes – it is an inner tube. This was often used in pipes by Gubbels. The tube extended into the bottom of the bowl the longer side sat in the bowl bottom and the angled shorter side faced upward. I went over the bit with wet micro mesh from 1500-12000.albert22 albert23 albert24Using red and White Tripoli and White Diamond on the bit with the electric buffer and just the clean buffer on the wood, the Albertson brandy was finished.albert25 albert26 albert27 albert28Photos taken on the front case at Stag Tobacconist

CONCLUSION
Anyone who doubts the high standing of the Gubbels name, consider this.  Some left-over Big Ben Barbados natural bent Dublin pipes with exquisite grain, crowned for the occasion with special metal rim fittings, were the 2015 Year Pipes of the Dutch/Belgian Pipe Smokers Forum (PRF, for Pijprokers Forum, the Dutch translation of something that should be obvious).  Dhr. van Goor, the fortuitous source of all of my factual information concerning Gubbels and a member of PRF, wrote in the second blog below: “Just over 60 pipes were available and when forum-members could order them they all were gone in no time!  To be perfectly honest, I did not apply for one.   I simply did not like the shape, but came to regret it later.”albert2And for some of the ladies, there are these Big Ben Pipes, averaging 5” long and very stylish.albert29On the other hand, if you prefer something of still smaller proportions, there is the Albertson brandy described above, which is the smallest conventional tobacco pipe I have ever owned.  It measures 4¼” long; the bowl is 1½” high; the rim is 1” across, and the chamber diameter is ¾” x 1⅞”.  In other words, perfect for the female pipe aficionado who prefers a petite and light yet elegant pipe.  And it’s for sale on my new webstore noted above!

SOURCES
http://www.eyemagazine.com/feature/article/the-dictionary-of-visual-language
https://www.amazon.com/The-Dictionary-of-Visual-Language/dp/0140511172
http://www.pipephil.eu/logos/en/logo-a3.html
http://www.pipephil.eu/logos/en/logo-h3.html#hilson
https://pipedia.org/wiki/Albertson
http://www.gubbelspipes.com/
http://pipesmagazine.com/blog/pipe-news/maker-of-big-ben-porsche-hilson-pipes-declares-bankruptcy/
**https://dutchpipesmoker.wordpress.com/tag/gubbels/
**https://dutchpipesmoker.wordpress.com/2014/12/16/2015-prf-pipe-made-by-big-ben/

A Bleak Looking Royal Danish with an indistinguishable shape number


Blog by Steve Laug

My brother Jeff found this old pipe either on eBay or in his travels and picked it up. He sent me photos of the pipe when he received it. It looked pretty bleak to me but there was some promise in the interesting shape of the pipe and the grain that was visible in the photos. There were also some dark spots on the sides of the bowl that I wondered about as I looked at the photos. The finish was very dirty and underneath the grime it was gone. There were some burn marks around the top of the bowl. The bowl was lightly caked but very dirty. The stem was lightly pitted and oxidized but there were no tooth marks or chatter on the stem.dan1 dan2My brother cleaned the pipe really well and the grime and remnants of the finish were all gone by the time I received the pipe. I took some photos of the pipe before I started to work on it. The dark spots on the sides of the bowl are visible in the photos below. The damage to the rim is also visible. There are some nicks in the top of the bowl and some burned areas that will need to be addressed. He cleaned out the airway in the shank and the stem as well as the mortise area. I noticed however that there was a slight ledge in the mortise that was hard and made me wonder what was happening there.dan3 dan4I took a close up photo of the bowl to show the extent of the damage to the inner edge of the rim and the rim top. The bowl was quite out of round and the burn marks though not deep were prevalent in the briar. I took some close up photos of the stem as well to show the condition they were in when I started the clean up.dan5I topped the bowl on the topping board with 220 grit sandpaper until all of the damage was removed.dan6I sanded the inside of the bowl and the inner edge of the rim with a tube of sandpaper until the edge was smooth and round.dan7I sanded the top of the rim with micromesh sanding pads – wet sanding with 1500-2400 grit pads and dry sanding with 3200-12000 grit pads. The rim took on a shine.dan10I wiped the bowl down with acetone on a cotton pad to remove the remaining debris and worked on the dark areas. The dark areas turned out to be fills and the darkening occurred around the edges of the fills.dan8 dan9I warmed the briar and then stained it with a dark brown aniline stain mixed 50/50 with isopropyl alcohol. I flamed the stain to set it in the briar and then repeated the process until the coverage on the bowl was good.dan11I hand buffed the bowl with a microfiber cloth to see what the coverage looked like particularly over the filled areas. The photos below show the pipe at this point in the process. The putty spots are visible in the first two photos. I have circled them in red to make them clear. Both fills were solid and tight but had a red overtone that stood out.dan12The top of the rim came out looking really good. The burned spots and damage to the rim top and inner edge have been minimized.dan13I recleaned the interior of the shank using the dental spatula to scrape away the hardened tars and oils. I scrubbed it with pipe cleaners, cotton swabs and alcohol until it was clean. I cleaned up the airway in the stem with bristle cleaners and was able to remove the last of the tars.dan14The stem fit against the shank with a slight gap on the right side. I heated the tenon with a Bic lighter and while it was still soft held it straight in the shank until it cooled.dan15On the underside of the shank next to the stem there was a chipped area where the briar was missing from the shank. I cleaned out that area and filled it in with clear super glue and briar dust. Once it dried I sanded it smooth with 220 grit sandpaper and then polished it with 1500-4000 grit micromesh sanding pads. I used a dark brown stain pen to touch up the sanded area.dan16I sanded the stem with 220 grit sandpaper to smooth out the pits and roughness. I polished it with micromesh sanding pads. I wet sanded it with 1500-2400 grit pads and dry sanded it with 3200-12000 grit pads. I rubbed the stem down with Obsidian Oil between each set of three pads. After the final rubdown I let the stem dry.dan17 dan17a dan18I used a black Sharpie Pen to draw “grain” lines through the fills and used the dark brown stain pen to blend the pen lines into the body of the pipe. I buffed the pipe and stem with Blue Diamond polish on the buffing wheel to finish cleaning up the small remnants of oxidation. I gave it several coats of carnauba wax and buffed it with a clean buffing pad. I hand buffed it with a microfibre cloth. The finished pipe is shown in the photos below. Thanks for looking.dan19 dan20 dan21 dan22 dan23 dan24 dan25 dan26


Another nice find at the ‘Hole in the Wall’ – Jeantet Fleuron 70-7


Blog by Dal Stanton

The Jeantet Fleuron before me was mentioned when I posted the restoration of a beautiful BBB Banker Bent Volcano.  I found both pipes last April, during a visit to ‘The Hole in the Wall’ antique store near the Zhenski Pazar (Women’s Market) in downtown Sofia, Bulgaria.  In order to achieve a better bargain for the BBB Banker I grabbed the Jeantet out of the basket as a good candidate for a bundled deal, which helped me negotiate 30 Bulgarian Leva for the pair – not a bad deal!  When I arrived home from the Hole in the Wall I took these pictures:dal1 dal2 dal3 dal4 dal5 dal6 dal7 dal8The bent egg shape is in pretty good condition with an attractive elongated bowl that fits well in the hand.  The left side of the shank is marked with Jeantet (pronounced, ‘Zhawn-Te’) over Fleuron and on the right what I assume is the shape number 70-7.  The stem has the nice Jeantet J stamp.  Looking at Pipedia to do a little research on this name led me to Sainte Claude, France, considered to be the birthplace of the serious production of briar pipes and scores of French made pipe names claim Saint Claude as home. My curiosity piqued, I wanted to know why St. Claude, France?  Was the briar in good supply there?  I looked to the history of the city itself to see what I could find.  I unearthed an archived New York Times article written March 20, 1983, in the ‘Shoppers World’ travel section entitled, THE PIPE CAPITAL OF FRANCE – very interesting and worth reading.  I found the answer to the question, ‘Why Saint Claude and pipes?’ with this article I found posted on Fumerchic.com with these informative excerpts:

In the 15th Century, Saint-Claude was canonised by Pope Louis XI, the city took on the name Saint-Claude alone and remained a favoured site for pilgrims.

Since Saint-Claude was one of the stops on the Way of Saint James, the monks, who had been turning wood since the 7th century, began crafting wooden religious objects like crucifixes and rosaries. These monks slowly began training craftsmen, which lead to the establishment of the first wood turning workshop in Saint-Claude.

The craftsmen developed the manufacture of wooden items and widened the scope of their operation by making toys (spinning tops, whistles and rattles), so children and pilgrims could play during their pilgrimages. The number of turning workshops then grew. The main materials they used were wood, bone and ivory.

But with the introduction of tobacco to France, of smoking tobacco in particular, the wood turning workshops adapted by making snuff boxes and pipes made from local boxwood. The pipe craftsmen of Saint-Claude gradually forged themselves a reputation for an unparalleled level of manual skill and expertise.

So, it wasn’t the plentiful supply of briar that put Sainte Claude on the pipe-makers’ map but industrious wood-turning monks who passed their wood working skills on to local craftsman.  The story went on with the discovery of a non-burning pipe made from our beloved briar:

During the 19th Century, pipes from Saint-Claude underwent a profound change. Boxwood had been the wood used to make the pipes until then, but it produced a bitter taste when smoked. Around 1855, a businessman passing through Saint-Claude presented a Saint-Claude wood turner with a pipe, the bowl of which did not burn, carved from a heavy wood in dark shades. It was the first pipe made from briar. The arborescent briar pipe is highly resistant to heat and fire, giving the smoker the greatest possible pleasure from the plumes of tobacco smoke. The craftsmen of Saint-Claude therefore began using briar instead of boxwood, ensuring the Saint-Claude pipe caused excitement in the pipe smoking community. The number of workshops grew, with names like Chacom and Butz-Choquin appearing for the first time, while the craftsmen began producing more and more high-quality pipes thanks to their expertise that became globally renowned among pipe smokers.

Considered to be the capital of briar wood pipes, EoleChacomBayard,Butz-ChoquinDenicoteaJeantet and Ropp are well-known names all originally claimed by Saint Claude, France. The works of Saint Claude’s craftsmen are also present, for example, in the unique handmade pipes created by Pierre Morel (link).

One more factoid about Saint Claude’s history caught my attention.  In 1966, Saint Claude established the Confrérie des Maîtres-Pipiers de Saint-Claude (The Brotherhood of Master Pipe-Makers in Saint-Claude) to promote the expertise of the many masters that have historically resided and worked in Saint Claude.  Famous personalities are inducted as the “Premier Pipe-Smoker of the Year’ to serve as ambassadors for the pipe industry in Saint Claude.   For every personality chosen, Paul Lanier (awarded the prestigious meilleur ouvrier de France title in 1991), crafts a pipe that includes a portrait of the inductee, thus perpetuating the tradition of the sculpted briar pipe.  I think this is a very cool tradition and found it very interesting that the first likeness below strongly resembles the master pipe restorer who oversees Rebornpipes.com!dal9According to Pipedia, the Jeantet name came on to the scene in 1775.  The 1800s saw great expansion of production of Jeantet pipes primarily through the development of local cottage industry – farming out different aspects of the pipe production to small shops in Saint Claude.  Consolidated production grew in the 1900s but in the 1960s sales dwindled in spite of attempts to modernize.  This final part of my research comes from Pipehill:

1988
The company was taken over by S.A. Cuty Fort Entreprises(1) while keeping its label. It established in the group beside Chapuis-Comoy (Chacom), Jean Lacroix and Emile Vuillard.  Today (2010) the brand isn’t part of the group any more. The label owned by Dominique Jeantet still exists but pipe production is discontinued.dal10When I take this product of Sainte Claude, France, the Jeantet Fleuron, out of the ‘Rescue Me’ basket, I take a closer and more appreciative look at the pipe.  First impressions mark the nice shape of the stummel – I like the tapered egg shape that culminates in a tightly circled rim beveled on the inner chamber side.  The bowl shows minor cake and appears to have been cleaned before but I will bring it down to the briar and clean it well.  The stummel surface has minor dents and ‘blemishes’ on the finish.  A significant ‘scab’ is evident where the shank and bowl converge on the topside.  It doesn’t appear to be a burn through but this will need attention after cleaning the exterior surface.  The rim has minor dent marks on the blade edge of the beveled rim.  When I take off the stem, I notice that in the mortise is a metal cylinder – some sort of a metal airway or a stinger that got loose?  With a few thumps on my palm, the rogue stinger shakes loose (pictured below).  After attempting to insert it into the end of the tenon, I have questions as to whether this stinger is original – the fit is very loose which explains why it slipped down into the stummel airway.  I decide the stinger is history and it goes in the spare parts bucket.  Minor teeth dents are on the underside of the bit. I take some close up shots for a better look at problem areas.dal11 dal12 dal13 dal14 dal15 dal16I begin by putting the stem in an OxiClean bath to soak in order to raise the oxidation out of the vulcanite.  Then I take my Pipnet Reaming Kit and work on the light cake build up in the bowl.  I use the two smaller blades of the four blades available to me to ream the bowl.  After this I use 240 grit sanding paper to further clean and smooth the chamber wall.  I like working on a clean pipe so I take pipe cleaners and Q-tips dipped in isopropyl 95% and work the mortise and stummel airway.  The internals were surprisingly clean so it didn’t take long.

Now to the external surface.  I use undiluted Murphy Oil Soap on the stummel with cotton pads to remove the grime and hopefully to eradicate some of the blemishes I detect on the surface.  After cleaning with Murphy Soap I rinse the stummel with cool tap water avoiding water entering the fire chamber or mortise.  The ‘scab’ at the upper junction of the shank and bowl is starting to look like a botched superglue repair job.  I’ll need to give some thought as to how to address this eyesore on an otherwise attractive piece of briar – I’m starting to see the briar’s potential.  The pictures show the progress. dal17 dal18 dal19 dal20I put the stummel aside and turn to the clean-up of the stem.  I fish the stem out of the Oxyclean bath.  It did the job of ‘surfacing’ the dull greenish oxidation and I initially attack it with 000 steel wool.  I then clean the internal airway with bristled and smooth pipe cleaners dipped in isopropyl 95%.  The stem put up more resistance than the stummel.  After several pipe cleaners I’m satisfied that the airway is ready for service.dal21 dal22Next, the ‘scab’ on the bowl surface.  I take 240 grit sanding paper rolled as close to a blade as I could make it and sanded the gummed up super glue patch – at least I believe that is what it is – at the junction between the upper shank and bowl.  I sand the super glue or epoxy down to the surface.  When I remove the buildup bump it appears to be a patch – I don’t believe it’s a burn through, but it’s definitely a fill.  It appears to be solid so I leave it as is and hope to blend it when I finish the stummel.  Next I prepare a batch of briar dust super glue putty to fill in two holes just below the rim at about 1 o’clock (picture below).  I use a toothpick as a trowel to pack the holes well and to leave an overflow so that it will sand out smoothly with the surface.  The final repair is to apply black super glue to two small tooth dents on the underside of the bit.  When cured, it will sand smooth and polish well.  The pictures show the progress of the patch work.dal23 dal24 dal25 dal26After the KE-150 Black super glue patch on the underside of the bit cures, I take 240 grit sanding paper to smooth out the patch bumps bringing them down to the stem surface level.  I do the same to remove light tooth chatter on the upper side.  To redefine the button, I use the needle file to shape the contours of the button lip top and bottom.  I again use 240 grit to remove the file marks and remove light tooth chatter.  With micromesh pads grit from 1500 to 2400 I wet sand the stem and apply Obsidian Oil.  Unfortunately, after admiring the shine beginning to move to the surface, I also saw some small ‘patches’ of oxidation remained visible – a bit near the button and on both upper and lower parts of the saddle stem that tapers from shank level down to button level.  If this part of the saddle stem has a special name, I’m not sure what it is!  I was frustrated and therefore forgot to picture this!  I put the stem back in the Oxyclean bath for another baptism.  The pictures below represent the micromesh process after the second bath, which raised the residue oxidation to the surface and I remove it beginning with the 1500 grit micromesh pad.  Following the 1500 to 2400 micromesh wet sand cycle (again!) I apply Obsidian Oil.  With pads from 3200 to 4000 grit I dry sand and follow again with applying Obsidian Oil to the stem.  I complete the micromesh polishing with pads 6000 to 12000, apply Obsidian Oil and put the stem aside to dry.  I’m pleased with the results even though I had a detour.  The pictures show the progress on the stem repairs and polishing.dal27 dal28 dal29 dal30 dal31With the stem ready for a stummel, I start working on completing the Jeantet’s re-commissioning by using 240 grit sanding paper to remove the cured briar dust super glue putty patch on the holes just below the rim.  I’m careful to sand strategically by folding the paper and using it like a blade directly on the patch so I don’t unintentionally sand into the rim’s sharp beveled top edge – that would not be good to deface the rim!  I take a before and after picture to show the progress.  The rim already has a very nice bevel, but to remove the dents and pitting on the rim I use 240 grit paper folded and work on the rim.  I pinch the paper with my thumb on the beveled contour as I rotate the stummel.  I find that this method allows for an even movement and a consistent bevel angle to develop.  With the bevel already in place, I simply go with the contour that is already present but remove the damage producing a fresh beveled surface.dal32 dal33 dal34Well, all work on the Jeantet came to a halt for about 3 weeks as my wife and I enjoyed our annual R&R on the Black Sea coast near the fishing town of Sozopol.  Reading books and enjoying the beach is one of our favorite things to do to relax and decompress from the work we do in Bulgaria.  A special joy to us during these weeks was the visit of our daughter and her husband from Denver, Colorado.  They joined us at the Black Sea for our last few days on the beach and from there we took them to see different sights in Bulgaria as well as spending the last week of their visit on the beautiful Greek island of Santorini!  Another great part about their visit was that they brought supplies and pipes I had ordered and purchased from eBay.  They also brought another prize – the Savinelli pipe knife to add to my tool box that I won in a fierce bid on eBay!  During this time of R&R I also visited several antique shops in different Bulgarian towns and secured some future restorations – it was a good time but now, back to life and the Jeantet Fleuron!

With stem reattached to the stummel I use a medium grade sanding sponge on the bowl.  Following this, I utilized all 9 micro-mesh sanding pads, 1500 to 12000 to sand/polish the bowl preparing it for staining. I’m liking the briar grains beginning to make an appearance on the Jeantet.  The pictures show the progress on the stummel surface.dal35 dal36I’m anxious to try out one of the supply items that my daughter and son in law brought from the US – Fiebing’s Leather Dye.  They brought dark brown and oxblood colors and I decide to try the dark brown on the Jeantet.  One of the challenges that I have finding supplies in Bulgaria is not having good selection of aniline (alcohol based) dyes or stains that would readily ‘flame’ helping to set the stain in the wood. I remove the stem and give the bowl a cleaning with alcohol with a cotton pad to make sure it is clean from the residue left over from sanding.  I set the bowl up on the cork and candle stand, inverted to apply the dark brown dye that I have chosen.  Using a cotton dauber, also a new arrival from the US, I apply the dye liberally over the inverted bottom of the bowl allowing the dye to saturate the briar surface.  I’m able to rotate the bowl with the cork in hand to make sure dye reaches the rim beveled surface on the bottom. When the surface is covered I flame it with a butane lighter which evaporates the alcohol from the dye and sets the color more deeply in the grain.  After it cools to the touch, I repeat the process above a second time, applying dye and flaming.  The pictures below show the progress but also the fact that I need to figure out a better way of pouring the dye into the lid so I’m not wasting so much on my work board missing the briar!  After cooled, I use cotton pads with isopropyl 95% and wipe down the newly stained bowl to lighten it and even out the dye application.  This allows the grain to jump out more it seems to me.dal37 dal38 dal39I let the bowl sit overnight to thoroughly dry and set the newly stained surface.  I turn to my Dremel using a felt wheel with Tripoli compound on the bowl surface and stem to begin the polishing process.  I utilize the slowest RPM speed and keep the wheel moving over the briar surface – not pressing too much allowing the wheel and compound to do the work.  I follow the Tripoli with Blue Diamond – also with its own dedicated felt wheel (each compound has dedicated wheels) and again, allow the RPMs, wheel and compound to do the work, keeping the movement of the wheel moving on the stummel surface.  For the carnauba wax application, I switch from a felt wheel to a cotton cloth wheel and also increase the RPM speed on the Dremel by one number.  I have discovered that the carnauba needs a bit more ‘heat’ to spread evenly over the surface.  I apply several coats of carnauba wax over the bowl surface and stem.  I love to watch how the briar grain increasingly pops with each step of the polishing process.  The beauty of the grain on the Jeantet Fleuron is living up to its name – Fleuron.  Since I didn’t study French in school, Google translate provided the English meaning of Fleuron – ‘finial’, which is, according to Dictionary.com, “a relatively small, ornamental, terminal feature at the top of a gable, pinnacle, etc.”  Or, simply, a nice finishing touch!  I complete the Jeantet Fleuron with a clean cotton cloth wheel buff with the Dremel and then a rigorous buffing by hand with a microfiber cloth to bring out the grain even more and deepen the shine.

Since my wife has lovingly started to put her foot down regarding my growing collection of pipes (I’m sure some of you have faced this as well!) this Jeantet Fleuron 70-7 will make a debut on eBay Europe and US to find a good home! I am considering how to sell more restored pipes and giving the profits to help further the work we do here, with the Daughters of Bulgaria – Bulgarian women who are sexually exploited and trafficked.  If you’re interested in adding the Jeantet to your collection, leave a comment below.  Thanks for joining me!dal40 dal41 dal42 dal43 dal44 dal45 dal46 dal47


This BBB Tiger Grain Bulldog was in rough shape


Blog by Steve Laug

I have always liked older BBB pipes. I used to buy them on eBay when no one was hunting for them for almost nothing. The prices they are today they are generally untouchable for me. Once in a while though one slips under the radar. This Tiger Grain with a Lucite stem was one my brother caught in his ongoing prowl of eBay. He got it for a decent price. It is either a newer BBB or it has a replacement stem on it. My thinking tends toward the previous – a newer pipe from when Cadogan took over the line. The pipe is stamped on the left side of the shank with BBB in a Diamond and underneath it reads Tiger Grain. The right side of the shank reads London England and the number 4. The next two photos show the condition of the pipe when it arrived in Idaho. The bowl finish on the bowl was dirty and there were rough spots. The rim had burn marks on the outer and inner edges on the front side. The beveled rim was thickly caked with the overflow from the cake in the bowl. The Lucite stem had tooth marks and was covered with sticky debris. The airway in the stem was darkened with tars and oils. The mix of bright yellows, white and greys looked good underneath the grime. The dark black/brown airway stood out like a sore. With the exterior that dirty I could only guess that the inside was also very dirty.bbb1My brother once again did the major clean up on this pipe. He reamed the bowl with a PipNet reamer and took the cake back to bare briar. He scrubbed the exterior with Murphy’s Oil Soap to remove all of the grime and grit. He was able to scrub away much of the rim build up and the surface of the stem. He scrubbed the internals with pipe cleaners and cotton swabs. When the pipe arrived in Vancouver it was pretty clean. I took the following photos of the pipe before I began to work on it.bbb2 bbb3I took a close up photo of the rim to show the small amount of cake on the rim and the burn marks on the front of the pipe on both the inner and outer edge of the rim. I circled the burned spot with a red circle in the photo below.bbb4There was a red tone to the briar. I rubbed it down with a light coat of olive oil and brought out the red. I wanted to see what the bowl and rim looked like when it had been oiled.bbb5I sanded the rim and bevel with a folded piece of 220 grit sandpaper to remove the remaining cake and clean up the bevel on the rim. When I finished the rim was clean but it still showed the burn marks and the inner bevel on the rim was also darkened.bbb6I decided to top the bowl on the topping board to remove the damaged rim top and the burn marks. I sanded it until the rim top was smooth and the outer edge was clean.bbb7I polished the topped bowl with micromesh sanding pads – wet sanding with 1500-2400 grit pads and dry sanding with 3200-12000 grit pads. When I finished the rim was smooth and polished.bbb8I worked on the mortise and shank with pipe cleaners, cotton swabs and alcohol. I used a dental spatula to scrape out the mortise. Once I was finished cleaning it the shank and airway was clean. I also scrubbed out the airway in the stem with pipe cleaners and alcohol. I used bristle pipe cleaners- both thin and thicker to scrub out the tars and dark stains.bbb9 bbb10I sanded out the tooth marks on the top and underside of the stem to remove them and blend them into the surface of the Lucite.bbb11aI polished the stem with micromesh sanding pads – wet sanding it with 1500-2400 grit pads and dry sanding it with 3200-12000 grit pads. I wiped it down with a damp cloth between each grit of micromesh pads.bbb12 bbb13 bbb14I buffed the pipe and stem with Blue Diamond on the buffing wheel to polish the pipe. I carefully avoided the stamping. I gave the bowl and stem several coats of carnauba wax and buffed it with a clean buffing pad. I hand buffed it with a microfibre cloth to deepen the shine. The finished pipe is shown in the photo below. It is a nice looking pipe. The bowl and rings are in perfect shape. The new rim top looks like it has always been there. Thanks for looking.bbb15 bbb16 bbb17 bbb18 bbb19 bbb20 bbb21 bbb22

A unique old WDC Turin Rustic Volcano


Blog by Steve Laug

When I saw this one on eBay I sent a message to my brother and asked him to bid on it. He did and we got it. I love the rustication on the Turin Rustic series. It is rough and yet dignified at the same time. The seller billed it as restored/refurbished and clean. By and large that was true. The shank and the inside of the stem were very clean. The rim had been knocked about a bit and the inner edge of the rim was rough and uneven. The bowl had been reamed. The stem was polished though there were deep tooth marks on the top and underside of the stem next to the button.demuth1 demuth2My brother took the above photos and the following ones before he cleaned the pipe. You can see the damage to the rim top and the inner edge in the next photo. The second photo shows the stamping on the left side of the shank.demuth3Though I knew a bit about the WDC pipe maker and the William Demuth Company I thought it might be good to review the history before I started restoring the pipe. I googled the Turin Rustic to see what I could find. It immediately referred me to a post on the Kaywoodie Forum that in turn was an excerpt from pipedia.org. Here is the link.

http://kaywoodie.myfreeforum.org/archive/w.d.c.-master-list__o_t__t_191.html

William Demuth, a native of Germany, entered the United States at the age of 16 as a penniless immigrant. After a series of odd jobs he found work as a clerk in the import business of a tobacco tradesman in New York City. In 1862 William established his own company. The William Demuth Company specialized in pipes, smoker’s requisites, cigar-store figures, canes and other carved objects.

The Demuth Company is probably well known for the famous trademark, WDC in an inverted equilateral triangle. William commissioned the figurative meerschaum Presidential series, 29 precision-carved likenesses of John Adams, the second president of the United States (1797-1801) to Herbert Hoover, the 30th president (1929-1933), and “Columbus Landing in America,” a 32-inch-long centennial meerschaum masterpiece that took two years to complete and was exhibited at the World’s Columbian Exposition in Chicago in 1893.

The Presidential series was the result of Demuth’s friendship with President James A. Garfield, a connoisseur of meerschaum pipes. Demuth presented two pipes to Garfield at his inauguration in 1881, one in his likeness, the other in the likeness of the President’s wife. Later, Demuth arranged for another figurative matching the others to be added to the collection as each new president acceded to the White House, terminating with President Hoover.

In 1897 Ferdinand Feuerbach joined the Demuth Company and by 1903 had become the production manager. Feuerbach is credited with developing Demuth’s popular Royal Demuth and Hesson Guard Milano pipelines. He left in 1919, when Sam Frank Sr. needed an experienced pipe man to run his pipe factory, located at 168 Southern Blvd., in the Bronx. Feuerbach and Frank had been close friends since Frank started his own business in 1900 and was closely associated with the sales staff of WDC, selling their line of pipes.

In early 1937, the City of New York notified S.M. Frank & Co. of their intent to take by eminent domain, part of the land on which the companies pipe factory was located. This was being done to widen two of the adjacent streets. As a result of this, Frank entered into negotiations to purchase the Wm. Demuth Co.’s pipe factory in the Richmond Hill section of Queens. It was agreed upon that Demuth would become a subsidiary of S.M. Frank and all pipe production of the two companies would be moved to Demuth factory. New Corporate offices were located at 133 Fifth Avenue, NYC.

Demuth pipes continued to be made at the Richmond Hill plant till December 31. 1972. Then the Wm. Demuth Company met its official end as a subsidiary company by liquidation. Demuth’s mainstay pipe, the Wellington continued to be offered in the S.M. Frank catalog until 1976. In the mid-80’s, the Wellington even made a brief return as a direct to the consumer offer.

When the pipe arrived from Idaho it was quite clean and ready to work on. I took some photos of it before I started.demuth5 demuth6The next photo shows the rim and the damage to the surface. There were a lot of dents and dings as well as some roughness on the right side toward the front of the bowl. The inner edges was also worn and rough.demuth7The next photos show the condition of the stem – it had some deep tooth marks on the top and underside that are visible in the photo below.demuth8I “painted” the surface of the vulcanite with the flame of a Bic lighter to lift the dents and I was able to raise all but one of them completely. Even the worst one on the underside came up so that is only needed a little patch. The rest of them I was able to sand smooth with 220 grit sandpaper.demuth9I cleaned the sanded area on the underside of the stem with alcohol and then filled in the remaining tooth mark with a spot of clear super glue. Once it dried I sanded it smooth with 220 grit sandpaper and blended it into the surface of the stem.demuth10I rolled a piece of sandpaper and sanded out the inside of the bowl and the inner edge of the rim to smooth out the damage.demuth12

I touched up the rough spots on the inner edge with a piece of 220 grit sandpaper and smoothed out the edge until it was back in round. In the photo below you can see the damage to the top and outside edge of the bowl toward the front. It looked like it had been knocked out on concrete.demuth13I decided to lightly top the bowl on the topping board with 220 grit sandpaper until the rim top was smooth and clean of damage.demuth13aI sanded the rim top with micromesh sanding pads from 1500-12000 grit until the surface of the rim was clean and smoothly polished.demuth13bI used a light brown stain pen and touched up the rim top. The next four pictures show the bowl after I had rubbed it down with a light coat of olive oil. I love the rustication on the bowl sides and bottom. It really is a unique pattern.demuth13c demuth13dI polished the stem with micromesh sanding pads – wet sanding with 1500-2400 grit pads and dry sanding with 3200-12000 grit pads. I rubbed the stem down with Obsidian Oil after each set of three pads. After the final rub down I set the stem aside to dry.demuth14 demuth15 demuth16

I buffed the bowl and stem with Blue Diamond on the buffing wheel. I gave the stem multiple coats of carnauba wax and buffed it with a clean buffing pad to raise the shine. I hand wax the bowl with Conservator’s Wax and buffed it with a clean buffing pad. The finished pipe is shown in the photos below. The finish shines and the pipe belies its age. It is a beauty. Thanks for looking.demuth17 demuth18 demuth19 demuth20 demuth21 demuth22 demuth23 demuth24 demuth25


Cleaning up a Long Shanked Jeantet Lumberman


Blog by Steve Laug

This lightly sandblasted long shank Canadian is stamped Jeantet over Lumberman on the underside of the shank. The tortoise-shell Lucite stem is stamped with a J in a circle on top of the freehand style stem and on the underside it is stamped Hand Cut and France. The shank extension is made of acrylic made to look like faux bone. The mortise is lined with a brass insert to stabilise the shank extension. The tenon is Delrin. The fit in the shank is snug and clean. The slot in the stem was dirty with a black buildup in the edges and the Y-shaped opening. The shank smelled dirty and strongly of aromatic tobacco. The finish was dirty but looked to be in good condition under the grime. There was a large nick in the right side of the bowl half way down the side. It was rough to the touch. The rim was tarry and dirty but underneath it was smooth. The inner and outer edge of the rim looked in good condition. There was a light cake in the bowl. It is a big pipe – 8 inches long, 2 inches tall, bowl is 1 ¾ inch deep, the bowl diameter is ¾ inch.jean1I have had a few older Jeantet pipes over the years but never one that was quite like this one. It is truly a beautiful piece of workmanship. I looked up information on two of my go to websites for information. The first was pipehphil’s Logos and stamping site. There I found that the Jeantet Company joined the Cuty-Fort Enterprises group (Chacom, Ropp, Vuillard, Jean Lacroix…) in 1992. In 2010 it dropped out and the brand isn’t part of the group any more. The label once again is owned by the Jeantet family (Dominique Jeantet). The production of pipes is currently discontinued. Dominique Jeantet retired in 2000. http://www.pipephil.eu/logos/en/logo-jeantet.html

The second site I looked on was Pipedia (https://pipedia.org/wiki/Paul_Jeantet_SA). There I found information from a book by José Manuel Lopes’ entitled Pipes, Artisans and Trademarks. Since I have the book here I went and read it first hand in the book. Here is what I found there.

Paul Jeantet SA (formerly Ebonite Co. is a French factory in Saint-Claude, and the name and business of the business man who in 1912 began making vulcanite stems for the pipe industry. Coming from a family of pipe makers (see Jeantet), Paul started using ebonite for the stems.

Paul Jeantet SA factory (1905 Saint-Claude), from the Jeantet Website: At one point the company was producing 35 million stems a year, and is still one of the few to produce ebonite stems in Europe.

From the Jeantet website: Founded in 1905 by Paul JEANTET, our company is being progressing in the field of rubber compound. Since the 70´s, JEANTET élastomères has been controlling the both processes of over molding and adhesion rubber / metal. Our manufacture is set in a 7000 m2 block, based in Saint-Claude, France. We are at one hour far from Geneva and one hour and a half far from Lyon. From prototype to mass production, JEANTET élastomères, certified ISO 9001, guarantee you availability and speed answers to all your asks of quotation.

Today, our group includes three companies specializing in vulcanized and thermoplastic elastomers : JEANTET élastomères, IXEMER ans PERROT. We are at your disposal for the creation and the development of innovating solutions. In 2014, the Group JEANTET took back the clientele of the Swiss company DUFOUR industries, what consolidates an important presence on the Swiss market of parts in Elastomers. (The Lopes’ book included the following contact information for the brand.

Contact Information:
JEANTET élastomères
Website: http://www.jeantet.com
6 Faubourg des Moulins
39200 SAINT-CLAUDE
Phone: +33 (0)3 84 45 79 00
E-mail: jeantet@jeantet.com

When the pipe arrived in Vancouver in a lot of pipes that Jeff sent me it caught my eye. It is a beautiful pipe. I took the next four photos to show the condition of the pipe when I started working on it.jean2 jean3I took a close up photo of the bowl and the rim. You can see the light cake in the bowl and the overflow on the back and the right side of the rim top. Underneath it looks like there is some good-looking grain.jean4I sanded the rim clean and took off the burned areas on the rim top with 220 grit sandpaper. I followed that by sanding the rim with 1500-4000 grit micromesh sanding pads. I wiped it down with alcohol and then used a light and a medium brown stain pen to touch up the rim to match the rest of the bowl.jean5I rolled a piece of sandpaper and sanded the inside of the bowl and the inner edge of the rim to clean up the damage left behind by the burns.jean6I waxed the bowl and shank with Conservator’s Wax and buffed it with a shoe brush to give it a shine.jean7I cleaned out the inside of the mortise, the airway in the shank and the stem with pipe cleaners, cotton swabs and alcohol until it was clean.jean8I polished the tortoise coloured Lucite stem with micromesh sanding pads – wet sanding with 1500-2400 grit and dry sanding with 3200-12000 grit pads. I wiped the stem down with a damp cloth to remove the grit and grime.jean10 jean11 jean12I buffed the pipe with Blue Diamond on the buffing wheel to polish the stem and the rim. I buffed the bowl and stem with carnauba wax and buffed it with a clean buffing pad to raise the shine. I hand buffed it with a microfibre cloth to deepen the shine. The finished pipe is shown in the photos below. It is a beautiful pipe and one I have not seen before. There is something about it that draws the eye. For a pipe this large it is well-balanced and proportionally works well. Thanks for looking.jean13 jean14 jean15 jean16 jean17 jean18 jean19 jean20

Enlivening an interesting Bonnie Brier Interlude Prince


Blog by Steve Laug

My brother Jeff picked up this interesting pipe on eBay and sent it my way. He has a real knack for finding unusual and interesting pipes. This one is stamped Bonnie Brier in script and underneath that is stamped Interlude over Imported Briar. The bowl was carved with lines and leaf patterns on the sides. The smooth left side of the shank bears the stamping mentioned above. The finish was not too bad but a bit spotty. Some nice grain on the briar shines through the mottled finish. The stem is not vulcanite or even Bakelite. It is far softer than that. I am not sure what the material is it may be a plastic derivative of some sort. The bowl was lightly caked and the rim had some overflow of tars that darkened it. The stem has a JB logo stamped on the side in gold. The stem is over bent and the angle hangs the bowl so that the tobacco falls out. The stem looked like it had a dark stripe of oil in the airway and the slot in the button was really darkened from the tars.brier1Jeff took some close up photos of the rim, the bowl bottom and the stamping on the shank and stem. The rim shows the tars and oils on the back side of the top. There is a light cake on the inside of the bowl. The underside of the bowl has well carved lines that are cleanly laid out on the briar. The stamping on the shank gives a clear view of the stamping and the JB on the stem.brier2 brier3 brier4 brier5I was unfamiliar with the Bonnie Brier brand and the circle JB logo.so I looked it up on the internet. I found a notation on Pipedia. There I found the following information. First the link: https://pipedia.org/wiki/Bonnie_Brier Bonnie Brier is a trademark of Finsbury Products, Inc. of Elmsford, NY. The trademark was registered in November of 1976, and expired in August of 1997. The pipes are signed “Bonnie Briar” in script with the name of the model line underneath and “Imported Briar” below. There are several model lines with different makers’ marks on the stem or shank: Matterhorn (a crown), Standard, Highlands (script “H”), Interlude (stylized “JB” in an oval) and Willow Ridge (script “W R”).

I also looked obrier6n Pipephil’s site (www.pipephil.eu) and found the photo to the left of the stamping on the shank of an Interlude. It has the same stamping as the one I am working on. The circled JB is also the same.

My brother scrubbed the externals of the bowl and shank with a tooth brush and Murphy’s Oil Soap. He scrubbed it under running water and the grime and finish came off the bowl. The rim because cleaner but still needed some more work. He also cleaned the inside of the shank and the airway in the stem. The next four photos show the pipe as it was when it arrived in Vancouver.brier7 brier8I took a close up photo of the rim as it looked when I got it and also a photo of the stamping on the stem.brier9I stained the bowl with some Cherry stain in Danish Oil. I put a cork in the bowl and rubbed the stain on to the bowl with a cotton pad. I put the cork in a candle holder and let the bowl dry.brier10I heated the stem in boiling water to straighten out the bend. I wanted to correct the overbend in the stem. There was a small trough in the underside of the stem. I filled it in with clear super glue.brier11I sanded the repaired spot with 220 grit sandpaper until it was smooth and it blended into the surface of the stem.brier12I polished the stem with micromesh sanding pads – wet sanding with 1500-2400 grit sanding pads and dry sanded it with 3200-12000 grit pads. I rubbed it down with Obsidian Oil between each set of three pads. I set it aside to dry.brier13 brier14 brier15I applied several coats of Conservator’s Wax to the bowl and hand buffed it with a shoe brush.brier16I lightly buffed the stem and the bowl with Blue Diamond and gave it multiple coats of carnauba wax. I buffed it with a clean buffing pad to raise the shine. I hand buffed it with a microfibre cloth. The finished pipe is shown in the photos below. It turned out pretty well. Thanks for looking.brier17 brier18 brier19 brier20 brier21 brier22 brier23 brier24