Tag Archives: repairing tooth marks

Restoring a Long Stem Mini Churchwarden Imperial 15 Prince


Blog by Steve Laug

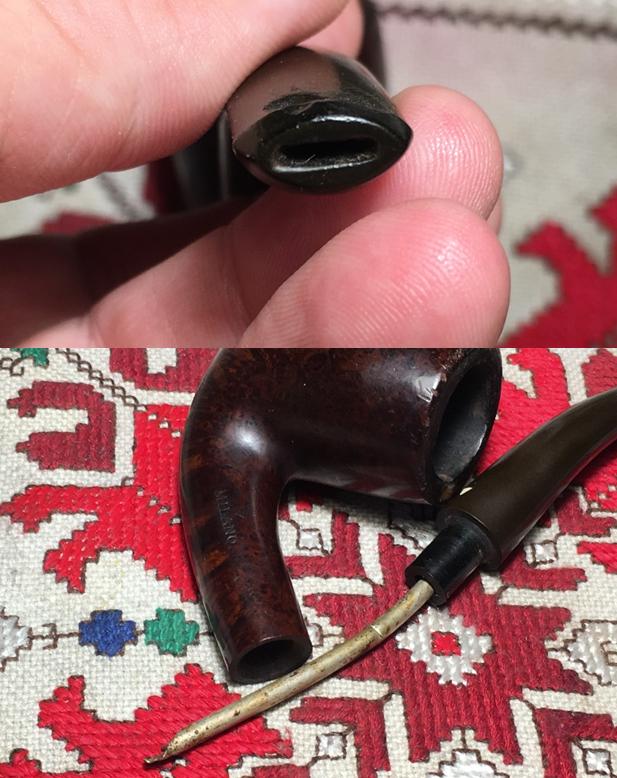
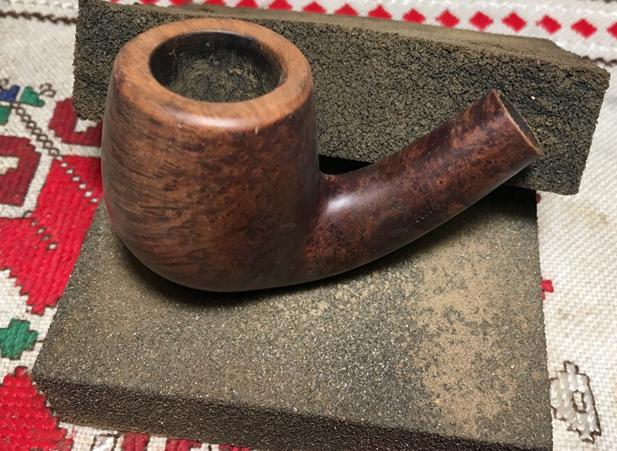
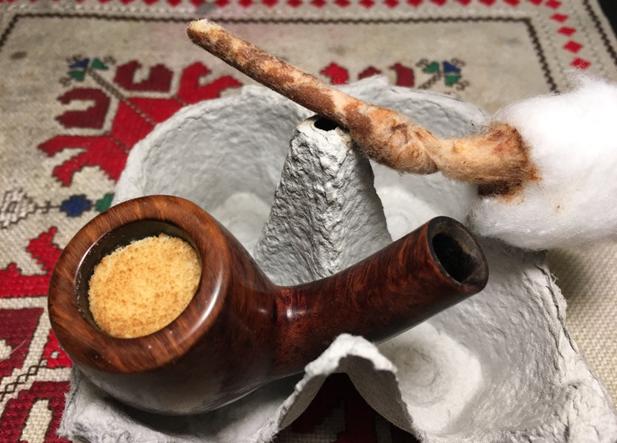
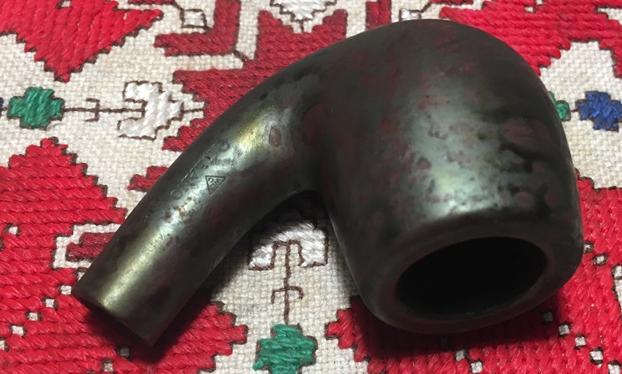
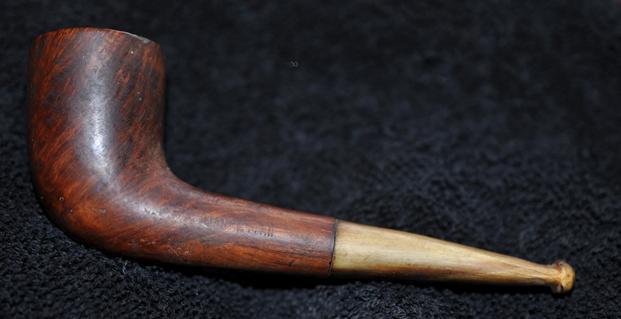
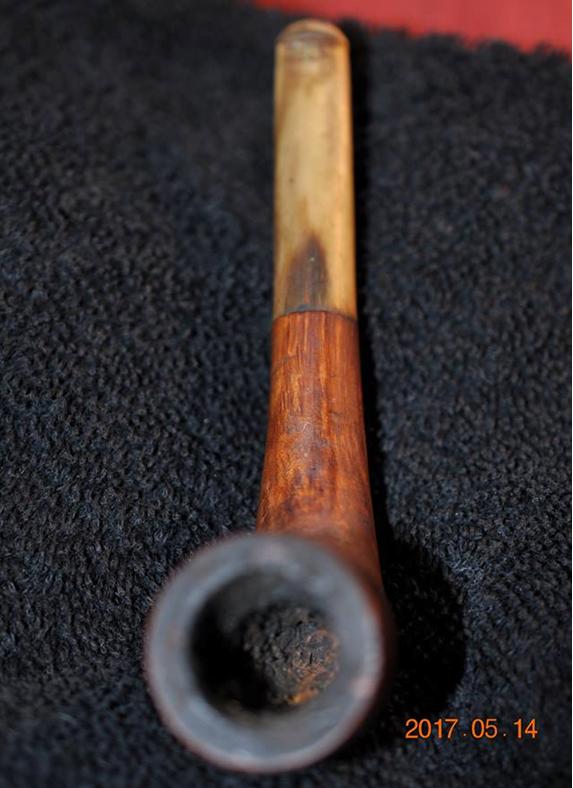
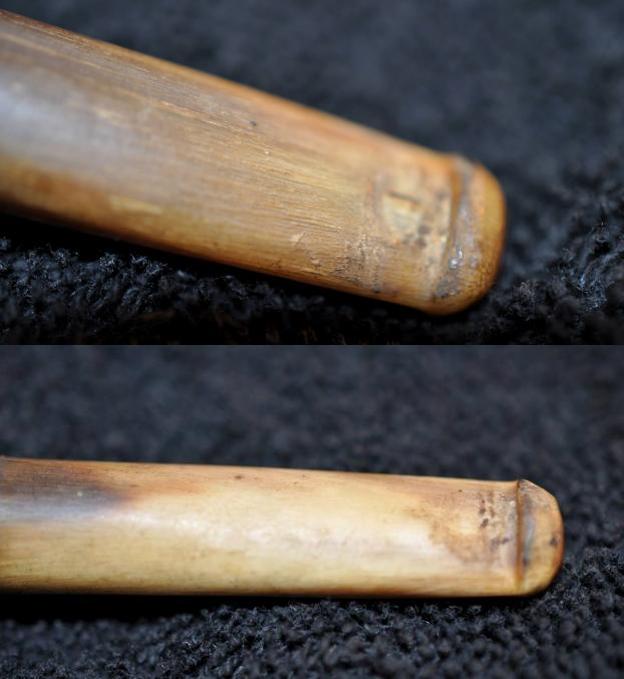
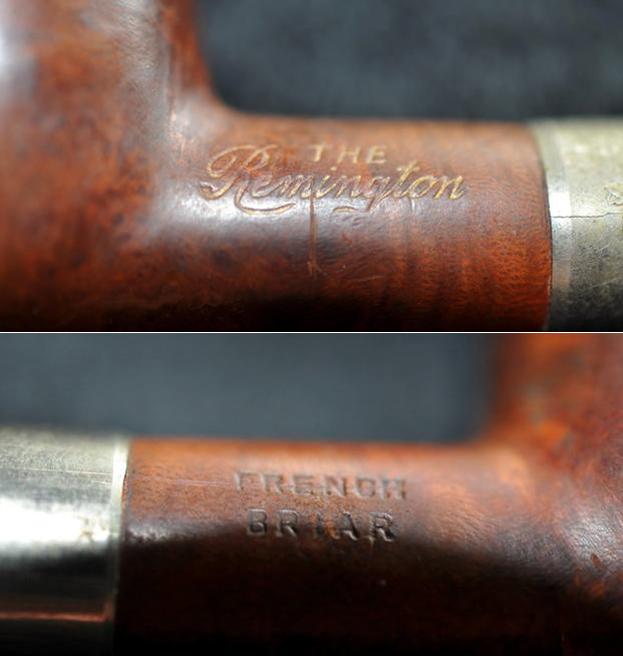
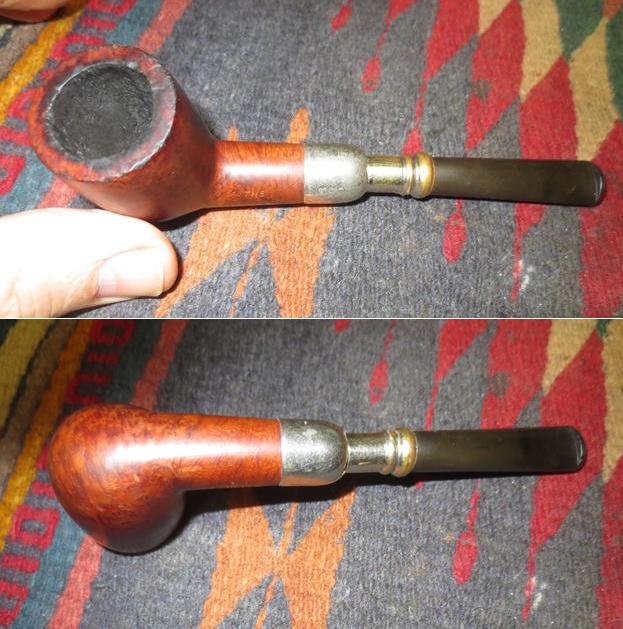
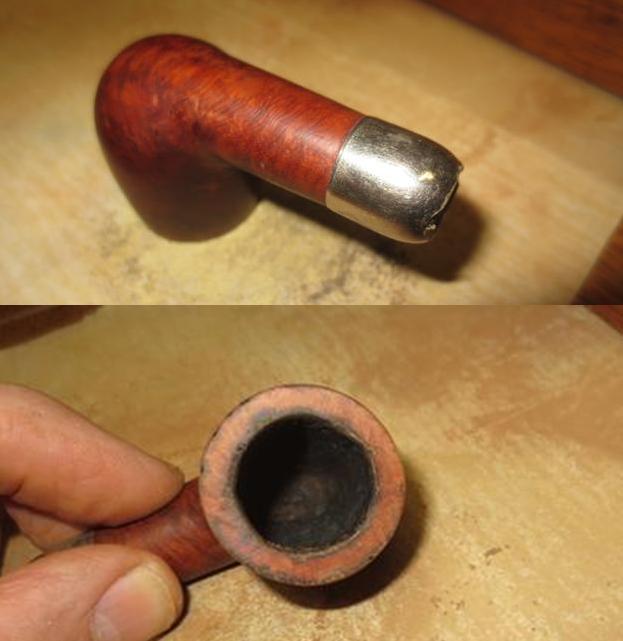
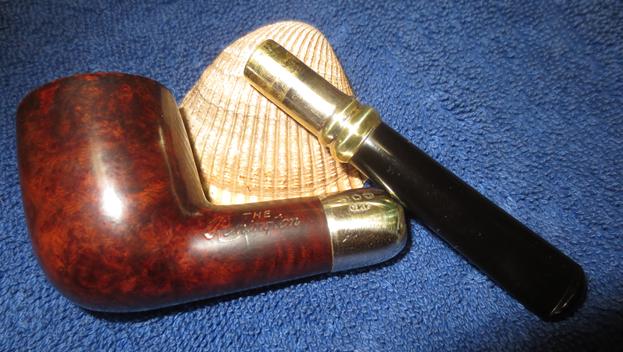
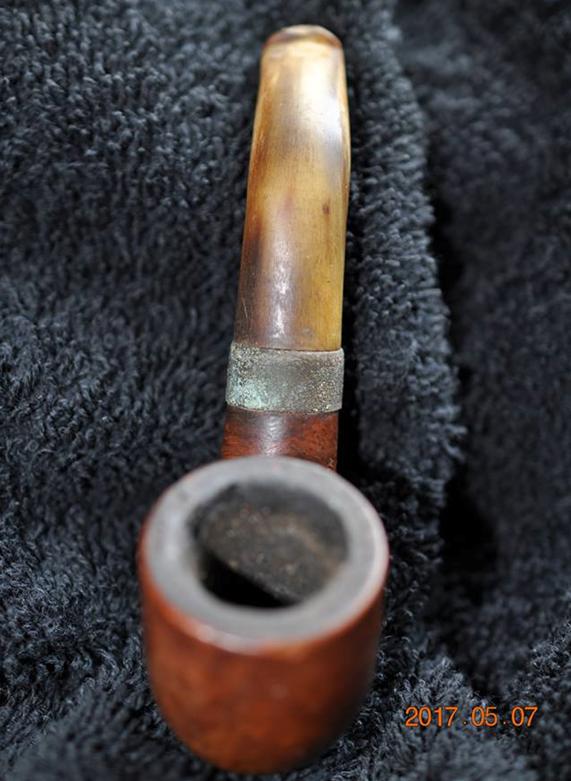
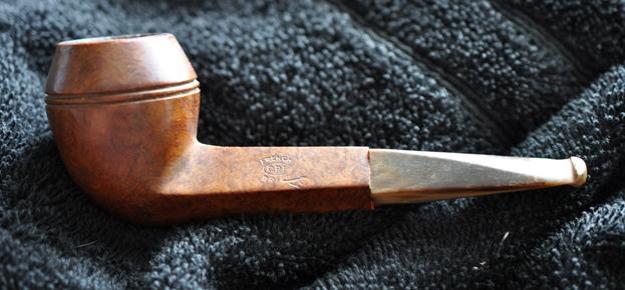
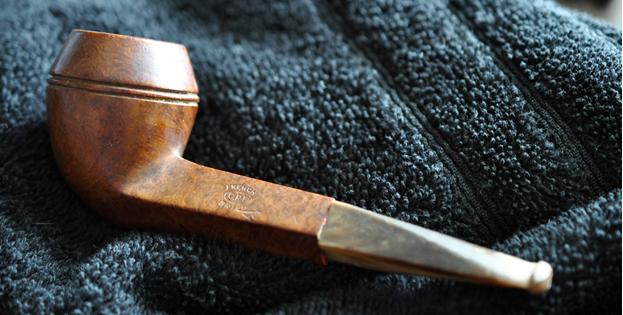
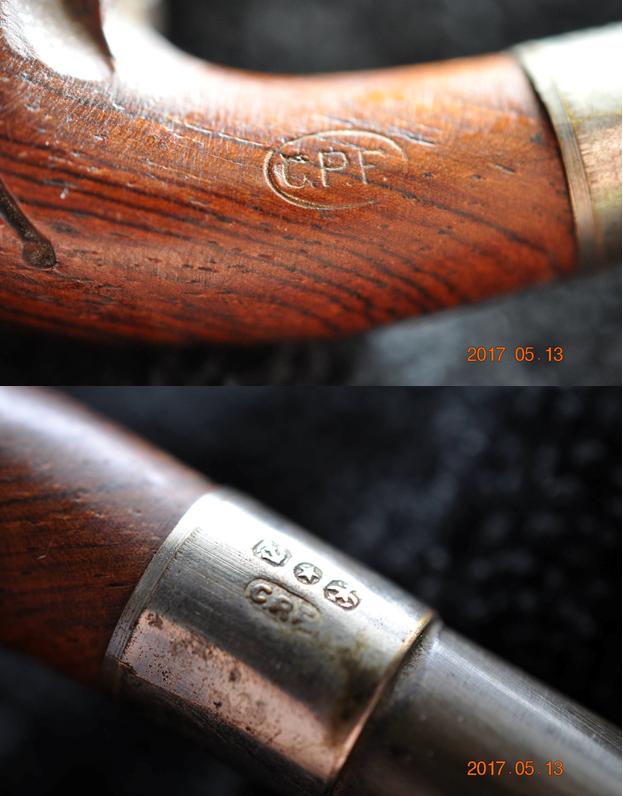
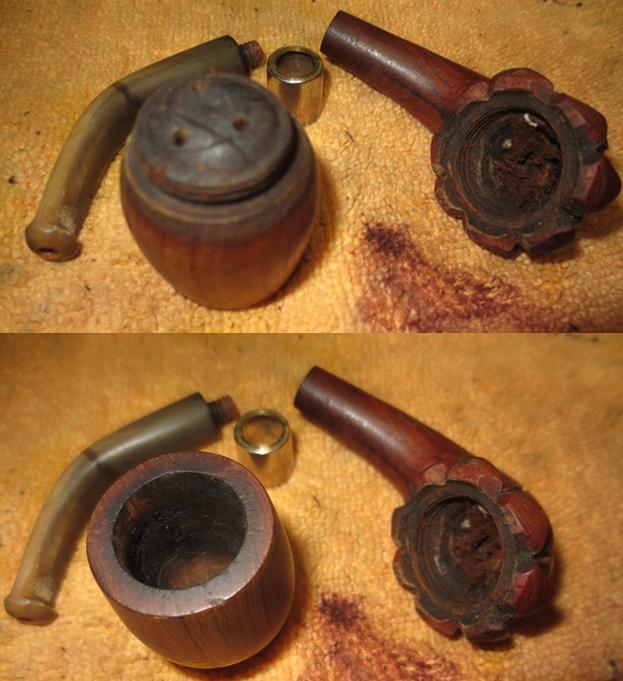
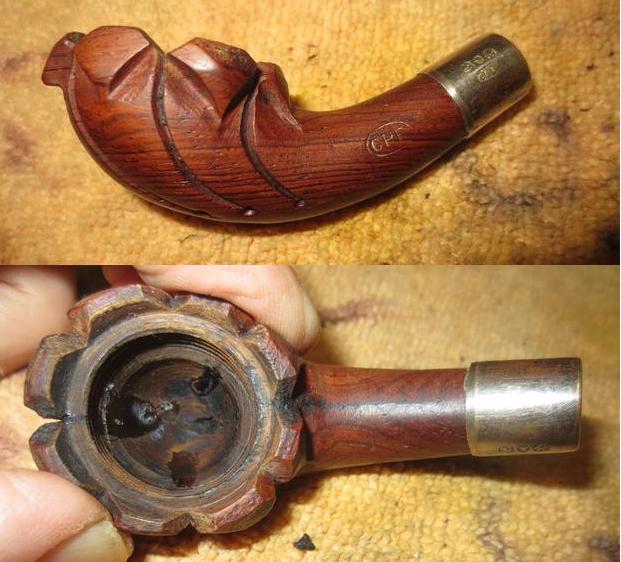
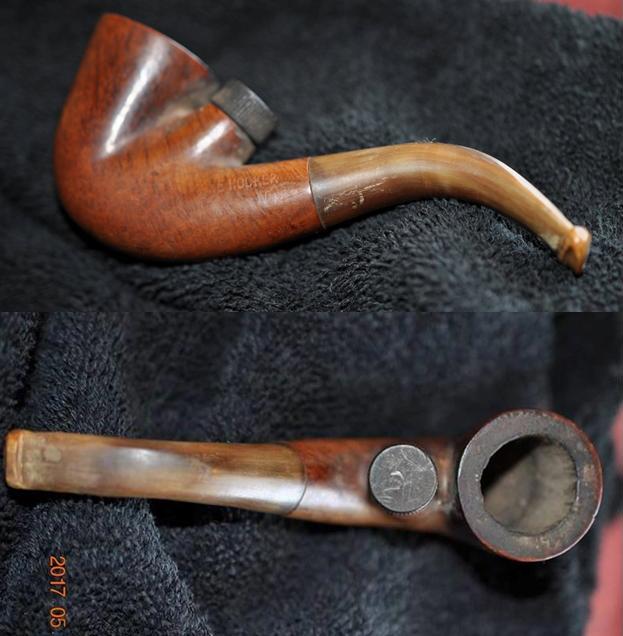
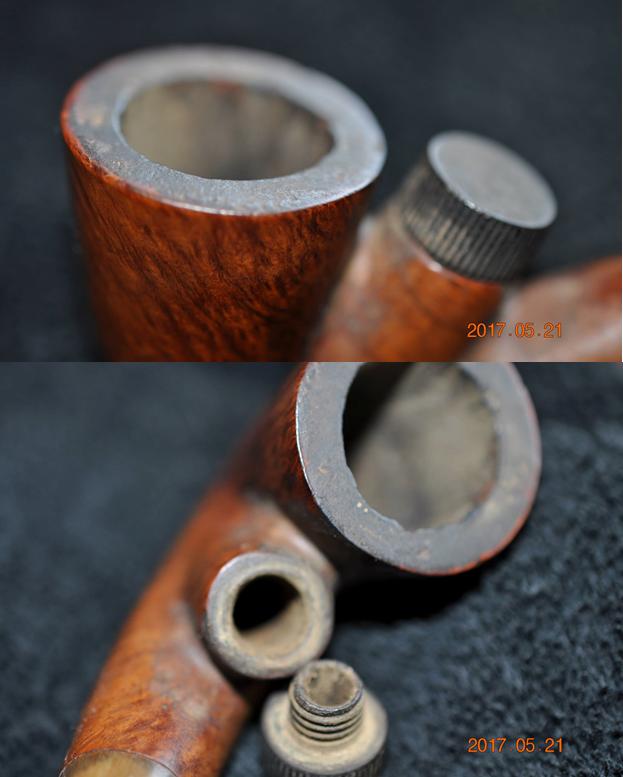
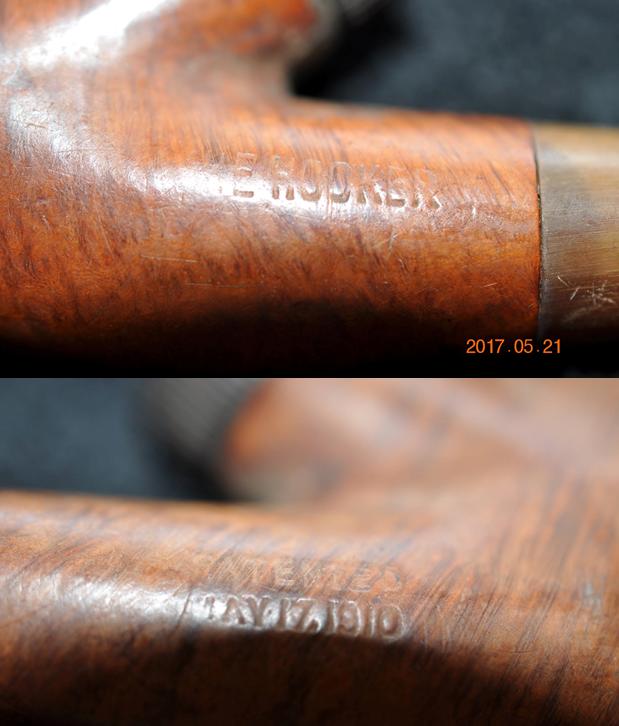
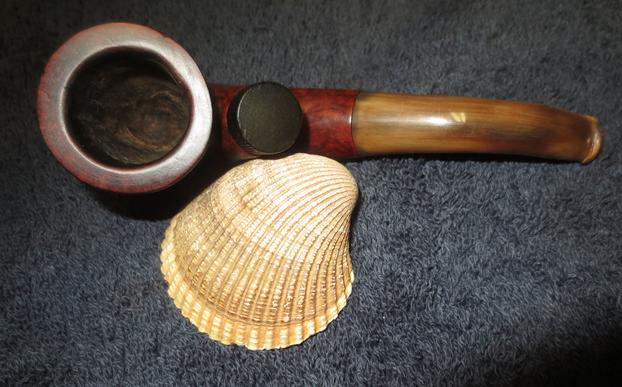
The next pipe on the worktable is a mini churchwarden prince shaped pipe. It has a delicate look to it and is very lightweight. It is petite with a length of 6 ¾ inches, height of 1 1/8 inches, bowl diameter of 1 ½ inches and a chamber diameter of 7/8 inches. The pipe is stamped on the left side of the shank Imperial in script with a flourish underneath. Below the flourish it reads De Luxe. On the right side of the shank it is stamped Made in London over England with a shape number 15. The next photos of the pipe show what it looked like before my brother did his clean up work.
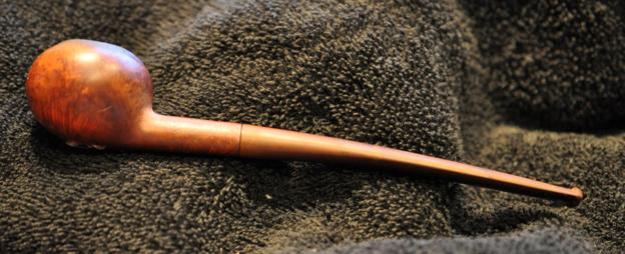
The pipe was in rough shape. The finish was worn and crumbling. There were some small sandpits on the bottom left and right sides. The underside of the bowl had a spot of glue and the remnants of something that the pipe had been glued to. I wonder if it had not been in a display box of some sort before being liberated and sold. The bowl had a thick cake but the rim had an overflow of lava on the top and the inner edge was damaged to the point that the bowl was no longer in round. There was an inner tube extending into the bottom of the bowl. The original slant on the tube was ruined and the end of the tube was chewed and damaged. The stem was oxidized and there were deep tooth marks on the top and underside near the button. The underside tooth marks had a small hole that broke through into the airway in the stem. 
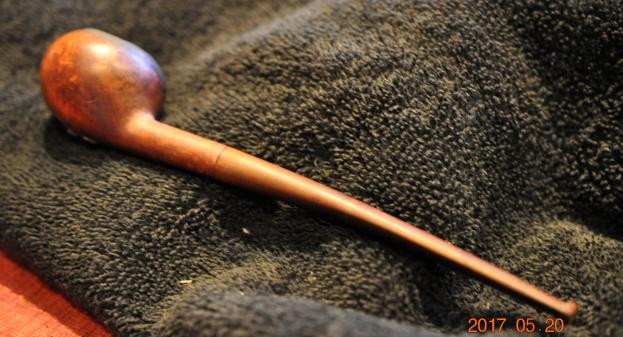
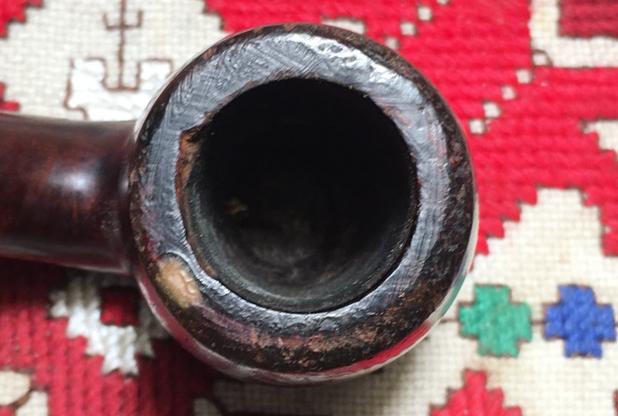
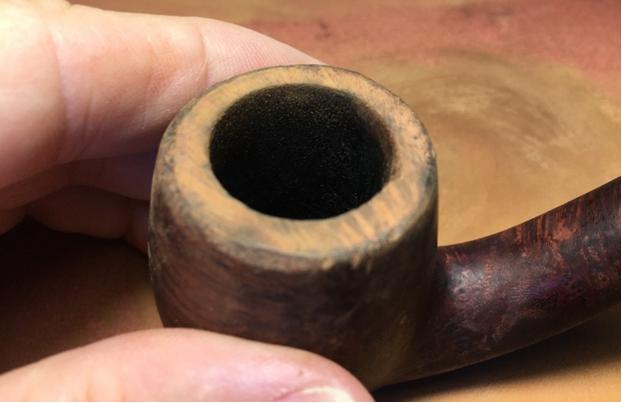
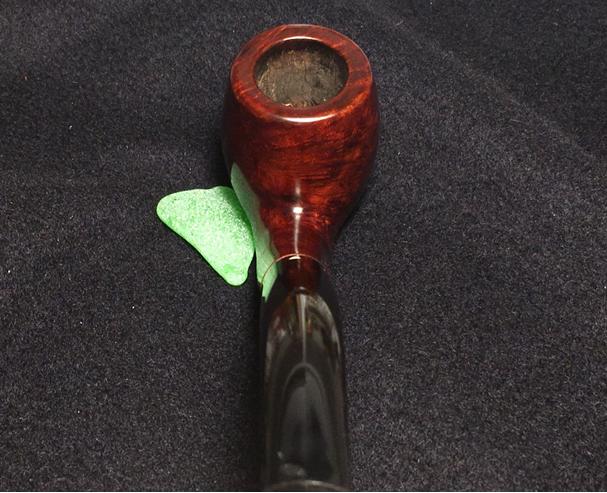
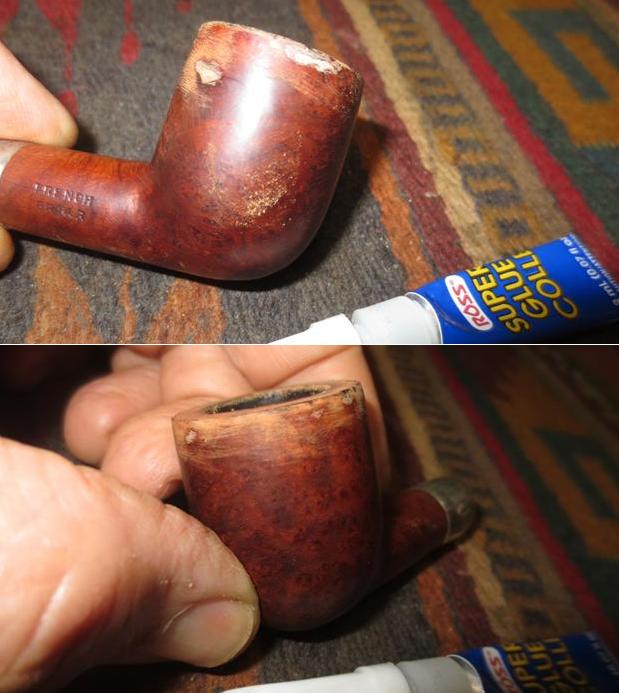
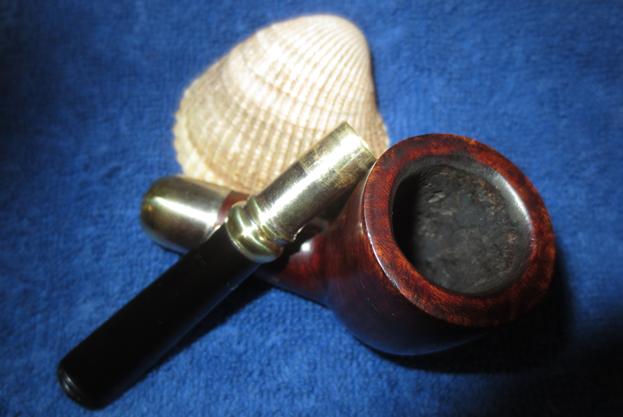
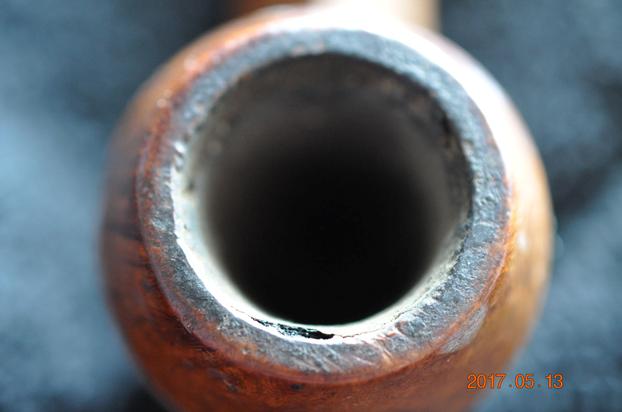
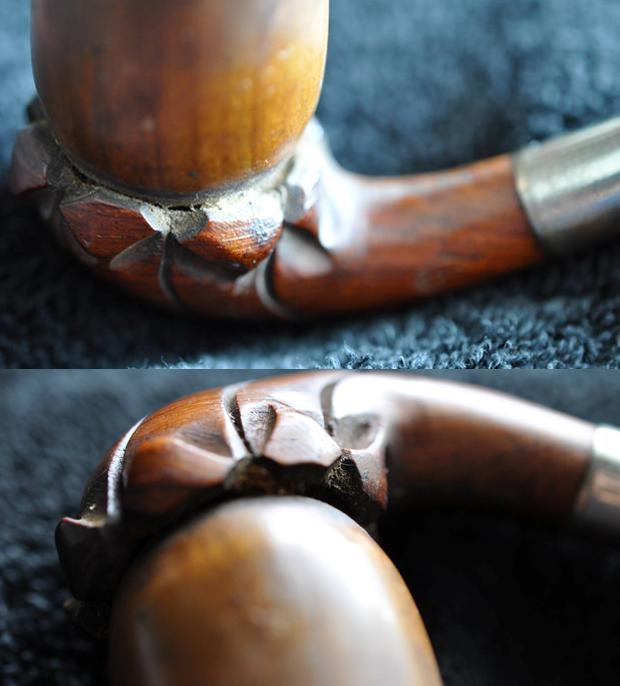
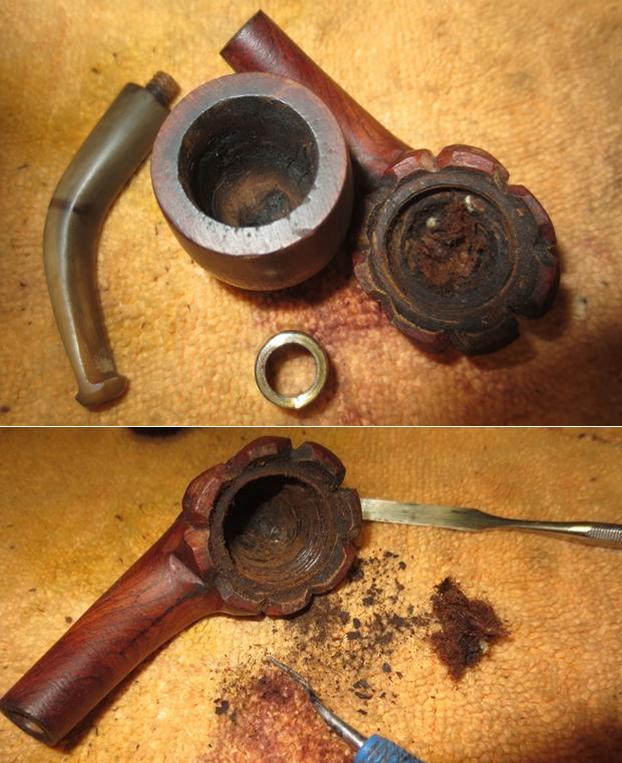
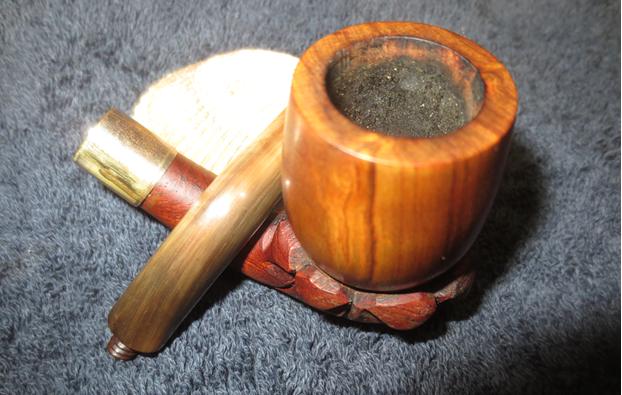
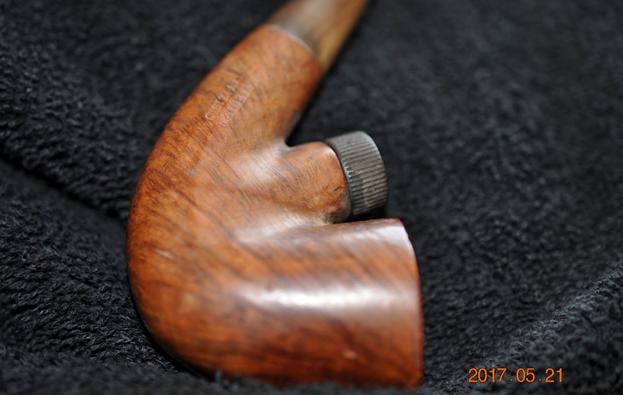
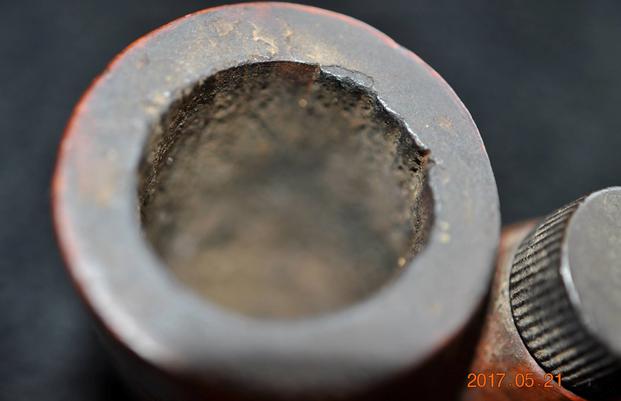
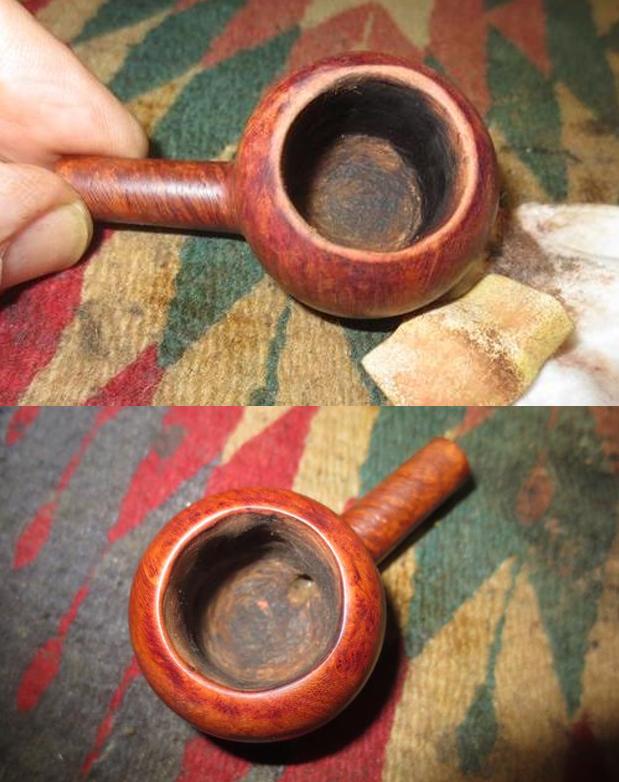
Jeff took some photos of the bowl and rim to show the condition of both. You can see the cake in the bowl and the lava overflow down the sides of the bowl from the surface of the rim. The fact that the bowl did not have a flat rip to but a rather rounded/thin rim top allowed the flow downward on the bowl.
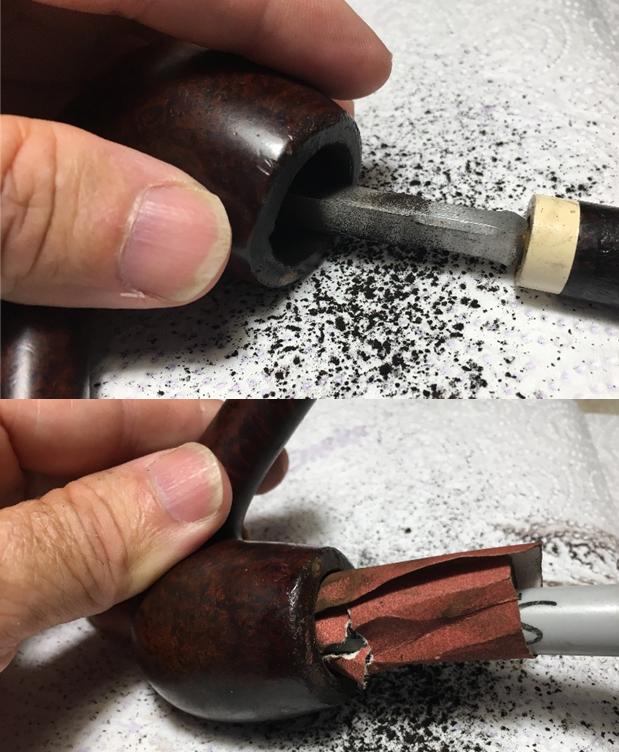
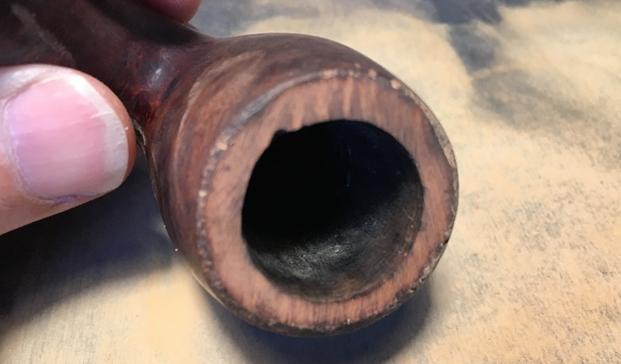
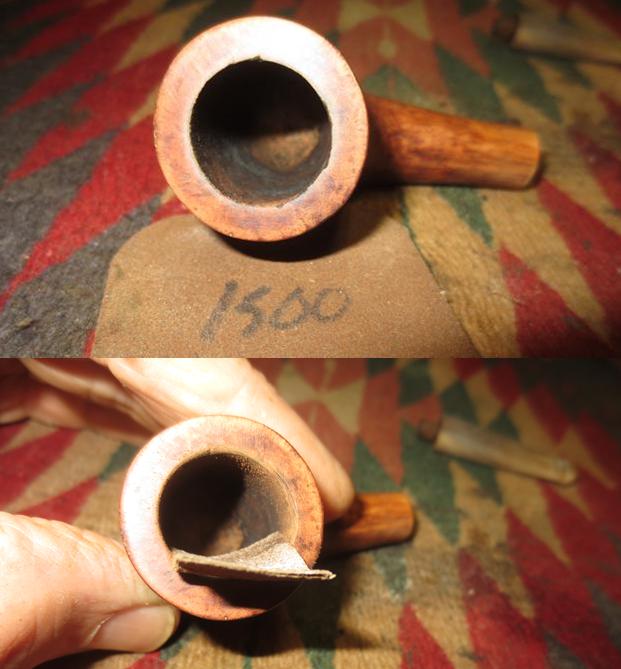
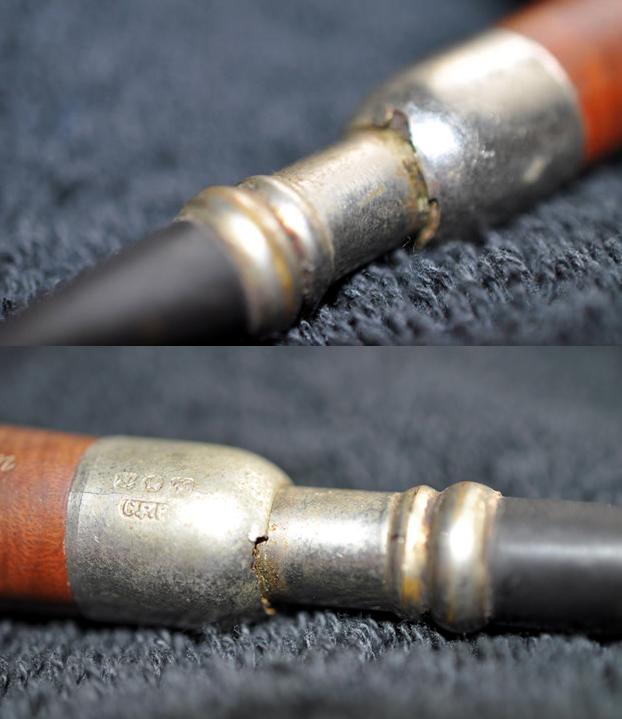
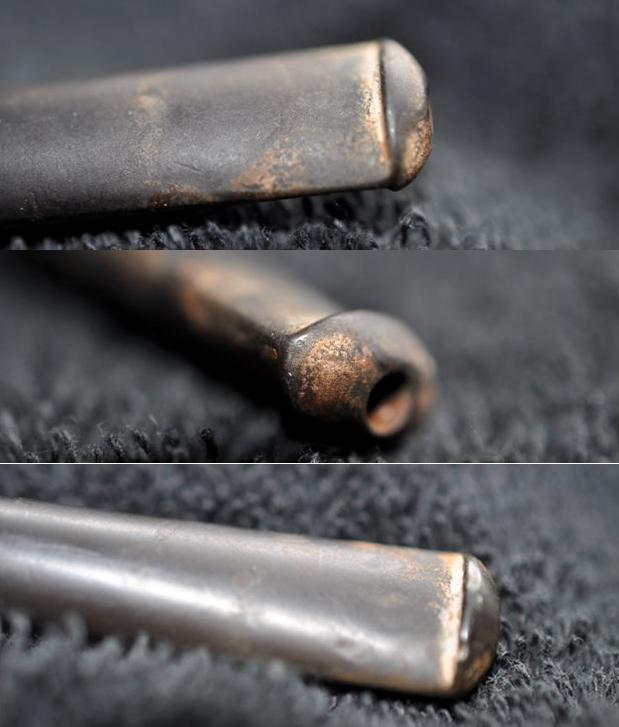
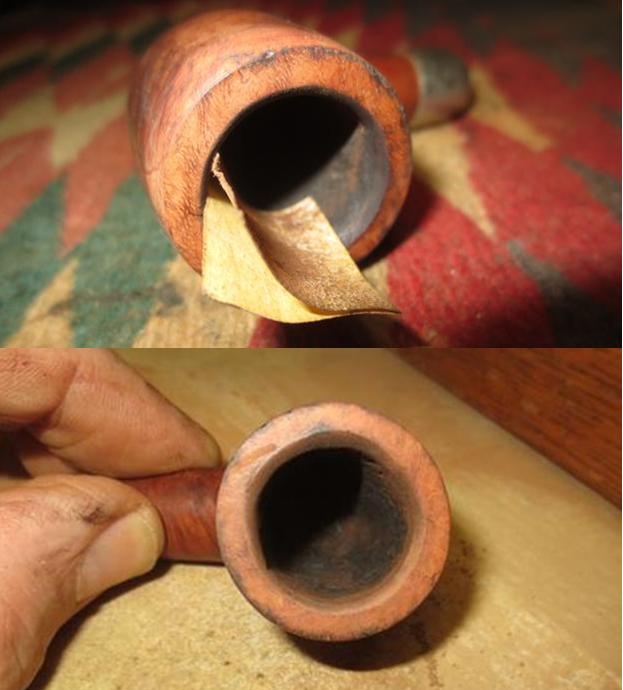
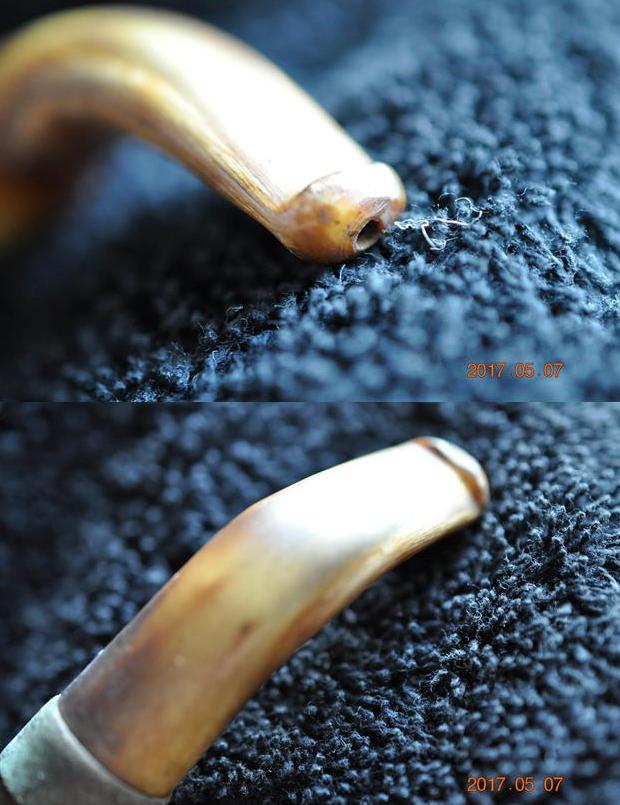
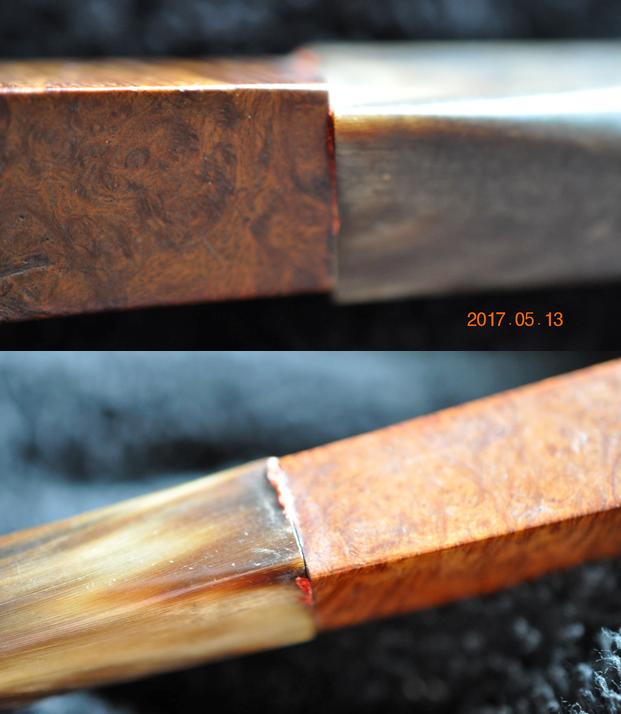
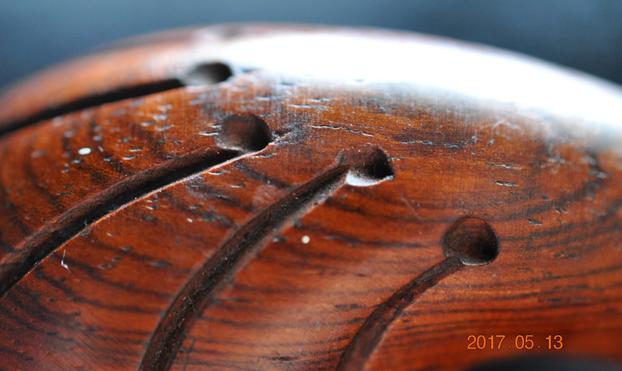
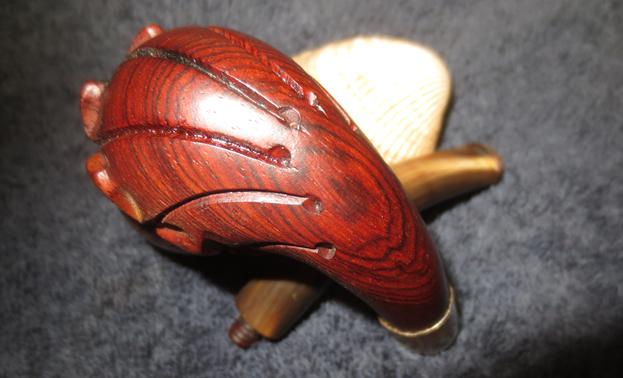
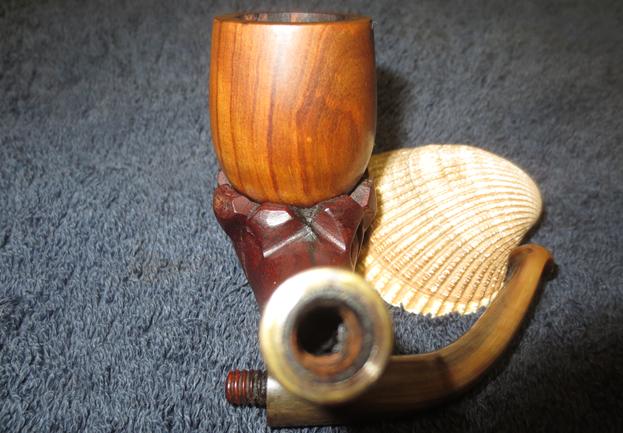
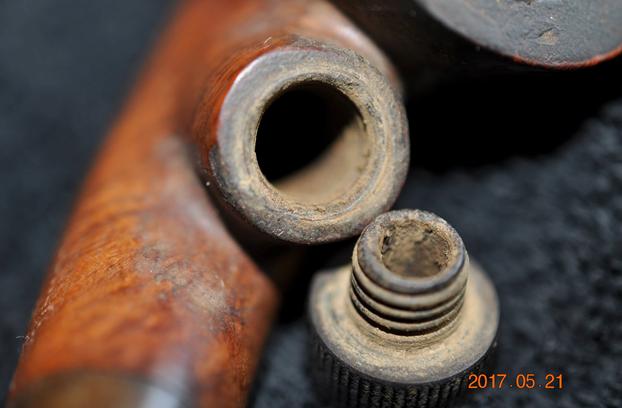
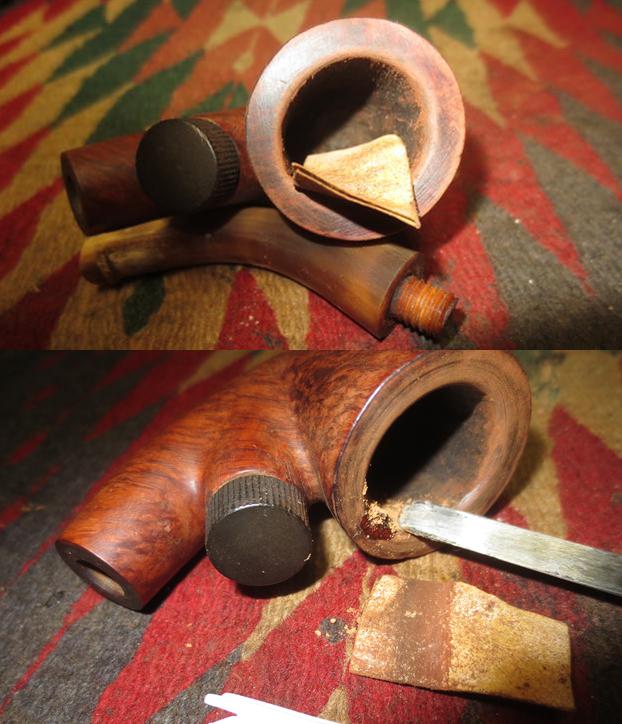
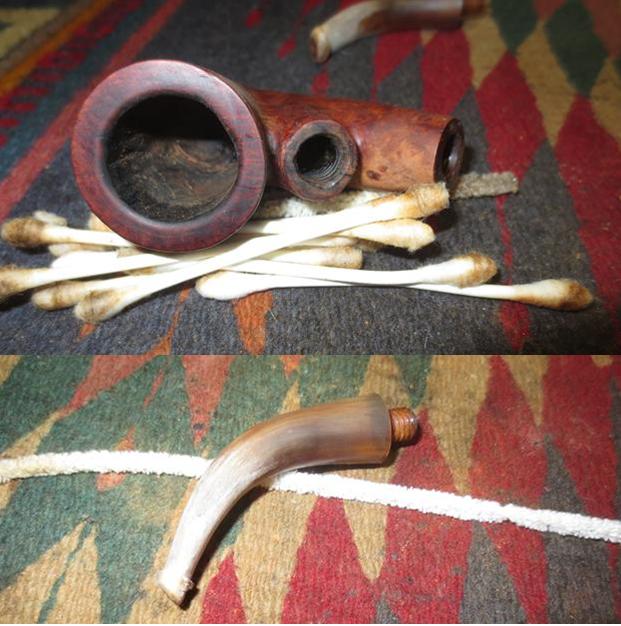
The next photo shows the bottom of the stummel and the thick glue/paper coat that is stuck to that part of the bowl. It appears to me that someone had the pipe stuck to some fibre board in a display case of pipe shapes. Possibly, it was a shadow box of “dad’s” or “grandpa’s” and this one was a centerpiece. Following that photo are three different pictures of the inner tube that sat in the bottom of the bowl. The end on these is usually slanted with the longer edge sitting on the bottom of the bowl and the shorter edge ending at the entrance of the airway into the bowl.
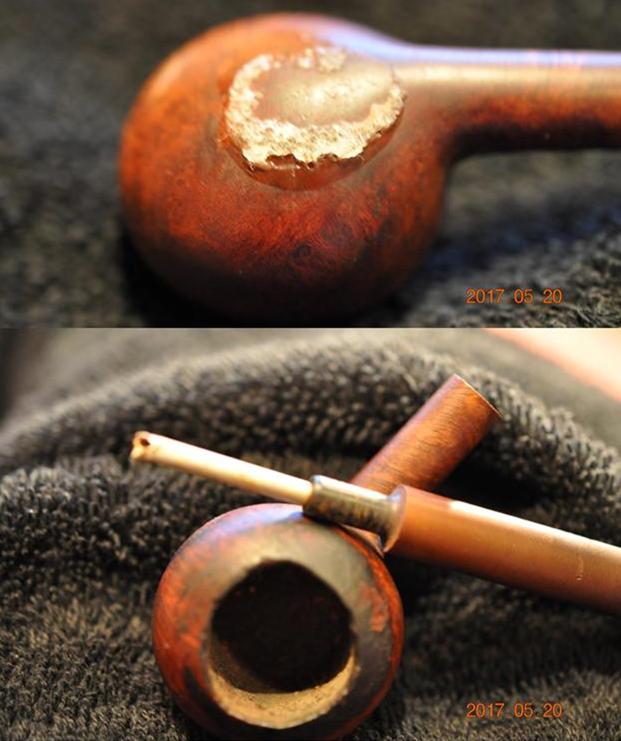
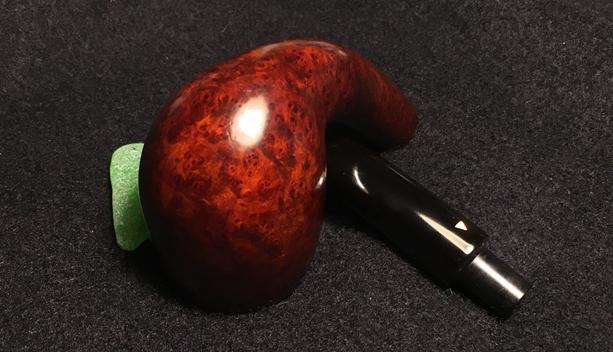
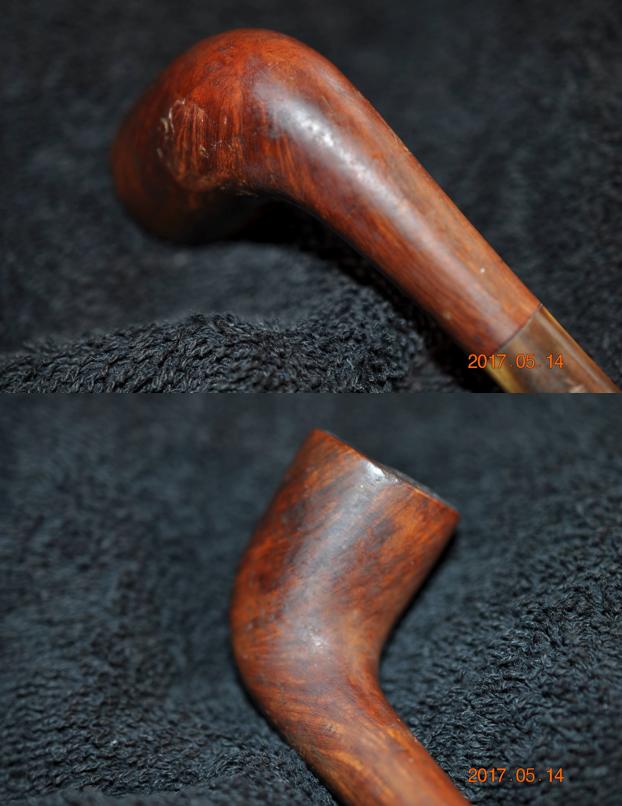
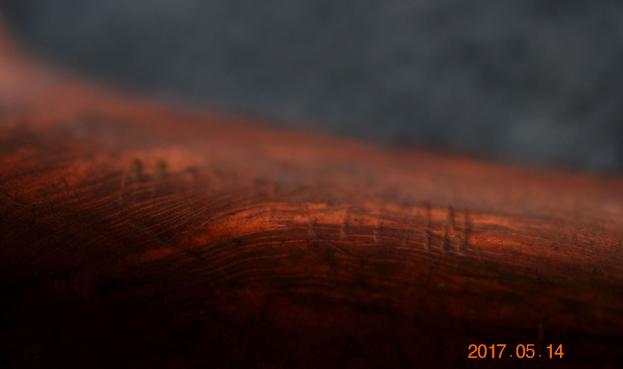
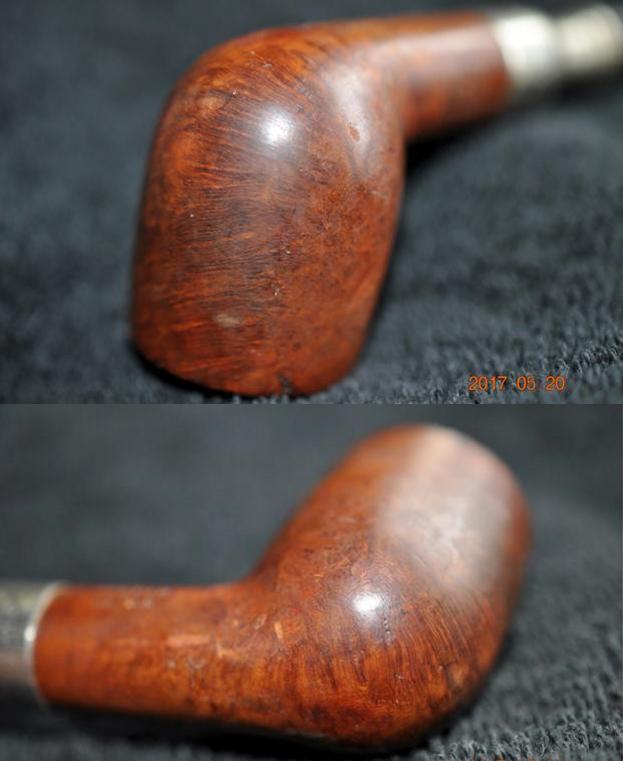
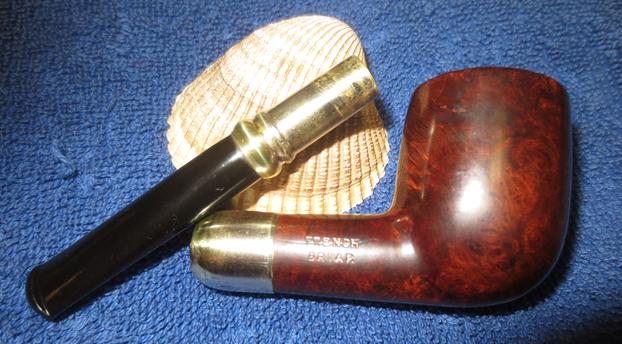
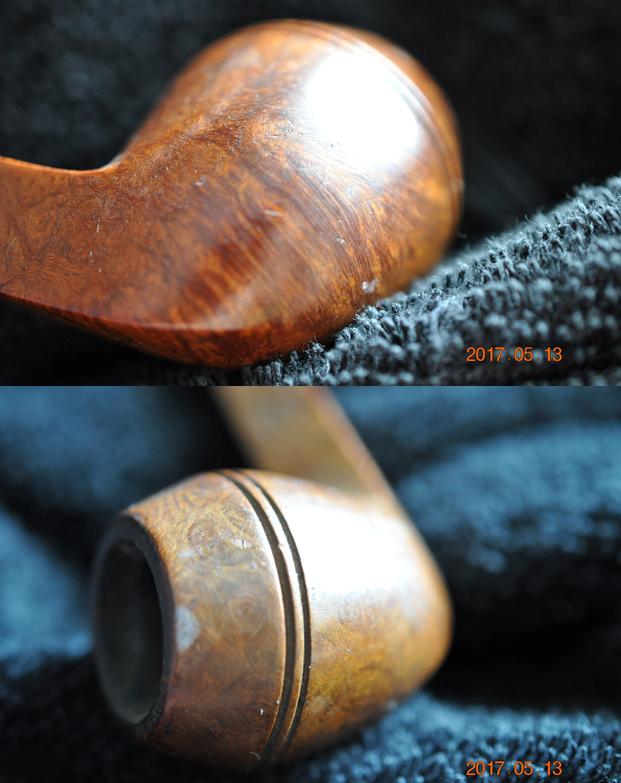
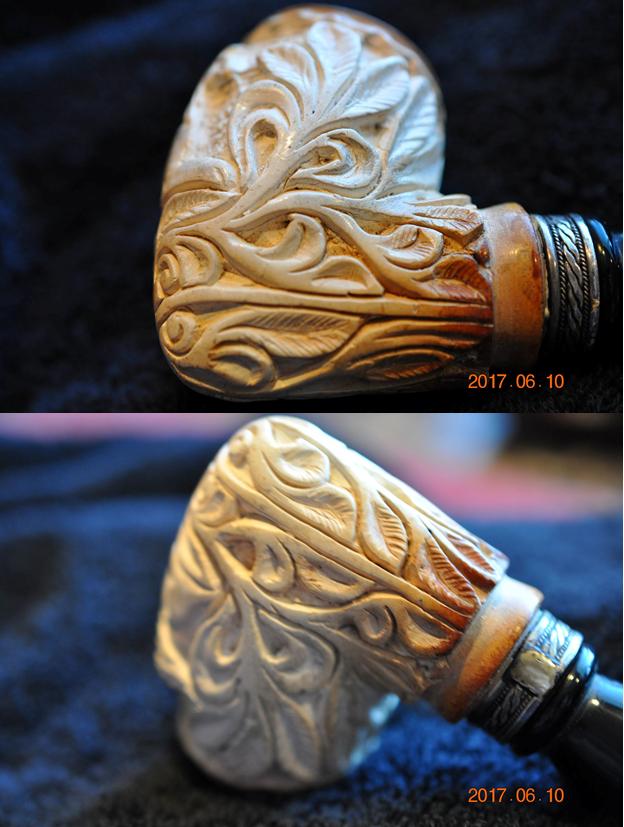
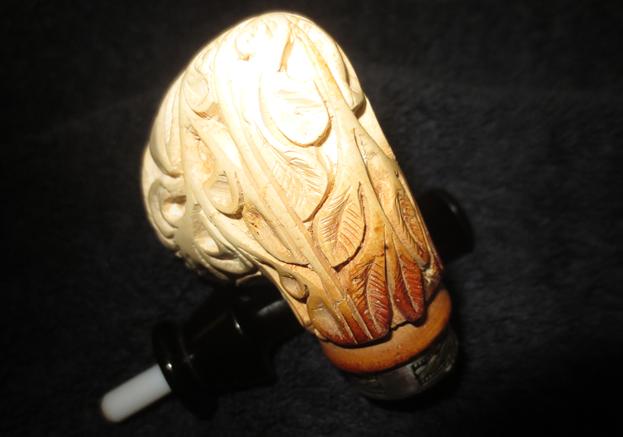
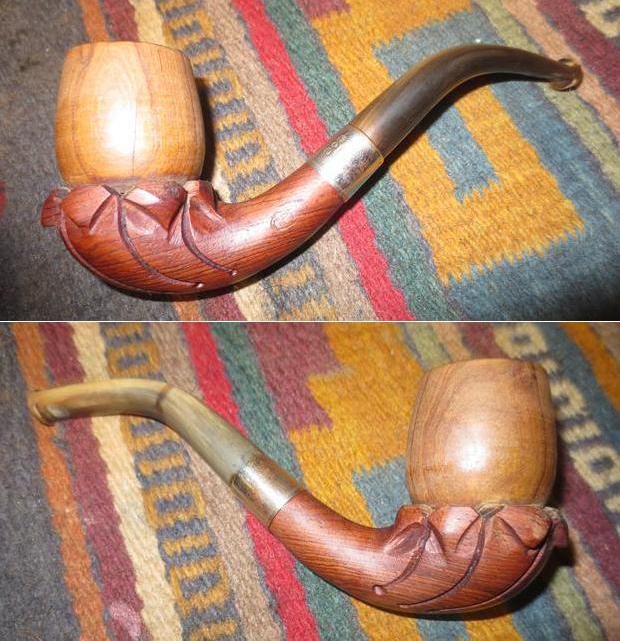
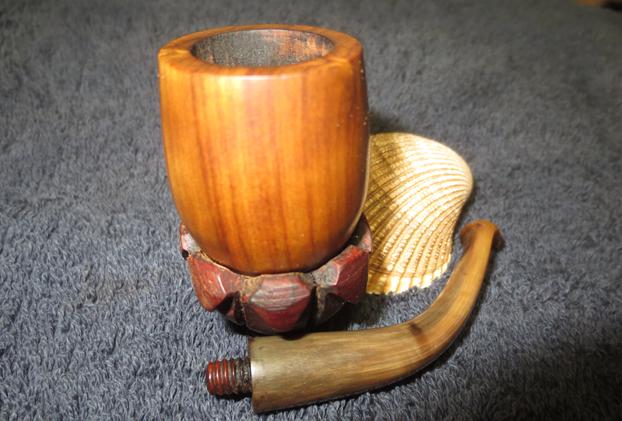
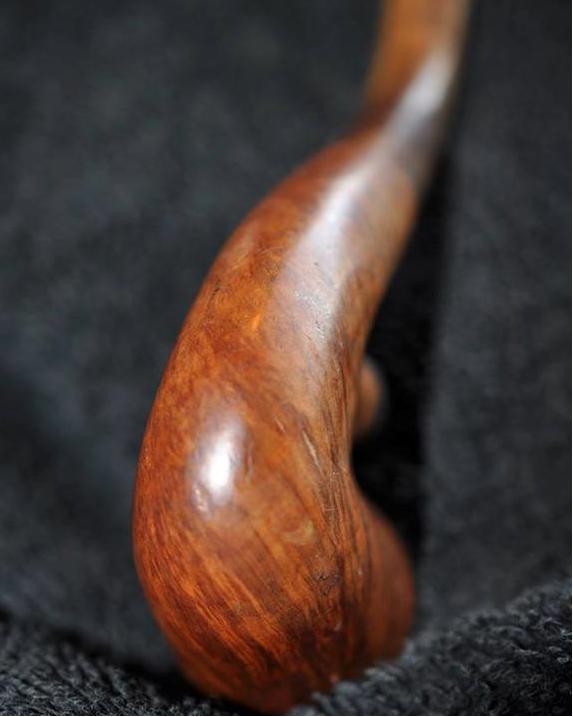
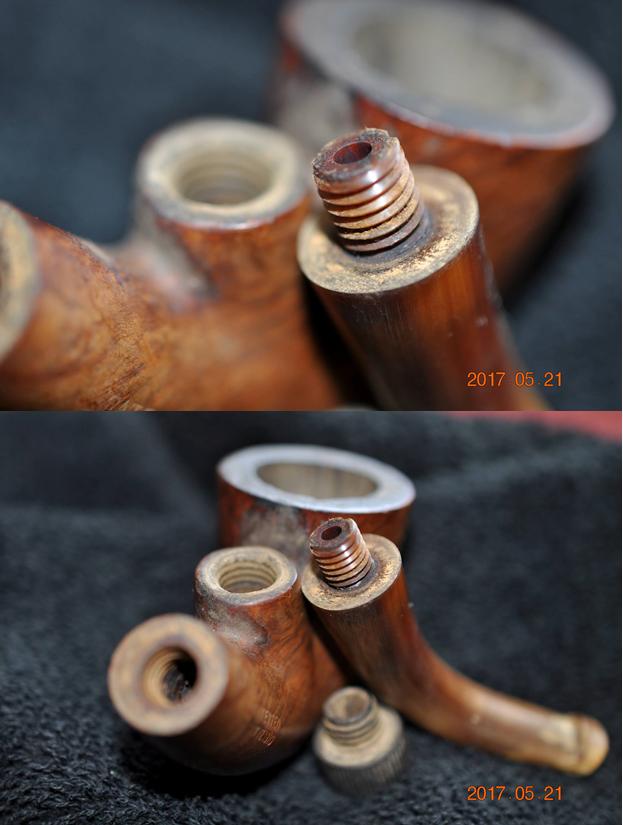
The bowl has some amazing grain running up the sides of the bowl and I am sure that underneath the debris that is glued to the bottom there will be some nice bird’s eye grain. The finish was worn but the grain popping through the grime.
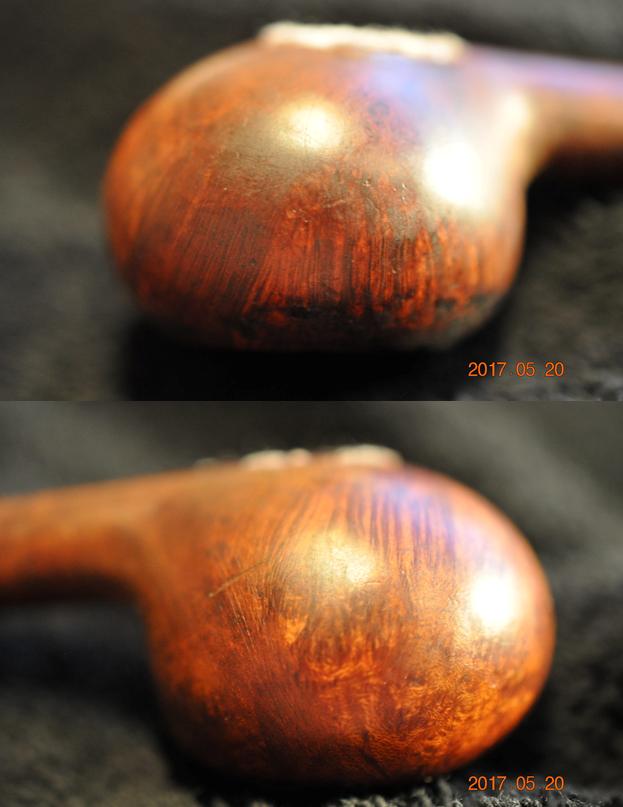
The stamping was readable but it was faint. Care would need to be taken in the clean up so as not to damage it further.
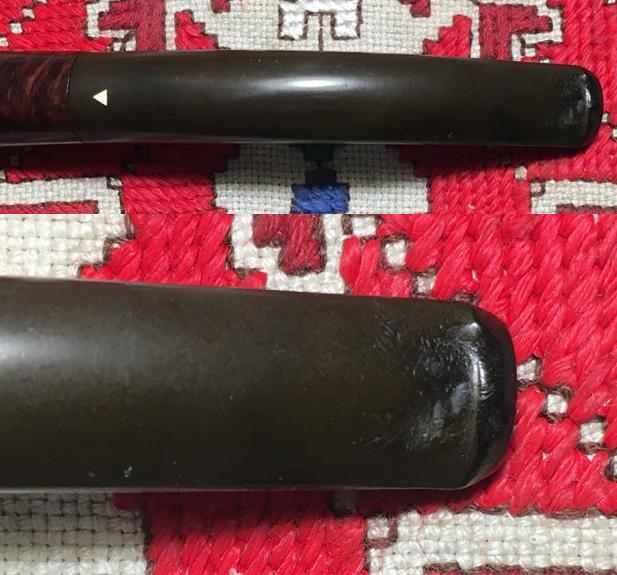
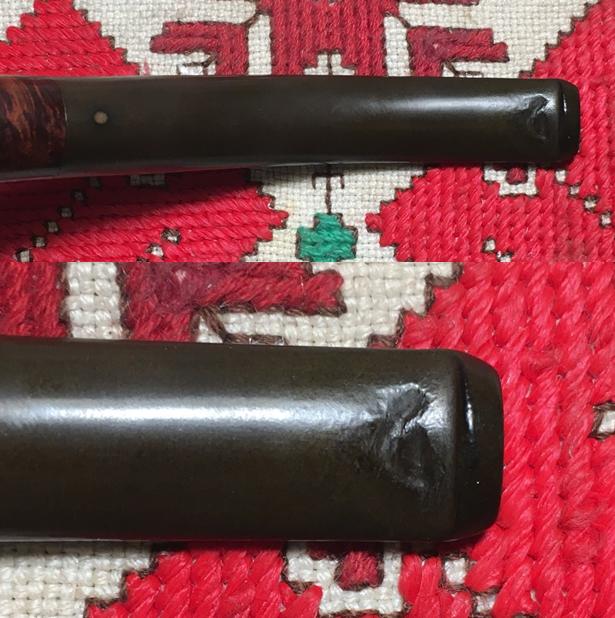
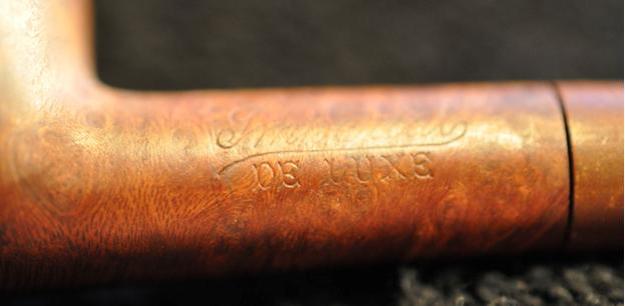
The stem had some issues – there were deep tooth marks on both sides from the button forward. On the topside there were nicks mid stem and near the shank/stem junction. The button also seemed worn and there was a possible crack on the underside mid button.
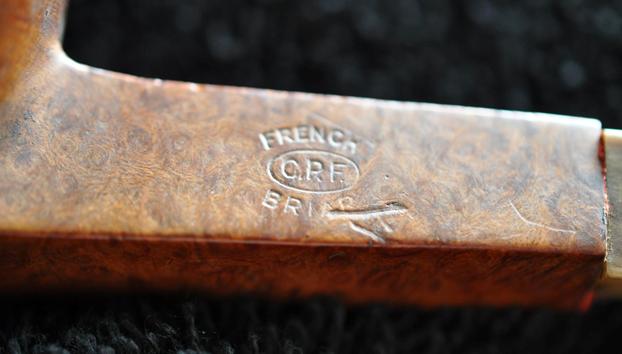
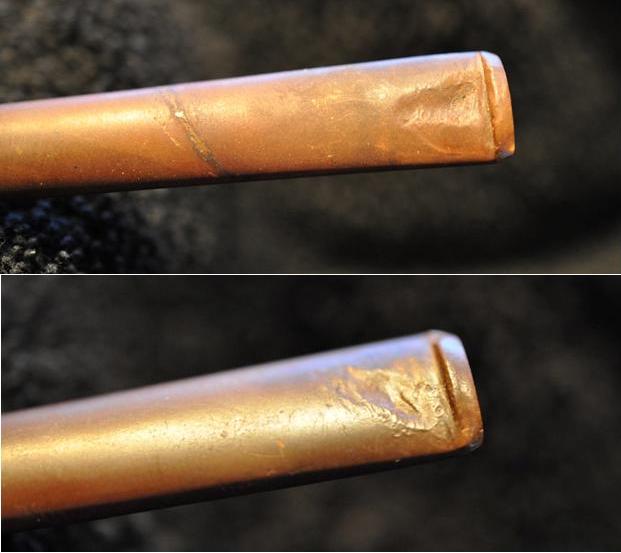
I have read different bits of history on the Imperial pipes and trying to put them together is an interesting puzzle. From Pipes, Artisans and Trademarks, by Jose Manuel Lopés’ I found that t he Imperial Tobacco Co. (Imperial Tobacco Ltd.) was founded in 1901 through the merger of several British tobacco companies. In 1902 it went into partnership with the American Tobacco Company to found the British American Tobacco Company. This information was also cited on https://pipedia.org/wiki/Imperial_Tobacco_Co.

I looked further on Pipedia under The Civic Company https://pipedia.org/wiki/Civic. This lead came from a price list/catalogue that I had found in researching information on an earlier Imperial pipe I was working on. Here is the link https://rebornpipes.com/2014/05/11/civic-company-1921-trade-list/. The Pipedia article says Civic was formed in 1921out of the Imperial Tobacco Co. (Fancy Goods Department) Ltd which was located in Fulham Palace Road Hammersmith. The article went on to give a bit more information on the The Imperial Company itself. It repeat that it was formed in 1901 but that it was formed in response to an aggressive take over raid in Britain by American Tobacco and involved the pooling of tobacco retail outlets including closely related items such as briar pipes. Here is the additional information that was not included in Lopés’ – in 1902 Imperial purchased the Salmon & Gluckstein retail empire, which included a section that finished briar pipes, originally made in France, for sale in Britain. It was this unit that became the fancy goods department within Imperial and, ultimately in 1921, the Civic Company. In 1928 Civic was a key element in the merger with other producers and retailers that formed Cadogan Investments, which still trades today.

I did some further searching on Google to try to pin down more information on the brand. I found lots of repetitive information in bits and pieces but nothing that added to what I already knew. I did find confirmation of the above information in a discussion on the pipesmagazine online pipe forum. It contained no new information but it gave the same data I had quoted above.  http://pipesmagazine.com/forums/topic/need-help-to-identify-this-pipe-1.

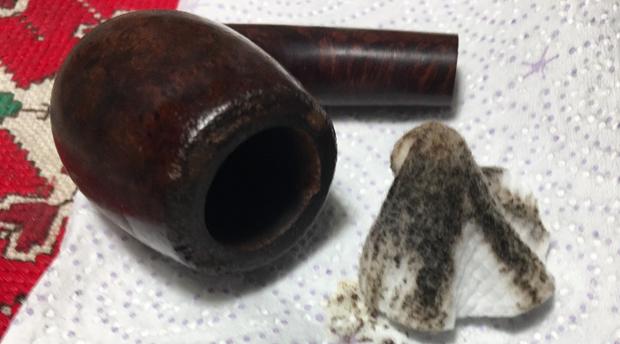
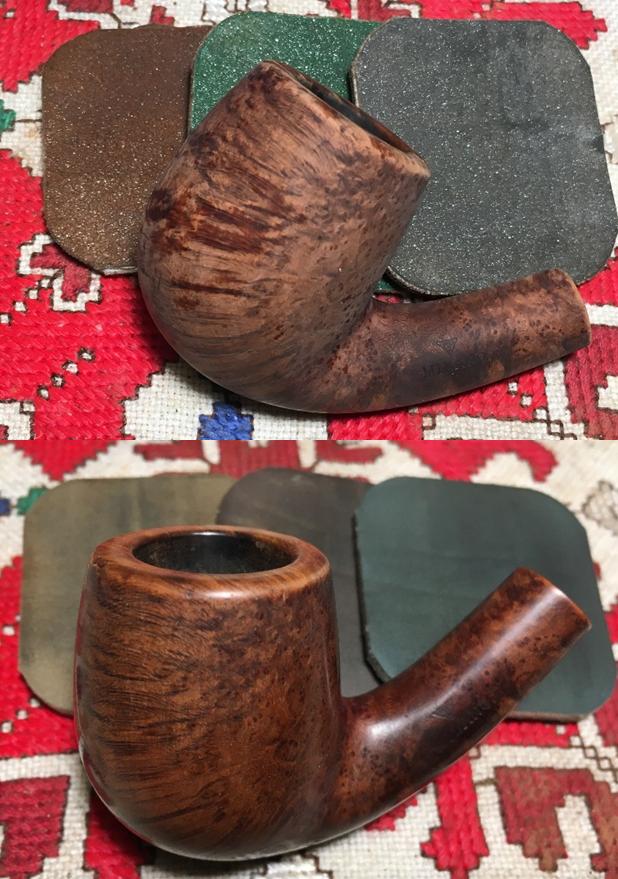
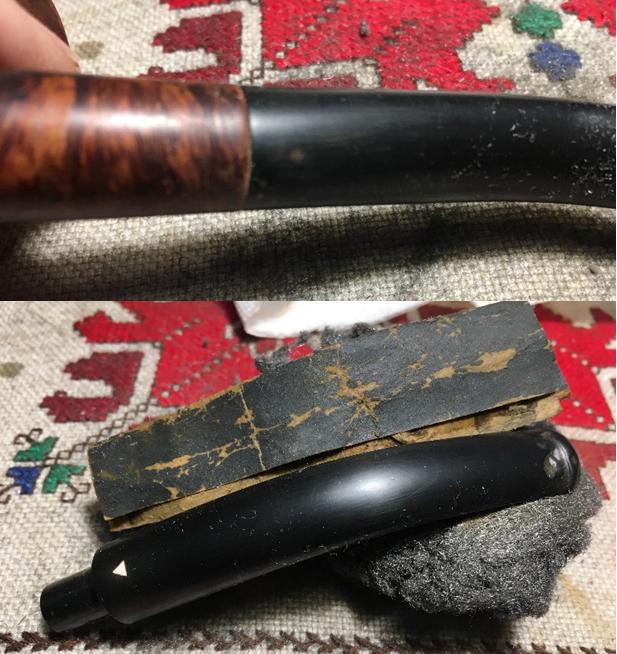
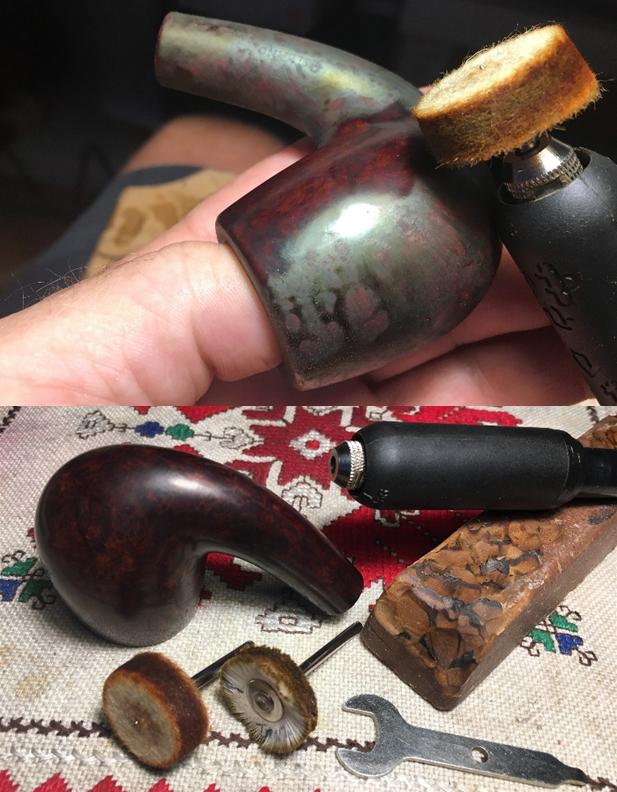
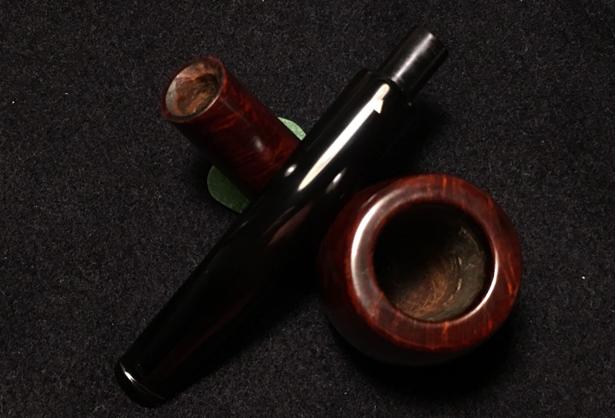
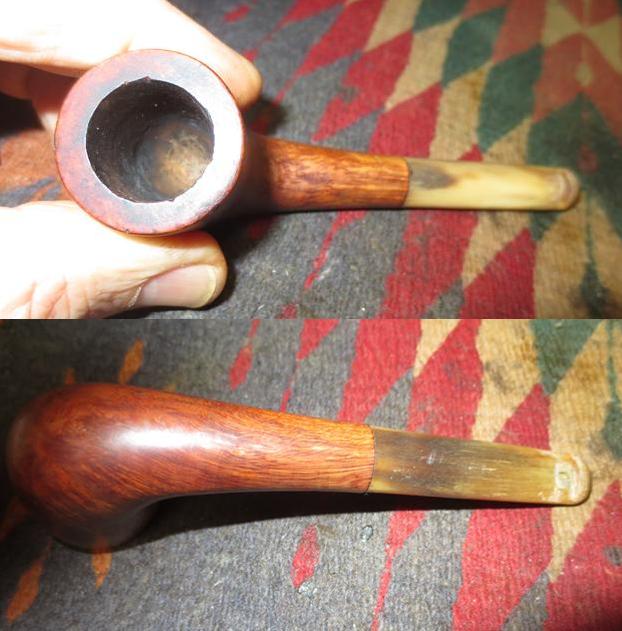
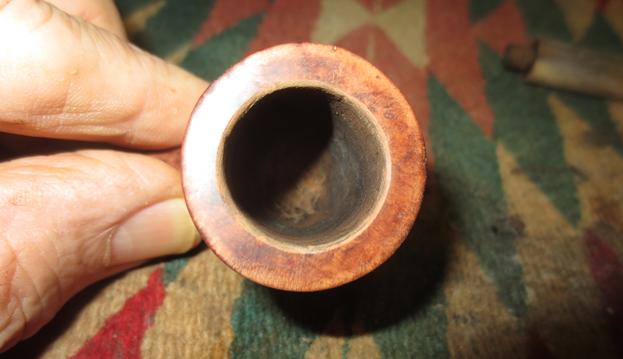
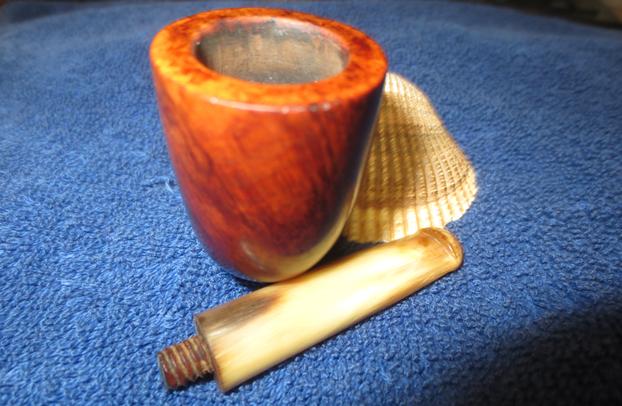
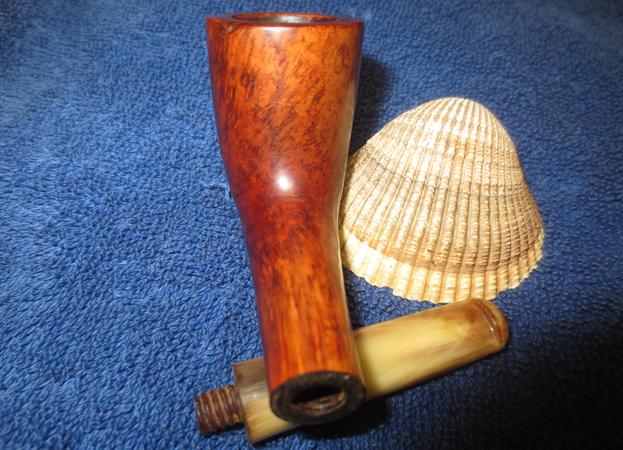
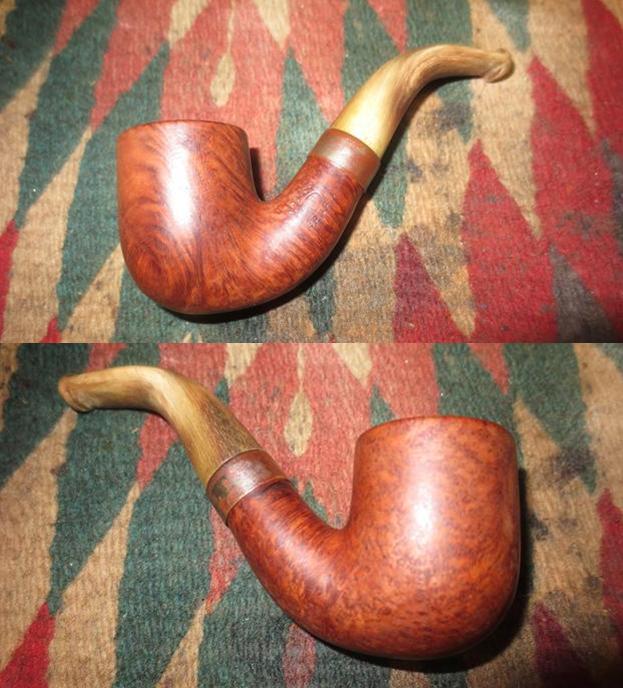
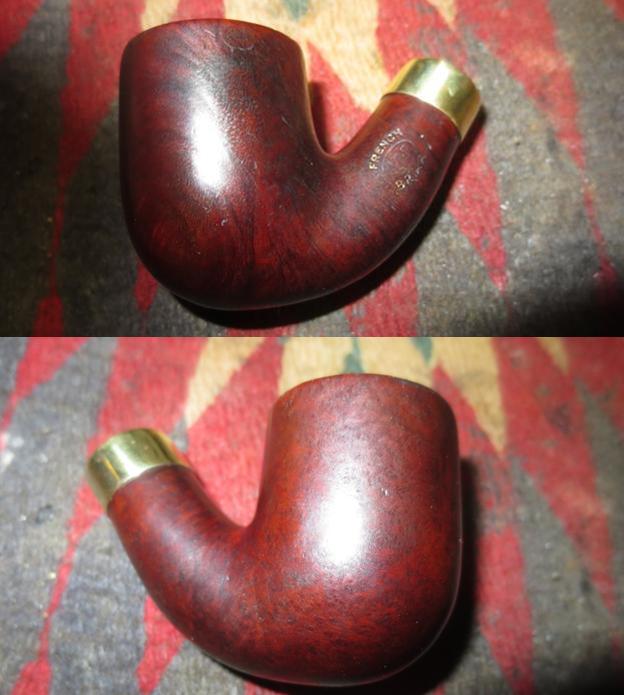
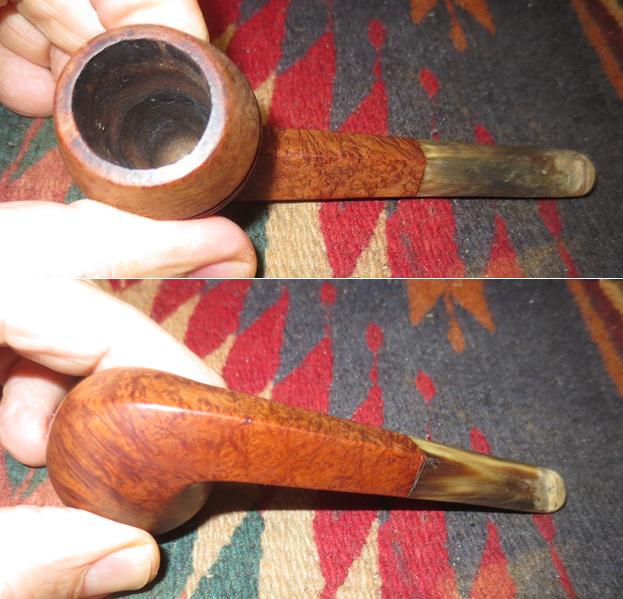
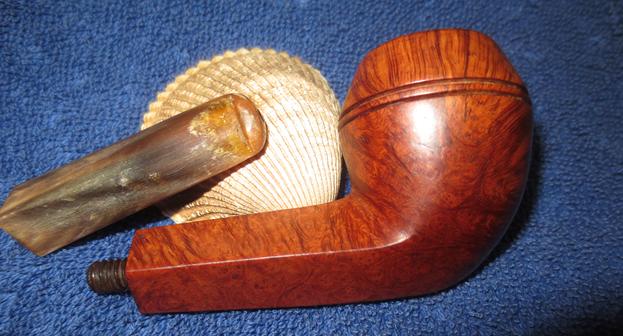
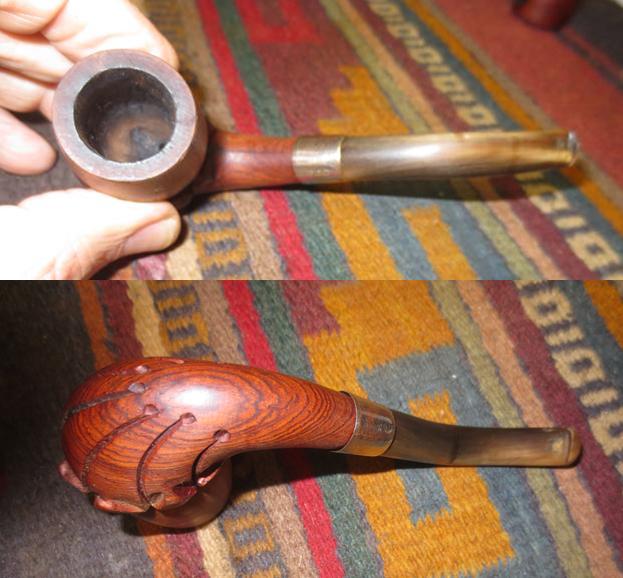
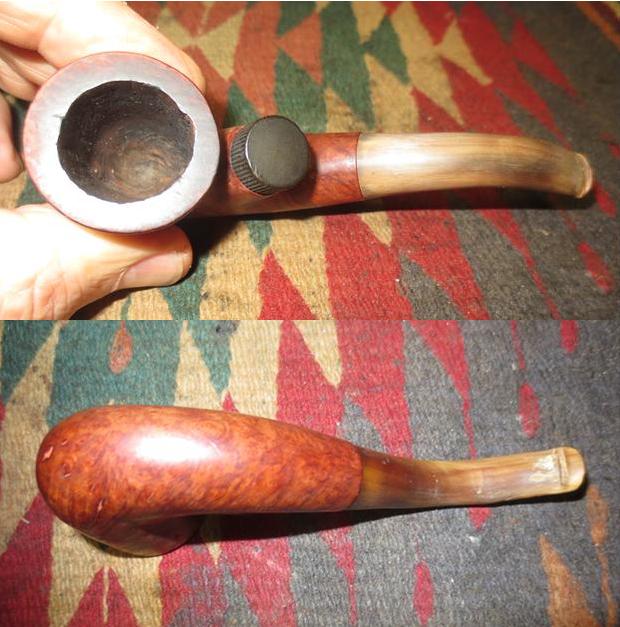
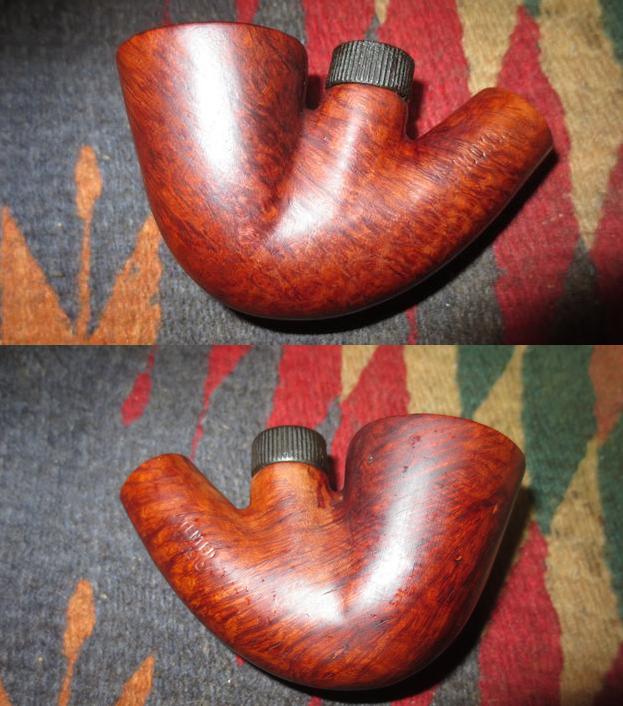
Jeff has established his own process of thoroughly cleaning pipes for me and he did not vary in his procedure here. He reamed the bowl with a PipNet reamer and tidied it up with a Savinelli Fitsall Pipe Knife. He scrubbed out the mortise and the airway in the shank and the stem with pipe cleaners, cotton swabs and alcohol and cleaned the exterior of the threaded bone tenon with a cotton swab and alcohol. He scrubbed the exterior of the pipe with Murphy’s Oil Soap to remove the grime and grit on the bowl. The top took some special work because of the heavy lava overflow. He scrubbed it with a tooth brush and the oil soap until he removed the majority of the build up. There was still some minor buildup that would need to be dealt with when I worked on the out of round bowl. I took photos of the pipe to show the condition it was in when it arrived in Vancouver. The grain really was quite stunning. 
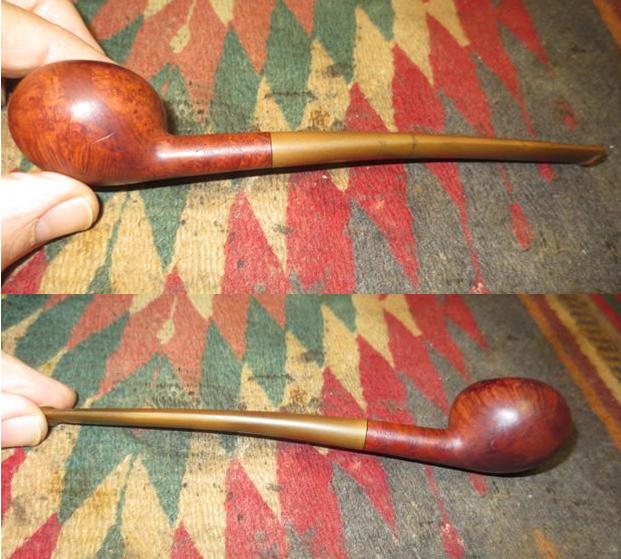
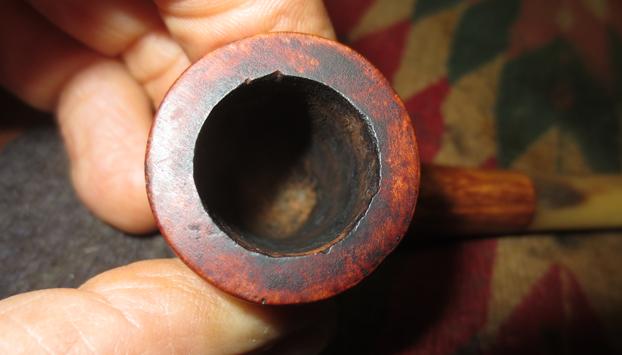
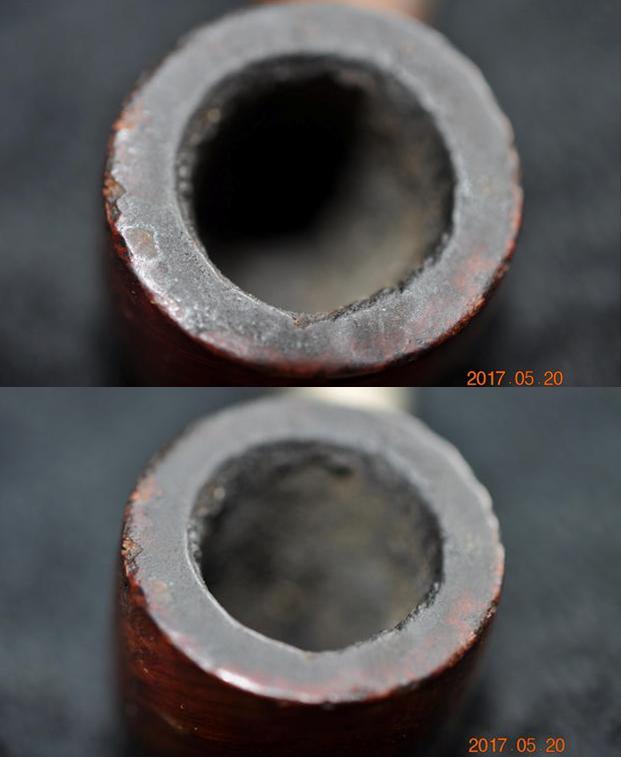
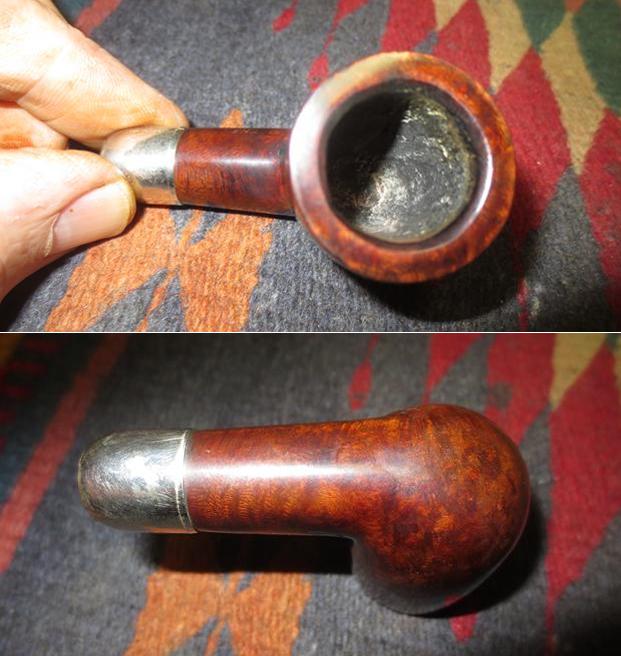
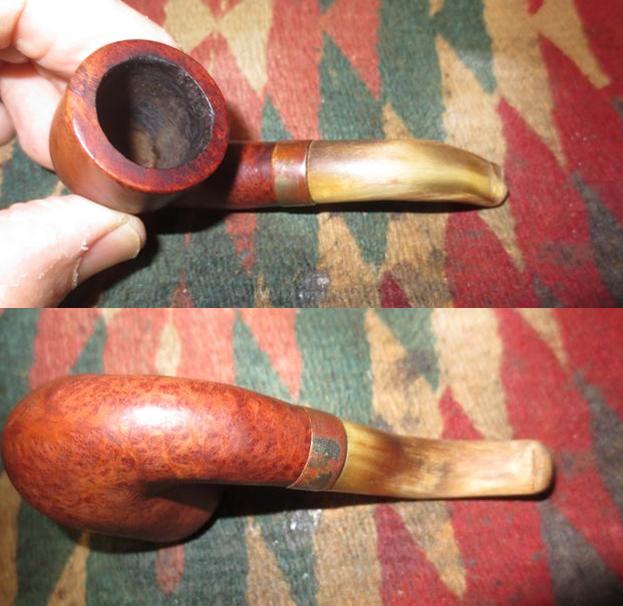
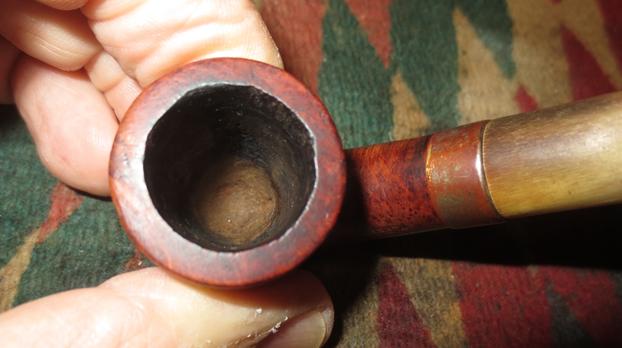
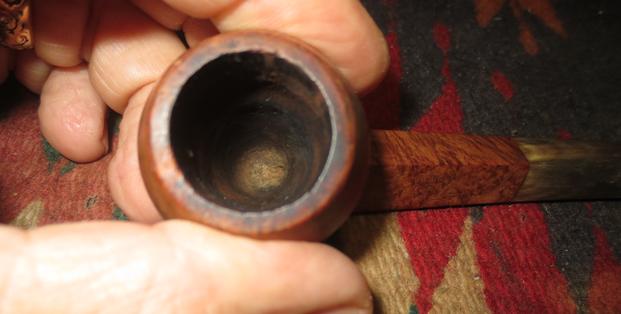
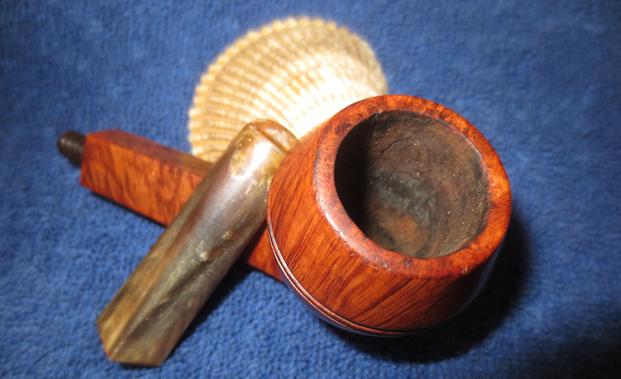
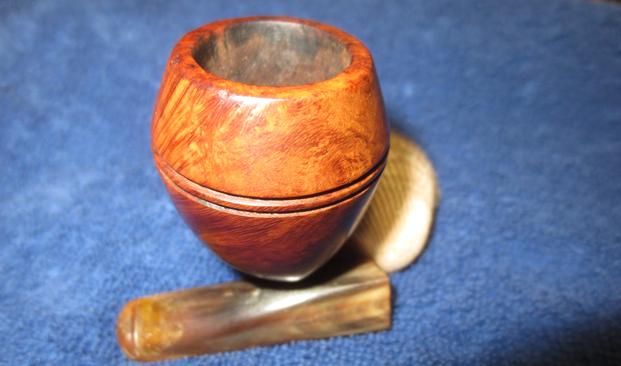
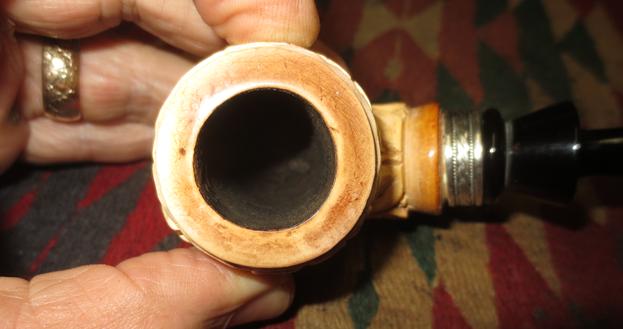
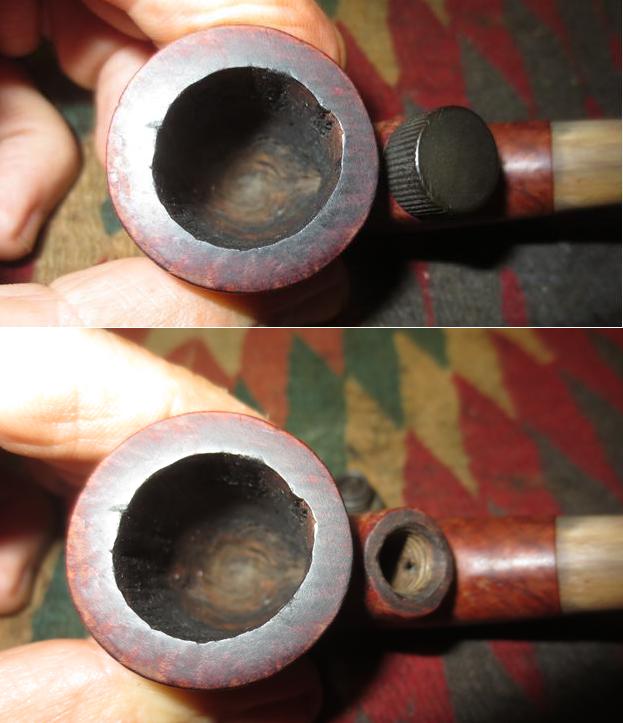
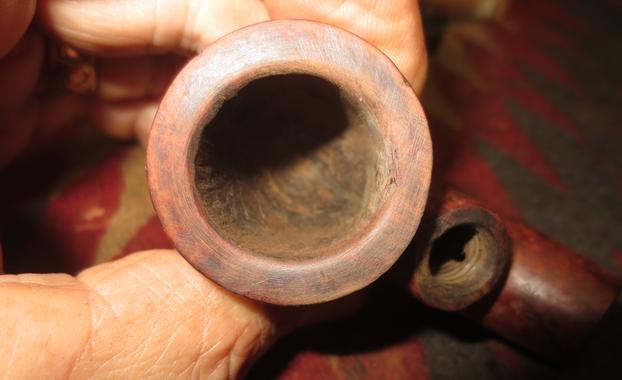
I took a close up photo of the rim top and bowl, to show how well he was able to remove the buildup around those areas and down the bowl sides.
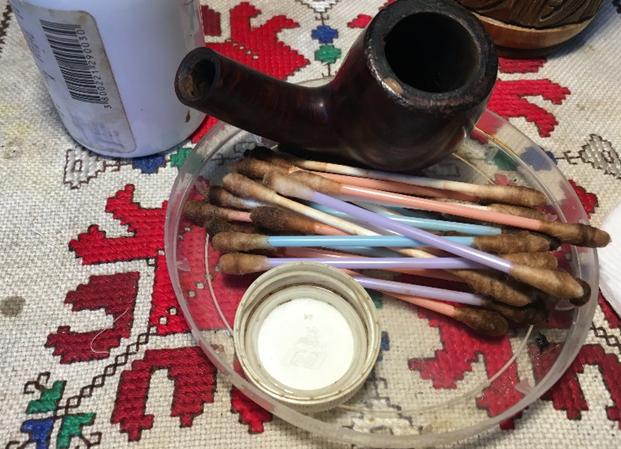
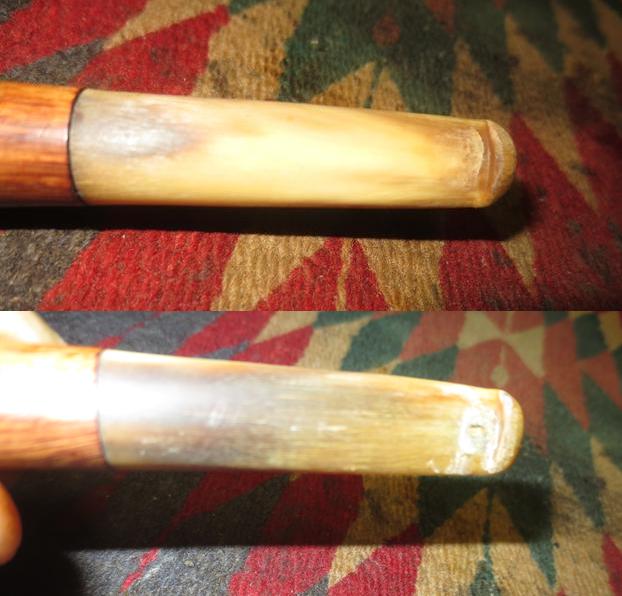
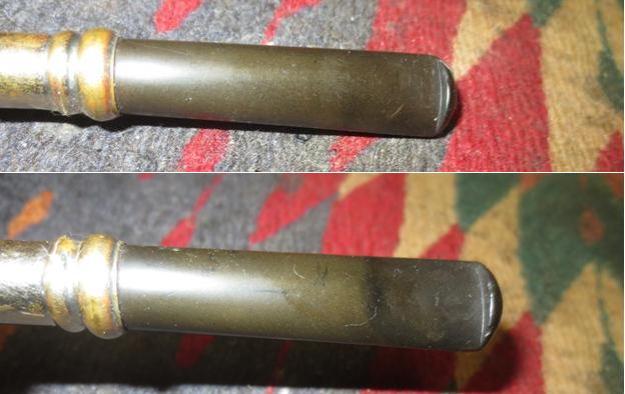
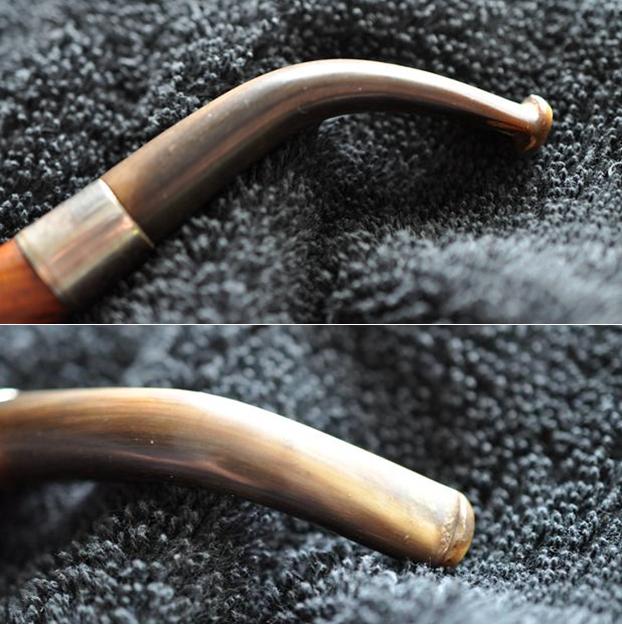
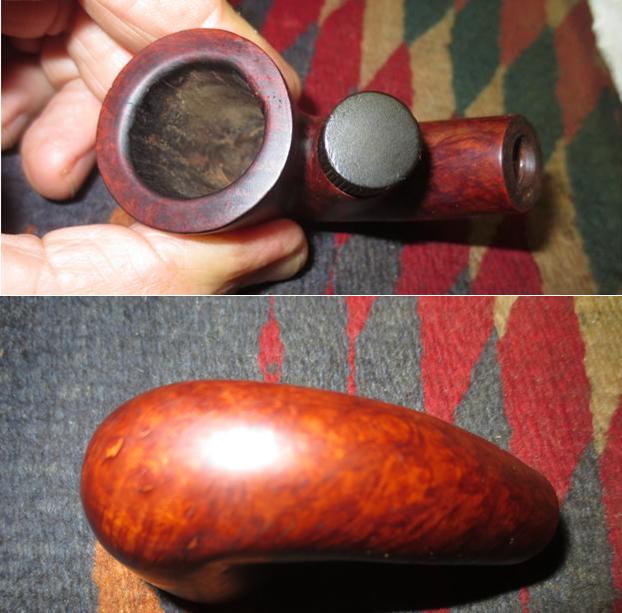
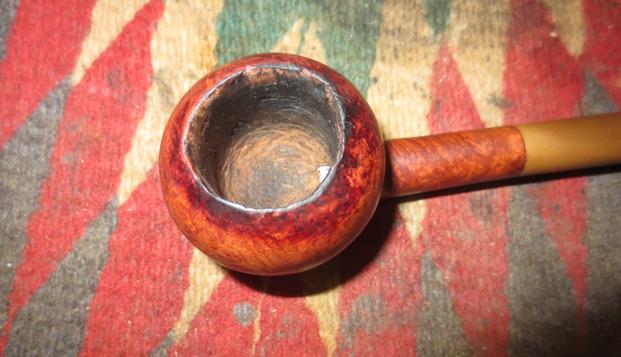
He had soaked the stem in OxyClean so when it arrived it was clean and the oxidation sat on the surface of the stem. The tooth marks were very evident.
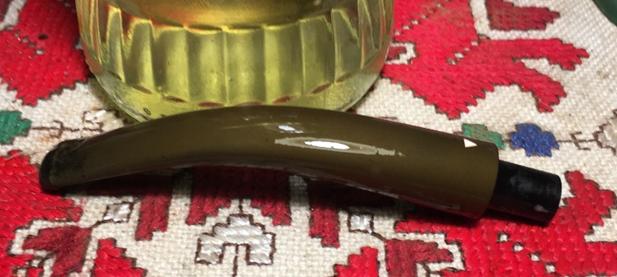
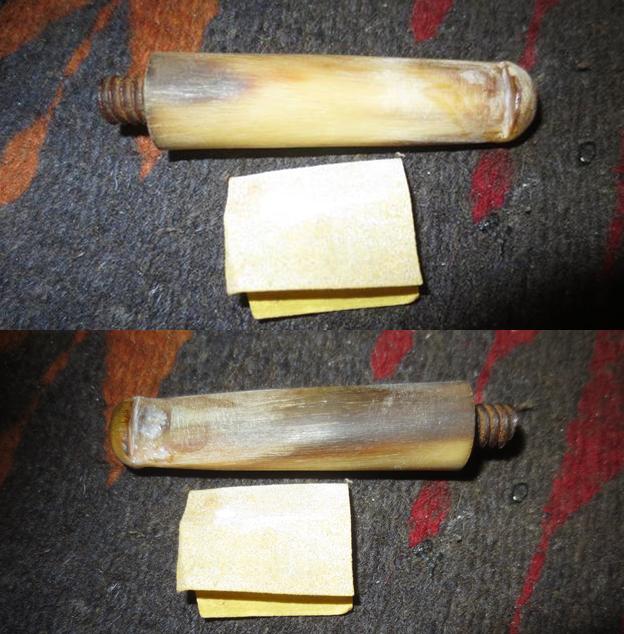
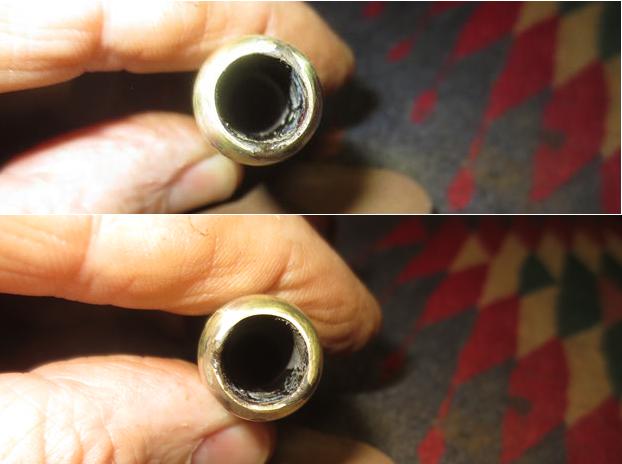
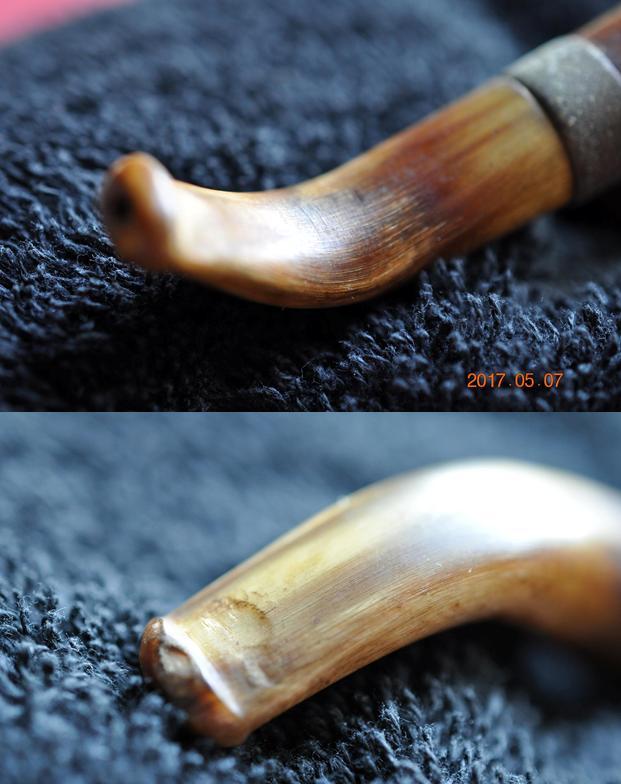
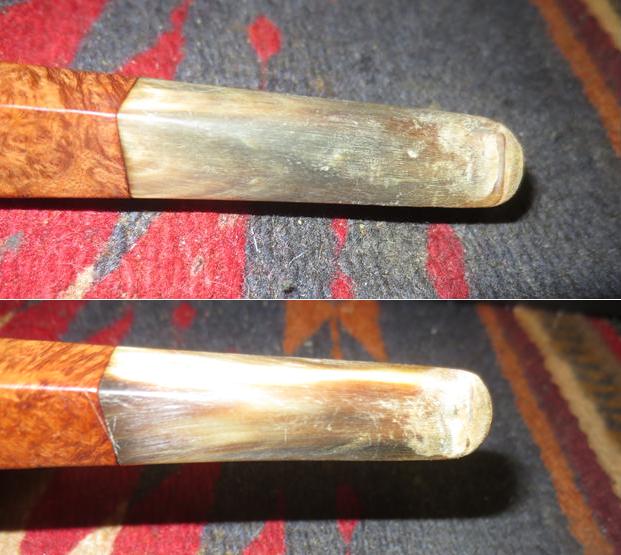
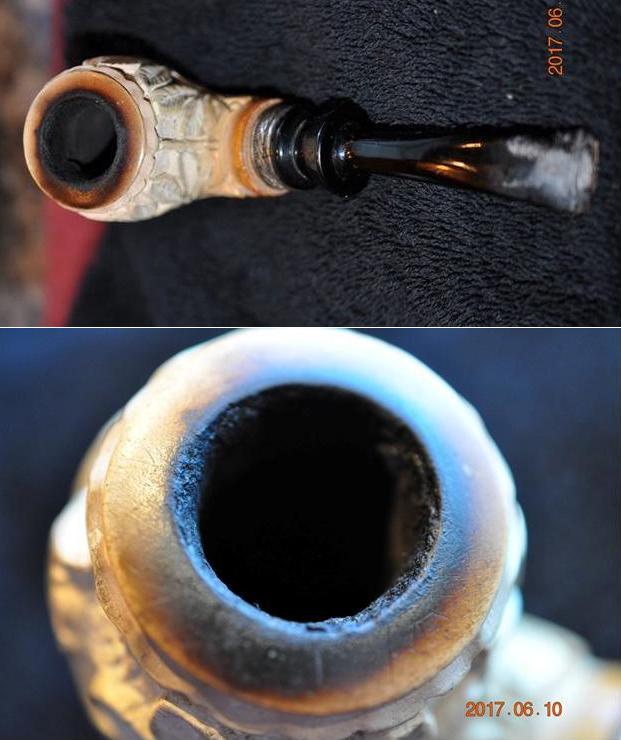
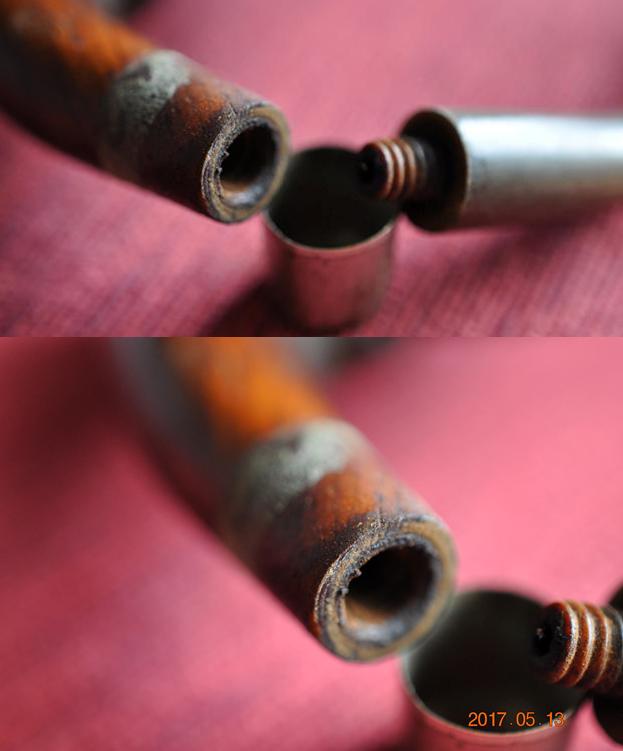
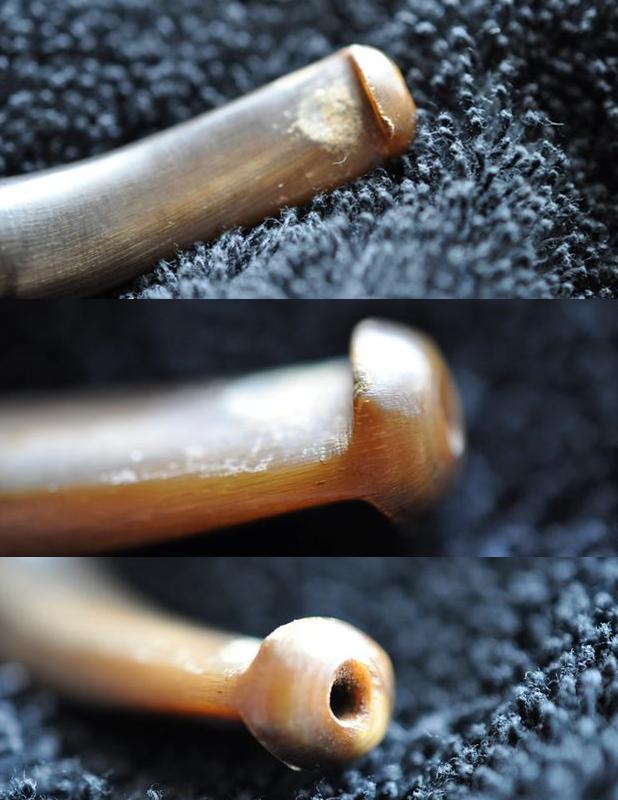
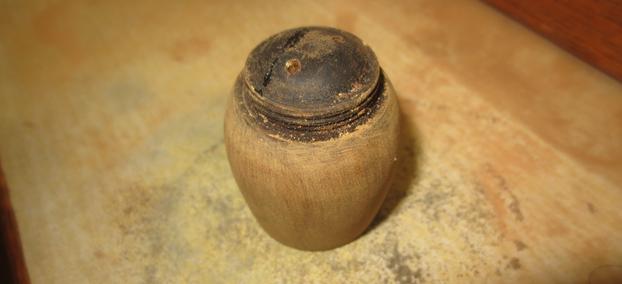
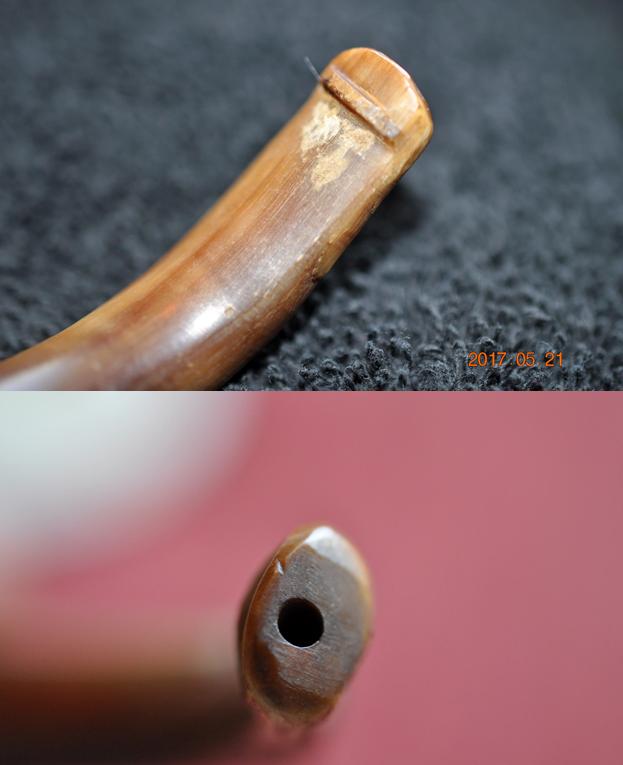
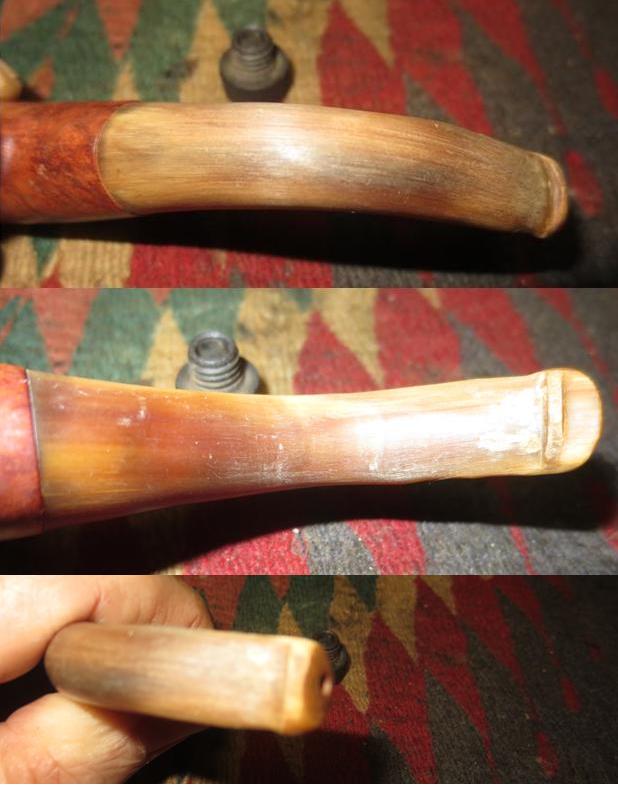
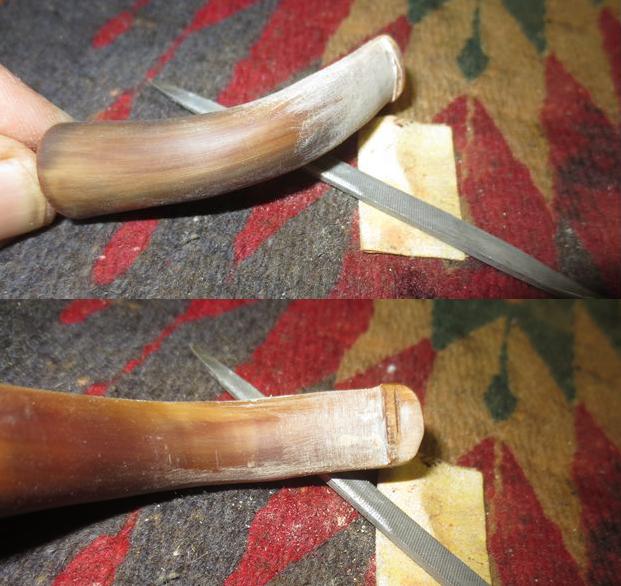
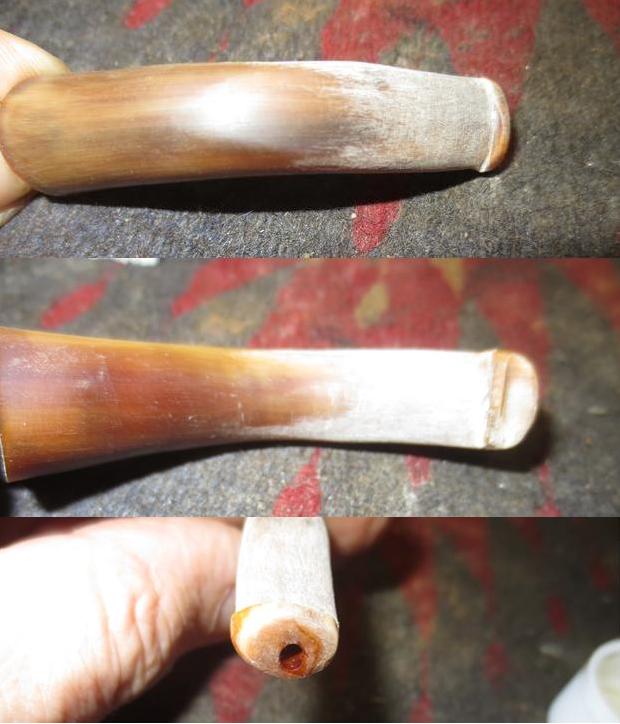
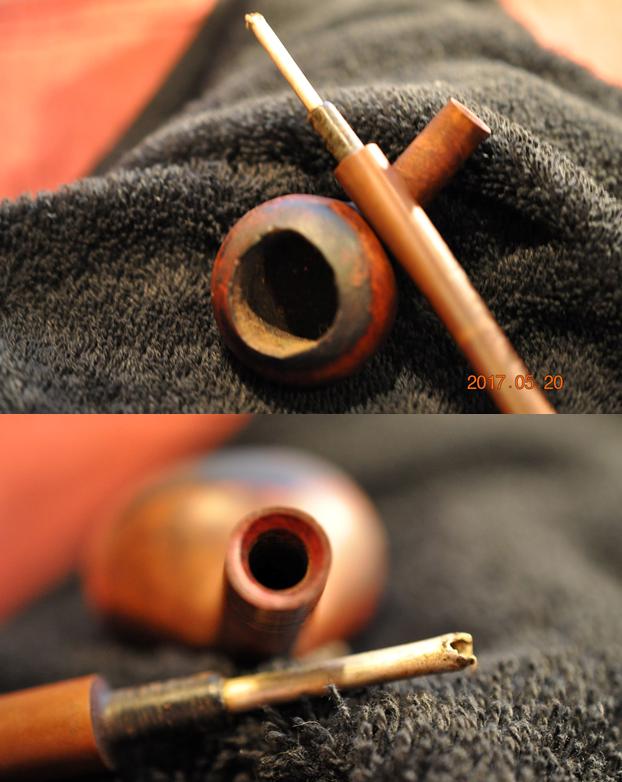
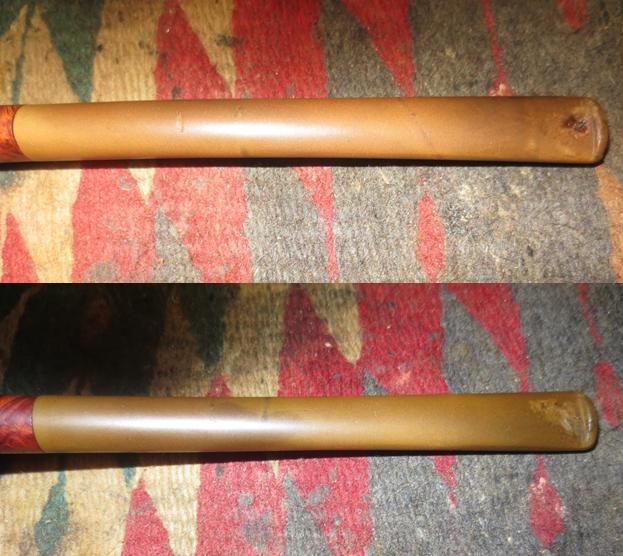
The damage to the inner tube was visible and it was ragged and torn. I would need to rework it to smooth things out and restore the angle.
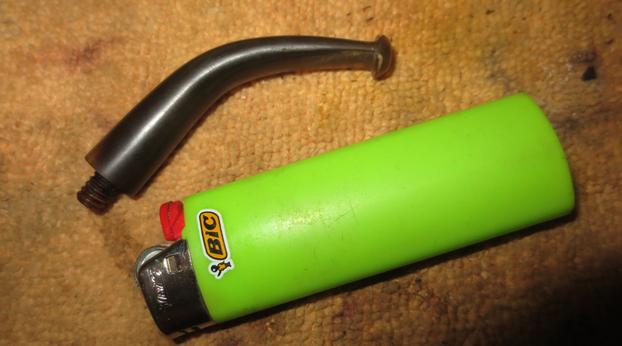
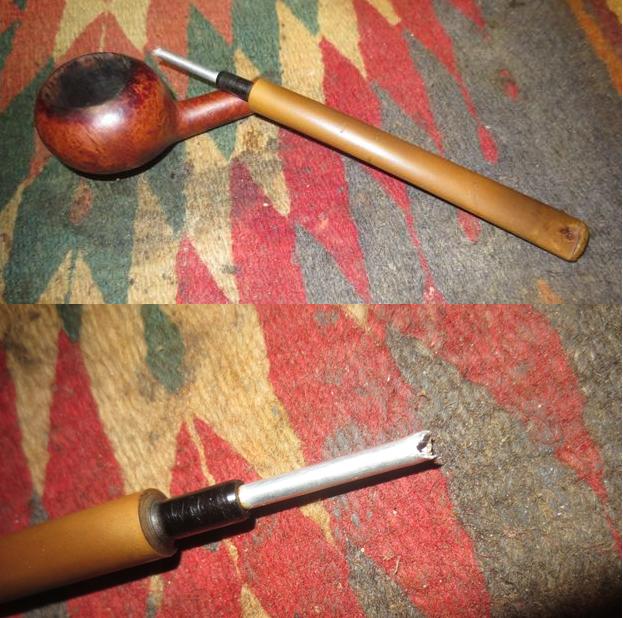
I used a Dremel and sanding drum on low speed to sand and shape the angled end of the inner tube and remove the damaged areas. I put a slot on the tube end to match other inner tubes I have on hand and fit the bottom of the bowl once the stem was in place.
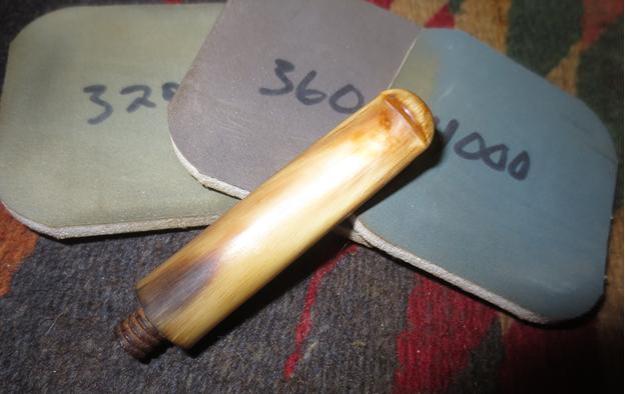
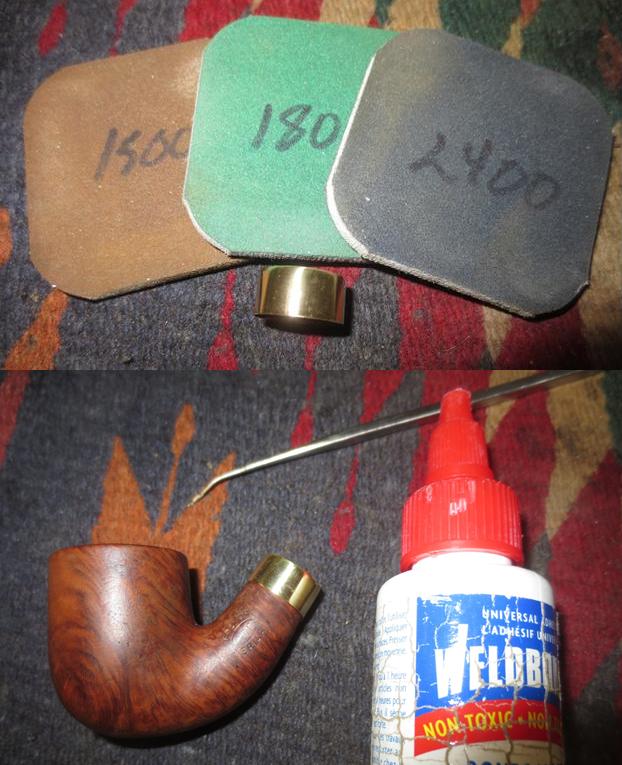
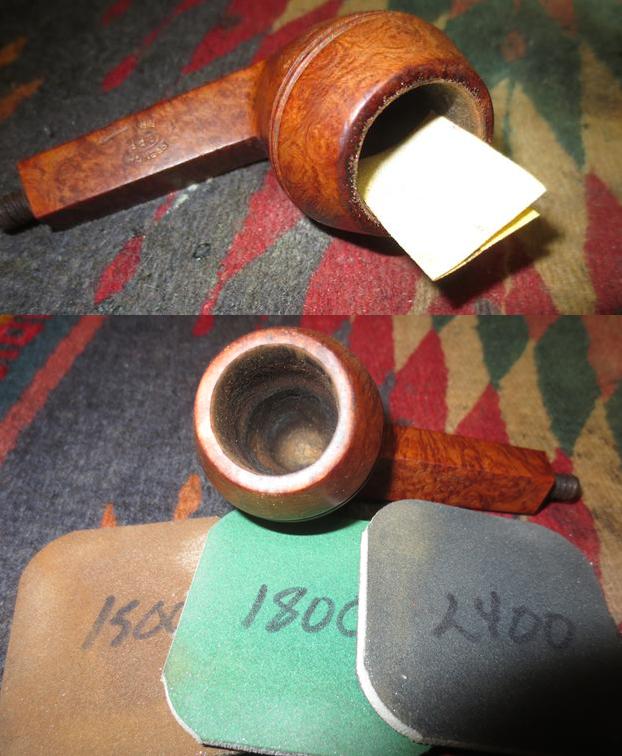
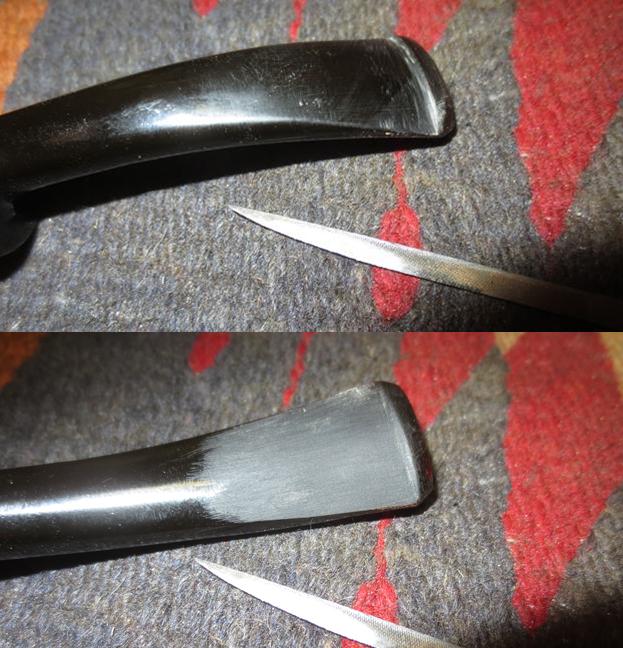
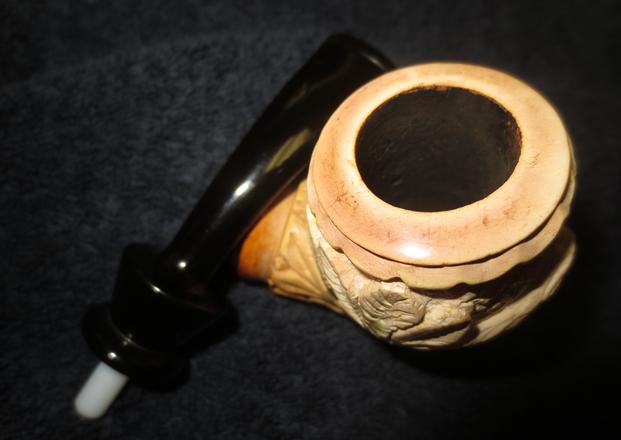
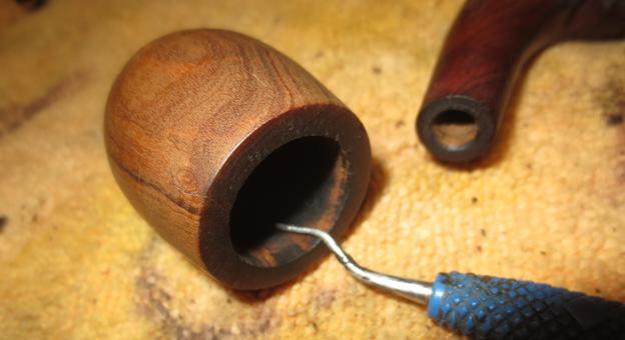
The next series of photos show the process of repairing the out of round bowl. I used a folded piece of 180 and 220 grit sandpaper to smooth out the inner edges of the bowl and repair the top edge. Once I sanded it smooth I wiped it down with a cotton pad and alcohol to clean off the sanding debris and darkening on the surface. There was still polishing to do but the major portion of the repair was finished. 
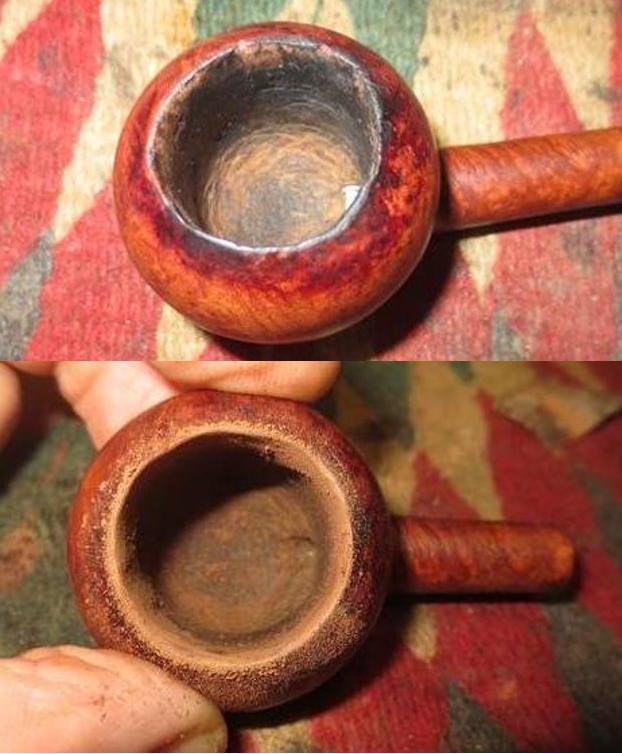
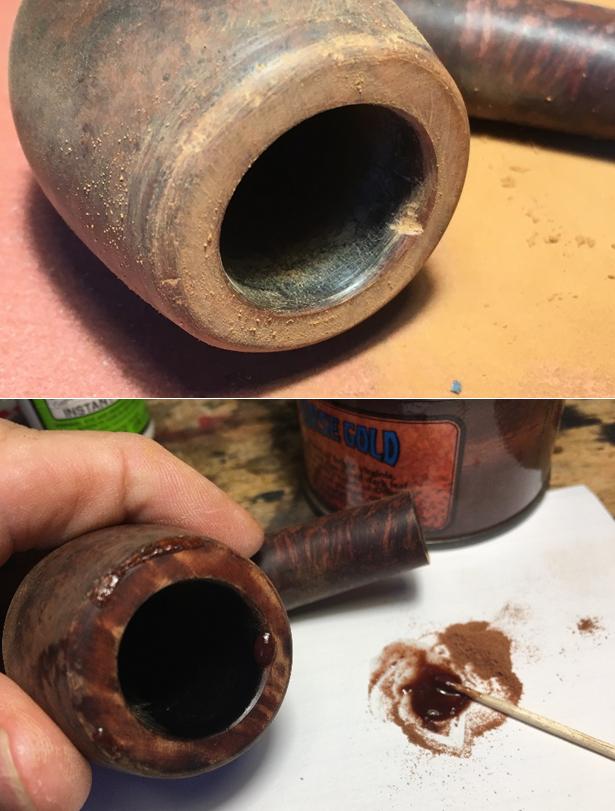
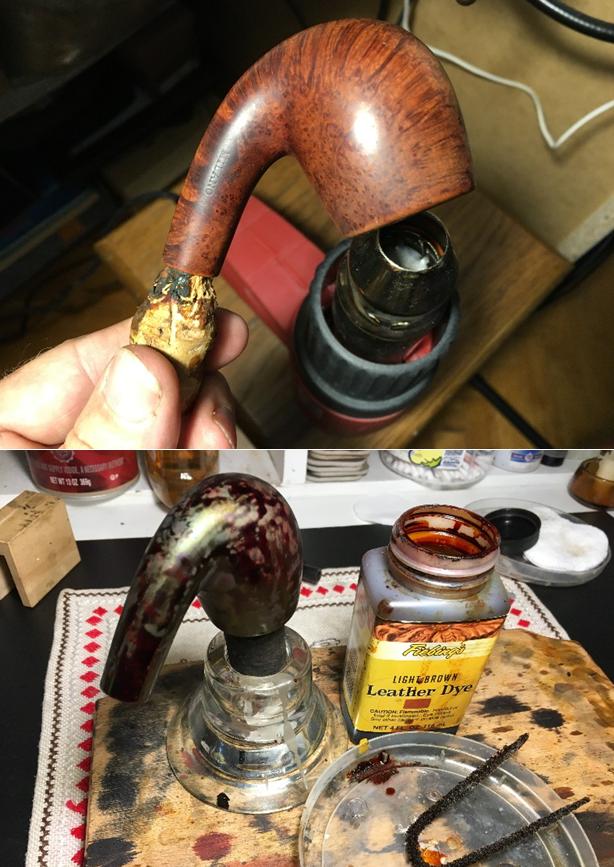
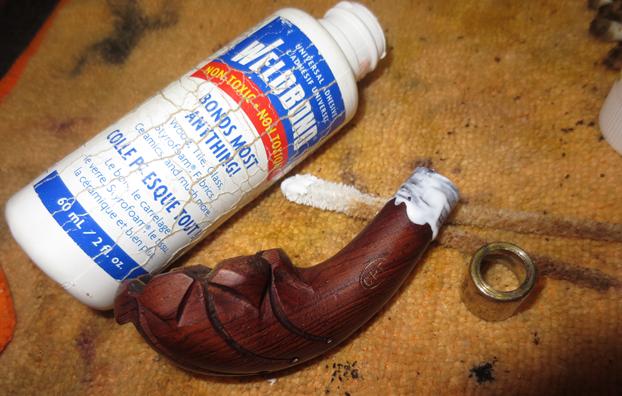
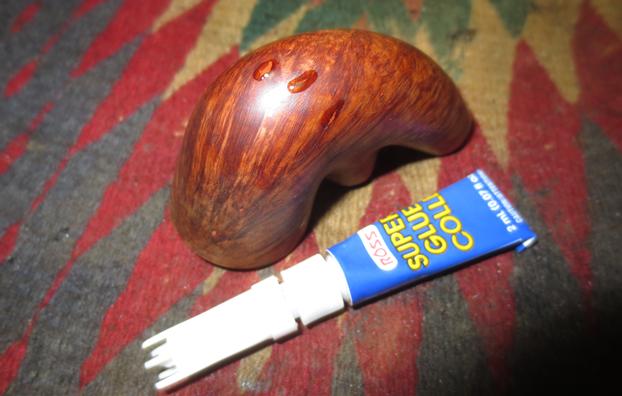
I repaired the two small sandpits on the bottom sides of the bowl with super glue and sanded them smooth with 220 grit sandpaper once the repairs had cured.
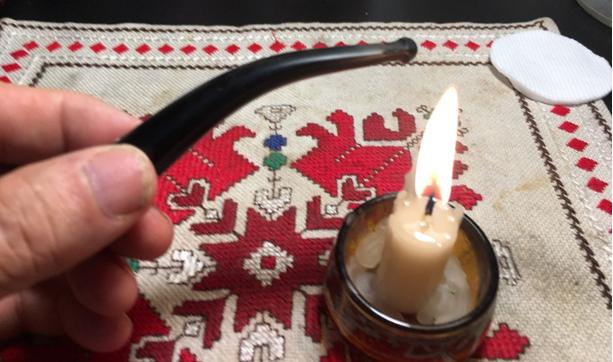
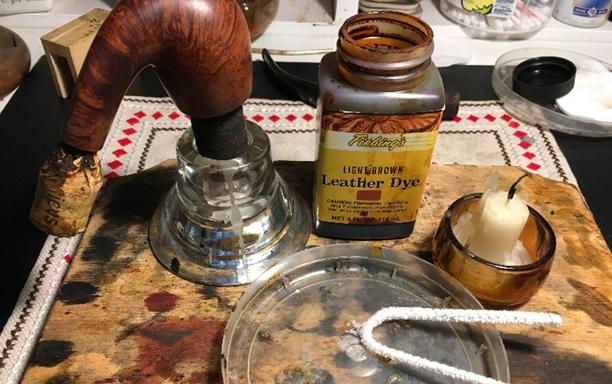
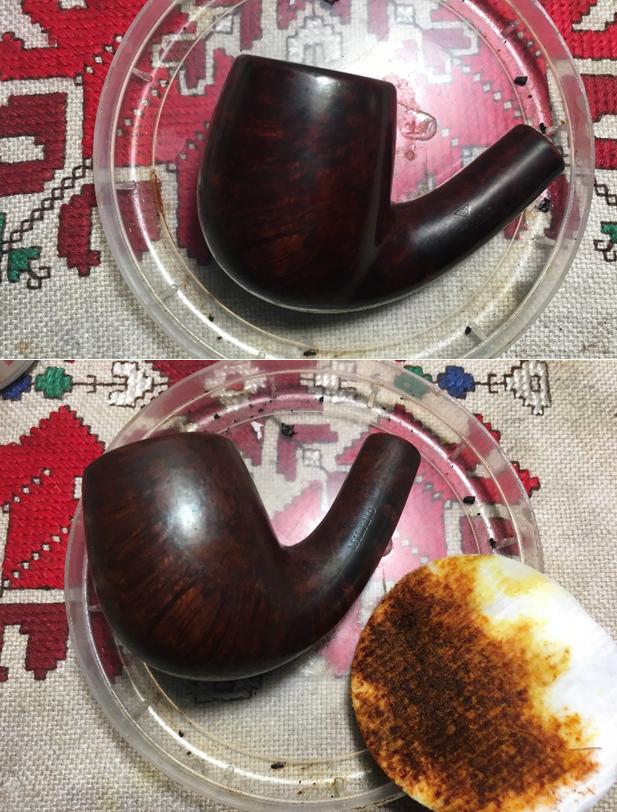
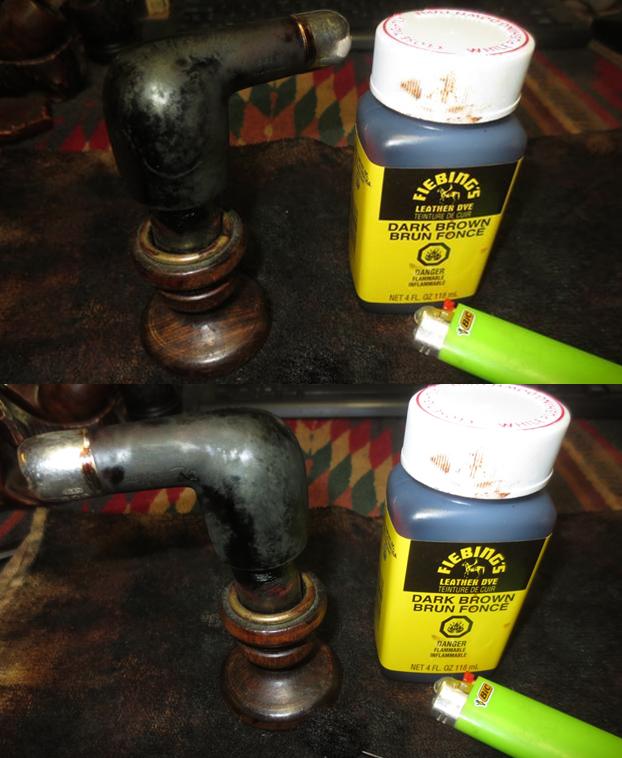
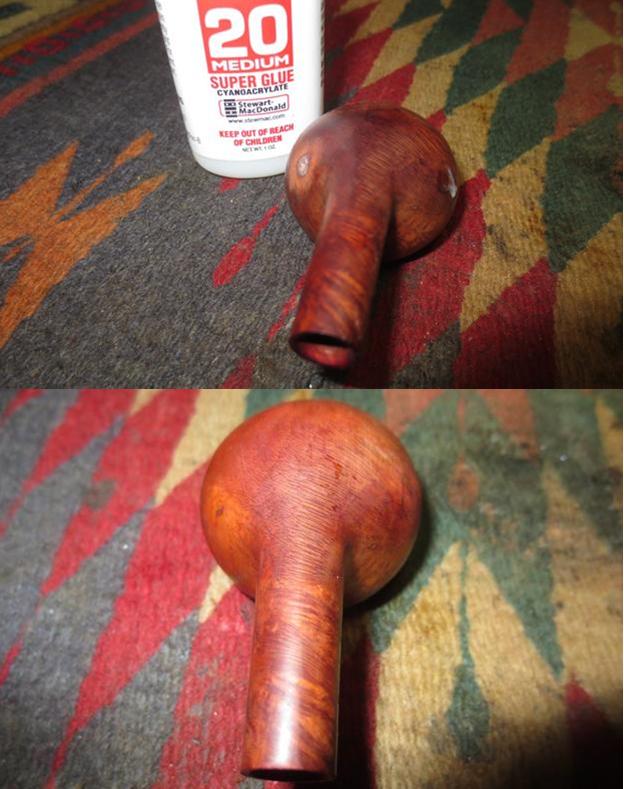
With all the repairs and reshaping on the rim and bowl finished it was time to stain the pipe. I decided to use a dark brown aniline stain that I mixed 50/50 with isopropyl alcohol to make it more transparent. It will still have the dark stain in the grains but once I wipe it down and sand it with micromesh it will be a rich brown tranparent overcoat with dark highlights. I applied the stain with a dauber and flamed it with a lighter to set it in the briar. I repeated the process until I was pleased with the coverage on the bowl and shank.
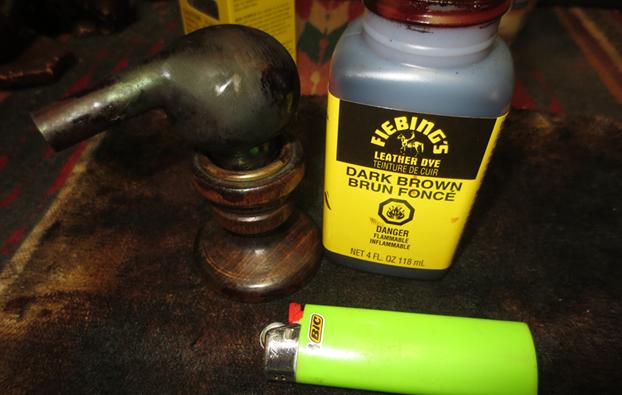
Once the stain dried I wiped the pipe down with alcohol on cotton pads to remove the thick topcoat and make the stain more transparent. It significantly lightens the colour at this point but the grain won’t stand out until I polish it with micromesh pads. 
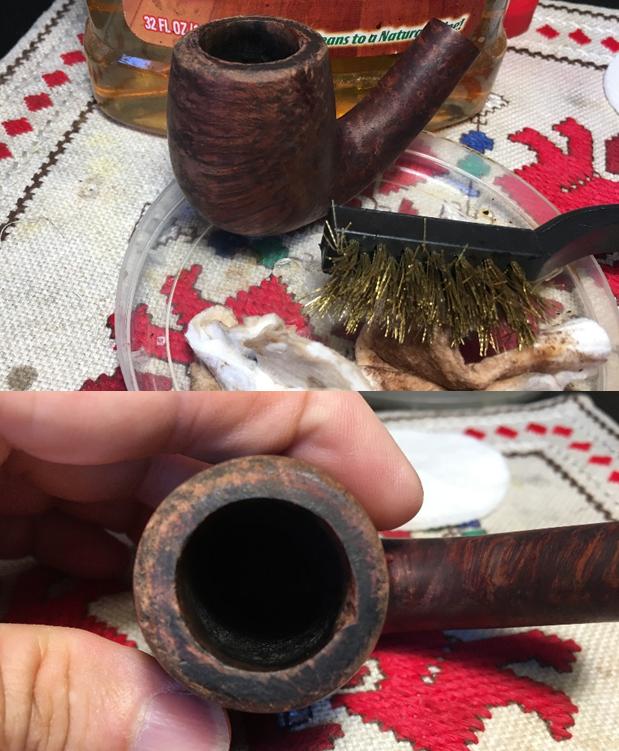
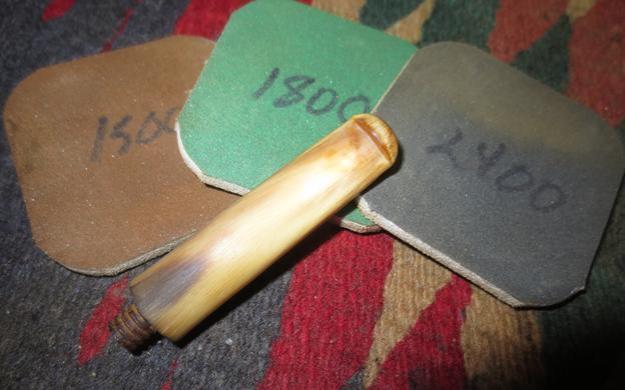
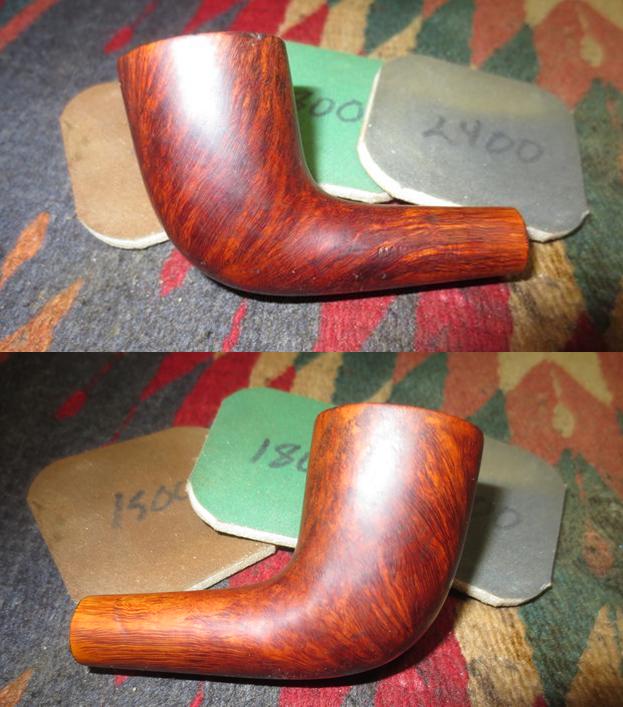
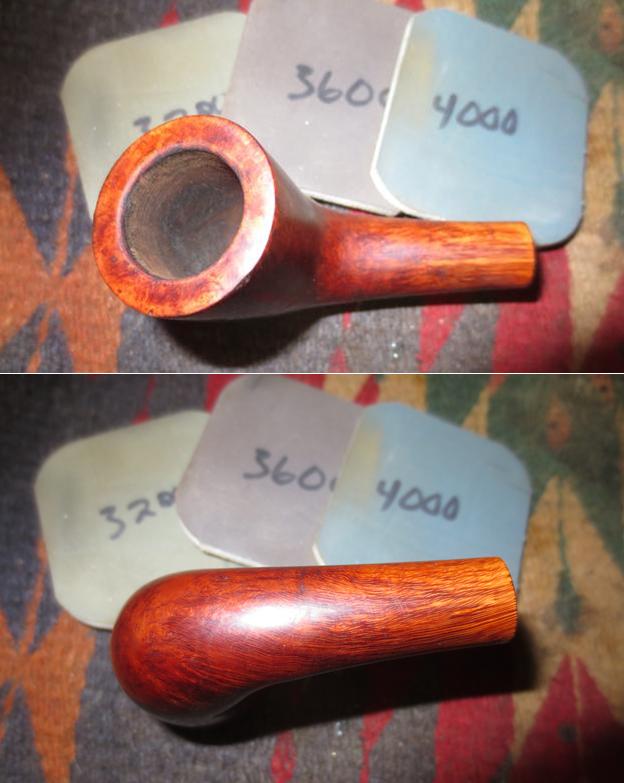
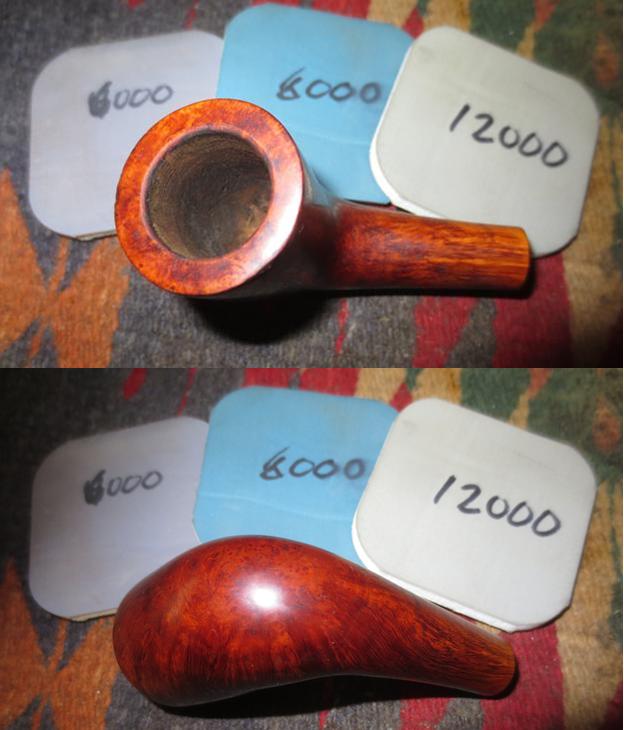
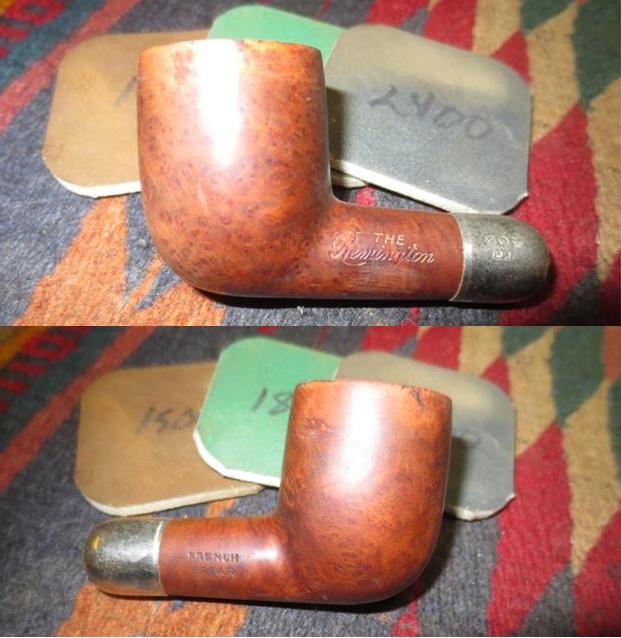
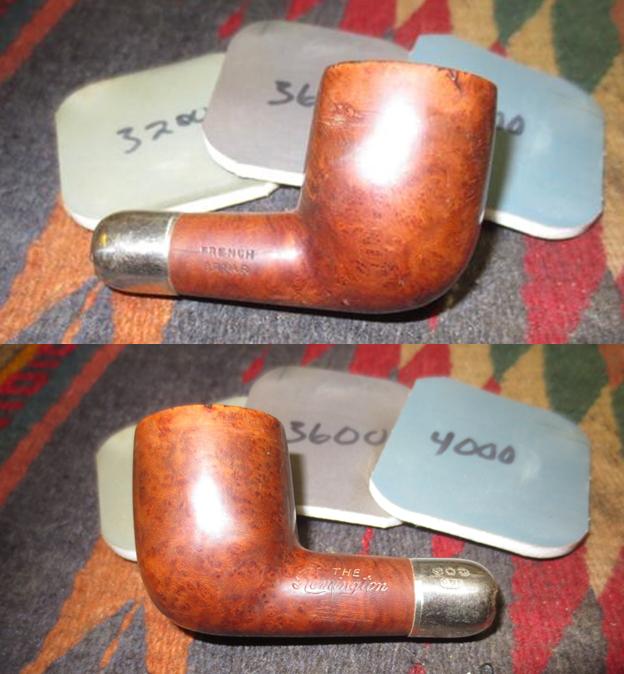
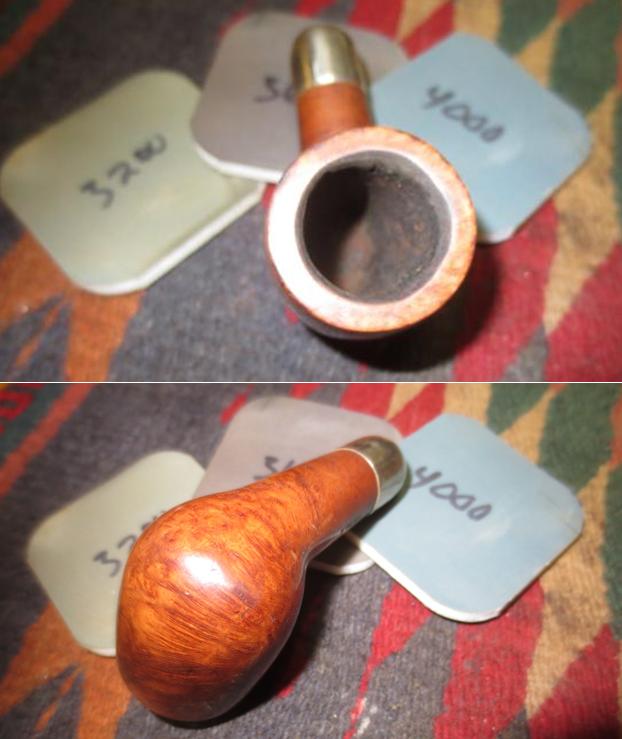
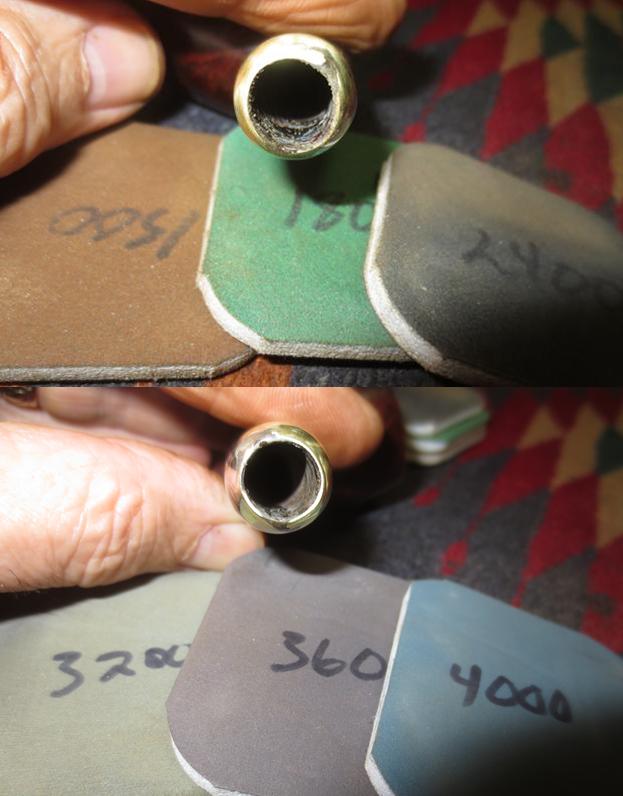
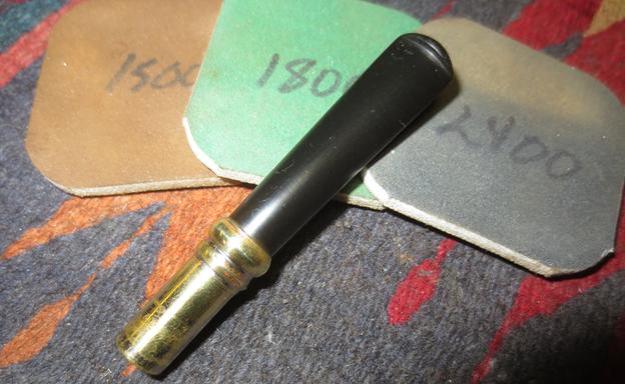
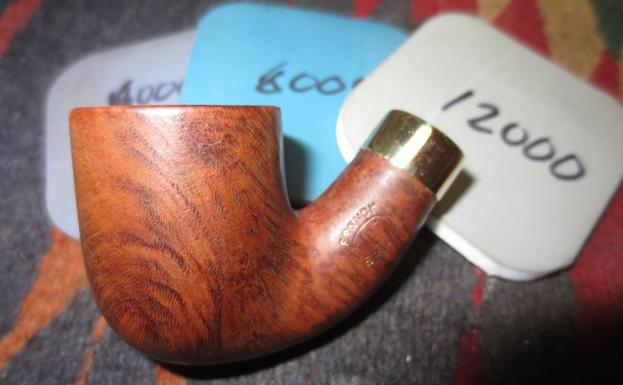
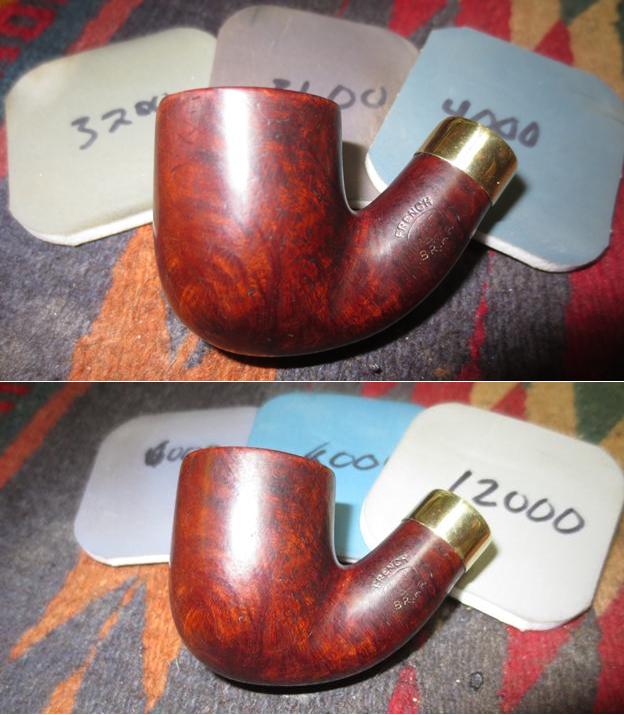
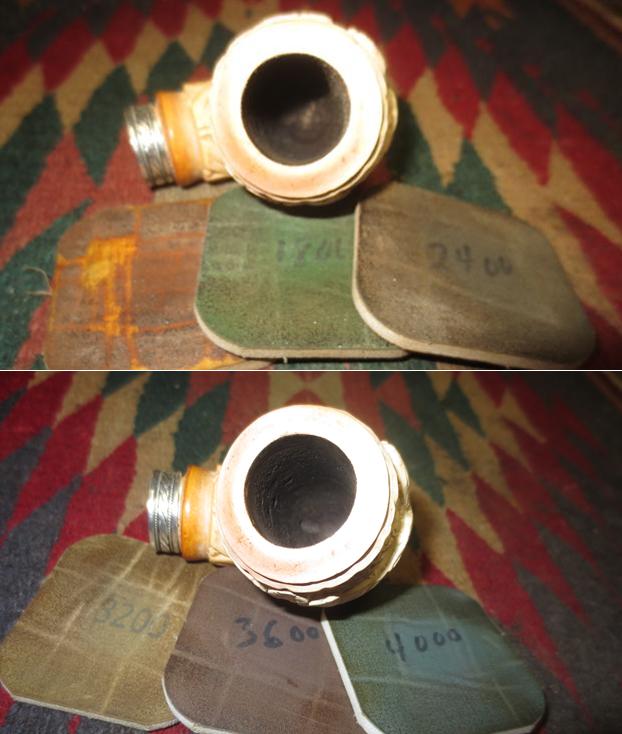
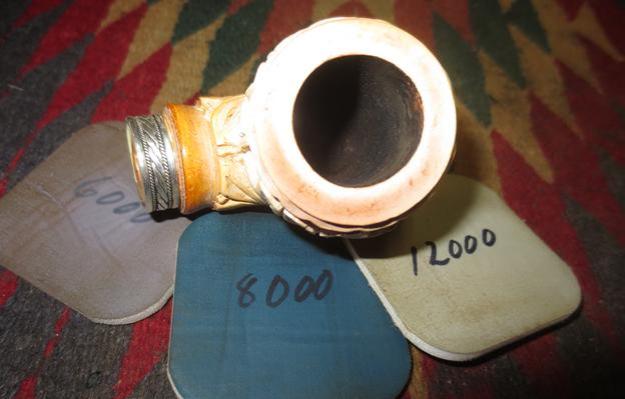
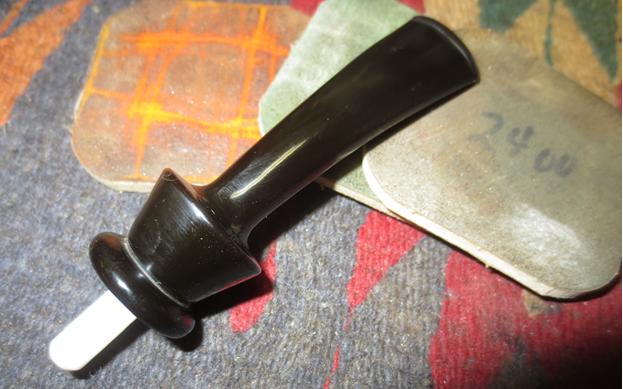
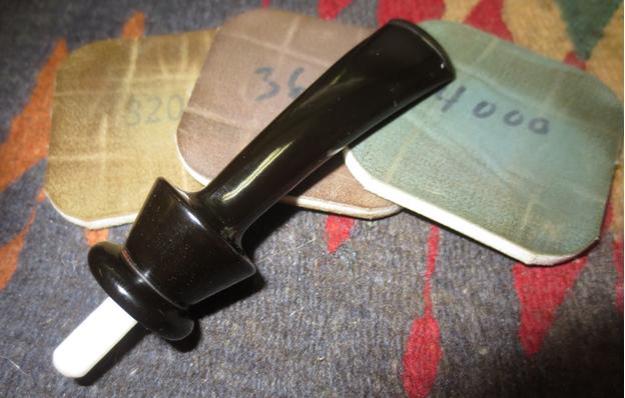
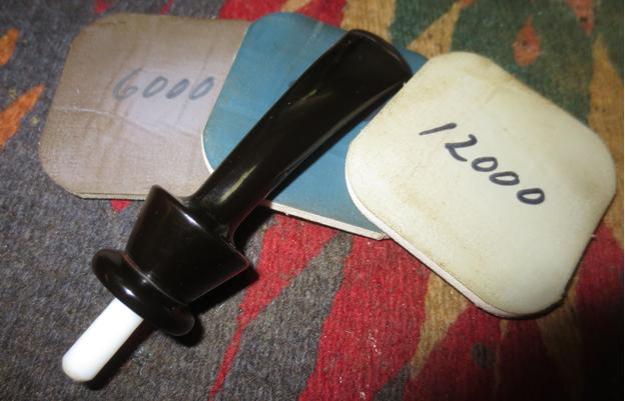
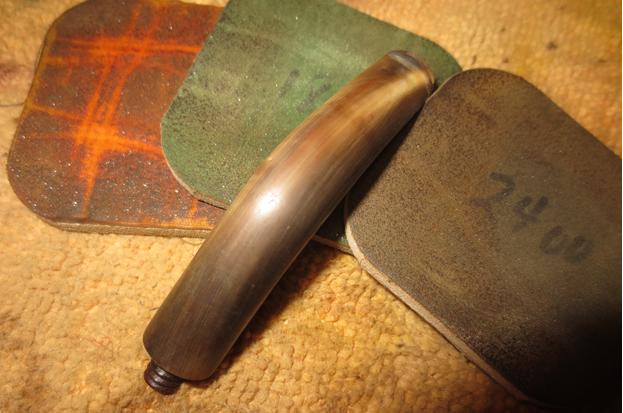
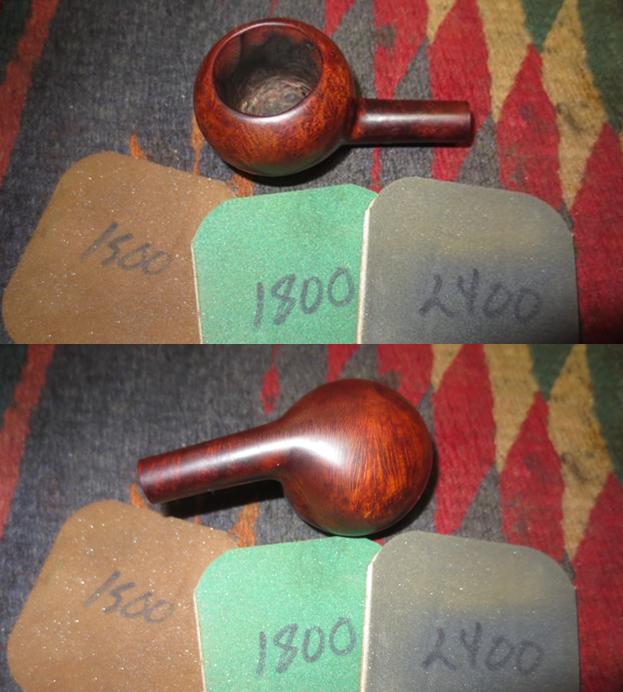
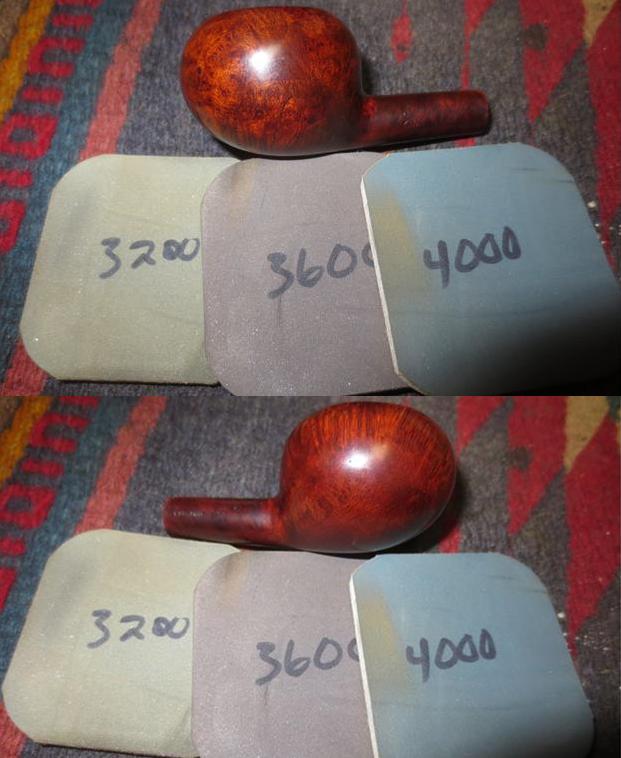
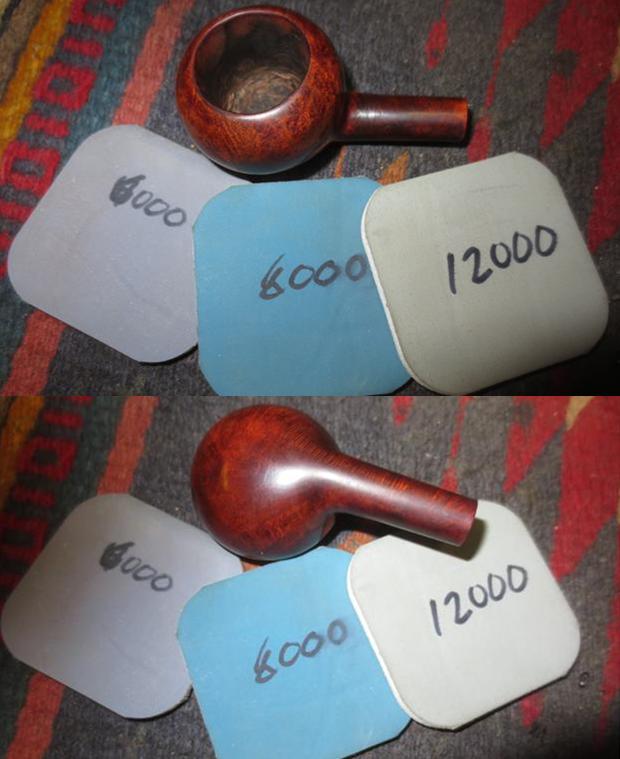
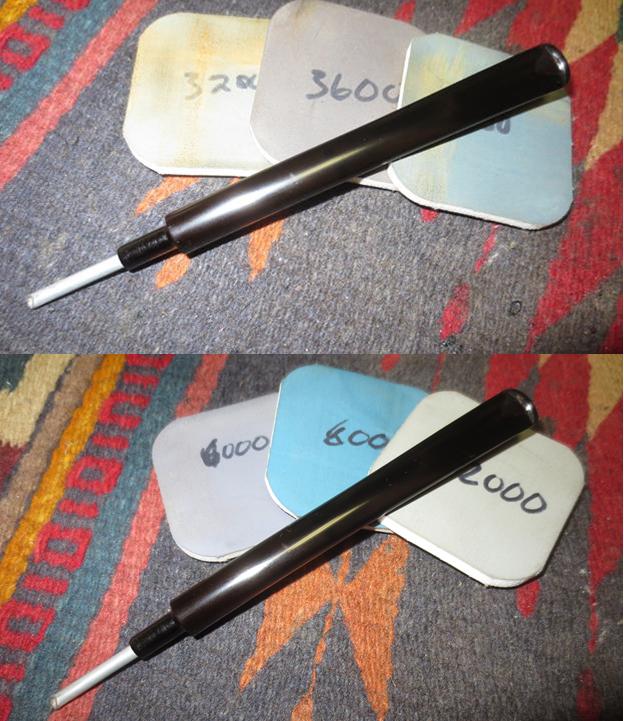
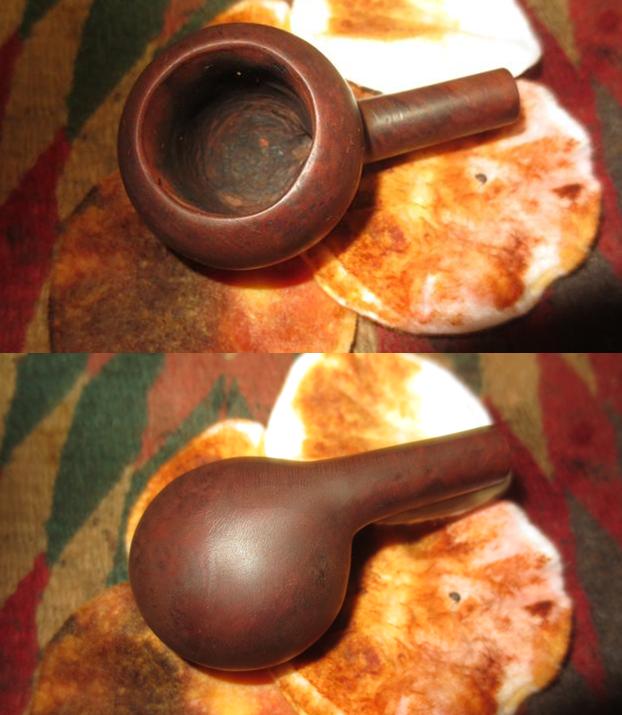
I polished the briar, being careful around the stamping on the shank, with micromesh sanding pads – wet sanding with 1500-2400 grit pads and dry sanding with 3200-12000 grit pads. I wiped the bowl down after each girt with alcohol and cotton pads. 
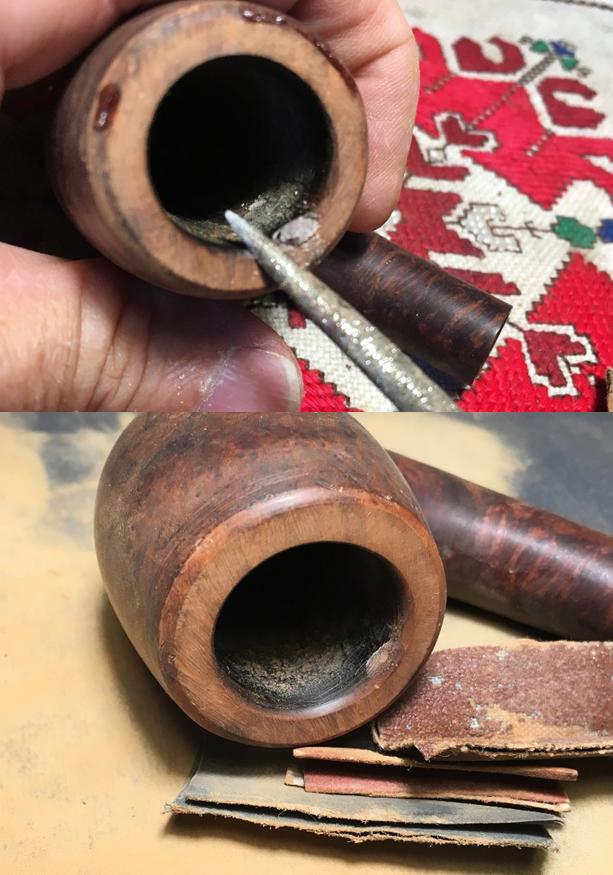
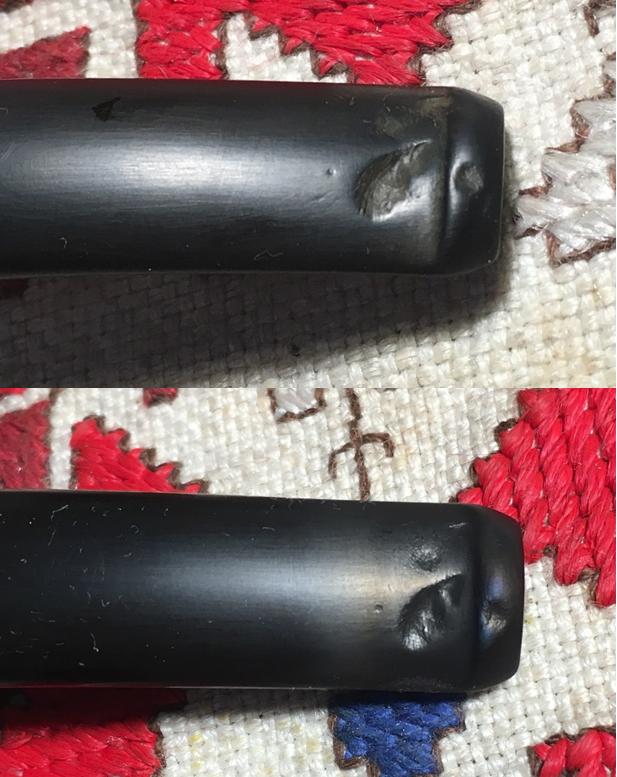
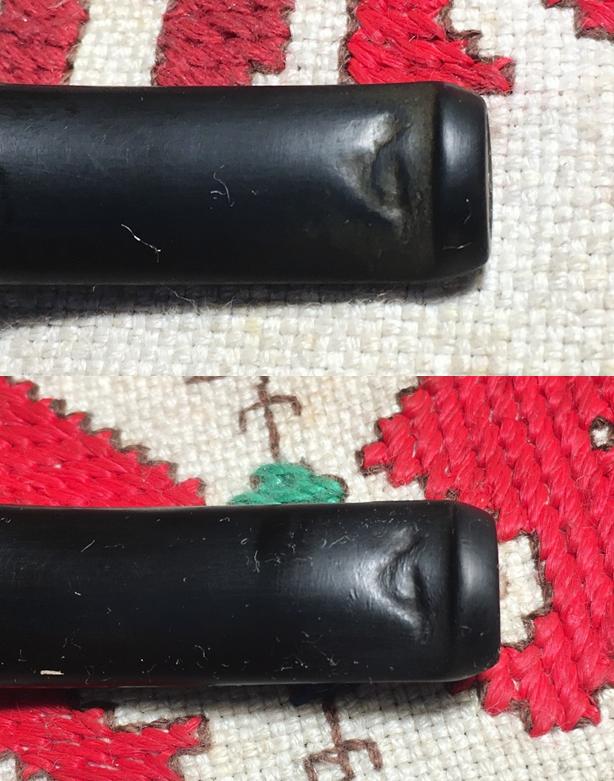
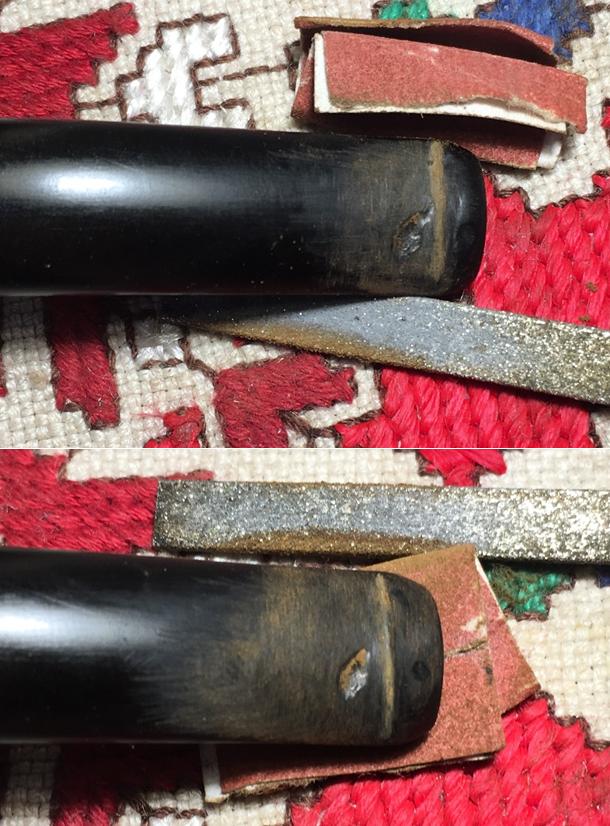
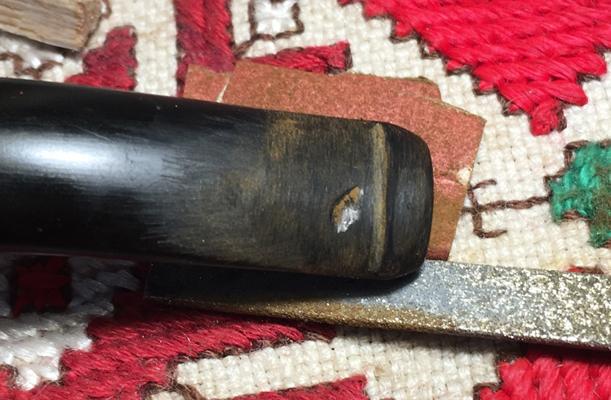
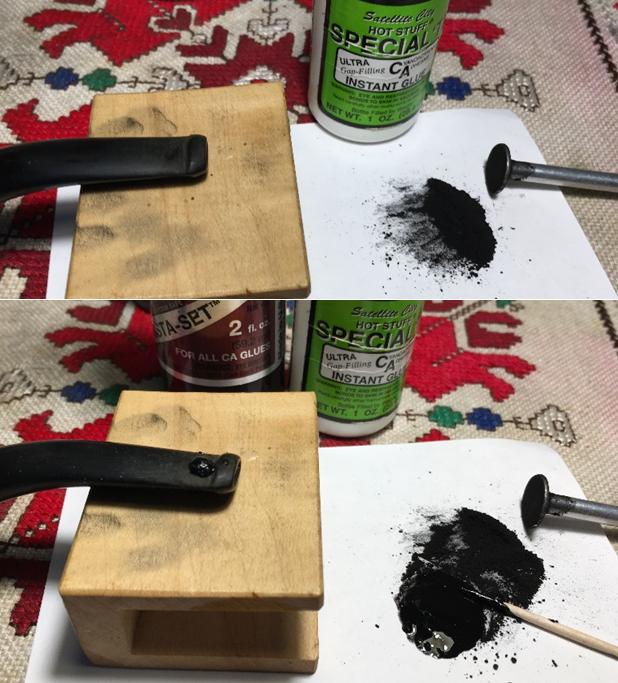
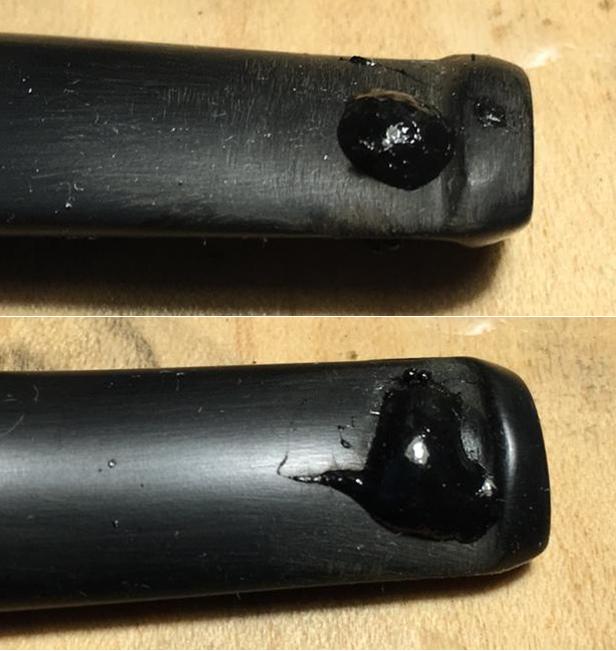
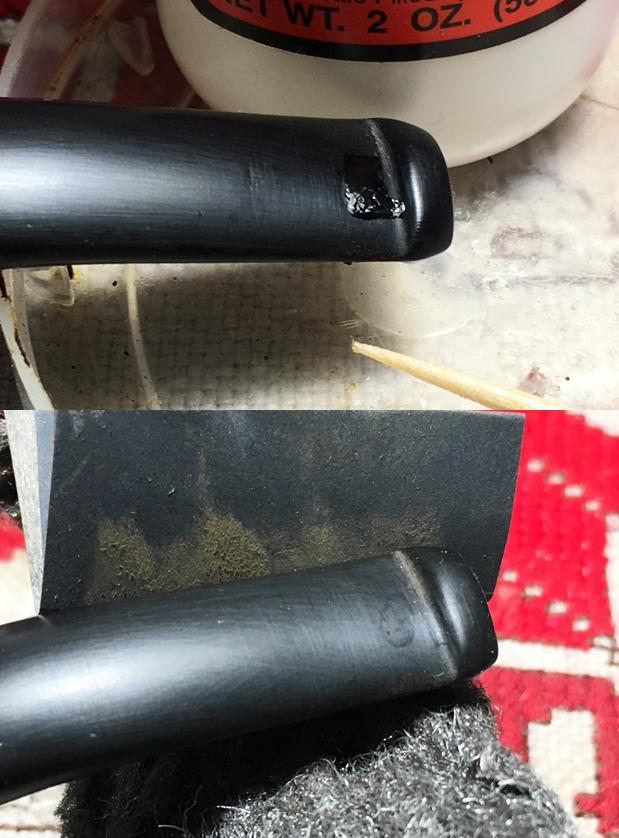
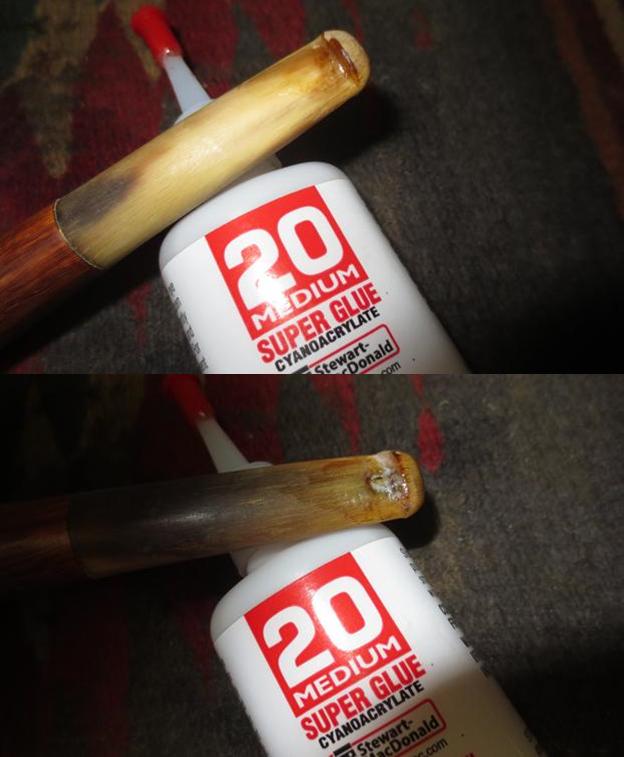
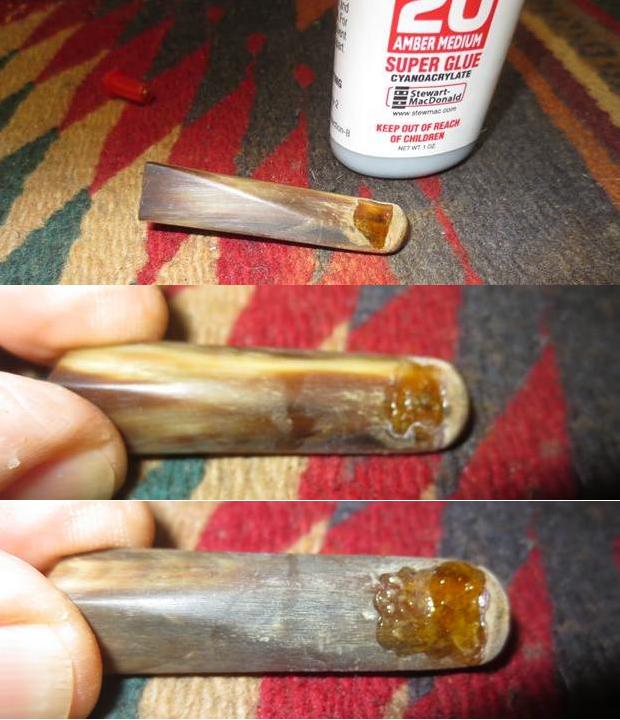
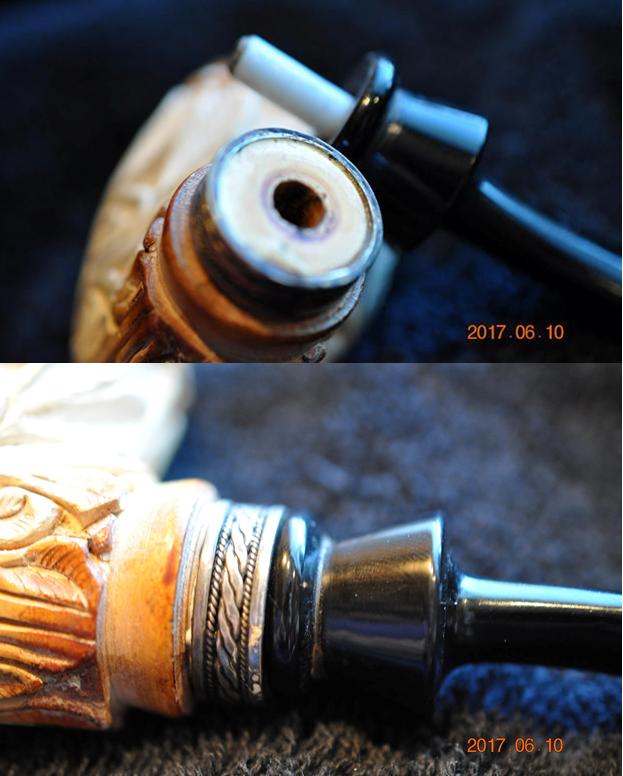
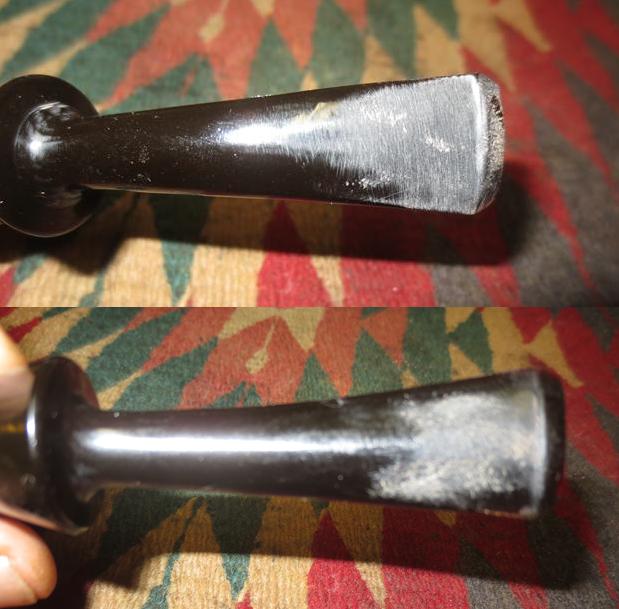
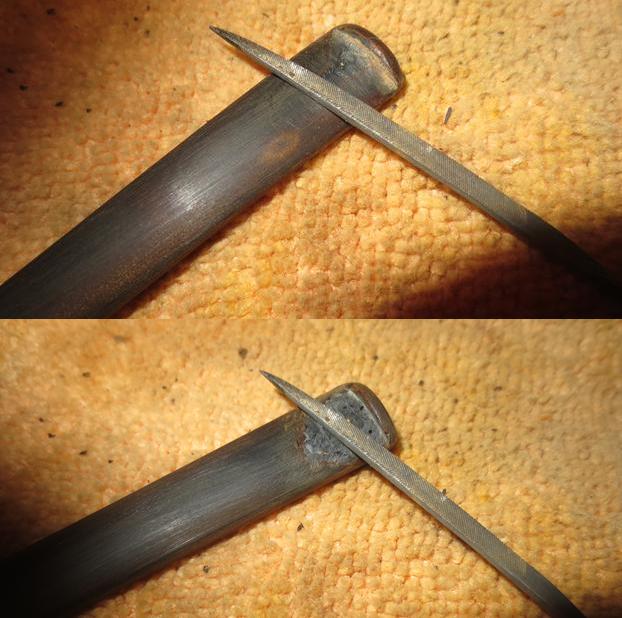
With the bowl finished I directed my attention to the stem. I cleaned out the damaged areas with a dental pick and sandpaper and filled them in with black super glue. The photos below show the repairs on both sides of the stem. The third photo shows the repairs further up the topside of the stem.
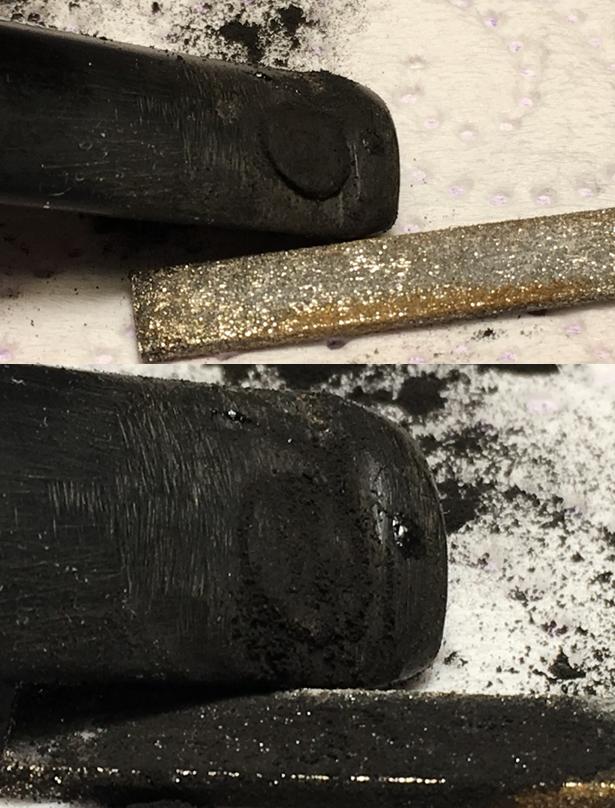
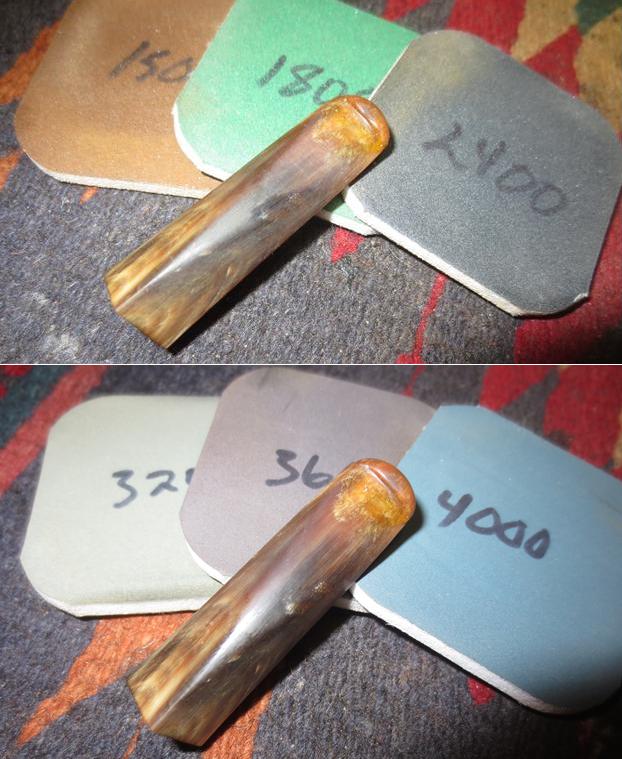
When the glue had cured I used a file to bring the thickness of the repairs down to the surface of the stem. I used to do all this with sandpaper but figured out that the file actually sped things up a bit. I sanded the stem surface and repairs with 180 grit sandpaper after the file to smooth out the surface and remove more of the oxidation. I would need to sand it with higher grits to remove the scratching but it was at least getting better. I used a needle file to reshape the edge of the button and the top and underside surfaces of the button. 
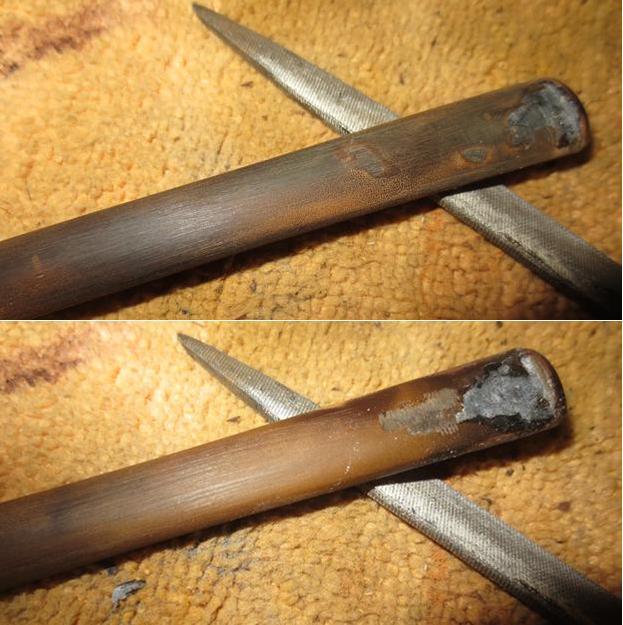
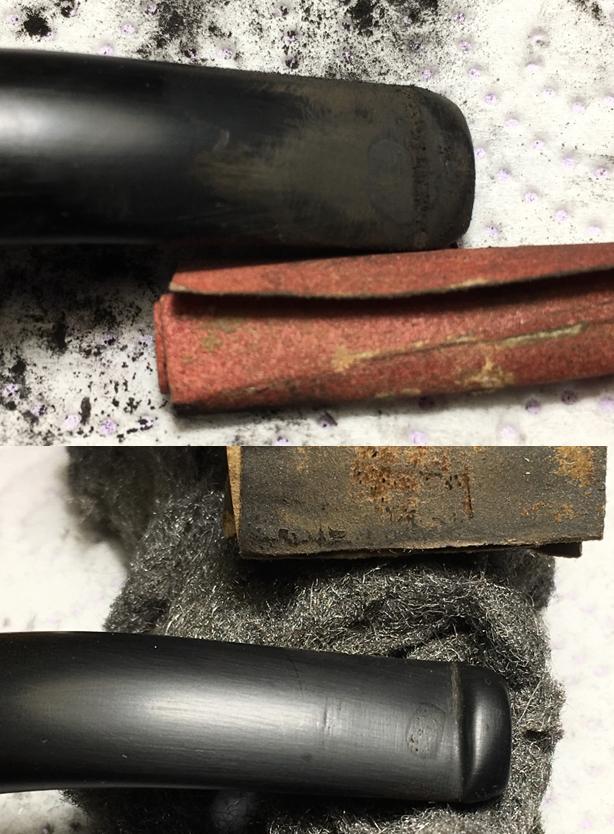
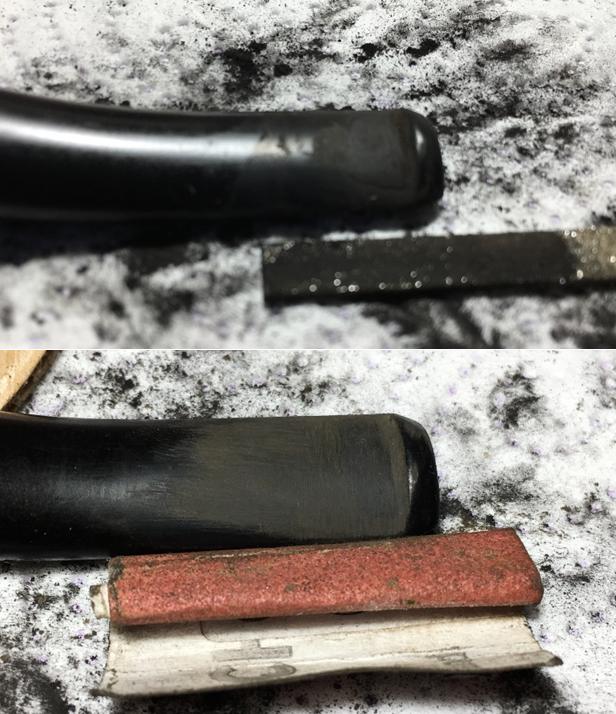
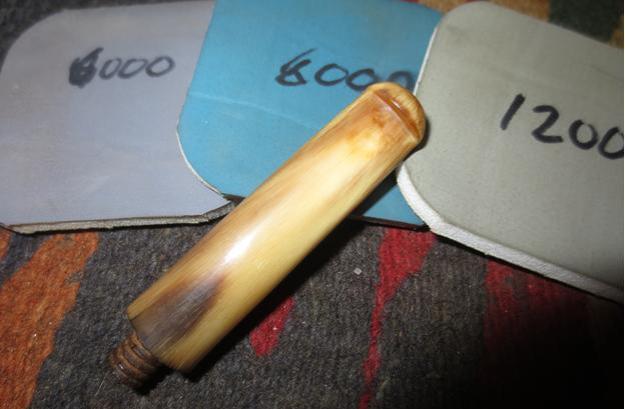
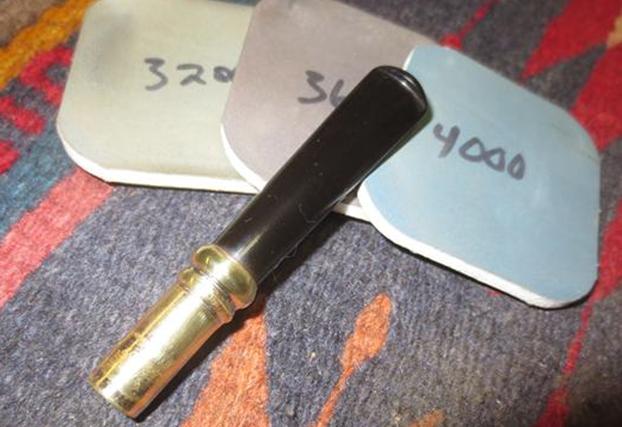
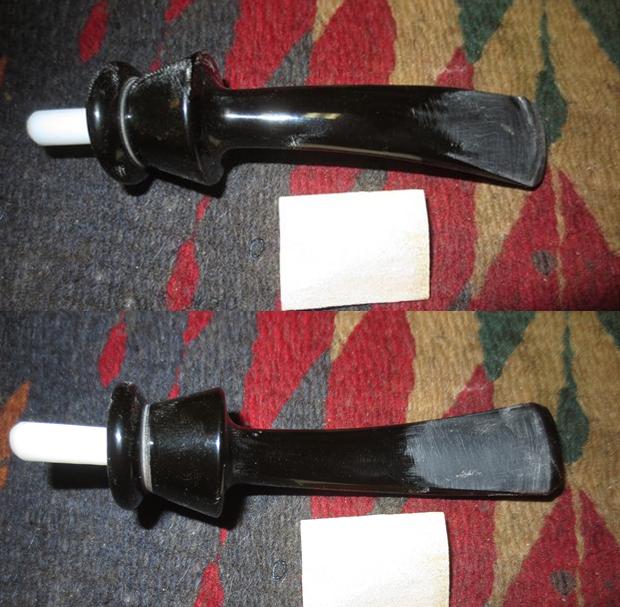
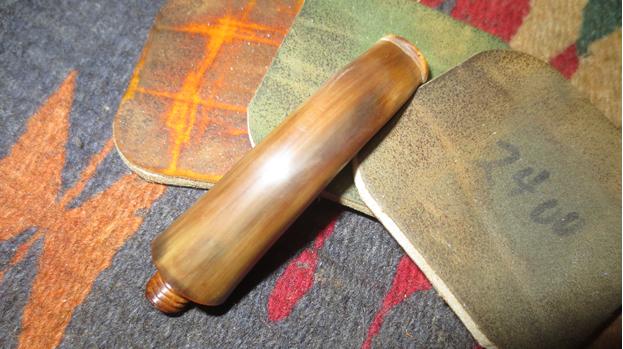
I sanded the repairs smooth with 220 grit sandpaper and then polished them with 1500-2400 grit micromesh sanding pads. I took a photo of the stem at that point in the process and the oxidation showed up clearly in the bright light of the flash. I poured the Before & After Stem Deoxidizer into a flat container and put the stem in to soak while I worked on other pipes. 
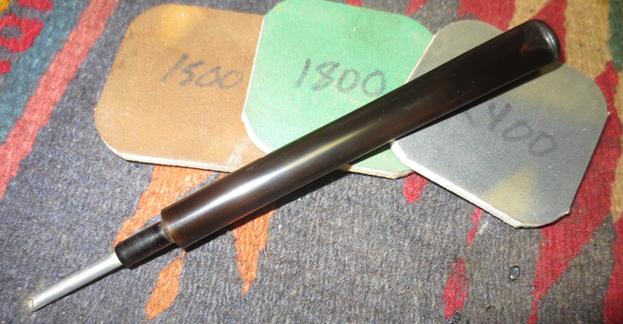
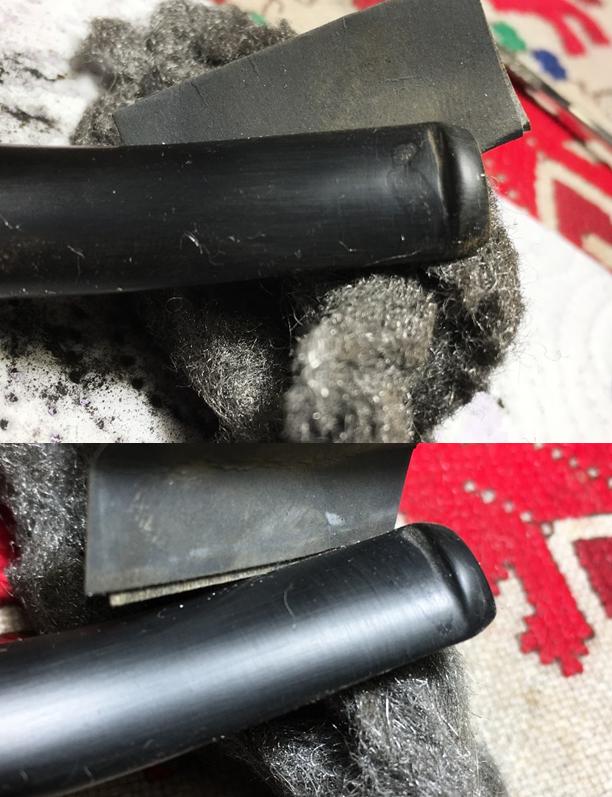
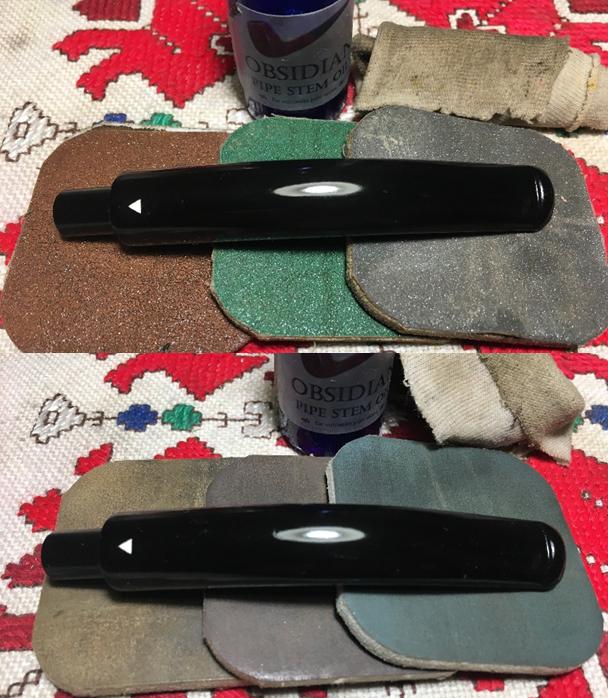
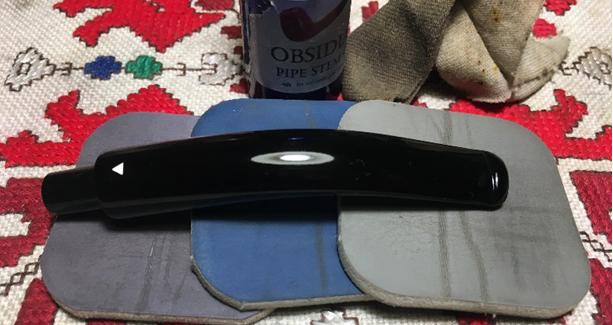
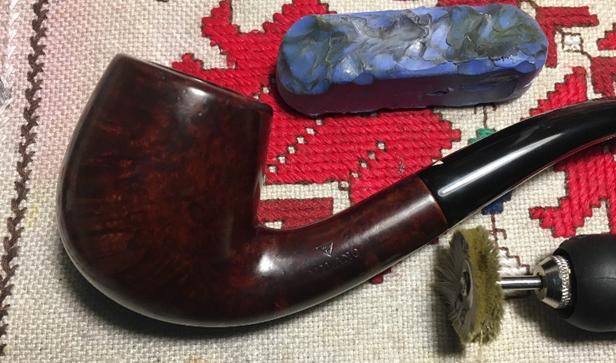
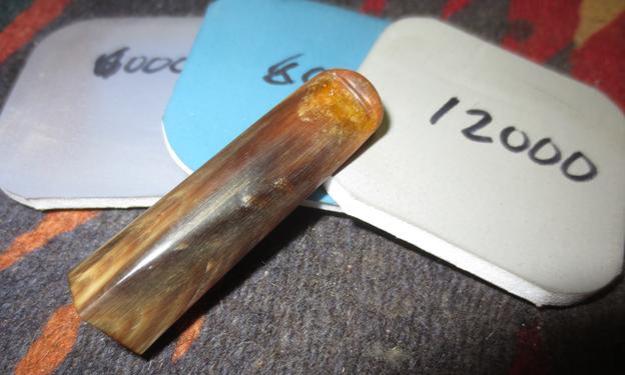
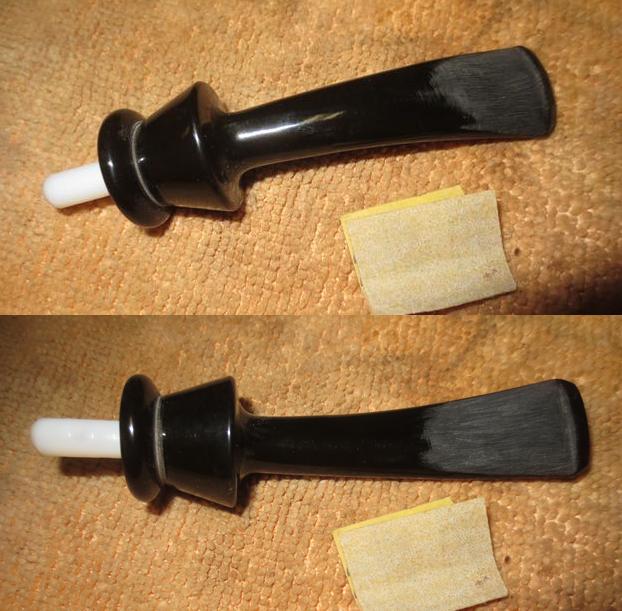
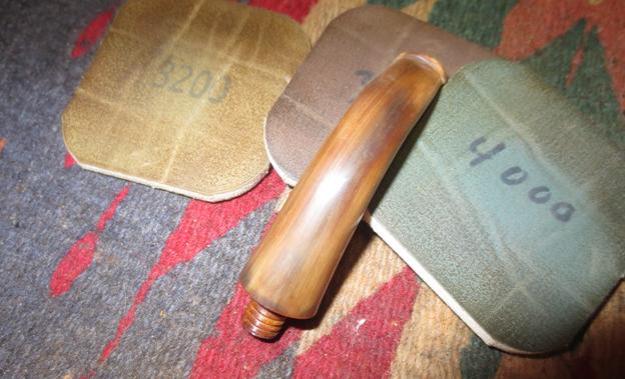
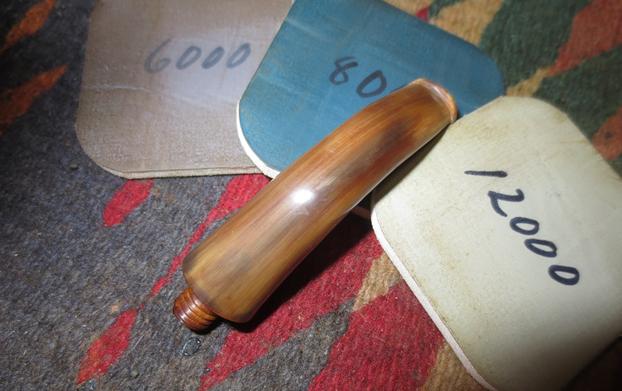
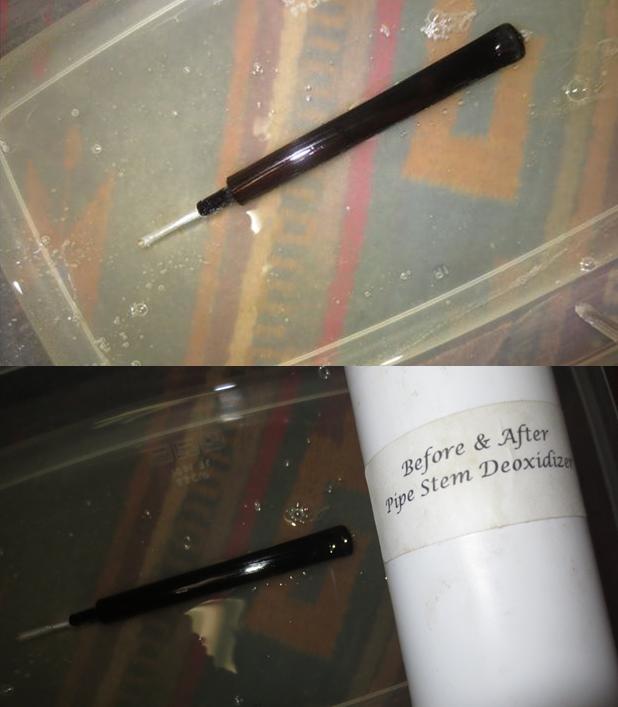
I removed it from the soak after about 2 hours and polished it with Before & After Pipe Polish. It looked much better than it did when I put it in the bath. I decided to continue polishing it with micromesh sanding pads. I wet sanded it with 1500-2400 grit pads and rubbed it down with Obsidian Oil. I dry sanded it with 3200-12000 grit pads and rubbed it down again with the oil after each pad. I gave it a final rub down with the oil and set it aside to dry. 
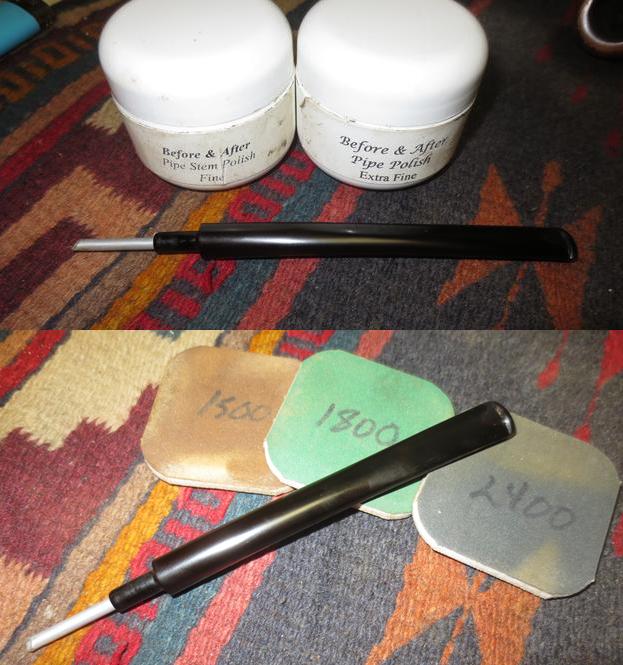
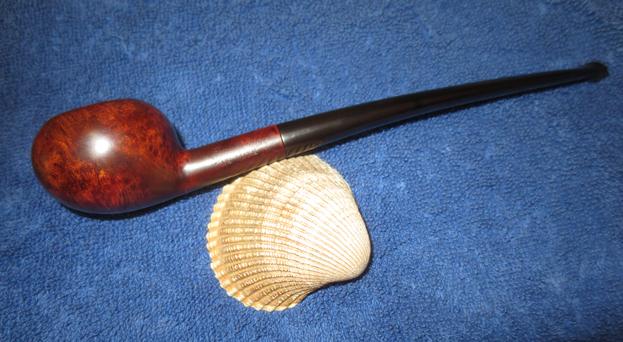
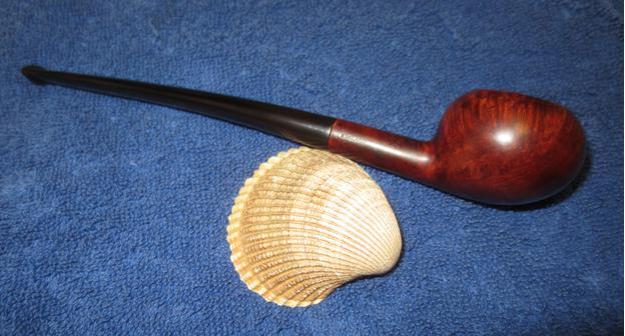
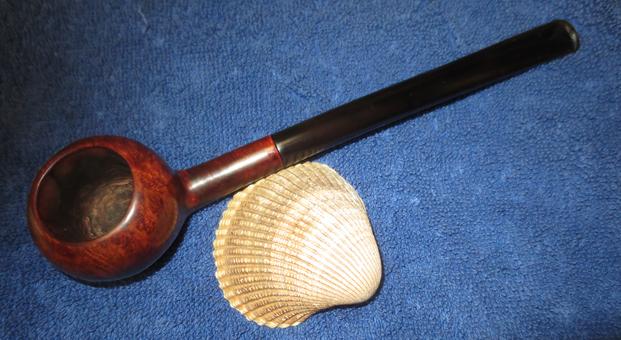
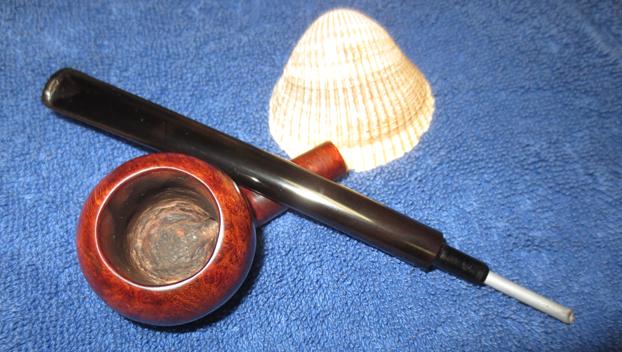
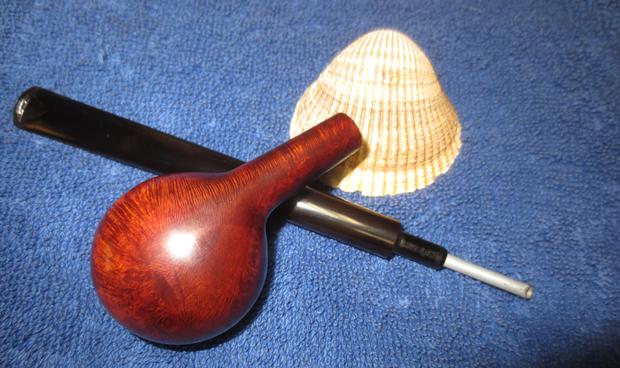
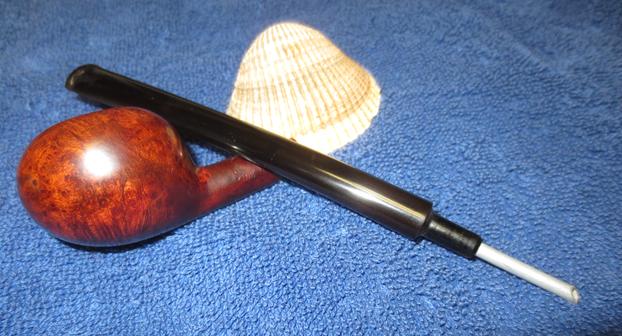
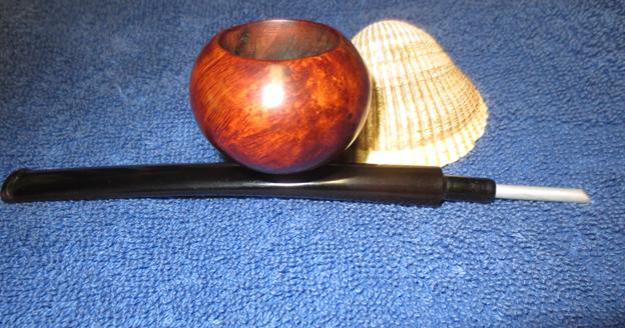
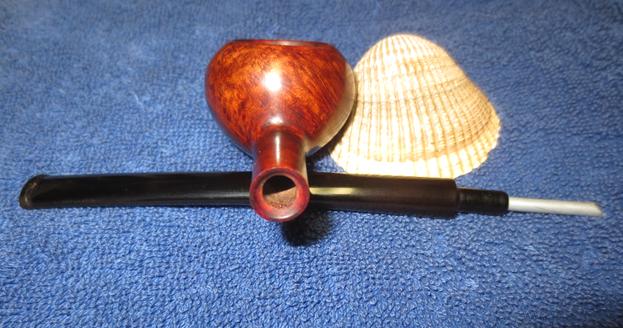
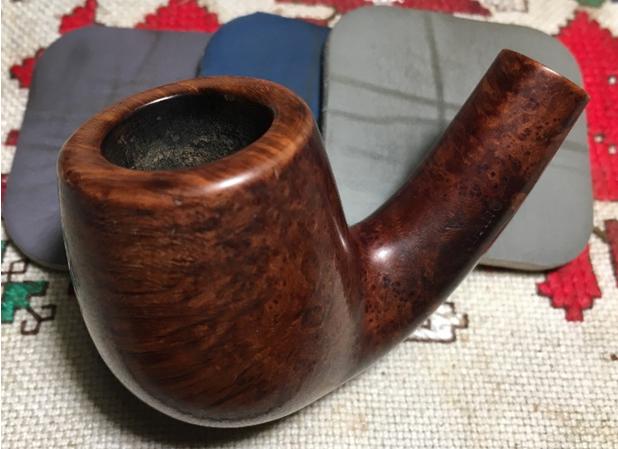
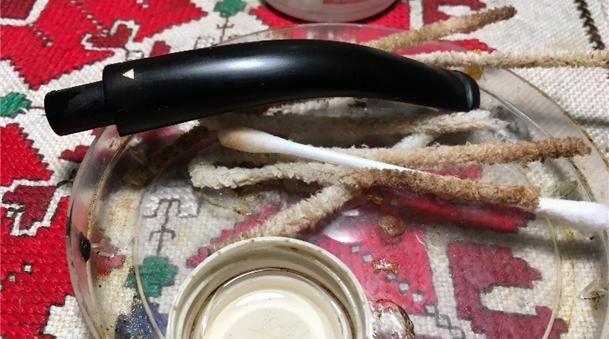
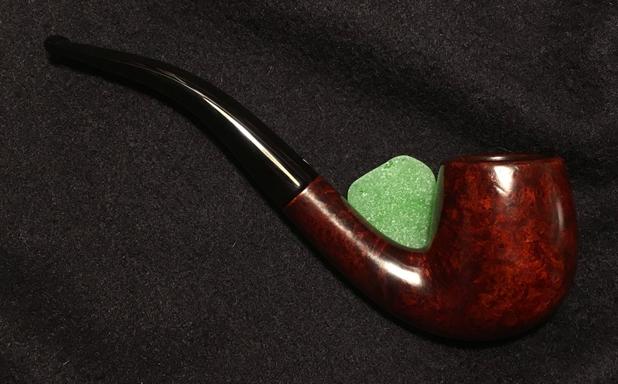
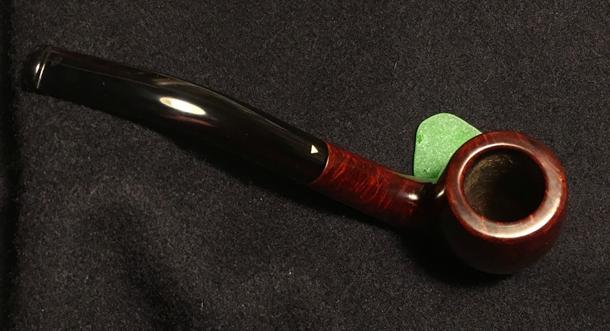
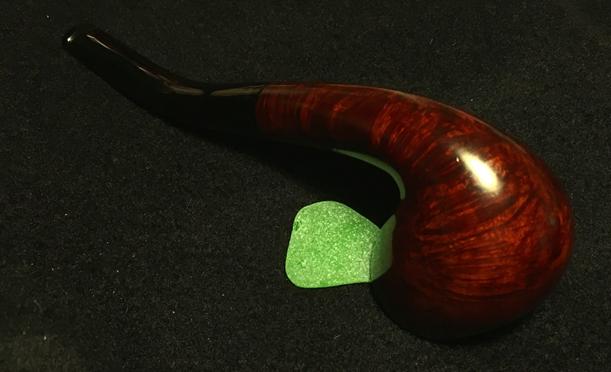
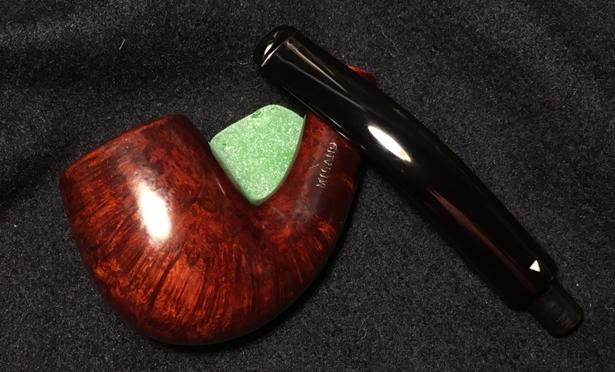
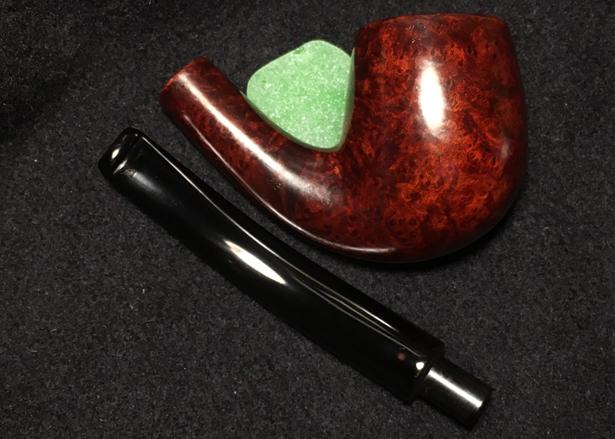
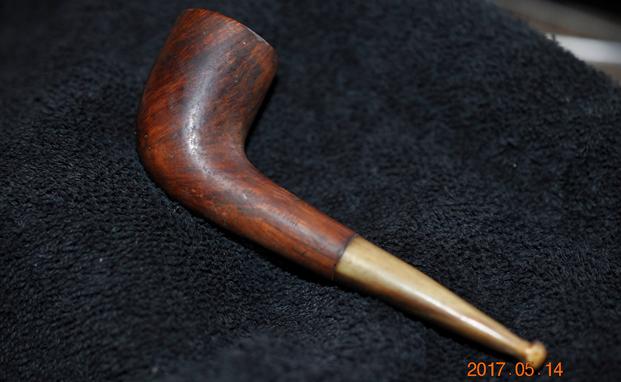
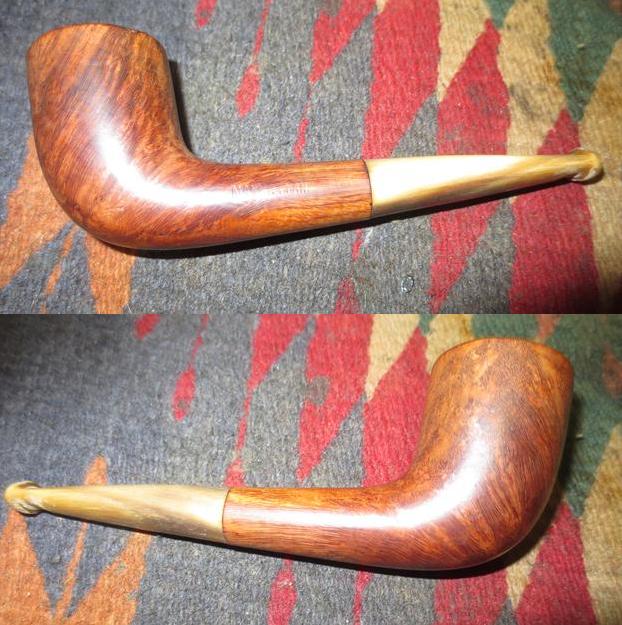
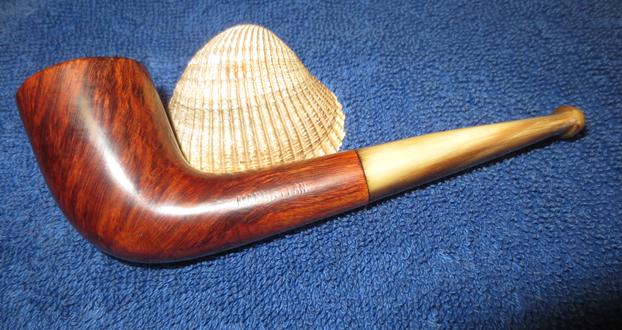
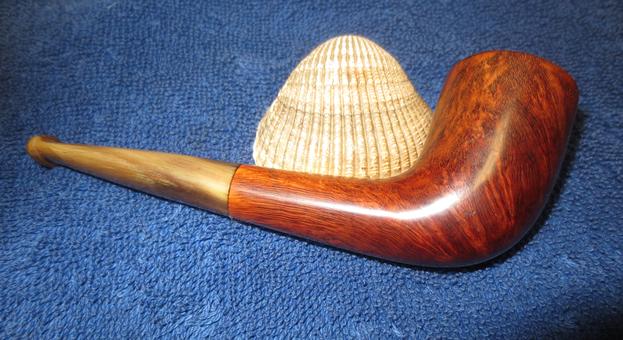
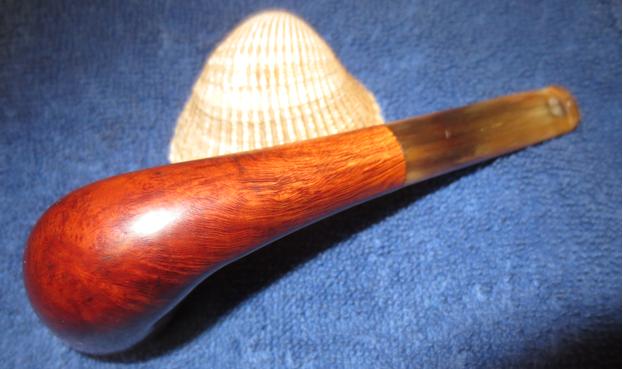
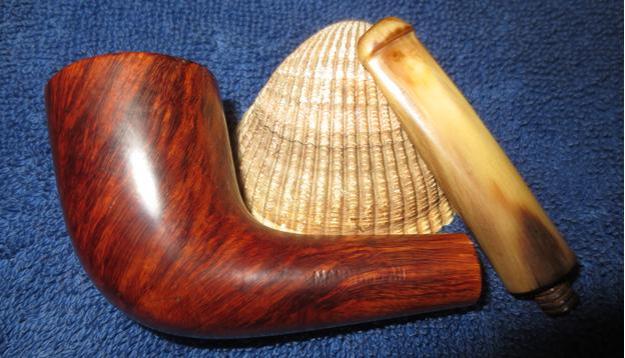
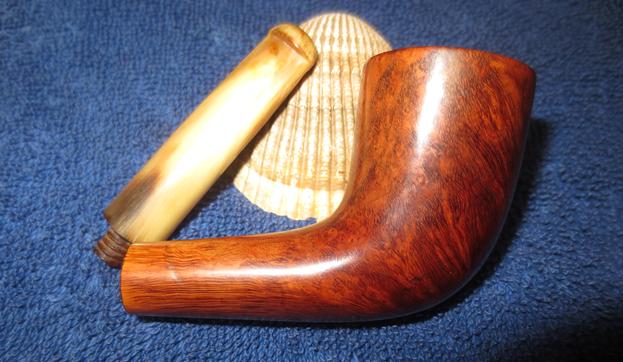
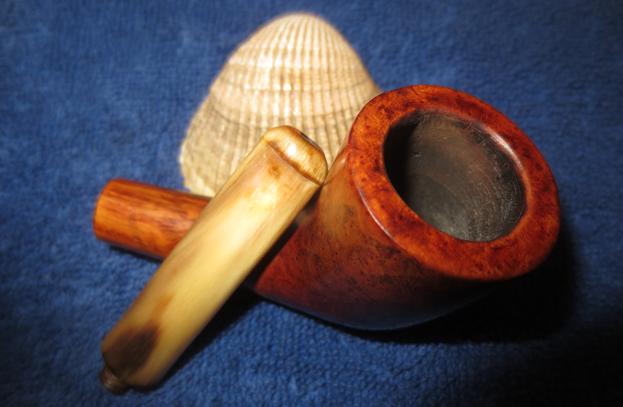
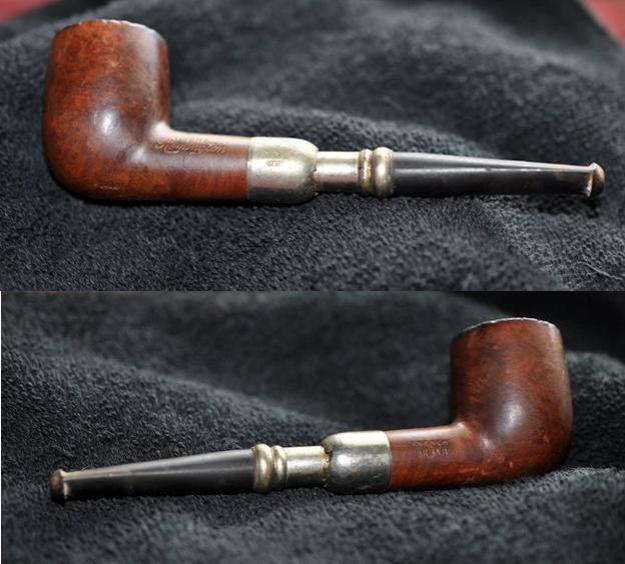
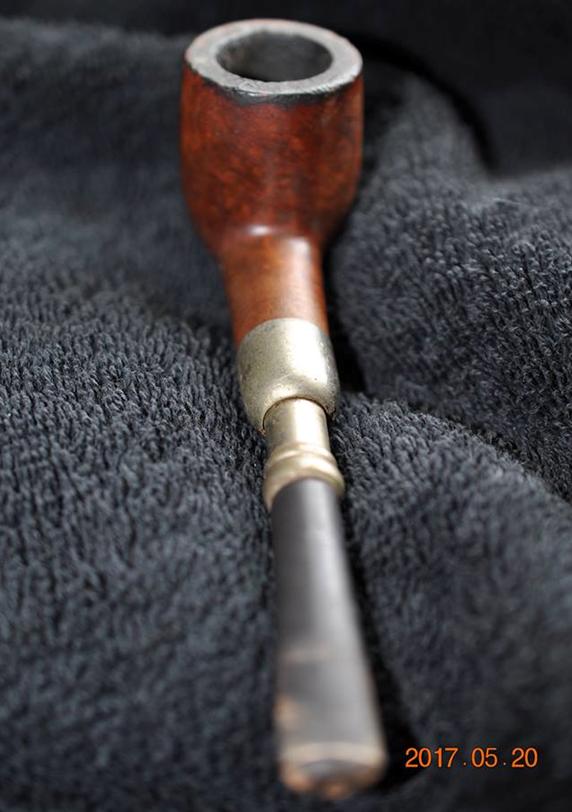
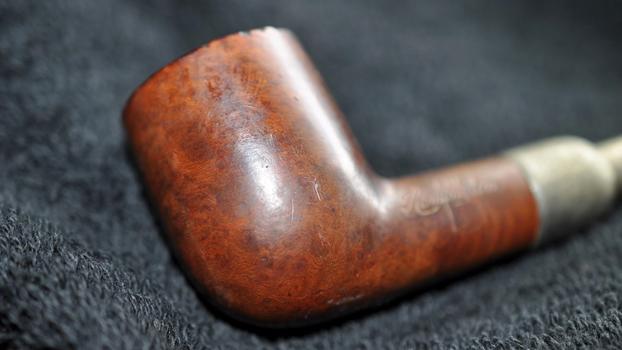
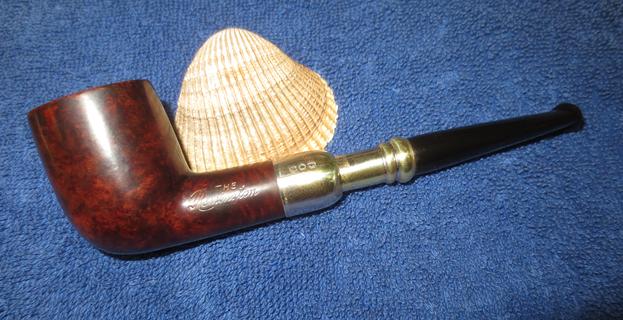
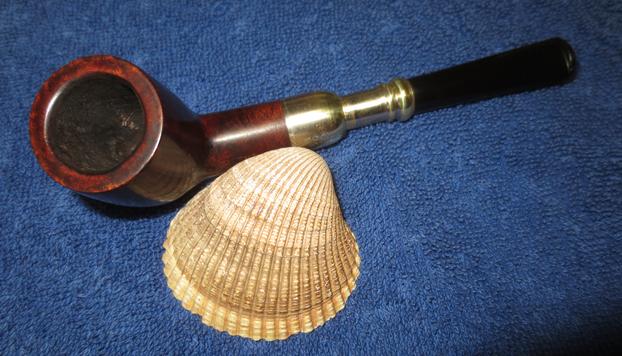
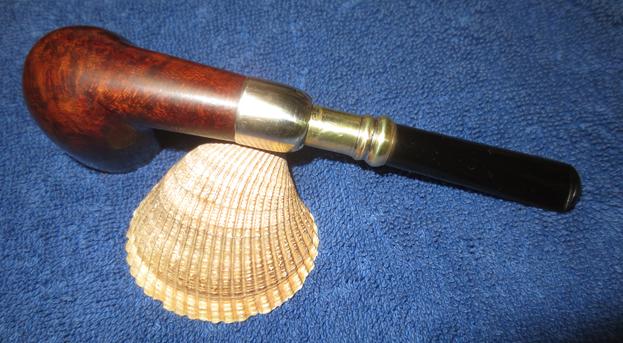
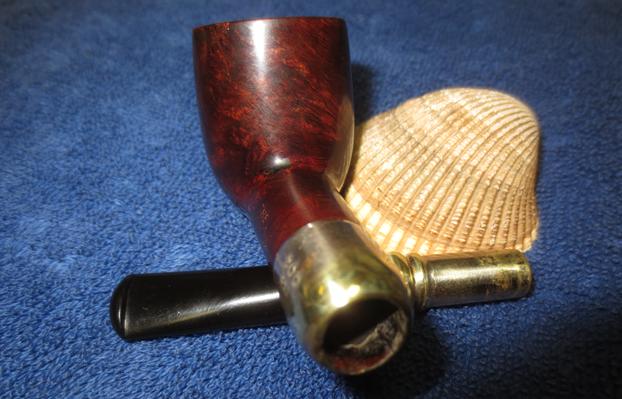
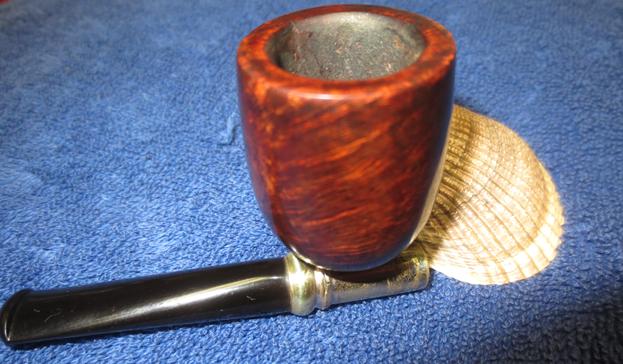
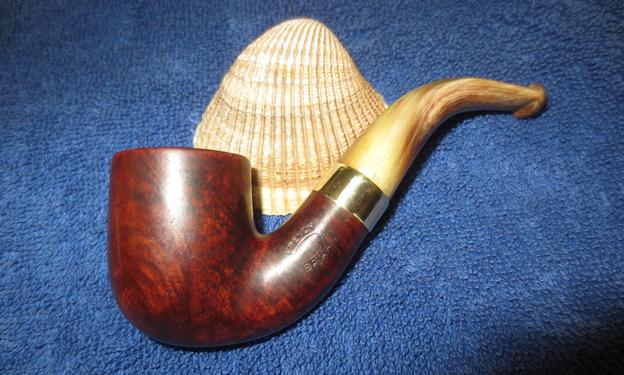
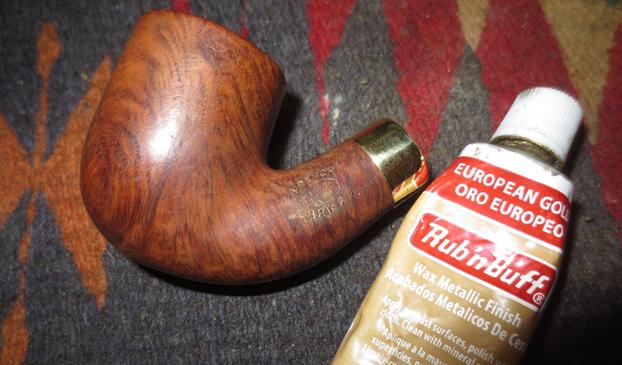
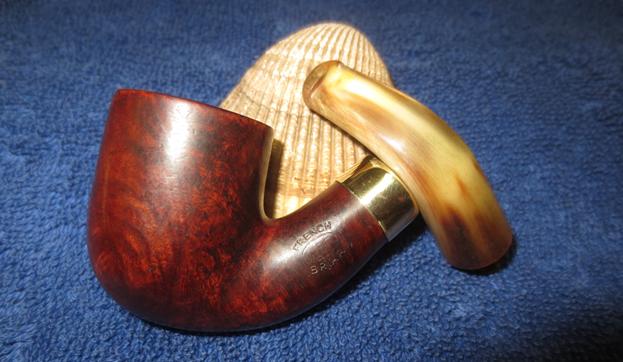
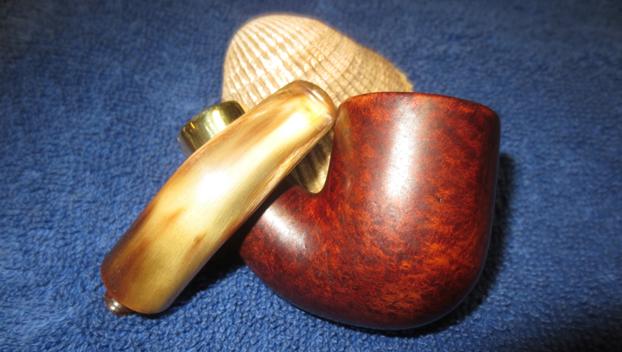
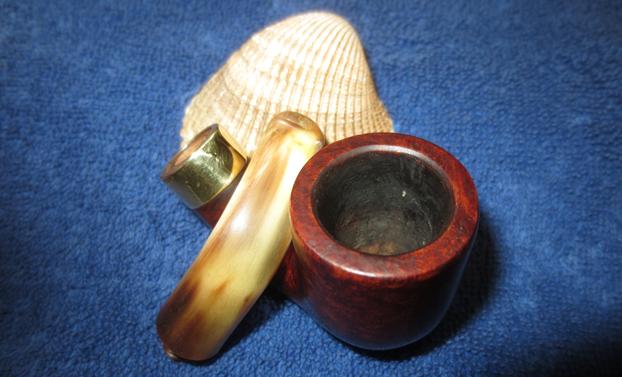
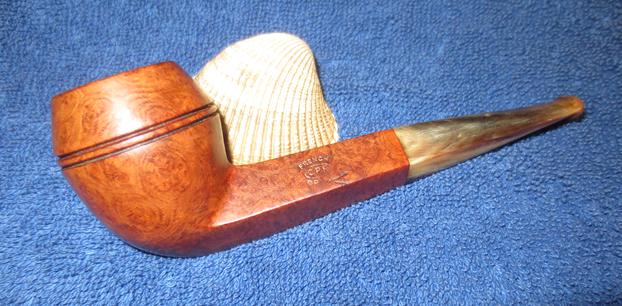
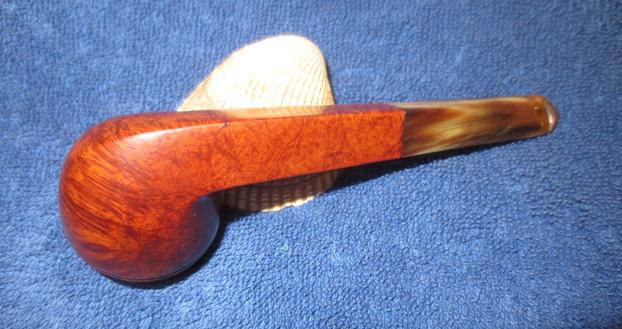
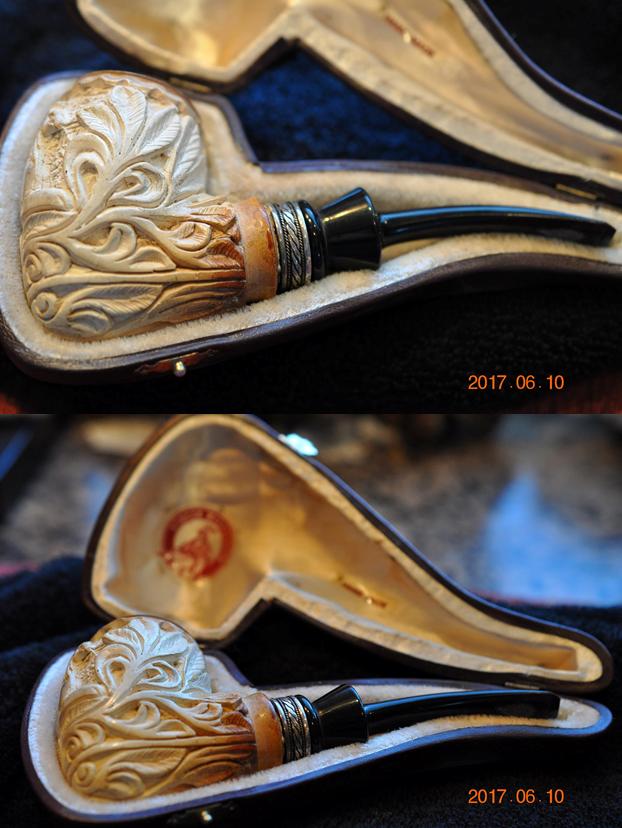
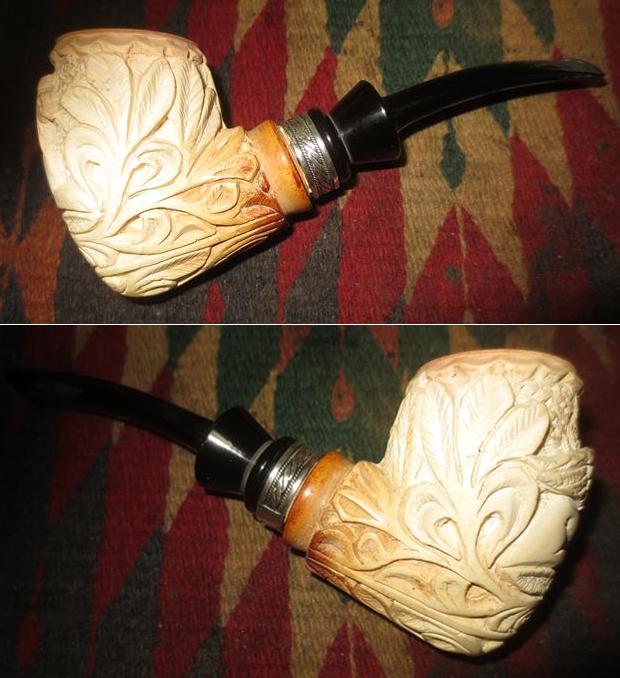
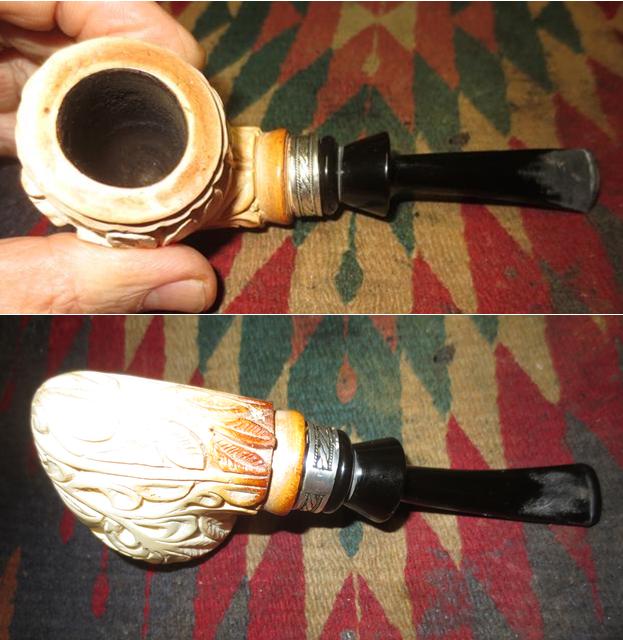
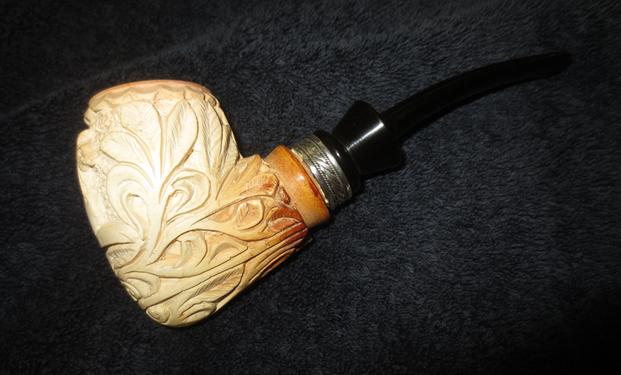
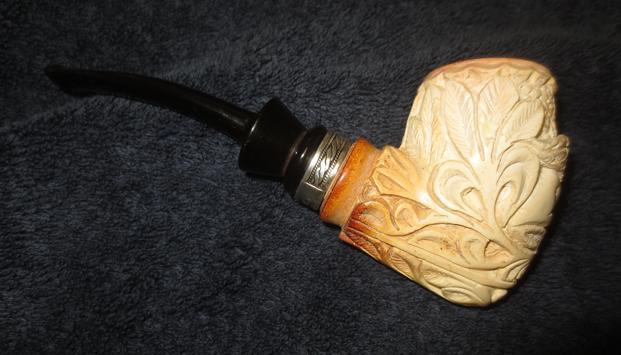
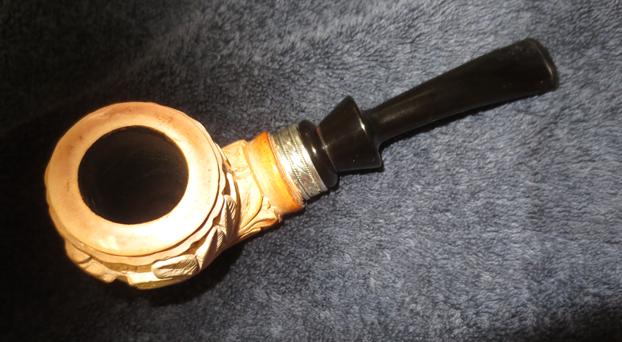
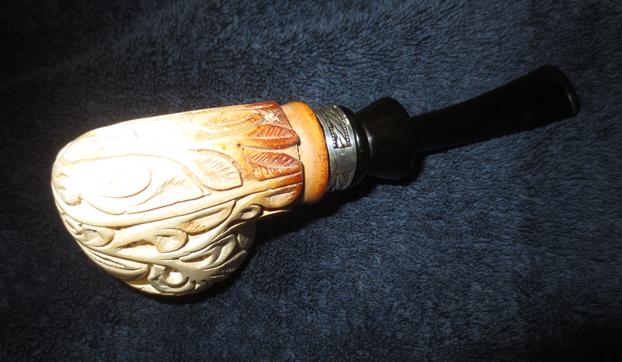
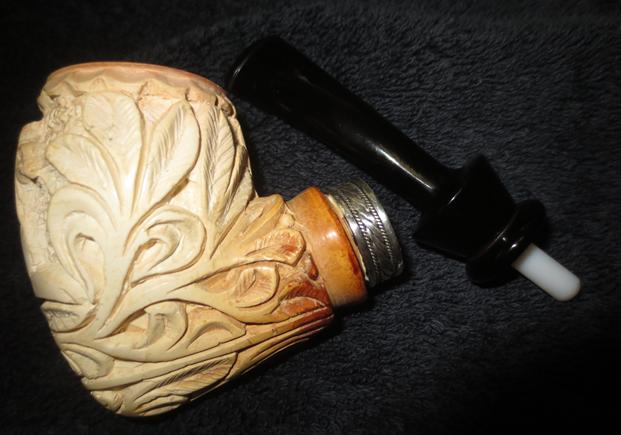
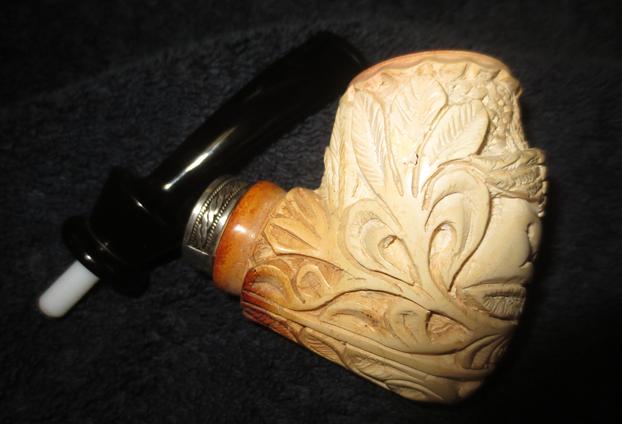
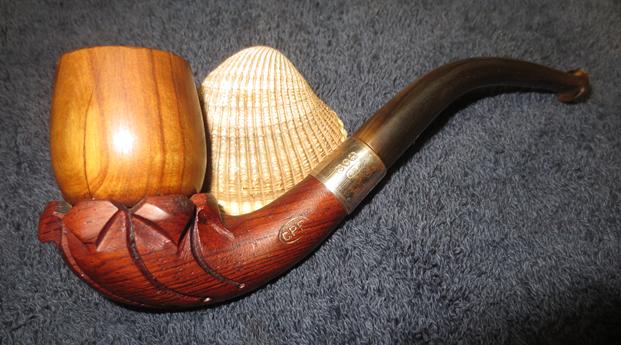
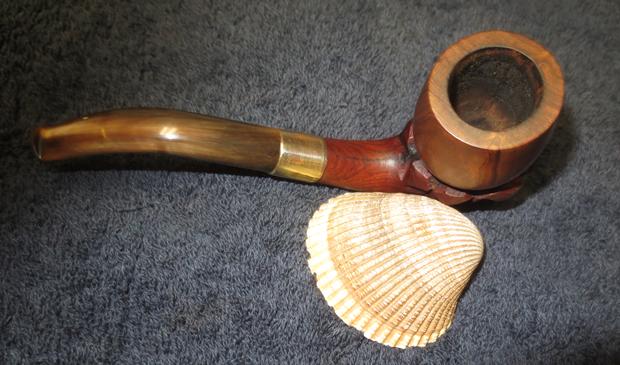
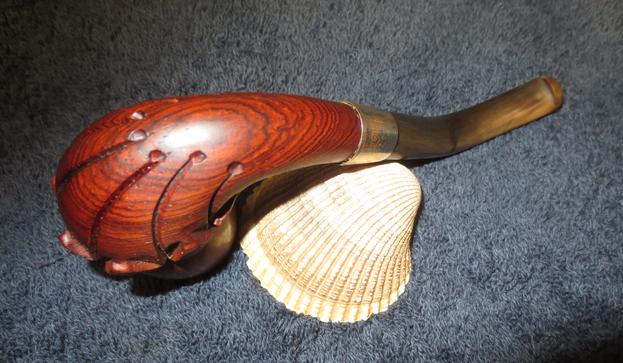
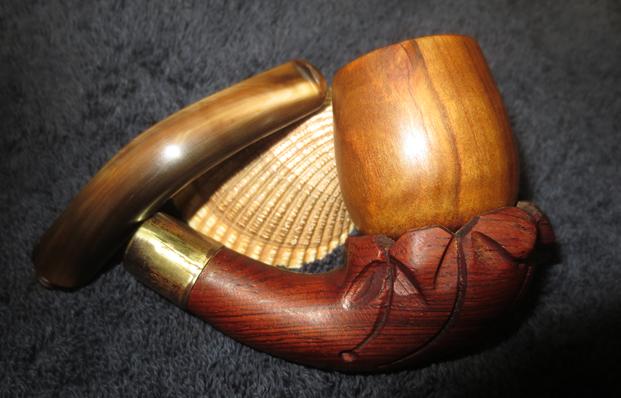
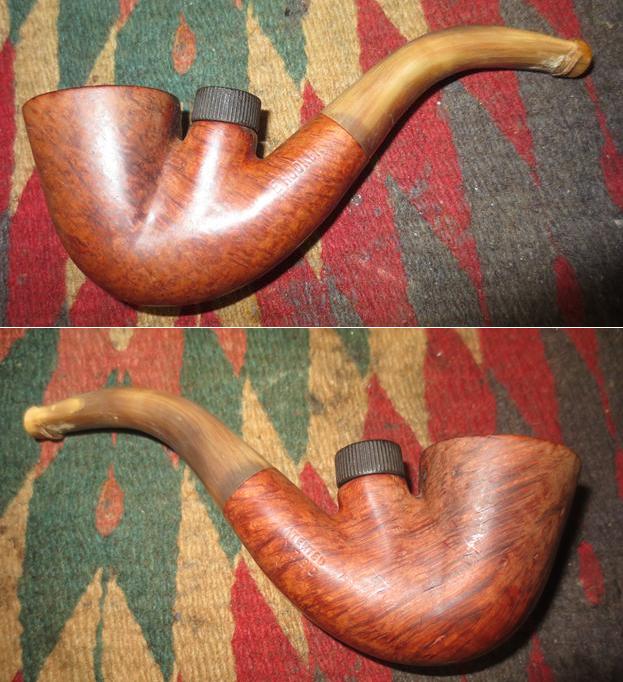
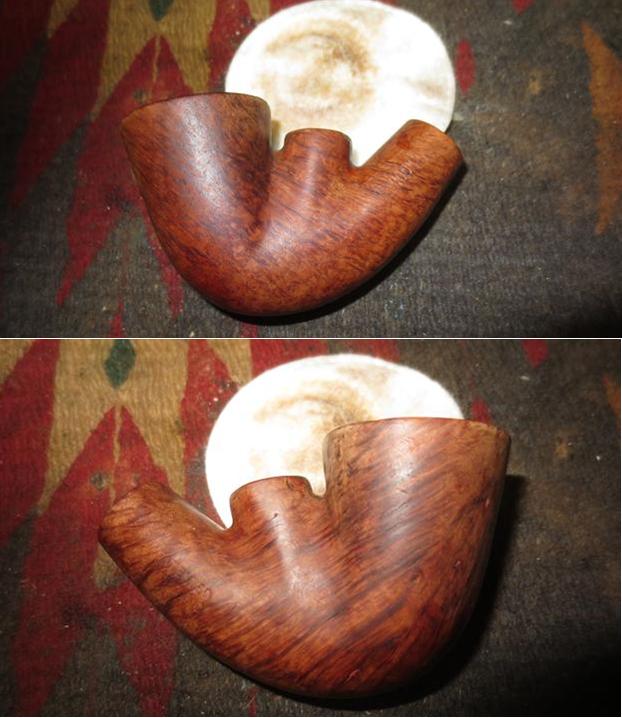
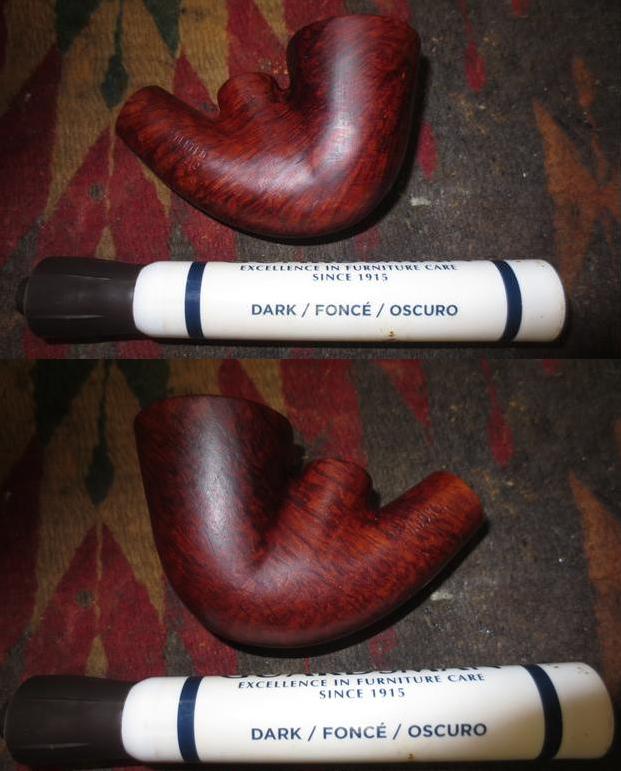
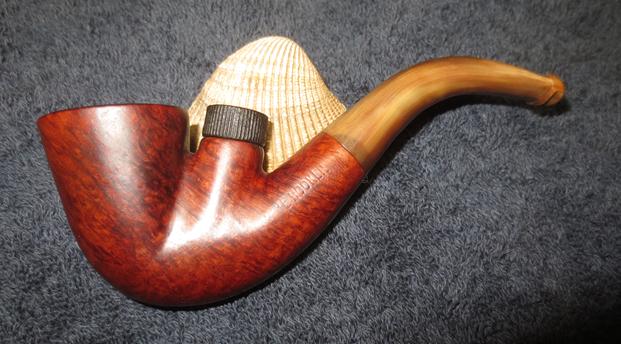
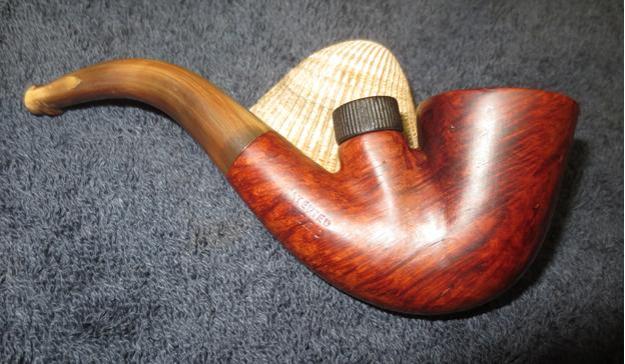
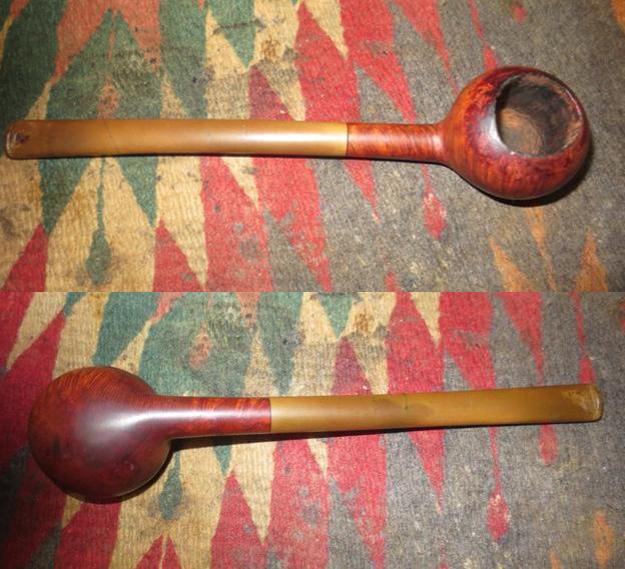
I polished the bowl and stem on the buffing wheel with Blue Diamond to take out the last minute scratches in the briar and vulcanite. I gave the bowl and stem multiple coats of carnauba wax and buffed it with a clean buffing pad to raise a shine. I hand buffed it with a microfibre cloth to deepen the shine. The finished pipe is shown in the photos below. The pipe looks far better than it did when I started. The bowl looks round, the finish looks far better and the repairs on the stem though visible up close blend in well with the black of the vulcanite stem. The aluminum inner tube is shine and smooth with the reshaped angle of the tube looks like it must have when it left the factory. Thanks for walking with me through this refurbishing it was a fun one to work on. Cheers.


A Lady’s Choice – WDC Milano Swan Neck Billiard


Blog by Dal Stanton

Is there a psychology in the choosing one makes when befriending a pipe?  A young Bulgarian lady, who also is a budding pipe lady, chose a pipe out of my ‘Help Me!’ baskets and boxes.  After looking at scores of hopeful candidates, there was only one – only one – that she held in her hands, looking at it and smiling. A beautiful, graceful, WDC Milano Swan Neck Billiard caught her attention, and it would seem, her affections.  Is there a psychology unfolding in the process, the evaluation, and the weighing of one pipe against another?  Or, is the process more like the lore of Harry Potter’s choice of one’s wand?  The young wizard does not choose the wand – the wand chooses his wizard.  Does the pipe do the choosing?

And is there any credence to the oft unspoken observation – do pipe stewards resemble their pipes like canine lovers sometimes uncannily resemble their 4-legged friends?  These observations come to my mind because intriguingly, the young lady who was claimed by the WDC Milano Swan Neck, shares, in some very remarkable ways, pleasing characteristics of this graceful pipe.

And then there is the ‘question’ of the ‘Pipe Lady’ more so than the ‘Pipe Man’.  A Pipe Lady lives closer to the social and cultural ‘edge’ when she takes her pipe in hand and enjoys a bowl of her favorite blend.  This picture I found somewhere on the internet (sorry, can’t cite!), I suspect would never be ascribed to Pipe Men.  Yet, a Pipe Lady looks at the three with a smile of agreement and a wink, while she is thinking, ‘You’ve got that one right!’This graceful, Milano Swan Neck stem comes from the William Demuth Company, established in 1862 – one of the oldest pipe manufacturing houses in the United States (Pipedia article).  The WDC Milano patent goes back to the 1920s with an example of the familiar WDC rhombus from the same WDC article in Pipedia (courtesy of Doug Valitchka).The eBay seller from Akron, Ohio, described the long dimensions of the Lady’s Choice WDC Milano:  Very graceful bent billiard! About 6″ long, bowl is 2″ tall, 1 3/8″ wide. ID 3/4″, depth 1 13/16″. From Pipedia’s WDC article, courtesy Doug Valitchka, a very nice example of what appears to be the same Swan Neck Billiard of the Milano line.From my worktable on the 10th floor of our flat here in Sofia, Bulgaria, I take these pictures to fill in the gaps. On the left side of the shank is stamped the traditional WDC rhombus [over] MILANO.  The right side is stamped the single shape number, ‘63’.  The chamber appears to have been cleaned to some degree and the carbon cake is very light.  The rim is sad.  It appears someone took a divot out of the internal lip trying to clean it or something.  The rim’s outer edge is beat up and I can see the vestiges of a bevel.  There is lava crusting as well on the rim surface and some hardened light stuff – the rim needs cleaning.  The stummel has few if any fills that I see – the grain of the tall bowl is impressive.  The stem has the WDC inlaid white triangle on the top.  Oxidation is present and the former steward was a clencher and chewer.  Both top and bottom of the bit shows deep bite dents.  The top button lip is dented.

The recommissioning of this Lady’s Choice WDC Milano Swan Neck Billiard, begins by putting the stem into the OxiClean bath to work on the oxidation.  The second thing I do is toss the tubing that was hanging in the tenon.  If it belonged to this pipe originally, something is missing as the airway diameter of the tenon is much larger than the tubing.  On an interesting note, there is a patent number stamped on the tubular stinger.  I looked it up in Google patent search but found nothing that had bearing on pipes (PAT. NO. 5861 / IX – I think).Next, after spreading paper towel to catch the carbon dust, I use the Savinelli Pipe Knife to remove the little carbon left.  I follow with sanding the chamber walls with a 240 piece of sanding paper wrapped around a Sharpie Pen. I then turn to cleaning the internals of the stummel using cotton swabs and pipe cleaners wetted with isopropyl 95%.  There’s a good bit of tar and oils in the mortise.  After some time, I decide to switch to a Kosher Salt and alcohol soak to finish off the internal cleaning and to freshen the stummel.Next, using undiluted Murphy’s Oil Soap I work on the external surface of the stummel and the rim with cotton pads.  I also use a brass bristled brush on the rim.  After the scrub, I rinse the stummel in cool tap water.  The condition of the rim becomes more evident.  I think I will be able to remove the large divot at 4 o’clock in the second picture below by creating an internal bevel on the rim after I lightly top it. I start with by topping the stummel using 240 grit paper.  I follow by creating an internal and external bevel around the rim.  After a few rounds of working on the bevels, I realize that the internal rim divot is too much for the bevel to erase.  I switch gears and mix some briar dust with thick CA glue and create a putty and fill the divot on the rim.  I spray it with an accelerator to shorten the curing time.  With a needle file, I file down the briar dust patch material until it’s almost flush with the briar.  I then use 240 and 600 grit sanding paper to blend the patch and finish the bevel on the internal and external edges of the rim.I then sand the stummel using a medium grade sanding sponge followed by a light grade sanding sponge.  I remove the minor nicks and scratches on the bowl surface.I then proceed to sand the bowl using micromesh pads 1500 to 2400, then 3200 to 4000, then finally, 6000 to 12000.  The process brings out the beautiful horizontal grain flows from the front of the bowl downward to encompass the heel.  Bird’s eye grain is sprinkled nicely on the stummel sides. With the day ending, I continue the cleaning and refreshing of the stummel internals using a Kosher Salt and alcohol soak.  I create a wick to insert into the shank/mortise by twisting and stretching a cotton ball.  I take a straight stiff wire to help stuff it deeply into the mortise.  With the stummel secured in the egg carton I fill the bowl with Kosher Salt (which leaves no iodine after taste) and give it a shank to displace the salt.  I then, using a large eye-dropper, put isopropyl 95% into the bowl until it surfaces over the salt.  I put it aside for the night.  The next morning, the salt and alcohol soak did the job well.  The salt had turned dark and pulling the wick out – the same was true of it.  I toss the expended salt and wick in the waste and wipe the bowl out removing leftover salt.  Then returning to the use of cotton swabs and alcohol, in only a few plunges down the mortise, the internals are clean.  Pictures show the cleaning process. The stem was soaking in an OxiClean bath to raise the oxidation from the vulcanite.  I take stem out of the bath and the oxidation was raised showing the normal olive-green color.  I then take 600 grit sanding paper and wet sand the stem to remove the oxidation and to work on the serious teeth clenching damage. After the 600 grit sanding, I give the stem a stiff buffing from 0000 grade steel wool.  Interestingly, I noticed it earlier but thought that it would go away with the OxiClean and sanding.  I see a small lighter (reddish?) dot on the underside of the stem (second picture below), almost below the WDC triangle mark but just off center.  I’m not expecting a ‘manmade’ mark there so I assume it’s a discoloration in the vulcanite.  I take a little 240 grit paper and go after it, but it remains for now.  Pictures show oxidation and post-oxidation sanding. The button area is in bad shape.  The former steward was a clencher par excellence.  Neither upper nor lower bit areas were spared.  The upper has deep bites and a ‘wedgy’ dent on the button lip.  The lower button lip is spared, but there is a ‘go to’ clench handle which is distinct.  I take pictures to mark the start. Focusing first on the topside, I use the heating method to see if I might hopefully tease out the concave dents.  Then the bottom-side.  Vulcanite, a form of rubber, amazingly will seek out its original disposition when heated as the rubber expands with the heat.  I light a candle and pass the bit-end of the stem over the flame in back and forth style.  I try not to cook the vulcanite, but simply heat it strategically.  After some time, using heat on upper and then lower, I take pictures to compare.  You can see the closing of the dents in the picture comparisons below.  I think there is a beneficial change, but there are still dents to repair.  Pictures 1 and 2 are before heating and after for the upper side.  Pictures 3 and 4 of the lower side – before heating and after.  I first use 240 grit paper on the upper bit.  I sand out as much as possible all the smaller dents. Through the years of clenching, the button lip has lost its distinction so using a flat needle file, I reintroduce the lip edge and then follow by sanding with 240 to erase file tracks and shape more.  I’m wondering if I can avoid having to rebuild the button lip.  I gently sand the upper button lip as well.  The tooth grip has turned into only a small dimple – good movement.  I sand gently to remove the dimple because I don’t want to lose too much button real estate.  The top looks great.  The only patch needed is the remaining large dent.  The topside filing, sanding and shaping progression is pictured below. Turning to the lower bit, again I use 240 grit sanding paper to sand out what can be removed and blended by sanding. The dent/clench configuration was minimized by sanding but I need to patch what remains of the surface damage.To prep the vulcanite for the patch work, I wipe down the upper and lower bit with a cotton pad wetted with alcohol.  I mix activated charcoal powder with Hot Stuff Special ‘T’ CA Instant Glue (extra thick) to form a putty which is like molasses in viscosity to apply to the damaged areas.  I use a tooth pick as my trowel and tamper and I apply more putty than needed – the patch mound allows me to file down gently to the surface of the stem to achieve a better blended patch.  I apply putty to the upper bit, and a dab on the small, remaining dimple on the button lip.  I spray it with accelerator to cure the putty.  I then do the same for the needed area on the lower bit.  The pictures show the patch progress. Using a flat needle file, I begin filing the patch mound on the upper bit until I’m very close to the vulcanite surface.  With the patch expanding closely to the button lip, I also utilize the flat needle file to separate and define the button lip.  When close to the surface, I switch to 240 grit paper to bring the patch flush with the vulcanite surface.  After I’ve blended as far as 240 paper will take me, I switch to 600 grit paper and then finally, 0000 steel wool which fine tunes the blending and each in turn erases the former’s scratch marks.  I take pictures along the way to document progress. At this point, not surprised, I see very small air pockets exposed on the patch area (see picture above).  Taking Hot Stuff CA Glue, thinner than the ‘T’ I used for the patch, I dip a toothpick into the glue opening to give a coat of CA glue on the toothpick.  With this wet glue, I paint the patch with a thin glaze of glue which fills the air pockets.  I give the glaze of glue a quick spray of accelerator to cure it.  I then take 600 grit paper followed by 0000 steel wool to blend and complete the upper bit patch work.  The micromesh sanding later will further blend the patches.Now, to the lower bit patch.  As before, I use the flat needle file initially, then 240, 600 and then 0000 grade steel wool working toward the vulcanite surface then blending.  Again, a few miniscule air pockets are revealed in the patch, and I repeat the same procedure as on the upper patch. Having been so focused on the button repairs, I almost forget (again) to clean the stem internal airway.  With pipe cleaners dipped in alcohol, I do that and it does not take long to clean.Putting the stem aside, I pick up the stummel.  I will use Fiebing’s Light Brown Leather Dye to add some unifying hues on this very attractive WDC Milano’s grain.  I like the lighter motif which is what the Milano’s picture included above courtesy of Doug Valitchka.  I wipe the stummel with a cotton pad wetted with isopropyl 95% to make sure it’s clean.  I then warm the stummel with the heat gun after inserting a whittled cork into the shank to serve as a handle.  After the bowl is warmed, helping the briar more effectively to absorb the dye, I apply the dye liberally using a folded over pipe cleaner.  After the stummel is covered, I fire the dye with a lit candle which ignites the alcohol in the dye and sets the pigment in the grain.  After a few minutes, I repeat the procedure concluding with firing.  I then put the stummel aside to rest. While the stummel rests, the stem is ready for the micromesh pad cycle.  I wet sand with pads 1500 to 2400, then dry sand with pads 3200 to 4000 then 6000 to 12000.  After each cycle, I apply Obsidian Oil to rejuvenate the vulcanite, and my how it likes it!  The pop of a newly restored stem is wonderful to behold! The next day, I’m home from work, and it’s time to ‘unwrap’ the stained and fired bowl.  I mount the felt buffing wheel on the Dremel, which provides more abrasion to the surface, helping to remove the crust.  I used Tripoli compound with the Dremel set at 20% speed – slow because I don’t want to generate too much friction. Using the Dremel’s adjustment wrench, I purge the old compound off the felt wheel to clean and soften it.  I work the felt buffing wheel applying the abrasive Tripoli compound over the stummel.  I am not able to reach the bend curve between the shank and the bowl with the felt wheel.  I change to a cotton cloth buffing wheel again, only dedicated to Tripoli compound.  Each compound has its own dedicated Dremel buffing wheels.  With the cotton cloth wheel, I’m able to reach into the harder to get places.  I run the wheel over the entire surface.  I take a picture showing the completion of the ‘unwrapping’.  One of the helpful aspects of aniline, or alcohol-based dyes, is the ability to wipe it with alcohol to lighten the application as well as blend the dye.  I want to lighten this WDC Milano so I wipe it down with cotton pad wetted with alcohol.  I take a picture before and after.  Immediately after wiping down the surface, the surface clouds with the alcohol.  Then I remove the alcohol wipe clouding effect with Blue Diamond compound, with a cotton cloth wheel mounted on the Dremel at 40% speed.  Following the Blue Diamond application, the true ‘after’ picture is taken.  I also reunite the stem with the stummel for the Blue Diamond buffing.  Well, the third picture below represents the lighter ‘after’ picture, but I don’t believe the picture does justice to what my eyes are seeing.  The lightening and blending of the surface hue is showing off the grains quite nicely.  I’m liking it!  I think this, “Lady’s Choice” is going to like her choice too! I give the pipe a hand buffing with a felt cloth, not so much to buff up the shine at this point but to remove the compound dust from the surface.  The compounds are abrasives and the dust is the residue left over.  After this, I mount the Dremel with a dedicated cotton cloth buffing wheel, leaving the speed at 40%, I apply the carnauba wax evenly over the stummel and stem.  I finish with a hefty hand buffing of the pipe with a microfiber cloth to raise the shine more.

This WDC Milano Swan Neck Billiard is a lady’s choice.  I hope she likes it.  It is an elegant pipe and showcases beautiful flowing grain.  I’m pleased with the button repair that blended very well – without knowing it’s there, most people would not see it.  The repaired rim also looks good – forming the beginning of the long elegant lines carried through to the swan neck stem.  Nice.  Each pipe I restore benefits the work we do with the Daughters of Bulgaria – helping women and girls who have been sexually exploited and trafficked.  For more information about this and pipes I have available, check out the store at The Pipe Steward.  Thanks for joining me! 

Another interesting piece of pipe history Manhattan Canted Dublin with a Horn Stem


Blog by Steve Laug

I have worked on at least two other pipes that I wrote about that bore the Manhattan stamp on the shank in the past few years. One of them was a cased, bent Bakelite Bulldog with a Lockrite Stem. It had a Bakelite Manhattan stamp on the left side of the shank. When I wrote that blog I could find no information on the brand. The second one was a cased Manhattan Bakelite Billiard. The shank and the case on this one both had the same identifying information. The inside cover of the case read Manhattan over French Briar over Bakelite. The shank read Manhattan De Luxe stamped on the left side. In researching the blog on that pipe, I found that a company in the US called the Manhattan Pipe Company made the pipe. There was no other information that I could find at that time.

We found the next Manhattan on the virtual pipe hunt that my brother and I did in Montana. It was an older pipe than the others I had worked on. It also had a horn stem. I would call it a canted Dublin shape (others may differ on that). It is a very lightweight pipe and was in fair condition. The finish was worn and peeling but the briar had very interesting straight/flame grain that flowed on an angle on both sides of the bowl and horizontally along the shank. The back and front of the bowl had a mix of birdseye and flame grain. I have included the photos that Jeff took of the pipe before he worked his magic on it. I thought it would be interesting to see if there was any new information online regarding the brand. Of course, I checked on the Pipes, Logos and Stampings – PipePhil’s site. There was a listing for Manhattan pipes but there was not any new information and what was there was inconclusive. I turned to Pipedia to see if there was a new article. I was surprised to find that there was one, I do not know if it was new or not, but I do not recall seeing it before. The article was called The Manhattan Briar Pipe Company. It is an interesting read so I have included the article in its entirety as well as the advertisement from 1913 that showed a Manhattan pipe. The interesting thing for me is that the pipe is the same shape and style as the one I have in hand. The difference of course is that mine does not have a silver band and there is a horn stem rather than a vulcanite stem.

1913 Manhattan Advertisement

The Manhattan Briar Pipe Co. was organized in October, 1902 by the American Tobacco Company, under an agreement with the owners of the Brunswick Briar Pipe Company, as a New York corporation. Its initial address was 111 5th Avenue, New York City, and the value of its stock in 1902 was $350,000.00. American Tobacco Company had itself been founded in 1890 by J. B. Duke through a merger between a number of U.S. tobacco companies, and was one of the original twelve members of the Dow Jones Industrial Average in 1896. It was commonly called the “Tobacco Trust”.

The majority of the stock in Manhattan Briar Pipe Company was immediately acquired by the American Tobacco Company after the company was organized, but the prior owners retained a controlling minority interest for some years. In October, 1906, however, the American Tobacco Company acquired the remaining shares of stock, and from that point on Manhattan Briar was the pipe making branch of American Tobacco. By 1911, however, American Tobacco had been dissolved in anti-trust litigation, and Manhattan Briar Pipe Co. became a separate concern.

Manhattan Briar Pipe Co. had started operations in 1905 in Jersey City, New Jersey, having taken on a lease for a ten year period in 1905, and maintained a factory at Marion, New Jersey, where the pipes were made. By 1913, former American Tobacco pipe department chair John Glossinger was the president of Manhattan Briar Pipe Company, and began a significant advertising push for high grade pipes, using the slogan “Don’t spoil good tobacco by using a poor pipe”. It appears from cases having appeared on the estate market that Manhattan also sold meerschaum pipes, most likely rebranded articles originally made by European craftsmen.

After the expiration of the Jersey City lease the Manhattan Briar Pipe Company maintained offices and a factory at 415-425 Greenpoint Avenue, Brooklyn, New York beginning in 1915, evidently under the direction of W. C. Bastian, who had been granted a patent for a chambered pipe stem otherwise seemingly identical to a Peterson P-Lip in 1910. An employee of the company, one J. Gianninoto, was granted a patent for a device meant to permit the emptying of a cuspidor without the mess in early 1918, and the company continues to be listed in local directories through 1921. In 1922 Manhattan Briar was purchased by S.M. Frank and merged into that company. https://pipedia.org/wiki/Manhattan_Briar_Pipe_Co.

Further digging led me to a link on the S.M. Frank Co. & Inc. history page. Reading through the history of the company I found that S.M. Frank not only purchased the Manhattan Briar Pipe Company but also purchased WDC or William DeMuth & Company – two of the older brands that I enjoy working on. Here is the relevant section from the link: In the year 1900 Sam Frank Sr. started his own business, selling pipes and other tobacco items. His original office was located at 20 W. 17th Street, NYC. He was also closely associated with the sales staff of Wm. DeMuth & Co., selling their line of pipes. It was at this time that Mr. Frank first met Ferdinand Feuerbach and formed what would be a lifelong friendship. Mr. Feuerbach started working for the DeMuth Company in 1897 and by 1903 had become the production manager. In 1919, when Mr. Frank needed an experienced pipe man to run his pipe factory, located at 168 Southern Blvd., in the Bronx, he persuaded his old friend Ferdinand to join him. Mr. Feuerbach is credited with developing DeMuth’s popular Royal DeMuth and Hesson Guard Milano pipelines. In 1922, when S. M. Frank purchased the Manhattan Briar Pipe Co. the company incorporated.  http://www.smfrankcoinc.com/home/?page_id=2

That link led me to me to some further information including an advertisement and a shape chart on Chris Keene’s Pipe Pages http://pipepages.com/mbpc2.htm. I have included them here with acknowledgement to Chris Keene. I always enjoy reading the old copy of these advertisements as they take me back to place where the pipe was an acceptable part of the life. Of course, this influx of information makes me wonder what I was looking for the last time I did a search for this brand. It seems some days you put in the right search parameters and hit the jackpot and other days the wrong ones leave you with nothing. I now knew more about the brand than I ever imagined when I began the hunt. I am pretty sure that my pipe was made in the era between 1900-1910. It is roughly from the same time period as the C.P.F. pipes that were in that lot.The bowl had a thick cake that had flowed out of the bowl and on the rim top. The inner edge of the rim appeared to be damaged but I would know more once I had it in hand. The next series of photos show the bowl from a variety of angles to show the condition of the finish and the grain around the bowl sides and bottom. The pipe was stamped on the left side of the shank MANHATTAN and there was no other stamping on the pipe.The horn stem was in decent condition with tooth chatter and marks on the top and underside near the button. There was also a small hole that was on the underside of the stem – it did not go all the way through the stem into the airway but it was present. The bone tenon was in good condition and the alignment of the stem to the shank was perfect.My brother Jeff has established his own process of thoroughly cleaning the pipes that he works on for me. This one was no exception, it was cleaned thoroughly. He reamed the bowl with a PipNet reamer and tidied it up with a Savinelli Fitsall Pipe Knife. He scrubbed out the mortise and the airway in the shank and the stem with pipe cleaners, cotton swabs and alcohol and cleaned the exterior of the threaded bone tenon with a cotton swab and alcohol. He scrubbed the exterior of the pipe with Murphy’s Oil Soap to remove the grime and grit on the bowl. He scrubbed the rim top with a tooth brush and the oil soap and was able to clean off the lava overflow. I took photos of the pipe to show the condition it was in when it arrived in Vancouver. The grain really was quite stunning. While the MANHATTAN stamp is legible on the left side of the shank it is quite faint. I took a close up photo of the bowl and rim top after my brother had clean it up. The rim top was in good condition, the bowl was clean but the inner edge of the bowl showed a lot of damage and looked like the same knife that had been used to ream the other pipes in this lot had done its work here as well.His clean up on the horn stem had revealed that the small hole I had noted on the photos above was indeed present and was a small separation between the fibres of the horn. Fortunately this is a simple repair but the repair always shows.Since the stem was clean, the repair was simple. I filled in the tooth dent on the top side of the stem near the button with clear super glue. I sprayed the repair with accelerator so that I could repair the split on the other side. I filled that split in with the same clear super glue, sprayed it with accelerator and took the following photos.I sanded the repaired areas with 220 grit sandpaper to smooth out the excess and blend it into the surface of the horn. I worked over the entire stem at the same time to smooth it out and remove some of the nicks and marks on the surface of the horn.Since I was already working on it, I decided to continue and polish the stem before moving on to the bowl. I polished it with micromesh sanding pads – wet sanding with 1500-2400 grit pads and dry sanding with 3200-12000 grit pads. I rubbed the stem down with Obsidian Oil after each pad to give more life to the horn. I gave it a final coat of oil after the last pad and set it aside to dry. The repair on the top of the stem disappeared into the horn while the larger split on the backside was smooth but more visible. I set the stem aside for its final polish on the buffing wheel once I finished the work on the bowl. I began by polishing the rim of the bowl with a 1500 grit micromesh pad. My purpose was to see if I could remove some of the darkening or if I would need to top the bowl. I was happy to see that the pad cleaned it up and no topping was necessary. I used a folded piece of 180 and 220 grit sandpaper to work over the inner edge of the rim and smooth out the rough spots. It did not take too much sanding to even things out and bring the bowl back into round. The next three photos show the process of the rim repair. I decided not to stain this pipe because the briar was so nice in its original form. I chose instead to polish the rim and bowl with micromesh sanding pads – wet sanding with 1500-2400 grit sanding pads and dry sanding with 3200-12000 grit pads. I wiped the bowl down with a damp cloth after each sanding pad to remove the sanding dust. The briar really began to shine as each successive grit of sanding pad was used. With the bowl finished, I put the pipe back together and took it to the buffing wheel. I buffed the bowl and stem with Blue Diamond, being careful not to damage the already faint stamping on the left side of the shank. I gave the pipe multiple coats of carnauba wax and buffed it with a clean buffing pad to raise a shine. I hand buffed it with a microfibre cloth to deepen the shine and give depth to the finish. The completed pipe is shown in the photos below. I love the way the rich striations of the stem play against the red of the buffed and polished briar. This is a beautiful pipe. Thanks for walking with me through the process.


Restoring another CPF French Briar – a Remington Silver Mount Billiard


Blog by Steve Laug

The next pipe I chose to work on from the lot of the lot of pipes my brother and I picked up on our virtual pipe hunt in Montana is a C.P.F. French Briar Silver Mount Billiard. It is a classic billiard shape, while the silver ferrule and cap on the stem end give it a feeling of elegance. The photos below show what it looked like before my brother did his clean up on it. It is another one from the lot of pipes my brother and I picked up on our virtual pipe hunt in Montana. I have written about several of the other CPF finds with the latest being a CPF horn stem bulldog and a CPF French Briar billiard. Just a reminder – CPF stands for Colossus Pipe Factory. The brand was made in the late 1880s and 1890s.Jeff took the above photos and those that follow to show the condition of the pipe before he cleaned it up. This little billiard comes from the same era as the other pipes in this find late 1880s – early 1890s. It was in worse condition in many ways than the previous pipes I had worked on from this lot. It was worn and was in rough condition. The finish was worn off and there were a lot of nicks, scratches around the outer rim of the bowl and top edge of the pipe. The outside of the bowl was covered with grime and grit. Once again there was a thick, crumbling cake buildup in the bowl and the lava from the bowl overflowed over the top of the rim. The damage to the outside of the rim made me think that the inner edge of the bowl was also damaged from the same kind of knife reaming. But I could not be certain until the cake was gone. The silver ferrule on the shank end was damaged and torn on end with what looked like small cracks in the silver. The tenon endcap was worn, scratched and some brass colour showed through the finish. The vulcanite stem had small tooth marks on the top and underside near the button and was oxidized.Jeff took the next two close up photos of the rim top and bowl. You can see the thick cake in the bowl and the chipped overflow on the rim top. The damage to the inside edge and the chips on the outer edge are visible under the cake. The next three photos show the grain under the dirty and damaged finish on the bowl sides. There are also scratches and nicks in the bowl and around the rim. The stamping on the sides of the shank was very readable. The left side read The Remington and the right side read French Briar. The silver ferrule is stamped with three faux hallmarks and the logo of C.P.F. in an oval. Some of the cracks and tears on the ferrule are also visible in the third photo. Jeff took photos of the condition and tears in the ferrule. It was in very rough shape and would take some work to repair and smooth out. But was it worth the effort. The bite marks, chatter and wear on the both the top and underside of the stem surface are visible in the next photos.Following his usual pattern, Jeff thoroughly cleaned the pipe. He reamed the bowl with a PipNet reamer and tidied up with a Savinelli Fitsall Pipe Knife. He scrubbed out the mortise and the airway in the shank and the stem with pipe cleaners, cotton swabs and alcohol. He scrubbed the exterior of the pipe with Murphy’s Oil Soap to remove the grime and grit on the bowl. He scrubbed the metal ferrule and stem end at the same time to clean it. I took photos of the pipe to show the condition it was in when it arrived in Vancouver. You can see the damaged rim top and edges and the fill on the right side of the bowl. The condition of the briar is rough and the stem is oxidized. Jeff had cleaned up the rim top and what was underneath was sad. The rim was chipped and damaged. The inner and outer edge of the bowl was badly damaged. The inner edge was out of round and the cuts in it seemed like they had been down when a previous owner had reamed the bowl with a knife. The outer edge was beat up with large chips and nicks going down the side of the bowl.The next photos of the stem and end cap show the brass shining through and the oxidation on the surface of both sides. The tooth marks and chatter are also visible. Fortunately they do not appear to be deep.I topped the bowl on the topping board using 220 grit sandpaper to remove the surface damage and clean up the edges from the top view. I did not have to top it too much to smooth out the rim. Topping the bowl also removed much of the damage to the edges as well.I used clear super glue and briar dust to repair the rough outer edge on the bowl top and the damaged fill on the back right side. I sanded the repairs smooth with 220 grit sandpaper to remove the excess repair and blend it into the surface of the briar.I sanded the repairs smooth and repaired the light bevel to the inner edge of the rim with a folded piece of 220 grit sandpaper to repair the damages to the inner edge.I polished the briar rim and the sides of the bowl with micromesh sanding pads – wet sanding with 1500-2400 grit and dry sanding with 3200-4000 grit pads. I wiped the bowl down after each pad with a damp cotton pad. The photos tell the story of the polishing process on the bowl. I heated the briar and stained it with dark brown aniline stain thinned by 50% with isopropyl alcohol. I flamed it to set it in the briar and repeated the process until the stain coverage was even all around the bowl.Once the stain had dried I wiped it down with isopropyl alcohol to thin the stain and make it more transparent. When I finished wiping it down I buffed it with red Tripoli to reduce the stain even more. The pictures that follow show the process of reducing the opacity of the stain. I touched up the gold leaf on the stamping using European Gold Rub’n Buff. I applied it with a cotton swab and rubbed off the excess with a cotton pad. The repaired stamping is shown in the next two photos.I decided to experiment with a repair to the tears in the ferrule using clear super glue. I had never tried this before but I had a hunch that the hardened glue would fill in the gaps and then I could sand it smooth. I applied the glue in layers until the edge was even with the end of the ferrule. I sanded the repairs after each application of glue until the surface of the repair matched the rest of the ferrule. While the glue is slightly visible it bound the tears together and I was able to sand it smooth and blend it into the silver. I polished the repair with micromesh sanding pads – wet sanding with1500-2400 grit pads and 3200-12000 grit pads. The following photos show the progress of the ferrule repair. With the bowl and ferrule restored and functional I turned my attention to the stem. I polished the metal end cap with Blue Diamond on the buffing wheel. I polished the vulcanite with micromesh sanding pads – wet sanding with 1500-2400 grit pads and dry sanding with 3200-12000 grit pads. I rubbed the stem down with Obsidian Oil after each pad and after the final pad I set it aside to dry. I buffed the pipe with Blue Diamond on the buffing wheel to polish the briar and the stem. I gave the bowl and stem multiple coats of carnauba wax and buffed it with a clean buffing pad to raise the shine on the pipe. I hand buffed it with a microfiber cloth to deepen the shine. The finished pipe is shown in the photos below. It has come a long way from the sad and damaged pipe that I started with when I began the restoration. What do you think? Was it worth the effort? Seems to me that it was more than worth it. Thanks for walking with me through this process.

Another Piece Pipe History – a Lovely CPF French Briar Bent Billiard


Blog by Steve Laug

The next pipe I brought to the work table was a little bent CPF French Briar billiard. The photos below shows what it looked like before my brother did his clean up on it. It is another one from the lot of pipes my brother and I picked up on our virtual pipe hunt in Montana. I have written about several of the other CPF finds with the latest being a nice little CPF horn stem bulldog. Just a reminder – CPF stands for Colossus Pipe Factory. The brand was made in the late 1880s and 1890s. This little bent billiard comes from the same era as the other pipes in this find. It was very worn and looked to be in rough condition. The finish was non-existent and there were a lot of nicks, scratches and grime on the surface all around the bowl. There was a thick, crumbling cake buildup in the bowl and it overflowed on to the top of the rim. It looked like the inner edge of the bowl was damaged from reaming with a knife but I could not be certain until the cake was gone. The gold band on the shank was so badly oxidized that it was impossible to see what was under the grime and sticky debris on it. The horn stem had tooth marks on the top and underside near the button and looked like it was delaminating along the edges and the bend on the underside. The horn was very dry. Jeff took some close up photos of the bowl and rim from the top. You can see the crumbling condition of the cake in the bowl and the thick overflow on the rim top. It was really hard to see the condition of the inner edge of the bowl.The grain underneath all of the grim on the sides of the bowl was really quite stunning, even through the debris, grime and buildup. The birdseye and cross grain stain out really well even through the dirty surface. The oxidation on the band was also heavy and very rough. It is hard to know what is underneath the corrosion.The stamping on the left side of the shank has the standard C.P.F. logo in an oval with French arched over the oval and Briar arched underneath. The stamping on the C.P.F. is fainter than the stamping on French Briar. The second photo shows the junction between the band and the horn stem. The horn looks rough and grainy.The next four photos show the stem from various angles. The first and second photos show what looks like delaminating on the left side near the button. The third and fourth photos show tooth marks on the top and underside of the stem at the button. The tooth marks on the top are deep. Jeff thoroughly cleaned the pipe. He reamed the bowl with a PipNet reamer and cleaned it up with a Savinelli Fitsall Pipe Knife. He scrubbed out the mortise and the airway in the shank and the stem. He scrubbed the exterior of the pipe with Murphy’s Oil Soap to remove the grime and grit on the bowl. He scrubbed the tenon with a tooth brush and removed the tars and oils. I took photos of the pipe to show the condition it was in when it arrived in Vancouver. I took a close up photo of the rim top to show the condition it was in after my brother had cleaned it up. It is amazing to me that he was able to remove the thick buildup on the rim top and the crumbling cake in the bowl and leave no debris behind. It was better than I had expected. The rough spots would be easy to sand out and smooth the ridges and bring it back to round. It appeared that the pipe had never been smoked to the bottom of the bowl as the bottom of the bowl is raw briar.The next two photos show the condition of both sides of the stem after the cleanup. Note the roughness on the underside of the stem and the tooth marks/chatter on both to top and the bottom near the button.You can see the oxidation on the band in the photos above. It is not clear what colour it is. The sticky grime was cleaned off but the oxidation would need to go. I sanded the band with 1500-2400 grit micromesh pads to remove all of the sticky substance and the oxidation on the surface. It came off really easily with some polishing. I glued the band in place on the shank with white glue and let it dry.I smoothed out the damage on the inner edge of the rim with 220 grit sandpaper and gave it a light bevel to minimize the damage. I stained the beveled edge on the bowl with a black Sharpie pen to blend it in with the inside walls of the bowl. I wet sanded the bowl and rim with 1500-2400 grit micromesh pads and dry sanded it with 3200-12000 grit pads.  I wiped it down with a damp cotton pad to remove the sanding grit. I polished the band while I worked on the bowl with the same grits of micromesh pads. The following photos showed the polishing on the briar. I touched up the gold leaf on the CPF French Briar logo with European Gold Rub’n Buff. I applied it with a cotton swab and wiped down the excess gold. The light of the flash showed more of the gold buff that needed to come off.I stained the bowl with a 50/50 mix of dark brown aniline stain and isopropyl alcohol. I applied the stain and flamed it with a lighter. I repeated the process until I felt the coverage was even. Once it dried I took some photos of the stained bowl. It is too dark to my liking but the coverage was even. I wiped the bowl down with alcohol on cotton pads to make it more transparent and let the grain show through. I polished the briar with micromesh sanding pads to further remove the stain and make the grain show through. The process of unveiling the grain is shown in the photos that follow.With the bowl finished I worked on the stem. I used some small drops of super glue to fill in the tooth marks on the stem surface and the button. Once the repairs had dried I sanded them smooth to blend them into the surface of the stem. I polished the stem with micromesh sanding pads. I wet sanded it with 1500-2400 grit pads and dry sanded it with 3200-12000 grit pads. I wiped the stem down after each pad with Obsidian Oil on a cotton cloth. I gave it a final coat after the last pad and set it aside to dry. I buffed the stem and bowl with Blue Diamond polish on the buffing wheel to polish it. I gave the stem and bowl multiple coats of carnauba wax. I buffed the waxed bowl and stem with a clean buffing pad to raise the shine. I hand buffed it with a microfiber cloth to deepen the shine. The finished pipe is shown in the photos that follow. The old timer looks really good and should have long years of life in it. I look forward to enjoying this pocket sized pipe. Thanks for walking with me through the process of the restoration.

Breathing life into an 1890’s era CPF French Briar Horn Stem Bulldog


Blog by Steve Laug

I decided to work on another one of the older 1890s CPF (Colossus Pipe Factory) pipes that my brother and I found on our virtual pipe hunt in Montana. That antique mall had just received a large estate of older CPF and WDC pipes. We picked up 30 pipes and one pipe case. There were 11 unique CPF brand pipes. Included were the following pipes (the three pipes that I have already restored are listed as hyperlinks below and you can click on any of them to read about the restoration. The rest will be finished in the near future). I chose to work on the French Briar Bulldog for this blog.

CPF military mount Oom Paul
CPF The Remington, French Briar, (military mount)
CPF French Briar with Hallmarked band and horn stem. Filigree carving around bowl
CPF Pullman with Horn Stem
CPF Siamese with twin horizontal stems
CPF Cromwell with twin vertical stems
CPF Olivewood Bowl Sitting on Petals- Horn Stem
CPF French Briar Bulldog with Horn Stem (the pipe in this blog)
CPF French Briar with tarnished metal band and a Horn Stem (looks like mini-Wellington)
CPF French Briar Horn Shaped Pipe with metal band and Horn Stem
CPF Colon French Briar with Black Meer Bowl and Amber stem

It is a beautifully grained, long shank Bulldog with a horn stem. It is stamped with the C.P.F. in an oval logo. Arched above and below the logo it is stamped French Briar. There is a small flaw in the briar at the end of the Briar stamping. The finish was worn but the pipe was in otherwise good shape. There was a thick cake in the bowl and an overflow of lava on the rim top. The inner edge of the rim top appeared to have some damage but otherwise it was in good shape. The double ring around the bowl under the cap was undamaged and the center ring was unbroken. The horn stem was worn at the button and had been well chewed on both the top and bottom sides. The stem appeared to be underclocked in the pictures that follow but once my brother cleaned it up I would have a better idea with regard to that.

My brother took the following photos of the pipe before he started cleaning it. They give an overall picture and also close up pictures of the pipe from a variety of angles. He included a photo of the stamping on the left side of the shank. It was originally stamped with gold filigree in the letters but that had pretty much worn out. You can see the flaw or gouge going through the AR on the word Briar.The next four photos show the grain on the bowl from a variety of angles. The finish is very worn and dirty but the grain is quite nice and there are no fills in the briar. The close up photo of the rim top shows the scratches and lava on the top and the slight damage to the inner edge of the bowl. A fairly thick cake lines the walls of the bowl and is peeling on the front edge.The next two photos show the underclocked horn stem and what appears to be red thread that had been used to align the stem. It had obviously not worked.The next four photos show the condition of the horn stem. It is dried, chewed and delaminating at the button on both sides of the stem. The button itself also has some tooth damage to the top and underside. There appears to be a lot of colouration to the striations of the horn and it should clean up and be beautiful once polished. My brother did an amazing job on the cleanup of this old timer. His work keeps getting better and better and does not damage the old briar or horn. He reamed the bowl with a PipNet Reamer and cleaned it up with the Savinelli Fitsall Pipe Knife. He scrubbed the airway through the tenon and into the shank with pipe cleaners, cotton swabs and alcohol until it was clean. He scrubbed the externals with Murphy’s Oil Soap and was careful around the remaining gold filigree in the stamping on the left side of the shank. He was able to remove the tar and lava build up on the rim top and showed that inner edge was just lightly damaged. And low and behold once he had removed the thread on the metal tenon the stem lined up perfectly. I took the next four photos of the pipe when it arrived in Vancouver. I took a close up photo of the rim top and bowl to show how thoroughly Jeff had cleaned it. It would take very little work with a folded piece of sandpaper to smooth out the remaining damage to the inner edge of the bowl.He had been able to clean out the debris from inside the stem and also smooth out the exterior of the stem. The delamination of the horn would need to be stabilized and the deep tooth wear would need to be rebuilt to restore the taper of the stem.I decided to change my normal routine a bit and used amber coloured super glue from Stewart MacDonald to stabilize the horn around the button and up the surface of the stem for about an inch. This would bind together the strands of the horn and build up the tooth damaged areas on the surface. Once it dried I would be able to smooth out the repaired surface and blend it into the rest of the stem. I had an idea that the amber super glue would blend in better with the colours of the horn in this particular stem.I sanded the repairs with 220 grit sandpaper to blend them into the surface of the horn. I wanted a smooth transition between the repair and the rest of the horn. I also wanted to see if I had covered the damaged area of the stem surface well enough. I was pleased by what I saw once I had smoothed the repairs out. I polished the stem with micromesh sanding pads – wet sanding with 1500-2400 grit pads and rubbing the stem down with Obsidian Oil after each pad. I dry sanded the stem with 3200-4000 grit pads to further polish it and gave it more oil after each pad. The oil serves to give life to the dried horn. I buffed the stem with Blue Diamond on the buffing wheel before finishing polishing it with 6000-12000 grit micromesh sanding pads. I rubbed it down with Obsidian Oil after each of the micromesh sanding pads and let it dry after the final pad.With the stem finished I worked on the inner edge of the bowl. I used a folded piece of 220 grit sandpaper to smooth out the damage on the bowl edge. It did not take too much work to make it smooth once again. I sanded the top of the rim with micromesh sanding pads – wet sanding with 1500-2400 grit pads and dry sanding with 3200-12000 grit pads (I forgot to take photos of the work on the rim top with the 3200-12000 grit pads).I used some European Gold Rub’n Buff to rework the stamping on the shank side. I applied it to the stamping with a cotton swab and then wiped off the excess. The photo below shows the stamping with the gold applied.I put the stem back on the shank and buffed the pipe with Blue Diamond on the buffing wheel. I carefully worked over the shank so as to not damage the stamping. I gave the entire pipe multiple coats of carnauba wax to protect the briar and the horn. I buffed it with a clean buffing pad to raise the shine and hand buffed it with a microfiber cloth to deepen the shine. The finished pipe is shown in the photos below. It is a classic piece of pipe history. The shape and the finish of the pipe are exceptionally well done and show European craftsmanship that Colossus Pipe Factory was famous for. This is one of those pipes that will have a place in my own collection. It is just too beautiful to part with!

Jen’s Trove No. 4 – Reclaiming a Kaywoodie ‘Flame/Super Grain’ #11 Large Billiard


Blog by Dal Stanton

I think the reason this Kaywoodie stood out to Jen as she was rummaging through my baskets and boxes of ‘Help Me!’ pipes, was the ‘fancy stem’ and the strong, full look of the stummel.  The grain is impressive and it will clean up nicely.  Jen is leaving Bulgaria soon after working with us for a few years.  She’s taking a trove of pipes back to the US to give to the men in her family.  For her too, is the fact that each pipe she purchases will benefit our work with the Daughters of Bulgaria – helping women and girls who have been trafficked in Europe and sexually exploited.  This is the second Kaywoodie she has chosen.  The first was a beautiful Kaywoodie Author (See: LINK) that needed extensive rim repair.  The Kaywoodie now on the work table got my attention too, on the eBay auction block from a seller in North Carolina.  After Jenny rescued it from the basket, I take some pictures of the Kaywoodie she chose. Generally, the pipe is in pretty good shape other than normal time wear and tear issues, but the stem bit might need some work.  The rim and fire chamber are both in good shape, but in need of cleaning and the removal the light carbon cake to bring it to fresh briar for a new start.  In the picture immediately above shows two fills – one filled and one emptied.  The hole looks like a drill hole and I first suspected it was part of a cracked shank repair, but no cracks are evident.  Only these two fills on the stummel will need to be refilled and I’ll see if the other needs to be replaced.  The ‘Fancy Stem’ (I spent time trying to find a name for this type of stem and this is what I came up with via Steve’s assistance!) has serious tooth dents on the upper button lip and a significant dent and chatter on the lower bit.  I also detected that the classic Kaywoodie Synchro-Stem threaded tenon is underclocked a bit – which over time, I discovered, is a normal happening with metal threaded tenons (See from Reborn Pipes: About Stem/Bit Shapes).The nomenclature on the sides of the shank are in bad shape – almost warn off and beyond history’s grasp.  I had to take several looks at the stamping with a magnifying glass at different angles of light – lamp light and sunlight outside on my ‘Man Cave’ balcony on the 10th floor of our former Communist Blok apartment building.  What I can decipher with much effort, is a phantom “Kaywoodie” [over] “***in” offset to the far right of the Kaywoodie stamping above it (under the ‘-die’).  On the shank’s right side, I make a guess at ‘11’ which is a shape number.  These two pictures try to show what I can barely see!  I mark with yellow pen where the ‘K’ starts of Kaywoodie and I underline the ‘***in’ and the 11 in the second picture.With a passion to understand as much as I can about the provenance of the pipes I restore, I know that I’m on a steep learning curve with this only being my second Kaywoodie.  I’ve benefited much from Troy’s expertise, of Baccy Pipes, with Kaywoodie pipes and his help on this Kaywoodie.  I’ve picked up some of the markers that help establish a Kaywoodie’s identity.  The first thing to look at is, what is the “***in” refer to?  Identifying the Kaywoodie line, at least partially, can help place a pipe.  It did not take long as I search Pipedia for a listing of the names of the Kaywoodie lines (see LINK).  What I found is that throughout the years, Kaywoodie has put forward several lines with the word “Grain” making sense of my mystery “***in”:  Straight Grain, Super Grain, Flame Grain, Bird’s Eye Grain, Relief Grain, and Custom Grain – were the Kaywoodie lines that I cataloged from Pipedia.  My next step was to go to the Kaywoodie section of Pipe Phil’s inventory of examples and to see if I could find an example of what appears to be the same script style for the ‘Kaywoodie’ [over] ‘*** Grain’ in cursive, simply to visualize.  The only example I found of the same script for both ‘Kaywoodie’ and ‘Grain’ was this Flame Grain, Meerschaum from the 1947 catalogue that Kaywoodie produced.  A close look of the script follows in picture two.  I think this is a pretty good visual match of the nomenclature style.So, I think it’s safe to say that the Kaywoodie before me was a line suffixed by ‘Grain’.  I don’t know how rare or common the use of the cursive script was with Kaywoodie ‘Grain’ lines, but it could possibly help in identification if one knew.  Another concrete marker I identified was the shape number, ‘11’ which is identified as a ‘Large Billiard’ in the Pipedia Kaywoodie Shapes Guide.   This description seems to be right on with the Kaywoodie before me – a handful of wonderful Billiard briar!  The other marker that I was aware of was the iconic Kaywoodie stem shamrock or club.  From PipePhil.eu, I found this concise description that indicates that the black shamrock in the white dot started to emerge on pipes since 1937:

The cloverleaf logo: the round logo (black cloverleaf in white circle or white cloverleaf in black circle) was first used in 1937. Up until the late 40’s this logo was used on all of the upper grades pipes. The concomitant use of the plain white cloverleaf and the disk inlaid logo continued until the early 80’s.

Up until the late 1940’s/early 50’s, the logo was on top of the stem. After that the logo was moved to the side of the stem (exceptions exist).

The other solid marker that I investigated was the No. ‘11’ shape number.   In Pipedia’s Kaywoodie Shapes Number section, shape number 11 is described:

Shape # Description Years Produced
11 Large billiard 1935-1972

Troy later sent me another helpful link from Kaywoodie My Free Forum that allowed me to see all the Kaywoodie Billiard offerings with the comparison of 2 and 3-digit shape numbers.From the same Forum article, the center column reflects the 2-digit system employed from 1927 to 1972, when the system was changed to a 3-digit system when pipe production (for Kaywoodie, Yello-Bole and Medico) was moved to the Medico factory in Richmond Hill Queens NY as plans for new plant were in process.  The left-hand column above was the 3 digit numbers used during this period for all Kaywoodie and Medico pipes, from 1972 to 1980.  The same article indicated that the 2-digit numbers were only for Kaywoodies produced in the US – that Kaywoodie of London to Cadogan had their own three-digit system.

I took my search for a Kaywoodie ‘Something Grain’, shape #11 to the latest Kaywoodie Catalog that would have a representation of the #11 Billiard at Chris’ Pipe Pages that is consistent with the older Kaywoodie catalogues leading up to it (See: LINK).  See the 5th pipe down on the left:That is the Large Billiard stummel on my work table.  There is one thing that doesn’t line up. The Fancy Stem. I spend extensive time trying to find the No. 11 with a fancy stem flipping through all the Kaywoodie catalogs (referenced above) and found no specimen – not even on another shape.  During this exploration, I sent my forensic findings and some pictures to Troy whose experience with Kaywoodies is extensive.  I wanted to know what I might be missing.  After an enjoyable time of communicating back and forth – pipe restorers’ cyber fellowship, Troy’s experience with Kaywoodie pipes cut through my fog quickly.  Regarding the nomenclature of the Kaywoodie Jenny chose as part of her trove, I’ll let Troy’s observations conclude this Kaywoodie origins adventure!  Thanks Troy!

if the shank is straight then the only thing I can think of is someone took a pre-1972 #11 and re-stemmed it with a 1970’s type quarter bent stem.  If that is the case then it’s a 1955-1972 #11 Flame Grain with a different stem…. Or it could be a Super Grain (1955-1972) with a later Flame Grain type stem.

With a better understanding of this Kaywoodie in front of me, I start the restoration by reaming the fire chamber.  Since the cake is so thin, I use the Savinelli Pipe Knife to do the job.  After spreading out paper towel to catch the carbon, I employ the knife and it makes short work of the cake.  I follow by sanding the fire chamber with a coarse 120 grade paper, then a 240 grade paper – in both cases wrapped around a Sharpie Pen.  I finish by wiping the bowl with cotton wetted with isopropyl 95% to remove the residue carbon dust.  The pictures show the initial clean up.

Next, using undiluted Murphy’s Oil Soap I address the grime on the stummel using cotton cloth pads.  After scrubbing, I rinse the soap off the stummel with cool tap water, not allowing water in the internals. While the stummel is still wet, I probe the fill on the left side of the shank to see if it had softened and might come out.  It was solid.  The pictures show the progress. I now turn to cleaning the stummel internals because I like working on clean pipes.  Using pipe cleaners and cotton swabs dipped in isopropyl 95%, I go to work.  The internal gunk is thick – I use a curved, spaded dental probe to scrape the sides of the mortise and I remove a lot of old tars and oil built up. After some time working like this, I decide to switch tactics and use a retort to clean the internals and make more efficient headway!  After setting up the system, putting a cotton ball in the bowl, and lighting a candle to heat the alcohol in the capped test tube, the alcohol heats and eventually boils.  When it boils, the expansion forces the hot fluid into the stummel.  Much of the alcohol is initially absorbed into cotton ball so I replenish the alcohol and continue the process.  The rhythm of boil, expansion and then removing from the flame and tipping the stummel so that the expanded alcohol runs back into the test tube, is repeated several times. I pour off the first cycle into a Lord of the Rings commemorative shot glass to compare.  I refill the test tube with alcohol, and continue several more cycles, pouring out the expended alcohol in another shot glass and refilling with fresh alcohol for a 3rd and final cycle.  There is a gradual lightening of the expended alcohol as I picture all three for comparison.  After finishing use of the retort, I finish up again using pipe cleaners and cotton swabs.  The pictures show the progress. Looking at the stummel surface, the old finish does not look uniform so I use cotton pads and wipe down the stummel with acetone to remove vestiges of the old finish.  The acetone worked very quickly.  I again look at the suspect fill on the left side of the shank, and this time I detect a gap on the edge of it. I use the sharp dental probe to remove the old fill. Looking now more closely at the rim, there is a dark ring around the external edge simply indicating wear.  I take a picture of the right side of the rim that shows more wear.  To freshen the rim lines, I decide to lightly top the KW Billiard.  Using a chopping board topped with 240 grit paper I evenly rotate the inverted stummel, checking to make sure I’m staying true. After making sufficient progress with the 240, I switch to 600 grade to smooth further the top surface.  The pictures show the topping progress. With the topping completed, I fine tune the rim freshening by beveling the internal edge of the rim.  I use 120 grit paper rolled tightly to cut the initial angle of the bevel.  I follow the 120 with a rolled piece of 240, then 600.  To me an internal bevel adds class to a stummel.  This #11 Large Billiard stummel looks good.  I also lightly sand around the edge external rim.  This softens the lines.  The pictures show this rim fine-tuning process.To address the small holes on the left side of the shank, using a toothpick, I drop fill the holes using HOT STUFF Special ‘T’ – thick CA glue.  I put a little CA glue on close to the end of the toothpick and allow gravity to run it to the tip to allow a surgical application of the glue.  After applying the thick CA glue, I spray it with an accelerator to cure it more rapidly.  In a few minutes, using a flat needle file then a rolled-up piece of 240 grit paper, I bring the CA patch mound down to the briar surface. I finish by using a rolled-up piece of 600 grit paper to smooth the patches more and blend.  The pictures show the process. To prepare the stummel for sanding, to preserve what is the precious little of this Kaywoodie’s nomenclature, I cut small pieces of masking tape to cover the remnants.  First using a medium grade sanding sponge, I sand the stummel gently removing very small nicks and pits to smooth the stummel.  I follow with a light weight sanding sponge.  Using strategically placed thumb and fingers the masking tape guards did the job.Now to the micromesh pad cycles to bring out the grain on this already attractive Kaywoodie Large Billiard.  Using pads 1500 to 2400 I wet sand the stummel, followed by dry sanding with 3200 to 4000 and then 6000 to 12000 – throughout, guarding the nomenclature.  I am impressed by the quality of the briar grain emerging in the Kaywoodie Large Billiard.  The pictures show what I’m seeing. Putting the stummel aside, it’s time to tackle the Fancy Stem.  Using pipe cleaners dipped in isopropyl 95% I work on the internals.  I also employ the use of long wired brushes that more easily work up into the Kaywoodie 3-hole stinger/tenon system.  Following this, I use a brass bristle brush on the exterior of the stinger/tenon and finish with shining it with 0000 steel wool.With stem internals clean, I look again at the work needed on the upper and lower bit.  The upper button area has tooth chatter but more significant is the compression on the button lip that may need rebuilding.  Looking at the upper lip from the slot side, the lip has a dent that compresses toward the slot.  The lower bit has a significant tooth dent and chatter.  The lower button lip is in better shape.  I take some pictures to mark the problem areas. I decide to use the heating method first to see if this will minimize the damage.  By heating the vulcanite over a flame, the expansion of the rubber will seek out its original shape – at least in part.  I’ll give it a try, then move to sanding and filling.  With a candle lit, I pass the button area over the flame – back and forth several times.  The technique helps on the lower bit but not sufficiently.  The upper bit, button repair was not helped much.  So, using 240 grit paper, I work on the lower and upper bit. Using a flat needle file, I also try to remove dents from the upper button lip.  Pictures show the progress. The first pictures below show the sanding/filing progress on the upper lip.  I’m not satisfied with the results as I will need to remove more of the button than I want to remove the dents.  I wanted to see if I could repair the lip without rebuilding the lip, but this will not be possible.  I’ll need to mix activated charcoal powder with CA glue to rebuild the upper button lip and fill the dent on the lower bit.I open one capsule of activated charcoal and mix it with Hot Stuff Special ‘T’ CA glue. This CA glue is extra thick.  After cleaning the patch areas with a cotton ball and isopropyl 95%, I place a small puddle of ‘T’ CA glue on an index card, and use a toothpick as a mixer and trowel. After reaching a molasses-like viscosity with the mixture, I apply the mixture to the dent and the upper button lip.  I apply more mixture than necessary to enable later sanding down, shaping and blending the patches.  To shorten the curing time for the patches, I spray each with an accelerator.  The pictures show the progress. Back to filing and sanding.  Using a flat needle file, I file the patches down.  I follow by using 240 grit paper to fine tune bringing the lower bit dent patch down to surface level.  I blend the patch further using 600 grit paper. I do the same with the lower button lip.  After shaping the bit with the flat needle file, I use 240, 600 grit papers. The process with the button is a gradual filing, sanding and shaping until the button emerges and looks balanced.  Pictures show the progress. Above the slot, during the sanding, I notice a pinhole – what appears to be a small air pocket.  There are also very small air pockets on the upper button lip repair.  This is normal and I use a toothpick and drop-fill the hole with CA glue. I then paint a thin coat of CA glue over the button lip to fill the air holes.  I quickly spray the glue with an accelerator to shorten the curing.  I then finish the button sanding out the air pocket fills. I complete this phase of repair by using 0000 steel wool to the upper and lower bit.   The lower bit patch will blend more as I polish the stem.  The button looks good.  The pictures show progress. With the repair to the bit completed, I now turn to the Fancy Stem.  Even though there is no oxidation, I use 0000 steel wool to buff the entire stem to remove many small nicks and scratches on the surface.  I then begin the micromesh pad process by wet sanding with pads 1500 to 2400.  I follow by dry sanding with pads 3200 to 4000 then 6000 to 12000.   After each cycle, I apply Obsidian Oil to revitalize the vulcanite.  The Fancy Stem is looking good.  The pictures show the progress. I again take the stummel after completing the stem sanding.  During the stem work, I had in the back of my mind the consideration of the next step working with the Kaywoodie ‘Flame/Super Grain’ stummel.  The stummel’s natural briar color is dark and rich with grain flow – horizontal, bird’s eye and flame.  My idea is to add some pop to the grain by staining the stummel with a light brown dye.  This will not darken the stummel, but perhaps it will lighten the softer wood grains.  We’ll see!  I take a few pictures of the stummel to mark the progress.  Using a cotton pad wetted with isopropyl 95%, I wipe the stummel down to assure it’s clean. I use a cork inserted into the bowl to use as a handle and I warm the stummel using the heat gun to warm and expand the grain helping it to be more receptive to the dye.  I then apply a generous amount of Fiebing’s Light Brown Leather Dye to the stummel using a folded pipe cleaner.  When covered thoroughly with dye, I ‘flame’ the stummel with a lit candle which immediately burns off the alcohol in the aniline based dye.  This sets the hue in the grain.  After a few minutes, I repeat the process again and then set the stummel aside to rest.  The pictures show the process. After several hours, the stummel is ready to ‘unwrap’.  Using the Dremel, mounting a felt buffing wheel, at the slowest speed, I apply Tripoli compound to the surface to remove the fired crust.  I take a picture to show the contrast from the crust, and the emerging grain.  After the Tripoli, I lightly wipe the stummel with a cotton pad wetted with isopropyl 95% to blend the dye further.  After this, using a cotton cloth buffing wheel mounted on the Dremel, and notching up the speed to ‘2’ (fastest is 5), I apply the slightly less abrasive compound, Blue Diamond.  I love to see the rich tones of the briar grain emerge during this process.   Before I apply the carnauba wax to the stummel, I have a couple of corrections to apply.  The first is to correct the under-clocked stem.  Using a lit candle, I heat the metal tenon so that the vulcanite loosens its grip and I quickly screw the tenon in until it tightens and I apply pressure carefully to advance the stem.  I repeated the heating process a few times until I reached the desired stem position.  The pictures show the process. The second thing I wanted to do before applying the carnauba wax was to coat the fire chamber with pipe mud.  I have this tutorial bookmarked on Reborn Pipes here: LINK.  I noticed minor heat fissures in fire chamber earlier which is shown in the first picture below.  Applying a coat of pipe mud will simply coat the chamber, filling the fissures, and provide the foundation for a new cake to develop.  To create the pipe mud, I use a mixture of cigar ash (thanks to my colleague, Gary!) and water.  I make sure that the cigar ash is finely ground using the flat end of a pipe nail and I remove any solid debris.  I put ash in a shot glass and water in a small bottle and I add water using a large eye-dropper and mix with the pipe nail until I achieve a paste like viscosity.  I then use a pipe cleaner to paint the mud to the chamber wall and tamp it using the spoon end of the pipe nail tool.  I’ll wait about an hour for the mud to fully set up.  The pictures show the process. Now for the home stretch.  With stummel and stem reconnected, I apply several coats of carnauba wax to the Large Billiard stummel of this Kaywoodie Flame/Super Grain.  I use a cotton cloth buffing wheel mounted on the Dremel at the same speed (2) and methodically apply the carnauba using the sheen reflection on the surface to guide my application.  After applying carnauba, I change to a clean cotton cloth buffing wheel and go over the surface again to bring out the shine and more fully blend the wax.  Finally, I hand buff the pipe with a microfiber cloth to raise the shine more.

While we don’t know with 100% certainty whether this Kaywoodie #11 Large Billiard is a Flame Grain or a Super Grain, I believe the grain is a cut above the norm looking at its quality.  It has a beautiful flow of grains and is quite attractive.  The Large Billiard fills the hand well with an interesting, tapered Fancy Stem, that probably came later and is not original with the older #11 stummel.  I’m happy to provide this Kaywoodie to add to Jenny gift trove as she goes back to the US.  Jen’s purchase benefits the Daughters of Bulgaria, our work here in Bulgaria with women and girls sexually exploited and trafficked.  For more information about this work, take a look at The Pipe Steward.  Thanks for joining me!


Rejuvenating a Beautiful Koncak Pegasus Carved Meerschaum


Blog by Steve Laug

The next pipe I chose to work on today is a nicely carved meerschaum by Koncak. I have never really collected meerschaum pipes so I do not have much knowledge of the various makers or carvers. I did some looking in some of the references I have here in the shop and found that Koncak is a Turkish meerschaum pipe brand. The meerschaum factory was founded by Ekrem Koncak in 1934 in Eskiehir, Turkey. It is one of that country’s oldest producing meerschaum pipe factories. They carve some highly unusual shapes. In 1974, Ekrem was succeeded by his son, Sadat, and in 1980 his daughter, Nurham took over the running of the company. In the meantime, Sedat Koncak bought the Austrian brand Bauer, and the two companies have maintained close commercial ties (from Pipes, Artisans and Trademarks, by José Manuel Lopes).

Jeff bought the pipe on EBay because the carving and shape stood out to him as beautiful. It is a large bowled unique. The sides and back of the bowl are carved with fronds of leaves possibly tobacco leaves. The front of the bowl is carved with reclining Pegasus – winged horse with some pock-marked stone around him. The end of the shank is smooth culminating in a silver band with a rope twist and a single line and a beaded line on each side of the rope. The shank is lined with Delrin and the push tenon is either Delrin or nylon. The stem is Lucite/acrylic and had a saddle and a wide blade that has tooth marks and file marks on both the top and bottom sides in front of the button.

The first photos below on the green background were taken by the seller. I include them here so that you can appreciate what caught my brother’s eye when he saw this beauty.

The photos on EBay show the dirty condition of the pipe but also show that it is in excellent shape under the grime and the dirt. My brother was wise in bidding and winning this beautiful example of Koncak workmanship. The photo of the bowl front shows the winged horse, Pegasus in a reclining position. The carving is quite well done. The details of the feathers on the wings, the mane on the horse’s head and the surrounding foliage around Pegasus are well done.

The bowl was shown with a thick cake that was spread throughout the bowl and there was an overflow of lava on the top. The shank and the underside of the bowl was already beginning to show a golden colouration and once the bowl was scrubbed clean I was pretty certain that the rim top and edge would also show the same kind of developing colour. My brother did very well in his purchase of this one. Now I just need to decide whether I keep it or let it go on the rebornpipes store. I guess that by the time I finish the pipe and do this write up for the blog the decision will have been made. I will let you know once the post has been completed. Thanks.

The EBay sellers photos also showed the condition of the stem (at least from the top view).When the pipe arrived in Idaho, Jeff took some more photos of it so that I could see the condition of the pipe. While it looked much like the seller’s photos it was both in better condition and worse condition at the same time.The case it came in was well fitted to the pipe. It was in good condition though there were places that the leather cover would need to be reglued. (When it arrived in Vancouver this was the first thing I took care of and set the case aside to let the glue cure.) There was a sewn in Koncak logo on the inside top of the case. The dirtiness of the pipe was as shown in the seller’s photos and surprisingly there were no areas that were damaged or broken. I was grateful that the pipe was in dirty but undamaged state.The next two photos show the condition of the cake in the bowl and the lava overflow on the rim top. The cake was thicker than it had appeared in the seller’s photos and the lava overflow was heavier and thicker.The next series of photos show the ornate leaf carvings around the bowl and shank leaving the centre of the front piece open for the carving of Pegasus, the winged horse. The next two photos show the stem and band work on the pipe. The silver band is quite beautiful and really stands out against the colouring meerschaum shank. The next photos that my brother took show the condition of the stem far better than the seller’s photos had. It had a lot of tooth chatter and dents on both the top and underside near the button extending about one inch up the stem. Jeff reamed the bowl carefully with a PipNet reamer and a Savinelli Fitsall Pipe Knife scrapping the cake back to the meerschaum wall of the bowl. He scrubbed the exterior of the pipe and rim with Murphy’s Oil Soap and was able to remove the entire lava overflow on the rim and the dust and grime from the nooks and crannies of the carving. He cleaned the internals with pipe cleaners, cotton swabs and alcohol until the surface was clean and refreshed. I took photos of the pipe when it arrived in Vancouver to show his craftsmanship in the cleanup phase of refurbishing. He does very good work and it makes my job much easier on this end. His work on the rim top is an example of how clean he gets the pipes. He was able to remove all of the lava overflow and leave behind a bit of patina.He had cleaned up the tooth chatter with the soap and scrubbing and what tooth chatter was left behind was minimal. There were also some tooth marks that would need to be addressed.I sanded out the tooth chatter and the tooth marks with 220 grit sandpaper to clean them up as much as possible. I wiped down the surface of the stem with a damp cotton pad to remove the sanding dust. I filled in the deeper tooth marks with clear super glue and set the stem aside to wait for the repair to cure. While the repairs cured I worked on polishing the bowl. I used micromesh sanding pads to polish the smooth portions of the pipe. I wet sanded them with 1500-2400 grit pads and wiped the bowl down with a damp cotton pad between each grit of micromesh. I dry sanded it with 3200-12000 grit pads and repeated the wipe down after each pad. By this time the glue had cured so I sanded the repairs on the stem smooth with 220 grit sandpaper blending them into the surface of the stem on both the top and bottom sides. At this point the stem is looking really good. Still work to do in reshaping the button but the repairs are getting there.I recut the sharp edge of the button with a needle file and smoothed out the edge with the thin edge of the file. The button was looking right. Now I needed to polish the stem.I polished the stem with micromesh sanding pads – wet sanding it with 1500-2400 grit pads. I wiped the stem down with a damp cotton pad to remove the dust. I buffed the stem with red Tripoli on the buffing wheel before continuing to polish it with micromesh sanding pads – dry sanding with 3200-12000 grit pads. When I had finished the polishing I wiped it down with a damp pad and gave it several coats of Conservator’s Wax. I buffed the stem with a microfiber cloth to deepen the shine. I gave the bowl a coat of softened white beeswax called Clapham’s Beeswax Polish and hand buffed it with a shoe brush. I hand buffed it with a microfiber cloth to deepen the shine. It is a large pipe whose dimensions are length: 6 inches, height: 2 ½ inches, outer diameter of the bowl: 1 ½ inches, chamber diameter: 7/8 inches. The finished pipe is shown in the photos below. Well the decision has been made as I hoped it would by this time in the write up of the restoration. While working on the pipe and cleaning it up I realized that it is too big for my liking and thus I will part with it on the rebornpipes store. I will list it shortly and if it is a pipe that you want to add to your collection you can email me at slaug@uniserve.com or send me a private message on Facebook. It truly is a stunning pipe. Thanks for walking with me through the cleanup.

Restoring a Unique Alternative Wood C.P.F. Tulip


Blog by Steve Laug

This is yet another unique older C.P.F. pipe find from our Virtual Pipe Hunt in Montana. It is amazing the number of older C.P.F. and other brands we found in that antique shop. Even more amazing is the sheer number of shapes that I have never seen or worked on before. This one is a C.P.F. that is made in two parts – a bowl that is screwed onto a base. The wood is not briar. The bowl is olivewood and the base is cherry. The pipe has the C.P.F. in an oval stamp on the left side of the shank. It is also stamped on the band with the faux hallmarks from that era and the logo. The stem is made of horn. It is a graceful and elegant looking pipe and one that I look forward to working on. My brother took quite a few photos of the pipe before he cleaned it up to show the details of the carving and the wood. I have included them at the beginning of the blog. My guess is that this pipe also comes from the mid-1880s to the early 1890s like the other C.P.F. pipes in the lot.The pipe was in pretty rough shape. The bowl had a thick cake with lava overflowing the rim. The finish was very dirty though appeared to look good underneath the grime. The screw in bowl was stuck in place on the base and we were uncertain that it would even come off. It looked like it originally was a separate piece but the grime and grit had locked it in place. The grooves in the base were filled with grime and the silver band was tarnished. The gold C.P.F. logo on the shank was faint. The horn stem had the usual tooth chatter and marks but other than that was in decent condition. With a little work this would be a beautiful pipe.

If you would like to read a bit of history on the brand you can have a look at a blog I wrote concerning C.P.F. or the Colossus Pipe Company https://rebornpipes.com/2013/04/14/some-reflection-on-the-historical-background-on-cpf-pipes/.The next series of photos show the condition of the bowl before cleaning. It was very dirty and there appeared to be cracks in the backside of the bowl. I would not be certain until it was cleaned and I had it in hand. The next photos show some of the detail on the base of the pipe. It is an interesting piece of carving. I have never seen one like it in either the old C.P.F. catalogues or in my online research regarding the brand. The bottom of the base shows the grain on this portion. Notice how well the carver centered the grain pattern on the base. It is a beautiful piece of wood. I am guessing cherry but I am not certain. You can see from the unique vertical grain on the bowl portion of the pipe that it is not briar. My thoughts are that it is olivewood but I could be wrong. Note also the buildup of grime around where the bowl sits on the base.The C.P.F. oval logo can be seen on the left side of the shank and also on the silver band. You can see from the photo that the band appears to be loose. Later photos reveal that it was indeed loose and could be slipped on and off the pipe.The next two photos show the shank with the band sitting under it and the threaded bone tenon on the horn stem. It is really dirty looking in the shank and mortise.The stem was probably in the best condition of the entire pipe. The graceful curve of the horn was undamaged. The striations were not separating and the variation in colour was stunning. The overall condition was really good. There was some light tooth chatter and marks near the button on each side but otherwise it was clean. The button was not chewed and the orific airhole in the centre of the button looked good. Jeff cleaned up the pipe – reaming the bowl with a PipNet reamer and cleaning up the reaming with a Savinelli Fitsall Pipe Reamer. He took the cake back to bare wood. He scrubbed the exterior of the pipe with Murphy’s Oil Soap and rinsed the soap and grime off the pipe. He removed the band and scrubbed under that as well with the soap. He cleaned out the mortise and the airway in the shank and the stem with pipe cleaners, cotton swabs and alcohol. He cleaned the horn stem with some oil soap as well. I took these pictures when the pipe arrived in Vancouver. It was in better shape than when we picked it up. Jeff had not been able to unscrew the bowl from the base as it was stuck with the goop that had covered the bowl and base. The rim top still had some darkening and spotty damage to the surface. Jeff and I were talking last evening on FaceTime and I decided that I would tackle the restoration on this old timer next. While we were chatting I held the base in one hand and wiggled the bowl with the other. After a few moments I was able to turn it from the base. What was underneath was absolutely gross. It looked like someone had packed the base with some kind of coarse material to act as a filter to trap any moisture that came from the combustion of the tobacco above. I also noticed that the bowl bottom had three airholes and one was entirely plugged and could not be seen from the inside of the bowl. The bowl had some dark staining and build up on the bottom of the bowl. I put the junk back in the bowl and set the pipe aside for the night.In the morning I took the pipe apart again to clean out the bowl base. I used a dental pick and a spatula to clear out the debris and hard build up in the base. I scraped out the threads on the bowl and the base to remove the debris. I scraped out the rounded base bottom to also remove the debris. I twisted the tip of a dental pick through the clogged third hole in the bottom of the bowl. I worked it from both the inside and the outside of the bowl until I had cleaned out the blockage. Once again the bowl had three holes that worked.I scrubbed the base and the bottom of the bowl with alcohol and cotton swabs. I scrubbed until it was absolutely clean. I scraped out the ledges on the inside of the base to remove the buildup that was there as well.I painted the shank end with Weldbond white glue so that I could put the band back in place. The band had a split on the right side that would need to be worked on as well. I put the band on the glue and held it in place until the glue had dried. I sanded the split in the band with 220 grit sandpaper and filled it in with clear super glue. There were also cracks in the bottom of the base just below the threads that matched the grooves carved on the outside of the shank. Once the glue dried I sanded the inside of the base smooth. With the repairs done to the base I turned to what had appeared to be cracks in the bowl sides and base. I sanded the stained and dirty base and the part of the bowl that had been seated in the base behind the leaves. I used clear super glue to fill in the small cracks on the bowl sides and bottom. They were very tight and did not move when I worked them with a dental pick. When the glue dried I sanded the bowl with 220 grit sandpaper until they were smooth and blended in well with the surface of the olivewood. I lightly topped the bowl with 220 grit sandpaper on a topping board until all of the damaged areas were removed and the rim top was smooth once again. I polished the olivewood with micromesh sanding pads – wet sanding it with 1500-2400 grit pads and dry sanding it with 3200-12000 grit pads. I wiped the bowl down after each of the micromesh sanding pads with a damp cotton pad to remove the sanding dust. The photos below show the progress of the polishing. I sanded the stem to remove the tooth chatter on the top and underside near the button. There was one deep tooth mark on the underside that I could not remove by sanding. I filled it in with clear super glue and let it dry. Once it had cured I sanded it smooth with 220 grit sandpaper to blend it into the rest of the stem surface. It was smooth but a bit lighter in colour than the surrounding area. Thankfully it was on the underside.When the stem was turned on to the shank it was slightly underclocked and there was no give in the stem to get the alignment correct. I carefully heated the bone tenon without burning it to soften the glue that held it in place. While it was still warm I was able to screw it in and align the stem properly.Now that things were aligned it was time to polish the stem. I polished the stem with micromesh sanding pads – wet sanding it with 1500-2400 grit pads and dry sanding it with 3200-12000 grit pads. I wiped the stem down after each of the micromesh sanding pads with Obsidian Oil to remove the sanding dust and give it more life. The photos below show the progress of the polishing. I love polishing horn stems because as you work them over they seem to take on a life of their own with a deep and resilient sheen. I took the pipe apart and buffed the parts. I buffed the bowl and the bottom and sides with Blue Diamond on the buffing wheel. I buffed the stem with Blue Diamond as well to polish out the tiny scratches that were left behind by the micromesh. I gave the parts multiple coats of carnauba wax and buffed them with a clean buffing pad to raise the shine. I hand buffed all of the parts with a microfiber cloth and put the pipe back together. I hand buffed it once again to finish the restoration. The finished pipe is shown in the photos below. It is a remarkable example of pipe making at the end of the 19th Century. The wood and the shape work well with the beautifully striated and gracefully bent horn stem. The silver band with the hallmarks and C.P.F. logo is a nice transition between the stem and the cherry wood base. Thanks for walking with me through this restoration.

Restoring a Unique Horn Stem W.E. Hooker System Pipe


Blog by Steve Laug

Another one of the pipes found on the Virtual Pipe Hunt in Montana was this interesting old piece. It is an oddity and I was sure when we found it that it was another example of the eternal hunt for the dry, perfect smoke. I joking call it a camel pipe for the humps it has from a side view. This old timer is stamped on the left side of the shank with the words W.E. Hooker and on the right side of the shank it is stamped Patented over May 17, 1910. The pipe was in pretty rough shape at first glance with wear and tear to the finish and the rim caked with lava flowing over to the top. The inner edge of the bowl was out of round and there was some damage to the surface. There were some small sandpits on the right side of the bowl and on the top of the shank. The vulcanite cap in the middle of the shank perplexed me a bit so I was curious what we would find beneath the cap. The stem was horn and it had a lot of tooth damage to the top and underside at the button as well as some significant damage to the button itself and the edges around it. It looked as if someone had taken a knife to it and done some whittling on the horn. It had originally had what looked like a faux P-lip as the airway left the button on the end rather than the top. It was going to be a fun one to clean up.My brother Jeff took quite a few photos of the bow from various angles to give an idea of the overall condition of the pipe.The function of the cap on the top of the shank intrigued me and the overall airflow of the pipe was a mystery. When I put a pipe cleaner in the shank it came out in the sump under the cap. There were two other holes in the sump – one at the top front that connected to the airway as it entered the bowl and one at the top back that went back into the shank and the stem. When I pushed a pipe cleaner through the stem it stopped at the bottom of the sump under the cap. Now I really wanted to know how this worked. I Googled W.E. Hooker tobacco smoking pipe and came up with a patent number 958,398. The inventor was a William E. Hooker of Buffalo, New York. He filed the patent October 13, 1909 and it was patented on May 17, 1910 (just like the stamping on the right side of the shank). I have copied that information below. Note the airflow in the diagram accompanying the patent, I have inserted red arrows how it flowed through the pipe.

I have included the complete text of the patent below. It explains the letters A-H in the above diagram.

W.E. HOOKER- TOBACCO SMOKING PIPE.

APPLICATION FILED OCT. 13, 1909.

Patented May 17, 1910.

PHOTOLITHOGRAPHER: WILLIAM  E. HOOKER, OF BUFFALO, NEW YORK.

TOBACCO-SMOKING- PIPE.


Specification of Letters Patent.

Application filed October 13, 1909. Serial No. 522,496.

To all whom it may concern:

Be it known that I, WILLIAM E. HOOKER, a citizen of the United States, residing at the city of Buffalo, in the county of Erie and State of New York, have invented a new and useful Tobacco-Smoking Pipe, of which the following is a specification.

My invention relates to certain improvements in a tobacco smoking pipe and I do hereby declare the following to be a full, clear, and exact description of my invention such as will enable others skilled in the art to which it appertains to make and use the same, reference being had to the accompanying drawings and to figures and letters of reference marked thereon, which form a part of this specification.

The objects of my improvements are: First: To provide a chamber or receptacle wherein can be collected all the moisture, nicotine and other foul secretions usually present in a tobacco smoking pipe and prevent the said moisture, nicotine and foul secretions from reaching the mouth of the smoker by means of the aforesaid chamber or receptacle and smoke channels, thereby insuring a clean and sanitary smoke. Second: By means of this chamber or receptacle and smoke channels and drainage channels, to prevent all moisture or saliva that might collect in the pipe stem from flowing into the pipe bowl. Third: To provide ample and easy facilities and means for cleaning the pipe. I attain these results by the position and location in which the nicotine receptacle or chamber and the smoke and drainage channels, are constructed or drilled in the pipe bowl, as illustrated in the accompanying drawings and which forms a part of this specification.

The accompanying drawing is a central vertical longitudinal section of my pipe embodying my invention.

A is an ordinary pipe bowl. B is a chamber or receptacle, for the purpose of collecting nicotine, moisture and other foul secretions, situated between the pipe bowl A and the pipe stem H, in a vertical position and parallel with the pipe bowl A, with an opening at the top. I prefer to have said chamber or receptacle in a vertical position as indicated and parallel with the pipe bowl, to insure the best results with my invention, although it is not absolutely essential that the chamber or receptacle aforesaid, should be nearer to the pipe bowl than to the pipe stem, but the vertical position and location of the chamber or receptacle is essential and necessary. This chamber or receptacle in the position or location described, serves as a collector of all moisture, nicotine and foul secretions which might flow through channels D and E and also has for its purpose the conveying of smoke from channel D to channel E. The opening at top of the aforesaid chamber permits of the easy cleaning of the nicotine and moisture chamber B, and the smoke channels D and E.

C is the well or socket, into which the mouth-piece or stem H fits and also serves as a smoke conductor from channel E, to stem H and as a conductor of any moisture or nicotine which might collect in said well, to the bottom of chamber or receptacle B, through channel F.

D is a smoke channel leading from the bottom of pipe bowl A to the top of chamber or receptacle B and serves as a smoke passage to convey the smoke from the bottom of pipe bowl A to the top of chamber B, thence across said chamber B into and through smoke channel E into the well C and thence to the mouth of the smoker through stem H.

E is a smoke channel leading from the top of chamber B into well or socket C and terminating midway between the end of well or socket C and where the pipe stem or mouth piece H enters said well or socket, and is a conductor of smoke from top of chamber B to the well.

F is a drainage channel to convey saliva, moisture, nicotine and foul secretions which might form in the well or socket C, from said well to the bottom of chamber or receptacle B. By the particular position and location of this drainage channel F, any moisture, saliva, nicotine or secretions, which might form and collect in said well or socket C, pass through this drainage channel and into the bottom of the chamber or receptacle B, and a free and unobstructed draft is thus obtained.

G is a cap which can be removed and it screws into the top of chamber B, to close opening of said chamber and can be easily removed for the purpose of cleaning chamber B and smoke channels D and E.

H is a pipe-stem or mouth piece.

I am aware that prior to my invention, Patented May 17, 1910. tobacco smoking pipes have been made with nicotine chambers or receptacles. I therefore do not claim the invention of a nicotine receptacle; but having thus fully described my invention, I claim: In a tobacco smoking pipe, a moisture or nicotine receptacle, situated or located between the pipe bowl and pipe stem

 or mouth piece, in a vertical position and parallel with the pipe bowl, having an opening at the top of said moisture or nicotine receptacle or chamber, with two smoke channels entering said receptacle or chamber at the top and a drainage channel entering said receptacle or chamber at the bottom as substantially set forth herein and for the purposes specified. In testimony whereof, I have hereunto subscribed my name in the presence of two witnesses, this 11th day of October, 1909. WILLIAM E. HOOKER. Witnesses: Himmler BOWEN, CHAUNCY W. ABBOTT.

Now, I had it in the words of the inventor himself – he designed a different kind of sump vertically in line between the bowl and the stem. That made his invention different from the sump in a Peterson System pipe designed to accomplish the same thing. This is truly a complicated piece of tobaciana.

My brother took close up photos of various angles showing the grain of the pipe, the structure and the pipe taken apart. These give a clear picture of what we would have to deal with in the restoration process. The rim top photo shows the cake in the bowl and the overflow of lava on to the rim top. You can also see the damage to the inner edge of the bowl at the back of the pipe.The next series of photos show the hard rubber cap on top of the entrance to the sump on the shank. It is threaded and can be removed by unscrewing it from the briar shank. The horn stem was held onto the shank by a threaded bone tenon that screwed into the threaded mortise in the briar. Both threaded portions were in excellent condition. The second photo below shows the view of the pipe with the three openings showing from the shank to the bowl.The stamping on both sides of the were faint but readable. As mentioned above the left side read W.E. Hooker and the right side read Patented over May 17,1910. I was dealing with an old pipe.The horn stem had tooth chatter and tooth marks as well as some nicks from a knife that had been used to try and reshape the stem. The next photos tell the story. Jeff did a pretty thorough job cleaning this old timer up. The finish was really rough and dirty and the cake in the bowl foretold a very dirty interior. He reamed the bowl with a PipNet reamer and took the cake back to briar. He cleaned the interior of the bowl with alcohol, cotton swabs and pipe cleaners. He worked through the various channels and airways in the shank and the stem until they were clean. I took the photos below to show the condition of the pipe when it arrived in Vancouver, clean and ready for me to work on. I took a close up photo of the bowl with the sump cap on and off. Note the nicks out of the inside edge of the bowl leaving it out of round.I took some photos of the stem to show the cleanness of the horn and the damage to the various parts – sides near the button, the button surface and the stem next to the button on the top and underside.I worked on the inner edge of the bowl to smooth out the damaged areas and even out the rim top. I wanted to work as much as possible to bring the bowl back into round. Once I had sanded the edge I mixed some putty of clear super glue and briar dust to build up the back edge of the rim. Fortunately the damage did not go deep into the bowl but was concentrated at the top.I sanded the repaired area with 180 and 220 grit sandpaper and took the following photo. I still needed to do more sanding but the rim top is taking shape.I wiped down the bowl and rim with cotton pads and alcohol to remove the sanding debris and any remaining finish on the bowl. I did that in preparation for repairing the filled areas on the right side of the bowl and the top of the shank. I put drops of clear super glue in the fills and sandpit areas on the bottom of the bowl and right side. Once they had dried I put some in the sandpits on the top of the shank near the stem shank junction. I sanded the repairs smooth with 220 grit sandpaper and blended them into the surface of the surrounding briar. I wet sanded the areas with 1500-2400 grit micromesh sanding pads. I used the needle file to reshape the stem edges and button and smooth out the damage that had been caused by the knife. I smoothed out the flow of the P-lip style button and recut the ledge on the underside of the stem.I cleaned the airways in of the pipe and stem with pipe cleaners and alcohol. I cleaned out the sump area with cotton swabs and alcohol. There was still some sludge in the bottom of the sump that came out with coaxing. I cleaned out the mortise as well for good measure.I continued to reshape the stem some more with 220 grit sandpaper. I really wanted to have it smooth to touch and closer in appearance to what it must have looked like when it left the factory. When I was done with the sanding the shape was looking much better.I touched up the repaired areas of the bowl and rim with a dark brown aniline stain pen. The colour matched perfectly with the existing stain. I wiped the bowl down with a light coat of olive oil and took the following photos to show where things stood at this point in the process. With the bowl finished I went to work polishing the stem with micromesh sanding pads – I wet sanded with 1500-2400 grit pads and dry sanded with 3200-12000 grit pads. I rubbed the stem down with Obsidian Oil after each pad. It is always amazing to me to see the horn begin to develop a deep glow and shine. I polished the hard rubber sump cap with the micromesh once I finished the stem. I buffed the pipe and stem with Blue Diamond on the buffing wheel to remove any minute scratches that remained in the stem and the briar. I gave the pipe multiple coats of carnauba wax and buffed it with a clean buffing pad to raise a shine. I hand buffed it with a microfiber cloth to deepen the shine on the briar and horn. The finished pipe is shown in the photos below. I am really having a bit of a dilemma with these old pipes – in all of my time refurbishing and restoring old pipe I have never seen pipes like these… I am so tempted to hang on to the lot of the old C.P.F. pipes and the rest that come from that era as I probably will never see them again… ah well definitely a first world problem. Time will tell. Thanks for coming with me on this interesting old restoration. It was a fun one to work on.