Tag Archives: repairing bite marks

Recommissioning a GBD International Carved Rim Bent Bulldog London Made


Blog by Dal Stanton

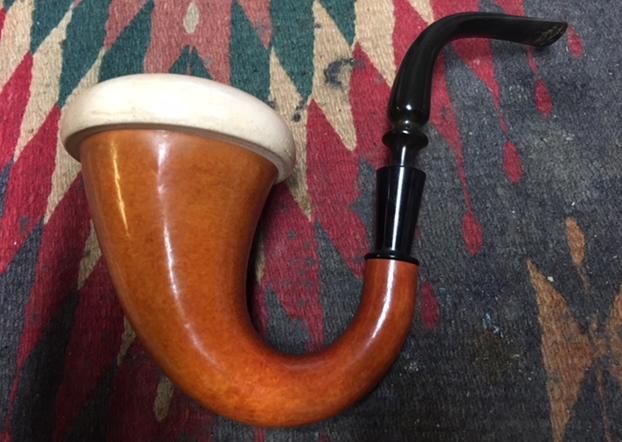
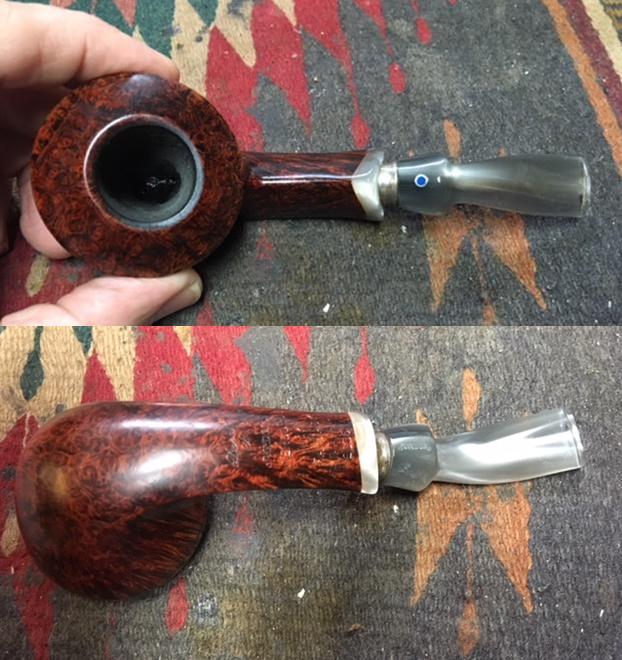
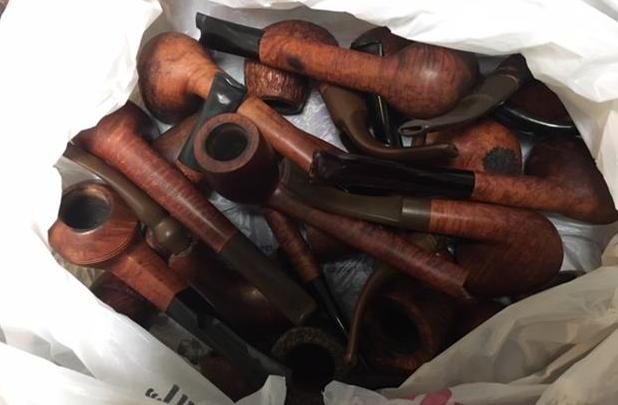
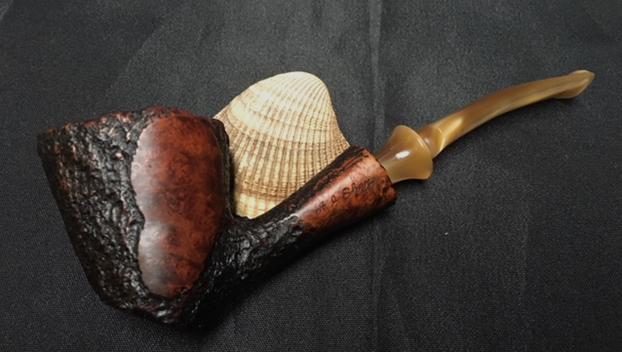
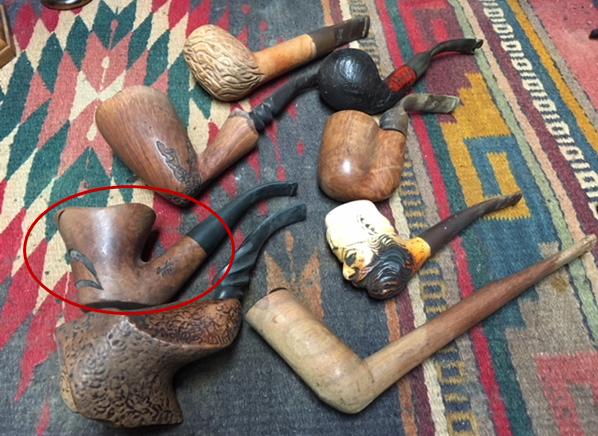
This Bulldog is simply cool.  It was one of those wonderful surprises one hopes for when you buy many pipes in one fell swoop on eBay.  In many of my restoration blogs I’ve mentioned the Lot of 66 which I landed last year while back in the US.  What can I say – God knew that I was restoring pipes to benefit the Daughters of Bulgaria and this Lot of 66 has been a gift that keeps on giving.  It isn’t possible to see all the pipes in the landscape pictures provided and one hopes in the percentages – there has to be some good pipes in the Lot!  Here is the Lot of 66 that I saw then and have pictured several times before.  I’m not positive, but the GBD Rustified Rim Bulldog is on the extreme lower right below – only his bowl showing.Many of my restorations for the Daughters come from people seeing a pipe in my “For ‘Pipe Dreamers’ Only” section on The Pipe Steward blog.  I came up with the idea of this ‘before restoration offerings’ when I found that when people visited us here in Bulgaria, they would know about our work with the Daughters of Bulgaria and that I restored pipes that benefited that cause.  Almost always they wanted to see what pipes I had in the “Help Me! Basket” and they would choose one to be restored.  The interesting thing I discovered was that people live in hope for what something can become.  Estate pipes can be pretty nasty, but people know the amazing wonders of what the restorative processes can produce and so they see the potential and trust me to realize that hope as I bring a pipe to The Pipe Steward worktable on the 10th floor of a former Communist apartment block in Sofia, Bulgaria!  What a story!  I’m living the dream 😊.

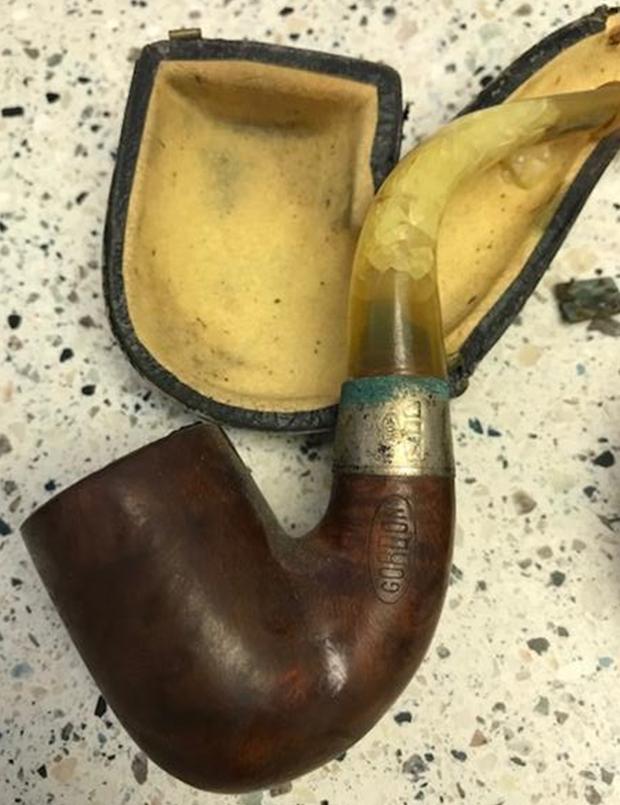
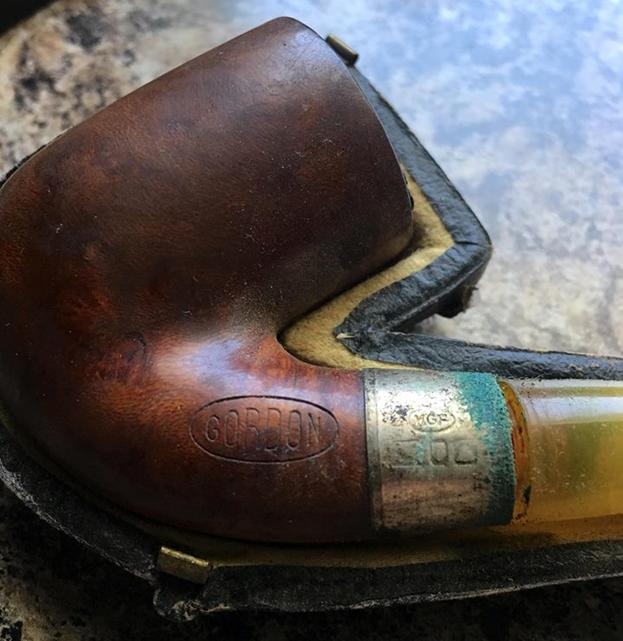
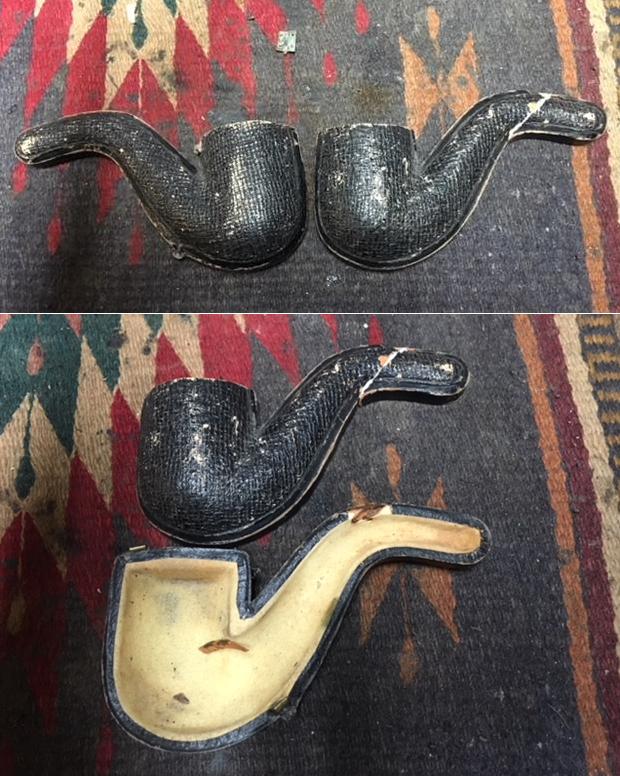
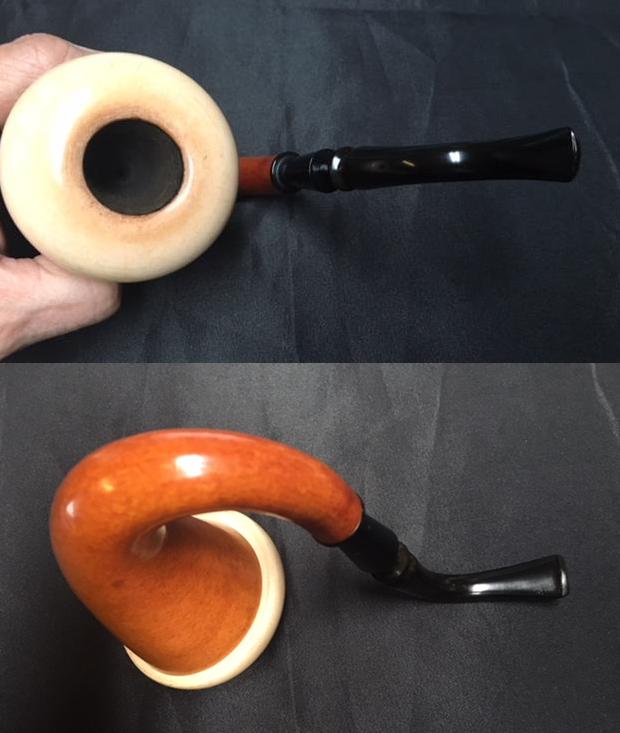
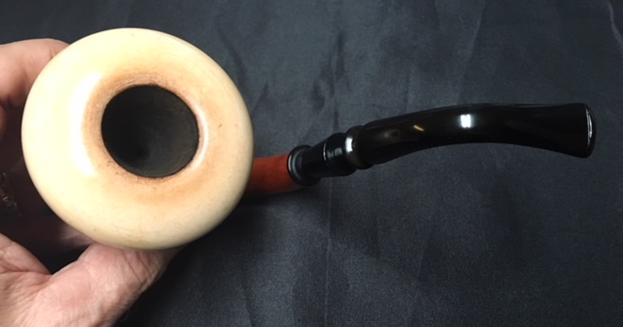
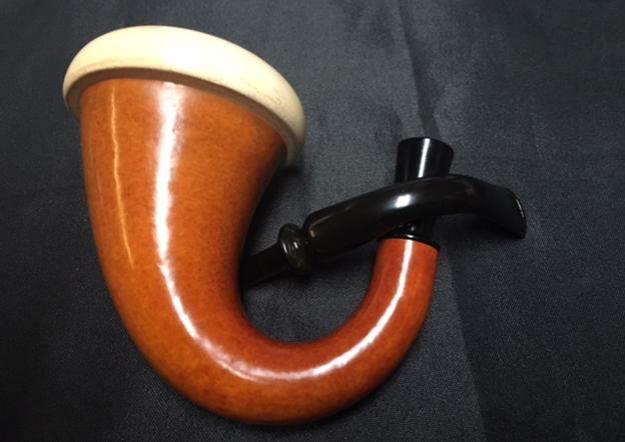
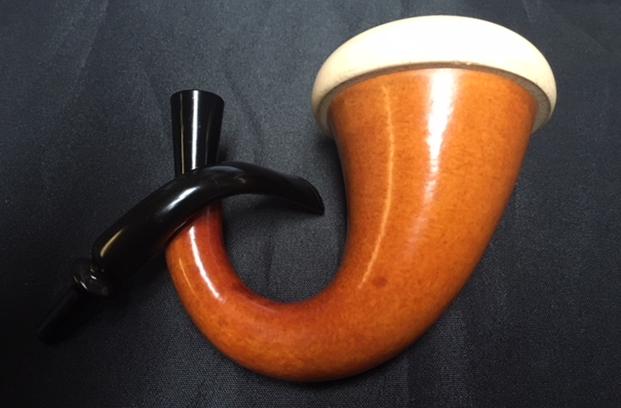
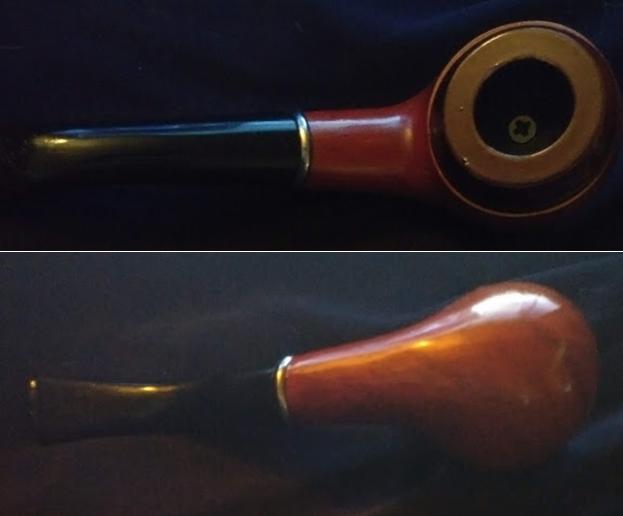
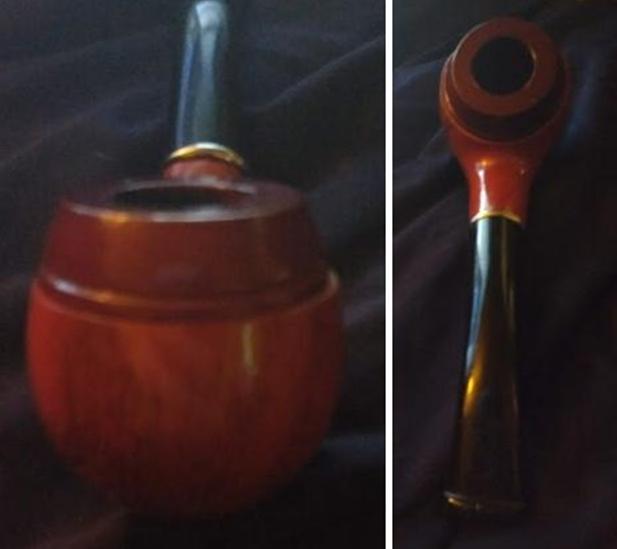
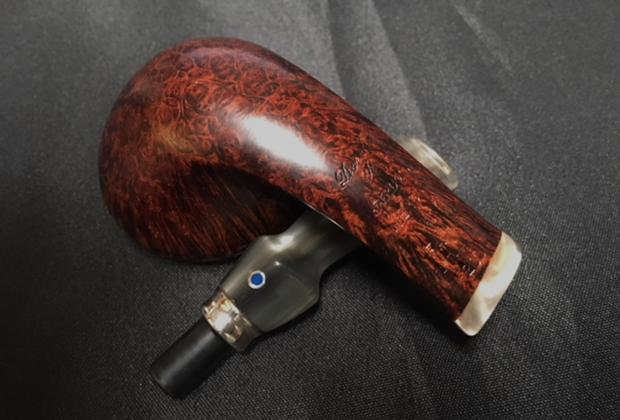
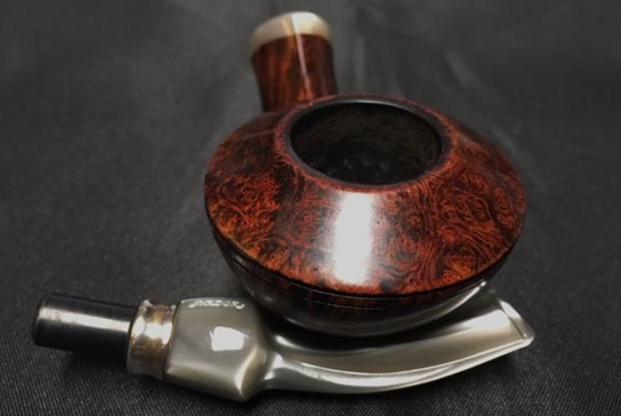
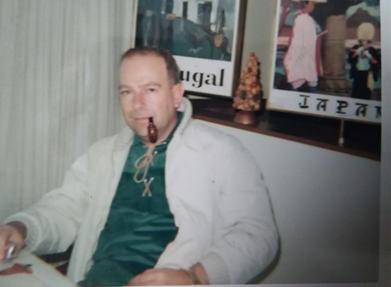
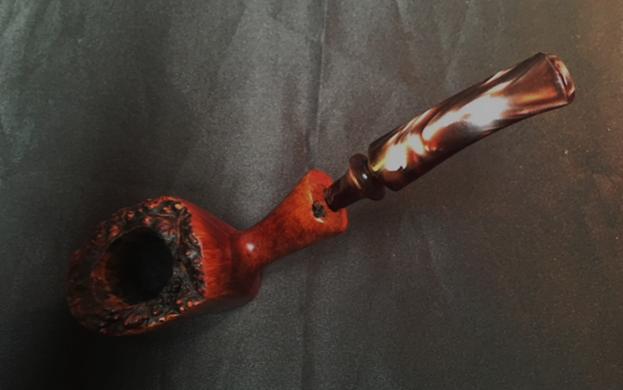
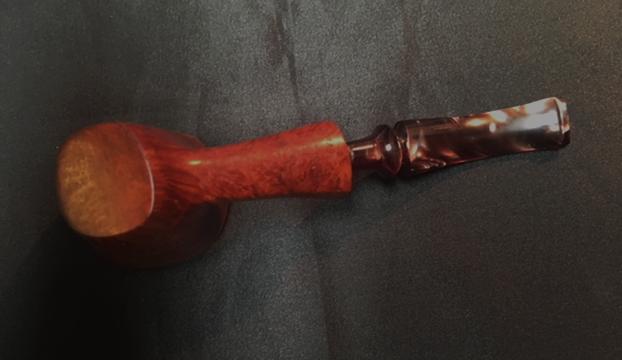
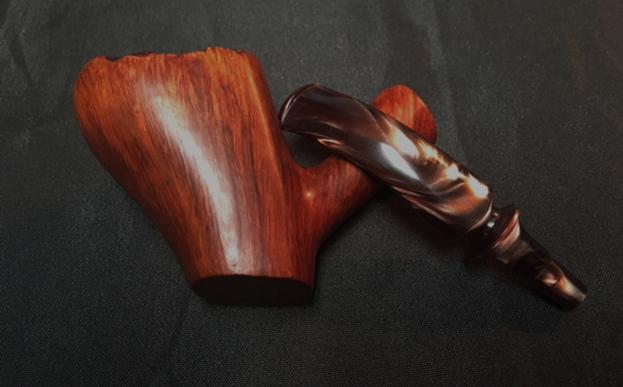
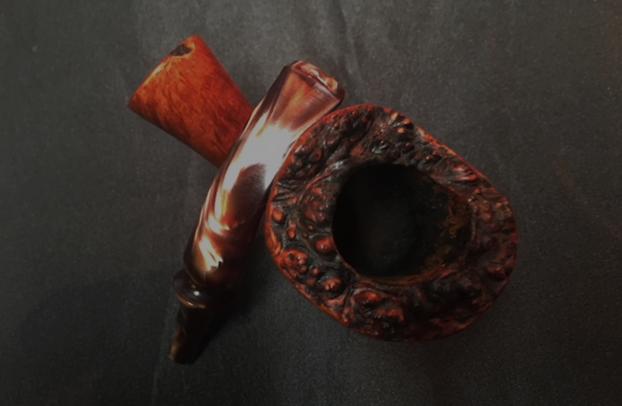
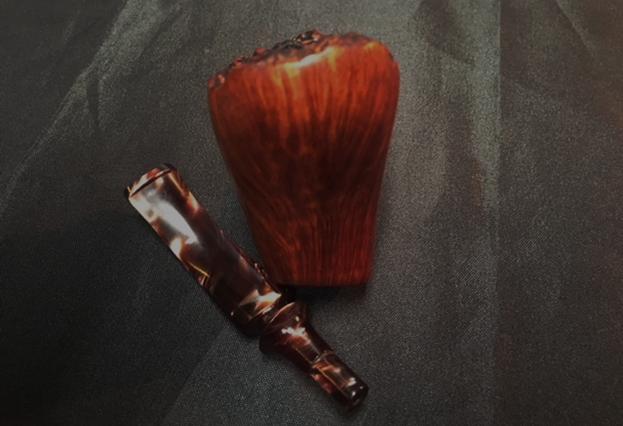
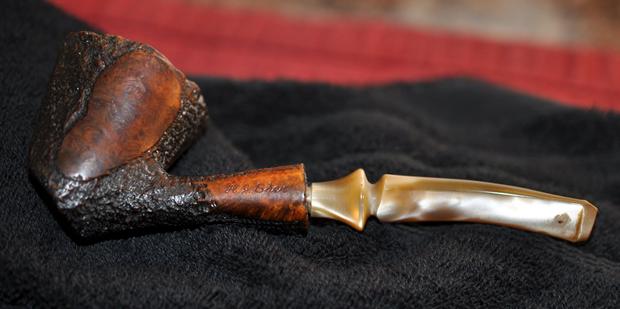
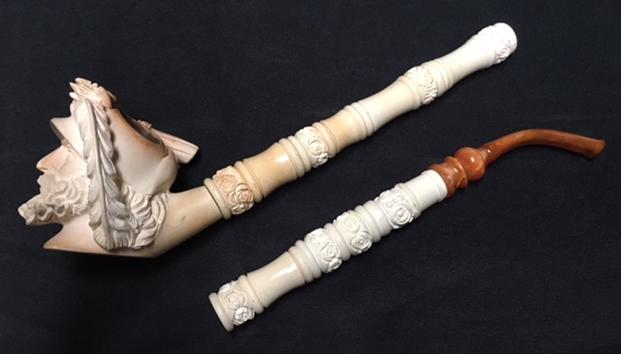
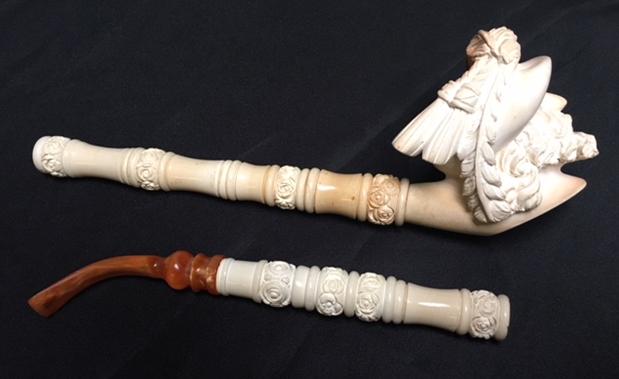
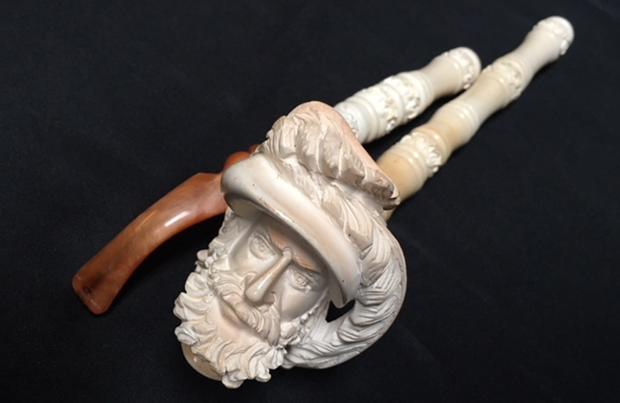
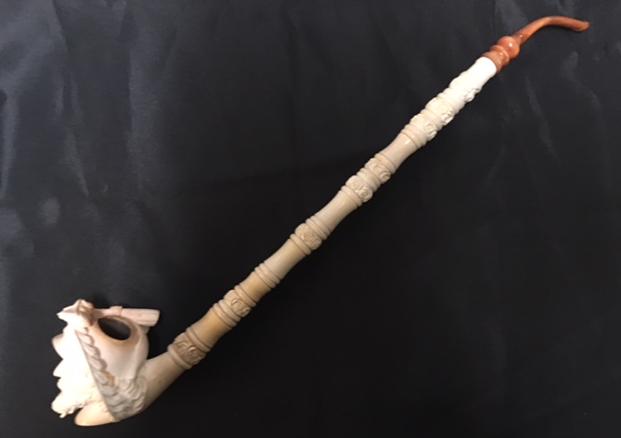
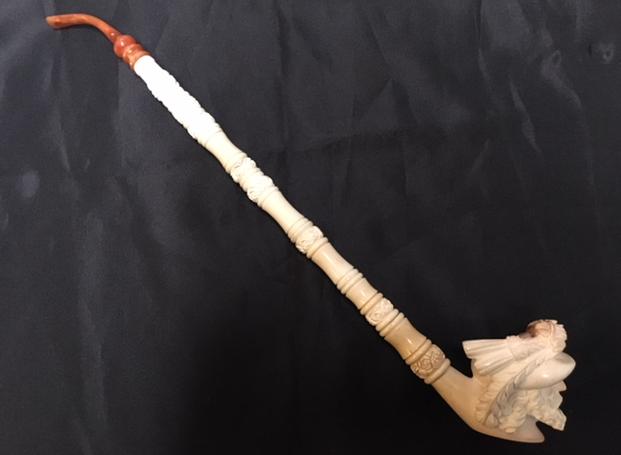
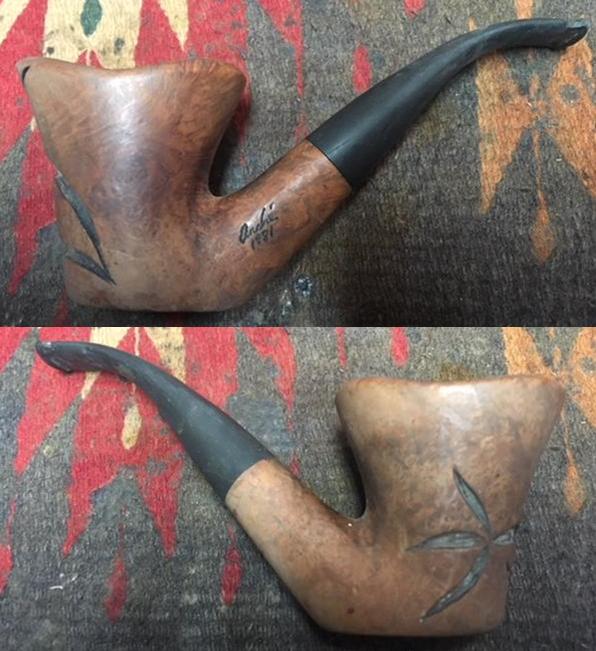
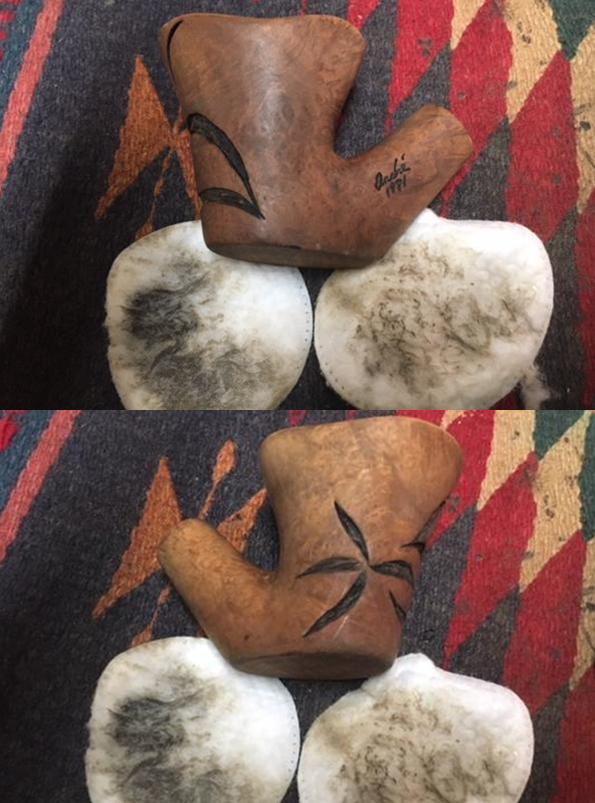
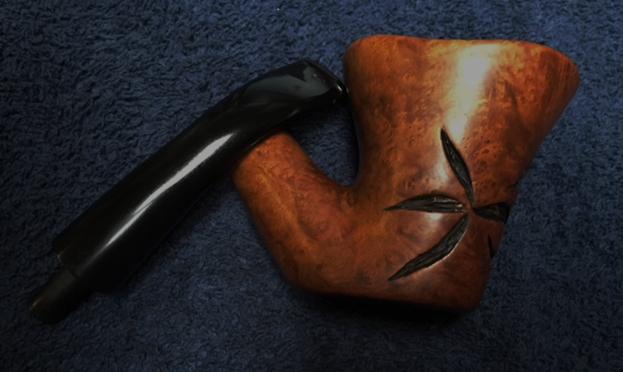
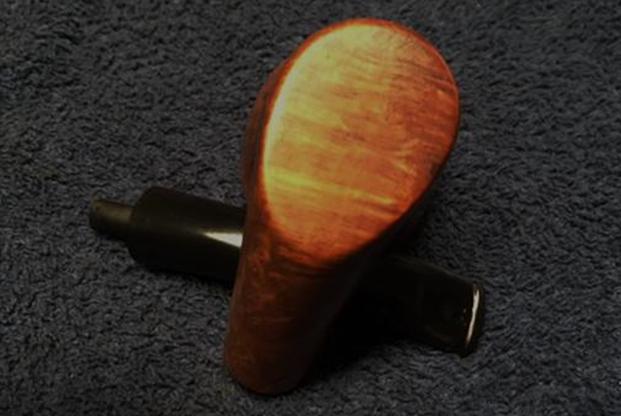
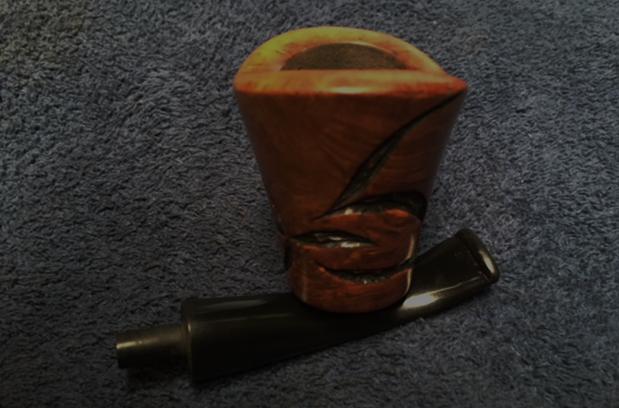
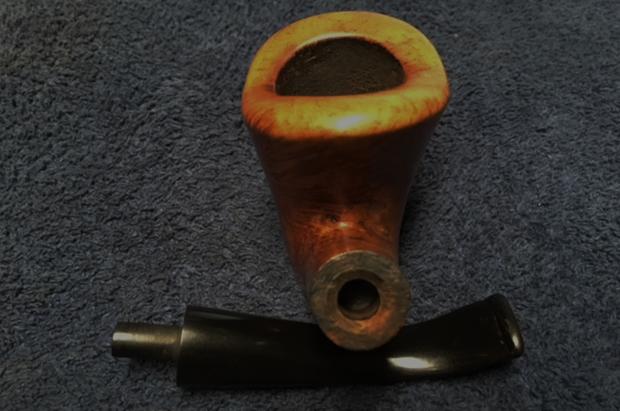
Chris, a dedicated pipe man and regular contributor on the Facebook group, ‘The Gentlemen’s Pipe Smoking Society’ was ‘Pipe Dreaming’ while tooling around looking at the offerings and saw the GBD International Bulldog.  What attracted him to the Bulldog was the unique rustified rim with hearty agreement from me.  It adds a flair that you don’t often see on a London Made Bulldog.  The bent stem is cool, too, adding a bit more flare.  Here are some of the pictures Chris saw in the “For ‘Pipe Dreamers’ Only” page: 
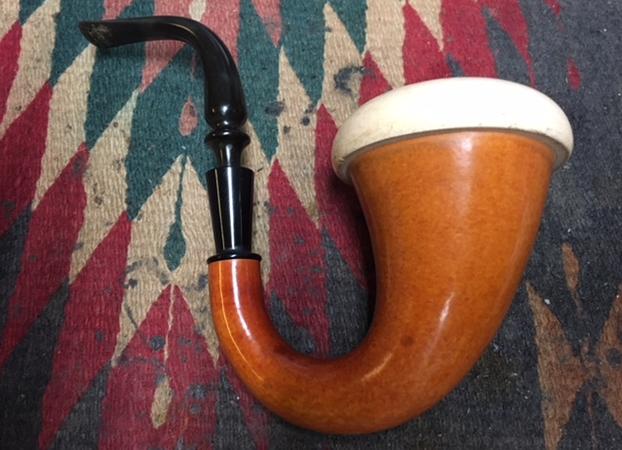
Chris commissioned the GBD Bulldog, which put it in the queue for restoration.  After the restoration is completed and published, I then place a value on the pipe resulting from my research.  The commissioner has the first opportunity to claim the pipe from The Pipe Steward Store.  Chris will have first dibs on this Bulldog when completed.

GBD (Pipedia’s article on GBD), was the handshake enterprise started by three French ‘Master Pipemakers’, Ganneval, Bondier and Donninger in Paris in 1850 to manufacture Meerschaum pipes, which was the primary material used in manufacturing pipes along with clay.  This was true until the discovery of briar in Saint Claude, France, a discovery that changed the pipe manufacturing world.  In 1902 Marechal and Ruchon sold GBD to A. Oppenheimer & Co. in London, which began the shift of GBD to being primarily a British enterprise, even though GBD pipes continued to be produced in Paris and Saint Claude, until 1981, with the closing of the French operation when the name, GBD, was merged with the Cadogan Group.  I enjoy rehearsing the historical developments of pipe names and companies because they add to the enjoyment and appreciation of restoring pipes.

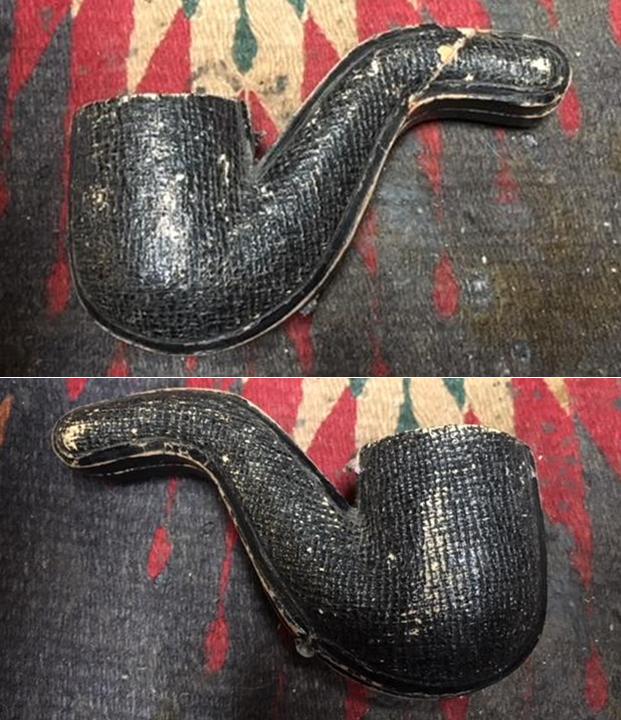
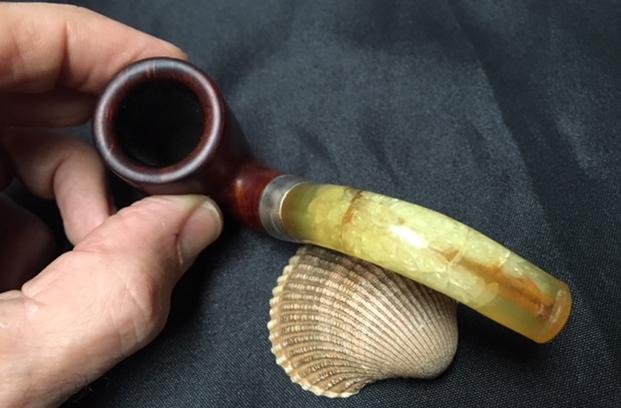
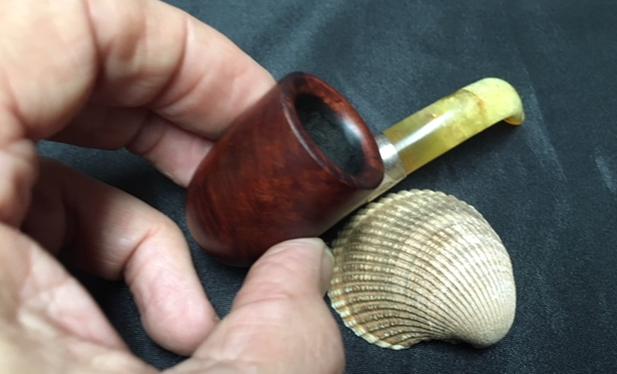
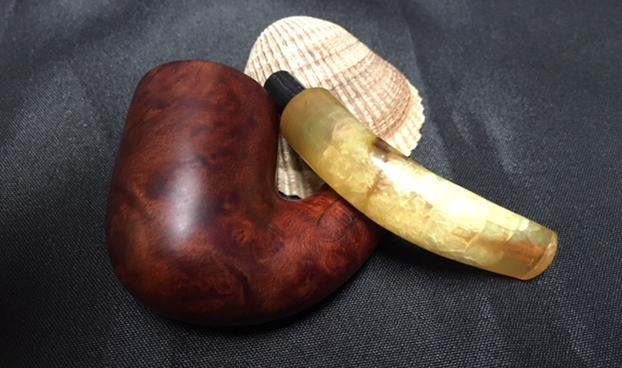
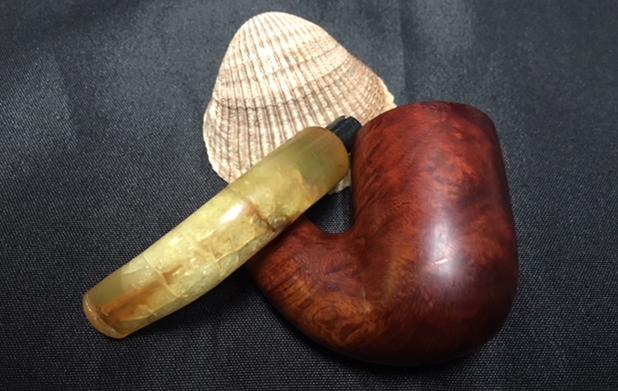
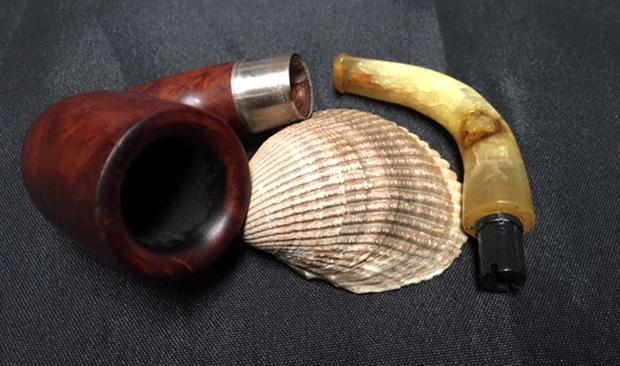
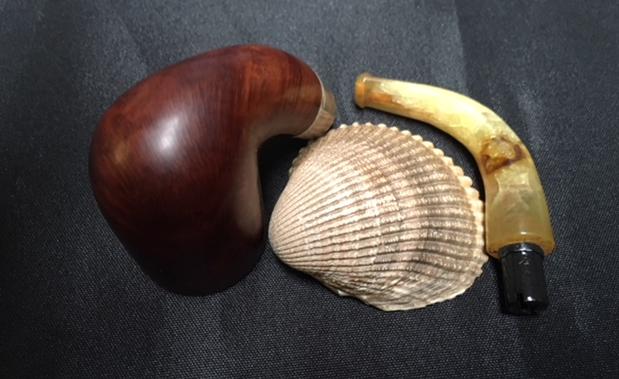
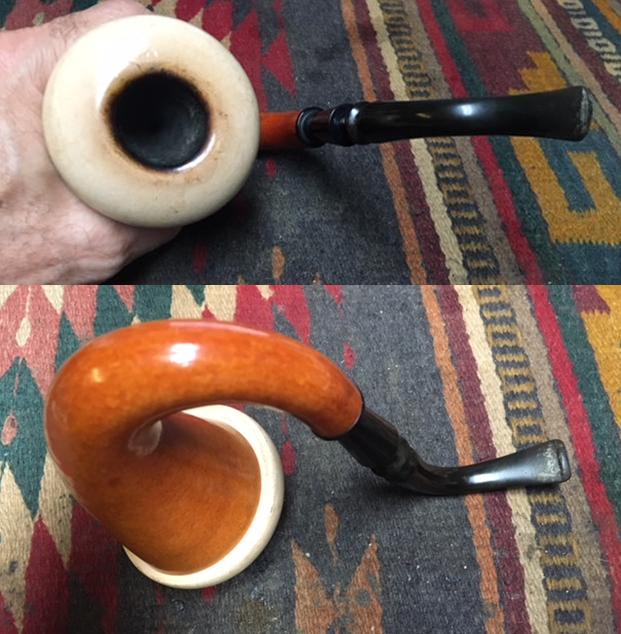
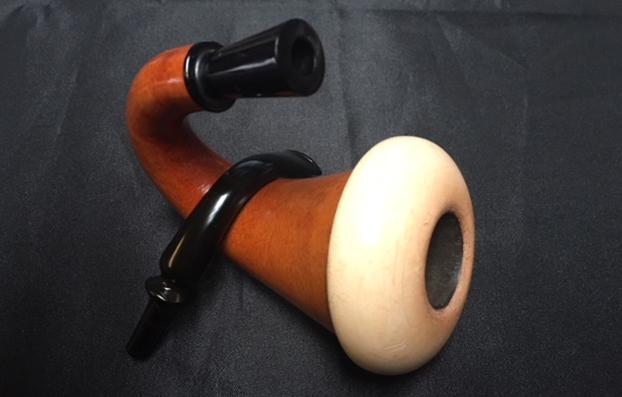
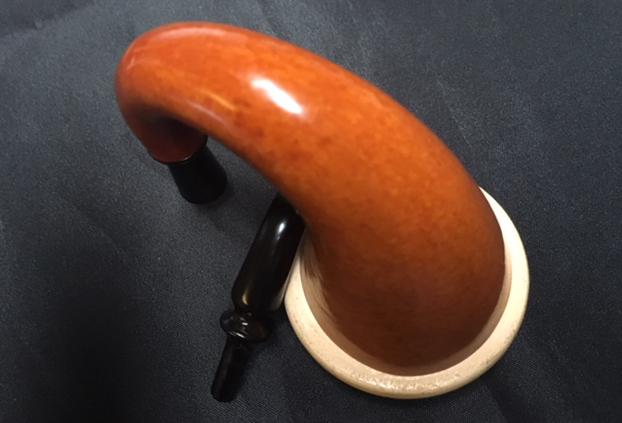
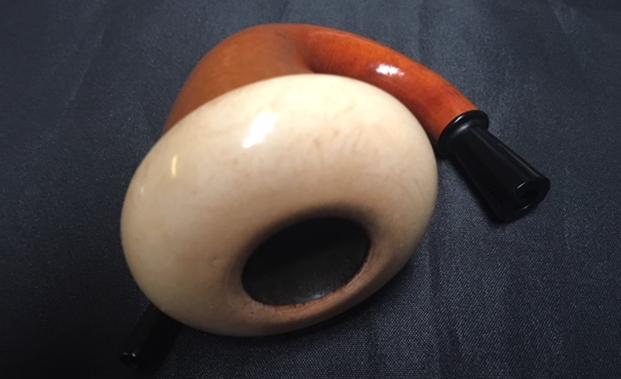
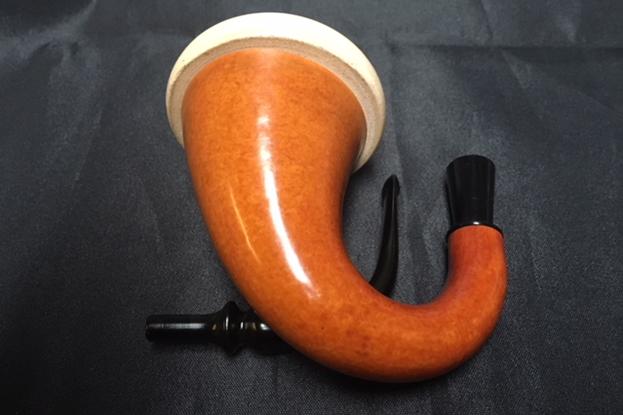
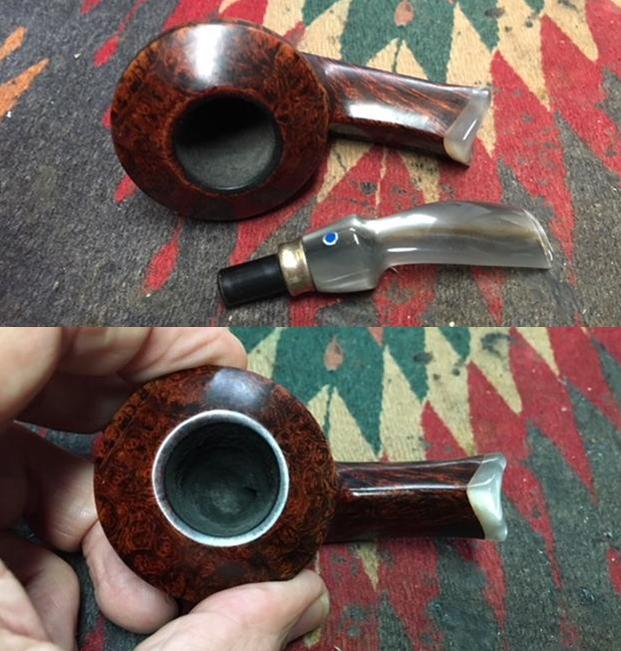
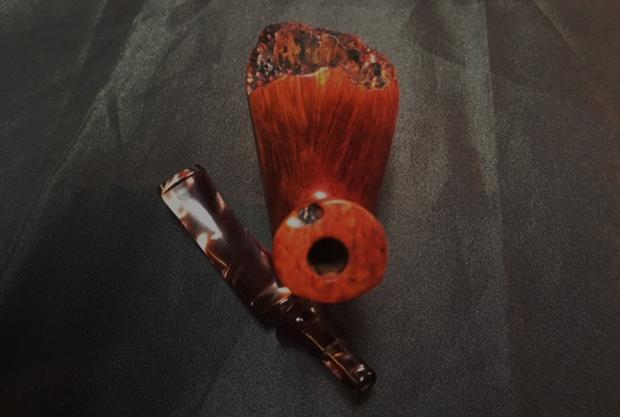
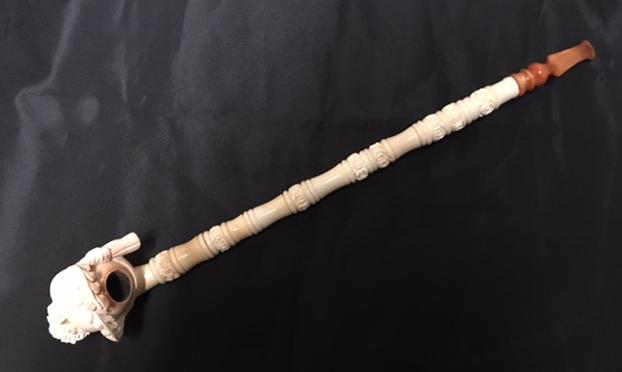
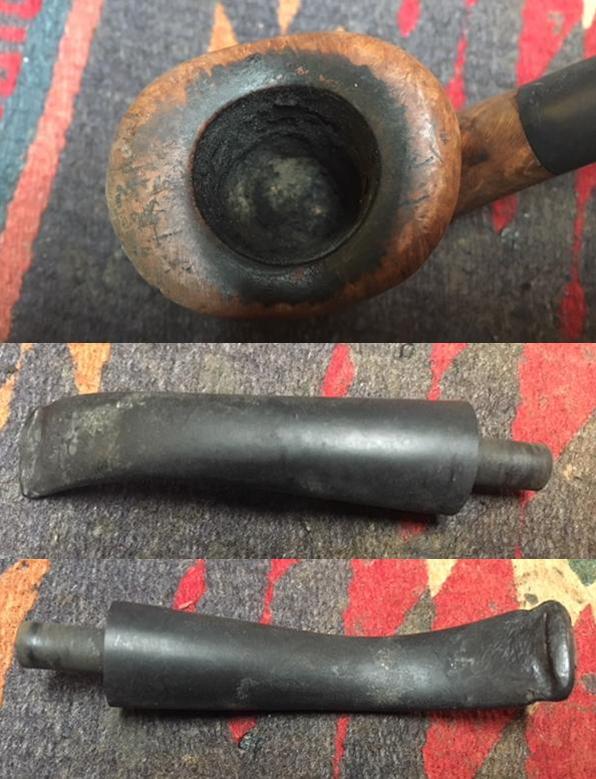
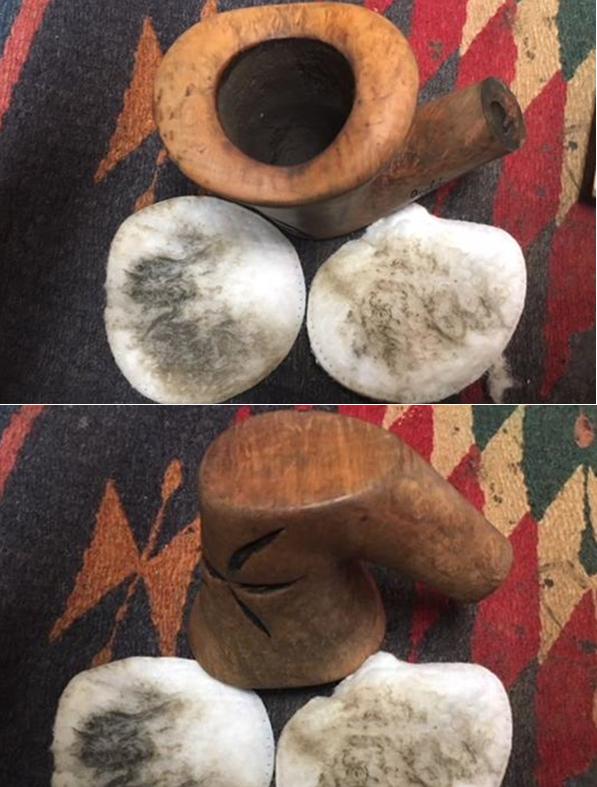
I take some additional pictures of the GBD International Bulldog on my worktable. 
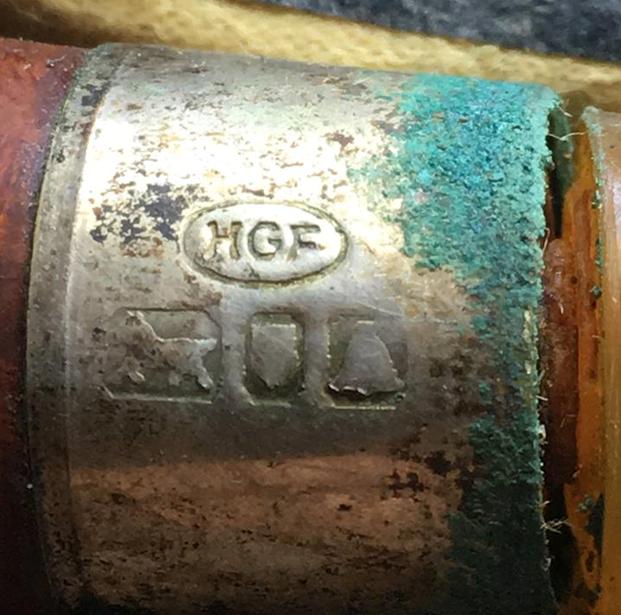
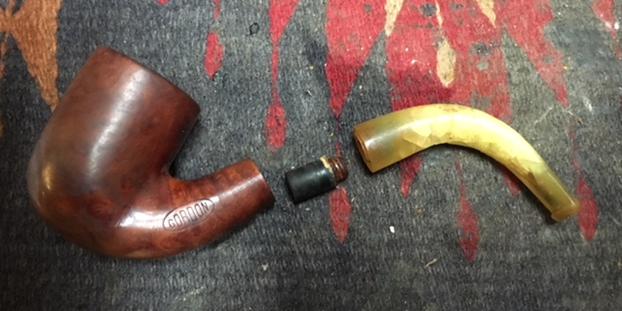
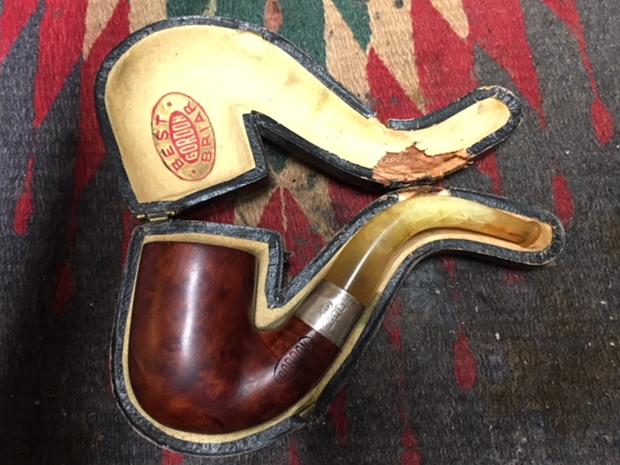
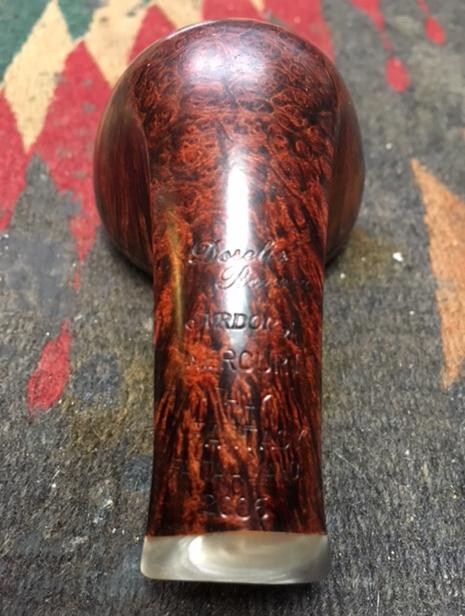
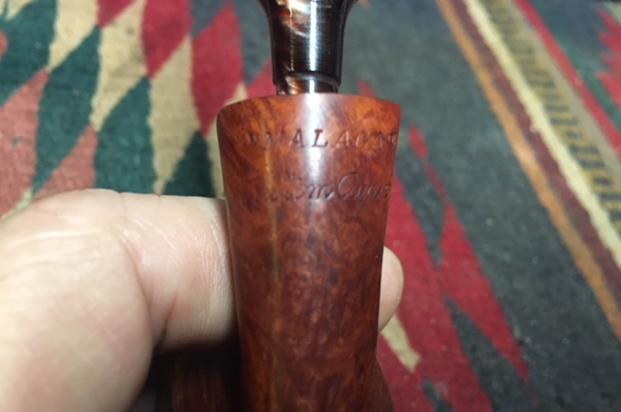
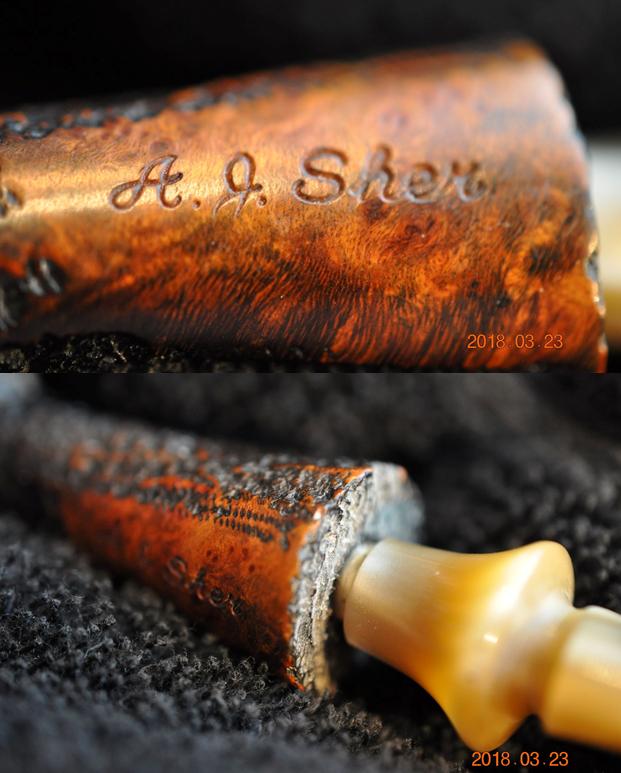
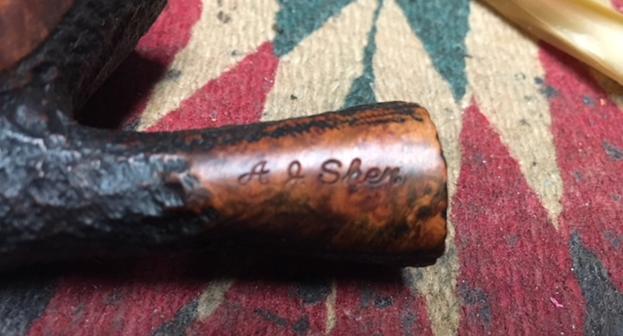
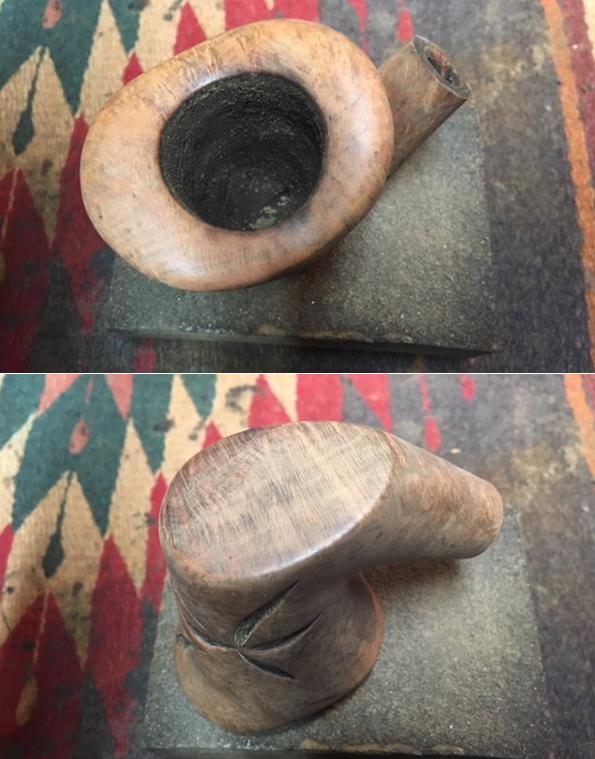
The nomenclature has on the left side of the shank, a GBD circled with an oval over INTERNATIONAL over LONDON MADE.  The right side has LONDON ENGLAND over 546, the shape number.  The shape number lines up as a Bulldog, ¼ bent, Diamond shank according to Jerry Hanna’s GBD shapes chart listings in Pipedia.  The dating of the pipe is pre-1980s.  The stem’s brass rondel along with the “London, England” stamp indicates a pre-Cadogan era GBD.  The merger was 1981.  This information is clear.

There’s some information that is proving to be a bit more difficult to mine in my research.  I’ve contacted Al Jones (Upshallfan), a regular contributor to rebornpipes, on a few GBDs I’ve restored in the past.  Al is a gold mine of information about GBDs and I appreciate his help.  Previously, he had sent me a PDF he had gleaned from now defunct www.perardua.net/ entitled ‘GBD Model Information’.  From that PDF I found this reference regarding the ‘International’ line of GBD.  I clipped it:I was excited to get a lead on what appears to be a GBD pipe line of “carved top rims” that were stained black.  The reference in the second line is to a 1976 catalog where I could hopefully find more about the International line.  Hopeful of finding this catalog, I went to the internet.  Unfortunately, I could find nothing.  Also disheartening, the usual go to page for catalogs, Chris’ Pipe Pages, I discovered some time ago, now seems to be defunct.  Sad.  So, again I sent Al a note with some questions.  His reply came very quickly with this picture of at least one ‘GBD International’ from the 1977 Tinderbox catalog.  The writing is not easy to make out but the “M.” example of the International line is a nice looking oval shank Volcano shape which I can make out has a carved rim like the Bulldog.  With this information, my thinking is that the GBD Bulldog I have is dated from 1976 but earlier than 1981.  Again, much thanks to Al Jones!
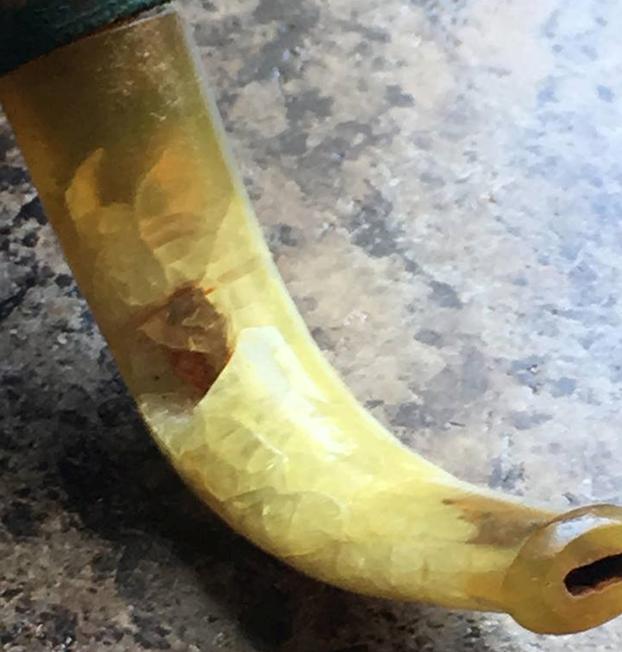
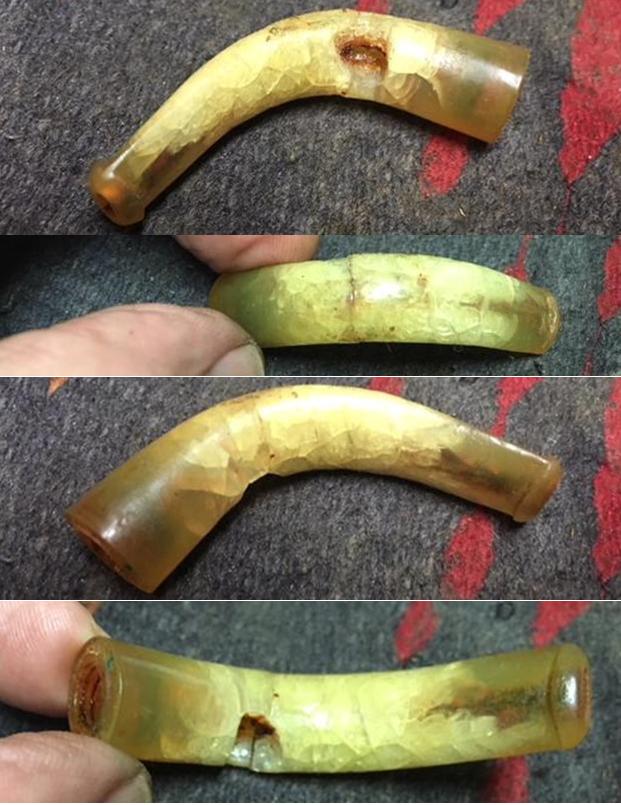
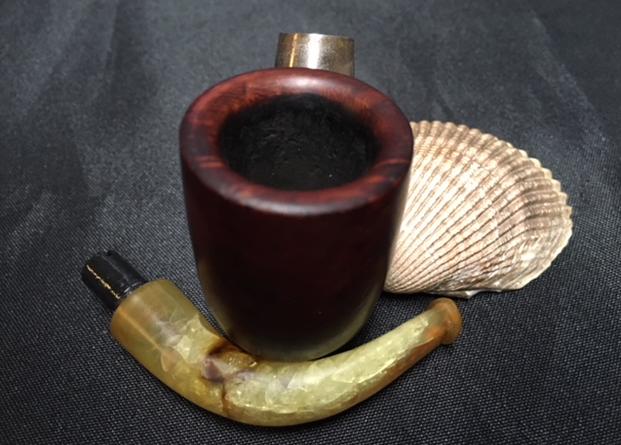
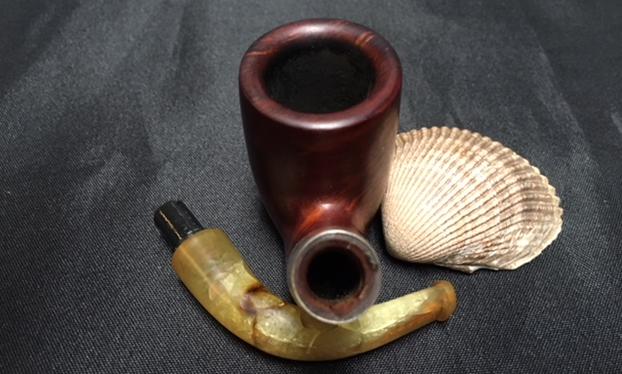
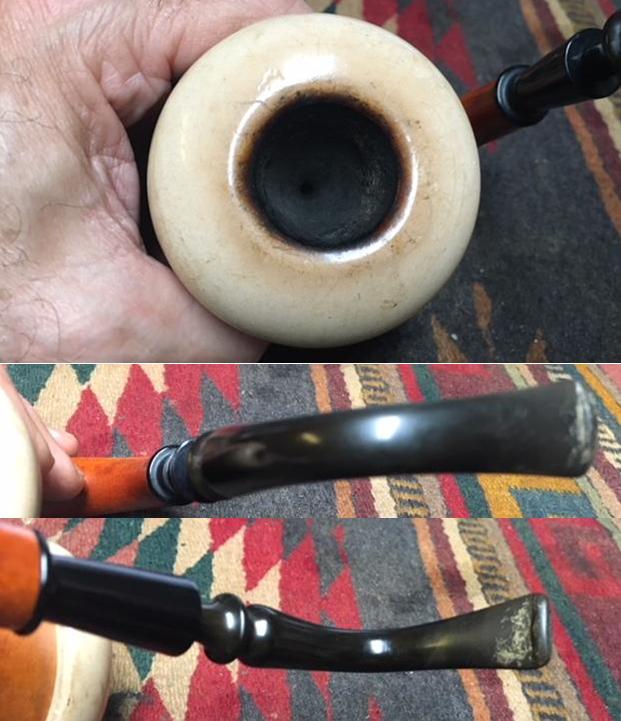
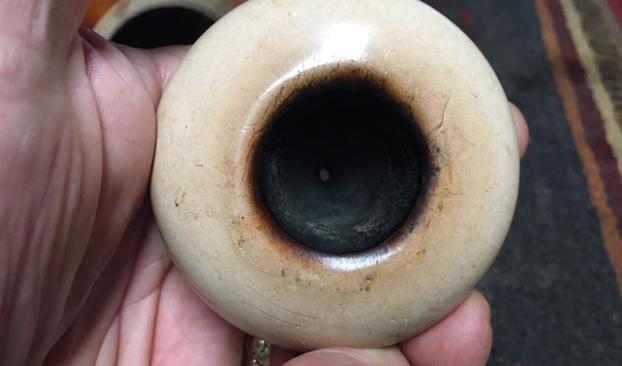
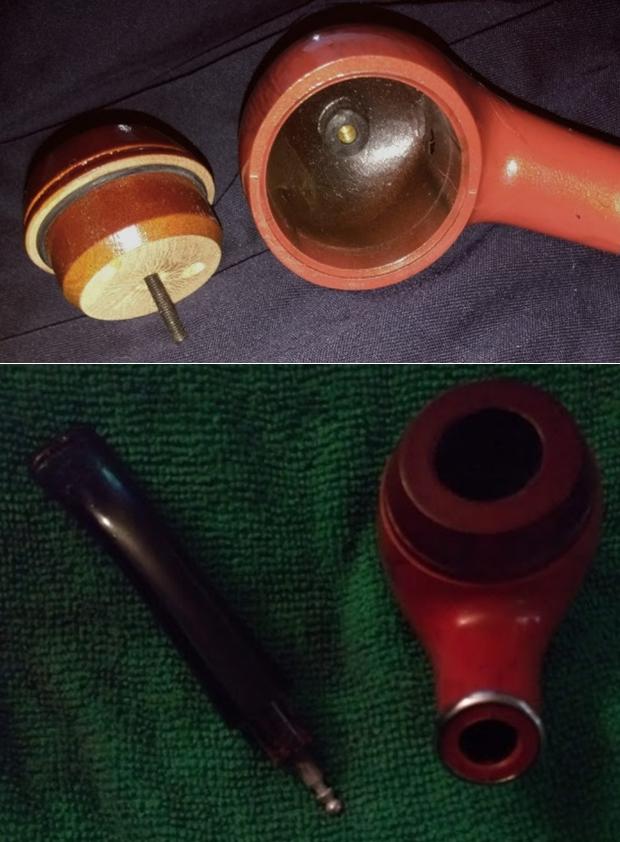
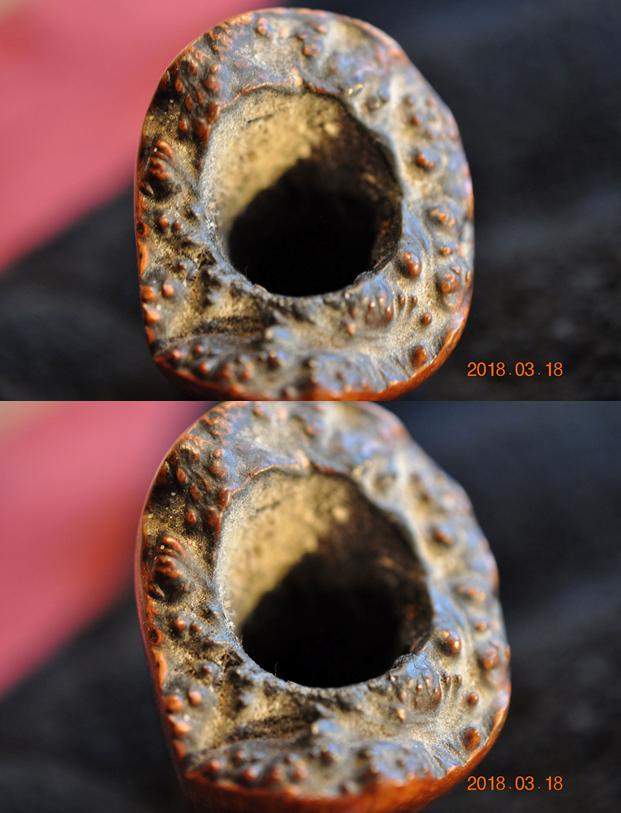
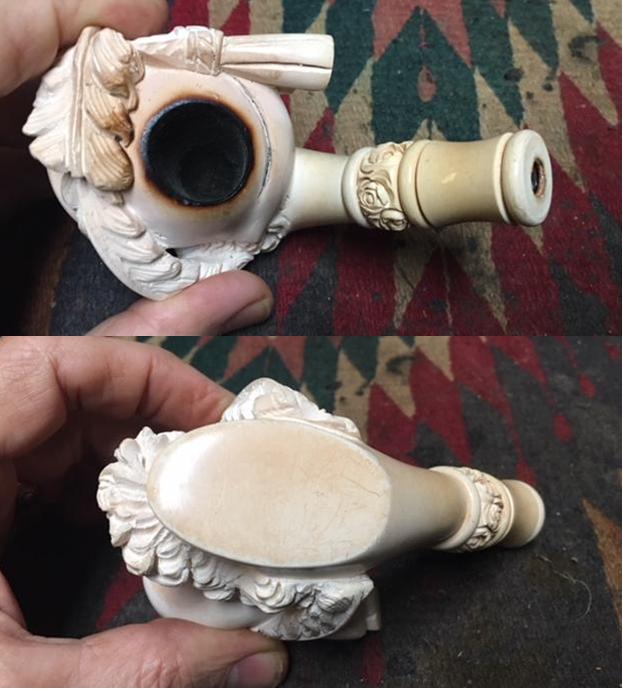
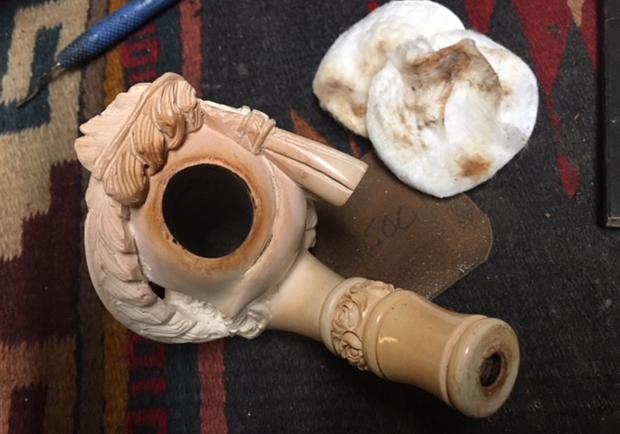
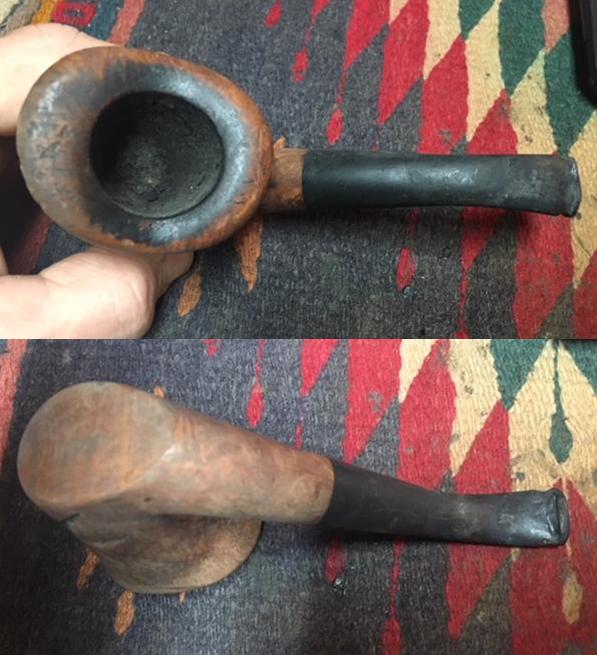
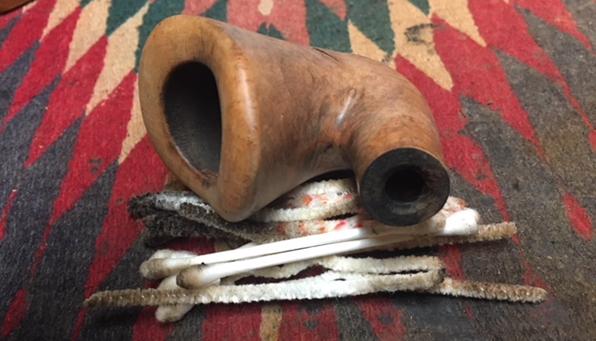
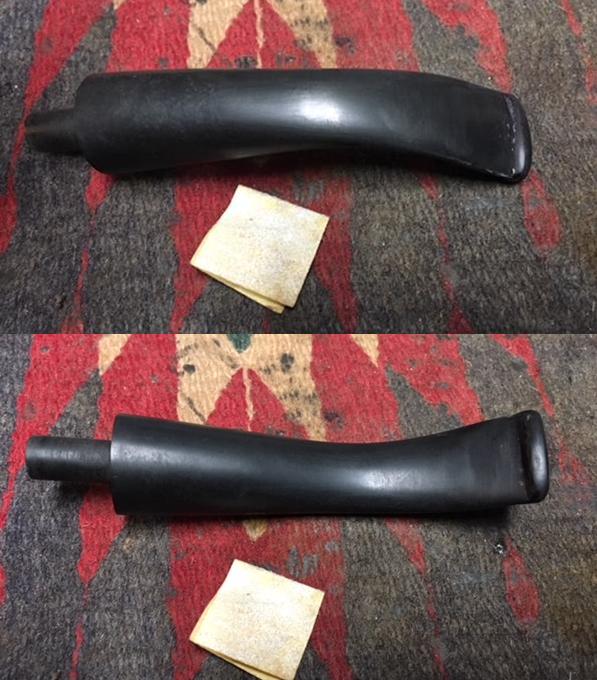
Looking at the GBD International Bulldog itself, it is in decent condition.  There is some cake build up in the chamber and the carved rim shows some expected grime but not too much.  The twin dome grooves are full of debris and need to be cleaned.  The bowl itself looks very good – it has some expected grime, but the briar looks exceptional underneath.  It will look good when cleaned up.  The stem has some deep oxidation and the bit shows some dents and tooth chatter that will need correcting.

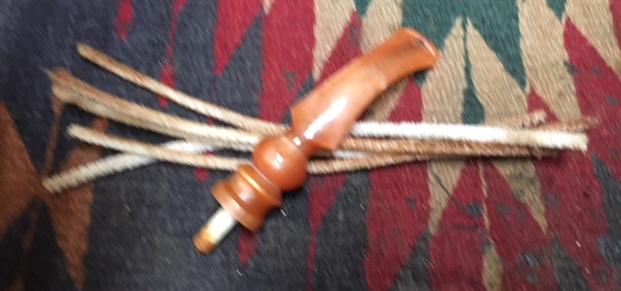
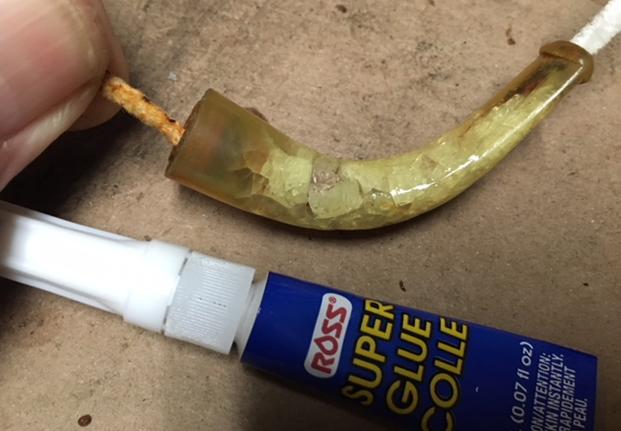
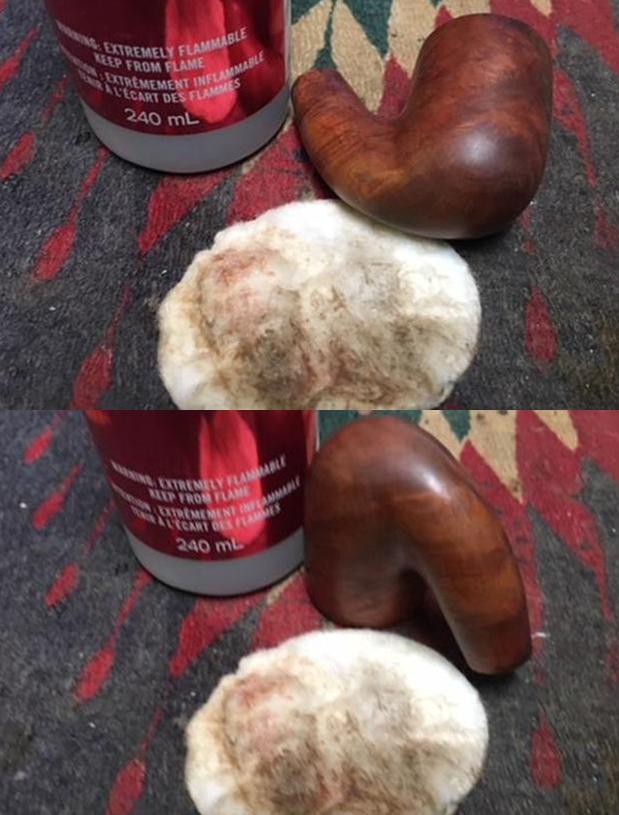
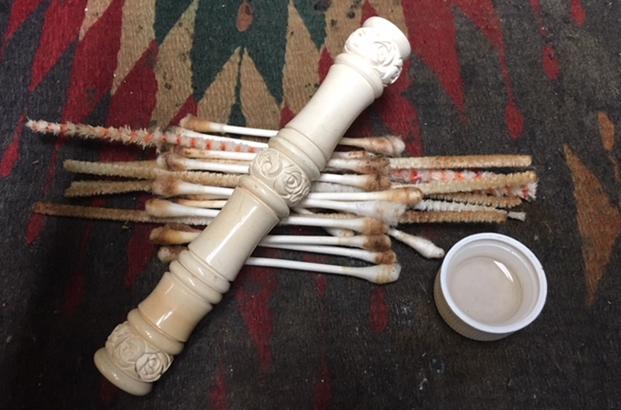
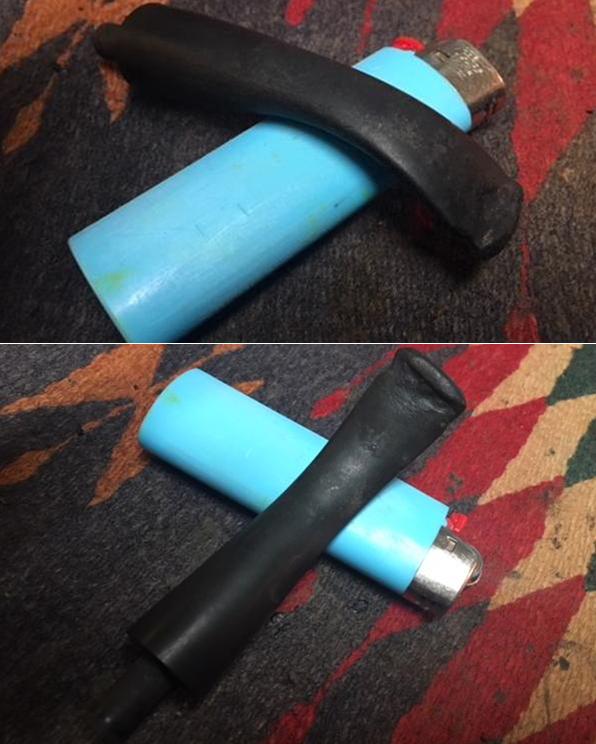
I begin the restoration of this GBD International Bulldog by adding the stem to a soak using Before & After Deoxidizer.  After running pipe cleaners dipped in isopropyl 95% through the internals of the stem, it joins 5 other pipe stems in queue for restoration.  I leave the stem in the soak for a few hours then fishing the GBD stem out, I wipe it off with a cotton pad wetted with light paraffin oil.  I also put a pipe cleaner through the stem to push the fluid out and follow with a pipe cleaner dipped in isopropyl 95% to assure that the airway is clear. After cleaning the stem of the Deoxidizer, I can still detect oxidation in the vulcanite.  I take another picture of the stem with the aperture open more to show what I’m seeing.I decide to give the stem another soak in an OxiClean solution.  After covering the rondel with petroleum jelly, I put it in the soak. I’m not sure if the brass rondel will react or not to the OxiClean, but I take no chances.
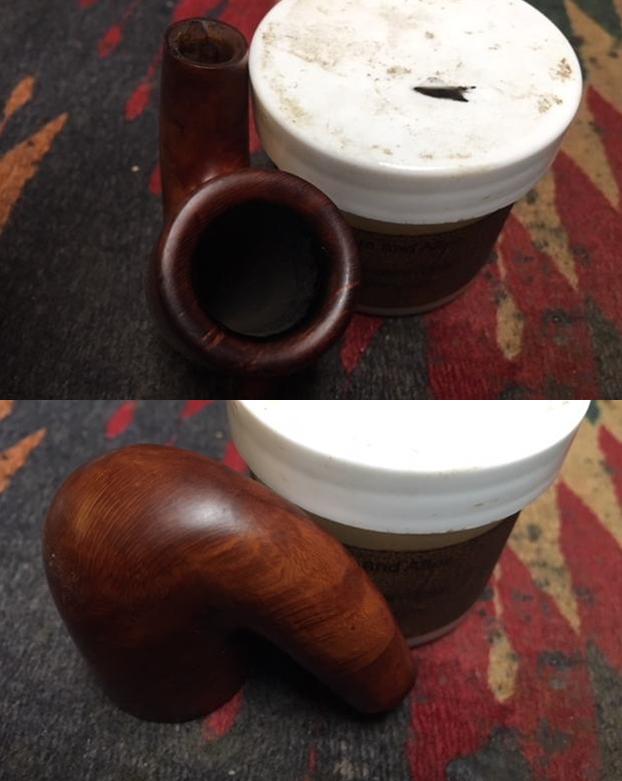
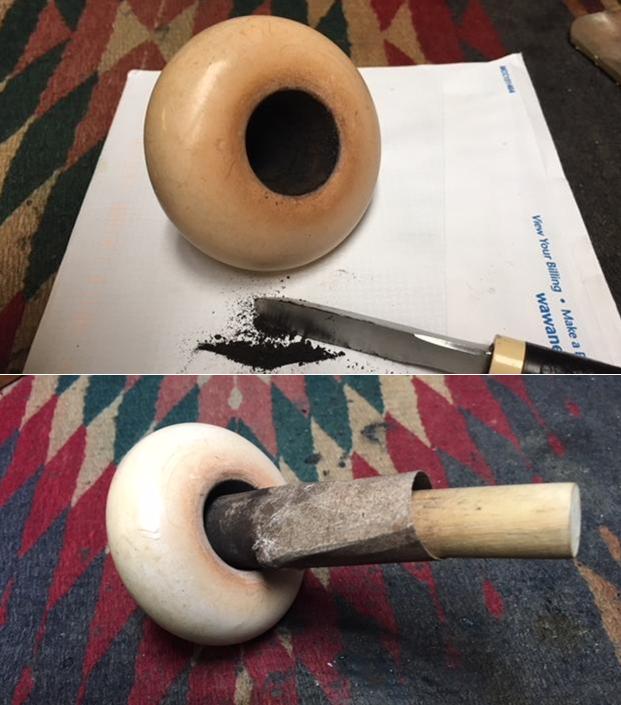
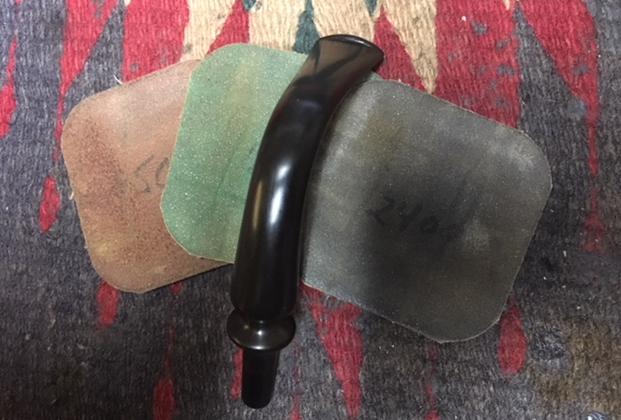
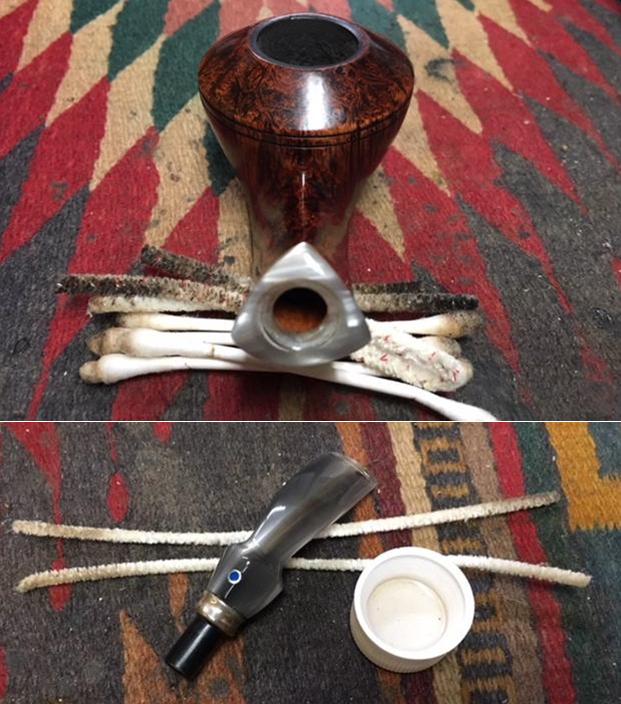
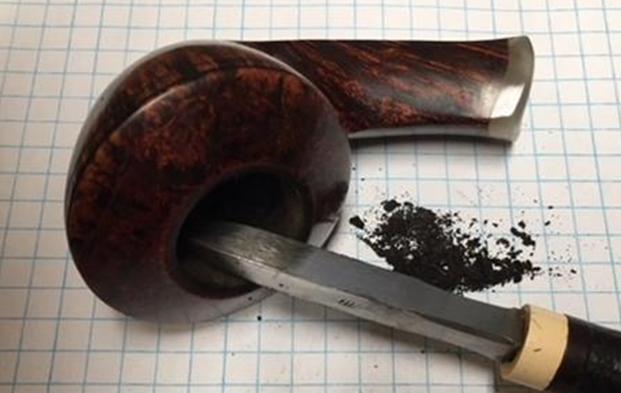
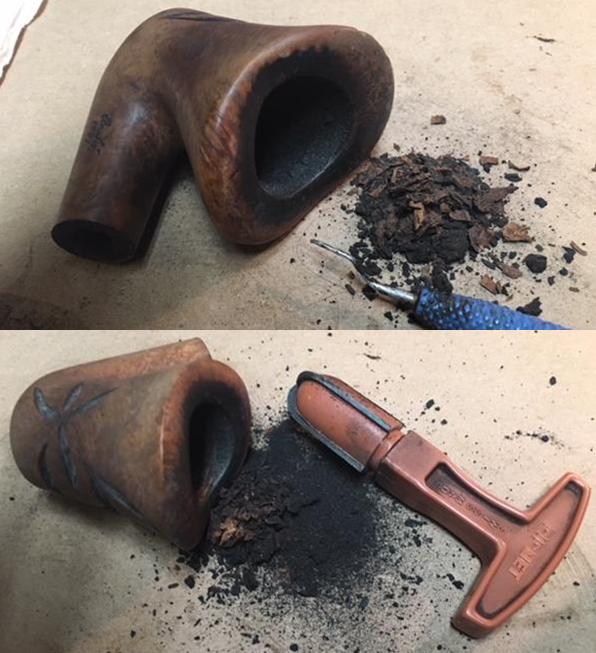
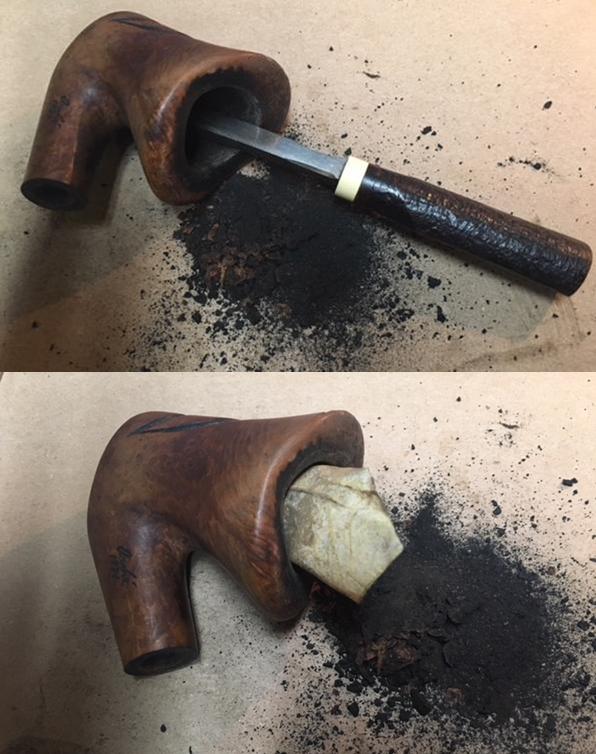
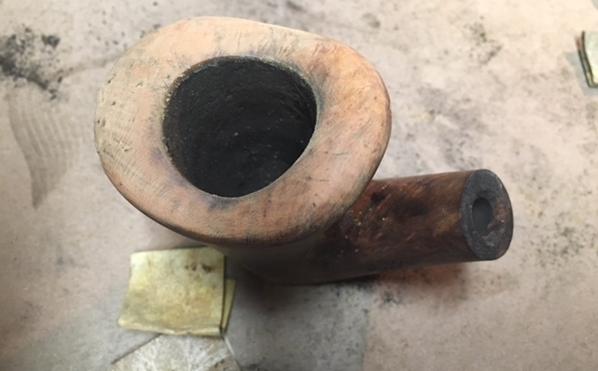
While the stem is in the OxiClean cooker, I turn to the stummel.  First, I use the Pipnet Reaming Kit to remove the carbon cake from the Bulldog’s chamber.  It takes 2 of the 4 blade heads available in the kit.  I follow this using the Savinelli Fitsall Tool to fine tune more by scraping the chamber walls removing more carbon.  To get down to fresh briar, I then wrap a 240 grit piece of sanding paper around a Sharpie Pen and sand the chamber.  To clean up, I wipe out the carbon dust with a cotton pad wetted with isopropyl 95%.  The pictures show the progress. 
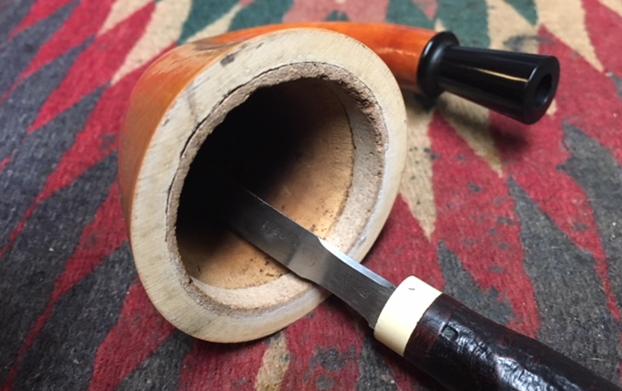
Moving along with the stummel, I use undiluted Murphy’s Oil Soap with a cotton pad to scrub the surface of the briar.  To clean the rim, I use a bristled tooth brush with Murphy’s to clean the carved angles and valleys.  I then rinse the bowl with cool tap water.  The last thing I do is take a sharp dental probe and run it through the twin dome grooves to remove the small debris that had lodged in the grooves.  With my wife’s help, I record a picture of this surgery.
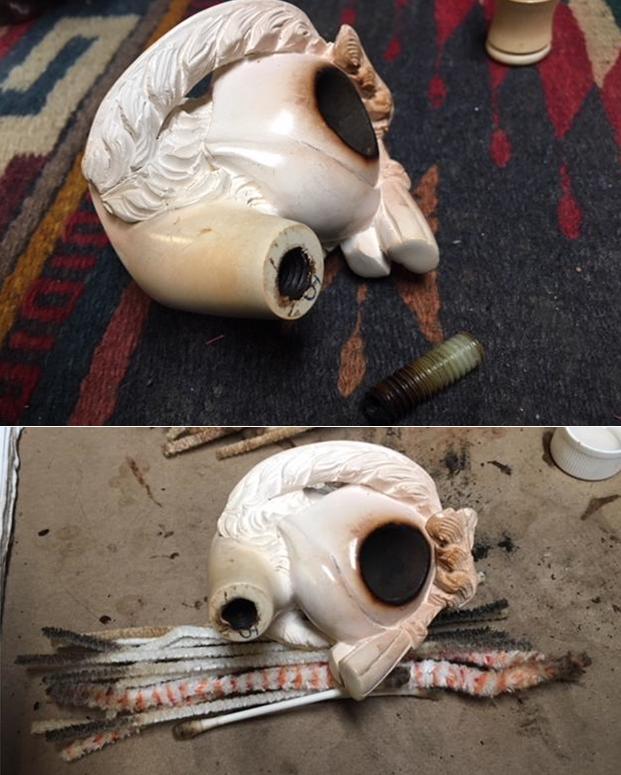
Since I like working on clean pipes and I know new stewards like smoking with clean pipes, I turn to the internals of the stummel.  Using cotton buds and pipe cleaners with isopropyl 95%, I go to work.  I’m thankful to discover that there is little resistance.  Later, at the end of the day, I’ll clean the internals further by using a kosher salt and alcohol soak.
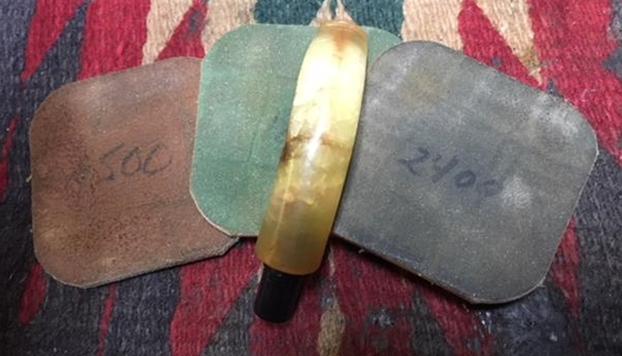
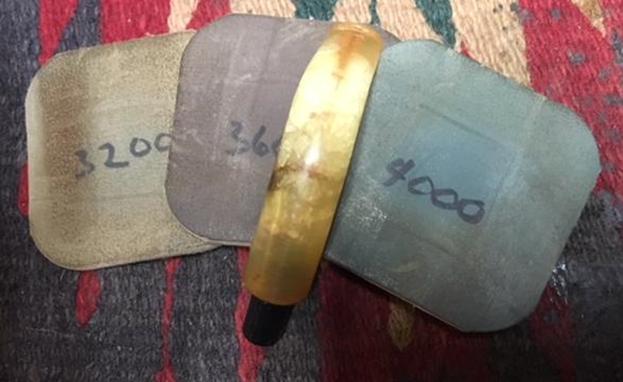
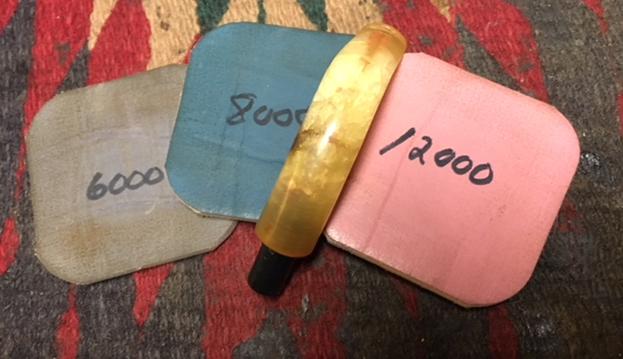
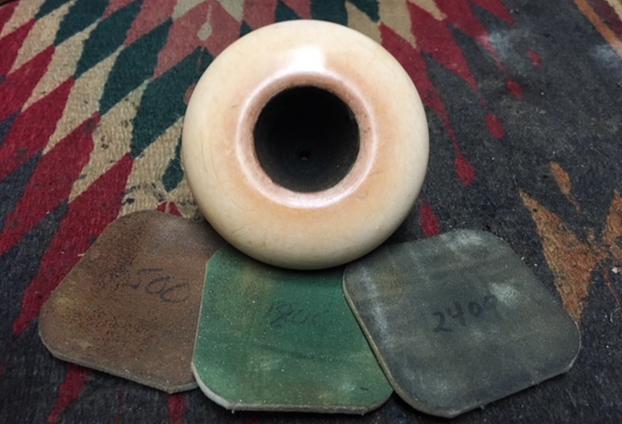
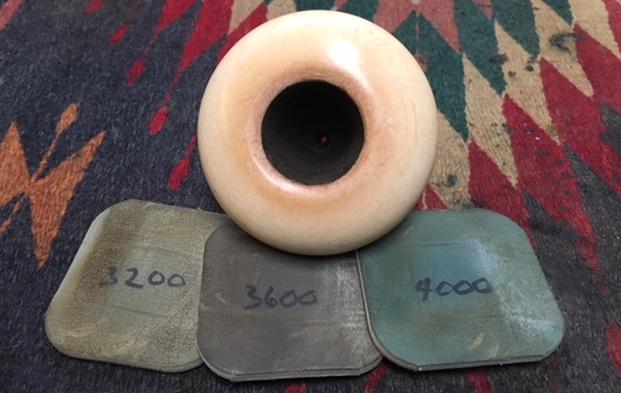
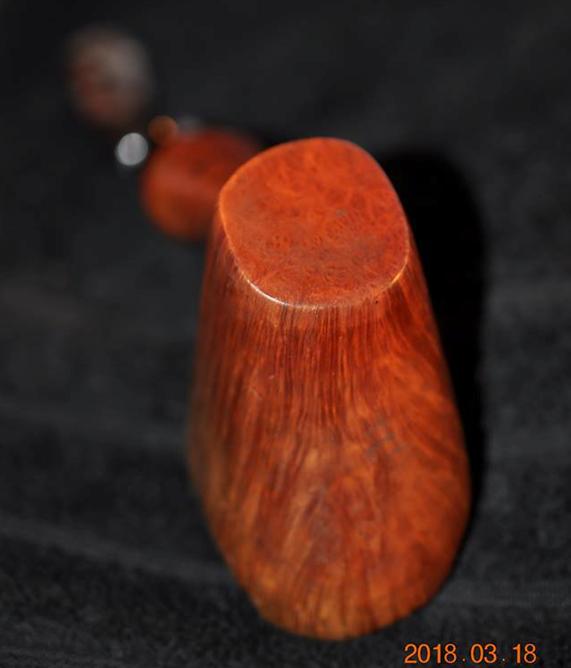
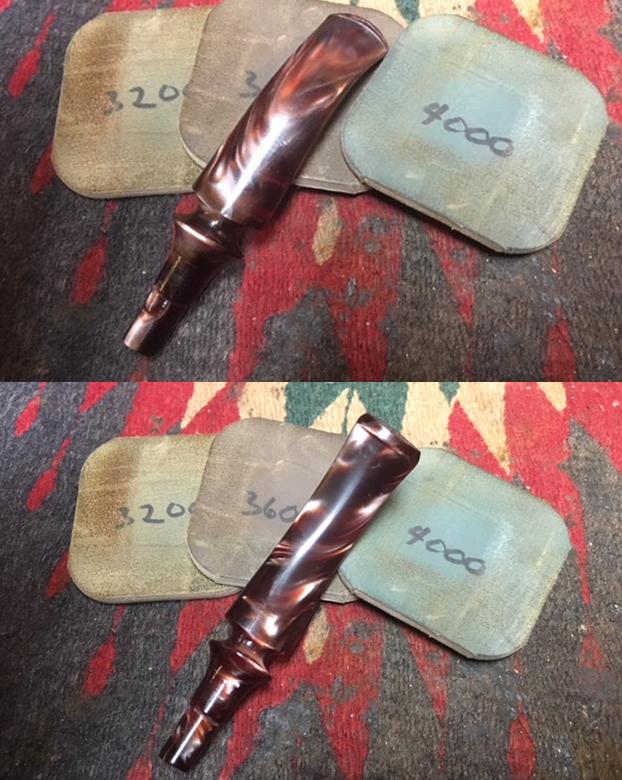
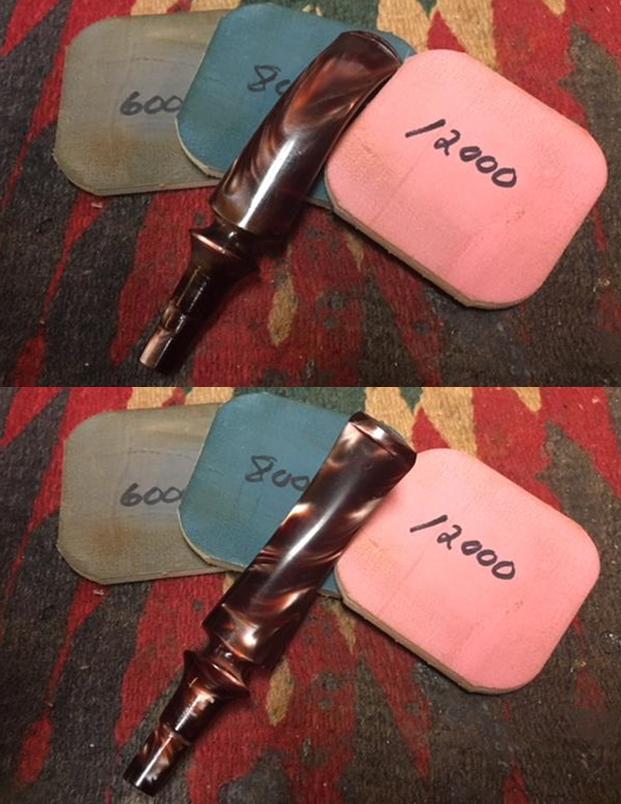
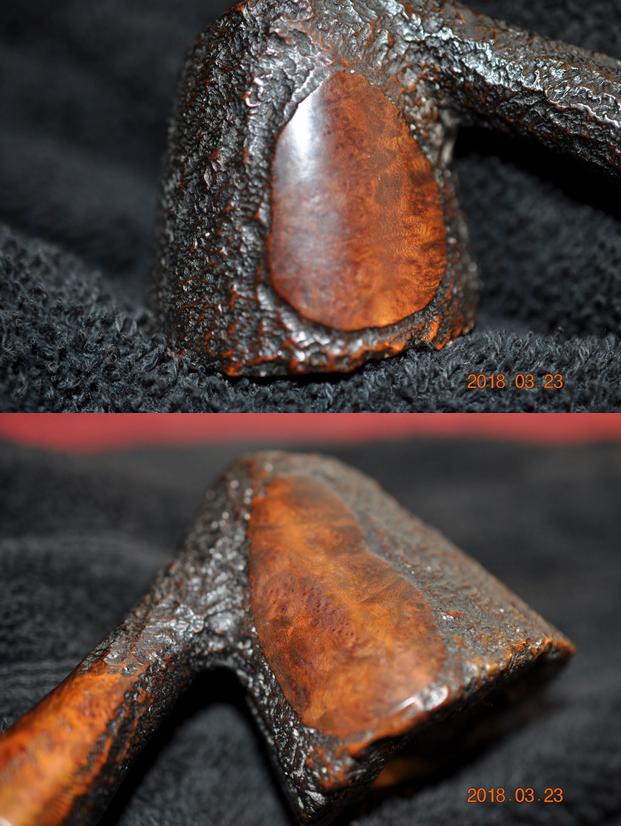
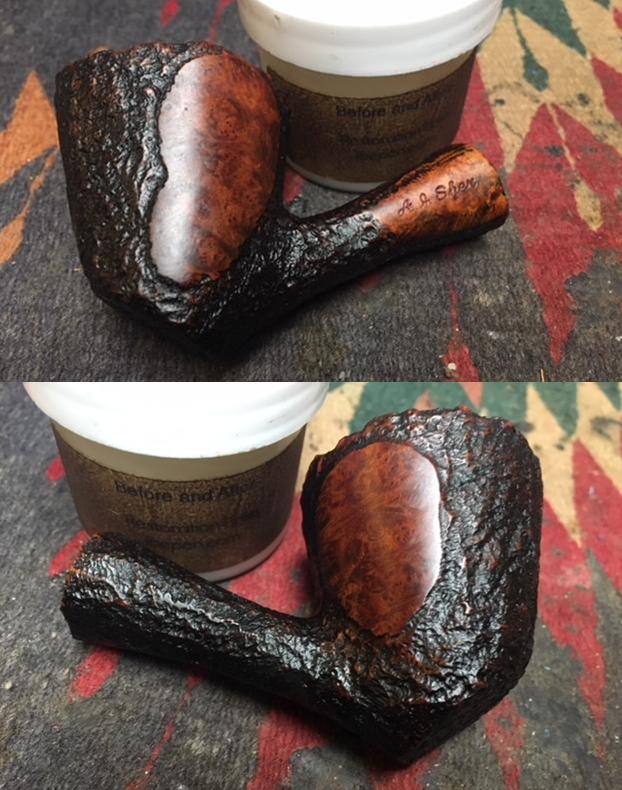
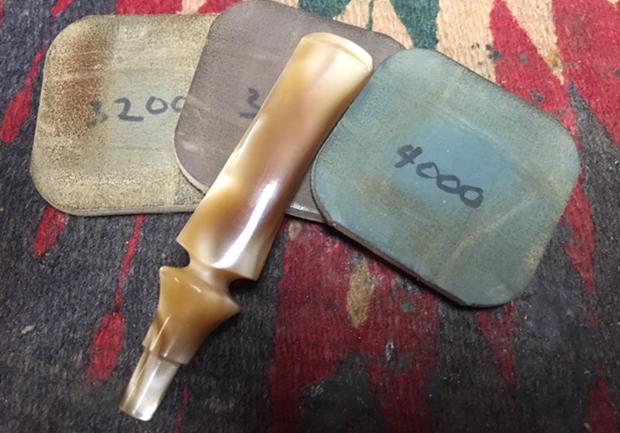
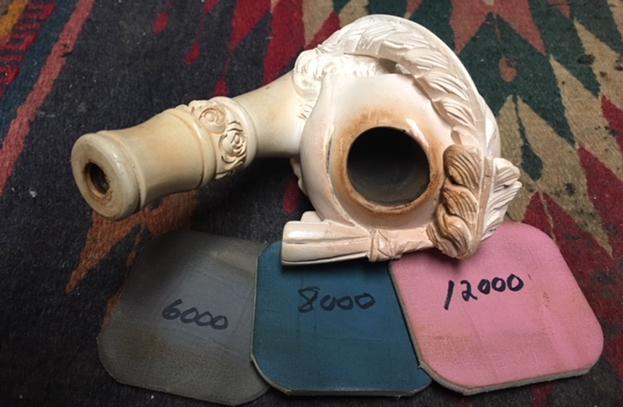
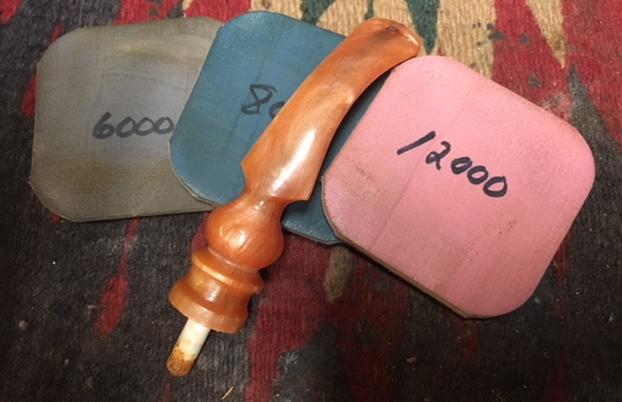
With the internals clean, I turn again to the briar surface.  To enliven the tired finish and to remove the small nicks and cuts that come from wear, I wet sand with micromesh pads 1500 to 2400, then dry sand with pads 3200 to 4000 and 6000 to 12000.  With each cycle, I enjoyed watching the grain emerge.  This GBD International Bulldog has nice grain – nice vertical flames rising to the carved plateau.  I’m liking this. 
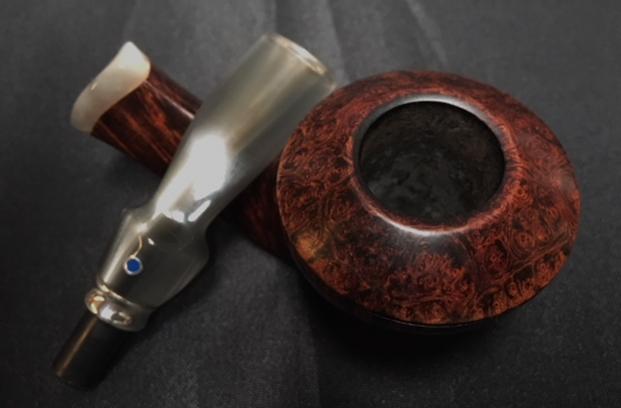
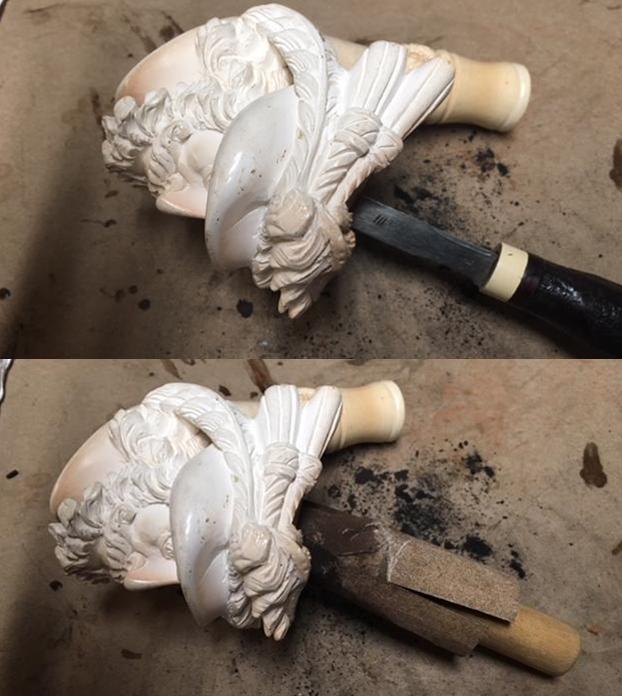
I also want to freshen the carved black plateau – rim.  I use a black furniture dye stick to apply to the rim.  Later, when I apply compound, I’ll blend the black more, so it has more textured matte depth. 
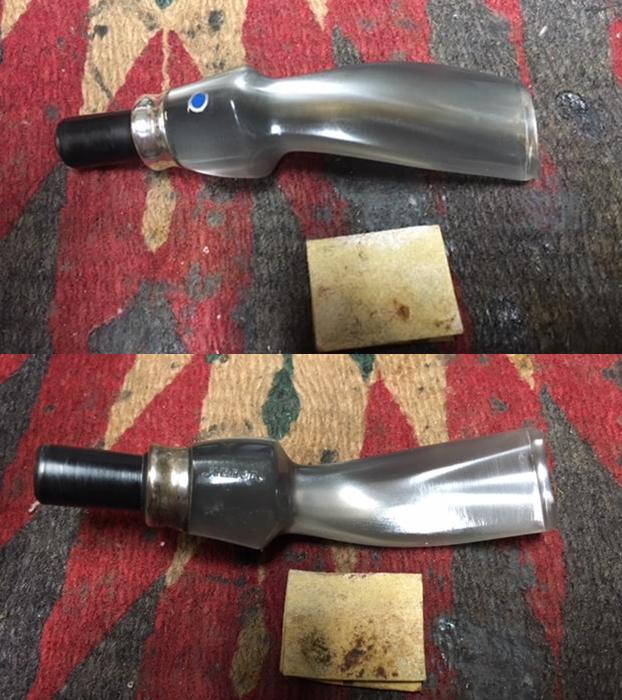
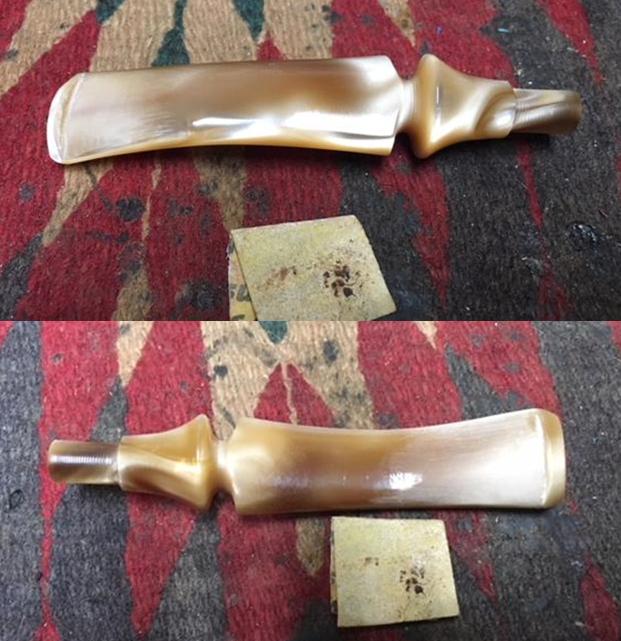
Now, back to the stem.  The GBD stem has been soaking in OxiClean as a second salvo against the oxidation in the vulcanite.  After taking it out of the OxiClean bath, I use 600 grade paper and I wet sand the stem.  I work on the areas that show the deeper oxidation.  I then use 0000 steel wool and work over the entire stem, paying close attention to the area around the rondel.  I’m not 100% satisfied, but I may do more after I work on the bit. 
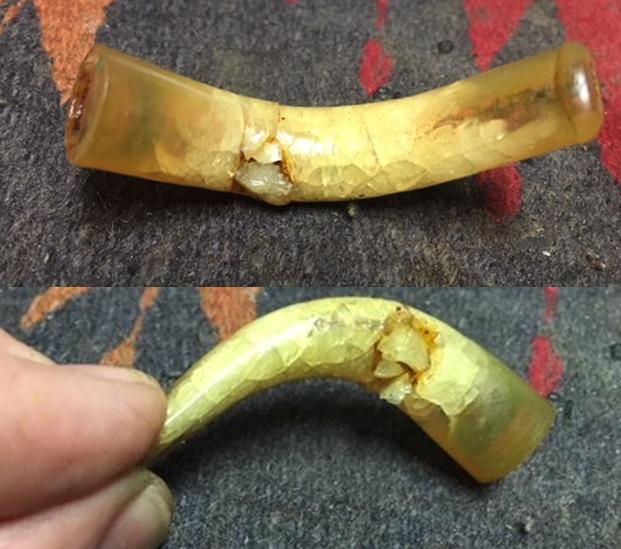
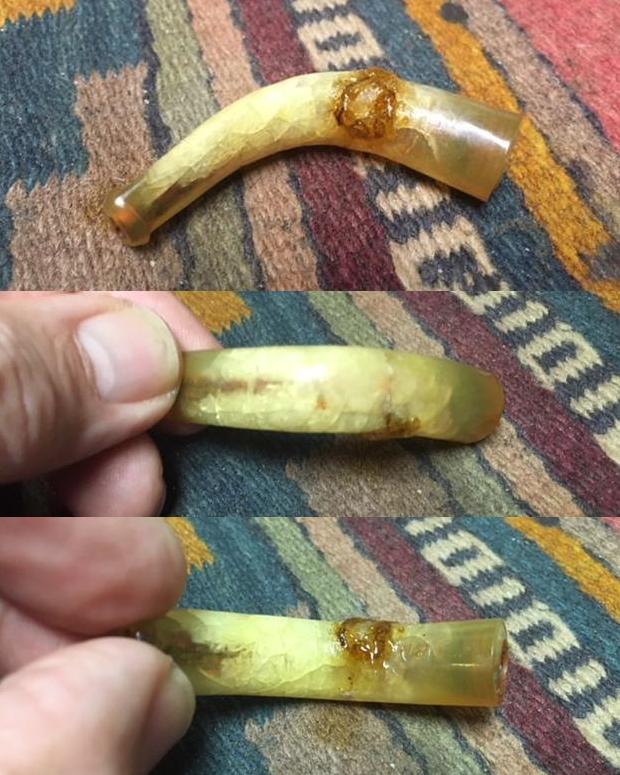
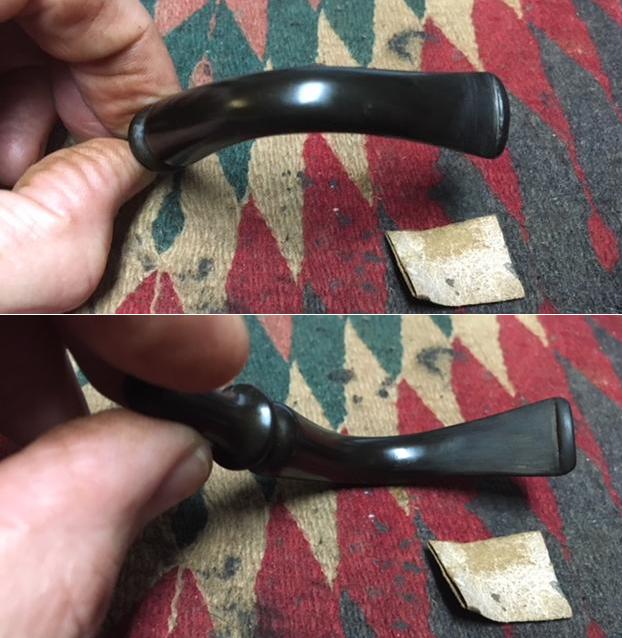
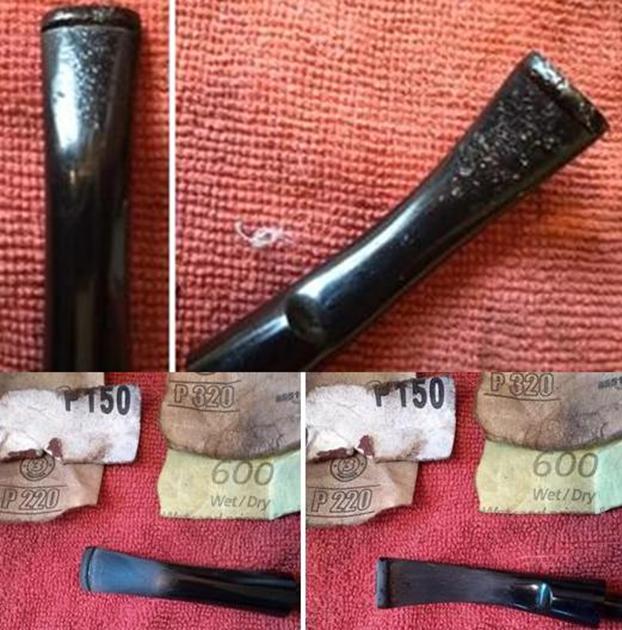
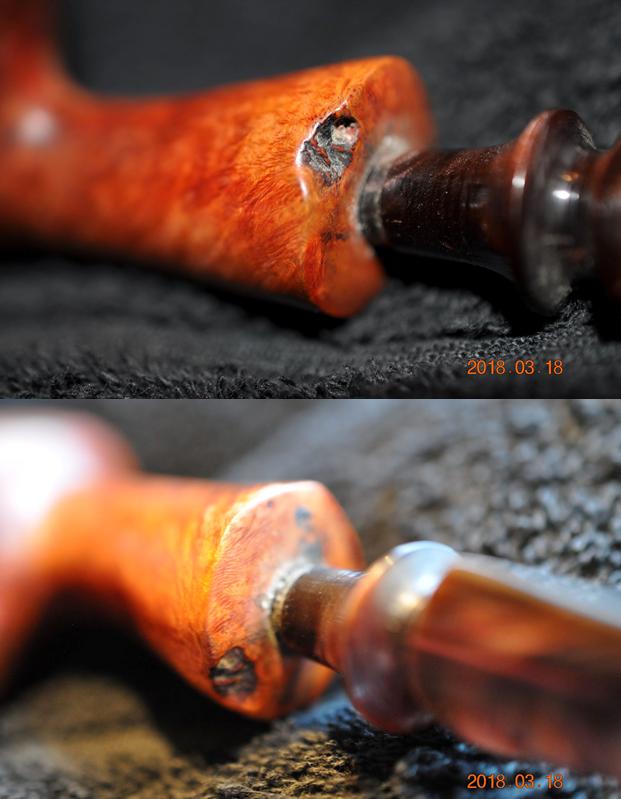
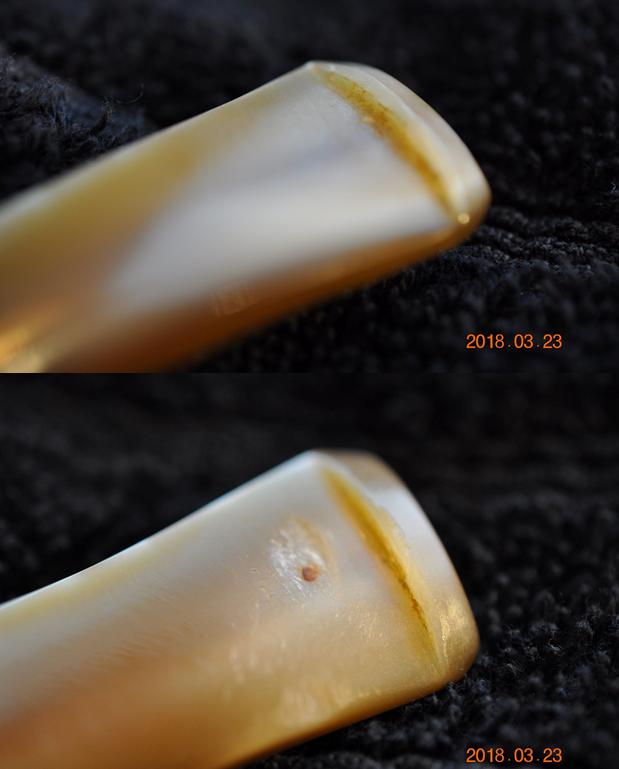
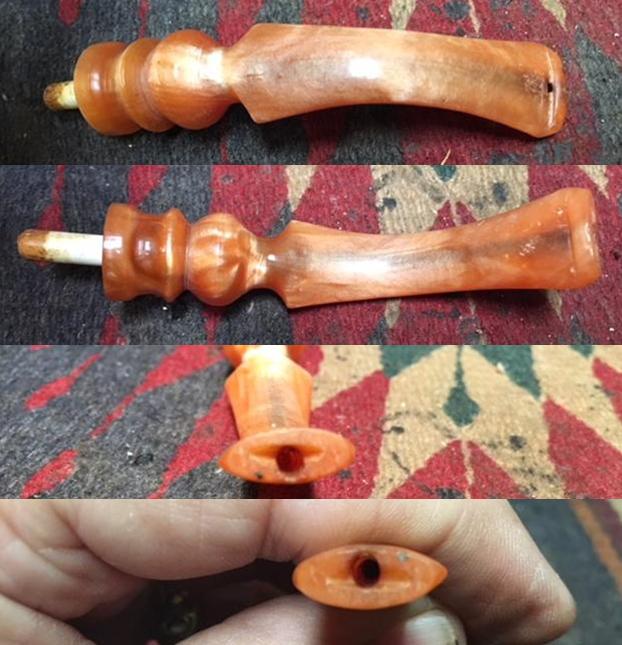
I take a picture of the upper bit and the lower bit to show the tooth dents.  The upper is not bad but the lower has two significant clinch bites and some damage to the button lip.
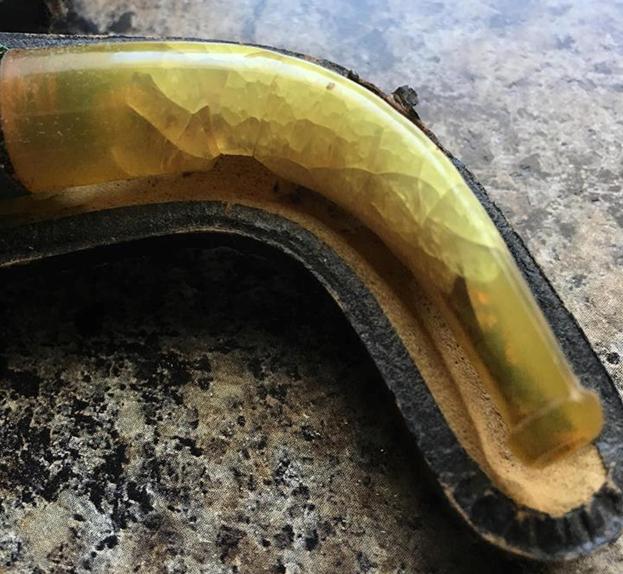
To lessen the severity of the dents I heat the vulcanite using a Bic lighter by painting the dented areas with a flame.  As the vulcanite heats, it naturally expands and retakes some of the original ‘foot print’ of the dent.  I heat both upper and lower.  The upper will easily sand out but the lower still has work to do.
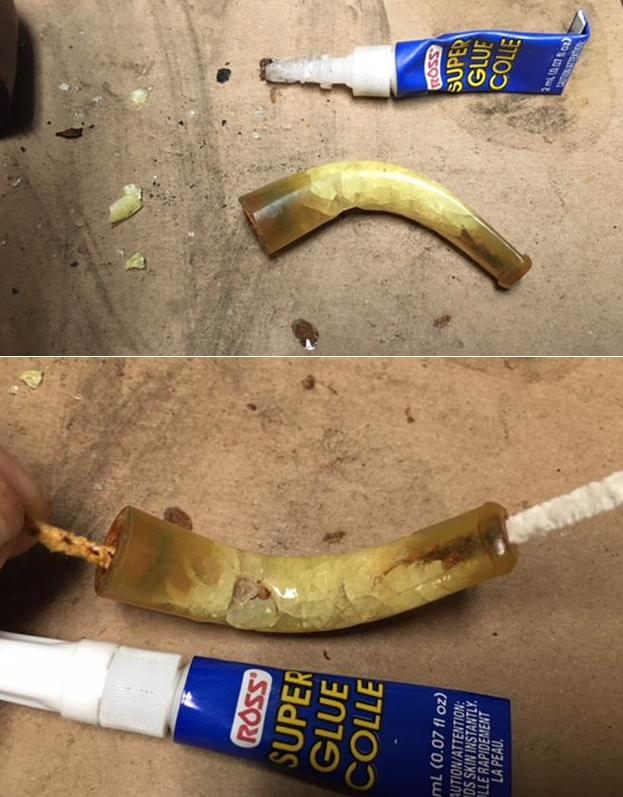
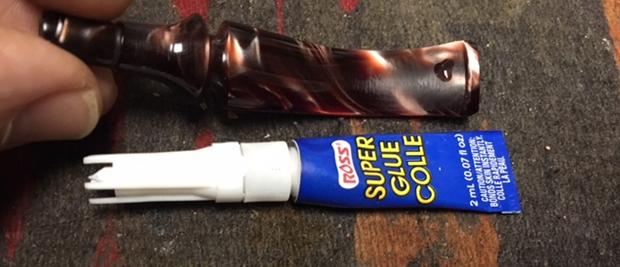
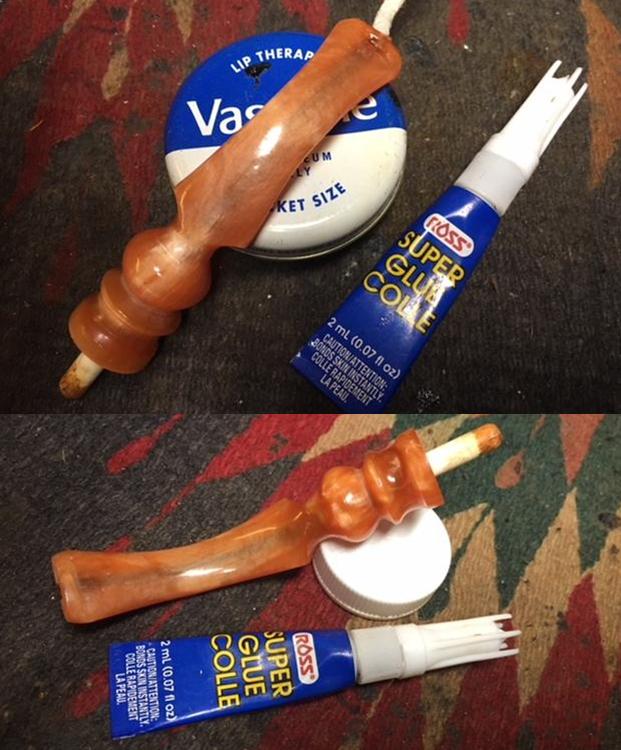
To fill the dents and rebuild a little of the button, I use Starbond Black Medium CA glue.  I spot drop the black CA glue on the dents and then I use an accelerator to quicken the curing time.I then use a flat needle file and 240 grade sanding paper to sand down the patches.  I use the file to freshen the button – to reestablish crisp button edges.
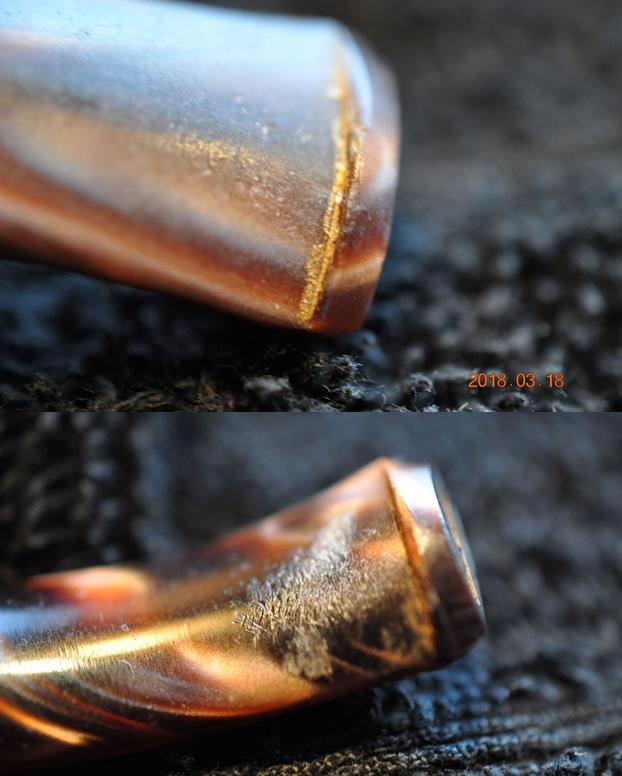
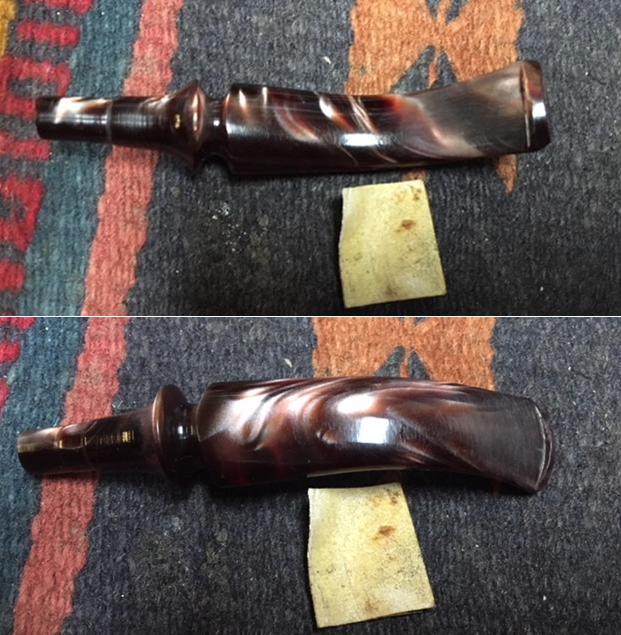
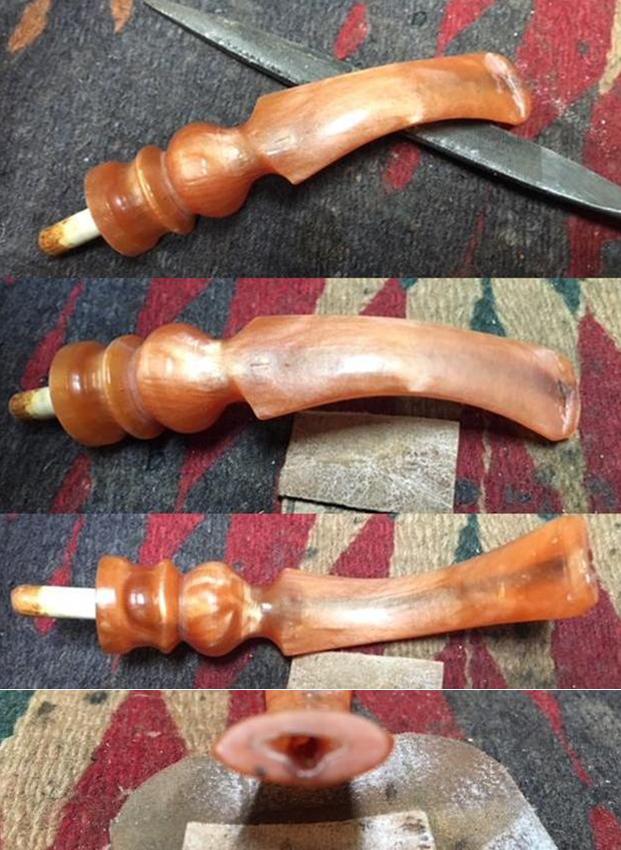
The following two pictures show the lower bit/button work – first in progress then completed with filing and 240 paper.
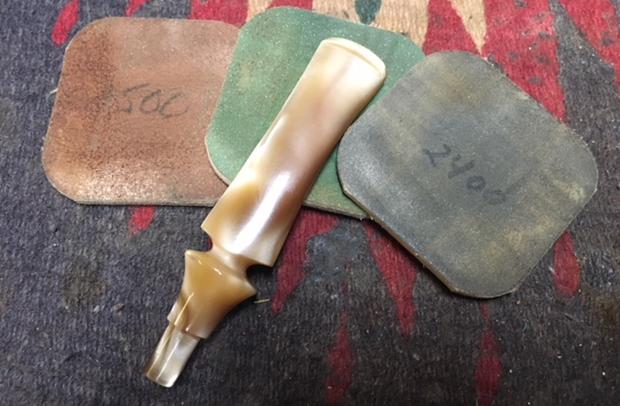
I continue the smoothing and erasing of the 240 scratches by using 600 grade paper and then finishing with 0000 grade steel wool.  The patches look good, oxidation seems to be abated and the button shaping will be greatly appreciated by a new steward!
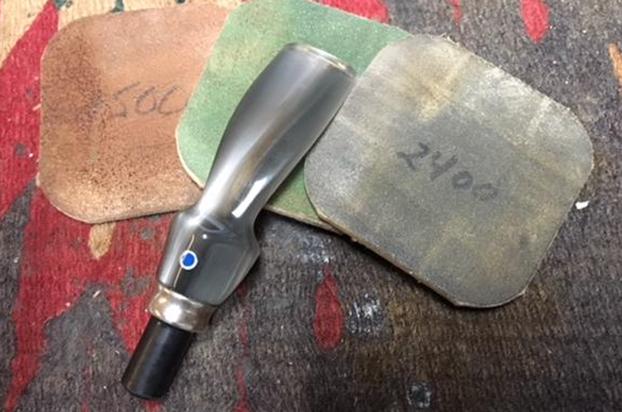
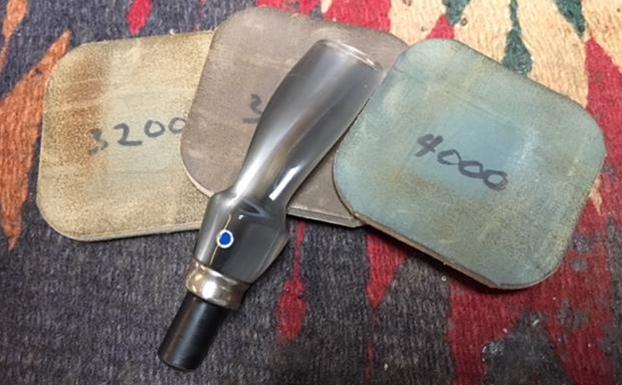
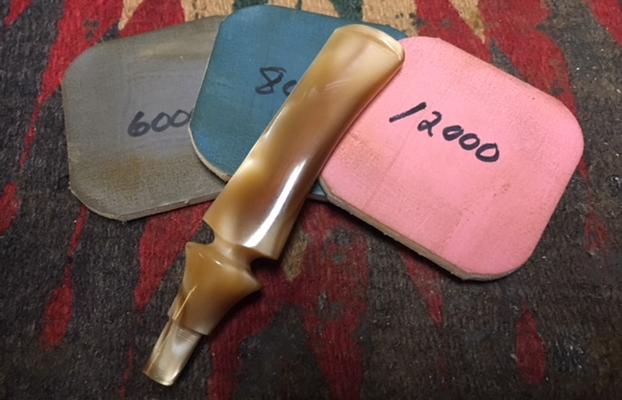
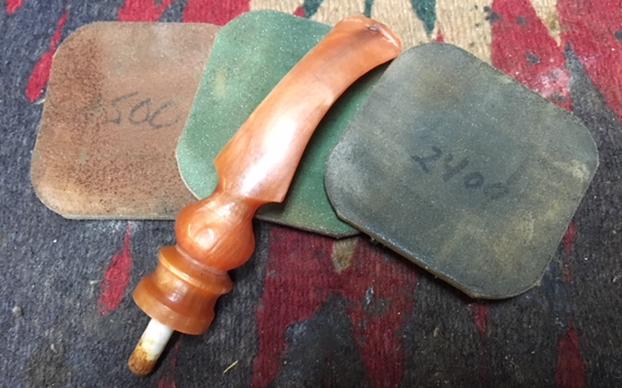
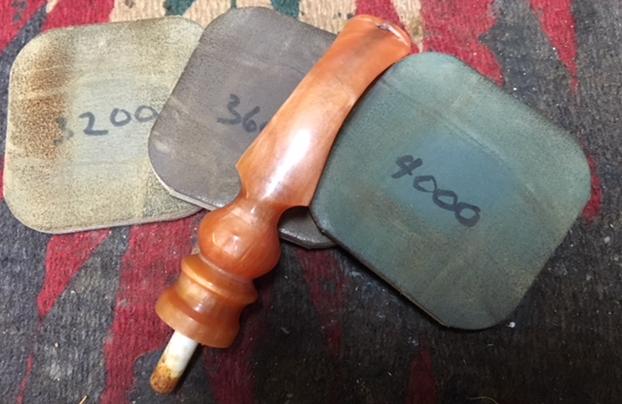
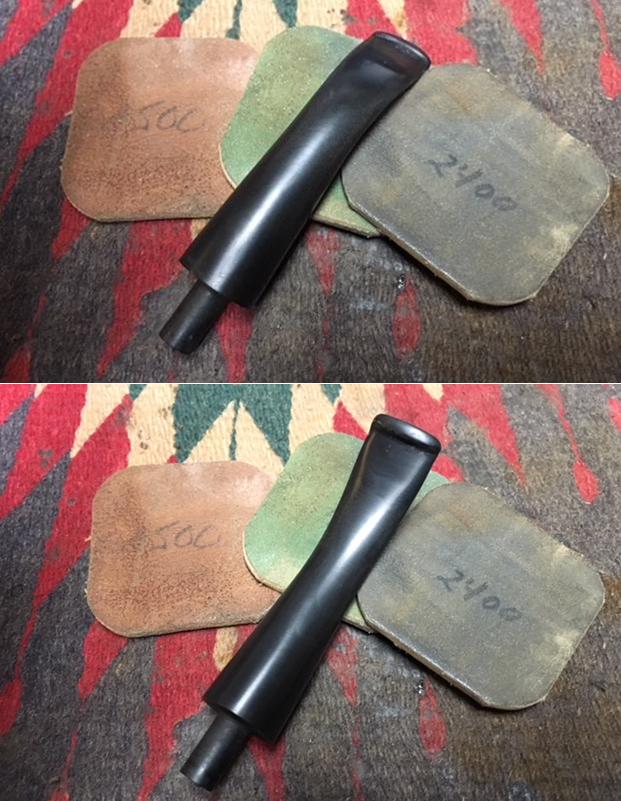
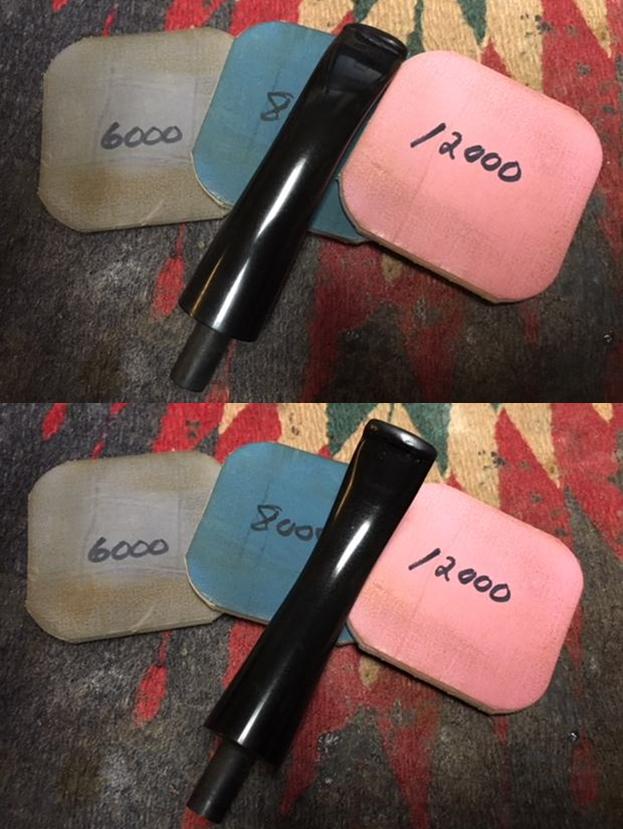
I now turn to micromesh pads by first wet sanding with pads 1500 to 2400, then dry sanding with pads 3200 to 4000 then 6000 to 12000.  After each set of three I apply Obsidian Oil to revitalize the vulcanite.  The stem looks good. 
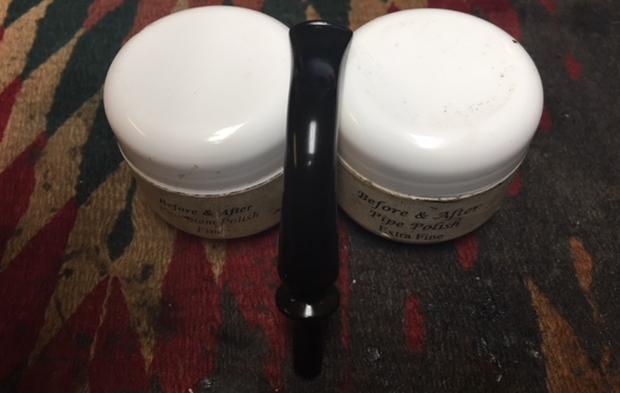
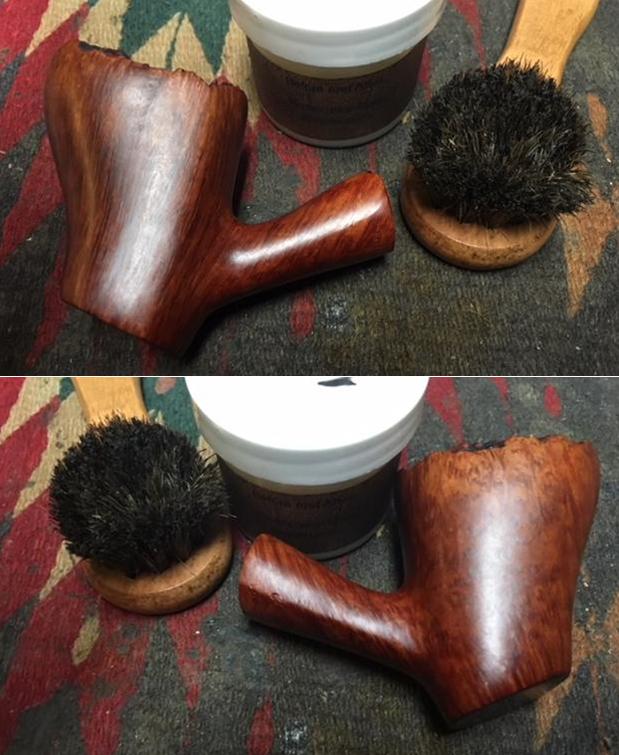
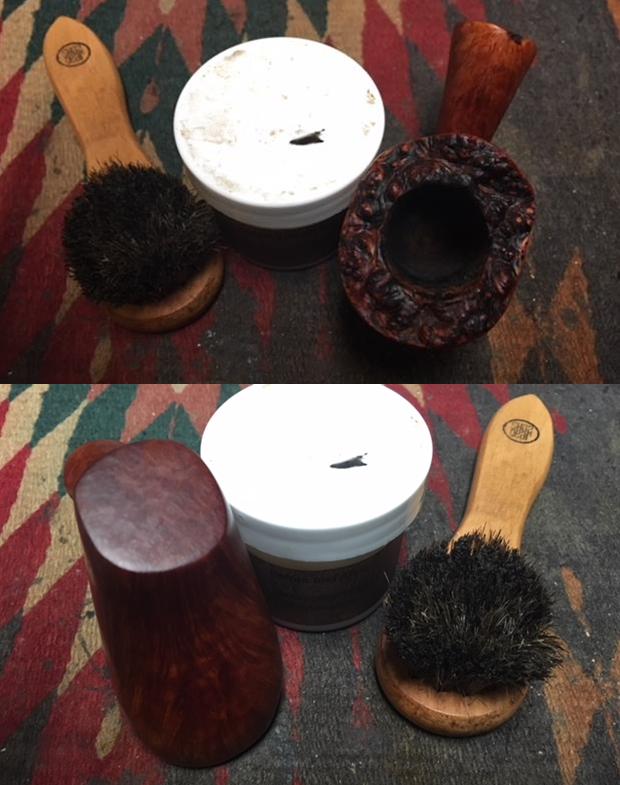
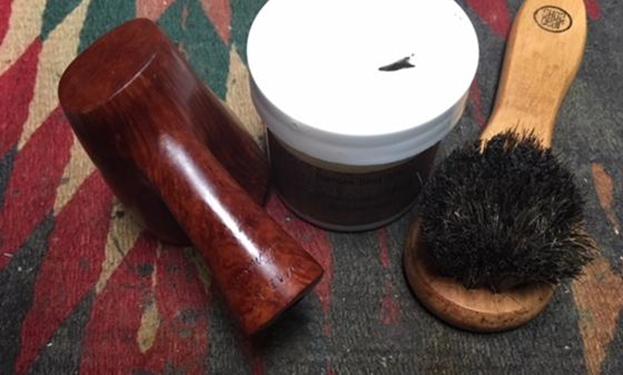
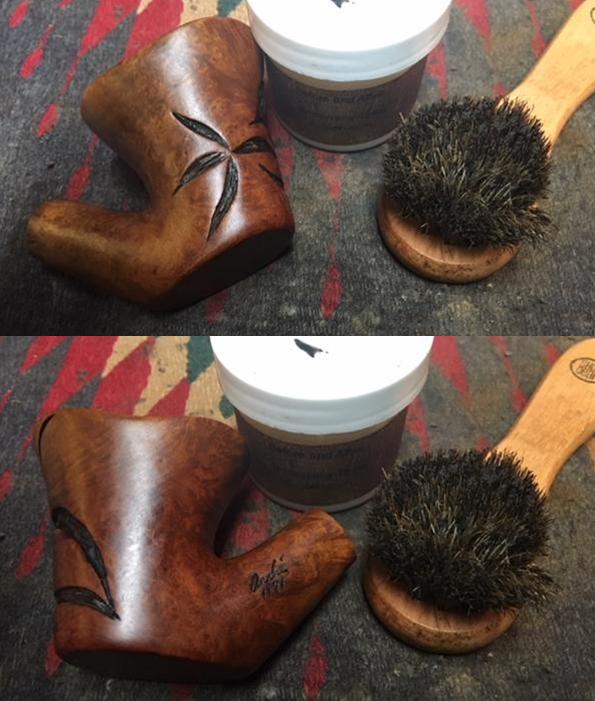
Turning now to the stummel, to enrich the briar grain I apply Before & After Restoration Balm.  I put a little on my finger and work it into the briar surface.  As I work it in, the liquid thickens into a wax-like substance.  After some minutes, I wipe off the Balm using a clean cloth.  As the Balm comes off, the surface buffs up nicely.
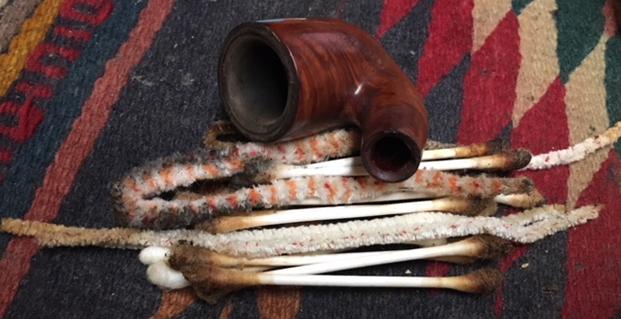
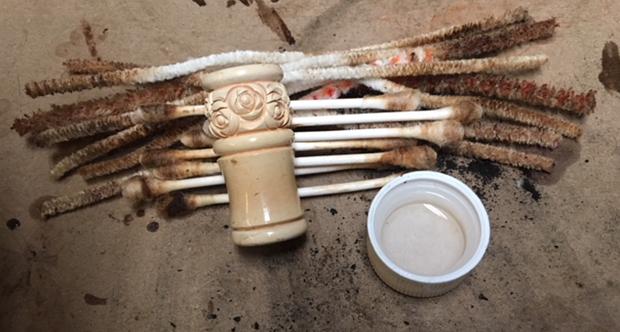
With my day ending, I continue cleaning the internals of the stummel.  I use a kosher salt and alcohol soak.  I fashion a wick by stretching and twisting a cotton ball. I insert the ‘wick’ down the mortise into the airway.  I then fill the chamber with Kosher salt which, unlike iodized salt, leaves no aftertaste.  I then situate the stummel in an egg crate giving it stability and then add isopropyl 95% with a large eye dropper until it surfaces over the salt.  After a few minutes I top the alcohol once again and then turn out the lights.
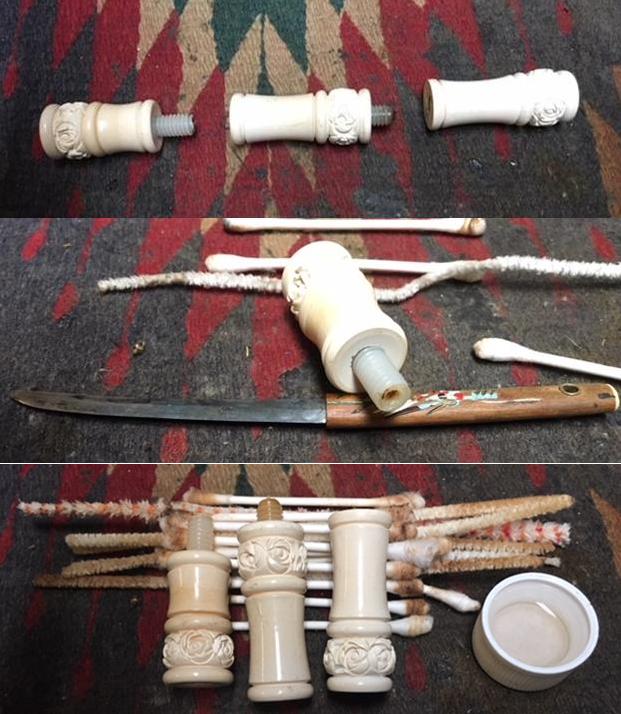
The next morning the soak had produced results with soiled salt and the wick absorbed more oils and tars.  I remove the expended salt to the waste and wipe the chamber with paper towel.  I also blow through the mortise to remove any remaining salt particles.  I then expend a few more pipe cleaners and cotton buds to clean up left overs from the soak.  The internals are as fresh as I can make them.
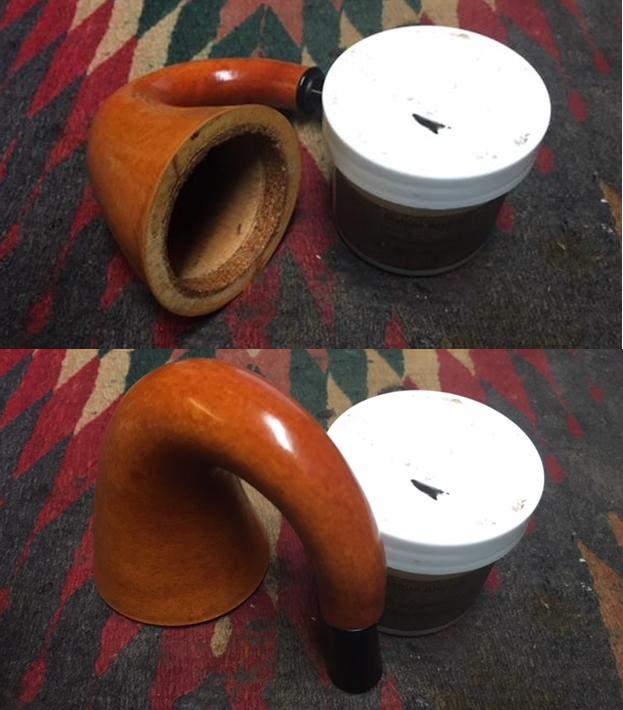
I reunite stem and stummel and mount a cotton cloth buffing wheel to the Dremel, setting the speed at the slowest.  I then apply Blue Diamond compound to the entire pipe.  I also work on blending the black matte plateaued rim.  What I discover regarding the rim is that when I simply buff it with the Blue Diamond compound, is shines it up!  The exact opposite than dulling it down to a matte, charcoal look.  Then I came up with the idea of simply wetting a cotton pad with alcohol and dabbing it over the rim to dull the finish.  It worked like I was hoping.  I take a picture of before and after.  It’s difficult to see different shades of black in a photo!  But it does look good – the effect is striking. After completing the compound application and blending the rim, I wipe the pipe with a felt cloth to remove residue compound dust in preparation for the wax.  I then switch to another cotton cloth wheel on the Dremel, increase the speed to about 40% full power and apply a few coats of carnauba wax to both stummel and stem.  After application of the carnauba, I give the pipe a rigorous hand buffing to raise the shine.

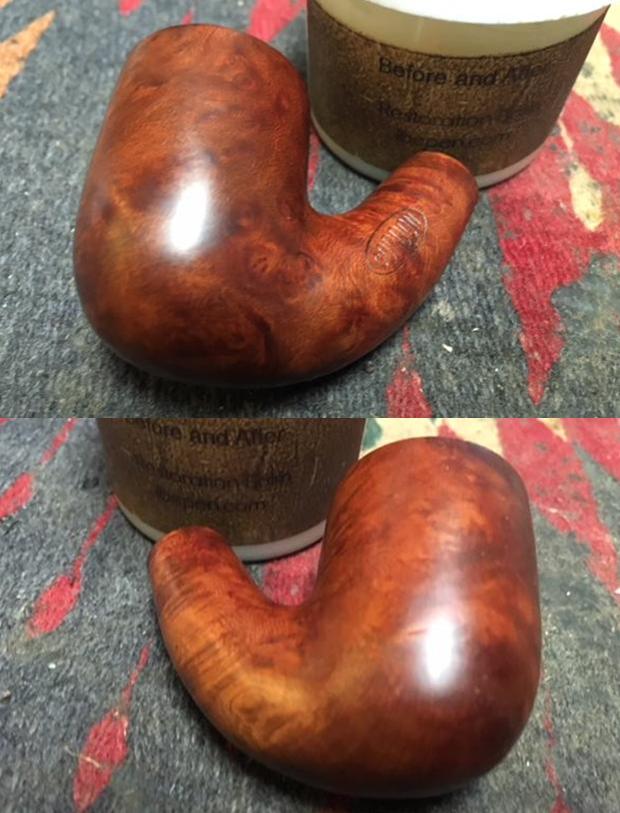
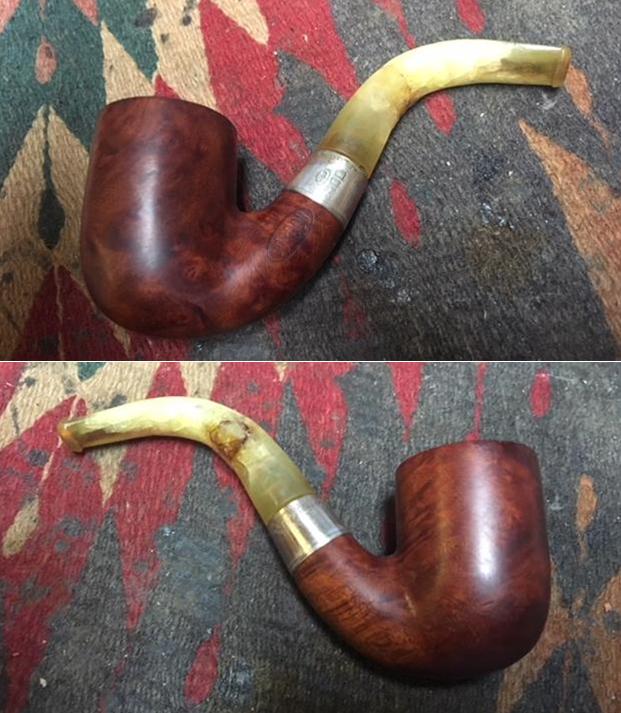
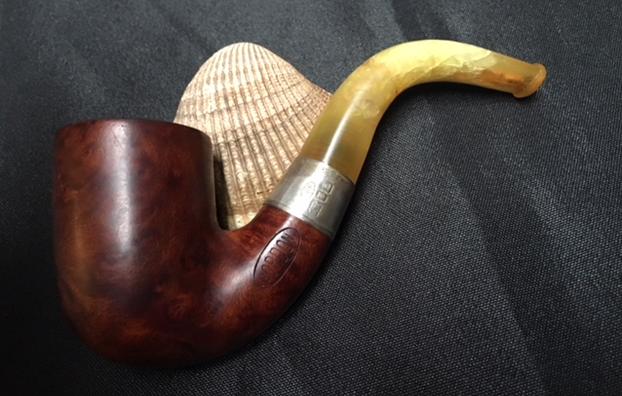
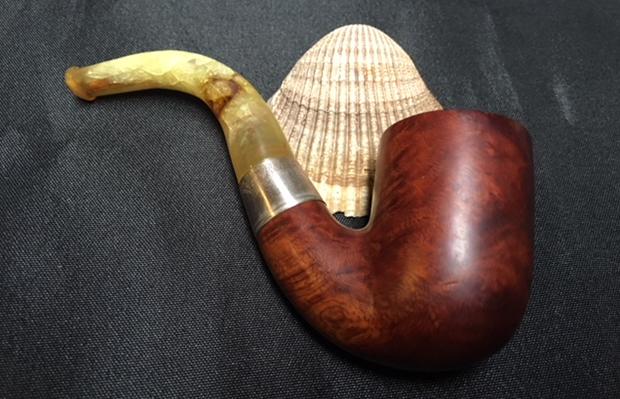
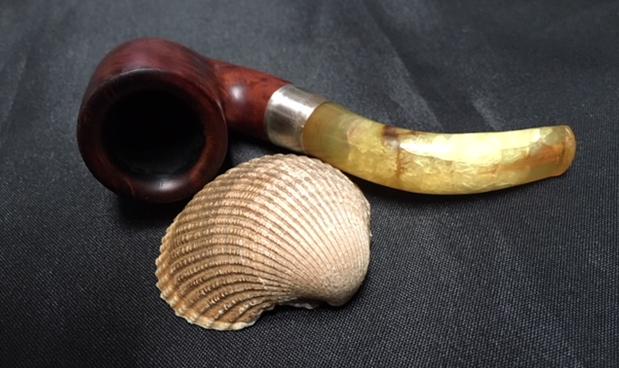
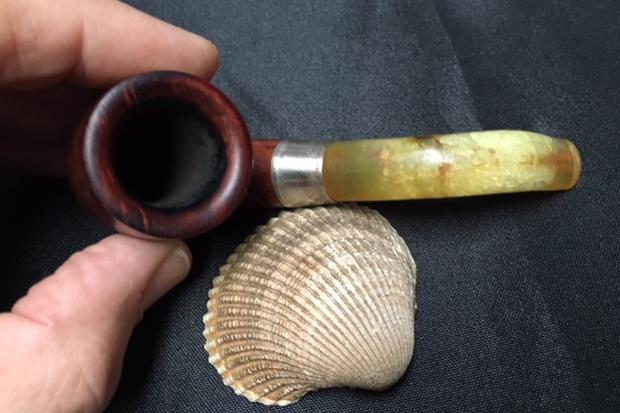
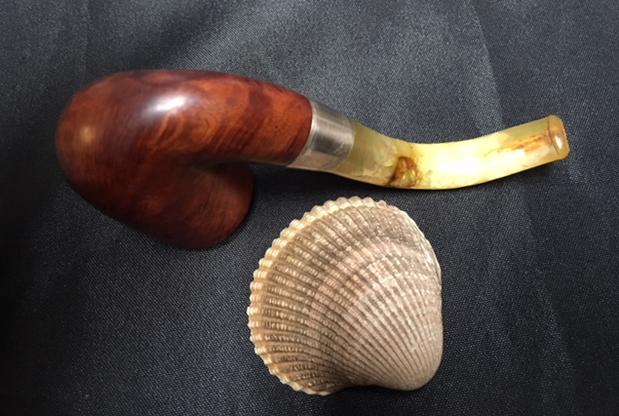
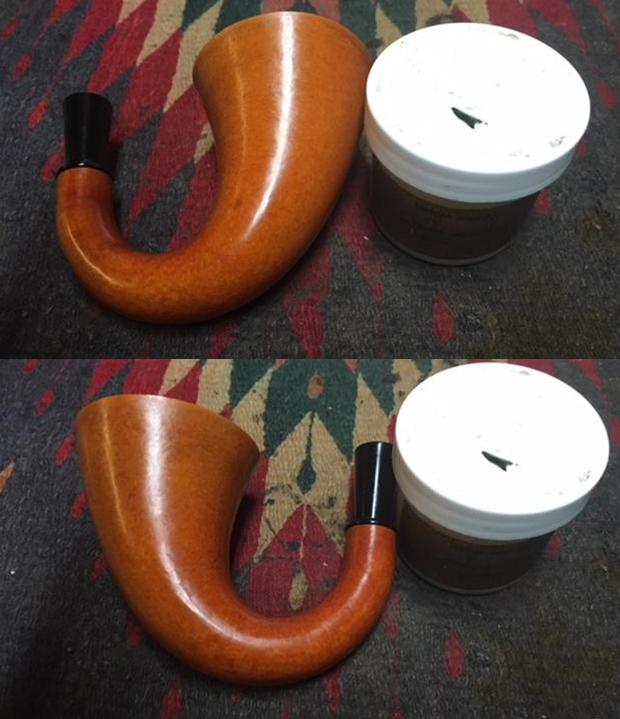
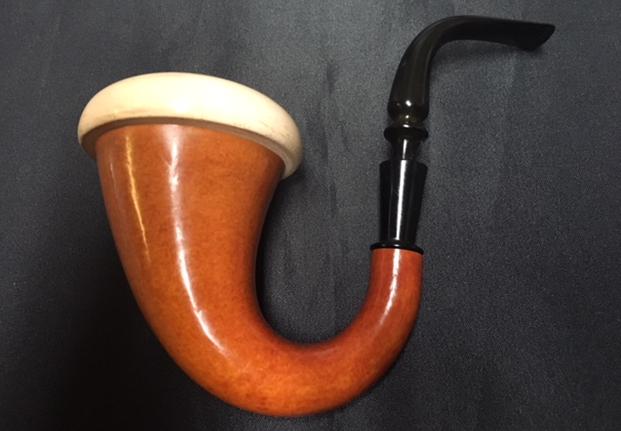
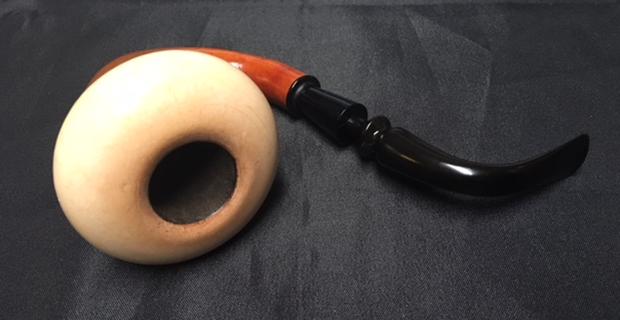
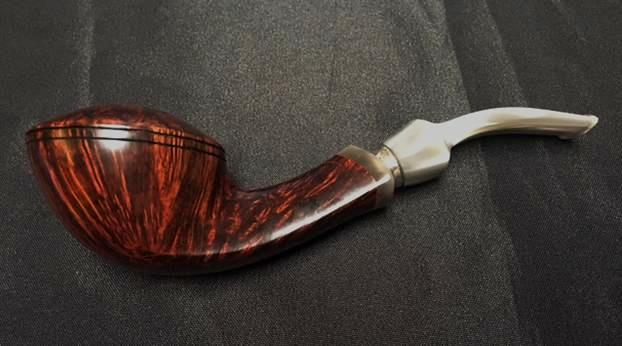
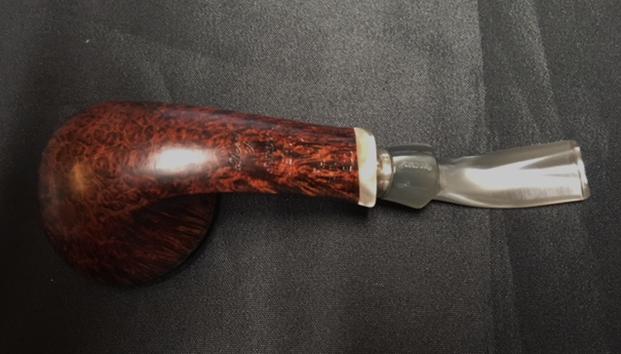
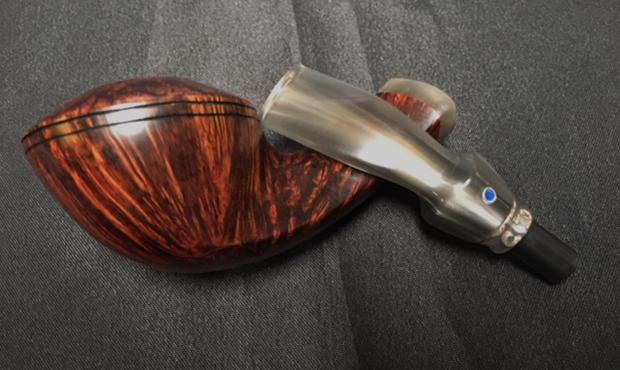
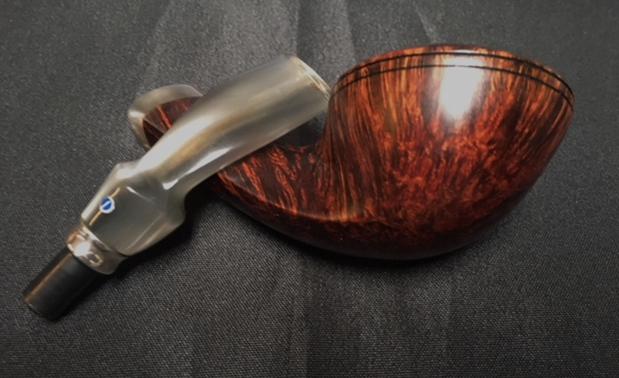
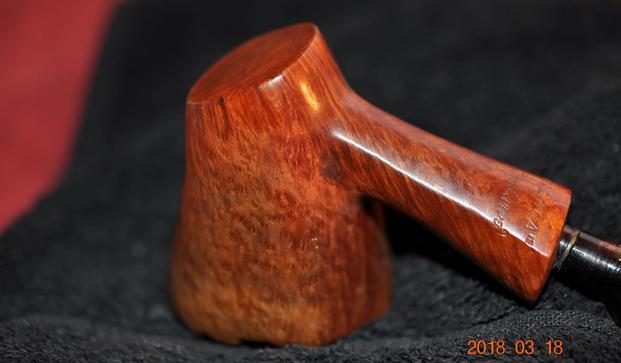
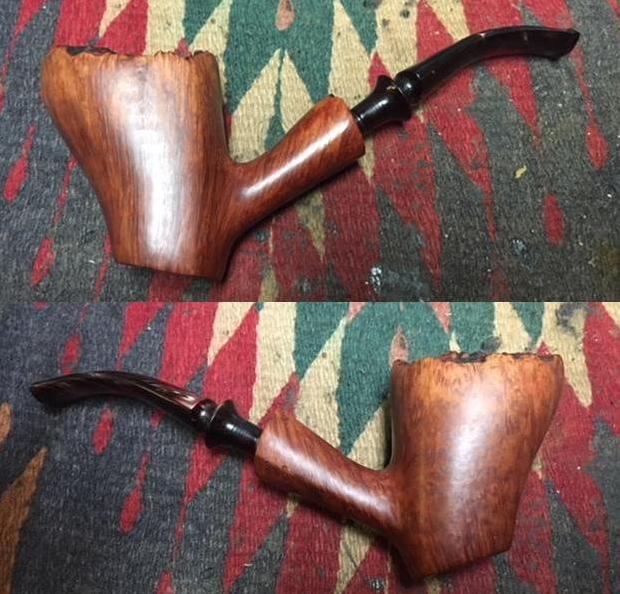
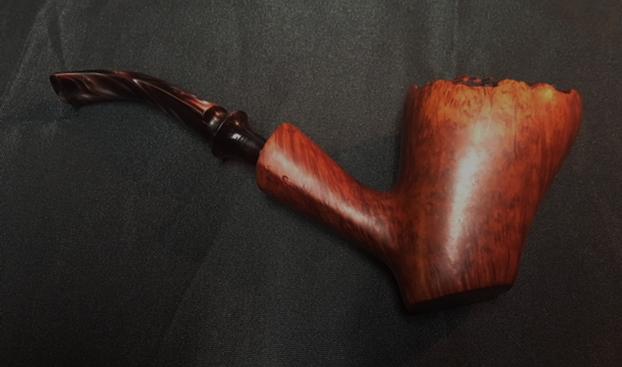
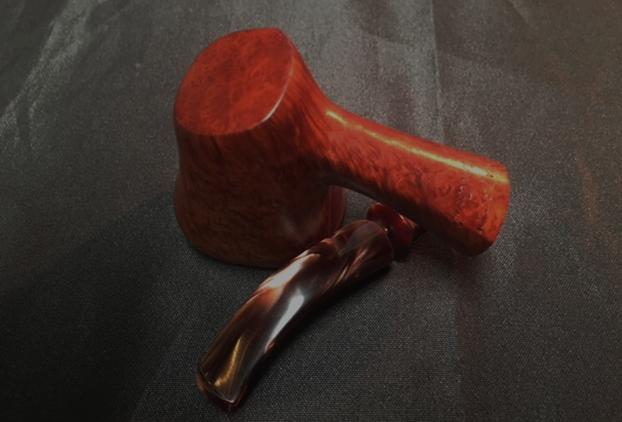
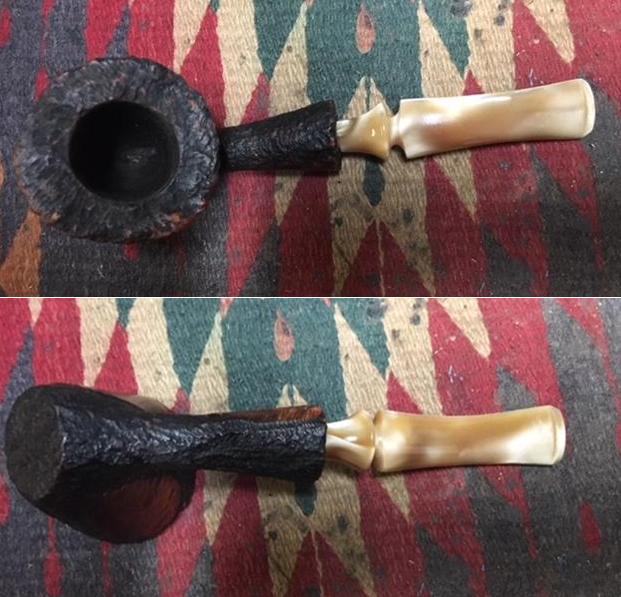
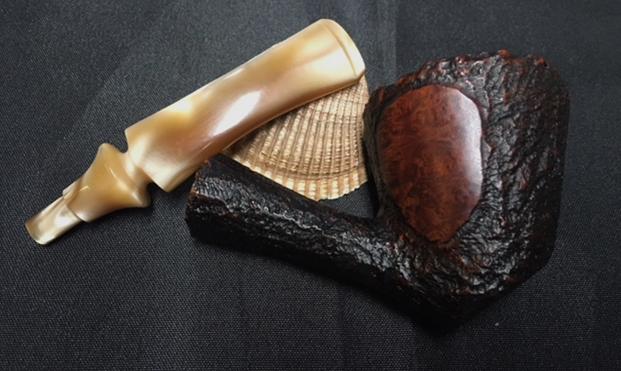
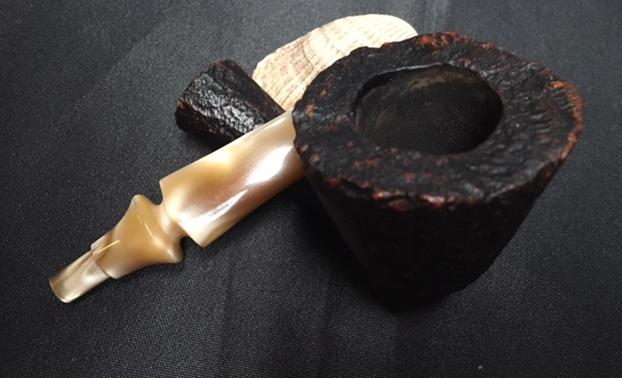
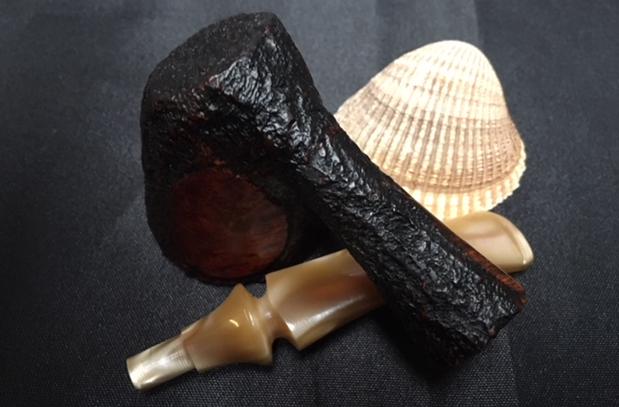
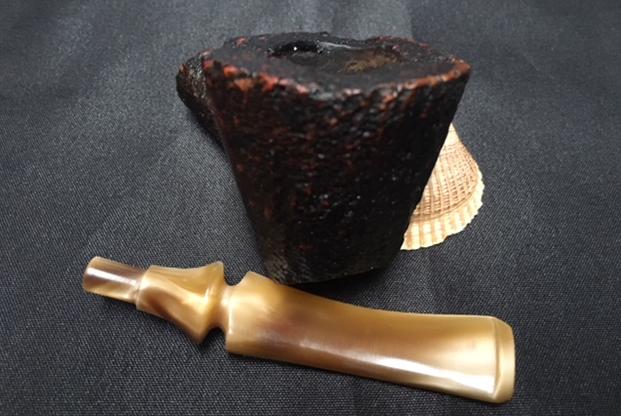
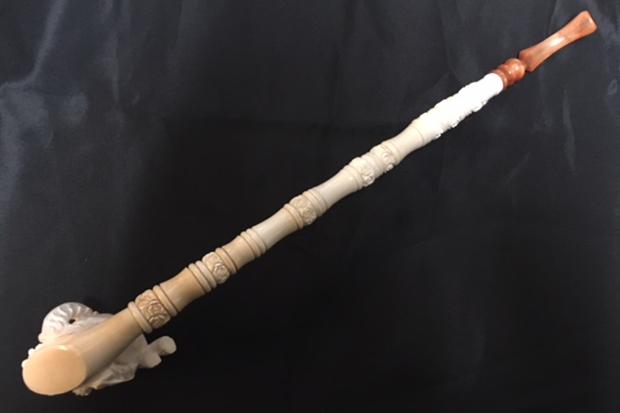
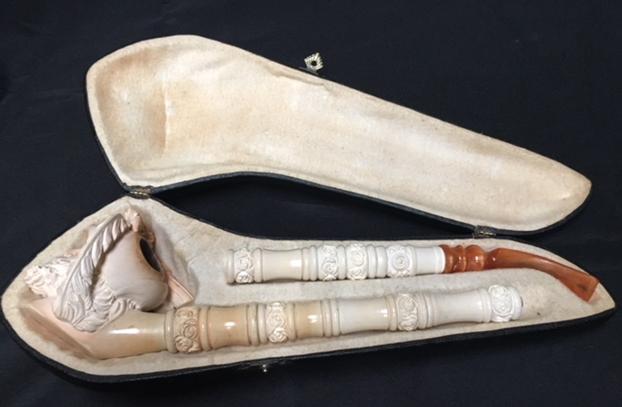
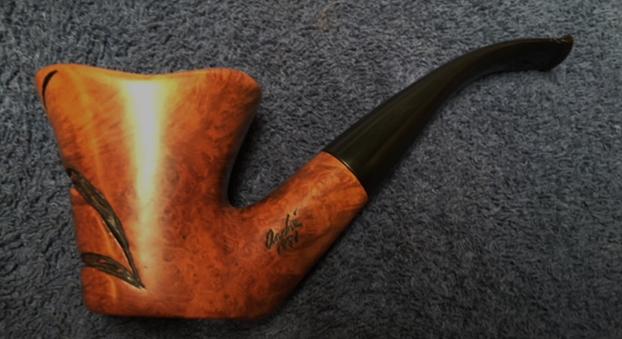
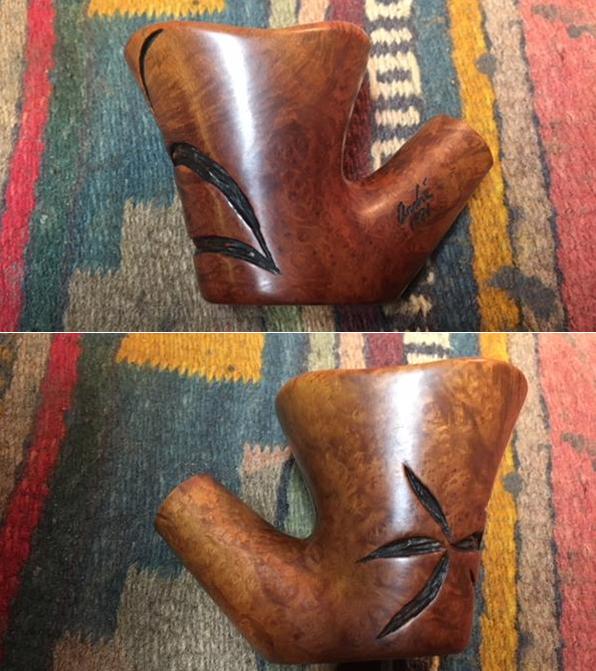
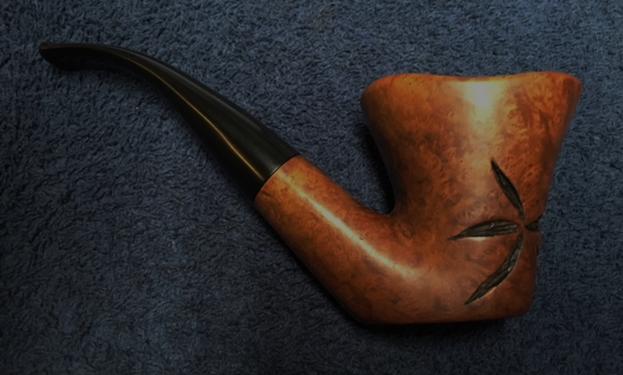
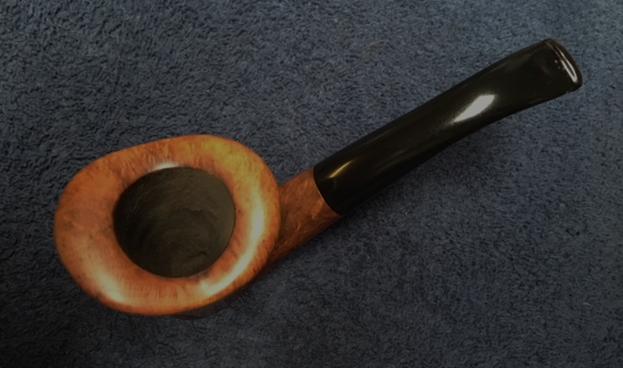
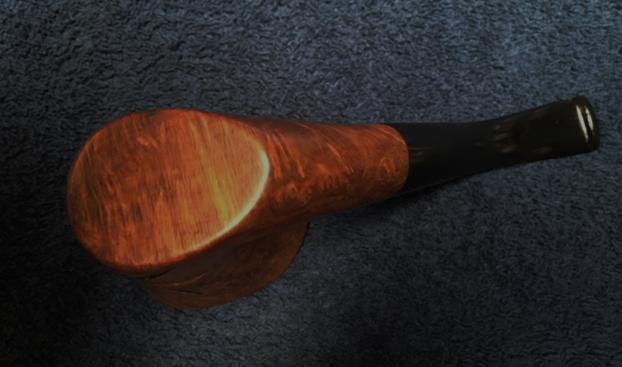
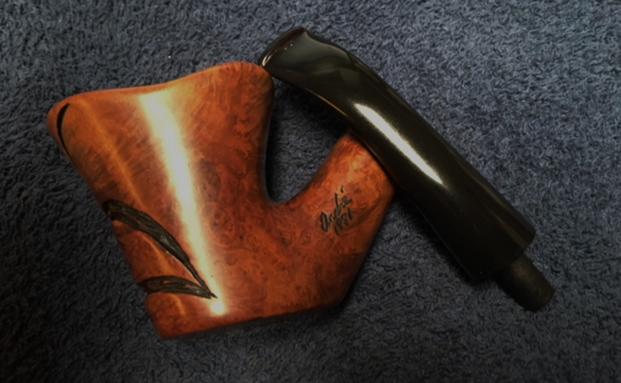
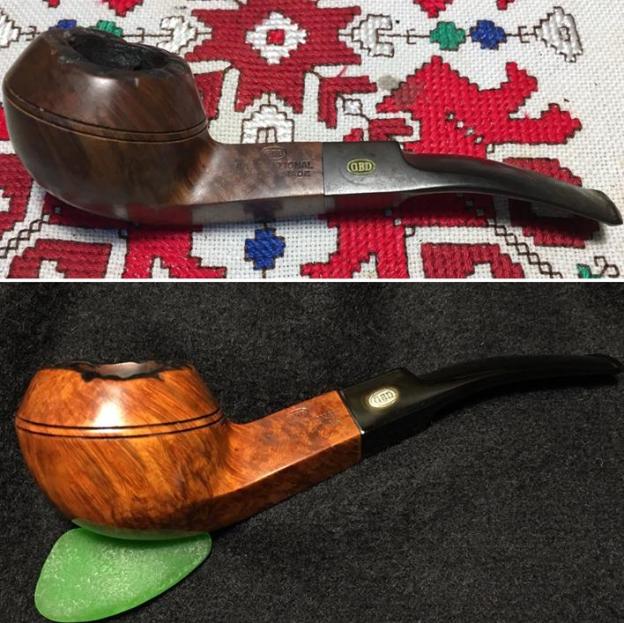
Oh my.  The grain on this GBD International London Made shouts for attention!  I’m pleased with the results.  The flame grain emerges from the heel of the bowl – out of densely populated bird’s eye and swirls to reach toward the dome of the stummel, culminating in the craggy plateau of the rim.  There’s a lot going on with this bent Bulldog. It is headed to The Pipe Steward Store and since Chris saw the potential of this GBD International, he will have first dibs on bringing the Bulldog home.  The sale of this pipe benefits the Daughters of Bulgaria – helping women and girls (and their children) who have been trafficked and sexually exploited.  Thank you for joining me!  I can’t resist starting off with a before and after picture lest we forget!

A Humpty-Dumpty Restoration/Reclamation of a piece of Kay Family History


Blog by Steve Laug

Not long ago I was in communication with Alice regarding a pipe that had belonged to her Grandfather, William Kay. She had been keeping it in a drawer for many years and she took it out to pass it on to her nephew. When she opened the case she said that the amber stem was crumbling to pieces and the case itself was also crumbling. She said that it had been kept dry and safe in a dresser drawer for years so she was sadly surprised by the condition of the pipe. It was a piece of her family’s history but it was in sad condition. She really did not know what to do with it. She wrote to see if I would even be interested in it. She wanted to pass it on and thought I might want it. When I heard about it I wanted to see it before I accepted the challenge to work on it and assess whether I could stabilize the amber and resurrect the old pipe. I was not sure but I wanted to see it. Alice graciously took some photos of the pipe and emailed them to so that I could have a look at what she saw as she looked at it. The photos below tell the story. From what I saw in her photos I was hooked. I could see the “crystallization” of the stem and the chunks of amber in the broken case. It looked salvageable from the photos. Besides that, I wanted to see what I could do with the pipe. I loved shape of the bowl and the curve of the stem. The band was green which made me wonder what was happening to make it that way. The pipe had definitely seen a lot moisture along the way. To me it was certainly worth a try to restore it and the history of the pipe alone made me want to work on it. I wrote Alice back and told her I was interested. After several emails went back and forth between, the pipe was on its way to my brother Jeff’s home in the US as it is definitely easier to ship things within the states that to ship them to Canada. I would have to wait for a bit until I would see it in person.

It did not take too long for the package to arrive at my brother’s house. When he opened the box it looked much the same as Alice had described it so nothing more happened in transit. My brother shook his head when he saw it and I think questioned my sanity yet again. LOL! We shall see if I have any semblance of sanity left once I have it in hand and see what I can do. I figure at worst I will need to craft a new stem for it and at best I may be able to make the amber one at least functional and stop the breakdown of the amber. I asked Jeff to take some photos of the pipe so I could see what he saw. He sent me the following photos and they pretty much tell the story of the pipe’s condition.Two of my daughters visited their Grandad in the States for his birthday at the end of June and brought the pipe in a baggie back to Canada with them on their return. I wrote and asked Alice to send me a photo of her grandfather and a couple of paragraphs about him to give me a sense of background on this pipe. She did a great job capturing his personality and a bit of the unique character that went with it. It helped me see a bit of the man behind this Gordon pipe and gave me even more reason to see it come back to life. Here is what she wrote about her Grandfather, William Kay.

William Ewart Kay August 21, 1880 – June 6, 1938.  His US Naturalization papers list his race as Scotch. (Not Scottish…Scotch) Born in Ontario, Canada, and ended up in Grassy Lake, Alberta somewhere around 1905.  He married Lucy Evaleen Phipps in 1909 and they had 4 children. He was a rather interesting man and not always a very nice one. About 1917 he relocated the family to Auburn, Washington and came as a railroad strike breaker. No one talked about those years but my father told me that he was known as Scabby Bill Kay until he died.  Railroad towns have no pity. The kids didn’t seem to suffer, at least. 

I have his pocket watch. It is not a very expensive piece.  According to whispered family stories, he often had a lady friend and this watch was a gift from one of them  When he came home sporting a shiny new watch he told my grandmother (not a stupid lady) that when he was walking home a crow flew over his head and dropped the watch right in front of him. Still shaking my head over that tale!  Grandmother outlived him by 26 years, happily. I think she loved every minute of not keeping his house. 

My Dad said he was an amusing man, a good carpenter and became a strike breaker because there was no work in Canada in those years. My dad met him when they were both working on a government fish hatchery project in Auburn. That’s about all I know about the man. He died 10 years before my birth and the family rarely spoke of him. Times have certainly changed. Nothing is a secret any longer. Sadly, being a family elder means I have no one to ask!

Thanks for all this. I hope it makes it in a reasonable number of pieces. I am still amazed that it disintegrated so fast and in so many strange ways. It has been in its case in a dry dresser drawer forever. — Alice

I was unfamiliar with the brand so I did a bit of hunting on the internet for information on the brand. The inside of the case Gordon Best Briar in an oval on the lid. Gordon was also stamped on the left side of the shank in an oval. I did find a Gordon pipe on Pipephil’s site but the stamping and logo were very different so I am not sure it was the same maker. I also looked on Pipedia and found a listing for Gorden Pipes – spelled differently but the information that followed the name stated that it was an early 20th century brand of Samuel Gordon and that the stamping was Gordon in a lozenge on the shank. Here is the link for that information as it does match this pipe (https://pipedia.org/wiki/British_Pipe_Brands_%26_Makers_E_-_H). There was no more information that I could find on the brand anywhere on the net. The time line fits pretty well with the look and make of the pipe I am working on.

Armed with that information and the backstory of William Kay I brought the pipe to my worktable started the rebuilding of the Humpty-Dumpty pipe. It was going to be a real challenge to put all the pieces together again. Rebuilding and stabilizing the stem was only part of the work. I was not sure that would even be possible because it really seemed to be disintegrating as I touched it. I am pretty certain that the stem is made of amber. I would know more once I tried to rebuild it and put the pieces back together. The tenon was loose in the stem and when I touched it I could see that it was not even connected.

The tenon was metal and it was rusted and deteriorating. It was stuck in the shank of the pipe. I assumed that the end in the shank was also threaded because the stem end was. I thought that it was screwed into a threaded mortise in the shank. The band was silver and the normal black tarnish was present. There was a lot of pitting and a green oxidation that came from the metal tenon and inside the case. The finish on the bowl was ruined and worn out. There was a lot of buildup and grime on the outside of the bowl that would need to be dealt with. The rim top looked like it might be the least damaged part of this old pipe because of the thick lava coat overflowing from the cake in the bowl. The airway from the shank to the bowl was clogged. This was definitely going to be a challenge. I took a photo of the parts of the pipe when I removed the stem from the tenon.I tried to turn the tenon with a pair of pliers to see if I could unscrew it from the shank. It did not take long to realize that I was not dealing with a threaded tenon at all. The tenon turned out to be a push tenon. It looked like a repair person sometime in the life of the pipe had converted it from a threaded shank and tenon to a push tenon. Their methodology was interesting to say the least. They had slipped a hard rubber tube over the worn threads of the original tenon and drilled out the threaded mortise to receive the push tenon – creative but damaging. He had lined the mortise with a paper washer to hold the tenon tight in the shank. Over the years moisture had gotten into the mortise and the paper was disintegrated and stuck on the tenon and in the shank.  The threaded tenon conversion was full of rust as the original metal tenon had deteriorated with the moisture and wicked up the stem and around the band. It was a compound mess that would need creative solutions to be dealt with.The band was loose on the shank. The glue that had held it in place had long since deteriorated. I removed the green tarnished band from the shank and laid out the pieces of the pipe at this point in the process to show what I was dealing with.I decided to try to put all of the pieces of the amber stem together again. I greased a pipe cleaner and put it in the airway to keep the glue from filling in the airway. I glued it together with super glue gel and filled in the hole in the right side with the broken chunks of amber. I filled in the gaps around the chunks with clear super glue. I painted the surface of the rest of the stem with clear super glue to stabilize the stem material. Time would tell if it would hold together or not. I let the glue cure for over four hours and when I picked it up to look it over, it fell apart. The stem broke in half and there was a large hole in the right side of the stem. I had not fixed anything at this point but only made things significantly worse. I shrugged it off and glue the two parts back together again. I left the hole to deal with later. The photos below show the state of the stem after repairing the break. It was not looking very promising. I set the stem aside to cure for three full days – it was pretty depressing.I started to formulate a plan B – a new acrylic stem in case all the efforts on this older stem were for naught. I place an order for a stem with Tim West at J.H. Lowe and it is on its way here. I am hoping it will be a suitable replacement. In the meantime, I took all the pieces of the original stem that I had in the plastic bag that it came in and tried to put Humpty Dumpty back together again. I used an amber super glue gel to build up the edges of the broken part of the stem. I pressed the pieces in place in the hole to build it up and provide a base that I could fill in once the initial glue on the stem cured. I set the stem aside to cure for another couple of days. I did not want to take any chances with breaking it again.I kept looking over at it and wondering if my repairs would work in the long run. I could see that it was rough but I think it may form enough of a base for me to rebuild the stem with amber super glue once it cures. We shall see. I turned my attention to the filthy bowl. I had already removed the silver band from the shank as it was loose anyway. I used a sharp pen knife to scrape away the paper gasket that lined the walls of the shank. It fell apart as the knife cut it. I reamed the bowl with a Savinelli Fitsall Pipe Knife and scraped the rim top and inner bevel with the edge of the knife. I sanded the bowl with a piece of sandpaper wrapped around a dowel. I cleaned out the interior of the mortise, shank and airway to bowl. The airway was plugged and I could not blow any air through it from either the shank end or the bowl. I pushed a straightened paper clip through the airway to open it up again. I used alcohol, cotton swabs and pipe cleaners – smooth and bristle – to clean out the tars, oils and build up that had collected over the years. It was as much a mess on the inside as the outside.I wiped off the exterior of the bowl and shank with acetone on a cotton pad to remove the remnants of the old varnish finish and the grime that had been ground into the briar. At this point the pipe bowl was beginning to look pretty good. There was some nice grain on the bowl. Once I had the surface clean and free of the old finish and the debris of time it was ready for the next step in the process. I worked Before & After Restoration Balm deep into the briar on the smooth finish to clean, enliven and protect it. I wiped it off with a soft cloth. I buffed the bowl with a cotton cloth to polish it. It really began to have a deep shine in the briar. I took some photos of the bowl at this point to mark the progress in the restoration. The grain on the bowl is really beginning to stand out and will only do so more as the pipe is waxed. The stem was still quite a mess. Once the first coats of glue cured I used some thick amber super glue to fill in the larger holes in the right side of the stem and build up around the inserted pieces of the original stem. I needed to fill in some of the open space to stop the airflow through the repair. Once the amber glue had cured I filled in the small areas around the repairs with clear super glue. I set the stem aside and let the glue cure.The original tenon was a mess – it really was a hard rubber tube forced over a threaded metal tenon that was rusting and crumbling as well. The shank had been drilled out to remove the threads in the mortise so once again I am guessing that this was some repair person’s idea of creating a push stem. I had removed it earlier and put it aside. I created a new tenon for the stem. It was a threaded Delrin tenon – in this case the threaded portion on a Jobey system tenon was the perfect size for this stem. I would try fitting it once the glue had cured enough to not damage the stem further.  I reduced the side of the hip at the top of the tenon to match the diameter of the mortise using files and sand paper. I set the tenon aside and called it a night.

In the morning I checked the stem and found that the glue had hardened on the stem so I sanded the repaired areas with 180 grit sandpaper to smooth out the surface of the repairs and blend them into the rest of the stem. Then I tried to fit the mortise to the stem and found that my measurements were correct and it fit perfectly. I carefully turned it into the stem and took the following photos. The stem was looking pretty decent at this point and the patch seemed to be hard and stable.I decided to be daring at this point and pushed the stem into the mortise of the shank and took some photos of the pipe at this point. Even though there was still a lot of sanding to do on the stem to smooth and polish it, I was making progress and I was excited to see what it looked like. I wanted to send the two photos to Alice so she could see the salvage job on Humpty. At this point the stem material is stabilized and I could see that the stem would be usable. Now I needed to see if I could make it look even better.I smoothed out the final touches on the repair with 220 grit sandpaper to blend the repairs into the surface of the amber. I polished the stem with micromesh sanding pads – wet sanding with 1500-2400 grit pads and dry sanding with 3200-12000 grit pads. I wiped the stem down after each pad with Obsidian Oil to give life back to the amber. I put the stem on the shank and set the pipe aside to work on the broken and damaged case. I glued the parts together with all-purpose white glue. I pressed them together until the glue set enough to let the parts hold when I laid the case down. I polished the stem with a polishing cloth. I buffed the bowl with Blue Diamond on the buffing wheel. I carefully avoided the stamping on the left side of the shank so as not to damage it. I gave the bowl multiple coats of carnauba wax and buffed the pipe with a clean buffing pad to raise the shine. I hand buffed the bowl and stem individually it with a microfiber cloth to deepen the shine. The finished pipe is shown in the photos below. It is great to be able to hold William Kay’s pipe in my hand as a solid and smokeable whole. I can’t wait for Alice to read this blog and see the finished pipe. I look forward to hearing from her. This was a challenging and a fun project to work on. Thanks for taking time to give it a read.

Refurbishing a Gourd Calabash


Blog by Steve Laug

In the past weeks I finished up some pipes for a guy here in Vancouver and when he came to pick them up he brought some more for me to work on for him. I finished up some of the ones on the worktable so I decided it was time to work on these. The fourth pipe is a Gourd Calabash with a Meerschaum bowl. It is a nicely shaped gourd that makes up the base of the bowl. The meerschaum cup is in excellent condition – a few minor scratches and nicks in the bowl. The shank end is plastic/acrylic and seals the end of the gourd. It is made to fit a bent vulcanite stem. The meerschaum bowl had a thin and uneven cake. The upper half of the bowl was more thickly caked than the bottom half. I would need to ream it to even out the cake. There was some slight darkening around the inner edge of the rim top as well as some scratches and nicks in the top of the rim. The inside of the shank was dirty and needed to be cleaned. The black vulcanite stem had tooth marks and chatter on the top and underside of the stem near the button. I took photos of the bowl and stem to give a clear picture of the condition of the pipe before I started to work on it.I removed the bowl from the gourd bowl. The cork gasket was in tact but dry. The inside of the bowl had some build up of tars and oils on the walls.The bowl was dirty and the rim top scratched and worn. There was some darkening on the top and around the inner edge. There was also some uneven cake that is visible in the photo below. I scraped out the excesss cake with a Savinelli Fitsall Pipe Knife to even the cake on the walls of the bowl. I sanded the walls smooth with sandpaper wrapped around a piece of dowel. I worked over the top of the bowl and the inner edge of the rim top with micromesh sanding pads – wet sanding with 1500-2400 grit pads and dry sanding with 3200-12000 grit pads. I removed the most of the damage to the rim top with the micromesh sanding pads. I was able to smooth out the scratches with the micromesh pads. I wiped the bowl down after each pad with a damp cloth. I scraped out the hardened tars on the walls of the gourd with a Savinelli Fitsall Pipe Knife. This is done with care so as not to dig too deeply into the skin of the gourd. I just wanted to knock off the high spots and smooth it out. I blew out the debris onto a paper. I cleaned out the airway in the stem and shank, the mortise and shank interior with pipe cleaners, cotton swabs and alcohol. I forgot to take photos of this as I was on a roll and moving quickly through the process.I rubbed down the outer surface of the gourd with Before & After Restoration Balm. I worked it into the finish with my fingertips and finished working it in with a shoe brush. The balm worked to clean, preserve and enliven the surface of the gourd. I also rubbed some Vaseline into the cork gasket to soften and enliven it at the same time. I really like the effect of the product on the gourd bowl so I took some photos of the pipe at this point. Once the outside and inside of the gourd was as clean as I was going to get it I set the bowl aside and turned to address the stem. I sanded the tooth marks and chatter out of the stem surface with some folded 220 grit sandpaper.I polished the stem with micromesh sanding pads to remove the scratches in the acrylic. I wet sanded it with 1500-2400 grit pads and dry sanded it with 3200-12000 grit pads. I wiped the stem down with a damp cloth after each sanding pad. I polished the stem with Before & After Pipe Stem Polish – both Fine and Extra Fine polishes. I wiped it down with a cotton pad and gave it a final coat of Obsidian Oil. I set the stem aside to dry. I put the stem back on the gourd bowl and buffed the pipe with Blue Diamond polish on the buffing wheel. I gave the gourd outer bowl, the meerschaum inner bowl and the stem multiple coats of carnauba wax and buffed the pipe with a clean buffing pad to raise the shine. I hand buffed it with a microfiber cloth to deepen the shine. The finished pipe is shown in the photos below. I have four more pipes to finish for him – these are some finds he made while pipe hunting. This is a fun bunch of pipes to work on. I look forward to moving through the rest of them. Thanks for looking.  

Refurbishing a Bjarne Hand Made Nosewarmer


Blog by Steve Laug

In the past weeks I finished up some pipes for a guy here in Vancouver and when he came to pick them up he brought some more for me to work on for him. I finished up some of the ones on the worktable so I decided it was time to work on these. The third of them is a Bjarne bent apple nosewarmer with a short stem. It is another really beautiful pipe. The shape, the rich reddish brown finish along with the black acrylic stem with the bj logo all combine to make this a uniquely beautiful pipe.   The bowl had a thin and uneven cake. The upper half of the bowl was more thickly caked than the bottom half. I would need to ream it to even out the cake. There was some slight darkening on the rim top as well as dents and nicks in the top of the rim. The inside of the shank was dirty and needed to be cleaned. The black Lucite stem had tooth marks and chatter on the top and underside of the stem near the button. There was one deep tooth mark on the top edge of the button. The short saddle stem looked good otherwise. I took photos of the bowl and stem to give a clear picture of the condition of the pipe before I started to work on it.I did a quick review of the history of the brand by turning to Pipedia. Here is the link https://pipedia.org/wiki/Bjarne. I quote from part of that article to give a short synopsis of the history of the brand.

With a demanding job it was hard to find time to make pipes in that quantity, and Bjarne had to choose. His dream had always been to have a company of his own, and if he wanted fo fulfill that dream, now was the time to do it. But to leave a promising career, in which he probably would have become a Danish ambassador in some foreign country, was indeed a big step to take. “Many thought I was crazy”, Bjarne says, “and one of them was my wife. But she supported my decision anyway.”

He made that decision in 1973, and became a fulltime pipemaker. But he soon realized that it was impossible for one person to handle all of it–he could not make a lot of pipes, sell them and collect money for them all by himself. So he decided to find some pipemakers to help him. In those days Preben Holm was one of the biggest makers of fancy pipes, and he employed a great number of pipemakers. But not all of them were happy to work for Preben,m so Bjarne recruited a few of those.

During the first years all of Bjarne’s pipes were sold in the USA, but at the end of the 1970s he visited the pipe show in Frandfurt and found that there was a market for his there as well. However, he found that the Germans wanted a completely different style of pipes–pipes in traditional shapes. So if he wanted to be successful there, he had to add a completely new line to his production. “It was not easy, we learned it the hard way,” Bjarne says. But they certainly succeeded, and for a number of years Germany became the top-selling market for Bjarne’s pipes.

The photo below shows pictures of Bjarne Nielsen. The photo is from the Pipedia article and comes from Doug Valitchka as noted below the photo.I then turned to the Pipephil website – http://www.pipephil.eu/logos/en/logo-b5.html  and did a screen capture of the article there on Bjarne pipes. Bjarne Nielsen distributed his own brand of pipes carved by Danish Pipemakers. It is stamped on the underside of the shank with Bjarne over Hand Made in Denmark. There are no other stampings or numbers on the shank. The pipe was obviously made prior to 2008 when Nielsen died.I started my clean up on this pipe by reaming out the bowl and smoothing out the cake on the walls. I reamed it back with a Savinelli Fitsall Pipe Knife. I sanded it smooth and even with a dowel wrapped in 220 grit sandpaper. Once that was finished the walls were smooth and undamaged and the surface ready for a new cake.I worked over the rim top with micromesh sanding pads – wet sanding with 1500-2400 grit pads and dry sanding with 3200-12000 grit pads. I removed the most of the damage to the rim top with the micromesh sanding pads. I removed the area on the rear that had been darkened. I polished the exterior of the bowl with the pads at the same time. I wiped the bowl down after each pad with a damp cloth. I touched up the cleaned up rim top with a Maple stain pen to match the colour of the rest of the bowl. The match was perfect and once the bowl was waxed and polished would be indistinguishable from the rest.I rubbed down the briar with Before & After Restoration Balm. I worked it into the finish with my fingertips and finished working it in with a shoe brush. I worked over the rim top to blend it into the rest of the stain. The balm works to clean, preserve and enliven the briar. I really like the effect of the product on briar so I took some photos of the pipe at this point. I cleaned out the airway in the stem and shank, the mortise and shank interior with pipe cleaners, cotton swabs and alcohol. It did not take as much as I expected to remove all the tars and oils in the shank and mortise. The stem had some debris in the edges of the slot in the stem.I set the bowl aside and turned to address the stem. I sanded the tooth marks and chatter out of the stem surface with some folded 220 grit sandpaper. I polished the stem with micromesh sanding pads to remove the scratches in the acrylic. I wet sanded it with 1500-2400 grit pads and dry sanded it with 3200-12000 grit pads. I wiped the stem down with a damp cloth after each sanding pad. I polished the stem with Before & After Pipe Stem Polish – both Fine and Extra Fine polishes. I wiped it down with a cotton pad and gave it a final coat of Obsidian Oil. I set the stem aside to dry. I put the stem back on the bowl and buffed the pipe with Blue Diamond polish on the buffing wheel. I carefully avoided the stamping on the underside of the shank. I gave both the smooth bowl and the stem multiple coats of carnauba wax and buffed the pipe with a clean buffing pad to raise the shine. I hand buffed it with a microfiber cloth to deepen the shine. The finished pipe is shown in the photos below. I have five more pipes to finish for him – one move from his personal rotation and four of them that are some finds he made while pipe hunting. This is a fun bunch of pipes to work on. I look forward to moving through the rest of them. Thanks for looking.  

THE RHODESIAN CALABASH THAT LOST ITS GOURD


Blog by Robert M. Boughton

Copyright © Reborn Pipes and the Author except as cited
https://www.facebook.com/roadrunnerpipes/

6 And the LORD God prepared a gourd, and made [it] to come up over Jonah, that it might be a shadow over his head, to deliver him from his grief.  So Jonah was exceeding glad of the gourd  7 But God prepared a worm when the morning rose the next day, and it smote the gourd that it withered.  8 And it came to pass, when the sun did arise, that God prepared a vehement east wind; and the sun beat upon the head of Jonah, that he fainted, and wished in himself to die, and said, [It is] better for me to die than to live.

The Holy Bible (KJV), 4:6-8

INTRODUCTION
The unique and, one would not be out of line calling it, bizarre implement for enjoying pipe tobacco that is the subject of this post came to me in an estate lot of three “unbranded” examples.  That’s just a euphemistic way of saying no-names.  I never before bid on a lot with nothing but unknown pipes, much less heard of such a thing, but I wanted this lot so much I offered three times more than anyone in his right mind would even consider.  The tactic worked.  One other bidder offered 50 cents more than the price at the time and therefore drove the final cost up that much, but I would have loved to see the look on his face when the minimum bid popped up on his screen!  I’m a little evil that way, I know.

The price I paid for the three has already been compensated with the sale of the top pipe below, a frayed straight brandy I cleaned and dressed up in a shiny black finish and sold for more than the lot cost.  The African meerschaum in the middle that made me desire the lot at all is destined for my own collection.

Three no-name pipe lot courtesy adamcam1985_eBay


I have nothing against no-names.  In fact, some of them have been favorites of mine, one of which, below, I’m sure will shock some readers here.  Both of the no-names in the following photos came incidental to a couple of other lots filled with treasures the sellers could not have recognized, and they smoked as well as any pipe I’ve owned. And so, this is about the bottom pipe in the lot of no-names, a definite art deco wannabe that can only be described as a Rhodesian calabash, despite the lack of calabash gourd or anything like the traditional meerschaum bowl insert.  Instead, the “insert” is made of wood I believe to be Medium Density Fiberboard (MDF), similar to plywood only much denser and stronger, and something that looks and feels like some sort of metal and therefore probably is.  I’m sure it was made in China, if only because of the unmistakable color.

The refurbish was as easy as they come.

REFURBISH The newfangled calabash is comparable in size to other pipes in one way, having a length of 6”, but the chamber diameter is tiny at ⅝” x ⅝”.  When I first held the pipe and looked it over, I thought it was brand new (pun intended).  But closer examination showed carbon in the little insert bowl chamber and the larger enclosed bottom chamber, and the rim needed some work.  After more than a little consideration, I determined the insert is MDF coated almost all over with whatever maroon finish of which the Chinese are so fond.  It reminds me of a mushroom, truth be told. Unfortunately, after having no success removing the char from the bottom chamber with super fine “0000” steel wool, I escalated the process to 150-grit paper and took off enough of the Teflon-like red finish that there remained no reason not to finish the job.  The steel wool worked well on the rim, though.The plastic stem had been gnawed well below the lip until it was, well, gnarly.  I attacked it with a progression of 150-, 220-, 320- and 600-grit papers, followed by the full power of all nine micro mesh pads and, to finish it off, a buff on the wheel with red and white rouge.  I don’t really know if the last measure did any good.  You be the judge. And that, as they say, was that, except for a quick spin on the wheel to buff the rim.
CONCLUSION
All I want to know now is what’s up with the stinger?  And BTW, one reason I chose the Biblical quote at the beginning is that I suspect it might be the origin of the term “losing your gourd.”  I meant no blasphemy.

SOURCES
I do not believe there is a source for this perhaps – one at least would hope – unique pipe.  But everything deserves its day in the sun!

Refurbishing an Ardor Mercurio Fantasy 2006 Bulldog


Blog by Steve Laug

Last week I finished up some pipes for a guy here in Vancouver and when he came to pick them up he brought some more for me to work on for him. I finished up some of the ones on the worktable so I decided it was time to work on these. The first of them is the following Ardor Bulldog. It really is a beautiful pipe. The shape, the grain the colouration, the silver/grey acrylic shank end, the silver trim band on the stem and the silver/grey stem all make this a uniquely beautiful pipe. I have worked on one other Ardor that I added to my collection. I wrote about that restoration on the blog a few years back. While it was a rusticated Urano this one is a Mecurio. Here is the link – https://rebornpipes.com/2016/02/26/with-just-a-little-work-i-now-have-a-dr-ardor-urano-fantasy-apple/ The bowl had an uneven cake and there was some darkening on the rim top. The inside of the shank was dirty and needed to be cleaned. The silver on the stem was tarnished and dull looking. The Lucite stem had tooth marks and chatter on the top and underside of the stem near the button. There was also a tooth mark in the top of the button on the left side. I took photos of the bowl and stem to give a clear picture of the condition of the pipe before I started to work on it. I took a photo of the stamping to show what it looked like. The underside of the stem is stamped as follows – Dorelio over Rovera. Under that it is stamped Ardor over Mercurio. Under that it is stamped Italy then Fantasy. Under that is stamped Fatta A Mano and the year 2006.I did a quick review of the history of the brand by turning to Pipedia. The link there was an article that came from Italian Pipemakers.com. Here is the link – https://pipedia.org/wiki/Ardor. I quote part of the article that gives a quick view of the brands

Ardor Courtesy of italianpipemakers.com

In 1974 Dorelio Rovera, with his father Angelo, established the Ardor Pipe, name which comes from the “AR” (Angelo Rovera) and “DOR” (Dorelio Rovera), changing a medium quality level production into a completely handcrafted product, with a very high level of design and finishing.

[Editor’s Note: Angelo Rovera is the son of Francesco Rovera, who along with his brothers comprised Sociedade Rovera, a pipe company they founded in 1911.]

Dorelio personally chooses the briar which is left seasoning for at least 4 to 5 years before it is worked. It is stocked in particular baskets which leave the wood always visible and airy. The pieces chosen to become a pipe are cut with a circular saw to identify the model. Then each piece is rough hewn by hand with special files, definitely “dangerous” but very efficacious to give the shape to the wood.

Like most artisans, Ardor couples a classical style and a very original style with definite but free and fanciful lines, to offer and meet the largest number of requests, from the simple to the most complex. Ardor is a pipe company which is always looking for innovations, indispensable to collectors, but trying to offer a very high level product in the smoking aspect and performance of the briar, always dried and light for a higher comfort of the smoker.

With Damiano, Dorelio’s son, Ardor introduced the coloured methacrylate (acrylic) stems, really appreciated in the international markets. Damiano has been able to condition the Ardor style with new shapes and with a new mouthpieces style, having a modern point of view. His target is to keep up the interest of new generations, surely more variable in a shorter period.

The Ardor Urano Fantasy that I have was marked AR which told me it was made by Angelo while this pipe was made by his son, Dorelio. The coloured, interestingly shaped stems are obviously the additions of Damiano. The stems he does add a definite flair to the pipe that is unique.

I started my clean up on this pipe by cleaning out the airway in the stem and shank, the mortise and shank interior with pipe cleaners, cotton swabs and alcohol. It did not take as much as I expected to remove all the tars and oils in the shank and mortise. The stem had some darkening in the airway and in the slot in the stem. I used pipe cleaners to clean out the debris that had collected in the edges of the slot and the darkening in the airway.I evened up the cake on the walls of the bowl with a Savinelli Fitsall Pipe Knife. I took the cake back to where there was a thin layer all around the bowl.I rubbed Before & After Restoration Balm into the smooth finish on the bowl and shank. The balm cleans the surface and enlivens and protects the briar. I worked it into the lines and the finish. I let it sit for a while and then buffed it off with a soft cloth and polished it. I took photos of the bowl at this point to give an idea of what it looked like at this point. I set the bowl aside and turned to address the stem. Once the repair on the top side of the stem button had cured I shaped it with some folded 220 grit sandpaper and sanded out the tooth chatter and marks on both sides.I polished the stem with micromesh sanding pads to remove the scratches in the acrylic. I wet sanded it with 1500-2400 grit pads and dry sanded it with 3200-12000 grit pads. I wiped the stem down with a damp cloth after each sanding pad. I polished the silver band with a jeweler’s cloth. I put the stem back on the bowl and buffed the pipe with Blue Diamond polish on the buffing wheel. I gave both the bowl and stem multiple coats of carnauba wax and buffed the pipe with a clean buffing pad. I hand buffed it with a microfiber cloth to deepen the shine. The finished pipe is shown in the photos below. I have seven more pipes to finish for him – three come from his personal rotation while four of them are some finds he made while pipe hunting. This is going to be a fun bunch of pipes to work on. I look forward to moving through the rest of them. Thanks for looking.


Kathy’s Dad’s Pipes #11 – Restoring a Beautiful Custom Carved Malaga Freehand


Blog by Steve Laug

With this blog I worked on another of the Malaga pipes from Kathy’s Dad’s estate. This is the eleventh of the pipes from collection. For a reminder to myself and those of you who are reading this blog I will retell the story of the estate. Last fall I received a contact email on rebornpipes from Kathy asking if I would be interested in purchasing her late Father, George Koch’s estate pipes. He was a lover of “Malaga” pipes as well as others and she wanted to move them out as she cleaned up the estate. We emailed back and forth and I had my brother Jeff follow up with her as he also lives in the US and would make it simpler to carry out this transaction. The long and short of it is that we purchased her Dad’s pipes – Malagas and others. I have never seen this many “Malagas” together in one place in all of my years of pipe restoring and refurbishing. There are some beautiful pipes in that lot. The condition of all them varied from having almost pristine to gnawed and damaged stems that will need to be replaced. These were some well used and obviously well-loved pipes. Cleaning and restoring them will be a tribute to this pipeman. (Here is a link to some history of the Malaga Brand if you are interested: https://rebornpipes.com/tag/malaga-pipes/. There are also links there to a catalogue and the maker George Khoubesser.)Those of you who have followed me for a while know how much I love getting to know about the pipeman who held the pipes in trust before me. That information always gives another dimension to the restoration work. This is certainly true with this lot of pipes. I can almost imagine George picking out each pipe in his collection at the Malaga shop in Michigan. Once again, I am including that information so you can know a bit about the pipeman who held these pipes in trust before they are passed on to some of you. I include part of Kathy’s correspondence with my brother as well…. I may well be alone in this, but when I know about the person it is almost as if he is with me while I work on his pipes. In this case Kathy sent us not only information but also a photo of her Dad enjoying his “Malagas”.

Jeff…Here is a little about my dad, George P. Koch…I am sending a picture of him with a pipe also in a separate email.

Dad was born in 1926 and lived almost all his life in Springfield, Illinois. He was the youngest son of German immigrants and started grade school knowing no English. His father was a coal miner who died when Dad was about seven and his sixteen year old brother quit school to go to work to support the family. There was not much money, but that doesn’t ruin a good childhood, and dad had a good one, working many odd jobs, as a newspaper carrier, at a dairy, and at the newspaper printing press among others. He learned to fly even before he got his automobile driver’s license and carried his love of flying with him through life, recertifying his license in retirement and getting his instrumental license in his seventies and flying until he was grounded by the FAA in his early eighties due to their strict health requirements. (He was never happy with them about that.) He was in the Army Air Corps during World War II, trained to be a bomber, but the war ended before he was sent overseas. He ended service with them as a photographer and then earned his engineering degree from University of Illinois. He worked for Allis Chalmers manufacturing in Springfield until the early sixties, when he took a job at Massey Ferguson in Detroit, Michigan. We lived in Livonia, and that’s where his love for Malaga pipes began. After a few years he returned to Allis Chalmers and we moved back to Springfield. I remember that when we went back to Michigan to visit friends, Dad had to go to the Malaga store and acquire a few new pipes. Many a year I wrote to Malaga and they picked out a pipe for me to purchase that I could give Dad for a Christmas or birthday present. He was always pleased. His favorites were the straight stemmed medium sized bowl pipes, but he liked them all.  He had some other pipes, but the Malagas were his favorites. I remember him smoking them sitting in his easy chair after work, with feet up on the ledge by the fire burning in the fireplace.  Growing up it was my job to clean them and he liked the inner bowl and stem coated with Watkins vanilla, leaving a little of that liquid in the bowl to soak in when I put them back on the rack. Dad quit smoking later in life and so they’ve sat on the racks for many years unattended, a part of his area by his easy chair and fireplace. Dad passed when he was 89 years old and it finally is time for the pipes to move on. I’m very happy they are being restored by you and your brother and hope they find homes who enjoy them as much as Dad did. Thank-you for your care and interest. — Kathy, the oldest daughter

Kathy, once again I thank you for providing this beautiful tribute to your Dad. We will appreciate your trust in allowing us to clean and restore these pipes. I am also trusting that those of you who are reading this might carry on the legacy of her Dad’s pipes as they will be added to the rebornpipes store once they are finished.

The eleventh of the pipes that I chose to work on is a nice looking Freehand with beautiful grain all around the bowl – straight, flame and birdseye. The top of the bowl is very rustic looking plateau briar that is filled with nooks and crannies. The end of the shank has one small spot of plateau that is almost a token piece. The plateau top was almost filled in with a heavy lava build up flowing from the bowl. It appeared that underneath the rim top was in good condition and the inner and outer edge of the bowl was in good condition. The stamping was on the underside of the shank and was clear and read “Malaga” over Custom Carved. The brown, swirled, pearlized Lucite stem had tooth dents and chatter on the top and the underside of the stem. The interior of the pipe was dirty. I could see that this was another pipe that George thoroughly enjoyed this pipe along with the others as is evidenced by the wear that all of them show. Jeff took these photos before he started the cleanup work on the pipe. Jeff took close up photos of the bowl and rim to show the condition of the pipe before he started to work his magic on it. The exterior of the bowl and shank were dirty. You can see the lava on the rim top, the thick cake and remnants of tobacco in the bowl. The second rim top photo shows the thick cake and debris in the bowl. It is dirty but in otherwise good condition.  He also took photos of the sides of the bowl and shank from different angles to show the condition of the design of the bowl. The pipe looked good. He took photos of the shank end to show what it looked like before cleanup.Jeff also took a photo to capture the stamping on the underside of the shank. The next two photos show the stem surface. There are tooth marks and chatter on both sides near the button. On the second photo below there appears to be a tooth mark/hole deep in the surface of the acrylic. I am hoping that it is not all the way the surface of the stem.Jeff cleaned this one up before he sent it my way. After having cleaned quite a few pipes lately, it was nice to work on another one that he had cleaned for me. He is really good at the cleanup work. He had reamed the bowl with a PipNet pipe reamer and followed up with a Savinelli Fitsall pipe knife to remove the cake. He scrubbed out the mortise and the airway in the shank and the stem with alcohol, cotton swabs and pipe cleaners. He scrubbed the exterior of the bowl, rim, shank and stem with a tooth brush and Murphy’s Oil Soap to remove the oils and tars on the bowl, plateau rim and shank. He rinsed it under running water. He dried it off with a soft cloth. The lava mess on the rim was thoroughly removed without harming the finish underneath it. Without the grime the finish looked really good. The Lucite stem would need to be worked on but I really like the thin profile it cast. I took photos of the pipe to show its condition before I started my work on it.   I took close up photos of the bowl and rim top as well as the stem. You can see the condition of the rim top and bowl in the first photo. The top was in excellent condition and Jeff was able to remove all of the lava and oils. He had scrubbed the bowl with a tooth brush and oil soap and it looked really good. The thin profile acrylic/Lucite stem had tooth chatter and some bite marks on the top and a deeper more prevalent tooth mark among the chatter on the underside of the stem just ahead of the button.The underside of the shank was stamped with “Malaga” over Custom Carved. I took a photo of the shank to show the stamping. I am not sure how far up the hierarchy of Malaga pipes this one comes. It is a beautiful piece of briar.I rubbed down the briar with Before & After Restoration Balm. I worked it into the plateau on the rim and the smooth portions to clean, enliven and protect the briar. I worked it into the plateau on the rim top and the shank end with my fingertips and the help of a horsehair shoe brush. I let the balm sit for a little wall and then buffed with a cotton cloth to raise the shine. There were some tooth marks and chatter on the top and more chatter and a deeper tooth mark on the underside of the acrylic stem at the button. I cleaned off the surface of the stem with alcohol and filled in the deep tooth mark with clear super glue. Once it cured, I sanded both sides smooth with 220 grit sandpaper to blend the tooth chatter and the repair into the surface of the stem. It did not take too much sanding to remove the marks and smooth out the stem surface. When it was sanded it was smooth and the marks were gone. I polished the acrylic stem with micromesh sanding pads – wet sanding with 1500-2400 grit sanding pads and dry sanding it with 3200-12000 grit sanding pads. I wiped it down after each sanding pad with a damp cloth. I the polished stem and lightly polished the bowl with Blue Diamond to polish out the remaining small scratches and raise the shine. I gave the bowl multiple coats of Conservator’s Wax and the stem several coats of carnauba wax and buffed the pipe with a clean buffing pad to raise the shine. I hand buffed it with a microfiber cloth to deepen the shine. The pipe polished up pretty nicely. This turned out to be a beautiful pipe in terms of shape and finish. This is the eleventh pipe that I am restoring from Kathy’s Dad’s collection. I am looking forward once again to hearing what Kathy thinks once she sees the finished pipe on the blog. The finished pipe is shown in the photos below. The dimensions are Length: 6 1/2 inches, Height: 2 1/2 inches, Outside diameter of the bowl: 1 3/4 inches wide and 2 inches long, Chamber diameter: 7/8 inches. Thanks for walking through the restoration with me as I worked over this Malaga from George’s estate. More will follow in a variety of shapes and sizes. I will be adding it to the rebornpipes store shortly so if you are interested in adding it to your collection and carrying on the trust from her father send me an email or a message on Facebook. Thanks for looking. 

Kathy’s Dad’s Pipes #10 – New Life for an A.J. Sher Freehand


Blog by Steve Laug

With this blog I am stepping back to work on the tenth of the pipes from Kathy’s Dad’s pipes. For a reminder to myself and those of you who are reading this blog I will retell the story of the estate. Last fall I received a contact email on rebornpipes from Kathy asking if I would be interested in purchasing her late Father, George Koch’s estate pipes. He was a lover of “Malaga” pipes as well as others and she wanted to move them out as she cleaned up the estate. We emailed back and forth and I had my brother Jeff follow up with her as he also lives in the US and would make it simpler to carry out this transaction. The long and short of it is that we purchased her Dad’s pipes. There are some beautiful pipes in that lot. The condition of all them varied from having almost pristine to gnawed and damaged stems that will need to be replaced. These were some well used and obviously well-loved pipes. Cleaning and restoring them will be a tribute to this pipeman.

Those of you who have followed me for a while know how much I love getting to know about the pipeman who held the pipes in trust before me. That information always gives another dimension to the restoration work. This is certainly true with this lot of pipes. I can almost imagine George picking out each pipe in his assortment at the Malaga shop in Michigan. I may well be alone in this, but when I know about the person it is almost as if he is with me work on his pipes. In this case Kathy sent us not only information but also a photo of her Dad enjoying his “Malagas”. Once again, I am including that information so you can know a bit about the pipeman who held these pipes in trust before they are passed on to some of you. I include part of Kathy’s correspondence with my brother as well…

Jeff…Here is a little about my dad, George P. Koch…I am sending a picture of him with a pipe also in a separate email.

Dad was born in 1926 and lived almost all his life in Springfield, Illinois. He was the youngest son of German immigrants and started grade school knowing no English. His father was a coal miner who died when Dad was about seven and his sixteen year old brother quit school to go to work to support the family. There was not much money, but that doesn’t ruin a good childhood, and dad had a good one, working many odd jobs, as a newspaper carrier, at a dairy, and at the newspaper printing press among others. He learned to fly even before he got his automobile driver’s license and carried his love of flying with him through life, recertifying his license in retirement and getting his instrumental license in his seventies and flying until he was grounded by the FAA in his early eighties due to their strict health requirements. (He was never happy with them about that.) He was in the Army Air Corps during World War II, trained to be a bomber, but the war ended before he was sent overseas. He ended service with them as a photographer and then earned his engineering degree from University of Illinois. He worked for Allis Chalmers manufacturing in Springfield until the early sixties, when he took a job at Massey Ferguson in Detroit, Michigan. We lived in Livonia, and that’s where his love for Malaga pipes began. After a few years he returned to Allis Chalmers and we moved back to Springfield. I remember that when we went back to Michigan to visit friends, Dad had to go to the Malaga store and acquire a few new pipes. Many a year I wrote to Malaga and they picked out a pipe for me to purchase that I could give Dad for a Christmas or birthday present. He was always pleased. His favorites were the straight stemmed medium sized bowl pipes, but he liked them all.  He had some other pipes, but the Malagas were his favorites. I remember him smoking them sitting in his easy chair after work, with feet up on the ledge by the fire burning in the fireplace.  Growing up it was my job to clean them and he liked the inner bowl and stem coated with Watkins vanilla, leaving a little of that liquid in the bowl to soak in when I put them back on the rack. Dad quit smoking later in life and so they’ve sat on the racks for many years unattended, a part of his area by his easy chair and fireplace. Dad passed when he was 89 years old and it finally is time for the pipes to move on. I’m very happy they are being restored by you and your brother and hope they find homes who enjoy them as much as Dad did. Thank-you for your care and interest. — Kathy, the oldest daughter

Kathy, once again I thank you for providing this beautiful tribute to your Dad. We will appreciate your trust in allowing us to clean and restore these pipes. I am also trusting that those of you who are reading this might carry on the legacy of her Dad’s pipes as they will be added to the rebornpipes store once they are finished.

The tenth of the pipes that I chose to work on is a nice looking Freehand with a mix of sandblast and smooth patches on the sides of the bowl. The top of the bowl and the end of the shank have a faux rustication that makes it look like plateau. The Lucite stem had lots of tooth chatter and a few tooth marks on both sides near the button. Some great grain peeks through the grime around the bowl. The warm combination of dark and medium brown stain on the bowl appeared to be good condition under the dust and tars of time.

The mixture of sandblast and smooth on the bowl sides and the faux plateau on the rim top of this pipe was covered with dust and grime. The blast and rustication on the rim top was all but filled in with an overflow of lava from the thick cake in the bowl. It appeared that underneath the rim top was in good condition and the inner and outer edge of the bowl was in good condition. The stamping was on the left side of the shank and was clear and read A.J. Sher on a smooth panel. The pearlized Lucite stem had tooth dents and chatter on the top and the underside of the stem. The interior of the pipe was dirty. I could see that George thoroughly enjoyed this pipe along with the others as is evidenced by the wear that all of them show. Jeff took these photos before he started the cleanup work on the pipe. Jeff took close up photos of the bowl and rim to show the condition of the pipe before he started to work his magic on it. The exterior of the bowl and shank were dirty. You can see the lava on the rim top, the thick cake and remnants of tobacco in the bowl. The second rim top photo shows the thick cake and debris in the bowl. It is dirty but in otherwise good condition. He also took photos of the sides of the bowl and shank from different angles to show the condition of the design of the bowl. The combination of smooth panels and sandblast look good. He took photos of the stamping and the shank end to show what it looked like before cleanup.The next two photos show the stem surface. There are tooth marks and chatter on both sides near the button. On the second photo below there appears to be a tooth mark/hole deep in the surface of the acrylic. I am hoping that it is not all the way the surface of the stem.Jeff cleaned this one up before he sent it my way. After having cleaned quite a few pipes lately it was nice to work on one he had cleaned for me. He is really good at the cleanup work. He had reamed the bowl with a PipNet pipe reamer and followed up with a Savinelli Fitsall pipe knife to remove the cake. He scrubbed out the mortise and the airway in the shank and the stem with alcohol, cotton swabs and pipe cleaners. He scrubbed the exterior of the bowl, rim, shank and stem with a tooth brush and Murphy’s Oil Soap to remove the oils and tars on the bowl, rim and shank. He rinsed it under running water. He dried it off with a soft cloth. The lava mess on the rim was thoroughly removed without harming the finish underneath it. Without the grime the finish looked really good. The stem would need to be worked on. I took photos of the pipe to show its condition before I started my work on it.   I took close up photos of the bowl and rim top as well as the stem. You can see the condition of the rim top and bowl in the first photo. The top was in excellent condition and Jeff was able to remove all of the lava and oils. He had scrubbed the bowl with a tooth brush and oil soap and it looked really good. The acrylic/Lucite stem had tooth chatter and some bite marks on the top and the underside of the stem just ahead of the button. I was glad to see that there was no bite through on the underside of the stem. What had appeared as a hole in the above photos of the stem seemed to have cleaned off and all that was present was a large tooth mark.The left side of the shank was simply stamped with a signature line that read A.J. Sher. I took a photo of the shank to show the nature of the stamping. I cannot find any information on the brand on any of my usual information sites so I am asking you all to help with that. Any of you know the brand?I rubbed down the briar with Before & After Restoration Balm. I worked it into the sandblast finish and smooth portions to clean, enliven and protect the new finish. I worked it into the rim top and the shank end. Both had the appearance of plateau but I think they were carved to look like it. I let the balm sit for a little wall and then buffed it with a horsehair shoe brush. I buffed the bowl with a cotton cloth to raise the shine. There were some tooth marks on the top and underside of the acrylic stem at the button. Since there was not a hole in the stem it was a pretty easy clean up. I sanded them smooth with 220 grit sandpaper to blend them into the surface of the stem. It did not take too much sanding to remove the marks and smooth out the stem surface. When it was sanded it was smooth and the marks were gone.I polished the acrylic stem with micromesh sanding pads – wet sanding with 1500-2400 grit sanding pads and dry sanding it with 3200-12000 grit sanding pads. I wiped it down after each sanding pad with a damp cloth. I the polished stem and lightly polished the bowl with Blue Diamond to remove any remaining small scratches and raise the shine. I gave the bowl multiple coats of Conservator’s Wax and the stem several coats of carnauba wax and buffed the pipe with a clean buffing pad to raise the shine. I hand buffed it with a microfiber cloth to deepen the shine. The pipe polished up pretty nicely, it was a beautiful pipe in terms of shape and finish. I will definitely be keeping an eye out for more pipes by A.J. Sher. This is the tenth pipe that I am restoring from Kathy’s Dad’s collection. I am looking forward once again to hearing what Kathy thinks once she sees the finished pipe on the blog. The finished pipe is shown in the photos below. The dimensions are Length: 6 1/4 inches, Height: 2 inches, Outside diameter of the bowl: 1 7/8 inches, Chamber diameter: 7/8 inches. Thanks for walking through the restoration with me as I worked over this pretty Freehand. I will be adding it to the rebornpipes store shortly so if you are interested in adding it to your collection and carrying on the trust from her father send me an email or a message on Facebook. Thanks for looking. 

One of those once in a life time finds – a Long Shank Figural Meerschaum


Blog by Steve Laug

My brother Jeff always comes up with some amazing finds. I am not sure how he does it, but there is never a box of pipes that I get from him that does not have a surprising find in it. In this case we had talked about a meerschaum pipe that he was interested in picking up. I can’t remember where he had seen it but his sights were set on it. He had sent me some photos that he had received from the seller to give me an idea of what I would be dealing with when the pipe arrived. Here are the photos that he sent me. They are grainy and really don’t give an idea of the size and proportions of the pipe. They do however show the issues clearly. The shank was joined in two spots with nylon/Teflon threaded tenons and those had snapped off inside the shank. It also showed that the pipe had been smoked and the rim top was dark. There was some nice patina developing on the shank and bowl. I did not have a clue what the carving on the front of the pipe looked like.The next two photos show some close up views of the damaged areas. The first partially shows the damage of the first broken tenon on two parts of the shank. What it does not show is where the rest of the broken tenon is. I am pretty sure that it is in the other half of the shank. My guess is that somewhere along the way someone tried to take the pipe apart and snapped the tenon.The second photo shows the broken tenon at the bowl shank joint. This one is a bit more disconcerting because not only are parts of the tenon broken off in each side of the shank and bowl but it appears that someone tried to glue the two parts together. I would not know for sure until I had it in hand but that was my guess at this point. We talked about it and Jeff made the deal. Soon I would see the pipe in person.At this point your guess is as good as mine in terms of what the pipe looked like, what face was carved on the front and what the size and proportion were going to be. I had no idea what to expect but Jeff told me that he would send it home with my daughters when they returned from a visit for my Dad’s 90th birthday. Sure enough, he talked them into bringing a few pipes and a rack with them in their luggage. They got home around 11:30pm but that did not stop them from unpacking their bags to show me what they had brought home with them. In my second daughters luggage there was a long trombone shaped case – the case alone is 13 inches long and 4 inches wide at the widest point. It is three inches tall on the thickest portion of the case. It is covered with a black vinyl like many meerschaum cases are these days. I could see that the pipe inside must be a big one. I knew it was the one we had spoken of above but I had no idea what I was in for once I opened the case. Here are some photos of the case and what I saw when I opened it.I put the pipe away because I did not want to be tempted to work on it until I had finished some repairs that I was doing for a guy here in Vancouver. Yesterday I finished the last of his repairs and last evening I took the pipe out to have a look. The end of the shank at the bowl had a piece of the nylon tenon broken off inside of it. I used an easy out and turned it into the tenon until it grabbed then unthreaded the tenon from the shank. One done, and not too difficult.I used the easy out section that held the stem as well. It was also relatively painless. I turned it into the tenon until it grabbed then unthreaded the tenon from the shank piece. Two done, with no breakage and without making things worse!The third section was another story. It worried me because it was the piece that had been glued to the bowl end of the short shank. It had glue on the meerschaum surface that turned out to be rubber cement. I scraped it off and tried to turn that tenon out with an easy out. No success. It was glued in solid in the shank. I took out my cordless drill and fit it with a bit slightly larger than the airway in the tenon and carefully drilled it into the tenon. You have to be careful because one wrong move and the bit could damage the shank piece. Nerve wracking for sure! I was able to drill it carefully and when the bit grabbed I reversed the drill and unthreaded the glued piece from the shank. Success! All of the broken tenon pieces were removed. I could now see what else I had to do on this one.I started by checking out the connections between each section of the shank pieces. It did not take long to realize that the shank portions were made up of shorter spool like sections. I took the spools apart and took a photo of all the pieces. It was an interesting looking pipe. This is also the first look you are all getting of the figural. I think it is called a Courtier. It is a bearded gent with a cap and feather. It is well carved and very detailed.I decided before calling it a night to put the pipe back together again using the pieces of broken tenon that I had to reconnect the parts. I wanted to have some idea of the finished look of the pipe and what the length would be once it was all put back together. It is a long pipe. I measured it once I had it put together and from the tip of the beard to the end of the stem was 17 ½ inches. I truly had no idea this was what it would be when I first saw it in those first photos above. I took a couple of photos to show you what I saw. It is a gorgeous pipe with well done, intricate carvings. Now that all the parts were working I would need to clean them each. But that is it for the night. I packed the pipe back in the case and headed to bed. The first thing I did in the morning was to take some photos of the figural carving. I wanted to have a look before I started the cleanup and have found that taking photos gives me a good idea of what I need to work on with each pipe. Here is what I saw. It was a beautifully carved, ornate piece. There was some patina developing on the shank and the bowl, particularly around the bottom portion and the sharper edges of the carving. The rim top had a bit of lava buildup that would need to be removed along with the cake. Overall this portion of the pipe was in excellent condition. I reamed the bowl with a Savinelli Fitsall Pipe Knife and removed all of the cake. I wanted the walls clean and uncaked. I followed that by sanding the inside of the bowl with a dowel wrapped with sandpaper. I wiped down the inside of the bowl with a damp paper towel to remove the dust and sanding debris. I tried to blow air through the shank and bowl and was surprised that it was clogged and nothing flowed. I unscrewed the shank piece from the bowl and blew through that. It was clear so I knew that the clog was in the bowl portion for sure. I tried to push a pipe cleaner through the airway and met a hard clog. So to open the clog I pushed a piece of stiff wire through the airway and worked it around to clear out the clog. I checked to make sure there was airflow and then cleaned out the shank with pipe cleaners, cotton swabs and alcohol until the airway was clean and there was unrestricted airflow between the bowl and shank. Part one of the airway cleanup was finished and I was ready to work on the rim top.I sanded the lava on the top of the bowl with a 1500 grit micromesh sanding pad and wiped it down with a damp cotton pad. It did not take too much work to get the rim top clean. I cleaned out the grooves in the cap with a damp cotton swab to leave the top surface clean.I polished the meerschaum top with micromesh sanding pads – wet sanding with 1500-2400 grit pads and dry sanding with 3200-12000 grit pads. I wiped down the top of the rim with a damp cotton pad after each sanding pad. The following photos show the progress. I cleaned up the shank section that was connected to the bowl. I scraped away the rubber cement on the surface of the shank end and cleaned out the interior with pipe cleaners, cotton swabs and alcohol. I beveled both ends of the nylon connector to help with the airflow. Once it was clean I attached the first spool to the bowl portion.It was time to move on to the cleaning of each of the spools that made up the first section of the shank. I unscrewed the parts so that I could better work on them. It is easier to clean up the nylon connectors and the inside of the spool when they are apart. I used a pen knife to lightly bevel and open up the end of each of the connectors to improve the airflow. I cleaned out the airways in each section with pipe cleaners, cotton swabs and alcohol until they were clean. I checked the airflow on each section and then put it back together. Now the bowl and the first section of the shank were clean.  I put the spools back together and took a photo of the first section of the shank.I moved on to the cleaning of each of the spools that made up the second section of the shank. I unscrewed the parts so that I could better work on them. It is easier to clean up the nylon connectors and the inside of the spool when they are apart. I used a pen knife to lightly bevel and open up the end of each of the connectors to improve the airflow. I cleaned out the airways in each section with pipe cleaners, cotton swabs and alcohol until they were clean. I checked the airflow on each section and then put it back together. Now the bowl and the first and second section of the shank were clean. I cleaned airway in the stem with pipe cleaners and alcohol. I used a penknife to bevel the end of the push tenon. I sanded the exterior of the nylon push tenon to remove the buildup and stain that was on the white tenon end. The photo is a bit out of focus but you can see how dirty the airway was inside from the pipe cleaners under the stem.I wiped down the exterior of the stem and found another surprise. There was a hole in the top of the stem next to the button. In examining the hole I found that I was not dealing with a bite mark but with a misdrilled stem. The airway in the button was too high and that left the Lucite material too thin at that point. I took photos of the top and bottom of the stem and of the end view and include them now. The hole is the dark spot on the top side next to the button.I put some Vaseline on the end of a pipe cleaner and inserted it in the airway below the hole in the stem surface. I filled it in with clear super glue. I build up the top of the button and filled in the over-drilled airway in the button at the same time.Once the repaired area cured I shaped the button edge on both the top and the underside with a needle file. I blended the repair into the surface of the stem with 150 and 220 grit sandpaper. I polished the stem with micromesh sanding pads – wet sanding with 1500-2400 grit pads and dry sanding with 3200-12000 grit pads. I wiped it down with a damp cotton pad after each grit. I buffed the stem with Blue Diamond on the buffing wheel. I buffed the pipe with a shoe brush and finished polishing it with a soft microfiber cloth. Finally the pipe is clean and finished. I polished all of the parts individually with the cloth and took photos of the pipe before I put it together. This is one that I think I will hang on to for my own collection. I have ordered some new nylon connectors to replace the broken ones that I am using to hold it together at the moment. I took photos of the pipe as a whole and then broke it down and put it in the case and took photos of that to close this chapter of the story. Thanks for walking with me through this restoration.

An Andre Hand Carved Freehand – #8 of Anthony’s Dad’s Pipes


Blog by Steve Laug

I am finishing the work that began with an email from Anthony, a reader of rebornpipes asking if I would be willing to help him clean up his Dad’s pipes. He wrote; “I have a few pipes (8 or so) that haven’t been smoked in 15 years. They were my dad’s. I would like to get someone to restore them”. We chatted back and forth via email and the long and short of the story is that I have eight of his Dad’s pipes in my shop now to work on. The photo below shows the mixture of pipes that he sent me. There are some interesting shapes and most are very dirty and have very little if any of the original finish left on the briar. All have an overflow of carbon on the rim top and all have chewed, damaged stems and buttons. Anthony remembers his Dad smoking them throughout the years he was growing up so they went from regular use to being boxed and stored. They will need a lot of TLC to bring life back to them but it should be fun to give it a go. I went through the pipes and assessed their condition and contacted him and got the go ahead to proceed on the lot.I have completed the restoration of seven of the pipes. The last pipe I am working on is a floral shaped freehand with a rounded top and a flush fit tapered, bite proof stem. It the third pipe down on the left hand column in the above photo. I have circled it in red. It is another tall freehand with a 1/4 bent stem. It has some pretty grain with carved floral patterns on the front and right side of the bowl. The bottom of the bowl is flat making the pipe a sitter. The stem that is on it is a twin bore/bite proof stem that is chewed with deep tooth marks on both the top and bottom of the stem and button. This may well be the original stem on this pipe. But in any case the fact that most of these pipes have a replacement twin bore bite proof stem tells me a lot about Anthony’s Dad’s habitual gnawing on his pipes. The pipe is stamped on the left side of the shank with the script signature Andre over 1981. The bowl had about a half a bowl of dottle and tobacco in the bottom and a thick cake, and some lava overflow on the rim top. The finish was gone and very washed out looking. Even the dirt and grime were anemic. I took photos of the pipe to show its overall condition when it arrived at my work table.   I took some close up photos of the bowl, rim top and the stem to show what I was going to be dealing with on this pipe. The rim top was in rough condition – mold filled in the grooves and valleys of the plateau. There was also some lava overflowing from the bowl that had filled in the grooves. The plateau on the shank end was worse than the rim top (if possible). The finish worn off and there was water staining all around the shank end.After I cleaned the pipe up a bit, I took a photo of the stamping on the left side of the shank. It reads Andre over 1981.The stem was in rough condition as you can see from the photos below. The “bite proof” stem evidently was not bite proof. Anthony’s Dad had gnawed on it and left behind deep tooth marks on the stem and button. It would take some work but I would save this stem.I looked up the brand on the pipephil website index and found it listed. Here is the link – http://www.pipephil.eu/logos/en/logo-a6.html. I have included a photo from the site that shows a stamp on the left side of the shank that is like the one I am working on. The only difference is the year – this is a 1985 while I am working on a 1981. The site says that André Mermet was a French craftsman who immigrated to the USA. He (and after him his son) produced pipes for Barclay Rex or Wilke pipeshops.

I looked on Pipedia https://pipedia.org/wiki/American_Pipe_Brands_%26_Makers_A_-_B and found that though there was no listing with information, there was the brand name in the list of US pipe companies and makers. It stated: North American brand, possibly associated with Andre’s Pipe Gallery.

I wondered if this was not the shop that Anthony’s Mom had referred to in her email to him that I quoted in previous blogs on these pipes. She had written about a shop called “Andre’s,” around 1969 or ’70. She said it was a unique shop, originally located in Los Gatos, or Campbell, California she thought. She said that it later moved to the Alameda area in San Jose. Anthony’s Dad also bought his favorite tobacco blends there so it makes sense to me that he may have also purchased this signature pipe from them. Perhaps Anthony will let us know when he reads this.

One last time I want to include the tribute Anthony wrote about his Dad and his pipe smoking. Here is what Anthony sent: When my dad died 6 years ago, my mom asked if I wanted my dad’s old pipes. He was a long time pipe smoker, ever since I was a kid I can remember him sitting on the couch smoking his pipe inside. He worked at IBM and used to smoke his pipe in his office before they changed the laws in California. So you can imagine he had quite the collection over the years.

I took his pipes and put them in storage for a few years, I myself recently quit smoking cigarettes and decided to take up pipe smoking as it was easier on the wallet. I asked in /r/pipetobacco if anyone could recommend a pipe restoration service and someone told me about rebornpipes.com. I was hesitant but after looking at the blog I knew it would be a good place to send my dad’s pipes.

My dad loved smoking his pipes, sitting out by the pool in the sun taking a nap or in the garage wood working. The house was my mom’s area and the garage was my dad’s area. I spent hours sitting out in the garage as a kid watching the niners or a’s and giants on tv while doing woodworking projects. I hope to do the same with my kids these days.

I’m not sure if my dad smoked other tobacco but I remember Captain Black was the kind he smoked regularly. He had tins of it in the garage, full and empty and would turn the old tin jars into storage for odds and ends, like screws or washers or miscellaneous stuff.

I remember when I played little league my dad would sit in the stands and smoke his pipes. One of my teammates asked “What is that smell?” and I ashamedly said “Oh that’s my dad’s pipe…I’ll go tell him to put it out” and my teammate said “No man, it smells good!”.  It’s funny how the little conversations over the years you remember.

Another time when I was in 3rd grade or so we learned how smoking was bad for you (this was back in the 80s). I remember I asked my teacher if smoking a pipe was bad for you too….and she hesitated and said “Not as bad as cigarettes, since you don’t inhale it”. After that I was no longer worried about my dad smoking.

Knowing my mom I have no idea how my dad pulled this off but he managed to smoke his pipe in the house. I guess she liked the smell of it. Recently when I was waiting for my girls to get out of school I was sitting on a side street smoking my pipe and someone walked by and thanked me for bringing the pipe back. He said his dad used to smoke a pipe and he loved the smell. As did mine. The only difference is my daughters complain constantly about the smell of my car, but that is mostly because I smoke cigars too.

Anyway, grab some fine tobacco, light up a bowl and sit back and relax. I don’t have a pool like my dad did but you can catch me working on my laptop sitting in my driveway smoking a nice pipe, especially one of these restored pipes from reborn pipes….I can’t wait to smoke them.

Thanks Anthony, I appreciate how your tribute gives a sense of who your Dad was and how he enjoyed his pipes. I think it is somehow appropriate that the 8th and final pipe is from Andre’s shop. I decided to start with the stem. I “painted” the deep tooth marks with a Bic lighter to raise the dents. It helped but these dents were deep and had sharp edges.  I filled in the remaining dents with black super glue. It would take several applications of the glue to thoroughly fill in and repair the dents. I set the stem aside to let the repair cure and worked on the bowl.I set the stem aside and worked on the bowl. I used a dental pick to remove the dottle and unsmoked tobacco that filled the lower half of the bowl. I reamed it back to bare briar using a PipNet pipe reamer to remove as much of the cake as I could. I finished with a Savinelli Fitsall pipe knife and then sanded it with 220 grit sandpaper wrapped around my index finger. The rim top had a thick coat of lava and many nicks and dents in the surface and along the outer rounded edge. I sanded it with a fold piece of 150 grit sandpaper followed by 220 grit sandpaper to clean off the damage and smooth out the nicks and dents.I wiped down the bowl and rim with acetone on a cotton pad to remove the remnants of stain in the bend of the shank/bowl junction and the grime ground into the finish. I was careful around the carved leaves or flower petals around the bowl and the stamping on the shank. Both seemed to have a darker stain in the grooves and I wanted to leave that undamaged. I sanded the smooth surfaces of the bowl, rim and shank with a medium and a fine grit sanding sponge to remove the scratches on the briar. I cleaned out the internals in the mortise, shank and airway with bristle and smooth pipe cleaners, cotton swabs and alcohol. It was pretty dirty but it did not take a lot of time to clean it up.I worked some Before & After Restoration Balm into the nooks and crannies of the carvings on the front and right side of the bowl and into the grain of the smooth portions of the briar. I worked it deeper into the grooves with a horsehair shoe brush. The balm works to clean, enliven and protect the briar. I really like the way it brings life to the briar. When I wipe it off with a soft cloth it not only adds a shine but takes away the grime that is in the finish.    I buffed the bowl with Blue Diamond on the buffing wheel to polish briar and further work in the Restoration Balm. The pipe is looking good. I smoothed out the repairs with a needle file and 150 and 220 grit sandpaper. I reshaped the button and repaired the straight edge. I sanded the light oxidation off the surface of the stem at the same time.I polished the stem with micromesh sanding pads – wet sanding with 1500-2400 grit pads and dry sanding with 3200-12000 grit pads. I wiped the stem down with Obsidian Oil after each sanding pad. I polished the stem with Before & After Pipe Stem Polish – both Fine and Extra Fine to finish removing the light scratches that remained. I gave stem another coat of the oil after that and set it aside to let the oil dry. I put the pipe back together and polished the bowl and stem with multiple coats of carnauba wax. I buffed it with a clean buffing pad to raise the shine. I hand buffed it with a microfiber cloth to deepen the shine. The pipe polished up pretty nicely. The finished pipe is shown in the photos below. This is final pipe of the eight pipes that I restored from Anthony’s Dad’s collection. I am looking forward to hearing what Anthony thinks once he sees the finished pipe on the blog. This week I will pack them up and send them back to him so that he will have the opportunity to carry on the trust from his Dad. The dimensions are Length: 6 inches, Height: 2 1/4 inches, Outside diameter of the bowl: 2 inches, Chamber diameter: 1 inch. Thanks for walking through the restoration with me as I worked over this final pipe from Anthony’s Dad’s collection.