Tag Archives: polishing a Cumberland stem

Cleaning up an F. Baki Danish Egg with a Cumberland Saddle Stem


by Steve Laug

While I was travelling in the US I received an email from Dave regarding restoring a meerschaum pipe that he had. I quote from the initial email below:

Hello, I have a meerschaum pipe that needs some TLC. I was wondering if you do restorations for pipes that you send back to the owner. I’m sure it somewhat depends on the condition. I’d be happy to send you some pictures if you do that kind of work and would be willing to give me a ballpark estimate. Thank you! Dave

I wrote back to Dave and asked him to send photos of the pipe. Once I received them I looked them over and answered Dave’s questions in the initial email. I gave him my malling address and last evening I received his pipe. I have included the photos of the pipe that he sent me below. 
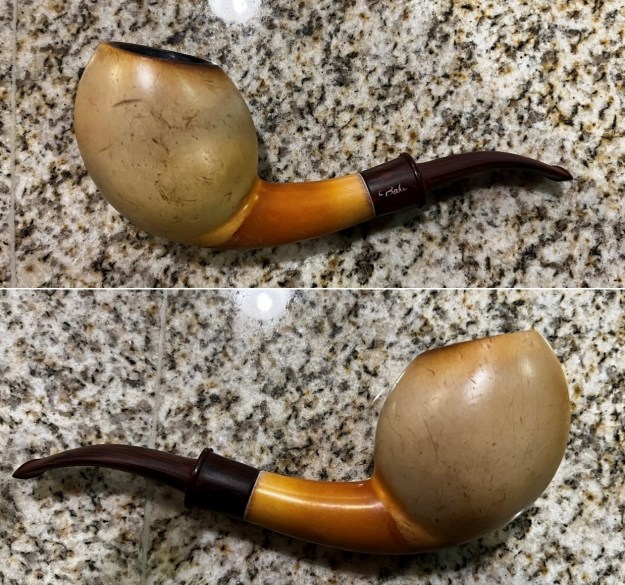
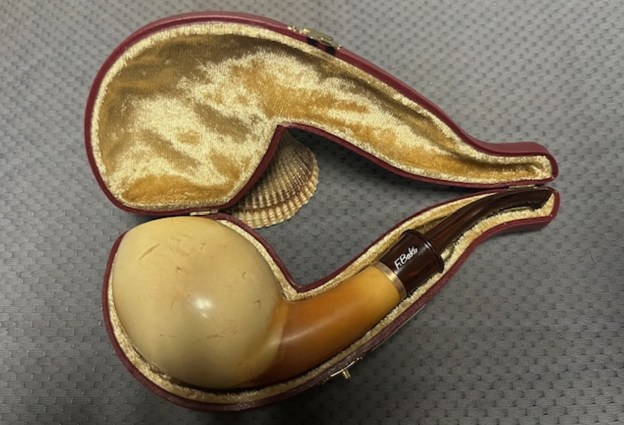
This morning I started working on Dave’s pipe. I brought the Baki to the work table. It came in its own hard-shell case that is covered with a red leather and with a soft gold velour like fabric on the inside of the case. There are no logos or marks in the case itself. Dave had taped a paper label on the case that reads FBK – C071. Next to the clasp on the front edge it reads Made in Turkey. 
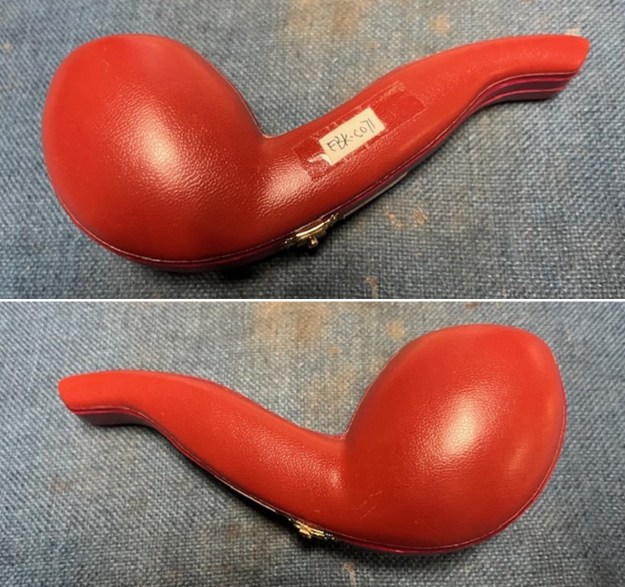
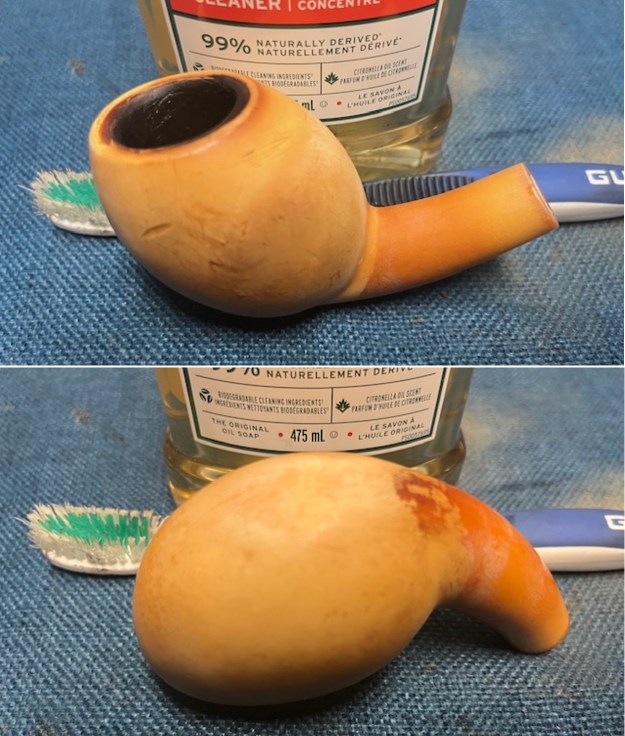
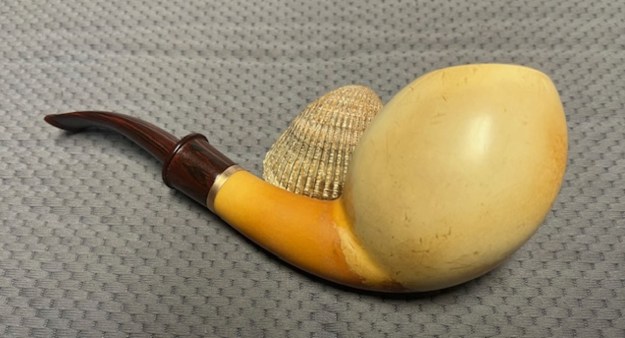
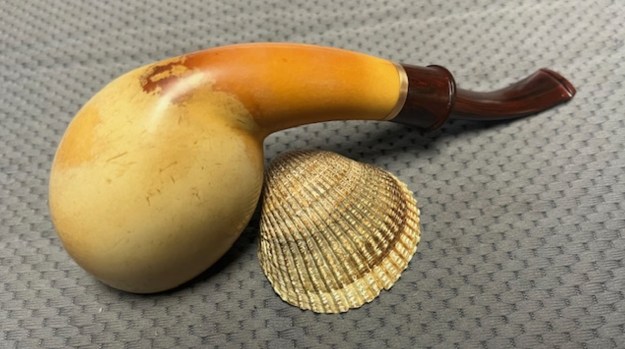
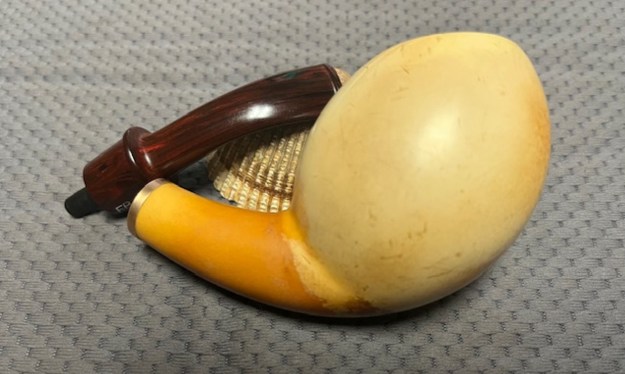
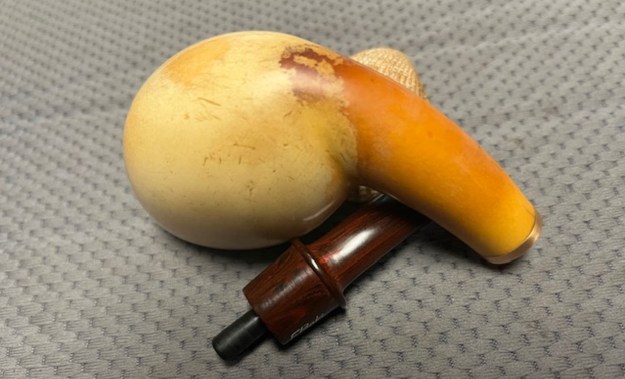
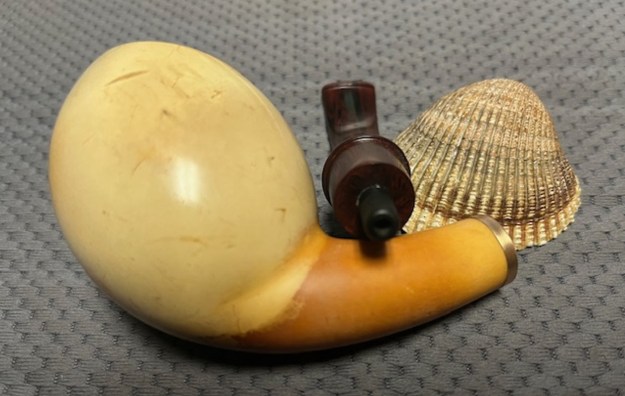
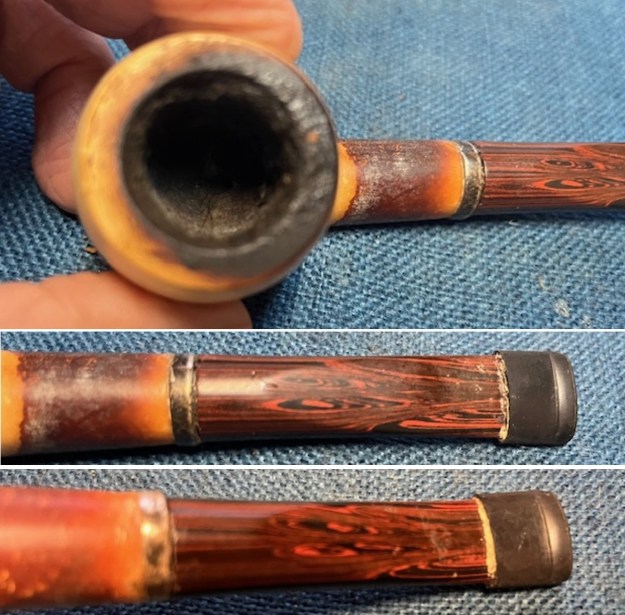
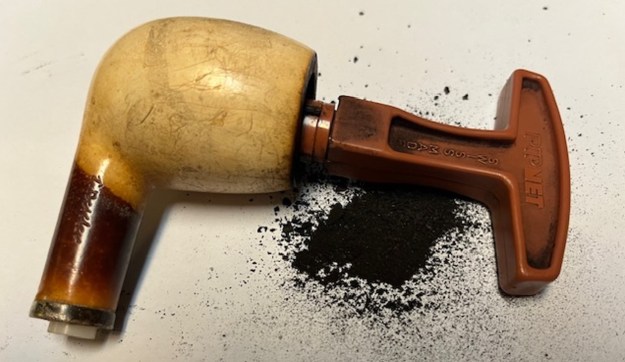
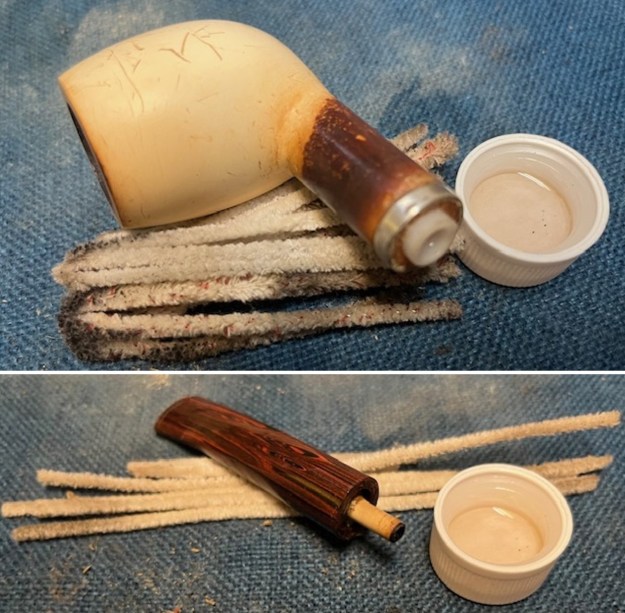
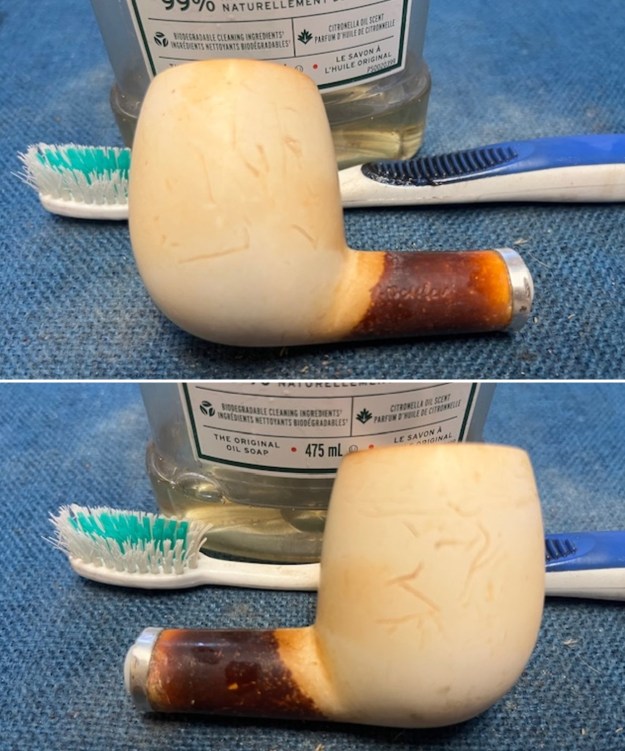
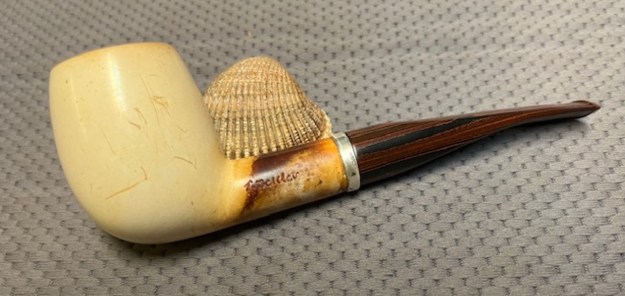
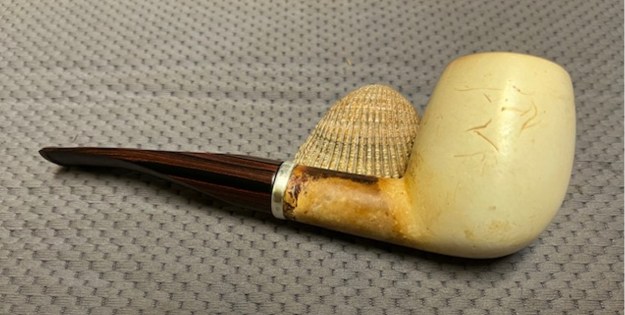
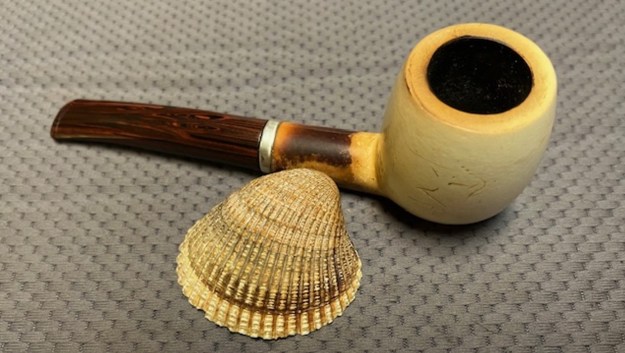
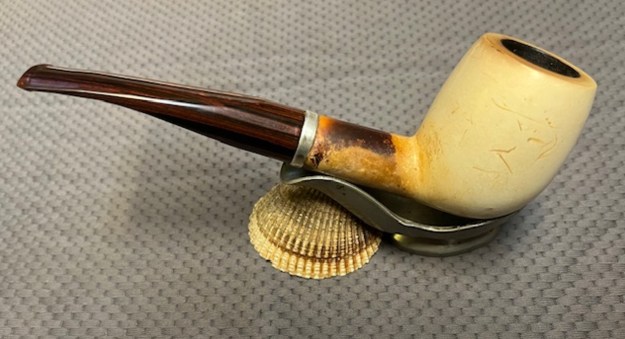
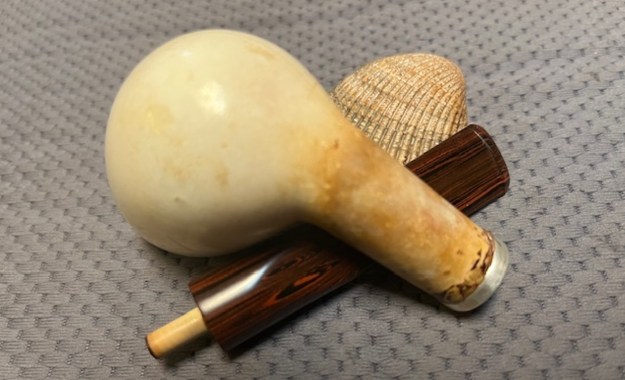
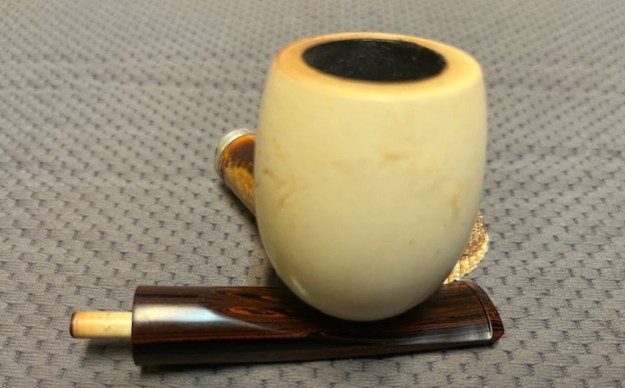
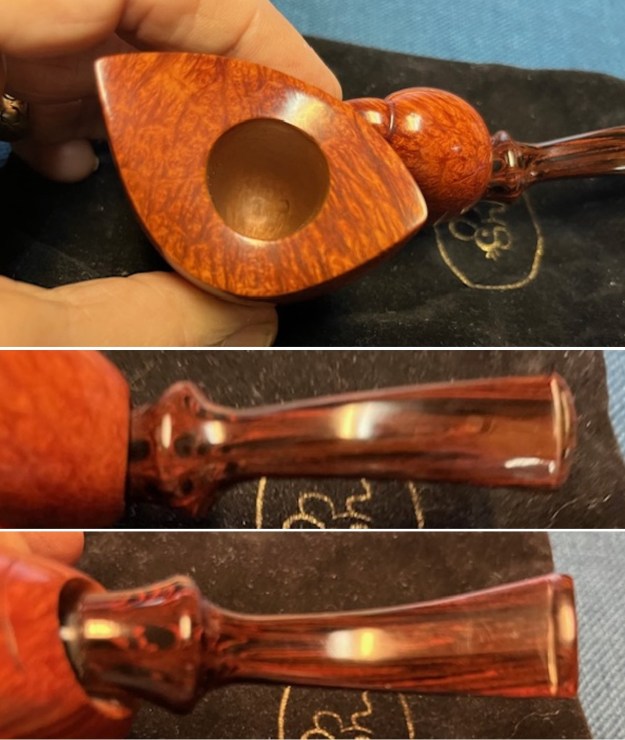
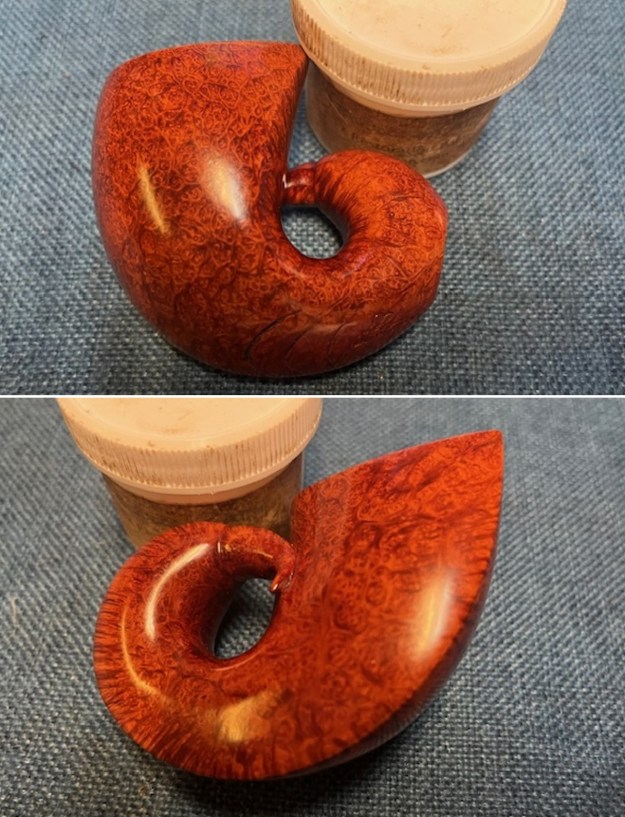
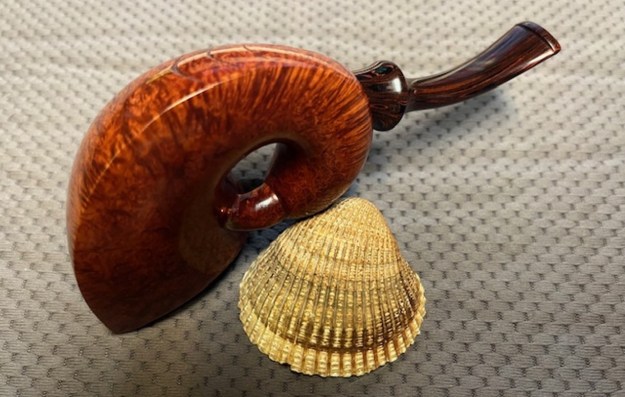
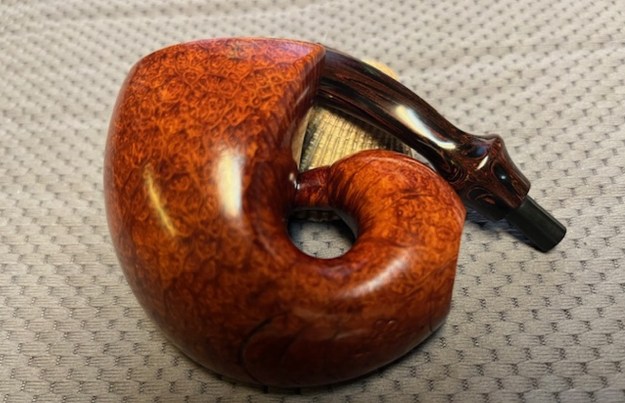
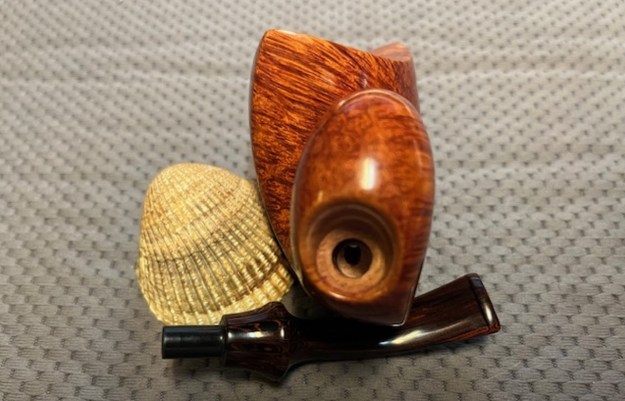
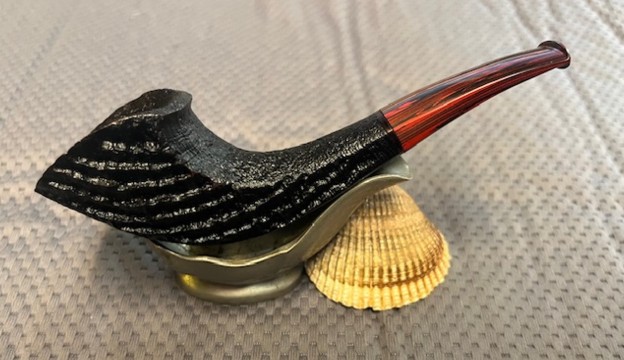
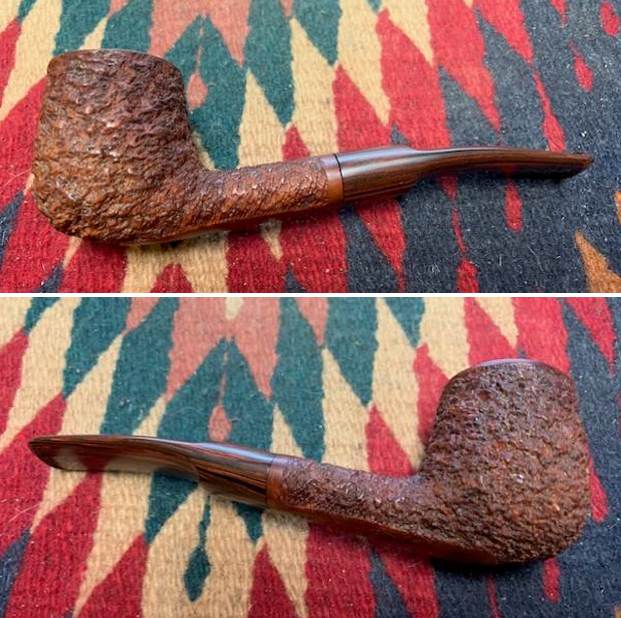
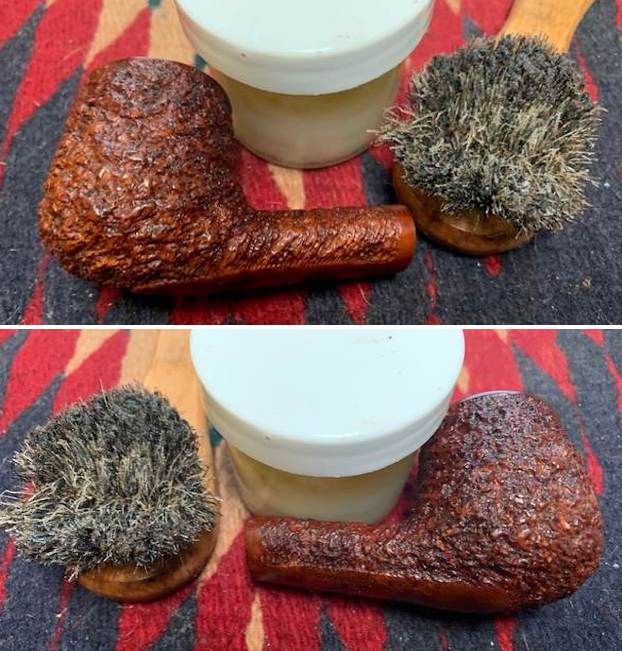
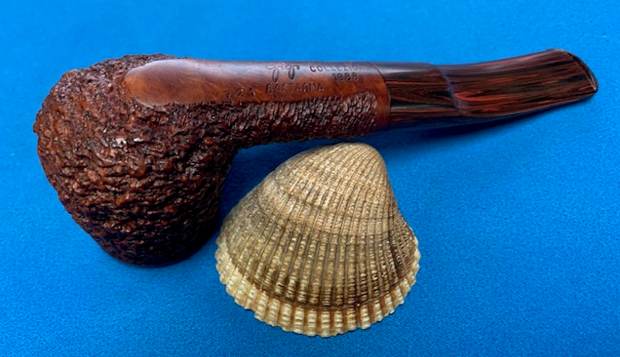
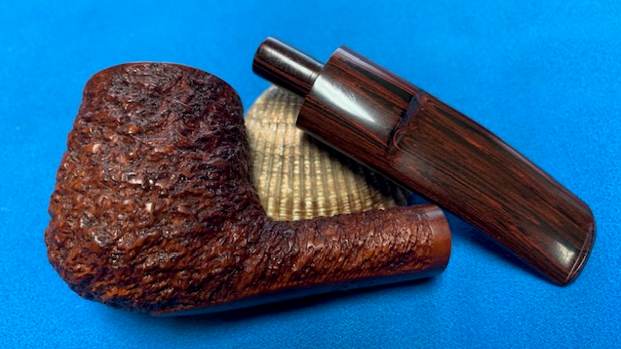
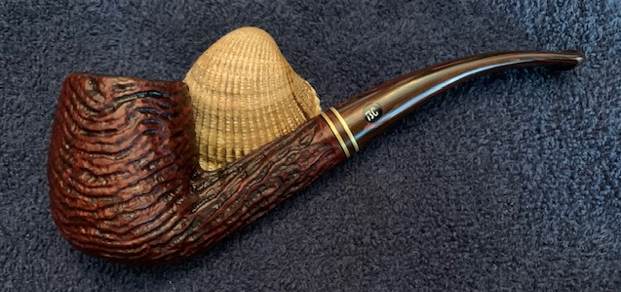
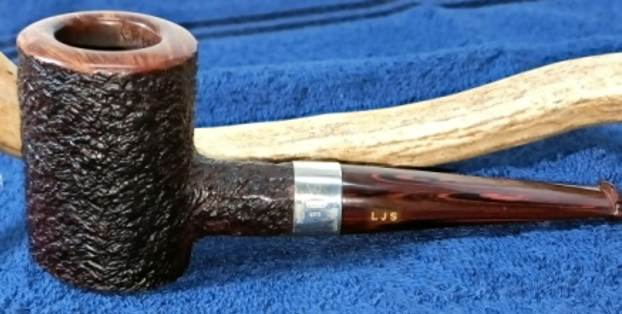
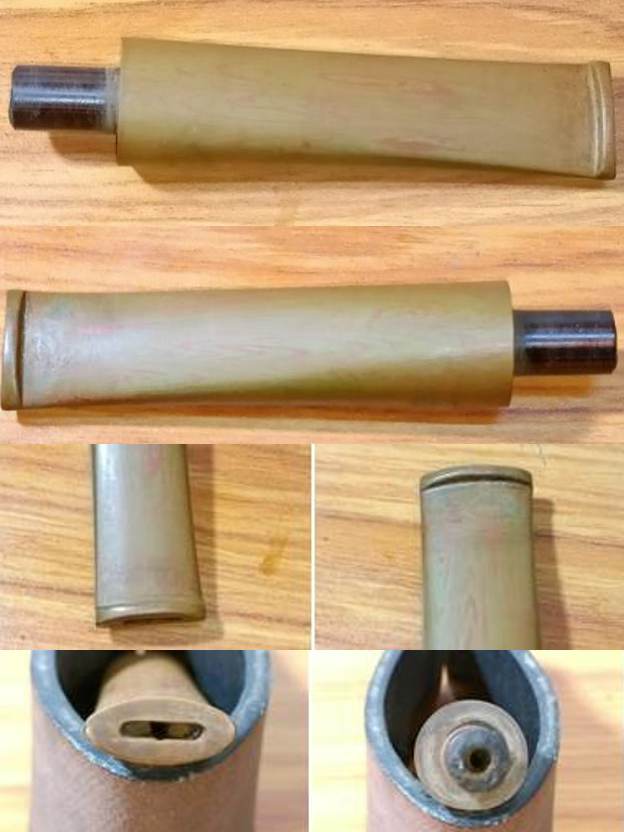
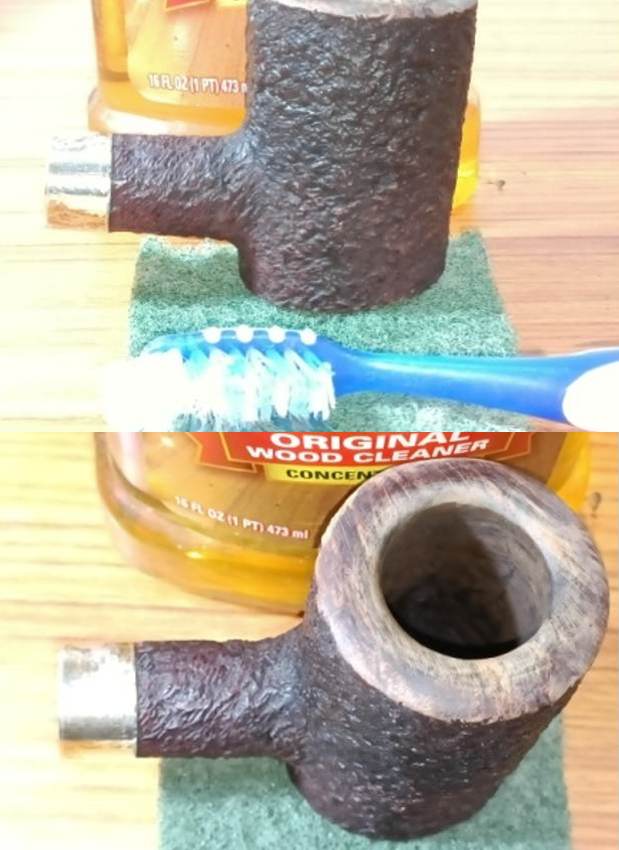
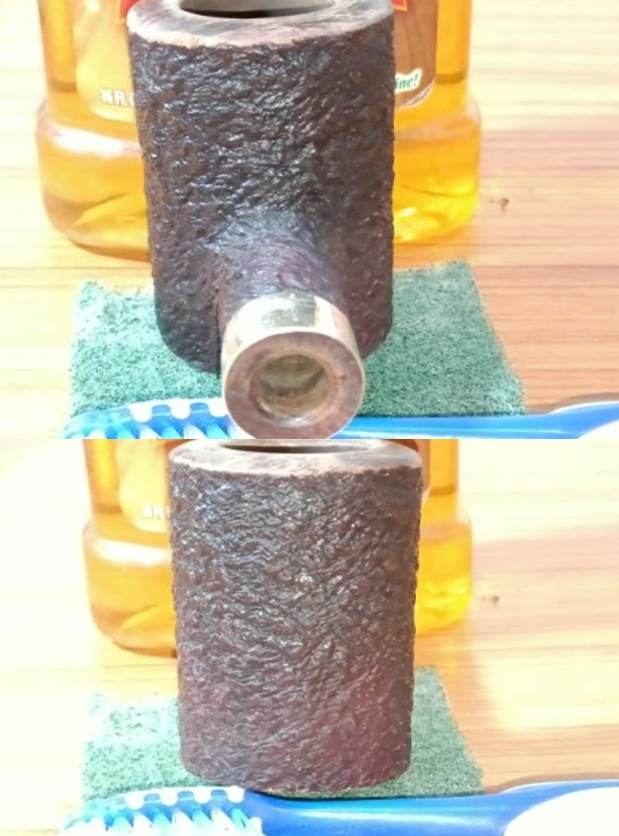
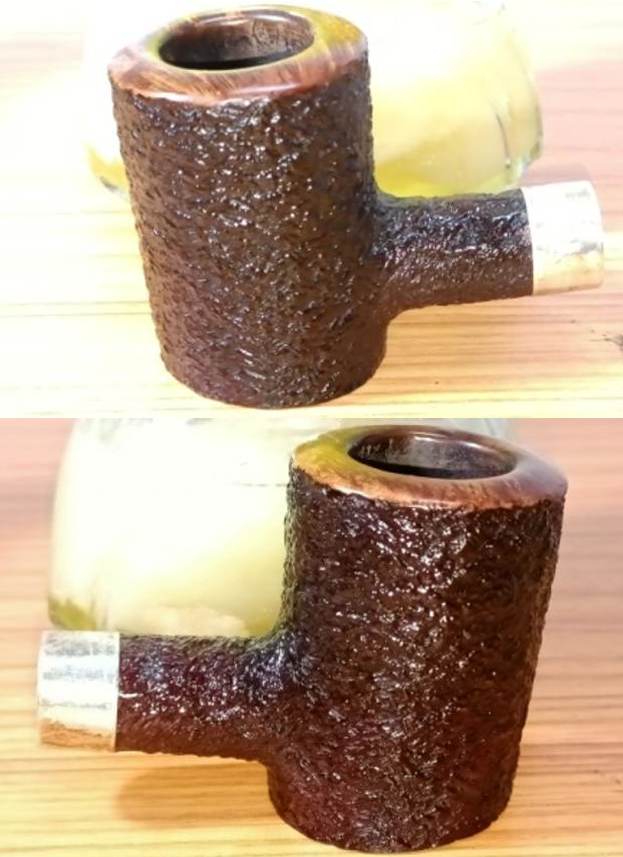
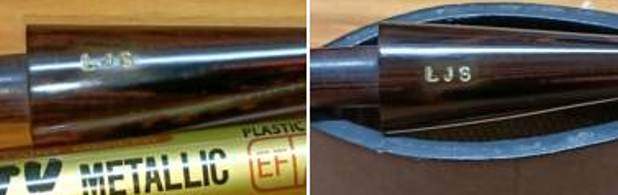
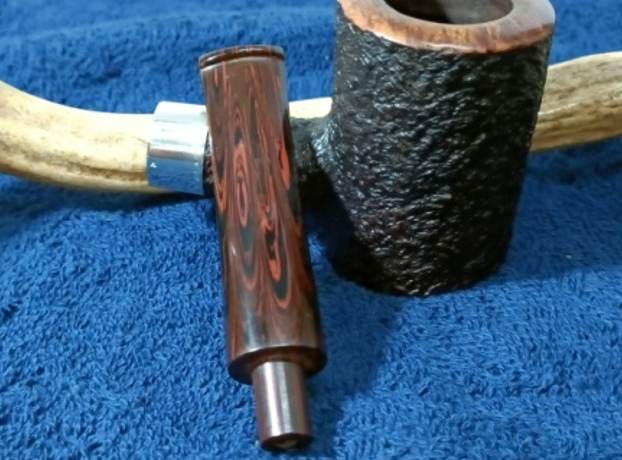
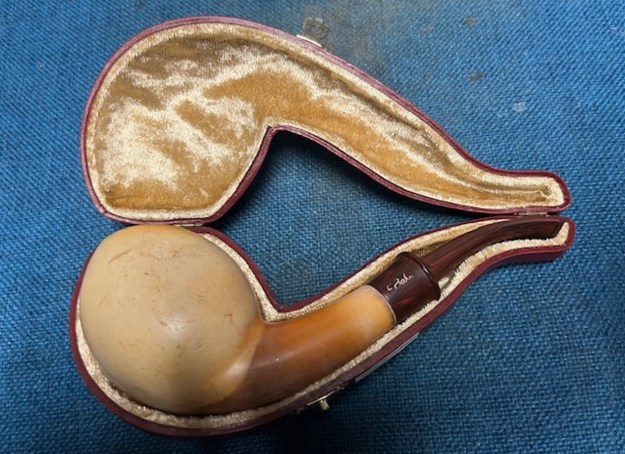
The pipe is dirty on the smooth finish with grime on the bowl sides. It does have a great looking developing patina that is darker on the shank than the bowl but the bowl is getting darker. The rim top has a coat of lava on the top and edges. The bowl has a thick cake on the walls overflowing onto the rim top. The original Cumberland saddle stem is dirty and oxidized. It bore the F. Baki stamp on the left side of the saddle. The threaded mortise was loose in the shank and came out when I turned the stem loose. The push tenon was quite clean and the fit was fairly snug in the threaded mortise. I took photos of the pipe when I removed it from the case to show what it looked like before I started working on it. 
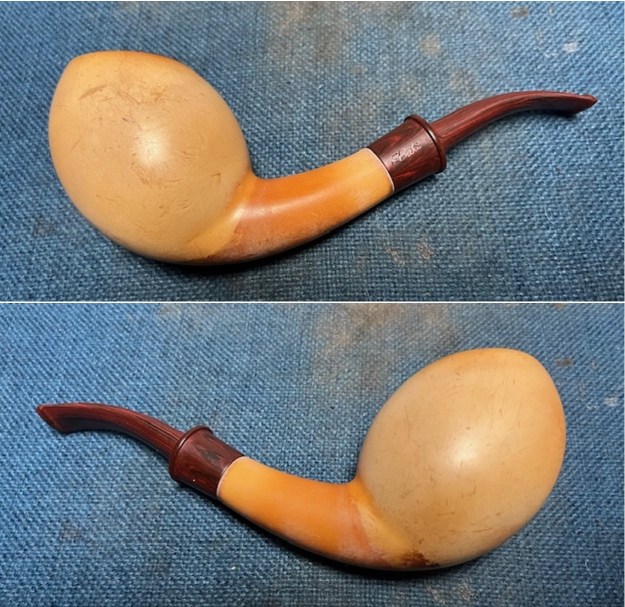
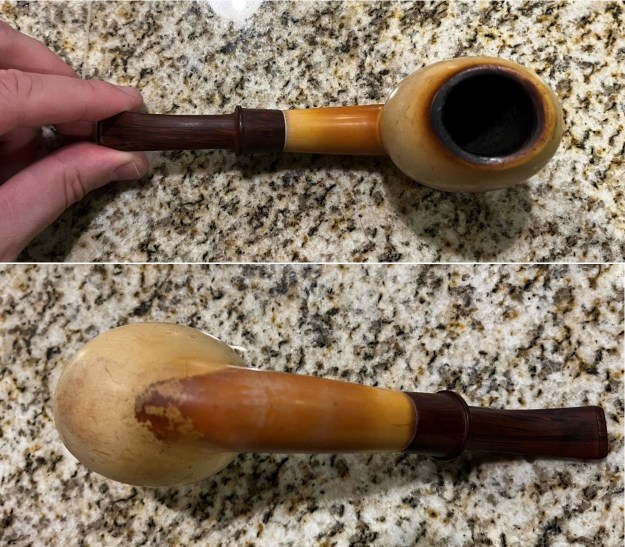
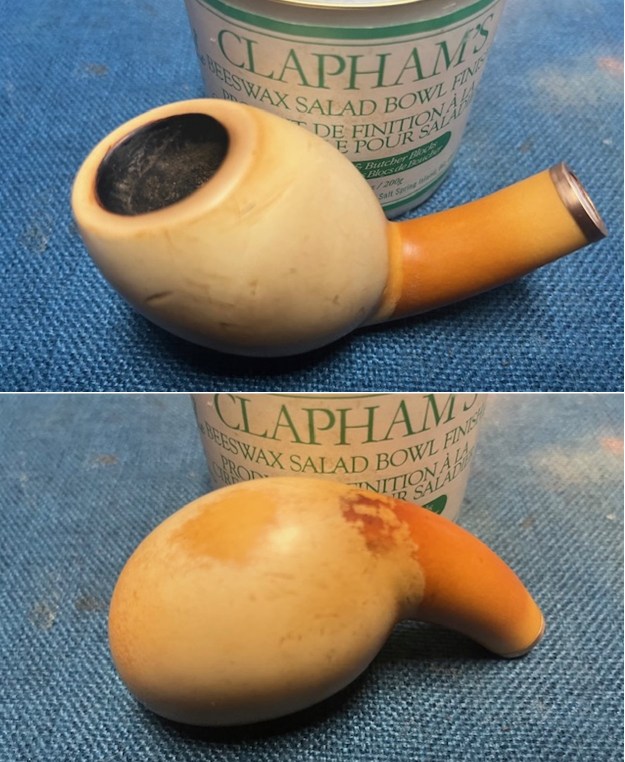
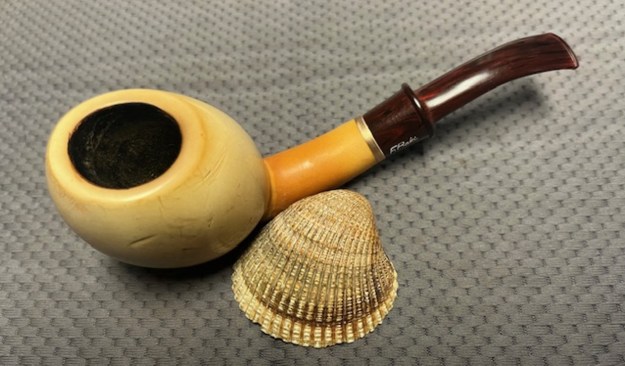
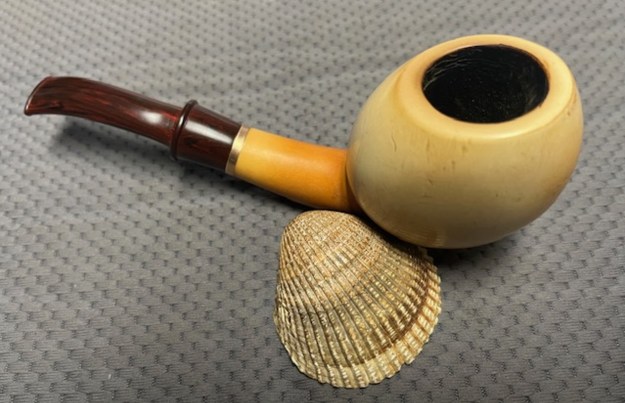
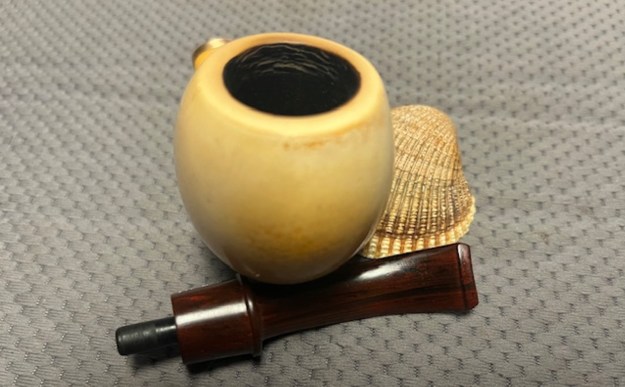
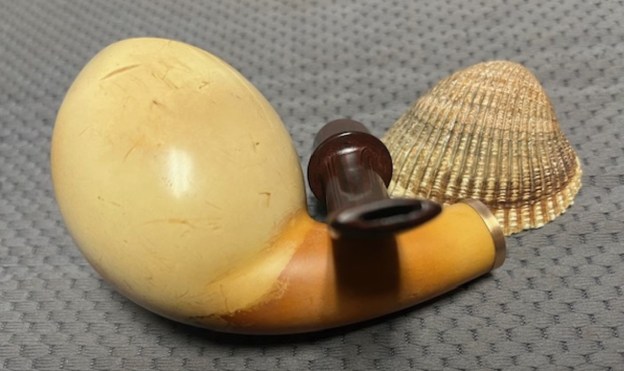
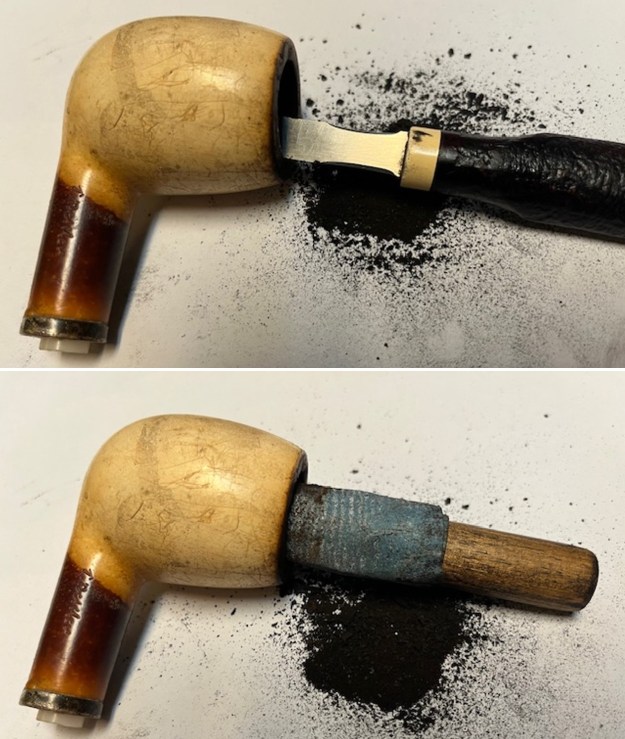
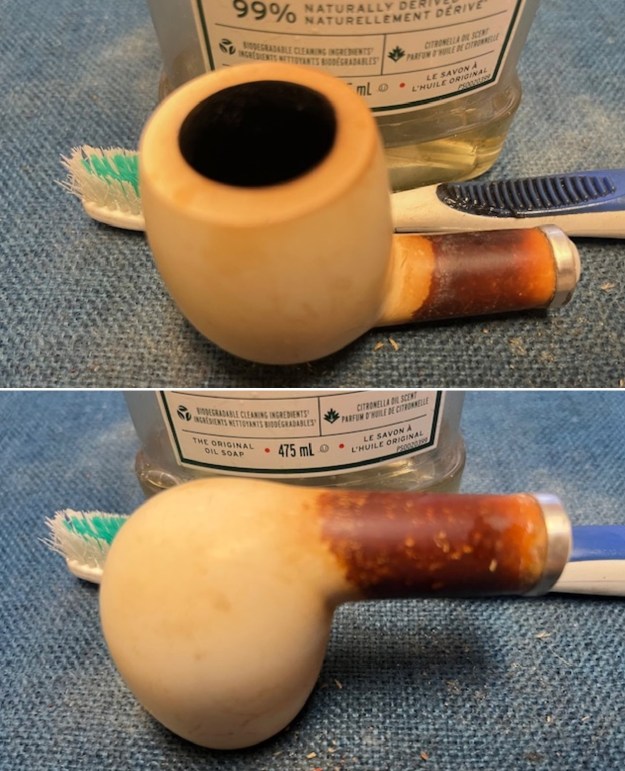
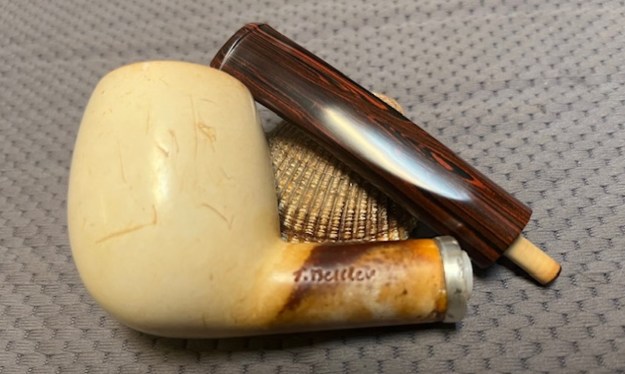
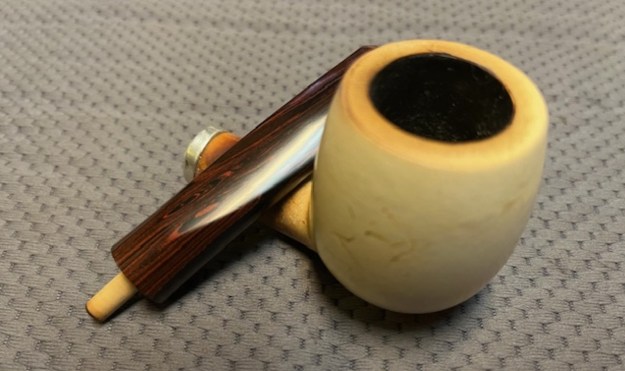
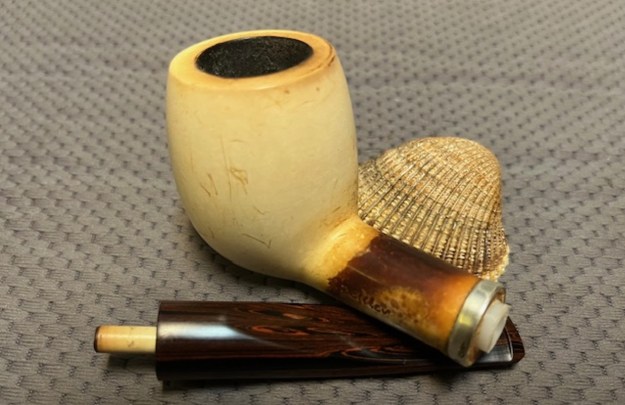
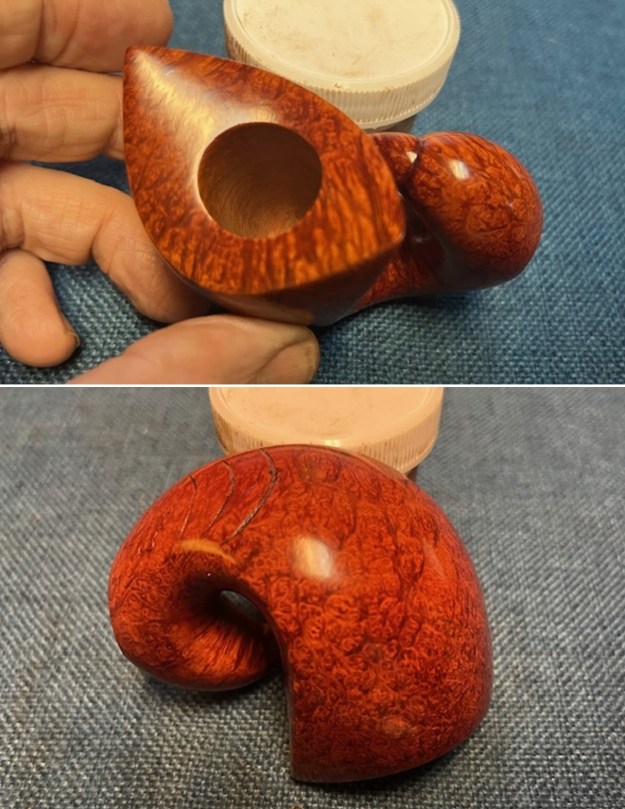
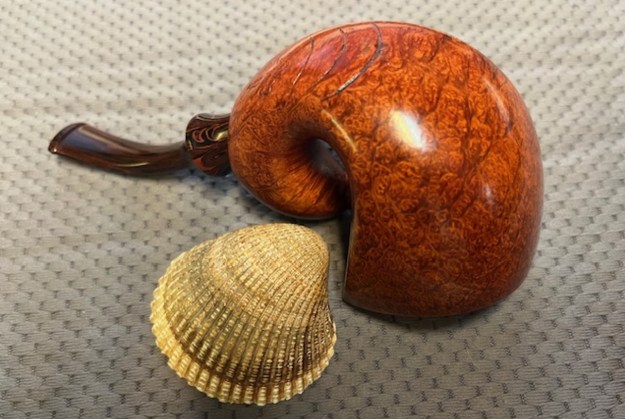
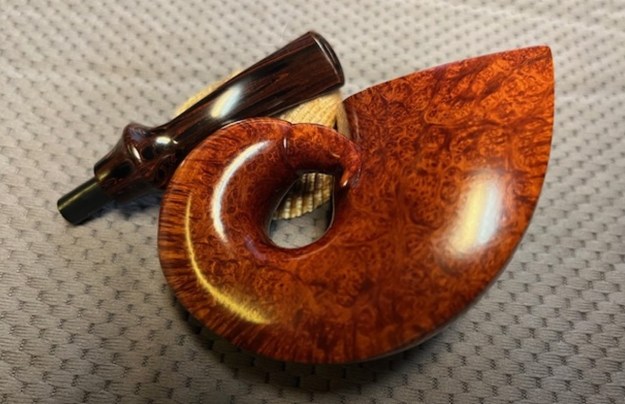
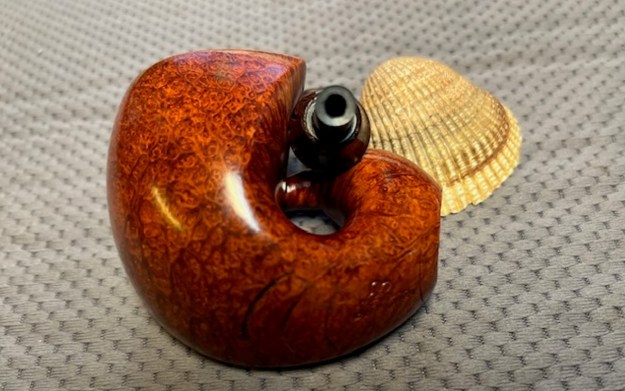
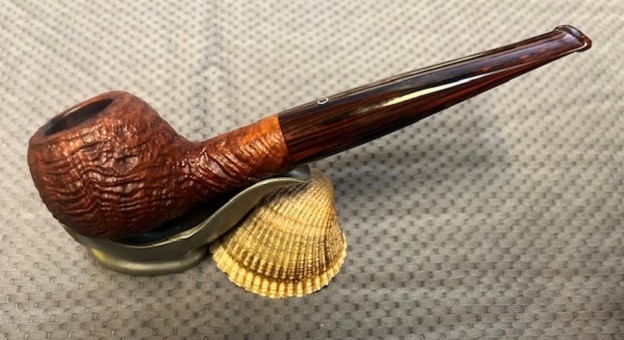
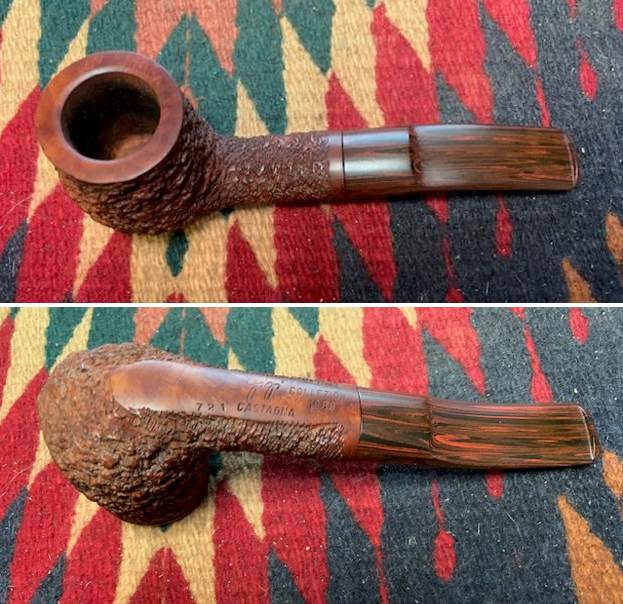
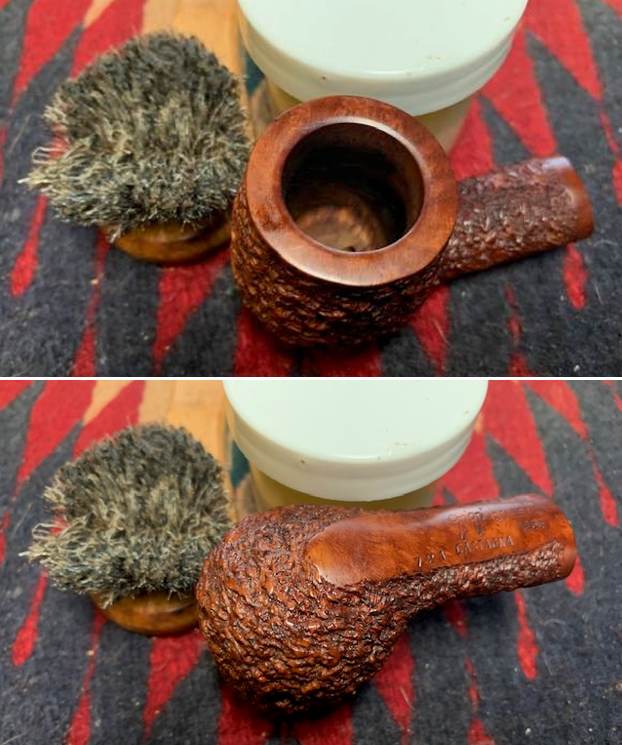
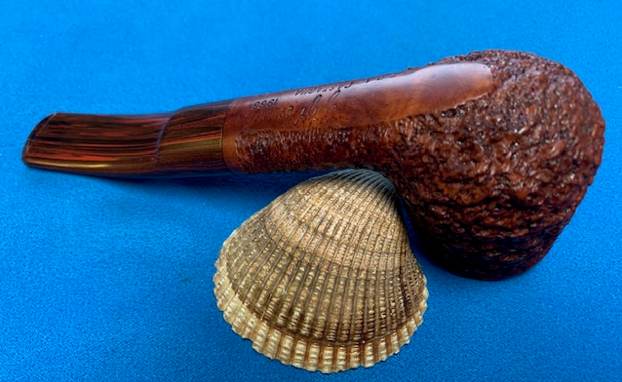
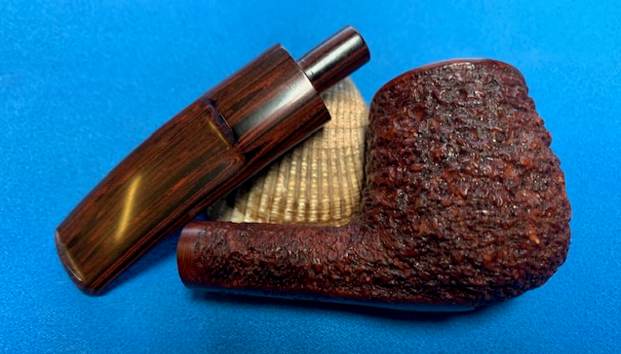
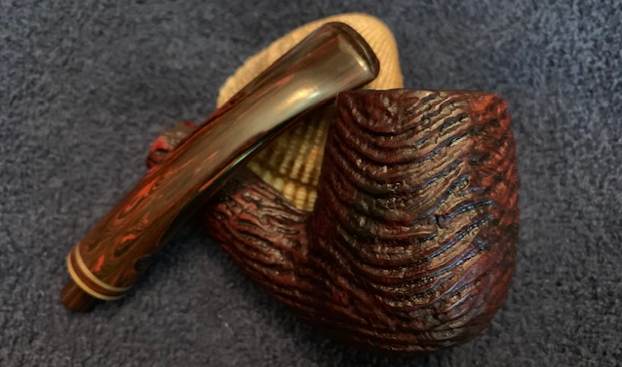
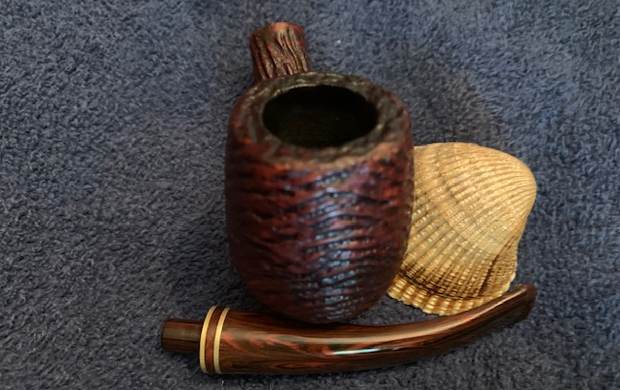
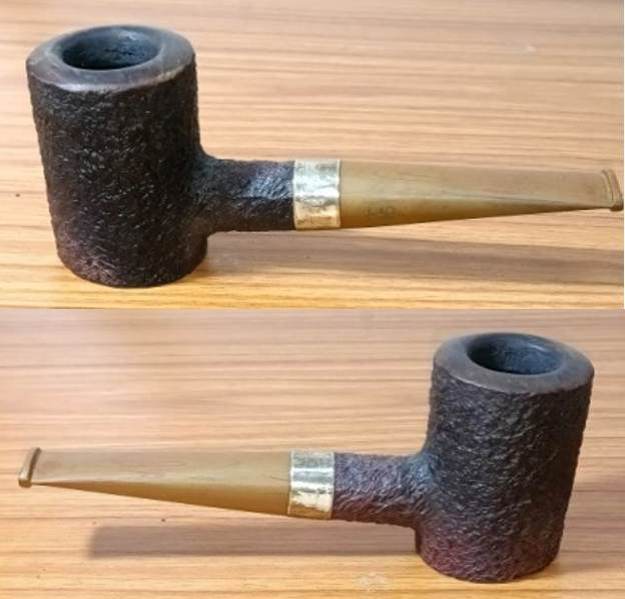
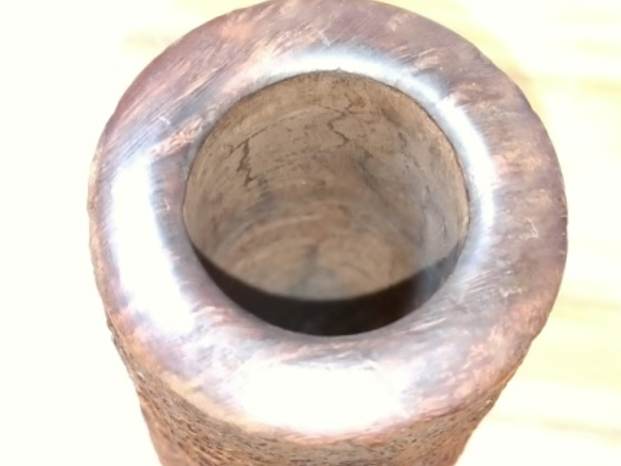
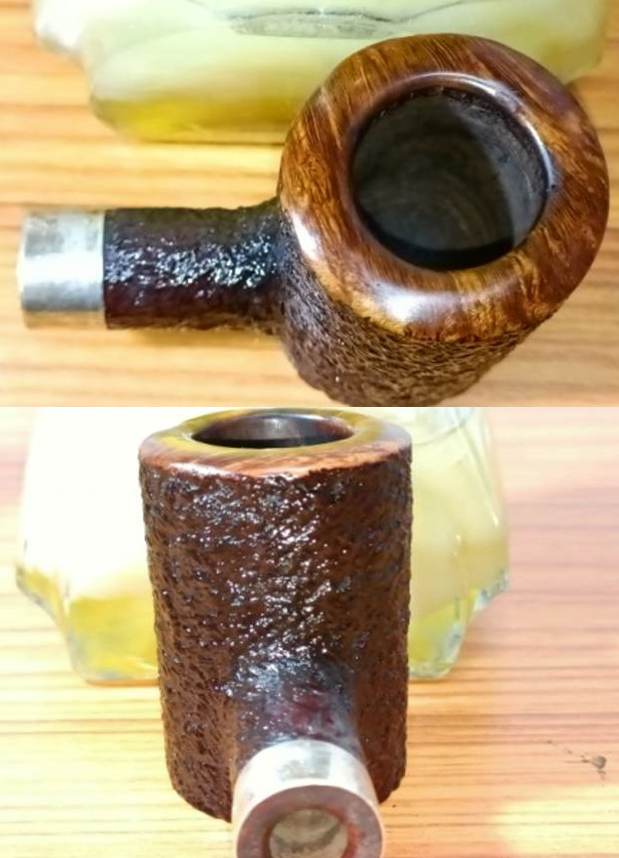
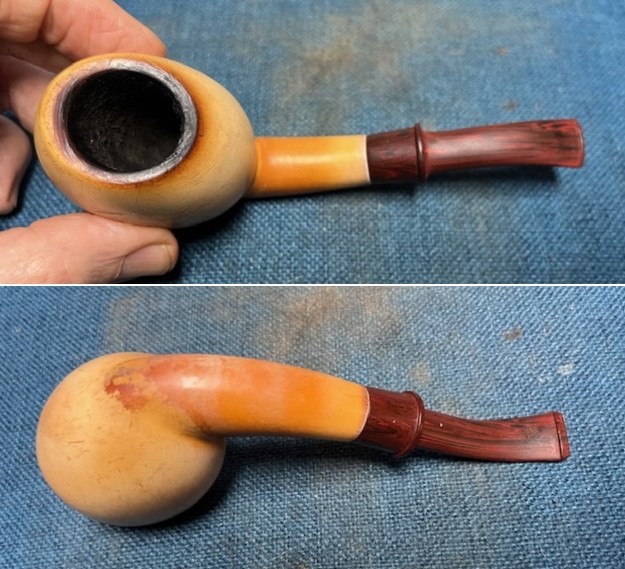
I took photos of the bowl and rim top to show the thickness of the cake and the lava coat on the rim top. There was some tobacco debris in the bottom of the bowl. The stem photos show the condition of the saddle stem ahead of the button. 
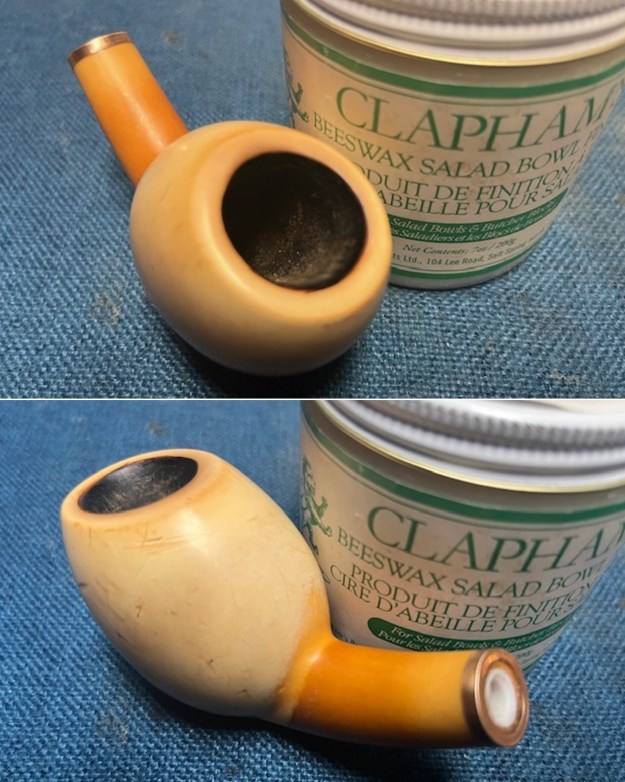
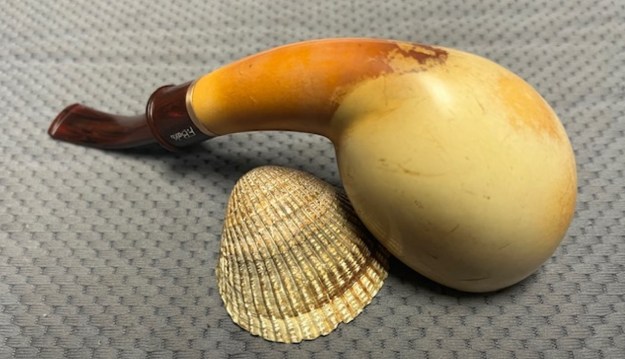
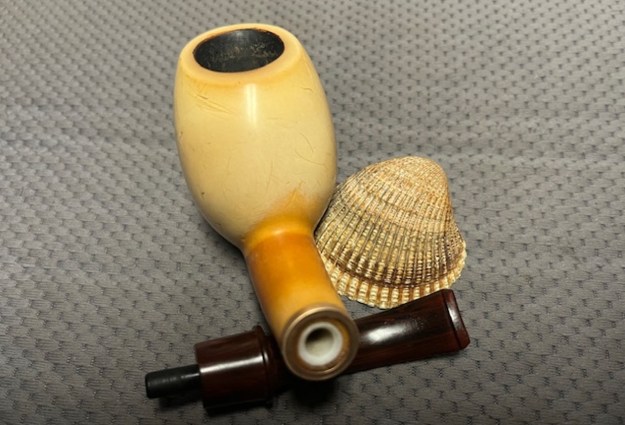
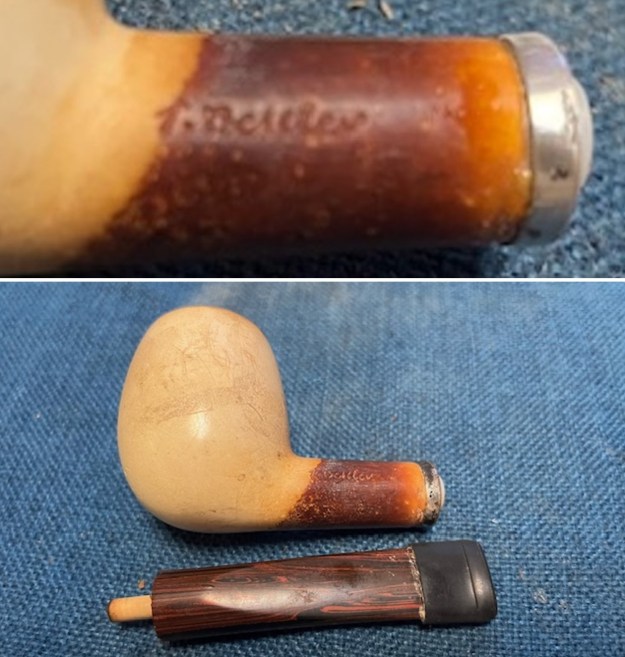
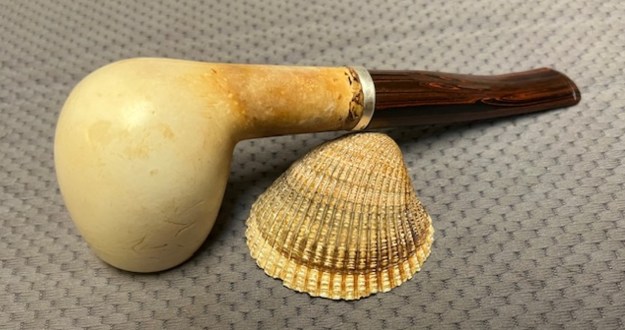
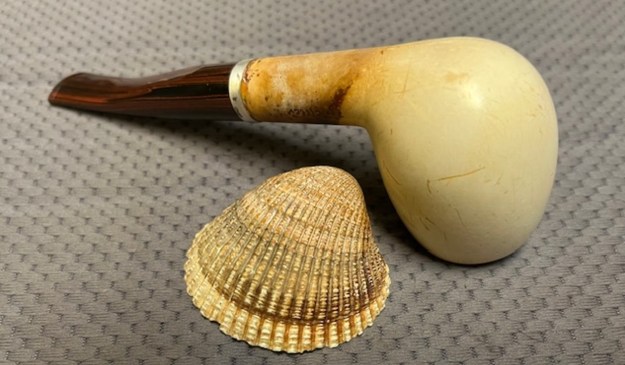
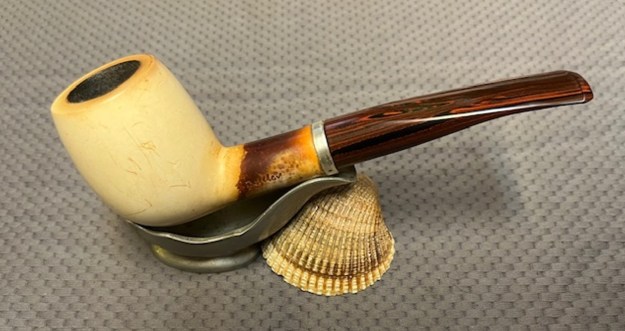
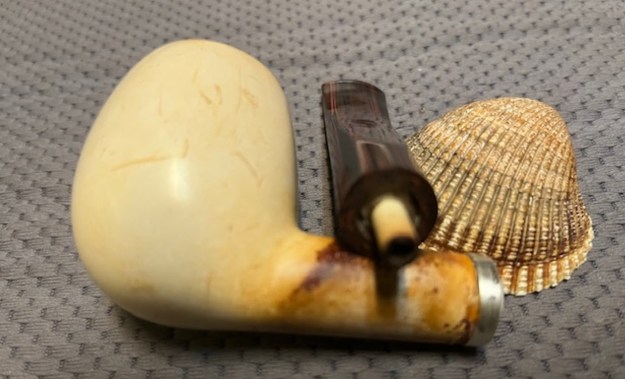
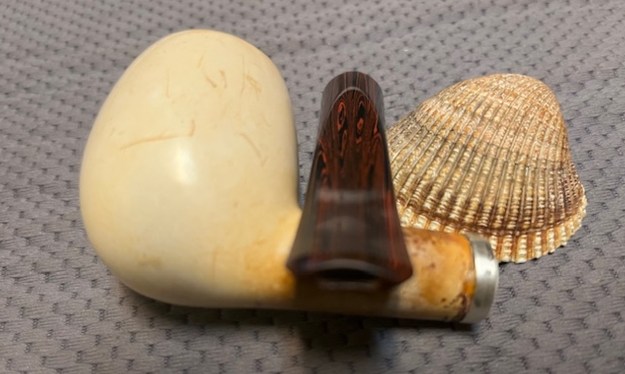
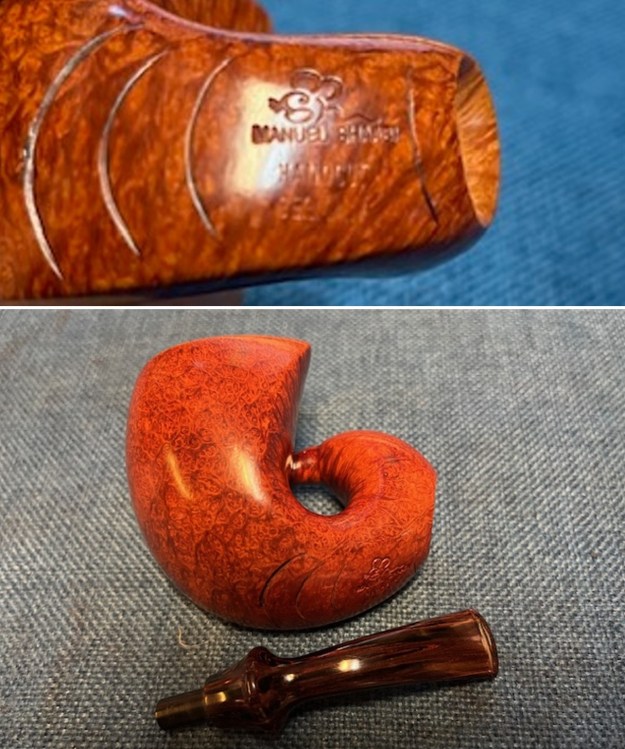
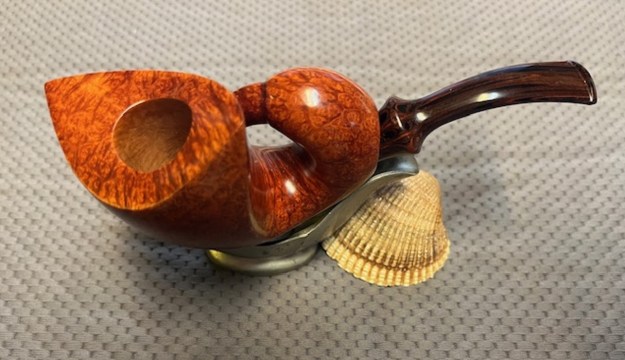
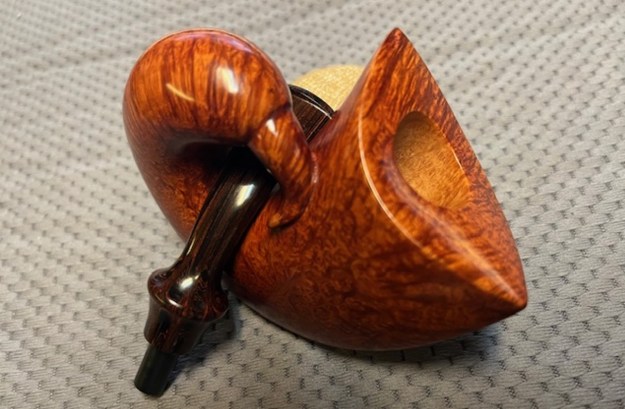
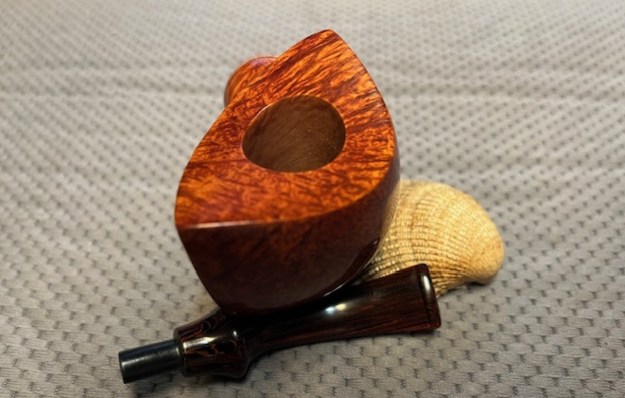
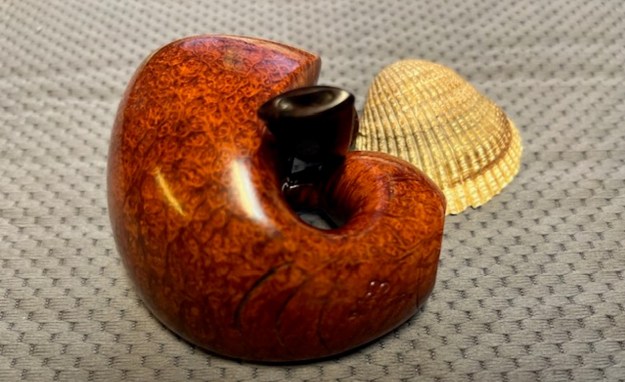
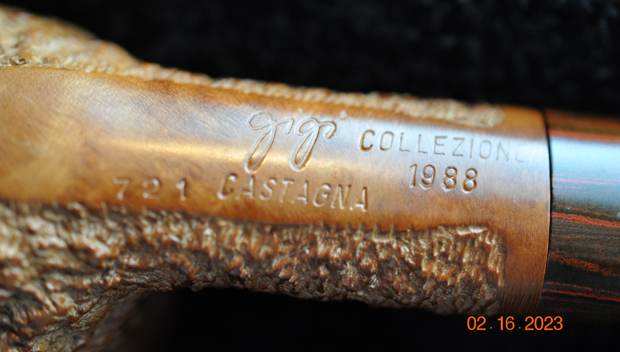
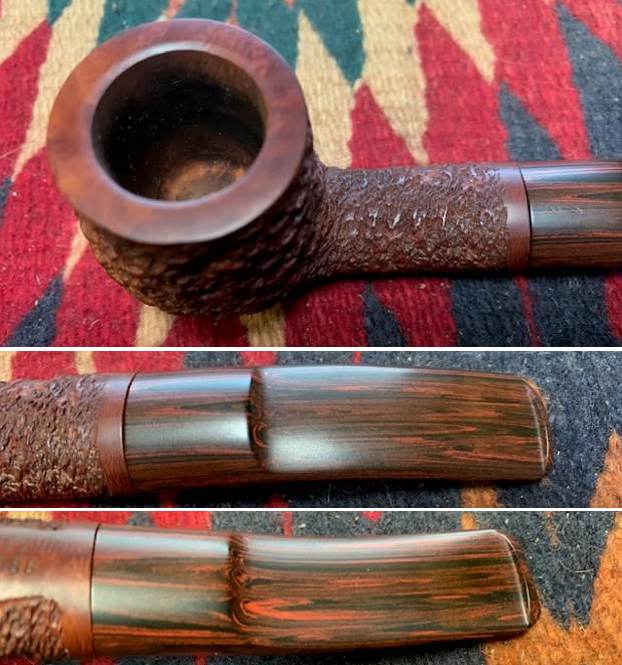
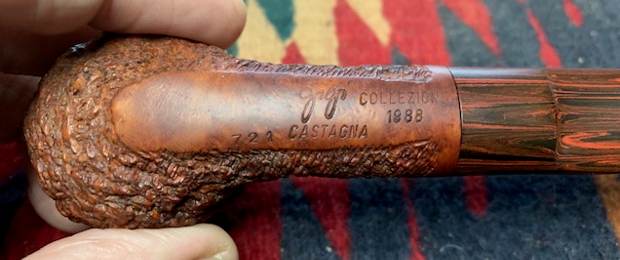
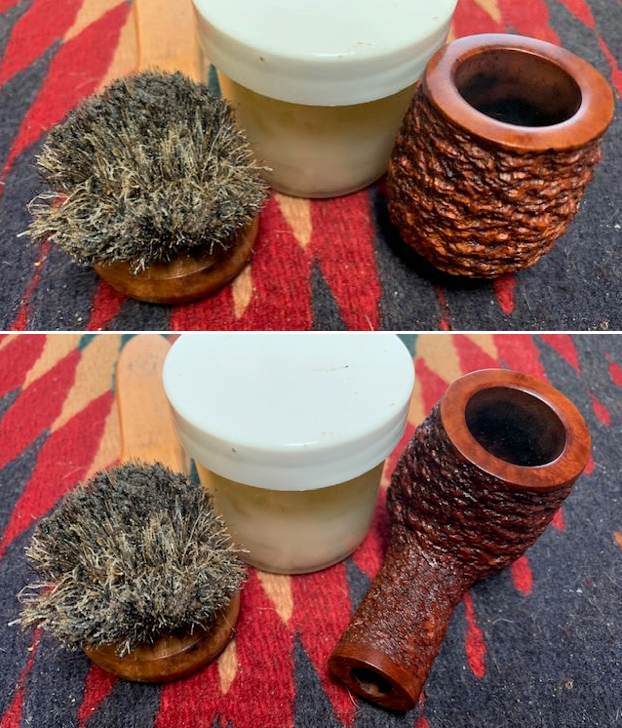
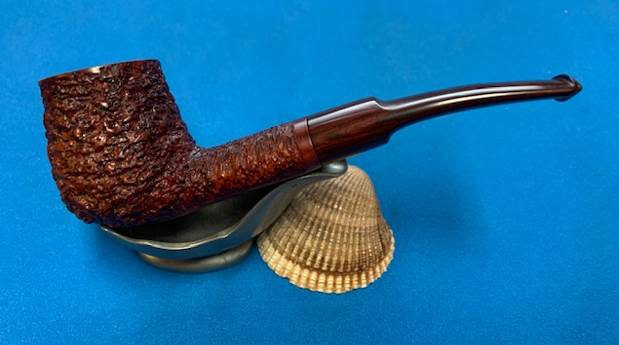
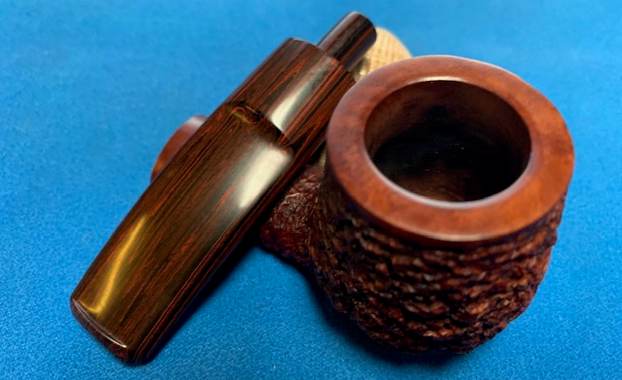
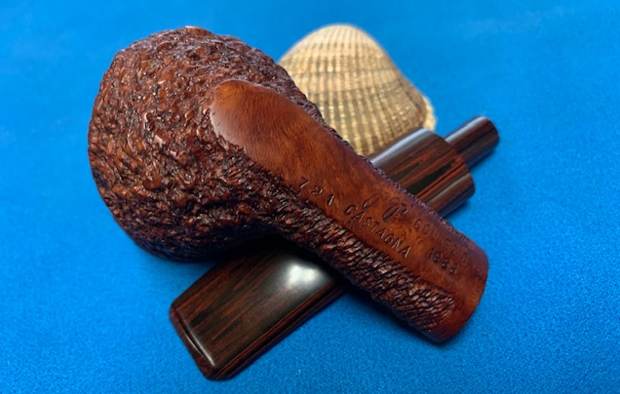
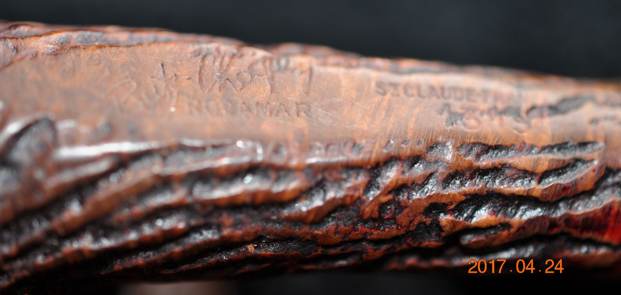
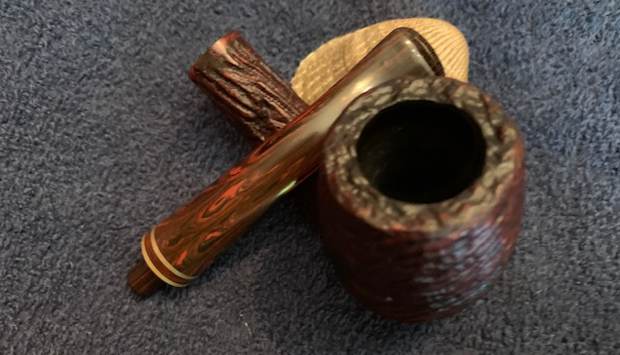
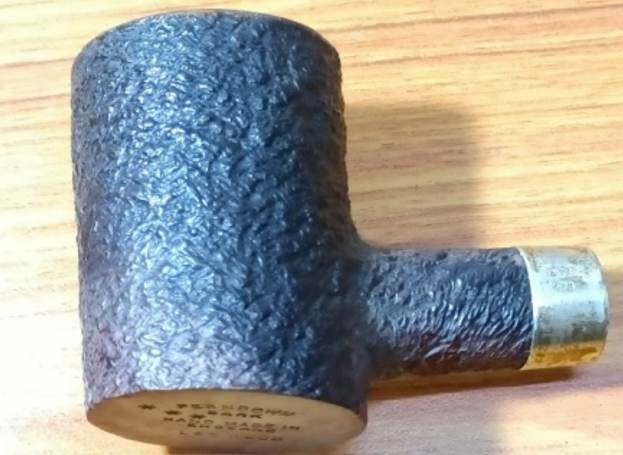
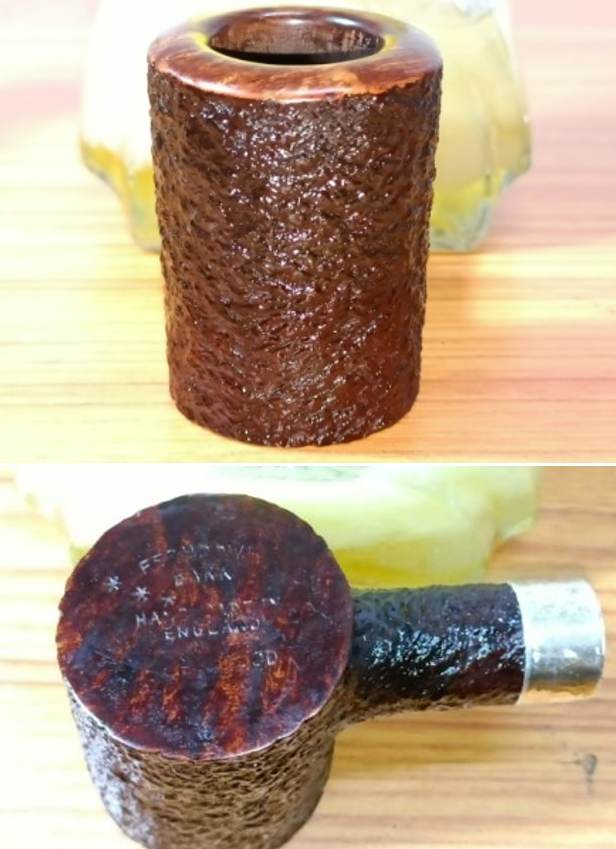
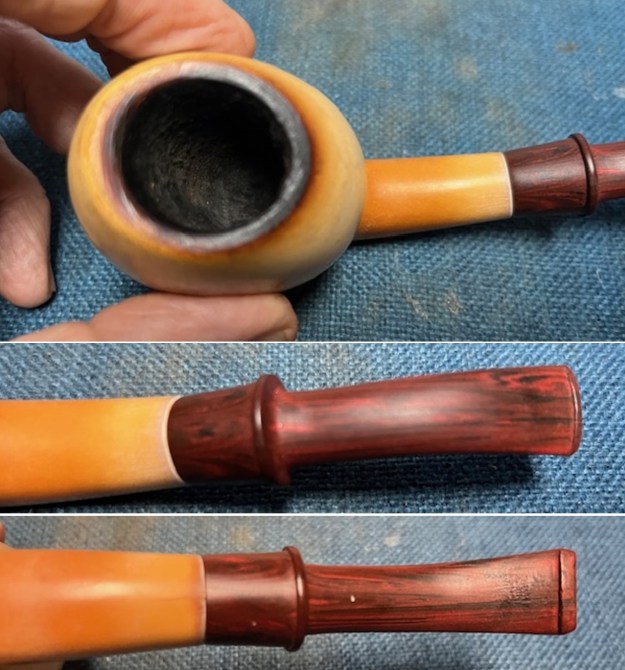
The stamping on the side of the saddle stem is clear and readable as noted above. I took a photo of the pipe with the stem removed to give a sense of the proportions of the pipe. It is a real beauty.
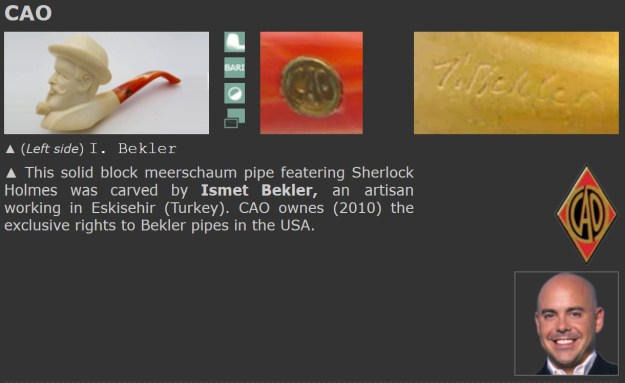
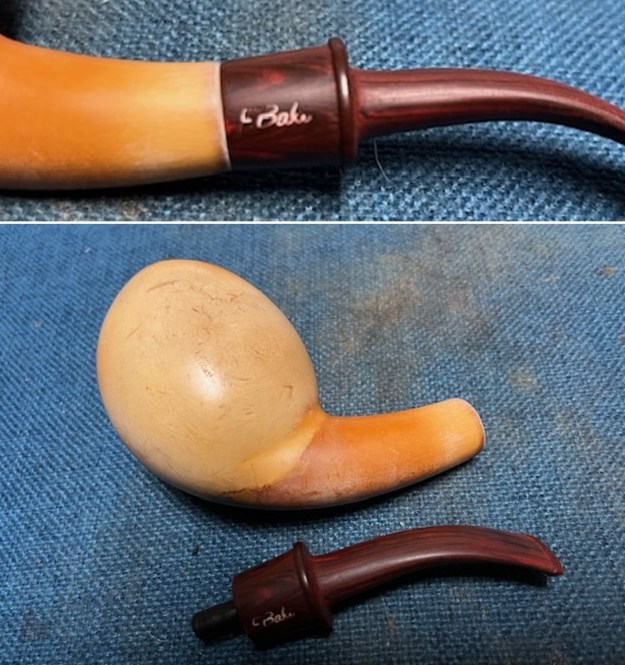
Before I started working on the pipe I did a bit of research on the brand to learn as much as I could about it (http://www.pipephil.eu/logos/en/logo-f2.html#fikribaki). I did a screenshot of the pertinent information and have included it below.
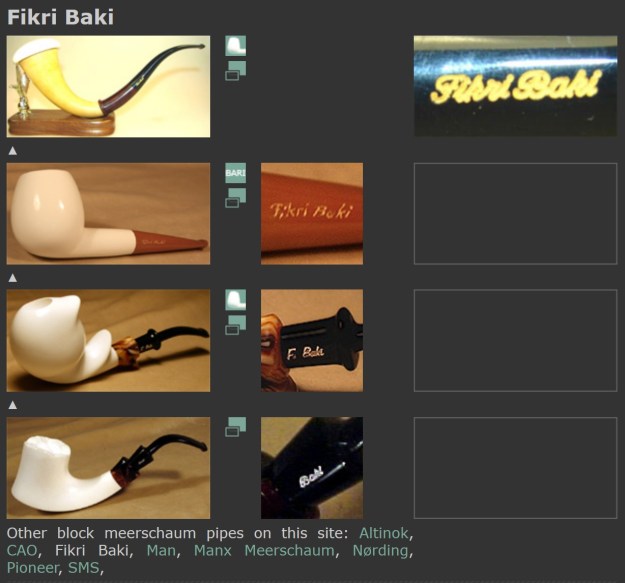
I turned next to Pipedia (https://pipedia.org/wiki/Fikri_Baki) and found a short quote from Pipes, Artisans and Trademarks, by Jose Manuel Lopés’

Fikri Baki is a young Turkish meerschaum pipe maker, who trained in Europe with a well-known artisan. He produces models inspired by contemporary Danish aesthetics, with handmade stems. For many years, Baki’s pipes were distributed exclusively by Deniz Ural. As of 2019, he is distributed by the Chinese-based TuWun Meerschaum store which is sold through AliExpress.

His stamp is his signature done on the side of the stem and is either F. Baki or on some newer pipes, Fikri Baki.

I turned also to the Meerschaum Market site (https://www.meerschaummarket.com/master-carvers/f-baki/) where I found a little more information on the maker. I quote: F. Baki

Fikri Baki Cetekinkaya is a well-known meerschaum pipe carver who lives in Eskisehir, Turkey. He was born in to meerschaum, he is from Sepetci, new name Beyazaltin village. Village’s new name means “White Gold” in English.

He started carving meerschaum pipes in 1969 as an apprentice. He had been trained by the top master carvers in 1970s. He worked on figural pipes for many years as all meerschaum pipe carvers. European pipe carvers inspired him and he moved away from sculpture carving to classic shapes, his own styles and freehands. His passion to meerschaum pipe carving took him to the most preferred carvers. He is the first master carver who worked with bamboo in Eskisehir. F. Baki is already retired…

I turned to work on the pipe itself. I reamed the bowl with a PipNet pipe reamer using the cutting heads 2 and 3. I finished the reaming with a Savinelli Fitsall Pipe Knife. I sanded the walls of the bowl with 220 grit sandpaper wrapped around a piece of dowel. 
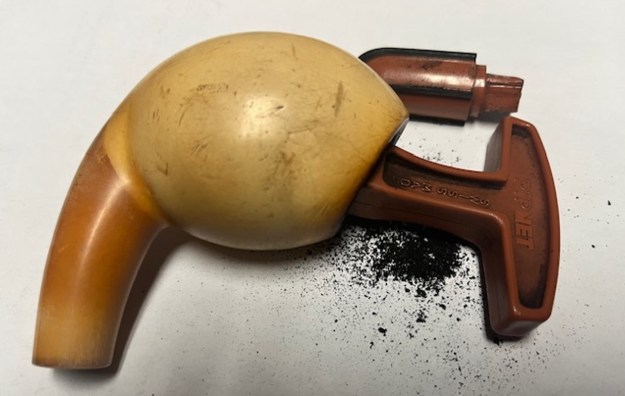
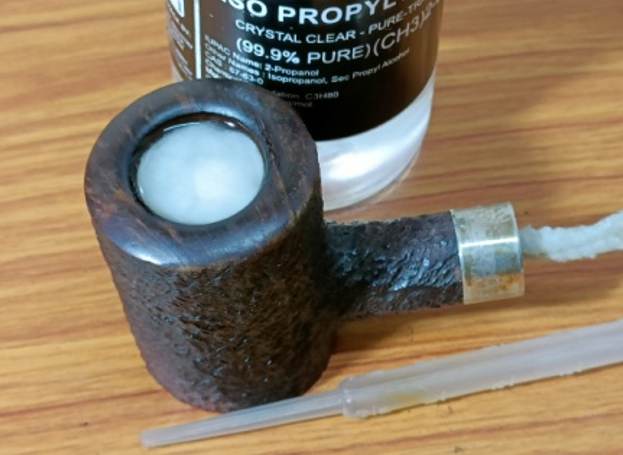
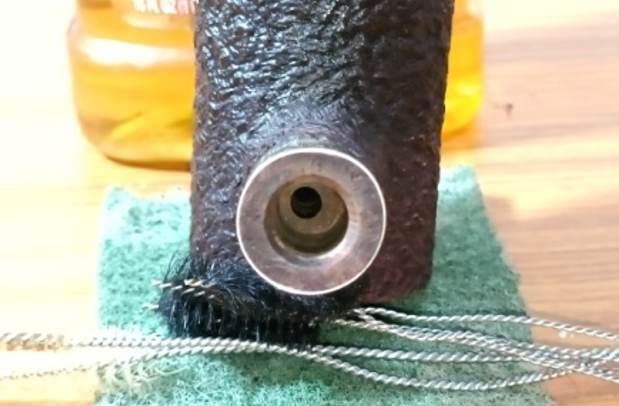
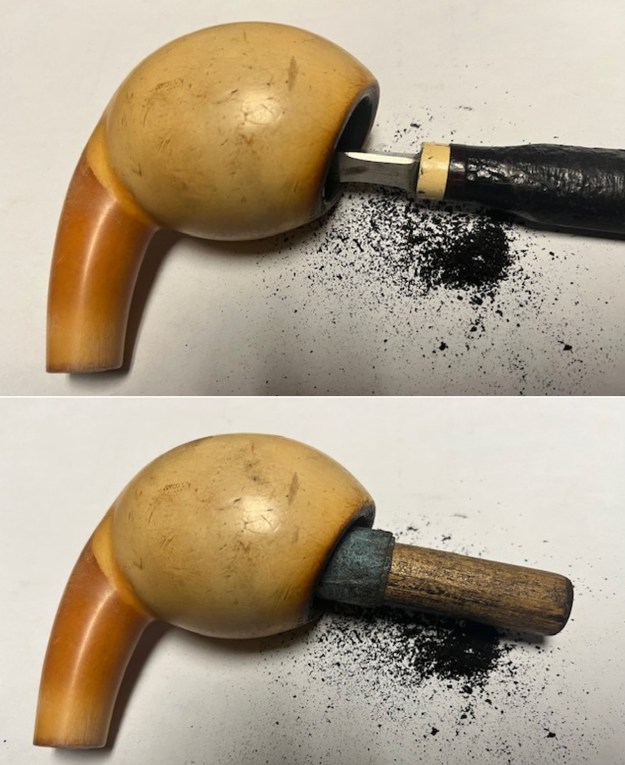
I cleaned out the inside of the shank and the airway in the stem with alcohol, cotton swabs and both bristle and regular pipe cleaners.
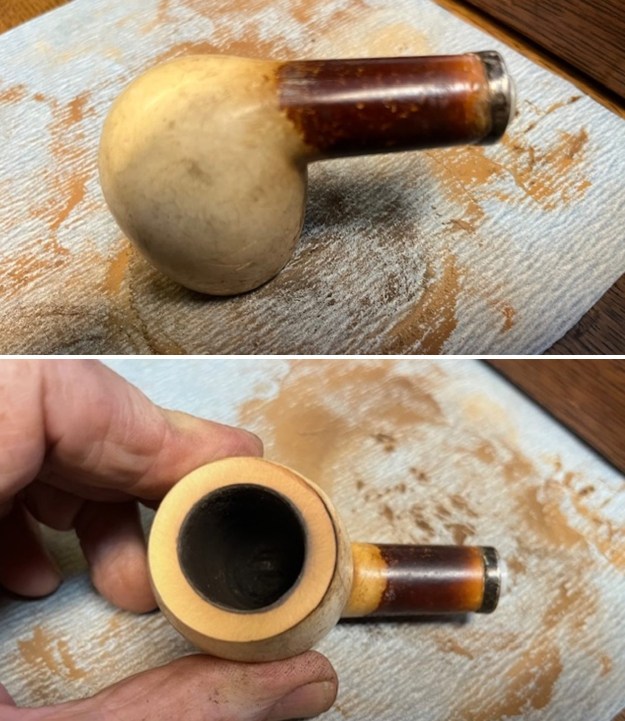
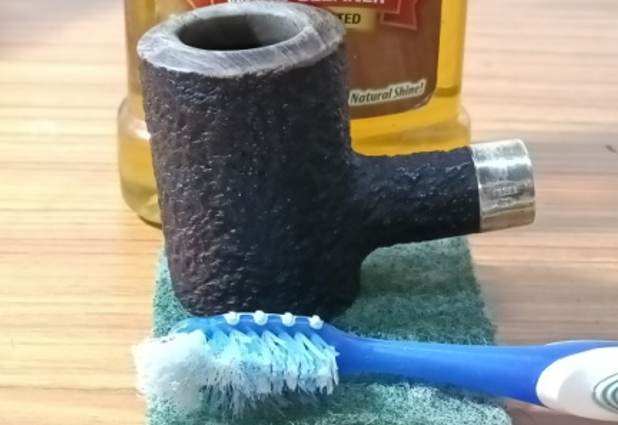
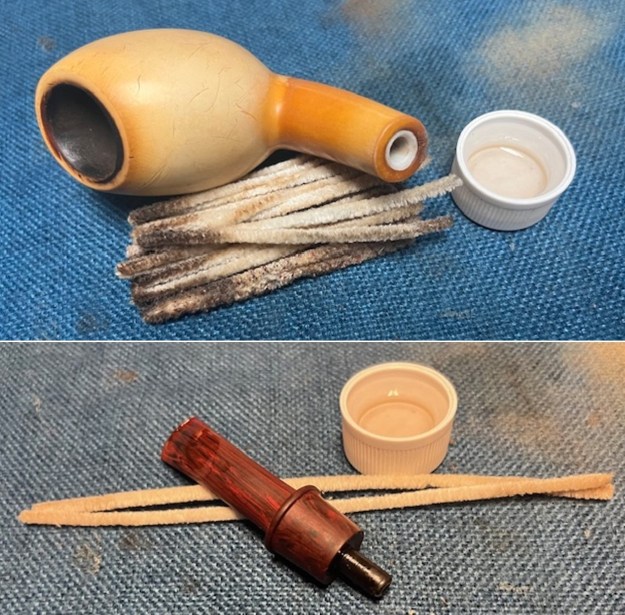
I scrubbed the bowl and shank with a tooth brush and some undiluted Murphy’s Oil Soap. I rinsed it off with warm water to remove the dust and soap from the finish. I dried it off with a soft cloth and it looked much better. 
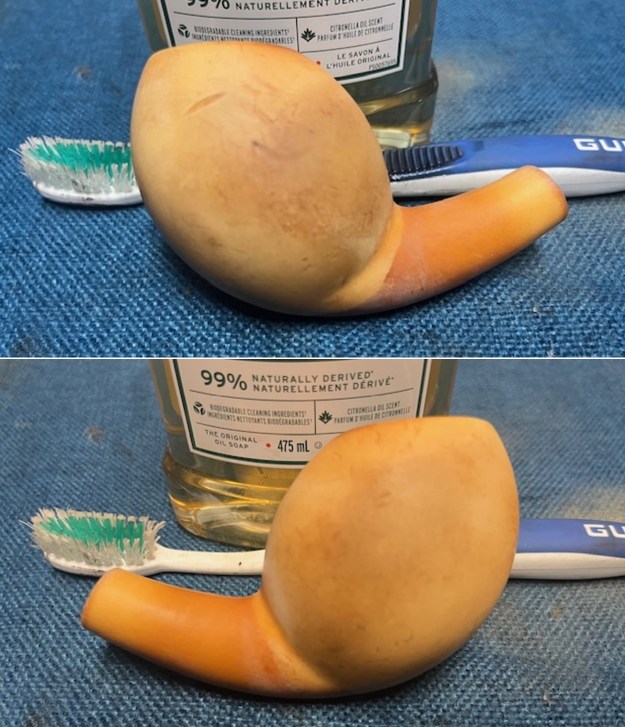
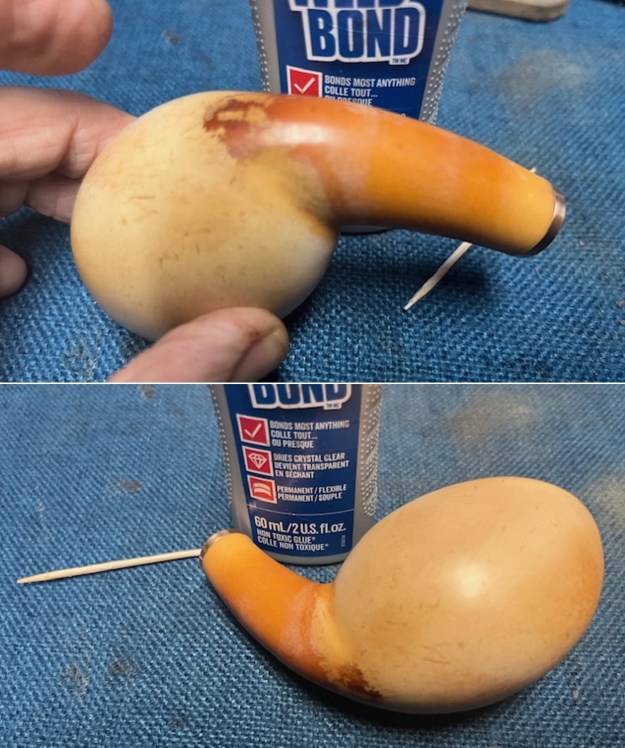
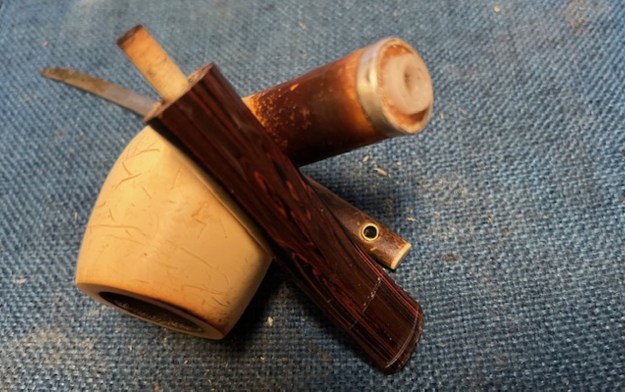
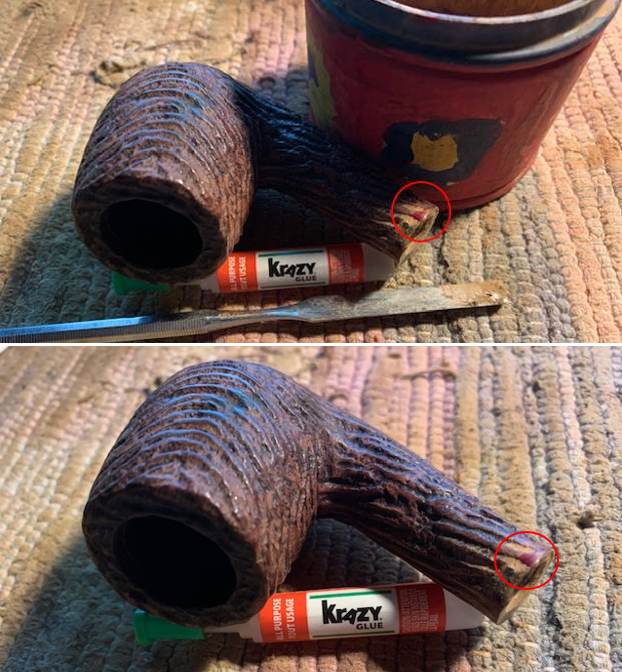
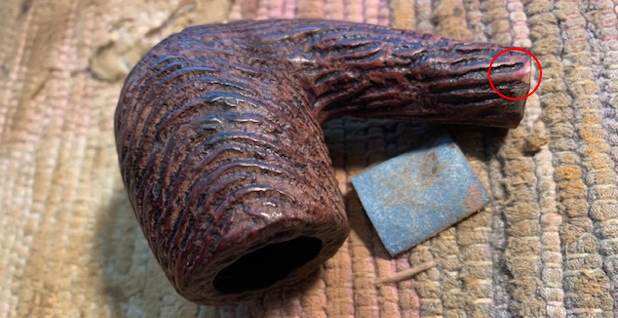
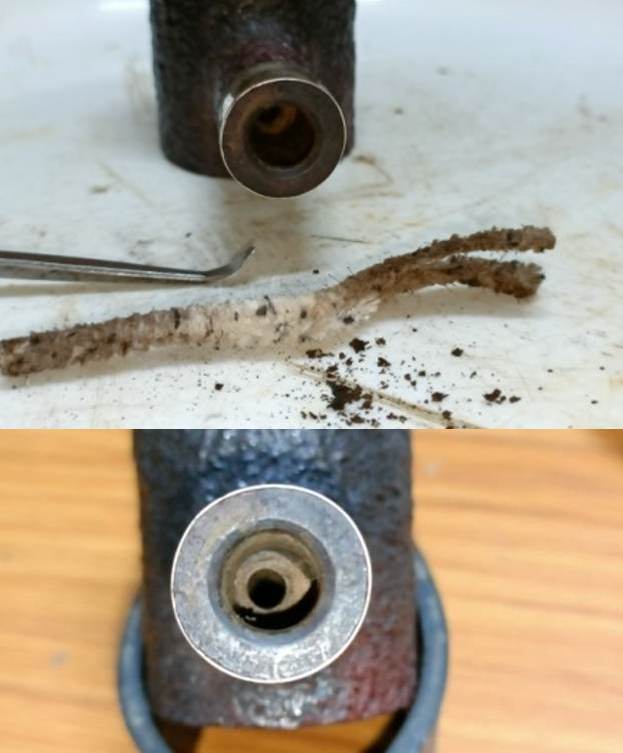
I examined the bowl after it was clean and found a small crack on the underside of the shank. It was a small hairline crack that explained why Dave had noted in his email to me that the stem was loose. It also explained why the nylon threaded mortise in the shank was also loose. I gave it a think line of all-purpose glue and then coated the inside of the thin brass band with the glue as well. I pressed it on the shank end and wiped off the excess glue. 
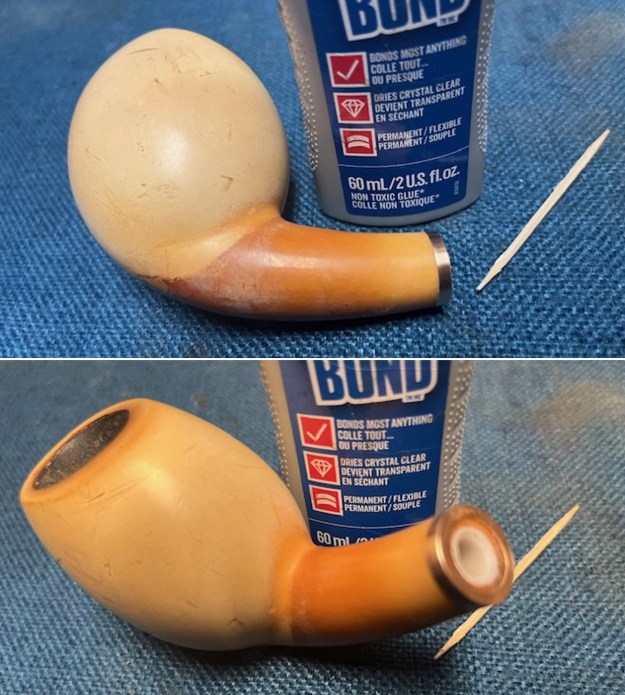
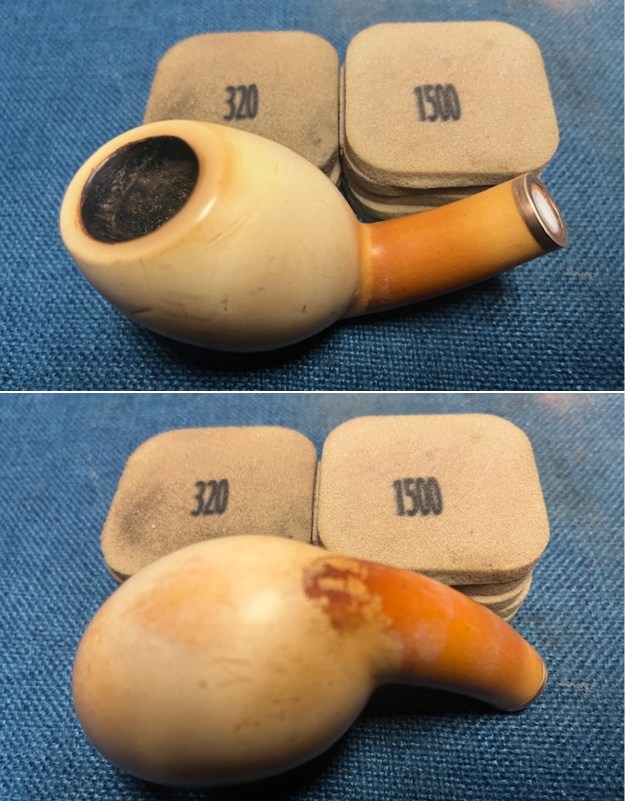
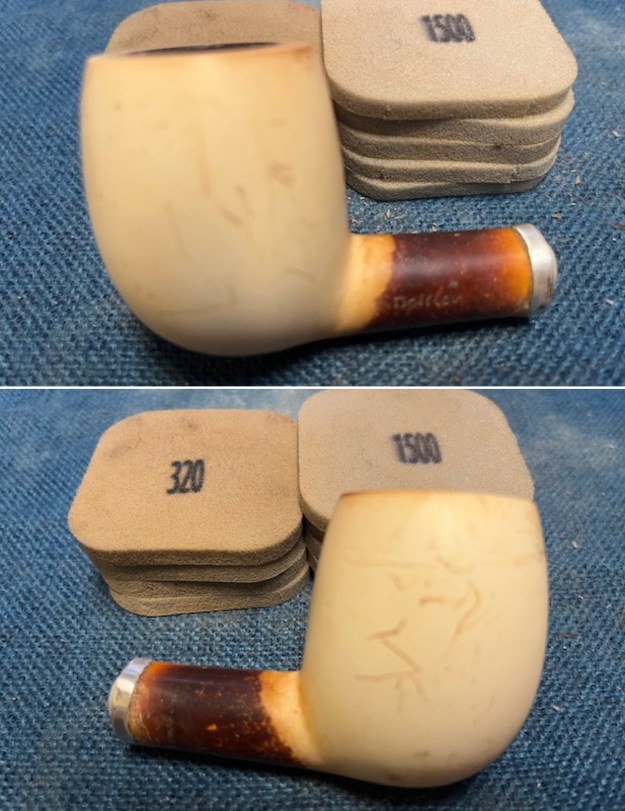
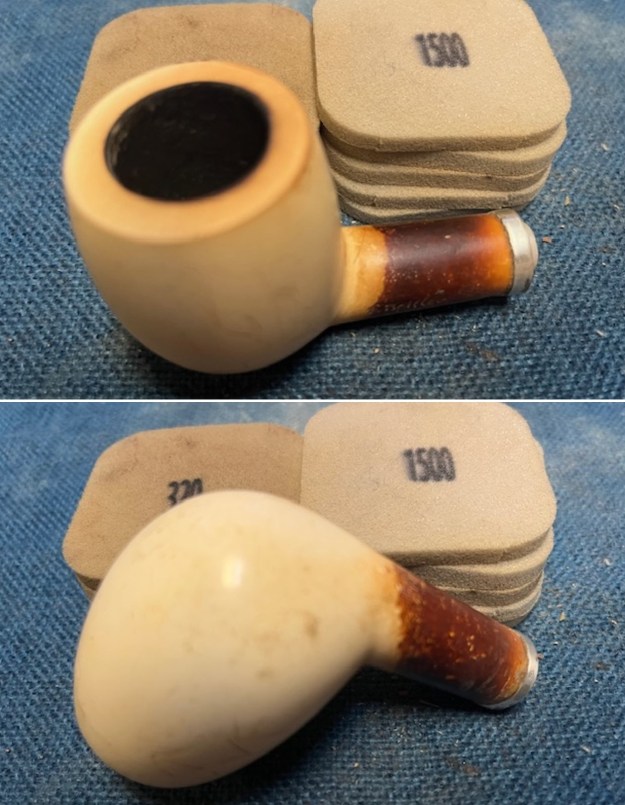
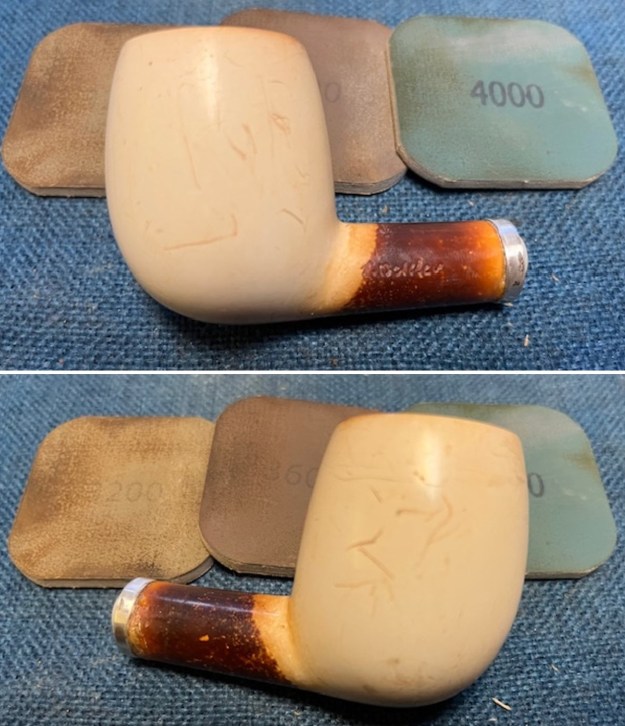
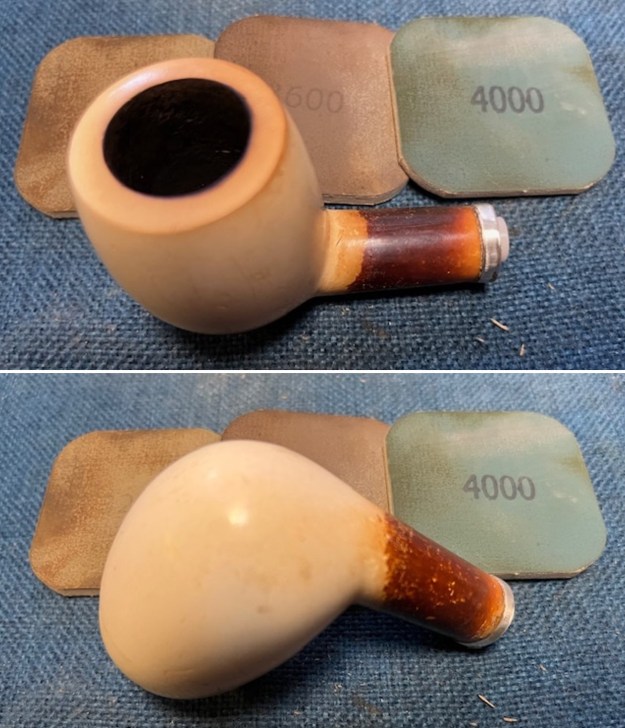
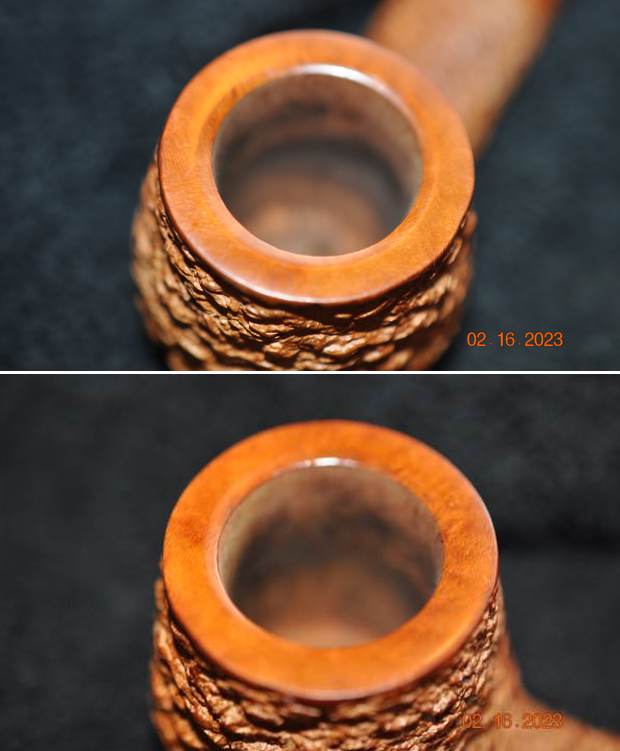
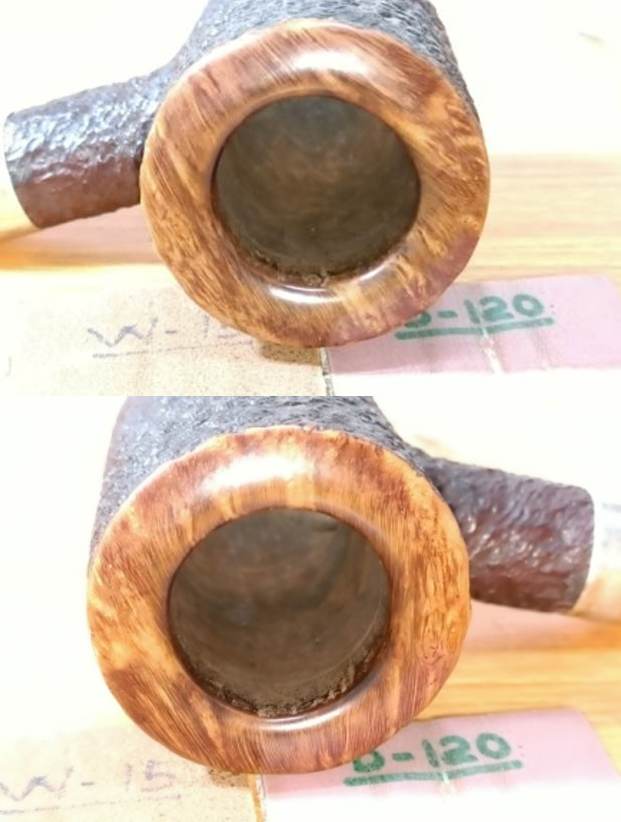
I worked over the rim top lava build up and the scratches on the walls of the bowl and shank with 320-3500 grit 2×2 inch sanding pads. I wiped the bowl down with a damp cloth after each sanding pad. The crowned smooth rim top looks good. 
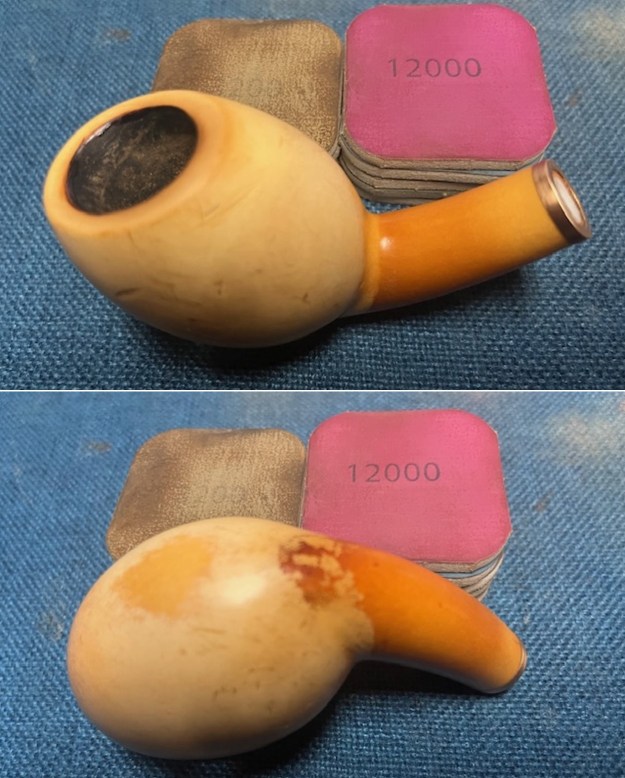
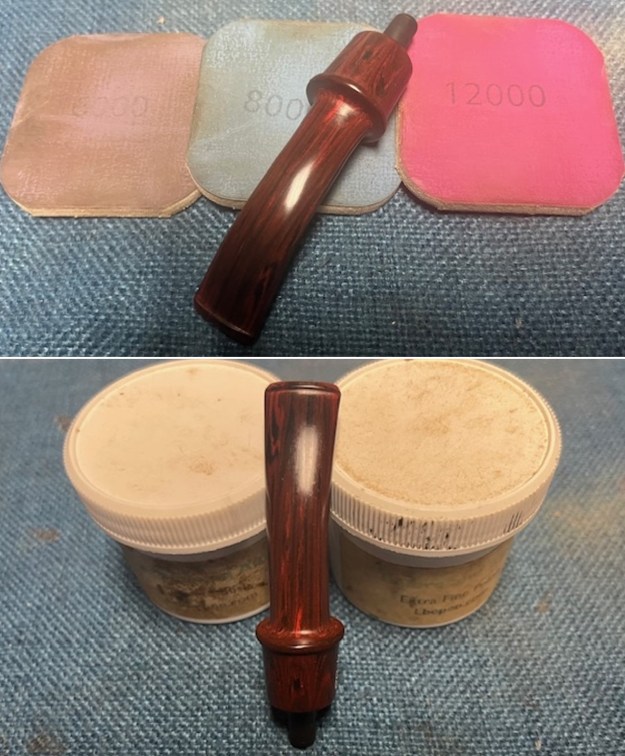
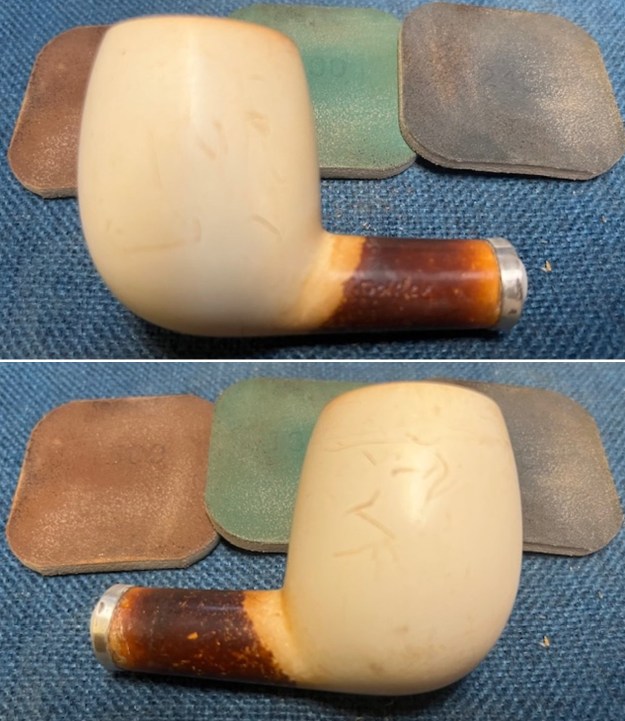
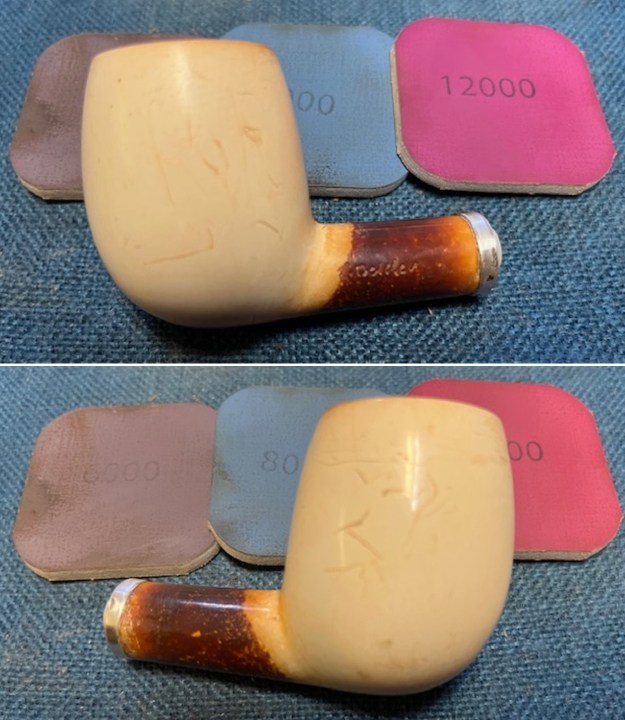
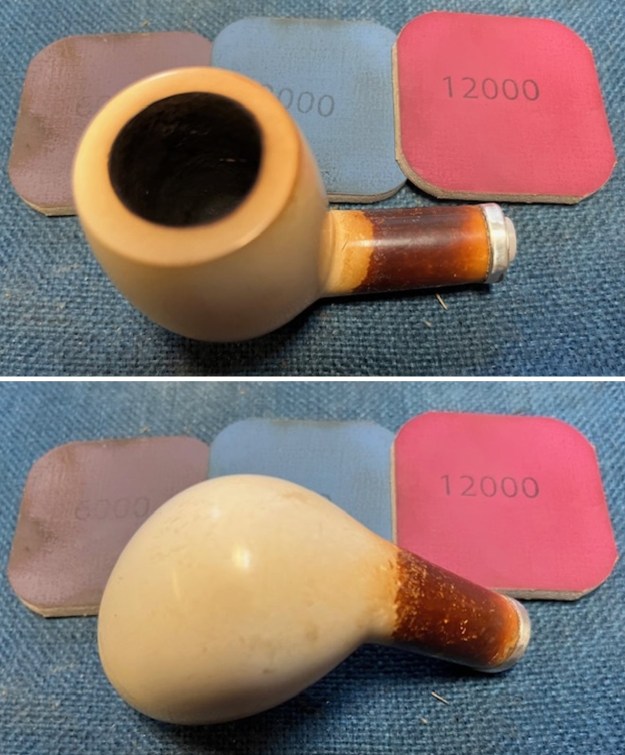
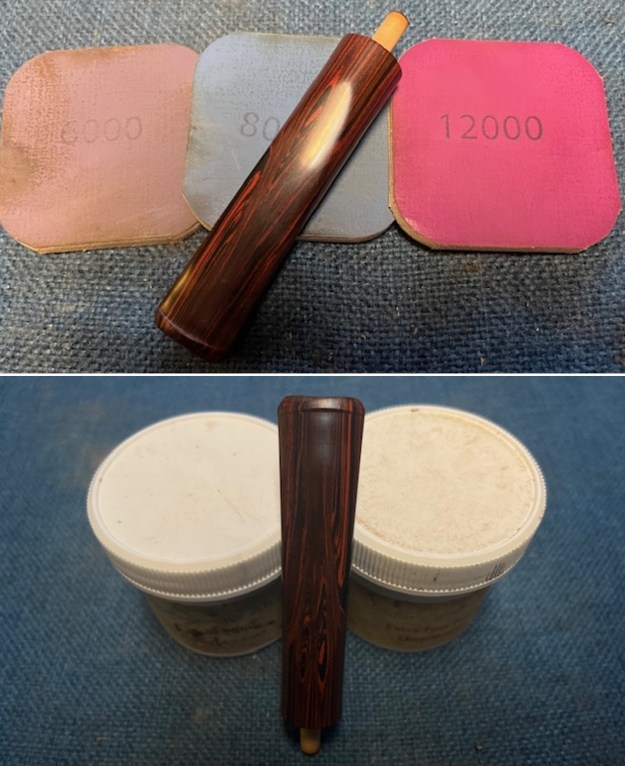
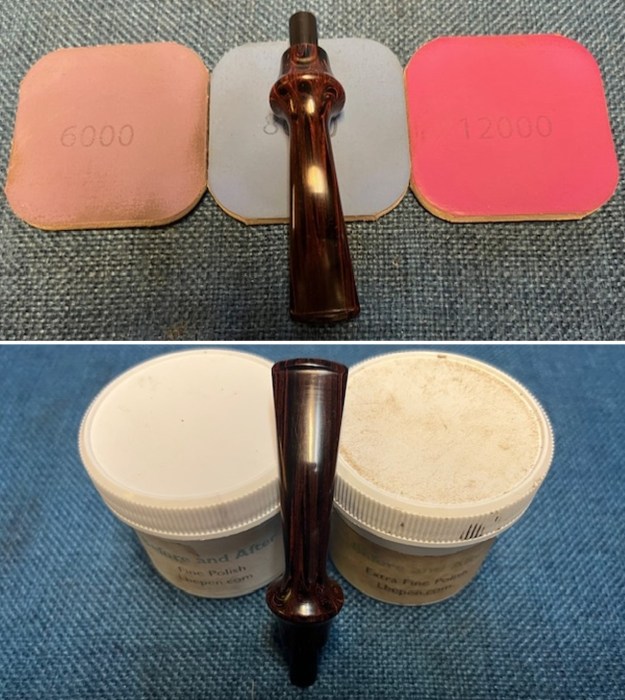
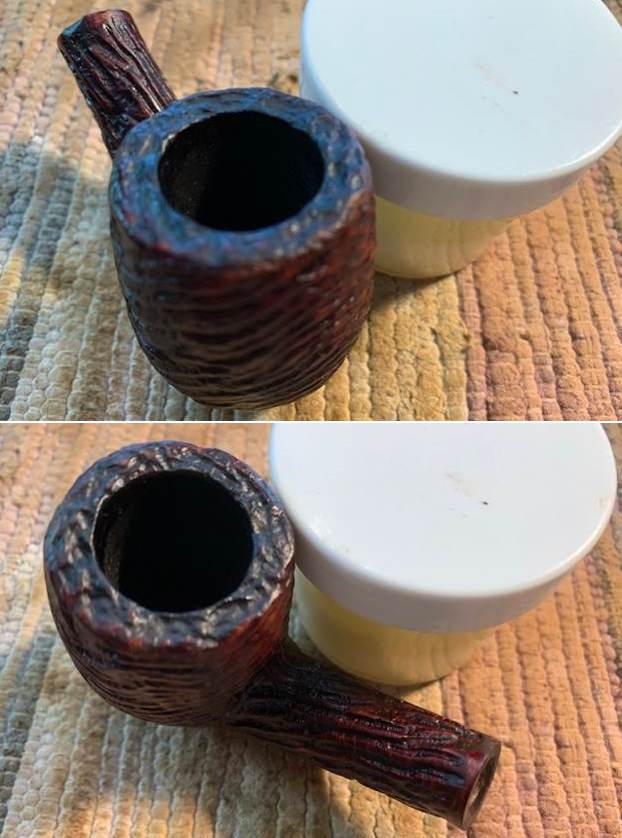
I polished the meerschaum with 1500-12000 grit sanding pads. I wiped the bowl down after each sanding pad with a damp cloth to remove the sanding debris. By the time I finished the bowl took on a rich and clean shine. 
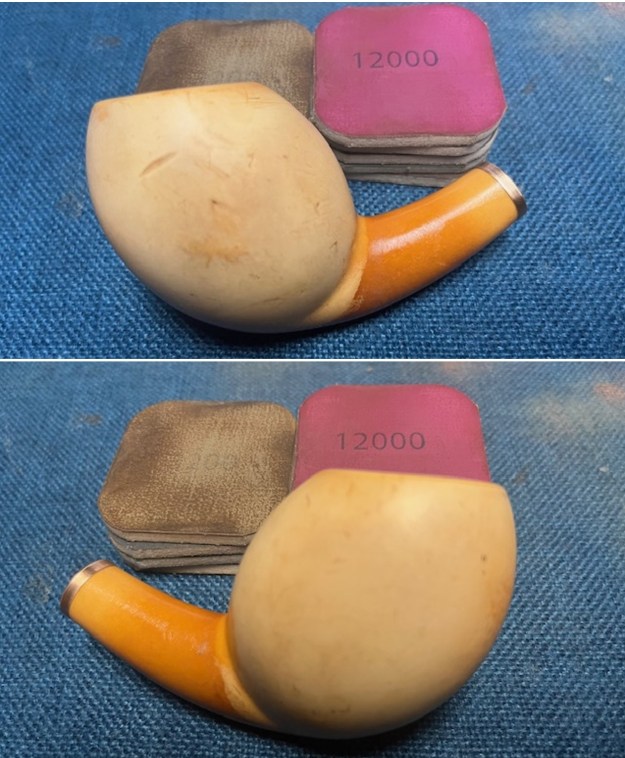
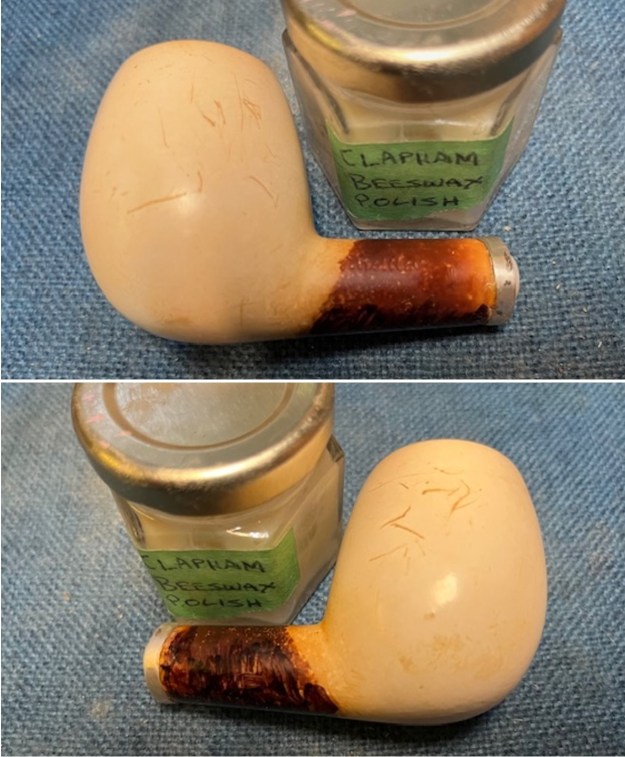
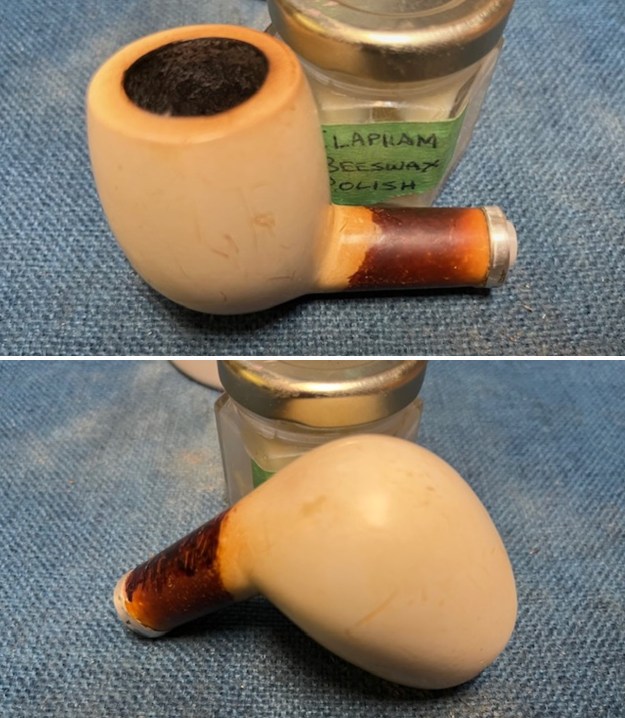
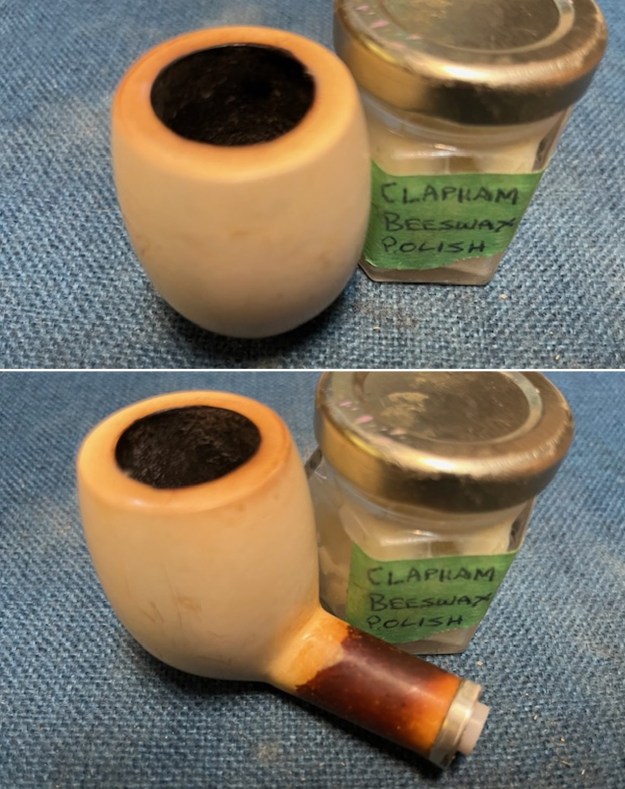
I rubbed the meerschaum down with some Clapham’s Beeswax/Carnauba Wax. I let it sit for a short time then hand buffed it with a soft cloth to raise the shine on the meer. 
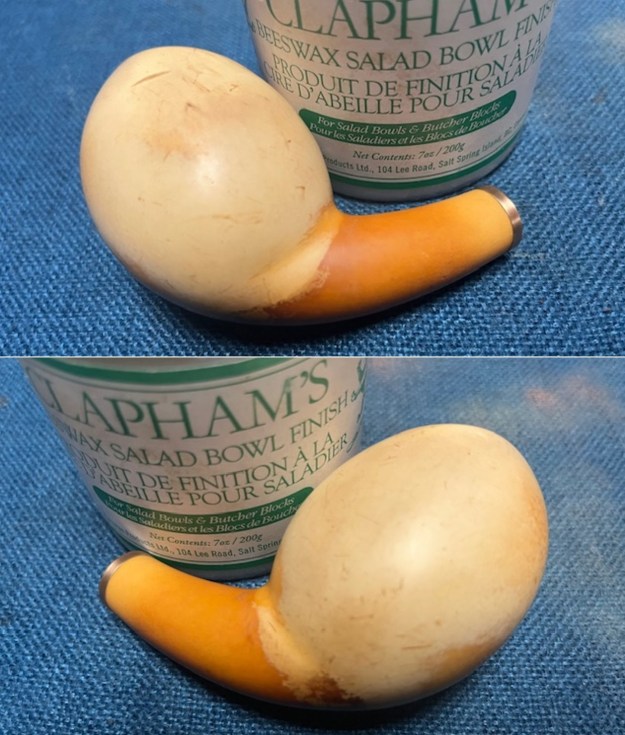
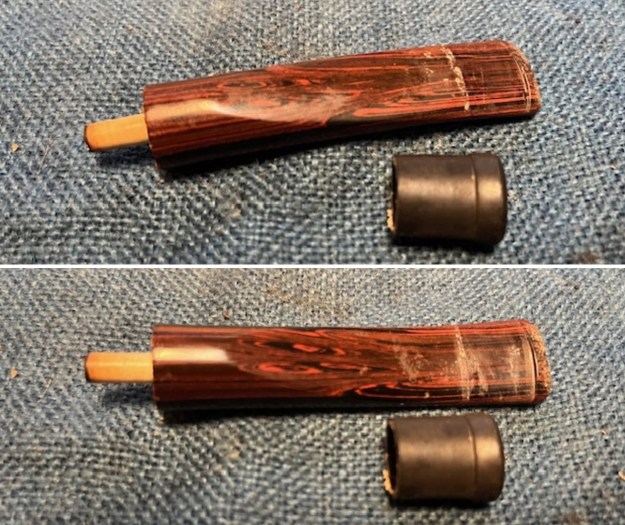
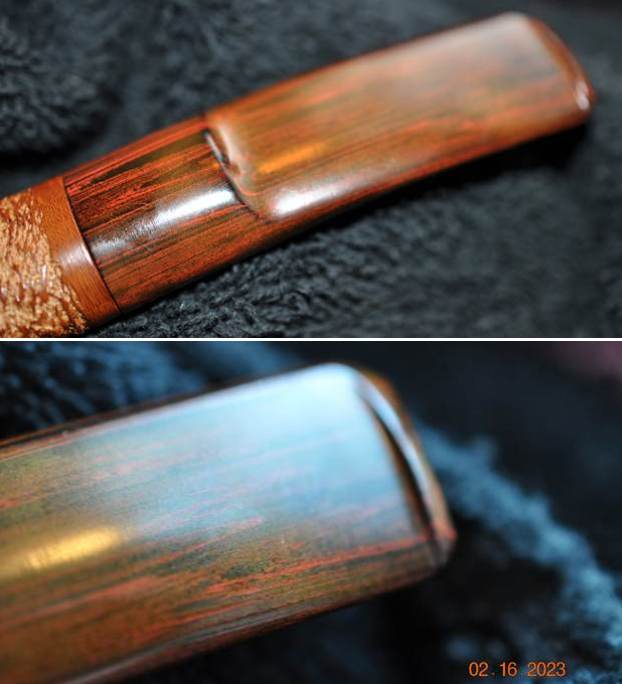
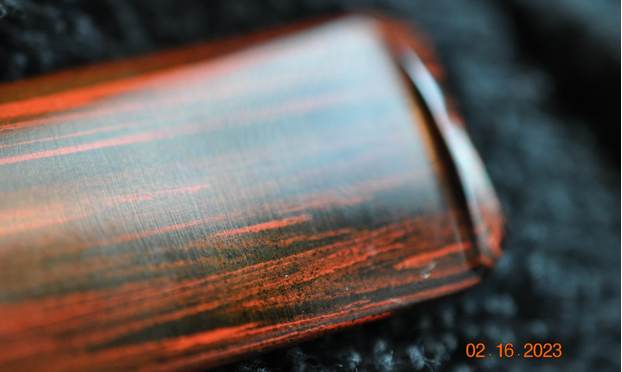
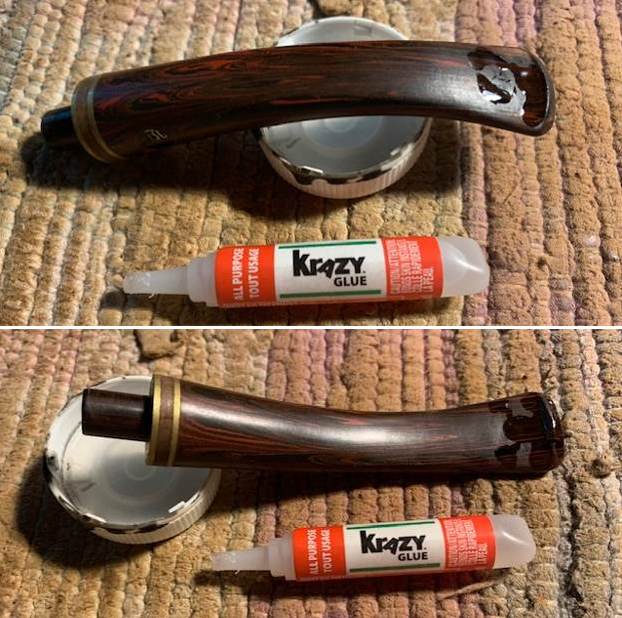
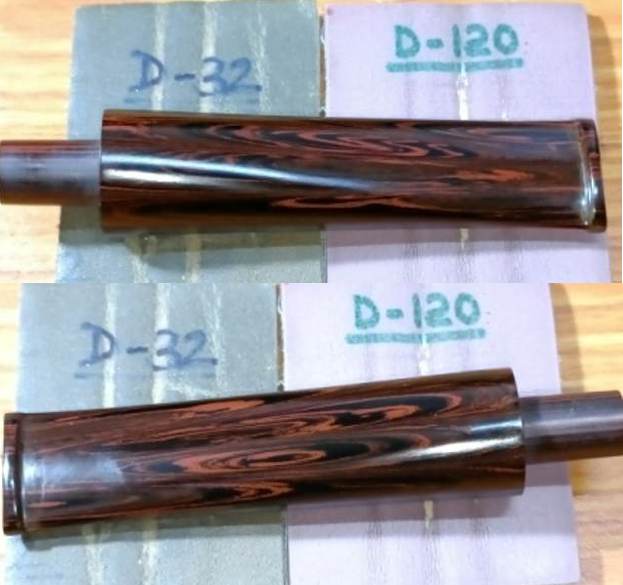
I used a folded piece of 220 grit sandpaper to sand out the tooth marks and chatter on both sides ahead of the button. It did not take too long to work out the tooth marks and chatter in the surface of the Cumberland.
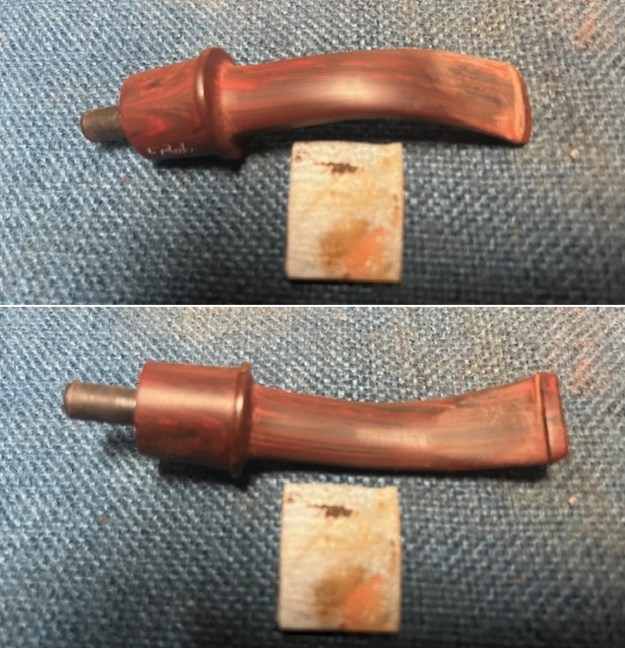
I touched up the stamping on the left side of the saddle stem with white acrylic fingernail polish. I worked it into the stamping with a tooth pick. I set it aside to dry and then I sanded it off with a worn 1500 grit micromesh sanding pad.
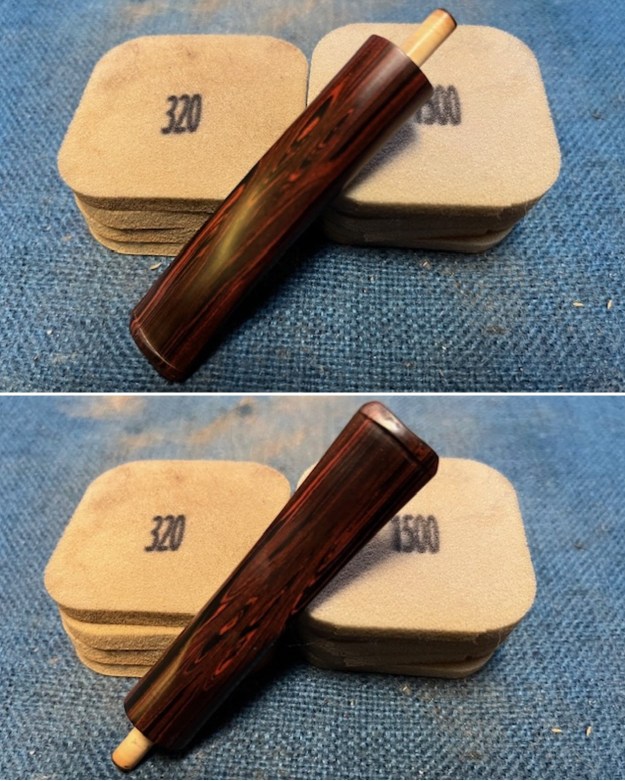
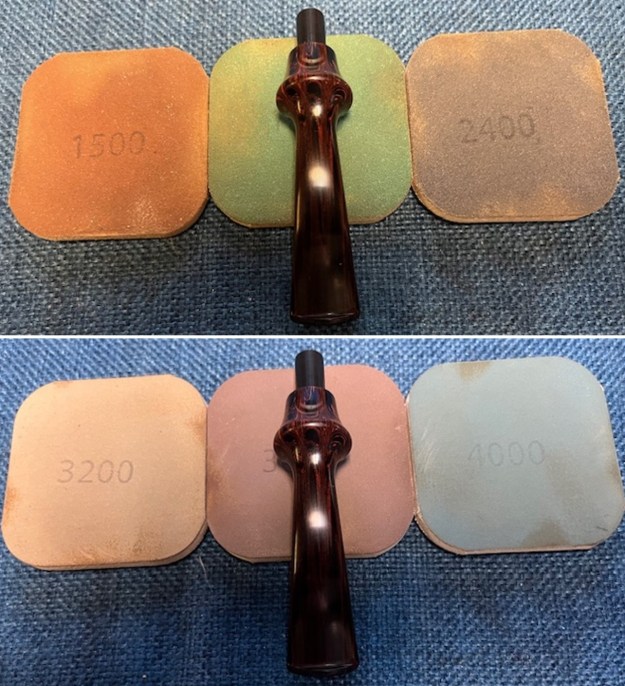
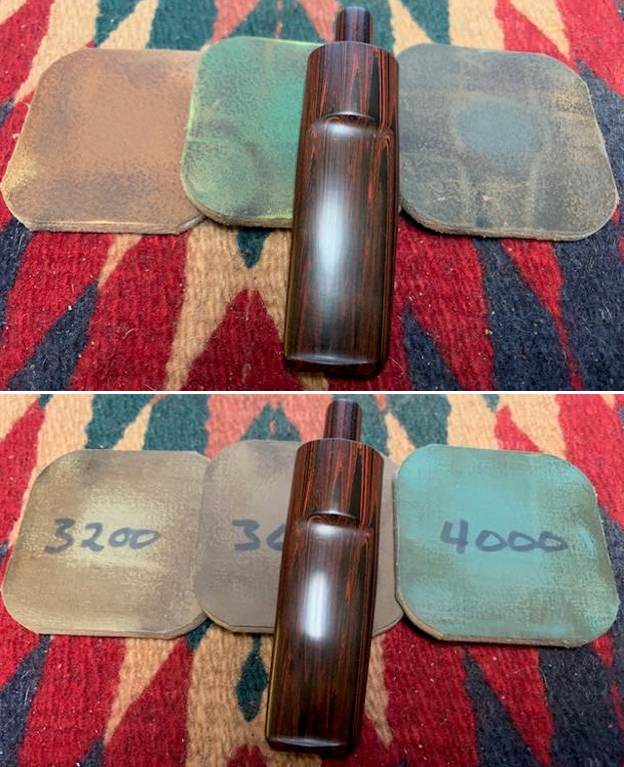
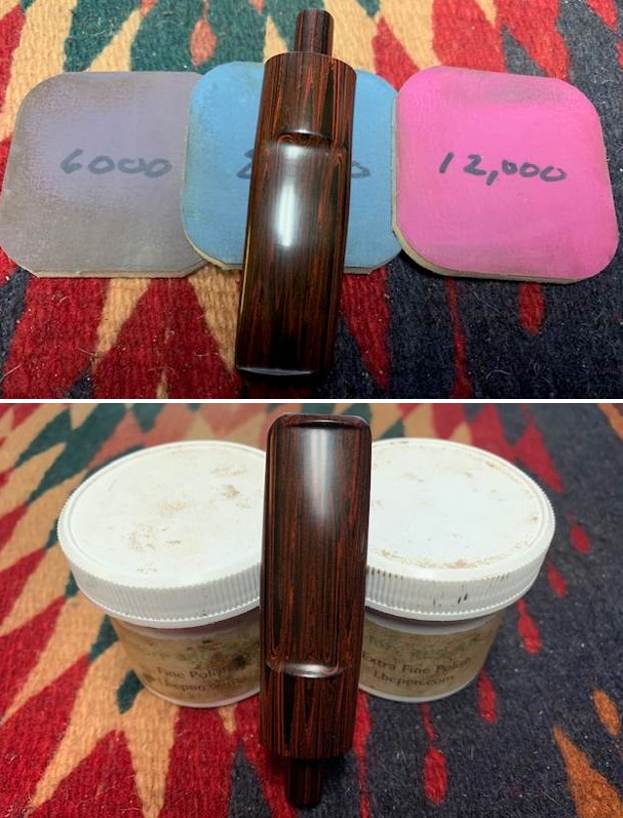
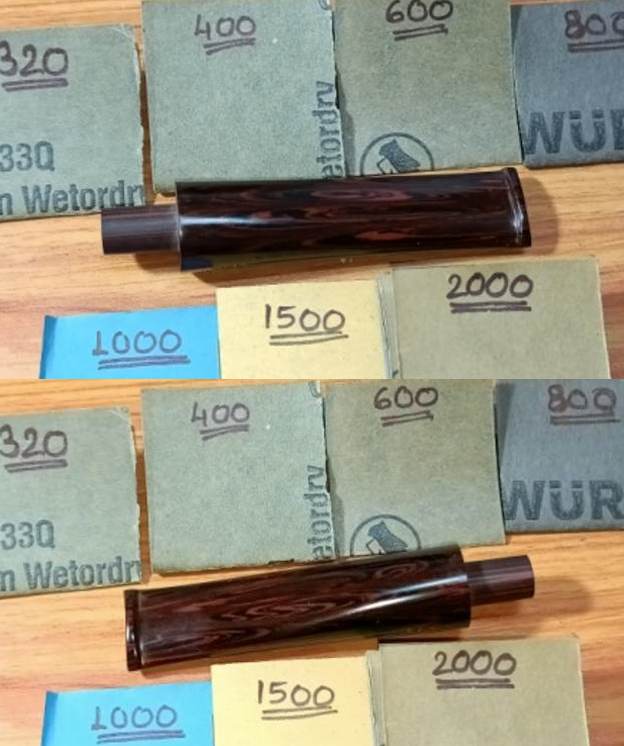
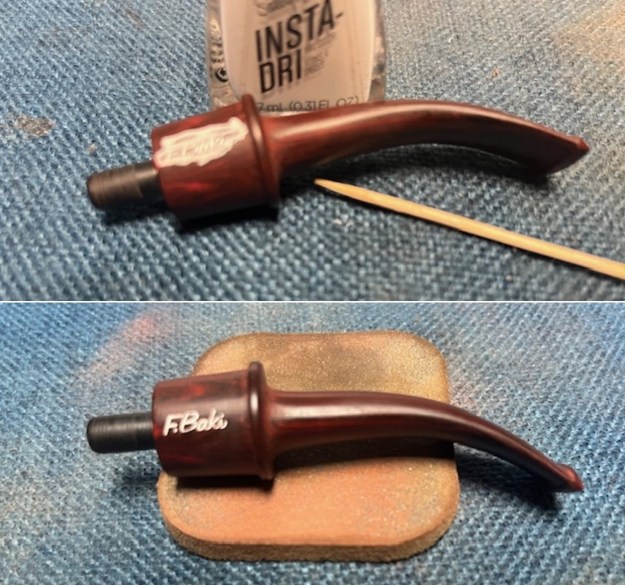
I set the bowl aside and turned my attention to the stem. I sanded the stem with 320-3500 grit 2×2 inch pads. I wiped the stem down with an Obsidian Oil cloth after each sanding pad. The rich look of the Cumberland began to take on a shine.
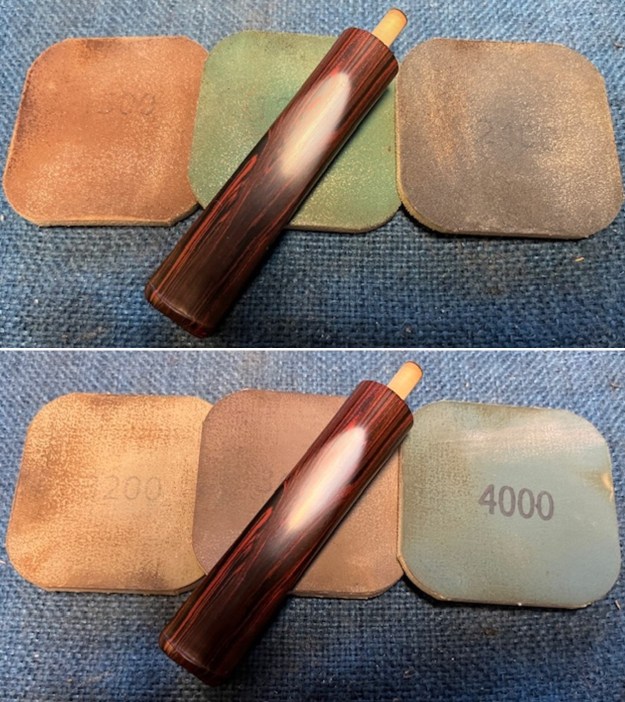
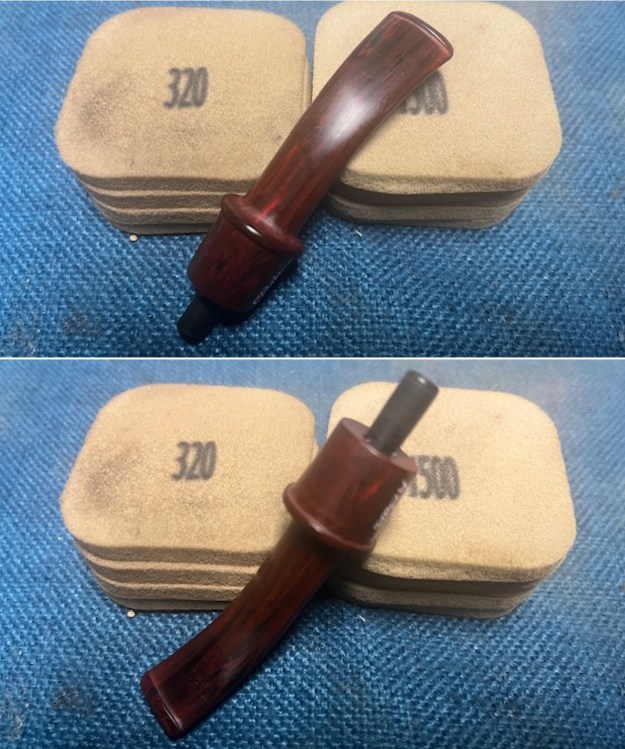
I polished the vulcanite with micromesh sanding pads – 1500-12000 grit pads. I wiped it down with Obsidian Oil after each sanding pad. I used Before & After Pipe Polish – both Fine and Extra Fine to further polish the stem. 
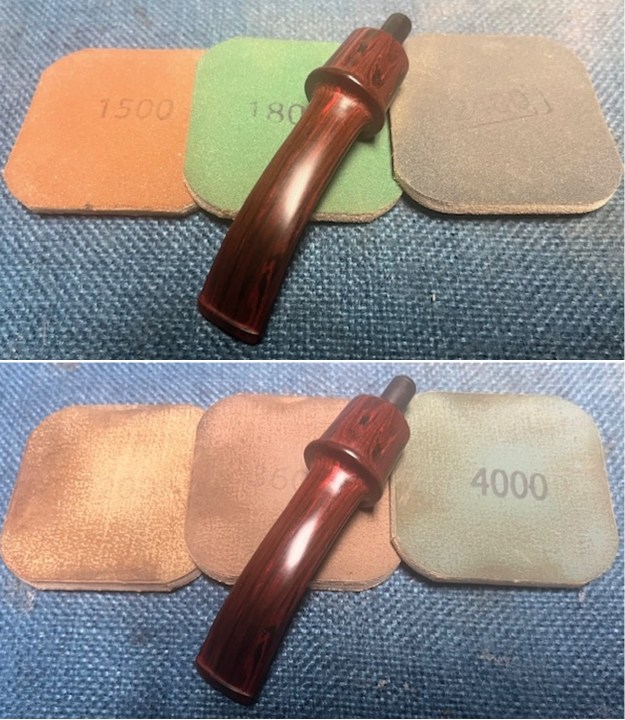
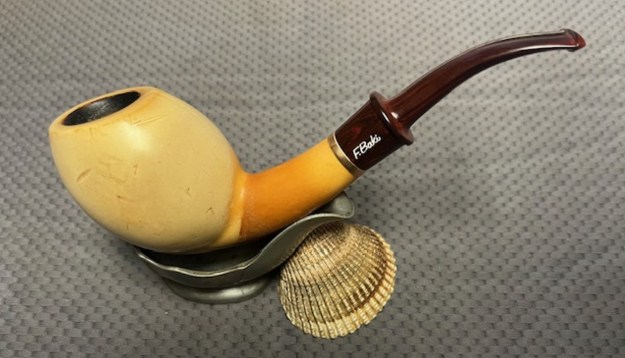
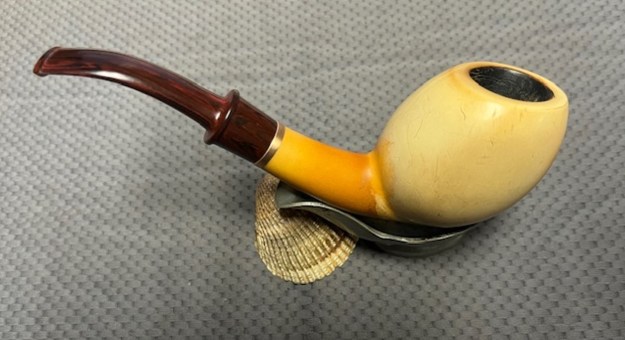
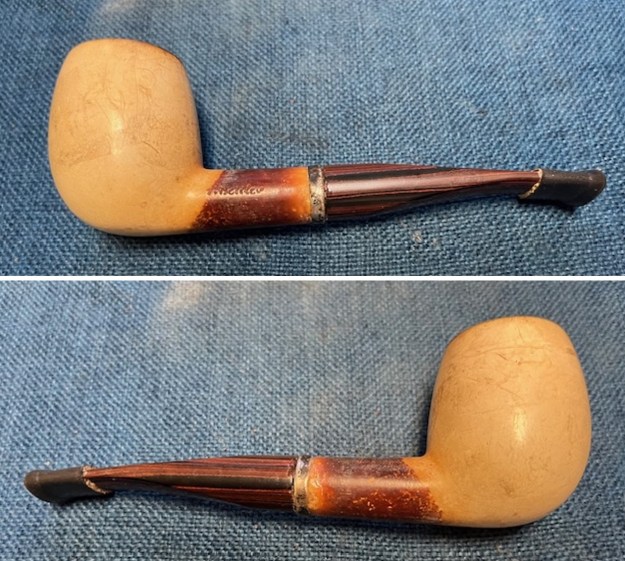
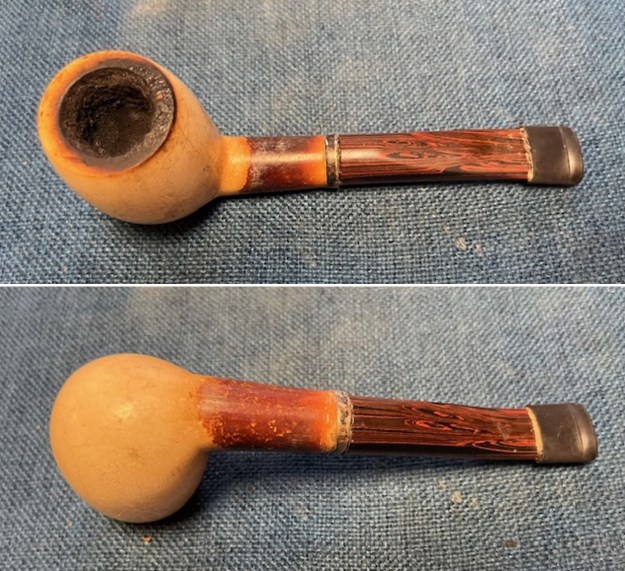
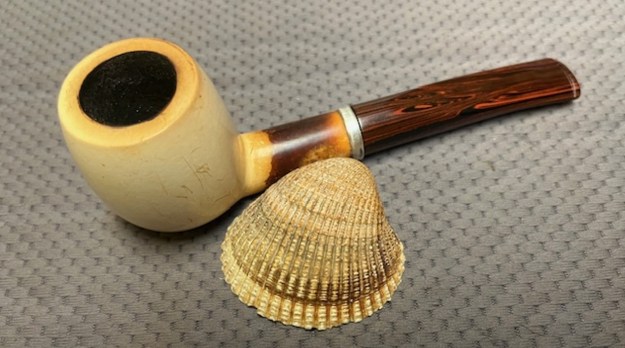
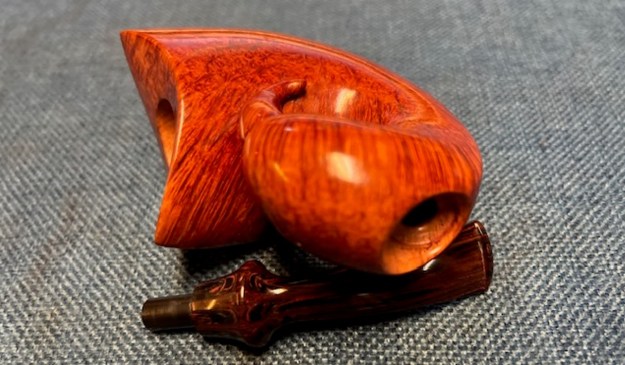
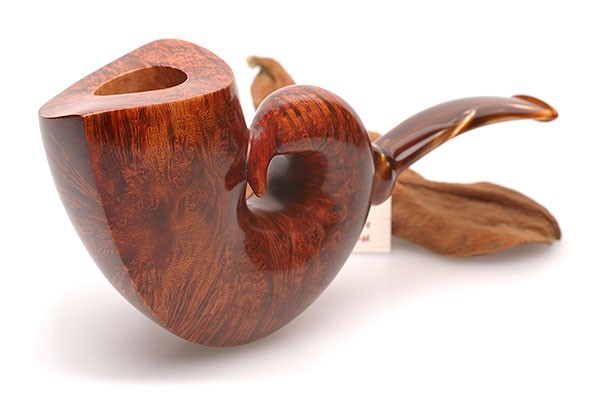
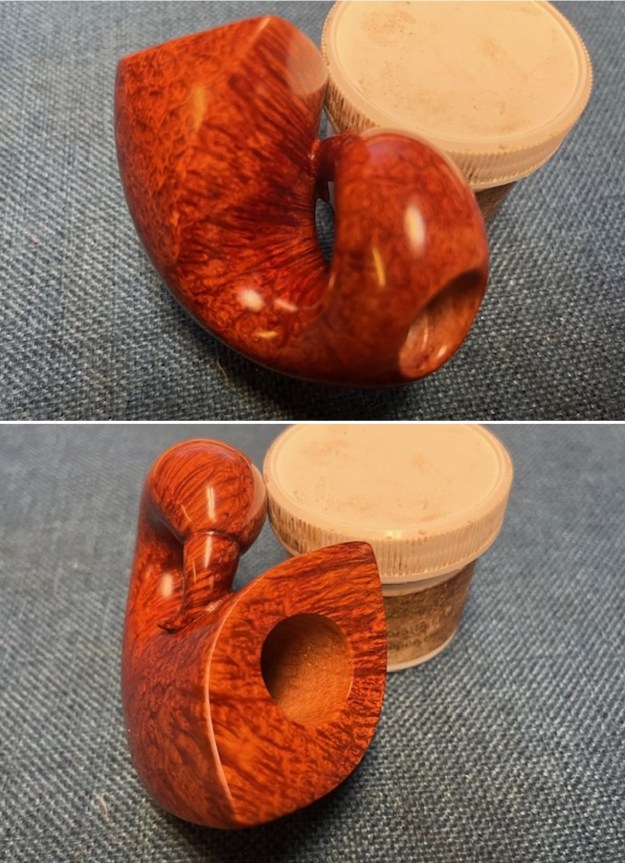
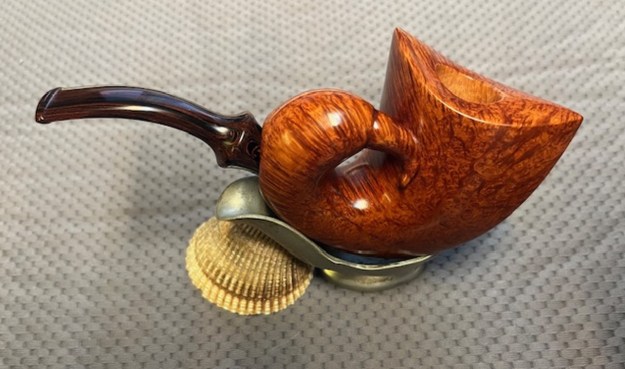
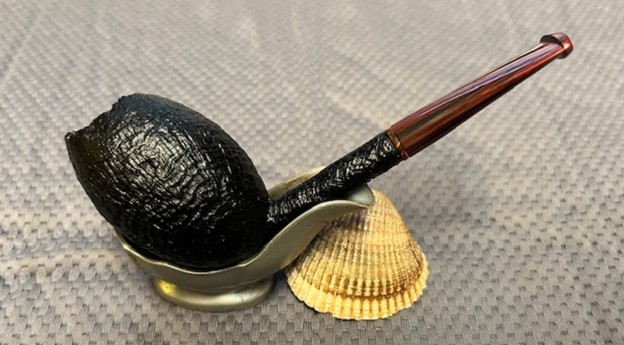
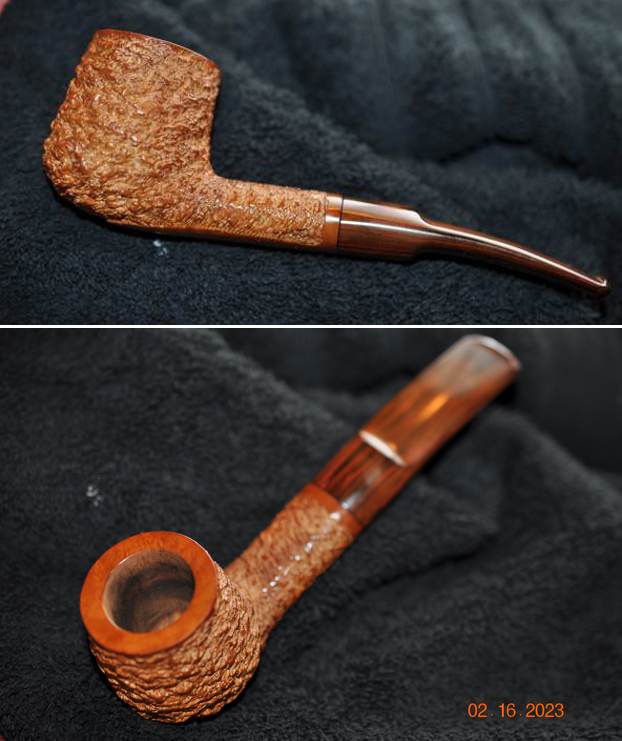
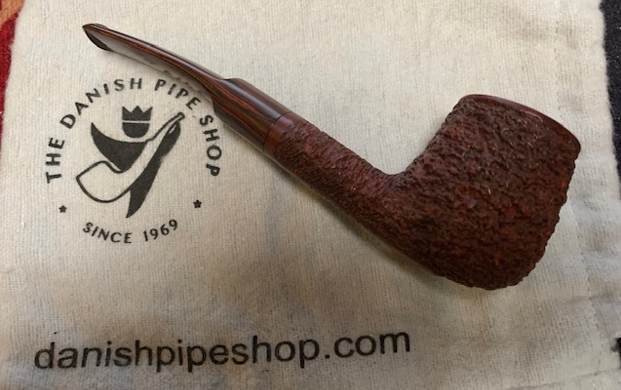
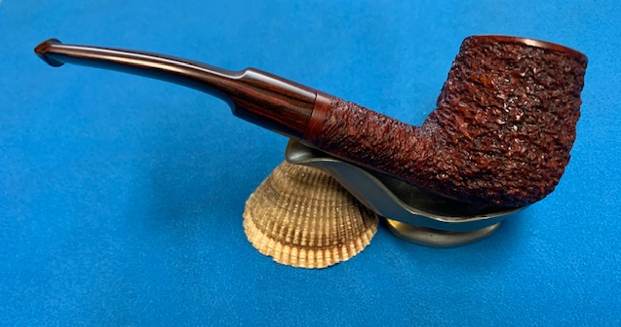
I the polished stem and the Meerschaum Bent Egg bowl with Blue Diamond to polish out the remaining small scratches and raise the shine. I gave the Cumberland stem several coats of carnauba wax and the bowl several coats of Clapham’s Beeswax/Canuaba Wax then buffed the pipe with a clean buffing pad to raise the shine. I hand buffed it with a microfiber cloth to deepen the shine. The pipe polished up pretty nicely. This turned out to be a beautiful Fikri Baki Meerschaum Danish Egg. The finished pipe is shown in the photos below. The dimensions are Length: 6 inches, Height: 2 ¼ inches, Outside diameter of the bowl: 1 ½ inches long by 1 ¼ inches wide, Chamber diameter: 7/8 of an inch. The weight of the pipe is 1.94 ounces/53 grams. Thanks for walking through the restoration with me as I worked this beautiful F. Baki Meerschaum Danish Egg. I will be sending it back very soon to the pipeman who asked me to restore it. Thanks for looking.
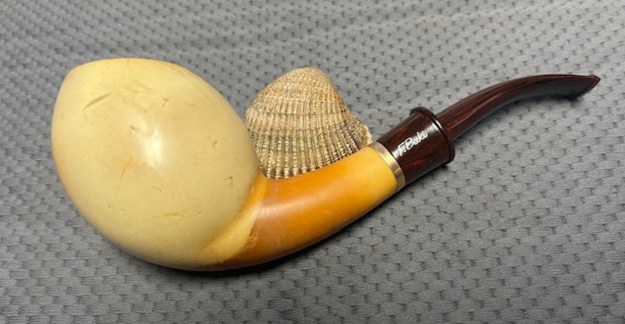
Restoring a I. Bekler Meerschaum Banded Billiard with a Cumberland Taper Stem


by Steve Laug

This afternoon I decided to work on another pipe that I no longer know where or when we purchased it. I have a large box of Meerschaum pipes that is sitting in my storage that I need to clean up and restore. I have honestly avoided them for years but now was the time to start my work on some of them. Today I chose another of the uncased meers. This one is a Billiard shape with a Cumberland Taper Stem and a Softee Bit on the end. My guess is that the Softee protected the stem for tooth marks. I will know for sure once I remove it. It is a beautifully shaped Billiard Meer that is filthy and covered with scratches from its journey. The bowl and shank have some nice patina particularly on the shank. There is also a signature stamp on the left side of the shank that reads I. Bekler. It is dirty from use with a thick cake in the bowl and a heavy overflow of lava on the inner edge and thin rim top, heavier on the back side. The shank has a silver band on the end that is quite oxidized. The Cumberland stem had a push tenon and the shank was fitted with a receiver mortise. It fit well against the shank end and was slightly dirty and had a dirty and well chewed Softee Bit on the end protecting the stem surface and button. I took photos of the pipe before I started my clean up work on it. I took photos of the rim top and the stem to show the condition of the pipe when I brought it to the worktable. You can see the cake in the bowl and the heavy build up of lava and debris on the edge and top of the rim. It is another dirty pipe but still a charmer. There is a silver band on the shank end that is very oxidized and almost black. The Cumberland Taper stem has a rubber Softee Bit on both sides near the button.I took a photo of the I. Bekler signature stamp on the left side of the Cumberland taper stem. It is clear and readable. I removed the stem from the shank and took a photo of the parts. I used a small knife to pry off the Softee Bit on the stem end. I took photos of the stem. There was some sludge on the stem where the bit had ended but there were not any tooth marks or chatter on the stem surface ahead of the button. The Softee Bit had done its job and the stem looked great.I wanted more background on the brand and on the carver Ismet Bekler. I turned first to Pipephil’s site (http://www.pipephil.eu/logos/en/logo-c2.html) and found a link between CAO meerschaum and Ismet Bekler. I have included a screen capture of the section on the brand and the connection between Ismet Bekler and CAO.The CAO company was founded in 1968 by Cano Ozgener. Scandinavian Tobacco Group acquired the corporate in 2010. Current President of CAO (2010): Tim Ozgener (son of Cano). CAO was the US distributor for Europeans pipe brands like Preben Holm (from 1985) or Joura (Karl Heinz)

I then visited pipedia.org and did a search for more information on the American Meerschaum pipe company, CAO and Ismet Bekler(https://pipedia.org/wiki/CAO).

It was revealed that Ismet Bekler was a pipe carver who had carved many meerschaum pipes for CAO. I have reproduced certain relevant snippets of information from that article on pipedia.org.

C.A.O International, Inc. is the producer of one of the country’s top lines of premium cigars, cigar accessories, Meerschaum pipes, and pipe tobaccos. CAO’s Meerschaum pipes are smoked by presidents, senators, actors and other dignitaries. CAO was founded in 1964 by Cano A. Ozgener. Using his initials as the company logo.

Cano Ozgener’s interest in tobacco began on the banks of the Bosporus. Born on January 19, 1937, Ozgener was raised in his birthplace of Istanbul, Turkey, by his Armenian parents. His father was a jeweller, his mother a homemaker. He studied at a Jesuit French grammar school before being accepted into the American-run Roberts College in Istanbul, from which he received a bachelor’s degree in mechanical engineering in 1960.

As a student in Turkey, Ozgener enjoyed smoking pipes, especially those made from meerschaum.

Graduating from Columbia in 1964 with a professional engineering degree, Ozgener was recruited by DuPont to work in the firm’s Kinston, North Carolina, plant. It was during his stint in the textile division at the age of 27 that he came across some imperfect Turkish meerschaum pipes. In his spare time, he decided to use his engineering abilities to improve the pipes.

As Cano and the tobacconists were not happy with the quality of Turkish meerschaum, he decided to take the meerschaums and change the stems, make modifications and work with the carvers to improve them,” One day a tobacconist from Wilmington, Delaware, asked him where had he found the meerschaum, that he had never seen such quality. Cano told him that he had modified them. The tobacconist then ordered a dozen or two. That was just the beginning.

Ozgener kept his engineering job as he built his company. He worked constantly; his vacations from DuPont were spent attending tobacco conventions, which left little time to relax with his wife and two young children. Finally, in 1977, he left his engineering position to devote more attention to his growing business and to spend more time with his family.

The preceding article is reprinted here with the permission (forth coming) of Bennington Tobacconist

Ismet Bekler carved many meerschaum pipes, which were signed by him and sold by CAO, beginning in 1977. CAO actually trademarked his last name for use in 2001. Other carvers also provided pipes to CAO, and at least one other, Kural, also signed pipes made for CAO.

I surfed the net to know more about the pipe carver Ismet Bekler. I chanced upon a website that had some beautiful pipes on sale and most prominently, had many un-smoked meerschaum pipes carved by Ismet Bekler. Here is the link to the website. I have also noted some information about Ismet Bekler which is given in the introduction on this website. https://www.therightpipe.com/meerschaum-pipes/ismet-bekler-c382.html

Ismet Bekler was a prolific and popular carver. He began carving in the early 1970’s. Bekler is known as one of the best carvers in the history of Turkish Meerschaum. Master carver Bekler passed away in 2018 at the age of 84.

In 1980, the CAO Meerschaum Company contracted with Bekler to sell all of his carvings to them. CAO wanted to make Bekler a more well-known carver in the US and it was at this time he began signing his pipes.

Thus, from the above, my guess would be that this pipe is from the period post 1980 but could be pre-2018 since it is signed with the first initial, I. and the last name. However the lack of CAO in brass logo on the stem makes matters murky. Any inputs on this would definitely help me and other readers to know more about this pipe maker whose demise has left a void in the pipe carver’s community.

I started my work on the bowl by reaming the thick cake out of the bowl. I started with a PipNet reamer and the 2nd and 3rd cutting heads to take back the cake to the walls of the bowl. I cleaned up the reaming with a Savinelli Fitsall Pipe Knife. I sanded the bowl walls with a piece of dowel wrapped with 220 grit sandpaper. Once finished it looked very good.I scraped off some of the lava coat on the rim top. I used a topping board and some worn 220 grit sandpaper to smooth out the damage on the rim top and remove the rest of the darkening on the meer. It looked much better once I finished.I used a sharp knife blade to clean out the build up in the shank end around the nylon/Delrin insert in the shank for a push tenon that was in the stem. The inset in the stem was also very dirty so I cleaned it up at the same time using the knife. Once clean it looked much better.I cleaned out the airway in the shank and mortise as well as in the new stem with pipe cleaners (both bristle and regular) and alcohol. It was much better.I scrubbed the bowl surface with a tooth brush and undiluted Murphy’s Oil Soap. I rinsed the bowl with warm running water to wash off the dirt and the soap. It looked much better at this point. I sanded the bowl to smooth out the scratches in the bowl sides and rim top with 320-2500 grit 2×2 inch sanding pads. I wiped the bowl down after each sanding pad to remove the debris. It seemed to minimize the scratches and bring out the beauty of the patina developing in the meer. I polished the meerschaum with micromesh sanding pads – dry sanding with 1500-12000 grit pads. I wiped the bowl down after each pad with a damp cotton cloth. The bowl took on a shine by the last pad. I gave the bowl multiple coats of Clapham’s Beeswax Polish which is a soft wax. I rubbed the wax on the bowl sides and the shank end with my finger tips and set it aside to dry. Once the wax cured I buffed the bowl with a clean buffing pad and then with a soft microfibre cloth. The bowl has a rich glow. I set the bowl aside and turned my attention to the stem. I sanded the stem surface with 320-3500 grit 2×2 inch sanding pads. I wiped the stem down after each pad with a damp pad to remove the debris. By the end it was quite shiny and ready for polishing.I polished the stem with micromesh sanding pads – wet sanding it 1500-12000 pads. I wiped it down with a damp cloth after each pad to protect it and preserve it. it with Before After Pipe Polish – both Fine and Extra Fine. I polished the stem on the buffer with Blue Diamond. I took photos of the finished I. Bekler Billiard with a Cumberland Taper Stem to show the shine and the patina around the bowl. The polished Cumberland stem looks very good with the deepening colour on the shank and the bottom of the bowl. With time the contrast will grow richer and deeper to a thing of beauty. The finished Bekler Billiard fits nicely in the hand and I think it will feel great as it heats up with a good tobacco. Give the finished pipe a look in the photos below. The dimensions of the pipe are Length: 6 inches, Height: 2 inches, Outside diameter of the bowl: 1 ¼ inches, Chamber diameter: ¾ of an inch. The weight of the pipe is 1.69 ounces/49 grams. If you are interested in carrying on the legacy of this pipe it will be going on the rebornpipes store shortly. It is listed in the Ceramic and Meerschaum Section. You can send me a message or an email to let know you are interested. Thanks for reading this blog and my reflections on the pipe while I worked on it. This is an interesting estate to bring back to life.

Best of the Lot an Unsmoked Manuel Shaabi Handcut Scorpion with a Cumberland Saddle Stem


by Steve Laug

I was recently contacted by a fellow here in Vancouver about some pipes he had. He was referred to me by a local pipe shop. I was unclear if he wanted them cleaned or exactly what. When he came on the weekend he brought six pipes in two pipe boxes for me to have a look at. I spoke with him about the cost of restoring them. It finally became clear to me (I guess I am slow) that he wanted to sell the pipes. He was tasked with the job by his sister in law as the pipes were from her late husband’s collection. As I unpacked them it was clear that they were some nice pipes and some were higher grade. All but one was smoked and had the heavy smell of fruity aromatics to them. Some had cake in the bowl and lava on the rim. Of the six, four of them had significant rim damage – bowls out of round, burn marks, cut marks. The saddest part is that the damage was most significant on the higher end pipes. Most of them had tooth marks in the stems. Obviously, they had been his late brother in laws favourites and he had enjoyed them. He left them with me and I went over them, researched the brands and wrote up an offer for him to present to his sister in law. By the end of the day we had a deal. The six pipes now have a new home and five of them had fruity smell needs to be exorcised! The Curled looking one is unsmoked.I turn my attention to the last of the six pipes I purchased. The bottom right pipe of the six is unsmoked. It is another beautiful looking pipe that is the most unique of the lot. It is a Scorpion shaped Bent pipe stamped on the underside of the shank and has a Mouse logo with an MS as part of the stamp [over] Manuel Shaabi [over] Handcut [over] Germany. To the left of the stamping moving up the bowl are three lines like waves. The bowl had beautiful birdseye grain around sides and cross grain on the eye shaped rim top and underside of the shank. The shape is impeccably done. The finish was absolutely beautiful and unblemished. The bowl was unsmoked and there was no cake or lava to worry about anywhere around the bowl. The inner edge of the bowl was flawless and round. The inside of the bowl was polished smooth. The fancy turned saddle stem was Cumberland and no tooth marks or chatter on the stem. The tenon was Delrin and the fit was perfect. The shank had been drilled and the stem was inset in the shank. There was no stamping on the stem. The pipe came with the original Shaabi box and soft felt pipe sock with the Shaabi logo on it. I took photos of the bowl and rim top to give you an idea of what I see. This is a uniquely carved and beautiful looking Scorpion pipe. The unsmoked condition and the pristine Cumberland stem on the pipe make a gorgeous pipe!I took a photo of the stamping on the underside of the shank. It is clear and readable as noted above. I took a photo of the bowl with the stem removed to give a sense of the proportion and appearance of the pipe. To help me understand the pipe and its maker a bit more I turned to Pipephil’s site and read what it said about Shaabi’s Handcut pipes (http://pipephil.eu/logos/en/logo-s6.html). I have included a screen capture of the section below as well as the side bar information below the capture. Artisan: Manuel Shaabi (born 1950 in Lebanon) was a cabinet maker when he decided in 1993 to learn pipe carving. He started as professional pipemaker in 1998.

Next, I turned to Pipedia for more information and detail (https://pipedia.org/wiki/Shaabi_Pipes). I find that the articles there often fill in some more information on the relationships and history of a given brand. In this case I found that also true. I quote it in full below.

Manuel Shaabi was born in Lebanon in 1950. He apprenticed as a wood sculptor and cabinet maker. In 1979, he left, because of the Lebanese civil war, for Bavaria, Germany. There he worked making one a kind furnishings and restoring old sculptures and figurines in churches and cathedrals.

In 1984 he moved to Hamburg, Northern Germany because of his daughter’s asthmatic condition. Unfortunately, he couldn’t find enough work, so he went back to school and completed his professional training. His final test was to make a trunk. He made such a fine trunk that he was offered a position at the school as an instructor.

In 1993, having won numerous awards for his cabinet making, he gave it up as it didn’t satisfy his creative needs. He started over at Dan Pipe learning to repair pipes. He quickly mastered the art of pipe making and in 1998 left to start his own studio.

Shaabi’s’ pipes have an unheard of degree of hand craftsmanship. He feels a drill doesn’t cut true for the tobacco chamber so he uses a special knife. His draft holes are 4mm. “The draft hole should meet the tobacco chamber just a little bit above the the bottom”. He believes this prevents tobacco residue coming up through the air hole and stem.

Manuel Shaabi is probably the only pipemaker who combines the skills of a wood carver, cabinetmaker and pipe smith. His pipes combine the best of European design with a Middle Eastern aesthetic. He has secured some of the best wood on the planet and they smoke as good as they look. Each pipe has an individually hand cut Lucite stem…

I did a Google search for the Manuel Shaabi Nautilus as that is what I thought it was in terms of the shape. Instead of a Nautilus it came up with quite a few pipes that were very similar in shape. One of them was the same style pipe as this one on Esterval’s Pipe House (https://www.tecon-gmbh.de/product_info.php?manufacturers_id=50&products_id=10834). That link gave me the name of the pipe shape that Shaabi called a Scorpion. I have included a photo of the pipe that was on the site.

Now I knew what I had in hand – a Handcut Manuel Shaabi Scorpion that was a real beauty. Knowing that it was new and unsmoked was a bonus. In terms of the six pipes I had purchased in the lot this unsmoked beauty was very high end.

I rubbed the bowl and shank down with Before & After Restoration Balm. I worked it into the surface of the briar with my fingertips to clean, enliven and protect the briar. I let the balm sit for a little while and then buffed with a cotton cloth to raise the shine. The Balm did its magic and the grain stood out. I polished the stem with micromesh sanding pads – 1500-12000 grit pads. I wanted to remove the light oxidation on the stem surface and bring back the shine. I wiped it down with a damp cloth after each sanding pad. I used Before & After Pipe Polish – both Fine and Extra Fine to further polish the stem. I put the German Made Manuel Shaabi Handcut Scorpion and its fancy Cumberland saddle stem back together. The rich browns and blacks of the contrasting stain makes the grain come alive with the polishing and waxing. I carefully buffed the pipe with Blue Diamond on the buffing wheel using a light touch on the briar. I gave the bowl and the stem multiple coats of carnauba wax on the buffing wheel and followed that by buffing the entire pipe with a clean buffing pad. I hand buffed the pipe with a microfiber cloth to deepen the shine. The finished Manuel Shaabi Handcut Scorpion really is a beauty and fits nicely in the hand and looks very good. Give the finished pipe a look in the photos below. The dimensions of the pipe are Length: 5 ½ inches, Height: 3 inches, Outside diameter of the bowl: 1 ½ inches wide x 2 ¼ inches long, Chamber diameter: ¾ of an inch. The weight of the pipe is 2.93 ounces/83 grams. This pipe will soon be on the Pipes From Various Makers Section of the rebornpipes store if you would like to add it to your collection. Send me a message or an email. Thanks for reading this blog and my reflections on the pipe while I worked on it.

Restoring a Bjarne Nielsen Handmade Brandy C Grade with a Cumberland filter stem


Blog by Steve Laug

The next pipe on the table is a Freehand with some rustication at the shank/bowl joint and plateau on the rim top.  It has a well shaped thick vulcanite taper stem. We purchased it from an estate sale in Oregon City, Oregon, USA on 03/21/2024. The pipe is stamped on the underside of the shank and reads Bjarne Nielsen [over] Handmade [over] In Denmark [over] C. There is no other stamping on the bowl or shank. There was a thick cake in the bowl and some darkening and lava on the inner edge of the bowl and some spots of lava on the rim top. It was hard to know for certain the condition of the inner edge though it appeared to be in good condition. There were oils and grime ground into the bowl sides gives the finish a flat look though there is some great grain. The shank is thick and has a slight curve to it giving the pipe a Brandy Glass shape. The saddle stem matches the curves of the bowl and shank. It has what looks like a Boxwood band on half of the saddle. The Cumberland stem is a dirty stem and has a rubber Softee Bit on the area ahead of the button. There is calcification, oxidation, grime, grit on the surface and also light tooth marks on both the top and underside of the stem just ahead of the button. Jeff took photos of the pipe before he started his clean up work. I have included them below. He took photos of the pipe’s bowl and rim top to show the cake in the bowl, the darkening on the inner edge and the spotty lava coat overflowing onto the top. It is another dirty pipe. He also took photos of the stem with and without the rubber Softee Bit to capture the oxidation, calcification and the light tooth marks on the top and underside of the stem near the button. He took photos of the sides and heel of the bowl to show the grain around the bowl and the amount of grime ground into the surface of the briar. He took photos of the stamping on the underside of the shank. It is clear and quite readable. It reads as noted above. I have had many Bjarne pipes cross my work table over the years but all had been stamped only Bjarne or Bjarne Handmade. None of them had his full name stamped on it and none had a letter stamp which I assumed indicated the grade of the pipe. I did some research on Pipedia.com and found some helpful information on both the stamping of my pipe and the history of Bjarne Nielsen himself. I am including the link to the full article on Pipedia and also some pertinent sections of the article that I have edited for quick reference. https://pipedia.org/wiki/BjarneFrom the early 1990s Bjarne had seven pipemakers employed and the pipes were sold in no fewer than 32 countries. For more than six months each year, Bjarne travelled around the world to promote his pipes by meeting with dealers and customers. But sadly, it all ended in February 2008 when Bjarne, then 66 years old suffered a fatal heart attack. An unexpected blow fist of all to his family, but also to the pipemakers who had been working for him, and to all lovers of his pipes from around the world. And as no one was willing to take over, the Bjarne pipe died together with its creator.

Among the pipemakers that worked for Bjarne were Johs (for the lower priced high volume pieces), and makers like Ph. Vigen, Ole Bandholm and Tonni Nielsen for high grade pieces. The cheaper line was stamped “Bjarne” while the highest grades were stamped “Bjarne Nielsen” (never with the pipemakers’ name) and graded, from highest to lowest, by the letters: AX, A, B, C, D, E, F, G, H, I, and J.

From that information I knew that the pipe that I was working on was made before 2008 and could well have been made by Tonni Nielsen. The C stamping told me it was a fairly high grade pipe – fourth grade from the top AX grade. That makes sense when I look at the grain and also the way the pipe maker cut the pipe to maximize the lay of the grain on the bowl. Now it was time to work on the pipe on my end.

When I received it from Jeff this past week it did not look like the same pipe. It was clean and the finish had life. He reamed it with a PipNet pipe reamer and got rid of the cake. He cleaned up the reaming with a Savinelli Fitsall Pipe Knife so that we could see the walls of the bowl and assess for damage. It was in good condition. He cleaned the internals of the shank and stem with cotton swabs, pipe cleaners and alcohol. He scrubbed the exterior with undiluted Murphy’s Oil Soap and a tooth brush. He rinsed the pipe under warm water. He dried it off with a cloth and then let it air dry. The stem was scrubbed with Soft Scrub and soaked in Briarville’s Stem Deoxidizer. It came out looking very good. The finish on the bowl and the rim top cleaned up nicely. I took pictures of the pipe to show how it looked when I brought it to the table.  I took some photos of the rim top and stem to show the condition of them both when the pipe arrived. Overall the briar looked good. The Cumberland stem had some light tooth chatter and marks ahead of the button and on the button surface on both sides.I took a photo of the stamping on the underside of the shank. It is readable and in great condition. I removed the stem from the shank and took a photo of the pipe to show the look of the pipe.I took a photo of the filter tenon on the stem and the Boxwood band on the saddle portion of the stem. It looked very good and I fit it with an adapter that converted it to a regular tenon. It is removable allowing the pipe to be smoked with or without a filter. There was some nicking and damage on the inner edge once I examined it closely. I used a folded piece of 220 grit sand paper to smooth out the inner edge and give it a light bevel. Once the bevel was in good condition I used a Cherry stain pen to blend in the newly sanded areas into the rest of the bowl.I polished the bowl with micromesh sanding pads – dry sanding with 1500-12000 grit pads. I wiped the briar down after each pad with a damp cloth. The bowl is starting to look very good. I worked some Before & After Restoration Balm into the surface of the briar with my fingertips to clean, enliven and protect it. I let the balm sit for a little while and then buffed with a cotton cloth to raise the shine. The photos show the bowl at this point in the restoration process. I set the bowl aside and turned my attention to the stem. I sanded out the tooth marks and chatter with 320-3500 grit sanding pads. I wiped it down after each sanding pad with a damp cloth. By the final 3500 grit sanding pad the rim top had a shine.I polished the stem with micromesh sanding pads – wet sanding with 1500-12000 grit sanding pads. I wiped it down after each sanding pad with some Obsidian Oil. I finished polishing it with Before & After Pipe Stem Polish – both Fine and Extra Fine and buffed it off with a cotton cloth. This is a beautiful Bjarne Nielsen Bent Brandy Handmade in Denmark C Grade with a Cumberland saddle stem. It has a great look and feel. The shape fits well in the hand with the curve of the bowl and shank junction a perfect fit for the thumb around the bowl when held. I polished stem and the bowl with Blue Diamond polish on the buffing wheel. I gave the bowl and the stem multiple coats of carnauba wax. I buffed the pipe with a clean buffing pad to raise the shine. I hand buffed it with a microfiber cloth to deepen the shine. The pipe polished up pretty nicely. The rich combination of browns in the smooth finish took on life with the buffing. The rich colour of the briar works well with the polished hard rubber stem. I like the grain and finished look of this Bjarne Nielsen Bent Brandy C Grade. Have a look at it with the photos below. The shape, finish and flow of the pipe and stem are very well done. The dimensions are Length: 6 inches, Height: 2 ¼ inches, Outside diameter of the bowl: 1 ¼ inches wide, Chamber diameter: ¾ of an inch. The weight of the pipe is 80 grams/ 2.82 ounces. This Danish Freehand is a real beauty. Thanks for walking through the restoration with me as I worked over another beautiful pipe. This one will be going on the rebornpipes store in the Danish Pipe Making Section shortly if you would like to add it to your collection. Thanks for your time.

Refreshing a Dominik Sandblast Plateau Top Pencil Shank Egg with a Cumberland Stem


Blog by Steve Laug

The pipes that I will be posting over the next few days from this lot that Jeff and I purchased are fascinating pipes. They were quite stunning but altogether unknown to me. I did not recognize the name of the maker. All the pipes were unsmoked other than the Stanwell Pipe of the Year. We purchased them from a fellow in Kalundborg, Denmark on 02/03/2024. He said that they were all unsmoked and when they arrived they were. They were relatively clean and merely dusty with a little light debris on the stem surfaces. The shapes, sandblasts, shank extensions, and stems were all unique and very well done. The pipes were very beautiful and I could not wait for Jeff to refresh them a bit and get them up to me to do my part. Here are some of the photos of the pipes that we purchased provided by the seller.Here is a photo of the pipe that was sent to us by the seller. It is the one that I chose to work on next. It is a beautiful sandblast plateau rim top Egg with a Cumberland stem. The plateau rim top is thin and the bowl sides and culminate on the thin edge. The blast is very well done. The military stem is also well cut and other than dusty and lightly oxidized is in great condition. The bowl is unsmoked. The bowls all have a carbon bowl coating that is well done on the walls of the bowl. The pipe is stamped on the underside of the shank with the etched name of Dominik. I am looking forward to working on it as it will take very little work and will be a great relief from some of the complicated ones I have been doing lately.I knew nothing about the brand or the carver other than he did beautiful work so I turned to Pipedia to see what I could find (https://pipedia.org/wiki/Dominik_Pipes). There was a listing for Dominik Pipes. He is a Polish Carver and I have included the short article in its entirety below.

Dominik pipes are made by Dominik Kobryń. His journey with pipes began in 1993 at a flea market, where he bought his first pipe. From that time his collection has grown a lot. He made his first pipe in December 2016. Dominik credits Wojtek Pastuch as his mentor, and is very grateful for that!

Dominik uses briar from Mimmo Romeo. He makes his stems by hand, mainly from Ebonite and Cumberland rods, but occasionally acrylic. He focuses on unique pipes that are well done technically.

From there I clicked on a link at the bottom of the page that took me to his Pipe sales website (http://www.dominikpipes.com/). Interestingly the site contained almost word for word the information that I had found on Pipedia.

My name is Dominik Kobryń.

My journey with pipes began in 1993 on a flea market, where I bought my first pipe. From that time my collection has grown a lot.

I made my first pipe in December 2016. Wojtek Pastuch has taught me a lot about pipemaking and I am very grateful for that!

I use briar from Domenico Romero (Mimmo). I make stems by hand, mainly from ebonite rods and cumberland, sporadically acrylic. I pay much attention to create unique pipes, well done technically.

If you are interested in my work do not hesitate to contact me.

I have been following Wojtek Pastuch for some time now and really like what he is doing. It is fascinating that Dominik considers him his mentor. In chatting with Jeff, he sent me a link to Dominik’s Facebook page (https://www.facebook.com/dominikpipes). It is worth a look to see his current pipes.

Now it was time to “work” on the pipe. For his part, Jeff had simply rinsed the pipe off with warm water and dried it. He soaked the stem in deoxidizer to remove the grime and the light oxidation near the shank joint. The pipe came here a few days ago and it is beautiful. The bowl shows the blast on mixed grain, while the rim top is plateau briar. I tried to capture that a bit in the photos that follow. I took photos of the plateau rim top and bowl along with both sides of the vulcanite stem to show the condition of the pipe. It is clearly unsmoked and new.I took a photo to try to capture the etching of Dominik on the underside of the shank in an oval. It is very readable in person but is curved around the shank bottom and it hard to capture in a photo. I also removed the stem from the shank and took a photo of the parts of the pipe. The bowl was in excellent condition so skipped ahead to applying the Balm to the briar. I rubbed the briar down with Before & After Restoration Balm. I worked it into the briar with my fingertips and a horsehair shoe brush to work it into the nooks and crannies of the sandblast finish. The product works to clean, enliven and preserve the briar. I let it sit for 10 minutes then I buffed it with a cotton cloth to deepen the shine. The briar really comes alive with the balm. I polished the Cumberland stem with micromesh sanding pads – 1500-12000 grit pads. I wiped it down with Obsidian Oil after each sanding pad. I used Before & After Pipe Polish – both Fine and Extra Fine to further polish the stem. This Sandblast Dominik Plateau Rim Top Egg with a Cumberland stem has a beautiful, unique Sandblast finish that is deep and craggy. The rich dark finish highlights some great grain around the bowl and shank. It has some great rugged sandblast that I am enjoying looking at on the Dominik pipes I have picked up. The polished taper stem adds to the mix. I put the stem back on the bowl and lightly buffed the pipe with Blue Diamond on the buffing wheel being careful to not buff the stamping and have a lighter touch on the briar. I gave the bowl multiple coats of Conservator’s Wax and the stem multiple coats of carnauba wax on the buffing wheel and followed that by buffing it with a clean buffing pad. I hand buffed the pipe with a microfiber cloth to deepen the shine. The finished Dominik Plateau Rim Top Egg is quite stunning and feels great in my hand. Give the finished pipe a look in the photos below. The dimensions of the pipe are Length: 5 ½ inches, Height: 2 ¼ inches, Outside diameter of the bowl: 1 inch, Chamber diameter: ¾ of an inch. The weight of the pipe is 1.66 ounces/47 grams. Thanks for walking through the restoration with me as I worked over another beautiful pipe. I will be adding to the rebornpipes store in a new section for Polish Pipe Makers. If you wish to add it to your collection let me know. Thanks for your time.

Refreshing a Dominik Sandblast Panel Horn with Cumberland Stem


Blog by Steve Laug

The pipes that I will be posting over the next few days from this lot that Jeff and I purchased are fascinating pipes. They were quite stunning but altogether unknown to me. I did not recognize the name of the maker. All the pipes were unsmoked other than the Stanwell Pipe of the Year. We purchased them from a fellow in Kalundborg, Denmark on 02/03/2024. He said that they were all unsmoked and when they arrived they were. They were relatively clean and merely dusty with a little light debris on the stem surfaces. The shapes, sandblasts, shank extensions, and stems were all unique and very well done. The pipes were very beautiful and I could not wait for Jeff to refresh them a bit and get them up to me to do my part. Here are some of the photos of the pipes that we purchased provided by the seller.Here is a photo of the pipe that was sent to us by the sell. It is the one that I chose to work on first. It is a beautiful sandblast Panel Horn with a Cumberland stem. The rim top is flared almost like a flower. The blast is very well done. The Cumberland stem is also well cut and other than dusty is in great condition. The bowl is unsmoked. The bowls all have a carbon bowl coating that is well done on the walls of the bowl. The pipe is stamped on the underside of the shank with the etched name of Dominik. I am looking forward to working on it as it will take very little work and will be a great relief from some of the complicated ones I have been doing lately.I knew nothing about the brand or the carver other than he did beautiful work so I turned to Pipedia to see what I could find (https://pipedia.org/wiki/Dominik_Pipes). There was a listing for Dominik Pipes. He is a Polish Carver and I have included the short article in its entirety below.

Dominik pipes are made by Dominik Kobryń. His journey with pipes began in 1993 at a flea market, where he bought his first pipe. From that time his collection has grown a lot. He made his first pipe in December 2016. Dominik credits Wojtek Pastuch as his mentor, and is very grateful for that!

Dominik uses briar from Mimmo Romeo. He makes his stems by hand, mainly from Ebonite and Cumberland rods, but occasionally acrylic. He focuses on unique pipes that are well done technically.

From there I clicked on a link at the bottom of the page that took me to his Pipe sales website (http://www.dominikpipes.com/). Interestingly the site contained almost word for word the information that I had found on Pipedia.

My name is Dominik Kobryń.

My journey with pipes began in 1993 on a flea market, where I bought my first pipe. From that time my collection has grown a lot.

I made my first pipe in December 2016. Wojtek Pastuch has taught me a lot about pipemaking and I am very grateful for that!

I use briar from Domenico Romero (Mimmo). I make stems by hand, mainly from ebonite rods and cumberland, sporadically acrylic. I pay much attention to create unique pipes, well done technically.

If you are interested in my work do not hesitate to contact me.

I have been following Wojtek Pastuch for some time now and really like what he is doing. It is fascinating that Dominik considers him his mentor. In chatting with Jeff, he sent me a link to Dominik’s Facebook page (https://www.facebook.com/dominikpipes). It is worth a look to see his current pipes.

Now it was time to “work” on the pipe. For his part, Jeff had simply rinsed the pipe off with warm water and dried it. He soaked the stem in deoxidizer to remove the light oxidation near the shank joint. This is a classic spot for oxidation and it was certainly on this Cumberland stem. The pipe came here a few days ago and it is beautiful. The sides of the bowl show the blast on straight grain, while the rim top and front and back of the bowl show sandblasted birdseye grain. I tried to capture that a bit in the photos that follow. I took photos of the rim top and bowl along with both sides of the Cumberland stem to show the condition of the pipe. It is clearly unsmoked and new.I took a photo to try to capture the etching of Dominik on the underside of the shank in an oval. It is very readable in person but is curved around the shank bottom and it hard to capture in a photo. I also removed the stem from the shank and took a photo of the parts of the pipe.The bowl was in excellent condition so skipped ahead to applying the Balm to the briar. I rubbed the briar down with Before & After Restoration Balm. I worked it into the briar with my fingertips and a horsehair shoe brush to work it into the nooks and crannies of the sandblast finish. The product works to clean, enliven and preserve the briar. I let it sit for 10 minutes then I buffed it with a cotton cloth to deepen the shine. The briar really comes alive with the balm. I polished the Cumberland stem with micromesh sanding pads – 1500-12000 grit pads. I wiped it down with Obsidian Oil after each sanding pad. I used Before & After Pipe Polish – both Fine and Extra Fine to further polish the stem. This Sandblast Dominik Panel Horn with a Cumberland Panel Taper Stem has a beautiful, unique Sandblast finish that is deep and craggy. The rich dark black/oxblood finish highlights some great grain around the bowl and shank. It has some great rugged sandblast that I am enjoying looking at on the Dominik pipes I have picked up. The polished Cumberland taper stem adds to the mix. I put the stem back on the bowl and buffed the pipe with Blue Diamond on the buffing wheel being careful to not buff the stamping and have a lighter touch on the briar. I gave the bowl multiple coats of Conservator’s Wax and the stem multiple coats of carnauba wax on the buffing wheel and followed that by buffing it with a clean buffing pad. I hand buffed the pipe with a microfiber cloth to deepen the shine. The finished Dominik Panel Horn is quite stunning and feels great in my hand. Give the finished pipe a look in the photos below. The dimensions of the pipe are Length: 5 ½ inches, Height: 2 inches, Outside diameter of the bowl: 1 ½ inches x 1 ¾ inches, Chamber diameter: ¾ of an inch. The weight of the pipe is 1.41 ounces/40 grams. Thanks for walking through the restoration with me as I worked over another beautiful pipe. I will be adding to the rebornpipes store in a new section for Polish Pipe Makers. If you wish to add it to your collection let me know. Thanks for your time.

What about this Ashton Old Church Made in England 27 XX Apple?


Blog by Steve Laug

In January Jeff found out about an estate sale in Pocatello, Idaho, USA. It turned out that the sale was for a fellow Jeff and I had purchased pipes from in the past, Gene. He had been the owner of Outwest Tobacco in Pocatello (long closed now) and I bought tobacco and other smoking items from him in the past. As I think about it now, it seems that I had known Gene for over 30 years Jeff and I had been to his home and enjoyed coffee and a few pipes together. I have no idea how many pipes we bought on those visits as well as to the antique shop of his daughter. I know that there were many pipes. When we heard that it was Gene’s personal collection that was for sale and that he had passed away we decided for Jeff to go to the house and have a look. He went on January 25, 2024 to scope it out as we had seen his personal collection of pipes and there were definitely some among those well smoked old warriors that would be great to pick up. Perhaps there would even be one that could join my own collection in memory of Gene.

Jeff went to the house and looked through the racks, pipe bags, tobacco both bulk and tinned as well as a variety of pipes. All the pipes were well smoked and needed serious cleaning. One the pipes he picked up was this Ashton Sandblast Apple with a Cumberland stem. It was very dirty and probably had been a natural coloured pipe when it started. Sandblast finish around the bowl was dirty and had hand oils ground into the grooves. The bowl had a thick cake that overflowed in lava onto the sand blast rim edge and top of the bowl. I also flowed down onto the bowl sides particularly in the back of the bowl. The stem was Cumberland and the marks of a rubber Softee Bit on the end. It had become discoloured and there was a line where the debris from smoking had accumulated along the edge and under the bit protector. The good news was that there were no tooth marks or chatter. The rest of the Cumberland stem was oxidized and had lost the characteristic shine. The pipe was stamped on the heel of the bowl and shank on a smooth panel. It read XX in an oval on the heel of the bowl followed by Ashton [over] OLDCHURCH mid shank. After that it bore the stamp Made In [over] England followed by the number 27. The stem had the characteristic Ashton logo, a brass ring enclosing a piece of briar or in this case perhaps a piece of Cumberland. Jeff took photos of the pipe so I could have a sense of what it looked like before he started his work on it.Jeff took photos of the stem surfaces and the bowl and rim to give a sense of condition of the pipe. You can see the thick cake in bowl and the lava overflow on the edges and rim top of the bowl. It is had to know if there is any damage as the cake and lava is quite thick. The stem surface is very dirty and you can see the area on the end of the stem where the Softee Bit had protected it from chewing but had left it dirty and discoloured. He also took photos of the sides of the bowl and the heel to show the interesting sandblast that went around the bowl. It was deep and quite rugged looking. You can see the oils and debris in the grooves of the blast.  He took photos of the stamping on the underside of the bowl and shank. It is a clear and readable as noted above. The logo on the top of the taper stem is also in good condition. Before working on the pipe I wanted to familiarize myself with the meaning of the stamping on the shank. For general info I turn to Pipephil’s site (http://www.pipephil.eu/logos/en/logo-a8.html). I have included both a screen capture and the side bar notes on the brand.Brand established in 1983 by Bill Ashton-Taylor (1945 – 2009†). James Craig (Jimmy) was designed by Bill himself worthy to continue Ashton pipes manufacture. Sub-brand: Romford (sold through McCranie’s). See also: Taylor Made, Mac Cranie

From the information in the screen capture and notes I learned a lot about the stamping on the pipe. Here is the information collected for ease of reference

  1. Old Church is the name of a Tan Sandblast
  2. XX refers to the size of the pipe with the X’s ranging from X to XXX. This one is a midsized pipe.
  3. 27 gives me that date of the pipe. Using the formula above I have added the 27 to the date 1980 for a date of 2007 as the date the pipe was made.

From there I turned to Pipedia (https://pipedia.org/wiki/Ashton) for further information and background. I have included that information below.

The Ashton Pipe Story (the article is worth reading in its entirety. Click on the link above to do so. I am including the pertinent information to the Ashton pipes.)

… In the early 1980’s Bill strongly felt the need to form his own company in order to return both pipe making and the finished product to the very high standard formerly held. From the time the first pipe bearing his name was made to the present, ASHTON pipes have been manufactured of the best materials and with the utmost skill. And because no one today knows more about the criteria for making fine briar smoking pipes than William Ashton-Taylor, there is no more convincing guarantee for the high quality of ASHTON pipes than the man himself.

R.D. Field played a critical roll in Bill Taylor’s transition from Dunhill to the father of Ashton pipes, Bill Ashton-Taylor. Field wrote The Ashton Pipe Story chronicling this transition.

Due to Bill’s unique knowledge of pipe making and the seasoning of briar, he was granted a British patent for his method of manufacturing. This special process results in pipes that are 12- 14% lighter in weight than comparable pipes of other brands. About his handmade pipes Bill states: “For us, both parts of the pipe are equally important- bowl and mouthpiece. In both cases the best material and perfect finishing are essential.” Each ASHTON pipe, therefore, offers quality from bowl to bit…

The purchase of selected briar wood is the most important pre-condition for the manufacture of high-quality pipes… Bill used Calabrian briar for his smooth finished pipes because the wood is both hard and light, coming as it does from a light, sandy soil. Often, he took these straight grain plateau blocks and turned them on their sides in order to fashion beautiful cross grain/birds eye pipes which are widely believed to smoke cooler than straight grains.

Briar from Tuscany is used for the ASHTON sandblast finishes, as this type of briar takes on a rich, deep patina after the soft grain is removed by the sand-jet. Ashton sandblasted pipes are often compared to early Dunhill Shell pipes, which are highly prized for their deep, craggy sandblasting. While Dunhill seems to have, by and large, abandoned the deep sandblasting technique as time has progressed, Ashton revived the practice, as can be seen on Ashton sandblasted pipes…

The manufacture of ASHTON pipes is based upon an ingenious method first developed in 1915 and improved upon after years of experimentation by William Ashton-Taylor. After the pipe bowls are turned from briar blocks they are heated for eight hours in order that they expand. They are then steeped for an additional eight hours in a mixture composed of three beneficial oils. During this procedure the wood acts like a sponge in soaking up the oils.

After steeping, the oiled bowls are placed on heated brass pegs where they reside for fourteen days. Throughout this period the oil “exudes” from the briar, bringing with it unwanted sap and residue and leaving behind the nut-like flavor for which ASHTON pipes have become renowned…

The site also confirmed the dating information that I had found on Pipephil’s site earlier and quote above. It also included a brief chart on Ashton Pipe Finishes & Grading that I have included below. I have marked the items in the chart below that apply to this pipe in red below.

  • 1: Sandblast –
    • a. Pebble Grain (Pebble Grain) – dark
    • b. Old Church – Natural (OC)
  • 2: Claret & Gilt Edge – smooth with a burgundy to gold burgundy color
  • 3: Oak – dark smooth
  • 4: Sovereign – smooth natural
  • 5: Sovereign SG – smooth natural straight grain, # 1- 5
  • 6: Achievement – pipes that have some unusual work on them, spiraling, bamboo etc.
  • SIZING: X, XX, XXX, LX, ELX, Magnum

Now it was my turn to work on the pipe. Jeff had done an amazing cleanup of the pipe. He reamed the light cake with a PipNet reamer and cleaned up that with a Savinelli Fitsall Pipe Knife. He scrubbed the internals of the bowl and stem with alcohol, cotton swabs and pipe cleaners. He scrubbed the externals with undiluted Murphy’s Oil Soap and rinsed the bowl off with running water. He soaked the stem in Briarville’s Pipe stem Deoxidizer and once it had soaked rinsed it off with warm water to remove the residual solution. He dried it off and rubbed it down to remove any oxidation that was still on the stem. The pipe looked very good when I received it. I took a photo of the rim top to show the condition. You can see the clean bowl. The bowl is in excellent condition and looks very good. There is some darkening on the rim top and some light damage to the front inner edge of the bowl. The stem came out looking quite good. It only needed to be polished. I took a photo of the underside of the shank to show the stamping. The photo clearly shows the stamping and is actually more readable in person. The Ashton logo on the stem is in good condition. I removed the stem from the shank and took a photo of the pipe parts to show what I was working with. It is a nice looking pipe. I worked over the sandblast finish with a brass bristle brush to clean up the darkening on the rim top and in blast on the sides of the bowl. I worked on the inner edge of the bowl to bring it back to round using a folded piece of 220 grit sandpaper. I gave it a slight bevel to accommodate the damage. I stained the top, edge and cap of the bowl with a Maple stain pen to match the rest of the bowl. The bowl was in such good condition that I had to do some minimal work with it. I rubbed the briar down with Before & After Restoration Balm. I worked it into the briar with my fingertips and a horsehair shoe brush to work it into the nooks and crannies of the sandblast finish. The product works to clean, enliven and preserve the briar. I let it sit for 10 minutes then I buffed it with a cotton cloth to deepen the shine. The briar really comes alive with the balm. I set the bowl aside and turned my attention to the stem. I sanded the roughness on the surface of the stem smooth with 320-3500 grit sanding pads. It worked well to smooth things out and once finished the stem looked much better.I polished the Cumberland with micromesh sanding pads – 1500-12000 grit pads. I wiped it down with Obsidian Oil after each sanding pad. I used Before & After Pipe Polish – both Fine and Extra Fine to further polish the stem. This 2007 Ashton Old Church Made in England 27 XX Apple with a Cumberland Taper Stem has a beautiful, unique Dunhill Sandblast finish that is very deep and craggy. The rich brown/red finish highlights some great grain around the bowl and shank. It has some great rugged sandblast that Bill Ashton Taylor specialized in making. The polished Cumberland taper stem adds to the mix. I put the stem back on the bowl and buffed the pipe with Blue Diamond on the buffing wheel being careful to not buff the stamping and have a lighter touch on the briar. I gave the bowl multiple coats of Conservator’s Wax and the stem multiple coats of carnauba wax on the buffing wheel and followed that by buffing it with a clean buffing pad. I hand buffed the pipe with a microfiber cloth to deepen the shine. The finished Ashton Old Church XX Apple is quite stunning and feels great in my hand. Give the finished pipe a look in the photos below. The dimensions of the pipe are Length: 6 inches, Height: 1 ½ inches, Outside diameter of the bowl: 1 ¼ inches, Chamber diameter: ¾ of an inch. The weight of the pipe is 1.80 ounces/51 grams. Thanks for walking through the restoration with me as I worked over another beautiful pipe. I am going to enjoy smoking this one and remembering my visits with Gene both at his home and at Outwest Tobacco in Pocatello. Thanks for your time.

Restoring a GiGi Castagna 1988 Collezion 721 Rusticated Brandy with a Cumberland Stem


Blog by Steve Laug

The next pipe was another surprise to Jeff and me when  it came in a lot of pipes that we bought it from the fellow in Copenhagen, Denmark on January 26, 2023. Most of what we have picked up from him are Danish Pipes and few interesting exceptions. However, this Italian Made rusticated Brandy was a unique addition. It is a rusticated oval shank Pot with a smooth rim top and band at the shank end. The pipe is stamped on the underside of the shank and reads GiGi [over] Castagna. To the left is the shape number 721 and to the right is the line – Collezion [over] 1988. The bowl appeared to be lightly smoked with raw briar on the lower half. The smooth rim top was clean and the edges undamaged. The finish on the rusticated bowl was dull looking with dust in the grooves of the rustication. The Cumberland saddle stem is oxidized and dirty but otherwise undamaged. It came with a flannel bag stamped The Danish Pipe Shop in a circular logo. Jeff took these photos of the pipe before he started his cleanup work.He took photos of the rim and bowl to show how clean the inside was and the lightly smoked condition. The bowl and the rim top and edges were in flawless condition. He also took photos of the stem surfaces to show its overall condition when it arrived. It was lightly oxidized and dirty but did not have any tooth marks or chatter. The photos of the sides and heel of the bowl show the rugged rustication around the bowl and shank sides. The rich tan stain adds depth to the finish. He also took a photo of the stamping on the smooth panel on the underside of the oval shank. The stamping was clear and read as noted above.I turned to Pipephil’s site to see what I could learn about the GIGI brand and the carver who had made the pipe (http://www.pipephil.eu/logos/en/logo-g3.html). I have included a screen capture of the pertinent section from the site. The information I found was as follows:

Artisan: Luigi “Gigi” Crugnola made at Gigi Pipe Via Rovera, 40 21026 Gavirate Oltrona al Lago (VA).

Now I knew that the pipe was made by Luigi “GIGI” Crugnola. That was the extent of the information on that site. I turned to Pipedia to see if I could gain a bit more information on the brand as it generally has a great digest of the history of the brand and maker (https://pipedia.org/wiki/Gigi). I quote the article in full below:

Luigi “Gigi” Crugnola was born in 1934, the same year Giorgio Rovera founded a company in his own name in Varese, Italy along with partners Angelo and Adele Bianchi, who also happened to be Luigi Crugnola’s Uncle and Mother, respectively. The company produced pipes for 30 years, largely exported to America and elsewhere in the world. Crugnola took over the company in 1964 with the death of Angelo Bianchi, changing the name soon after to his own nickname Gigi, and continues to run the company today. The vast majority of Gigi pipes continue to be made for export.

What I learned is that the pipe was made post 1964 and was in all likelihood made for export. We purchased this pipe from our Copenhagen, Denmark connection so indeed it was exported. Now it was time to work on the pipe.

Jeff cleaned up the pipe for me. He reamed the bowl with a PipNet pipe reamer and cleaned it up with a Savinelli Fitsall Pipe Knife. He scrubbed the exterior with Murphy’s Oil Soap and a tooth brush to clean off the grime and dust off the finish. The cleaning had removed the debris and left the pipe looking very good. He cleaned up the internals of the shank, mortise and stem with pipe cleaners, cotton swabs and alcohol to remove any remnant of oils and tars in the lightly used pipe. He soaked the stem in Before & After Deoxidizer and was able to remove much of the oxidation, calcification. When it arrived here in Vancouver it was a clean pipe and I knew what I had to work with. I took photos of it before I started my part of the restoration. I took a photo of the rim top and the stem to show their condition once it arrived in Canada. Jeff was able to clean up the rim and bowl sides as shown in the photos below. He was also able to get rid of the grime and grit in the surface of the briar. The Cumberland stem was quite clean and just needed a good polishing. I took a photo of the stamping on the underside of the shank. It reads as noted above.I removed the stem from the shank and took a photo of the parts to give a sense of what the pipe looks like. It is a proportionally pleasing pipe with classic dimensions and an oval shank with a Cumberland stem.I started my work on the pipe by polishing the smooth rim top with micromesh sanding pads – dry sanding with 1500-12000 grit pads. I wiped it down after each sanding pad with a damp cloth to remove the sanding debris. I rubbed the bowl and shank down with Before & After Restoration Balm and a horsehair shoe brush to deep clean them. The product works to clean, enliven and protect the briar. I worked it in with my fingers and the brush to get it into the rustication of the briar. I let it sit for 10 minutes then I wiped it off and buffed it with a soft cloth. The briar really began to have a rich shine. I set aside the bowl and turned my attention to the stem. I polished the stem with micromesh sanding pads – dry sanding with 1500-12000 grit pads. I wiped the stem down after each pad with a damp cloth to remove the sanding dust. I gave it a further polish with Before & After Stem Polish – both Fine and Extra Fine. I finished by wiping the stem down with a final coat of Obsidian Oil and set it aside to dry. I put the Cumberland stem back on the GiGi Castagna 1988 Collezion 721 Brandy and took the pipe to the buffer. I buffed the bowl and stem with Blue Diamond to lightly buff the briar and the Cumberland. Blue Diamond does a great job on the smaller scratches that remain in both. I gave the bowl several coats of Conservator’s Wax and the stem several coats of carnauba wax and buffed the pipe with a clean buffing pad to raise the shine. I hand buffed it with a microfiber cloth to deepen the shine. I am amazed at how well it turned out. The finished pipe is shown in the photos below. This is a beautiful GiGi Castagna 1988 Collezion – the Cumberland saddle stem and the rusticated finish combine to give this Brandy pipe a great look. The polished Cumberland stem looks really good with the deeply rusticated bowl and shank. The dimensions of the pipe are Length: 5 ½ inches, Height: 1 ¾ inches, Outside diameter of the bowl: 1 ¼ inches, Chamber diameter: ¾ of an inch. The weight of the pipe is 1.62 ounces/46 grams. This beautiful pipe will soon be added to the rebornpipes store in the Pipes By Italian Pipe Making Companies section of the store. Thanks for walking through the restoration with me on this beauty!

Can this one be brought back to life? A Butz-Choquin Rocamar 1319 Bent Billiard


Blog by Steve Laug

The next pipe on the table is French made Bent Billiard with rugged sandblast that looks like it was helped along by a guided hand. Jeff purchased it on eBay on 04/14/17 from a seller in New Tripoli, Pennsylvania, USA. The shape of it fits well in the hand and has a tactile feel as well. The pipe is stamped on the underside of the shank and reads Butz-Choquin [over] Rocamar. That is followed by St. Claude France [over] the shape number 1319. Rocamar in Spanish means Rocklike and that applies well to the finish on this one. The finish appears to be a rugged sandblast but I am not sure if it is as it appears. The finish is a rich reddish brown colour and it is dirty with grime ground into the grooves of the finish. The bowl had a thick cake in it and a thick overflow of lava spills over the rim top. It is thick enough to make assessing the edges hard to do. The bent taper Cumberland stem was oxidized, calcified and had deep tooth marks and chatter on both sides ahead of the button and on the button surface itself. There was a BC logo encased in a circular, clear acrylic inlay on the left side of the stem. There was a band on the end of the stem composed of twin brass rings and a wafer of briar between them. Jeff took photos of the pipe before he started his work on the clean up. The exterior of the pipe was very dirty – grime and grit ground into the blasted/carved finish from years of use and sitting. The rim top was covered with a coat of thick lava that overflowed from the thick cake in the bowl. It was hard to know what the rim edges looked like because of the lava. The stem was dirty, calcified and oxidized with tooth chatter and marks on the top and underside of the stem ahead of the button and on the button surface. Jeff took a photo of the side and the heel of the bowl to give a better feel for the condition of the briar around the bowl. It is an interesting finish that has the look of a sandblast but also seems to look like some rustication/carving as well. The next photos show the stamping on the underside of the shank and it is very readable. It reads as noted above.  Jeff also took a photo of the chipped edge of the shank on the right side where it met the stem band. It appeared that someone had tried to pry off the stem from the shank and damaged the shank end in the process.I turned to Pipephil’s site (http://pipephil.eu/logos/en/logo-butzchoquin.html) to see if I could find any information on the Rocamar line. There was nothing there on the line itself to help me understand more about it. There was a good summary of the history of the brand that I have included below.

The origin of the brand reaches back to 1858 when Jean-Baptiste Choquin in collaboration with his son-in-law Gustave Butz created their first pipe in Metz (France). Since 1951 Butz-Choquin Site officiel Butz Choquin, pipes de Saint-Claude jura. BC pipe de bruyere luxe is a brand of the Berrod-Regad group (Saint-Claude, France).

Jean Paul Berrod managed the company from 1969 to 2002 when he retired and sold the corporate to Mr Fabien Gichon. Denis Blanc, already owner of EWA, took over the S.A. Berrod-Regad in 2006.

I then turned to Pipedia (https://pipedia.org/wiki/Butz-Choquin) to see if I could find any info on the Rocamar line. There was nothing there either but there was further information on the brand itself. I have included it below.

The pipe, from Metz to Saint-Claude.

Jean-Baptiste Choquin of Metz started out as a tobacconist. This enterprise was prosperous; he had several employees. Among those, there was a certain Gustave Butz who was its first workman and who became his son-in-law by marrying Choquin’s daughter Marie in 1858.

In 1858 Jean-Baptiste Choquin created, in collaboration with Gustave Butz, the Choquin pipe. This bent pipe with a flat-bottomed bowl was finished with an albatross-bone mouthpiece, fixed with silver rings.

In 1858, still in Metz, Gustave Butz built an establishment for the manufacture of the Choquin pipe which took the name of . In 1951, the Berrod-Regad company bought the trademark, continuing manufacture until 2002. Departing from Metz, the workshop was relocated to Saint-Claude, then also called “the world capital of the briar pipe”, under the Berrod-Regad group. The Berrod-Regad group would go on to completely rebuild the network of representatives until finally entering the export market in 1960 and has since won several prizes, as well as the Gold Cup of French good taste.

In a few years, the brand’s collection increased from ten to seventy series. 135 years after it was founded, the pipe is still well-known not only in France but throughout the world. In 2002, the Berrod family, wishing to preserve manufacture of pipes in Saint-Claude, handed over the company to Fabien Guichon, a native of the area, who will continue to develop the brand during the 21st century.

The site also had some catalogue pages showing the various shape numbers thanks to Doug Valitchka (https://pipedia.org/images/0/03/BC_Shape02.jpg). I am including a screen capture of the page that shows the shape 1319 Bent Billiard. I have circled it in red in the chart below.Jeff had reamed the pipe with a PipNet pipe reamer and cleaned up the reaming with a Savinelli Fitsall Pipe Knife. He scrubbed out the internals of the shank and stem with alcohol, pipe cleaners and cotton swabs until the pipe was clean. He scrubbed the exterior of the bowl with Murphy’s Oil Soap and a tooth brush to remove the grime and grit on the briar and the lava on the rim top. The finish looks much better but there is still some darkening on the rim top and edges of the bowl. Jeff scrubbed the stem with Soft Scrub and soaked it in Before & After Deoxidizer to remove the oxidation on the vulcanite. When the pipe arrived here in Vancouver for the second stop of its restoration tour it looked a lot better. It has been sitting here for 5 years so it is about time I worked on it. I took photos this morning before I started my part of the work.  I took some close up photos of the rim top and the stem surface. I wanted to show the cleaned bowl and rim top. The rim top and the inner and outer edges of the bowl were in good condition. The top of the bowl had some darkening in the grooves of the carved surface of the rim top and the inner edge of the bowl. I also took close up photos of the stem to show the tooth marks on the stem surface. I took a photo of the stamping on the underside of the shank and it is faint but readable. It is stamped as noted above.   I removed the stem for the shank and took a photo of the bowl and stem to give a picture of what it looked like. The Rocamar finish is totally unique.I started my work on the pipe by addressing the chip on the right end side of the shank where it met the stem. I used a dental spatula to rebuild the chip with clear CA glue and briar dust. Once it cured I sanded the repair smooth. With the repair finished I turned my attention to the darkening on the rim top and inner edge. I wiped the rim top and edge down with some acetone on a cotton pad. I used a brass bristle wire brush to clean up the grooves in the carving on the rim top. I also used the wire brush on the rest of the bowl as well to clean up the debris of time in the box here. The bowl and the rim top came out looking much better.I rubbed the bowl down with Before & After Restoration Balm. I worked it into the surface of the briar with my fingertips and a horse hair shoe brush to clean, enliven and protect it. I let the balm sit for a little while and then buffed with a cotton cloth and shoe brush to raise the shine.  I set the bowl aside and turned my attention to the stem. I used the flame of a Bic lighter to “paint” the surface of the stem to lift the tooth marks on both sides of the stem. The heat lifted many of the marks. I filled in what remained with clear CA glue and set it aside to harden.  Once the repairs cured on the top and underside of the stem I filed them flat and recut the button edge with a small file. I sanded them with a folded piece of 220 sandpaper. I started polishing the stem with 400 grit wet dry sandpaper.   I polished the vulcanite with micromesh sanding pads – 1500-12000 grit pads. I wiped it down with a damp cloth after each sanding pad. I used Before & After Pipe Polish – both Fine and Extra Fine to further polish the stem.  I left a little oxidation around the stamp so as not to damage it more.   This Butz-Choquin Rocamar 1319 Bent Billiard was a fun one to work on. Did we achieve our goal of bringing it back to life? In the end, you have to decide. To my mind it cleaned up really well and looks very good. The Before & After Restoration Balm brought the colours and grain out in the sandblast/carve finish on the pipe. It works well with the polished Cumberland taper stem. I put the stem back on the bowl and carefully buffed the pipe with Blue Diamond on the buffing wheel using a light touch on the briar. I gave the bowl multiple coats of Conservator’s Wax and the stem multiple coats of carnauba wax on the buffing wheel. I followed that by buffing the entire pipe with a clean buffing pad. I hand buffed the pipe with a microfiber cloth to deepen the shine. The finished Butz-Choquin Rocamar Bent Billiard fits nicely in the hand and I think it will feel great as it heats up with a good tobacco. The tactile finish will add to the experience. Give the finished pipe a look in the photos below. The dimensions of the pipe are Length: 6 inches, Height: 2 inches, Outside diameter of the bowl: 1 ¼ inches, Chamber diameter: ¾ of an inch. The weight of the pipe is 2.15 ounces/61 grams. If you are interested in carrying the previous pipeman’s legacy with this pipe send me a message or an email. I will be adding it to the rebornpipes store in the French Pipe Makers Section. Thanks for reading this blog and my reflections on the pipe while I worked on it.

Pipe Gods Smiled And I Got Not One But Three Les Wood Pipes… Restoring a Les Wood Poker


Blog by Paresh Deshpande

Les Wood pipes are on every collector’s either wish list or in personal collection and I am no exception, though I was in the former category up until now. These pipes are as rare as hen’s teeth and very rarely make an appearance on the estate pipe market and whenever they do, the stratospheric prices made them beyond my reach. After waiting for years on end, I came across a gentleman desirous of parting with his Les Wood pipes collection. We discussed the price and I discussed with Abha, my wife, discussed some more with the gentleman, again discussed a lot more with my wife and thereafter again discussed some with the gentleman and after all these discussions, three Les Wood pipes made their way from the European Union to India.

The first of the three Les Wood pipes that I decided to work on is a rusticated large, stout classic poker with a beautiful Cumberland stem. The large rusticated chunky stummel feels great in the hand and given its size, it is definitely not a light weight. The pipe is stamped on the smooth surface of the foot of the stummel as “FERNDOWN” in a slight arc over “BARK” over “HAND MADE IN” over “ENGLAND” over “LES WOOD”. Running oblique to the FERNDOWN BARK on the left side are three stars one below the other. The Sterling silver band bears the stamp “L & JS” in a rectangular cartouche over “.925”. The Cumberland stem is stamped on the left side as “L J S”I had read about Leslie John Wood sometime back when I read an article on English pipes and pipe carvers. I remembered that he worked for Dunhill’s as a silversmith. Just to refresh my memory, I visited Reborn Pipes and sure enough, Steve had indeed worked on and researched Les Wood. It’s very comprehensive and is recommended as a read. Here is the link to the write up.

https://rebornpipes.com/2021/05/20/this-restoration-is-a-bit-of-a-resurrection-of-a-beautiful-ferndown-root-3-dublin/

From the article, I know I am working on a ‘BARK’ grade pipe (ca. 90%, rusticated, dark brown and black) in size 3 from Les Wood.

Initial Visual Inspection
The pipe is actually in quite a good condition. The chamber has a very thin layer of cake that is even all around and is rock hard. The stummel surface feels solid to the touch and thus, I don’t anticipate any serious issues with the chamber walls. The rim top surface is smooth and devoid of any cake build up or darkening over the surface. The rim edges are in pretty good condition too. The stummel finish has faded more towards the foot of the stummel and has a lot of dirt and grime ground into the rusticated finish. This makes the stummel appear dull, lifeless and lackluster. The silver band at the shank end is deeply oxidized and appears blackened. The Cumberland stem is deeply oxidized with a couple of minor tooth indentations in the bite zone. Here are a few pictures of the pipe as it sits on my worktable. It’s a nice solid pipe with a robust construction yet elegant in its huge size and shape. This one will take your breath away once it is restored, I think.

Detailed Inspection
There is a thin layer of cake in the chamber that is even all around. The cake is hard and compact and this makes me believe that it has been regularly reamed to maintain the correct cake thickness in the chamber. The condition of the chamber walls can be ascertained only once the cake has been taken down to the bare briar; however, I do not foresee any major issues with the chamber walls. The smooth rim top has no dents and dings and overflowing lava. The condition of the inner rim edge will be known once the complete cake has been removed and the surface thoroughly cleaned. The chamber does have smells of old tobaccos and would need to be addressed.The rustication on the stummel surface are very fine and shallow. It is a very uniquely rusticated stummel for sure. The stain has faded from the lower half of the bowl and lower surface of the shank. The surface looks tired and lifeless and would benefit from a nice thorough TLC routine. The shank is quite clean and has no signs of accumulated old oils and gunk. The draw is nice and smooth. The Cumberland stem is deeply oxidized with minor tooth chatter in the bite zone on either surface. The horizontal slot opening is clean and the tenon shows accumulation of old dried oils and gunk. The airflow through the stem is smooth and easy. That my detailed appreciation of the condition of this pipe was completely off the mark became amply evident as I went through the process of refurbishing this pipe.

The Process
I started the process of refurbishing this pipe with internal cleaning of the stem and this is where my initial appreciation of the stem condition faulted. Using thin shank brushes and anti-oil dish washing soap, I cleaned the stem airway. I have modified this process of cleaning the stem airway by doing away with pipe cleaners and alcohol as it saves me a ton of pipe cleaners, which is a precious commodity for me here in India. To say that the airway was filthy, would be an understatement as is evidenced by the following pictures. The dark smelly and sticky goo that was being dislodged with each passing of the shank brush was never-ending. However, I persevered with my efforts till only white clean foam came out of the stem airway, indicating that the airway was nice and clean. I ran a couple of pipe cleaners dipped in alcohol through the airway to dry it out and make sure that there are no traces of soap and gunk hidden in the airway.With the stem internals now clean, I moved to external cleaning of the stem surface by dunking the stem into “Before and After Deoxidizer” solution developed by my friend Mark Hoover. The solution helps to draw out heavy oxidation to the surface making it’s further removal a breeze, while the minor oxidation is eliminated to a very great extent. I usually dunk stems of 5-7 pipes that are in-line for restoration and the FERNDOWN BARK is marked in red arrow. I generally allow the stems to soak in this solution overnight for the solution to do its work.While the stem was set aside to soak in the deoxidizer solution, I moved on to removing the thin (????) layer of cake from the chamber walls. Boy was I wrong in my assessment of thin layer and how! I started the reaming process with head size 2 of the PipNet reamer blade and progressed through head sizes 3 and 4. The blades kept cutting through the layers of cake and there seemed no end to it. Finally, I resorted to using my Kleen Reem pipe tool extended to its max width to divest the chamber walls of its entire carbon layer. The chamber is huge ! I used my fabricated knife to remove cake from areas inaccessible to the reamer blades and completed the process of removing the cake by sanding the walls smooth with a folded piece of 180 grit sandpaper. I wiped the chamber with a cotton swab wetted with alcohol to clean the residual carbon dust. The chamber walls are solid and the minor thin veins that are visible over the walls are not heat fissures but an ultra thin layer of carbon which will be addressed once the cake is loosened up after a salt and alcohol bath, or at least that is what I hope for. Next, I cleaned the mortise by scraping out all the dried oils and tars from the walls. My assessment of the mortise being clean was proved wrong by the amount of crud that was scraped out. The icing on the cake was when I tried to clean the airway with a folded pipe cleaner dipped in alcohol and it just wouldn’t pass through. I realized that the airway was clogged to some extent. Using the drill bit attachment from the Kleen Reem pipe tool, I cleaned out the accumulated oils and tars from the airway and ran a folded bristled pipe cleaner dipped in alcohol through the airway. I checked the draw and if earlier I felt the draw was smooth and open, after the cleaning, it was surreal! The draw was something I had not experienced earlier. The air literally gushed through the airway. This one is a sure fire excellent smoker.Continuing with the internal cleaning of the chamber and shank, I subjected it to a salt and alcohol bath. I used cotton balls which is an at par substitute as I have realized over the years. I drew out a wick from the cotton and along with a folded regular pipe cleaner; inserted it into the mortise and through the draught hole and further into the chamber. Thereafter, I packed the chamber with cotton balls to about quarter of an inch below the rim inner edge and soaked the cotton balls with isopropyl alcohol up to the brim. About half an hour later, the level of alcohol had gone down, having being absorbed by the cotton. I topped it up once again and set it aside overnight. By next afternoon, the cotton and alcohol had drawn out all the remaining oils/ tars from the chamber and mortise and loosened out any residual cake and tar build up, fulfilling its intended task. I removed the cotton balls and ran pipe cleaners through the mortise to clean out all the loosened tars and gunk. Using my fabricated tool, I scraped out the entire loosed gunk from the mortise and further cleaned it with alcohol and q-tips. I also scraped the moist cake from the chamber using my knife and sanding it smooth with 180 grit sandpaper. The chamber now smelled clean and fresh and the tiny veins observed in the chamber were eliminated. I set the stummel to dry out naturally. I cleaned the external surface of the stummel with undiluted Murphy’s Oil Soap and a hard bristled toothbrush. I cleaned the smooth rim top surface with the soap and Scotch Brite pad. I thoroughly cleaned the mortise with shank brush and anti-oil dish washing soap. I polished the smooth rim top surface by dry sanding with 1500 to 12000 grit micromesh pads.  Next, I rubbed a small quantity of “Before and After Restoration Balm” into the briar with my finger tips and let it rest for a few minutes. The balm almost immediately works it’s magic and the briar now had a nice vibrant appearance with the beautiful rustication patterns on full display. I have been using this balm ever since I embarked on this journey and it is this part of restoration that I always look forward to. I further buffed it with a horse hair shoe brush. This pipe really oozes of a very high quality, in fact one of the best that I have come across. Now that the stummel refurbishing was nearly done and also the stem had now been soaking for more than 24 hours, I removed the stem from the solution. I first scrubbed the stem surface with a Scotch Brite pad, always being mindful of the stem logo on the left side. I followed this scrubbing with a nice cleaning of the surface using a 0000 grade steel wool. I rinsed the stem under running water to rid the stem of the thick solution. I ran a couple of pipe cleaners to remove the deoxidizer solution from the airway. The beauty of a Cumberland stem with swirls of red and black can now be appreciated once the heavy oxidation has been eliminated.The above cleaning also gave a clearer picture of the tooth chatter on either surface in the bite zone. This tooth chatter was very minor and would be easily addressed during the sanding process using various grit sandpapers followed by micromesh pads. I dry sanded the entire stem with 320, 400, 600 and 800 grit sand papers followed by wet sanding using 1000, 1500 and 2000 grit sand papers. This progressive use of higher grit sandpapers helps to, firstly,  reduce the sanding marks left behind by the more abrasive ones, secondly, completely eliminate the oxidation and imparting a clean shine to the stem surface. Thirdly, this also helped to even out the minor tooth chatter from the bite zone. I applied a little EVO and set the stem aside for a few minutes. This stem, as the rest of the pipe, is a real beauty.I went through the 3200 to 12000 grit micromesh pads to dry sand the stem. The stem now has a nice deep shine with the swirls coming to life as they dance around the entire stem surface. I rubbed a small quantity of EVO and set the stem aside for the oil to hydrate the stem surface. This is a beautiful stem and I cannot refrain from constant admiration of it. Have a look for yourself….I painted the stem logo L J S using a Gold paint glitter pen and wiped off the excess paint. The stem logo is now nice and prominently visible. I completed this project by hand polishing the stummel with Halcyon II wax. I rubbed this polish deep into the rustication and after a couple of minutes, vigorously hand buffed the stummel with a microfiber cloth to a deep shine. I polished the stem with Blue Diamond compound and subsequently with carnauba wax using my hand held rotary tool. This is a gorgeous looking pipe and will be an integral part of my collection of contemporary Pipe Carvers. I wish to thank each one for sparing their valuable time to read through this write up and praying for the health and safety of you and your loved ones.