Tag Archives: Paresh Deshpande article

Refurbishing an Intricately Carved Old Meerschaum Eagle Claw Holding an Egg


Blog by Paresh

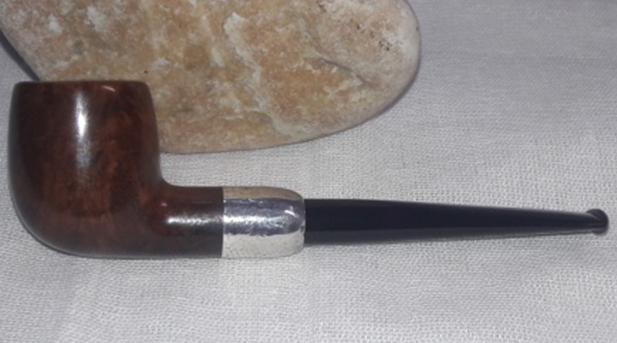
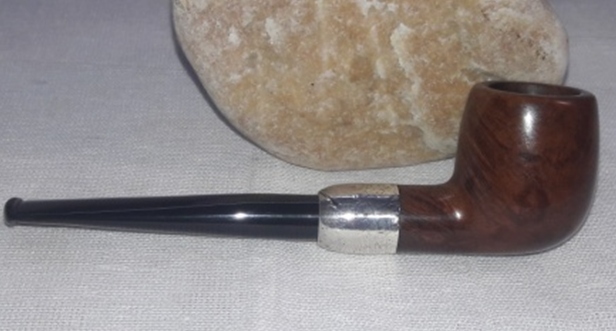
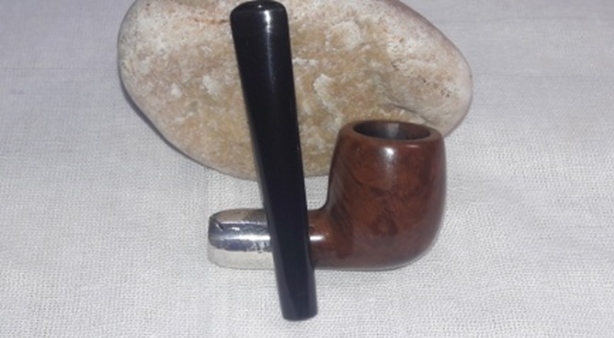
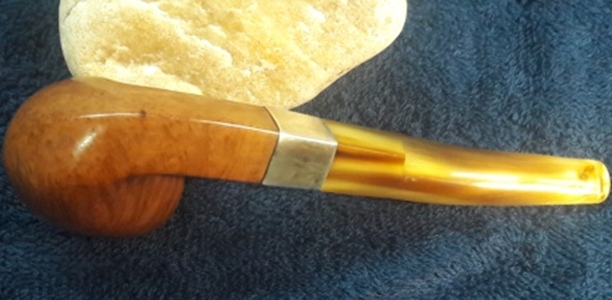
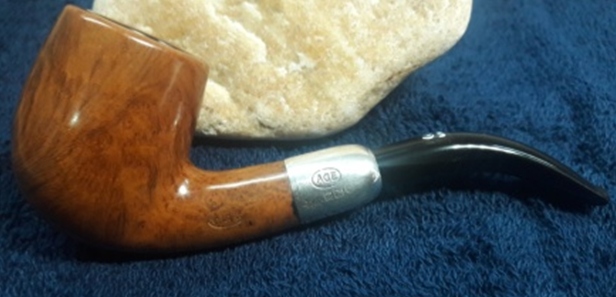
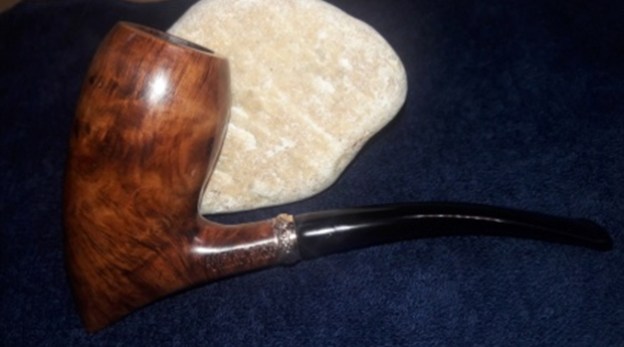
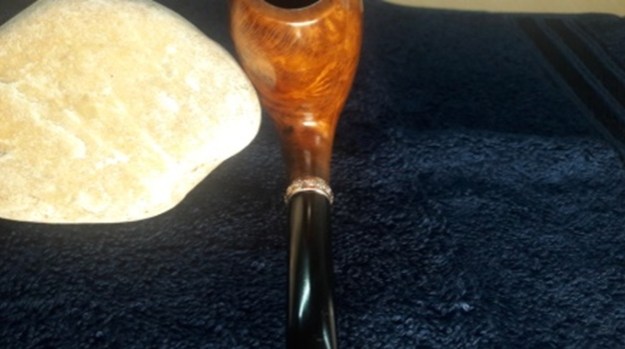
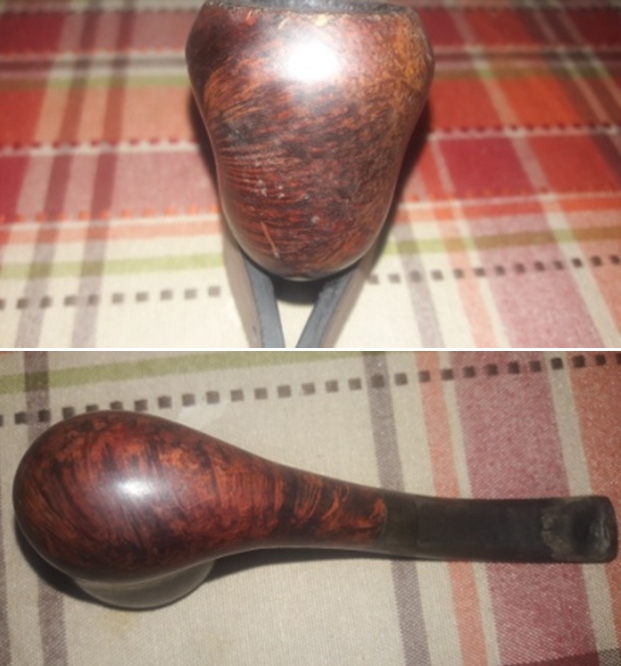
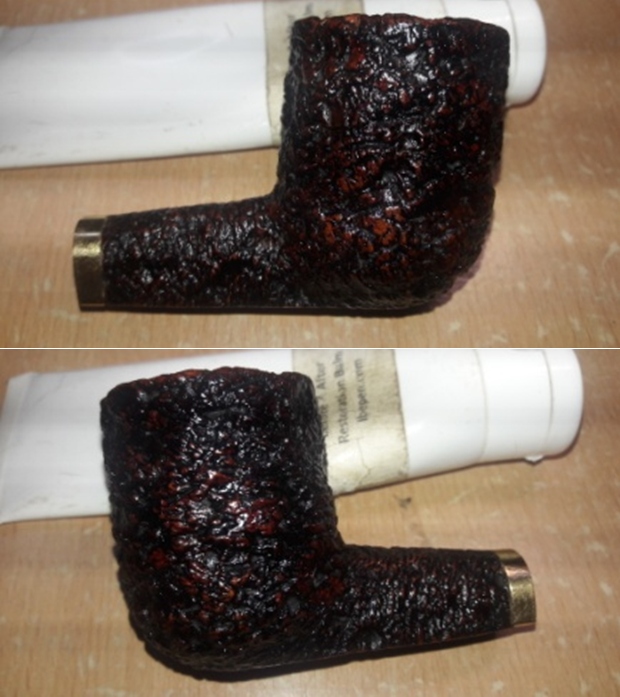
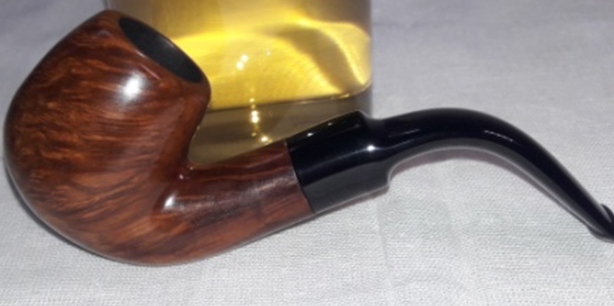
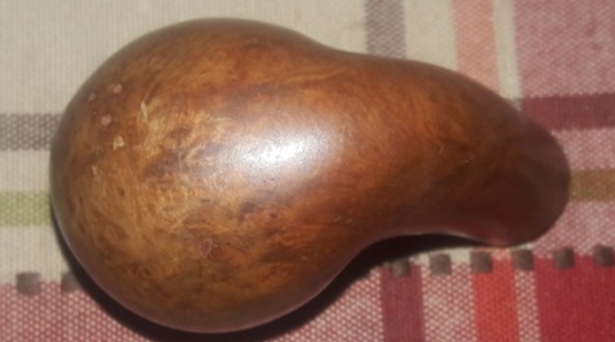
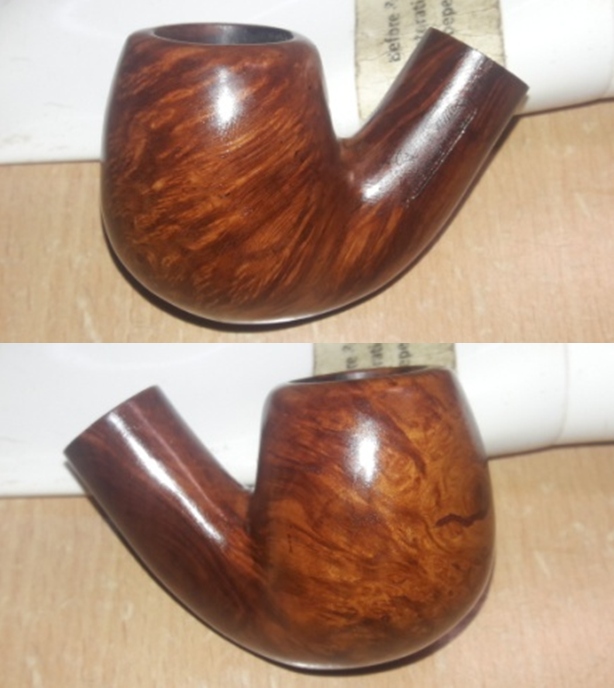
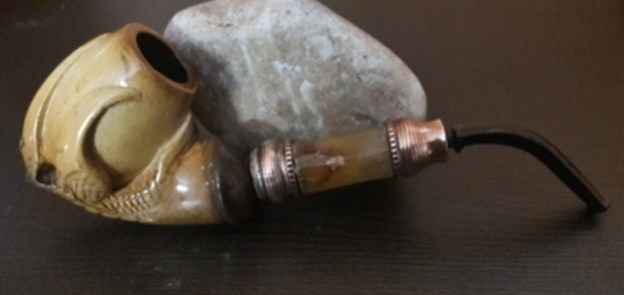
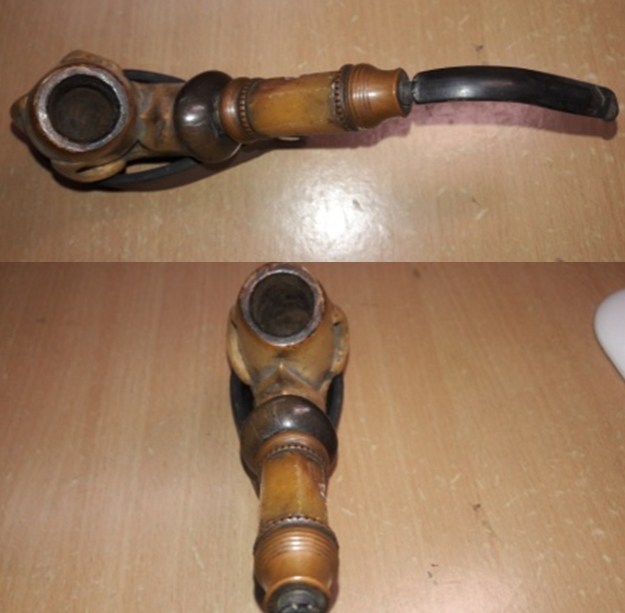
The next pipe on my work table is an old intricately carved meerschaum Eagle claw holding an egg in its talons. The stummel has an intricately carved shape of an eagle claw complete with perfectly carved scales and claw knuckles. The shank extension is a beautiful colored amber hexagonal block with copper end adornments. The delicate thin horn stem has a threaded bone tenon with orifice slot. There is no stamping whatsoever anywhere on this pipe. The lack of stamping makes it impossible to establish the origins of this pipe. However, the intricate carvings and eye for details on this pipe makes me believe this pipe to be Vienna made. Here is the pipe as it sits on my work table. Initial Visual Inspection
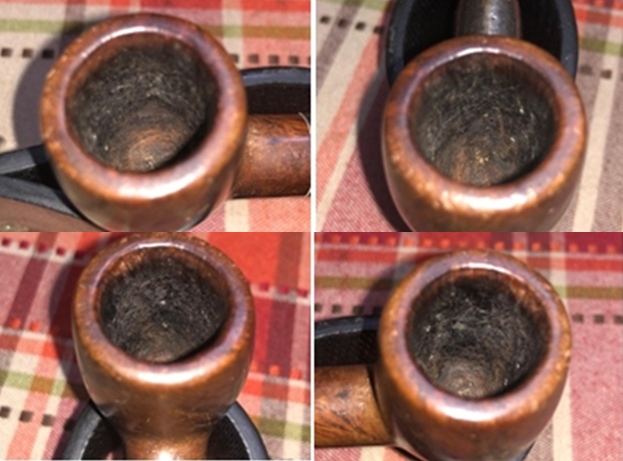
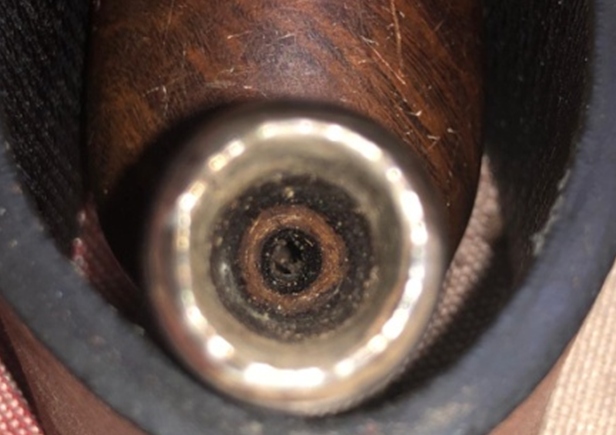
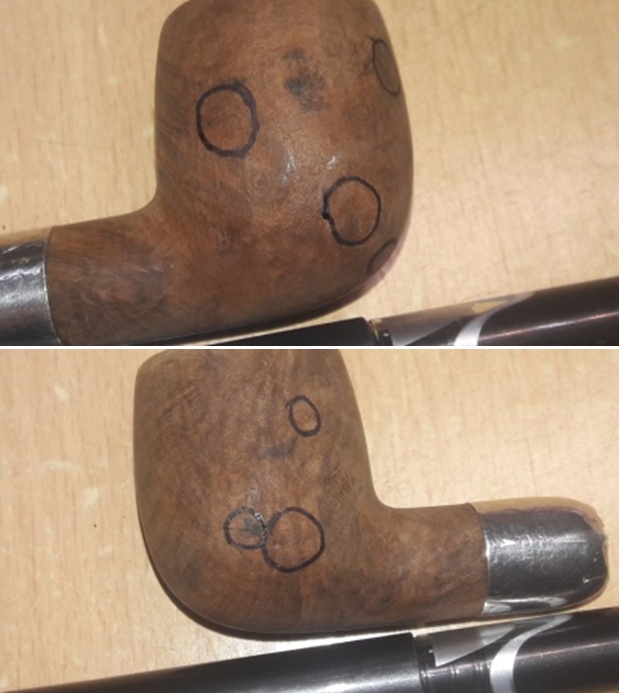
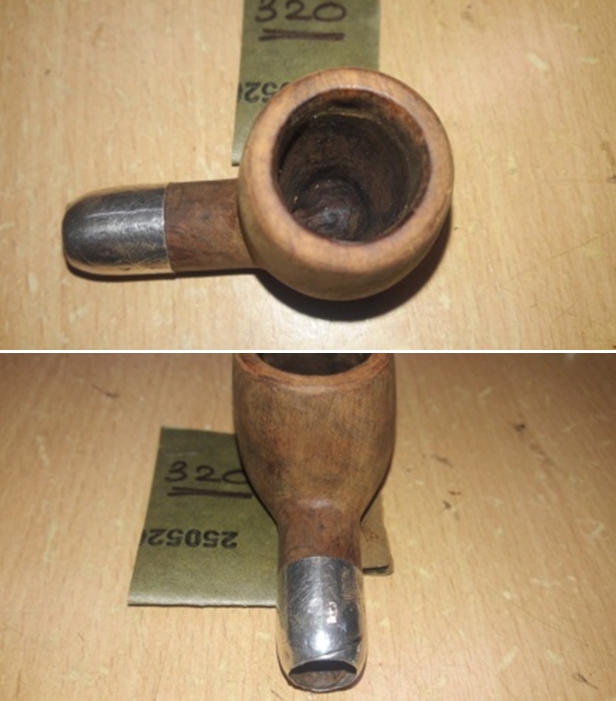
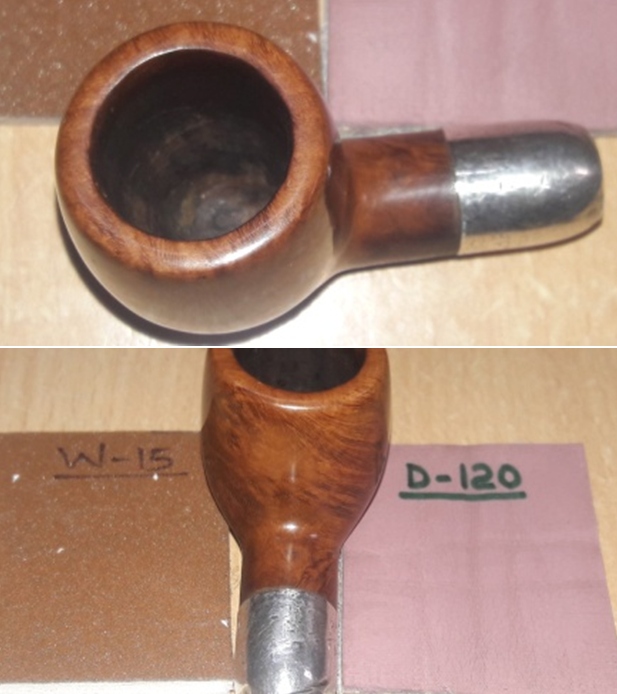
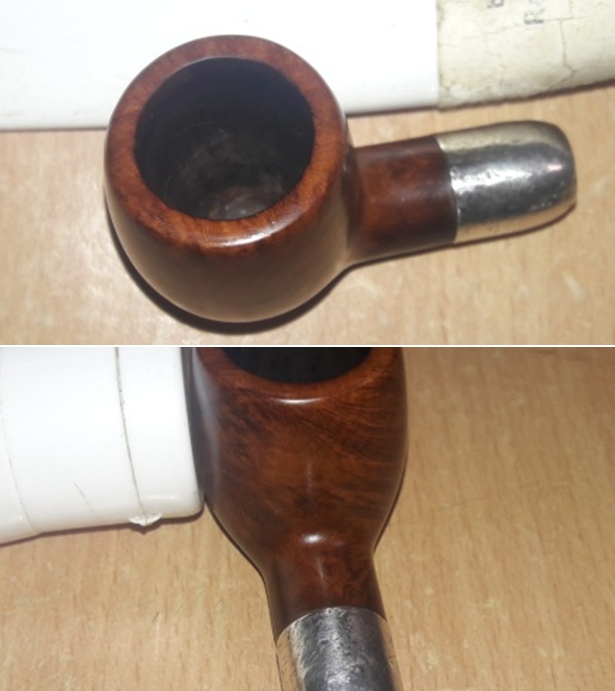
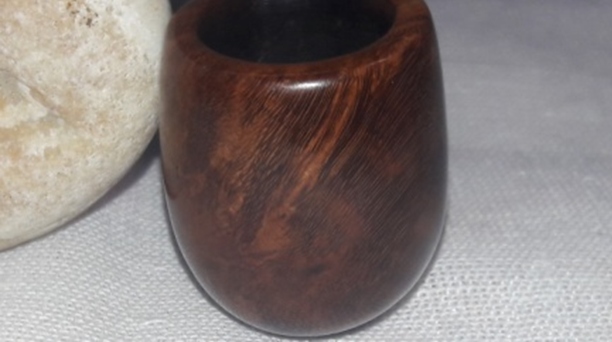
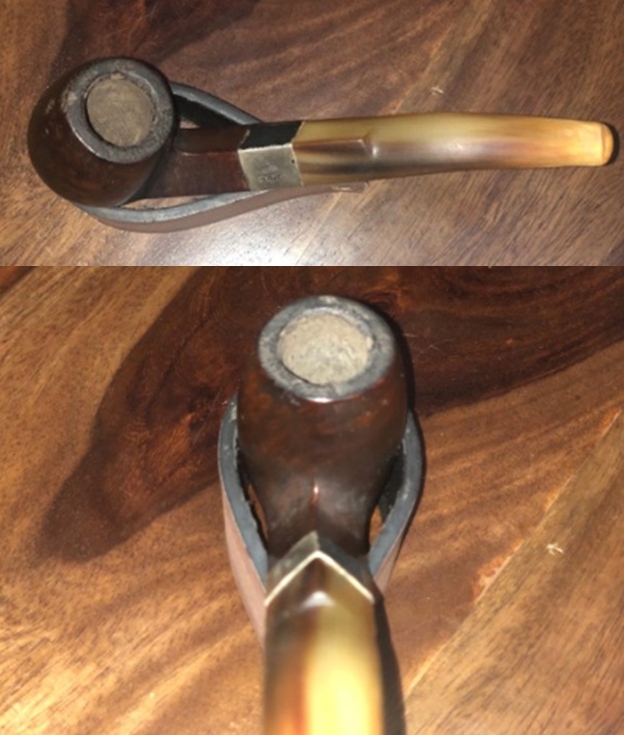
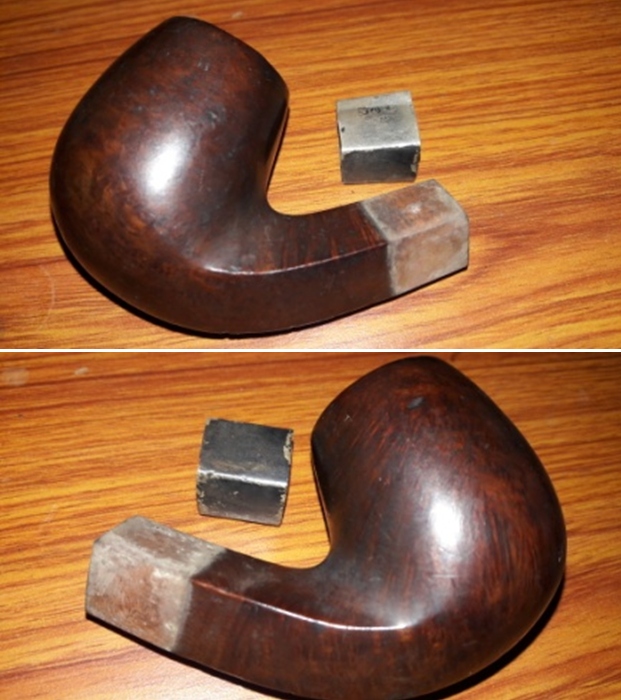
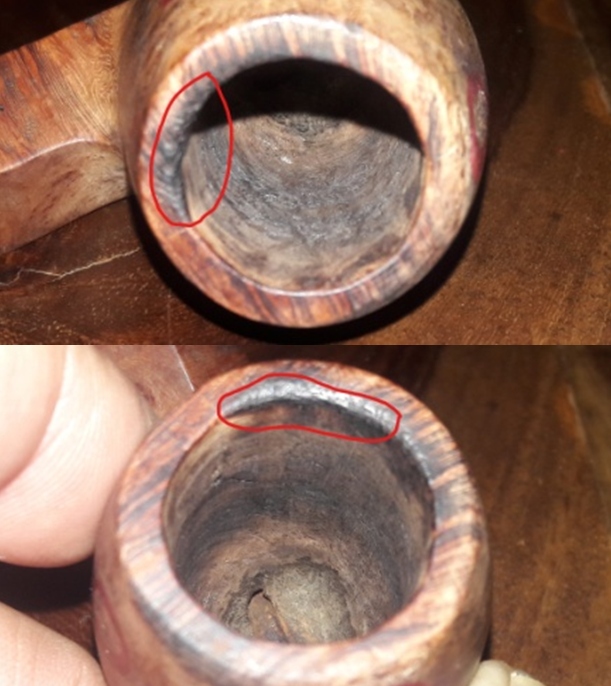
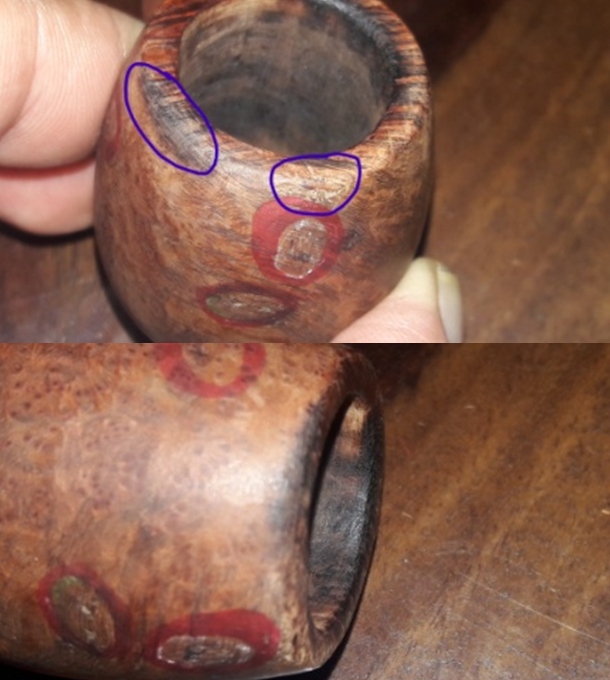
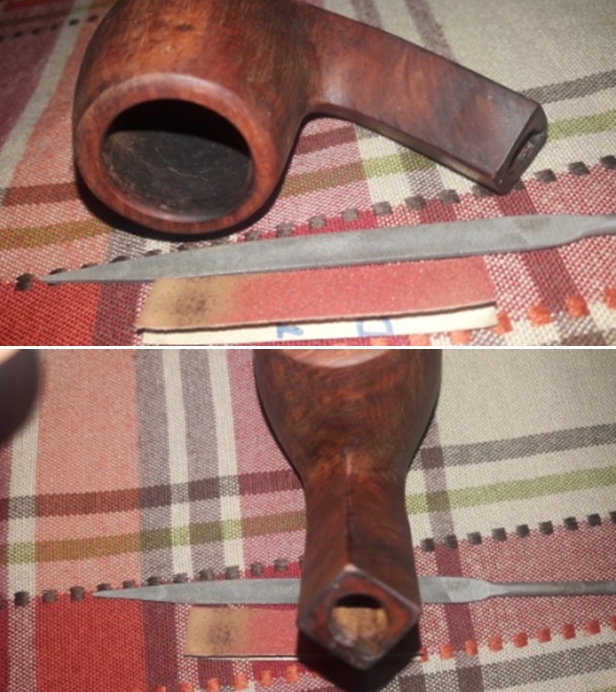
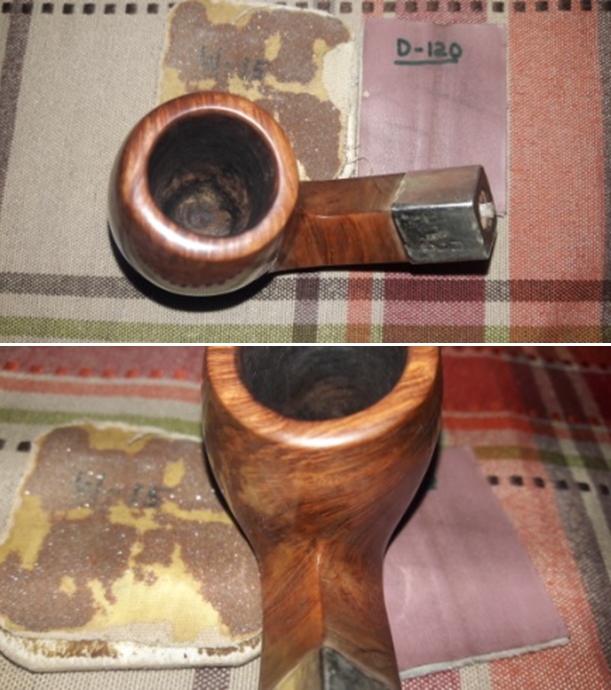
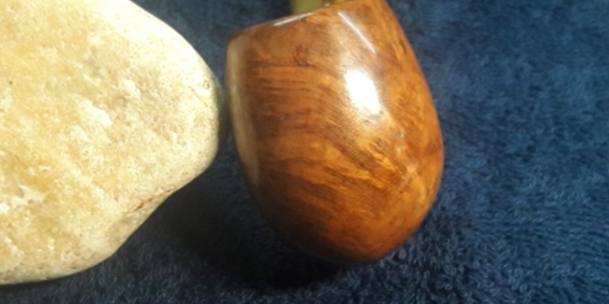
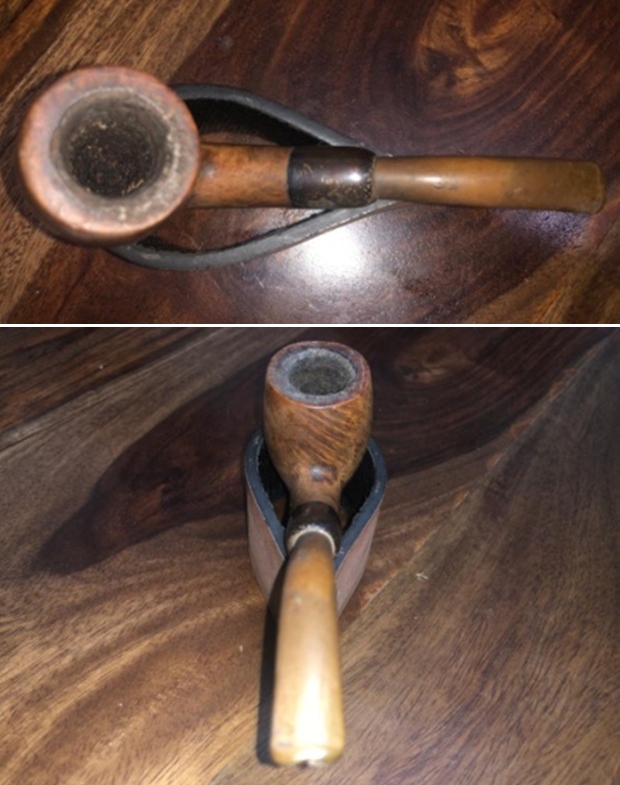
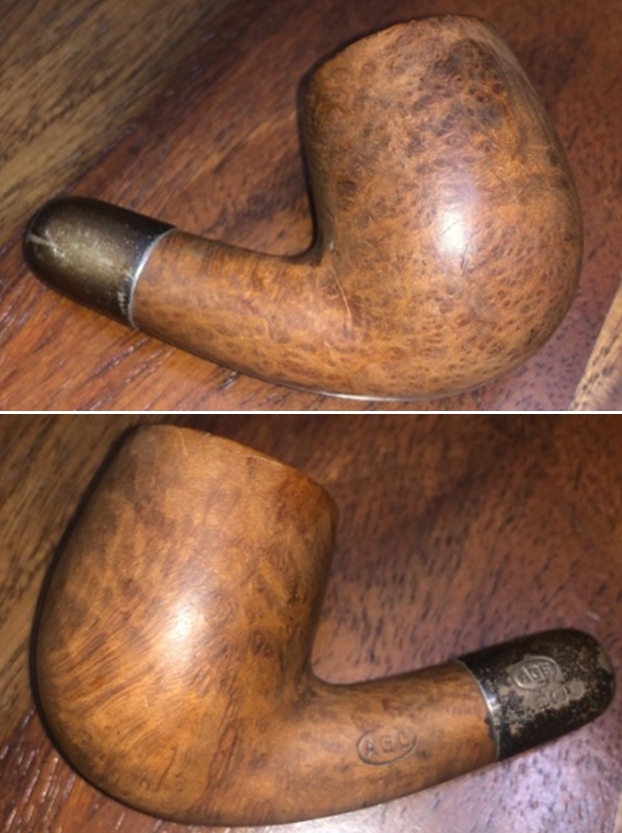
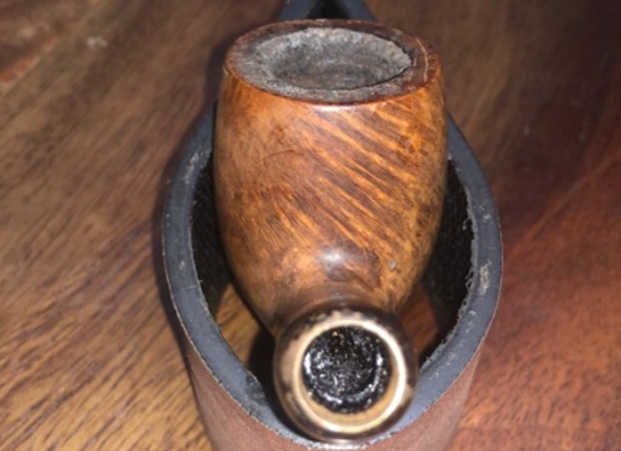
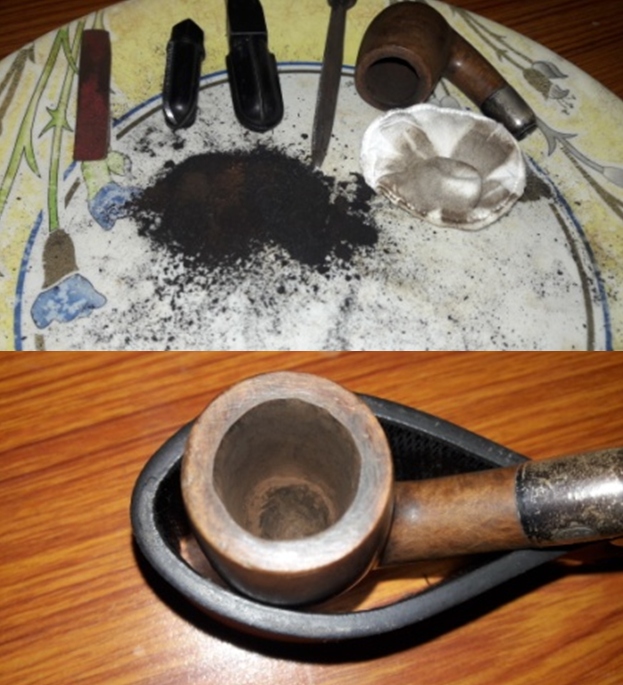
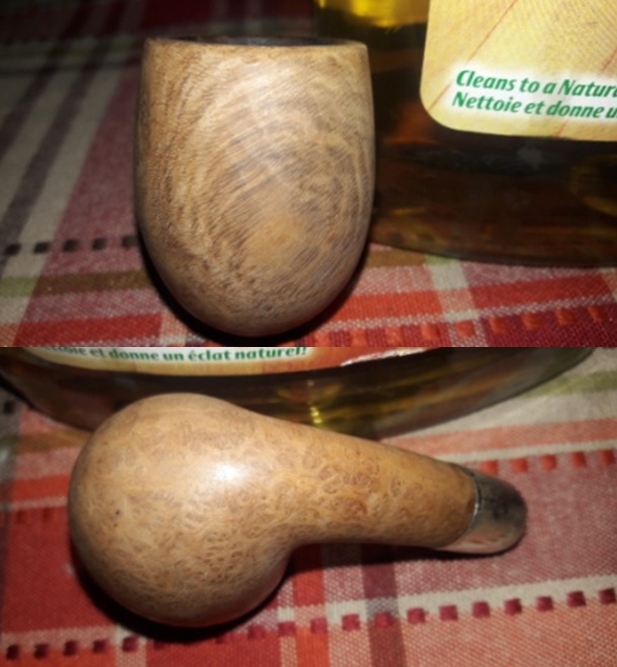
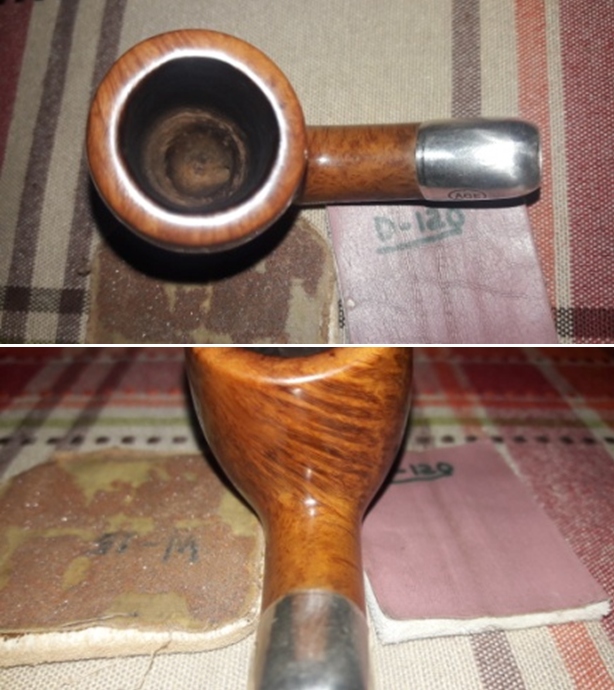
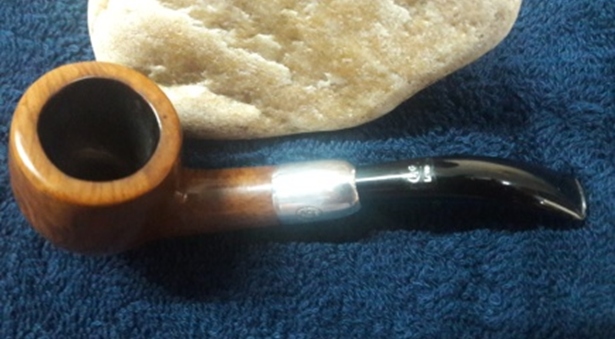
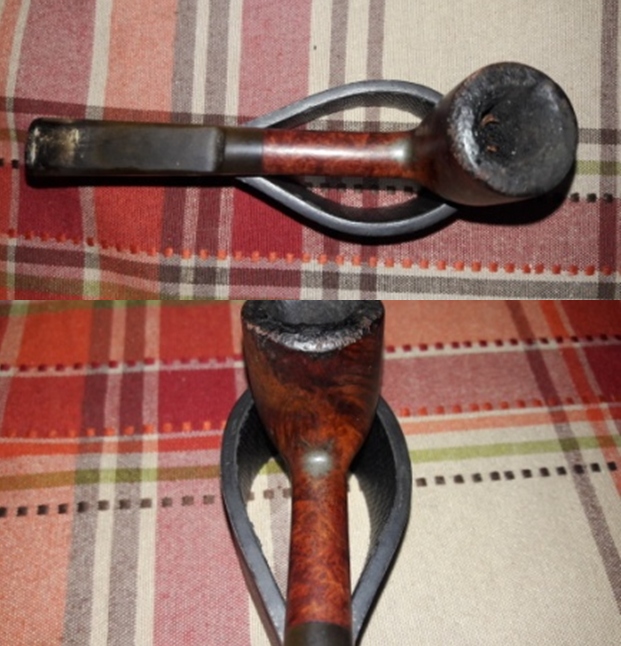
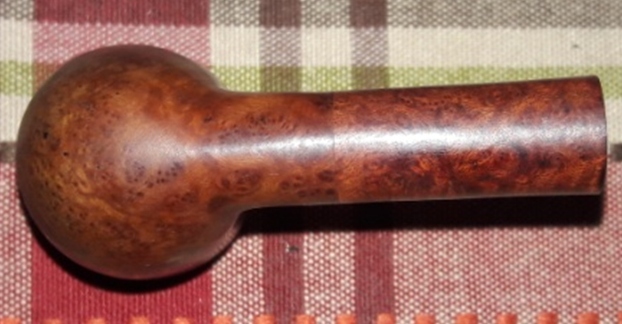
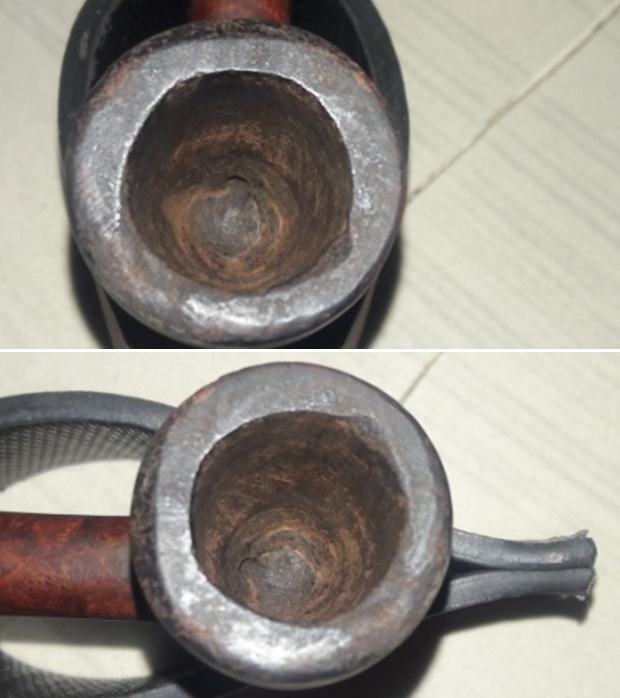
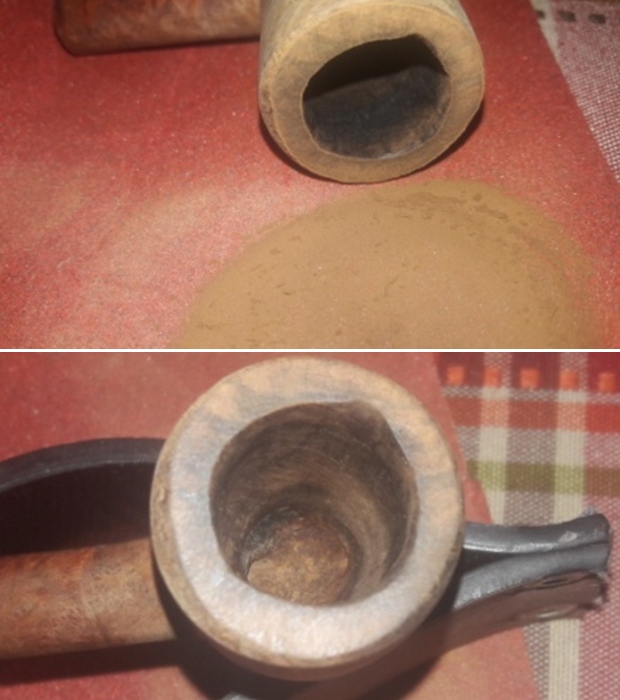
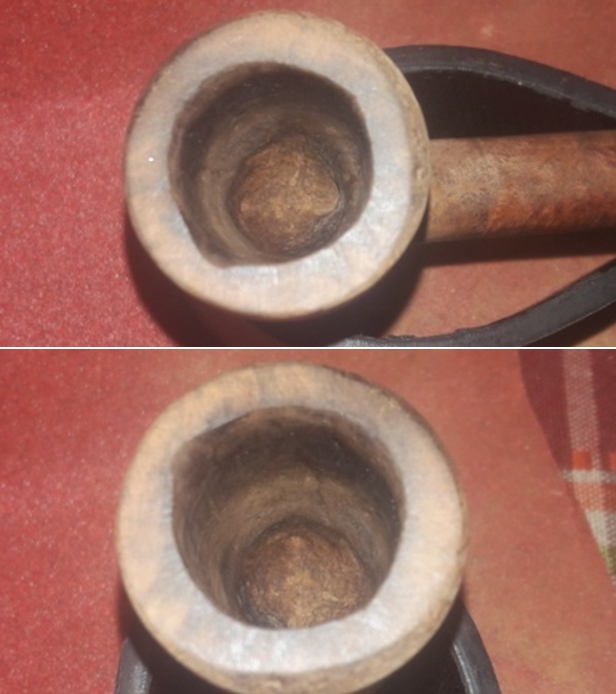
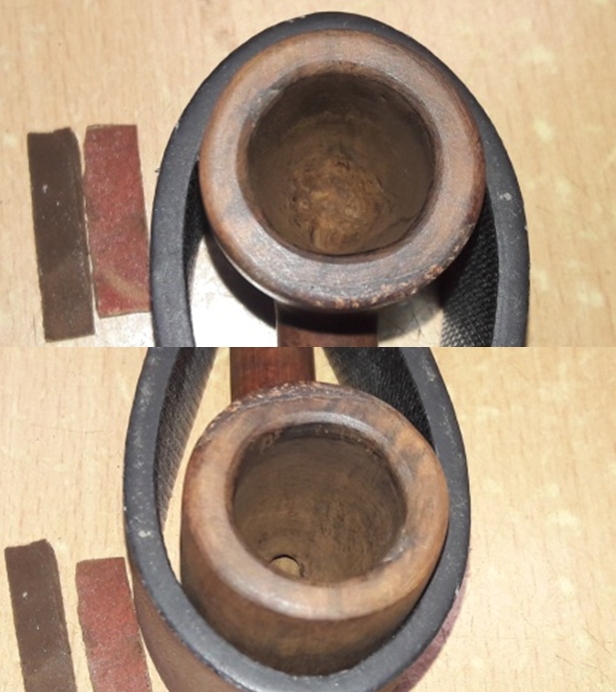
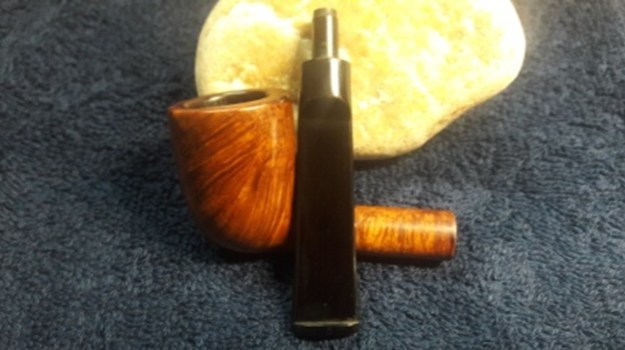
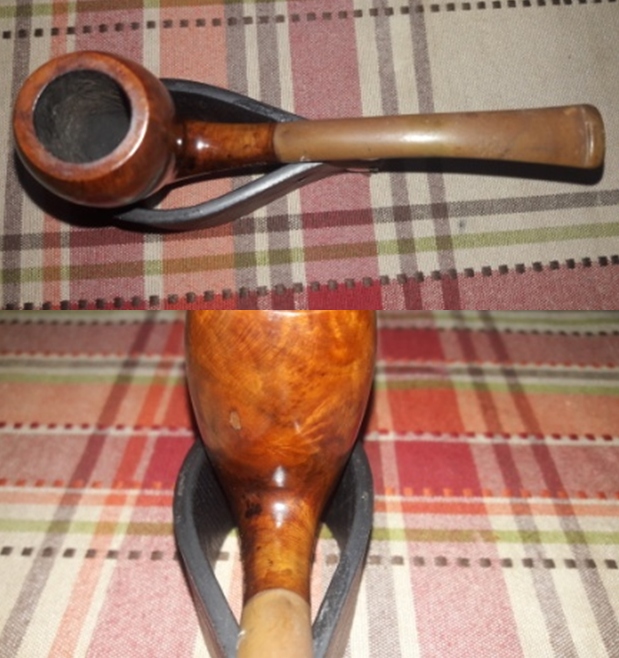
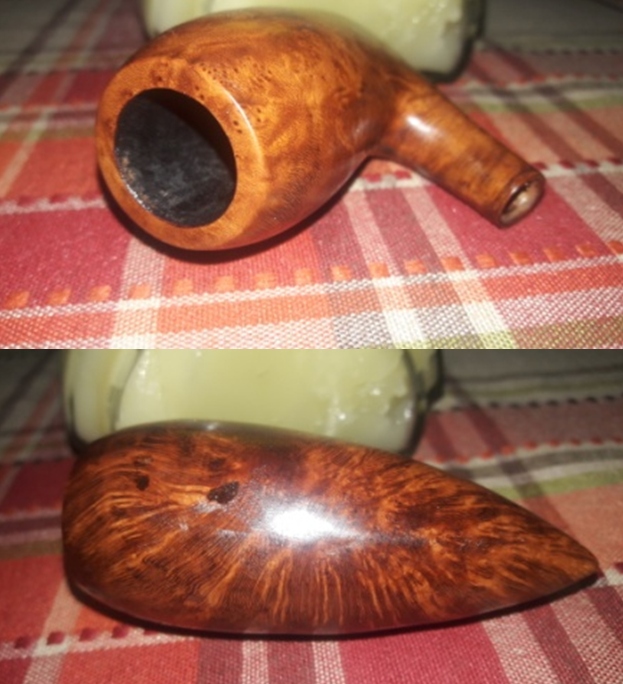
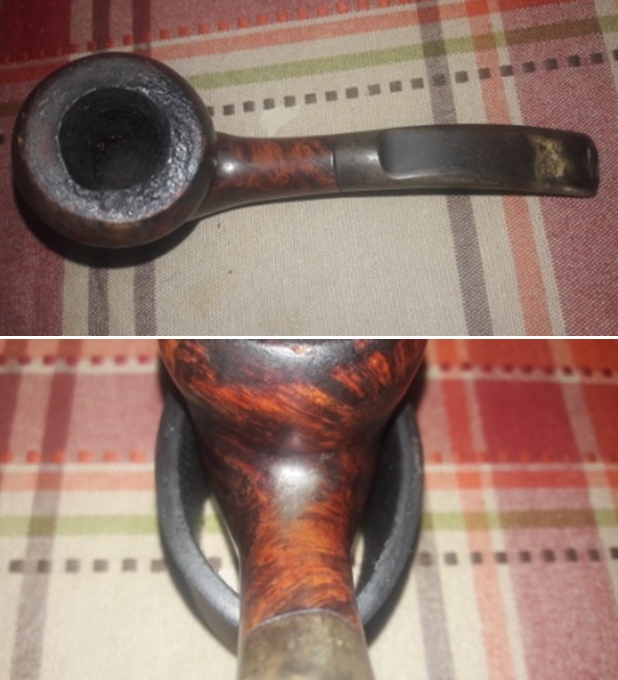
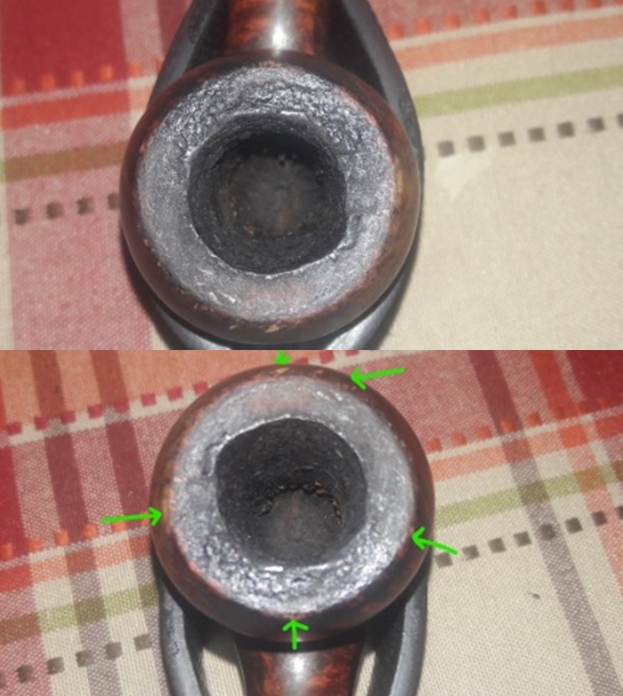
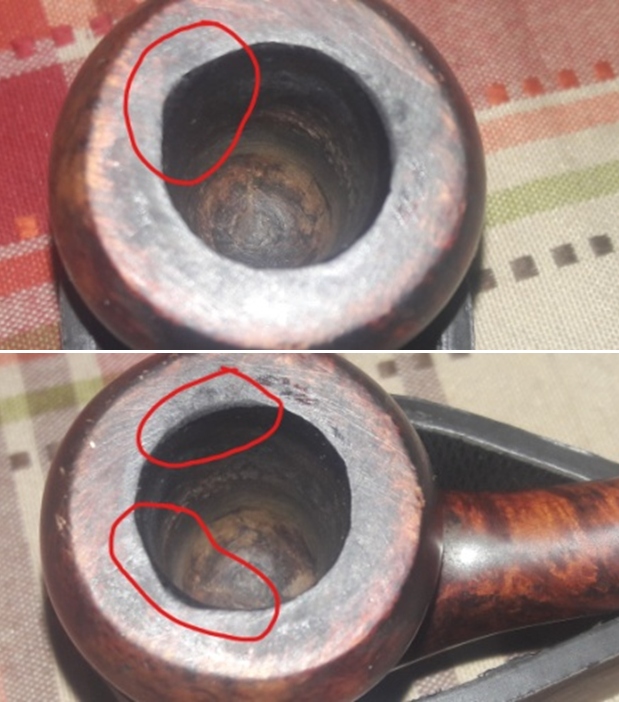
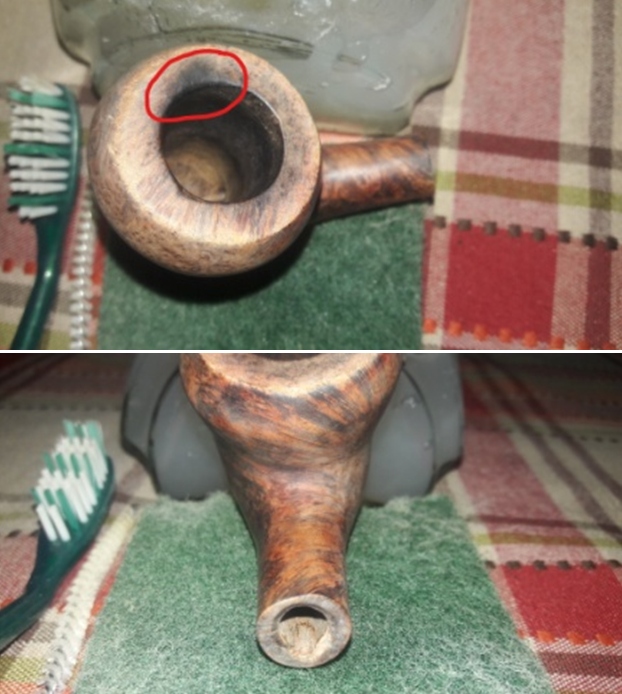
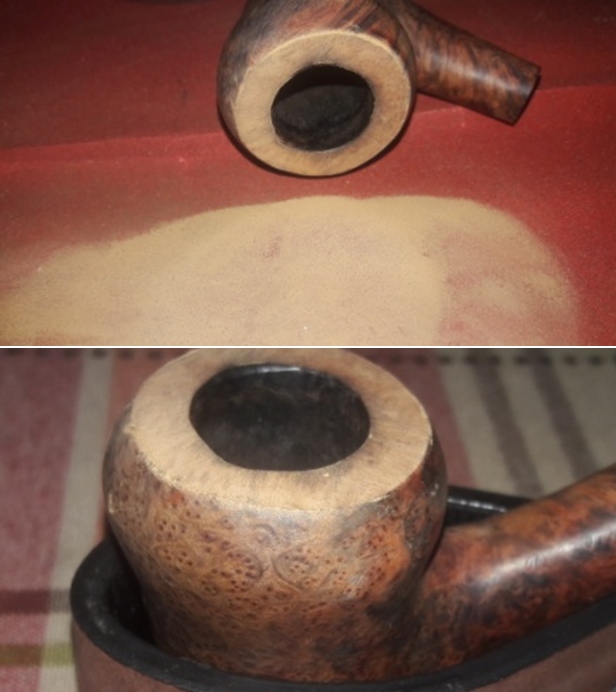
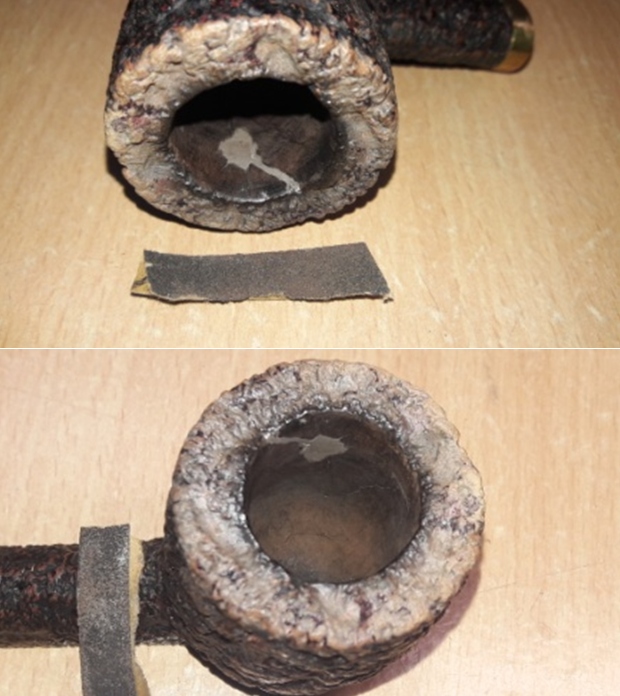
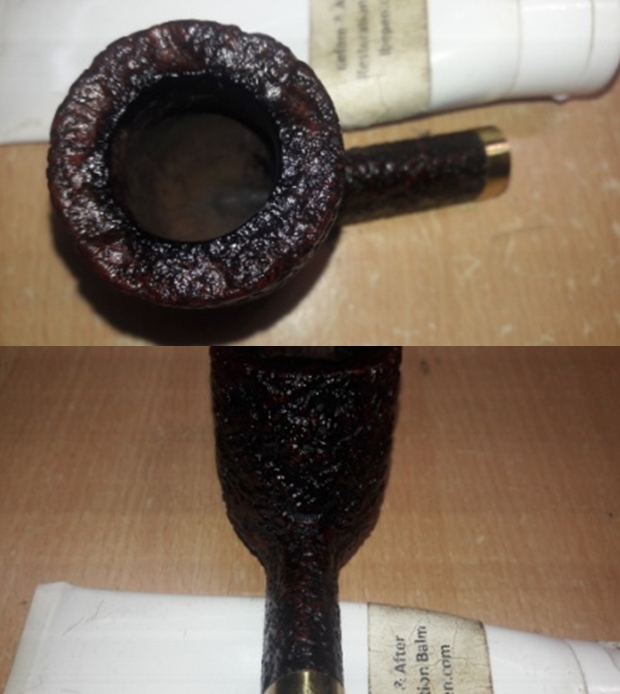
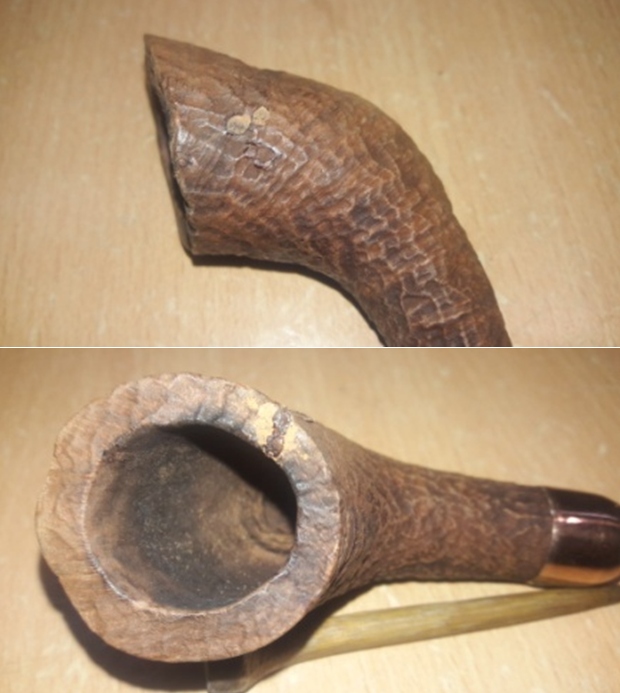
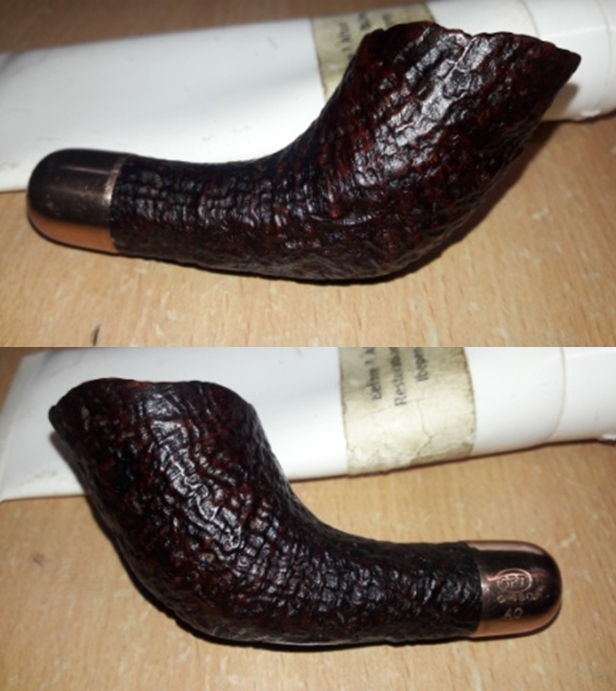
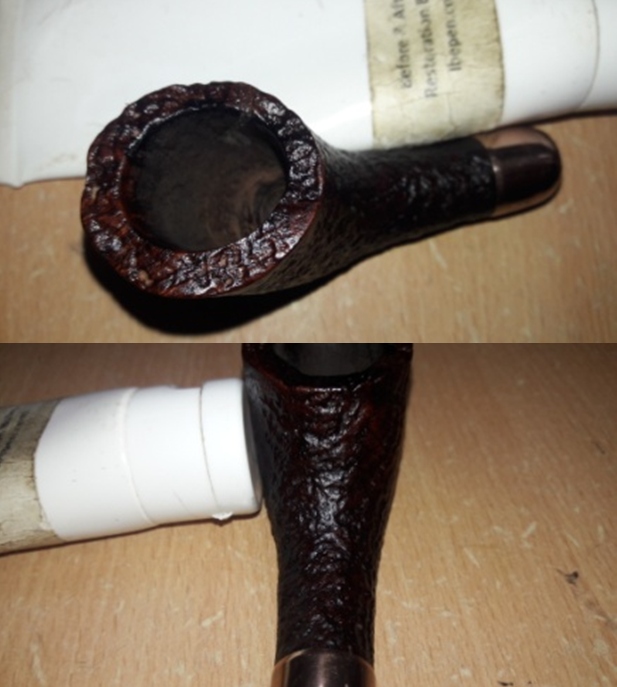
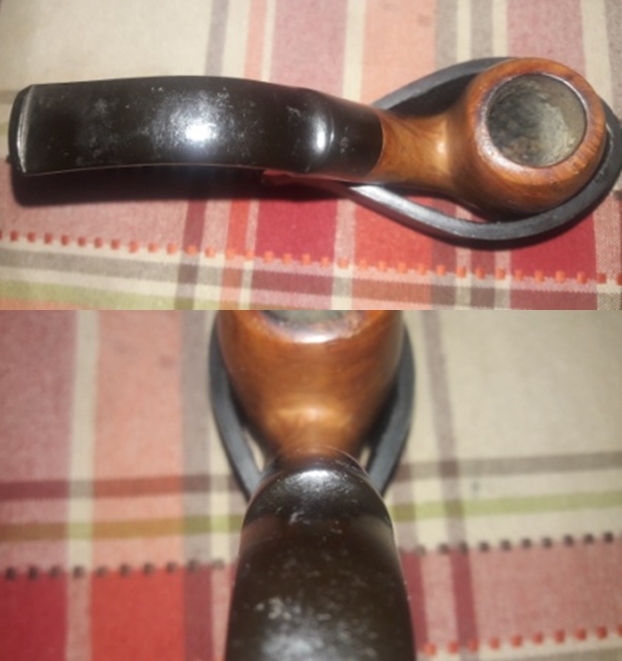
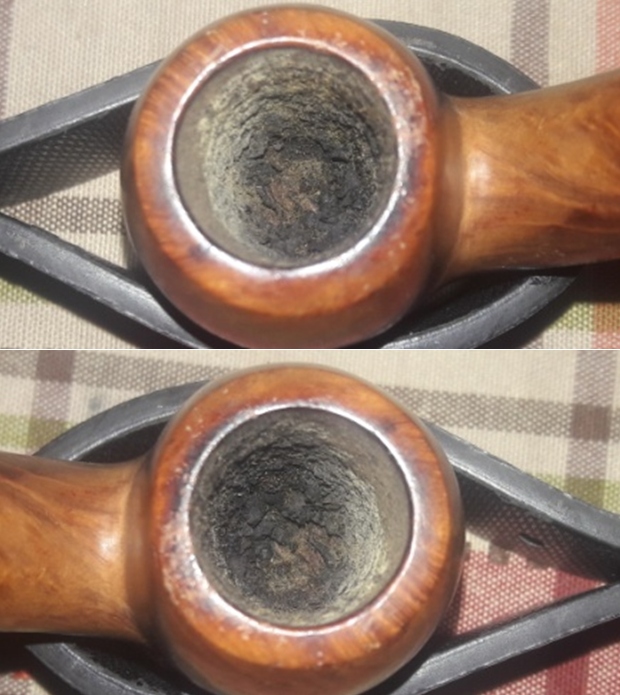
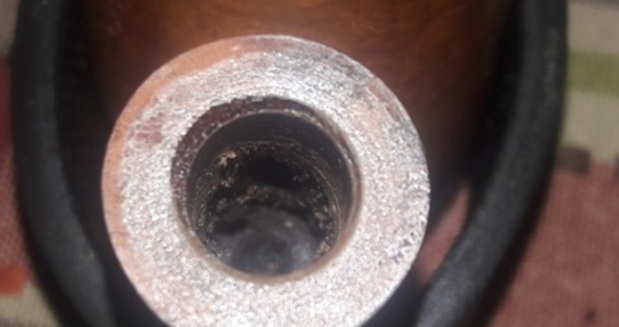
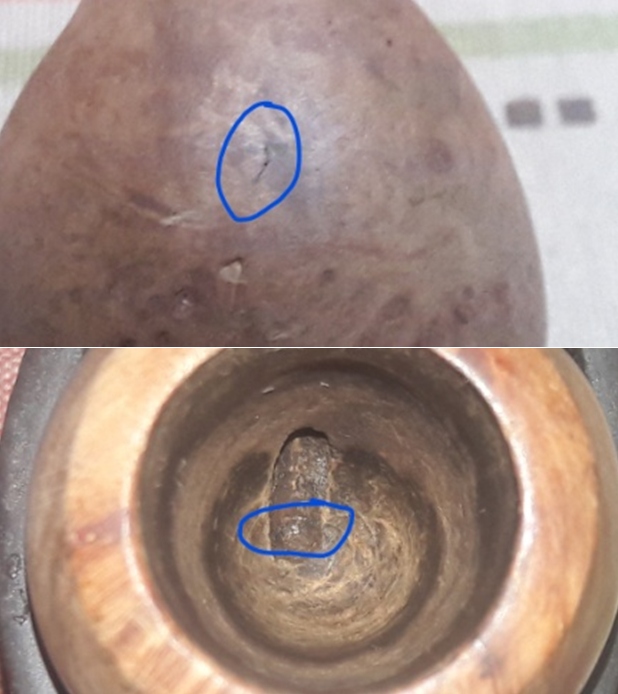
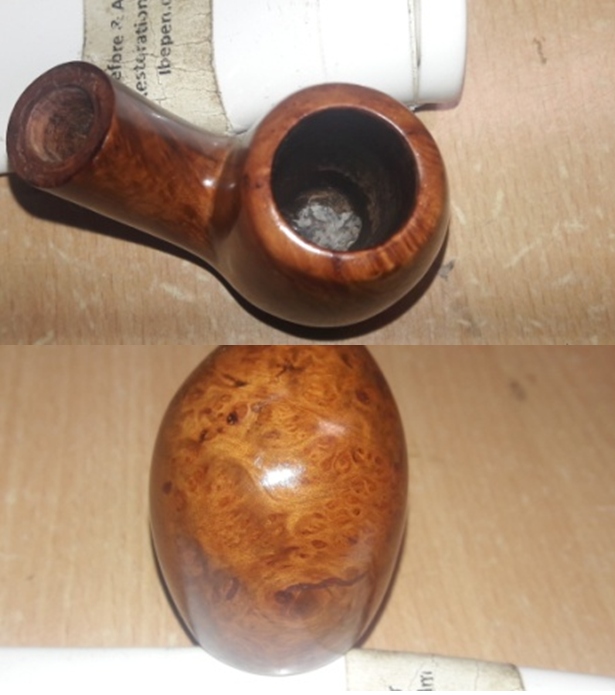
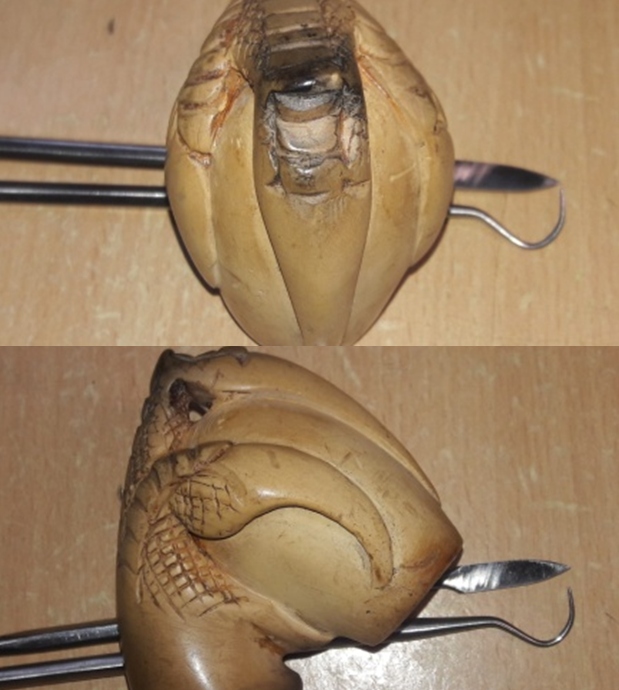
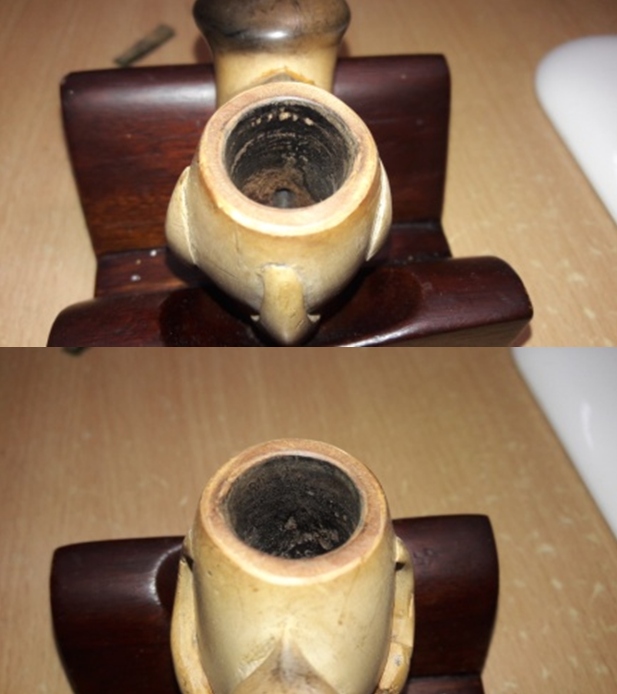
The pipe comes apart in three sections. The first is the meerschaum stummel carved to resemble an eagle’s claw that holds an egg; the second is a block of beautifully colored amber with six chiseled sides. The shank end and the stem end of this hexagonal amber block are adorned with decorated copper end adornments. The airway through the amber shank extension appears to be made of bone which extends out and seats into the mortise. Lastly is the delicate thin bent horn stem with matching threaded tenon end face and the orifice slot end face and appears akin to the triangular head of a grasshopper.There is a light build up of cake in the chamber that has dried and is crumbly due to prolonged storage. The condition of the inner walls of the chamber can be ascertained only after the cake has been removed completely. No apparent cracks or damage to the stummel surface is seen from the outside. The rim top has darkened due to overflow of lava and burn marks. There are a large number of dings and chips to the rim top which are visible through the lava overflow. The right side of the outer edge of the rim is severely damaged (enclosed in red), the result of striking the edge against a hard surface to remove dottle, presenting lop sided appearance to the rim on to the right. The inner edge of the rim on the left side appears thin in 8 o’clock direction (enclosed in blue) and combined with the damaged left outer edge gives the appearance of out of round chamber. The inner rim edge is dented and chipped in few places. Topping the rim surface and creating bevels should address these issues satisfactorily. 
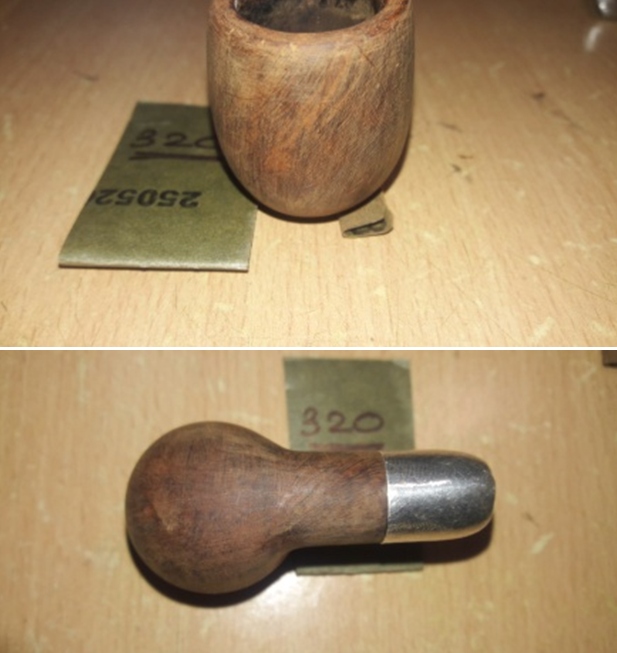
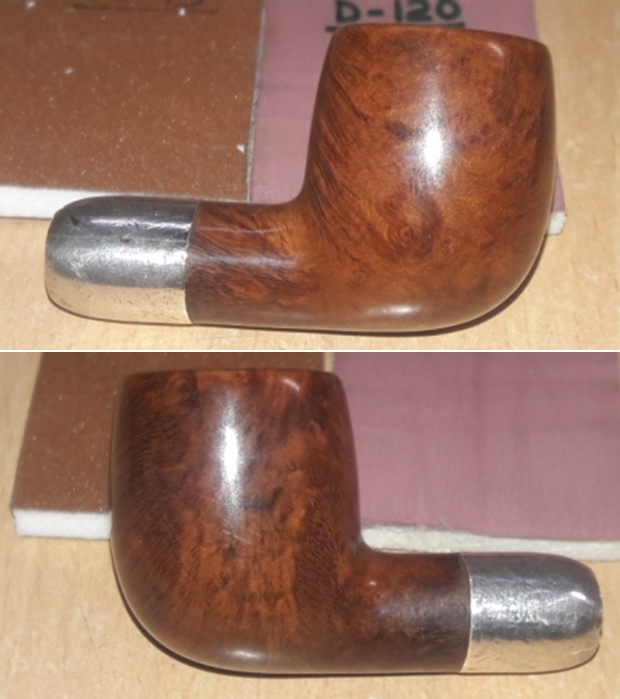
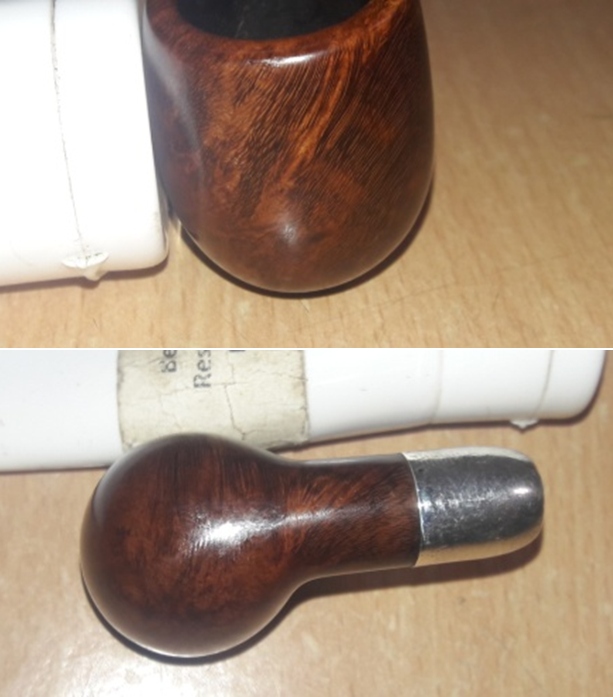
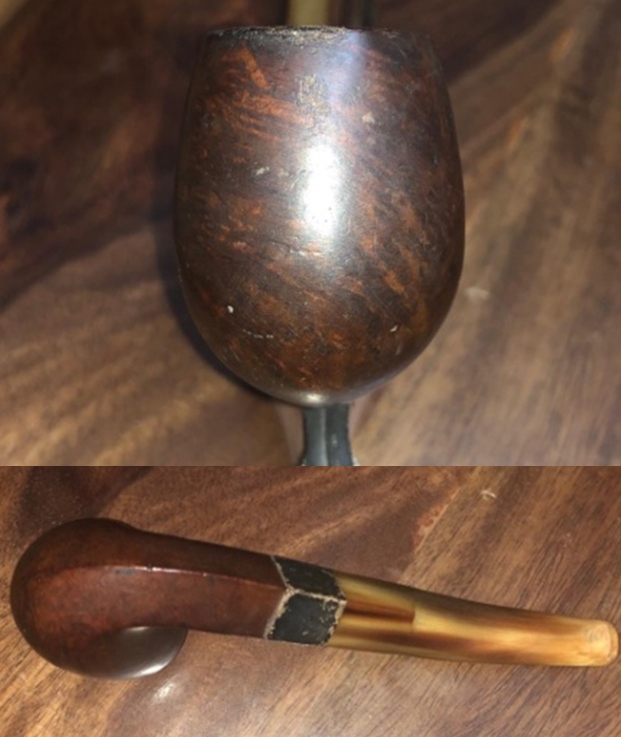
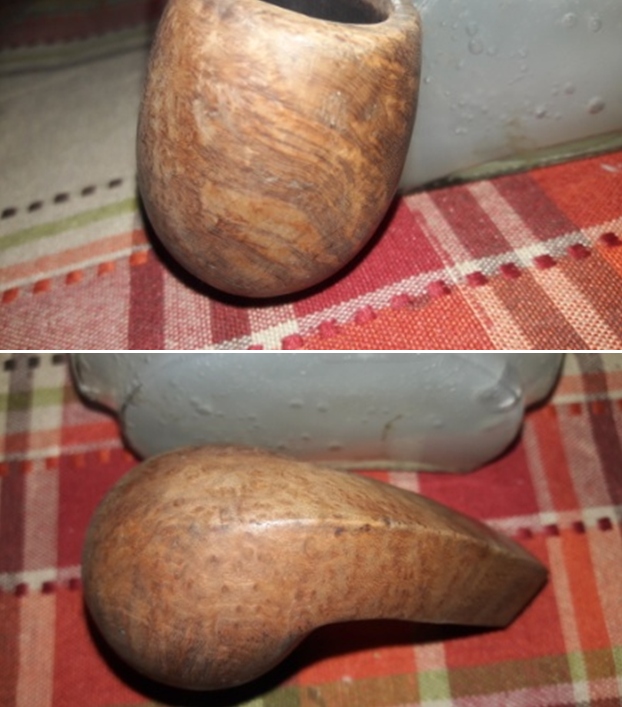
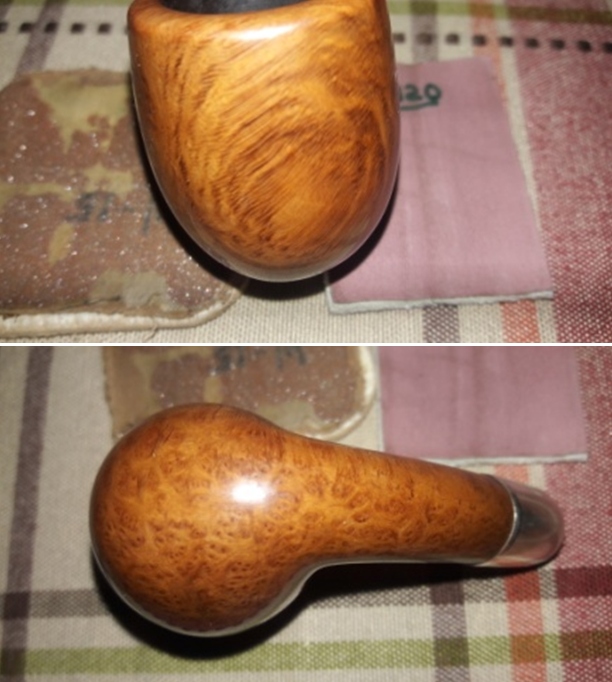
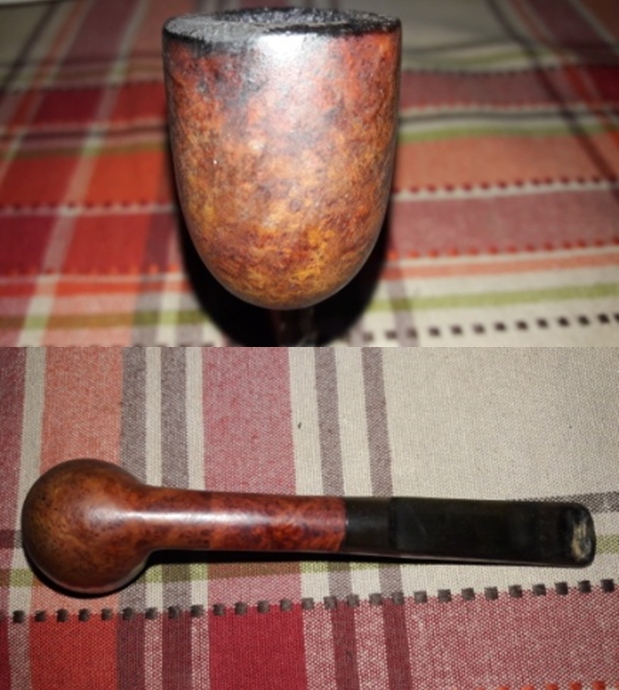
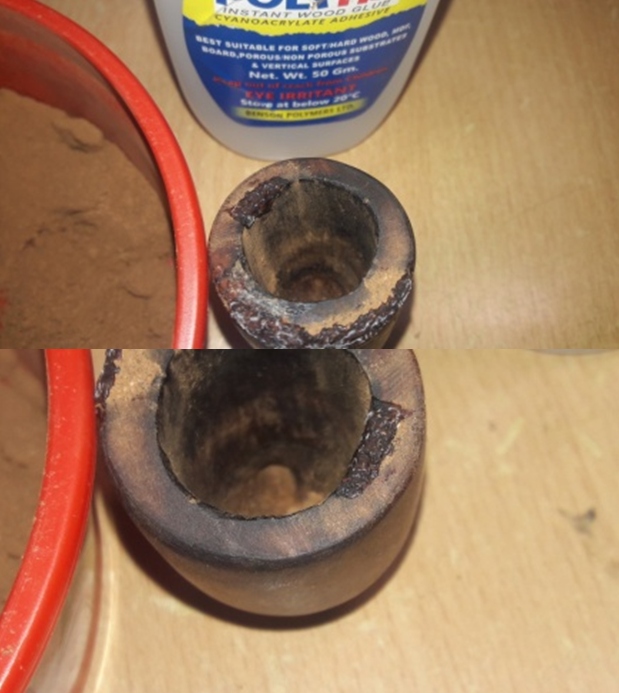
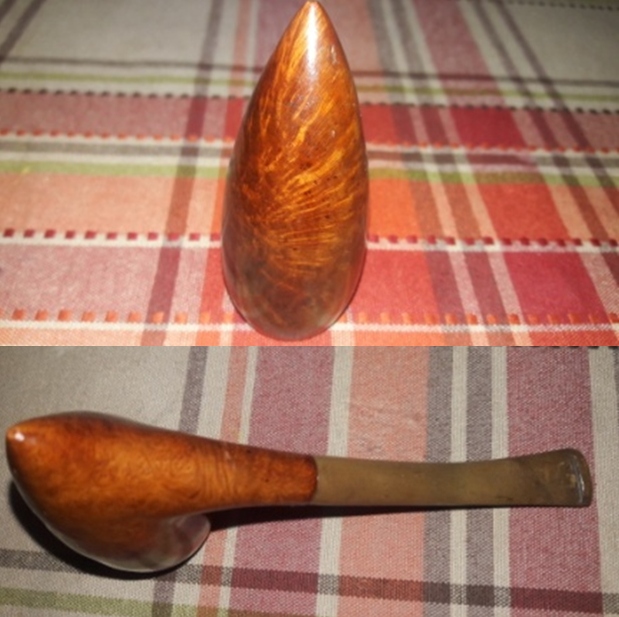
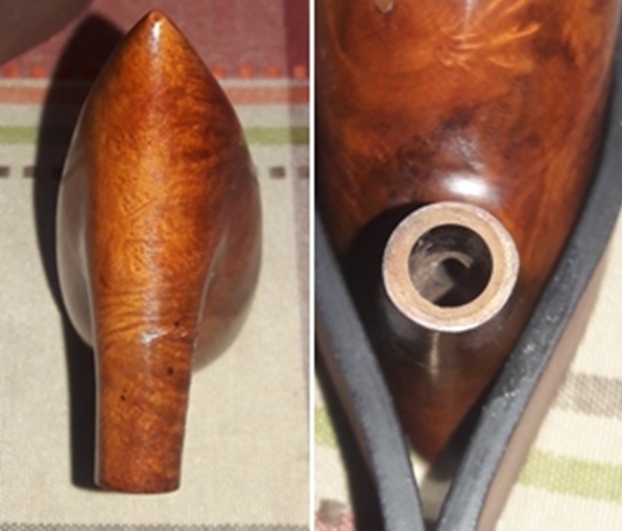
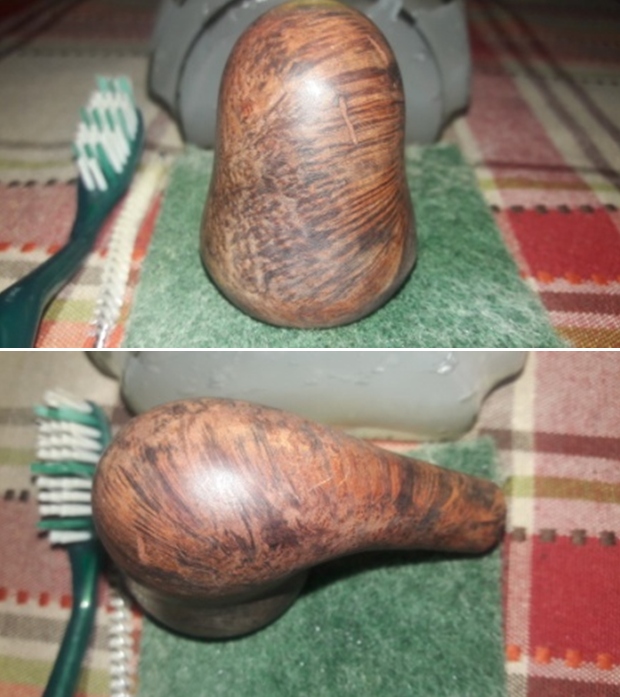
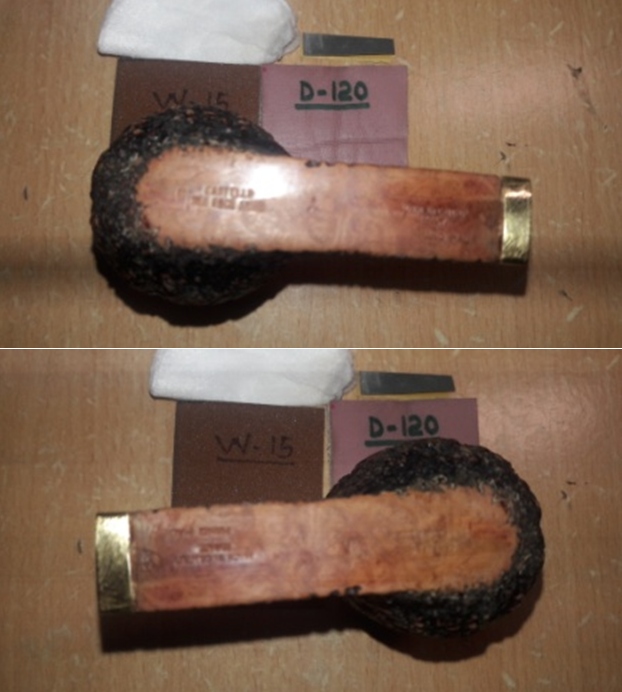
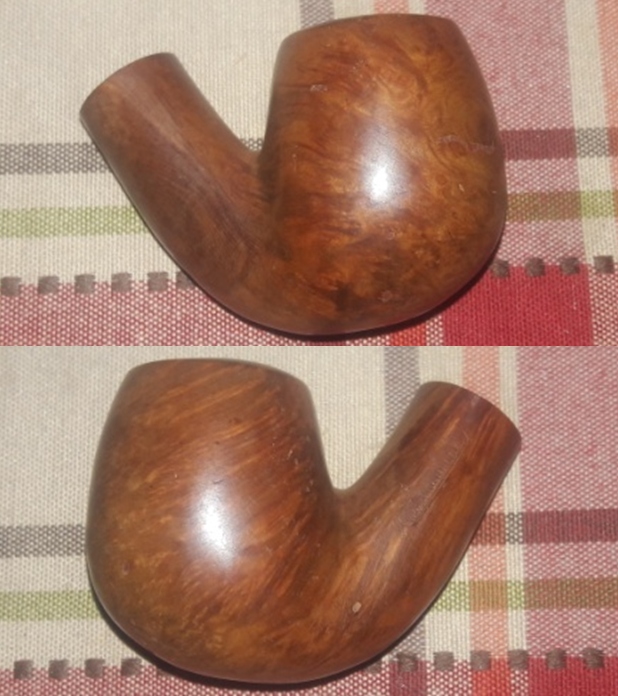
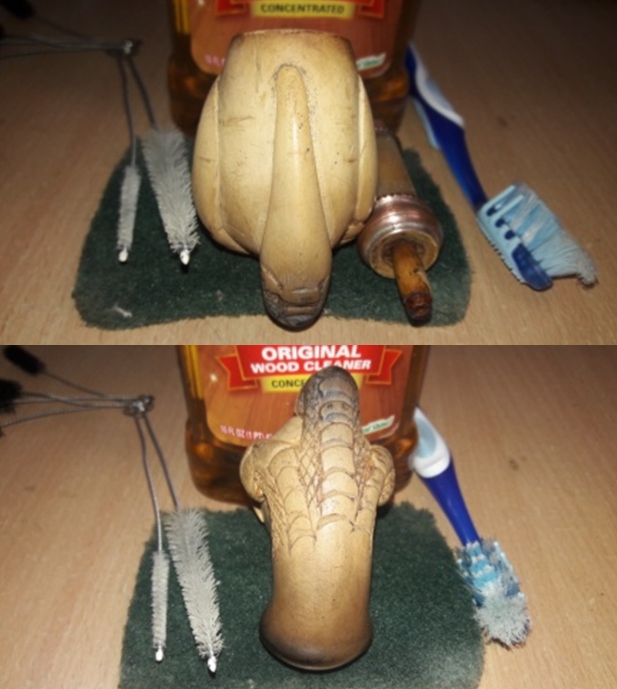
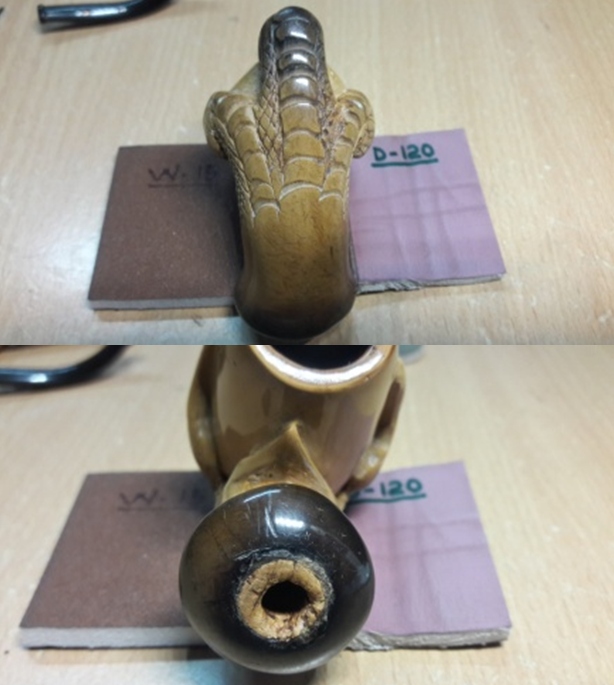
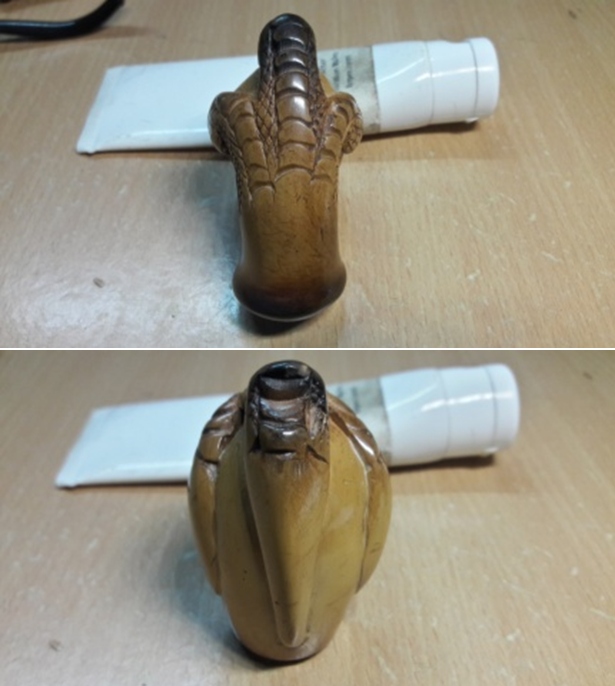
The stummel is exquisitely carved with intricate details of the scales and knuckles replicated real like!! The four talons are all intact and perfectly shaped. The stummel had developed a nice patina from years of usage. Every nook and cranny of the carvings is filled with dirt and dust from years of uncared for storage giving a very dull and dirty appearance to the stummel. The short shank is a flared round and flumed and there are a few scratches on the surface. The mortise is lined with cork and is intact all around. The mortise has strong odors akin to some sort of soap smell (?), a smell that I have not come across as yet. Cleaning of the stummel to dislodge all the grime and dust from the carving will have to be a deliberate effort. Preserving the old cork lining at the shank end while cleaning the shank and mortise will be a challenge as the cork is susceptible to easy crumbling.   
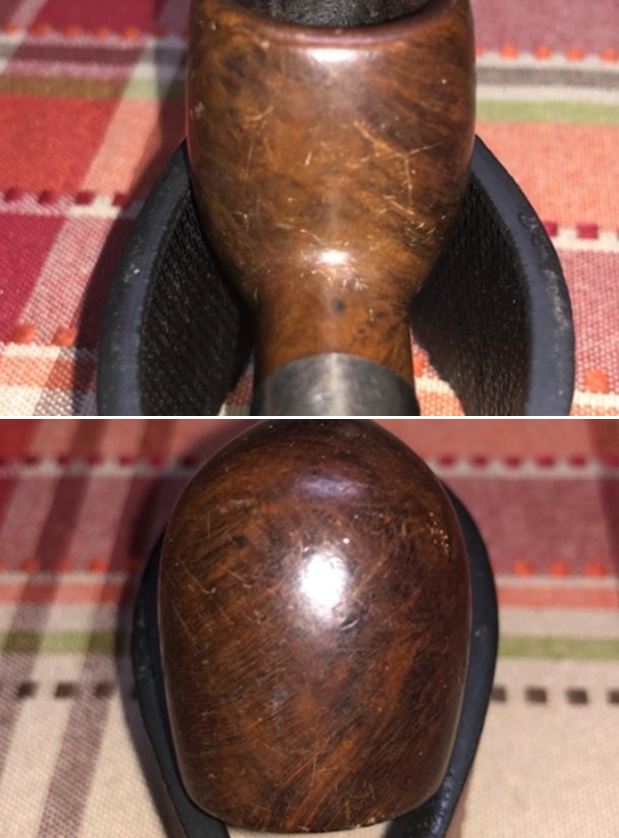
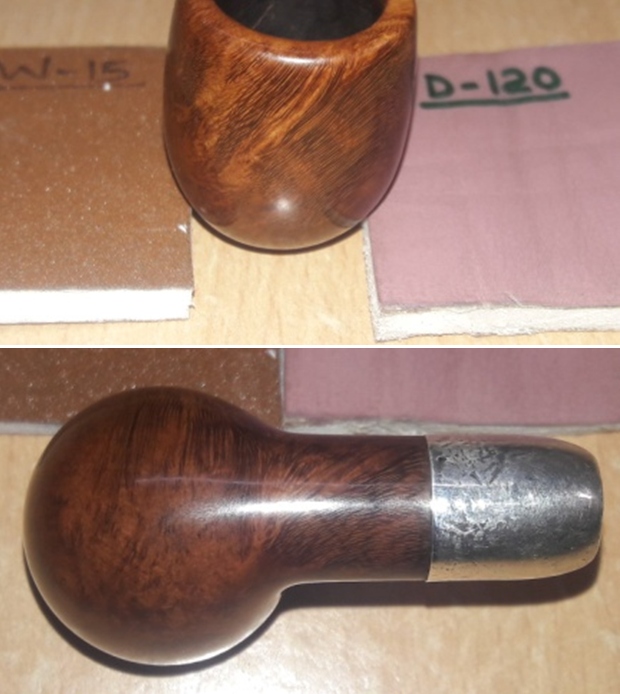
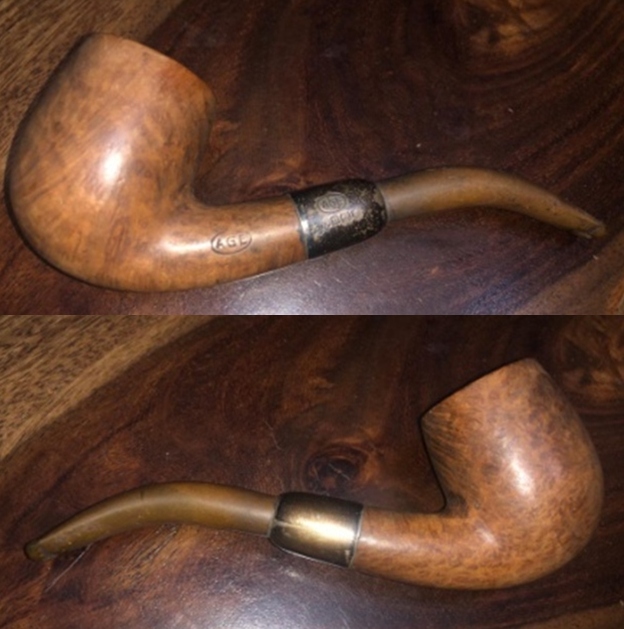
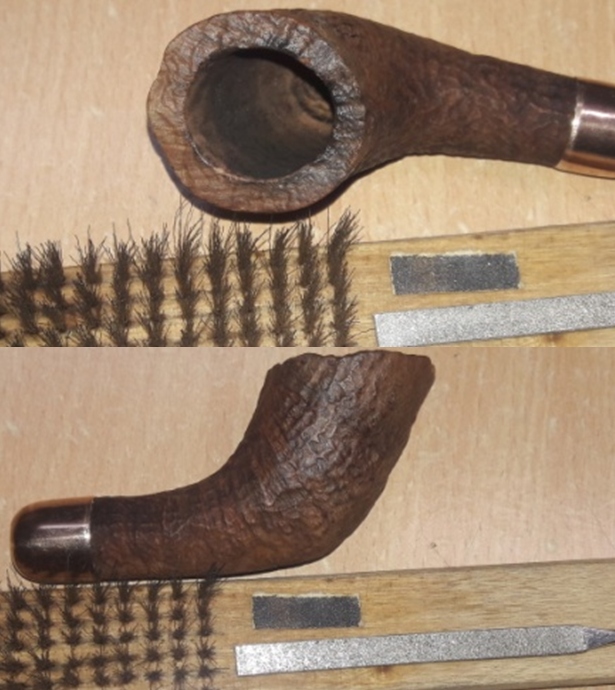
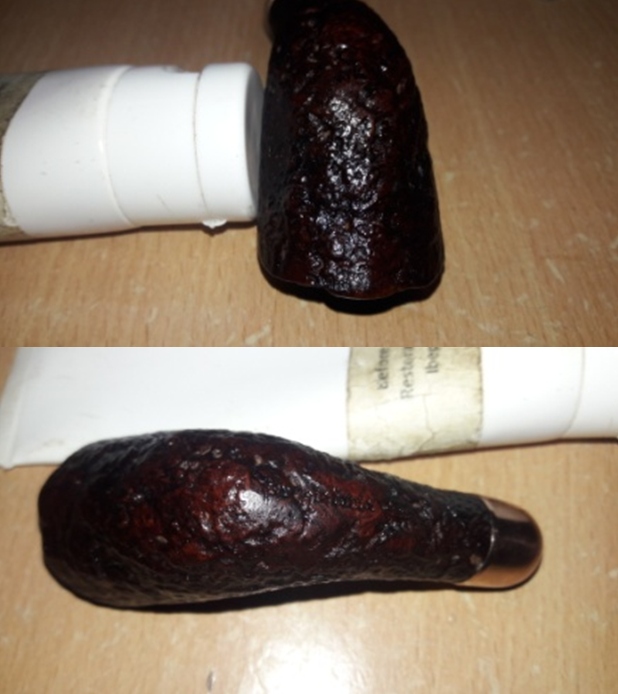
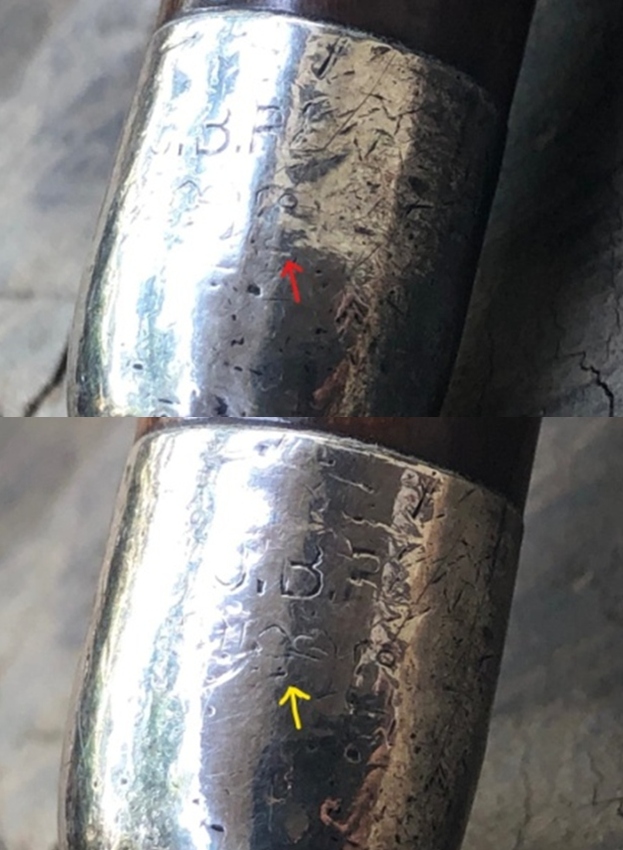
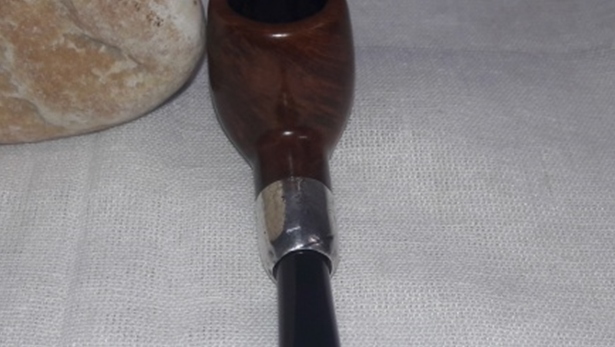
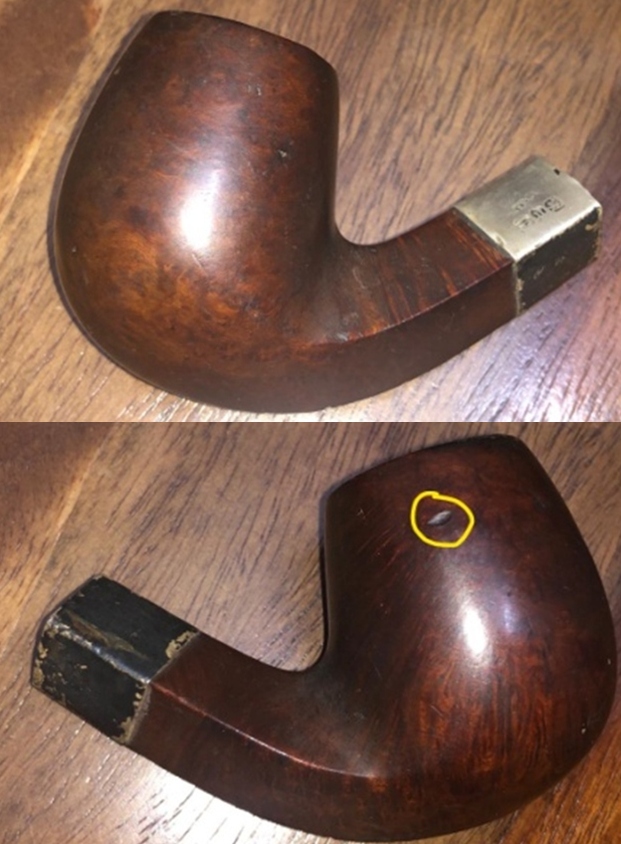
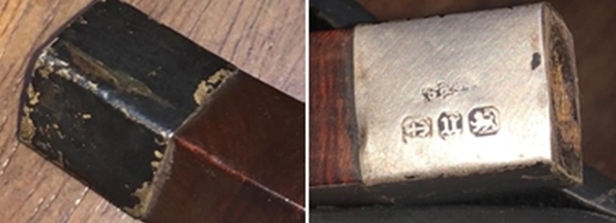
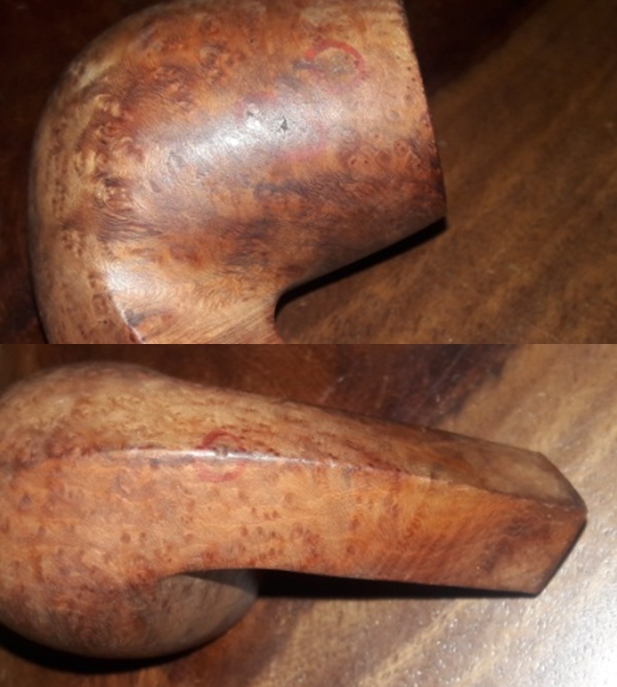
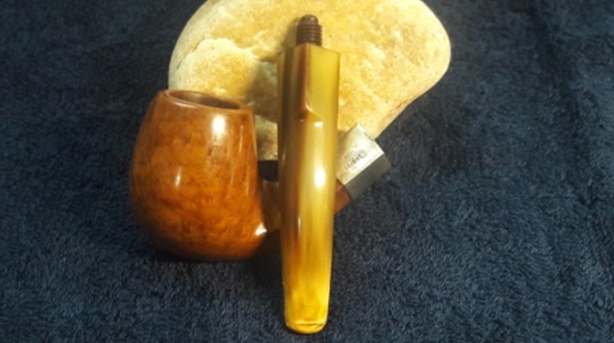
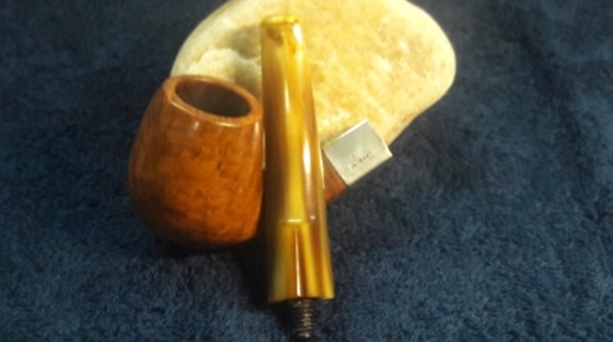
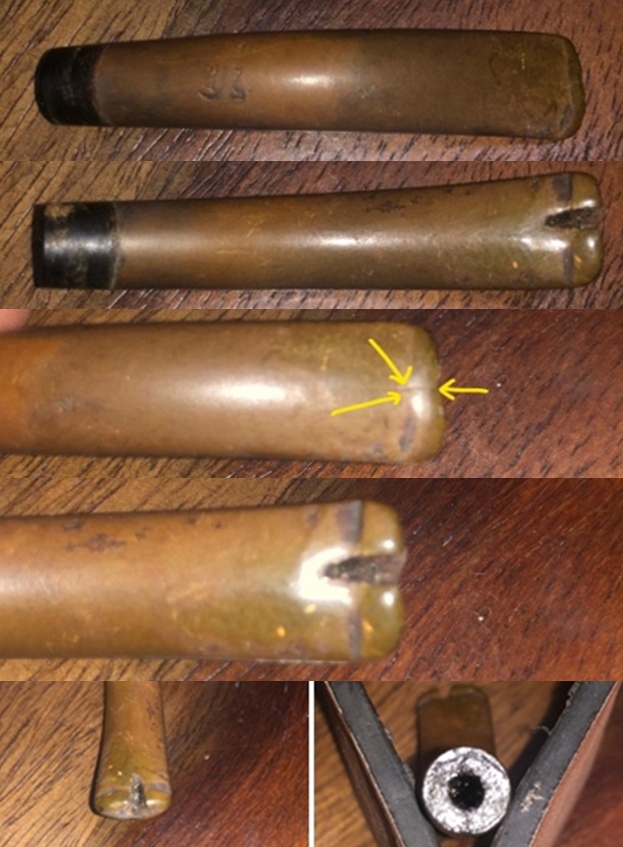
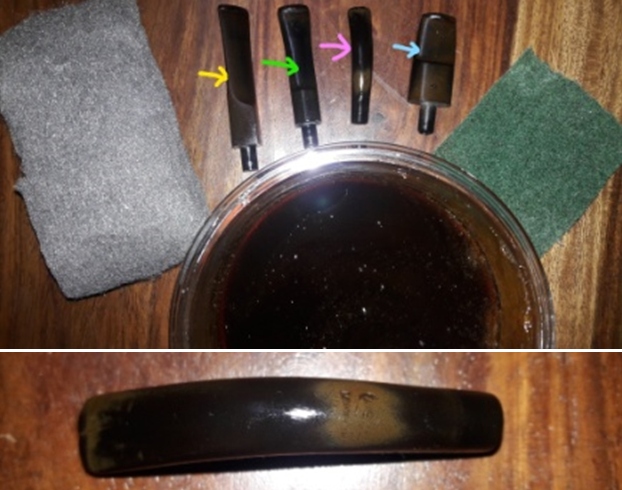
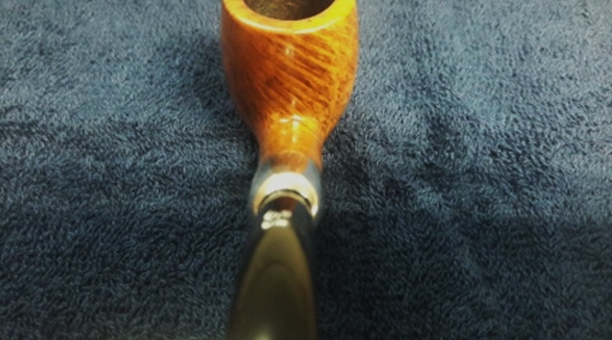
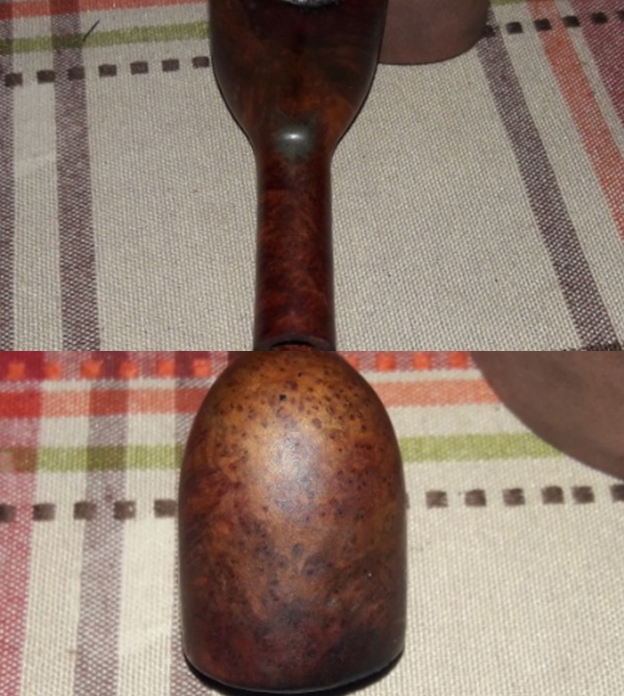
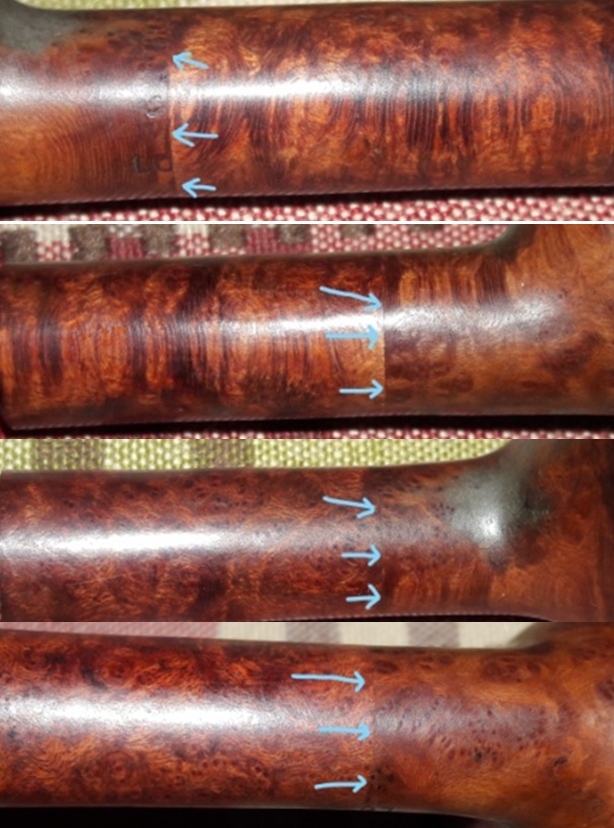
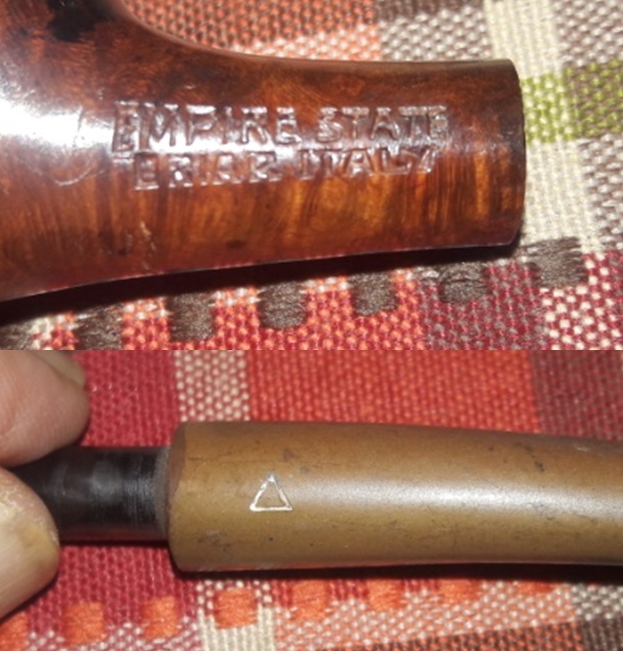
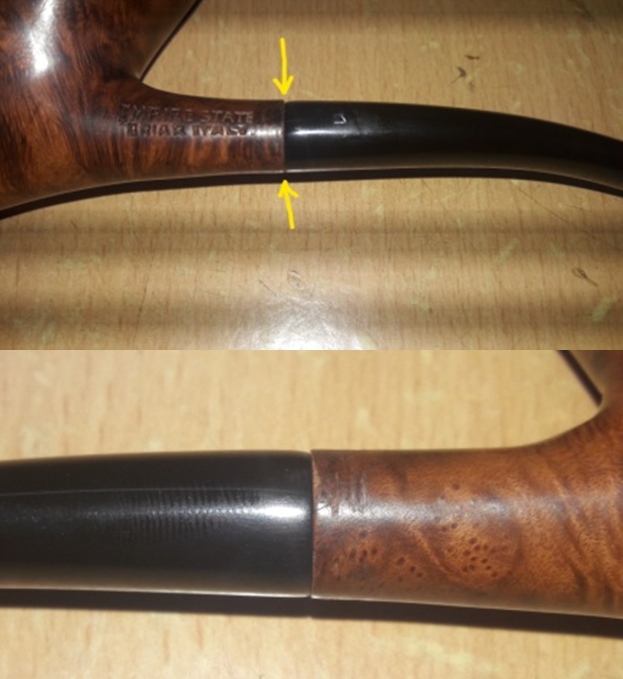
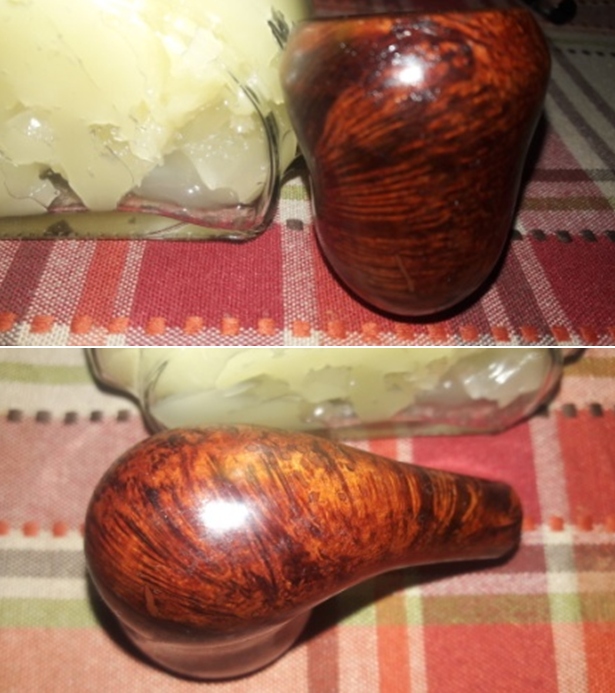
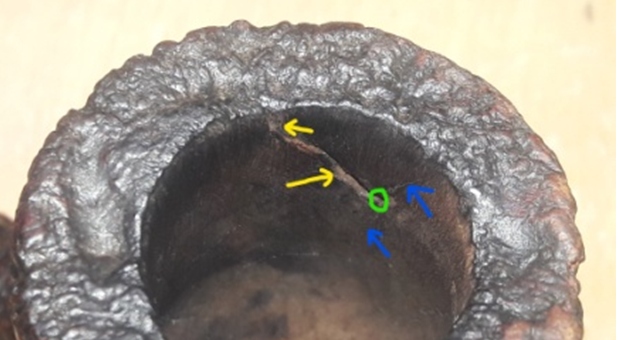
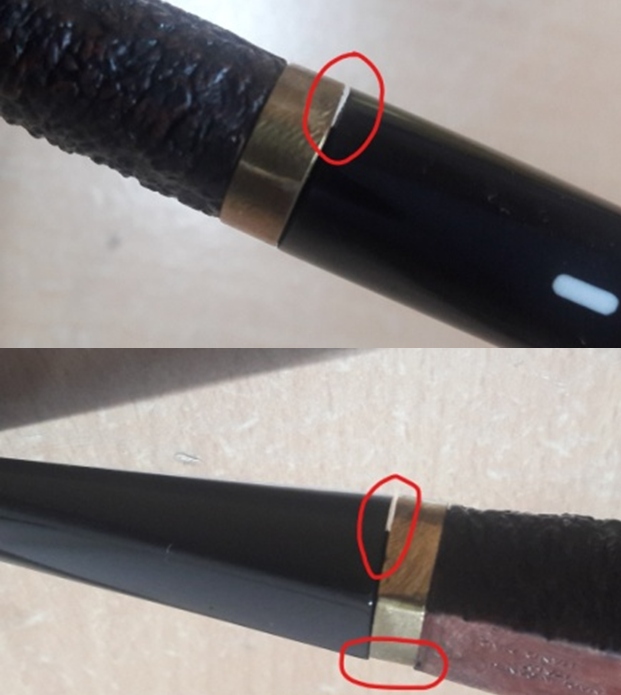
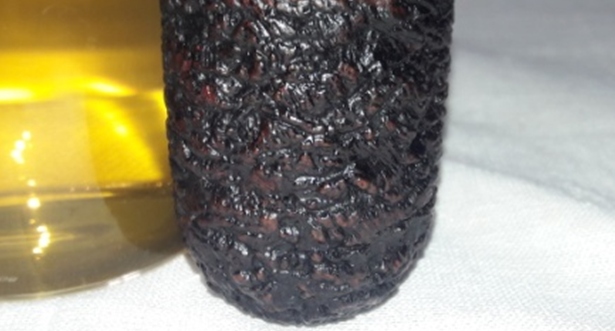
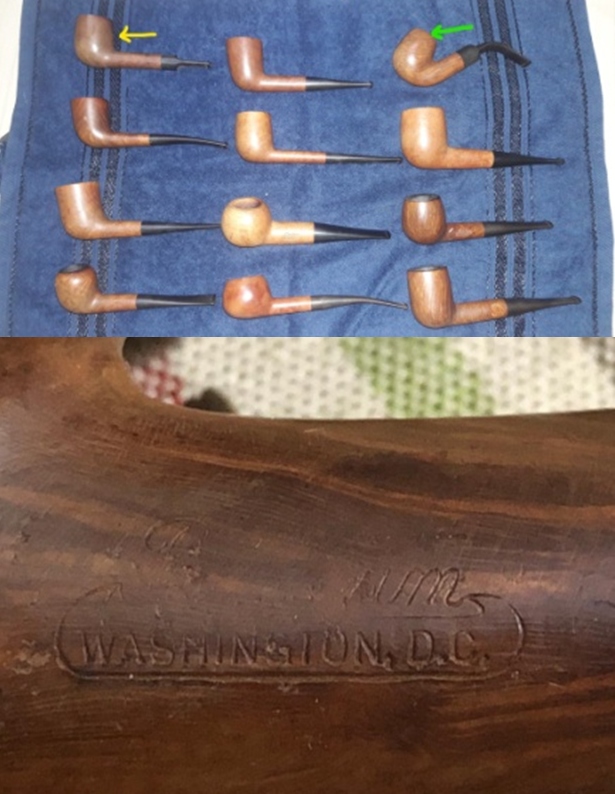
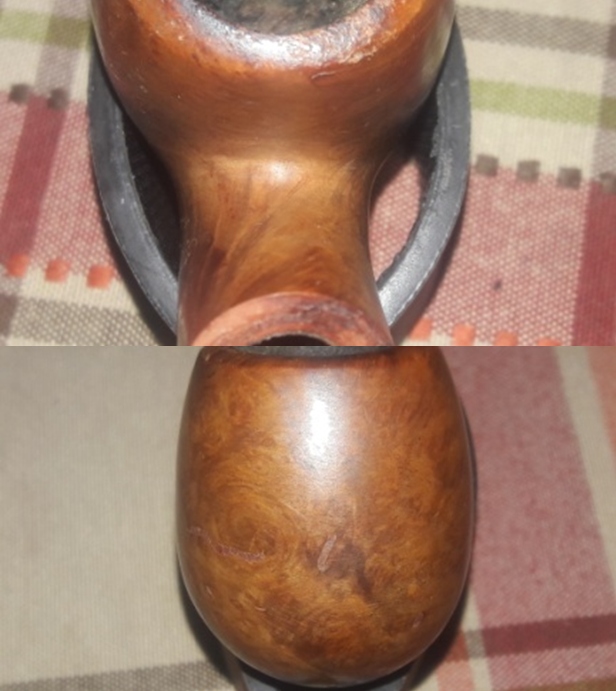
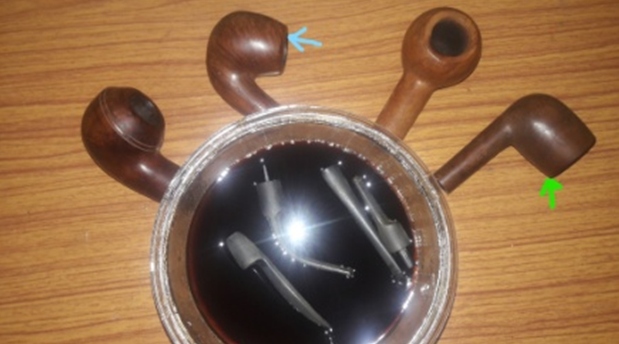
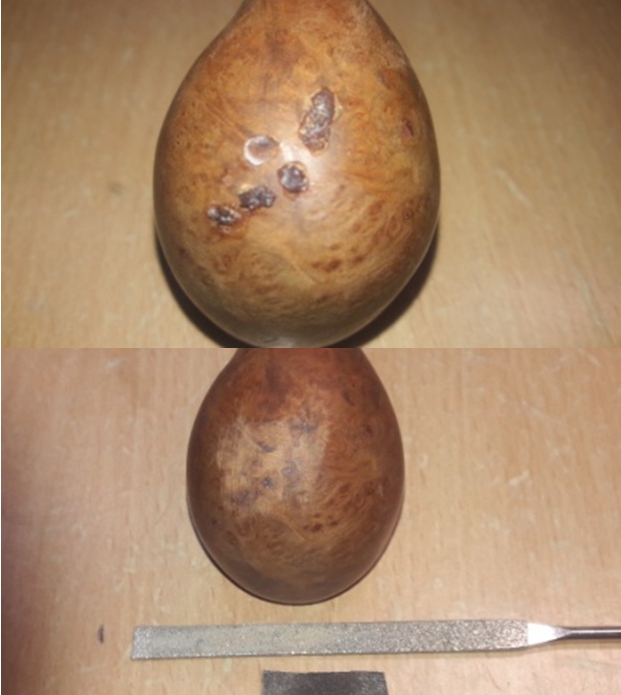
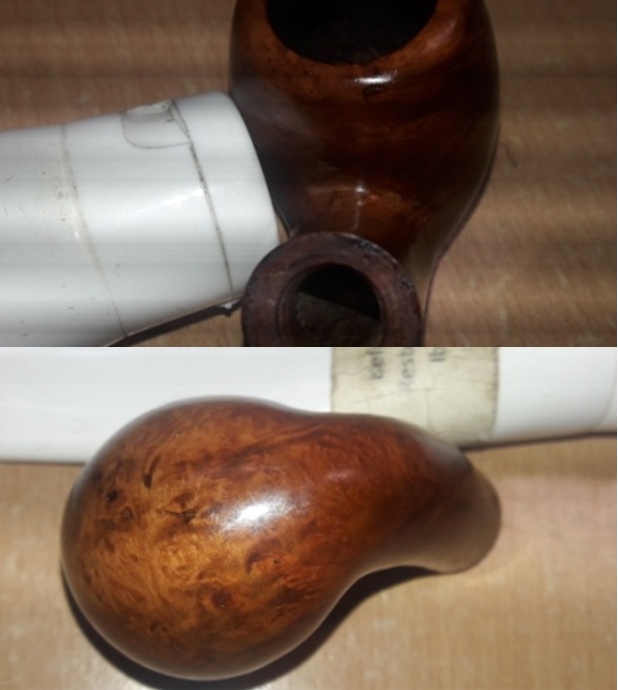
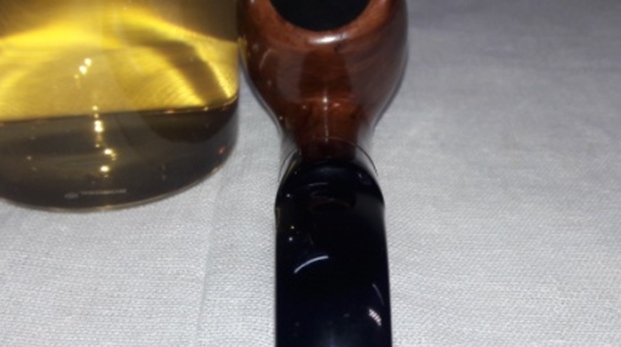
The hexagonal large block of Amber shank extension has developed a crack towards the tenon end (indicated with yellow arrow). This crack is deep but thankfully has not progressed all the way down to the airway. The amber is also chipped (indicated with green arrow) in one place just above the crack. The decorative copper end pieces are decoratively cast and serve the dual purpose of protecting the amber end face while adding a very classic bling to the appearance of the pipe. The copper adornments and the block amber piece are joined by a hollow bone that extends out as tenon. The amber is loose with gap in between the copper adornments and would need to be fixed. The threaded stem end copper adornment is full of old oils and tar accumulations. The tenon end of the copper adornment appears to have had some sort of packing/ separator between the metal and meerschaum shank end that has now worn out and disintegrated.  
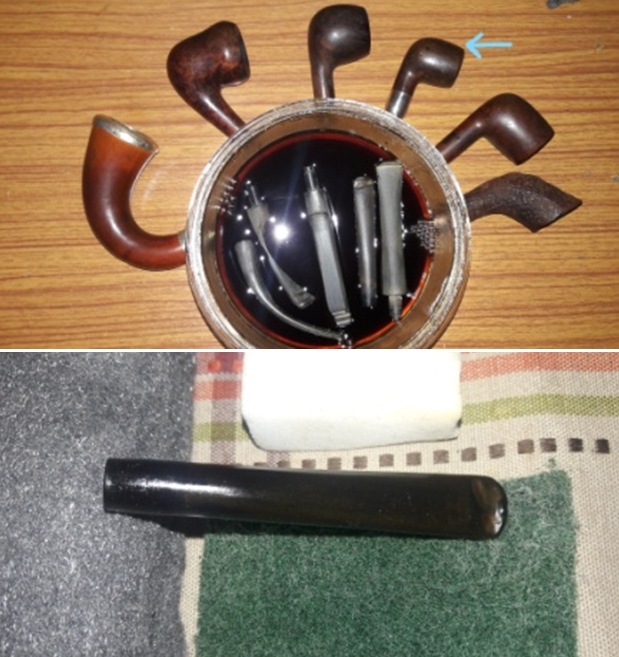
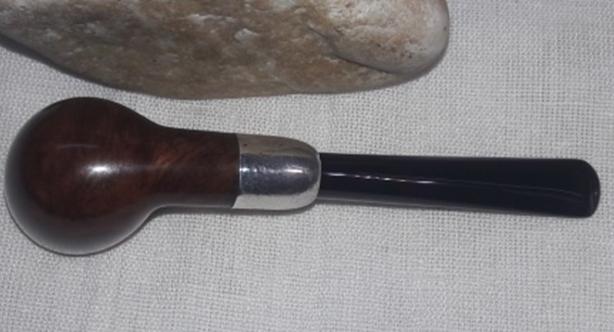
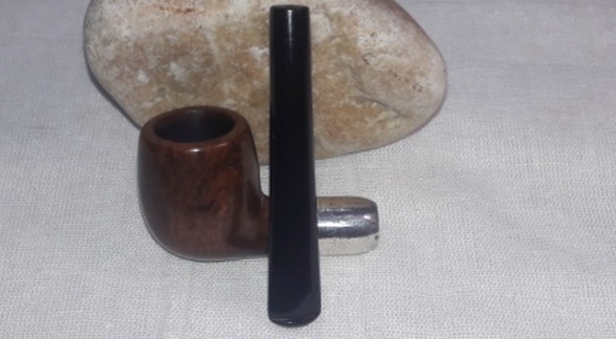
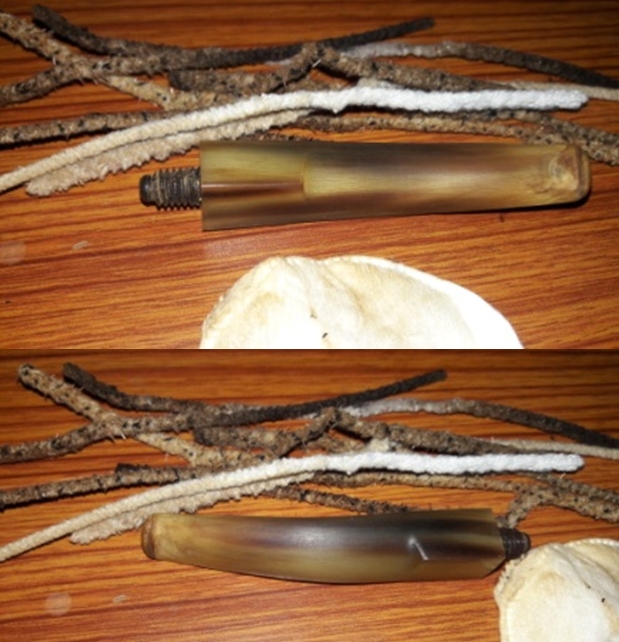
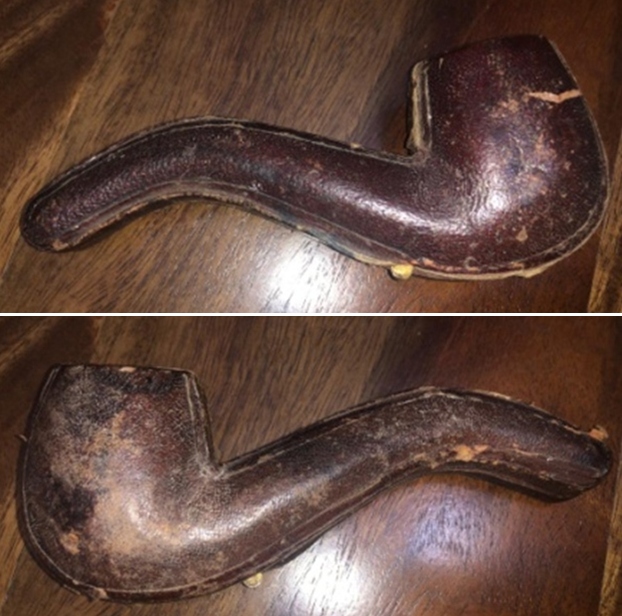
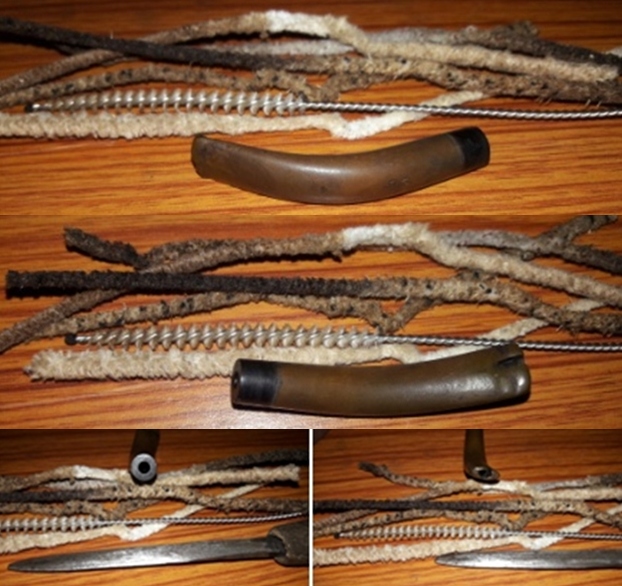
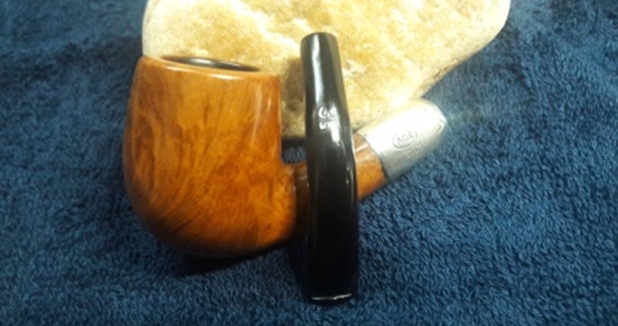
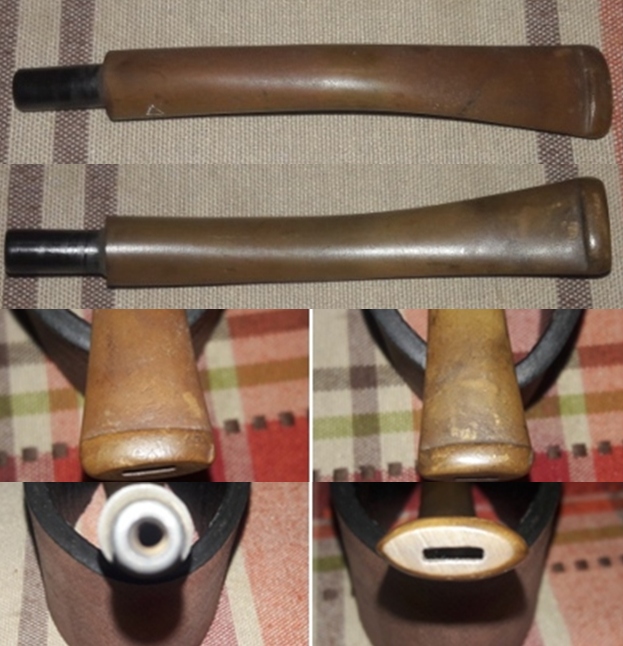
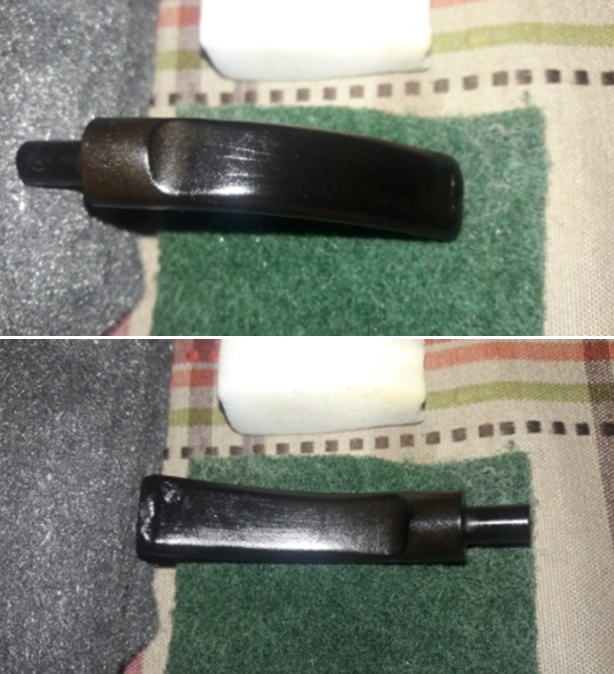
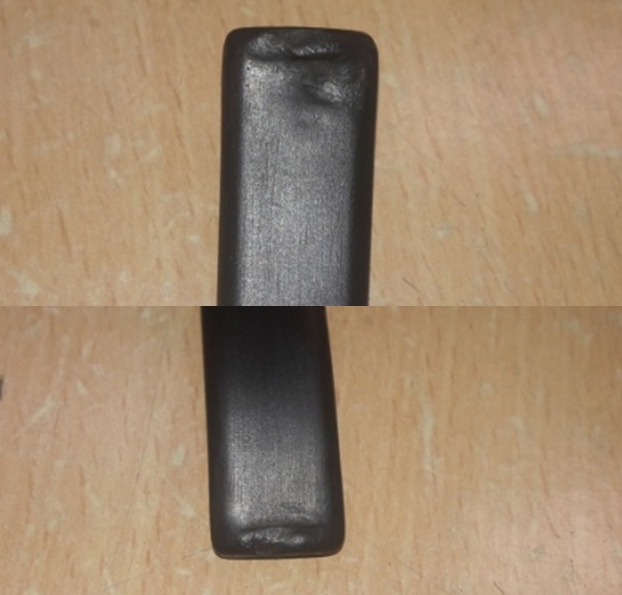
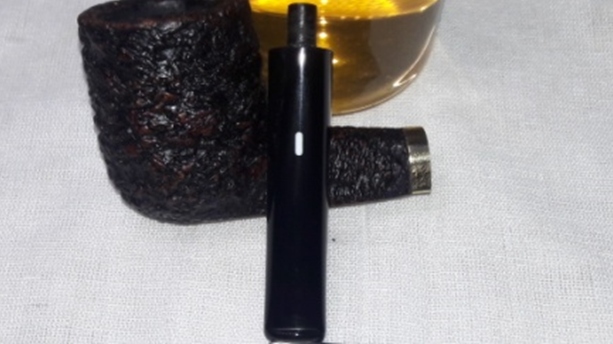
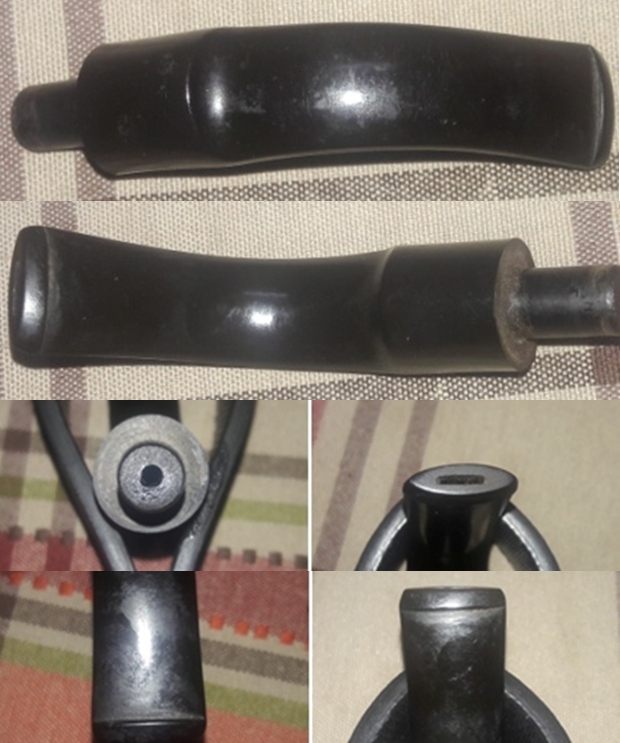
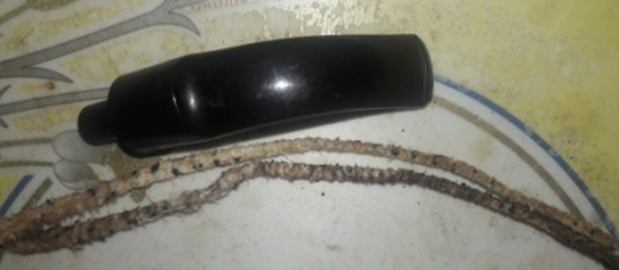
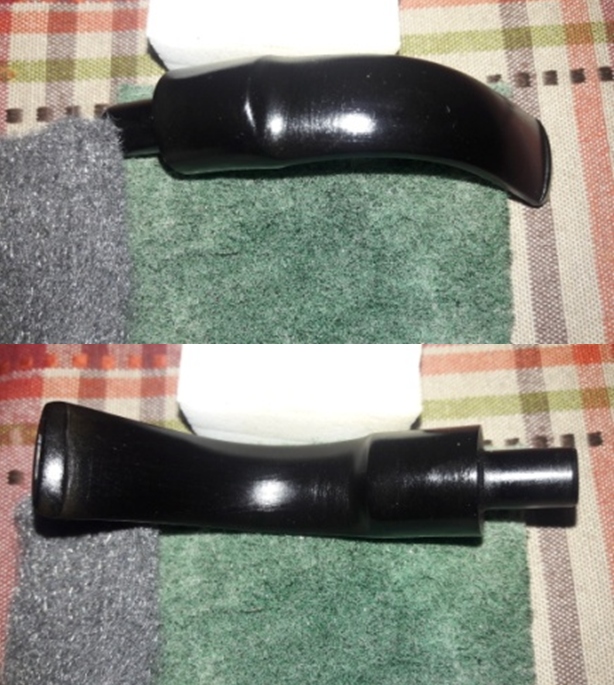
The horn stem is very delicate and thin that is full bent. The profile of the stem lends the entire pipe a tapered profile that is both delicate and attractive. The peculiarity of this stem is that the tenon end and the slot are identical in shape and size. The bite zone on either surface of the stem has been chewed up and with the horn fibers exposed. The thin delicate buttons on upper and lower stem surface have deep tooth indentations. The tenon end of the stem is heavily scratched. The threaded bone tenon is covered in oils and tars. One of the challenges in this project would be to match the tenon end and orifice slot end profile.
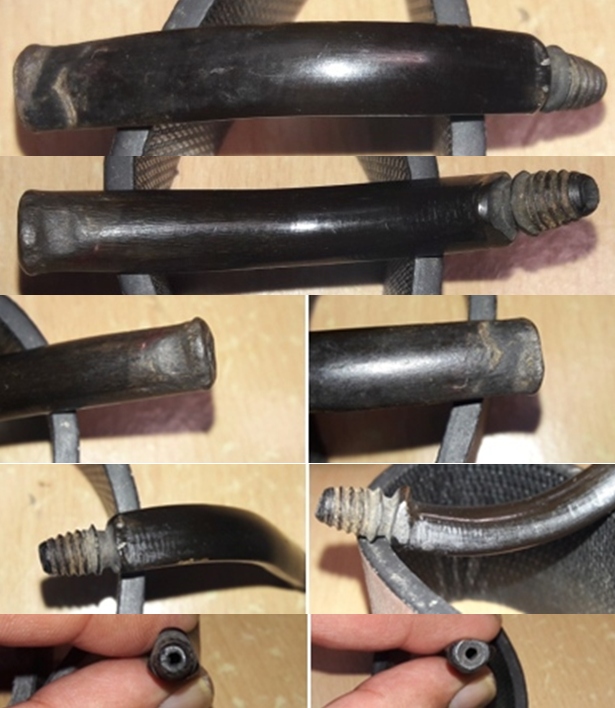
The Process
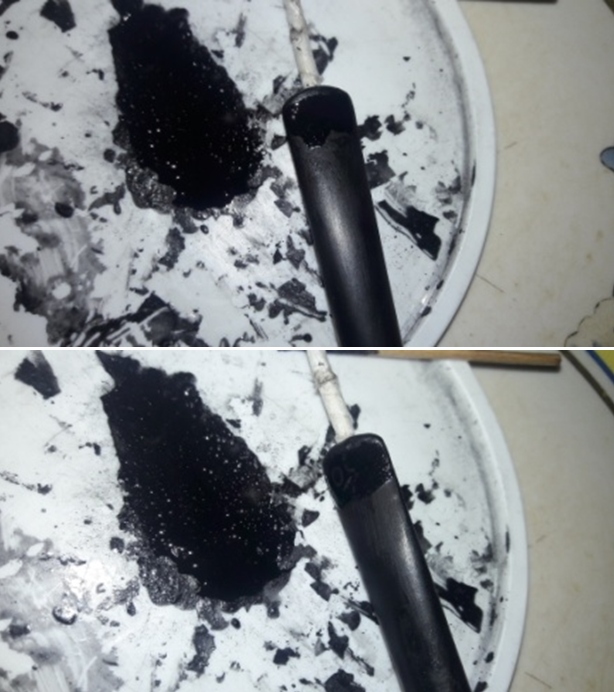
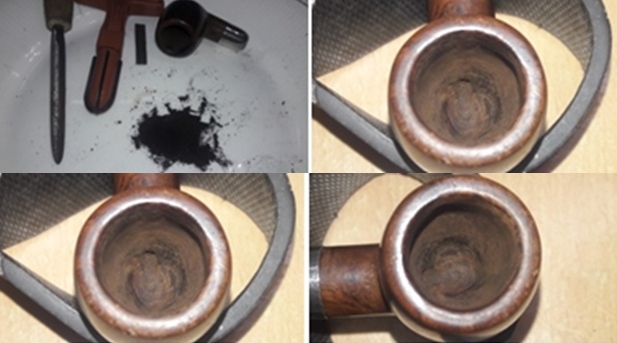
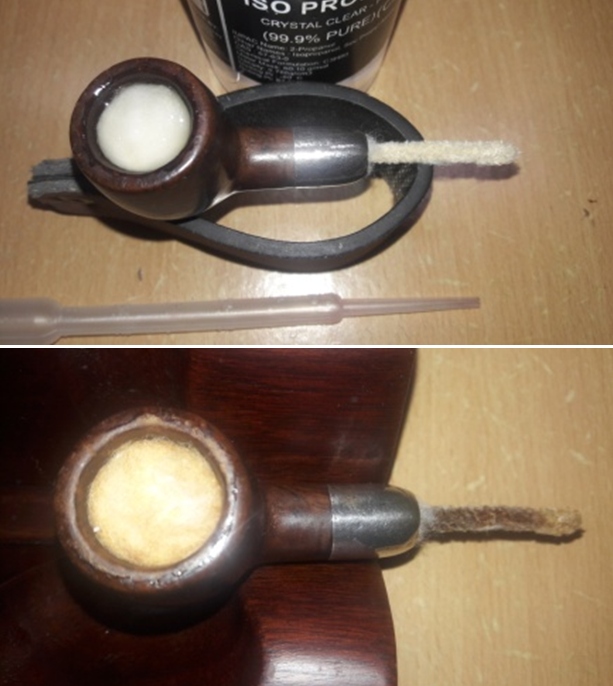
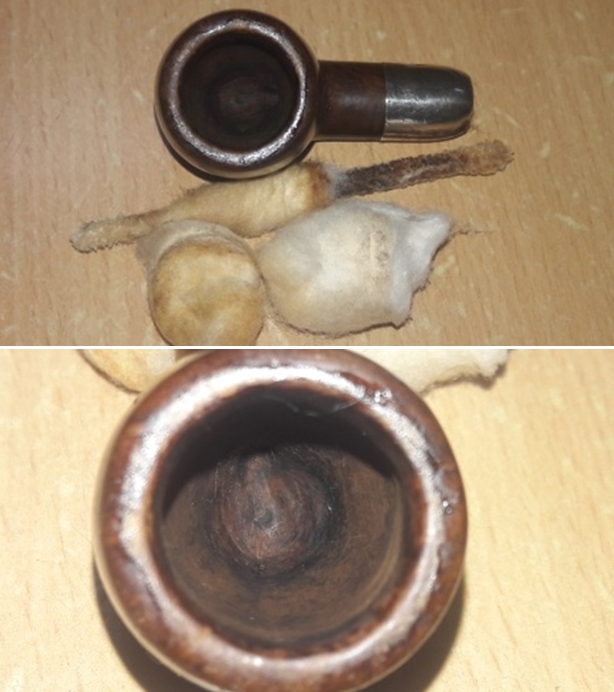
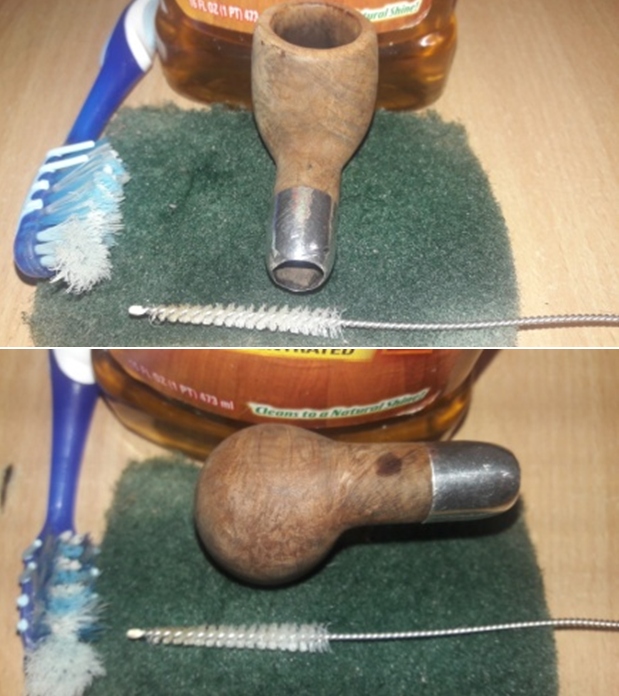
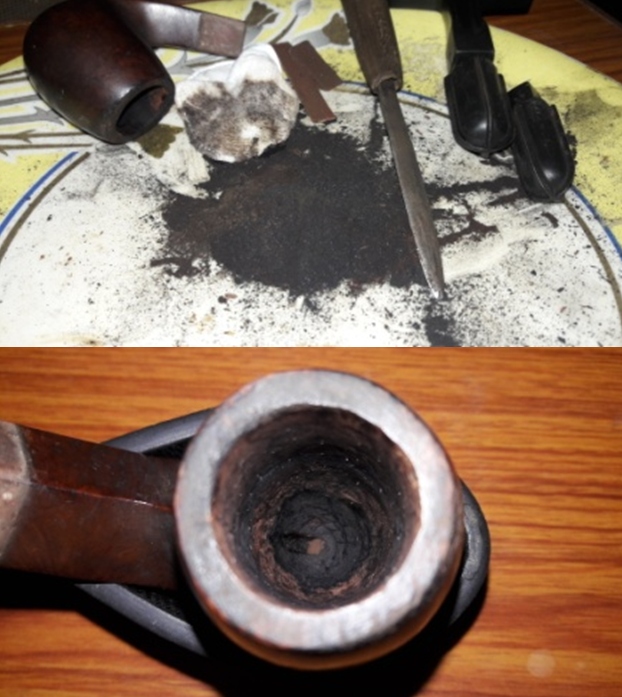
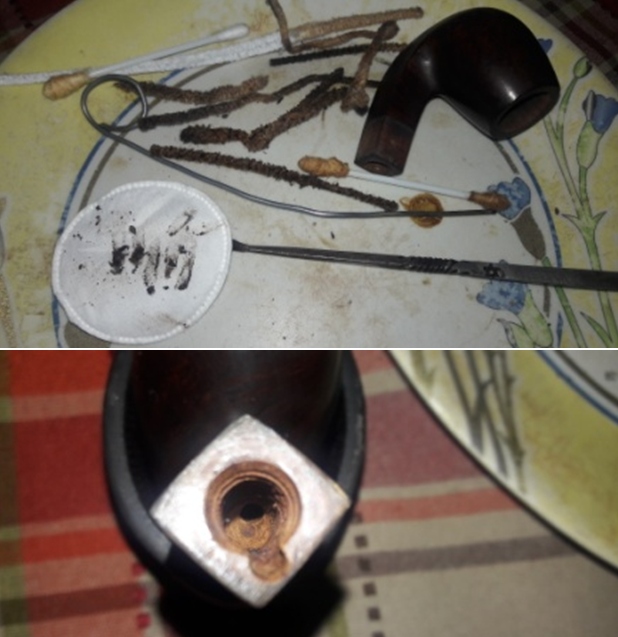
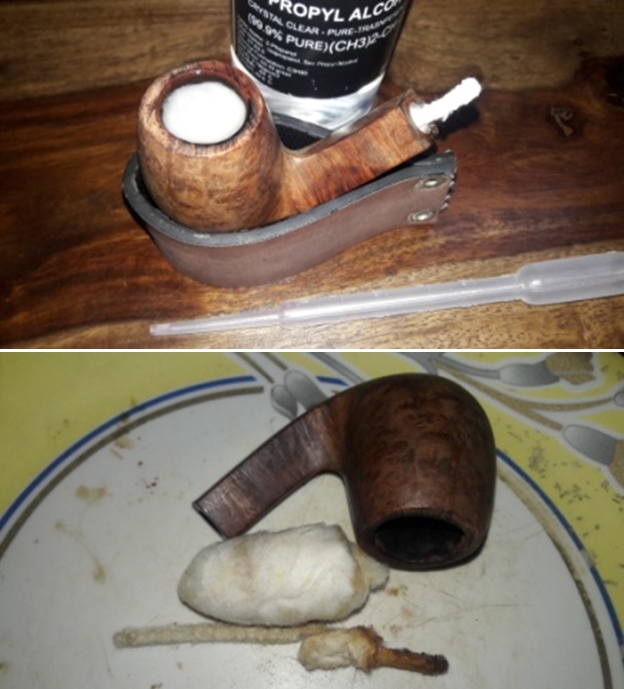
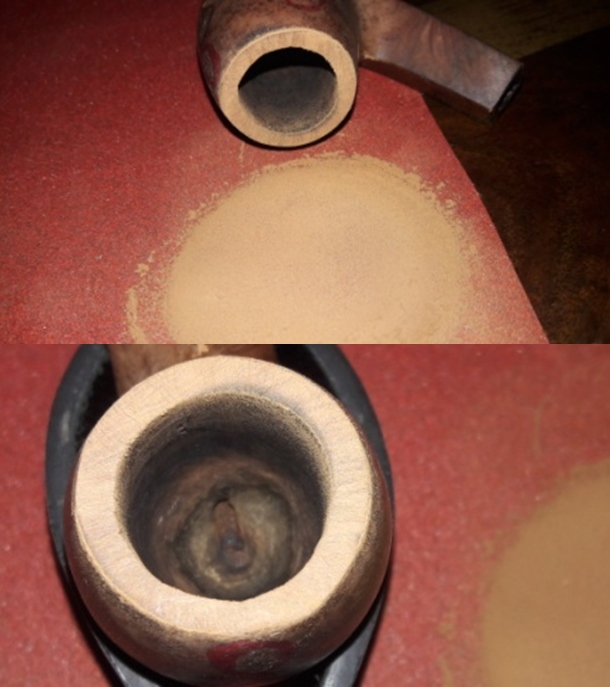
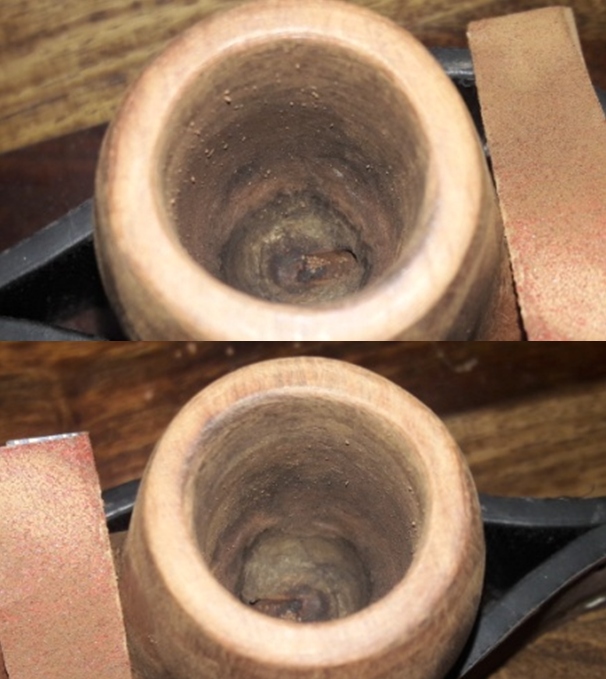
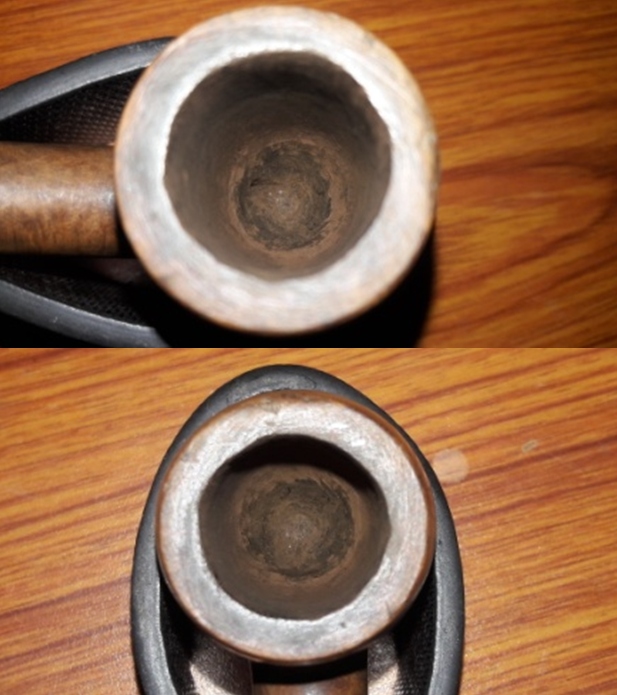
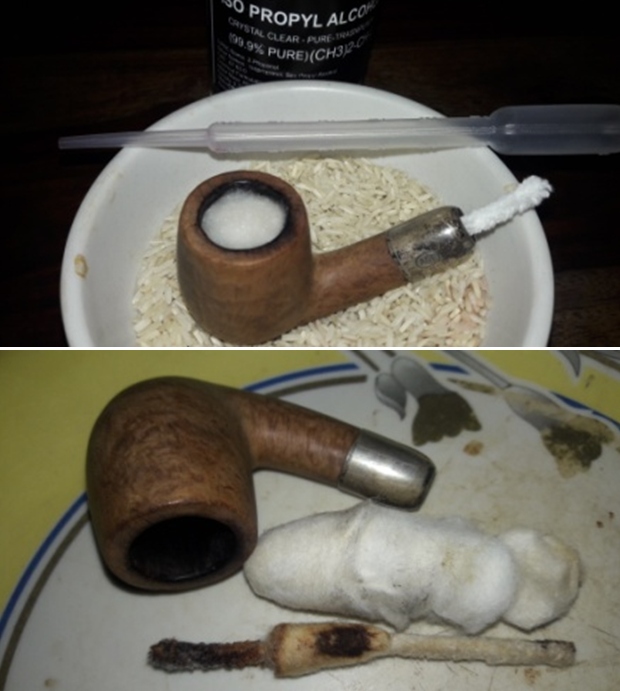
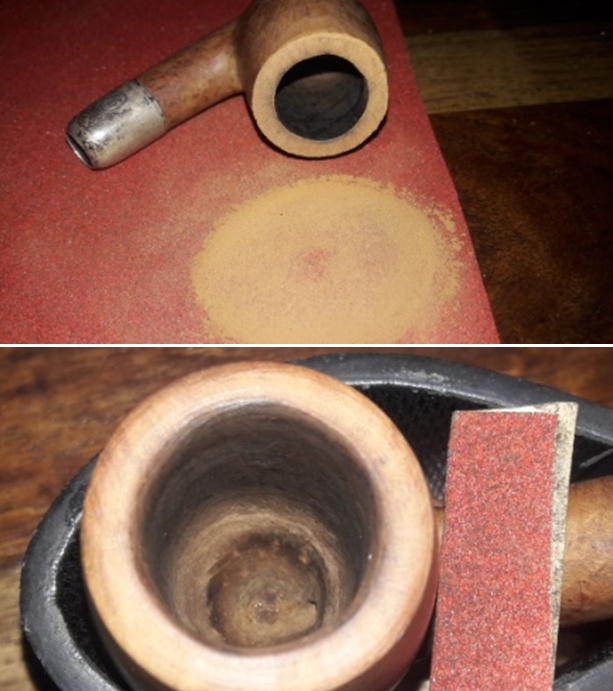
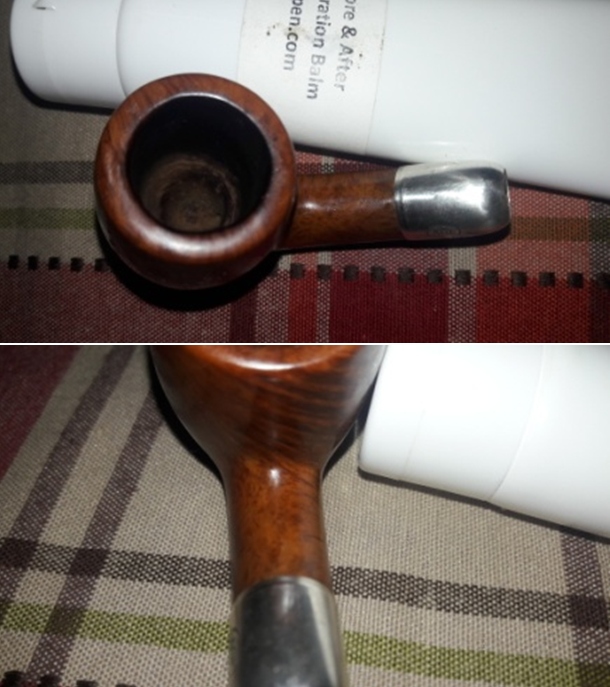
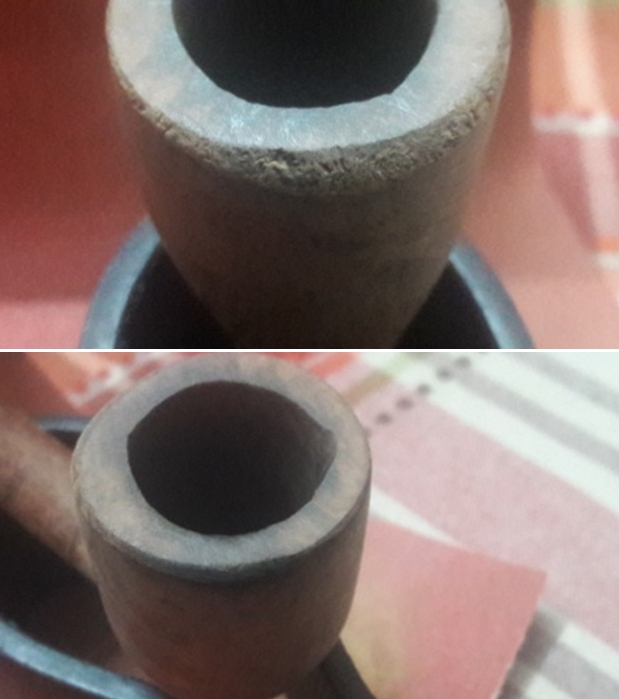
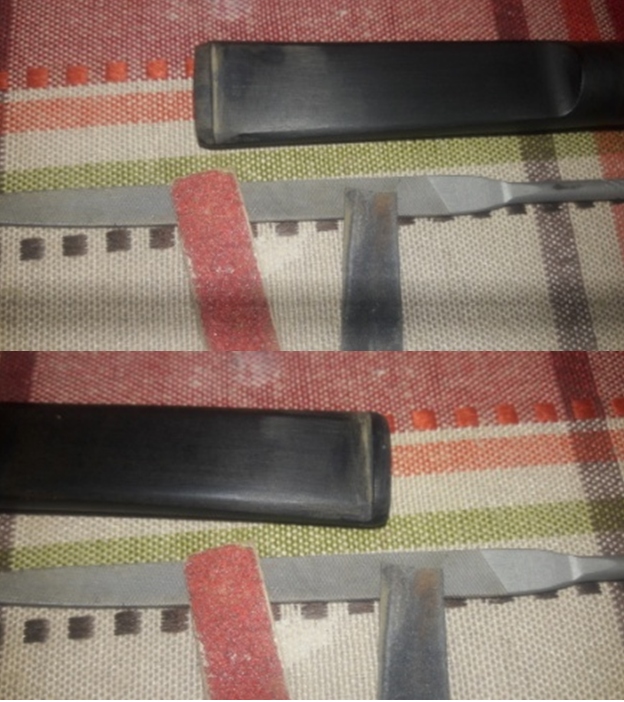
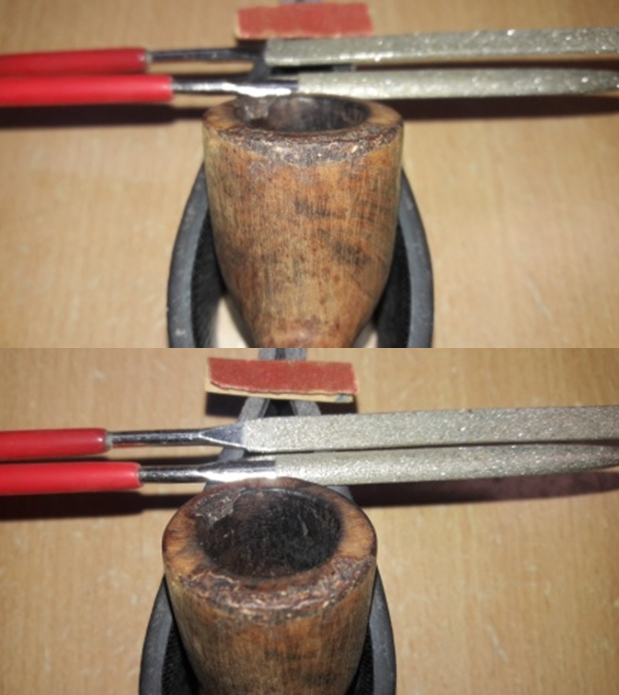
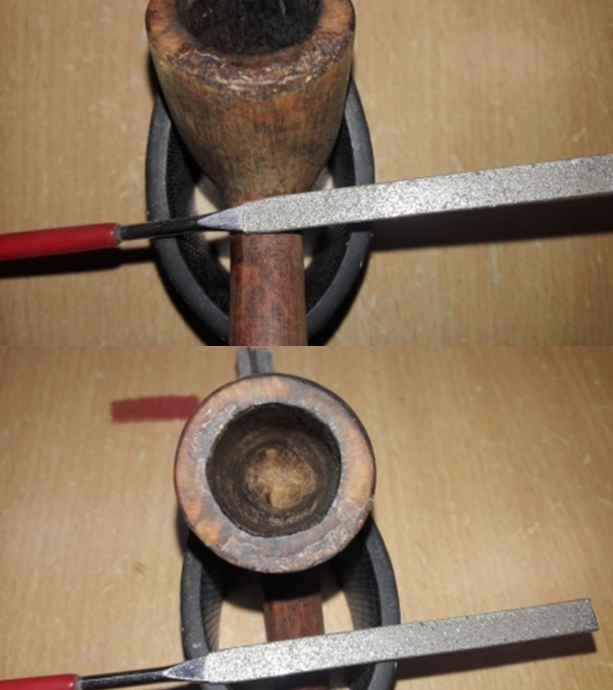
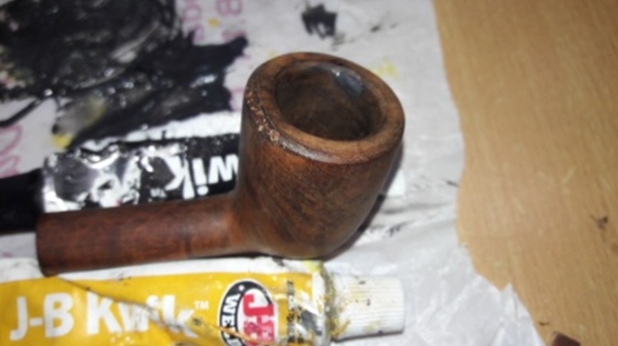
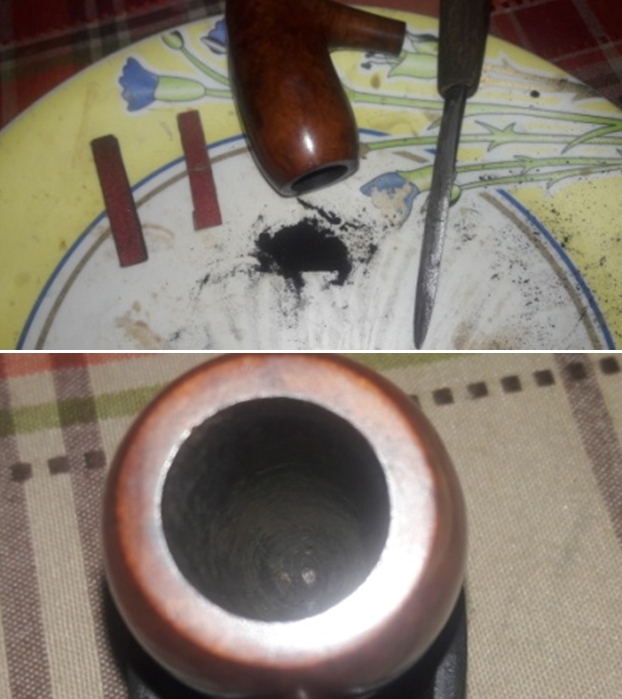
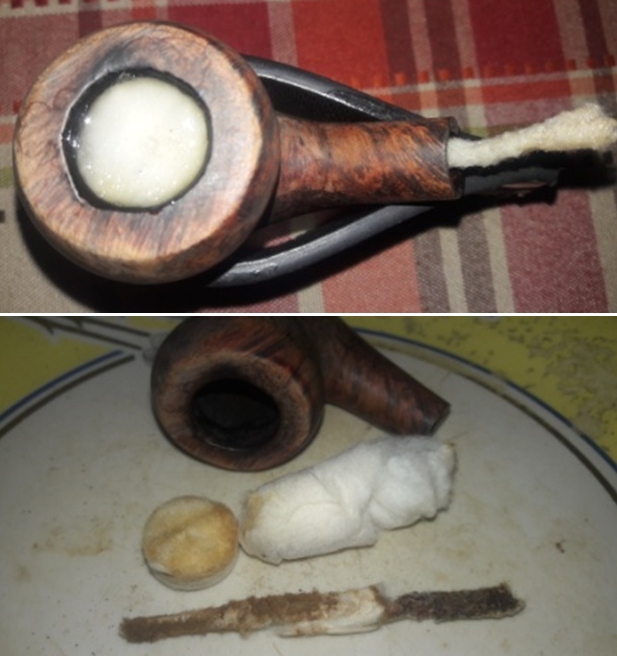
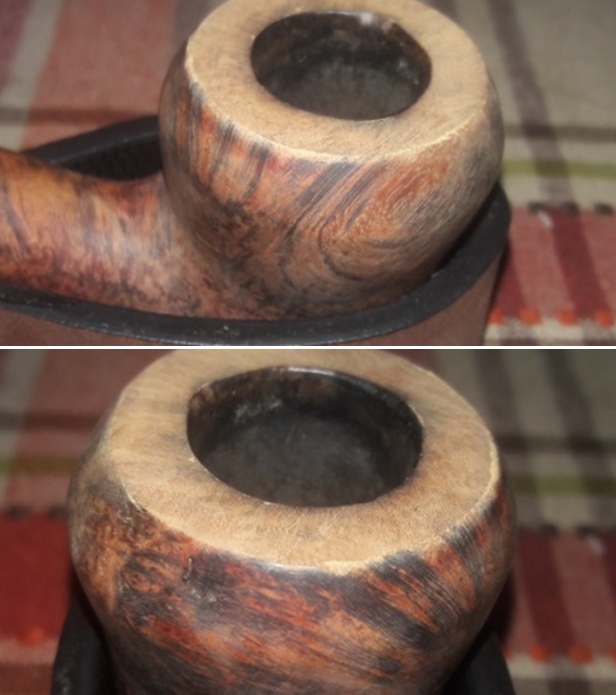
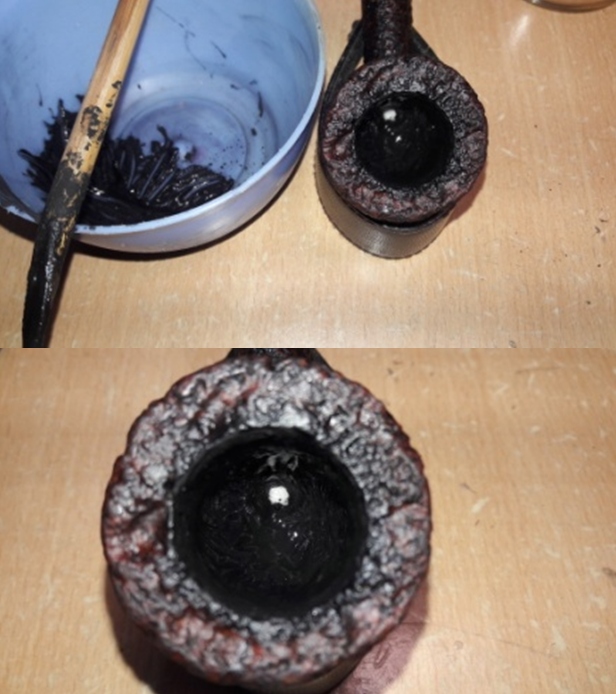
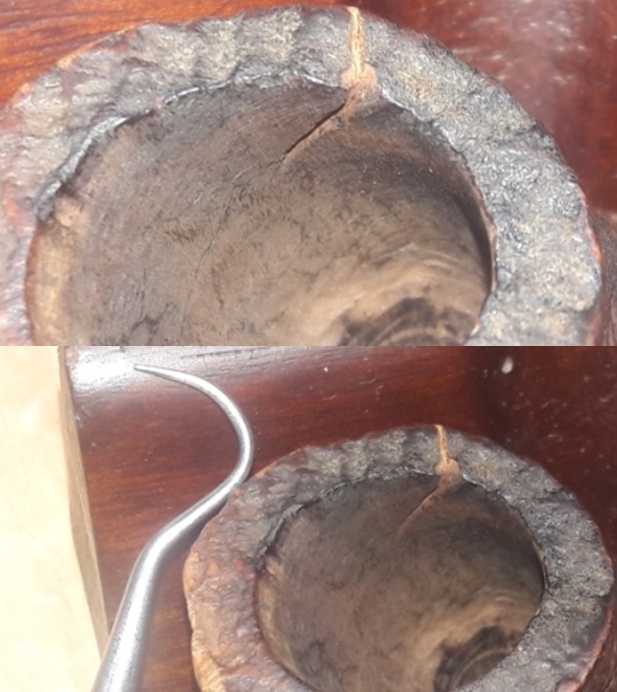
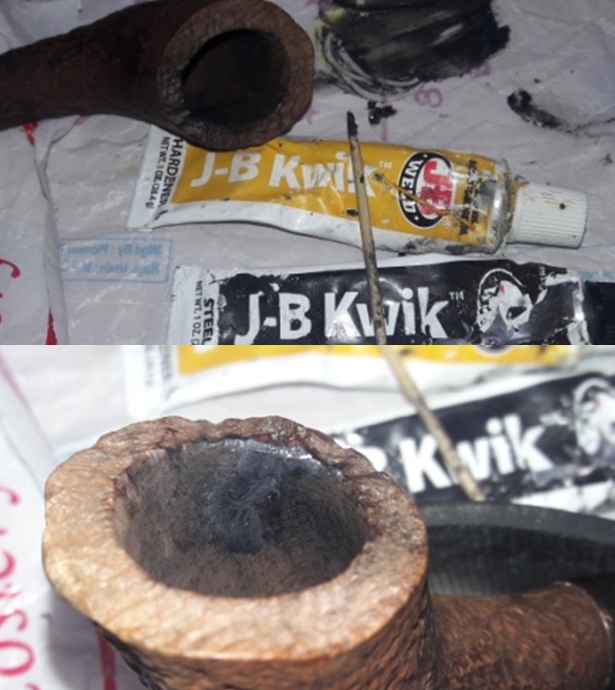
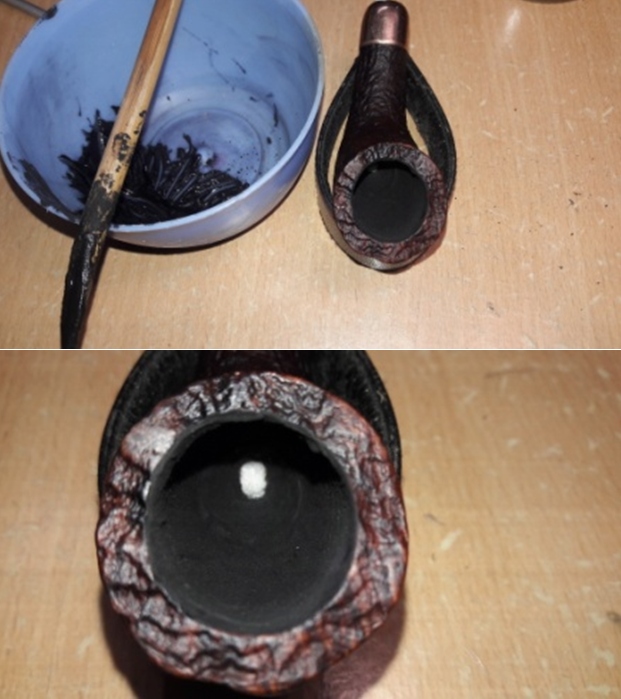
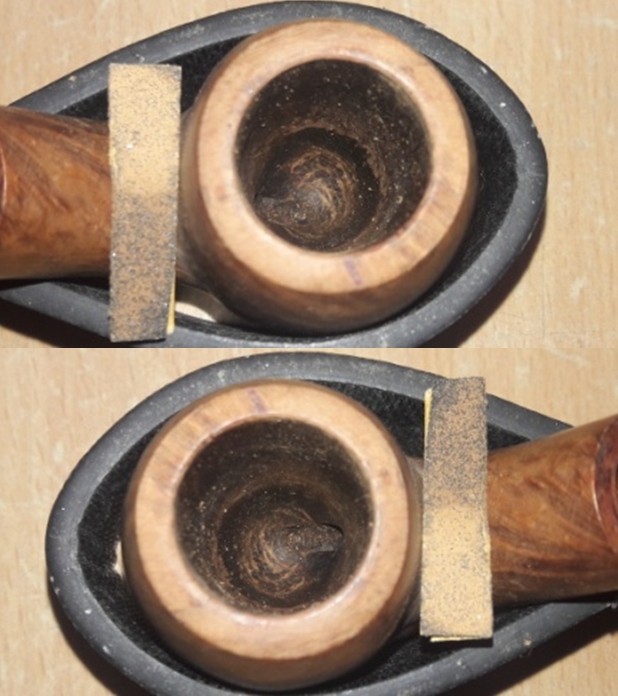
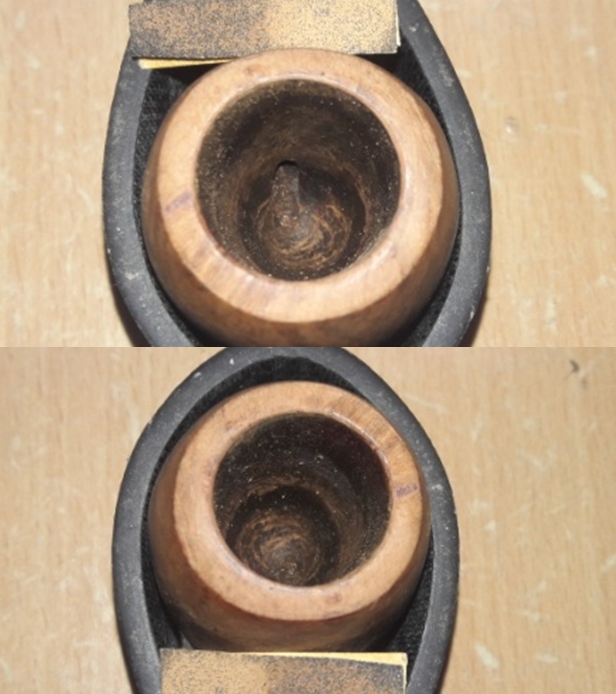
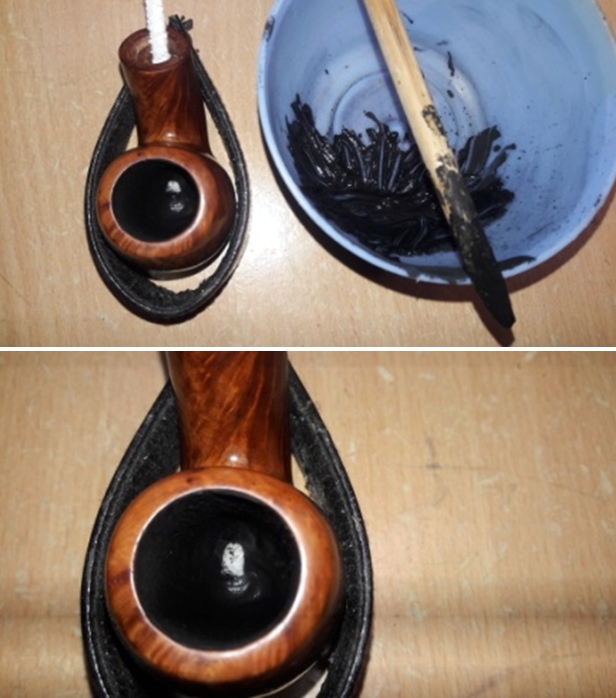
I started this project by reaming the chamber with my smaller fabricated knife and scraped out all the carbon from chamber. I used a 220 grit sand paper, pinched between my thumb and forefinger, to sand the inner walls of the chamber of the pipe. Once I had reached the bare walls, I wiped the chamber with a cotton pad dipped in isopropyl alcohol. This removed all the residual carbon dust and also rid the chamber of all ghost smells. The walls of the chamber are nice and solid with no signs of cracks. Using a sharp knife, I gently scraped out the overflow of lava from the rim top. The dents and chips on the rim surface are now clearly visible and so is the extent of damage to the outer edge of the rim. The inner rim edge too shows a few chipped spots along the edge. 
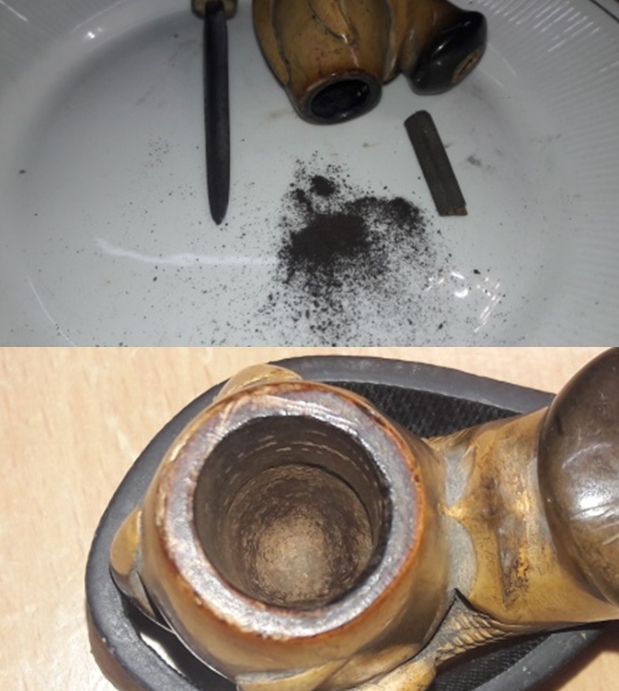
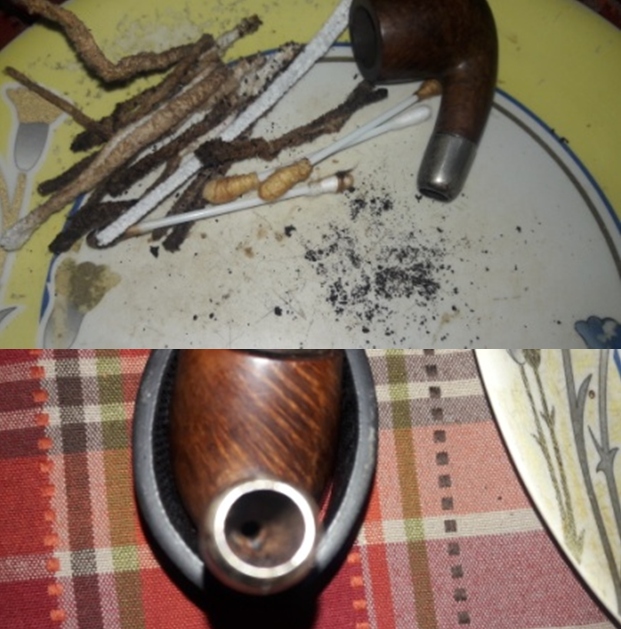
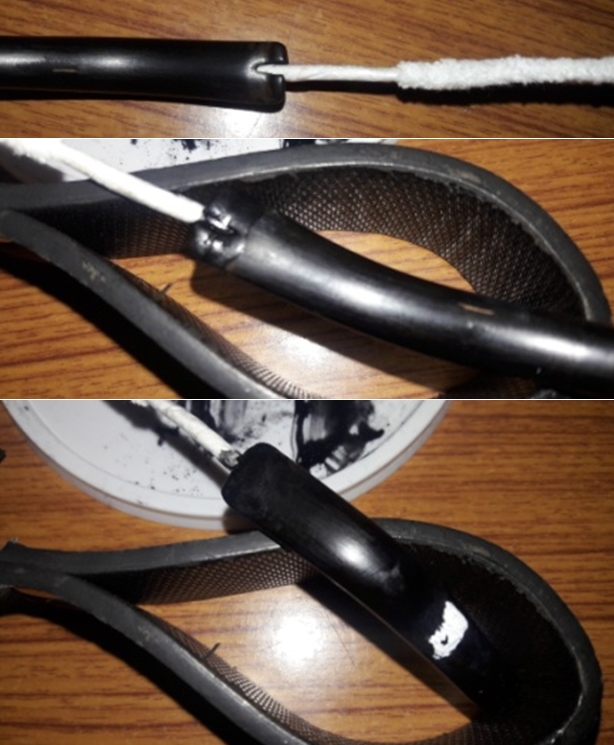
I followed up the reaming of the chamber with cleaning of the mortise and air way of the pipe using hard bristled and regular pipe cleaners, q-tips dipped in alcohol. The mortise and the draught hole were given a final clean with shank brushes dipped in alcohol. The shank internals and the draught hole are now nice and clean with an open and full draw. This was easier said than done. The pipe cleaners would not pass through the draught hole for the love of money!! A great deal of poking and prodding with a straightened paper clip got me there.Next I cleaned the internals of the stem and shank extension with pipe cleaners and alcohol. 
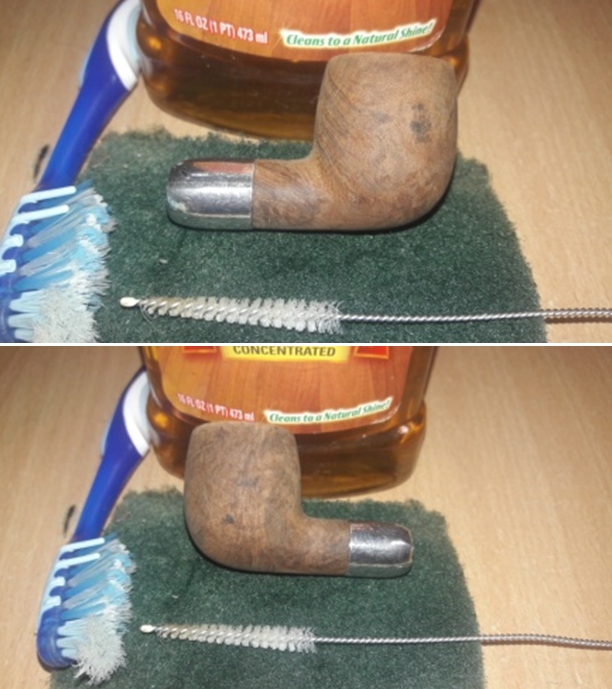
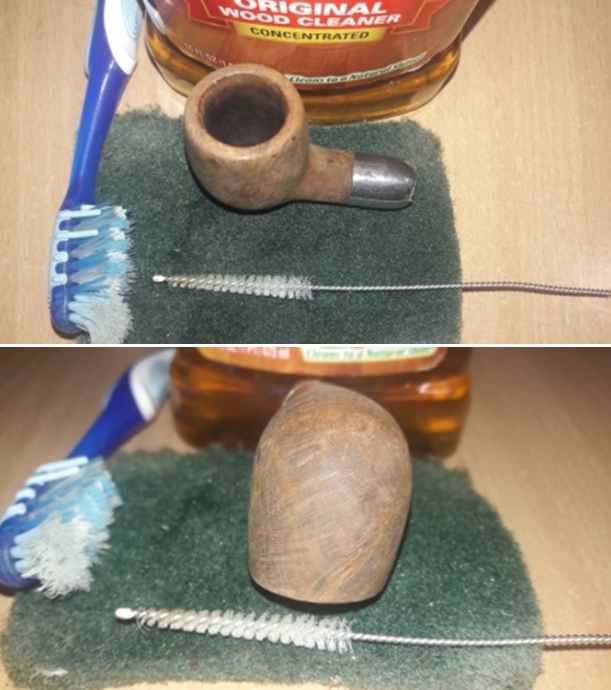
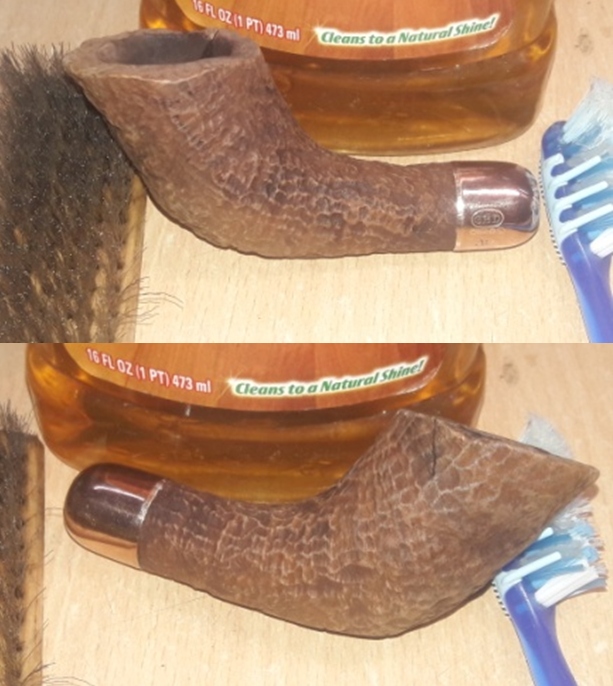
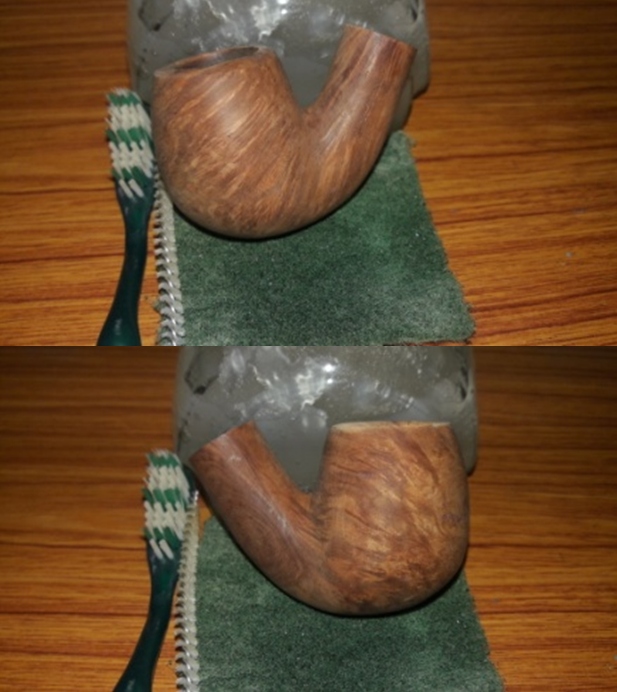
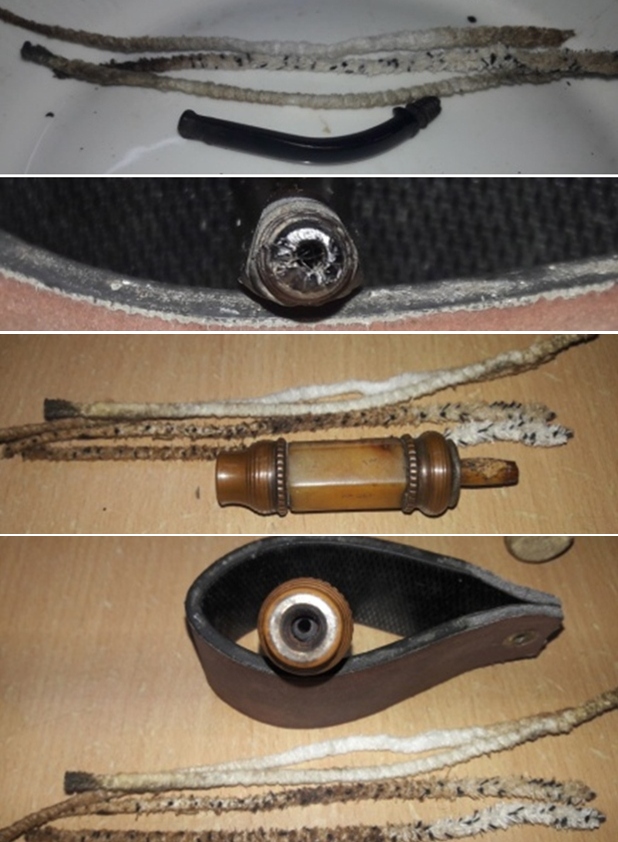
I followed up the internal cleaning of the stummel, shank extension and the stem with external cleaning. I cleaned the external surface of all the three parts with Murphy’s Oil soap and hard bristled tooth brush/ shank brush. The stummel surface cleaned up nicely. The scratches and dents and dings over the stummel and shank extension surface are now clearly visible. The crack in the block amber in the shank extension is wider and deeper than I had anticipated since the dirt and grime which was embedded in the crack has now been cleaned. 
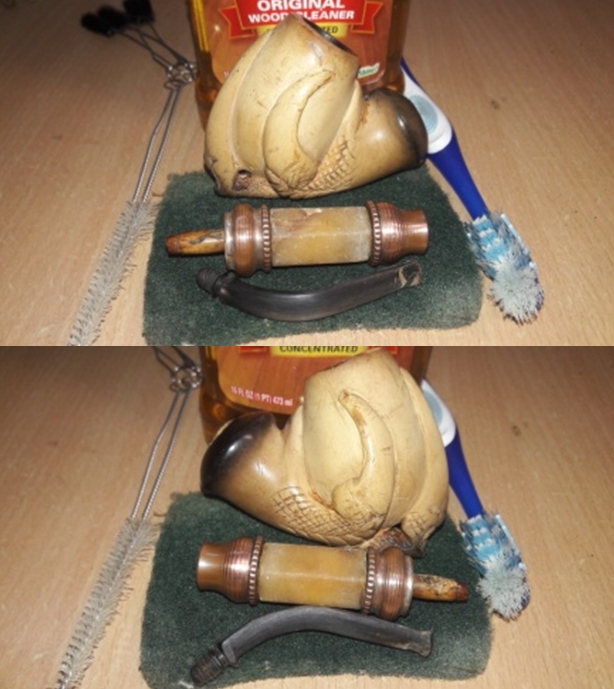
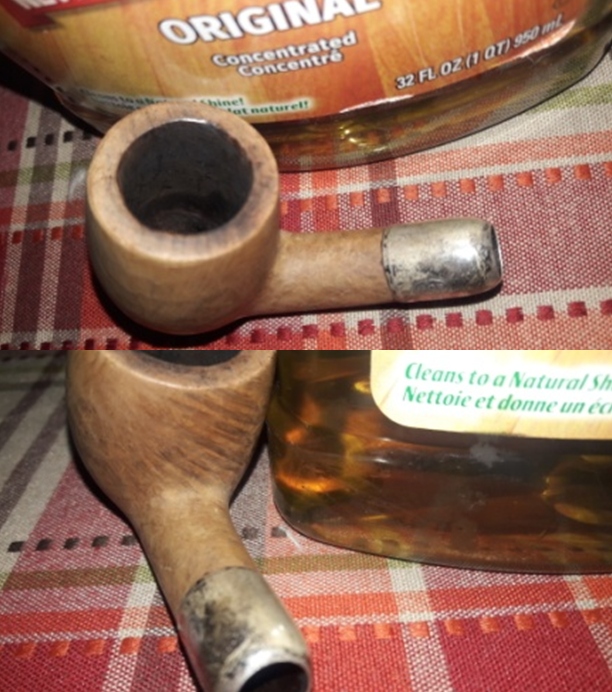
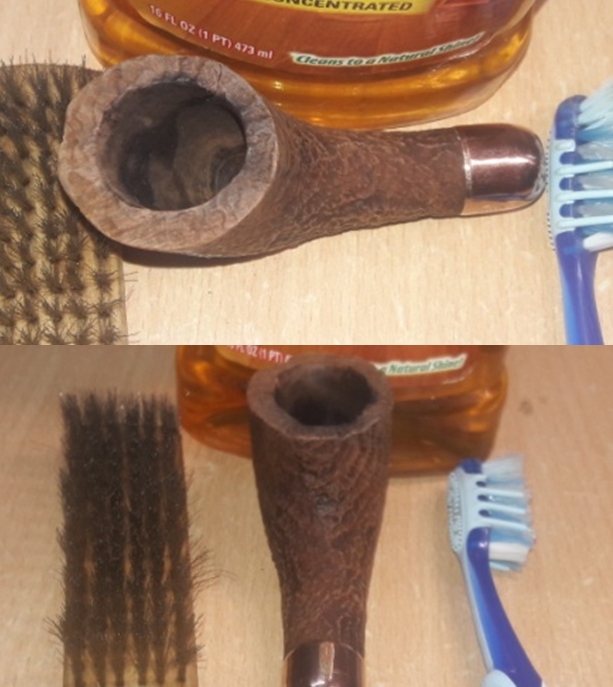
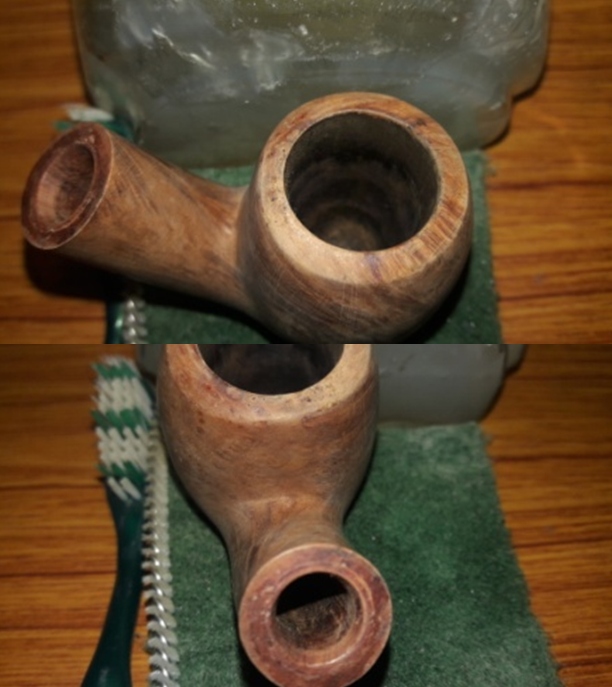
The external cleaning was followed by carefully removing old and now moistened wax and gunk that remained embedded in the many nooks and crannies of the intricate carvings over the stummel surface using sharp dental tools. The stummel is now truly cleaned and prepared for the next step in restoration.   
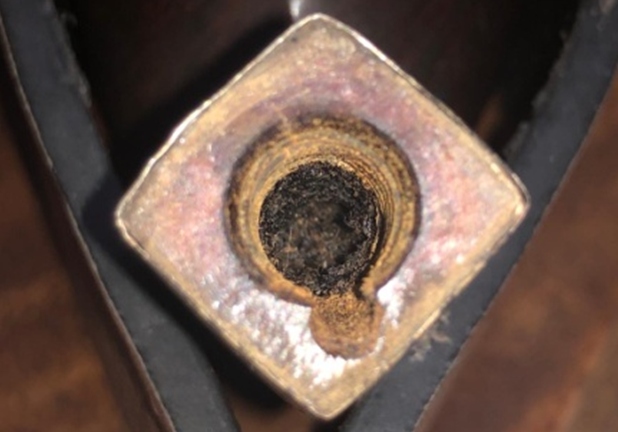
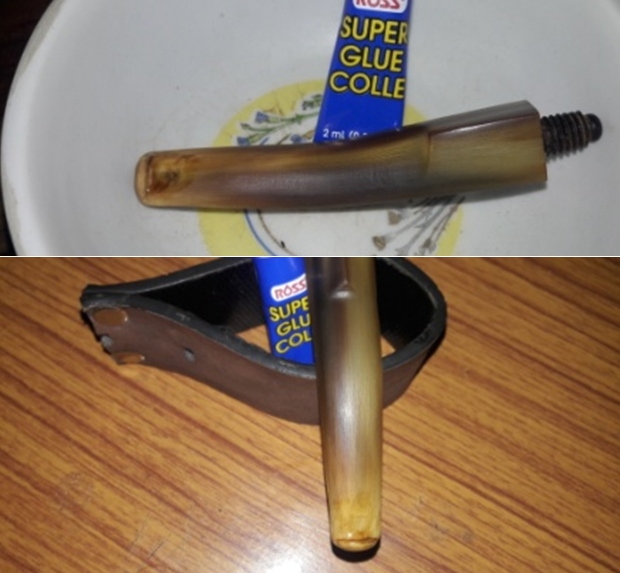
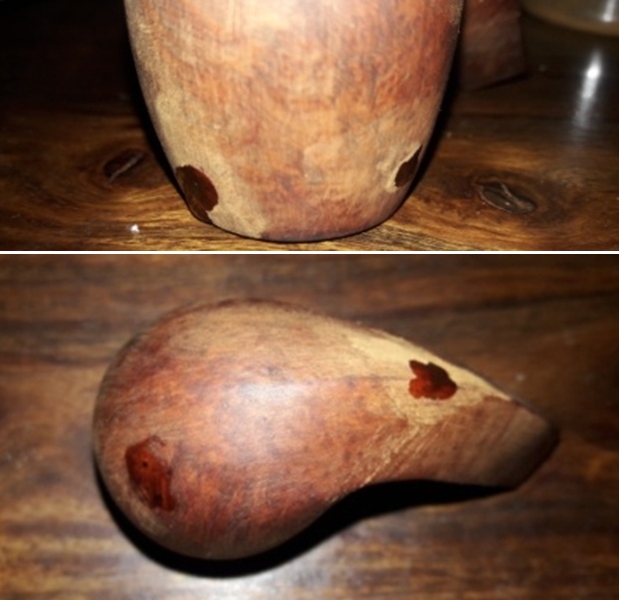
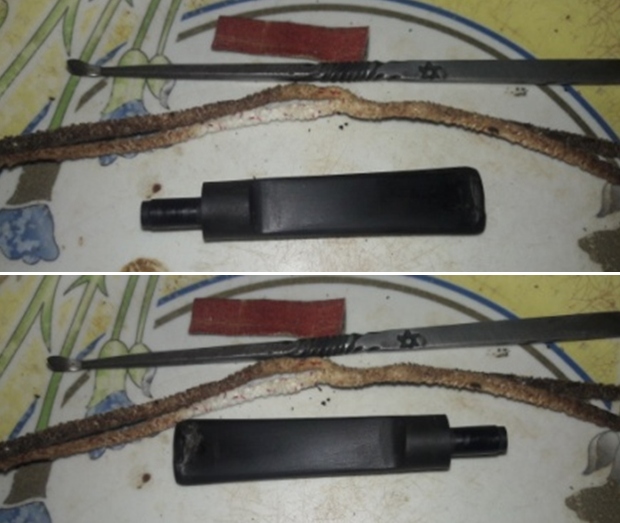
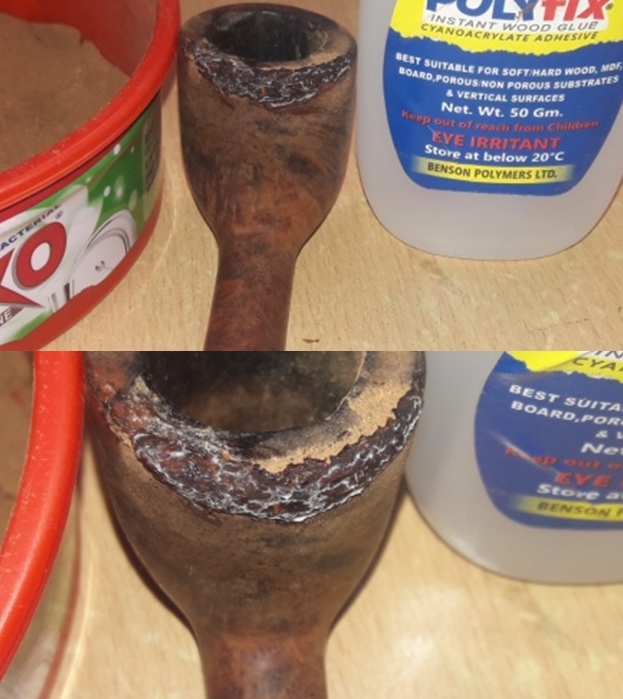
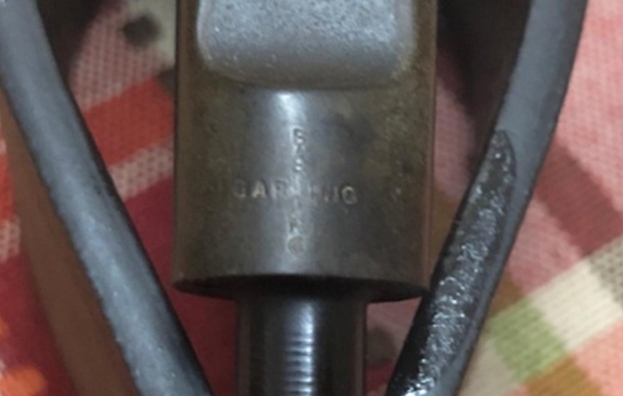
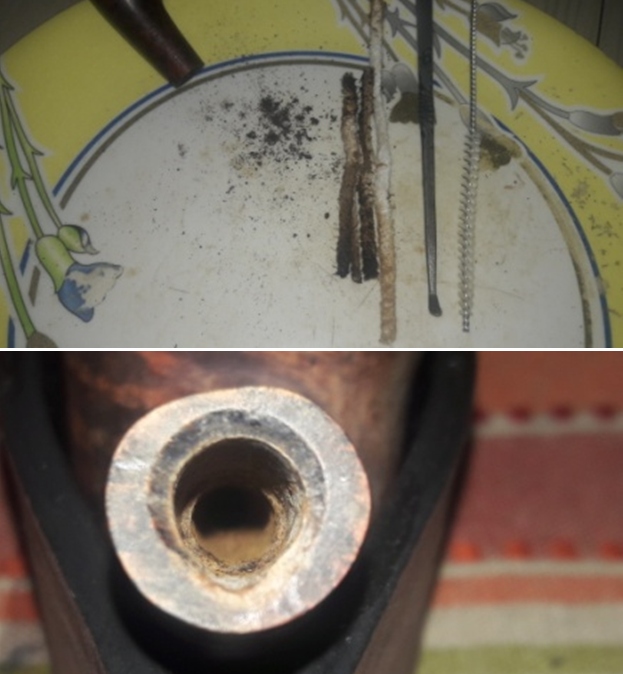
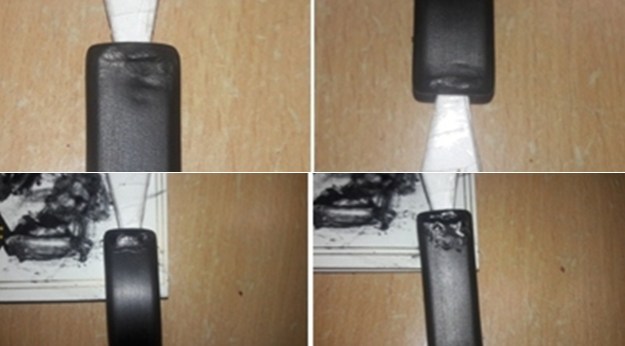
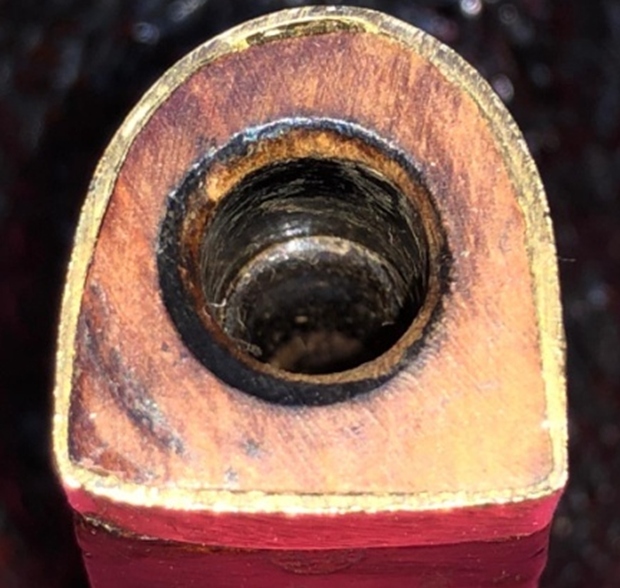
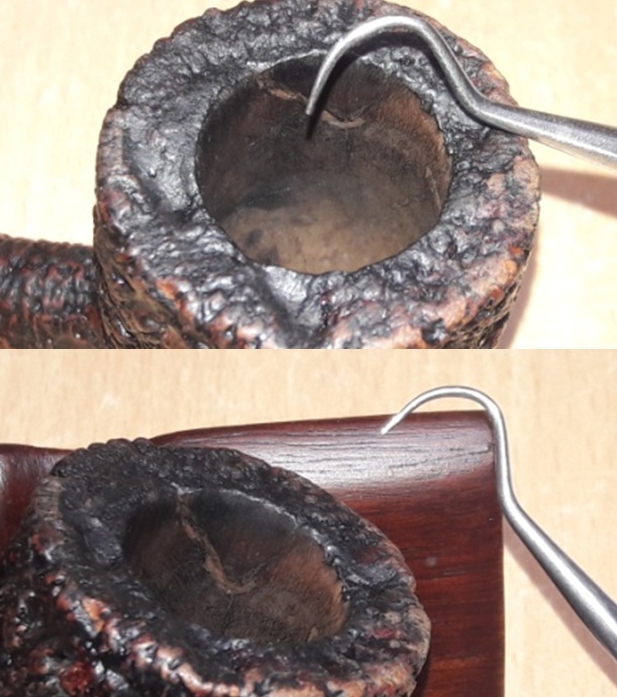
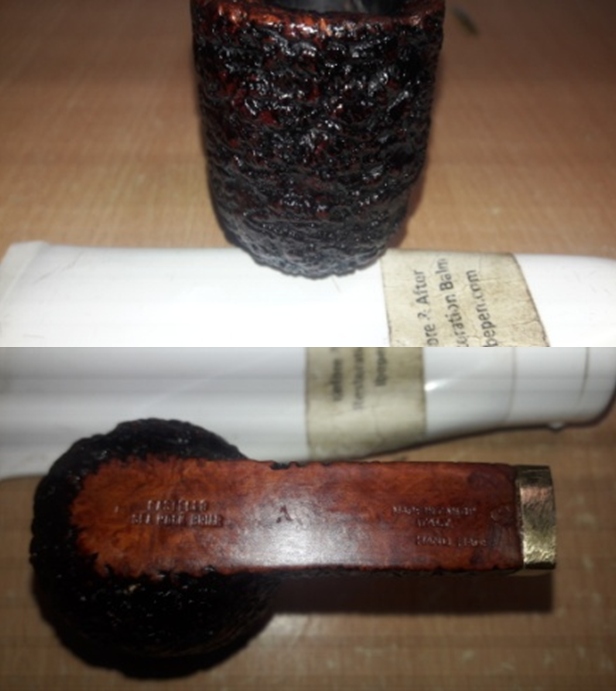
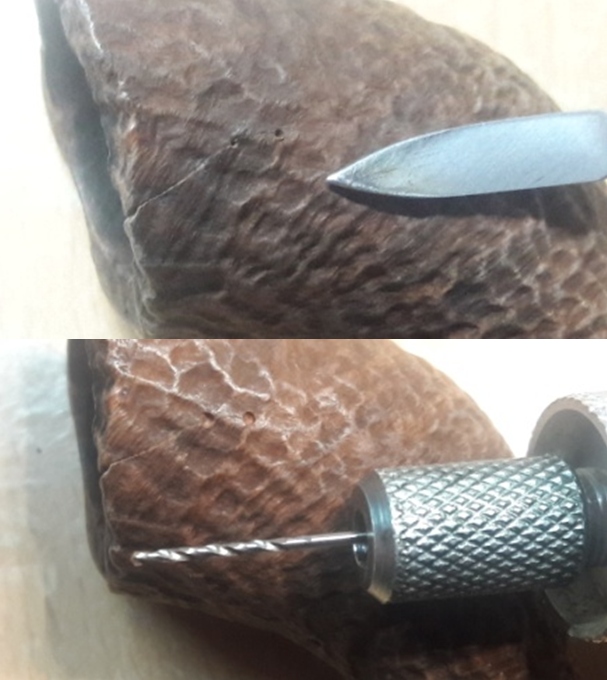
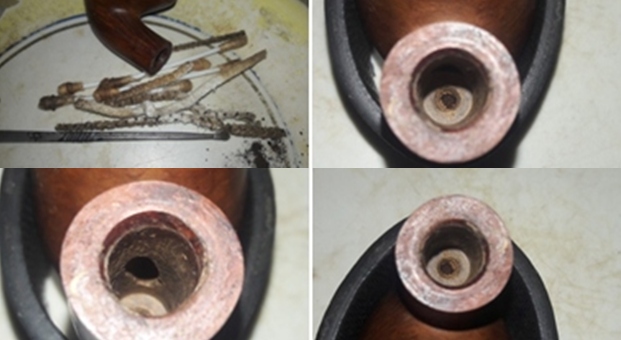
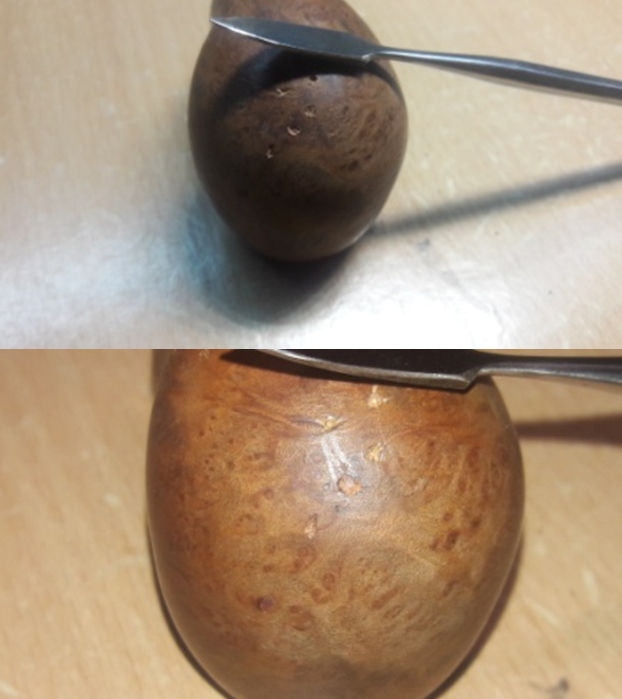
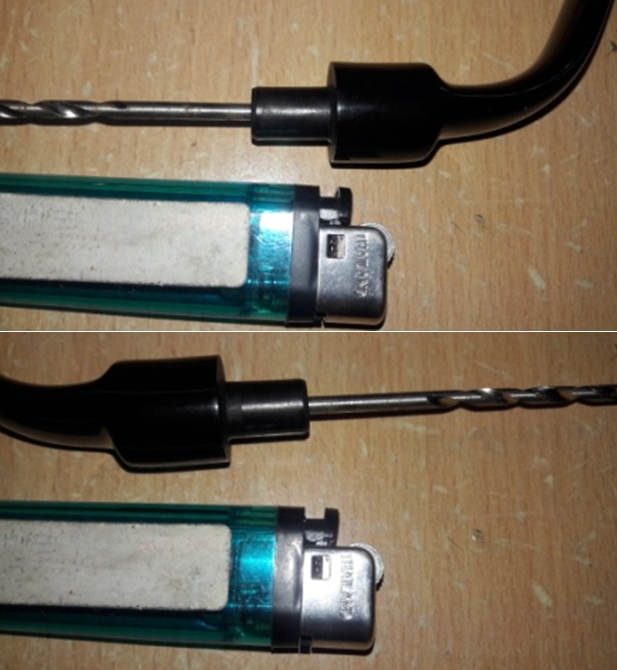
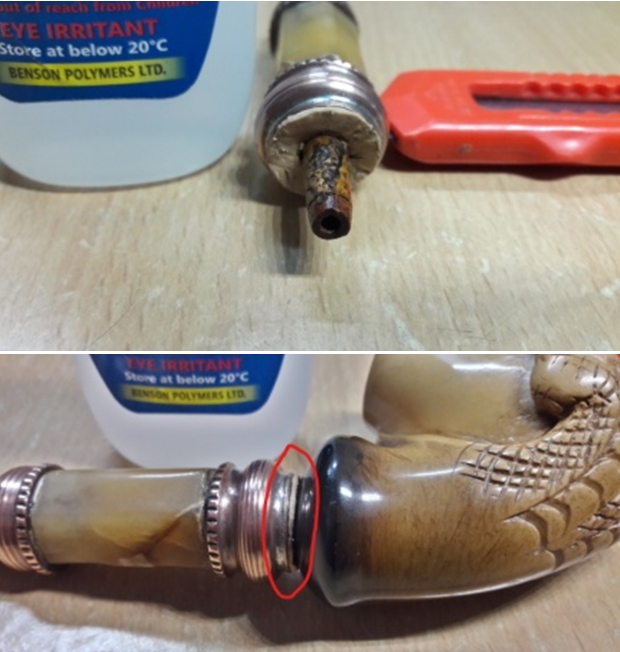
I scraped off the old remnants of the packing from the tenon end of the shank extension. This would provide a fresh and clean surface for a new packing between the shank extension and the shank end to protect and provide an airtight seal between the shank end cork lining and the copper adornment at the shank extension end. I intend to use a leather gasket (if I can find one!) to seal the joint between the shank extension and the shank end. It was at this stage that while cleaning the tenon of the shank extension that realization dawned on me that the tenon is not bone as I had appreciated but WOOD!! The wood tenon even has part of the old bark covering the tenon (encircled in green). I decided to let the piece of bark remain on the tenon to preserve the originality of the pipe. 
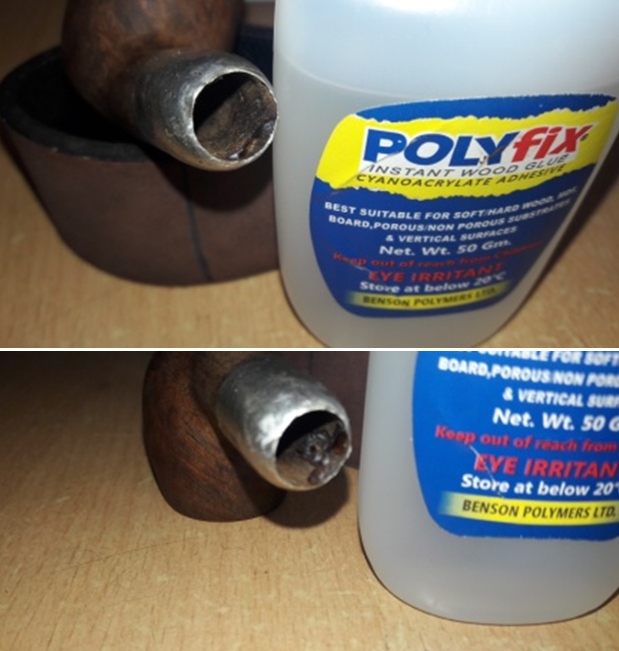
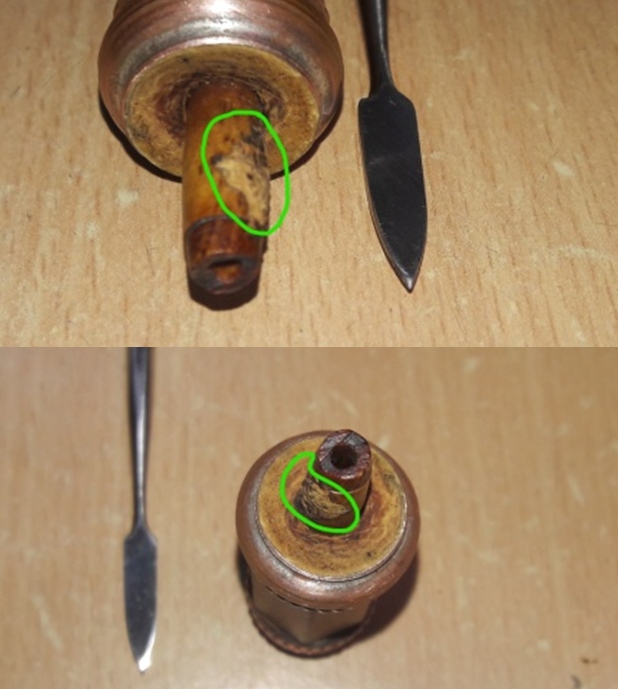
Next, I decided to address the crack, chipped surface in the amber and also the gaps between the amber block and copper adornments. I filled the crack, chipped portion and the gaps with clear superglue and set the amber shank extension aside for the glue to cure.  
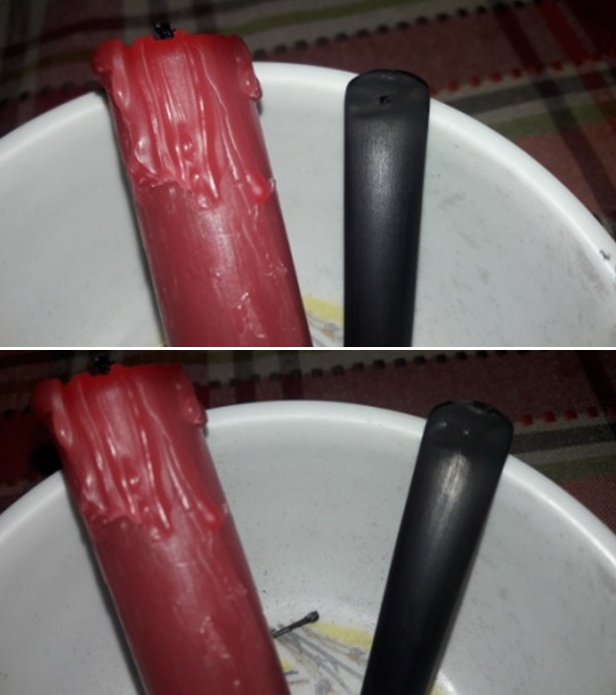
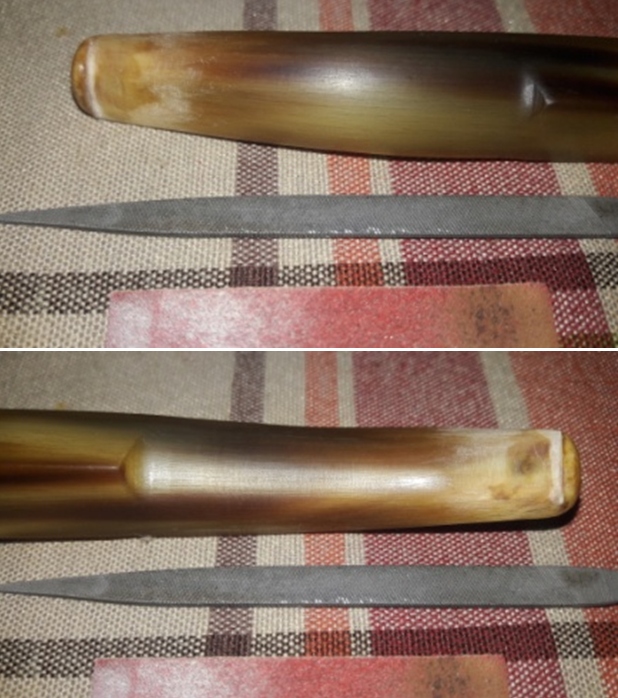
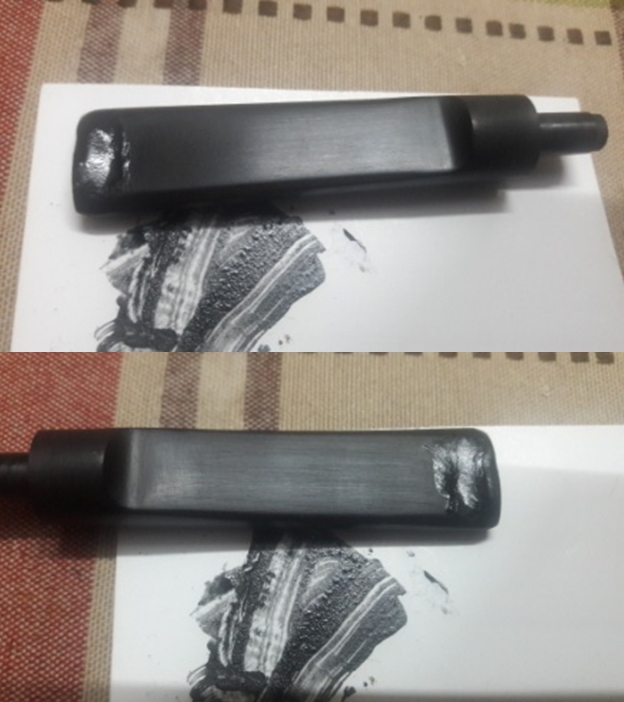
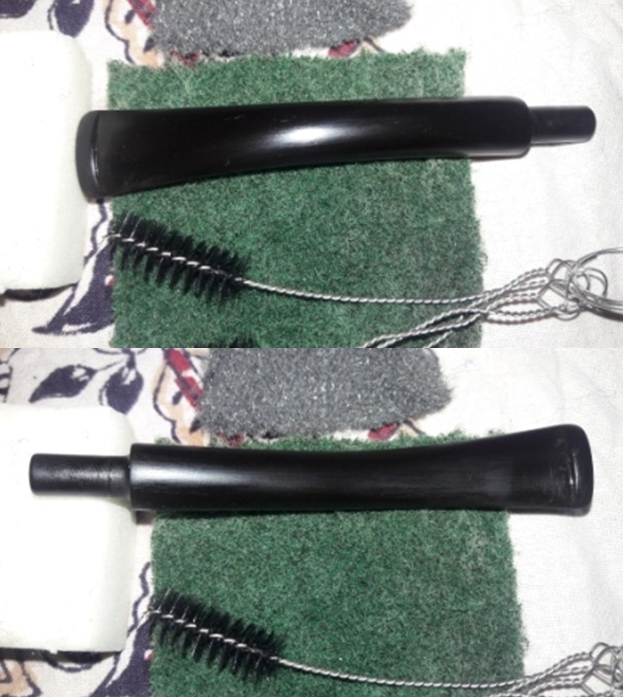
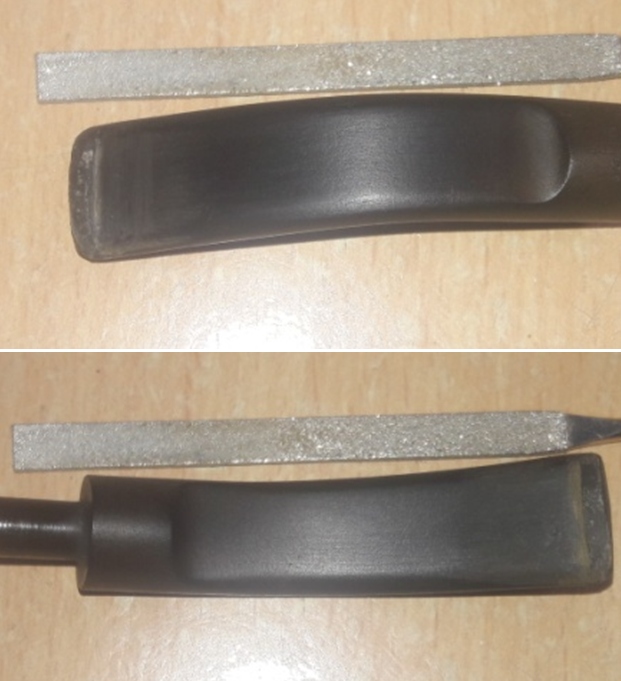
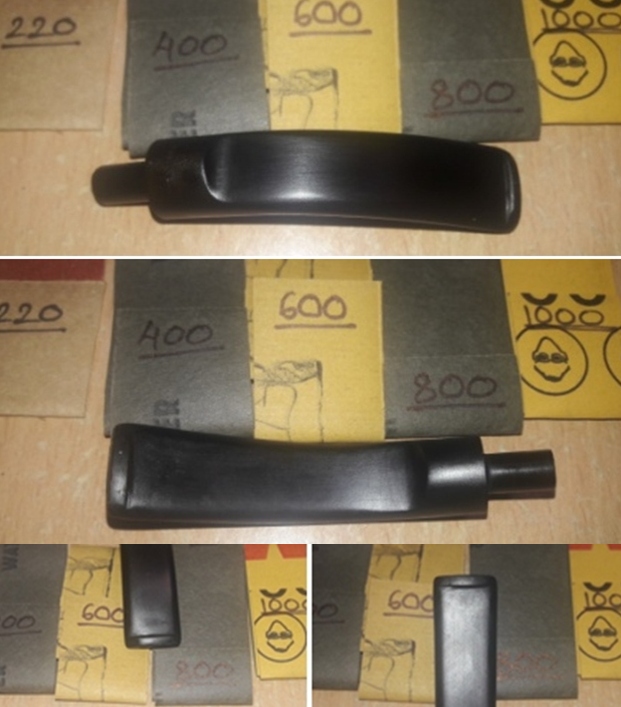
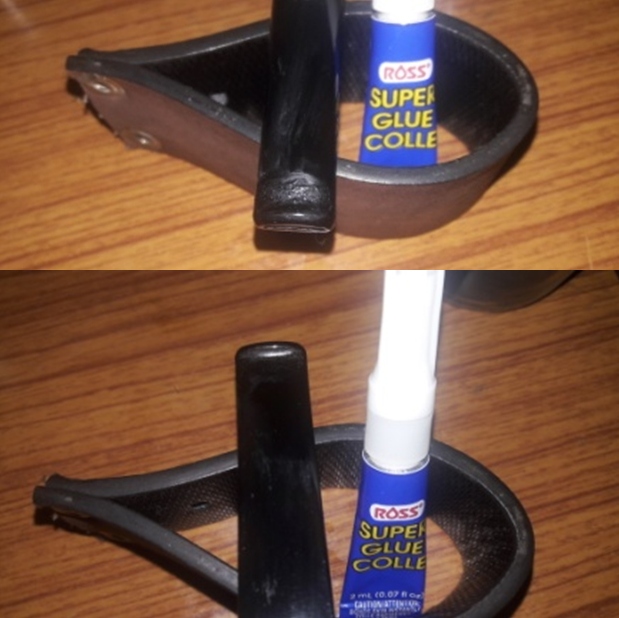
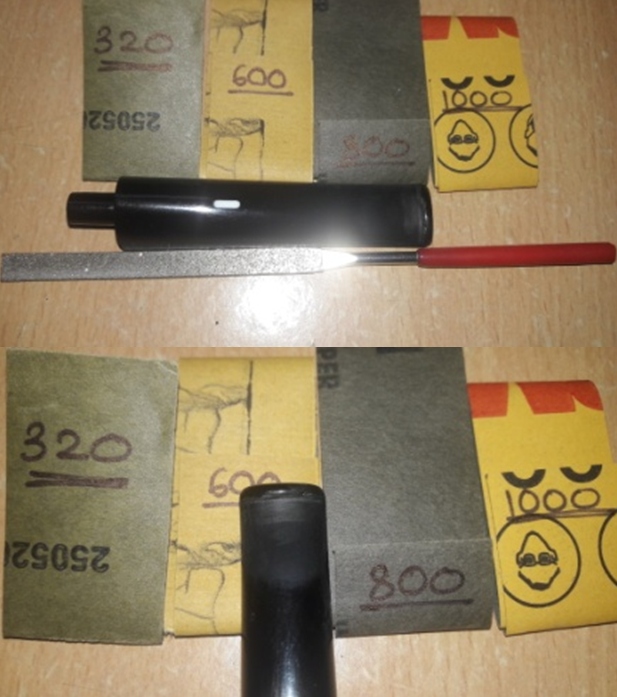
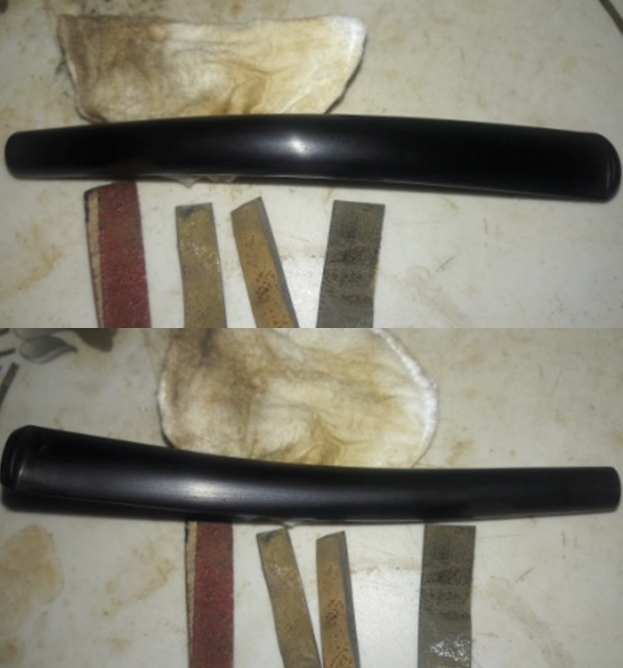
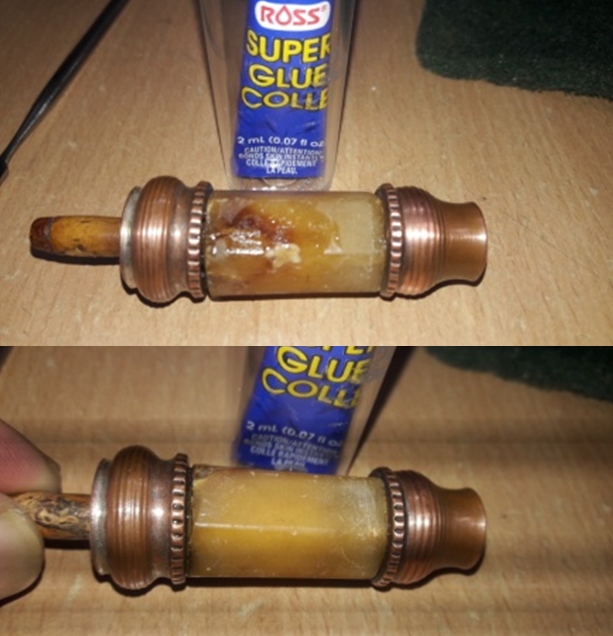
With the amber shank extension set aside to cure, I addressed the bit marks on the horn stem. I start by sanding the bite zone with a piece of 180 grit sand paper. I filled the bite marks on both lower and upper surfaces of the horn stem with clear superglue. Once the glue had set, I layered superglue over the button in the bite zone as well as over the tenon end and set the stem aside for the glue to completely cure. Once the glue at the either ends of the stem has cured, I shall sand the fill to match the button in the bite zone and at the tenon end.   
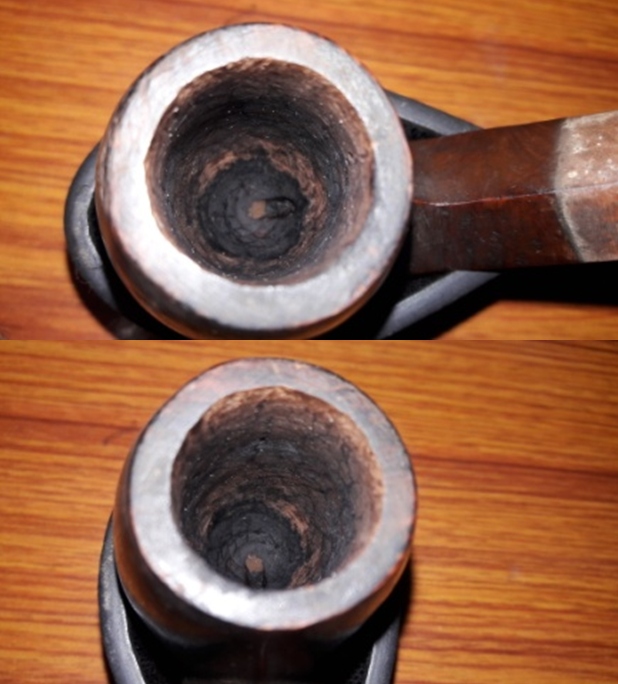
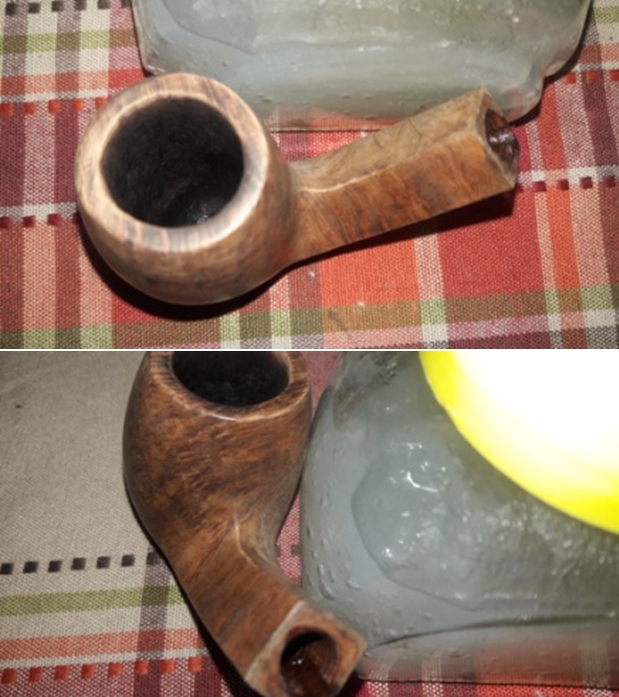
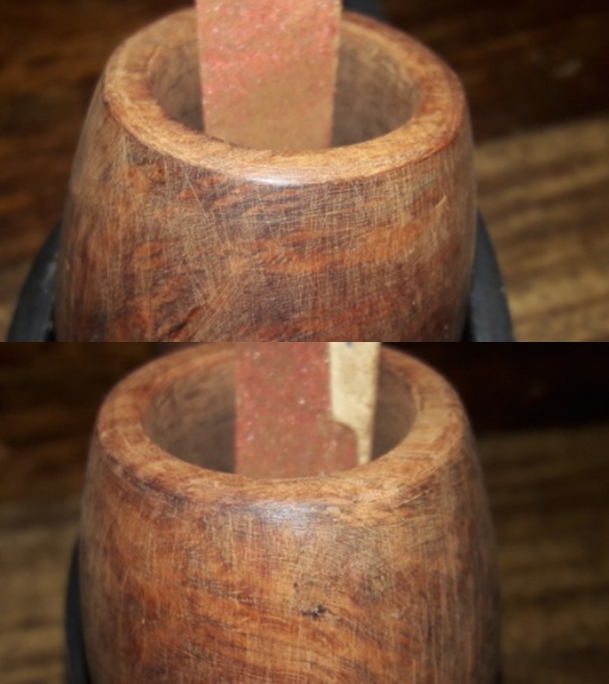
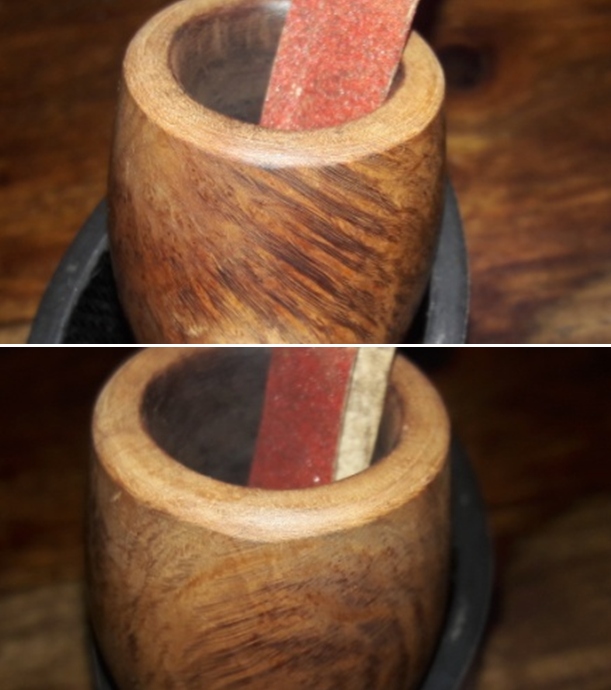
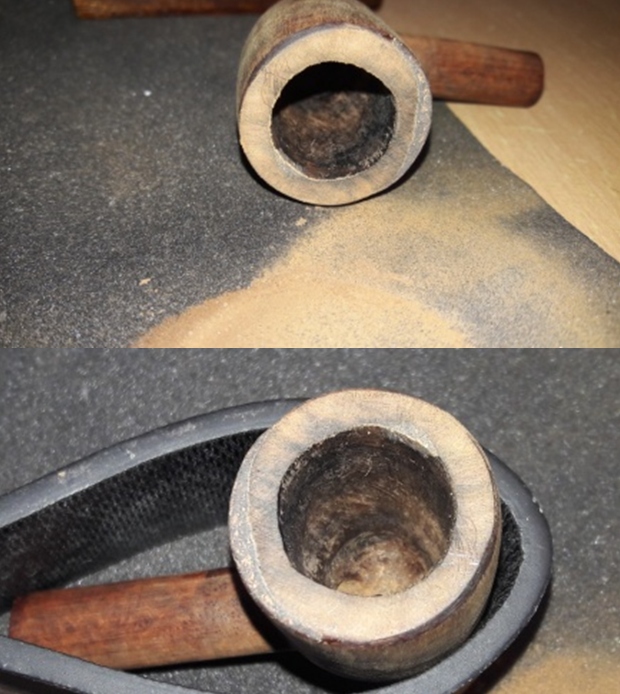
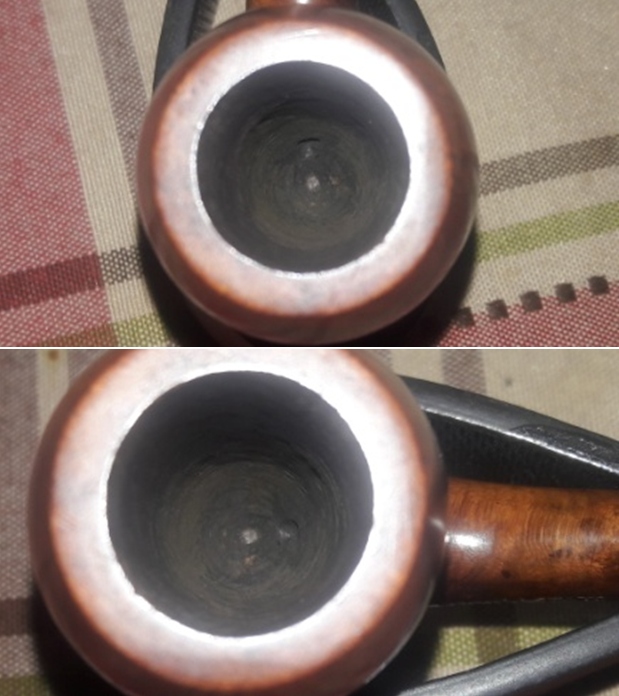
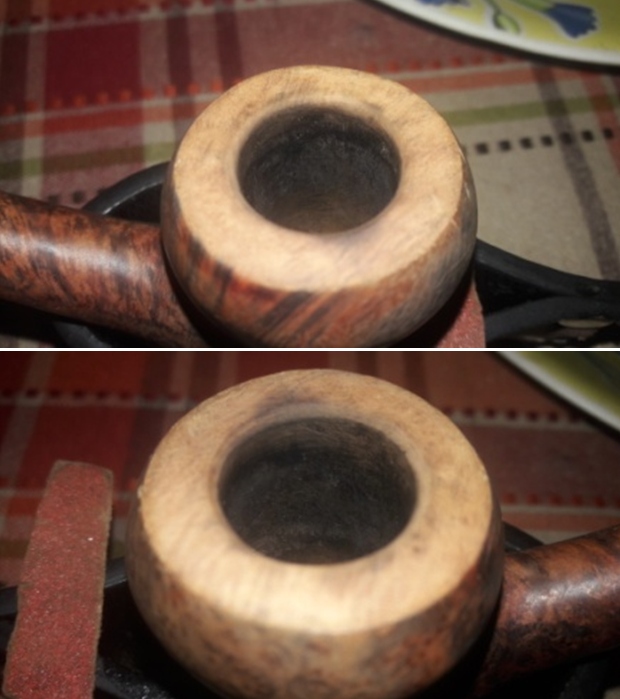
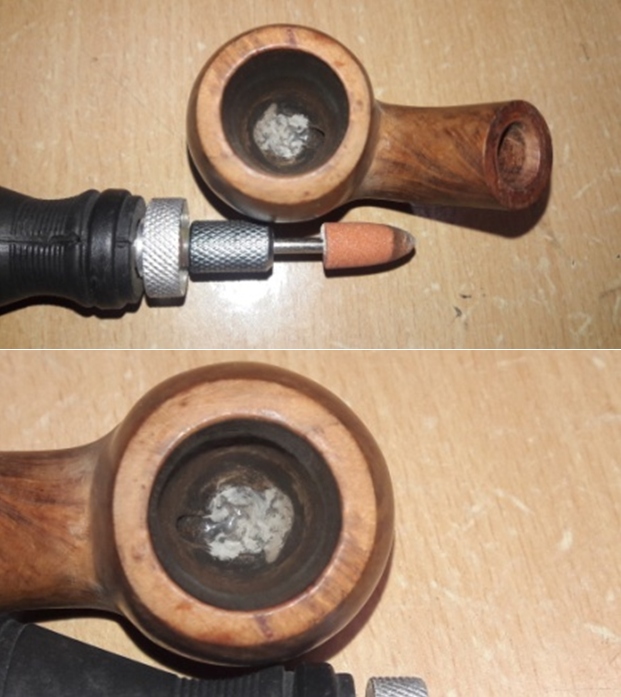
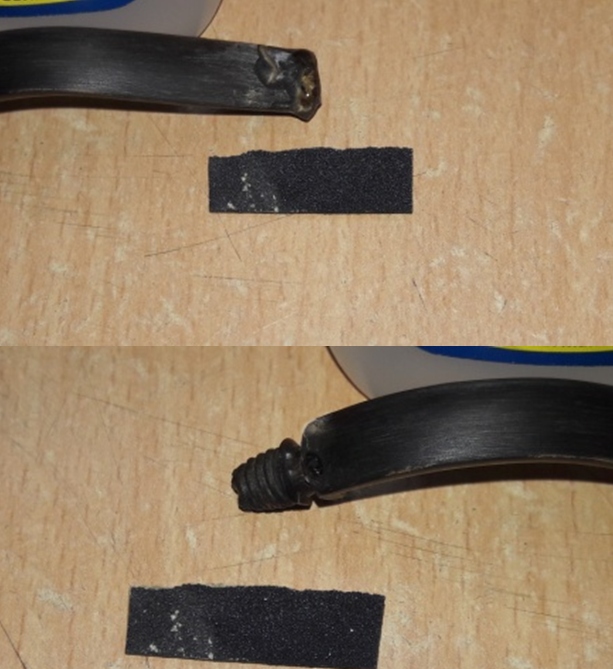
Now that the amber shank extension and horn stem had been set aside for the superglue fill to cure, I turned my attention to address the stummel issues. To address the darkened and out-of-round rim as well as the dings to the rim edges,, I first top the rim surface on a folded piece of 180 grit sand paper. Once the darkened areas were addressed, with a folded piece of worn out 180 grit sandpaper pinched between my forefinger and thumb, I create a slight bevel over the inner and outer rim edges till all the dings were removed and the out of round issue was reduced to a large extent.   
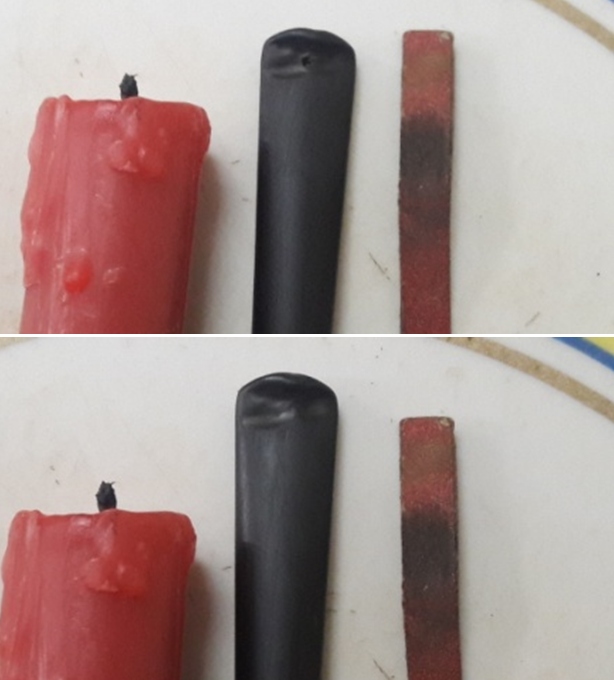
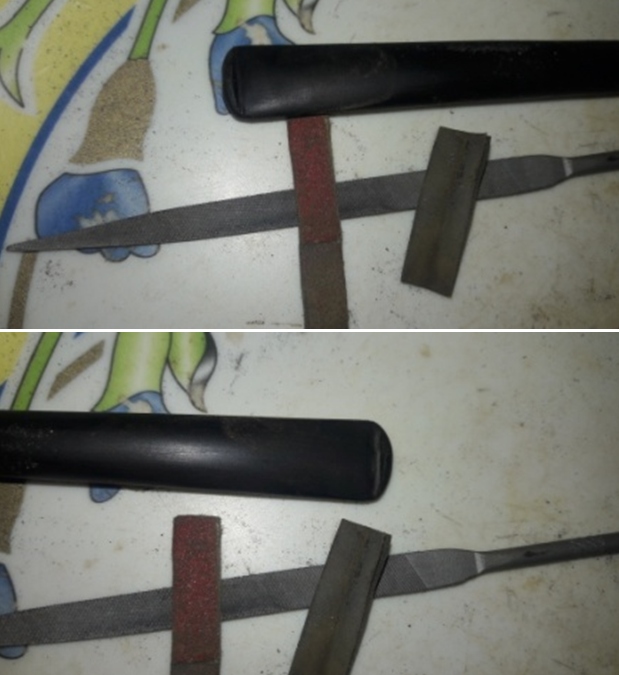
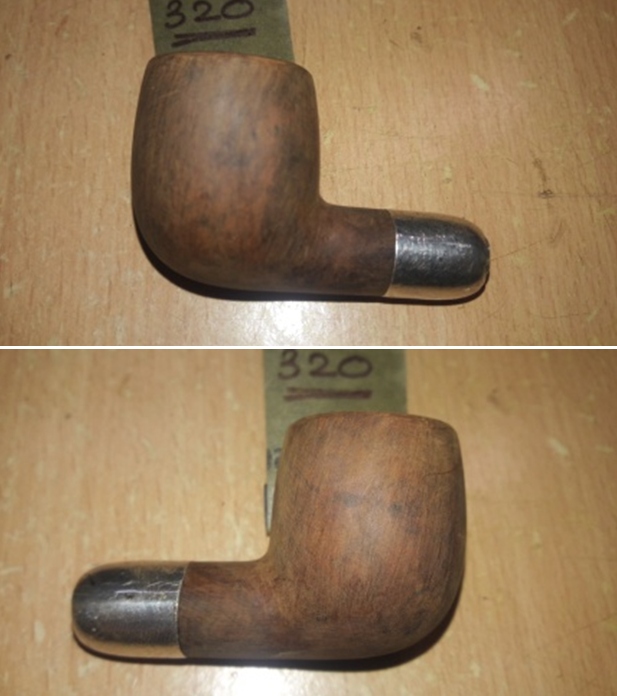
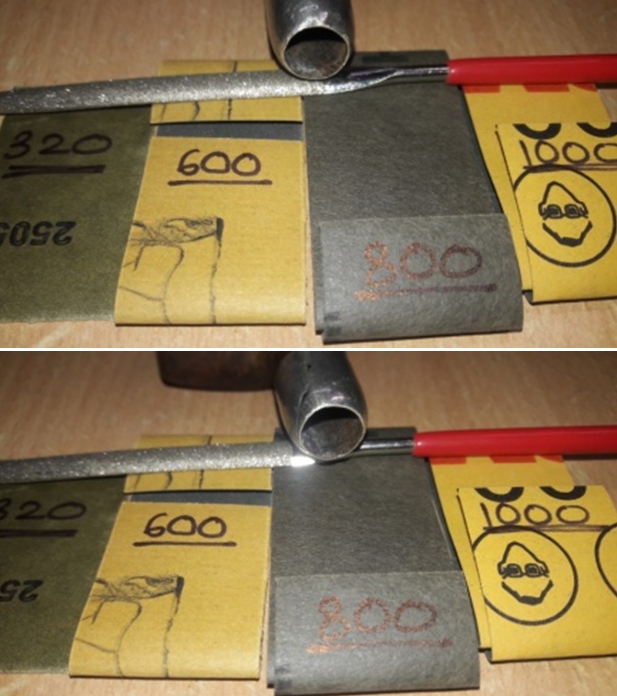
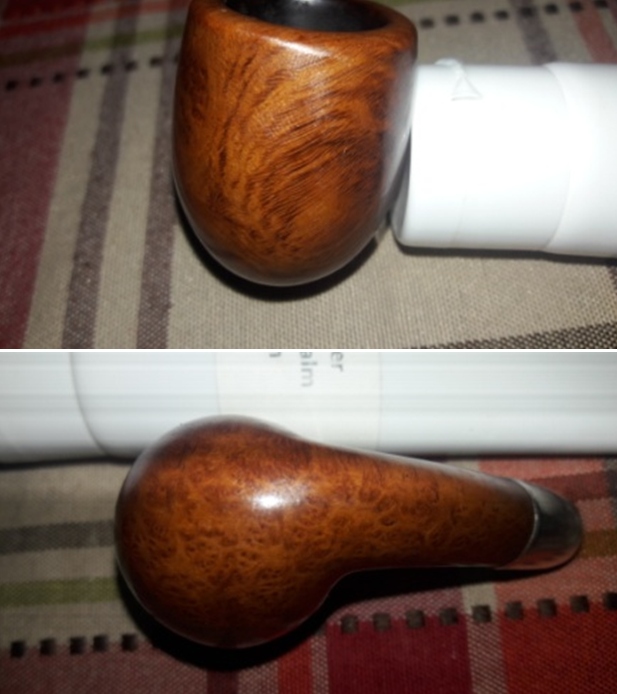
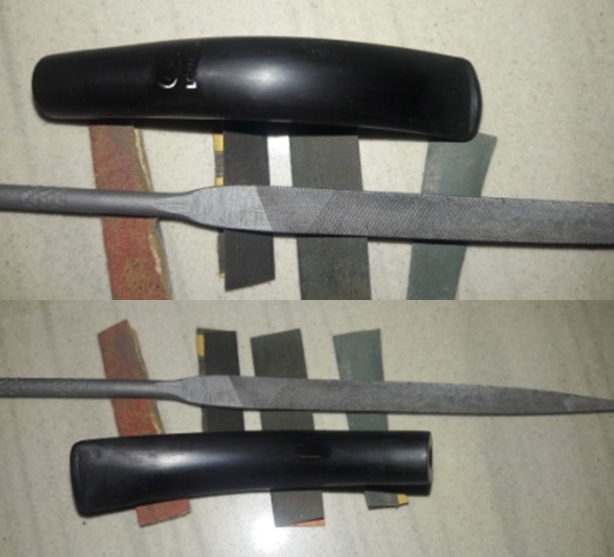
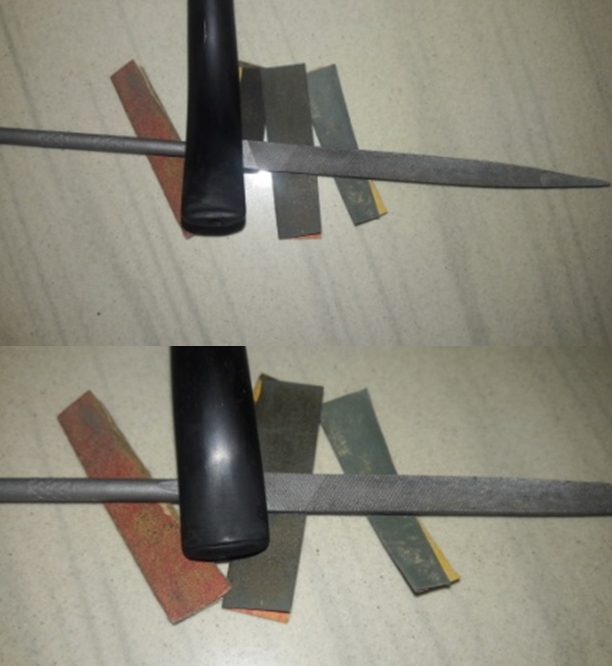
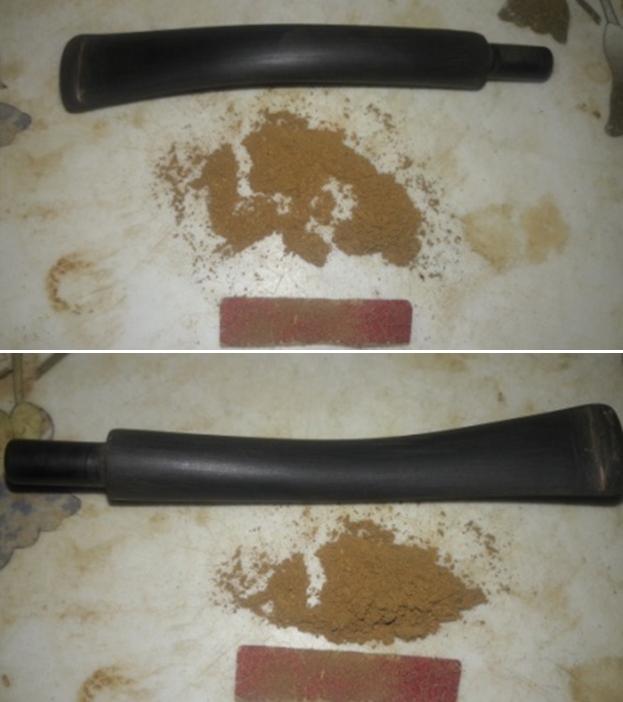
I set the stummel aside and checked the stem fills. The glue had hardened completely. With a flat head needle file, I sand the fills on upper and lower surface and reconstruct the button edges at either ends of the horn stem. With a folded piece of 320 grit sandpaper, I sand the entire stem surface, including the button edges, to blend and smooth out the repaired surfaces. I rubbed a generous amount of EVO in to the stem to rehydrate it and set the stem aside for the oil to be absorbed.    
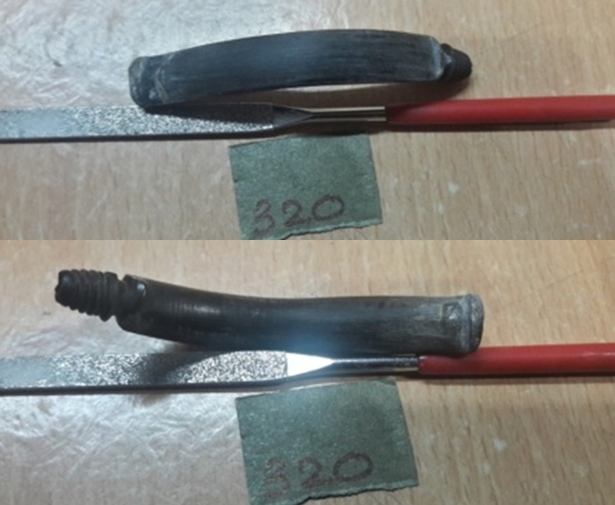
All the while that I was working on the stummel and the stem, the repairs to the amber shank extension were curing nicely. Once the glue had completely hardened, with a flat needle file, I sand off the excess fill to achieve a rough match with the surrounding amber surface. I further blend in the repairs by sanding the entire amber block with a folded piece of 320 grit sandpaper. 
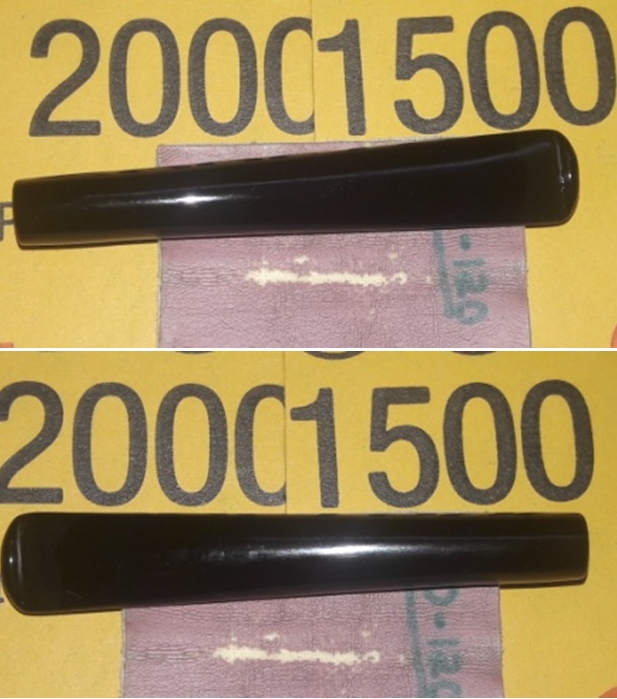
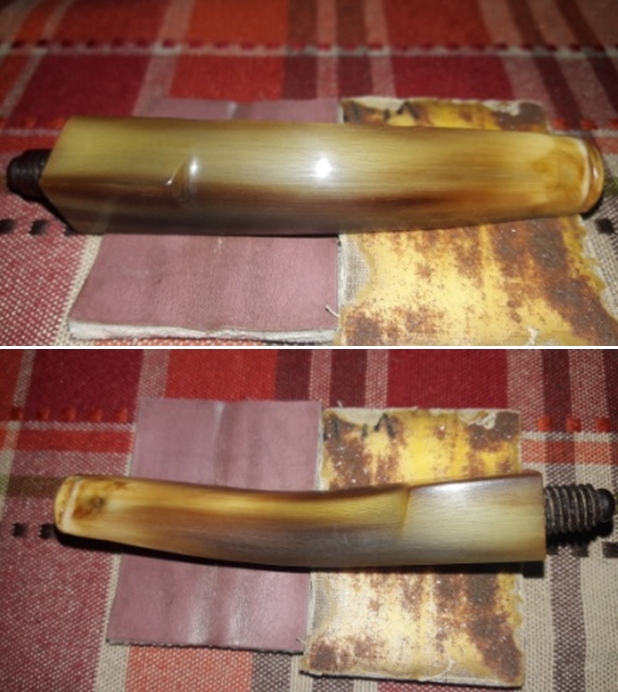
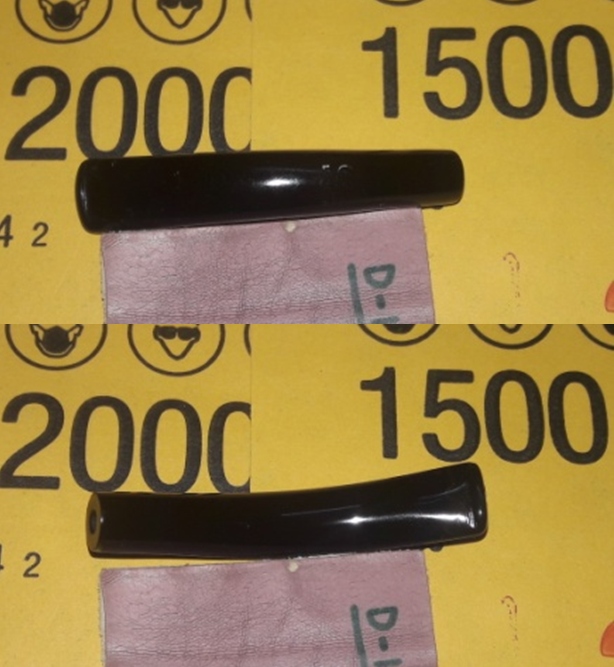
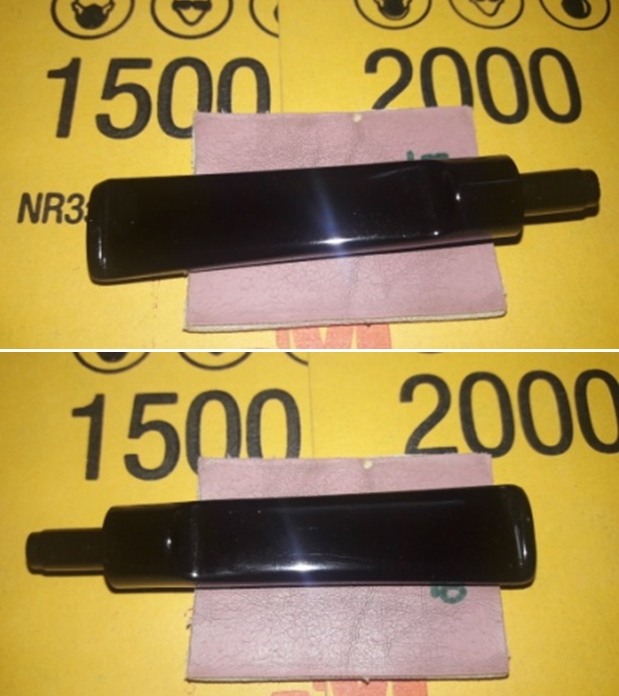
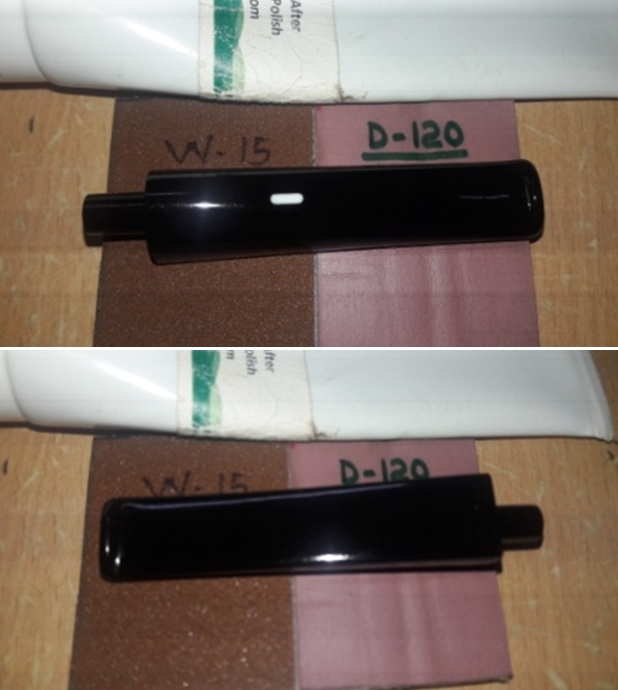
Now moving on to the most tedious and time consuming process of polishing the three parts of the pipe with micromesh pads. I wet sand the entire stem and the block amber shank extension with 1500 to 12000 grit micromesh pads. I wiped these parts with a moist cloth to note the progress being made. Once I was done polishing with all the pads, I rubbed a small quantity of EVO in to the stem to rehydrate it. I am happy with the progress being made thus far.    
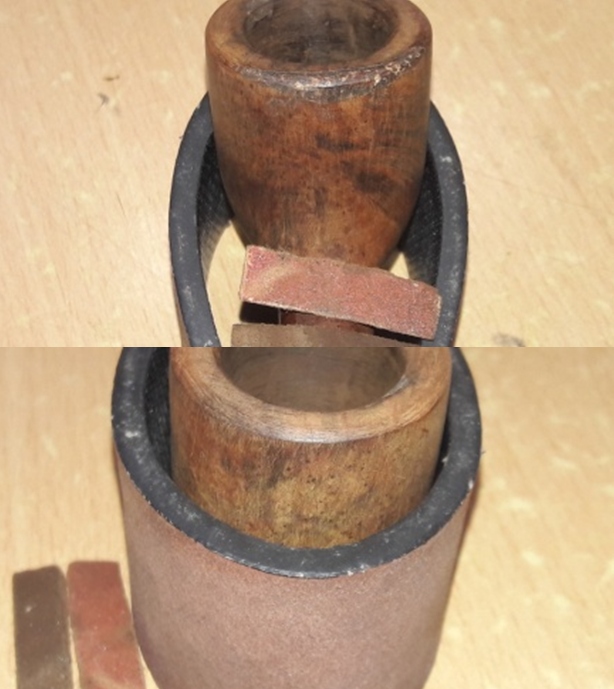
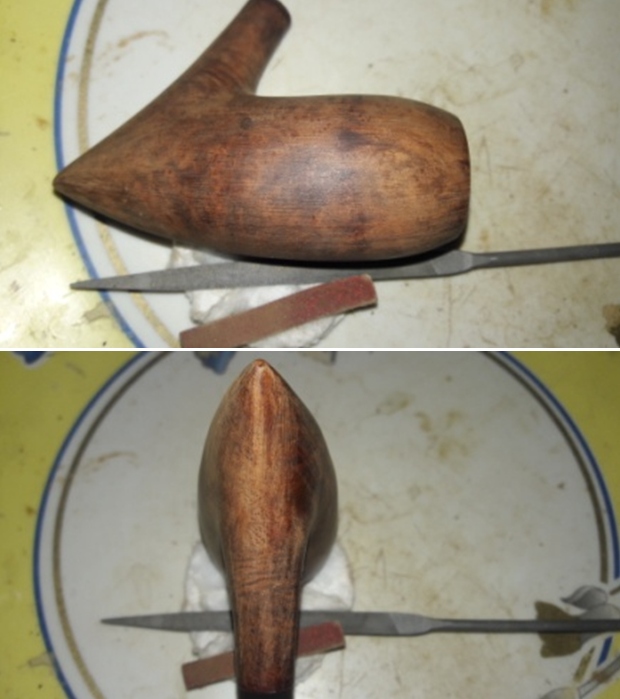
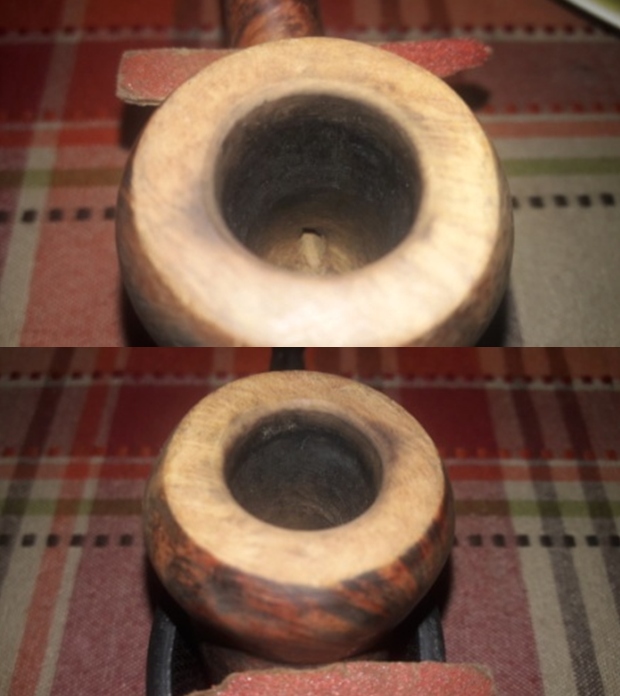
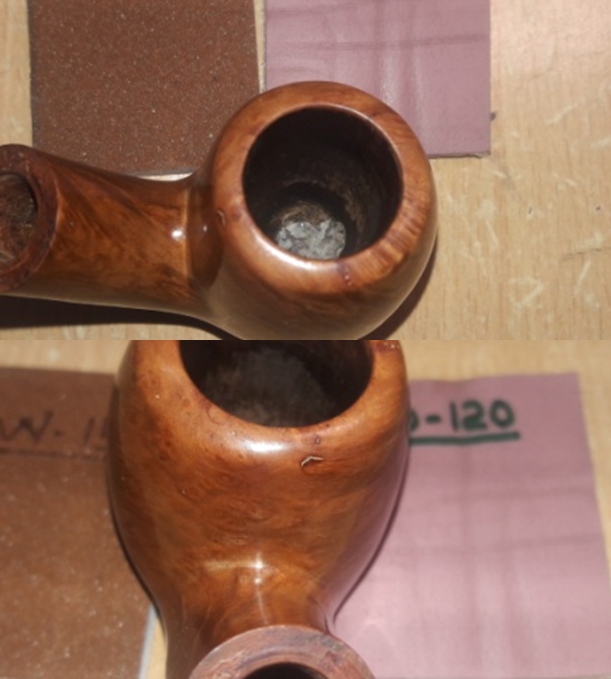
I polished the top of the bowl and rim edges with micromesh pads to remove the dark surface that still remained on the surface. I wet sand the entire stummel with 1500-12000 grit pads. I diligently worked around the intricately carved scales and knuckles of the claw to polish these carvings. I wiped the bowl down with a damp cloth to remove the dust that was left behind by the sanding. I wanted to minimize the scratching but not necessarily remove them. These lacerations and dings must have had a history and I wanted to preserve it.   
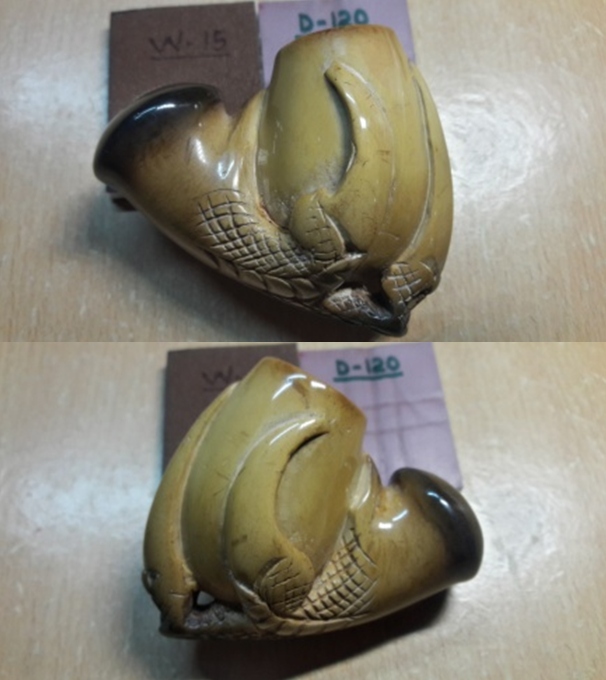
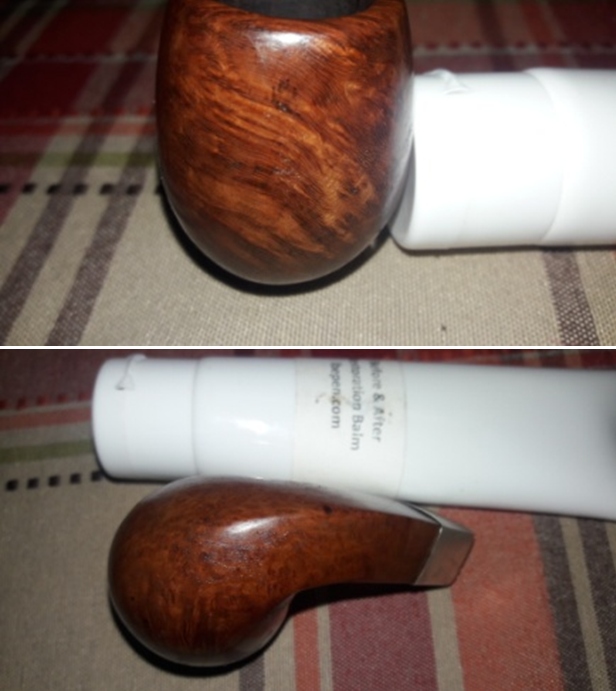
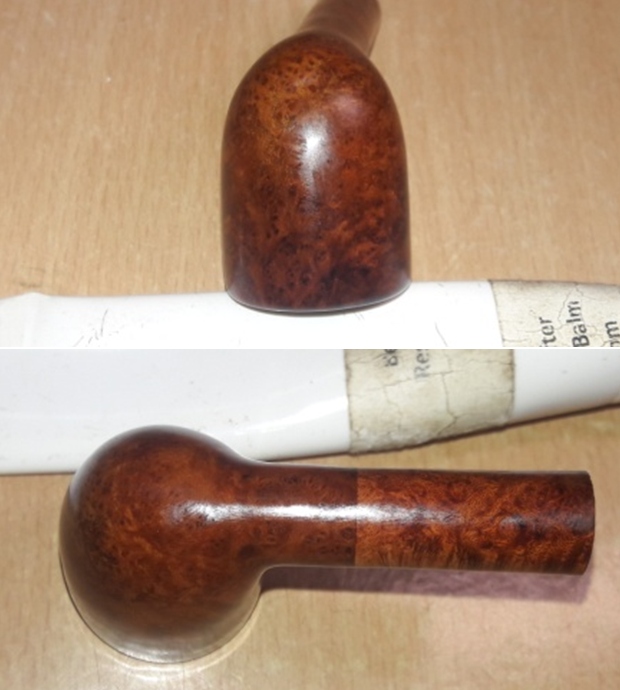
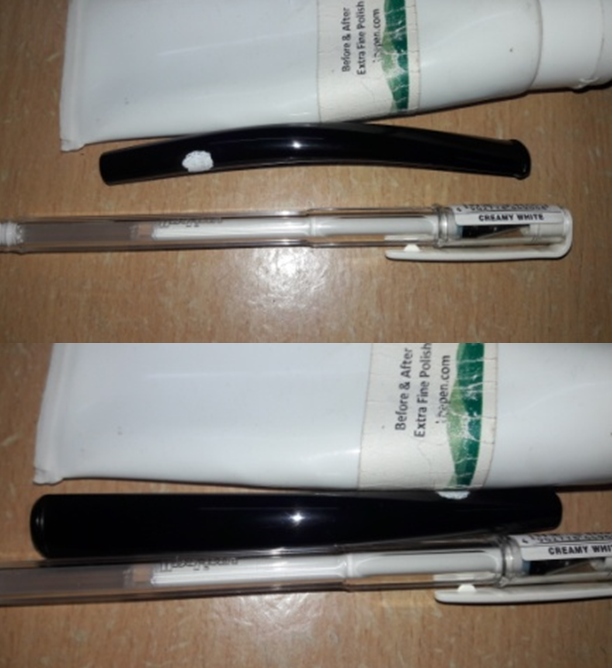
I rubbed a small quantity of “Before and After Restoration Balm” in to the meerschaum stummel. I rubbed this balm deep in to the nooks and crannies of the carvings with my fingers and let it rest for a few minutes. Though I use the balm on briars, I have seen Steve use it on meerschaums as well and it really helps to bring out the patina that has developed on the meerschaum!! I am very pleased with the way the meer bowl appears at this stage.   
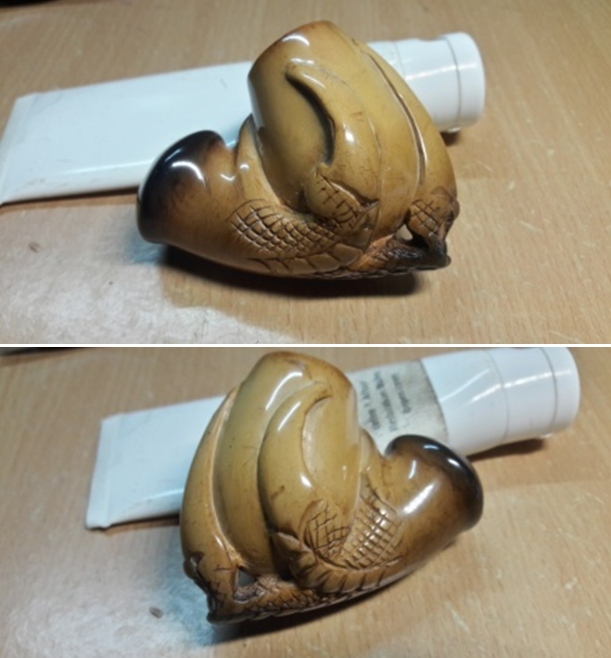
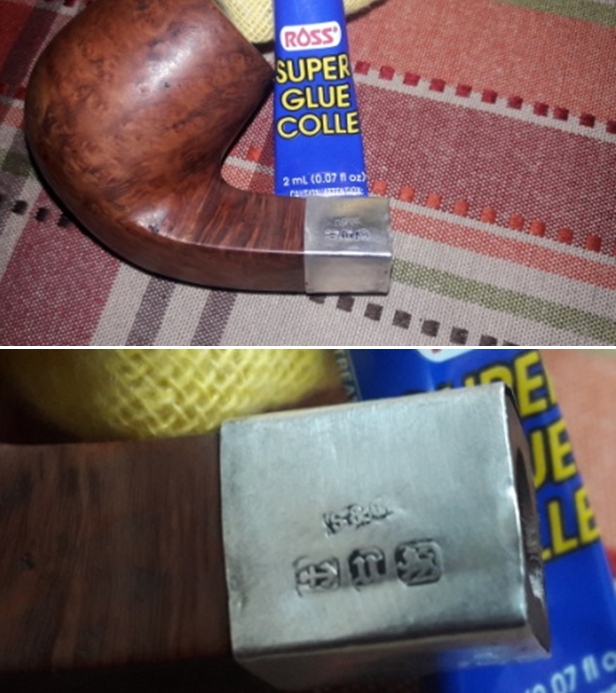
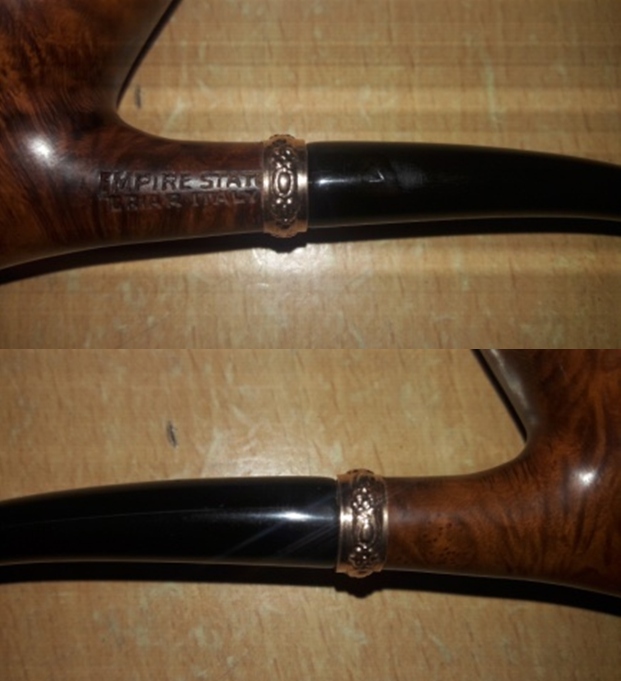
Next, I polish the copper adornments at either ends of the block amber shank extension with a multi-purpose polishing liquid. I wiped it clean with a soft cotton cloth and gave a final polish with a jeweler’s cloth. Wow!! These copper adornments are now looking fantabulous and add a very chic and classy look to the appearance of the pipe.
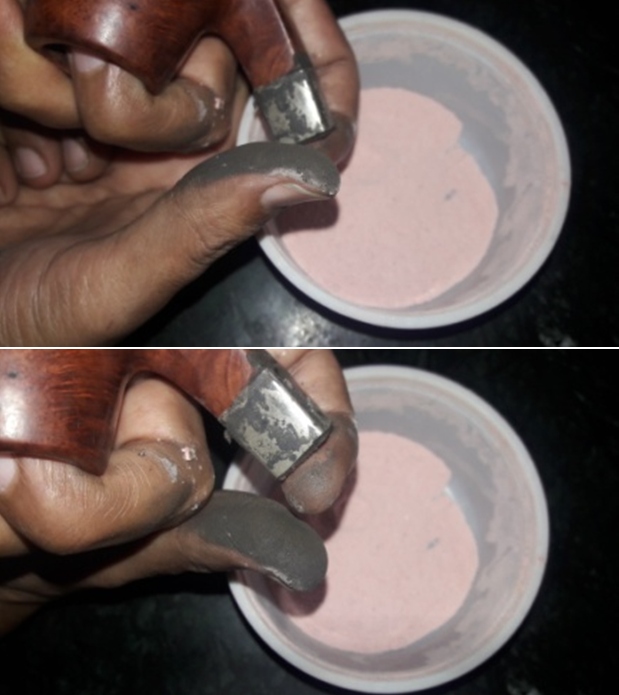
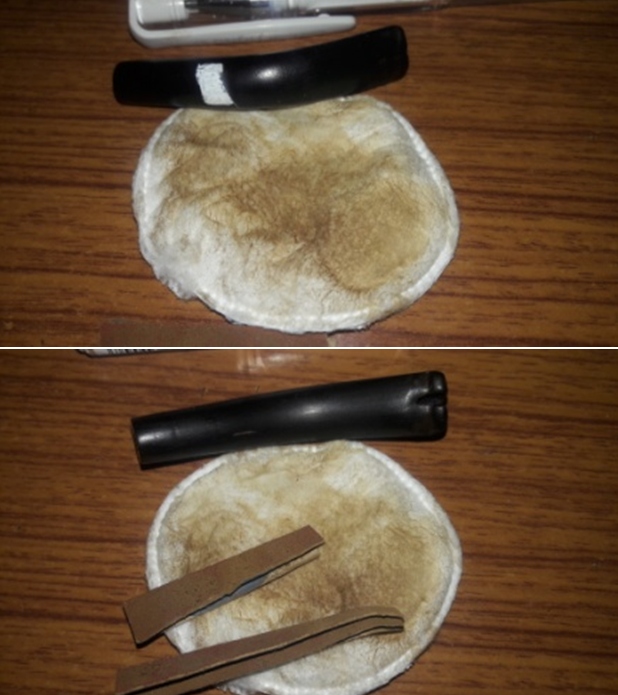
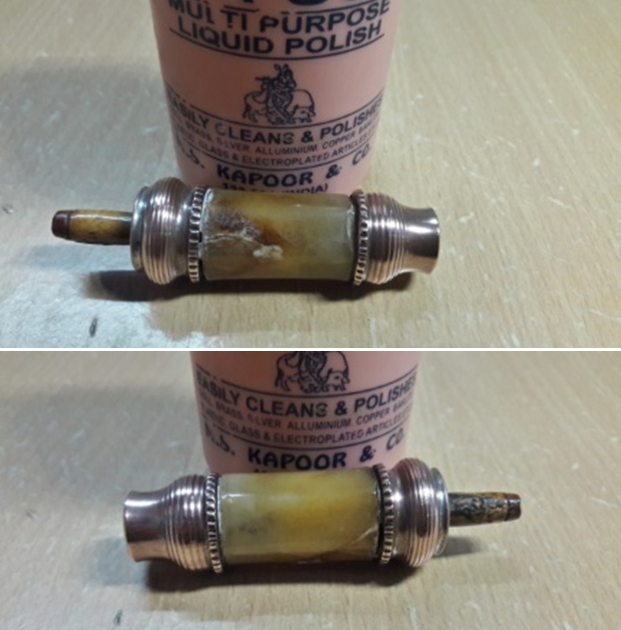
The only aspect, and functional aspect at that, to remain unaddressed was the gasket at the tenon end of the shank extension. I had thought of using a soft leather gasket as it is easy to shape and would provide an air tight seal. However, I could not lay my hands on one and neither could fabricate one. I discussed this with Abha, my wife, about the non availability of leather gasket. Always the problem solver, she promptly suggested using cork!! This solution was both practical and most likely original to the pipe. I selected a piece of cork that comes from wine bottle/ whiskey cap. With a sharp paper cutter, I carefully cut a couple of very thin round rings. I cut a hole of the size of tenon in the middle and stuck it to the end of the tenon end face of the copper adornment with superglue. I tried the seating of the tenon in to the mortise. It was snug and a perfect fit.   
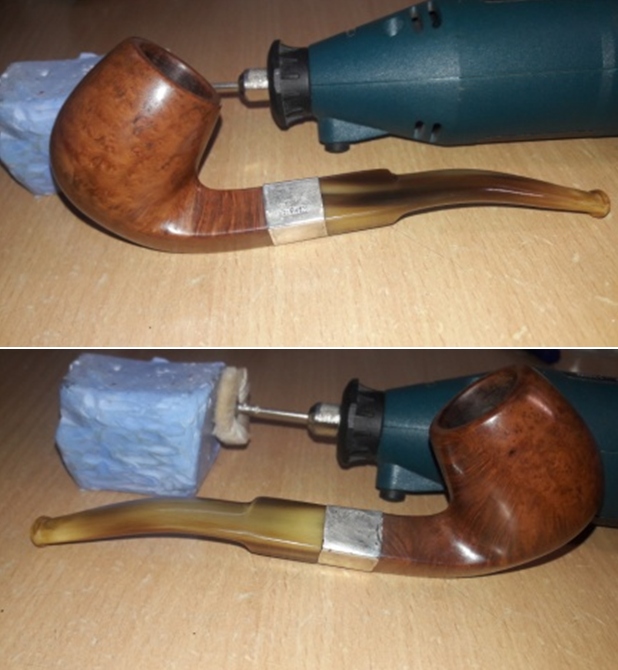
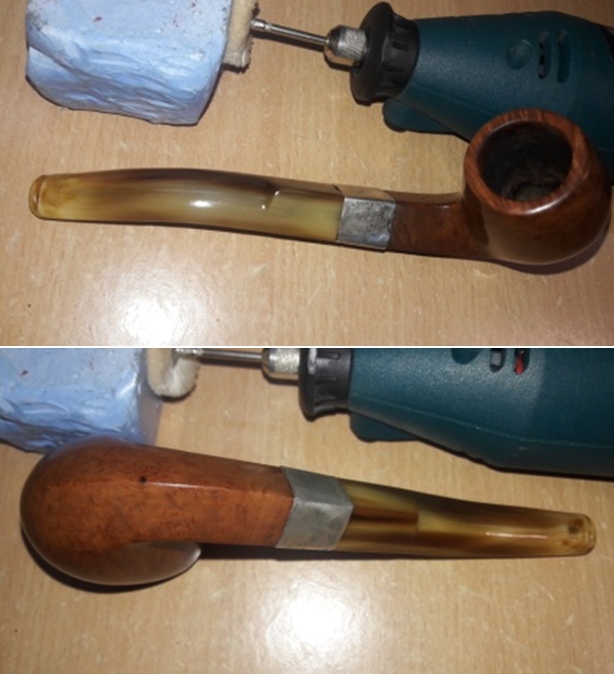
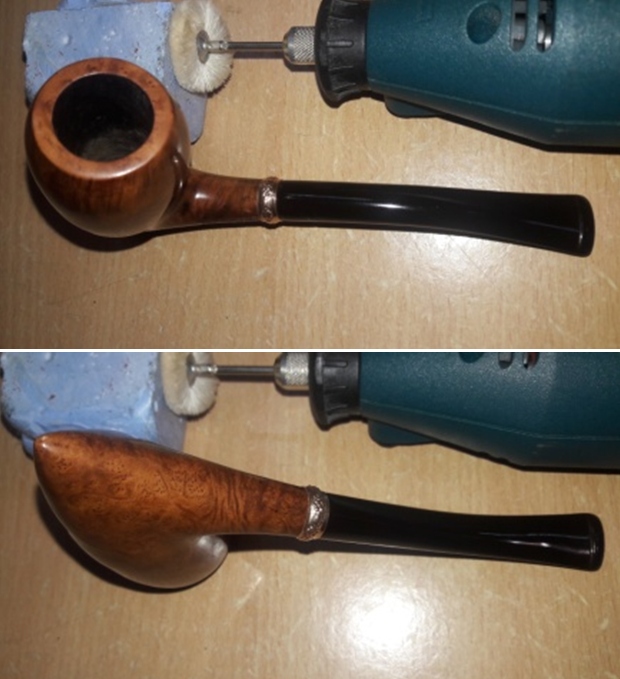
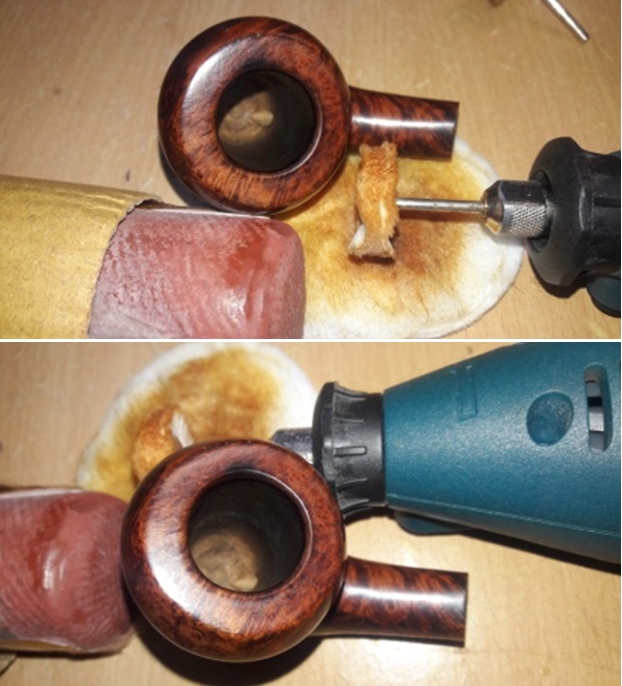
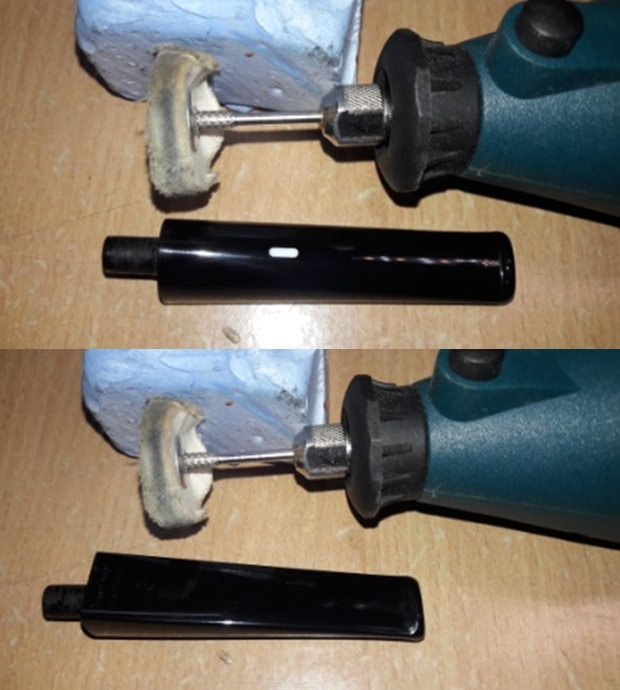
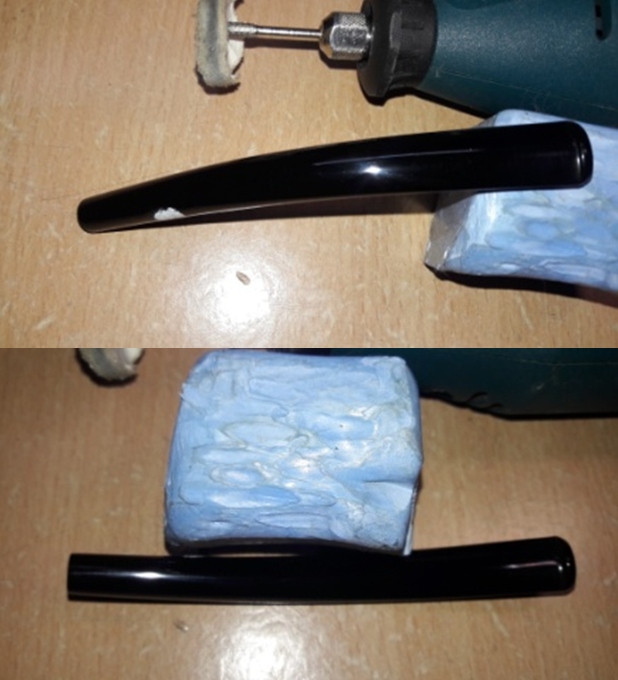
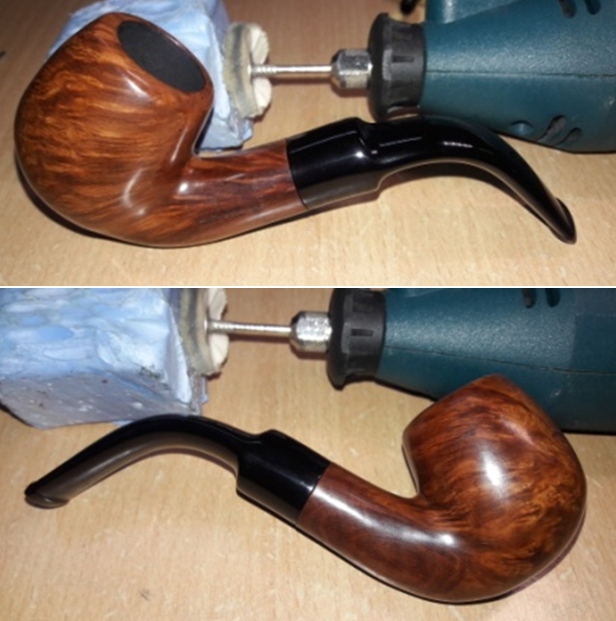
To complete the restoration of this pipe, I mount a cotton cloth buffing wheel on to my hand held rotary tool and applied White Diamond compound to each of the three pipe parts. I wiped/ buffed the pipe with a soft cotton cloth to clear it of any leftover compound dust.   
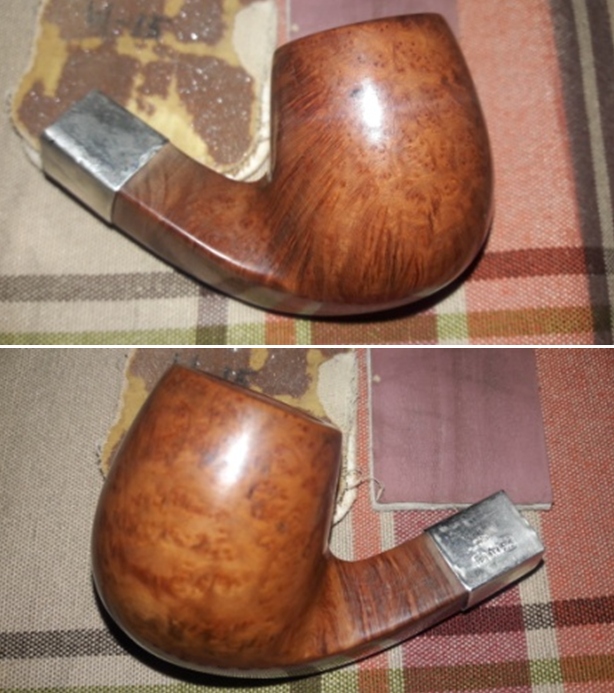
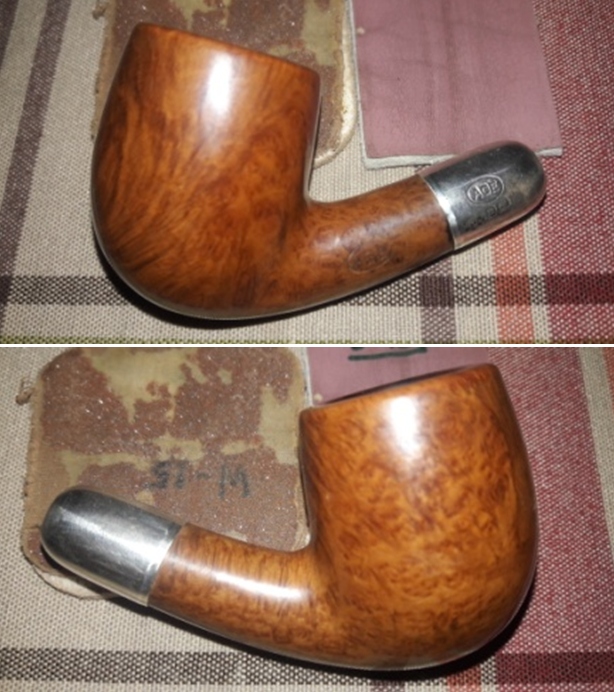
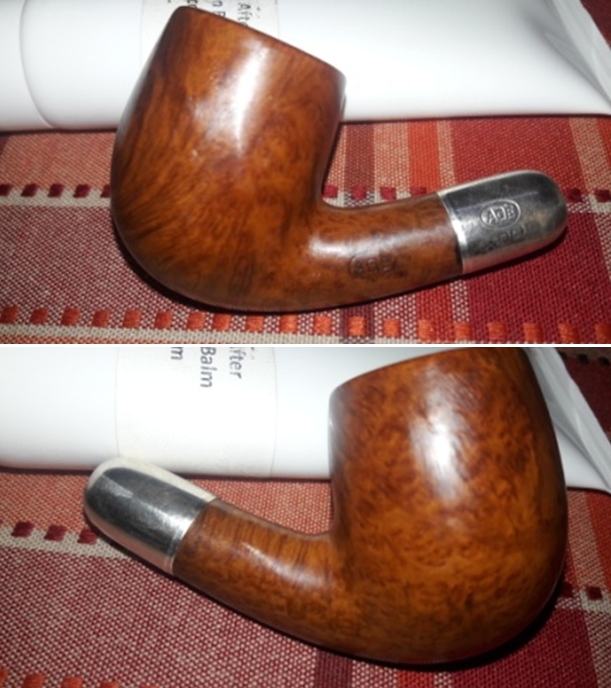
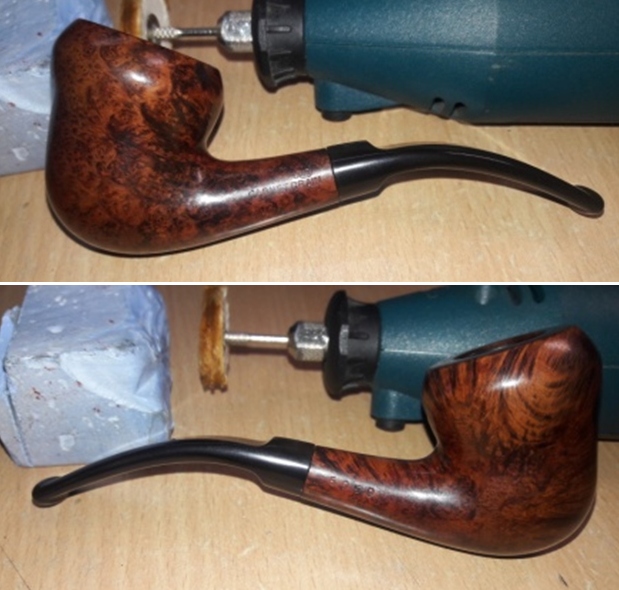
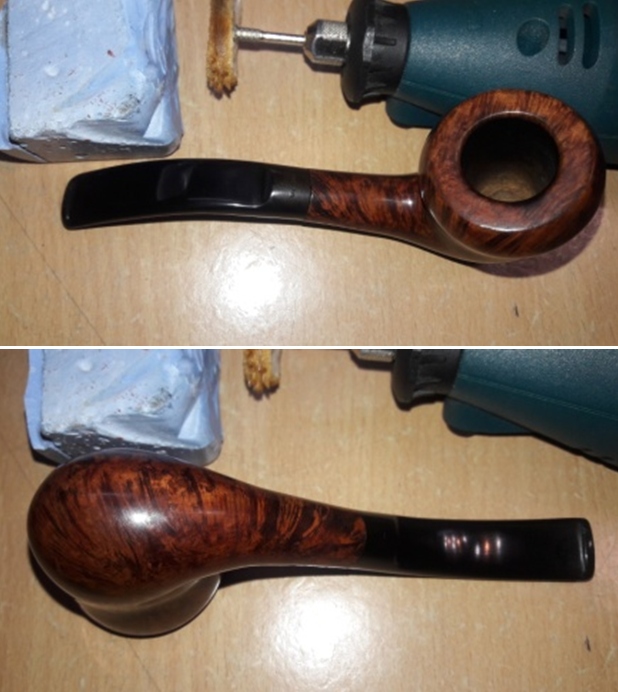
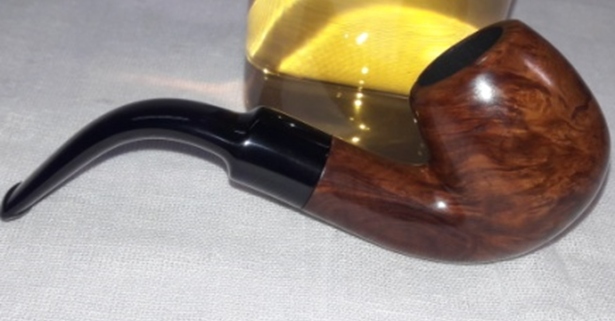
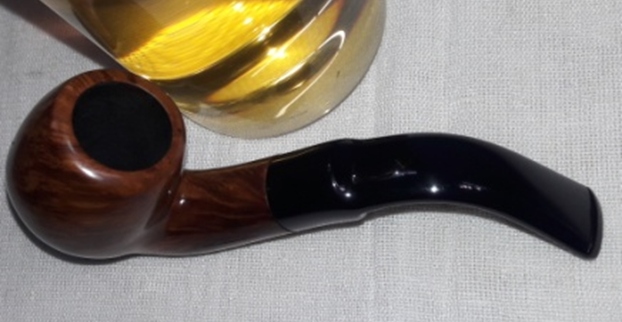
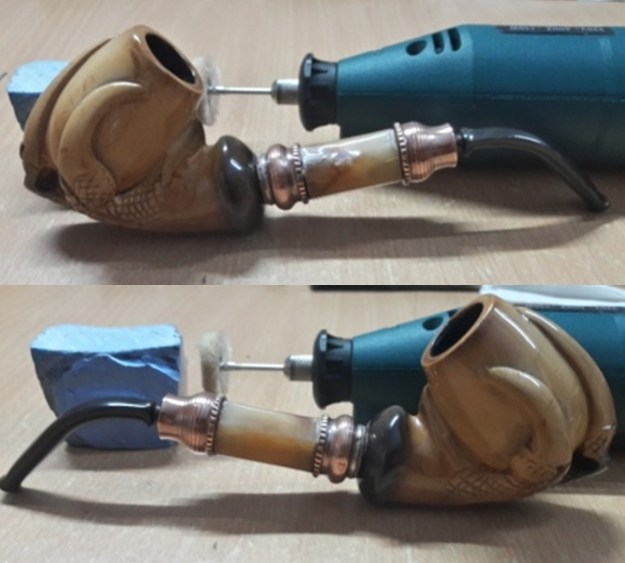
I then mounted another cotton cloth wheel on to the polishing machine and applied several coats of carnauba wax over the stummel, amber shank extension and the stem. I finished the restoration by giving the pipe a rigorous hand buffing using a microfiber cloth to raise the shine further. Admiring the pipe, it made me wonder, did he really have a spirit which kept him ticking after having suffered the kind of abuse which was evident from all the lacerations, dents and dings and chips. But he has survived his past nonetheless and will continue on his warpath with me…Cheers!! P.S. I wish to thank all the esteemed readers for being a part of my journey as I walked through this project.

Praying for you and your loved ones in these troubled pandemic spread. Stay Home and Stay Safe!!

Breathing Life into an Old Battered “JBB” Billiard With Military Mount Stem


Blog by Paresh

This petite small pipe had attracted my attention since the time I had received three huge boxfuls of pipe that once belonged to my Grandfather. But over the period of years, there were always other interesting and larger bowl sized pipes that piqued my interest and these kept moving up the ladder in line for restoration, relegating this beauty further down in the pile. Abha, my wife, knew that I had liked this pipe the first time I had seen it and she worked her magic in cleaning it up for me to work further. After she had done the initial cleaning up, this pipe languished at the bottom of the pile of around 50 plus pipes that she had cleaned up. And it was during the period of my stay at home on compulsory leave due to the countrywide lockdown to contain the spread of CORONA VIRUS (COVID-19), that this pipe came up for restoration.

The pipe with its petite classic billiard shape and a military mount vulcanite stem has a delicate feel and look to it. It has beautiful dark coloration with some astonishing grain patterns that are seen over the stummel surface. The shank end is adorned with a sterling silver ferrule that adds a touch of classy bling to the appearance of the pipe. It is stamped on the left side of the shank in capital letters as “JBB” in an oval. The sterling silver ferrule is stamped as “J.B.B” without any frame in capital letters over three sterling silver hallmarks. From left to right the first cartouche stamping is completely buffed out (indicated in pastel pink arrow) with only a cross with upward projections on either sides of the horizontal arm that can be made out. This is followed by a cartouche with a LION PASSANT (indicated with yellow arrow) certifying silver quality and the last cartouche with date code letter “i” (indicated with red arrow). The vulcanite stem is without any logo. The stamping on this pipe are all worn out and can be faintly made out under 5X magnification. The lack of COM stamp may pose difficulties in identifying and researching of this brand.    JBB…again an unknown brand for me, a third one on the trot!! A visit to my favored site, rebornpipes, drew a blank and I decided to trace the brand through the Maker’s mark on the sterling silver ferrule. I have identified http://www.silvercollection.it as my favored site to date and identify mounter’s/ makers for all things that are silver hallmarked. Sure enough, I found what I was searching for. The pipe currently on my work table is from Joseph B Brown, a tobacconist from Hull, England registered with Chester Assay office.

http://www.silvercollection.it/DICTIONARYTOBACCONISTJ.html  With the maker’s mark identified and established to my satisfaction, I move ahead to date this pipe on the same site. I searched for Chester Assay office date chart and came across the date code letter that had the closest resemblance to the date code letter on the ferrule. The letter code identified it as being assayed in 1872!! Here is the link to the Chester dating chart and below is the image of the relevant section with the year marked in red box.

http://www.silvercollection.it/englishsilverhallmarksCHE.html

Since the date code letter on the ferrule is faded and worn out, I wanted to be sure of the correctness of the year of this ferrule being assayed. I searched pipedia.org for more information on this brand and have reproduced the relevant information below along with the link to the article (https://pipedia.org/wiki/J.B.B.).

J.B.B. is the initials found on pipes manufactured and distributed by Joseph B. Brown of Kingston upon Hull, England from the early 1870s until sometime in the 1920s. Hull is located in East Yorkshire. Brown billed his company as a “Hull Importer of Tobacconists Goods,” and apparently produced various lines of meerschaum and briar pipes as well as cheroot and cigar holders. His business was located on Brook Street.

Joseph Brown was born in Ashbourne, Derbyshire about 1844. His early years were spent as a traveller (i.e. salesman) in the jewelry trade. By 1871 he had moved to the Hull area in Yorkshire, and on February 17, 1875 he married there. His wife was named Alice Fourster (this spelling is almost certainly a transcription error), who was born in Newcastle, Northumberland about 1850.

By 1876 Joseph was associated with the pipe trade; in that year he received a patent for “mounts for tobacco pipes”. In subsequent censuses he is clearly identified as an importer of fancy goods. For many years the business was located at 41 Brook Street in Hull, while the family maintained a residence some 18 miles away in Withernsea.

Joseph and Alice had four children: Joseph (b. 1881), Walter H. (b. 1882), Rachel (b. 1884), and James (b. 1887). Of the boys, at least Joseph and James were involved in their father’s business. Joseph lived until at least 1911, and the business was in existence at least as late as 1922. The directory in the latter year fails to show Alice or two Josephs, lending some credence to an assumption that the eldest son had by that time taken over operations.

J.B.B. creations often have silver banding as part of their design. In the Hull region, all silver was assayed and hallmarked by the Chester Assay Office, a city located in Cheshire, England. A well established dating schema exists for this office, and makes it possible for the collector to accurately date the production of J.B.B. sterling outfitted tobacciana.

Now, this is where the confusion arises.

(a) Joseph Brown was associated with tobacco trade from early 1870s until sometime in 1920s. This fits in with the above appreciated dating of this pipe.

(b) By 1876 Joseph was associated with the pipe trade; in that year he received a patent for “mounts for tobacco pipes”. However, the pipe currently on my work table dates to 1872 as per the date code letter of Chester Assay office i.e. 4 years prior to receiving the patent.

Well, the J.B.B stamp on the shank surface and on the silver ferrule establishes beyond doubts the authenticity of this pipe. The faded and worn out hallmarks, including the date code letter, raises some doubts. It is also quite possible that there could be an anomaly in the collated information. Thus, unless proven otherwise, I would rather stick to my findings and date this pipe to 1872.  

Initial Visual Inspection
As I have mentioned above, this pipe was initially handled by Abha and she is not in a habit of taking many pictures as she works on each piece of briar. There are not many pictures to give the readers an idea about the condition of the pipe before she had worked her magic and presented me with a nice clean canvas to carry forward my repair and refurbishing tasks. I have included a description of the initial condition of the pipe as documented by her. This pipe has a rather small bowl in a classic Billiard shape and has a chamber depth of about 1.1 inches. The chamber had an even layer of hard cake which is not very thick. The condition of the inner walls of the chamber can be commented upon after the cake has been taken down to the bare briar. The rim top surface is relatively clean but is peppered with numerous minor dents/ dings and nicks. The rounded inner rim edge is sans any damage however, the outer edge shows numerous small dings notably to the front edge and in between 12 o’clock and 3 o’clock direction. The draught hole is clogged and restricts the free flow of air through it. The ghost smells in the chamber are very strong.    The smooth stummel surface has some very beautiful grain patterns and has taken on a lovely dark patina. The stummel shows signs of vintage in the form of many scratches, dents and dings that it has acquired over the last century and a half!! The briar has accumulated a lot of grime and dust imparting the stummel a lifeless and bone dry appearance.    The shank end is where the maximum damage is on this pipe. A chunk of briar is missing from two places at the shank end; one on the left hand side (enclosed in green) with a crack that extends towards the stummel and the other on the right side (enclosed in yellow). The mortise is completely clogged with a restricted draw. In case I am able to separate the silver ferrule from the shank end, I shall reconstruct the missing chunks from the shank end using briar dust and superglue while stabilizing the crack by drilling counter holes.    The sterling silver ferrule has numerous dents and dings that obscure the stampings that are already worn out and faded. The tenon end of the ferrule has some sharp edges and is severely dented. The ferrule is securely glued on to the shank end to stabilize the crack/ damage and hold it together. There is nothing much that I can do about the dents and dings to the ferrule other than clean it up and polish it to a nice shine. These dents and dings are and shall remain a part of the pipes journey thus far.The high quality vulcanite military mount stem was deeply oxidized. Some deep tooth chatter and tooth indentations are seen on both the upper and lower stem surfaces in the bite zone and at the bottom of the button edge. The tenon end had accumulated ash and oils/ tars that had dried out on the inside as well as on the outside. The orifice has scratch marks and dried gunk embedded in to it which will have to be addressed.The Process
The shank end damage/ crack were something that would essentially require materials and equipment that are available to me at my work place; therefore, I had no option but to relegate the stummel repairs and restoration to a later date. Abha and I decided that we should complete the stem repairs and polishing while I was home as that would reduce the time that I would otherwise spend in stem restoration.

Abha cleaned out the internals of the stem air way and immersed it in “Before and After Deoxidizer” solution along with the stem of other pipes in line for restoration. Once the stem had soaked overnight, she cleaned the stem under running warm water and scrubbed the raised oxidation from the stem surface using Scotch Brite pad. She further removed the oxidation by scrubbing the stem with 0000 grade steel wool and applied a little olive oil to rehydrate the stem. Once the stem was internally and externally cleaned, I start with addressing the deep tooth indentations and chatter on either surface in the bite zone. Since rubber has a property to expand and regain its original shape when heated, I heat the bite zone with a candle flame to raise the bit marks and tooth chatter to the surface. I sand the stem surface with a folded piece of 220 grit sand paper. This helps to remove any raised residual oxidation and also smooths out the raised tooth indentations. The deeper bite marks were filled with a mix of CA superglue and activated charcoal and set aside to cure.   Once the fills had cured, using a flat head needle file, I reshaped the button and roughly matched the fills with the rest of the stem surface. I further fine tuned the match by sanding the filled area with a folded piece of 220 grit sand paper pinched between my thumb and forefinger. I followed it up by sanding the entire stem surface using 600 grit sand paper and finally with a piece of 0000 grade steel wool. This serves to remove the deep seated oxidation and also reduces the sanding marks of the more abrasive sand papers. I also sharpened the button edges while sanding. I wiped the stem with a cotton swab and alcohol to remove all the oxidation and sanding dust from the surface. I applied a little Extra Virgin Olive oil over the stem and set it aside to be absorbed by the vulcanite.To bring a deep shine to the vulcanite stem, Abha polished it by wet sanding with 1500 to 2000 grit sandpapers followed by further wet sanding with 3200 to 12000 grit pads. She wiped the stem with a moist cloth after each pad and rubbed it down with Extra Virgin Olive oil to rejuvenate the vulcanite. The finished stem is shown below.  Further repair and refurbishing work would have to be put on hold till I rejoin my work place.

Part II
Finally back at my work place…… After enjoying a compulsorily extended leave of three months with family and having honed my culinary and domestic chores skill set, I was happy to rejoin my duty and get back to completing the pending pipe restorations.

I started further restoration work on this pipe by reaming out complete cake with size 1 head of the PipNet pipe reamer and further smooth out the chamber walls with a folded piece of 220 grit sandpaper. The chamber walls are solid and in pristine condition.I further cleaned out the internals of the shank with pipe cleaners and alcohol and cotton buds. I scraped out the dried oils and tars from the shank walls with a dental tool. The ghosting is still strong and would need more invasive method to completely eliminate these smells.To completely eliminate the ghost smells, I subjected the chamber to a cotton and alcohol soak. The alcohol draws out all the deep oils and tars from the chamber and mortise walls which is thereafter trapped by the cotton balls. The next day, the soak had done its intended task and the pipe now smells nice clean and fresh. Once the cotton balls were removed, I ran a couple of bristled pipe cleaners dipped in alcohol to remove the loosened oils and tars from the mortise.  Before proceeding with further repairs, I decided to separate the sterling silver ferrule from the shank end as it would give me free access to rebuild the chipped shank end and stabilize the crack. I first tried to heat the ferrule with my heat gun but to no avail. Next trick that I tried was to soak the shank end in pure acetone. Acetone eats away at the glue and loosens the ferrule. I stuffed a cotton ball wetted in acetone in to the shank end and set it aside for the acetone to loosen the glue. However, this too failed and the ferrule remained firmly stuck to the shank end. I conferred with Steve about this rebuild and he suggested that I should try and rebuild the shank end with clear superglue from the inside. That is exactly what I would do to repair the damage.   Next, I thoroughly cleaned the rim top and the stummel surface using Murphy’s Oil soap and a hard bristled tooth brush. The stummel and the rim top have cleaned up nicely.    I decided to address the dents and dings on the stummel surface and on the rim outer edge. Using a marker pen, I marked all the major areas with dents and dings as I had decided to leave the minor ones as they were. I heated my fabricated knife over the flame of a candle, placed a wet Turkish hand towel over the marked areas and steamed out the dents by placing the heated knife over the towel. Though some dents were still observed, these were greatly reduced when compared to before steaming.   To even out and match the raised dings over the stummel surface, I sand the entire stummel with a folded piece of 320 grit sand paper.   Next I decided to address the damage to the shank end. As discussed with Steve, I filled the crack and chipped shank end on the left side with clear superglue. Once the glue had set, I applied another layer over it, repeating this process till I had a good coverage of superglue over the damaged area. I repeated this process over the right side after the superglue on the left side had set. Once the damaged surfaces were filled with superglue, I set the stummel aside for the fill to cure completely.     By the next afternoon when I got back to working on this pipe, the superglue fill had cured and hardened completely. With a semi circular needle file, I sand the fill to a smooth surface frequently checking for the seating of the stem in to the mortise. Once I had achieved a rough match, I worked the fills sanding it down with 320, 600, 800 and 1000 grit sand papers till I had a perfectly smooth shank wall and a snug seating of the stem in to the mortise. With the internal repairs to the shank end completed, I addressed the issue of sharp and uneven edges of the sterling silver ferrule. I lightly topped the sharp edges of the ferrule over a piece of 180 grit sand paper giving it only a few turns till I had a nice even edge surface. Using a round needle file, I filed at the rough and sharp edges till smooth. The silver ferrule edge is now even and smooth with no sharp edges and the seating of the stem in to the mortise is also snug and perfect.    I had reached the stage where I had to decide if I wanted to completely eliminate all the dents and chips by further sanding with various grit sand papers and loose the patina which has developed on the surface or maintain the old sheen and make peace with a few minor dings. I decided on keeping the old sheen and went straight for the micromesh cycle. The old patina and the minor dents and dings would add to the vintage look of the pipe, which it was. I dry sand the entire stummel with 1500 to 12000 grit micromesh pads. I love all the pipes that I have restored or bought and are in my collection, but this piece has evoked the feeling of “DESIRE” in my heart, it’s such a beautiful pipe.    Next, I rubbed a small quantity of “Before and After Restoration Balm” deep in to the briar with my finger tips and let it rest for few minutes. The balm almost immediately works its magic and the briar now has a nice vibrant appearance with the beautiful grain patterns displayed in their complete splendor. I further buffed it with a horse hair brush. The dark browns of the of the grain contrasts beautifully with the rest of the lighter brown stummel and makes for a visual treat. It really is a nice piece of briar.  To put the finishing touches, I mount a cotton cloth buffing wheel on to my hand held rotary tool and polished the entire pipe with Blue Diamond compound. This compound helps to remove the minor scratch marks that remain from the sanding. Next, I mount another cotton buffing wheel that I have earmarked for carnauba wax and applied several coats of the wax. I finished the restoration by giving the entire pipe a rigorous hand buffing using a microfiber cloth to raise the shine further. Lastly, I polish the sterling silver ferrule with a jeweler’s cloth to a nice and radiant shine.  The grain patterns on this finished pipe looks amazingly beautiful and coupled with the vintage, shape and the contrast that the sterling silver ferrule imparts, makes it quite a desirable pipe. This pipe shall be joining my small collection of English pipes to be admired and be happy that I have restored it, to the extent possible, to its former beauty and functionality. I wish to thank each one for sparing their valuable time to read through this write up and each one is in my prayers. Stay home…stay safe!!

Refurbishing an 1894 (?) Hallmarked “S & G” Square Shank Bent Billiard With a Horn Stem


Blog by Paresh

While surfing eBay for estate pipe lot, I came across a job lot that contained four estate pipes. The seller had not included any description for the item other than a simple statement that read “The lot is being sold as is. Pictures are part of description” or words to that effect. The worst part was that there were only two pictures that were posted by the seller!! Here are the pictures that were posted by the seller… I could make out one Orlik with dental stem, a Hardcastle “Drawel” Bulldog, one Comoy’s Lovat, and the last one was unidentifiable but appeared to be fitted with a horn stem. The pipes appeared to be in a decent condition and included some nice brand names. Soon the pipes reached Abha at my home town. When she opened the parcel, the stench that emanated from the box was just unbearable. The origin of the stench was the horn stem on the pipe that was in the lot. It is this pipe that Abha had worked on first (indicated with a red arrow) and thus finds itself on my work table now.The pipe is a classic Bent Billiard with a square shank and a saddle horn stem with a threaded tenon. It is a fairly large sized pipe with a nice hand feel and a surprisingly light weight that makes it comfortable for clenching. It has a hallmarked silver band at the shank end. The silver ferrule at the shank end is stamped as “S & G” in what appears to be a rectangle (?) that has been buffed out along with the other letters following “G” (faint outlining can be made out though!) over three sterling silver hallmarks. From right to left the first cartouche is with a LION PASSANT certifying silver quality followed by a cartouche with date code letter “U” and the last cartouche contains the “Anchor” of the Birmingham Assay Office. The shank and horn stem are devoid of any stampings.I had not come across this brand earlier and the only clue was in the stampings seen in the hallmarked silver band. I visited www.silvercollection.it and upon searching through the index, I came across a stamp that was the closest of all those that were described. The maker’s mark was described as S&G Ltd into an oval Salmon (Barnett) & Gluckstein of 41, Clerkenwell Road, London.

Here is the link to the relevant page followed by a screenshot of the same page with the nearly matching maker’s mark as seen on the pipe and indicated by the blue arrow.

http://www.silvercollection.it/englishsilvermarksXS.htmlThe next step was to date this pipe with the help of the hallmarks as seen on the silver band at the shank end. The Anchor was easy to identify as Birmingham Assay office. The letter “U” closely matched up with the letter that identified it as being assayed by the Birmingham office in 1894!! Given below is the link that will take the readers to the relevant section of dating.

http://www.silvercollection.it/englishsilverhallmarksBIR.html

While researching my previous project, a 1907 “AGE” pipe, Who Made That Pipe by Wilczak and Colwell had indicated towards Salmon & Gluckstein brand as English makers of this pipe.  Further, I remembered that Salmon & Gluckstein brand was brought over by Imperial Tobacco Co. in 1902 and was thereafter continued under the brand name “Bewlay”. I visited pipedia.org to know more about Salmon & Gluckstein. Though there is not much information that is available on the brand; here is the link for those readers interested.

https://pipedia.org/wiki/Salmon_%26_Gluckstein

To summarize, the pipe that is on my work table is by Salmon & Gluckstein, as inferred from the Anchor stamp of Birmingham Assay office and probably dates to 1894. The reason for the doubt is because the date letter is not a perfect match, but the closest that I could identify.

I would be really happy if any of our esteemed readers could either support or refute my appreciated dating of this pipe with necessary evidence.

Initial Visual Inspection
This pipe has the classic Bent Billiard shape with a diamond shank and a fairly large sized bowl. The stummel boasts of some beautiful and cross grains all over the bowl and shank. The stummel surface is covered in dirt and grime of the overflowed lava and grime. There is not a single fill in the briar which speaks of high quality selection of the briar. There is a thick layer of cake in the chamber. The horn stem, with a few bite marks, has a terrible stench emanating from it. The set of pictures below shows the condition of the pipe when it had reached us. Detailed Inspection Of The Pipe And Observations
The chamber has an even layer of thick cake. The smooth rim top surface shows a number of dents/ dings and is covered in lava overflow, dirt and grime from previous usage. Both the inner and the outer rim have suffered a few blows on a hard surface resulting in a few minor chipped edge surfaces and with the inner edge being out of round. The condition of the inner walls of the chamber can be commented upon after the cake has been taken down to the bare briar. The chamber exudes a very strong odor of old tobacco. The draught hole is dead center at the bottom of the chamber and that makes me believe that it should great smoke and the thick cake in the chamber lends credence to this observation. The stummel appears solid to the touch all around and hence I do not foresee any serious damage to the walls in the form of burnout/ deep heat fissures/ lines or pits. To address the damage to the inner and outer rim edges, I shall create a slight bevel to both the rim edges. Topping the rim surface should address the dents and dings over the rim top surface. The reaming and subsequent cleaning of the chamber and mortise should reduce the ghost smells from the chamber.The smooth stummel surface is covered in lava overflow which in turn has attracted a lot of dust and dirt. The briar has taken on a layer of aged patina, through which one can make out the tightly packed cross grains that adorns most of the stummel surface and Bird’s eye grain at the foot and bottom of the shank. There are a few dents and chipped areas over the stummel surface (encircled in yellow), probably due to likely falls and or rough, uncared for handling of the pipe. However, there is not a single fill in the entire stummel, signifying very high quality of briar used in carving this pipe. The briar is looking lifeless and bone dry and has taken on dull dark hues. Thorough cleaning of the stummel surface and rinsing it under warm water should highlight the grain patterns. This cleaning will also further reveal any other damage to the surface. In all probability, I shall let these minor dents and dings to the stummel surface remain and avoid the process of filling these up with briar dust and superglue mix while the large one on the right side of the stummel will need a fill. Maybe, micromesh polishing will address a few of these scratches to some extent. The mortise shows heavy accumulation of oils, tars and gunk and due to which the air flow is not full and smooth. The horn stem is in decent condition with no chipped surfaces and sans any worm holes which is common on such old horn stems. The stem surface is covered in dirt/ dust and looks dull and lifeless. The bite zone has deep tooth indentations on either surface. The button edges on both surfaces have minor bite marks. The threaded bone tenon is smeared in oils and tars and grime and so is the orifice slot. The entire stem had a horrendous stench and Abha, my wife, had half a mind to just throw the entire pipe away in some far away trash can. However, she did not and took upon herself the challenge to clean it up. Once the stem surface is cleaned and polished, the dark and light hues of the striations in the horn should stand out giving a new dimension to the appearance of the stem.   The sterling silver ferrule is heavily oxidized and developed a patina commensurate with the vintage. The stamping on the ferrule for most parts is crisp and clear. The stamping in the cartouche that houses the Maker’s mark is buffed out with only the faint outline of the letters still visible. I would need to be very diligent while polishing the silver ferrule, least I end up buffing away rest of the stampings on the ferrule. Once the ferrule has been cleaned up, the shining piece of silver will add an elegant touch to the pipe.The Process
Abha started the restoration of this pipe by first cleaning the external surface of the horn stem with warm water and dish washing soap. Next she cleaned the internals of the stem with bristled pipe cleaners and 99.9% pure isopropyl alcohol. She further cleaned out the stem internals with a shank brush and dish washing liquid soap. She had to repeat the above process a number of times, including drying it out in open air. The stem is now clean with the stench being a distant memory and what a relief that was!! She was careful to rehydrate the stem with EVO every time she cleaned the stem and left it out to dry in open air. While the stem was being cleaned by Abha, I worked on the stummel by first reaming the chamber with size 2 and 3 Castleford reamer heads. With my fabricated knife, I further scraped the chamber walls to remove the remaining carbon deposits and also scraped out the lava overflow from the rim top surface. Once the cake was reamed back to the bare briar, I used a 150 grit sand paper followed by 220 grit sand paper to remove all the traces of remaining cake and also to smooth out the inner walls of the chamber surface. Finally, to remove the residual carbon dust, I wiped the chamber with a cotton pad wetted with 99.9% pure isopropyl alcohol. Few very minor webbing of heat lines can be seen along the heel and walls of the chamber. I am not sure if these are heat lines or remnants of old cake over the wall surface. The outer and inner rim edge is chipped in a few places along the rim top and will be addressed by topping the rim top. The rim top surface itself is peppered with dents/ dings and scratches which too will be addressed during the sanding. The inner rim edge is charred and would need to be addressed. The ghost smells are still strong and may further reduce after the shank/ mortise are thoroughly cleaned. While I was working on the stummel, the sterling silver band at the shank end came off easily since the glue that had held it in place had dried out completely. Closer examination of the shank end revealed a pristine shank end with no signs of cracks or chipped surface.This was followed by cleaning the mortise with q-tips, pipe cleaners and shank brush dipped in isopropyl alcohol. I scraped the walls of the mortise with my fabricated knife to remove the dried oils and tars. The mortise was a bear to clean and the heap of pipe cleaners and q-tips that were used is an indication of the gunk and tars that were removed. The old smells of the tobacco are still strong and would need more invasive methods to get rid of these odors.  With the bowl internals clean, I move to clean the exterior of the stummel. I used a hard bristled tooth brush and Briar Cleaner, a product that has been developed by Mark Hoover, to scrub the stummel and rim top. I set the stummel aside for 10 minutes for the product to draw out all the grime from the briar surface. After 10 minutes, I washed the stummel under running warm water with anti oil dish washing detergent till the stummel surface was clean and dried it using paper towels and soft cotton cloth. I simultaneously cleaned the shank internals with the detergent and hard bristled shank brush and set the stummel aside to dry out naturally. The stummel surface has cleaned up nicely with the beautiful grain patterns on full display. This cleaning has also exposed the many dings and scratches over the surface that were hitherto fore were hidden under the dirt and grime. These will have to be addressed, either by steaming or sanding.  I shall subject the chamber to cotton and alcohol treatment to eliminate the ghost smells completely. I continued the cleaning of the chamber and shank internals with a salt and alcohol bath. I use cotton balls which is an at par substitute as I have realized over the years. I draw out a wick from the cotton and along with a folded regular pipe cleaner; insert it in to the mortise and through the draught hole in to the chamber. Thereafter, I packed the chamber with cotton balls to about quarter of an inch below the inner rim edge and soaked the cotton balls with isopropyl alcohol up to the brim. About half an hour later, the level of alcohol had gone down, having being absorbed by the cotton. I topped it up once again and set it aside overnight. By next morning, the cotton and alcohol had drawn out all the remaining oils and tars from the chamber and mortise, fulfilling its intended task. I removed the cotton balls and ran pipe cleaners through the mortise to clean out all the loosened tars and gunk and further cleaned it with alcohol and q-tips. The chamber now smells clean and fresh. I set the stummel aside to dry out naturally.To begin repairs to the stem, I cleaned the areas in the bite zone with cotton swab and alcohol. Next, I filled the tooth indentations in the lower surface with clear CA superglue and set it aside to cure. After the glue had partially hardened on the lower surface, likewise, I filled the upper surface tooth marks and set the stem aside for the superglue to harden completely. Once the fill has hardened, I shall file and sand the fills to reconstruct the bite zone and the buttons on either surfaces and subsequently match it with the surface of the stem.The stummel had dried out and I decided to have a closer look at all the dents and dings and scratches on the stummel surface. I marked them out with a red felt pen. This step would help me in getting a clearer picture of the extent of damaged areas and identifying the major surface damage which would need to be addressed. I would need to sand the stummel surface to address all the minor scratches and dings while the larger ones will be filled with a mix of superglue and briar dust.   Next I closely examined the inner rim edge. It is charred on the left side in the 7 o’clock direction (encircled in red). Though not very deep, it is significant enough to render the rim out of round. I shall firstly minimize the charred surface by topping the rim surface and thereafter crate a slight bevel to the inner rim edge. To address the outer rim dents and ensure the symmetry of rim top, I shall create a similar bevel to the outer rim edge. With the above observations completed,  I turned my attention to address the damage to the stummel. I decided to address the rim top surface dents/ dings and the out of round inner edge first. I topped the rim top surface on a piece of 220 grit sand paper, checking frequently for the progress being made as I hate to lose briar estate any more than absolutely necessary. The inner and outer edges are still uneven, though much better than before topping. With a folded piece of a 220 grit sand paper pinched between my thumb and forefinger, I create a slight bevel on the inner and outer edges of the rim top surface. This helps to mask and address the minor dents and dings that had remained on the rim edges after topping. I am careful so as not to alter the profile of the stummel by excessive topping or creation of the bevels. I am pretty pleased with the appearance of the rim top and edges at this stage. The following pictures show the progress being made and improvements to the inner and outer rim edges. I sand the entire stummel with a piece of 220 grit sand paper to address the dents and dings to the stummel surface. Though 95% of the scratches and dings have been eliminated, there still remains few dings that will be  required to be filled with a mix of CA superglue and briar dust. Using the layering method, I filled these dings and the chipped stummel surface with a mix of briar dust and CA superglue till the mound of the mix was slightly above the rest of the stummel surface. This helps in a better blending of the fill with the rest of the stummel surface while sanding and reduces the scratches caused by the use of a needle file as you have a correct perspective of the sanding that is required. I set the stummel aside for the fills to cure.  Once the fills had cured, with a flat head needle file, I sand the fills till I had achieved a rough match with the surrounding stummel surface. I again sand the entire stummel with a piece of 220 grit sand paper to address the dents and dings to the stummel surface and also to further match the fill with the rest of the stummel surface. A few minor dents and dings still remained and I accept these dings as part of this pipe’s journey to date. I cleaned the sterling silver ferrule at the shank end with “Pitambari”, a powder that is available all across India that is used to clean and shine brass and silverware. Even Abha uses it to polish her silver and gold jewelry and cutlery. This compound is a very fine powder and is least abrasive with fantastic results. The results were appreciated by Steve during his visit to India. The band is now a nice shining piece of sterling silver and will provide a nice contrast between the shining horn stem and the dark brown stummel.  Prior to proceeding with micromesh polishing cycle, I reattached the sterling silver band to the shank end using superglue.  I followed it by wet sanding the entire stummel with 1500 to 12000 grit micromesh pads, wiping frequently with a moist cloth to check the progress. I really like the looks of the stummel at this point in restoration. The grains and the clean lines of this piece of briar is really appreciable.      Next, I rubbed a small quantity of “Before and After Restoration Balm” deep in to the briar with my finger tips and let it rest for a few minutes. The balm almost immediately works its magic and the briar now has a nice vibrant appearance with the beautiful grain patterns displayed in their complete splendor. I further buffed it with a horse hair brush. The contrast of the dark browns of the Bird’s eye and cross grains with the natural patina of the rest of the stummel adds an interesting dimension to the appearance of the stummel which may be insufficiently described in words and far better seen in person. With the stummel rejuvenation almost complete, save for the final wax polish, I worked the stem. The fill had cured and with a flat head needle file, I worked on the filling till I had achieved a rough match with the surrounding surface and had sufficiently sharpened the button edges. To bring a deep shine to the horn stem, I went through the complete set of micromesh pads, wet sanding with 1500 to 12000 grit pads. I wiped the stem with moist cloth after each pad and rubbed it down with Extra Virgin Olive oil to rejuvenate the horn. I am pretty happy with the way the stem repairs have shaped up and also the buttons have a nice delicate shape to them. The finished stem is shown below.      I have now reached the homestretch in this restoration project. To complete the restoration, I mount a cotton cloth buffing wheel on to my hand held rotary tool and polished the stummel and stem with Blue Diamond compound. This compound helps to remove the minor scratch marks that remain from the sanding.     I mounted another cotton buffing wheel that I have earmarked for carnauba wax and applied several coats of the wax. I finished the restoration by giving the entire pipe a rigorous hand buffing using a microfiber cloth to raise the shine further. The finished pipe looks amazingly beautiful and is ready to join my collection. I only wish it could share with me its life story of the past years while I enjoy smoking my favorite Virginia blend in it or maybe an English blend or maybe just keep admiring it!! Big thank you to all the readers who have joined me on this path by reading this write up as I restored and completed this project.

Refurbishing An Inherited Cased 1907 “AGE” Bent Billiard With A Military Mount


Blog by Paresh

I had randomly selected four pipes to work on, three inherited pipes and one that I had purchased a few years back, since I prefer to put a few pipe stems together in the “Before And After” Deoxidizer solution that has been developed by Mark Hoover. I have completed the restoration of three of these pipes, a Wally Frank “BLACKTHORNE”, a Wally Frank “NATURAL UNVARNISHED” TWO DOT Bulldog and a GEORG JENSEN EXTRA. This is the last of these four pipes, a cased AGE Bent Billiard shaped pipe from my grandfather’s collection.

The pipe is a classic Bent Billiards with a military mount vulcanite stem. It is a medium sized pipe with a nice hand feel and a light weight that makes it comfortable for clenching. It is stamped on the left surface of the shank as “AGE” inside an oval. The silver ferrule at the shank end is also stamped as “AGE” in an oval over three sterling silver hallmarks. From left to right the first cartouche stamping is completely buffed out followed by a cartouche with a LION PASSANT certifying silver quality and the last cartouche with date code letter “m”. There was also a diamond with a banner and a “R.J.” stamp on it towards the bowl end. The vulcanite stem is stamped over the top surface as “AGE” inside an oval over “LONDON” in block capital letters. The stampings on the stem are faded and visible only under bright light and magnification. I had not come across this brand earlier and to know more about this brand I visited rebornpipes.com. As expected, Steve had worked and researched this brand in great detail. The link below will lead those interested to the write up posted on rebornpipes.com(https://rebornpipes.com/2019/05/18/restoring-a-1919-age-extra-bulldog/).

I earnestly request all the readers to read through the well researched write up on the brand as Steve’s efforts are worth their weight in gold. From the write up, I have deduced the following with respect to the pipe currently on my work table.

(a) AGE brand of pipes has both French and English connection. The hallmarked silver ferrule on my pipe points to the English connection. Who Made That Pipe by Wilczak and Colwell had pointed towards Salmon & Gluckstein brand as English makers of this pipe.

(b) Salmon & Gluckstein brand was bought out by Imperial Tobacco Co. in 1902. Since that was prior to the purported date of this pipe it made sense that it was made by Imperial Tobacco Co. The brand continued under their manufacture until 1955 when the brand was dropped.

(c) The R.J stamp on the silver ferrule stands for Reuben Jordon, a London silversmith who did bands for Imperial Tobacco Co. in London. Reuben Jordon had entered his mark at both the London Assay office in 1906 (by Imperial Tobacco Co.) and at the Chester Assay Office in 1910. The LONDON stamping on the stem of the pipe that I am working on is indicative that the silver hallmarks were assayed by the London office.

(d) Thus, it appears that the pipe was a brand of the Imperial Tobacco Co. and linked to the Salmon & Gluckstein brand.

To date this pipe based on the sterling silver hallmarks, I visited www.silvercollection.it. I have reproduced the downloaded picture of the relevant portion (enclosed in red circle) which points to the year in which this pipe was made.

Thus from the above information, it is concluded that the pipe that I am working on is a brand name made by Salmon and Gluckstein after it was brought over by Imperial Tobacco Co. and the silver ferrule was assayed in London Office by Reuben Jordon for Imperial Tobacco in 1907.

With the provenance of the pipe established to my satisfaction, I move ahead with my initial visual inspection.

Initial Visual Inspection
This pipe has the classic Bent Billiard shape with a medium sized bowl. The stummel boasts of some beautiful Bird’s eye to the right side and cross grains all over the remaining bowl and shank. The stummel surface is covered in dirt and grime of the overflowed lava and grime. There is not a single fill in the briar which speaks of high quality selection of the briar. There is a thick layer of cake in the chamber. The stem has been cut short and is heavily oxidized with a through hole on the lower stem surface and few deep bite marks in the bite zone. Here is how the pipe appears as it sits on my work table. The pipe was in its original leather covered case with a green velvet internal lining. The leather surface is dirty with pieces of leather cover missing along the seams of the case. The locking mechanism is in working condition and clasps firmly shut.   Detailed Inspection Of The Pipe And Observations
The chamber has an even layer of thick cake. The smooth rim top surface shows few dents/ dings and is covered in lava overflow, dirt and grime from previous usage. Both the inner and the outer rim have suffered a few blows on a hard surface resulting in a few minor chipped edge surfaces and with the inner edge being out of round. The condition of the inner walls of the chamber can be commented upon after the cake has been taken down to the bare briar. The chamber exudes a very strong odor of old tobacco. The draught hole is dead center and at the bottom of the chamber and that makes me believe that it should great smoke and the thick cake in the chamber lends credence to this observation. The stummel appears solid to the touch all around and hence I do not foresee any serious damage to the walls in the form of burnout/ deep heat fissures/ lines or pits. To address the damage to the inner and outer rim edges, I shall create a slight bevel to both the rim edges. The reaming and subsequent cleaning of the chamber and mortise should reduce the ghost smells from the chamber.  The smooth stummel surface is finished in a natural virgin finish and has taken on a layer of aged patina, through which one can make out the beautiful Bird’s eye grains to the right side of the stummel and over the lower shank surface. Tightly packed cross grains adorn the rest of the stummel surface. There are a few scratches over the stummel surface, probably due to likely falls. However, there is not a single fill in the entire stummel, signifying very high quality of briar used in carving this pipe. The briar is looking lifeless and bone dry and has taken on dull grey hues. Thorough cleaning of the stummel surface and rinsing it under warm water should highlight the grain patterns while preserving the patina. In all probability, I shall let these minor dents and dings to the stummel surface remain and avoid the process of sanding the stummel with sand paper in order to preserve the beautiful patina. Maybe, micromesh polishing will address a few of these scratches to some extent.   The mortise shows heavy accumulation of oils, tars and gunk and the air flow is not full and smooth. The high quality vulcanite military mount stem is so heavily oxidized that it appears brownish green in color. The stampings on the stem are also covered under the heavy oxidation. The tenon end of the military mount is black while the rest of the stem surface that was exposed to the elements is heavily oxidized. The upper and lower surface of the stem is peppered with tooth chatter and deep bite marks in the bite zone. The buttons on either surface have been chewed off and nonexistent with just a faint outline for lip edges. The upper surface has a superficial hairline crack extending from the lip edge in to the bite zone for about ½ an inch. The lower surface has a big chunk missing from the bite zone, including a part of the lip edge. The stem at one point in time of its 117 years of existence has had the stem cut off about an inch from the orifice end, probably due to extensive damage to the bite zone. The removal of the deep seated oxidation from the stem surface while preserving the stamping will be a long drawn and tedious process. I would need to rebuild and reshape the entire button on either surface while also repairing the through hole on the lower surface. Maybe sometime later, I may even consider a stem splice repair to bring the stem to its original length, but for now, I intend to restrict myself to the repairs only.   The sterling silver ferrule is heavily oxidized and developed a patina commensurate with the vintage. There are, thankfully, no dents or dings on the ferrule surface. The stamping on the ferrule for most parts is crisp and clear. The stamping in the last cartouche of the three hallmarks has been all but buffed out with only the outline of the cartouche still visible. I would need to be very diligent while polishing the silver ferrule, lest I end up buffing away rest of the stampings on the ferrule. Once the ferrule has been cleaned up, the shining piece of silver will add an elegant touch to the pipe.The fitted original leather covered case that has protected the pipe thus far, has the leather covering worn out on the sides. The seam has lost its leather cover at places exposing the wooden case beneath. The leather is covered in dirt and grime of over 117 years due to lack of care and appears dull and without any luster/ shine. The inner velvet green lining is devoid of any stampings and has accumulated oils and tars from the rim top of the pipe. The mechanical clasp is still functional and the case closes securely.  The Process
Abha started the restoration of this pipe by first cleaning the internals of the stem with bristled pipe cleaners and 99.9% pure isopropyl alcohol. She further cleaned out the stem internals with a shank brush and dish washing liquid soap. She scraped out the dried oils and tars from the tenon end with a fabricated knife.She dropped the stem in to “Before and After Deoxidizer” solution developed by Mark Hoover. The solution helps to draw out heavy oxidation to the surface, making its further removal a breeze, while the minor oxidation is eliminated to a very great extent. The initial sanding helps to draw out the complete oxidation as the sanding opens up the stem surface that has been initially covered with oxidation. We usually dunk stems of 4-5 pipes that are in-line for restoration and this pipe is marked in blue arrow. We generally allow the stems to soak in this solution overnight to do its work.While the stem was soaking in the deoxidizer solution, I worked on the stummel by first reaming the chamber with size 1 and 2 Castleford reamer heads. With my fabricated knife, I further scraped the chamber walls to remove the remaining carbon deposits and also scraped out the lava overflow from the rim top surface. Once the cake was reamed back to the bare briar, I used a 150 grit sand paper followed by 220 grit sand paper to remove all the traces of remaining cake and also to smooth out the inner walls of the chamber surface. Finally, to remove the residual carbon dust, I wiped the chamber with a cotton pad wetted with 99.9% pure isopropyl alcohol. The chamber walls are sans any damage. The outer and inner rim edge is chipped in a few places along the rim top and will be addressed by topping the rim top. The rim top surface itself is peppered with dents/ dings and scratches which too will be addressed during the sanding. Thankfully the inner rim was not charred under the lava overflow. The ghost smells are still strong and may further reduce after the shank/ mortise are thoroughly cleaned.  This was followed by cleaning the mortise with cue tips, pipe cleaners and shank brush dipped in isopropyl alcohol. I scraped the walls of the mortise with my fabricated knife to remove the dried oils and tars. The mortise was a bear to clean and the heap of pipe cleaners and q-tips that were used is an indication of the gunk and tars that were removed. The old smells of the tobacco are still strong and would need more invasive methods to get rid of these odors. With the bowl internals clean, I move to clean the exterior of the stummel. I used a hard bristled tooth brush and Murphy’s Oil soap to scrub the stummel and rim top. For this stummel cleaning, l I used Murphy’s Oil soap as I wanted to preserve the old patina that had developed on the stummel and was not sure how the Briar cleaner product would affect it. After the scrub with oil soap, I washed the stummel under running warm water with anti oil dish washing detergent till the stummel surface was clean and dried it using paper towels and soft cotton cloth. I simultaneously cleaned the shank internals with the detergent and hard bristled shank brush and set the stummel aside to dry out naturally.The stummel surface has cleaned up nicely with the beautiful grain patterns on full display. I shall subject the chamber to salt and alcohol treatment to eliminate the ghost smells completely.   I continued the cleaning of the chamber and shank internals with a salt and alcohol bath. I use cotton balls which is an at par substitute as I have realized over the years. I draw out a wick from the cotton and along with a folded regular pipe cleaner; insert it in to the mortise and through the draught hole in to the chamber. Thereafter, I packed the chamber with cotton balls to about quarter of an inch below the inner rim edge and soaked the cotton balls with isopropyl alcohol up to the brim. About half an hour later, the level of alcohol had gone down, having being absorbed by the cotton. I topped it up once again and set it aside overnight. By next morning, the cotton and alcohol had drawn out all the remaining oils and tars from the chamber and mortise, fulfilling its intended task. I removed the cotton balls and ran pipe cleaners through the mortise to clean out all the loosened tars and gunk and further cleaned it with alcohol and q-tips. The chamber now smells clean and fresh. I set the stummel aside to dry out naturally.While the stummel was drying, the next morning, Abha removed the stems (stem indicated with pastel pink arrow is the one being worked on) that had been soaking in the deoxidizer solution overnight. She cleaned the stem and the stem airway under running warm water and scrubbed the raised oxidation from the stem surface using a Scotch Brite pad and the airway with a thin shank brush. She further removed the oxidation by scrubbing the stem with 0000 grade steel wool and applied a little EVO to rehydrate the stem. This now gives a clearer picture of the extent of damage as can be seen in the pictures below. The oxidation is deep and stubborn and can be seen over the stem surface around the stem stamping and in the bite zone, as dirty greenish brown coloration. I need to further sand the stem to completely remove the oxidation. The lower bite zone including the button edges on either surface will need to be reconstructed. The round orific opening will need to be reshaped after the lip edges have been rebuilt.    I used a 220 grit sand paper to sand the stem and remove all the oxidation that was raised to the surface. This step further reduced the tooth chatter and bite marks present on the stem. I wiped the stem with Murphy’s Oil soap on a cotton swab. This helps in cleaning the stem surface while removing the loosened oxidation. With a white correction pen, I masked the entire stamping on the stem top surface. This masking helps in easy identification of the extent of the stamping and can be avoided as well as refreshing it when the ink has dried and carefully wiped out.  To begin repairs to the stem, I first inserted a pipe cleaner that had been tightly wound with a transparent sticking scotch tape through the stem air way. This helps prevent the CA superglue and charcoal mix from sticking to the pipe cleaner which in turn prevents the mix from running down in to the air way and clogging it. I generously applied a mix of CA superglue and activated charcoal over the stem areas to be repaired. I apply a thick layer of the mix as this aid in subsequent filing and shaping to match the repairs with the stem surface. Once I had applied the mix, I set it aside to cure overnight. Once the fill has hardened, I shall file and sand the fills to reconstruct the lower bite zone and the buttons on either surface and subsequently match it with the surface of the stem.With the fills in the stem set aside to cure, I turned my attention back to the stummel. I decided to address the rim top surface dents/ dings and the out of round inner edge. I topped the rim top surface on a piece of 220 grit sand paper, checking frequently for the progress being made as I hate to loose briar estate any more than absolutely necessary. The inner and outer edges are still uneven, though much better than before topping. With a folded piece of a 220 grit sand paper pinched between my thumb and forefinger, I create a slight bevel on the inner and outer edges of the rim top surface. This helps to mask and address the minor dents and dings that had remained on the rim edges after topping. I am careful so as not to alter the profile of the stummel by excessive topping or creation of the bevels. I am pretty pleased with the appearance of the rim top and edges at this stage. The following pictures show the progress being made and improvements to the inner and outer rim edges. I followed it by wet sanding the entire stummel with 1500 to 12000 grit micromesh pads, wiping frequently with a moist cloth to check the progress. I really like the looks of the stummel at this point in restoration. The grains and the clean lines of this piece of briar is really appreciable. The few scratches that were noticed over the stummel surface too have been addressed at this stage.    Next, I rubbed a small quantity of “Before and After Restoration Balm” deep in to the briar with my finger tips and let it rest for a few minutes. The balm almost immediately works its magic and the briar now has a nice vibrant appearance with the beautiful grain patterns displayed in their complete splendor. I further buffed it with a horse hair brush. The contrast of the dark browns of the Bird’s eye and cross grains with the natural patina of the rest of the stummel adds an interesting dimension to the appearance of the stummel which may be insufficiently described in words and be rather seen in person.   I cleaned the sterling silver ferrule at the shank end with Colgate Tooth powder. Even Abha uses it to polish her silver and gold jewelry and cutlery. This compound is a very fine powder and is least abrasive with fantastic results. The results were appreciated by Steve during his visit to India. The band is now a nice shining piece of sterling silver and will provide a nice contrast to the shining black stem and the dark brown stummel. With the stummel rejuvenation almost complete, save for the final wax polish, I worked the stem. The fill had cured and with a flat head needle file, I worked on the filling till I had achieved a rough match with the surrounding surface and had sufficiently sharpened the button edges. For a better blending, I further sand the entire stem with 220 followed by 400, 600 and 800 grit sand paper. This helps to reduce the scratch marks left behind by the more abrasive 220 grit paper. I am pretty happy with the way the stem repairs have shaped up and also the buttons have a nice delicate shape to them. To bring a deep shine to the vulcanite stem, I went through the complete set of micromesh pads, wet sanding with 1500 to 2000 grit sandpapers followed by further wet sanding with 3200 to 12000 grit pads. I wiped the stem with moist cloth after each pad and rubbed it down with Extra Virgin Olive oil to rejuvenate the vulcanite. The finished stem is shown below.  Stummel done, stem done!! All that remained was the original case that housed this pipe. Firstly, I reattached all the dark brown linings that had come loose, with superglue. I wiped the brown leather cover with Murphy’s Oil soap on a cotton swab. The color on the swabs should give the readers an idea of how dirty the surface was!! I wanted to further scrub the leather surface, but unsure that I was as to how the leather would hold up to all the scrubbing, I left it at that (remember my mantra… Less is more!!). I cleaned the inner velvet linings of the lid and bottom respectively, with a mild soap in warm water and a soft bristled tooth brush. I was very gentle with this as I had no intention of either tearing the lining or messing up the velvet surface. I completely dried the lining using paper towels. It now does look nice and rich.  With the externals and internals of the case all cleaned up, all that remained was to rejuvenate the leather. I applied a generous coat of Brown color shoe polish (it also has a very high wax content!) on either surfaces and kept it aside to be absorbed by the leather. Prevalent heat in my part of the country also kept the polish in a semi-liquid state which further helped in absorption. I polished it with a horse hair shoe brush to a nice shine and gave a final buffing with a microfiber cloth.  I have now reached the homestretch in this restoration project. To complete the restoration, I mount a cotton cloth buffing wheel on to my hand held rotary tool and polished the stummel and stem with Blue Diamond compound. This compound helps to remove the minor scratch marks that remain from the sanding.     I mounted another cotton buffing wheel that I have earmarked for carnauba wax and applied several coats of the wax. I finished the restoration by giving the entire pipe a rigorous hand buffing using a microfiber cloth to raise the shine further. The finished pipe looks amazingly beautiful and is ready to join my collection. I only wish it could share with me its life story of the past years while I enjoy smoking my favorite Virginia blend in it or maybe an English blend or maybe just keep admiring it!! Big thank you to all the readers who have joined me on this path by reading this write up as I restored and completed this project.


Refurbishing a Third Pipe From a Lot Of Six Pipes: a Barling That Has Had It’s Shank Repaired


Blog by Paresh

I had picked up a job lot of six pipes from a Curio Store on eBay. This lot contained brands like Barling’s, Parker and Orlik and other English make pipes. These are some of my favorite brands and I couldn’t pass them over even though they were in a hopelessly beat up condition. Here are pictures of the pipe lot that the seller had posted. This lot contained a variety of nicely shaped and grained pipes which I had been looking forward to work on. The two pipes from this pipe lot that I have completed are indicated in red and indigo arrow. The third pipe that I had selected to work on is shown in brown arrow. The third pipe that I decided to work on from this lot is a small sized classic Dublin shaped pipe. This pipe sometime during its period of existence has had its shank repaired, thus obliterating any stampings that would have been stamped on it when it came out of the factory. However, the quality of the briar, shape and the stem style all scream BARLING!! A couple of years ago I had restored a quaint little Billiard pipe from my inherited pipe lot and this pipe does remind me of it. I visited rebornpipes.com and went through the write up (https://rebornpipes.com/2018/12/10/decking-out-my-grandfathers-battered-pre-transition-barling-1354/) to compare these two pipes. The more I saw the pre-transition Barling, the more I was convinced that this pipe had to be a Barling. The partially visible stamping on the left side of the shank shows the start of the letter B in cursive hand over LO in block letters. Having just recently worked on an Early Corporate Era Barling pipe and the shape of the stem that tapers from the broader slot end in to a narrow saddle portion is typical of Barling. The tapered vulcanite stem too has its stampings completely buffed out!With no clues whatsoever to pursue and me being convinced about this pipe being a Barling, I proceed with my initial visual inspection.

Initial Visual Inspection
This pipe has a quaint little bowl size with a chamber depth of about 1 inch. The stummel boasts of some beautiful cross grains to the sides and back of the bowl and all around the shank and tight Bird’s Eye to the front of the stummel. The stummel is covered in dirt and grime of the overflowed lava and dirt accumulated over the years of heavy smoking and uncared attention to cleaning. The stummel has a dull and lifeless appearance to it. The stem repair, though clearly visible, the repairs are solid and seem to have been done by a professional. There is a thick layer of cake in the chamber and some damage is likely to the front of the rim top surface. The stem is heavily oxidized with a few deep bite marks to the button edge in the bite zone. The pipe’s appearance, as it sits on my work table, does not present an encouraging picture. The condition and state of this pipe including the damages are identical to the last two pipes that I had worked on. I think all these pipes are from the same estate and the previous piper was set in his ways of smoking and handling his pipes.Detailed Inspection Of The Pipe And Observations
This is a small sized pipe with a chamber depth of about I inch. The bowl rim slightly tapers down towards the heel giving it a classic Dublin shape. The draught hole dead center and at the bottom of the heel. The chamber has an even layer of very thick hard cake with remnants of un-burnt tobacco seen at the heel of the chamber. The rim top surface is covered with thick lava overflow and has max accumulation in the 6 o’ clock direction. The layer of lava overflow is so thick that the rim top surface is just not visible. The inner rim edge is charred and damaged in the 10 o’ clock direction (encircled in yellow) which makes the chamber appear out of round. The outer rim edge has dents and dings all around but is most severely damaged in the 6 o’clock direction (encircled in green), a damage that can result only due to repeated strikes against a hard edged surface. The condition of the inner walls of the chamber can be commented upon after the cake has been taken down to the bare briar. There is a strong ghost smell in the chamber which is all pervading. The stummel appears solid to the touch all around and hence I do not foresee any serious damage to the walls in the form of burnout/ deep heat fissures/ lines or pits. The dark inner rim edge, in the 10 o’clock direction, may be charred further than anticipated and the same will be confirmed after the surface has been thoroughly cleaned. I need to resort to topping the rim top in order to address the damage to the surface. The ghost smells should reduce once the cake from the chamber is removed and the shank has been cleaned.  The smooth stummel surface is covered in dust, lava overflow and grime through which one can make out the beautiful cross grains to the sides and back of the bowl and all around the shank and tight Bird’s Eye to the front of the stummel. There are no fills in the stummel signifying the use of a very high quality piece of briar.  The briar is looking lifeless and bone dry. For a pipe that has been so heavily smoked, there are surprisingly no dents and dings over the stummel surface save for the outer rim edge. Once the stummel has been thoroughly cleaned, dents and dings to the stummel surface, if any, will be apparent. Thorough cleaning and rising of the stummel under warm water will highlight the grain patterns. Micromesh polishing will help in imparting a nice shine to the briar. The shank was spliced but the joint is one that is seamless and smooth transition between the old shank and the spliced shank piece (indicated by pastel blue arrows). The repairman had even ensured that the seating of the stem in to the mortise is factory perfect. The repairs are solid and speak highly of the competence of the repairman and his skill sets. I shall not be tinkering with the shank repairs as it is professionally well executed and in excellent solid shape.The mortise shows accumulation of oils, tars and gunk and the air flow is not full and smooth. The shank end face is a perfect round pointing to excellent craftsmanship and attention to quality. The seating of the stem is flush and aligned perfectly and precisely. The air flow will smooth and the draw full once the mortise is cleaned out. The ghost smells should further reduce after the mortise and shank walls are thoroughly cleaned. The high quality vulcanite tapered saddle stem is typical Barling with a narrow saddle at the end of a proportionately broad stem. The stem is so heavily oxidized that it appears brownish green in color! Deep calcification is seen in the bite zone probably from prolonged use of rubber bit. Some heavy tooth chatter and deep bite marks in the bite zone are seen on both the upper and lower surfaces of the stem. The button edges on either surface have been completely flattened with the lip edges seen as mere straight thin edges with no shape and sharpness at all. The tenon air opening is completely blocked with accumulated ash and oils/ tars that have dried out on the inside as well as on the outside. The horizontal slot end is completely deformed and the slot itself is chock-a-block with gunk. The bite marks will be raised to the surface by heating to the extent possible and further will be filled using charcoal and CA superglue mix. The button end, including the button itself on either surface will have to be completely rebuilt and reshaped. The tooth chatter and the calcified deposits will be removed by sanding with a piece of 220 grit sand paper.I am convinced that all the pipes in this lot is from one estate as the damage to the rim, damage to the stem and general condition of each is exactly the same.

The Process
Abha, my wife, first cleaned the internals of the stem with stem brush, bristled/ regular pipe cleaners and 99.9% pure isopropyl alcohol. She scraped out the dried oils and tars from the tenon end with my fabricated knife and also removed the dried oils and tars from the slot end. She followed it up by sanding the entire stem with a folded piece of 220 grit sand paper to remove the surface oxidation. The amount of gunk that has been scraped out of the stem surface just to get to the black vulcanite shows that the oxidation was very deep and heavy over the stem surface. It has been our experience that sanding a stem before dunking it in to the deoxidizer solution helps in bringing the deep seated oxidation to the surface which in turn make further cleaning a breeze with fantastic result. She, thereafter, dropped the stem in to “Before and After Deoxidizer” solution developed by my friend Mark Hoover. The solution helps to draw out heavy oxidation to the surface, making its further removal a breeze, while the minor oxidation is eliminated to a very great extent. The initial sanding helps to draw out the complete oxidation as the sanding opens up the stem surface that has been initially covered with oxidation. We usually dunk stems of 4-5 pipes that are in-line for restoration and this pipe is marked in green arrow. We generally allow the stems to soak in this solution overnight to do its work.While the stem was soaking in the deoxidizer solution, I worked on the stummel by first reaming the chamber with size 1 followed by size 2 Castleford reamer head. I further scraped the chamber walls with my fabricated knife to remove the remaining carbon deposits where the reamer head could not reach. I scraped out the lava overflow from the rim top surface, especially from the area in the 6 o’clock direction. Once the cake was reamed back to the bare briar, I used a 150 grit sand paper followed by 220 grit sand paper to remove all the traces of remaining cake and also to smooth out the inner walls of the chamber surface. Finally, to remove the residual carbon dust, I wiped the chamber with a cotton pad wetted with 99.9% pure isopropyl alcohol. The inner rim edge was charred in 10 ‘O’ clock and 2 o’clock direction which have been encircled in red. I scrapped off the charred briar from these areas and now the chamber is seriously out of round. The outer rim edge damage is significantly deeper than I had anticipated (marked in green circle). The chamber walls are pristine without any damage. The inner rim charring in the 10 o’clock is very deep and creating a bevel to mask it will result in a very thin rim top surface. I may consider rebuilding both the damaged inner and outer rim edge with superglue and briar dust after I have topped the rim surface. The ghost smells are still very strong and may reduce after the shank/ mortise are thoroughly cleaned. The rim top surface is still considerably darkened and would need to be thoroughly cleaned to know the exact damage to the surface. I followed up the reaming with cleaning the mortise using cue tips, pipe cleaners and shank brush dipped in isopropyl alcohol. I scraped the walls of the mortise with my fabricated knife to remove the dried oils and tars. The end of the mortise now shows the shiny end of a metal tubing which has been inserted to strengthen the spiced joint, another pointer to an excellent and solid repair job. The ghost smells are still very strong and would require a salt and alcohol treatment.I continued the internal cleaning of the chamber and shank with a salt and alcohol bath. I use cotton balls which is an at par substitute as I have realized over the years. I draw out a wick from the cotton and along with a folded regular pipe cleaner; insert it in to the mortise and through the draught hole in to the chamber. Thereafter, I packed the chamber with cotton balls to about quarter of an inch below the inner rim edge and soaked the cotton balls with isopropyl alcohol up to the brim. About half an hour later, the level of alcohol had gone down, having being absorbed by the cotton. I topped it up once again and set it aside overnight. By next afternoon, the cotton and alcohol had drawn out all the remaining oils and tars from the chamber and mortise, fulfilling its intended task. I removed the cotton balls and ran pipe cleaners through the mortise to clean out all the loosened tars and gunk and further cleaned it with alcohol and q-tips. The chamber now smells clean and fresh. I set the stummel aside to dry out naturally.With the bowl internals clean, I move to clean the exterior of the stummel. I used a hard bristled tooth brush and Murphy’s Oil soap to scrub the stummel and rim top. I set the stummel aside for 10 minutes for the oil soap to draw out all the grime from the briar surface. After 10 minutes, I washed the stummel under running warm water with anti oil dish washing detergent till the stummel surface was clean and dried it using paper towels and soft cotton cloth. I simultaneously cleaned the shank internals with the detergent and hard bristled shank brush and set the stummel aside to dry out naturally. The stummel surface has cleaned up nicely and the beautiful grain patterns are now on full display. The charring to the inner rim edge in 10 o’clock direction is significantly deeper than anticipated. The outer rim edge chipping too is significant. I shall have to resort to topping to address this damage and also the issue of chipped outer rim edge to some extent. To completely address these issues, I shall have to resort to a rebuild the damaged portion of outer and inner rim edge using briar dust and superglue. Continuing with the stummel repairs, I topped the rim top over a piece of 220 grit sand paper till I had a smooth even surface and the charred surface in the 2 o’clock direction was completely eliminated. However the out of round chamber in the 10 o’clock direction and the chipped outer rim edge damage is still significant and would necessitate a rebuild. These damages are highlighted in the last two pictures below. Further repairs to the stummel is being put on hold as I did not have briar dust in required quantity and neither did I have any superglue at home. I shall complete these repairs once I rejoin my place of work once the lockdown due to COVID-19 pandemic is lifted.

While the stummel repairs were being put on hold, the next morning Abha removed the stem that had been soaking in the deoxidizer solution overnight. She cleaned the stem under running warm water and scrubbed the raised oxidation from the stem surface using a Scotch Brite pad and cleaned the airway with a thin shank brush. She further removed the oxidation by scrubbing the stem with 0000 grade steel wool and applied a little EVO to rehydrate the stem. This now gives a clearer picture of the extent of depth of the bite marks as can be seen in the pictures below. These will definitely require a fill even after I have heated and raised the vulcanite. The buttons on either surface will have to be reconstructed and reshaped. I need to further sand the stem to completely remove the oxidation. The deep tooth indentations are now clearly visible and I decided to address these issues at this stage. Since I did not have a lighter (I generally prefer to use it for this purpose), I used a lit candle instead. The result is equally good; however, one has to be doubly careful as the heat from a candle flame is more intense as compared to a lighter. These tooth indentations were raised to the surface to some extent due to the heating; however, it would require a fill to complete the repairs.I prepared a mix of CA superglue and activated charcoal and carefully applied it over the damaged bite zone on both surfaces and lip and set it aside for curing over night. I applied this mix in sufficient thickness as it would help during the filing and sanding to match the fills with the stem surface and reshaping the button.Using a flat head needle file, I reshaped the button and followed it up by sanding the stem with a folded piece of 220 grit sand papers. I followed it up by further sanding the stem with 320, 600 and 800 grit sand papers. Once I was satisfied that the fills had perfectly matched with the rest of the stem surface, using micromesh pads, I completed the polishing cycle by wet sanding the surface with 1500 and 2000 grit sand papers and further dry sanding with 3200 to 12000 grit pads. The stem looks great with the fills nicely matched with the rest of the surface. I rub a little quantity of Extra Virgin Olive oil into the stem surface. I have since rejoined back at my place of work and necessary tools, equipment and materials are now available to me to complete my pending projects that I have carried back from home to my work place. I had noted the issues that needed to be addressed on each pipe that I had carried and this pipe needed the rim inner as well as outer rim edge rebuilt, micromesh polishing of the stummel and final carnauba wax polish.

Starting with the rebuild of the rim edges, I reconstructed the inner and outer rim edge with briar dust and CA superglue using the layering technique. I ensured that the fill was slightly above the rest of the rim top surface as this would enable me to get a correct perspective of the match with rest of the stummel surface when I file and sand these reconstructed parts with the rest of the rim top. I set the stummel aside for the mix to cure. Once the fills had sufficiently hardened, with a flat head needle file, I sand the top portion of the fill to achieve a rough match with the rim top surface. I used a flat head needle file to match reconstructed portion of the outer rim edge with the rest of the stummel surface. For matching the inner rim edge fill with the chamber walls, I resorted to a 180 grit sand paper as the needle file did not afford me the flexibility that was required to shape this portion of the fill. I am quite pleased with the progress being made so far. For a perfect match of the reconstructed portion of the rim edges and also to further reduce the darkened rim top in 2 o’ clock direction, I again topped the rim surface on a piece of 180 grit sand paper. With a folded piece of 220 grit sand paper, I created a slight bevel to both the outer and inner rim edges to blend in the fills and also to address the minor dings and charring to the outer and inner rim edges respectively. The fills are now perfectly matched and rim top now looks pristine. To protect the briar dust and superglue fill on the inner edge of the rim from coming in to direct contact with the burning tobacco and also to prevent the heat from reaching the external surface of the stummel and causing a burnout, I plan, firstly, to fill only the small reconstructed inner rim edge of the chamber with J B Weld followed by a second coat of activated charcoal and yogurt to the entire chamber which would assist in faster cake formation. J B Weld is a two-part epoxy Cold Weld that consists of two parts; hardener and steel which are mixed in equal parts in a ratio of 1:1 with hardening time of 5-6 minutes and complete curing time of 6-8 hours. I poured the contents of the two tubes and mixed it well. With a flat bamboo frond, I applied this mix and filled the intended rebuilt inner rim edge. I worked fast to ensure a complete and even filling of the inner rim edge and set the stummel aside for the J B Weld to harden.Once the J B Weld had sufficiently cured, I sand it down with a semi circular needle file to remove excess weld from the area. I used a folded piece of 220 grit sand paper to further sand the fill and achieve a perfect blend and smooth coat of J B Weld over the reconstructed inner rim edge.At this stage, I observed a couple of air pockets over the outer rim edge rebuilt surface. I applied a coat of clear CA superglue and set the stummel aside for the coat of superglue to cure. Once the superglue had hardened, I sand the portion with a piece of 220 grit sand paper to match the rest of the rim edge. I followed it by wet sanding the stummel with 1500 to 12000 grit micromesh pads, wiping frequently with a moist cloth to check the progress. The outer rim edge is now smooth and completely filled with no air pockets. However, the light colored patches are still visible. I shall stain the rebuilt patch with a dark brown stain pen to mask these pockets. The spliced shank with the joint is now clearly visible. With the spliced part of the shank having such beautiful Bird’s eye and cross grains over the surface, I really don’t have the heart to stain it just to mask the repairs!! Next, I rubbed a small quantity of “Before and After Restoration Balm” deep in to the briar with my finger tips and let it rest for a few minutes. The balm almost immediately works its magic and the briar now has a nice vibrant appearance with the beautiful grain patterns displayed in their complete splendor. I further buffed it with a horse hair brush and gave a vigorous buff with a microfiber cloth to deepen the shine. The dark browns of the bird’s eye and cross grains spread across the stummel makes for a visual treat. It really is a nice piece of briar. I shared the pictures of the pipe and sought his opinion if I should stain the pipe to mask the shank repairs on leave it be? His characteristic reply was that “he would not stain it”!! With this aspect decided, I move ahead with the final polishing of the pipe. I mount a cotton cloth buffing wheel on to my hand held rotary tool and polished the stummel and stem with Blue Diamond compound. This compound helps to remove the minor scratch marks that remain from the sanding. This pipe is starting to look really beautiful with the glossy dark brown through which the beautiful grains pop out over the stummel surface. I mount another cotton buffing wheel that I have earmarked for carnauba wax and applied several coats of the wax. I finished the restoration by giving the entire pipe a rigorous hand buffing using a microfiber cloth to raise the shine further. The finished pipe looks amazingly beautiful and coupled with the quaint size and ultra light weight makes it an ideal pipe for a quick smoke while you continue working with your hands. If you feel that this pipe calls out your name, please let Steve know and we shall make arrangements for it to reach you. P.S. To avoid the J B Weld coated minor spot, though high nearer to the rim top from coming in to direct contact with the burning tobacco and also to aid in faster cake formation, I gave the bowl a coat of yogurt and activated charcoal. Unfortunately, I missed out on taking pictures of the process.

I wish to thank each one for sparing their valuable time to read through this write up and each one is my prayers. Stay home…stay safe!!

Adding a Bit Of Dazzle While Restoring An Italian “Empire State” Pickaxe Pipe.


Blog by Paresh

The next pipe selected for refurbishing is a beautifully shaped pickaxe pipe. The stummel has a slender tall chamber with a subtle flare about ½ inch below the outer rim edge. It’s a shape that I have, generally speaking, come to associate predominantly with Danish carvers; however, this one has its links with either USA or Italy!! This pipe has a smooth surface with a nice hand feel as it comfortably fills my entire palm. For a pipe with a length of 5 ½ inches and bowl height of 3 ½ inches, it’s pretty much ultra light weight, making it a perfect to clench. The vulcanite tapered stem is thin and delicate with a slight bend that matches the curve from the foot of the stummel to the shank end. The pipe as it sits on my work table is shown below. The pipe is stamped on the left side of the shank as “EMPIRE STATE” in caps over “BRIAR ITALY”, also in capital letters. The thin vulcanite tapered stem is stamped on the left side with an equilateral triangle as stem logo.This brand of pipe was completely new to me and had not even heard about this brand. It was, thus, natural that I had to first know about the pipe that I was working on. I turned to pipephil.eu to know more of this brand. I referred to the stem logos “triangle” to narrow down my search parameters to save on time. True enough, there on the screen staring at me was an exact same pipe with exact same shape and stampings!! The only difference being that the site says that “Italy” is stamped on the stem’s underside whereas the pipe on my table has “BRIAR ITALY” stamped on the shank itself. Also there is a band at the shank end which was conspicuous by its absence on my pipe. Given below is the link to the site and a screen shot of the relevant portion with the pipe. http://www.pipephil.eu/logos/en/motifs/mo-triangle.htmlSadly, there was no information about the brand on this site. Next I visited rebornpipes.com and pipedia.org to seek information on this brand. However, my search was futile as neither site had any information on this pipe.Home

Has this brand got to do anything or related in any which way to the famous EMPIRE STATE BUILDING of New York which housed many famous pipe companies like S M Frank & Co, KBB etc? I am not aware and would request readers to shed some light and share their knowledge with our fraternity.

With the provenance of the pipe a mystery, I proceeded to carry out a visual inspection of the condition of the pipe in my hand. This helps me map the road to restoring the pipe by identifying the issues involved and identifying methods/ options to address the same beforehand.

Initial Visual Inspection
The chamber has a decent build up of cake. The build-up of the cake is heavier on the middle half of the bowl, but overall well maintained. The condition of the inner walls of the chamber can be commented upon after the cake has been taken down to the bare briar. The draught hole is right at the bottom of the chamber with a nice wide opening. The rim top is clean and a couple of minor dings are visible over the rim top surface. The chamber odors are not very strong and should be completely eliminated once the cake has been removed and the shank has been thoroughly cleaned. The pipe does not seem to have seen much use or possibly it has been used but nicely taken care of as is apparent from the condition of the pipe. The chamber has a nice thickness to it and should provide a nice cool smoke. The stummel surface appears dull and lackluster due to the accumulated dirt, dust and grime. I could identify a couple of fills over the stummel surface and the same are indicated with pastel blue arrows. There are few scratch marks over the bottom surface of the shank. The mortise is relatively clean with small amount of oils and tars accumulated on the walls of the mortise. Thorough cleaning and rising under warm water of the stummel surface will confirm if these fills are required to be refreshed or otherwise and should also highlight the grain patterns. I shall need to sand the stummel surface with sand papers to remove and minimize the scratches, dents and dings. Micromesh polishing will further help minimize these dents and scratches to some extent. The delicate vulcanite tapered stem is heavily oxidized and has taken on a dirty brown coloration. The lip has some minor bite marks on both surfaces and will need to be rebuilt and reshaped. There is some minor tooth chatter seen in the bite zone on both the surfaces. The stem airway appears to be relatively clean. Further internal cleaning of the stem should make the draw full and open. The tenon and horizontal slot is nice and clean. The removal of deep and heavy oxidation from the stem surface is going to be the most tedious and time consuming part of this restoration. The Process
The process of refurbishing this pipe started with the cleaning of the stem. Abha cleaned the stem air way with regular and bristled pipe cleaners dipped in 99.9% pure isopropyl alcohol. She further cleaned the stem internals with thin shank brushes and dish soap to remove the stubborn and thick gunk from within the airway. The heap of pipe cleaners and their appearance tells a sordid story. With a sharp fabricated knife, she scraped off the little gunk and dried tars from the tenon and slot end. Since this stem did not have any issues to address and I wanted Abha, my wife, to progress beyond just initial cleaning to stem polishing, I requested her to complete this stem. She agreed though with great reluctance!!The stem surface was sanded down with a worn out piece of 180 grit sand paper by Abha. We have realized that following this step prior to immersion into the “Before and After Stem Deoxidizer” solution has two advantages, firstly, the stem surface oxidation gets loosened and the solution works deeper and more efficiently in pulling the deep seated oxidation from the stem surface. Secondly, the minor tooth chatter and calcium depositions are taken care of prior to the immersion. She immersed it in “Before and After Deoxidizer” solution along with the stem of other pipes in line for restoration. This solution has been developed by Mark Hoover and works to draw out all the deep seated oxidation from the surface making its subsequent cleaning and polishing a breeze. I would definitely recommend this product as it saves on to time and efforts. The pipe has been marked with a yellow arrow for easy identification.  With the stem in the deoxidizer solution, Abha, my wife, dealt with the cake by reaming the chamber with a fabricated knife as the narrow chamber opening was small even for size 1 head of the reamer. She further scraped the cake from the bottom of the bowl and also the walls of the chamber. She was especially very careful while reaming with the knife so as not to damage the inner edge of the rim. Once the solid briar was exposed, she further smoothed the walls and removed remaining cake by sanding with a 180 followed by 220 grit sand paper. Another advantage of this process is the elimination of traces of ghosting to a great extent. She wiped the chamber with a cotton swab wetted with 99.9% isopropyl alcohol. The chamber walls are pristine and solid with no heat fissures or pits. Simultaneously she cleaned out the internals of the shank/ mortise and airway using q- tips, pipe cleaners and isopropyl alcohol. She scraped the walls of the mortise with a fabricated knife till the accumulated gunk was removed. Further cleaning of the shank internals will be carried during the external cleaning of the stummel.Thereafter, she generously rubbed “Briar Cleaner”, a product that has been developed by my friend Mark Hoover, into the external surface of the bowl and the rim top surface. It works similar to Murphy’s oil soap and needs to be applied to the stummel surface and set aside for 5- 10 minutes. The product pulls out all the dirt and grime to the surface making further cleaning easy. We are quite happy with this product. She used a hard bristled tooth brush to scrub the stummel and rim top with the solution. After the scrub with Briar cleaner solution, she washed the stummel under running warm water with anti oil dish washing detergent till clean and dried it using paper towels and soft cotton cloth. She simultaneously cleaned the shank internals with the detergent and hard bristled shank brush. The stummel surface has cleaned up nicely with the mixed grains on full display. The stummel now looks and smells fresh and the old smells are all gone. She set the stummel aside to dry out naturally. I checked the fills for solidity and realized that all the fills had gone soft and would need to be refreshed. Otherwise the stummel had cleaned up nicely and the rim top surface was in pristine condition. The next morning, Abha removed the stems that had been soaking in the deoxidizer solution overnight. She cleaned the stem and the stem airway under running warm water and scrubbed the raised oxidation from the stem surface using a Scotch Brite pad and the airway with thin shank brush. She further removed the oxidation by scrubbing the stem with 0000 grade steel wool and applied a little olive oil to rehydrate the stem.While Abha was busy with the stem cleaning and sanding, I removed the old fills from the stummel surface with a thin edged sharp knife. I cleaned the gouged out spots with cotton swab and alcohol in preparation for a fresh fill. Using the layering method, I filled the gouged out spots with CA superglue and briar dust. I always ensure that the fill is above the rest of the stummel surface. This helps in subsequent sanding and blending in of the fills with rest of the surrounding surface. I set the stummel aside for the fills to cure. I had run out of medium CA superglue and had only the thin superglue. This glue is not ideal for a fill as it spread all over the stummel surface. It sure does look messed up, however, since I was to sand the entire stummel to achieve a perfect blending of the fill with the rest of the surface, I was not very perturbed with the spreading of the superglue. With me working on the stummel repairs, Abha had continued her work of polishing the stem. She further sanded the stem surface with a folded piece of 220 and 320 grit sand papers to completely remove the remaining traces of oxidation and reduce the sanding marks and followed it with wet sanding the entire stem with 1500 to 12000 grade micromesh pads (1500 to 2400 grit micromesh pads had completely worn out and we were unable to order a set due to lockdown. The use 1500 and 2000 grit wet or dry sand paper is the nearest option that we had). She wiped the stem with a moist cloth to remove the dust and monitored the progress being made after every three grit pads. The stem polished up nicely and had a rich deep black shine to it. She applied a little Extra Virgin Olive oil to rehydrate the vulcanite and set the stem aside.Once the fills had sufficiently cured, with a flat head needle file she sanded the fills and achieved a rough match with the rest of the stummel surface. To achieve a perfect blending in of the fills and to remove the excess spread of the thin superglue, She sanded the entire stummel surface with a folded piece of 220 grit sand paper. The minor scratches that were observed at the bottom surface of the shank were also addressed by this sanding. The fills have blended in nicely and further polishing with micromesh pads should further mask these fills and sanding marks left behind by the abrasive 220 grit sand paper. Abha polished the stummel by wet sanding with 1500 to 2000 grit wet or dry sand paper and followed it up with further wet sanding with 3200 to 12000 grit micromesh pads. The stummel has taken on a nice deep and dark brown color, nicely masking the refreshed fills to naked eyes. I was prepared to satin the stummel if need be to mask the fills, however, that does not seem necessary at this stage. We are very happy with the appearance of the stummel at this point in restoration. Next, I rubbed a small quantity of “Before and After Restoration Balm” in to the briar with my finger tips, working it deep in to the briar and let it rest for a few minutes. The balm almost immediately works its magic and the briar now has a nice vibrant appearance with the beautiful grain patterns displayed in their complete splendor. The contrast of the dark brown of the stummel interspersed with darker cross grains and Bird’s eye, adds an interesting dimension to the appearance of the stummel. I further buffed it with a horse hair brush. On to the home stretch!! I attach the stem to the stummel to first polish it with Blue Diamond. This helps in addressing the minor scratches that are left behind. It was at this point in restoration that I noticed that the stem was inadvertently rounded at the shoulder, causing what is called “shouldering” (indicated with yellow arrows). Abha felt very guilty for having caused it, however, I showed her the picture of the pipe on pipephil.eu and suggested that when I reach back at my place of work I shall band it and that it will look very nice and original.Now that I have reached my place of work, I rummaged through the various bands that I have and found one that matched perfectly with the size of the shank end. It was an ornately designed brass band with embossed floral design. I tried a rough fit and realized that the stamping was being covered when the brass band was completely seated on the shank face. The letter “E” of the word “STATE” was getting masked under the band. I shall address this issue by sanding down the band to a size that would not cover the stamping at all. I have had a terrible experience of using a sanding drum on my hand held rotary tool once and since then I have been doing such band modifications by manually sanding it on a piece of 150 grit sand paper. The aesthetics of the pipe has been transformed completely by this addition of the band. Abha, my wife, too liked the appearance of this pipe with this addition of the brass band. I attach the stem to the stummel to first polish it with Blue Diamond. This helps in addressing the minor scratches that are left behind. The fills that were refreshed have merged beautifully with surrounding briar. I mounted a cotton cloth buffing wheel on to my hand held rotary tool and applied several coats of carnauba wax. I finished the restoration by giving the entire pipe a rigorous hand buffing using a microfiber cloth to raise the shine further and remove any residual wax from in between the sandblasts. The finished pipe looks amazingly beautiful and is now ready for its long second innings with me. I tweaked the seating of the stem in to the mortise a bit and now it seats flush with the shank band. P.S. This pipe shall always remain special to me and will find a place of pride in my modest collection…reason? Well, this is the first pipe that was worked on by Abha and it has turned out to be the most beautiful pipe, just like her!!

I wish to thank each one for sparing their valuable time to read through this write up and praying for the health and safety of entire mankind. Stay home…stay safe!!

Refurbishing A Second Pipe From A Lot Of Six Pipes: A Barling Garnet Grain # 5059.


Blog by Paresh Deshpande

I had picked up a job lot of six pipes from a Curio Store on eBay. This lot contained brands like Barling’s, Parker and Orlik and other English make pipes. These are some of my favorite brands and I couldn’t pass them over even though they were in a hopelessly beat up condition. Here are pictures of the pipe lot that the seller had posted. This lot contained a variety of nicely shaped and grained pipes which I had been looking forward to work on. The first pipe from this pipe lot that I had worked on was a classic Billiards indicated in red arrow. The second pipe that I have selected to work on is shown with an indigo arrow.The second pipe that I decided to work on from this lot is an hour glass shaped pipe with beautiful tightly packed bird’s eye grain to the sides of the stummel and cross grains to the front, back and over the shank surfaces. This pipe is stamped on the left shank surface as “Barling” in running hand over “LONDON ENGLAND” in block capital letters over the grade “GARNET GRAIN”. The right side of the shank is stamped with the shape code “5059”. The stampings are all crisp and deep. The trademark Barling styled vulcanite saddle stem bears the trademark Barling stamped in cross. The size, shape and feel of the pipe are solid in hand. Barling’s pipe brand has been well researched and chronicled on pipedia.org and by Steve when he worked on many of Barling’s pipes over decades and thus, shall not waste time in repeating the information that is available. I too have carefully read and researched this brand as I do have many pipes that I have inherited. However, to refresh my memory, I read the entire article once again and tentatively date this pipe as being an Early Corporate Era pipe, that is made between 1962/3 to prior to 1970. I have based my conclusions based on the following facts that I have read on pipedia.org (https://pipedia.org/wiki/Barling)

(a) Barling logo on the shank is stamped in script without an apostrophe and without ‘S’, as against BARLING’S MAKE that was in use during the Family Era.

(b) The revamped Early Corporate Era grade includes the GARNET GRAIN that replaced the Ye Olde Wood finish (having dark or Plum stain) from the Family Era.

(3) The presence of London England in block lettering underneath the Barling stamp in script.

(4) The absence of the T.V.F stamping since the Ye Olde Wood and TVF both were discontinued at the beginning of the Corporate Era. These were reintroduced in the mid 1960s.

I have dated this pipe tentatively as being from the Early Corporate Era when the facts are conclusive enough, is because of the stummel shape. In my reading and knowledge, early Barlings pipes have always been in classic shapes and this one is anything but a classic shape. Any insight in to this aspect is most appreciated.

Initial Visual Inspection
This pipe has a decent medium bowl size with chamber depth of about 1 7/8 inches. The stummel boasts of some beautiful cross grains to the front and back of the bowl and all around the shank and tight Bird’s Eye to the left side of the stummel. The stummel is covered in dirt and grime of the overflowed lava and dirt accumulated over the years of heavy smoking and uncared attention to cleaning. The stummel has a nice deep and dark color to it, reminiscent of the Ye Olde Wood finish. There is a thick layer of cake in the chamber and some damage is likely to the back of the rim top surface. The stem is heavily oxidized with a few deep bite marks to the button edge in the bite zone. The pipe’s appearance, as it sits on my work table, does not present an encouraging picture. Detailed Inspection Of The Pipe And Observations
The bowl has a wide rim that slightly tapers down towards the heel and has a chamber depth of about 1 7/8 inches. The draught hole is in the center and at the bottom of the chamber. The chamber has an even layer of thick hard cake with remnants of un-burnt tobacco seen at the heel of the chamber. The rim top surface is covered with thick lava overflow and has max accumulation in the 6 ‘O’ clock direction. Through this layer of lava, a few dings can be seen over the rim top surface. The inner rim edge in the 6 ‘O’ clock direction appears dark and worn out. The outer rim edge is sans any damage. The condition of the inner walls of the chamber can be commented upon after the cake has been taken down to the bare briar. There is a strong ghost smell in the chamber which is all pervading. The chamber is out of round in the 10 ‘O’ clock direction (encircled in red) due to the charred inner rim edge. There are a number of dents and chipped areas over the outer rim edge (indicated with green arrows). There are a number of dents/ dings and scratches that are visible over the rim top surface. The stummel appears solid to the touch all around and hence I do not foresee any serious damage to the walls in the form of burnout/ deep heat fissures/ lines or pits. The dark inner rim edge, in the 10 ‘O’ clock direction, may be charred further than anticipated and the same will be confirmed after the surface has been thoroughly cleaned. I need to resort to topping the rim top in order to address the damage to the surface. The ghost smells should reduce once the cake from the chamber is removed and the shank has been cleaned.   The smooth stummel has an hour glass shape (or should I call it a fancy Dublin?) that is broad at the rim, narrow in the mid region and is slightly flared at the bottom/ foot. The surface is covered in dust, lava overflow and grime through which one can make out the beautiful cross grains to the front and back of the bowl and shank. The stummel surface has two small fills, one to the right side of the stummel and the other at the front of the bowl. These fills are difficult to spot against the dark finish of the stummel and can be seen only in a bright white light. The briar is looking lifeless and bone dry. For a pipe that has been so heavily smoked, there are surprisingly no dents and ding over the stummel surface. Once the stummel has been thoroughly cleaned, these fills will be more apparent. I intend to refresh only that fill which has loosened out with a fresh fill of briar dust and superglue. Thorough cleaning and rising of the stummel under warm water will highlight the grain patterns. Micromesh polishing will help in blending these fills while imparting a nice shine to the briar. The mortise shows accumulation of oils, tars and gunk and the air flow is not full and smooth. The shank end face is not a perfect round but slightly flattened at the top. The seating of the stem is not flush with the shank face if not aligned perfectly and precisely. The out of round shank end face is another pointer that this pipe is not from the Family Era!! The ghost smells should further reduce after the mortise and shank walls are thoroughly cleaned. The high quality vulcanite tapered stem is typical Barling with a narrow saddle at the end of a proportionately broad stem. The stem is so heavily oxidized that it appears brownish green in color! Deep calcification is seen in the bite zone probably from prolonged use of rubber bit. Some heavy tooth chatter and deep bite marks in the bite zone are seen on both the upper and lower surfaces of the stem. The button edges on either surface have been completely flattened with the lip edges seen as mere straight thin edges with no shape and sharpness at all. The tenon air opening is completely blocked with accumulated ash and oils/ tars that have dried out on the inside as well as on the outside. The horizontal slot end is completely deformed and the slot itself is chock-a-block with gunk. The other fact that is noticed, if observed closely, is that the trademark stem logo of BARLING CROSS is upside down!! The bite marks will be raised to the surface by heating to the extent possible and further will be filled using charcoal and CA superglue mix. The button end, including the button itself on either surface will have to be completely rebuilt and reshaped. The tooth chatter and the calcified deposits will be removed by sanding with a piece of 220 grit sand paper. I am convinced that all the pipes in this lot is from one estate as the damage to the rim, damage to the stem and general condition of each is exactly the same.

The Process
Abha, my wife, first cleaned the internals of the stem with stem brush, bristled/ regular pipe cleaners and 99.9% pure isopropyl alcohol. She scraped out the dried oils and tars from the tenon end with my fabricated knife and also removed the dried oils and tars from the slot end. She followed it up by sanding the entire stem with a folded piece of 220 grit sand paper to remove the surface oxidation. The amount of gunk that has been scraped out of the stem surface just to get to the black vulcanite shows that the oxidation was very deep and heavy over the stem surface. It has been our experience that sanding a stem before dunking it in to the deoxidizer solution helps in bringing the deep seated oxidation to the surface which in turn makes further cleaning a breeze with fantastic results.   She, thereafter, dropped the stem into “Before and After Deoxidizer” solution developed by my friend Mark Hoover. The solution helps to draw out heavy oxidation to the surface, making its further removal a breeze, while the minor oxidation is eliminated to a very great extent. The initial sanding helps to draw out the complete oxidation as the sanding opens up the stem surface that has been initially covered with oxidation. We usually dunk stems of 4-5 pipes that are in-line for restoration and this pipe is marked in green arrow. We generally allow the stems to soak in this solution overnight to do its work.While the stem was soaking in the deoxidizer solution, I worked on the stummel by first reaming the chamber with size 1 followed by size 2 Castleford reamer head. I further scraped the chamber walls with my fabricated knife to remove the remaining carbon deposits where the reamer head could not reach. I scraped out the lava overflow from the rim top surface, especially from the area in the 6 o’clock direction. Once the cake was reamed back to the bare briar, I used a 150 grit sand paper followed by 220 grit sand paper to remove all the traces of remaining cake and also to smooth out the inner walls of the chamber surface. Finally, to remove the residual carbon dust, I wiped the chamber with a cotton pad wetted with 99.9% pure isopropyl alcohol. The inner rim edge was charred in 10 o’clock and 3 o’clock direction which have been encircled in red. I scraped off the charred briar from these areas and now the chamber is out of round. The chamber walls are pristine without any damage. I shall give the inner rim edge a slight bevel to get the bowl back to a perfect round and mask the damage. The ghost smells are still very strong and may reduce after the shank/ mortise are thoroughly cleaned. The rim top surface is still considerably darkened and would need to be thoroughly cleaned to know the exact damage to the surface.    I followed up the reaming with cleaning the mortise using cue tips, pipe cleaners and shank brush dipped in isopropyl alcohol. I scraped the walls of the mortise with my fabricated knife to remove the dried oils and tars. The ghost smells are still very strong and would require a salt and alcohol treatment.   With the bowl internals clean, I move to clean the exterior of the stummel. I used a hard bristled tooth brush and Briar Cleaner, a product that has been developed by Mark Hoover, to scrub the stummel and rim top. I set the stummel aside for 10 minutes for the product to draw out all the grime from the briar surface. After 10 minutes, I washed the stummel under running warm water with anti oil dish washing detergent till the stummel surface was clean and dried it using paper towels and soft cotton cloth. I simultaneously cleaned the shank internals with the detergent and hard bristled shank brush and set the stummel aside to dry out naturally. I had anticipated that this thorough cleaning of the shank would help eliminate the strong ghost smells, but that was not to be. The stummel surface has cleaned up nicely and the beautiful grain patterns are now on full display. The fills, even the smallest ones, are now clearly discernible. I probed each of the two fills on the stummel surface with a sharp dental tool to check for solidity and thankfully, each fill was nice and solid without any give. I decided not to refresh these fills as my horrific experience while using the thin superglue that was available to me for the purpose, on my last project Bewlay “GENERAL”, still being fresh in my mind. The charring over the rim top surface in 3 o’ clock (encircled in red) is significantly deeper than anticipated. I shall have to resort to topping to address this damage and also the issue of chipped outer rim edge. The chamber and shank needs to be subjected to a salt and alcohol treatment to remove the deeply embedded ghost smells from the stummel.   I continued the cleaning of the chamber and shank internals with a salt and alcohol bath. I use cotton balls which is an at par substitute as I have realized over the years. I draw out a wick from the cotton and along with a folded regular pipe cleaner; insert it in to the mortise and through the draught hole in to the chamber. Thereafter, I packed the chamber with cotton balls to about quarter of an inch below the inner rim edge and soaked the cotton balls with isopropyl alcohol up to the brim. About half an hour later, the level of alcohol had gone down, having being absorbed by the cotton. I topped it up once again and set it aside overnight. By next afternoon, the cotton and alcohol had drawn out all the remaining oils and tars from the chamber and mortise, fulfilling its intended task. I removed the cotton balls and ran pipe cleaners through the mortise to clean out all the loosened tars and gunk and further cleaned it with alcohol and q-tips. The chamber now smells clean and fresh. I set the stummel aside to dry out naturally.While the stummel was drying, the next morning, Abha removed the stem that had been soaking in the deoxidizer solution overnight. She cleaned the stem under running warm water and scrubbed the raised oxidation from the stem surface using a Scotch Brite pad and cleaned the airway with a thin shank brush. She further removed the oxidation by scrubbing the stem with 0000 grade steel wool and applied a little EVO to rehydrate the stem. This now gives a clearer picture of the extent of depth of the bite marks as can be seen in the pictures below. These will definitely require a fill even after I have heated and raised the vulcanite. The buttons on either surface will have to be reconstructed and reshaped. I need to further sand the stem to completely remove the oxidation. Further stem repairs would have to be kept on hold till I got back to my work place where I have a couple of superglue tubes for the purpose.With further stem repairs being on hold, I turned back to the stummel repairs. I topped the rim top over a piece of 220 grit sand paper till I had a smooth even surface and the charred surface in the 3 o’clock direction was completely eliminated.    With a folded piece of worn out 180 grit sand paper pinched between my thumb and forefinger, I carefully gave a bevel to the inner and outer rim edge and addressed the issues of out of round chamber and chipped outer rim edge. The rim top surface and the edges look very neat at this stage with the bowl in a nice round shape. I followed it by wet sanding the stummel with 1500 to 2000 wet & dry sand paper and further with 3200 to 12000 grit micromesh pads, wiping frequently with a moist cloth to check the progress. It was at this stage of restoration when I was taking pictures that I saw the numerous tiny fills at the bottom of the bowl and shank junction. I heaved a sigh of relief when I checked and found these fills to be solid and not requiring any work. I really like the looks of the stummel at this point in restoration. The grains and the clean lines of this piece of briar are worthy of appreciation. The topping has resulted in the rim top surface being lighter than the rest of the stummel surface. I shall darken the rim top surface with a dark brown stain pen once I reach back to my place of work. Next, I rubbed a small quantity of “Before and After Restoration Balm” deep in to the briar with my finger tips and let it rest for a few minutes. The balm almost immediately works its magic and the briar now has a nice vibrant appearance with the beautiful grain patterns displayed in their complete splendor. I further buffed it with a horse hair brush and gave a vigorous buff with a microfiber cloth to deepen the shine. The dark browns of the bird’s eye and cross grains spread across the stummel makes for a visual treat. It really is a nice piece of briar. The dark YOW like stain elevates the beauty of this pipe to a new level.     Now, having rejoined my place of work after a hiatus of four months I need to work real fast to complete my backlogs of write ups and complete the repairs on pipes that were worked on during the lockdown period while at home. I have completed a few and now this pipe has inched forward on to my work table. While packing these pipes for its journey with me, I had noted all the issues that had to be addressed on each pipe. This one needed stem repairs to include filling of deeper tooth indentations, rebuilding/ reshaping of the buttons, stem and stummel polishing with a carnauba wax.

With the stummel rejuvenation almost complete, save for the final wax polish, I worked the stem. Here is how the damage to the stem looks as it sits on my work table. The damage to the buttons and the deep tooth indentations are also clearly visible. Once I have repaired these damages, the entire stem needs to be polished and the stem logo needs to be refreshed. That I have to use the CA Wood Superglue gives me shudders as I still am reeling under the frustrations of using this glue while I repaired the stem of the Bewlay “GENERAL” pipe, my last project!!I carefully inserted a triangle shape index card covered in transparent tape in to the slot so as not to break the bite zone. The tape prevents the mix of superglue and charcoal from sticking to the index card. I mixed superglue and activated charcoal powder and generously applied it over the bite zone, including over the buttons, on either surfaces of the stem and set it aside to cure. Once the fill has hardened, I shall file and sand the fills to match the surface of the stem and sharpen the button edges on either surface. This glue hardens immediately and allowed me only a few seconds of application whereas the all purpose CA superglue allowed me enough time to get an even spread over the damaged surface.The fill had hardened and with a flat head needle file, I worked on the filling till I had achieved a rough match with the surrounding surface and had sufficiently sharpened the button edges. As with the stem repair of my previous project, Bewlay “GENERAL”, this too had many air pockets. I filled these air pockets with clear CA superglue and set the stem aside for the superglue to harden.

While the stem repairs were curing, I stained the rim top surface with a Dark Brown stain pen and set the stummel aside for the stain to set. The rim top now blends in nicely with the rest of the dark stained stummel surface. Once polished it should match perfectly with the rest of the stummel surface.Once the fill had cured sufficiently, I sand the fills with a flat head needle file and reshaped the button, roughly blending the fills with the surrounding stem surface. For a better blending, I further sand the entire stem with 220 followed by 400, 600, 800 and 1000 grit sand paper. This helps to reduce the scratch marks left behind by the more abrasive 220 grit paper.   To bring a deep shine to the vulcanite stem, I polished the stem by wet sanding with 1500 to 12000 grit micromesh pads. I wiped the stem with moist cloth after each pad and rubbed it down with Extra Virgin Olive oil to rejuvenate the vulcanite. The finished stem is shown below. The sanding with 400 to 1000 grit sand papers followed by wet sanding with micromesh pads had miraculously eliminated most of the many air pockets that were observed earlier. A few air pockets do remain but they are few and not significant at all. I am pretty pleased with this appearance of the stem.  I polished the rim top surface with a cotton cloth buffing wheel mounted on my hand held rotary tool and Red compound. I wiped the rim top with cotton swab and alcohol to increase the transparency of the stain. I am quite pleased with the match of the rim top with the rest of the stummel surface.  I mount a cotton cloth buffing wheel on to my hand held rotary tool and polished the stummel and stem with Blue Diamond compound. This compound helps to remove the minor scratch marks that remain from the sanding. This pipe is starting to look really beautiful with the glossy dark plum like stain through which the beautiful grains pop out over the stummel surface.  The only cosmetic, yet important aspect that remained was to refresh the stem logo. I applied a coat of white correction ink over the logo and once dried, I gently wiped it with a cloth. The logo is now clearly visible.   I mount another cotton buffing wheel that I have earmarked for carnauba wax and applied several coats of the wax. I finished the restoration by giving the entire pipe a rigorous hand buffing using a microfiber cloth to raise the shine further. The finished pipe looks amazingly beautiful and coupled with the size, heft and the hand feel, makes it quite a desirable pipe. If you feel that this pipe calls out your name, please let Steve know and we shall make arrangements for it to reach you. I wish to thank each one for sparing their valuable time to read through this write up and each one is my prayers. Stay home…stay safe!!


A Fresh Lease On Life For a Castello Sea Rock ‘A’


Blog by Paresh Deshpande

I had restored a Castello Sea Rock from my inherited pipe lot, my first Castello pipe, last year while Steve, Jeff and Dal Stanton had visited me in Pune, India (https://rebornpipes.com/2019/06/07/a-simple-restoration-of-a-castello-sea-rock-briar-56-f-pipe-with-steve-and-jeff-laug/)

Since then after I had smoked this pipe, I always wanted to lay my hands on another Castello. They are fantastic smokers, I say. However, the prices of Castello pipes had gone through the roof and to some extent, beyond reach. During one of my search on eBay for estate pipes, I came across this Castello Sea Rock pipe that was being sold for a considerably lesser price and it had the option for Best Offer. The long and short of it is that my best offer was accepted by the seller and the pipe made its way to Abha, my wife. That this pipe was being sold for such a low price was a pointer that there were issues with this pipe, but what exact issues and the extent of these issues was neither described by the seller nor were they visible in the pictures provided by the seller.

The pipe with its large Billiard bowl and a triangular shank looks beautiful. The stummel has deep and craggy rustications that feel tactile in the hand. The shank end is adorned with a gold/ brass band that add a touch of classy bling to the appearance of the pipe. The flat lower surface of the stummel is smooth and bears the stampings on this pipe. It is stamped as “CASTELLO” over “SEA ROCK BRIAR” followed by the letter “A”. Towards the shank end, it is stamped as “MADE IN CANTU” over “ITALY” over “HAND MADE”. Stamped at the very end of the shank and partially covered by the gold/ brass band is “CARLO SCOTTI” in an oval.  The triangular Lucite stem is stamped on the lower flat surface as “HAND MADE” over “CASTELLO” over code “# 3”.  The trademark WHITE BAR adorns the upper surface of the stem.    I had researched this brand extensively when I had worked on my first Castello, link for which I have provided at the very beginning of this write up. In order to establish the provenance of this pipe, I revisited the Briar Blues site where a detailed history and dating guide is available for the discerning reader. I have reproduced the entire article here for posterity as the external link provided on pipedia.org did not work.

https://briarblues.com/castello/

CASTELLO – DATING & INFORMATION GUIDE

NEW INFORMATION JUST IN – The very first pipes made by Carlo Scotti were in 1936 in Switzerland!!!

1947 – Carlo Scotti begins the company. In the beginning (1947 – 1949, maybe 1950 ) the pipes were stamped Mi Reserva ( my reserve ). Later the Reg No was added. This Reg No has nothing to do with shape numbers, but is merely the Castello company trademark.

Vulcanite stems used until? This is an interesting question. From early Castello pipe advertising from the Wally Frank and later Hollco Rohr companies it says the pipe comes with Vulcanite stems. However the photos appear to have pipes with Lucite stems. To our knowledge no one has yet seen a Vulcanite stemmed Castello with the faux diamond logo inset.

The Old Sea Rock and the Sea Rock co-existed. As far as I know, the OSR was US only, imported by Hollco Rohr, and sported the rhinestone. The Sea Rock goes back to the early days.

There was an Antiquari (not Old Antiquari) that was also a Hollco import, and was fume top and rusticated. I think it was only around for a couple of years.

Stem logo’s. White bar, black dot, and faux diamond. The first stem logo was the white bar. However once Castello began it’s working relationship with The Wally Frank Co a different stem logo was required, as The Wally Frank Co had a line of pipes named White Bar.

The faux diamond logo was created and used primarily for the US market for many years.

Castello still occasionally put rhinestones in the mouthpieces, just to maintain it’s value as a trademark. It’s not on many pieces. The black dot logo is used on Castello pipes with white Lucite stems.

Shape numbers. Shape numbers are all 2 digits. A 2 in front indicates a “fancy” interpretation, a 3 in front means that the carving is somehow unique. I don’t know when the change was made, but currently, a π symbol is used instead of the 3xx.  It may be seen on a variety of finishes, that may have a unique carved section or some other interesting feature.

Hollco Rohr begins distribution in the mid to late 1960’s when they take over the Wally Frank Company.

Big Line – stamp used from 1968 – 1972. Replaced by Great Line, although still used on huge pipes.

Colored Lucite stems – used in the 1970’s and on occasion today although the material is difficult to find.

Pre K grading. Late 1950’s to mid 1960’s the pipe carried stamps which indicted sizes. These were as follows; SA, SB, SC, and SS. SA being the smallest and SS the largest.

K grading begins. In 1969 Franco ( Kino ) Coppo joins the firm. In the late 1960’s and early 1970’s the company began the use of the K grading. The upper case large K, was used for non smooth pipes to designate size. For smooth pipes to indicate a combination of grain quality and size. These are also the years that Castello switched from machine made pipes that were hand finished to completely hand made pipes.

Switch from large K to small k in an oval. In 1982 the company changed from the use of the large upper case K grading to a small lower case k within an oval ( 2 k or greater ) or circle for single k grades.

1984 – 1985 Franco ( Kino ) Coppo takes over the running of the firm. The Kino “knickname” given to Franco by Carlo Scotti, and is a shortened version of his full birth name, Franchino.

The Natural Vergin were issued in 1967 first but only in 1985 they started to be produced in series only on the natural carved pipes.

1987 – the 40th anniversary Castello begins the number within a castle stamp. The number added to 1947 gives the year of pipe creation. ie 50 within a castle = 1947 + 50 = 1997.

1992 – Carlo Scotti passes away.

US stamp begin in 1997

KINO stamp begin in 2007 – 60th anniversary. Kino is Franco Coppo’s nick name.

X – stamped on pipe. This stamp is added to pipes that are picked up directly at the factory by customers. Indicates a “friendship” pipe.

Ever wonder where your pipe came from? Which shop had it first? If so, read below;

N1 = Novelli ( Italy )
N = Noli ( Italy )
F = Fincato ( Italy )
LO = Lorenzi ( Italy ) ( this shop has closed and they used to add a * on every pipe )
B = Bonfiglioli ( Italy )
BO = Bollito ( Italy )
B15 = Bollito ( Italy )
V = Agide ( Italy )
SO = Tabaccheria Scarafioffi ( Italy )
JO = Osstermann ( Austria )
R3 = Ruocco Raffaella of Savona ( Italy )
L – Lanzola ( Italy )
US = sold into the US via the US Castello agent
A = “Amicizia” or friendship. That is the stamping for the pipes given for free to friends. It is quite rare.
LOB = is part of a large collection that the factory just re-purchased and they stamped with LOB (Legendary old briar)

The information gathered on this page comes from a variety of sources on the internet and through emails and conversations. I’d like to Thank these gentlemen for their help; Marco Parascenzo, Franco Coppo ( via Marco ), Greg Pease, Mike Penix, Bob Hamlin, Chris Jones, Mike McCain, and Mike Davis

Current finishes, grades, & SRP in US dollars;

Castello US prices have not increased since 2012!!
Sea Rock Briar – carved finish – various stains
k 380.00, kk 395.00, kkk 405.00, kkkk 425.00, G 450.00, GG 550.00, GL 615.00 & GGG 615.00
Old Antiquari – sand blast – various stains
k 415.00, kk 415.00, kkk 450.00, kkkk 450.00, G 530.00, GG 675.00, & GL 675.00
Trademark – smooth – various stains
k 430.00, kk 430.00, kkk 480.00, kkkk 480.00, G 500.00, GG 660.00, & GL 660.00
“Castello” – smooth – various stains
kk 550.00, kkkk 590.00, G 600.00, GG 690.00, & GL 690.00
Perla Nera – smooth polished black
k 560.00 & kk 590.00
Collection – smooth – various stains
k 595.00, kk 655.00, kkk 750.00, kkkk 825.00
Occho di Pernice – smooth – graded birds eye
k 685.00, kk 750.00, kkk 800.00, kkkk 855.00
Aristocratica – smooth – fumed rim
Trade Mark – 595.00, “Castello” – 690.00, Collection – 865.00, Collection Great Line – 910.00
Castello Collection Fiammata – 1090.00, Collect Great Line Fiammata – 1545.00
Dune – carved
k – ???.00, kk – ???.00
Big Line – various grades
Sea Rock – ???.00 Old Antiquari – 900.00, “Castello” – ???.00, Collection, ???.00
Collection Great Line – smooth – free style
k 780.00, kk 850.00, kkk 1000.00, kkkk 1270.00
Collection Fiammata – smooth – graded straight grains
k 970.00, kk 1150.00, kkkk 1270.00, kkkk 1600.00
Collection Great Line Fiammata – smooth straight grain free style
k 1660.00, kk 2300.00, kkk 3100.00, kkkk 3780.00
Special Series – Cavallo, Riso, etc
Sea Rock 765.00, Old Antiquari 810.00, Trademark 950.00, Castello 1050.00,
Collection 13000.00, Occhio di pernice 1300.00, Fiammata 1455.00
Preziosa ( semi precious stone floc )
Perla Nera 950.00, Castello 980.00, Collection 1180.00, Collection GL 1390.00,
Madreperla 1545.00, Fiammata 1700.00

Options

briar shank or stem application + 75.00
silver floc or band + 90.00
18 k gold band + 500.00 – now a very rare addition, due to gold cost
18k gold band with lacquer inlay + 500.00
silver pin / nail + 160.00
common stone inlay + 105.00
special pi trim + 55.00

From the above, it is evident that the pipe currently on my work table is from an early time period of Castello pipe making as evidenced by the stamp of SEA ROCK and WHITE BAR. That this pipe is stamped with the letter “A” is indicative that it was given for free to friends and IT IS VERY RARE. Lady luck smiled upon me during this purchase for sure!!

Initial Visual Inspection
This pipe has a large bowl with a depth of 2 ¾ inch. The chamber has an even layer of thick hard cake. There is a heavy overflow of lava over the rim top surface. The rim top has darkened considerably. The condition of the inner walls of the chamber and the inner edge can be commented upon after the cake has been taken down to the bare briar. The ghost smells in the chamber are not very strong.The deeply rusticated stummel surface has a very beautiful texture and is covered in dust and grime. The fact that the rustications are dusty and filled with dirt is accentuated more due to the contrast of dark and medium brown stains on the stummel and the shank. The briar is looking lifeless and bone dry and has taken on black dull hues. The smooth bottomed shank that bears all the stummel stampings, has deep scratches akin to road rash marks.The mortise was full of oils, tars and gunk and air flow was restricted. The shank end gold band made me wonder if it was a shank repair band or otherwise. However, the shank has no cracks and hence it is definitely an original adornment. The seating of the stem in to the mortise is not flush. This could be either a result of the accumulated gunk and grime in the mortise or incorrect drilling of the mortise (unlikely on a Castello though!) or a bent stem tenon.The high quality Lucite stem is nice and shiny. Some minor tooth chatter and a couple of deeper bite marks are seen on both the upper and lower stem surfaces in the bite zone. The tenon end had accumulated oils/ tars that had dried out on the inside as well as on the outside. The horizontal slot is filled with grime that will have to be addressed.Initial Cleaning By Abha…
The initial cleaning on this pipe was done by Abha, my wife (she has cleaned up around 40-50 pipes and these have now reached me for further restoration). She reamed out the complete cake and further smoothed out the chamber walls with a folded piece of 220 grit sand paper. She further cleaned out the internals of the shank with pipe cleaners and alcohol and cotton buds. She followed the internal cleaning of the shank with external cleaning of the stummel using Murphy’s Oil soap and hard bristled tooth brush and dried it with paper napkins and cotton cloth.

Next she cleaned out the internals of the stem air way and immersed it in “Before and After Deoxidizer” solution along with the stem of other pipes in line for restoration. Once the stem had soaked overnight, she cleaned the stem under running warm water and scrubbed the raised oxidation from the stem surface using Scotch Brite pad. She further removed the oxidation by scrubbing the stem with 0000 grade steel wool and applied a little olive oil to rehydrate the stem.

The Process
Finally back at my work place… After enjoying a compulsory extended leave of three months with family and having honed my culinary and domestic chores skill set, I was happy to rejoin my duty and get back to completing the pending pipe restorations.

I start this project by addressing the tooth chatter and bite marks on both the surfaces in the bite zone. Since this was a Lucite stem, heating the bite zone with the flame of a lighter would have damaged the stem further; hence, I filled the deeper bite marks with a mix of CA superglue and activated charcoal and set it aside to cure.Once the fills had cured, using a flat needle file, I reshaped the button and roughly matched the fills with the rest of the stem surface. I further fine tuned the match by sanding the filled area with a folded piece of 320 grit sand paper pinched between my thumb and forefinger. I followed it up by sanding the entire stem surface using 400, 600, 800 and finally with a piece of 1000 grit sand papers. This serves to reduce the sanding marks of the more abrasive sand papers. I also sharpened the button edges while sanding. I wiped the stem with a cotton swab and alcohol to remove all the sanding dust from the surface. I applied a little Extra Virgin Olive oil over the stem to impart a shine.To bring a deep shine to the Lucite stem, I polished it by wet sanding with 1500 to 12000 grit micromesh pads. I wiped the stem with a moist cloth and rubbed it down with “Before and After Extra Fine Polish” to remove the minor scratches left behind by the sand paper while polishing the stem to a nice black glossy shine. The finished stem is shown below. I took a closer look at the walls of the chamber to ascertain the condition of the chamber. To my chagrin, I noticed a distinct line (marked with yellow arrows) extending for about an inch from the inner rim edge in to the chamber. It was the beginning of a heat fissure and from the point of origin (circled in green), there were other two heat lines (marked with blue arrows) extending roughly perpendicular to the first. However, these heat lines were very minor and extremely superficial while the one that moved up towards the rim was slightly deeper. I checked the external stummel surface under bright light and magnification for any corresponding crack. It was heartening to note that there were none! I thoroughly checked the rim top surface and was relieved to note that there is no damage.With my sharp dental pick, I probed and removed all the charred briar wood from the crack. It was a big relief to note that the crack did not go all the way to the outside of the stummel. Here are a couple of close up pictures of the crack to the chamber wall. I conferred with my Guru and mentor, Steve, over Face Time video call and after seeing the crack, he concurred that it was best to fill just the crack inside the chamber with J B Weld followed by a coating of activated charcoal and yogurt to the entire chamber for further protection. Before proceeding with further repairs, I thoroughly cleaned the rim top to completely remove the lava overflow from the rim top surface Murphy’s Oil soap and a brass wired brush. To protect the crack from coming in to direct contact with the burning tobacco and also to prevent the heat from reaching the external crack to the stummel and causing a burnout, I plan, firstly, to fill only the crack of the chamber with J B Weld followed by a second coat of activated charcoal and yogurt to the entire chamber which would assist in faster cake formation. J B Weld is a two-part epoxy Cold Weld that consists of two parts; hardener and steel which are mixed in equal parts in a ratio of 1:1 with hardening time of 5-6 minutes and complete curing time of 6-8 hours. I poured the contents of the two tubes and mixed it well. With a flat bamboo frond, I applied this mix and filled the intended crack. I worked fast to ensure a complete and even filling of the crack and set the stummel aside for the J B Weld to harden.By the next afternoon when I got back to working on this pipe, the J B Weld coat had completely cured and hardened completely. With a folded piece of 150 grit sandpaper, I sand the weld coating to a smooth surface till I had as thin a coat as was essential to protect and insulate the crack from the direct heat of the burning tobacco. The Weld coat has completely covered only the crack and the point of origin which can be seen as a thin line. I am very pleased with the repairs at this stage. Next issue to be addressed was that of the numerous deep road rash marks that were seen to the flat lower surface of the stummel. With a folded piece of 180 followed by 600 and 800 grit sand paper, I diligently sand away the road rash marks from the lower flat surface of the stummel taking care that the stampings are preserved in total. I followed it up by polishing the surface by wet sanding with 1500 to 12000 grit micromesh pads. Though the road rash marks are not completely eliminated, they are greatly reduced. The road rash marks to the gold band are now distinctly visible in the last picture. The last issue that needed to be addressed before final polishing was that of the seating of the stem tenon in to mortise. The pictures below will give the readers an idea of the issue that I needed to address.    I checked the drilling of the mortise and it was perfect as expected. Next I checked the shank face and the gold band for unevenness but it was nice even and the band sat flush with the shank face. But yes, the seated stem in the mortise had some play in the fitting. I conferred with Steve on Face Time and he asked me to hold the stem upright with tenon side up. Immediately, it was apparent to both of us that the tenon had bent a little and was off center. To address this, I heated the tenon with the flame of a lighter till it was slightly pliable and carefully seated the tenon in to the mortise. Once completely seated, I adjusted the alignment and held the stem in place till the tenon had cooled down sufficiently. Again, though the seating is not perfectly flushed, the alignment of the stem and shank is near perfect. It has to be understood that we pipe restorers are undertaking repairs to the existing damages to make them functional again and not making new pipes, though we do strive for that kind of perfection. All said, I am quite pleased with this repair.  I rubbed a small quantity of “Before and After Restoration Balm” deep in to the briar with my finger tips and let it rest for a few minutes. The balm almost immediately works its magic and the briar now has a nice vibrant appearance with the beautiful grain patterns displayed in their complete splendor. I further buffed it with a horse hair brush. The dark browns of the raised portions of the sandblast contrasts beautifully with the rest of the dark stummel and makes for a visual treat. It really is a nice piece of briar. To protect the J B Weld coated crack from the direct heat of the burning tobacco, I coat the complete chamber walls with a mix of activated charcoal and yogurt and set it aside to harden naturally.To put the finishing touches, I mount a cotton cloth buffing wheel on to my hand held rotary tool and polished the stem with Blue Diamond compound. This compound helps to remove the minor scratch marks that remain from the sanding.    Next, I mount another cotton buffing wheel that I have earmarked for carnauba wax and applied several coats of the wax to impart a nice gloss to the finish. I finished the restoration by giving the entire pipe a rigorous hand buffing using a microfiber cloth to raise the shine further. Lastly, I polish the gold band with a jeweler’s cloth to a nice and radiant shine.  The rustications on this finished pipe looks amazingly beautiful and coupled with the brand, vintage, rarity and the contrast that the gold band imparts, makes it quite a desirable pipe. This pipe shall be joining my small collection of Castellos to be admired and be happy that I have restored it to its former beauty and functionality. P.S. Just out of curiosity, I took the stummel to my family goldsmith to check if at all the band at the shank end was gold or a brass made band. I was pleasantly surprised to be told that it was indeed an 18 carat gold band!! I am sure whoever the “FRIEND” was that received a Castello pipe with an 18 carat gold band had to be someone very dear to Carlo Scotti!! If only the pipe could tell me all about this friend…      

I wish to thank each one for sparing their valuable time to read through this write up and each one is always in my prayers. Stay home…stay safe!!

An Interesting Pipe To Work On – a GBD Prehistoric Xtra Horn


Blog by Paresh Deshpande

This pipe has attracted the attention of my wife, Abha, since the time I had received three huge boxes of pipes that once belonged to my Grandfather. So when she took the plunge of helping me in restoring all these inherited pipes, this was one of the first she had earmarked for cleaning up. After she had done the initial cleaning up, this pipe languished at the bottom of the pile of around 50 plus pipes that she had cleaned up. And it was during the period of my stay at home on compulsory leave due to the countrywide lockdown to contain the spread of CORONA VIRUS (COVID-19) that this pipe came up for restoration.

The pipe with its forward canted Horn shape with a long military mount vulcanite stem has a delicate feel and look to it. It has beautiful and deep sandblast with some astonishing grain patterns that are seen over the stummel surface. The shank end is adorned with a gold ferrule that adds a touch of classy bling to the appearance of the pipe. It is stamped at the foot of the stummel as “PREHISTORIC” in Gothic hand followed by “GBD” in an oval over “XTRA”. The gold ferrule is stamped as “GBD” in an oval over four different shaped cartouches bearing the stampings, from left to right, numeral “6 (or is it 9 ?) in a rhombus followed by purity grade number “.375” in a rectangle followed by date code letter “F” and lastly the symbol of the city Assay Office that has worn out but I guess it appears like a LION HEAD with protruding lines from the four corners. The vulcanite stem is stamped, not very deeply, on the left side as “GBD” in an oval over “XTRA” in a slight upturned arch. The stampings, save for the Assay Office, is crisp and clear. There is plenty of material available on pipedia.org on the brand GBD that makes for an interesting read. The link below should take you to the relevant page on pipedia.org. For the sake of brevity, I have reproduced only the relevant portions that are related and of interest with respect to the pipe that I am working on (https://pipedia.org/wiki/GBD).

Early GBDs were made only in one single grade concerning the wood’s quality, later supplemented by a second one, and there was only a very limited number of finishes. But toward the end of the 19th century, the demand changed. For example the Britons preferred darker stainings. More differentiated customer’s wishes made the introduction of additional markings necessary. GBD Xtra and GBD Special were very early models who’s names indicated special final treatments and / or fitments. The standard quality was stamped simply with GBD.

There is a very simple explanation for GBD’s program to turn more “British”: GBD became a British company soon after the turn of the century! In 1902 Marechal and Ruchon sold GBD to A. Oppenheimer & Co. in London.

The claims after the 1st World War demanded further distinctions. First of all was the London Made, which became the Standard London Made, followed by the New Era— in 1931 the top model asking 12½ Shilling. The Pedigree, although sketched around 1926, was not produced until the later 1930s. The New Standard was introduced in order to give the popular Standard of the 20s a higher rank in value. The Prehistoric, a deeply sandblasted black pipe, that still carried the small GBD Xtra stamp, was entirely new and unusual.

Dating GBDs
Xtras haven’t been made since the 1930’s.

That this pipe currently on my work table was made from 1918 to 1930s can be inferred from the information gleaned above:

(a) GBD Xtra and GBD Special were very early models whose names indicated special final treatments and / or fitments.

(b) The ferrule stamping of AO points to the fact that the pipe is post 1902 as Marechal and Ruchon sold GBD to A. Oppenheimer & Co. in London in 1902.

(c) The Prehistoric, an entirely new and unusual line that still carried the small GBD Xtra stamp, was introduced after WW I.

(d) Xtra hasn’t been made since 1930s.

To pinpoint the year of make of this pipe, I decided to follow the stampings on the ferrule. Here, I was not very sure about the Assay Office hallmark as it was pretty buffed out and the numeral could have been a 6 or a 9. But having worked and researched a few silver hallmarked pipes, I guessed that the Assay Office hallmark should be a lion head. I visited https://www.gold-traders.co.uk/hallmarks/

This site is a step-by-step guide to help identify the carat/ purity, Assay Office and year of hallmark on all things gold. All things matched up perfectly and I have included a screen shot of the final result.From the above, it can be conclusively indentified that this GBD Prehistoric Xtra was made in England (London Assay Office) in 1921, give or take a year as the ferrules were always sent to the Assay Office in bulk to be used over a period of time, usually a year.

Initial Visual Inspection
As I have mentioned above, this pipe was initially handled by Abha and she is not in a habit of taking many pictures as she works on each piece of briar. There are not many pictures to give the readers an idea about the condition of the pipe before she had worked her magic and presented me with a nice clean canvas to carry forward my repair and refurbishing tasks. I have included a description of the initial condition of the pipe as documented by her.

This pipe has a rather small and narrow bowl in a classic Dublin shape with a pronounced forward cant. The chamber tapers towards the foot and has a chamber depth of about 1 ¼ inches. The chamber had an even layer of thick hard cake. There was a heavy overflow of lava over the rim top surface. Through this thick layer of lava, a crack is clearly visible over the rim top (marked with yellow arrows) that extends over both the inner and outer stummel surface on the right side in the 5 o’clock direction. The rim top was darkened considerably and I had suspected a charred inner rim edge in 6 o’clock direction (marked in green). The condition of the inner walls of the chamber can be commented upon after the cake has been taken down to the bare briar. The ghost smells in the chamber are not very strong.The deeply sandblasted stummel surface has very beautiful grain patterns and is covered in dust and grime. The fact that the sandblasted patterns are dusty and filled with dirt is accentuated more due to the contrast of dark and medium brown stains on the stummel and the shank. The briar was looking lifeless and bone dry and had taken on black dull hues. The mortise was full of oils, tars and gunk and air flow was restricted.

The high quality vulcanite stem was deeply oxidized. Some minor tooth chatter and calcified deposit were seen on both the upper and lower stem surfaces in the bite zone and at the bottom of the button edge respectively. The tenon end had accumulated ash and oils/ tars that had dried out on the inside as well as on the outside. The horizontal slot has scratch marks which will have to be addressed.    Initial Cleaning By Abha…
The initial cleaning on this pipe was done by Abha, my wife (she has cleaned up around 40-50 pipes and these have now reached me for further restoration). She reamed out the complete cake and further smoothed out the chamber walls with a folded piece of 220 grit sand paper. She cleaned out the internals of the shank with pipe cleaners and alcohol and cotton buds. She followed the internal cleaning of the shank with external cleaning of the stummel using Murphy’s Oil soap and hard bristled tooth brush and dried it with paper napkins and cotton cloth.

Next she cleaned out the internals of the stem air way and immersed it in “Before and After Deoxidizer” solution along with the stem of other pipes in line for restoration. Once the stem had soaked overnight, she cleaned the stem under running warm water and scrubbed the raised oxidation from the stem surface using scotch brite pad. She further removed the oxidation by scrubbing the stem with 0000 grade steel wool and applied a little olive oil to rehydrate the stem.

The Process
The stummel crack was something that would essentially require materials and equipment that are available to me at my work place; therefore, I had no option but to relegate the stummel repairs to a later date.

I start this project by addressing the tooth chatter on either surface in the bite zone. Since vulcanite has a property to expand and regain its original shape when heated, I heat the bite zone with a candle flame to raise the tooth chatter to the surface. The deeper bite marks were filled with a mix of CA superglue and activated charcoal and set aside to cure. Once the fills had cured, using a flat needle file, I reshaped the button and roughly matched the fills with the rest of the stem surface. I further fine tuned the match by sanding the filled area with a folded piece of 220 grit sand paper pinched between my thumb and forefinger. I followed it up by sanding the entire stem surface using 400, 600, 800 grit sand papers and finally with a piece of 0000 grade steel wool. This serves to remove the deep seated oxidation and also reduces the sanding marks of the more abrasive sand papers. I also sharpened the button edges while sanding. I wiped the stem with a cotton swab and alcohol to remove all the oxidation and sanding dust from the surface. I applied a little Extra Virgin Olive oil over the stem and set it aside to be absorbed by the vulcanite. To bring a deep shine to the vulcanite stem, Abha polished it by wet sanding with 1500 to 2000 grit sandpapers followed by further wet sanding with 3200 to 12000 grit pads. She wiped the stem with a moist cloth after each pad and rubbed it down with Extra Virgin Olive oil to rejuvenate the vulcanite. The finished stem is shown below.  Further repair and refurbishing work would have to be put on hold till I rejoin my work place.

Part II
Finally back at my work place…… After enjoying a compulsorily extended leave of three months with family and having honed my culinary and domestic chores skill set, I was happy to rejoin my duty and get back to completing the pending pipe restorations.

I took a closer look at the crack on the right side of the stummel in the 5 ‘O’ clock direction. This crack extends over the rim top surface and in to the chamber. With my sharp dental pick, I probed and removed all the charred briar wood from the crack and also dislodged the entire lava overflow that had embedded itself in to the crack over the rim top. It was a big relief to note that the crack did not go all the way to the outside of the stummel. Here are a couple of close up pictures of the crack to the chamber wall and outer stummel surface at this stage. I conferred with my Guru and mentor, Steve, over Face Time video call and after seeing the crack, he concurred that it was best to fill just the crack inside the chamber with J B Weld followed by a coating of activated charcoal and yogurt to the entire chamber for further protection. Before proceeding with further repairs, I decided to thoroughly clean the rim top and the stummel again to remove all the dirt and dust that had accumulated since last one year and also to completely remove the lava overflow from the rim top surface. I cleaned the stummel using Murphy’s Oil soap and a hard bristled tooth brush. With a brass wired brush, I cleaned the rim top to remove the lava overflow. The stummel and the rim top have cleaned up nicely.   Next I decided to address the crack to the stummel surface. I marked the end point of the crack on with a sharp dental tool under magnification. This helps to identify the end point later with naked eye and also provides initial traction for the drill bit to bite in. With a 1 mm drill bit mounted on to my hand held rotary machine, I drilled a counter hole at the end of the crack, taking care not to go too deep and end up drilling a through-hole. I had to mark and drill a second counter hole as I later realized that the crack extended slightly below the first one that I had drilled. I ran the sharp dental tool along the crack to remove the dirt and debris that may have been lodged in the crack. I filled the drilled holes and the crack to the stummel surface with a mix of CA superglue and briar dust. I also filled the crack at the rim top surface with the mix of superglue and briar dust and set the stummel aside for the fills to cure. A few hours later, the fills had hardened completely. I sand them down with a flat head needle file to achieve a rough match with the rest of the stummel. I fine tuned the match with the rest of the surface by further sanding with a piece of 180 grit sandpaper. I used a tightly folded 180 grit sand paper to sand the fills and had carefully moved along the ridges of the sandblast to achieve a near perfect match. I vigorously brushed the rim top with a hard bristled brass wired brush to further blend the fill with the rest of the rim top surface.    Now that the external repairs are done, I decided to address the crack to the wall of the chamber. To protect the crack from coming in to direct contact with the burning tobacco and also to prevent the heat from reaching the external crack to the stummel and causing a burnout, I plan, firstly, to fill only the crack of the chamber with J B Weld followed by a second coat of activated charcoal and yogurt to the entire chamber which would assist in faster cake formation. J B Weld is a two-part epoxy Cold Weld that consists of two parts; hardener and steel which are mixed in equal parts in a ratio of 1:1 with hardening time of 5-6 minutes and complete curing time of 6-8 hours. I poured the contents of the two tubes and mixed it well. With a flat bamboo frond, I applied this mix and filled the intended crack. I worked fast to ensure a complete and even filling of the crack and set the stummel aside for the J B Weld to harden.By the next afternoon when I got back to working on this pipe, the J B Weld coat had completely cured and hardened considerably. With a folded piece of 150 grit sandpaper, I sand the weld coating to a smooth surface till I had as thin a coat as was essential to protect and insulate the crack from the direct heat of the burning tobacco. The Weld coat has completely covered only the crack which can be seen as a thin line. I am very pleased with the repairs at this stage.I refreshed the stem logo by first coating the logo with a white correction liquid and once it had dried, I wiped it lightly with a cloth. I polished the stem surface with “Before and After Extra fine” stem polish developed by Mark Hoover. This polish helps in removing the minor scratches left behind due to sanding while imparting a nice shine to the stem.   Next, I rubbed a small quantity of “Before and After Restoration Balm” deep in to the briar with my finger tips and let it rest for a few minutes. The balm almost immediately works its magic and the briar now has a nice vibrant appearance with the beautiful grain patterns displayed in their complete splendor. I further buffed it with a horse hair brush. The dark browns of the raised portions of the sandblast contrasts beautifully with the rest of the dark stummel and makes for a visual treat. It really is a nice piece of briar. Now that the cosmetic aspects of this pipe have been dealt with, all that remained was the functional aspect that needs to be taken care of. The J B Weld coated crack needs to be protected from the direct heat of the burning tobacco and for this; I coat the complete chamber walls with a mix of activated charcoal and yogurt and set it aside to harden naturally. The mix has to be of the right consistency; neither too thick nor too runny. It should be of a consistency that is thick enough to spread easily, evenly and stick to the walls. Also the coating should not be very thick. A thin film is all that is required. Another important aspect to remember is that it is essential to insert a pipe cleaner in to the mortise and through the draught hole for two reasons; first is obviously to keep the draught hole from getting clogged and secondly, the pipe cleaner absorbs all the moisture from the mix and helps in faster and even drying of the coat.To put the finishing touches, I mount a cotton cloth buffing wheel on to my hand held rotary tool and polished the stem with Blue Diamond compound. This compound helps to remove the minor scratch marks that remain from the sanding.  Next, I mount another cotton buffing wheel that I have earmarked for carnauba wax and applied several coats of the wax. I finished the restoration by giving the entire pipe a rigorous hand buffing using a microfiber cloth to raise the shine further. Lastly, I polish the 9 carat gold ferrule with a jeweler’s cloth to a nice and radiant shine. The blast pattern on this finished pipe looks amazingly beautiful and coupled with the vintage, shape rarity and the contrast that the gold ferrule imparts, makes it quite a desirable pipe. This pipe shall be joining my small collection of GBDs to be admired and be happy that I have restored it to its former beauty and functionality. P.S. In one of my previous blogs, I wrote that the question “Why do I enjoy bringing these old battered and discarded pipes back to life?” had popped up in my mind. I gave my third reason in my last write up and in all my subsequent write ups I intend to share with you, my readers my reasons as to why I really love this hobby.

The fourth reason is that every restoration project that I undertake is a new challenge for me. It sets my adrenaline pumping as I see the beauty of the pipe being unraveled before my eyes as I progress through each process of restoration. It helps me keep myself motivated and I wake up to each morning with enthusiasm to address the challenges that any project throws at me. Upon successful completion of repairs and refurbishing of a pipe to make it beautiful and most importantly FUNCTIONAL, gets me to a nice peaceful sleep at night… isn’t that what we all strive for?     

I wish to thank each one for sparing their valuable time to read through this write up and each one is in my prayers. Stay home…stay safe!!


Refurbishing a Second Bertram From the Lot Of 13 – a Bent Egg # 25


Blog by Paresh Deshpande

Last year while on a Face Time chat with my Guru, Mentor and friend, Steve Laug, we got talking about the Bertram lot that he had been working on at that point in time. He spoke about how overwhelming it was just to look at the large lot of about 200 plus pipes that he and Jeff had acquired. Never to miss an opportunity to add to my meager pipe lot that was available for me to work on, I suggested that if it was okay with him I would be more than willing to take a few of them off his hands. We worked out the details and soon a job lot of 12 pipes traveled all the way from US to Canada and then on to India!! That was one long journey undertaken by this lot of Bertram pipes. Here is the lot of Bertram pipes that I received. This lot contained a variety of nicely shaped and grained pipes which I had been looking forward to work on.The second pipe that I decided to work on from this lot is a Full Bent Egg shaped pipe, marked in green arrow, with swirls to the front and cross grains to the sides and over the shank surfaces. This pipe is stamped on the left shank surface as “Bertram” in running hand over “WASHINGTON D C” in block letters in a straight line. The grade code “25” is stamped on the bottom surface at the shank end. The stampings are slightly worn out but still readable by naked eye. The bent vulcanite saddle stem is sans any stamping. The size and feel of the pipe is solid in hand. This pipe has been well researched and chronicled by Steve when he worked on many of the Bertram pipes in his possession and thus, shall not waste time in proverbial “reinventing the wheel”. Interested readers may like to follow the link given below to get to know the brand better. https://rebornpipes.com/2019/04/10/the-4th-of-a-collection-of-bertrams-a-bertram-dublin-70s/

INITIAL VISUAL INSPECTION
This pipe has a compact bowl size that narrows slightly towards the rim with a sharply raked round shank and a bent saddle stem that lends itself nicely to clenching. The stummel boasts of some beautiful cross grains to the sides and all around the shank. The stummel is covered in dirt and dust. The entire stummel is peppered with a number of fills, both large and small. There is a thick layer of cake in the chamber and some damage is likely to the back of the rim top surface. The stem is lightly oxidized with tooth chatter in the bite zone. The pipe, as it sits on my work table, presents an encouraging picture. DETAILED INSPECTION OF THE PIPE AND OBSERVATIONS
The chamber has a slight taper towards the rim top and a chamber depth of about 1 ¼ inches. The outer edge of the rim towards the shank is slightly flattened while the rest of it is perfectly rounded. The chamber has an even layer of thick hard cake with remnants of un-burnt tobacco seen at the heel of the chamber. The rim surface has light traces of lava overflow over the rim surface. Through this layer of lava, a few dings can be seen over the rim top surface. The outer rim edge is sans any damage. The condition of the inner walls of the chamber can be commented upon after the cake has been taken down to the bare briar. The ghost smells in the chamber are not very strong. The stummel appears solid to the touch all around and hence I do not foresee any serious damage to the walls in the form of burnout/ deep heat fissures/ lines or pits. The ghost smells should reduce once the cake from the chamber is removed and the shank has been cleaned. The smooth stummel surface is covered in dust and grime through which one can make out the beautiful cross grains over the sides of the bowl and shank. The stummel surface is shows a couple of large and small fills. These fills stand out like flesh wounds against the briar surface. The briar is looking lifeless and bone dry. Thorough cleaning and rising of the stummel under warm water should loosen old fills while also serving to highlight the grain patterns. Once the stummel has been thoroughly cleaned, these fills will be more apparent and I intend to refresh only those fills which have loosened out with a fresh fill of briar dust and superglue. Micromesh polishing will help in blending these fills while imparting a nice shine to the briar. The mortise has a reservoir at the bottom that has accumulated oils, tars and gunk. The walls of the shank are filthy and covered in grime and dust. The mortise appears to be clogged as a pipe cleaner did not easily pass through it. I have worked on many Pete System pipes and cleaning the sump had always been a chore. Fervently hoping that is not the case this time around! The fit of the stem in to the mortise is slightly tight. However, once the shank walls are cleaned, this issue should be resolved.The high quality vulcanite saddle stem is lightly oxidized. Some minor tooth chatter and calcified deposit is seen on both the upper and lower stem surfaces in the bite zone and at the bottom of the button edge respectively. The tenon has accumulated ash and oils/ tars that have dried out on the inside as well as on the outside. The horizontal slot has scratch marks which will have to be addressed. The tooth chatter and the calcified deposits will be removed by sanding with a piece of 220 grit sand paper.THE PROCESS
I started the restoration of this pipe by first cleaning the internals of the stem with bristled pipe cleaners and 99.9% pure isopropyl alcohol. I scraped out the dried oils and tars from the tenon end with my fabricated knife and also removed the dried oils and tars from the slot end. I followed it up by sanding the entire stem with a folded piece of 220 grit sand paper to remove the surface oxidation. It has been our (Abha, my wife and self) experience that sanding a stem before dunking it in to the deoxidizer solution helps in bringing the deep seated oxidation to the surface which in turn make further cleaning a breeze with fantastic result.I dropped the stem in to “Before and After Deoxidizer” solution developed by my friend Mark Hoover. The solution helps to draw out heavy oxidation to the surface, making its further removal a breeze, while the minor oxidation is eliminated to a very great extent. The initial sanding helps to draw out the complete oxidation as the sanding opens up the stem surface that has been initially covered with oxidation. I usually dunk stems of 4-5 pipes that are in-line for restoration and this pipe is marked in pastel blue arrow. I generally allow the stems to soak in this solution overnight to do its work.While the stem was soaking in the deoxidizer solution, I worked on the stummel by first reaming the chamber with size 2 Castleford reamer head. I further scraped the chamber walls with my fabricated knife to remove the remaining carbon deposits where the reamer head could not reach. I scraped out the lava overflow from the rim top surface. Once the cake was reamed back to the bare briar, I used a 150 grit sand paper followed by 220 grit sand paper to remove all the traces of remaining cake and also to smooth out the inner walls of the chamber surface. Finally, to remove the residual carbon dust, I wiped the chamber with a cotton pad wetted with 99.9% pure isopropyl alcohol. And it was at this stage that I got the first (and hopefully the last) inkling of the likely damage to the heel of the chamber. The mortise and draught hole had been over zealously cleaned with pipe cleaners/ shank brush by the previous piper and which had resulted in a deep trough from the draught hole to the center of the heel with raised edges on the sides. This trough is indicated with red arrows. If or not the damage has extended to the foot of the stummel will be confirmed once the stummel surface has been cleaned. The chamber walls, inner and outer rim edges are pristine and without any damage. I followed up the reaming with cleaning the mortise using cue tips, pipe cleaners and shank brush dipped in isopropyl alcohol. I scraped the walls of the mortise with my fabricated knife to remove the dried oils and tars. The ghost smells have been eliminated and the chamber smells clean.With the bowl internals clean, I move to clean the exterior of the stummel. I used a hard bristled tooth brush and Briar Cleaner, a product that has been developed by Mark Hoover, to scrub the stummel and rim top. I set the stummel aside for 10 minutes for the product to draw out all the grime from the briar surface. After 10 minutes, I washed the stummel under running warm water with anti oil dish washing detergent till the stummel surface was clean. I dried it using paper towels and soft cotton cloth. I simultaneously cleaned the shank internals with the detergent and hard bristled shank brush and set the stummel aside to dry out naturally. The stummel surface has cleaned up nicely and the beautiful grain patterns are now on full display. The fills, even the smallest ones, are now clearly discernible. I probed each fill with a sharp dental tool to check for solidity and thankfully, each fill was nice and solid without any give, save for the fills at the foot of the stummel. I took a closer look at the foot of the stummel and the worst of my fears was staring right back at me with a smile!!! There is a small smiley crack right in the centre of the foot. Truth be told, looking at the heel, I had inkling that the foot may have some such damage, but now to be sure that the damage does exist, is painful. Desperately seeking some positives, I was relieved to note that the damage has not progressed to an extent that would be termed as a burnout. I did the tap test over and around the damaged foot (with the back of a spoon or any hard instrument gently tap the damaged area) and was relieved to hear a crisp sharp note signifying that nothing is lost. The briar around still feels solid over and around the damaged foot. The pipe still has many years of life left in it and with the repairs that I plan, this will last even longer. I plan to drill a counter hole at either ends of the crack and seal it with briar dust and super glue. This will prevent further spread of the crack in either direction. The trough formed at the heel of the chamber will be spot filled with J B Weld which will prevent the burning tobacco from coming in to direct contact with the now weak spot in the heal.While the stummel was drying, the next morning, Abha removed the stem that had been soaking in the deoxidizer solution overnight. She cleaned the stem under running warm water and scrubbed the raised oxidation from the stem surface using a scotch brite pad and cleaned the airway with a thin shank brush. She further removed the oxidation by scrubbing the stem with 0000 grade steel wool and applied a little EVO to rehydrate the stem. There is a need to further sand the stem to completely remove the oxidation.My significant half, Abha, used a 220 grit sand paper to sand the stem and remove all the oxidation that was raised to the surface. This step further reduced the tooth chatter and bite marks present on the stem. She wiped the stem with Murphy’s Oil soap on a cotton swab. This helps in cleaning the stem surface while removing the loosened oxidation. As is the norm, whenever she works on a pipe, taking pictures NEVER EVER crosses her otherwise sharp mind!!! No exceptions here…

To bring a deep shine to the vulcanite stem, she polished it by wet sanding with 1500 to 2000 grit sandpapers followed by further wet sanding with 3200 to 12000 grit pads. She wiped the stem with a moist cloth after each pad and rubbed it down with Extra Virgin Olive oil to rejuvenate the vulcanite. The finished stem is shown below. I checked the fit of the stem in to the mortise of the stummel and realized that the fit is very loose. This may happen when the mortise has been cleaned of the entire accumulated gunk and the briar has dried out completely. I shall address this issue by moistening the mortise with water and if that does not work, I shall use more invasive methods. RESTORATION ON THIS PIPE WAS PUT ON HOLD AS ALL THE NECESSARY TOOLS AND EQUIPMENT REQUIRED FOR FURTHER REPAIRS ARE AT MY PLACE OF WORK AND I WAS ON LEAVE INITIALLY AND THEREAFTER IN A NATION WIDE LOCKDOWN TO CONTAIN THE SPREAD OF THE DEADLY CORONA VIRUS!!!

PART II
Finally back at my work place…… After enjoying a compulsorily extended leave of three months with family and having honed my culinary and domestic chores skill set, I was happy to rejoin my duty and get back to completing the pending pipe restorations. The first in line was this Bertram Bent Egg # 25.

I decided to address the crack to the foot of the stummel. I marked the end points of the crack on either ends with a sharp dental tool under magnification. This helps to identify these end points later with naked eye and also provides initial traction for the drill bit to bite in. With a 1 mm drill bit mounted on to my hand held rotary machine, I drilled a hole each on either ends of the crack, taking care not to go too deep and end up drilling a through-hole.Simultaneously, I gouged out a few old fills that had loosened out from the foot of the stummel. I cleaned the stummel with isopropyl alcohol and cotton swab as I prepared the surface for the fill.I filled the gouges and the drilled holes with a mix of CA superglue and briar dust and set the stummel aside for the fill to cure. A few hours later, the fills had hardened completely. I sand them down with a flat head needle file to achieve a rough match with the rest of the stummel. I fine tuned the match with the rest of the surface by further sanding with a piece of 220 grit sandpaper. I shall decide to stain the stummel or otherwise after I have finished with the polishing with micromesh pads.I evened out the dents and dings from the rim top surface by sanding it with a folded piece of 180 grit sand paper. It was a tricky job since the rim top surface is not flat but slopes outwards from the inner to the outer edge. This peculiar shape ruled out topping the rim top. Now that the external repairs are done, I decided to address the trough that was formed at the heel of the chamber. To protect the heel from coming in to direct contact with the burning tobacco and also to prevent the heat from reaching the foot of the stummel causing a burnout, I plan, firstly, to coat only the heel of the chamber with J B Weld followed by a second coat of activated charcoal and yogurt to the entire chamber which would assist in faster cake formation. J B Weld is a two-part epoxy Cold Weld that consists of two parts; hardener and steel which are mixed in equal parts in a ratio of 1:1 with hardening time of 5-6 minutes and complete curing time of 6-8 hours. I poured the contents of the two tubes and mixed it well. With a flat bamboo frond, I applied this mix, as evenly as possible, over the intended areas. I worked fast to ensure a complete and even coating of the trough in the heel and set the stummel aside for the J B Weld to harden.By the next afternoon when I got back to working on this pipe, the J B Weld coat had completely cured and hardened considerably. With a folded piece of 150 grit sandpaper, I tried to sand the weld coating to a smooth surface. However, I could not sand the Weld as there was no space for maneuvering my finger with the sand paper. I decided to use a conical grinding stone which I had received along with my DIY hand held rotary tool kit and accessories. I mounted the conical grinding stone on to the rotary tool, set the speed at its lowest RPM and sanded the J B Weld coat till I had as thin a coat as was essential to protect and insulate the heel from the direct heat of the burning tobacco. I did not apply any downward pressure while sanding and let the rotary tool use the motor rpm to sand the weld to desired thickness.I followed it by wet sanding the stummel with 1500 to 12000 grit micromesh pads, wiping frequently with a moist cloth to check the progress. I really like the looks of the stummel at this point in restoration. The grains and the clean lines of this piece of briar are worthy of appreciation. Next, I rubbed a small quantity of “Before and After Restoration Balm” deep in to the briar with my finger tips and let it rest for a few minutes. The balm almost immediately works its magic and the briar now has a nice vibrant appearance with the beautiful grain patterns displayed in their complete splendor. I further buffed it with a horse hair brush. The dark browns of the bird’s eye and cross grains spread across the stummel makes for a visual treat. It really is a nice piece of briar. With the stummel rejuvenation almost complete, save for the final wax polish, I worked the stem. I moistened the shank with a q-tip dipped in water. I checked the seating of the tenon in to the mortise after an hour. It was still very loose. This called for stretching the tenon to improve the seating of the stem in to the shank. I selected a drill bit that was slightly larger in diameter than the tenon air hole. I heated the tenon with the flame of a lighter till it was slightly pliable and inserted the back of the drill bit in to the opening to enlarge it. I cooled the tenon under cold running water to set the increased diameter of the tenon. I checked the fit and it was much better, though not very snug. I remedied this issue by applying a coat of clear nail polish and set it aside for the nail polish to dry out. Now that the cosmetic aspects of this pipe have dealt with, all that remained was the functional aspect that needs to be taken care of. The J B Weld coated surface needs to be protected from the direct heat of the burning tobacco and for this; I coat the complete chamber walls with a mix of activated charcoal and yogurt and set it aside to harden naturally. The mix has to be of the right consistency; neither too thick nor too runny. It should be of a consistency that is thick enough to spread easily, evenly and stick to the walls. Also the coating should not be very thick. A thin film is all that is required. Another important aspect to remember is that it is essential to insert a pipe cleaner in to the mortise and through the draught hole for two reasons; first is obviously to keep the draught hole from getting clogged and secondly, the pipe cleaner absorbs all the moisture from the mix and helps in faster and even drying of the coat.To put the finishing touches, I mount a cotton cloth buffing wheel on to my hand held rotary tool and polished the stummel and stem with Blue Diamond compound. This compound helps to remove the minor scratch marks that remain from the sanding.Next, I mount another cotton buffing wheel that I have earmarked for carnauba wax and applied several coats of the wax. I finished the restoration by giving the entire pipe a rigorous hand buffing using a microfiber cloth to raise the shine further. The grains on this finished pipe looks amazingly beautiful and coupled with the size, heft and the hand feel, makes it quite a desirable pipe. If you are interested to enjoy this pipe for years to come, please let Steve know and we shall make arrangements for it to reach you. P.S. In one of my previous write up, a question “Why do I enjoy bringing these old battered and discarded pipes back to life?” had popped up in my mind. I had given my second reason in my last write up and in all my subsequent write ups I intend to share with the readers my reasons as to why I really love this hobby.

The third reason is that every pipe has a HISTORY attached to it. That history, in part, is about the maker/ carver of the pipe and the other part is the person who had posed faith in this piece of briar during his life time. Take the case of a Dunhill pipe that I had restored that once belonged to Late Mr. John Barber, an explorer who had been to Arctic and the Antarctic in the 1950s- 60s and an avid pipe smoker! His favored pipes were DUNHILL. His daughter, Farida had passed on his pipes to Steve to restore and trade these pipes for the family. Well, one of the Dunhill pipes was sent to me by Steve to let me test my skills in pipe restoration with the rider that “if I could restore it, I get to keep it!” This pipe had all the challenges that a pipe restorer usually faces while restoring a pipe and then some more. However, it was successfully repaired and restored and now is a part of my daily rotation (https://rebornpipes.com/2019/12/06/a-project-close-to-my-heart-restoring-a-dunhill-from-faridas-dads-collection/)

The point I want to convey is that whenever I smoke this pipe, it reminds me of Late Mr. John Barber and images of him smoking this pipe in the cold snow desert and the warmth, peace and comfort it must have provided him in that desolate environment…AND NOW I GET TO BE A PART OF THAT HISTORY/ LEGACY OF THE PIPE and this is what I just love!

I wish to thank each one for sparing their valuable time to read through this write up and each one is in my prayers. Stay home…stay safe!!