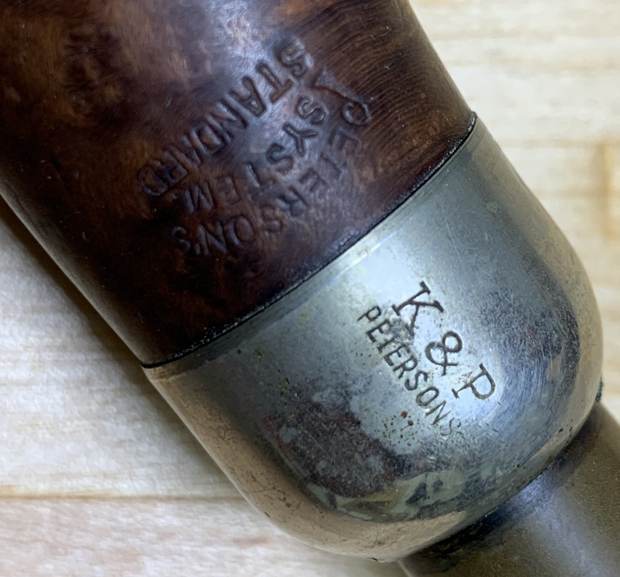
Tag Archives: Kenneth Lieblich article

Back to my Grandfather’s Pipes


by Kenneth Lieblich

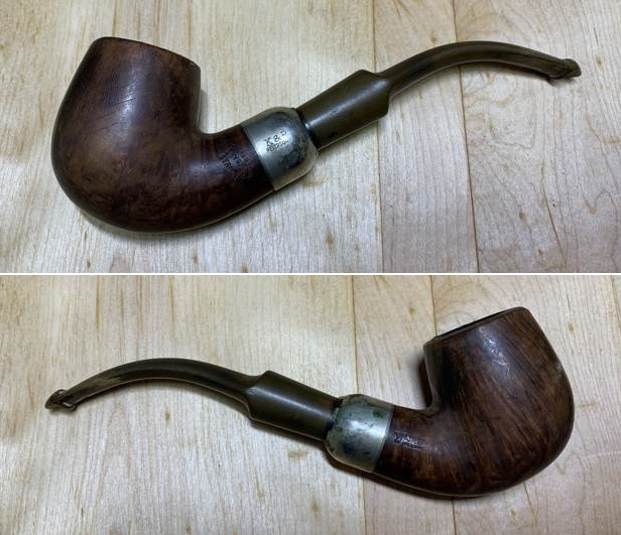
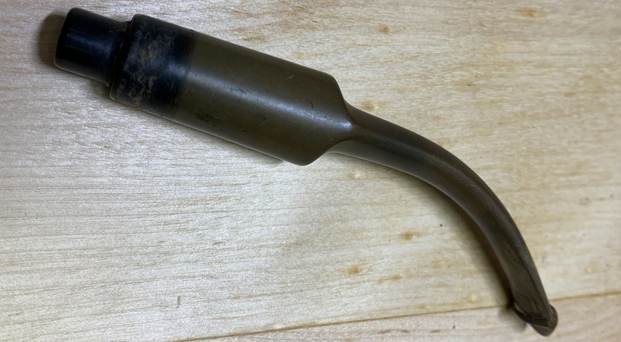
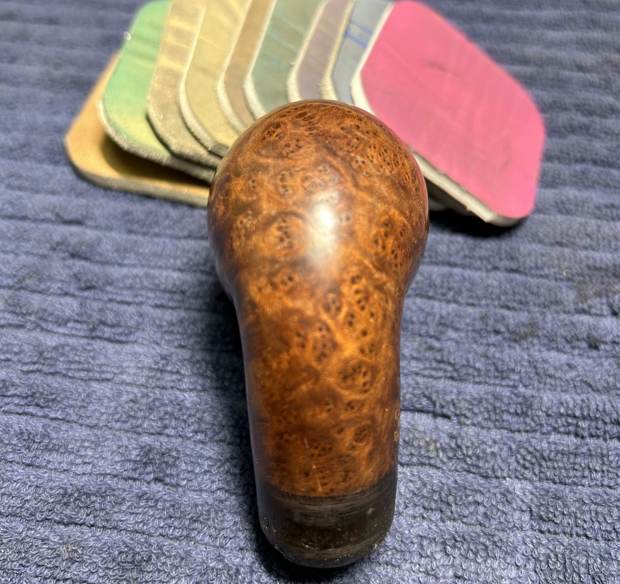
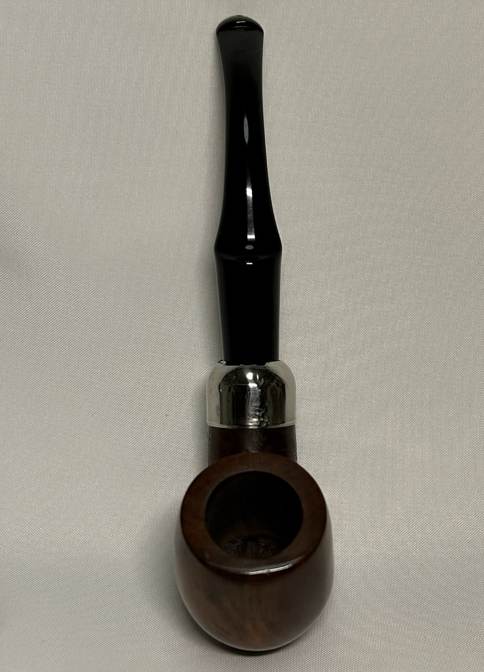
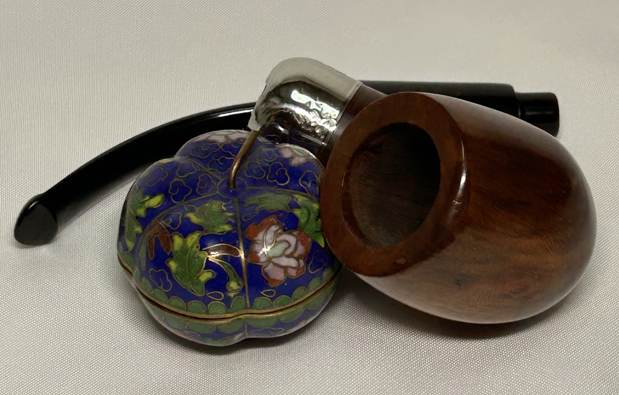
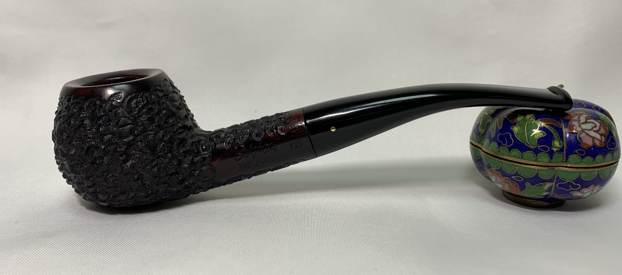
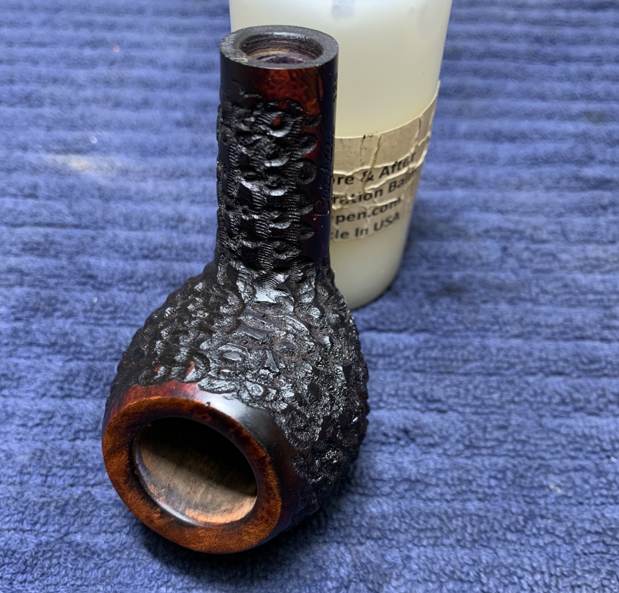
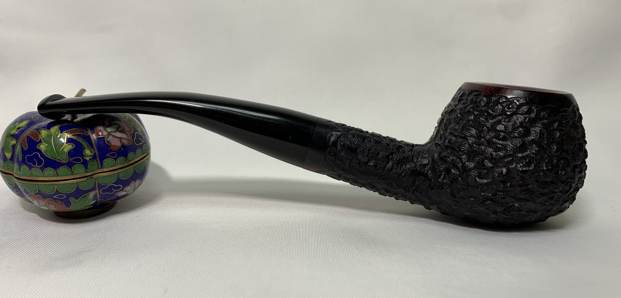
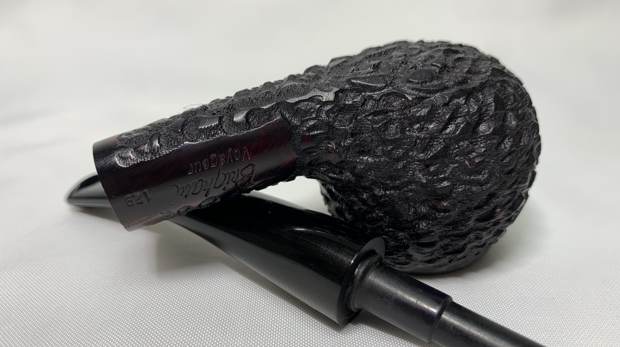
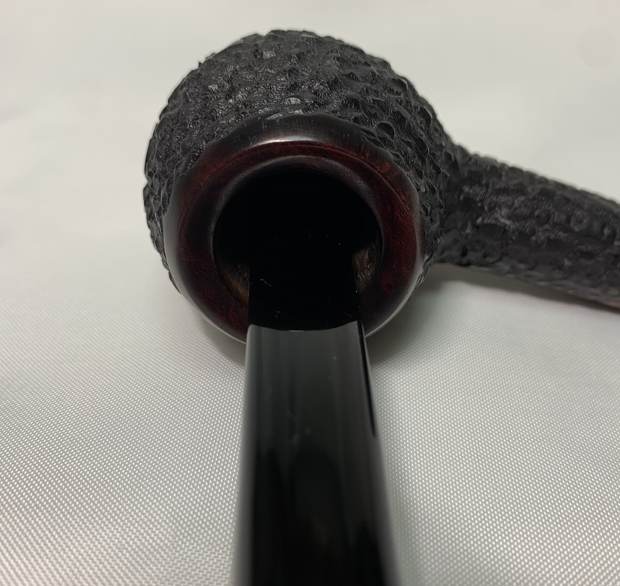
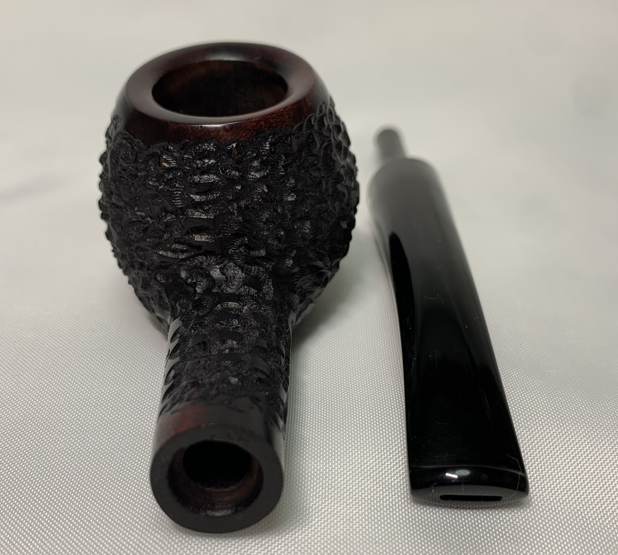
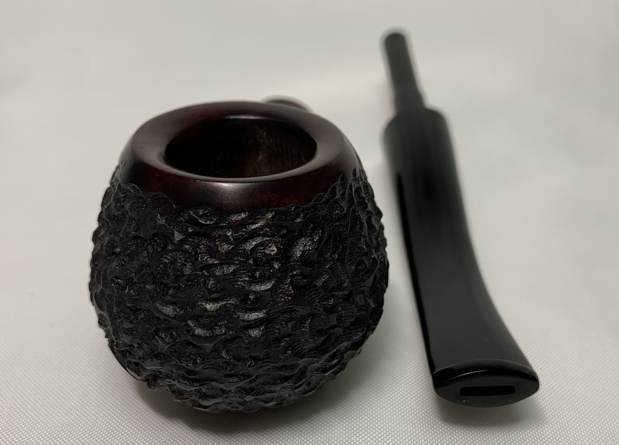
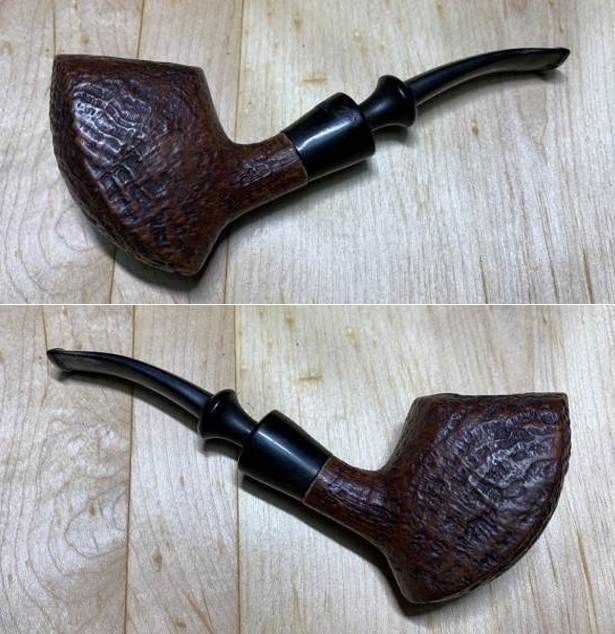
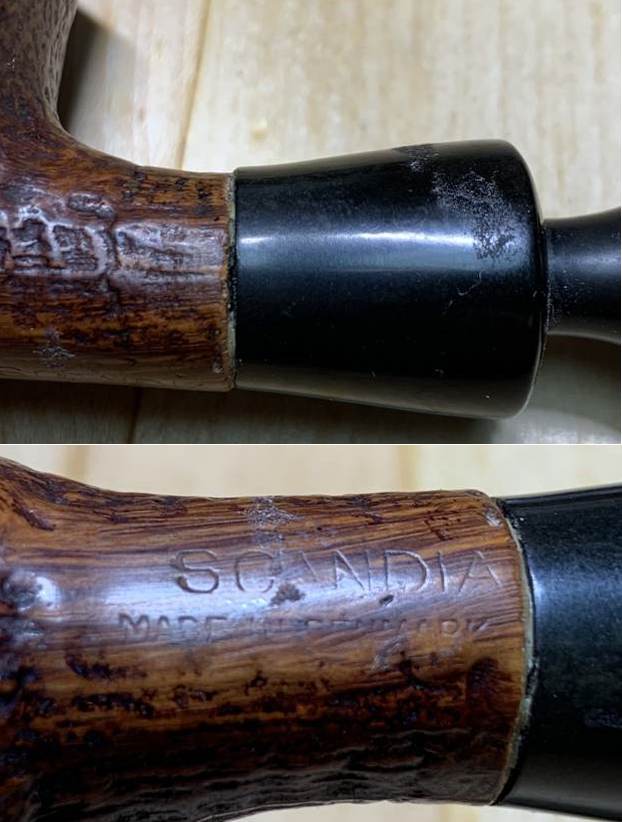
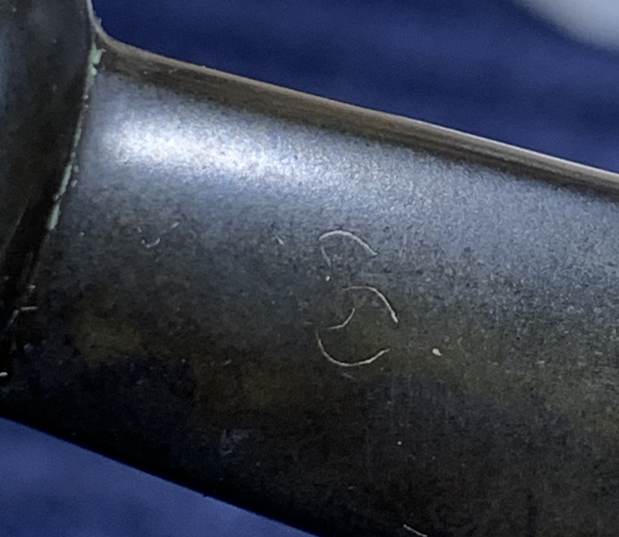
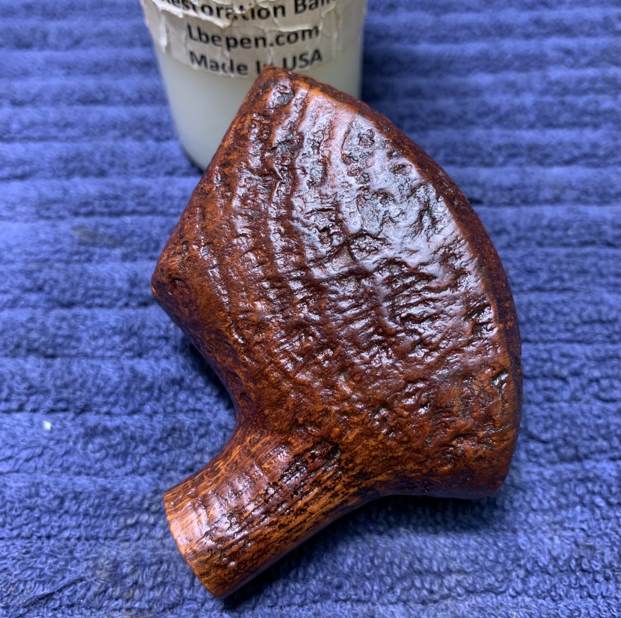
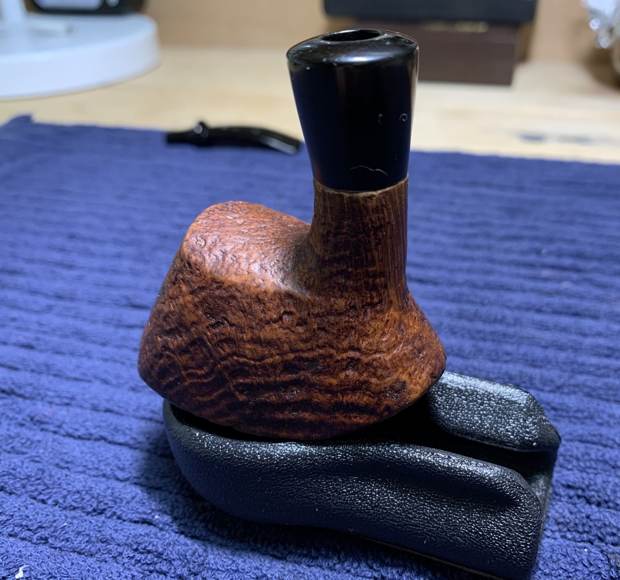
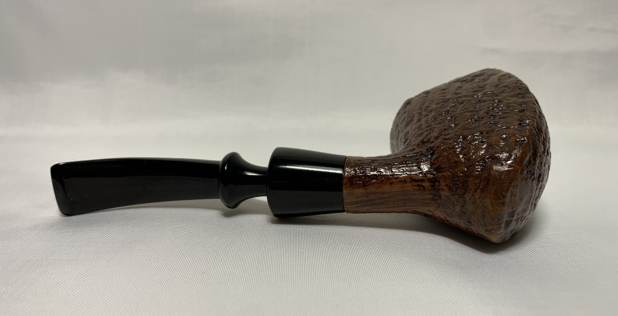
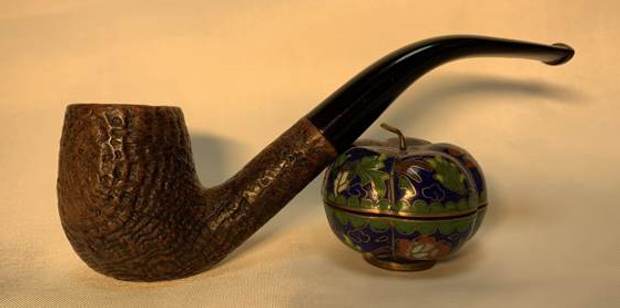
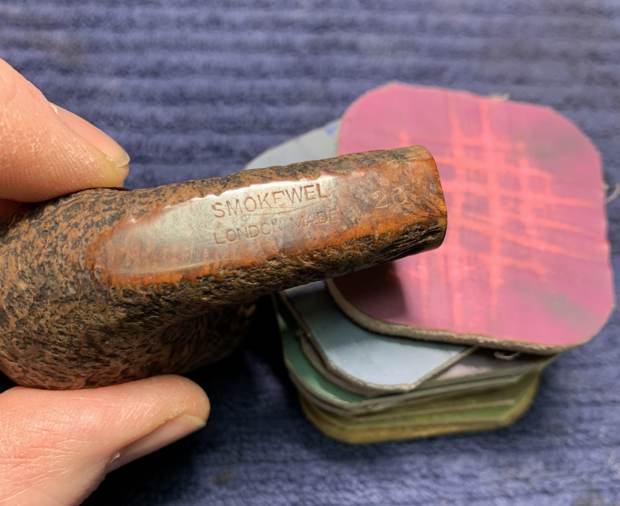
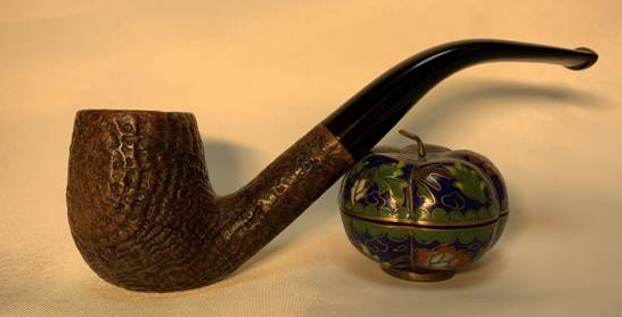
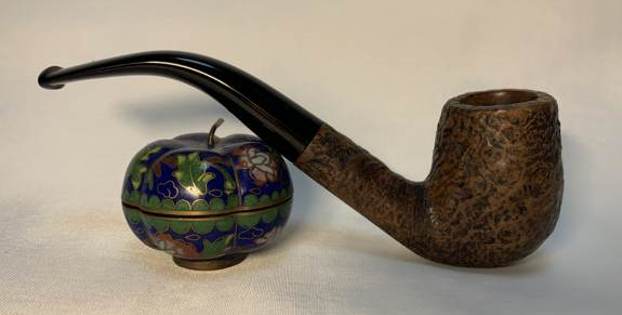
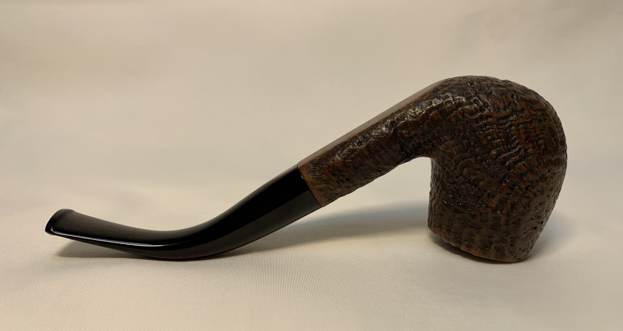
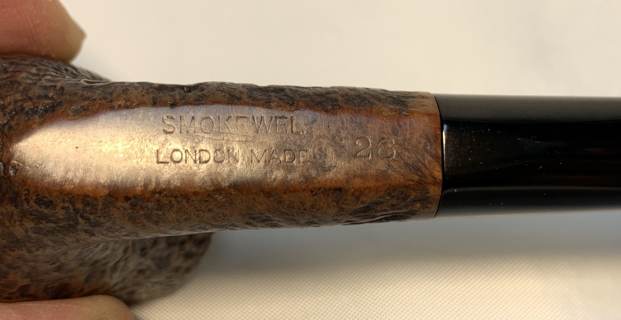
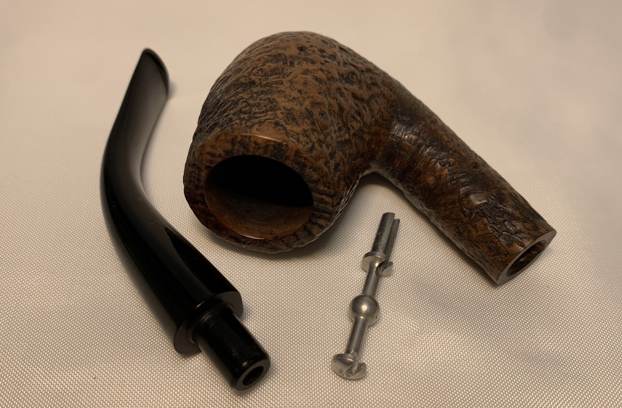
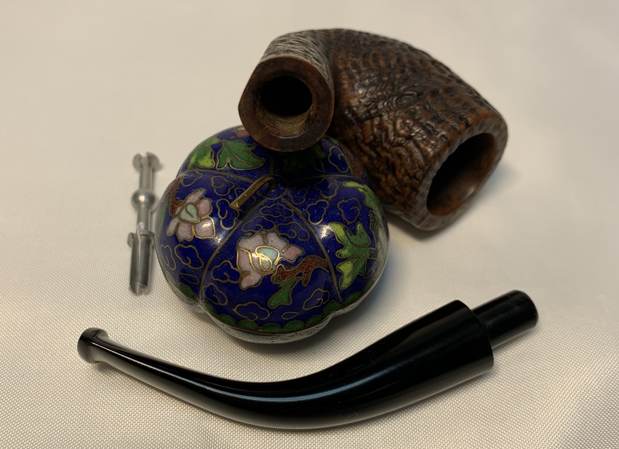
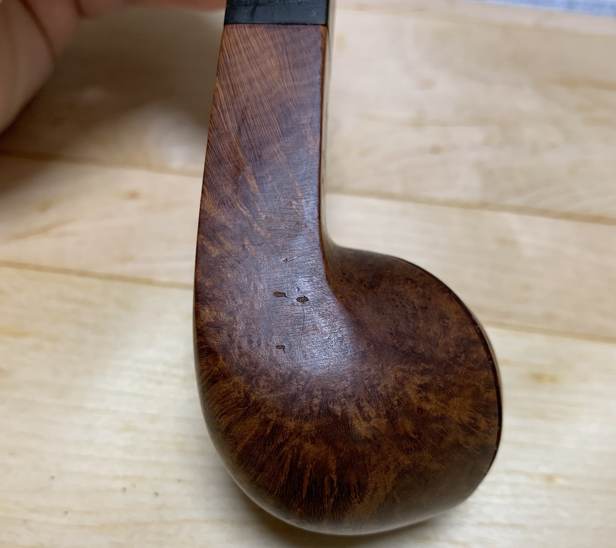
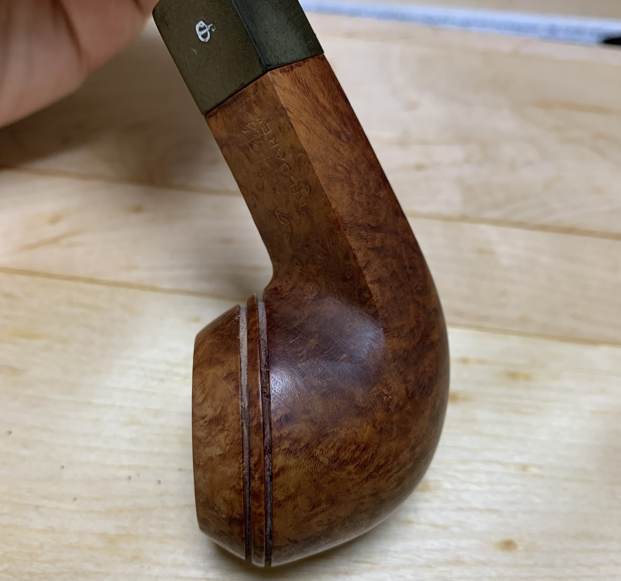
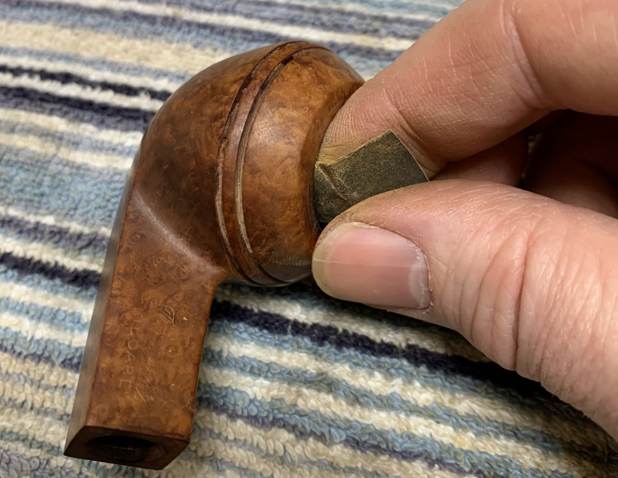
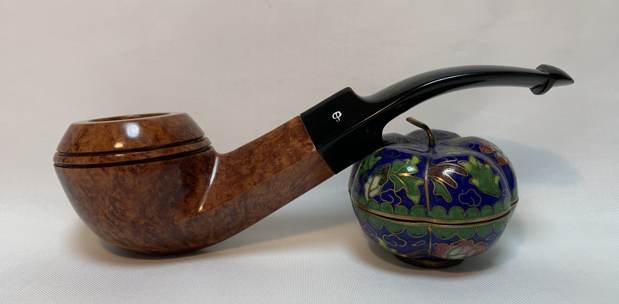
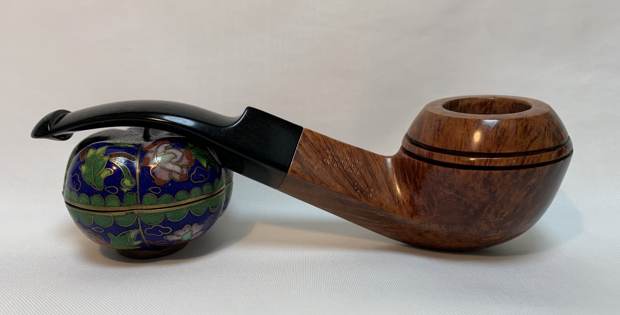
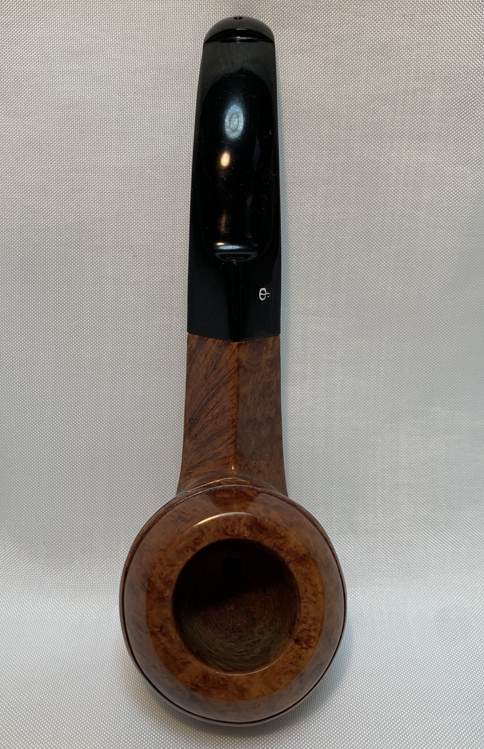
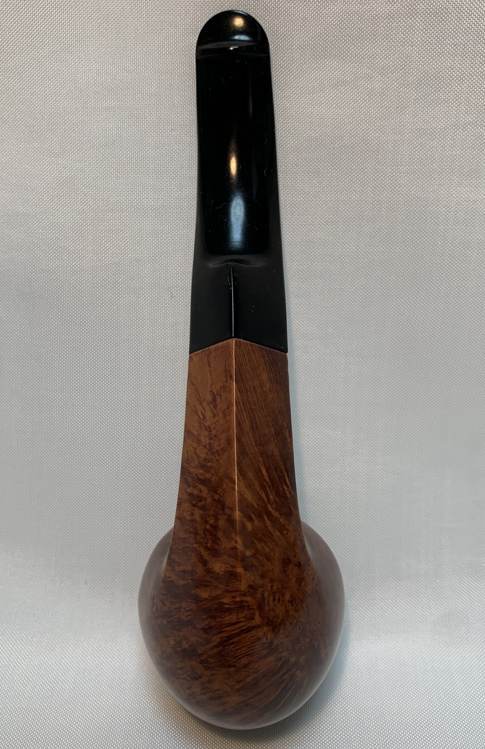
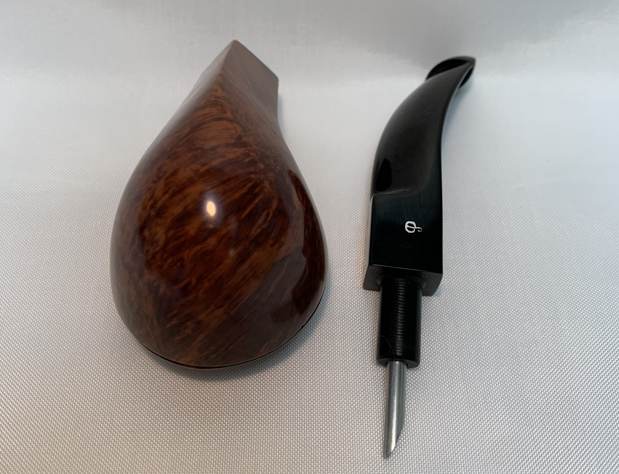
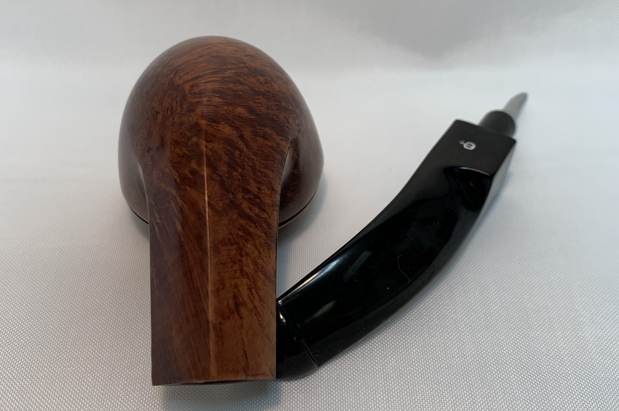
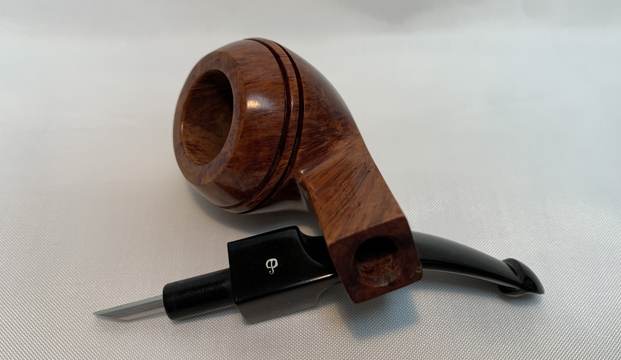
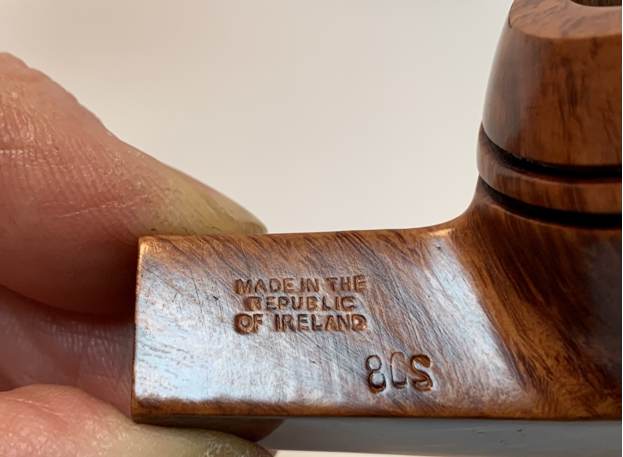
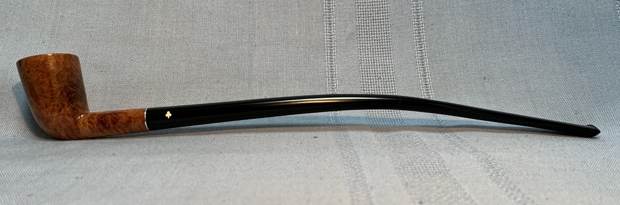
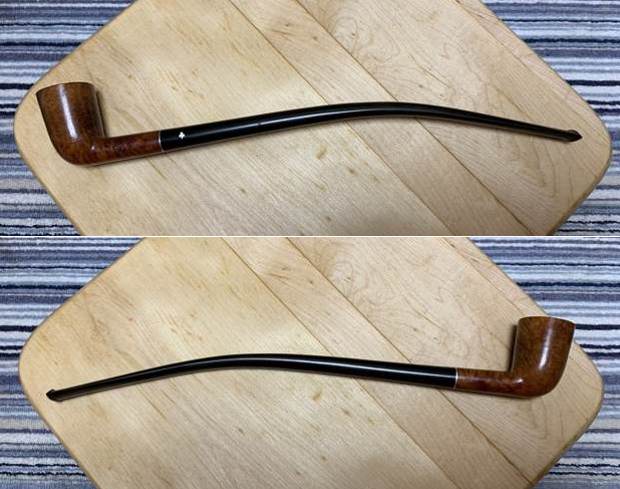
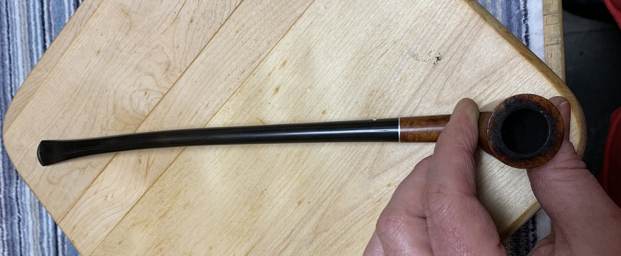
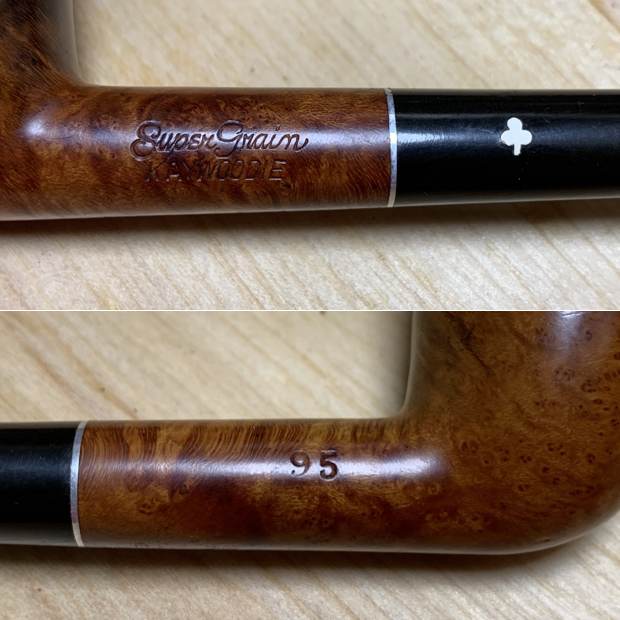
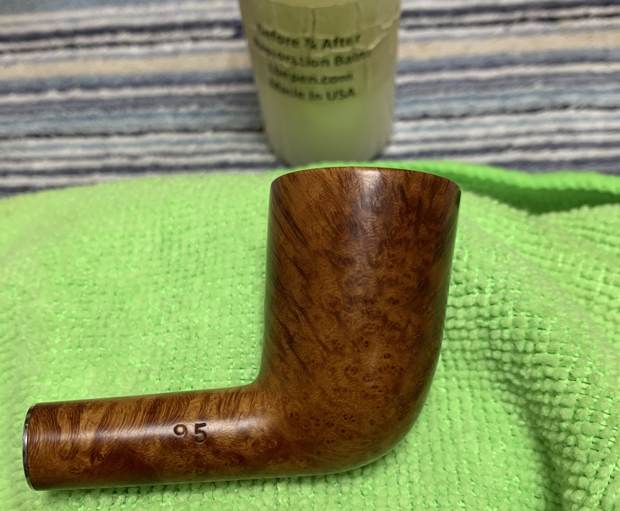
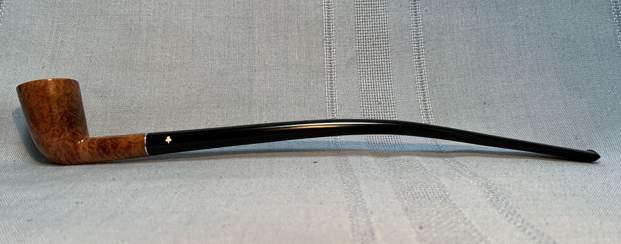
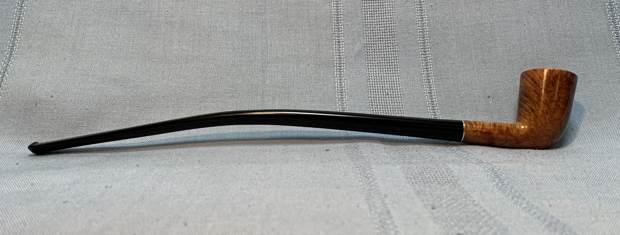
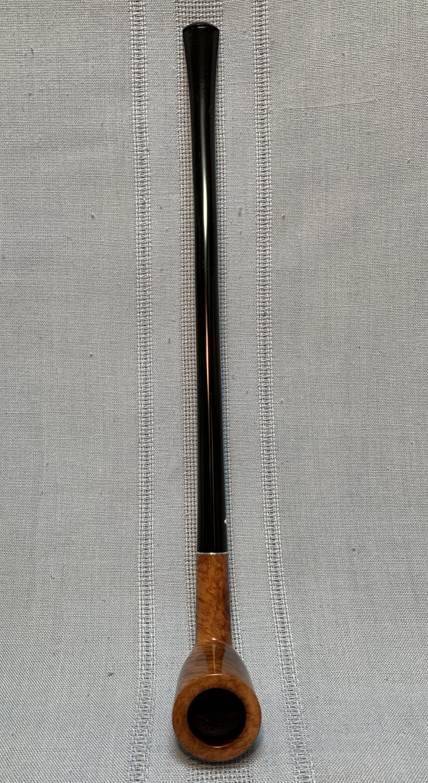
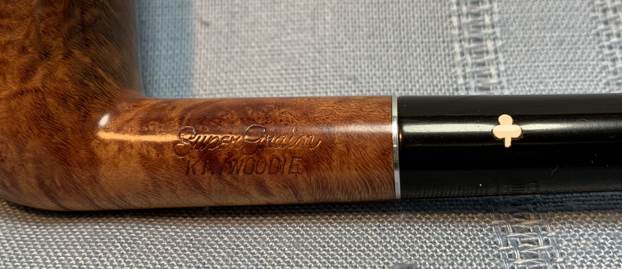
Next on the chopping block is a very personal pipe – and one that is staying in my collection. The unusual pipe you see belonged to my late grandfather. It is this pipe’s restoration that I am recounting today. I have blogged here about some of my grandfather’s pipes before, but I haven’t done one in a while. In this case, I do not know where my grandfather acquired it (or under what circumstances), but I suppose it does not ultimately matter. My grandfather was an enthusiastic pipe smoker and he clearly enjoyed this one. I am definitely looking forward to cleaning this one up. It has a value well beyond dollars.The pipe is a pencil-shank Rhodesian, with a long stem made from horn. What a charming and elegant pipe! I do not know the exact date of the pipe, but it seems likely to be from the 1950s or 1960s.On the left-hand side of the shank, the pipe’s markings read simply, Bruyere de Luxe – an utterly unhelpful bit of information. Since that’s all there is, I don’t have any useful information to be provide about the pipe maker. Also, I will apologize in advance for the fact that I don’t have so many photos this time. My brain was obviously in neutral.
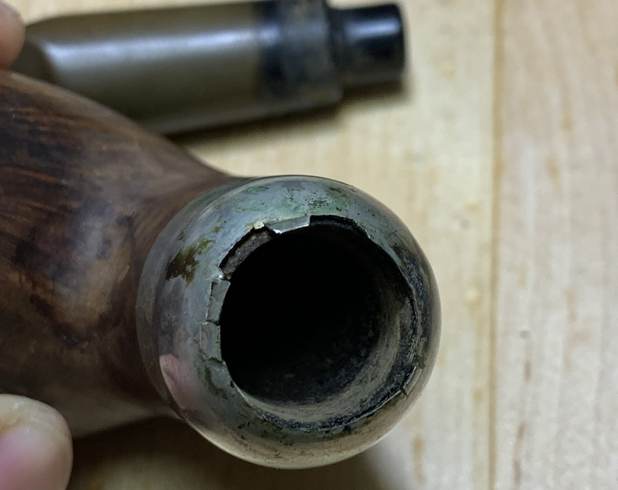
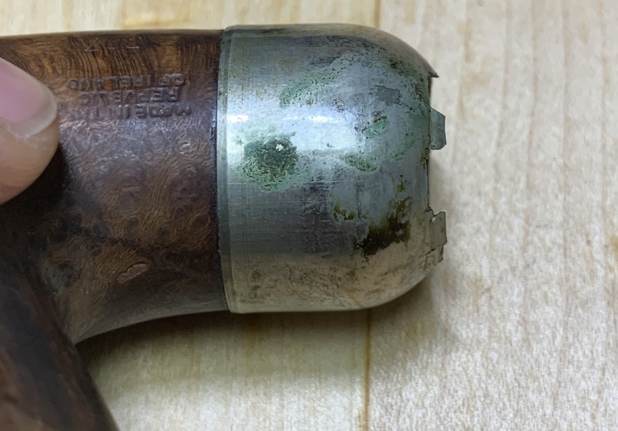
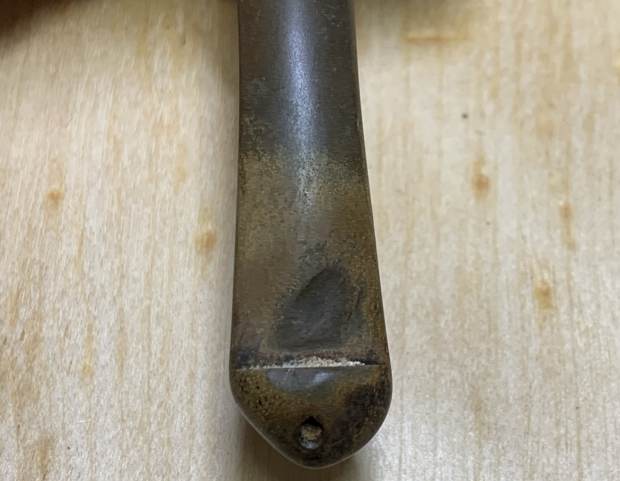
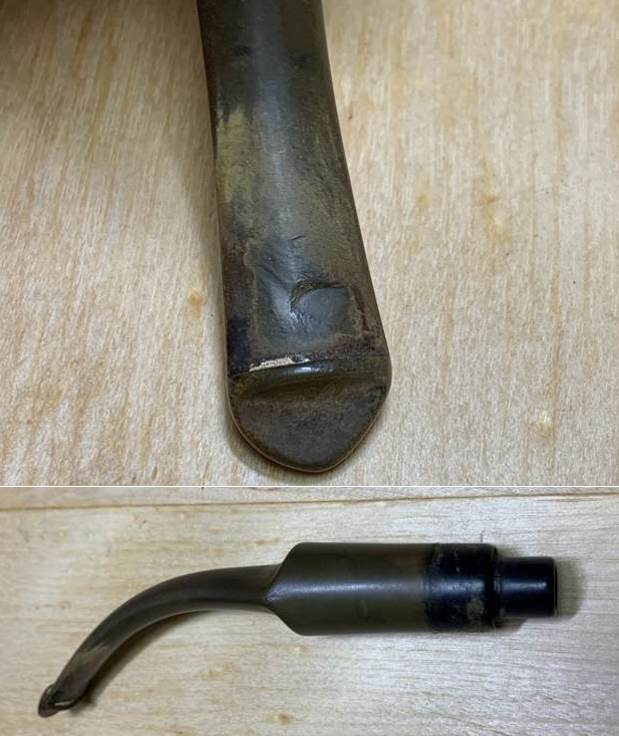
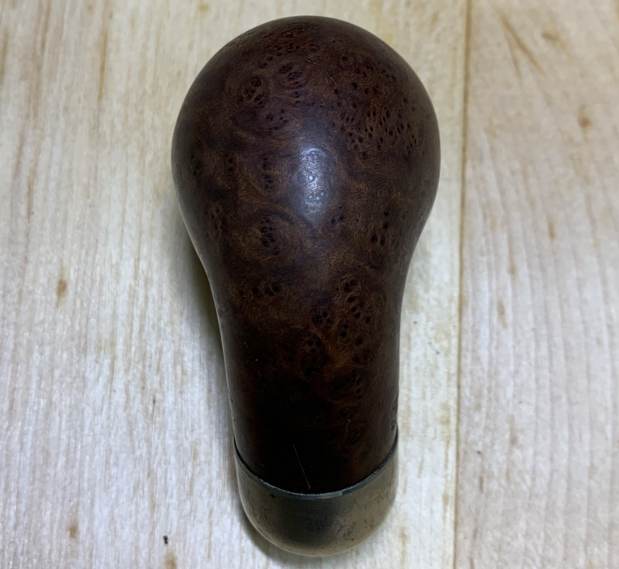
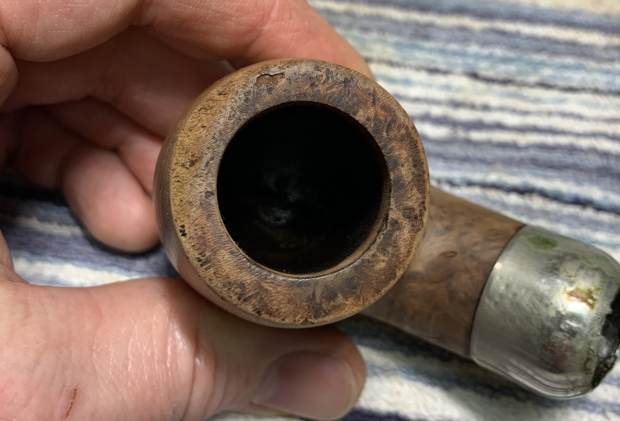
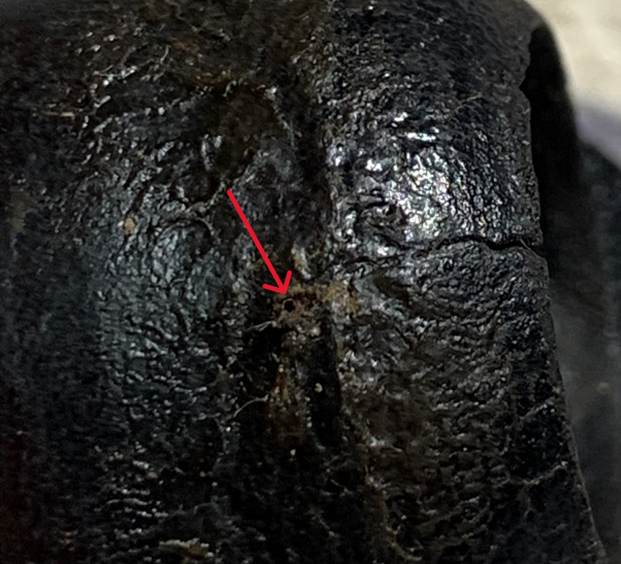
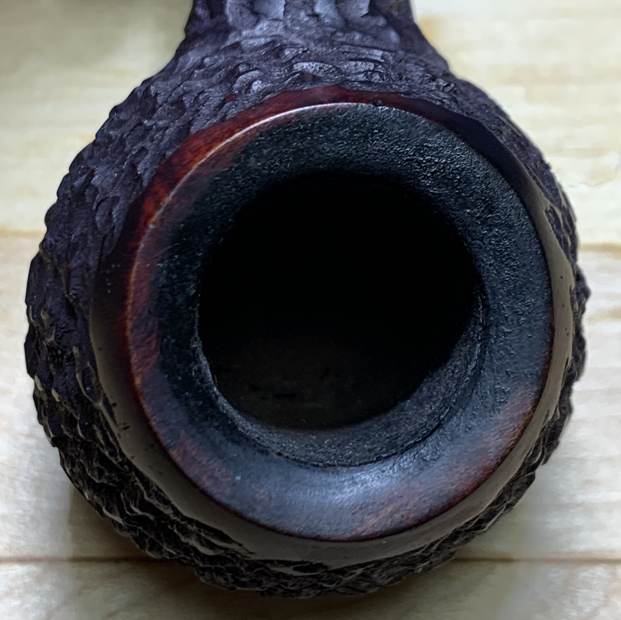
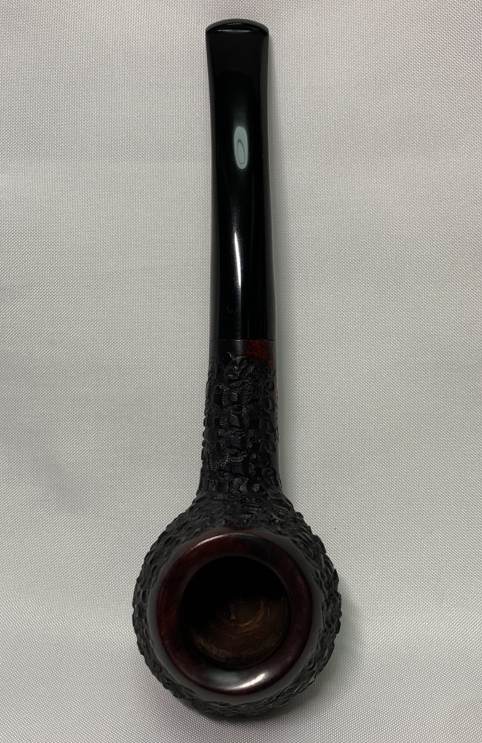
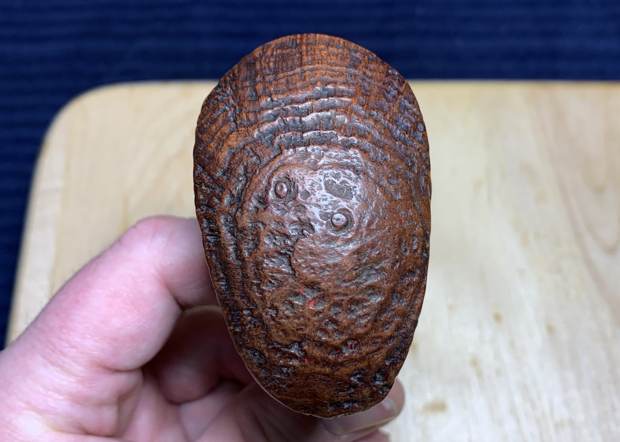
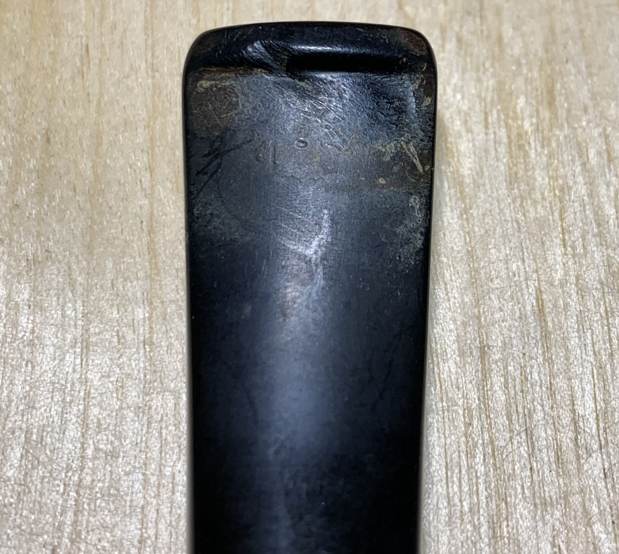
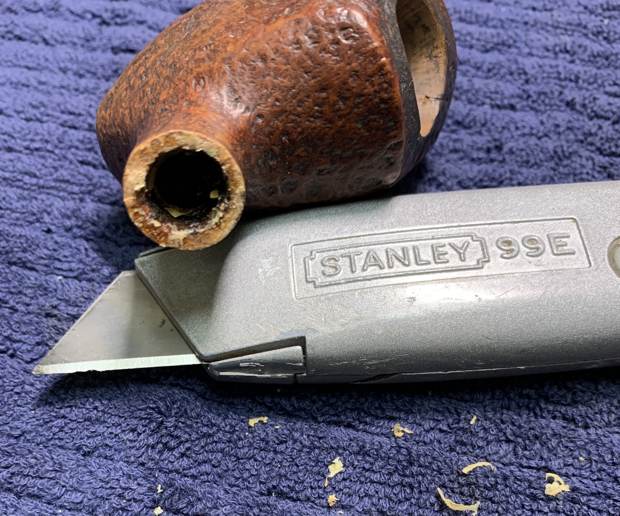
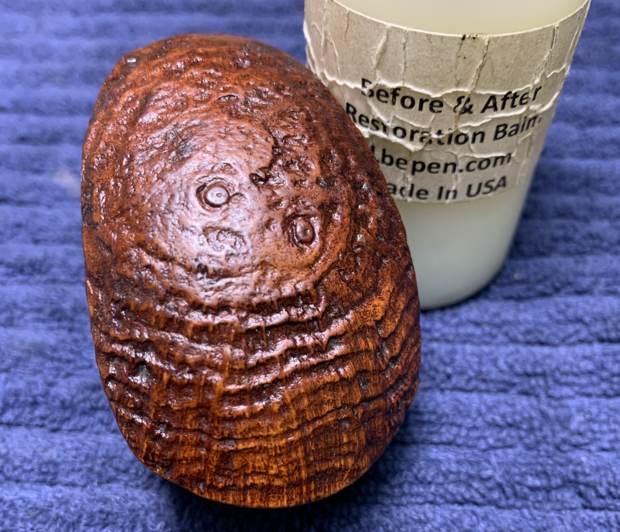
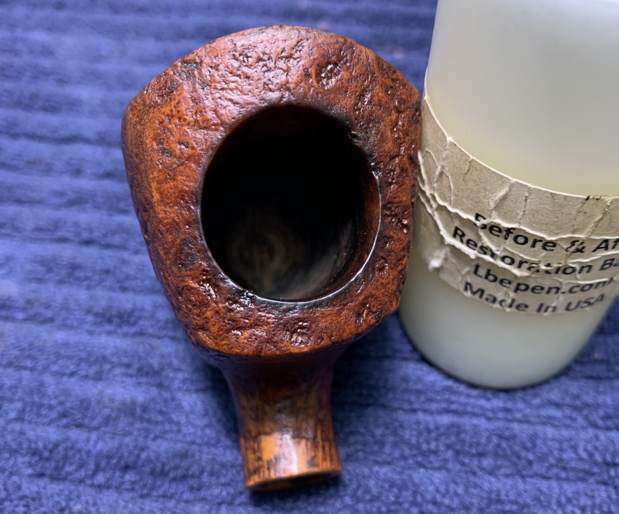
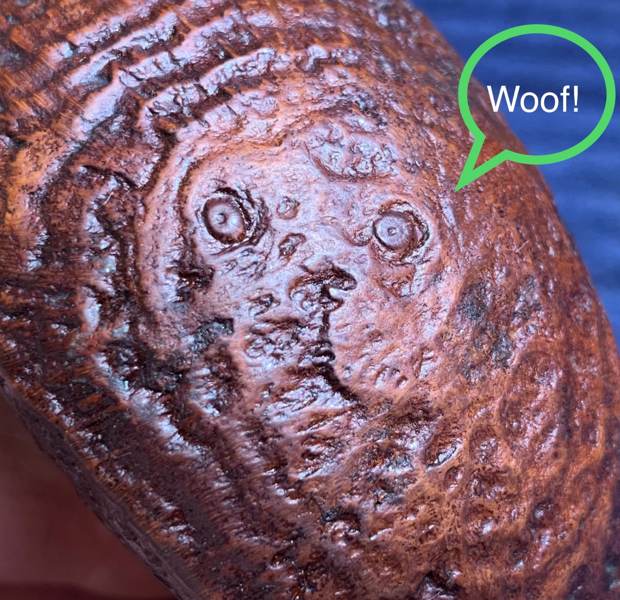
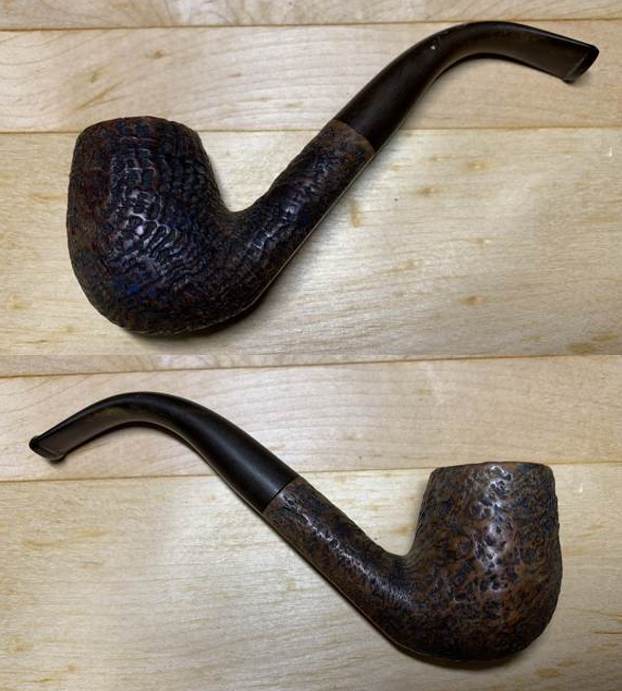
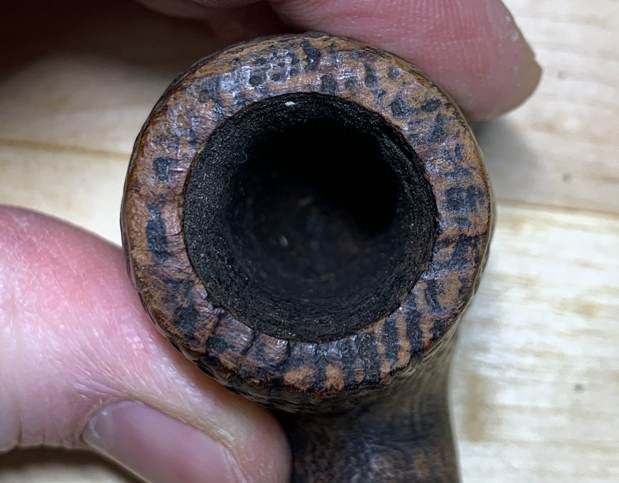
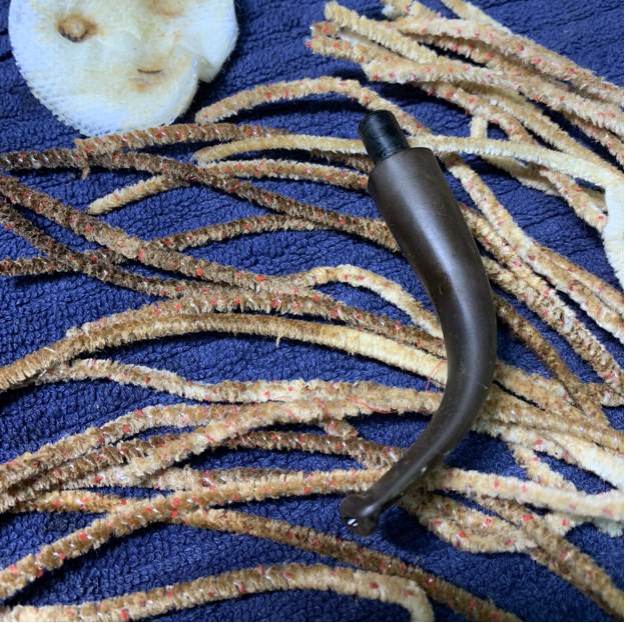
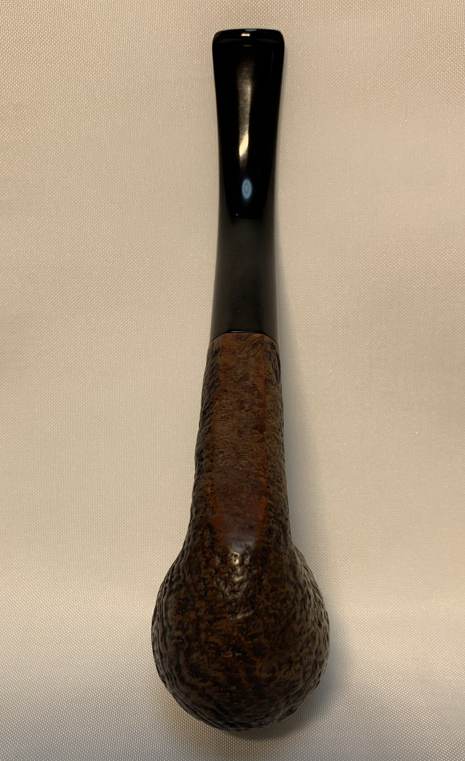
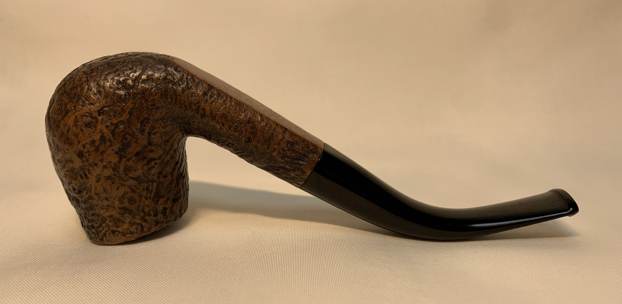
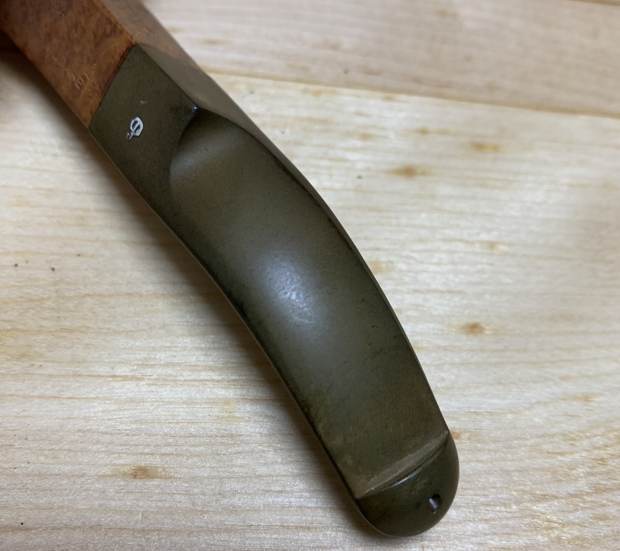
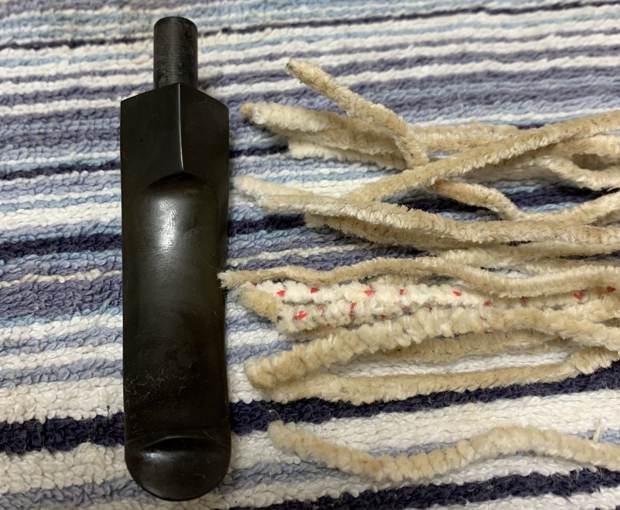
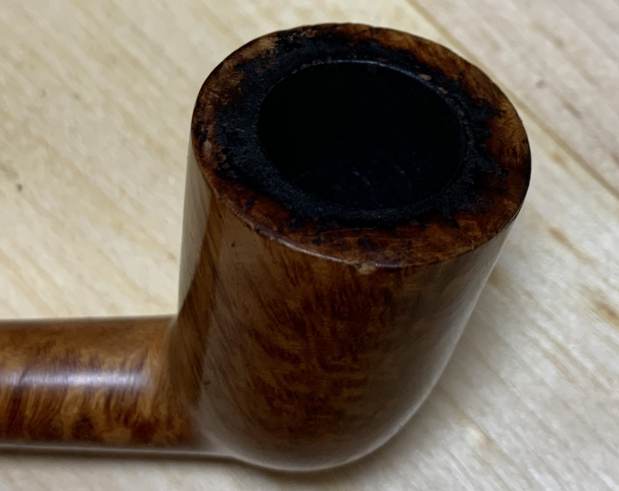
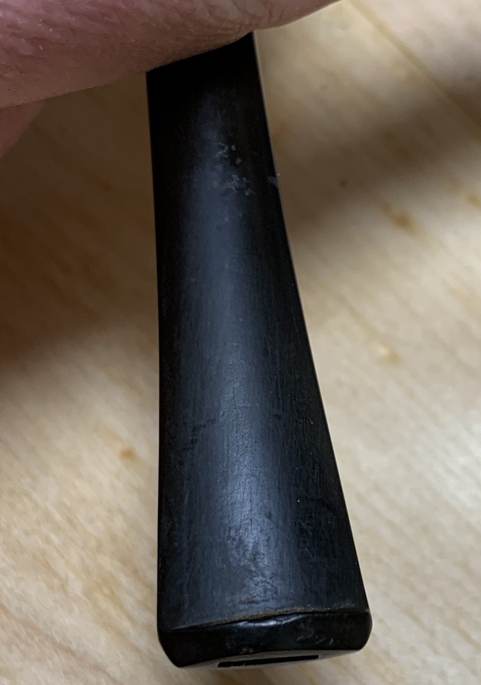
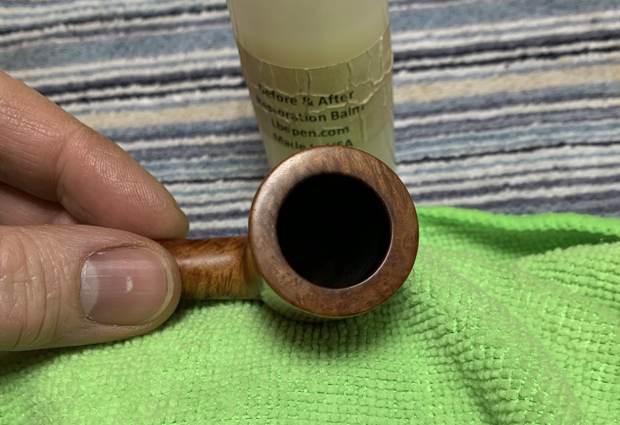
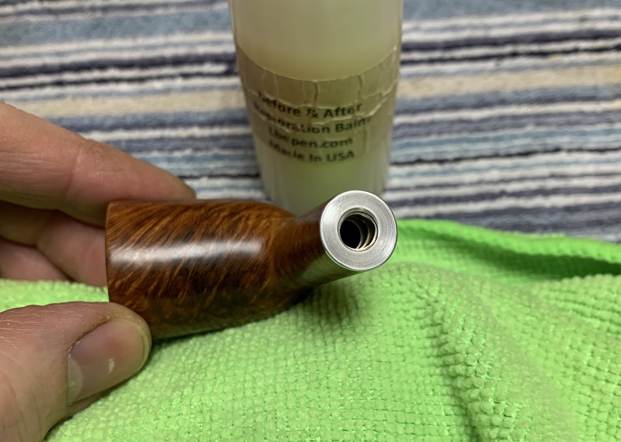
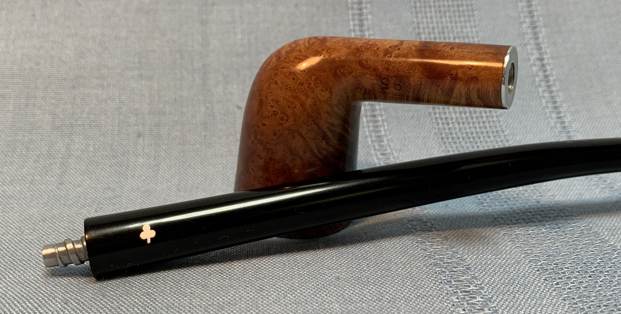
It’s a nifty pipe – however, it was not without its issues. The stem had some worm holes in the horn (not unusual for this type of stem). There was also some notable tooth wear near the button. The stummel was actually in pretty good shape. It had some minor wear, but nothing too tricky. I suspect that this pipe hadn’t been smoked too much. The wood had a kind of lacquer finish – I must say, I don’t like that look. 
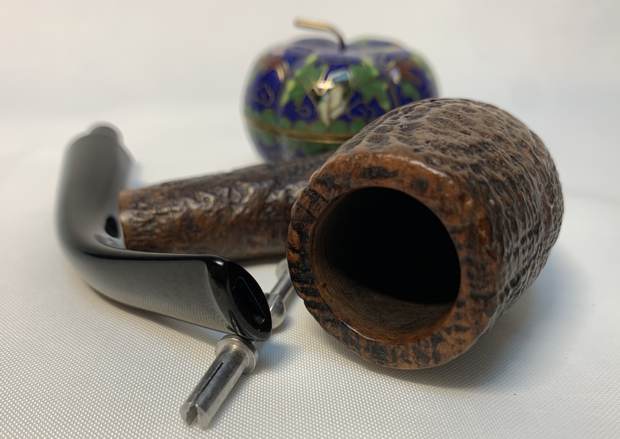
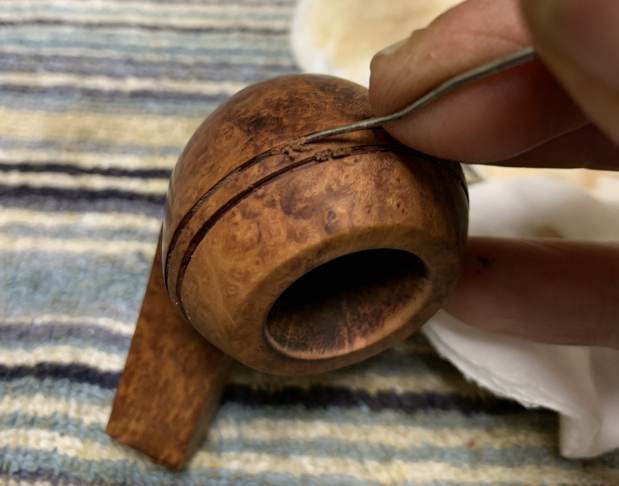
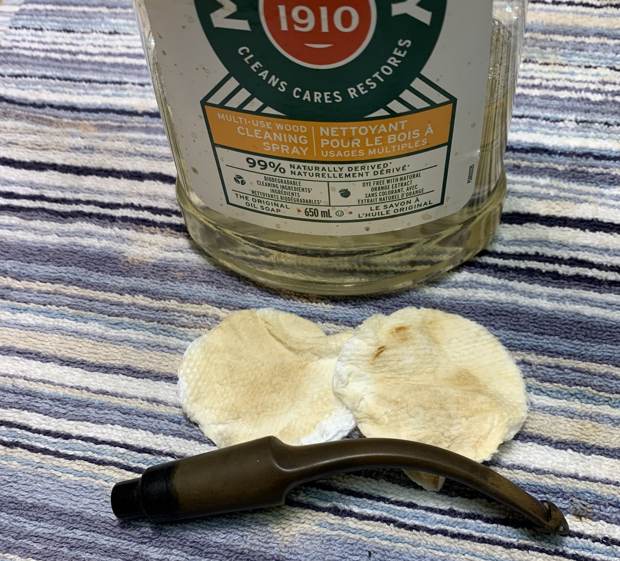
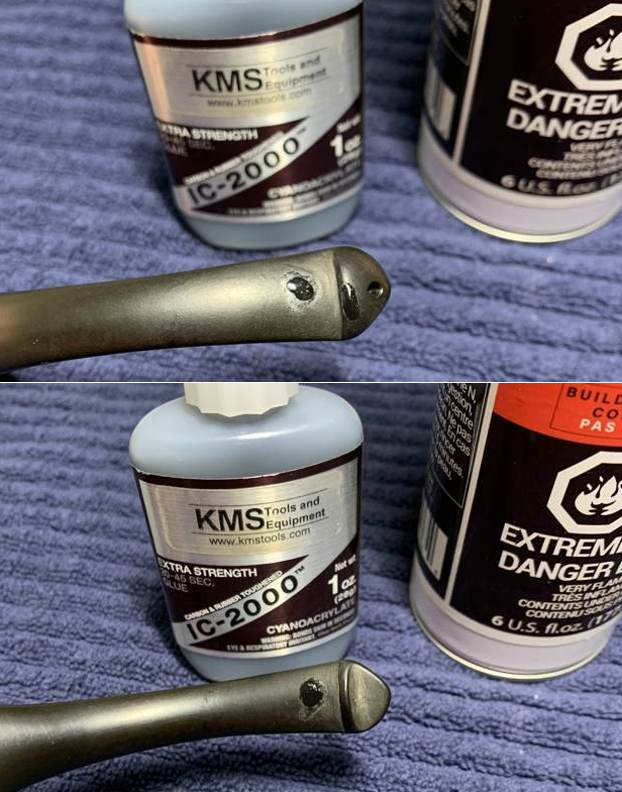
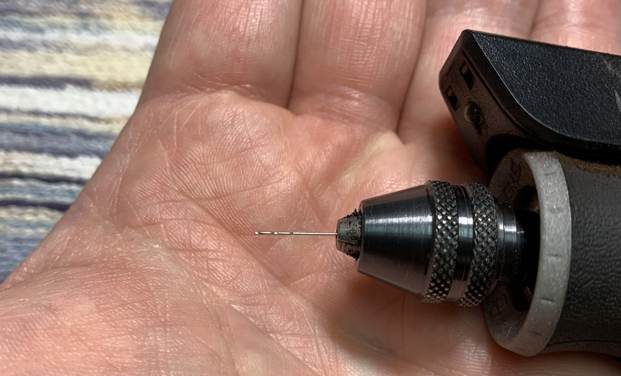
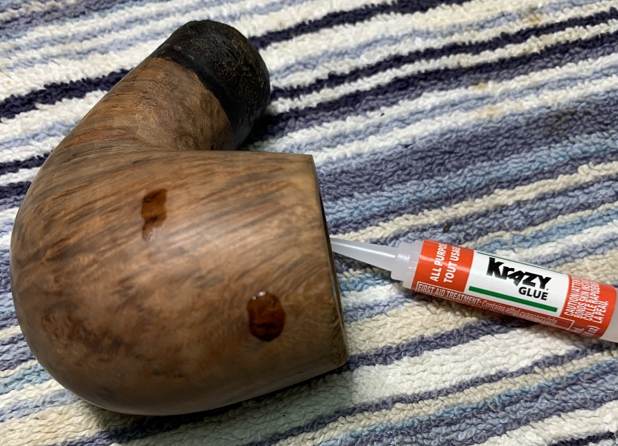
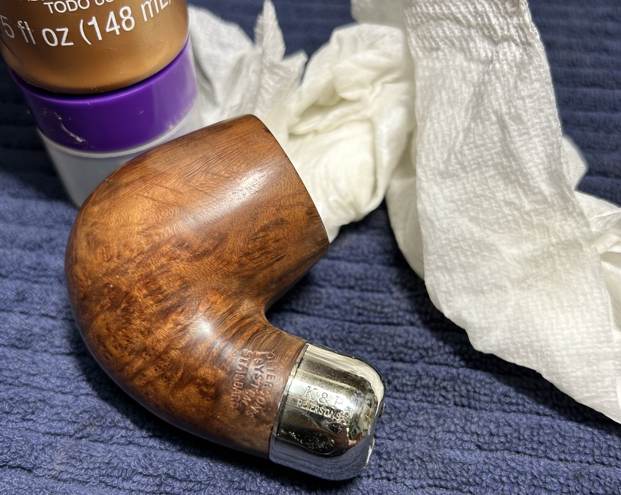
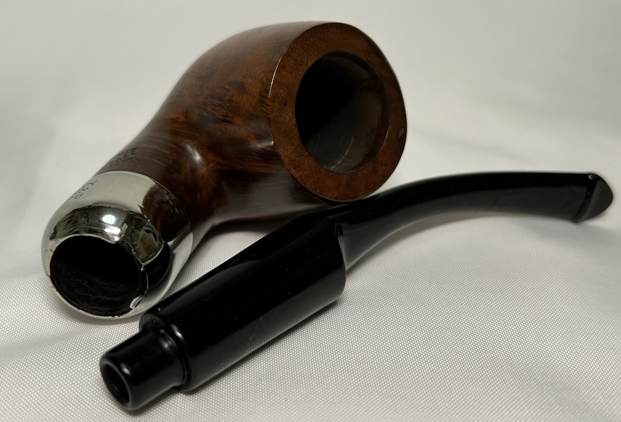
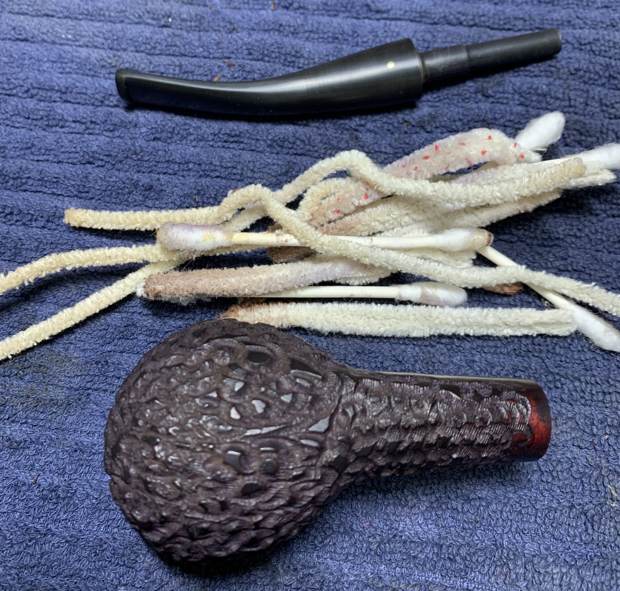
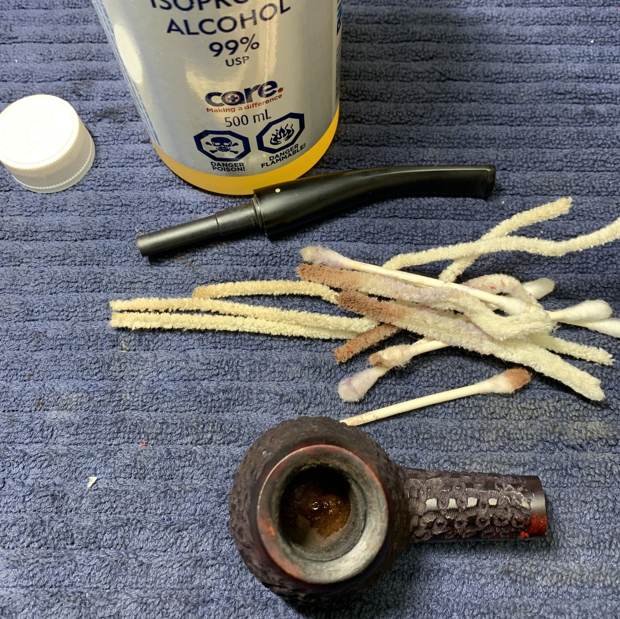
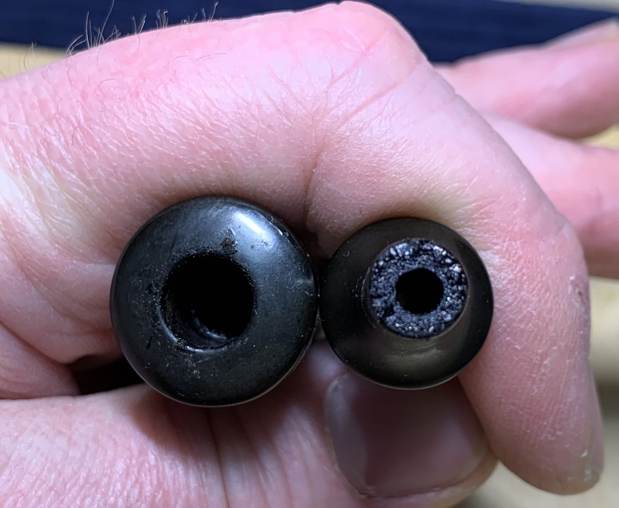
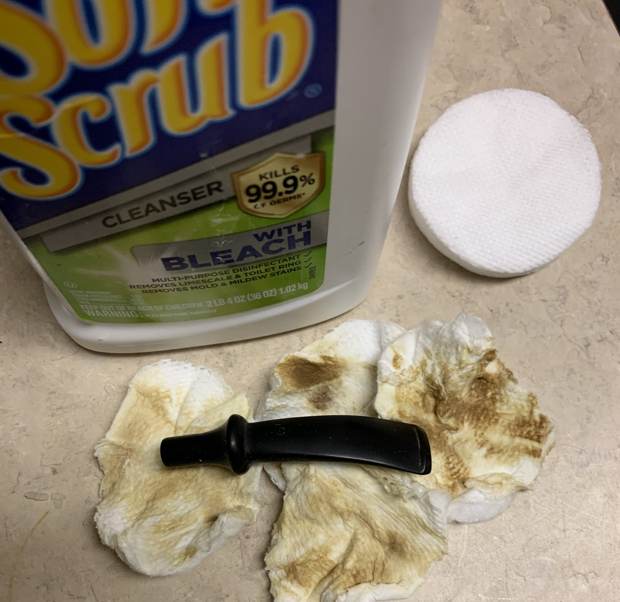
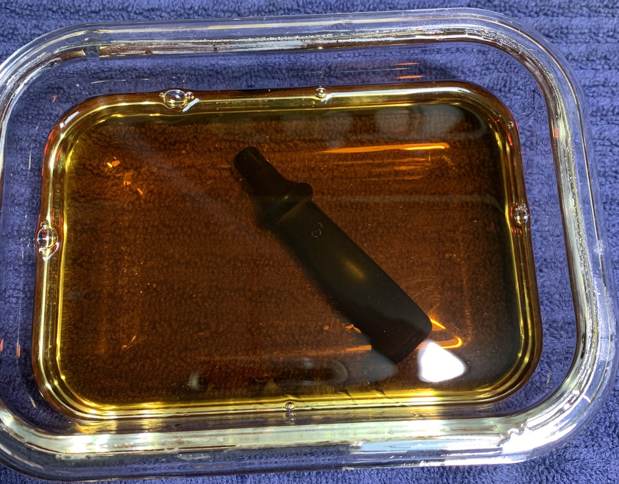
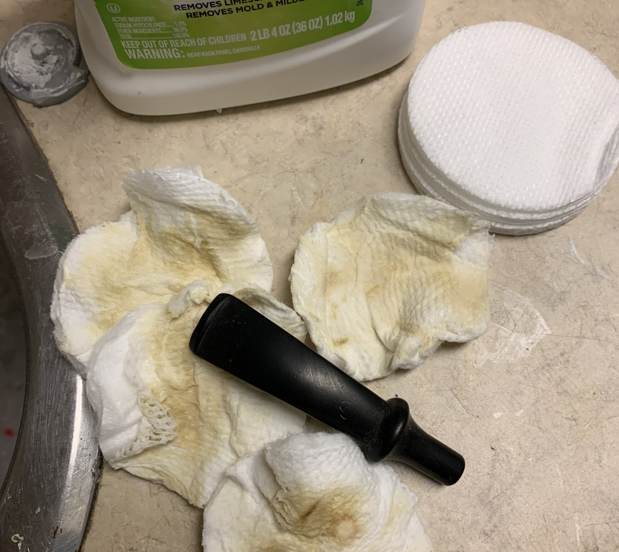
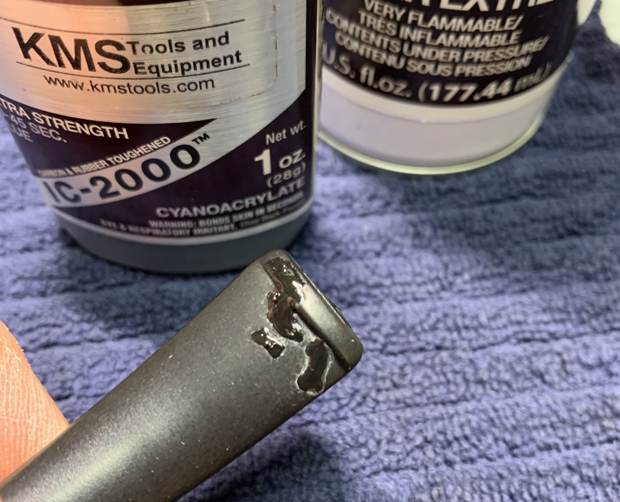
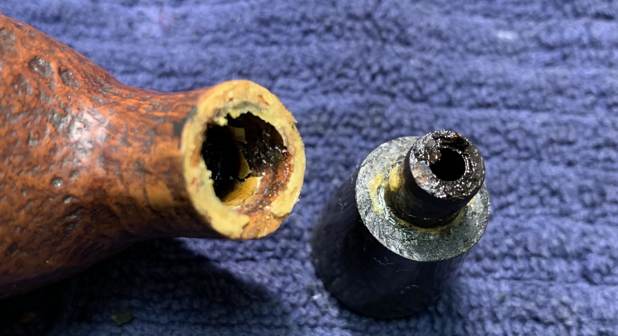
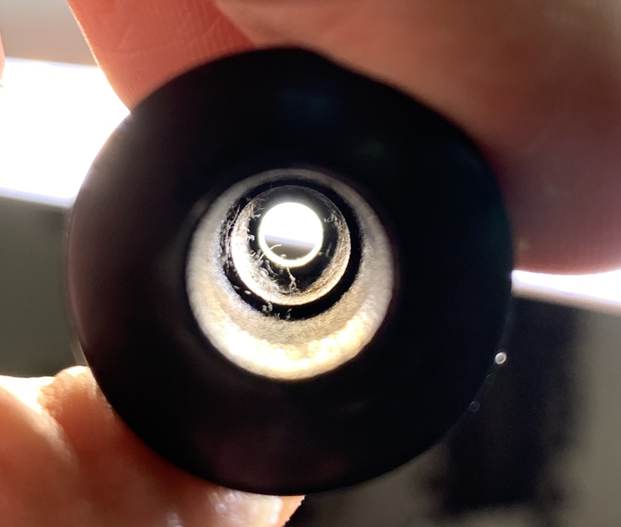
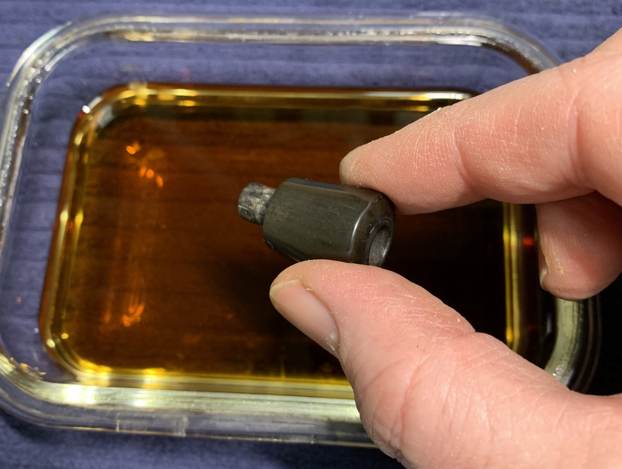
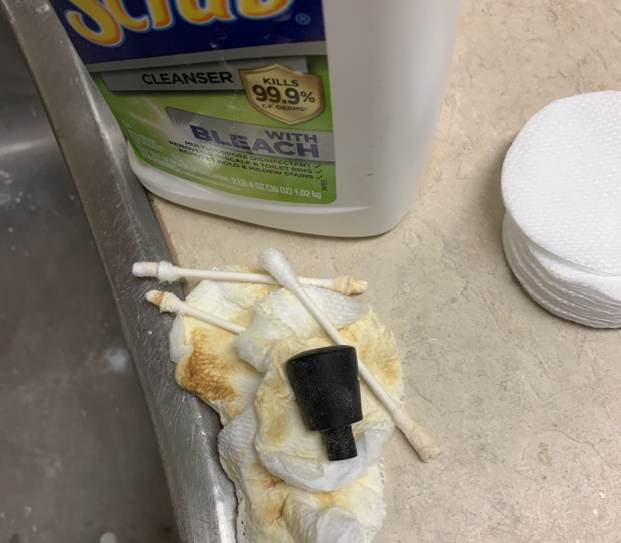
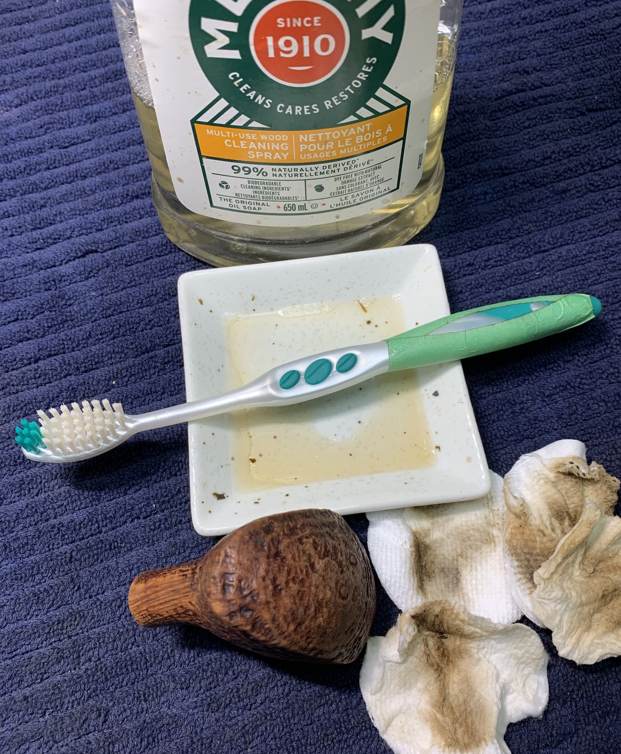
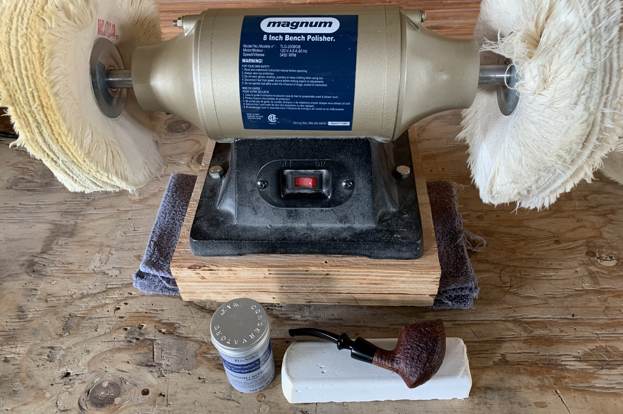
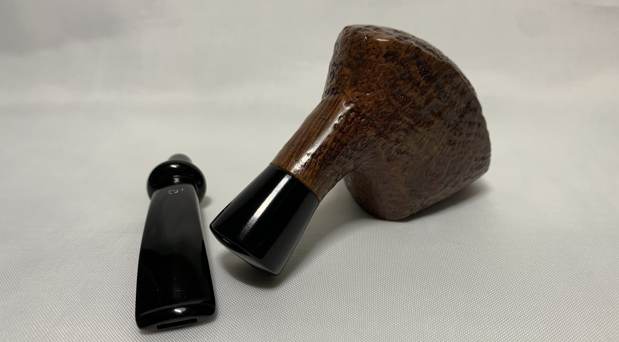
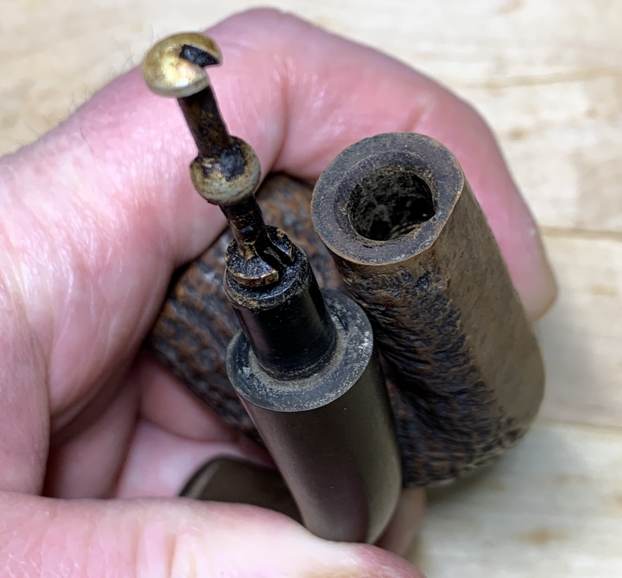
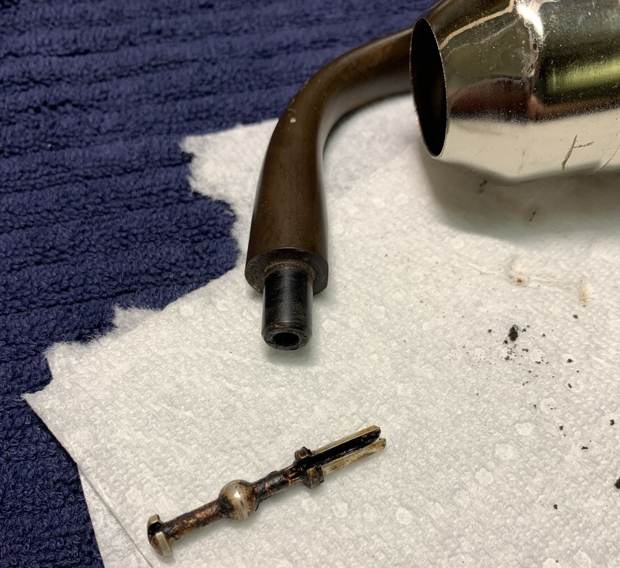
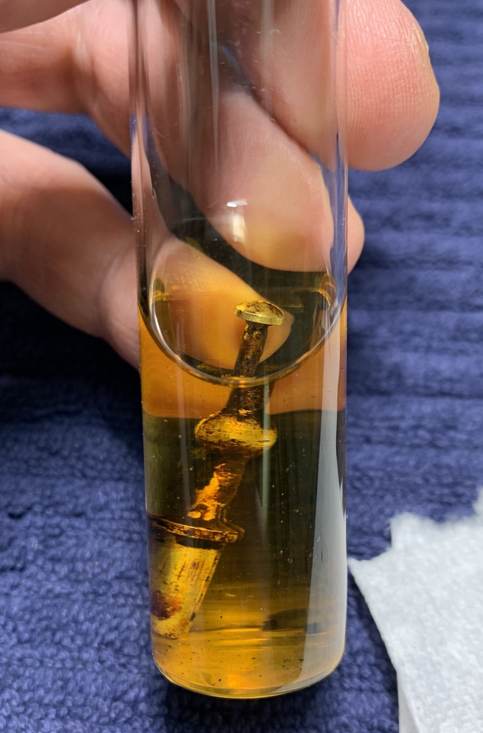
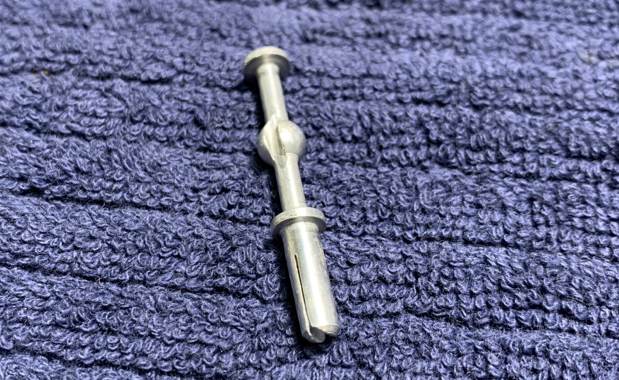
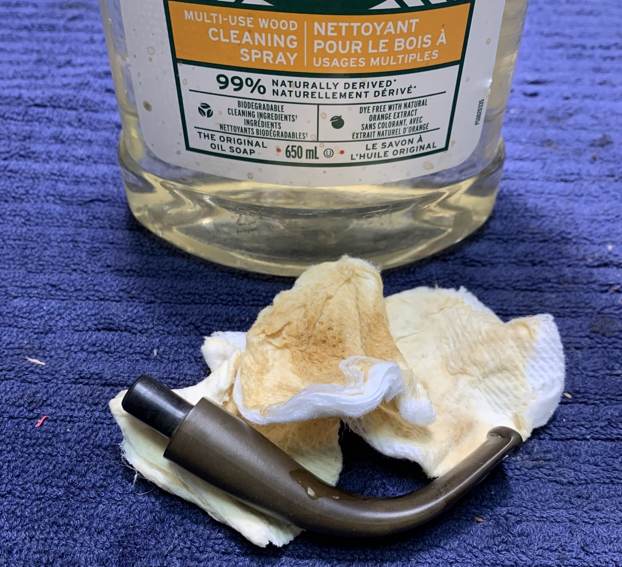
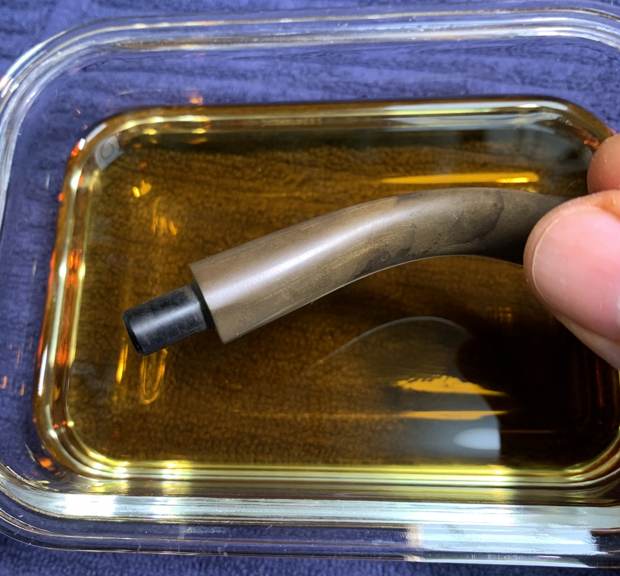
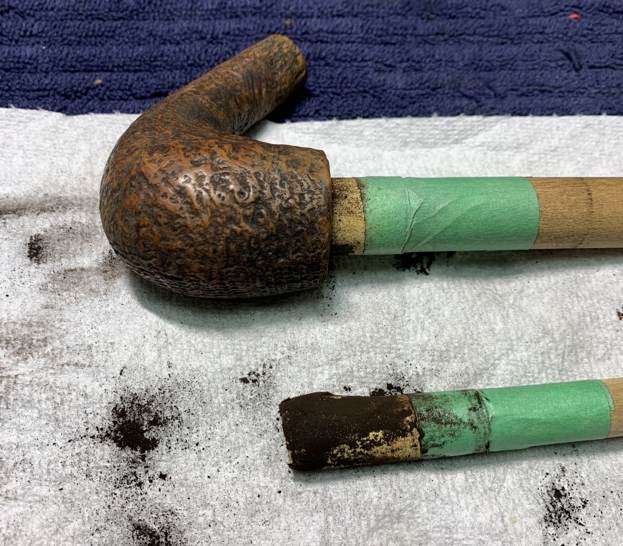
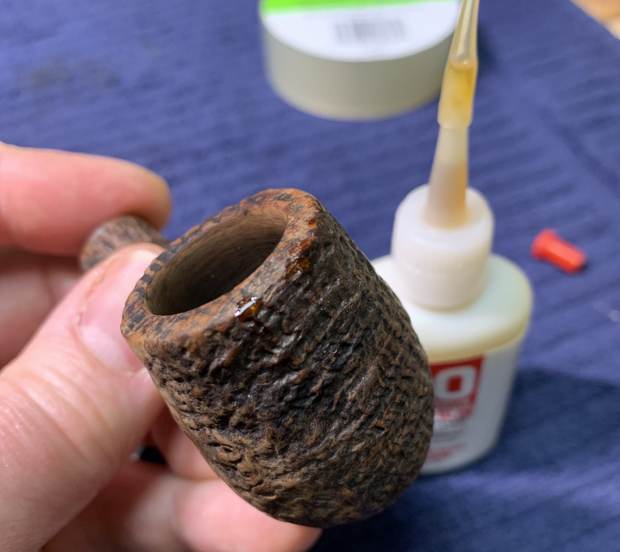
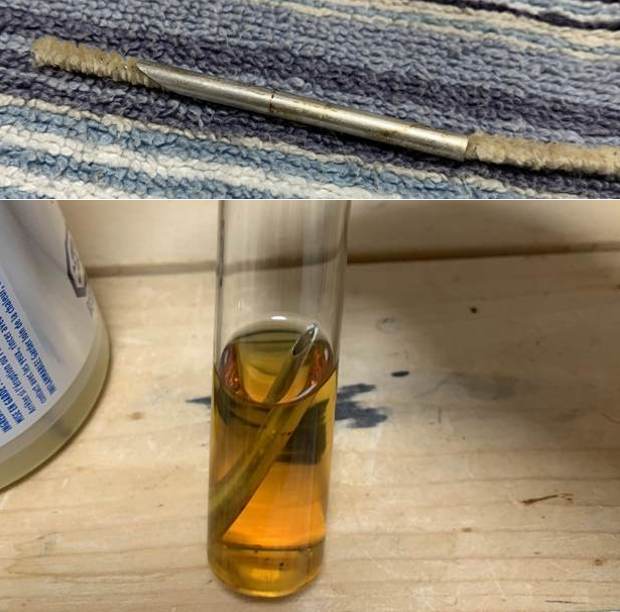
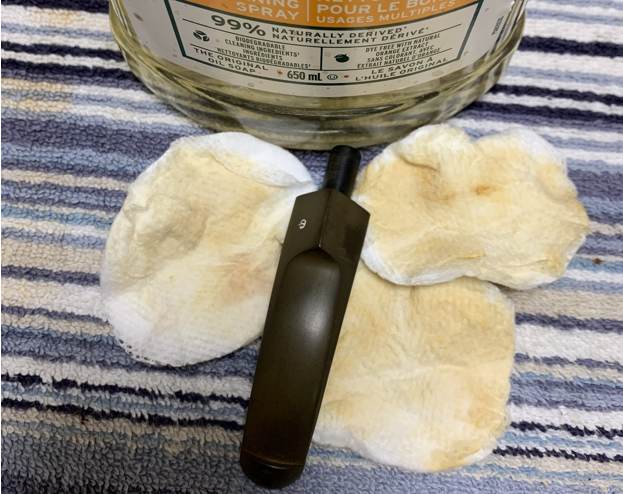
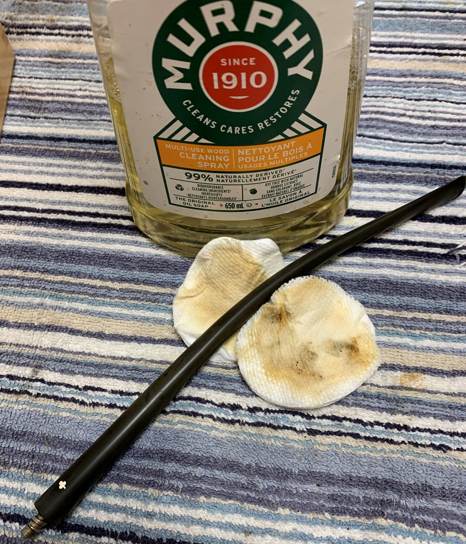
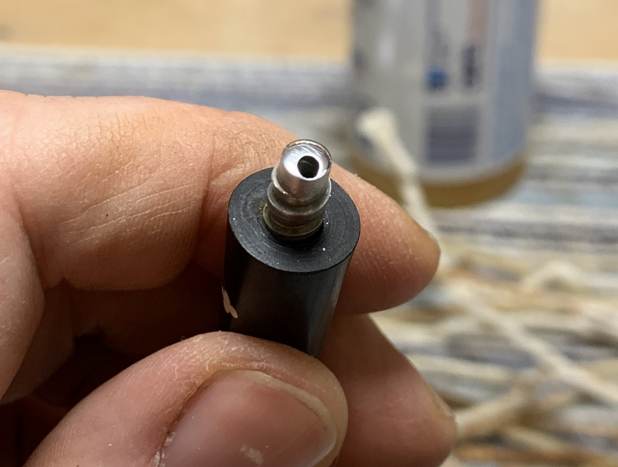
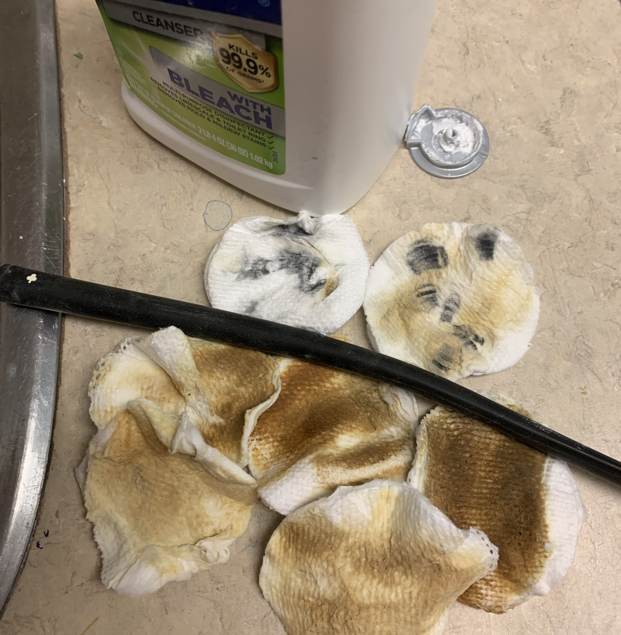
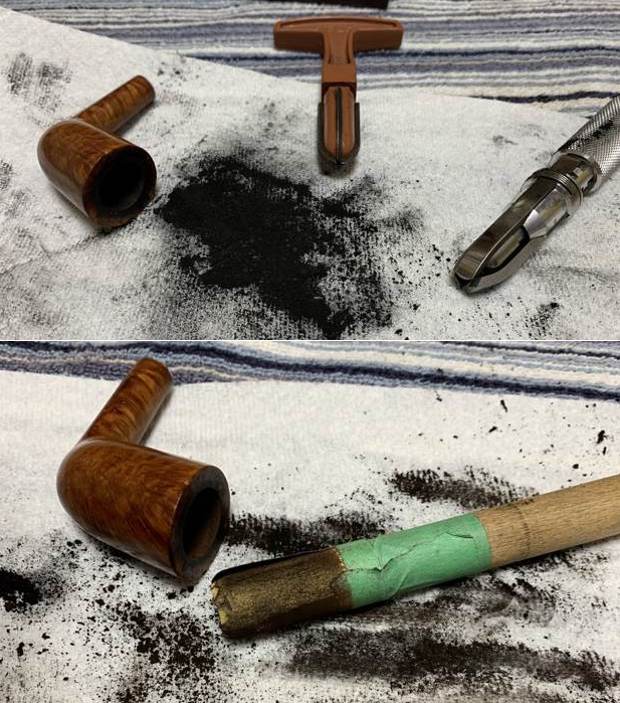
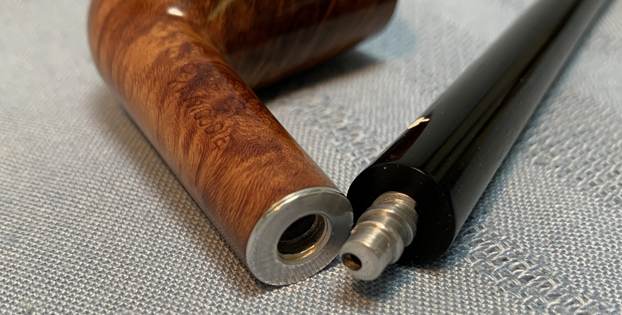
The stem was first on my list. This stem had a stinger in it – and it was being quite stubborn about coming out of the tenon! I opted to warm the stem and stinger with a heat gun and this provided just enough softening of the internal goo to allow me to pull it out. The stinger then went for a soak in some lemon-infused isopropyl alcohol. I let it set for several hours and then cleaned it off and it looked much improved. I wiped down the outside of the stem with Murphy’s Oil Soap on some cotton pads. Then, I cleaned out the insides with pipe cleaners and isopropyl alcohol. I also built up the worm holes on the stem with clear cyanoacrylate adhesive and let it fully cure.
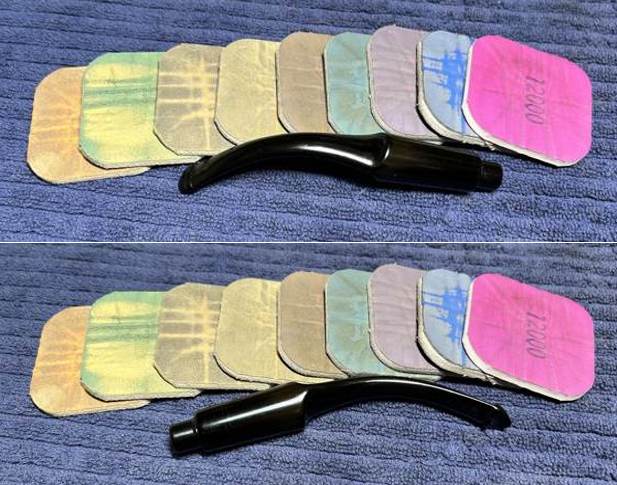
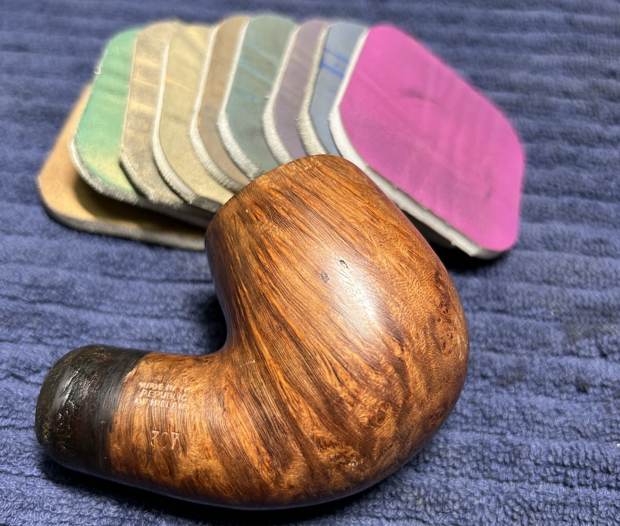
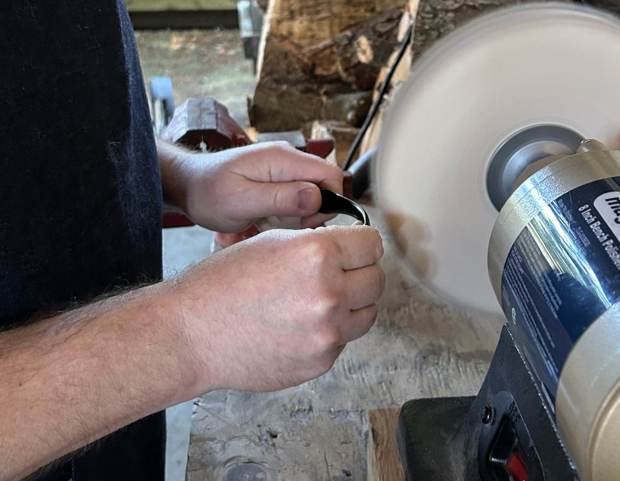
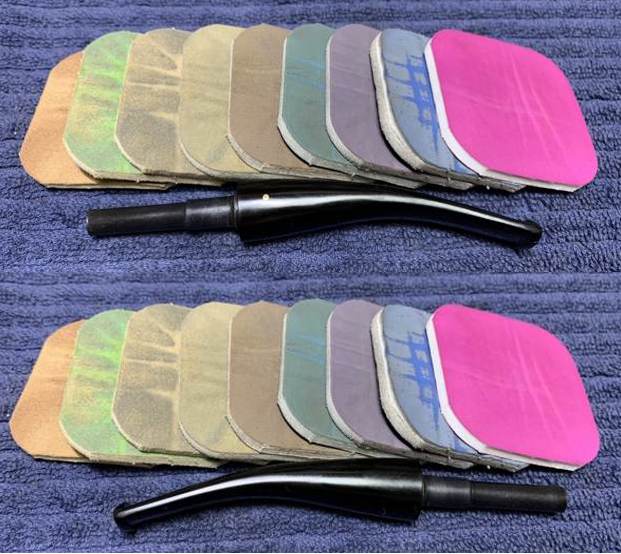
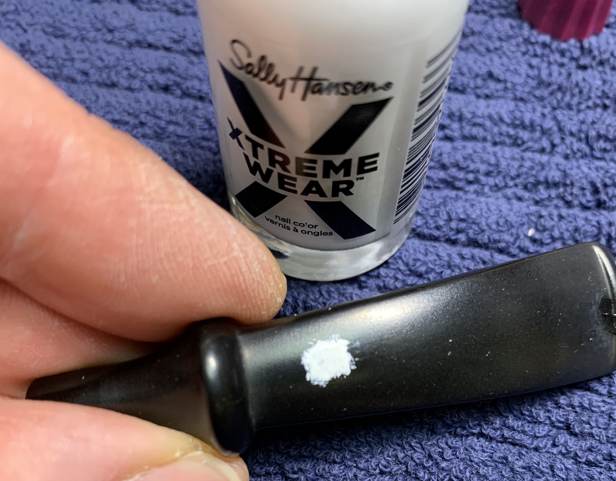
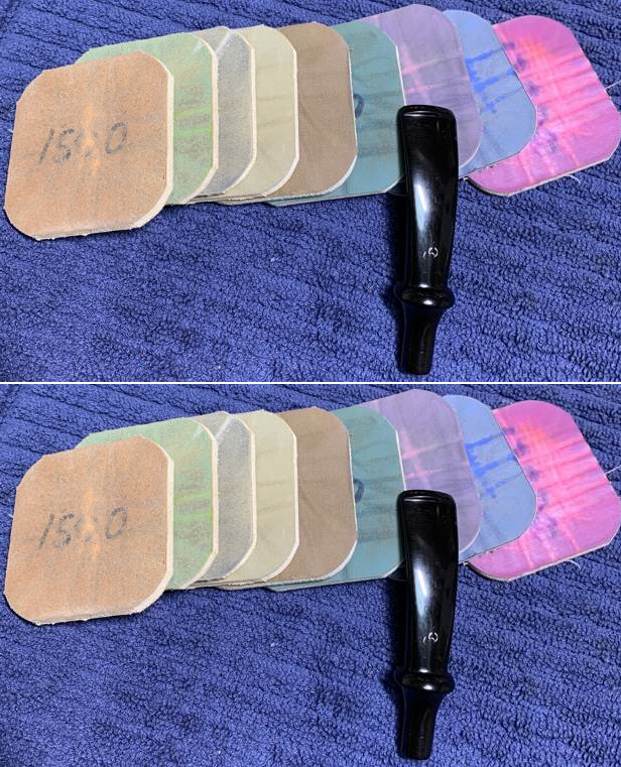
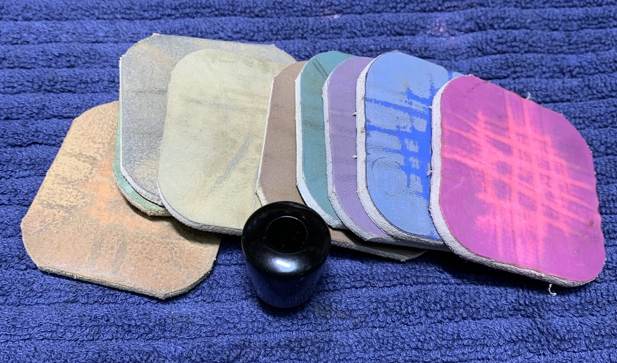
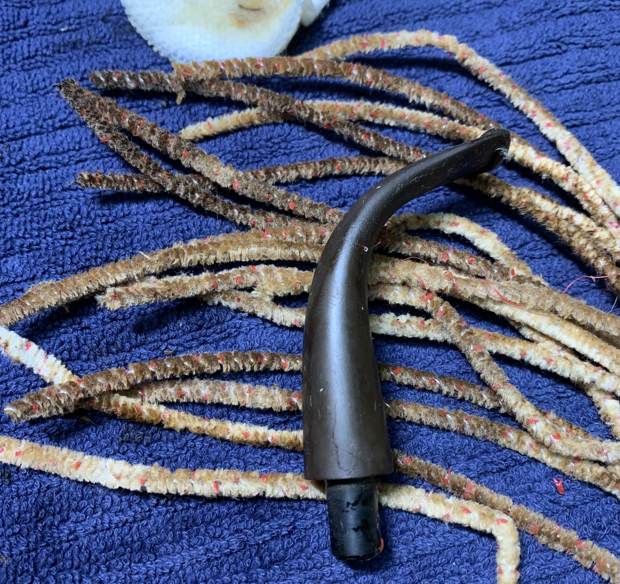
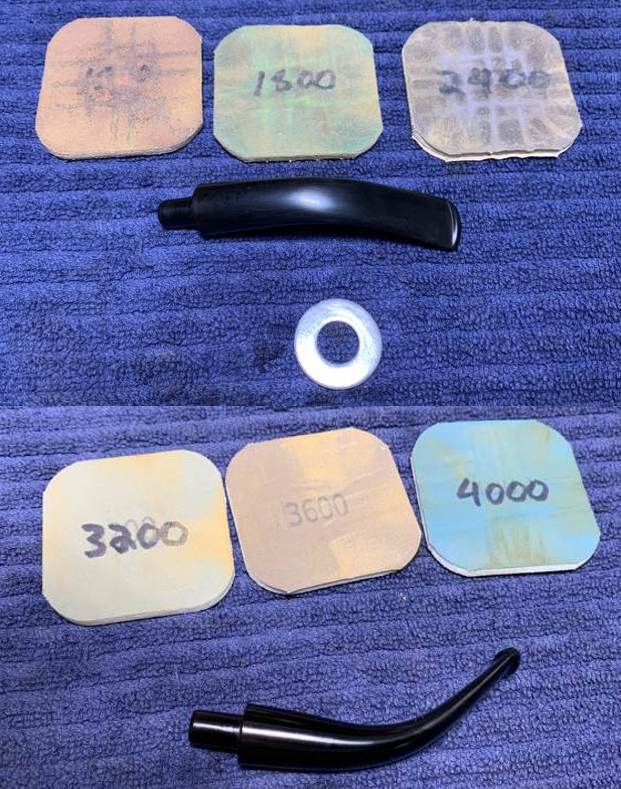
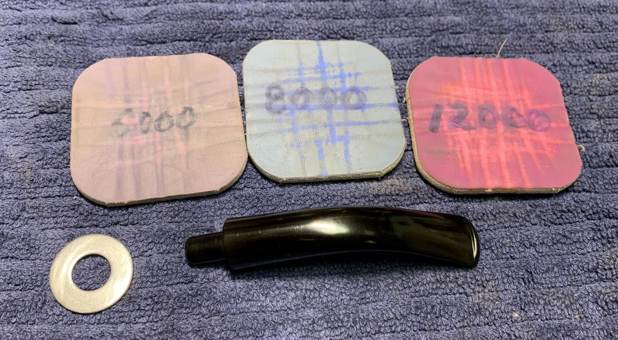
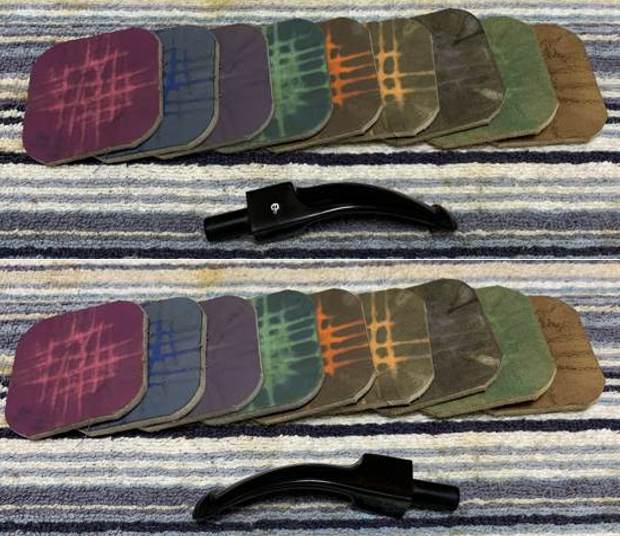
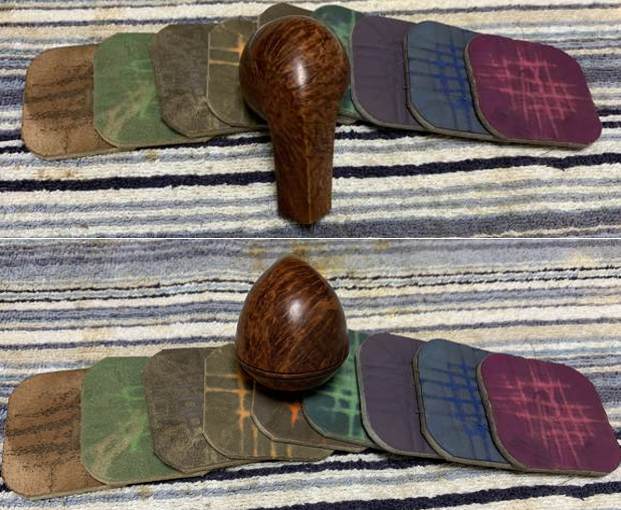
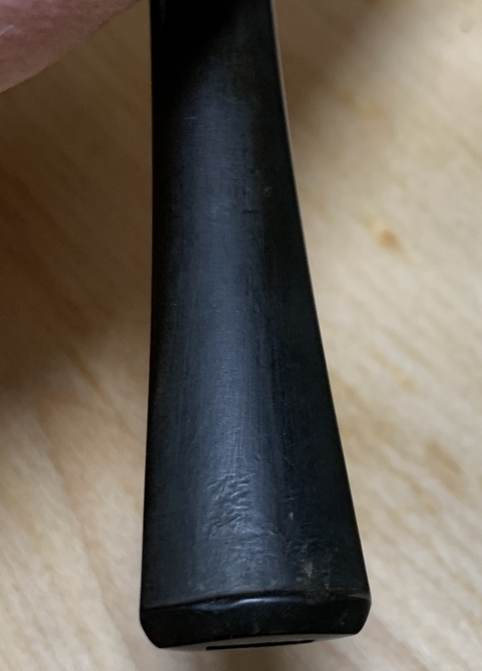
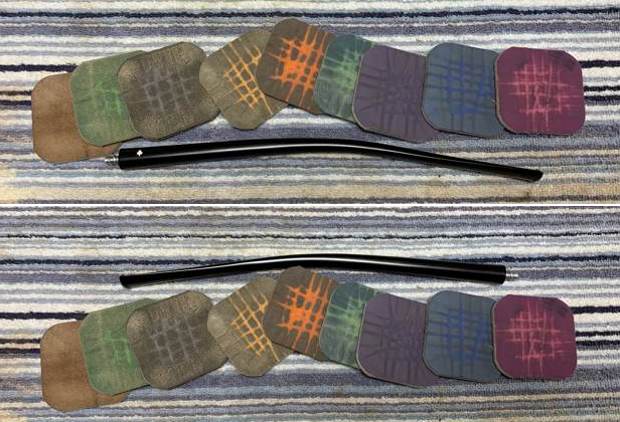
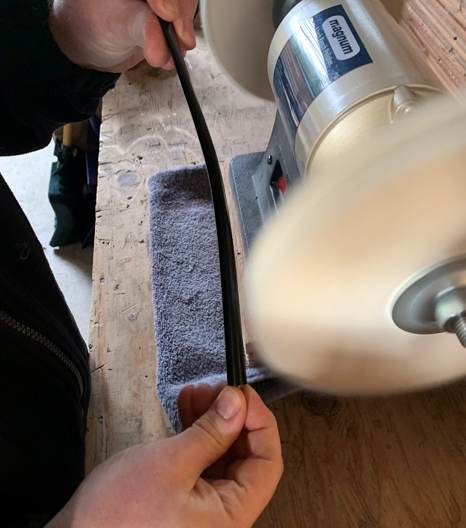
I then sanded the stem down with 220- and 400-grit sandpapers to bring down the repairs to the level of the stem. I ensured that the stem kept its shape and looked like it should. I then used all nine Micromesh pads (1,500 through 12,000 grit) to bring out the beautiful horn grain on the stem. I also used Obsidian Pipe Stem Oil in between each pad scrubbing. Some of the adhesive ended up having a strange reaction with the horn, but in the end, I think it looks pretty good.
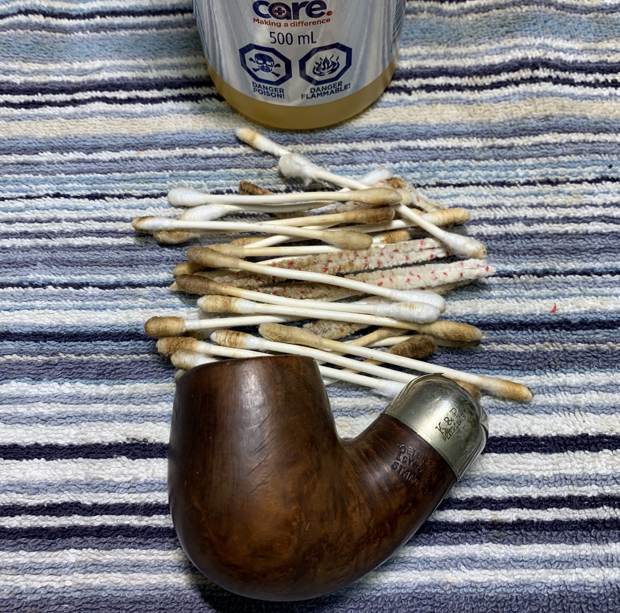
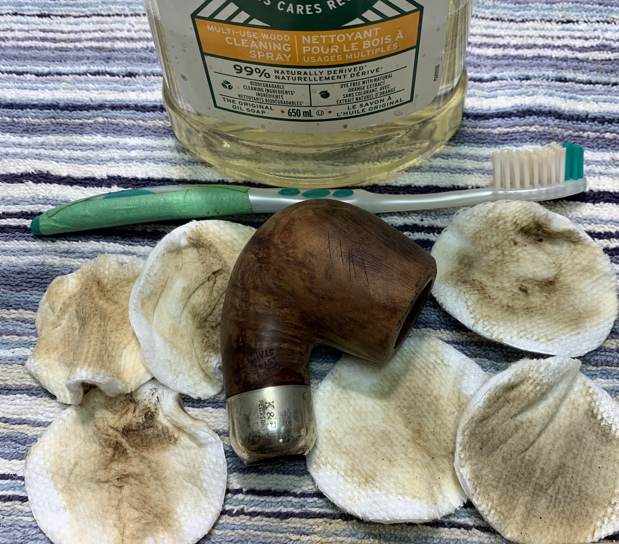
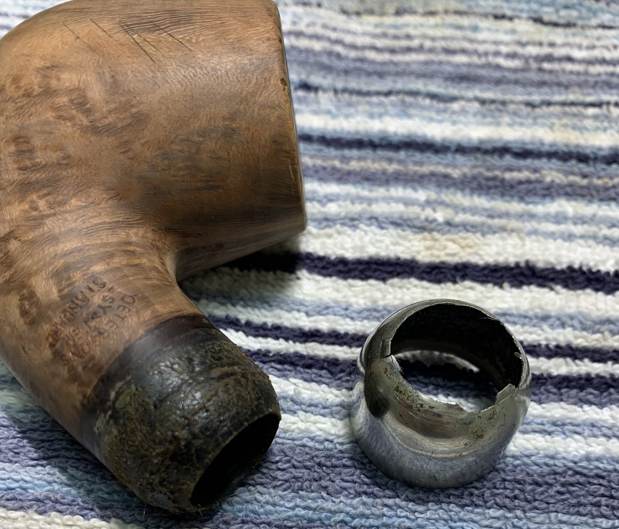
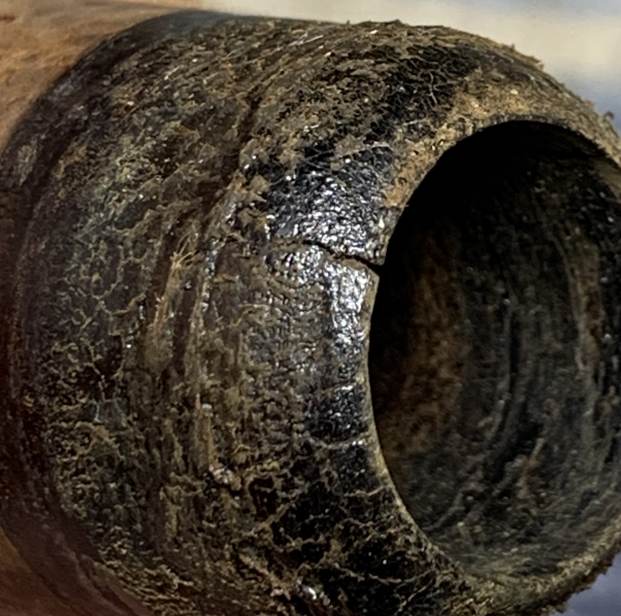
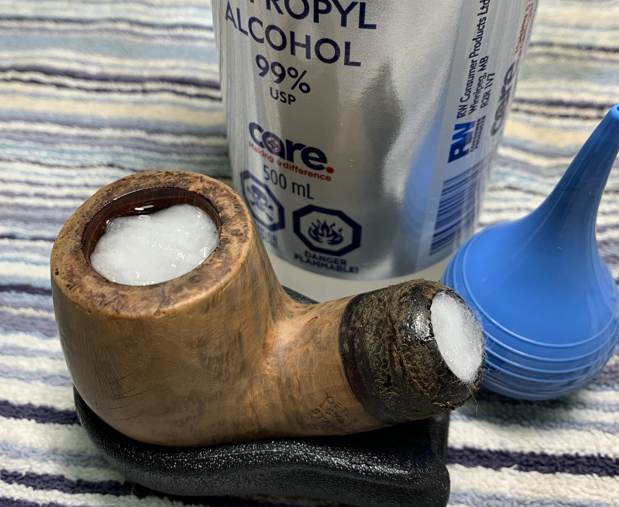
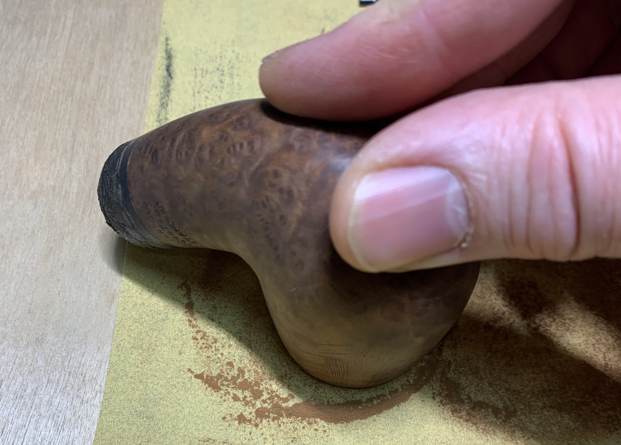
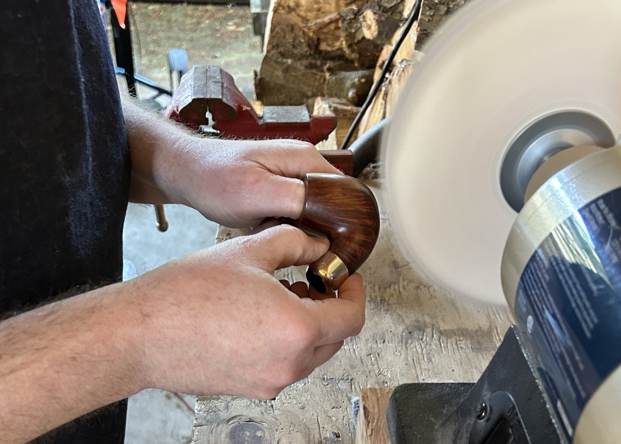
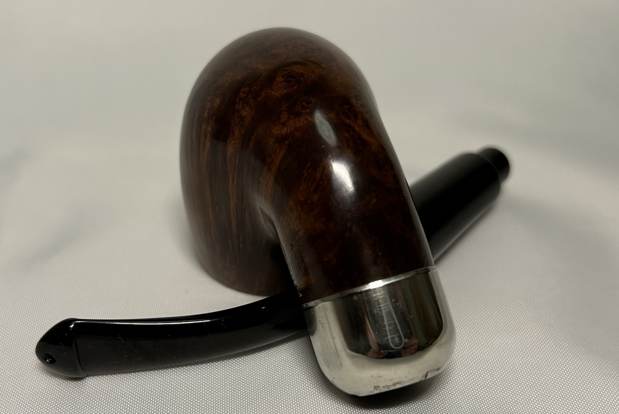
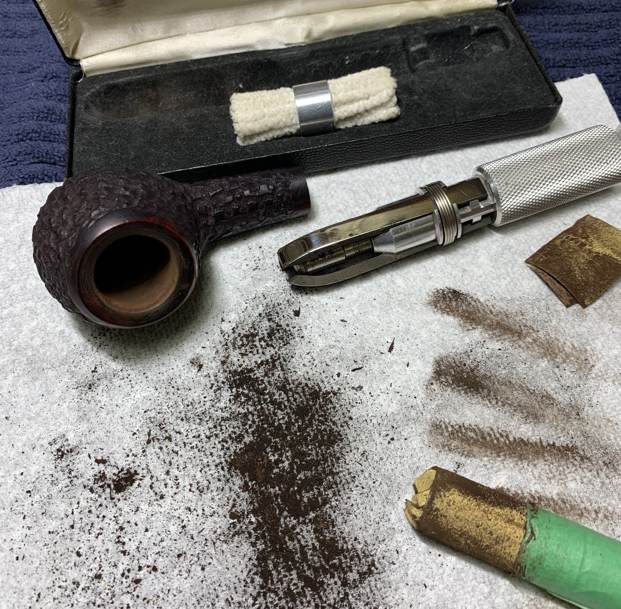
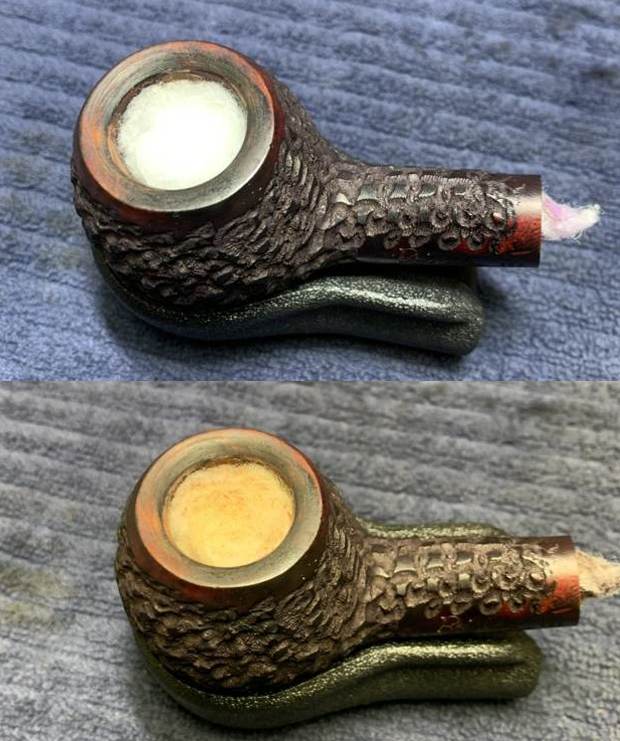
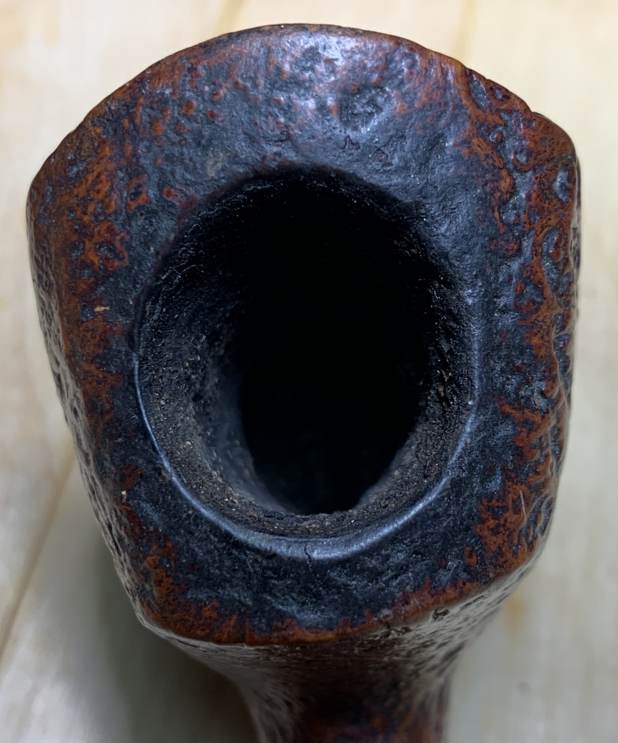
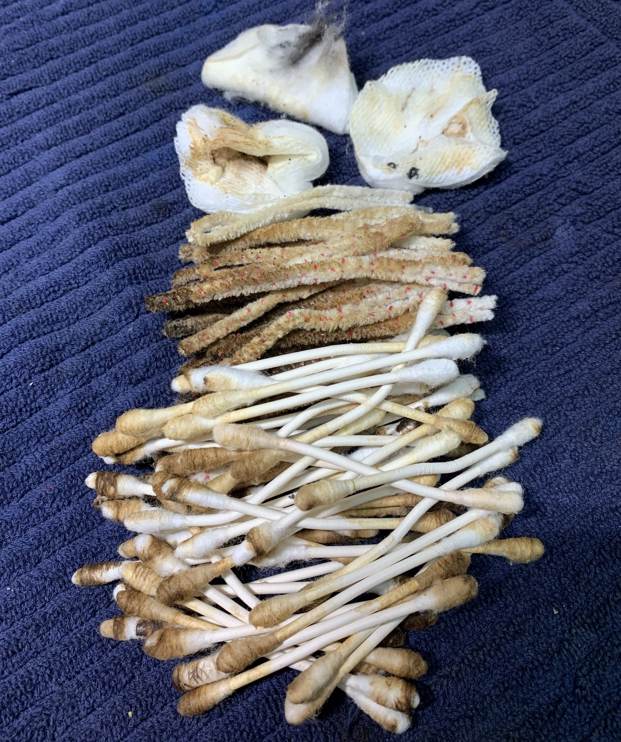
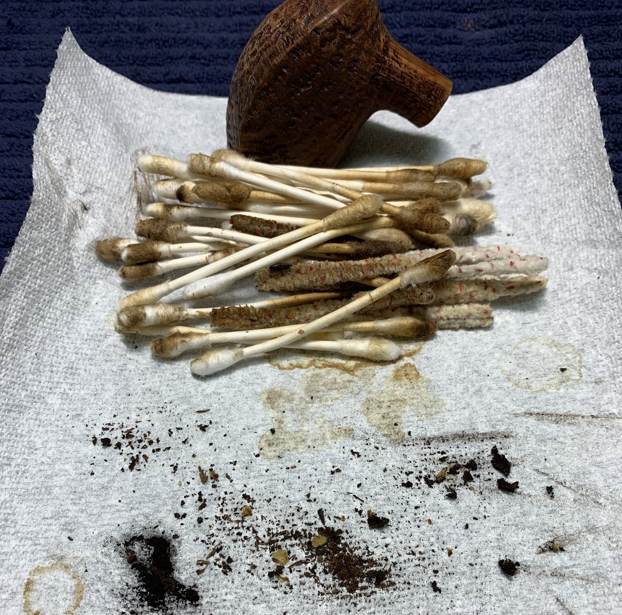
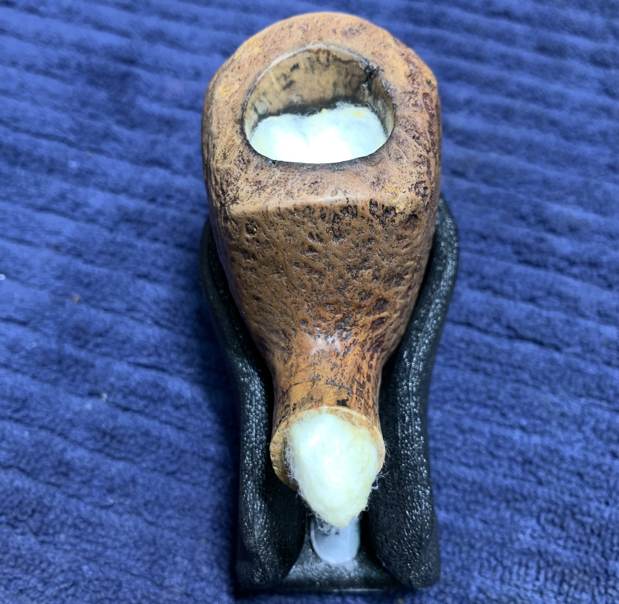
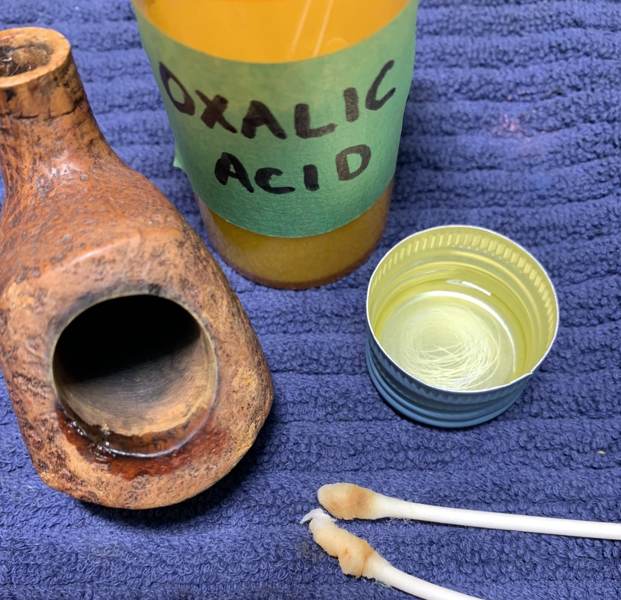
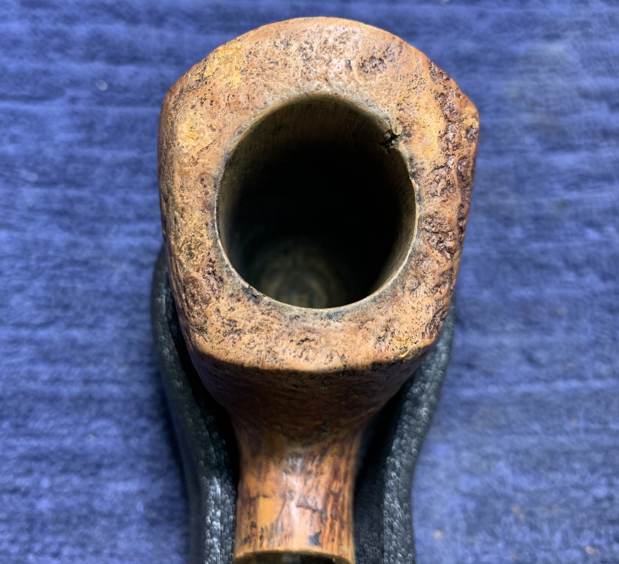
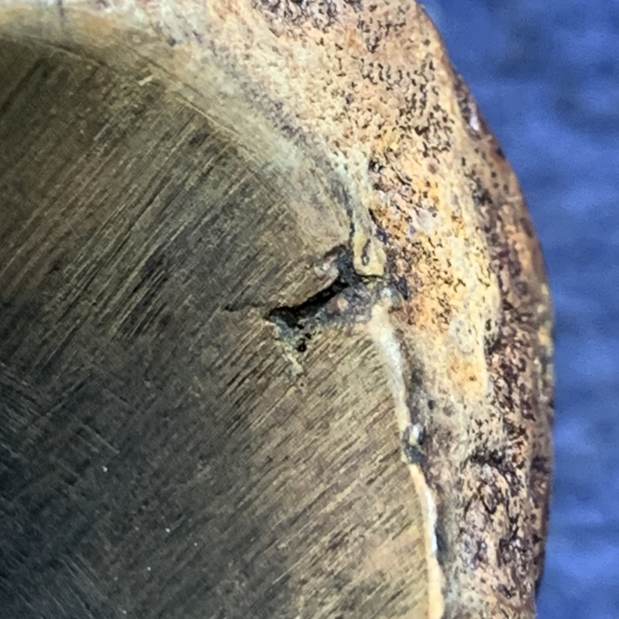
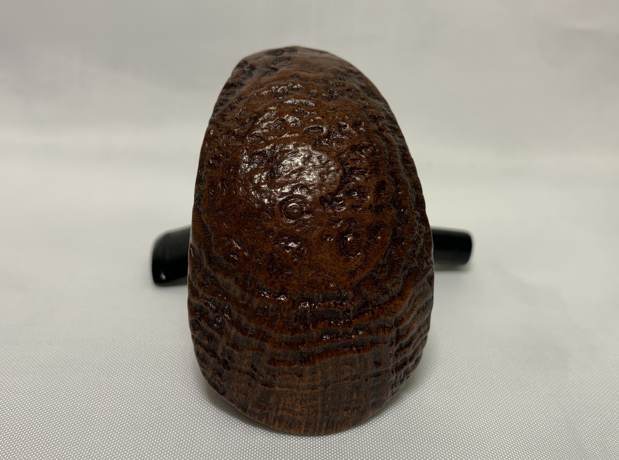
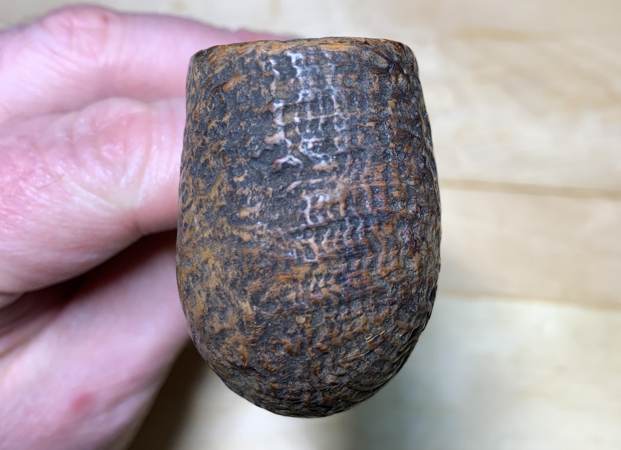
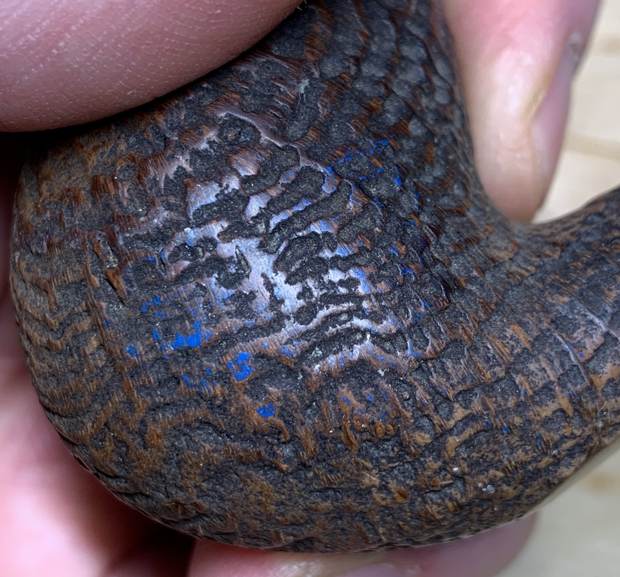
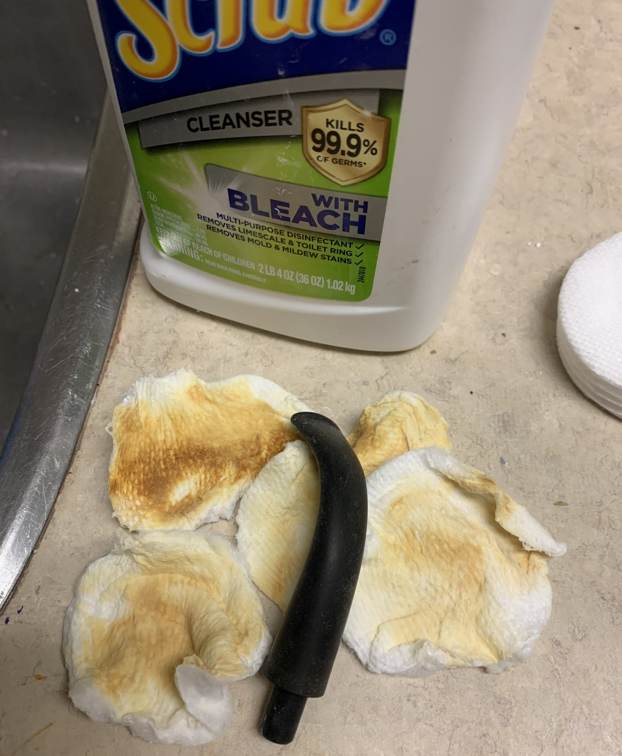
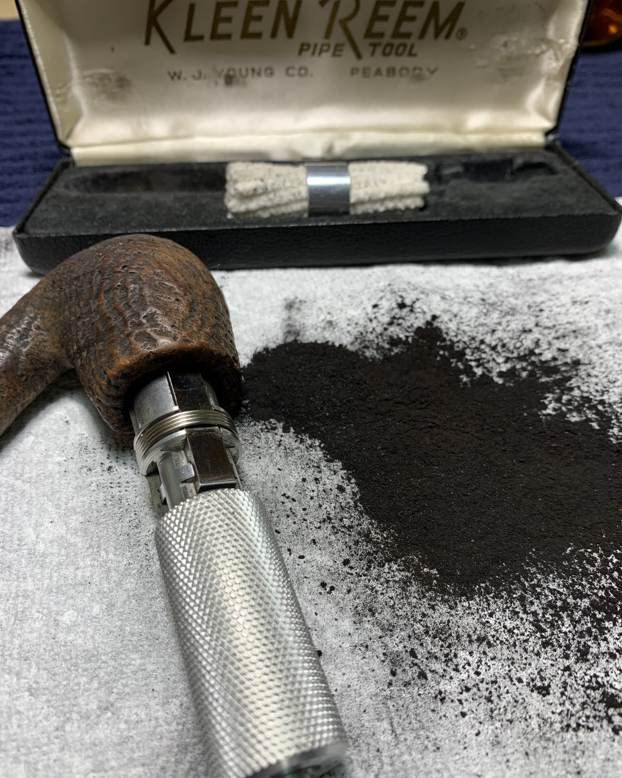
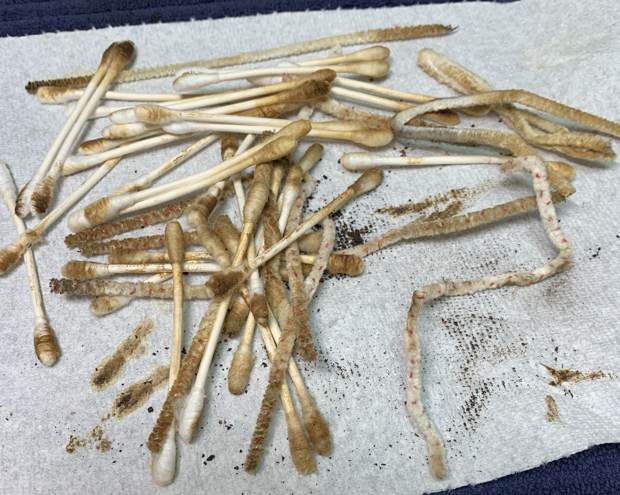
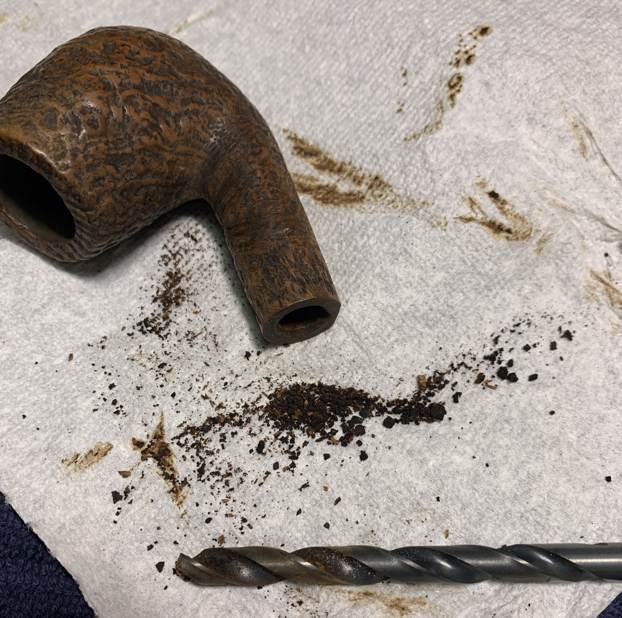
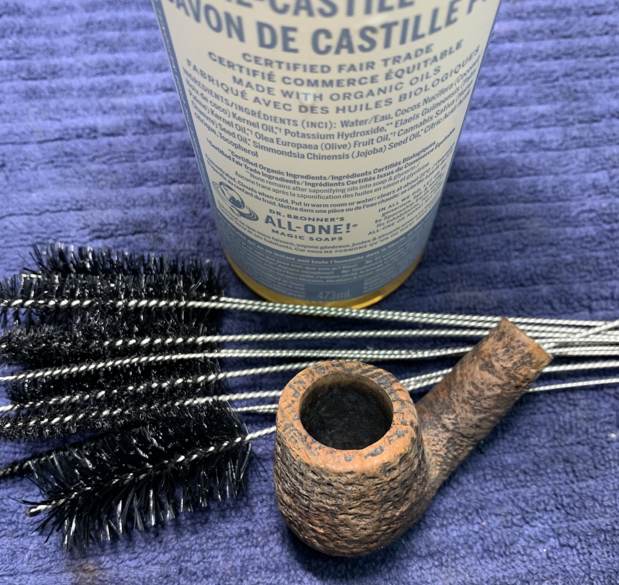
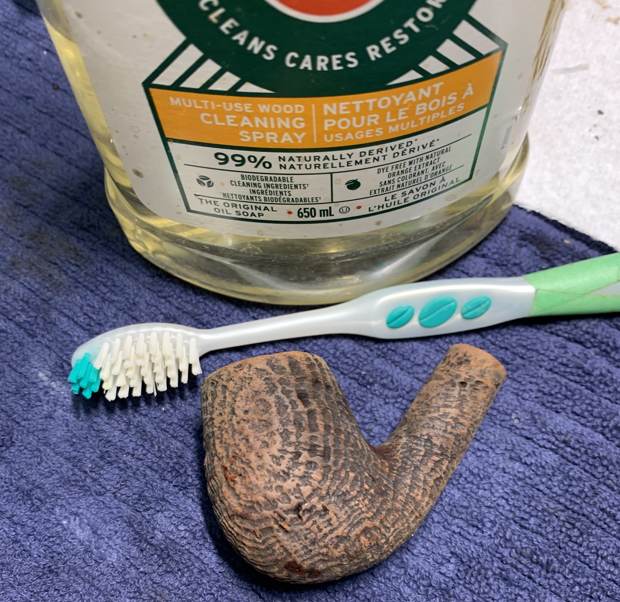
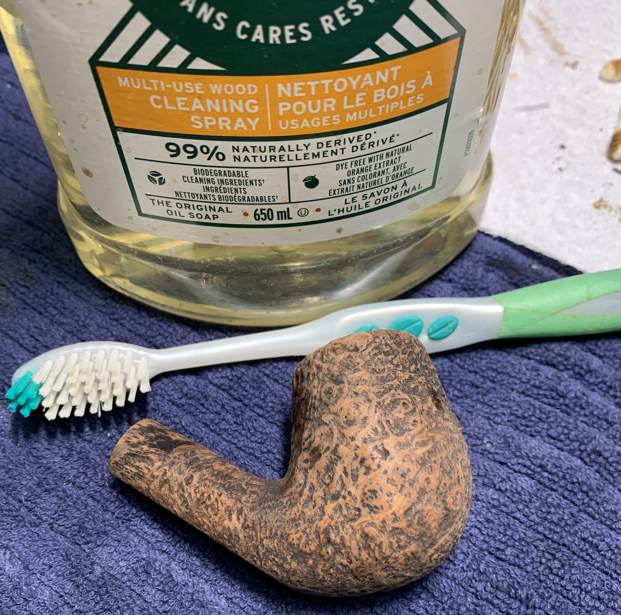
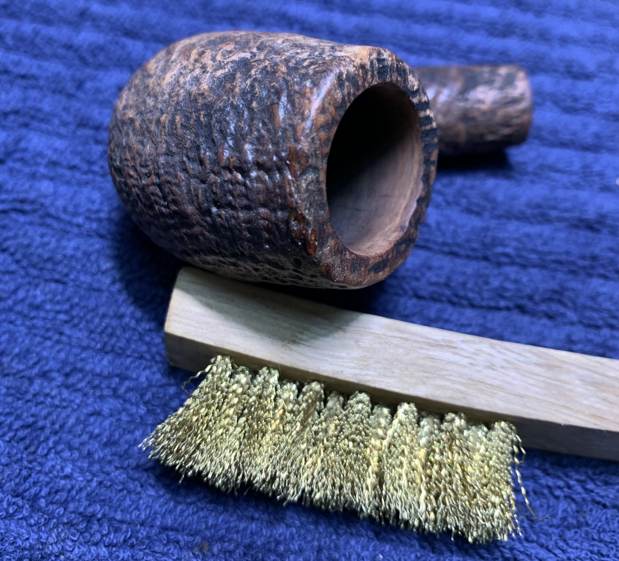
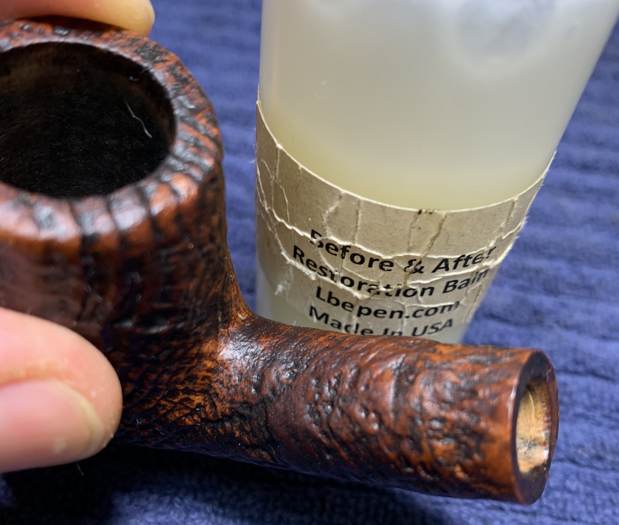
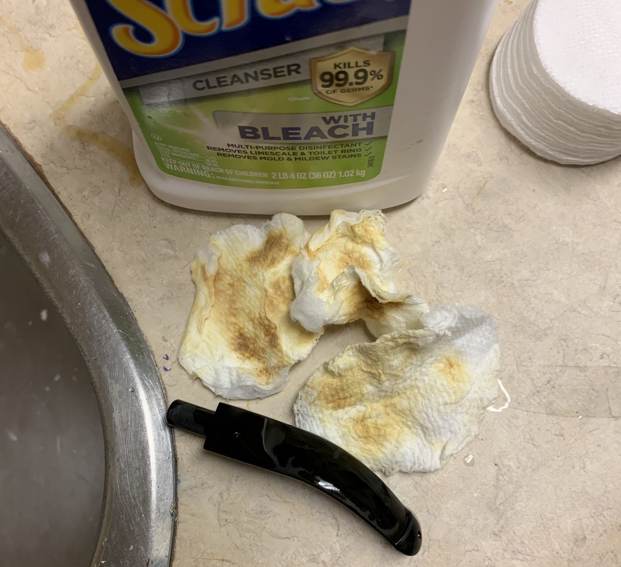
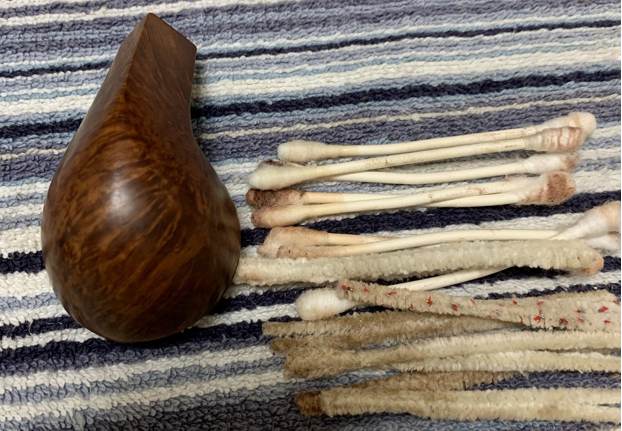
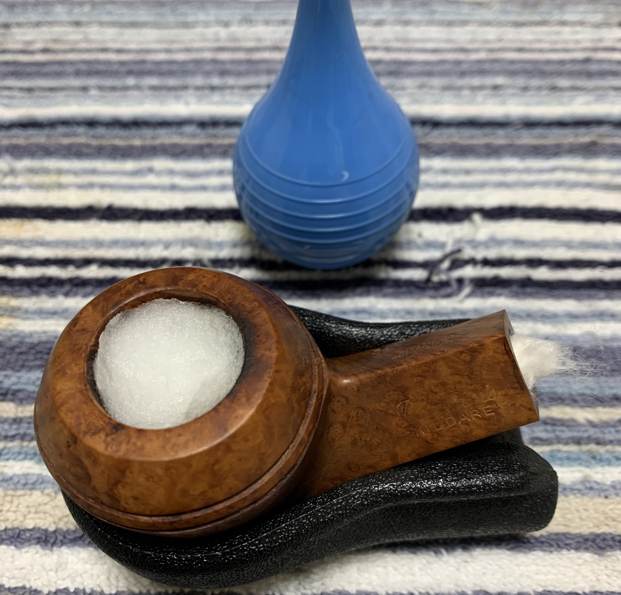
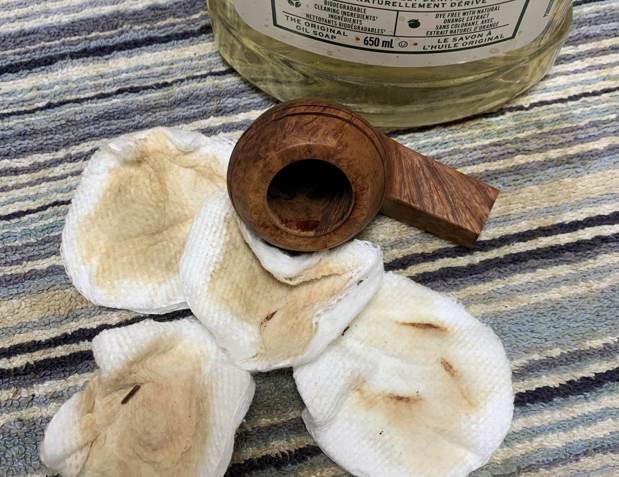
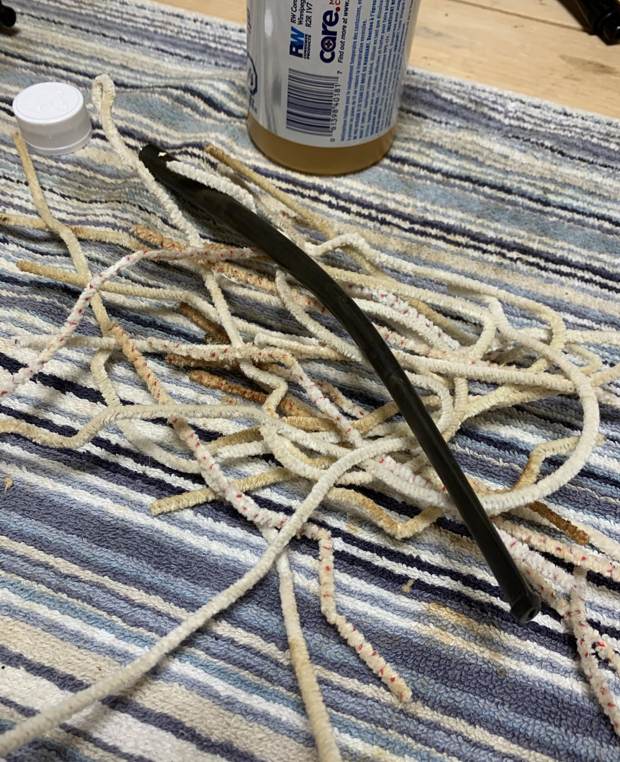
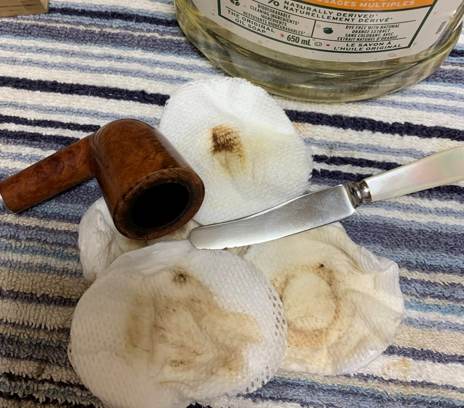
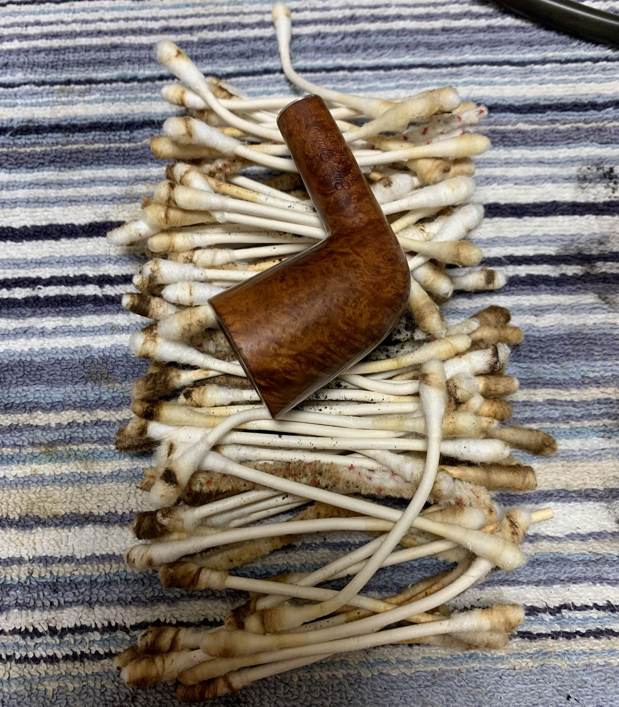
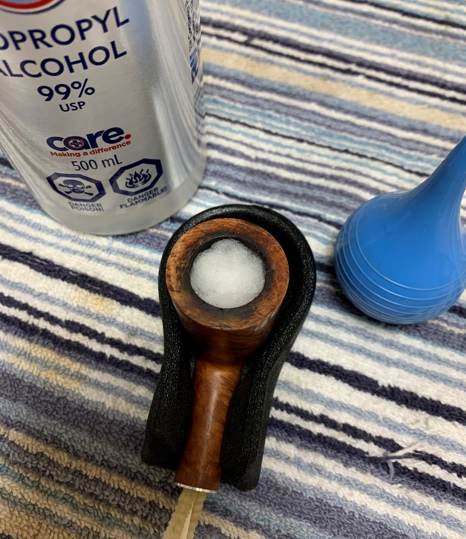
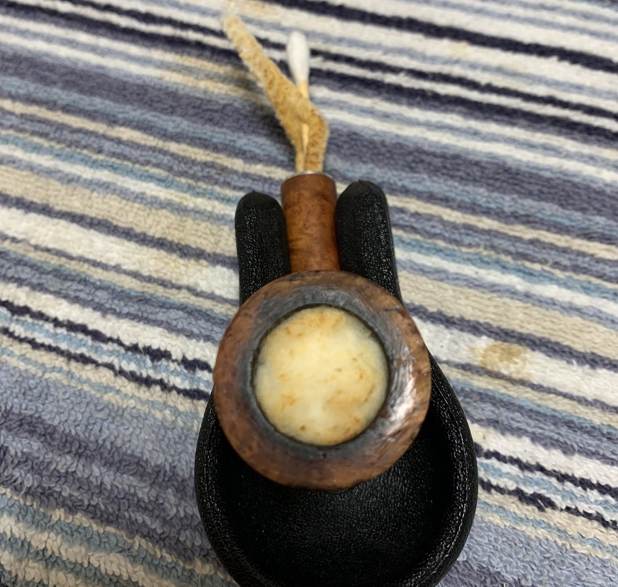
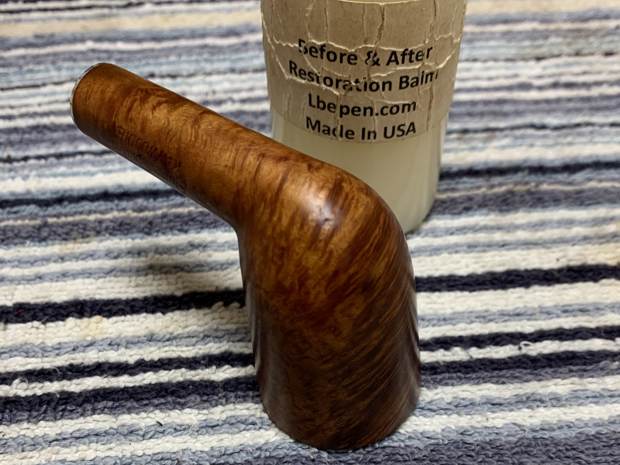
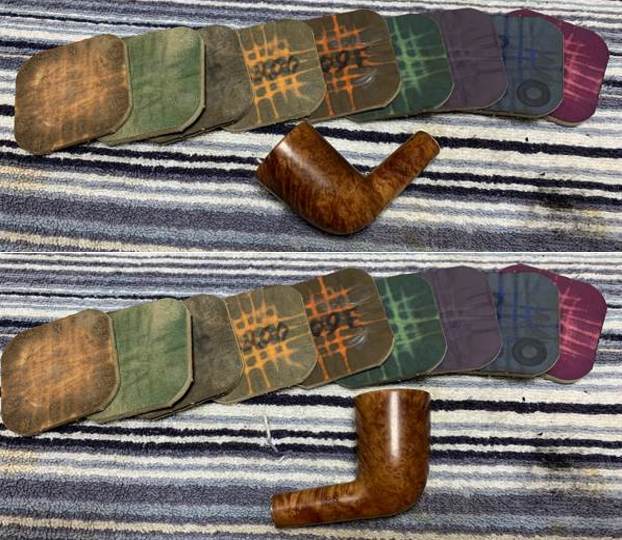
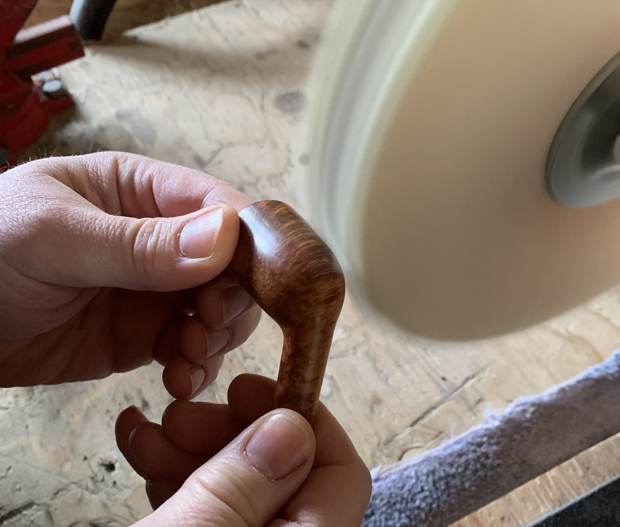
On to the stummel, and it was quite clean already. I began with some 220-grit sandpaper inside the chamber to even out the surface and remove any debris. I wanted to take the bowl down to bare briar to ensure there were no hidden flaws in the walls of the bowl. Fortunately, there were none. I then proceeded to clean out the insides of the shank with cotton swabs, pipe cleaners, and isopropyl alcohol. There was a bit of filth inside this stummel – it took a few pipe cleaners et cetera to clean it out. I followed that up by cleaning the insides with some dish soap and tube brushes. I then moved on to cleaning the outside of the stummel with Murphy’s Oil Soap and some cotton pads. In order to remove the lacquer finish, I used acetone on some cotton rounds and worked it hard. This worked very effectively.
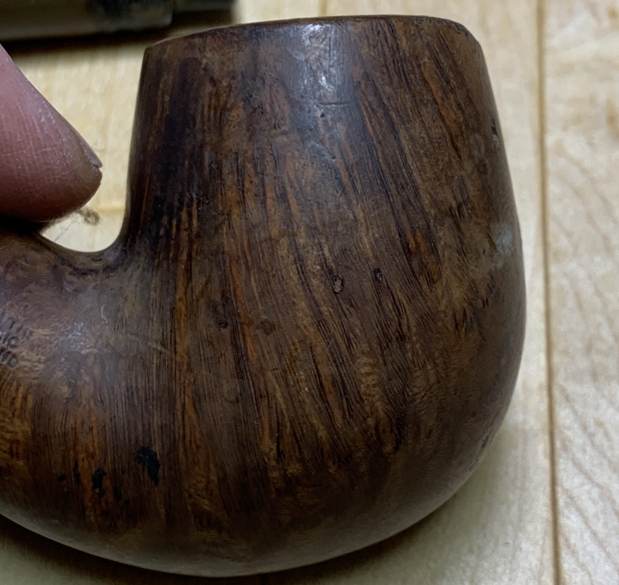
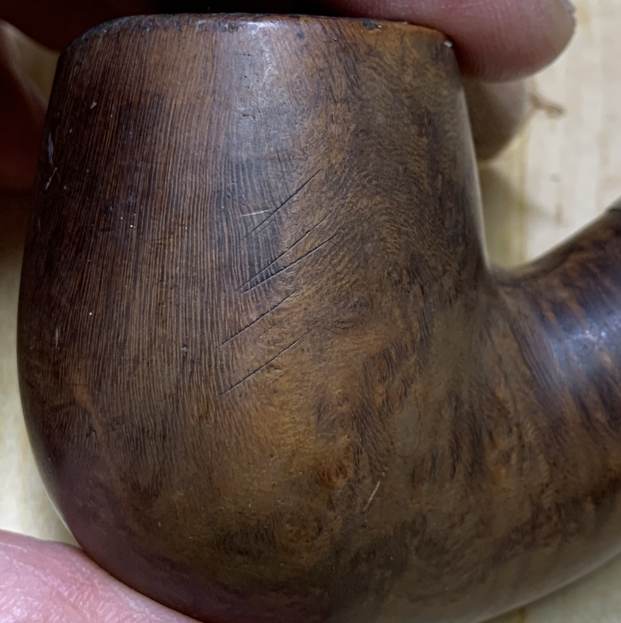
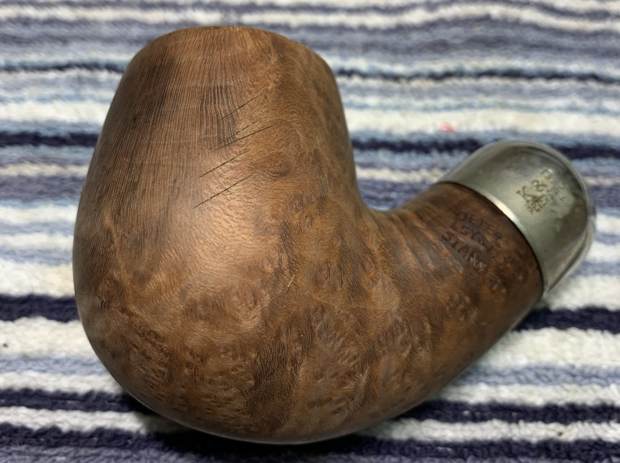
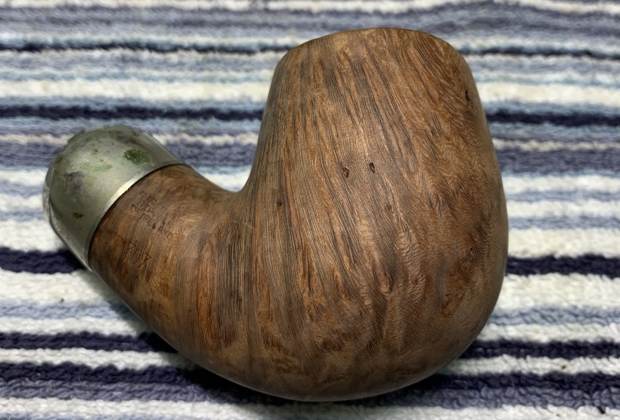
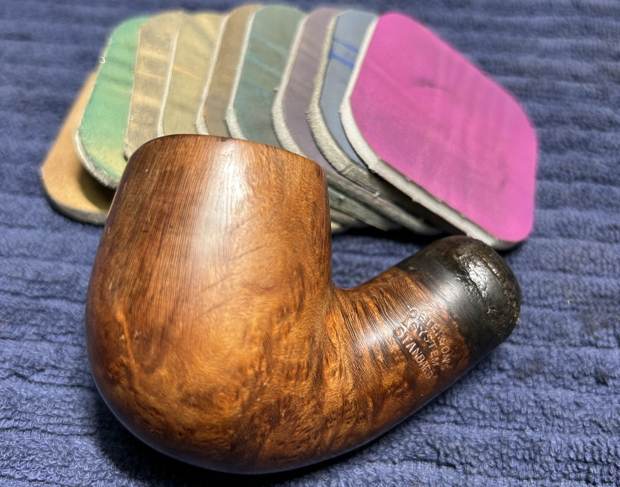
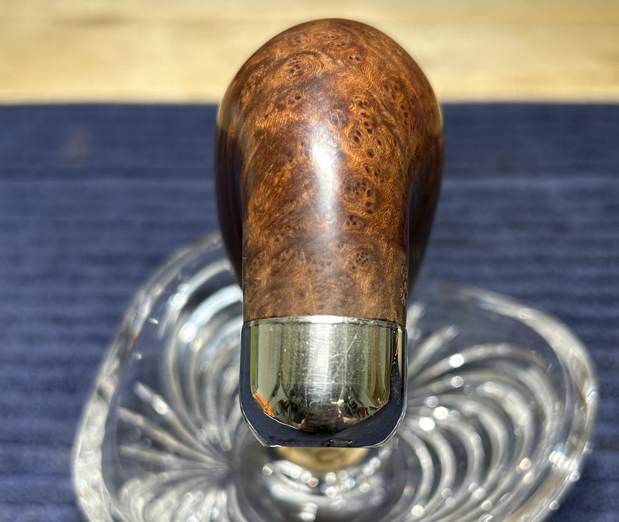
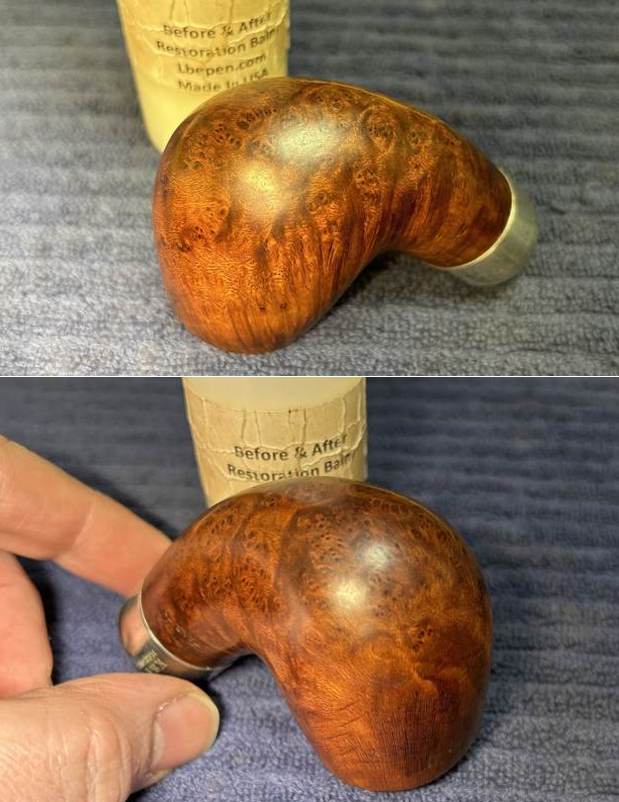
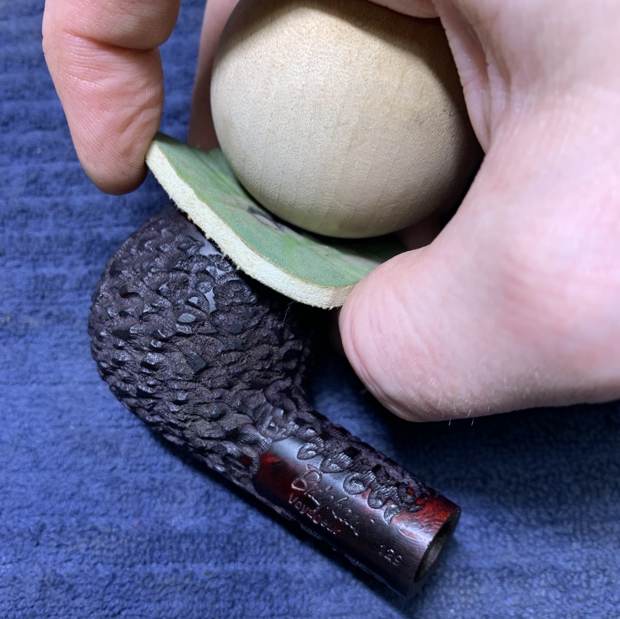
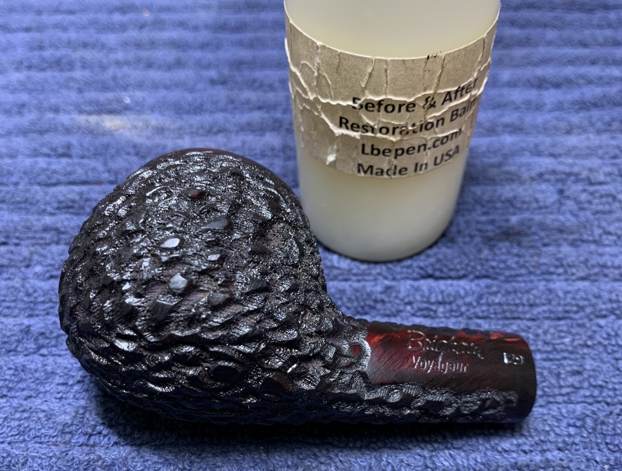
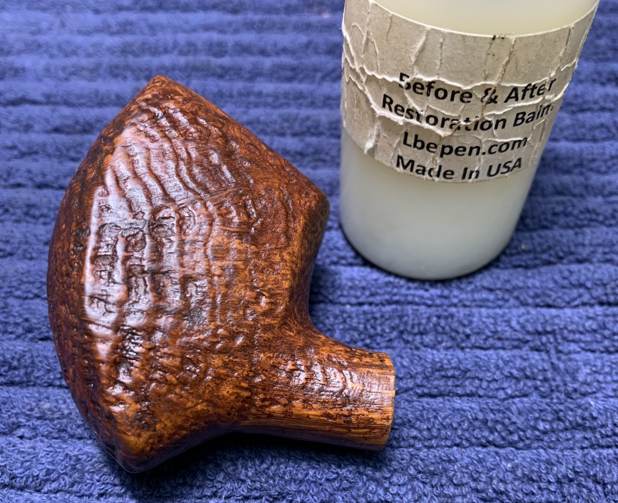
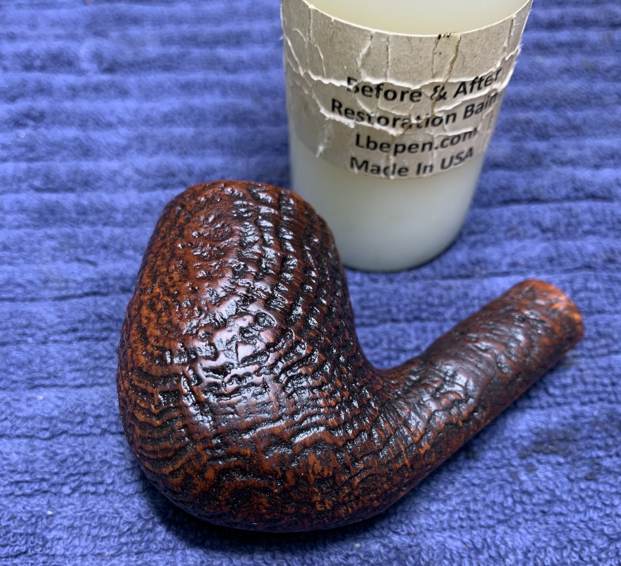
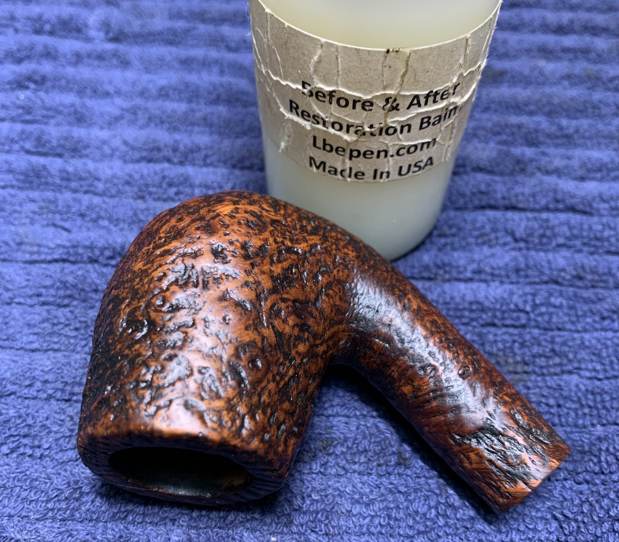
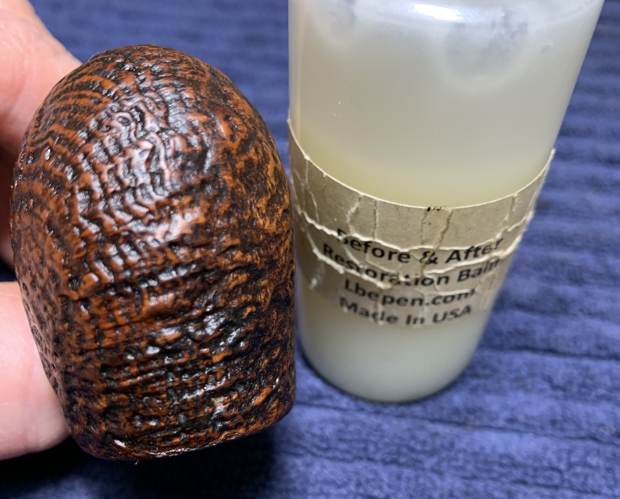
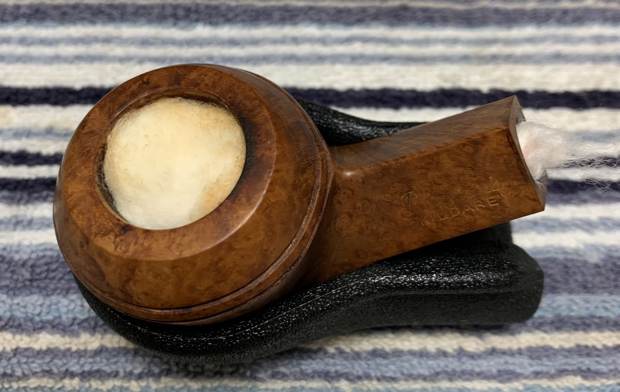
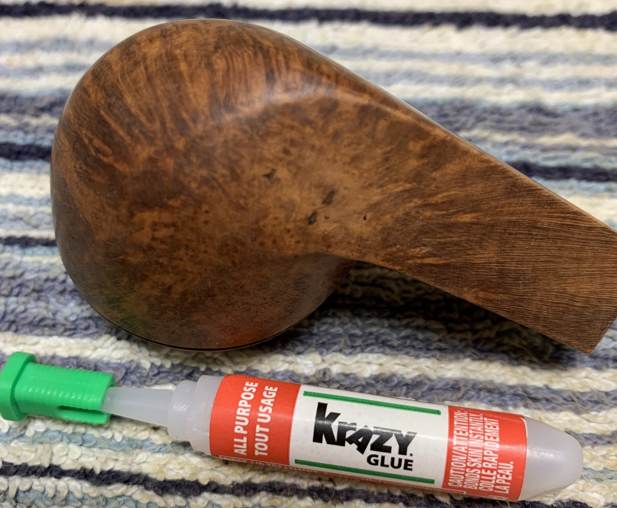
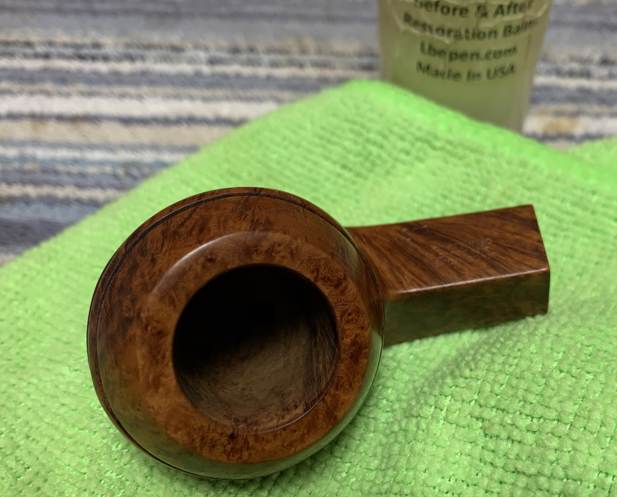
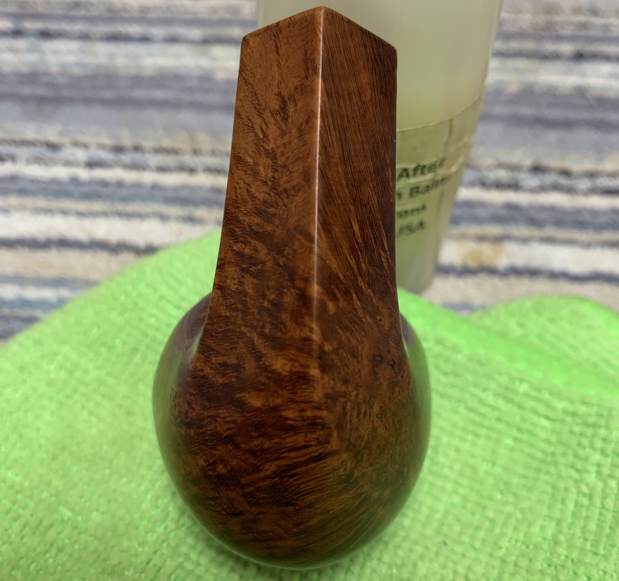
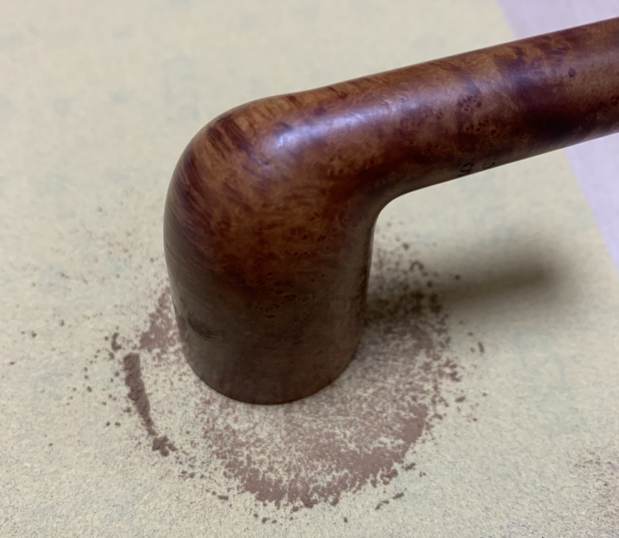
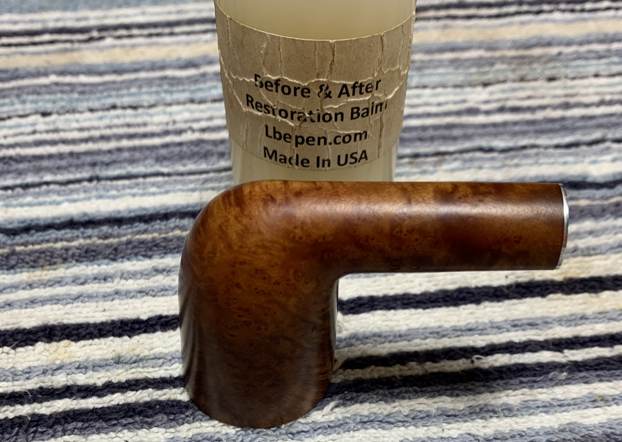
Now, it was time to sand down the stummel. I used all nine Micromesh pads (1,500 through 12,000 grit) to wet/dry sand everything smooth. After that, a light application of Before & After Restoration Balm brought out the best in the stummel’s grain. What a difference that made! There is some beautiful wood there! 
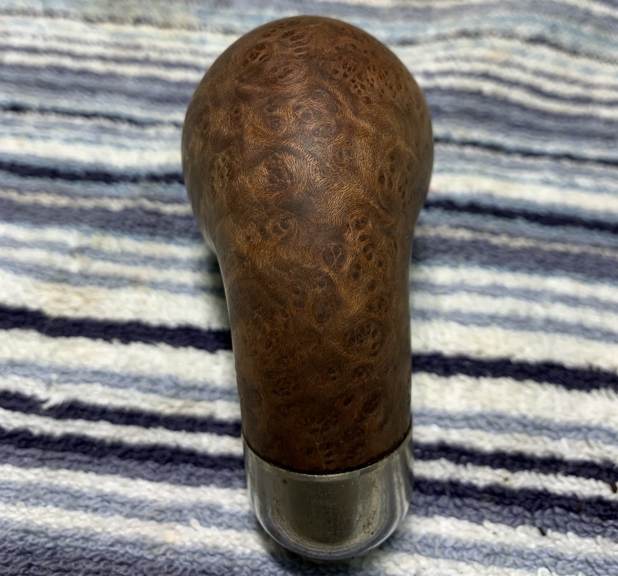
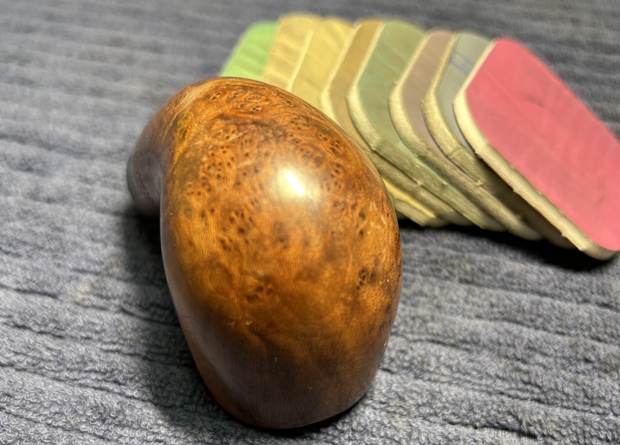
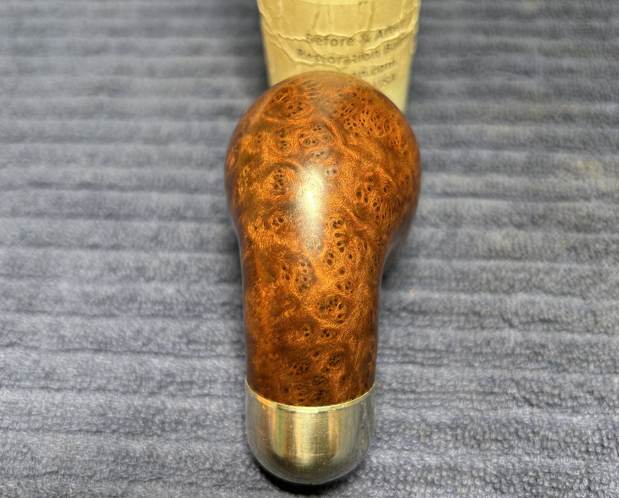
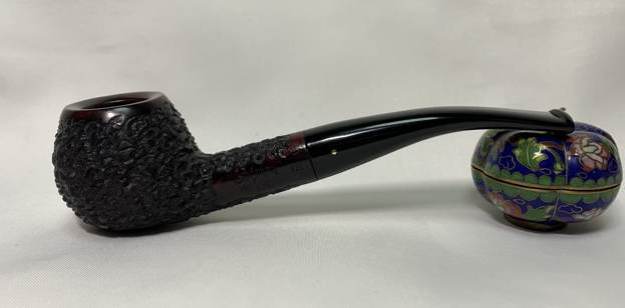
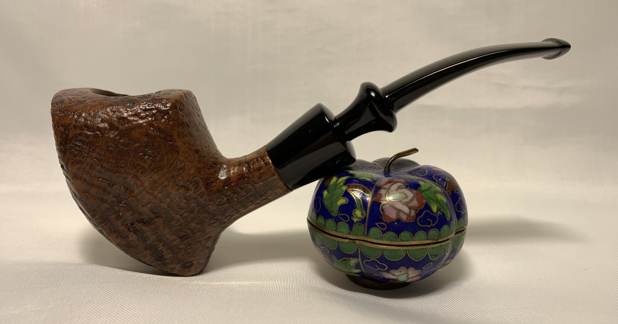
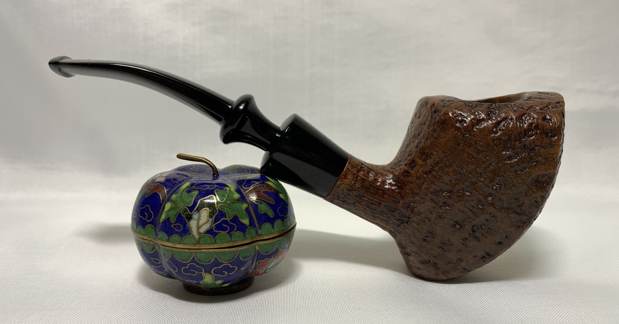
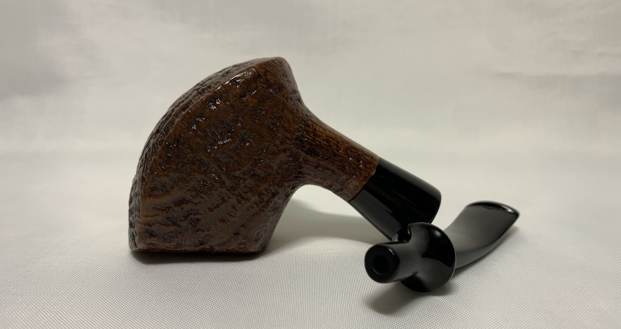
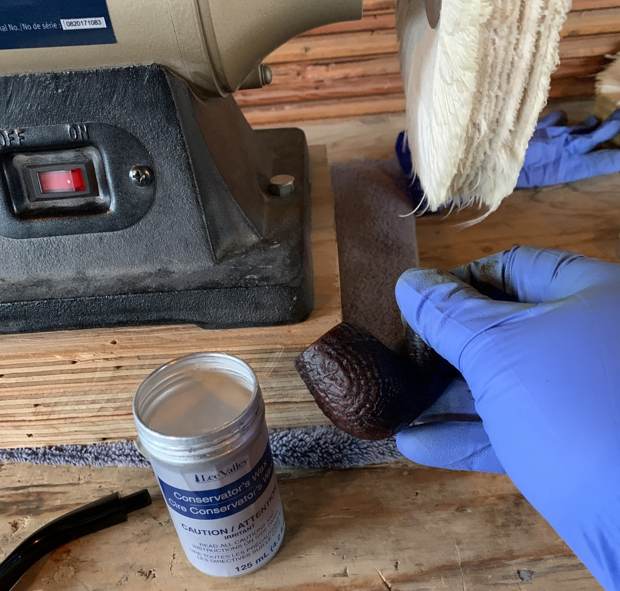
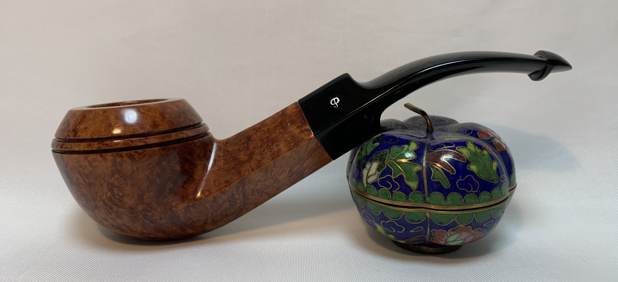
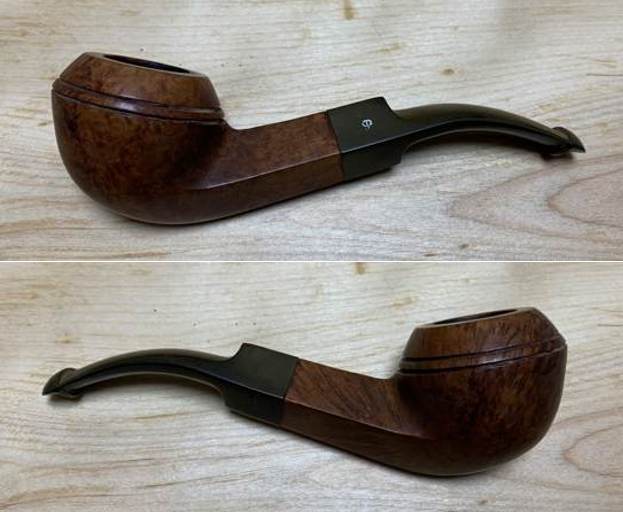
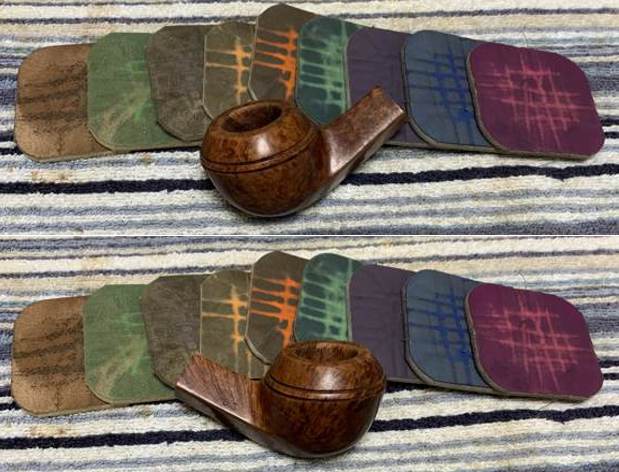
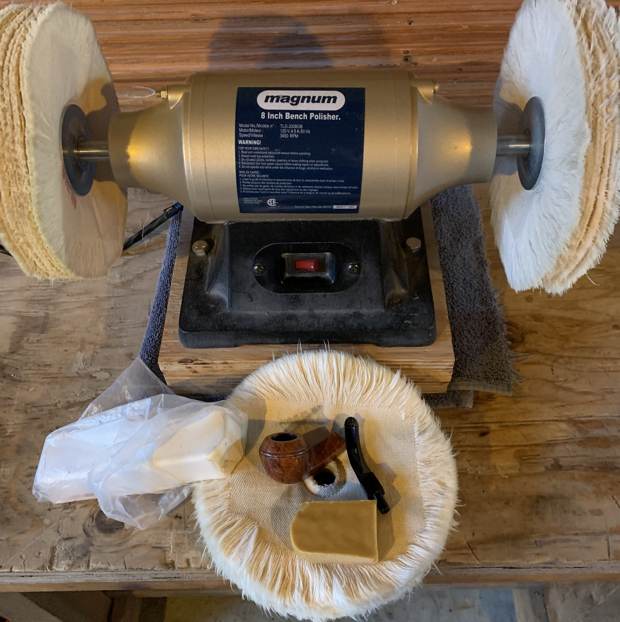
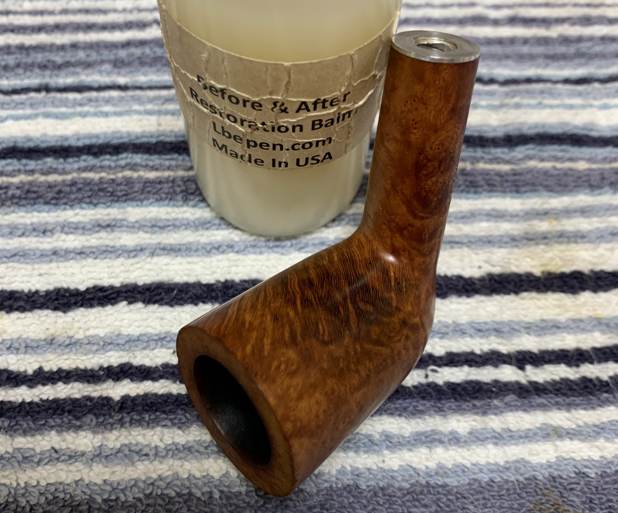
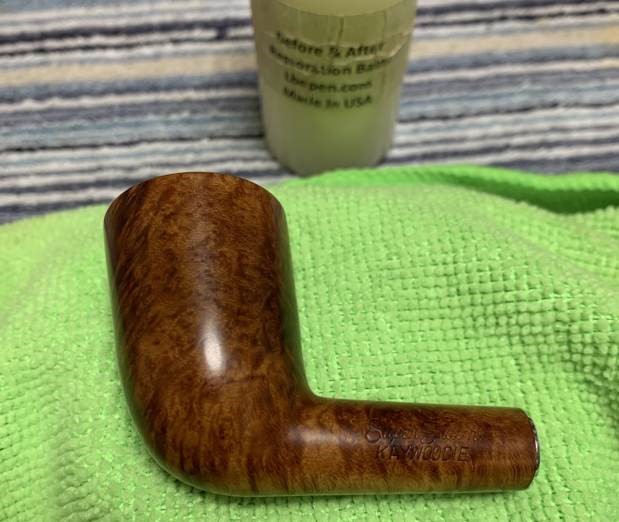
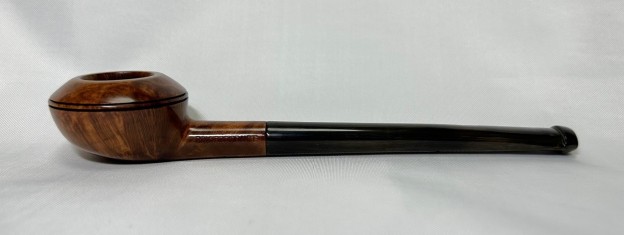
Then it was off for a trip to the buffer. A dose of White Diamond and a few coats of carnauba wax were just what this pipe needed. The lovely shine made the wood look absolutely beautiful.
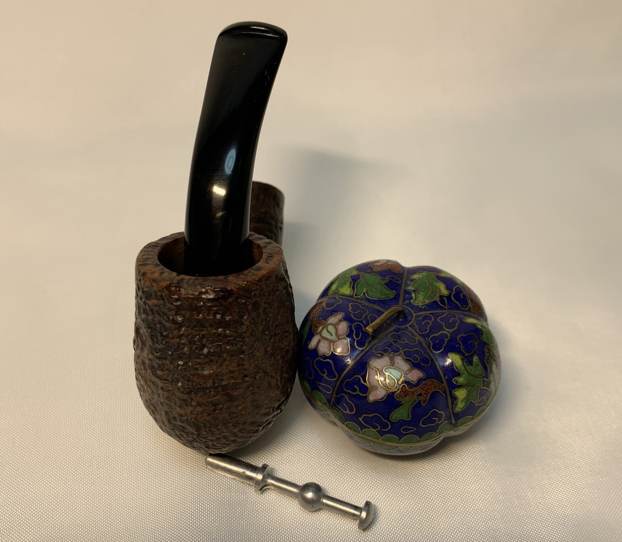
This is a quirky and charming pipe that has a very elegant feel to it. I hope the final product is worthy of my beloved grandfather’s memory. Obviously, this is one pipe that I am keeping for myself and adding to my collection. The approximate dimensions of the little Rhodesian are as follows: length 6 in. (150 mm); height 1 in. (25 mm); bowl diameter 1½ in. (38 mm); chamber diameter ¾ in. (19 mm). The weight of the pipe is ¾ oz. (24 g). I hope you enjoyed reading the story of this pipe as much I as I did restoring it. If you are interested in more of my work, please follow me here on Steve’s website or email me directly at kenneth@knightsofthepipe.com. Thank you very much for reading and, as always, I welcome and encourage your comments.

Pipes in the Eyes of Children


by Kenneth Lieblich

And now for something completely different. I thought I’d put together a quick piece on something a bit more jovial and lighthearted. My wife and I have been blessed with four children and, as they grow, I am constantly delighted and amused by their observations of the world around them. Over the past couple of years, two of my children have taken it upon themselves to draw pictures of pipes. The naïve art of any child is lovely, charming, and perhaps even beautiful because it simply manifests the reality of their world, by their own hand. In this case, my children are sharing something with me that they know has significance to me.

First, the drawing above is of a magician’s hat. However, instead of pulling a bunny rabbit out of the hat, pipes come out of the hat!

Next, here is a seven-day set of pipes;Followed, I suppose, by a twelve-month set of pipes:Then a few odds-and-ends:I hope you enjoyed the drawings! Please continue to follow me here on Steve’s website or email me directly at kenneth@knightsofthepipe.com. Thank you very much for reading and, as always, I welcome and encourage your comments.

Restoring a Lovely Danish Strawberry


by Kenneth Lieblich

Next on the chopping block is a beautiful Danish pipe from Scandia. This terrific pipe came to me from a lady whose husband had passed away. The price was reasonable, so I was happy to have it. The pipe is beautiful and a great example of Danish pipe-making. The pipe is a Danish pipe by Scandia, produced from the esteemed pipemaker, Stanwell. Steve called this shape a “strawberry”, which is a much more evocative name than my boring, old “freehand Dublin”. The strawberry is a very attractive shape and this one is no exception. It really makes an impression. It has beautiful, sandblasted briar from the bowl and down the shank. It also has a lovely saddle stem. The underside of the shank reads Scandia [over] Made in Denmark and, next to that, a shape number, 111. The stem also has the SC, indicating the Scandia make.Both Pipedia and Pipephil list Scandia as being a Stanwell sub-brand or second (and not much else), as per the photo below.Meanwhile, Pipedia has a good amount of information on the Stanwell brand and its history. I certainly recommend looking it over: https://pipedia.org/wiki/Stanwell.With the number 111 on the shank, I went to check the list of Stanwell shapes, here on rebornpipes, and I found a (partial) match! Shape 111 is listed as “Quarter-bent Dublin with a tapered stem.”. Now, my pipe doesn’t have a tapered stem, but this is clearly a quarter-bent Dublin. To further confirm this, here is a page from an old 70s or 80s Stanwell catalogue which clearly shows the same shape of pipe with the matching shape number. I also point out the 115, as it has the same shape (albeit, a different stem).

Anyway, this really is a good-looking pipe. No major issues to resolve – just a few minor ones. The stem was dirty, and some small scratches. There was also a lot of oxidation on the vulcanite. The rim on the stummel was a bit blackened and burnt. The insides were fairly dirty and would need some work to clean out. The stem was first on my list. I wiped down the outside of the stem with Murphy’s Oil Soap on some cotton pads. I also took a BIC lighter and ‘painted’ the stem with its flame in order to lift the bite marks and dents. Unfortunately, this didn’t really work, but I have ways of sorting this out. Then, I cleaned out the insides of the stem with pipe cleaners and isopropyl alcohol. Once this process was done, I used SoftScrub and cotton pads to wipe down the stem before throwing it in the Pipe Stem Oxidation Remover overnight. The following day, I cleaned all of the de-oxidizing mess and again scrubbed with SoftScrub on some cotton pads to remove the leftover oxidation. This worked well. I used some nail polish to restore the letters SC on the stem. I painted the area carefully and let it fully set before proceeding.Before I moved on to the Micromesh pads, I built up the dents on the stem with cyanoacrylate adhesive and let them fully cure.I sanded the adhesive down with 220- and 400-grit sandpapers to meld seamlessly into the stem. I then used all nine Micromesh pads (1,500 through 12,000 grit) to bring out the lovely black lustre on the stem. I also used Obsidian Pipe Stem Oil in between each pad scrubbing. On to the stummel, and the usual cleaning procedures were in order for this pipe. I used both the KleenReem and my pipe knife to remove the built-up cake and take the bowl down to bare briar, as I wanted to ensure there were no hidden flaws in the walls of the bowl. Fortunately, there were none.I then proceeded to clean out the insides of the shank with Q-tips, pipe cleaners, and isopropyl alcohol. There was some filth inside this stummel, but it wasn’t too bad. I followed that up by cleaning the insides with some dish soap and tube brushes. I then moved on to cleaning the outside of the stummel with Murphy’s Oil Soap and some cotton pads. That removed any latent dirt. I decided to de-ghost the pipe in order to remove any lingering smells of the past. I thrust cotton balls into the bowl and the shank and saturated them with 99% isopropyl alcohol. I let the stummel sit overnight. This caused any remaining oils, tars and smells to leach out into the cotton. The bowl was nice and clean after this. As I mentioned earlier, there were some small burn marks on the rim of the stummel that also needed to be addressed. Fortunately, I was able to resolve this by gently sanding the interior rim edge to remove any remnants that remained.Since this was a sandblast, I didn’t need to use the Micromesh pads. But a light application of Before & After Restoration Balm brought out the best in the stummel’s sandblast. There is some beautiful wood on this Danish pipe! A dose of White Diamond on the stem and a few coats of conservator’s wax on the stummel were just what this pipe needed. I had to be especially careful with the bench buffer, since the edges had a tendency to catch on the buffing wheels.This pipe was a delight from the start and its beauty only increased through the restoration process. Whether you call it a strawberry or a Dublin, this pipe is elegant, light, and incredibly comfortable to hold. Finally, I am pleased to announce that this pipe is for sale! If you are interested in acquiring it for your collection, please have a look in the ‘Danish’ pipe section of the store here on Steve’s website. You can also email me directly at kenneth@knightsofthepipe.com. The approximate dimensions of the Stanwell are as follows: length 5½ in. (140 mm); height 1⅝ in. (40 mm); bowl diameter 1⅝ in. (40 mm); chamber diameter ¾ in. (19 mm). The weight of the pipe is 1 oz. (30 g). I hope you enjoyed reading the story of this restoration as much as I enjoyed restoring it. If you are interested in more of my work, please follow me here on Steve’s website or send me an email. Thank you very much for reading and, as always, I welcome and encourage your comments.

Stunning Handmade Freehand Pipe from Paradis


by Kenneth Lieblich

I have a pipe that came my way recently and I am happy to offer it to you for sale. No restoration story on this one – just a stunning pipe. I gave it a quick and thorough once-over (and a quick polishing) and now it’s time to turn it over to you. This pipe has never been smoked and has some of the most amazing grain. Take a close look. This is a Canadian masterpiece from Paradis Pipes of Québec City – never smoked, brand new. It is a beautiful half-bent handmade freehand. First, a quick primer on the pipemakers. From Pipedia:

Paradis Pipes is the Canadian brand of the brothers Gilles and Fernand Paradis. In 1922 the Paradis family moved to the USA, when Lucien Paradis (1906-1979) was 16 years old. It was at this age that he started as an apprentice at his uncle’s pipe factory, Joseph B. Desjardins, maker of (JD) pipes, in Fall River, MA. Joseph Desjardins was issued two patents during this period, one for a new machine for making pipe stems and another for a new design of pipe reamer. The company employed 60 workers at one stage. In 1930, due to the Great Depression, Lucien lost his job and returned to Quebec to work in the agricultural machine industry. In his spare time, be made pipes, selling them door to door. Three years later the rest of the family joined him, and Lucien founded a pipe factory with two of his brothers. The company eventually employed 18 workers and in the 60s produced over 50 thousand pipes a year, under brads like JBL, Dr. Thomas, Fernand Gignac, S.C. Pipes, New London Golfer, and Jo Thomassin. Paradis was founded in 1978, at the Salon of Quebec Astisans’ and is available in tobacconists all over the country today. The brand produces 8000 pipes a year (400 “handmade”), with Greek briar.I acquired this pipe from a gentleman who used to sell Paradis Pipes locally, and he told me that this was one of their incredible “handmades”.

It’s a lovely, elegant pipe. If you are interested in acquiring it for your collection, please have a look in the “Canadian” pipe section of the store here on Steve’s website. You can also email me directly at kenneth@knightsofthepipe.com. The approximate dimensions of the Paradis Special are as follows: length 6⅛ in. (155 mm); height 2¼ in. (57 mm); bowl diameter 1¾ in. (44 mm); chamber diameter ⅞ in. (22 mm). The weight of the pipe is 2¼ oz. (67 g). If you are interested in more of my work, please follow me here on Steve’s website or send me an email. Thank you very much for reading and, as always, I welcome and encourage your comments.

Writing Straight with Crooked Lines


By Kenneth Lieblich

A few weeks ago, I posted a blog about a Peterson Standard System 307. That pipe sold quite quickly and a kind gentlemen contacted me to say that if I came across another, he would be interested. As it happened, I did have another 307 in my pile of pipes, so I was only too happy to get working on that one. The 307 is a good-sized pipe and the look of it gives one a feeling of confidence. It is satisfying and comfortable in the hand. This particular pipe had some serious issues, but I was confident that I could still make it beautiful again. I guess I was trying to make virtues out of vices (or something like that) – hence writing straight with crooked lines.Let’s have a closer look. This Peterson 307 pipe has the classic “System” look: bent shape, nickel mount, and tapered, army-style stem. Of course, it also had the traditional Peterson P-lip stem. The markings on the left side of the shank are Peterson’s [over] System [over] Standard. The right side of the shank showed Made in the [over] Republic [over] of Ireland [over] 307. The nickel mount on the shank had K&P [over] Petersons. There were no markings on the stem. The Peterson System pipes are well-storied among Peterson collectors/admirers. I took the opportunity to read the article on Pipedia, specifically about the System pipes, by Jim Lilley. There is lots of good information there and I encourage you to read it: https://pipedia.org/wiki/A_closer_look_at_the_famous_Peterson_Standard_System_Pipe On to the pipe itself: it was in rough shape – very dirty and harshly treated. The stem was thoroughly calcified and oxidized. It also had some major dents: one on the top and one on the bottom. Most notably, however, there was some significant wear to the side of the P-lip. The bowl was very dirty and had quite a bit of lava and plenty of cake. The front edge of the rim had been heavily bashed in – presumably from banging out dottle etc. The outside of the bowl had some small fills and some very deep scratches – much deeper than the photos convey. The nickel mount was in rough shape – stained, corroded, and heavily chipped along the top edge. To work! The stem was first on my list. I wiped the outside down with Murphy’s Oil Soap on some cotton pads. I also took a BIC lighter and ‘painted’ the stem with its flame to lift the bite marks. Sadly, however, this did not do much, as the dents were much too deep. Then I cleaned out the inside with pipe cleaners and isopropyl alcohol. I used some SoftScrub on the outside of the stem to remove some oxidation. Then, the stem went for an overnight soak in the Pipe Stem Oxidation Remover. The following day, I cleaned the de-oxidizing mess off with alcohol, pipe cleaners, et cetera. The oxidation had migrated to the surface and would be fairly straightforward to remove. I scrubbed again with SoftScrub on some cotton pads to remove the leftover oxidation. I built up the dents on the stem with black cyanoacrylate adhesive and let them cure. I then sanded the adhesive down with 220- and 400-grit sandpapers to meld seamlessly into the stem. I then used all nine Micromesh pads (1,500 through 12,000 grit) to polish it and highlight the black lustre on the stem. I also used Obsidian Pipe Stem Oil in between each pad scrubbing. What about the worn side of the P-lip? I decided to leave that as it was. I did not have a spare Peterson stem to replace this one and I always like to use original parts whenever possible. The stem shows that wear, but it is part of the history of the pipe and so it shall stay.

Moving on to the stummel, I first decided to ream out the bowl. I used both the PipNet Reamer and the KleenReem to remove the built-up cake and followed that with 220-grit sandpaper taped to a dowel to eliminate as much as possible. I took the chamber down to bare briar to ensure there were no hidden flaws in the wall. Fortunately, there were none.I proceeded to clean out the insides of the shank with Q-tips, pipe cleaners, and lemon-infused isopropyl alcohol. There was quite a bit of filth inside this stummel, and it took a fair amount of cotton to get it clean. I followed that up by cleaning the insides with some dish soap and tube brushes.I then used cotton rounds and some Murphy’s Oil Soap to scrub the outside of the stummel and a toothbrush with Murphy’s for the lava on the pipe’s rim. At this point, I opted to remove the nickel mount before moving on. It wasn’t well attached to the stummel anyway. It would need some special work, as there was a crack in the edge of the shank – hidden by the mount. The first step in dealing with this was to ensure that the crack would not continue to creep after I had repaired it. To that end, I took a micro-drill bit, inserted it in my Dremel, and very carefully drilled a hole right through the wall of the shank, into the mortise. I then needed to apply cyanoacrylate adhesive in order to seal and repair it. I carefully applied a tiny bead of adhesive to the hole and the length of the crack. Finally, I clamped it shut and let it cure. This was a great success and the mount would hide the repair going forward. I decided to de-ghost the pipe in order to remove any lingering smells of the past. I thrust cotton balls into the bowl and the shank and saturated them with 99% isopropyl alcohol. I let the stummel sit overnight. This caused any remaining oils, tars and smells to leach out into the cotton. The bowl was nice and clean after this. Now I could address the roughness on the rim. I “topped” the pipe – that is, I gently and evenly sanded the rim on a piece of 220-grit sandpaper. This effectively removed the damage without altering the look of the pipe.Then I was able to address the small nicks on the rim and the bowl. I dug out my iron and a damp cloth to try to raise the nicks. The hot and moist steam can often cause the wood to swell slightly and return to shape. This worked very well and many of the scratches were corrected with this method.Now it was time to address the remaining fills on the bowl. I repaired them with a mixture of briar dust and cyanoacrylate adhesive. This ensures a strong repair and one that looks similar to the surrounding wood. I sanded the repairs down with 200- and 400-grit sandpaper until they were level with the surrounding briar.Then, I used all nine Micromesh pads (1,500 through 12,000 grit) on the stummel to finish it off. I opted to turn the bashed-in front edge of the rim into a rounded front edge. This was possibly an odd choice, but I am very pleased how it turned out in the end. However, the deep, parallel scratches on the side of the stummel were not going anywhere. Unfortunately, they were too deep to be sanded out and too narrow to be filled with briar and glue. The scratches were sanded with the Micromesh pads, and looked much improved. The nickel mount also needed serious help. I wanted to keep as much of the metal as possible, but didn’t want to leave a purely jagged edge. I sanded this edge to ensure a proper balance between keeping the maximum amount of metal and taking away a possible hazard. Then, I used some SoftScrub on cotton rounds to clean the metal and remove some corrosion. I used some of my MicroMesh pads (only 3,600-12,000) to eliminate some of the minor scratches on the metal. It also gave a nice shine. I used a jewelry cloth to give the final polish to the nickel. This mount would always retain some small dents etc. from its hard life, but it looks much improved. I used some white glue to reattach it to the stummel. At this point, I rubbed some Before & After Restoration Balm into the briar and left it to sit for 15 minutes or so. I brushed it with a microfibre cloth. The B&ARB does wonderful things to the wood, and I really like the natural colour of the briar. Off to the bench polisher to put the final touches on this pipe. I first gave it a thorough going-over with White Diamond compound. Following that, several coats of carnauba wax created a beautiful, glossy seal on the pipe. This Peterson Standard System 307 looks fantastic again and I know that the new owner will enjoy smoking it for many years to come. The approximate dimensions of the pipe are as follows: length 6¼ in. (158 mm); height 2 in. (51 mm); bowl diameter 1⅝ in. (41 mm); chamber diameter ¾ in. (20 mm). The weight of the pipe is 2¼ oz. (66 g). I hope you enjoyed reading the story of this pipe as much I as I did restoring it. If you are interested in more of my work, please follow me here on Steve’s website or email me directly at kenneth@knightsofthepipe.com. Thank you very much for reading and, as always, I welcome and encourage your comments.

Making a Brigham Voyageur Just a Bit Spiffier


Blog by Kenneth Lieblich

Next on the chopping block is a good-looking 1-dot Brigham Voyageur. I acquired it (with some other stuff) from a local gentleman and, subsequently, a friend of mine said he wanted me to clean it up for him. No problem – the pipe was in good shape to begin with. This pipe really feels good in the hand. It has that look – no one could mistake it for anything but a Brigham. This is one of the newer Brigham system pipes – one can tell it’s newer because of the Delrin tenon (the old ones were aluminum). The markings on the pipe are as follows: on the left side of the shank are the words Brigham [over] Voyageur. Beside that is the shape number: 129. Also, on the left side of the stem is the classic dot of the Brigham company.I read through the article on Pipedia on Brigham Pipes. You can read it here. It’s a good article and contains lots of helpful information. I have included the chart below from the site as it shows the Standard (1 Dot) pipes and includes the Voyageur and the shape number, 29. The one dot pipes identify the pipe as part of the 100 series and the series shape is #29. Therefore, the shape number stamping is 129.As Steve has done in his restorations of Brighams, I am including information below from Charles Lemon’s website on the dating etc. of Brigham pipes. Check it out here. I quote from both Charles’ article below:

The Transition Era (2001 – 2006). The biggest change to hit Brigham since the advent of the Rock Maple filter occurred in 2001 when Brigham moved production from Toronto to Italy. The product lineup was, not surprisingly, heavily impacted, with the most obvious change a sharp decrease in the number of pipe shapes available.

Daniel More, President of Brigham Enterprises Inc. explains the move to the EU: Admittedly the hardest decision we ever needed to make. With an aging skilled work force we were losing the skills required at an alarming rate. We made attempts to bring in new people but we were not effective in staving off the atrophy. We were fortunate though to be able to move by increments allowing us control and comfort throughout the process. For example, instead of turning our own bowls we began to purchase turned bowls; then we had stems added with sanding at 100-grit ; then sanding to finer degrees; then staining and so on. The last bit of control was grading.

 I still visit the manufacturing facility in the EU at least once a year to discuss QC and pick shapes and designs. The shift [to the EU] resulted in fewer shapes. However, one of the biggest benefits was access to a wider variety of finishes. We had never been able to offer a sandblasted pipe and the access to accessories like rings and different colours, I think, allowed us to make the line more interesting

Coincidental with shifting production to the EU was the move from the original aluminum tenon/filter holder to one made of a composite material. Daniel More provides insight into the switch:

Principally there were two catalysts for the change. We were using a very specific OD for our Aluminum Tenons. In fact, we were one of only two companies in North America using this OD, the other being an aircraft manufacturer in California. When this aircraft company shifted to an alternative, it left us and us alone purchasing this specific size. To stay with Aluminum, our only alternative was to purchase an oversized OD and tool this down to our requirements results in significant expense due to the wasted material costs.

We had, for many years, experimented with a number of composite materials for both the tenons and Distillator Tips. The issue was always heat resistance. Technology having advanced as it did by the 1990’s presented us with a selection of alternatives. We tested 10 different compositions before landing on the formula we still use today.

Cost saving aside, the Composite Tenon virtually eliminated the breaking of shanks. That is, when a pipe shank would break due to leverage (think, in the pocket and sitting down), we could not repair this. The Composite Tenon would now break away rather than the shank allowing for an inexpensive repair versus having to throw out “an old friend”. Without a doubt, there were many cries about the inferior Composite Tenon breaking but with our offer to provide no cost tenon repairs we assuaged this concern. We still offer to this day no charge repairs for broken Composite Tenons – no questions asked.

During the Transition Era, the 100 – 300 series pipes looked very similar to Canadian-made pipes and continued to be recognized by their traditional brass pin patterns. These lower series pipes were offered in 9 shapes. The 400 series disappeared temporarily, while the 500 to 700 series pipes, available in only 8 shapes, lost their brass pins and were identified only by their 3-digit shape numbers.On the whole, the pipe was in very nice shape. It didn’t appear to have been smoked too much.
The stem had a few tooth marks/scratches – nothing too serious. The stummel had some lava on the rim, small marks on the rim, and some light caking in the bowl.
I began by wiping the outside down with Murphy’s Oil Soap on some cotton pads. I then took some lemon-infused isopropyl alcohol and pipe cleaners, and cleaned out the internals. Fortunately, the pipe had been well-maintained, so this wasn’t too dirty.I managed to address the tooth scratches with some 220- and 400-grit sandpaper. I then used all nine Micromesh pads (1,500 through 12,000 grit) to bring out the lovely black lustre on the stem. I also used Obsidian Pipe Stem Oil in between each pad scrubbing. Then to the stummel. Firstly, I decided to ream out the bowl. I used the KleenReem to remove the built-up cake and followed that with 220-grit sandpaper taped to a dowel to eliminate as much as I could. I took the chamber down to bare briar, as I wanted to ensure there were no hidden flaws in the wall. Fortunately, there were none. I then proceeded to clean out the insides of the shank with Q-tips, pipe cleaners, and lemon-infused isopropyl alcohol. There was a bit of filth inside this stummel and it took some cotton to get it clean. I followed that up by cleaning the insides with some dish soap and tube brushes.
I used cotton rounds and some Murphy’s Oil Soap to scrub the outside of the stummel and a toothbrush with Murphy’s for the lava on the rim of the pipe.
I decided to de-ghost the pipe in order to remove any lingering smells of the past. I thrust cotton balls into the bowl and the shank and saturated them with 99% isopropyl alcohol. I let the stummel sit overnight. This caused any remaining oils, tars and smells to leach out into the cotton. The bowl was nice and clean after this.Having completed that, I was able to address the lava and small nicks on the rim and the bowl. I used a piece of tool steel to gently scrape away the burn residue. I then took a solid wooden sphere, wrapped a piece of 220-grit sandpaper around it, and sanded the inner side of the chamber. This removed the lava on the inner edge of the rim, smoothed out the nicks.I then sanded the smooth parts of the stummel with all nine Micromesh pads. Naturally, I added a light application of Before & After Restoration Balm. This made the wood shine beautifully. I let it sit for about fifteen minutes and then buffed it with a microfibre cloth. In sanding the rim, some of the lovely burgundy colour was removed, so I next set about correcting that. I opted for two aniline dyes: Fiebing’s Black and Fiebing’s Oxblood. I had to approach this mix carefully, to ensure that it matched the pre-existing colour. As usual, I applied flame from a BIC lighter in order to set the colour. What a difference that made! It looked so much better with a fresh coat of stain.I applied some more Before & After Restoration Balm and then it was off for a trip to the buffer. A very precise use of White Diamond and a few coats of Conservator’s Wax made all the difference. The lovely shine made the wood very attractive. This is a very handsome pipe and will provide many years of smoking pleasure for my friend. I hope you enjoyed reading the story of this pipe as much I as I did restoring it. If you are interested in more of my work, please follow me here on Steve’s website or email me directly at kenneth@knightsofthepipe.com. Thank you very much for reading and, as always, I welcome and encourage your comments.

Restoring a Lovely Danish Pickaxe


Blog by Kenneth Lieblich

Next on the chopping block is a beautiful Danish pipe from Scandia. This terrific pipe came to me from an antique shop in the Fraser Valley (an area to the east of Vancouver). The price was reasonable, so I had to have it. The pipe is beautiful and a great example of Danish pipe-making. The pipe is a Danish pickaxe pipe by Scandia, produced from the esteemed pipemaker, Stanwell. The pickaxe is a very attractive shape and this one is no exception. It really makes an impression. It has beautiful, sandblasted briar from the bowl, down the shank and transitions into the vulcanite ferrule. It also has a fantastic push stem. The underside of the shank reads Scandia [over] Made in Denmark. There is a faint marking on the ferrule, which appears to show “10” or possibly “1C”. I don’t think this is a shape number, for reasons I will explain momentarily. Finally, the stem’s top also has the SC, indicating the Scandia make. Both Pipedia and Pipephil list Scandia as being a Stanwell sub-brand or second (and not much else), as per the photo below.Meanwhile, Pipedia has a good amount of information on the Stanwell brand and its history. I certainly recommend looking it over: https://pipedia.org/wiki/Stanwell.Despite the (possible) number 10 on the ferrule, I went to check the list of Stanwell shapes, here on Reborn Pipes, and I found that this definitely did not match. However, I did find something that was a match! Shape 1b is listed as “Freehand, Pick Ax, push mouthpiece, by Sixten Ivarsson. (1975)”. To further confirm this, here is a page from an old 70s or 80s Stanwell catalogue which clearly shows the same shape of pipe with the matching shape number. I think we can safely assume that this is a pickaxe, designed by the legendary Sixten Ivarsson.Anyway, this really is a good-looking pipe. No major issues to resolve – just a few minor ones. The stem was dirty, and some small scratches. There were a couple of significant bite marks, as well as some oxidation and calcification on the vulcanite. The rim on the stummel was blackened and burnt – that would need to be addressed. The insides were fairly dirty and would need some work to clean out. There was also a small nick along the inside edge of the rim. The stem was first on my list. I wiped down the outside of the stem with Murphy’s Oil Soap on some cotton pads. I also took a BIC lighter and ‘painted’ the stem with its flame in order to lift the bite marks and dents. Unfortunately, this didn’t really work, but I have ways of sorting this out. Then, I cleaned out the insides of the stem with pipe cleaners and isopropyl alcohol.Once this process was done, I used SoftScrub and cotton pads to wipe down the stem before throwing it in the Pipe Stem Oxidation Remover overnight. The following day, I cleaned all of the de-oxidizing mess and again scrubbed with SoftScrub on some cotton pads to remove the leftover oxidation. This worked well. I used some nail polish to restore the letters SC on the stem. I painted the area carefully and let it fully set before proceeding. These letters were too worn to be fully restored, but they definitely looked better after I worked on them.Before I moved on to the Micromesh pads, I built up the dents on the stem with cyanoacrylate adhesive and let them fully cure.I used my miniature files to ensure that the repairs keep the shape and look like they should. I then sanded the stem down with 220-, 400-, and 600-grit sandpapers to meld seamlessly into the stem. I did the same to the remaining tooth marks. I then used all nine Micromesh pads (1,500 through 12,000 grit) to bring out the lovely black lustre on the stem. I also used Obsidian Pipe Stem Oil in between each pad scrubbing.I repeated all of the above procedures for the vulcanite ferule, which only came off the stummel after applying heat and some gentle force. On to the stummel, and the usual cleaning procedures were in order for this pipe. I used both the PipNet Reamer and the KleenReem to remove the built-up cake and take the bowl down to bare briar, as I wanted to ensure there were no hidden flaws in the walls of the bowl. Fortunately, there were none.I then proceeded to clean out the insides of the shank with Q-tips, pipe cleaners, and isopropyl alcohol. There was lots of filth inside this stummel, and it took a good number of pipe cleaners etc. to sort that out. I followed that up by cleaning the insides with some dish soap and tube brushes. I then moved on to cleaning the outside of the stummel with Murphy’s Oil Soap and some cotton pads. That removed any latent dirt. I decided to de-ghost the pipe in order to remove any lingering smells of the past. I thrust cotton balls into the bowl and the shank and saturated them with 99% isopropyl alcohol. I let the stummel sit overnight. This caused any remaining oils, tars and smells to leach out into the cotton. The bowl was nice and clean after this.As I mentioned earlier, there were some small burn marks on the rim of the stummel that also needed to be addressed. Some of this was removed by the Murphy’s. For the burns that remained, I took some oxalic acid on a Q-tip and rubbed and rubbed. As you will see, the treatment worked reasonably well and the rim was improved. Some would remain, but that is part of the history of this pipe. I completed this step by gently sanding the interior rim edge to remove any remnants that remained. Then I addressed the nick on the rim by filling it with cyanoacrylate adhesive and briar dust. I sanded it down and made it look great. After this, the entire stummel was treated to a rub-down with all nine Micromesh pads (1,500 through 12,000 grit). A light application of Before & After Restoration Balm brought out the best in the stummel’s sandblast. There is some beautiful wood on this Danish pipe! In fact, as I was working, my youngest child came to watch me for a bit and said, “Is that a doggy?” I wasn’t sure what she meant, but she grabbed the stummel and pointed this out. That’s pretty funny!I glued the ferrule back I place and then it was off for a trip to the buffer. A dose of White Diamond and a few coats of conservator’s wax were just what this pipe needed. I had to be especially careful with the bench polisher, since the edges had a tendency to catch on the buffing wheels. This pipe was a delight from the start and its beauty only increased through the restoration process. This pipe is elegant, light, and incredibly comfortable to hold. Finally, I am pleased to announce that this pipe is for sale! If you are interested in acquiring it for your collection, please have a look in the ‘Danish’ pipe section of the store here on Steve’s website. You can also email me directly at kenneth@knightsofthepipe.com. The approximate dimensions of the Stanwell are as follows: length 5½ in. (140 mm); height 2½ in. (64 mm); bowl diameter 1⅝ in. (41 mm); chamber diameter ¾ in. (19 mm). The weight of the pipe is 1⅝ oz. (47 g). I hope you enjoyed reading the story of this restoration as much as I enjoyed restoring it. If you are interested in more of my work, please follow me here on Steve’s website or send me an email. Thank you very much for reading and, as always, I welcome and encourage your comments.

Giving Life to an Old Smokewel of Mysterious Origin


Blog by Kenneth Lieblich

Next on the chopping block is a bent billiard sandblast Smokewel (one “L”), which I acquired in a lot of pipes from a gentleman living on Vancouver Island. He had quite an assortment of pipes and they ranged from utterly horrible to surprisingly beautiful – fortunately, this was of the beautiful variety. The pipe is very well made: the proportions are right, the drilling is accurate, and it just oozes competence. This is a sandblasted bent billiard, with a tapered, vulcanite stem. And what a wonderful, rugged blast on this one! On the underside of the shank, the markings read ‘Smokewel [over] London Made’, and, off to the right, the shape number ’26’. This pipe had been well-loved and well-smoked, as it arrived with some marks and general wear, and the stem was pretty nasty. There were also beautiful indications of “hand erosion” on the right-hand side, where the previous owner’s hand had lovingly rubbed the pipe over the years. There were also a couple of tiny nicks, but, fortunately, nothing overly complicated.

Identifying exactly what a “Smokewel” pipe is turned out to be a typical pipe-history morass. There are a few twists and turns in this story, so join me in wading through this mess. As you’ve seen in the photos, the pipe clearly says “Smokewel” – not “Smokewell”. I initially thought that perhaps the terminal “L” had been rubbed off, but, looking closely, one can see that “Smokewel” is perfectly centred over “London Made”, which suggests this odd spelling was not the victim of rubbing. In other words, there is no missing “L”.

There is scant information to be had on both “Smokewel” and “Smokewell” – and none of it could be linked definitively to this pipe. There is this entry on Pipephil for “Smokewell”:As you can see, it is a line of pipes from the John Redman firm of London. There are some examples of these pipes that can be found online, and I have included a photo of the markings of Redman’s “Smokewell” line: This might be significant because I have studied the letters of the markings from my pipe and Redman’s pipe, and they are the same. In addition, a John Redman catalog (supposedly) from the 1960s, lists “Smokewell” as one of their “London Made Briars” (note the wording). I have clipped the specific passage here:All of this is persuasive evidence, but not definitive. The missing “L” on my pipe causes me to pause, if only briefly, before declaring it to be a John Redman pipe. Also, the various iterations of Redman pipe usually had markings on the stem – this one has none and I don’t think it’s a replacement stem. I am aware that Wilczak and Colwell’s Who Made That Pipe? lists “Smokewell” under John Redman – but there is more.

Wilczak and Colwell also list “Smokewell” under a company called Maurice Pipes. The second “L” here could be an error from Wilczak and Colwell – the book is full of them. I also found an old advertisement for Maurice Pipes. Based in London, this firm supposedly produced very fine pipes. Superficially, this ad seems to have nothing to do with our pipe, except that it instructs the reader to use the word “Smokewel” (one “L”) in telegram and cable correspondence with the firm. The word obviously had significance to Maurice Pipes.On the PipesMagazine forums online, I read a thread about early sandblasts and one comment stuck out to me: “The mysterious Maurice was listing blast pipes in the 20’s and as a pipe company they are totally in the dusty shadows, but I’d reckon they were a fine maker, mostly because of their prices – they sold their Sandblast alongside their topline Extra for the very same price, at 16/6 and that’s a fairly high price comparatively.”

The connection between Maurice Pipes and “Smokewel” is tenuous at best, but it was my only connection to the single-L “Smokewell”. If you have information about any of the research above, I would love to hear from you. The stinger is a bit odd – does it ring any bells for you?

And speaking of the stinger, let’s clean it. I heated the stem and stinger with my heat gun and this provided just enough softening of the internal goo to allow me to pull it out. It then went for a soak in some lemon-infused isopropyl alcohol. I let it sit for several hours and then cleaned it off and it looked much improved.I wiped the outside of the stem down with Murphy’s Oil Soap on some cotton pads. Though dirty, the outside of the stem was in decent condition and the oxidation wasn’t too bad. On the other hand, the inside was another kettle of fish! I used up a good chunk of the world’s supply of pipe cleaners to clean it out – the pictures only show a fraction of what I used. Next, the stem went for an overnight soak in the Pipe Stem Oxidation Remover. The following day, I cleaned all of the de-oxidizing mess off. The oxidation had migrated to the surface and would be fairly straightforward to remove. I scrubbed with SoftScrub on some cotton pads to remove the leftover oxidation and leave the stem in a dull black colour. Finally, I used all nine Micromesh pads (1,500 through 12,000 grit) to bring out the lovely black lustre on the stem. I also used Obsidian Pipe Stem Oil in between each pad scrubbing. Now for the stummel. It was nicked on the front edge of the rim, and the rim itself had lava and general filth, so, time to work on it! I started with the KleenReem to remove the built-up cake and followed that with 220-grit sandpaper taped to a dowel to eliminate as much as I could. I took the chamber down to bare briar, as I wanted to ensure there were no hidden flaws in the wall. Fortunately, there were none. I then proceeded to clean out the insides of the shank with Q-tips, pipe cleaners, and lemon-infused isopropyl alcohol. There was an extraordinary amount of filth inside this stummel and it took an enormous amount of cotton to get it clean. I only have a photo of a small number of pipe cleaners. I can’t imagine that this pipe had ever been cleaned – or, at least, not in many decades. Because the filth in the shank was well-encrusted, I used a couple of drill bits held in a chuck, by hand (not in a drill), to try and loosen up the debris. This worked quite well. I decided to de-ghost the pipe to remove any lingering smells of the past. I thrust cotton balls into the bowl and the shank and saturated them with 99% isopropyl alcohol. I let the stummel sit overnight. This caused oils, tars and smells to leach out into the cotton.In fact, the pipe was dirty enough that I then used my pipe retort system on it. I neglected to take photos of that, but it certainly helped clean the pipe. I followed that up by cleaning the insides with some dish soap and tube brushes. I used some Murphy’s Oil Soap and a toothbrush to scrub the outside of the stummel and the lava on the rim of the pipe. I didn’t scrub too hard – I wanted to keep the nice colour on the wood. Having completed that, I was able to address the small nicks on the rim and the bowl. I used some tiny drops of cyanoacrylate adhesive to fill the nicks, and a metal brush to camouflage the repairs in the wood. Finally, I used only the last three MicroMesh pads to polish the stummel, but I was careful not to damage the sandblast. After that, a light application of Before & After Restoration Balm brought out the best in the stummel’s grain. Then off to the buffer! A tiny dose of White Diamond and a few coats of conservator’s wax were just what this pipe needed. This Smokewel looks fantastic again. It is elegant and handsome, and is ready to be enjoyed by the next owner. I am pleased to announce that this pipe is for sale! If you are interested in acquiring it for your collection, please have a look in the British pipe section of the store here on Steve’s website. You can also email me directly at kenneth@knightsofthepipe.com. The approximate dimensions of the pipe are as follows: length 5¼ in. (133 mm); height 2¾ in. (70 mm); bowl diameter 1¼ in. (32 mm); chamber diameter ¾ in. (19 mm). The weight of the pipe is 1⅛ oz. (35 g). I hope you enjoyed reading the story of this pipe’s restoration as much as I did restoring it. If you are interested in more of my work, please follow me here on Steve’s website or send me an email. Thank you very much for reading and, as always, I welcome and encourage your comments.

A Very Spiffy Peterson Kildare Bent Bulldog


Blog by Kenneth Lieblich

How fine it is to come across a pipe as comely as this. I found this republic-era Peterson bent bulldog at a local antique fair and I was charmed by it right away. There is a feeling of satisfaction in just looking at it and a feeling of comfort with it in hand. Despite its rather shabby appearance when I found it, the pipe held great promise – and I was sure that I could tease out its beauty with a little TLC. Let’s have a closer look. This Peterson pipe has the classic bulldog shape: diamond shank and tapered stem. In this case, it also had a very nice bend and the traditional Peterson P-lip stem. The markings on the left side of the shank are Peterson’s [over] “Kildare”. The right side of the shank showed Made in the [over] Republic [over] of Ireland. Further along the right side of the shank was the shape number: 80S. Naturally, the Peterson logo “P” was engraved on the stem. I know something about Peterson pipes, but little about the Kildare line, so I went over to Pipedia to have a look. Obviously, there is a long and very good article about Peterson – here is the link. Here is a brief quotation about the republic-era pipes:

1950 – 1989 The Republic Era – From 1950 to the present time, the stamp for this era is “Made in the Republic of Ireland” in a block format generally in three lines but two lines have been used with or without Republic being abbreviated. During the 1950’s and 60’s the Kapp & Peterson Company was still in the ownership of the Kapp family. However, 1964 saw the retiral of the company Managing Director Frederick Henry (Harry) Kapp.

No mention was made of the Kildare line there, but Mark Irwin and Gary Malmberg’s book, The Peterson Pipe: The Story of Kapp & Peterson, did make mention of it:

Kildare (1965–) First issue of line with matte-finish in Classic Range shapes, P-Lip and fishtail mouthpiece. Second issue C.1979 as Kildare Patch, with rusticated patches on pipe surface. Third issue 2010, matte-brown, P-Lip or fishtail mouthpiece, no band. Fourth issue 2011-, burgundy sandblast finish, nickel army mount, fishtail mouthpiece, exclusive to smokingpipes.com.So? Does this mean I have a First Issue Kildare or a Third Issue Kildare (it’s clearly not Second or Fourth). Truth be told: I don’t know for sure. But the First Issue is the only one that specifically mentions the Classic Shapes, of which the 80S is one. So I have no reason to think that this isn’t from the earliest (1965-79) range. I am more than happy to be corrected by someone who knows more than I do!

Let’s have a closer look at this pipe. Someone had clearly attempted to clean the pipe in the past. Their cleaning job was mediocre, but better than nothing. The near side of the rim of the bowl had a clear burn mark. Mercifully, the burn looks quite superficial. The stummel has a couple of small nicks, which are not a big deal. The two grooves which wrap around the bowl were fairly grungy and would need to be cleaned. Fortunately, the stem was in good shape – just some oxidation to address. There was an inner tube in this pipe and it needed to be cleaned. I threw it in some lemon-infused isopropyl alcohol and let it soak for a while. I took it out, cleaned with some SoftScrub, gave it a rinse, and gave it a polish. Much better.Stem next. As usual, I cleaned the insides with lemon-infused isopropyl alcohol and some pipe cleaners. Fortunately, it wasn’t too dirty inside. Then I wiped down the outside of the stem with Murphy’s Oil Soap on some cotton rounds – that removed some exterior dirt. Then, of course, I stuck it in the deoxidizing solution overnight. The next day, I scrubbed it down with some SoftScrub on cotton rounds. Before moving on to sanding, I wanted to restore the stylized “P” logo on the stem. I could see that the impression was shallower at the bottom than at the top. I painted that “P” in white and let it dry. I then used all nine Micromesh pads (1,500 through 12,000 grit) to bring out the lovely black lustre on the stem. I also used Obsidian Pipe Stem Oil in between each pad scrubbing (from 3,600 on). Setting aside the stem, I grabbed the stummel and started on that. Fortunately, this pipe didn’t need to be reamed, but other cleaning still needed to be done. Just like the stem, I cleaned the insides with lemon-infused isopropyl alcohol and some pipe cleaners and Q-tips. One has to keep cleaning until the pipe cleaners no longer show any interior filth.Since I wasn’t sure what was done in the previous owner’s cleaning job, I decided that a de-ghosting session would be sensible. I thrust cotton balls into the bowl and the shank and saturated them with 99% isopropyl alcohol. I let the stummel sit overnight. This caused the oils, tars and smells to leach out into the cotton. The bowl was nice and clean after this. I then took some 400-grit sandpaper and gently sanded down the inside edge of the bowl. I wanted to remove any remaining detritus. Following that, I grabbed a dental tool and dug out the muck that filled the two grooves on the bowl. I was actually surprised how much stuff was in there. Once done, I thoroughly cleaned the outside with Murphy’s on cotton rounds. I gently “topped” the pipe in order to safely remove the burn on the rim. The burn was very slight, so it didn’t take much. The pipe was really beginning to look beautiful. I followed that up by cleaning the insides of the stummel with some dish soap and tube brushes.Almost forgot the little dents on the underside of the bowl! Those were easily repaired with cyanoacrylate adhesive and briar dust. After this, I used all nine Micromesh pads (1,500 through 12,000 grit) to sand the stummel smooth. I then applied some Before & After Restoration Balm which I massaged into the wood and let sit for 20 minutes or so. After that, I rubbed it with a microfiber cloth. The balm brings out the best in the beautiful wood. It makes things shine and really shows the lustre. Finally, I took it to the buffer and used some White Diamond and a few coats of carnauba wax.This Peterson Kildare really came out well. I am proud of the work and I’m sure the new owner will love it! I am pleased to announce that this pipe is for sale! If you are interested in acquiring it for your collection, please have a look in the ‘Irish’ pipe section of the store here on Steve’s website. You can also email me directly at kenneth@knightsofthepipe.com. The approximate dimensions of the pipe are as follows: length 5⅜ in. (136 mm); height 1¾ in. (45 mm); bowl diameter 1⅝ in. (41 mm); chamber diameter ¾ in. (19 mm). The weight of the pipe is 1¼ oz. (39 g). I hope you enjoyed reading the story of this pipe’s restoration as much as I did restoring it. If you are interested in more of my work, please follow me here on Steve’s website or send me an email. Thank you very much for reading and, as always, I welcome and encourage your comments.

Restoring a Kaywoodie Churchwarden


Blog by Kenneth Lieblich

Next on the chopping block is a charming and looooong Kaywoodie Dublin churchwarden (twelve inches long), commissioned by the daughter of a friend, for her fiancé. She was determined to get her beau a churchwarden as a gift. Fortunately, I was able to lay my hands on one and did a nifty restoration job on it. This pipe was made by the well-known American pipe company, Kaywoodie. The markings on the left side of the shank read Super Grain [over] Kaywoodie. On the right side of the shank is the shape number: 95. The left side of the stem has the traditional Kaywoodie logo, a club: ♣.   I went over to Pipedia, in order work out a rough date for this pipe. I know that the very old Kaywoodies have four-digit shape numbers – and this pipe obviously only has two digits. On the list of Kaywoodie shape numbers, the following information was shown:

Shape #                 Description                                                         Years Produced

95                           Extra Long Dublin Churchwarden              1932-1937, 1947-1972

So, at its youngest, this pipe is a minimum of 50 years old. Having said that, however, I think it’s older because the scant information I could find suggests that the 95 was not produced in Super Grain from at least 1968. I also don’t feel that this pipe falls into the earlier year ranges. My best estimate is that this pipe dates from the period of 1955 to 1968. Sadly, I cannot be more precise than that. The following photo shows the pipe in question from a 1955 Kaywoodie catalogue:The pipe was in decent condition. The pipe had been well-smoked add the bowl and shank were quite dirty, but nothing outlandish. The bowl had notable cake on the inside and some lava on the rim. I felt that some burning was possibly there too. Similarly, the stem was relatively clean – not much oxidation to speak of, and what I would describe as “typical” tooth marks on the bit. The stem was somewhat bent out of shape (in the yaw, pitch, and roll axes) and would need to be corrected. Finally, some previous owner had decapitated the drinkless filter system. Time to get to work. The stem was first on my list. I wiped the outside down with Murphy’s Oil Soap on some cotton pads. I cleaned out the insides with lemon-infused isopropyl alcohol and some churchwarden pipe cleaners. I also took a BIC lighter and ‘painted’ the stem with its flame to lift the few bite marks and dents. This was reasonably successful in raising the damage. It wasn’t perfect, but it was improved.

As I mentioned, the stinger thing had been lopped off. There was no repairing it – and I didn’t want to anyway! What I did do, however, was to gently sand down the cut edge with metal sandpaper in coarse, medium and fine grits. This worked beautifully and I was pleased with the results. I cleaned off the end with some alcohol on a cotton pad and gave the metal a quick polish. I then heated the stem with my heat gun and gently worked the twisted stem back into place. I have bent many stems before, but this one was by far the trickiest – perhaps because it was so long. There was considerable resistance in the stem and, after correcting the yaw and roll axes, I opted to leave some of the pitch – figuring that discretion was the better part of valour. Or, rather, I didn’t want to break the darn thing!

Fortunately, the stem was in good enough shape that it didn’t need a soak in the Pipe Stem Oxidation Remover. I simply scrubbed and scrubbed with SoftScrub on some cotton pads. I built up the remaining marks on the stem with black cyanoacrylate adhesive and then cured it with the aid of some CA glue accelerator. I then carefully sanded the adhesive down with 220-, 400-, and 600-grit sandpapers to meld seamlessly into the stem. I then used all nine Micromesh pads (1,500 through 12,000 grit) to bring out the lovely black lustre on the stem. I also used Obsidian Pipe Stem Oil in between each pad scrubbing (from 3,600 onward). Now for the stummel. I decided to ream out the bowl. I used the PipNet reamer to remove the built-up cake and followed that with 220-grit sandpaper taped to a dowel to eliminate as much as I could. I took the chamber down to bare briar, as I wanted to ensure there were no hidden flaws in the wall. Fortunately, there were none.   I then proceeded to clean out the insides of the shank with Q-tips, pipe cleaners, and lemon-infused isopropyl alcohol. There was quite a bit of filth inside this stummel and it took a fair amount of cotton to get it clean. I used cotton rounds and some Murphy’s Oil Soap to scrub the outside of the stummel. I soaked the rim of the pipe in Murphy’s in order to soften the lava. This worked well, but burn marks remained on the wood of the rim. I followed that up by cleaning the insides of the stummel with some dish soap and tube brushes. Next, I decided to de-ghost the pipe in order to remove any lingering smells of the past. I thrust cotton balls into the bowl and the shank and saturated them with 99% isopropyl alcohol. I let the stummel sit overnight. This caused any remaining oils, tars and smells to leach out into the cotton. The bowl was nice and clean after this. Often, to remove burn marks, I use oxalic acid, but, in this case, the burning was too extensive. I should say that the burning wasn’t severe or deep – just wide. In order to safely remove the burns on the rim, I “topped” the pipe – that is to say, I gently and evenly sanded down the rim on a piece of 220-grit sandpaper. This effectively removed the damage, without altering the look of the pipe.Before sanding, I applied some Before & After Restoration Balm and let it sit for 20 minutes or so. It does lovely things to the wood. Once I polished it with a microfibre cloth, I sanded the stummel down with all nine Micromesh pads (1,500 through 12,000 grit). Finally, I applied some more Before & After Restoration Balm and buffed it with a microfiber cloth a second time. I then took the pipe to my bench polisher and buffed it with White Diamond and a few coats of carnauba wax. Wow – the pipe really looks lovely. My friend’s daughter presented her fiancé with the pipe and he seemed quite pleased with it. I met the lucky fellow myself and I know that he will enjoy smoking it for many years to come. I hope you enjoyed reading the story of this pipe as much I as I did restoring it. If you are interested in more of my work, please follow me here on Steve’s website or email me directly at kenneth@knightsofthepipe.com. Thank you very much for reading and, as always, I welcome and encourage your comments.