Tag Archives: fitting a stem

Reclaimed – an Old Baronite Ceramic and an Old Briar


Blog by Steve Laug

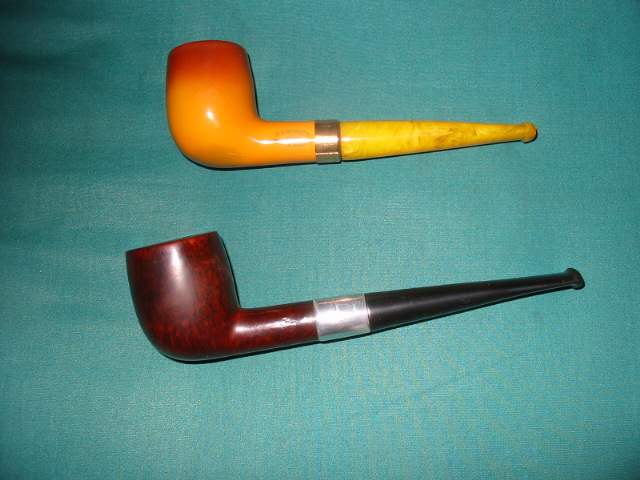
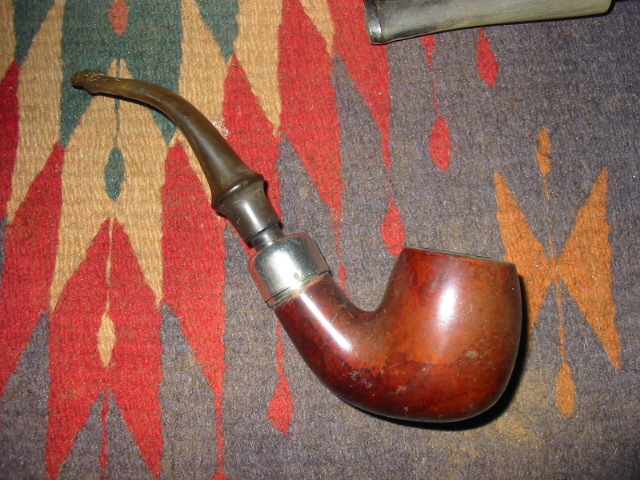
When I saw this pair of old pipes on EBay I was intrigued enough to put in a bid. I did not bid high as I was intrigued not captured by them. As I looked at them the upper pipe had some interesting possibilities in grain and the shape of the stem and angles looked old to me. The bottom pipe fooled me a bit – when I first looked I thought it might be a meerschaum with an amber stem. But after bidding and a bit more digging on the internet I found that it was a double walled ceramic pipe and the stem appeared to be Bakelite. I found out that I had bought these pipes when I got home from work that evening. They would arrive soon and I would have the pleasure of working on them.Image

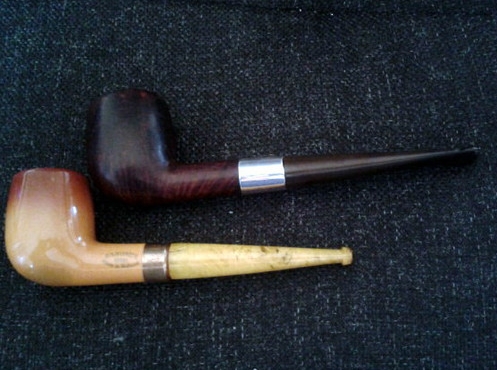
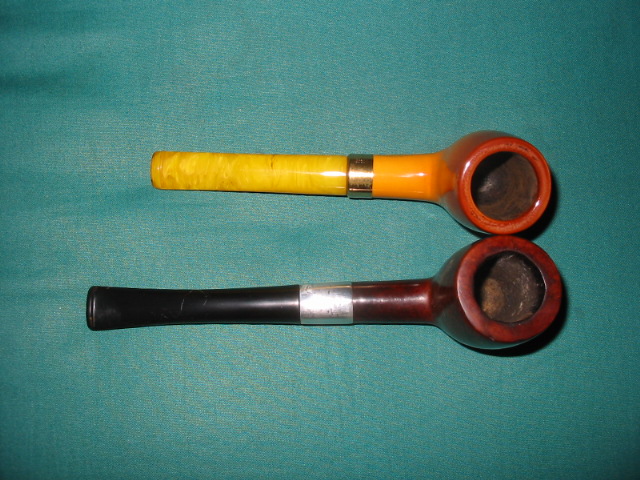
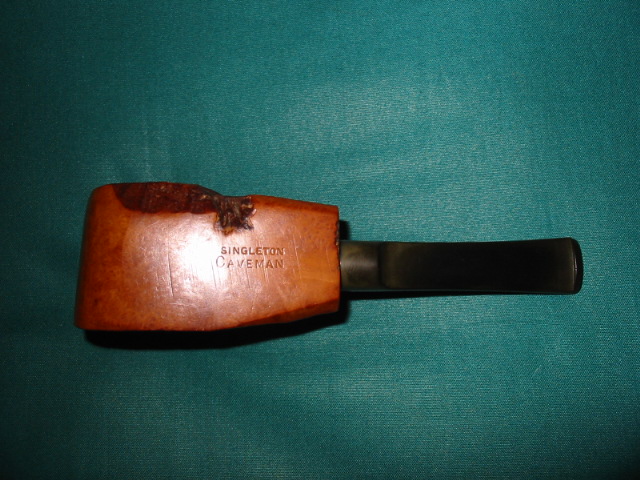
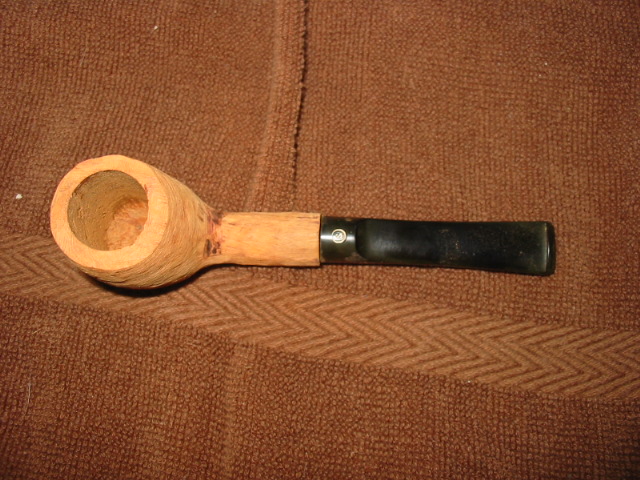
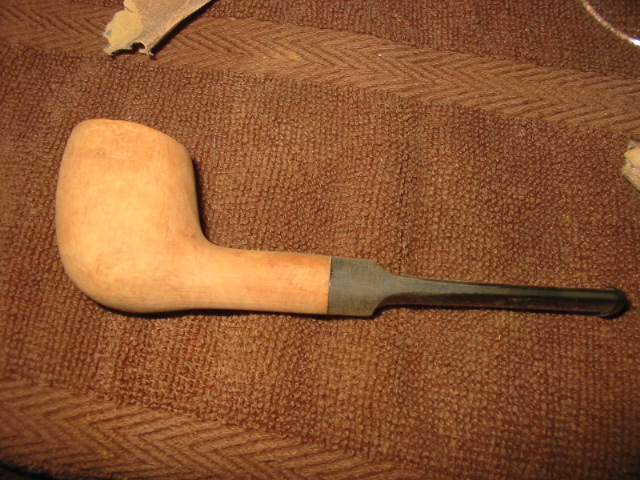
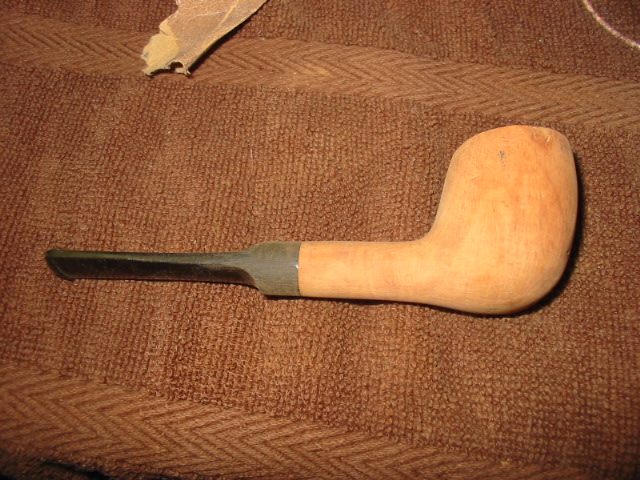
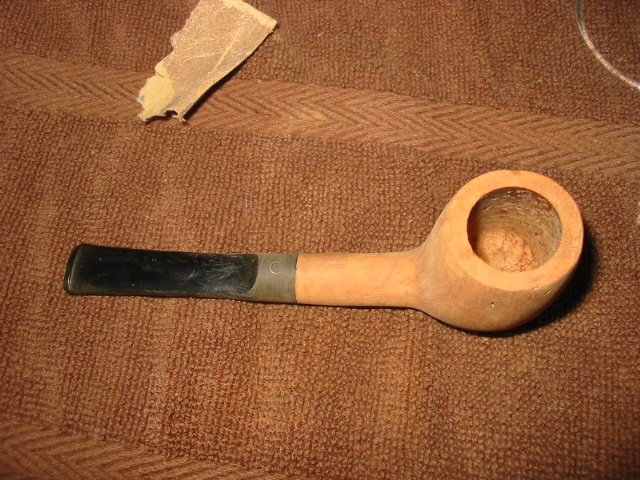
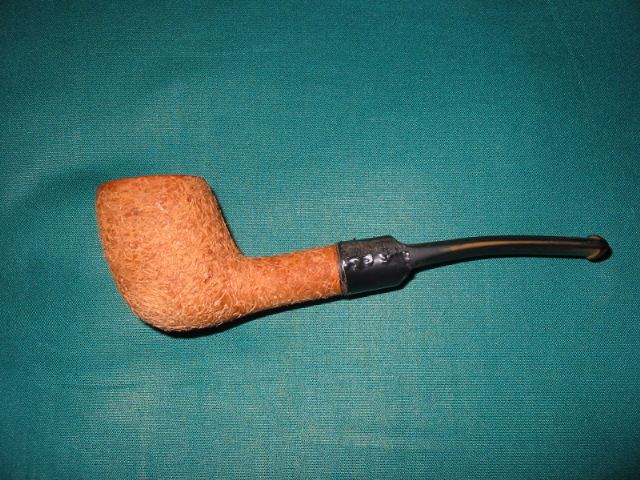
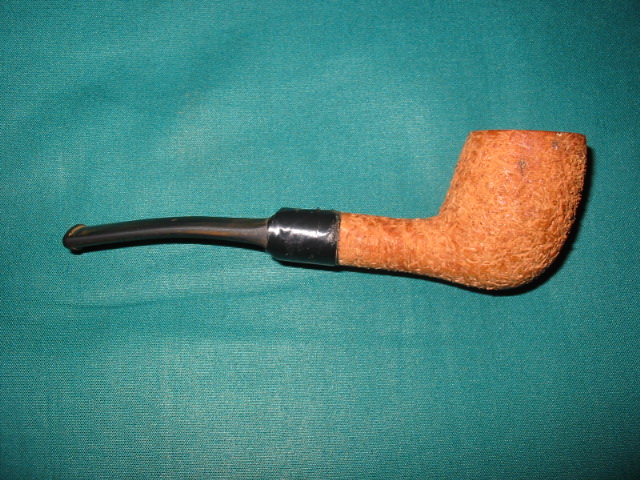
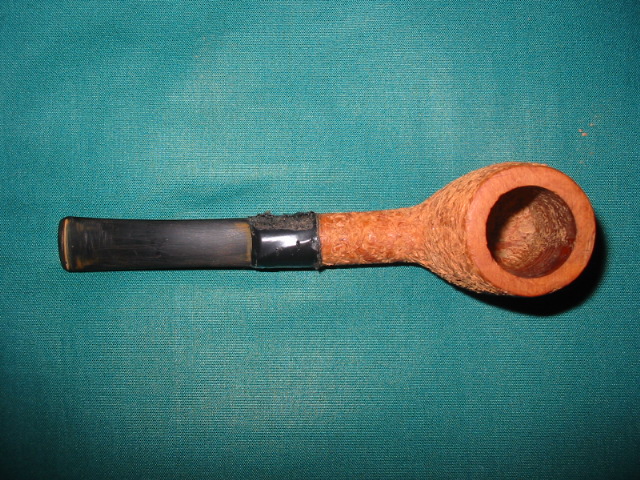
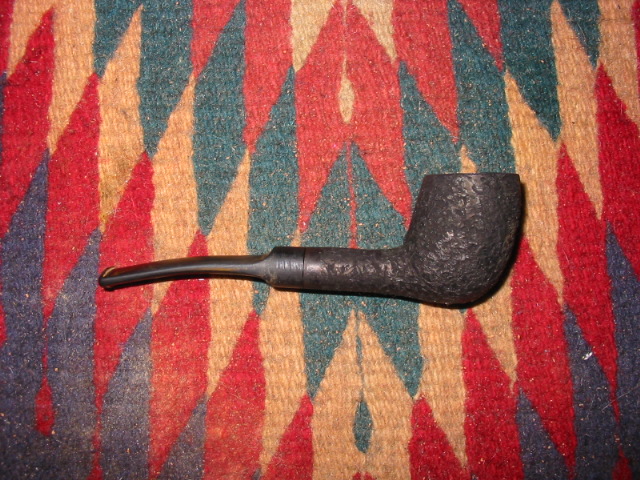
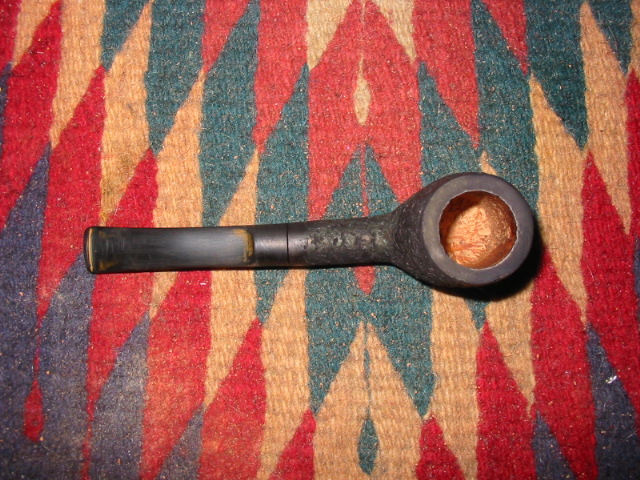
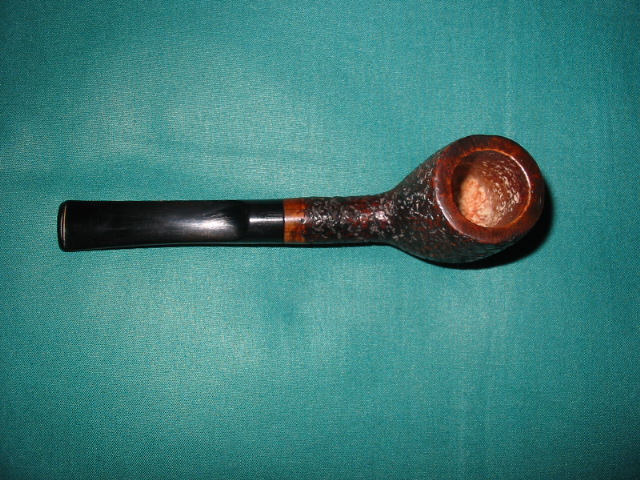
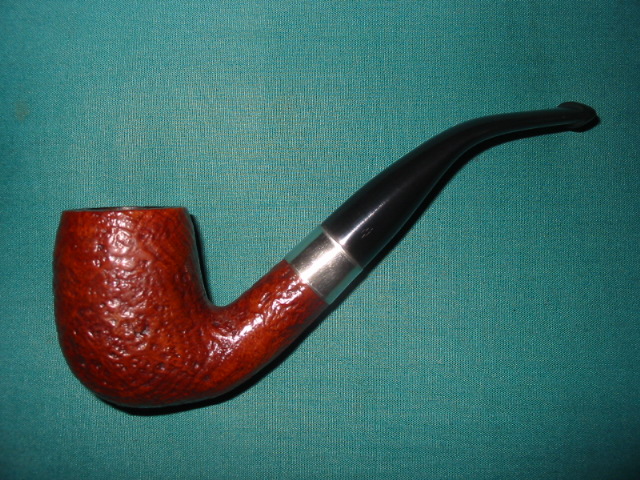
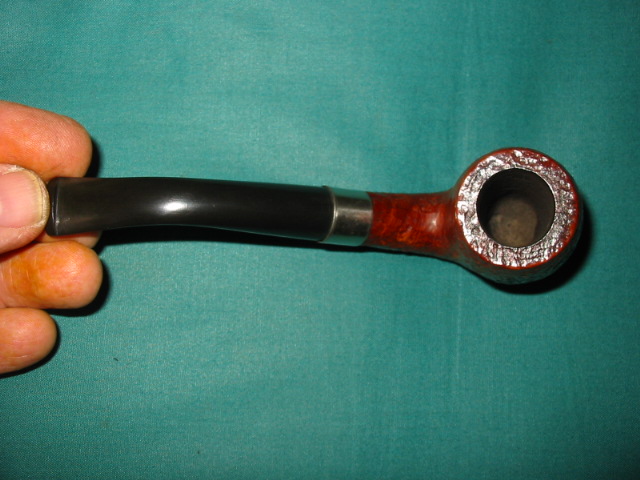
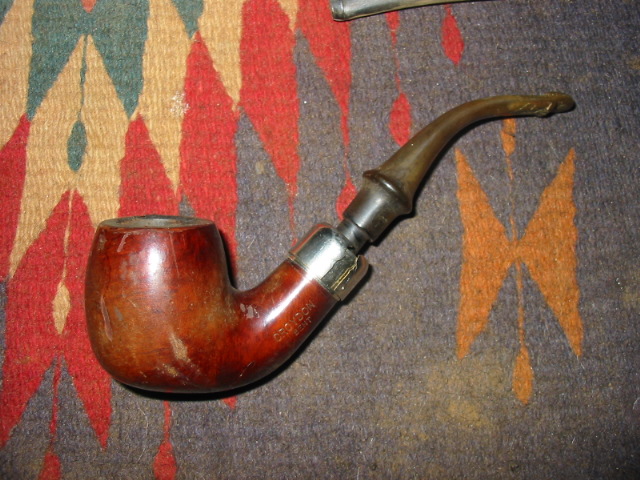
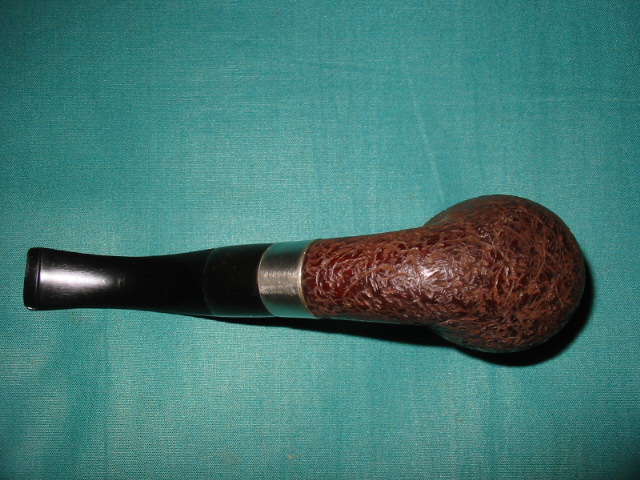
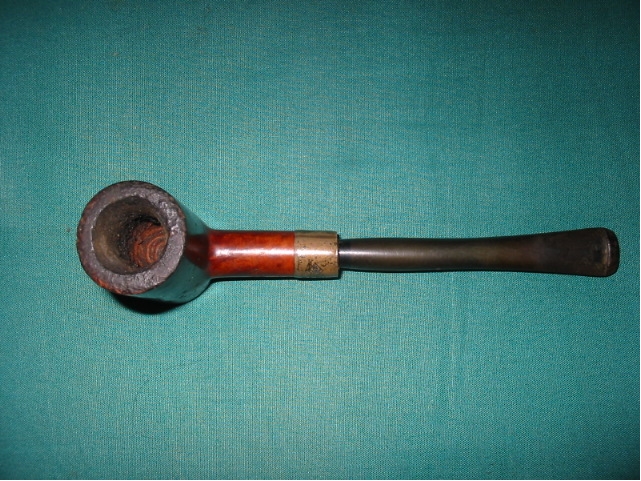
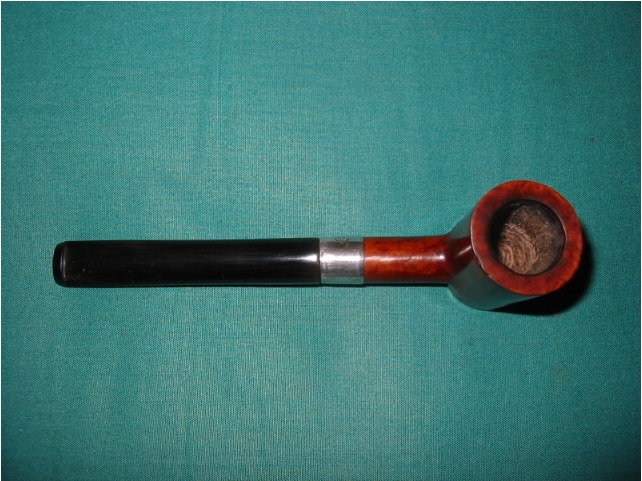
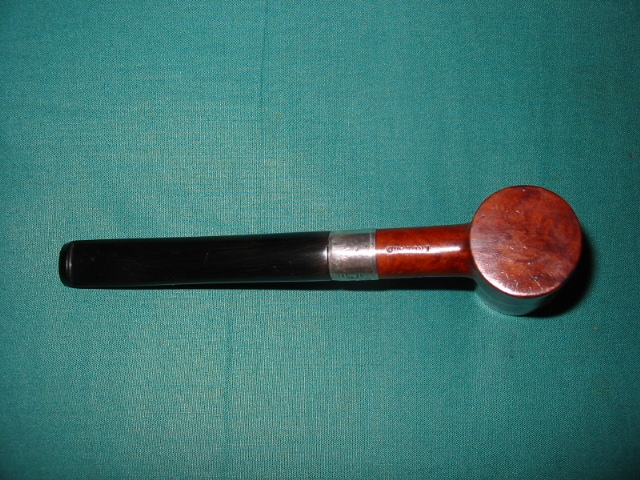
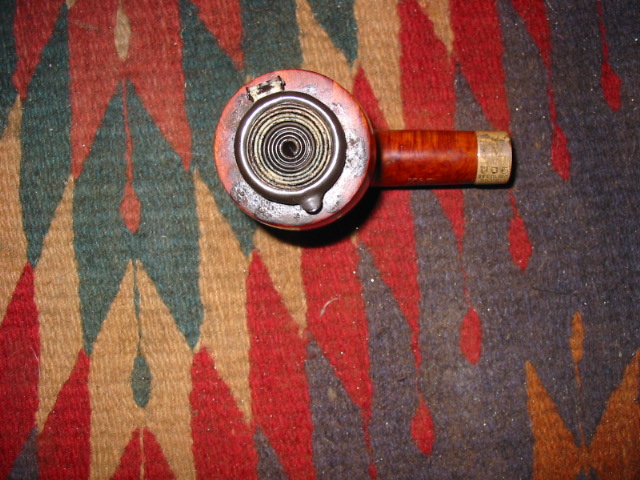
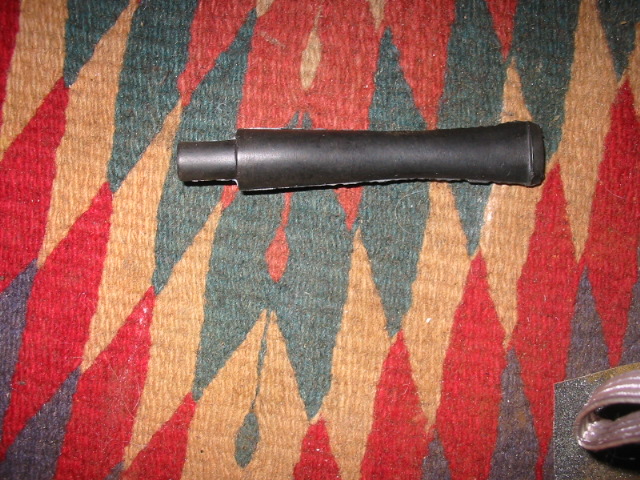
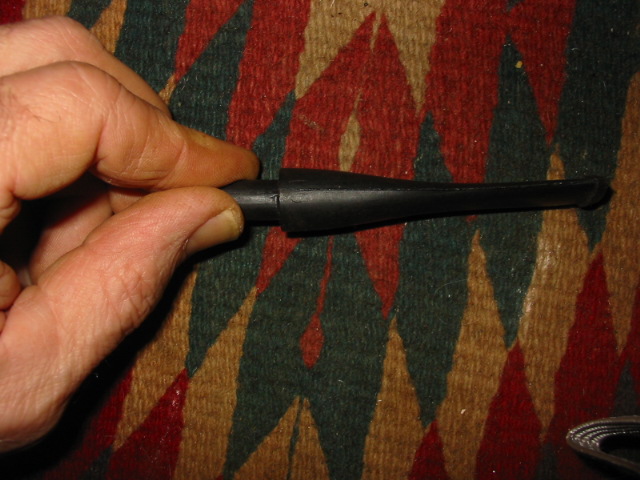
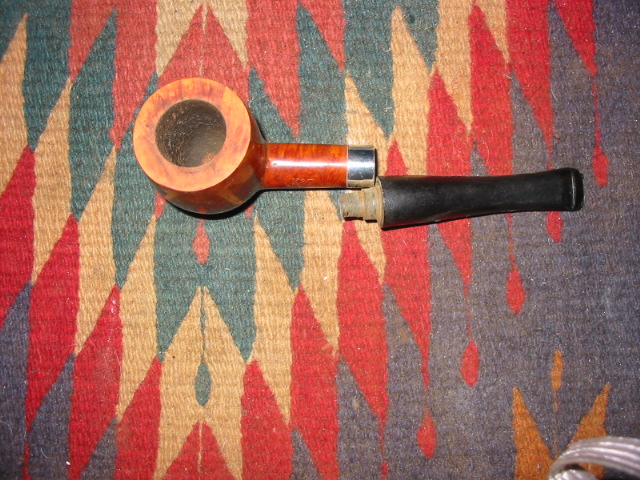
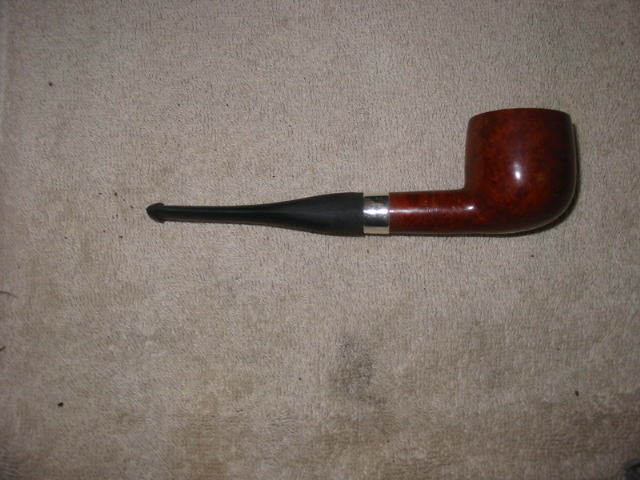
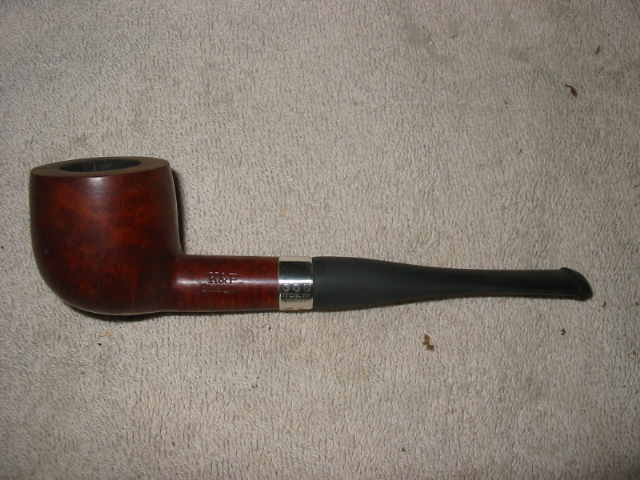
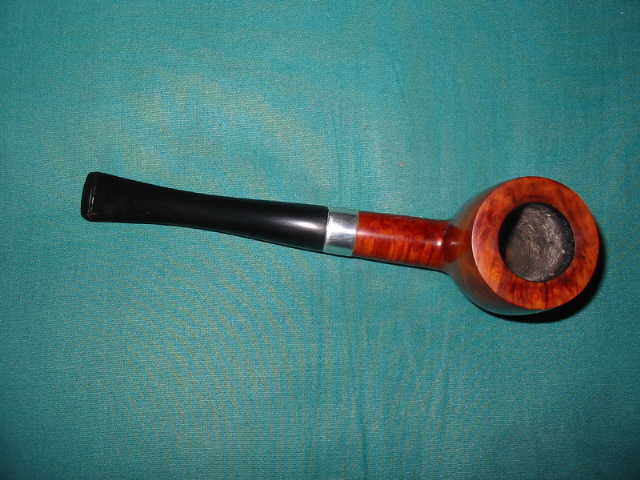
When they arrived I took time to look them each over to get a feel for what needed to be done to bring them back to service. Looking over the briar pipe first I could see that it is old. The stem style and the orific button point to an older pipe. The silver band has no hallmarks or stamping so it is no help in identifying the pipe’s brand or age. The stamping on the shank is too faint to see even with a bright light and a jeweler’s loupe for magnification. The bowl was thickly caked and much of the tars of the tobacco were built up on the rim. It appeared that the rim was not damaged with char or denting. The finish, as can be seen in the photo below as very dirty and darkened with oils from the hands on the sides of the bowl. The stem had deep tooth marks and much chatter from teeth along top and bottom from the button up about a ½ inch.

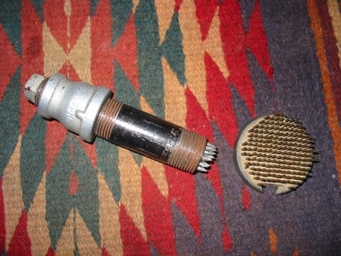
The second pipe was a double walled ceramic pipe. It was stamped Baronite Made in Holland. The outer surface of the bowl was dirty and darkened with what appeared to be grease. The band on it appeared to be a golden colour under the dirt. The stem was in pretty good shape but the cork seal on the tenon was dry and thus loose in the shank. The inside of the bowl was caked and black. The shank was also black and dirty. I shined a light into the shank and could see the gap between the walls of the inner and outer bowl. This area was in need of a thorough washing.

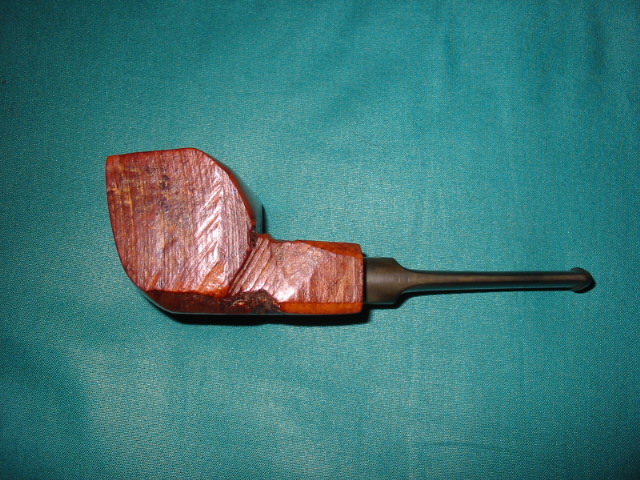
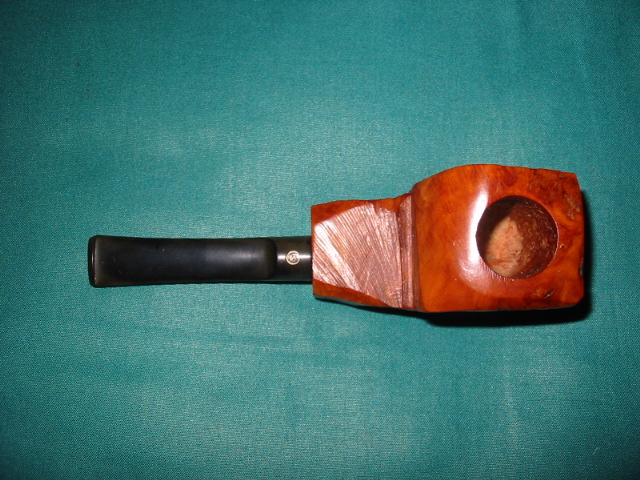
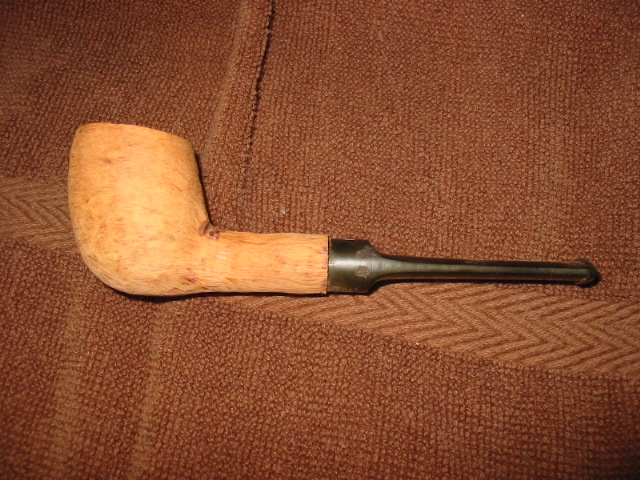
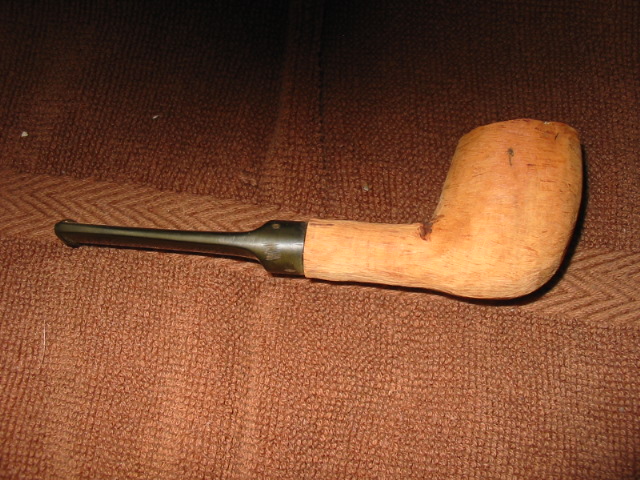
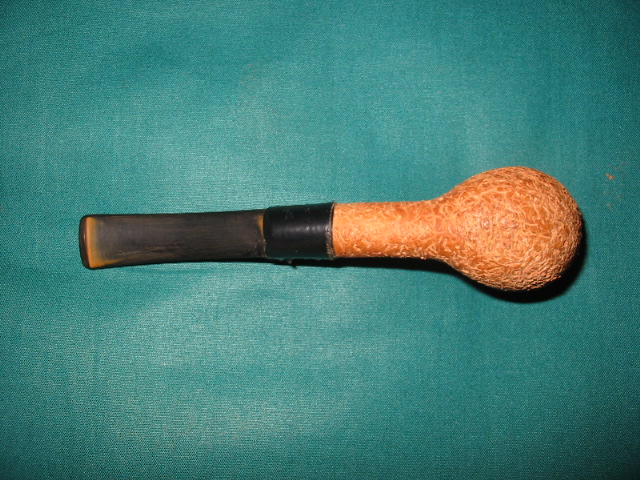
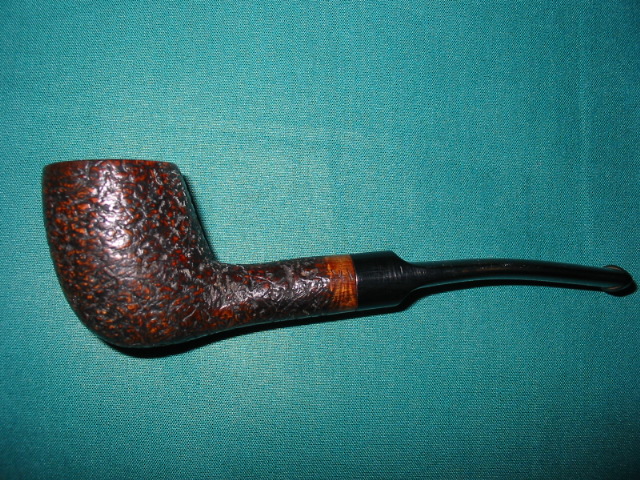
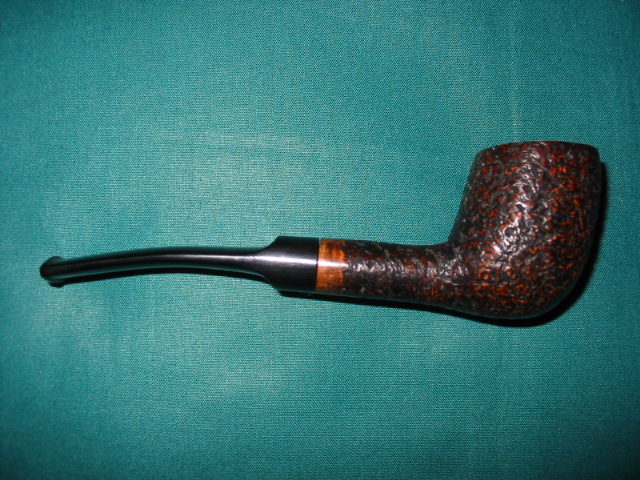
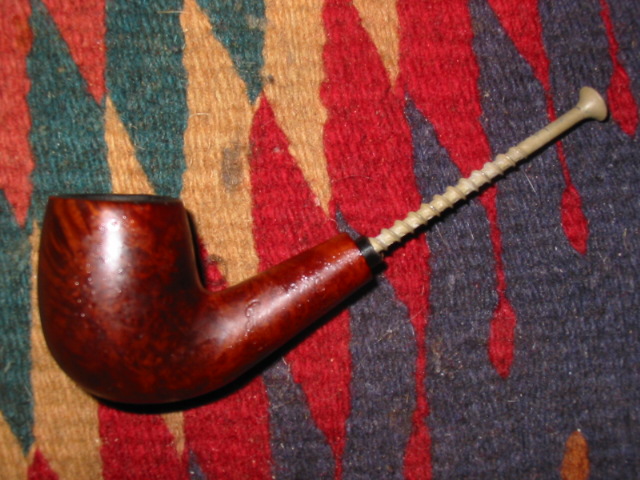
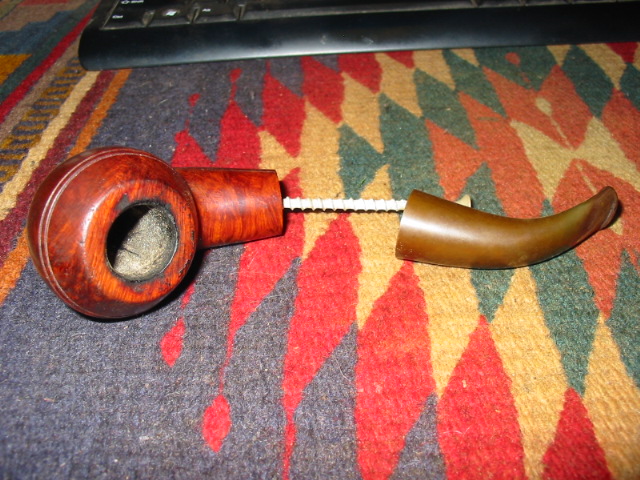
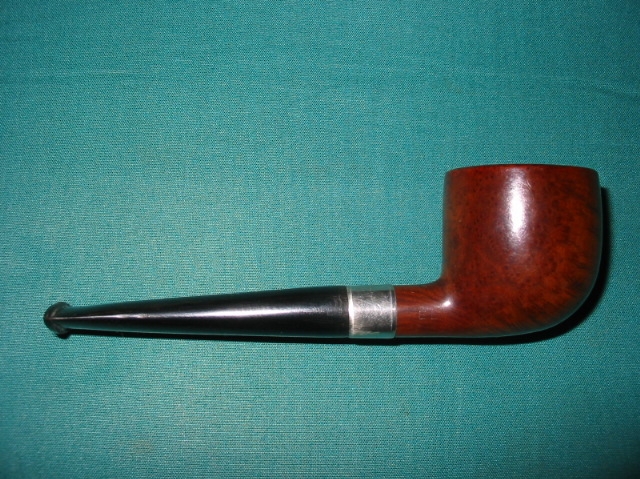
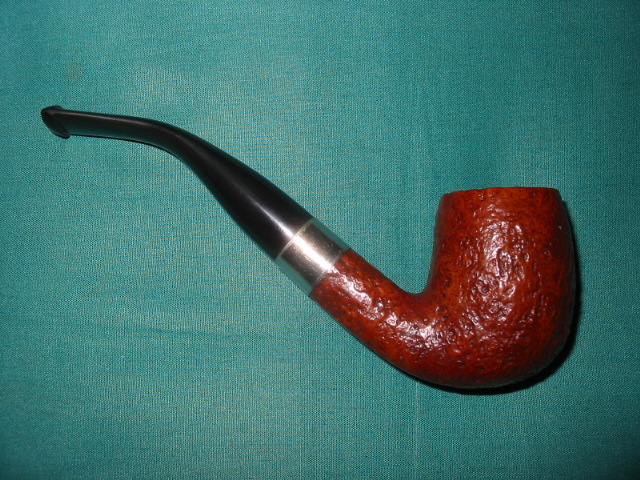
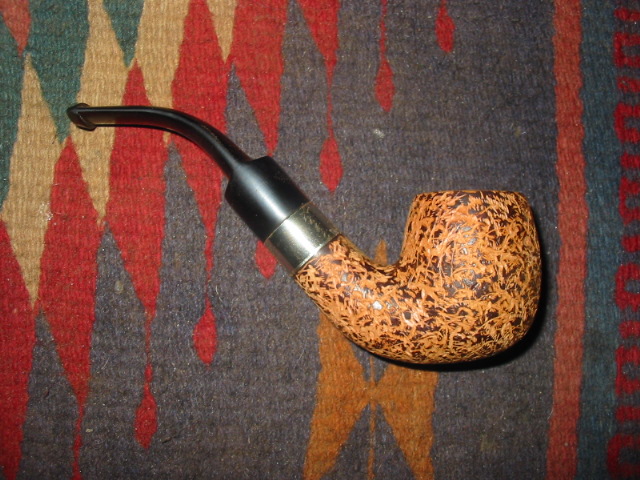
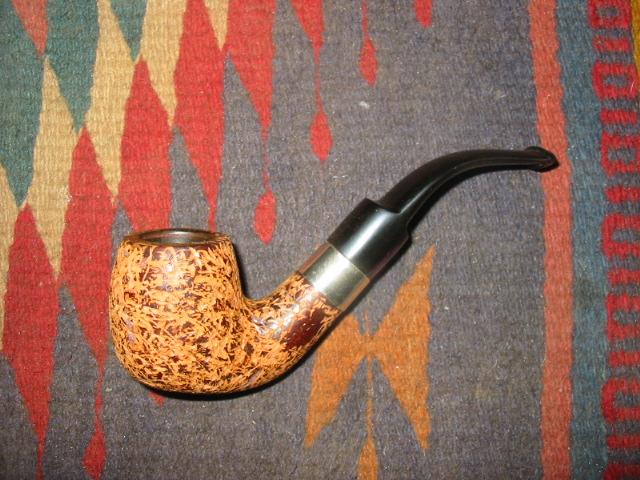
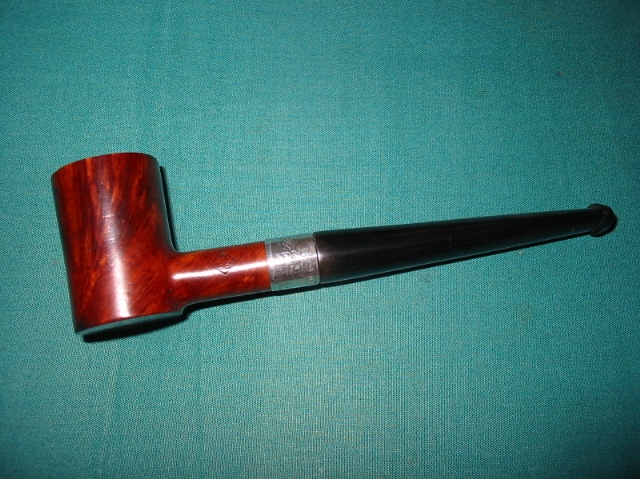
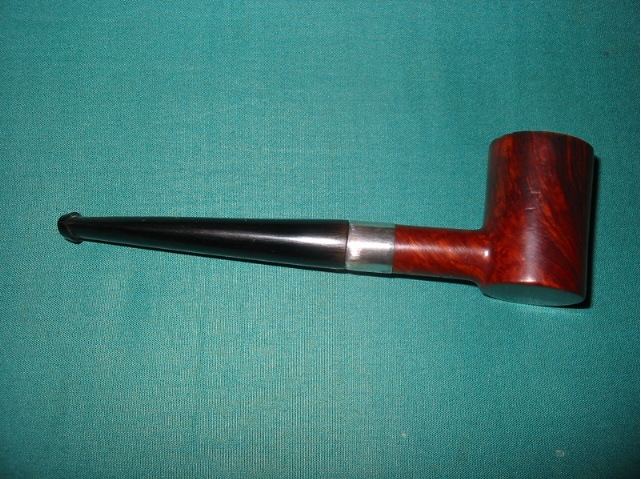
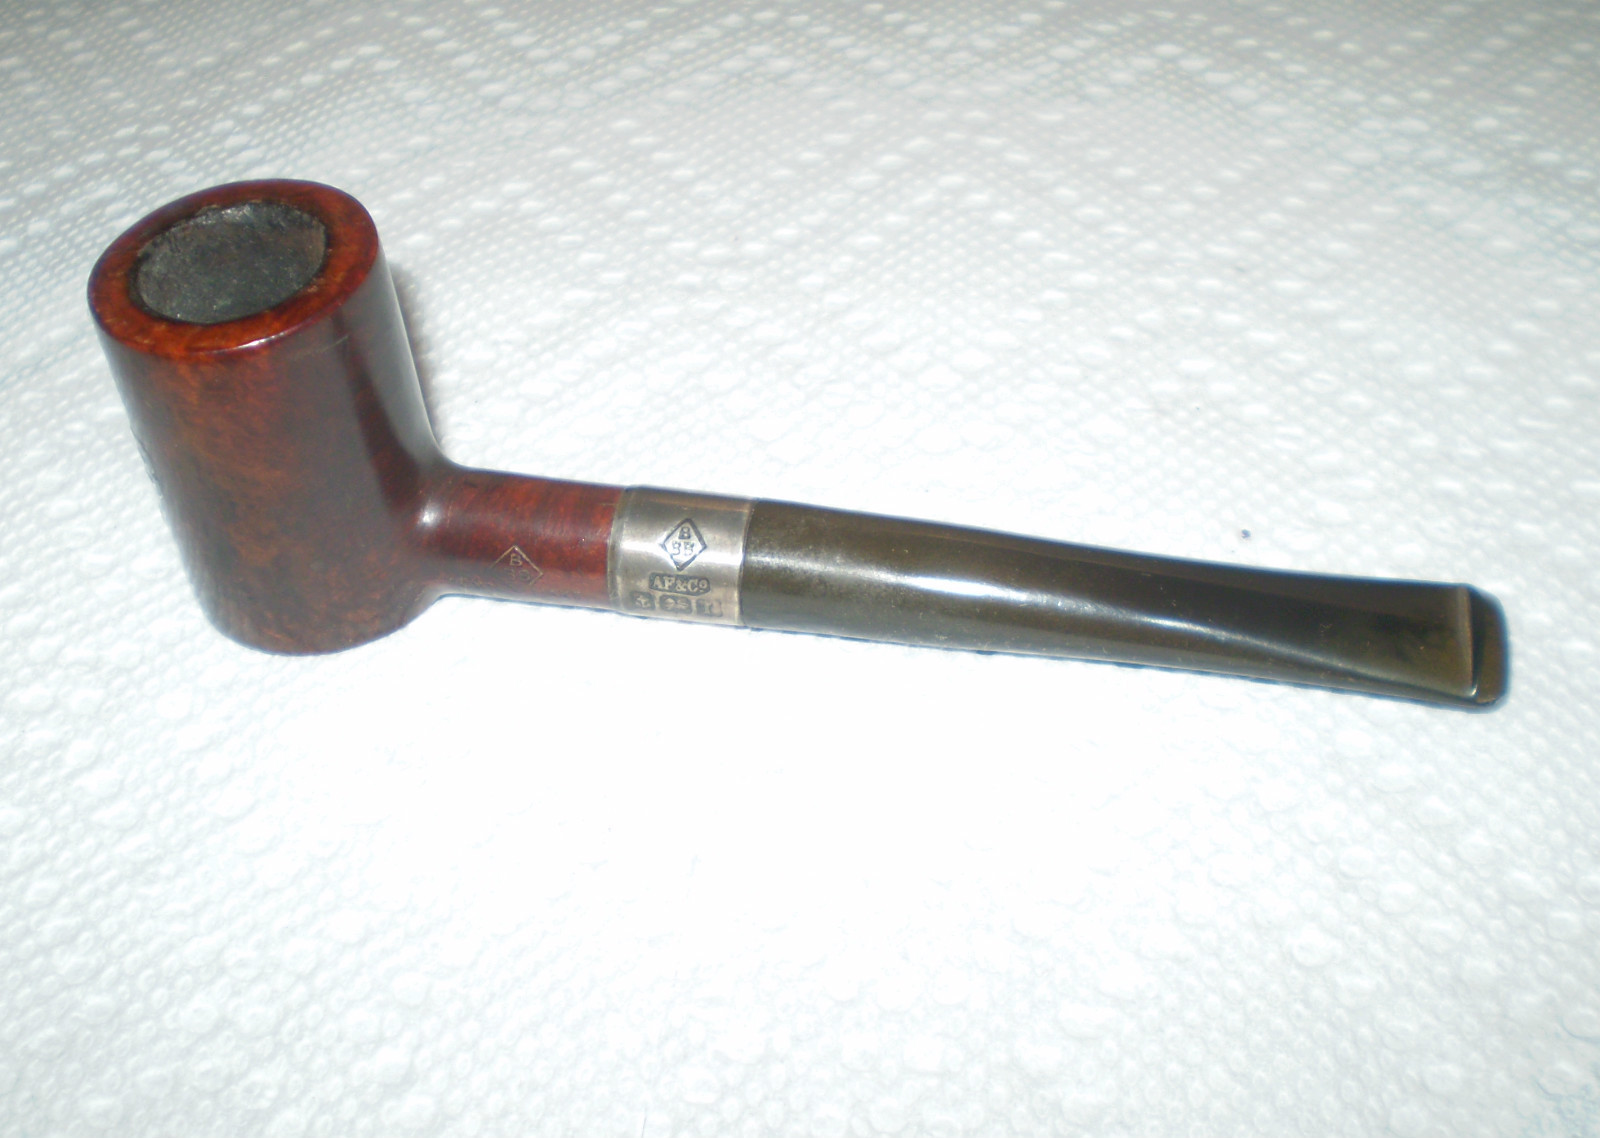
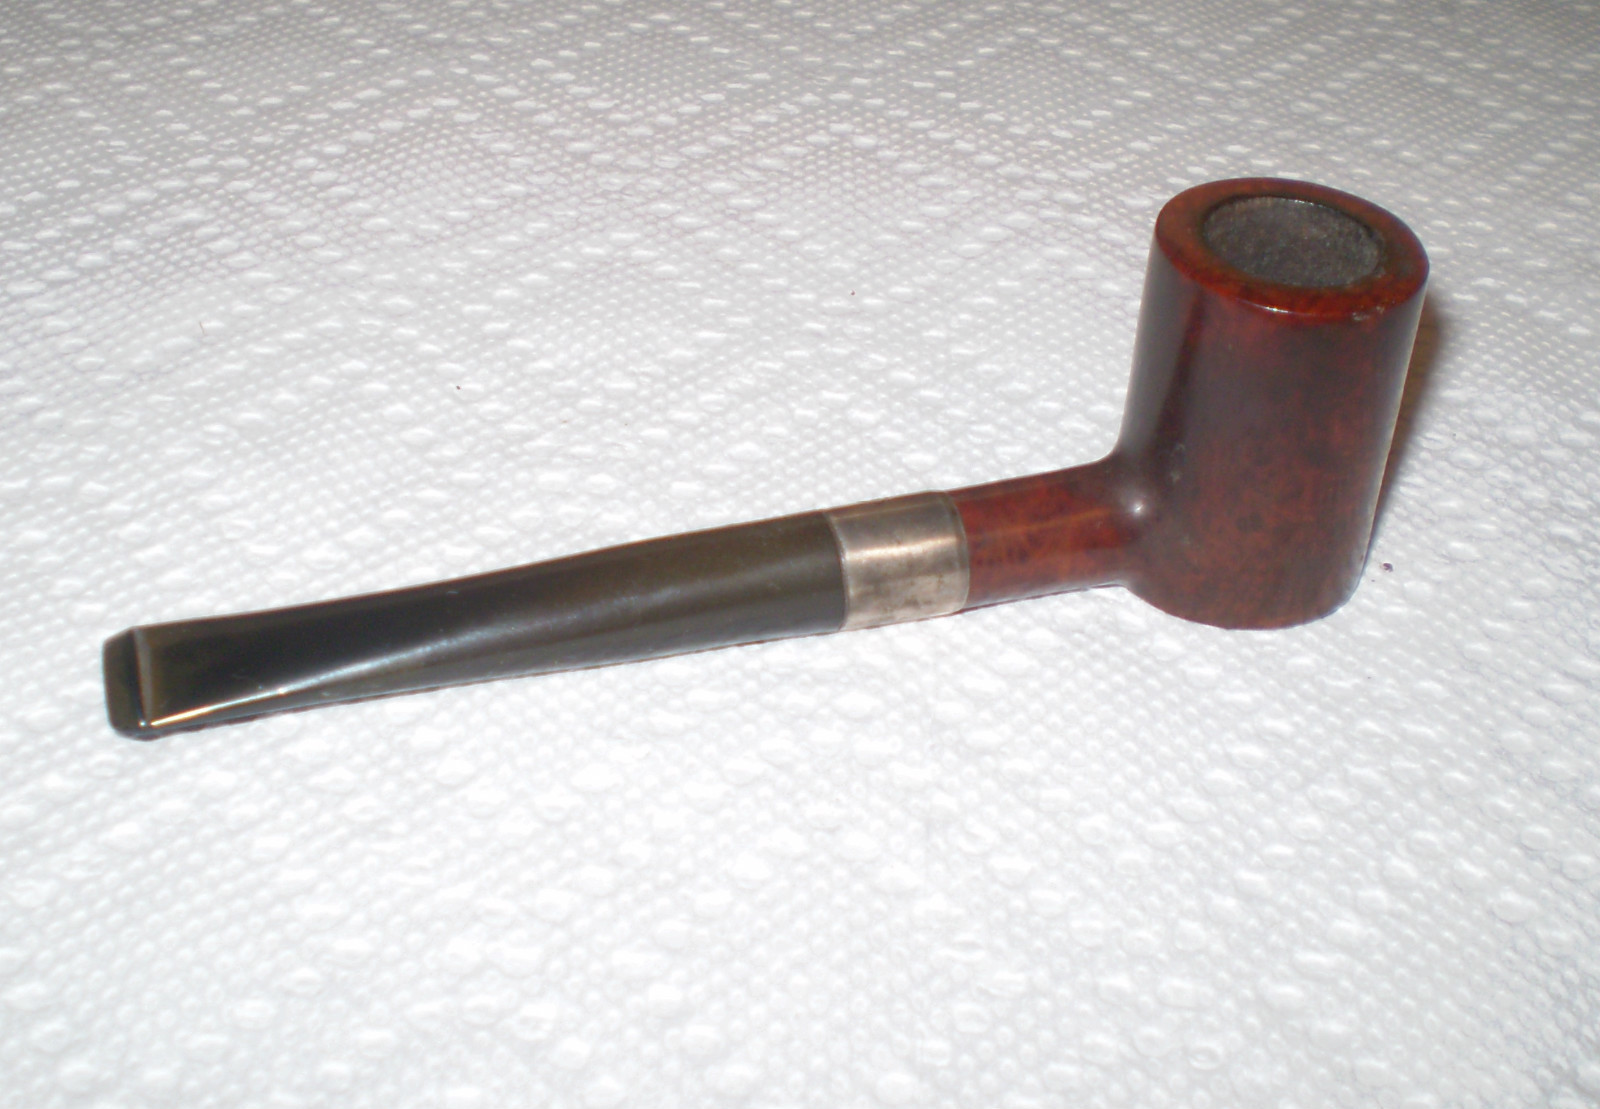
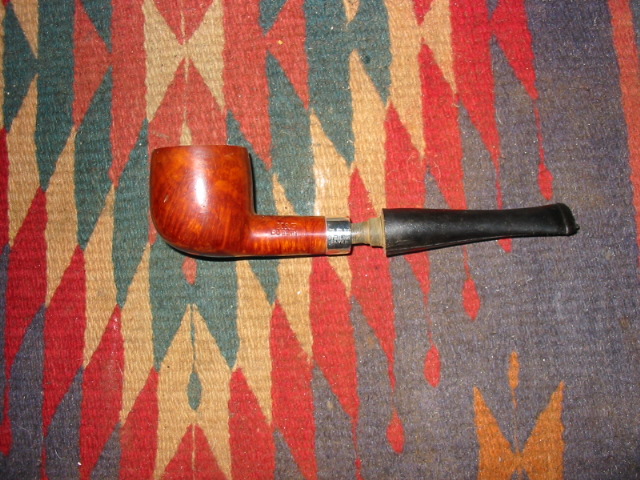
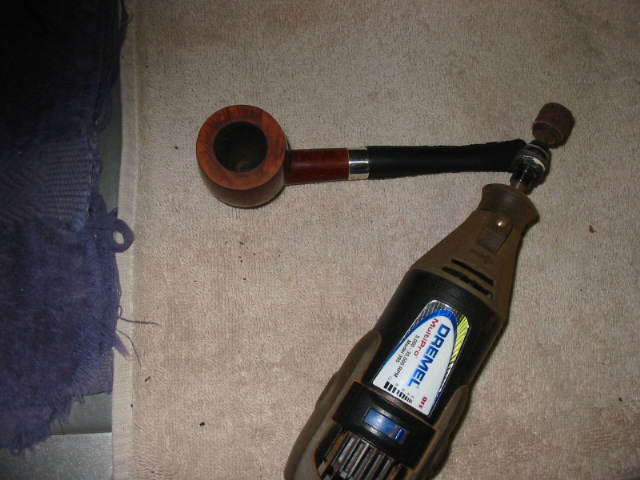
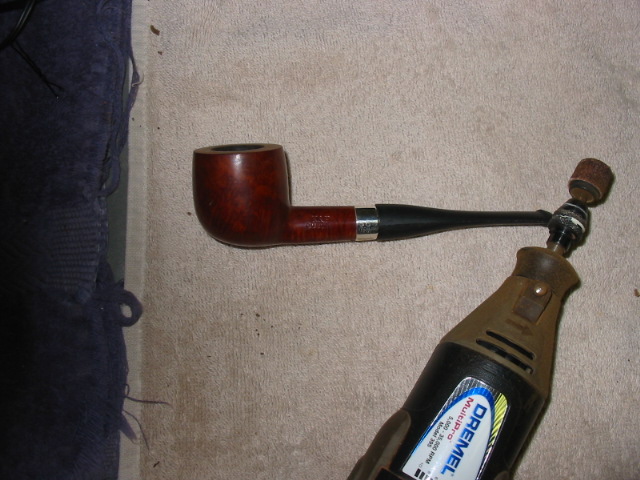
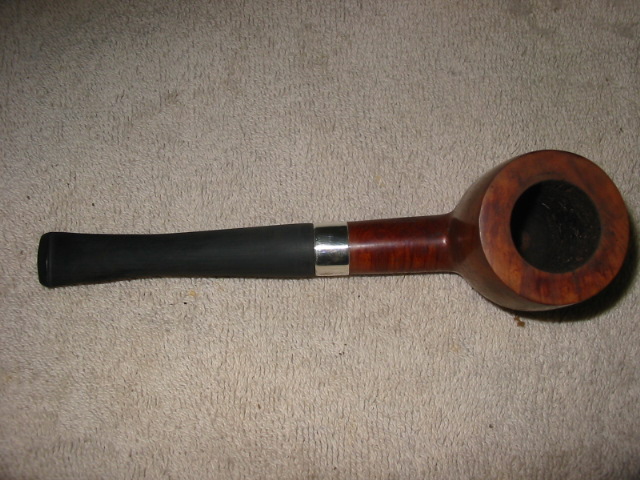
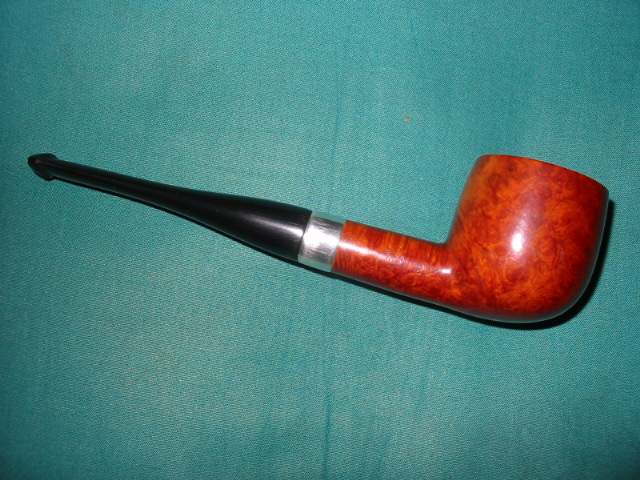
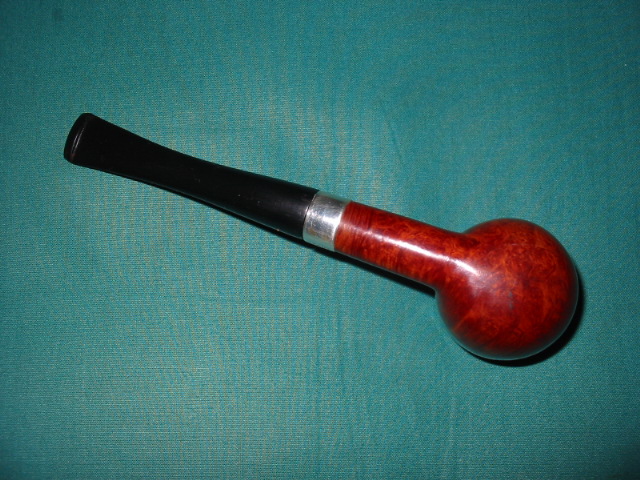
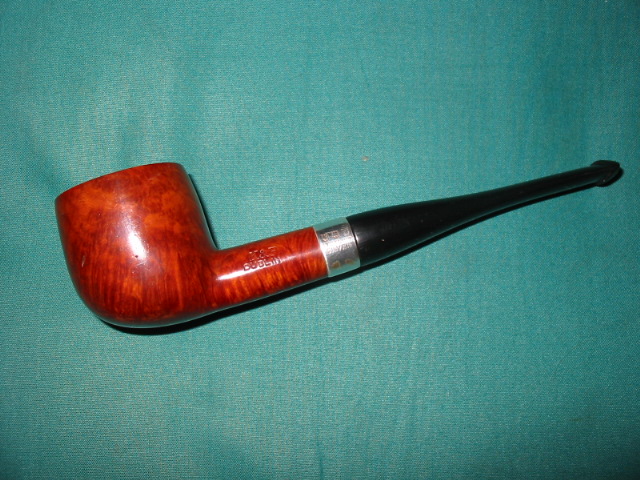
On the briar pipe I cleaned and reamed the bowl. The shank was a mess and full of grime and grit. It took many pipe cleaners, a shank brush and isopropyl alcohol before it was clean and the pipe cleaners came out white. The deep tooth marks on the stem were lifted with my heat gun and then sanded smooth. I used 240 grit sandpaper, 400 and 600 grit wet dry sandpaper and then finished the work on the stem with micromesh pads from 1500-6000. While I worked on the stem I had put the bowl in the alcohol bath to soak and hopefully remove the darkened and soild finish. When I took it out of the bath and dried it, I sanded the bowl and restained it with a medium brown aniline stain. I put the stem back on it and then buffed it with White Diamond and polished it with carnauba wax

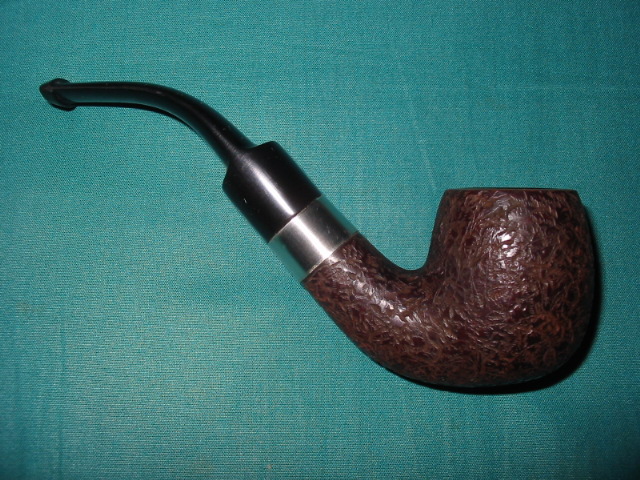
On the Baronite Ceramic pipe I did a bit of seeking advice and found out that I could flush out the bowl with hot water. I did this at my sink with the water running through the bowl and out the shank. I repeated it the other direction as well. Several times I filled the bowl and shank and shook it to help the water scour between the inner and outer bowl. After about five minutes of this the water came out clear and the pipe smelled clean again. I decided to do the same process with isopropyl alcohol as well and ran it through the pipe both directions for a final cleaning. I used repeated applications of Vaseline on the cork seal on the tenon to soften it and expand it again. Once that was done the stem fit snuggly to the shank. I cleaned the stem with isopropyl alcohol and pipe cleaners and a shank brush to get the dark areas out of the inside of the stem near the button. Once the stem was done I put it on the pipe and buffed the entirety with carnauba wax. The series of photos below show the finished look of the two pipes.ImageImageImage

Carving one of my own


Every so often I get the urge to carve a pipe of my own. I have done it from scratch, drilling the airway and bowl but often it is just as much fun for me to buy a pre-drilled block with its own stem and rework it into something I like. The pictures and essay below will take you through my process with a pipe I picked up off EBay for almost nothing. When you look at it some of you will recognize that for awhile in the 80’s and maybe earlier Singleton sold these pipes as Caveman Pipes. They were rough and were stained and waxed, stamped Singleton Caveman pipes and sold as is. I have always thought that they were ugly and looked unfinished. This one just begged to be reshaped – at least that is the excuse I gave when the package arrived and my wife commented on “yet another pipe”.

The first four photos give a good sense of what it looked like when it arrived at my house. It was a fairly small piece of briar and there was no way of knowing what lay beneath the surface of the block. It was stained and waxed. The stem was oxidized a bit but it did not matter as I was going to reshape it and make it my own. The last photo of the four shows the Caveman stamping I was referring to earlier.

ImageImageImageImage

I took out my Dremel with the larger sanding drum, replaced the sandpaper cylinder with a new one and began the process of removing the briar and making a shape that I liked and that I felt the briar held inside. The next three photos show the block with much of the briar removed and a shape is beginning to come out. I bring it to this point in the shaping process with the Dremel and the sanding drum. It works great for me. Some of you may notice the nicks from the Dremel on the saddle of the stem. Those are a pain but I was not worrying too much about it as I planned to shape the stem a bit more as well and those would disappear in the process. Also note, the shank is still not the diameter of the saddle on the stem at this point. From this stage one I do the shaping by hand with 100 grit sandpaper. It makes short work of the remaining excess briar. You will also see some burn marks at the bowl shank junction from the sanding drum – nothing that will not sand off. There are also sand pits and flaws beginning to show up in the surface of the briar.

ImageImage

Image

Much sanding went on before I took the next series of three photos. I used the 100 grit sandpaper to remove much of the excess and then progressed to 220 and 240 grit sandpaper to bring the shape to the stage in these photos. I also sanded the saddle of the stem and the edges of the blade to match the line of the shank. I wanted the flow to be uninterrupted by the juncture of the two materials and I wanted the transition to be smooth. There were many sand pits visible at this time on the sides, top and bottom of the bowl and the shank. It is always a bit of pain to get to this point in the shaping and sanding and not be able to get rid of them. This left me with a bit of a quandary. What should I do to get the best finish on this pipe? I dislike fills and did not want to use putty in any form on this pipe. I figured the next bet would be to rusticate the pipe and give it an interesting texture for the prestained finish.

ImageImageImage

I used a tool that I fashioned out of a fistful of galvanized nails, a piece of steel pipe, a cap and nipple coupling. It looks like the photos below. It is the tool on the left. I also used a florist’s frog (pictured on the right) to give the finished surface a different touch.

ImageImage

Before I used the tool on the surface of the briar, I wrapped the saddle of the stem and a 1/8th inch band with black electrical tape. I wanted to protect the saddle and the small band of briar from being rusticated with the tool. It is a work horse but is not subtle in its deep cuts. I wrap the cap end with a thick towel to protect my hand when I pushed the points of the nails into the briar. I pushed the head into the briar and twisted the tool back and forth to cut the surface of the briar and roughen it. The next series of four photos show the rusticated surface of the pipe after I finished with the nails and also after I rubbed the florist’s frog across the surface to knock off high points. I was aiming for a finish that has the look of aged leather so I wanted no roughness left but I wanted a crinkled, wrinkled look to the briar.

ImageImageImageImage

The next two photos show the pipe after I gave it a black understain. I used black aniline stain and applied it with a dauber. Once the pipe was covered I used a lighter to flame the stain to set it deeply in the briar. My goal was to have the black stain set deeply into the crevices of the rustication once I had buffed it. (I have learned that when I am staining to always start with the darkest stain and work toward the final lighter coat.) Once the stain was dry I took it to my buffer and buffed it with Tripoli. The buffer removed all of the black stain from the smoother, higher surfaces and the band next to the stem and the rim. The only black stain remaining was in the crevices and pits in the briar. At that point I restained the pipe with a medium brown aniline stain and flamed it as well. I took it to the buffer and this time buffed with Tripoli and White Diamond. I wanted the brown to give a top coat and allow the black to show through. I also wanted to smooth the surface a little to make it smooth in the hand.

ImageImage

The final series of photos show the finished pipe. I think I achieved the look of old worn leather I was aiming for with this rustication and staining. I worked on the stem and smoothed it out with 400 and 600 grit wet dry sandpaper and water. Once the scratches were gone I worked through the usual regimen of micromesh pads from 1500 to 6000 grit. These gave the stem a good polished look. I finished it on the buffer with White Diamond and multiple coats of carnauba. The bowl was waxed with Halcyon 2 wax so that I could avoid the wax build up from carnauba in the crevices of the rustication. I gave the entirety a final buff with a clean flannel buffing pad. This one has become a favourite smoker of mine. It is perfect size to fit in my jacket pocket and it is a veritable furnace for good Virginia Flake tobacco.

ImageImageImage

Restemmed Red Point Capped Bent


I picked up this Red Point Old Briar Capped Pipe bowl on Ebay awhile ago. It did not have a stem but seemed to have promising grain. When it came in the mail I cleaned it up a bit and then worked on a stem for it. I decided to use a faux p-lip stem that has the airhole on the end of the stem rather than on the top. I fit the tenon to the shank – that was a bit of a trick as the shank is like a Pete shank in that it narrows/tapers as it descends toward the bowl. I finished fitting and polishing the stem.

Here are some pictures of the bowl when it came. From the second photo you can see that it was barely smoked. It was very clean and needed a few pipe cleaners run through it. The exterior needed to be wiped down with a little oil soap to clean away the grime – I always rub it on undiluted (no water) and quickly wipe it off. I do not leave it to sit. I also polished the silver work on the shank and the cap.

ImageImage

I heated the stem with my heat gun and bent it slightly and took the next three pictures. I have learned that pictures give the true story in terms of bend and overall look of the pipe in a way that is clearer than the naked eye. From the photos I decided that the bend need to be a bit more dramatic and match the curve of the bottom of the bowl and shank. I reheated it and used the rounded edge of my work table to get a proper bend in it.

ImageImageImage

Here is the final product – a proper bend with a curve that matches the bottom of the bowl and shank. The look is like an elongated S. Once it was finished I cooled the stem for a bit and then loaded it with Blue Mountain and smoked the inaugural bowl. Since then I have smoked it several times. It delivers a great smoke.

Image

Pulling a Broken Tenon


Over the years I have had my share of broken tenons to remove. Some of them came from carelessness on my part but others I purchased that way. I took pictures of the process I use on two different pipes recently. The first was a little Barling with a broken tenon and a chewed stem. I ended up restemming this one. The second one was a Peterson 999 with a broken tenon that I hope to reuse the stem by drilling/tapping and inserting a new tenon to refit it.

Image

Image

Insert a screw part way into the airway on the broken tenon in the shank of the pipe. I use a dry wall or gyprock screw. I turn the screw in by hand. I do not want to expand the tenon at all I just want the screw to have a little bite to it so that I can use it to pull the tenon out by hand or with a pair of needle nose pliers. In this case in both pipes I was not able to pull out the tenon easily. Many times I am able to pull it out in a matter of seconds using this method. But both of these were exceptionally tight and immovable. I put them both in the freezer for an hour as I know that vulcanite and briar contract at different rates with a change in temperature. After an hour I removed the Barling from the freezer and was able to pull the broken tenon out very easily. I then unscrew the broken piece and lay it aside to use for a match on the new tenon I will cut as a replacement. It helps me to eyeball the fit. I also measure the mortise and set the tenon turner as closely as possible to the measurements. I then take the broken piece and slide it on the tenon turner to check the fit.

The tenon on the Peterson however, still did not budge after an hour in the freezer. I left it in for another half hour. Still it did not budge. I then dripped Isopropyl alcohol into the exposed mortise and hoped that it would work as a solvent to break the tenon free. I repeated this several times and left the pipe sitting with alcohol in it over night. The next morning the tenon still did not move.

ImageImage

I decided to not fiddle around with trying to pull the tenon. I used my small drill bit and began to drill out the tenon. I never start with the exact size of the tenon but rather work with the size of the airway and work my way up. I have found that in the process of working through the bits the tenon inevitably breaks loose or crumbles to pieces. In this case, by the time I got to the third drill bit, when I reversed it the tenon came out with the bit. You will notice that I also flattened the broken portion of the tenon on the stem so that the surface was flat and smooth. I wanted it to be ready for when I would drill it out or tap to receive the new tenon that I have ordered.

ImageImage

As I close this essay I want to just mention a couple of reminders:

  1. Do not turn the screw into the airway to deeply as it does expand the airway and can actually crack the shank on the pipe. BE CAREFUL and go slowly.
  2. Do not use a tool to turn the screw into the airway – do it by hand so you can feel the progress and the bite before damage is done.
  3. If the tenon is stuck and immoveable in the first try put the pipe in the freezer for an hour or more to expand and contract the tenon and mortise. This usually works to break it free.
  4. Should you have to drill it out – use a bit a little larger than the airway to begin the process and work your way up to larger bits. Do not use a drill bit that is the size of the mortise lest you damage the mortise.
  5. Use a T handle hand drill not a power drill to do this as you can easily drill right through the bowl and ruin the pipe.

Barling Garnet Grain Small Bent Billiard 2034 Given New Life


Blog by Steve Laug

I picked up this little Barling (transition era pipe so the Barling stamping is missing the “s” and is a script) in a lot I bought on EBay. It had a broken stem that was also chewed through on the end and not repairable. The tenon was still in the shank and was exceptionally tight. I put the bowl in the freezer for about 30 minutes and then used a screw to remove the broken piece from the shank. The key here is to not screw in the screw too much or you can crack the shank. I was able to easily pull it out as can be seen in picture 3. The finish on the bowl was rough on the top with tars and some denting. The sides of the bowl also had some denting. I cleaned the top of the bowl and removed the tars. I steamed the dents out of the top and bowl sides.

ImageImageImage

I wiped down the bowl with acetone to remove the grime and the waxes that were on the finish. When I had finished I inspected the shank area because the drilling was off a bit in the shank and the walls were thin near the top left. There were small hairline cracks that went through several places and spidered up to about a 1/8 inch into the length of the shank. I glued those and pressure fit a nickel band on the shank.

I turned the tenon on a recycled stem I had here and fit it on the pipe. I used my Dremel to remove the excess material where the diameter of the stem was greater than that of the pipe. I kept the broken stem near at hand to match the diameter, the flow of the stem and the shape. I used it as a bit of a template to shape the new stem. The three pictures below show the process of shaping the stem from Dremel to hand sanding with 240 grit sandpaper.

ImageImageImage

In the picture below I have finished the initial shaping with the sandpaper and have a good fit. You will notice the lightening of the shank below the band – that is part of the process of sanding to fit the band to the shank. I place the original stem below the pipe in the picture for comparison sake. It is a bit thinner in profile than the new one in this photo. I continued to sand the stem with 400 and 600 grit wet dry sandpaper and water to remove the remaining scratches and grooves that the 240 grit sandpaper left. Once I had them removed I proceeded to use the micromesh pads – 1500, 1800 and 2400 grit to sand the stem smooth. When I finished with those I buffed the stem with Tripoli and White Diamond and finished by returning to the micromesh pads -3200, 4000 and 6000 to polish it. One more trip to the buffer with White Diamond finished the polishing. I gave the stem a coat of Obsidian Oil and removed it and set it aside. It was time to work on the finish of the bowl.

Image

I used an oxblood aniline stain to match the stain to the original Garnet Grain colour. I have done this in the past and compared it to a very nice original Garnet Grain and the colour is a perfect match. Before staining I polished the bowl with the 3200 and 4000 micromesh pads avoiding the stamping on the pipe. I applied the stain with a cotton swab and then wiped it off, applied and wiped it off until I got the colour I wanted. I then flamed it and set it aside to dry. Once it was dry I put the stem on it and took it to the buffer and gave it a buff with White Diamond and carnauba wax.

In the first picture below I put the original stem in to show the damage to the underside near the button. I also put a 1 cent piece, a penny in to give perspective on the size of this diminutive billiard. I am very pleased with the overall look of the pipe. The finish came out as a perfect match to the original Garnet Grain colour.

ImageImageImageImage

A Barling’s Frustration


I had this old bowl in my box that just looked like a Barlings. I took it out and studied under bright light and a loop. It had the arched Barlings over Make. The other side was stamped EL and Made in England (I believe). It had a serious crack in the shank so I superglued it and banded it. This little pipe became the definition of frustration for me. It was a beautiful and I was incredibly hopeful when I cleaned it up and prepared it for the new stem I had cut for it. The grain was very nice and to find that it was an older Pre-transition Barling’s pipe was exciting. The bowl cleaned up very well. The shank and new band looked great. All that remained was to finish working over the stem for it.

About that time my wife came down to the basement where I was working on it and we decided to go for our Saturday morning walk about. We had planned to take the bus down to an area we like to visit and check out the antique shops. This is something that we both enjoy so I put the little Barling’s my pocket and brought along some sand paper to work on it while sitting and waiting for the bus. We had a good morning, went to the Vancouver Flea Market and even found a couple of older Peterson pipes that I picked up. We decided to have some lunch before going home so we walked over to a nearby Korean BBQ and ordered a nice lunch.

While we were waiting for our lunch I guess the pipe fell out of my pocket. I did not notice until the waiter stepped on something and I heard a crack. Well the long and short of it is when we sat down to lunch it had fallen out of my pocket and when the waiter stepped on it the shank cracked off just ahead of the band. I had a sick feeling as I picked up the pieces of the broken old timer. My visions of a nice older Barling’s Pot shape were pretty much crunched. I put the pieces on the table and looked them over as we continue to wait for the meal and I grumbled about my stupidity in not zipping the coat pocket and also about bringing it with me in the first place.

Once we had finished eating and headed home I had calmed down enough to think about what I would do with the pipe. I took the pieces to the basement work table and turned on a bright overhead light so that I could examine the damages. As I looked at the broken shank I could see that the wood was darkened, almost burned around the crack. It was almost as if the heat in the shank had found a flaw in the briar and followed it outward to the surface. It had not gotten all the way to the surface but was just under the outer layer of the finish. So it appeared that the crack was worse than I had imagined.

That helped me to get over being incredibly frustrated and disappointed in the broken shank. So I spent some time looking it over and decided I could work with it. I decided to turn it into a nose warmer. The saddle stem I had made was too small in diameter to fit so I had to cut another stem. I cut off the ragged edges of the break and used a piece of sandpaper on a solid board to face the shank again. I also drilled out the shank and opened it up enough to accept the new tenon. The tenon is a bit shorter than normal 5/8″ to allow a little difference between the opening in the bowl wall and the mortise. I re-banded the shank for a second time to strengthen the shank after the previous break. I fit the stem to the pipe and sanded and polished it to a shine. Then I buffed and waxed the “new” little pipe. I made it such that I can one day put a church warden stem on the bowl should I desire to do so. For now though it is a nose warmer with a short taper stem. Total length is 4 3/4 inches.

Here are some pictures of the finished pipe. I had pictures of the pipe before and after the break but somehow they were erased so this is all I have left to show. I hope you can imagine what it looked like with the new saddle stem before it broke. But if not, you can see the new version. I am also ordering a churchwarden stem for it so I can fit one of those to it as well. Should look great that way as well.

ImageImageImage

Replacing a screw mount stem


I have always wondered how to replace screw mount tenons without drilling out the mortise. I have done that before and it works well but I wanted to try to create a new screw mount stem using the existing tenon. I have learned from repairing overturned stems that you can heat the tenon and adjust its fit so I figured heating it and removing it would work much the same. So for the subject of the experiment I decided to tackle refurbishing an old Whitehall pipe I had here.

The Whitehall had a screw mount stem with a stinger attachment. The stinger was removable leaving about a half inch of tenon that I could work with. The stem had a huge hole on the underside of the stem near the button and was not a candidate for a stem patch. It would work perfect for the plan.

I heated the metal tenon with my heat gun until I could loosen it from the stem. I used a pair of needle nose pliers after wrapping the tenon with a cotton cloth to protect the threads. With a minimal effort of wiggling the tenon it came out very easily. Once it was removed I cleaned it thoroughly with pipe cleaners, alcohol and steel wool.

I then matched the length of the existing tenonless stem with my stem blanks until I had one that was roughly the same length and thickness. I used my Dremel to cut off the precast tenon until it was close to the flat surface of the stem. I then used the flat board with sandpaper attached (like I do when topping a bowl) to sand the surface flush. Care must be exercised to keep the stem vertical or the surface will quickly get an angle. I smooth that surface with wet dry sandpaper 40 and 600 grit and finished it with the micromesh pads.

Once completed smoothing the end of the stem I used a series of drill bits to work my way up to 1/4 inch diameter hole that the tenon insert required. I have learned the hard way that to start with the size I want can often cause the stem to break in my hands. So because of that I progress through the series of bits until it is the correct size. Before gluing the insert in place I screwed it into the shank and put the stem on so that it was correctly aligned. I did not want to have an overturned or under-turned stem when I was finished. I marked the insert with a black marker so that I would know which side was the top and then unscrewed it from the shank. I coated the insert end with some epoxy (like I do when inserting Delrin tenons in to the stem) and pressure fit it into the stem with the mark on the top side of the fitting. It was a perfect fit. The superglue dries quickly so I checked the fit on the stem again to make sure it still aligned. It did!!

I used my Dremel to shape the diameter of the stem until it was a close fit and then finished the fit with sand papers and micromesh. When I had it smooth and shiny I buffed it with Tripoli, White Diamond and finally several coats of carnauba wax. I then used my heat gun to bend the stem to the right angle for this bent pipe. I cooled it under cold water and then polished and buffed it again.

The bowl had been cleaned and scrubbed to remove the grime and build-up of the years with Murphy’s Oil Soap and a soft bristle tooth brush. Once it was clean I gave a light coat of medium brown stain and then waxed it with Halcyon II wax.

Here is the finished pipe:

ImageImageImage

Old Croydon-Reborn


I have spent a bit of time on this old Croydon Bent (Peterson Line of seconds I believe). In fact I probably spent more time than I should have done, judging by other refurbishers throw away buckets. Sometimes I just have to see what I can make of an old tired ugly looking pipe. It is a challenge more than it is a labour of restoration. In fact it could probably be argued that when I am done with this one it really no longer should be considered a Croydon at all. I suppose it is a matter of how far one goes in the process of restoration before it becomes a totally new work of briar. In my mind this one would probably qualify for the removal of the name – or at least a hyphenated name CROYDON-REBORN.

When I received this one it was in pretty rough shape. In the pictures below you can see the state of the finish on the bowl. There were places where pieces of the lacquer finish were peeling away and falling off. The stain on the bowl was spotted and variegated. Even the many fills all over the bowl had shrunken significantly and what remained were dips and divots in the surface. The rim was one part of the pipe that was in pretty good shape. It had some tar build up and a bit of blackening but no nicks and dents. That is actually remarkable given the condition of the rest of the pipe. The silver shank cap was split in half and torn from the stem being jammed in and out of the bowl. The P-lip stem was also marked with tooth chatter, was oxidized and dented.

ImageImageImage

I did not have any end caps in my collection of pipe odds and ends so I decided to put a regular nickel band on the shank as it was thin and weakened from the broken shank cap. I cleaned the shank end with alcohol and dried it out. I heated a band and pressure fit it on the shank. There was a small gap at the edge that I filled with wood glue to give stability to the shank. I probably should have waited to apply the band but the shank seemed fragile and I wanted to stabilize it before further work on the bowl.

I have never liked the thin Peterson type stems so I decided to restem it with a saddle fish tail stem. I used my PIMO tenon turner and turned the tenon close and sanded it to a good tight fit. I used my Dremel to take down the excess diameter of the stem and worked on the ridges and seams with the Dremel. I sanded the roughness of the new stem until it was smooth with 240 grit sandpaper followed by 400 and 600 grit wet dry sandpaper and a bit of water. It was finished with the regular regimen of micromesh pads – 1500, 1800, 2400, 3200, 4000 and 6000 grit. The final polish was done on the buffer with White Diamond and carnauba wax.

The bowl was a major problem. I tried to strip the bowl using acetone and 99% Isopropyl alcohol and could not break through the finish – don’t what they coated it with but it would not let go. I resorted to sanding the bowl to try and remove the finish and sanded, sanded and re-treated it with acetone and alcohol. The finish was finally gone and I had a raw briar bowl with so many fills in it that it looked like it had freckles. I decided to try staining it with a dark brown stain to hide the fills and give it a good deep colour that was a bit opaque. Once it was dry I buffed it and polished it with wax. It looked really awful and I hated it!!! Soooo… I decided to rusticate it. I used my fist full of nails (pipe with nails inserted in it) to do the rustication that appears in the photos below. The previous coat of stain that I had applied helped with the process of rustication and I could clearly see where I needed to do a bit more work. This is when I wished that the band was not present as it would have been a bit easier to avoid contact with the band and the rusticator.

Image

ImageImage

Once the rustication was acceptable to me, and the pipe felt good in the hand I prepared it for staining. On this one that involved using the floral frog to knock off any loose chips of briar and to smooth out the surface before I wiped it down with a damp alcohol cloth. I also sanded the rim smooth and used the micromesh to get rid of any scratches. A smooth rim and a smooth spot around the Croydon stamping would look good on the finished pipe. I decided to go for an aged leather like finish on this pipe as it seemed to fit the shape and the look. I gave the pipe a coat of black stain as an undercoat and then buffed it off the high spots. I gave the entirety a coating of Fiebing’s Medium Brown for the top coat. I flamed it and after drying took it to the buffer for a light buff. I waxed it with Halcyon II and buffed it with a soft cloth to give it the final look. Below are pictures of the finished pipe. In my book it is a significant improvement over the original!

ImageImageImage

The 1912 BBB Poker


Blog by Steve Laug

I picked up this old 1912 BBB Poker on EBay not long ago. It is stamped BBB in a diamond on the shank and on the underside England. The silver is hallmarked Birmingham 1912. It is a smaller group 1 or 2 sized pipe. In the pictures the military stick bit looked like it belonged. It looked like it was shipped that way from the factory. The grime on the silver and on the shank as well as the oxidation on the stem made it appear to be that style of pipe. When it arrived with the other 5 pipes that I bought with it I examined it a bit more closely. In the picture below you can see the roughness of the stem. It is definitely poorly cut. The closer I looked the more I realized that it was a poor replication of an older stem. A BBB pipe of this age came with a different style of military stem and it had an orifice button rather than a slot like this one. The stick bit was not original as it was a slotted bit and was not finished smoothly. There were lots of file marks on both sides of the stem. When I removed the stem I was even more certain that it was a poor copy. The one thing I was still thinking was that it was definitely spigot or military bit pipe.

ImageImage

Then I began to work on the shank and the band. Someone had darkened the end of the shank to make it look almost black like the tarnished silver band. Once I cleaned the silver and cleaned the shank I could see that it was not a silver end cap at all but a very typical BBB silver band. In the picture below you can clearly see the end of the shank showing as it sits inside the silver band. I used a 1500 micromesh pad to clean off the end of the shank and return it to wood. When I re-stained the pipe I would also re-stain the shank end to match. It was clear that I would need to do a bit of research on what kind of stem was originally on this poker style pipe if I was to restore it to its original glory.

Image

I have a copy of the BBB Catalogue reprint from Gary Shrier so I got it out and went to work researching the look of the missing original stem. It became clear rather quickly that the pipe shape I had originally came with a taper stem with an orific button. In the catalogue is the exact shape in the exact size. I could not believe it. I laid the bowl on the page and then traced out the shape and size of the stem. A part of my hobby refurbishing is collecting old stems. I buy them wherever and whenever I find them and stockpile them in an old coffee can in my office. I went and got the can and emptied it on my desk to sort through what I had. I have yet to organize them by size so it is a matter of dumping the can out and digging through them. Well, I found one in my can of stems that had the right orifice button and the correct taper so I turned the tenon and fit the stem to the pipe. I used my Dremel to remove excess diameter from the stem so that it was the same diameter as the shank and band.

I also had to clean up the bowl of the pipe as the top was pretty beat up and the inside rim had been chipped and cut as if it had been carelessly reamed with a knife. I steamed the dents from the rim and carefully did a minor topping on the bowl to bring the top back to smooth and the inner and outer rim to smooth. I also chamfered or beveled the inner rim to bring it back into round. There were also dents on both sides of the bowl so I steamed those out as well. I use a wet cloth and a hot butter knife (heated over a flame) to raise the dents. I finished the work on the pipe by re-staining the top to match the bowl then buffed it and gave it a final polishing with White Diamond and then several coats of carnauba wax.

Here are pictures of the finished pipe. Other than being in colour it is a perfect match to the one in the catalogue.

ImageImageImageImage

Edit – 24 Feb. 2013 – I just came across an old BBB poker on eBay that is similar to the one above. I did some research on the stem on the one above and restemmed it. The one in the eBay photos is a newer version of the same pipe number. I have attached two photos below for sake of comparison.

BBB Poker BBB Poker 2

Fitting a pipe with a new stem – photo essay


Blog by Steve Laug

I picked up this pipe bowl – a Pete 207 – an early Peterson from the late 40s. It was in need of a stem. I have a couple of cans of stems that are precast blanks. They need to have the tenons turned to make them fit correctly.

ImageImage

I have a PIMO tenon turning tool like the one pictured in the diagram below. I have to drill the stems to fit the guide pin as they are generally very small. Once that is done with a bit on my cordless drill I then put it on the tenon tool and adjust the carbide cutter to the diameter tenon I want to cut. I always start large and work my way down. I have found that trying to cut too much off at once causes the tenon to chip or break. So I start large and work my way down until it fits the mortise. I found this YouTube link that gives a video presentation of the process so I have included that as well for your information http://www.youtube.com/watch?v=drKxzteEEPk A quick look at the video will show you the process I use in turning the tenons. I generally turn the tenon until it is close to fitting and then finish the fit by hand. I have found it is better to proceed by hand from that point so as I don’t take off too much of the vulcanite and have a loose fit on the tenon. I will show that process from the point the tenon has been fit in this pictorial essay.

Image

Below is a stem blank that I picked up online from Pipe Makers Emporium. I have several coffee cans full of different sizes of blanks. I sort through them to find one that is close to the outside diameter of the shank. I find that it is not too difficult to get the two to match with a lot of sanding and fine work.

ImageImage

Below is a picture of the bowl prepped and ready for the new stem. I cleaned the top and polished the silver band as I want nothing in the way of a tight fit for the stem. You will also notice in the photo that the tenon is partially turned for a fit. I stopped at this point to show the process. The large portion still remaining on the tenon shows the first turn of the tool to take off the first portion of vulcanite. I keep the tool turning so that the carbide blade removes the face of the stem as well so that the seat will be straight and flush at the union of stem and shank. I find that when I do this at the beginning of the turn it give a good clean finish. The step down in the tenon shows the next portion removed. I have adjusted the tool to take off that portion. After this photo I finished turning the tenon.

ImageImage

The PIMO tenon tool took a bit of work for me to figure out the adjustments as I purchased the tool second hand without the instructions. The fellow I bought it from gave me some quick lessons on how to adjust it. He even threw in the hex keys!! So needless to say, I learned by trial and error how to adjust the cutting head and keep it straight for a straight cylinder cut on the tenon. Since then I have it has been pointed out to me that Kurt Huhn of Pipe Makers Forums has noted the tricks I learned the hard way.

ImageImage

I will try to capture the trick in my own words, combining what I have learned the hard way with Kurt’s recommendations. The first step in the process is to adjust the cutting head. Start by removing small portions at a time. To deep a cut makes the cutter wobble and give an uneven tenon. To adjust the cutting head insert the adjustment hex key (larger hex screw on the tool) and the lock key (smaller hex screw) into their set screws. Do not turn them, just insert them. Push in lightly on the adjusting key and pull up slightly. Loosen the lock key a quarter or half turn. While maintaining the up and in pressure on the adjusting key turn it in increments of a half turn (think half hour on a clock). With steady pressure on it by pulling it up, the arm with the carbide cutting head is not loose and wiggling as it is adjusted. If it is loose while adjusting it, you will get non-cylindrical tenons regardless of the number of turns from zero. Do not let go of the adjusting key, tighten the lock key while the pressure remains on the adjusting key. Pull the adjusting key straight out, being careful not to turn or press down on it. Trim the stem and repeat as you need to get a good tight fit on the tenon.

The next sequence of photos shows the tenon finished and the fit clean and tight. I hold it up to the light to make sure that there is no light showing between the stem and shank. Also note the Dremel with the sanding drum in the photo. I use that to bring the outside diameter of the stem to a close match to the shank. I run the Dremel at the middle speed to allow me more control of the tip as I take off material. If I run it too fast I find that it takes off too much. Too slow and it leaves a chunky beat up finish that takes a lot of sanding to smooth out. As can be seen from the photos there is not much material that needs to be removed for a smooth fit.

ImageImage

In the photos above I have used the Dremel and removed material to the point that the stem and the shank are almost level. I did it in stages with the stem on the shank and rotating the pipe to keep the perspective round and even. Once I got it to the stage above I move to my table and continue the rest of the work by hand. Sand paper in a variety of grades starting with 180 allows me to work the remainder of the material off and to get the scratches and grooves from the Dremel worked out of the stem.

Each of the next seven photos shows the progress of the stem toward the finished product with the different sand papers. Once I have removed the majority of scratches and grooves left by the Dremel with the 180 grit (pictures 1 &2) I move on to using 220 grit and 240 grit to take down more material. Care must be exercised to not scratch the band or the shank. The idea is to leave the shank exactly like it was without scratches or marks (pictures 3,4,5).
ImageImageImageImageImage

Pictures 6, 7 & 8 show the stem after using 1600 grit wet dry sandpaper. Each sanding step removes more material and evens the flow of the stem to shank. It also removes scratches and prepares the stem for the finish sanding.

ImageImageImage

The last four pictures show the pipe after sanding with micromesh pads – 1800, 2400 and 4000 grit. Generally each of the pads progressively polishes the stem. Any places that still show scratches send the stem back to the 600 wet dry sanding or even further depending on the depth of the scratches. When the polish is clean and smooth I take the stems to my buffer and buff with white diamond that raises a deep reflective finish on the stems.

ImageImageImageImage