Tag Archives: Dr. Grabow pipes

Breathing Life into a Dr. Grabow Omega Bent Billiard


Blog by Steve Laug

I have always liked the look of the Dr. Grabow Omega pipes. I have worked on quite a few over the years and have found them well made. The briar is a mixed grain pattern usually but the look of the classic shape and the feel in the hand is quite nice. The style of the stem mimics the Peterson P-Lip but up close it is very different. The airway exits not on the top of the button as in a P-Lip but out the end as in a standard fish tail stem. This old timer was no exception so when Jeff sent it I was interested in what it would look like after his cleanup. The bowl was structurally sound but the finish was worn and tired looking with a lot of scratches all around the sides and bottom of the bowl. The bowl had a thick cake that had flowed over the top. The rim was coated in lava and it was beat up. It had a lot of small holes in it like it had been knocked out on concrete and the outer front edge of the bowl was roughened and rounded over. The inner edge of the bowl looked like it was undamaged. The nickel ferrule was oxidized and scratched. The stem had some tooth marks on the top and underside near the button and was oxidized. Jeff took photos of the pipe to show its condition before he started his cleanup work. The next photo shows the cake in the bowl and the condition of the lava overflow on the rim top. You can see that it is quite thick. You can also see the rough condition of the outer edge of the bowl.Jeff took several photos of the bowl from various angles to show the general condition of the finish. There were scratches and nicks but none of them look too deep in the briar. The finish also appears to be very dirty and the varnish coat that is usually present seems worn and tired looking on the sides and bottom of the bowl. The next two photos not only show the stamping on the shank but also the buildup of tars and grime around the edges of the ferrule. It is almost as if the shank was weeping under the ferrule. The stamping is worn but readable. It is stamped OMEGA over Dr. Grabow on the left side of the shank and on the right Imported Briar.When Jeff took the pipe apart it appeared that the seller had put a newer Grabow Paper Filter in the shank of the pipe to make the pipe appear to have been cleaned. The next three photos show the condition of the tenon end of the stem and the filter. The oxidation on the stem is also visible in the photos below. The stem was scratched and worn but the Grabow Spade logo was in good condition on the left side of the shank. The top and underside of the stem had some deep tooth marks around the button and the sharp edge of the top of the button was quite worn and damaged.I did some searching to find out a bit of history about the Omega. I found that it was first released around 1975 and was a copy of a well pipe imported from Italy. It has continued to be offered for sale in their catalogues.

Jeff did a thorough cleanup on the bowl and stem. He reamed the bowl back to bare briar with a PipNet pipe reamer and cleaned up the remnants with a Savinelli Fitsall reamer. He cleaned the internals with alcohol, pipe cleaners and cotton swabs – scrubbing out the mortise as it was very dirty. He scrubbed the exterior of the pipe with Murphy’s Oil soap and a tooth brush and was able to remove all of the tars and oils built up on the briar. He was able to remove all of the tars and lava on the rim top and left it looking very clean. The damage on the rim top and outer edge was clean and visible. He soaked the stem in an Oxyclean bath to raise the oxidation to the surface of the vulcanite. When it arrived I took some photos of it to show how it looked before I did the restoration.  Jeff was able to remove the thick lava coat from the rim and revealed what I thought would be underneath the thick coat. The rim top was speckled with tiny dents and marks and the outer edge was damaged all the way around the bowl. There was a little damage on the inner edge on the right side of the bowl.The Oxyclean soak had really raised the oxidation to the surface. The stem was clean but heavily oxidized when it arrived.Because the was so oxidized after the soak in Oxyclean, I put it in a bath of Before & After Pipe Stem Deoxidizer to soak overnight and work on the vulcanite oxidation. In the morning I removed the stem from the deoxidizer and wiped off the excess deoxidizer from the surface of the stem with a paper towel. I cleaned out the airway in the stem with pipe cleaners and alcohol to remove any remnants of the bath from that part of the stem. The photos below show the stem after the soak and rub down. The oxidation looked much more manageable and what remained would be easily dealt with. The tooth chatter on the top and underside of the stem is hard to see in the photos, but it is present.I sanded the stem with 220 grit sandpaper to remove the tooth chatter and minimize the tooth marks on both sides of the stem. I reshaped the button with the sandpaper and a needle file. I sanded the rest of the stem to break up the remaining oxidation.I polished out the sanding scratches and marks in the vulcanite with micromesh sanding pads – wet sanding it with 1500-2400 grit pads and dry sanding it with 3200-4000 grit pads. I wiped the stem down with Obsidian Oil after each sanding pad. I buffed the stem with Blue Diamond on the buffing wheel being careful around the spade logo insert as they can easily be damaged. I brought it back to the table and sanded it with the final three 6000-12000 grit pads. After the final pad I gave it a final coat of oil and set it aside to dry. The outer edge of the rim was damaged all around the bowl but the worst damage was on the front edge. You can see the roughness of the rim edge in the next photo. With the small pin prick holes on the rim top and the damage on the inner edge of the right side of the bowl I decided to top the bowl. I top a pipe on a topping board with 220 grit sandpaper and work the bowl over the sandpaper holding the rim flat against the topping board and working the bowl to evenly sand the bowl top smooth and remove the damage. Once the rim edges were almost smooth I used a folded piece of sandpaper to smooth out the outer edge of the bowl all the way around the bowl. I polished the rim top with micromesh sanding pads – wet sanding with 1500-2400 grit pads and dry sanding with 3200-12000 grit pads. I wiped the rim down after each pad with a damp cotton pad. When I finished the polishing I wiped it down a final time. I blended some light and medium brown stain from a stain pen to restain the rim top and edges to match the colour of the rest of the bowl. The blend works well in trying to get this particular shade of brown. I hand buffed the stain to polish it and blend the colours together.I rubbed the bowl down with Before & After Restoration Balm to deep clean the smooth finish, enliven and protect the briar. I hand rubbed it with my fingers and wiped it off with a soft cloth. I buffed the bowl with Blue Diamond on the wheel to polish it. It really began to have a deep shine in the briar. I took some photos of the bowl at this point to mark the progress in the restoration. I decided to leave the small nicks in the bowl surface as marks of character rather than damage the original finish by sanding them all out. I cleaned and polished the nickel ferrule with micromesh sanding pads. I was careful in sanding the nickel in that the dust from the metal can discolour the briar and make more work. I was happy with the finished end cap. I buffed the briar on the wheel with Blue Diamond to polish it more. I was careful around the already light stamping. I hand buffed the bowl and ferrule with a microfiber cloth and took photos of the bowl at this point. I put the stem back on the bowl and worked the pipe over on the buffing wheel using Blue Diamond to polish the bowl and shank. I buffed the stem to raise the gloss on the vulcanite. I gave the bowl and stem multiple coats of carnauba wax. I buffed the entire pipe with a clean buffing pad to raise the shine. I hand buffed it with a microfiber cloth to deepen the shine. The finished pipe is shown in the photos below. The dark to medium brown stain on the billiard shaped bowl works well with the polished nickel ferrule and the rich black of the vulcanite stem. This old Omega pipe has some interesting grain and has lots of life in it to add your own story to the ongoing saga of the briar. The dimensions of the pipe are: Length: 6 inches, Height: 1 3/4 inches, Diameter of the bowl: 1 1/4 inches, Diameter of the chamber: 5/8 inches. I will be adding this one to the rebornpipes store shortly if you are interested in adding it to your collection. It will make a fine addition to the rack. If you are interested email me at slaug@uniserve.com or send me a message on Facebook. Thanks for looking.


Jen’s Trove No. 8 – Restore & Upgrade of a Dr. Grabow Omega Smooth Billiard


Blog by Dal Stanton

I begin the restoration of the final pipe in Jen’s Trove before she leaves Bulgaria and returns to the US.  As I have posted eight times before this (I just figured out that I mis-numbered her pipes – two number 5s!), these pipes have been culled from my “Help Me!” basket and boxes to give as gifts to the men in her family.  I have been pleased to restore these pipes for Jen, especially because she knows each pipe she acquires benefits the Daughters of Bulgaria, help women and girls who have been sexually exploited and trafficked.  Thank you, Jen!

Her final pipe is a Dr. Grabow Omega Smooth Billiard – Dr. Grabow’s humbler version of a Peterson System pipe or the WDC Wellington.  Similarities include the Military stem with a P-Lip, and band.  The Omega is a smart looking pipe.  The eBay seller had a good selection and I rolled the Dr. Grabow Omega with four other pipes.  One of these was a GBD Americana Made in England which I restored (See this link at The Pipe Steward) and has become a regular friend in my rotation.  The restored Americana follows and then the seller’s picture of the Dr. Grabow Omega. The Lewis B. Linkman Co. started in 1892 (Pipedia).  Yet, the name, Dr. Grabow, was used for the first time in 1930 or 1931.  Since this is my first Dr. Grabow to restore, I find the story of the ‘Dr. Grabow’ name interesting because the Doctor is a real doctor!  From Pipedia’s article on the history of Dr. Grabow (and photo courtesy of Doug Valitchka):

Dr. Paul E. Grabow was a general physician in Chicago, located at 2348 N. Seminary Ave. Some doors north at No. 2400 was the drug store owned by Mr. Brown, a personal friend of Dr. Grabow. Grabow and Brown, both fond of fly-fishing, would often sit together in the early evening hours in a back room of the drug shop talking to one another and enjoying their pipes. Before long, they were joined by Mr. Linkman, owner of M. Linkman & Co., a large pipe factory located one block west on W. Fullerton Ave., at the corner of Racine Ave. These three gentlemen shared common interests and became fast friends.

During one of their evening get-togethers in 1930, Linkman mentioned he would introduce a new type of pipe soon that exhibited what he felt were fine improvements that greatly improved the pipe smoking experience. He was still looking for a good name and believed his pipes would sell better if they bore the name of a physician. (1) Linkman asked his friend Dr. Grabow if he would permit him to use his name. The good doctor felt flattered by the idea a pipe should be designated for him and consented. A formal agreement was not made, nor were there any contracts signed or royalties paid to Dr. Grabow for the use of his name; it was, according to one of Dr. Paul Grabow’s sons, Milford, a “friendly understanding” and Linkman expressed his thanks by sending Dr. Grabow numerous pipes throughout Dr. Grabow’s lifetime. (see The Legend of Dr. Grabow). Also interesting of note are the various instances where Dr. Paul Grabow stated that he developed, or helped develop, the Dr. Grabow brand of pipes. This was a tactic used to convince people that a pipe developed, endorsed, and used by a medical physician would be ‘more healthful’ than a pipe that was not developed by someone in the medical community.

Dr. Grabow pipes have been known as inexpensive, quality smokers – the ‘Drug Store’ variety.  The Dr. Grabow Omega line started production in the 1970s (LINK) coming in a smooth and blasted finishes.

I take additional pictures of the Omega on my work table to fill the gaps.  The nomenclature is stamped on the shank sides – OMEGA [over] DR. GRABOW on the left.  The right is stamped, IMPORTED BRIAR.  The Military mount stem has the classic Dr. Grabow Club card suit mark.  Overall, the Omega is in good shape.  The fire chamber has very little carbon cake.  The stummel surface and rim are clean.  The P-Lip stem has chatter especially on the lover button area and the stem shows no oxidation.  The biggest problem that I see on this Dr. Grabow is the finish.  I don’t like it.  These two comments on a Pipes Magazine Forum discussion about Dr. Grabow Omegas’, cost, quality and appeal, capture my thoughts regarding positives and negative:

Positives: An Omega was the first briar pipe that I ever owned. It still gets regular use and like Brewshooter, I have no complaints with it. Bowl size is a little bit smaller than I like, but it makes for a nice quick smoke, and the military mount makes it really easy to clean. I have Savinellis that I have easily paid four times more for, and sure, they smoke a little bit better, but in terms of a good smoking instrument, the Omega will do you well as long as it is smoked properly and maintained properly.

Negative: One thing I noticed about my Omega is that it had a heavy varnish or clear coat. I sanded it and gave it a nice wax. It seems to breathe a little better now and I like seeing more of the grain. I also gave the band a bit of a brushed look with some fine grain sandpaper. It’s a nice little pipe for that quick smoke.

I remember when I first saw the Dr. Grabow Omega sitting in my palm after it arrived in the mail.  My first thought was, ‘Nice pipe if it didn’t have that candy apple finish.’  Even then, I knew when this pipe came to my work table, I would be removing the finish – it may be an acrylic finish and they often are bears to remove.  I’m hopeful that the acrylic finish doesn’t hide a lot of surprises.  So, with a better understanding of the Dr. Grabow Omega, Imported Briar before me, I begin its upgrade by putting the military mount stem in the OxiClean bath.  Even though I don’t detect oxidation, I want to be sure that what is there will be raised and revealed. The very light carbon cake in the bowl is addressed with the Savinelli Pipe Knife.  After putting down paper towel for a quick clean up, I ream the cake and follow by sanding the bowl with 240 grit paper wrapped around a Sharpie Pen for better leverage.  I then wipe the bowl using a cotton pad wetted with isopropyl 95% to remove the residue carbon dust.  The pictures show the progress. Even though I think it will be unsuccessful, I first try to remove the acrylic finish using cotton pads wetted with acetone.  Was I surprised.  The finish peels off immediately with the acetone.  What I thought was acrylic is more like a jell that thickens with the acetone and gums up on the surface.  It also has a reddish color to it.  I use several cotton pads because they gum up quickly with the red goo coming off the surface.  While I remove the red top layer of finish, after working on the stummel with the acetone, it still is darker than I expected if all the finish had been removed.  I also am now able to see more fills – one larger area in the back of the bowl, over the shank.  That will need some attention.  I take some pictures of the progress and fills.  I decide to let the stummel soak in an acetone bath to remove more of the old finish.  While the stummel soaks in the acetone bath, I fish the Military mount stem out of the OxiClean bath and take a picture.  While there is not much in the way of oxidation showing on the stem, the OxiClean had the effect of bringing out small speckling on the surface.  I use 600 grit paper and wet sand the surface of the stem.  I follow with a rigorous buffing with 0000 grade steel wool.  The 600 grit paper and steel wool were sufficient to work out all the tooth chatter.  I then use pipe cleaners and cotton swabs wetted with alcohol for the filter bay, and to clean the internals of the stem.  Very little was needed to finish the job. Now it’s time to fish the stummel out of the acetone bath.  The finish is removed and I’m looking at the natural briar and it does have a darker hue.  I use a sharp dental probe to test the fills I see variously around the stummel.  I see a few very small fills and most seem strong.  On a few, and on the large fill that I referenced before on the back side of the bowl, above the shank, the fill has a crevasse next to it.  Before working on the stummel fills, I first use a medium grade sanding sponge followed by a light grade sanding sponge to remove the surface blemishes on the stummel.  I like using the sanding sponges because they are gentler than regular sanding paper and soft – conforming to the nooks and crannies of the curves of the stummel.  I also do a ‘sponge topping’ to clean up the rim.  One of the things I want to do to upgrade this Dr. Grabow Omega is to work on the rim.  To me, the flat-top, sharp cut of the rim is detracting. I will introduce an internal bevel and a very gentle external bevel on the rim lip to soften the lines.  As I have said in several other restorations, I believe a beveled rim classes up the pipe.  I use a coarse 120 grit rolled piece of sanding paper to cut the initial bevel, and then following with 240 then 600.  The final picture below shows the addition of the external bevel which is less obtrusive.  I use only the 240 grit paper followed by the 600 grit paper to fashion this bevel.  I do the external bevel like this as more of an accent to the rim – softening the lines.  I really like the grain movement on the rim – upgrading Dr. Grabow Omega! After the sponge sanding, almost all of the pitting and nicks are removed from the briar surface.  At this juncture, only the large fill on the back of the stummel needs attention.  I take a close-up to show the fill.  I use Hot Stuff Special ‘T’ CA glue to fill the crevasse running along this fill. I drip a bit of glue on a toothpick and run the drop to the point to strategically place the glue.  Afterward, I spray the CA glue with an accelerator to shorten the curing time.  In a few minutes, I use a flat needle file to file the mounded CA glue down close to the briar surface.  I then use 240 grit and 600 grit paper to bring it down flush with the briar surface and blend.  Finally, I use the medium and light grade sanding sponges to finish the blending.  The pictures show the progress. With the patch sanded down, I’m ready to utilize micromesh pads on the bowl to bring out the grain of the briar.  I begin by wet sanding using micromesh pads 1500 to 2400. I follow by dry sanding with pads 3200 to 4000 and then 6000 to 12000.  Oh my, oh my.  I love to watch the grain emerge through the micromesh cycles.  This Dr. Grabow is looking good for a drug store pipe! Standing back a bit and looking at the Dr. Grabow Omega again, I reunite the unfinished smooth Billiard stummel with unfinished Military Mount stem to assess where things are and get a sense about which way this Omega wants to go in his upgrade. I’m drawn to the black, darker hues of the natural briar.  The currents of the briar’s grain flow remind me of a storm with bird’s eye swirls and flamed currents unleashed in the wind.  The stummel heel has an almost solid dark plane with a spurt of grain reaching out.  This Dr. Grabow’s newly revealed grain has some personality – no doubt! This grain pattern reminds me of a restoration I did with a very large pipe, A Desirable Reject London Made, where for the first time I used black dye as part of the staining mixture.  The results were surprising to me by pulling out almost a copper kettle hue – attractive.  Here is a picture of that project.For the upgrade of this Dr. Grabow Omega, I decide in favor of the same approach mixing 2/3s-parts Fiebing’s Dark Brown Leather Dye with 1/3-part Fiebing’s Black Leather Dye with the lightening option available by wiping down the bowl with alcohol later.  I set up my staining station and take a picture to show the setup and tools.  What I didn’t show are the latex gloves I’ve started wearing to keep my hands from being colored!  After inserting a fashioned cork in the shank as a handle, I warm the stummel with the hot air gun to open the briar grain for better reception of the dye.  Then, using a folded over pipe cleaner, I liberally apply the dye mixture to the stummel to have 100% coverage.  While the dye is wet on the stummel, I fire it using a lit candle and the alcohol in the aniline dye immediately burns off, setting the pigment.  After a few minutes of cooling, I repeat the process above and then set the stummel aside to rest.  The pictures show the staining process. With the stummel resting, I take the stem and wet sand with micromesh pads 1500 to 2400.  I follow by dry sanding with pads 3200 to 4000, then 6000 to 12000.  After each cycle, I apply Obsidian Oil to the stem to revitalize the vulcanite.  The stem looks good!  I put the stem aside to dry. This point of the process is like a kid getting up on Christmas morning!  With the stained, fired, crusted bowl in hand, I mount the felt buffing wheel in the Dremel, set the speed at the slowest speed (20%) and use the Dremel’s adjustment wrench to purge the wheel of old compound and to soften it.  Using Tripoli compound, I ‘unwrap’ the stummel with the felt buffing wheel.  When I finish with the Tripoli, I wet a cotton pad with alcohol and wipe down the stummel.  I do this to lighten it a bit and to blend the dye.  Then, with the cotton cloth buffing wheel mounted to the Dremel, and turning up the speed to 40%, I apply Blue Diamond compound to the stummel and use it to buff up the nickel planted band.  While the Blue Diamond buffing wheel is mounted, I also use it on the stem to buff.  The pictures show the progress with the compounds. Well, it was going so well until it wasn’t!  My wife arrived home with KFC Chicken for supper that we ate on the ‘Man Cave’ balcony of our 10th floor flat.  Yes, we have Colonel Sanders in Bulgaria. After finishing the chicken which was ‘finger licking good’ I was anxious to show my wife the progress on the Dr. Grabow.  You can guess.  On the balcony, perhaps because of the ‘finger licking good’ chicken was still a bit on my fingers, the Dr. Grabow literally took off and launched from my hand and hit the floor.  With inspection, the dent on the rim was evident… oh my.  Oh well….  I remembered in the back of my mind, I think I read it on an Al Jones’ post, about using a wet towel super-heated with the help of an iron, can help expand dented wood as it heats and absorbs the moisture.  Wood is more like a sponge.  I used my wife’s iron and gave it a go.  Believe it or not, it worked well.  Before and after pictures are #1 and #3.  The briar had dulled where the iron was applied so again I use the buffing wheel with Blue Diamond to restore the sheen with the rest of the stummel. Disaster averted.  Thanks, Al!  I buff the stummel with a clean cotton cloth to remove compound residue.  I mount the Dremel with a cotton cloth buffing wheel and apply carnauba wax to stem and stummel.  Following a few coats of wax, I give the entire pipe a hand buff with a microfiber cloth.

This Dr. Grabow Omega was an unremarkable ‘Drug Store’ pipe.  Now, he’s enjoys an upgrade – he has cuff links now!  The grain hidden underneath the original finish is not unremarkable!  I’m pleased that all this Omega needed was a little TLC.  Jen will give this pipe to one of the men in her family.  ALL the gifts she has given benefit our work here in Bulgaria with the Daughters of Bulgaria – helping women and girls who have been trafficked and sexually exploited.  This Dr. Grabow is the last pipe in Jen’s Trove.  Thanks, Jen!  Check out The Pipe Steward to find out more about why I do what I do.  Thanks for joining me!

Cleaning up a Dr. Grabow Westbrook 44


Blog by Steve Laug

Not long ago I received and email from Dave, a reader of the blog, asking about a couple of pipes that he had picked up. I have included his email below. He gives his assessment regarding the pipes and what he wanted done. He had also done a bit of research on the Dr. Grabow pipe for me. I really like this kind of information.

Steve… I have recently been gifted 2 estate pipes that I would love to have reincarnated by your hands. I am not sure of the cost and wanted to speak with you first. One because I have never shipped anything to Canada and I am not sure if there would be any issues. Two, I also wanted to get an estimate of cost before going forward. The 2 pipes in question are not in bad shape, just have some age, cake and minimal wear; one is a Whitehall rusticated with saddle stem and the other a Pear shaped Dr. Grabow Westbrook. The Dr. Grabow from what I can find is a special R J Reynolds model which has the orange spade on the side of the stem. I have attached some images with this email so that you have some idea of how they look. If you need additional images please let me know. Thank you for your time and consideration.
Regards, Dave The first that I chose to work on was the Dr. Grabow Westbrook Pear Shaped pipe. The pear shape came in both a slim pear (#74) and a medium pear (#44). The chart below is taken from https://pipedia.org/wiki/File:1960sDrGrabowFlyer5.jpg. It shows the shape of the pipe I was working on. I believe that I am working on a shape 44, Medium Pear.I examined the shank with a lens and I could see that the left side of the shank was stamped Westbrook over Dr. Grabow. The right side of the shank was stamped Imported Briar over PAT. The number that follows the PAT. stamp is illegible. It is very faint. From this I can extrapolate that the pipe is an early version of the Dr. Grabow Westbrook line. It came out in the early 1960s. https://pipedia.org/wiki/Dr._Grabow

I found an article on Pipedia about the RJ Reynolds pipes and when and how they were offered through pipe coupons. I have included the majority of the article as well as the link.

https://pipedia.org/wiki/RJR_Grabow_information

R.J. Reynolds Tobacco Company had two other pipe tobaccos which were George Washington and Carter Hall that shared a good hunk of the pipe tobacco market left over from Prince Albert and Sir Walter Raleigh. Thus sets the stage for a coupon to be placed in each package or can of these tobacco products. The pipes presented to the American public were the very finest mass produced pipes ever created by man, or in all probability will ever be created by man. Pipes were presented with either a metal filter or a paper filter. The highest quality pipes were presented with only a metal filter. The Westbrook model came either in a rustic or matte finish and had metal filters along with the Berwyck that presented the same choice with paper filters. These pipes could be purchased only by mailing five coupons and three dollars to Sparta, North Carolina. The classic of the series was a natural grain Emperor with only the metal filters and its cost was five dollars and required twenty five coupons. About half way through the duration of the offer the Sculptura was introduced as demand was high for a quality sandblast grain pipe. So, R. J. Reynolds Tobacco Company set out to produce the perfect sandblast grain pipe and boasted that no finer sandblast pipe had ever been produced by man nor ever would be produced by man than its Sculptura that could only be purchased by collecting five coupons and sending that along with four dollars to Sparta, North Carolina.

Each order that was filled for every pipe ordered throughout America came in a neat box with a full set of literature including a shape chart that actually gave a pipe smoker an immediate choice to choose from far greater than any pipe store or other outlet that America has ever seen or probably will ever see.

This mail order offer that began sometimes in the early 1950’s would end in 1987 when R. J. Reynolds Tobacco Company sold its tobacco products to John Middleton, Inc. At that time it was announced that this mail order offer was the longest running mail order offer in duration of time of any mail order offer of any product on the American market. Thus, an era ended eighteen years ago or so and as each year turns over these pipes become less available and thus more valuable.

The argument about a good smoking pipe so prevalent today among pipe smokers is not applicable to these pipes for the simple reason that they all smoke good and they all smoke just alike with no discernable differentiation that any one pipe is any better or worse than any of the others. These pipes came from the top twenty percent of Briar obtainable and were constructed with the quality control standards of a Zippo lighter. The only difference was in the shape and this was presented in a very large number of choices. The Dr. Grabow pipe is clearly stamped as such, but was never ever retailed. It was admitted by all that these pipes were superior to the retail Dr. Grabow pipe. Those with the metal filter are no longer obtainable from any source. Those with the paper filter, although similar to the present Dr. Grabow, is of a superior quality. Since those with the paper filter were not nearly so popular as the metal filter in those old days it is rather difficult to find one these days. There will not be many days until those with the metal filter are gone forever never to be replaced and it is likely that anyone who possesses such a pipe has a very valuable piece of Briar or to become such in not very many years. One other point, also like a Zippo, these pipes are virtually indestructible…

I took some photos of the pipe when it arrived. Overall impressions of the pipe were good. The briar was a beautifully grained piece; the stamping was faint on the left side of the shank and not readable on the right. The bowl had a light cake with overflow and darkening on the crowned rim. The stem was oxidized and appeared to have been clipped off. The new button was thin and the slot was sloppy. Work would need to be done with that end of the stem. I took a close up photo of the rim top and bowl to show the overall condition. It was in great shape for a pipe this age. It had been pretty well cared for over the years. I also took photos of the stem to show the thinness of the button. I am pretty certain it was reshaped somewhere along the way. The stinger apparatus was different from other Grabows that I have worked on. It was pressure fit into the threaded tenon and was a tube rather that the shovel stinger I was expecting.I scrubbed the top of the rim with a cotton pad and saliva to try to remove the buildup and darkening that was there. It actually worked very well. I sanded it with 1500 grit micromesh to further smooth things out. I reamed the bowl with a Savinelli Fitsall Pipe Knife and took the cake back to bare briar.I built up the button top and bottom with black super glue. I did not need to build it up too much so I decided to just use the glue and not add charcoal powder. I set the repaired stem aside to let the glue cure.I sanded the bowl with 1500-6000 grit micromesh sanding pads and wiped it down with a damp cotton pad to remove the sanding dust. The photos below show the bowl after sanding it with 1500-2400 grit pads. I scrubbed out the shank and the metal mortise with alcohol, pipe cleaners and cotton swabs until they came out clean. The interior of the shank was really dirty. Many pipe cleaners and cotton swabs later the shank was clean and the metal mortise was shiny.In the past I have used a Cherry Danish Oil Stain that matches the colour of these older Grabow Westbrook pipes really well. It is the kind of stain that you rub on, let sit and rub off. Since the finish on the Westbrook smooth pipes was smooth, once the stain was dry I would rub it down to a matte gloss look.I hand rubbed the finish once it had been sitting for a short time. The photos below show what the bowl looked like after it had been rubbed down. The grain really stands out now – showing a combination of birdseye and cross grain. I love the look of the briar on this old pipe. Once the repair had dried I reshaped the button with needle files. I worked on the slot with needle files. The third photo shows what the slot looked like at this point. I will need to smooth it out but it is looking better.I sanded down the file marks and the oxidation on the stem with 220 grit sandpaper. I folded a piece of 220 grit sandpaper and worked on the slot to smooth out the file marks. I sanded the flat end of the button. I cleaned out the airway in the stem with a pipe cleaner and alcohol. I polished the stem with micromesh sanding pads – wet sanding with 1500-2400 grit pads and dry sanding with 3200-12000 grit pads. I carefully buffed the stem with red Tripoli between the 2400-3200 grit pads. I finished with the pads. I rubbed the stem down with Obsidian Oil after each set of three pads. I gave it a final rubdown with oil and set it aside to dry. After I saw the oxidation still showing in the above photo I buffed the stem again with red Tripoli. I started the sanding process over and sanded the stem with the earlier micromesh sanding pads. I buffed it with Blue Diamond on the buffing pad.I worked some more on the stem to get out the hard to remove oxidation. It took time but I think it is gone for the most part. I polished the end of the stem with micromesh sanding pads to smooth out some of the scratches. The stem looks much better. I buffed the bowl and stem with Blue Diamond, carefully avoiding the Dr. Grabow spade logo so as not to damage it. I gave the bowl and stem multiple coats of carnauba wax to protect it. I buffed it with a clean buffing pad to raise the shine and by hand with a microfibre cloth to deepen the shine. I took the following photos of the finished pipe. It is truly a beautiful piece of briar – hard to believe it is a coupon pipe it is such nice wood. The pipe is ready to go back to Dave. Now I have to finish up the second pipe he sent to me. Thanks for looking.

The Berwyck Poker Compromise


Blog by Aaron Henson

Last summer’s tip to Dallas netted me several great pipes. One of which was my first poker.  It was in a basket in an out of the way corner of a second hand store.  Very dirty and grimy but I could tell the grain underneath was beautiful with a nice contracting stain.  The stem was broke off about half way but I thought I could turn it into a nice stubby.  I looked forward getting it home and start working on it.ber1 ber2The stem had a heavy amount of oxidation and a buildup of white near the broken end.  This leads me to guess that the previous owner had used a softy bit to compensate for the broken stem.  I set the stem to soak in a mild Oxi-clean bath to raise the oxidation. After 24 hours I removed the oxidation with a magic eraser and an application of Walker Briar Works Pipe stem cleaner.ber3 ber4I wiped down the outside of the stummel with 91% on a cotton pad to remove the dirt and oils.  I was looking for any hidden issues that might be need to be addressed.  Thankfully there were none just a few handling dents/scuffs.  In fact, there weren’t even any fills.  The grain was beautiful and the existing contracting stain really made it stand out.

There was a healthy buildup of tars on the rim but not a lot of cake in the bowl.  What little cake there was came out easily with my reaming tool.  I smoothed out the interior of the bowl with 80-grit paper wrapped around a ½ inch dowel.ber5I like to clean the inside of the pipe before working on the outside so next came the interior of the shank. Lots of cotton swabs dipped in alcohol eventually saw it clean.

Next, I finished the bowl by doing a salt and alcohol soak.  I plugged the shank with a cotton swab and filled the bowl with salt.  Sometimes I use cotton balls but this time I chose salt – no reason why.  I filled the bowl to the top with grain alcohol and let it soak 24 hours.  This leached out a lot of the leftover tars and removed the smell of the old tobacco from the bowl.

Not wanting to top the bowl, I tried something new.  I placed a little Oxi-clean powder on a green pad in a shallow dish of water. Inverting the bowl, I worked it in a circular motion on the pad.  This had the desired effect and only a little bit of sanding was required on the rim.ber6Returning to the stem I began work on a new button. I taped off the end and mixed up a slurry of black super glue and charcoal powder using a tooth pick to apply it to the stem.  Several coats of slurry were needed to build up the button.ber7 ber8After the slurry dried, I used a flat file to rough out the shape of a new button.  Trying it out, I realized that the stem was too thick and narrow to be comfortable.  So I began to file the top and bottom of the stem to make it a more comfortable fit.  But as I did so, I had another revelation: the Berwyck was a filtered pipe.  The filter chamber extends back to where I was trying to shape a flat spot in the stem. ber9While I didn’t file into the airway I decided not to continue for fear that I would.  It was at this point that I decided to abandon the idea of a stubby and start looking for a replacement stem.  I figured I had a few of options: 1) I could buy an old stem that matched, 2) I could make my own stem using the tenon of the old stem, 3) I could splice a fish tail onto the existing stem (this would allow me to keep the spade trademark – thank you, Dal for this idea), or 4) I could try Dr. Grabow and see if the factory could supply me with a new stem.

I started with the last option first.  I figured if I was willing to buy and old stem, why not buy a new stem with a better chance of a good fit.  I sent an email off to International Pipes & Accessories, the Dr. Grabow factory in Sparta, North Carolina, but received a disappointing response.  So my next course of action was to begin a search online for someone with an old stem to sell that would fit.  I eventually posted the story of my quest on the Dr. Grabow Collectors Facebook page.  It was not long before I was contacted by Joe Mansueto, the moderator for the Dr. Grabow Collectors Forum.  Joe very kindly offered to use his contacts at International Pipes and too my surprise he was told that I should send the pipe to them.

I had not completed the work on the stummel and I wanted to have it at the 95% complete point before sending to the factory.  So, steamed out the dents using a wet terry cloth rag and my wife’s clothes iron.  Next came a light sanding with 1500-3200 grit micro mesh pads.

The rim was is in need of some stain and I had just received a set of Guardsman stain pens I bought from Amazon.  This was my chance to try the out.  I was very happy with the way they worked.  I have used other stain pens in the past but with less than satisfactory results.  Blending the three pens I got a good color match with the rest of the stummel.

With the stummel done, I packaged up the pipe with a hand written letter describing the situation and my connection with Joe.  I included a $15 check ($12 for the stem and $3 for return shipping) and sent the pipe off to Sparta.  The pipe left on a Thursday and arrived in North Carolina on Monday.  I had no idea what to expect for timing so I determined to wait as patiently as I could, figuring it would be 3-4 weeks.

To my pleasant surprise it was just a week and a half later.  I was on the road in Texas again when my son told me that a package had arrived from Dr. Grabow.  When I got home I was like a kid at Christmas wanting to get the pack open and see what Santa sent me.  I was not disappointed.  The new nylon stem looked great.  It returned all the grandeur and dignity that the pipe once had.  I was glad now that the stubby conversion had not worked out.

Although I am not a big fan of nylon stems, mostly to the fact that they are a pain to repair, clean and polish.  But this one being new was not a problem.  I did polish the stem using 6000-12000 grit micromesh.  The stem also needed a little deburring at the air hole and smoothing out on the face of the button.  All of which was done in short order.

I finished the pipe at the buffing station while smoking a bowl of McClelland’s Stave Aged in a Yello-bole Chesterfield – a previous repair.  I started with red diamond rouge on a rag wheel then finished with three coats of carnauba wax.  I could not be happier with the results.  Thank you for taking the time to read this.ber10 ber11 ber12


Great Grain – a Triangle Shank Grabow Westbrook Billiard


Blog by Steve Laug

Wikus asked me in a comment on the blog I wrote on the KBB Yello-Bole Churchwarden why I don’t give the pipe a coat of either varnish or shellac after I have refinished them. I wrote a response in which I said I don’t like that finish and want the pipe to be able to breathe. I have found that the varnished bowls get hot when smoked so that is another reason. But probably the biggest reason is that I really like a more matte finish instead of the high gloss that some like. I have to be honest – to me the matte finish that lets the grain pop and hides nothing behind the shine really is my preference. It does not mean I don’t like a shine but rather that I like the shine of a good wax and buff over the other options.

The pipe I worked on next is a prime example of what lies beneath the varnish coat. This one is a unique (at least to me as I have not seen one before) triangular shank billiard made by Dr. Grabow. It is stamped on the left side of the shank WESTBROOK over Dr. Grabow (the bottom edge of the lower stamp is faint as it is very close to the ridge on the angle of the side). It is stamped on the right side Imported Briar (faint stamp) over Adjustomatic in script. Underneath both lines it reads PAT.2461905. My brother picked this one up because the grain and shape caught his attention. He took the following photos before he cleaned it up.grab1 grab1aFrom the above photos you can get a general idea of the shape and condition of the pipe. It is sound and has no cracks or burns on the surface. The finish is pretty well shot – the varnish is crackled and checked looking on the sides of the bowl and shank. The overall look is cloudy and muddied by the varnish going. There is a pretty thick cake in the bowl and it overflows onto the rim top. The bowl however appears to still be in round both on the inner and outer edges as far as can be seen in the slightly out of focus third photo. The stem looks good at this point with light oxidation and some tooth chatter and marks on the topside near the button. The orange Grabow spade logo is in place on the left side of the stem. More will be revealed through his close up photos.

The first photo shows the rim condition up close. My initial observation about the edges need to be modified somewhat. The inner edge looks good but it will be better determined once the thick and uneven cake is removed from the bowl (good news is that this one must have been a good smoker to have developed this kind of cake). The outer edge looks good other than some slight damage to the front right side where there appears to be a chip and some wearing.grab2The next close up photos show the stamping and stem logo. I have recorded the condition and content of the stamping above. I include these for you to see the overall condition of them and the finish on the shank and stem.grab3The last photos he included show the condition of the stem. There is a visible line that covers the separates the first inch of the stem from the rest which looks to me that the stem had a Softee bit on it for most of its life. There is tooth chatter on both sides of the stem and on the top side (second photo below) there are visible tooth marks that need to be dealt with. This is why I think the bit protector came after the initial tooth marks or they would have been far worse. On the underside of the stem there is a small tooth mark that is quite deep. Both sides will need some work to smooth out the damage.grab4I did a US Patent search to see what I could find out about the patent number on the side of the shank. I was able to find out that the patent was filed on Jan. 25, 1946 but was not issues until February 15, 1949. I learned that the inventor of the Adjustomatic system for Grabow was D.P. Lavietes. I know nothing about him but I do know that Dr. Grabow used the mechanism in their pipes. With this information I know that the pipe was made after 1949 because the patent stamp says that the mechanism is patented not patent applied for. I have included the entire patent below for those who may be interested. I enjoy the descriptions, rationale and drawings that the inventor includes in these old patents. They are a pleasure for me to read through them. If you want you can skip over the next four photos and read about the pipe’s restoration.grab5 grab6 grab7 grab8My brother did his usual thorough cleaning of the pipe. He reamed the bowl and cleaned the internals of the shank, mortise and stem with alcohol, cotton swabs and pipe cleaners. He scrubbed the rim and was able to remove all of the tars and oils that had built up there. He cleaned the exterior of the bowl and stem with Murphy’s Oil Soap to remove the grime and build up in those areas. When I received the pipe in Vancouver it was clean. The only thing that he had not been able to do was remove the stinger from the threaded tenon to clean behind it. The next four photos give a clear picture of what the pipe looked like when it arrived.grab9 grab10The close up photo below shows how well the rim and bowl cleaned up. The inner rim was in pretty decent shape other than a little burn on the front edge almost in line with the chip on the outer edge.grab11The stem was in better condition than I expected as in the cleaning process a lot of the chatter seems to have been removed with the calcification.grab12I took photos of the condition of the stinger apparatus because it was looking really good. In the past when I got these they were black and looked awful. They were bad enough that if I did not like stingers before, the general grime and grit would have sealed the deal. This one however was sparkling.grab13I heated the stinger with a Bic lighter and the tars that held in the tenon released it. With the stinger removed I was able to clean out the buildup behind it in the stem. I used pipe cleaners, cotton swabs and alcohol to clean out that area of the stem. I cleaned out any remaining debris in the mortise at the same time.grab14I sanded the tooth marks and the rest of the stem to deal with the oxidation using a folded piece of 220 grit sandpaper. The tooth marks came out of the top side of the stem with no problem. There was still one small almost pin hole tooth mark on the underside that I would need to deal with and repair. I cleaned the surface of the stem with alcohol and filled in the mark with clear super glue. Once it dried I sanded it with 220 grit sandpaper to blend it in with the rest of the stem surface.grab15 grab15aI buffed the stem with Red Tripoli on the buffing wheel and brought it back to the work table to polish it with micromesh sanding pads. I wet sanded it with 1500-2400 grit pads and dry sanded it with 3200-12000 grit pads. After each set of three pads I rubbed it down with Obsidian Oil. After the last pad I gave it a final coat of oil and set it aside to dry.grab15b grab15cAfter polishing with the 1500-2400 grit pads I wiped down the tenon with an alcohol wet cotton pad to remove some of the darkening in the threads. In doing so I got some alcohol on the end of the stem and it brought out a bit more oxidation to the surface. This is one of those frustrations but also a good thing as I was able to then back track and sand the stem again with 1500-4000 grit pads and then buff it with some Blue Diamond on the wheel and I removed the rest of the oxidation. I then went back to polishing the stem with 6000-12000 grit pads to bring the shine to the surface.grab15dWith the stem polishing done I set it aside and turned to the bowl. I examined it and decided that the best way to deal with the crackling varnish coat was to remove it. My choice for removing varnish coats is to scrub the finish with acetone on a cotton pad until it is gone. The first wipes will leave the surface gummy and rough. You have to scrub the surface until it is smooth to touch. The next four photos show the bowl with the crackled finish.grab16 grab17It took four cotton pads and acetone to remove this crackled varnish finish. Underneath the cloudy varnish coat there was some really stunning grain.grab18 grab19Once the finish was gone and I had wiped the pipe with a paper towel with a little bit of olive oil I took photos of the pipe. There was some scratching in the briar that would need to be polished and there were some nicks that would need to be lifted if they did not polish out but the overall appearance of the pipe was stunning.grab20 grab21I worked on the bevel of the inner edge to smooth out and remove the damage on the front side. I used 180 grit and 220 grit sandpaper to bevel the rim a little to accommodate the edge damage. I polished the briar on the rim with 2400 grit micromesh sanding pads to remove the scratching left behind by the beveling. I polished the bowl and rim with 3200-12000 grit micromesh sanding pads to raise a shine in the briar and make the grain stand out.grab22 grab23I put the stem and bowl back together again and buffed the pipe with Blue Diamond on the wheel to further polish it. I gave the bowl and stem multiple coats of carnauba wax to protect it and buffed it with a clean buffing pad to raise the shine. I hand buffed it with a microfibre cloth to deepen the shine. The finished pipe is shown in the photos below. It has come a long way from the worn and tired pipe that came to my brother in Idaho. The depth of the shine, the look of the grain and the flow of the pipe all work together to make this a beautiful Dr. Grabow pipe. It is one of the earliest pipes of the RJ Reynolds era. It was a fun pipe to work on and the results just multiplied as each step I took in the cleaning and polishing process brought more of the beauty of this piece of briar alive. Thanks for looking.grab24 grab25 grab26 grab27 grab28 grab29 grab30 grab31

About the Winner of an Amphora Bent Billiard and More Information on the Brand


Guest Blog Addendum by Robert M. Boughton
Member, International Society of Codgers
Member, North American Society of Pipe Collectors
http://www.roadrunnerpipes21.biz (under construction)
http://www.naspc.org
http://about.me/boughtonrobert
Photos © the Author except as noted

INTRODUCTION
I have only offered a free pipe to readers of my blogs on two occasions, both times as rewards for answering questions related to restorations I chronicled as homages in the styles of great writers I admire and wish I could even emulate.   The other time, Chris Chopin (Flatticus, who has made many fine contributions to this forum) came up with all 13 Ernest Hemingway titles to the Pulitzer Prize winning author’s original books I added to the text of “The Young Man and the Pipe” two years ago.  Chris therefore scored a surprise that was much better than the Thinbite I restored for that homage.

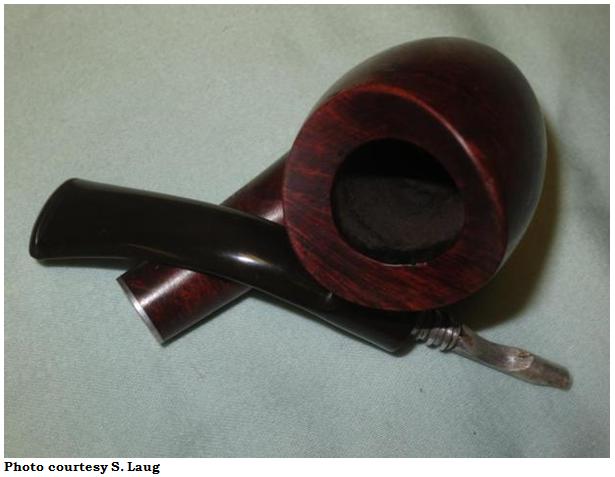
My latest homage – counting a bizarre tribute to “The Twilight Zone” TV series a little more than a year ago that didn’t include a prize – concerns an Amphora bent billiard with an unusual elliptical curve from the front of the rim continuing to the back.  The front side had such a bad gash that I had to file the inside curve to fix the damage, which as a consequence left the full original contour uneven on either side – but only a tad.  The rest of the pipe was in pretty bad shape, also, in particular the sedimentary-like layers of grime and other overuse, if not downright abuse, resulting in obscured nomenclature.

Uncovering the identity and origin of the pipe therefore required serious uncovering of the truth, or “detective” work, inspiring me to write the blog in as close to the style of the great British-American hard-boiled detective writer, Raymond Chandler, as I could manage.  At first intending to put the Amphora up for sale, I decided to offer it as a prize to the reader who could identify the most names of Chandler’s six novels and/or “certain less obvious references” specific to The Big Sleep.

ABOUT THE WINNER

The winner of the Amphora bent billiard is David J. Martin, a Reborn Pipes reader and relative newcomer to pipe restoration from Hinton, Virginia.  David aced all six titles of Raymond Chandler novels (including the best best known, to which I admit “The Big Sleeplessness” is a very rough tribute).  The titles, in the order they appeared in my blog, are:

The Little Sister, 1949
The High Window, 1942
Farewell My Lovely, 1940
The Long Goodbye, 1953
Playback, 1958
The Big Sleep, 1939

David also had the correct answers to five of the ten character names, without the benefit of knowing what he was supposed to be looking for.  They were either spelled out – one as a phonetic slang word from the 1940s that was close enough to the actual name for David to recognize it – or alluded to in various degrees of difficulty.  I did not expect anyone to crack all ten of the character name hints, and David found these:

3. “Carmen was okay, come to think of it.” – On the surface, Carmen brings to mind the music of the opera written for the most part by Georges Bizet, in which a gypsy dancer/singer seduces a naïve soldier only to abandon him for another man. She is murdered by the young soldier.  It is also an allusion to Carmen Sternwood, General Sternwood’s younger daughter in the novel, who is salacious, toys in the attic crazy and prone to considerable alcohol, drugs and sex.

5. “My biz was to fix the brodie….” – Brodie was ’40s slang for an accident or injury, and is similar enough to Joseph Brody, a petty criminal who tries to blackmail Carmen’s older sister Vivian with embarrassing photos of Carmen’s pornographic endeavors, that David noticed. Brody ends up dead, also.

8. “It’s not like I had a Geiger counter tuned to a man’s sweat….” – Harry Gwynne Geiger is the gay lover of Carol Lundgren and a purveyor of pornography, which was illegal in those days. Geiger’s attempted blackmail of the General, which led to the old man hiring Marlowe, ended with his murder early in the novel but starts the chain of events that keeps the P.I. searching for answers but coming up with more and more stiffs.

9. “I kept her wrapped up like I found her and got her safe and sound to my office on Agnes Avenue.” – Agnes Lozelle is Geiger’s front woman at his “rare bookstore” and a grifter with a big drug problem.

10. “I don’t buy a word of the stories that some fellow named Marlowe wrote any play credited to another Brit.” – A reference to Christopher Marlowe, a Shakespeare contemporary believed by some to have penned many if not all of the Bard’s plays, and a nod to our protagonist, private detective Philip Marlowe.

David’s inclusion of the last connection to the book seems to be almost reluctant, but he got it.  In his answer, he wrote, “Philip Marlowe is our detective but this is a literary reference to Christopher Marlowe and Shakespeare.”  I tried to make some easy, others more difficult and one or maybe two real challenges.  The digression in the blog’s “storyline” to the theories about Christopher Marlowe’s alleged part in penning what is almost without doubt the most significant and vast contribution in the history of literature, and its placement as the last clue, were deliberate attempts at one of the second types.  I am very happy that David went with his instinct.

In hindsight, I suspect I should have included a hint that there were ten special connections to make their discoveries more possible.  But I stand by my decision not to reveal that they were clues to character names.  Well, maybe that’s being too harsh, also.

David gave seven answers in all, two of which were wrong.  However, they were very clever.  At the end of the story-blog, I paraphrased William Blake’s famous poem, “The Tyger,” which begins

Tyger, Tyger, burning bright,
In the forests of the night;
What immortal hand or eye,
Could frame thy fearful symmetry?

As David noted, I might have added that part because of the fact that Chandler “also wrote [quite a bit of] poetry.”  I think the narrator’s somewhat lascivious comment about “a long, full-bodied, folksy Ukrainian tiger” and “feeling her fearful symmetry that only the Master Craftsman Himself could dare frame” was in fact a subconscious attempt at a fourth category of connections, one of a misleading variety.  Still, Chandler’s prolific poetry writing had nothing to do with the story of the novel to which I tried to pay tribute.  The observation was nevertheless an astute observation on David’s part.

I have to say the most amazing mistake David made was his almost psychic interpretation of a part I wrote and then edited because, as first written, it referred to one of Chandler’s short stories, “The Simple Art of Murder,” rather than novels.  I had written, “ It’s not like I had a Geiger counter tuned to a man’s sweat, and the simple art of murder is about as simple as common sense is common.”  Catching the mistake, I edited the sentence to end, “and murder is about as simple as common sense is common.”  The fact that David was so well attuned to Chandler’s complete works, and the reason for my altered line, astounds me.

Now, I will reveal the five undiscovered clues, in order of their appearances in the blog, and starting with the most difficult of all.

1. “At night the blood red color of the fourth planet from the sun, and the fact that it was closer to our little world than it had been in eleven years, only made the air outside seem hotter.” – The red fourth planet is suggestive of Eddie Mars, the antagonist and leader of a gambling racket who is both corrupt to the bone and the indirect cause of many of the murders in the novel.

2. “…I hadn’t seen any since the part of the year I liked best, what the locals called the monsoon season with the kind of cock-eyed, soppy buzz that got under my skin, right after the mere sound of a Christmas carol.” – Referring to Carol Lundgren, a young gay man who kills the wrong person in retaliation for the murder of Carol’s lover. Carol’s poor vocabulary also gets under Marlowe’s skin.

4. “…every one of my flannel uniforms was at Owen’s, my tailor.” – The most obvious reference to a character, Owen Taylor, the Sternwood’s chauffeur. Taylor is also one of the many killers in the story, murdering Anthony Geiger for the love of Carmen.

6. “Briar is a stern wood….” – An obvious reference to the Sternwood family in general, the patriarch of which hires Marlowe in the first place. [I WAS SURPRISED DAVID MISSED THIS ONE, CONSIDERING IT WAS IN THE SAME PARAGRAPH MENTIONING “THE BRODIE,” OR BRODY.]

7. “I’m not one to lash out unless I’m threatened to my face….” – Referring to Lash Canino, Eddie Mars’ sadistic, uncontrolled and hair-trigger hired gun who kills one person with cyanide and tries to kill Marlowe.

Given David’s extraordinary knowledge of Raymond Chandler’s varied works, and in particular that singular “wrong” answer, I can say that even in the improbable event of anyone else finding all 16 correct answers, I would still restore something special for David as a well-deserved consolation prize.  But as it stands, he gets The Big Prize, as it were, and it’s not in consolation but respect.

As I’m sure Steve would write, well done, David. (ed. Well done David – Steve)

ABOUT AMPHORA PIPES
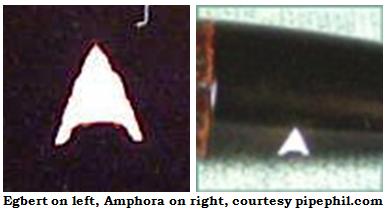
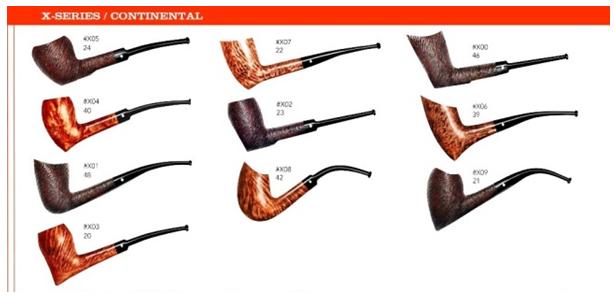
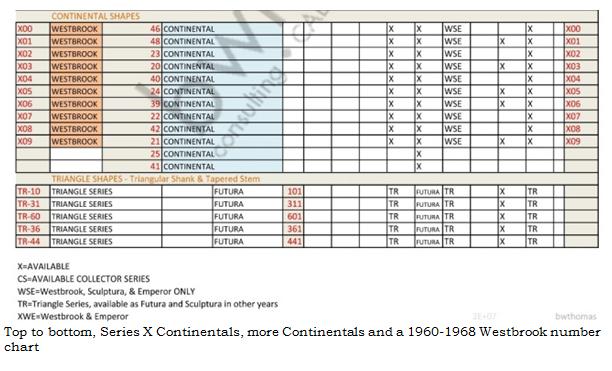
Steve clued me to the definite comparison of the unique rim curve of the pipe I had (which later proved to be an Amphora despite some of my local friends’ shared belief that it was an Israeli Alpha) to the Dr. Grabow Westbrook.  Steve had restored a Westbrook #42 and, for lack of a better name for the design oddity, referred to it as a Westbrook.amp1 I had no problem confirming the Dr. Grabow lead with the following chart showing the ubiquitous, All-American pipe company’s 1981 line of X Series/Continental pipes.Amp2 Still unable to make out the full name on the left side of the pipe I was restoring, I turned to pipephil.com to track down the distinctive mark on the bit that resembled a sort of A in the form of a spaceship. That search ruled out Alpha and turned up two possibilities, the Douwe Egbert Company and Elbert Gubbels & Sons, both Danish makers.amp3 As it turned out, they were related, and the latter was further connected to the Royal Dutch Pipe Factory that went bankrupt in 2012. Gubbels & Sons made Amphora. That makes Amphora a Royal Dutch Pipe Factory second, or to be more precise, perhaps a Douwe Egbert “third.”

That was as far as I got until I posted a thread on the Smokers Forums UK offering the free Amphora pipe to the reader of my rebornpipes blog who came up with the best response to the stated contest rules. A friend on Smokers Forums (SF) named Ed posted this initial and most pertinent of several comments in the thread.

“Nice job on the Amphora and an enjoyable read on the restoration! As you found out there is a connection to Dr. Grabow. They made several shapes of Amphora for Douwe Egbert as the attached copy of an Amphora coupon shows. The easiest way to tell a Grabow made Amphora is the shape number–all were 800 series I believe. They also made the Douwe Egbert ‘Color’ pipes which were painted like the Grabow Color Viscount and Color Dukes. Also, if I remember correctly the ‘A’ on the stems of the Grabow made pipes were embossed, not inlaid.”amp4 In response to my query as to where he found the documentation (a single photo of the two items), Ed later added, “I got that photo from the Dr. Grabow Collectors Forum… There is quite a bit of info on the Amphora pipes there. One of the members is a retired president of the company and he has posted quite a lot of info on them – as well as many other pipes made by Grabow. He’s also very knowledgeable about Mastercraft as he was VP [at] Mastercraft after it was merged with Grabow. That forum and R.J. McKay’s website are the two best sources of Grabow and related pipes info. http://drgrabow-pipe-info.com/ RJ’s site is ‘under construction’ and has been for some time but there is a ton of info especially on the Linkman Grabows.

“A lot of folks don’t realize that Grabow made pipes for several companies – tobacco companies as well as pipe companies. Ever see an Elsinor pipe made by Grabow for Edgeworth. If you see [a] Grabow that looks like an Alpha – there is a reason –and a connection. If I remember correctly they even furnished Carey at times with unfinished stummels.”

My interest in the Gubbels & Sons, founded in 1870, spiked like the average price of dot com stocks just before the collapse of that infamous period of financial history, although in a good way. Returning to Pipephil’s entry for Amphora, I noticed again the peculiar mention of pipes known as Porsche Designs and discovered that they were all conceived and manufactured in Germany by Ferdinand Porsche but apparently crafted, to the point where they were ready to be finished, by none other than E. Gubbels & Sons of the Netherlands, not Denmark as I claimed in error in my previous blog.

I have known the name Porsche for almost as long as I can remember and tried to dismiss the preposterous notion that the legendary sports car could be associated with a line of tobacco pipes by anything more substantial than a licensing agreement. My dad owned and drove two while we were still talking, a 911t from 1968, as I recall, and a 1973 914s. The second was made the year my dad turned 40 and I 11, and I now know from experience long past that men do crazy things around that age. Still, I always preferred the little red ’68 rocket.

And so, Googling Ferdinand Porsche, I was shocked to see that Herr Porsche of the cars was the same man who designed the pipes. But no,David, as good as the Amphora may be, it is no Porsche. I am sorry, but I must be honest. Gubbels, by the way, also makes the Bugatt, Hilson and Big Ben.

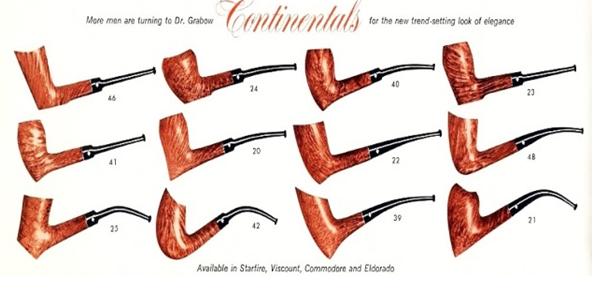
I did find the following charts of Dr. Grabow pipe shapes and numbers for various years and/or periods.Amp5

amp6

amp7 The information about Amphora pipes included here should – hint-hint – pique Steve’s insatiable curiosity enough to do a little more searching. I will, of course, continue to see what I can come up with to add to the data collected so far. As I see it, all I’m missing is a clear Grabow-Mastercraft-Amphora connection, which I have no doubt is to be found in the cacophony of online conversations in Ed’s fifth link below.

By the way, Ed was correct about the Amphora bit logo being embossed rather than inlaid – which accounts for the main reason I didn’t let it have an OxiClean bath. Given the frail, weathered and abused condition of the rest of the pipe, I had serious reason to doubt the etching

The Big Sleeplessness

Restoring a Dr. Grabow Westbrook 42


http://www.pipephil.eu/logos/en/logo-d7.html#douweegbert
http://www.pipephil.eu/logos/en/logo-a5.html#amphora
http://drgrabows.myfreeforum.org/index.php?sid=c13a84f8440dc5de0af48b4afec89e6c
http://www.pipephil.eu/logos/en/logo-p4.html#porschedesign
http://www.gubbelspipes.com/

A Dr. Grabow Color Duke Billiard Renewed


Blog by Steve Laug

Most of the Dr. Grabow Color Duke pipes that have come across my worktable have been in rough shape. The paint has been chipped and the finish ruined. This is the second one lately that I have worked on. The first was the Cherry Apple Red Dr. Grabow Viscount that my brother found for me. This second one is a White Billiard with a saddle stem. It is one that was made for a paper filter rather than a stinger/spoon apparatus. The pipe is stamped Color Duke over Dr. Grabow on the left side of the shank and Imported Briar over Adjustomatic over Pat. 2461905. The Patent Number is for the Adjustomatic tenon.

The pipe came to me from a friend quite awhile ago and I just got around to working on it. It was in pretty decent shape other than being dirty. The finish has some dents in the bottom of the bowl on the right side. There was some staining on the right side of the shank at the stem/shank junction. The rim was dirty and had some darkening and a few spots where the finish was worn off. The bowl had a cake that would need to be removed. The screw in tenon was dirty but the stem aligned with the shank perfectly. The stem itself was dirty inside and out. There was tooth chatter on the top and underside of the stem near the button. On the underside was a deep tooth mark in the center about ½ inches from the button. The next photos show the pipe when I brought it to the work table.Duke1

Duke2

Duke3

Duke4 I took some close-up pictures of the rim and the dents on the bottom of the bowl to give a clear picture of the issues with this pipe.Duke5

Duke6 I reamed the bowl with a PipNet reamer and took the cake back to the bare briar. I used a pen knife to clean up remaining cake that the reamer left behind.Duke7

Duke8 I scrubbed the finish with cotton pads and Murphy’s Oil Soap as I did not want to use anything that potentially would damage the painted finish on the bowl. My intent was to get the grime off the finish and to remove as much of the rim darkening as possible without compromising the paint on the rim or edges.Duke9

Duke10 I rinsed the bowl with warm water and dried it off with a towel. Here are some photos of the cleaned bowl.Duke11

Duke12

Duke13

Duke14 I cleaned the inside of the shank and the stem with pipe cleaners, cotton swabs and alcohol until they came out clean.Duke15 With the bowl cleaned inside and out it was time to address the stem. I sanded the surface of the stem to clean off the dirt and tooth chatter. I wiped it down with a cotton swab and alcohol to remove the dust and to examine the dent on the underside.Duke16 After the deep dent was cleaned I filled it with a few drops of clear super glue.Duke17 Once the glue dried I sanded the repair to make it flush with the stem surface using 220 grit sandpaper.Duke18 I sanded the entire stem with medium and fine grit sanding sponges. The repair spot is beginning to blend in very well.Duke19

Duke20 I sanded the stem with micromesh sanding pads – wet sanding with 1500-2400 grit pads and then rubbing it down with Obsidian Oil. I dry sanded with 3200-4000 grit pads and gave it another coat of oil. I finished by dry sanding it with 6000-12000 grit pads. I gave it a final coat of Obsidian Oil and let it dry.Duke21

Duke22

Duke23 In the past buffing the painted bowls and the Grabow stems has caused me a lot of grief. I have found that these stems can take very little heat that the buffing pads generate so I hand buff them with Paragon Wax and a shoe buffer. I buff the bowls the same way using the shoe buffing brush and a microfibre cloth. The finished pipe is shown in the photos below. If you are interested in this pipe email or message me and make an offer. It could easily join your rack. Thanks for looking.Duke24

Duke25

Duke26

Duke27

Duke28

Duke29

Bringing a Dr. Grabow De Luxe 9704 Bent Billiard Back to Life


Blog by Steve Laug

I just finished cleaning up the last of the pipe I picked up from the antique malls while I was in Idaho Falls. It is a little Dr. Grabow bent billiard. It is stamped on the left side of the shank Dr. Grabow over De Luxe over Imported Briar. On the right side near the stem shank union it is stamped with the shape number 9704. From what I can find on the Grabow shape charts the 04 shape is the bent billiard. This one was in rough shape. The finish was basically worn off and the bowl had spots of sticky grime on the sides and shank. There were also spots of paint on the shank and bowl. There were scratches all over the bowl. There were a lot of small fills on the right side of the bowl and the top of the shank as well as a large one on the lower part of the front of the bowl. Because of the missing finish these stood out. The top of the rim had a buildup of tars that looked flaky and hard. The bowl had a thick cake that made it impossible to see if the inside of the rim was in decent shape. I would need to ream it back to be sure. The stem was oxidized and the dirty with light tooth chatter on the underside near the button.Dr1

Dr2

Dr3

Dr4 I took a close up photo of the top of the rim to show what I had to work with in cleaning up the bowl and rim.Dr5 When I took the stem off the pipe it had the usual Dr. Grabow shovel stinger apparatus. This was a little unique in that it was not inserted into the metal tenon but was an integral part of the tenon. The two were cast together which made removing it impossible. It was covered in tars and in a tobacco coloured lacquer that was rock hard.Dr6 The next two photos show the stamping on both sides of the shank. The right side shows the clear shape number stamp and the left side the Dr. Grabow stamping. The Imported Briar stamping is weak but visible.Dr7

Dr8 I reamed the bowl back to bare wood with a PipNet reamer. I started with the smallest cutting head and worked my way up to one that was the same diameter as the inside of the bowl. Once the cake was cleaned out I used a pen knife to clean up the small ridge that shows up in the second photo below.Dr9

Dr10 I used a sanding sponge to lightly top the bowl. The tars and lava on the top were hard and this was the way I chose to remove it without damaging the finish to the rim. I worked on it until the rim was clean and smooth. It would still need to be scrubbed to remove the darkening.Dr11

Dr12 I scrubbed the rim and the bowl with acetone on a cotton pad to remove the grime and oils left in the finish. I scrubbed until the rim and bowl were clean.Dr13 I scrubbed the shovel stinger with 0000 steel wool to remove the buildup on the aluminum and polish it at the same time.Dr14

Dr15 I cleaned out the shank with alcohol, pipe cleaners and cotton swabs until it was spotless. I then worked on the stem. It was made a bit more difficult with the built in stinger but I was able to get it clean with a bit of effort.Dr16 With the inside clean I sanded the bowl and rim with 220 grit sandpaper and a medium and fine grit sanding sponge to clean up the finish. I was able to remove the darkening on the rim and also the dark spots on the sides of the bowl.Dr17

Dr18

Dr19

Dr20 I screwed the stem back on the shank and then sanded the stem with the same sandpapers as I had sanded the bowl. I removed tooth chatter and the calcification on the first inch of the stem. I worked on the slight tooth marks on the button itself and cleaned them up. The pipe was beginning to take shape. Much more sanding would need to be done to the bowl to remove all of the scratches left behind by the sandpaper and a lot of polishing would need to be done on the stem before the pipe was finished.Dr21

Dr22

Dr23

Dr24 I rubbed the bowl down with olive oil so that I could wet sand the finish and work out the scratches.Dr25

Dr26

Dr27 I sanded the bowl with micromesh sanding pads and the olive oil until I was able to remove the scratches. I started with 1500-2400 grit pads and sanded until the scratches were minimized and then rubbed it down with olive oil once again before sanding with 3200-4000 grit pads. Each successive micromesh pad brought more of a shine to the briar. The fills became smooth and blended into the briar better and began to disappear into the briar as the scratches around the edges were smoothed out.Dr28

Dr29

Dr30

Dr31

Dr32

Dr33 I gave it a final rub down with oil and then finished sanding it with the last three grits of micromesh – 6000-12000. The bowl was smooth to the touch and had a shine to it that once was buffed and waxed would glow.Dr34

Dr35 I sanded the stem with micromesh sanding pads – wet sanding with 1500-2400 grit pads and then rubbing it down with Obsidian Oil. I continued to dry sand with 3200-4000 grit pads and gave it another coat of the oil. I finished by sanding it with 6000-12000 grit pads and then gave it a final coat of oil and let it dry.Dr36

Dr37

Dr38 I buffed the pipe on the wheel with Blue Diamond polish and then gave the bowl and stem multiple coats of carnauba wax. I buffed it with a clean flannel wheel to give it a shine and finished by buffing it with a microfibre cloth to deepen the shine. The finished pipe is shown in the photos below. It is a beautiful old Grabow that has a lot of life left in it. Whether I keep it or pass it on to someone else it should last much longer than I will. It should continue to give companionship to whoever’s rack it graces. Thanks for looking.Dr39

Dr40

Dr41

Dr42

Dr43

Dr44

Dr45

Dr46

ADDENDUM: I received the following message on FaceBook from Christopher Chopin. It adds much to the information on this pipe so I add it here:

A favorite shape. Nice job as always Steve. And yes, 04 is the shape code, 97 was the finish code for deluxe. Also 92 and 98, there was more than one De Luxe, and 97 was the natural variegated finish. Dating on that if I’m not mistaken is between 1944 and 1953, at which point the spade was rotated so that the tip pointed to the bowl instead of the mouthpiece, after the company was purchased by HL&T. That is a true Linkman’s grabow, they just discontinued the Linkman’s stamp in ’44. I suspect it’ll find a place in your regular rotation.

A Very Simple Cleanup on a Dr. Grabow Regal Dublin


Blog by Steve Laug

This pipe came to me in a box of pipes that a friend brought by for me. He was getting rid of a bunch of the pipes that he no longer smoked and thought I might enjoy cleaning them up. This one is stamped on the left side Regal over Dr. Grabow and on the right side, Imported Briar over Adjustomatic over Pat. 2461206. When I took it out of the box it had a half stem. The rest of it had been broken off and it was about 1 ½ inches long. I took it off and put the bowl back in the box. I have no idea what I did with the old stem; I have looked for it for a while now as I wanted to pirate the Adjustomatic tenon from the stem. It will show up when I least expect it and I will deal with it then. Yesterday I took the bowl out of the box and was looking it over. It was in very decent shape. The finish was clean. There were some lighter marks on the back right outside edge of the rim but other than it was clean. There was no cake in the bowl. It was worth a little time to see what I could do with it.

I went through my can of stems and found a Dr. Grabow stem that was the proper diameter. It was in decent shape. There were tooth marks on the top and underside of the stem next to the button. The button itself had some tooth dents. There was some calcification on the surfaces as well. The tenon and stinger were black with tars and oils but would clean up easily enough. The only thing with this stem and tenon is that it was not an Adjustomatic stem but it would do.Dr1

Dr2

Dr3

Dr4

Dr5 I cleaned out the shank and mortise with cotton swabs, pipe cleaners and alcohol. The shank was pretty clean and it did not take much to remove the little that was there. I removed the stinger and cleaned out the stem with alcohol. It too was not in to bad of shape on the inside. I cleaned the stinger and tenon with alcohol and 0000 steel wool.Dr6

Dr7 I heated the stem and raised the tooth dents as much as possible and then sanded them smooth with 220 grit sandpaper. One of the divots was a little too deep to raise so I filled it with a small batch of black super glue and sanded it smooth.Dr8

Dr9 I used a needle file to redefine the sharp edge of the button and make a clean line on both sides of the stem.Dr10 I sanded it with a medium and a fine grit sanding sponge to remove the scratches from the vulcanite and then wiped the stem down with Obsidian Oil.Dr11 I sanded the stem with micromesh sanding pads – wet sanding with 1500-2400 grit pads and then wiping down the stem with Obsidian Oil. I dry sanded with 3200-4000 grit pads, gave it another coat of oil and then continued with 6000-12000 grit pads. Each successive grit of pad made the patch disappear and blend into the surface of the stem. I gave the stem a final rub down with Obsidian Oil and let it dry.Dr12

Dr13

Dr14 I buffed the pipe with Blue Diamond polish on the wheel and then gave it multiple coats of carnauba wax. I buffed it with a clean flannel buff on the wheel and then hand buffed it with a microfibre cloth for a final deep shine. The following photos show the finish pipe. It should work well for many years to come. This one is for sale should anyone wish to add it to their rack. Email me and let me know.Dr15

Dr16

Dr17

Dr18

Dr19