Tag Archives: Dal Stanton article

An Unexpected Find in Athens – A Savinelli Oscar Aged Briar 614


Blog by Dal Stanton

When I first laid my eyes on this Savinelli, I didn’t realize it was a Savinelli.  I was in Athens, Greece, tooling through the Monastiraki market area at the foot of the Acropolis, next door to the Forum.  As I explored I found one shop nestled on a tree-covered side street with a table set on the front sidewalk with all kinds of paraphernalia. It drew me like a bee to pollen!  Two congenial men were sitting behind the table conversing in Greek. I assumed they chatted about all manner of life, family, politics…, and what is usually the case, as I drew near, their conversation stopped, and the English began.  As I perused the table with strategic disinterest, I saw one pipe on the table that did not grab me too much.  The shop owner asked me if I was interested in pipes?  I said yes, and he said that he had many more that he didn’t know what to do with…. “Oh, my…” – my heart skipped a beat!  In his wonderfully, friendly, thick Greek accent and manner of hospitality, he said, ‘Come with me.”  As he pulled a chain out of this pocket a full ring of keys followed. He led me down a narrow, alley walkway along the side of the shop.  We stopped and he unlocked a side door that led immediately up the stairs to an ‘upper room’ where, as he explained with a subdued, secretive flourish, he seldom brought customers.  When we entered the room, I saw why.  It was his special place – family pictures were arrayed everywhere, icons of the Greek Orthodox Church were given special deference as they hung from places of honor. Many shelves full of his collections.  He pulled my attention away from the array to a slew of pipes displayed in a case hanging on the wall and arranged beneath on a cluttered table. I took it all in.  He explained that his good friend, from Armenia, asked him to sell off his collection of pipes and he gave me a price for everything, including the wall-hanging display case.  With gratitude to him for his generous offer, I had to decline as I was flying back to Sofia and would have no room in my luggage for all of it.  I suggested to him that his friend could possibly make more money if he sold the pipes and case separately and he confided that he knew little about pricing pipes individually.  As we talked, I discovered that he was a board member of a foundation that assisted orphaned children Armenia – the home of his friend.  That opened the door for me to share that I too, was a board member of the Daughters of Bulgaria Foundation and I shared with him why I collected pipes – to restore and sell them to benefit the Daughters and their children.  He encouraged me to go through the collection and pull out pipes that interested me and make him an offer.  In Mediterranean culture, very much like Bulgarian culture – relationship is supreme, and we had talked of things near and dear to our hearts.  Pipes became the doorway to a deeper fellowship that we both understood and appreciated.   I left the shop owner with a firm handshake, a parting picture, and an appreciation for him and his journey. 
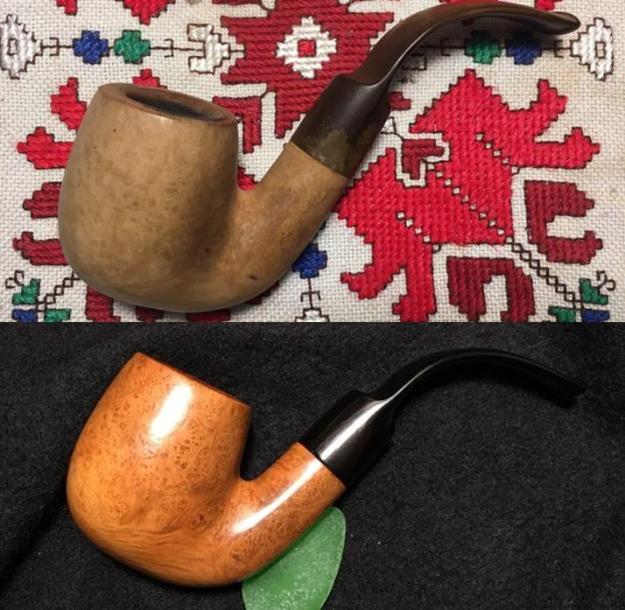
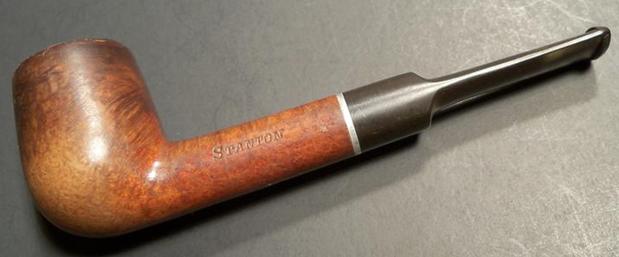
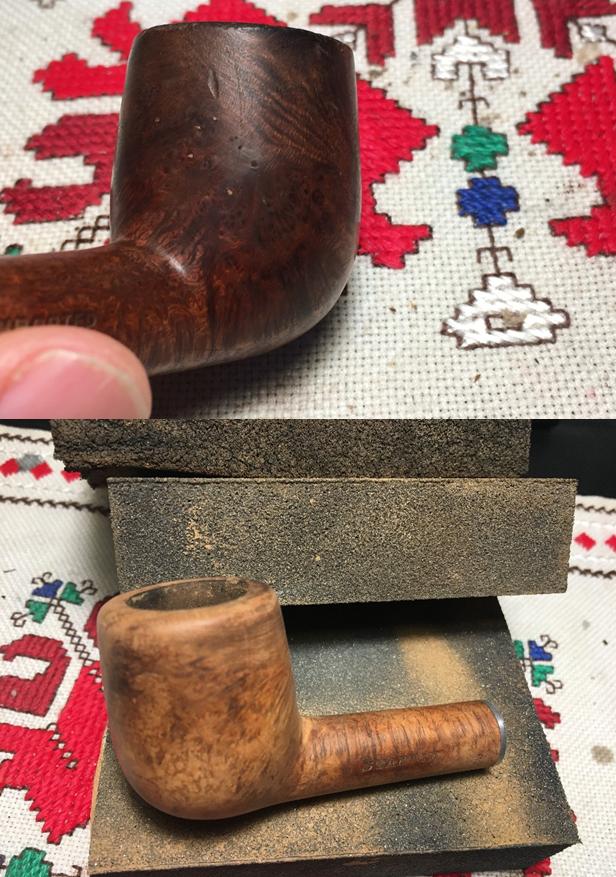
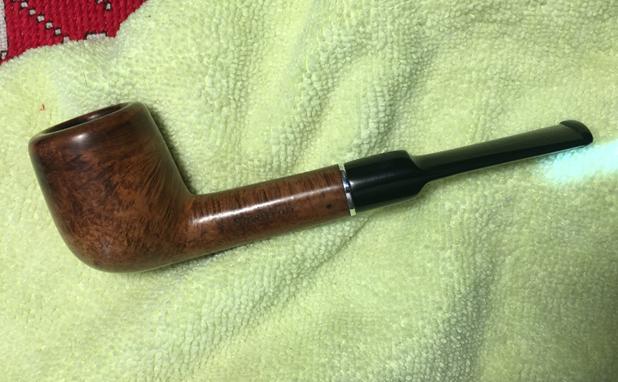
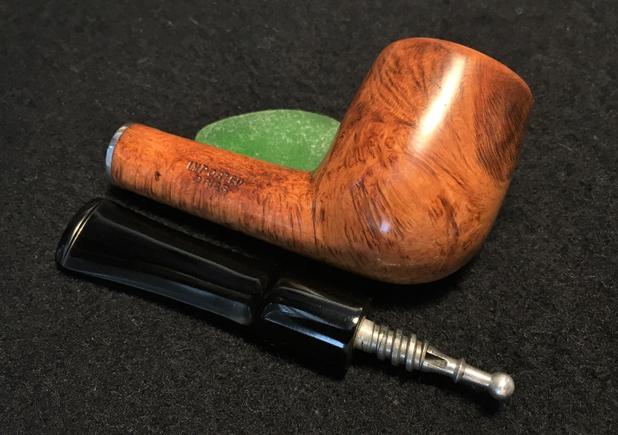
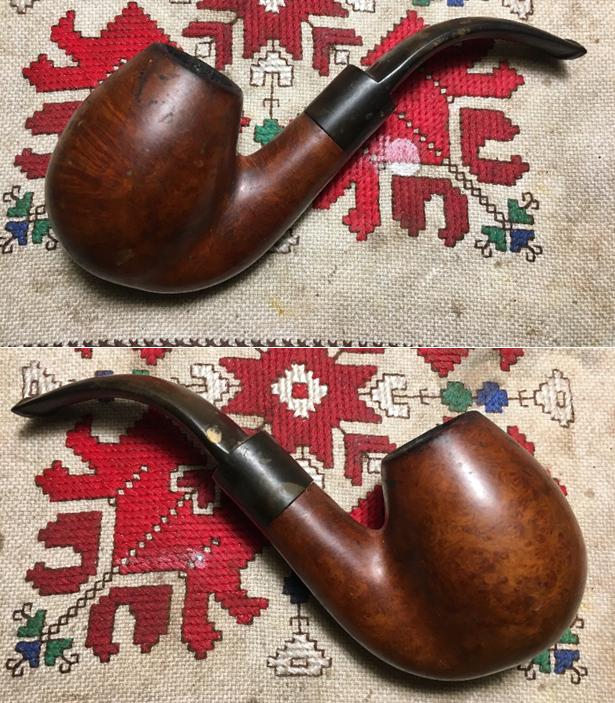
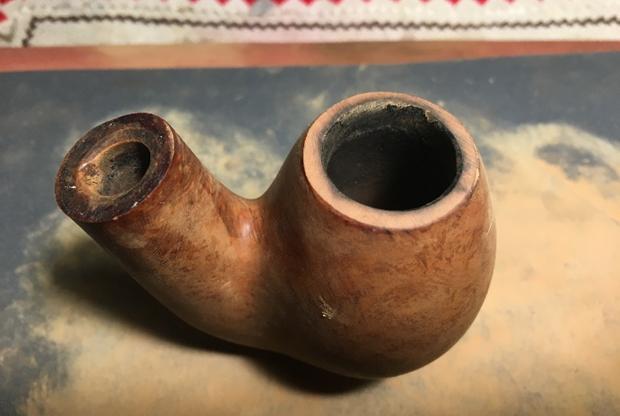
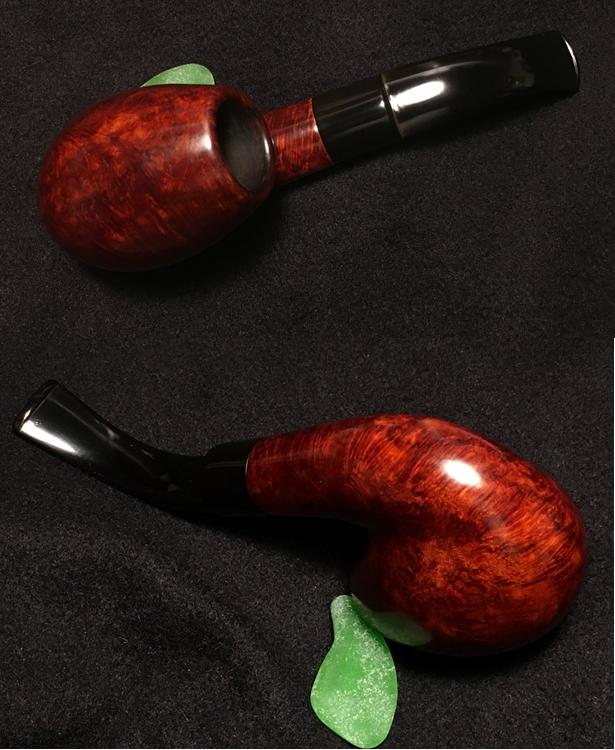
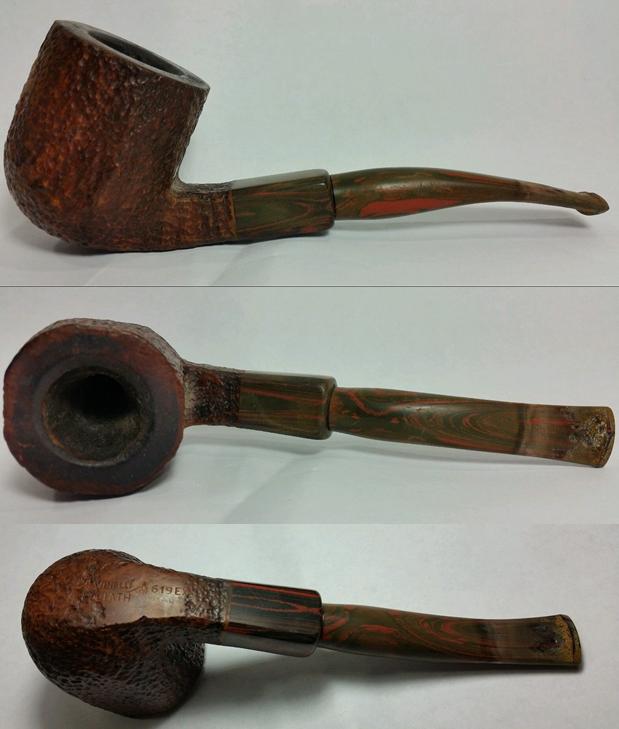
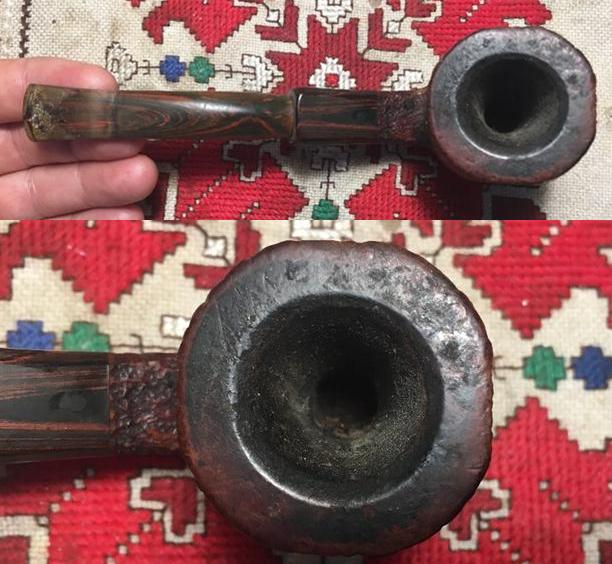
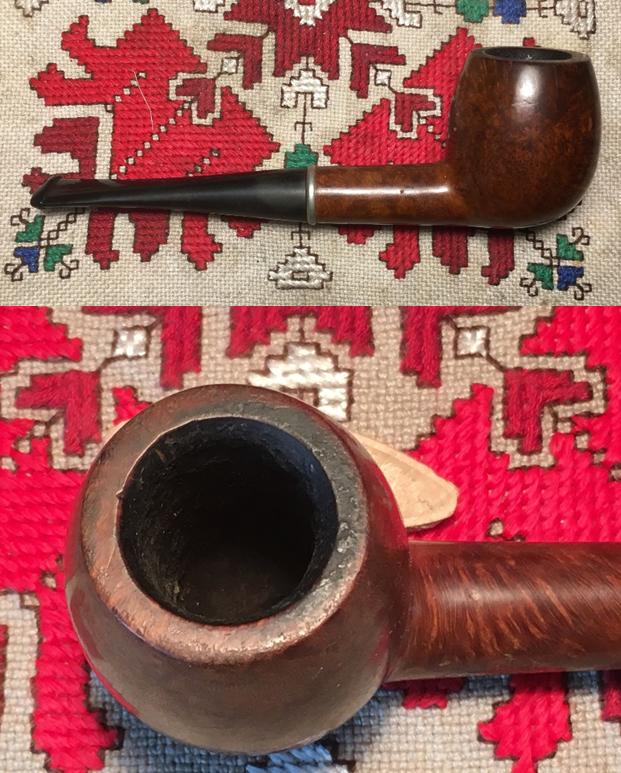
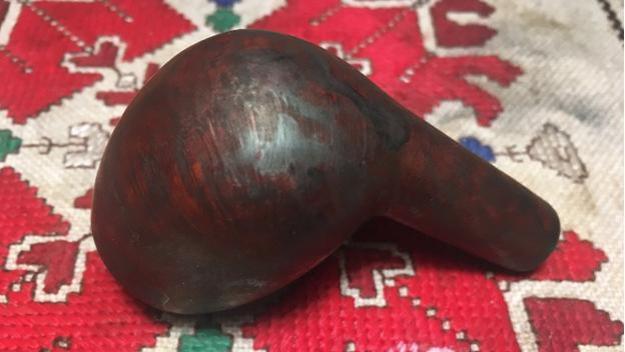
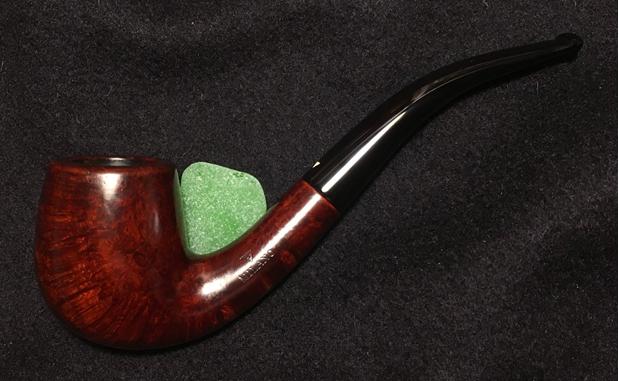
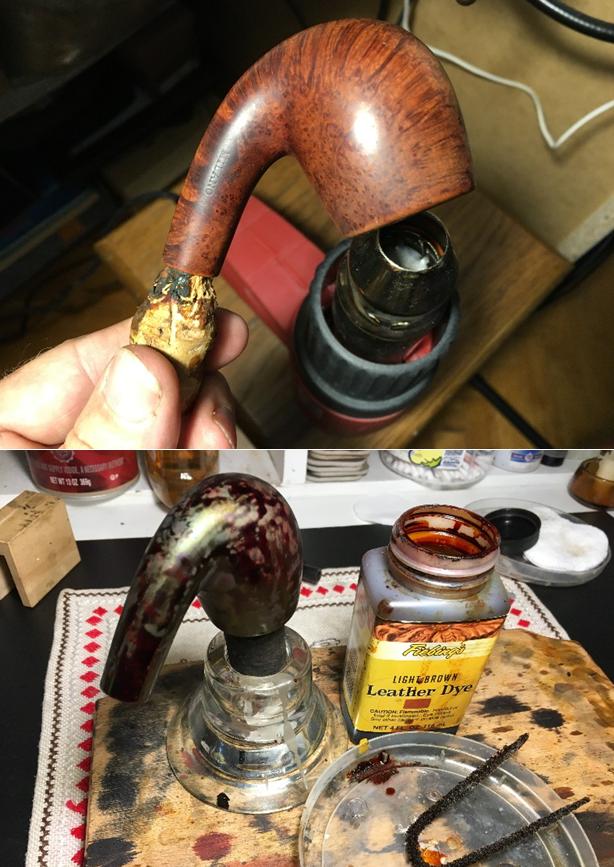
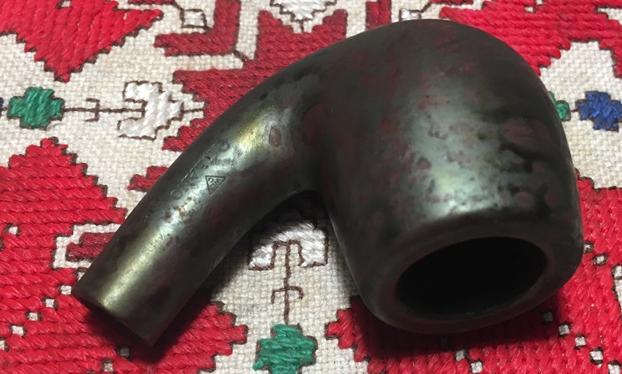
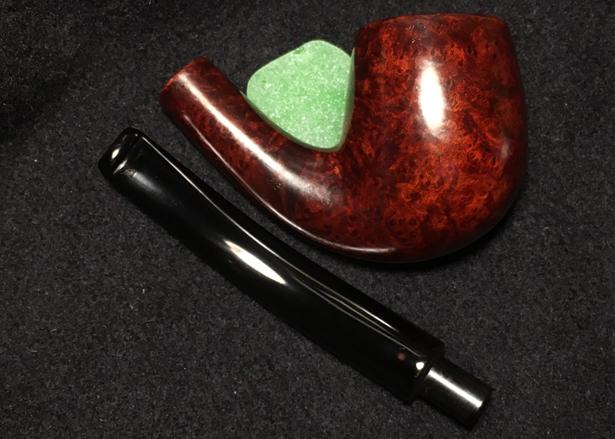
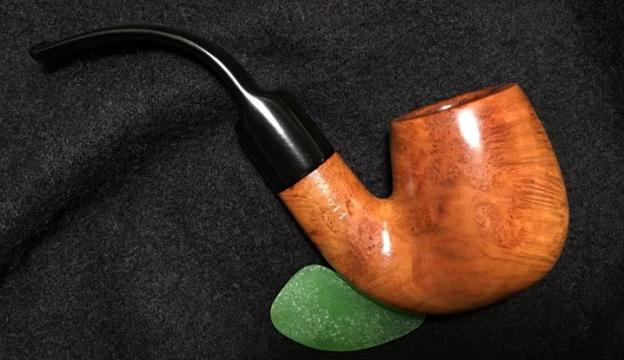
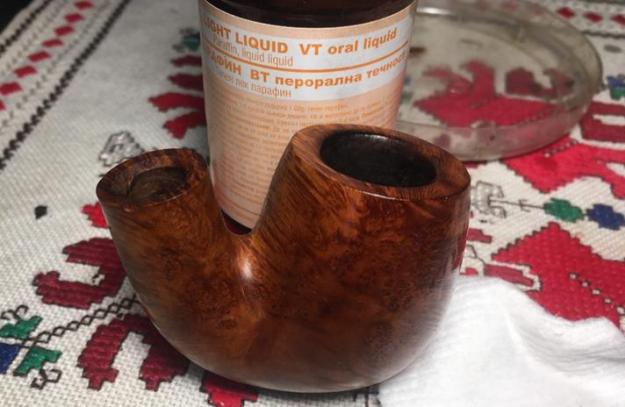
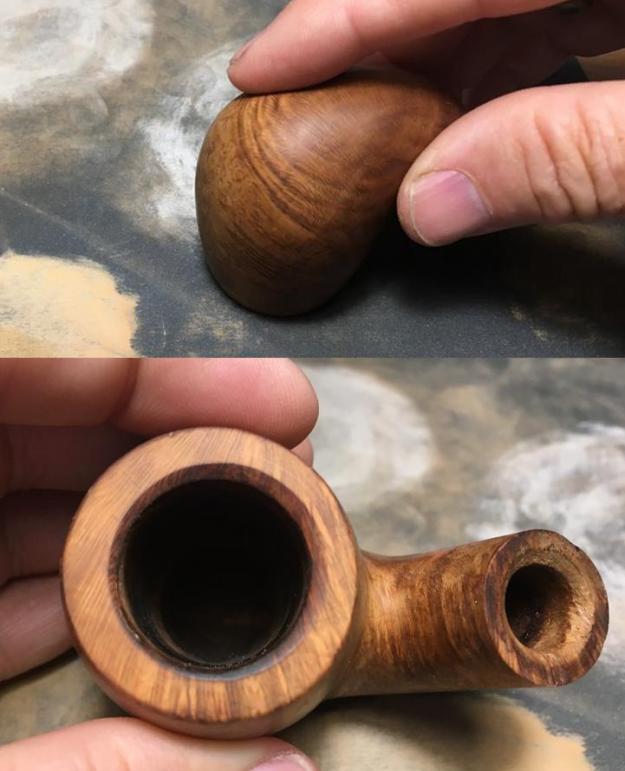
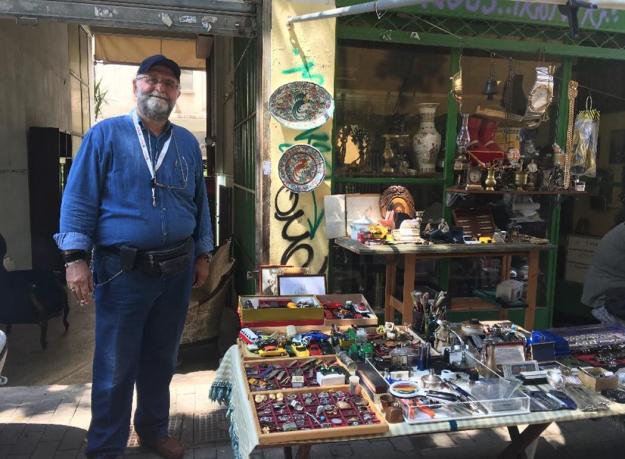
I also left his shop with some special pipes and friendly prices 😊: Lorenzo Carnevale Sanremo of Italy (on top in picture below), a Savinelli Roley Pocket Pipe (bottom, below), and a sorry looking ¾ Bent Billiard (center below) that appeared to have no name – at least in the dim light of the upper room, I could not see any.  It appeared the pipe had been left out in a sun-drenched field through a few seasons – showcasing a terribly oxidized stem and a bleached-out bowl, but the old boy had nice form and I liked him.  It struck me that this pipe reminded me of a Southern US epithet, ‘Bless his heart, he can’t help how ugly he is!’  The ‘Bless his/her heart’ is the softener or honey before the hard news! 
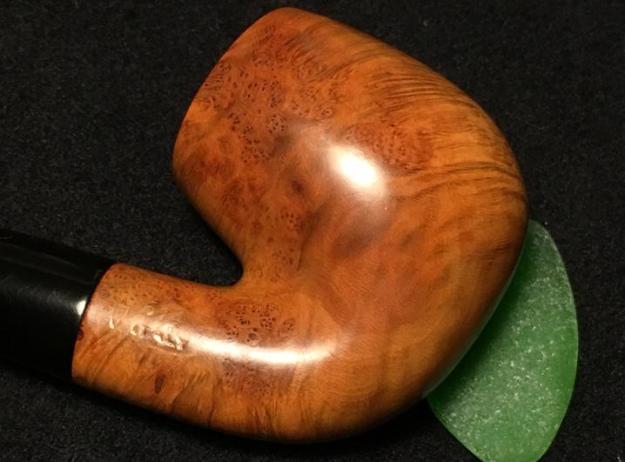
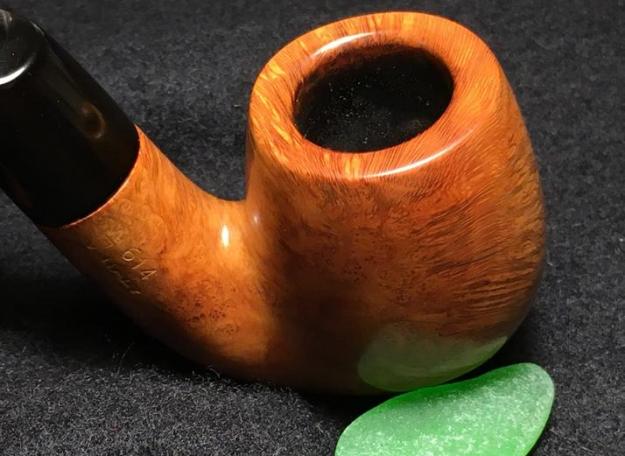
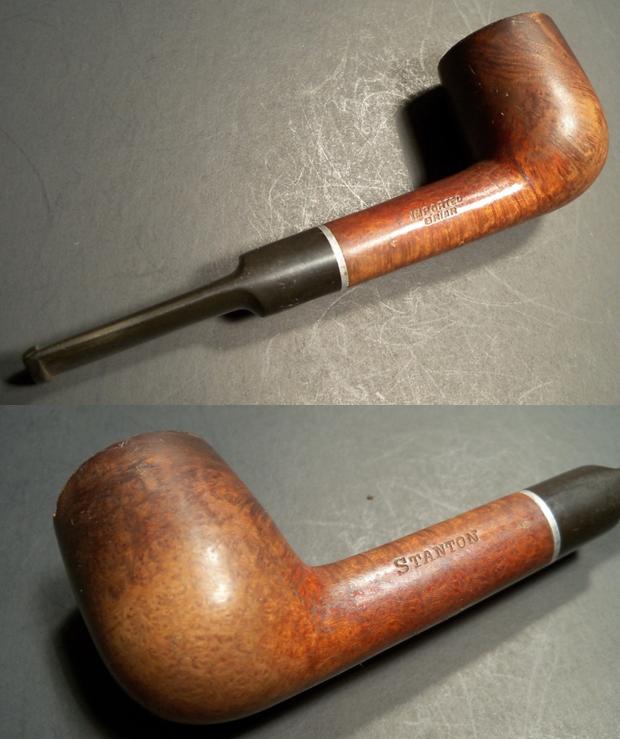
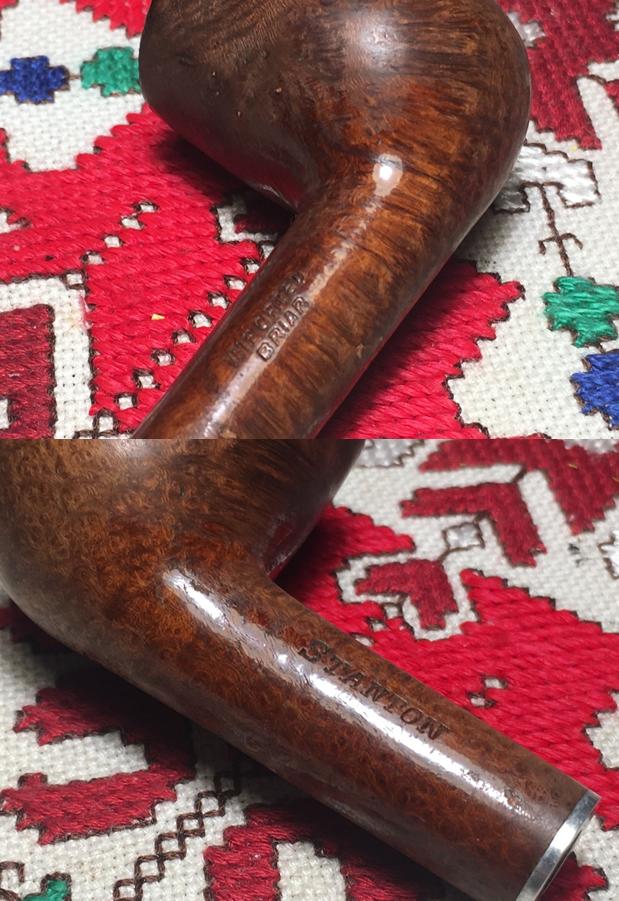
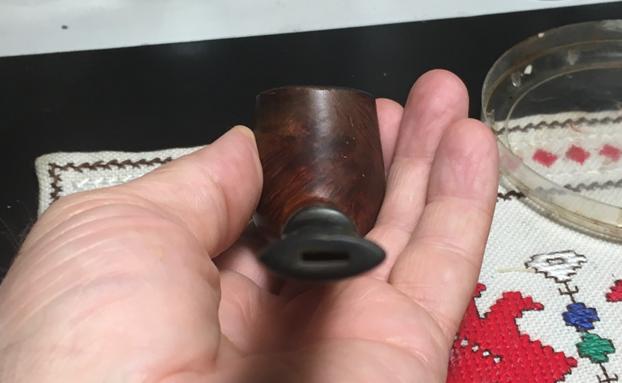
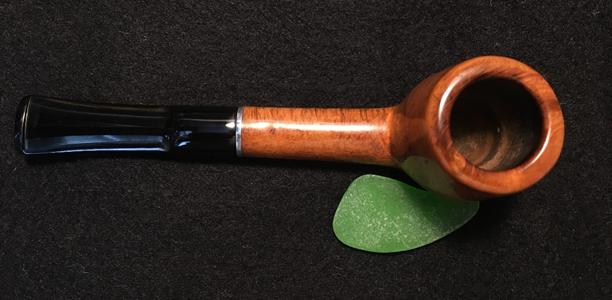
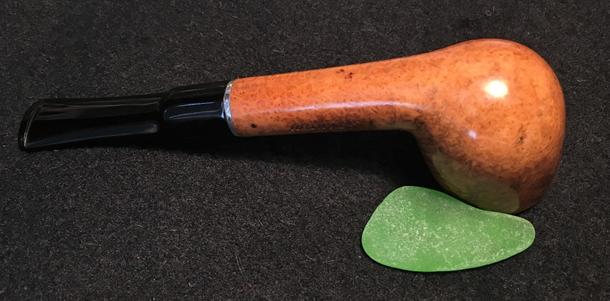
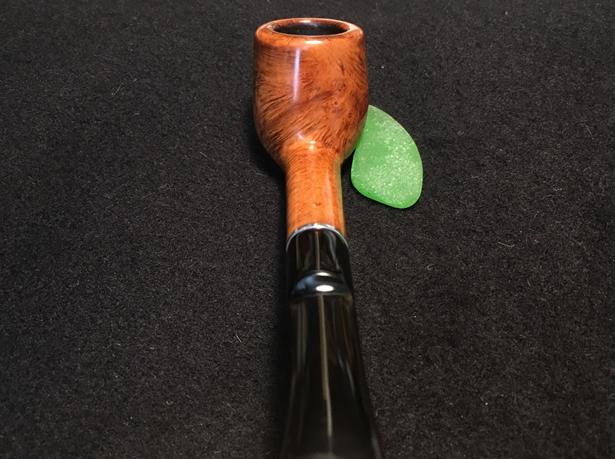
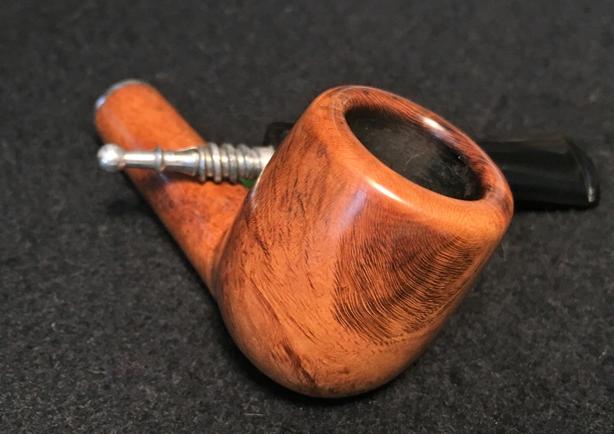
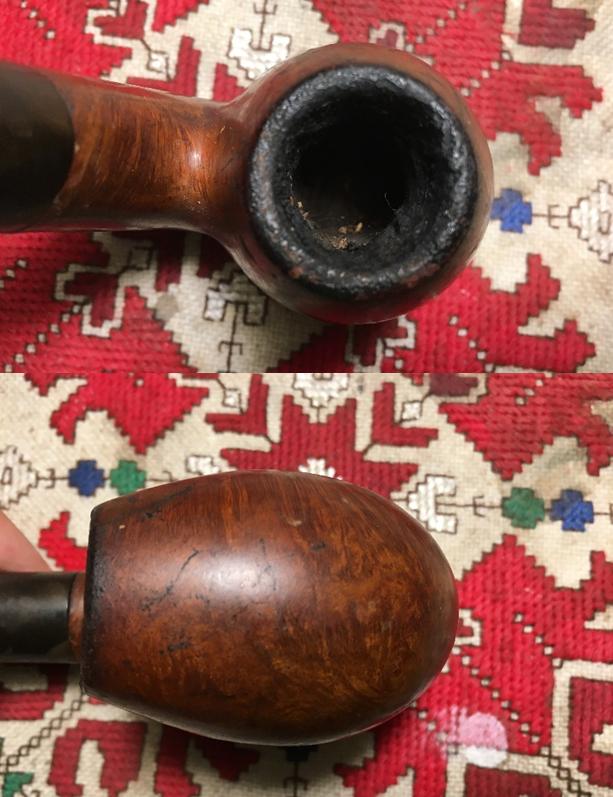
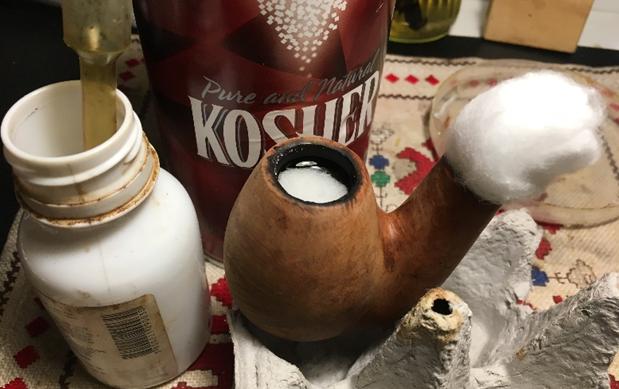
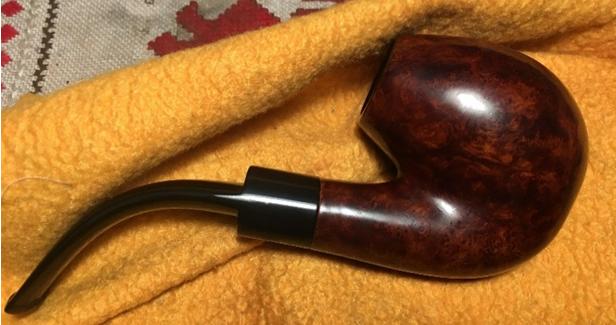
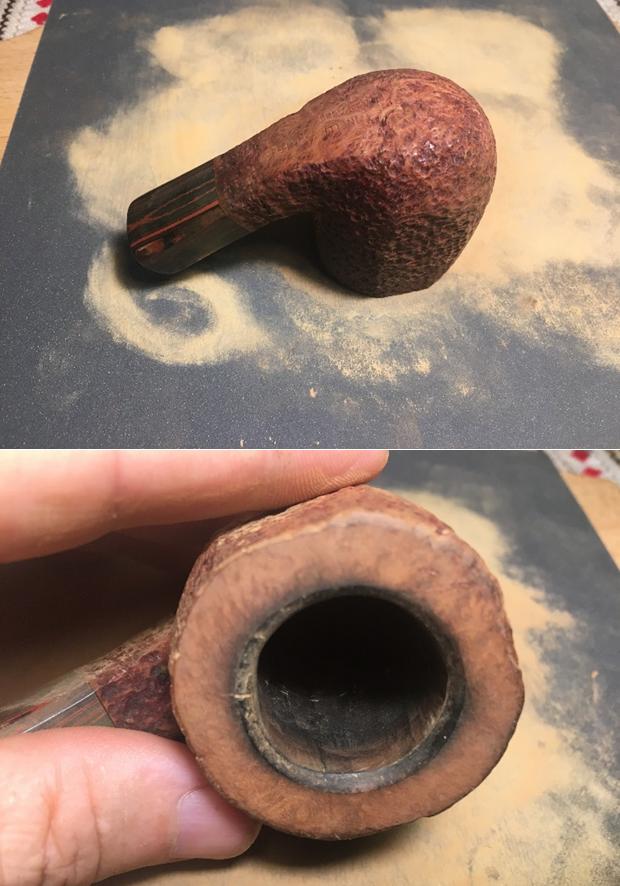
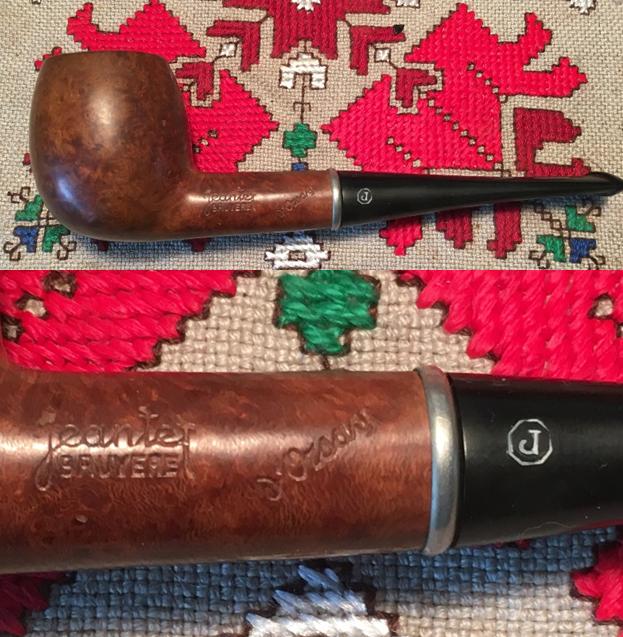
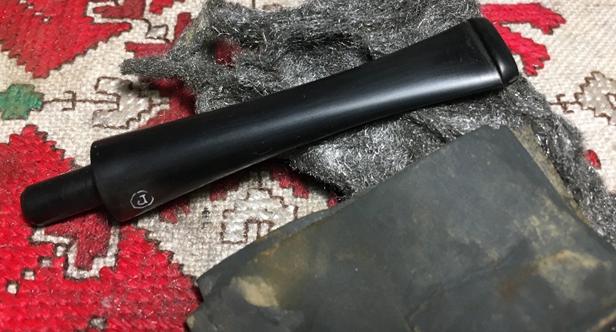
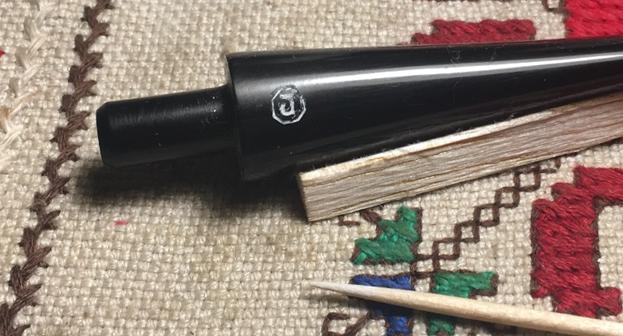
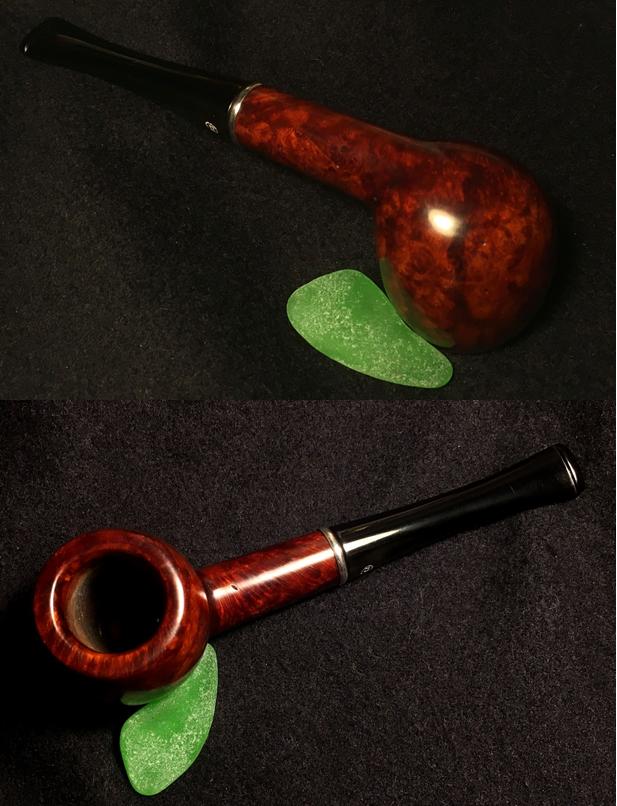
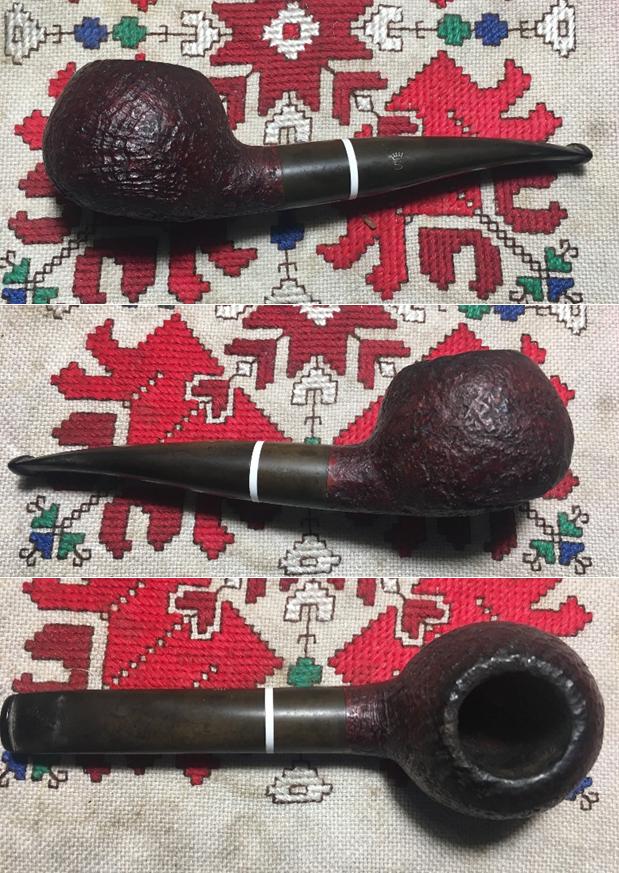
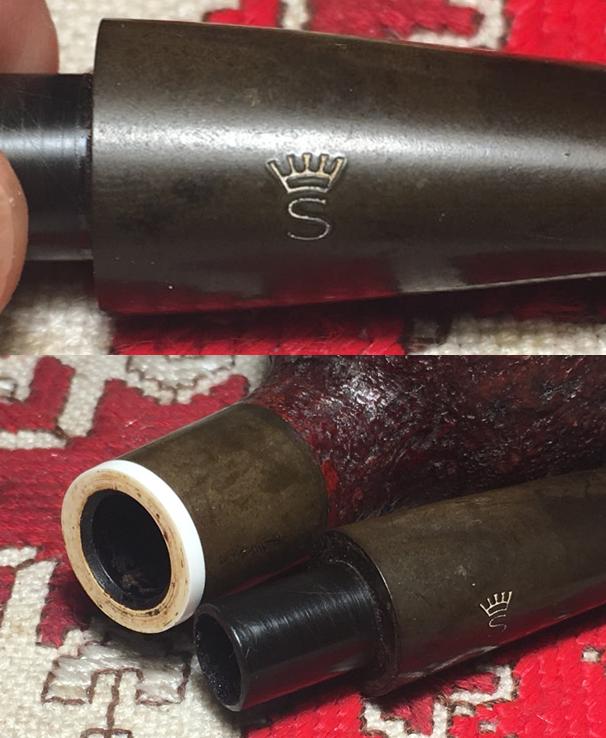
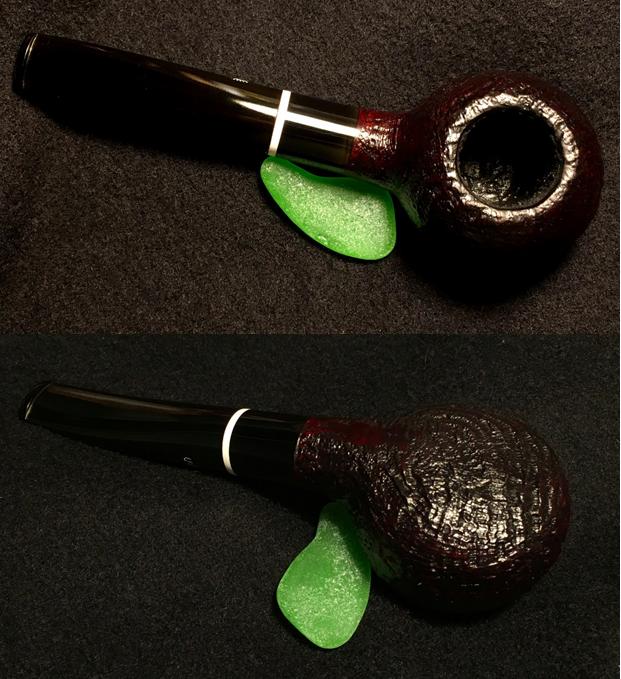
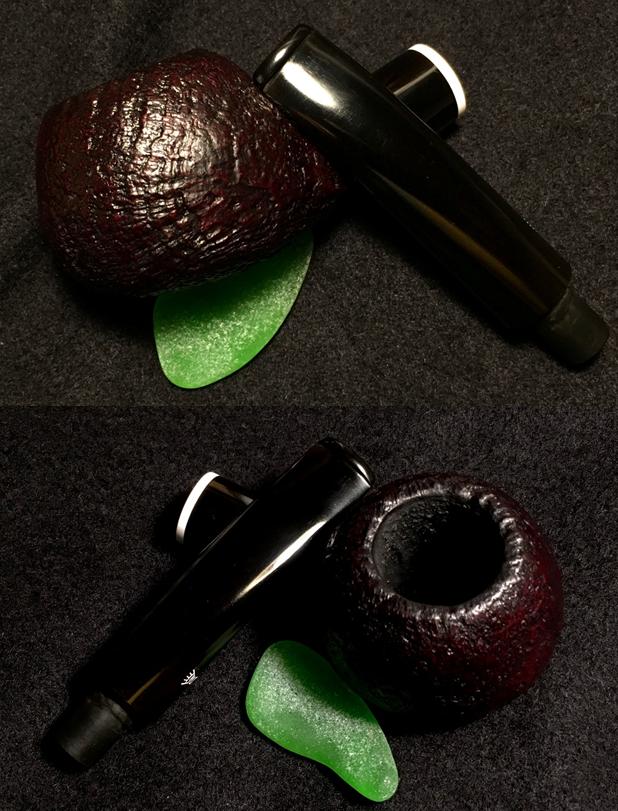
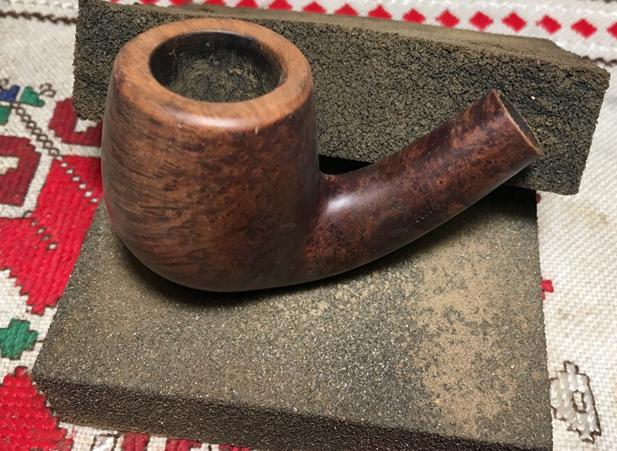
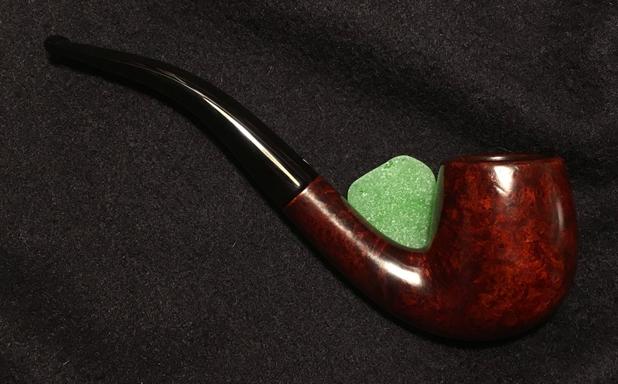
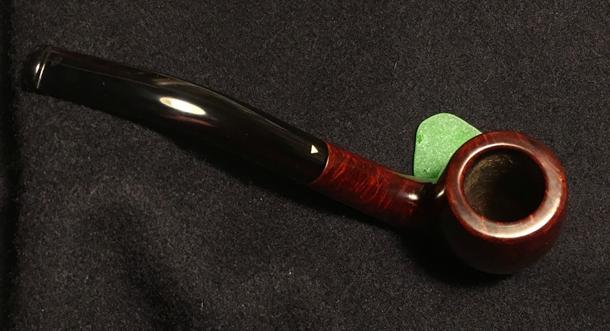
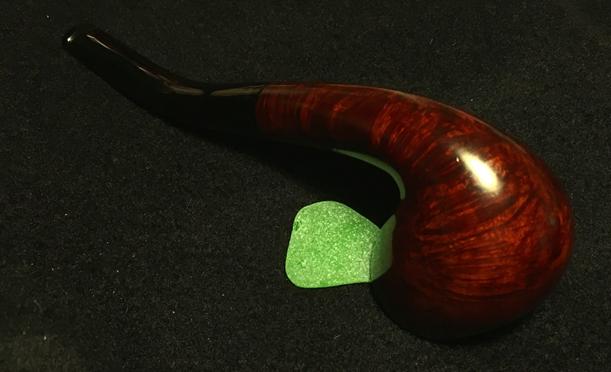
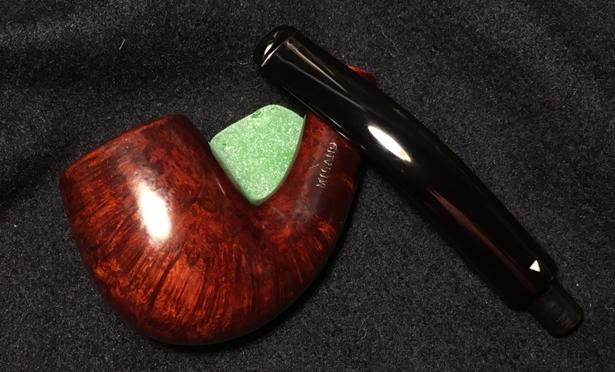
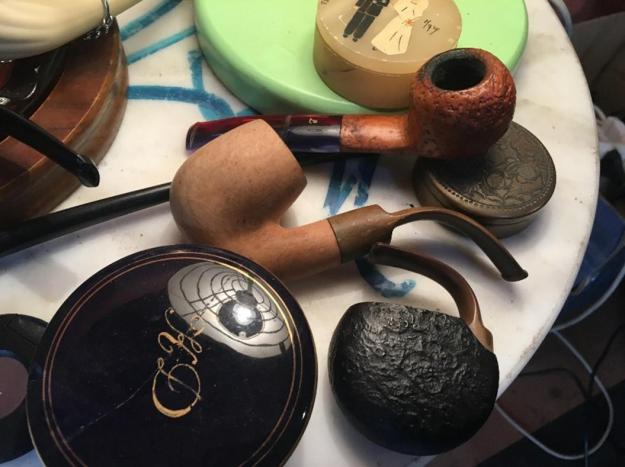
The pipes were unwrapped when I returned home to Sofia.  I was anxious to look at them, take some pictures, and to do my normal ‘information intake’ for each pipe I collect so that I can remember later when they emerge from the ‘Help Me! Basket’ heading to The Pipe Steward worktable.  With a magnifying glass in hand, I discovered that the ‘Bless his heart’ charity pipe was a hidden prince with great potential – a Savinelli Oscar Aged Briar 614 of Italy.  The Oscar is a popular line of the well-known Italian pipe family, Savinelli.  I was surprised and happy to see what I could do to help him out!  On the left side of the shank was stamped in cursive script, ‘Oscar’ over ‘AGED BRIAR’.  The right side of the shank was stamped the Savinelli ‘S’ logo on the left, and to its right was shape number ‘614’ over ‘ITALY’. 
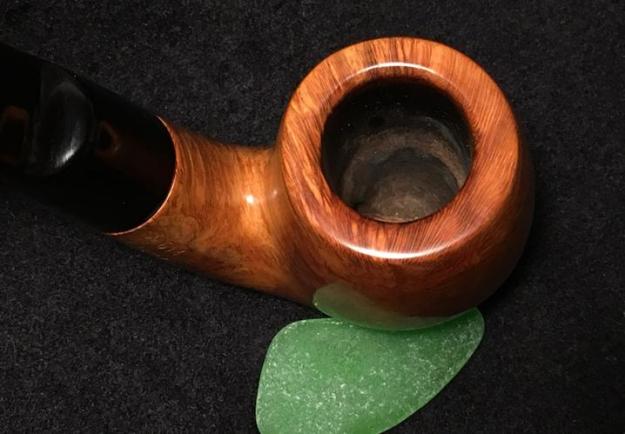
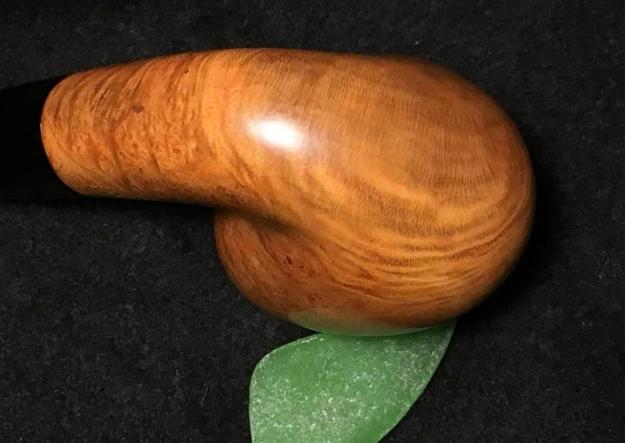
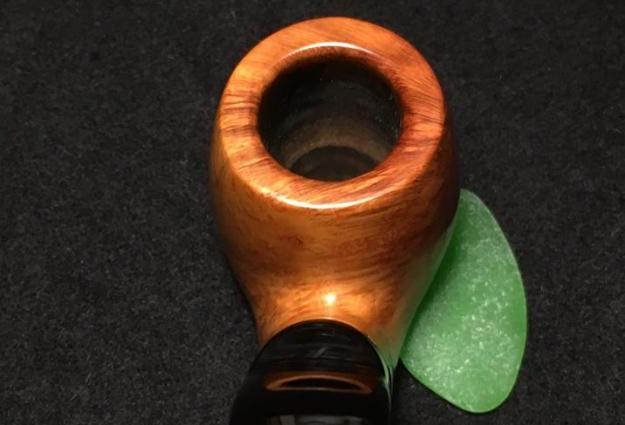
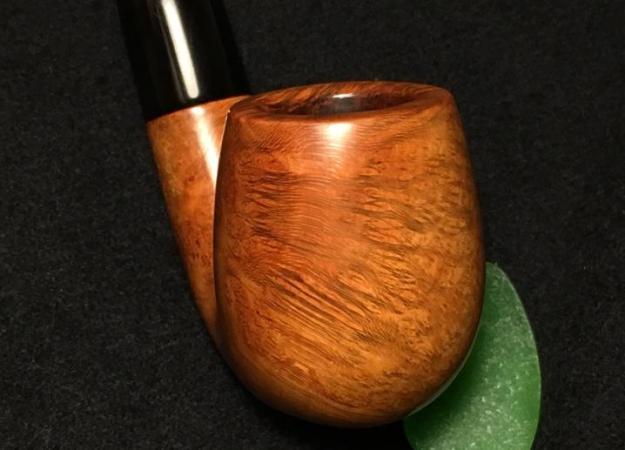
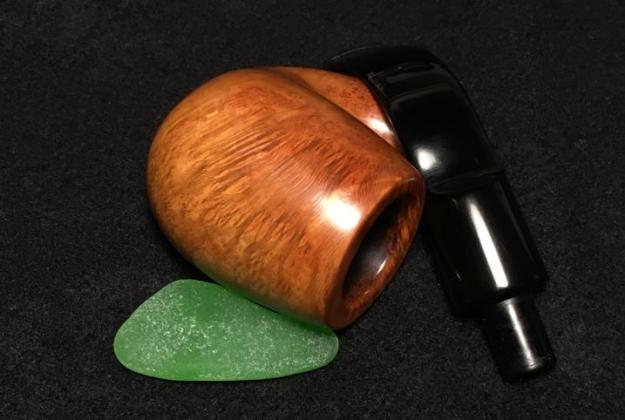
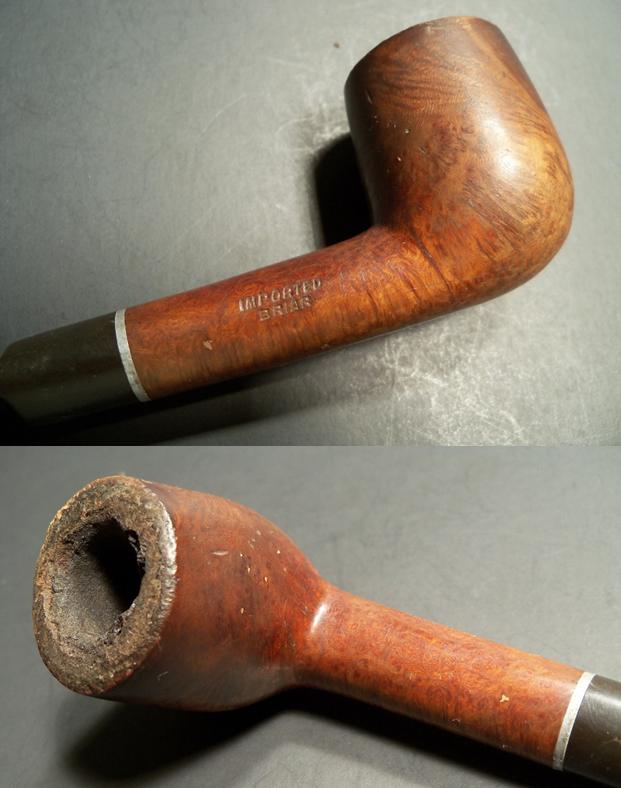
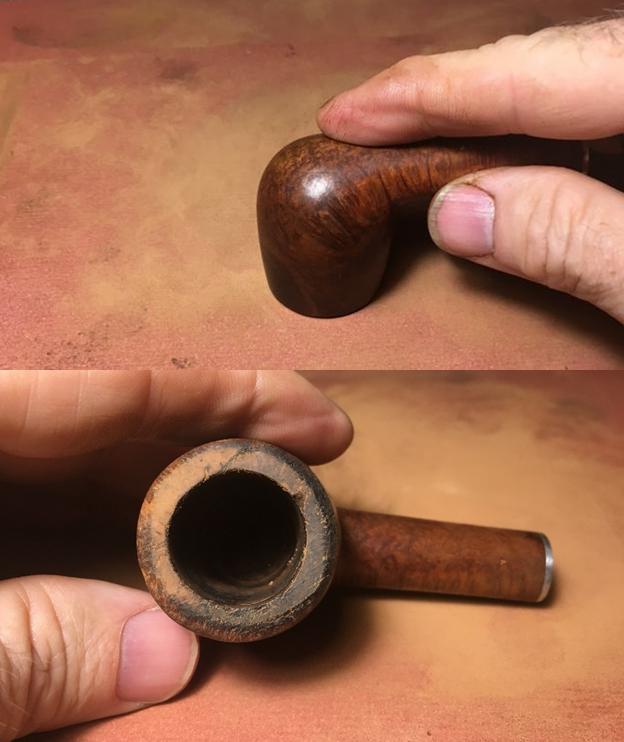
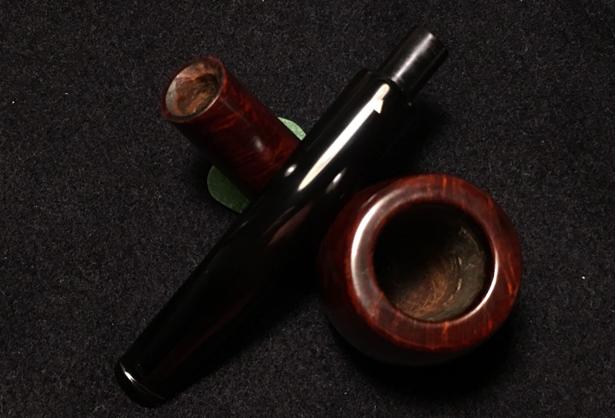
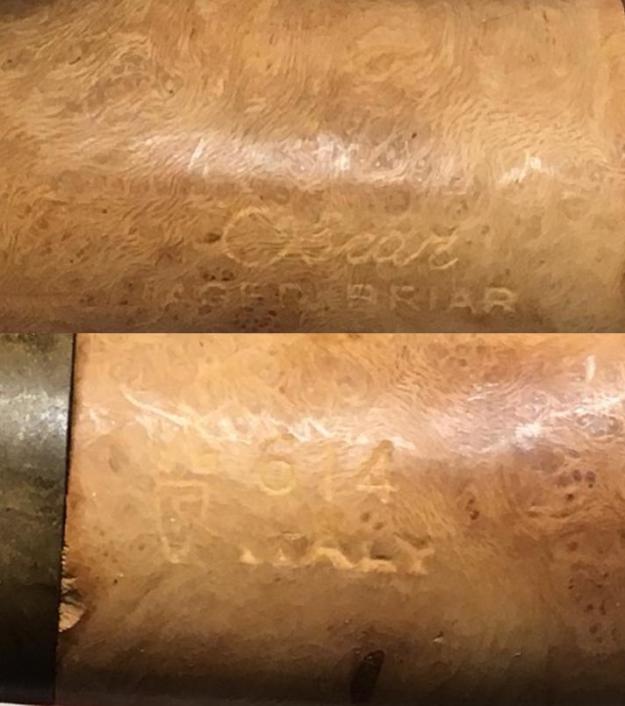
I took some other pictures of the Savinelli Oscar on my worktable to catalog his condition when he arrived from Athens. 
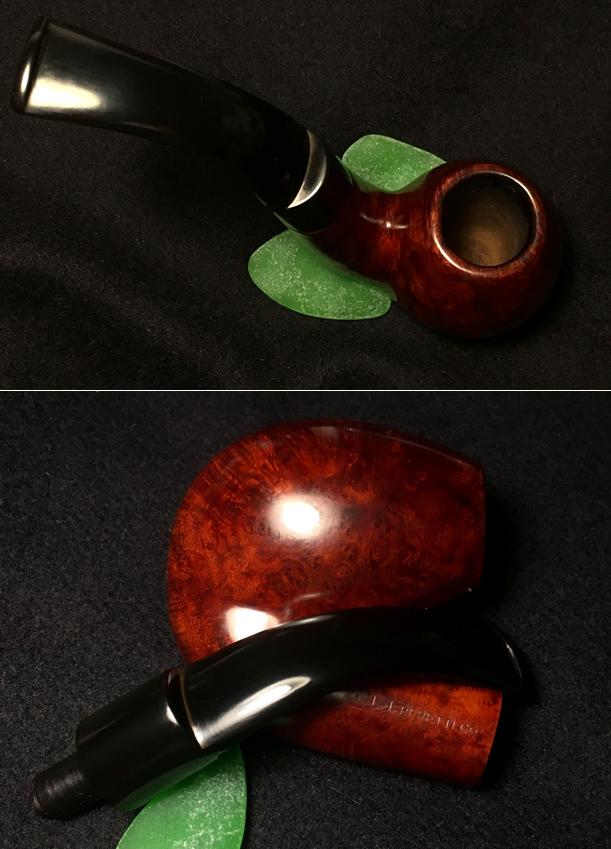
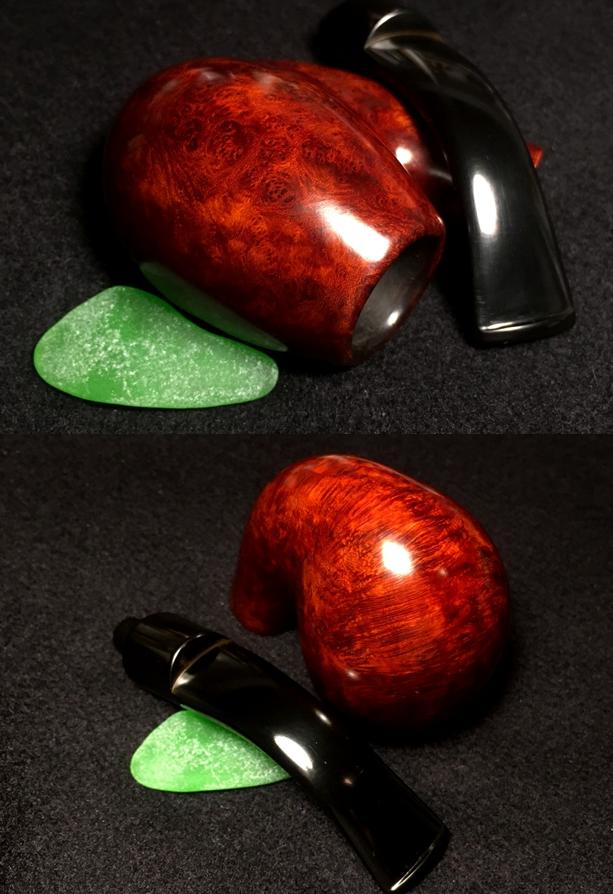
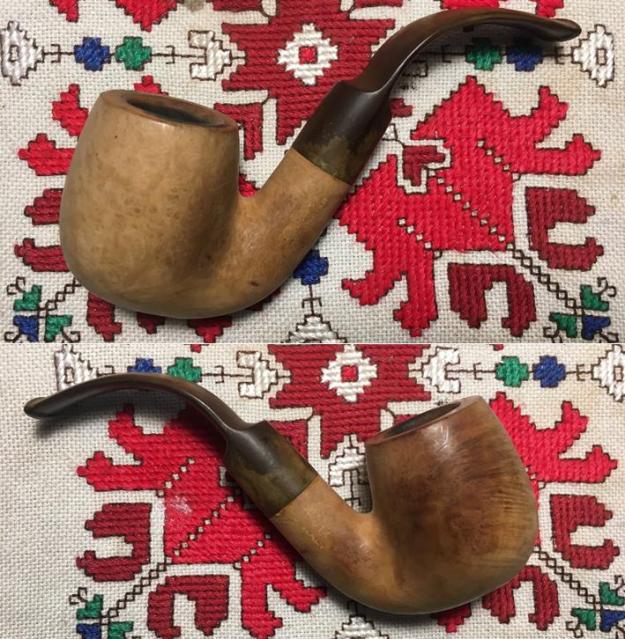
Fast forward now nearly a year. Many of my restoration projects start because a pipe is commissioned, and it is plucked from the ‘Help Me!’ Basket.  This often happens when a pipe  listed in the “For Pipe Dreamers Only!” on The Pipe Steward site attracts someone.  Or, here in Bulgaria, when folks are in our home and know about my pipe restoration work, they often will pour through the many pipes in the ‘Help Me!’ Basket (and boxes 😊) in search of just the right one!  That was the case with the Savinelli Oscar. Taylor, a colleague and blooming pipe man, wanted a couple of pipes for himself and one for a friend in the US. The favorite he chose, or did the pipe choose him 😊(?), was the Savinelli Oscar which is now on my worktable.

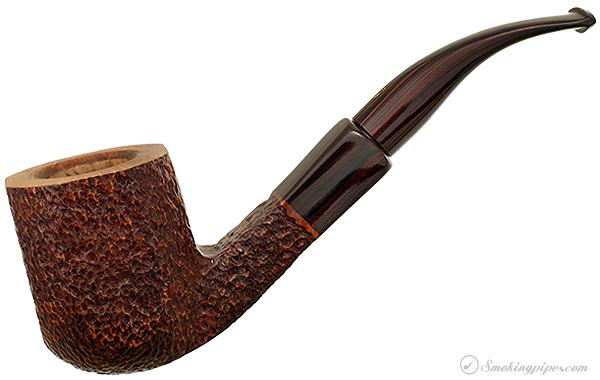
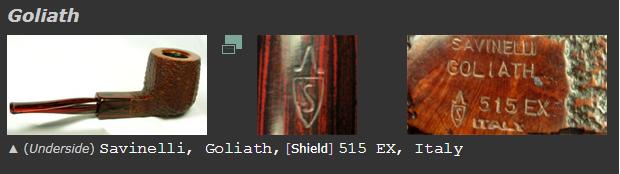
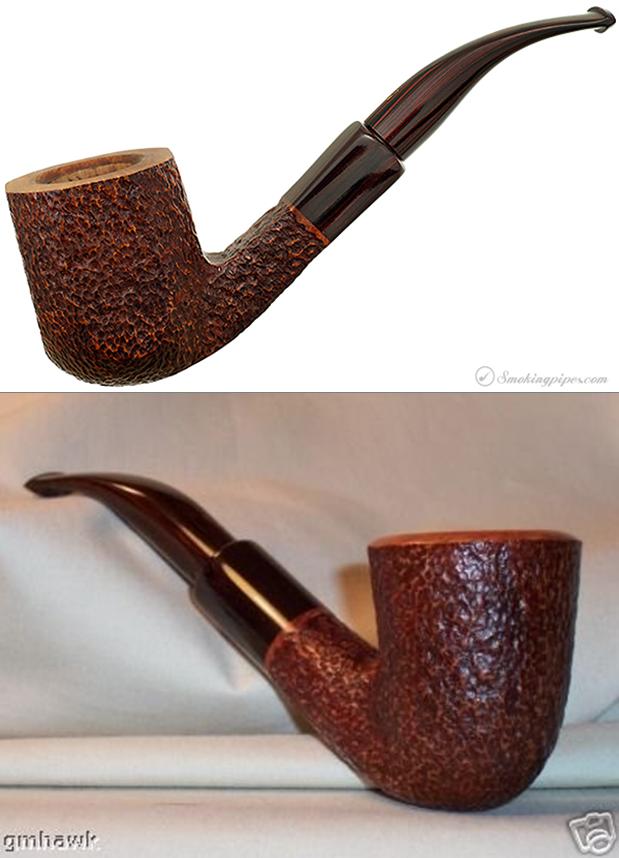
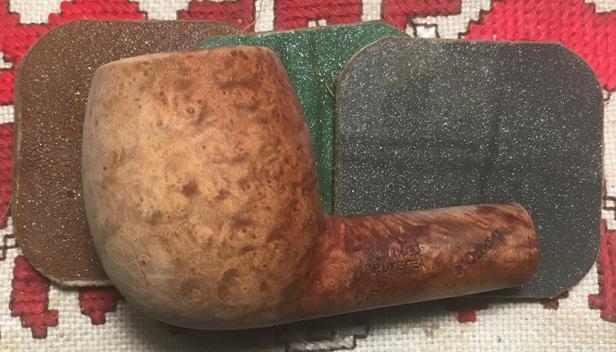
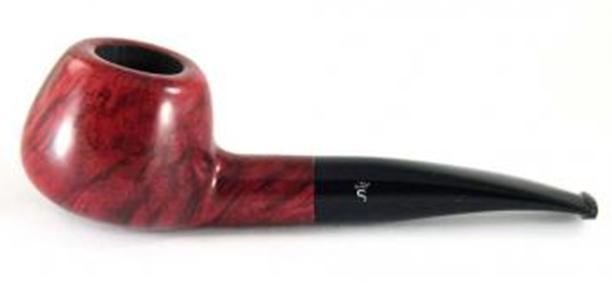
To learn more about the Savinelli Oscar Aged Briar, I look at the Savinelli Pipe Shape guide to identify shape 614.  I locate it in the chart and it looks to be a 3/4 Bent Billiard. I circle the 314 in the chart and it’s interesting to see the other Bent Billiards nearby to compare.  I’m thinking that the Oscar is a 3/4 Bent but I am surprised to see, that comparing it to all the other Savinelli bent shapes, it seems to be the most fully bent shape that Savinelli offers – at least from this chart.
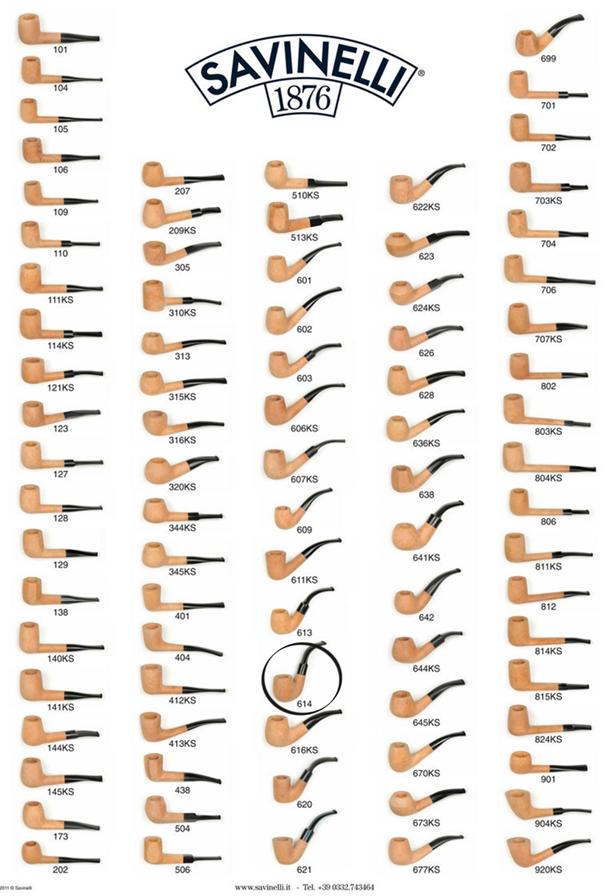
Then, with a simple search on Google using the name and the shape number, 614, I’m hoping for an Oscar 614 in pristine condition to guide the restoration of this sad boy.  I find this example of an Oscar Aged Briar 614 formerly on the AntiqueAuctionsNow website – a nice looking classic bent stem Billiard.
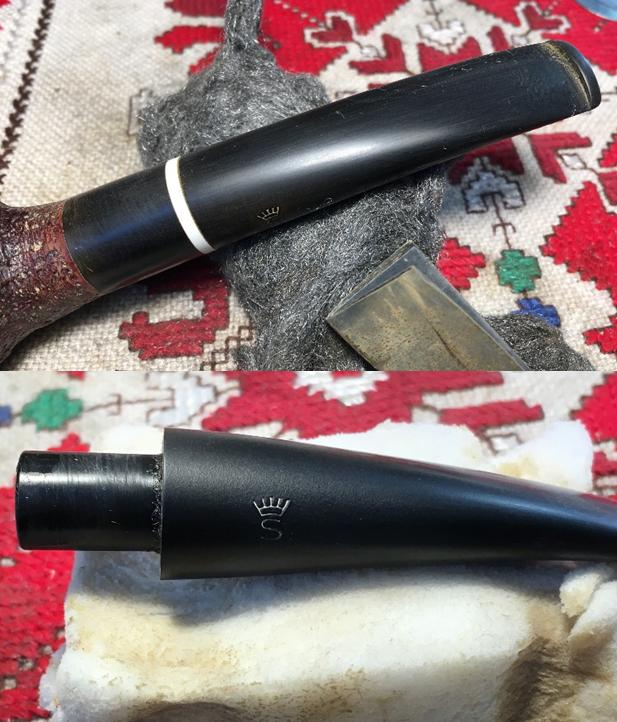
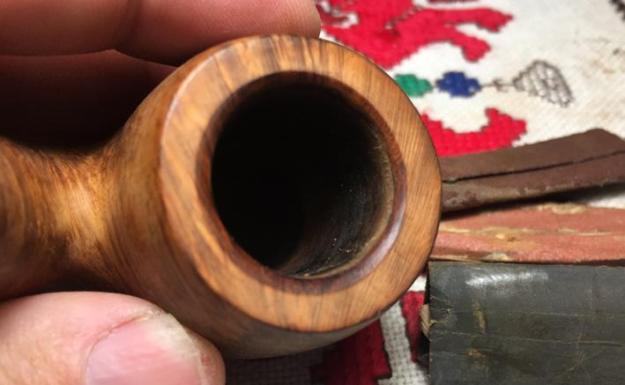
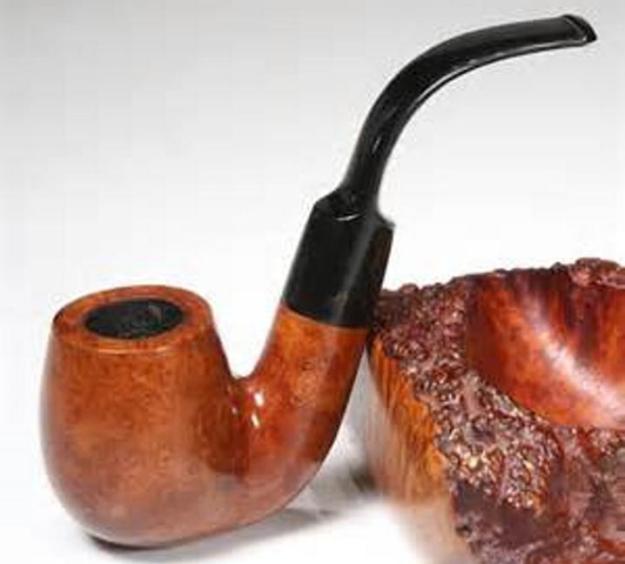
Ah ha! As I look closely at the picture above, it cues me into the possibility of the Savinelli Shooting Star stem stamp on the Oscar – impossible now to see with the heavy oxidation.  I look to another regular place, PipePhil.eu, which gives me more information and understanding.  The Savinelli Oscar line, along with three others, is marked with the Shooting Star stamp.
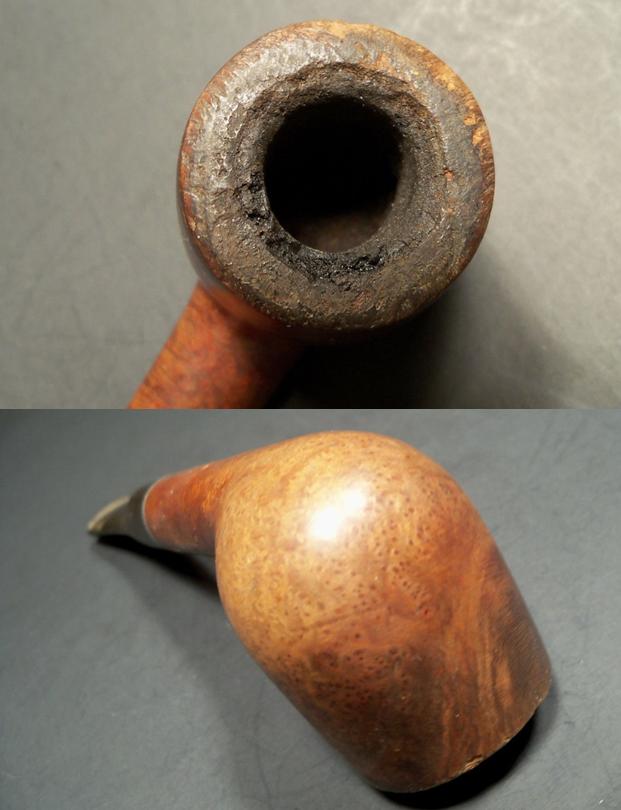
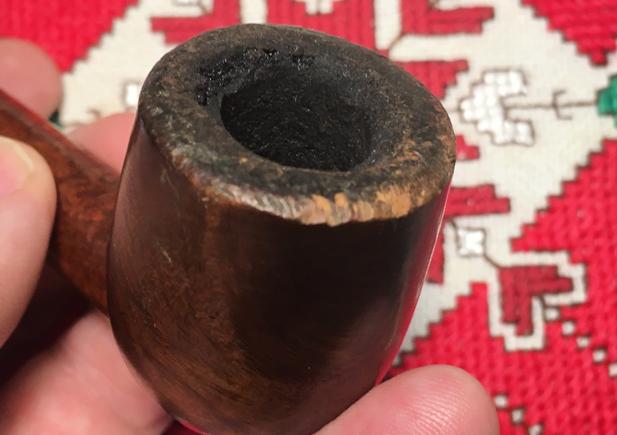
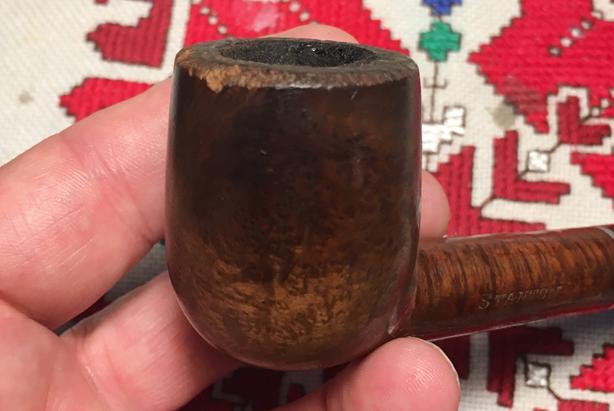
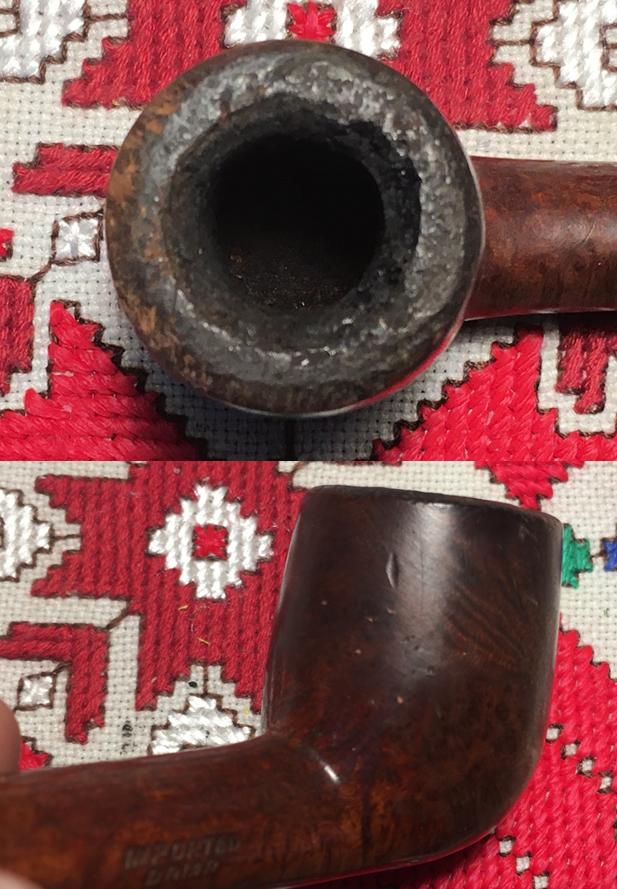
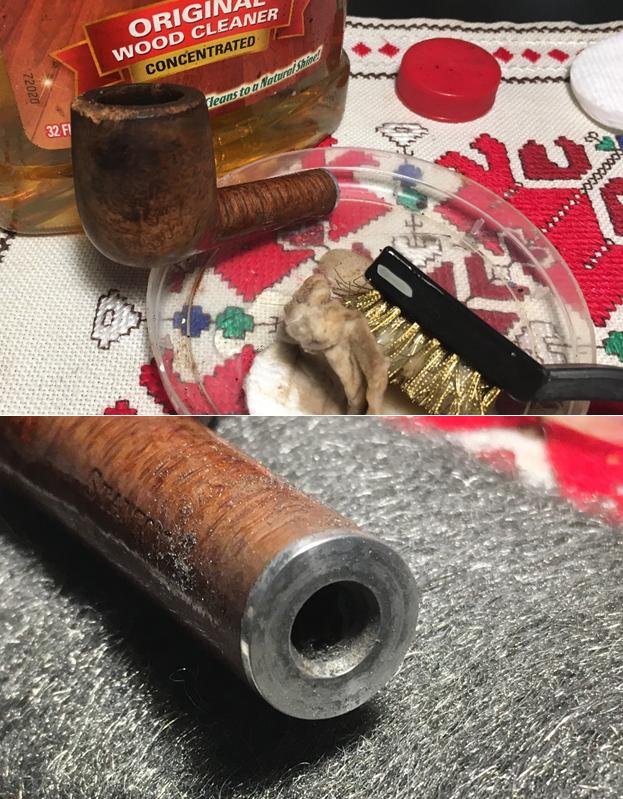
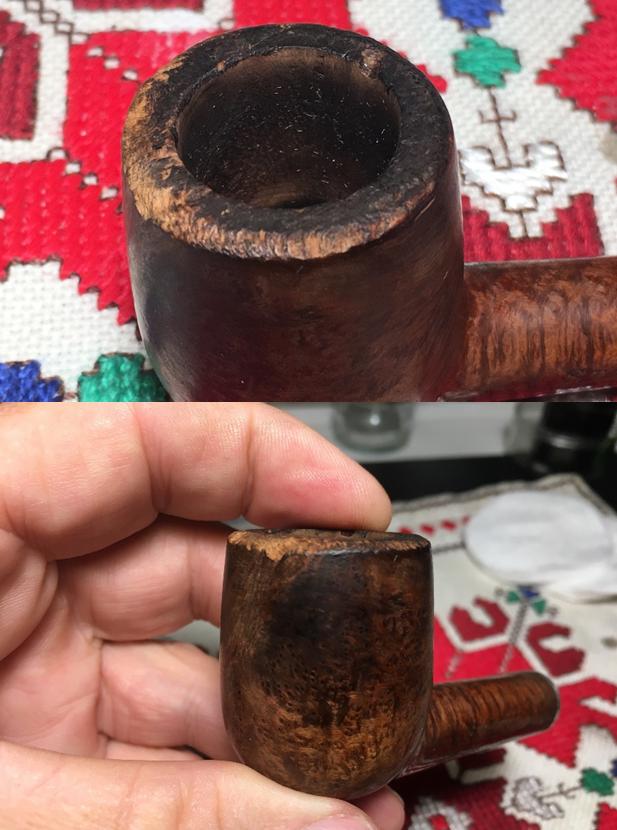
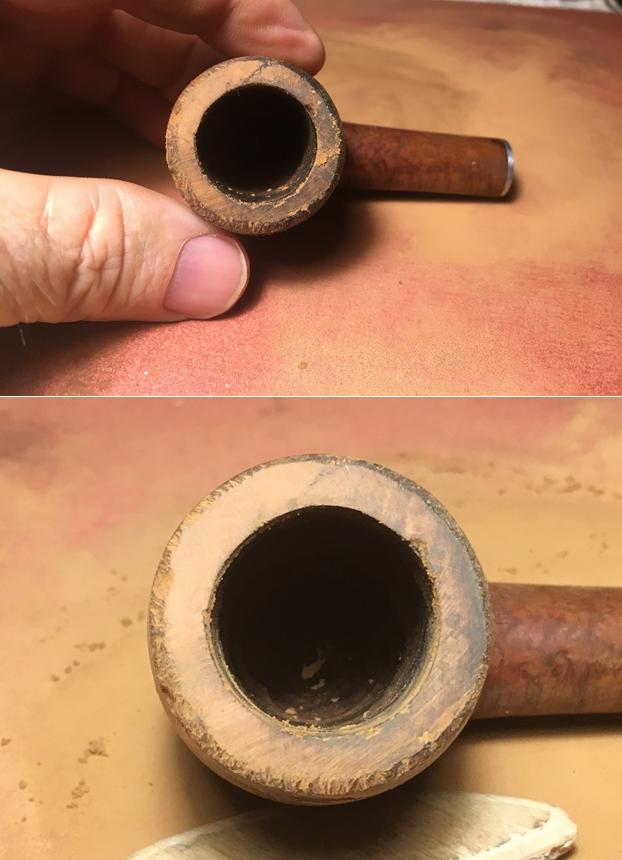
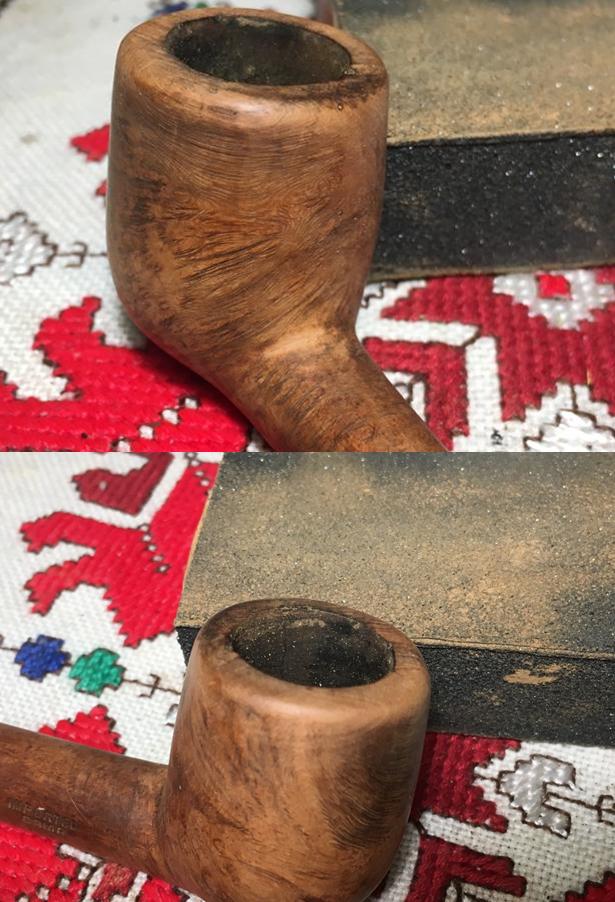
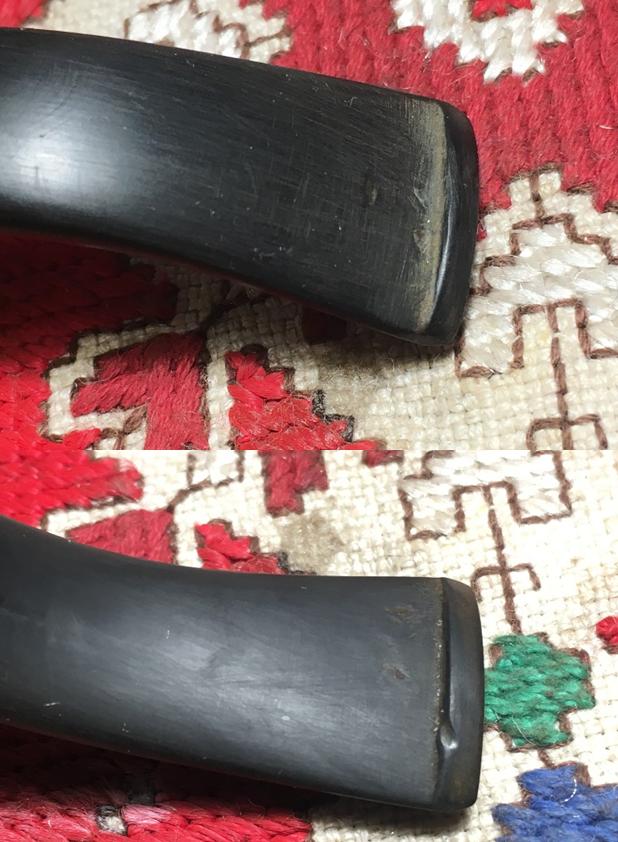
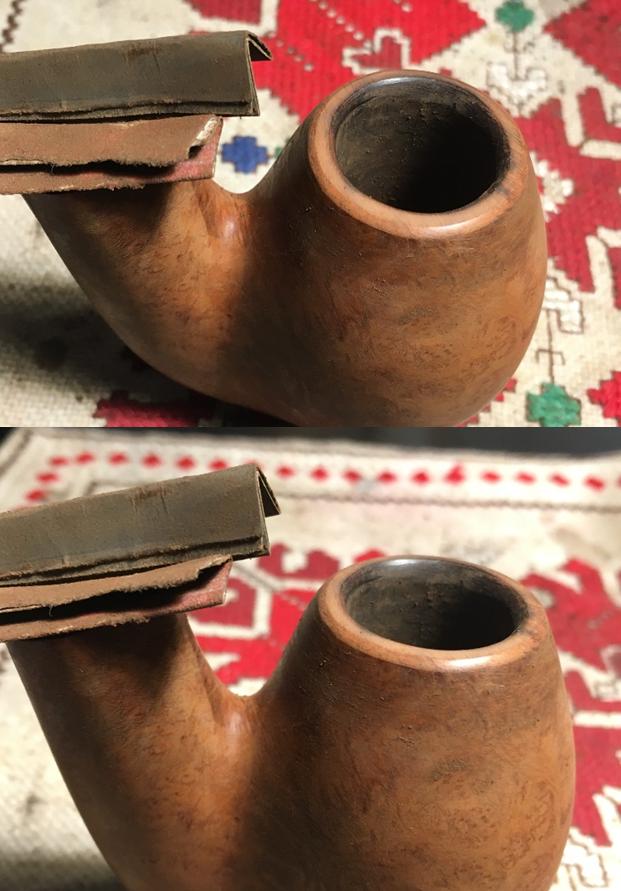
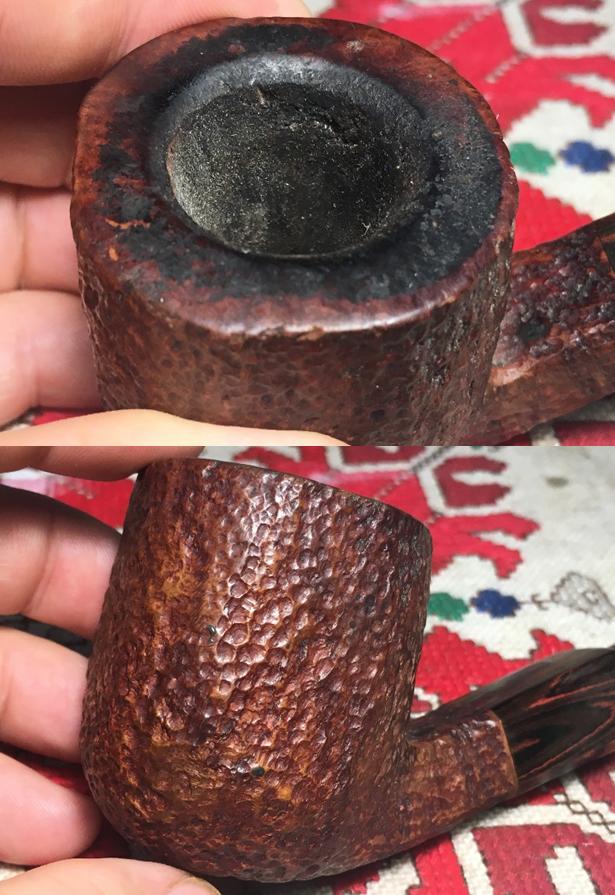
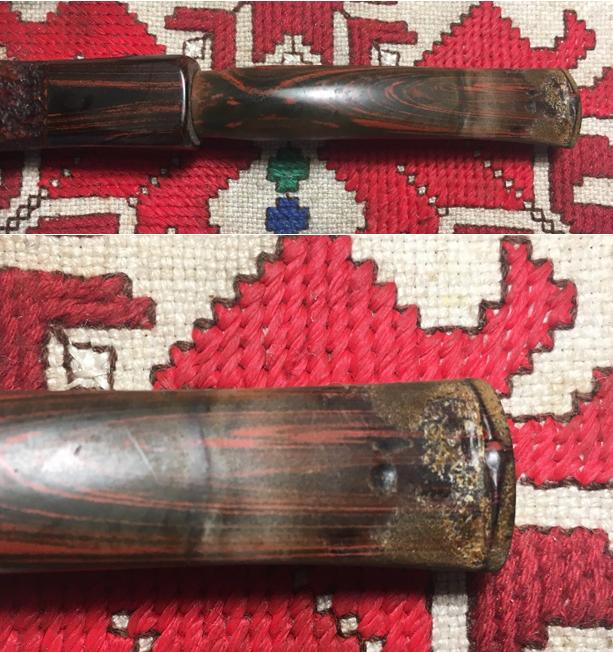
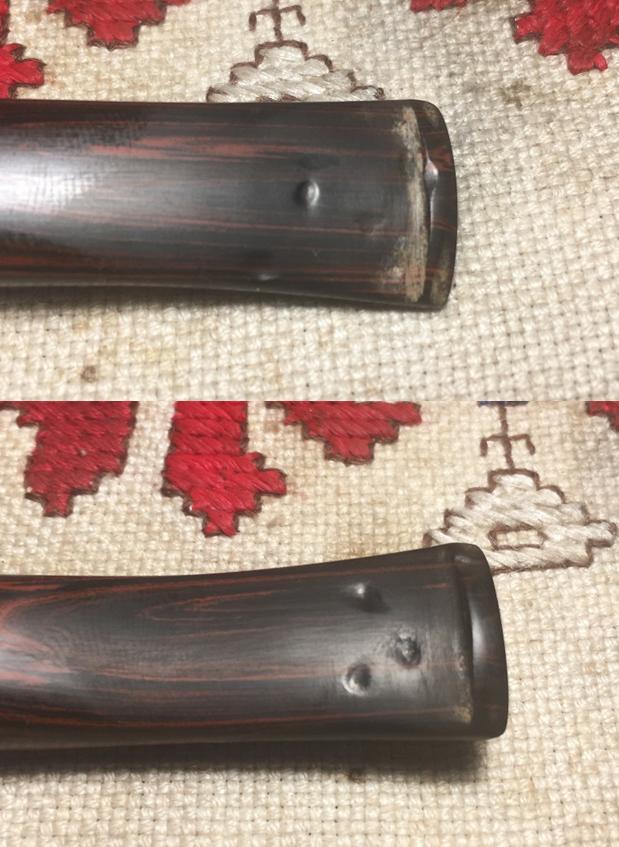
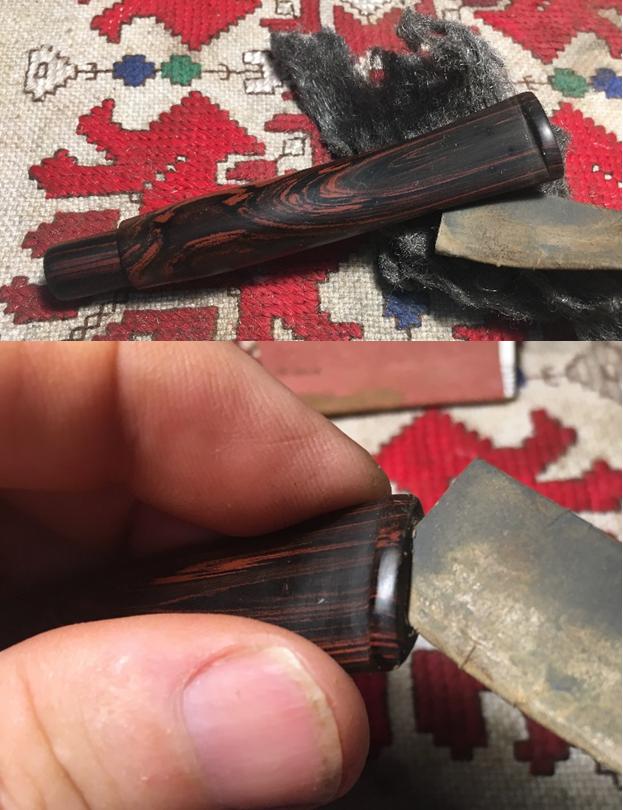
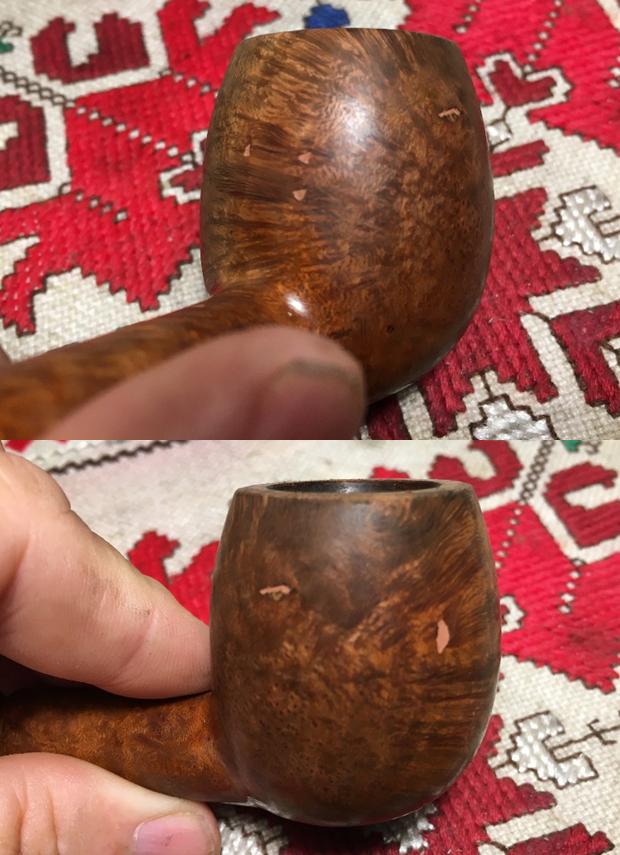
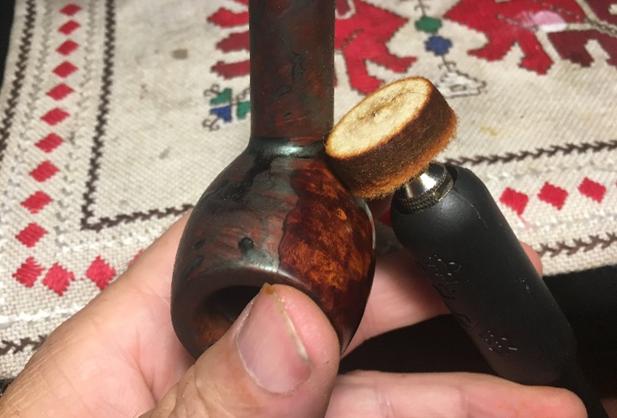
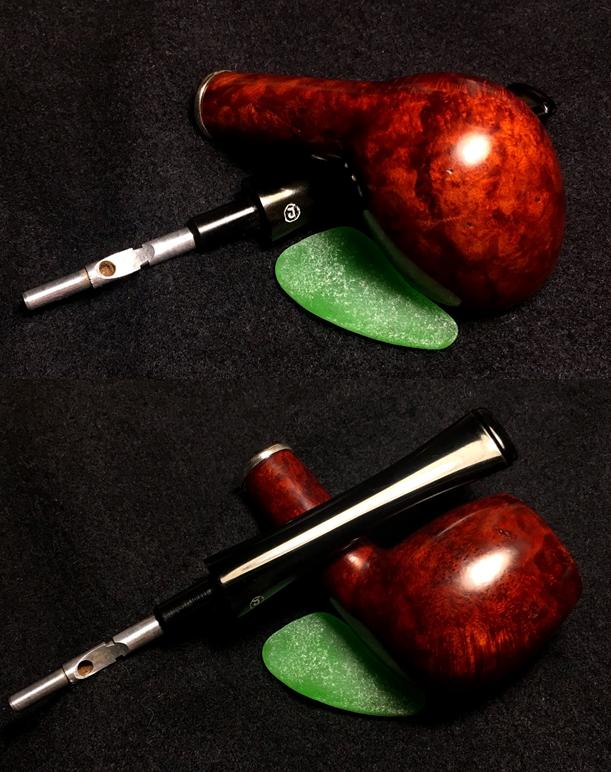
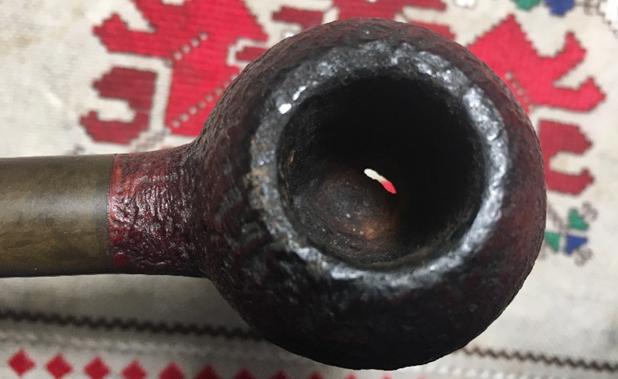
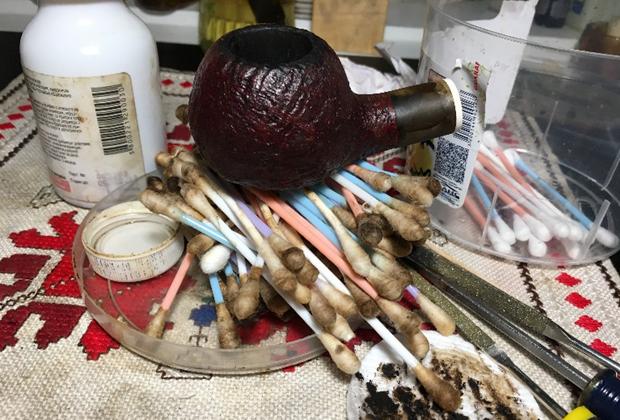
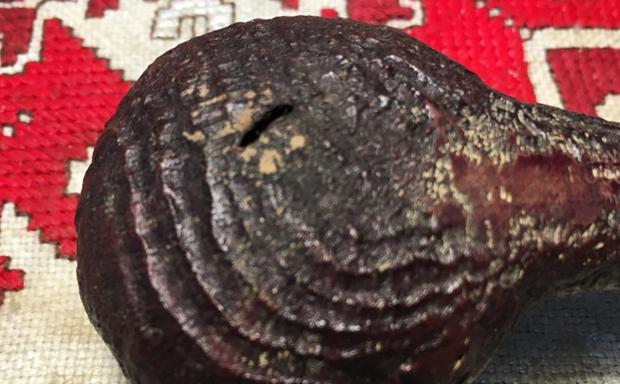
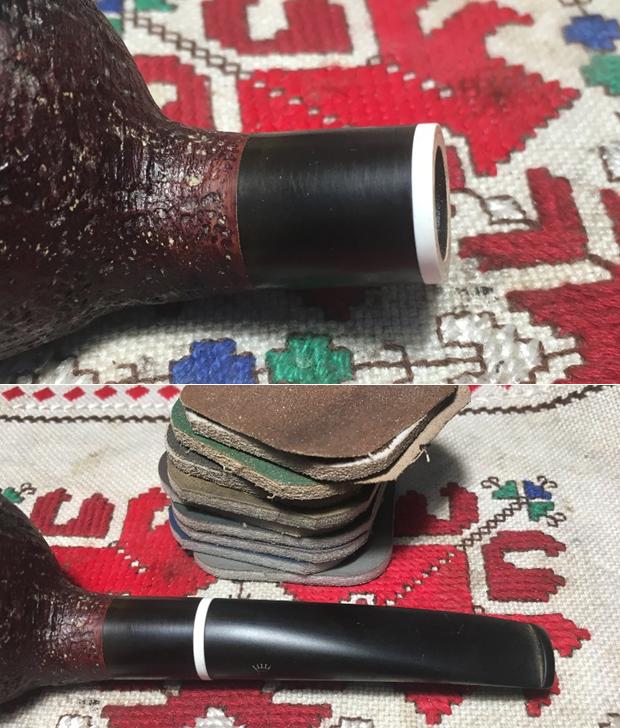
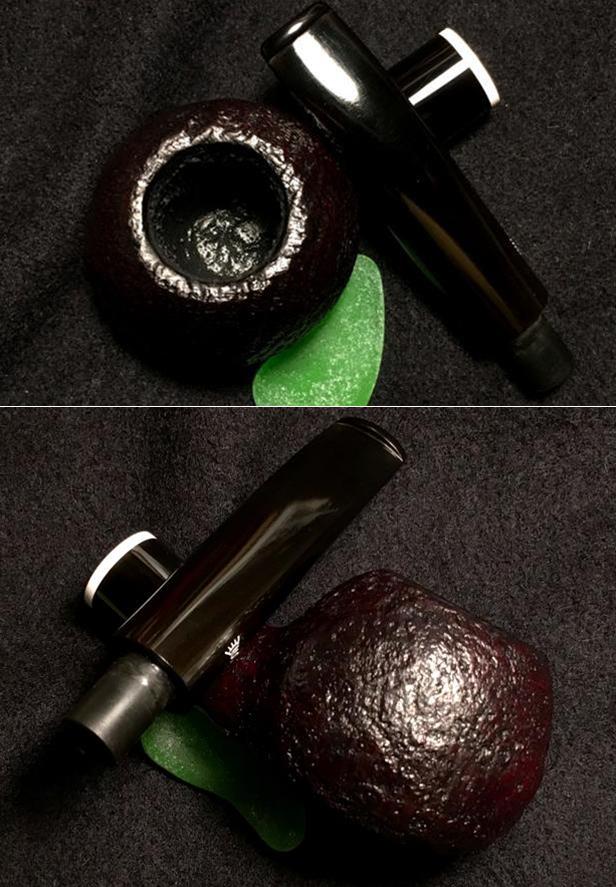
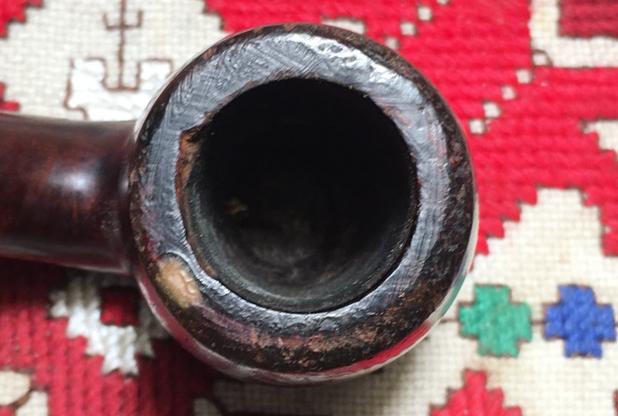
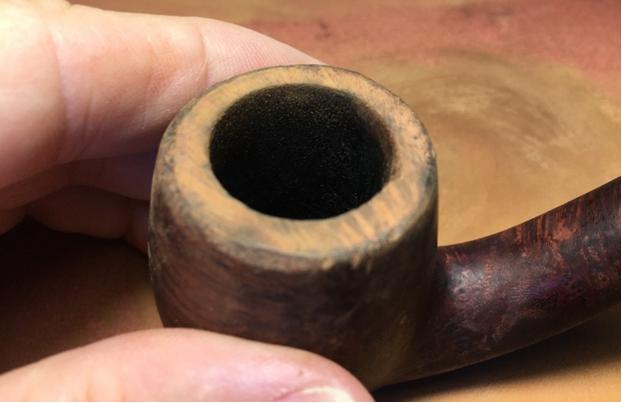
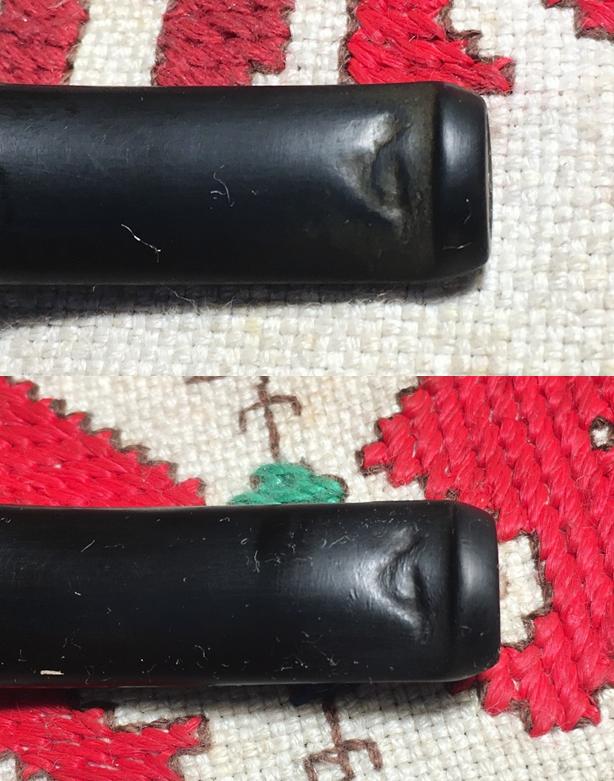
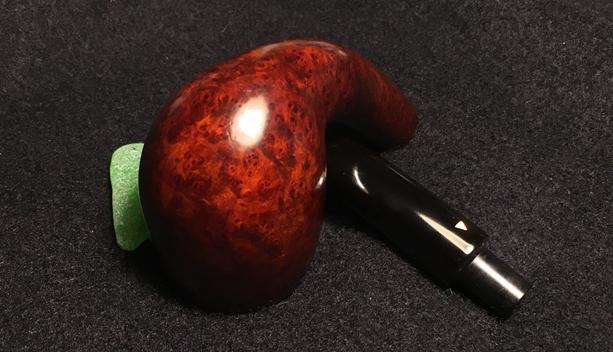
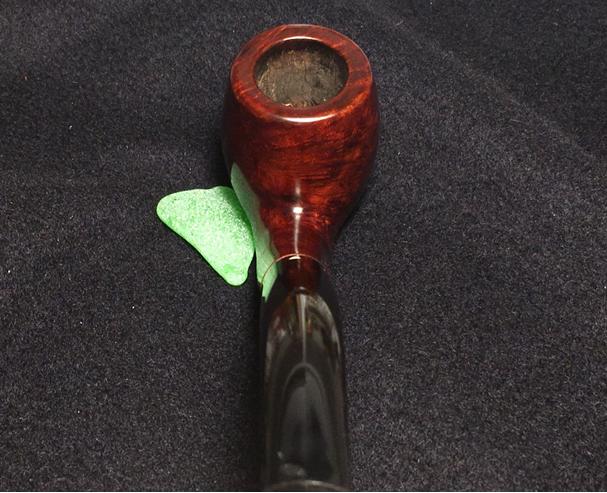
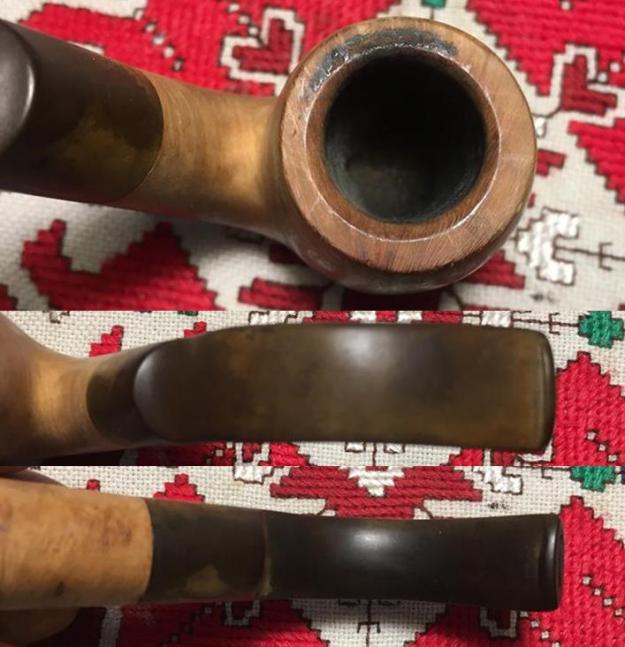
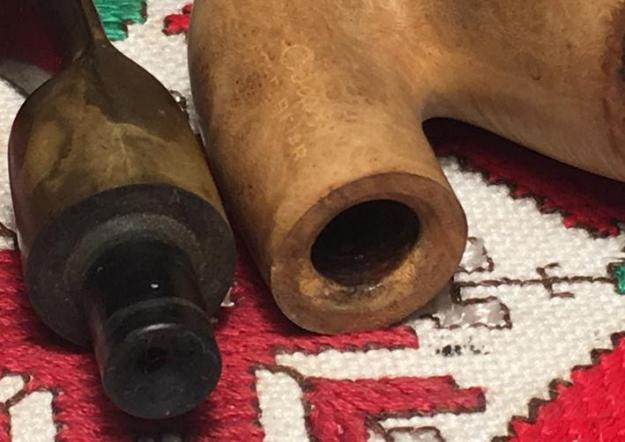
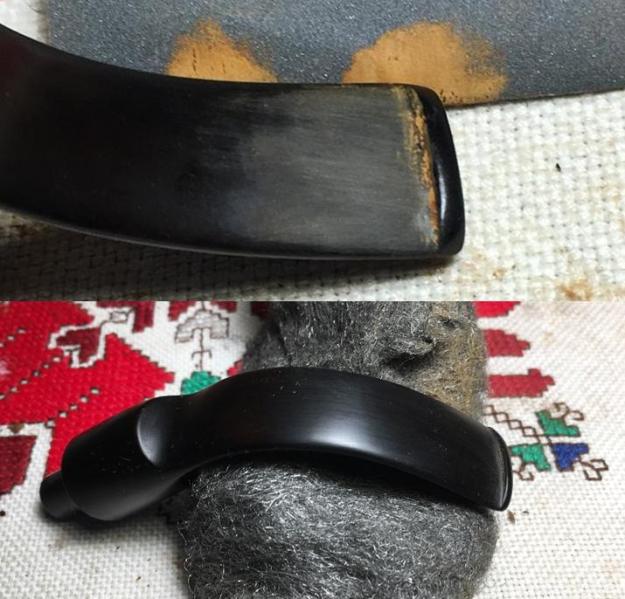
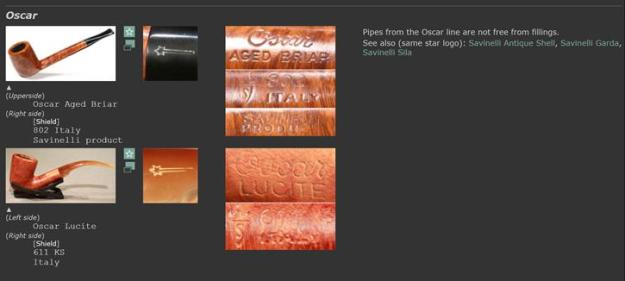
Looking at the overall condition of the pipe, I have already noted the oxidation and a hope that the Shooting Star stamping can be salvaged.  The bit also has very minor tooth chatter with a single dent on the upper button. The bowl almost appears like it has been bleached by the sun and the nomenclature stampings on the sides of the shank are thin and will take some care not to diminish more.  The rim has some scorching over the left quadrant and has minor cake build up in the chamber.  The internal rim has a smart bevel that I will refresh.  I’ll ream the chamber to get down to the briar for a fresh start. A few small fills are detected on the lower shank and a significant divot is evident on the shank end, just below to the left of the Savinelli ‘S’ logo.

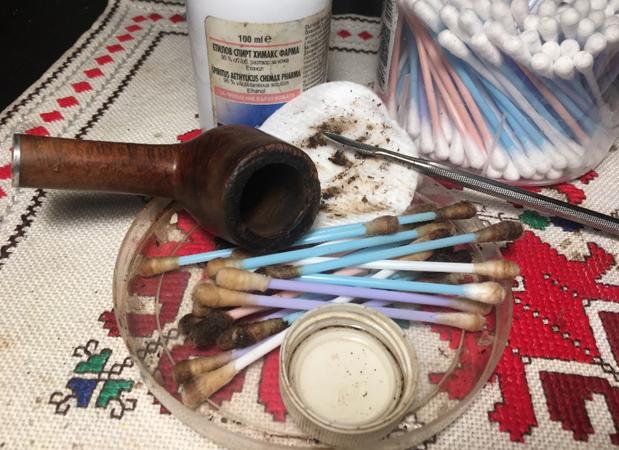
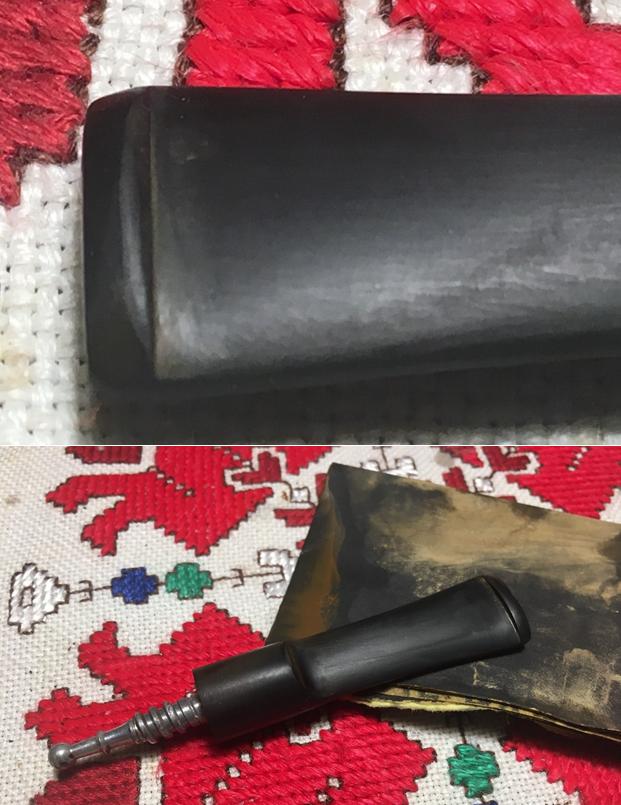
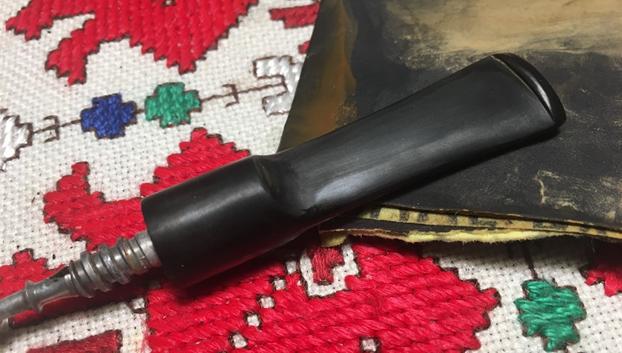
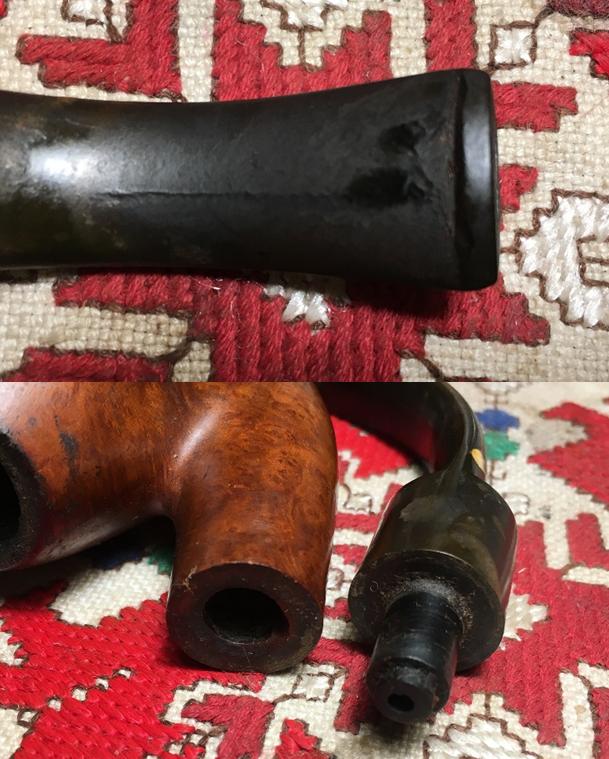
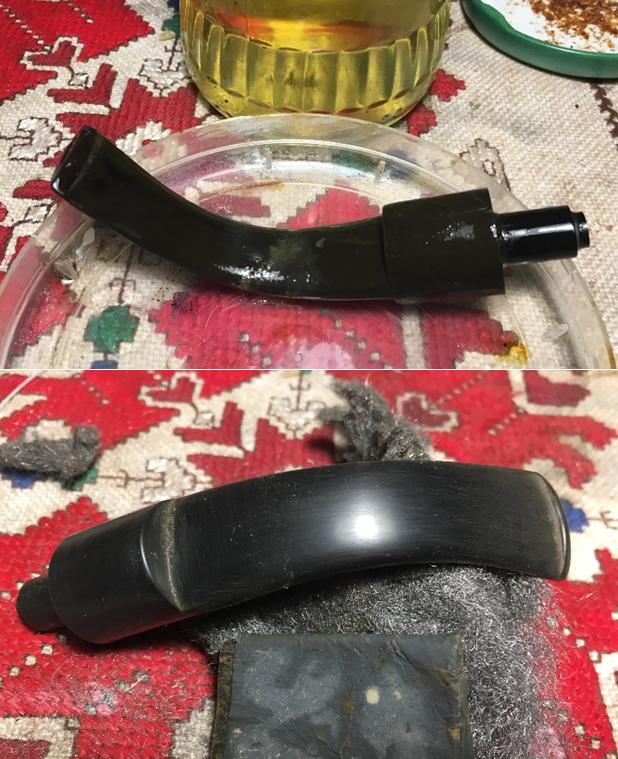
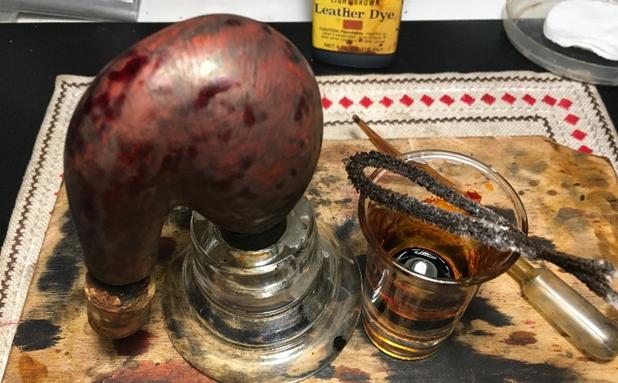
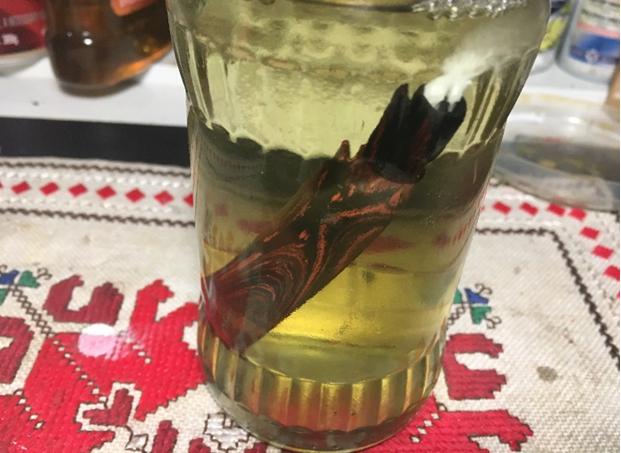
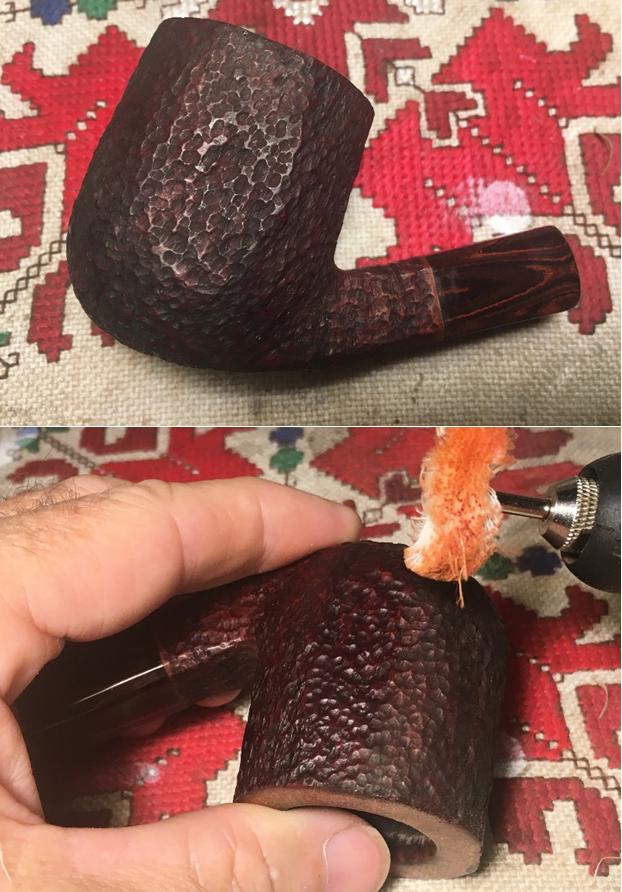
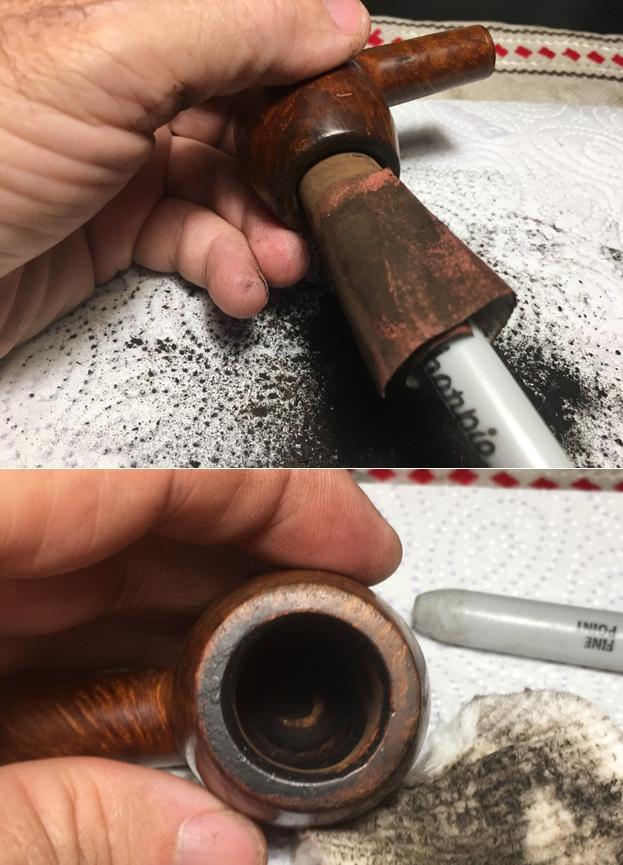
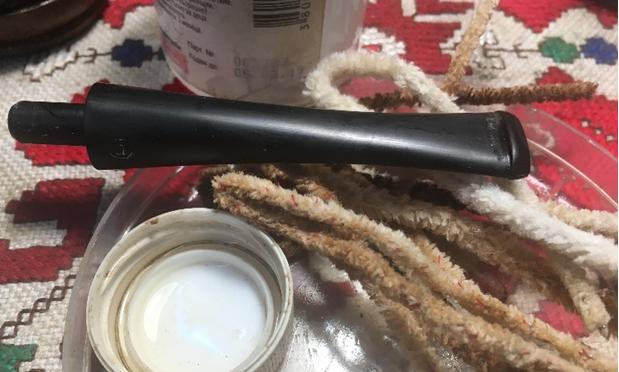
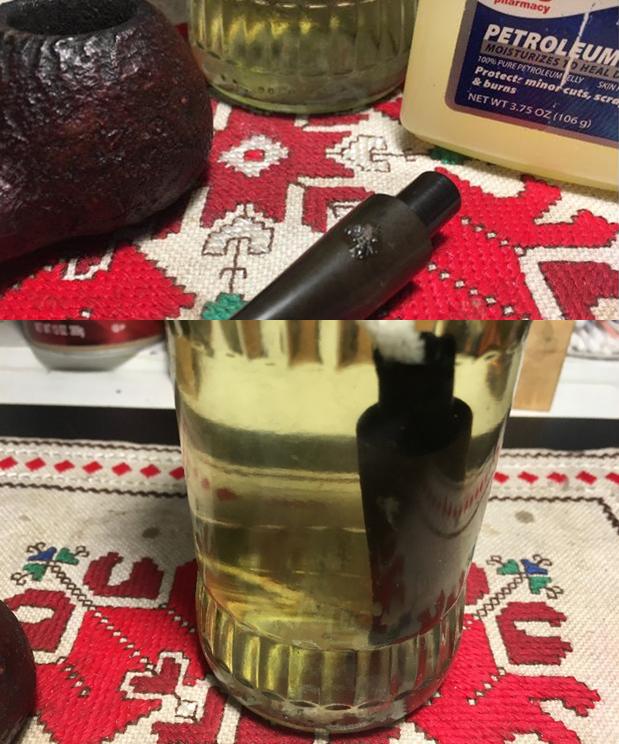
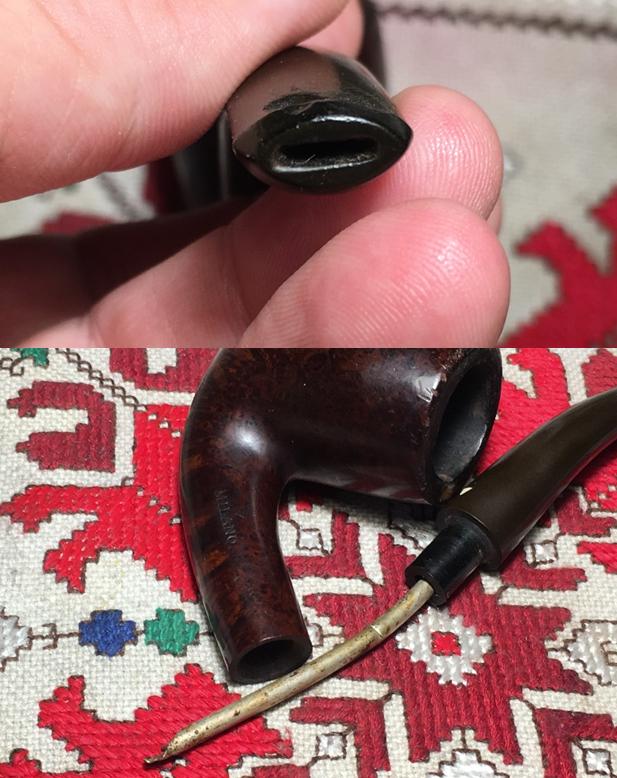
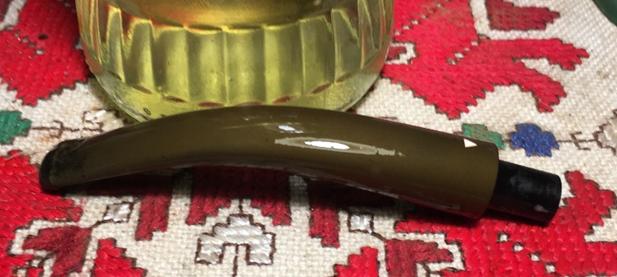
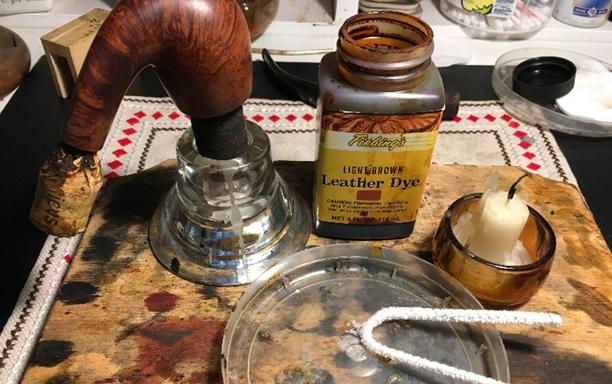
The first thing to address is the stem’s oxidation.  I add the Oscar’s deeply oxidized stem with a batch of other stems into a bath of Before and After Deoxidizer to remove the oxidation on the stem.  Aligned with each stummel, the stems are put into the solution for a few hours.  The Savinelli Oscar is on the left.  I’m hopeful that the Before and After Deoxidizer might uncover the Shooting Star stem stamp – hopeful, but doubtful.
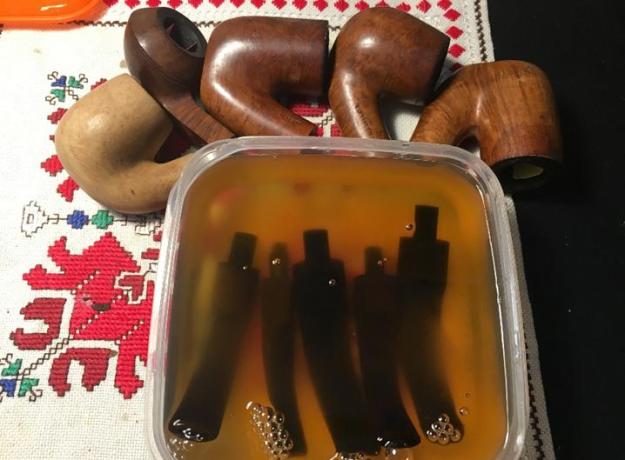
After a few hours, using a toothpick, I fish out the Oscar’s stem and allow it to drip-drain the Before and After Deoxidizer.  I then wipe the stem with cotton pads and mineral spirits (light paraffin oil here in Bulgaria) which removes layers of raised oxidation off the surface.  Miraculously, the Savinelli shooting star stamp appears out from underneath the oxidation!  It is very thin and I’m not sure there’s enough depth left of the stamp for acrylic paint to find purchase. 
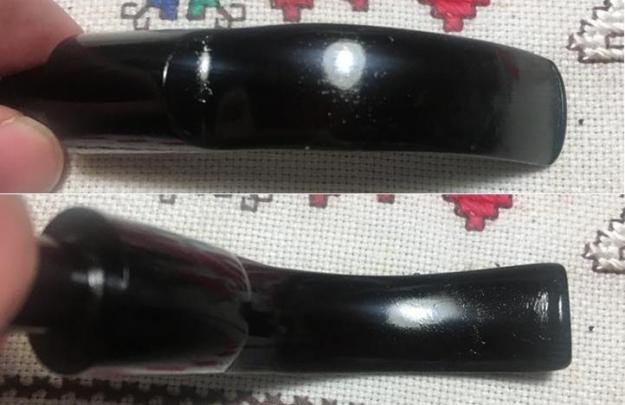
Continuing with the stem, I use Before and After Fine Polish then Extra Fine Polish to further condition the stem.  With both, I place some polish on my finger and work it in on the vulcanite surface until it is absorbed.  After each, I buff it further with cotton pads.  The stem looks great – though the Shooting Star stamp doesn’t look like there’s much I can do with it but save what’s left of it!
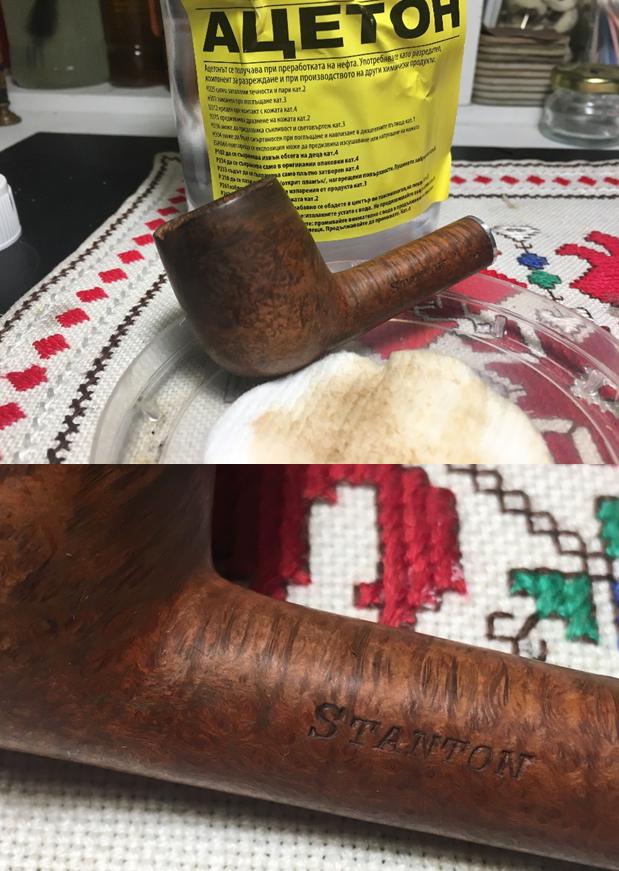
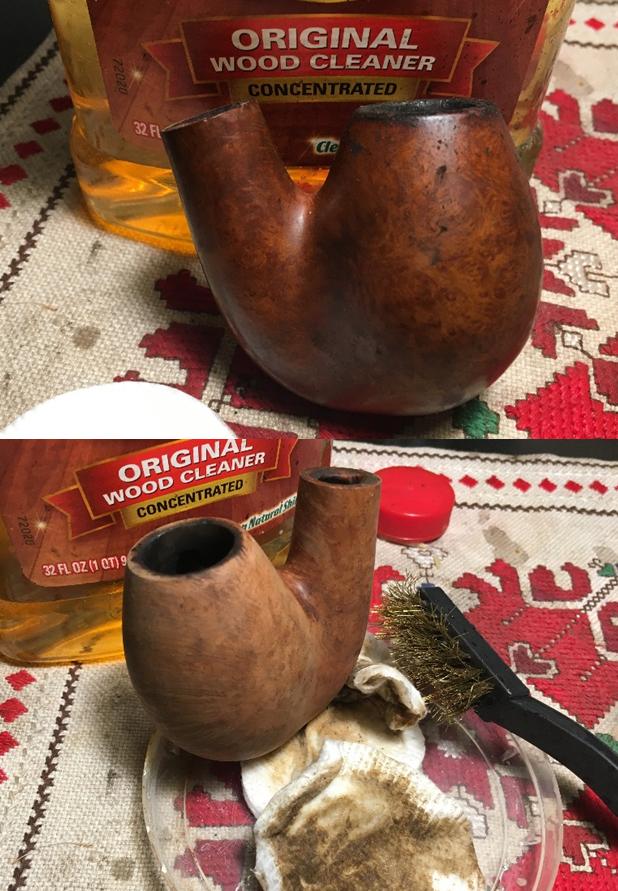
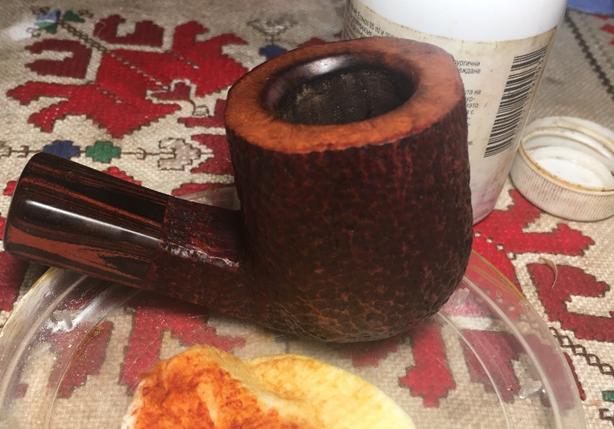
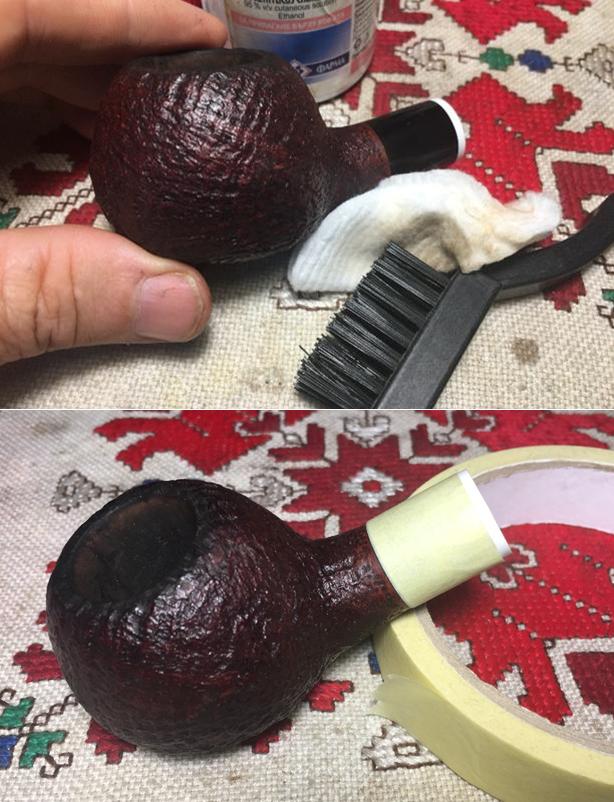
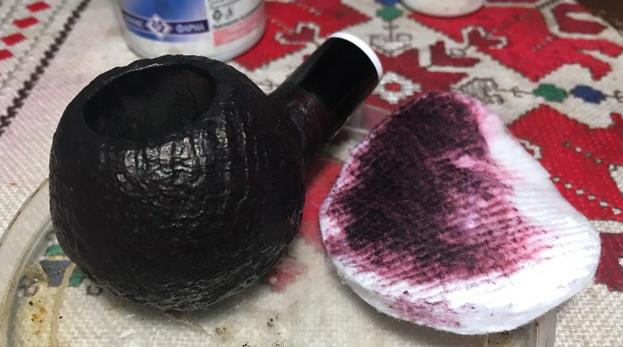
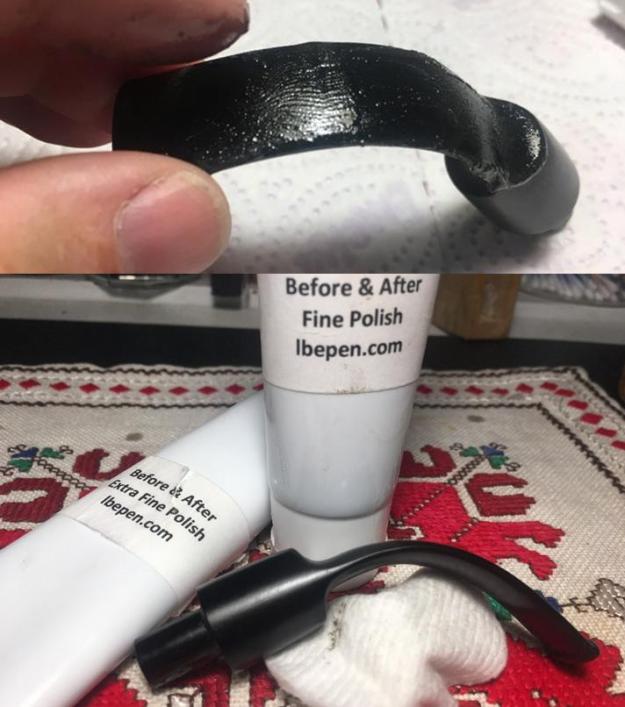
Turning to the stummel, I use undiluted Murphy’s Oil Soap to scrub the surface and rim with a cotton pad.  Whoops!  Usually, I do the reaming before this – I’ll need to back track.  I rinse the stummel with cool tap water and it cleaned up very well – the rim gunk is gone.  I decide to apply a coat of light paraffin oil (mineral oil) to the surface to rehydrate the briar.  I set it aside for a while for the paraffin oil to absorb fully.  The grain looks good. 
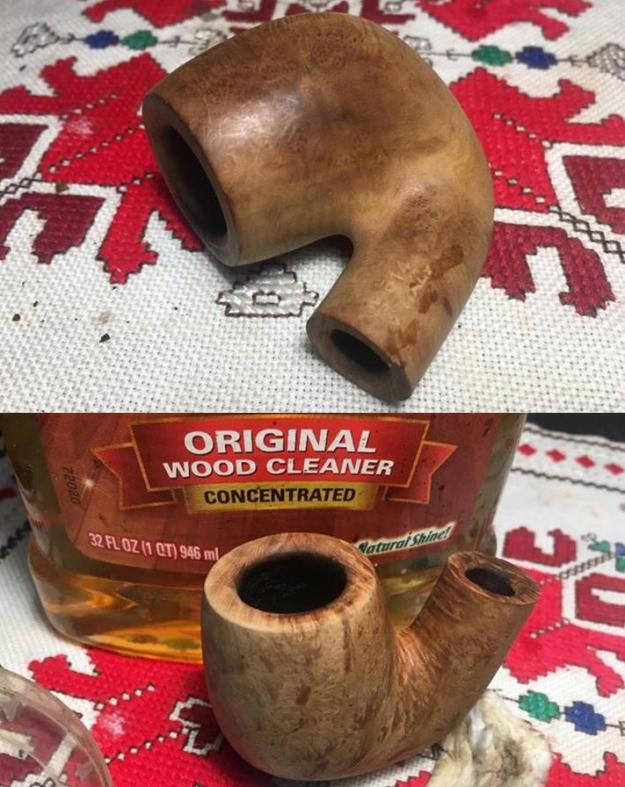
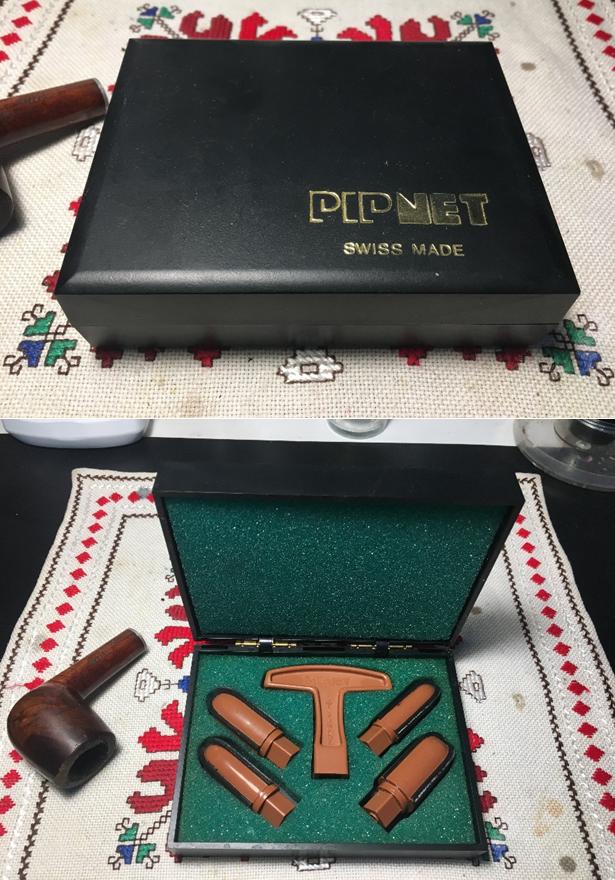
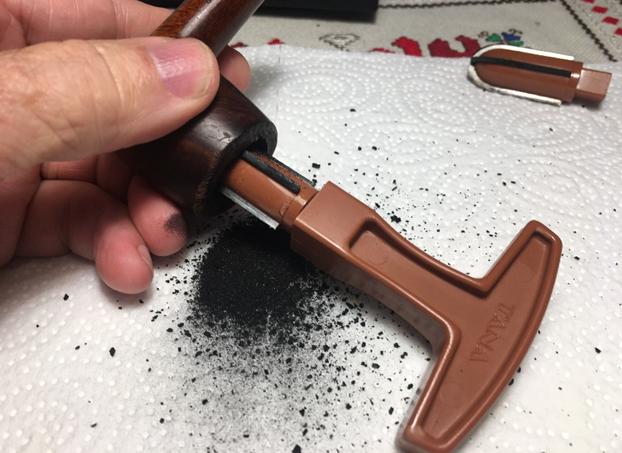
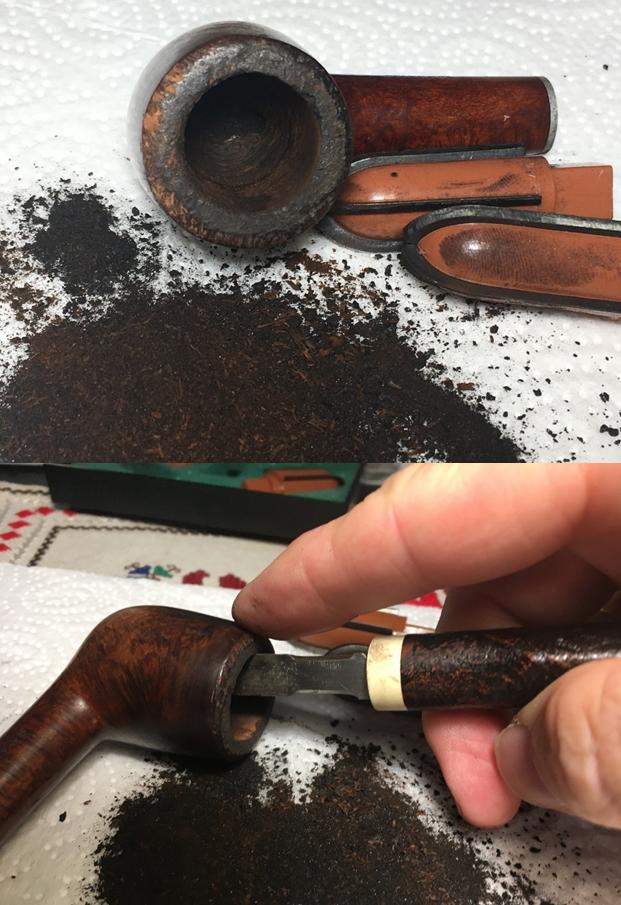
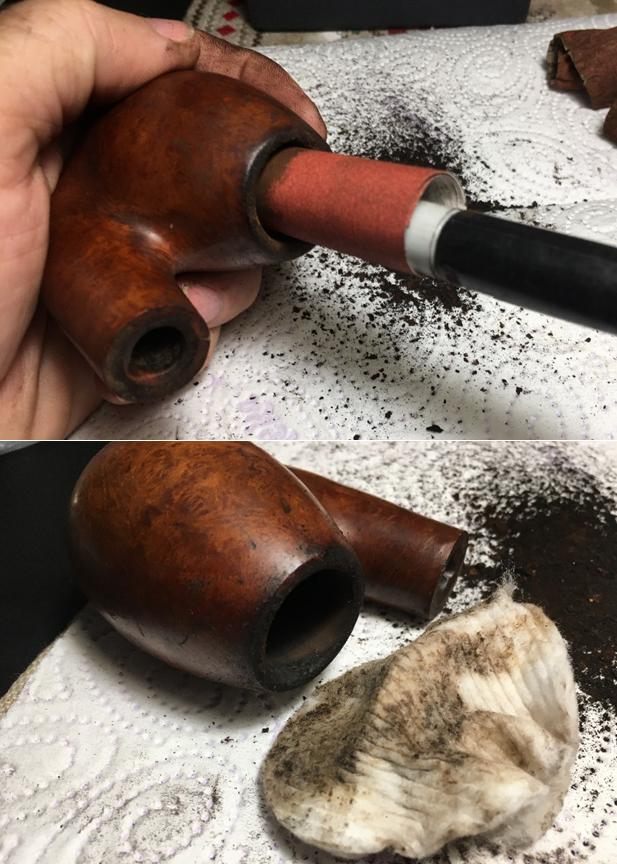
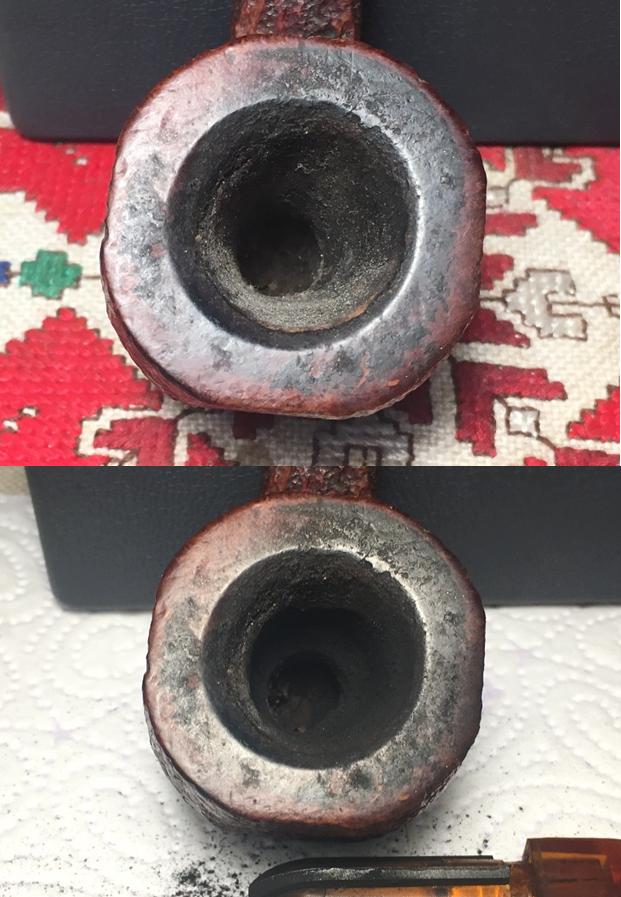
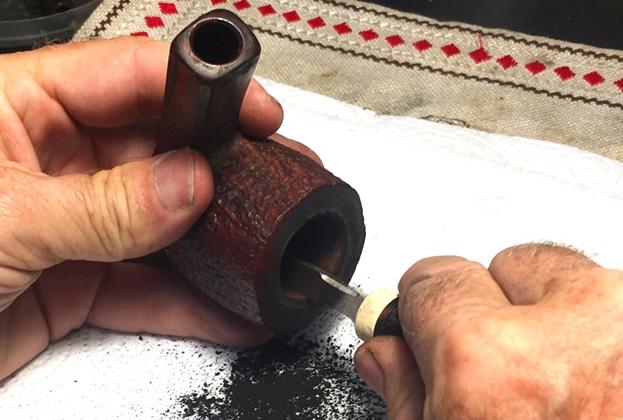
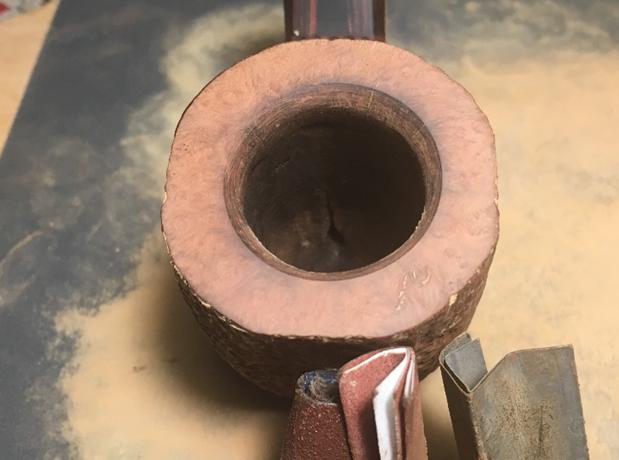
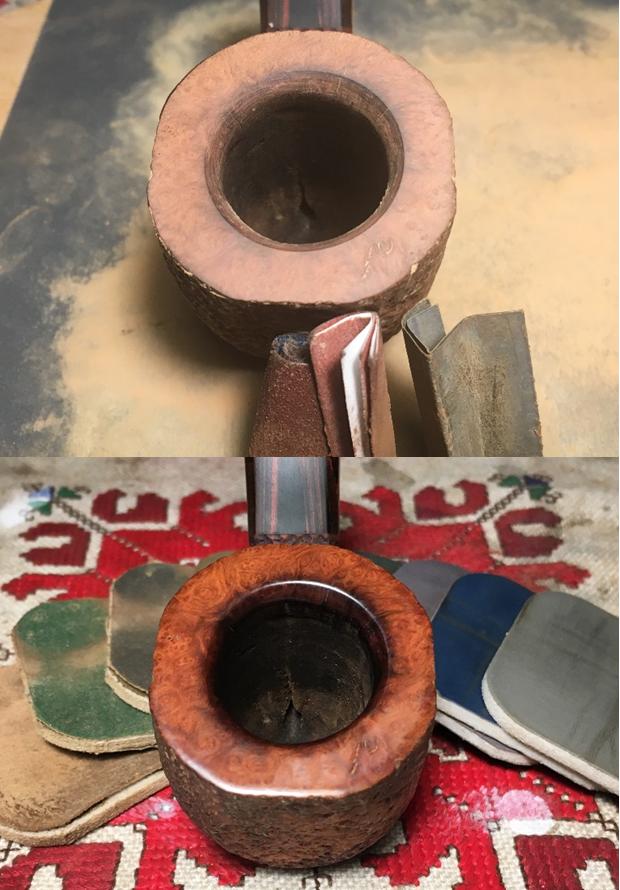
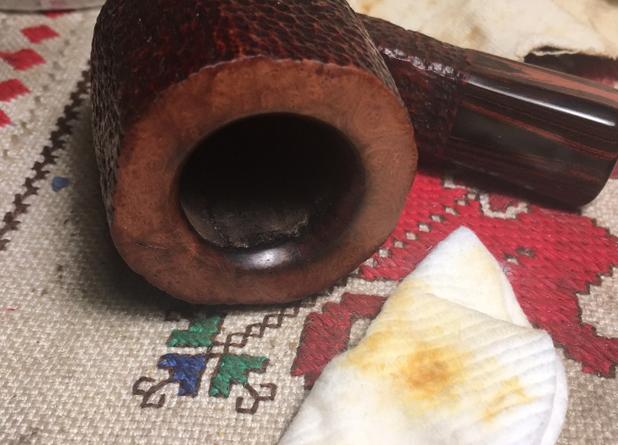
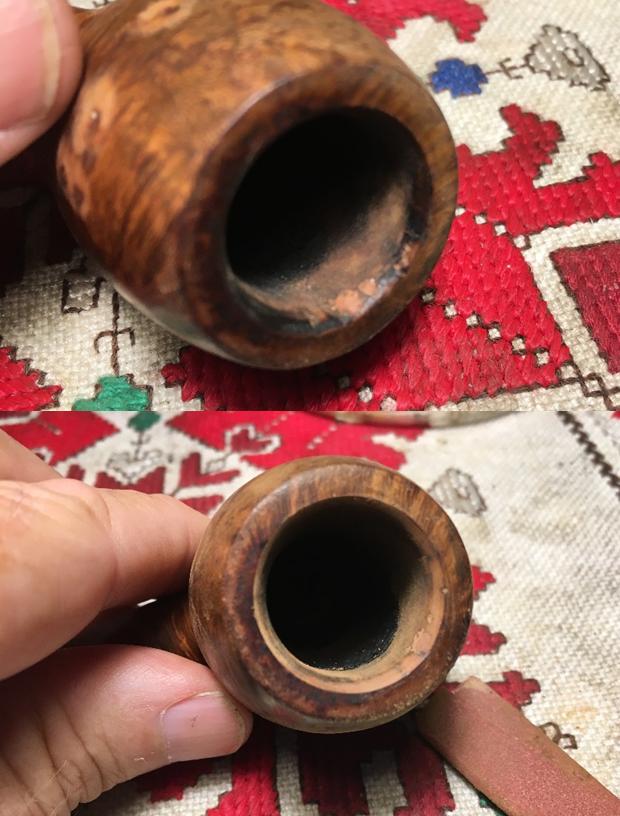
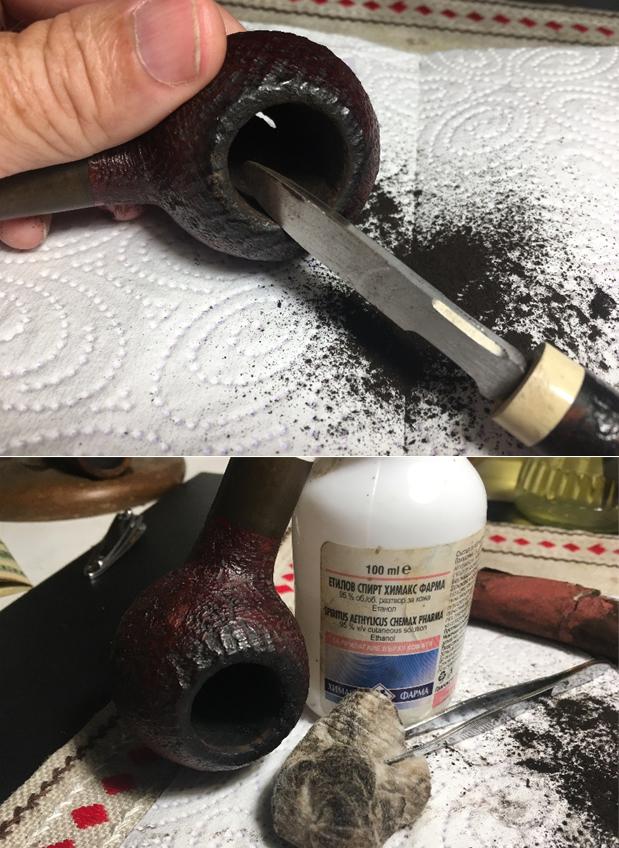
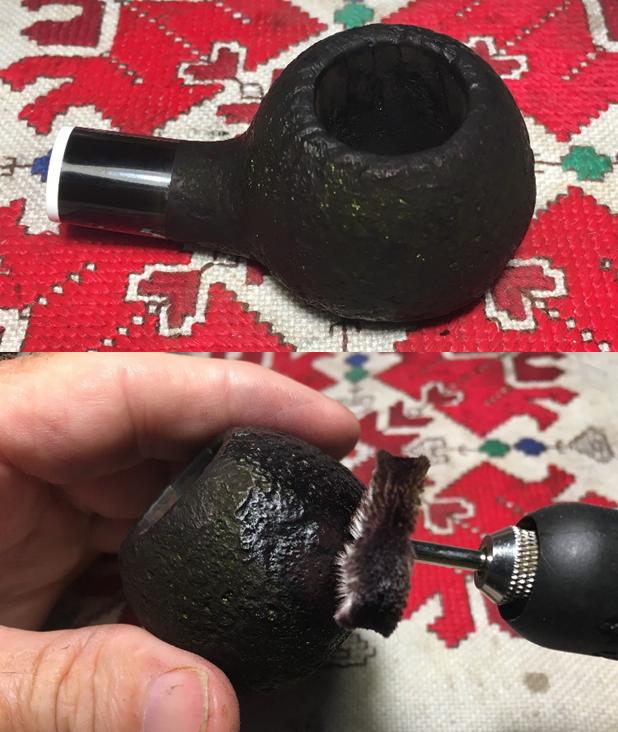
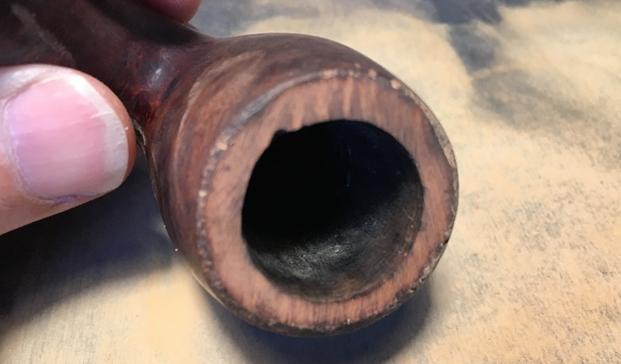
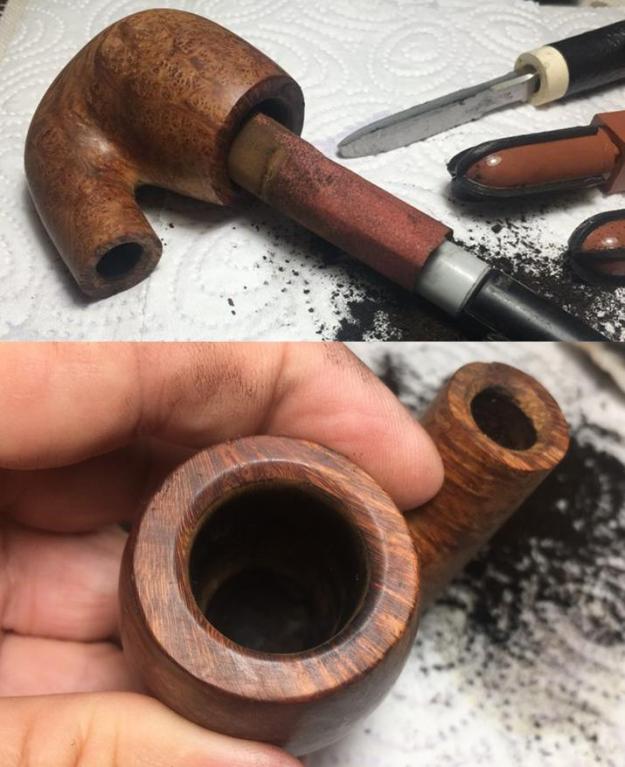
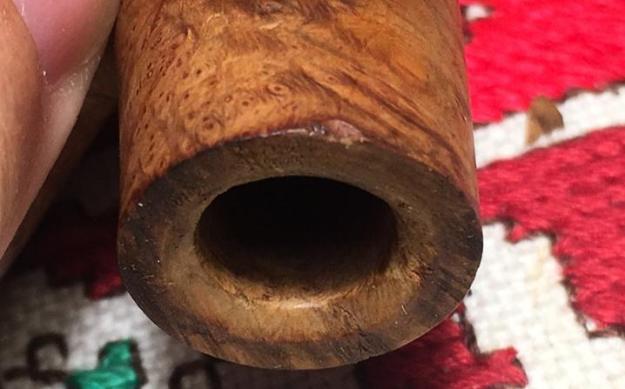
Now, back to the chamber cleaning that I missed.  I use the Pipnet Reaming Kit to ream the light cake out of the chamber. I use only the two smaller blades.  I then fine tune the reaming with the Savinelli Fitsall Tool.  Finally, I wrap 240 grade paper around a Sharpie Pen and sand the chamber down to the fresh briar.  I finish the chamber cleaning by wiping it with a cotton pad wetted with isopropyl 95%.  The pictures show the progress. 
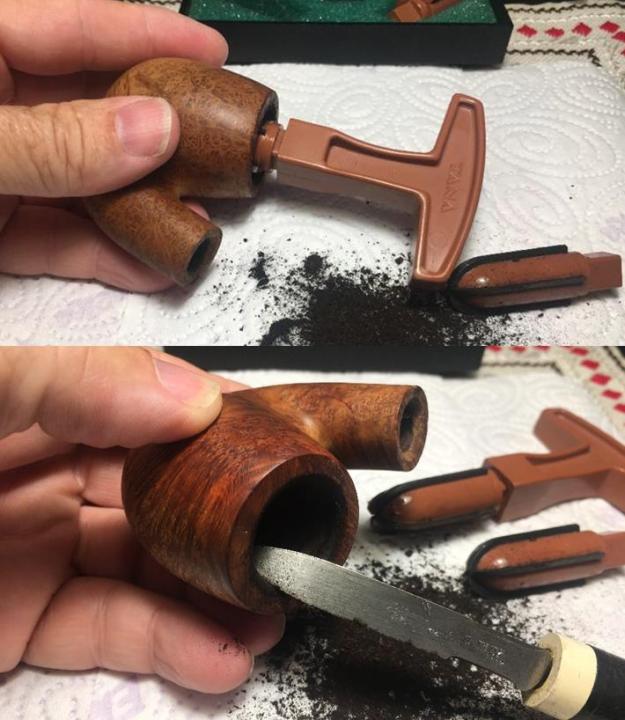
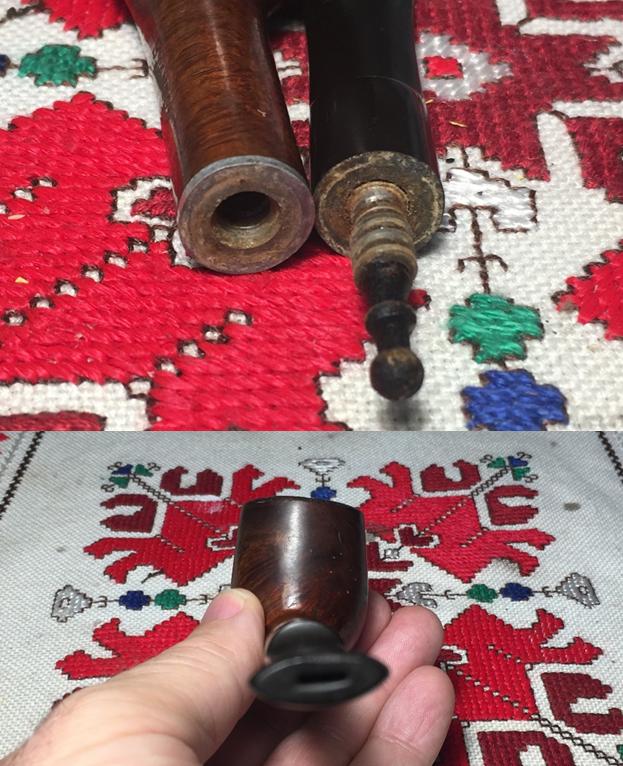
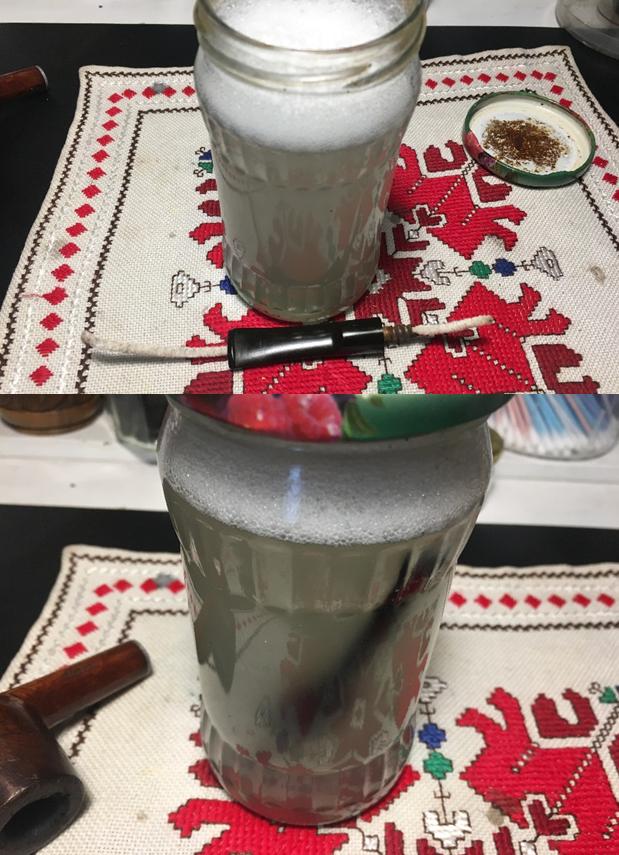
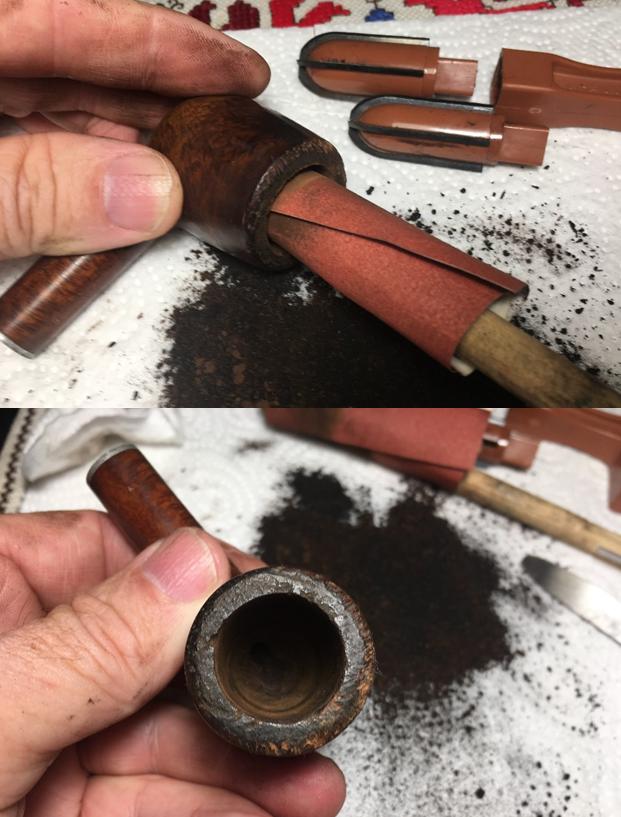
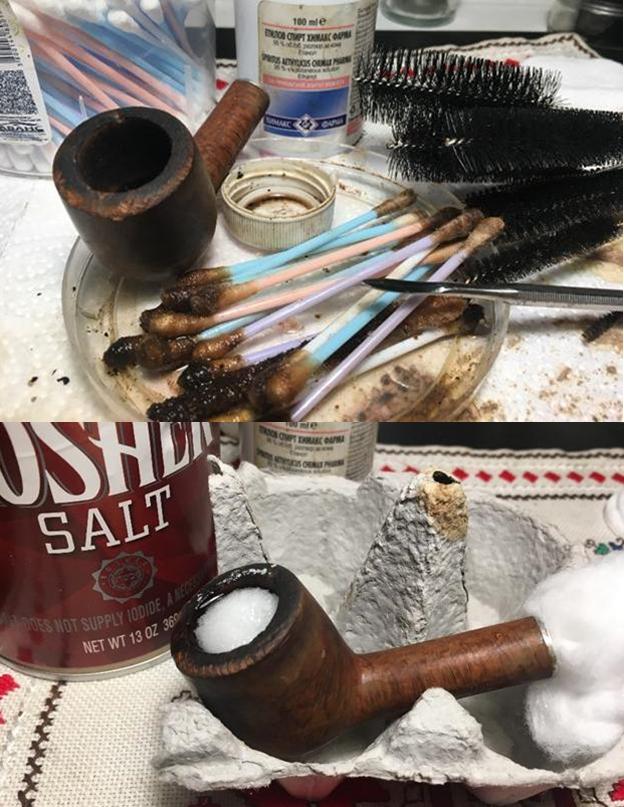
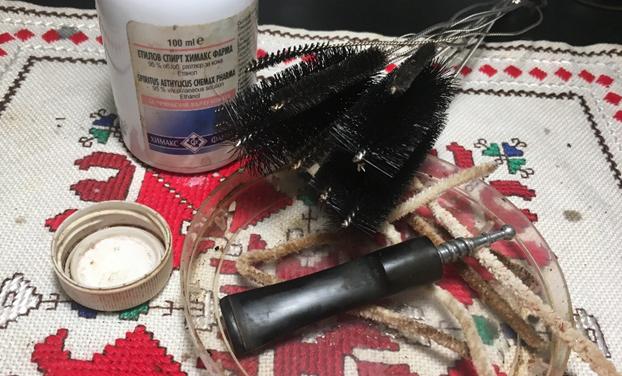
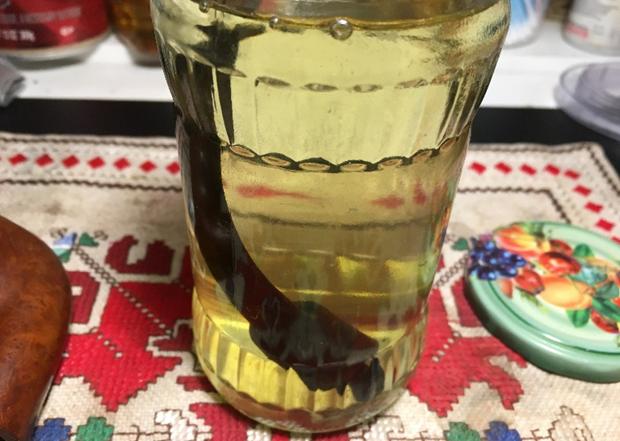
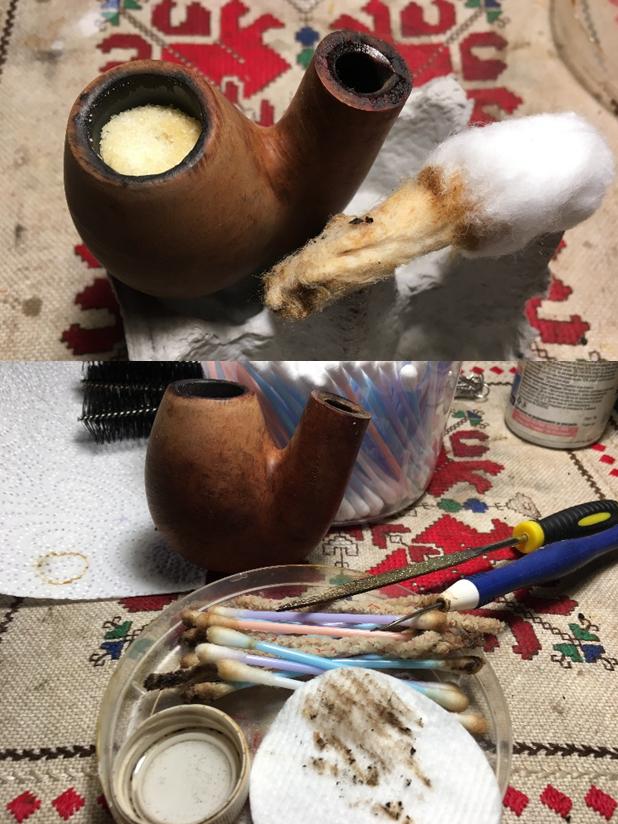
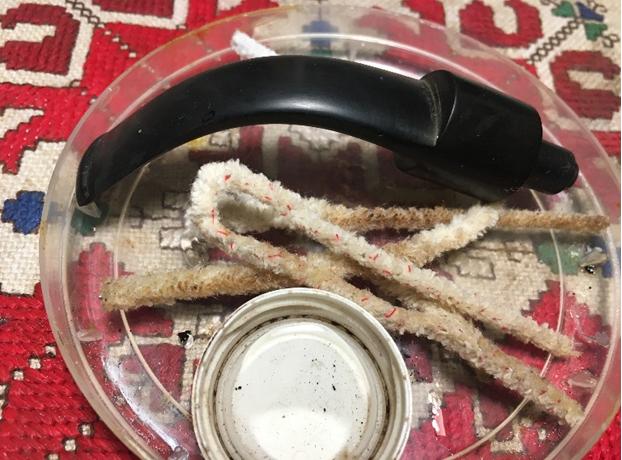
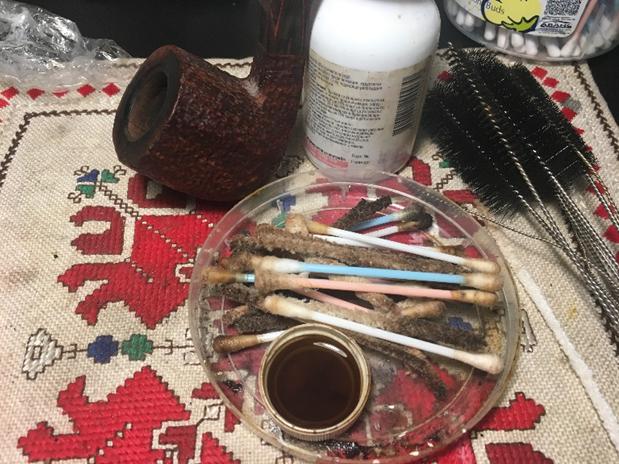
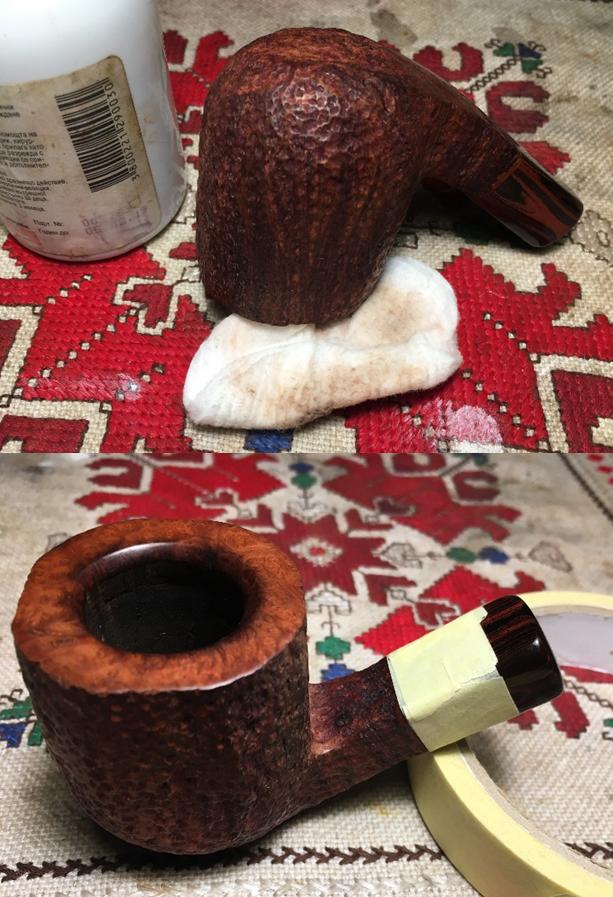
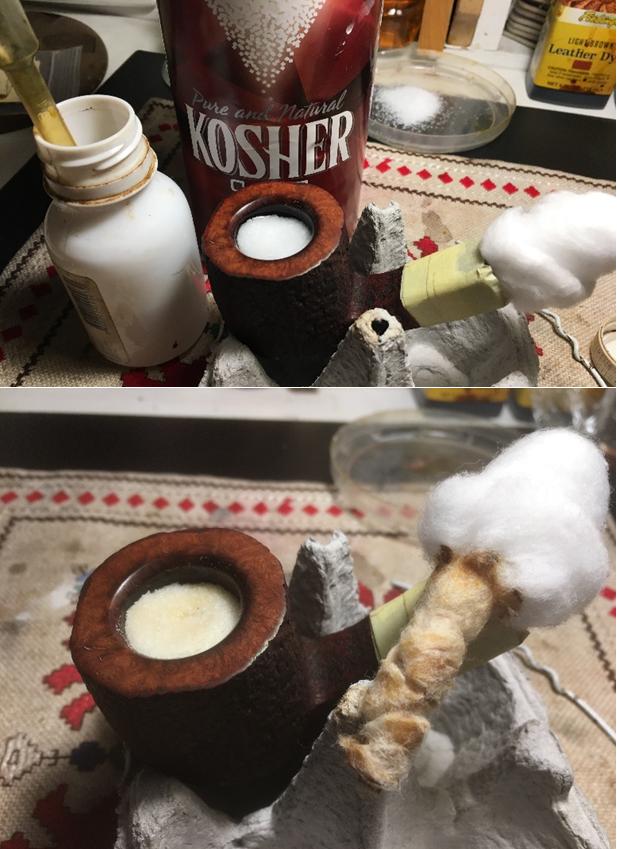
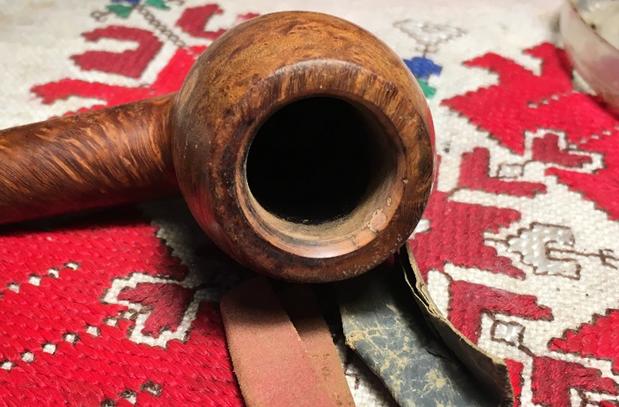
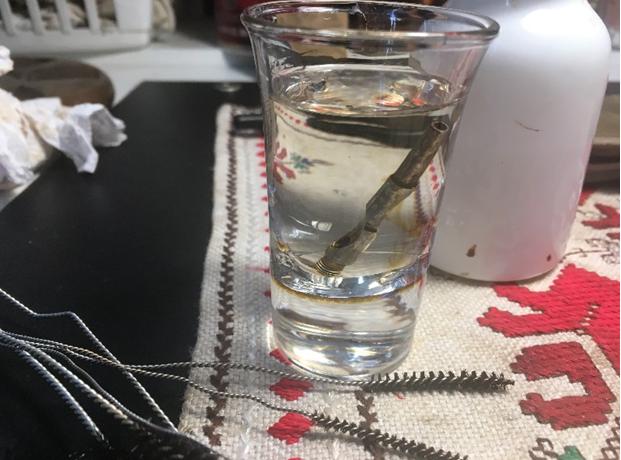
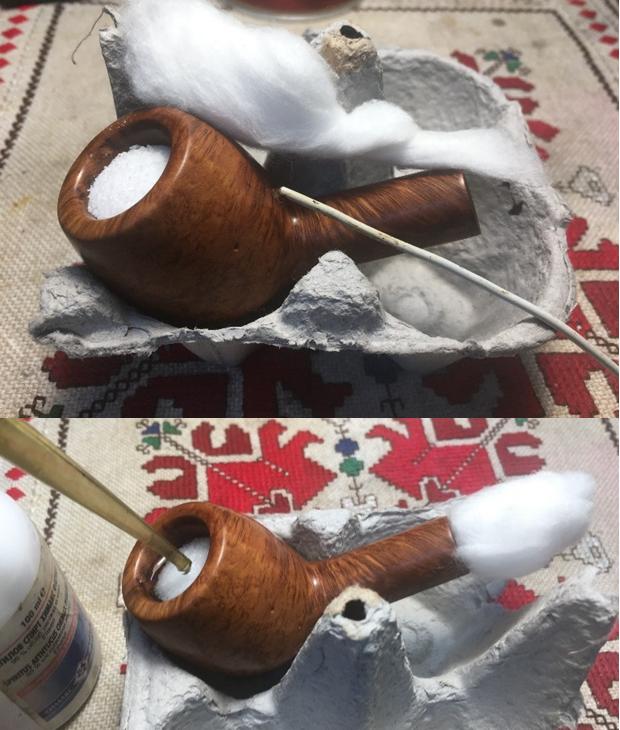
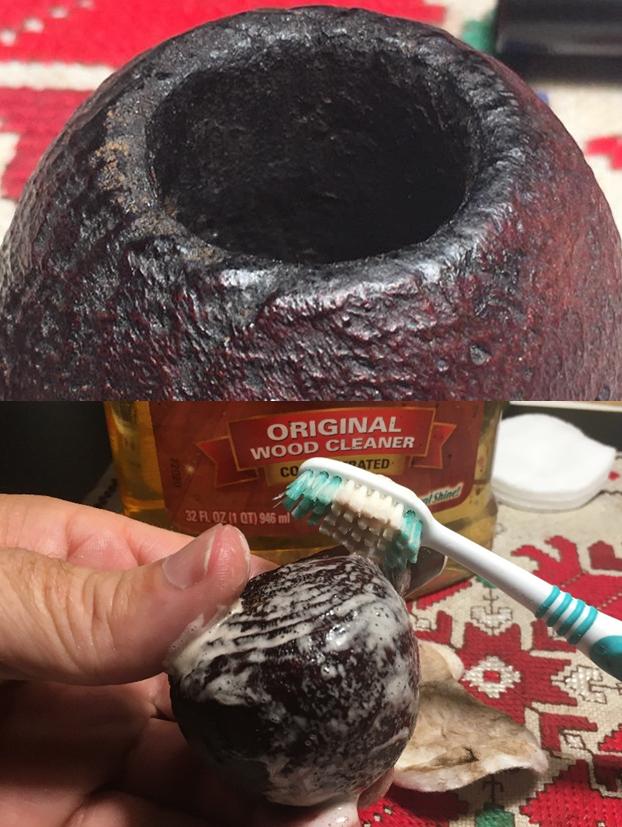
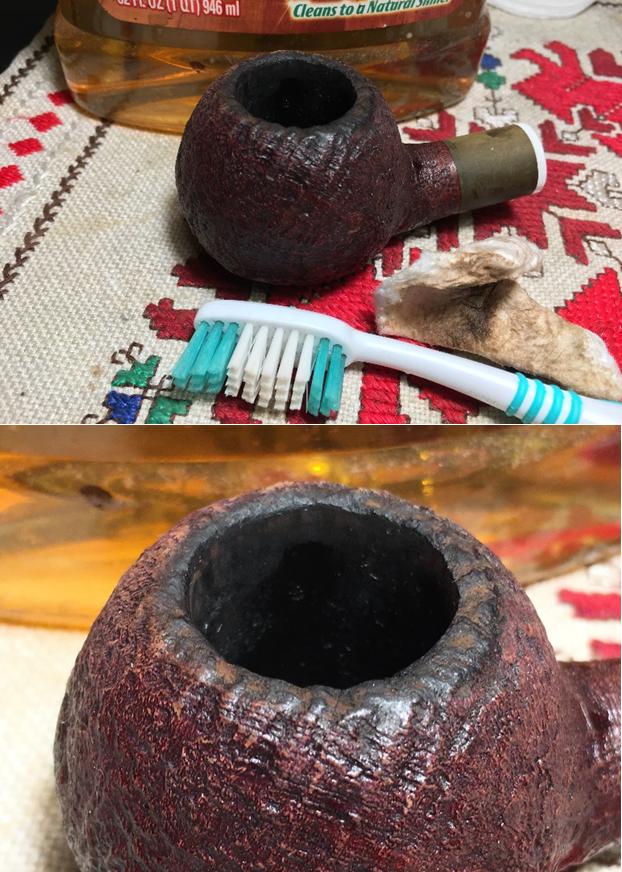
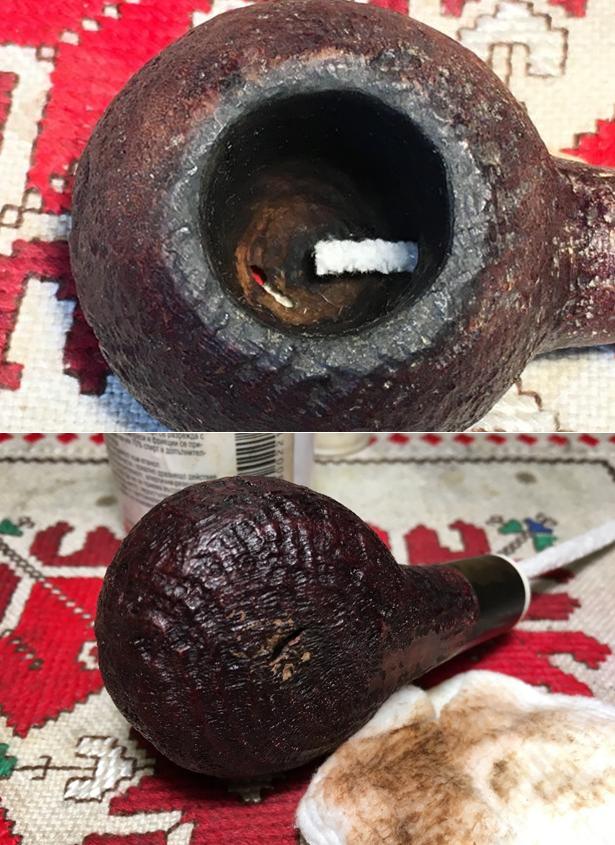
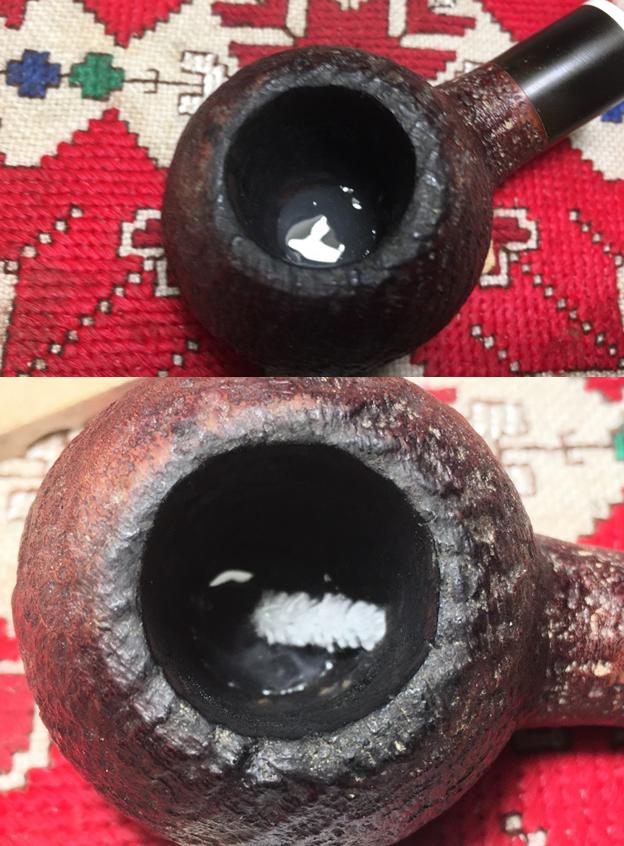
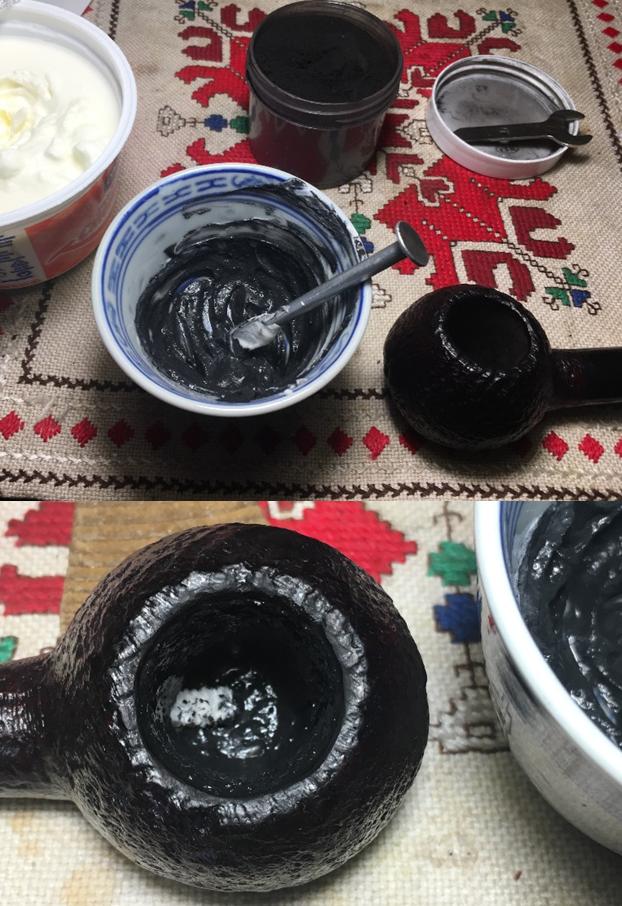
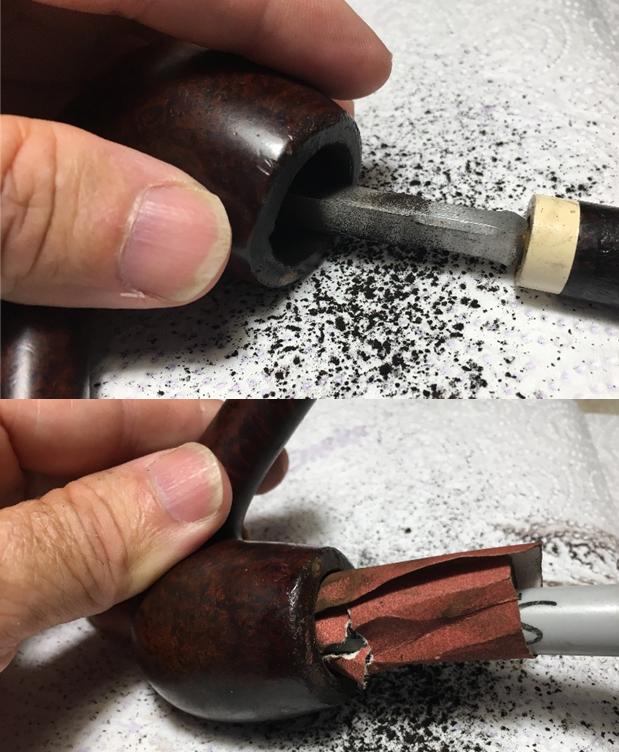
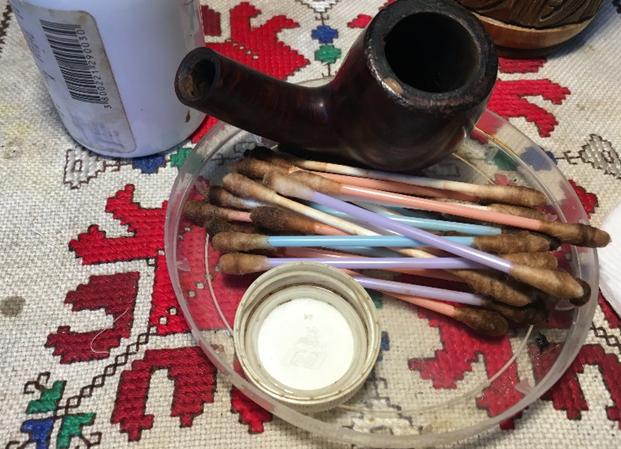
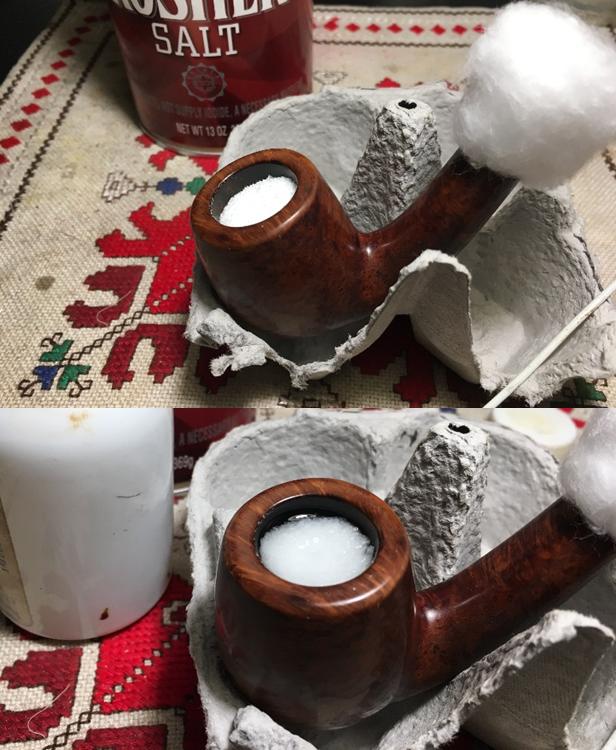
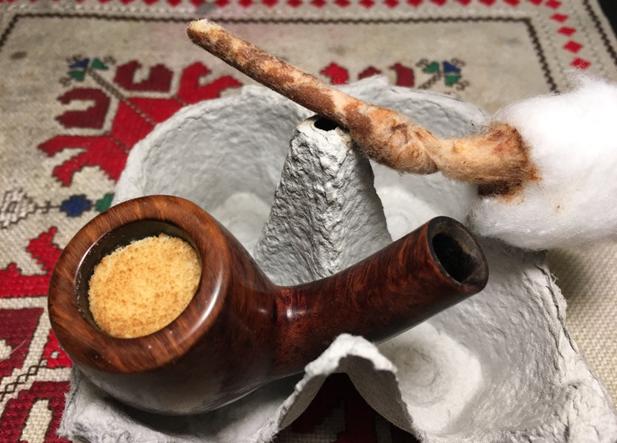
To the internal cleaning – using cotton buds, pipe cleaners and a shank brush I clean the mortise.  I also use a dental spatula to scrape the mortise walls to remove gunk.  With my day ending, to give a more thorough cleaning, I use a kosher salt and alcohol soak to penetrate the tars and oils left in the bowl and mortise overnight.  I fill the bowl with kosher salt – not iodized that leaves a taste.  I give the bowl a shake with my hand covering the top to disperse the salt.  I then form a wick to stuff down the mortise to draw out the oils and tars.  I stretch and twist a cotton ball to do this.  With the cotton wick in place, I place the stummel in an egg crate to keep it steady.  I then use a large eyedropper to fill the chamber with isopropyl 95%.  I wait a few minutes and top it again.  Time to call it a day. 
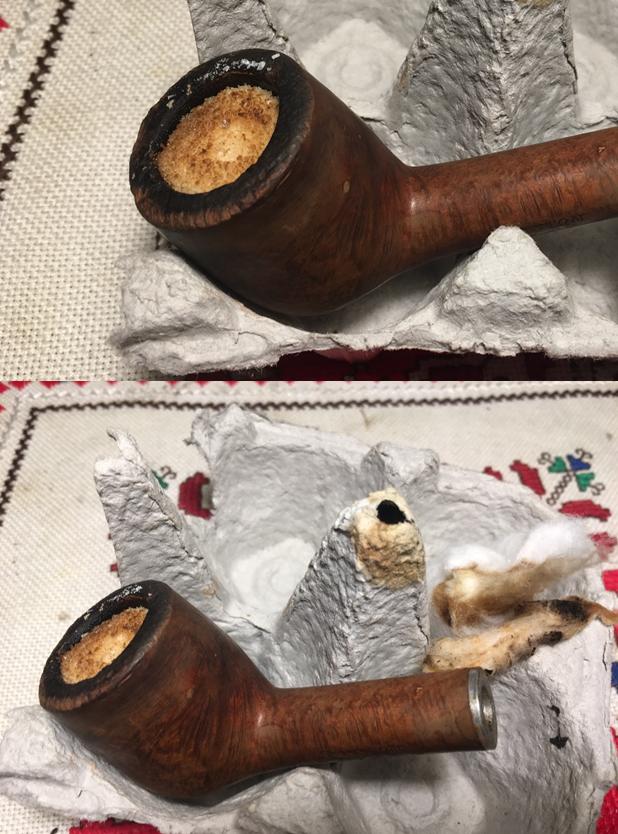
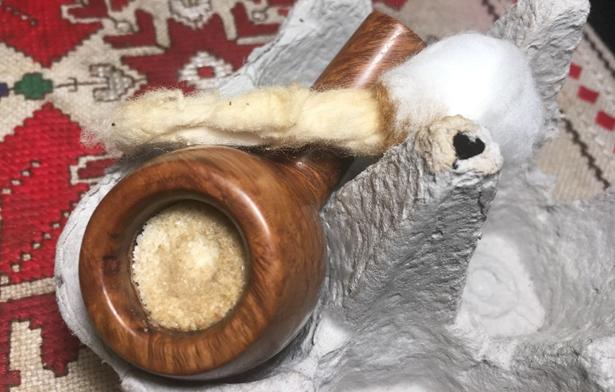
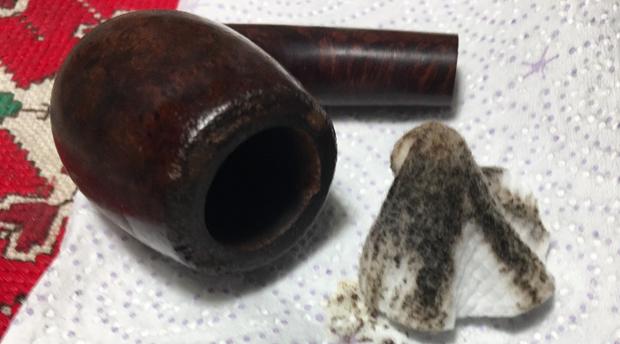
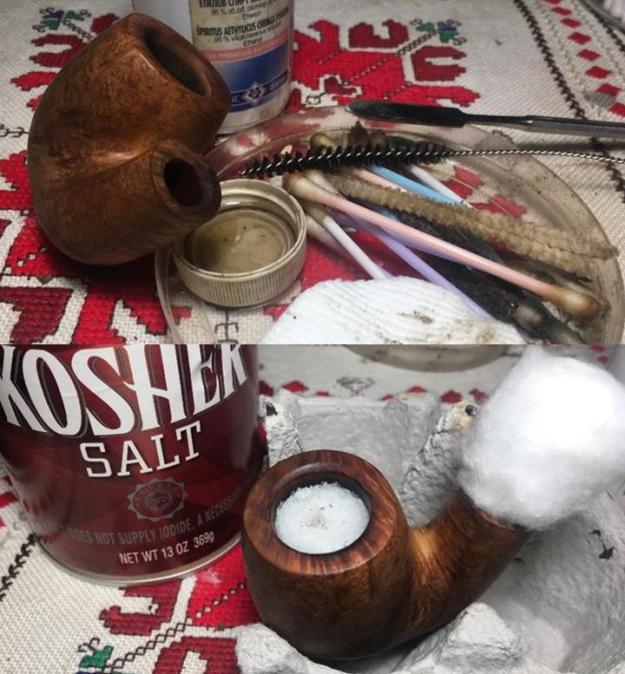
The next morning, the soak has done the job of pulling even more oils and tar out of the internals.  I dump the used salt in the waste and use a paper towel and shank brush to wipe out the expended salt left in the bowl and mortise.  I also blow through the stummel to make sure there’s no old salt left.
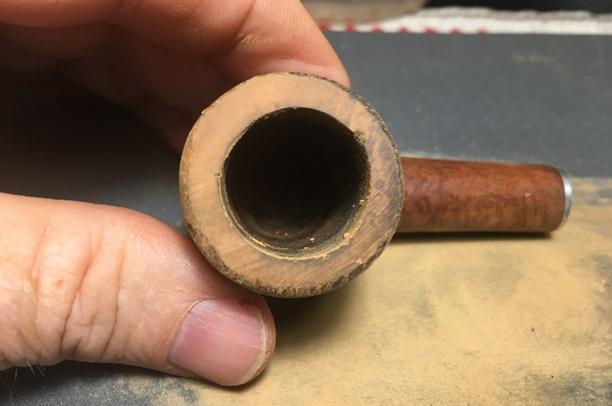
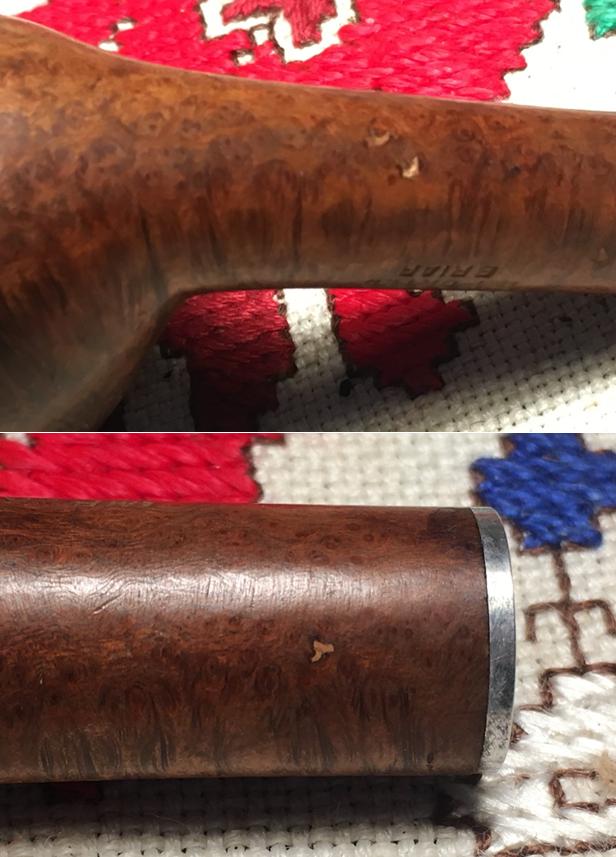
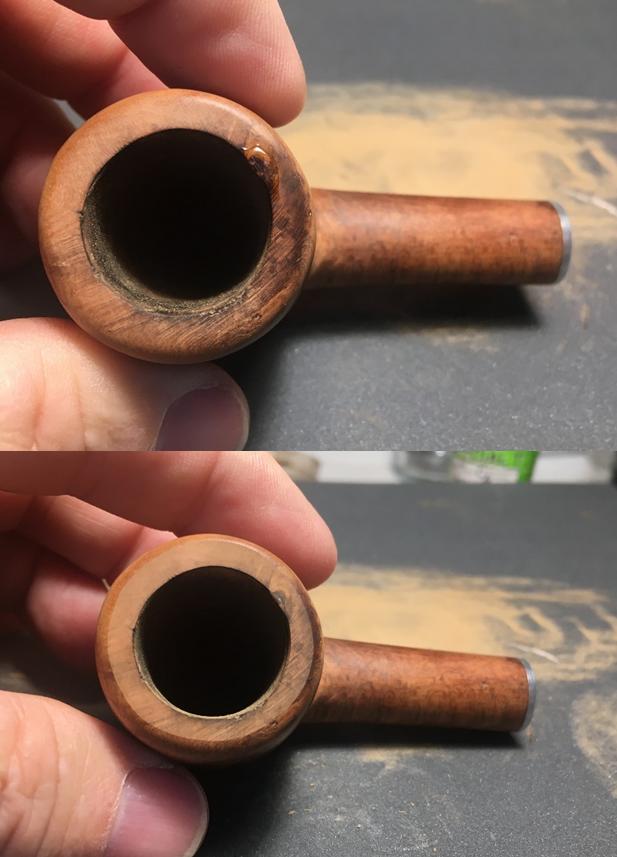
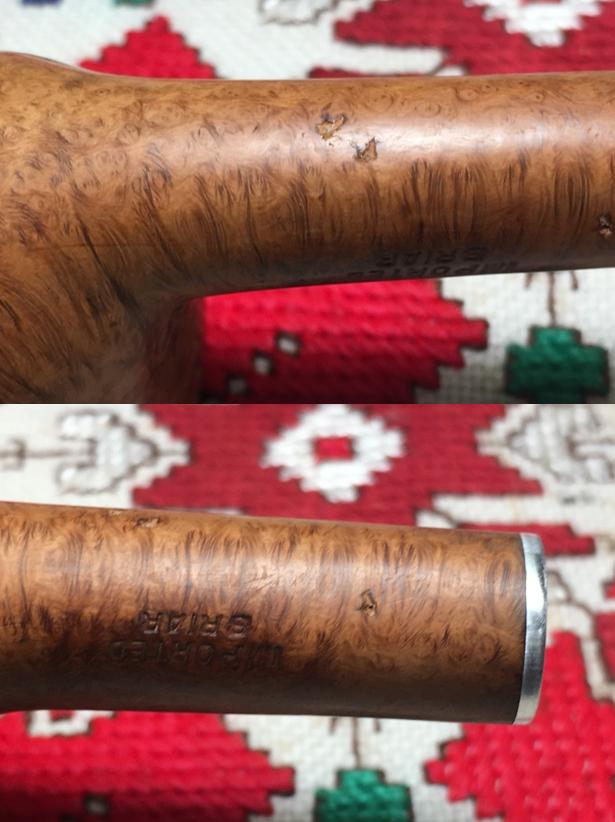
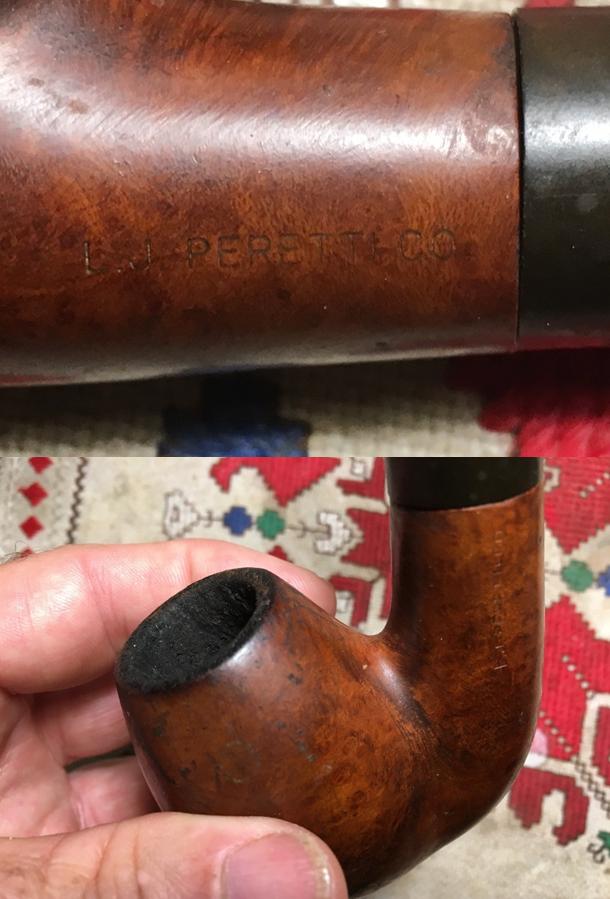
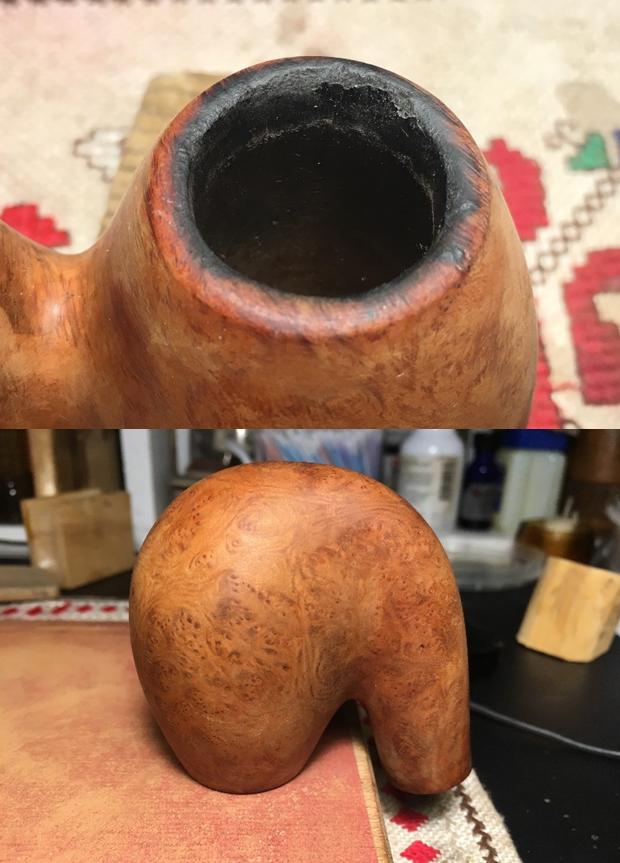
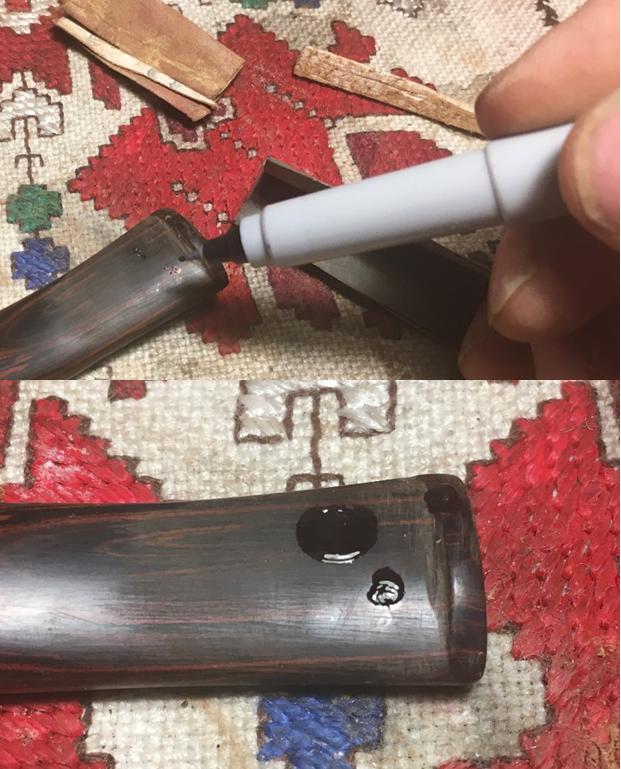
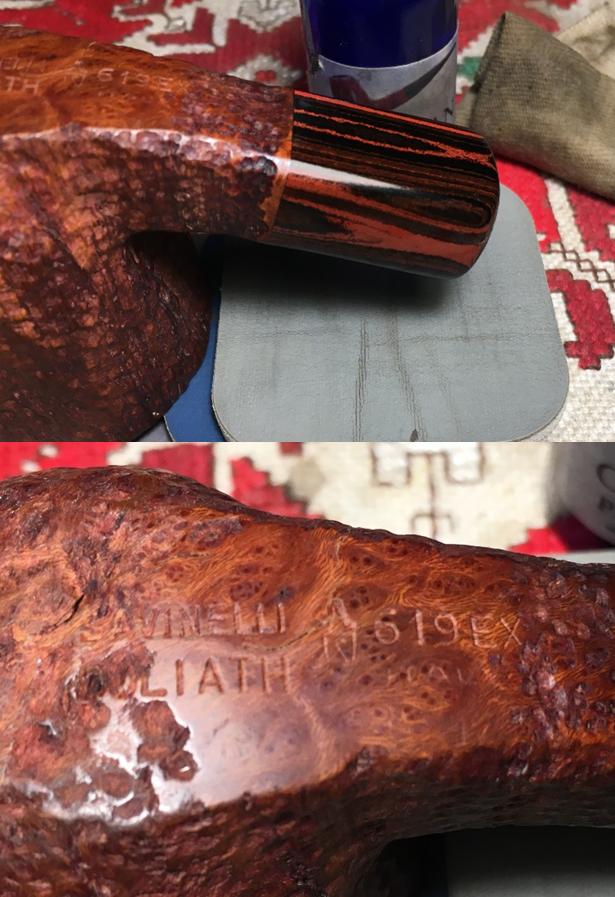
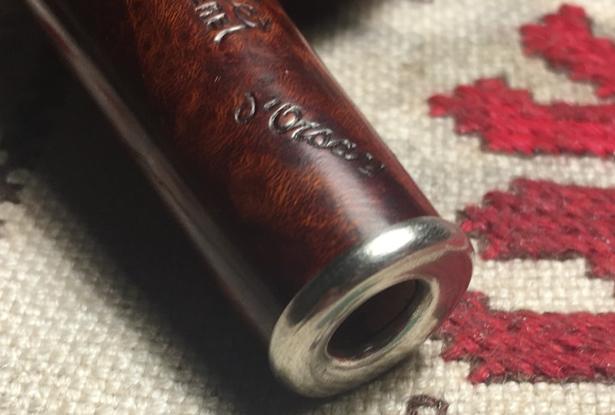
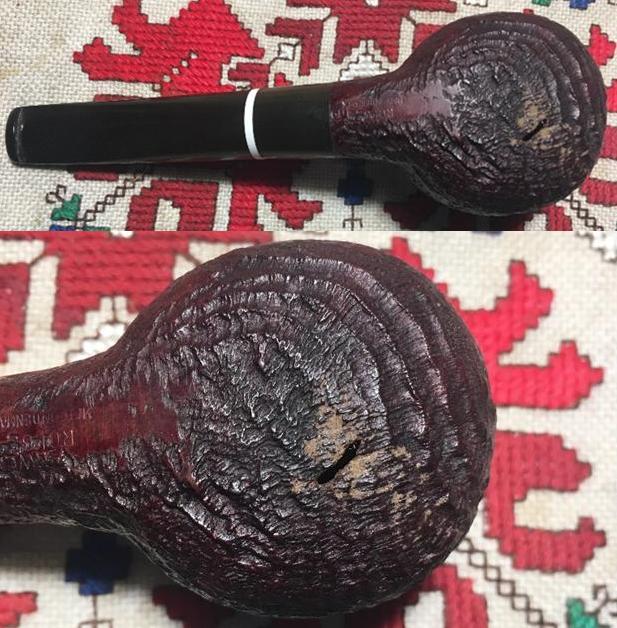
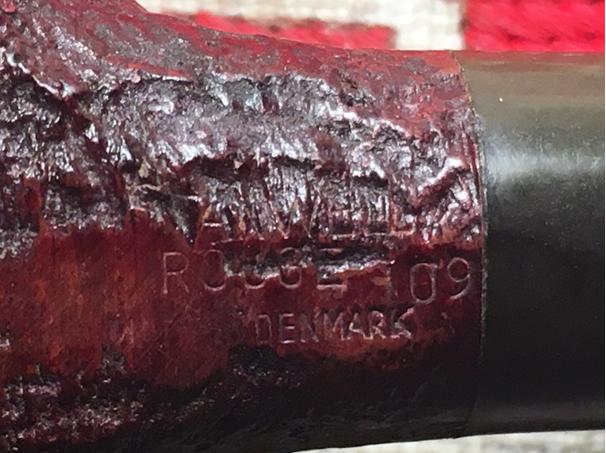
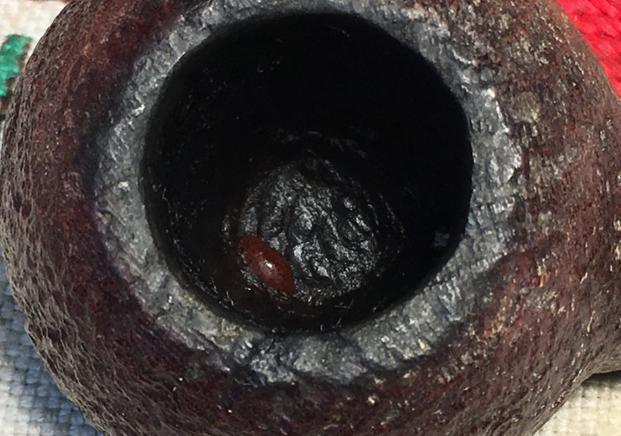
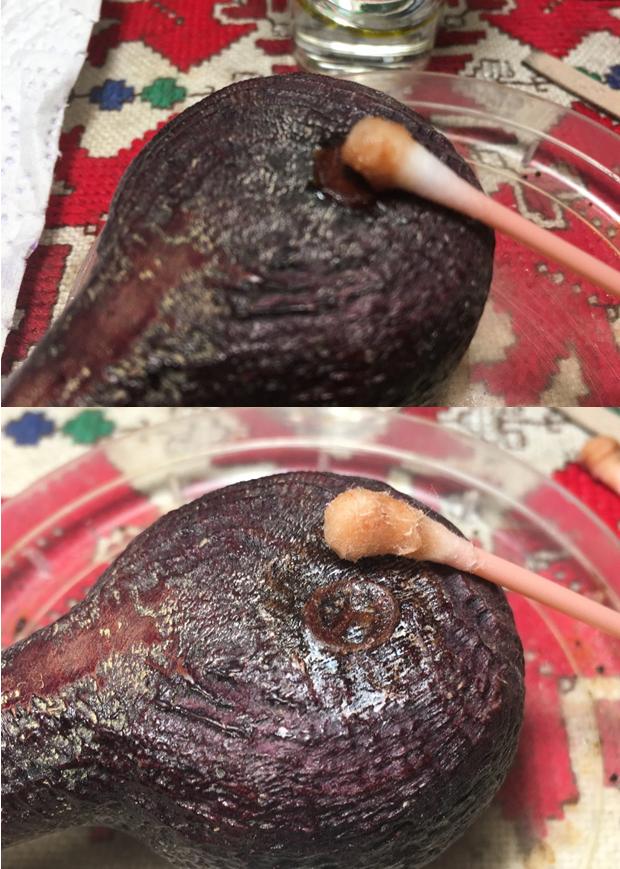
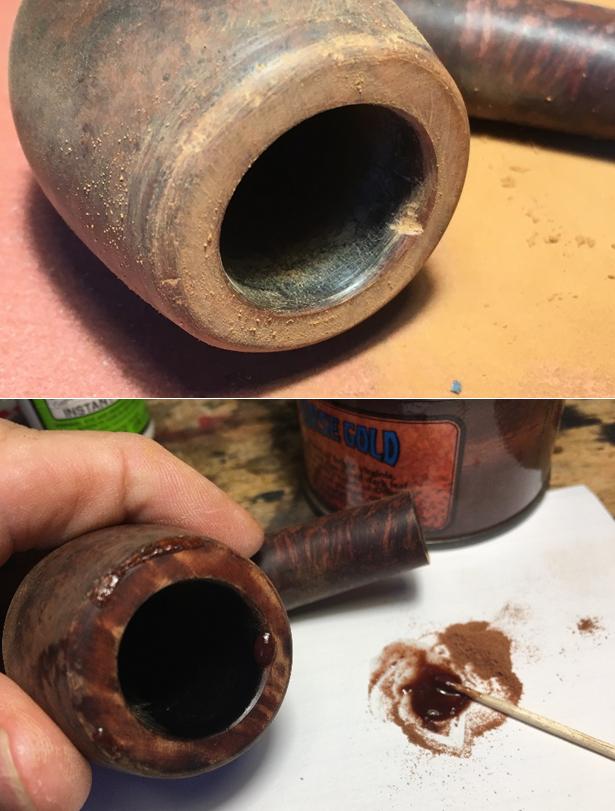
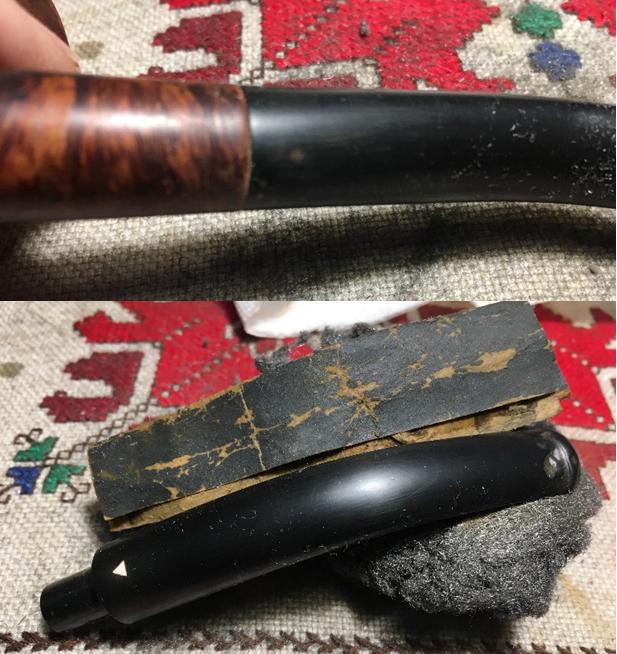
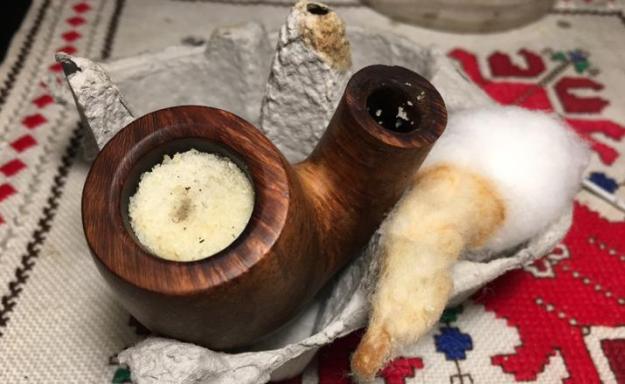
While I’m inspecting the stummel after removing the salt, looking at the scratch by the nomenclature and small chip on the shank end, I notice what I didn’t see before.  A stamp on the lower side of the shank that is nearly invisible.  I can make out only some of the stamping with a magnifying glass – Sav… over Produ….  I look again at the examples of the Oscar from Pipephil.eu (above) and sure enough, it shows a lower stamp as well – Savinelli over Product.  I take a picture to show what I found.
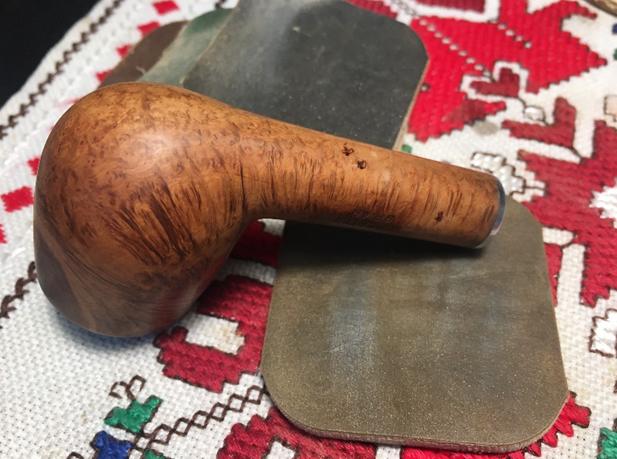
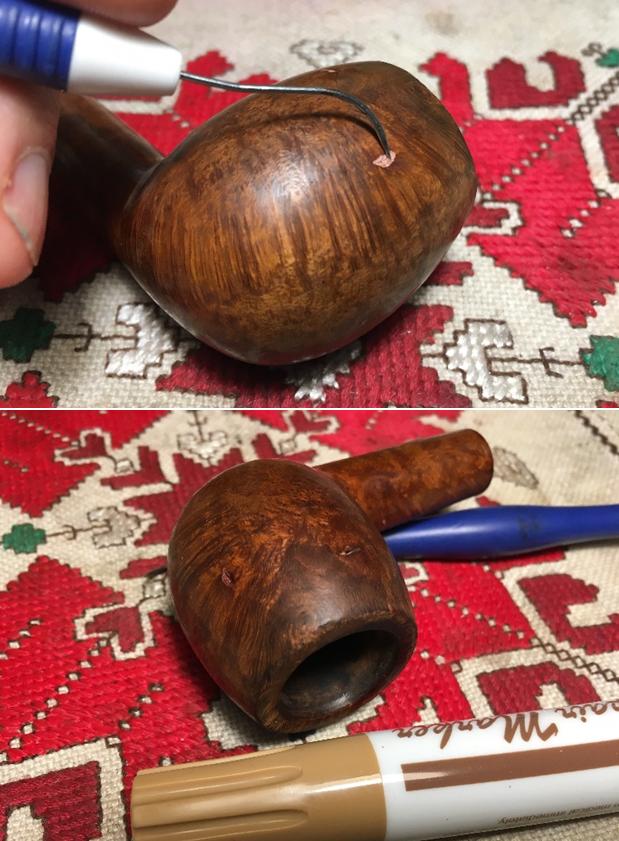
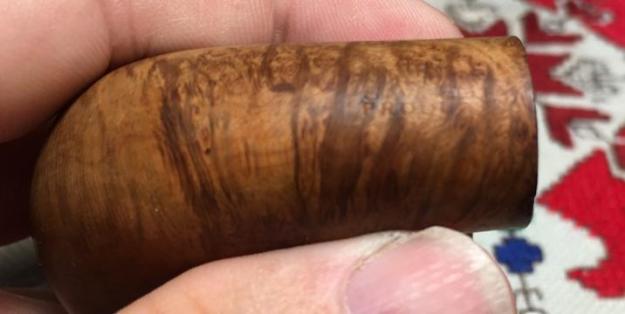
I take a few shots of some problem areas – a cut or possibly a hairline crack, just above the shape number, the internal bevel of the rim is worn from lighting practices.  I want to refresh the bevel and rim, which is already in good shape.  I begin with the divot on the shank.  
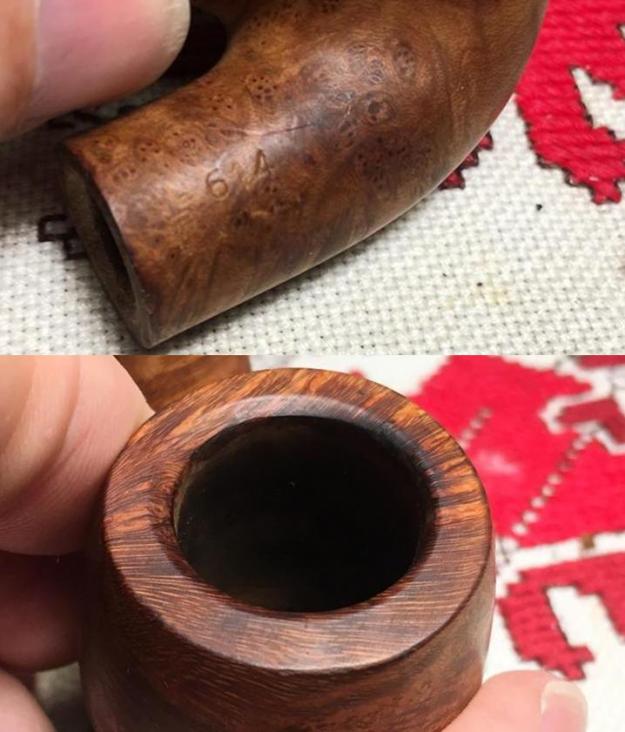
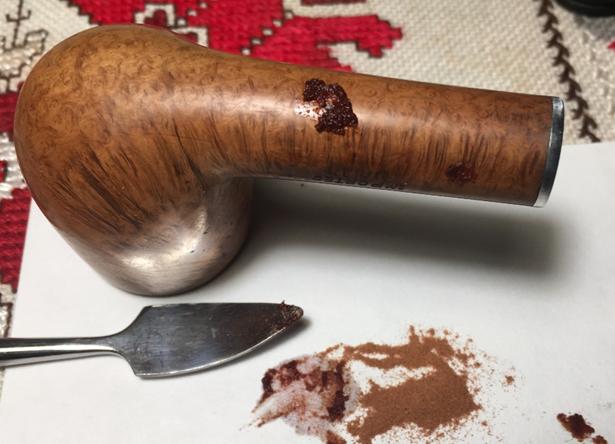
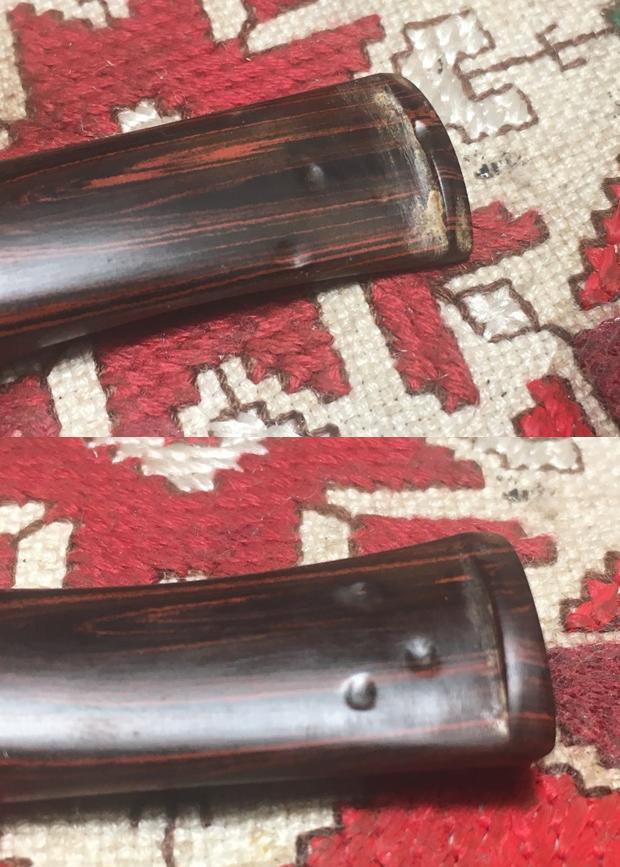
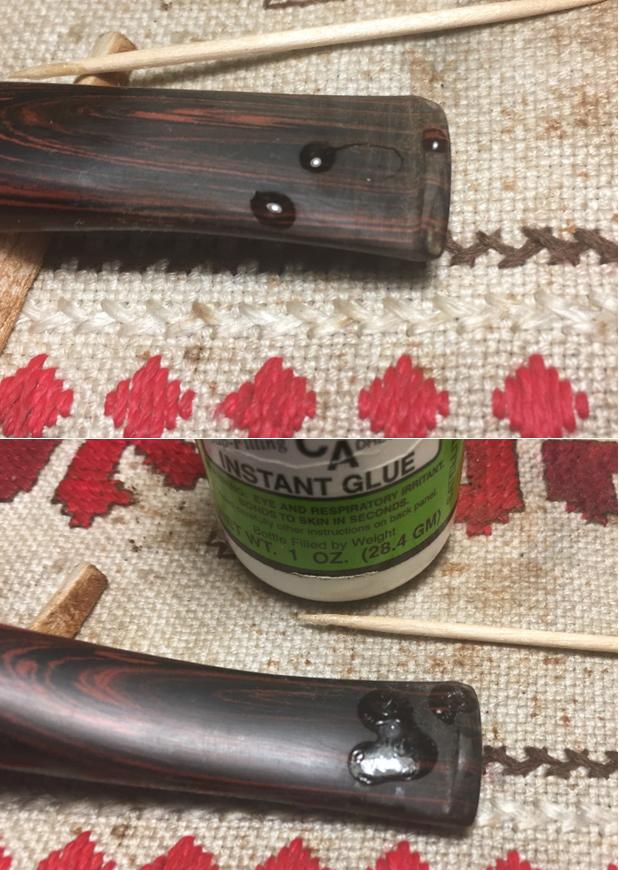
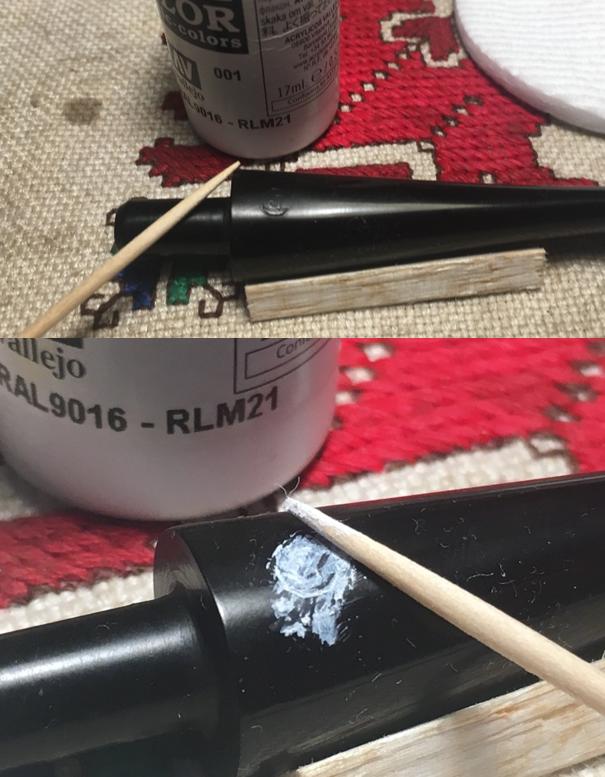
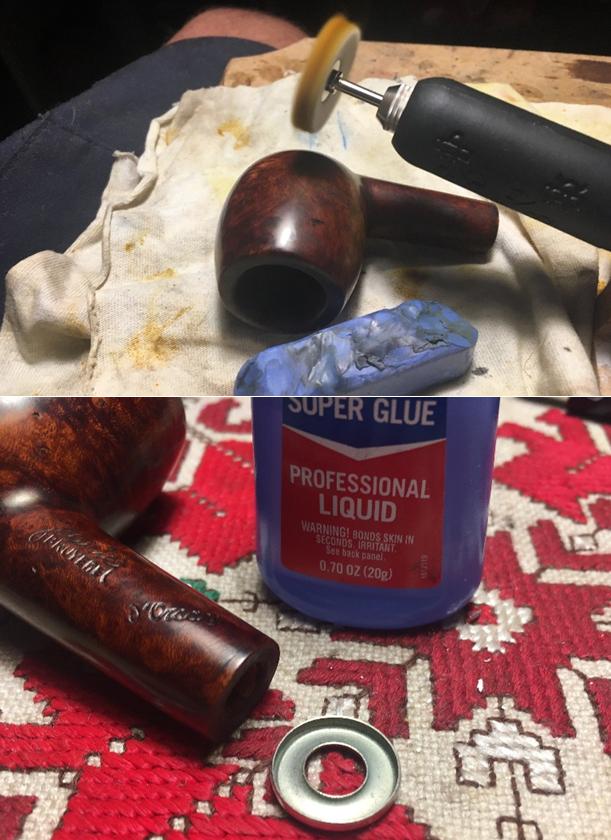
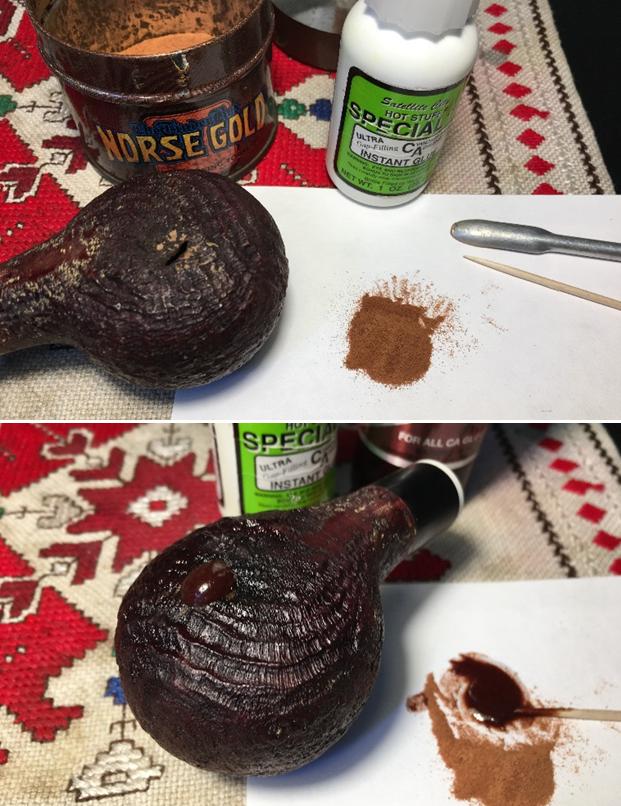
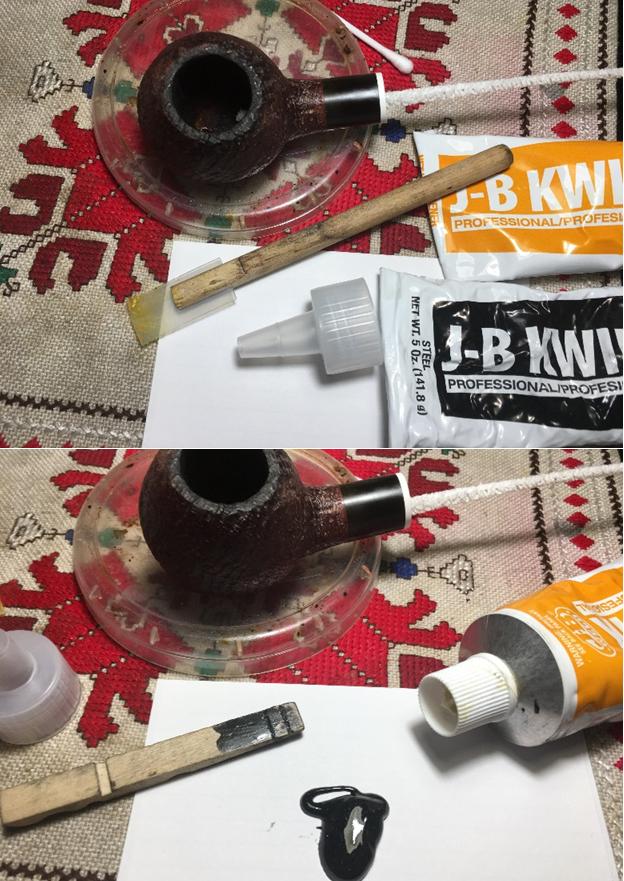
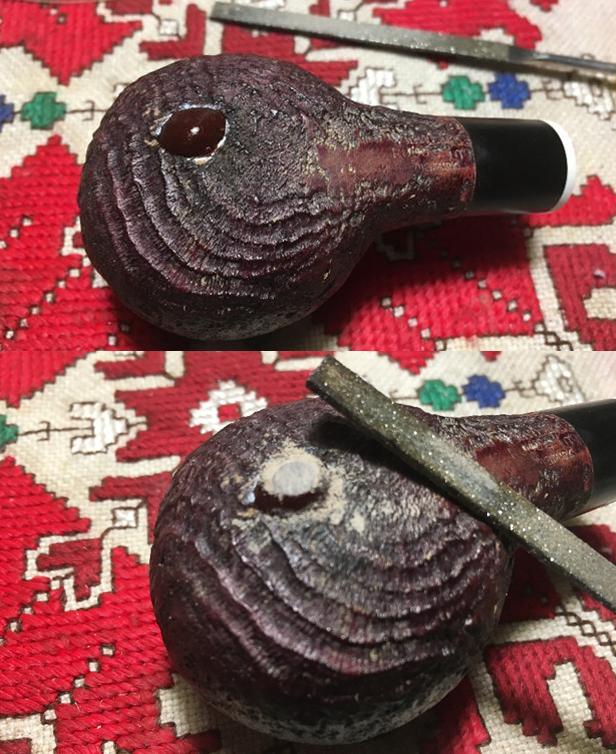
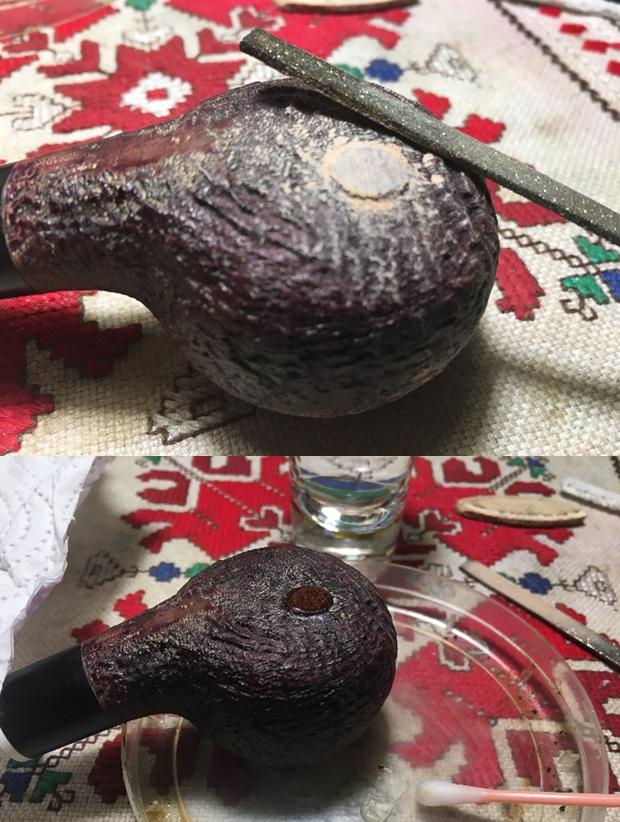
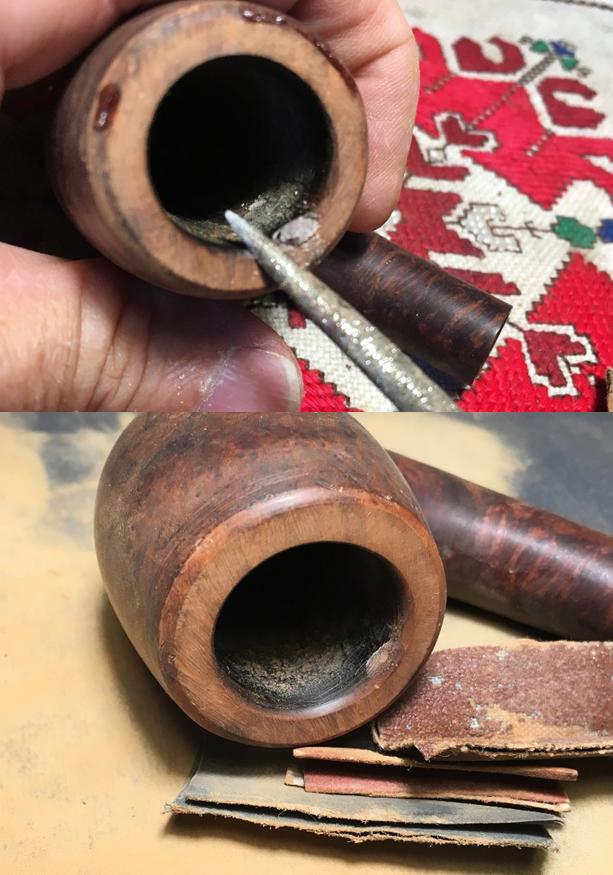
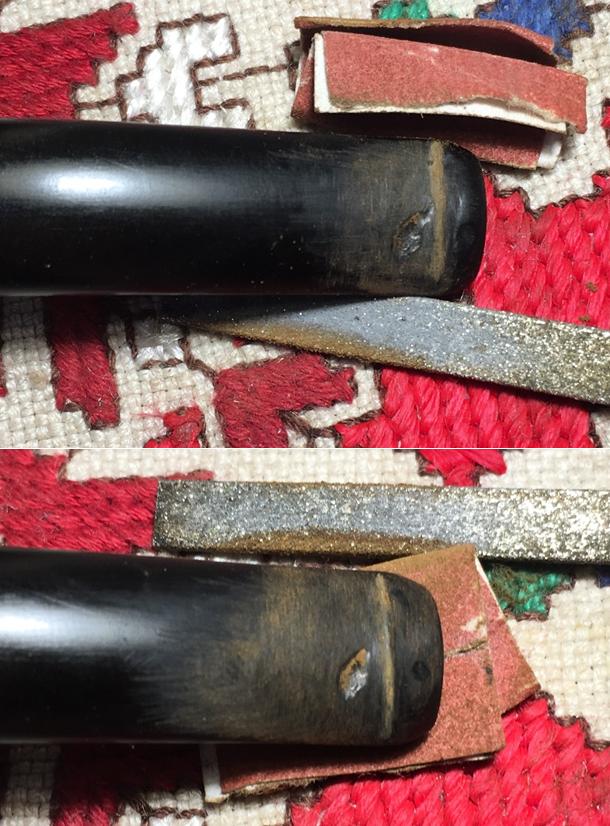
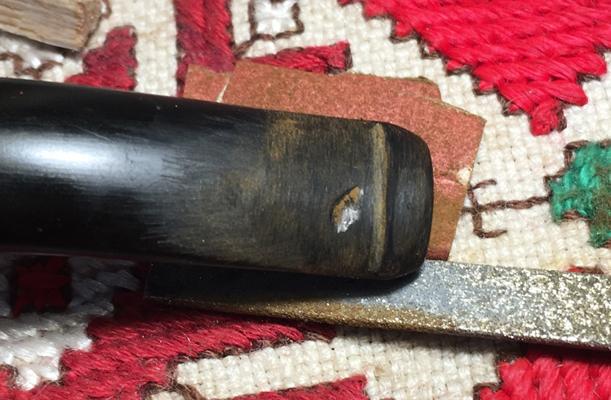
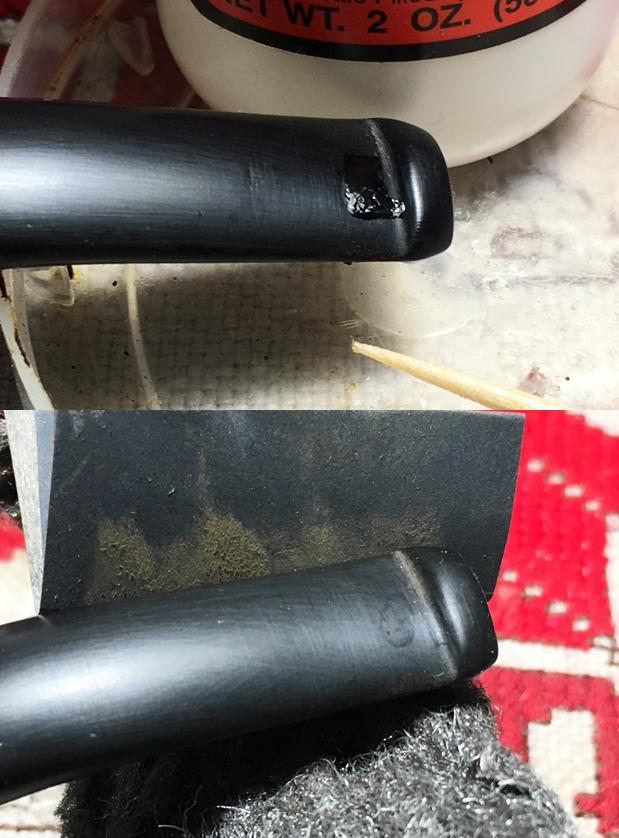
I decide to apply a drop of regular, clear super at the divot to build it out.  I’ll let it cure a few hours before sanding and blending it.  After a couple of hours, the shank end divot has set up enough for me to work on the cut/crack.  I’m not convinced it is a crack – a cut is more likely I think.  I decide to lay a very small line of regular super glue over the cut using a toothpick to guide the glue.  It will be close quarters with the shape number when I sand it down, but I think it will look better.
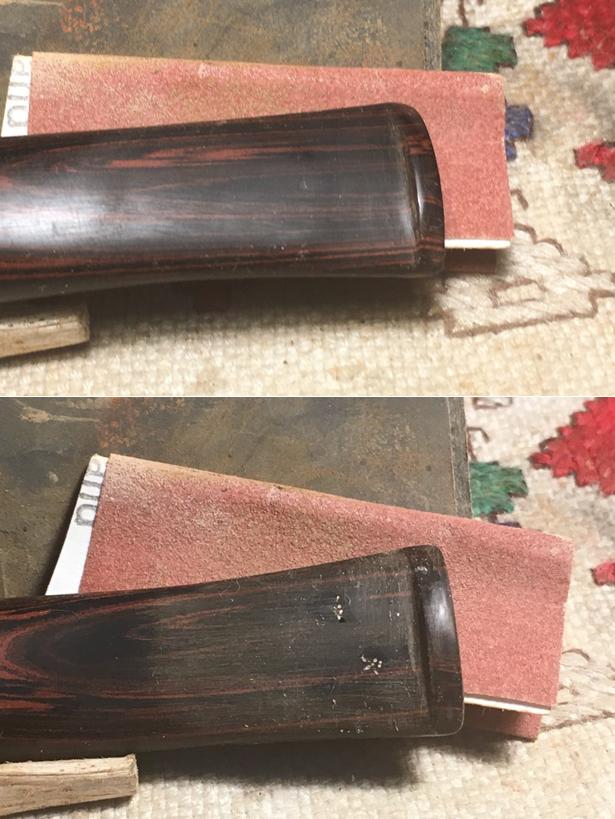
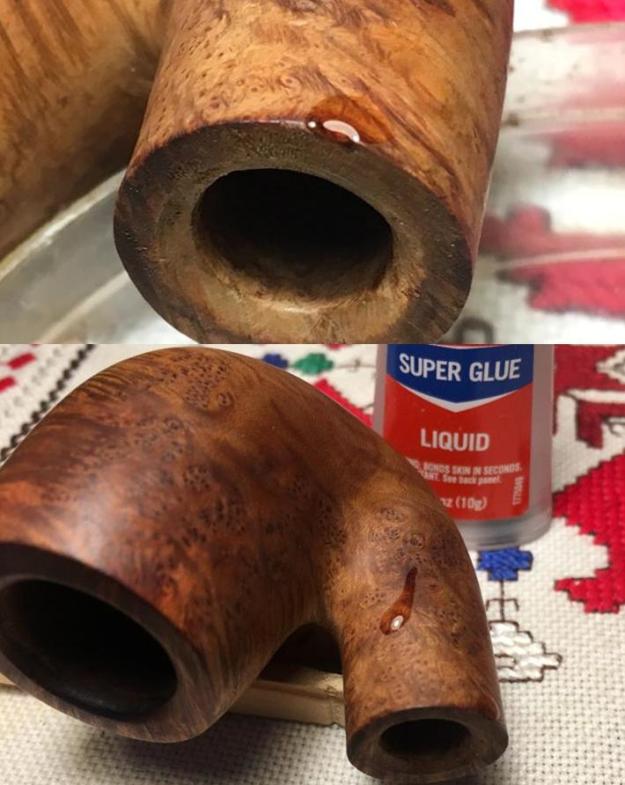
After the glue cures, I first use 240 grit paper to sand both the divot and the cut down to the briar.  I stay on top of the glue mound as much as possible to not impact the briar surface.  I then use 600 grit paper to smooth and blend.  These were small issues, but I feel better for addressing them – the Savinelli Oscar will look good.  
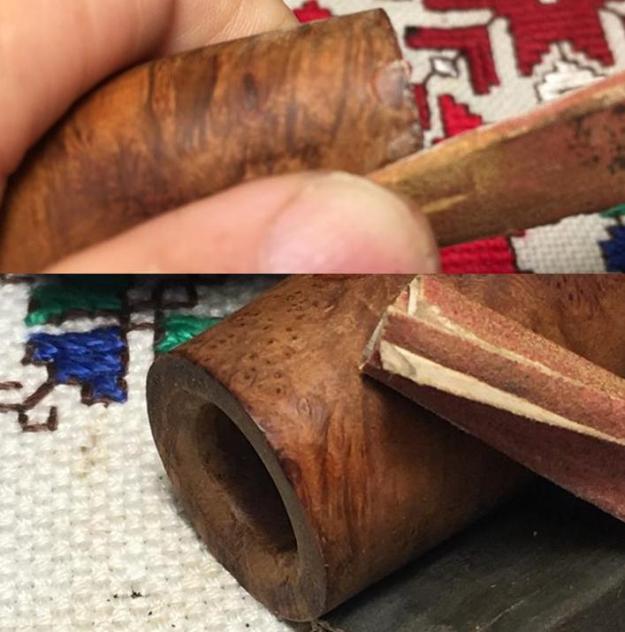
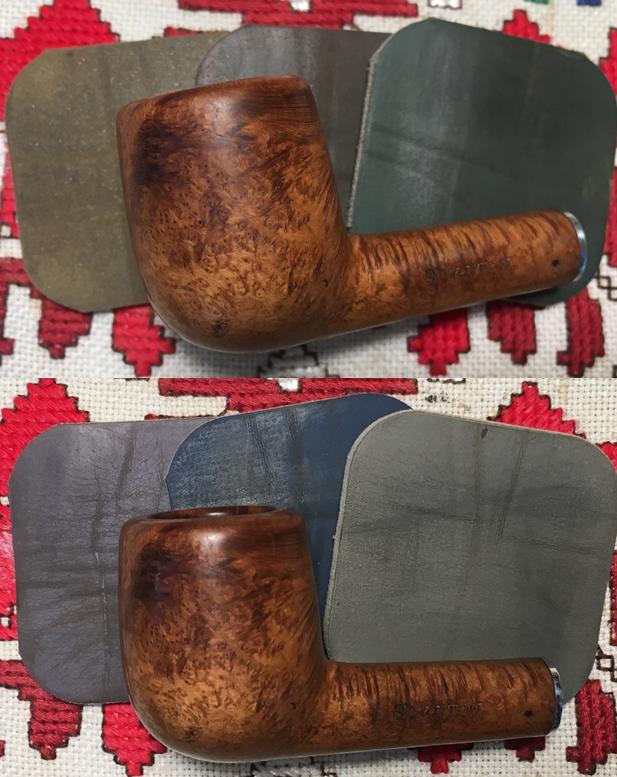
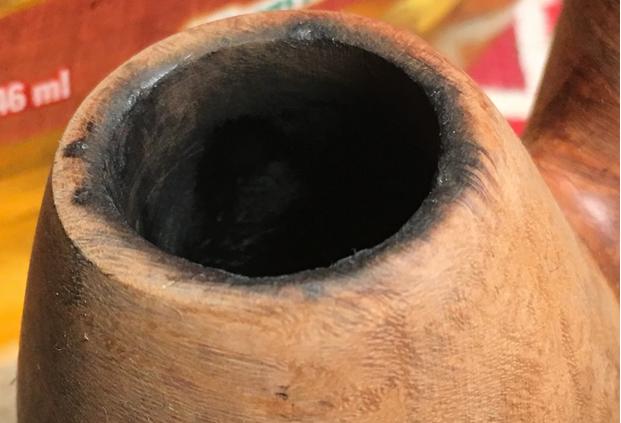
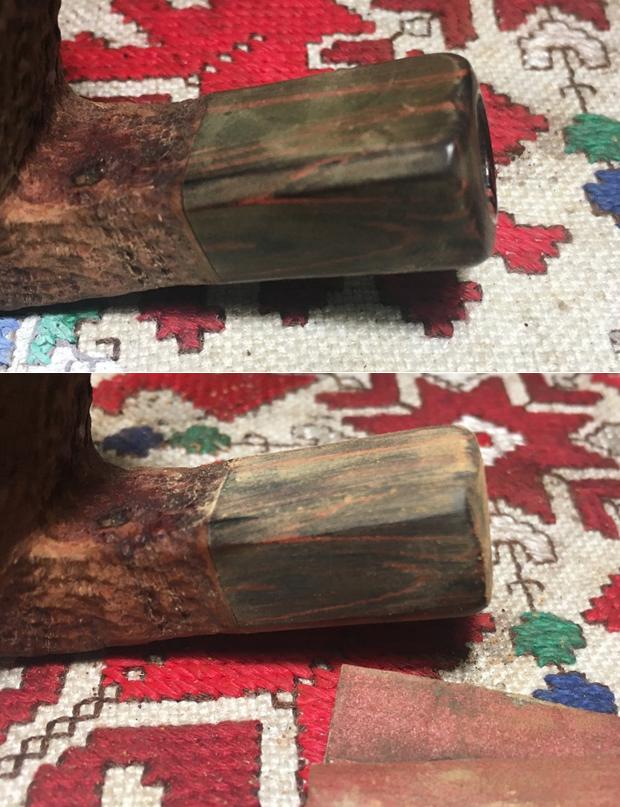
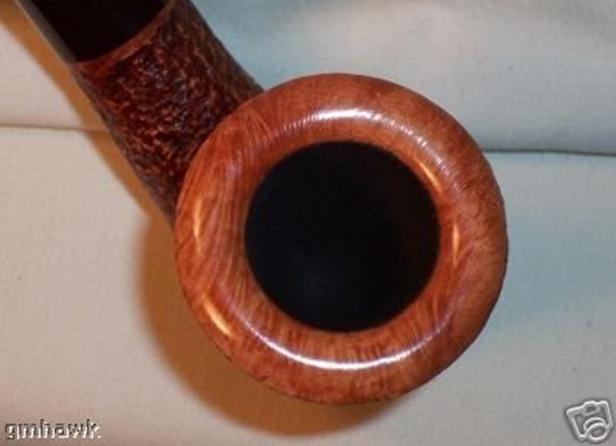
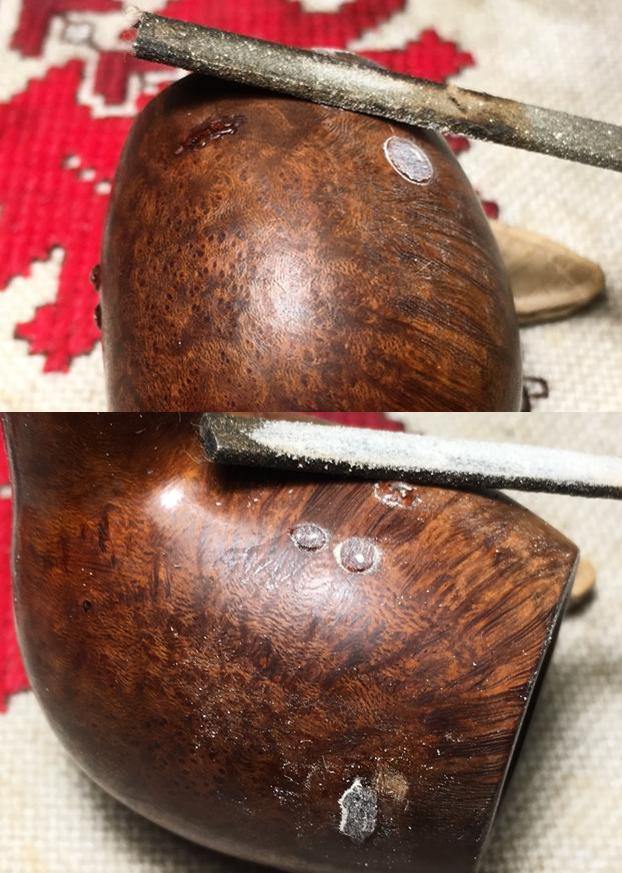
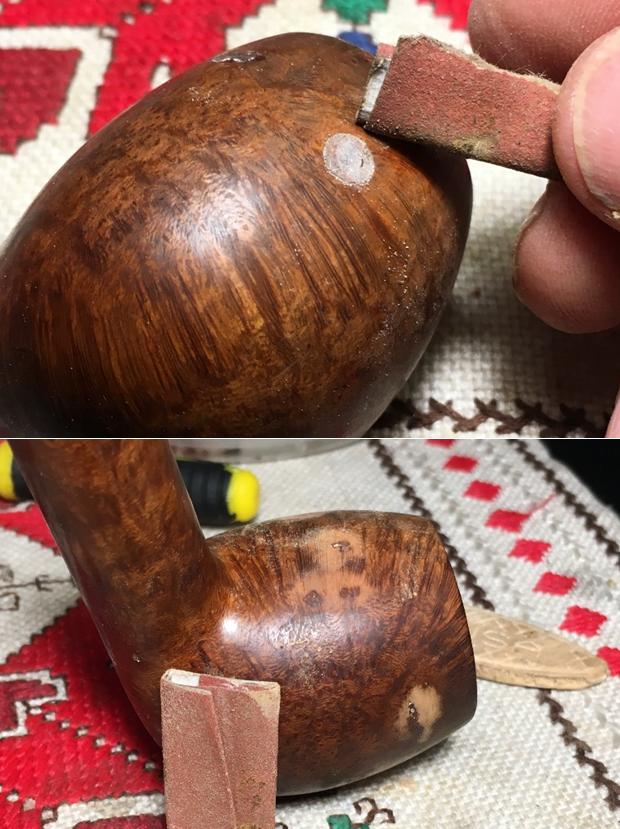
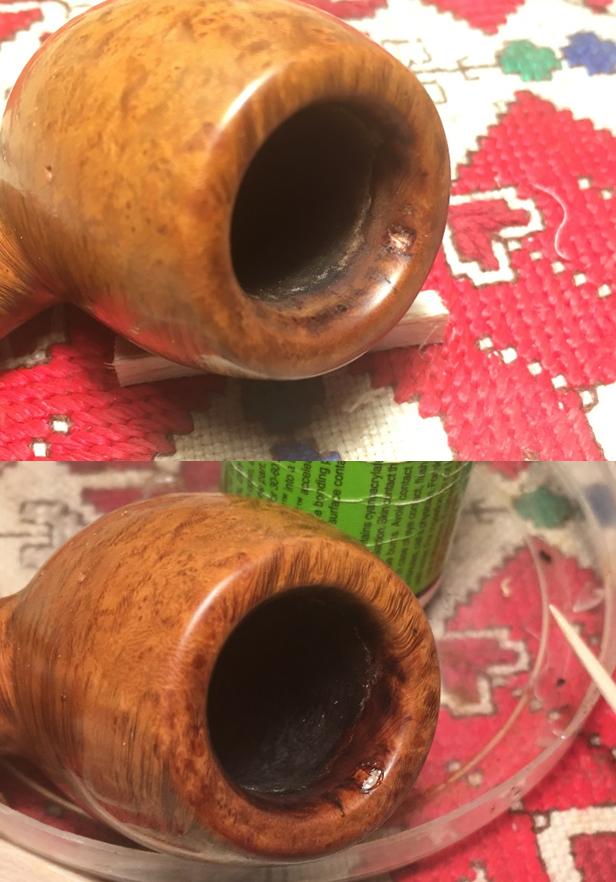
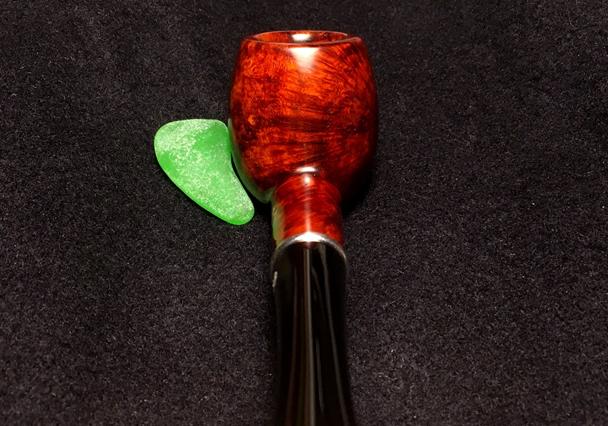
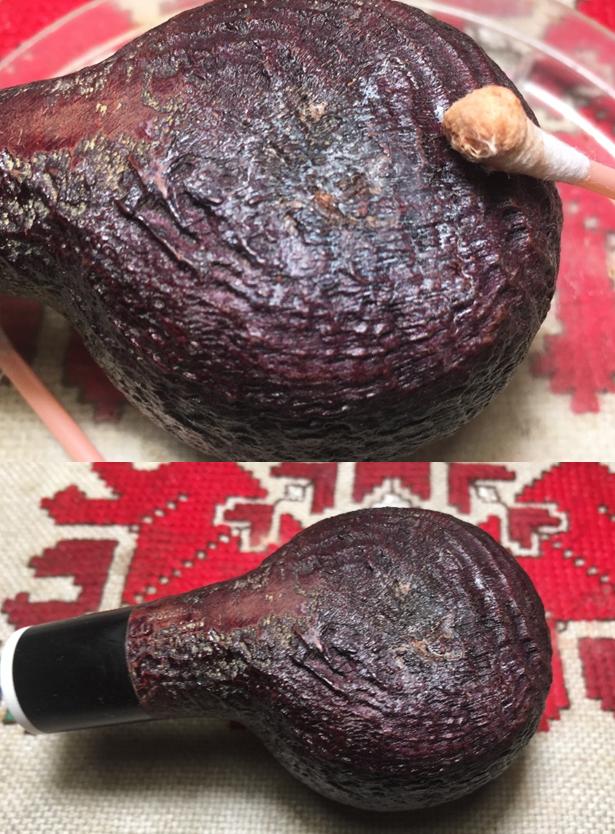
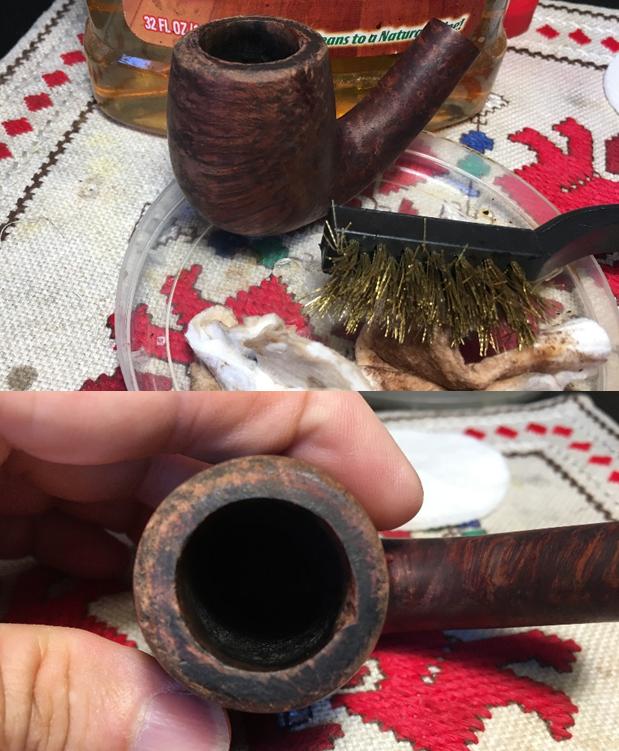
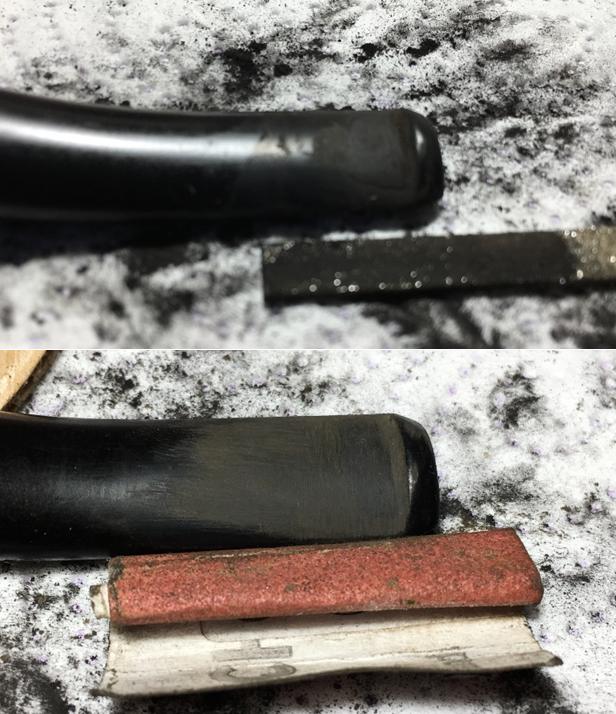
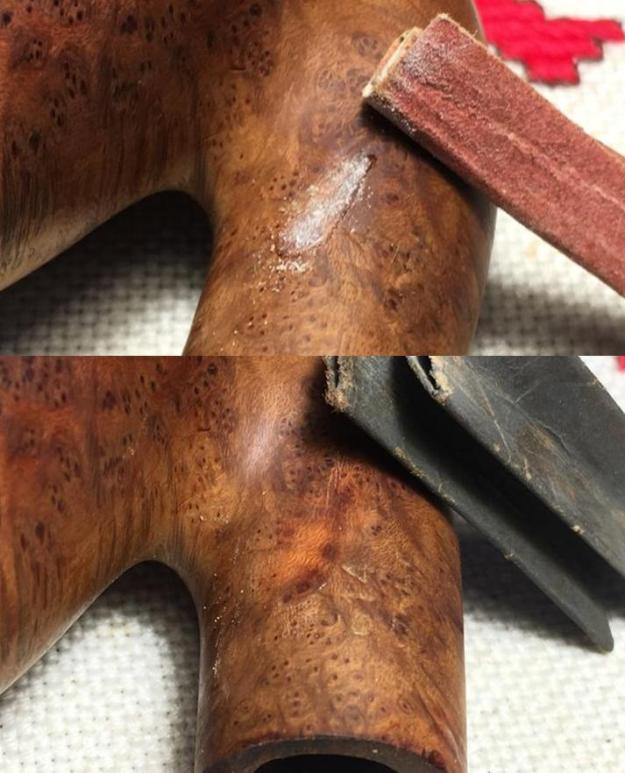
Now, I turn to the rim.  It’s in good condition but there are some nicks and dents on the edge of the rim.  There is also a darkened area from minor scorching from lighting the tobacco. (11 o’clock in the first picture).  In this area, the internal bevel has also eroded.  I decide to give the stummel a very light topping using 600 grade paper to reestablish the lines of the rim and bevel. After this, I wrap first a 120 grade paper around a tapered wooden disk to provide a hard surface behind the paper to cut a more distinct bevel.  I work the 120 paper around the damaged bevel area to shape the bevel.  I then follow in the same manner with the wooden disk, 240 then 600 paper to finish the rim and bevel repair.  The rim now looks fresher – I like it. 
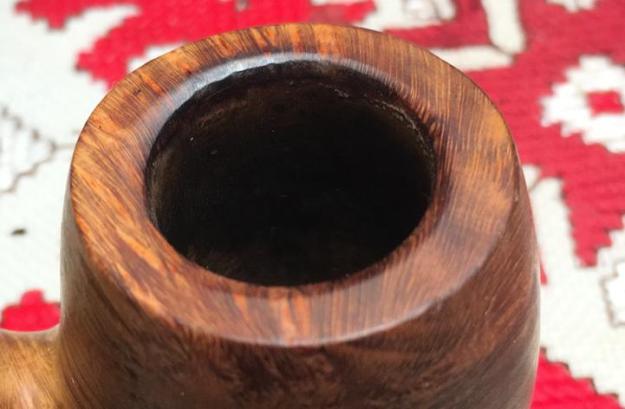
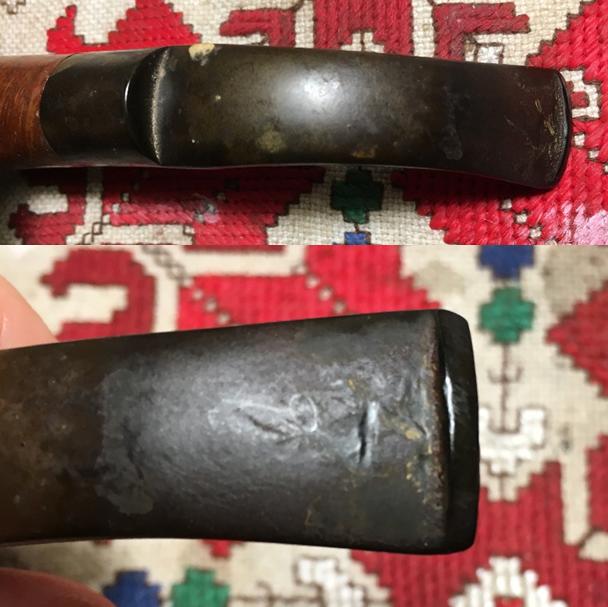
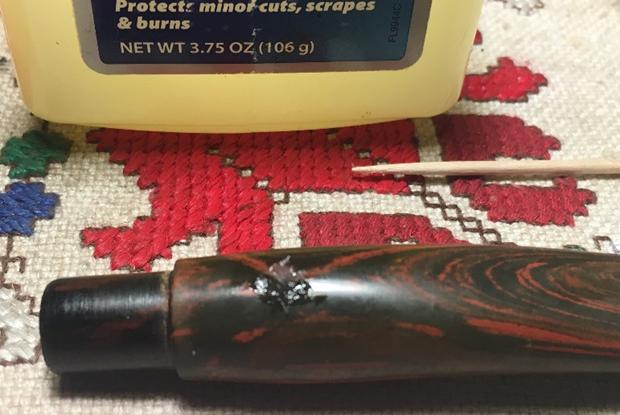
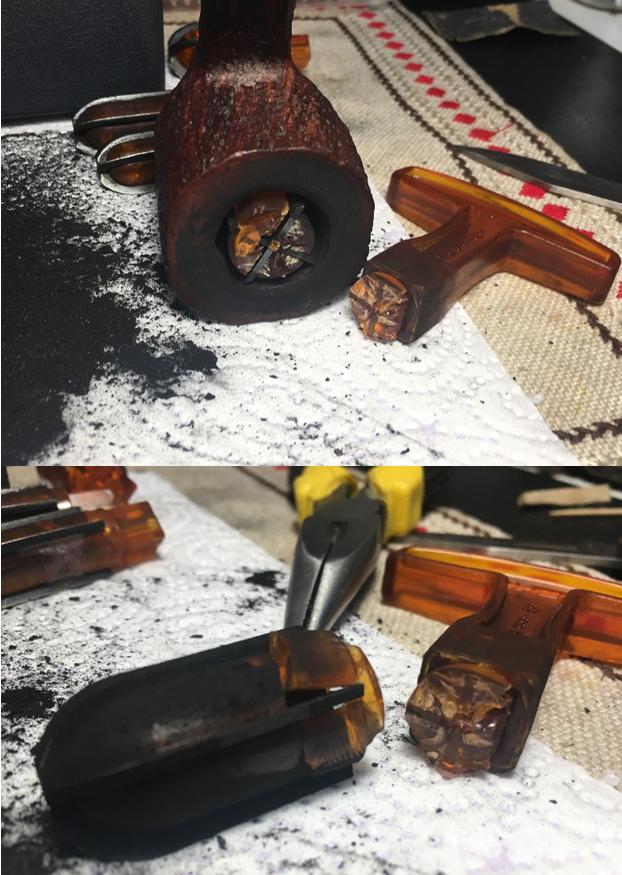
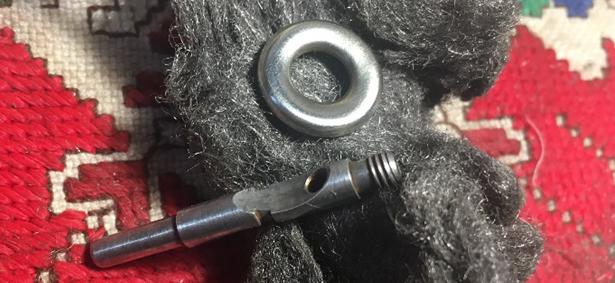
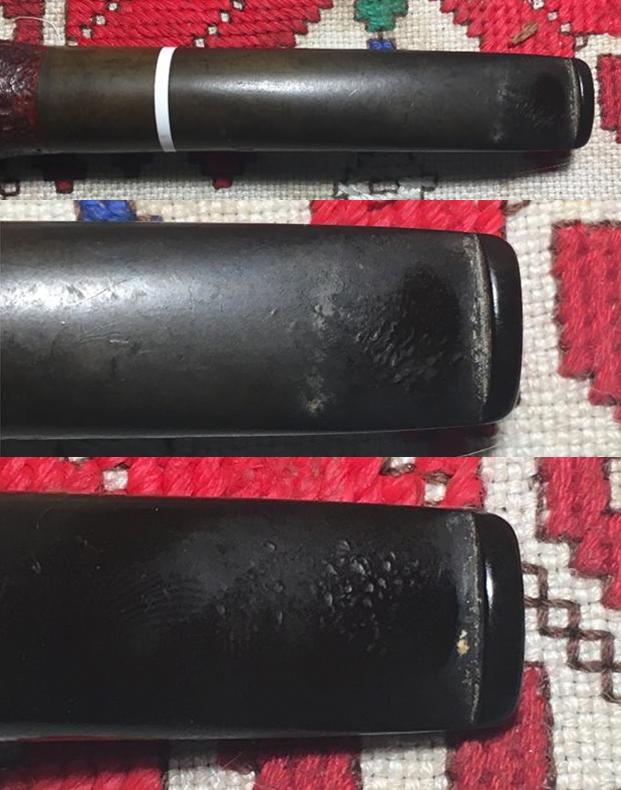
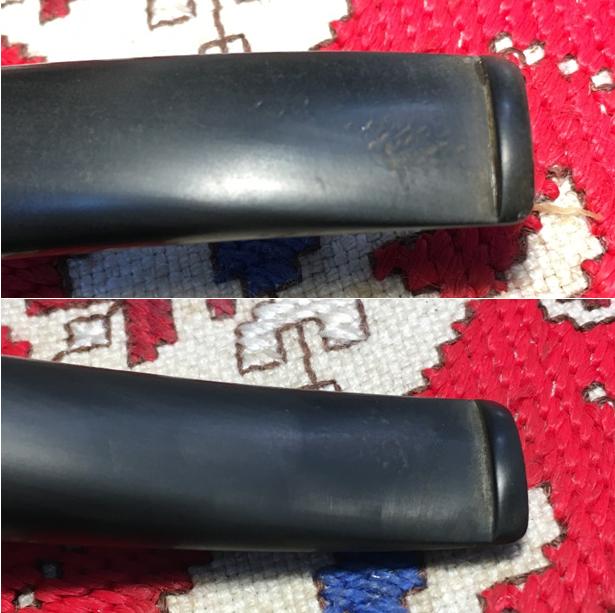
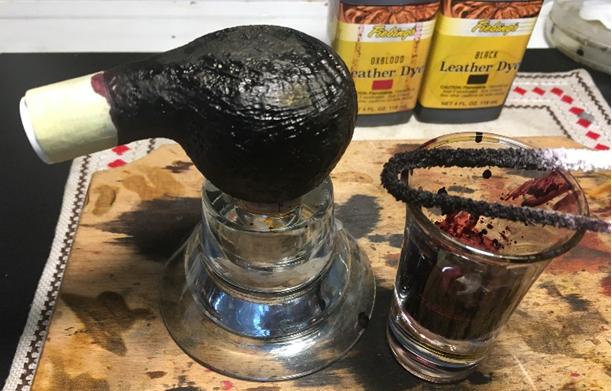
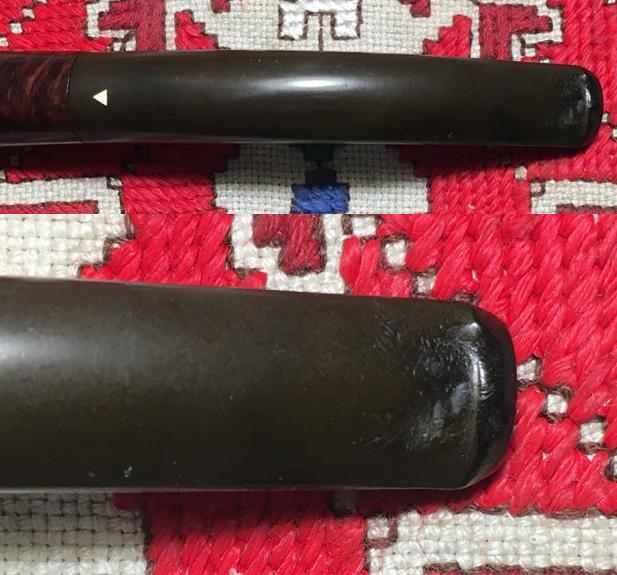
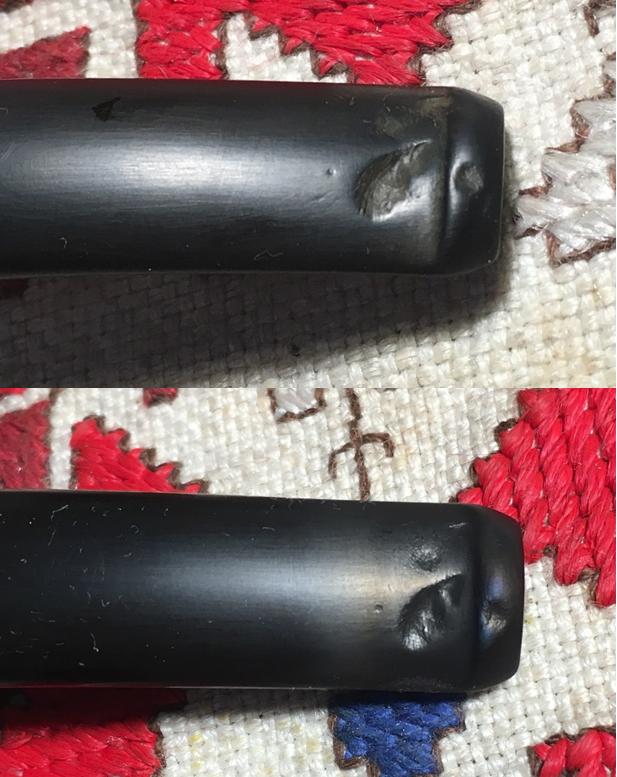
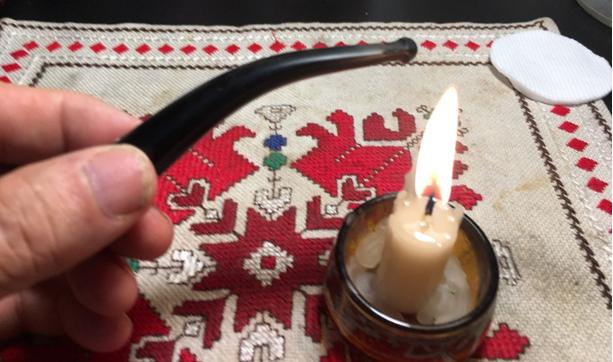
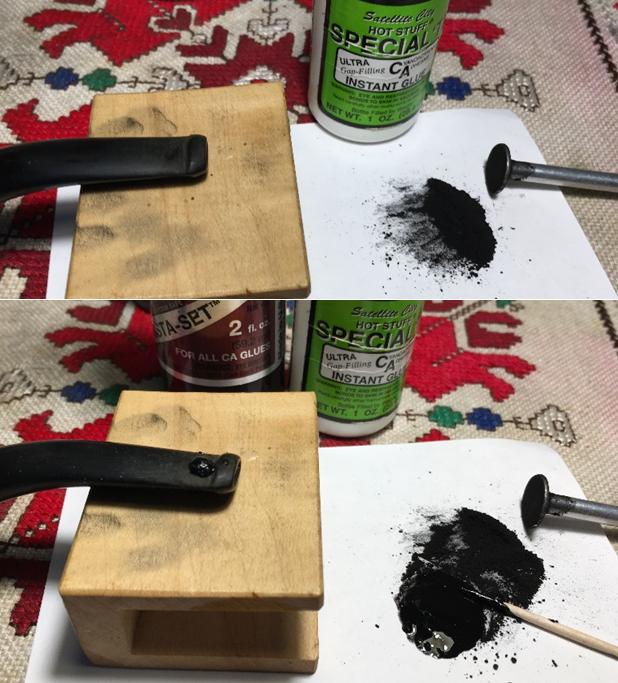
I put the stummel aside for a time to address the stem.  After deoxidizing the stem, discovering the Shooting Star stamp hanging on by threads, I look closely at the stem and the bit is in good shape.  There are only shadows of tooth chatter and one small dent on the upper button lip.  To bring up the button dent, I try painting it with a flame from a Bic lighter to expand the vulcanite enabling me to sand out the dent.  After several attempts, I was still left with a dent.  I decide to apply a drop of Black Medium KE-150 CA glue to the dent.  I put the stem aside to let the patch cure. 
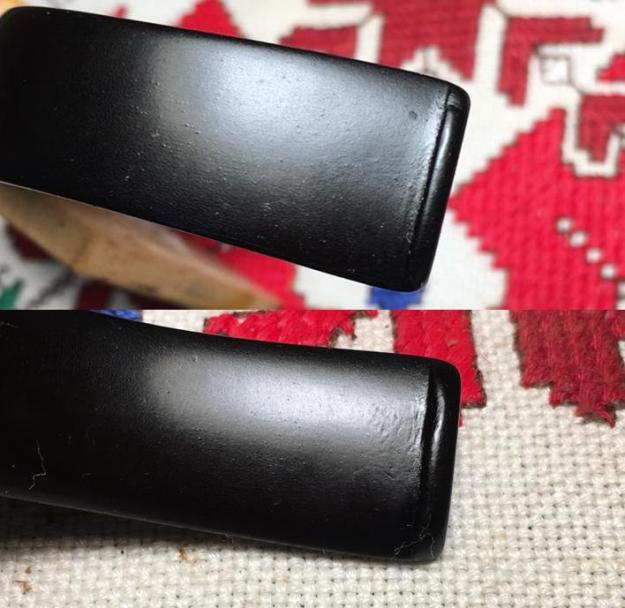
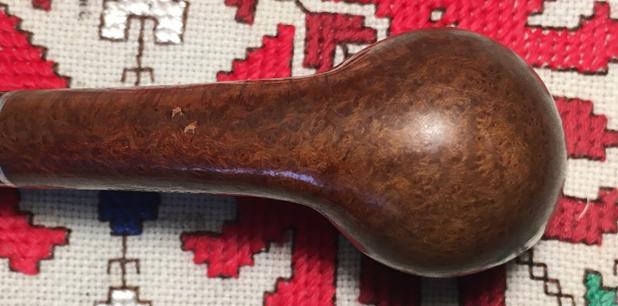
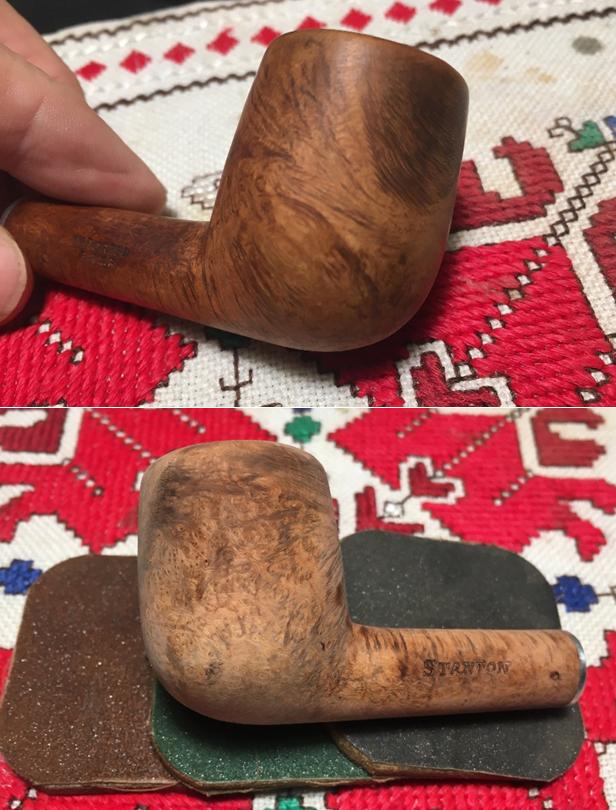
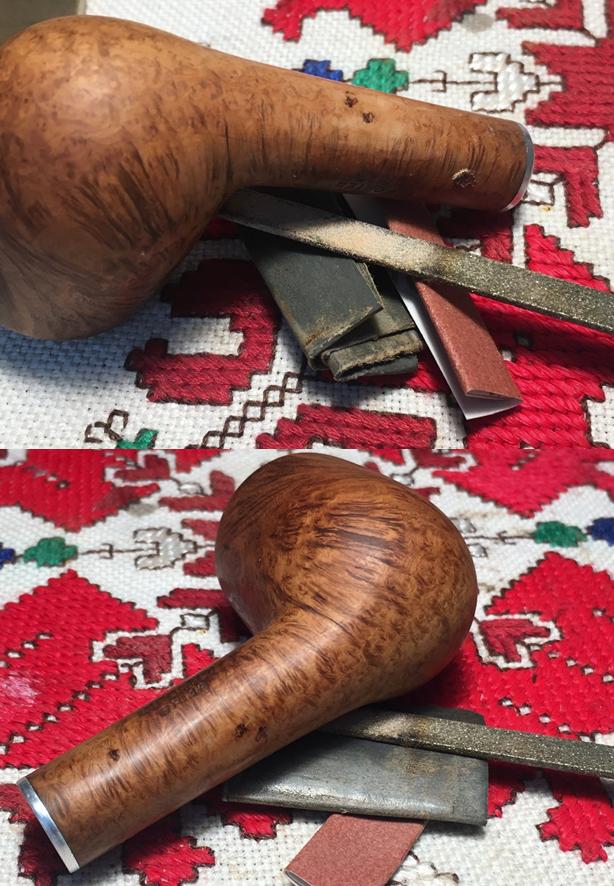
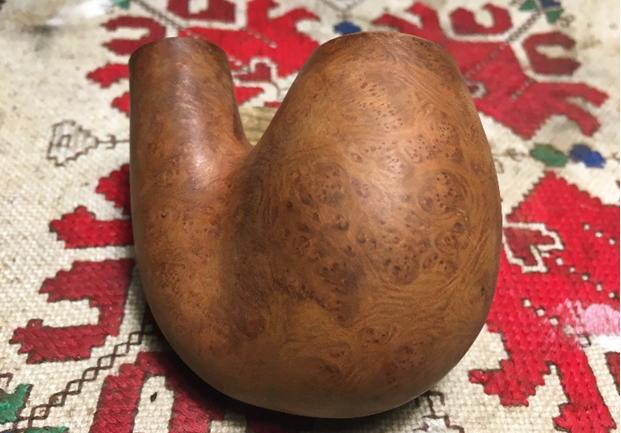
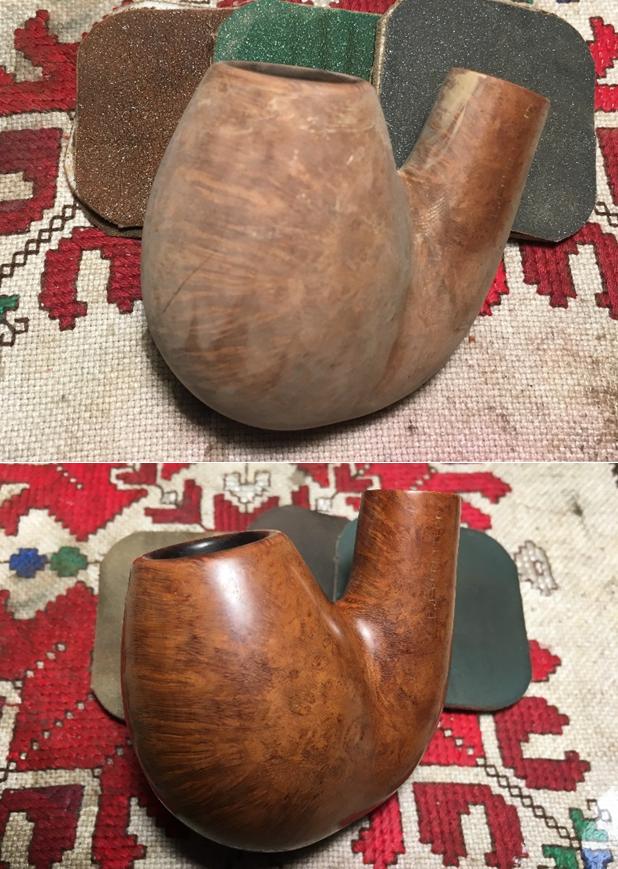
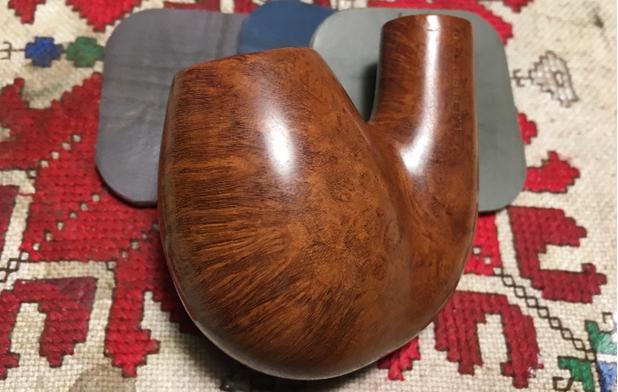
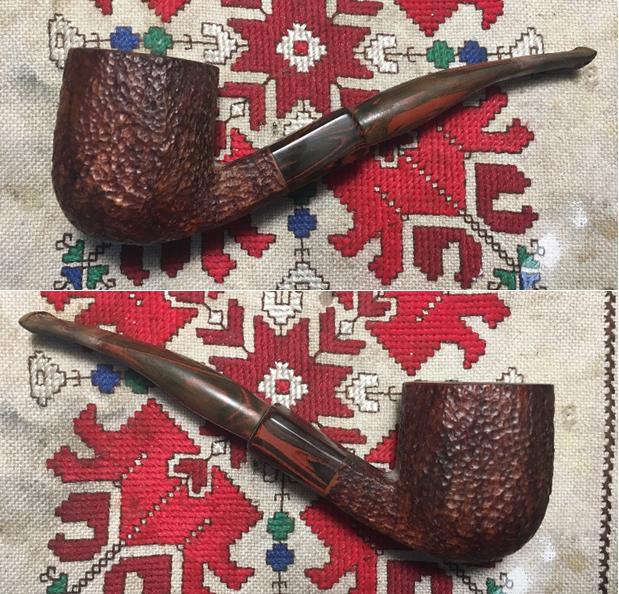
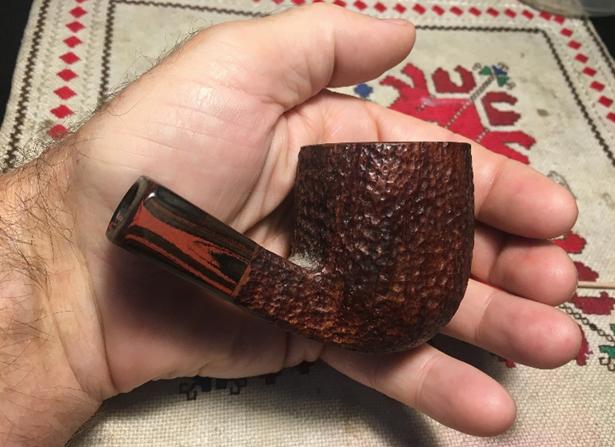
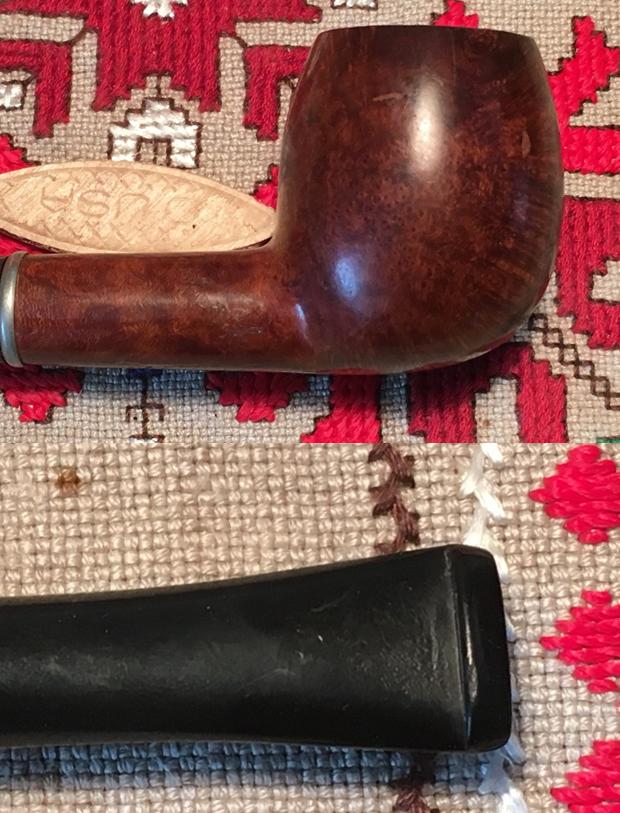
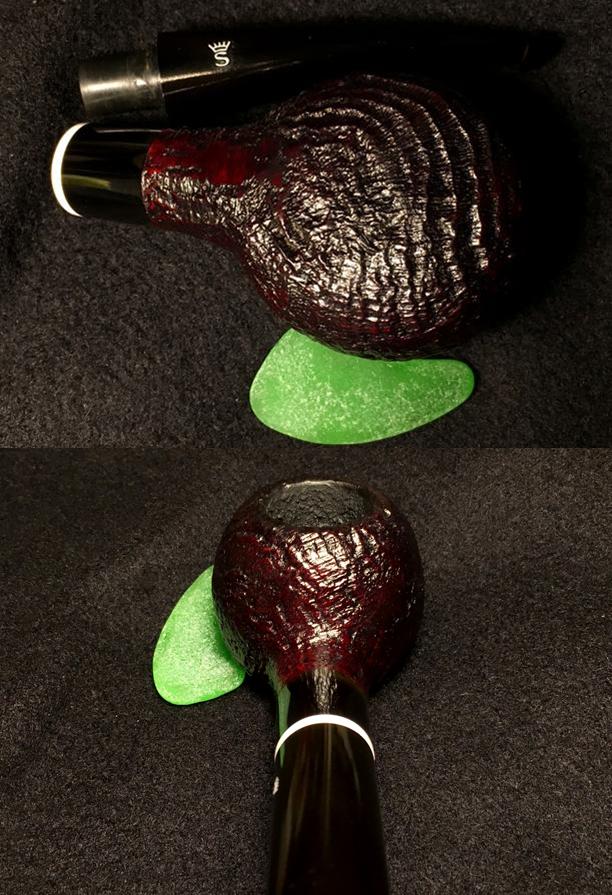
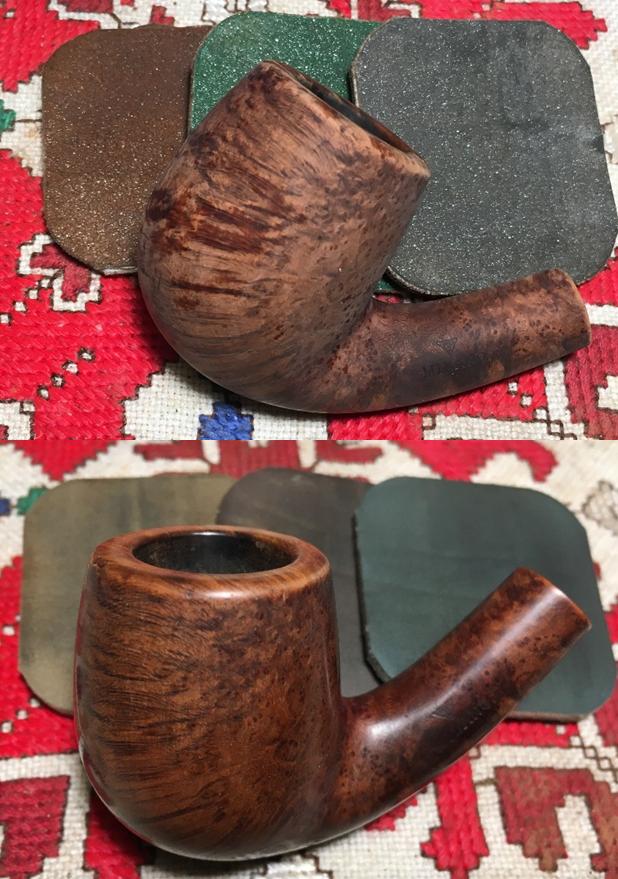
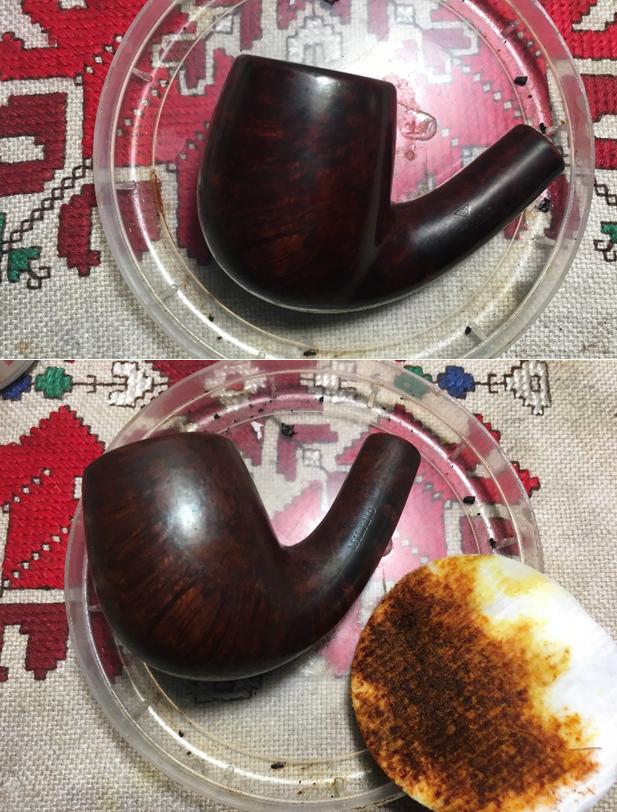
While I wait for the stem patch to cure, I pick up the stummel and start the external finishing process by first using a light grade sanding sponge to work the surface – addressing minor nicks.  I then wet sand the stummel using micromesh pads 1500 to 2400.  I follow this by dry sanding using pads 3200 to 4000, then 6000 to 12000.  I take pictures after each set of 3 to show the progress. I enjoy this part of the restoration process!  With each cycle of micromesh pads, the beauty of the grain emerges.  This Oscar has attractive grain.  I am drawn to the knot pattern on the heel as it gravitates outwardly and up the stummel with lateral grain having a feathered texture – bird’s eye grain as well on the upper bowl.  Very nice! 
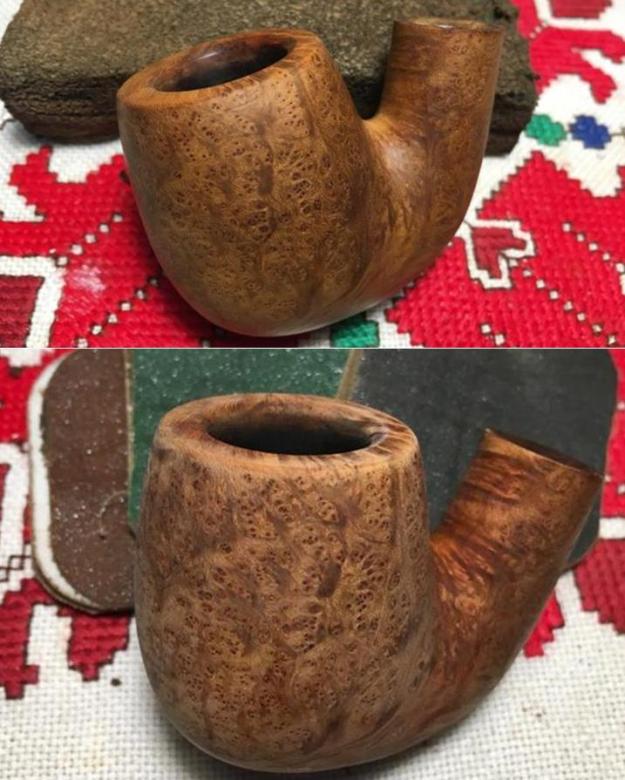
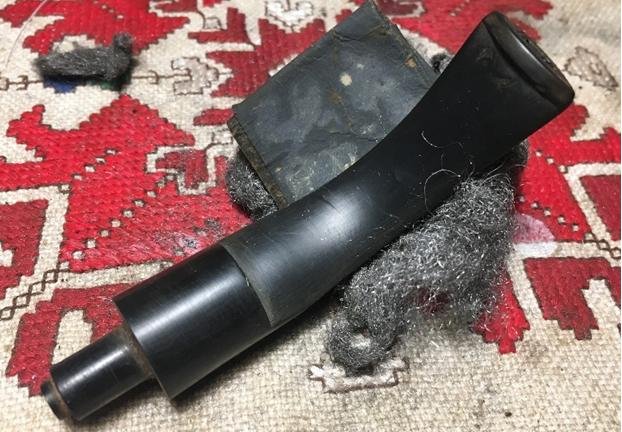
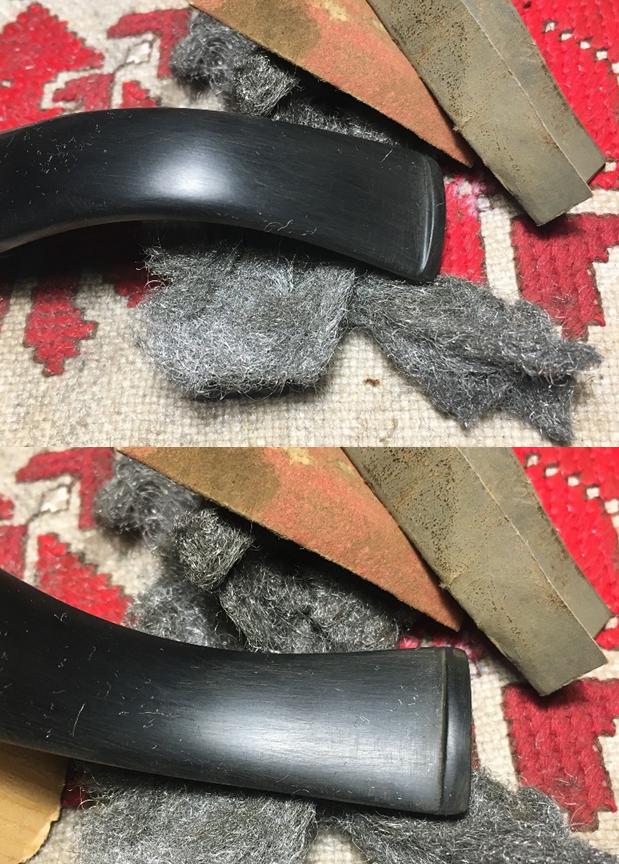
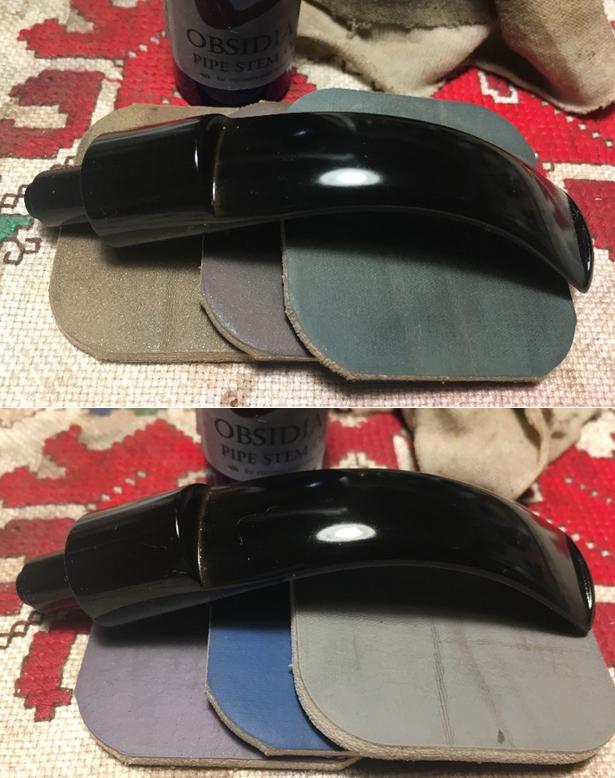
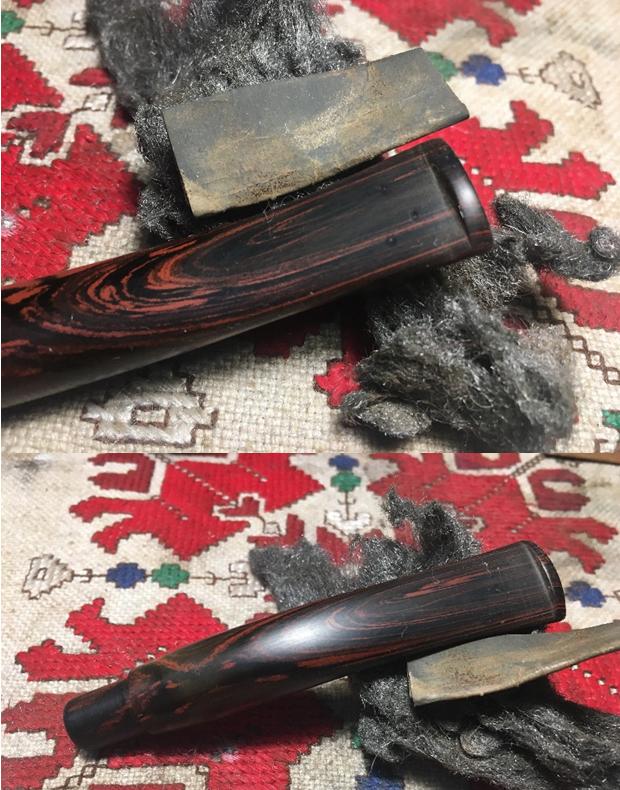
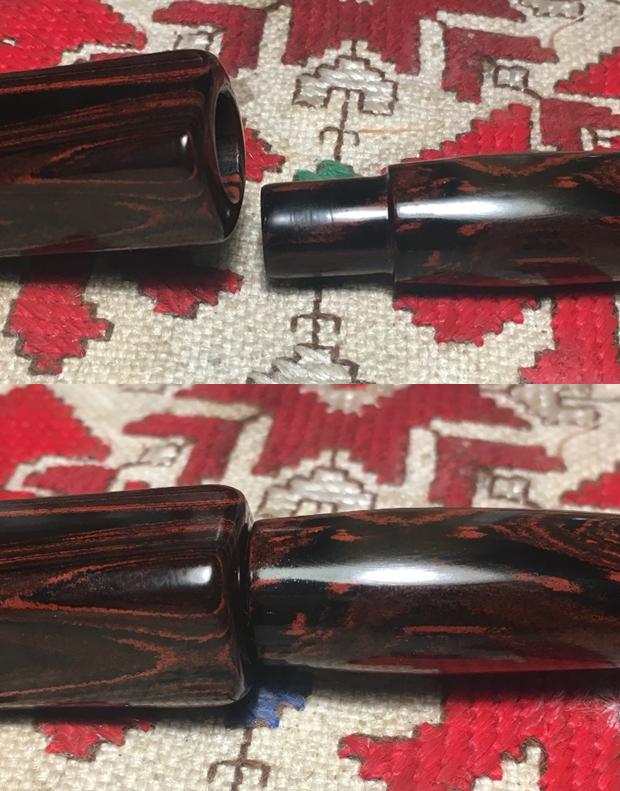
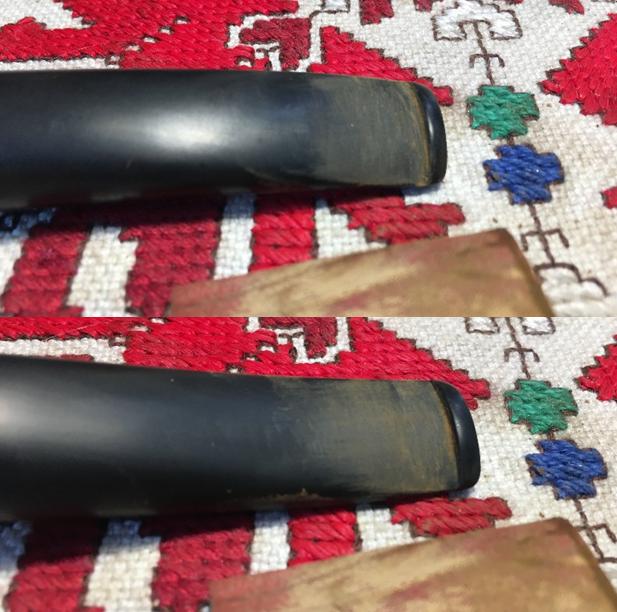
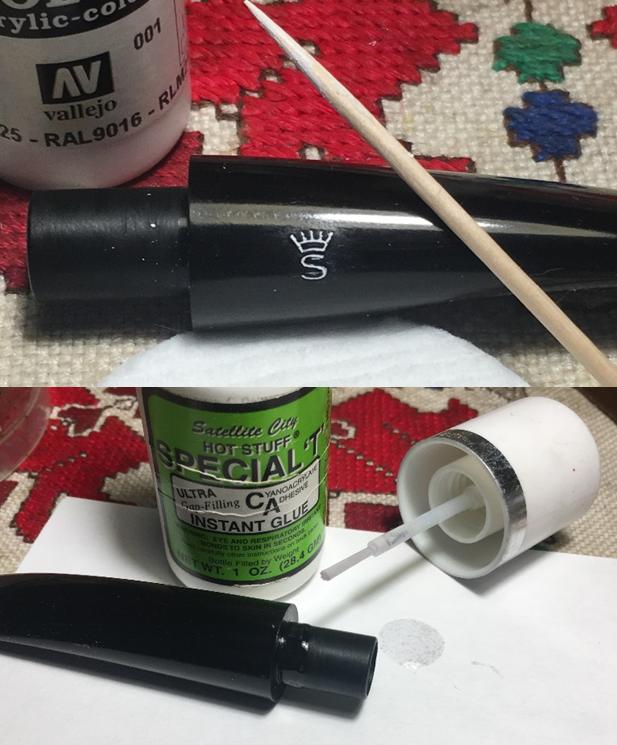
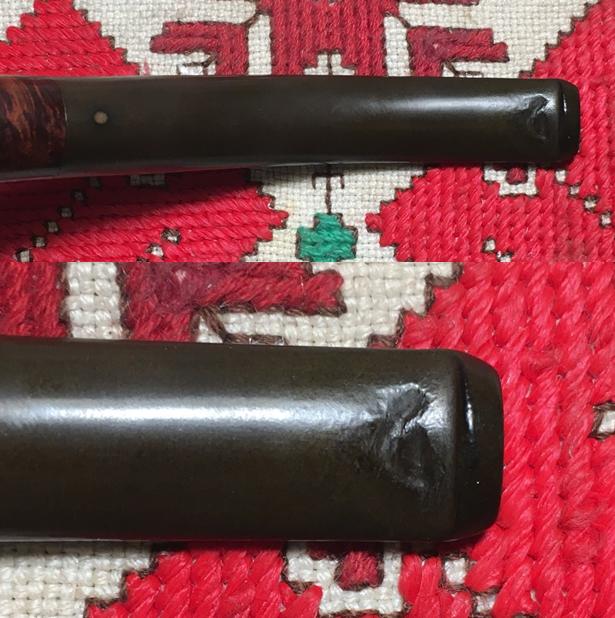
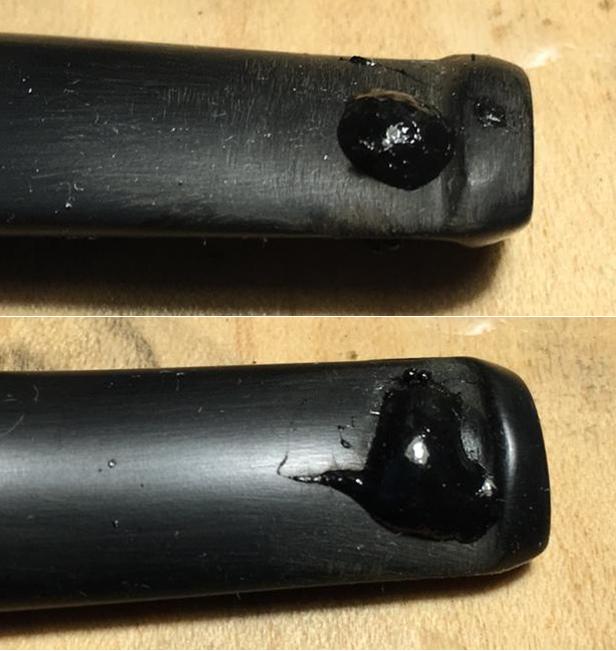
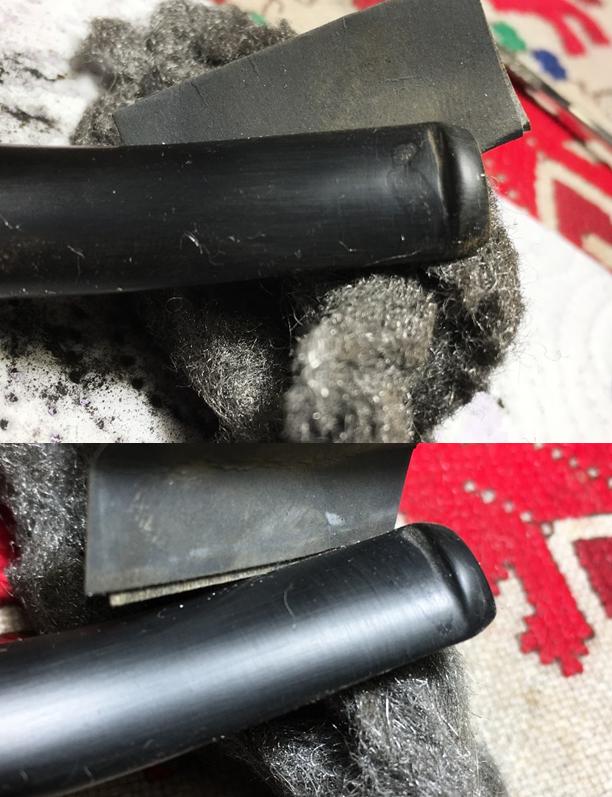
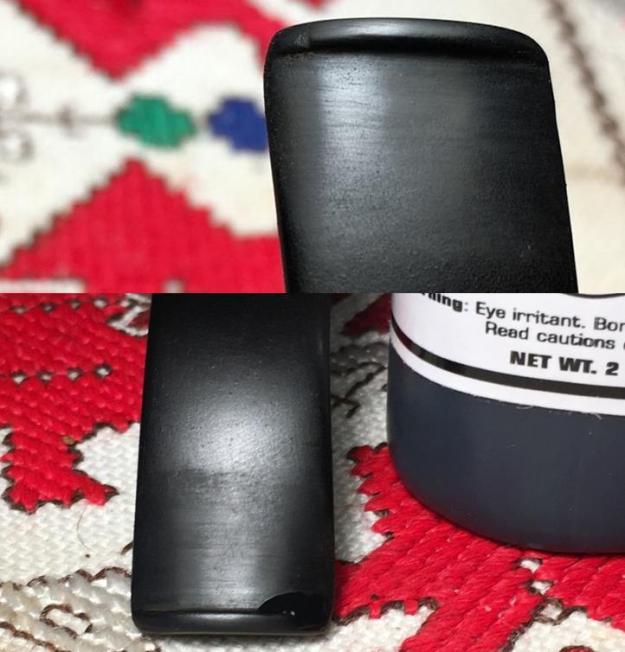
With the black CA glue cured, I now return to the stem.  Using a flat, needle file, I remove the patch area above the vulcanite and redefine the button.  I follow with 240 grade paper to erase the tracks left by the file.  I then use 320 grade paper followed by 600 grade to smooth the area further.  I flip the stem and sand the lower bit with 600 grade paper to remove the light tooth chatter.  Finally, I buff the entire stem, watchful of the Shooting Star stamp, using 0000 steel wool.  The pictures show the progress. 
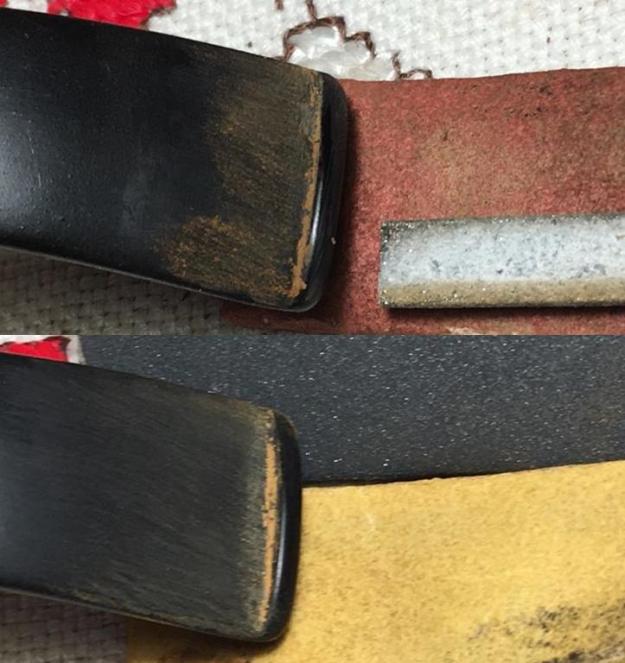
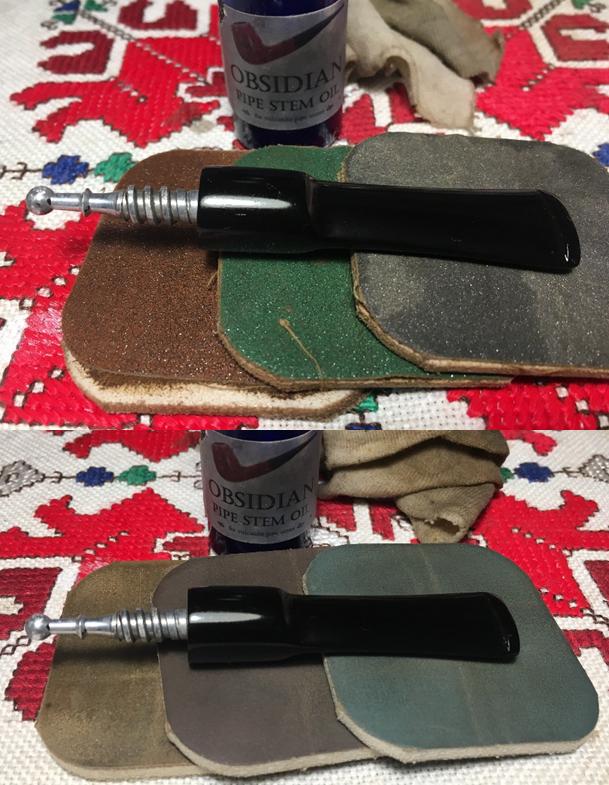
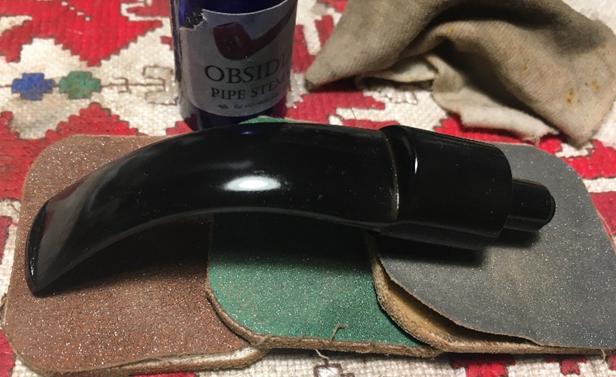
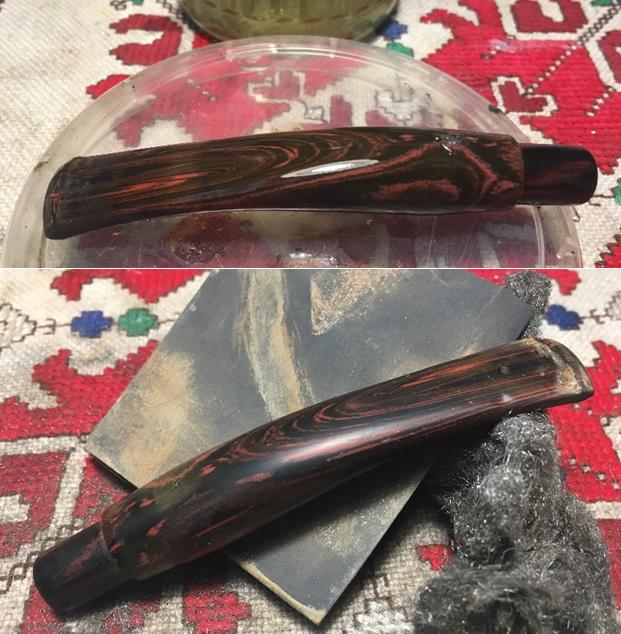
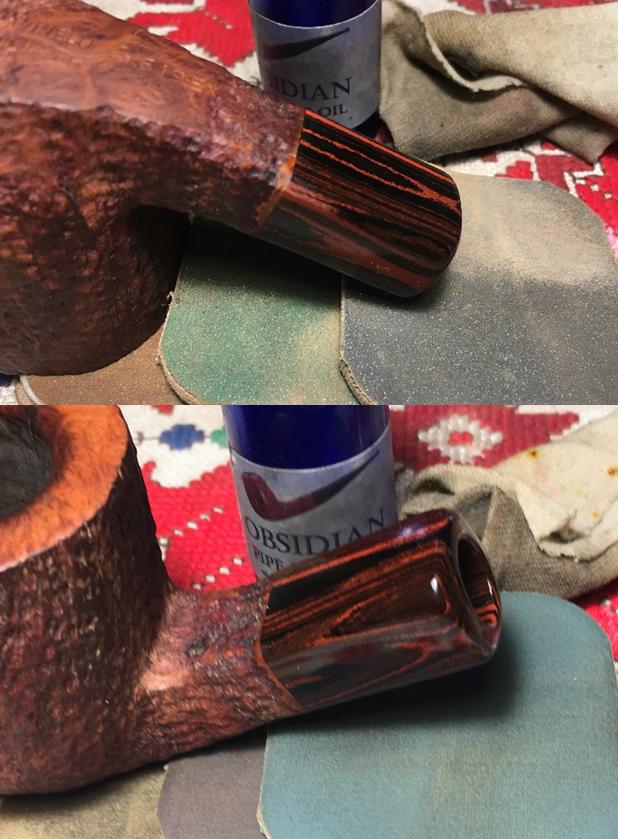
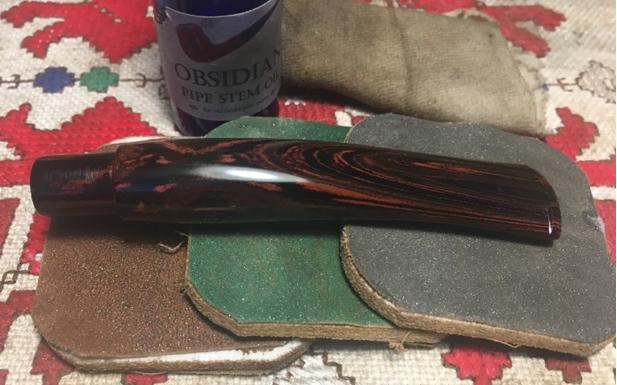
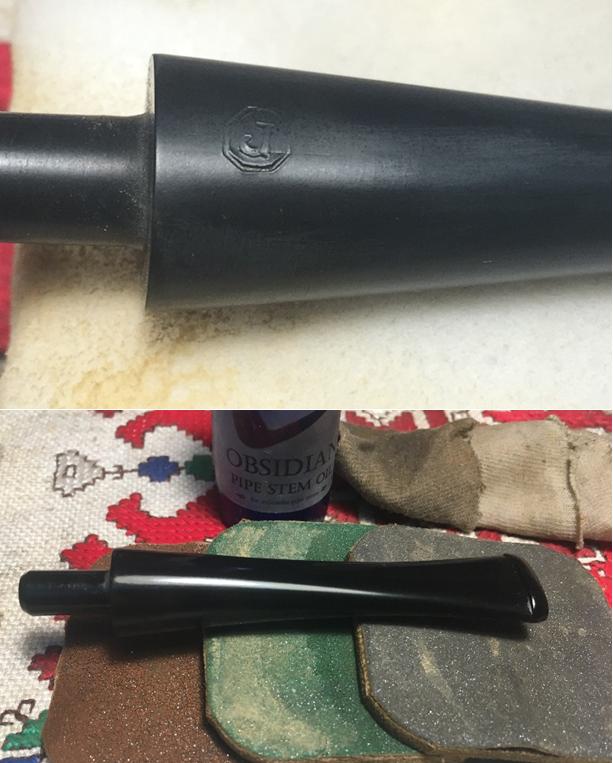
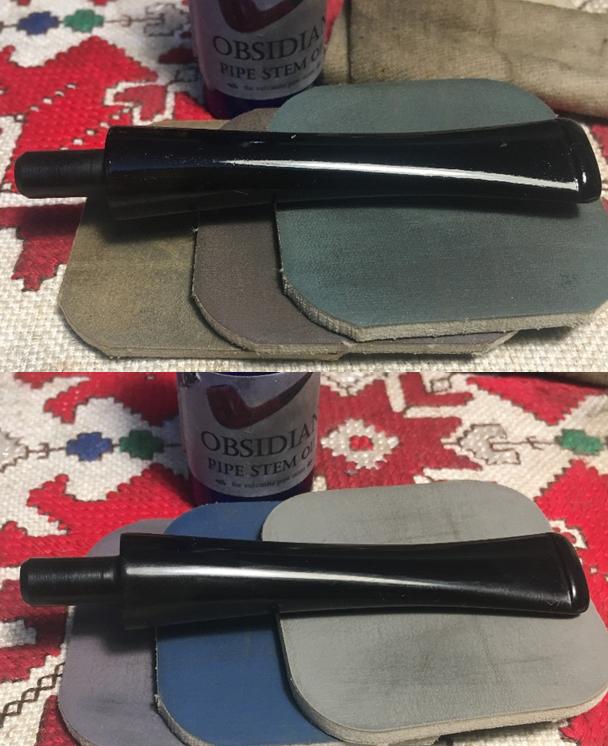
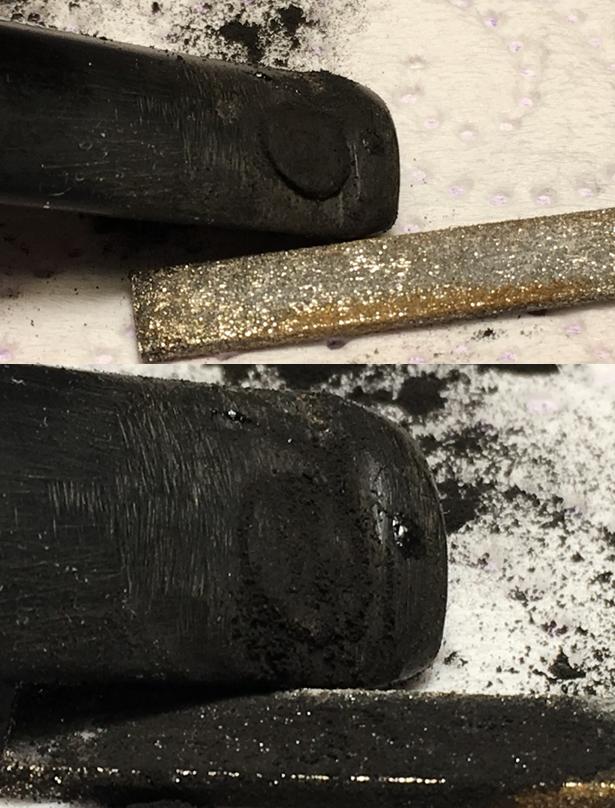
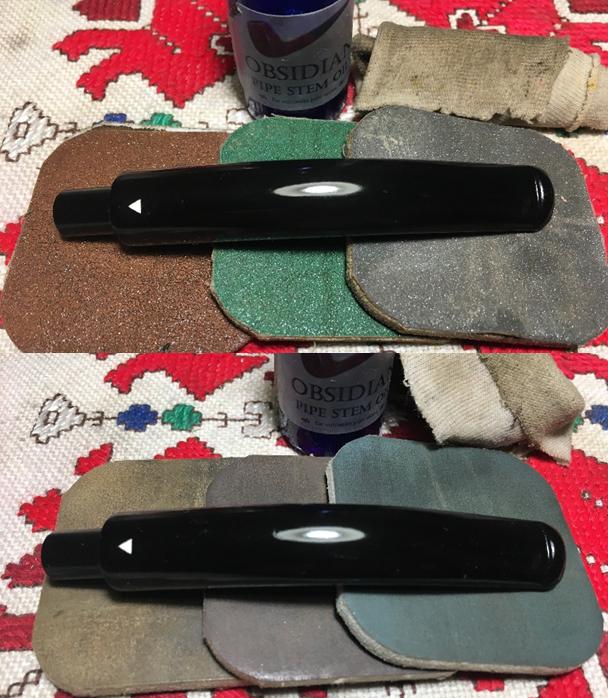
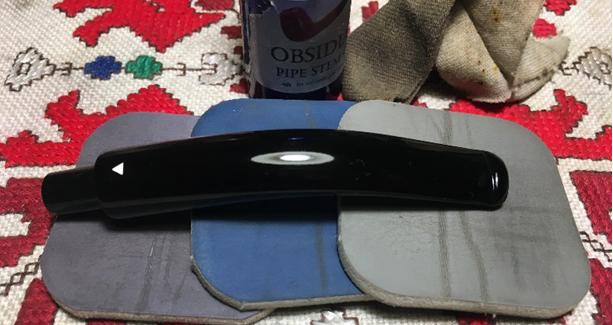
Following the steel wool buff, I now wet sand the stem with micromesh pads 1500 to 2400. After finishing with this first wet sand cycle, I was bushwhacked by oxidation resurfacing on the Oscar’s stem!  Ugh!!  After all the sanding and roughing up the surface, sometimes it’s difficult to see the oxidation left behind until the fine tuning with the micromesh pads. The first picture below doesn’t show what I can see with the eye – a deep shadow of oxidation.  I take another picture adjusting the aperture, so you can see the source of my frustrations!  I send a note to Steve with questions and his response was good news and bad.  The good news was that it wasn’t my process but that Savinelli stems are notoriously difficult to exorcise oxidation.  The bad news is that I simply will go back to work, sanding with 240 grit, 320, 600, then again steel wool buff and application of Before and After polishes….  I did all these, including a few times going through the first set of 1500 to 2400 micromesh pads, so that I am finally satisfied with the Savinelli Oscar’s stem.  Yet, I haven’t rid the oxidation 100%, but time to move on!
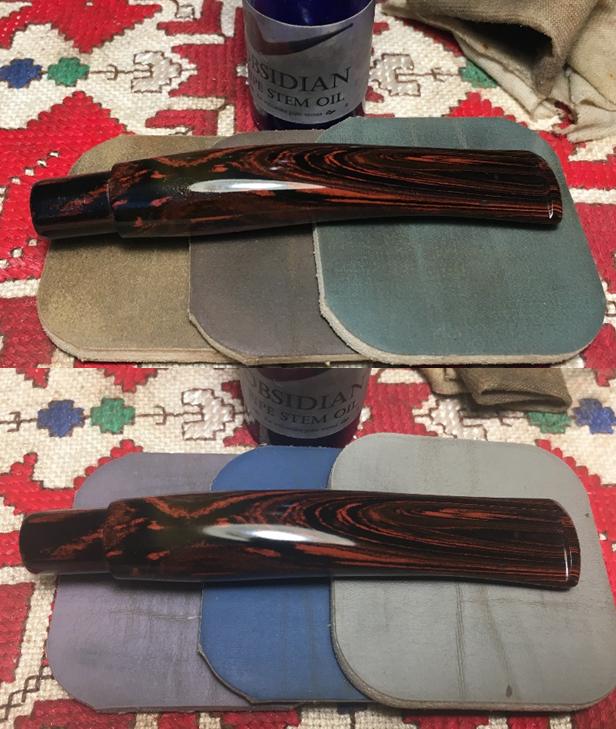
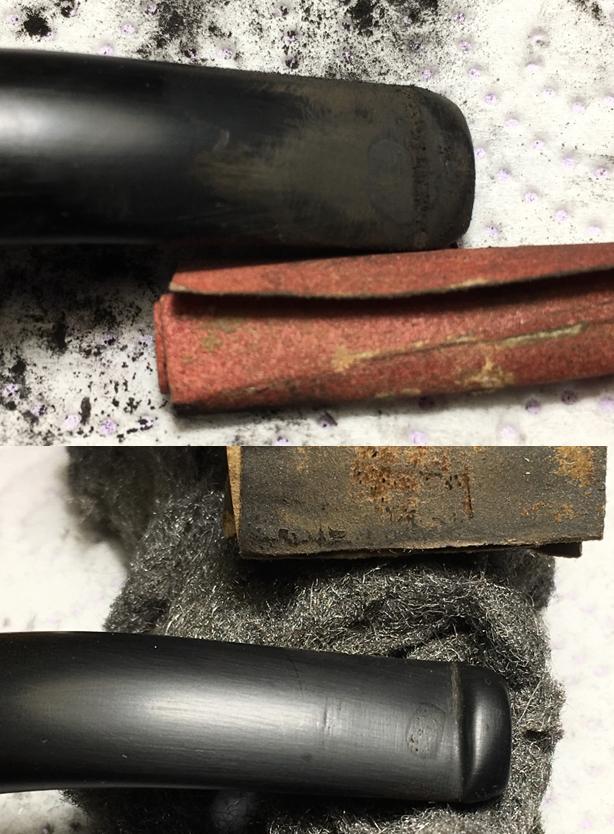
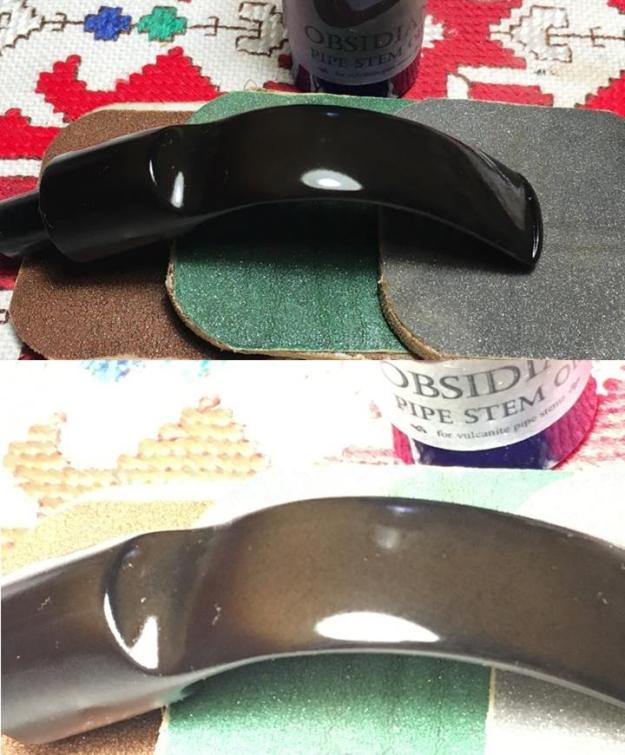
Again, at the end of the first cycle of 3, wet sanding with micromesh pads, 1500 to 2400, I then dry sand with pads 3200 to 4000, then 6000 to 12000.  After each cycle I apply Obsidian Oil to the (almost!) exorcised vulcanite.  When I look at the stem now, it looks pretty good! 
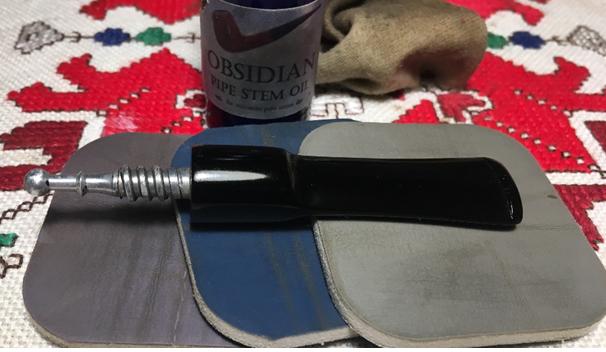
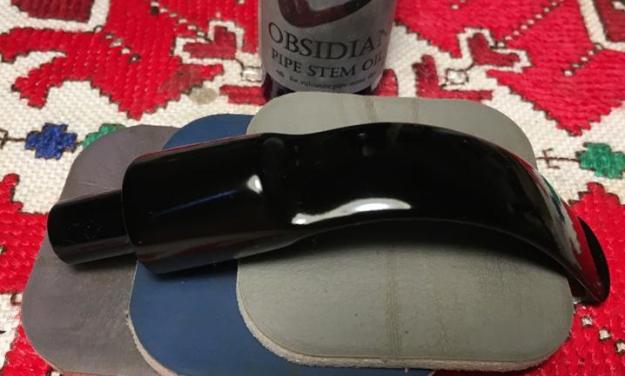
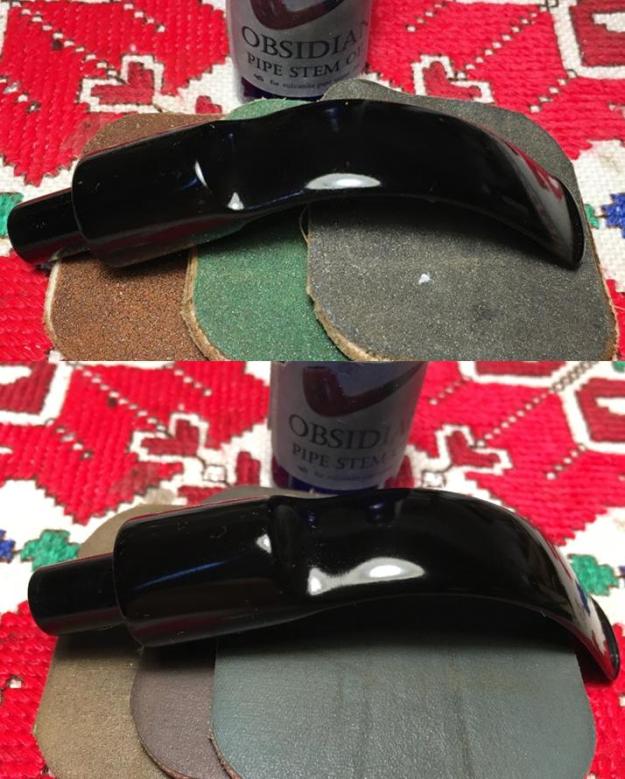
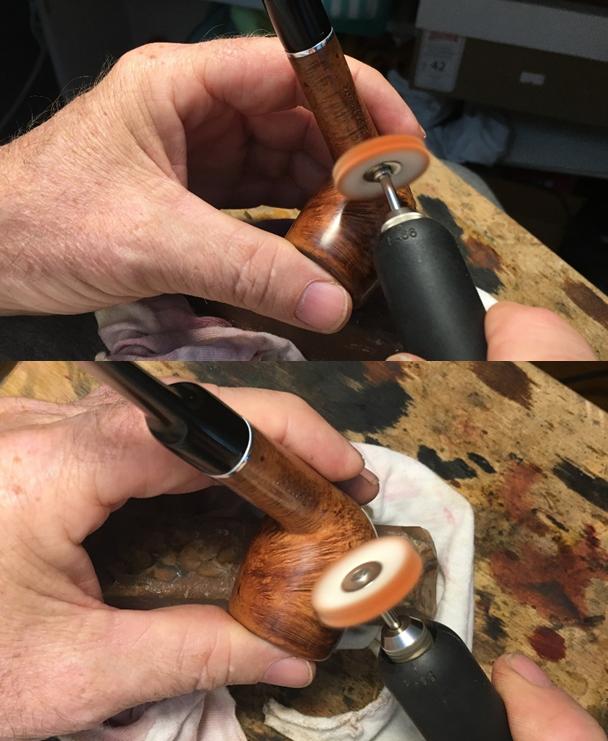
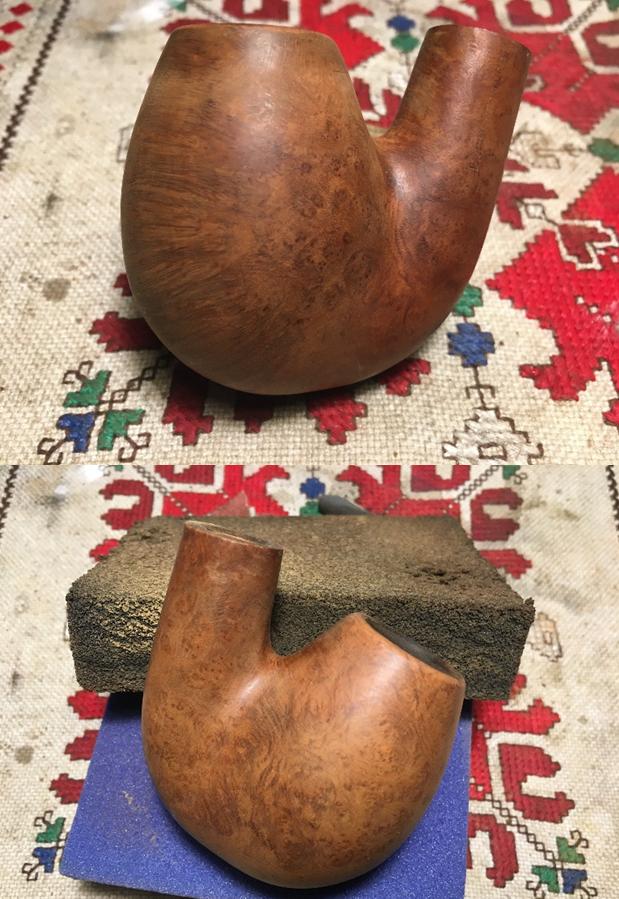
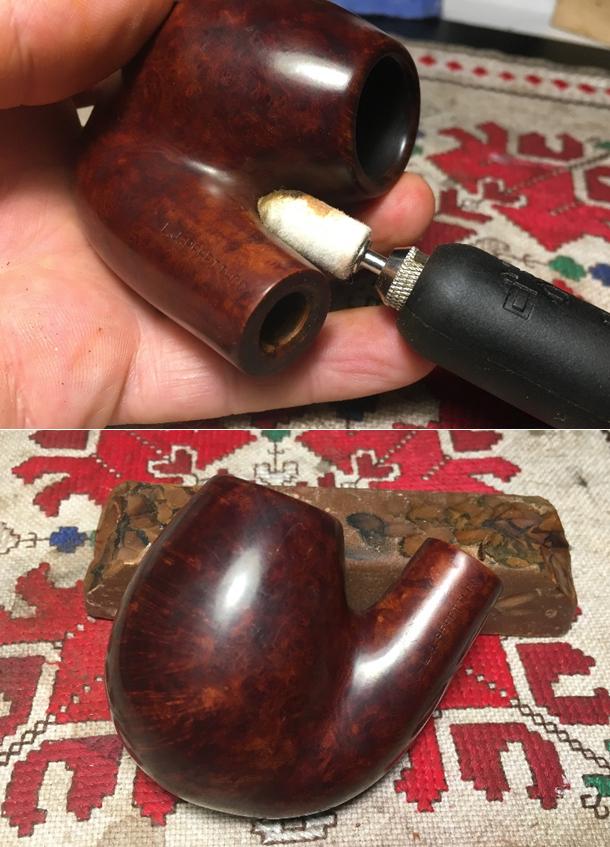
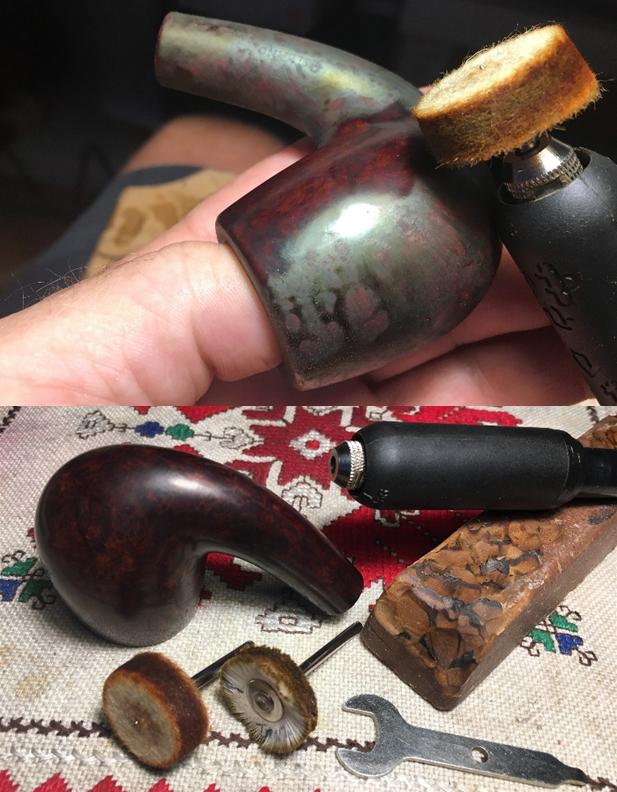
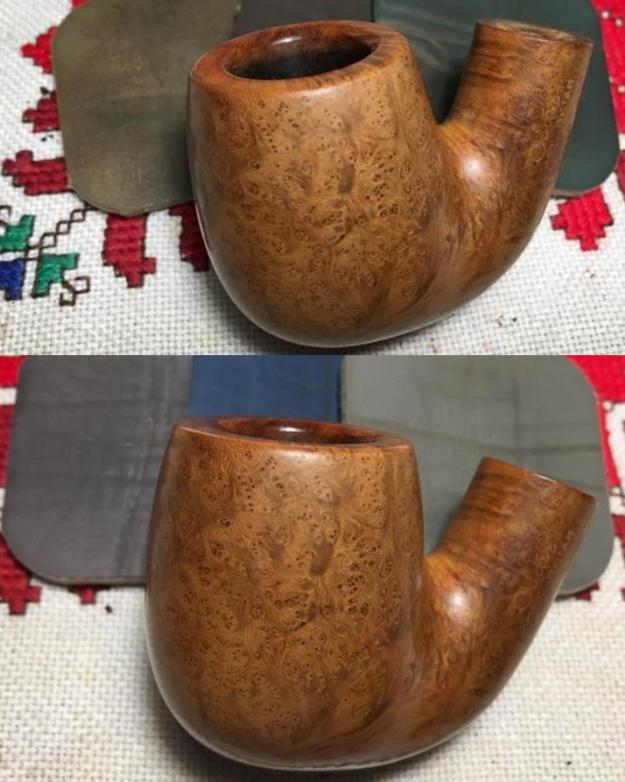
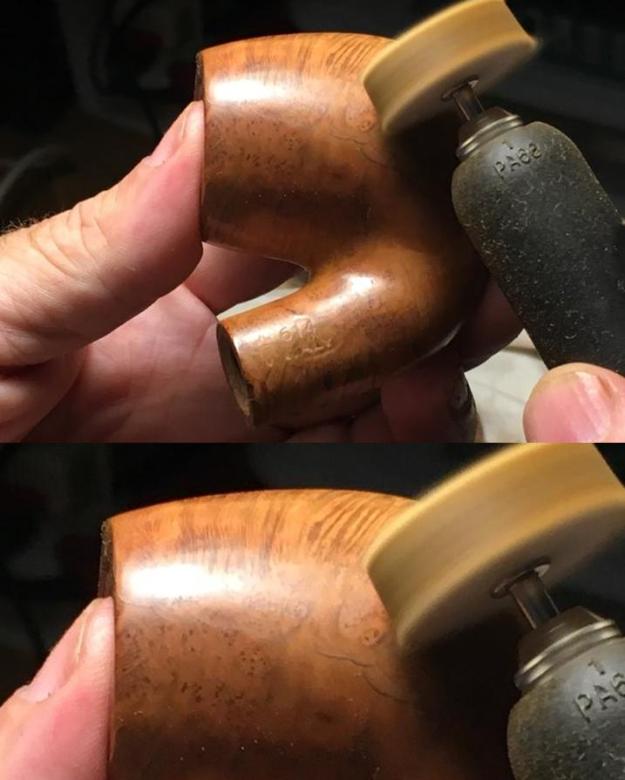
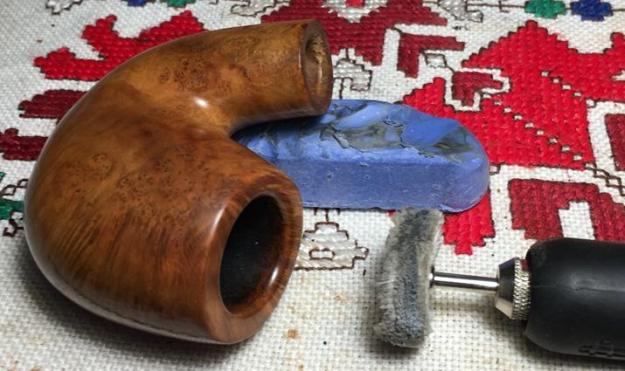
With the Savinelli Oscar’s bowl back in front of me, I begin the final sanding and waxing process.  I first mount the felt buffing wheel on the Dremel and apply Tripoli compound to the briar’s surface.  I first set the speed at the slowest speed, purge the wheel with the Dremel’s tightening wrench’s sharp edge, and I apply the compound.  I apply compounds, which are abrasives, not waxes, in a methodical, circular motion, not applying too much downward pressure on the wheel but allowing the compound, speed and the wheel to do the work.  Following the Tripoli, I apply Blue Diamond compound in the same manner, with a cotton cloth buffing wheel mounted on the Dremel, set at about 40% speed.  During the application of the compounds, I love to watch the natural shine of the briar start reflecting like glass.  The beauty of this Savinelli’s grain is popping. With the help of my wife, the picture below shows the application of Tripoli compound.  You can see how I use the sheen of the lamp to ‘steer’ the compound around the briar surface allowing the action to buff out the microscopic lines and nicks.  
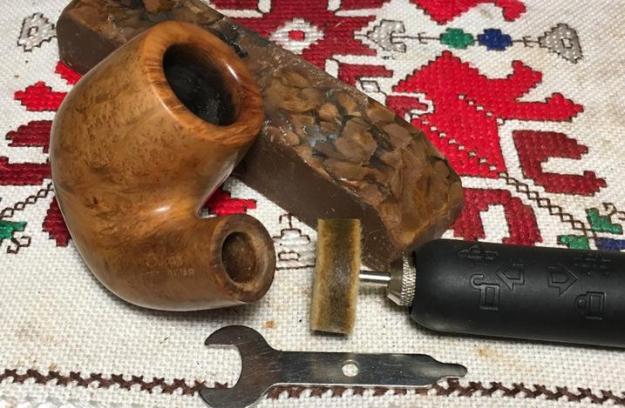
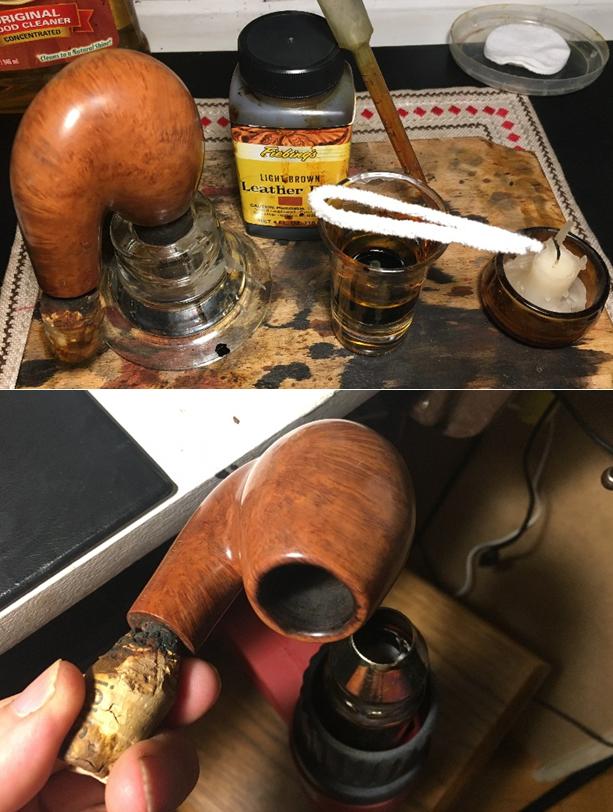
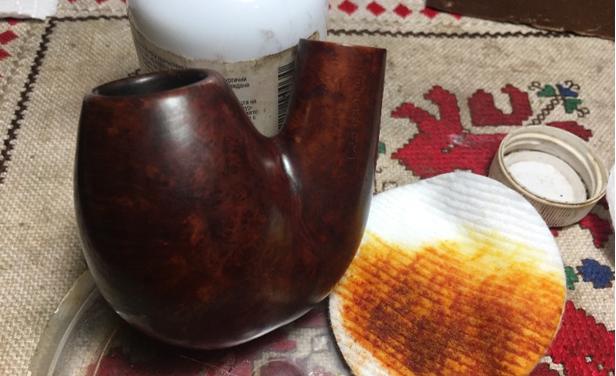
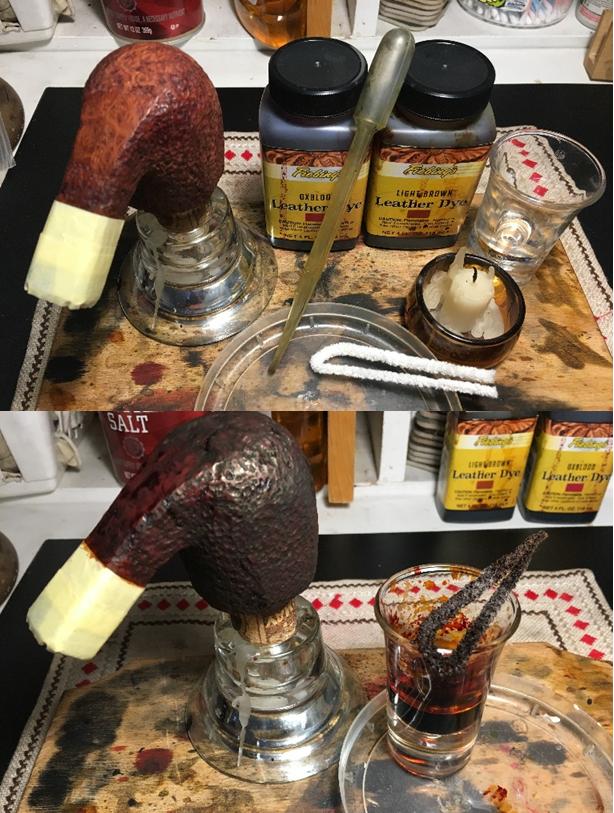
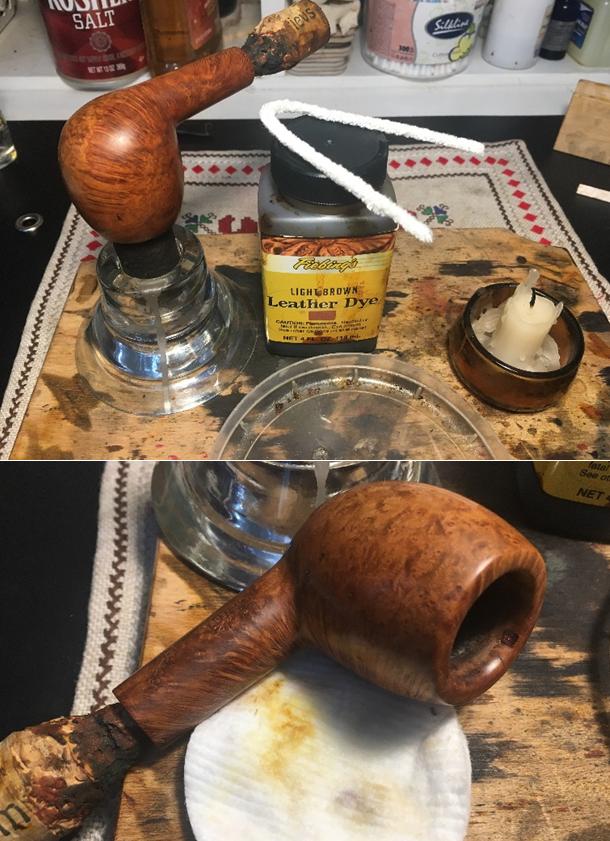
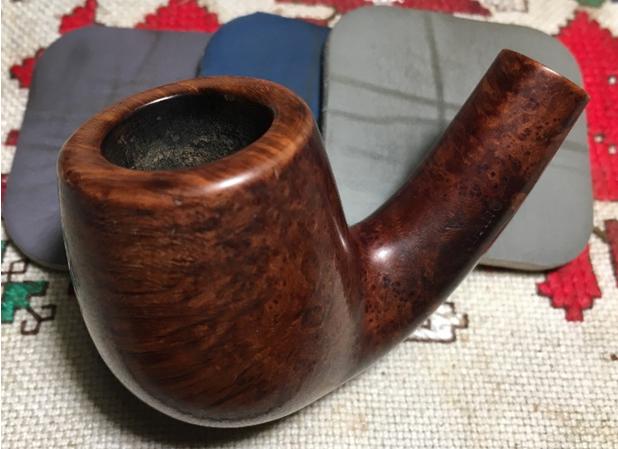
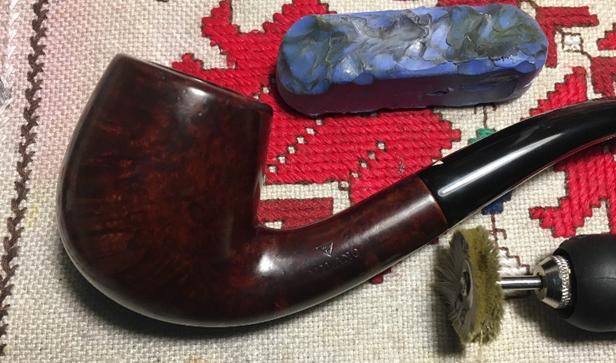
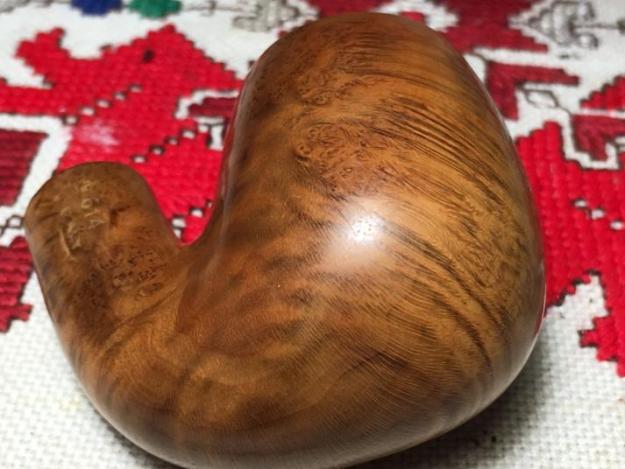
With the compounds finished, I buff the stummel with a clean felt cloth to remove the compound dust left behind.  The last restoration I did of the L. J. Peretti Oom Paul (see LINK) which I added to my own collection, I utilized for the first time the Before and After Restoration Balm.  I liked the results a lot.  The Restoration Balm maintains the lighter hues of the natural grain but enriches the patina.  I use the Balm with the Savinelli Oscar as well.  I reunite the stem and stummel and I put some Balm on my fingertips and I work it into the briar surface as well as the stem.  As I rub, the Balm thickens until it has almost a stickiness.  After application, I lay it aside for a while to allow the Balm to do its thing – while it’s doing its thing, I take a picture.  I then wipe it down and buff it with a cotton cloth pad.  I like the rich luster that the balm brings up from the briar. The vulcanite stem also responds very well.I follow the Restoration Balm by applying carnauba wax to the stem and stubble.  I mount the Dremel with a cotton cloth buffing wheel dedicated to applying wax.  With the Dremel speed still at 40% I apply several coats to the pipe and follow the wax with a hearty hand buffing using a micromesh cloth that bring up the shine even more.

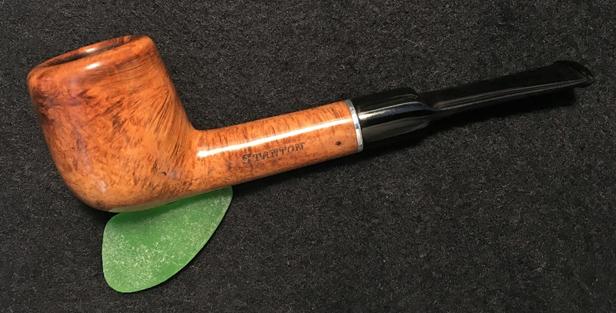
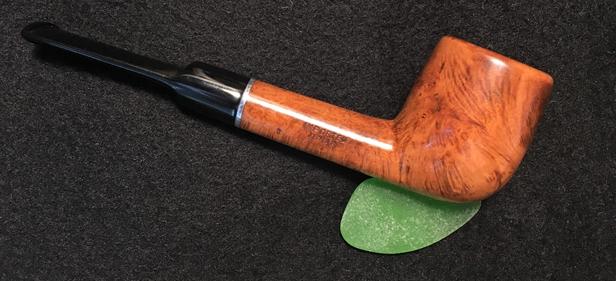
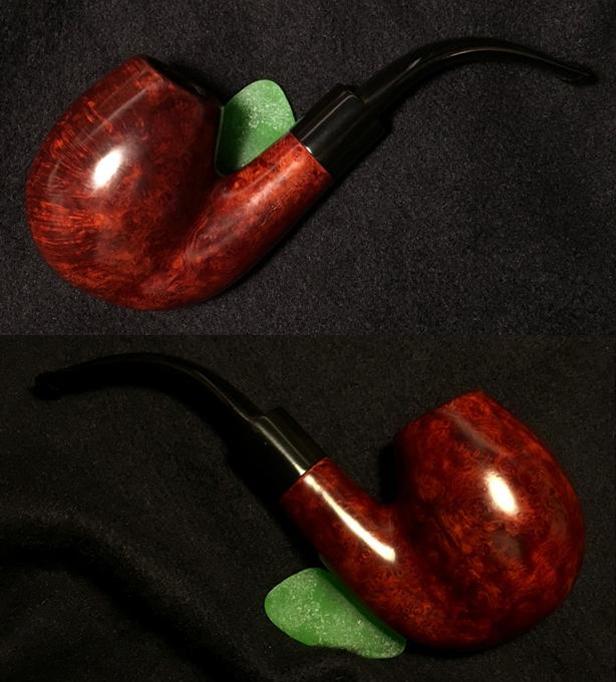
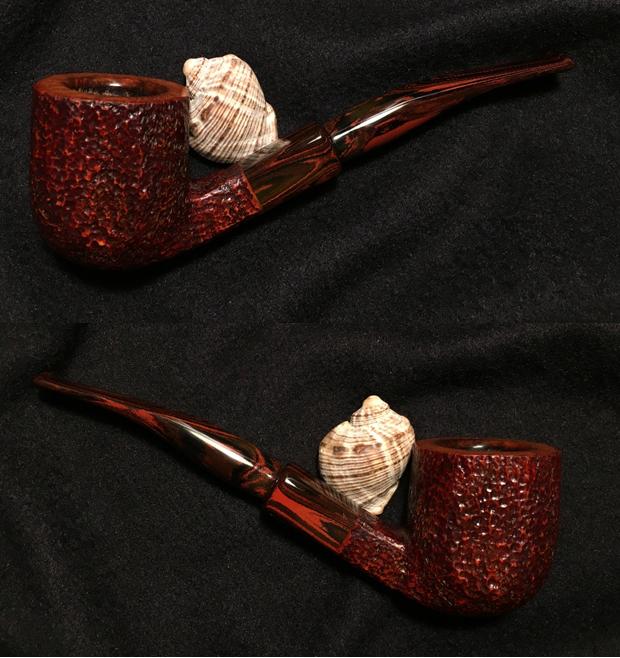
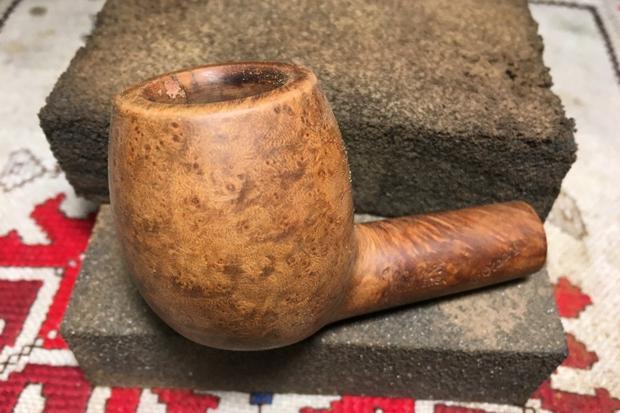
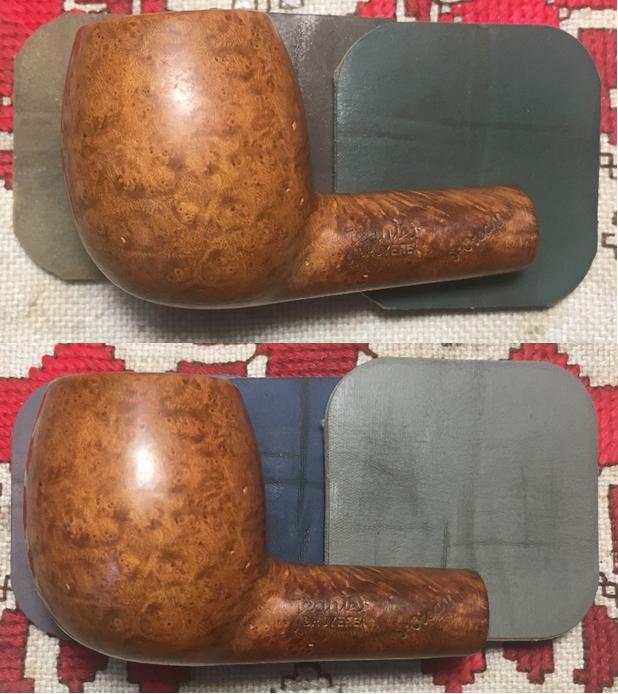
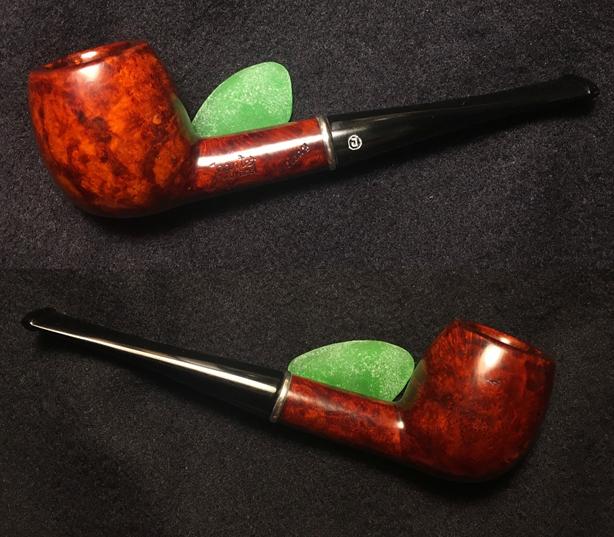
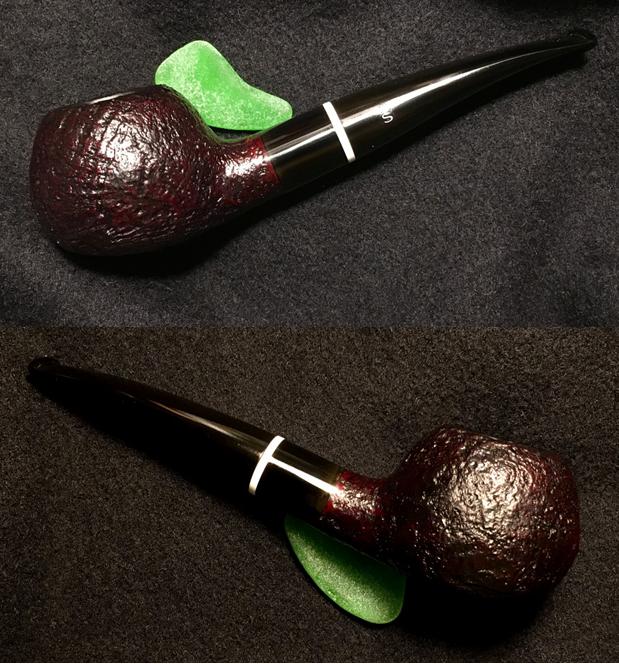
This surprising Savinelli Oscar find in Athens turned out better than I expected.  The grain is eye-catching, with plentiful bird’s eye captured around the bowl.  The knot on the heel though, grabs my attention.  The deep briar that I see now is a far cry from the sun-bleached conditioned that I found it in.  This Savinelli Oscar will go into the Pipe Steward Store and since Taylor commissioned this pipe as his first pipe, he will have first dibs.  The restoration of this Italian Savinelli Oscar Aged Grain 614 will benefit the Daughters of Bulgaria – helping women, girls, and their children, who have been trafficked and sexually exploited.  The first picture is a reminder of before and after.  Thanks for joining me!

An Italian Croc Skin Zulu and a Bear of a Meer Lining Repair


Blog by Dal Stanton

This Zulu caught my eye along with a striking, Comoy’s Royal Falcon bent Bulldog on the UK eBay auction block.  I have always been attracted to the canted stummels of both Dublin and Zulu shapes.  They strike me as pipes with a bit of attitude!  The second thing that caught my attention was the exquisite, tight crocodile skin-like texture of the rustification.  When I first took the Zulu out of the ‘Help Me!’ basket, I wasn’t quite sure how to best describe the pattern. Initially, I was thinking maybe, pine cone – mainly because of the tight, uniform design.  I showed it to my wife for her first impressions.  Without hesitation she said that it was iguana or crocodile skin…  I chose the croc description because it seems to go better with the Zulu motif!  Of course, the final selling point was the Meer lining.  That is always cool not only because of the aesthetics but also because of the special attributes of Meerschaum.  The seller provided some helpful information on both pipes.  After sealing the eBay deal in pounds, it did not take long for the Zulu and Bulldog to arrive in my box here in Sofia, Bulgaria.  I restored the Royal Falcon already and if you’re interested, you can take a look at it HERE.  Here are pictures I took on my worktable of the Zulu.  The Zulu is clearly marked on the bottom of the shank, on the left side Ariston [over] Rustic, and to the right, Veritable [over] Ecume, a French reference which means, “Real Foam”, referencing the Meerschaum lining.  “Meerschaum” means, ‘sea foam’ in German.  The other identifying mark is a gold rondel with a tilted ‘R’ ensconced in it. When I went to all my usual places to identify the origins of this Ariston Rustic, what I found was not a lot, and what I did find did not seem to line up.  My first stop was Wilczak & Colwell (3/3/97) ‘Who Made That Pipe?’ listed ‘Ariston L’ as coming from the Lane Tobacco Co. Importer 1942 – ENG/USA.  However, subsequent searches for Lane Tobacco Co., didn’t turn up anything.  The seller on eBay provided information saying that the Zulu was made by “Empire State” and referenced this link to Pipephil.eu (See: LINK).  The gold stem rondel with the tilted ‘R’ was the common connector.  I had wondered before why an ‘R’ on the stem with a name, ‘Ariston’?  But this link pointed to ‘Regis’ bearing the same logo – probably the source of the ‘R’.  ‘Empire State’ below also states an Italian connection.Going to the ‘Regis’ link in Pipephil brings you to the listing below with the connecting stem rondel.  A seller of another Regis on eBay gave more information which is helpful, but I’ve not been able to substantiate it.

Aristons were originally made in Italy under the trade name “Empire State” (go figure) for a niche market in France that catered to dignitaries in the French Government, somewhat like Bertram pipes were for the US Government dignitaries.  Who knows – this pipe might have been smoked by French President Charles DeGaulle !  Well, maybe….As I look at the Italian, perhaps, Regis Ariston Rustic Zulu with a critical eye to the issues it has, the rusticated surface appears to be in good condition.  It needs to be cleaned.  The Meerschaum lining has carbon cake buildup and the rim shows lava flow which has formed a caked layer on the top of the Meer lining and has flowed over the rim briar. I will not know the condition of the Meer until I carefully remove the cake in the chamber.  Meerschaum, a stone, needs no cake to protect it like briar pipes.  When carbon cake forms on a Meerschaum surface, it can crack and damage the Meer as the carbon heats up and expands and contracts.  The stem has little oxidation as I can see.  The larger issue is the bit.  The former steward of this Zulu was a clincher and there are significant bites on the top of the bit and the lower lip of the button is compressed and the bit suffers from a hole. That was probably when the Zulu was retired. The bit needs some TLC.

Beginning the restoration, I will deal with oxidation in the stem.  I decided to use the Before and After Hard Rubber Oxidizer that Steve ran through the paces several months ago to test the product put out at www.iberen.com.  Steve published his findings on Rebornpipes (A Review – Before & After Pipe Stem Deoxidizer and Fine and Extra Fine Polishes) which is very helpful.  So, I picked up some of the Before & After product while I was in the US and decided to try it.  As Steve discovered in his review, its important to read the directions 😊!  I did, and Steve’s input was beneficial.  One of the things I learned was that the Deoxidizer isn’t aggressive toward stem stampings and marks – that is a big plus.  The other, which is impacting how I restore pipes, is that the solution is geared to deoxidize several stems in one soaking.  My usual practice is one pipe at a time – I’m not thinking too far ahead what’s next or working on more than one pipe at a time.  So, with that in mind, I decide to move forward with a project restoring several L. J. Peretti pipes I purchased in a Lot from a seller near Boston – this Lot contained several Oom Paul’s which will be sold to benefit the Daughters of Bulgaria, helping women, girls (and their children) who have been trafficked and sexually exploited.  So, I fish those pipes out of the ‘Help Me!’ basket and clean the internals of each Oom Paul stem with pipe cleaners and a long bristle brush dipped in Isopropyl alcohol 95% before putting them into the Before & After Deoxidizer. I pour the Before & After Deoxidizer in a plastic container that can be sealed up and airtight.  The liquid reminds me of slime products out there for people’s morbid entertainment!  It has an odor too, that’s not too pleasant.I lay out the full Lot of L. J. Peretti boys that are destined for the worktable eventually!  I’m choosing the 4 Oom Paul’s to serve as both an experiment to test the new deoxidizer product which is more beneficial to soak several stems at once and to give me a jump start for the next restoration projects!  I pull 4 of the Perretti Oom Paul stems and clean the internals. Then I take a picture to show the ‘before’ condition.  Along with the Ariston Zulu’s stem, which has minor oxidation, 2 of the 4 Perretti stems, I would say also have minor oxidation.  The other 2, one stamped with the Peretti “P”, are heavily oxidized. I slip the stems into the slime goo, careful not to mix the order of the stems so they make it back to the correct Oom Pauls! Pictues of the Peretti Lot and the deoxidation in process: The instructions indicate that even for the most oxidized stems, the process takes less time than with my usual OxiClean bath, but I leave them in the solution overnight because its late and I need some sleep! The next morning, I take one stem at a time, hooking it with a tooth pick and allowing the goo to run off the stem as much as possible to save the product.  I finally found Bulgaria’s version of mineral oil to use to clean off the goo – staying away from water.  A pharmacist friend here looked it up and she provided me with a bottle of Paraffin Light Liquid – used in Bulgaria for ingestion for certain lower abdominal blockages 😊.   With a cotton pad I use paraffin oil to remove the deoxidizer.  With each stem I follow the same procedure by scrubbing off the oxidized layer with the cotton pad to then buffing with the cotton pad.  Then with each, I apply Before & After Polish, first Fine and Extra Fine, by putting a dab on my finger and working the polish in, which has a gritty oily feel (Fine) and then smoother (Extra Fine).  With each application I work it in then, with cotton pad, I wipe the polish off but buffing at the same time. I have to say, I’m impressed.  The more oxidized of the Peretti stems came out looking good, apart from one oxidation shadow in the first stem to the left.  But overall, the vulcanite appears darker, blacker, rejuvenated.  I take the ‘after’ pictures and I think this product is working as advertised. Back to the Ariston Rustic Zulu, here are shots of the stem after the Deoxidizer and then after each Before & After polish regimen.  From above’s ‘P’ Peretti marked stem and the ‘R’ gold rondel mark in the Zulu, it also appears that the B&A Deoxidizer is not harmful as reported and acted to polish and bring out the stamps.I put stems aside for the time and turn to the croc skin rustification, rim and the Meerschaum lined chamber and take a closer look.  Two-thirds of the rim is hidden by a thick lava flow, but the forward third, shows the briar rim.  I like the lighter smooth briar that provides the border between the Meer and the external surface.  When cleaned up, that will look good.  Before working on the Meerschaum chamber, I want to clean the rim and get a better look at the condition of the Meerschaum’s topside.  While I’m doing this, I will clean the Zulu’s surface.  First, using undiluted Murphy’s Oil Soap, I use cotton pads and a bristled tooth brush to do the scrubbing in the nooks and crannies.  I also lightly utilize a brass brush to work on the rim. I then rinse the Murphy’s with cool tap water, careful to keep water out of the internals.  The croc skin stummel’s surface is in good shape dirt-wise.  I see nice attractive, minute reddish flecks on the peaks of the black rustification which brings out some contrast to the croc texture. The cleaning did not make a dent on the hard, caked lava over the rim.  The pictures show the progress. To clean the rim and reestablish crisp lines, I take out the topping board, which for me is a small chopping board with a piece of 240 grade sanding paper on top.  I lightly top the Zulu’s rim first with 240 grade paper then 600 to smooth things up.  It didn’t take much to remove the lava build-up and to reintroduce the crisp lines – the rim will look great contrasted to the black croc rustification. Now to clean the fire chamber.  Working on the Meerschaum requires care and most of all, patience.  I’ll first start on the chamber proper to remove the thickest carbon cake buildup.  I use my Savinelli Fitsall pipe tool to scrape the cake from the Meer gently and slowly! The trick is to know when the Savinelli Fitsall starts meeting the Meer surface.  The sound and feel of the carbon cake a crunchiness.  When the crunch stops, and the feel is more solid on the surface, this lets me know that I’m on the Meerschaum. When I remove what I can with the Savinelli Fitsall, I then wrap a piece of 240 grit paper around a dowel rod and sand the Meer surface – removing more of the carbon from the Meerschaum surface. With the carbon cake removed, I can inspect the Meer surface revealing some minor perforations, but no threatening cracks, that I see!Now, to remove the lava from the beveled top and smooth out some nicks on the Meerschaum lining, I again use a rolled piece 240 grade sanding paper.  I first pinch the paper with my thumb and run it around the circumference of the Meerschaum bevel.  To get more of an edge in contact with the bevel, I then wrap the paper around the dowel rod and work methodically around the rim to remove the cake and scratches.  After the 240 grit paper, I switch to 600 and repeat the movement around the rim.  During this process, the sanding of the Meer bevel causes a slight rounding of the rim’s briar in contact with the Meer.  I take the stummel back to the topping block and lightly top again using 600 grit paper.  This does the trick restoring the crisp lines of the rim which I like. To remove the dust in the chamber, I wet a cotton pad with alcohol and wipe the chamber, using tweezers to grip the pad as I pushed it into the chamber.  That cleaned things up but also revealed a crack in the Meer lining starting at the front of the stummel and going down about halfway into the chamber – where there is some wearing in the Meer surface – a bit craggy.  I take some closeups to get a better look at the culprit and try to assess the seriousness of what I’m seeing. In the second picture below, I lighten the exposure to enable seeing in the darker chamber – the crack starts at the 9PM position in that picture.  Wanting to be sure of my next steps and not wanting to miss something, I decide to send the following pictures to Steve, with his vast RebornPipes restoring experience he is usually able to give some help.  His response came quickly from Vancouver – 10-time zones away!  His assessment agreed with mine, that the Meerschaum was most likely OK, that it seemed solid.  He also agreed that I could utilize Troy’s (of Baccy Pipes) method of using chalk and egg whites to repair Meer surfaces.  Steve had reposted Troy’s blog on the methodology and I had saved it as a keeper in my resource bucket.  Steve’s repost can be found here: Old Time Meer Lining Repair Method On a Kaywoodie Shellcraft #5651 | Baccy Pipes

While I’m mulling over this new challenge to restore this Ariston Rustic Zulu, and how I’m going to find white chalk here in Bulgaria (I asked my wife and neither of us have seen old fashion chalk for sale here), I decide to finish the cleanup of the stummel by taking cotton buds dipped in isopropyl 95% and working on the buildup in the mortise.  I also utilize a shank brush (thanks to Charles Lemon of DadsPipes.com for giving me a name for what I was calling a ‘long bristled brush’ foever!) which does the job.I reread Troy’s blog describing his Meer lining repair and the basic concept is simple – a mixture of ground white chalk and egg whites creates a surface that, when it cures, is very durable and emulates amazingly the composition of Meerschaum.  If you’re new to Meerschaum, here is a quick easy read about how Meerschaum is mined (See: LINK) which I found interesting.  Chalk!  On a recent two-day trip to Plovdiv, Bulgaria’s second largest city where we have colleagues working, I put out the appeal for ‘Chalk!’ and Tammy, a Kindergarten teacher by profession, had some in store!  So, unloading the small paper bag of my precious chalk from Tammy onto my work desk, I follow Troy’s direction to pulverize the chalk, getting it as fine as possible.  I use an old fashion mortar and pestle to do the job.  I have absolutely no idea how much powdered chalk is necessary for the applications Troy’s method utilizes.  If too much, then I’ll have some on queue for the next Meerschaum lining repair project! Troy described in his blog how he came upon this strategy as he approached repairing his first Meer lining:

I had read and heard from other pipe restores that an old late 19th-early 20th century druggist recipe for fixing broken meerschaum was egg whites and finely ground chalk, so that was what I was going to try and fix the meer lined rim with. It is said to have about the same porous properties of meerschaum and imparts no taste to the tobacco. 

I follow Troy’s lead in masking the stummel to protect it from the chalk/egg white mixture because it sets up very hard – not something I want on the croc skin rustified surface! My plan is to apply an initial thin coating of the Meer patch mixture to fill in the cracks in the fire chamber and over the cracked area originating from the rim.  I would like to build up the lining toward the rim so that it will cover the crack as well as provide a new platform for an internal bevel or rounding.  For the first application, I mix about 1 tablespoon of white to 1 tablespoon of chalk to create a thinner mixture to get into and fill the cracks for the first two applications. After mixing the chalk and whites well, I used my finger to apply the mixture to the Meer surface.  I’ll let it sit for a few hours then apply another coat.The first thin coat.After a couple of hours, I apply another thin coat which I leave to cure overnight. To be on the safe side, I insert a pipe cleaner into the airway to be sure that it remains open. I made enough of the egg white/chalk mixture to apply the next coats.  I put the Meer patch mixture in the fridge, sealed in a small plastic container for use tomorrow.The next morning, I jiggle the pipe cleaner to make sure its keeping the airway open.  I take the mix out of the fridge, pour some of it into a smaller mixing cup and I add more chalk to thicken it.  Troy described a more methodical ‘parts to parts’ ratio.  I simply added more so that it would provide a somewhat thicker application.  After it looks right, after thoroughly mixing with a pipe nail tool, I apply it to the chamber walls with my finger as Troy describes.  Using the finger enables me to feel the foundation and spread the mixture evenly.  I leave it until I return tonight after my workday!  It should have about 7 to 8 hours to cure before I apply another coat.Seven hours later, I return to the worktable.  I decide the next coat of Troy’s Meer Recipe mixture will be my final and thickest application.  I take the mixture out of the fridge and add a portion to a smaller mixing cup.  I add more chalk until it looks right – thicker than before but not too thick it sets up in the mixing cup!  I take a picture of the finished mixture and the final application.  I’ll set the stummel aside now for 24 hours to assure that the Meerschaum coating has cured thoroughly and ready for sanding.With the Meer Recipe curing, I now turn to the stem work.  The former steward of this Zulu liked his pipe.  Zulus or Yachtsmen, being lighter weight, usually ride very well hands free.  Yet, without a bit protector, over time the teeth work as God created them, furrowing in the vulcanite to achieve a tight, comfortable grip.  Eventually, as this Zulu bears witness, the bite breaks through under the pressures and a hole is the result.  I take pictures to show the forensics of this bit.  There is a long, elongated tooth dent on the top, and some chatter, the breakthrough on the bottom, and the button has a cut of sorts – not sure how that happened.  All are pictured – I insert a pipe cleaner to highlight the hole.  To work on the dents, I first use heat to expand the vulcanite.  With a cheap bic lighter, I paint the top dent first with the flame – moving the flame back and forth without scorching the surface.  This method helps some, but not enough to avoid the next step, mixing up Special T CA glue and activated charcoal to patch the hole and fill the dents.  After forming a point with an index card, covering it with scotch tape to keep the glue from sticking, I insert it into the button to form a backing for the patch material.  I then empty one capsule of activated charcoal with a bit of the glue and mix it with a tooth pick.  When it arrives at a molasses-like consistency, I apply it to both hole and the upper dent, applying more than needed to build a mound to file down to shape a button later.  To quicken the curing process, I use an accelerator. Pictures show the progress.    I also apply a drop of Starbond Black Medium KE-150 glue to the cut on the button and let it sit to cure until tomorrow.  Another day has come and gone in Sofia, Bulgaria.The next day, after a LONG day on the job, I’m thankful to return to the worktable with both stummel, with cured Meerschaum lining repair and stem bit/button reconstruction waiting for my attention.  I decide to work on the stem.  To establish a button baseline, I use a topping board with 240 grit paper to remove the excess patch glue.Next, using a flat needle file, I score a working starting point to establish a new upper, button lip.  The score is intentionally leaving a large ‘button real estate’ to enable a patient, methodically sculpting of the button from large to normal sizing.  After the scoring, I file toward the stem’s vulcanite surface, removing the patch mound.  Of all the mini-projects in restoring pipes, stem work as I’m doing now, is probably the most time consuming. So, I put on my favorite Spotify jazz station, set back, and enjoy the moment.  I take pictures to chronicle the upper bit progress. After the top is roughed in, I turn to the lower bit. The initial shaping with files is completed! It’s normal to uncover small pockets where air was trapped in the glue as I can see.  I’ll fill those in later.Now, continuing the removal of excess patch material and shaping with 240 grit sanding paper, I also remove the marks left over from the filing.  I also work on the tooth chatter left over on the upper side of the bit.  After 240, I  use 320 grit, then 600.  Pictures show the progress. Now to address the air pockets that have emerged in the charcoal/superglue patch.  I clean the area with alcohol and cotton pad, even using a dental probe to make sure the pockets and surface are free of dust and leftover sanded vulcanite.  When it’s clean, I paint the surface of the button with a thin film of regular, clear super glue, filling the pockets.  I use the tip of a toothpick to spread the glue evenly over the surface.  I do both sides and set the stem aside to allow the glue to cure. Finally – in the interest of full blog disclosure – I had several iterations of filling the air pockets with thin glue and sanding.  I think I’m finally satisfied with the button/bit repairs!  Moving on.I turn to the Zulu’s Meer lined stummel.  The egg white/chalk layering has cured thoroughly.  I unmask the stummel to get a closer look at the results.  I am careful to peel away the masking tape at the rim.  I’m not sure how the Meer mixture will respond – will it crumble away?  It doesn’t, and I find that my fingernail is a good tool to remove excess Meer Recipe from the rim surface showing me the general lay of the land. My priority is to clear away the excess Meer Recipe from rim plateau.  I first use a flat needle file reaching across the chamber to remove material.  When near the briar surface, I top the stummel very lightly using 600 grade sanding paper.  As I have my first experience working with Troy’s Meer Recipe, I’m pleased with how durable it is.  It doesn’t feel fragile. After a gentle topping, I am VERY pleased at the appearance and composition of the Meer Recipe and the rim, now with clean briar, looks great. The pictures show the rim’s emergence.  Next, after wrapping a piece of 240 grit paper around a sharpie pen, I carefully start smoothing the chamber walls, removing the rough Meer Recipe and expanding the chamber, marching it back towards the original Meerschaum surface.  The method that emerges is that I rotate the stummel in my hand and allow the natural shape of the cylinder to emerge.  I do this with 240, followed by 320, then finally with 600 grit papers.  I leave enough of a layer of the Meer Recipe to cover the old Meerschaum and do not expose it. Now to cut a gentle bevel to remove the rough Meer Recipe on the rim and to lower the threshold of greater vulnerability of the surface where pipe tools go in and out.  I roll a tight piece of 240 paper to shape the bevel.  I do a combination of sawing it vertically to smooth rougher rises and pinching the paper with my thumb over the top of the rim.  I follow with 600 grit paper doing the same.  Here are pictures showing the progress.I notice that there are a few pockets around the circumference of where the Meer Recipe and briar meet.  I decide to bring out the unused Meer Recipe and apply a thin coating on the surface of the rim to fill these gaps.  I’ll give it a few hours and then clean off the residue.  I think this bit of improvisation works.  It looks good.  The lining will require TLC as any Meerschaum deserves.  Troy’s Meerschaum Recipe looks like Meerschaum and has essentially the same composition characteristics.  I think the Meer Recipe repair is now completed!  Thanks for your pioneering and sharing, Troy!Now to the Zulu’s croc skin surface.  I clean the stummel using mineral water, which in Bulgaria is light paraffin oil.  I remove the dust from all the Meer Recipe sanding and I am again reminded why I was attracted to this sharp looking Zulu – the Croc Skin rustification is striking.  I take a black dye pen and darken many of the valleys of the rustification to freshen the black pop of the croc skin.  Earlier I noticed that the texture of the croc skin rustification was enhanced and given depth by lighter, reddish flecks on the peaks of the rustification.  To further enhance this, I use an 1800 grade micromesh sponge pad and randomly sand on the Croc Skin surface – nipping the ridges to lighten them here and there allowing more briar to peek through.  These are subtle enhancements to the Zulu and I think they look good.Back to the final stages of the stem’s refurbishment. I reunite the Zulu bowl with the stem to give me a bird’s eye view of the progress.  I like what I’m seeing!Now to the final stage of the stem restoration.  I use 0000 grade steel wool and buff the entire stem, including the Regis ‘R’ gold rondel.  The steel wool removes the final scratches and tracks left from sanding and buffs the stem up.  I then do a complete cycle of micromesh pads from 1500 to 12000.  I wet sand using 1500 to 2400, then dry sanding with 3200 to 4000 and then 6000 to 12000.  Between each cycle the stem receives a coating of Obsidian Oil which refreshes the vulcanite.  At the end of the process, the stem is looking great – including the bit and button repairs. Now, looking at the rim, I will buff up the bare briar ring forming the rim.  I use the full 9 entourage of micromesh pads from 1500 to 12000 to shine and deepen the briar ring.  I think this bare briar ring is one of the attractive features of a Meer lined pipe.  The contrasts enhance the overall attractiveness of the pipe.  This Zulu surrounds the rim with the dark, craggy croc skin rustification – the center is the light Meer and the rich, butterscotch bare briar pops in contrast.  I like it. The first picture is before the micromesh sanding – then after.  On the home stretch, I use a Dremel with cotton cloth wheels and I go over the stummel applying Tripoli and Blue Diamond compounds.  These compounds bring out more the bare briar flecks in the rustification.  I also apply the compounds to the rim and lower shank nomenclature area where the briar is smooth.  Then, with another cotton cloth wheel, I apply coats of carnauba wax to the stem and stummel.  I find that by using the high speed and compact Dremel, I’m able to effectively apply wax even to most rustified and blasted finishes without the wax gunking up. I’m pleased with the restoration and recommissioning of this Italian (perhaps) Meerschaum lined Ariston Rustic croc skin rustified Zulu.  The use of Troy’s Meer Lining Recipe worked well and looks good.  I’m also pleased with the stem button/bit hole repair and button rebuild.  The Zulu is 5 ¾” long, 2” in height, bowl depth: 1 ½”, internal chamber diameter: ¾”, and full rim diameter: 1 ¼”.  If you would like to add this Meerschaum lined, croc skin rustified Zulu to your collection, go to The Pipe Steward Store and leave a comment or send me a note at ThePipeSteward@gmail.com.  This Zulu will benefit the Daughters of Bulgaria, our work here in Bulgaria helping women and girls (and their children) who have been trafficked and sexually exploited.  Thanks for joining me!


Refreshing a ‘Faux’ Mastro de Paja Poker


Blog by Dal Stanton

One of the great things returning to Bulgaria after 6 months in the US, was again reuniting with our colleagues, fellow team members – our family in Bulgaria.  One of those reunions was in Bulgaria’s second largest city, and arguably one of the most beautiful, Plovdiv, declared to be the ‘European Capital of Culture’ in 2019 by the EU.  I met with our team working there, and one of my team members, Brett, confided that he had something for me in his flat.  When we arrived, I was not expecting what he pulled off the top shelf of the bookcase, waiting some months for my return to Bulgaria.  What I saw was a massive Poker with an eye-catching brown-swirl acrylic stem.  The shank was joined with the stem by an attractive silver ensemble – stem extender joining a shank ferrule. As frosting is to cake, I turned the stummel over in my hand and found the eye-catching starburst heel.  Oh my!  I was speechless – wafting in Pipe Man Heaven.  When I looked closer, I saw the round silver rondel embedded in the stem, which I had not seen before.  I asked Brett where he found this beauty and as I expected, in one of the many second-hand antique shops in Plovdiv’s Old Towne quarter was his reply.  He told me I could keep it for my own collection as a gift or sell it to benefit the Daughters of Bulgaria – our work helping women and girls trafficked and sexually exploited.   I thanked Brett as thoroughly as I knew how – what better gift for a pipe man???  When I returned to Sofia, I took these pictures of this very striking Poker. The last picture I took with the pipe in my hand to give an idea of its size – the stummel is 2 ¼” tall and 1 ¾” wide at the rim – a wonderful handful!  Normally, I’m not drawn as much to swirly, acrylic stems because sometimes, it seems to me, they are too ‘blingy’ for my taste and detract from the real show, the beauty of the briar.  However, this multi-brown hued acrylic stem compliments well the massive and expressive Poker stummel.  My first impressions of this pipe, mainly because of the starburst heel, was that it was probably a freehand – someone’s creatives juices unleashed in a classic Poker shape – a shape which to me is iconic and fun.  Pokers got their name from the ease of setting them on the card table as their stewards looked at their dealt hands, preparing the strategy to take the hand of poker warfare.  The pipe is distinctive and the first question that came to mind was whether there was a mark on it that would identify its origin.  What I found on closer examination of the shank was this mark.As I considered the small mark on the left, underside of the shank, was it was a rustic ‘W’ or perhaps an ‘M’?  I could find no other identifying marks except for the silver rondel unexpectedly embedded purposefully in the stem. I didn’t have a lot to go on to uncover the origins.  So, as I’ve done before, I sent the pictures to Steve.  With the 100s of pipes he’s seen and chronicled in Reborn Pipes, perhaps he’ll have a clue.  Steve’s response to my query was quick and helpful:

For sure the shape is a Poker. I would not even call it a freehand. No plateau and a standard shape. I think it is a Mastro de Paja from the silver spot on the stem and the silver work on the stem and shank. The mark on the bottom is a sunburst which I have seen on those pipes. I wonder if the lack of stamping and the marks are not XX which is a mark reserved for pipes that did not meet the grade. Not sure but the pipe certainly looks like a Mastro to me…

Steve

Hmm, maybe a Mastro.  My first stop after receiving this lead from Steve was to Pipedia and to its article (see LINK) on the Italian, Mastro de Paja name.

In 1972 Giancarlo Guidi, after having spent some time as a hobbyist in producing pipes, decided to officially found a production workshop called “Mastro de Paja”. Mastro: obviously as a master craftsman, De Paja: it derives from the name with which he was affectionately called by friends “Pajetta” because of his curly hair and translated into a dialectal expression “de Paja”.

After describing the ups and downs of the company and the changes in oversite of the company, I found this statement interesting revealing Mastro de Paja’s commitment to excellence:

Currently the Mastro produces about 2 thousand pipes a year with strictly artisan procedure, at the Mastro currently reigns a warm harmony, is a group of friends who strives to get the best. This also stems from the fact that pipes for Mastro de paja are not to be considered as any other object to be produced and sold following cold strategies common to everyone in the business world, it’s completely different, it is necessary to love it, it is a style of being, a philosophy of life that can only be appreciated by a noble soul and not noble by title but by principles.

Looking over the entire article, it became clear that Mastro de Paja produces very high quality, high-end pipes – way beyond my budget!  As I looked through the pictures in the Pipedia article, the Mastro stem rondel displayed throughout was the sun with a face – pictured in the top, right in the example pictured below.From Pipedia, I found some Mastro de Paja examples at Pipe Phil’s site.  Here I found what I was looking for.  The solid, silver rondel like the Poker on my worktable.  Here is one example for comparison. What was clear was that my Poker, in some significant ways, resembled the Mastro pipes, but the Poker was missing typical markings on the shank identifying it specifically, as did the other Mastro pipes.  I decided to go to the source, to Mastro de Paja’s website which was listed in the Pipedia article.  My impression of Mastro de Paja via it’s website, overwhelmingly confirmed what I read earlier – production of very high-end pipes, and a commitment to quality with an artistically complimenting use of fine metals augmenting their creations.  I would describe it as a ‘Tobacconist Boutique’.  I looked through several of their catalogues which can be downloaded via PDF files after giving one’s contact information.  Then the idea hit me – to email the Mastro contact address and ask if they had a mark ‘XX’ which identified their sub-par pipes/seconds or rejects?  I’ve done this in the past and had surprisingly positive results.  I sent the same pictures as I had sent to Steve and received a response the very next day from Mastro de Paja!  Here is the note from Alberto:

Dear Mr. Dal Stanton
First of all thanks a lot to appreciate our pipes.
Talking on the pipe in the photos, I am so sorry to inform You that this pipe is a FAKE.
I see on the mouthpiece the silver dot but this is not our production.
May I ask You where did You get?
Thanking in advance for Your help waiting to read You, I remain
Friendly Your
Alberto

Hence, the title on this post, “Refreshing a ‘Faux’ Mastro de Paja Poker”.  I responded to his question about where I acquired the pipe and assured him that I would be sure that the genuine name of Mastro de Paja was clearly communicated in my publication of this restoration.  I have yet to hear back from Alberto, but my curiosity is piqued as to whether he is the same ‘Alberto’ who is the current owner of the company which Pipedia described:

Soon after even Spadoni decides to leave (and create his own new company), Cecchini then puts his eyes on a very smart young man who he considered capable of giving new glaze to the mastro de paja which, meanwhile, inevitably presented some productive and commercial problems. That young man is called Alberto Montini and he start like this in his thirties his beautiful adventure in the pipes world.

The Pipephil.eu information said that Alberto Montini became the sole owner of the brand in 1995.  Whether Mr. Montini responded to my inquiry or not, I appreciate that I received a response and had the opportunity to learn more about this distinctive Italian pipe name.

What is amazing to me, is that the Poker on my worktable is a striking pipe.  Whether it is an intentional copying of the Mastro style or not, I don’t know.  Nonetheless, it stands on its own as a pipe that I would gladly add to my collection!

I take a closer look at the stummel.  The pipe is in excellent condition.  It has been smoked, but very lightly.  The briar’s flame grain is striking along the circumference of the Poker’s cylindrical stummel – I see no fills but the finish is dulled some.  There is very light dirt and oils on the surface and tiny hair-like scratches that come from normal wear. The acrylic stem is pristine and is prepared for a 9mm filter or airway restrictor for those who prefer this – like I do. The silver-plated ferrule and stem extender will shine up very nicely.First, I turn to the chamber and only use the Savinelli Fitsall tool to scrape the chamber wall removing the light cake.  I then roll a piece of 240 grade paper wrapped around a dowel rod and sand the chamber uncovering the fresh chamber briar. I finish the chamber cleaning with a cotton pad wetted with alcohol and wipe out the carbon dust.  Inspecting the chamber wall, I find no problems. Turning to the internals, for both the mortise and the stem, the grunge is very light.  Using pipe cleaners and cotton buds, and a long bristle pipe brush, wetted with isopropyl 95%, the internals clean up quickly.  Using undiluted Murphy’s Oil Soap, I clean the stummel surface using a cotton pad.  I also employ a bristled tooth brush especially on the starburst ridges of the Poker’s heel.  Afterwards, I rinse the stummel surface in cool tap water.  I take a closer look at the stummel after the Murphy’s cleaning and I see two fills on the base of the stummel.  They don’t look like they will be an issue – they are solid and already well blended.  I also look at a small imperfection on the rim.  It is small and is part of the grain.  I let it pass as it adds character.Looking at the starburst heel of the Poker, I like the look – very rustic and gives the whole stummel the impression of a tree branch.  What I decide to do is to deepen the darker hues in the crevices of the sculpted burst.  I’ll then remove the upper ridges with sanding to give the multi-textured look.  I first use a darker walnut colored dye stick to apply the color getting down into the valleys.  Then I follow with an even darker, slightly redder hue, mahogany dye stick to add contrast.  Finally, I use 1800 and 2400 grades micromesh sanding pads lightly to sand swipe the peaks of the ridges to lighten the ridge peeks.  I’m pleased with the overall look and the darkening and shading. Without removing the finish, I put the bowl and rim through the full micromesh sanding regime with pads from 1500 to 12000.  This teases out the minor, simple wear scratches on the stummel surface.  The micromesh pads do a great job of abrasive polishing with major intrusion on the wood and the grain responds!Next, to fine tune the abrasive buffing more, I apply Red Tripoli compound to stem and stummel, while avoiding the silver ferrule and stem extender.  I use a felt buffing wheel (which applies more abrasion than a cotton cloth wheel) mounted on the Dremel, set to the slowest speed. I apply the Tripoli methodically to the stummel using the sheen of the lamp light reflecting off the briar surface which helps me in applying the fine abrasive.  Because of my small, compact workspace on the 10th floor of a former Communist apartment block, I use a Dremel for all my buffing procedures.  This enables me to get up close and personal to see the effects of the buffing using the compounds and later the wax.  After completing the smooth briar on the Poker’s sides and rim, I run the wheel sparingly over the ridges of the sculpted starburst on the heel of the Poker.  The starburst is meant to look rustic and I rough it up a bit with the felt buffing wheel and Tripoli going with the ridges, not across them.  After Tripoli, I repeat the same on the stummel with the slightly lesser abrasive, Blue Diamond compound – but this time, I mount a cotton cloth wheel and turn the Dremel’s speed up about 20%. With my wife’s help, one picture below shows the application of Blue Diamond compound in action. I complete the use of compounds using White Diamond – the finest of the 3 compounds.  I mount a new, cotton cloth wheel, applying the White Diamond on the ferrule and stem extension to shine up the silver.  I’m careful not to overrun onto either the briar or acrylic stem.  The polishing of silver produces a dark residue that can color the briar – not good.  I can see the coloration on the new, white cloth wheel.  I take a picture at the end of the silver polishing to show this.  Then, I give the entire pipe a buffing with a cotton cloth to remove the powder left behind after the compounds.  This prepares the surface for the carnauba wax application. I mount the Dremel with a cotton cloth wheel dedicated to applying carnauba wax and maintain the speed at plus 20%.  I apply several` coats of the wax on stem and stummel and finish by giving the entire pipe a good, hearty buffing using a micromesh cloth.  This brings out the shine and the richness of the briar even more.  It looks great!

This iconic Poker shape was not, in the end, claimed by the Italian pipe maker, Mastro de Paja. I appreciate Alberto’s response to my inquiry.  The origins will probably not be known with certainty, but what I do know with certainty is that this is a beautiful pipe regardless of the origin.  Its robust size amply fills the hand and the grain is a sweeping display of God’s amazing handiwork.  The front of the Poker has a tight grain pattern that reminds me of the pattern of a tiger and the starburst heel of the Poker gives it a classic, rustic feel – ‘down home’.  Both the acrylic swirled stem and silver work joining the stem and bowl completes a very attractive ensemble that is both upscale but not pretentious.  I’m tempted to keep this Faux Mastro de Paja Poker for my collection, but it’s going into the Pipe Steward store to be sold to benefit the Daughters of Bulgaria, helping women and girls who have been trafficked and sexually exploited.  Thank you, Brett, for this wonderful gift which will help the Daughters as well as make a new pipe steward very happy!  Thanks for joining me!

A Pipe for Vanity – a Stanton for a Stanton


Blog by Dal Stanton

I suppose it IS vain to restart my restoration operations after 6 months with a pipe bearing my name.  In my recent travelogue blog, ‘There and Back again – to Bulgaria’, I described what I called my ‘Vanity Pipe’ as one of the 105 pipes I acquired during our 6 month US visit.  I came across this name-sake while trolling eBay’s offerings.  I hadn’t come across a ‘Stanton’ before and so I decided to place a bid.  As it turned out, I was the only Stanton bidding on the Stanton and claimed my Vanity Pipe with no competition.Name aside, the medium sized billiard looked to me like he was a hearty pipe – I will see if he’s a good smoker.  Yet, if the heavy use, thick cake, and banged up stummel is any indication of the former steward’s affections, I would say it was very much part of the rotation and saw much active duty!  The eBay seller provided good pictures of the Stanton which show the numerous challenges, but also the potential.  The grain is attractive and will look great when the surface is refurbished and polished up.  Here are some the pictures I saw on eBay. ‘STANTON’ is stamped on the left side of the shank, and ‘IMPORTED’ over ‘Briar’ on the right.  Of course, one of my first questions when I landed the Stanton from eBay was, where was this pipe manufactured?  Are there any clues?  My first inquiry was in Wilczak & Colwell’s, ‘Who Made That Pipe?’  Stanton was listed but designated as ‘Unknown’.  My next stop after Pipedia came up empty, was PipePhil.eu where I found my first Stanton cousin listed:There were some differences in the nomenclature – my Stanton has ‘Imported Briar’ stamped on the left side shank.  The specimen from Pipephil has ‘Genuine Briar’ under Stanton.  Another difference is the dot.  My Stanton’s saddle stem has no identifying mark.  Yet, what was very clear from the comparison of the ‘Stanton’ on both pipes is that the same stamp pressed Stanton in the briar.  The font is identical.  My Stanton is the lower comparison. Simple google searches revealed the clan was larger with additional Stanton cousins showing up demonstrating a variety of shapes being produced under the Stanton name.

Two cousins from eBay:The only thing I found of a Stanton that provided any remote tidbit on origin was from SmokingPipes.com where the listing was for a very attractive Stanton Rhodesian described as an American Estate pipe.  I liked Eric N. Squires’ description which I thought was apropos for my rugged and worn billiard:

American Estates: Stanton Smooth Rhodesian

Product Number: 004-009-6323

Here is another example of a pipe that was built extra stout, where it is a good thing that it was. This is because whoever else owned it, sure as hell didn’t baby it. I can see why they kept it so long though, as the broad chamber promises plenty of flavor, the drilling is nice and straight, and wide, firmly rounded bowl is pleasing in hand.

– Eric N. SquiresSo, it’s starting to become clearer – my new Vanity Pipe isn’t quite as vain as I!  He has humble origins it would seem.  If anyone can add information to this query into this Stanton’s roots, I would be appreciative.

When I take a closer look at the Stanton billiard on my Pipe Steward work table here in Sofia, Bulgaria, I take a few more pictures to chronicle some of the challenges.  The rim is in rough shape, with most of the front quadrant showing heavy wear – almost looks like the edge was scraped on concrete. The cake is heavy and thick in the chamber and will need to be removed to reveal the condition of the chamber wall.  The bowl surface is grimy and dark with old finish, several pocks and dents.  Surprisingly, I do not detect any fills – the briar underneath the surface carnage looks to be very expressive, with much flow and character.  The heel of the stummel is populated with tight bird’s eye grain. The saddle stem looks to be in good condition, with some oxidation and wee bit of tooth chatter and dents.  The old screw in stinger needs to be cleaned along with the nickel insert/band – which seems to be a consistent design with the other Stantons.  I did note that the set of the tenon, when fully engaged, is under-clocked.  I’ll need to address this as well.   I begin the restoration of my first pipe after a 6-month hiatus AND one bearing my name by inserting a pipe cleaner into the stem, through the stinger, and putting it into OxiClean solution to raise the oxidation from the vulcanite.  As a side note, after reading several of Steve’s posts testing and then using Before & After Deoxidizer from Ibepen.com, I decided to try it.  I brought a bottle of it back with me to Bulgaria along with the balm and polishes.  Down the road I’ll give them a try.Turning to the stummel, I begin the reaming process with my newly acquired vintage Swiss Made Pipnet reaming kit made with heavier duty hard rubber.  Previously, I used the acrylic version that Pipnet put out later which tended to be more prone to breaking – the blades cracked on harder jobs.  With a bit of patience watching eBay, the older, stronger Pipnet system surfaced and I’m thankful to have it back in Bulgaria! Now, to take the new Pipnet blades for a test spin!  After putting some paper towel down to help in cleanup, starting with the smallest blade, I work on removing the hard, thick cake.  The blade went through with little effort.  The next larger blade did its job as well.  I then used the Savinelli Fitsall reaming tool to fine tune, removing more of the carbon in the harder to reach places.  Then, wrapping a piece of 240 grade sanding paper around a dowel rod, I sand the chamber walls and finish the job wiping out the remaining carbon dust with a cotton pad wetted with alcohol.  The pictures show the reaming process. Turning to the rim and the stummel surface, I need to clean the lava off the rim and the grime on the briar surface.  Using undiluted Murphys Oil Soap, I scrub the rim and surface with a cotton pad.  I also utilize a brass brush to work on the rim which will not add to the damage already present.  I then rinse the stummel with cool tap water.  While I’m working on the surface, I take 0000 steel wool and clean the nickel plate band/connector.  An inspection of the clean chamber walls reveals no problems.After the surface cleaning, I take a closer look at the stummel surface.  The rim will need to be topped, but it is possible that the severe outer lip damage to the rim can be leveraged to my advantage.  I can introduce an outer, rounded bevel and blend it with the freshened top.  This can allow less real estate to be lost in the topping process.  Along with the dents and pocks I saw before, I notice a dark area on the left front quadrant of the stummel which may indicate overheating of the stummel.  I also note that in the shank area, around the stamping, the old, shiny finish persists.  I want to remove all the old finish, especially around the stampings. To address this old residue of finish I use acetone and a cotton pad and make short work of the finish.  As hoped, the surface is now clean.Before moving further with the surface, I attack the internal cleaning of the mortise and airway.  I use pipe cleaners, cotton buds wetted with isopropyl 95% to do the dirty work.  I also use a dental probe to scrape the mortise surface and to excavate the oils and tars that have congealed over time in the airway.  That was the frontal attack.  With grunge still surfacing on the cotton buds, and with the late hour approaching, I decide to use the passive-aggressive approach.  Using Kosher salt, I fill the bowl and then add alcohol to sit overnight to work on cleaning the mortise.  I set the stummel in an egg crate to provide stability.  Then I fill the bowl with Kosher salt – not iodized salt which leaves an aftertaste.  I then stretch and twist a cotton ball, to create ‘wick’ to draw the crud out of the mortise as the salt/alcohol does its work.  I then fill the bowl with isopropyl alcohol 95% until full.  I wait a few minutes and top it off.  With that, I turn off the lights and head to bed.  Another day coming.  The next day, as hoped, the salt and cotton wick showed signs of the extraction of old oils and tars from the internals of the stummel.  I clean out the dried salt and used a dry paper towel and bristle brushes to remove the residue salt.  I also blow through the airway to help out.  Even after the salt treatment, there is gunk left in the mortise.  I continued to scrape the mortise wall with a dental spatula and follow with cotton buds dipped in alcohol to finish the job.  The pictures tell the story. I put the stummel aside to work on the stem, now soaking in OxiClean.  After taking it out of the soak, I take a picture and see that a moderate amount of oxidation had raised to the surface.  Taking a piece of 600 grade paper I wet sand the stem removing the oxidation from the vulcanite.  I also use a brass brush to remove the caked residue off the stinger.  Taking a close look at the bit, there were only very small dents remaining after the sanding.  I returned with the 600-grade paper focusing on those minute points and the stem is looking good. On a hunch, after the cleaning of the stinger and the mortise receptor band/plate, I refitted the stem to see if it still was under-clocked a few degrees as I saw earlier.  As hoped, the cleaning corrected the alignment – now, looking down the pipe from the steward’s view, one sees a true alignment.  Nice..To complete the clean-up, I turn to the stem using pipe cleaners dipped in isopropyl 95%.  I also utilize a long-bristled brush.  I find that utilizing the set of bristled brushes that I acquired some time ago saves on the pipe cleaners and are effective in getting at the gunk.  Stem and stummel are now clean. The rim needs my attention now.  I take a close look again.  I will top the stummel using 240 grade paper on a chopping board.  Looking at the first picture below, most of the external rim damage is on the front – 7 to 11 o’clock in the picture.  What I’m a bit concerned about is the large internal rim divot at the 2 o’clock position.  I’ll top a little and see if can address this without taking too much briar off.  Otherwise, I’ll need to fill it with a superglue/briar dust patch to build it up to the rim surface.On the topping board with 240 grade paper, I rotate the stummel as evenly as I can to avoid leaning in one direction or the other.  I check the progress to make sure I’m not leaning into softer wood.  I take some intermittent pictures below to show the progress.  I come to a point where not all the damage is removed, but enough that can be addressed by cutting bevels in the external and internal lips of the rim.  To me, applying bevels to rims generally makes it look classier.  I finish the topping by using a sheet of 600 grade and rotate the stummel several times to provide a smoothing of the surface.  The pictures show the progress.  Without going any further with the topping, I look closely at the dents and pocks on the stummel surface.  I see that some of the ‘pocks’ as I’ve described them may be very small fills on the underside of the shank and one on the top.  The fill is a light material.  The shank-side of the stummel is especially banged up with small dents.  I utilize sanding sponges to remove these and work toward smoothing out and rounding of the outer rim lip to remove the damage.  Careful to avoid the stampings on the shank, I progress by using the roughest grade, medium then fine grade sanding sponges in order.  I’m pleased with the results with most all the damage removed from the stummel.  The rounding of the rim looks great.  The pictures show the progress. The inner lip of the rim is next.  The one major divot at the 2 o’clock position I decide is too deep to remove it by creating an internal bevel.  To build this divot up, I apply a few drops of Hot Stuff Special ‘T’ CA Glue.  I’ll let the glue sit overnight before I bevel the inside lip. The next day, the CA has cured well.  To re-establish crisp rim lines, I take the stummel again to the topping board covered by 600 grade paper.  I’ll remove the CA glue mound and redefine the rim after the rounding of the rim edge.  I take a before and after pix. That does the job. Next, to complete this phase of the rim repair, I roll pieces of 120, 240 and 600 grade papers and cut an internal rim bevel to remove the remaining nicks and to soften the look.  With each rolled piece, I pinch the inside of the rim with the paper using my thumb and rotate evenly around the circumference.  The bevel is slight, and I think it looks good.  Again, before internal bevel and after pictures. I set the stummel aside and turn now to the stem.  The initial wet sanding of the stem with 600 grade paper removed the minor bite marks and I’m ready to move to the micromesh cycle.  Using all nine pads, 1500 to 12000, I wet sand with 1500 to 2400, then dry sand from 3200 to 4000 then 6000 to 12000.  Between each set of 3 pads, I apply an ample amount of Obsidian Oil to refresh the vulcanite stem. I love the pop of newly polished vulcanite!  My vanity pipe is shaping up nicely. As I pick up the stummel, I look closely at the briar grain and a dark area I thought might be an overheating of the stummel – scorching.  Now, with the old finish off and the hidden briar making an appearance, the area is a briar knot – a tight swirl of briar. It has character and I think it looks good.  To continue the preparation of the stummel, I wet sand using micromesh pads 1500 to 2400, followed by dry sanding with grades 3200 to 4000 then finishing up with pads 6000 to 12000.After finishing the first wet sanding cycle, I notice that the ‘pocks’ or fills on the shank had softened and become more noticeable and in need of filling.  A detour, but better now than later!  I use a dental probe to work out the softer fill.  I then mixed a small batch of superglue and briar dust to fill the holes.  I use a dental spoon to pack the mixture in the holes and put the stummel aside for it to cure. After the glue cures, I use a flat needle file surgically to bring the patch mounds down to the briar surface.  I am careful to keep the file on the glue mound not to create collateral damage to the surrounding briar.  Then using a tightly rolled piece of 240 grade paper, I remove the remaining glue residue by using the tight abrasive edge of the roll and rotate it in a circular motion over the mound area.  With touch and a close look, I’m able to determine the excess glue is removed.  Then, using 600 grade paper, I fine tune the entire area, not as concerned about the overrun on neighboring briar.  At this point the fine abrasion is blending and shining.  I finish the patches by catching the repair areas up with the first 3 micromesh pads.  The areas are still visible, but now smooth and will blend better as I continue with the finishing process.  The pictures show the detour progress. With the detour completed, I continue with the last two sets of dry sanding with micromesh pads 3200 to 12000.  This pipe’s briar is looking very nice. Well, there are a few pipes the make it through the restoration gauntlet up to this point, and the natural briar just says, I’m enough.  I had been planning to apply a lighter dye to the surface, but now…no.  The actual look of the briar is lighter than the pictures above, which I like.  So, with that decision made by my Stanton Vanity Pipe 😊, “I’m enough!”, I reunite the waiting stem with the stummel and take a picture – the bird’s eye view looks good.To tease out the briar grain even more, I finally take my Dremel off the hook and again use it after the 6 months hiatus!  Using Red Tripoli compound, I begin the buffing process on stem and stummel using a cotton cloth wheel mounted on the Dremel at the lowest speed. After completing a methodical circuit with the Tripoli, I switch to the lesser abrasive, Blue Diamond, using another cotton cloth wheel at the same speed.  Completing the abrasive compounds, I give the pipe a quick buff with a clean cotton cloth to remove the compound dust/powder before applying the wax.  I apply the carnauba wax with, yet another cotton cloth wheel dedicated to application of wax.  I increase the speed of the Dremel by about 20% and I apply a couple of coats of wax to the entire pipe.  For those who have not read my restorations, I live on the 10th floor of a former Communist block apartment building here in Sofia.  I do not have a lot of room, so my techniques for restoration, especially polishing techniques have had to bend to the realities – hence, my exclusive utilization of a Dremel with no room for the more powerful full wheel buffers.  After Steve asked me to write an essay on my techniques using a Dremel, I discovered out in the blogosphere many people who appreciated what I had written out of my own trials and errors.  You can find this essay at the Pipe Steward website here: My Dremel Polishing Techniques with a No-Name pipe from Sozopol Bulgaria.  My techniques have developed since then, but it’s a helpful essay.  Thanks to my wife for helping take the following pixs since I don’t have a third hand to use!After completing the application of carnauba wax, I give the pipe a rigorous hand buffing with a microfiber cloth.  This helps bring out the shine even more but also removes wax buildups that I may have not spread adequately with the Dremel.

The Stanton Vanity pipe came out well.  I’m please with the rim repair that was significant. The removal of the old finish and cleaning revealed a very nice presentation of briar grain – the highlight is the dark knot cluster that almost looks like a thumb print.  If anyone has any leads on more information about the ‘Stanton’ nomenclature I would appreciate a note!  It is good to back to The Pipe Steward work table.  The vast majority of my pipes are put in the store to help benefit the Daughters of Bulgaria, helping women and girls who have been trafficked and sexually exploited, but this fellow, Stanton, is staying in my collection.  Thanks for joining me!


There and Back Again – to Bulgaria


Blog by Dal Stanton

Roads go ever ever on
Under cloud and under star,
Yet feet that wandering have gone
Turn at last to home afar.
Eyes that fire and sward have seen
And horror in the halls of stone
Look at last on the meadows green
And trees and hills they long have known
Bilbo Baggins

These words, ascribed to Bilbo, penned by J. R. R. Tolkien in The Hobbit, captured Bilbo’s thoughts as he came over the rise and his eyes again canvassed his beloved, Shire – home again. I borrow the sentiments he so well expressed after my wife and I returned to Bulgaria, our home, after about six months traveling in the US.  We visited sponsors of our work in Bulgaria, and renewed ties with family and friends – AND not to go unmentioned, we also celebrated the addition of two beautiful granddaughters during this 6-month sprint!  Now, I’m anxious to return to the Pipe Steward work table and to dive back into a hobby I love – collecting, restoring and recommissioning pipes to worthy stewards.  And adding frosting to this cake – these pipes are sold to benefit the Daughters of Bulgaria, helping women and girls who have been trafficked and sexually exploited in Bulgaria and Europe.

Sometime ago, Steve asked me to post a bit of our US adventures and I’m finally getting to it!  From September to February we traveled practically every weekend visiting sponsors and holidays to visit family in Denver, Detroit, Nashville, St. Louis and Port St. Lucie, FL, from home base in Palmetto, GA.  We flew mostly but did some road trips along the way.  Of course, pipe hunts were plotted using Google maps to locate and explore flea markets, second hand stores, and antique shops – choosing to travel off the grid and interstates when we could.  I love the hunt!  I found some nice pipes through these safaris as well as from eBay auctions.  Another source was from people who donated pipes from family pass downs and from personal collections to help support the Daughters of Bulgaria.  All totaled, if I counted accurately(!), 105 pipes were added to my ‘Help Me!’ baskets in queue to be restored and recommissioned to benefit the Daughters!  A couple of those pipes will be added to my own personal collection, but not many!

The first major acquisition was a Lot of 66 from eBay – the largest lot I’ve ever tackled!  One tries to examine the pictures provided by the seller to assess the possibilities – looking for treasures lurking here and there among all the shapes and nomenclature, and I believe I did well.  Some of the highlights of the Lot of 66 include a Gourd Calabash sculpted with a Meer bowl, Comoy’s Made in London England P510 – D billiard, Peterson’s System Standard K&P Republic 312, GBD Flame 1344 Made in France poker, Kaywoodie Super Grain 08 Dublin, Comoy’s Sunrise Volcano – H 16, Savinelli 4015 Dublin, Sculpted Imported Briar calabash, M.G.M. Rock Italy Briar 19 12 – 25 freehand, GBD International London Made London England 549 rustified rim bent bulldog, Butz Choquin Regate St. Claude France 1693 bulldog, Imperial Churchwarden Algerian Briar France, Butz Choquin Regate St.Claude France 1275 Slightly bent billiard, Kiko 343 Made in Tanganyika Meer lined, Peterson System Standard Republic 392, Abbott London Made 715 pocket pipe, Jarl Chieftan 15119 Made in Denmark billiard, Jarl 1545 Made in Denmark Dublin, Savinelli Capri Root Briar Italy 8004 rustified Canadian, Ben Wade Hand Model LONDON MADE, Savinelli Punto Oro 510ks Italy bulldog rustification, Peterson’s “Kildare” Made in the Republic of Ireland 83.  There were a few clay pipes in the Lot which I was interested in seeing.  Unfortunately, the seller didn’t do a very good job packing and these were broken!  Here’s a bird’s eye view of the Lot of 66 I saw on eBay and now in Bulgaria (the pictures aren’t great but gives an idea what I had to work with): Another special acquisition was from Dan in Butler, PA.  He and his wife knew about our work with the Daughters of Bulgaria and my restorations serve to advance it.  During our visit to Butler to speak at their church, they welcomed us into their home and Dan donated this lot of 4 pipes which belonged to his father who had passed away. He told me a bit about his father, his recollections of his dad’s pipe smoking and I’ll look forward to restoring these pipes to benefit the Daughters of Bulgaria.  I will also try to tell the story of this former steward. Not all treasures were pipes.  On a road trip taking us through Somerset, KY, we landed upon a flea market in full swing that gave a unique picture of middle America not often seen on the interstate!  After poking through 100s of tables, I came upon a Kleen Reem Pipe Tool in its original box – with mini-pipe cleaners to boot.  I didn’t have one, so I negotiated a win/win price with the crusty, bearded, table keeper and now it is added to my arsenal here in Bulgaria.  One more reaming tool acquisition was to find an older, vintage Swiss Made Pipnet Reaming tool off eBay.  Patience paid off and one came up on the auction block.  This solid heavy-duty rubber version will replace an acrylic Pipnet version – which was susceptible to breaking. Another highlight during the time in the US was reconnecting with friends.  Dave Shain, was one such friend.  Dave and I worked in Ukraine together when we were both a bit younger.  Over the years, we went in different ways but we found each other again on The Gentlemen’s Pipe Smoking Society group on Facebook.  We discovered that both of us had been found by pipes!  Dave’s endeavors go far, far beyond mine as he has been recognized for his work by the Chicagoland Pipe Collectors Club and has a cool, ‘Master of Pipes’ award hanging on his shop wall and a magazine cover and article to boot!  Dave and I shared a bowl together and reminisced about the past, present and future, around a hot wood stove in his ‘Man Shed’. He gave me a tour of his workshop – a far, far cry from my desktop operation on the 10th floor of a formerly Communist apartment block!  He also donated some promising pipes for my work with the Daughters of Bulgaria.  I left with an aging tin of October 2015, Escudo Navy De Luxe which came to Bulgaria with me.  Thanks, Dave!  It was a pleasure reconnecting with an old friend. Through all of our travels and with more eBay acquisitions after the Lot of 66, more standout pipes caught my attention (from top to bottom below):  Knute of Denmark freestyle (this may make my collection!), Savinelli Autograph 5 bamboo shank rusticated (a great acquisition – needs work but great potential), Stanwell Hand Made 56 Canadian, Pipstar Standard 06 026 Dublin sitter, Comoy’s MADE IN LONDON ENGLAND 4097 H bent bulldog, La Strada Staccato 187 Italy sculpted billiard, Italian Import Italy custom shape, Comoy’s Moorgate 102 Italy bent billiard, and a Savinelli Dry System 3621 (shown) and a Savinelli Dry System 362 (not shown below). Another group of standouts are: Brigham 103 Can. Pat. 372982 rusticated billiard, Lorenzo Savona #750 Made in Italy rusticated chimney, Sasieni The Kensington 236B Canadian Made In England, Longchamp France leather wrapped billiard, Royal Danish 995R 995 R squat tomato, Lorenzo Matera Pipe Studio 807 Italy special shape (the hourglass shape was interesting), a cool Native American Hand Carved Indian Head CHIEF Italy that I couldn’t pass up!, Whitehall Gulf Stream Imported Briar rustified Dublin, a very sweet Comoy’s Pebble Grain Made in London England 605 bent poker, and a Kiko 543 Made in Tanganyika leather wrapped saddle stem billiard.I’ve seen some autograph pipes, but I didn’t know that vanity pipes existed, especially one marked with my namesake, ‘Stanton’.  He’s not too flashy, but obviously a workhorse billiard with some nice grain peeking out.  When I saw him on the eBay auction block, I did a double-take and decided then that he was coming home to Bulgaria.  Curiosity piqued, I did a quick look up in Wilczak & Colwell’s, ‘Who Made That Pipe?’ and came up with a very clear designation: “UNKNOWN”.  He’ll clean up nicely.The last bit of sharing to conclude this, ‘There and Back Again’ blog is not about pipes but tobacco.  For Christmas, in Detroit’s suburb of Dearborn, my daughter-in-law gifted me some popular selections from Boston’s Perretti Tobacconist, the second oldest tobacconist in the US where they still create blends as you wait – free testing too (so I’ve read)! She was in Boston on a business trip and thankfully (!) did some Christmas shopping for the men in her life!  Not pictured below is one of L.J. Peretti’s more popular, signature blends which I like a bunch, Park Street. This shop is on my bucket list of places to visit one day when I make it back to Boston.  The blends are very nice and pleasurable, and I’ve enjoyed sitting on my 10th floor Man Cave balcony here in Sofia, sipping on a bowl and thinking about family and how blessed I am for it.  Thanks Maureen!Now, which pipe is first on the work table?  Hopefully, soon, I’ll let you know!  Check out The Pipe Steward when you have a chance!  Thanks for joining me and my musings. It’s good to be back home!  (Below, enjoying Park Street with my good friend – Savinelli Goliath)

Revitalizing a Distinctive L J Peretti of Boston – Large Full Bent Egg


Blog by Dal Stanton

I’ve grown to like L J Peretti pipes and I guess you could say, that I’ve started collecting them.  Why?  My son gave me my first Peretti for Christmas which I restored by splicing the missing part of the stem by cannibalizing another:  A Christmas Gift in need of a stem splice – L J Peretti Squared Shank Billiard.  It turned out to be a great smoker and I like the stout squared shank.It was my research with this pipe that I discovered the mystique of the Boston-based, L. J. Peretti name and its place in Americana pipe history as the second oldest US Tobacconist started in 1870 (Quoted from Lopes in Pipedia).  The L J Peretti Co. continues to serve patrons today in their Boston shop on 2 ½ Park Square by being one of the few places where one can bring his/her pipe and be guided by experienced tobacconists and test several selections before deciding to purchase!  I was also attracted to the Peretti story because Boston is a cool city – my son lived there and I enjoyed my visits.The next Peretti I serendipitously received was from a colleague working in Ukraine – a square shanked Rhodesian.  He brought it to me when we met last winter in Oslo, Norway, to watch a world-class Biathlon event (skiing and shooting).  He wasn’t utilizing him anymore and asked me if I would.  Yes!  It’s a smaller pipe and good for a shorter smoke.  Suddenly, I had two Perettis of Boston!  Both, strong, squared shanks – I liked them.Then I drank the Peretti Kool Aid.  I bought my own Peretti – well, that’s not the whole truth.  I bought 10 pipes of Peretti in a lot for sale on eBay from a seller located in Everett, Massachusetts, just north of Boston.  I guess you could say that I’m now a Peretti collector!  Of the 10 pictured from the eBay seller below, I chose 4 to add to my personal collection – one of the Oom Paul’s (many to choose from!), the Calabash (top left), the Billiard EX (bottom), and the massive Full Bent Egg in the center of the picture. The remaining Peretti cousins will eventually be restored and put up for adoption in The Pipe Steward Store Front to benefit the Daughters of Bulgaria.  I’m pressing to restore and ready the Peretti Full Bent Egg for service because my wife and I will be returning to the US from Bulgaria for a few months and I was hoping to bring this new Peretti along!  Now on my worktable, on the 10th floor of a former Communist block apartment building, I take some pictures of the L J Peretti Full Bent Egg in the condition he arrived from Everett, Mass. The pipe is generally in good shape.  It shows normal wear and usage.  The briar surface is grimy.  The narrow, cylindrical bowl is laden with cake which needs removal.  The stem is heavily oxidized with tooth chatter and some compressions present.  This L J Peretti has enjoyed a lot of use showing that the former steward enjoyed his company.  The nomenclature is situated on the left-side of the shank and simply reads, ‘LJ PERETTI CO’ and is very worn.  I’ll be careful to preserve it.  There are no other markings that I can tell.  I take a magnifying glass to the left side of the full bent saddle stem to see if there might be a Peretti ‘P’ stamp hiding in the oxidation, but I see no sign.  I’m anxious to recommission this newest of my L J Perretti collection – an extra-large Full Bent Egg.  The first step is to put the full bent stem into the OxiClean bath to raise the serious oxidation on the stem.  I leave it in the bath overnight. Then, using the Pipnet Reaming Kit (minus blade #3 which broke during the last restoration), I attack the cake in the chamber.  I use only the smallest two blades, and the cake easily surrenders.  The carbon cake was crusty – like hard toast, and it comes out readily.  I finetune the reaming with the Savinelli Fitsall Reaming Knife which can reach down the long, deep chamber.  To clean the walls further and to reveal fresh briar for a new start, I wrap 240 grade paper around a Sharpie Pen and sand the chamber.  Finally, I wipe out the chamber with a cotton pad and alcohol – ridding the chamber of the carbon dust resulting from the reaming.  The chamber condition looks good.  The pictures show the progress. Next, I clean the external briar surface.  I do this using undiluted Murphy’s Oil Soap with a cotton pad.  I also employ the use of a brass wire brush to work on the tight rim of the Egg shape as well as my thumb nail to scrape the crusted briar and lava.  Grimy was an understatement.  The stummel was dirty and the rim came clean through the process, but revealed some burn damage to the slender, vulnerable rim.  I’ll need to top the rim gently to remove the scorched, ‘charcoaly’ wood.  The cleaning also reveals a beautiful piece of briar – inspecting the surface I find no fills.  The large Egg bowl shows a lot of grain movement – very nice!  My day is ending and I will let the internals of the stummel clean through the night using a kosher salt/alcohol soak.  I’ve never started with the soak before.  I’ve always worked first on the internals with pipe cleaners, cotton swabs and isopropyl 95% and then followed with a soak.  I’ll do the soak and see how it does.  I fill the chamber with the kosher salt, that does not leave an aftertaste as does the iodized variety.  Then I fashion a cotton wick by stretching and twisting a cotton ball and then stuffing it down the mortise.  Its purpose is to draw the tars and oils out during the soak.  I then fill the chamber with alcohol using a large eye dropper until it surfaces over the salt.  I wait a few minutes and top off the alcohol once more.   Then I set the stummel in an egg cart and turn off the lights. Morning has arrived and I check out the progress with the salt/alcohol soak.  Both the kosher salt and the cotton wick have darkened indicating the nocturnal stealth activities of cleaning.  I remove the expended salt and wipe the chamber with a paper towel and run long-wired bristled brushes in the bowl and through the mortise to remove salt crystals.  I then use pipe cleaners and cotton swabs dipped in isopropyl 95% to clean up the leftover gunk from the soak.  There were additional oils and tars in the mortise – in the moisture trap underneath the airway drilling, but all clean up quickly and well.  I also scrape the mortise walls with dental probes and a pointed needle file to augment the cleaning.  Internals clean!It’s time to take the stem out of the OxiClean bath and clean it up.  The oxidation has surfaced well during the soak and using 600 grit sanding paper I wet sand the stem to remove the top layer of oxidation and tooth damage to the bit.  I follow with 0000 steel wool to reduce the oxidation further and buff up the vulcanite. I now take a closer look at the bit to see what tooth chatter remains.  Using 240 grit paper I sand the areas where tooth dents remain on the top and bottom bit.  There also remains a dent on the lower button lip. At this point I use the heat method to help minimize the dents that remain.  With a lighter, I pass the flame over the bit area and ‘paint’ the vulcanite surface.  I don’t want to ‘cook’ the vulcanite but warm it sufficiently to expand the rubber.  When this happens, the dents seek their original pre-dental positions.  This works very well and the dent on the lower button lip has all but disappeared.  I return to using 240 grit paper, followed by 600 then steel wool and the damaged bit areas look great.  This time around I will not need to use CA glue to repair the dents.With the stem in hand I turn to cleaning the internal airway.  Using only a few pipe cleaners dipped in alcohol and the stem is good to go!Looking now at the scorched rim, I need to remove the charred briar at the 1 to 2 o’clock position on the rim in the picture below.  The Egg shape bowl sets off the rim as the shape tightens as it moves toward the rim.  It creates a very tight look with the top.  The rim appears originally to have been crowned – a gently rounded rim.  I will aim toward restoring the crowned rim.  First, I top the rim very little – it’s not easy as the shank extends further than the plane of the rim so it will not sit on the topping board.  I must hang the shank over the topping board edge to allow the rim to sit flat.  I then gently rotate the stummel in a limited fashion.  I don’t take much off and then switch to 600 grit paper on the board and rotate the stummel more. Now, using 240 grit paper rolled, I sand the inside of the rim creating a beveling effect and removing the remaining damaged briar.  After beveling and cleaning the internal rim lip, I gently bevel the outer lip of the rim.  This is sharpening and restoring a rounding of the tight rim.  I follow using 600 grit paper which smooth the rim more and enhances the crowned effect I want.  The pictures show the results – I like the look of the rim – it enhances the Egg shape.Looking at this large block of briar, the Bird’s Eye grains are wonderfully portrayed in the first 2 pictures below – large landscapes of grain movement – I like that!  From my original Peretti research I emailed the L J Peretti Tobacconist Shop in Boston with a question about where their pipes were manufactured.   Tom was kind enough to respond, saying that over the years they had used many different sources, but most had been produced by Arlington Briars.  I found this about Arlington in Pipedia:

Arlington Briar Pipes Corporation was founded in 1919 in Brooklyn, New York, and produced the Arlington, Briarlee, Firethorn, Krona and Olde London brands among dozens of others, primarily acting as a subcontractor making pipes to be sold under other brand names. Among others, in the 1950’s, Arlington turned pipes for the famed Wilke Pipe Shop in New York City. The corporation was dissolved by the State of New York as inactive on December 6, 1978. 

Where ever this L J Peretti Full Bent Egg was birthed, the block of briar used was an excellent specimen and it is now showcased in this striking pipe.  I see no fills on this stummel, only minor nicks which is normal for any pipe’s experience.  I use a two grades of light sanding sponges to remove these small imperfections. I continue with the grain’s emergence using micromesh pads.  I begin by wet sanding with pads 1500 to 2400, followed by dry sanding with pads 3200 to 4000, then 6000 to 12000.  There is nothing quite like the natural briar shine that emerges during the micromesh process.  The pictures show the transformation. I will stain the bowl keeping it on the lighter side by using Fiebing’s Light Brown Leather Dye and adding alcohol to it.  I use a 2 to 1 ratio of Light Brown to alcohol.  I first clean the stummel with a cotton pad wetted with alcohol.  I mix the ratio of dye/alcohol in a shot glass and insert a cork into the shank to serve as a handle.  I heat the stummel with a hot air gun to expand the briar better to receive the dye.  After warmed, I use a folded pipe cleaner to apply the dye to the bowl.  After fully covered with dye, I fire the aniline dye using a lit candle.  The alcohol burns off setting the pigment in the grain.  I wait a few minutes then repeat the process.  I then put the stummel aside to rest. With the stummel resting, I turn again to the stem and wet sand it using micromesh pads 1500 to 2400, then dry sanding with pads 3200 to 4000, then 6000 to 12000.  After each cycle, I apply Obsidian Oil to restore vitality to the vulcanite.  The full bent saddle stem was a chore to hang on to and sand with the tight angles, but the stem looks good and has that new vulcanite pop! It is finally time to unwrap the stained and fired stummel to see what we have underneath!  I enjoy this part of the restoration process primarily to see the grain emerge – this large Egg shaped stummel holds great promise.  I mount a felt buffing wheel onto the Dremel and set the speed at the lowest which is 20% of its power.  I apply the more abrasive Tripoli compound to the stummel to do the unwrapping of the crusted shell.  To reach into the crook between the shank and stummel, I switch to an angled felt buffing wheel to remove the wrapper from the hard to reach place. To lighten the stain and to blend the dye, using a cotton pad wetted with alcohol, I wipe the stummel.  This is an advantage of using aniline dyes for staining.  The alcohol wipe clouds the finish but this is normal.  I follow now by mounting a cotton cloth buffing wheel onto the Dremel and set at 40% speed, I apply the less abrasive Blue Diamond compound to buff-sand the stummel, as well as the full bent saddle stem which I remount. After completing the application of Blue Diamond compound on stem and stummel, to remove compound dust before waxing, I buff the pipe with a felt cloth.  Then, I mount a cotton cloth buffing wheel to the Dremel and maintain the speed at 40% and apply several coats of carnauba wax to the Egg shape stummel and full bent saddle stem.  The wax protects the surfaces but it also causes the shine and natural gloss of the briar to shine – I don’t know how to describe the natural beauty of briar when it shines through – and this L J Peretti is making a statement!  After completing the application of carnauba wax I give the pipe a rigorous hand buffing and I’m enjoying the view.This L J Peretti Full Bent Egg is a beautiful example of briar grain coming and going.  The size and the feel of the large Egg stummel in my hand fits like a glove.  The tight, cylindrical bowl’s apex with the thin, crowned rim is classy.  I’m happy to add this Peretti to my Peretti collection and I look forward to trying him out with a bowl of my favorite blend, Lane BC.  The pipes I restore and don’t adopt myself, are put in The Pipe Steward Store Front which benefits our work with the Daughters of Bulgaria, women and girls who have been sexually exploited and trafficked.  Thanks for joining me!

A Goliath Among Giants – Releasing a Savinelli Goliath 619EX Italy


Blog by Dal Stanton

Have you ever trolled through the 1000s of “Vintage Estate Pipe” offerings on eBay’s auction block and then, one pipe seizes your attention, and you know that you will be bringing it home?  When I saw the Savinelli Goliath, I saw the pipe – not the Savinelli name, nor the condition information offered by the seller.  I could tell it was a huge pipe – I like big pipes not just sitting in my palm, but occupying it.  I also saw the rustification beautifully textured across the paneled (octagon shaped) Billiard landscape.  Lastly, but not with waning attention, I saw the Cumberland vulcanite swirl – not just the stem but also the shank extension.  The Cumberland display was like frosting on the cake.  Here are a few pictures I saw from the seller in California.This Savinelli Goliath 619EX of Italy may represent my last restoration for several months as my wife and I return to the US from Bulgaria to reconnect with family and friends. Our organization here in Bulgaria, is a ‘not-for-profit’ so we also spend time reconnecting with the generous, dedicated people who provide their resources to enable our efforts in Bulgaria to happen.  Before my wife and I head to the US, we will spend one last bit of time on the Black Sea coast enjoying the sun and sand, and I wanted to restore a pipe from my own personal collection’s “Help Me!” basket.  So, this big boy will not be going into The Pipe Steward’s Store Front for a new steward to adopt and hence, benefiting the Daughters of Bulgaria, one of our important activities, helping women and girls who have been sexually exploited and often trafficked.

The Savinelli name needs almost no introduction as one of the most well-known Italian pipe houses and whose pipes are highly sought after (See the TobaccoPipes Link for Savinelli’s History).    The Goliath line is no longer produced by Savinelli.  Eric Squires, from SmokingPipes.com, observes,

I’ve only seen a few Savinelli Goliaths, but between the name and the fact that those few I’ve seen have all been “EX” sized pipes, I would presume the entire series was all-EX. Finish-wise they look much like the Hercules line, with the significant difference being the presence of Cumberland ferrules and stems.

The Savinelli Hercules line is still produced and examples of the differences between the former Goliaths and current Hercules offerings can be seen in the Hercules shape 619EX also from Smoking Pipes.  It looks like my Goliath without the Cumberland stem and shank extension.The following now defunct Smoking Pipes ad for the Savinelli Goliath 619EX does all the work for me regarding description of this massive pipe.  I find Andrew Wike’s description spot on.

Savinelli’s Goliath line is aptly named, presented some of their classic shapes in extra-large, EX proportions and topped them with Cumberland mounts and stems. Here we see the “619” bent Foursquare rendered positively massive. It’s finished in a crisp, uniform rustication, offering plenty of texture in hand, without compromising the paneled shape’s clean lines. Length: 6.19 in./157.23 mm.

Weight: 2.50 oz./70.87 g.

Bowl Height: 2.12 in./53.85 mm.

Chamber Depth: 1.80 in./45.72 mm.

Chamber Diameter: 0.89 in./22.61 mm.

Outside Diameter: 1.65 in./41.91 mm.

Stem Material: Vulcanite

Filter: 9mm

Shape: Panel

Finish: Rusticated

Material: Briar

Country: Italy

These pictures that I take of the Savinelli Goliath 619EX from the worktable here in Sofia, Bulgaria, form the starting planks of rebuilding the bridge from where this massive pipe is now and the pristine picture depicted above.  I don’t have huge hands, but just to give a sense of the size of the stummel, I conclude with a ‘palm shot’ where I’m imagining this Goliath in my rotation! The nomenclature is located on the underside of the shank.  To the left is stamped ‘SAVINELLI’ [over] GOLIATH.  To the right of this, is stamped the Savinelli logo followed by ‘619EX’.  Without success, I look through several catalogues featuring Savinelli lines and I am unable to unearth the Goliath to try to date the production history.  I sent the question to Savinelli’s current ‘Contact’ page in their website to see if someone might fill in those details – I’m not holding my breath.  I find this nice example of a Goliath, slightly different shape, at Chris’ Pipe Pages and I discover something that I had totally overlooked.This example provides pictures of a stem stamping on the topside of the Cumberland stem!  Looking more closely at my Goliath’s stem, I discover the faintest shadows of the stamping.  Now that I know it’s there, I’ll do my utmost to protect it!  I take a picture of the phantom.I’m anxious to recommission this Savinelli Goliath and introduce him to the other pipes in my rotation!  He needs some work.  The stummel has plenty of grime in the rustified surface.  The cake in the chamber is thick and it needs to be removed to expose fresh briar.  The rim has lava flow and crusting.  The Cumberland stem has heavy oxidation and the former steward of this Goliath was a definite clencher – the bit/button area is pocketed with chatter and dents.  The button lip also has damage.  We have some goliath challenges, but I’m glad to start the restoration.  The first thing I do is cover the phantom stem mark with petroleum jelly and put the Cumberland stem in the OxiClean bath to soak and to raise the oxidation. With stummel in hand, the first thing is to ream the ample chamber removing the thick accumulation of cake on the chamber wall.  Using the Pipnet Reaming Kit, I use the full array of 4 blades available to me, starting with the smallest blade. After putting paper towel down to minimize clean up I go to work.  The cake is hard as a brick and it takes more effort than normal.  I wonder if this bowl has ever seen the likes of a reaming blade before.  As I continue to work with the first, smallest blade, images of oil drilling come to my mind….  I’ve never taken a progress picture of a reaming project before, but I do drilling down into the deep recesses of this Goliath.  The first picture shows the starting point.  The second picture shows the shape of the smaller blade as it makes progress down the throat of the carbon cake – maybe just past the halfway point.  The cavern beyond is visible.  The last picture shows the break-through to the floor of the chamber.  Now, the next larger blade, blade number 2.  That blade worked through to the floor and then to blade #3, the next larger. I was just thinking that I seldom worked on a pipe requiring blade #3, let alone #4.  I was also just thinking, “Let the blade do the work, and don’t put a lot of torque on it.  The Pipnet system is made of heavy duty plastic.  Not long after those fleeting thoughts, blade #3 had a major failure and the extending blade part broke off from the insert part, stuck in the hand turning tool.  Ugh!  I gently coax the parts out of the stummel and tool, and put them aside for potential repair! Unyielding, I mount blade #4 and coax it gently down the chamber, overtaking the short-comings of blade #3.  I record the completion of the Pipnet progress, clean the carbon dust which is much.  The chamber looks good, but I’ve yet to finish. I finish up the reaming, which is no perfunctory job this time, using the Savinelli Pipe Knife, which more accurately is the Savinelli Fitsall Pipe Reamer (See: Savinelli site).  I found it on eBay sometime back after Steve bragged so much about his during many of his restorations on Reborn Pipes!  It did not come cheap, but I have enjoyed its talent to finetune a reaming project. After using the Fitsall Pipe Reamer to remove more carbon in hard to reach places, I take 240 grit paper, wrap it around a Sharpie Pen and sand the chamber wall clearing out the last remaining deposits of carbon cake and presenting fresh briar for a new start.  To finish the internal cleanup, I use cotton swabs and pipe cleaners wetted with alcohol to clean the mortise.  I also employ the long, wired bristle brushes for the cleaning.  The mortise is cleaning up well.  Later, I will give the bowl a Kosher Salt/alcohol soak to clean further and freshen it. I let the stem soak overnight in the OxiClean bath.  I take it out and with thumb firmly over the phantom stem stamp, I work on removing the oxidation by wet sanding with 600 grit paper then with a buffing with 0000 grade steel wool. I like working on clean stems.  I use pipe cleaners dipped in isopropyl 95% to work on the internal airway of the stem. I use cotton swabs to clean the filter bay. With the condition of the chamber, bit and grime on the stummel, I expected some gunk deposits in the stem and filter bay.  I was not disappointed, but after several courses of pipe cleaners and cotton swabs and alcohol, the gunk gave way to a state of cleanliness.Turning now to the rustified surface of the Goliath, I use undiluted Murphy’s Oil Soap with cotton pads and a bristled tooth brush to scrub the grime off the surface as well as the rim.  After scrubbing, I rinse the stummel with warm tap water without flooding the inside with water.  The grime has come off, but the finish has as well for the most part.  The rim is still a bit dark, but that’s not a problem.  I want to reestablish a very smooth and perhaps a bit lightened rim, as I’ve seen exemplified with newer Goliaths and the Hercules series.  To reestablish a crisp rim and remove the dings, scratches and darkened briar, I will lightly top it.  There is already an internal rim bevel which will be re-sharpened as well.  With the chopping block serving as my topping board, I put a sheet of 240 grit paper on it and rotate the stummel in circles over the paper.  I don’t need to remove much – my goal is cleaning and crisper lines and to remove the scorched briar on the internal ring.  After the 240 grit paper, I put 600 grit paper down and repeat the process.  The rim plateau looks good, but the black ring is now more distinct.  To address the blackened ring, I use a piece of rolled 120 grit paper and recut the bevel.  After this, I smooth the bevel more with 240 grit paper rolled tightly and then with 600 grit paper.  After the beveling, I again put the stummel on the topping board with 600 grit paper to give a finishing touch to the bevel lines.  I still see a hint of the dark ring but I’m satisfied with where the rim is.Switching from the rim, I now want to work on the Cumberland shank extension.  To break up oxidation and remove scratching, I lightly sand the surface with 240 grit sanding paper.  I follow this using 600 grit paper then 0000 grade steel wool.  The Cumberland shank extension looks good. Now, back to the stem and to address the bit repairs needed.  Up to this point, I’ve only dealt with the oxidation in the stem.  Next, I will use the heating method to expand the vulcanite to minimize the dents on the upper and lower bit.  There are dent compressions on the button lips as well.  I take fresh pictures of the upper and lower bit area to mark the starting point.  It is apparent, based upon how far forward the tooth dents are on the stem, the former steward smoked the Goliath without hands at times.  To counter the weight of the stummel, one would have to clench the stem toward the center. Using a butane lighter, I pass the stem through the flame, ‘painting’ the damaged areas with the heat.  I do this several times until it appears that I’ve reached maximum benefit of the heating method.  The deepest dents and compression points remain, but are tighter and more defined by the expansion of the vulcanite. Now, I use 240 grit paper and a flat needle file to sand down the area more.  I work primarily on the lower button lip area with the flat needle file to redefine the edge of the lip.  After sanding and filing, I’m left with the areas needing patching. I wipe and clean the bit, upper and lower, with a cotton pad and alcohol to prepare it for the drop-filling with CA Glue.  I use transparent Hot Stuff Special ‘T’ to do the filling, by applying it with a toothpick. For the deep fills on the lower bit, I allow ample glue to fill the area. I spray the patches with an accelerator to shorten the curing time.  Starting with a flat needle file I remove the excess CA glue to bring the mounds down close to the stem surface as well as shape the buttons working off the excess glue.  After the file, I use 240 grit paper to sand the patch mounds down to the vulcanite surface, removing the excess CA and blending as much as 240 paper allows.  Then, I follow the 240 with 600 grit paper which fine tunes the patch surfaces and blends further.  At this point, I used a method for the first time.  Note the first picture below – this is the upper bit and what transpired which I didn’t picture, I’ve pictured in the second picture, of the lower bit.  As often is the case, CA glue patches after curing will have air pockets which are addressed by painting the patch area with thin CA glue which fills the small pocket holes and after dried, removing the film of excess glue with sanding.  I notice that the patch areas, where the air pockets emerge, were whiteish.  Often this is vulcanite dust lodged in the pockets.  I wipe off the patch areas with a cotton pad and alcohol but pockets remained white as in the second picture.  The white is the cured CA glue itself which I’ve seen before.  What I also have seen before is that if you paint the white again with CA to fill the air pockets, the white spot is also sealed by the transparent CA glue and will show.  What I do, for both the upper (which is not shown above) and the lower bit (which is shown below) is to darken the whitened patch material using a black fine point Sharpie Pen.  After this, I paint with the thin CA glue to fill the pockets.  Black blends much better than white does on vulcanite – or in this case, a black/red swirl of a Cumberland stem.  After the CA glue cures, I will file/sand it down in the same manner as the upper bit.Turning again to the stummel, before I stain the stummel, I continue sanding the rim plateau with the full array (9) of micromesh pads 1500 to 12000.  Since I forgot to take a start picture, I brought this picture forward again for comparison.Now, also using the micromesh pads, I work on the Cumberland shank extension first using pads 1500 to 2400, then 3200 to 4000, then finally, 6000 to 12000.  After each set of 3, I apply Obsidian Oil to the shank to revitalize the vulcanite.  What can I say?  I love Cumberland vulcanite!  With each iteration of micromesh pads and Obsidian Oil, my anticipation of recommissioning this Savinelli Goliath with a bowl full of my favorite blend, Lane BC, is growing!  For the last 6 micromesh pads, I also polished the smooth briar on the lower shank that holds the Savinelli nomenclature – pictured below.  Since I cleaned the stummel with Murphy’s Oil Soap (a few days ago!) and the finish dulled significantly, I have been thinking about how to finish this Savinelli Goliath keeping it within the original Savinelli framework when it was initially commissioned.  For a ‘tenderfoot’ (former Boy Scouts will understand) restorer, here are the questions that come to my mind.  The color – there is a subtle reddish lean to the rustified surface.  How do I emulate it?  The rustification – the texture of the rustification in the picture below shows the rising and falling definition of the color tones over the contoured rustified landscape.  How do I emulate this so that the stummel color doesn’t turn out one dimensional?  And finally, the Rim Plateau.  I call it a plateau – it’s too massive simply to be a rim!  Goliath’s Plateau!  I’ve seen pictures of Goliaths and the cousin series, Hercules, that leave the rim ‘plateau’ lighter or perhaps, left natural – leaving a striking relief between stummel and rim.  An example from Worth Point in pictures 2 and 3 below – though the rounded rim is not wanted for the Goliath.  Should I stain the plateau or leave it as is?  Questions. Question 1 – Color of stain. After consulting with my wife, and a lot of going back and forth, I’ve settled on a dye mixture of 3 to 1 – 3-parts Fiebing’s Light Brown Leather Dye to 1-part Fiebing’s Oxblood.  Question 2 – Rustification contouring.  After I apply the stain and unwrap it after firing, I will experiment with lightly applying a 1500 grit micromesh pad to the ‘peaks’ of the rustification which creates the different tones in the color – peaks and valleys.  I did this once before when I restored another Italian – a rustified Lorenzo Rialto full bent Egg.  And, question 3: Goliath’s Plateau.  I’ve decided to leave as is initially but TRYING to avoid applying dye to the rim.  I’ll look at the results and then decide whether to go ahead and apply the dye afterwards.  Thinking done – time for action!

The first thing I do to prepare the stummel is to clean it thoroughly with isopropyl 95% and a cotton pad.  Then, to protect the vulcanite Cumberland shank extension from the dye, I tape off the shank with masking tape.  I mix the dyes, 1-part Oxblood to 3-parts Light Brown.  I use a large eye dropper to do the mixing.  At the last minute, before I added the Oxblood to the Light Brown, I decide to add a small bit of alcohol to the Light Brown – to lighten it.  We’ll see how that works!  Using the hot air gun, I warm the stummel to expand the briar to help its receptivity to the dye.  After warmed, I use a folded over pipe cleaner to apply the dye mixture.  Instead of covering the whole stummel and then firing it, I did a portion of the stummel at a time – panel by panel, firing it, and moving on.  This seems to have worked well for this large stummel and for the fact that the rustified surface was absorbing the dye quickly.  After applying 2 coats of dye, I set the stummel aside to rest.  The pictures show the progress. With the stummel resting, I finish the repairs to the Cumberland stem.  Now on the lower bit, I file down the patch mounds with a flat needle file, further sanding with 240 grit paper to bring the patch flush with the vulcanite surface.  Then finally, I finish the sanding and blending with 600 grit paper and 0000 grade steel wool over the entire surface (but protecting the Savinelli stem logo). The patches on the lower bit are still visible to the informed eye, but I’m hoping that micromesh process will continue to blend and hide the patches.  I finish by cleaning up the slot with 600 grit paper. With my day closing, while the stummel is resting, I’ll give it a bath, or rather a kosher salt and alcohol soak.  The work order of this soak is not ideal with the new stain, but I’m careful to pour the salt into the bowl, and insert into the shank a stretched and twisted cotton ball to act as a wick to draw the oils out of the mortise. I then add isopropyl 95% to the bowl with a large eye dropper until it surfaces over the kosher salt.  I then put the stummel aside to continue its rest and soak for several hours.  Again, careful not to disturb the externals, the next morning, I dump the expended salt and wick which had darkened somewhat, and finish cleaning the mortise with cotton swabs and pipe cleaners dipped in alcohol.  The internals are now declared cleansed! Time to continue work on the Cumberland stem.  I begin by wet sanding using micromesh pads 1500 to 2400, then dry sand with pads 3200 to 4000 and 6000 to 12000.  After each set of 3 I apply Obsidian Oil which revitalizes the vulcanite.  The swirling colors of the Cumberland stem are revitalized!  I’m liking what I see! I’m now ready to unwrap the fired crust on the rustified stummel to see what we have.  I mount a cotton cloth buffing wheel on the Dremel, speed set at 40%, and apply Tripoli compound, a more abrasive compound, to the surface.  The cotton cloth buffing wheel is better able to work the crevices of the rustification than the felt wheel, which I use for smooth briar during the Tripoli phase. After unwrapping the stummel with the Tripoli compound, I want to lighten the stain some so I use a cotton pad and alcohol and wipe it down.  After wiping the stummel with alcohol, I load another cotton cloth buffing wheel on the Dremel, at the same speed, and apply Blue Diamond compound not only to the stummel, but to the Cumberland shank extension and stem.  I attempt to rejoin the stem but discover that during the restoration process, the stem loosened up a bit and I’ll need to tighten the fit with the mortise.  After I complete the application of the Blue Diamond compound, I give the stummel, stem and shank extension a buffing with a felt cloth to remove the compound dust from it. At this point, as I mentioned before, I hope to create more color texture in the rustified surface.  I do this by using a 1500 grit micromesh pad and rubbing it gently over the surface of the rustification – aiming to nip the peaks of the contoured rustified briar.  This will remove the finish on the peaks and lighten them.  After I do a few runs at gently applying the micromesh pad to the peaks, I then do a follow-up buffing with the Blue Diamond wheel on the Dremel.  I am very pleased with what I’m seeing emerge.  I’m seeing the color texturing but what I didn’t anticipate, but has happened, is that the lightened peaks are tying in the unstained rim – I had decided to leave the rim plateau the bare, natural briar to form (I had hoped) an appealing, eye catching, contrast with the rustified stummel.  With the smooth grain-showing rim plateau and the rustified bowl – the best of both worlds is captured.  I’m liking the decision not to stain the rim so I will leave it the natural briar.  As I look at the rim, I notice just a few places where the staining did veer a very small bit onto the rim plateau.  I remedy this by wetting a cotton pad with acetone and carefully wiping the rim and removing the stain.  It looks good – no, looks great!My day is coming to an end, but I want to do one more thing.  To tighten the tenon insert in the Cumberland shank extension, I paint the tenon/filter sleeve with thick CA glue applying it around the base of the tenon with a manicure brush.  I let it cure overnight and I will see how it fits tomorrow.  Tomorrow arrived and I work further on fitting the stem.  I sand the CA glue that I painted around the base of the tenon with 240 grit paper.  I follow with 600 to smooth and blend it.  I try the fit several times, sanding slowly – not wanting to sand too much.  With patience, the stem is fitting much more snugly and the repair is invisible! For the final push, I mount a cotton cloth buffing wheel on the Dremel dedicated to carnauba wax and I apply several coats of the wax to the rustified stummel, rim plateau, Cumberland shank extension and stem.  After applying the wax, I give the entire pipe a rigorous hand buffing with a microfiber cloth to bring out the shine even more.

What can I say?  I am proud of the results of this Savinelli Goliath 619EX.  The interplay of the natural briar of the rim plateau with the rustification flecks on the peaks and the deep red tones of the briar pulling at the swirls in the Cumberland shank extension and stem – all coalescing together are striking.  Then, when one adds the staggering size and presence of the bowl….  Oh my.  I can say that this Pipe Steward is happy that this Sav is going to the Black Sea coast in a few weeks to enjoy the sand, surf and yes, a few bowls of my favorite blend!  Even though this Savinelli Goliath will be joining my personal collection, check out my blog, The Pipe Steward for other pipes available in the store.  These pipes benefit the Daughters of Bulgaria, our work with women and girls who have been sexually exploited and trafficked.  Thanks for joining me!

Refreshing a French Jeantet D’Orsay Billiard Found in Burgas


Blog by Dal Stanton

The first time I saw the Jeantet D’Orsay was looking at a picture of it on my iPhone 6s.  My fellow colleague, Gary, who also lives and works here in Bulgaria, was with his wife on the Black Sea coast strolling down the main walking street of Burgas.  Gary has previously culled pipes for me during his travels as he keeps his eyes open and sends pictures of possibilities.  Gary also is my main supplier of ‘quality’ cigar ash which is the main ingredient in making ‘Pipe Mud’ to coat the inside of bowls.  The picture he sent was of two pipes, the Jeantet (top in picture below) and a nice hefty bent Billiard marked only with Bruyere [over] Garantie.  My primary interest was the product of Saint Claude, France, the Jeantet, but I encouraged him to do a bundle deal which landed both in my ‘Help Me!’ basket.  Thank you, Gary!I’ve not been restoring pipes long, but among my earliest restorations were French made and I enjoyed those initial forages of discovery of a pipe’s heritage and the geopolitical significance of the name.  My first restoration of a Jeantet was a Fleuron and it was discovered at my favorite antique shop, dubbed, The Hole in the Wall, here in Sofia.  It was then I discovered the historical importance of Saint Claude, the pipe production center in Europe for much of the 1800 and in the 1900s until pipe production peaked in the 1960s, causing many corporate closings and consolidations (See Pipedia’s article on Jeantet).  Saint Claude became the a center for pipe production and the place many prominent pipe houses called home, not because of the accessibility of briar, but it was where industrious monks and artisans turned their abilities from making toys and religious paraphernalia to pipe making after briar pipes first started being mass produced (See: fumerchic.com) when briar was discovered to have heat resistant qualities.   The Jeantet D’Orsay now on my worktable enjoys a part of this heritage, though most likely produced toward the closing chapters of Jeantet’s history.  On my worktable, I take more pictures of the Jeantet D’Orsay to fill in the gaps. The nomenclature is stamped on the left side of the shank, with ‘Jeantet’ (in fancy script) [over] ‘BRUYERE’, and to the right of this is ‘D’Orsay’ (in diagonal fancy script).  The stem bears the ‘J’ ensconced in a heptagon.  As I research the D’Orsay line, I have found a dearth of information as I’ve looked for and through catalogues trying not only to ID the D’Orsay, but even finding any systematic information on Jeantet pipes in general is a challenge.  If there is any clue in the name ‘D’Orsay’, I’m not sure what it is.  Today, Orsay is a smaller suburb of Paris, primarily known as a center in the development of technology with different educational institutions based there.  Historically, this Wiki article is informative:

There has been a village called Orsay on this site since 999, and the first church there was consecrated in 1157. From the sixteenth century, the town and surrounding area were owned by the Boucher family, and it was in honour of this family that Louis XIV gave the quai d’Orsay its name. This is the reason that the Musée d’Orsay is not in Orsay. In the eighteenth century, the family of Grimod du Fort bought the land and received the title of comte d’Orsay. In 1870, during the Franco-Prussian war, Orsay was occupied by the Prussian army. 88 young “Orcéens” were killed in the First World War.

Interesting, but not too helpful regarding the heritage of this French made pipe.  Generally, the pipe is in great condition.  The chamber has moderate cake.  The rim has trace amounts of lava and grime – not too much to clean.  The stummel has nice grain, but many very small fills to be examined. Not much in the way of oxidation or tooth chatter on the stem.  Of interest to me is the long stinger system which reaches all the way to the draft hole – visible looking down the chamber.  I will keep the stinger since it’s such a goliath.  Perhaps it does help deliver the dryer, cooler smoke which has been the holy grail in pipe technological innovations.  The cleanup and recommissioning of this Jeantet begins with placing the stem in the OxiClean bath after covering the ‘J’ stamp with petroleum jelly to protect it.  Even though it has little oxidation, I’ll let it soak.  I also easily remove the stinger as I discover that it is threaded and unscrews with a little help.  The nickel divider band also comes off. I use the Pipnet Reaming Kit to address the moderate cake.  Starting with the smallest blade, I remove the cake, bringing the fire chamber to fresh briar.  I use two of the four blades available.  To fine tune the reaming, I switch to the Savinelli Pipe Knife and scrape the chamber wall further.  Then, wrapping a piece of 240 grit paper around a Sharpie Pen, I sand the bowl removing the vestiges of carbon.  Finally, I wipe the chamber with a cotton pad wetted with alcohol.  The chamber looks good – no problems that I see. Next, using undiluted Murphy’s Oil Soap and a cotton pad, I scrub the external briar surface and rim.  I also use my pin knife to scrape the crusting on the rim.  I do this by dragging the blade over the surface rather than pushing the blade to not cut into the briar.  Afterwards, I rinse the stummel in tap water.  Examining the stummel more closely, the cleaning reveals a gouge on the internal rim lip.  I also picture several of the small fills in the surface.  I use a sharp dental probe to test the strength of the fills to see if they need replacing.  What I discover is mixed news – some need more attention than others.  I dig out the weaker fills and will need to refill them.  I will simply use clear CA glue to fill them, but first I will darken the pits with a dye pen to improve blending.  I use Special ‘T’ CA glue and spot drop on each pitted fill using a toothpick.  I place a bit of glue on the toothpick and gravity pulls it to the tip and I apply it to the pit.  I spray them with an accelerator to quicken the curing time.  In all, 6 fills were patched.  The pictures show the progress. Using a flat needle file, I bring each of the CA glue patches down near to the briar surface.  Then I use 240 grit sanding paper to bring the patch flush with the briar surface.  I try as much as possible with both the file and sand paper to file/sand only on the patch footprint.  The second picture below shows a ‘slip’ off the footprint by the lower patch – ugh.  The pictures show the progress. Turning now to the rim gouge mentioned earlier.  There was already an internal bevel on the rim.  To erase the damage, using 240 grit paper then 600 grit paper, I recut the bevel.  That does the job. With the stummel repairs completed, I take a medium grade sanding sponge and apply it to the surface to remove surface nicks and to start blending the fill patches.  I follow with a light grade sponge.Before I proceed further on the external surface, I need to address the internal unpleasantness.  I’m curious what collects in the mortise with the tenon extending right to the draft hole?  Unless, its design is to bypass all the sludge.  Well, it didn’t take long to discern the latter to be the case!  With cotton swabs, alcohol and a bit of scraping the edge with a needle file the mortise started cleaning up.  Later, I will still utilize a Salt/Alcohol soak to clean and freshen further for the new steward of this classic Billiard.The stem has been soaking in the OxiClean bath and I take it out to start removing the light oxidation on the vulcanite.  After reattaching the stem with the stummel, divided by my separation disk, I wet sand using 600 grit paper followed by 0000 grade steel wool.  I’m not sure how I did it but it looks like I nicked the Jeantet ‘J’ circle during the sanding – that is a grand bummer.  I’ll try to fix it later.  The tooth chatter was removed by the 600 grit and steel wool.  The pictures tell the story. Before moving further on the external sanding, I need to clean the internals.  Using bristled and smooth pipe cleaners and isopropyl 95%, I do the job – the internals take more effort than I was expecting.  I also use a long, wired, bristled brush to work on the stinger.  In the end, I soak it in alcohol to make sure it’s clean. Turning back to the stummel, I plunge into the micromesh sanding by wet sanding with pads 1500 to 2400, then dry sanding with 3200 to 4000, finishing with 6000 to 12000.  With the completion of the micromesh process on the stummel, my work-day here in Bulgaria will soon demand my full attention.  Before heading out the door, I want to give the bowl a Salt/Alcohol soak through the day.  I pour kosher salt, leaving no aftertaste, into the bowl until almost full.  Then I twist and stretch a cotton ball to act as a wick in the mortise – drawing out the remaining tars and oils.  I palm the top of the bowl and shake it causing the salt to settle into the internals and set the stummel in the egg carton.  Then, with a large eye dropper I fill the bowl with isopropyl 95% until it surfaces over the kosher salt.  I wait a few minutes as alcohol is absorbed, and then I top the bowl off again.  I set the egg carton aside and let the alcohol and salt do their thing – off to work!  Back from work!  The salt has darkened a bit, but not much.  This means that the job of cleaning was well along the way. After cleaning away the expended salt with paper towel and a bristled bush in the mortise, I put a cotton swab into the mortise to make sure and it came out clean.  Clean as a whistle – nice! After the salt/alcohol soak, I see a fill on the inner rim lip that I did not see earlier.  After digging it a bit with a dental probe, I drop fill it with ‘T’ CA glue, let it cure, file it down with a half-circle needle file, sand it with 240, 600 and then the full spectrum of micromesh pads – all these focused on bringing this patch up to the speed with the rest of the stummel! The Jeantet D’Orsay Billiard’s stinger was soaking in alcohol.  I take it out and the alcohol had cleaned it up.  I buff it with 0000 grade steel wool.  While I was at it with the steel wool, I also buffed up the nickel band divider to clean and shine it.I love the classic leather brown look on work-horse Billiards.  To blend the fills overall, I use Fiebing’s Light Brown Leather Dye to do the job.  I set up my staining workstation and take a picture of it.  I wipe the stummel down with a cotton pad wetted with alcohol to clean dust off the surface.  I use a whittled cork in the stummel as a handle and I warm the stummel using a hot air gun to expand the grain helping it to be more receptive to the dye.  When warm, I use a folded-over pipe cleaner to apply liberally the dye to the stummel – I want full coverage.  Then, with a lit candle, I fire the stummel – burning off the alcohol in the dye which sets the pigment in the grain.  I repeat this process after a few minutes, then I put the fired stummel aside to rest for several hours. With the dyed stummel resting, I turn to the stem.  Earlier, I was using MagicEraser on the Jeantet’s ‘J’ stem stamp and I noted then that the paint was readily coming off because of it.  I decide to go ahead and remove the paint and clean the stamp with the MagicEraser with the view to refreshing the ‘J’ stamp later.  I then wet sand the stem – mindful of the ‘J’ stem stamp, with micromesh pads 1500 to 2400.  Then I follow successively with pads 3200 to 4000 and 6000 to 12000, and applying Obsidian Oil after each set to revitalize the vulcanite stem.  I’m hoping that there is enough tread left in the Jeantet ‘J’ stem stamp to hold new paint.  Using white acrylic paint, I dab paint onto the area of the stamp.  Instead of waiting for it to dry, I gently wipe the excess off while wet.  Then I dab a little more wet where it is thin, and gently wipe off the excess. After some time has elapsed, it’s time to ‘unwrap’ the fired, dyed stummel.  After mounting the felt buffing wheel on the Dremel, setting the speed to slow – 20%, I buff off the crust by applying Tripoli compound.  The second picture below shows the contrast and progress. After the application of the more abrasive, Tripoli compound is completed (1st picture), I wipe down the stummel using a cotton pad and isopropyl 95% to both lighten the stain and blend it.  The alcohol wipe leaves a cloudy film on the stummel.  I remove this by going to the next compound, Blue Diamond.  I mount a cotton cloth buffing wheel on the Dremel and increase the speed to 40% and buff the briar surface.  During this buffing, the grain starts to come out more distinctly and I like the deep rivers of grain that divide the stummel like a watermelon rind. I use a little CA glue and reattach the nickel band divider to the shank.  I then use the Blue Diamond compound on the stem and band as well.  The pictures show the progress. After completing the Blue Diamond buffing, I hand buff the stummel and stem with a felt cloth to remove the compound dust before waxing.  I mount a cotton cloth buffing wheel on the Dremel, also at 40% speed, and apply a few coats of carnauba wax to both the bowl and stem.  Completing the restoration, I give the pipe a rigorous hand buffing with a microfiber cloth to heighten the shine and distinctiveness of the briar grain.

When I started this restoration, I saw a classic straight Billiard that had potential.  The Jeantet D’Orsay that Gary found for me in the antique store in Burgas, on the Black Sea, has proven to be a very attractive pipe with the light brown leather-look finish.  The grain pops.  I like the band divider – it’s not a precious metal but it provides a nice accent.  This Jeantet D’Orsay is ready for a new steward!  If you are interested in adding this pipe to your collection you can check it out in The Pipe Steward ‘Store Front’.  All the pipes I restore benefit the Daughters of Bulgaria – women and girls we work with here in Bulgaria who have been trafficked and sexually exploited.  Thanks for joining me!

Burn through Repair – Salvage of a Worthy Stanwell Rouge 109 Sand Blasted Ball


Blog by Dal Stanton

Stephen, a friend visiting Bulgaria from Rainbow City, Alabama, and I were walking through the Antique Market in the shadow of Nevski Cathedral in center city Sofia, when I my roving ‘pipe eyes’ spied an unbelievably nice looking, hefty, handful of a sand blasted Ball or Apple shaped pipe waiting on a table gratuitously mixed with WWII paraphernalia, old Communist memorabilia, skeleton keys and an assortment of cork screws, lighters and want-a-be Rolex watches.  This pipe, though, was the real deal.  With Stephen by my side, I did my best not to lock my eyes on the prize.  Finally, after I gave serious non-interested examination of the seller’s other offerings, I picked up the pipe and gave it a cursory, equally, non-interested look over.  As I looked down into the chamber, I saw my opportunity.  There was daylight at the bottom of the chamber – a hole, my leverage for the negotiation.  A quintessential burn through.  With my index finger at the chamber floor, it was sharply wedged downwardly so that the wearing, digging and burning finally was more than the briar could handle.  Turning the pipe over in my hand I read the nomenclature stamped on the underside of the shank – STANWELL (barely visible in the blasted briar) [over] ROUGE 109 [over] MADE IN DENMARK.  The hefty sand blasted stummel received my initial attention, and then the vulcanite shank extension I had not seen too often.  I laughed after the seller gave me his opening volley.  At the end of the day, both Stephen and I were happy.  The deal struck for the Stanwell Rouge was very satisfactory given that the hole in the bottom of the pipe just would not go away no matter what the seller said.  As we headed to the Metro Subway, Stephen proposed that he become the next steward of the Stanwell after I tackled the burn through.  So, some time later, Stephen emailed me from Alabama, saying he was still interested in the Stanwell.  Now on my worktable here in Sofia, Bulgaria, the time has come to recommission him. Here are the pictures from my worktable.  I recalled that Steve had posted a blog by Bas Stevens, who, according to Steve, was one of the foremost authorities on Stanwell pipes (See: LINK HERE).  Bas Steven’s extensive list of Stanwell shape numbers and designers also included this Rouge’s shape 109, which is described as:  109. Flat, ball-shaped bowl, slightly bent, full mouthpiece.

I did searches on Rouge and I could not find a Stanwell listing for only ‘Rouge’ but ‘Royal Rouge’ was evident.  This BollitoPipe.it listing has for sale, a ‘Royal Rouge’ 109 which is a smooth version described with information that matches the ‘Rouge’ in dimension with the difference of the briar shank compared to the vulcanite extension on my Rouge. Pipedia’s site links to Stanwell catalogues shows this 2008 9mm catalogue listing the 109 shape (2nd down on left) with others.  Rouge simply means ‘Red’ in French which is a good description of what the Rouge’s sand blasted stummel formerly revealed, as the ‘Royal Rouge’ exemplifies above.  The Danish pipe company, Stanwell, according to Pipedia’s article closed its doors in 2009 ending an interesting chapter of pipe history as the only remaining pipe manufacturer in Scandinavia.  The ‘Stanwell’ name moved to Italy where pipes were produced bearing the name since 2010.  The ‘Made in Denmark’ on the Rouge indicates that it was produce pre-2010 before the closing.  With a better appreciation for the Stanwell Rouge 109 before me, the first thing I do in his recommissioning is to put the stem in an OxiClean bath after putting petroleum jelly on the Stanwell Crown stamping to protect it. Before I tackle the repair of the burn-through the stummel’s heel, I like working on clean pipes because it helps with the assessment of needs.  I start by carefully reaming the bowl to remove the light carbon build up.  I say, “careful” because the floor of the fire chamber is dangerously thin.  The last thing I want is the floor to drop through!  For the gentle approach, I use the Savinelli Pipe Knife and work the sides of the chamber without reaching too deeply.  Next, I take 240 grit paper wrapped around a Sharpie Pen and sand the chamber ridding it of more carbon and exposing fresh briar.  Finally, I wipe the chamber out with a cotton pad wetted with alcohol.  Using undiluted Murphy’s Oil soap, a cotton pad and a bristled tooth brush, I scrub the exterior of the sand blasted bowl working the brush well into the surface as well as the rim (pictured below) before starting the cleaning.  The surface had a good bit of grime.  The good news is the rim is in good shape – it still shows the blasted sculpting over it, though it is darkened. Now to the internals of the stummel – using pipe cleaners and cotton swabs and isopropyl 95%, I clean the internals.  Oh my.  This old boy I believe was like the old proverbial horse saying, ‘he’s been road hard and put up wet’!  There was no end to the gunk in the mortise.  I scraped it with straight edge files and small screw drivers, and with scads of cotton swabs – the effort was immense to clean the internals.  After some time, things would start to look up, I would scrape a bit more and it was like I was starting over.  Yet thankfully, eventually the tide turned.  The picture shows the aftermath.The stem has been soaking in the OxiClean bath and I take it out to reveal the raised oxidation on the stem.  The petroleum jelly is still intact covering the Stanwell stem Crown stamping, protecting it from the OxiClean process. I start by putting a disk between the stem and the shank to protect the stem from shouldering as I wet sand with 600 grade sanding paper to remove the raised oxidation.  Then, I had one of those ‘Duh!’ moments – the shank extension on the stummel is also vulcanite with a white acrylic divider.  Removing the disk, I treat the two together.  First, with the shank extension, I lightly use 240 grit sanding paper around the extension because it did not have the benefit of the OxiClean bath.  I do this to loosen the oxidation.  Then, with the shank and stem united I wet sand using the 600 grade paper, careful to protect the stem Crown stamping. With this completed, I look to the bit area with minor tooth chatter. Using 240 grit paper I sand the chatter out, following with 600 grit again, then finish off this phase of the stem’s polishing using 0000 grade steel wool over the entire shank and stem.  To try to remove any oxidation in the Stanwell Crown stem stamp, I use a MagicEraser sponge to apply a non-abrasive cleaner.  The pictures show the progress with the stem. With the stem completed up to the micromesh phase, I put it aside to focus on the stummel repairs.  I have been developing the plan since I first saw this incredibly desirable and redeemable Stanwell Rouge beckoning on the table in the Antique Market.  There are two main steps in the burn through repair.  The first is to patch the external presentation of the stummel using a putty created from CA glue and briar dust.  This patch will fill the hole leaving an external mound for eventual sanding and shaping aiming at blending with the sand blasted finish.  When the Briar Dust Putty is applied from the external side, there also will form an internal mounding as the putty presses through the hole.  This is good and desired.  This internal mound will form the primary internal encasing of the burn through area, which is extremely thin and therefore weakened.  This internal covering of Briar Putty will form the hole fill as well as the initial reinforcement of the chamber floor.  The second step is to augment this initial reinforcement internally by using JB Weld.  I first saw the use of this from Charles Lemon on Dad’s Pipes.  I will mix a batch of JB Weld and apply it on top of the patch area and rebuild and level the floor of the fire chamber, bringing the new floor almost up to the draft hole.  That is the theoretical plan – of course, the best laid plans are often…. You know the story 😊!

I begin by taking another close picture of the external hole area as well as the floor of the chamber, with a pipe cleaner inserted to mark the gap the new floor will need to fill.  This marks the starting point.  The second picture below does not reveal the depth, but I estimate a good, 3 to 4 mm between the hole and the draft hole level.  I clean the stummel external surface with a cotton pad wetted with alcohol.  The pictures show the prep. Using an index card, I mix briar dust and Hot Stuff Special ‘T’ CA Instant Glue (thicker) with a toothpick to form a putty.  I’m shooting for the thickness of molasses so that the putty will not run and spread but stay where I apply it.  When the putty reaches the viscosity I desire, I apply the putty to the hole pressing it through until I achieve sufficient mounding on the inside.  As I press the putty through with the toothpick, the putty spreads out a bit more than I desire.  I use an accelerator on the inside and outside to cure the putty more rapidly.  I take pictures to mark the completion of step one.  It will be tricky filing and sanding on the sand blasted surface, but not impossible with patience.  As I reflect further, a different approach that may have lessened the mounding on the external side would have been to apply the putty internally and pushed it through…. The approaches for smooth briar and blasted briar may not be the same! Next time. I’m back to the worktable after a day’s work and unfortunately, in the back of my mind the application of briar dust putty to the external surface as I did yesterday, has blossomed in my mind into a colossal blunder!  In my mind, I picture the way I should have done it and it was perfect – in my mind!  But, I have a salvage plan coming together, also in my mind and my hope is that my blunder might spare others from the same fate 😊.

Before I work on the salvage plan coming together in my mind, I will complete the floor build-up using JB Weld.  One of the difficulties that I’ve thought about is a delivery system – how to get the JB Weld mixture to the chamber floor where it’s needed and not smeared on chamber walls trying to place it.  I’ve come up with plan of using a plastic bottle nozzle as the delivery system – load the mixture in the nozzle and force it down with a dowel rod and cotton swab.  It looks like it should work. I also insert a pipe cleaner into the airway to protect the draft hole from being clogged by the JB Weld.  It also helps me know where the floor should be.  The mixture sets up in about 4 minutes after the Hardener and Steel are combined.  Thankfully, everything works as hoped.  I take pictures through the process. Regarding the external surface patch mound, I realize that with a sandblasted surface it will be very difficult to remove the entire patch mound by filing and sanding as is the method with smooth briar.  This will damage the blasted briar surface.  After doing research on the internet, I discover that acetone dissolves CA glue.  Acetone is the primary active ingredient in nail polish removers.  What I’m hoping is a salvage plan; I begin by filing the patch mound down as far as possible without impacting the surface briar terrain. I then apply acetone to the remaining patch mound with a cotton swab to dissolve the surface overflow of the patch.  I work the briar dust patch with the cotton swab and gradually the surface patch begins to loosen and dissolve.  I’m encouraged.  I continue patiently, allowing the acetone to set its own pace.  The putty patch dissolves toward the center and leaves ridges which I scrape with my fingernail.  At the end of the process, I am relieved – it works. Not only did it work, but the blending is incredible!  I cannot see where the hole was without very close scrutiny.  The blunder becomes a teachable moment and a bit more experience for future restorations!  The pictures tell the story and I’m thankful a disaster was averted with this Stanwell. The next day, after several hours of curing for the JB Weld, I look at the new rebuilt floor of the chamber.  I rub my finger over it and it, as expected, is flat.  I want to introduce a slightly bowled chamber bottom.  To do this I employ the round grinding stone attachment which I mount on the Dremel.  I will remove just enough of the JB Weld floor to create this bowl.  With the speed at 40%, I start in the center with a circular motion creating the initial rounding.  I gradually expand it outwardly by moving it in circular motions.  This works well.  Afterwards, I use 240 grit paper to sand it more and wipe the bowl out with a cotton pad and alcohol to clean the chamber.  Done.  Later, near the end of the project, I will coat the chamber with a mixture of activated charcoal dust and sour cream that will form a hard base for forming a new cake for the bowl.  Bowl repair officially complete.  Yes! Before I address the Rouge’s stummel finish, I continue the sanding and finishing of the vulcanite shank extension so it doesn’t get in the way. I reattach the stem and beginning with micromesh pads 1500 to 2400, I wet sand the extension and stem and then apply Obsidian Oil to the vulcanite.  At this point I realize that I have forgotten to clean the internals of the stem (again!).  Before moving on, I clean the airway and the 9mm filter bay – which really needed some cleaning.  With a ‘proof of cleaning’ picture taken, I follow by dry sanding the extension and stem with pads 3200 to 4000, then 6000 to 12000.  After each set of three, I apply Obsidian Oil to the stem and extension to revitalize the vulcanite.  While sanding, I notice that the stem is a bit loose in the mortise extension.  I will look at this later.  The stem and extension look good! Turning now to the Stanwell Rouge’s stummel, and it is evident that the historic color of this stout, blasted ball shape was in keeping with its namesake – red.  My sense is a deeper burgundy tone would fit well.  My plan is to use 2 parts Fiebing’s Oxblood Leather Dye with 1 part of Fiebing’s Black Leather Dye.  I want it on the darker side.  Let’s see what happens!  Taking a close look at the stummel, I probe around with the sharp dental tool and see that there’s bits of dust and residues in the crevices of the blasted texture of the briar.  I use a cotton pad and alcohol to clean the stummel, and I use a bristled brush as well to dislodge debris.  I then tightly wrap masking tape around the vulcanite extension so that the dye does not possibly impact it – in a note from Steve, he said that some vulcanite will absorb the stains, others not….  Better to be on the safe side.  I mix the dyes in a shot glass using a large dropper at 2 to 1, insert a cork in the shank as my handle – and then realize later that the shank extension works just fine as a handle.  I take a picture of the set-up.  I then warm the stummel with a hot air gun and then apply the 2 to 1 dye mixture to the stummel with a folded pipe cleaner.  I work the dye into the crevices – I want good coverage.  I then ‘fire’ the aniline dye and the alcohol immediately burns off and sets the dye pigment in the briar.  After a few minutes, I repeat the process and set the stummel aside to rest. With the stummel now resting, I want to freshen the Stanwell Crown stamp on the stem.  Using white acrylic paint, I dab a bit of paint over the Crown with a tooth pick.  After the paint sets well, I scrape the excess off gently with the flat edge of a toothpick which goes over the stamp patterns leaving color in the stamp.  It looks good.  I had noted that the stem was a bit loose when seated in the mortise.  As I slowly insert the stem into the mortise extension, it is properly snug until the very end – at home station.  The tightness is generated by the white acrylic divider garnishing the end of the extension.  This lets me know that the tenon has thinned only at the base – where it ties in to the stem.  I use Special ‘T’ CA glue and a manicure brush and paint a line around the circumference of the tenon base.  We’ll see if this tightens the stem a bit after the CA glue cures.  After several hours, I’m anxious to unwrap the fire crusted stummel.  With the surface being sand blasted, I use a softer cotton cloth buffing wheel on the Dremel instead of the felt wheel, that I use with smooth briar pipes.  The softer cotton wheel better navigates the textured blasted surface.  With the speed at 20%, I utilize Tripoli compound to remove the crusting and to begin the buffing process.  After a short time, I decide to up the speed to 40% and this works better with the cotton wheel.  I take a picture to show the unwrapping.  After completing with the Tripoli, I wipe the bowl down with a cotton pad and alcohol to blend the dye better.  Then, loading another cotton cloth wheel, I apply Blue Diamond compound to the stummel.  I am liking the very, very subtle oxblood reds tucked away in the contours of the 3-D grain of the sand blasted surface.  This was exactly the classic, smoking jacket effect I was aiming for.  I press on and after changing to another cotton cloth wheel, I apply carnauba wax to the stummel, shank extension and stem.   One last project.  I use a mixture of sour cream (or plain yogurt may be used) and activated charcoal powder to apply to the fire chamber wall.  When this mixture hardens, it provides a good foundation for a new carbon cake to grow – but the new steward needs to be gentle with this after the first few bowls, not scraping the chamber but simply using a folded over bristled pipe cleaner to rub the sides.  This will remove the needed leftovers but protect the walls.  Over time, a cake grows and life as usual!  After mixing the sour cream and charcoal powder to a non-running thickness (like mayonnaise), and inserting a pipe cleaner through the draft hole, using a pipe nail tool, I scoop the mixture into the bowl and spread it over the surface.  After spreading, I see that there is too much here and there as the mix thickened.  I would scoop a little out and spread again.  After it starts to dry, it is thicker.  It takes about 15 to 20 minutes for it to set totally.  I let it set for at least 24 hours before smoking the pipe.  The pictures show the progress.After the sour cream/charcoal powder mixture dries, I check the fit of the stem and shank extension after applying CA glue to tighten the fit.  The patch is too thick so I sand it down using 600 grade sanding paper until the stem slides into the mortise.  I fine tune the cleaning of the tenon and apply some Obsidian Oil to it.  I complete the restoration with a rigorous hand buffing using a microfiber cloth to bring out the striking shine of this Stanwell Rouge.

I thought I was facing disaster with the burn through repair when I mounded briar dust putty on the external surface with no way of removing it without damaging the sand blasted briar grain.  Yet, I was bailed out by acetone.  Now, as I look at this Stanwell Rouge, I can’t believe I could see daylight through it and that most people would pass it by as a loss.  I’m glad to have restored it for his new steward.  I’m pleased with the subtle red – burgundy tones in the finish.  The hefty Ball shape is a distinctive presence in the palm and the sand blasted grain stands out well.  This Stanwell Rouge 109, Made in Denmark, is ready to go.  All my restorations benefit the work we do here in Bulgaria with the Daughters of Bulgaria – women and girls who have been trafficked and sexually exploited.  Check out my blog, The Pipe Steward for more information about this, why I do what I do and other pipes I have for sale in the store!  Thanks for joining me!

A Lady’s Choice – WDC Milano Swan Neck Billiard


Blog by Dal Stanton

Is there a psychology in the choosing one makes when befriending a pipe?  A young Bulgarian lady, who also is a budding pipe lady, chose a pipe out of my ‘Help Me!’ baskets and boxes.  After looking at scores of hopeful candidates, there was only one – only one – that she held in her hands, looking at it and smiling. A beautiful, graceful, WDC Milano Swan Neck Billiard caught her attention, and it would seem, her affections.  Is there a psychology unfolding in the process, the evaluation, and the weighing of one pipe against another?  Or, is the process more like the lore of Harry Potter’s choice of one’s wand?  The young wizard does not choose the wand – the wand chooses his wizard.  Does the pipe do the choosing?

And is there any credence to the oft unspoken observation – do pipe stewards resemble their pipes like canine lovers sometimes uncannily resemble their 4-legged friends?  These observations come to my mind because intriguingly, the young lady who was claimed by the WDC Milano Swan Neck, shares, in some very remarkable ways, pleasing characteristics of this graceful pipe.

And then there is the ‘question’ of the ‘Pipe Lady’ more so than the ‘Pipe Man’.  A Pipe Lady lives closer to the social and cultural ‘edge’ when she takes her pipe in hand and enjoys a bowl of her favorite blend.  This picture I found somewhere on the internet (sorry, can’t cite!), I suspect would never be ascribed to Pipe Men.  Yet, a Pipe Lady looks at the three with a smile of agreement and a wink, while she is thinking, ‘You’ve got that one right!’This graceful, Milano Swan Neck stem comes from the William Demuth Company, established in 1862 – one of the oldest pipe manufacturing houses in the United States (Pipedia article).  The WDC Milano patent goes back to the 1920s with an example of the familiar WDC rhombus from the same WDC article in Pipedia (courtesy of Doug Valitchka).The eBay seller from Akron, Ohio, described the long dimensions of the Lady’s Choice WDC Milano:  Very graceful bent billiard! About 6″ long, bowl is 2″ tall, 1 3/8″ wide. ID 3/4″, depth 1 13/16″. From Pipedia’s WDC article, courtesy Doug Valitchka, a very nice example of what appears to be the same Swan Neck Billiard of the Milano line.From my worktable on the 10th floor of our flat here in Sofia, Bulgaria, I take these pictures to fill in the gaps. On the left side of the shank is stamped the traditional WDC rhombus [over] MILANO.  The right side is stamped the single shape number, ‘63’.  The chamber appears to have been cleaned to some degree and the carbon cake is very light.  The rim is sad.  It appears someone took a divot out of the internal lip trying to clean it or something.  The rim’s outer edge is beat up and I can see the vestiges of a bevel.  There is lava crusting as well on the rim surface and some hardened light stuff – the rim needs cleaning.  The stummel has few if any fills that I see – the grain of the tall bowl is impressive.  The stem has the WDC inlaid white triangle on the top.  Oxidation is present and the former steward was a clencher and chewer.  Both top and bottom of the bit shows deep bite dents.  The top button lip is dented.

The recommissioning of this Lady’s Choice WDC Milano Swan Neck Billiard, begins by putting the stem into the OxiClean bath to work on the oxidation.  The second thing I do is toss the tubing that was hanging in the tenon.  If it belonged to this pipe originally, something is missing as the airway diameter of the tenon is much larger than the tubing.  On an interesting note, there is a patent number stamped on the tubular stinger.  I looked it up in Google patent search but found nothing that had bearing on pipes (PAT. NO. 5861 / IX – I think).Next, after spreading paper towel to catch the carbon dust, I use the Savinelli Pipe Knife to remove the little carbon left.  I follow with sanding the chamber walls with a 240 piece of sanding paper wrapped around a Sharpie Pen. I then turn to cleaning the internals of the stummel using cotton swabs and pipe cleaners wetted with isopropyl 95%.  There’s a good bit of tar and oils in the mortise.  After some time, I decide to switch to a Kosher Salt and alcohol soak to finish off the internal cleaning and to freshen the stummel.Next, using undiluted Murphy’s Oil Soap I work on the external surface of the stummel and the rim with cotton pads.  I also use a brass bristled brush on the rim.  After the scrub, I rinse the stummel in cool tap water.  The condition of the rim becomes more evident.  I think I will be able to remove the large divot at 4 o’clock in the second picture below by creating an internal bevel on the rim after I lightly top it. I start with by topping the stummel using 240 grit paper.  I follow by creating an internal and external bevel around the rim.  After a few rounds of working on the bevels, I realize that the internal rim divot is too much for the bevel to erase.  I switch gears and mix some briar dust with thick CA glue and create a putty and fill the divot on the rim.  I spray it with an accelerator to shorten the curing time.  With a needle file, I file down the briar dust patch material until it’s almost flush with the briar.  I then use 240 and 600 grit sanding paper to blend the patch and finish the bevel on the internal and external edges of the rim.I then sand the stummel using a medium grade sanding sponge followed by a light grade sanding sponge.  I remove the minor nicks and scratches on the bowl surface.I then proceed to sand the bowl using micromesh pads 1500 to 2400, then 3200 to 4000, then finally, 6000 to 12000.  The process brings out the beautiful horizontal grain flows from the front of the bowl downward to encompass the heel.  Bird’s eye grain is sprinkled nicely on the stummel sides. With the day ending, I continue the cleaning and refreshing of the stummel internals using a Kosher Salt and alcohol soak.  I create a wick to insert into the shank/mortise by twisting and stretching a cotton ball.  I take a straight stiff wire to help stuff it deeply into the mortise.  With the stummel secured in the egg carton I fill the bowl with Kosher Salt (which leaves no iodine after taste) and give it a shank to displace the salt.  I then, using a large eye-dropper, put isopropyl 95% into the bowl until it surfaces over the salt.  I put it aside for the night.  The next morning, the salt and alcohol soak did the job well.  The salt had turned dark and pulling the wick out – the same was true of it.  I toss the expended salt and wick in the waste and wipe the bowl out removing leftover salt.  Then returning to the use of cotton swabs and alcohol, in only a few plunges down the mortise, the internals are clean.  Pictures show the cleaning process. The stem was soaking in an OxiClean bath to raise the oxidation from the vulcanite.  I take stem out of the bath and the oxidation was raised showing the normal olive-green color.  I then take 600 grit sanding paper and wet sand the stem to remove the oxidation and to work on the serious teeth clenching damage. After the 600 grit sanding, I give the stem a stiff buffing from 0000 grade steel wool.  Interestingly, I noticed it earlier but thought that it would go away with the OxiClean and sanding.  I see a small lighter (reddish?) dot on the underside of the stem (second picture below), almost below the WDC triangle mark but just off center.  I’m not expecting a ‘manmade’ mark there so I assume it’s a discoloration in the vulcanite.  I take a little 240 grit paper and go after it, but it remains for now.  Pictures show oxidation and post-oxidation sanding. The button area is in bad shape.  The former steward was a clencher par excellence.  Neither upper nor lower bit areas were spared.  The upper has deep bites and a ‘wedgy’ dent on the button lip.  The lower button lip is spared, but there is a ‘go to’ clench handle which is distinct.  I take pictures to mark the start. Focusing first on the topside, I use the heating method to see if I might hopefully tease out the concave dents.  Then the bottom-side.  Vulcanite, a form of rubber, amazingly will seek out its original disposition when heated as the rubber expands with the heat.  I light a candle and pass the bit-end of the stem over the flame in back and forth style.  I try not to cook the vulcanite, but simply heat it strategically.  After some time, using heat on upper and then lower, I take pictures to compare.  You can see the closing of the dents in the picture comparisons below.  I think there is a beneficial change, but there are still dents to repair.  Pictures 1 and 2 are before heating and after for the upper side.  Pictures 3 and 4 of the lower side – before heating and after.  I first use 240 grit paper on the upper bit.  I sand out as much as possible all the smaller dents. Through the years of clenching, the button lip has lost its distinction so using a flat needle file, I reintroduce the lip edge and then follow by sanding with 240 to erase file tracks and shape more.  I’m wondering if I can avoid having to rebuild the button lip.  I gently sand the upper button lip as well.  The tooth grip has turned into only a small dimple – good movement.  I sand gently to remove the dimple because I don’t want to lose too much button real estate.  The top looks great.  The only patch needed is the remaining large dent.  The topside filing, sanding and shaping progression is pictured below. Turning to the lower bit, again I use 240 grit sanding paper to sand out what can be removed and blended by sanding. The dent/clench configuration was minimized by sanding but I need to patch what remains of the surface damage.To prep the vulcanite for the patch work, I wipe down the upper and lower bit with a cotton pad wetted with alcohol.  I mix activated charcoal powder with Hot Stuff Special ‘T’ CA Instant Glue (extra thick) to form a putty which is like molasses in viscosity to apply to the damaged areas.  I use a tooth pick as my trowel and tamper and I apply more putty than needed – the patch mound allows me to file down gently to the surface of the stem to achieve a better blended patch.  I apply putty to the upper bit, and a dab on the small, remaining dimple on the button lip.  I spray it with accelerator to cure the putty.  I then do the same for the needed area on the lower bit.  The pictures show the patch progress. Using a flat needle file, I begin filing the patch mound on the upper bit until I’m very close to the vulcanite surface.  With the patch expanding closely to the button lip, I also utilize the flat needle file to separate and define the button lip.  When close to the surface, I switch to 240 grit paper to bring the patch flush with the vulcanite surface.  After I’ve blended as far as 240 paper will take me, I switch to 600 grit paper and then finally, 0000 steel wool which fine tunes the blending and each in turn erases the former’s scratch marks.  I take pictures along the way to document progress. At this point, not surprised, I see very small air pockets exposed on the patch area (see picture above).  Taking Hot Stuff CA Glue, thinner than the ‘T’ I used for the patch, I dip a toothpick into the glue opening to give a coat of CA glue on the toothpick.  With this wet glue, I paint the patch with a thin glaze of glue which fills the air pockets.  I give the glaze of glue a quick spray of accelerator to cure it.  I then take 600 grit paper followed by 0000 steel wool to blend and complete the upper bit patch work.  The micromesh sanding later will further blend the patches.Now, to the lower bit patch.  As before, I use the flat needle file initially, then 240, 600 and then 0000 grade steel wool working toward the vulcanite surface then blending.  Again, a few miniscule air pockets are revealed in the patch, and I repeat the same procedure as on the upper patch. Having been so focused on the button repairs, I almost forget (again) to clean the stem internal airway.  With pipe cleaners dipped in alcohol, I do that and it does not take long to clean.Putting the stem aside, I pick up the stummel.  I will use Fiebing’s Light Brown Leather Dye to add some unifying hues on this very attractive WDC Milano’s grain.  I like the lighter motif which is what the Milano’s picture included above courtesy of Doug Valitchka.  I wipe the stummel with a cotton pad wetted with isopropyl 95% to make sure it’s clean.  I then warm the stummel with the heat gun after inserting a whittled cork into the shank to serve as a handle.  After the bowl is warmed, helping the briar more effectively to absorb the dye, I apply the dye liberally using a folded over pipe cleaner.  After the stummel is covered, I fire the dye with a lit candle which ignites the alcohol in the dye and sets the pigment in the grain.  After a few minutes, I repeat the procedure concluding with firing.  I then put the stummel aside to rest. While the stummel rests, the stem is ready for the micromesh pad cycle.  I wet sand with pads 1500 to 2400, then dry sand with pads 3200 to 4000 then 6000 to 12000.  After each cycle, I apply Obsidian Oil to rejuvenate the vulcanite, and my how it likes it!  The pop of a newly restored stem is wonderful to behold! The next day, I’m home from work, and it’s time to ‘unwrap’ the stained and fired bowl.  I mount the felt buffing wheel on the Dremel, which provides more abrasion to the surface, helping to remove the crust.  I used Tripoli compound with the Dremel set at 20% speed – slow because I don’t want to generate too much friction. Using the Dremel’s adjustment wrench, I purge the old compound off the felt wheel to clean and soften it.  I work the felt buffing wheel applying the abrasive Tripoli compound over the stummel.  I am not able to reach the bend curve between the shank and the bowl with the felt wheel.  I change to a cotton cloth buffing wheel again, only dedicated to Tripoli compound.  Each compound has its own dedicated Dremel buffing wheels.  With the cotton cloth wheel, I’m able to reach into the harder to get places.  I run the wheel over the entire surface.  I take a picture showing the completion of the ‘unwrapping’.  One of the helpful aspects of aniline, or alcohol-based dyes, is the ability to wipe it with alcohol to lighten the application as well as blend the dye.  I want to lighten this WDC Milano so I wipe it down with cotton pad wetted with alcohol.  I take a picture before and after.  Immediately after wiping down the surface, the surface clouds with the alcohol.  Then I remove the alcohol wipe clouding effect with Blue Diamond compound, with a cotton cloth wheel mounted on the Dremel at 40% speed.  Following the Blue Diamond application, the true ‘after’ picture is taken.  I also reunite the stem with the stummel for the Blue Diamond buffing.  Well, the third picture below represents the lighter ‘after’ picture, but I don’t believe the picture does justice to what my eyes are seeing.  The lightening and blending of the surface hue is showing off the grains quite nicely.  I’m liking it!  I think this, “Lady’s Choice” is going to like her choice too! I give the pipe a hand buffing with a felt cloth, not so much to buff up the shine at this point but to remove the compound dust from the surface.  The compounds are abrasives and the dust is the residue left over.  After this, I mount the Dremel with a dedicated cotton cloth buffing wheel, leaving the speed at 40%, I apply the carnauba wax evenly over the stummel and stem.  I finish with a hefty hand buffing of the pipe with a microfiber cloth to raise the shine more.

This WDC Milano Swan Neck Billiard is a lady’s choice.  I hope she likes it.  It is an elegant pipe and showcases beautiful flowing grain.  I’m pleased with the button repair that blended very well – without knowing it’s there, most people would not see it.  The repaired rim also looks good – forming the beginning of the long elegant lines carried through to the swan neck stem.  Nice.  Each pipe I restore benefits the work we do with the Daughters of Bulgaria – helping women and girls who have been sexually exploited and trafficked.  For more information about this and pipes I have available, check out the store at The Pipe Steward.  Thanks for joining me!