Tag Archives: contrast staining

Bringing a Dunhill Bruyere Bent Rhodesian 08 Back From the Brink


Blog by Steve Laug

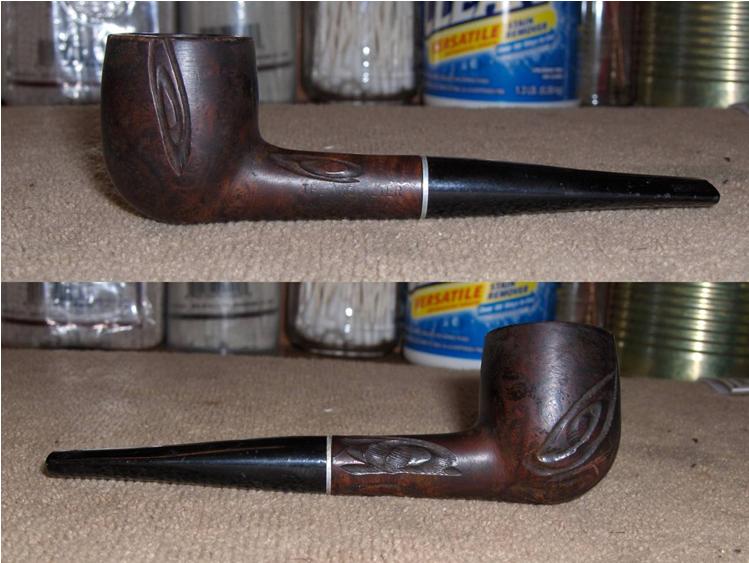
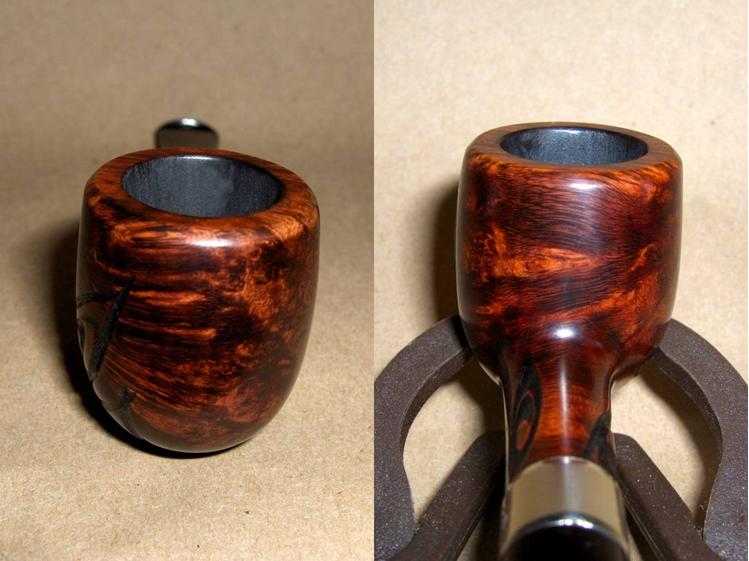
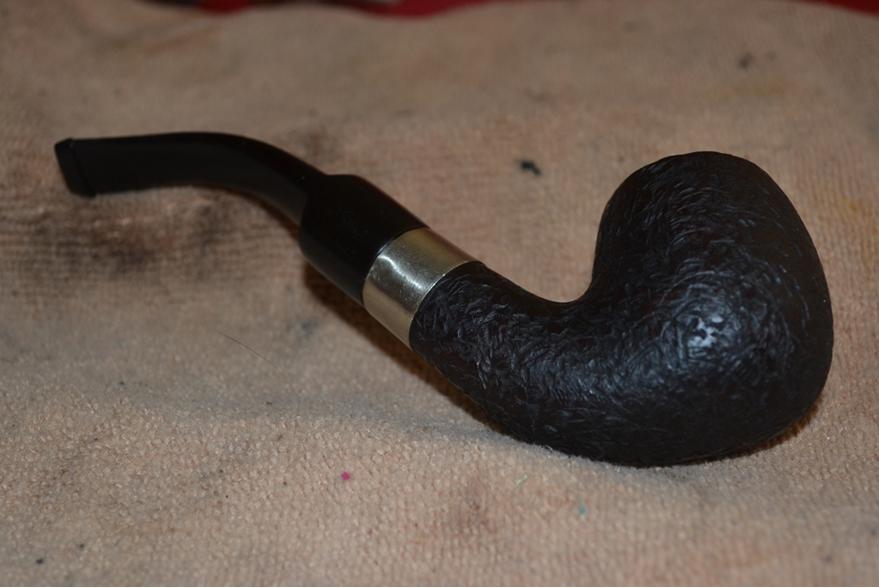
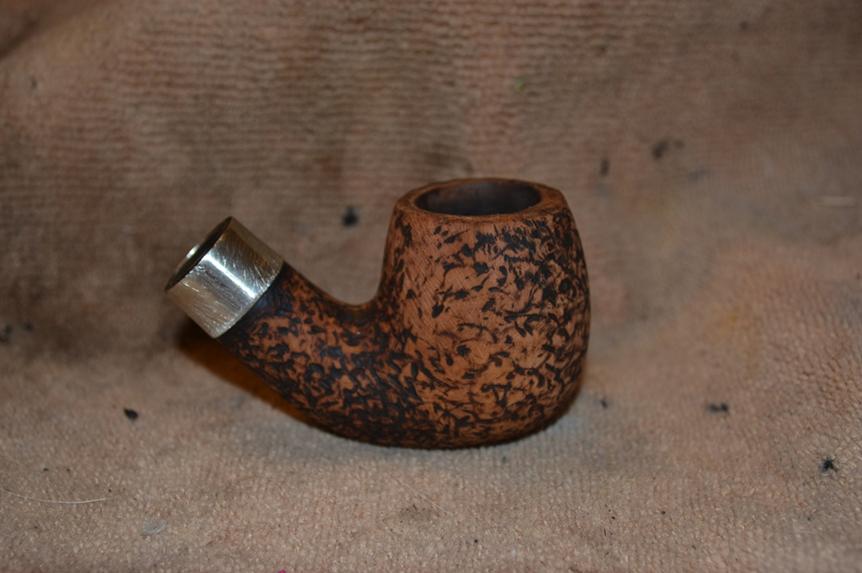
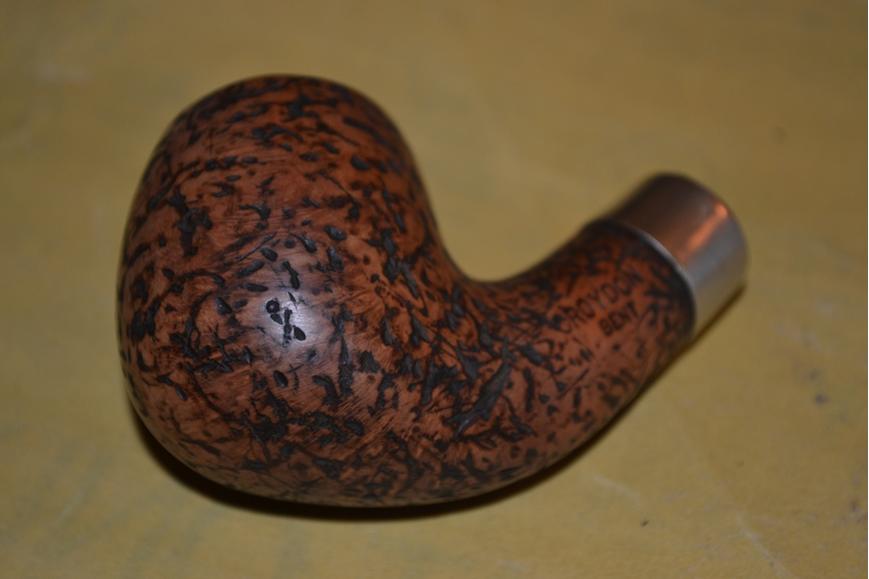
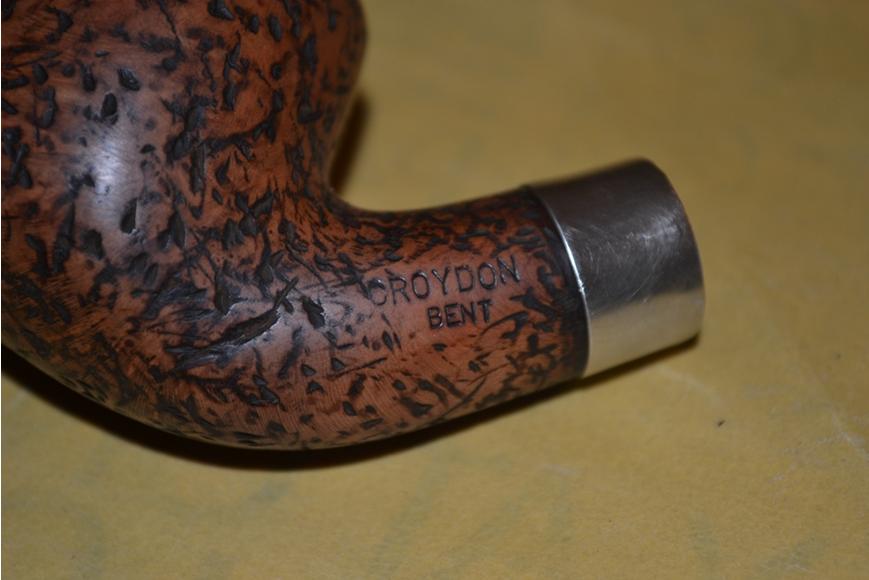
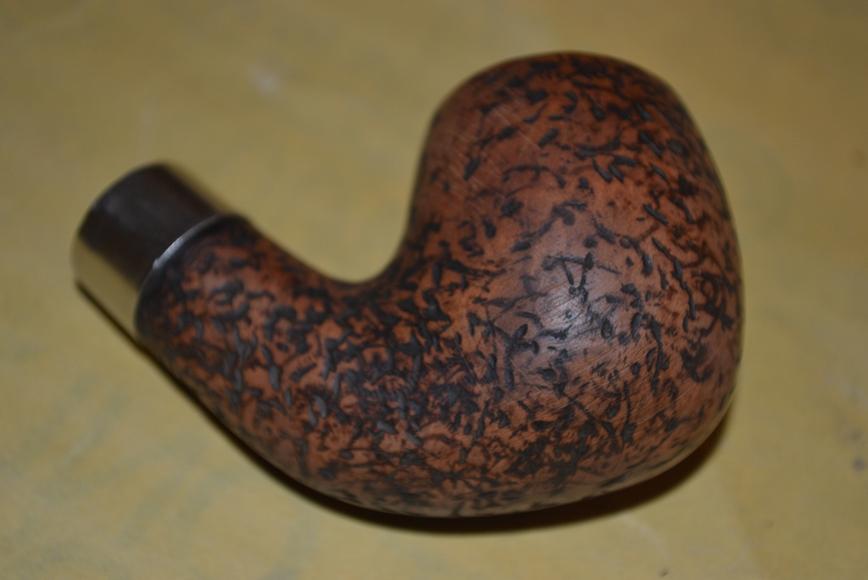
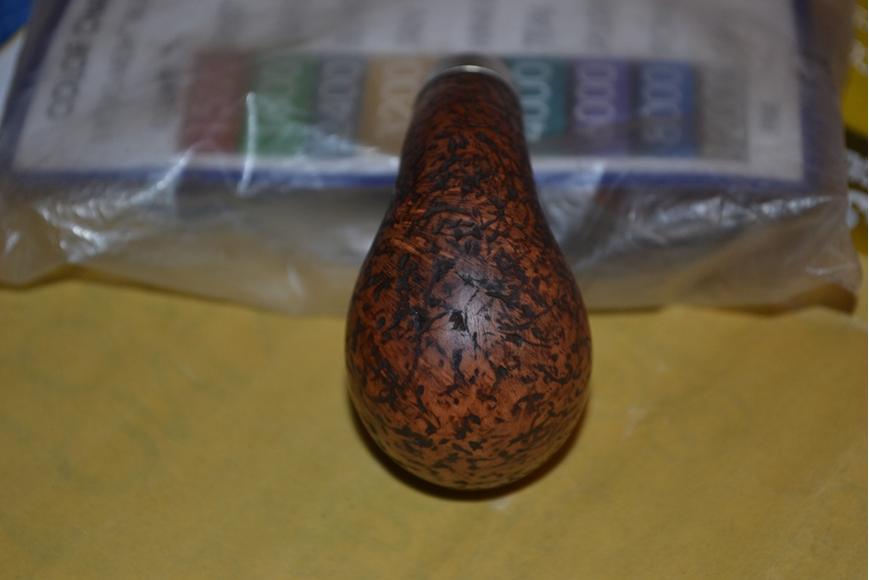
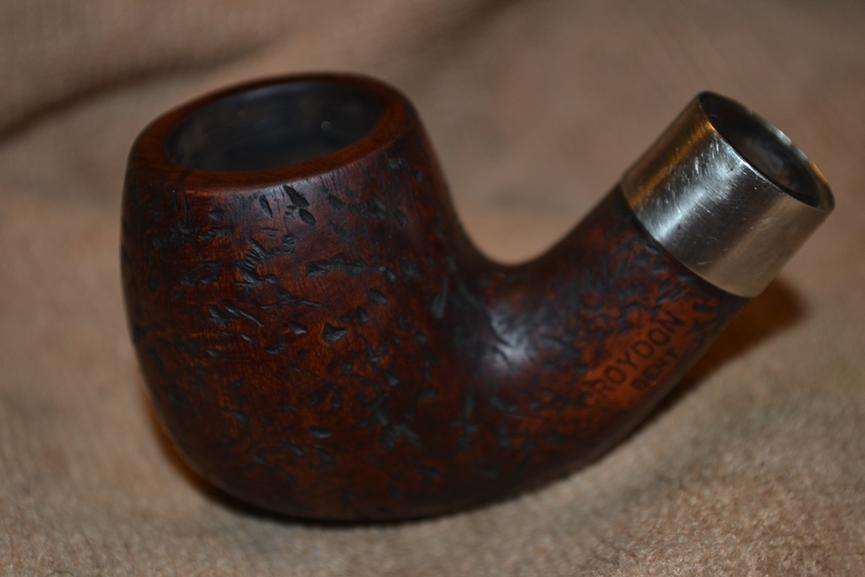
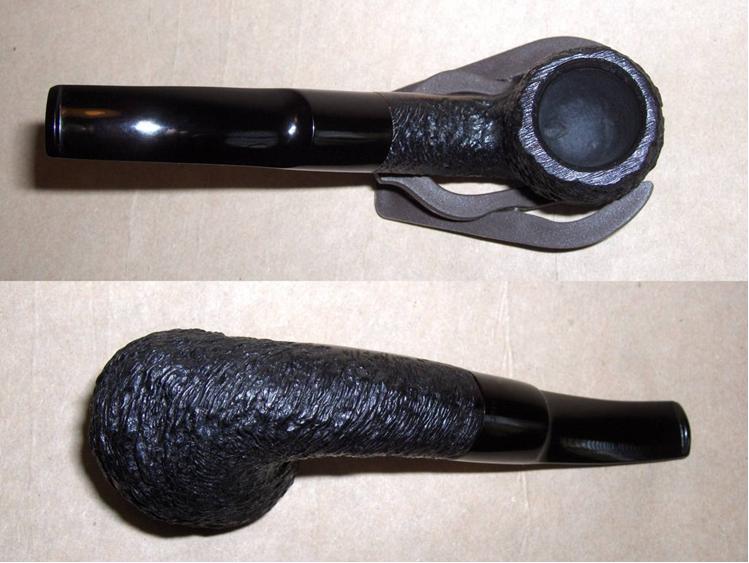
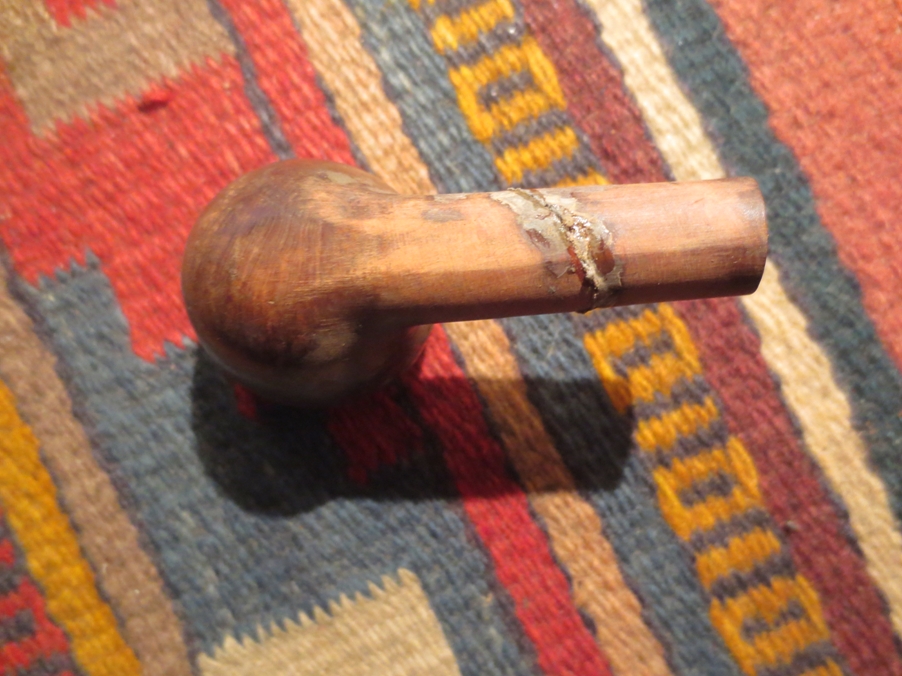
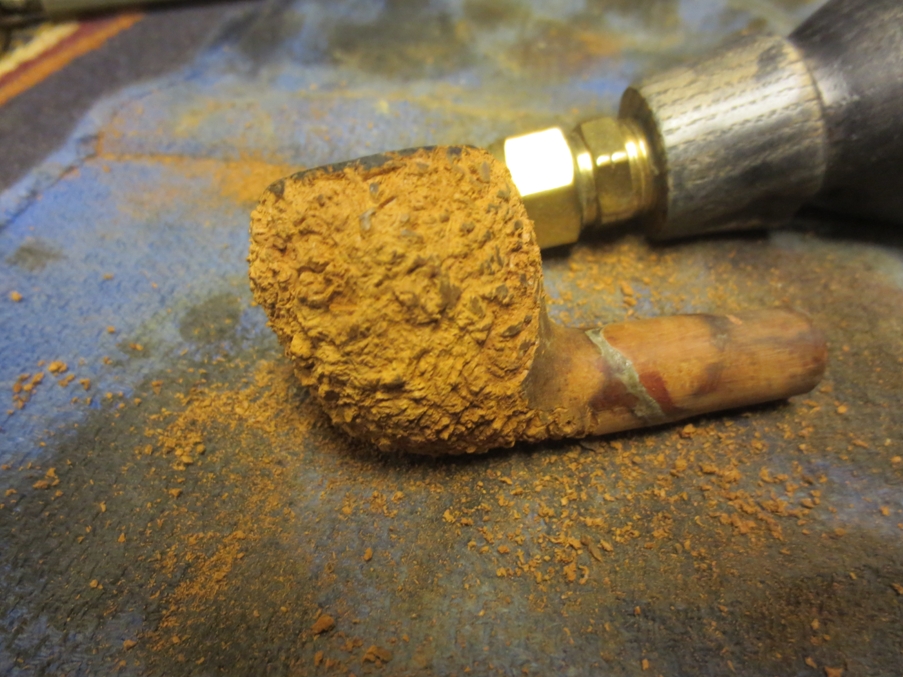
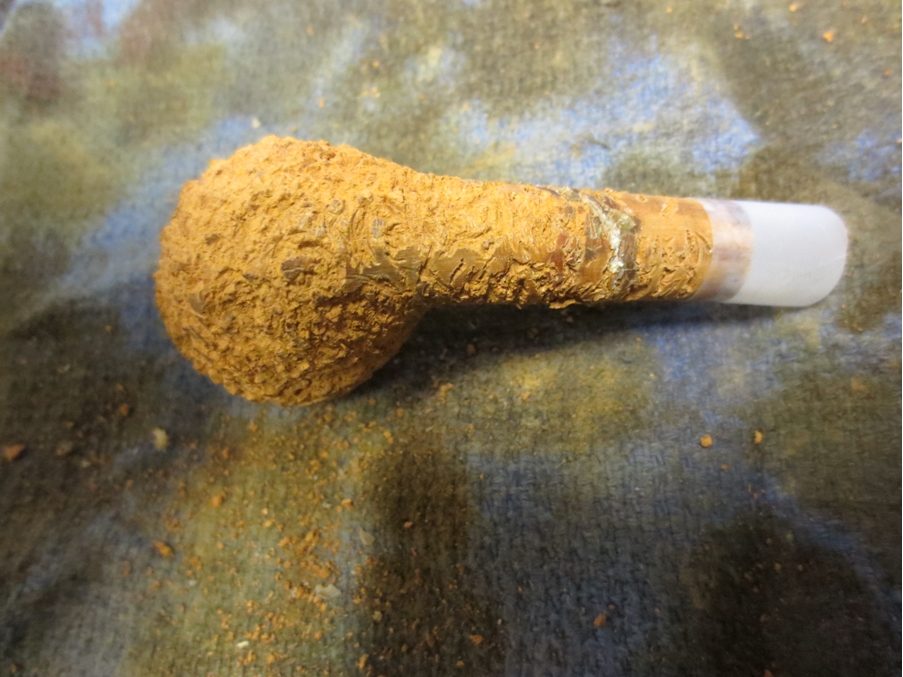
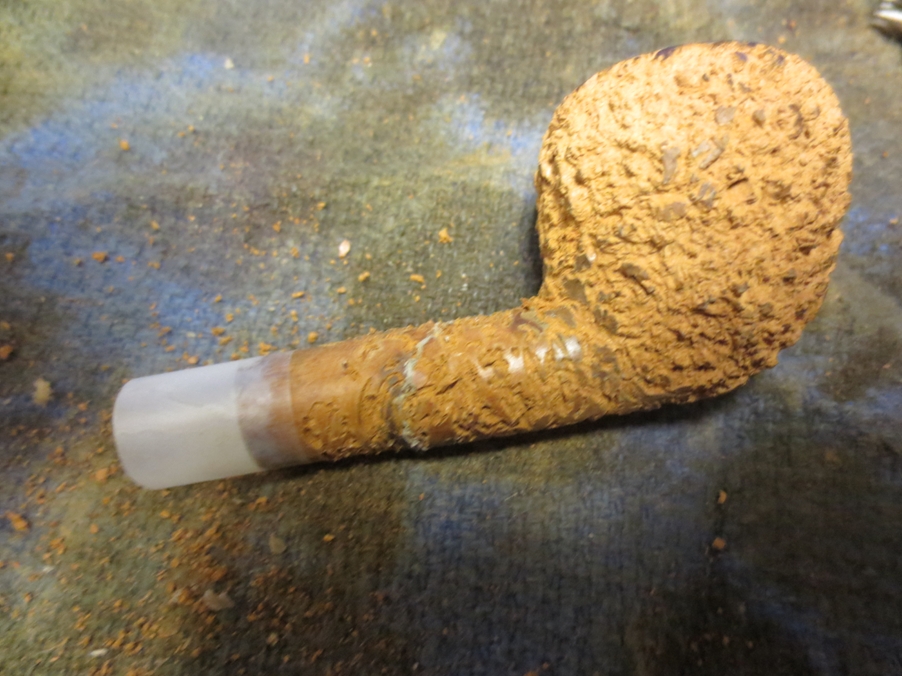
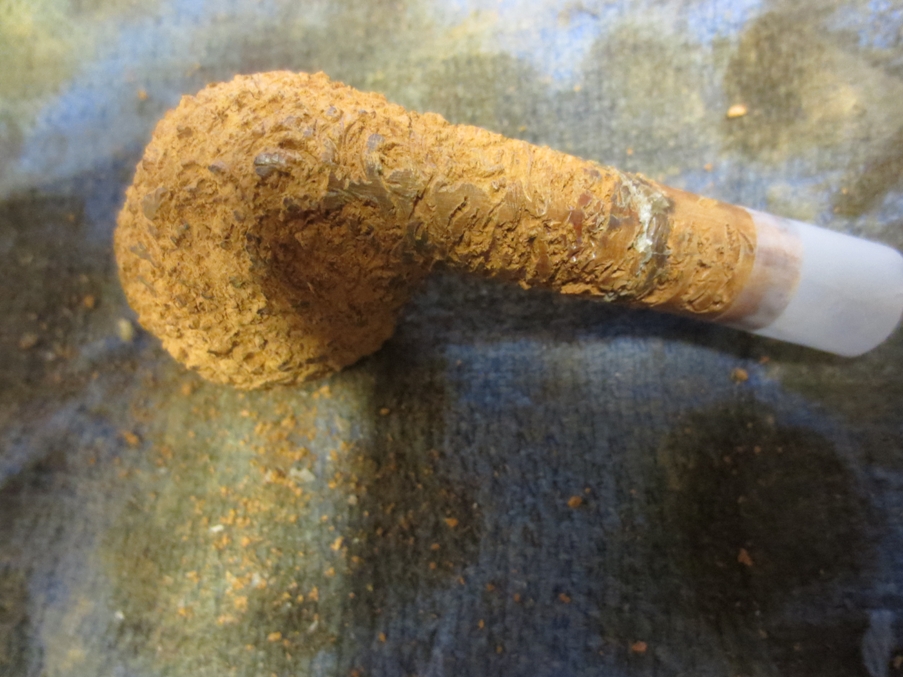
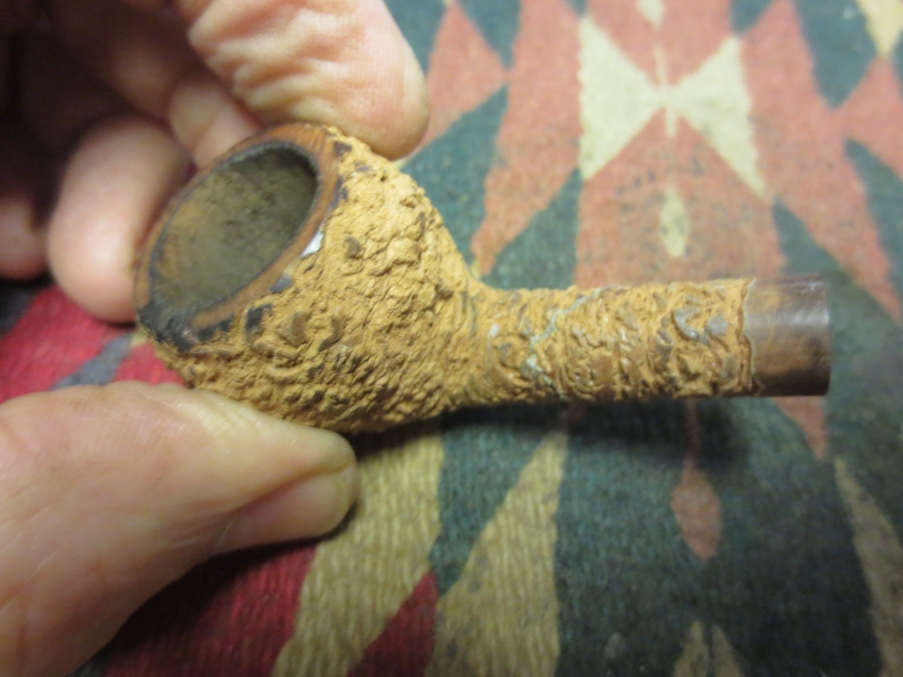
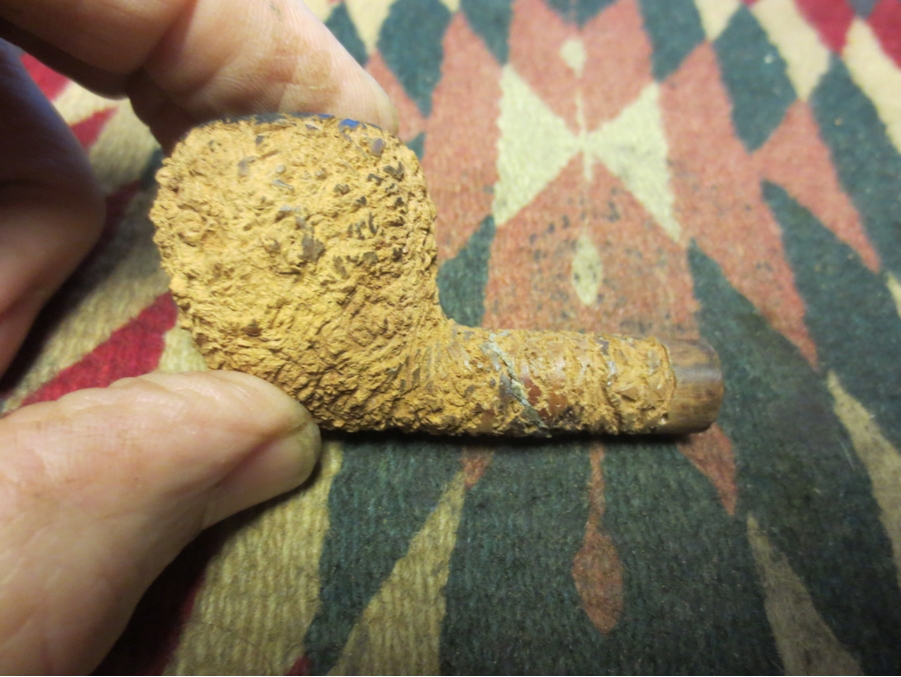
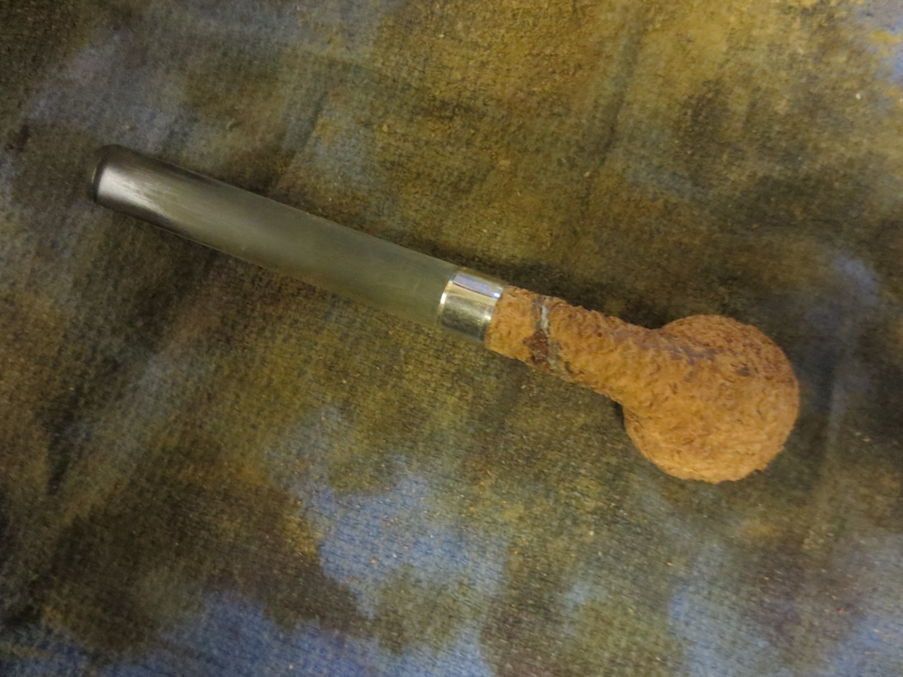
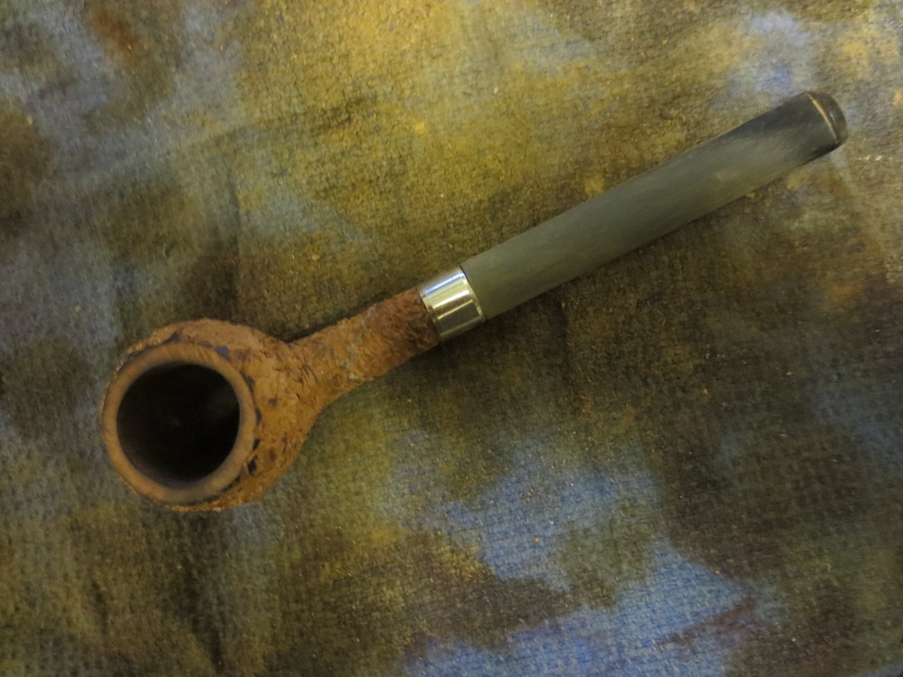
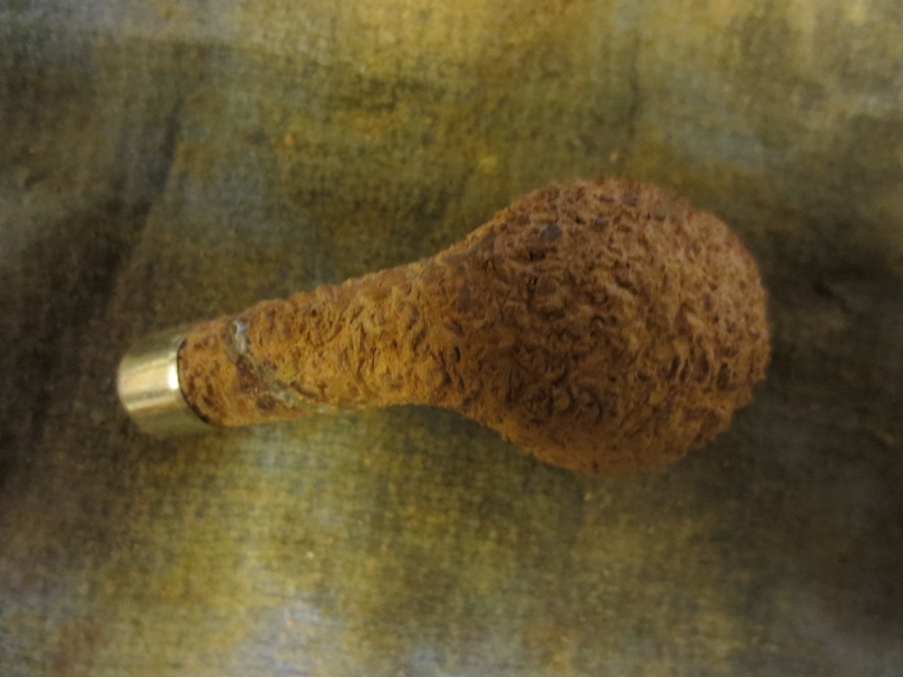
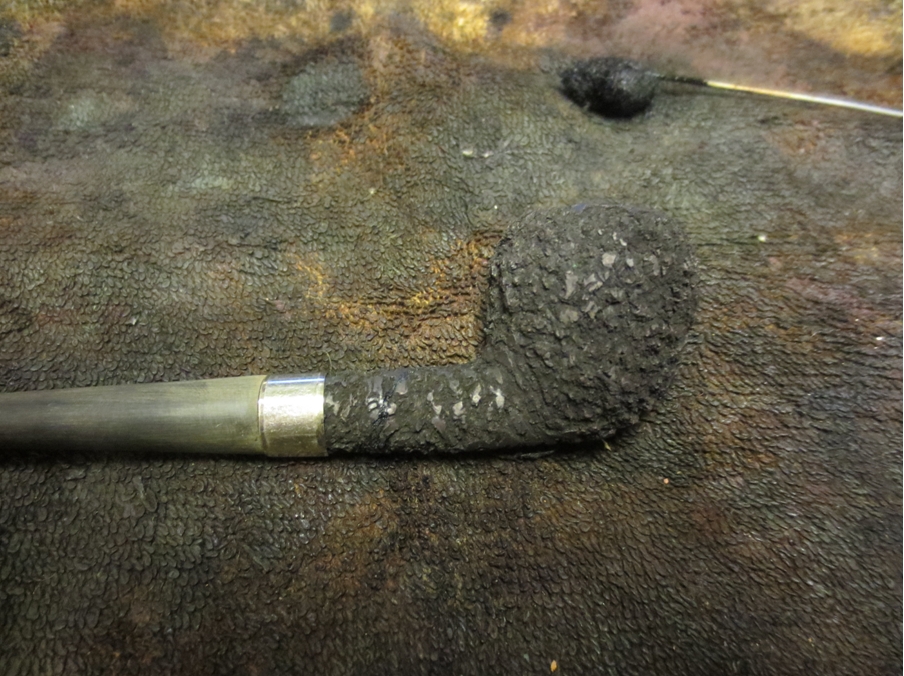
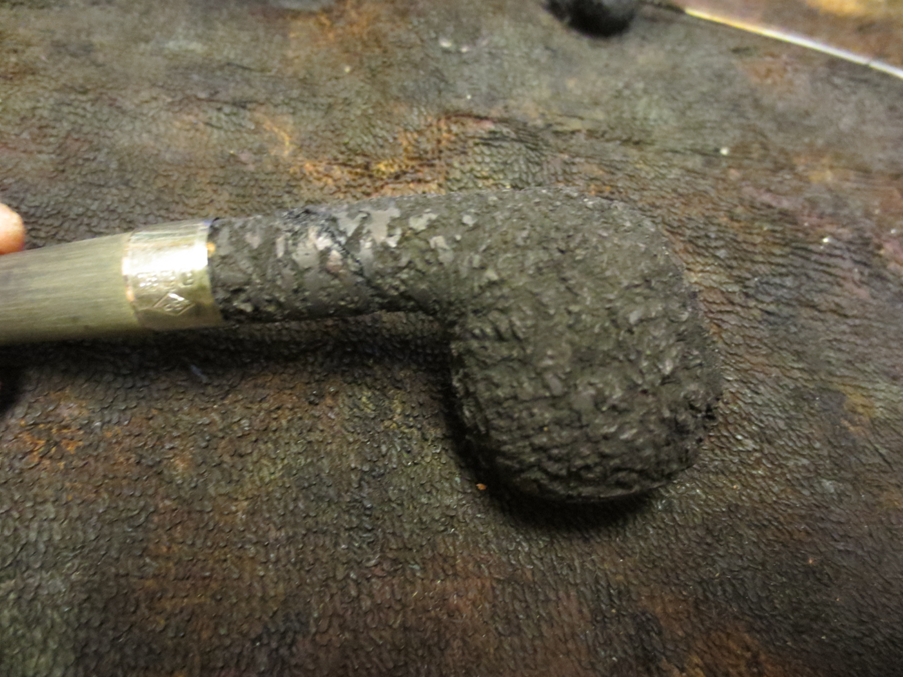
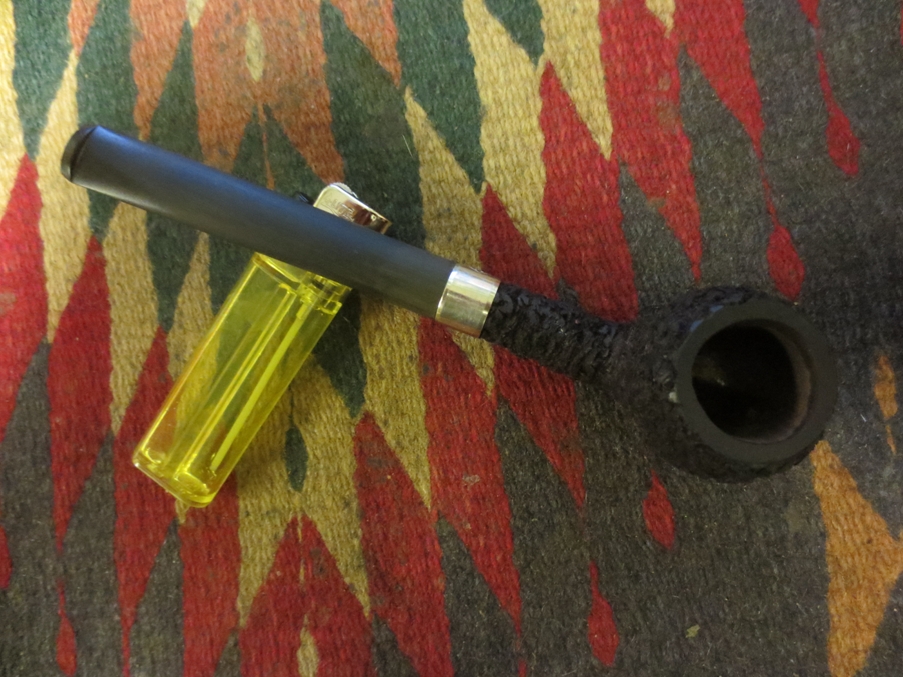
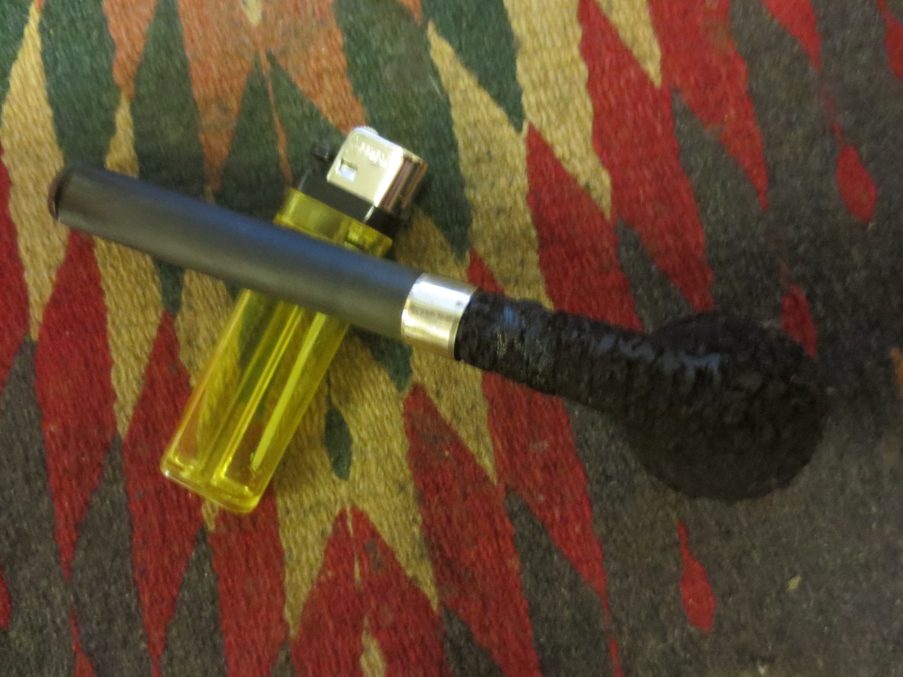
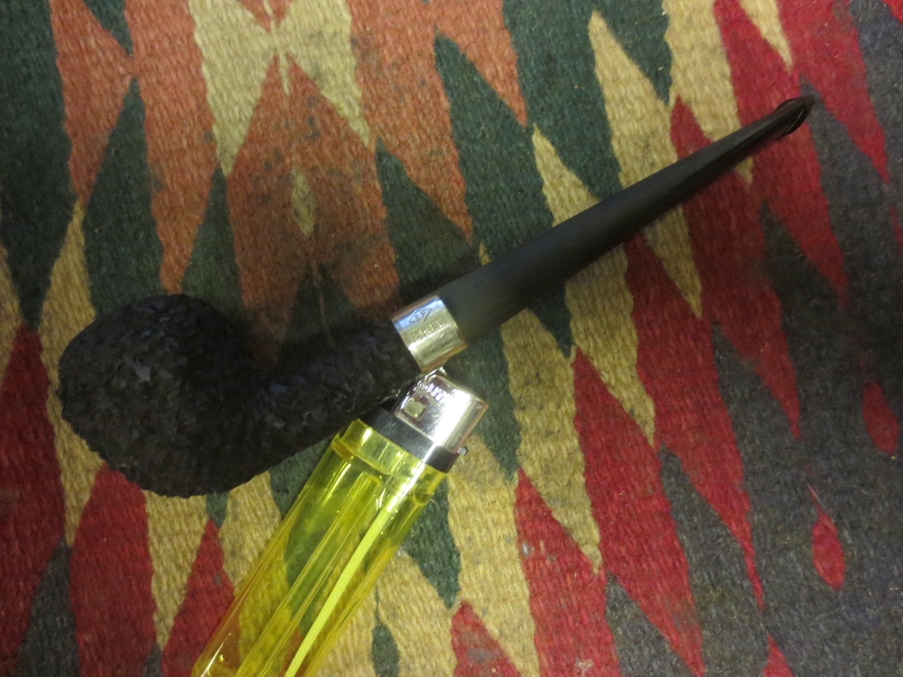
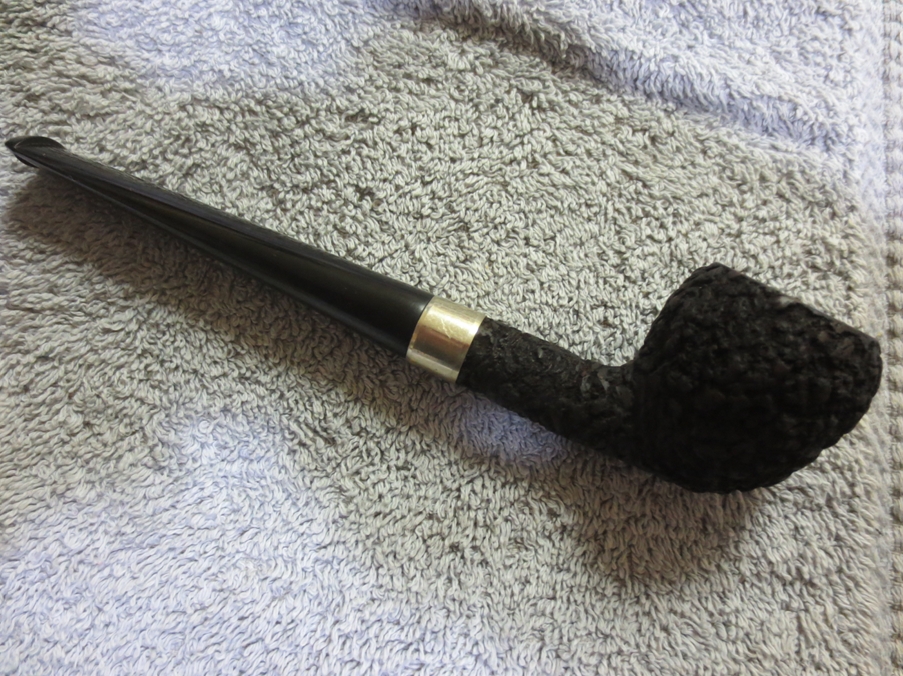
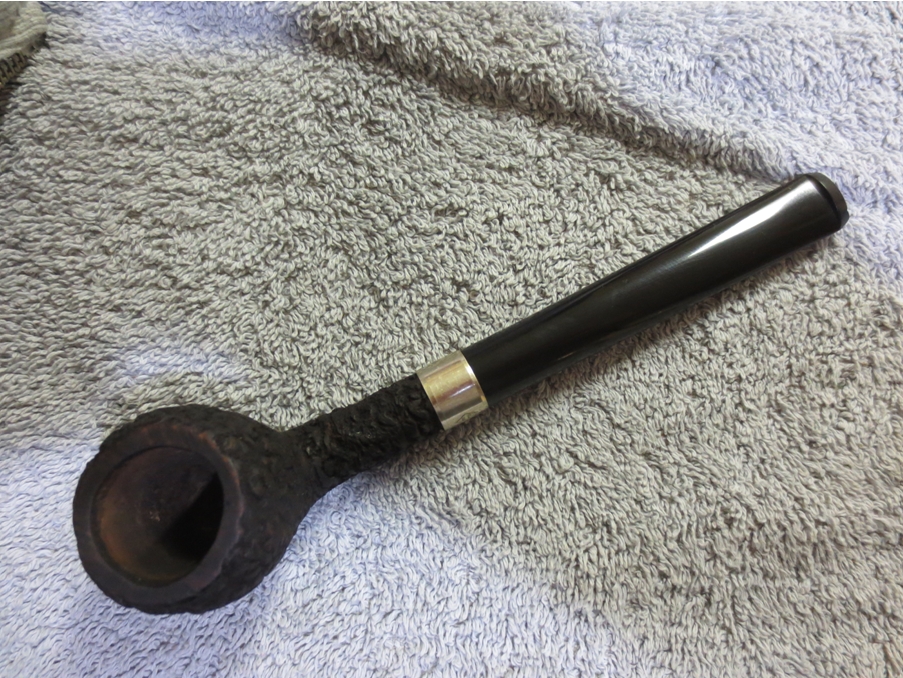
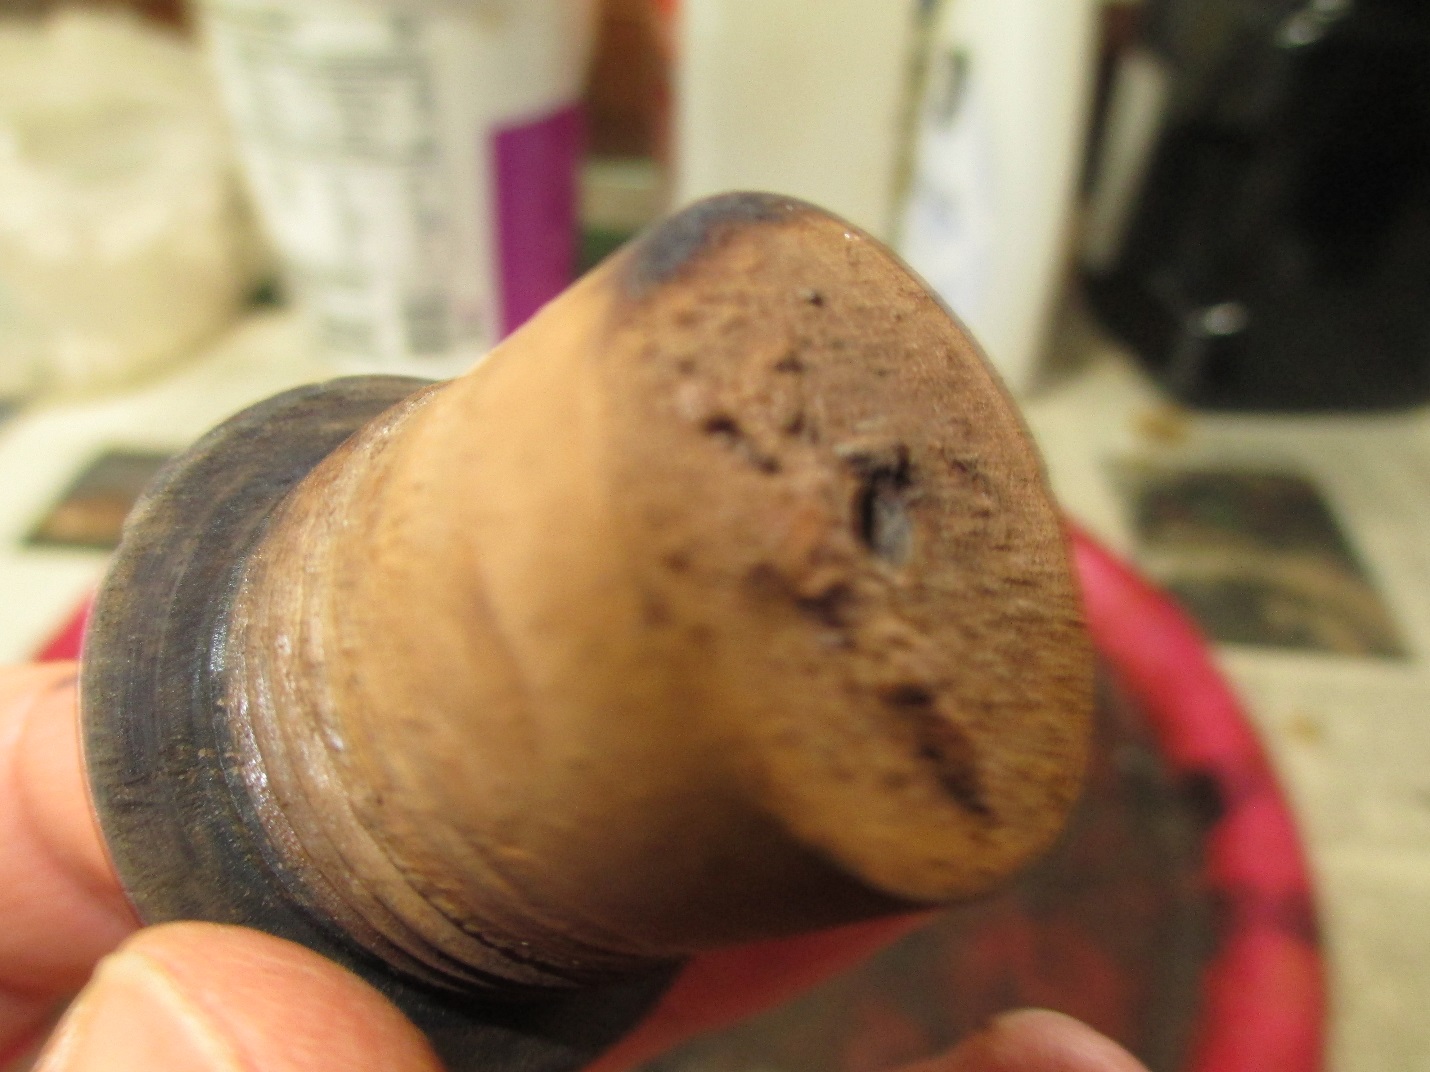
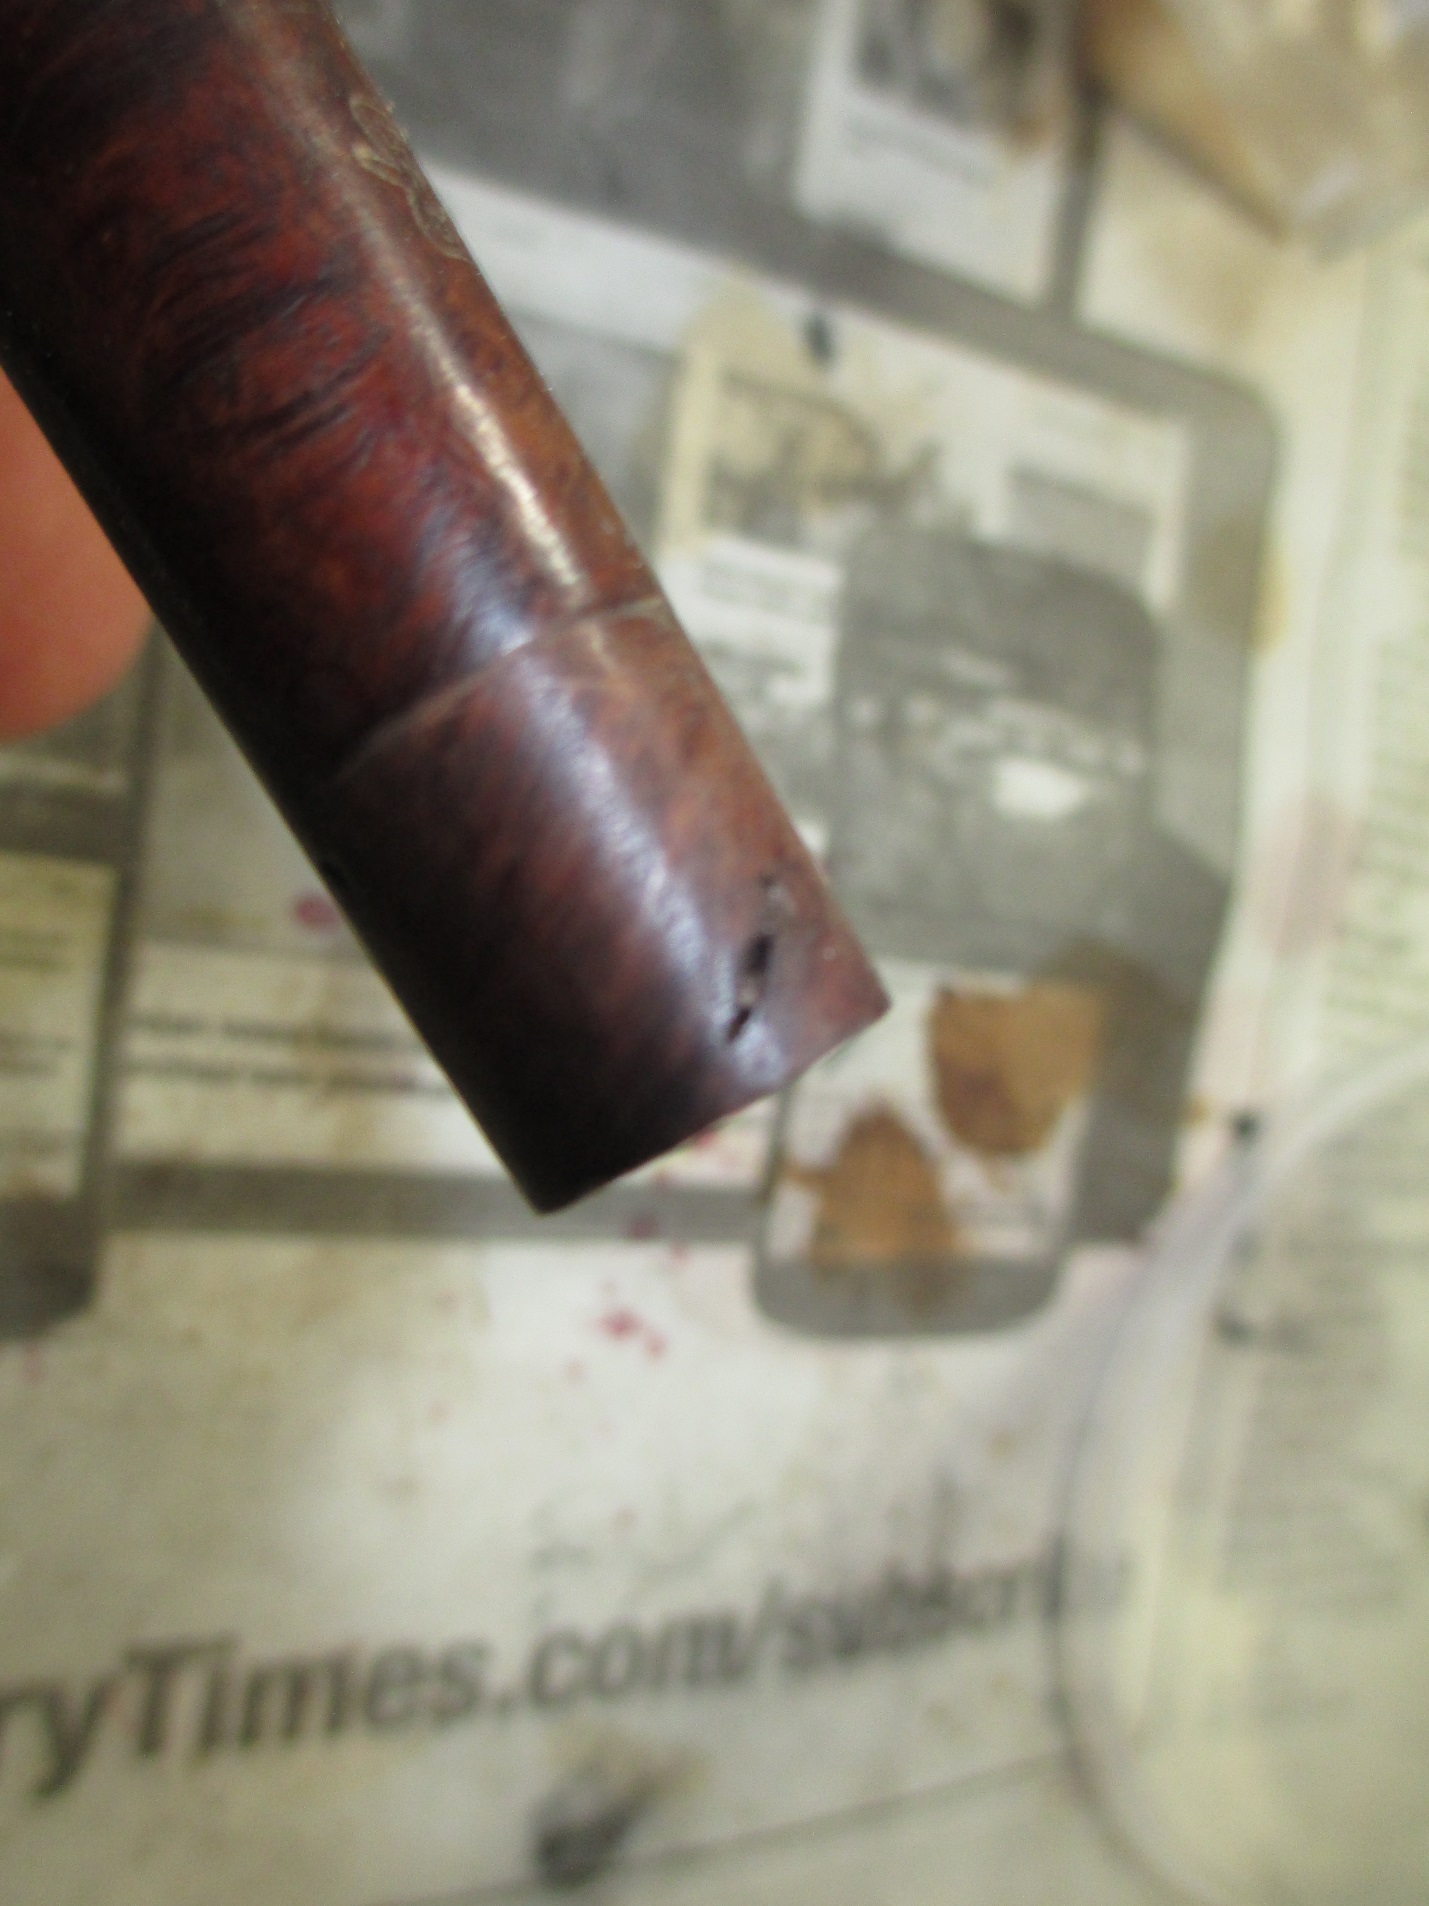
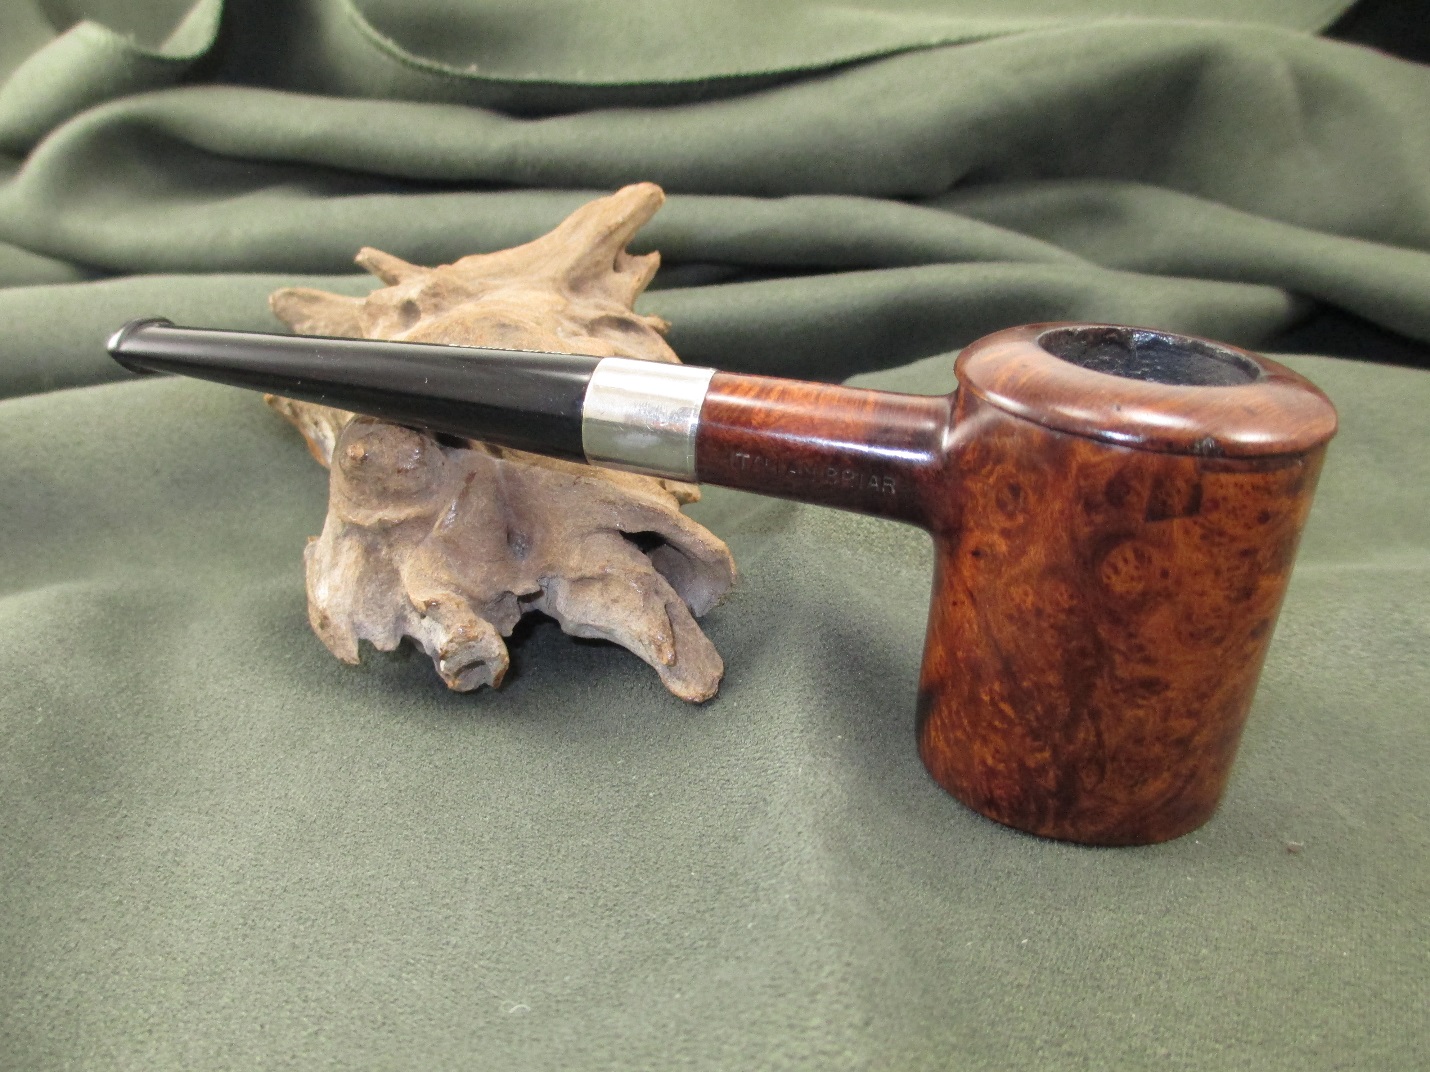
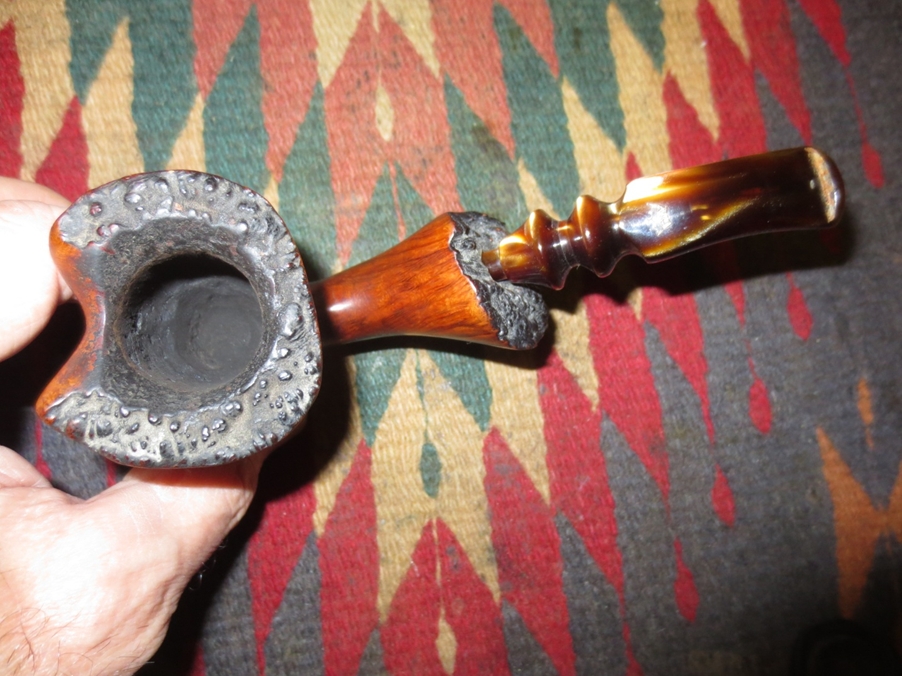
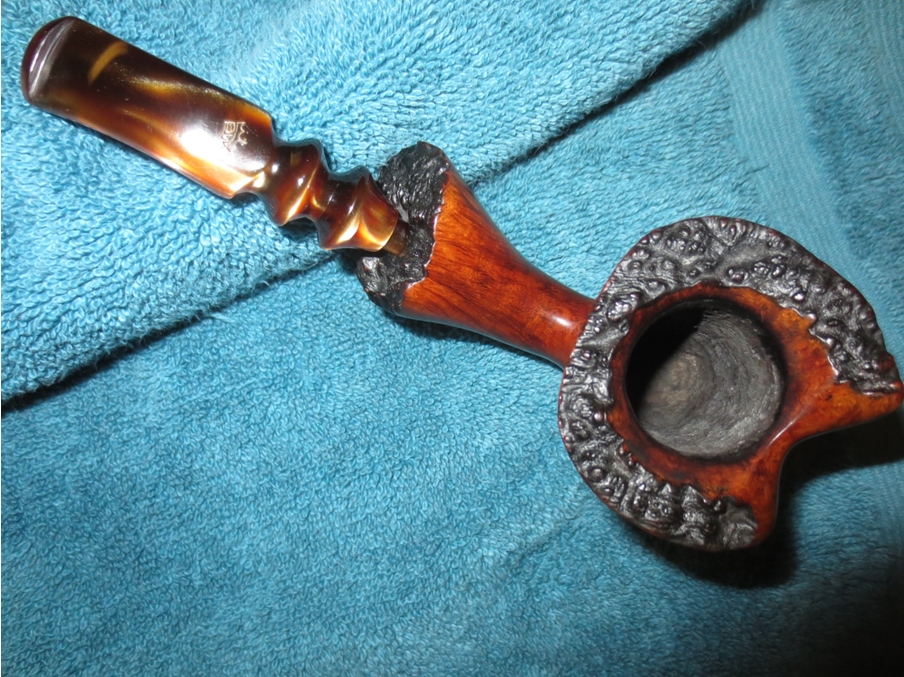
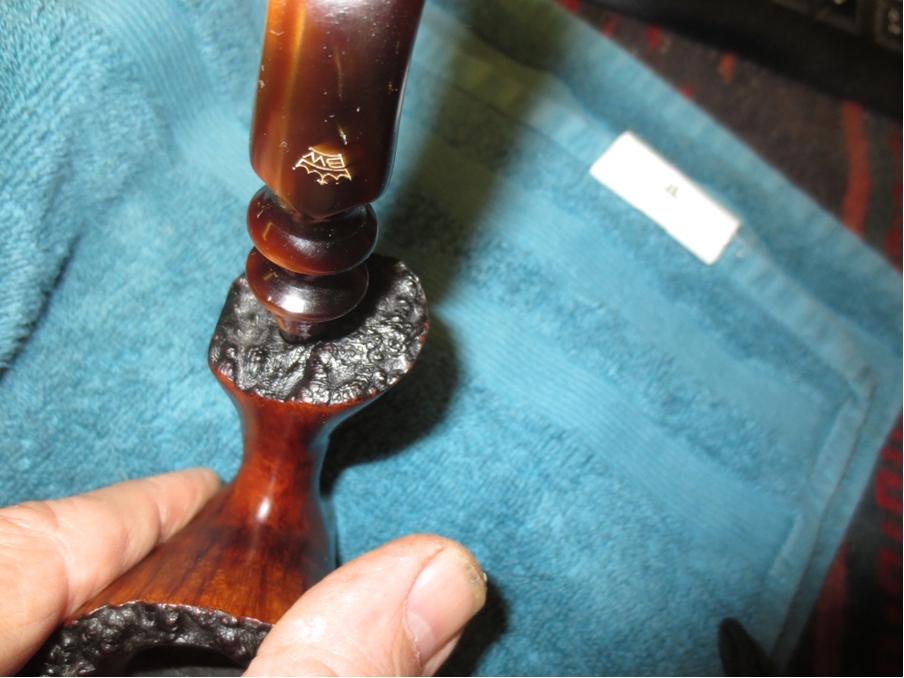
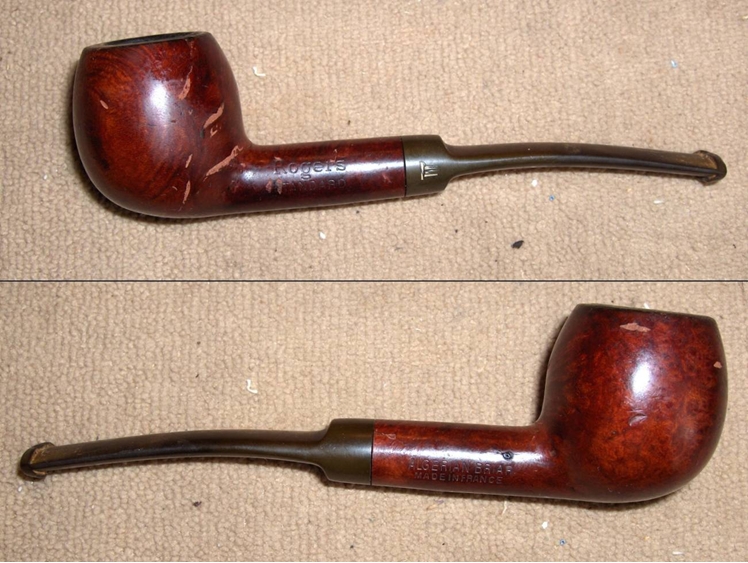
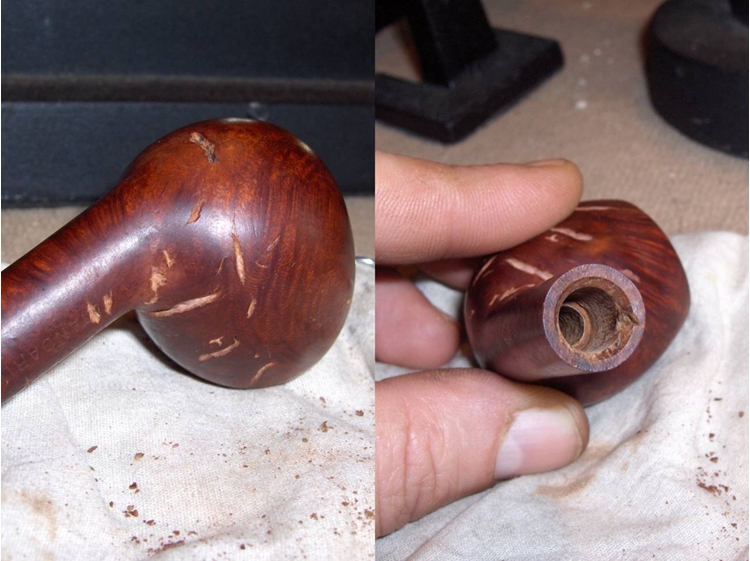
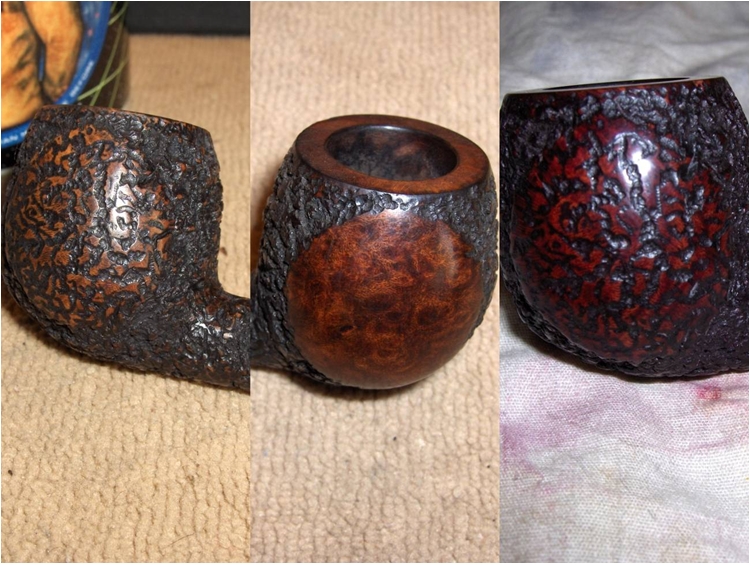
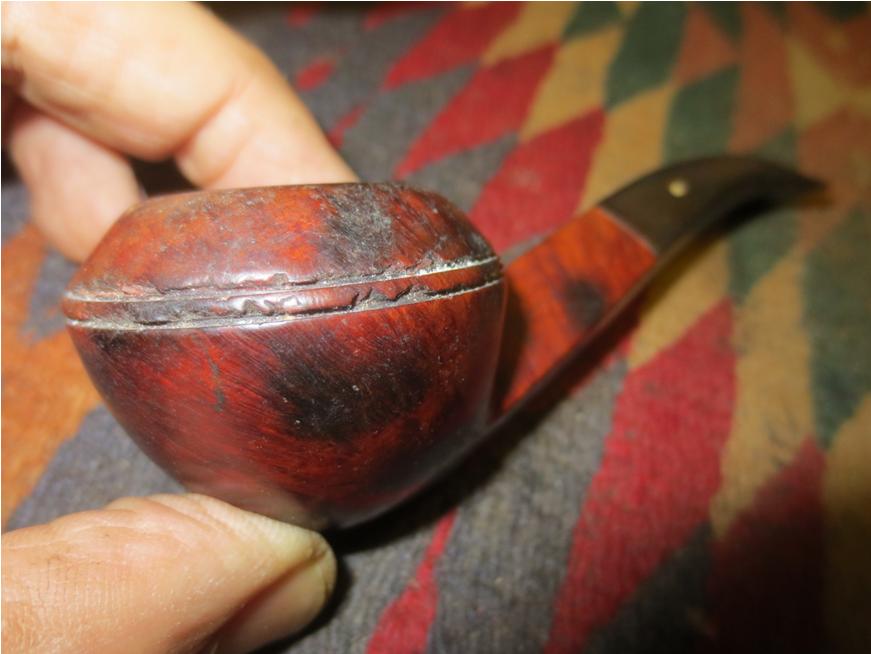
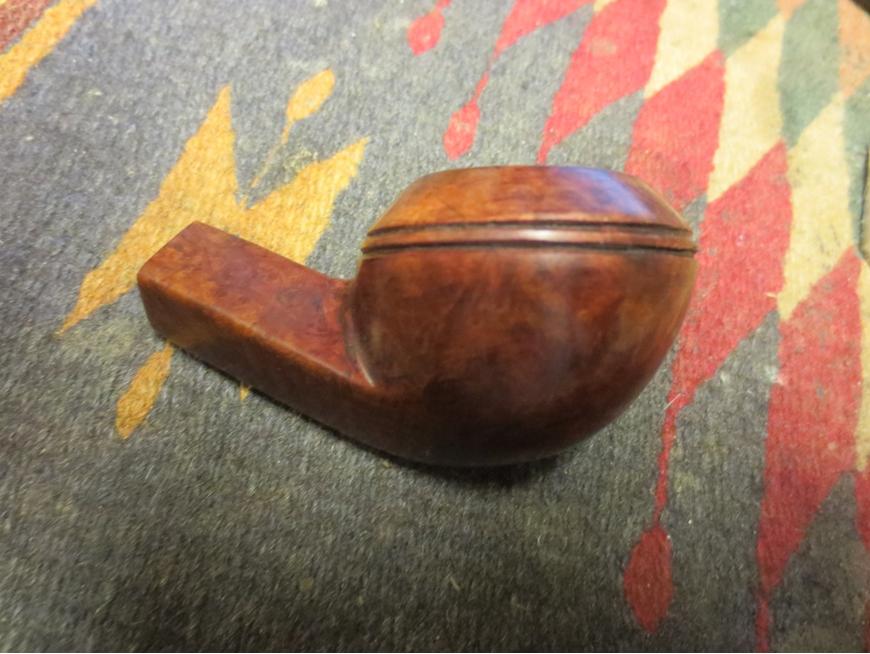
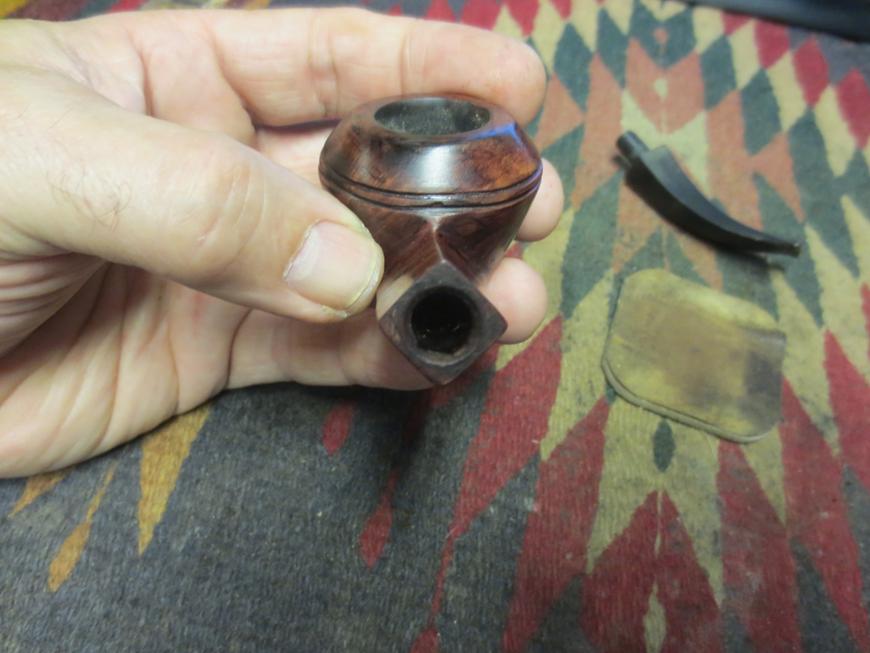
This Dunhill Bruyere was part of the gift lot for sale for Nepal. It was in very rough shape and one that would never be fit enough to grace a collection. The Dunhill stamping is only visible under bright light with a lens. The stamping on the left side of the shank is Dunhill over Bruyere. On the right side it is stamped with 4 in a circle and an A. The rest of the stamping is very faint and reads Made in London England (At least that is what it looks like). The shape number 08 is gone except for the 0. The finish was gone. The double ring around the bowl was virtually ruined and the bowl itself was in very rough shape. The rim was beat up and out of round. There were burn marks on the rim, the left side and bottom of the bowl and on the left side of the shank. To me it looks like the pipe was laid in an ashtray and the cigarette burned the bowl. It was in very rough shape. The stem was badly oxidized and upon examination there was a small split in the button on the underside and the stem was thin and the edges of the button were rounded down.Dunhill1

Dunhill2

Dunhill3

Dunhill4 
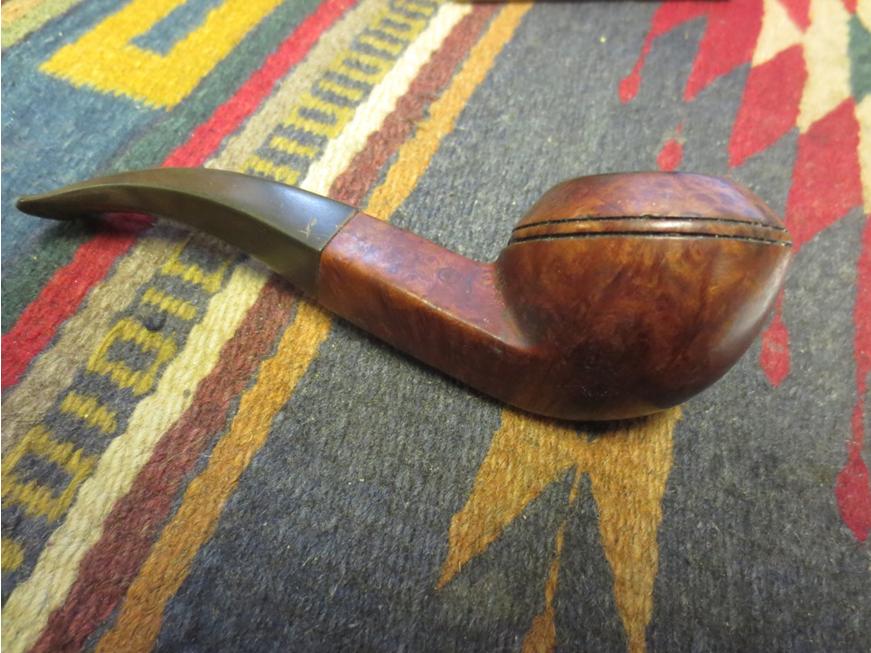
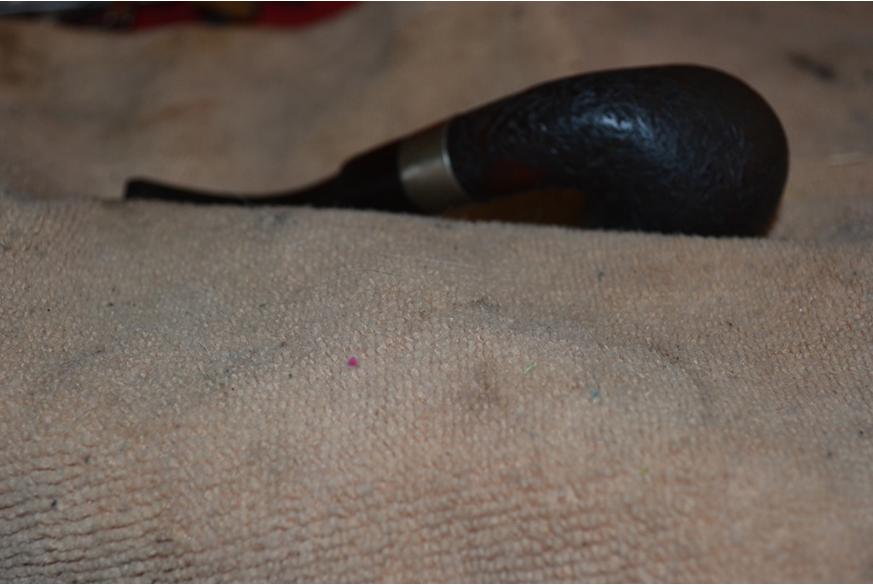
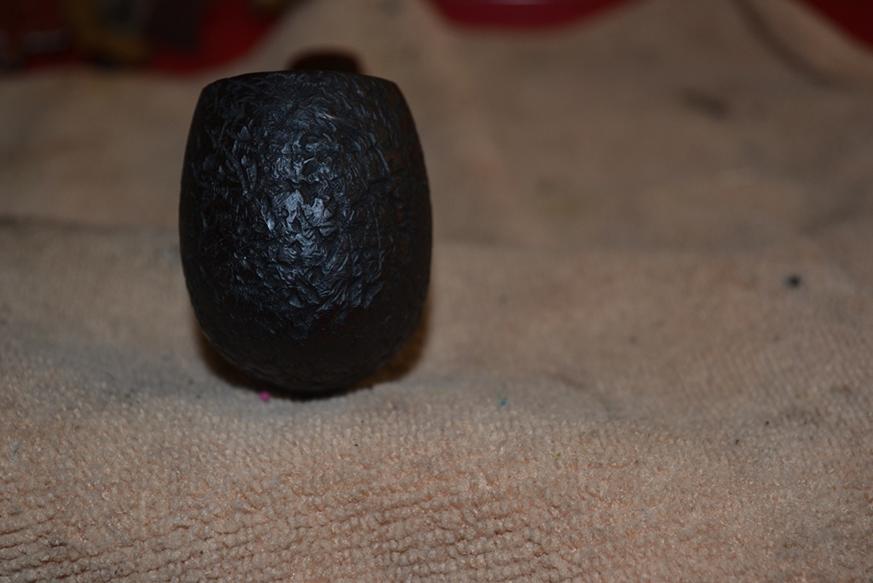
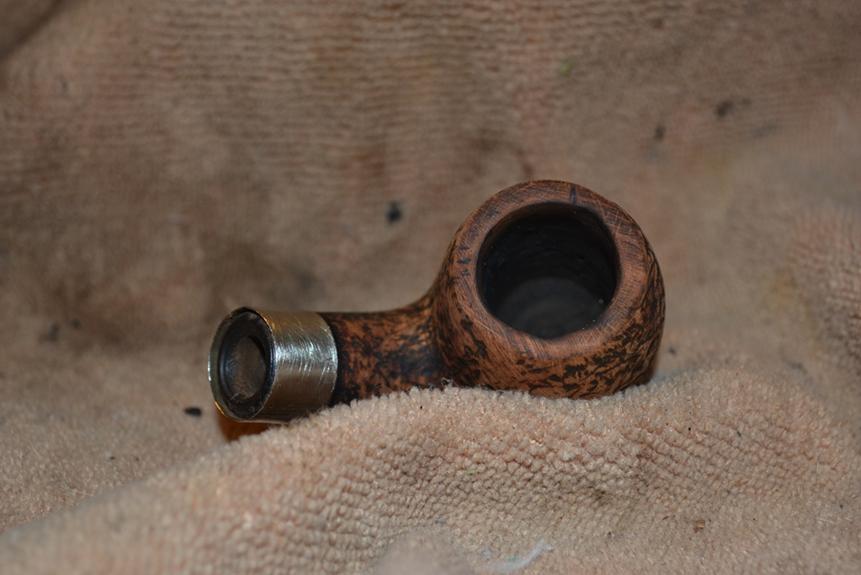
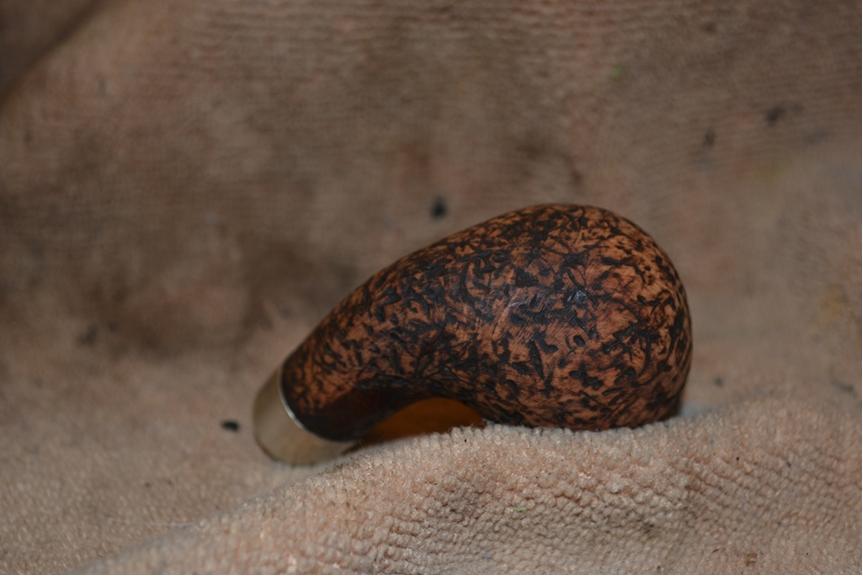
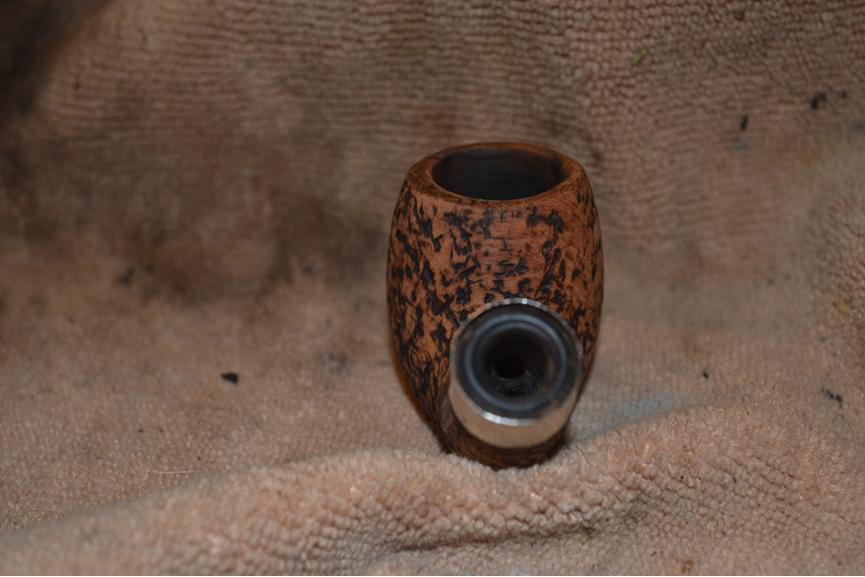
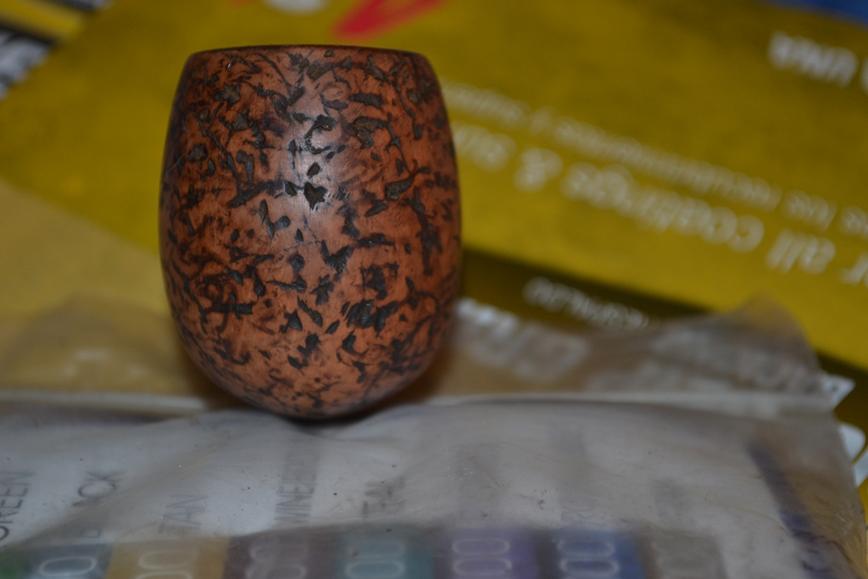
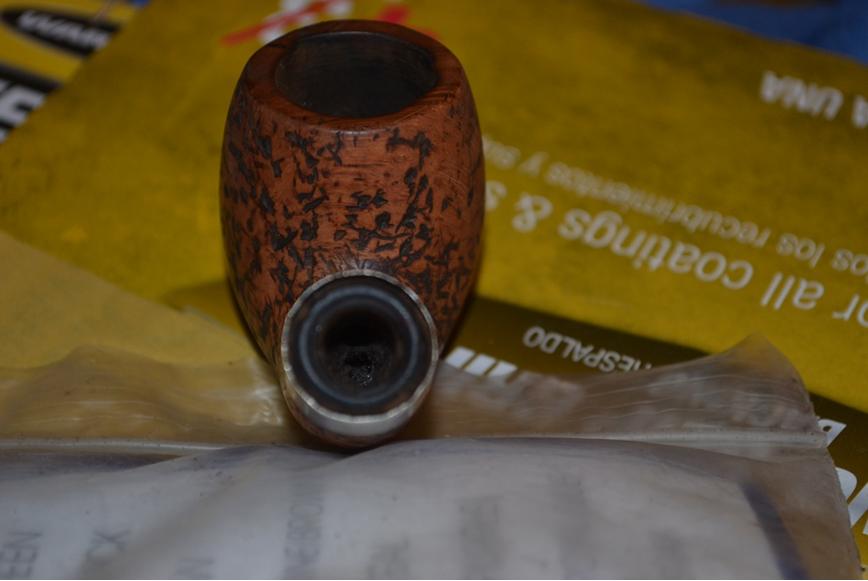
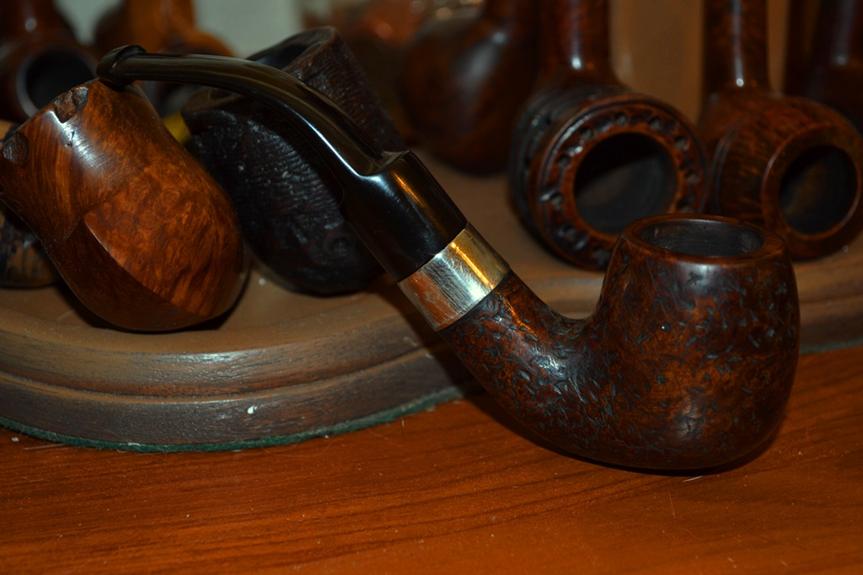
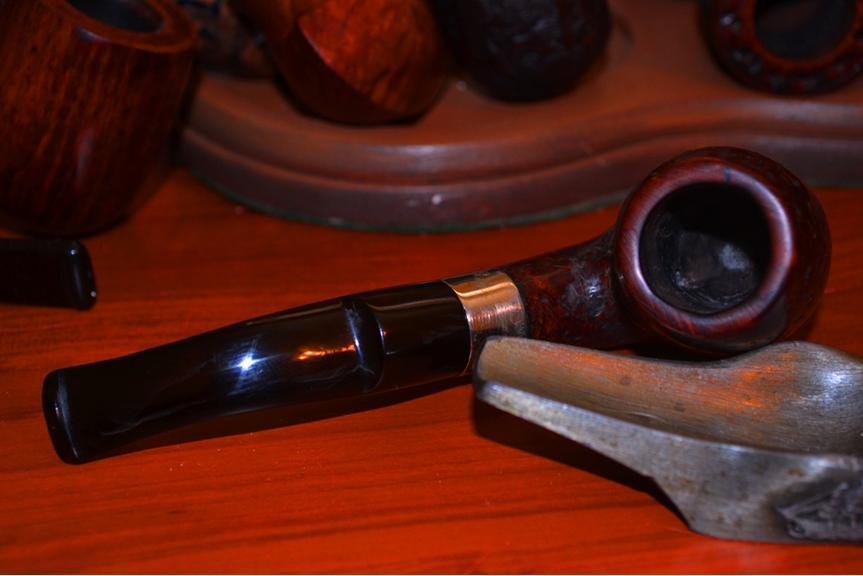
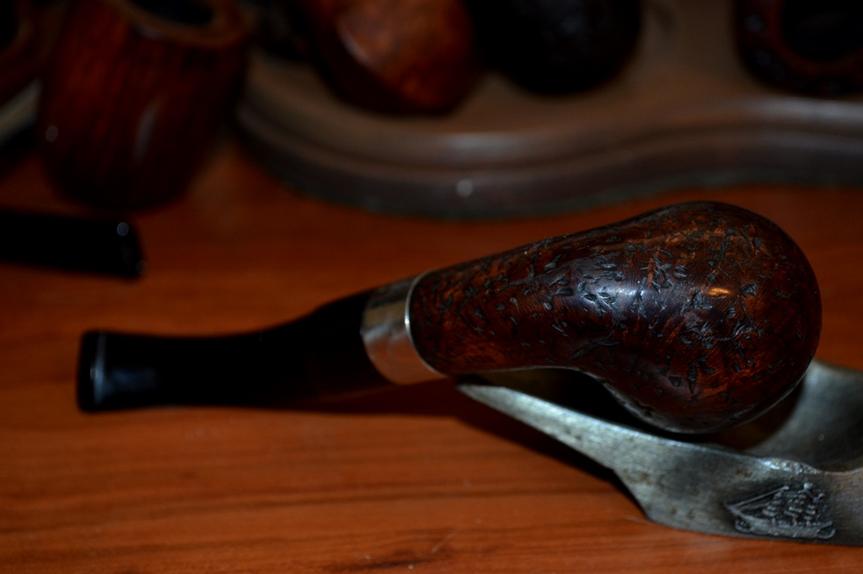
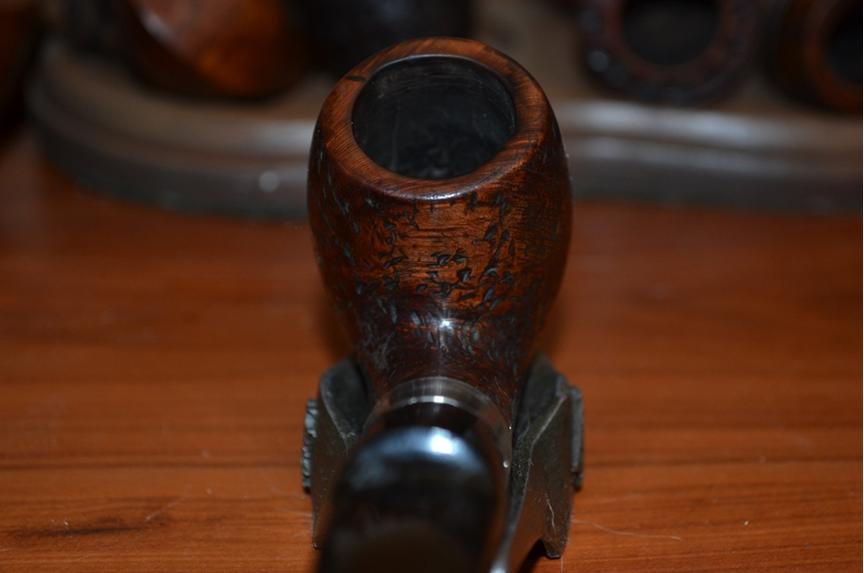
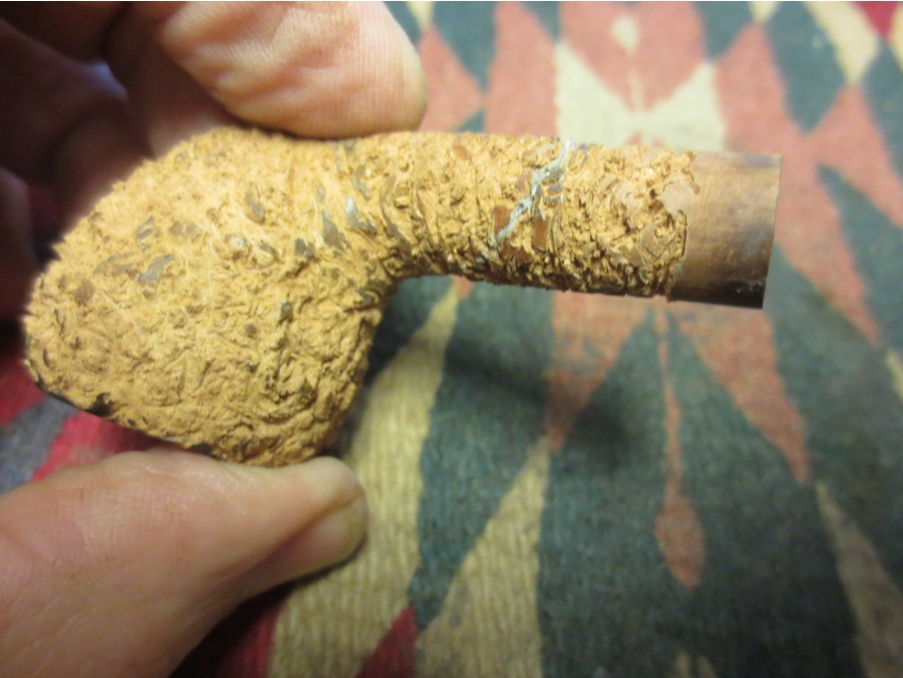
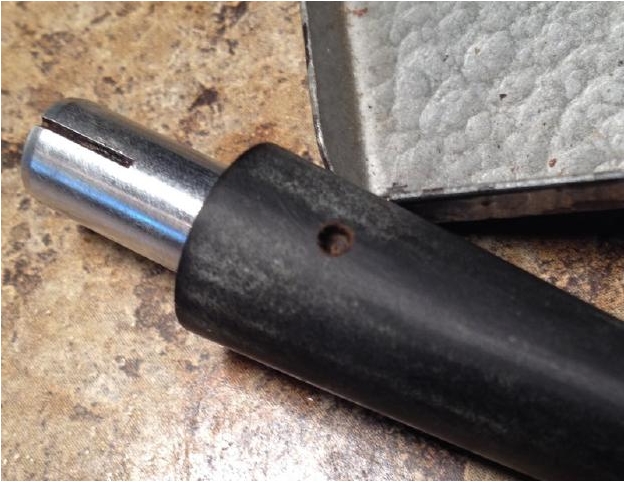
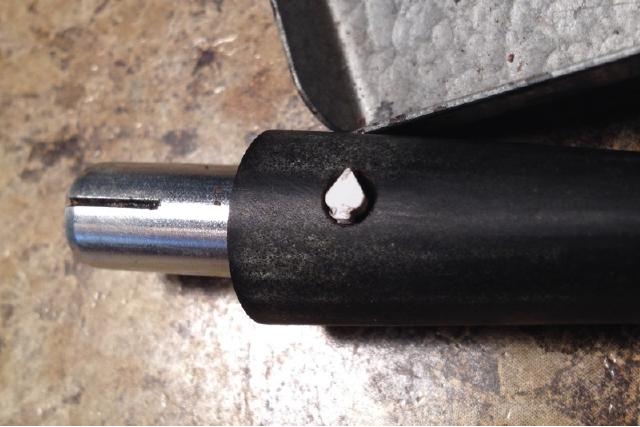
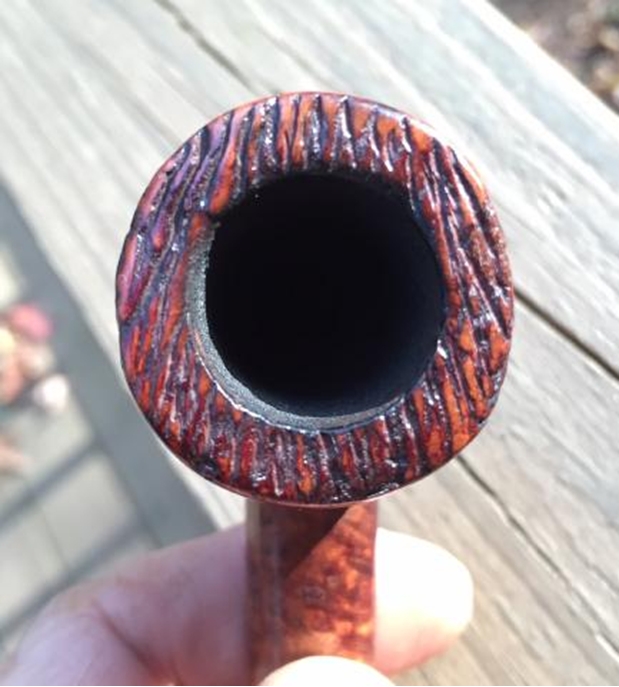
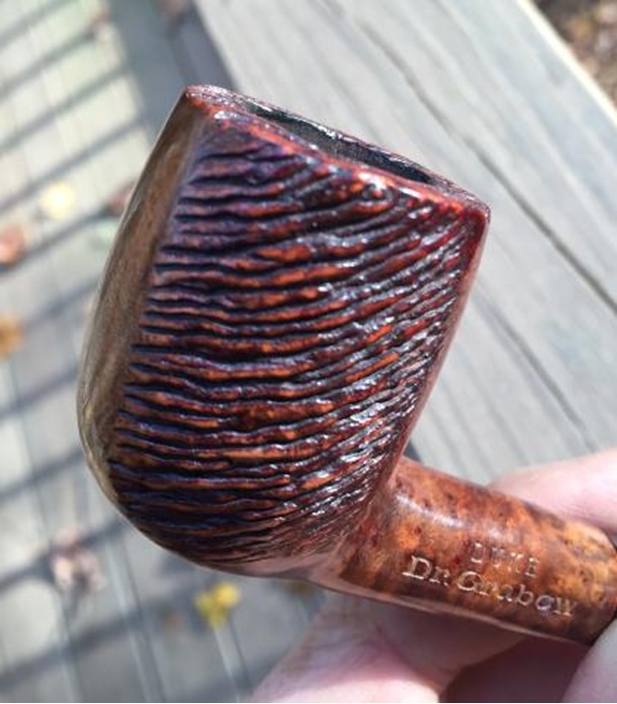
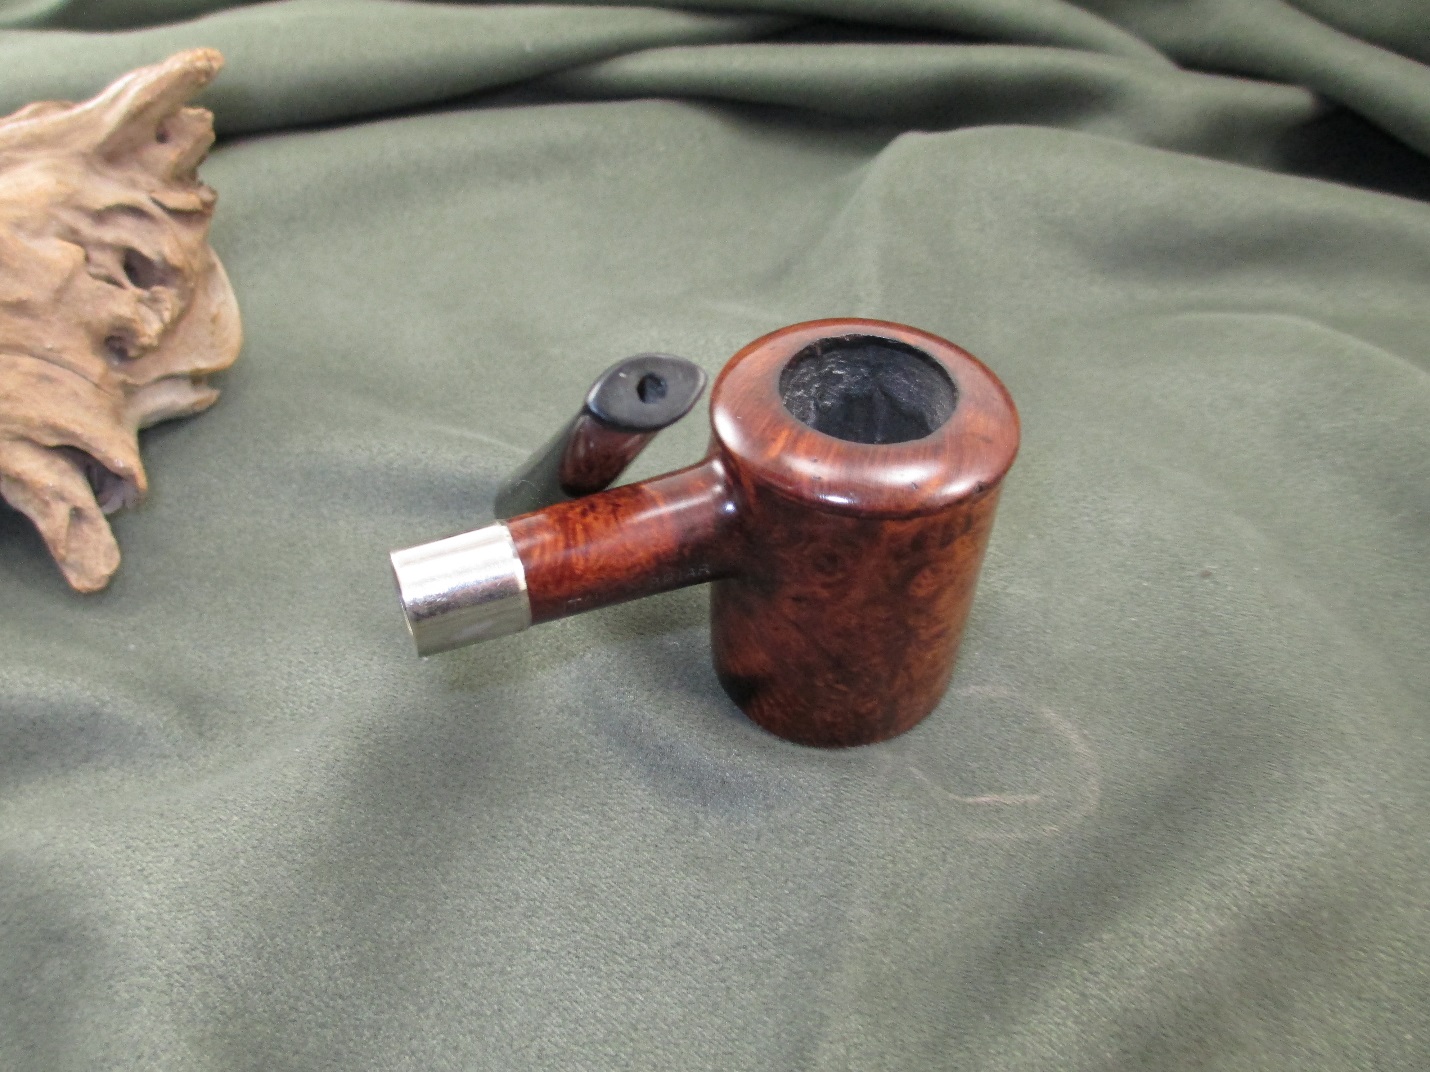
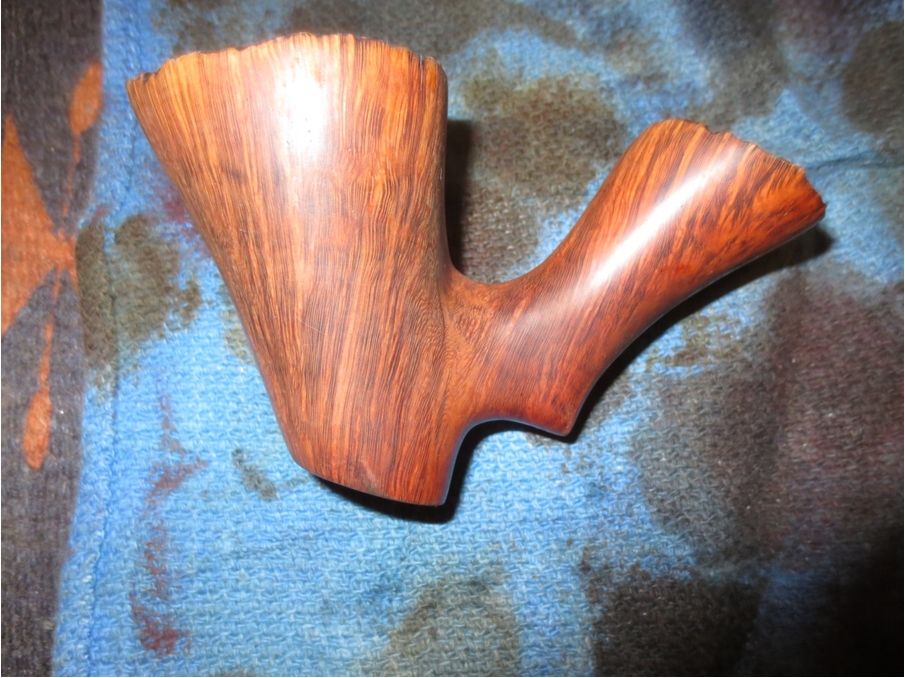
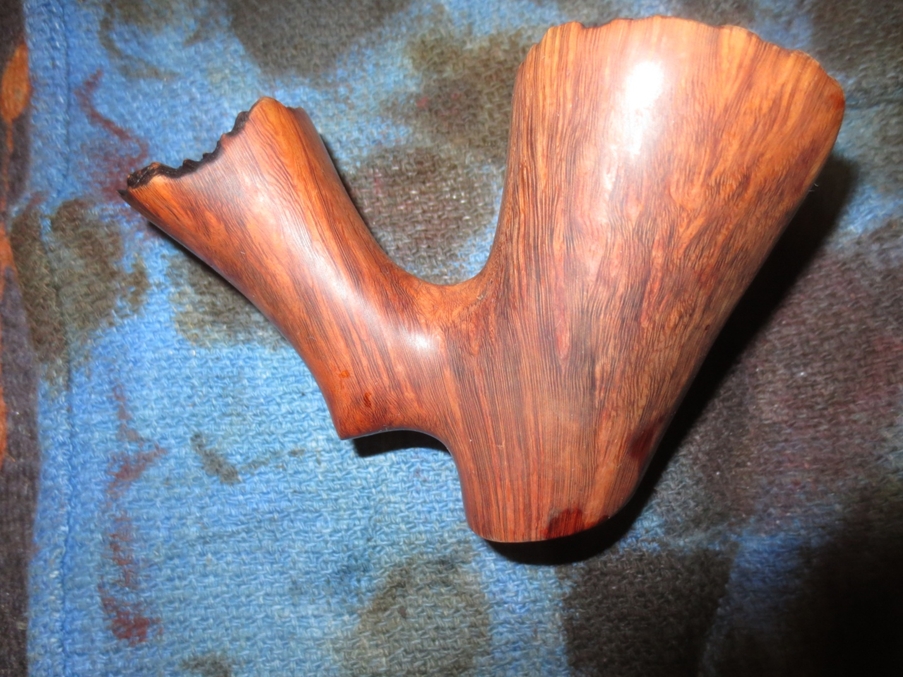
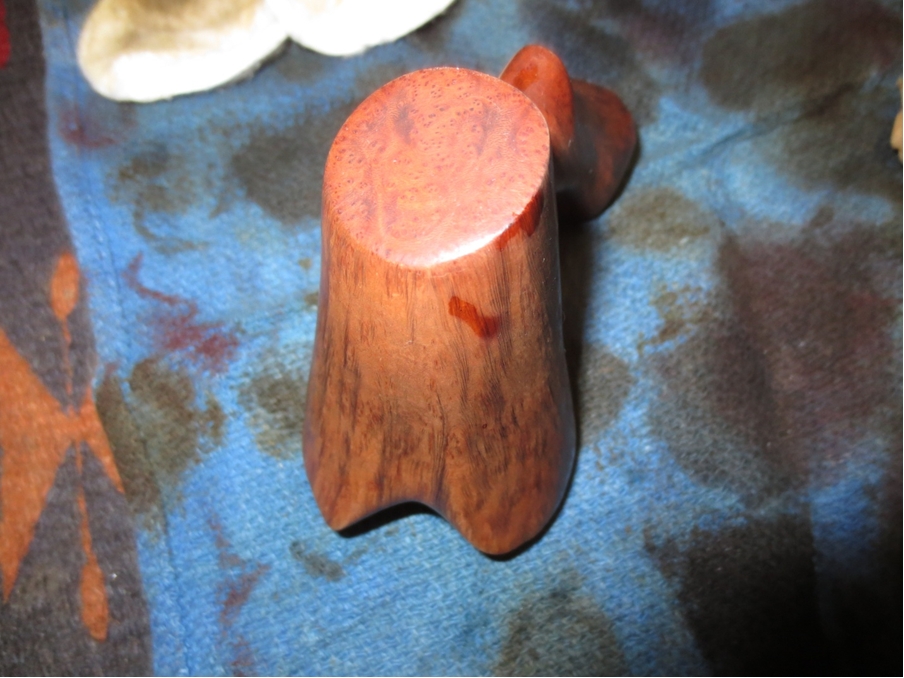
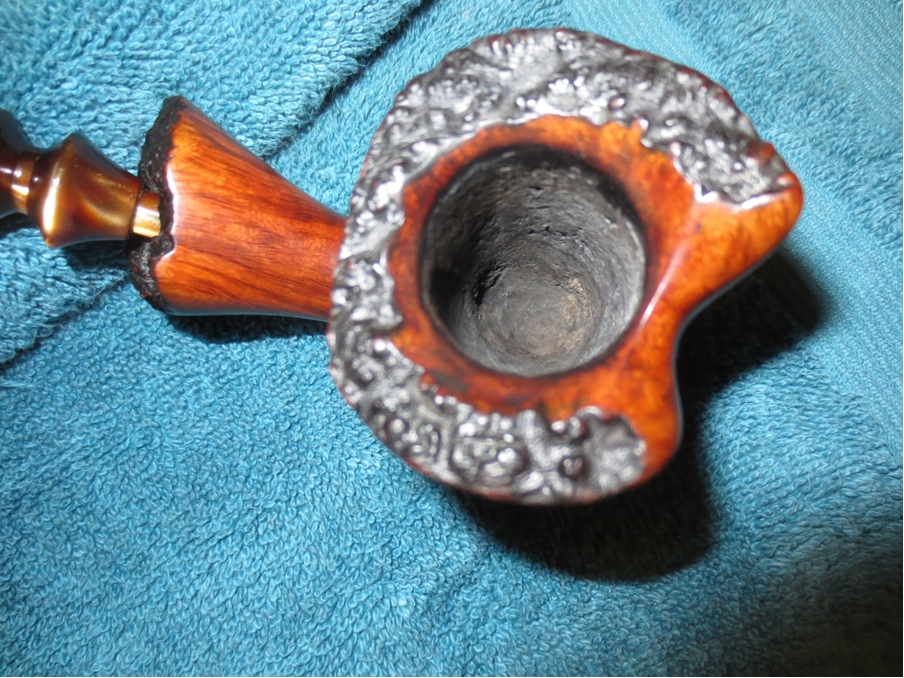
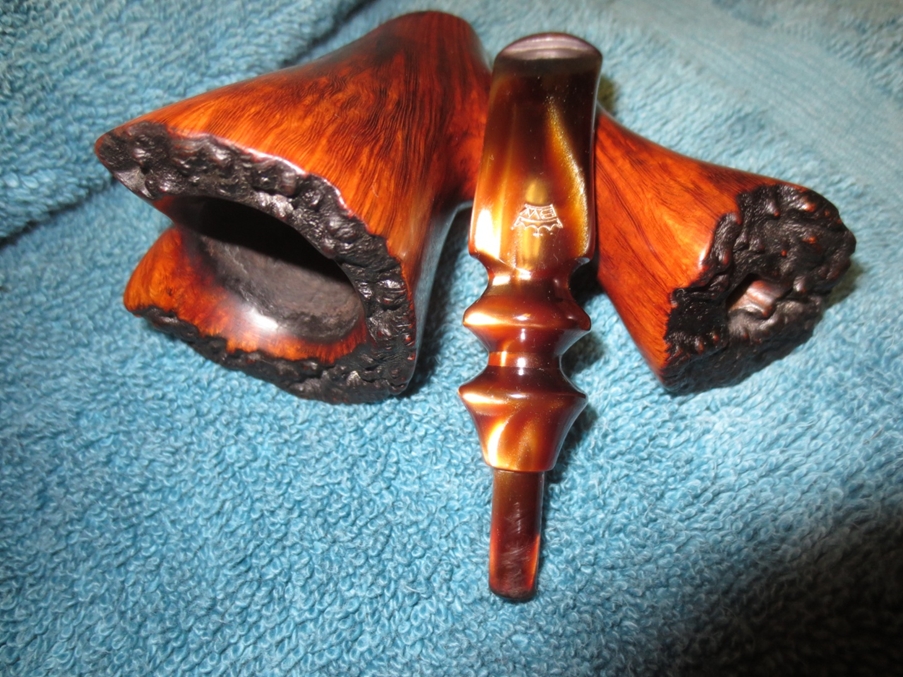
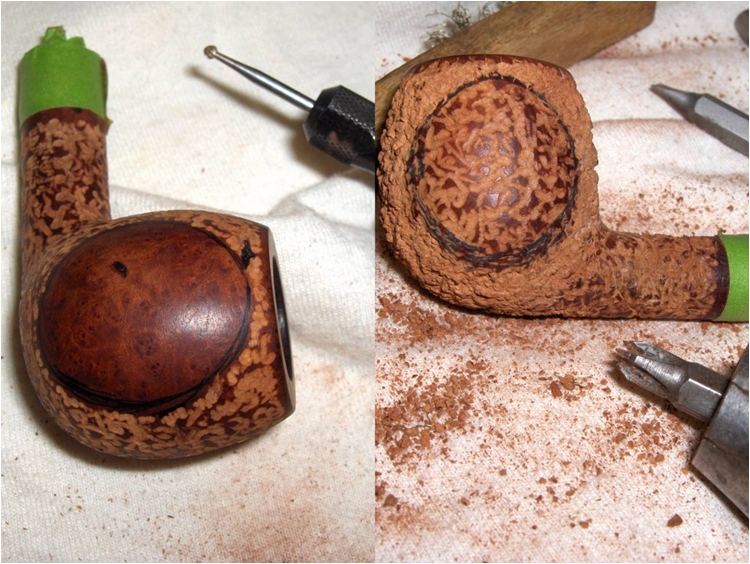
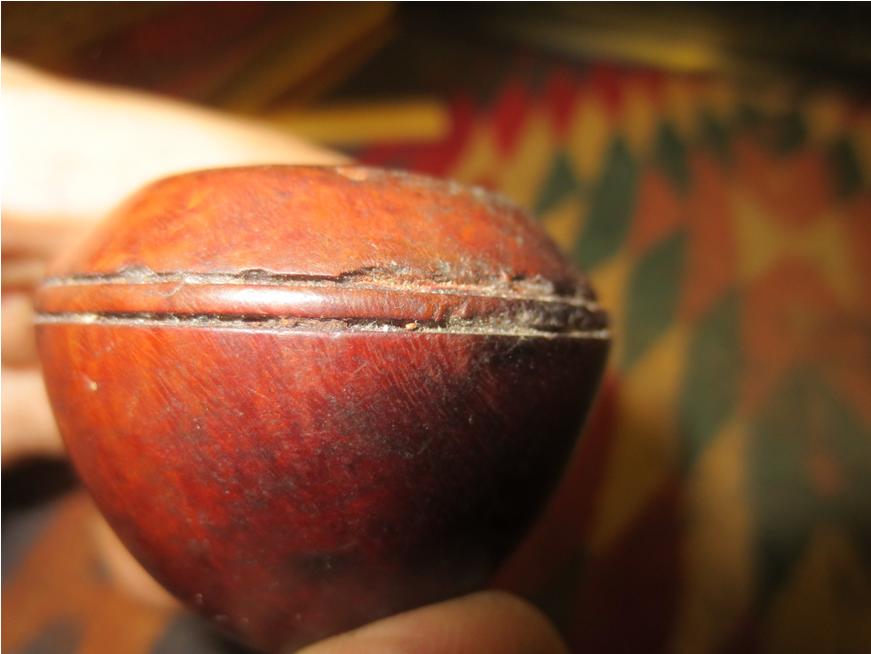
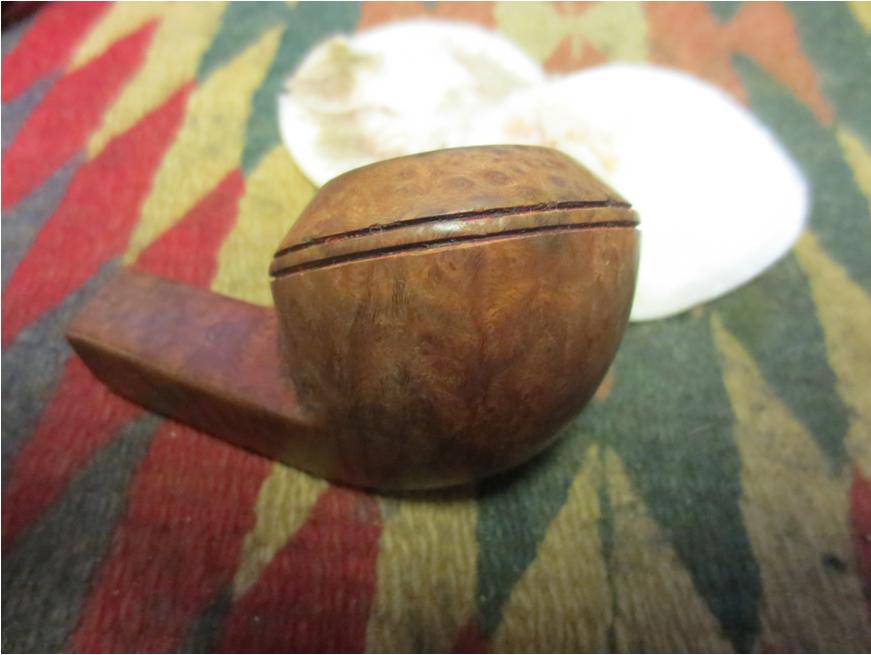
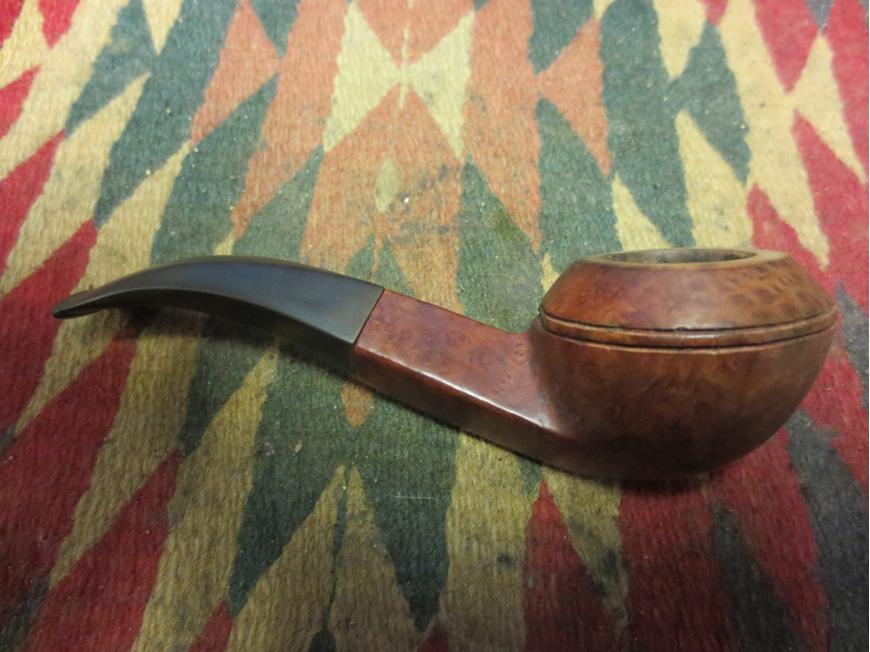
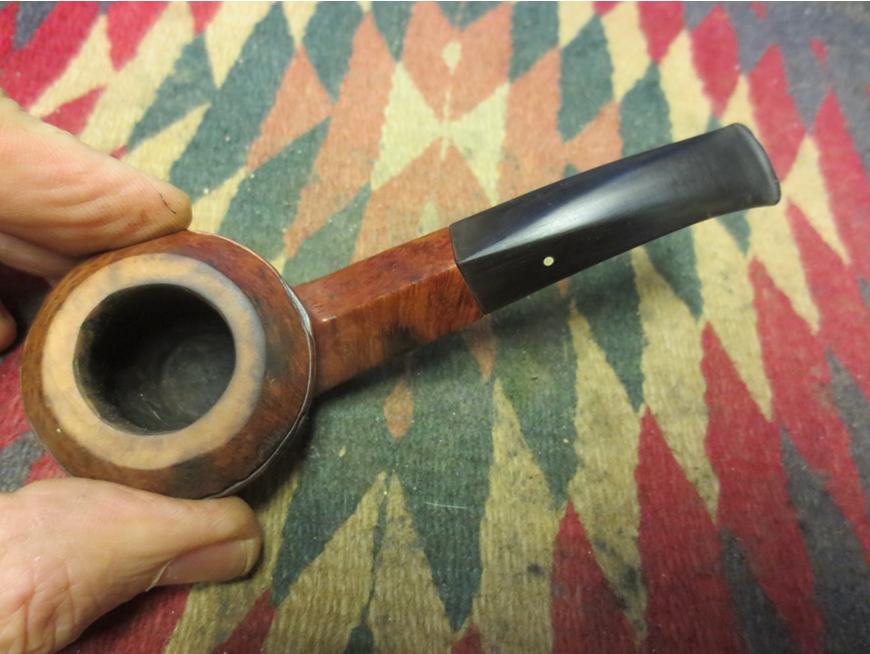
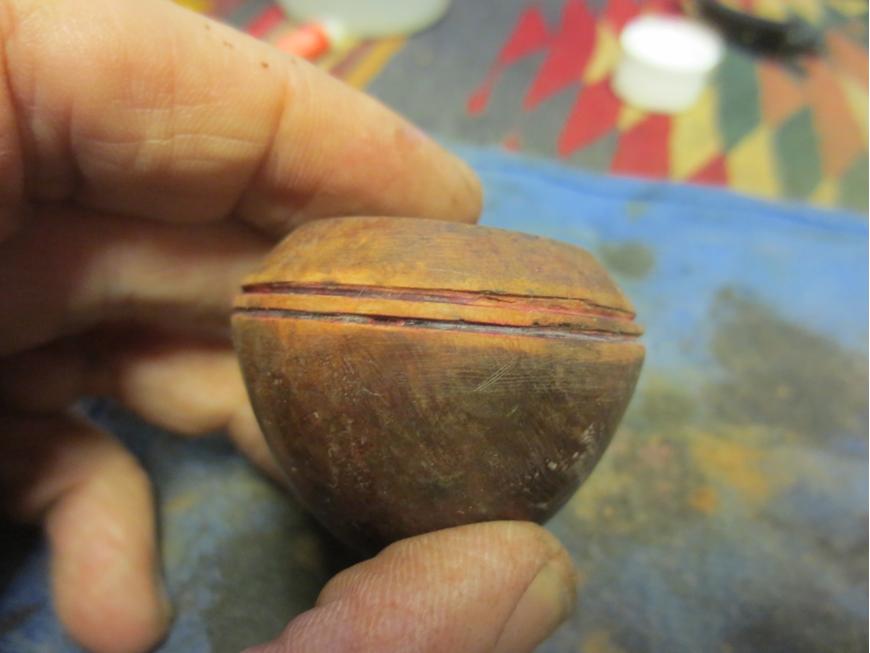
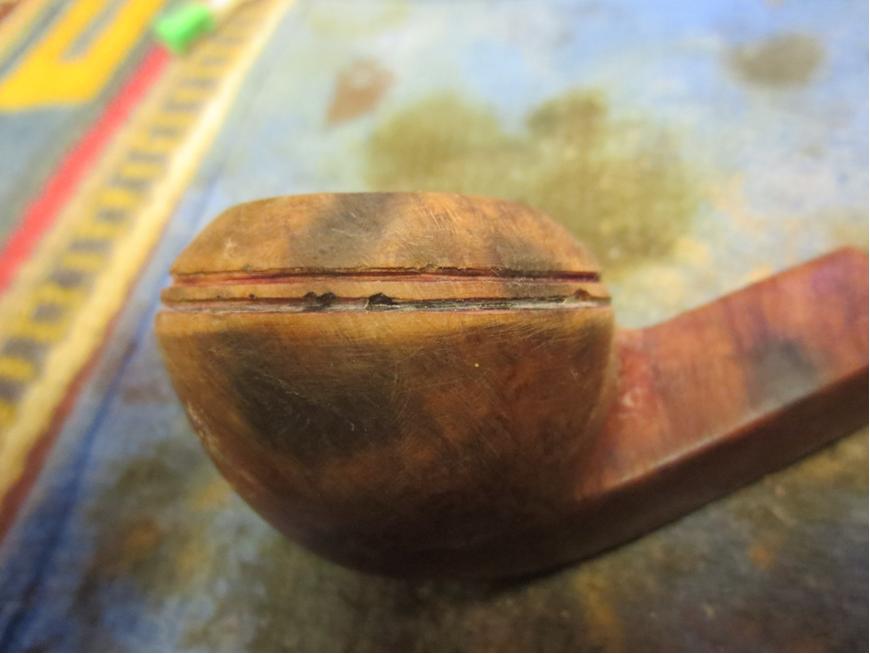
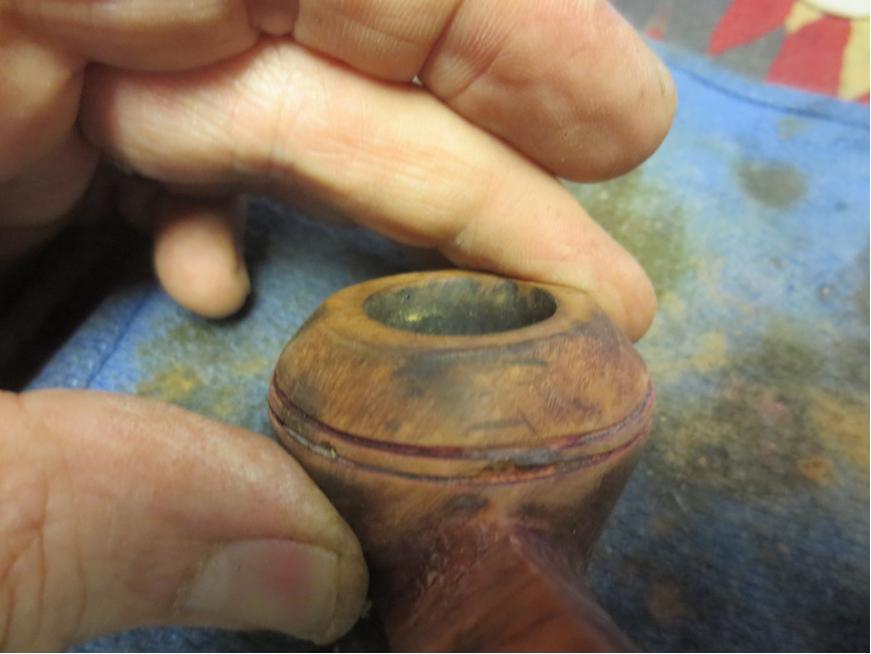
I took some close up photos of the bowl to give a better picture of what I had to work with on this one. You can see from the photos the issues that I pointed out above. The ring was badly damaged and rough. The bowl was out of round and the rim was damaged. The finish was spotty and grimy.Dunhill5

Dunhill6

Dunhill7

Dunhill8

Dunhill9 
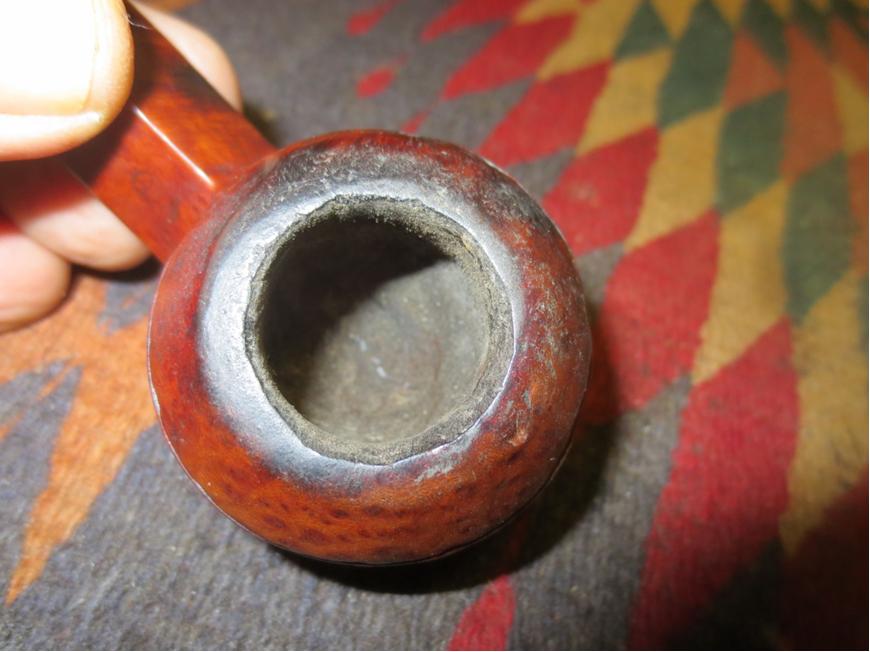
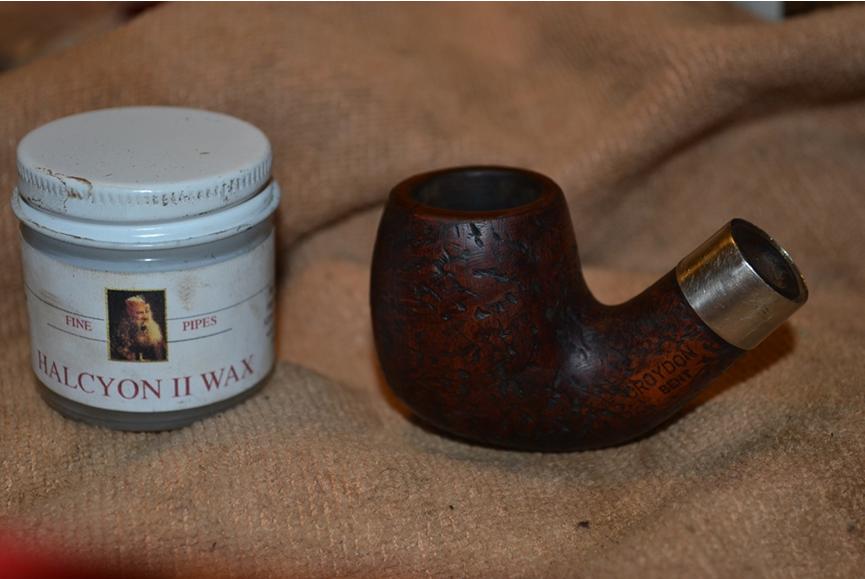
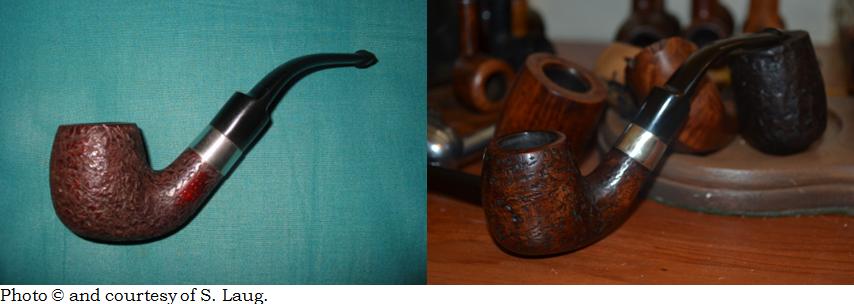
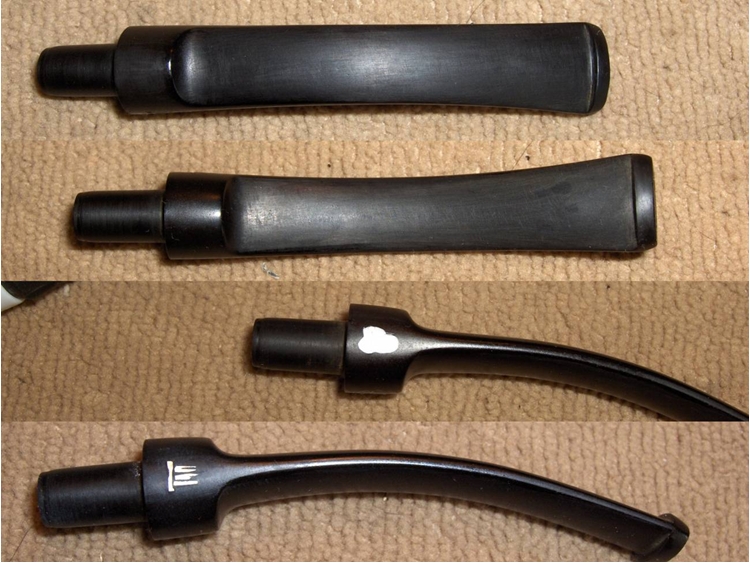
I have one newer Bruyere in my rack so I kind of knew the colour this pipe should have been and it was not even close any more. I did a bit of searching on the web to see if I could find a finish chart and also one that would confirm the shape number that I was “speculating” on. I have included the next two charts for the information that I gleaned from them. The Bruyere was more dark/reddish coloured than this one was and the faint number was indeed 08 which was called a Bent Rhodesian.dunhill_pipe_finishes

dunhill_shape_size_chart 
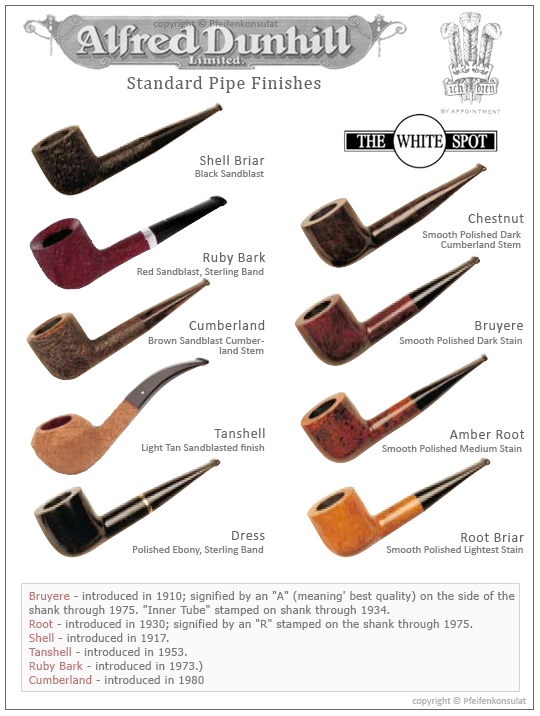
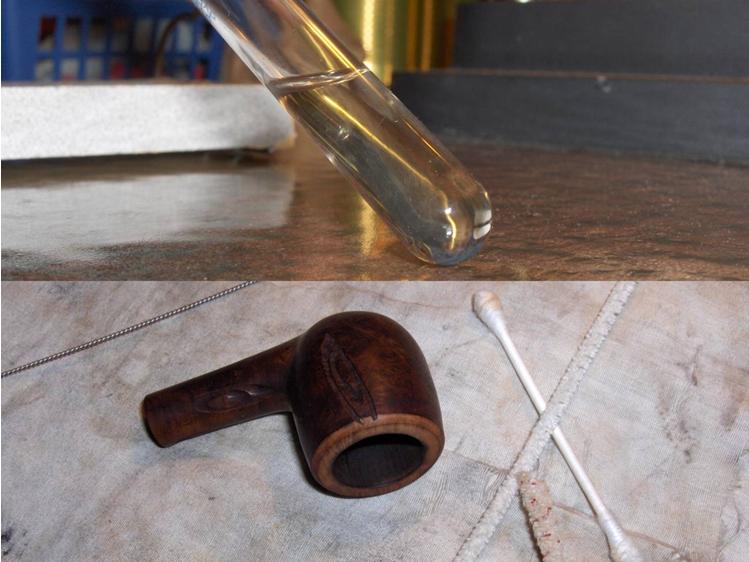
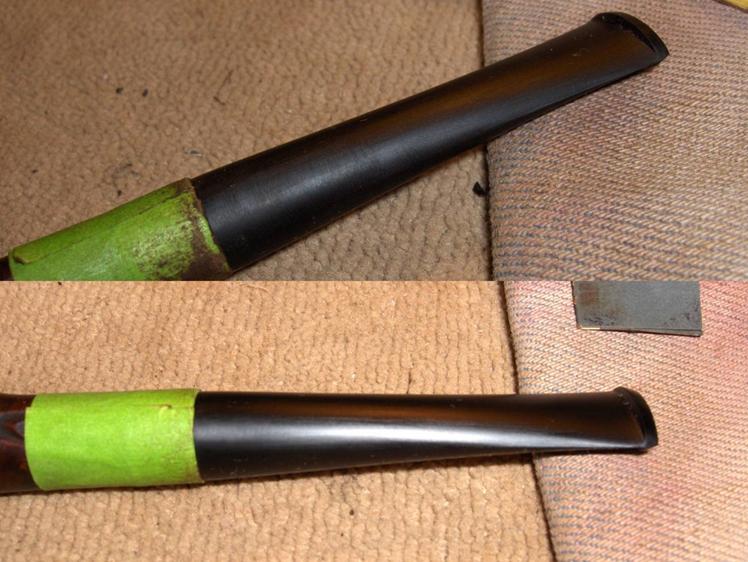
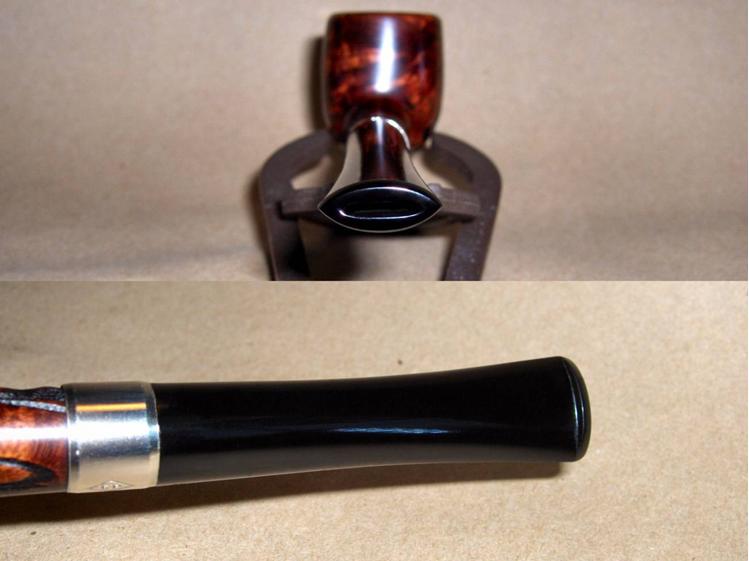
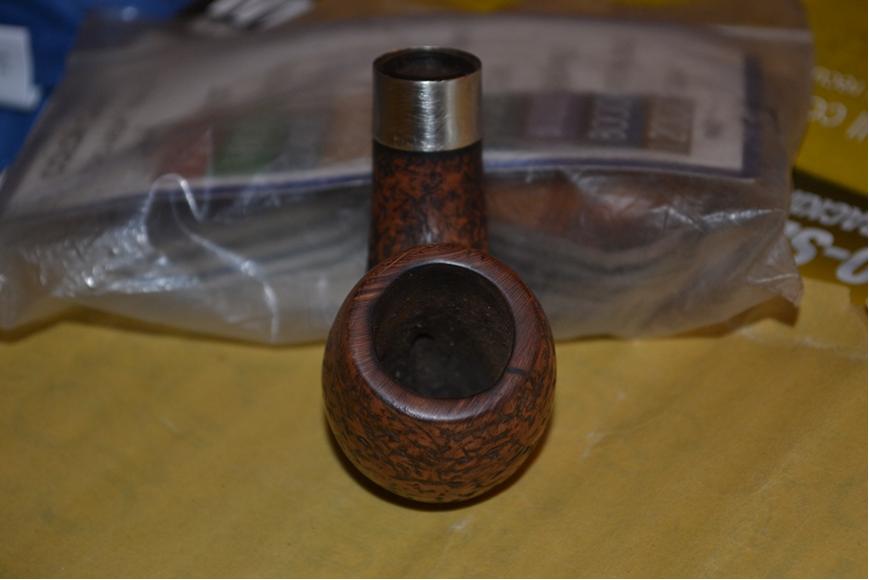
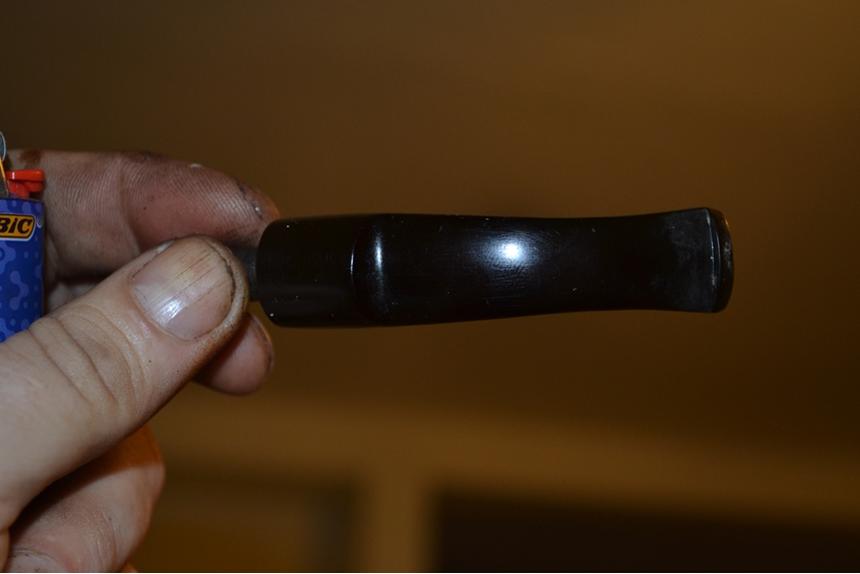
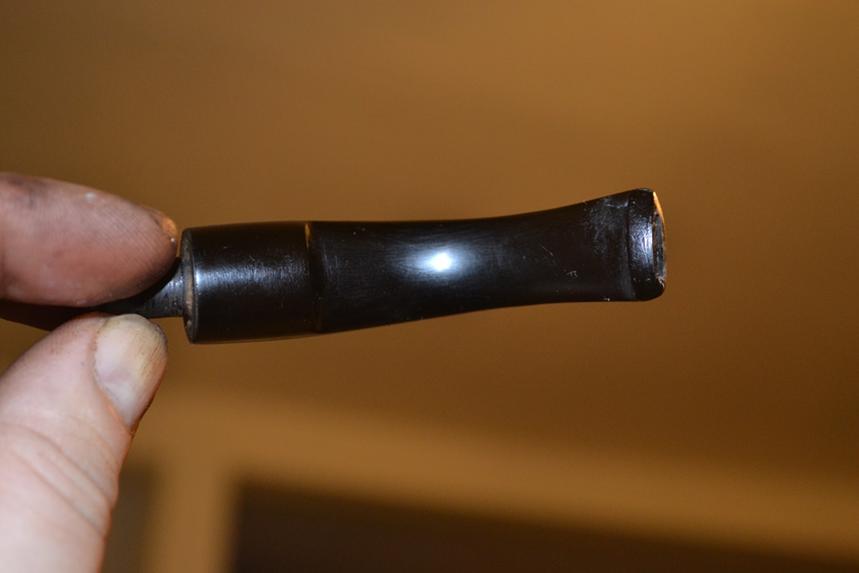
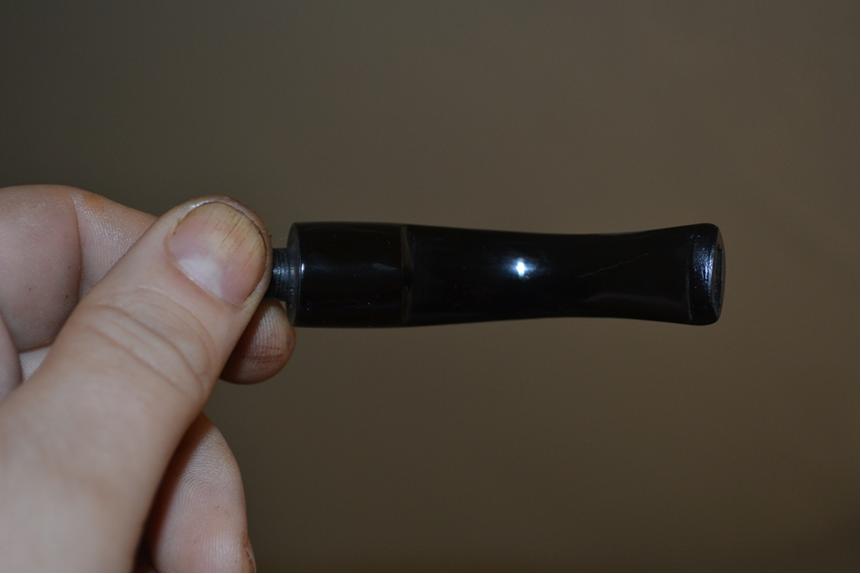
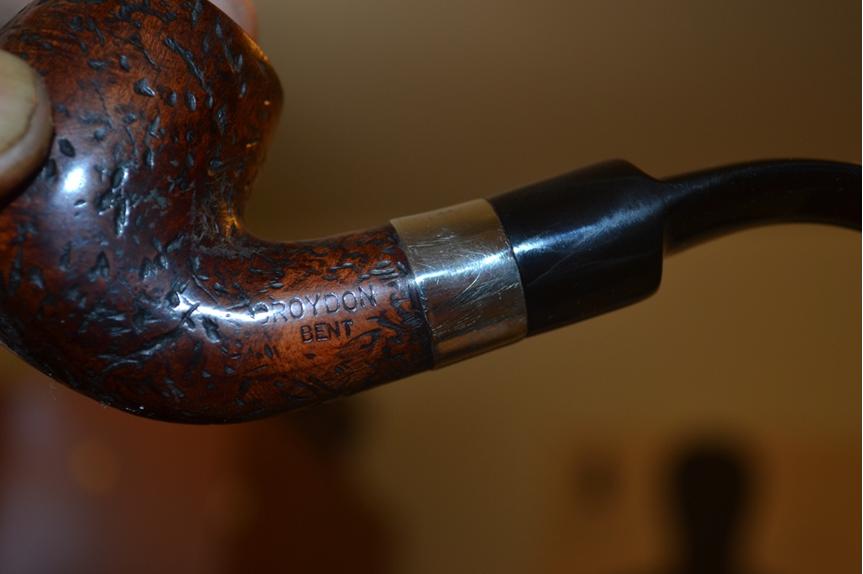
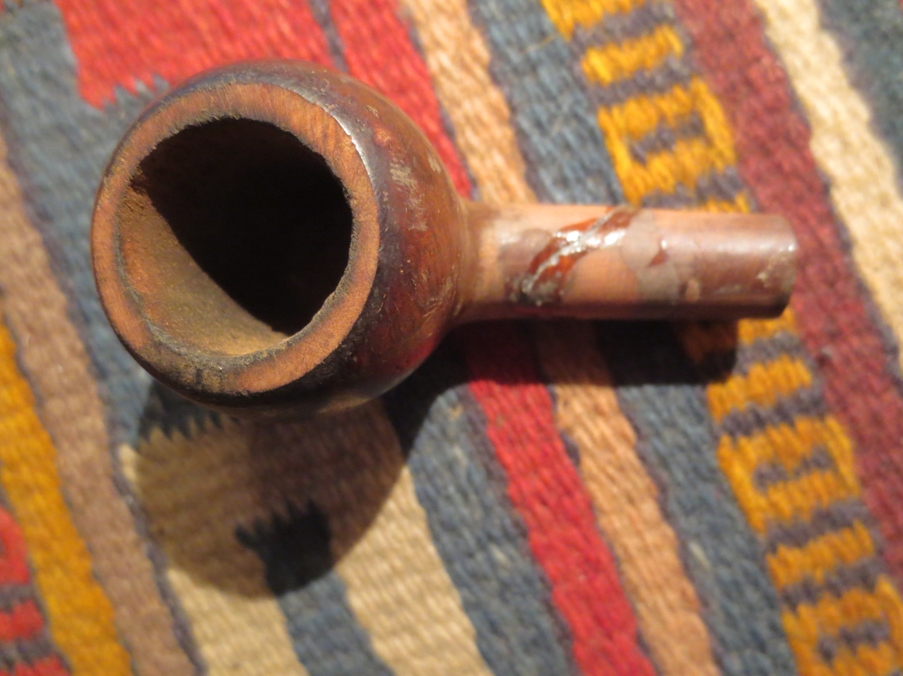
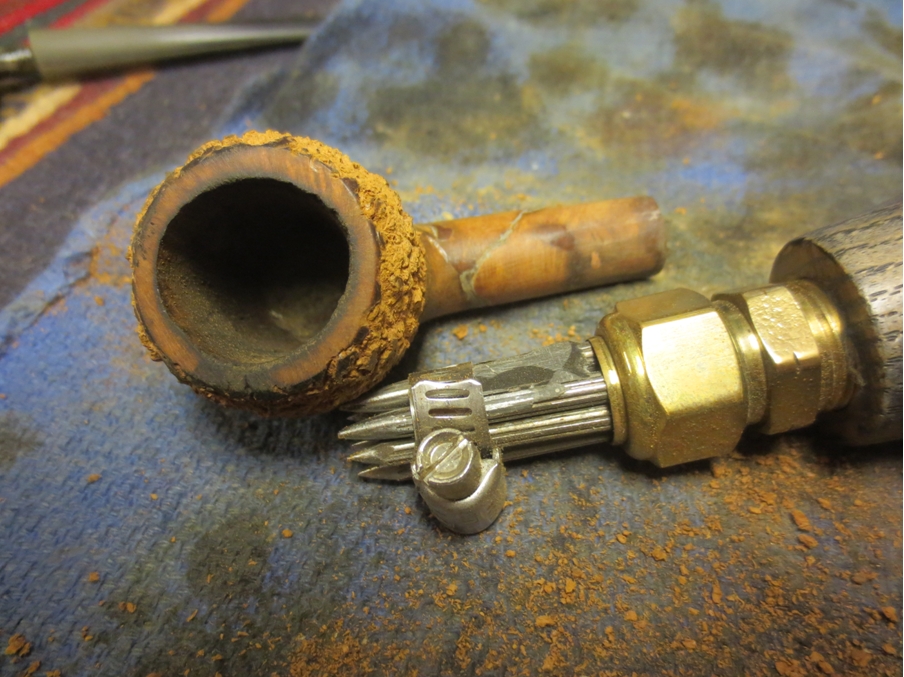
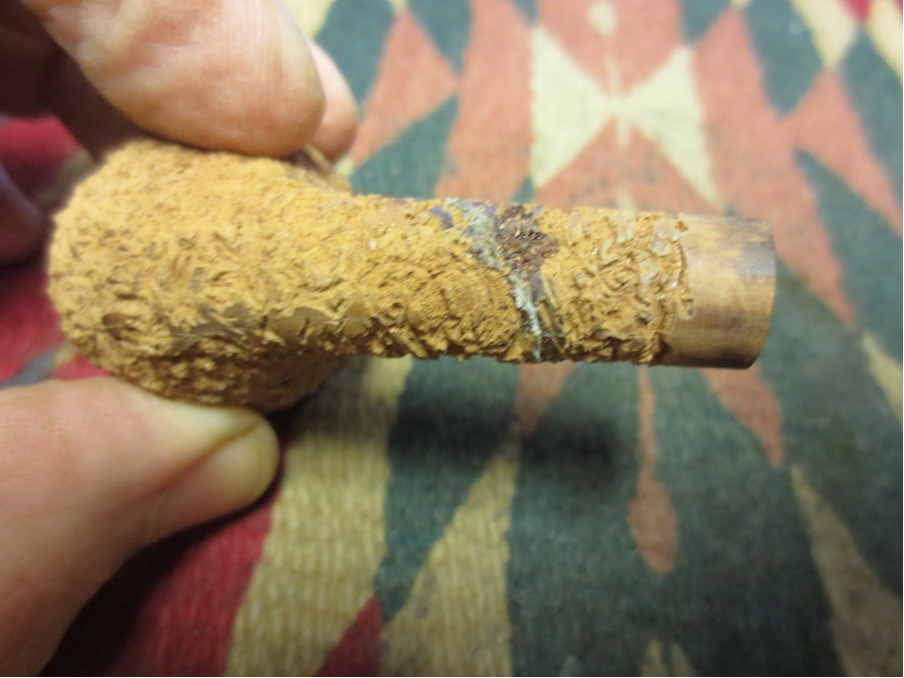
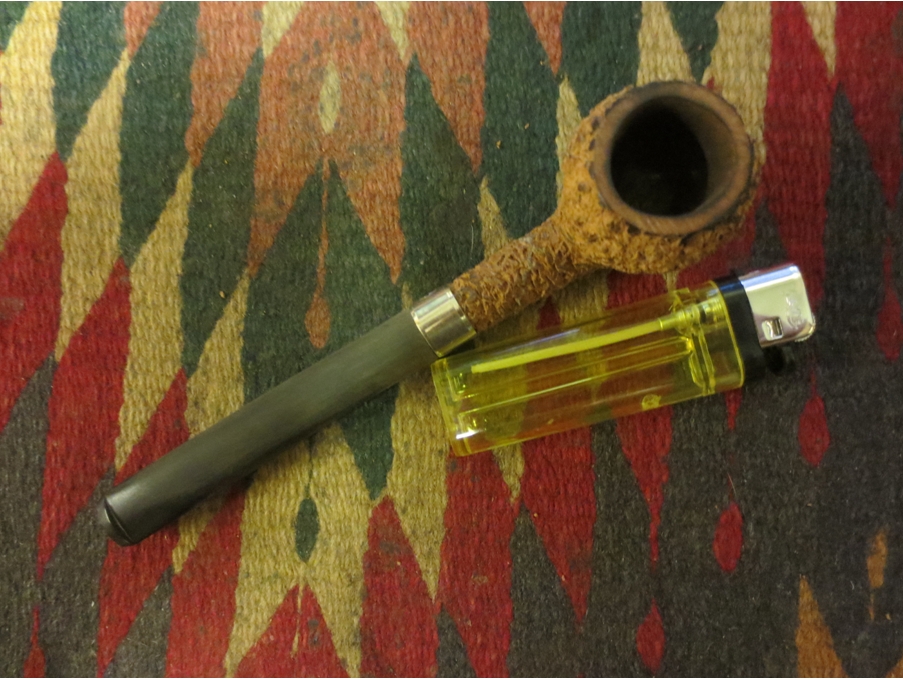
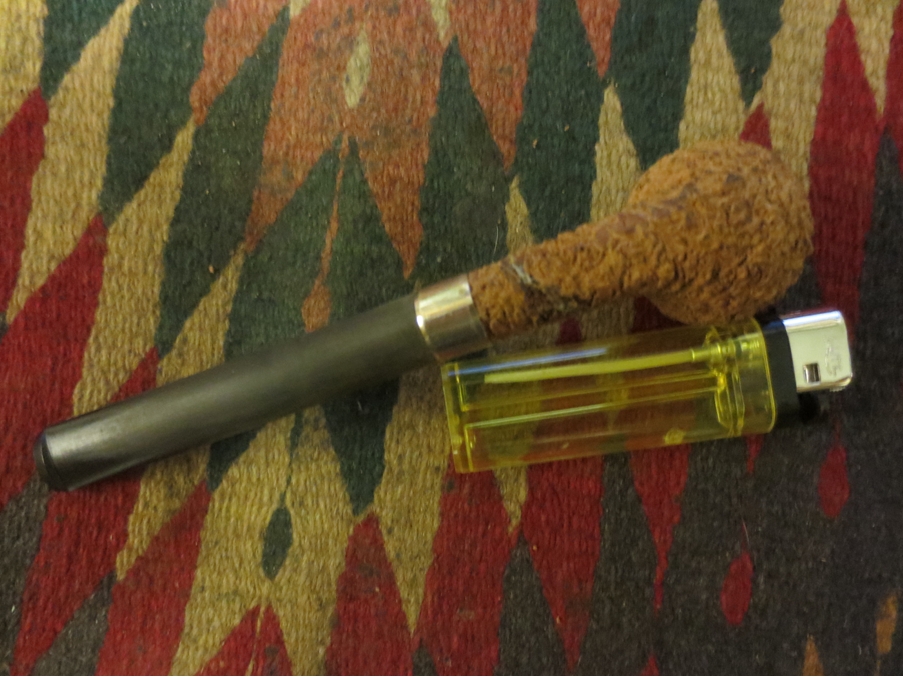
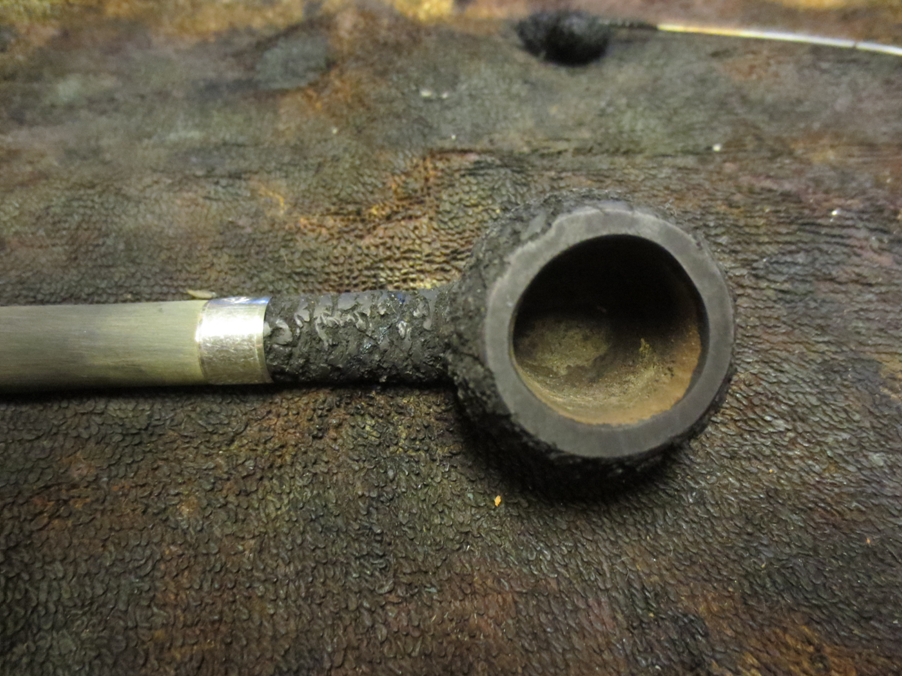
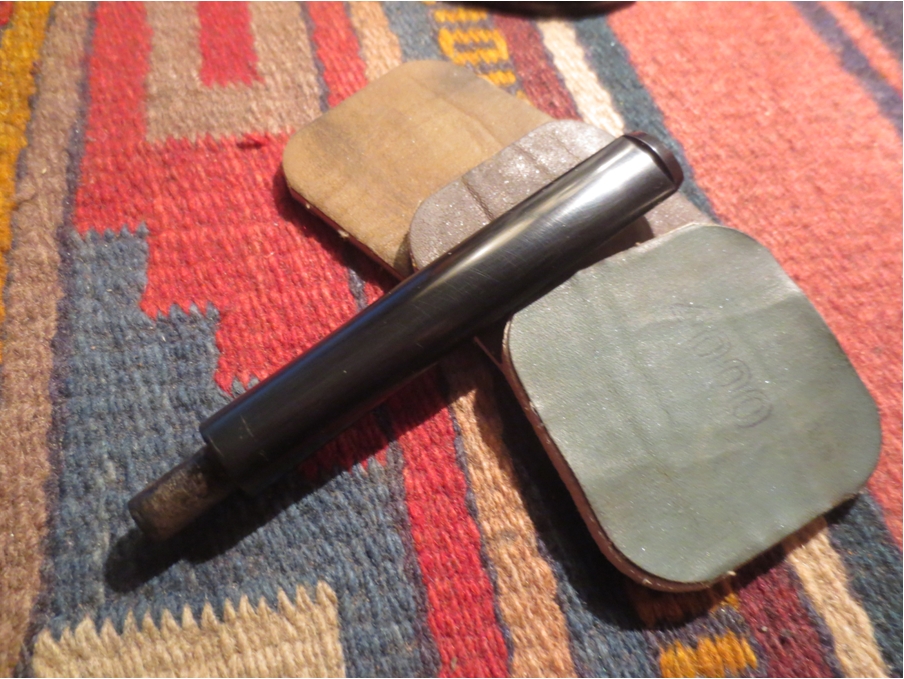
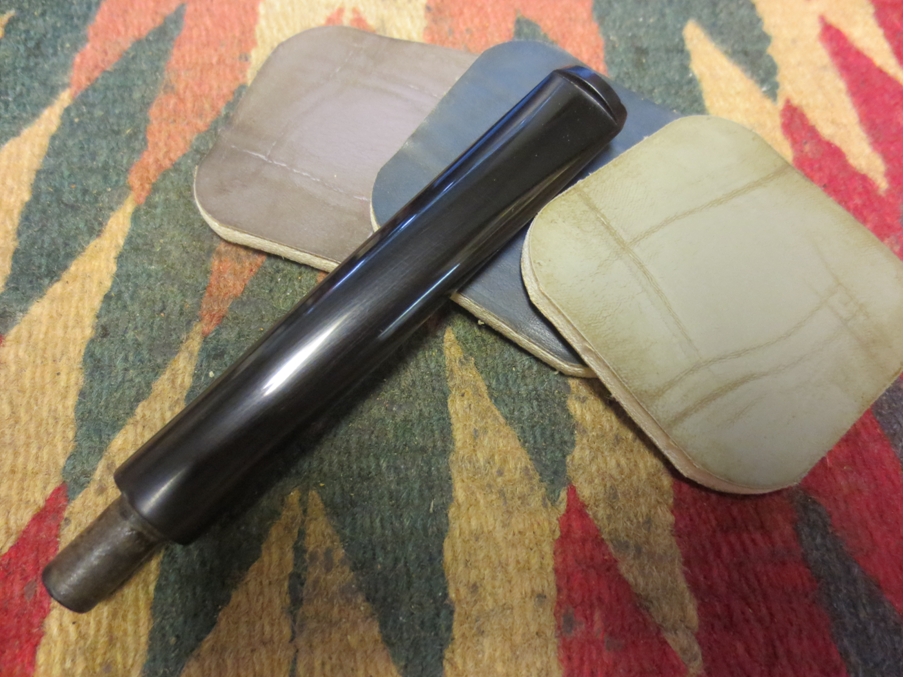
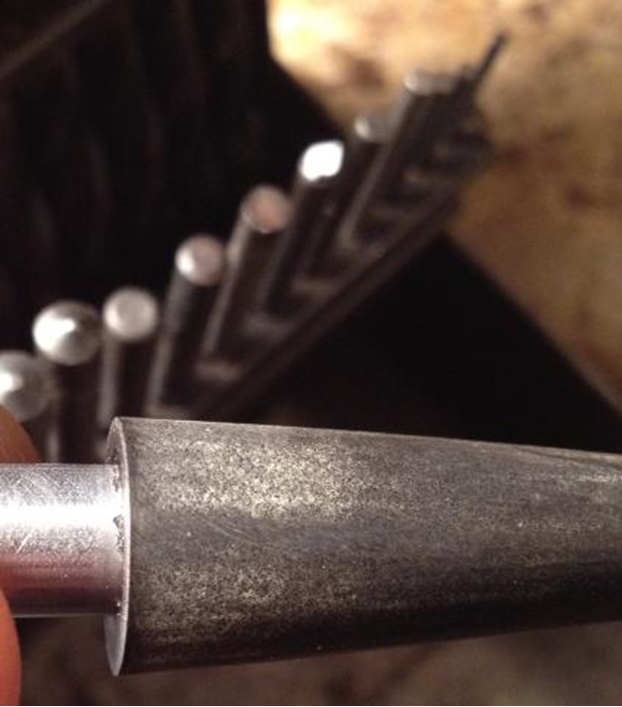
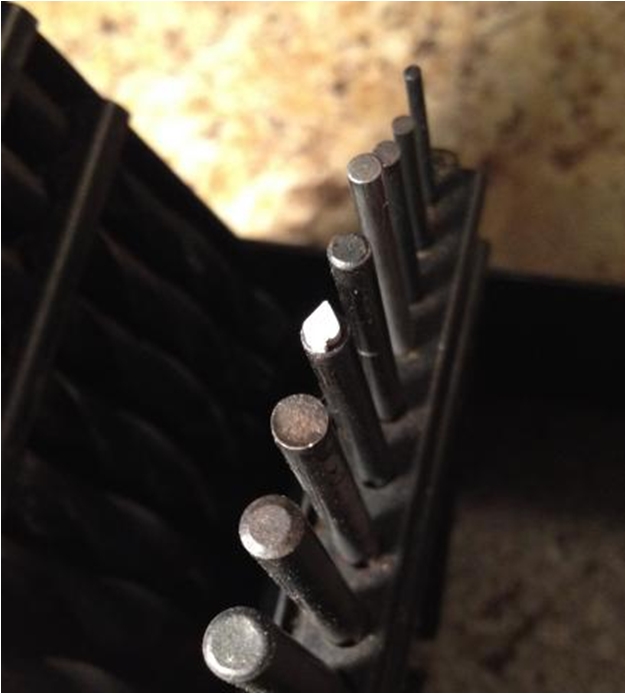
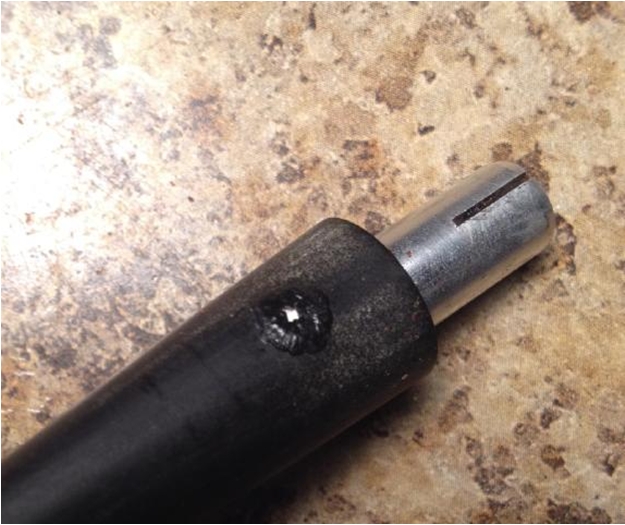
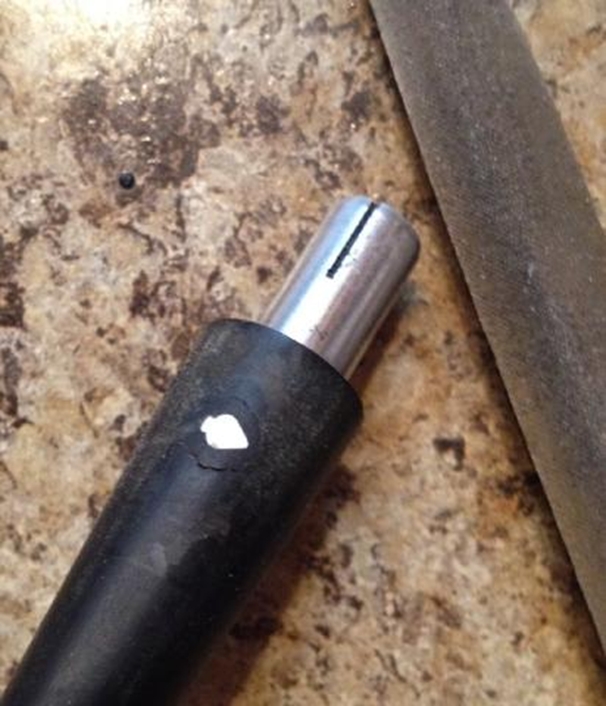
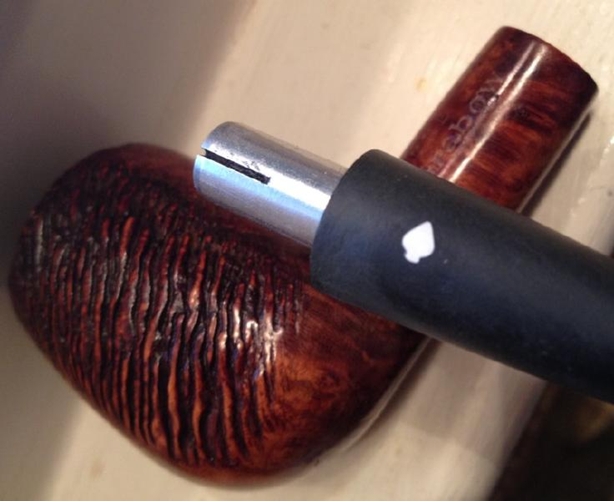
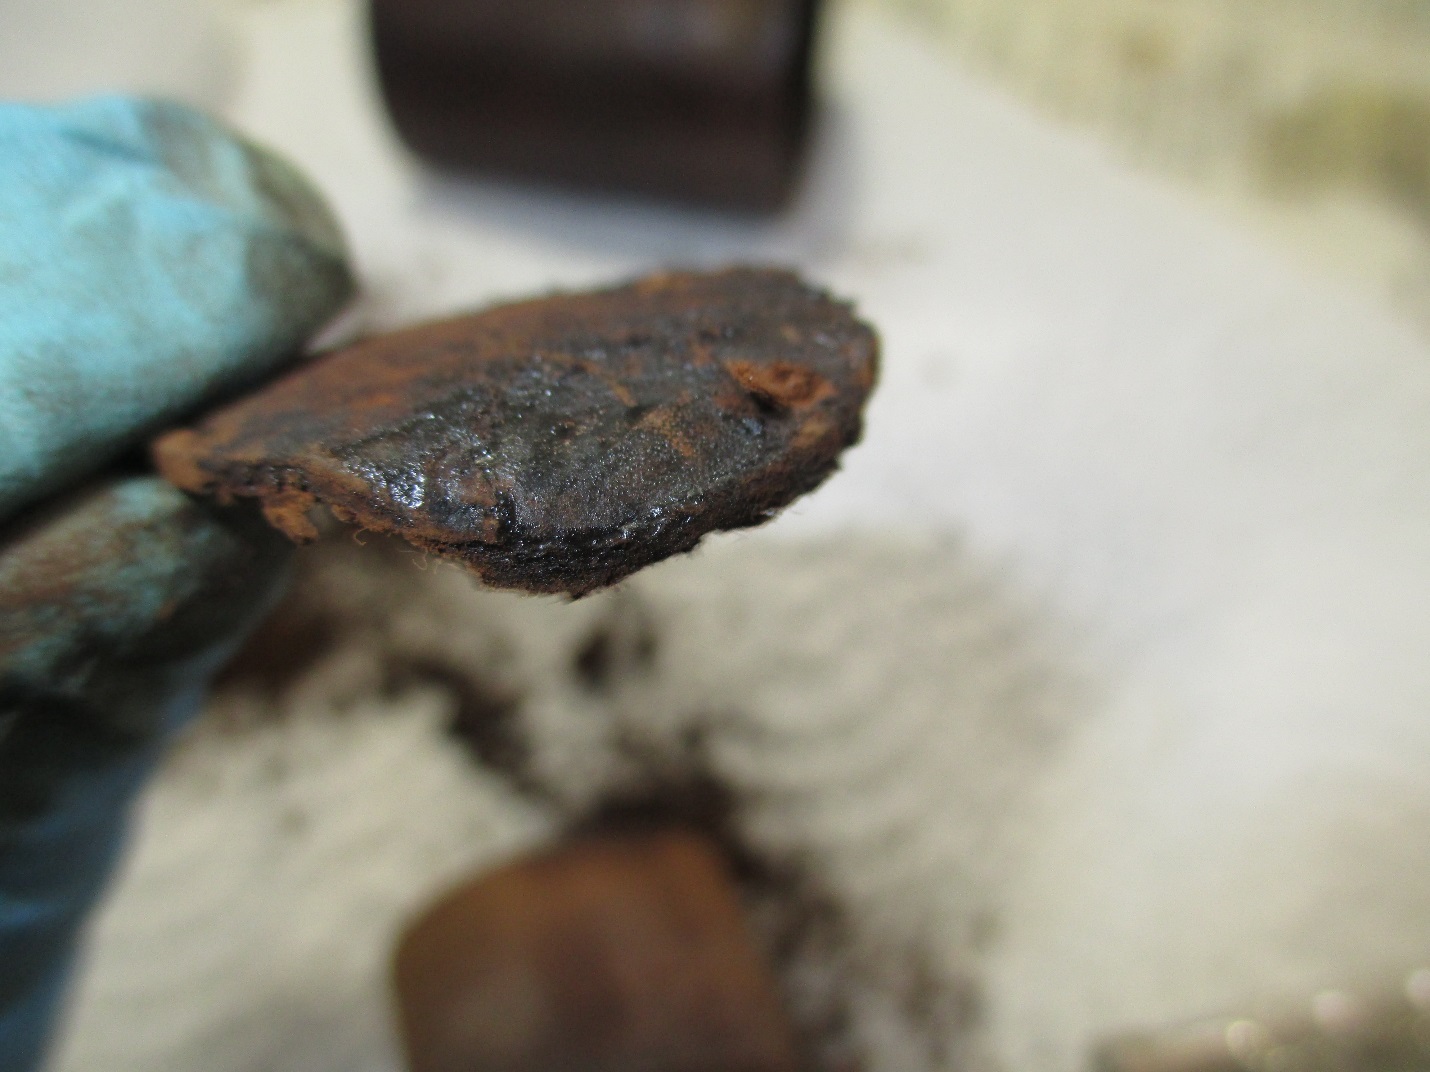
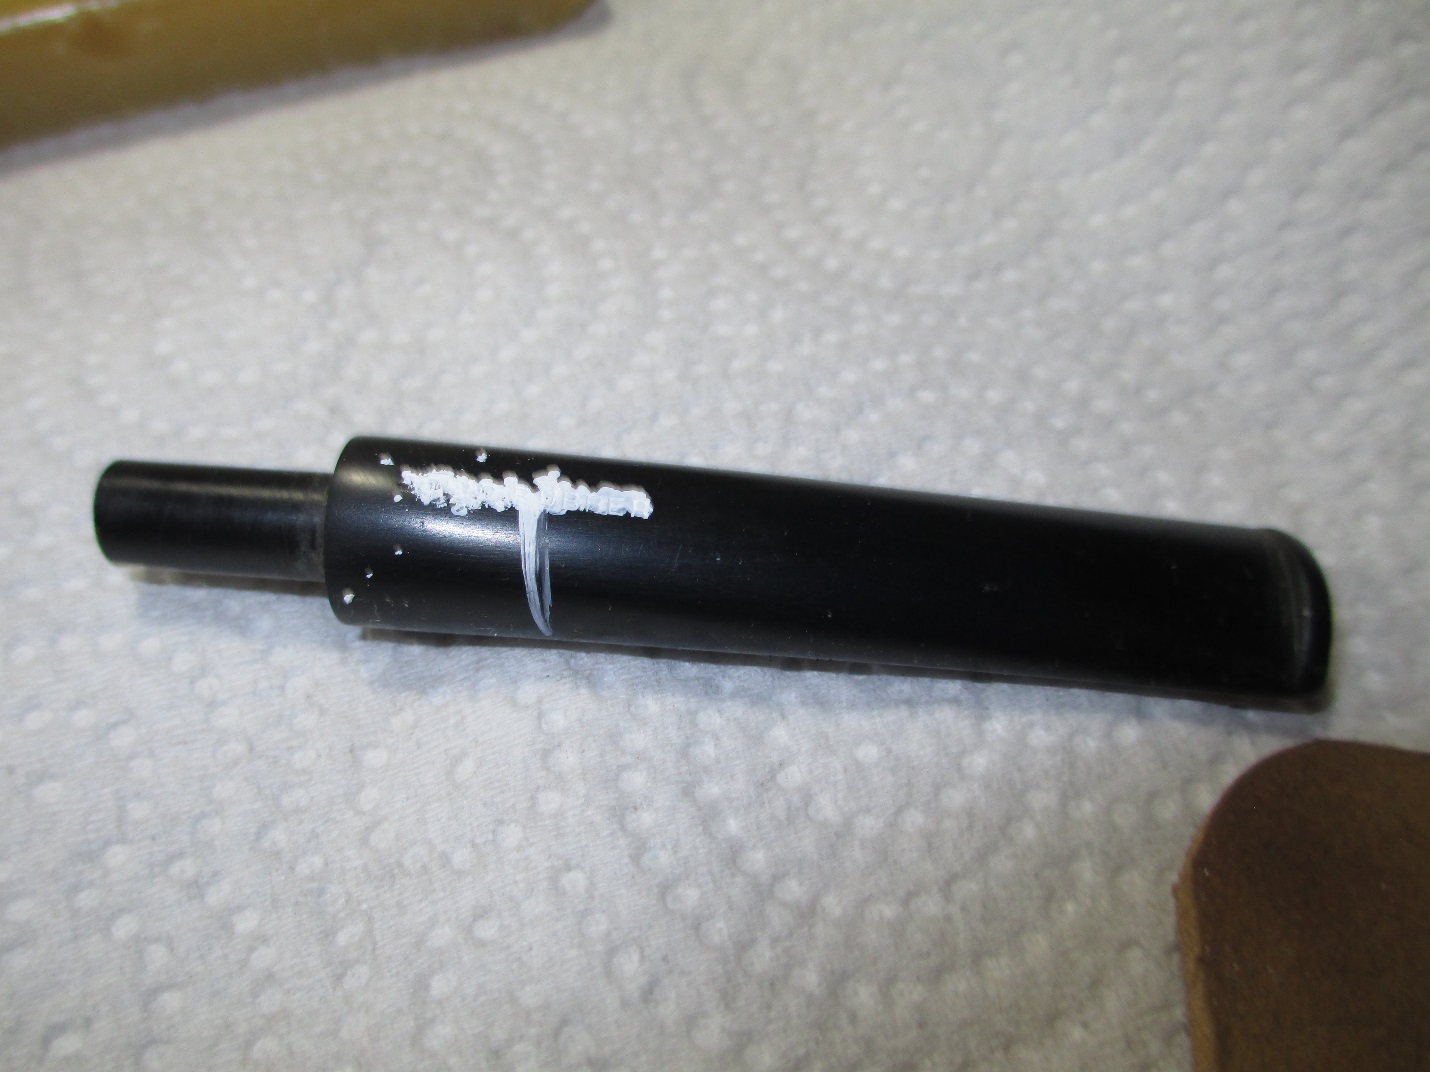
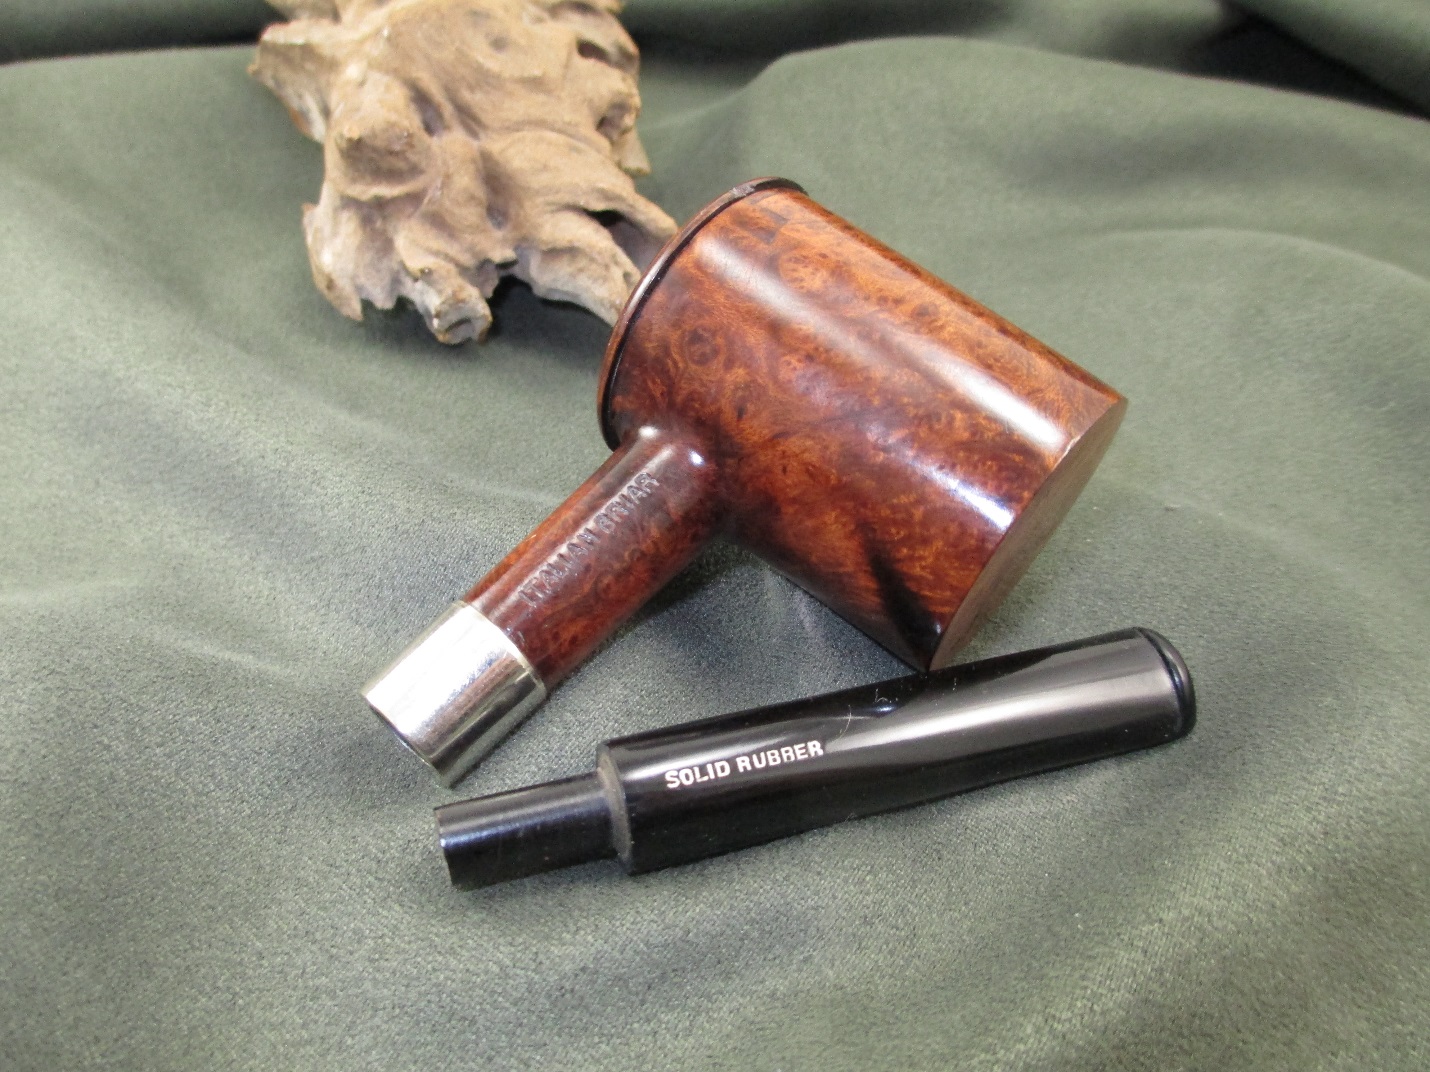
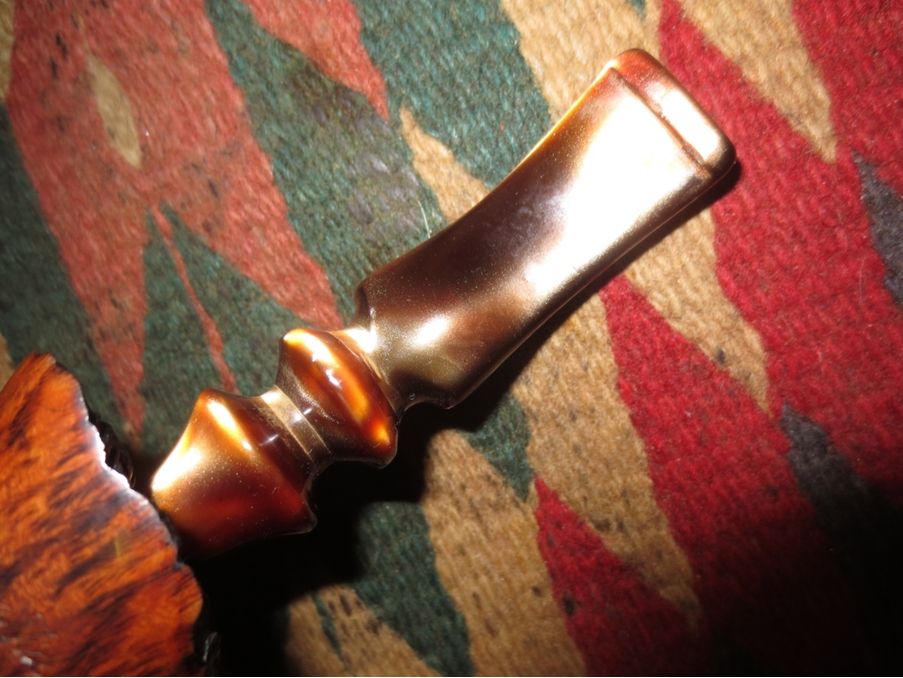
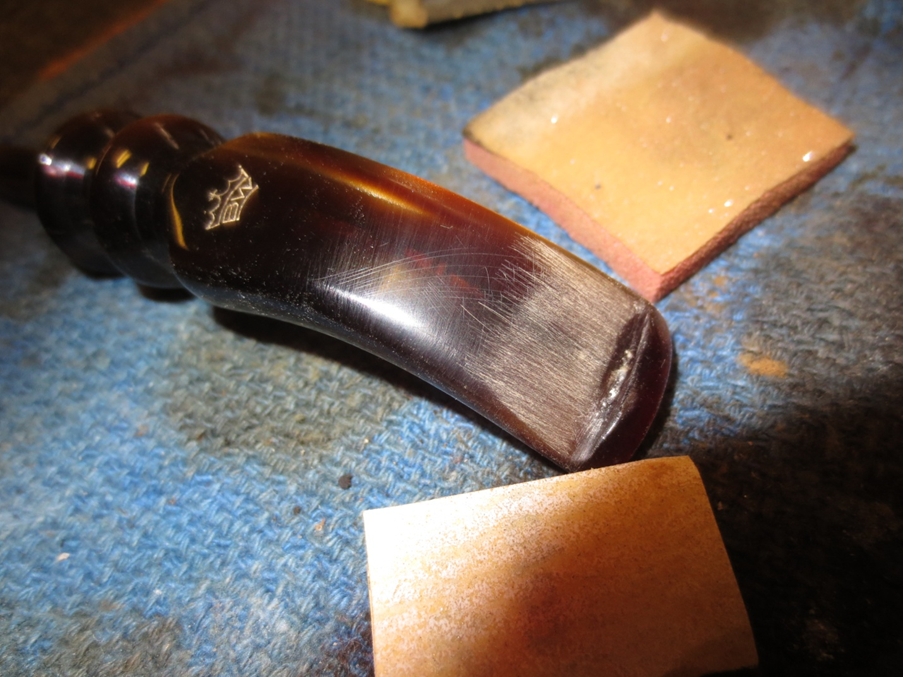
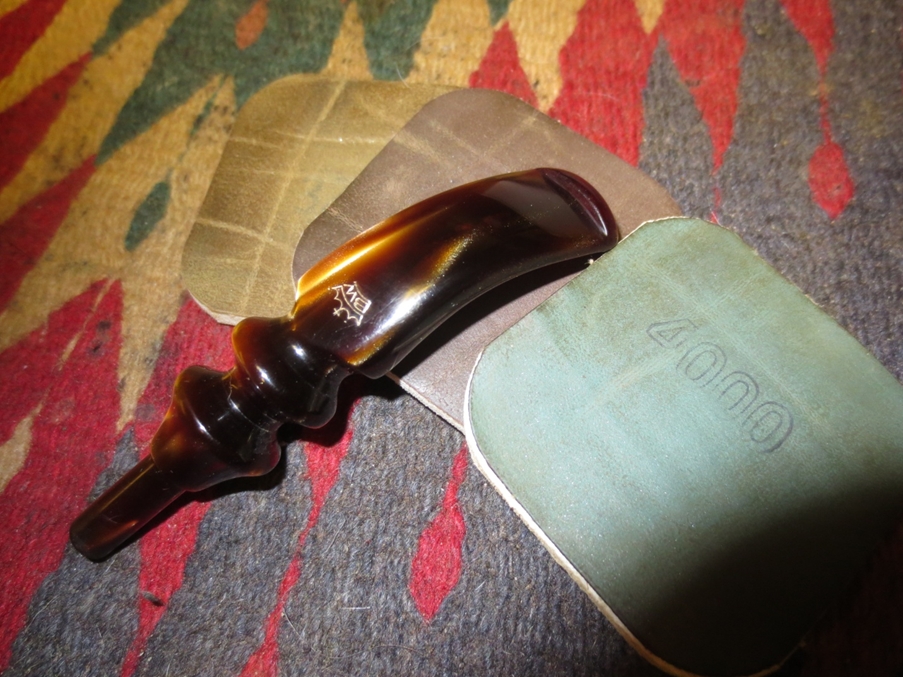
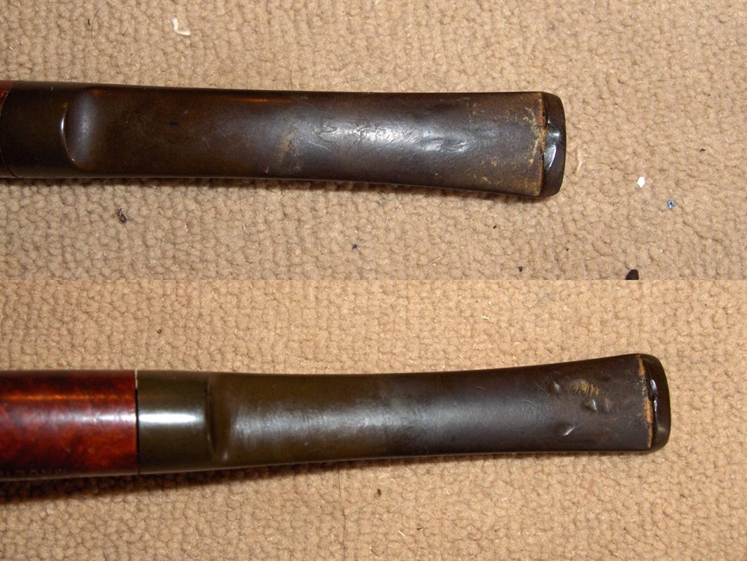
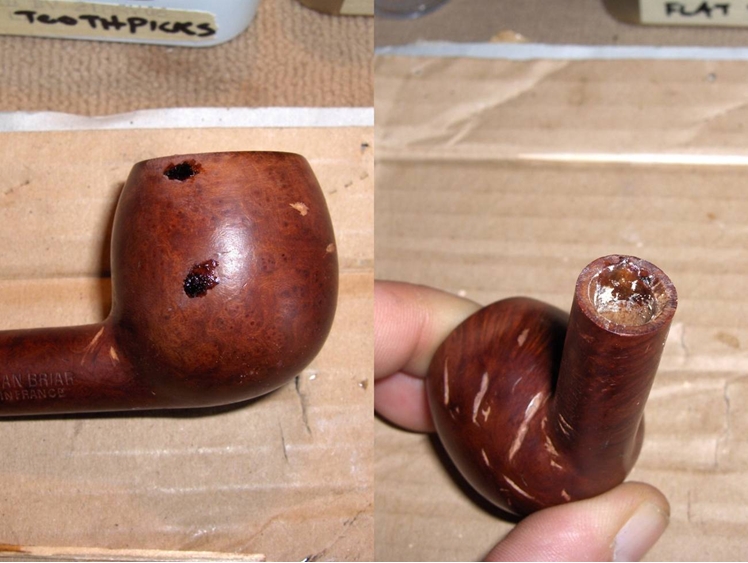
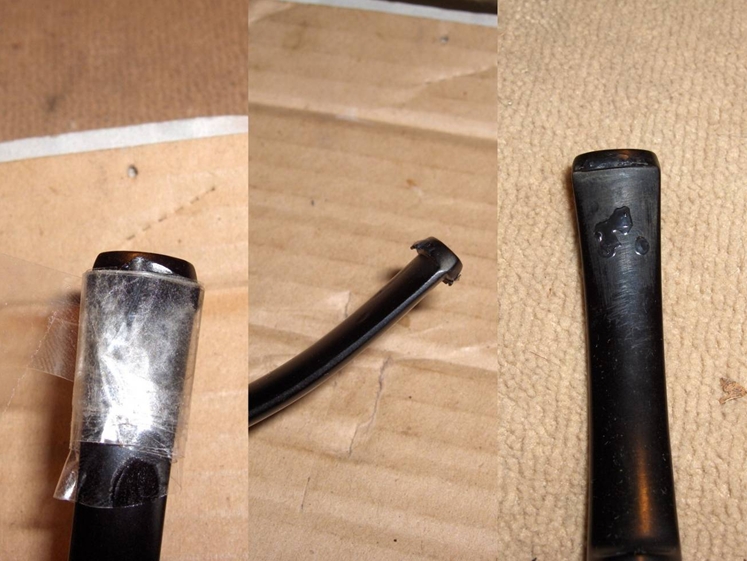
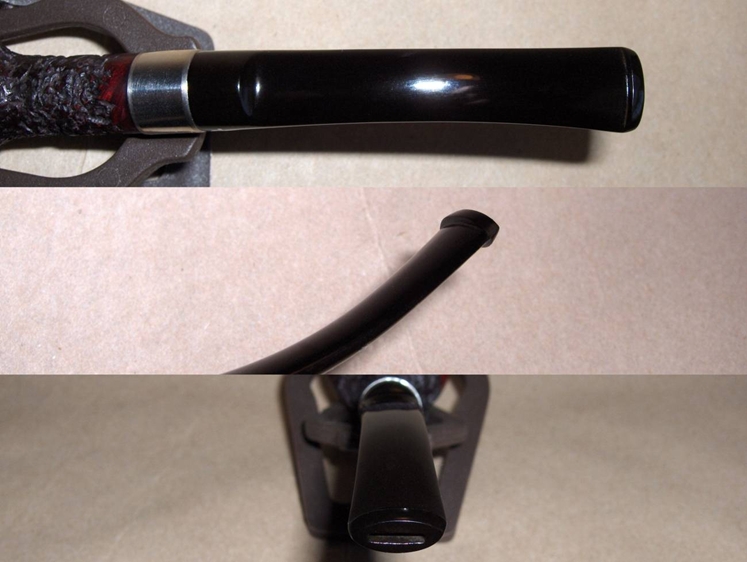
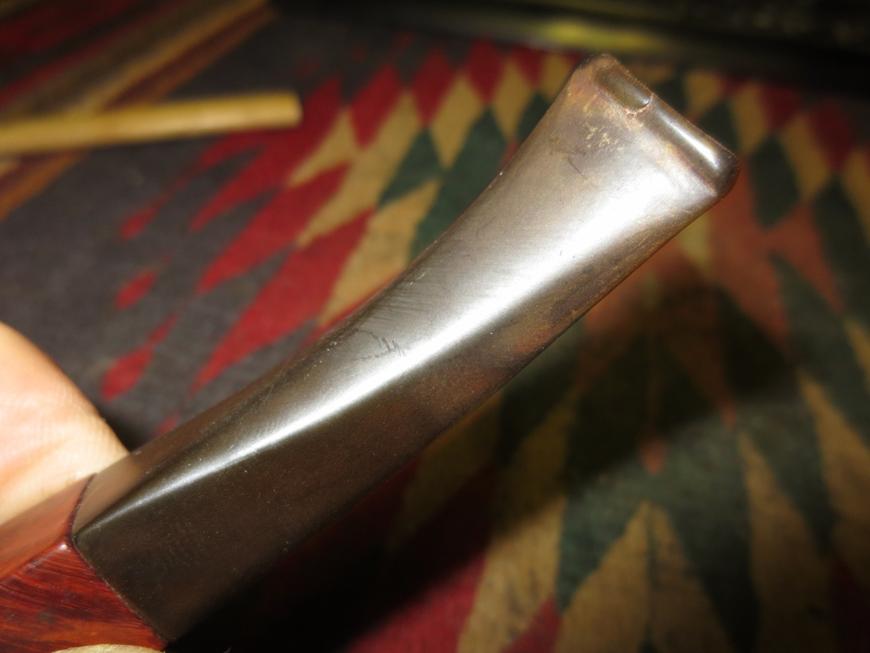
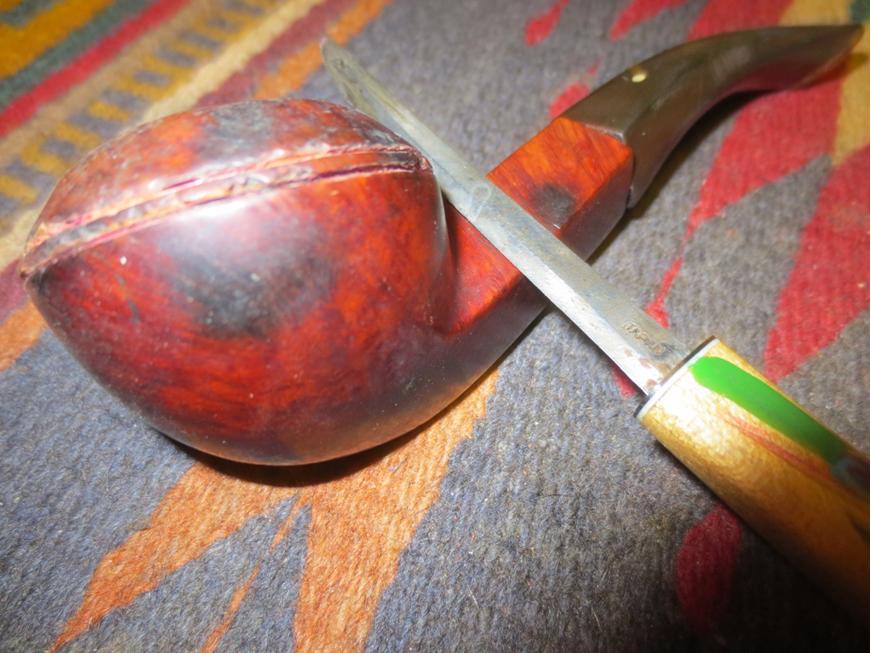
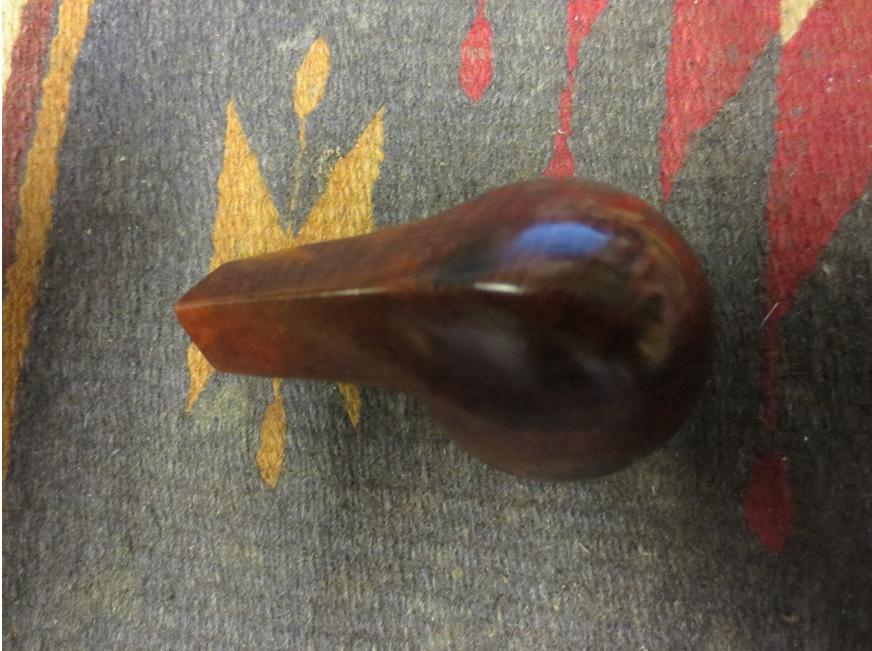
The next two photos show the stem in some closeup photos. I wanted to show the oxidation and the split in the button on the bottom side of the stem. The fit in the shank was also worn. The tenon was sloppy fitting and could be wobbled side to side and up and down.Dunhill10

Dunhill11 
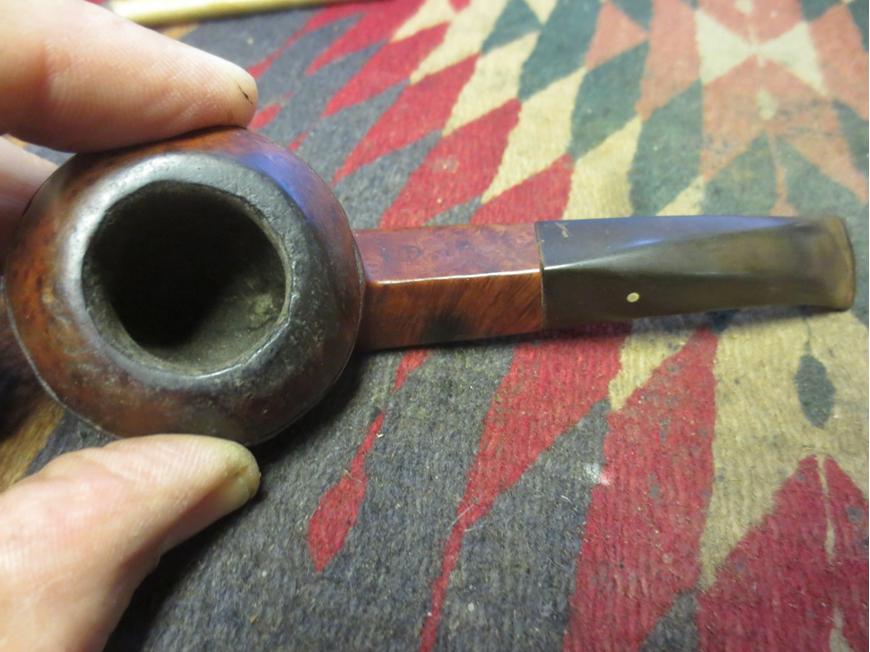
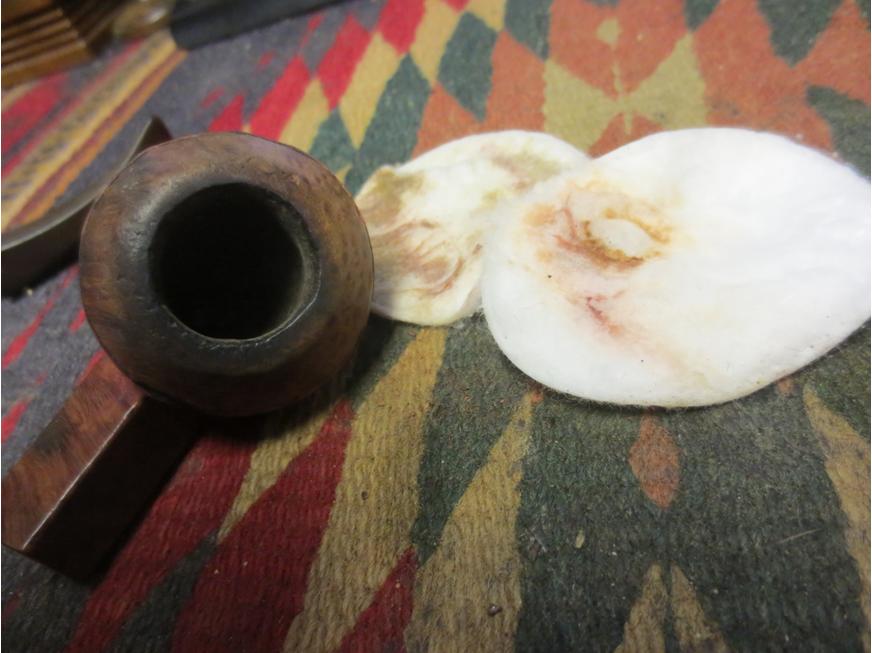
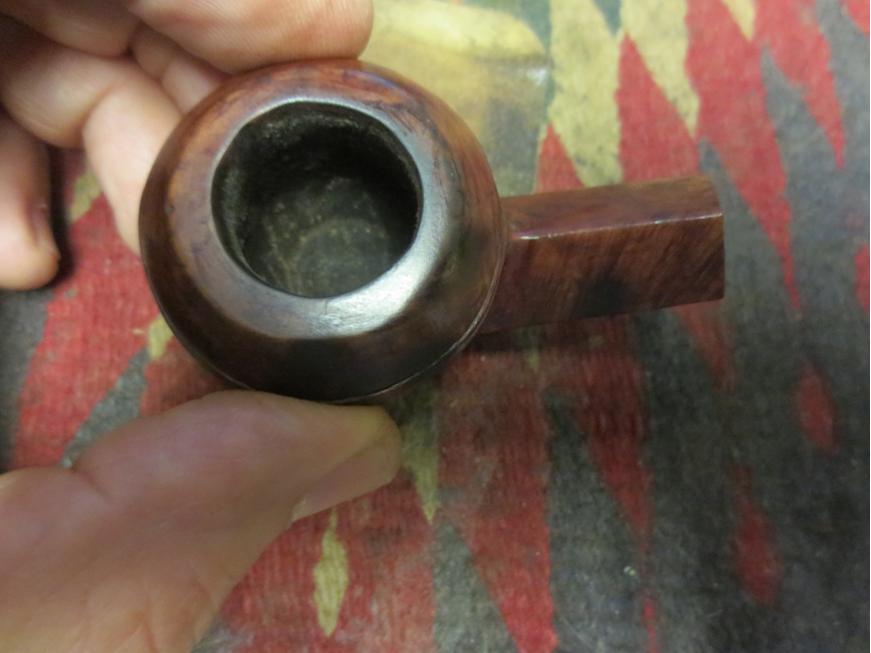
I put off working on this one for a long time, choosing rather to work on pipes that I had some sense of what the finished product would look like. I had no idea if I could restore this one to any semblance of its original state let alone bringing back to “BEST QUALITY” which the Dunhill catalogue above said that Bruyere pipes stamped with the large “A” were supposed to be. This one was a challenge and I really drug my feet and postponed the test as long as possible. After looking at the photos above I hope that I have communicated the state of the pipe I was going to deal with. I have made no mention at all of the state of the inside of the shank and the stem. It was a mess as well – a thick black crud covered the inside of the airway in the stem and the shank and the mortise was almost clogged with the almost petrified tars of years of neglect.

So, yesterday I decided was the day to tackle this pipe. I had mowed the yard and done my weekend chores and needed some down time to relax. I suppose many of you would not call this relaxing but I still am under the illusion that it is restful…. Shhh don’t change my illusion please. I began with cleaning out the rings around the bowl. They were rough but they were also clogged with all kinds of debris. I used a sharp, thin blade pen knife that I have and use for this kind of thing. It works wonders and within a short time I had cleaned out the grime and the original red stain was showing in the bottom of the grooves.Dunhill12

Dunhill13 I scrubbed the bowl with cotton pads and acetone to remove the grime and the damaged finish. I also wanted to see the extent of the burn marks on the bowl, rim and shank. I wanted to see if they went deeper than the surface. Knowing that would help me decided what to do to address them.Dunhill14

Dunhill15

Dunhill16 
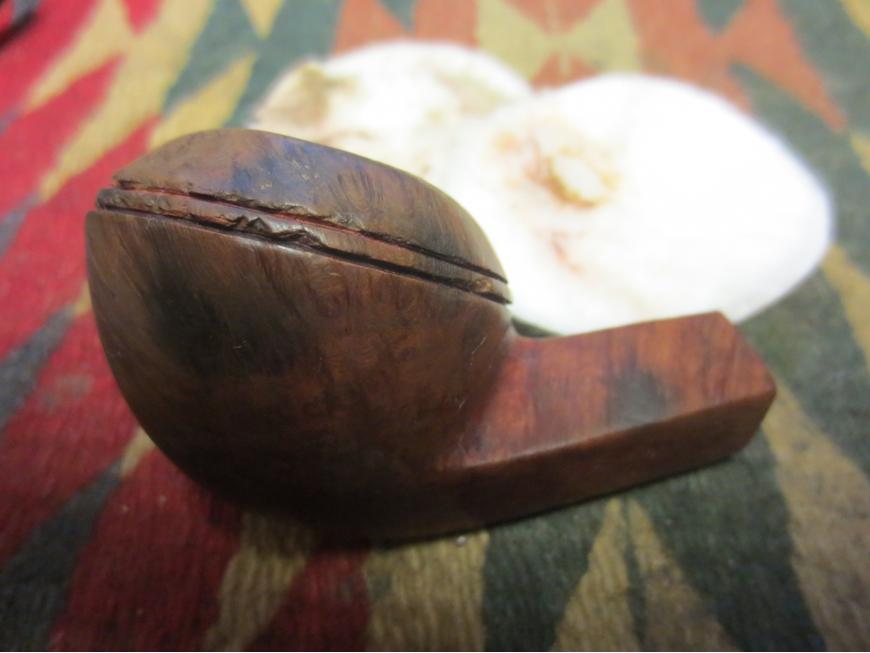
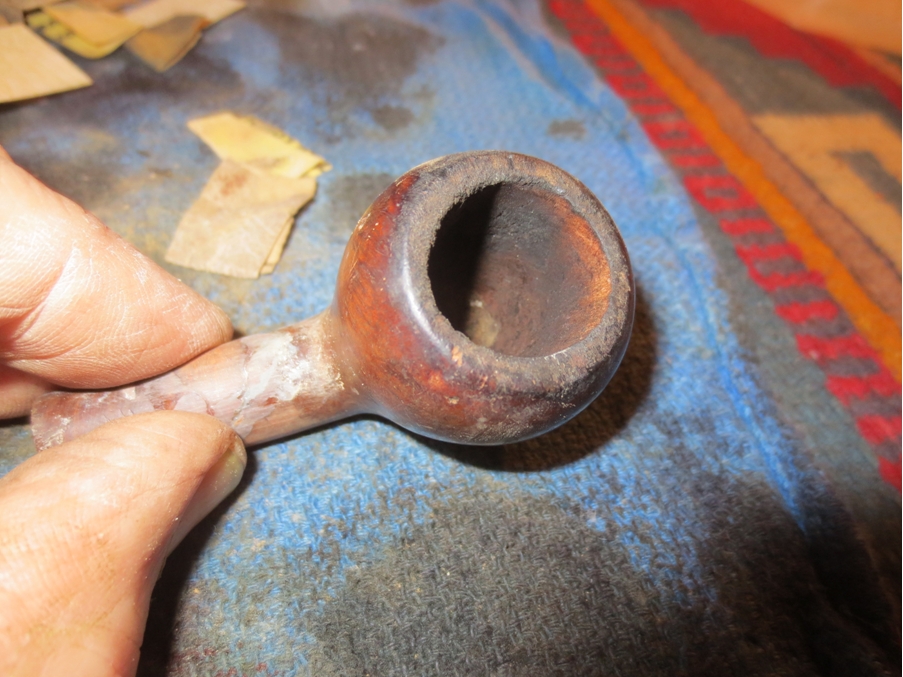
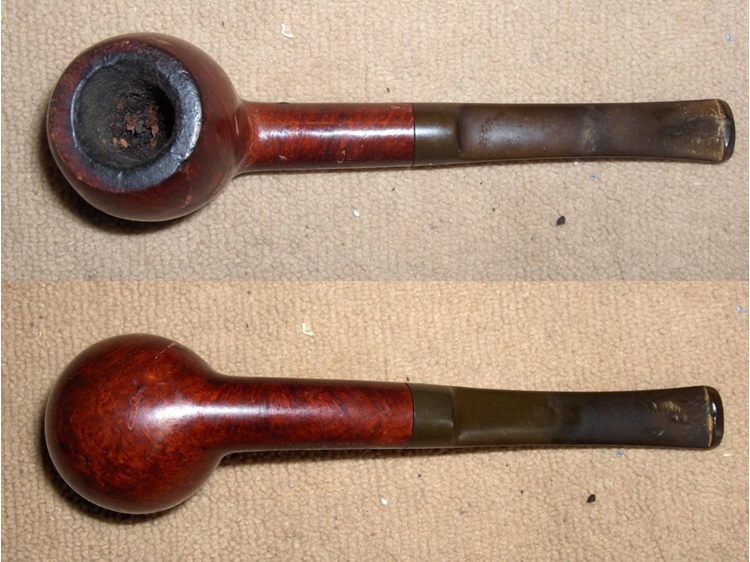
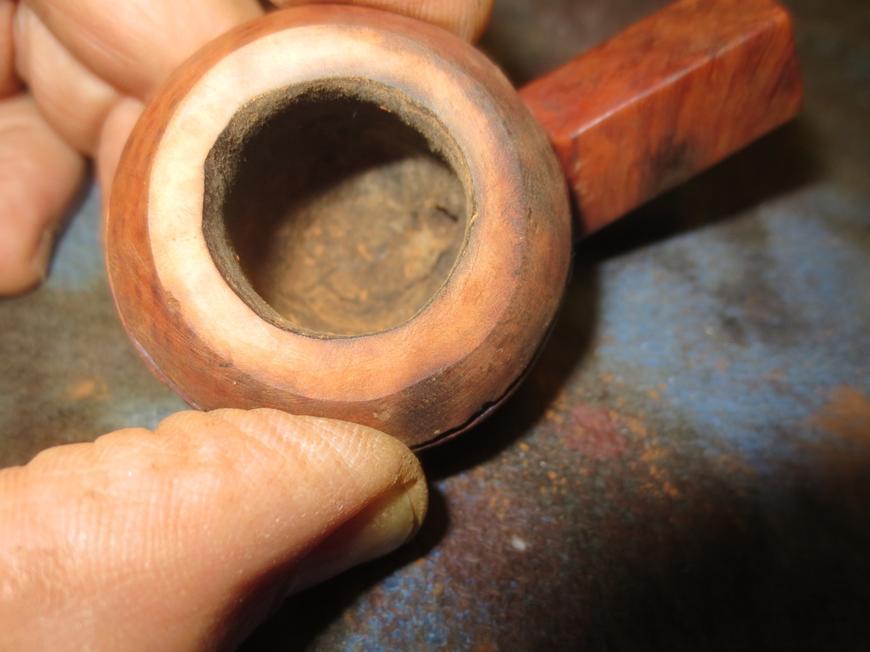
With the grime cleaned off the rim I could see what I had to work with. The bowl was in rough shape. It was out of round but the inner edges did not have any char or burn. The rim had lots of dents and dings from someone using it as a hammer.Dunhill17 
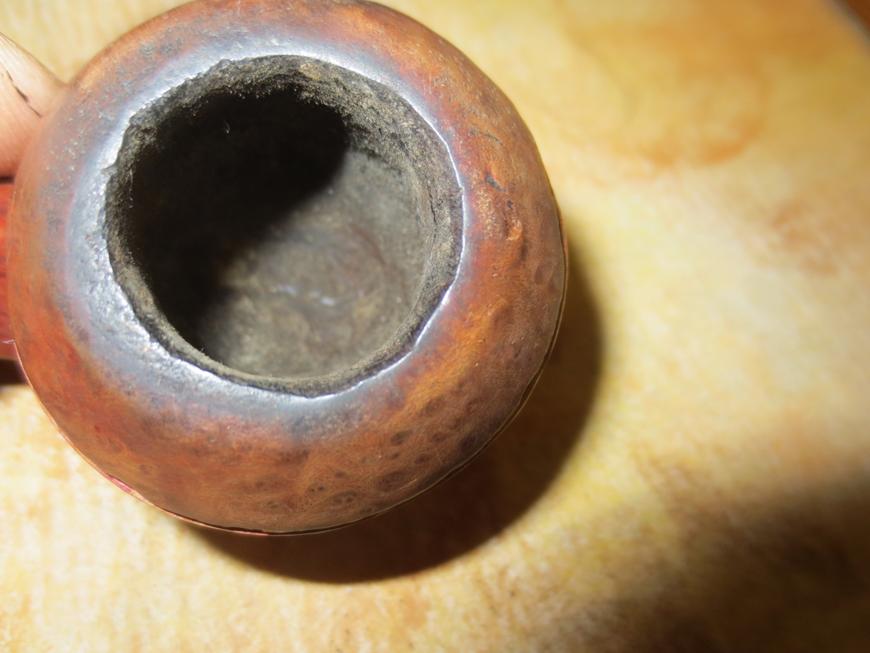
I decided to top the bowl to flatten out the rim and clean up as much of the damage as possible. I would then have to work on sanding the inner edge of the rim to smooth it out. I used the topping board with 220 grit sandpaper.Dunhill18

Dunhill19 
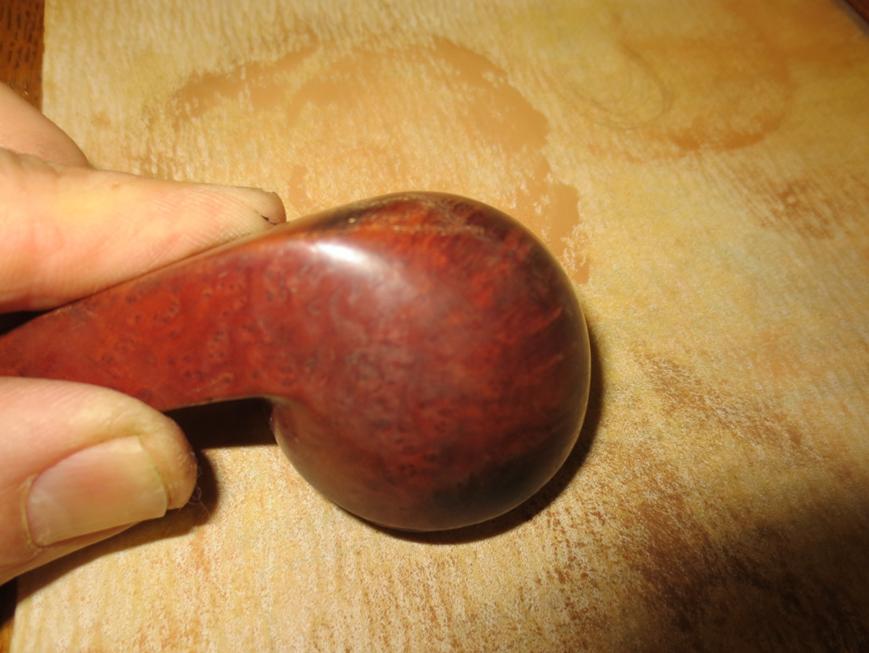
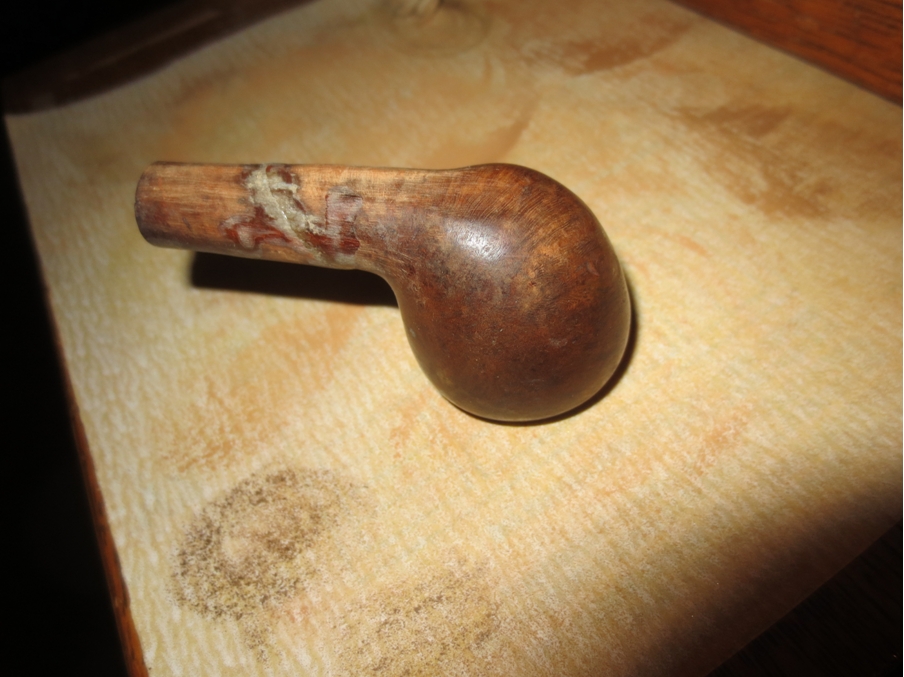
With the rim flattened out once more and the outer edge more evenly set on the bowl top it was time to address the inner edge of the rim. I used a folded piece of 220 grit sandpaper to clean up the edge. I was able to greatly improve the “roundness” of the inner edge. While it was not perfect it was far better than when I started.Dunhill20 
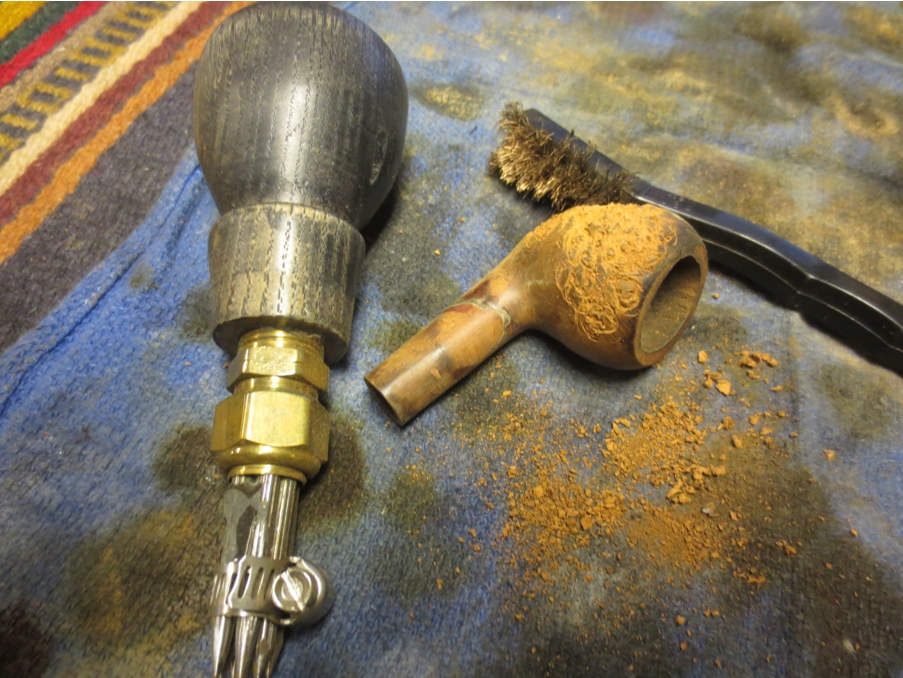
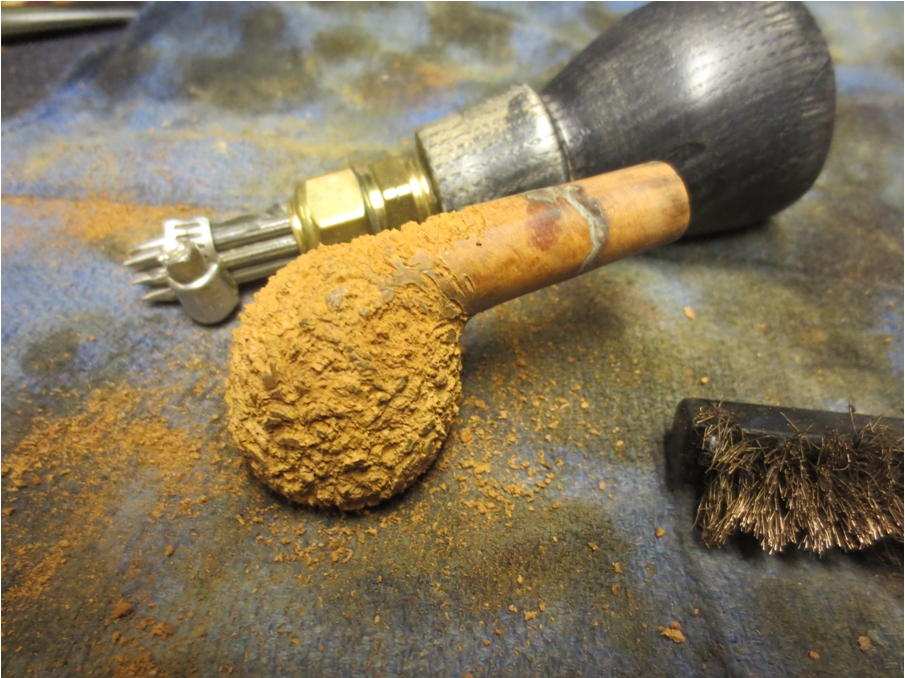
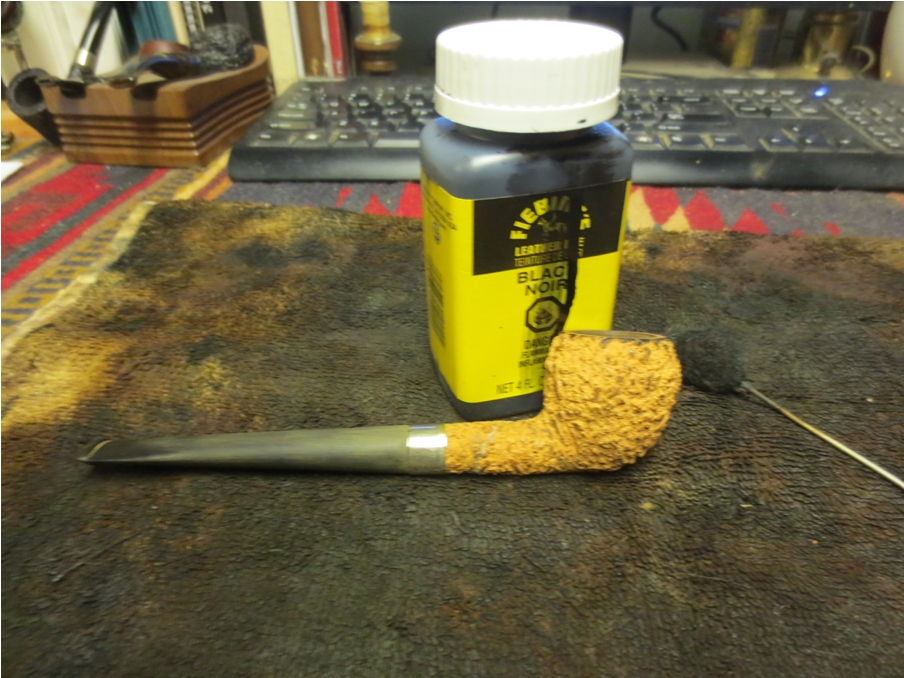
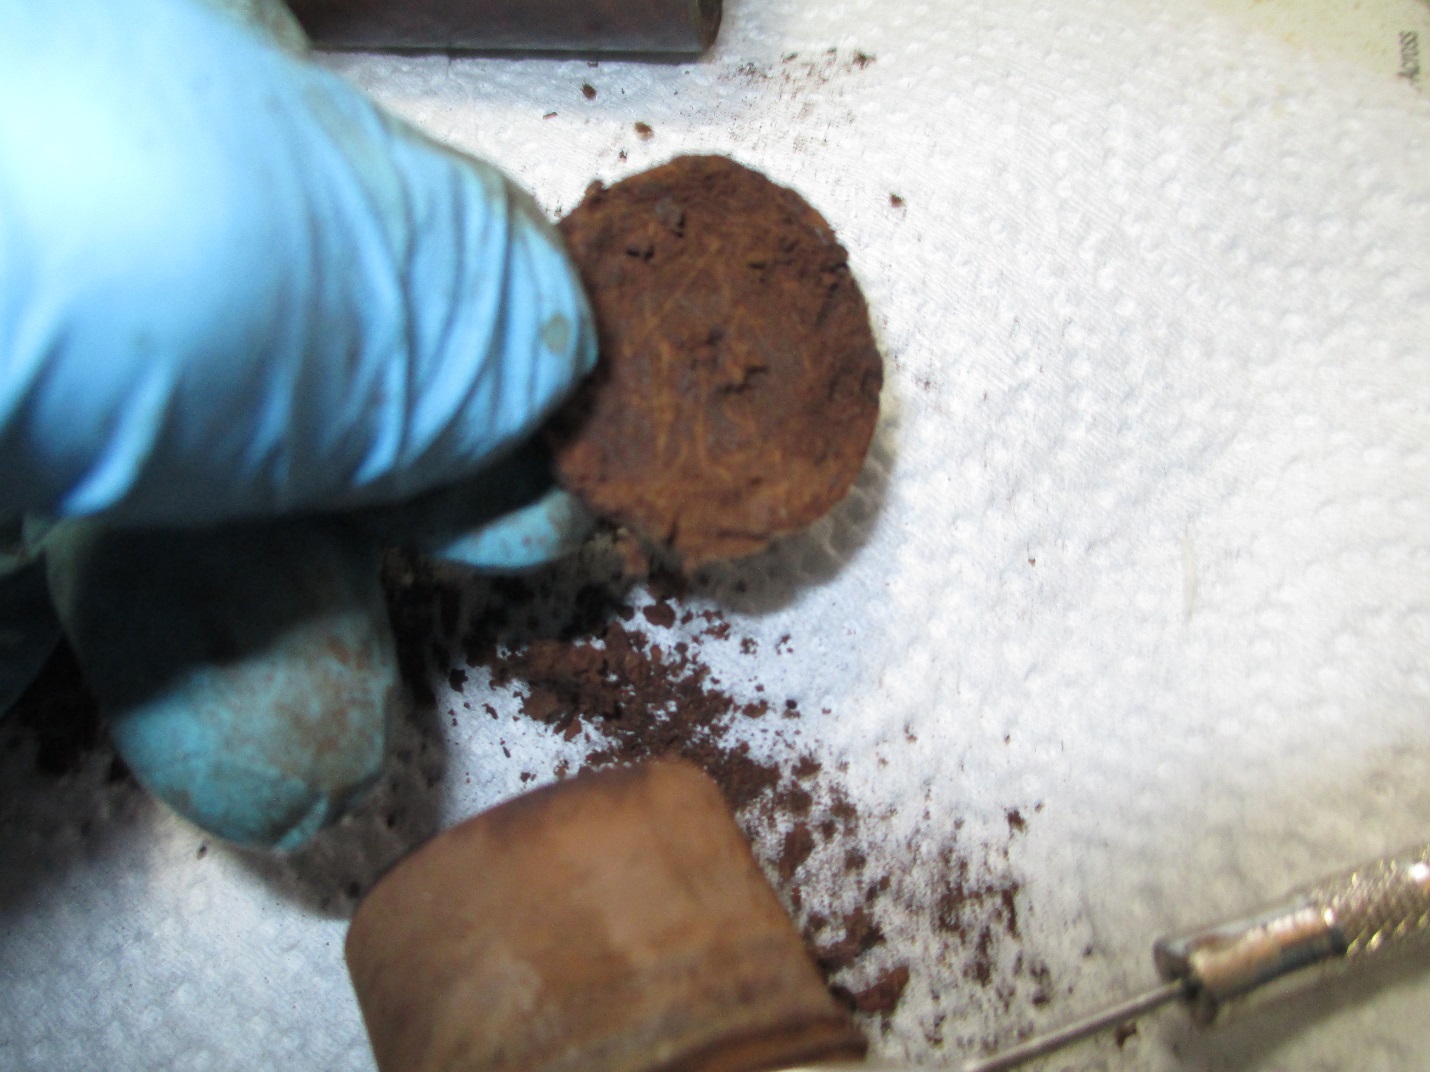
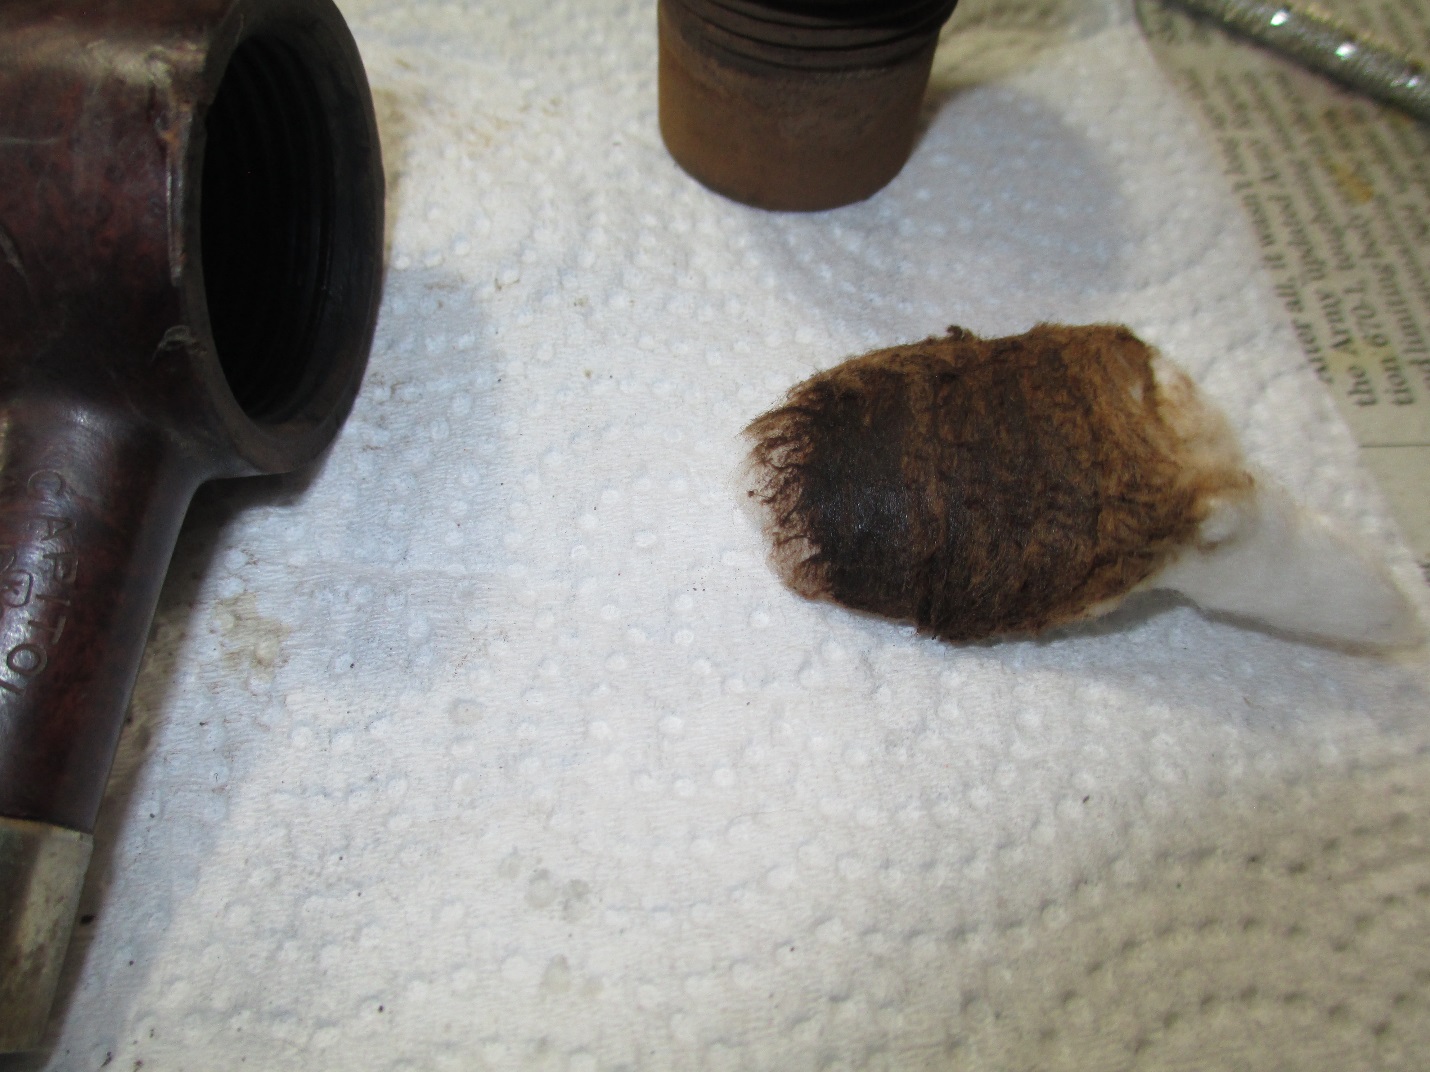
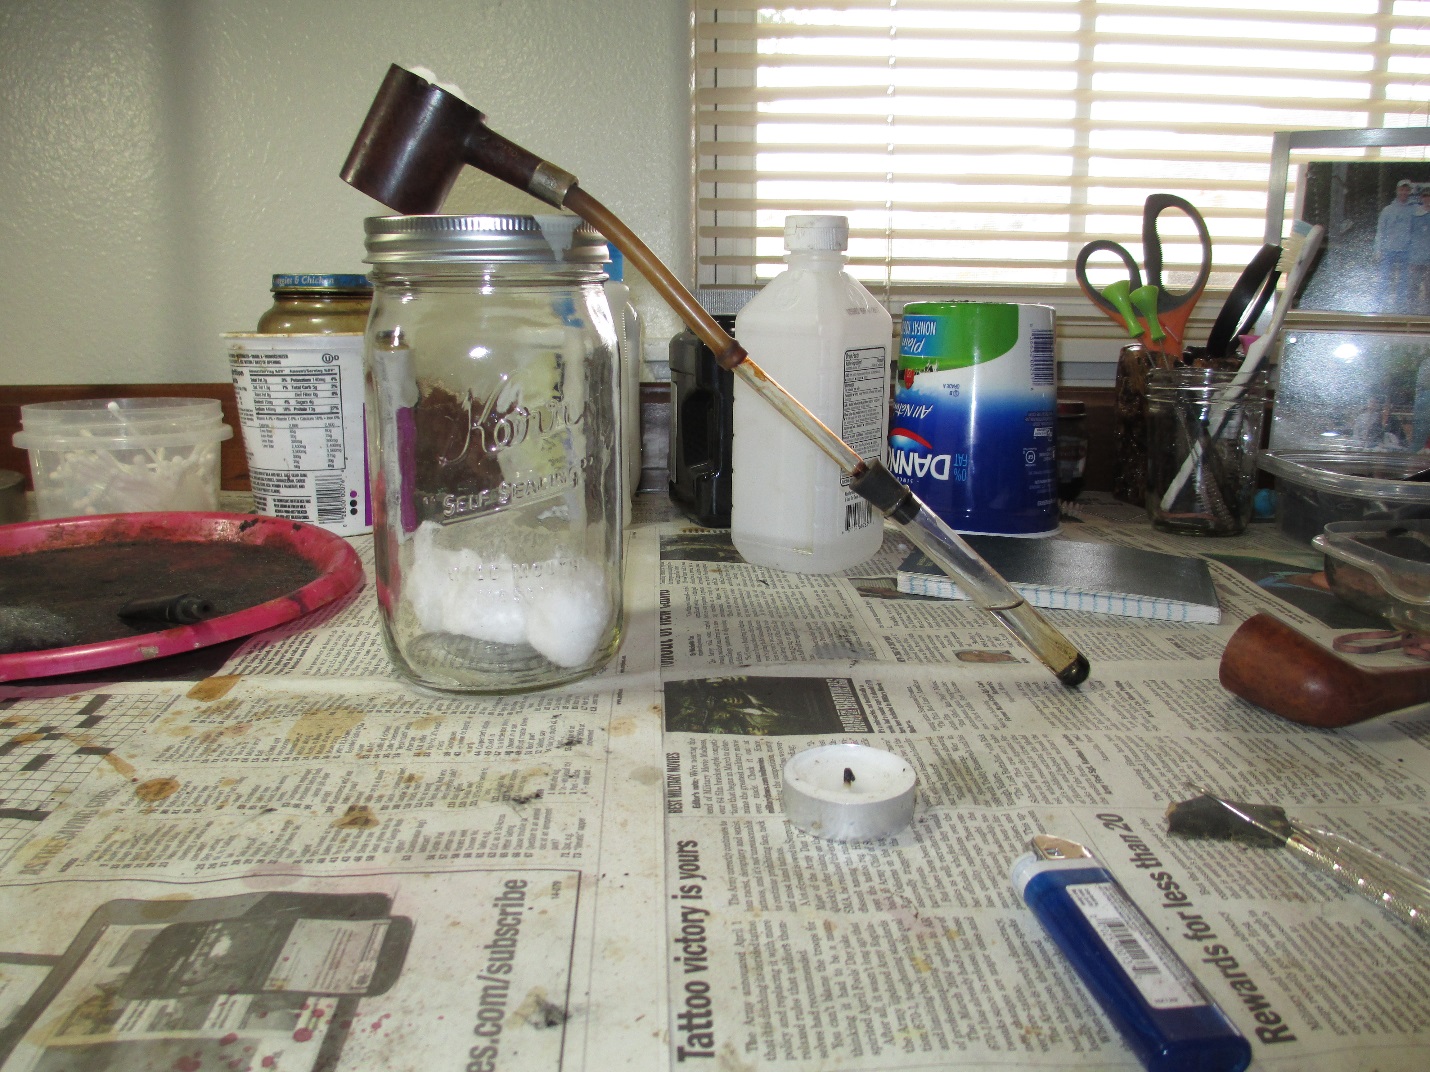
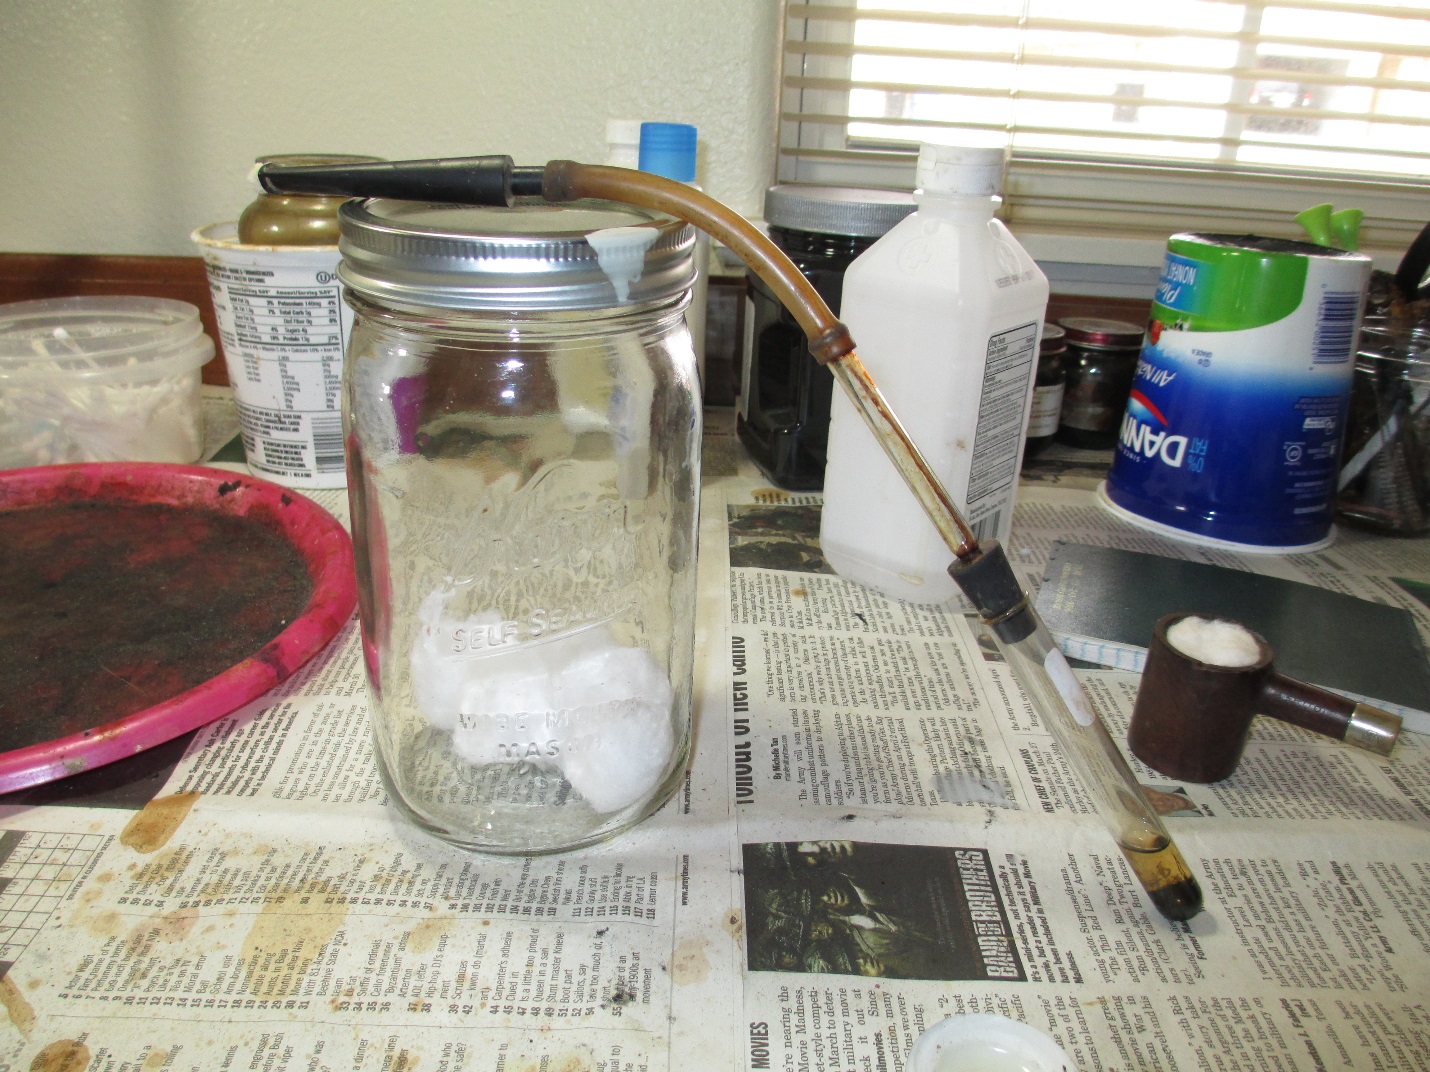
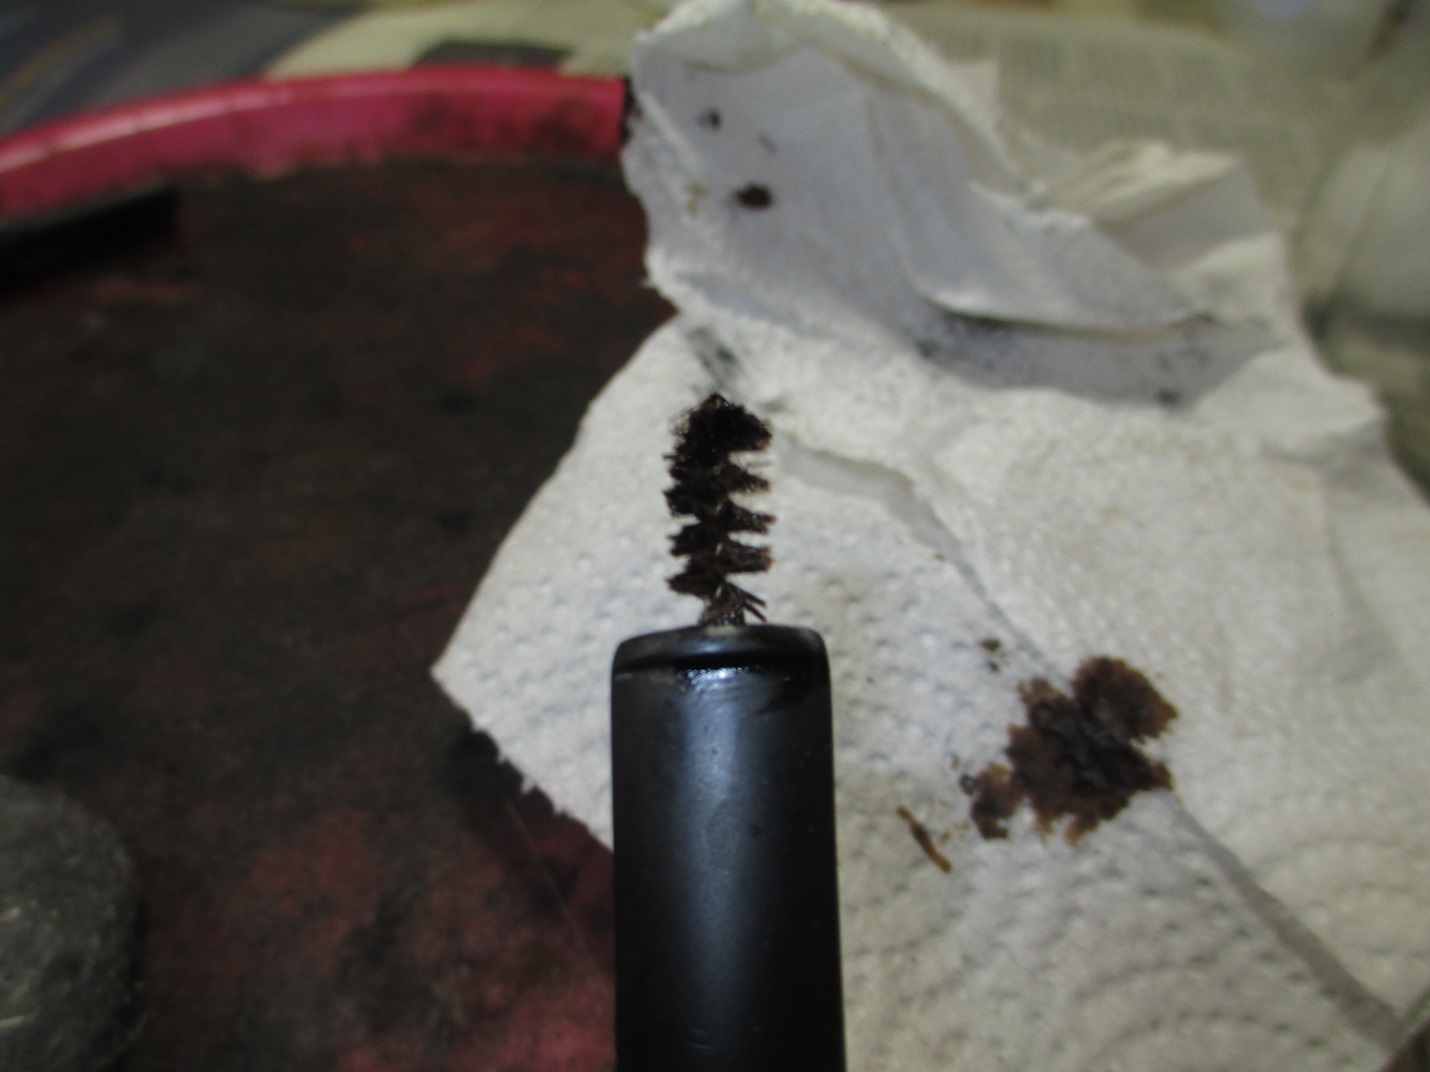
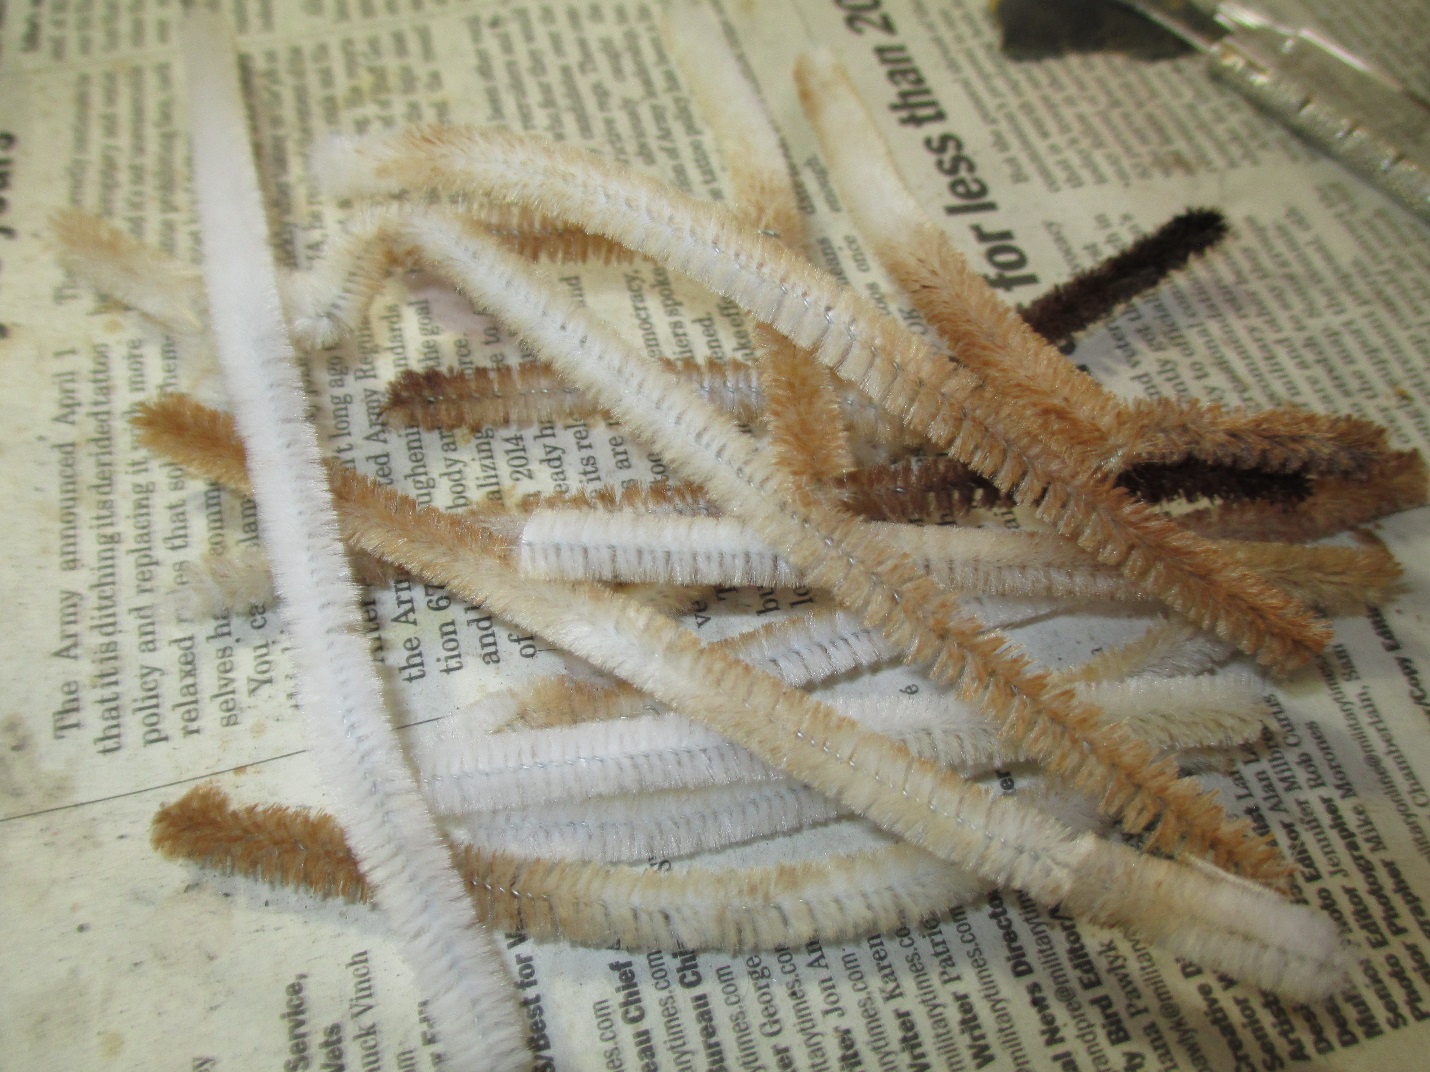
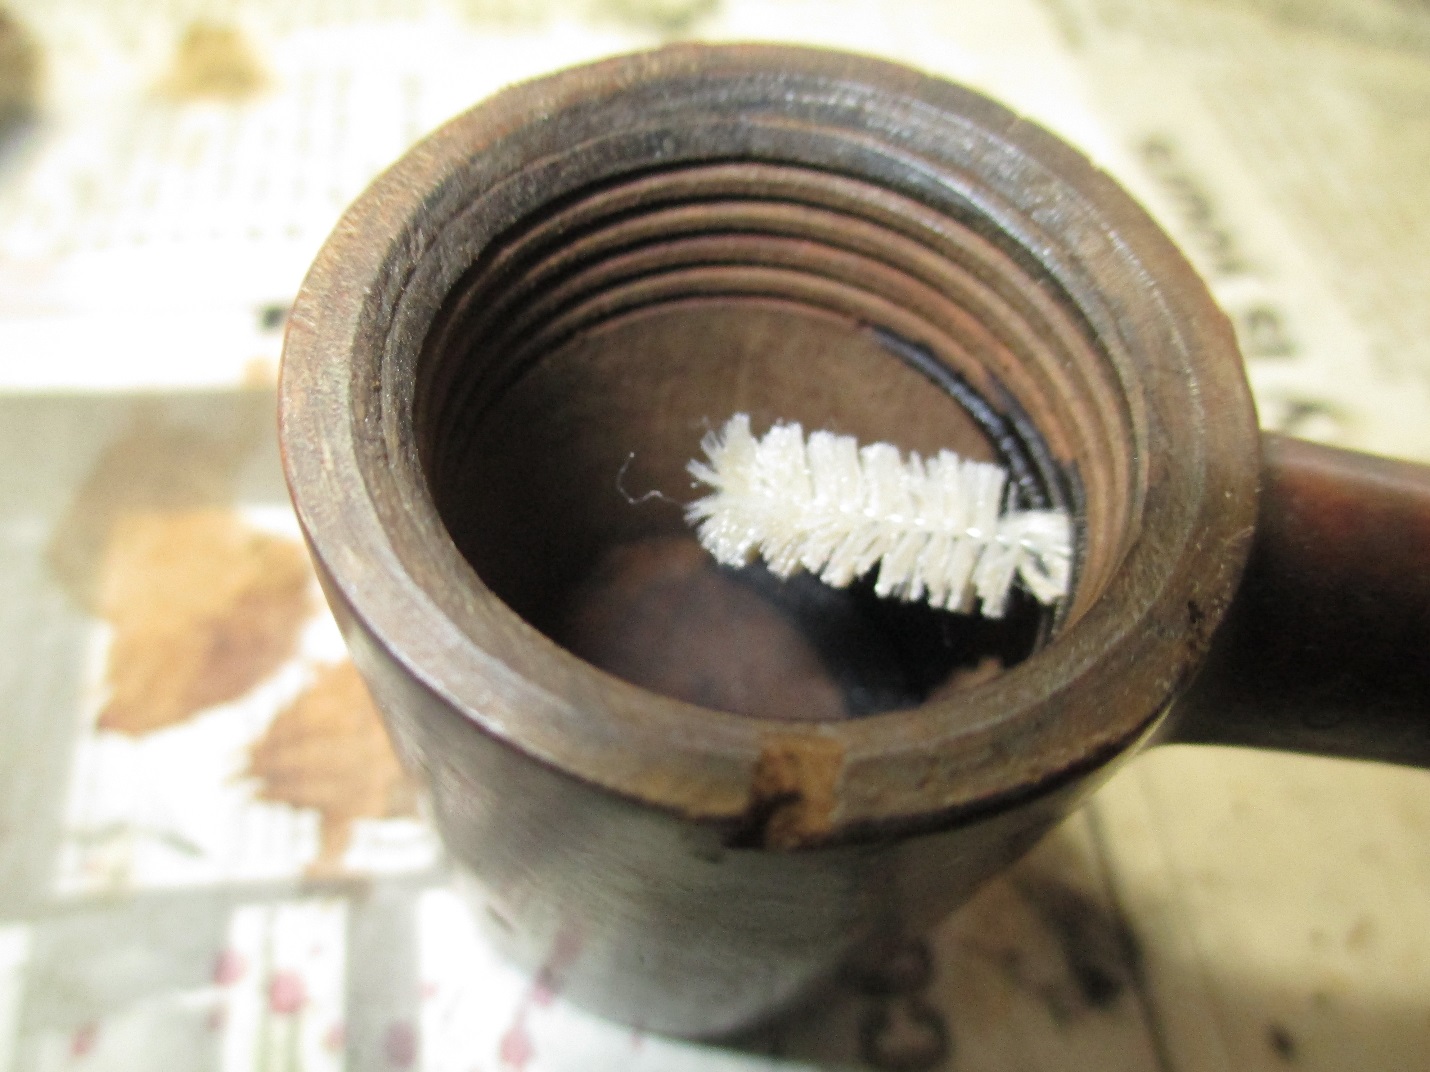
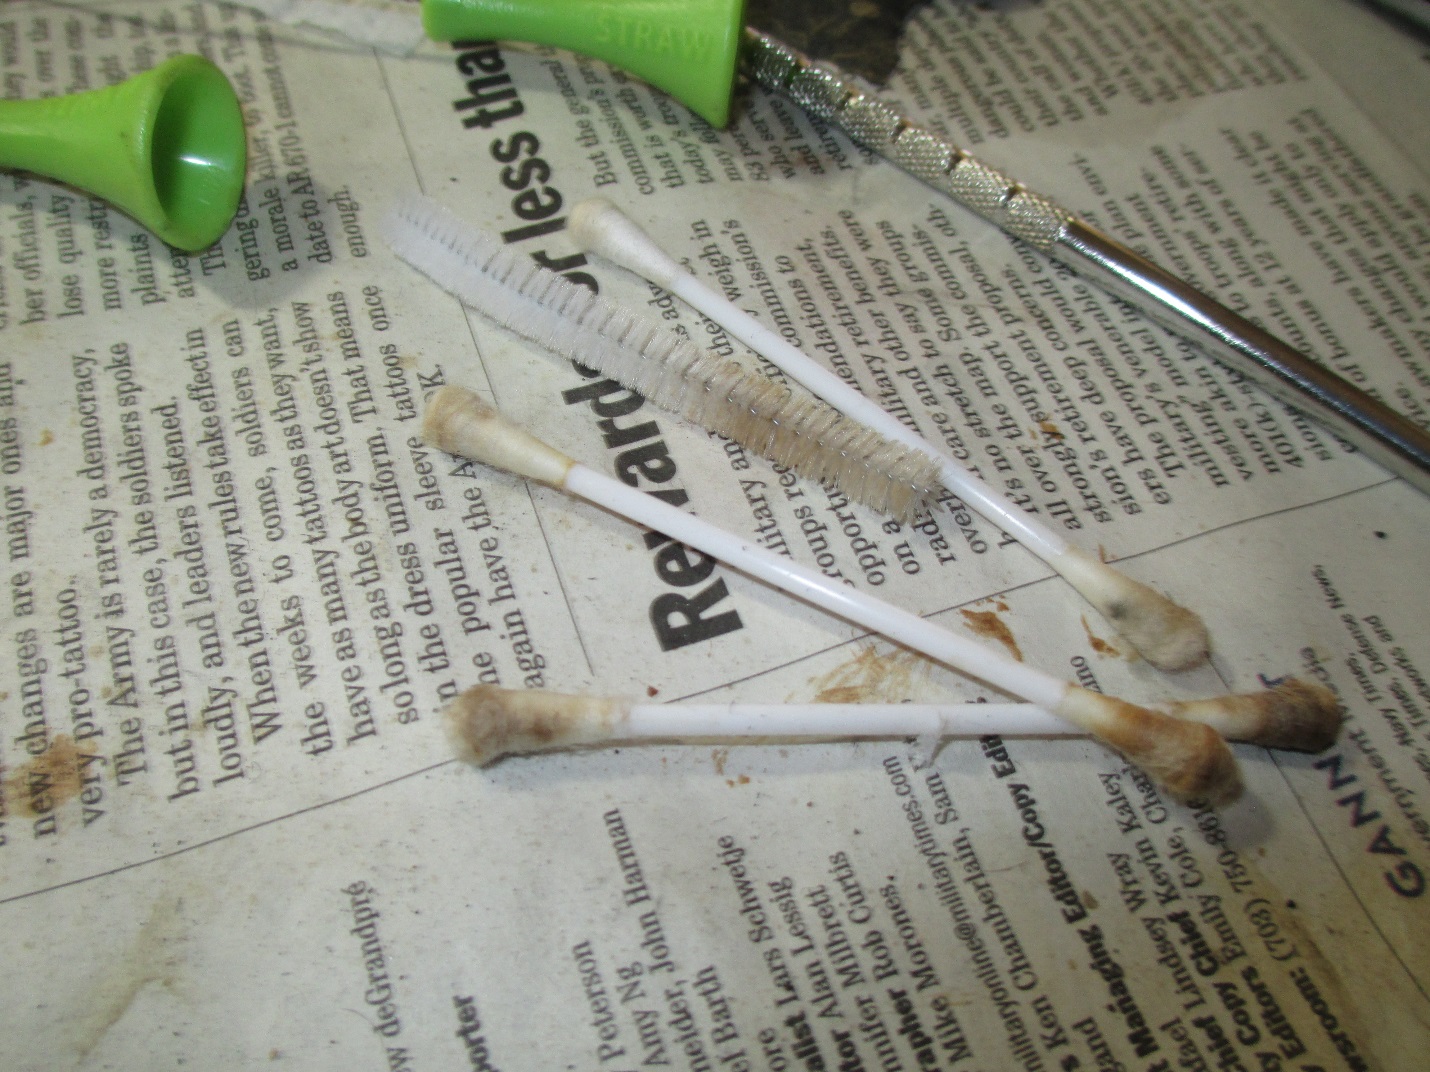
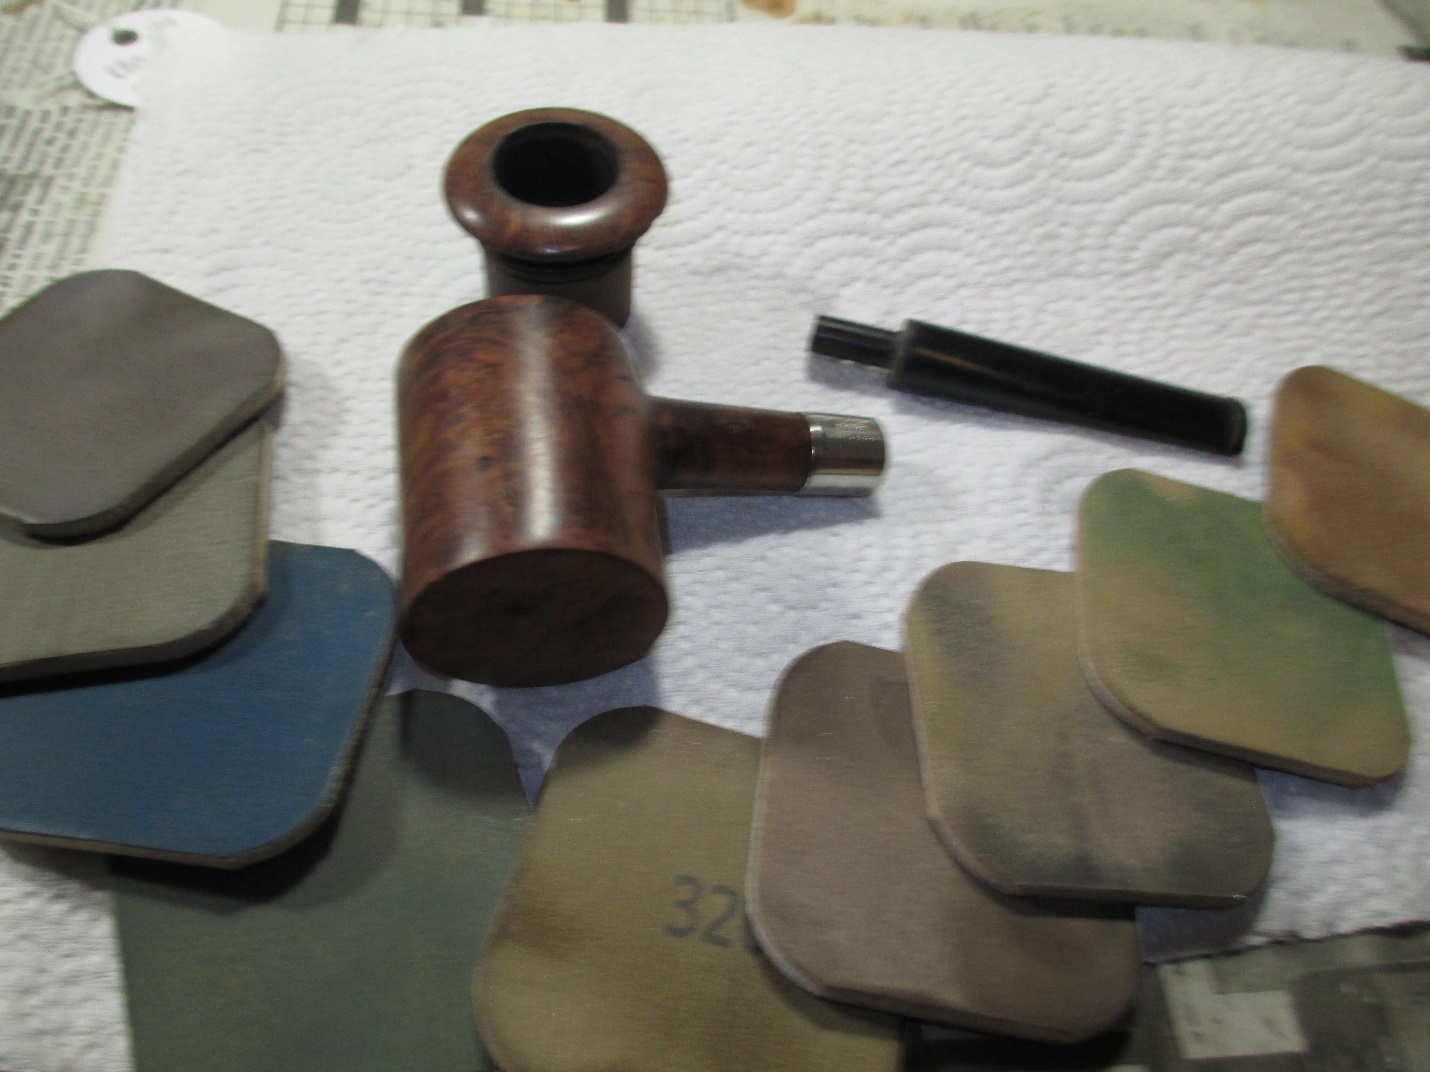
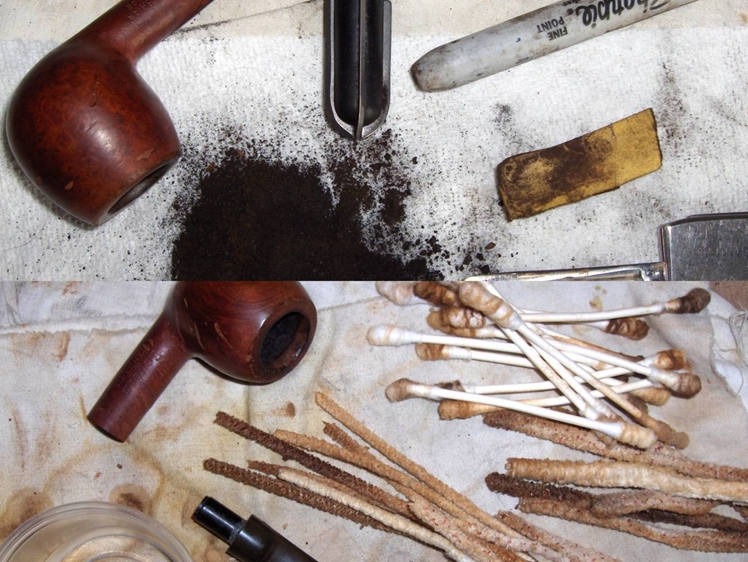
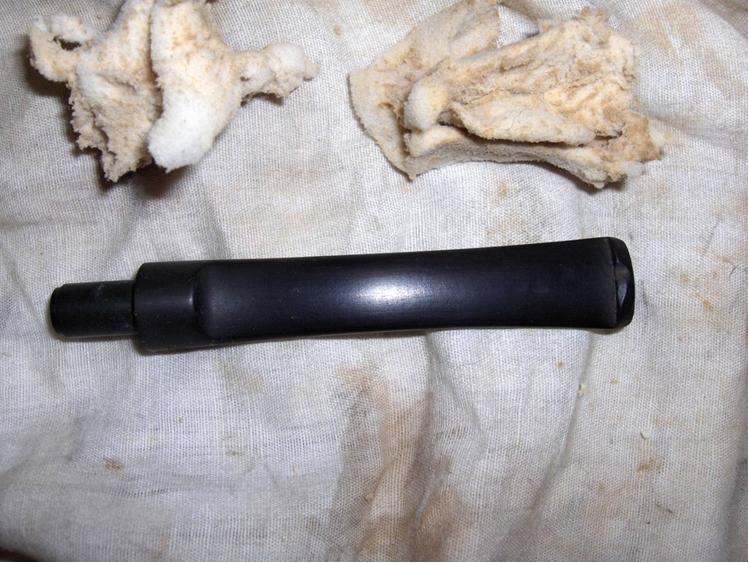
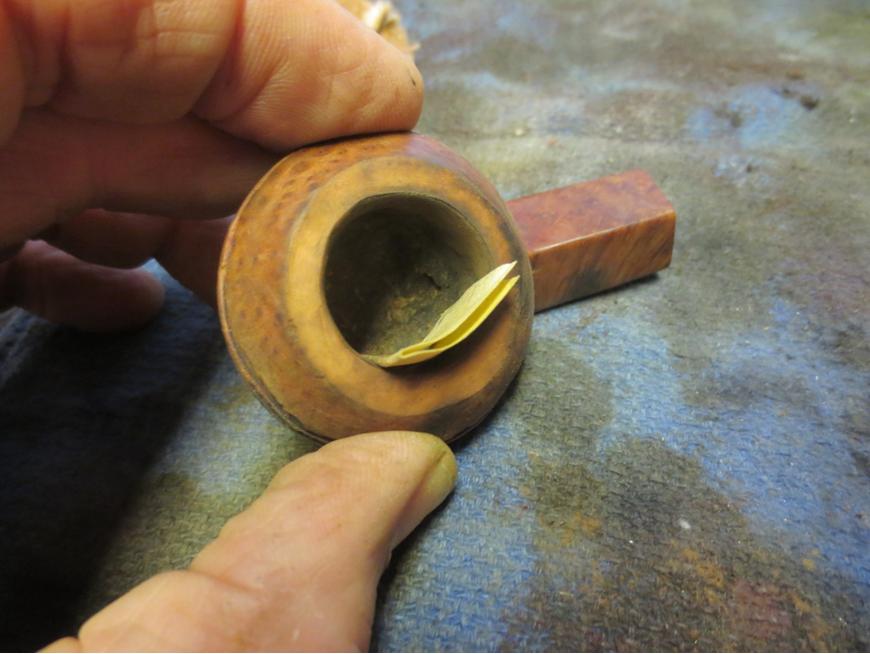
I cleaned out the shank and the airways with alcohol, cotton swabs and pipe cleaners. I scrubbed and scoured and scraped the airways clean of the “fossilized” tars until the pipe cleaners and cotton swabs came back white. Since I was probably going to smoke this one myself I decided to not use the retort at this point. If it smoked rough I could always set up the retort and let it do its magic.Dunhill21 
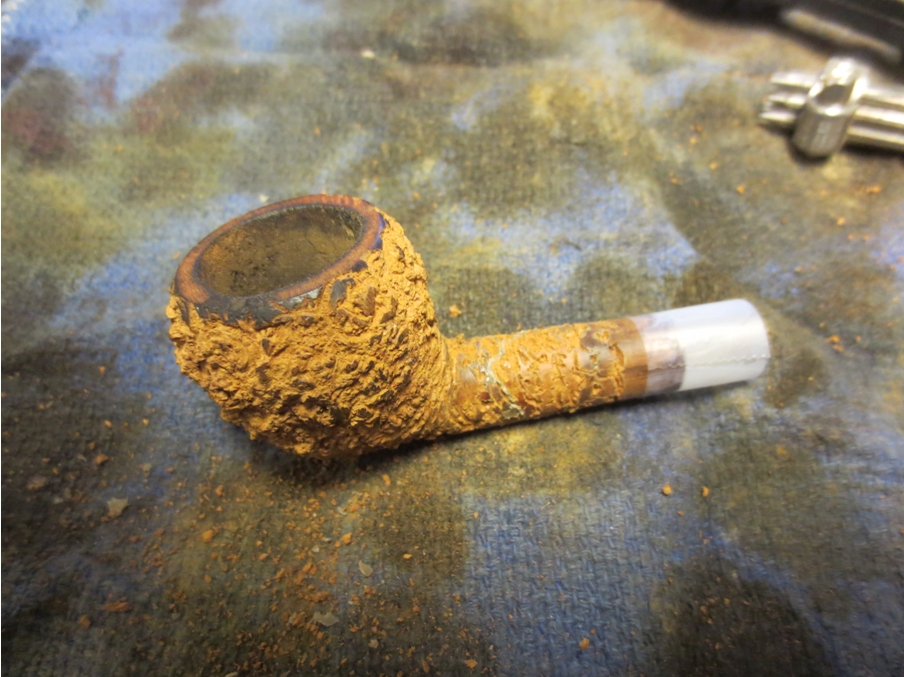
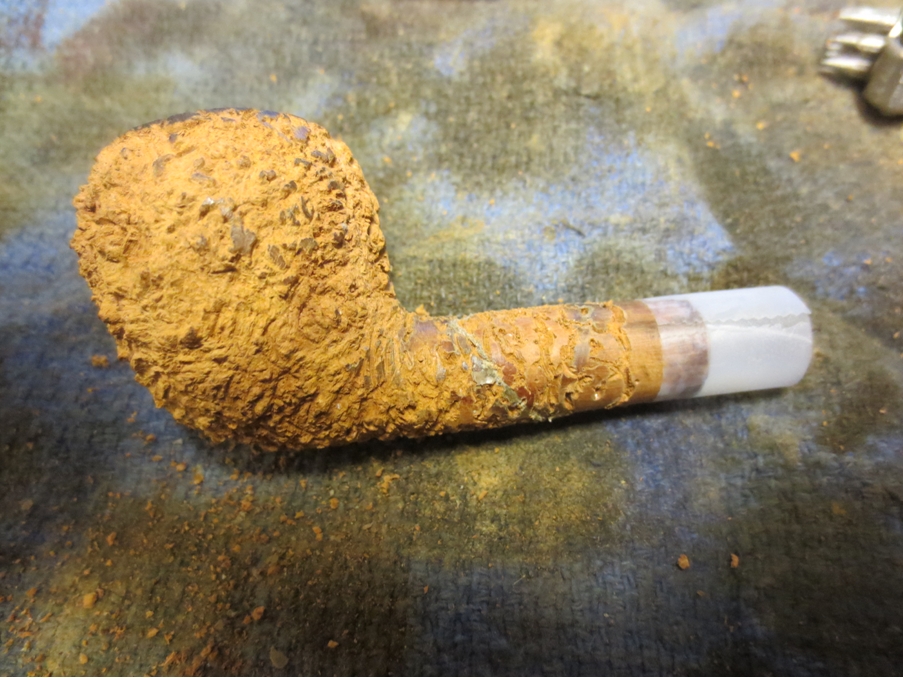
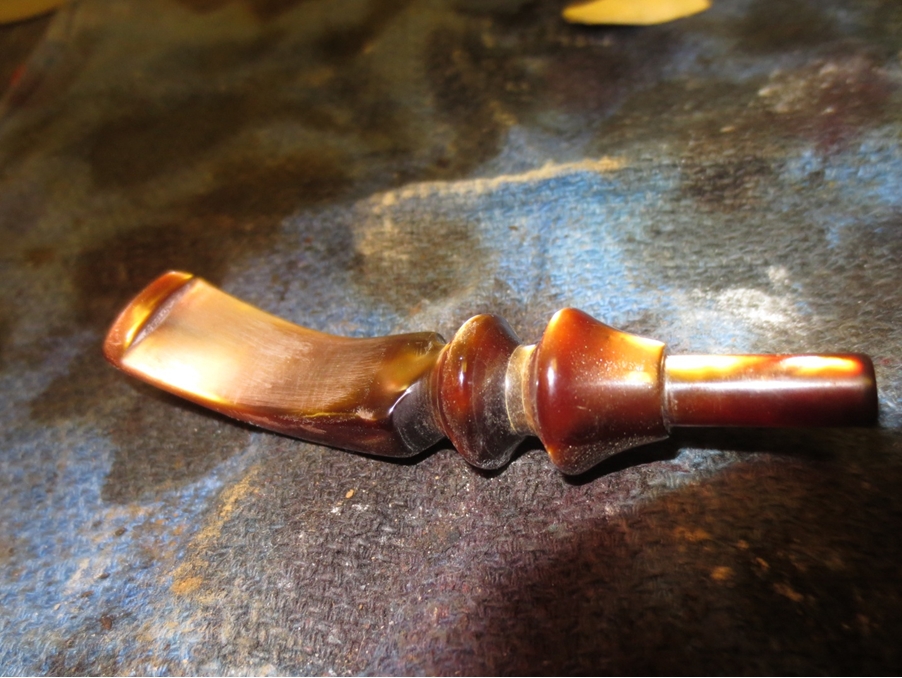
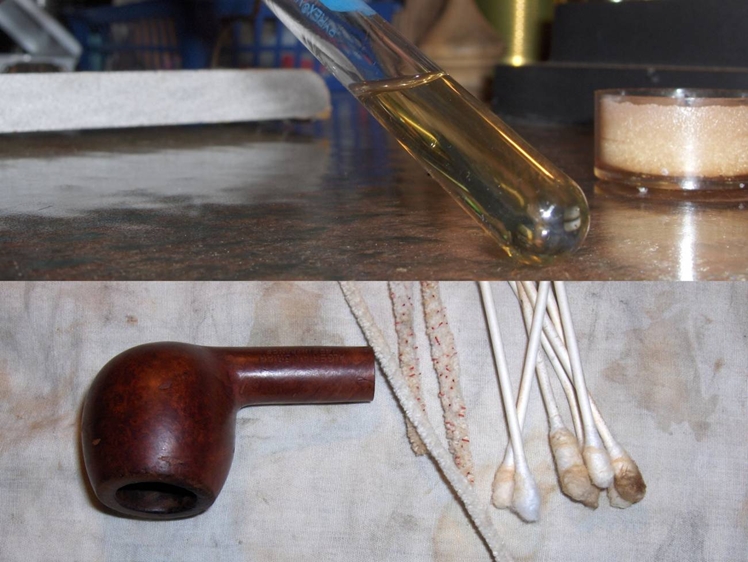
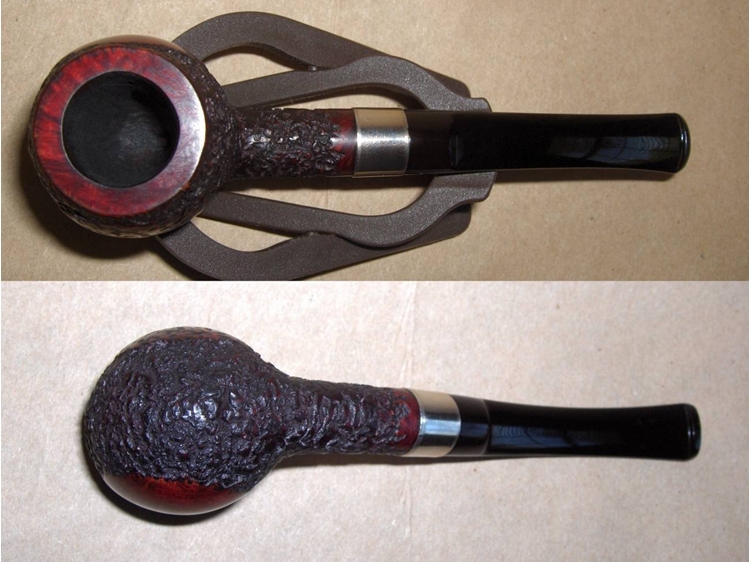
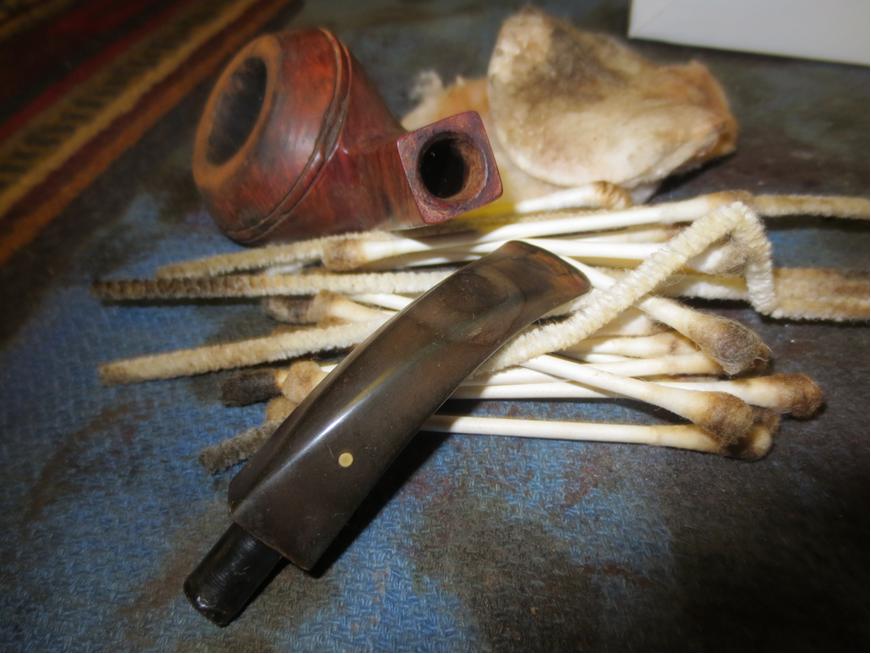
I sanded the stem with 220 grit sandpaper, repaired the small split in the button on the bottom side and then sanded the stem with a medium and a fine grit sanding sponge. I rubbed it down with some Obsidian Oil and put the pipe back together. I took a few photos of the cleaned up look. If you are getting the idea that I was postponing working on the double ring and the heavy damage there you are correct in your assumption. I was not sure I would be able to work any redemption on that area of the bowl. Time would tell.Dunhill22

Dunhill23

Dunhill24

Dunhill25 
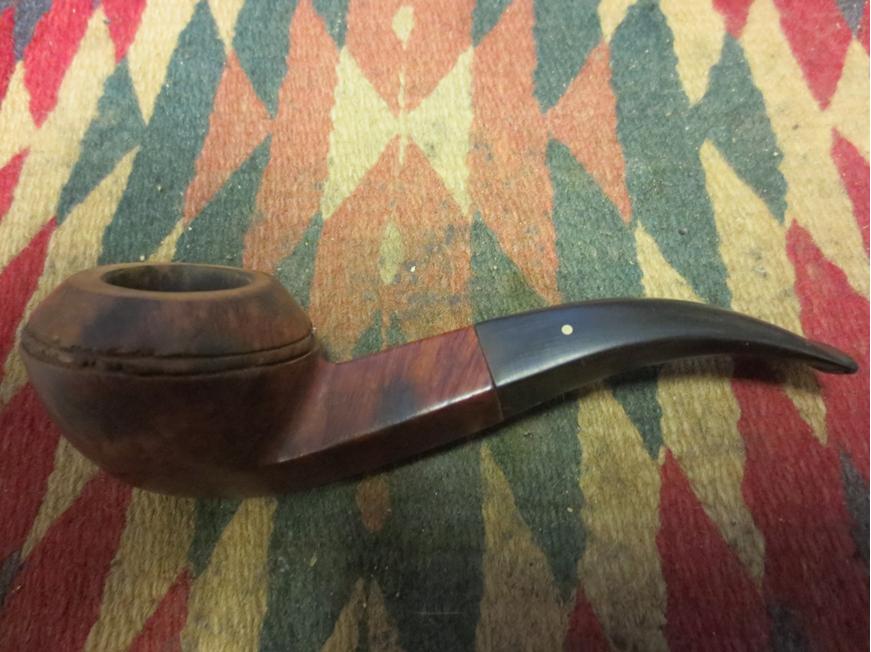
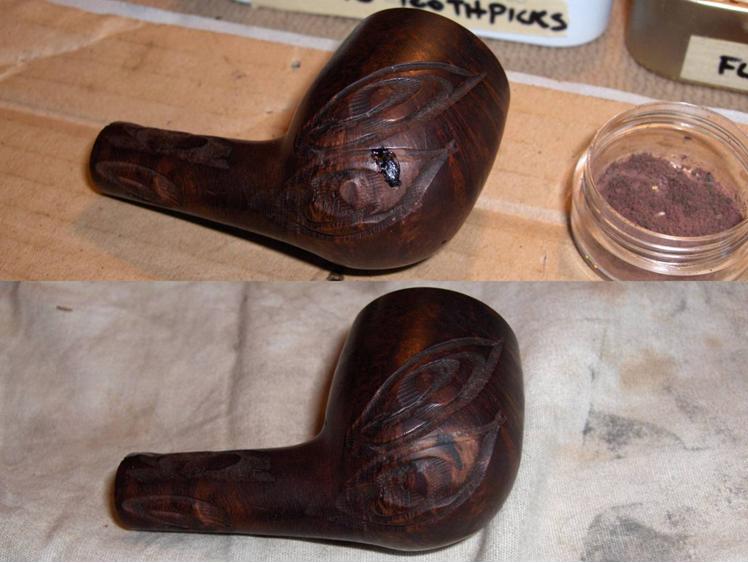
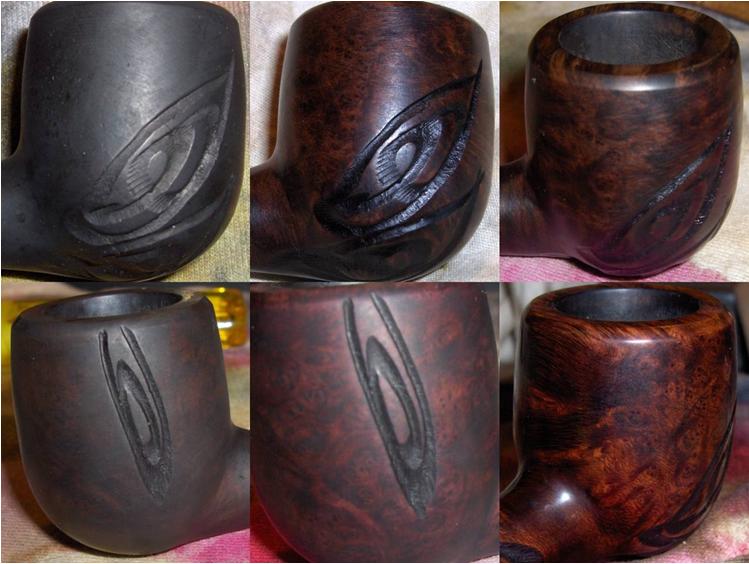
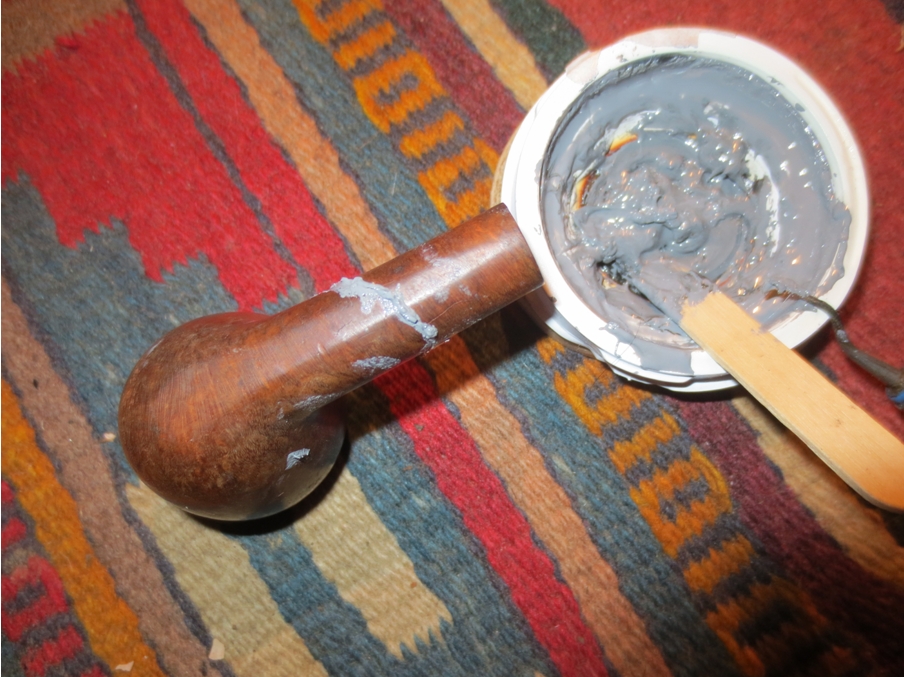
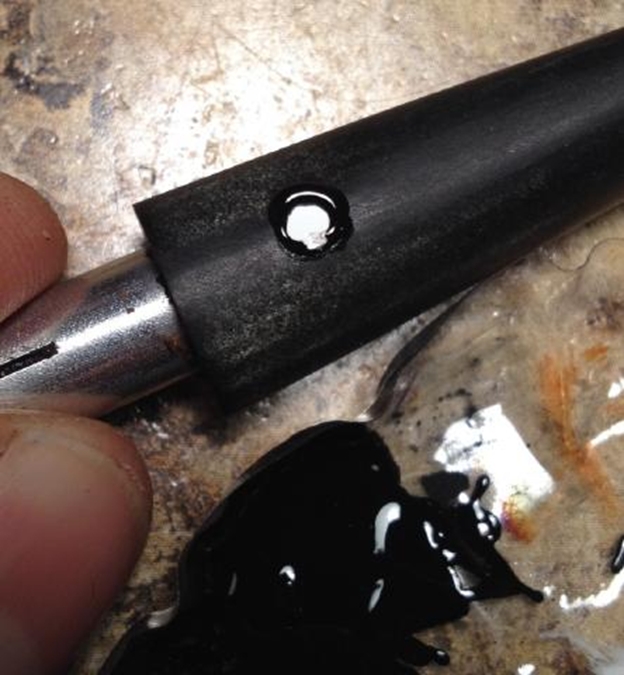
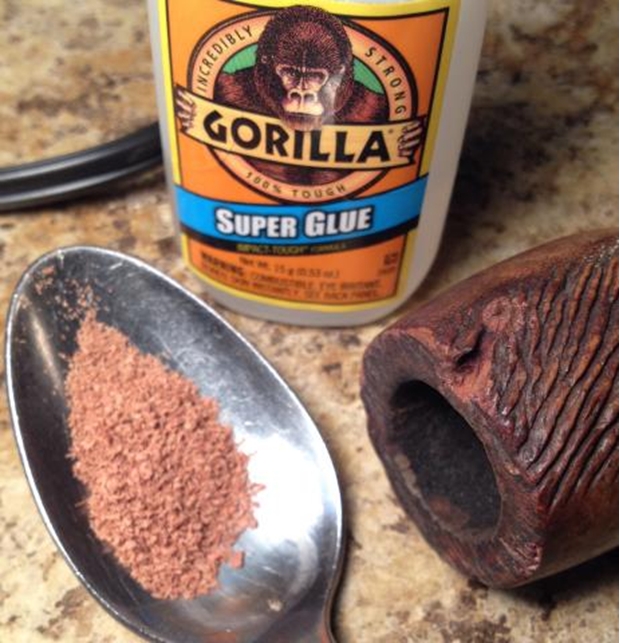
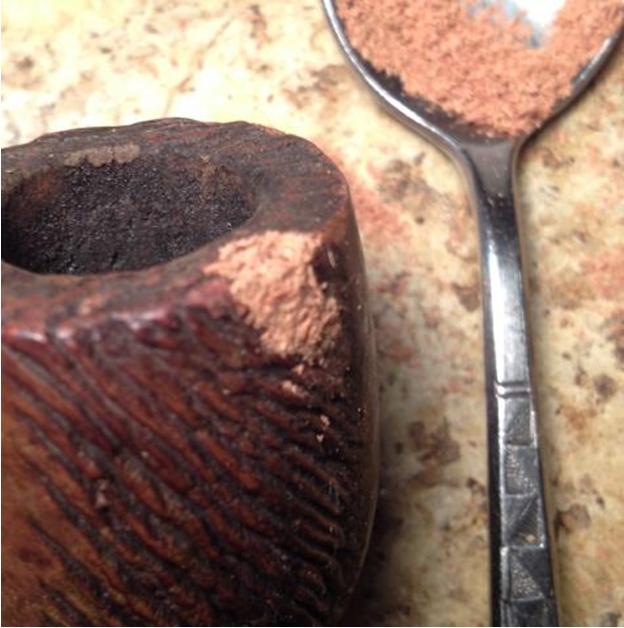
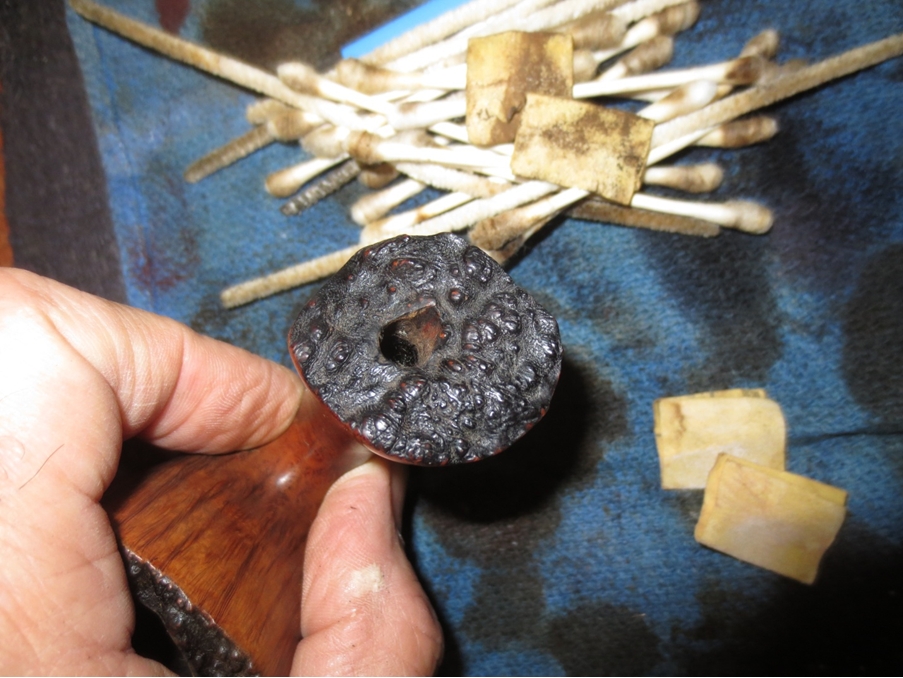
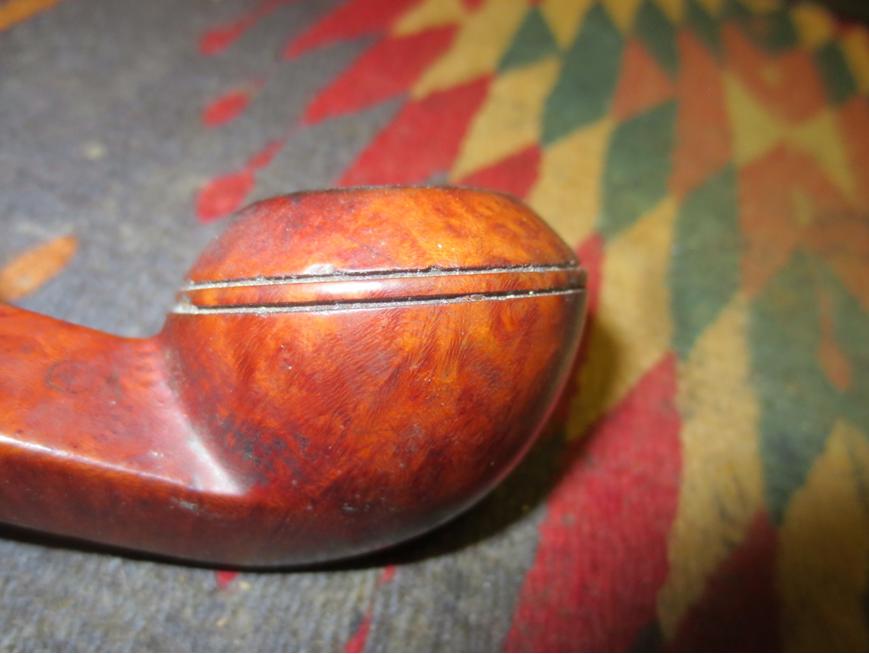
I could not postpone dealing with the ring damage any longer if I was going to finish the pipe. I had read with interest Mark Domingues write up on restoring the rings on the Peterson 80 that he posted here recently. I spent time looking at how he rebuilt the centre briar ring between the two lines. I was ready to start. I cut a piece of note card the width of the back of the bowl and decided to address that damage first. I pressed briar dust into the damaged area of the ring and tamped it in with dental pick. When it was full I put some drops of clear super glue onto the briar dust. I did the same all around the bowl until I had a real mess on my hands. I was careful not to put the glue or dust on the places where the rings were in good shape. I would use these as guides to recut the lines later.Dunhill26

Dunhill27

Dunhill28 
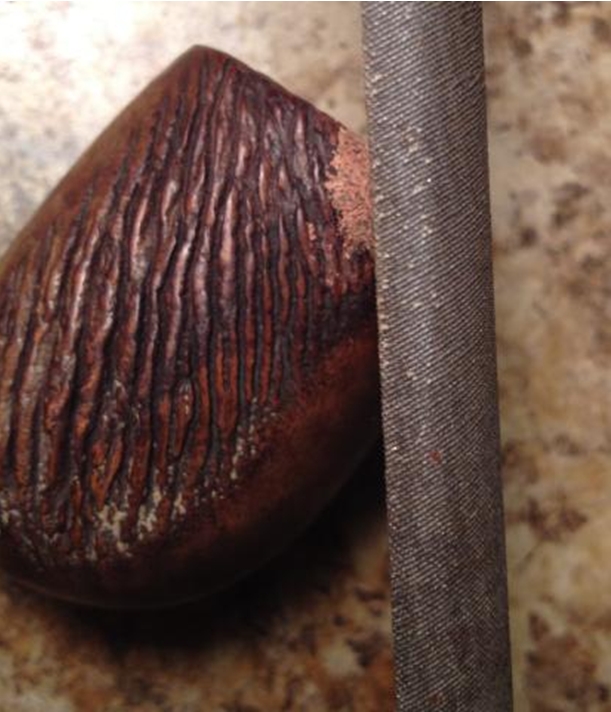
I used a flat, thin blade knife edge needle file to recut the grooves in the bowl. It took a lot of work to slowly and carefully recut them but it worked as the photos below show.Dunhill29

Dunhill30

Dunhill31

Dunhill32 
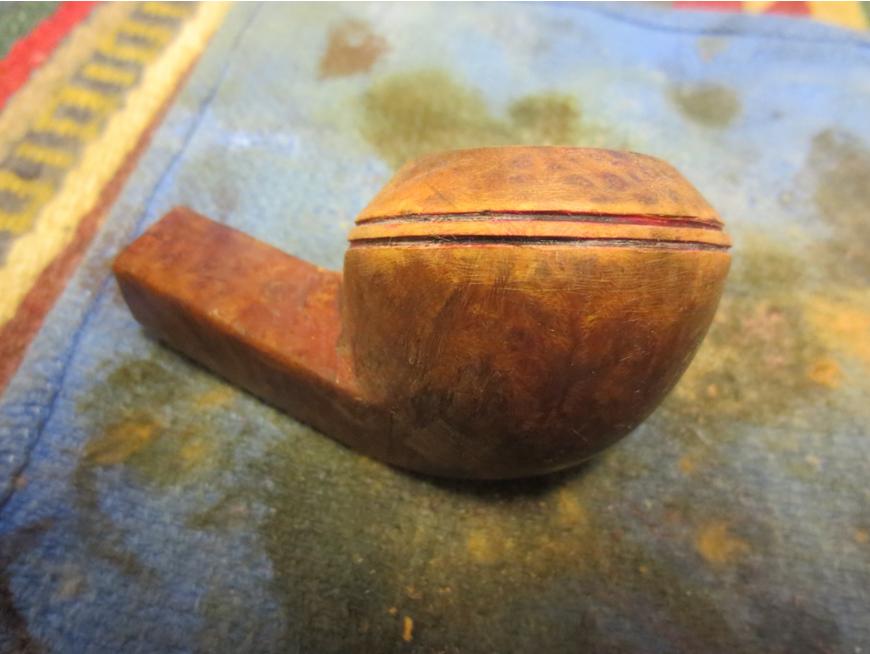
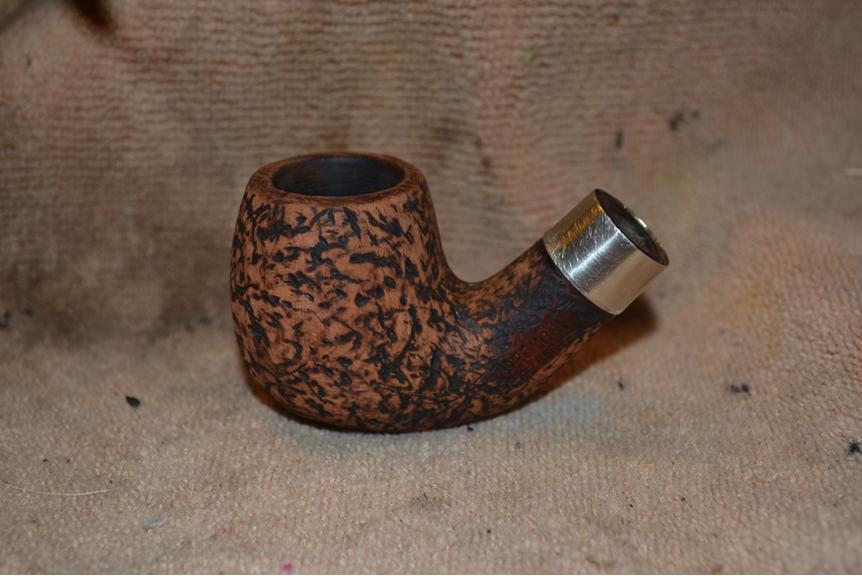
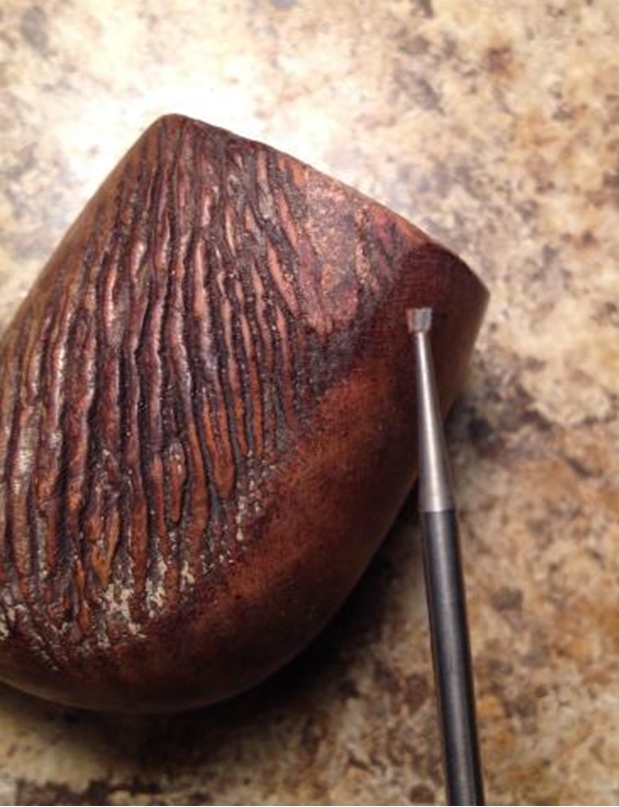
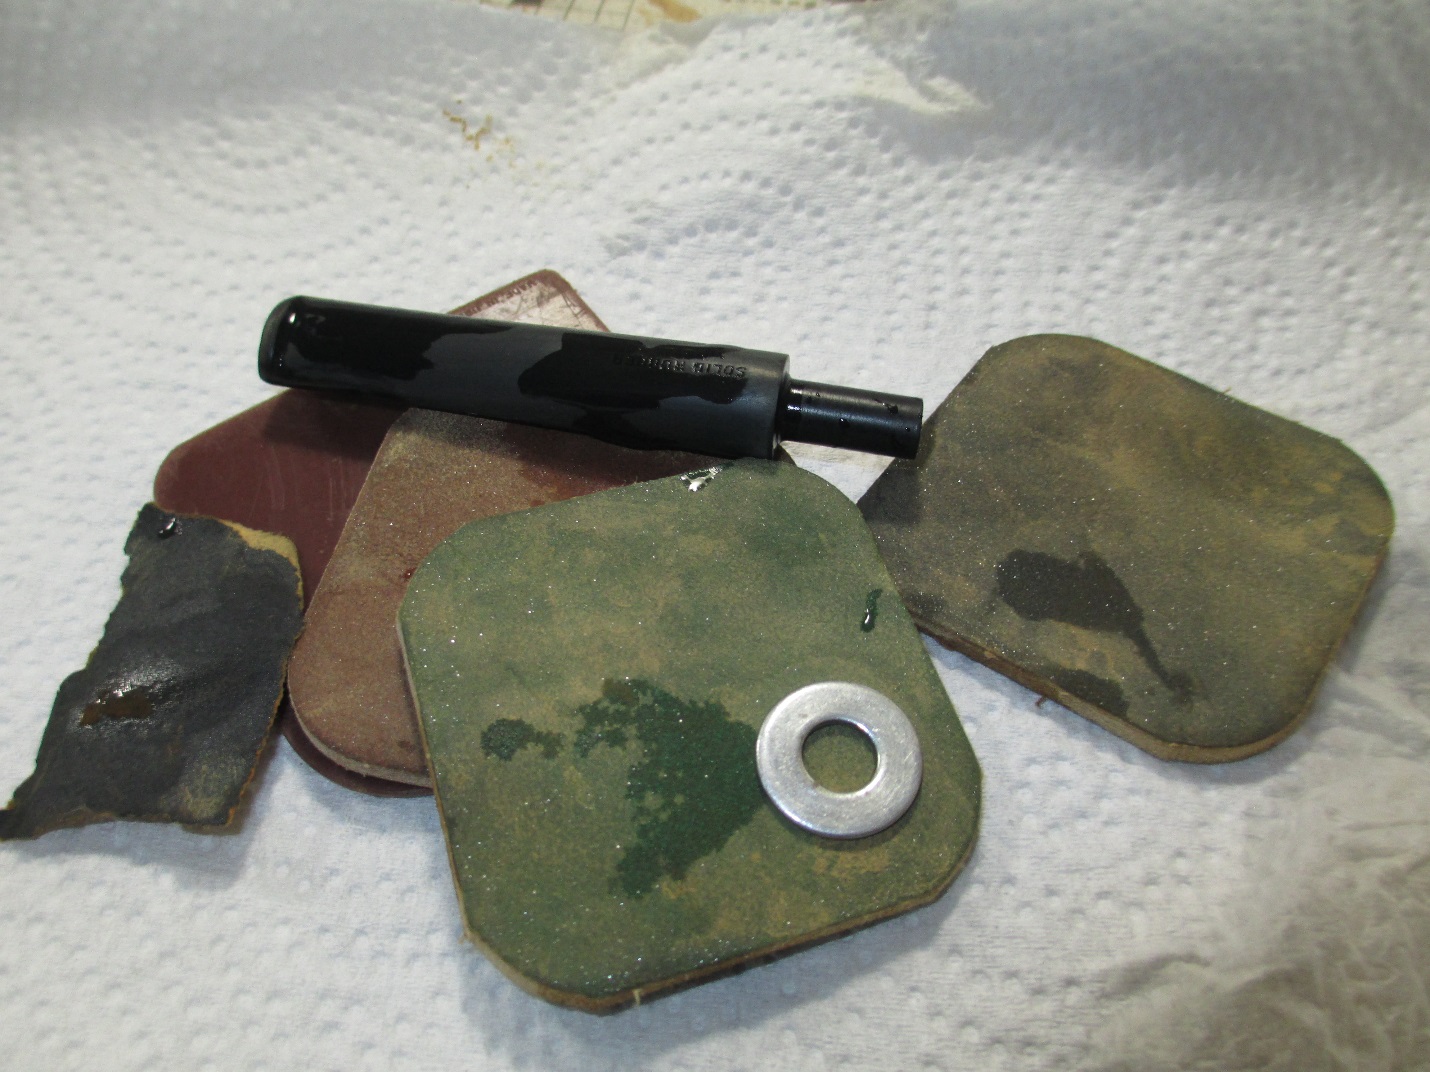
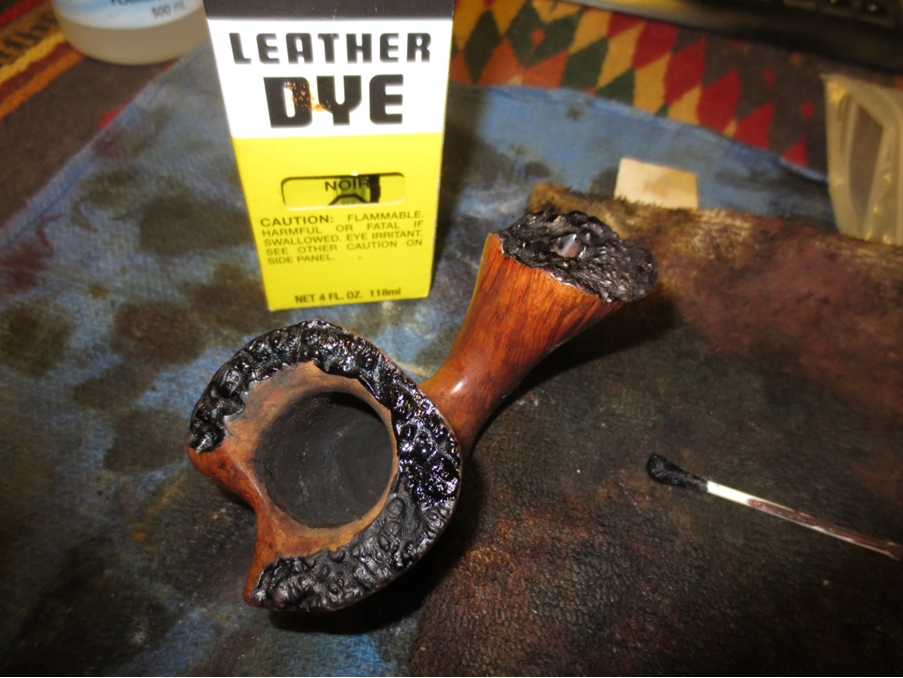
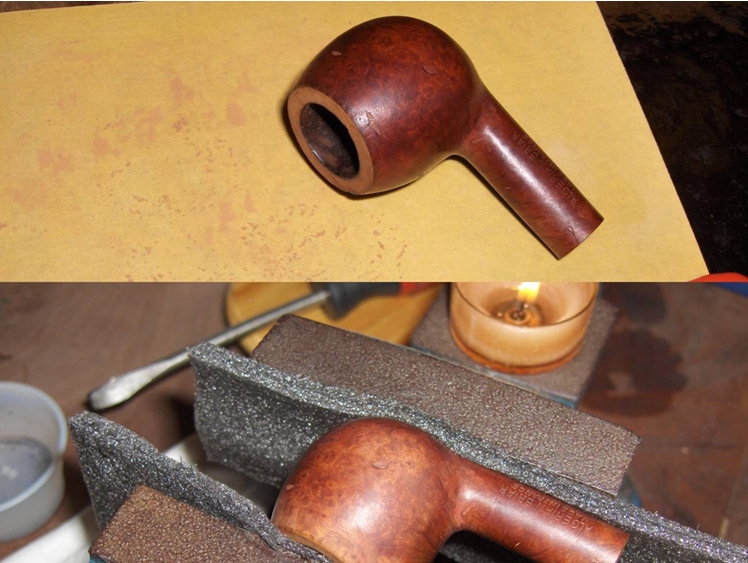
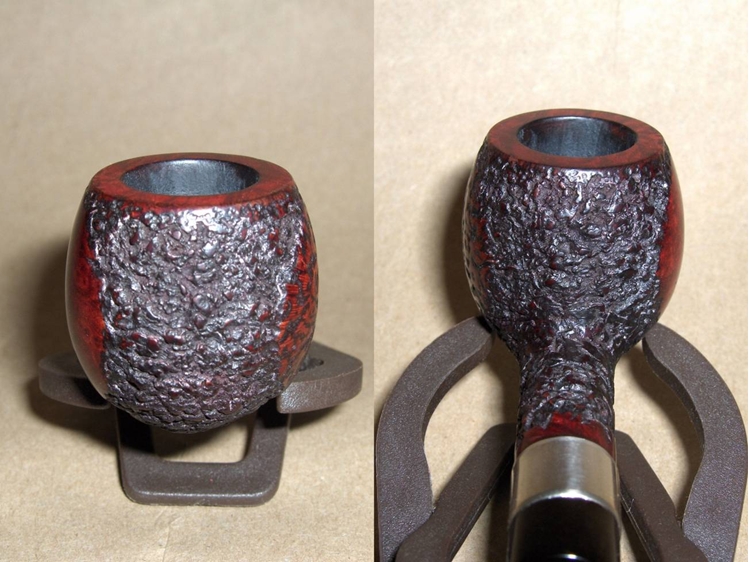
After the initial cutting of the grooves with the needle file I continued to use it to smooth out the grooves and the edges on the top and bottom. They took a lot of work to smooth things out. I also folded 220 grit sandpaper and ran it through the grooves on the bowl. Once they were smooth and cleaner looking than before it was time to clean off the bowl and then restain it with the first coat of stain. I wiped the bowl down with alcohol on cotton pads to remove the excess briar dust and any remaining glue. I sanded the burn marks on the bowl and rim with a medium and a fine grit sanding sponge to minimize them. I sanded them again with 1500-2400 grit micromesh pads to smooth out the scratches. I then gave it a coat of oxblood aniline stain, flamed it and set it aside to dry.Dunhill33

Dunhill34 
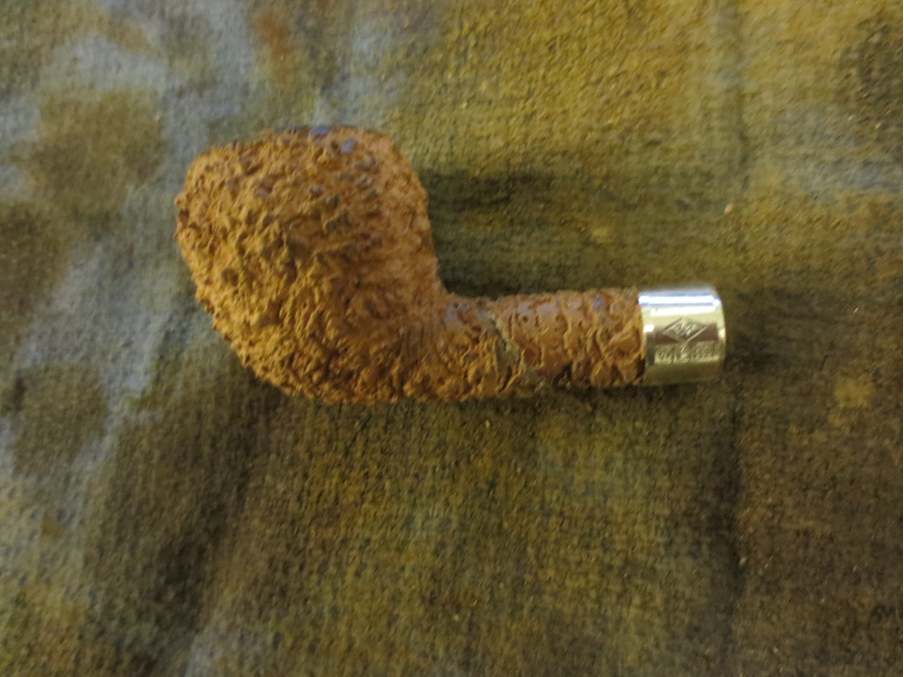
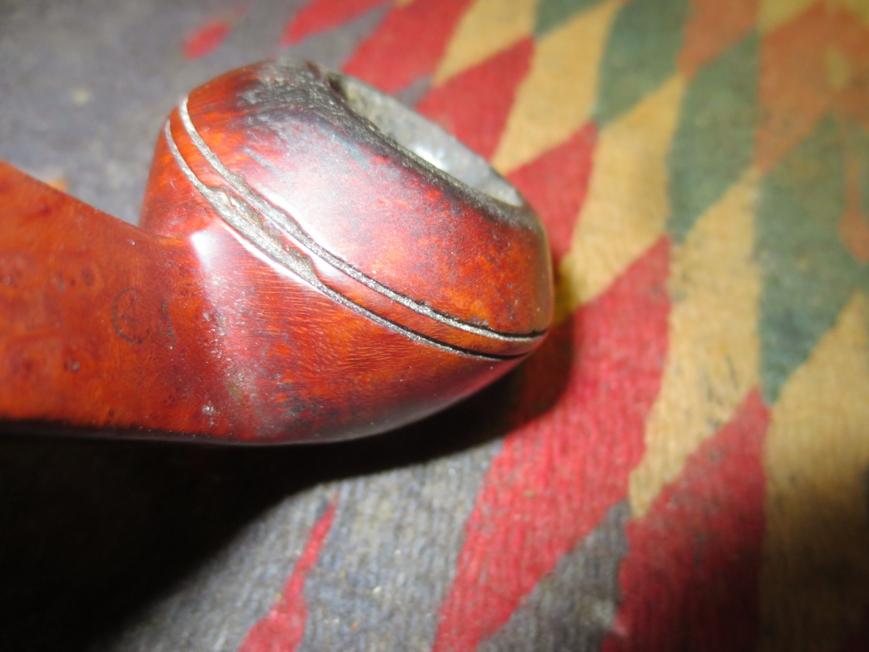
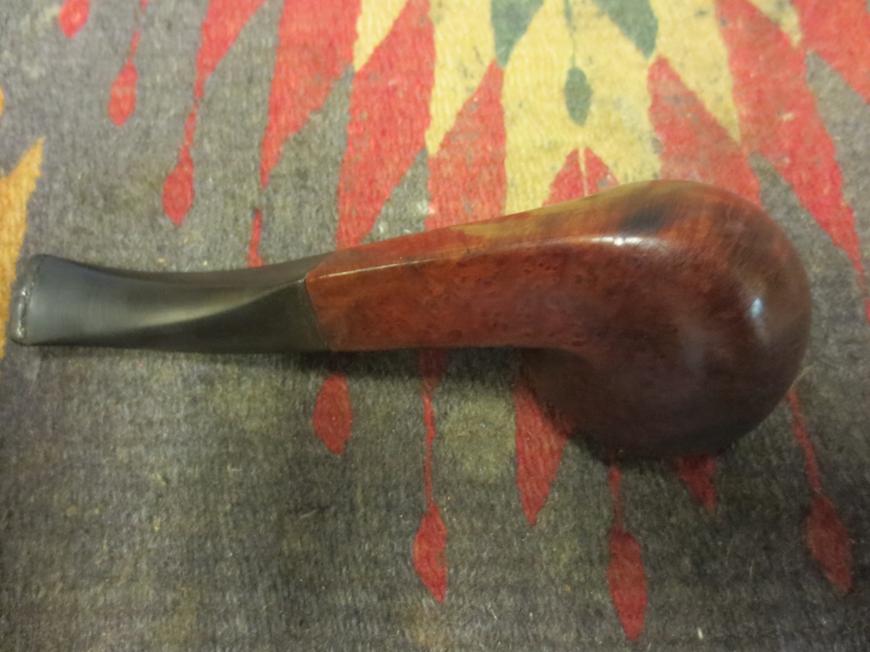
The burn marks still showed with this first coat of stain and it was a little too red to my liking. I buffed it with White Diamond and then brought it back to the table to do some more work. I took some photos of the pipe after the buffing. I find that a couple pics help me focus on what needs some more work. In this case I could see that a little dark brown stain would work to tone down the red and also blend the dark spots in a bit more.Dunhill35

Dunhill36

Dunhill37

Dunhill38 
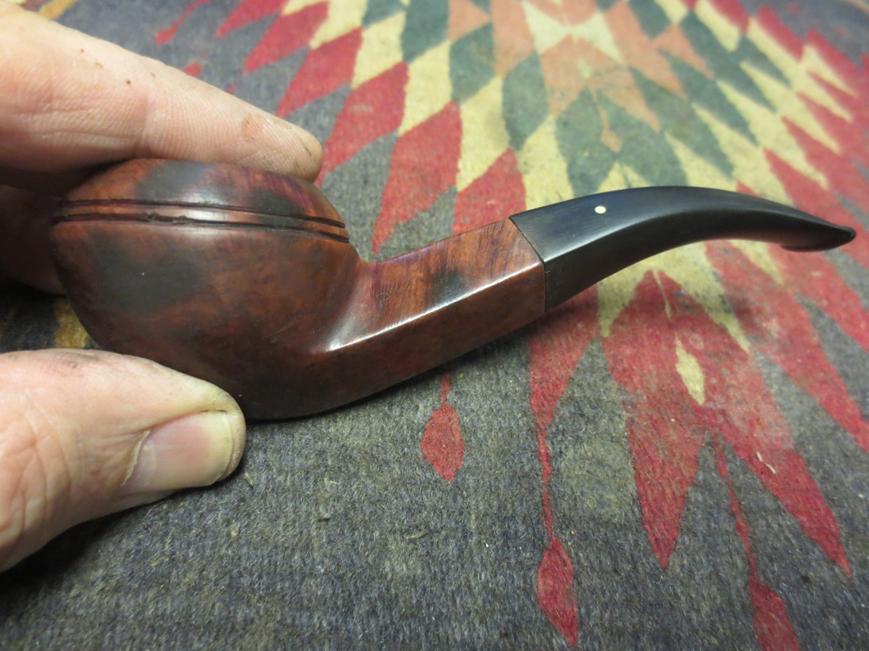
I used a dark brown stain pen to give it a top coat of stain. In the photos it looks streaky but I don’t worry too much about that as a buff once it is dry will take care of that.Dunhill39 
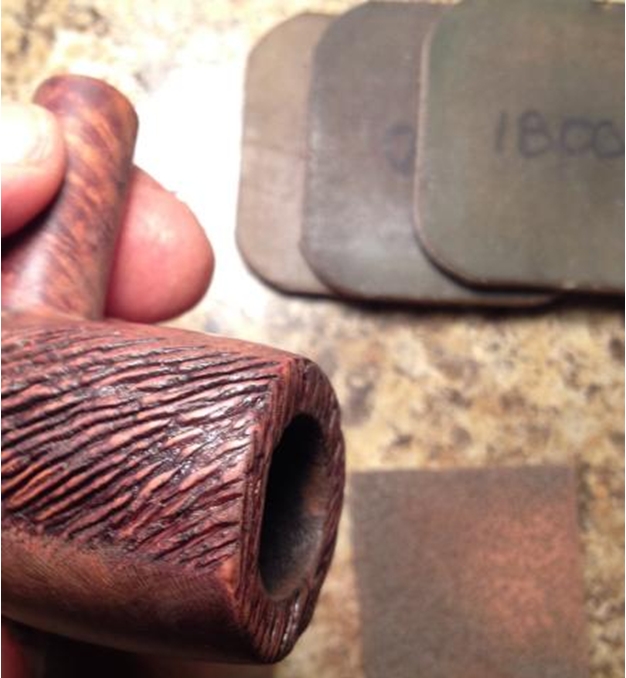
I buffed the bowl with White Diamond and a light touch. It is looking better. The rings on the left side are better but are still a little rough. The rest of the way around the bowl they are looking really good. The dark brown stain did a better job of blending in the dark spots and toning down the red. I liked the colour and it seemed to match the chart photos of the Bruyere that I had found.Dunhill40

Dunhill41

Dunhill42

Dunhill43

Dunhill44 
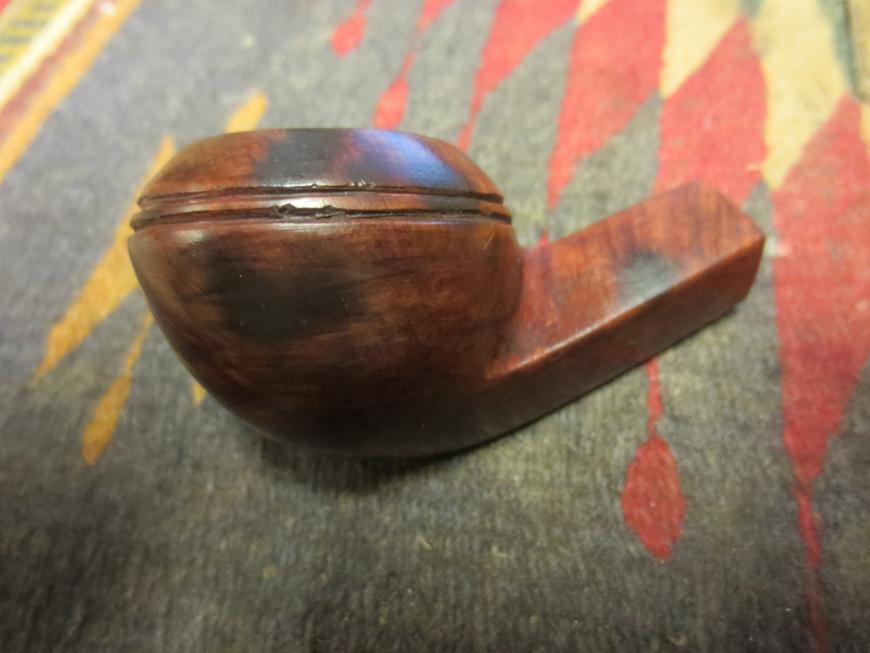
At this point it was time for a break. I put the stem on the bowl and loaded a bowl of Boswell’s North Woods and went to church with my daughters. I smoked a bowl as I walked with them and loaded another bowl on the way home. I sat on the porch and fired up a third bowl filled with Malthouse Reserve 12. This pipe really sang with English tobaccos. Even if it was still a bit ugly it smoked well!

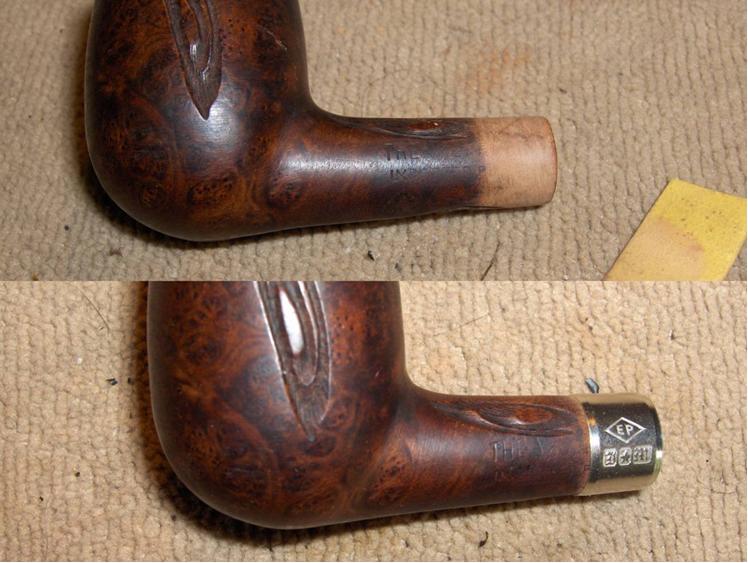
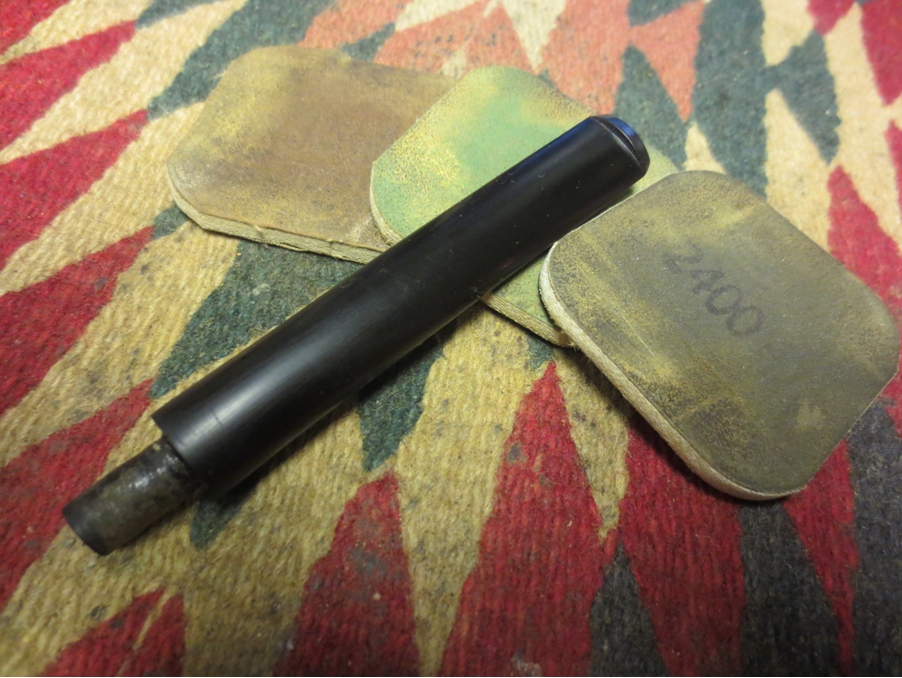
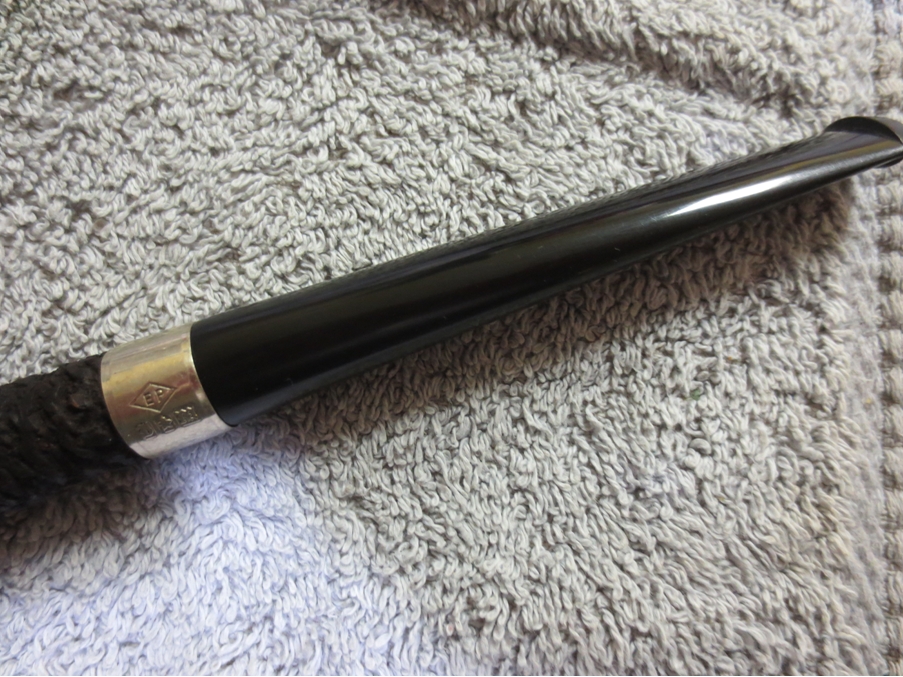
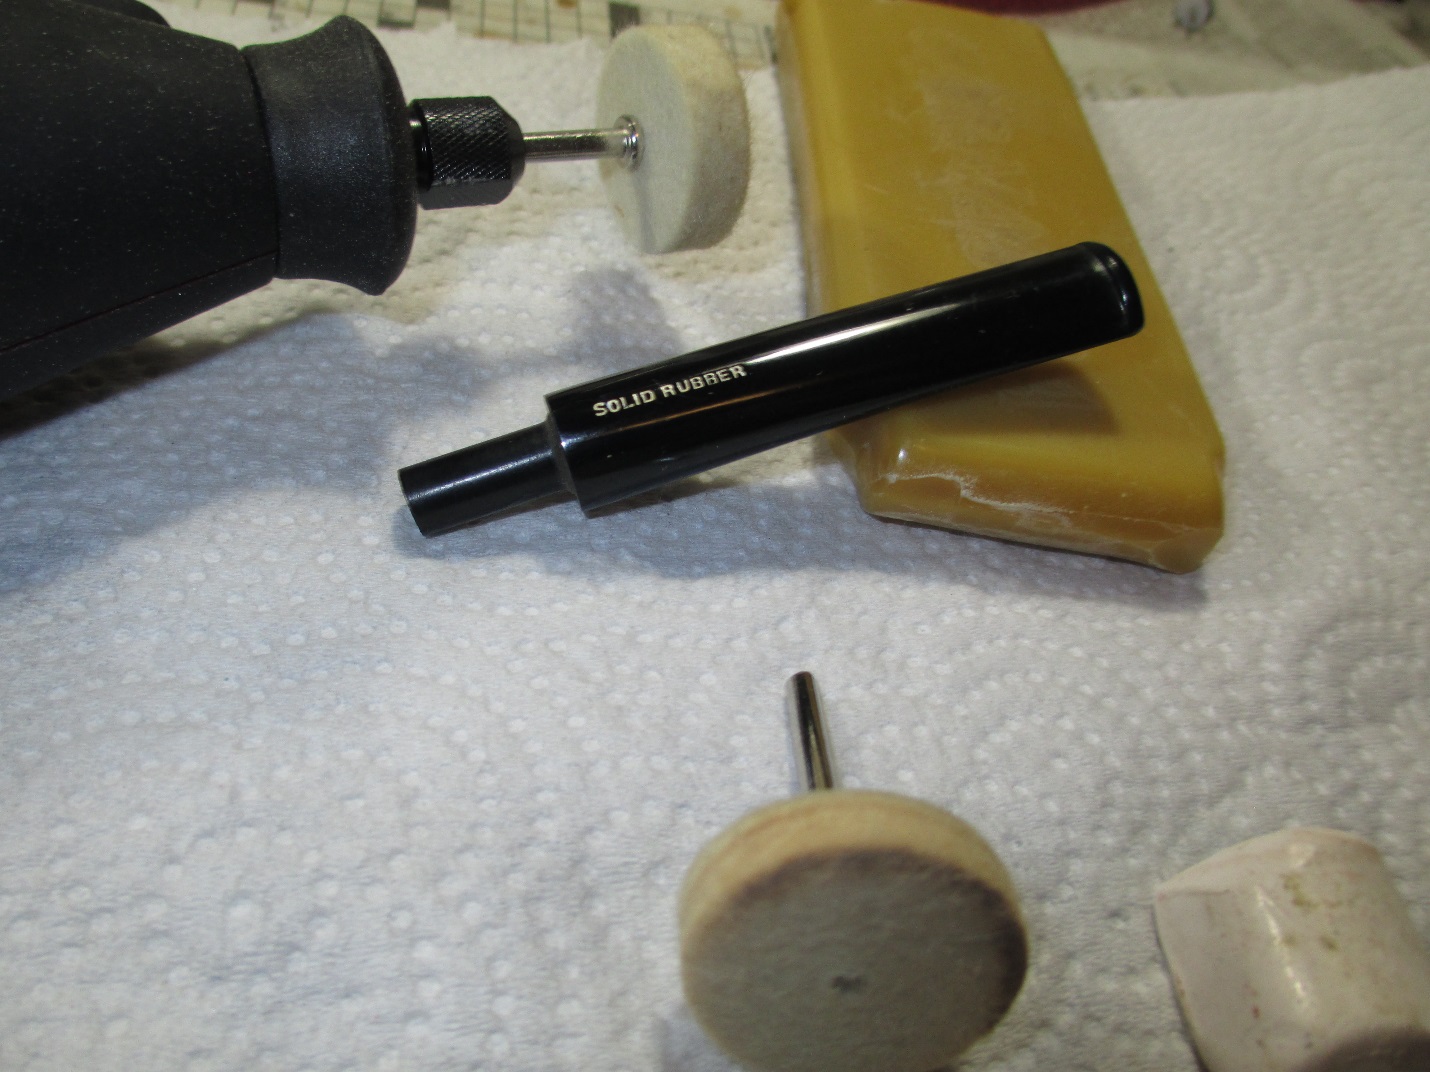
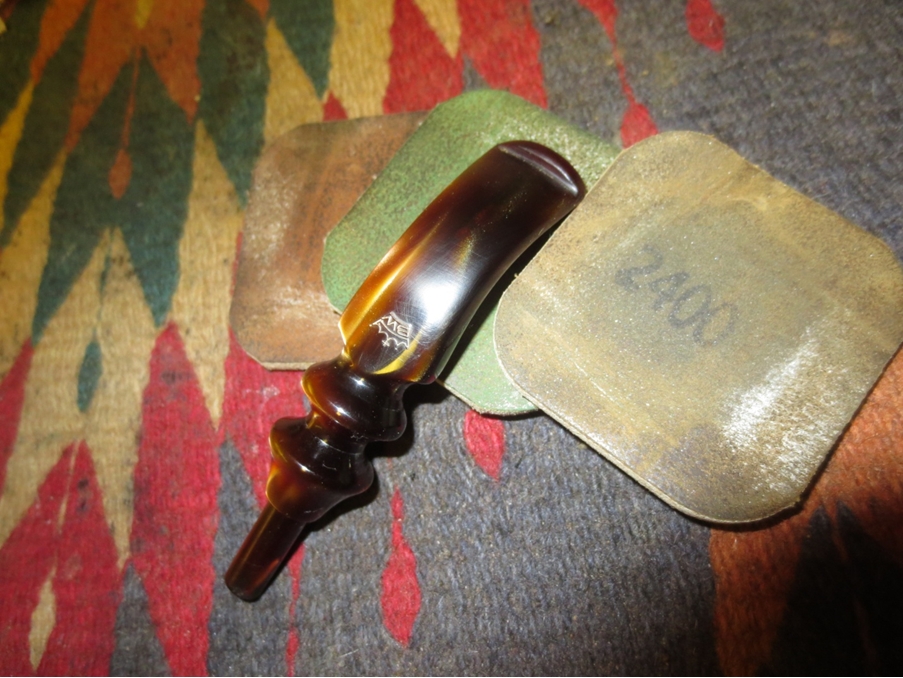
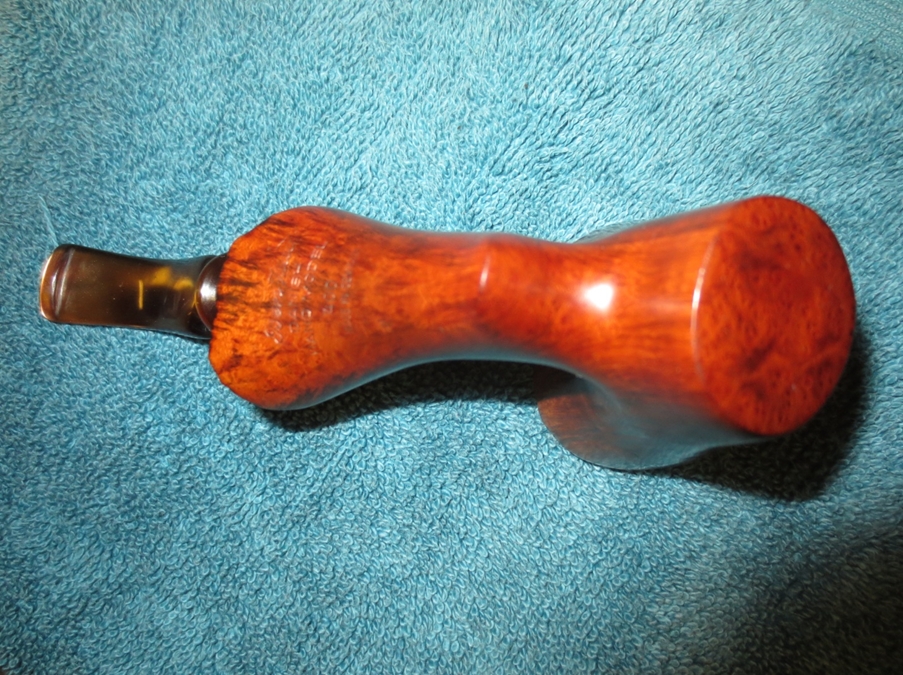
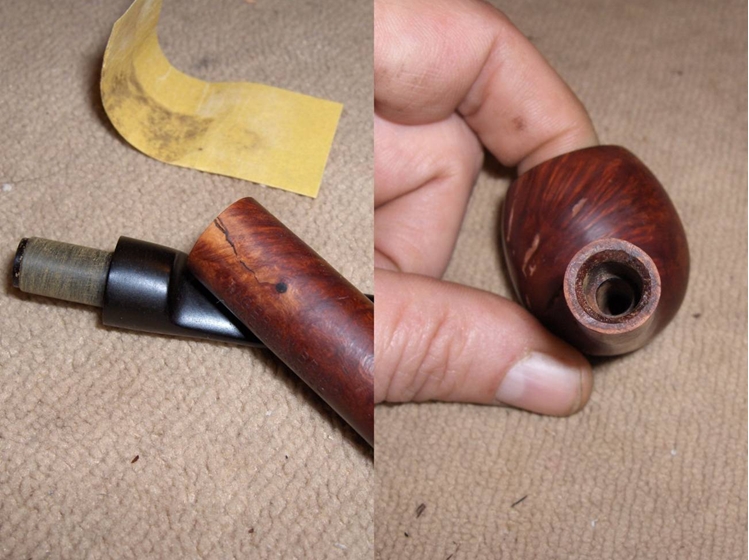
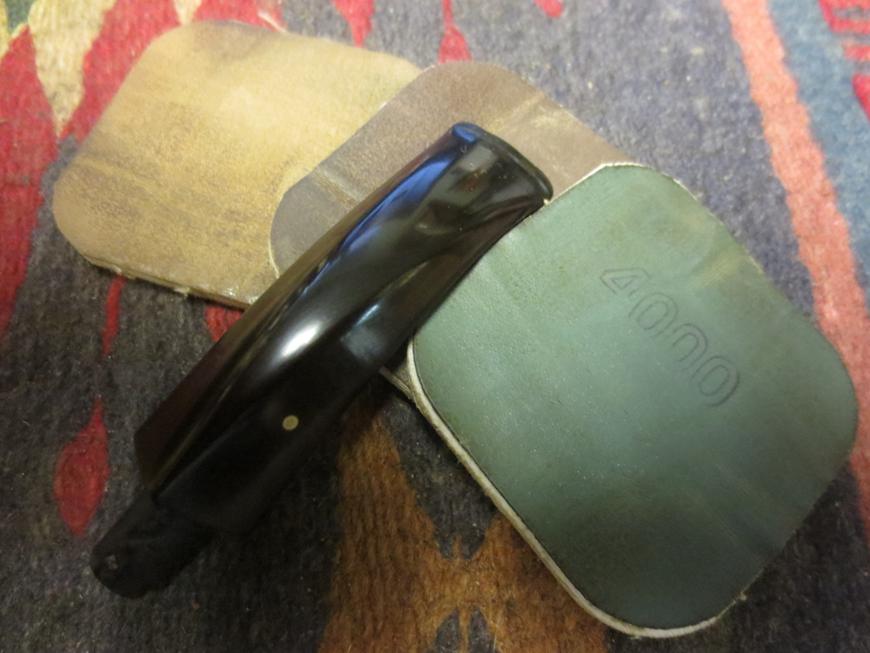
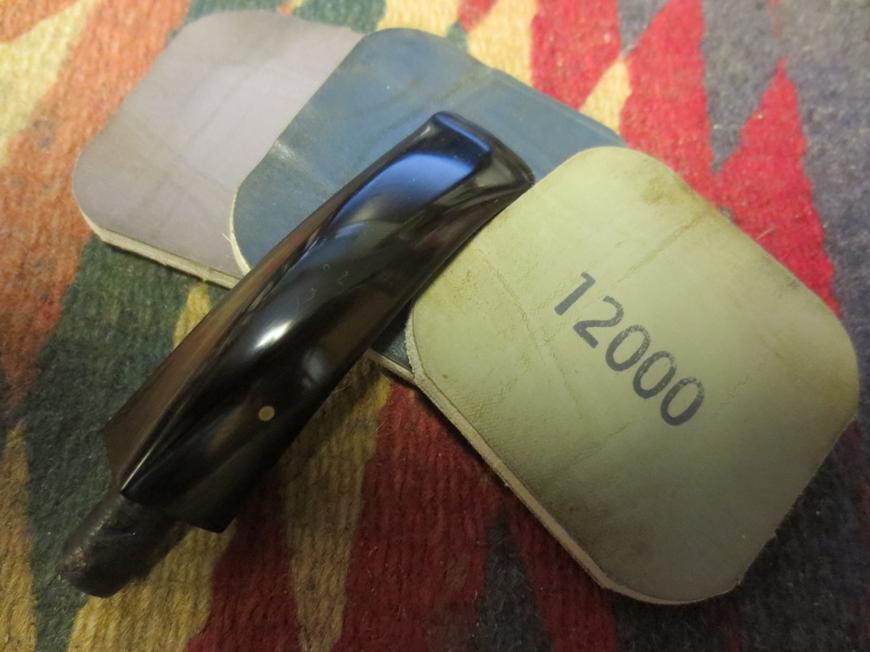
When I finally went back to the shop I worked on polishing the stem. I put the plastic spacer/washer between the shank and the stem and worked on it with micromesh sanding pads. I wet sanded with 1500-2400 grit pads and then rubbed the stem down with Obsidian Oil. I dry sanded with 3200-4000 grit pads and rubbed it down again with the oil. I dry sanded with 6000-12,000 grit pads and then gave it a final coat of Obsidian Oil. I set it aside to dry.Dunhill45

Dunhill46

Dunhill47 
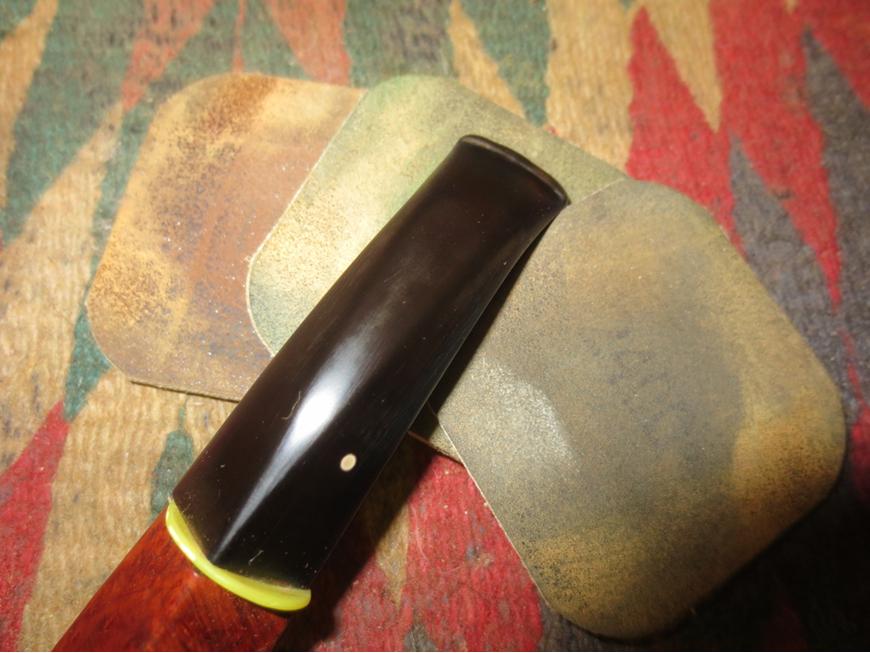
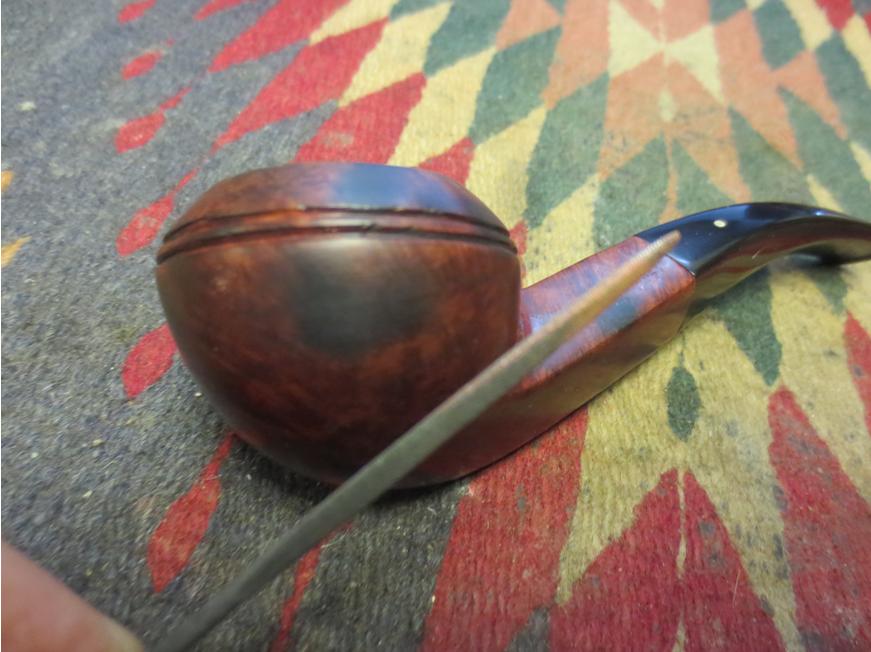
The stem was looking really good. There was a rich glow to the vulcanite. These older Dunhill pipe stems really shine like glass when they are polished. I set the stem aside and did a bit more work on the bowl. I used a very small oval needle file to work on the rings on the left side and front of the bowl. I wanted to clean up the edges and sharpen the overall look of the rings.Dunhill48

Dunhill49 
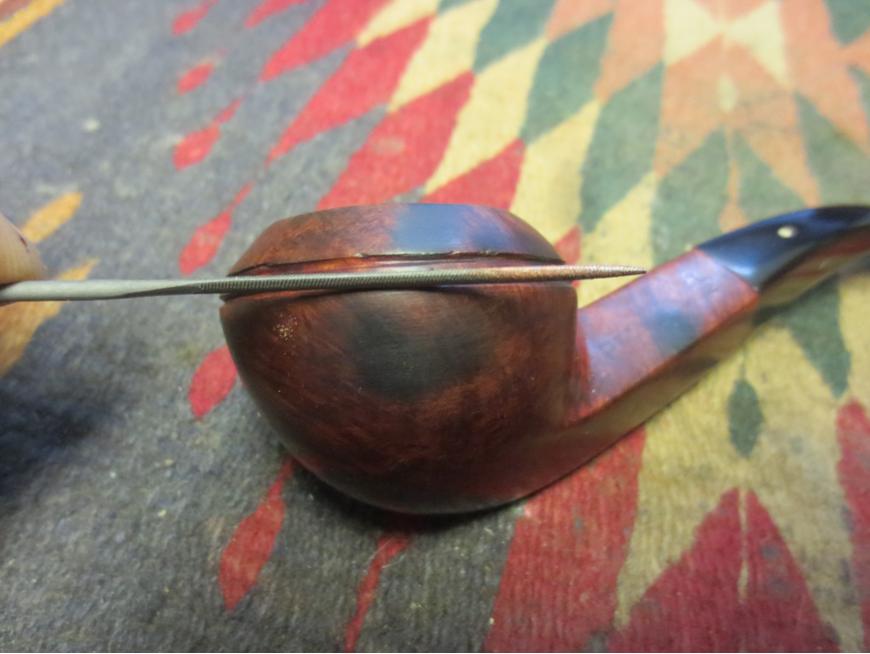
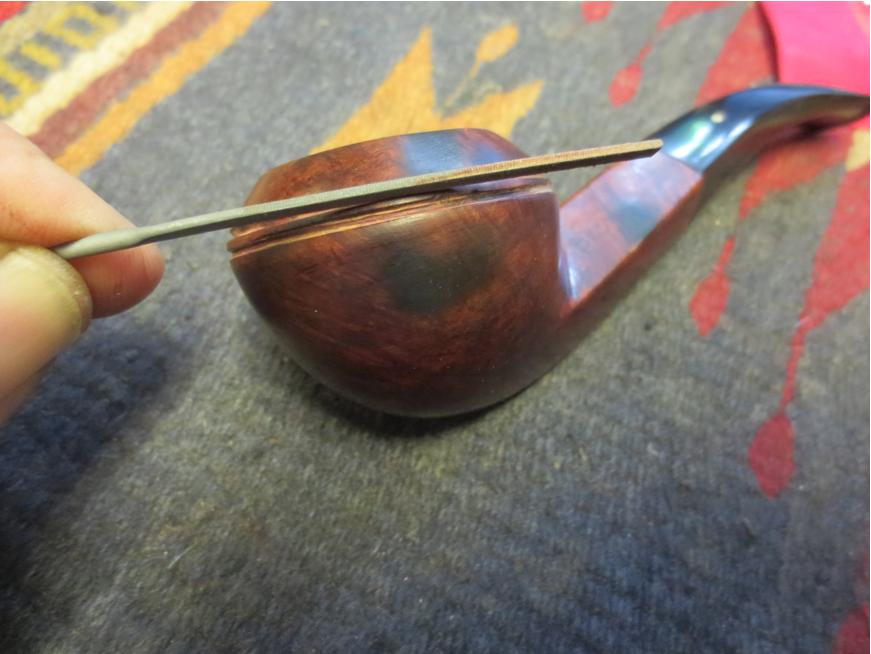
I followed the oval file with a flat rectangular blade needle file and cleaned up the edges of the rings some more. When I had finished with the flat file the rings looked far better than they were when I started.Dunhill50

Dunhill51 
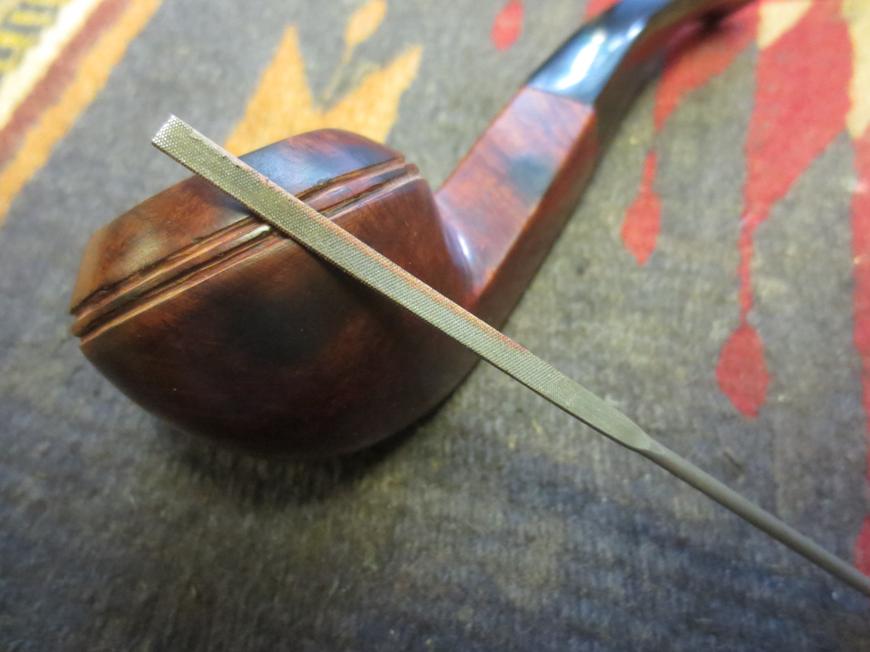
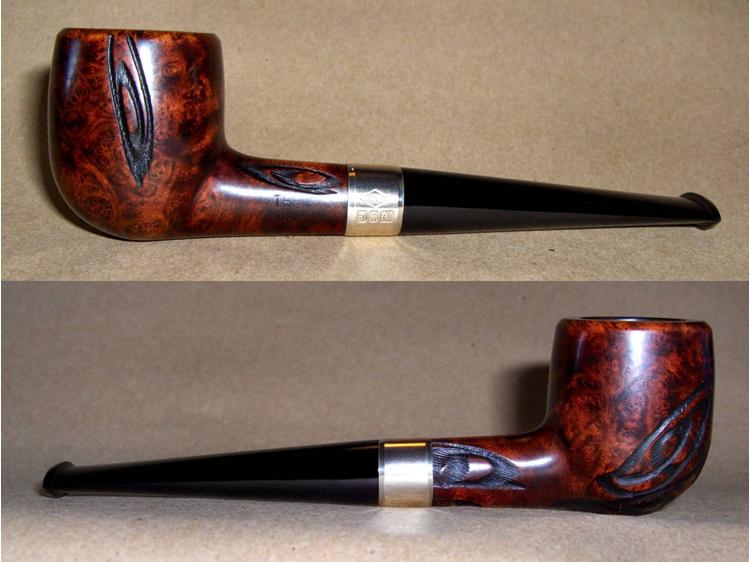
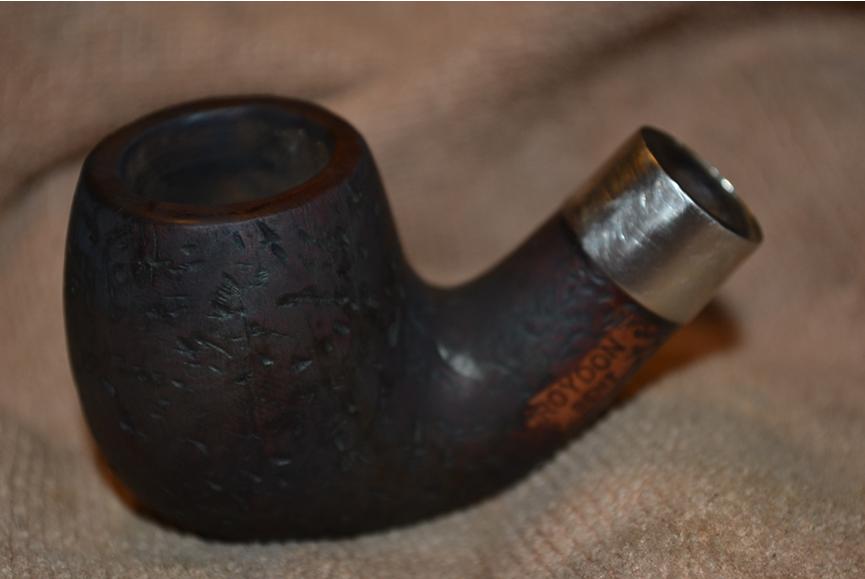
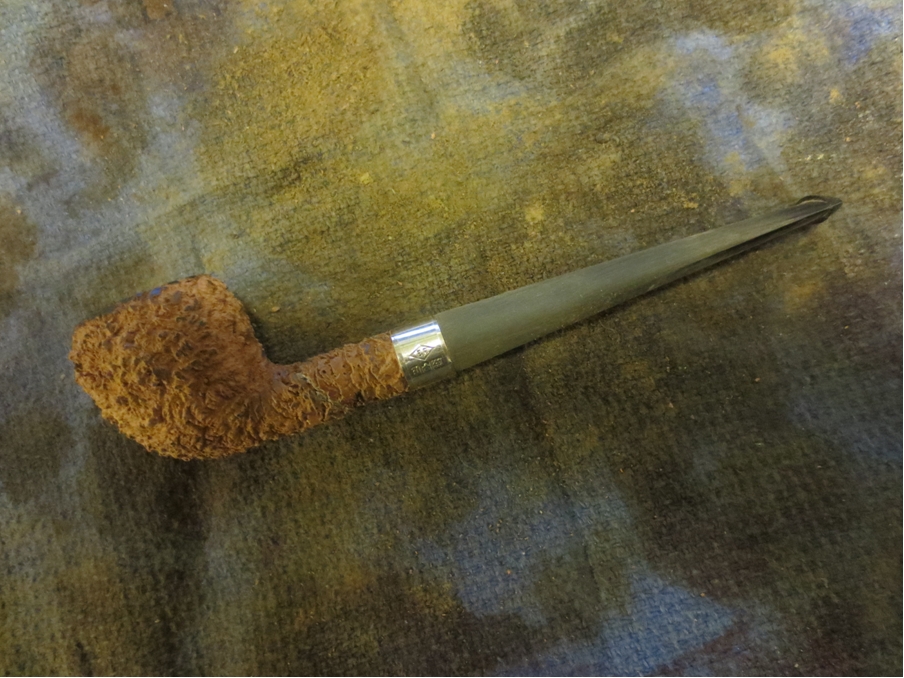
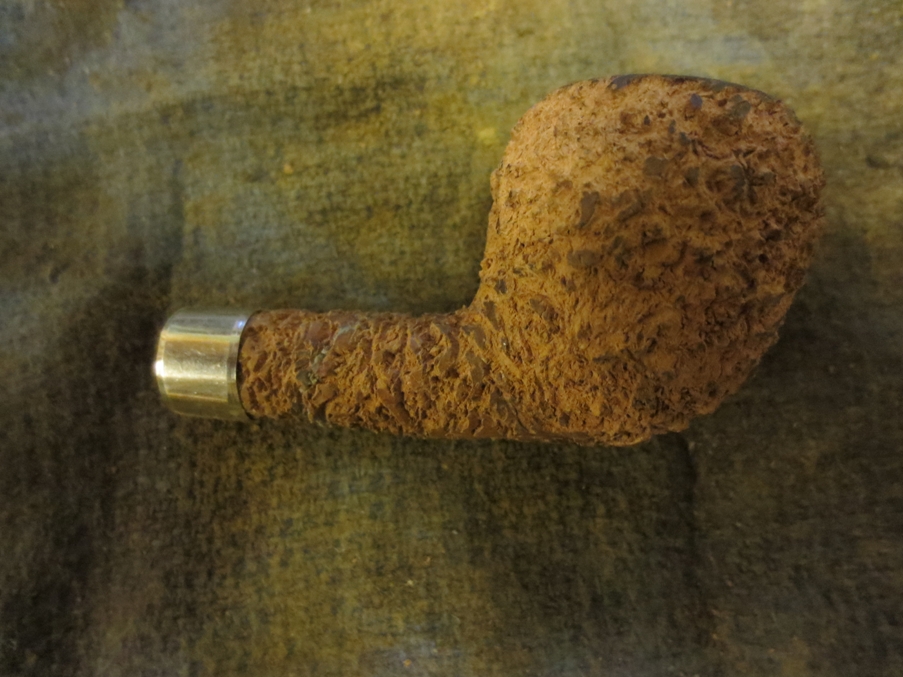
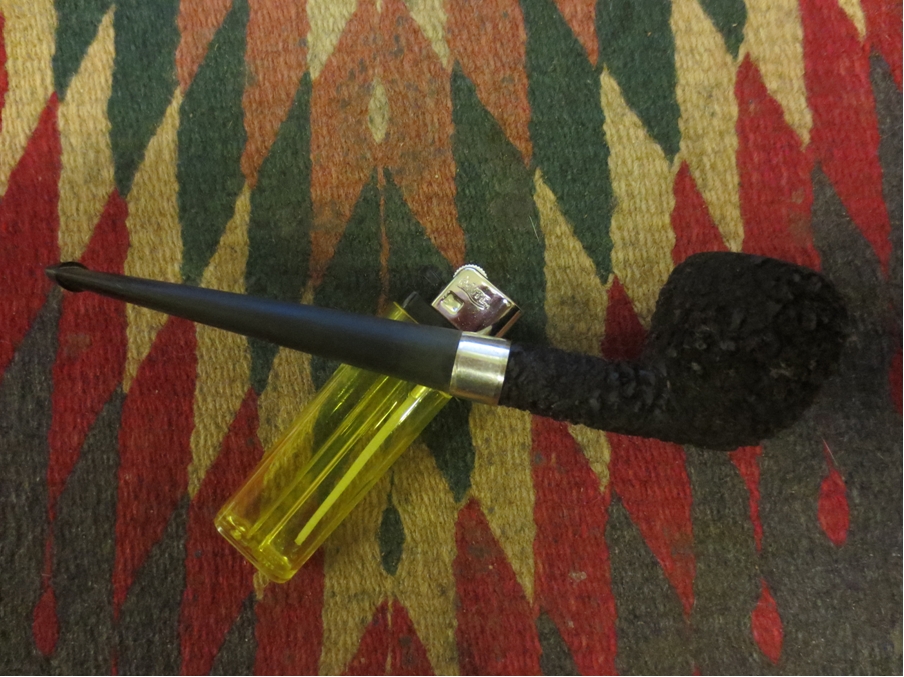
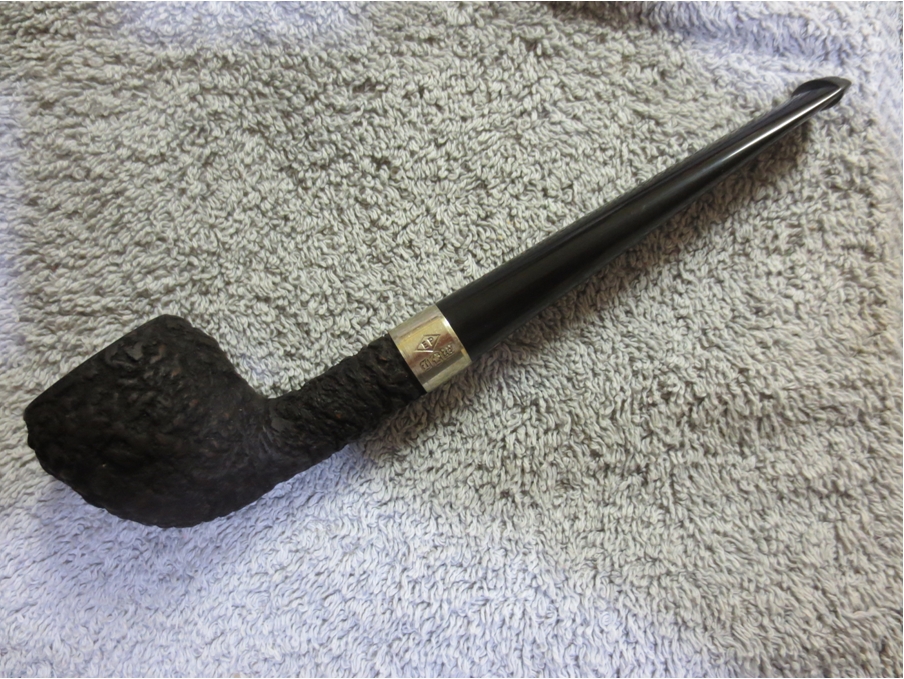
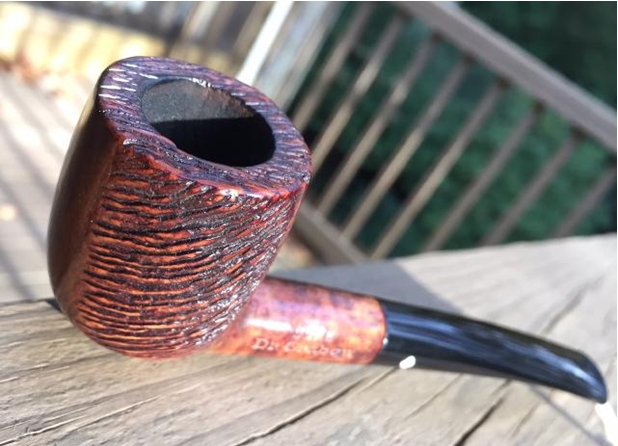
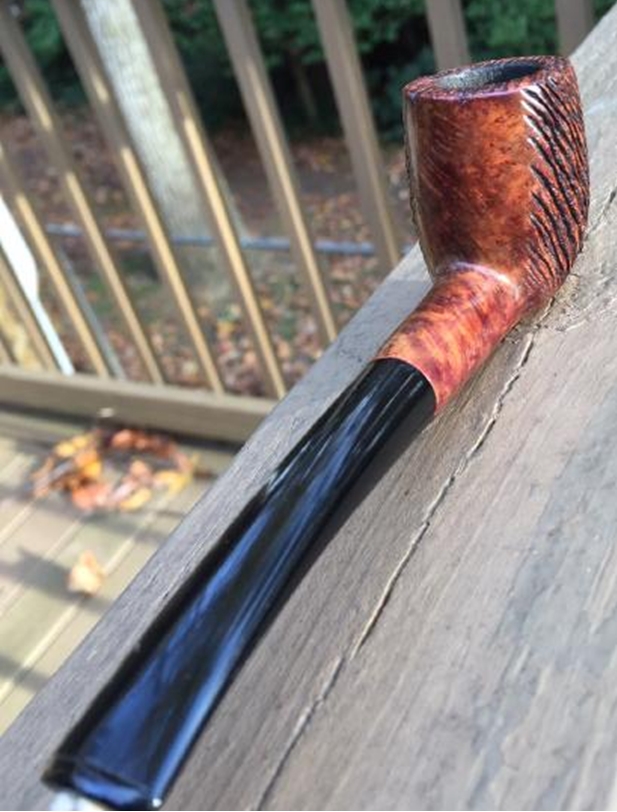
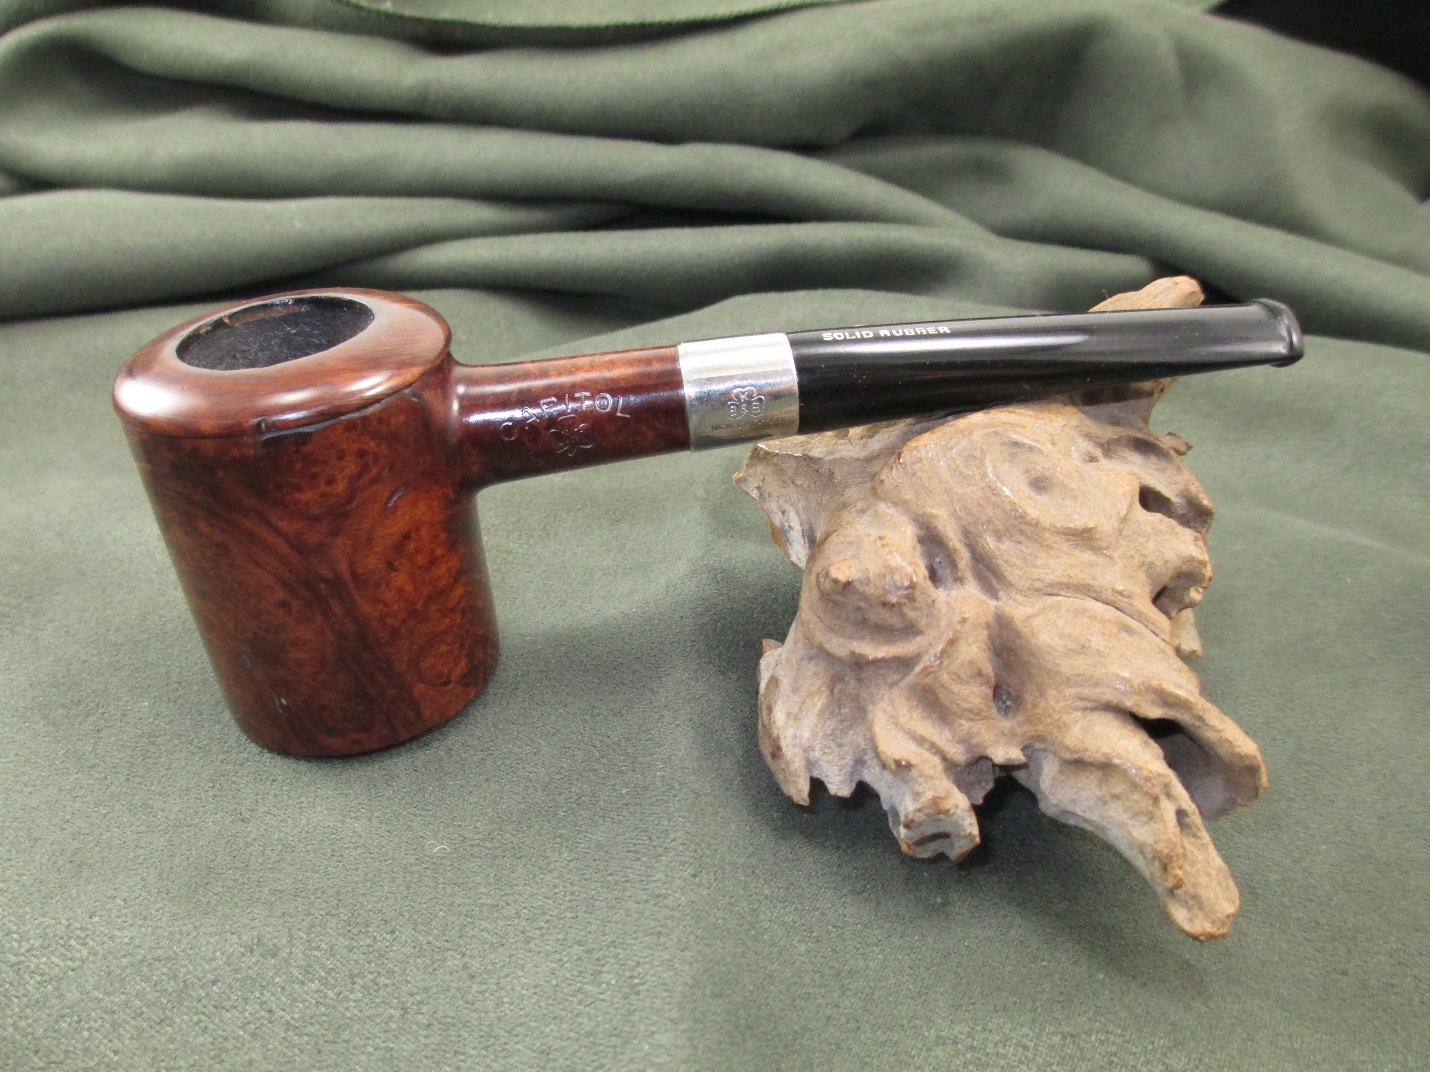
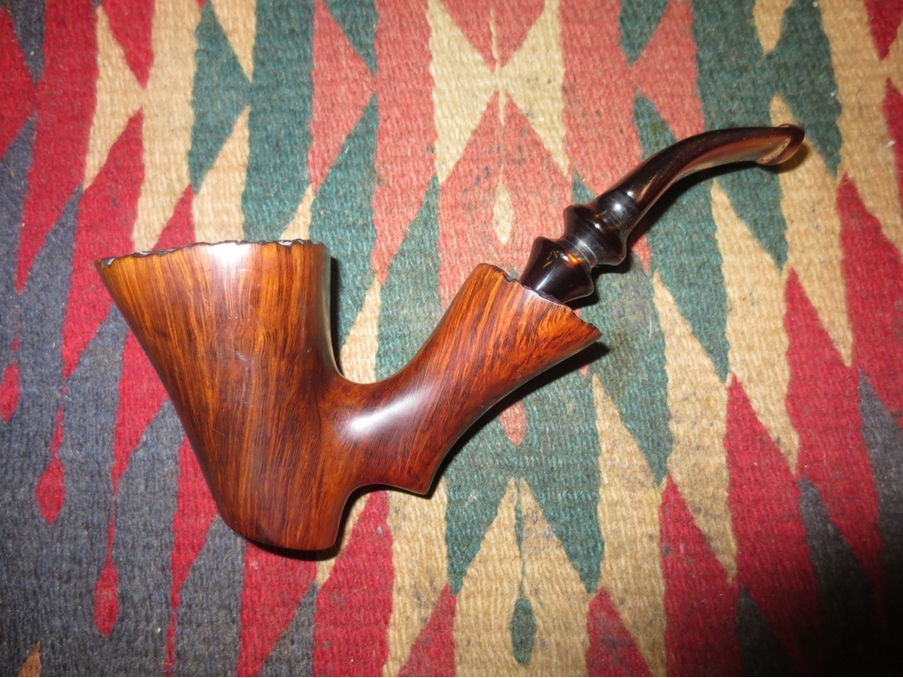
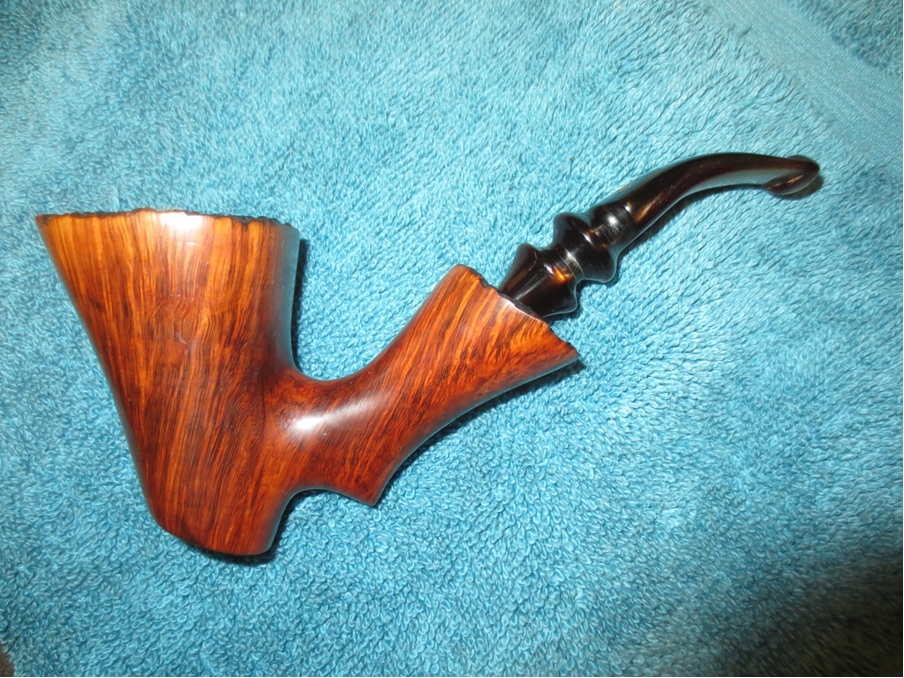
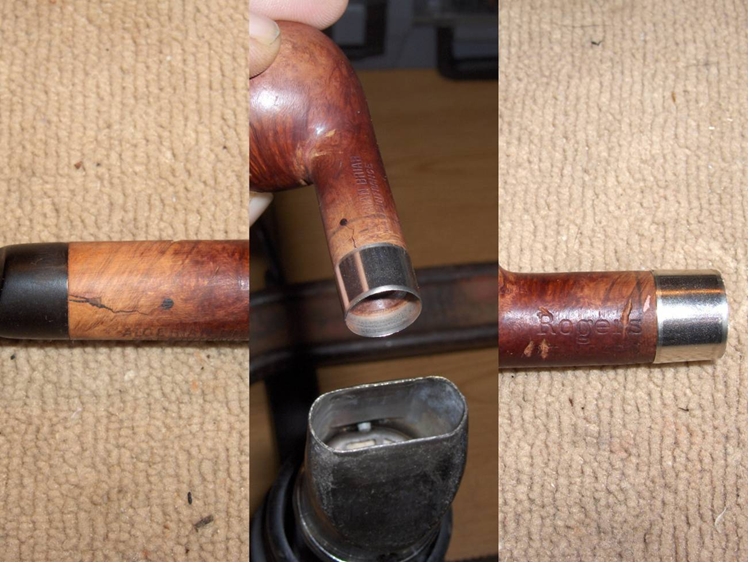
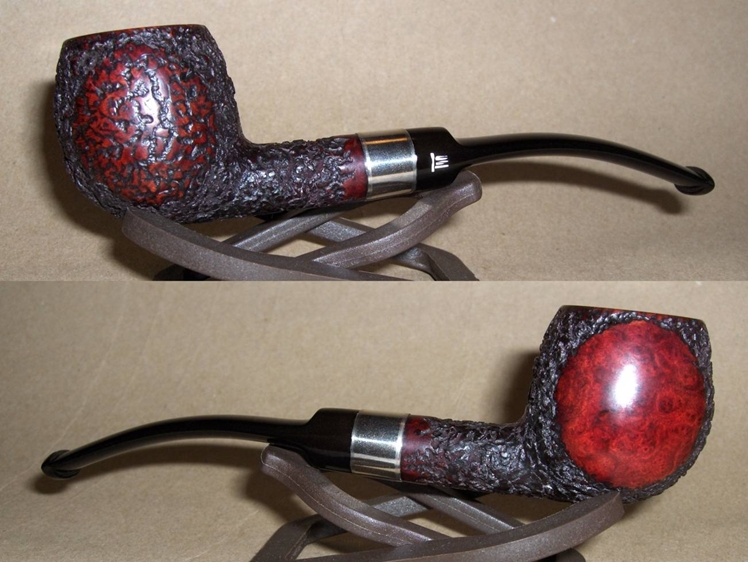
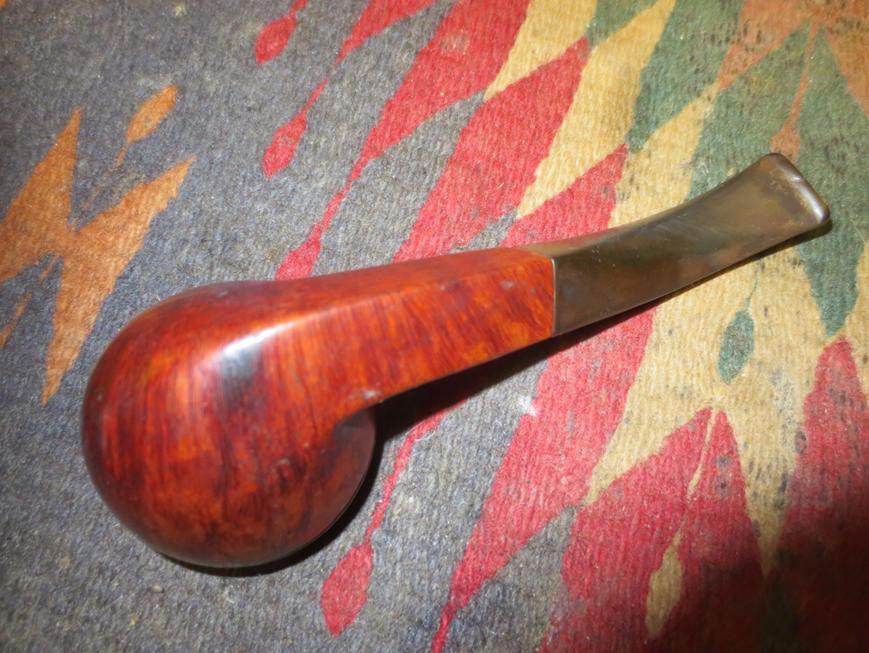
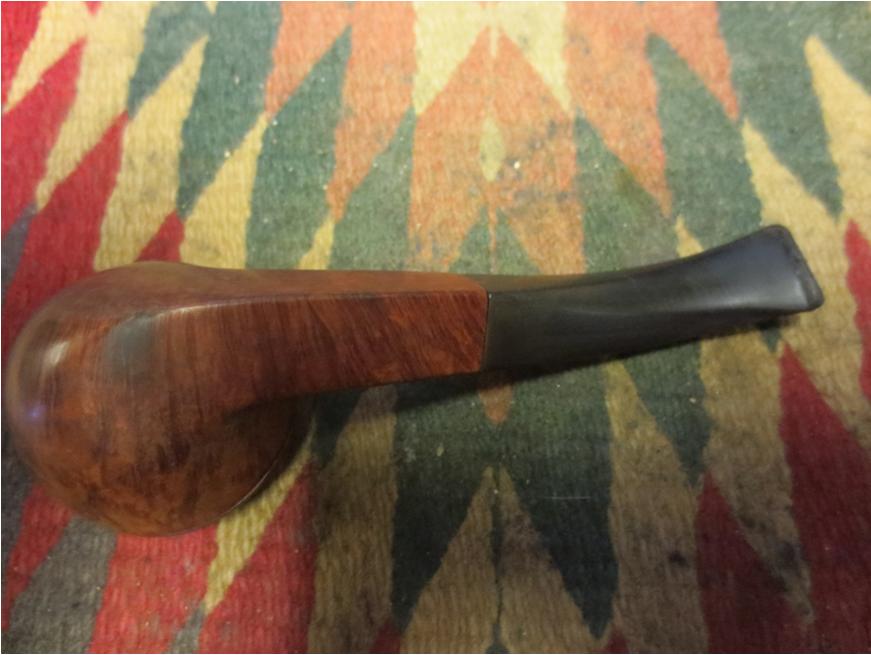
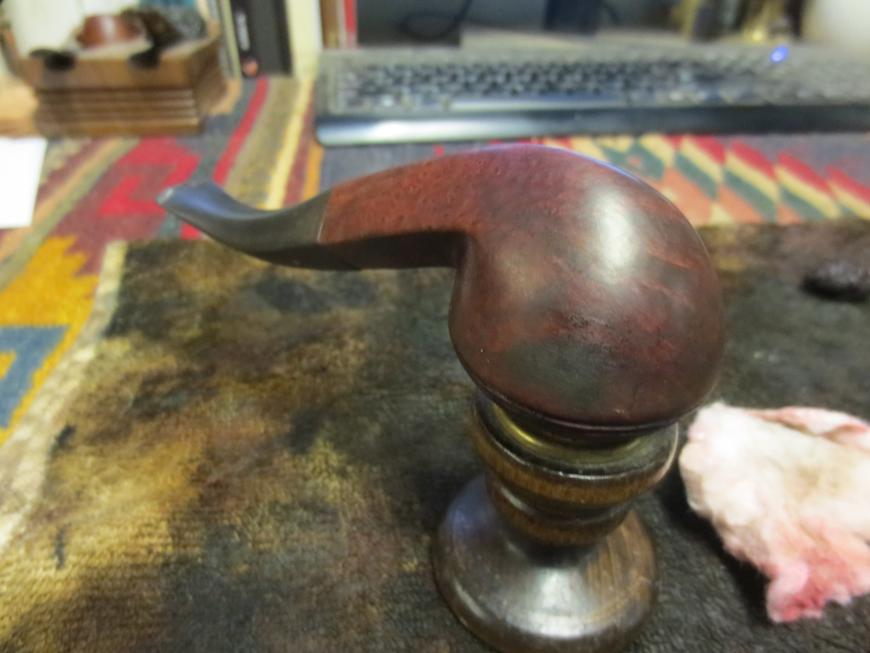
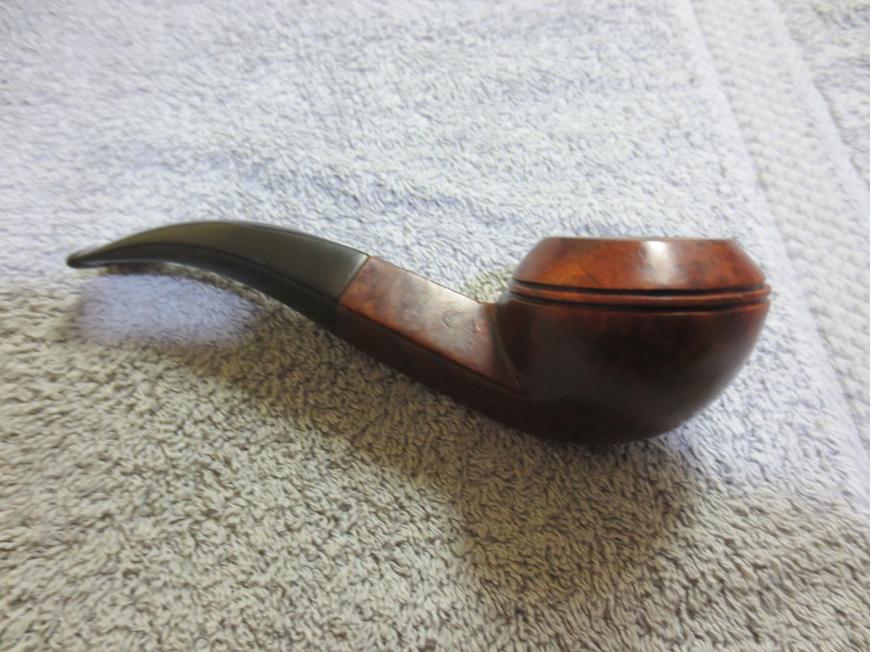
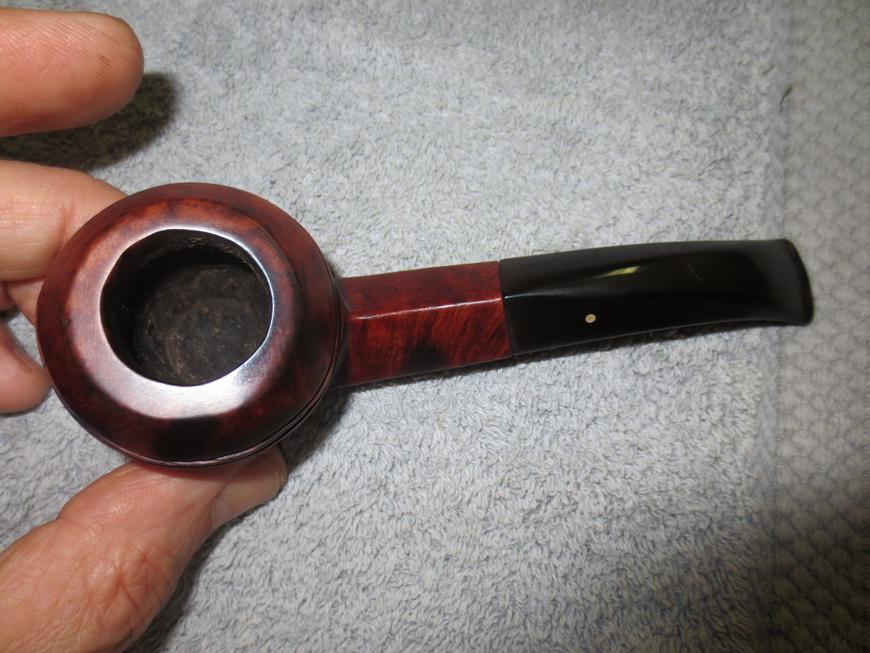
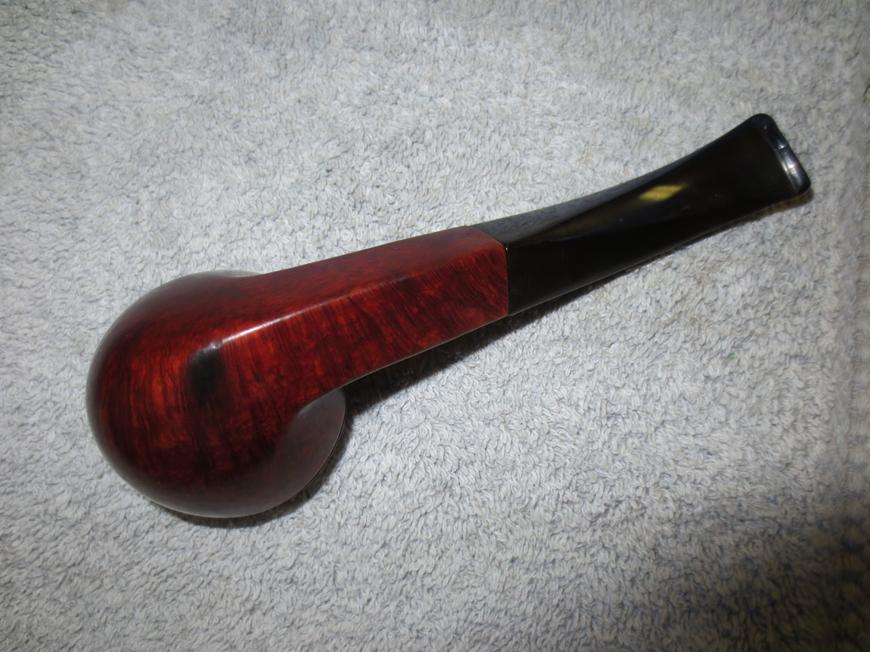
I gave the bowl another coat of stain with the dark brown stain pen and then buffed the bowl and stem with Blue Diamond Plastic polish. I gave them both multiple coats of carnauba wax. Then I buffed the pipe with a clean flannel buff and polished it. The finished pipe is shown below. I think this one will stay with me as the nomenclature is almost illegible and the dark marks all over the bowl still show. The pipe smokes well so it will be a work horse pipe for me. It was well worth the time to clean up and I learned much in the process of reworking the rings.
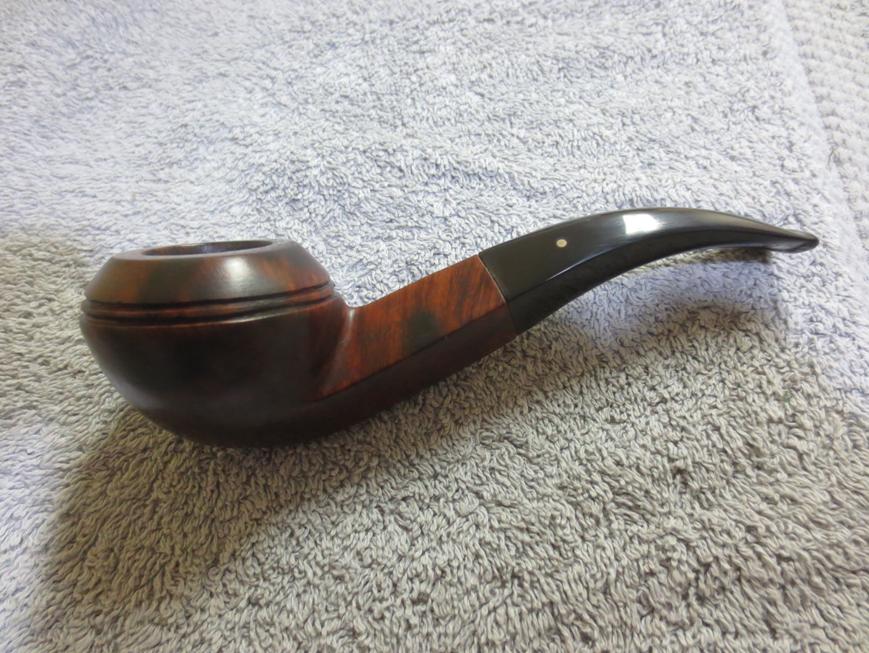
Dunhill52

Dunhill53

Dunhill54

Dunhill55 Thanks for looking.

Midterm Exam #3: Restemming a Thermofilter Billiard


Blog by Anthony Cook

I’m turning in my third midterm exam today. This one is based on an old Thermofilter pipe. I’ve made plenty of mistakes while fumbling my way through the learning process of pipe restoration, but one of my biggest and earliest blunders was inflicted on this poor pipe.

Thermofilter seems to be one of those nearly forgotten brands that nevertheless still pops up on eBay on a fairly frequent basis. The best information that I can dig up on it comes from a comment that “emo” posted on the Dr. Grabow Collector’s Forum:

Thermofilter was made in Italy by Fratelli Rossi in Varese. Started about 1964 and continued till about 73/74. It was imported and sold by Mastercraft…. to, best I recall, Whitehall Products Co. in Wheeling WV… Division of CULBRO.

We had several “left over” and closed them out for $3.98 over a year or two… not as Thermofilter, but simply as a filter pipe, even though they were stamped Thermofilter. Pretty cheap stuff…

The pipe in my possession is a small billiard with carved rustication. The center letters of the stamping are very worn and faint, but there’s enough there to make out “THERMOFILTER” over “IMPORTED BRIAR” on the left side of the shank. The stem did not have any markings and the bit end had been hacked off. Below are some photos of the pipe that I took shortly after its arrival.Anthony1

Anthony2 You may have noticed that I used past tense when mentioning the stem above. That’s because I dissolved the original, plastic stem from the inside out. Yes, you read that right. When I was running alcohol dampened pipe cleaners through the stem to clean it out, the first couple came out covered with the thickest, blackest, and stickiest goo that I had ever encountered and I surmised that I was working on some serious tar build-up. I was surprised to find that the amount goo wasn’t diminishing as I worked, but actually appeared to be increasing. Eventually, I noticed that the bore of the airway seemed larger than I had originally thought it was. That’s when I realized the horrible truth. The alcohol on the cleaners was causing the cheap, plastic material of the stem to break down and it was disintegrating from the inside out. You can see for yourself in the comparison photos below.Anthony3 You’d think that I would have noticed it earlier, but I honestly wasn’t paying attention to the diameter of the airway. I mean, who thinks that their stem is just going to dissolve, right?

In any case, I didn’t have any extra stems to replace the original with. So, I tossed the poor, mutilated stem into the trash and dropped the stummel back into the box. It’s been wasting away in there for the past several months. For my third midterm exam, I decided to pull it out to see if I could do right by this old pipe, try some new things, and correct my past mistakes.

I started by giving the stummel an alcohol bath and wiping it down with acetone. This removed the lacquer coat and much of the old stain. It also revealed some really nice grain between the areas of carved rustication. Then, I topped the bowl with 220-grit and 320-grit papers. I used the same grits to rough out a chamfer around the rim to remove the gouges along the edge.Anthony4 Even though the pipe had been hand cleaned before being boxed up, I wanted to do a retort since I didn’t have one at the time. So, I placed the original, aluminum tenon into the mortise and attached the retort tube directly to that. I flushed the boiling alcohol through the shank 8-10 times before setting the pipe aside to cool, and then I dumped the amber-colored alcohol and repeated the process. After the second flush, the alcohol remained nearly clear and I was satisfied that the retort had done all that it could do. I gave the shank a final scrub using a few pipe cleaners, cotton swabs, and a shank brush and considered the pipe to be clean as it was going to get.Anthony5 The stummel had a few fills that needed to be dealt with. It also had a small, surface crack at the end of the shank that did not penetrate into the mortise. I had wondered about using black CA glue for fills for a while. When I saw Al’s work on the Chelsea pipe I knew that I had to give it a try. After picking the fill material out, I applied a bit of glue into the pits and crack with a round toothpick, and then packed in a little pre-stained briar dust that I had left over the Rogers pipe that I posted earlier. I repeated this until I had a good patch built up above the surface. When the glue was dry, I sanded it down with 220 and 320-grit paper. I also used a round, tapered needle file and 240/320-grit sanding needles to smooth and shape a patch inside the carved rustication.Anthony6 Once the fills and crack were repaired, it was time to do something about the stem. I had picked up a grab-bag batch of pre-made stems a short while earlier. I sifted through them until I found a decent match. I decided to trim the tenon rather refitting the old, aluminum one. So, I cut off the stepped end of the tenon with a Dremel, and then trimmed the tenon with the tenon turning tool chucked into the drill press. The tool was new to me and the first image in the picture below shows the result of my first cut. My speed was off and I didn’t take it up far enough to face it properly. No worries though, because it was still too large and the subsequent trims went much better.Anthony7 After each turn of the tenon, I tested the fit by inserting it partially into the shank. When I thought I was getting very close, I attempted to insert the stem a bit farther and heard a sharp “snap”. It was the unmistakable sound of the shank cracking. It seems that the surface crack that I had thought was insignificant had suddenly become significant.

To repair the crack, I smeared petroleum jelly over the tenon and inserted it into the mortise to spread the crack open. Then, I applied CA glue (clear, not black this time) into the crack and removed the stem to allow the crack to close. I squeezed the shank tightly together with my fingers for a couple of minutes until the glue had set.Anthony8 I wasn’t going to do anything more with the stem until I added some support to the shank. I considered trimming down the original, aluminum tenon to use an internal splint, but decided against it. Since the new crack had run longer than the length of the tenon. So, I decided to band the shank.

I had some trouble finding a band that would fit properly. A 13mm would slide most of the way up the shank easily, but a 12.5mm band wouldn’t even start over the end. So, using the 13mm as a guide, I marked off an area that was the width of the band and sanded it down until the 12.5mm band would just barely slide onto the shank. Then I held the band attached to the stummel over a heat gun to expand it. In less than a minute it had expanded enough that I could push the band the remaining distance up the shank by pressing the end into a soft cloth on a hard surface.Anthony9 With the band in place, I could continue working on the tenon. I continued to slightly reduce the diameter of the tenon with 220-grit, 320-grit, and 400-grit paper until the stem was held tightly in place but easily removed.

The stem was already a pretty close match to the width of the stummel but it needed some refinement and the artifacts from the mold needed to be removed. I kept the stem attached to the stummel and wrapped a strip of painters tape around the band to keep from dragging fine metal shavings into the vulcanite (which dulls it). Then, I began shaping the stem and removing the extra material with sandpaper and sanding sticks. I began roughing it with 220-grit and 320-grit (results in first picture below) and refined it with 400-grit and 600-grit (results in second picture below).Anthony10 I used a set of needle files and sanding needles to open the slot and funnel it. This was my first time trying my hand at this and I’m going to need some more practice because the results were rough. I also funneled the tenon to remove the whistle when the stem was drawn on. Finally, I lightly sanded the entire stem with 1200-grit paper before polishing with micro-mesh pads 1500-12000. The final stem, along with a whole lot of lint, can be seen in the bottom image below.Anthony11 Between the large areas of carved rustication (blech!) on the stummel there was some really nice grain. I can appreciate straight grain for its rarity, but I love a good bird’s eye. When it’s stained well, it has a depth that’s almost like looking at an x-ray of the briar. So, I wanted to do everything that I could to accent that grain and take your eyes away from the ugly, carved, tobacco leaf swirls.

Three main stains were used to achieve the final look of the pipe; black to accent the grain, mahogany to give the overall tone, and ox blood at the end to add a bit of vibrancy. The first two colors were mixed at a 3:1 ratio of isopropyl alcohol to stain. The final color was mixed as a thin wash that I just eyeballed. The stummel was sanded between each staining; starting with 400-grit after black, 600-grit after mahogany, and 1200-grit after the ox blood wash, and then a micro-mesh polish 1500-12000. I also did a lot of grain massaging between each stain using a variety of tools including liner brushes and markers and inks and dyes of a few different colors. You can see how the staining progressed from start to finish in the pictures below.Anthony12 When the staining was complete, I reattached the stem and buffed the entire pipe with White Diamond, gave it several layers of carnauba wax, and added a bowl coating to the well worn chamber. Here’s the pipe that I’m turning in for my third exam.Anthony13

Anthony14

Anthony15

Anthony16 Thanks for looking!

A Possible Peterson Croydon That Could Be the Twin of another Reborn Pipe; or, Two Minds with Almost a Single Thought


Guest Blog by Robert M. Boughton
Member, North American Society of Pipe Collectors
http://www.naspc.org
http://www.roadrunnerpipes.com
http://about.me/boughtonrobert
Photos © the Author

“There comes a time in every rightly-constructed boy’s life when he has a raging desire to go somewhere and dig for hidden treasure.”
― Samuel L. Clemens (Mark Twain, 1835-1910), U.S. author and humorist, in “The Adventures of Tom Sawyer” [1876]

INTRODUCTION
I often wonder what my life would be like today had my mother married the man she loved – a well-known Apollo Program astronaut who later even tried to convince her to leave my dad. But she chose the space research and development nerd in the Brooks Brothers suits instead of the man in the dark blue uniform – which he sometimes traded for a big, bulky, white one with a sealed helmet to protect him from the void of space – who had the Right Stuff.Rob1 By the time he called again, I was about 10, living in the well-to-do Cleveland suburb of Shaker Heights, and Tricky Dick had somehow just been re-elected President. Even I knew what a mistake that was. I got out of bed late one night during one of my parents’ Gatsby-like parties to answer the phone upstairs in the hallway. A hushed voice, halting in surprise, asked, “Is Kit – your mother – there?”

I told him she was at the party downstairs and said I could go and get her, but he quickly said no, asking me to have her call him and giving me his nickname. He must have thought I wouldn’t know who he was, but meeting him when I was just a toddler was something I never forgot. “Yes, sir, I’ll tell her, Colonel So-and-So [not his real name],” I replied, and can still hear him almost choke up over the long-distance phone line 43 years ago. Speechless for a moment, he at last suggested I just tell my mother in the morning, and I said, like a good little soldier on a mission, “Okay, sir. I understand.” And somehow I did.

Some events seem probable had my mother not married the man in the Brooks Brothers suits: I likely would have followed the astronaut to the Air Force Academy, and he would have been proud of me until he died some years back, unless I beat him to it in the service of my country. But the rest is blurry, except that I am still fatherless although my dad is alive and well.

Oh, and one more thing. I would not be here in beautiful Albuquerque, searching for treasures in pipe lots and one at a time and all the other right places.

RESTORATION
Looking online last week for background information on Croydon, I found links to various sites showing versions said to be made in London and Surrey, England as well as Spain, but without photos showing the nomenclature. Then I found a site for a definite Croydon brand from a Dutch carver named Lex Brouwer. There were also several sites for other brands, including Hilson and Peterson’s, with Croydon lines. I felt safe ruling out Hilson, which is known for its meerschaum lined chambers and mostly glazed clay bowls and shanks. Imagine my surprise to find an old Reborn Pipes blog by our host himself, from three years ago (June 20, 2012), about a ruined Croydon he believed was an old Peterson and of course re-made it to look perhaps better than new! Here are, top to bottom, his Croydon before restore and mine:Rob2

Rob3 Clearly, the similarity of the two pipes, other than the identical stampings of CROYDON over BENT, is not in these two before shots. What is amazing is how alike our vision of the finished pipe should be. (No fair skipping ahead to see what I mean! Bad habit!) Maybe even scarier is the fact that Steve’s modifications were made by necessity, about which you can read at https://rebornpipes.com/2012/06/20/old-croydon-reborn-3/, while mine were just for the sake of personal preference and nothing else. I might just as well have reamed and sanded the chamber, scrubbed and retorted the insides, lightly micro-meshed the bit below the lip and given the whole thing a nice new buffing.Rob4

Rob5

Rob6

Rob7

Rob8

Rob9 But I’m just sick and tired of all the rusticated pipes that are finished with black stain! Enough is enough, I say! At least for this restoration, which I can only call that because of the initial stripping of the insidious stain, starting with 300-grit sandpaper followed by 400 and micromesh every grade from 1500-4000.Rob10

Rob11

Rob12

Rob13

Rob14

Rob15 I wanted to remove as much of the black from the crooks and crevices of the rustication as possible. Yes, my goal was to eradicate it if possible, which proved impossible with my knowledge – short of soaking only the wood in Everclear, which was problematic what with having to plug both ends of the draught hole and keeping the metal tilted up and out of the 95% alcohol. I suspect the alcohol would have eaten its way past any stoppers I might have devised anyway, and besides, I have had enough experience stripping pipes this way to have learned that less, in most cases, is better. Of course, in the case of Steve’s Croydon, he had absolutely no choice but to do a total makeover, even to the point of considering the idea of re-Christening the completed work a “Croydon-Reborn.” Reading his blog, I was touched by the apparently sincere struggle he had with the entire process he has many times since performed with ever-increasing brilliance.

At any rate, I chose the kinder, gentler approach of going over the wood again, but with super fine 0000 steel wool and focusing my tiring hand-work on the celestial but microcosmic canals and pocks. Then I did the full range of micromesh again from 1500-4000.Rob16

Rob17

Rob18

Rob19

Rob20

Rob21

Rob22 As is apparent, my efforts to remove even a little more of the blackness were fruitless. I should have known better than to try, but still not refrained from using the steel wool and another thorough micromesh progression for its fine effect on smoothing the wood and making it glow.

It was time, if not overdue, for retorting, which took a surprisingly low number of Pyrex test tubes of boiled Everclear shot through the stem and shank into the chamber filled with cotton that came out with any brown, and another to boil up and drain out several more times to confirm the job was done right.

Now, for the point of all this technically unnecessary work obliterating the certainly OK original black stain. What I was looking for was something closer to the briar’s true color but dark enough to cover the grain and fill in the grooves. I decided on Lincoln Marine Cordovan (Burgundy red) boot stain, knowing that except with the lightest shades of briar, it leaves only a subtle redness. Here it is, first stained and flamed, then gently buffed with 3200 micromesh and then after being hand-coated with Halcyon II to sit a while before buffing on the clean wheel.Rob23

Rob24

Rob25 Everything so far had worked out just right to do the minor clean up needed on the upper top and bottom of the bit, and including the lip, while the wax on the briar dried a little and worked into the wood. I micro-meshed the bit with 1500, 2400, 3200 and 3600 before buffing with red and white diamond, using the clean wheel and a soft cotton rag after both. Below are two shots before and one after, as both sides ended up the same.Rob26

Rob27

Rob28 The last part of the job was to put the briar to the clean buffer with a light touch, re-join the two separated parts of the pipe and again wipe the whole thing with a cotton cloth.Rob29

Rob30

Rob31

Rob32

Rob33

Rob34

Rob35 I caught the slight smudge on the top of the stem in the photos above after taking them and fixed the problem. Now for the final, left view photos of Steve’s finished Croydon and mine side-by-side.Rob36 CONCLUSION
This was, of course, no competition, if only because of the fact that Steve’s was done three years ago, a few months before we ever “met” online. But had they both taken place at the same time, his would, hands-down, be the winner. Being able to take a pipe in the abominable condition in which Steve found his and clean it, rusticate the bowl and shank himself and replace not only the stem but, it appears, the band using the exact types with which an original is created astounds me…and inspires me.

If I still drank, Steve, I’d have two, one for me and one for you. But I wouldn’t stop there, so I guess I’ll have to settle for a Monster!

Midterm Exam #2: Repairing the Leaky Airway on a Champion Deluxe


Blog by Anthony Cook

It’s exam day again. I didn’t get much sleep, but I did have a good breakfast of Pop-Tarts and leftover ramen. So, let’s do this! This time, the exam is based on a bent brandy shaped Champion Deluxe.

PipePhil provides a little info on the Champion brand:Champ1 The pipe I’m working with has shank stamping and a stem logo that is identical to the middle pipe in the above graphic. The country of origin for the brand is listed as Switzerland, but there must be some French connection. The word “FRANCE” is stamped across the bottom of the shank-end of the stem on my pipe. You can see the pipe for yourself in the photos below, which were taken shortly after its arrival.Champ2 I was really pleased with this one when it arrived. I really liked the size, shape, and rustication pattern. As I turned it over in my hands, it seemed to be in pretty good condition. There were no major cracks or gouges, only a generous amount of grime on the stummel, one or two nicks on the rim, and a little oxidation on the stem. I thought it would clean up nicely and was beginning to look forward to working on it.

Then, I pulled the stem out to check the internals and cringed…Champ3 The airway was drilled so high that it actually penetrated the top of the mortise and only a very thin layer of briar remained between it and the surface of the shank. In fact, the wood was so thin that it had either cracked from heat/moisture expansion or had been punctured by the rustication tool. If you look closely, you can see in the second image that the alcohol from a dampened pipe cleaner would seep out of the airway to the surface of the shank.

I didn’t have the confidence at the time to attempt to repair something as essential and delicate as an airway. So, I reamed the bowl, scrubbed the inside of the shank and stem clean, and then dropped it back into the box where it’s been withering away for several months. So, today I pulled it back out for my second midterm exam.

The airway needed to be sealed before doing anything else. If that wasn’t successful any other work would be pointless. So, I clamped the stummel upside-down in my bench vise using a couple of foam strips to cushion it. I tried to make sure that the airway was as level to the ground as possible. Then, I applied super thin CA inside the airway with an applicator bulb. Since I couldn’t really see inside the shank and bowl, I had previously measured the length of the airway and marked it off on the applicator with a strip of tape. This, along with a slow and steady hand, kept me from dribbling the CA into the bowl.Champ4 Once I was sure that the glue was completely dry, I used 240-grit and 320-grit sanding needles to smooth out any lumps and bumps that the glue may have created in the airway. Then, I prepared my initial test of the patch. I dampened a pipe cleaner with alcohol and inserted it into the airway. I couldn’t see any seepage, but just to be sure I pulled out my jeweler’s loupe to give it a closer inspection. Still nothing. The patch had passed its first test.Champ5 I set up a retort for the next test. If there were any open fissures in the shank, the evaporation from the boiling alcohol would surely seep through. I flushed the shank 10-12 times before setting the pipe aside to cool. The color of the alcohol in the tube is a testament to the merits of a retort. It’s not filthy by any means, but remember, this is a pipe that I once thought was clean.

While the pipe rested, I closely inspected the shank to see if the patch had held. Success! I found no moisture seepage at all. The patch was doing its job and the worst part of the exam was over!Champ6 After another dozen or so flush with the retort the alcohol in the tube was almost completely clean. I let the pipe cool, and then gave it a final, quick scrub the wrap up the internal cleaning.Champ7 I placed the stem into a bath of warm water and Oxyclean and let soak for about an hour before I scrubbed it down with cubes cut from a Magic Eraser pad to remove the oxidation. Once the stem was clean, I applied a black CA glue patch to the remaining dents. I put a drop of activator on the patches to speed up the drying and they were ready to be worked again in about ten minutes. I sanded out the patches with 220-grit (the bottom image in the picture below), 320-grit, and 400-grit paper. Then, I gave the entire stem a light sanding with 600-grit paper to remove any minor scratches.Champ8 The paint in the stem logo was cracked and flaking. So, I picked out the loose paint, and then I began to fill in the area around the logo with a grout pen begin restoring the logo. I was a little worried about how well this was going to turn out since the recessed stamp was very narrow and shallow. I let the “paint” dry for about 20 minutes before carefully sanding it down with 1200-grit paper and I thought that it came out surprisingly well in the end. I finished up work on the stem by lightly sanding it with 1200-grit paper to even everything out, and then polished with micro-mesh pads 1500-12000.Champ9 The stem was finished and the clock on the wall was ticking. Some of the other guys were already turning in their papers. So, it was time to start wrapping things up. I mixed up a 3:1 stain solution of isopropyl alcohol and Fiebing’s black dye and applied it to the stummel. Then I buffed the entire stummel with red Tripoli before sanding out the scratches around the stamping with 400-grit, 600-grit, and 1200-grit sandpaper.Champ10 Then, I applied a 3:1 dilution of Fiebing’s cordovan before polishing the stamping area with micro-mesh pads 3200-12000. I reattached the stem and gave the entire pipe a light buff with white diamond, and waxed the pipe with Halcyon II for the stummel and a few coats of carnauba for the stem. Finally, I applied a bowl coating to promote cake growth, and then turned the exam in with my fingers crossed.

The photos below show how it finally turned out. For some reason, in these photos the cordovan and black blend together in the rusticated areas making them appear much darker. When you have the pipe in hand the cordovan is much more evident. I don’t know why that is. Man, I hope we aren’t being graded on our photography skills as well.Champ11

Champ12

Champ13

Champ14

Champ15 But, wait..!

Okay, I realize that this is a little unusual for an exam, but I’d like to make a bit of a revision. You see, when I ran my first bowl through this Champion the draw was extremely poor and it gurgled so badly that it sounded like an aquarium. To be honest, this wasn’t unexpected. The misalignment of the airway between the mortise was so extreme that it couldn’t help but create a lot of turbulence, and therefore a lot of moisture. I couldn’t let that stand. So, I took the stem back to the worktable to tweak it a little.

I clamped the stem in the vice and used a Dremel to cut off the stepped end of the tenon. You can see the piece I removed lying on top of the vice in the photo below.Champ16 After that, I sanded the face of the tenon smooth and level, and then used a tapered abrasive point in the Dremel to begin funneling the airway. I kept the airway lubricated with mineral oil to prevent the friction from burning or melting the vulcanite. The abrasive point opened up the end of the airway to a 3/16” diameter but transitioned it down to the 1/8” diameter of the original airway. Then, I used 240-grit and 320-grit sanding needles to make sure the transition was smooth. Finally, I used a round abrasive point to create a ¼” diameter chamfer on the tenon face around the airway and the sanding needles again to round off any of the sharp edges. In the picture below, the left image shows the step that I removed balanced on top of the stem for comparison; the right image shows the completed tenon after being reworked.Champ17 I was eager to try it out and the results were amazing for such a simple modification. The bowl smoked all the way to the bottom with no gurgle at all; even when I intentionally tried to build up steam by puffing rapidly (it was for the sake of science). After the pipe had cooled, I removed the stem and found a lot of moisture in the mortise. So, the extra space below the airway was acting like the sump/well of a system pipe. Very cool. The pipe was once again looking good and smoking well. My second exam was in the bag.

Repairing a Broken Shank Acorn Shaped Pipe and giving it a New Look


Blog by Steve Laug

I have had this broken Acorn shaped bowl in my box of parts for a long time now. I remember breaking it. There were several fills around the shank at that point. The stem was absolutely stuck in the shank and no matter what I did I could not get it out. Heat, cold, alcohol bath or any other means would not work. Finally after I had dunked it in boiling water hoping to loosen things I twisted on the stem and the shank snapped. Then I could see the problem. The stem had an aluminum tenon that had basically begun to disintegrated and had bonded to the shank. It had a long aluminum stinger that extended virtually to the air hole. It was a mess. I clean up the shank and the bowl to remove all of the corroded aluminum and scraped it clean. I was undecided whether to fix it or just part it out so I put it in the box and left it there.

Yesterday I decided to take it out and have a look at it. I put the two parts back together and saw that the fit was actually quite clean. There were just two small places where the briar actually had chipped. I had a polished aluminum tenon that I had extracted from a broken stem and saved for just such a repair. I sanded it and used a file to score the surface of the metal tube so that the glue would have something to grab hold on in the shank. I mixed a batch of two part epoxy and a painted it on the tube with the mixing stick. I liberally coated the tube with epoxy and let it sit until it got a little tacky and then inserted it in the shank end of the break. I inserted the stem in the mortise end so that I did not set the tube too deeply in the shank. Once I had it positioned I let it cure for 30 minutes until the epoxy set and the tube was solidly in place in the shank.Broke1 I put epoxy on both sides of the exposed briar and then on the other end of the extended tube. I carefully pressed the two parts together and worked to make sure that I had them aligned correctly. The excess epoxy squeezed out and bulged around the enter repair. I used a dental pick and scraped away the excess leaving a smooth top coat of epoxy in the cracked area.Broke2

Broke3

Broke4 The top surface of the rim was quite damaged and the bowl was out of round. I topped the bowl on a topping board to remove the damage and burn marks that were present on the surface. I sanded it with a sanding block to remove the scratches and smooth out the finish.Broke5

Broke6 I sanded the epoxy on the shank back until it was smooth with 220 grit sandpaper. In the photo below you can still see the slight bulge of epoxy that needed to be removed but since I was planning on rusticating the bowl and shank I did not spend a lot of time sanding that out.Broke7

Broke8

Broke9 I sanded it a little bit smoother and then used the rustication tool that Chris Chopin made for me to do a deep rustication on the bowl and shank. As I rusticated it I then used the brass bristle wire brush to knock off the loose briar chips. (I collected the briar chips as I plan on using them as Joe suggested in fill repairs to see if I can get them to stay light). I left the rim smooth and would later top it lightly to smooth it out.Broke10

Broke11

Broke12

Broke13

Broke14

Broke15

Broke16 When I finished the bowl I wrapped a piece of cello-tape around the end of the shank to make a smooth area that I would later install a band on. The shank end was not straight so I would need to clean it up a bit and then band it to get a clean fit of the stem in the shank.Broke17

Broke18

Broke19

Broke20

Broke21 Once I finished rusticating the shank I removed the tape to show the smooth shank end.Broke22

Broke23

Broke24

Broke25 I slid the band on the shank slightly and then heated it with a lighter until the metal expanded enough to press the band into place. I left about 1/8 of an inch extended to allow for the stem to fit properly in the shank and sit inside the band. I sanded the stem with 220 grit sandpaper until the diameter was a close fit in the band. I slid it in place and took the pictures below to show the look of the pipe at this point. I knew that there was a lot more sanding to do to get a snug fit in the band but I wanted to see a picture to look at the fit a bit removed from the pipe I held in my hands. I purposely chose a longer stem to give it a subtle elegance and length bordering on a mini-churchwarden pipe.Broke26

Broke27

Broke28

Broke29 I lightly topped the bowl some more to take care of the burn marks on the right side of the rim top. Then I took a set of close-up photos of the bowl with the band to look at the rustication and figure out where I needed to do some touch up work on it. The shank was where I was the most concerned. I wanted it to match as much as possible with the bowl rustication. I could see that overall it looked good but that the left side of the shank would need some adjusting before it was finished.Broke30

Broke31

Broke32

Broke33 I touched up the rustication on the left side of the shank and then wire brushed the entire bowl and shank with the brass bristle brush to knock of loose particles.Broke34

Broke35

Broke36

Broke37 I brushed of the dust with a shoe brush and then took out some black aniline stain to give the rustication and undercoat of black. I applied the stain with the dauber and then flamed it with the lighter to set the stain in the bottom of the rustication.Broke38

Broke39

Broke40

Broke41 I sanded the stem with a medium and a fine grit sanding pad and put it back in the shank to get a feel for the appearance of the pipe after staining.Broke42

Broke43

Broke44

Broke45 I took the stem back out and worked on it with the micromesh sanding pads. I wet sanded with 1500-2400 grit pads and dry sanded with 3200-12,000 grit pads. I rubbed the stem down with Obsidian Oil between each of the three grits.Broke46

Broke47 Between the 4000 and the 6000 grit pads I buffed it with White Diamond on the wheel and then finished with the higher grit micromesh pads.Broke48 I buffed the stem with Blue Diamond and gave it a coat of carnauba wax. The next two photos show the polished stem in place on the pipe.Broke49

Broke50 I sanded the surface of the rustication to knock off some of the high points and smooth it out slightly using a sanding block. The sanding made the rustication a bit more pebble like in appearance and once I had finished the sanding I gave the bowl a coat of oxblood aniline stain as a top coat. It added some red highlights to the rustication – particularly on the high spots. I then buffed the stem with Blue Diamond on the wheel and gave the stem multiple coats of carnauba wax. I polished the band with silver polish and hand buffed it with a soft jeweler’s cloth. The finished pipe is shown below. It has a delicate look that gives it an air of elegance and class. I am looking forward to firing it up and enjoying a bowl soon.Broke51

Broke52

Broke53

Broke54 Thanks for looking.

A KB&B Capitol


Blog by Andrew Selking

As a collector of old KB&B pipes, I have searched for a KB&B Capitol for a very long time. First of all they just have a unique look, kind of like an upside down poker, but what really interests me is the craftsmanship required to make a threaded briar insert. There is very little information available about these pipes, about the best I could find is that it was made between 1919 and 1924.
When I received the pipe it had some cake built up in the bowl and tar stains on the rim and the stem was unmolested. The biggest issue was that the insert was firmly stuck. In fact a previous owner tried pliers to get it out, based on the gouges along the top. I tried the usual method of freezing it, but to no avail. I wrote Steve for any ideas and he suggested doing a retort. That didn’t work either. I finally ended up soaking the bowl in alcohol for 24 hours, freezing it, then heating it with my heat gun. With the help of a rubber kitchen gripper, it finally broke loose.
In these first pictures you can really see the tar build up on the inside of the pipe.KBB1

KBB2

KBB3 I soaked the stem in Oxyclean. The stem was marked “Hard Rubber” and exhibited no oxidation after soaking. It was pretty filthy though. I used a pipe cleaner soaked in the Oxyclean solution to remove as much gunk as possible, this was the first pass.KBB4 Next I turned my attention to removing the serious tar build up in the inner bowl. I found my dental pick was the perfect tool for this task.KBB5 The bottom of the inner bowl had a biscuit of tar.KBB6

KBB7 I used an alcohol soaked cotton ball to loosen the tar in the threads.KBB8 Since this pipe has two bowls, I did a retort with just the outer bowl followed by a retort with the inner bowl inserted.KBB9 I love the old stems.KBB10 I did a retort on the stem. It was nasty, but the boiling alcohol did the trick.KBB11

KBB12

KBB13 The design of this pipe makes it extremely easy to clean, although I doubt that ever happened prior to my getting ahold of it.KBB14 A couple of q-tips and a pipe cleaner and the shank was clean.KBB15 Next I tackled the stem. I used 400 grit wet/dry with water followed by 1500-2400 grit micro mesh pads with water. You will notice the small washer, I use that to make sure that I don’t round off the edges of the stem.KBB16 You may have noticed in a previous picture that there was a piece missing at the top of the inner bowl. I spread a small amount of CA glue into the hole with a push pin followed by briar dust and accelerator.KBB17 I also noticed a small fill residing under the band, so I picked out the old fill and replaced it with briar dust and CA glue.KBB18 The exterior of the bowl was caked with tars and grime, so I used acetone and 0000 steel wool to clean it up.KBB19 That was only minimally effective, so I ended up sanding the whole thing. I used 400 grit to get the worst off, followed by a progression of micro mesh pads, 1500-12,000 grit. While working on the bowl, I also polished the stem with 3200-12,000 grit micro mesh pads. One of the things Steve talks about is using Obsidian Oil after each third set of pads. Since I don’t have Obsidian Oil, I used a very small amount of mineral oil with the 3200 grit pad. It really cut down on the dust and seemed to help the rest of the pads polish more effectively. Here is the pipe ready for stain and polishing.KBB20 I don’t know if the stamping on the stem was originally filled in white, but I thought it might look nice. I used my correction pen to fill in the letters.KBB21 I removed the excess correction fluid with my rotary tool and some white diamond. I then polished the stem with carnauba wax.KBB22 I stained the pipe with a medium brown stain and polished it on the buffer with white diamond and carnauba wax. Here is the final result.KBB23

KBB24

KBB25

KBB26

KBB28

Restoring a Ben Wade Danish Hand Model Free Hand 400


Blog by Steve Laug

The latest pipe that I have on the work table was a beautifully grained Ben Wade Danish Hand Model 400 free hand. It has some amazing flame and straight grain all the way around the bowl. The flat bottom of the bowl has some great birdseye grain. There is plateau on the top of the bowl and on the end of the shank. There appeared to be a smooth inner rim that had been covered with tars and oils. The plateau on the rim was oily and tarry. The valleys were basically filled in and the rough beauty of plateau was hidden under the grime. The smooth bowl sides were dirty with dark spots where hand oil and grime had been rubbed into the finish. Fortunately there were not any dents or scratches on the briar.Ben1

Ben2 The stem was Lucite and quite thick. There were tooth marks on the top and underside of the stem near the button and there was some calcification on the stem top next to the button. The airway in the stem was partially closed off and there was not much airflow being drawn through the stem. The shank airway was also closed partially with oils and tars. The bowl had been reamed before it came to me and was quite clean.Ben3

Ben4 The next two photos are close up pictures of the stem and the bite marks. The first shows the calcification next to the button and the slight damage to the inside button edge. The tooth mark is visible just ahead of the white line on the stem. The stem was also lack luster and the shine was gone. The second photo shows the underside of the stem. It was slightly wavy like it had been pushed to heavily into the buffing wheel. There was a small tooth mark in the same spot as on the upper side of the stem.Ben5

Ben6 I decided to address the issues with the stem first. I used a straightened paper clip bent to the angle of the stem to push through the airway. Pushing from the slot I was unable to get the wire through the airway. I pushed it through from the tenon and a large chunk of tars and pipe cleaner detritus came out of the button. I worked the wire around in the airway to clean the sides and remove any other build up. It appeared to be at the bend in the stem. I then used pipe cleaners and cotton swabs and isopropyl alcohol to clean out the airway and remove the remaining tars and oils in the stem and tenon.

I sanded the tooth marks on the topside and underside of the stem with 220 grit sandpaper until I had removed the damaged area. I also wanted to thin the thick Lucite slightly as there was plenty of material to work with. I sanded with a medium and a fine grit sanding sponge to remove the scratches and see if I had removed the mark. It took repeated sanding with the three grits of sanding material to remove the remnants of the tooth marks.Ben7

Ben8

Ben9 I continued to sand with the fine grit sanding sponge to minimize the scratches and then sanded the stem with 600 grit wet dry sandpaper. Once I had finished with the sandpaper I used micromesh sanding pads. I wet sanded with 1500-2400 grit sanding pads and dry sanded with 3200-12,000 grit pads. I rubbed the stem down with Obsidian Oil between the grits in order to provide the medium for the micromesh to cut better. When I finished I buffed the stem with Blue Diamond plastic polish on the buffing wheel and then gave it several coats of carnauba wax.Ben10

Ben11

Ben12 I set aside the stem so that I could work on the bowl. When the bowl was finished I would buff the two parts together and also give them another coat of wax. I used a soft bristle brass white wall brush to work on the buildup on the rim and plateau. It was quite thick on the inner edge of the rim. I have learned over time that the tar coat really protects the briar underneath. Once I had removed the tars I would see that.Ben13 I scrubbed the exterior of the bowl with Murphy’s Oil Soap to remove the grime and oils that were all over the surface. I used cotton pads to scrub the bowl.Ben14 Once I had removed the grime I washed the exterior of the bowl with running water to remove the soap. The photos below show the clean bowl of the pipe.Ben15

Ben16

Ben17

Ben18 I cleaned out the shank with pipe cleaners, cotton swabs and alcohol. I wiped down the plateau with alcohol on a cotton pad to remove any remaining dust in preparation for staining.Ben21 I stained all of the plateau areas with a black aniline stain and flamed it. I repeated the process until the coverage was thorough. When it had dried I hand buffed the plateau with a shoe brush until the high points shone and the valleys were slightly darker.Ben22 I buffed the pipe and stem with Blue Diamond and then gave the bowl multiple coats of carnauba wax. I finished by buffing it with a clean flannel buff to raise the shine on the bowl and stem. The finished pipe is shown in the photos below. Thanks for looking.Ben23

Ben24

Ben25

Ben26

Ben27

Ben28

Ben29

Ben30

Ben31

A Dodgy Rogers: Restoring and Modifying a Rogers Standard


Blog by Anthony Cook

I was recently engaged in a conversation with another member of an online pipe tobacco forum and I learned that he had been smoking a pipe for six months and had only one pipe. I’ve been there, man. From what I’ve seen, six months seems to be the sweet spot for new pipe smokers. They’re likely to stick with it if they’ve made it that far, but everything is still new enough that even simple things can be a challenge. I’m sure that most of you will agree that smoking a pipe isn’t rocket science, but the initial learning curve can be fairly steep all the same. So, I offered to send him a pipe to give his faithful companion a break, reward his perseverance, and encourage him to hang in there.

I sent him a photo of a few pipes that I had on hand. I told him to pick one and I’d send it along. I half expected him to balk after seeing the photos. None of the pipes had been restored at all. If you’re not used to dealing with estate pipes, it can be difficult to see one as anything other than what it is; grime, tar, fills, and all. So, to ease any concerns that he may have I sent him a few before/after photos of some of my work and promised that I would make sure that his pipe was clean and pretty. He responded quickly with his choice, and to my surprise, it was probably the grungiest in appearance of the lot. Here it is…An1 The pipe is a Rogers Standard. I think the unique shaping is what attracted him and I can understand why. The slightly longer shank paired with the short saddle on the stem give it a quirky look that’s still classy. Here are a few more photos to give you an idea of what I was working with.An2

An3

An4 The stem was stuck tight on this one, but a couple of hours in the freezer took care of that. Once the stem was removed, I found a grimy, spiral stinger in the tenon. It too was stuck. So, I dripped alcohol into and around the tenon to soften the tar that was gluing it in. After a few minutes, I wrapped it in several layers of soft cloth to protect it and pulled it out with a pair of pliers. I dropped it into a container of alcohol for about an hour, and then scrubbed it with a pipe cleaner until it was as good as new.An5 I gave the stummel an alcohol bath to remove the old, lacquer finish. Several hours later, I removed it and wiped it down. Only about the top two-thirds of the bowl was caked to any degree, but what was there was thick, uneven, and harder than chicken lips. In the end, it took a group effort to ream the bowl back to bare wood the way I like it, but a T-handle reamer, a pipe knife, 400-grit paper wrapped around a Sharpie pen, and a little elbow grease got the job done.

I’ve added a retort to my tool chest since I last posted here, but I still like to scrub out the solid debris and lumpy build-ups by hand before using it. The Rogers took a whole handful of pipe cleaners, cotton swabs, and a couple of shank brushes before I was satisfied enough to move on.An6 I set up the retort and flushed the stem and shank several times before setting it aside to cool for about 15 minutes. Then, I refilled with clean alcohol and flushed several more times. After the second retort, the alcohol was nearly clear. So, I considered the retort to have done its job and gave the stummel and stem one last quick scrub to remove any remaining tar.An7 While I had been retorting the stummel, the stem had been soaking in an Oxyclean bath. I removed it and scrubbed it down with a couple of 1” cubes cut from a Magic Eraser pad to remove the oxidation. There is one thing to note though. I noticed that the paint had come out of the stem stamping during the bath despite my attempt to protect it with a dab of petroleum jelly. I’ve never really trusted this method of protection and I think I’m going to explore some others ideas in the future.An8You may have noticed from the photos that this pipe had a few fills. Okay… It had a lot of fills and the ones that concerned me the most were a few that were right inside the stamping on the shank. I was considering what to do about them when the thought occurred to me that it might be best to leave it up to the guy that was going to smoke the pipe. I contacted the future owner and presented him with a few option: (1) I could patch the fills with briar dust and CA that would blend well into the final finish, but some of the stamping would be sacrificed, (2) I could leave the stamping intact, but there would be some obvious fills on the shank of the finished pipe, or (3) I could rusticate the pipe, which would completely obliterate the stamping but the pipe would be unique. He chose to go with rustication.

So, once I knew the direction in which I was heading, I set up my topping surface to remove the scratches and charring on the rim. I sanded with a progression of 220-grit, then 320-grit, then 400-grit paper until I was satisfied that all of the scratches were gone. I also softened the inside and outside edge of the rim by light sanding with 400 grit paper (not pictured).

My rustication plan called for a round, smooth button on the right side of the bowl where there were few fills and some fairly decent bird’s eye. There were also a few dents in the area. So, I clamped the stummel in a vice and tried to steam them out by pressing a heated screwdriver into a wet cloth placed over the dents. Most of them were removed successfully, but one large dent with sharp edges still remained. You win some. You lose some.An9 Nobody wants a pipe that looks like it has the measles and those pink putty fills will show through and ruin even a rusticated finish. So, I picked them all out. I also discovered that the wood inside the mortise directly beneath the shank crack was weak and spongy. I scraped it out easily with a pick, but left behind a disconcertingly large gouge in the mortise.An10 I had been experimenting with pre-staining briar dust for patches and fills, but I hadn’t had the opportunity to put it into practice until this pipe. I dripped a couple of drops each of Fiebing’s black and oxblood into a bit of briar dust, and then added a few drops of isopropyl alcohol to spread it evenly. After mixing it up and sitting it under a warm lamp for about 30 minutes, I had a batch of stained briar dust.An11 The stained dust and a bit of CA glue were used to patch the dent and a large fill on the right side of the bowl. I also used unstained dust and CA to fill in the area of missing wood in the mortise.An12 The bowl patches were sanded out with 220-grit, then 320-grit, sandpaper. In the mortise, I used 240 and 320-grit sanding needles. When I inserted the stem to test the fit, I heard a sharp “snap”. Uh-oh.
When I flipped the pipe over I saw that the shank had cracked again. This one began about 1mm below the patched crack and was also longer than that one. I used a 1/32” drill bit to make a small hole at the end of the crack to stop the run. I didn’t drill all the way through, only a hair’s width below the crack. Then, I inserted the stem (after smearing petroleum jelly on the tenon) to widen the crack and filled the crack and drill hole with stained dust and CA. Once the patch had set up, I removed the stem, wiped the petroleum jelly from the mortise, and added more briar dust and CA there to add the strength that it obviously needed.An13 The new patches were sanded out once dry and I used a strip of 400-grit paper to reduce the diameter of the tenon before trying to insert is again. The fit was snug but not overly tight, and best of all, there were no new cracks.An14 Since the shank crack had been opened up and then filled, the overall diameter of the shank had increased slightly. So, I used 220-grit, then 320-grit, sandpaper to bring it back into register with the stem.

Then it was time to strike up the band. I selected a band from my box that was large enough to fit over the end of the shank, but not so large that I could slide it all of the way up by hand. With the band partially in place over the shank, I heated it with a heat gun to expand the metal, and then pressed it into place on a hard, cushioned surface.An15 The mortise had been constricted by the placement of the band. So, again, I had to do a bit of sanding with 220-grit, 320-grit, and 400-grit paper to turn the tenon down enough to make a good, snug fit.

The heat gun was already set up. So, I used it to heat the stem to see if I could raise some of the tooth dents. It did a fair job, but a few still remained after the heat treatment. I also took the opportunity to add a few more degrees of bend in the stem to give it a more elegant flow (at least to my eyes).An16 The stem button had a couple of chunks bitten out of it that needed to be repaired. I borrowed Andrew Selking’s idea of wrapping the area below the button with tape to keep a crisp edge before applying black CA glue to the gouges. The middle picture in the image below shows the button just after removing the tape. There was a bit of overhang at the lip that would have to be taken off, but the area where the button meets the stem is crisp and clean. That would save a lot of work. Thanks, Andrew!

I sanded out the lighter dents on the stem with 220-grit paper. For the deeper dents, I patched them with a bit of black CA glue applied with a toothpick.An17 When the stem patches where dry I sanded them down with 220-grit paper, and used 320-grit and 400-grit to blend them into the rest of the surface and to shape the button. Then, I lightly sanded the entire stem with 600-grit paper to remove any scratches and pits in the vulcanite. I also used a grout pen to paint in the stamped logo. Some of the logo area had been worn smooth over time. So, the resulting logo didn’t look as good as the example over at PipePhil.eu, but I think it looks better than it did originally.An18 For comparison, here’s the logo example from PipePhil.eu (first image), the original logo (second image), and the repainted logo (third image):An19 The stem was polished with micro-mesh pads 1500-grit to 12000-grit. I applied a drop of Obsidian Oil to the stem, let it sit for a couple of minutes, and then wiped off the excess to finish up the work on the stem.An20 I decided to go for three levels of texture in the partial rustication and hoped that would give the pipe a unique appearance. I used a felt pen to mark an oval-shaped guideline on each side of the bowl. I started carving with a Dremel and a 3/32” engraving burr. Basically, I just scribbled around the stummel avoided the areas that I wanted to leave smooth to create the base for the medium texture. Then, I used a variety of hand-cut bits and tools to really get in there and remove some wood to create the craggy texture around the ovals that I had marked. To finish up the rustication, I used a 1/32” engraving burr to touch up a few of the places where the rustication met the smooth areas.An21 It turned out to be a rather lengthy process to get the final color and finish the way that I wanted it. So, I won’t go into a lot of detail, but here’s the gist of it:
1) Applied black stain, sanded smooth areas and rustication high spots with 400-grit, and buffed with Tripoli
2) Applied mahogany stain, lightly sanded smooth areas and brushed the rustication high spots with 600-grit, and buffed with a clean wheel.
3) Applied ox blood stain to the rusticated areas only, hand buffed, sanded smooth areas with 1200-grit (Not pictured below. Oops).
4) Polished with micro-mesh 1500-grit to 2400-grit, applied red stain to smooth areas only, buffed with a clean wheel, continued polishing smooth areas with micro-mesh 3200-12000.An22 After the final micro-mesh polish, I reattached the stem and buffed the entire pipe with White Diamond. I then applied Halcyon II wax to the stummel and carnauba wax to the stem and buffed the pipe with a clean wheel. Lastly, I painted the walls of the chamber with a sour cream and activated charcoal bowl coating to add some temporary insulation until a good cake could form.

The finished pipe is very different from what it was when I started. It has lost its pedigree, but it has gained a unique, one-of-a-kind appearance. I’m quite pleased with the way that it turned out and I’m hoping that the new owner will be too. It’s in the mail, Dustin. Smoke it well, brother!An23

An24

An25

An26

Conjuring a Makeover for a Carey Magic Inch


Guest Blog by Robert M. Boughton
Member, North American Society of Pipe Collectors
http://www.naspc.org
http://www.roadrunnerpipes.com
http://about.me/boughtonrobert
Photos © the Author

“Blessed are they who see beautiful things in humble places where other people see nothing.”
― Camille Pissarro (1830-1903), French Impressionist painter

INTRODUCTION
I suspect there is some aspect of my basic personality that is incapable, to a degree, of not admiring the tenacity alone required to survive 67-years – and still going – in the admirable pursuit of providing affordable smoking pipes. Remember, this is an industry that has seen all manner of fly-by-night systems for dissipating the high heat of the all-important tobacco that has an inherent tendency to become moist and therefore brackish in the process of flowing through the basic designs of all pipes.

Notwithstanding the relative quality of pipes that evolve based on the periodic new patents from the ever-pioneering designers at E.A. Carey, which also owns the Duncan Hill Aerosphere brand, the system’s section that comprises the so-called “Magic Inch” has changed little since 1948, when the first billiard version was created and marketed. The system involves five elements: 1-2) the first two in the double-pronged tenon, the thin, hollow end of which attaches to the plastic bit and the typical part that slides into the shank; 3) the thin bit insert with six small drilled holes, two each on the top and bottom (when properly inserted) and one each on either side; 4) the newer Papyrate II sleeve (two-ply) – made of very thin, wet slices, from the roots of an aquatic plant, that are pressed together and dried – that fits snugly over the holes of the bit insert, and 5) six horizontal slits in the shank end of the bit, three on the top and three on the bottom. The photos of the bit show the used, brownish papyrate sleeve that came with the original pipe.Carey1

Carey2

Carey3

Carey4

Carey5 Back some months when I was snatching up pipe lots online, I bought one with 10 sundry examples of the craft, including a few nice finds such as a Kaywoodie Filter Plus metal pipe from the late 1950s, a Jobey Extra, a nice glazed clay pipe and others, with this Magic Inch among them.Carey6 I put all of these in a small box “for later,” except for the beautiful unknown clay billiard that I cleaned up and added new cork in the shank with a hole drilled to fit the screw-in tenon attached to the acrylic stem, for my own collection.

By the way, not everyone knows that Carey does not only make Magic Inch pipes. Here are a few of the company’s representative standard briar pipes.Carey7 But this blog concerns the vintage Magic Inch billiard, U.S. Patent №. 3,267,941 granted in 1966, shown in the lot above three rows down on the right. A few years ago, I owned, and for a while enjoyed, another Magic Inch, and it wasn’t – well, bad. But first, I have a few comments regarding Carey’s rather imaginative advertising.

Numerical data and the manifold methods of collection, arrangement and interpretation of them for publication as fact by the complex use of statistics in almost every facet of society – including but by no means limited to governmental and other political concerns, businesses and the news media – can be misleading at best and downright manipulative at worst.

Take, for example, the E.A. Carey Smokeshop claim [http://www.eacarey.com/ pipes.html] that it has sold more than one million of its Magic Inch pipes since 1948. That sounds impressive, and suggests that Carey’s pipes are superior to others. But that total averages to 15,152 pipes (rounded up, through 2014) per year. Then again, Carey changes the number of Magic Inch pipes sold in the same period to a vague “hundreds of thousands” [http://www.eacarey .com/magicinchinfo.html]. Allowing for hundreds of thousands to be a maximum of 200,000 pipes, which quite likely is stretching it, the average drops to 3,030. Somehow, I doubt that either annual sales figure engenders any impulse among the world’s other pipe makers to compete with the folks at the venerable Carey Smokeshop online, both in the U.K. [http://www.eacarey. co.uk/] and U.S.

Now, to return to the real subject matter, the purpose of this particular blog is to show how a pipe with a singular lack of attractive qualities can be transformed into something nicer.Carey8

Carey9

Carey10 RESTORATION
After removing and separating the bit and two-sided tenon, throwing away the old brown papyrate sleeve, on an impulse, I decided to give the old rusticated briar girl an Everclear soak. For some reason, this process took quite a while – say six hours. At any rate, when the old finish was stripped and the wood dried, I began a hand-buff with super fine steel wool followed by a progression of micromesh pads from 1500-3600.

I turned a reamer a few times in the chamber, followed by sanding with 200-grit and 320, and the chamber was almost good to go. Then I attached a suitable stem and retorted the shank and chamber.Carey11

Carey12

Carey13

Carey14

Carey15

Carey16 Thinking the pipe, which was dreary in the beginning, deserved something more distinctive and in keeping with its natural reddish color, I chose maroon boot stain. After the quick application and flaming, I rubbed the wood gently with 3200 micromesh.Carey17

Carey18

Carey19

Carey20

Carey21

Carey22 To clean the hollow plastic bit and tenon, I diluted – and I mean heavily – a little Everclear with a lot of water. I like to think of this as the Reverse Julia Childs Approach. The popular cook once said, “I like to cook with wine. Sometimes I even put it in the food.” From what I recall of watching Julia in the studio kitchen on TV, I am not surprised that she seemed to have forgotten the apparent equal measures of wine expended in the food and down the hatch. Anyway, I bent a soft pipe cleaner in half and dipped it in the comparatively wimpy solution, which is like comparing wine to Moonshine, and inserted the folded end in the stem, turning it several times and finding it needed replacing. And so I repeated the action, but giving the inner bit the old in-and-out, scrubbing its sides. Only the slightest amount of grime came out on the second run, and I used the same cleaner to work through the slits on the top and bottom. I used a third, dry cleaner to finish.

The outer bit required very little work with one micromesh pad, although I forget the grade, to make it shine. Using a white china marker, I filled in the small, long-empty square with a three-sided C in the middle, forming all but one line of a second square. Thanks to a generous gift of a handful of papyrate sleeves from my good friend and mentor, Chuck Richards, I was able to complete the tenon for ultimate placement into the shank.

All that was left to do was buff the wood on the electric wheels, using white Tripoli and White Diamond, with quick runs on the clean wheel after each. At last, with a finger, I applied a thin, even coat of Halcyon II, and after letting the briar sit for 10-15 minutes, buffed it with the clean wheel.Carey23

Carey24

Carey25

Carey26

Carey27

Carey28

Carey29 CONCLUSION
Love ’em, hate ’em or really don’t give a hoot either way, the Carey Magic Inch has secured its place in tobacco pipe history, as well as giving many a smoker a start in the pleasures derived from fine tobaccos. And as far as I’m concerned, the Carey system works better than most far more complicated attempts.

Imagine, if you will, a special place in the Twilight Zone – an area so horrific only the most heinous attempts at pipe cooling ever make it there. Take, for example, the following specimen, a Jenkins, which, with its screw designed to hang while smoking like a broken appendage from the underbelly of the shank at a point just before the bowl, may never find its way back.Carey30