Blog by Steve Laug
In the last box of pipes Jeff sent me there was an American Smoking Pipe – a Long Shank Brandy. I am a sucker for Mark’s Pipes and Jeff knows it so we pick up every one of them we can find. This particular pipe came to us from a seller in Clarkesville, Virginia, USA on 07/25/2020. It is stamped on the underside of the shank and reads American in an oval [over] Regd. No. [over] 11/90 MT [over] 9 [over] JBH 502. It was a beautiful pipe but another dirty pipe when we received it. The finish on the bowl and shank were beautiful but the grime and oils were ground into the sides. There was a thick cake in the bowl that overflowed as lava on the bevelled rim top and the inner edge of the bowl. It was hard to evaluate the condition of the edge or top with the thickness of the lava. The acrylic saddle stem was dirty and there were deep tooth marks and chatter on the top and underside ahead of the button and on the button surface itself. It had an inlaid logo on the left of the saddle – a silver star set in clear acrylic with what looks like a briar ring around it. Jeff took some photos of the pipe before he started his cleanup work.
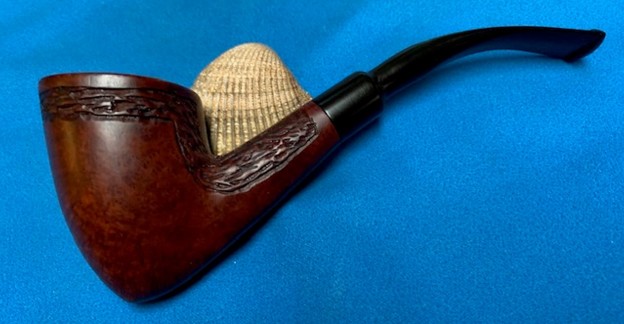
 He took photos of the bowl and rim top to show their general condition. You can see the thick cake in the bowl and the thick lava coat on the top of the rim and inner edge of the bowl. The finish on the bowl is very dirty with grime and oils ground into the bowl, but still very stunning. The round saddle stem is dirty and has chatter and deep tooth marks on the top and underside ahead of the button and on the button surface.

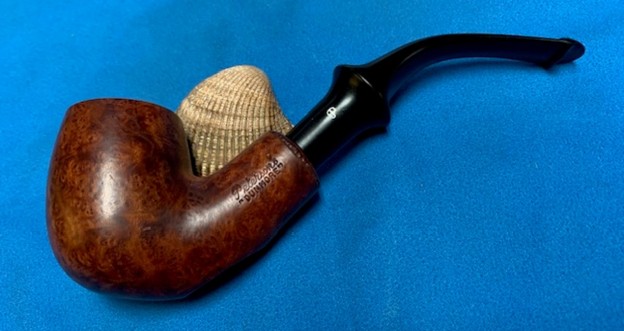
 Jeff took some photos of the sides and heel of the bowl to give an idea of the grain around the bowl and shank. It is amazing and I cannot wait to see what it looks like once it is polished and waxed.
 He took some photos of the stamping on the underside of the shank to capture it for me. It is clear and readable as noted above. He also included a photo of the star logo inlaid in clear acrylic in the left side of the stem.
 I have collected and smoked Mark Tinsky’s pipes for over 30 years now and thoroughly enjoy them. I cannot speak highly enough about the quality and craftsmanship of his pipes. I have pipes made by Mark and by Curt Rollar in my collection and both are great smokers and pipes that reach for regularly in my choice of pipes. I turned to his website for a quick summary of the history of the brand (http://www.amsmoke.com/Index%20Folder/PipeHist.html). I quote from the site as it is a short, concise history.
The American Smoking Pipe Co. was formed in 1978 by Mark Tinsky and Curt Rollar. Both started making pipes for Jack Weinberger ( JHW Pipes ) while in high school and throughout college. Determined to blaze their own path, they formed their own company- its goal to create unique pipes, lightweight and comfortable, where attention to detail was the rule not the exception. Exulting in their new freedom, they carved out new shapes that were balanced between the radical freehand era of the 70’s and the board pipe look of other conservative companies. Hungry for recognition, they stormed the Eastern and Southern shops looking for markets to sell their pipes. Many hidebound retailers refused to try something new, preferring to sell, well, what has always sold before. However, their pipes did take root in many shops and the business thrived.
They continued expanding their pipe making capabilities, adding employees to help finish the pipes. In 1990, over a disagreement over how much to expand, Curt Rollar left the company. This put a break on expansion and coupled with a U.S. recession and rising anti-smoking fervor served to limit production to supplying existing retailers, thus ending a decade of growth. With pipes sales in decline, we turned to pipe repair as a way to supplement revenues. Finding that we liked fixing things, American concentrated on pipe repair. While working hard at repair and manufacture American is ready once again to expand its markets through its existing network of shops serviced by pipe repair.
The pipe I am working on is stamped with a Reg. No. 11/90 MT9 as noted above. The stamp tells me that the pipe was made in November of 1990. The MT stamp signifies that the pipe was carved by Mark Tinsky. The 9 could be a size or even quality designation. There is also a JBH 502. This make me wonder if the pipe was a shape made for John B. Hayes, tobacconist. Now it was time to work on the pipe.
Jeff had thoroughly cleaned up the pipe. He reamed the pipe with a PipNet Pipe Reamer and cleaned up the remnants with a Savinelli Fitsall Pipe Knife. He scrubbed the bowl with undiluted Murphy’s Oil Soap with a tooth brush. He rinsed it under running warm water to remove the soap and grime. He cleaned out the inside of the shank and the airway in the stem with alcohol, cotton swabs and pipe cleaners. He scrubbed the exterior of the stem with Soft Scrub to remove the grime. He soaked the stem in Briarville’s Pipe Stem Deoxidizer and rinsed it off with warm water. The pipe looked very good when it arrived here in Vancouver.
 I took a photo of the bowl and rim top to show how clean the bowl and the rim top and inner edges of the bowl. I took photos of the stem surface to show the condition and tooth marks and chatter on both sides ahead of the button.
 I took photos of the stamping on the underside of the shank and the logo on the left side of the stem. It is readable as noted above and though faint is clear. I took a photo of the Silver Star with a black background logo on the stem as well. It is in excellent condition. I removed the stem from the shank and took a photo of the pipe parts. It is quite a stunning piece.
 I started my work by polishing the bowl and shank with micromesh sanding pads – dry sanding with 1500-12000 grit pads. I wiped the bowl down after each pad with a damp cloth to remove the grit. The bowl began to take on a rich shine. It is a beauty.


 I rubbed the bowl down with Before & After Restoration Balm. I worked it into the surface of the briar with my fingertips and a shoe brush to get it in the grooves. It works to clean, restore and preserve the briar. I let it do its magic for 15 minutes then buffed it off with a cotton cloth. The pipe looks incredibly good at this point in the process.

 I set the bowl aside and turned my attention to the stem. I filled in the deep marks in the acrylic stem with black rubberized CA glue. Once it hardened I flattened the repairs out with a small file. I sanded the stem with 220 grit sandpaper to blend them into the rest of the acrylic stem and started the polishing them with 600 wet dry sandpaper.

 I set the bowl aside and turned my attention to the stem. I polished the stem with micromesh sanding pads – 1500-12000 grit pads. I wiped it down with a damp cloth after each sanding pad.
 I finished polishing it with Before & After Pipe Stem Polish – both Fine and Extra Fine and buffed it off with a cotton cloth. I gave it a coat of Obsidian Oil to preserve and protect the stem.
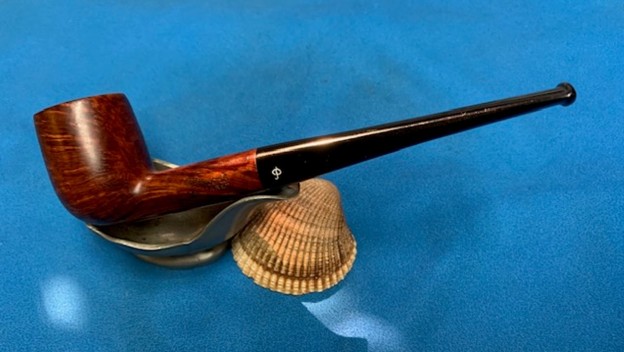
  This American Reg. No. 11/90 MT 9 JBH 502 Brandy is a great looking pipe now that it has been restored. The brown stains really highlight the grain and the polished finish is stunning. I put the stem back on the bowl and carefully buffed the pipe with Blue Diamond on the buffing wheel. I gave the bowl and the stem multiple coats of carnauba wax on the buffing wheel and followed that by buffing the entire pipe with a clean buffing pad. I hand buffed the pipe with a microfiber cloth to deepen the shine. The finished American Mark Tinsky Brandy fits nicely in the hand and feels great. Give the finished pipe a look in the photos below. The dimensions of the pipe are Length: 5 inches, Height: 2 inches, Outside diameter of the bowl: 1 ½ inches, Chamber diameter: 7/8 of an inch. The weight of the pipe is 77 grams / 2.72 ounces. I will be adding the pipe to the American (US) Pipe Makers Section of the rebornpipes store. If you are interested in purchasing this pipe send me a message or an email. Thanks for reading this blog and my reflections on the pipe while I worked on it.
As always, I encourage your questions and comments as you read the blog. Thanks to each of you who are reading this blog. Remember we are not pipe owners; we are pipe men and women who hold our pipes in trust until they pass on into the trust of those who follow us.