A Review – A Julius Vesz Shape 76 Zulu


Blog by Steve Laug

Pipedia gives good background information on Vesz. The picture and the material is taken from this link: http://pipedia.org/wiki/Vesz_Pipes
aboutpg“Born and raised in Hungary, Julius Vesz was first exposed to pipe making through his grandfather. Although his grandfather died when Julius was only 9 years old, he can still picture his grandfather making pipes. It made a lasting impression that matured years later.

After immigrating to Canada at age 23, Vesz worked as a mechanical draftsman, but ever since a child had wanted to do something on his own. Remembering his grandfather’s pipe making and repairing, he thought perhaps he should try his hand at that also. He sought out Charlie Dollack, who had a repair shop in downtown Toronto, but while Charlie encouraged the young Vesz, he did not offer any help or instruction.

Julius continued on his own, setting up a modest shop in his own home, and was soon fixing and making pipes for several department stores, as well as United Cigar, which later turned into his main source of work. He discovered he had a unique skill, which he practiced and nurtured on his own. Like his grandfather, Vesz is motivated by a desire to create pipes that approach perfection.”

Over the years I have followed Julius Vesz’ pipes and kept an eye out for one that caught my eye. Julius Vesz is a Canadian pipe maker who has been controversial in his claim to use dead root briar. Many have argued about his choice of terms regarding the briar that he uses. But regardless of your take on that issue he makes beautiful pipes that smoke exceptionally well. His unique raindrop shaped pipes may be how many people know him. He has a shop in the Royal York Hotel, 100 Front Street West in Toronto.

His Handcut pipes are crafted from his oldest and finest blocks of aged briar. They come in a variety of shapes and styles and no two are the same. Often personalized with beautiful ornamentation such as bone, silver and gold, these pipes have long been sought after by collectors all over the world. Julius has customized pipes for dignitaries and clients worldwide.

His early pipes bore the Craft Briar stamp, and though his company still is registered as Craft Briar his pipes are now stamped Julius Vesz. He carved every pipe that bears his name and though they may bear similarities to others that he has carved each one is one of a kind. His site says that “Every pipe is meticulously crafted from his personal supply of aged briar that he has been accumulating since the 1960s. The extremely old briar gives each pipe the exceptional smoking characteristics found only in a world famous Julius Vesz pipe.”

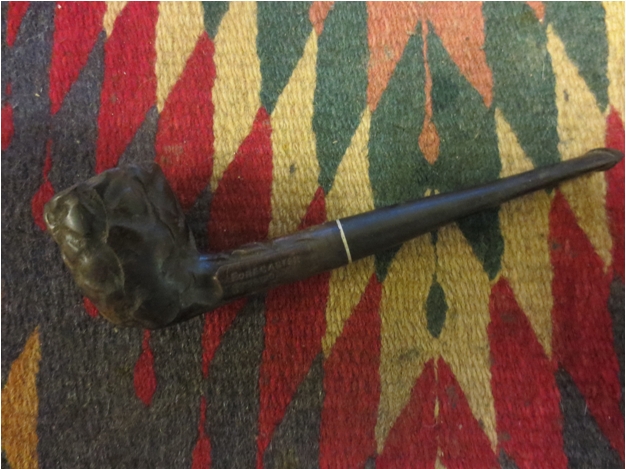
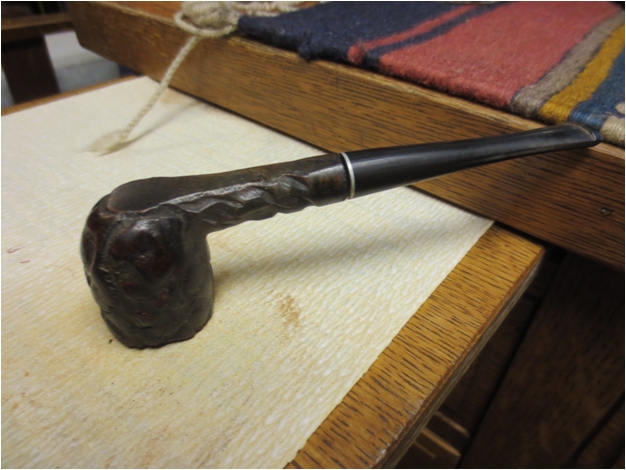
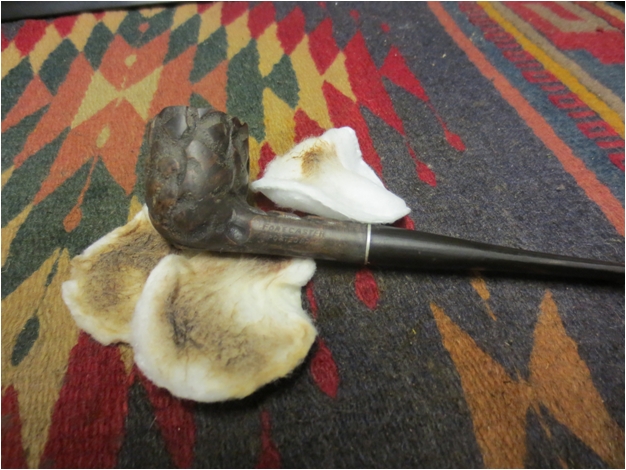
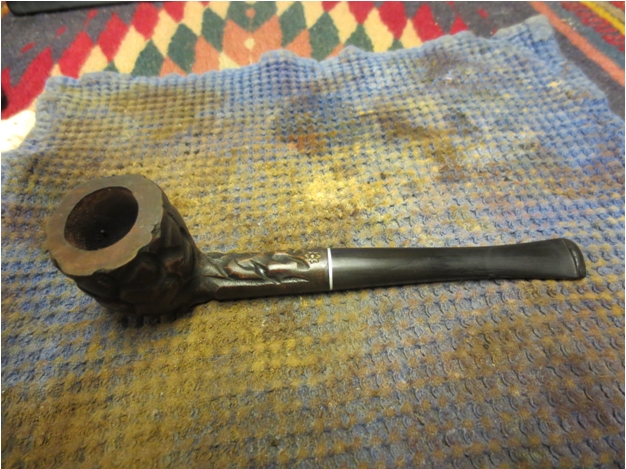
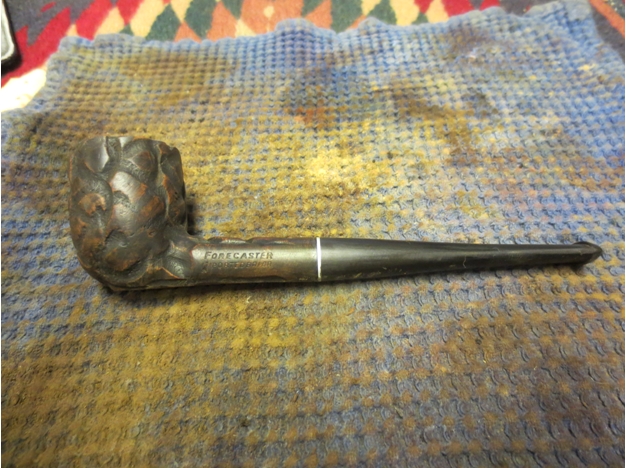
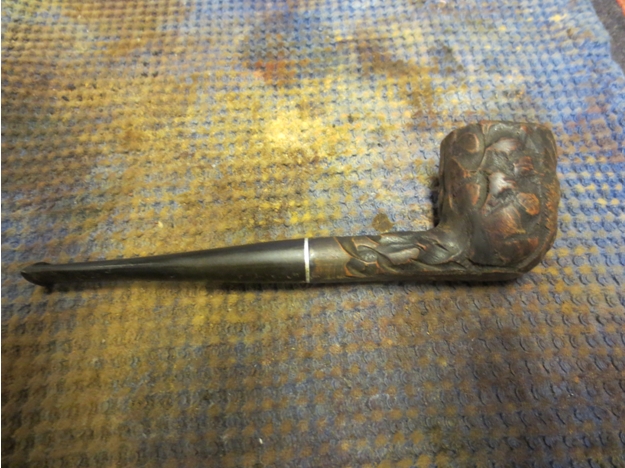
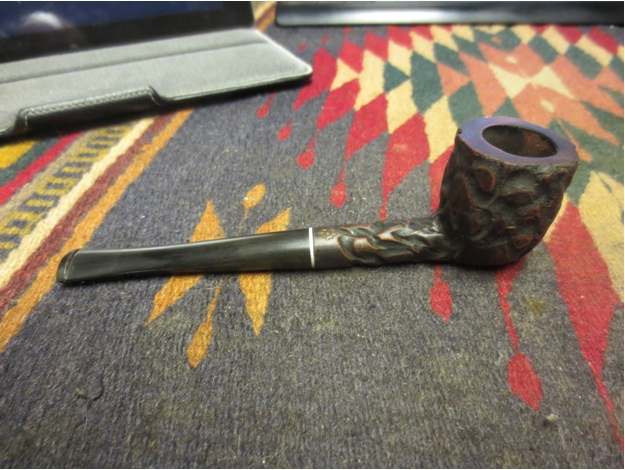
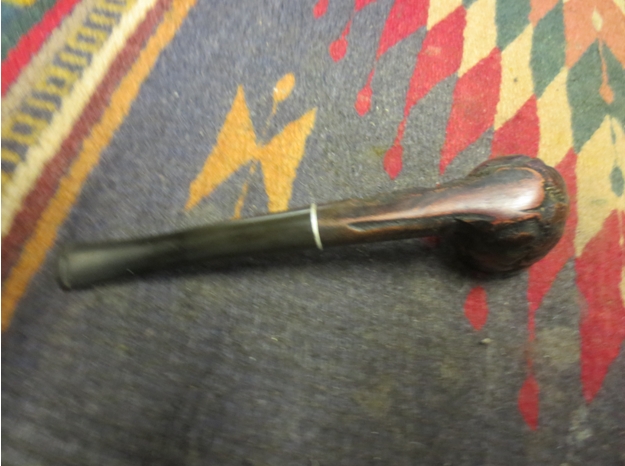
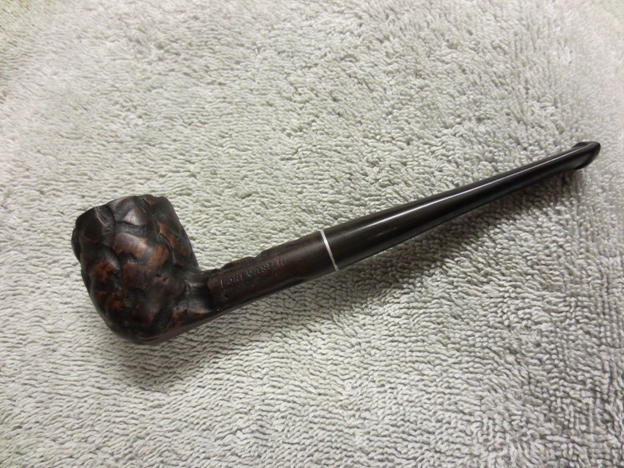
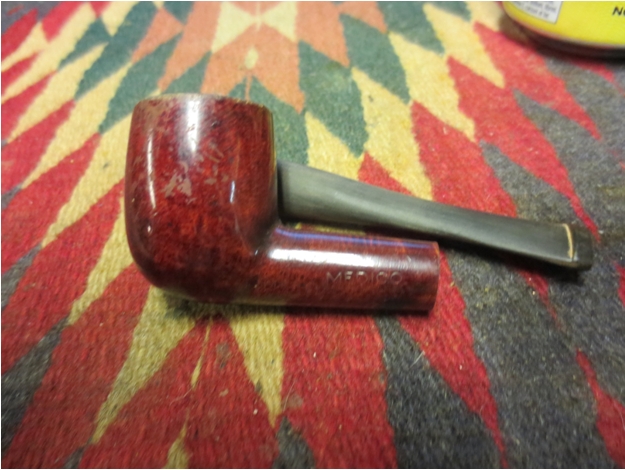
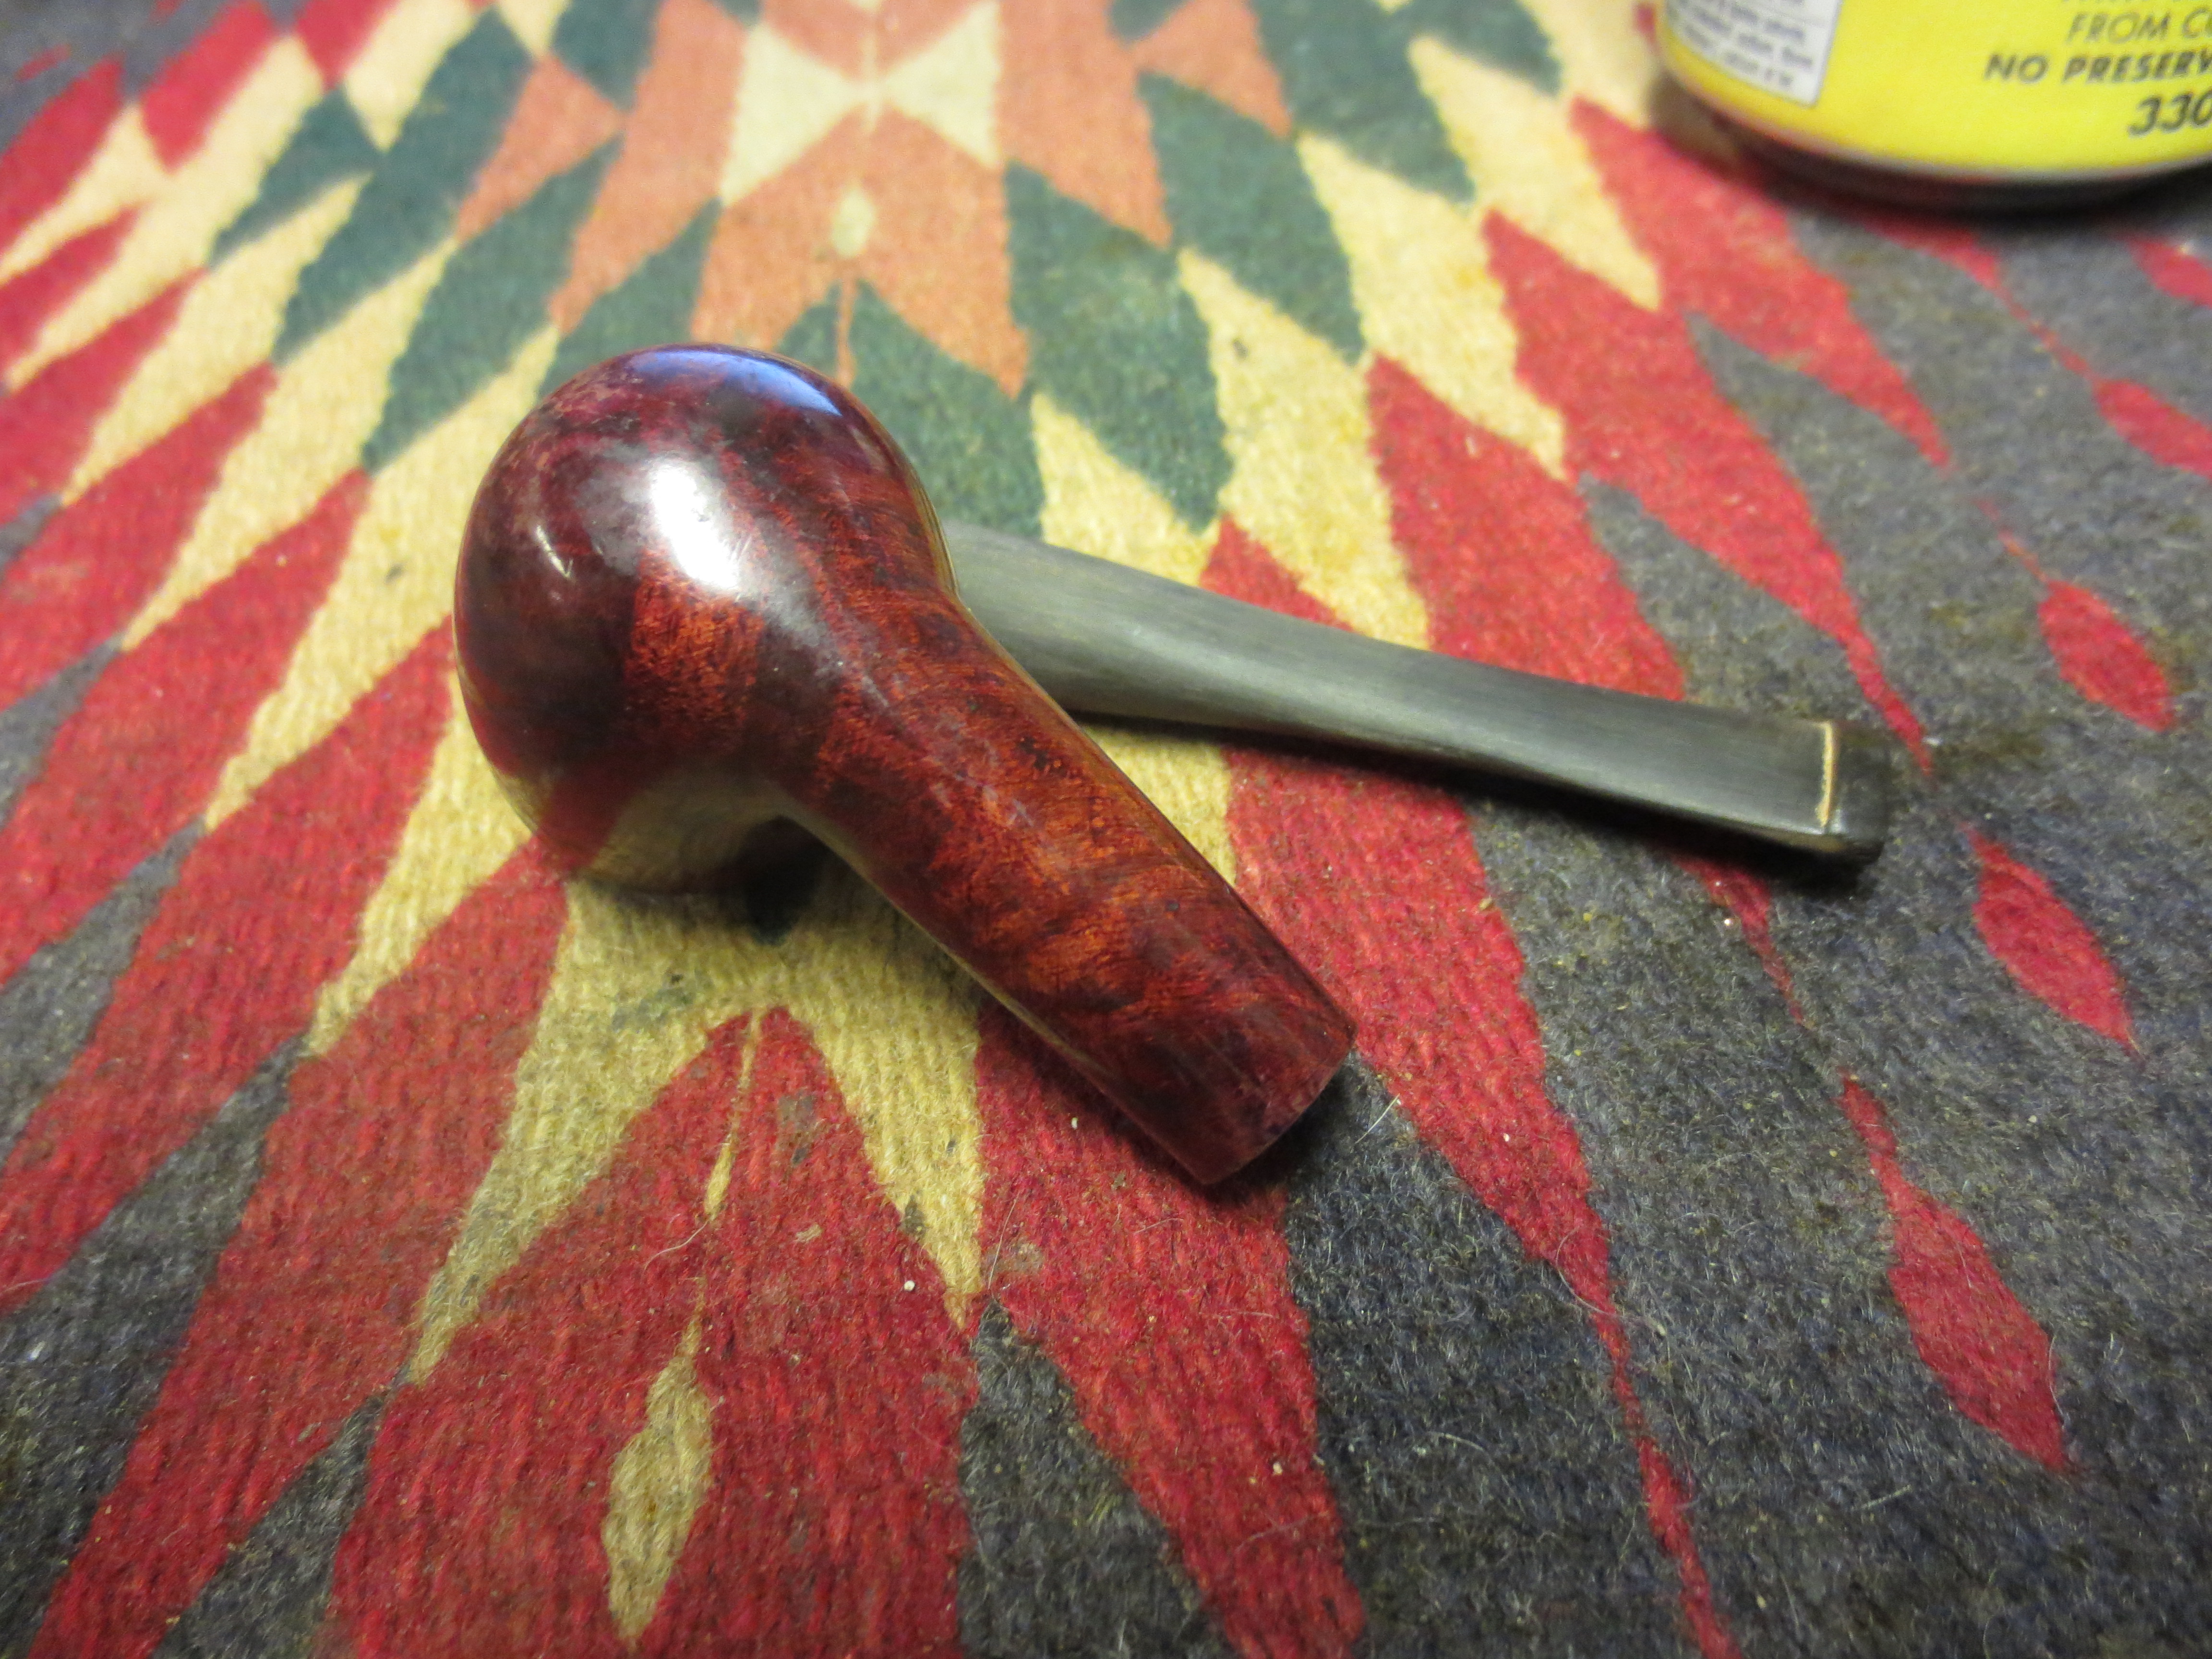
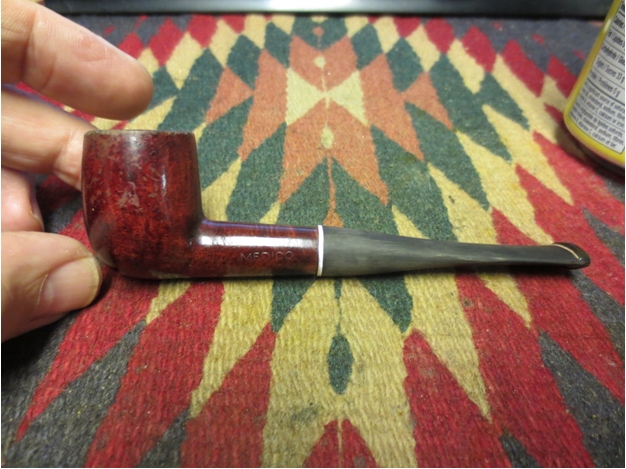
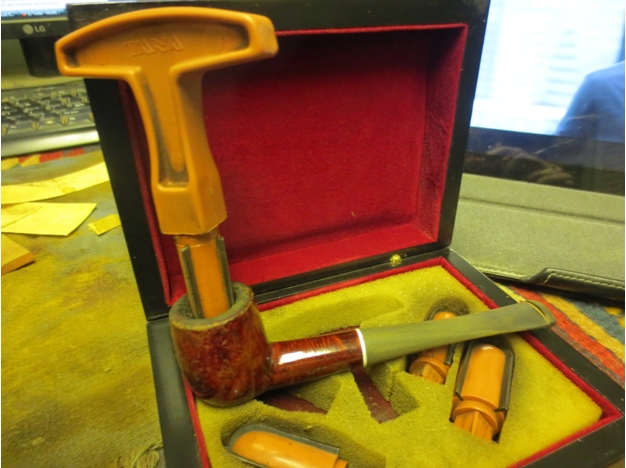
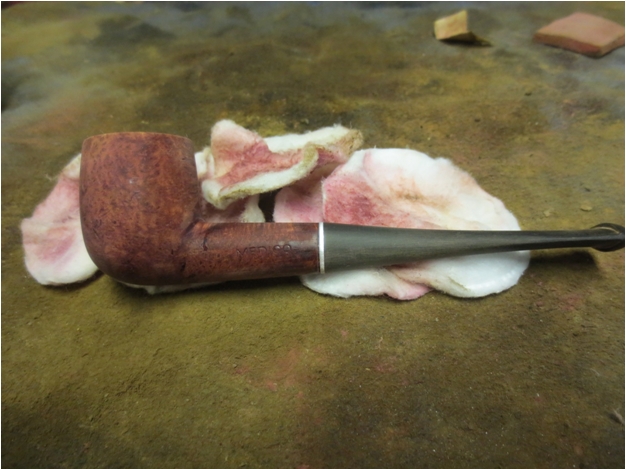
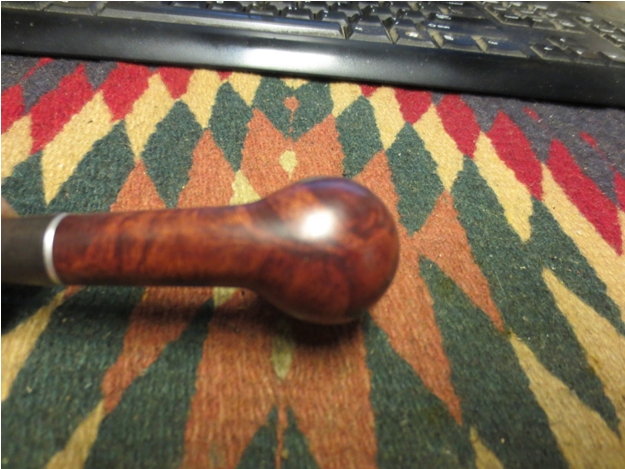
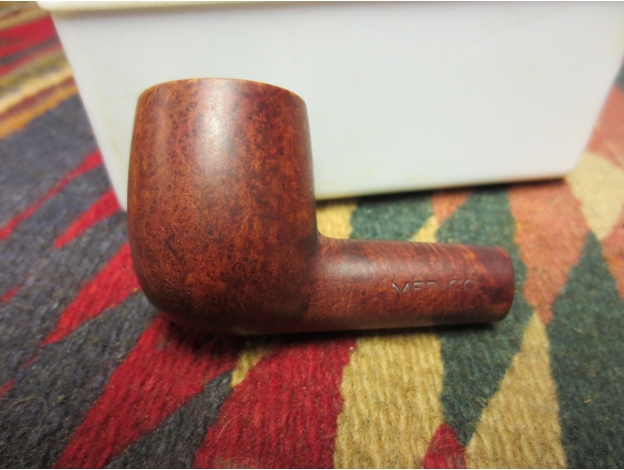
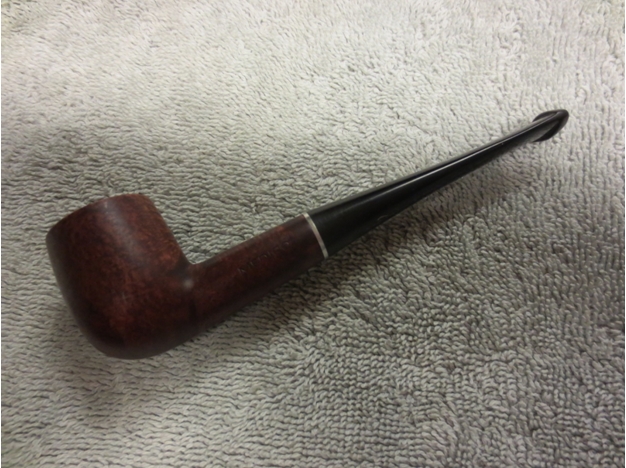
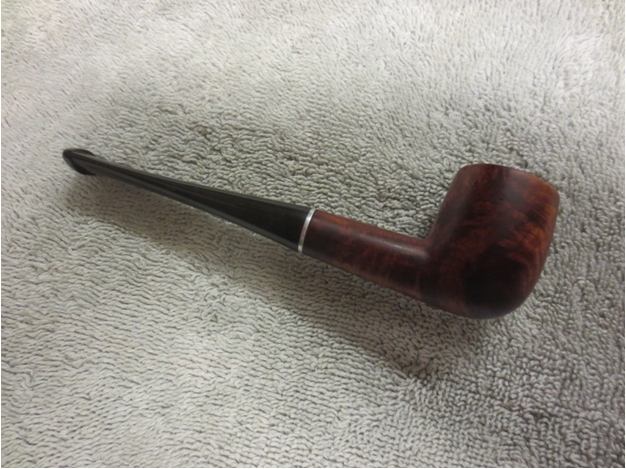
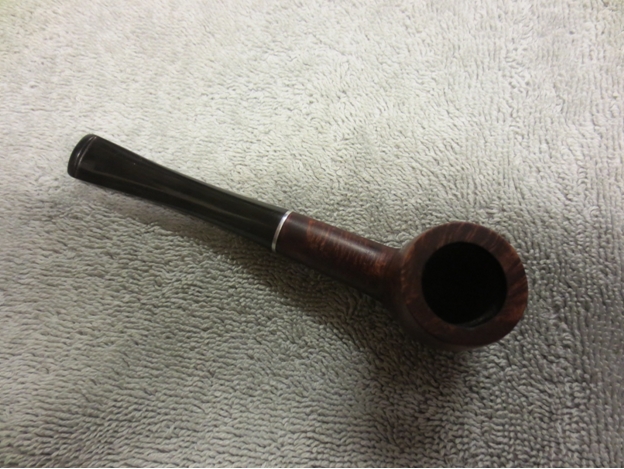
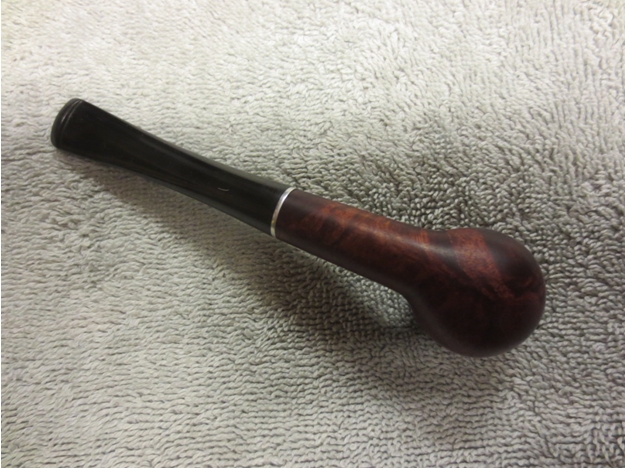
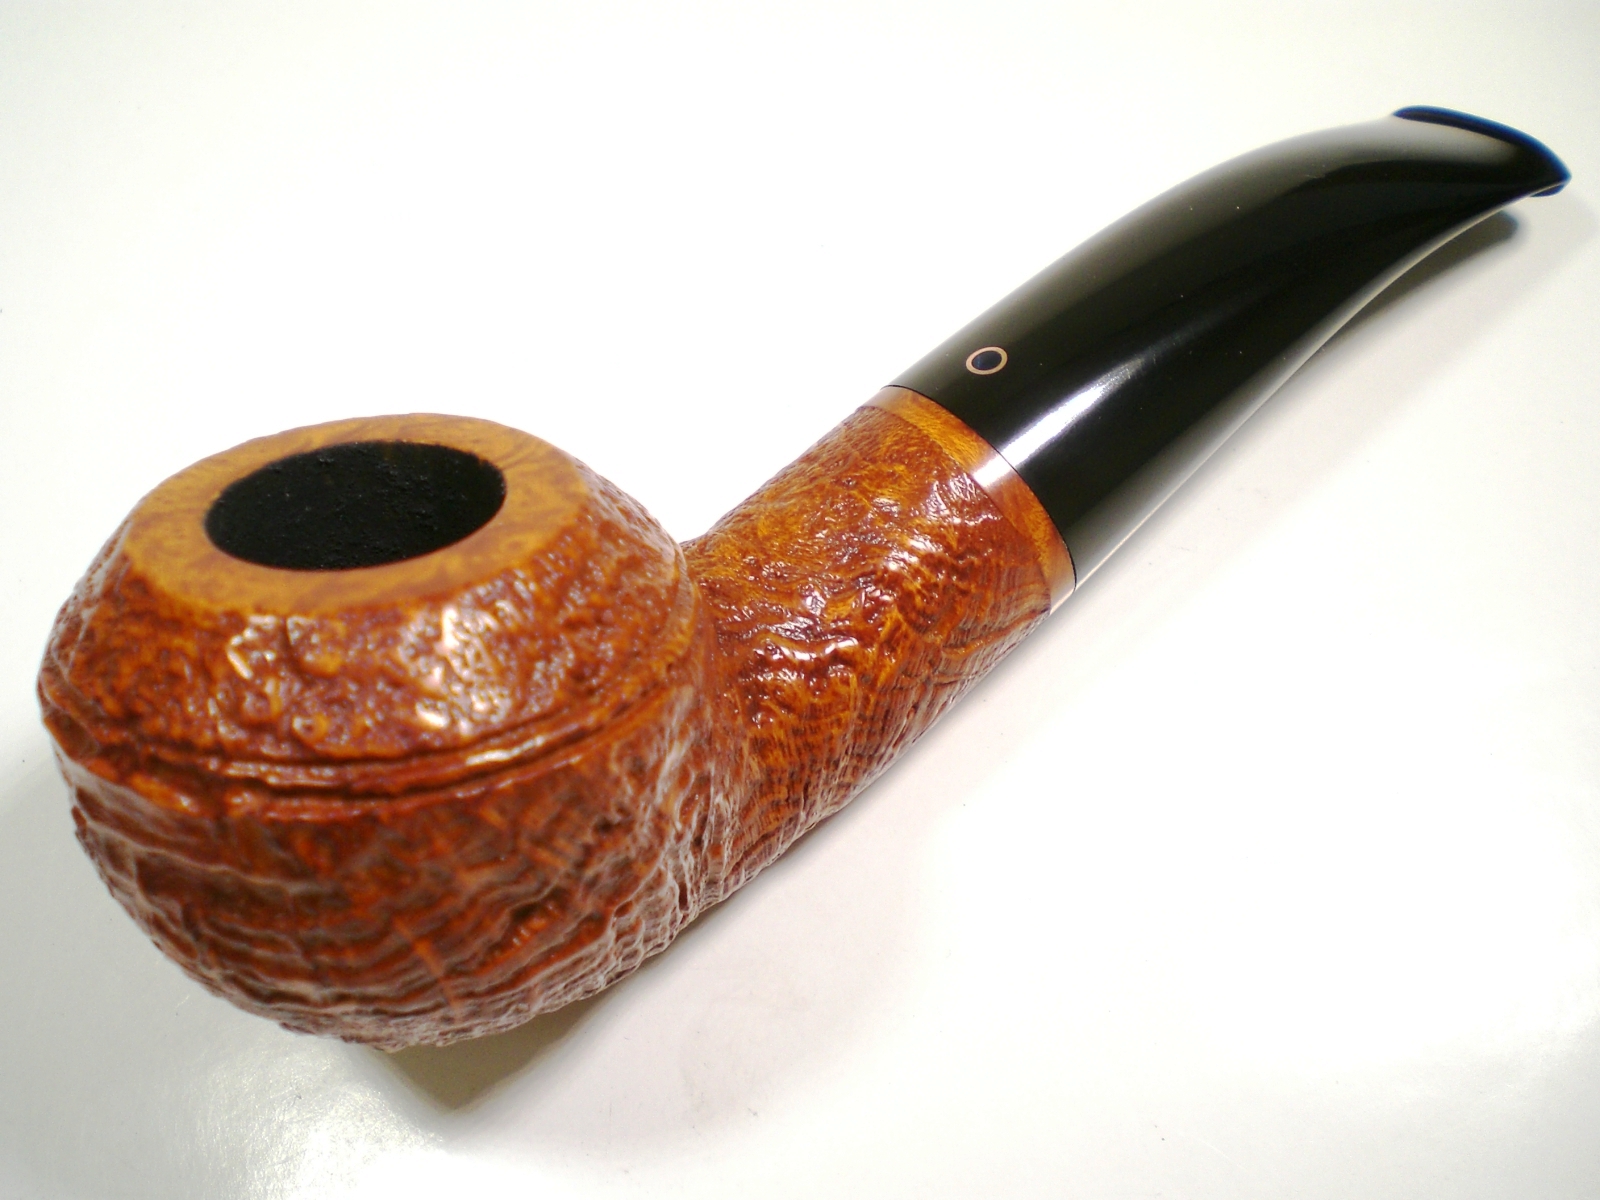
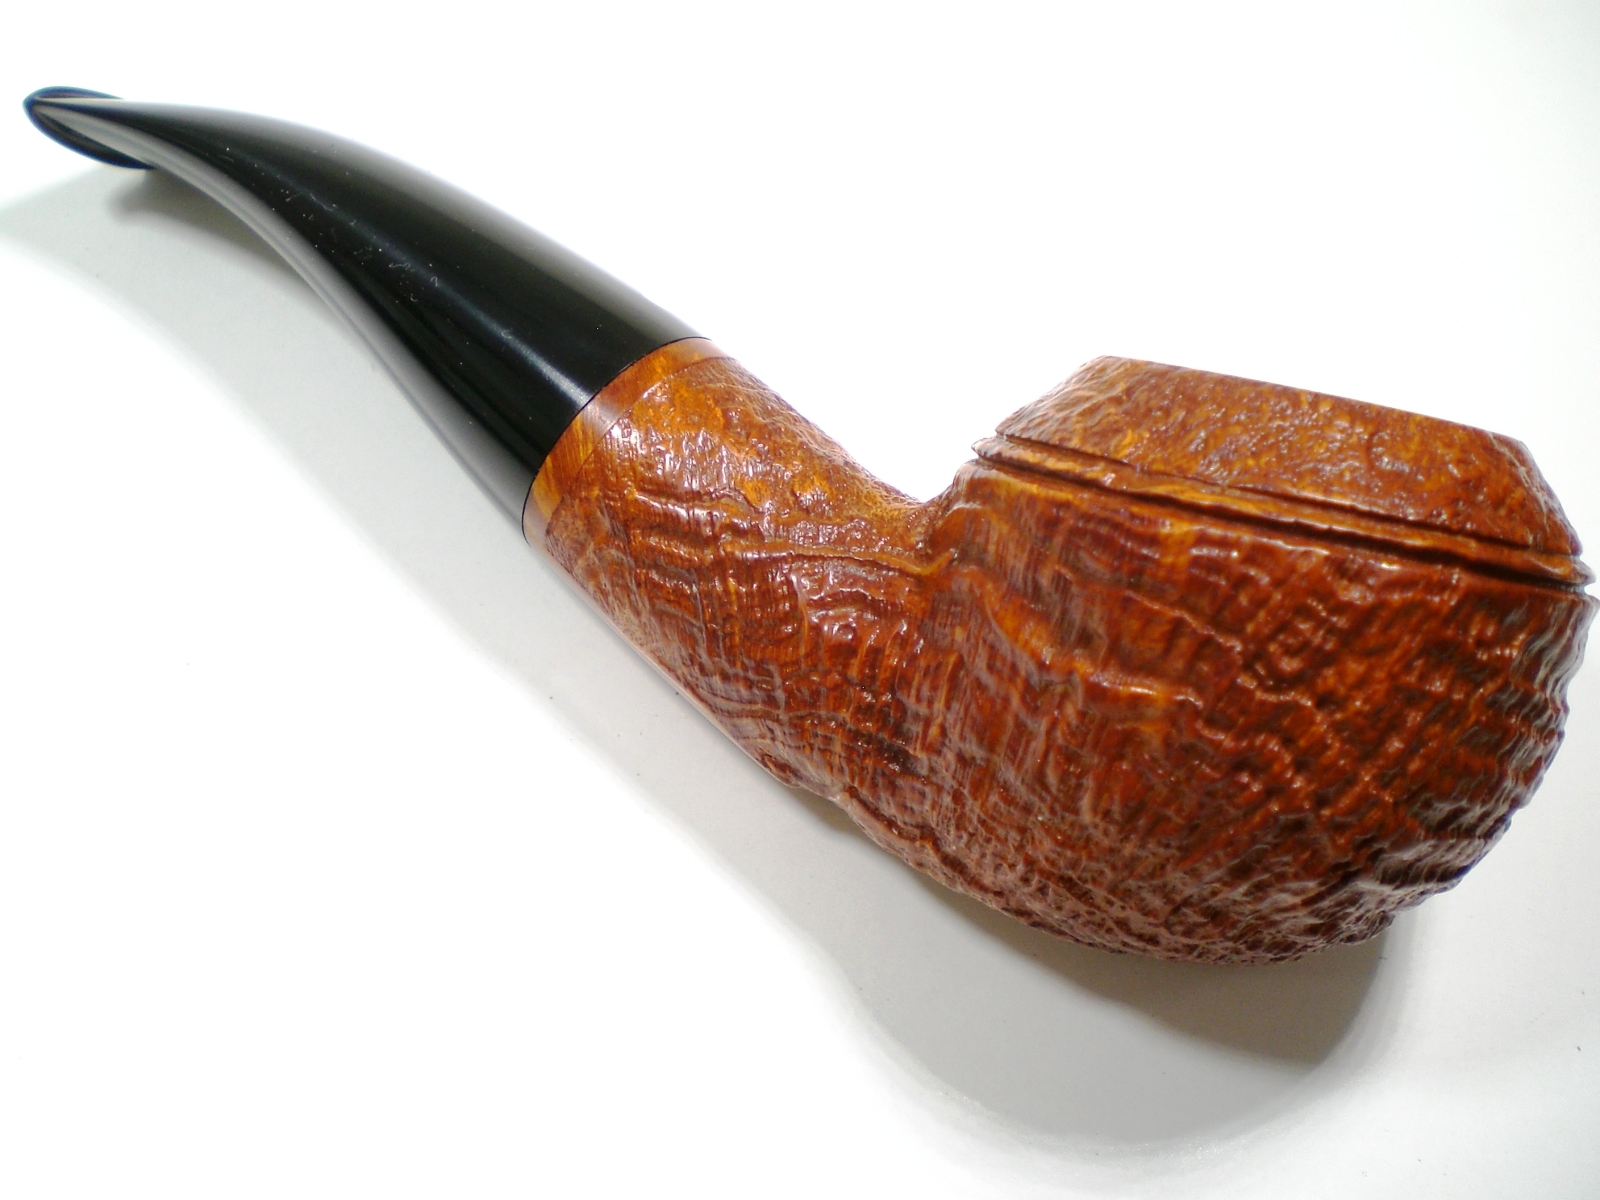
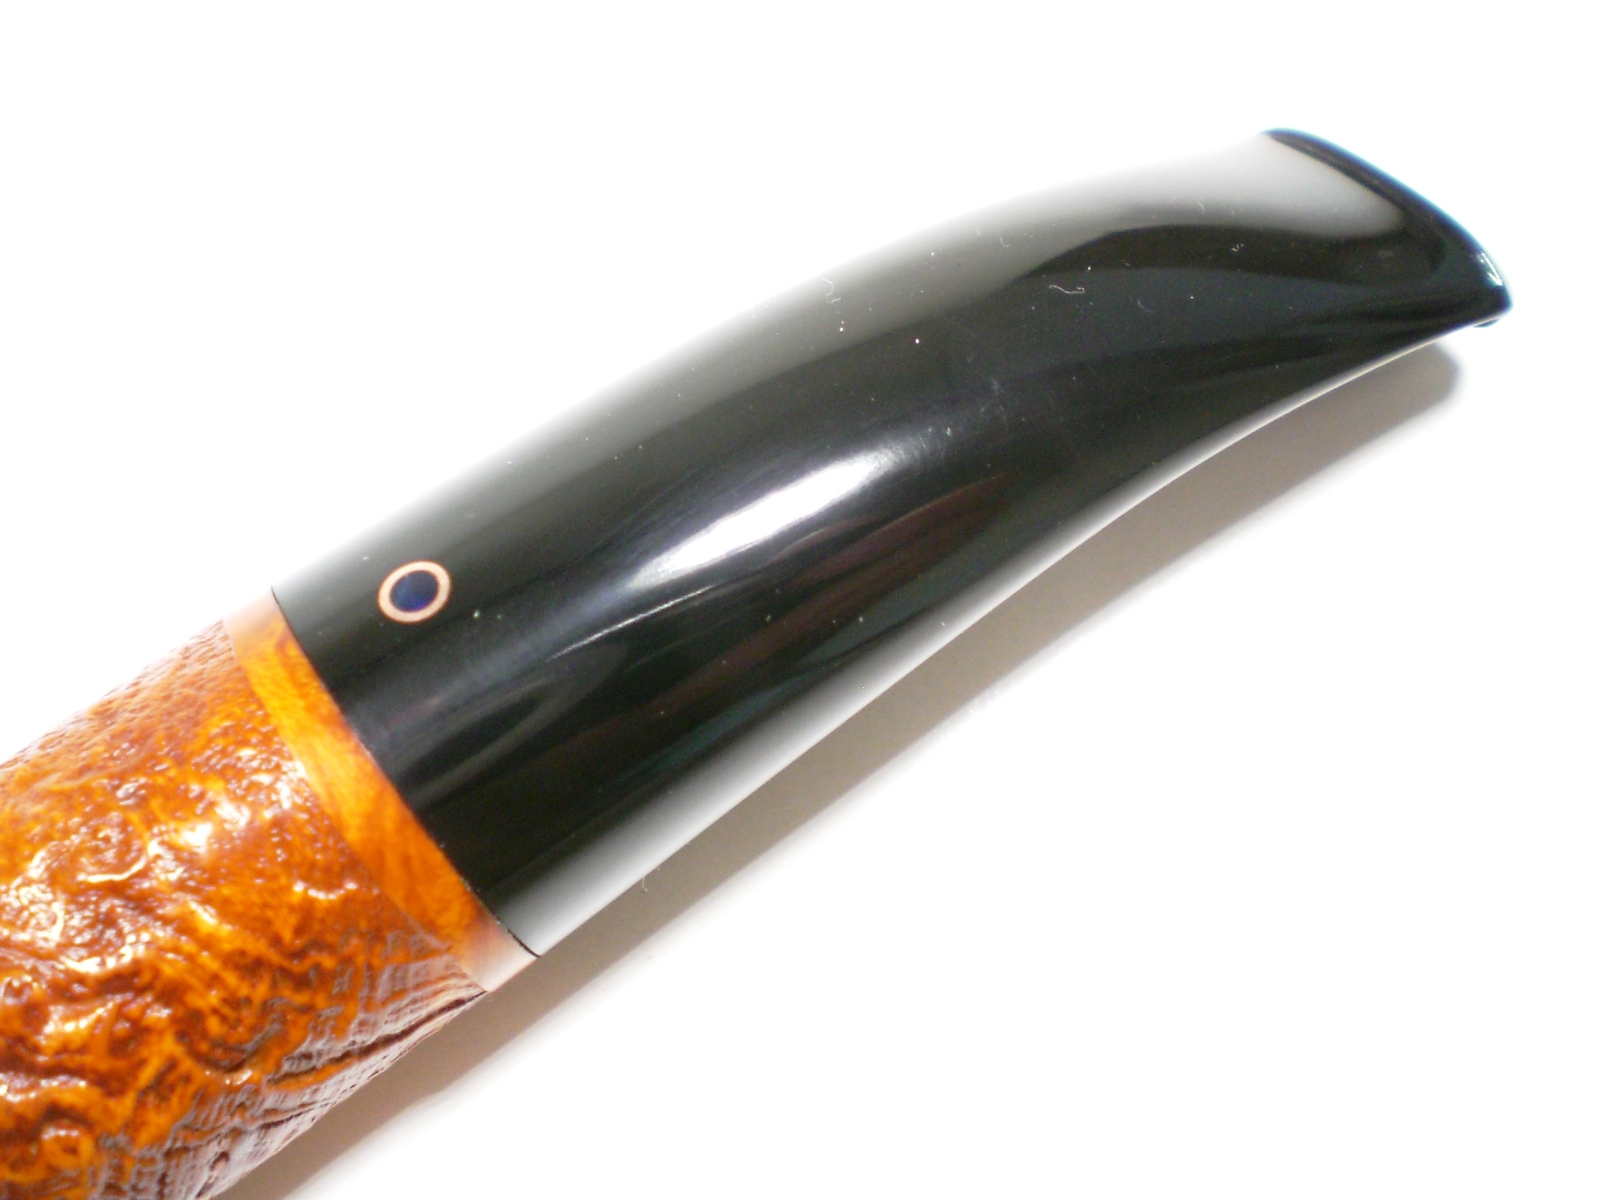
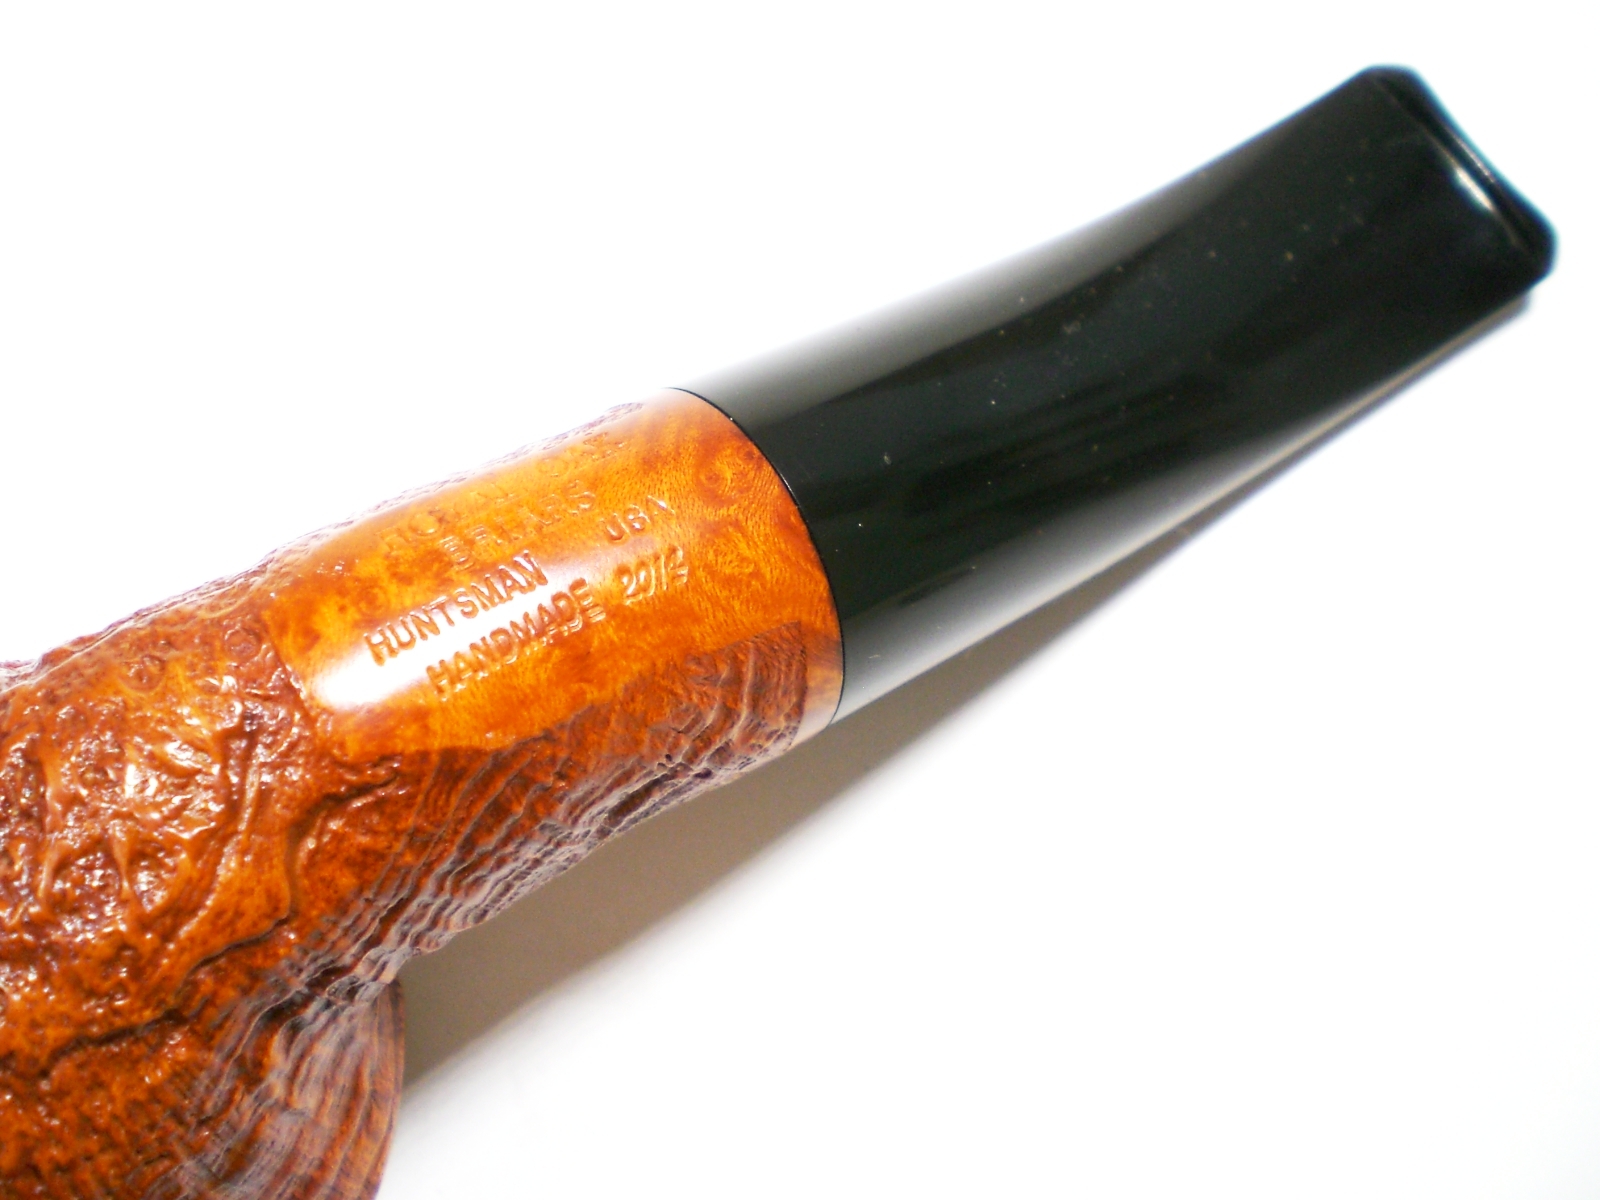
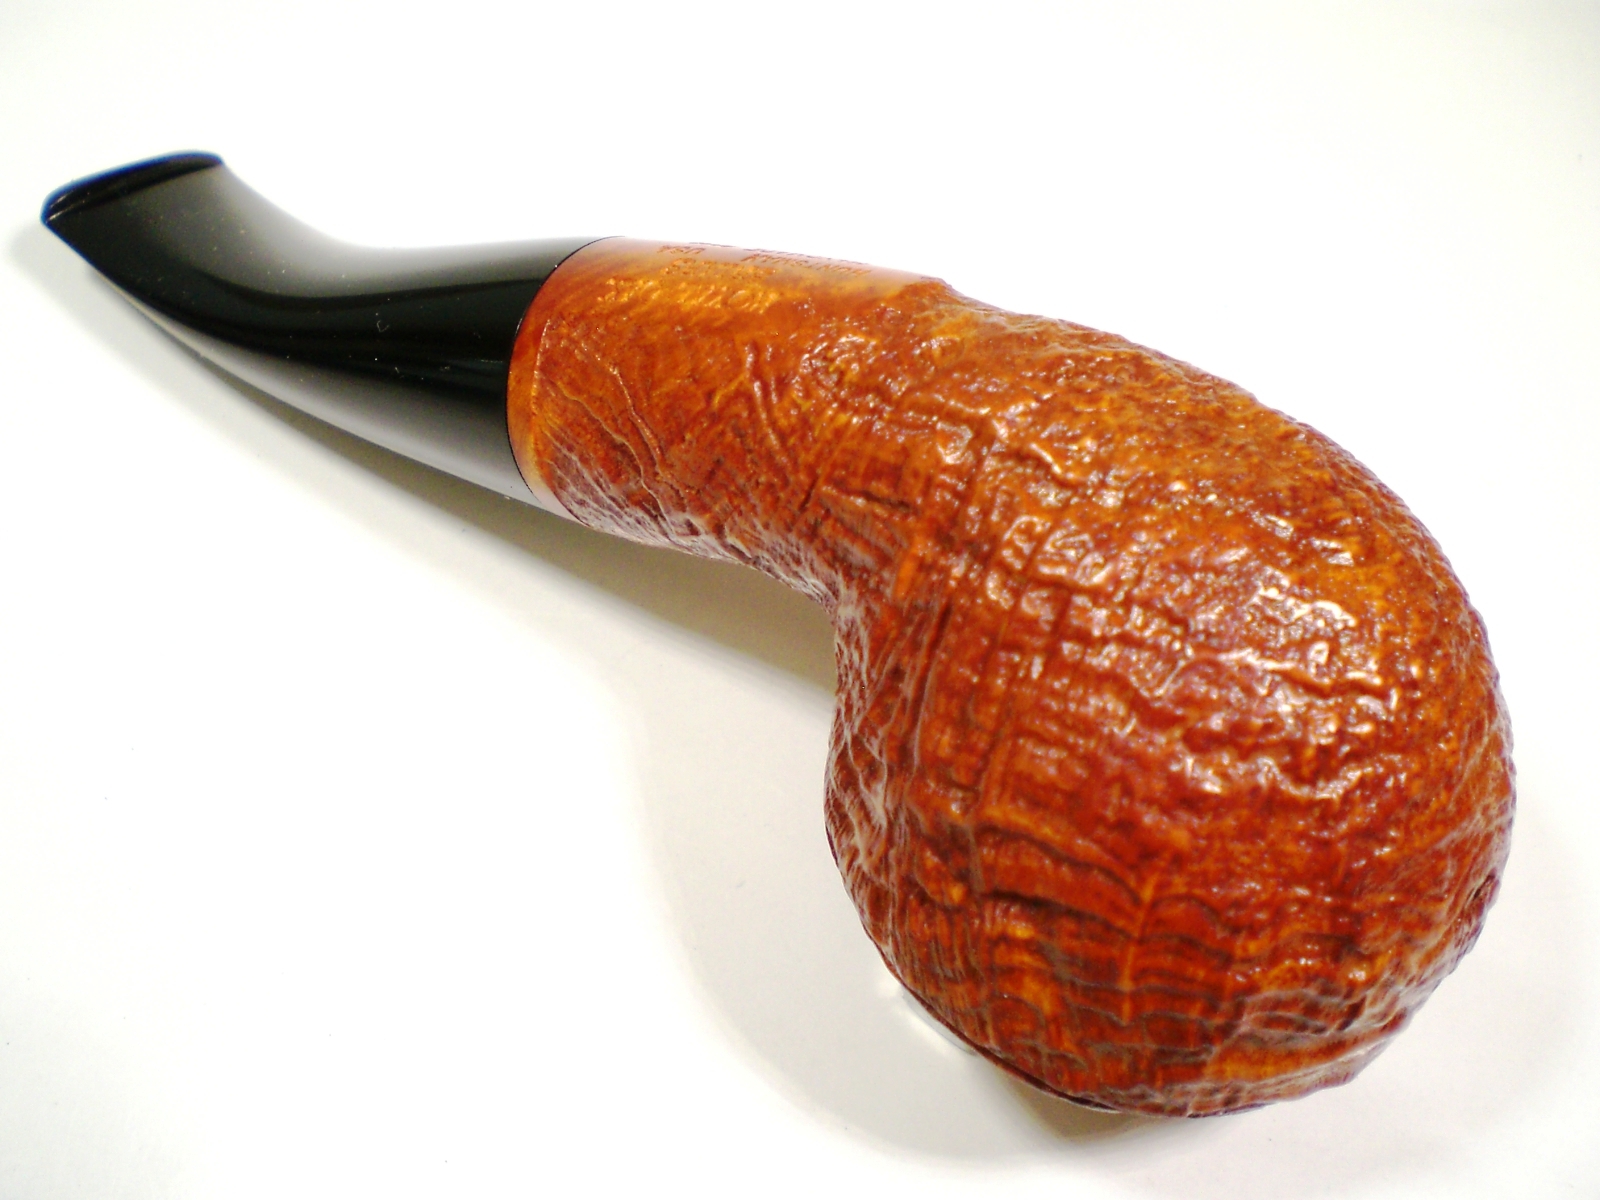
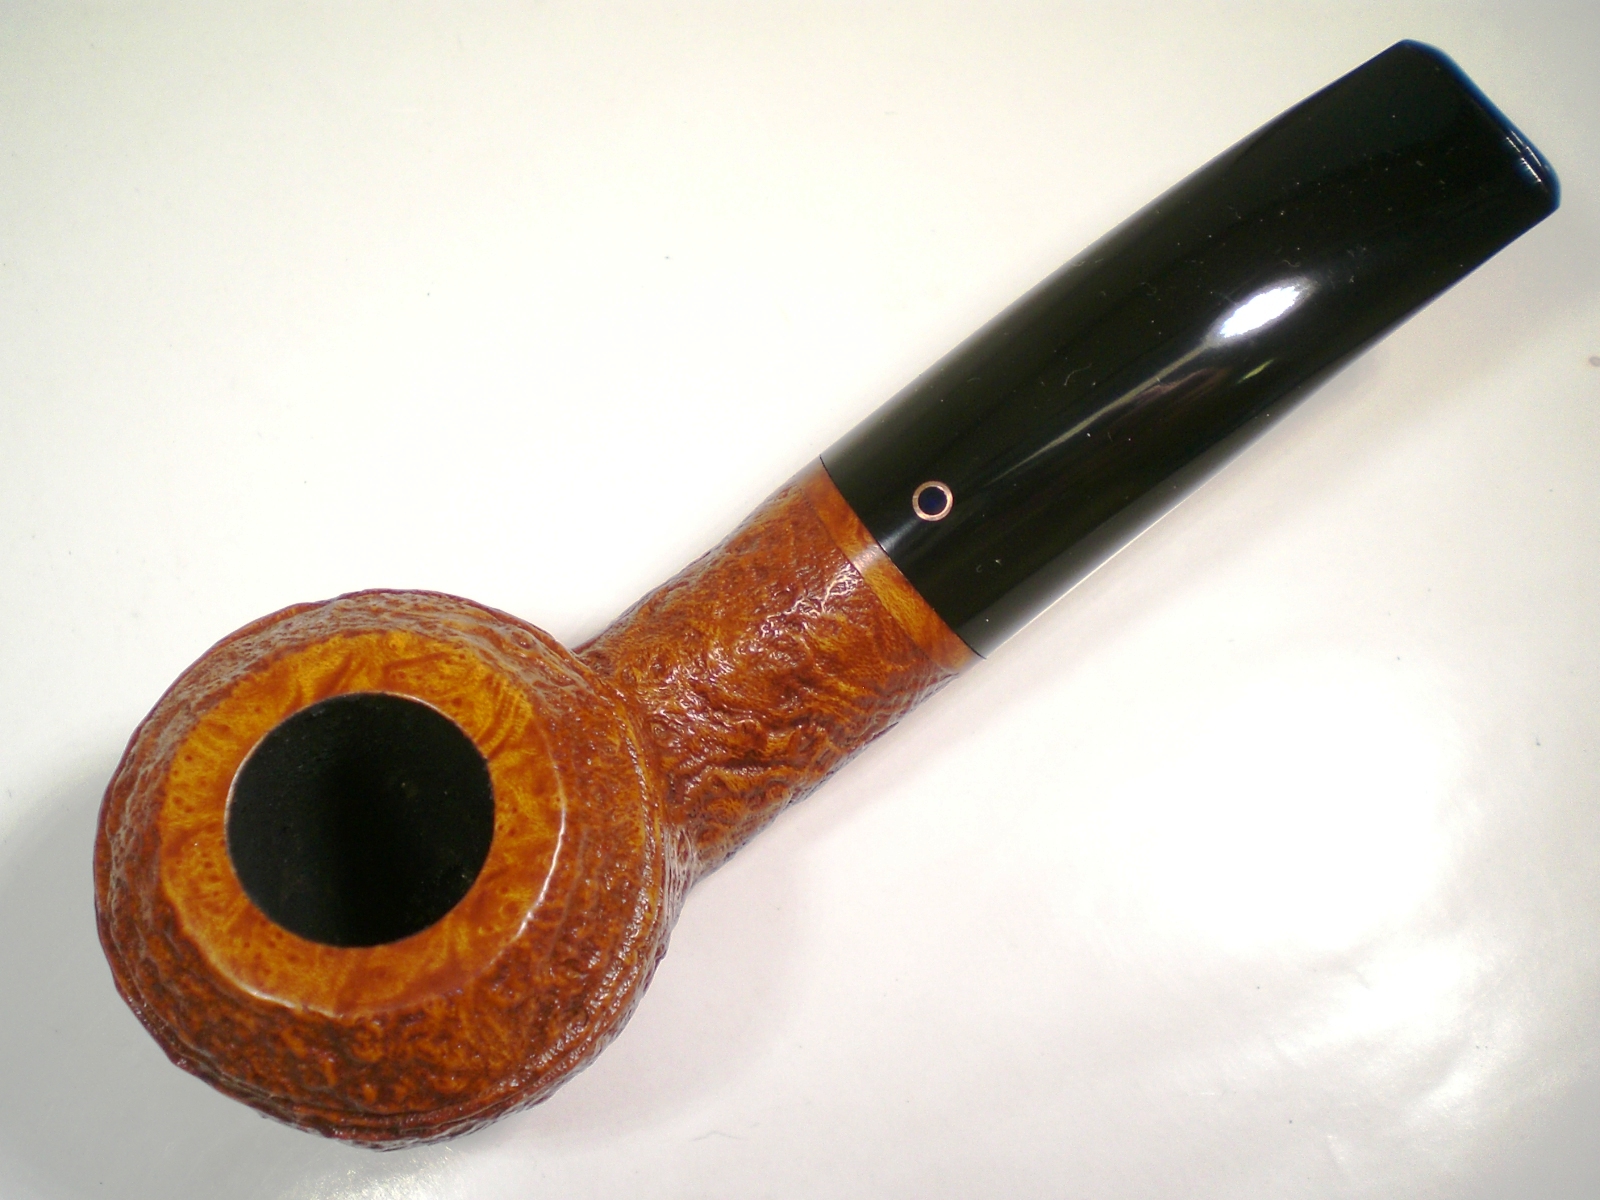
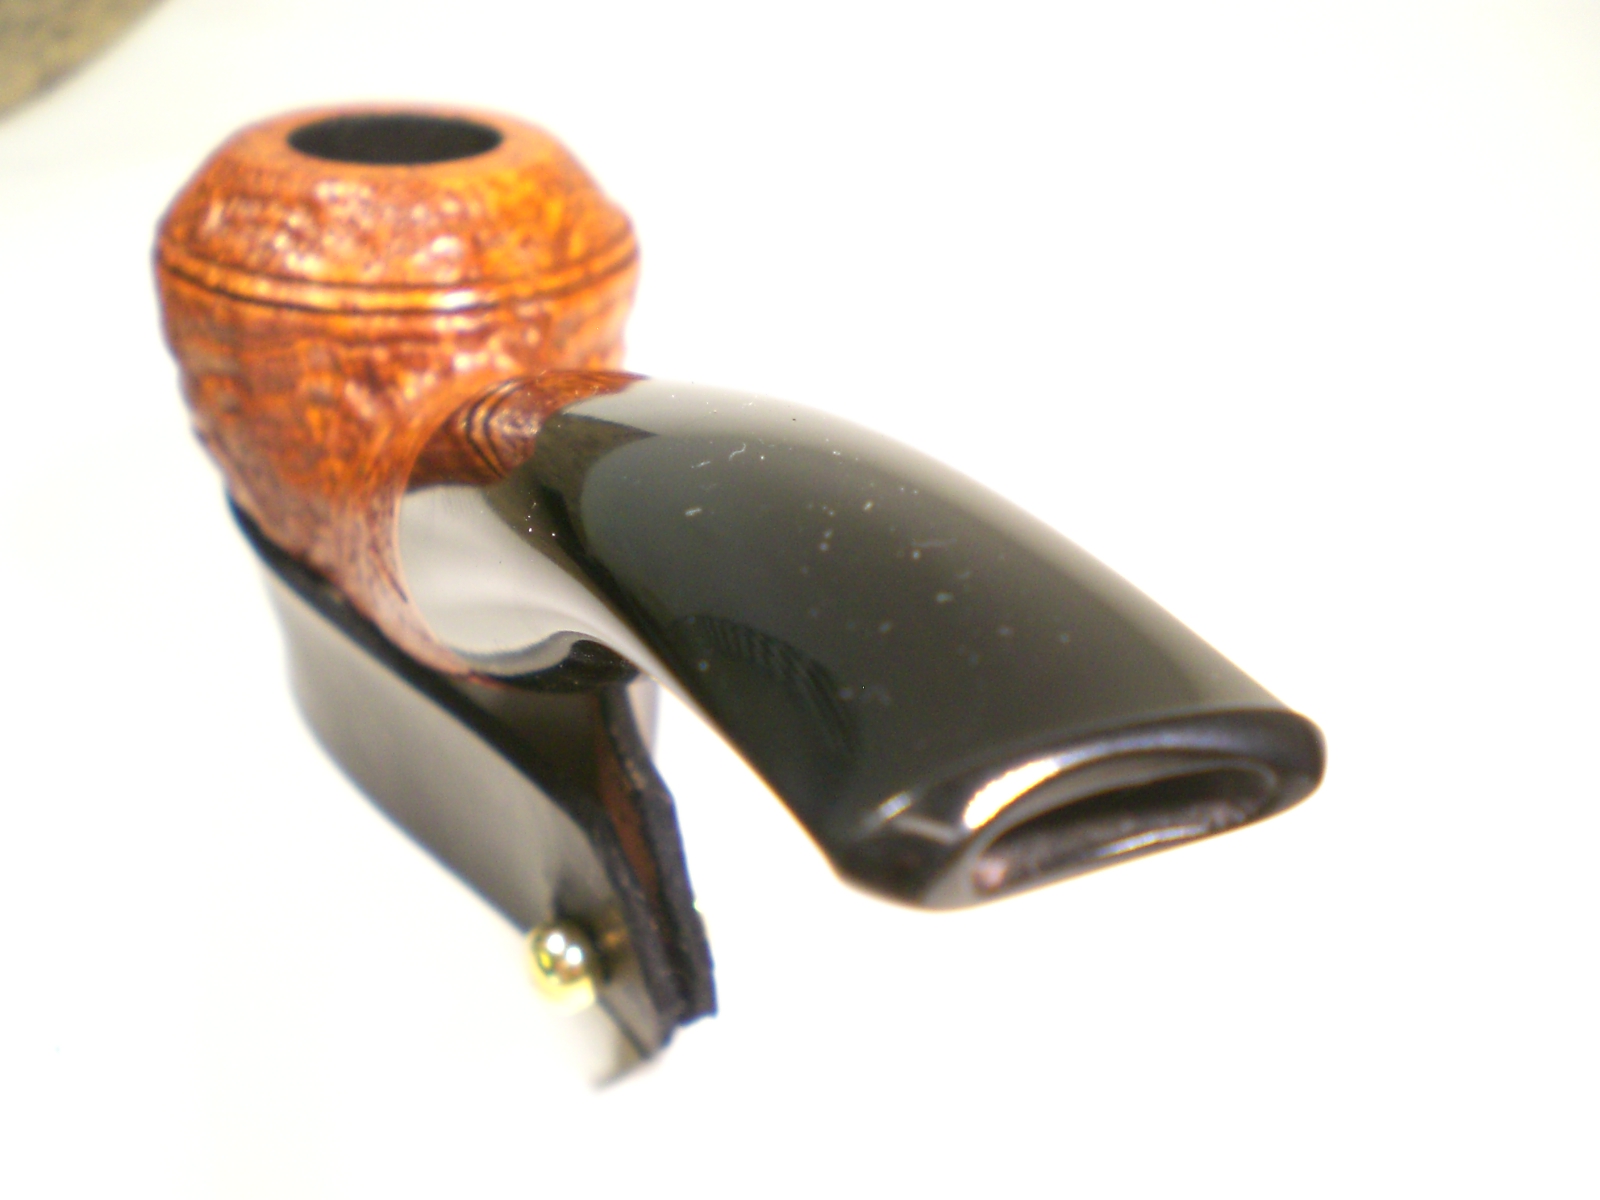
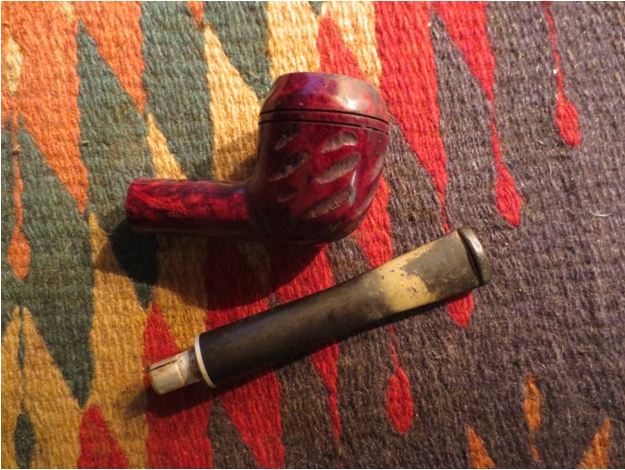
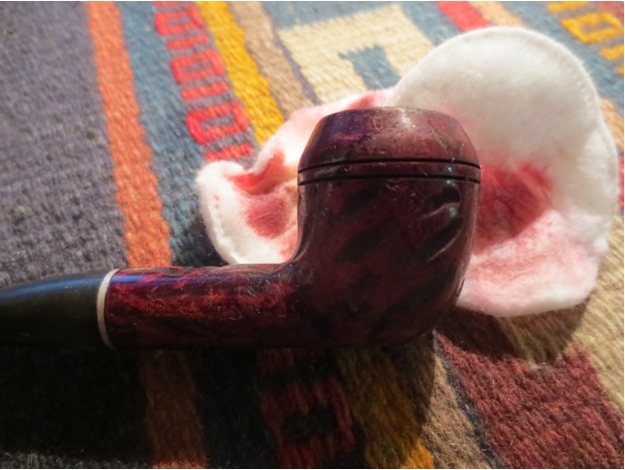
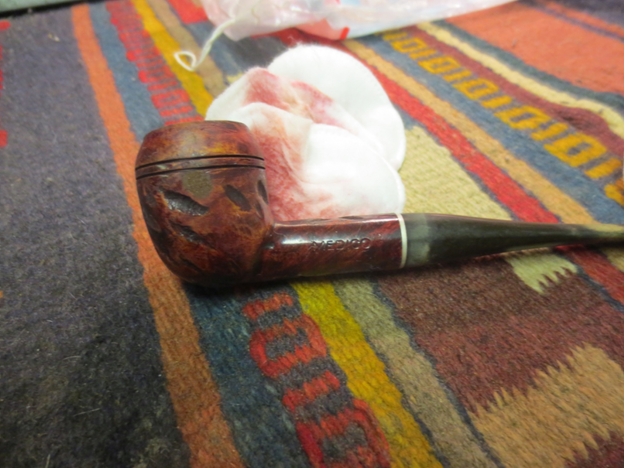
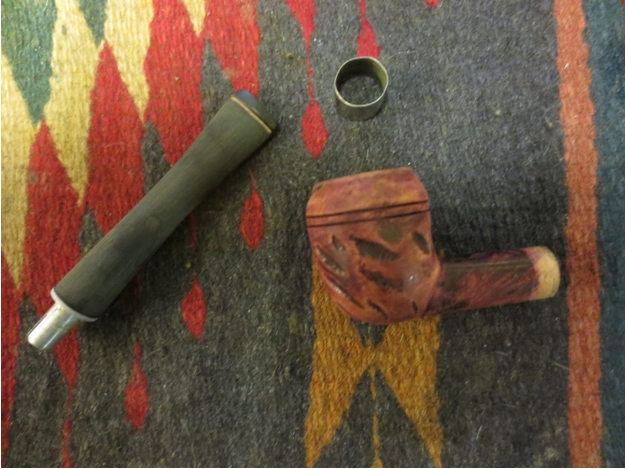
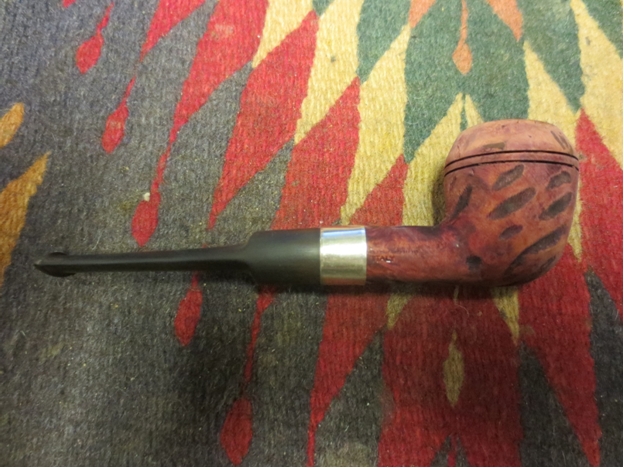
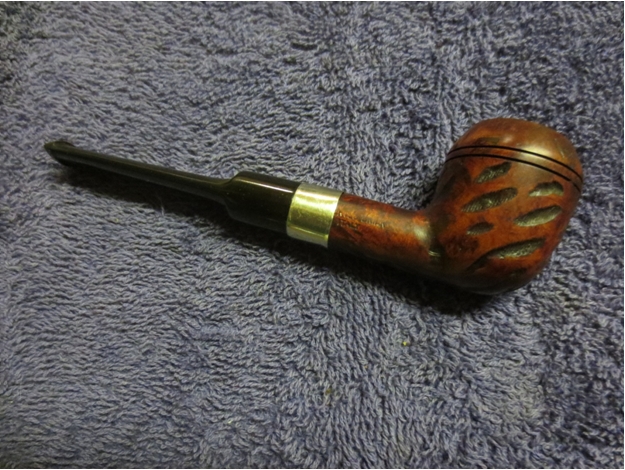
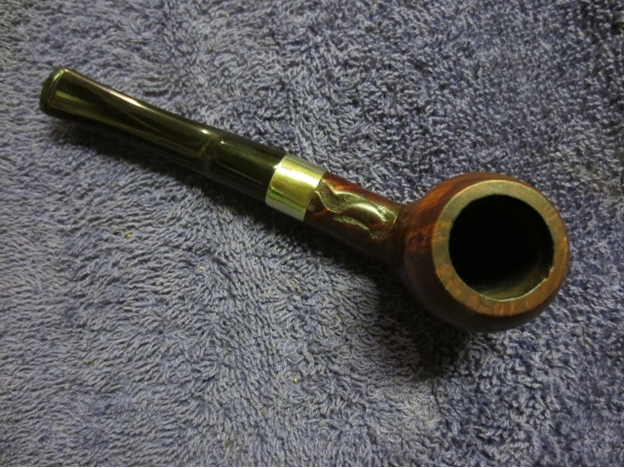
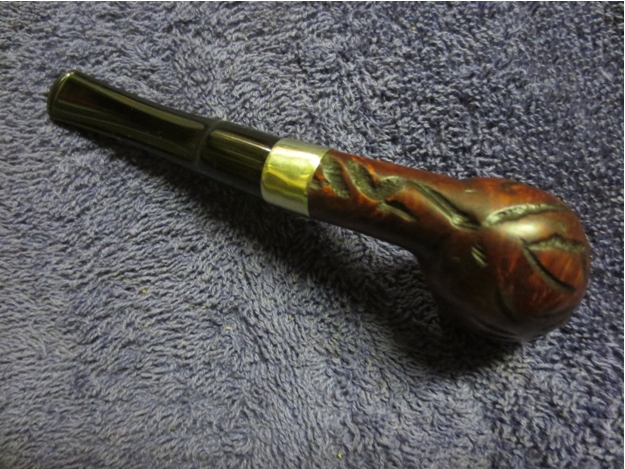
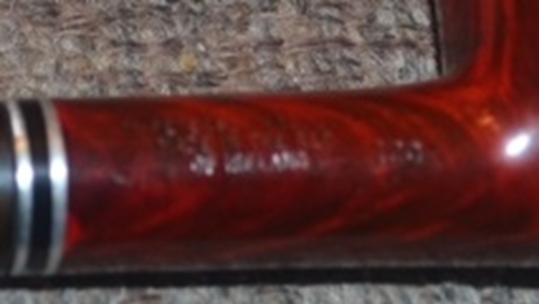
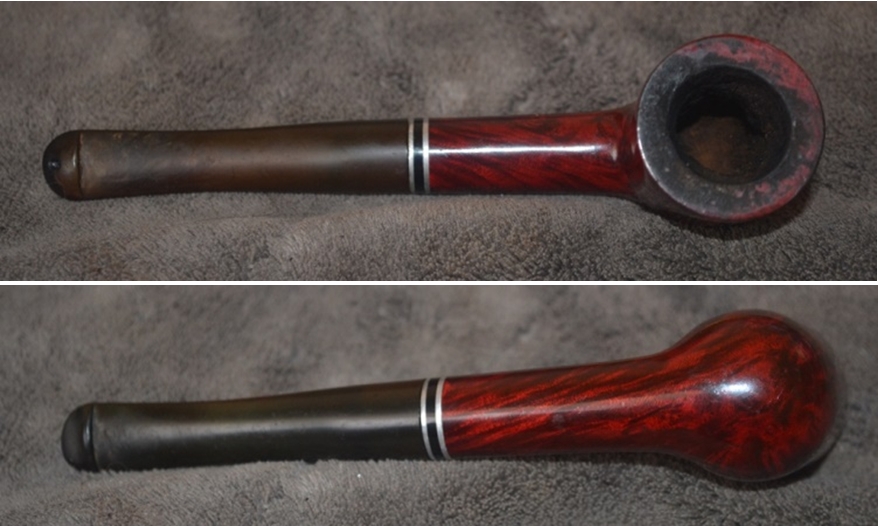
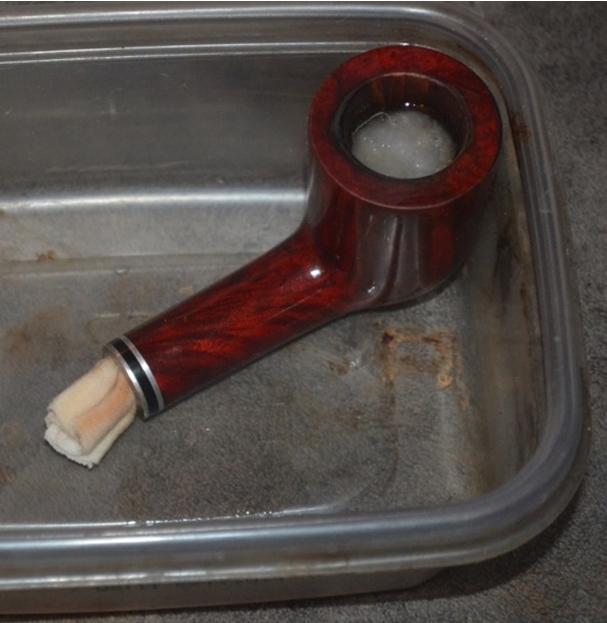
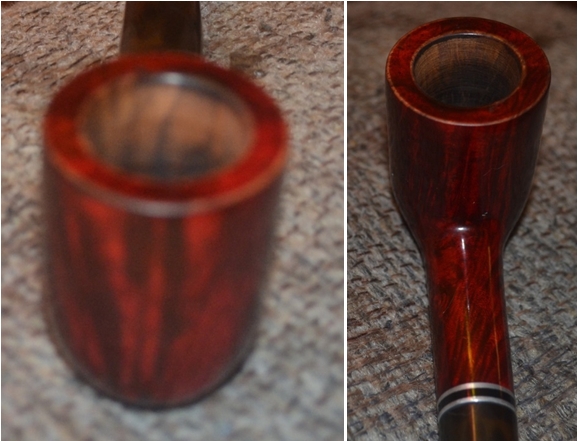
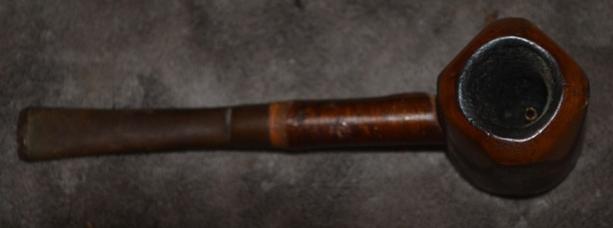
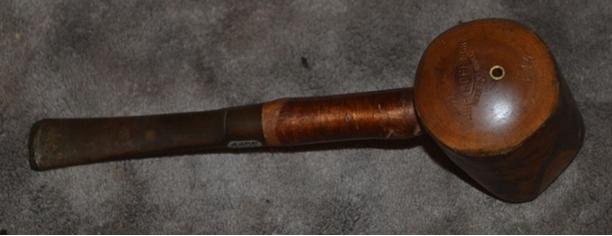
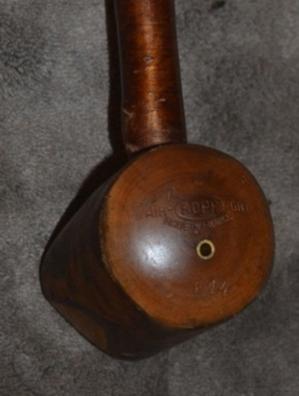
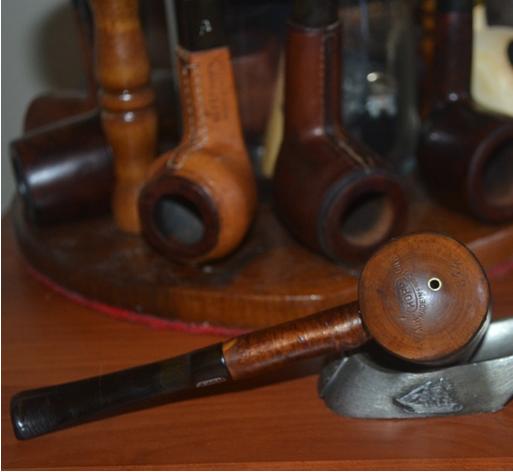
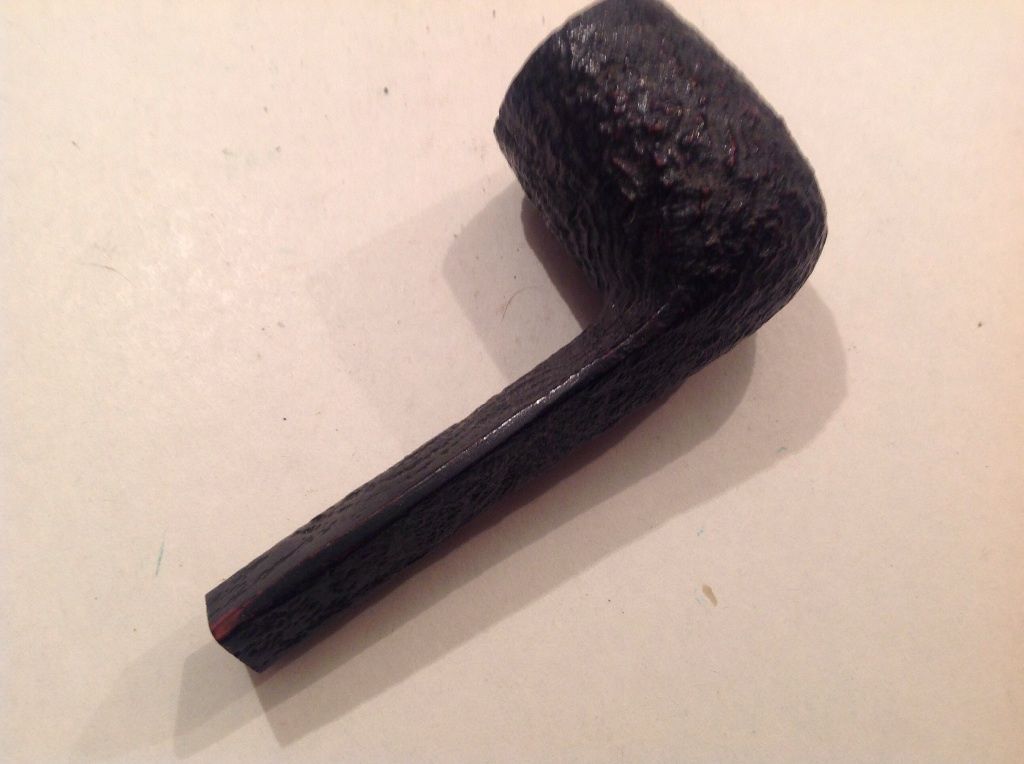
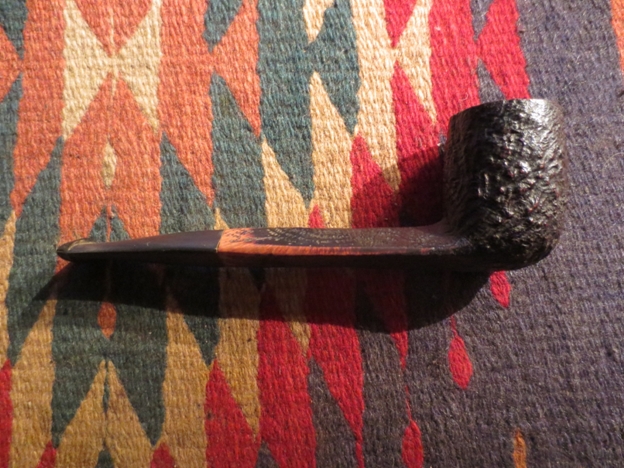
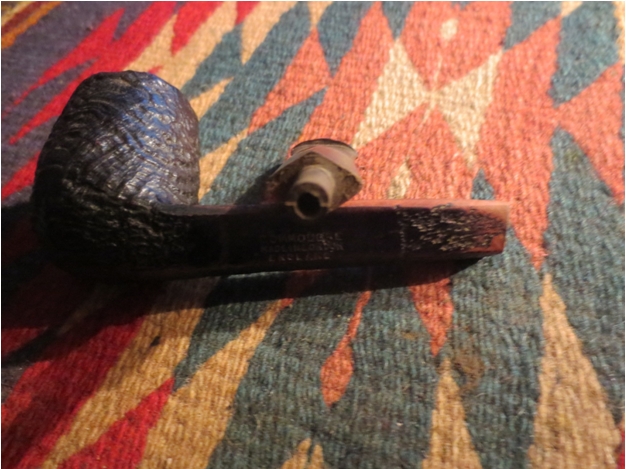
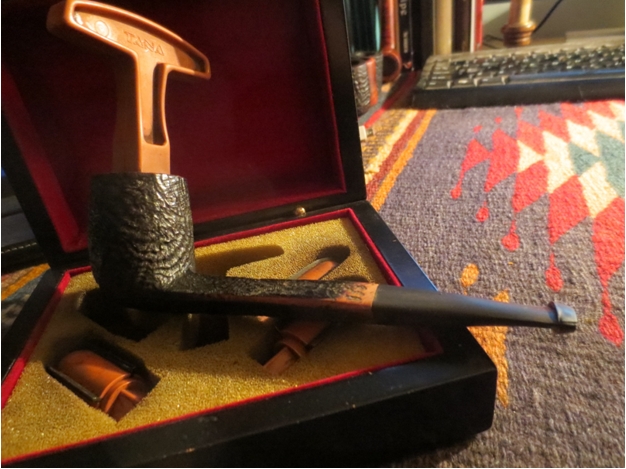
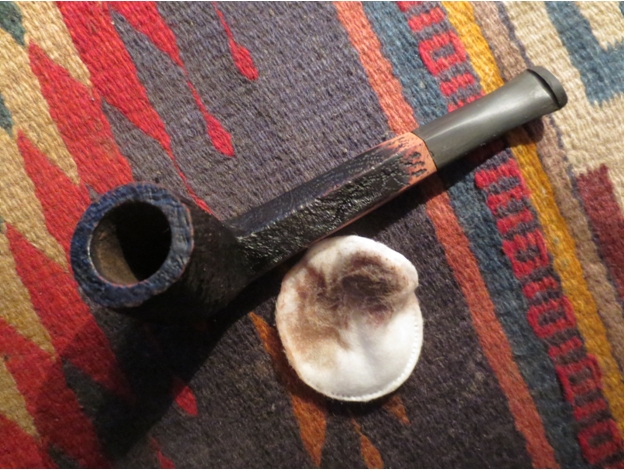
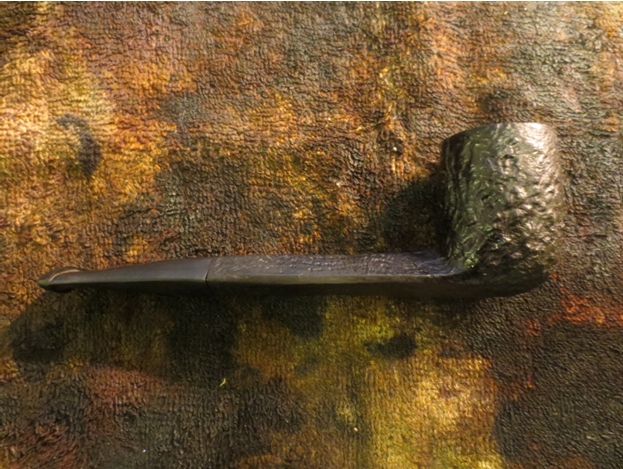
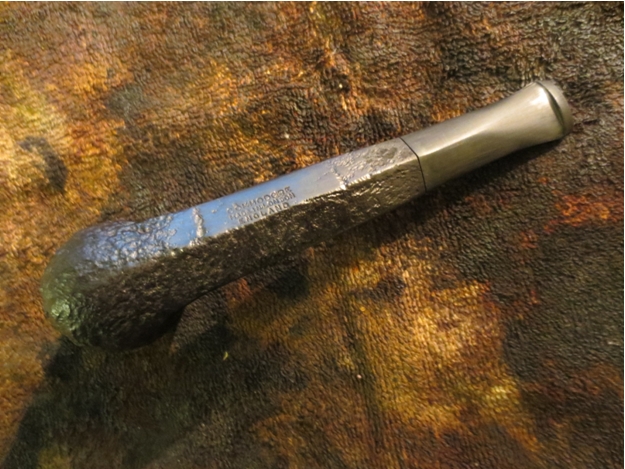
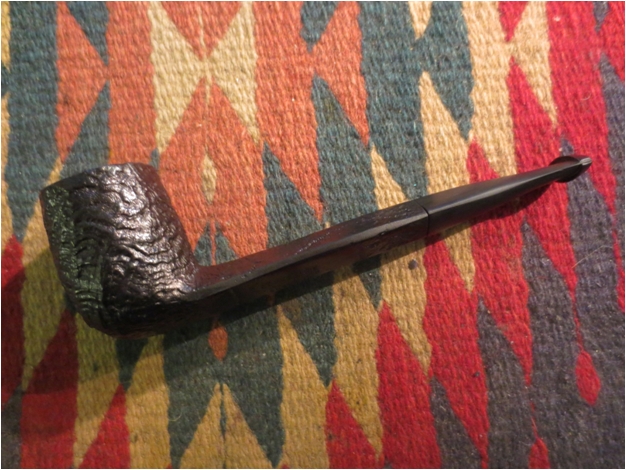
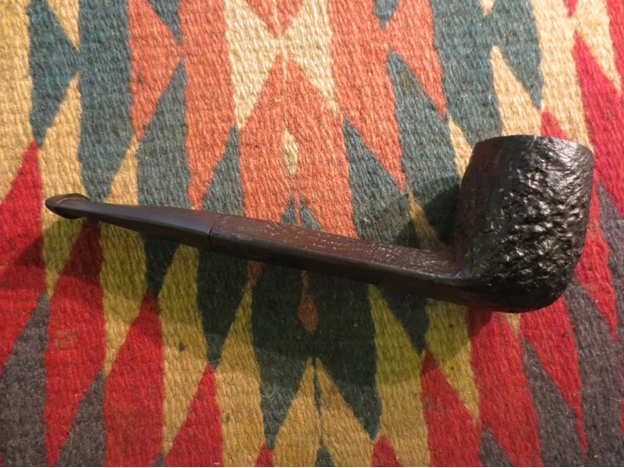
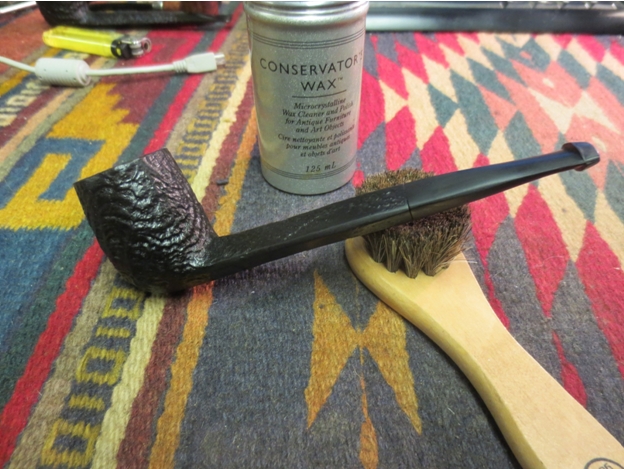
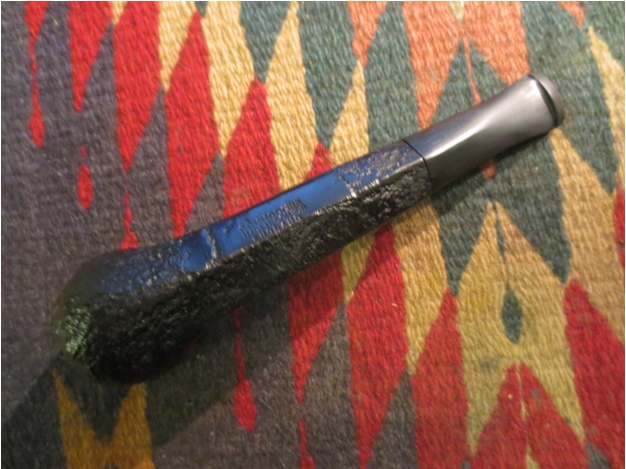
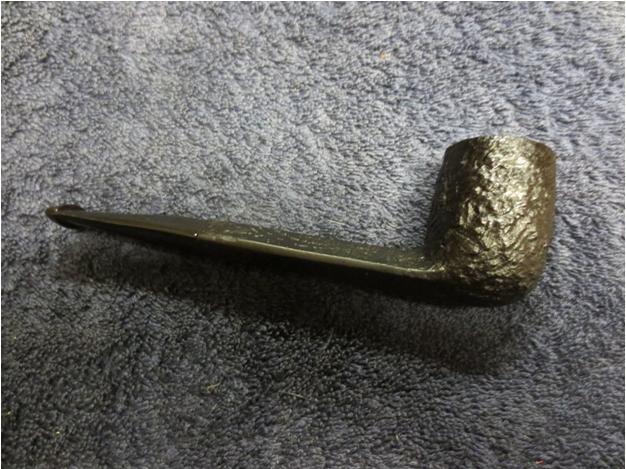
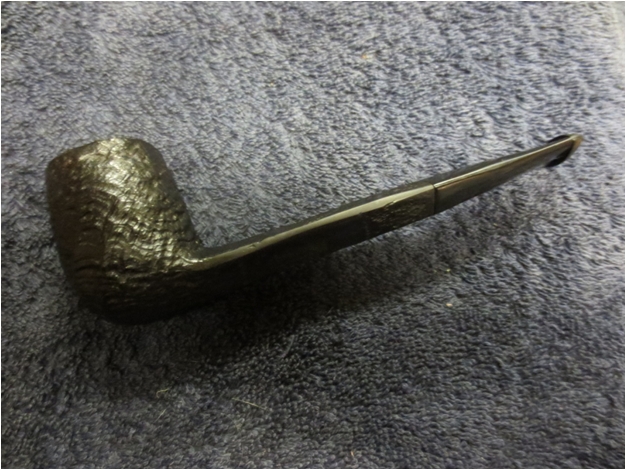
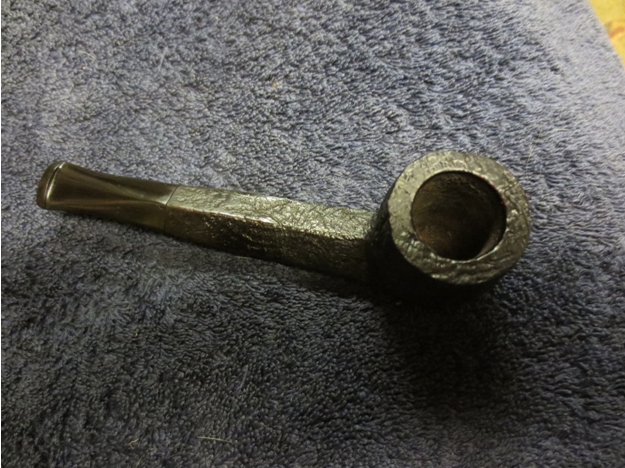
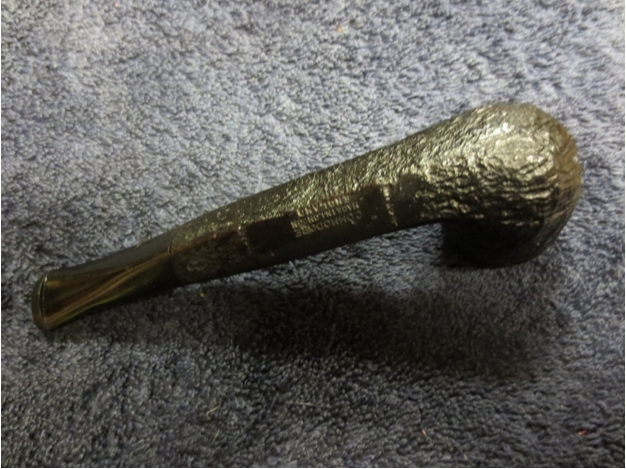
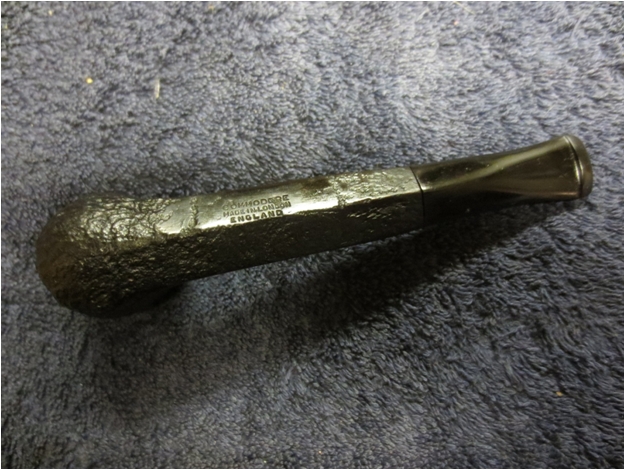
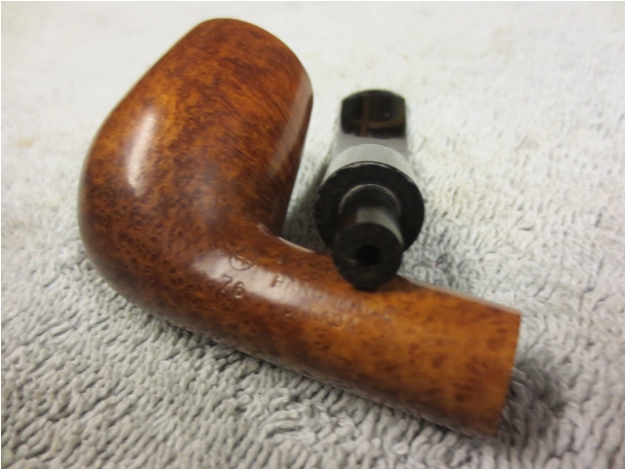
I have since picked up two of Julius’ pipes and found them to be very good smoking pipes. The first one I found was a beautiful little shape 76 Zulu Hand Made while the second was a Craft Briar shape 86 Volcano. In this review I will address the Zulu.IMG_2469My first Vesz is stamped on the left side of the shank Julius Vesz Hand Made Canada with a circle 4 stamp. I learned from correspondence with Julius’ son Rob that his dad’s Hand Made pipes were graded (in ascending order): 2 – 4 and this one is a grade 4 stamped pipe. It also bears a shape number of 76 which is the Zulu shape. The stem bears a white circle inlay that is common on his pipes. The vitals are as follows: length 5 ½ inches, height 1 7/8 inches, bore of the bowl 3/4 inches, outer diameter at the widest point 1 1/8 inches and depth of the chamber 1 1/4 inches.

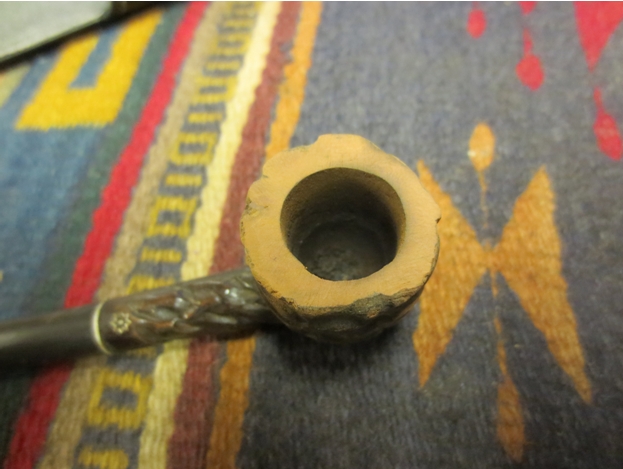
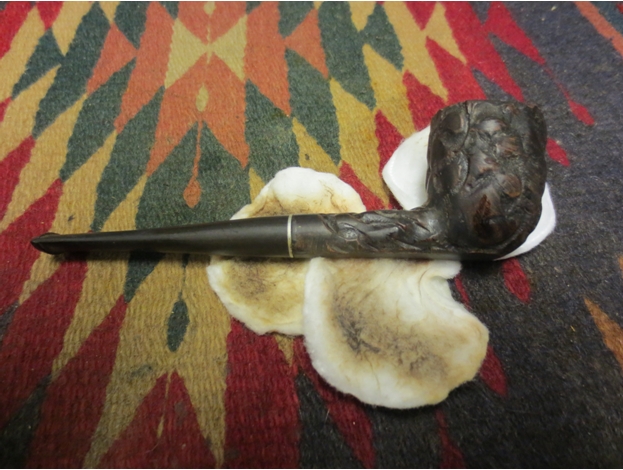
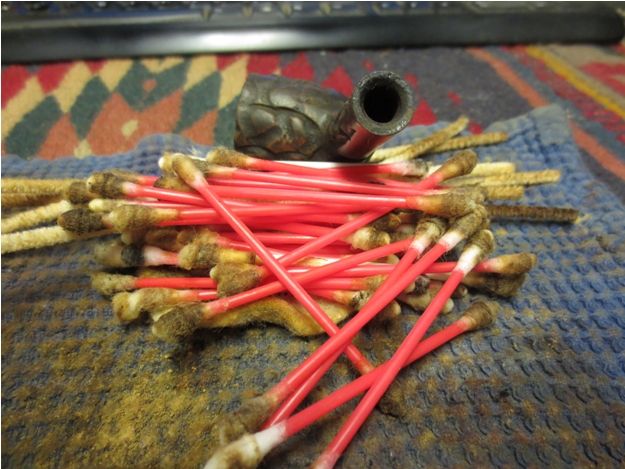
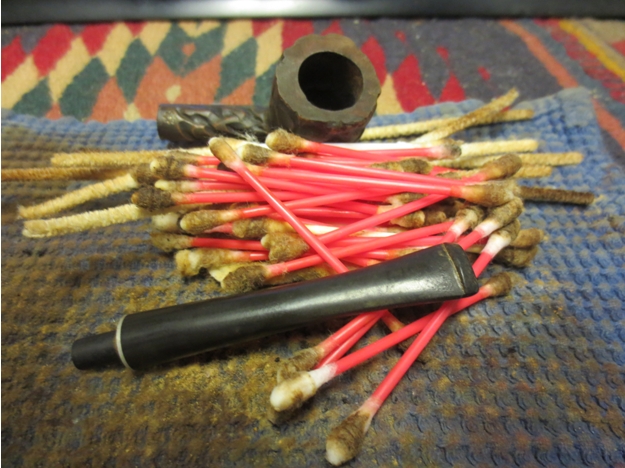
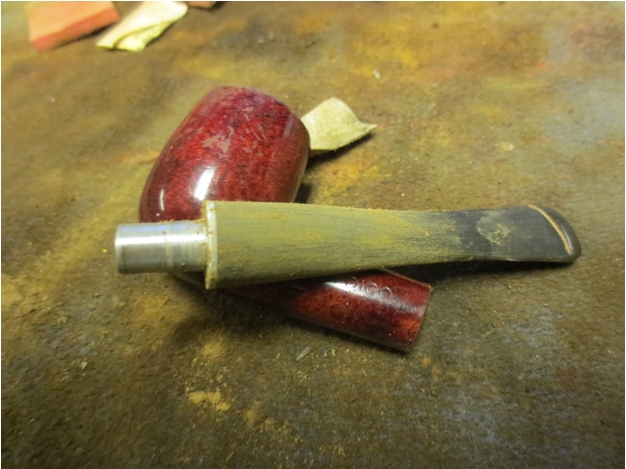
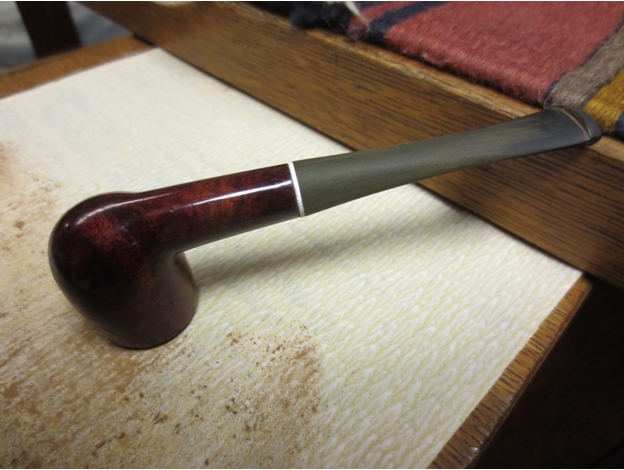
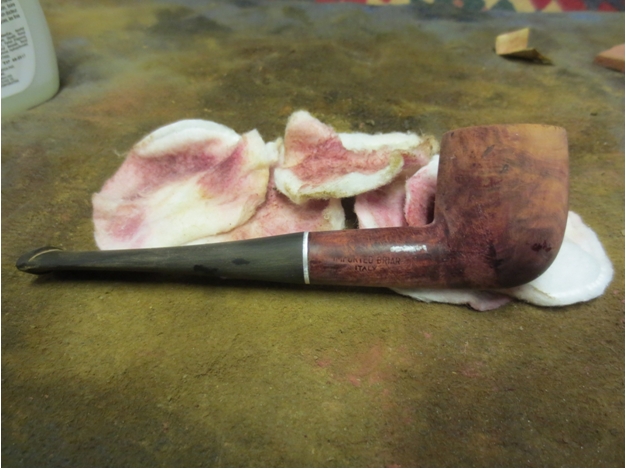
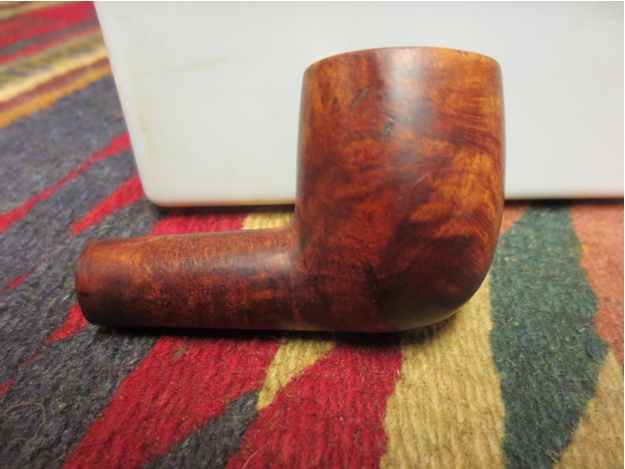
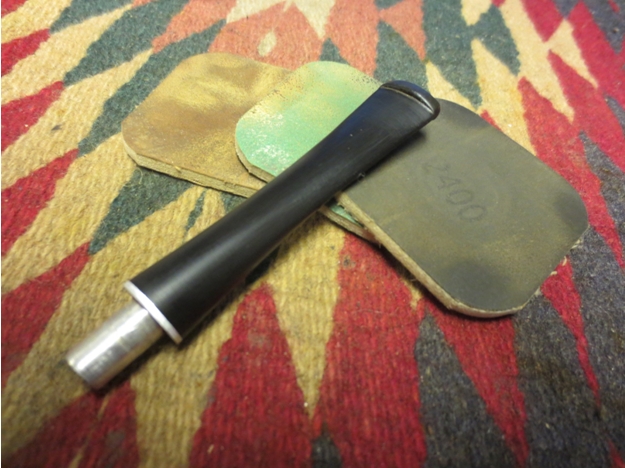
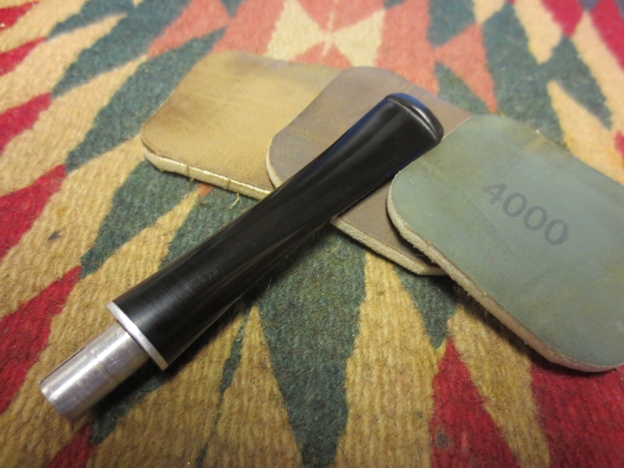
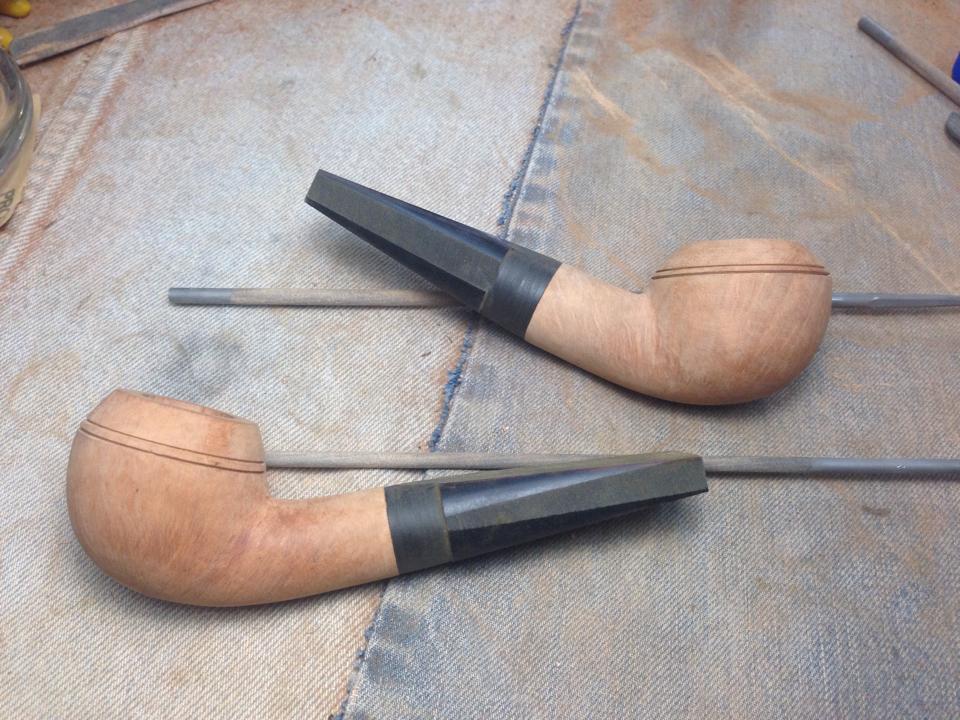
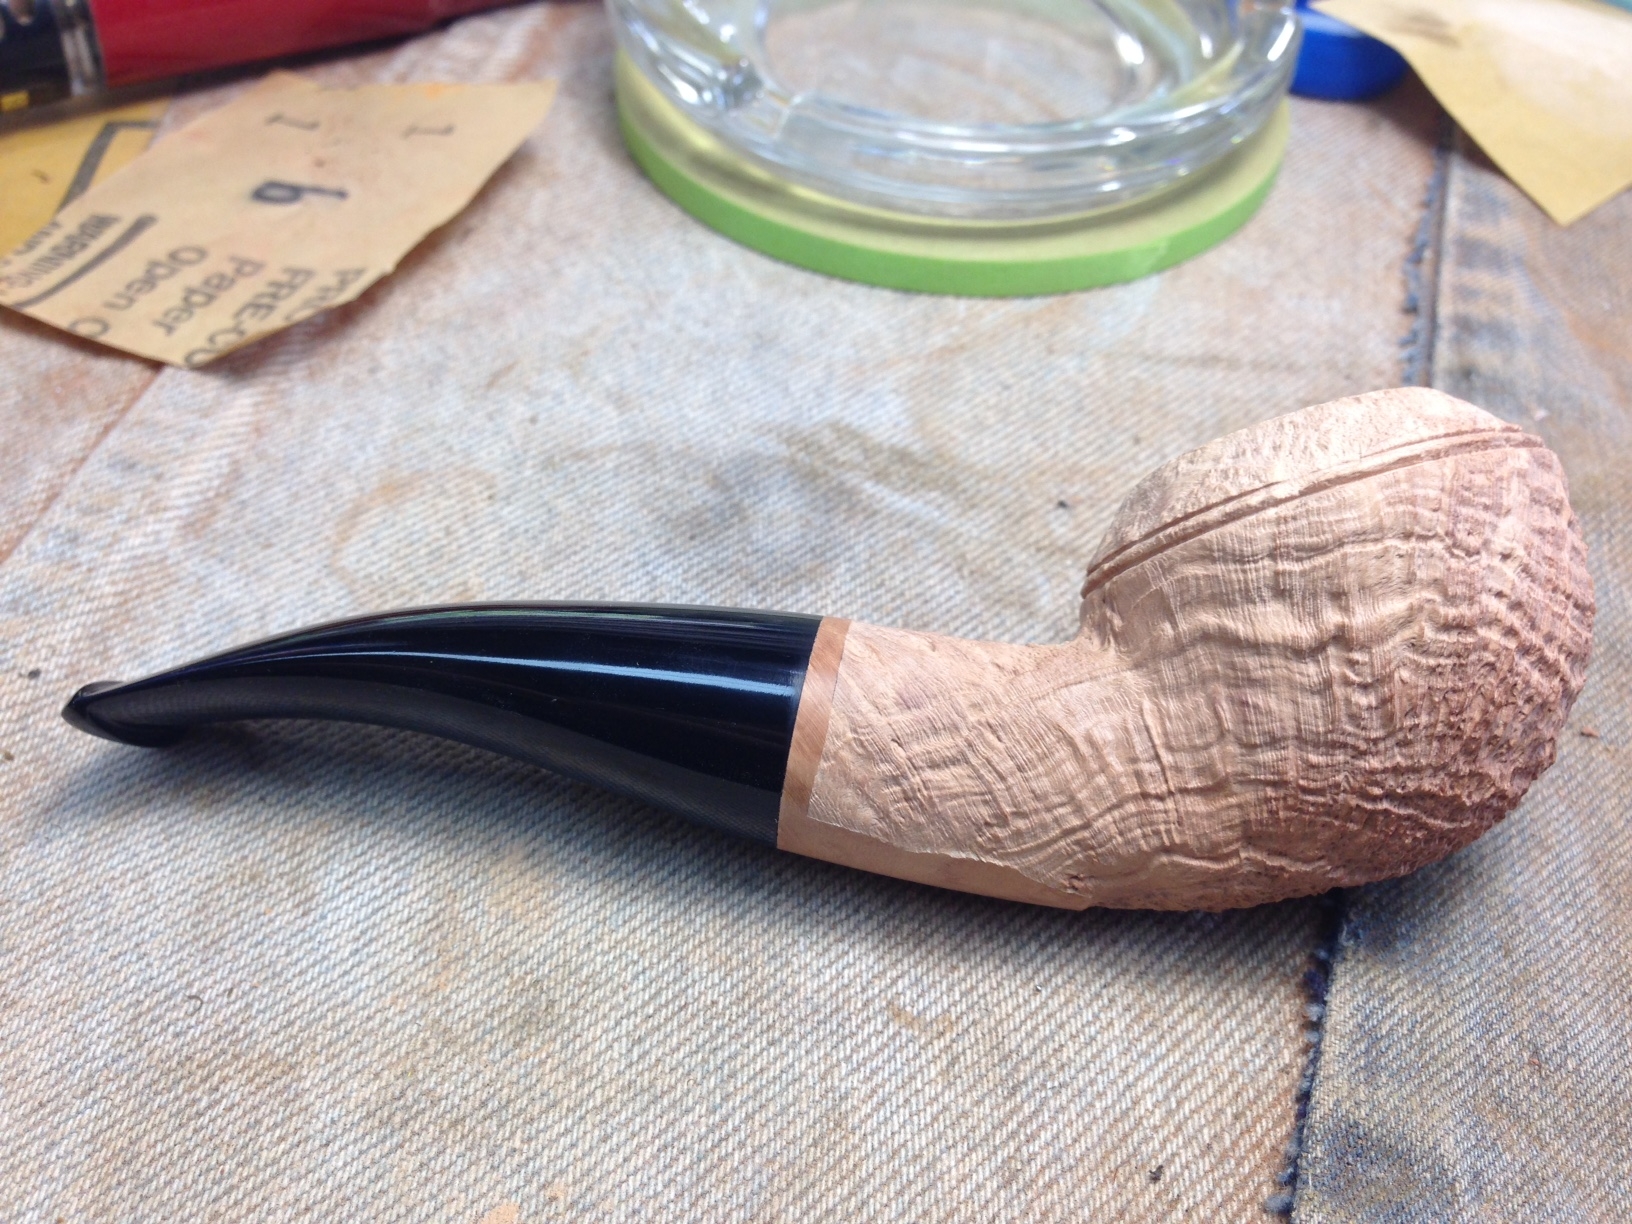
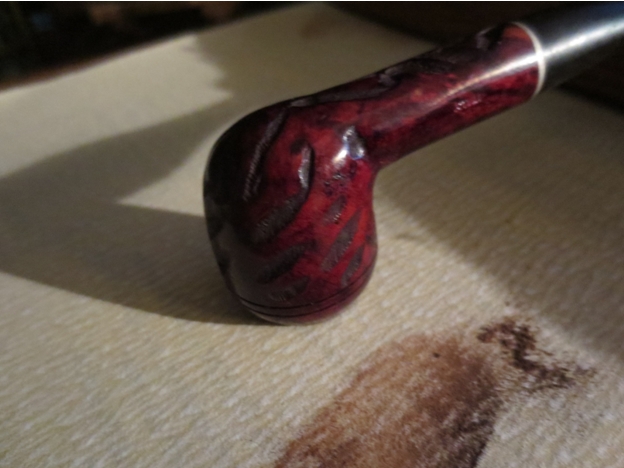
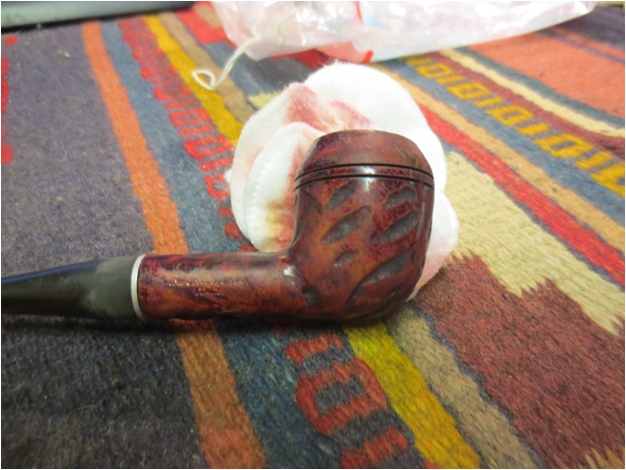
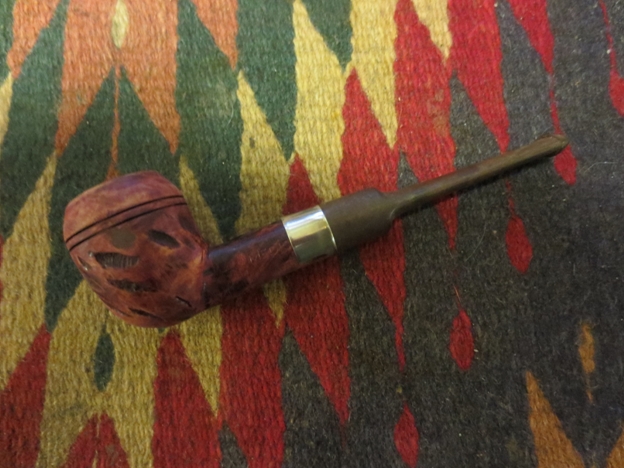
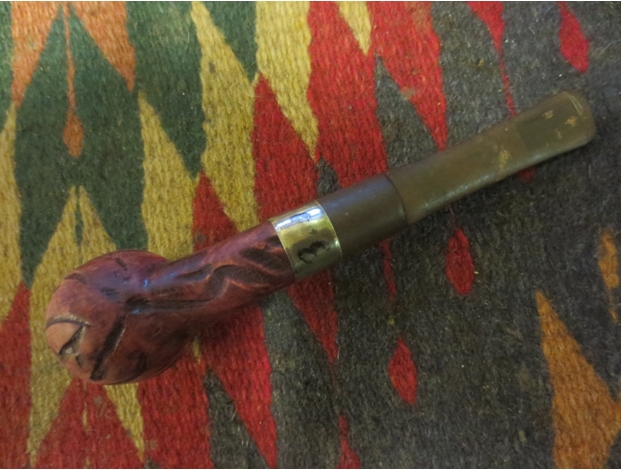
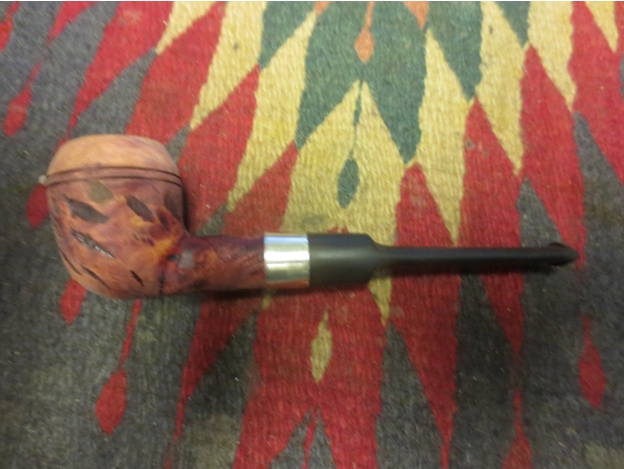
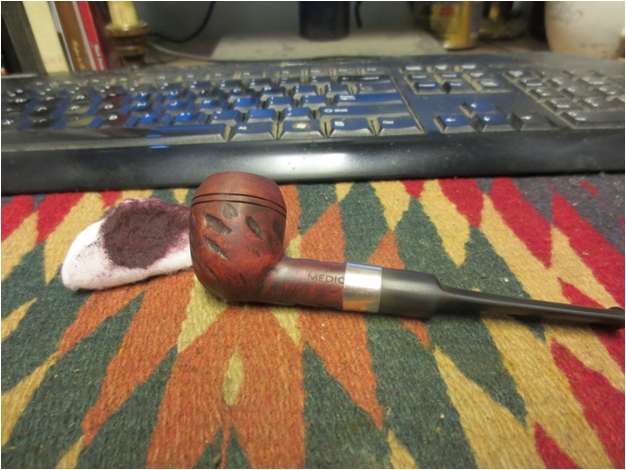
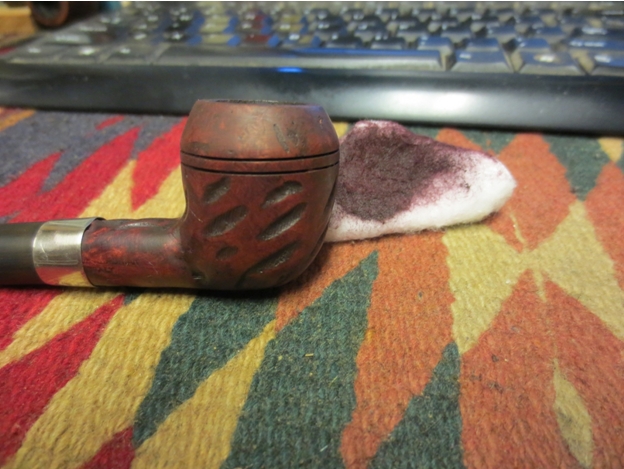
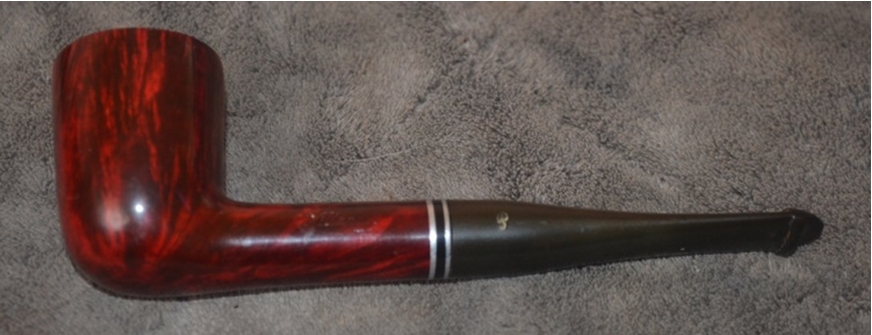
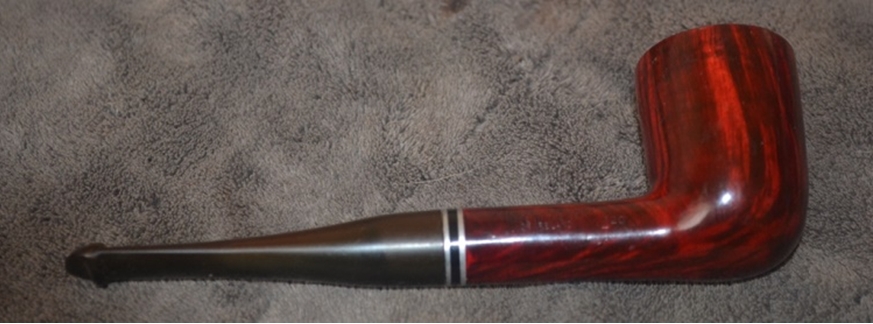
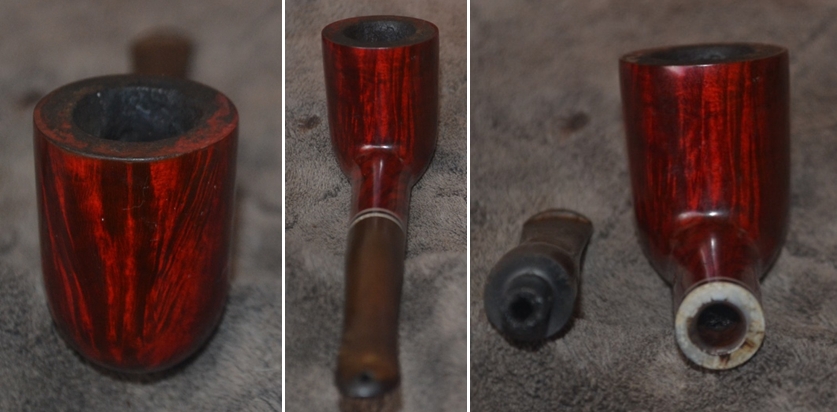
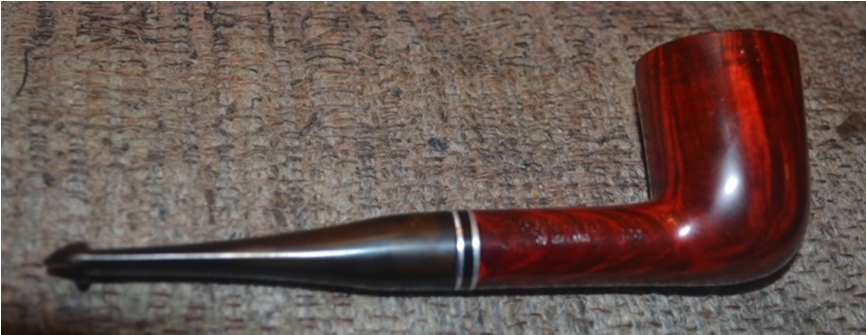
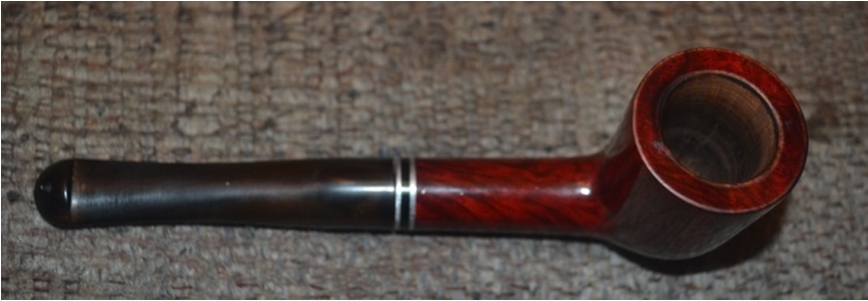
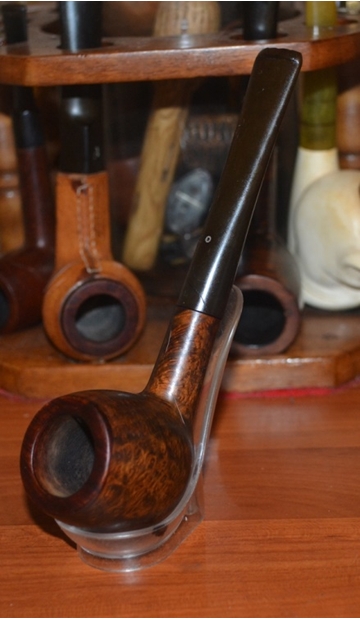
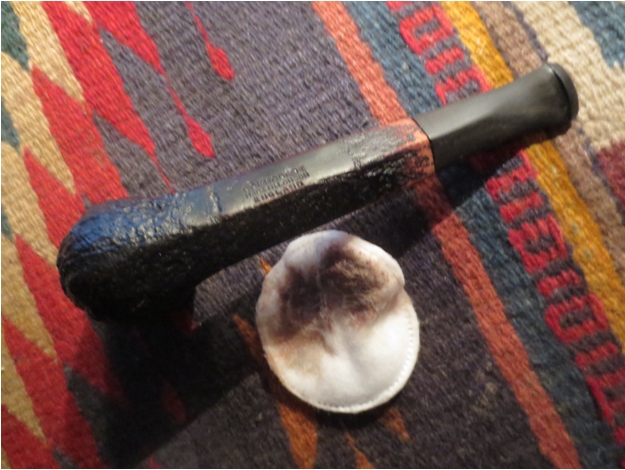
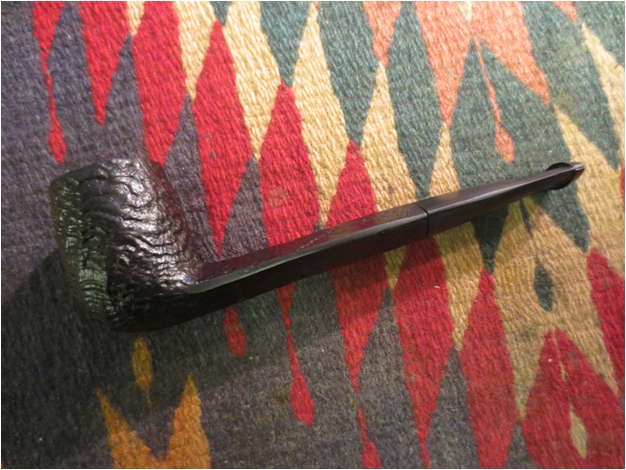
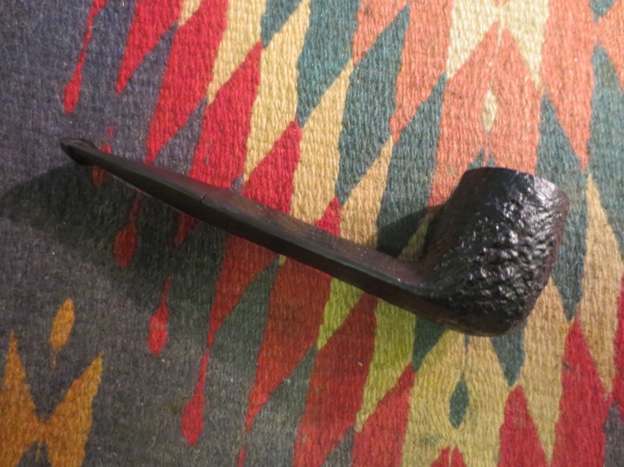
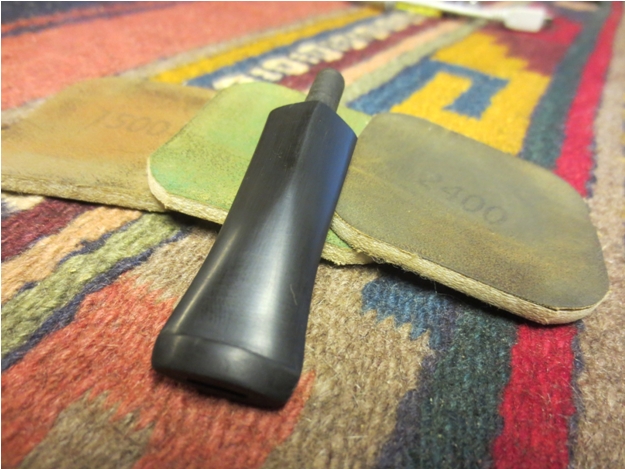
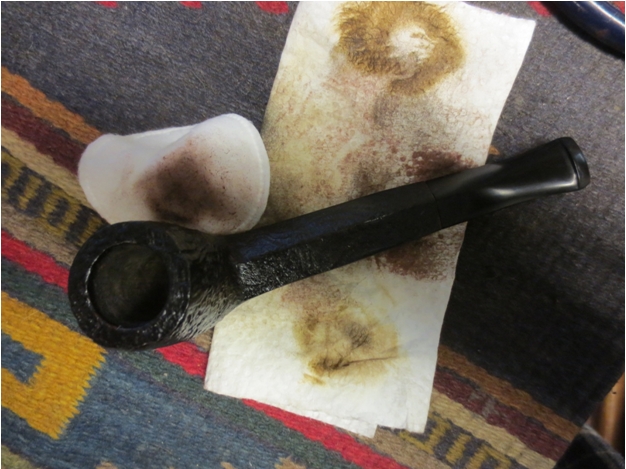
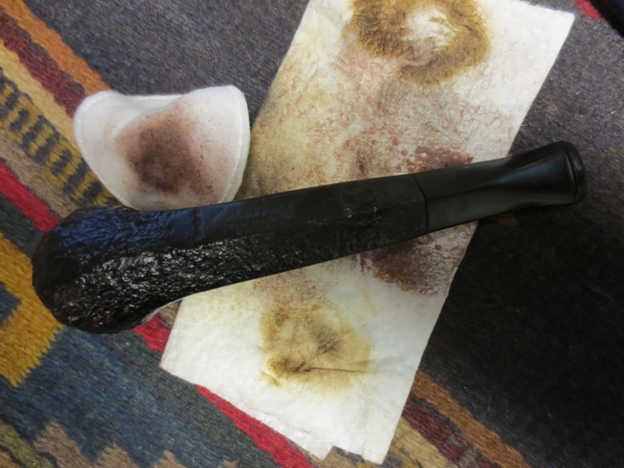
In this review I want to look at the pipe from a more technical side and walk through its construction, feel and delivery of the smoke to me. The pipe came in a cloth pipe sock with no stamping. When the pipe arrived in the mail I was excited to see and hold my first Vesz pipe. I had read reviews and scrolled through many pictures of his work on his website but had never held one in hand. In taking this out of the sock I have to say that it is more than I expected from the photos that I had seen before I bought it. The shape was well executed and I liked the shape of the bowl, its cant and finish immediately. The finish was well done and the stain highlighted the beautiful grain. The weight of the pipe is light, I can only wish I had a scale because it is lighter in weight than I expected in a pipe of this size.IMG_2470
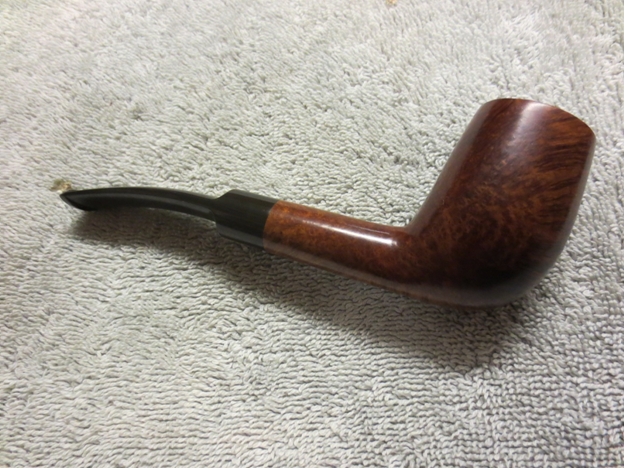
Looking at the externals of the pipe. Julius use of stains makes the grain stand out on the pipe. The rich brown tones pick up both the birdseye and cross grain and makes them stand out against the back ground colour. He has laid out the cut of the briar to take advantage of the grain patterns. The top and bottom of the shank and the front and back of the bowl are predominantly cross grain. There are some slight mixed grain portions on the front and back of the bowl. The crossed grain pattern on the bowl is set slightly to the left of the bowl center. But the look of these portions is gorgeous. The birdseye grain on the sides of the bowl and shank are lovely to look at. I get lost in the grain patterns while I hold it in my hand. The centres of the birdseye are dark in colour and the ridges surrounding the eye are lighter. The bottom of the bowl is cross grain that flows up to the front of the bowl. The cross grain on the top of the shank also flows up the back of the bowl to the rim.IMG_2471
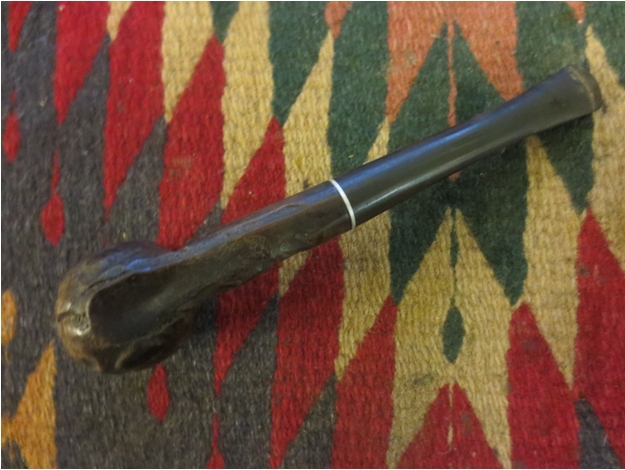
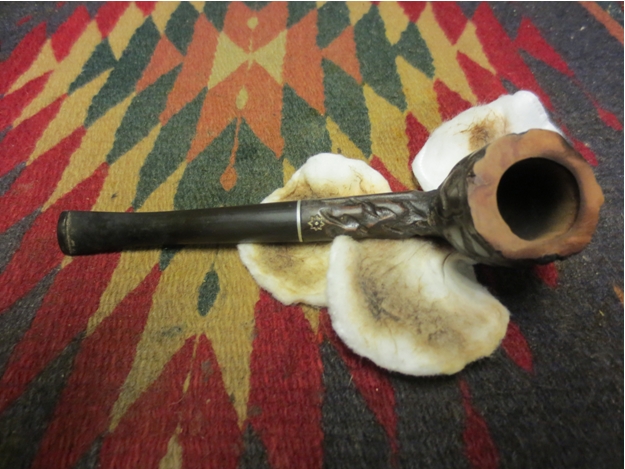
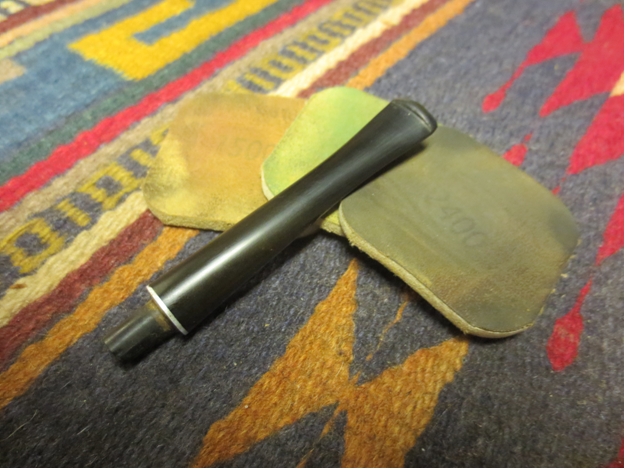
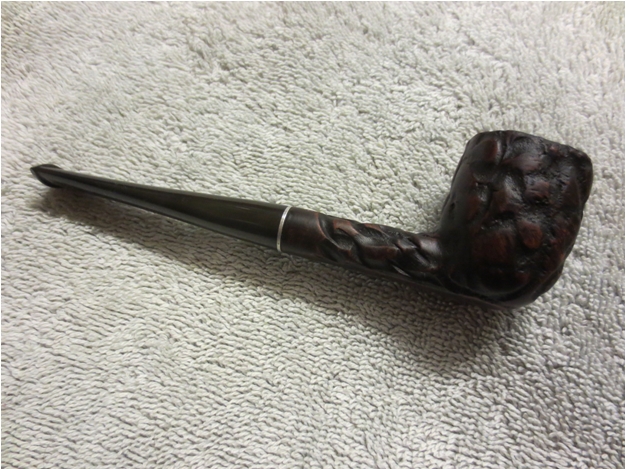
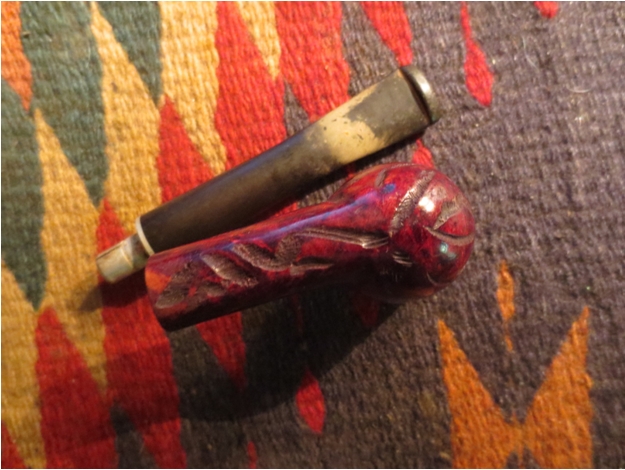
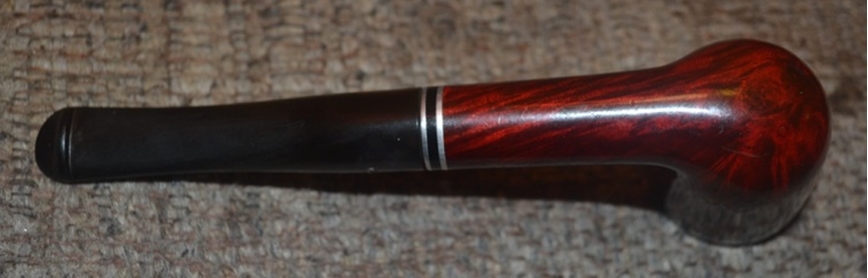
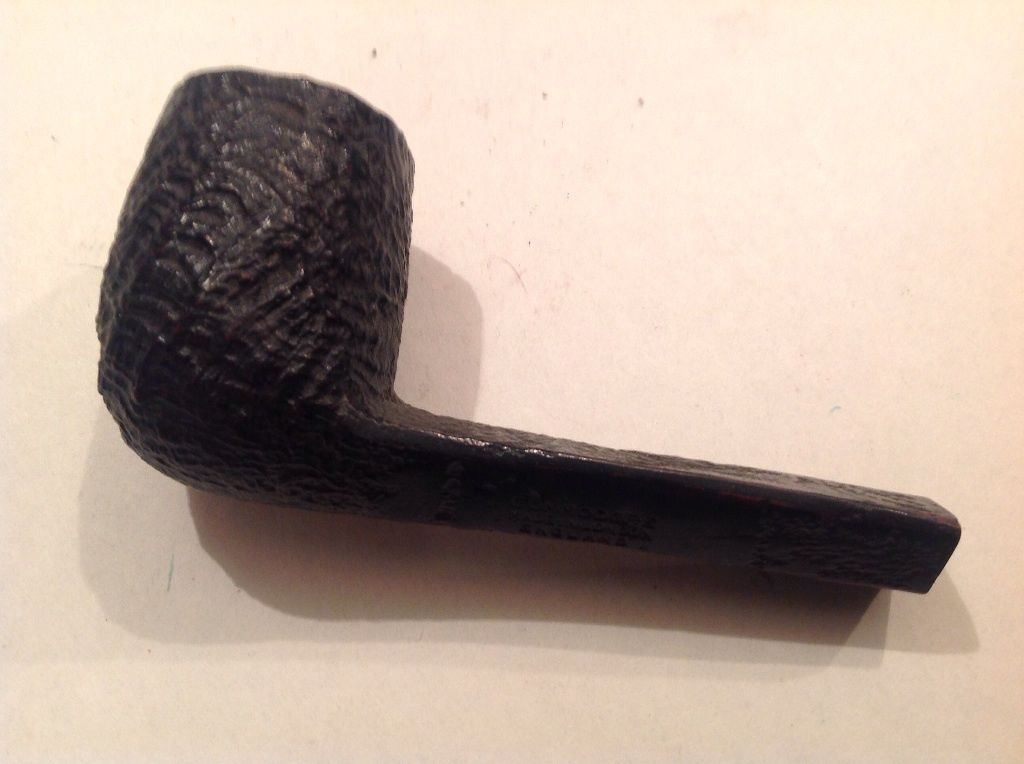
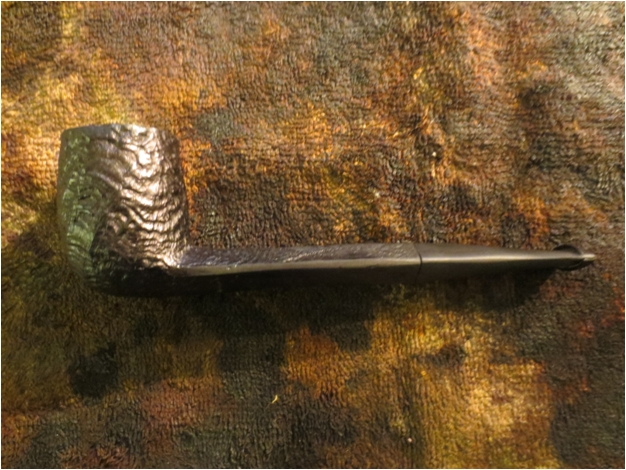
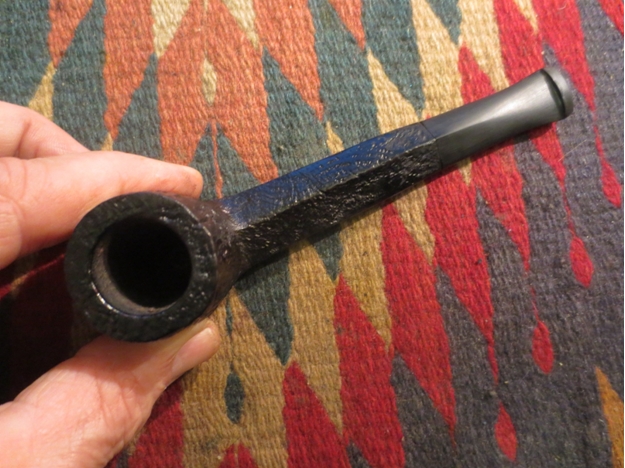
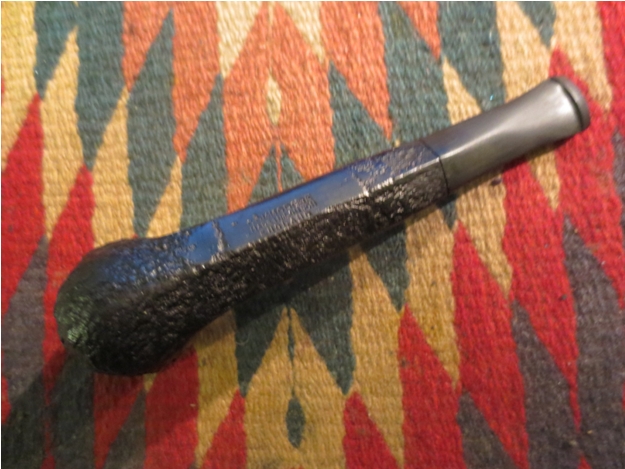
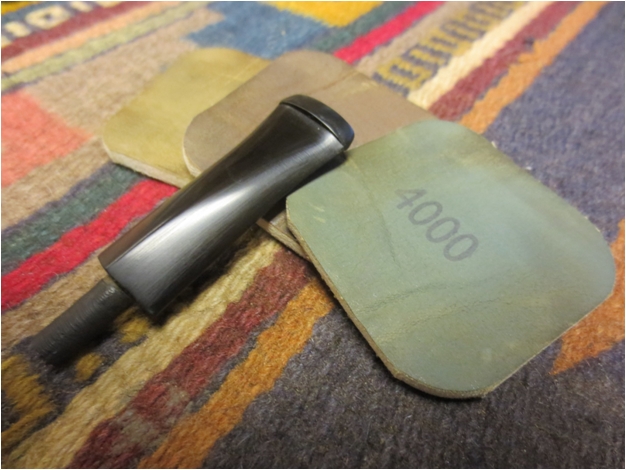
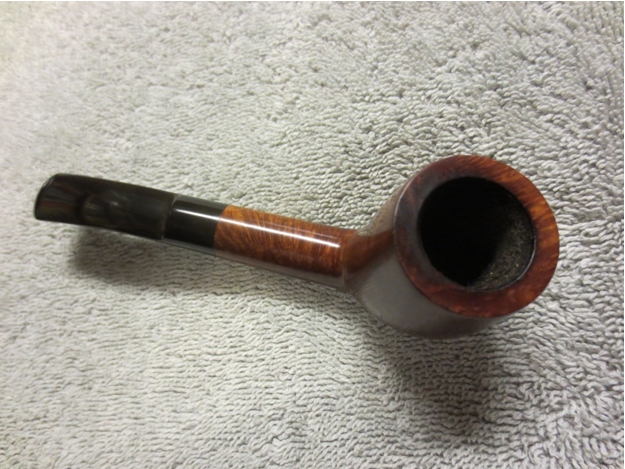
The stamping on the pipe is on the left side of the shank. The shank is round, sitting at a 90 degree angle to the bowl. The hand cut ebonite stem is very well done and comfortable in the mouth. The saddle of the stem sits tightly against the shank that gently tapers into a thin blade. The taper of the blade is subtle and sporting a 1/8 bent to the stem. It has a thin oval shaped button that is sharply cut and catches well on the back of my teeth. The slot in the button is oval shaped and there is a smooth V slot that facilitates the movement of smoke across the mouth. The polish and smoothness of the finish is like glass. The overall appearance of the pipe and stem is beautiful and it fits my hand very well. The smooth finish gives the pipe a simple elegance that is a pleasure to look at while I smoke it.IMG_2473
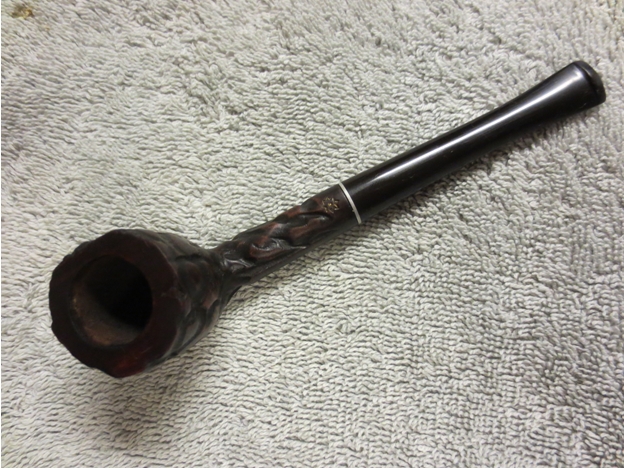
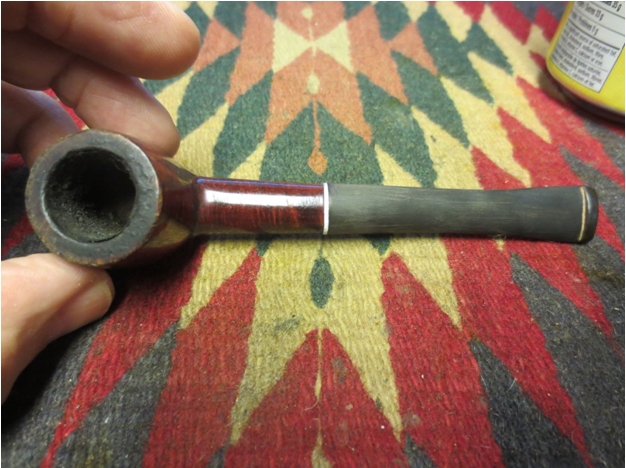
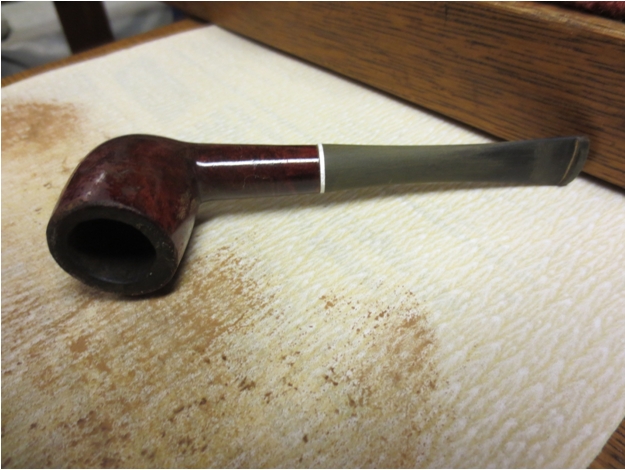
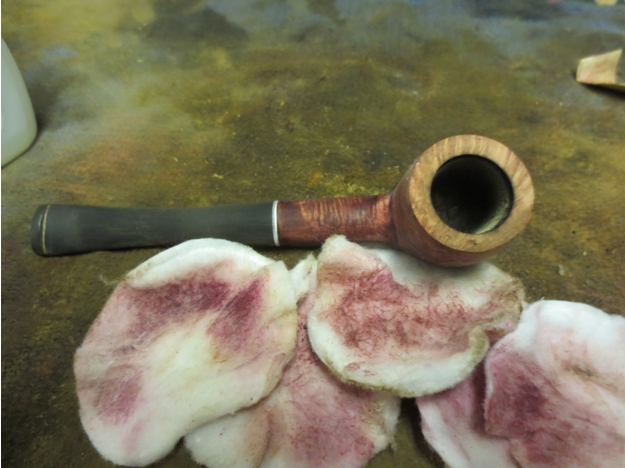
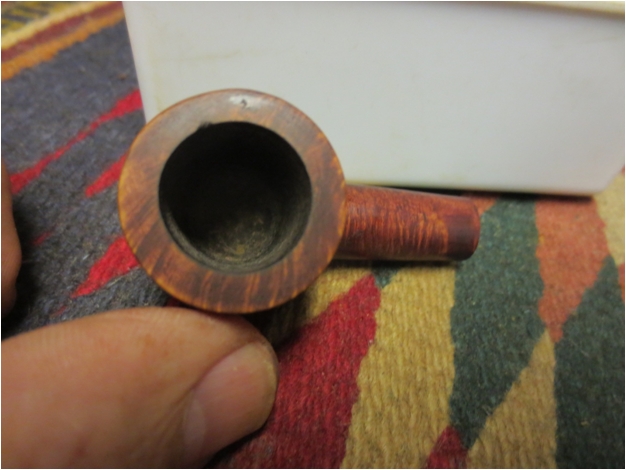
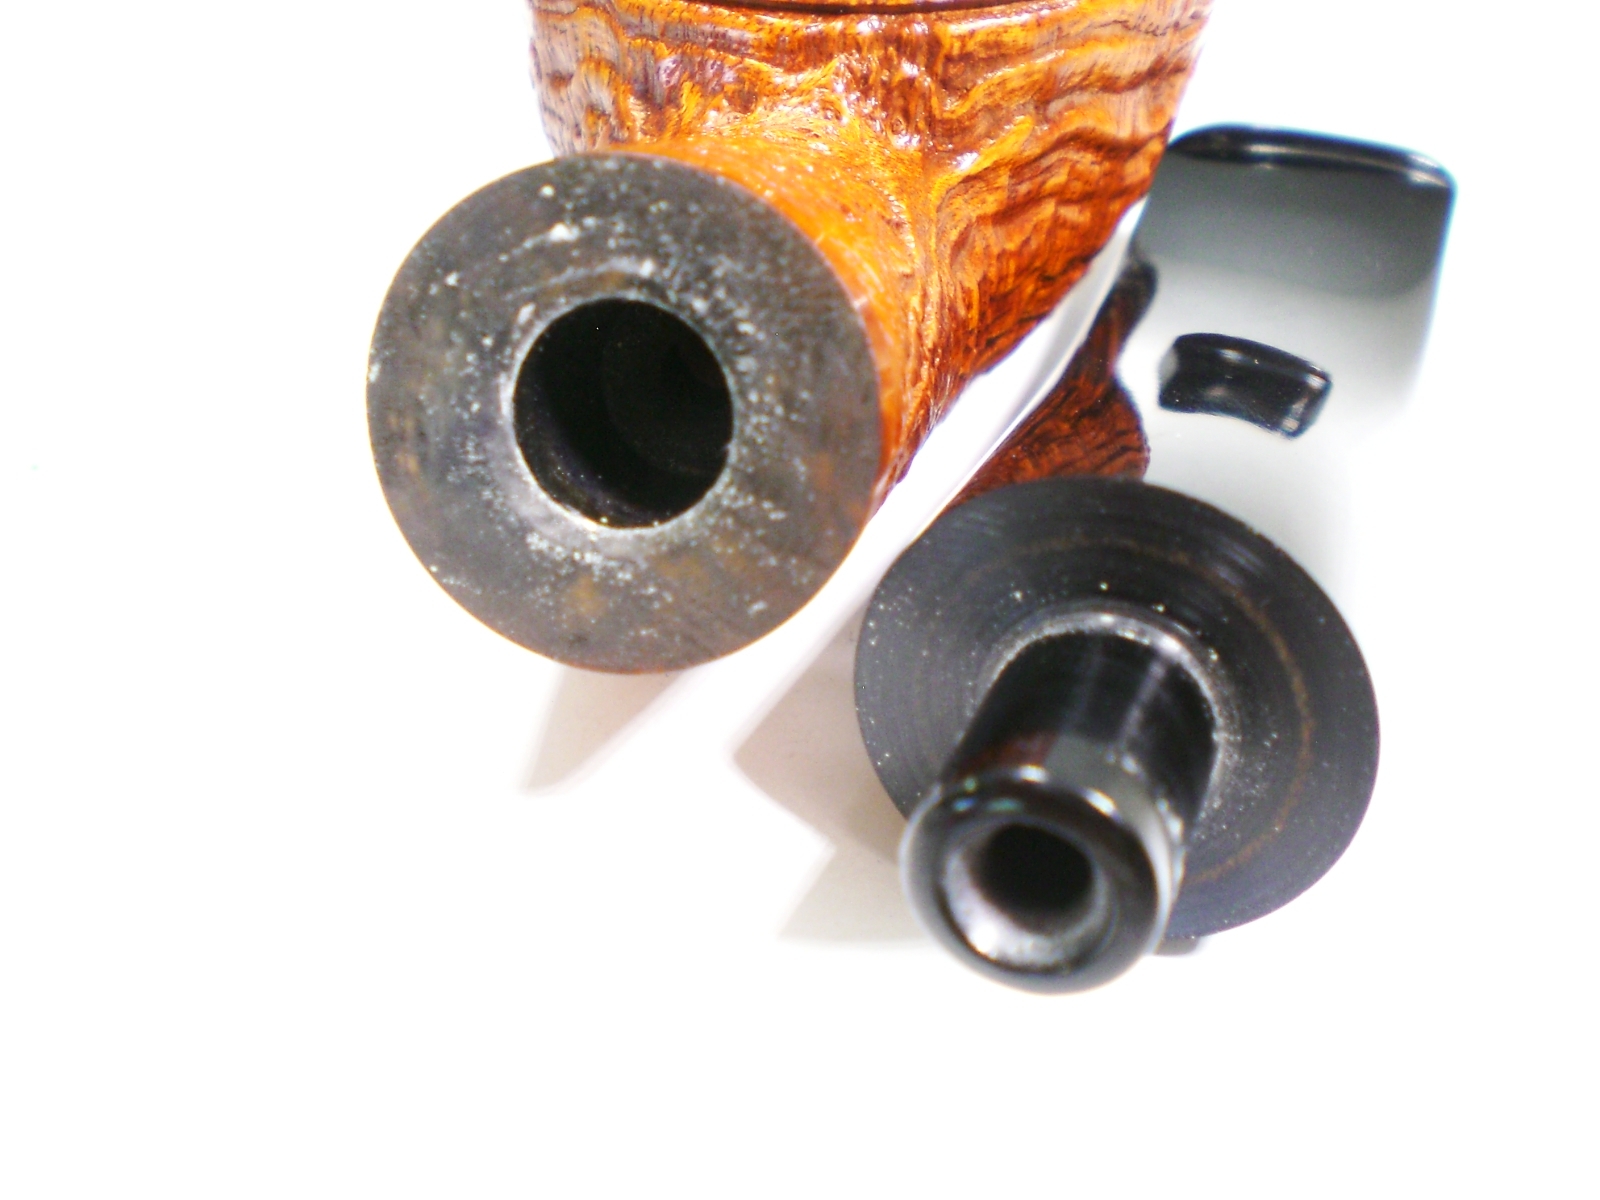
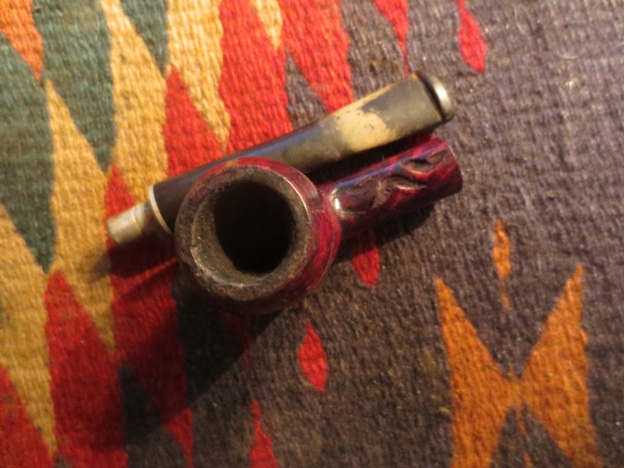
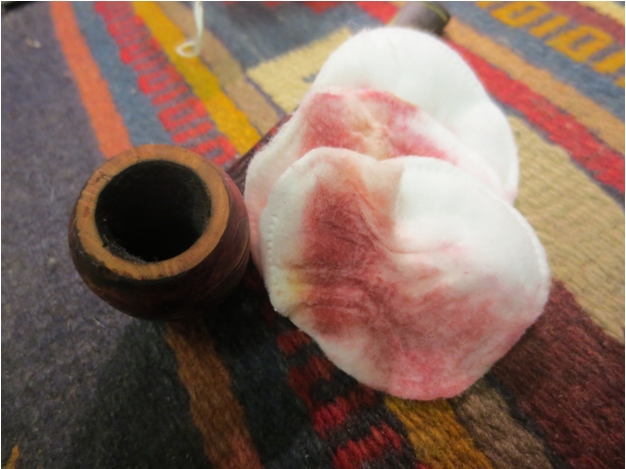
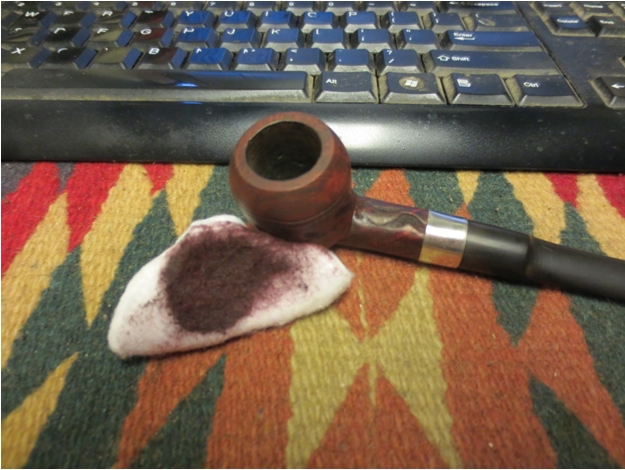
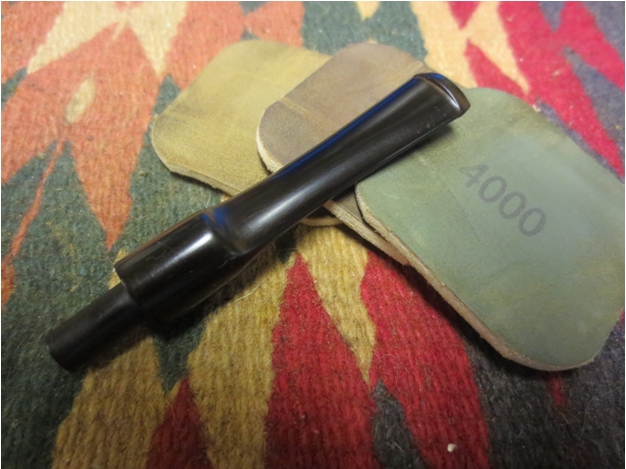
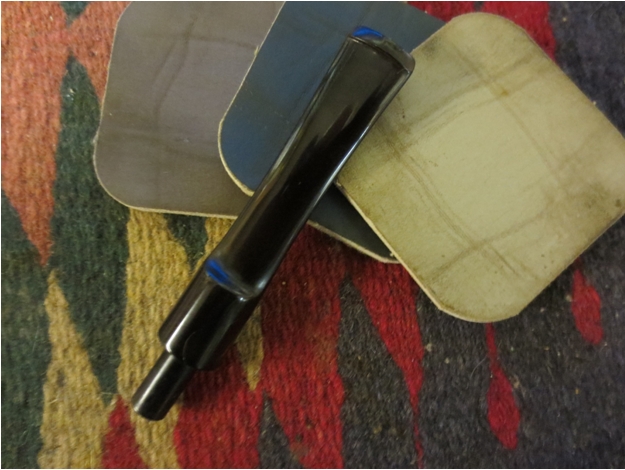
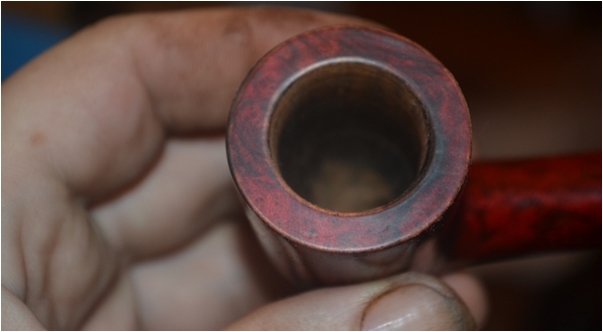
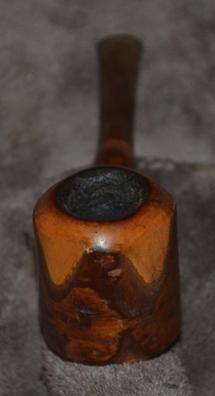
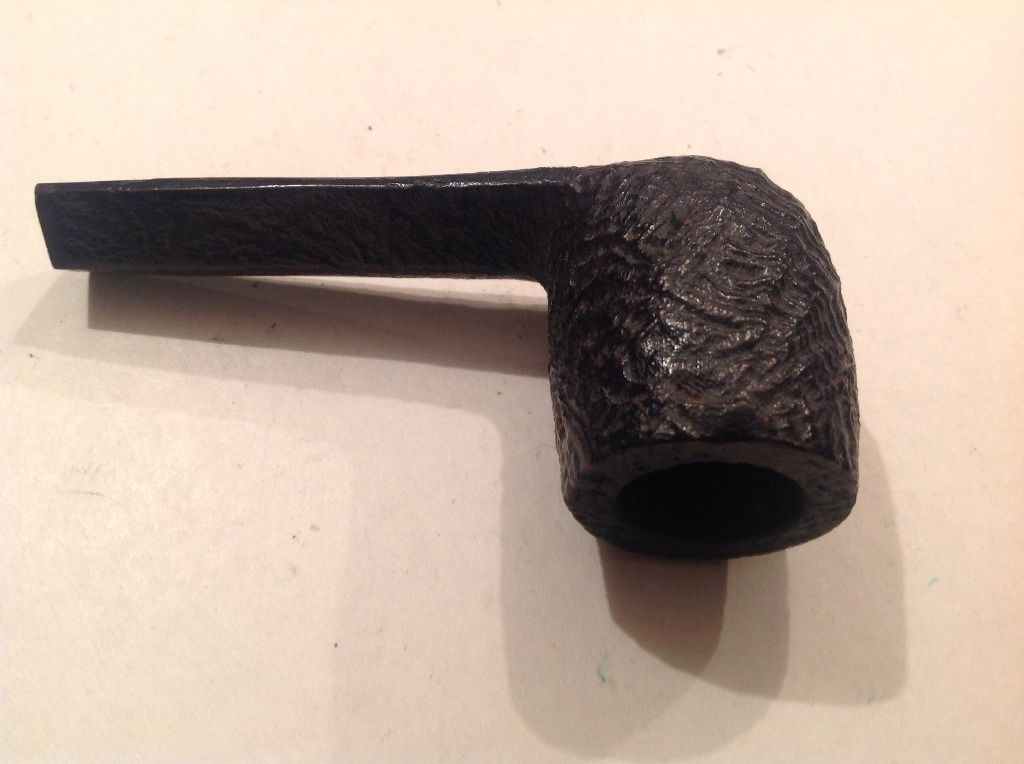
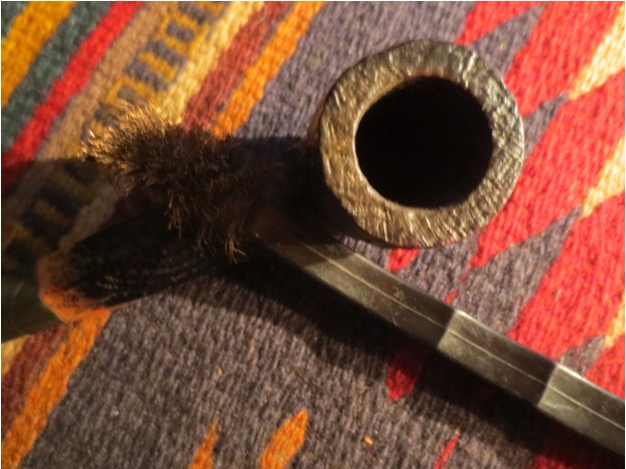
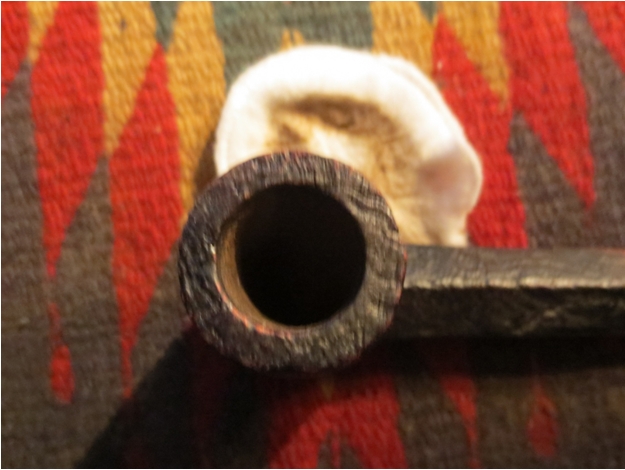
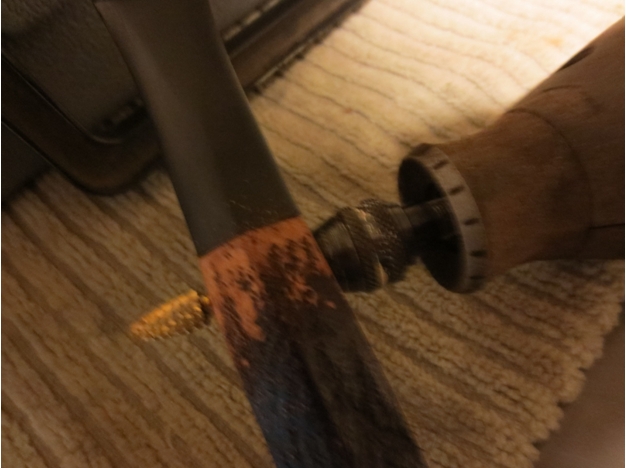
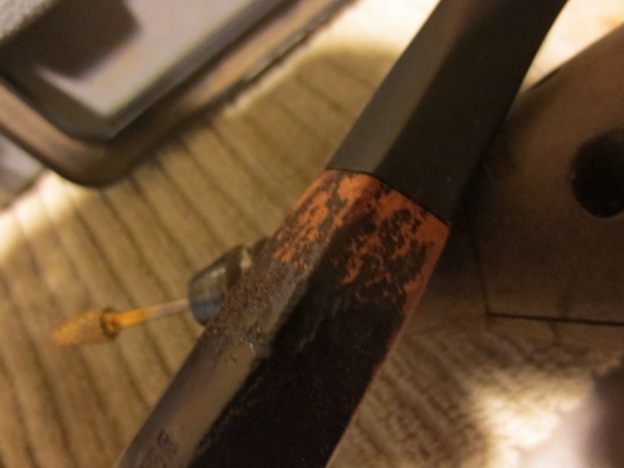
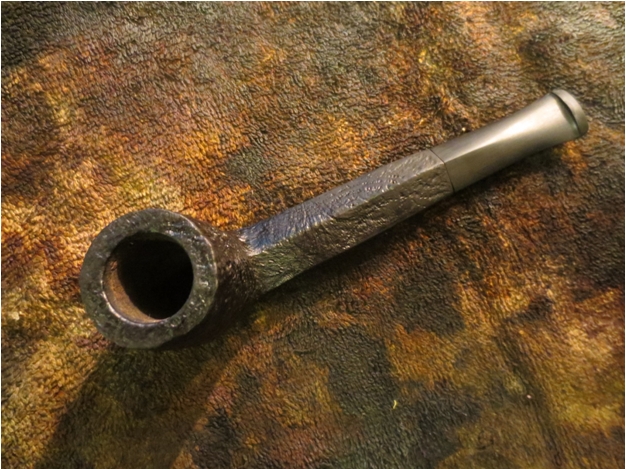
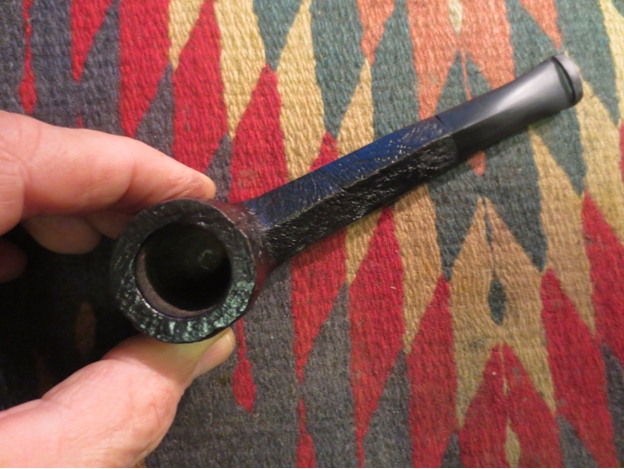
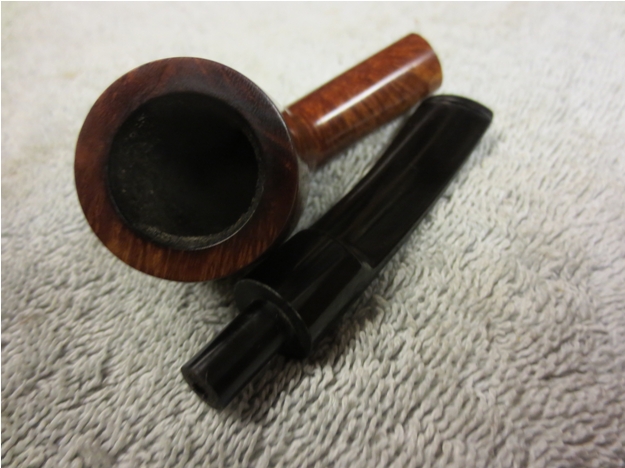
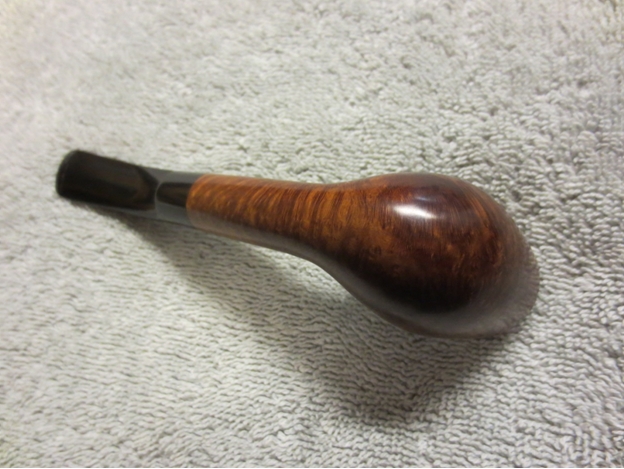
Moving from the externals of the pipe to the internal mechanics. The workmanship on this pipe is well done. The angle of the drilling is done in such a way that the bowl is of a uniform thickness throughout. The bowl bottom is relatively the same thickness as the walls of the pipe. The bowl is drilled at the same angle as the exterior of the pipe. The draught hole is precisely where it should be – centred at the back side bottom of the bowl. As the pipe came to me pre-smoked I cannot speak to whether there was a bowl coating originally. Holding the bowl to the light revealed a clean and smooth airway with no impediments. The drilling in the mortise is clean and smooth. The airway is centered in the back of the mortise. The tenon goes straight into the mortise and sits against the back of the mortise. The airway in the stem and in the mortise line up perfectly. The tenon appears to be integral to the ebonite stem material it is not an insert. The airway is not chamfered or funneled on the end of the tenon but is flat and centered in the end of the tenon. The inside of the stem is very smooth. There is no roughness or constriction from the tenon end to the slot in the button. The airway flattens out like a squeezed drinking straw so that the diameter does not change but is flattened and opened.IMG_2481 IMG_2482 IMG_2483
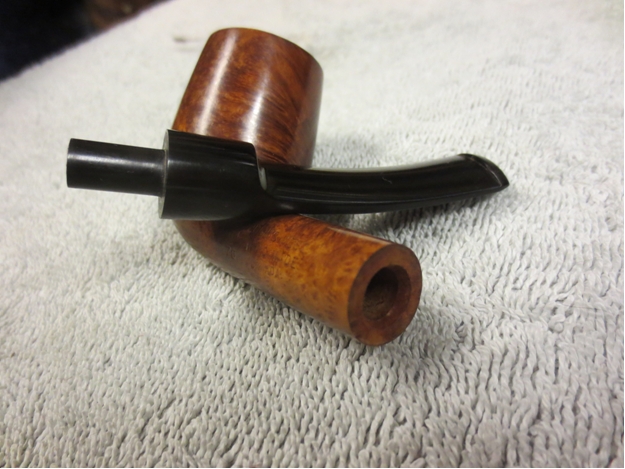
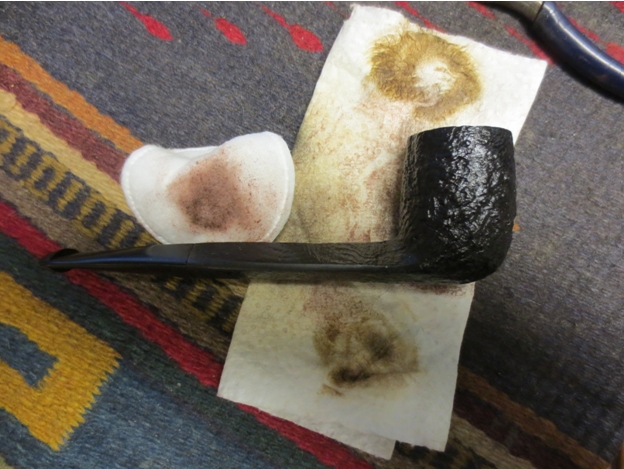
I have been smoking this pipe for several years now and it smokes very well. Whenever I load a bowl of a favourite Virginia tobacco it delivers a flavourful and cool smoke. When I received the pipe it was already broken in and there was a thin cake already forming in the bowl. The pipe has always smoked dry and clean with no moisture build up or gurgle during the smoke. The ash and any remnants of tobacco in the bottom of the bowl are dry and easily dumped out at the end of the smoke. The draught on this pipe is very smooth – no whistling sound and no sense of having to suck or work to get the smoke to move through – it is effortless as it should be. It has been and will continue to be a pleasure to smoke, exactly what I look for in a pipe that keeps its place in my rotation.

I would highly recommend that you have a look at Vesz pipes. While many are quite high end his Handmade line still offers affordable pipes at a lower price. His pipes are available through Julius himself and through other online retailers such as Uptown’s Smoke Shop and Smokingpipes.com. Julius’ fine craftsmanship can be seen in the beauty of the pipes that are available on these sites. He carves both classic shapes and designs that are uniquely his own like the raindrop. His silver work and ornamentation are also beautiful additions to his pipes and give them look of fine art. They are beautiful to look at and explore. Have a look at the beautiful work that he does on his own website at http://www.juliusvesz.ca/. He can also be contacted directly at his shop at the Royal York Hotel in Toronto or by phone at 416-362-0581, fax at 416-306-9908 or email at juliusvesz@rogers.com.

There was nothing redeeming about this ugly old pipe…


Blog by Steve Laug

I am getting down to the bottom of my refurbishing box yet again. This is one of three pipes that are left to work on. It is one ugly old pipe to my tastes. Certainly it is one that I have left until there are few to choose from to work on. There truly was nothing redeeming about the look of it. The rough cut billiard with a bark like rustication pattern did nothing for me. The left side of the shank is stamped Forecaster over Imported Briar. The bottom of the bowl had been flattened to make the pipe a sitter. But even that was done poorly as it was to one side and the pipe sat with a list. The finish was worn out but appeared to have been a dark thick stain that was opaque enough to hide all the briar. The outer rim of the bowl had been badly beaten up from hitting against some hard surface and left to be a ragged rough edge around the bowl. One thing that gave this tired old pipe a unique, eye-catching touch was that the top of the shank had been stamped with an eight point star and then inlaid with gold paint. The bowl had a thick soft cake all the way down reducing the diameter of the bowl by almost half. The stem had a metal spacer that gave the appearance of a stem with a metal tenon as well. But when I removed the stem I found that it had a vulcanite tenon. The stem was badly oxidized and had some deep scratches in the surface.IMG_2440 IMG_2441 IMG_2442 IMG_2443I reamed the bowl with a PipNet reamer using the smallest cutting head and worked my way up to the head that would take the cake back to the bare wall of the pipe.IMG_2444The top was so damaged that it needed to be topped. In looking it over I was not sure how much of the rim I could remove without dramatically changing the look of this pipe so I would proceed slowly. I set up a topping board with 220 grit sandpaper and slowly topped the bowl. I sanded it until I had removed as much of the damaged portion of the rim as I could without changing the shape. The rustication made the bowl look out of round but is actually still round. The right side is more rusticated at the top edge than the left so it looks unusual from the top down photo below.IMG_2445IMG_2446I wiped down the finish with acetone on cotton pads until I had removed the heavy dark finish. It took a lot of scrubbing to get through the grime and then the varnish coat. Underneath the dark top coat it appeared that there was a walnut stain that highlighted the grain on the high spots of the bowl. The grooves and valleys were dark with a black stain. The contrast had some potential.IMG_2447 IMG_2448 IMG_2449 IMG_2450I sanded the smooth parts of the bowl and rim with medium and a fine grit sanding sponges to smooth out the scratches in the bowl and on the topped rim. I wiped it down with isopropyl alcohol and then stained it with a dark brown aniline stain. I applied it and flamed it and repeated the process until the coverage was even.IMG_2451 IMG_2453 IMG_2454The bowl was very dark brown but it was at least evenly stained. I would have to do some more work on it to get the contrast that I wanted between the rustication and the smooth parts of the briar. I cleaned out the shank and bowl with isopropyl alcohol, cotton swabs and pipe cleaners until they came out clean. I cleaned the stem at the same time until it also was clean.IMG_2455 IMG_2457I wiped the bowl down with isopropyl alcohol to remove some of the heavy dark brown stain and make it more transparent. I then sanded the bowl with a fine grit sanding sponge to remove some more of the stain on the high spots and to match the colour of the stain on the rim. I sanded the stem with the sanding sponges at the same time to minimize the scratches on the vulcanite.IMG_2458 IMG_2459 IMG_2460I buffed it with White Diamond and took it back to the worktable to work on the stem and bowl some more. I wanted the stain to be a bit more transparent and the contrast between the high spots and the crevices to show clearly.IMG_2461 IMG_2462 IMG_2463I still needed to deal with the list to one side when I set the pipe down on a flat surface. I probably should have done this before I stained the bowl but forgot to do so in cleaning up the mess. I decided it was better late than never so I dealt with it next. In examining it I found that it was not centered on the bottom of the bowl and shank but was off to one side. I sanded flat portion to take down the higher side and even out the flat bottom. I used 220 grit sandpaper and then a medium and fine grit sanding sponge to flatten it out and remove the list. When I was satisfied with the way the bowl sat I refinished it with a stain pen to darken it and blend it into the stain of the rest of the bowl.IMG_2464I sanded the stem with micromesh sanding sponges – wet sanding with 1500-2400 grit pads and dry sanding with 3200-12,000 grit pads. Between each set of three pads I rubbed the stem down with Obsidian Oil and let it soak into the vulcanite before proceeding with the next set of pads. When I finished I gave it a final coat of oil and then buffed it with White Diamond to a shine.IMG_2474 IMG_2475 IMG_2476I buffed the entire pipe with White Diamond and then gave it several coats of carnauba wax and buffed it with a soft flannel buff. The finished pipe is shown below. It is still an ugly pipe in my opinion but there is something redeeming about the ugliness. I suspect it will make a great yard pipe for someone and will deliver a good smoke. It must have been a good smoking pipe in its day – otherwise why would its previous owner have smoked it to the point of near death!IMG_2477 IMG_2478 IMG_2479 IMG_2480

The Sentimental Journey Continued – Restoring a Second Medico, a Smooth Billiard


Blog by Steve Laug

In a previous post called a Sentimental Journey I wrote of why Medico’s always get attention when they cross my desk. Last evening I reached into my box of pipes to be refurbished and pulled out the next pipe to clean up and it too was Medico – this time it was a smooth billiard. The finish was worn and the varnish was peeling off the bowl. The rim was badly knocked around so there was damage on the outer edge at the front of the bowl and the back. There was a heavy build up on top of the damage and the bowl had a thick cake at mid bowl – not much at the top or bottom. The stamping was the same as the previous pipe – MEDICO on the left side of the shank and Imported Briar Italy on the right side. A bonus for me was that the stem I had work on for the little Rhodesian fit this one and only needed adjustment in the diameter of the stem. It had the metal tenon that was generally on Medico pipes and would hold the Medico paper filter as per design. The rest of the stem was vulcanite not nylon which was a bonus.IMG_2408 IMG_2409 IMG_2410 IMG_2411I cleaned out the shank and fit the stem in place to see how much sanding I would need to do to match the diameter of the shank. It did not look like it would take very much to bring it in line. I would need to sand the aluminum band on the stem at the same time so I would need to be careful to not create dips or valleys next to it on the softer vulcanite when sanding.IMG_2412 IMG_2413I sanded the stem with 150 grit sandpaper to reduce the diameter of the stem.IMG_2414I reamed the bowl with a PipNet reamer using the smallest cutting head to clean it out.IMG_2415To clean up the rim damage I topped the bowl with 220 grit sandpaper to take down the rim and reduce the rough pitting on the outer edge. I also sanded around the edge of the rim to smooth out the remaining roughness.IMG_2416IMG_2417IMG_2418I wanted to get rid of the peeling varnish on the bowl so I wiped it down with acetone on cotton pads to remove it. It took a lot of scrubbing as the varnish was very stubborn.IMG_2419IMG_2420IMG_2421I sanded the bowl and the rim with 220 grit sandpaper and then with medium and fine grit sanding sponges to remove more of the finish and reduce the scratching on the bowl. I sanded it with a medium and fine grit sanding sponge before wiping it down one last time with alcohol. I decided to stain it with an aniline based oxblood stain. I applied it and then flamed it to set it in the grain.IMG_2422 IMG_2423I rubbed the excess stain off with an alcohol dampened cloth and then hand buffed it with a shoe brush. This old Medico had some really nice grain and was a far better piece of briar than I had expected.IMG_2424 IMG_2425 IMG_2426 IMG_2427 IMG_2428I sanded the bowl with 1500-2400 grit micromesh sanding pads and then buffed it with White Diamond to smooth out the bowl further. I gave it a coat of carnauba wax and buffed it lightly.IMG_2429 IMG_2430 IMG_2431 IMG_2432I finished the work on the stem fit and then sanded it with micromesh sanding pads – wet sanding with 1500-2400 grit pads and dry sanding with 3200-12,000 grit pads. I rubbed it down with Obsidian Oil and moved through each successive set of three pads. Once I had finished sanding it I rubbed it down a final time with the oil and gave it a buff with White Diamond.IMG_2433 IMG_2434 IMG_2435I put the pipe back together and gave it a final buff with White Diamond and then multiple coats of carnauba wax. I buffed it with a soft flannel buff to finish and polish the wax. The finished pipe is shown in the next series of photos. It is a small light weight billiard with fairly decent grain and a few character marks. The new stem fits well and it looks better than it did when it left the factory. It should provide a great smoke to another pipeman. This is one that I will inevitably gift to someone along the way.IMG_2436 IMG_2437 IMG_2438 IMG_2439

Royal Oak Briars “Huntsman” Review


Blog by Al Jones

I completed my first pipe commission this week with, working with  James Aydlott, who makes “Royal Oak Briars”.  James has been showing his creations on the Bulldog Lovers Facebook page for several months.  I was very impressed with his shaping and stems, particularly with the classic shapes.   Initially I didn’t realize his pipes were branded “Royal Oak Briars”, which I had seen advertised on Micheal Lindners site, “The Pipe Rack”.  Micheal Lindners pipes are very highly regard and I met him last year in at the NYC show.  James has been working in Micheal’s shop, and in the past two years started his own line.    The connection to Micheal Lindner gave him was definitely a factor in the project, as to that point, I had not yet seen a Royal Oak pipe in person.  Thru Facebook and several pipe forums, I was able to communicate with folks who owned Royal Oak Briars and all were quite pleased and encouraged me to proceed.  James was very upfront with me and he was clear that if I didn’t care for the final product, I was under no obligation to complete the purchase.  As you will read, I was completely thrilled with the finished pipe.

James had made and shown a Comoys 498 Extraordinaire recreation (straight Chubby Rhodesian) that was sold thru The PIpe Rack.  I complimented James on his shaping and thru subsequent messages, I learned he was starting on a pipe that would be an homage to the Comoys 499 Extraordinaire.  Since I am fortunate to own that model Comoys, that immediately piqued my interest.  I let James know that I was interested and I was able to see the pipe unfold and offer some personalization along the way.   The pipe would be blasted and I requested a polished bowl top.  The last decision was the golden tan stain, which I thought turned out magnificently.

One very important detail to me on any pipe purchase is the weight of the pipe.  My 499 Extraordinaire weighs 68 grams.  I asked James if he could create the shape under 60 grams.  James nailed that request and the pipe weighs 59 grams, which coincidentally is exactly what most of my GBD 9438’s weigh, one of my benchmark shapes.

Below are some pictures of the pipe in the early and latter stages.

Royal_Oak_Briars_Rhodiesian-1 Royal_Oak_Briars_Rhodiesian-2 Royal_Oak_Briars_Rhodiesian-3 Royal_Oak_Briars_Rhodiesian - 4 Royal_Oak_Briars_Rhodesian-5

The pipe is drilled perfectly with an open draw. James tells me that the draft hole is drilled with a 5/32″ bit and tapering to 1/8″ in the stem.  The pipe smokes wonderfully, with an excellent draft and no moisture.  It also packs easily, not something I always find with a pipe with an open draw.  I am very impressed with the stem work, it seems James has learned his lessons well from Micheal Lindner. The button end is beautifully funneled and the tenon also has a concave detail that I like.  James feels the funneling on the tenon helps minimize moisture buildup in the pipe.  On the button end, the height is just right for holding without being uncomfortable.  I also like how the button has a concave feature.   James uses briar from a variety of sources.  For this pipe he used briar from Mimmo that had been aged for four years.  James feels this briar made it possible for him to achieve my weight goal.  The blast is nice and craggy, which is also my preference.  We mulled over several stain choices before deciding on the golden tan.  I think it gives the pipe a wonderful glow.

James uses a bowl-coat on his pipes, made from a gelatin/activated charcoal substance.  As someone who primarily purchases estate pipes, I hate breaking in new pipes. This is my second pipe with a bowl coating of this nature, and I’m now a big fan of this process. James assured me the product was neutral and in use, I agree completely.  Smoking the new pipe, it felt like an old friend from the get-go.

Another unique aspect of a Royal Oak Briar is the stem logo, which is a blue acrylic dot in a copper ring. As an Ashton fan, I love that detail. Many artisan pipes lack a stem logo.  To me, that was another appealing aspect of the Royal Oaks Briars line.  A member of the PipesMagazine forum commented on the stem logo that “it was like the cherry on top of a sundae”.

James work combines classic shaping, solid mechanicals along with quality briar and ebonite materials.  He was easy to communicate and work with and I enjoyed our conversations.  Hopefully, we’ll meet some day at a pipe show.  I’m looking forward to having this one in a solid rotation and I can highly recommend Royal Oak Briars.

Royal_Oak_Briars_Huntsman_Gallery Royal_Oak_Briars_Huntsman_2014 (2) Royal_Oak_Briars_Huntsman_2014 (1) Royal_Oak_Briars_Huntsman_2014 (3) Royal_Oak_Briars_Huntsman_2014 (4) Royal_Oak_Briars_Huntsman_2014 (5) Royal_Oak_Briars_Huntsman_2014 (6) Royal_Oak_Briars_Huntsman_2014 (7)

Royal_Oak_Briars_Huntsman_2014 (8)

Below is a comparison picture with my 1930’s Comoys 499 Extraordinaire, the inspiration for this pipe.

Royal_Oak_Briars_Huntsman_2014 (9)


A Sentimental Journey – the Restemming and Restoration of a Medico Rhodesian


Blog by Steve Laug

For years now I have had a special spot in my heart for Medico pipes. I don’t like the paper filter system, or the cheap stems with the split aluminum tenon, or the heavy varnish on the briar, or the fills that are hidden below the thick varnish, or any endless number of complaints that come to the surface with these old US made briar pipes. But I can’t get past the fact that the first pipe I ever owned was a Medico – paper filter and all, and that the first pipe I picked up when my first daughter was born years later was a Medico as well. Because of that whenever I am given an old Medico bowl I restem it and restore it. I strip away the varnish and rework the fills, make a new stem and bring it back to life in even better condition that it was when it was first sent out.

The Medico that I worked on in this restoration was a straight shank Rhodesian that came to me in a gift box of bowls. It was stemless and I had two potential stems that would work for it. There truly was nothing particularly redeemable that I saw in the bowl so the reason was as stated above solely sentimental. The bowl was dirty and worn with a thick cake. The rim had been battered and had deep nicks on the outer edge. There was a thick dark red varnish on the briar. It was stamped MEDICO on the left side of the shank and Imported Briar Italy on the right side. On the left side of the bowl was a large brown putty fill that stood out like a sore thumb. The first stem I tried was a split metal tenon Medico style stem. It was worn but usable.Med1 Med2 Med3 Med4 It fit the shank perfectly and looked good on the pipe. I thought for sure this would be a simple and quick restoration. I should have learned by now that whenever I think that problems would pop up on the way to the finish. I cleaned the shank with cotton swabs, pipe cleaners and isopropyl alcohol.Med5The top of the bowl was badly damaged with large dents and missing chunks on the outer edge of the rim so I decided to top the bowl. I used the topping board with 220 grit sandpaper and worked on the rim until it was smooth and clean. There were still several places on the outer front edge that would need to be worked on but the finished look of the topped bowl was far better than when I had started.Med6 Med7I wiped down the bowl with acetone on cotton pads to remove the thick varnish coat and clean up the finish on the bowl. I wanted to remove it back to the briar. In the process the dark red stain coat also was removed from the bowl.Med8Once the stain coat and varnish were removed I could see several problems that I would need to address. The front edge of the bowl needed to be sanded and the slope on the cap would need to be modified by hand sanding to remove the damage on the front edge and face of the cap. There was also a fine crack that had seeped tobacco oils on the top right edge of the shank. It had been hidden by the dark stain. When I move the stem it was not visible and did not open or spread but it was definitely present. I would need to clean up the shank, band it and with the band a different stem would need to be fit to the shank. The stem I had previously chosen had a metal face that would not work against the band. I scrubbed the bowl and shank until all the red stain that I could remove was gone.Med9 Med10 Med11I used a Dremel with a sanding drum to sand back the shank so that I could fit a band on the shank. I also wanted to smooth out the surface of the rustication pattern and clean up the crack so that I could glue and clamp it before banding.Med12I put the band around the end of the shank and then heated the metal band with a Bic lighter until I could press it into place on the shank. It took several reheats with the lighter before I had a flush fit on the band. At that point I took the second stem I had chosen and lightly sanded the tenon to get a good tight fit in the shank and pushed it in place.Med13 Med14 Med15 Med16I reamed the bowl with my PipNet reamer and the smallest cutting head until I had taken the cake back to bare wood. I wanted the bowl to be clean so that I could see if there was any damage to the interior of the bowl.Med17Once I had reamed the bowl I reshaped the angle on the cap with 220 grit sandpaper and medium and fine grit sanding sponges. Once I had the angle correct around the entire rim and had removed the damage on the front of the cap I sanded the entire bowl with the sanding sponges. I also sanded the stem with the same sandpaper and sanding sponge combination to remove the oxidation and tooth chatter near the button. The newly shaped bowl and freshly sanded stem is shown in the next series of four photos below.Med18 Med19 Med20 Med21I stained the bowl with some oxblood aniline stain and flamed it. I wanted the red colour of the stain but I did not want it to be as opaque as the original stain had been. The aniline stain seems to be more transparent. It did however, do a great job in hiding the big fill on the left side of the bowl.Med22 Med23 Med24I sanded the stem with 220 grit sandpaper, then a medium and fine grit 3M sanding sponge. I followed that with my usual array of micromesh sanding pads – wet sanding with 1500-2400 grit pads and dry sanding with 3200-12,000 grit pads. I rubbed the stem down between each set of three pads with Obsidian Oil before moving on to the next three pads. I finished by giving it a final rubdown with the oil before taking it to the buffer.Med25 Med26 Med27I buffed the entire pipe with White Diamond and then gave it multiple coats of carnauba wax to protect and polish both bowl and stem. With that completed my sentimental journey with this old Medico was complete and it was ready to go back into service. I am sure I will gift this pipe to some new pipeman somewhere along the way as it should smoke very well and give many years of service. It is not a thing of beauty and never will be but it is a good serviceable pipe that will deliver a good smoke. The finished pipe is pictured in the photos below.Med28 Med29 Med30 Med31

A Glorious Republic Era Pete Killarney Flame Grain Tall Billiard – Robert M. Boughton


Guest Blog by Robert M. Boughton
Member, North American Society of Pipe Collectors
http://www.roadrunnerpipes.com
http://about.me/boughtonrobert
Photos © the Author

“What’s this world without its pleasure? What is pleasure but a pipe?”
— W.H. Logan, author, “A Pedlar’s Pack of Ballads and Songs,” 1869

INTRODUCTION
I doubt anyone could have summed up my own thoughts on the matter better or with more conciseness than the eclectic author, W.H. Logan. My pipes are my great pleasure, my main collection, my hobby, my trade. When I found this Peterson Killarney Red Flame Grain Tall Billiard available online, for a price that seemed too good to be true, I suspected some serious flaws somewhere. But a close inspection showed only a few scratches on the shiny wax and perhaps high grade varnish surface as well as the kind of rim blackening and chamber buildup that scares away so many bidders who are not prepared to deal with these little matters.

I had to have it, and so once again I over-bid to ward away the timid masses. I never had to increase that one bid and got it for an incredible $38.01, which seemed so precise I knew one of the others watching the pipe had offered a mere penny more than the previous contestant. The day it arrived at my Post Office Box, I cut through the tape and package label of the parcel on my way to the car and then sat behind the wheel to take out the contents. I admit I was relieved to inspect the new prize and find there were no hidden damages.

Giving the seller a high rating in all areas and commenting that I got it for a steal, I received a response from the gentleman that thanked me for one more perfect grade on his spotless record and went on to add, in reply to my written comment, “Yes, you did get it for a steal.” I could hear him saying it with a touch of disappointment.

Still, I was surprised when I saw the following nomenclature on the right shank:Robert1In case the enlargement is unclear, it reads, in block letters, “A Peterson Product” (which was in fact in quotes) over “Made in the Rep.” over “of Ireland,” with the number 120 to the right of the bottom line. Looking it up on pipephil.eu, I was pleased to confirm that it was a Republic Era pipe, a fact I had not been able to determine when I bid for it, placing its date of manufacture at somewhere between 1950-1989. Given the discoloration of the stem and general appearance of long, hard use, I suspect it is from the 1970s.

Out of about 85 pipes I have in my collection, although the biggest part of that is comprised of meerschaums, a dozen are Peterson’s (and there is still another, a vintage Kildare, on the way). This old Killarney is not the best of them – being outdone by the tiny Gold Spigot natural grain, the Mark Twain Rusticated Bent Billiard system and the 150th Anniversary Special Edition natural bent billiard – but it is without doubt the most beautiful.

At one point believing I would never have the skill to restore a meerschaum, I did so with several and have a major project underway with one that is 115-120 years old. Among my other great wishes was to have the opportunity to restore a Peterson, and now it is a done deed, with even better results than I ever imagined.

Please don’t get the idea that I am bragging; far from it. I possess an acute awareness of my strengths and weaknesses (among the latter of which remains stem fitting, not to mention the mere idea of re-shaping one). Nevertheless, I have learned much during the past two years – most of it coming with ease due to my natural affinity for working with wood – but nothing more so than how much is left. In fact, I understand now, nobody knows everything about the craft/art of restoring pipes, not even my good friend and mentor or our host, both of whom are masters.

My greatest fear with the restoration of this Killarney was that after removing the burning of the rim I would be unable to return that thin, small but vital part of the pipe as a whole to its original, rich red color and shine. But almost by instinct, I worked out that problem when the time came.

THE RESTORATIONRobert2 Robert3 Robert4 Robert5First thing after my quick-clean inspection of the pipe’s interior integrity, I began my assault on the chamber with my Senior Reamer, the blades of which I retracted all the way and was still almost unable to insert it past the buildup of cake to the bottom. Turning the blades outward until they were stuck, I cranked in a slow, circular manner, pushing the top of the tool toward the rim as I listened to the carbon crumble. This step of the process took three adjustments of the blades to clear the cake.

After blowing through the shank to clear most of the leftover carbon dust, I wet a small square of cotton with alcohol and pushed it with a finger down the center of the chamber, then turned it a few times to soak up the rest. Using a 1-1/4×2” piece of 150-grit paper that, when curved to fit inside the chamber, just fit the diameter and left a little room above the rim with which to apply torque, I put a smaller finger inside the paper and began to twist it, first using the most pressure along the top of the chamber and working my way down. In this fashion I was able to clear the remaining carbon until briar showed most of the way through to the draught hole.

Having learned by the restoration of my third meerschaum that super fine steel wool is my favorite and, I think, the safest way to remove rim burning, I applied a pad of the 0000-grade to the blackness and watched as it disappeared with ease and left the rim clean and still shiny. However, there were some serious scratches covering the rim as well as a groove worn into it on the inner shank side.Robert6A little elbow grease and 1500 micromesh eliminated all of these blemishes, but at the same time dulled the finish. A piece of 2400 micromesh worked out the scratches on the bowl with minor effect on the original waxes.Robert7It was time to clean and sanitize the shank and stem. I dipped a cleaner into alcohol, and as I inserted it into the shank I felt the tar and other gunk resist. The cleaner came out pitch black. After seven identical runs, during which the grime inside at least lost its resistance, the cleaners were just as black. I decided to do a bowl and shank flush with alcohol, but first I ran about eight cleaners soaked in alcohol through the stem until it came out clean.

Top: Shank cleaners.  Middle: chamber cake and cotton cleaner.  Bottom: stem cleaners.

Top: Shank cleaners. Middle: chamber cake and cotton cleaner. Bottom: stem cleaners.

Robert9Following the alcohol flush, the shank was clean and the briar showed through from top to bottom of the chamber. That is the cleanest I have ever restored a chamber.

The stem was in good shape except for some tooth chatter in the lip. I used 400-grit paper on the chatter followed by 1500 micromesh again on the entire stem to remove minor scratches and discoloration. As usual, I buffed it with red and white Tripoli and White Diamond.

The end of my project being nigh so soon, it seemed, I looked over the bowl and shank. The next to last thing left to do was re-stain the rim using marine cordovan (burgundy) boot stain and flame it. I let it sit for a minute before turning to 2400 micromesh for a nice, slow, gentle rub to remove the black flakes left from the stain and get down just to the wood grain. Again, the color was lighter red than the rest of the bowl, which worried me, but there was no choice but to buff the whole thing.

I almost always use the same three waxes for this step: white Tripoli, White Diamond and carnauba. But this time I looked at the red Tripoli wheel and decided it could only help. Starting there and following with the rest, I was shocked to see that the finished pipe was uniform in deep red color and shine. The feeling when that kind of success occurs is indescribable.Robert10 Robert11 Robert12 Robert13 Robert14CONCLUSION
As I wrote this account, I smoked in the just restored Peterson’s Killarney a full bowl of Comoy’s Cask №. 5 Bullet Eye Select, with its tasty blend of bright orange Virginias, Burleys and Tennessee bourbon. The writing came to me with unusual ease, but still, that was one long bowl! This all just goes to point out that the beautiful, red, flame grain Killarney gives a long, excellent smoke, although the bowl does tend to get hot enough to hold the pipe as necessary by the shank.

Being a Peterson’s fan and collector, as I stated already, I’ve decided this is a keeper. There is just no way, no how, I am going to offer this pipe as the newest addition to my online store, as nice as it would be to post it for sale and take in the money.

Now the pipe is almost empty, and I am full.

Cleaning Up an Old Ropp Cherrywood That Was Once Given Love and Attention – Robert M. Boughton


Guest Blog by Robert M. Boughton
Member, North American Society of Pipe Collectors
http://www.roadrunnerpipes.com
http://about.me/boughtonrobert
Photos © the Author

“Action is character.”
— F. Scott Fitzgerald, in a note to himself on a page of “The Last Tycoon,” his final and unfinished novel (published in 1941)

INTRODUCTION
The great American novelist and short story writer quoted above, who is lesser known for his screenwriting work, and for good reason, only resorted to the genre to make ends meet while he attempted to dry out. Note I write attempted, as he died of alcoholism in 1940 at 44. Nevertheless, he knew from both experiences that memorable characters, and therefore their stories, are created far more through their actions than their words.

Fitzgerald was among the best at describing what all of his characters do in his own unique way, although that in no way detracts from the words they speak. His unvarying craft of employing the rule he penned to himself on his final and half-finished manuscript has become the basis of most good present-day screenwriters’ rule of thumb, “Character is action, not dialogue.”

And so it is with this Ropp cherrywood. Its condition tells the whole story of the man who smoked it through the inconsistent actions he took to preserve it. The wood of the bowl and shank was kept as the pipe’s probable one owner obtained it. The stem, however, was left with scratches and minor tooth marks. And while the bore, mortise and draught hole showed clear signs of being cleaned almost with fanaticism, the chamber did not fare so well. Although nowhere close to being as filled with cake as the other pipes I described in prior admitted diatribes, I still removed enough carbon to fill the chamber whence it came.
All of this suggests to me that the lovely cherrywood was adored by its previous owner, who indeed smoked it so often it may have been his only pipe. His sole lack of full attention was to the chamber.

In a recent purchase of several lots of pipes on eBay, the first of which had some gems that were grotesque from abuse, I still saw that I could restore their luster. Some of my recent blogs have hinted at my ill opinion of those who treat their pipes with such disrespect. I even resorted to outright railing against these unknown enjoyers of the fair leaf. But in fact, the truth is that they know not what they do. When I received it in the mail, the condition of a Ropp natural cherrywood Air Dry system pipe [see “The Revolution of the System Pipe”], with a small brass tube inserted in the bottom of the bowl and leading to the chamber to relieve excess heat, was a little more complicated.

I own a more conventional Ropp natural cherrywood De Luxe, canted and flat on the bottom and therefore a sitter as it should be.

Picture 1

Picture 1

I considered swapping it with the more recent Air Dry, which has a rounded bottom and is already listed for sale on my online store. My only reasoning being that the Air Dry was more novel and might be older, I had a change of heart, in the literal sense. The more I thought about it, the more certain I became that the Air Dry’s long-time owner would not have traded it for anything. Who was I to give up with such nonchalance one that has served me so well? Besides, my De Luxe might just be older.

THE PIPE RESTORATION
The first thing I did was disassemble the pipe, meaning I unscrewed the stem and shank from the bowl.

Picture 2

Picture 2

Picture 3

Picture 3

Picture 4

Picture 4

There was blackening beyond the screws in the bowl’s hole [picture 3]. I saw that the threads of the shank itself were blackened [picture 2] and so I cleaned them right away with alcohol and also followed my initial quick clean routine to find if there were any obstructions in the parts. To my happy surprise, given the first impression of the chamber [picture 7], the quick clean was all that was necessary. Without doubt, these were the easiest stem and shank I have ever had to clean, leading to my surmising in the Introduction as to the complicated character of the original owner.

I also noted the small, unpolished areas of wood around the shank hole in the bowl [picture 3] and both ends of the shank [picture 4], although the stem side’s roughness does not show in the last picture. A fast buffing of the bowl’s hole and the tips of the shank (excluding the threads) with red and white Tripoli, White Diamond and carnauba made them shine like the rest of the wood. The following photos are the pipe before any work was done.

Picture 5

Picture 5

Picture 6

Picture 6

Picture 7

Picture 7

Picture 8

Picture 8

Picture 9

Picture 9

Picture 10

Picture 10

Picture 11

Picture 11

Starting the hardest part of the restore, which was pretty straightforward with nothing of special difficulty, I put my reamer to the bowl and began the process of turning it at increasing depths with great care to protect the cherry wood. Most of the top quarter-inch cleared down to the wood. The rest came in time. Altogether this stage took me about a half-hour, including the final sanding with 220-grit paper to make the chamber smooth and even all the way down.

All that was left to do was finish up the scratched stem with minor chatter and the wood. I used #1500 micromesh on most of the stem and 200-grit paper for the teeth marks, and spun it on the buffers with red Tripoli and White Diamond. The shank and bowl I could have left alone, but since it was a bit duller than it could be I applied white Tripoli, White Diamond and carnauba.

As with my De Luxe, a dab of beeswax was needed to hold the stem in place.

Picture 12

Picture 12

Picture 13

Picture 13

Picture 14

Picture 14

Picture 15

Picture 15

Picture 16

Picture 16

Picture 17

Picture 17

Picture 18

Picture 18

CONCLUSION
I figured out at last that those who enjoy pipes are complex characters, perhaps or perhaps not more so than others. As William Shakespeare, a greater writer even than Fitzgerald, had Jacques put it in “As You Like It,” Act II, sc, vii:

All the world’s a stage,
And all the men and women merely players;
They have their exits and their entrances,
And one man in his time plays many parts….

Shakespeare, who is believed to have written the play c. 1600, when he would have been about 36, knew better than anyone about the importance of action to character. He made his final exit when he was 54 – but in those days, that was common.

A Note of Clarification on the Monarch Apple Fiasco – Robert M. Boughton


Guest Blog by Robert M. Boughton
Member, North American Society of Pipe Collectors
http://www.roadrunnerpipes.com
http://about.me/boughtonrobert
Photos © the Author

Last week, a blog of mine called “Giving It the Old College Try, As a Favorite Substitute Teacher Used To Put It” [https://rebornpipes.com/2014/09/24/giving-it-the-old-college-try-as-a-favorite-substitute-teacher-used-to-say-robert-m-boughton/], about a Monarch apple with an absurd tenon contraption that screwed into the shank with more or less permanence. Really, the nice-looking briar apple, as it was designed, was the worst example of pipe engineering I can imagine – and the maker even had the nerve to patent the monstrosity.Robert1I described my great difficulty trying to keep the pipe intact with its worse than useless tenon and my eventual semi-success by removing an obnoxious, bulbous extension that protruded from the shank to connect to the stem, much as a Space Shuttle docks with a station way up beyond the limit of the Earth’s atmosphere. However, at the time, I was so caught up with the notion that the tenon was necessary as to miss the obvious. Here was my final effort, which was far from perfect in its sturdiness.Robert11After writing that I wouldn’t even give the ridiculous pipe away to anyone who purchased another one on my Web store, I became more and more fixated on finishing the project some unknown right way – using the right stuff, so to speak. I considered all kinds of possibilities, including tracking down a replacement rod of appropriate length and design to replace the original. Now that, I must admit, was stupid.

Then I showed the pipe with all due meekness to Chuck Richards, my friend and mentor, describing its imperfections and showing him the reason. But all he had to say was that the stem had a minor crack in the lip anyway, and it would break altogether in time. I figured that meant sooner than later. And so my immediate brainstorm was to go ahead and offer the pipe for free with another purchase and include both the original and a prepared replacement stem.

Still, the only real solution eluded me! But at last, by George, I got it! Remove the whole wretched tenon and replace the stem!

And so, that I did, spending hours sanding down the new stem’s tenon to fit. I even added a brass band to make up for the dorky faux band that was attached to the original tenon-lunar module piece.Robert1Satisfied of a job done right, I filled the bowl halfway with some good Gawith Full Virginia Flake and spent the next hour or so puffing away in delight. I could taste the natural sweetness of the Virginias all the way through. Minus the tenon and with a stem that attached without it, the old Monarch became a good pipe after all.

I have decided either to keep the unique but dreadful tenon as a souvenir or maybe donate it to the local space museum.

That is all.

Restemming and Restoring a Diamond Shank Commodore Canadian


Blog by Steve Laug

This pipe bowl came up on eBay and I bid on it. I really liked the diamond-shaped shank and the pipe looked to be in great condition. I did a bit of research and found that the brand was either made by Comoy’s or Charatan. The style of the stamping, which read Made in London over England, made me more inclined to think it was a Charatan made pipe. The diamond shank and the overall style of the pipe also seemed to point to it being Charatan made. The photos below were the ones included by the seller. Commodore1 Commodore2 Commodore3 Commodore4The sandblast was very rugged and craggy. The rim had a lighter blast and the shank had a blast about 2/3 of the way back from the bowl toward the stem. The last 1/3 was rusticated to match the blast of the first portion of the bowl. The diamond shank was flattened – it was wider from side to side than it was tall. The sides of the shank were sanded smooth and the bottom left side of the shank was smooth and stamped COMMODORE over Made in London over England. The bowl had a light cake and some shards of tobacco still in the bowl. The finish was in very good shape other than the sides next to the shank end – it was worn and the stain was worn. The rim had some tars on it and a light build up. There was not a stem with this bowl.

The first steps I took in this process I forgot to document with my camera. The battery was dead when I did remember so I will have to describe it with words. I went through my can of stems to see if any of the diamond-shaped stems would fit this shank. None of them were wide enough for the width of the shank. I had several oval stems that were close in width and height. I looked through the stems until I found one that was the right height and width for the shank. I turned the tenon on a PIMO Tenon Turning Tool until it was a close fit and then sanded it by hand until it fit snuggly in place. The end of the shank was not quite square so there was a slight gap on the side corners. Filing and shaping the stem would help with the fit. I shaped it with a Dremel and sanding drum as well as hand sanded until it was a flattened diamond. I sanded the stem in place on the shank to make the transition smooth between the shank and stem. It took a lot of sanding to shape it correctly.IMG_2324 IMG_2325 IMG_2326 IMG_2327The photo below shows the shape of the finished stem. There was still a lot of work to do to smooth out the end of the tenon to remove the casting marks and to smooth out the diamond shape of the stem but the diamond shape was basically finished.IMG_2328I reamed the bowl with a PipNet reamer to remove the slight cake and the tobacco shards that were stuck to the sides of the bowl.IMG_2131I used a brass bristle tire brush to clean the rim top and remove the overflow of cake on the top. I wiped it down with a cotton pad and alcohol to remove the dust and clean out the grooves in the blasted rim.IMG_2333 IMG_2334I wiped down the bowl and shank with cotton pads and alcohol to remove the dirt in the finish and prepare it for working on the shank.IMG_2335 IMG_2336I used a dental burr in the Dremel to re-rusticate the shank area where I had sanded it smooth. I ran the Dremel at a slow speed to match the pattern on the rest of the shank.IMG_2337 IMG_2338 IMG_2339 IMG_2340I wiped down the rusticated shank area and wiped down the dust on the rest of the bowl to prepare it for the new stain coat. I used a black aniline stain for the stain on the newly rusticated areas and also gave the entire bowl a coat of the black stain to cover the worn areas. I applied the stain, flamed it and repeated the process until the coverage was even on the bowl.IMG_2341 IMG_2342I hand buffed the pipe with a rag I use for that purpose. It picks up the stain coat and evenly spreads it across the bowl and rim.IMG_2343 IMG_2344 IMG_2345 IMG_2346I buffed the pipe with White Diamond to polish the new stain and to blend it better with the rest of the bowl colour. The next series of four photos below show the pipe after this initial buffing.IMG_2351 IMG_2352 IMG_2353 IMG_2354I decided to give the bowl a coat of wax to see what black looked like when polished. I wanted to see if I would need to give it another coat of stain to highlight the higher spots on the sandblast. I applied it by hand and then buffed it with a shoe brush.IMG_2355 IMG_2356 IMG_2357 IMG_2358 IMG_2359 IMG_2360I set the bowl aside to work on the stem. I sanded it some more with the 220 grit sandpaper and then with the medium and fine grit sanding sponges. I followed those up by sanding with my usual array of micromesh sanding pads. I wet sanded with 1500-2400 grit pads and dry sanded with 3200-12,000 grit pads. I rubbed the stem down with Obsidian Oil between each group of three pads. I buffed the stem with White Diamond to polish it.IMG_2361 IMG_2362 IMG_2363I decided to give the pipe a second coat of stain to highlight the black. I used a oxblood stain to give it the contrast that I was looking for. I applied the topcoat of stain and wiped it off. I buffed the pipe and stem with White Diamond again to polish the stain coat and stem.IMG_2364 IMG_2365 IMG_2366 IMG_2367I waxed it with several light coats of carnauba wax. I use a light touch so as not to gum up the wax in the sandblast. At the same time I want the shine that a good coat of wax gives the bowl and stem. The finished pipe is shown below. The new stem works well with the shape of the shank and gives the pipe a quiet, understated elegance. I hope to load up a bowl and give it an inaugural smoke tomorrow out on the front porch and relax with a good bowl of aged Virginia.IMG_2370 IMG_2371 IMG_2372 IMG_2373 IMG_2374

Renewing a Savinelli Punto Oro Canadian 804


Blog by Steve Laug

This is the last of the lot of pipes I picked up on my recent pipe hunt. It is pictured as the second photo down from the top in the photo below. It is stamped on the smooth underside of the shank Savinelli Punto Oro and next to that is the Savinelli shield next to 804 over Italy. The blast on this one is rugged and very clean. The shape is a tall bowl with an oval long shank – the sides of the oval are sharp on both sides and the curve of the top and the bottom of the shank a subtle oval shape.IMG_2049The finish on the bowl is in excellent shape. There are no dents or scratches in the bowl. The bowl had a thick cake that was crumbling toward the bottom of the bowl. The rim had a buildup of cake that had spilled over on to the top. The edges of the rim on both the inside and outside were crisp and sharp. The stem was oxidized and had a line of calcium around the stem about 2/3 of the way up the stem. I wonder if the pipe did not have a softie bit at some time during its life. There was light tooth chatter by the button. The inside of the stem and shank were dirty and there was a buildup of dark tars.Sav1 Sav2 Sav3 Sav4I reamed back the cake to bare wood using a PipNet reamer. I know that others who restore pipes don’t do that drastic a reaming but that is the method I use as I find that once cleaned the bare wood minimizes ghosting in the bowl.IMG_2131I cleaned out the stem and shank with pipe cleaners, cotton swabs and isopropyl alcohol (99%). I cleaned them until the cleaners came out white and no more oils remained.Sav5 Sav6I wiped down the rim with alcohol to wet the overflow of cake and then used a brass bristle brush to scrub the rim.Sav7 Sav7a Sav8 Sav9I sanded the stem with 220 grit sandpaper and with medium and fine grit sanding sponges to remove the oxidation and calcium deposits. I also sanded until the tooth chatter was removed from the top and bottom sides of the stem.Sav10Sav11Sav12I used the Guardsman stain pens from Greg to touch up the rim and the edges of the rim and the shank.Sav13I buffed the bowl and shank with White Diamond to polish and blend in the new stain on the rim and shank.Sav14 Sav15 Sav16 Sav17I sanded the stem with my usual list of micromesh sanding pads – wet sanding with 1500-2400 grit pads and dry sanding with 3200-12,000 grit pads. I rubbed it down after each set of three pads with Obsidian Oil and then gave it a buff with White Diamond.Sav18 Sav19 Sav20I put the stem in place and then buffed the entire pipe with White Diamond, lightly on the briar and a little heavier on the stem. I gave it multiple coats of carnauba wax and buffed it with a soft flannel buff to polish and raise the shine on the pipe. The photos below show the finished pipe – cleaned and ready to be smoked.Sav21 Sav22 Sav23 Sav24