Repairing a Cracked Horn Shank Extension on a Stanwell Buffalo


Good tutorial on repairing a split horn stem and a good recovery after the unexpected issue. Thanks Charles

Charles Lemon's avatar

Needing a break from all the Brigham and Blatter pipes I’ve worked on lately, I dug down through my box of estate pipes and came up with this Stanwell Buffalo. It is a Shape # 140, which Bas Steven’s list of Stanwell shapes identifies as a “Small freehand, slightly bent, full mouthpiece by Jess Chonowitsch”. I’m not very familiar with Chonowitsch’s designs, but I quite like this Dublin-esque freehand.

Out of the refurb box, the pipe looked to be in very good condition. It had obviously been smoked, as the rim was partially obscured by a thin crust of lava, and the mouthpiece showed some light tooth chatter. There was a decent amount of cake in the bowl, and a few dents and dings around the outside edge of the crowned rim.

20170414_11274620170414_112750
20170414_11275520170414_112802
20170414_11280920170414_112943
20170414_112947

The pipe is stamped “Stanwell” over “Made in Denmark” over “Buffalo” on the underside of the shank near…

View original post 828 more words

Breathing Life into an Antique Imported Briar Bull Moose


Blog by Steve Laug

There is something about these older Mincer style pipes that grabs my attention. I am drawn to their rustic appearance and feel in the hand. This one was a Bullmoose shape – though the “nose” on it is much more conservative than many of these that I have seen. The stamping on the left side of the shank is a standing lion inside of a shield and next to that ANTIQUE over Imported Briar. I have searched on the web and in my books for this logo and cannot find it but I did find a listing for the ANTIQUE in Who Made That Pipe for a company called Heritage Pipes Inc. NYC. The company is to be distinguished from the Heritage line made by Kaywoodie as a high end alternative to Dunhill pipes. I have looked for information on the company online but so far have not found any. Anyone have any information on the brand?

My brother took photos of the pipe before he cleaned it up. I have included those photos below. It is an interesting pipe.The next photos of the pipe show the damage on the rim top. The three different photos show the damaged areas from different angles. The rim top looked like it was damaged on the inner and outer edges of the bowl. The top looked like the finish was peeling but I would know more about it once I had it in hand. He took photos of the rusticated bowl sides. The smooth portions show grain. The double rings around the bowl cap have nicks and chips out of the top and bottom edges of the rims as well as the centre spacer. The next photo shows the stamping on the left hand side of the shank. Metal shank insert that separates the stem from the shank is oxidized.The stem is oxidized and has tooth chatter and tooth marks on both sides near the button. It is also overclocked making the stem sit crooked in the shank.My brother reamed the bowl with a PipNet reamer and cleaned out the insides. Pipes with the threaded metal mortise hold a lot of grime and tars so I will need to clean it further. The exterior was scrubbed with Murphy’s Oil Soap and a tooth brush and the grime and deteriorating finish was removed completely. The stem oxidation came to the surface in the cleaning. The next four photos show the condition of the pipe when I received it. I took a close up photo of the rim to show what it looked like when it arrived. Fortunately the areas on the rim that looked like flaking in the early photos was only lava buildup and it was gone. I breathed a sigh of relief when I saw that.The next two photos show the stem. The tooth chatter was lighter on the top of the stem than the underside. There were two deep tooth marks on the underside. The button edge on the topside was dented from teeth as well.I took the stem off the shank and was surprised that the conical stinger apparatus was gone. I heated the metal tenon with a lighter until the glue softened and twisted the stem around in the mortise until it lined up straight on the shank.I sanded the rim top and the inner beveled edge of the bowl with 220 grit sandpaper to remove the damage and the darkening. It did not take too much work to smooth out the dents and nicks and clean out the darkened inner edge of the bowl.To repair the chip out of the ring around the cap on the bowl on the right side I filled in the gap with briar dust and put drops of clear super glue on top of the dust. I used a dental spatula and a knife to recut the twin rings around the cap. Once it dried I sanded the repaired area on the ring and the rim top with a medium and fine grit sanding sponge and with 1500-6000 grit micromesh sanding pads to smooth out the scratches left behind by the paper.I cleaned out the inside of the mortise and the airway in the shank and stem with pipe cleaners, cotton swabs and alcohol until the cleaners came out white.I sanded the stem with 220 grit sandpaper to remove the oxidation and then used black super glue to fill in the tooth marks on the top edge of the button and the underside of the stem.When the glue dried I sanded the stem with 320 grit sand paper and polished it with micromesh sanding pads. I wet sanded it with 1500-2400 and dry sanded it with 3200-12000 grit pads. I rubbed the stem down after each pad with Obsidian Oil. After sanding it with the 4000 grit pad I buffed it with red Tripoli on the buffing wheel then finished polishing it with the final three grits of micromesh. I gave it a final coat of oil and set it aside to dry. I stained the bowl with Cherry Danish Oil and wiped it down to give it a shine. I wanted to highlight the red colours in the briar. The colour came out really well and the grain shines through on the rim and the smooth portions of the bowl and shank. I buffed it lightly with a shoe brush. The photos below show the staining and the finished bowl. I buffed the stem some more with red Tripoli and with Blue Diamond on the buffing wheel to polish out the oxidation that still remained at the junction of the stem and shank. I gave the stem multiple coats of carnauba wax and gave the bowl several coats of Conservator’s Wax. I buffed the bowl with a clean buffing pad to raise the shine and hand buffed it with a microfibre cloth to deepen the shine. The dimensions on the pipe are Length: 5 1/2 inches, Height: 1 1/2 inches, Outer diameter: 2 inches, Chamber diameter: 7/8 inches. The finished pipe is shown in the photos below. It really is a nice looking older piece of pipe history and should make a great addition to someone’s pipe rack. It will go on the rebornpipes store shortly. If you would like to purchase it contact me via private message on Facebook or through my email at slaug@uniserve.com. Thanks for looking.


A Beautiful Italian Hand Made DiMonte Classica 991


Blog by Steve Laug

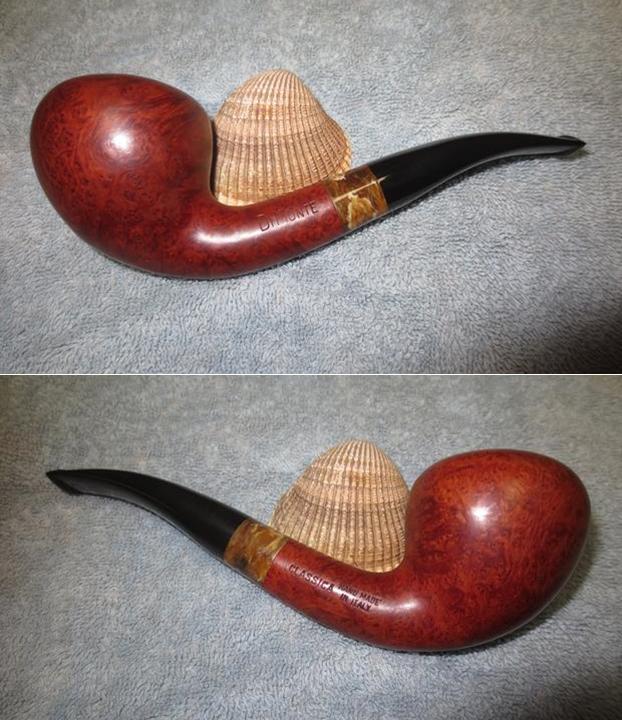
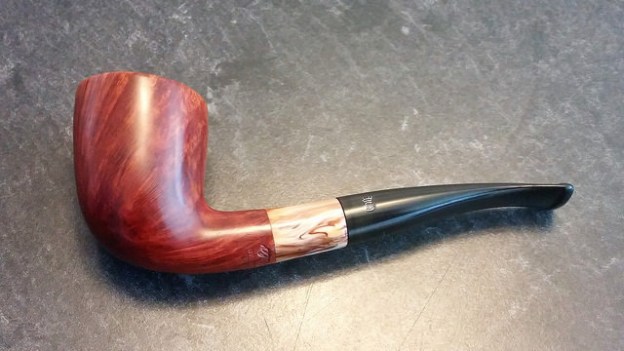
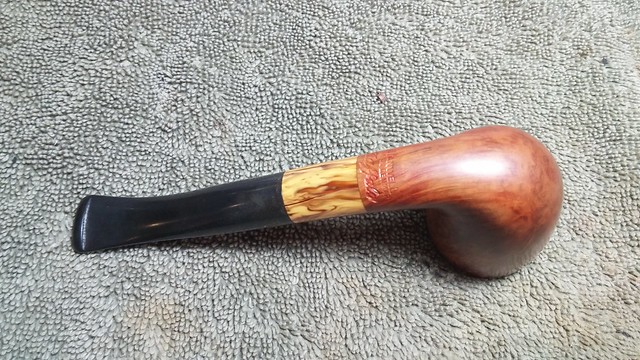
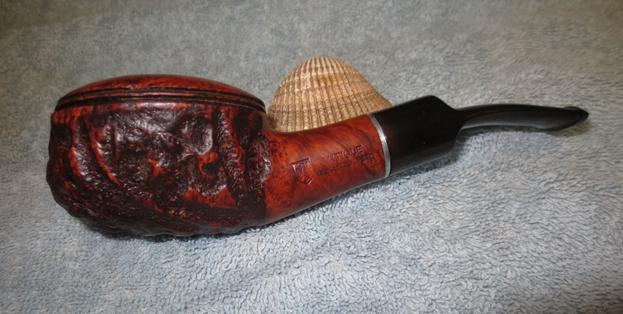
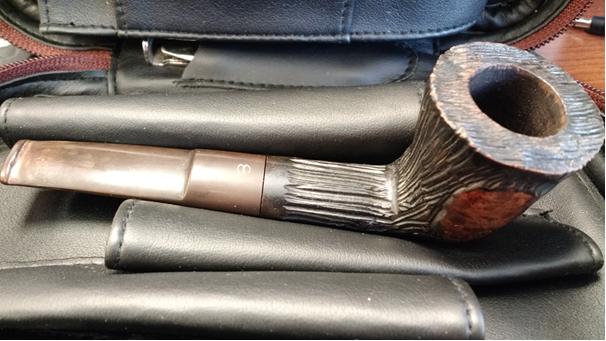
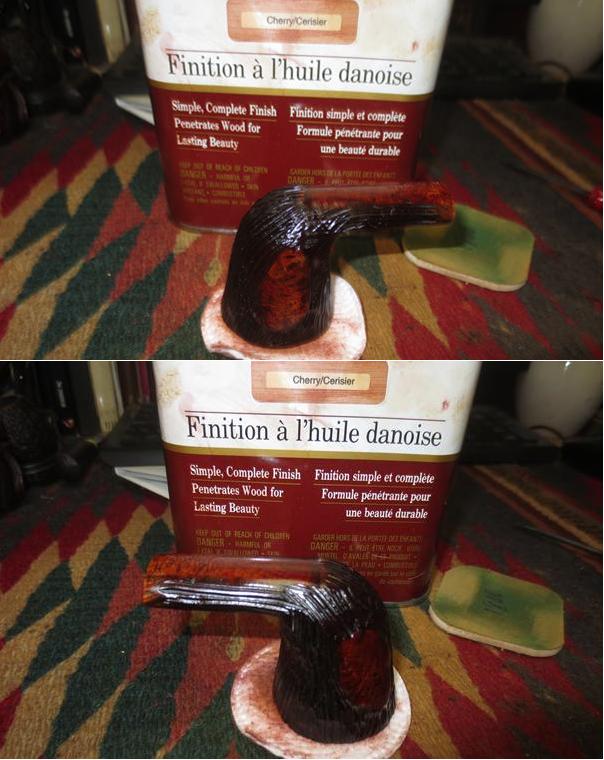
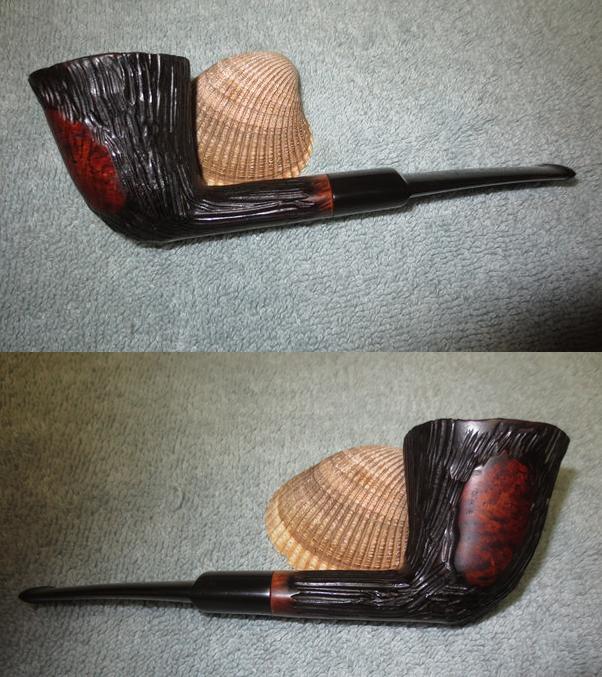
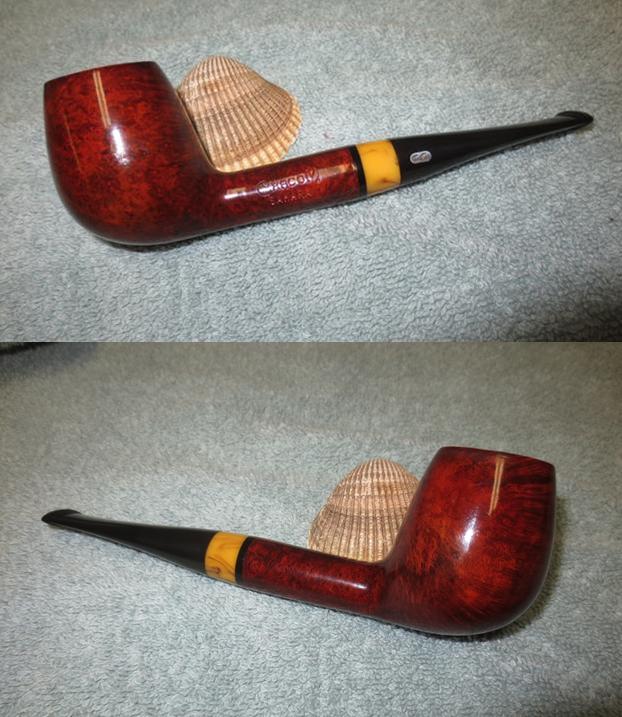
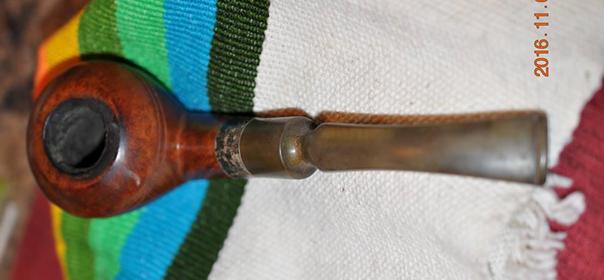
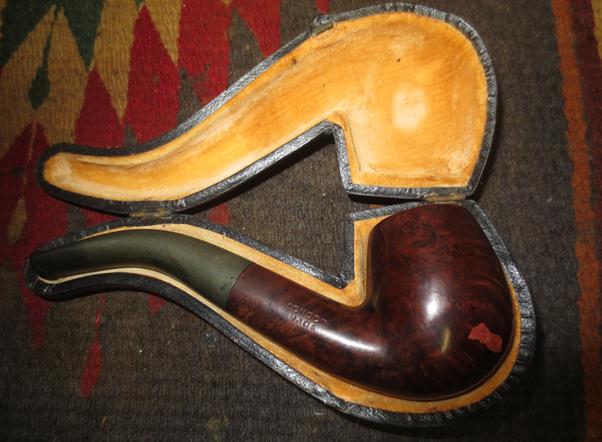
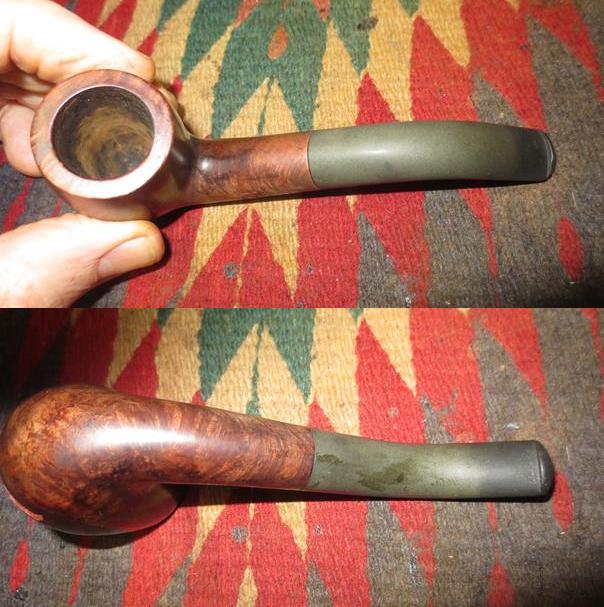
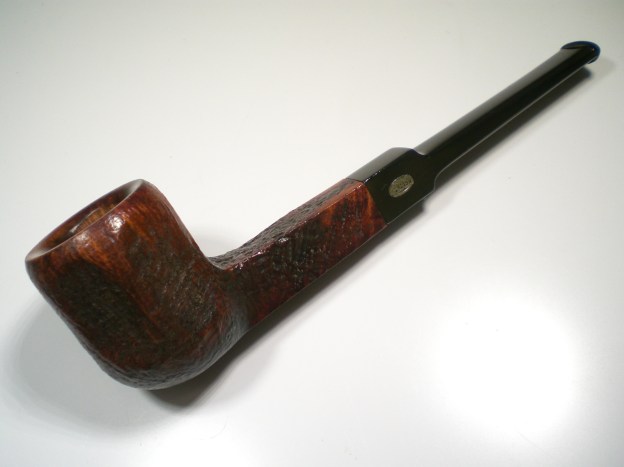
The next pipe in the lot that my brother picked up at the latest estate sale is stamped DiMonte on the left side of the shank. On the right side it is stamped Classica and next to that Hand Made in Italy. The pipe is a beauty. It is a natural or light tan coloured briar with a Lucite stem. There is a mottled yellow acrylic insert on the stem that separates the black of the Lucite from the natural colour of the briar. The shape is an acorn with an under-slung stem. My brother took photos of the pipe before he cleaned it and sent them to me. 
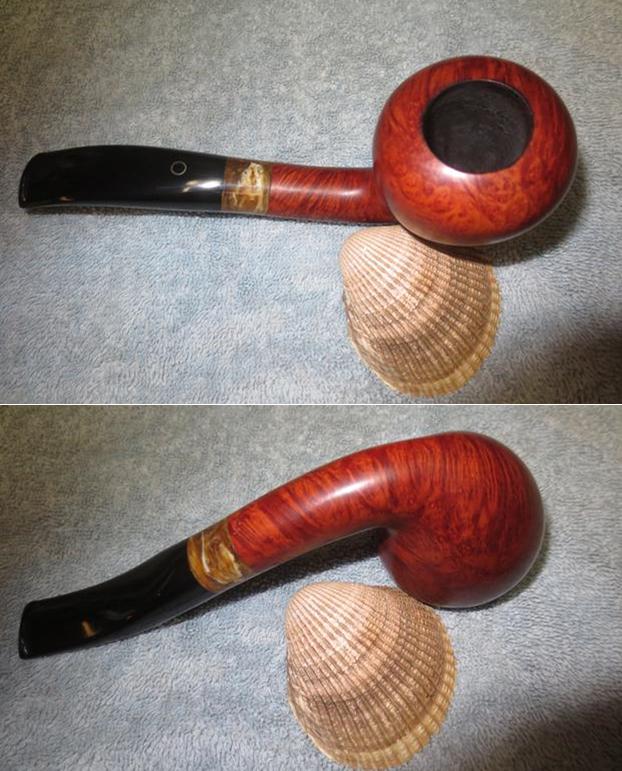
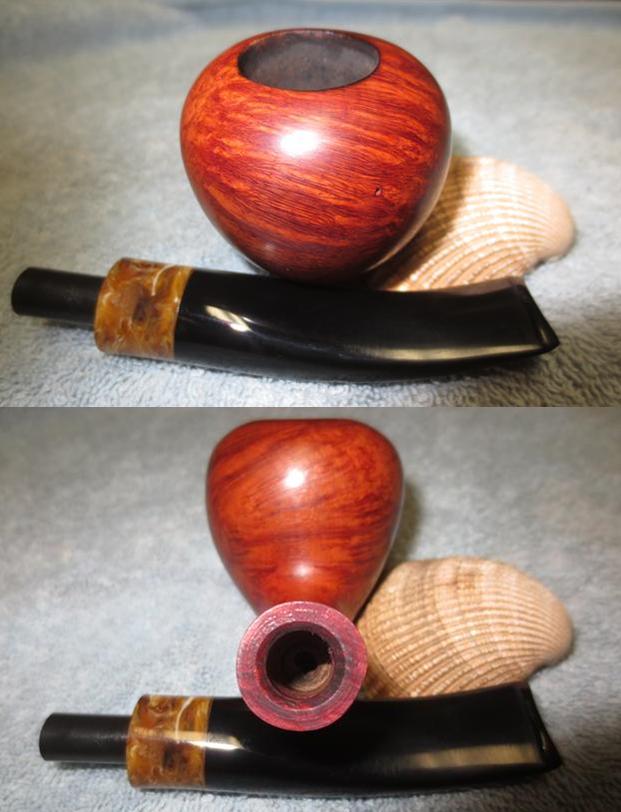
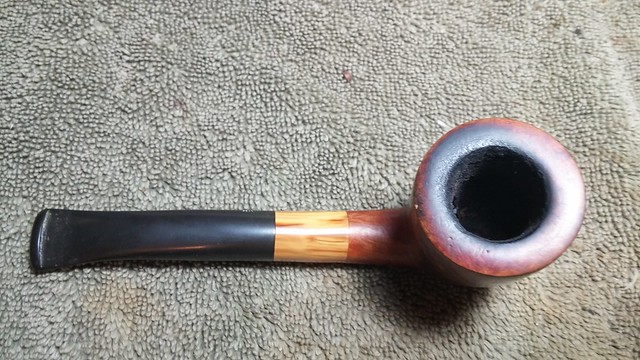
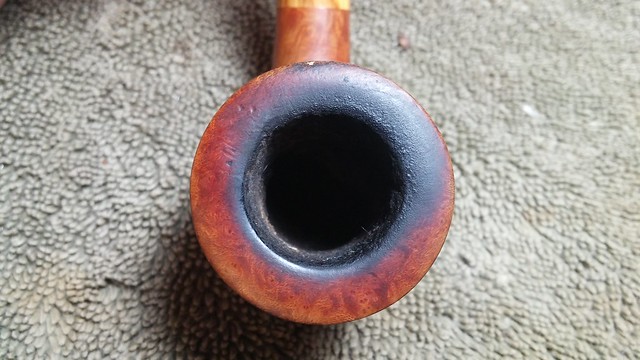
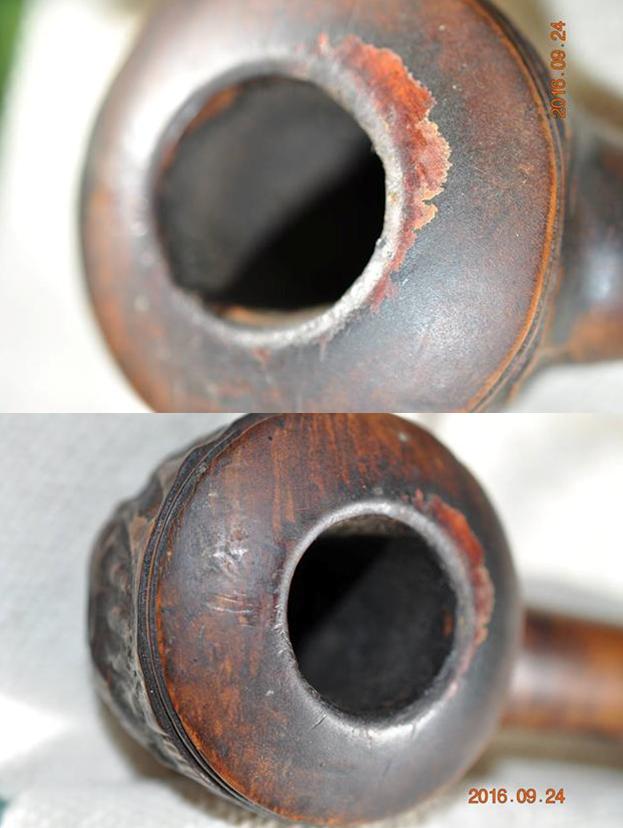
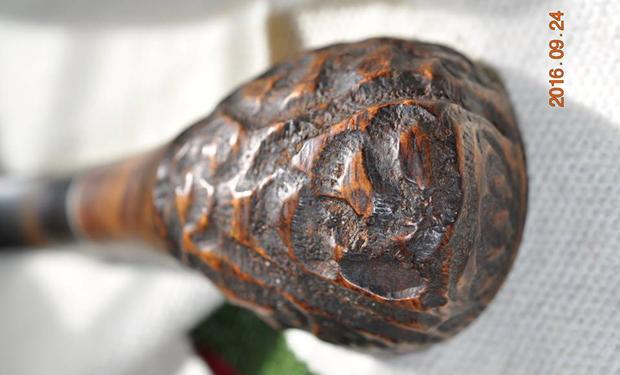
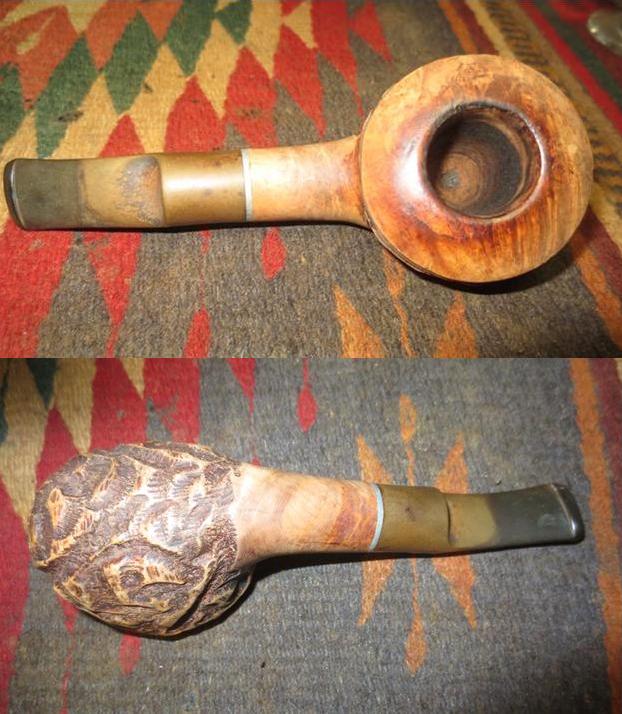
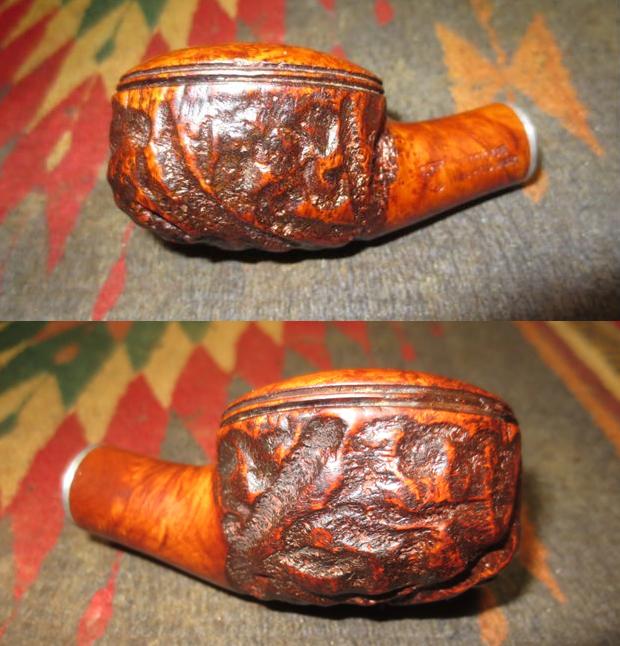
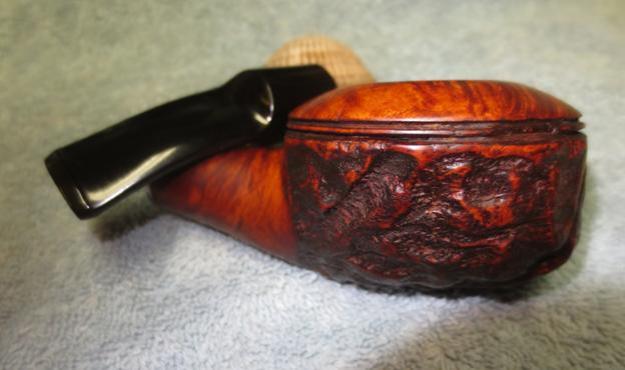
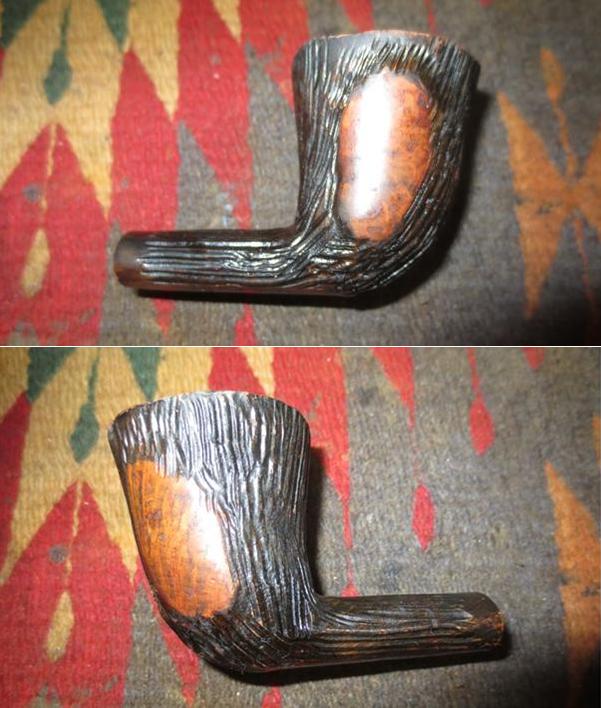
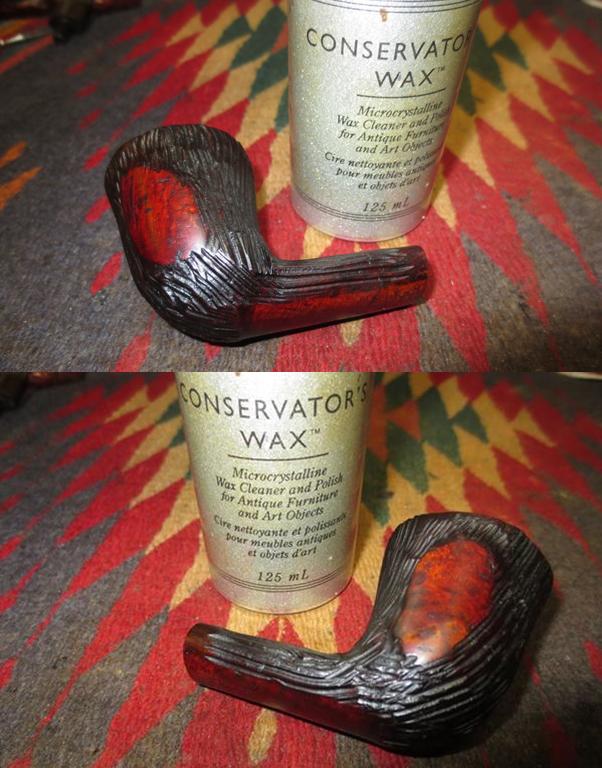
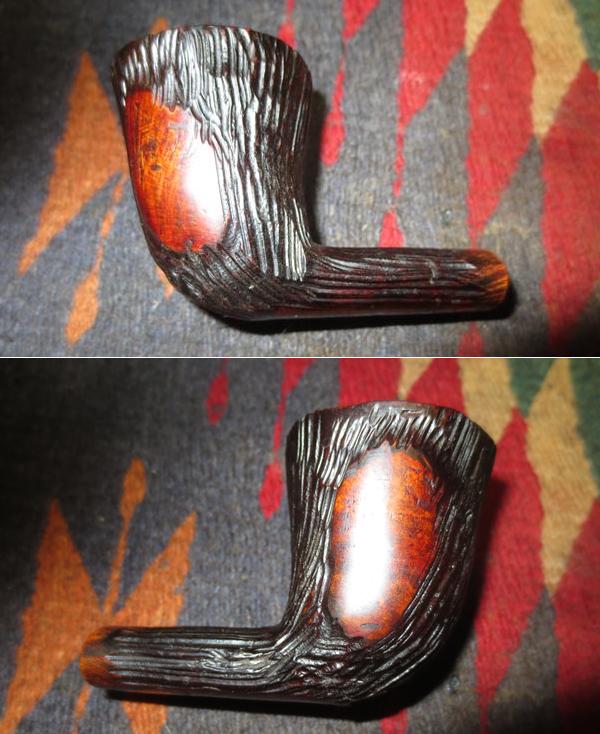
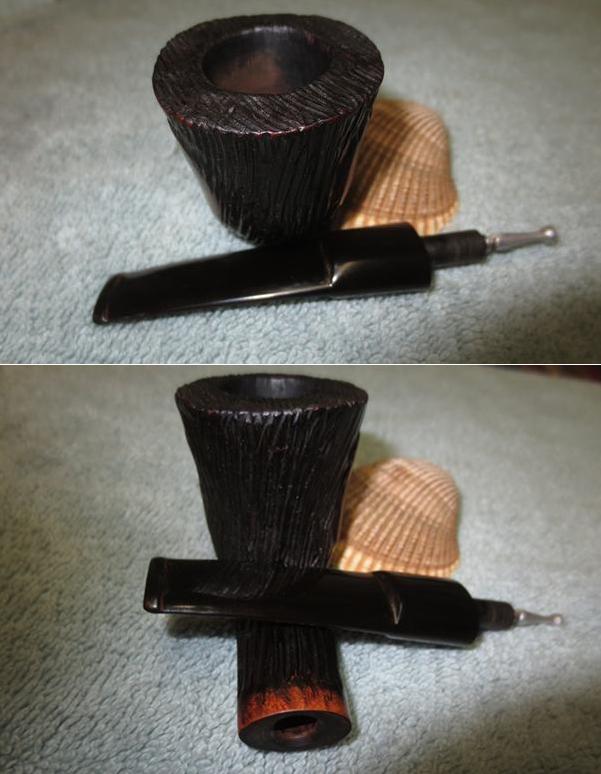
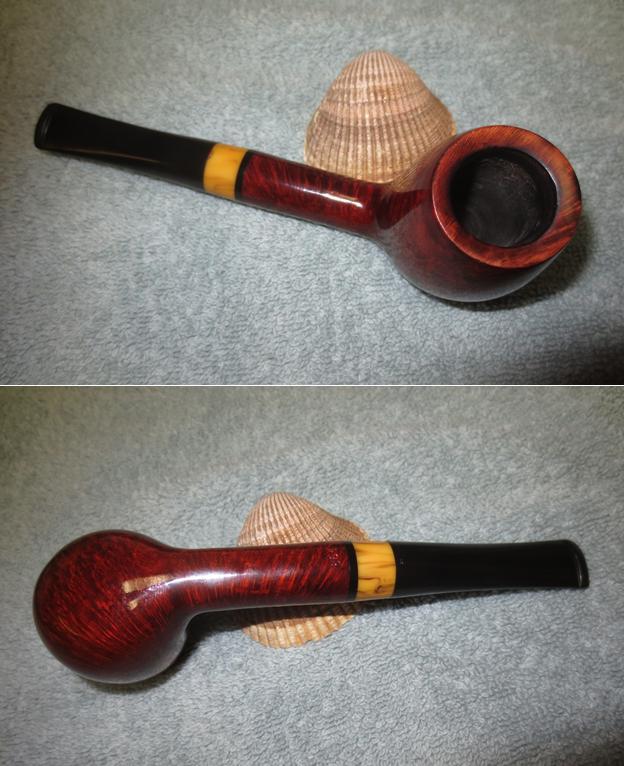
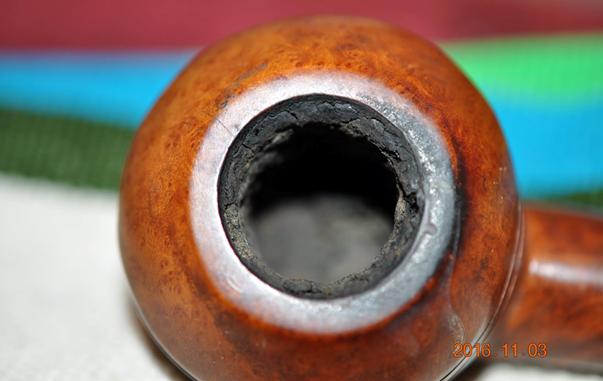
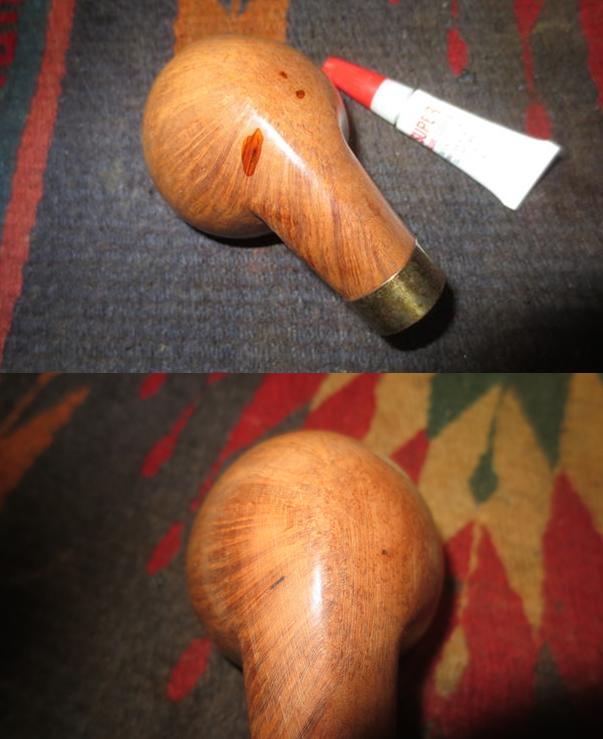
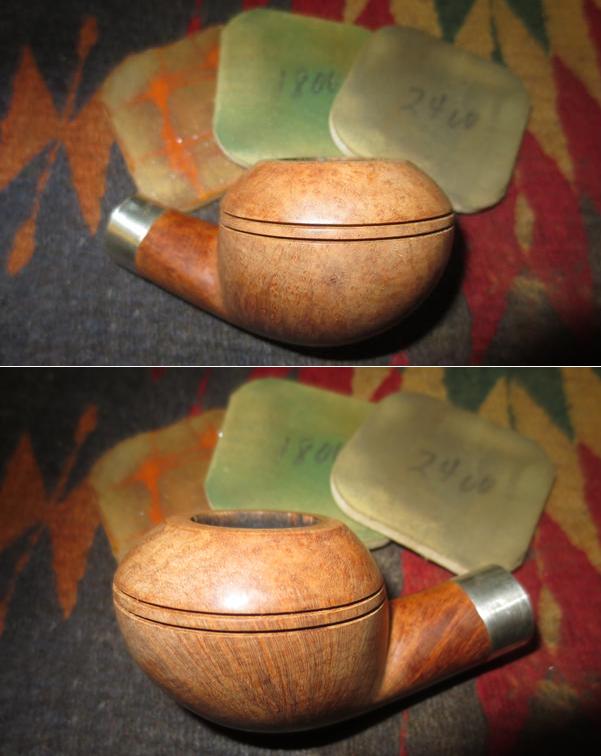
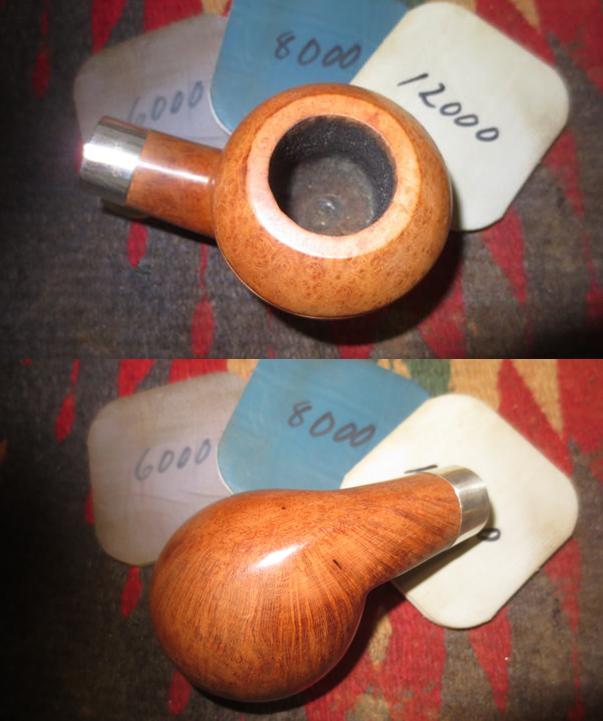
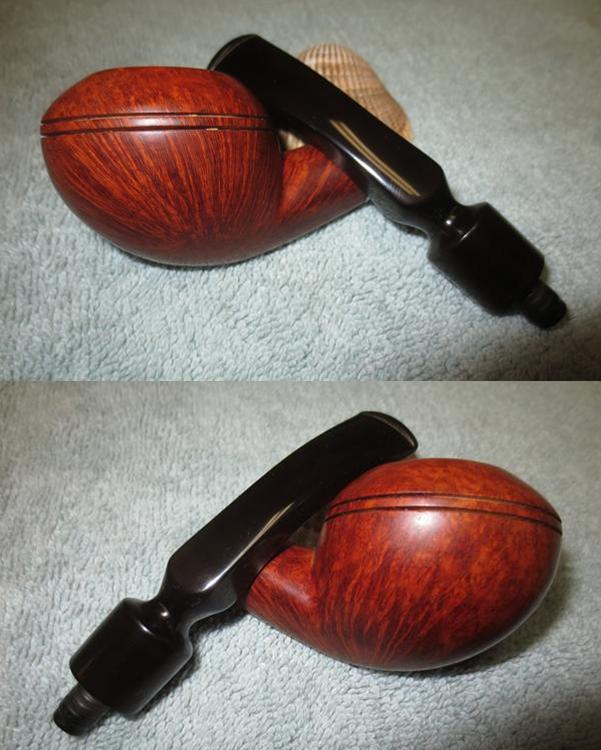
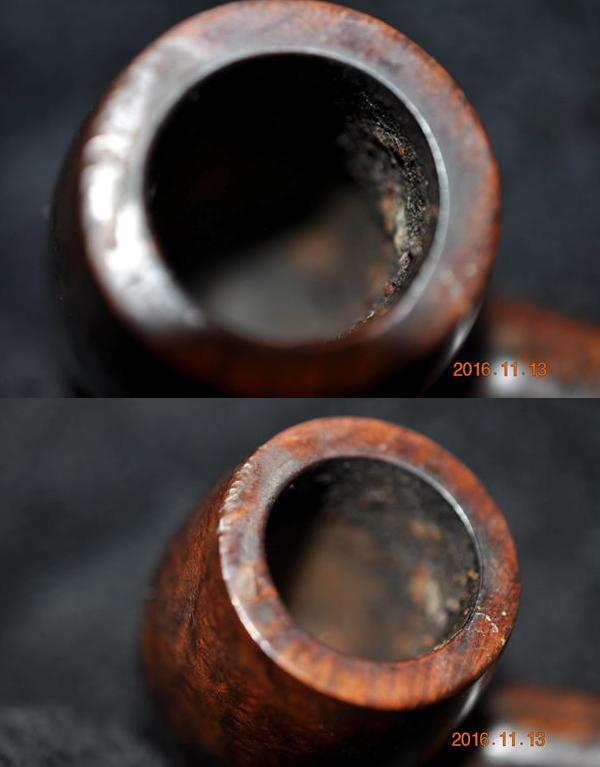
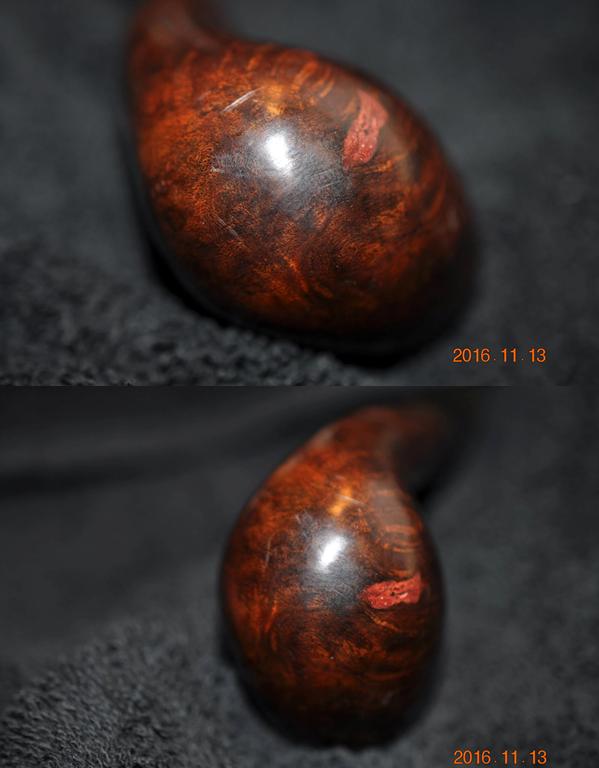
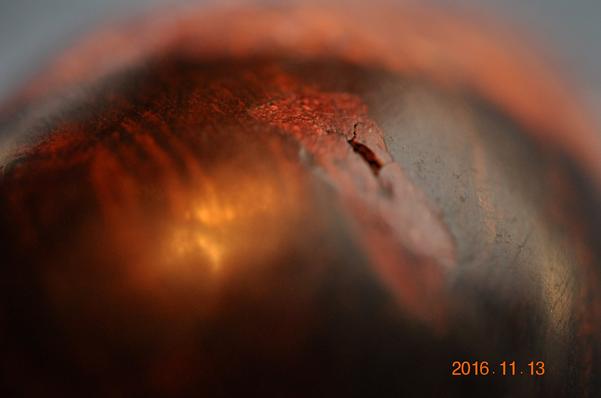
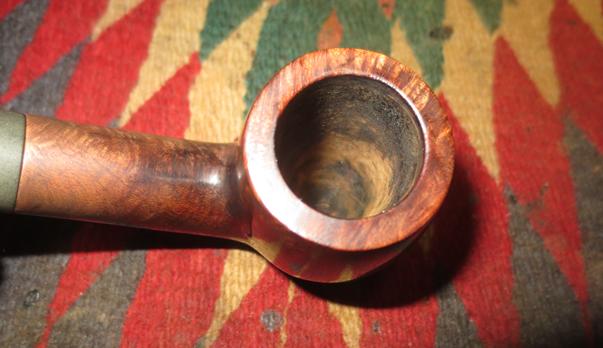
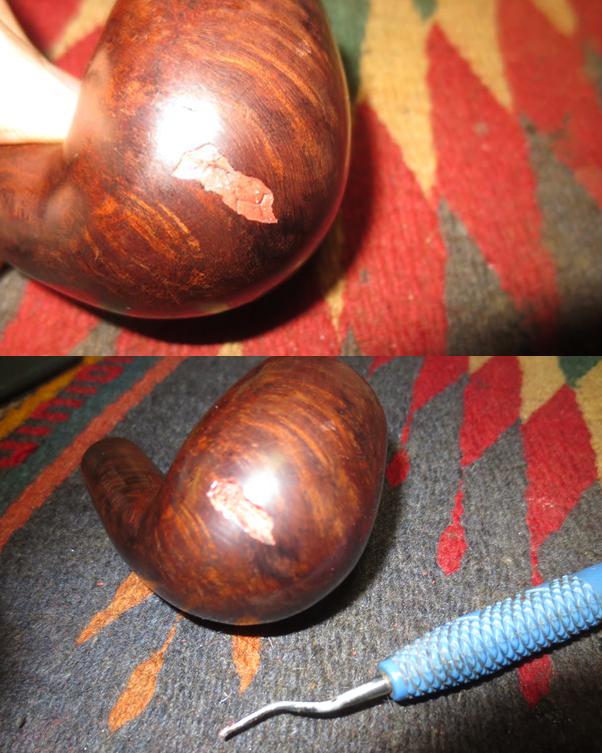
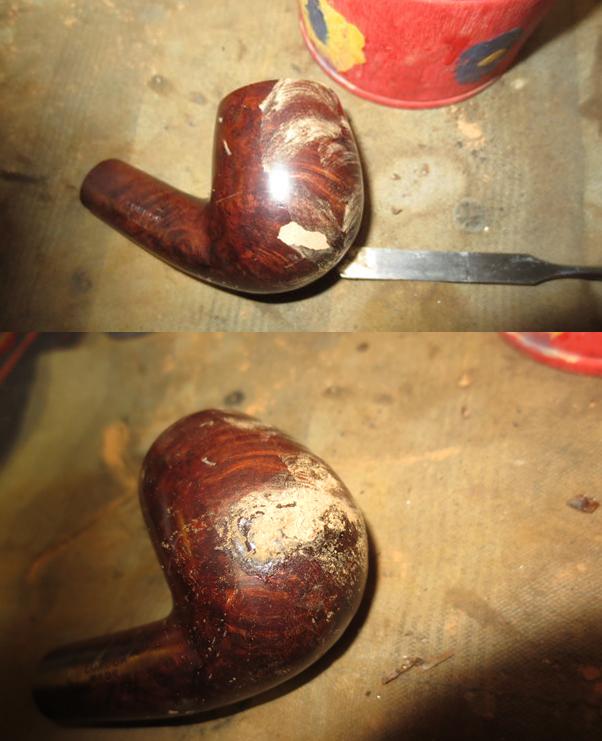
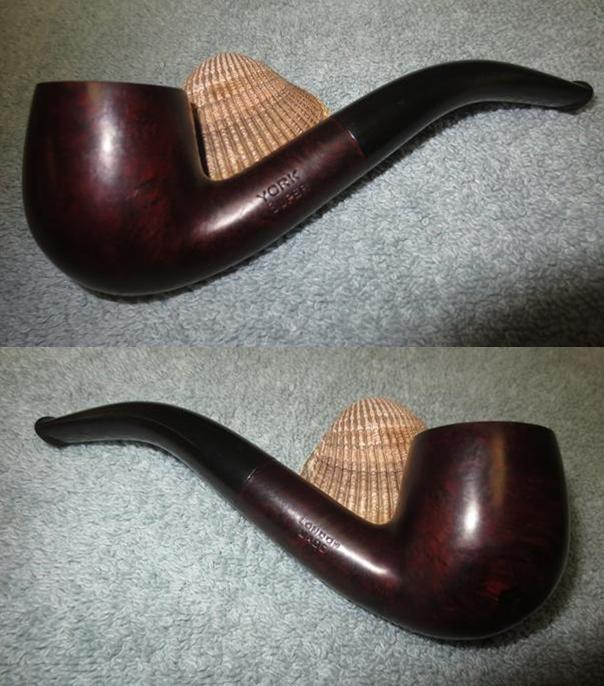
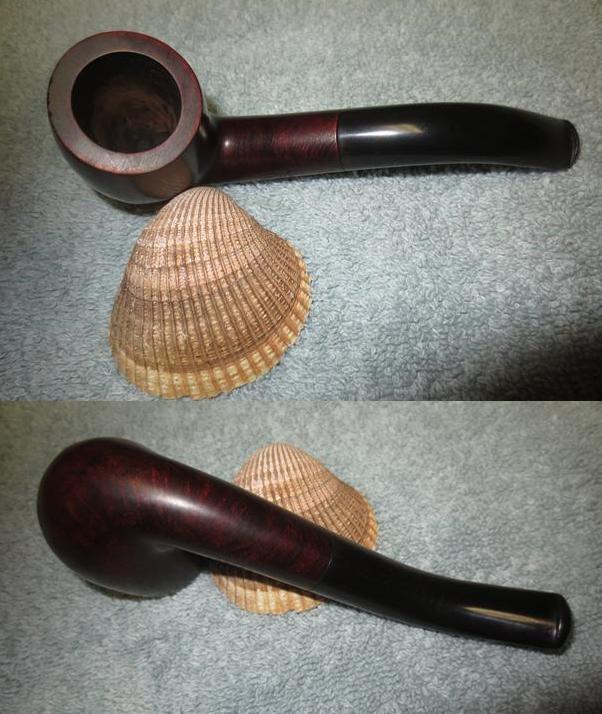
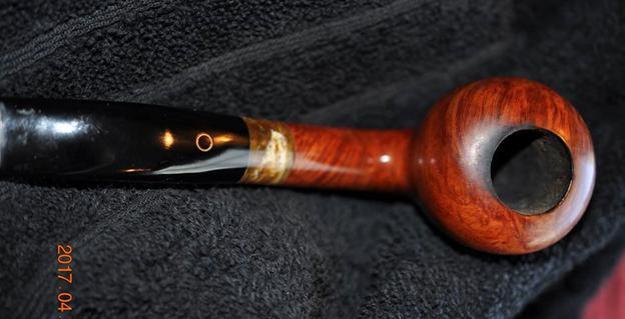
He sent some close up photos of the bowl rim and top along with photos of the bowl sides to give a clear picture of both the condition of the pipe and also the beautiful grain that flowed with the shape of the bowl. The rim top had some overflow from the cake in the bowl. It covered most of the inner edge of the bowl and extended on to the rim top. There is a great combination of birdseye on the sides of the bowl and cross grain on the front and back. There are a few very minute sandpits in the briar that in no way detract from the beauty of the pipe. 
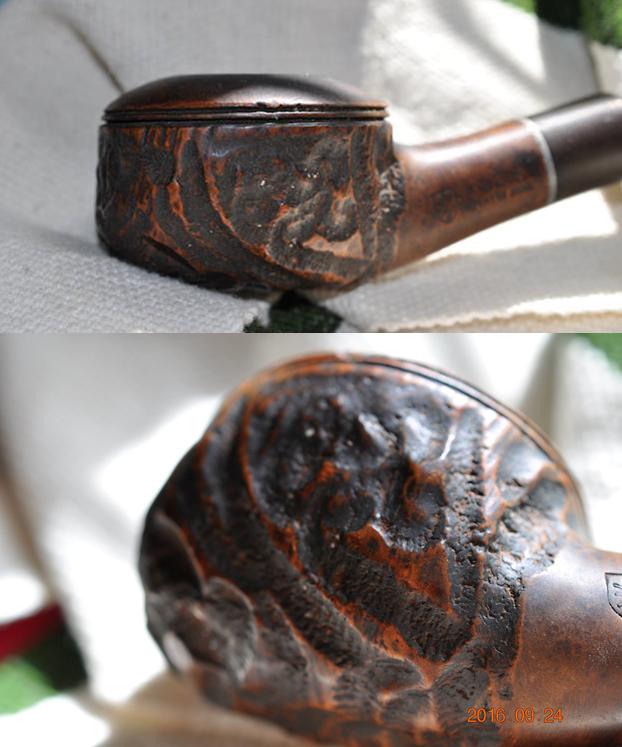
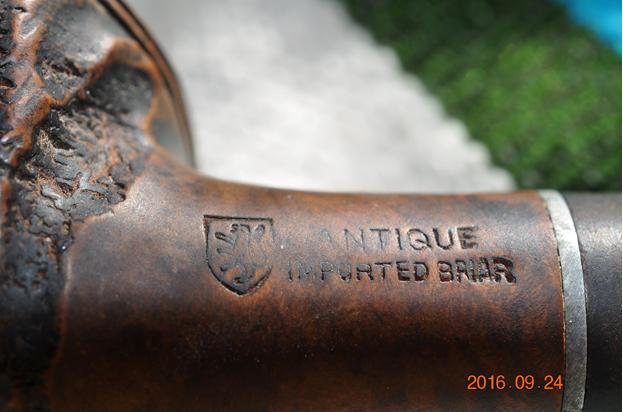
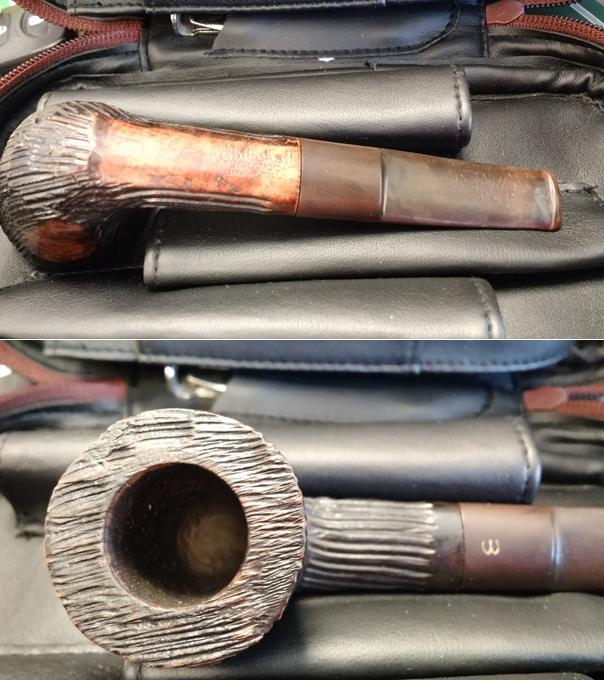
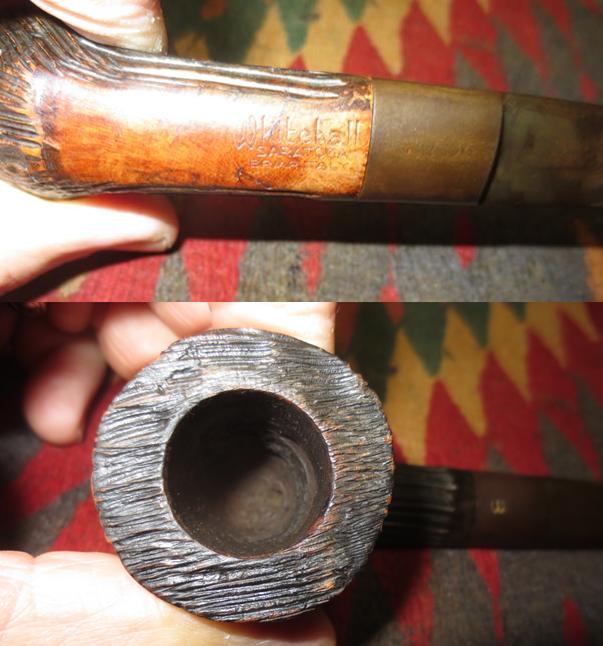
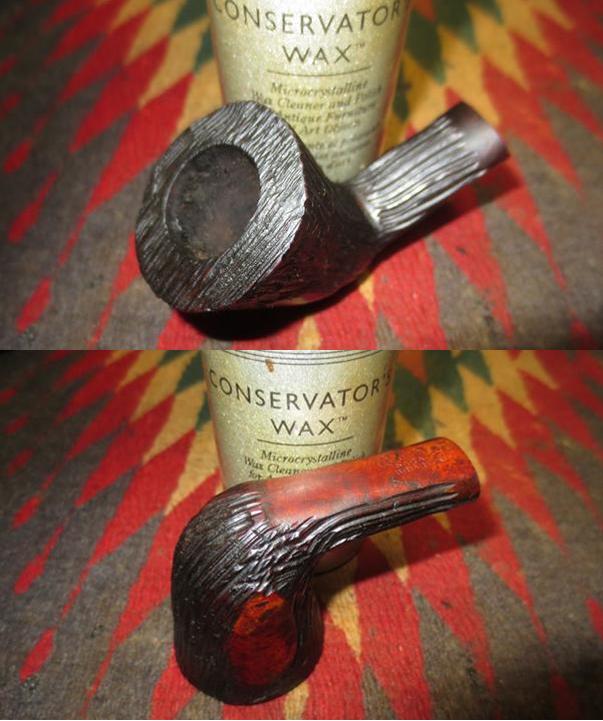
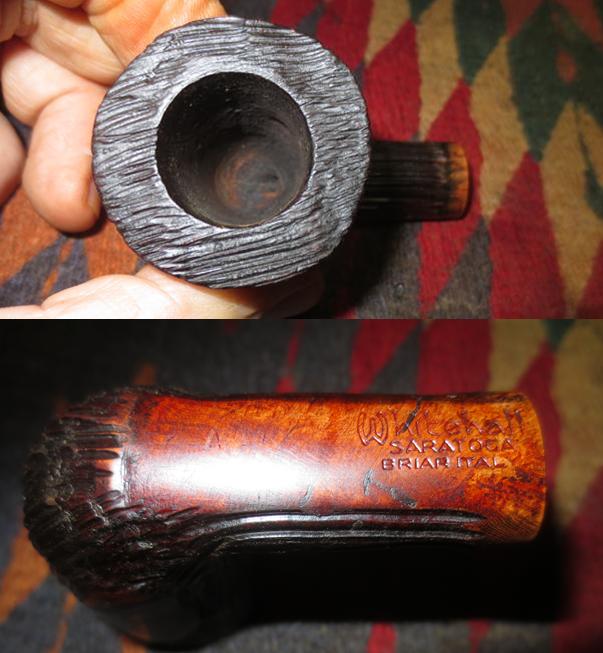
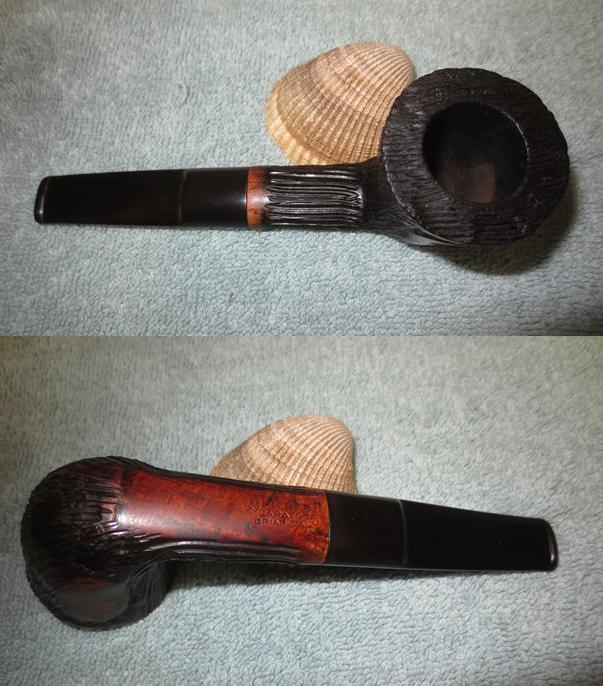
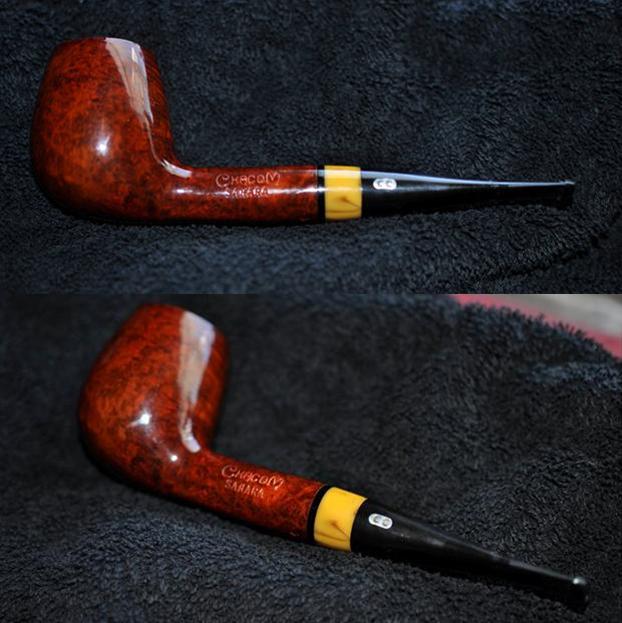
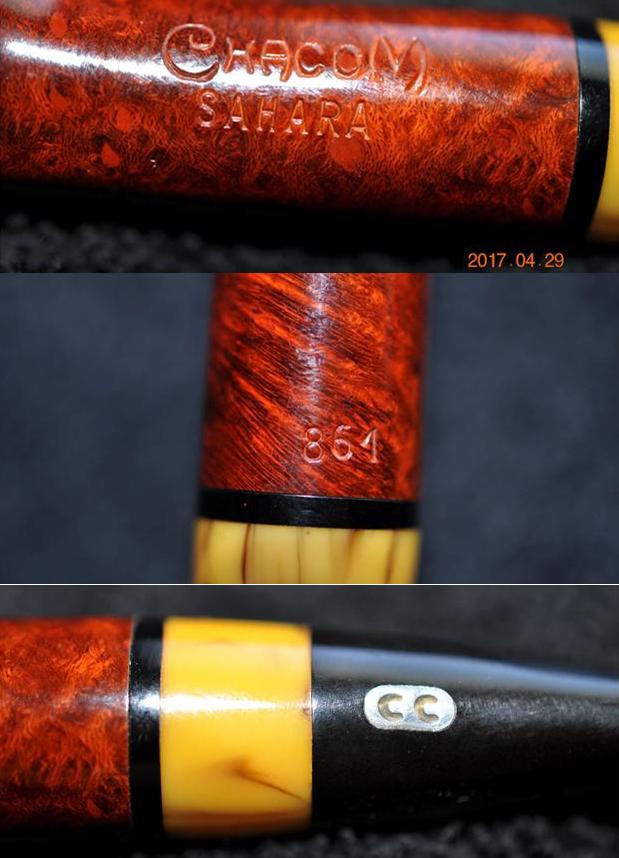
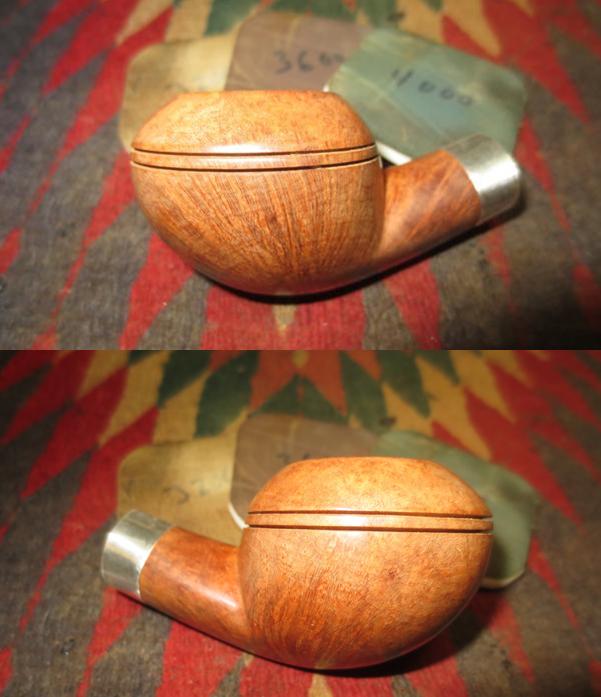
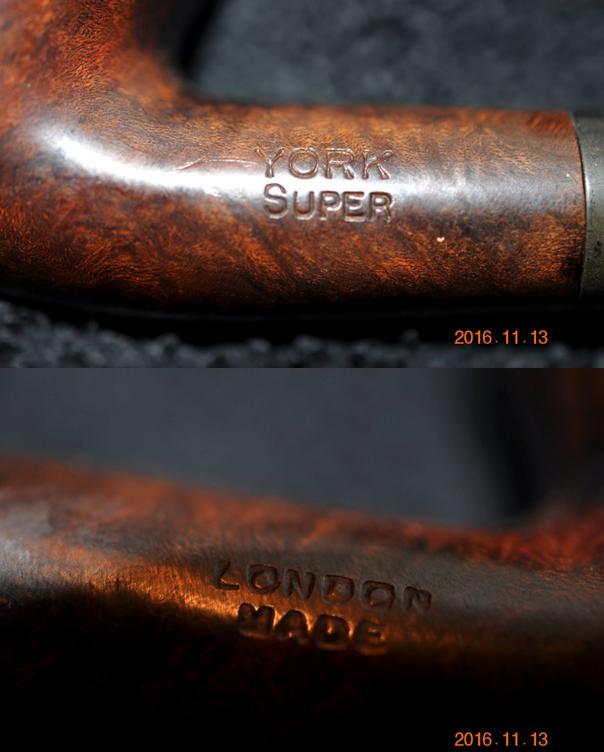
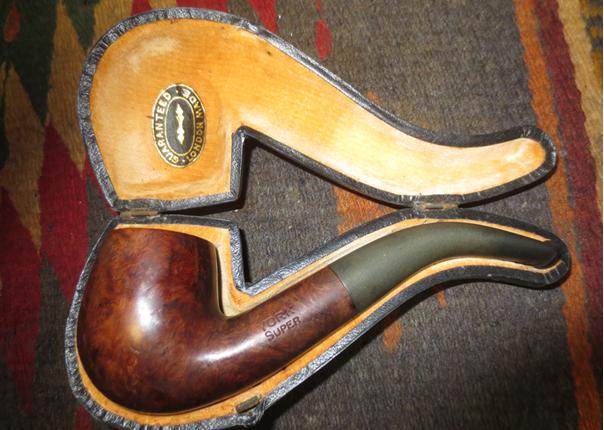
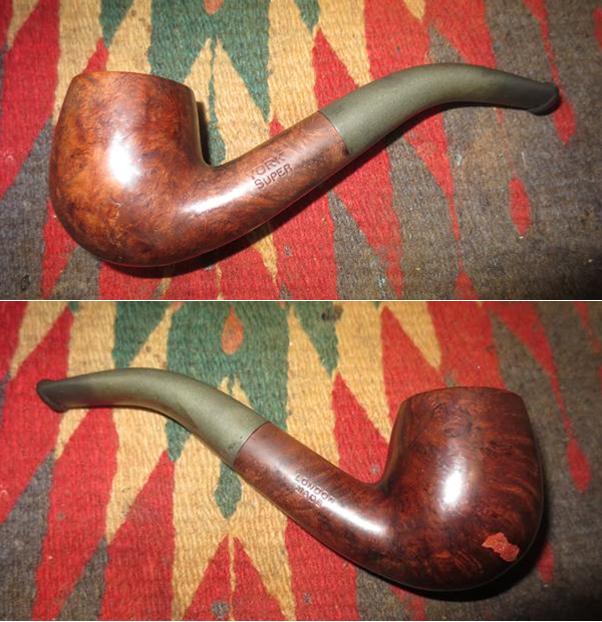
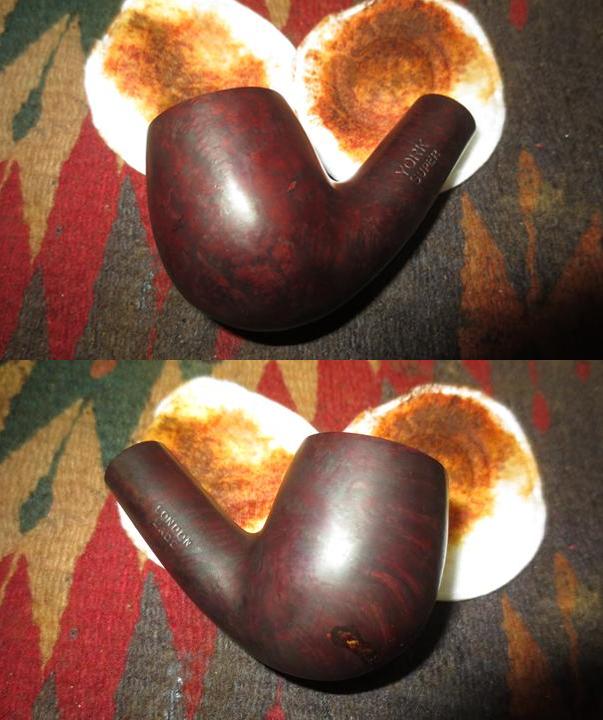
The next photo shows the stamping on the right side of the bowl and gives a clear picture of the look of the stamp.
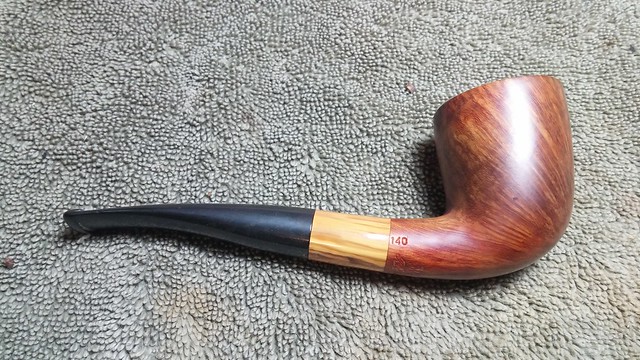
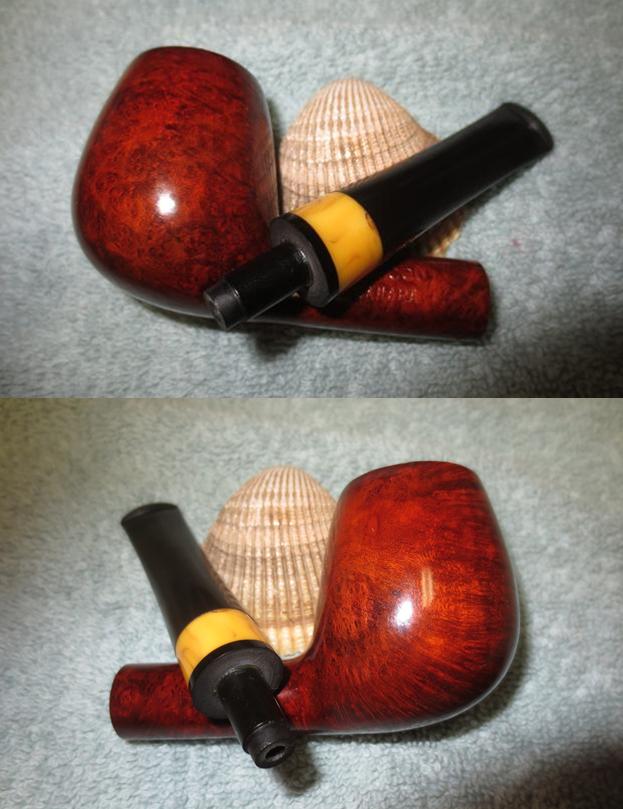
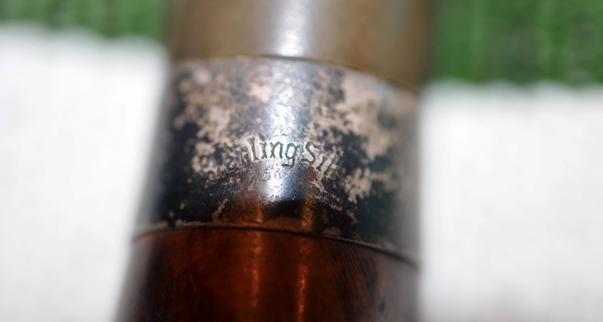
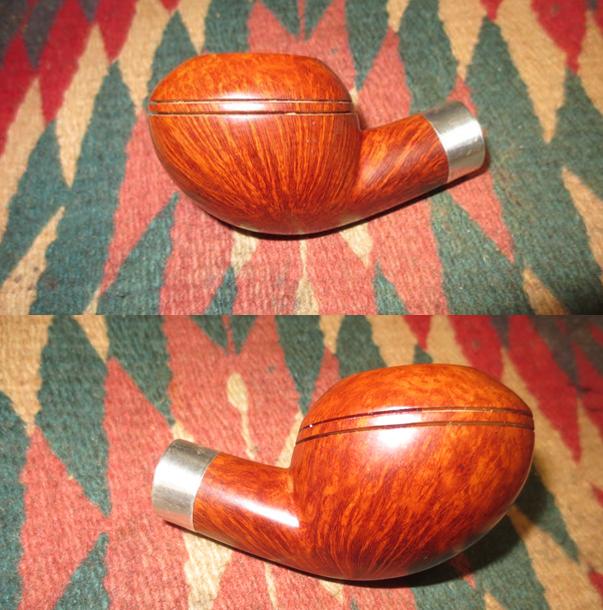
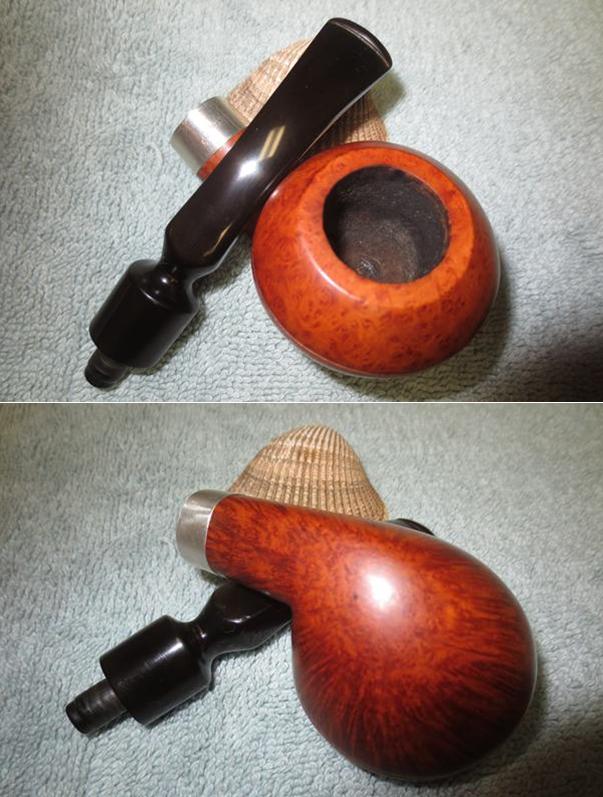
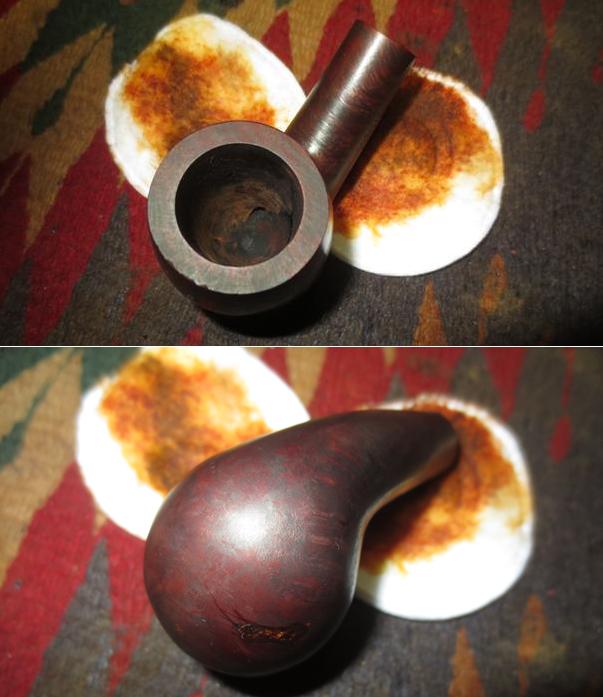
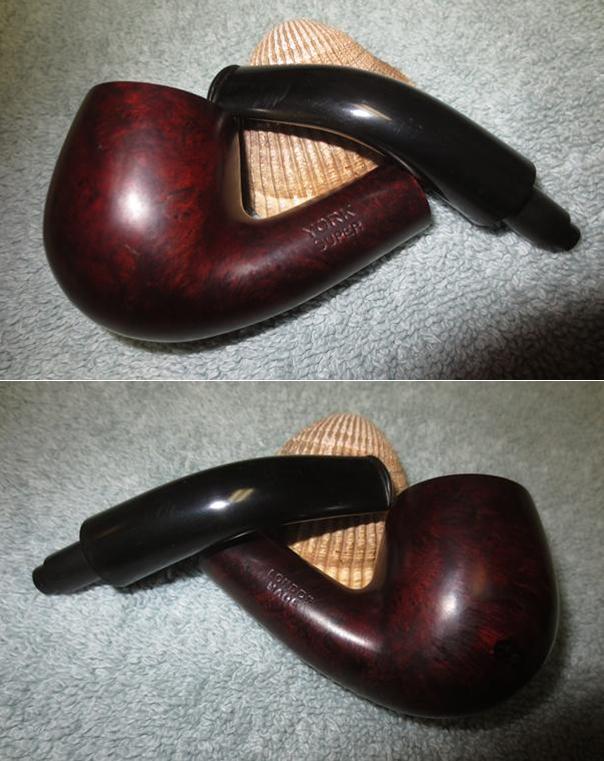
The next two photos show a bit of the stamping on the left side of the shank and the underside with the shape number 991. The mottled yellow acrylic stem insert is also shown in the photos.
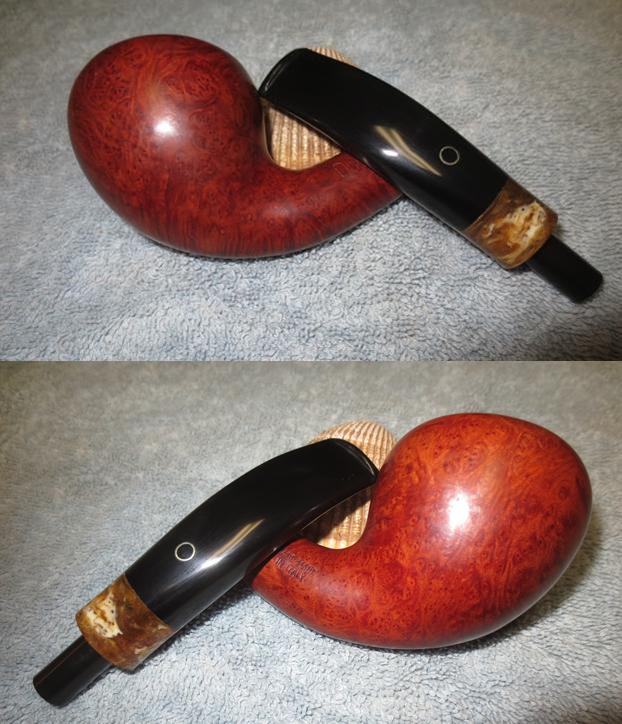
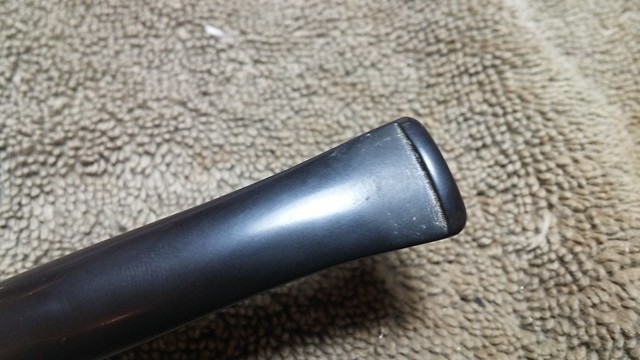
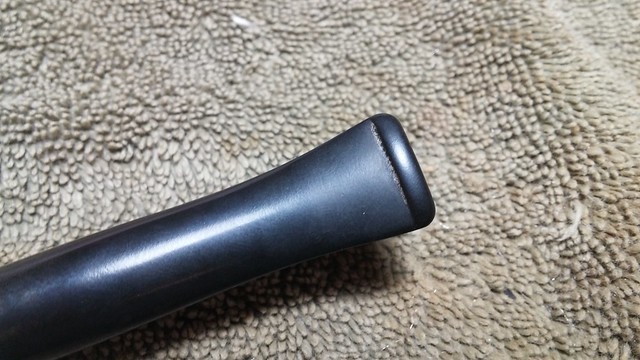
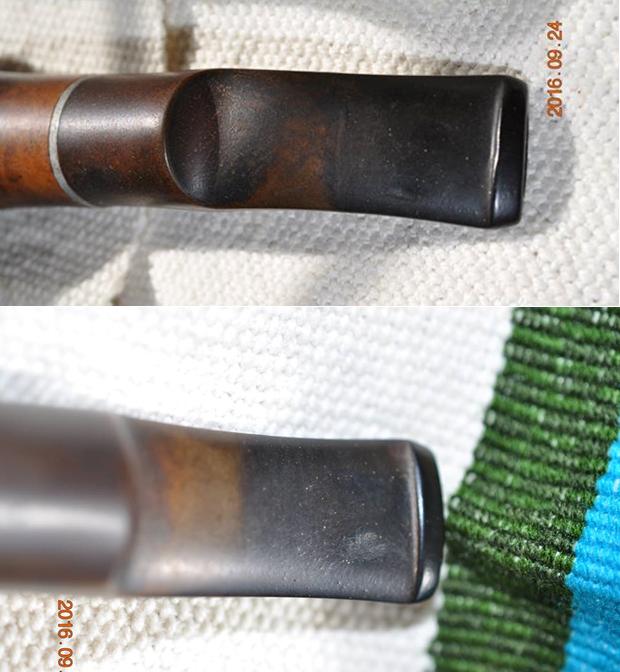
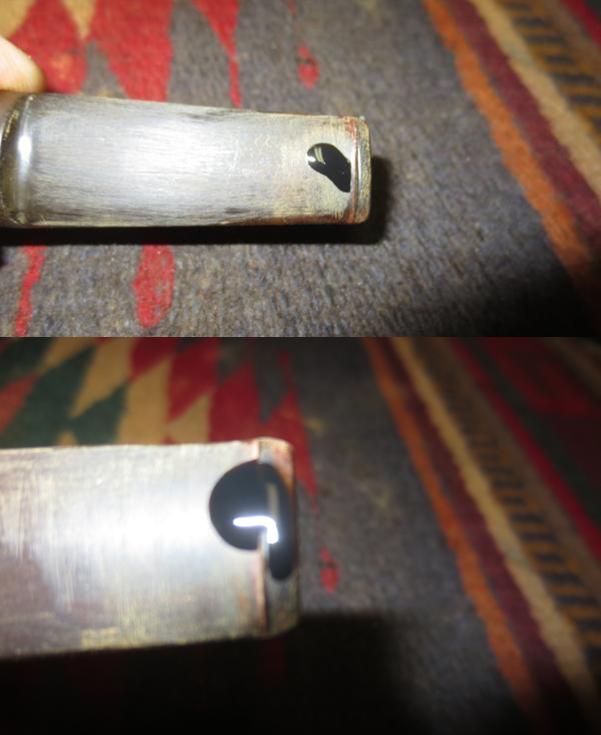
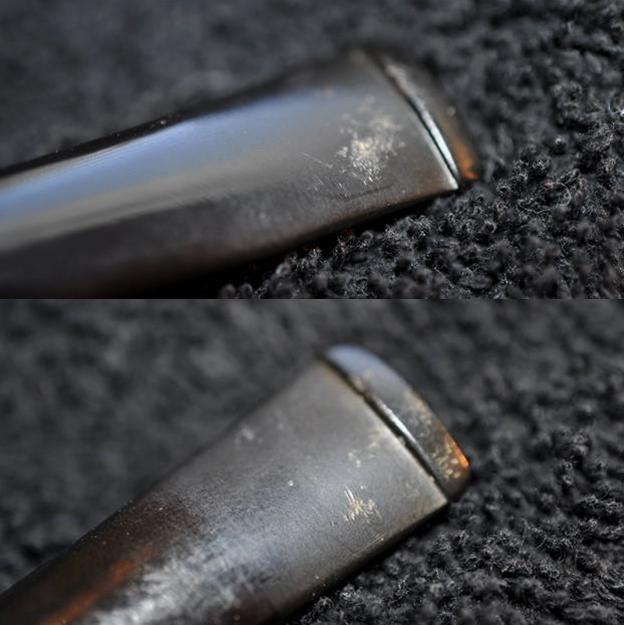
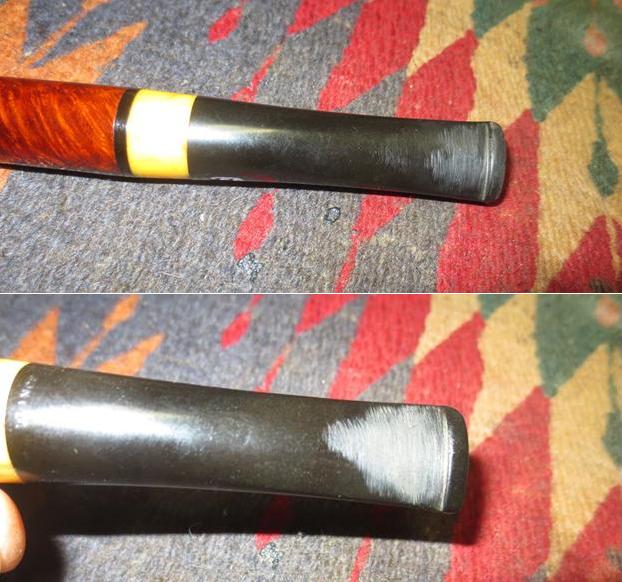
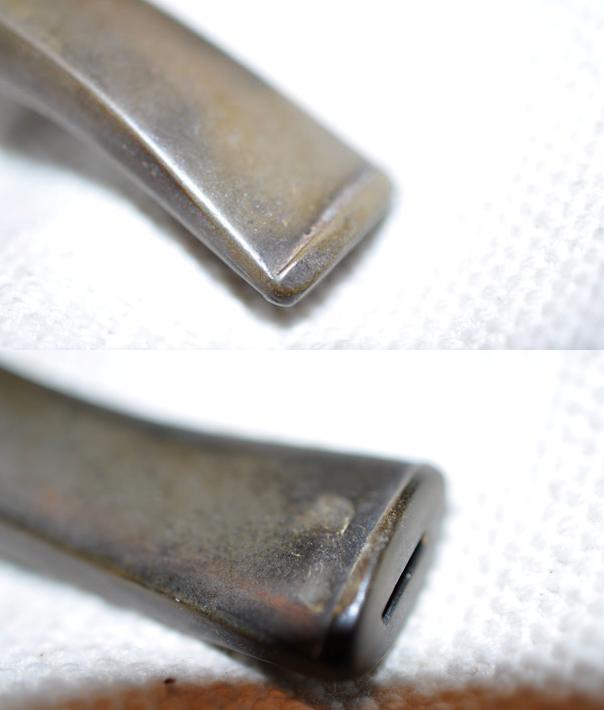
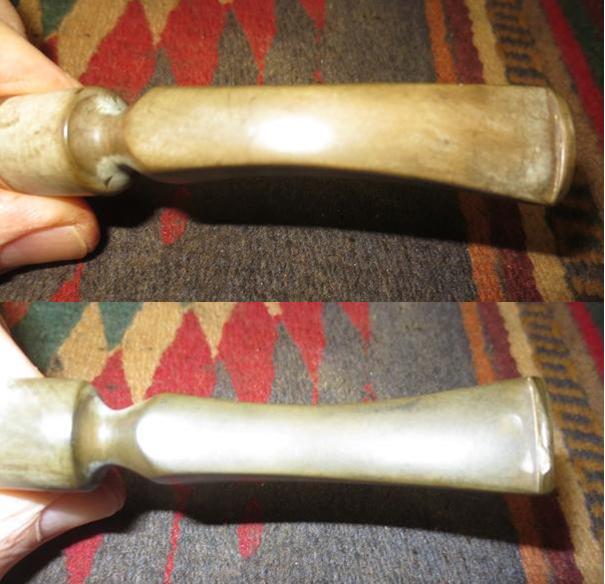
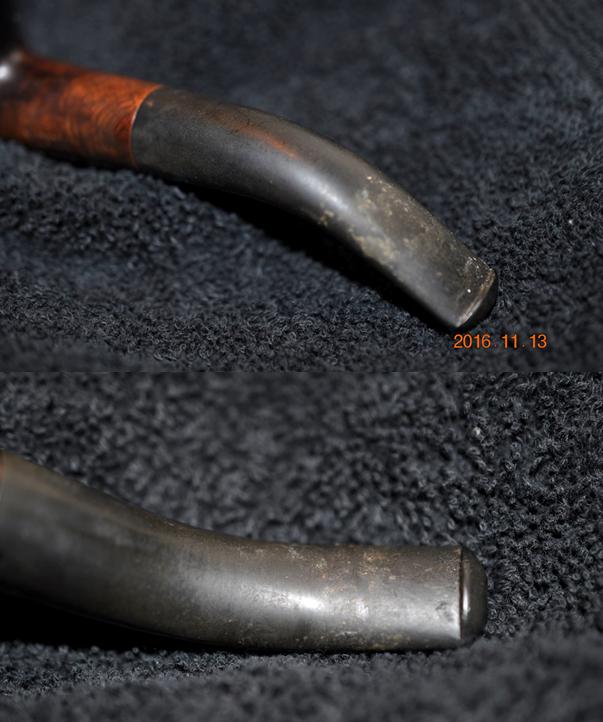
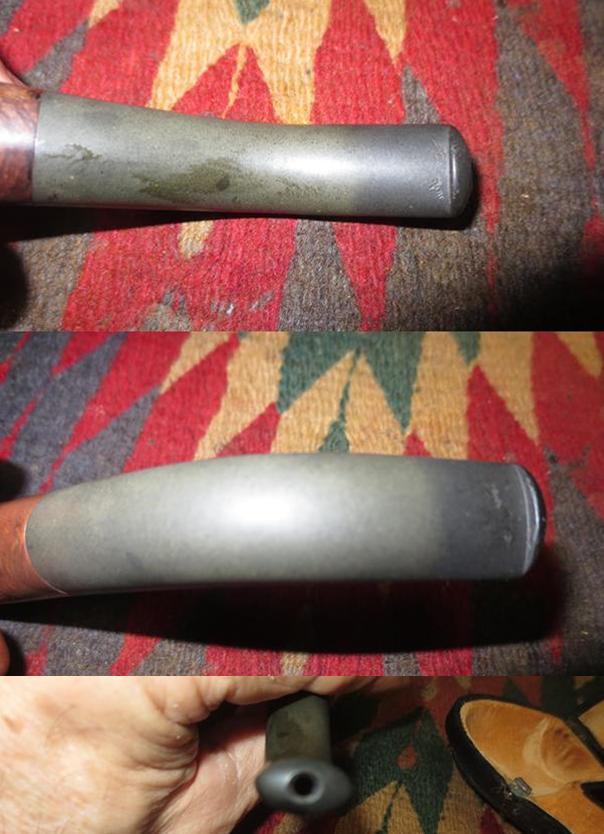
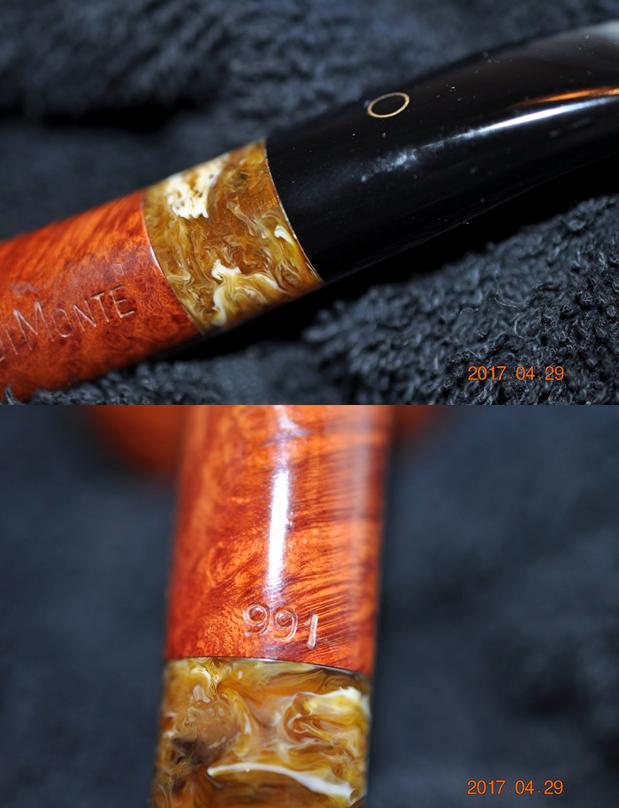
Like the other pipes in the lot from the estate sale the stem had a lot of tooth chatter on the stem near the button on both sides and also some wear on the edge of the button itself. The slot in the end of the stem was in really good shape and was well formed.
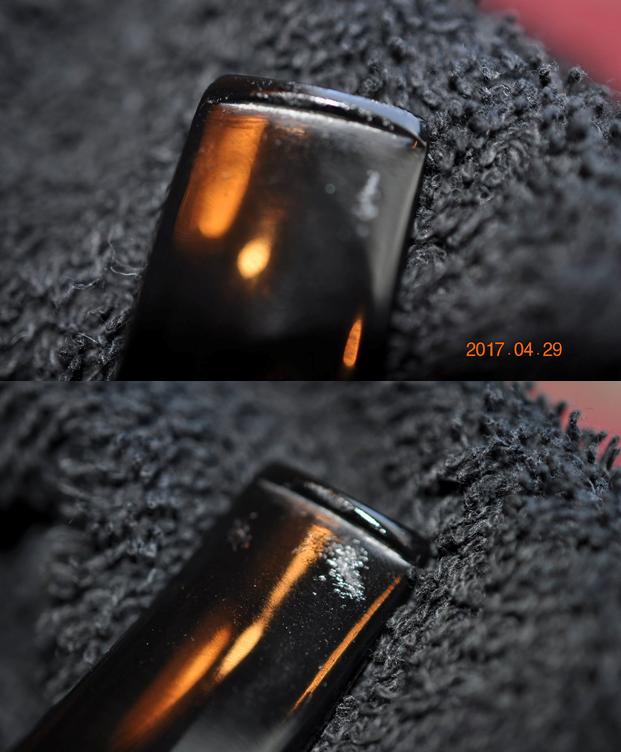
I knew nothing about the DiMonte brand. My first thought was it was an Italian Hand Made pipe somewhere between Savinelli and Castello. The quality of the craftsmanship and the hand made stem and briar work made me think that it was more toward the Castello side of the scale. This is a beautiful pipe. I did some searching on the web and found a link to a post on alt.smokers.pipes. It was a response to a fellow who posted a question about the brand. I have included the link to the thread as well as the informative response regarding the history of the brand and its place of origin. Here is the link: https://pipesmokersforum.com/community/threads/info-on-this-pipe-brand.20964/

Hello Pappy, here’s a bit of information that I found from an alt.smokers.pipes post in 02/10/2003 that reads:

DiMonte was originally Arlington Briar Works, a pipe factory in New York. It went out of the pipe-making business, and sold off its machinery, I think in the 1970s. Maybe later. Mark Tinsky could probably give you an accurate date on when, if that is of concern.

Recently (2003), the family has decided to get back into pipes, and has been having them made under contract in Italy and importing them. The few I have seen so far seem to be good value for the money, but nothing to rave about. I have one. Wood is good, combustion chamber and shank both properly drilled, good quality mouthpiece. Some of the digits in the nomenclature look as if stamped by a dyslexic (and perhaps were — upside down 8, other minor things), and the finishing touch in fine details was not apparent in all instances.

If you find one and like it, I would expect it to be a good smoker. But if you worry about nit-picks, examine the pipe carefully before buying. You might find some…

One more comment: The old pipes from Arlington Briar Works that I have picked up at estate sales have been of lesser quality wood and a touch on the small side, but craftsmanship and attention to detail was great. The new pipes from Italy have better wood, size is generally larger (better, for me), but attention to detail is not always what it might be. As smokers, I rate the newer ones higher, because wood is so important, but in fit and finish things ain’t what they used to be…”

It appears when Arlington attempted to re-enter the pipe market, they contracted with an unknown Italian outfit, who manufactured these pipes under the DiMonte label. However, Arlington once again soon went out of business.

However, I’m sure there must be some knowledgeable pipers here that may have more information for you. Hope this helps you a smidge more…

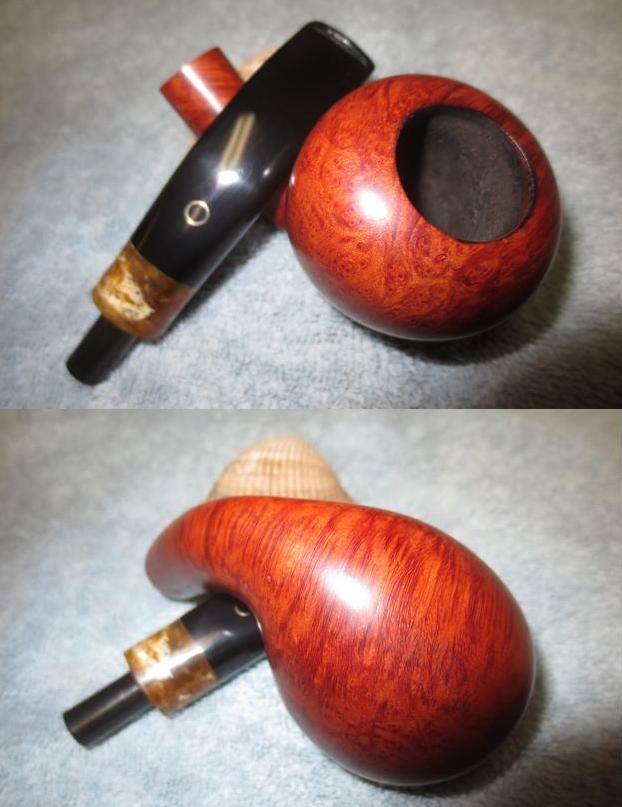
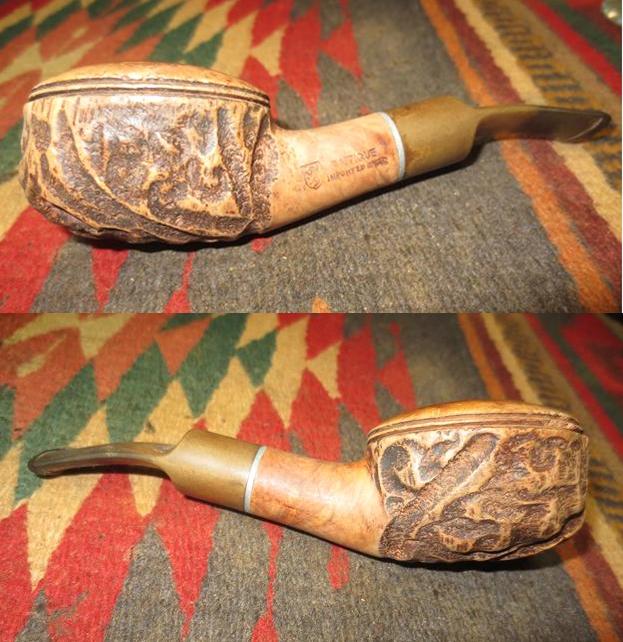
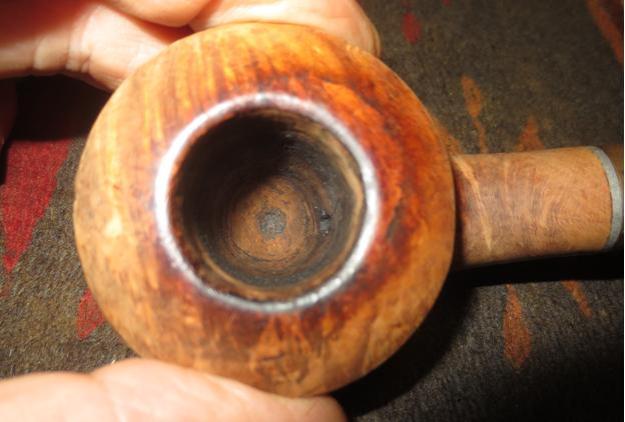
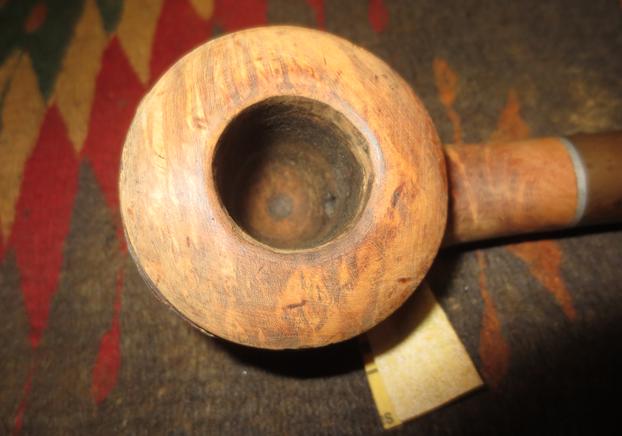
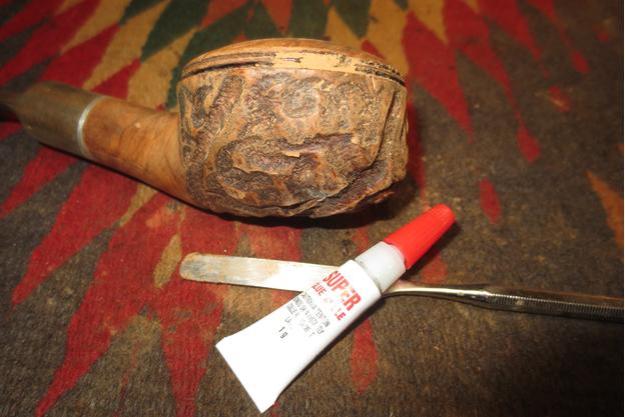
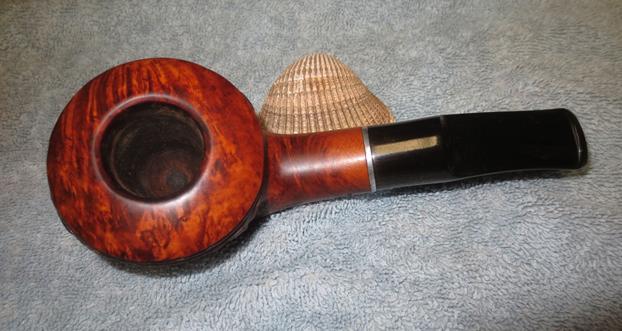
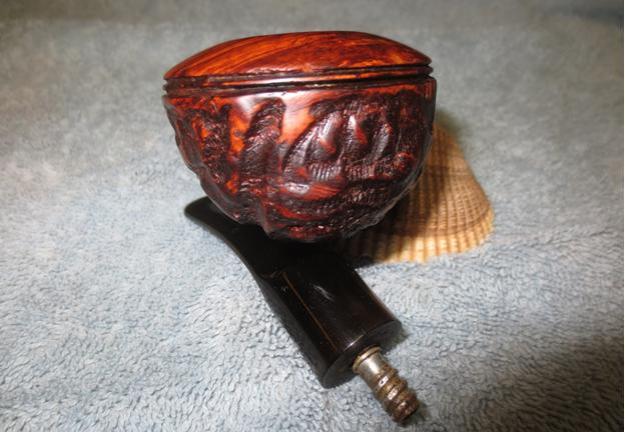
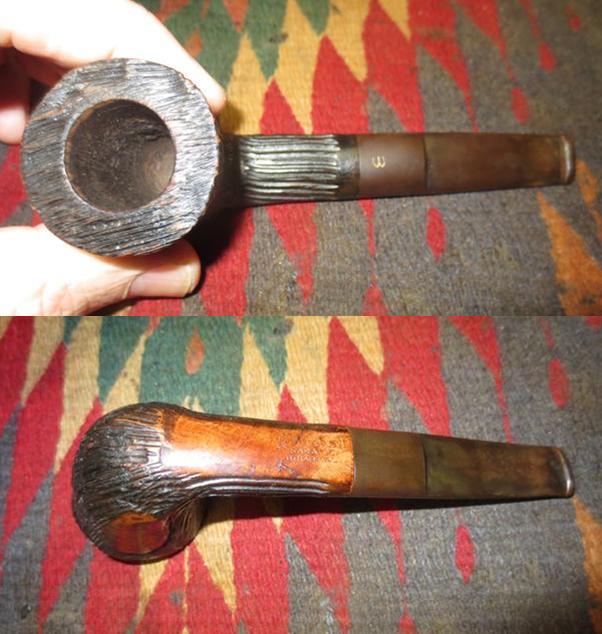
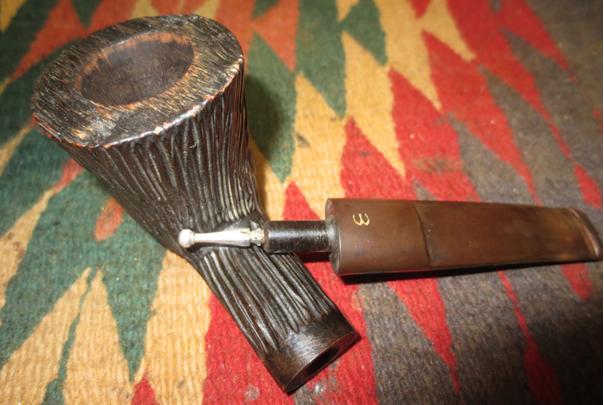
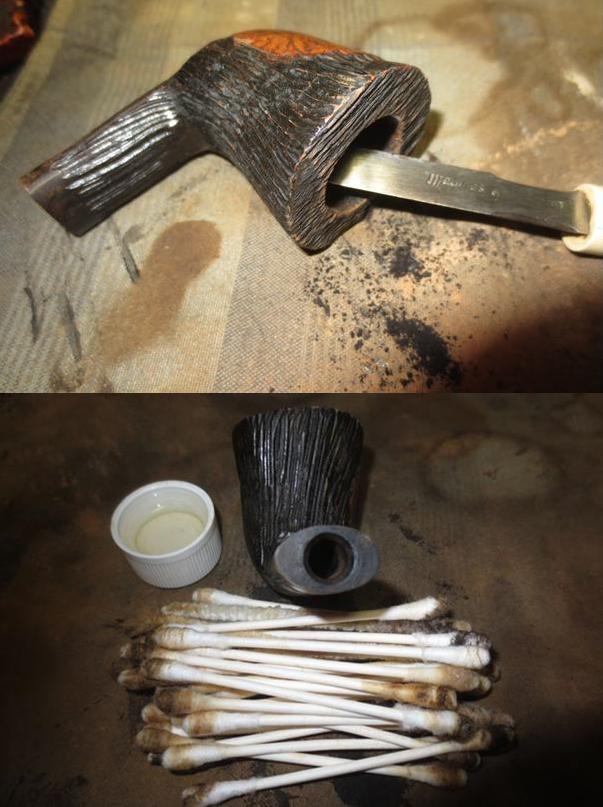
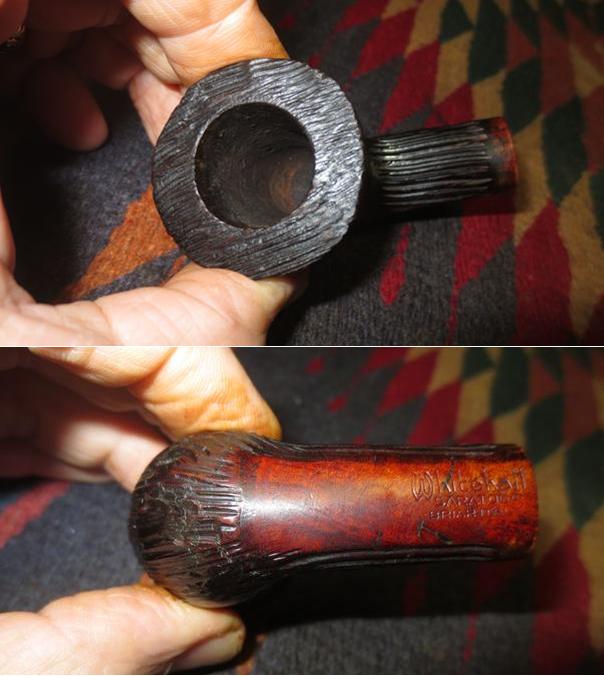
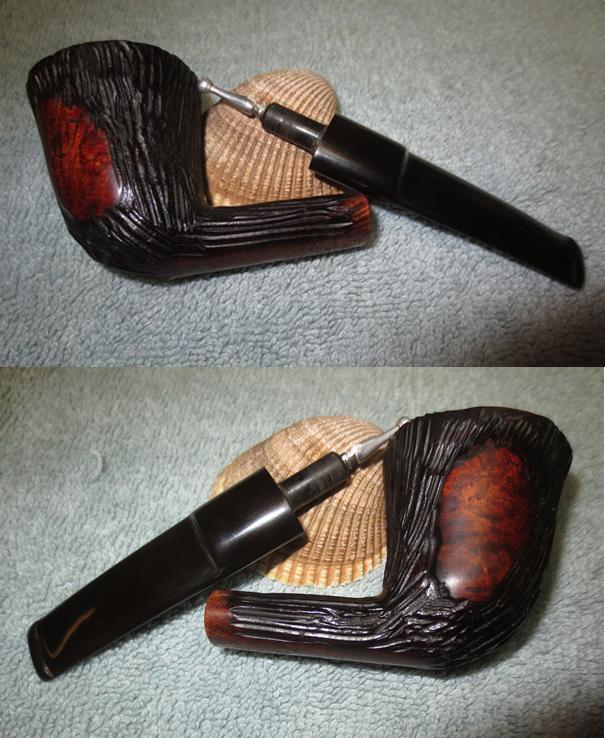
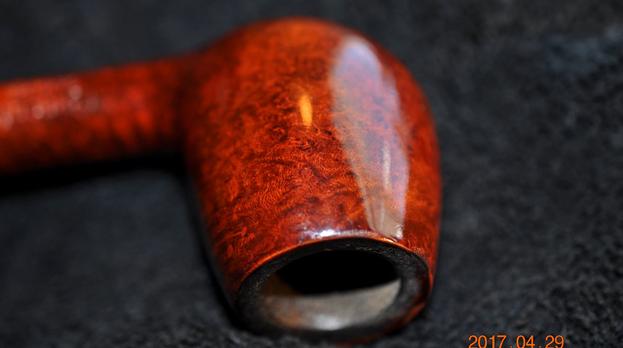
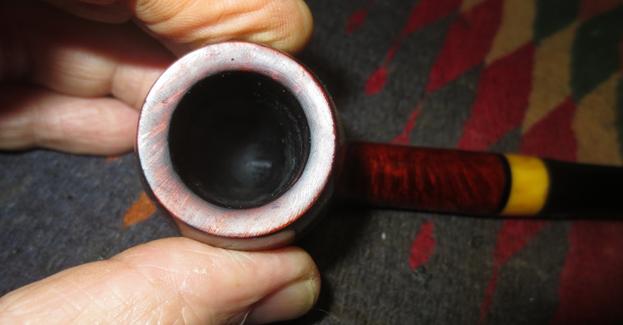
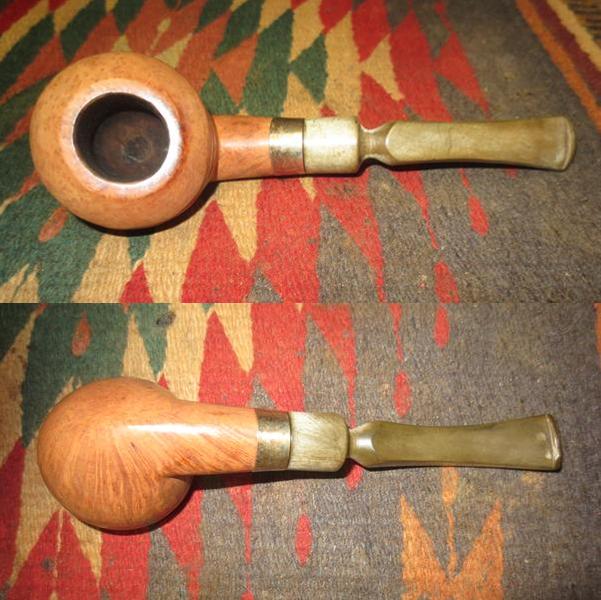
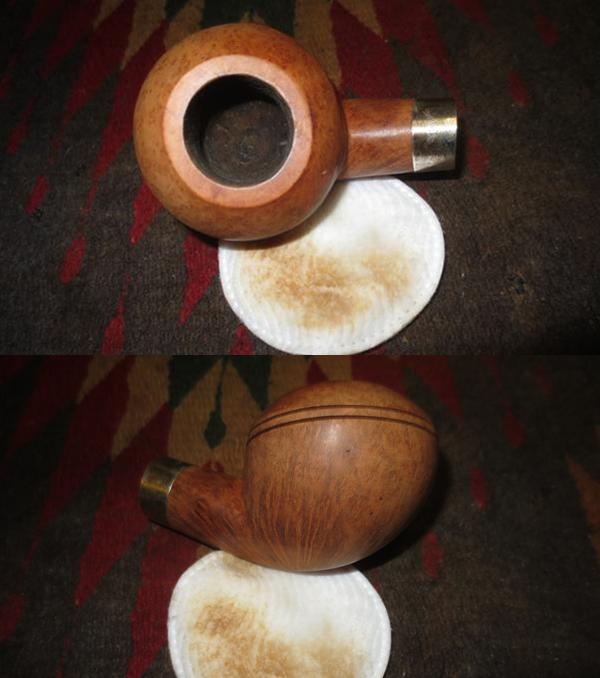
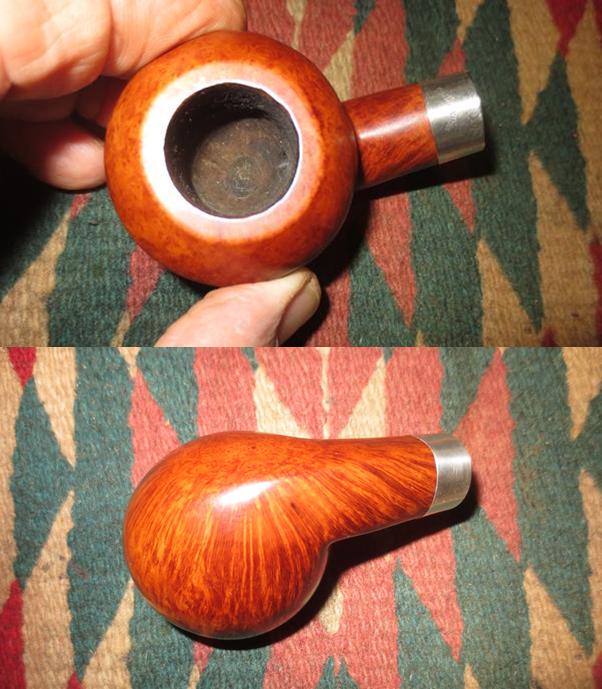
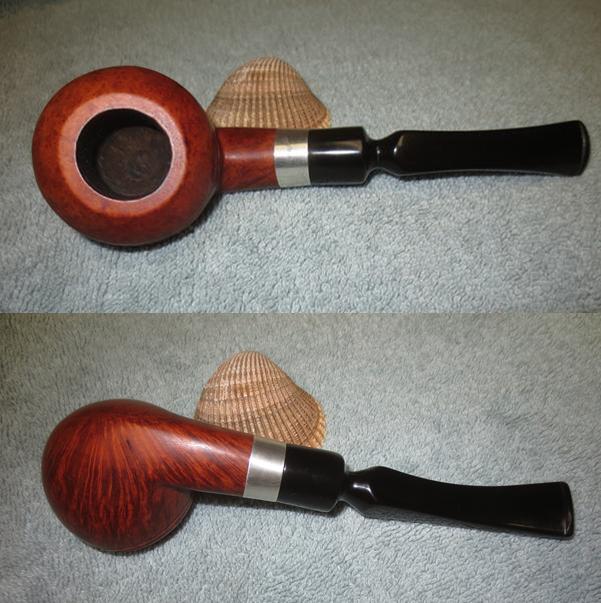
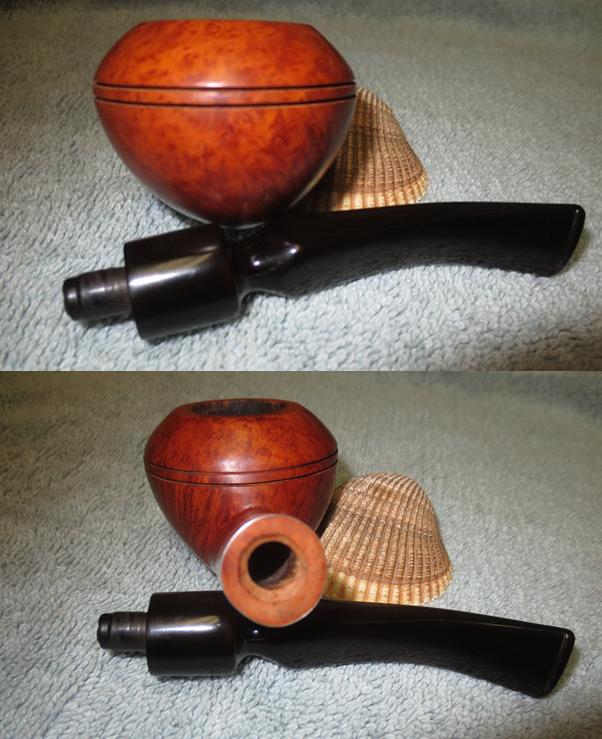
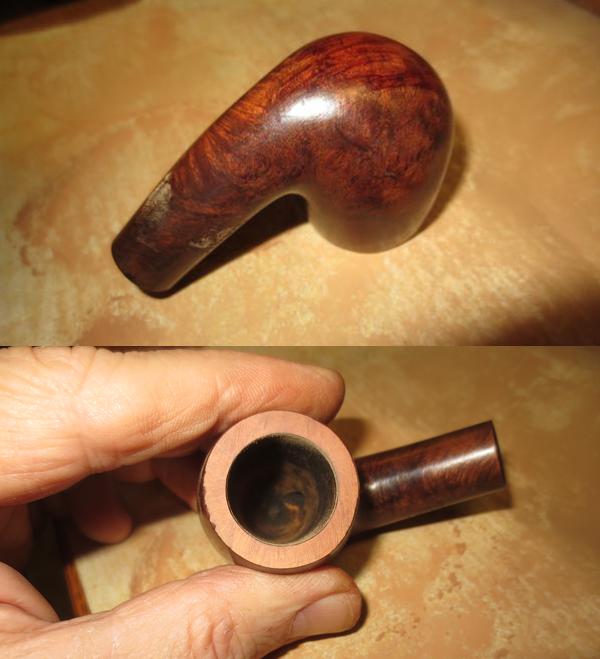
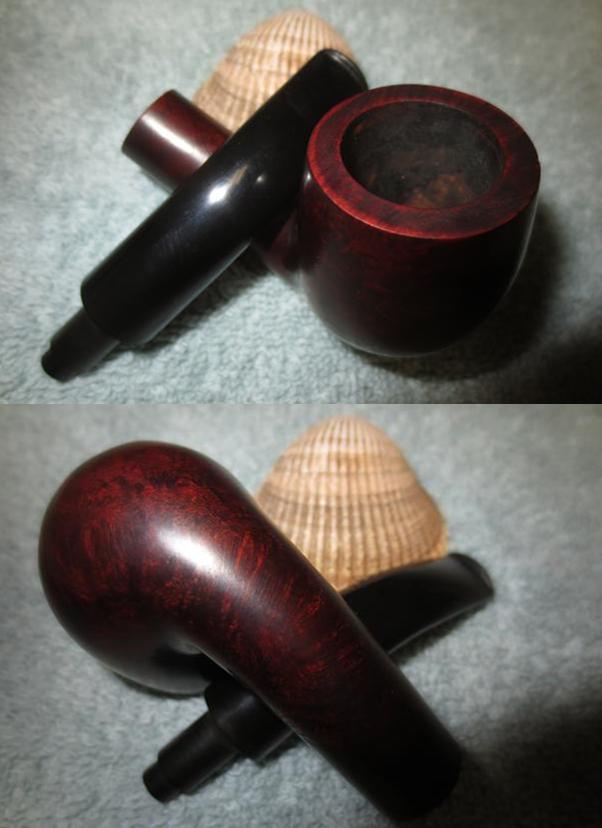
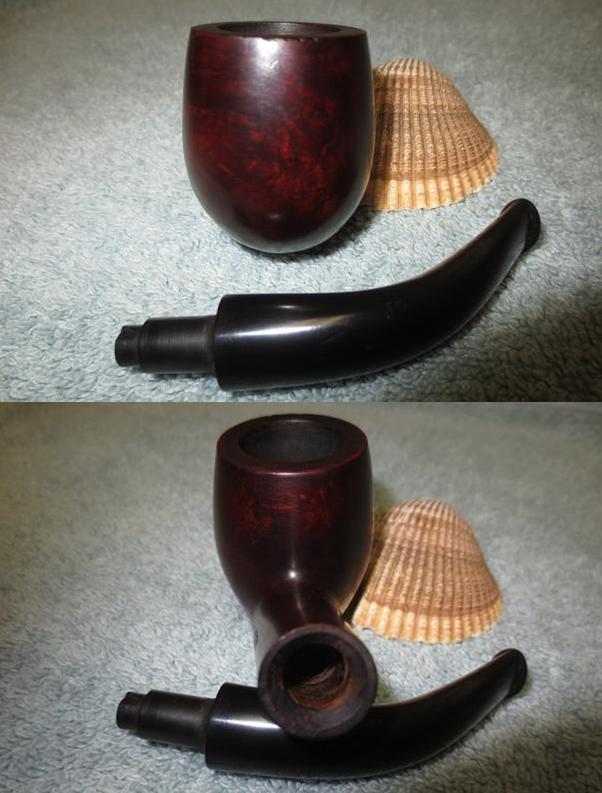
When I brought the pipe to my work table I took the next four photos to show the condition of the pipe when I received it. My brother had done a great job cleaning up the bowl cake and the overflow on the rim. The rim surface was clean and smooth. He did a thorough cleaning of the internals of the pipe. 
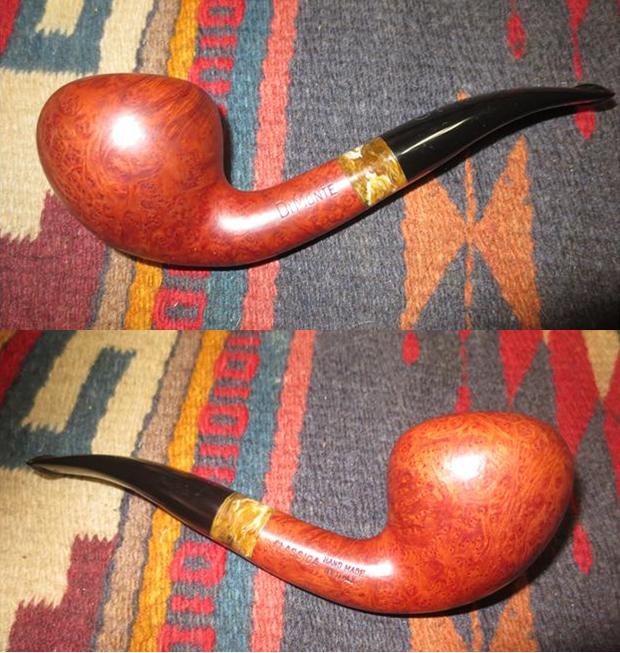
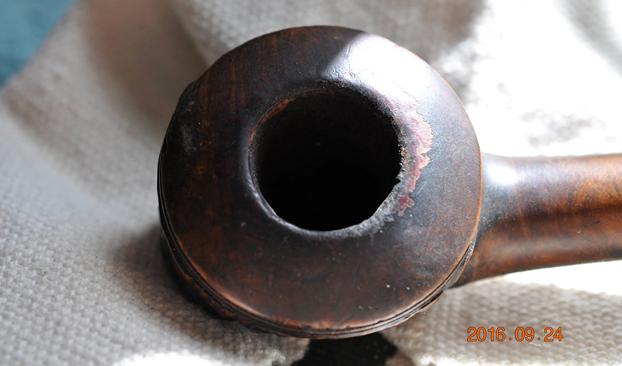
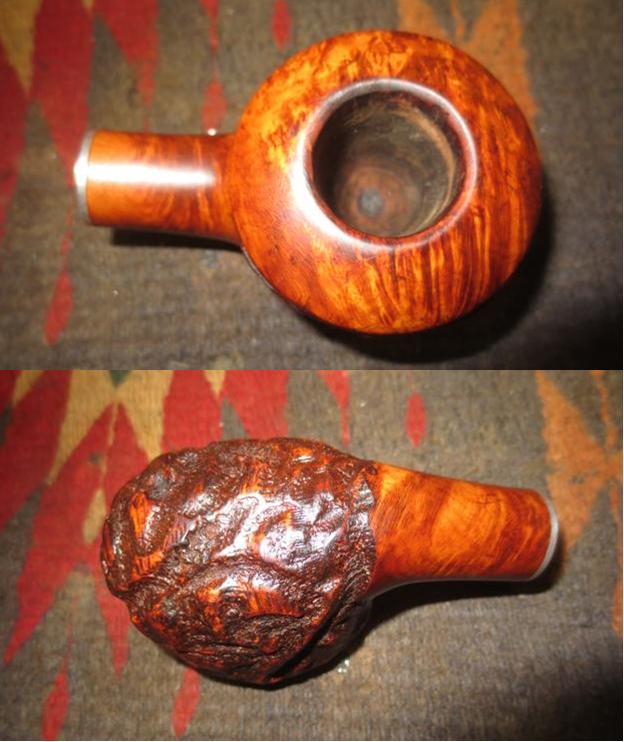
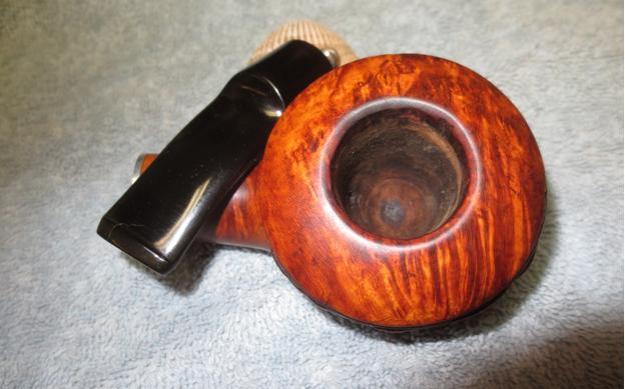
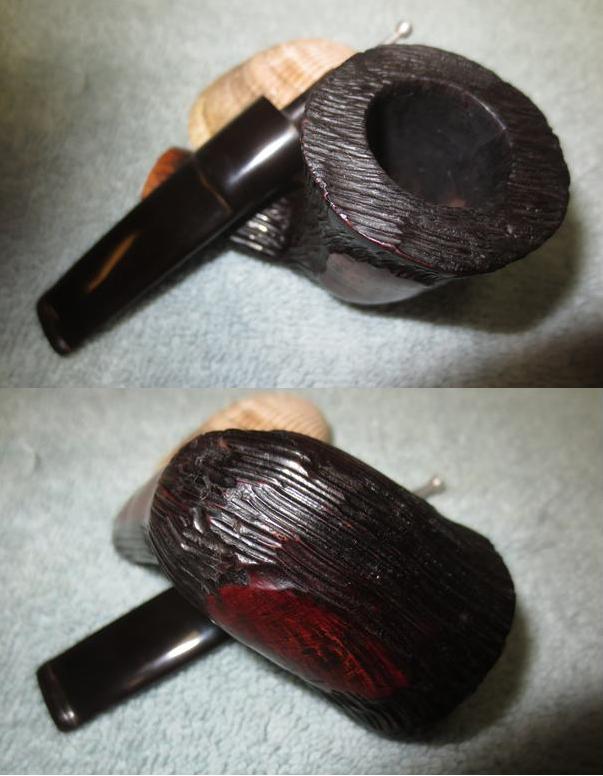
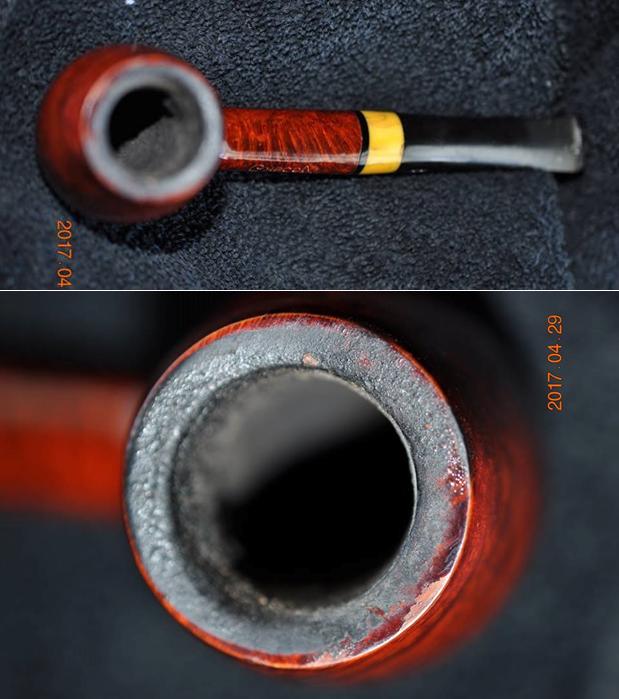
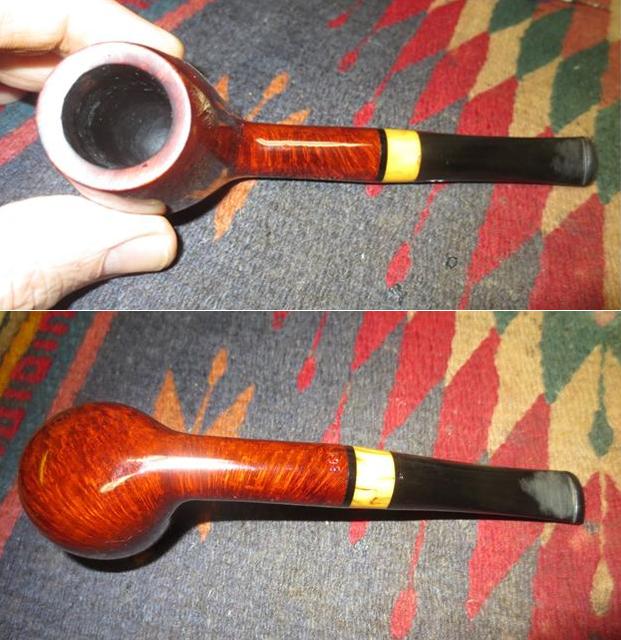
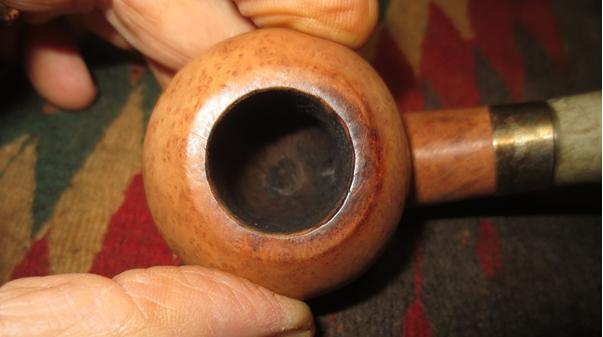
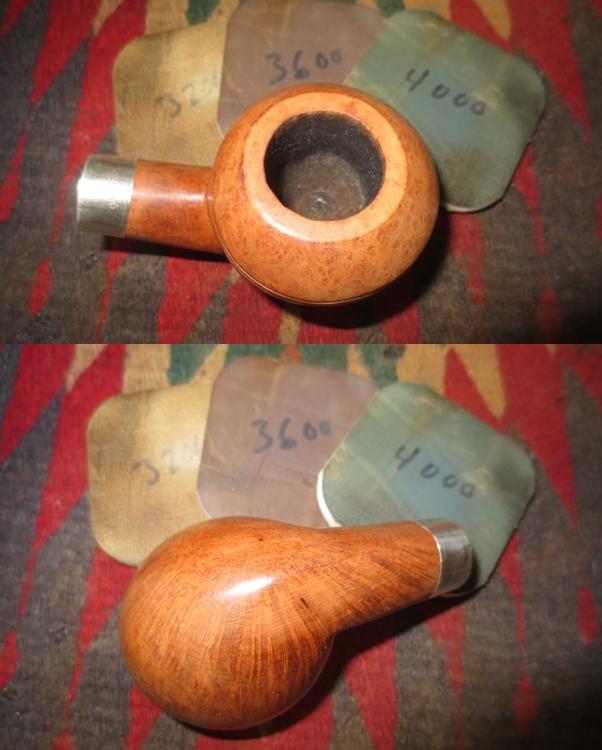
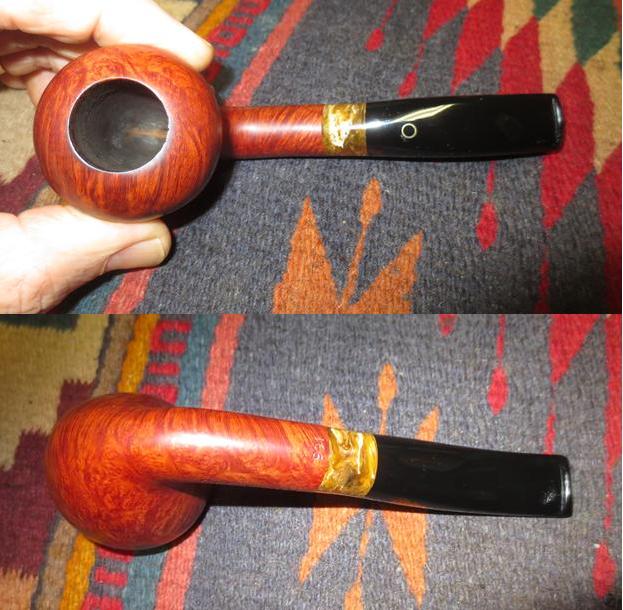
The next close up photo shows the inside of the bowl and the cleaned and restored rim top.
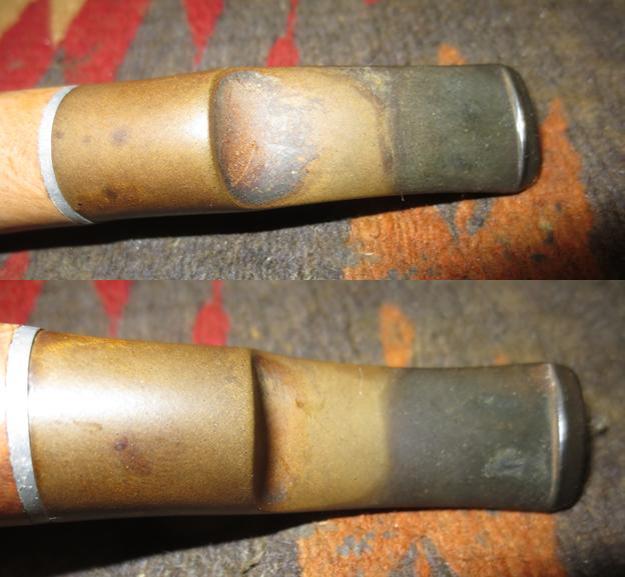
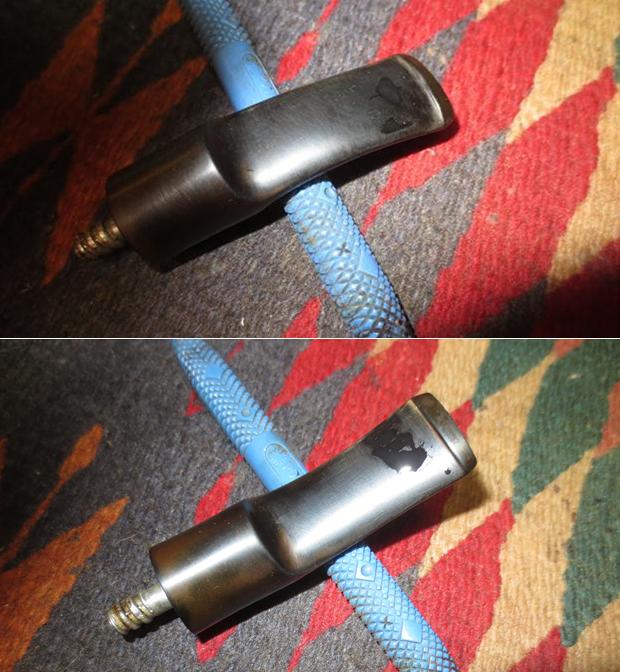
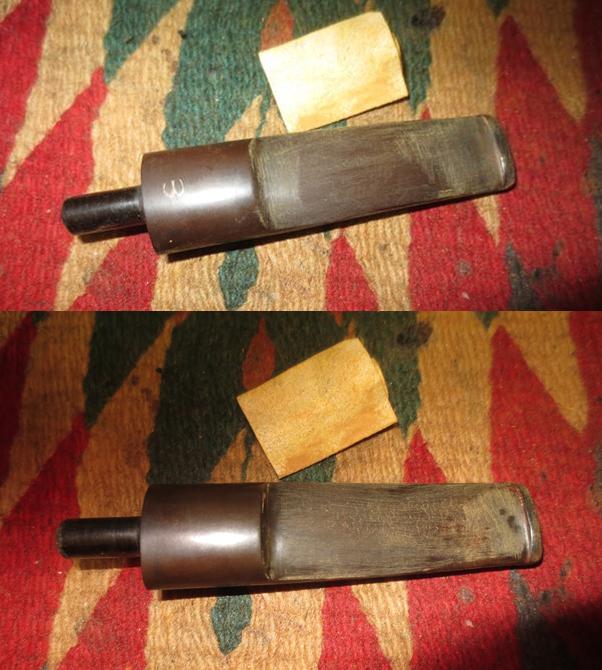
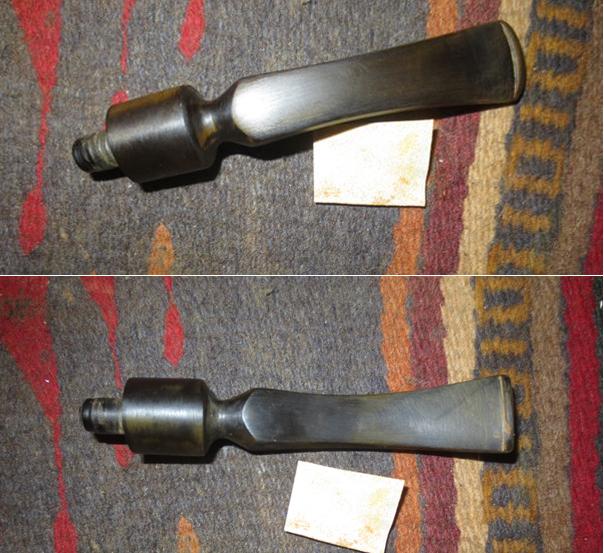
The stem was clean but it had a lot of tooth chatter on both sides of the stem that would need to be sanded out.
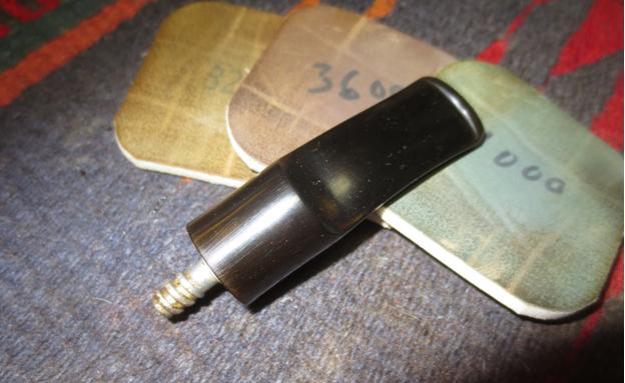
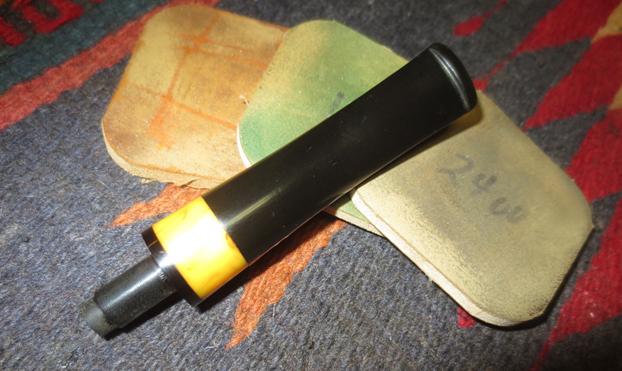
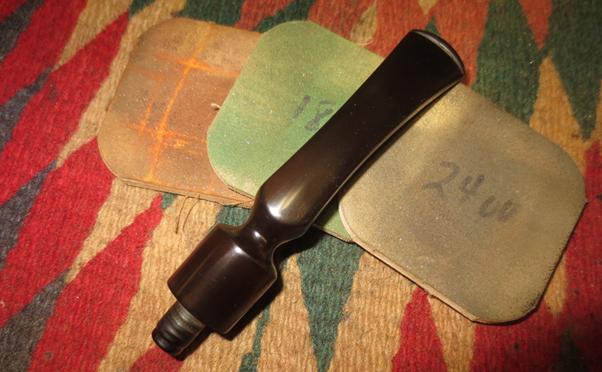
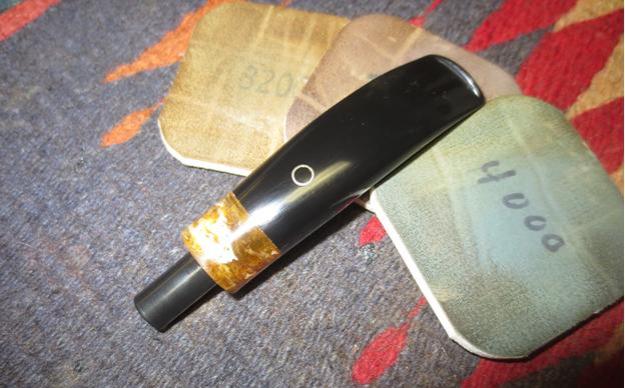
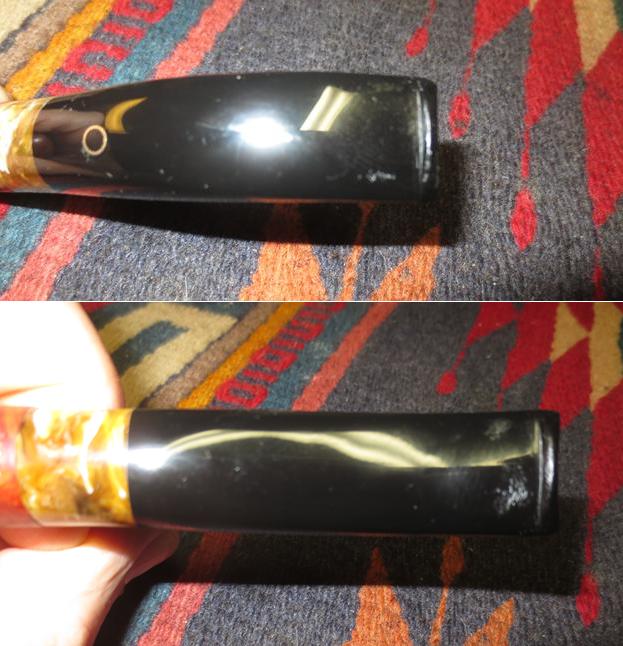
I sanded out the tooth marks and reshaped the button edges with 320 grit sanding pads and was able to remove all of the chatter and the marks. Fortunately they were not too deep in the Lucite so sanding them out was quite simple. I sanded them without damaging the profile of the stem.
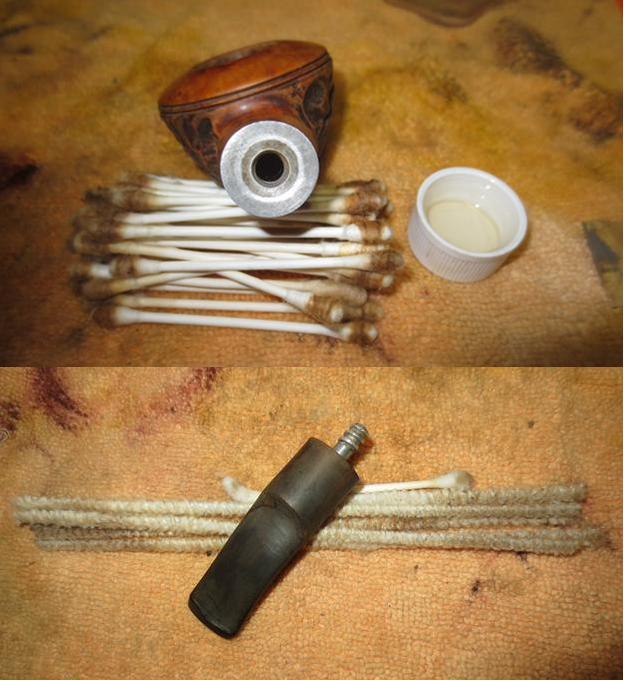
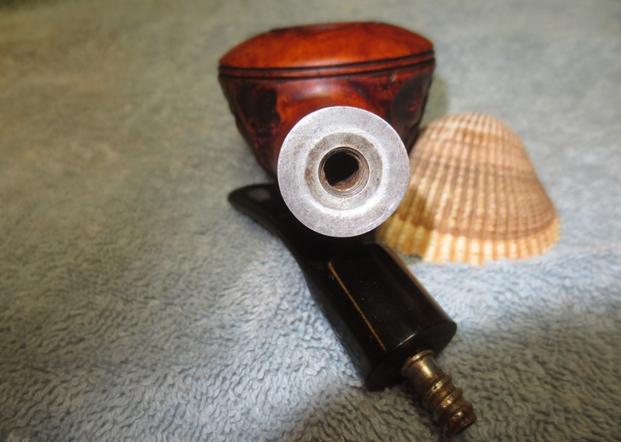
I ran a pipe cleaner through the mortise and the airway in the shank and stem. The airway was very clean.
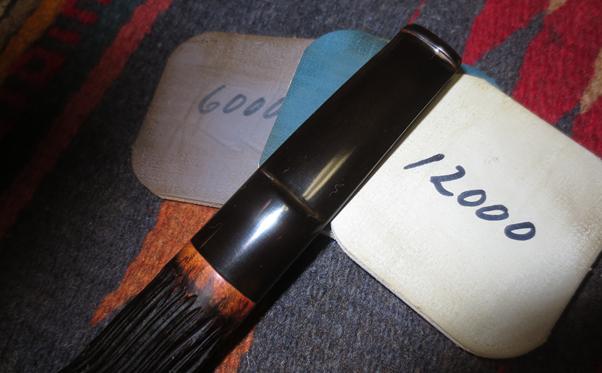
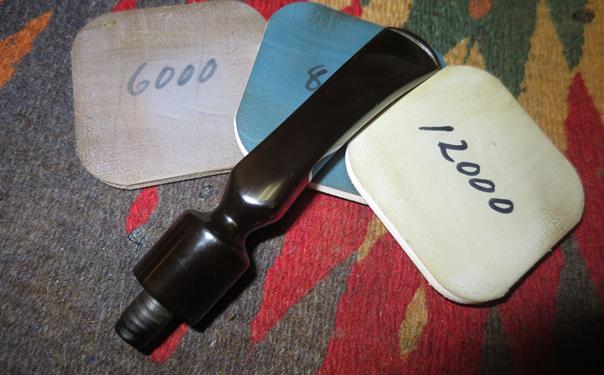
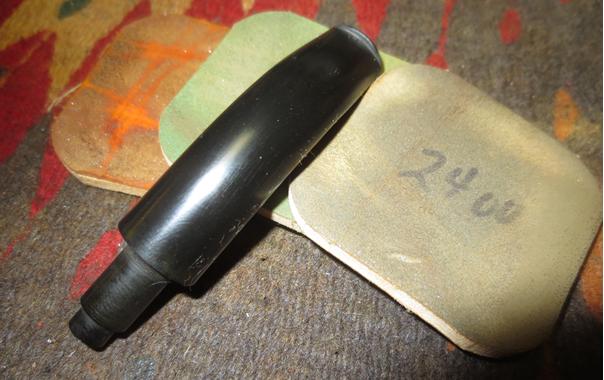
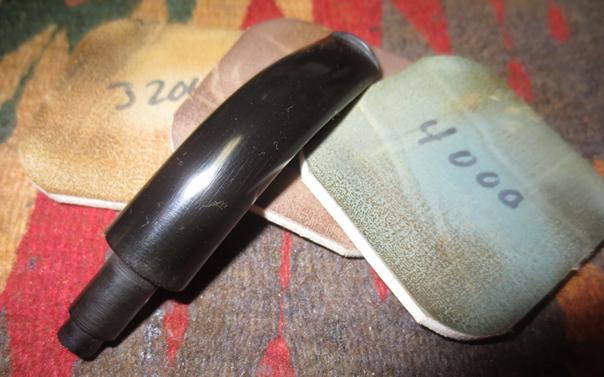
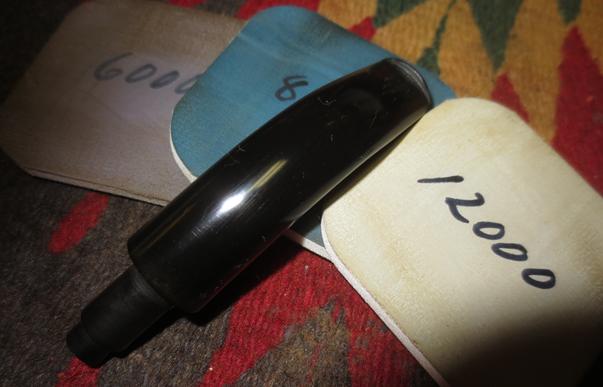
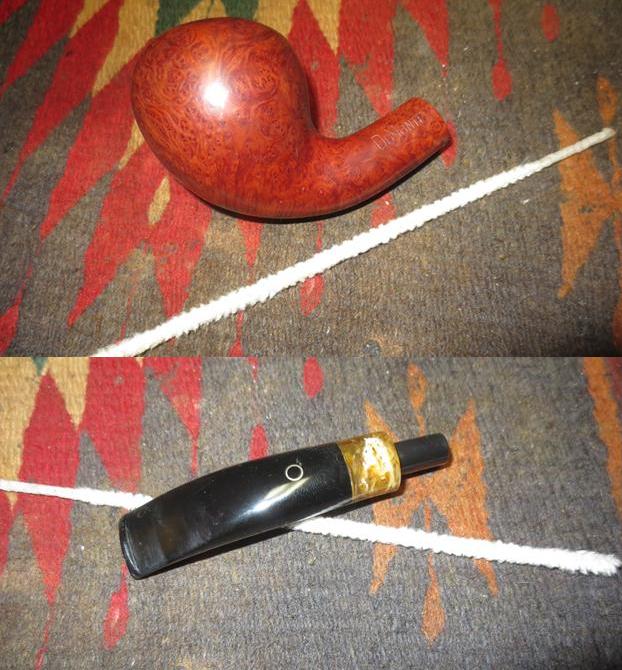
I polished the stem with micromesh sanding pads – wet sanding it with 1500-2400 grit pads to remove the scratches and dry sanding with 3200-12000 grit pads. I wiped the stem down with a damp cotton pad after each grit to remove the sanding dust. Each successive grit of pad brought more of a shine to the surface of the Lucite. 
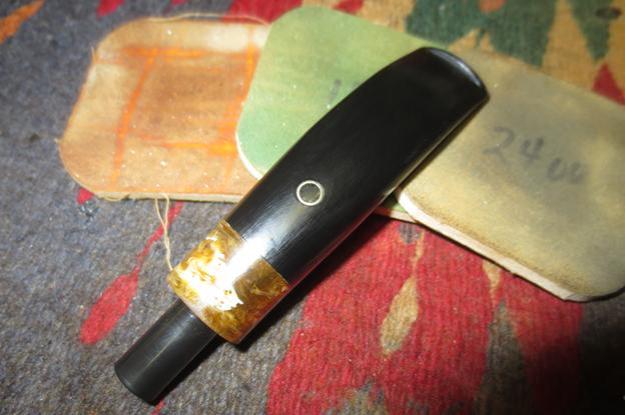
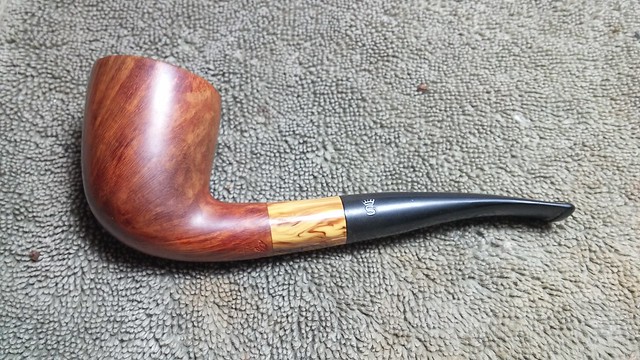
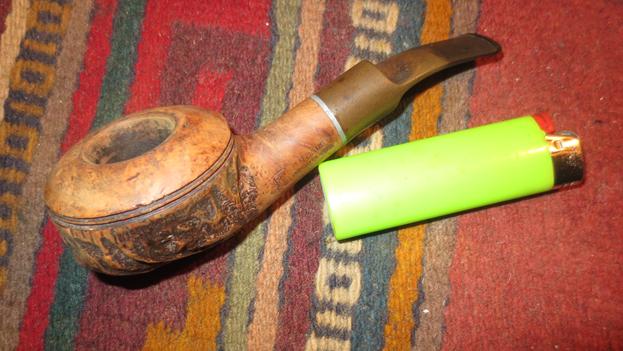
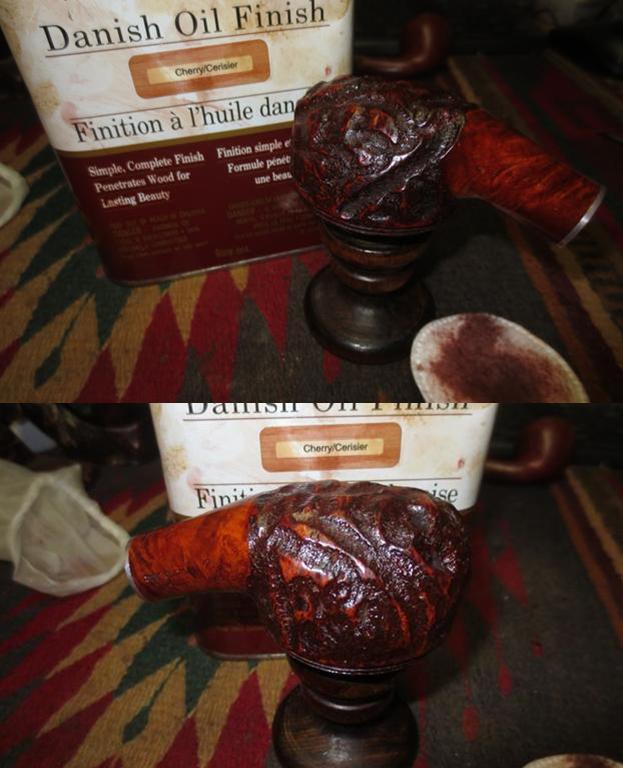
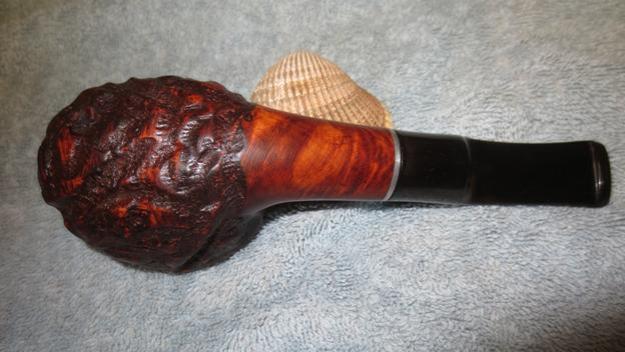
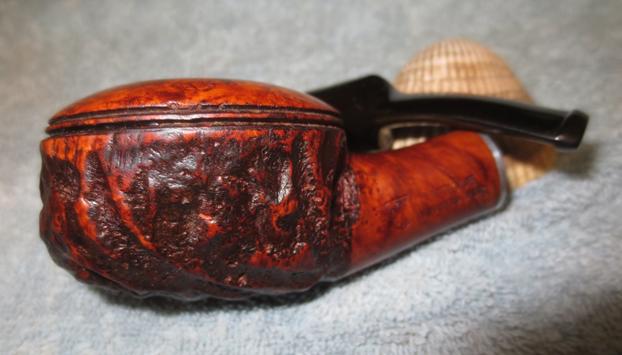
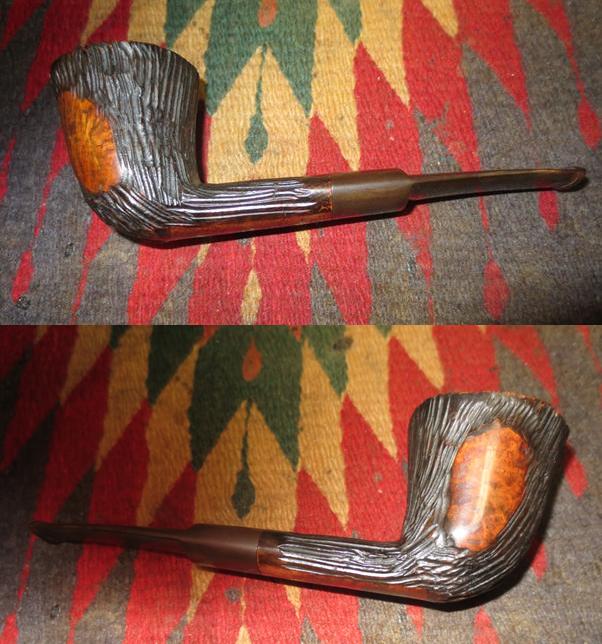
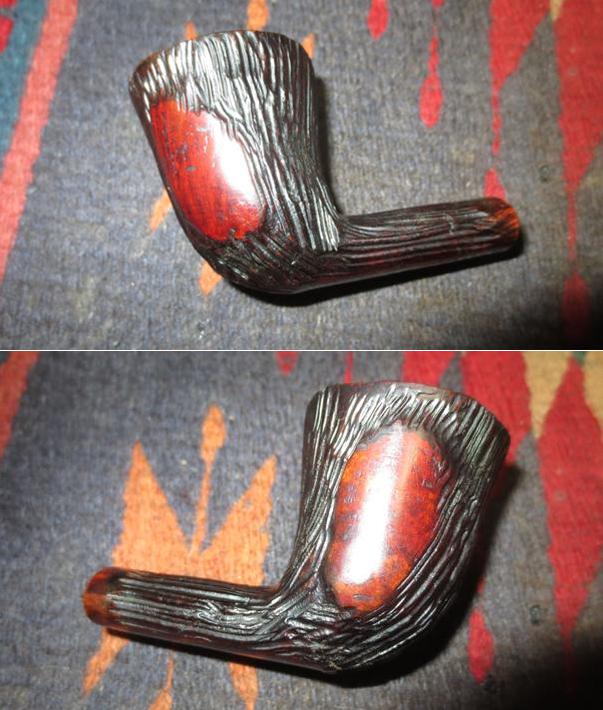
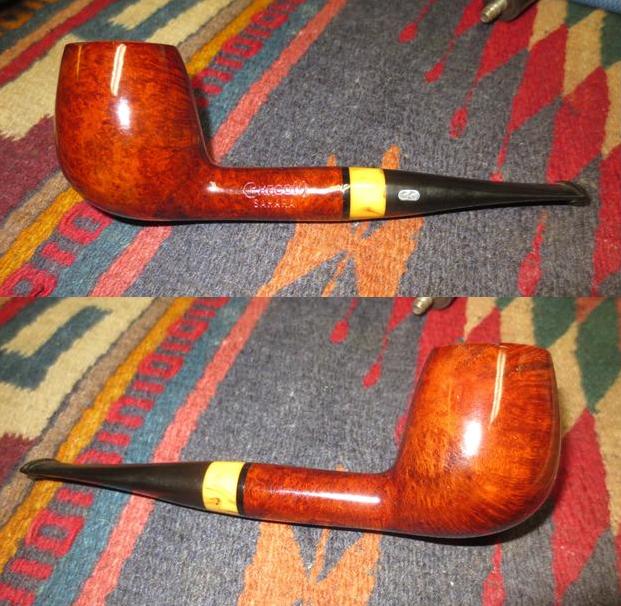
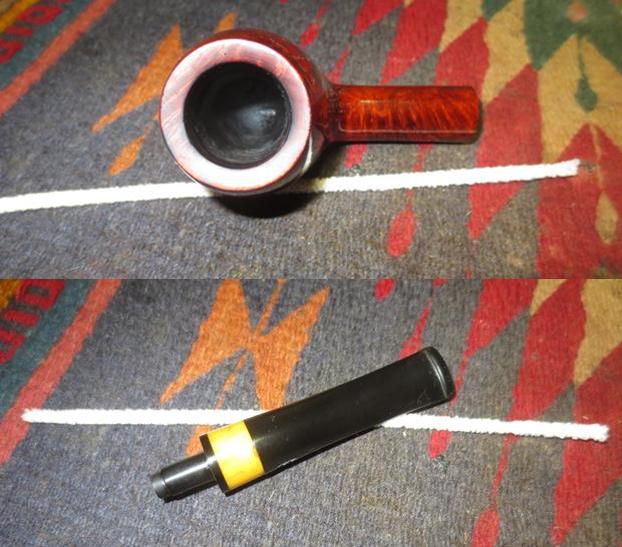
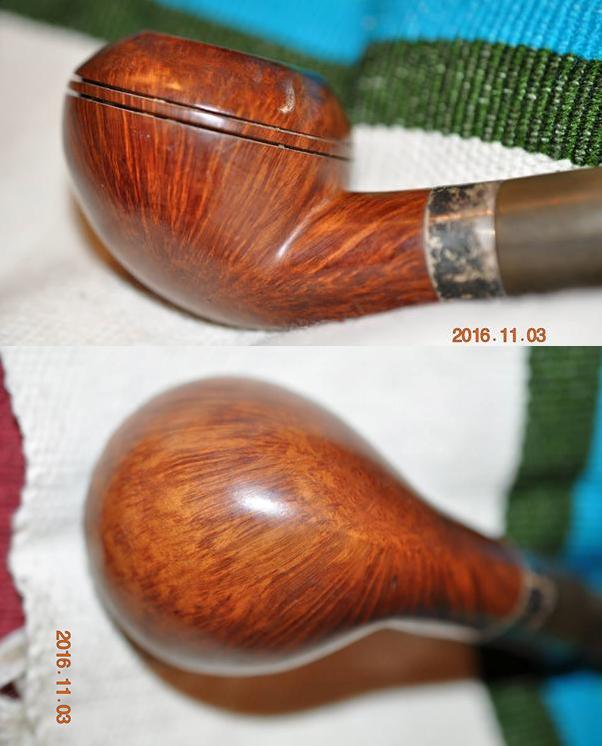
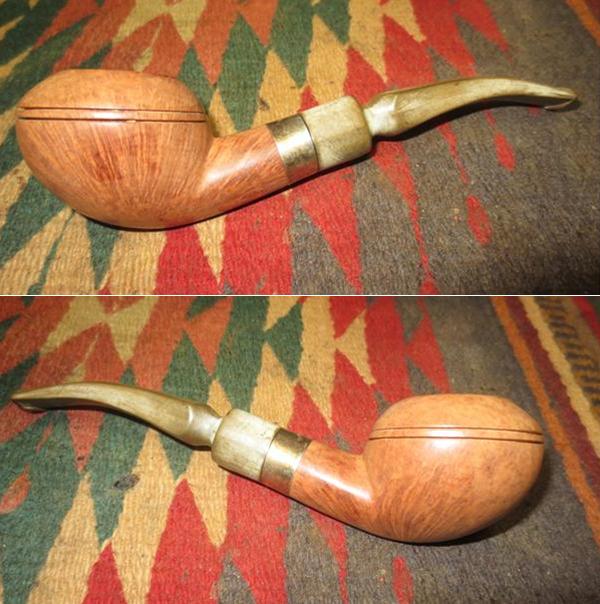
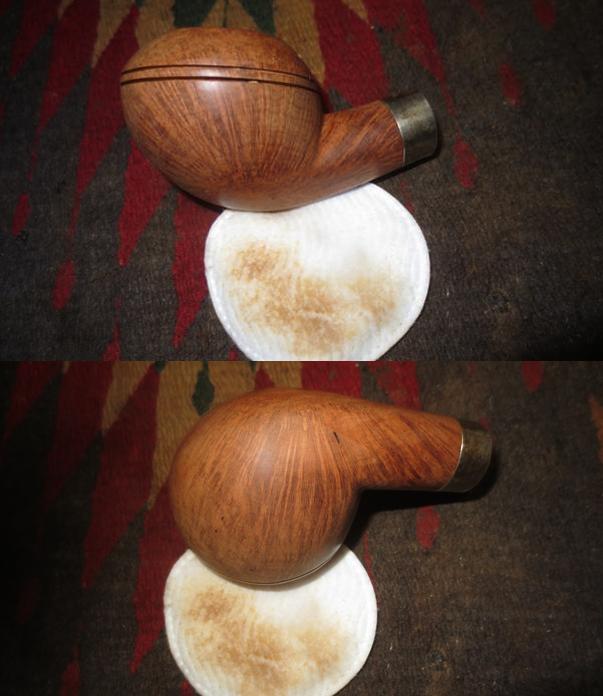
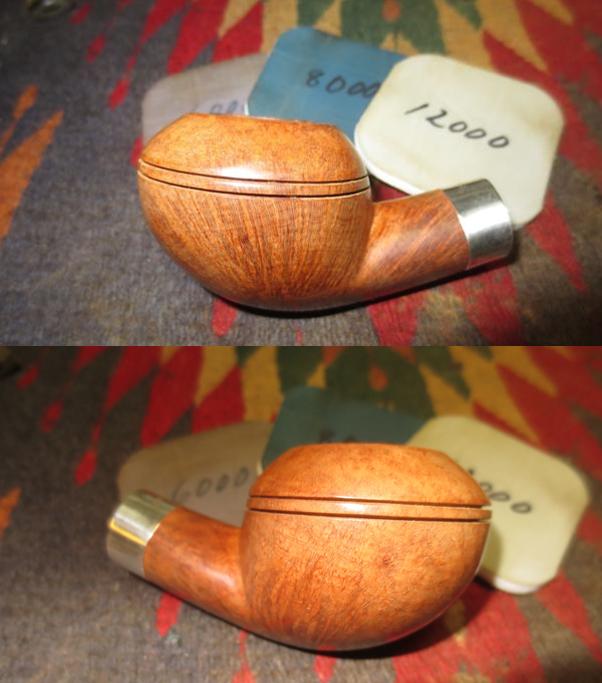
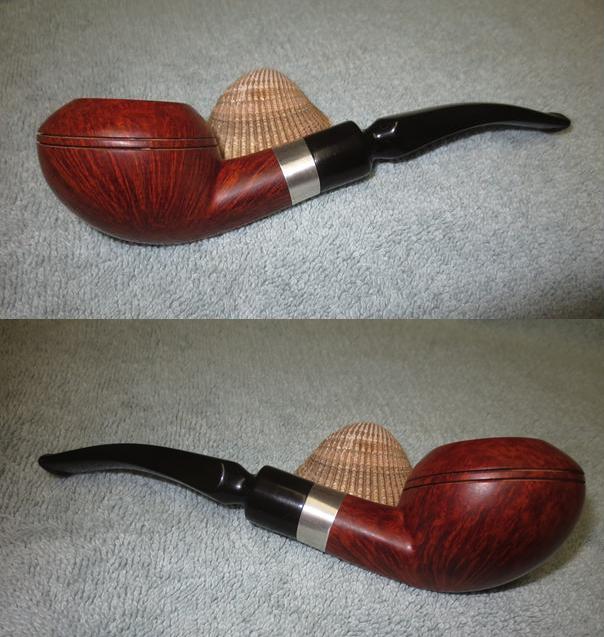
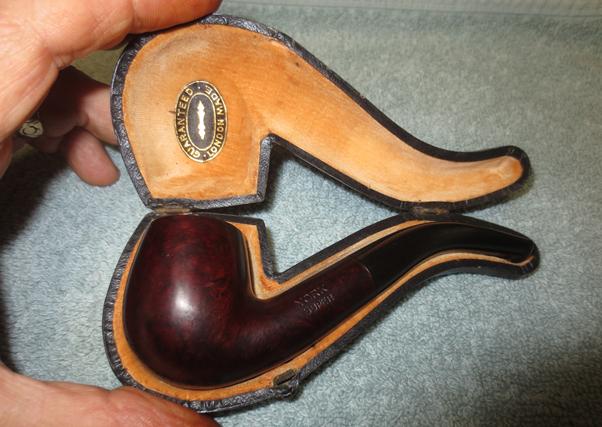
I put the stem back in place in the shank and buffed the pipe with Blue Diamond on the buffing wheel. I gave the stem and bowl multiple coats of carnauba wax and buffed it with a clean buffing pad to raise a shine. I hand buffed it with a microfibre cloth to deepen the shine. The finished pipe is shown in the photos that follow. It is a beautiful pipe and that fits well in the hand and the mouth. The draught on the stem is open and flowing. The briar is lovely and a rich patina will develop as it is smoked. The dimensions of the pipe are: length 6 inches, height 2 inches, outer diameter 1 5/8 inches, chamber diameter 3/4 inches. It should provide a great smoke for whoever adds it to his/her collection. I will be posting the pipe on the rebornpipes store soon. If you are interested in purchasing it email me at slaug@uniserve.com or send me a private message on FaceBook. Thanks for looking.


New Life or an Oval Shank Whitehall Saratoga Dublin


Blog by Steve Laug

Not long ago I received and email from Dave, a reader of the blog, asking about a couple of pipes that he had picked up. This is the second of the two pipes – the Whitehall Saratoga. I have included part of his email below. He gives his assessment regarding the pipes and what he wanted done.

Steve… I have recently been gifted 2 estate pipes that I would love to have reincarnated by your hands? I am not sure of the cost and wanted to speak with you first… The 2 pipes in question are not in bad shape, just have some age, cake and minimal wear; one is a Whitehall rusticated with saddle stem and the other a Pear shaped Dr. Grabow Westbrook… I have attached some images with this email so that you have some idea of how they look. If you need additional images please let me know. Thank you for your time and consideration.

Regards, Dave The pipe was in pretty decent shape over all. The rim was dirty but the inner and outer edges were in good shape. The finish was worn and dirty but the carved striations looked good. The smooth patches around the shank, the underside and the two panels on the bowl sides were scratched but otherwise clean. The stem was oxidized and had some deep tooth marks on both the top and underside near the button. The W stamp on the top of the saddle was faint and worn. I would need to be careful in cleaning the oxidation not to damage the logo stamp. The photos below show the condition of the pipe when I received it. I took a close up photo of the stamping on the shank. The stamp is clearly legible and reads Whitehall over Saratoga over Briar Italy. The second photo shows the rim and bowl condition. There was still a light cake that would need to be scraped out but it was really quite nice.I took photos of the stem. It is hard to see the tooth dents in the photos below but they are present. There was a W on the top of the saddle stem that was a decal and it was coming off. The button is worn from use. The oxidation is quite deep.When I took the stem out there was a small stinger in the tenon. It was dirty but was easily removed and would be polished and put back in place.I sanded the stem with 220 grit sandpaper to break up the oxidation on the stem and reshape the button. I sanded out the shallower tooth marks to remove them. I wiped down the stem and repaired the deeper marks with black super glue. I set the stem aside to let the repairs cure. I turned my attention to the bowl. I scrubbed it with a tooth brush and Murphy’s Oil Soap to remove the grime from the grooves in the briar on the bowl and rim. I rinsed the bowl down with warm water and dried it off with a towel. The freshened pipe is shown in the photos below. I reamed out the bowl to remove the last of the cake with a Savinelli Fitsall Pipe Knife. It did not take too long to smooth out the remnants of the cake in the bowl. I scrubbed out the mortise and the airway in the shank and stem with pipe cleaners, cotton swabs and alcohol to remove the tars and oils. I went through a lot of pipe cleaners and cotton swabs before they came out clean.I restained the bowl with a dark brown aniline stain and flamed it with a lighter. I repeated the process until the coverage was even and I was happy with the results. I wiped down the bowl with alcohol on cotton pads to lighten the stain and make the contrast between the rusticated part and the smooth ones more obvious. I gave the pipe a coat of Conservator’s Wax and buffed it with a shoe brush to give it a shine and check out what the colour looked like. I took some photos of the polished bowl to show how it looked at this point in the process. The pipe is beginning to look really good. I sanded the top of the shank to remove the dark colour and make it more transparent at the stem shank junction. Note the nicks in the smooth portions of the bowl and shank. They are deep so I will not be able to sand them out. They actually act like marks of history of the journey of this pipe. It was not quite right. I wanted a little more red in the finished briar. I wiped the bowl down with alcohol on a cotton pad to remove the wax so I could do a bit of a contrast stain. For the second coat I rubbed down the bowl with a coat of Cherry Danish Oil to highlight the red colour in the briar. The combination of stains gives a nice contrast look to the pipe. I polished it with a soft cloth and took photos of the finished bowl. I set the bowl aside and turned my attention to the stem. I talked with Dave regarding the W decal on the saddle and we decided to remove it as it was worn and kept me from removing the oxidaiton on the saddle while trying to protect it. I resanded the with 220 grit sandpaper to remove the oxidation and the remnants of the decal. I polished it with micromesh sanding pads. I wet sanded it with 1500-2400 grit pads and rubbed it down with Obsidian Oil between each pad. I dry sanded it with 3200-12000 grit pads and repeated the oil treatments. I buffed the stem with red Tripoli on the buffing wheel and followed that with Blue Diamond polish. I gave the stem several coats of carnauba wax and polished it by hand. I buffed the stem with Blue Diamond to polish out some of the minute scratches in the surface. I gave the stem several coats of carnauba wax to protect and give it a shine. I hand waxed the bowl with Conservators Wax and buffed the bowl and stem with a clean buffing pad to raise the shine. I hand buffed it with a microfibre cloth to deepen the shine. The finished pipe is shown in the photos below. I will be packing it up soon and sending it back to Dave so he can fire up a bowl and give this beauty a smoke. Thanks for looking.

Refreshing a Beautiful Aldo Velani Bent Dublin


Blog by Steve Laug

This is the second pipe from the lot my brother Jeff picked up an estate sale a few weekends ago. He had received a call from the auction house that was running the sale to let him know that there were going to be some pipes in the sale. They said that many of the pipes were what they called higher end pipes. They talked a bit and he asked if they would mind sending him a list of the pipes that were coming up. They went one step better and sent him the two photos to the left of the pipes as a preview of what was going on sale. Using FaceBook Messenger we went through the pipes and picked the ones that we wanted to purchase. He would go to the sale the next day and see what he could find. It is times like this that I wish I lived close so I could go with him to these sales.

Friday morning he went into the sale and they handed him a bucket and the box of pipes that they had set back behind the counter for him. There were indeed some nice pipes in the batch and certainly pricier than the average lot we usually find at estate or antique sales and malls. There were quite a few Savinelli pipes as well as Stanwell, GBD, Aldo Velani, Nording, Il Ceppo, Barlings, DiMonte and a Chacom Sahara. They made him a proposition for the entire lot of pipes and he went for it. He came home with all of the pipes in the photos to the left.

When he got home he called me on FaceTime and went through the pipes he had picked up. We were both pretty excited by the lot. As we went through them we noted the names, brands and the stamping on the shank of each pipe. I got more excited as we noted each pipe and its condition. We realized that these pipes were in pretty decent shape other than the usual dirtiness and grime from smoking. There was not any significant damage to rims or bowls. Almost all the stems had tooth marks near the button on both sides that would need to be cleaned up. But other than that, it was a very nice lot of pipes. We had done well with the purchase.

I chose to work on the Aldo Velani Italian Dublin next. It is a beautiful Dublin shaped pipe that was in pretty good shape. It was stamped on the left side of the shank with the brand ALDO VELANI. On the underside of the shank next to the stem shank junction it bore the stamp ITALY. The saddle stem was Lucite and had not stamping or logo on it. My brother took the following photos before he worked on the pipes.The finish on the bowl was in pretty decent shape. The rim surface was dirty and had some tars and oil build up. Around the inner edge of the bowl some of varnish coat was peeling off and the briar was showing through. There were some dents and nicks in the surface. On the front right of the bowl there was a spot where the varnish was damaged like the bowl had been rubbed against a rough surface (it is visible in the second photo below). I would need to smooth out those areas and stain and give them a top coat to replace the shine. The finish on the sides and the  bottom of the bowl was in excellent shape. The next two photos show the stamping on the pipe – the brand on the left side and the country of origin on the underside next to the silver band.The stem had tooth chatter on the top side next to the button and on top of it. On the underside there were tooth marks and chatter that would need to be sanded out. Fortunately none of them were too deep.Once again Jeff did his usual thorough cleanup of the pipe. He scrubbed the interior and exterior and sent me a very clean pipe that I only needed to put the finishing touches on. The next four photos show the pipe when I brought it to my work table. The pipe looked really good. The finish on the bowl sides, bottom and shank were in excellent condition. The scrape on the front of the bowl and the rim scrapes where the varnish coat was missing were clean and ready to repair. The stem was clean as well other than the light oxidation and the tooth chatter. I took a photo of the rim top to show the damage on the inner edge. You can see the area on the right side of the inner edge and the back side. There was also some damage on the front inner edge of the bowl. These would need to be sanded and repaired.The stem was very clean other than the tooth chatter and tooth marks.When I removed the stem the silver band fell off in my hands. The glue that had held it in place had dried and cracked. I used a tooth pick to spread all purpose glue around the end of the shank and pressed the band in place.I sanded the inner edge of the rim to remove the damaged finish. I used 1500-6000 grit micromesh sanding pads to smooth out the damaged areas. I wet sanded the areas to minimize the damage. I touched up the sanded areas with a dark brown stain pen. It matched the stain on the surrounding bowl. I ran a pipe cleaner and alcohol through the mortise and airway in the shank and stem. The pipe cleaner came out very clean and showed that the pipe was spotless.I sanded out the tooth chatter and tooth marks with 220 grit sandpaper until the surface of the stem was smooth. Once I had it sanded smooth I polished it with micromesh sanding pad – wet sanding it with 1500-2400 grit pads and dry sanding it with 3200-12000 grit pads. I wiped the stem down with a damp cotton pad to remove the sanding dust after each pad so that I could see how it was polishing. To give the repaired areas on the rim top a shine like the rest of the bowl I buffed it with Blue Diamond and then applied some Cherry Danish Oil to the rim top with a cotton swab. I repeated the process until the top of the rim shone. It looked like the rest of the bowl once again. I buffed the bowl and stem with Blue Diamond polish on the buffing wheel. It polished out all of the minute scratches in the surface of the Lucite and the briar. It does a great job with a soft touch when polishing briar and the shine that the Blue Diamond gives Lucite is glassy. I gave the bowl and stem several coats of carnauba wax and buffed the pipe with a clean buffing pad to raise the shine. I hand buffed it with a microfibre cloth to deepen the shine. The finished pipe is shown in the photos below. It really is a beautiful looking pipe. The Dublin shape is perfectly laid out to maximize the grain. This one will soon be for sale on the rebornpipes store. If you are interested in adding it to your collection let me know either by email to slaug@uniserve.com or a private message on FaceBook. Thanks for looking.

Cleaning up a Beautiful Chacom Sahara Brandy


Blog by Steve Laug

My brother Jeff got a call from an auction house that does estate sales. He had built relationships with the owner and his son in law over the past months and we had purchased other pipes from them. This time they were calling about a lot of what they called higher end pipes that they had coming up on a weekend estate sale. They talked a bit and he asked if they would mind sending him a list of the pipes that were coming up. They went one step better and sent him the two photos of the pipes as a preview of what was going on sale. We looked them over and chose a few of them for purchase if Jeff had the chance. (It is times like this that I wish I lived close so I could go with him to these sales.

He went on a Friday morning and stood in line for the doors to open. When they did he went in and they handed him a bucket and the box of pipes that they had set back behind the counter for him. There were indeed some nice pipes in the batch and certainly pricier than the average lot we find at antique sales and malls. There were quite a few Savinelli products, Stanwell, GBD, Aldo Velani, Nording, Il Ceppo, Barlings, DiMonte and a Chacom Sahara. They made him a proposition for the entire lot of pipes and he went for it. He came home with all of the pipes in the photos to the left.

He called me on FaceTime and we were both pretty excited by what he had picked up. We went through them and noted the names and brands. We noted all of the stamping on the shank of each pipe. I got more excited as we noted each pipe and its condition. We realized that they were in pretty decent shape other than the usual dirtiness and grime from smoking. There were not any damaged rims or bowls. There were tooth marks on the stem that would need to be cleaned up but really it was a very nice lot of pipes. We had done well with the purchase.

This afternoon I was greeted at my door by the box that he had sent my way. I excitedly opened cut the tape on the box. Like a child at Christmas I tore in to the box to see what was inside. I pulled away the bubble wrap that he had put around each pipe. Now I was really excited by the pipes that he had sent along for me.

I chose to work on the Chacom Sahara first. It is a beautiful brandy shaped pipe that was in decent shape. It was stamped on the left side of the shank with the brand CHACOM over SAHARA. On the underside of the shank next to the stem shank junction it bore the shape number 864. The stem bore the Chacom CC oval logo inset in the vulcanite. There was a band of faux horn/Lucite that was part of the stem. It sat between a thin band of black and the rest of the tapered stem. My brother took the following photos before he worked on the pipes.The finish on the bowl was in excellent shape. There was a thin cake in the bowl and an overflow of lava on the rim top. Sometimes this can be a good sign in that it can protect the finish underneath it. Other times it was a bad sign and hid a lot of rim burn and damage. I wondered what would be underneath this buildup. He took a photo of the pipe from the top and a close up photo to show the condition of the bowl and the rim.He also took some close up photos of the bottom and sides of the bowl. The finish was in excellent condition all around the bowl. Jeff took some good photos of the stamping on the shank. The first shows the left side of the shank. The second shows the shape stamping on the underside of the shank. The third shows the CC logo oval on the right side of the stem.He also took some photos of the chatter on the top and underside of the stem next to the button. Fortunately none of them were too deep.Jeff did his usual thorough cleanup of the pipe. He scrubbed the interior and exterior and sent me a very clean pipe that I only needed to put the finishing touches on. The next four photos show the pipe when I brought it to my work table. The pipe looked really good. The finish on the bowl sides, bottom and shank were in excellent condition. The stem was clean as well other than the light oxidation and the tooth chatter. The rim top had been cleaned up but it looked dull. I took a close up photo of the rim to show what it looked like after Jeff had cleaned it up. The top was clean and free of all build up. The finish on the rim was a bit dull but it looked like it would polish up nicely.I forgot to take a picture of the tooth chatter before I started working on it. I sanded the surface with 220 grit sandpaper to remove the tooth chatter and marks. I was able to remove all of them without changing the profile of the stem. I left behind the usual scratch marks after sanding with 220 grit sandpaper.I wiped the stem down with a damp cloth to remove the sanding dust and took the following photos before I polished it with micromesh sanding pads.I cleaned out the mortise and the airway in the shank and stem with pipe cleaners and alcohol. My brother had done a great job cleaning both so that nothing came out. It was very clean on the inside.I scraped out the last of the cake on the bowl walls with the Savinelli Fitsall Pipe Knife until the walls were clean.I polished the stem with micromesh sanding pads – wet sanding with 1500-2400 grit pads and dry sanding with 3200-12000 grit pads. I rubbed the stem down with Obsidian Oil after each pad. The oil both enlivens the rubber and provides bite for the sanding pads. I polished it with the 12000 grit pad and gave it a final coat of oil and set it aside to dry. (I forgot to take a photo of sanding it with 4000-6000 grit pads.) To give the rim top a shine like the rest of the bowl I buffed it with Blue Diamond and then applied some Cherry Danish Oil to the rim top with a cotton swab. I repeated the process until the top of the rim just shone. It looked like the rest of the bowl once again. I buffed the bowl and stem with Blue Diamond polish on the buffing wheel. It polished out all of the minute scratches in the surface of the vulcanite and the briar. It does a great job with a soft touch when polishing briar and the shine that the Blue Diamond gives rubber is almost glassy. I gave the bowl and stem several coats of carnauba wax and buffed the pipe with a clean buffing pad to raise the shine. I hand buffed it with a microfibre cloth to deepen the shine. The finished pipe is shown in the photos below. It really is a beautiful looking pipe. The layout of the grain with the brandy shape is really well done. This one will soon be for sale on the rebornpipes store. If you are interested in adding it to your collection let me know either by email to slaug@uniserve.com or a private message on FaceBook. Thanks for looking.

Restoring an Unstamped Rhodesian Handmade


Blog by Steve Laug

When I saw this pipe that my brother picked up I was captivated by the grain. The unknown maker had done an amazing job of laying the shape out with the grain. The sides of the bowl and shank have stunning flame grain radiating from the point at the heel of the bowl. The heel and the cap on the bowl, as well as the top and the pointed bottom edge of the shank have beautiful birdseye grain. He sent me the following pictures to whet my appetite for this pipe. I like the Rhodesian shape and I like the combination of nice grain, a sterling silver band and a black vulcanite stem. This one had them all. The only oddities to me were the shape of the shank – it was an egg shape, pointed at the bottom and the freehand style panel stem. The bowl had a thick cake in it and it was scratched at about 11 o’clock in the photo below. It looked as if it could have been cracked but it was not once he had reamed it free of the cake. The finish was dirty and there was some darkening/burn marks on the back side of the cap. It appeared to me that it was originally a virgin finish but I would know more once I had it in Vancouver and had cleaned up the finish.The next two photos show the grain on the sides of the bowl and the bottom. There is birdseye toward the left side of the bottom of the bowl curving up to meet the grain on the sides.Underneath the oxidation and tarnish on the band it was stamped Sterling Silver in an arch. The stamping was centred on the top side of the shank.The stem was heavily oxidized and had tooth chatter on both sides near the button. On the underside of the button there were deep tooth marks and one of them was on the button. The chair leg style stem would be a challenge to clean up.My brother did his usual comprehensive clean up on the pipe. He was able to remove all of the cake in the bowl and on the rim. He cleaned up the dirty finish on the bowl and cleaned out the mortise and the airway in the shank and the stem. The stem was more oxidized from his cleanup but the oxidation was on the surface so it would be a bit simpler to work on. The next four photos show what the pipe looked like when I brought it to the work table. There was some rim damage on the back side of the bowl. You can see it in the photo below. There was some burn damage as well as some bad nicks in the burned area. The outer edge had been flattened at that point and would need to be reworked. I took close up photos of both sides of the stem to highlight the tooth marks and chatter on them. There were three sandpits on the bottom of the bowl. The first was on the right side and was the largest of the three. The second and third were on the opposite side and were mere pin prick flaws. I filled in the holes with clear super glue. When it dried I sanded it with a piece of 220 grit sandpaper and then with a medium and fine grit sanding sponge to blend it into the surrounding briar.I topped the bowl on a topping board with 220 grit sandpaper to smooth out the damaged rim and ready the back side for a repair. I was pretty sure that if I topped it most of the damage would be remedied and the burn mark would disappear. Fortunately it was not deep in the briar so the sanding took care of it. Once I had it smooth I sanded it with the medium and fine grit sanding sponge.I wiped the bowl down with alcohol on a cotton pad to remove any remaining oils and dirt on the on surface of the briar. The next set of four photos show the cleaned surface of the briar. I polished the briar with micromesh sanding pads – wet sanding it with 1500-2400 grit pads and dry sanding with 3200-12000 grit pads. The photos below tell the story of the polishing and interestingly the ring grain in the briar begins to show through by the polishing with the three final pads. I rubbed the polished briar down with a light coat of olive oil to highlight the grain and make it stand out. A little olive oil brings new life to the dry briar. This pipe truly  has some stunning grain as is evident in the following photos. I sanded out the tooth marks and chatter on the stem along with the oxidation with 220 grit sandpaper. The photo below shows the stem after the sanding. I rebuilt the dent in the button with black super glue. Once it was dry I sanded it to match the rest of the button.The stem had a very interesting tenon. It was short and it had what looked like threads on it. I decided to leave these in place rather than change the original shape of the tenon. I worked over the stem itself. I polished the vulcanite with micromesh sanding pads. I wet sanded it with 1500-2400 grit pads. I rubbed it down with Obsidian Oil repeatedly during the sanding. The photo below shows the stem after being sanded with the first three pads. There is still evidence of oxidation in the rubber so it will take a lot more sanding and polishing before it is black again. I buffed it after this with red Tripoli on the buffing wheel and was able to remove more of it. I dry sanded it with 3200-12000 grit pads (the second and third photos below) and again rubbed it down repeatedly with Obsidian Oil. Once it was finished I gave it a final coat of oil and let it dry. I buffed the bowl and stem with Blue Diamond a final time and worked to remove any remaining oxidation on the stem. The Blue Diamond is a plastic polish and it really brings a shine to the vulcanite. I gave the bowl and the stem multiple coats of carnauba wax. I buffed the pipe with a clean buffing pad to raise the shine. I finished buffing by hand to deepen the shine. I polished the silver band with a jeweler’s polishing cloth and removed the remaining tarnish. The finished pipe is shown in the photos below. I wish I knew who the unknown maker was. He or she did a great job making this pipe. The shape, the layout with the grain and the craftsmanship make this a pipe that will outlive me that is for certain. It is truly a beautiful pipe. Thanks for walking with me through the process of the restoration.

Restoring a York Super London Made Bent Billiard


Blog by Steve Laug

In a recent box of pipes that my brother Jeff sent to me from Idaho there was an interesting little pipe. It came in its own black leather case with a gold felt lining. There was a logo on the inside that read Guaranteed London Made. The case was in excellent condition. The pipe inside was really good looking and from the stem shape and orific button it was clear that it had some age on it. It was stamped on the left side of the shank with the words YORK over SUPER and on the right side of the shank with the words LONDON MADE. For a pipe of this age I was surprised that the finish was still in pretty decent condition. The only real issue of consequence was a spot on the right side where there was a large fill that was falling out. The bowl had a thin cake around the top half of the bowl while the lower part of the bowl appeared to be unsmoked. It had not even darkened from smoking it. There was some minor rim damage on the outer edge toward the bowl front where the pipe had been knocked out against something hard. There were some nicks on the front edge and there were some dents in the rim but they were not too bad. The rest of the finish was dirty and dull but would clean up nicely. The stem had tooth marks and chatter at the button on both the top and bottom sides of the stem and it was oxidized. The vulcanite was older and was a good quality rubber. The button was an older orific style with a single hole in the end. I liked the overall look of the pipe.The next series of photos show the large fill toward the front on the lower right side of the bowl. It was a pink putty fill and it was crumbling revealing the flaw in the briar. The third photo captures the crumbling area of the fill. It would need to be picked out and refilled. The next two photos show the stamping on both sides of the shank. It was sharp and readable and did not show signs of over buffing.My brother took two photos of the stem to show its condition. The photos show the oxidation on the stem and the nature of the tooth marks near the button. The quality of rubber used in this old timer can be seen in the lack of oxidation.I have restored on other older York pipe and from my research I found that it was probably made by KB&B. The London Made stamp on the cover of the case and on the pipe led me to consider several other options but the stamping itself matches exactly the style used by KB&B. From what I could find they also had London Made pipes like this. I would love to find the back story on this brand but at this point this is all I could find. Do any of you have any more information on the brand? Post it here for all of us to learn from. Thank you ahead of time for your help.

My brother did his usual stellar cleanup of the pipe. He scrubbed the surface with Murphy’s Oil soap and removed the buildup of wax and oils on the exterior of the bowl. He reamed the bowl and cleaned out the mortise and airway in the shank and the stem with pipe cleaners, cotton swabs and alcohol. When I ran a pipe cleaner through the pipe it came out clean. The chamber and mortise area showed that this pipe had not been heavily smoked. The stem was clean on the inside and needed no more work on my part. The light tooth marks and chatter would be fairly simple to remove. When it arrived at my work table I took the following photos of the pipe both in and out of the case. The shape is one of my favourites and the diminutive size make it a pipe that probably traveled well in a pocket. I took some close up photos of the bowl, rim and stem to show the condition of the pipe before I started the restoration process. The large pink putty fill was really ugly on the bottom right side of the bowl. It was cracked and chipped, but even if it were not I would still pick it out and start over. The grain on the pipe is quite nice but this eyesore of a fill makes it disappear from view. I picked the fill out completely with a dental pick. I wiped down the surface of the bowl around the area that needed to be repaired with alcohol on a cotton pad. I packed in some briar dust and put some drops of clear super glue on top. I added more briar dust and super glue until the surface bulged slightly above the bowl surface.When the repair dried I sanded the area with 220 grit sandpaper to blend the surface of the fill into the surrounding briar. I sanded it with a medium and a fine grit sanding sponge to remove the scratch marks. I refilled the small air bubbles that had showed up in the surface of the bowl with some more super glue and then sanded them again. Once the surface was smooth I wiped down the bowl with alcohol to remove the finish before restaining the pipe. I use alcohol as it does not react to the super glue repair like acetone does. Acetone actually dissolves the super glue and compromises the repaired area. At this point I could have left the rim alone and not worried about the nicks and dings. They do not show up well in the photos but they were very visible in person. I could also feel them when I ran a finger over the rim. To put it mildly, they bugged me. I lightly topped the bowl to remove the damage and minimize the damage to the front edge. I sanded the bowl with a medium and a fine grit sanding sponge to remove the scratches. I was happier with the rim top now that I had finished it.I stained the pipe with a dark brown aniline stain and flamed it to set it in the grain of the briar. I have found that when a pipe has been previously stained with a oxblood colour that it will come out in the final colour of the dark brown stain and give the pipe a rich patina that is really close to the original colour.I wiped the bowl down with alcohol on cotton pads to make it more transparent and help the grain show. You will notice in the second photo that the filled area is still showing. I needed to do a little more work on that to get it to blend in more. I used a black Sharpie pen and touched up the spots on the fill that looked lighter than the bowl. I hand buffed the pipe to give it some lustre and touched up the area of the fill with some more dark brown stain. I set the bowl aside to dry and turned my attention to the stem. I sanded out the tooth chatter and tooth marks with 220 grit sandpaper. I polished the stem with micromesh sanding pads – wet sanding with 1500-2400 grit pads and dry sanding with 3200-12000 grit pads. I repeatedly rubbed the stem down with Obsidian Oil and after the final sanding pad gave it a last coat of the oil and let it dry. I put the stem back on the pipe and buffed the pipe with Blue Diamond on the buffing wheel. I find that Blue Diamond gives lustre to the briar and the vulcanite. I gave the bowl and stem multiple coats of carnauba wax and buffed it with a clean buffing pad to raise the shine. Don’t skip this step in the process. Many folks do not buff with a clean pad after the waxing and miss out on giving the pipe a rich shine by missing this. I hand buff my pipes afterward with a microfibre cloth as I find that it deepens the shine and evens out the finished look on the briar and rubber. The finished pipe is shown in the photos below. The elegant shape of the older bent billiards is quite captivating. These smaller, compact ones have a definitive look all their own. Thanks for looking.

GBD Prehistoric Paneled Billiard Restoration


By Al Jones

This Prehistoric GBD was in pretty decent shape, with some bowl-top build-up and a mildly oxidized stem. GBD Prehistorics usually have polished bowl tops that survive even the worst build-up abuse and restore beautifully.  This one is shape 9486.

I used my Pipenet reamer set to remove the cake. I used a wet cloth and then a worn piece of scotch-brite pad to remove the build-up on the bowl top. The top was finished with a worn piece of 8,000 grit micromesh. All of the build-up came off, without breaking the stain and it polished beautifully. I soaked the bowl with alcohol and sea salt. The interior of the bowl was in excellent condition.

I put a dab of grease on the GBD rondell and soaked the stem in a mild Oxy-Clean solution. Mounted to the bowl, I used 800, 1500 and 2000 grade wet paper to remove the oxidation. The stem was finished with 8,000 and 12,000 grade micromesh. I wrap the sanding papers around a popsicle stick to keep the square shank edges sharp. The stem was buffed with White Diamond and Meguiars Plastic Polish.

The bowl top was polished with White Diamond and several coats of Carnuba wax. The blasted part of the bowl was hand waxed with Halycon wax.

Below is the finished pipe.

Comoy’s 184 Pebble Grain Restoration


By Al Jones

This was a simple clean up of a classic Comoy’s bent billiard, this one in Pebble Grain finish. The 3-piece, drilled “C” stem logo is from the pre-Cadogan era (1981 or earlier). I wasn’t able to determine when the Pebble Grain finish was introduced. The pipe was in overall very good condition, with a mildy oxidized stem and some build-up on the bowl top.

The bowl was reamed of the mild cake. I used a wet cloth and then a worn piece of scotch-brite pad to remove the build-up on the bowl top. I soaked the bowl with alcohol and sea salt. The interior of the bowl was in excellent condition.

A dab of grease was applied to the C on the stem, for the soak in a mild Oxy-Clean solution. After the stem and bowl were soaked, the stem was mounted to remove the oxidation. Wet paper in 800, 1,500 and 2,000 grade were used followed by 8,000 and 12,000 grades of micromesh. The stem was then buffed with White Diamond and Meguiars Plastic Polish. The bowl was hand waxed with Halycon wax.

Below is the finished pipe.