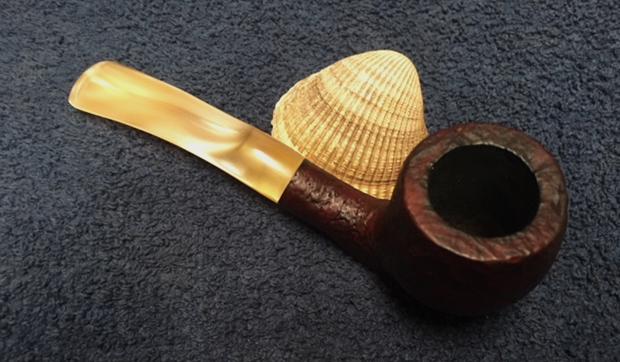
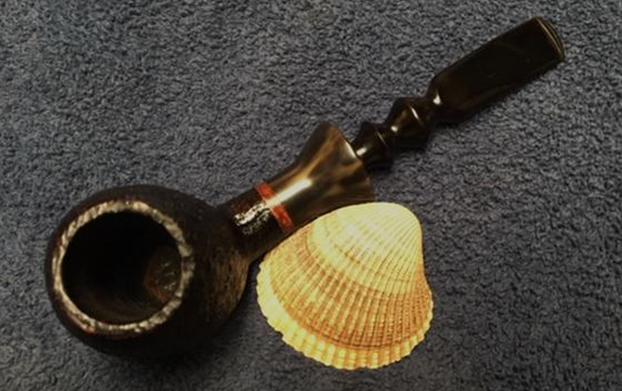
Here is the second installment on that Late Patent-Era House Pipe. Mark did a great job on the resto of this one. Give it a read today.
106. Restoring A Late Patent-Era House Pipe (Pt. 2)
Leave a reply
Here is the second installment on that Late Patent-Era House Pipe. Mark did a great job on the resto of this one. Give it a read today.
Blog by Steve Laug
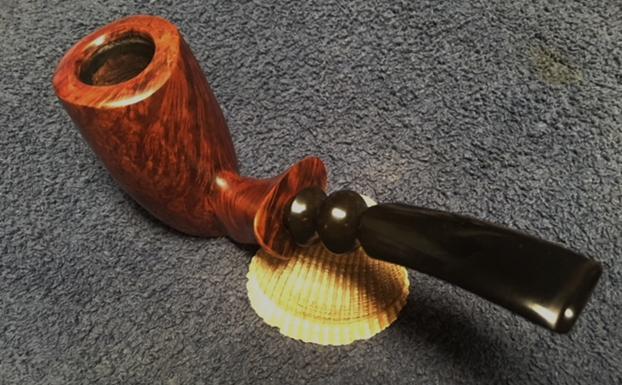
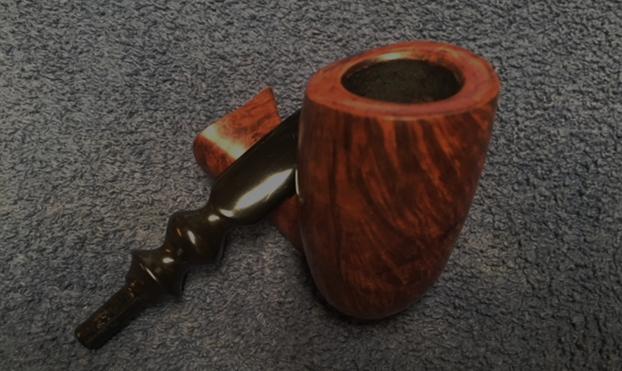
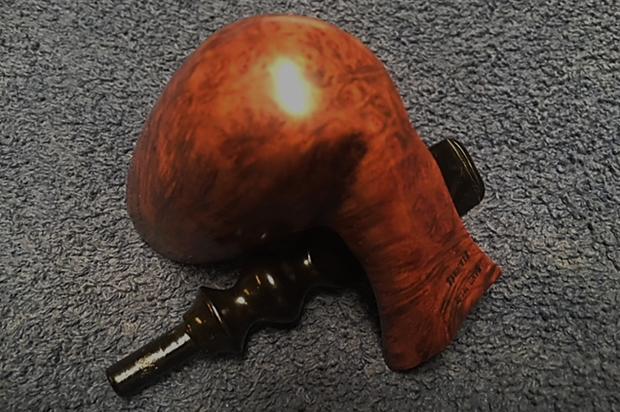
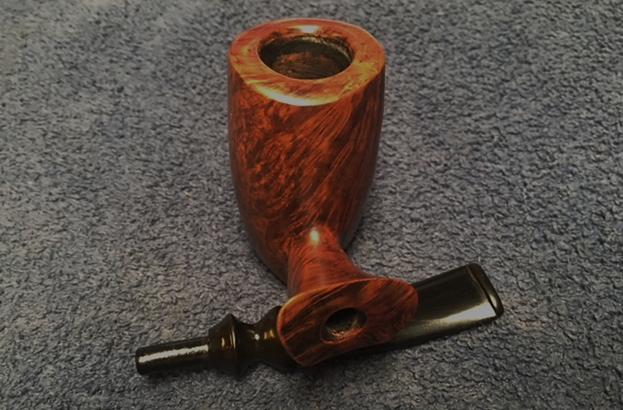
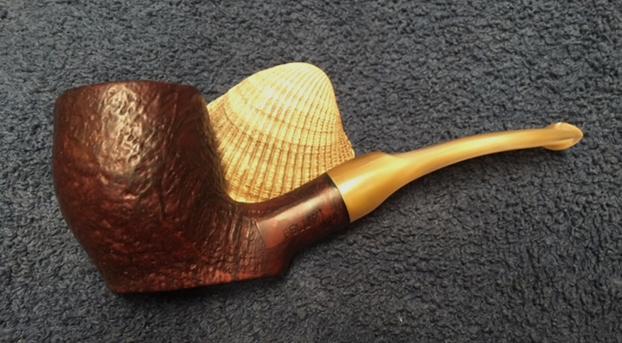
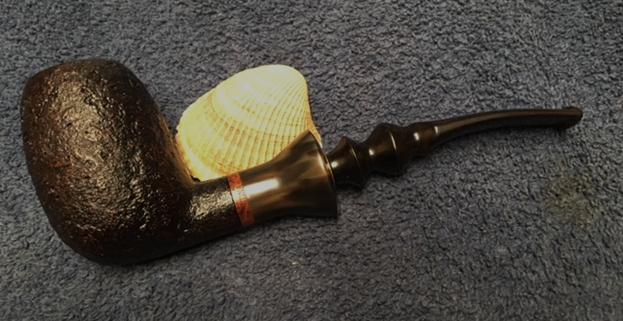
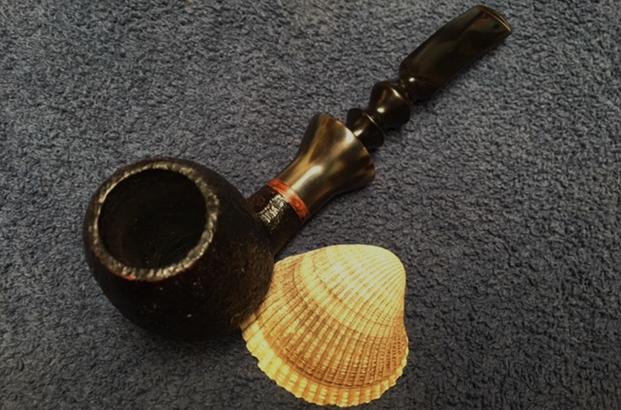
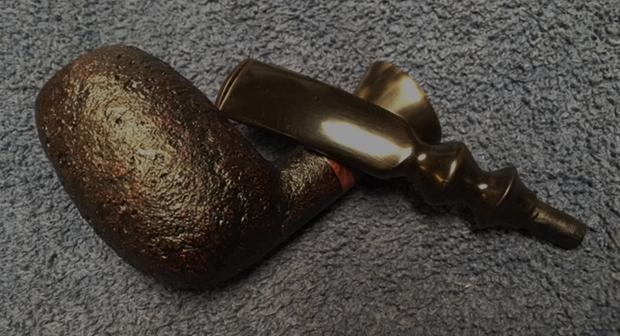
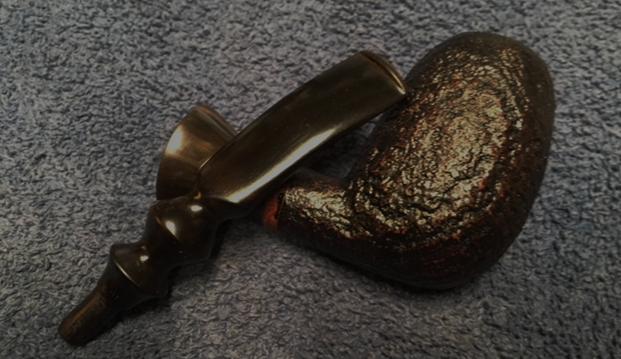
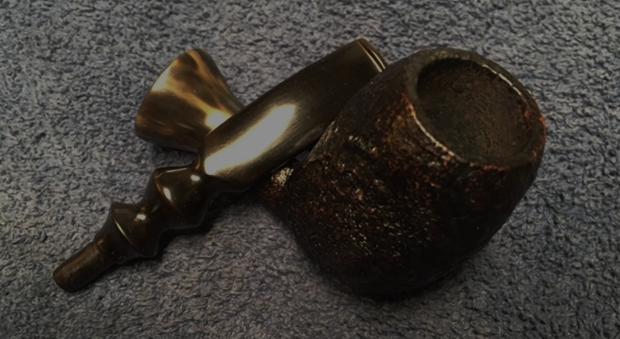
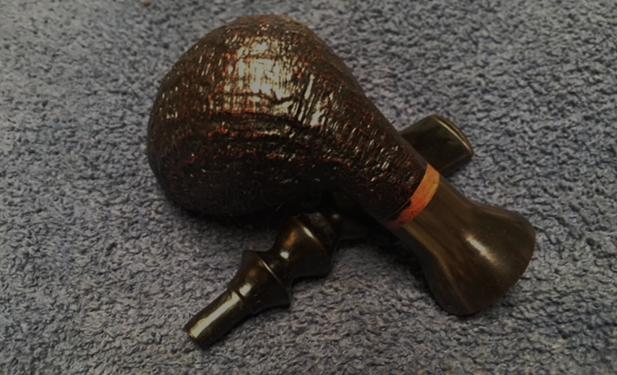
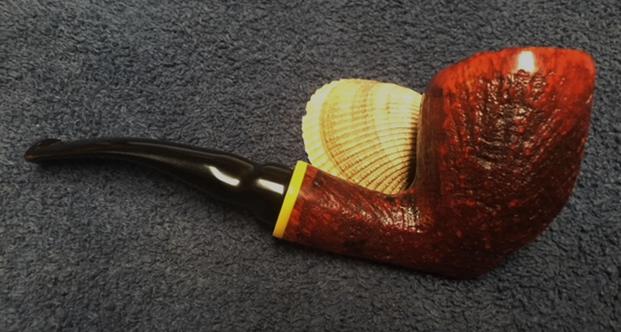
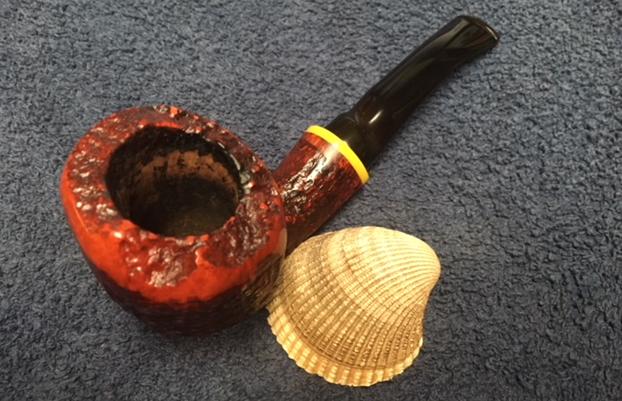
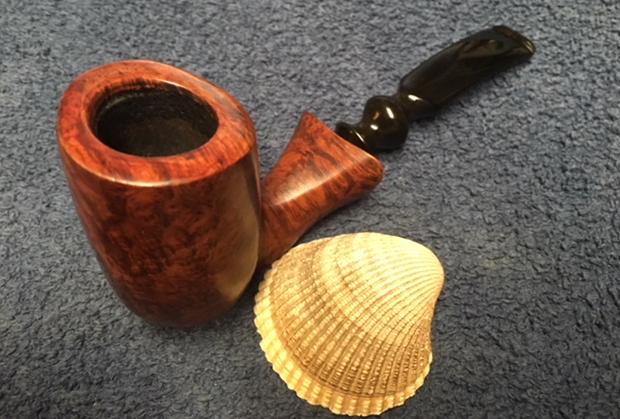
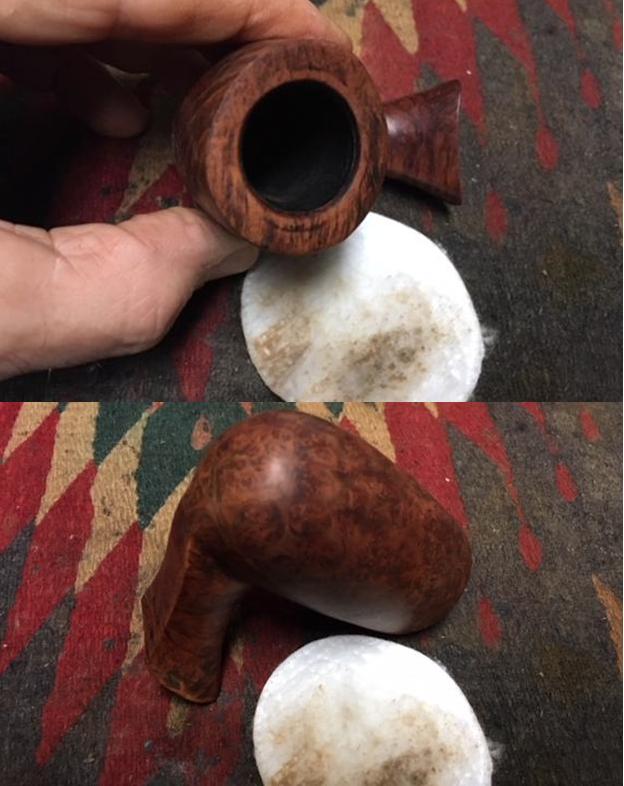
The next pipe on the table was one that my brother Jeff picked up from a seller in Texas. We have picked up quite a few pipes from him. It was in a box with the freehand pipes that I have been working my way through. Even though it is not properly a freehand I had put it in the box – go figure. It is more of a Billiard shape with a flat bottom making it a sitter. It has a slight bend in the shank and stem and the pipe is balanced to stand on its own. It has a sandblast finish to the bowl that reveals some swirling grain patterns. It is stamped on the left side of the shank in a smooth panel with the word FELLINI. It is also stamped at the stem shank junction ITALY. The pipe was very dirty when it arrived from the seller. There was dirt and grime in sandblast finish on the bowl. There was a thick cake in the bowl and an overflow of lava on the rim top. The inner and out edges of the bowl appeared to be undamaged under the grime. There were a few sand pits/fill areas that needed attention and the finish was spotty – dark and medium brown randomly around the bowl and shank. The stem was a striated tan and cream acrylic and has some tooth chatter on both sides near the button. The tenon had come loose from the stem and was stuck in the shank. Because of that the fit of the stem to the shank was off. Jeff took photos of the pipe before he started his cleanup up work.
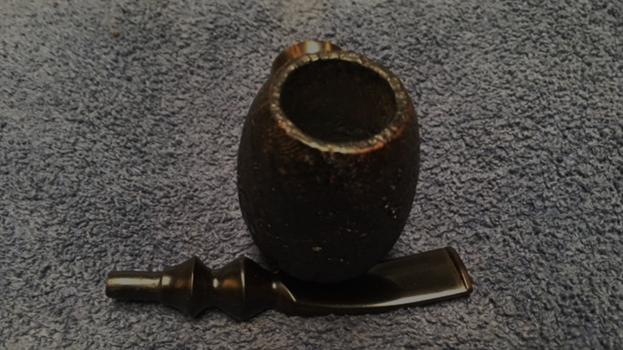
 Jeff took photos of the rim top and bowl. You can see the thick coat of lava and grime on the rim and the thick cake in the bowl. This was a dirty pipe. There is even the fuzz of dust all around the bowl from sitting unused for a long time.
 The next photos show the finish on the bowl from various angles. Though it is dirty it is an interesting looking sandblast.
 He took a close up photo of the stamping on the left side of the shank. You can see that it is sharp and readable. You can see the gap between the stem and shank end in the photo.
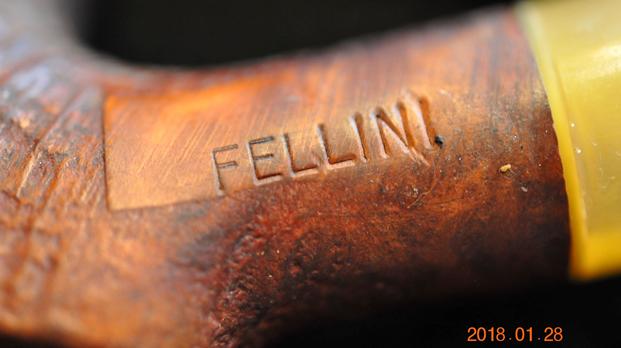 The stem was actually in great condition. The tooth chatter was light and there were no deep tooth marks in the surface of the acrylic.
 Jeff had scrubbed the exterior of the bowl with Murphy’s Oil soap and removed the dust and grime that had accumulated there. The finish looked very good once it had been scrubbed. He lightly reamed the bowl with a PipNet reamer and cleaned it up with a Savinelli Fitsall Pipe Knife. He cleaned the interior of the mortise and the airway in the shank and the stem with alcohol, cotton swabs and pipe cleaners. The pipe came to me clean and ready to do the restoration. I took some photos of the pipe to show the condition at this point in the process.
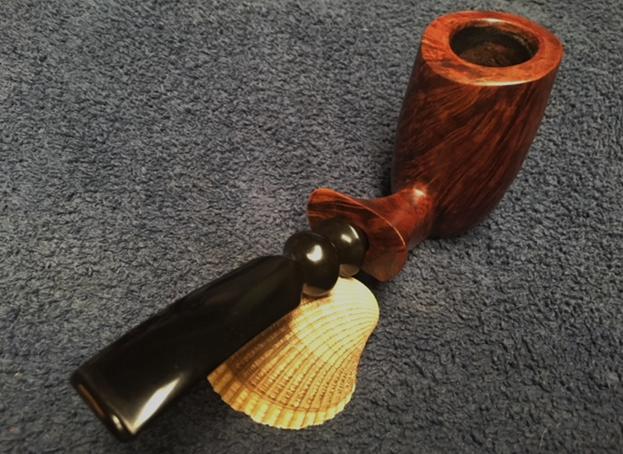
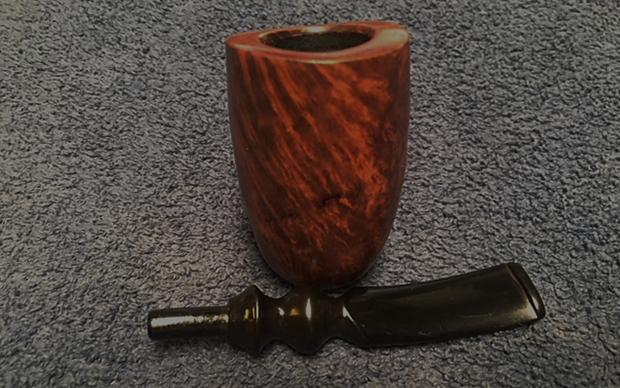
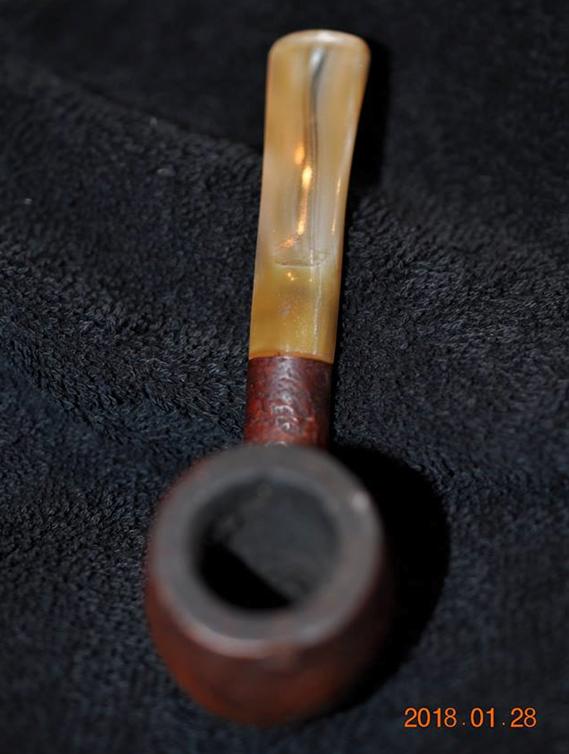
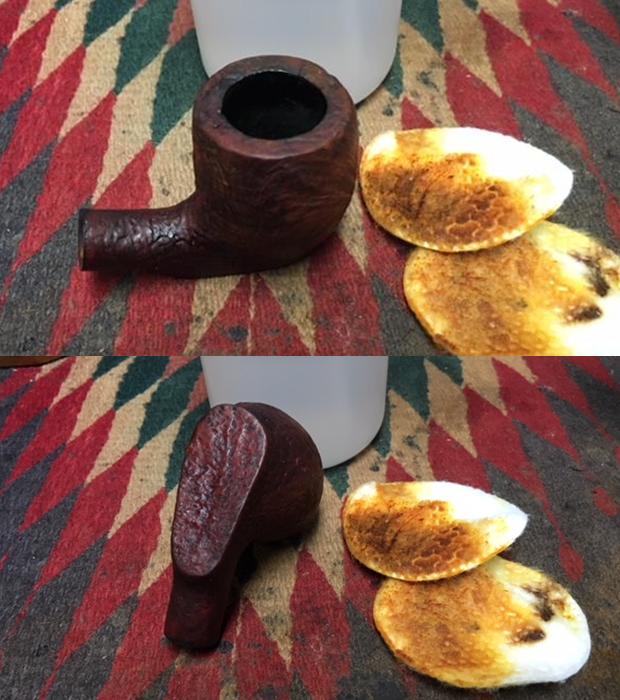
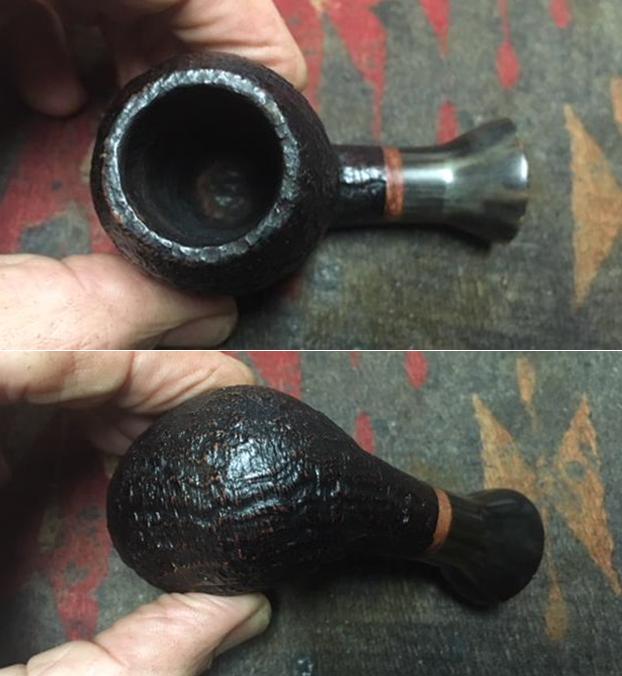
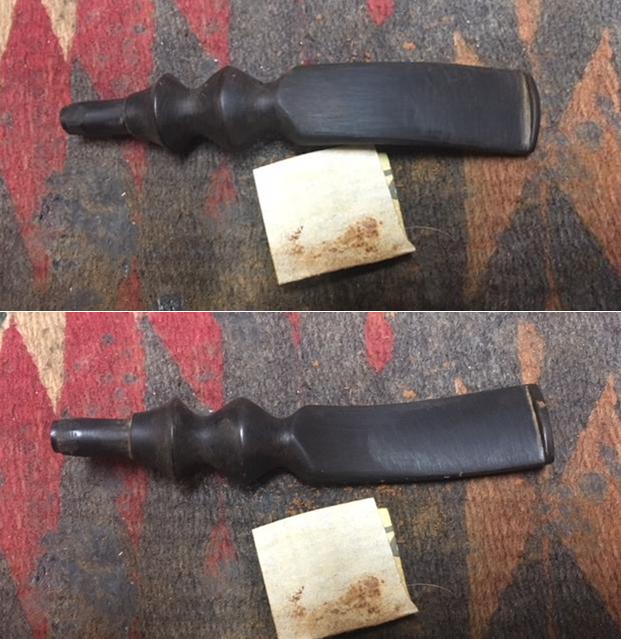
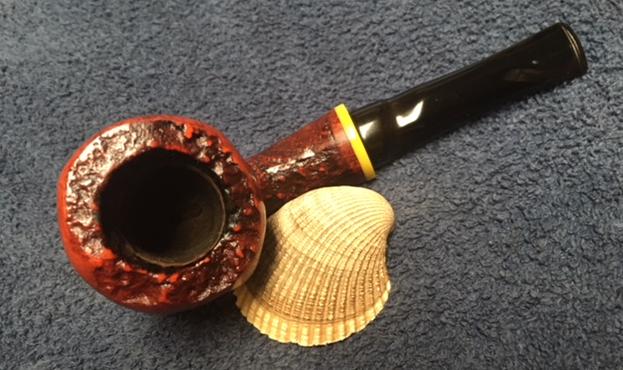
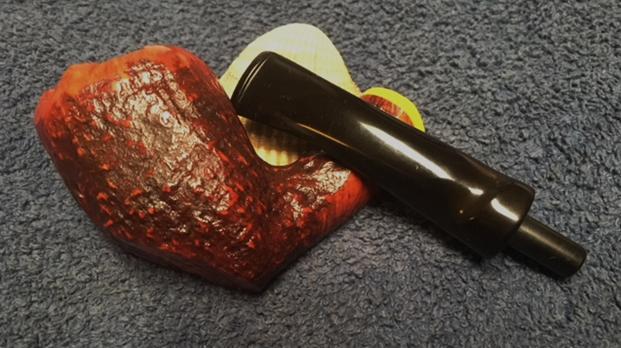
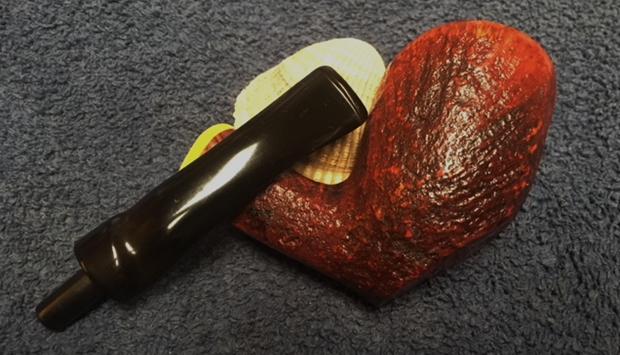
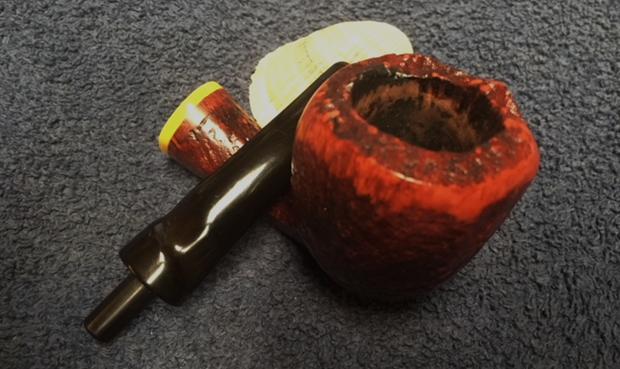
 I took some photos of the rim top and sides of the bowl where there were sandpits or fills that needed attention. I have circled the damaged areas in red in the second and third photo below. Both of them will need to be repaired and restained. There is some darkening to the surface of the rim and some spottiness to the finish that a restain will take care of. I also took close up photos of the stem to show its condition. It was in good condition other than the loose tenon in the stem.
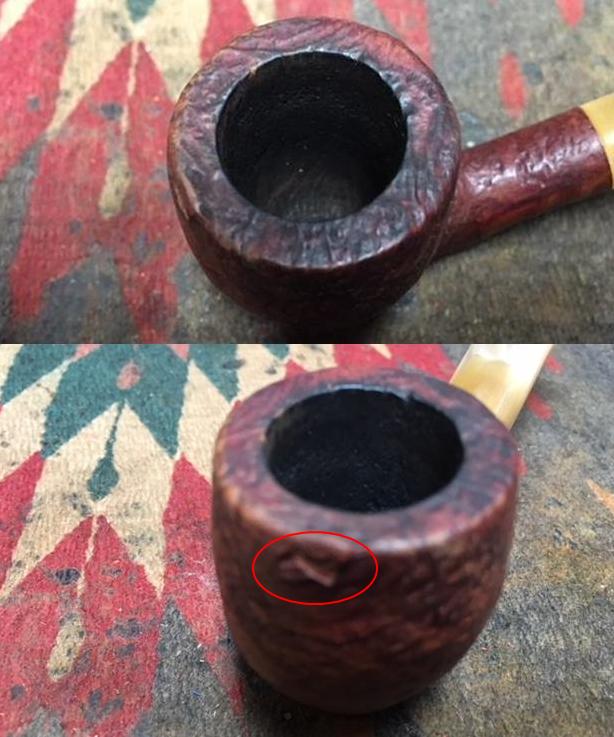
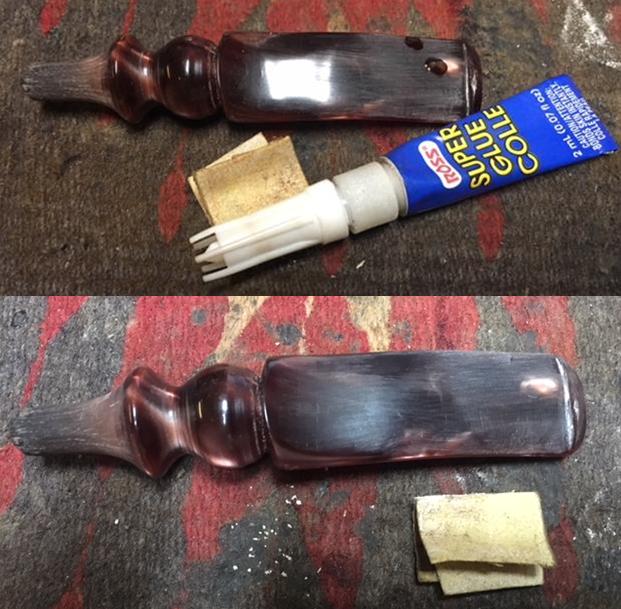
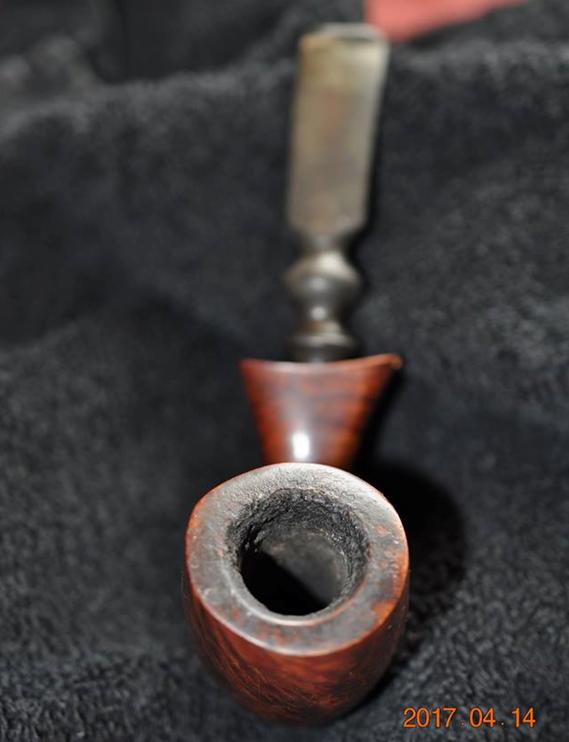
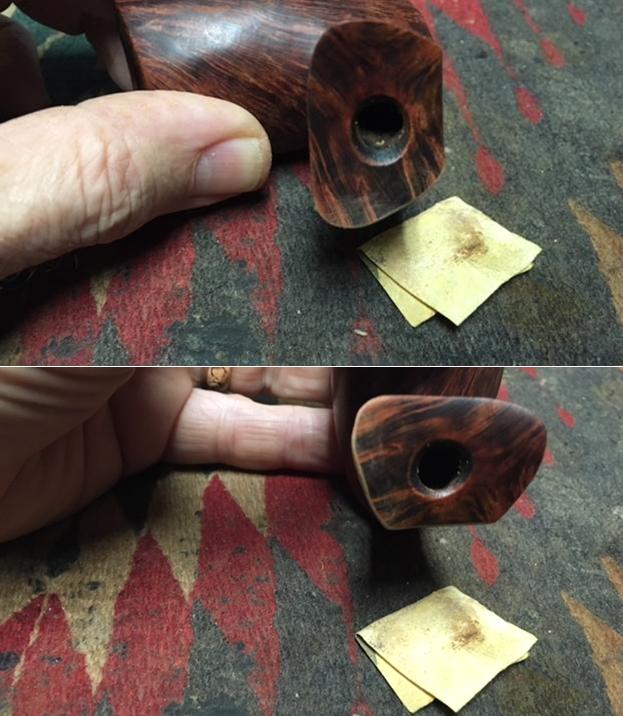
 I took the stem off the shank and you can see the tenon stuck in the shank. It has obviously been this way for a while as there is staining from tobacco on the end that sits in the stem. I used a pair of pliers to wiggle the tenon free from the shank so I could reglue it in the stem later.
 Once again I turned to the internet to see if I could find out any information on the brand. There was a lot of information on the Italian Film Director Frederico Fellini but very little other than pipes for sale on eBay that bore the name. Pipedia did not even mention the brand so that was unhelpful. I turned to the Pipephil site and found a listing for the brand. I have included a screen capture from that site (http://www.pipephil.eu/logos/en/logo-f1.html). You can see from the screen capture that even that information was very slim. Ah well, it will remain a mystery that hopefully one of you reading this can unravel for us.
 I started my restoration of the pipe armed with the little bit of information that I could find on the brand. I decided to reglue the tenon in the stem. I used a needle file to roughen the surface of the Delrin/nylon tenon. I wanted to make it rough enough for the glue to have something to bite on when I glued. I coated the roughened end of the tenon with clear superglue gel and pressed it into the drilled hole in the stem. I wiped away the excess glue on the face of the stem. With that done I set the stem aside to let the glue cure.
 I turned to repairing the damaged fills or sandpits on the bowl sides (front and rear). I put a drop of clear super glue in the pit and filled it in with briar dust using a dental spatula. When the repair had dried (fairly quickly as it is warm here) I used a brass bristle wire brush to remove the excess repair. I find that the brush follows the pattern of the sandblast.
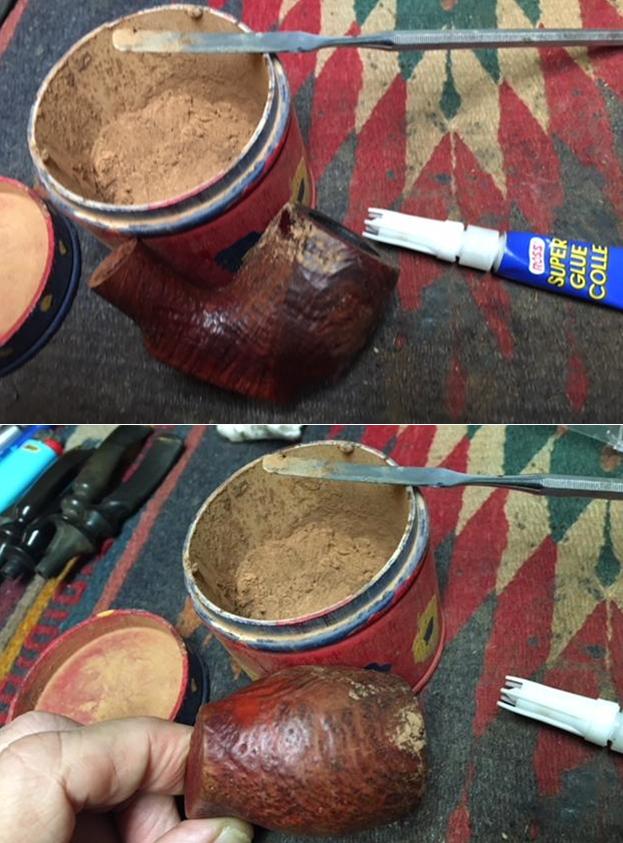
 I touched up the repaired fills with an Oak stain pen. I used it to stain the area around the new fill and deep in the crevices of the fill. I intended staining the pipe again in full but this would allow me to at least do a bit of the cosmetic work before the full stain. (Before I did that I put the stem on the shank to check the fit – it was flawless!)
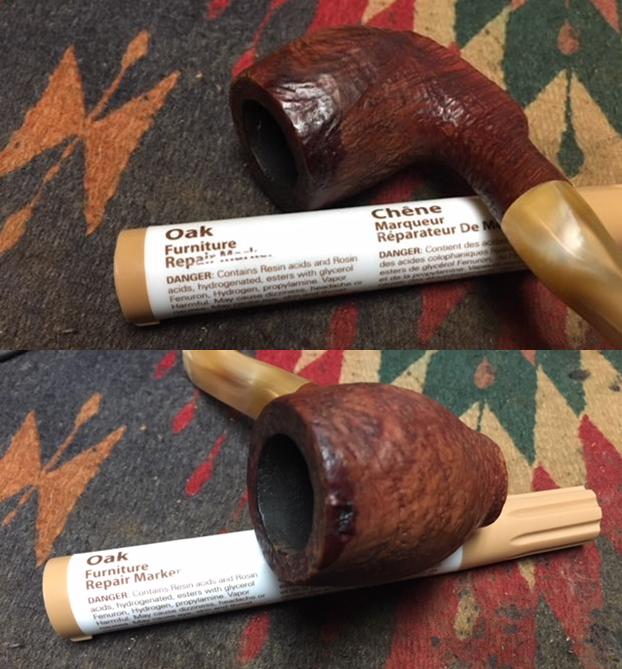 You might notice in the above photos that the briar has a definite red tint to it and the light oak stain had turned a red/brown colour. I decided to go with that and highlight the colour of the briar. I have a bottle of Fiebing’s Tan Stain that really is a light Cordovan colour so I used that to stain the briar. I heated the briar and applied the stain with a dauber. I flamed it with a lighter to set it in the wood and repeated the process.
 I wiped the bowl down with isopropyl alcohol on cotton pads to make the stain more transparent. I took photos of the bowl to show it.
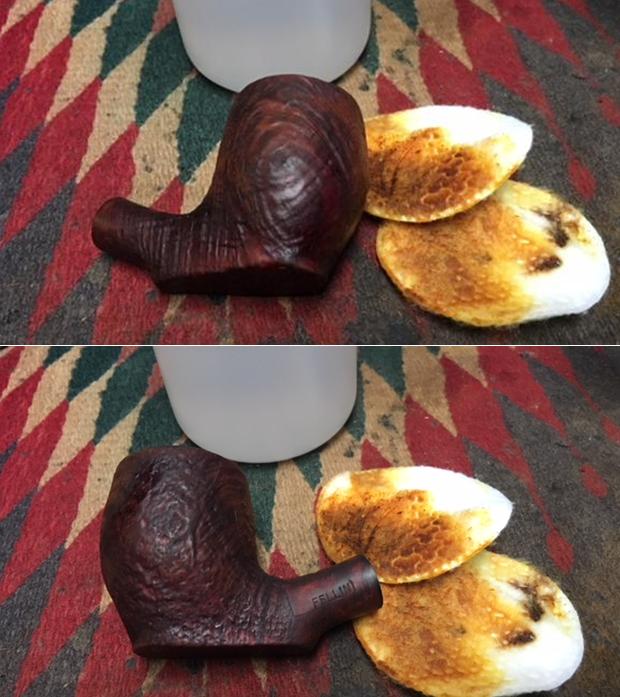
 I rubbed the bowl down with Before & After Restoration Balm to deep clean the briar bowl and the rim top as well as the briar shank. The product works to clean, enliven and protect the briar. I hand rubbed it with my fingers, working it into the exterior of the pipe. I worked it into the blast with a horsehair shoe brush. After it had been sitting for a little while I buffed it with a soft cloth to polish it. The pipe really began to have a rich shine. I took some photos of the bowl at this point to mark the progress in the restoration.
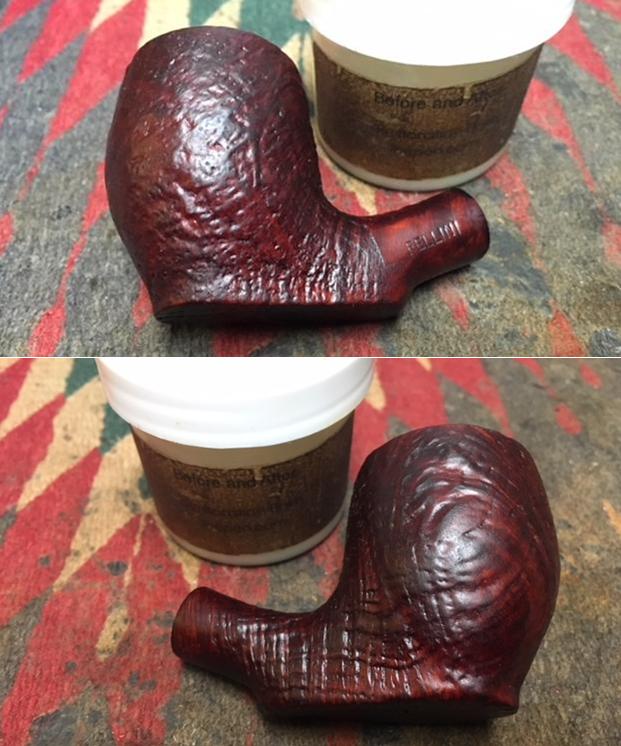
 It dawned on me that Jeff may not have been able to get the shank cleaned with the tenon stuck in the mortise so I went back and quickly cleaned the mortise and the airway in the shank and stem with pipe cleaners, cotton swabs and alcohol. I was right he had not been able to get to the debris behind the stuck tenon.
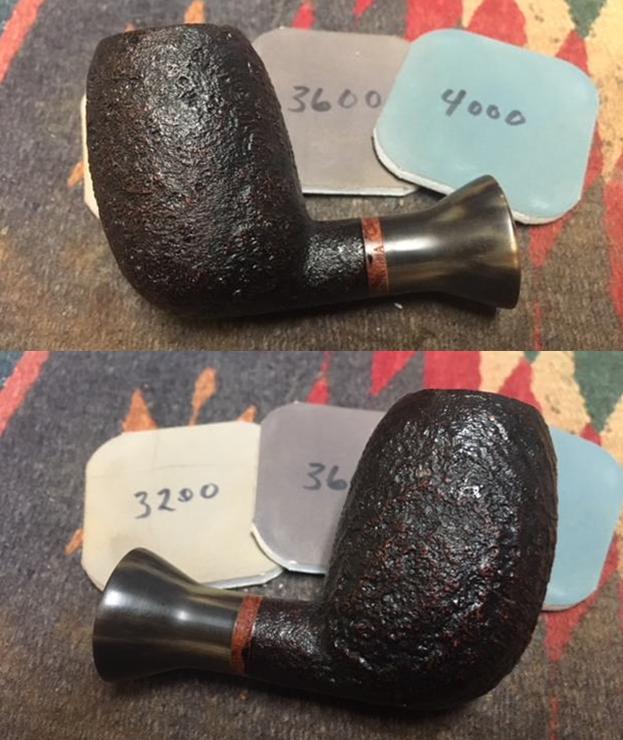
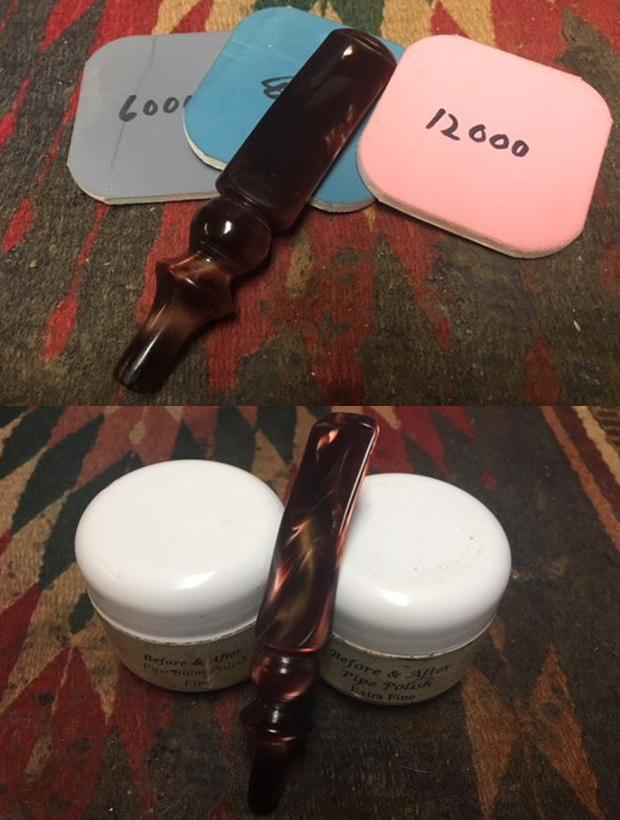
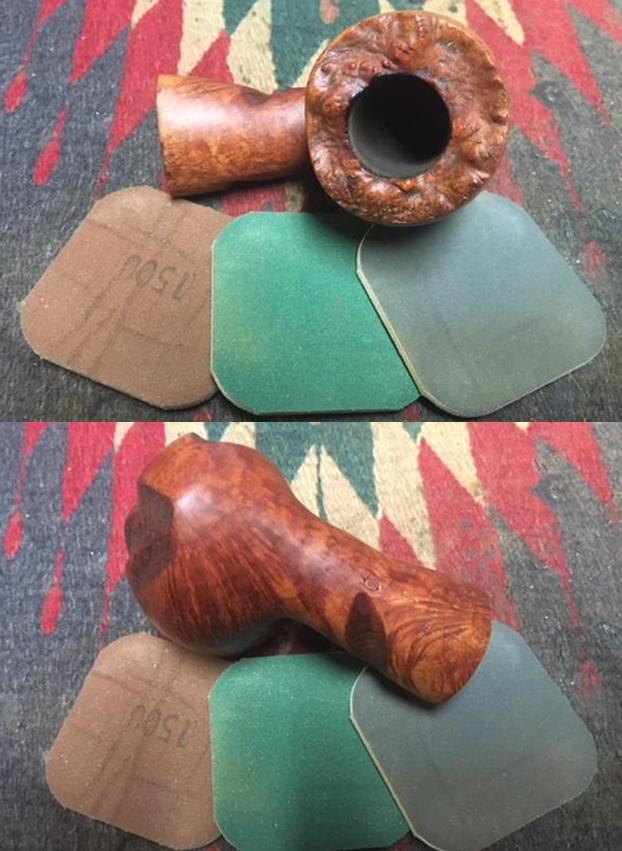
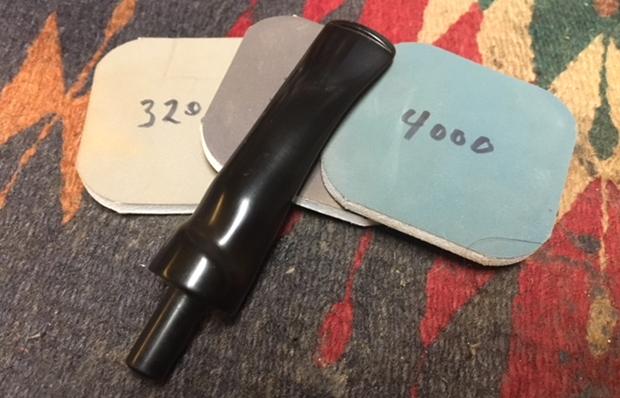
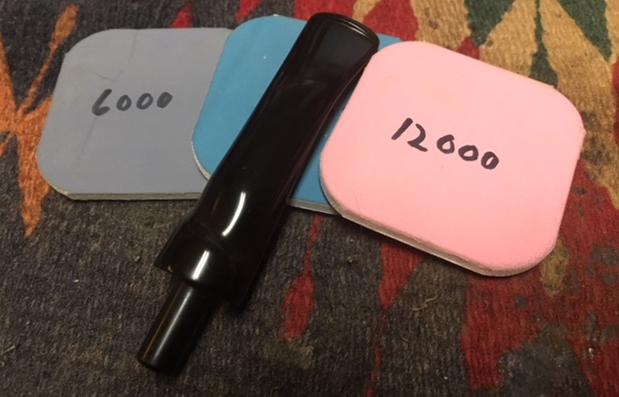
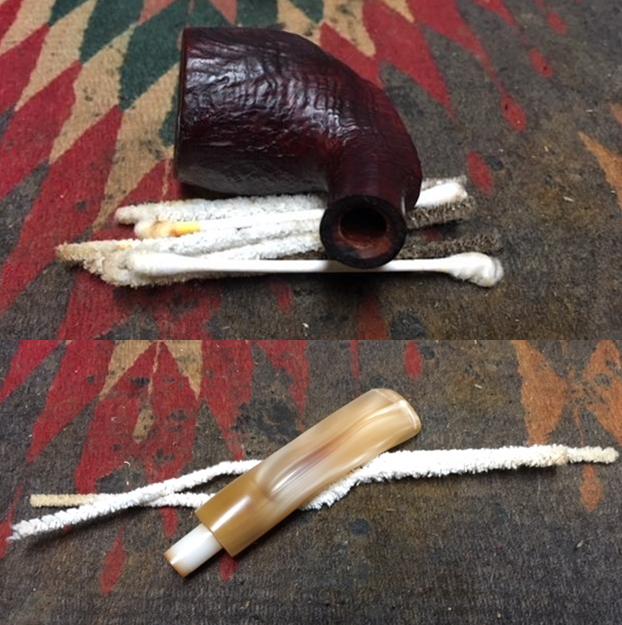 I polished the stem with micromesh sanding pads – wet sanding with 1500-2400 grit pads and dry sanding with 3200-12000 grit pads. I wiped the stem down after each pad with a damp cloth to remove the sanding dust on the acrylic. When I finished polishing and wiping it down I set it aside to dry.
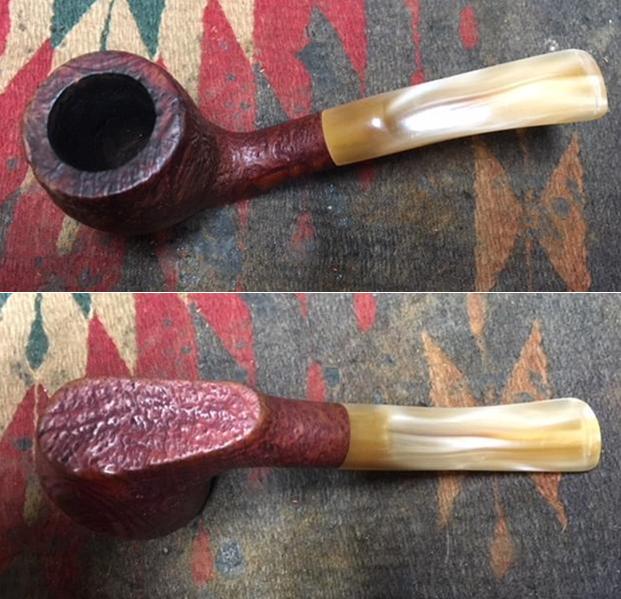
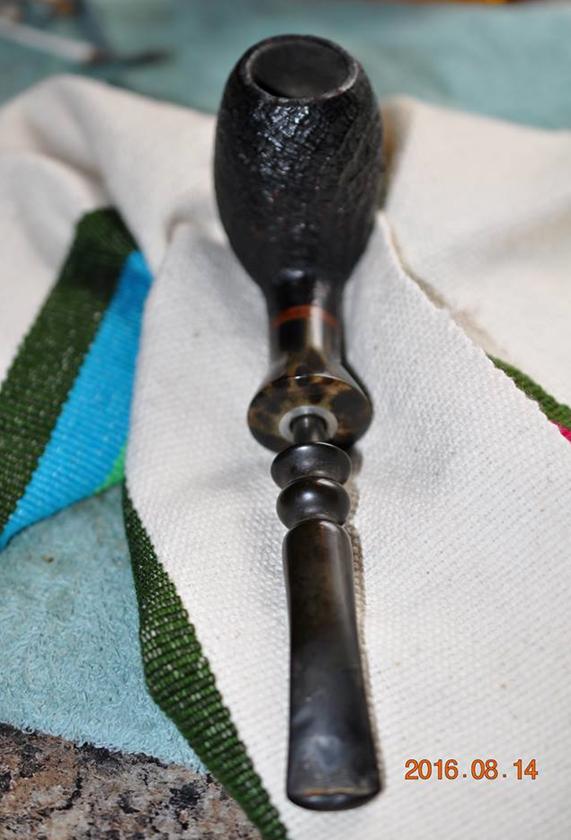
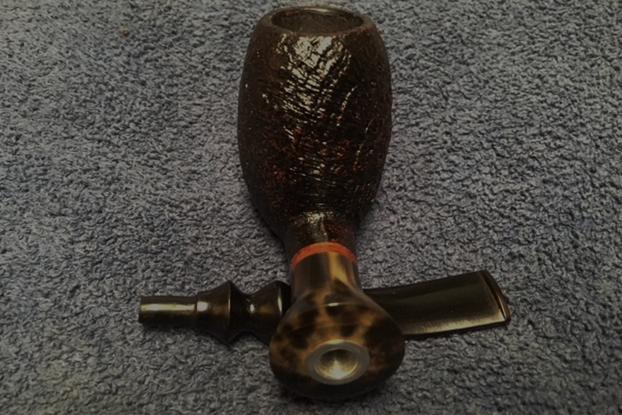
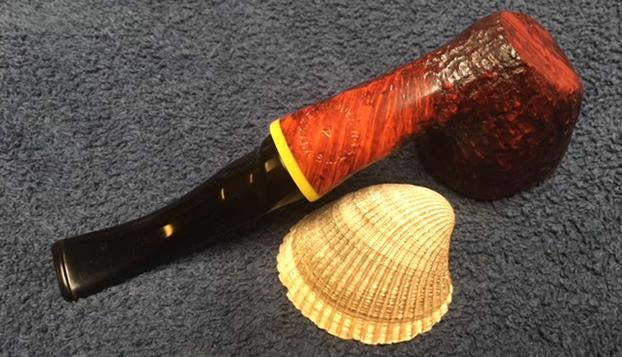
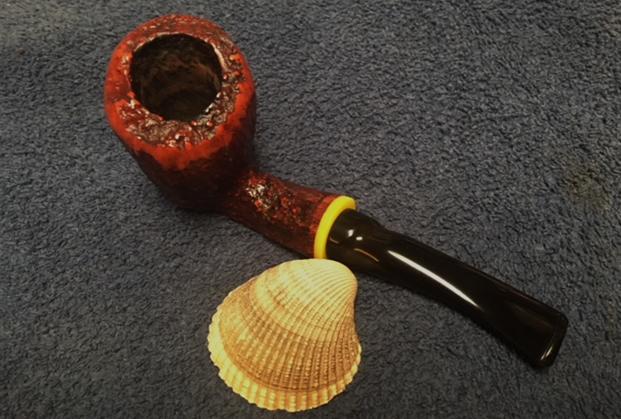
 I polished stem and bowl with Blue Diamond to polish out the remaining small scratches. I gave the bowl multiple coats of Conservator’s Wax and the stem multiple coats of carnauba wax and buffed the pipe with a clean buffing pad to raise the shine. I hand buffed it with a microfiber cloth to deepen the shine. The pipe polished up pretty nicely. The contrasting brown stain on the sandblast and the polished, variegated swirls and striations of the acrylic stem worked together to give the pipe a unique look. The finished pipe is shown in the photos below. This is one of those interesting Italian Made pipes about which little information can be found. The shape, finish and flow of the pipe and stem are very well done. The dimensions are Length: 5 1/2 inches, Height: 2 inches, Outside diameter of the bowl: 1 3/8 inches, Chamber diameter: 3/4 inches. This one will be added to the rebornpipes store soon. If you are interested in adding it to your collection send me an email to slaug@uniserve.com or send me a message on Facebook. Thanks for walking through the restoration with me as I worked over this nice little Italian Made sitter.


Blog by Steve Laug
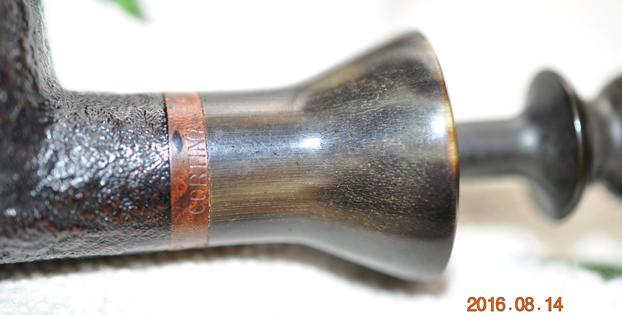
The next pipe on the table was one that my brother Jeff picked up on an eBay auction from a seller in Franklin Tennessee almost two years ago. I know it seems like a long time ago and I suppose it is but I have boxes of pipes to refurbish here and this one came up today! It was in a box with the freehand pipes that I have been working my way through. It is an interestingly shaped sandblast pipe that is a stack. When I first looked at it I did not see any stamping on the shank. As I examined it today I found stamping on the thin band of smooth briar between the horn shank extension and the bowl. It stamped around the band and reads CORTINA FACTORY DENMARK with the shape number 22. The pipe looked pretty good when he got it from the seller. There was dirt and grime in sandblast finish on the bowl. The horn shank extension was oxidized and tired looking. There was a metal mortise inset in the horn to protect it from splitting. There was a light cake in the bowl and the inner and out edges of the bowl were in good shape. The contrast brown finish on the pipe was in excellent condition. I am not sure if the stem on the pipe was the original as the tenon was very long and the fit in the shank was snug but not deep. It was lightly oxidized but in decent condition. I think a stem with a shorter tenon and snug fit to the shank would work well. I would also see if I could shape one to follow the shape of the horn extension. I would have to see what I could find in the can of stems. Jeff took photos of the pipe before he started his cleanup up work.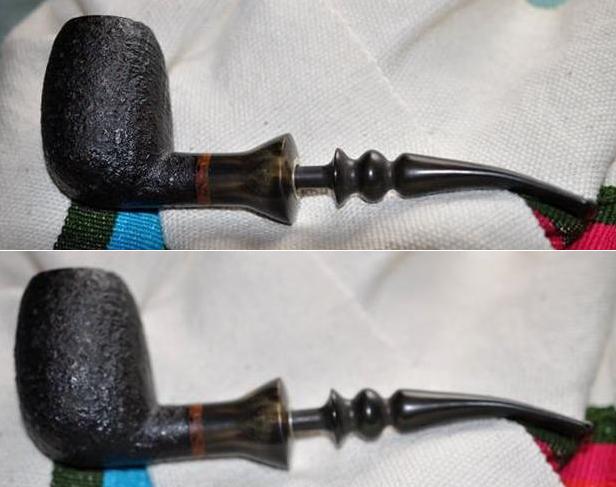

 Jeff took photos of the stamping on the pipe. The first photo shows the shape number 22 on the smooth band. The second shows the CORTINA stamp on the smooth band. The third and fourth photos show the stamping Denmark Factory.
 The next photo shows the shank end – a mottled horn with the metal mortise insert. The stem is in place but you can see that the diameter of the tenon is smaller in diameter than the insert. The second photo below shows the striations in the horn shank extension.
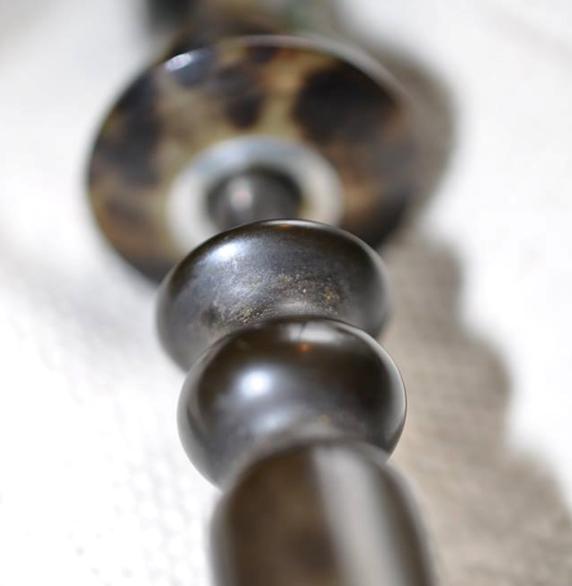
 The stem was dented and worn. I wanted to replace it with a different stem than the replacement that came in it so I was not too concerned with the stem condition.
 Jeff had scrubbed the exterior of the bowl with Murphy’s Oil soap and removed the dust and grime that had accumulated there. The finish looked very good once it had been scrubbed. He lightly reamed the bowl with a PipNet reamer and cleaned it up with a Savinelli Fitsall Pipe Knife. He cleaned the interior of the mortise and the airway in the shank and the stem with alcohol, cotton swabs and pipe cleaners. The pipe came to me clean and ready to do the restoration and restemming. I took some photos of the bowl to show the condition at this point in the process.
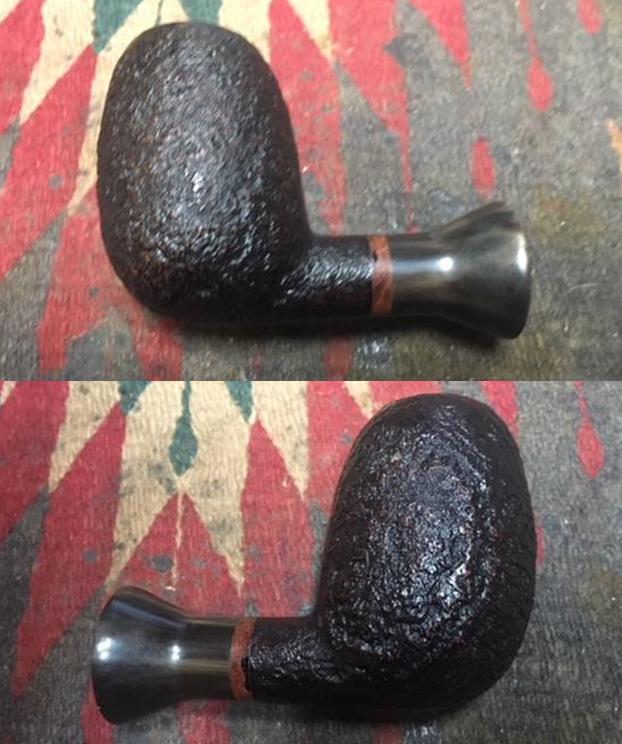
 I took some photos of the horn shank extension. At first I thought it was acrylic but as I worked on it I was sure that it was real horn. It was a unique and pretty piece of polished horn. It need to be polished but it was unsplit and in good condition.
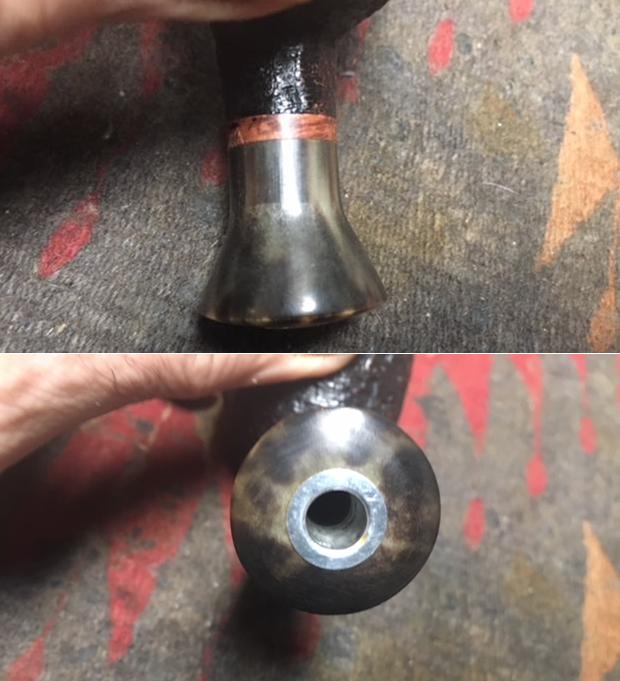 As has become my practice when working on restoring pipes I did some research on the Cortina Factory Denmark brand name. Pipedia noted the brand but had no information to give in terms of the company or a time frame. I also looked on Pipephil’s site and found a listing for the brand. I have included a screen capture from that site (http://www.pipephil.eu/logos/en/logo-c7.html). The first pipe in the photo shows the Cortina brand and stamp that is the same as on the pipe I am working on. The second one is attached to the Georg Jensen brand and the stamping is actually very similar. It makes me wonder if the Cortina was not a line of pipes made by Georg Jensen. I have no proof of that other than the connection shown in the screen capture below.
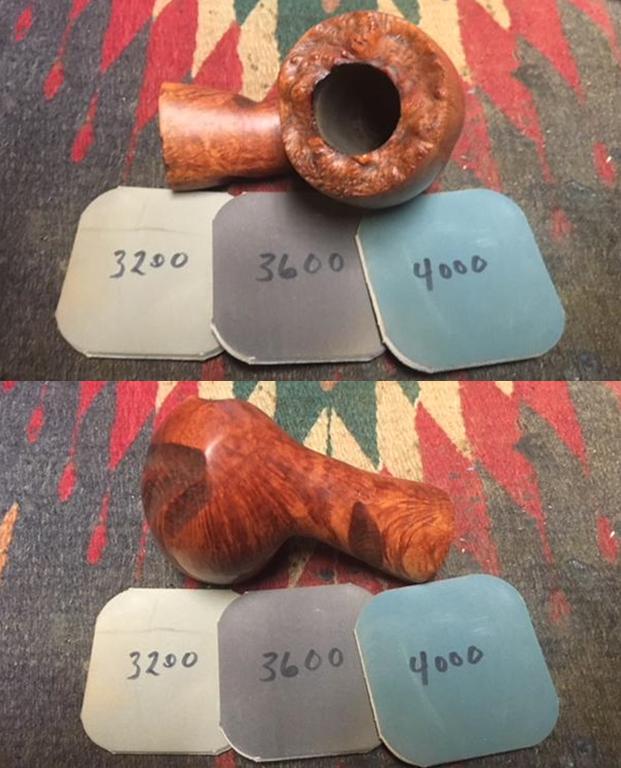
 I started my restoration of the pipe armed with the little bit of information that I could find on the brand. I polished the horn shank extension with micromesh sanding pads – wet sanding with 1500-2400 grit pads and dry sanding with 3200-12000 grit pads. I wiped the bowl down with a damp cloth after each sanding pad to remove the sanding dust. Once I had finished with the last pad I wiped it down with Obsidian Oil to enliven the horn and preserve it.

 I turned from the horn shank extension to work on the sandblast briar of the bowl. I rubbed the bowl down with Before & After Restoration Balm to deep clean the briar bowl and the rim top as well as the briar shank. The product works to clean, enliven and protect the briar. I hand rubbed it with my fingers, working it into the exterior of the pipe. I worked it into the blast with a horsehair shoe brush. After it had been sitting for a little while I buffed it with a soft cloth to polish it. The pipe really began to have a rich shine. I took some photos of the bowl at this point to mark the progress in the restoration.
 I had a stem in my can of stems that had turned portions that as the shape of the shank extension on the pipe. Once the stem is cleaned up I will point out the shapes more clearly. I sanded the stem with 220 grit sandpaper to shape the tenon to fit in the mortise. I sanded the oxidation to remove it from the rest of the stem.
 I took a photo of the new stem next to the one that had come with the bowl. You can see the variation in the shape of the stem. The top one has a very long tenon that fit into the shank up to the spot where the oxidation begins. It is longer than the new stem and the shape is not quite right. On the new stem I have boxed in the shapes in red that parallel the shape of the shank extension.
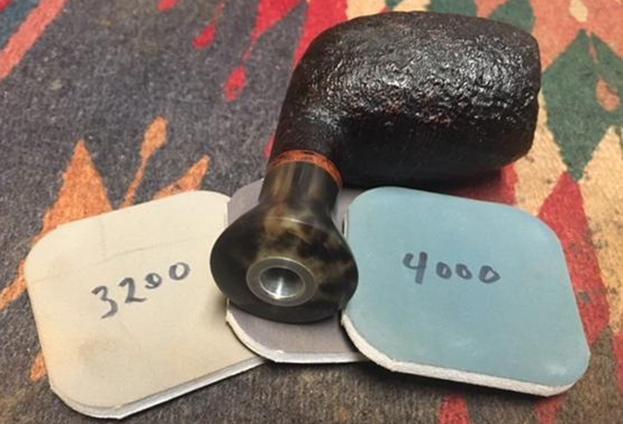
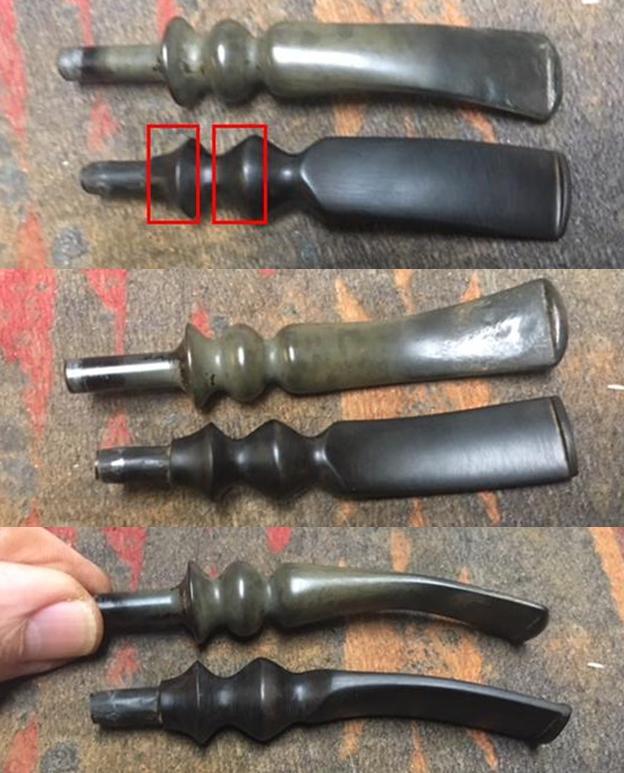 I polished the stem with micromesh sanding pads – wet sanding with 1500-2400 grit pads and dry sanding with 3200-12000 grit pads. I wiped the stem down after each pad with a damp cloth to remove the sanding dust on the acrylic. I polished the stem with Before & After Pipe Stem Polish – both Fine and Extra Fine and I set it aside to dry.
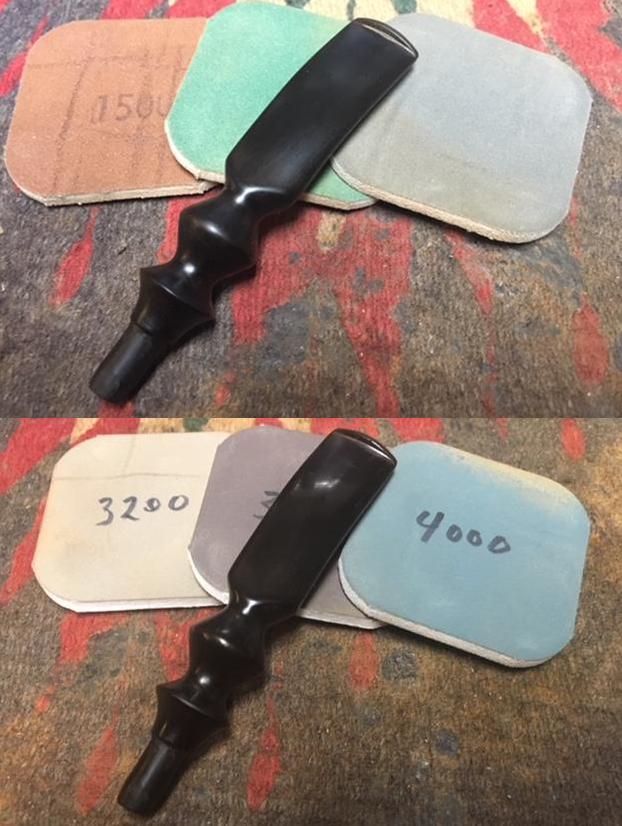
 I polished stem and bowl with Blue Diamond to polish out the remaining small scratches. I gave the bowl multiple coats of Conservator’s Wax and the stem multiple coats of carnauba wax and buffed the pipe with a clean buffing pad to raise the shine. I hand buffed it with a microfiber cloth to deepen the shine. The pipe polished up pretty nicely. The contrasting brown stain on the sandblast, the variegated swirls in the horn shank extension and the polished vulcanite stem worked together to give the pipe a unique look. The finished pipe is shown in the photos below. This is one of those interesting unknown Danish Pipes that I think could possibly lead back to Georg Jensen but we will probably never know for sure. The shape, finish and flow of the pipe and stem are very well done. The dimensions are Length: 6 1/2 inches, Height: 2 1/4 inches, Outside diameter of the bowl: 1 1/4 inches, Chamber diameter: 3/4 inches. This one will be added to the rebornpipes store soon. If you are interested in adding it to your collection send me an email to slaug@uniserve.com or send me a message on Facebook. Thanks for walking through the restoration with me as I worked over this piece of Danish pipe making history.

Blog by Steve Laug
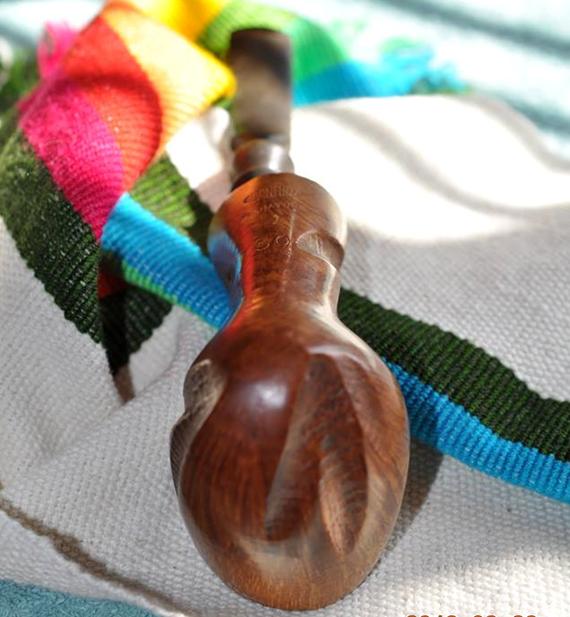
I have been working my way through some freehand pipes that my brother Jeff picked up recently. There are some amazing freehand pipes among them. The one on the work table now is another Granhill Freehand. I have already restored a beautiful large freehand Granhill earlier this summer (https://rebornpipes.com/2018/06/09/another-large-and-unique-freehand-pipe-a-granhill-signature-1-100/). It was a Granhill Signature 1 100 where this new one is a Granhill Signature 1 50. The pipe looked pretty good when he got it. There was dirt and grime in the plateau on the rim top. The edges were clean and undamaged. The bowl had a pretty thick cake inside. The finish on the pipe was an oil finish on natural briar. There were some carved trails up the sides of the bowl and the shank that had been lightly sandblasted and had an interesting texture. The stem was a replacement stem of cast vulcanite. It was oxidized but in decent condition. The acrylic stem on the other Granhill made me want to put the same kind of stem on this one as well. We would have to see. Jeff took photos of the pipe before he started his cleanup up work.
 Jeff took photos of the rim top to show the grime and dirt in the crevices of the rim top. There was also some darkening around the inner edge of the rim top and some lava build up that was overflowing onto the inner edge.
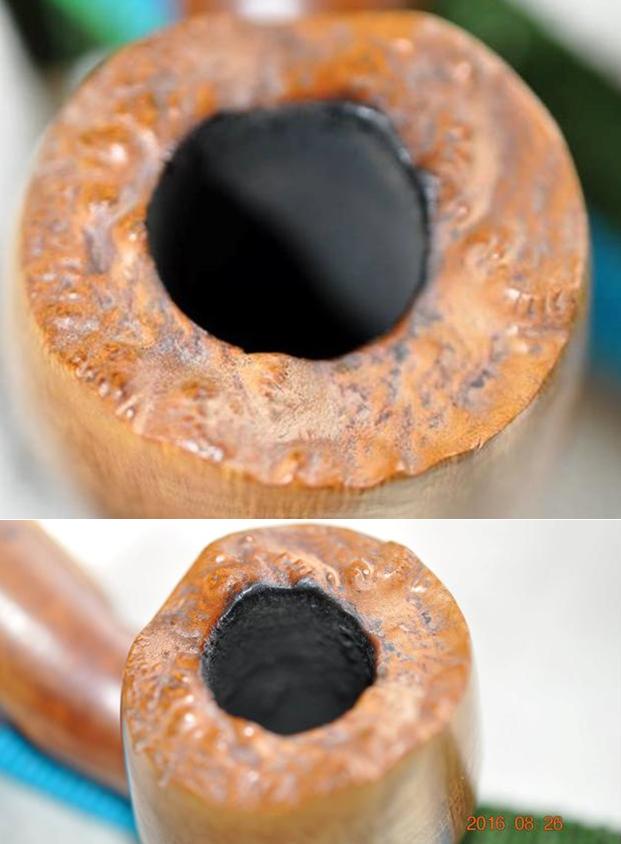 He also took a photo of the stamping on the shank. The stamping is very clear and readable.
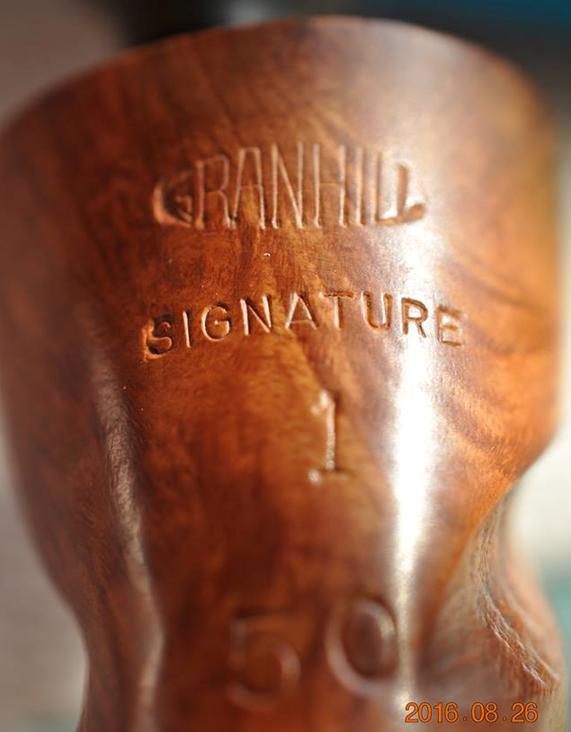 The stem was in decent condition. The surface of the vulcanite was pitted and oxidized. There was some light tooth chatter on both sides of the stem near the thin button.
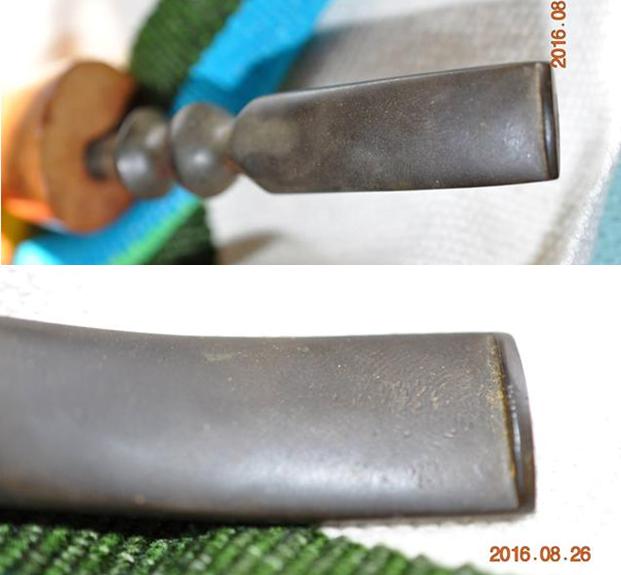 Jeff had cleaned the rim top and removed the debris in the plateau. He had scrubbed the exterior with Murphy’s Oil soap and removed the dust and grime that had accumulated there. The oil finish disappeared and there was natural unfinished briar and once it was scrubbed it was clean and unstained briar. He lightly reamed the bowl with a PipNet reamer and cleaned it up with a Savinelli Fitsall Pipe Knife. He cleaned the interior of the mortise and the airway in the shank and the stem with alcohol, cotton swabs and pipe cleaners. The pipe came to me clean and ready to do some light touch ups and polishing. The stem was cleaned but had tooth chatter on the top and underside near the button and on the surface of the button itself.
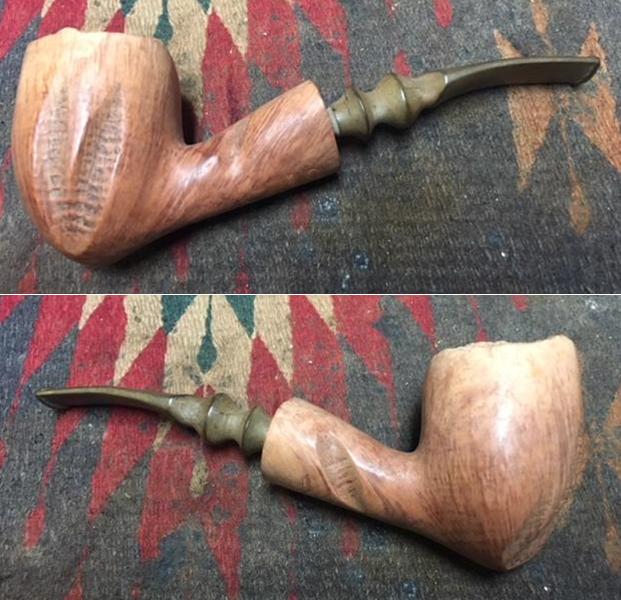
 I took close up photos of the rim top to show the condition of the plateau. It was very clean and there was no damage to the inner or outer edge of the rim. Jeff had been able to remove all of the tars and oils and lava coat on the edge of the bowl. The photos of the stem to give a clear picture of what it looked like before I cleaned it up. They also show the smooth shank end on this particular pipe. There was a slight bit of plateau on the top of the shank end in the second photo.
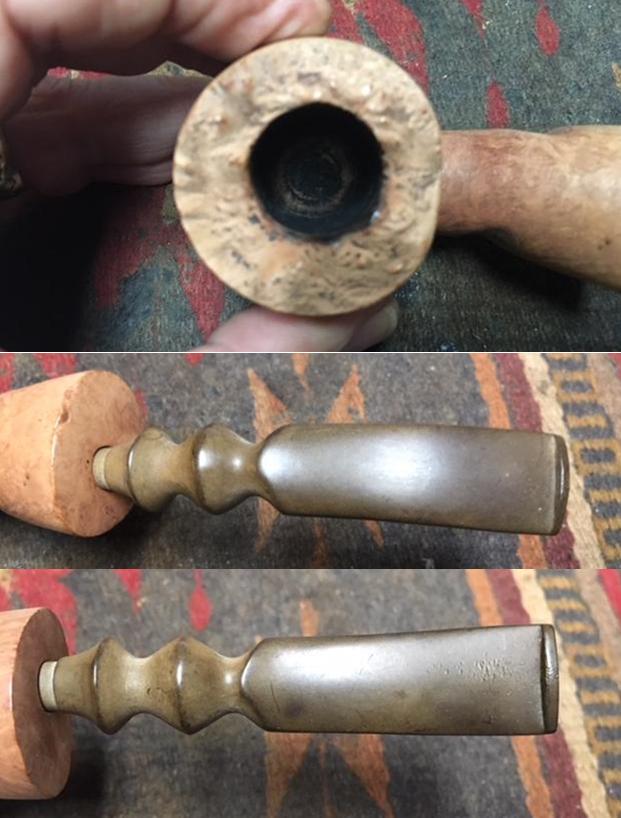 In my earlier blog on the other Granhill I had done research on Pipedia to find information. I found two potential makers of the brand though they separated the name into two parts Gran Hill. The first possible maker was Michael V. Kabik with some of them stamped Made in Denmark. The spelling of the name was noted to come in other versions: Granhill, Gran-Hill. The second possibility comes from Lopes book where he states that the brand also was used by a Fargo Tobacconist, Lonnie Fay, who made freehands bearing this stamp in the 1970s. To me the similarity of the pipe to other Kabik pipes that I have worked on made me go with him as the maker of this pipe as well.
 I went back to Pipedia and spent time reading about Michael Kabik (https://pipedia.org/wiki/Kabik). Here is a summary of what I found.
Michael Victor Kabik or Michael J. Kabik, now retired artisan and pipe repairman, was born in Annapolis, Maryland in 1950. As a student he was fascinated by science, but finally turned to the arts. In the early 1970s he started working as an artisan and designer for Hollyday Pipes Ltd., and when the company closed he set up in his own right.
Kabik writes as follows:
…In the 1960s, I had helped Jay build Jay’s Smoke Shop and was his first employee. Since that time, he had set up one of the very first freehand pipe-making operations in the U.S. along with his partner, Chuck Holiday, called CHP-X Pipes. The staff consisted of four full-timers actually making the pipes and perhaps another four in sales and office work. Chuck, who did the actual design and carving, had long since had serious disagreements with Jay and split. Chuck’s replacement from the staff was quitting, and Jay was in a bind. Jay offered me the job, and I gladly accepted. The fellow quitting was supposed to train me for two months but left after two weeks, leaving me with an awesome responsibility. I felt as though the future employment of all these people depended on me as the designer and cutter…and it did.
…Sadly, CHP-X closed its doors two years after my arrival, due primarily to distribution, sales force problems, and other issues to which I was not privy…In love with a medium that satisfied my creative impulses while, pretty much, paying the bills, I bought up the essential equipment and produced pipes on my own. I did this from a farm house my wife and I rented in Phoenix, Maryland. I produced pipes under the name KANE, Gran Hill and others I can’t remember as well as a private label line for a store in, I believe, South Dakota.
…In 1973, I was approached by Mel Baker, the owner of a chain in Virginia Beach called Tobak Ltd. Mel was interested in producing a freehand pipe line and was alerted to my product by Al Saxon, one of his managers and a former CHP-X employee. Mel wanted to relocate me to Virginia Beach, give me carte blanche, and recreate the CHP-X studio with, of course, a new name for the product. I’m sure my answer came very quickly.
…We decided on the name Sven-Lar. Why? Well, when I bought out CHP-X, I also got a small drawer full of metal stamps that were created for private-label work. The Sven-Lar name was conceived but never realized. Aside from having the stamp already made, there were other reasons we chose Sven-Lar. First, we were making a line of pipes in the Danish freehand tradition and also, sadly, we knew the difficulty American pipe makers had breaking the foreign market mystique barrier. The latter certainly played a big part in the demise of CHP-X.
After rereading the previous blog I was pretty certain that the pipe I was working on was another one made by Kabik. I turned my attention to restoring the pipe. I started with the clean bowl, I rubbed the bowl down with Before & After Restoration Balm to deep clean the briar bowl and the rim top as well as the briar shank. The product works to clean, enliven and protect the briar. I hand rubbed it with my fingers, working it into the exterior of the pipe. I worked it into the plateau top with a horsehair shoe brush. I wiped it off and buffed it with a soft cloth to polish it. The pipe really began to have a rich shine. I took some photos of the bowl at this point to mark the progress in the restoration.

 I wrapped a piece of dowel with 220 grit sandpaper and sanded out the inside of the bowl to smooth the walls. I removed all of the remaining cake on the walls of the bowl.
 I set the bowl aside and turned my attention to the stem. I looked over the replacement stem and decided to not use it. I went through my stem collection and found a nice brown swirled acrylic stem that I thought would look good with the pipe bowl. It was very similar to the stem on the other Granhill I worked on so I decided to use it instead. I took photos of the two stems side by side for comparison.
 I sanded the tenon end with a Dremel and sanding drum and smoothed it out with 220 grit sandpaper to adjust the tenon to the same diameter as the tenon on the replacement stem. It did not take too much work to adjust the fit to the shank.
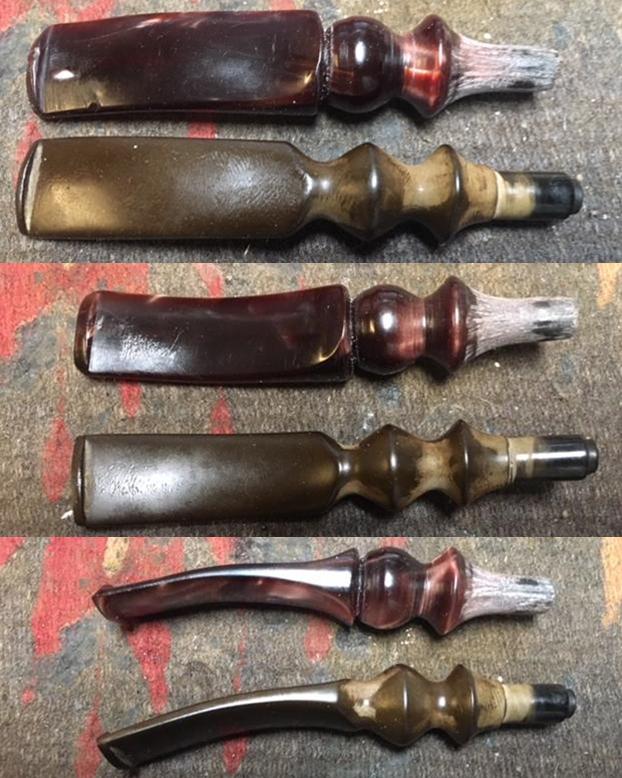 I sanded out the tooth marks out of both sides of the stem with 220 grit sandpaper. I worked over the surface with sandpaper to remove the tooth chatter, marks and to smooth out the surface. There were tooth deeper tooth marks on the top side of the stem that I would need to fill in and work on. I filled in the dents with clear super glue. Once the glue cured I sanded them smooth with 220 grit sandpaper to blend them into the surface of the acrylic.
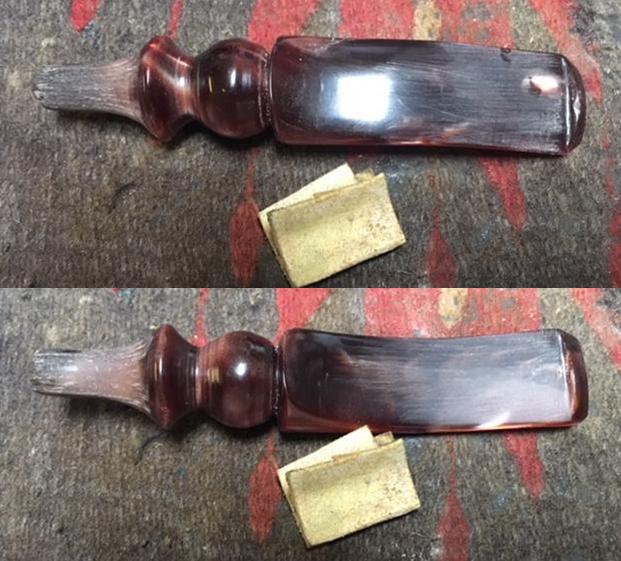
 I polished the stem with micromesh sanding pads – wet sanding with 1500-2400 grit pads and dry sanding with 3200-12000 grit pads. I wiped the stem down after each pad with a damp cloth to remove the sanding dust on the acrylic. I polished the stem with Before & After Pipe Stem Polish – both Fine and Extra Fine and I set it aside to dry.
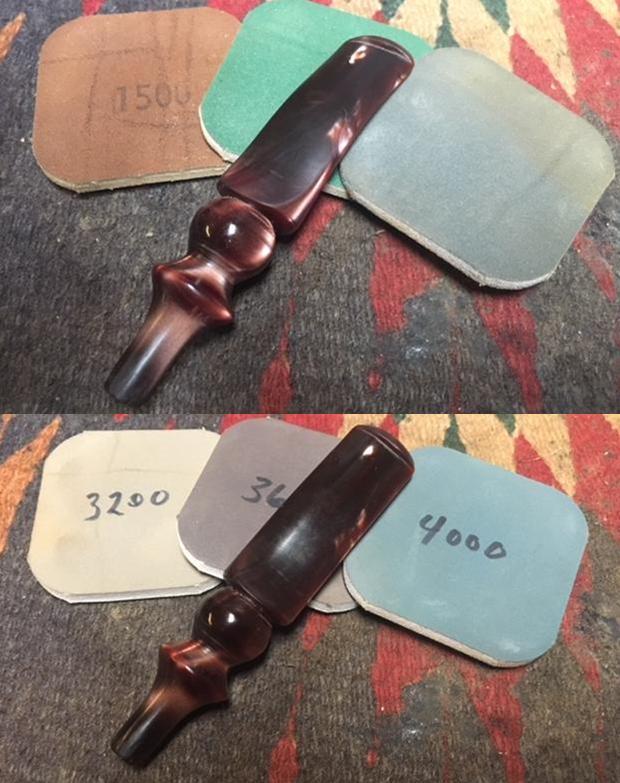
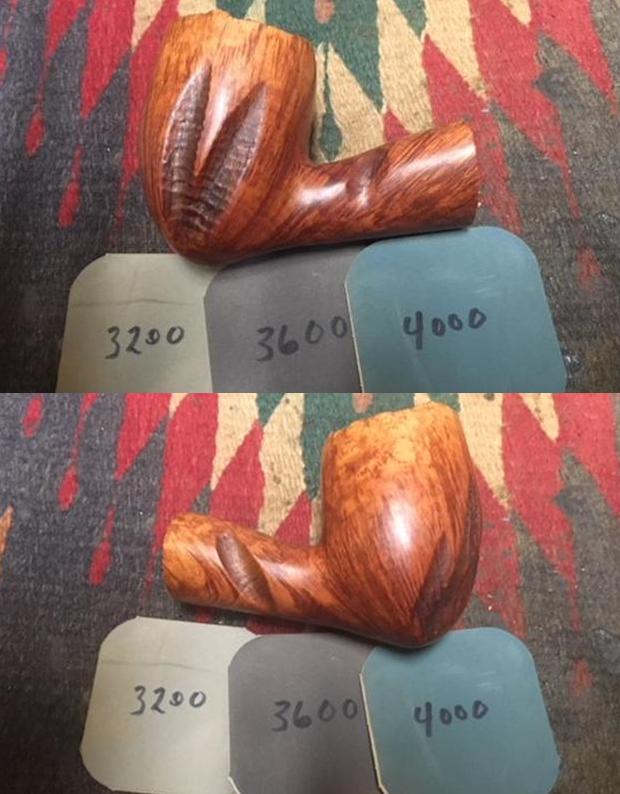
 I polished the briar with micromesh sanding pads – wet sanding with 1500-2400 grit pads and dry sanding with 3200-12000 grit pads. I wiped the bowl down with a damp cloth after each sanding pad to remove the sanding dust. Once I had finished with the last pad I wiped it down with a light coat of olive oil to collect the dust and to give some depth to the finish.
 I polished stem and bowl with Blue Diamond to polish out the remaining small scratches. I gave the bowl and the stem multiple coats of carnauba wax and buffed the pipe with a clean buffing pad to raise the shine. I hand buffed it with a microfiber cloth to deepen the shine. The pipe polished up pretty nicely. The plateau on the rim top and the smooth natural oiled finish work very well with the swirled brown acrylic stem. The finished pipe is shown in the photos below. While I have worked on other Michael Kabik pipes (a CHIP-X) this is the second Granhill pipe of his that I have restored. It is well crafted and is very similar to the CHIP-X that I worked on in the past. The shape, finish and flow of the pipe and stem are very well done. The dimensions are Length: 6 1/2 inches, Height: 2 1/4 inches, Outside diameter of the bowl: 1 3/4 inches, Chamber diameter: 3/4 inches. This one will be added to the rebornpipes store soon. If you are interested in adding it to your collection send me an email to slaug@uniserve.com or send me a message on Facebook. Thanks for walking through the restoration with me as I worked over this Granhill freehand.

Blog by Joe Gibson
August has been a good month for rescuing pipes from various antique shops in Mississippi. Earlier this month, I bought a Peterson Kapp-Royal and a Søren Refburg Rasmussen freehand from an antique mall in Picayune, Mississippi.
This past weekend, we visited the antique shops/flea markets in the Meridian, Mississippi area and after not seeing any pipe or tobacco related items (except for 4 brass spittoons), we walked into the last shop on our list. To be honest, we almost didn’t go into Penny’s Little Flea Market. None of the previous shops had air conditioning and were hot. What convinced us to go into Penny’s was the big sign, “Air Conditioned.”
Talk about a lucky sign! The first thing my wife saw was a display case on the counter containing pipes. I could tell before the case was open that these were not the usual suspects – Kaywoodie, Dr. Grabow, Medico pipes. The first three I picked up were a Preben Holm and two Ben Wade freehands. The case also held three pre-1965 Charatan’s Make and four Savinelli’s.
The Preben Holm caught my heart though.
 Preben Holm carved and sold his first pipe before he turned 16. By the time he was 22 years old, he had his own shop and employed 45 employees. He is widely considered one of the godfathers of the Danish freehand design. For those wanting more information check out the about Holm on https://pipedia.org/wiki/Holm,_Preben.
Interestingly, Holm also produced the Danish Era Ben Wade pipes. Holm signed on with Herman Lane of Lane, Ltd. in 1971 after his previous distributor could not pay him. That dates the Preben Holm Delight as either pre-1971 or after 1980 according to my research. Since his prior distributor still had a stock of “Preben Holm” pipes, Lane decided to market the pipes under the Ben Wade name. My understanding is that once the old distributor depleted his stock, Holm and Lane reinstated the Preben Holm name on the pipes.
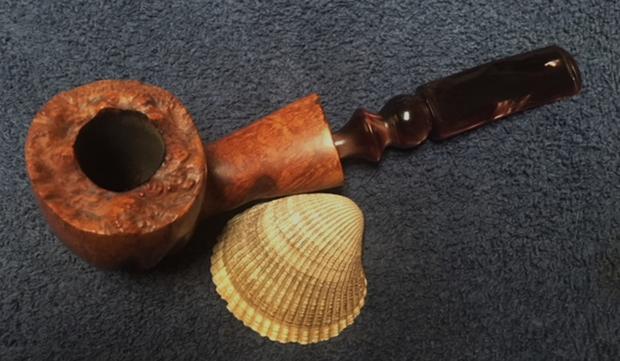
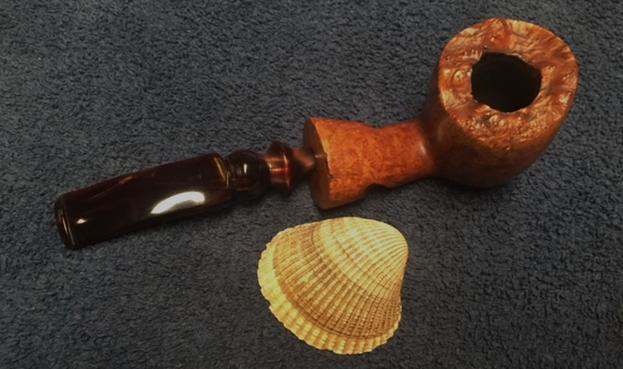
Despite the outside of the bowl being dark and grimy, there was relatively little cake in the pipe when I bought it. The stem was moderately oxidized but hadn’t turned dark orange yet. When I sniffed the bowl, it smelled like old tobacco but didn’t have that funky smell I normally find in pipes at flea markets.
The Cleaning Process
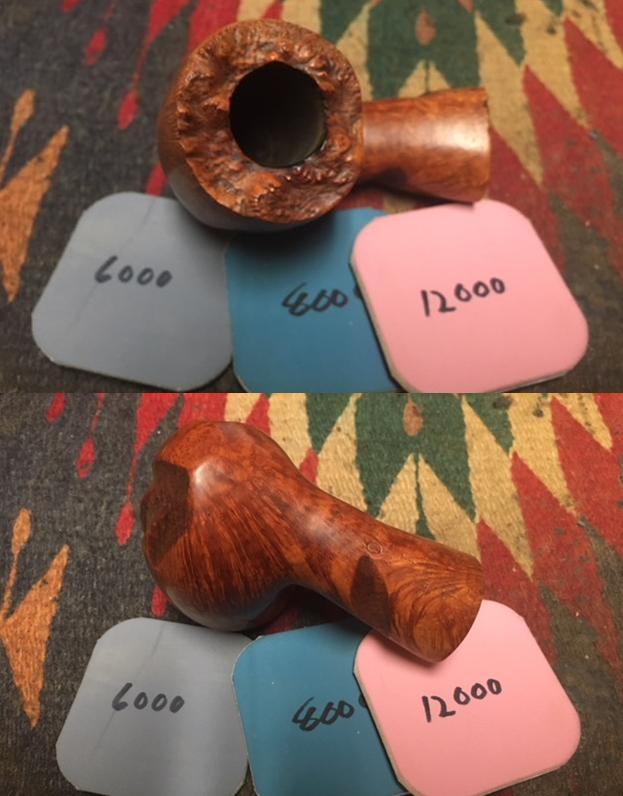
My first cleaning step on this pipe was to scrub it down with a Magic Eraser and undiluted Murphy’s Oil to remove as much of the dirt and grim as I could. I followed that with scrubbing the bowl with isopropyl alcohol and a Scotch Brite pad. It was then packed with cotton balls and saturated with isopropyl alcohol for an overnight soak.
The next morning, I put the stem to soak in an Oxyclean solution to soften the oxidation. After dumping the cotton ball and alcohol, I went to work on the outside of the pipe again. I really wanted to lighten up the smooth portions of the bowl to increase the contrast between smooth and rustication. I started wet sanding with 320 or 400 grit sand paper dipped in the alcohol. After rinsing, I wet sanded with 600 grit until I was happy with the results.
After cleaning the outside of the pipe with isopropyl alcohol and Murphy’s Oil, I sanded the smooth portions with 400 and 600 grit sandpaper. Following the 400 & 600 grit sandings, I used alcohol wipes to remove the dust residue.
 Next, I move to finishing sandpaper starting with 1000 grit. It removes any residue the alcohol wipe left and starts polishing the pipe. I use 2K, 4K, 8K grits next.
 I finish this process with 12K grit sandpaper. It requires time and patience, but the result is a nice, glossy shine before applying wax.
 The same technique is used on the rim. The top of the bowl looks out of round but it was apparently carved like that.
 I’m a big fan of using finishing sand paper and micro-mesh sanding pads to bring out the grain and shine on pipes. I have been told that I overdo it, but I like my results. I start with 1,000 grit sand paper and move up the scale – 2,000 grit, 4,000 grit, 8,000 grit and finally 12,000. Between each step, I use an alcohol wipe to remove and residue. The end result is always a very smooth feel to the pipe and a glossy shine. The pipe gets a second overnight alcohol soak after that.
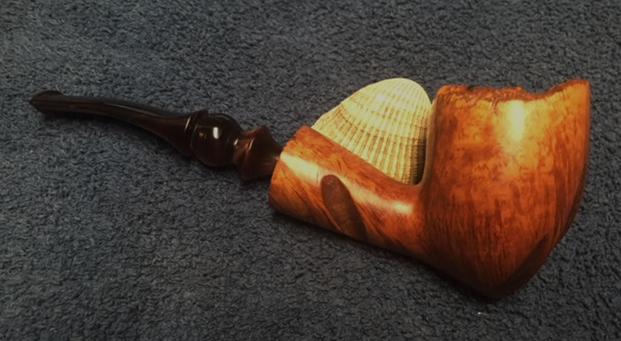
For some reason, the stem was almost more challenging to clean than the pipe. Using micro-mesh pads and a lot of elbow grease usually give me a nice black, semi-glossy stem. This stem didn’t want to cooperate. The micro-mesh removed all of the surface oxidation and looking at it under room lighting, it looked good. When I looked at the stem under sunlight though I could still see discoloration, especially around the curved parts of the stem.
Red Tripoli applied with my buffer reduced the discoloration, but it took over an hour of buffing to remove the last vestiges of the oxidation. A light application of carnauba to the stem and bowl had both gleaming and ready to smoke. 

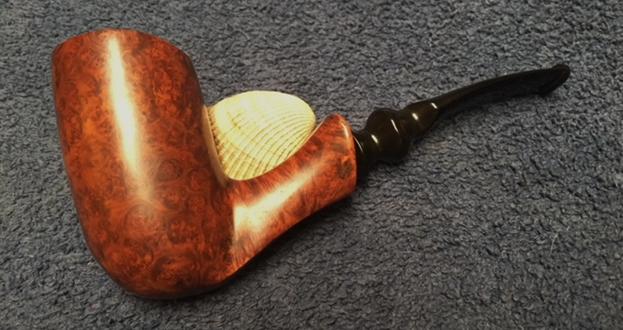
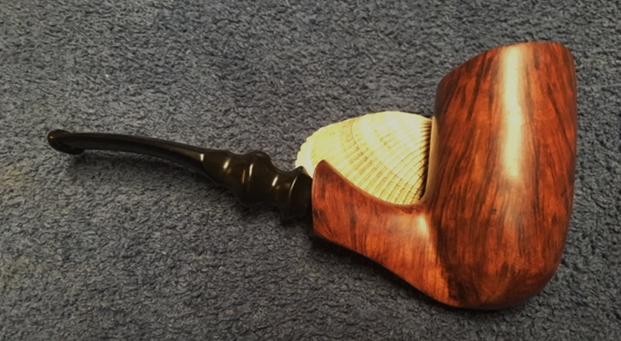
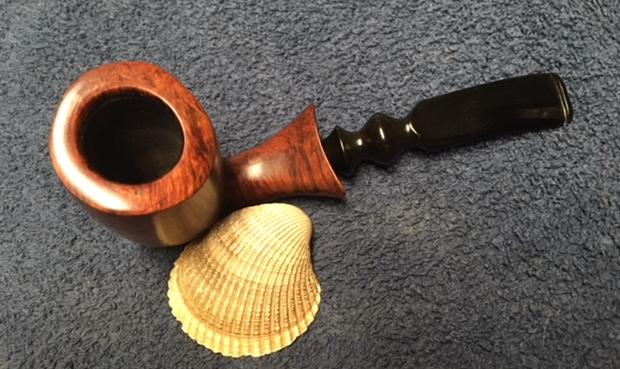
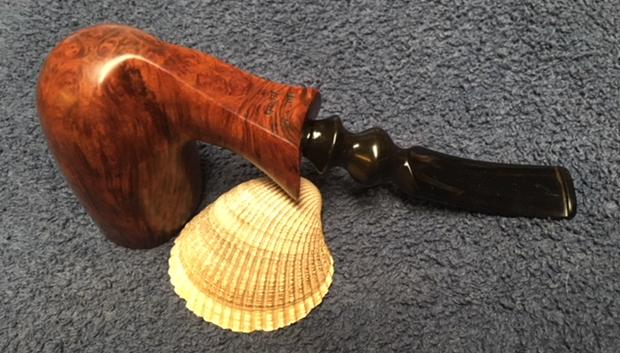
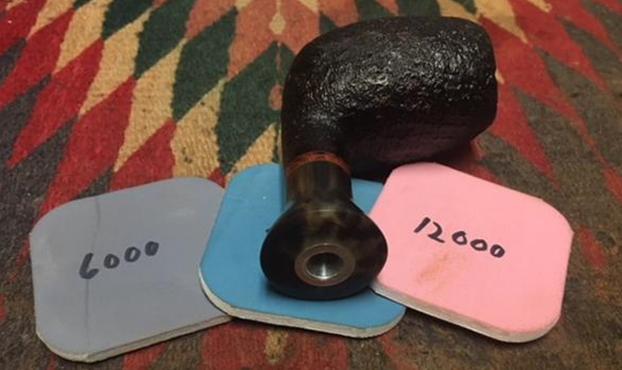
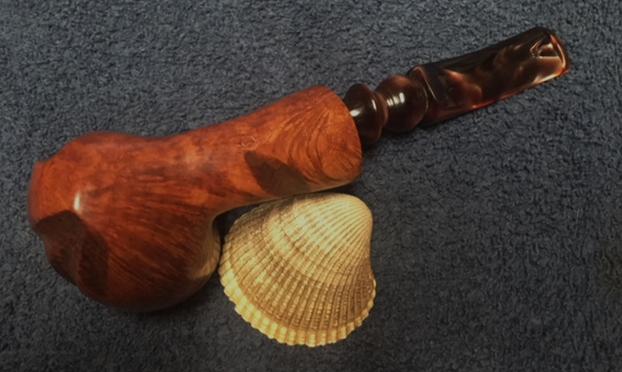
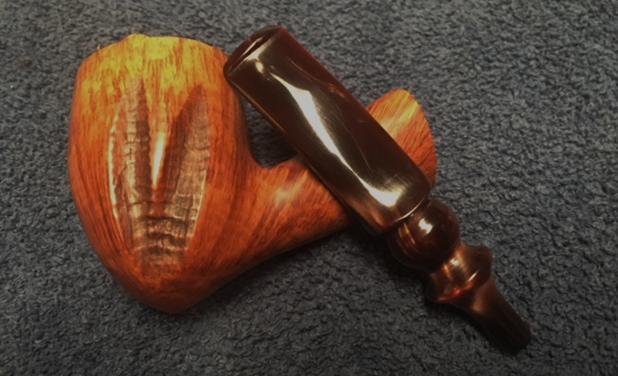
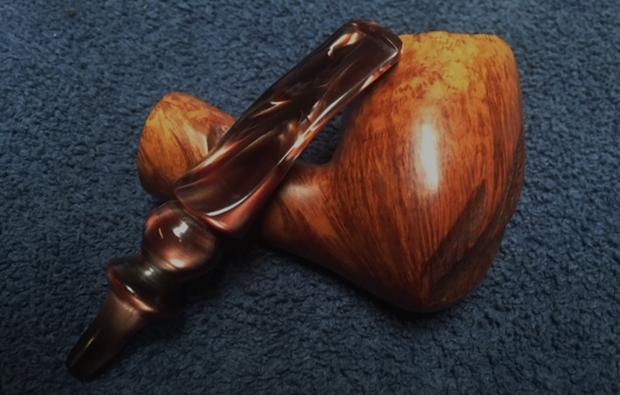
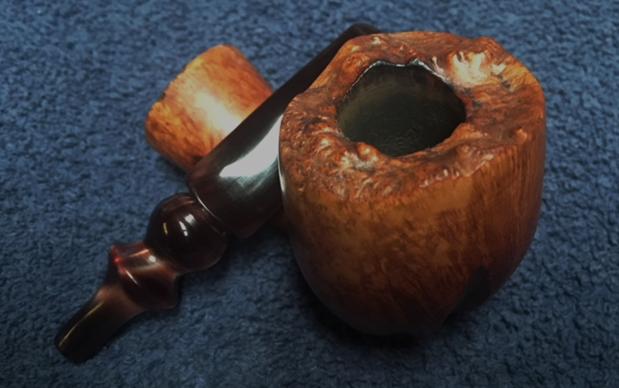
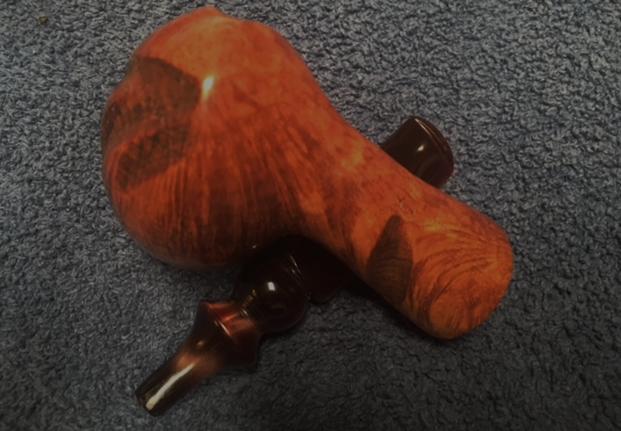
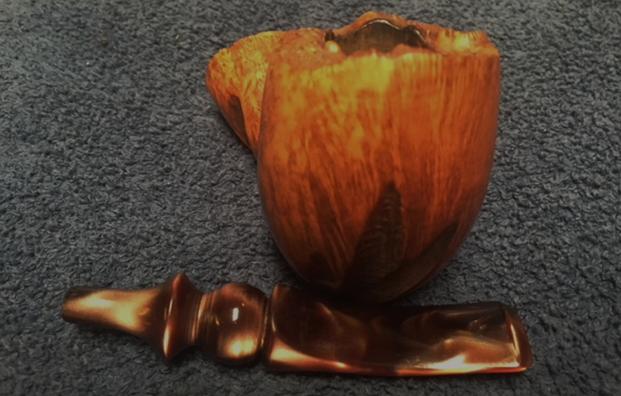
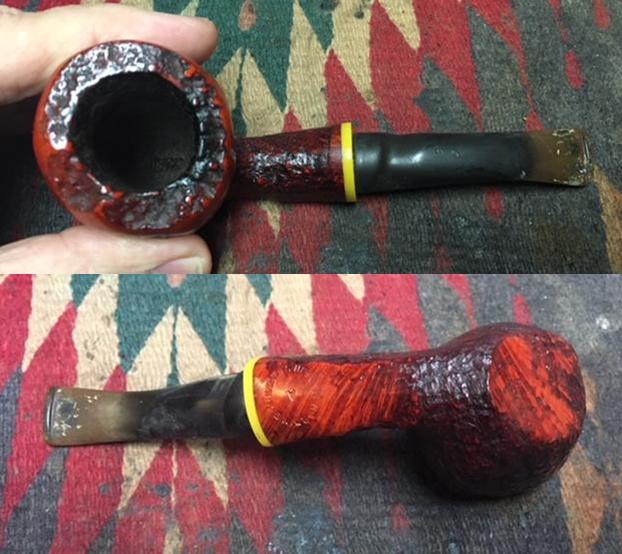
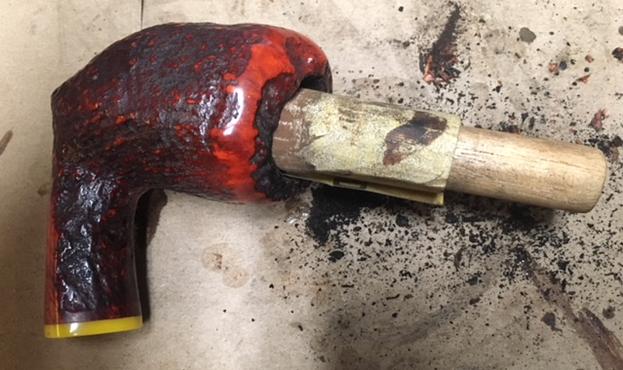
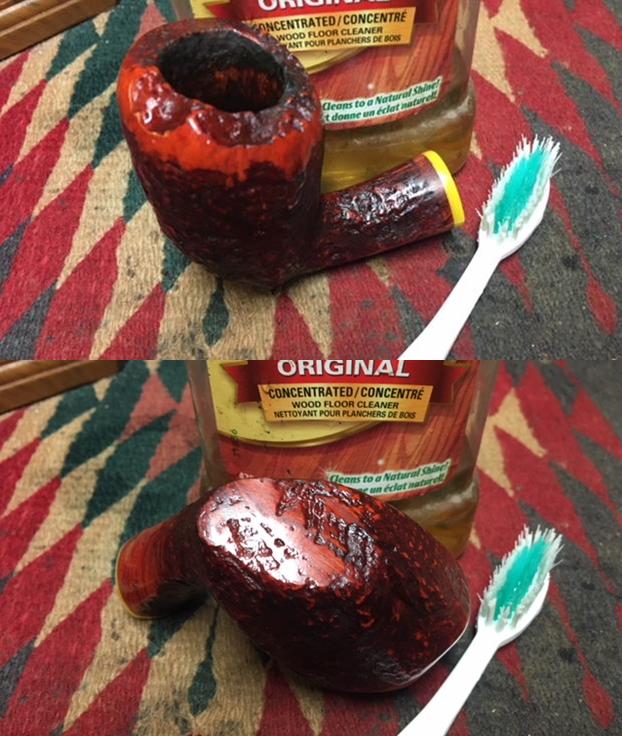
Mark did this recent blog on Restoring A Late Patent-Era House Pipe (Pt. 1). He highlights several restoration methods that are worth noting. Thanks Mark.
Great write up on Peterson System Day – September 3. Great diagrams and info on the pipe. Thanks Mark

Blog by Steve Laug
I don’t remember where this pipe came from but it showed a lot of promise. It is stamped Nording Made in Denmark in a circle with an “A” in the center of the circle on the underside of the shank. The bowl is sandblasted around the bowl and shank. The stamping is on the smooth panel on the underside of the shank. There is a smooth ring of briar on the shank just ahead of the yellow acrylic ring. The ring is asymmetrical like the shank. The rim top is a combination of smooth briar curving upward to plateau on the rim top. The stem was vulcanite and was oxidized and had some calcification on each side of the stem for the first inch ahead of the button. I think that at some point in its life before it came to me it had a rubber Softee bit on the stem to protect it from tooth marks and chatter. It had done its job and there were no tooth marks or chatter on the surface of the stem. I took the following photos of the pipe before I worked on it.
 I took some close up photos of the rim top and the stem to show the condition it was in when I started the cleanup. The plateau on the rim was dirty with dust and tars in the grooves of the plateau. The grooves of the sandblast were also dusty and dirty. The inside of the bowl appeared to be in good condition under the thin cake. The close up photos of the stem shows the oxidation and calcification on the surface. On the second photo, the top side of the stem you can see the faint remnants of the Nording signature N. There is very little of the stamping left in the vulcanite. The vulcanite stem has an interesting spiral look that gives a sense of whimsy to the pipe that will become more apparent after the polishing.
 I took a photo of the underside of the shank – you can see the circular Nording Made in Denmark encircling a capital “A”. The yellow acrylic shank extension.
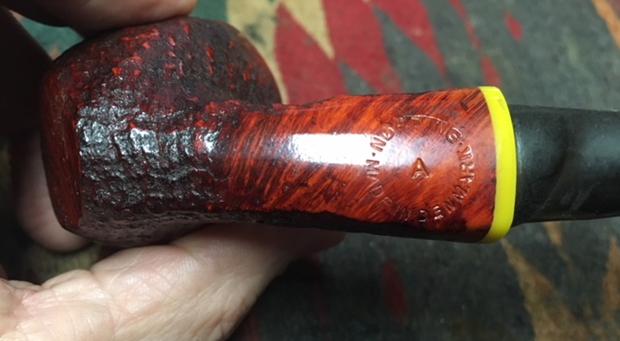 I reamed the bowl with a PipNet reamer using the second and third cutting heads to take the cake back to bare briar. I cleaned up the remnants of cake in the bowl with a Savinelli Fitsall Pipe Knife. I finished the cleaning of the inside of the bowl with 200 grit sandpaper wrapped around a piece of dowel. I turned it in the bowl until the bowl was smooth and clean.
 I scrubbed the exterior of the bowl with a tooth brush and Murphy’s Oil Soap. I scrubbed the plateau rim top with a brass bristle brush to remove the tars and oil in the grooves. I rinsed the bowl with warm water in the sink while scrubbing the finish with the tooth brush to remove the dust and grime. I took photos of the pipe after cleaning. It was starting to look very good.
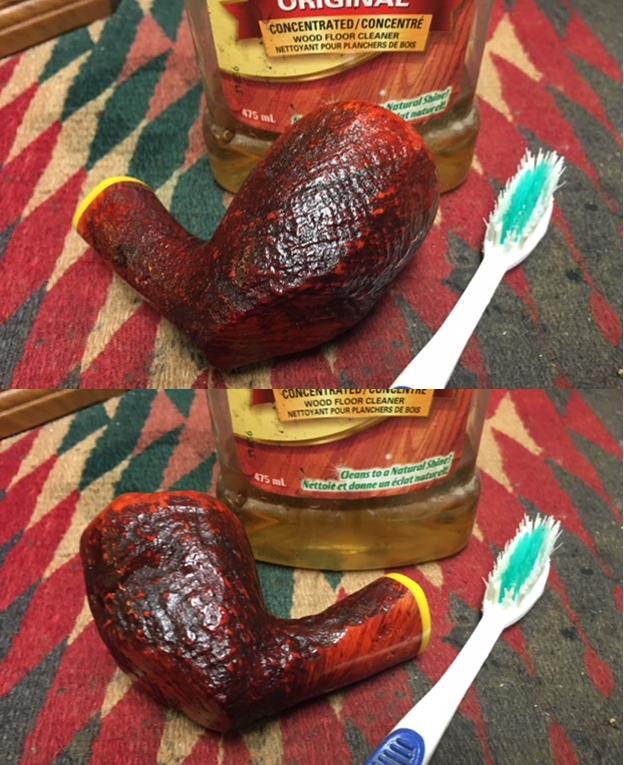
 I scrubbed out the mortise and the airway in the shank and stem with pipe cleaners, cotton swabs and alcohol. Once the grime was removed the pipe smelled good and looked good.
 I rubbed some Before & After Restoration Balm into the surface of the briar to enliven, clean and preserve it. I rubbed it in with my fingertips working it into the briar. I worked it into the plateau rim and the sandblast on the sides of the shank and the bowl. I buffed it into the finish with a horsehair shoe brush. I set it aside for a little while to let the balm do its work. I buffed it off with a cotton cloth and a shoe brush. The photos below show the pipe at this point in the restoration process.
 I set the bowl aside and turned my attention to the stem. I sanded the oxidation and the calcification on the stem with 220 grit sandpaper. I was able to remove the oxidation and the calcification and the stem actually began to look really good.
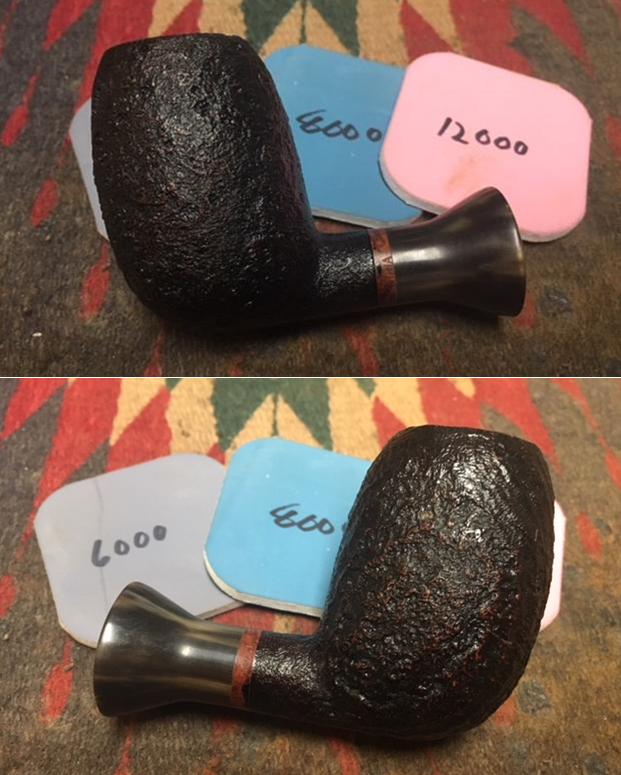
 I polished the stem using micromesh sanding pads – wet sanding with 1500-2400 grit pads and then buffing on the wheel with red Tripoli. I dry sanded the stem with 3200-12000 grit pads to further polish it. After each pad I wiped it down with Obsidian Oil to protect and enliven the stem. When I finished with the final pad I gave it the stem another coat of oil and set it aside to dry.
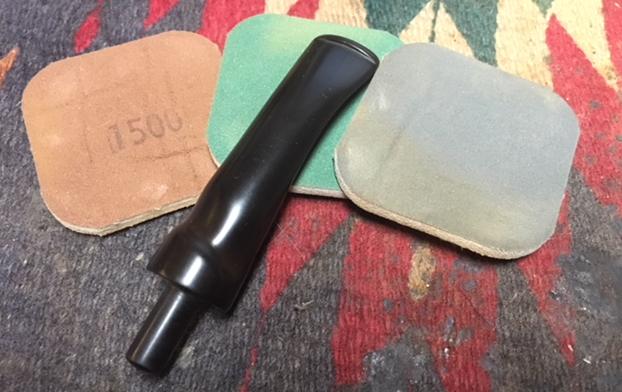
 This interesting mixed finish Freehand is a classic Nording. Everything about the shape, style, and the craftsmanship of the stem say Nording. The Nording Made In Denmark stamp with the “A” in the middle gives the grade of the pipe. I am not sure where it fits in the Nording hierarchy but it is a well-made pipe. The shape of the pipe takes full advantage of the sandblast grain on the briar. The mix of grains – straight, flame and birdseye all work together to give the sandblast finish a beautiful look from any direction it is viewed. The reddish colour of the bowl and shank with the bright yellow acrylic shank work together well with the polished black of the vulcanite stem. I buffed the bowl and the stem with Blue Diamond polish to raise the shine on the briar and the vulcanite. I was careful to not buff the stamping and damage it. I gave the bowl and the stem multiple coats of carnauba wax. I buffed the entire pipe with a clean buffing pad to raise the shine. I hand buffed it with a microfiber cloth to deepen the shine. The finished pipe is shown in the photos below. The dimensions of the pipe are: Length: 6 inches, Height: 2 1/4 inches, Outside Diameter: 1 3/4 inches, Diameter of the chamber: 7/8 of an inch. It is an interesting pipe and should make a great addition to anyone’s rack. Thanks for walking through the restoration with me.
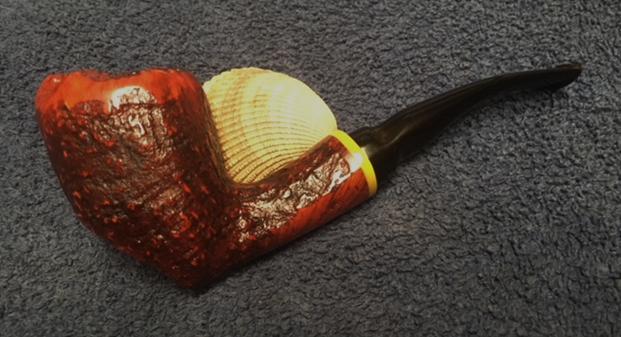

Blog by Paresh Despande
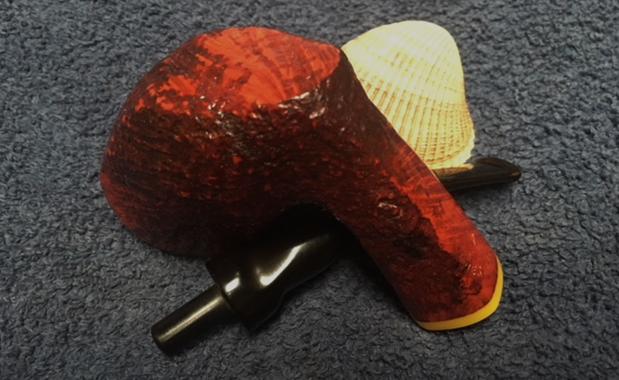
This large sized Sasieni was always on my mind to work on and I wanted to work on it at leisure as I wanted to do justice to this solid large piece of briar. What intrigued me was the shape of the stem towards the bore end where it flared out to a large extent which was made more pronounced due to pinching of the stem between the saddle and button end.
The pipe has beautiful, densely packed small sized birdseye grain on the right side of the stummel while the left side has a mix of straight and birdseye grains. The front and back of the stummel has densely packed cross grains. The shank has a flat bottom in the middle making it a sitter and has cross grains running across the top and bottom surface. Right and left side of the shank shows small, beautiful and densely packed birdseye.
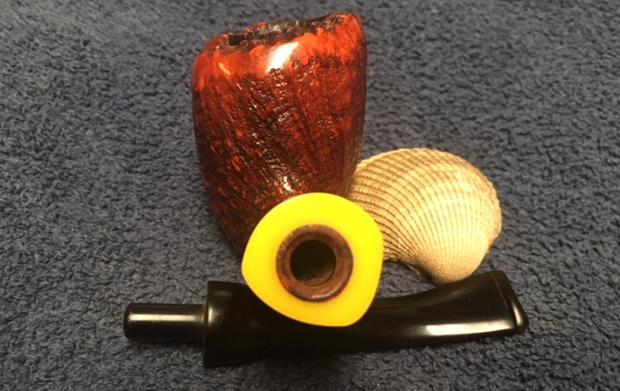
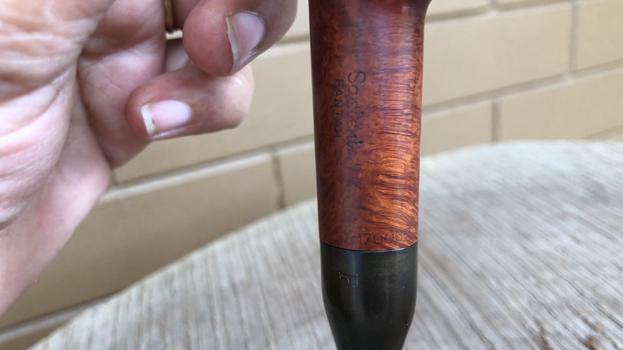
 The shank, on the left side, bears the stamp of “Sasieni” over “FANTAIL” and football COM stamp of “MADE IN” over “ENGLAND” towards the bowl. At the edge of the shank where it meets the stem, it is stamped “PATD- 170067”, which has been circled in red. On the right side, it is stamped “LONDON MADE” with numeral “55” towards the bowl. The stem bears the stamp “F” on the left side of the saddle. Except for the PATD number, the stampings are crisp and clear.
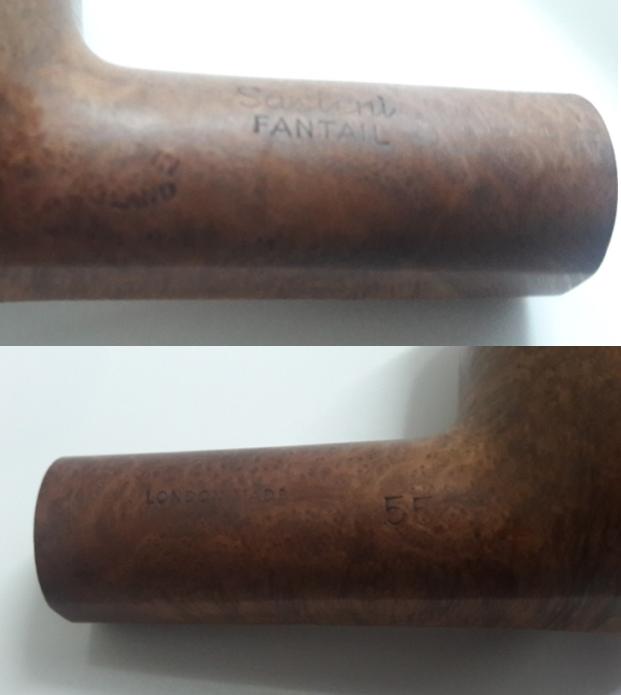
 I wanted to gain some background information about this brand and unravel some detailed information and period it was made in, about this particular pipe that I have been working on. There are three sites I frequent for information, first being Pipedia.com, second is pipephil.eu and the third being rebornpipes.com. Over a period of time, I have realized that Mr. Steve Laug has been working on pipes for such a long time that there are hardly any brands and models that he has not worked on and so, instead of reinventing the wheel, I first visit rebornpipes to eke out necessary information I seek. Luckily for me, Mr. Steve had indeed worked on a Sasieni Fantail wire rusticated and has researched this pipe. Here is the link to the blog written by him for necessary information and is a highly recommended read, https://rebornpipes.com/2017/06/07/sasieni-fantail-wire-rusticated-patent-billiard/.
I now know that “FANTAIL” is a Sasieni second line pipe and is from the “Family Era” from the period 1946 to 1979. Mr. Steve, thank you Sir for allowing me to reproduce your work in my write up. Now, that my curiosity has been satiated, I progress to my visual inspection of the pipe.
INITIAL VISUAL INSPECTION
This large sized straight billiard has its stummel covered in dust, oils and grime giving it a dull and sad appearance. The front of the stummel has two chips and will need to be addressed. The chamber has a thick cake which has been evenly reamed to a nice thickness of a dime!!!!! Either my grand old man had learned to care for his pipe during later years or this one belonged to his friend!!!! The rim top is clean but shows some darkening along the entire surface. The inner and outer edges of the rim are intact. It has a faint sweet smelling cake.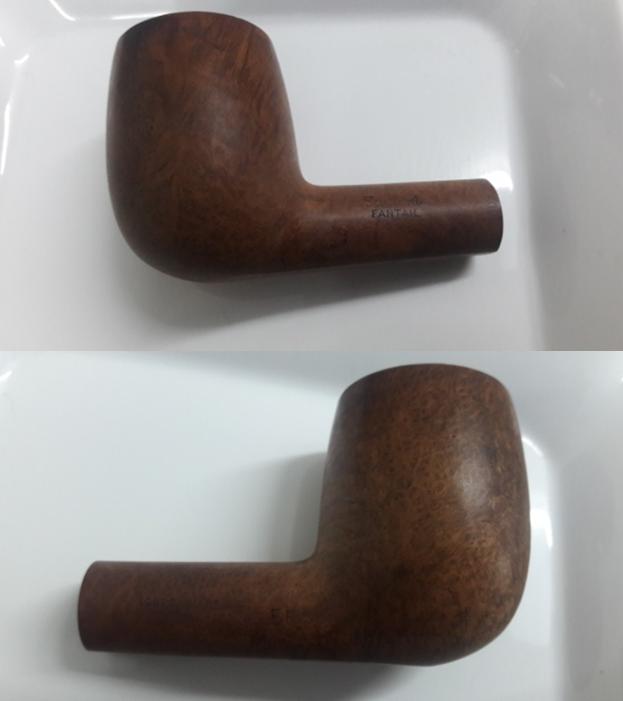
 The mortise and shank is clogged and will require a thorough cleaning.
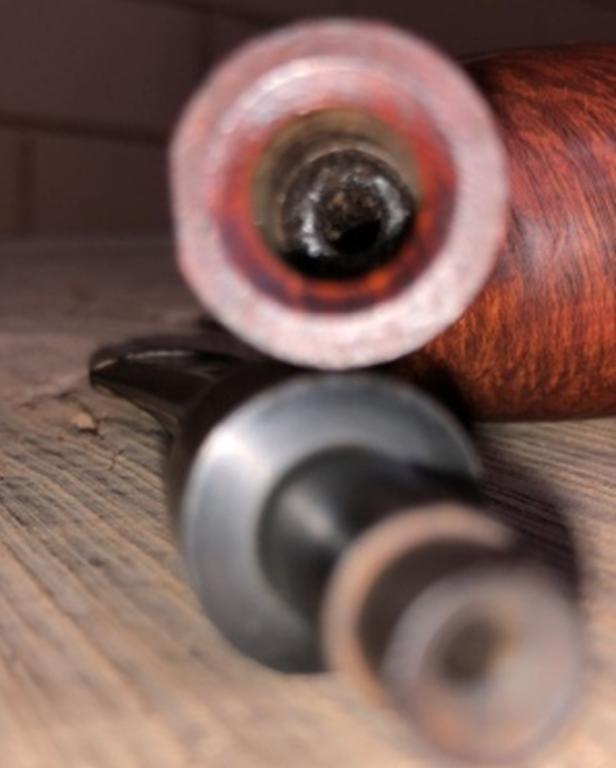 It is the stem which has, comparatively, the most damage on this pipe. Both the surfaces have tooth chatter and a couple of deep bite marks. This needs to be addressed.
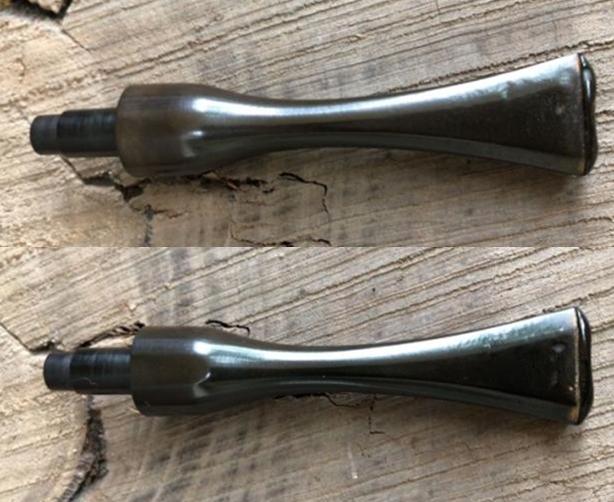
THE PROCESS
Now that I have moved out of my hometown for work, I sorely miss Abha’s help in cleaning the chamber and the stummel. I cleaned the chamber of all the cake by reaming it with a Kleen Reem pipe cleaner. With my fabricated knife, I scrap the bottom and the walls of the chamber of all the remaining cake taking it down to solid bare briar. To smooth out the surface and get rid of last remnant cake, I sand it down with a 220 grit sand paper. I cleaned the internals of the shank and mortise with pipe cleaners and cue tips dipped in isopropyl alcohol (99.9%). I use this alcohol as it evaporates rapidly and leaves no odor behind. The chamber is now clean, smooth and fresh smelling.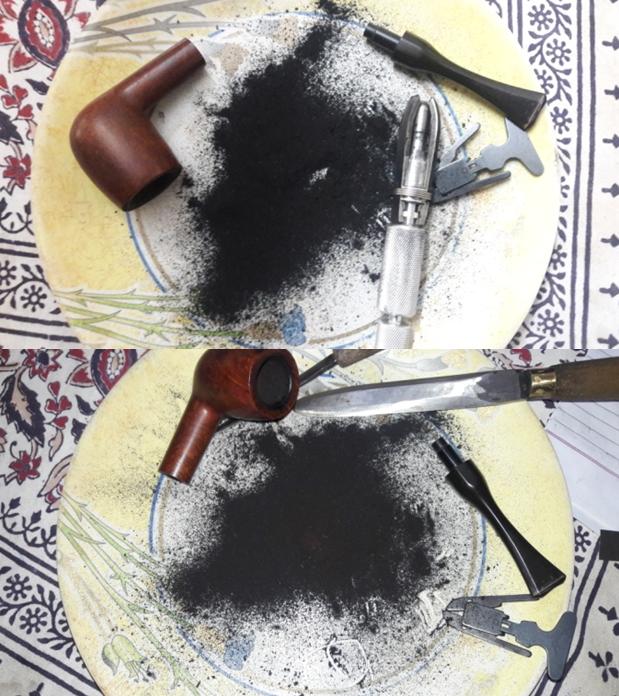
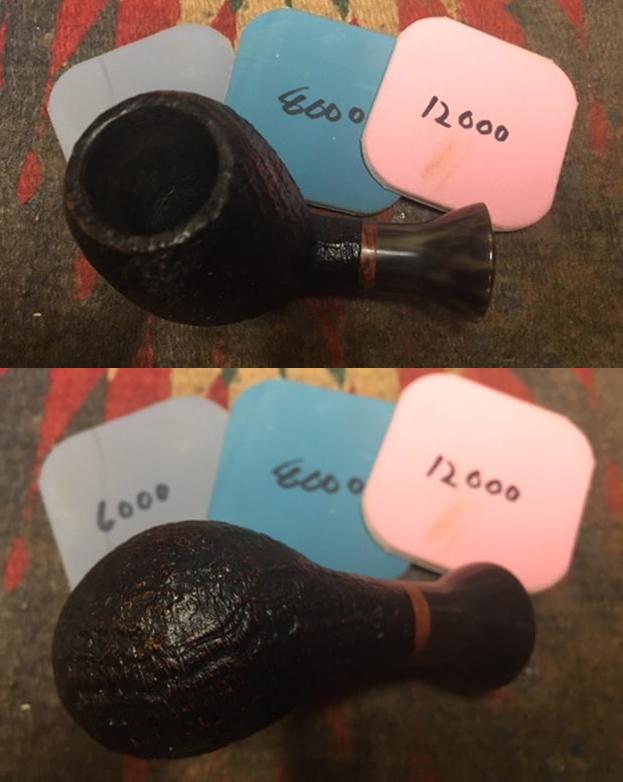
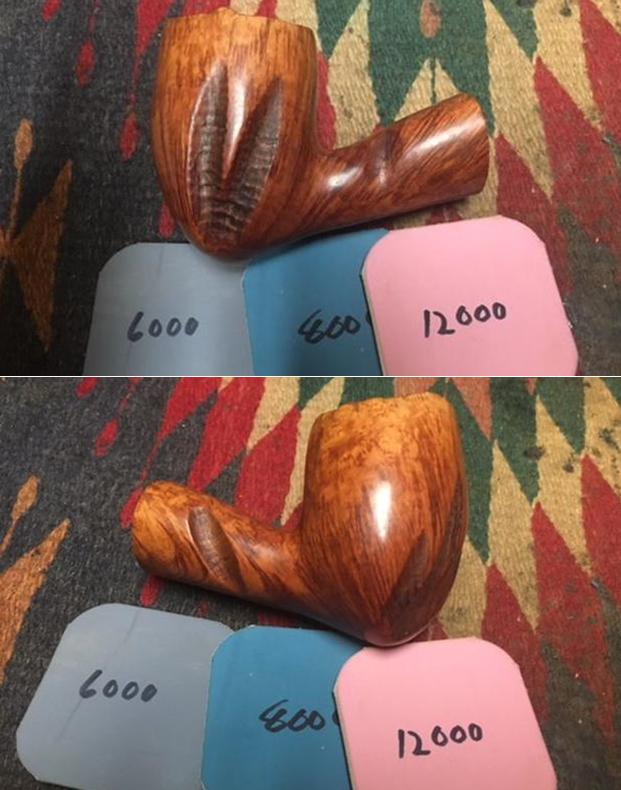
 The internal walls of the chamber are solid with no signs of burn out or heat fissures, which is definitely a big relief. I resorted to light sanding of the rim edges with 220 grit sand papers to remove the very minor dents and chips on the inner edges. The rim surface does show darkening all along. I address this issue and the issue of a dirty stummel by cleaning it with Murphy’s oil soap and a tooth brush. I rinse it under tap water and dried it with paper towels. Thereafter I sand the rim surface with micromesh pads, wet sanding with 1500 to 2400 grit pads and dry sanding with 3200 to 12000. I wipe down the rim surface with a moist cloth to get rid of the sanding dust.


 I address the two chips in the front of the stummel by spot filling each chip with clear CA super glue. I let it cure overnight. Next day, with flat head needle file, I sand down these fills and further match these fills with the stummel surface using 400 and 800 grit sand papers. I am satisfied with the end result.
 Turning my attention to the stem, I clean the surfaces of the stem with alcohol and cotton pads. I sand the stem with a 220 grit sand paper to even out the minor tooth chatter and fill the deeper tooth bite marks with CA super glue and set it aside to cure for about a day. After the glue had cured, I sanded the fills with a flat head needle file. To further match the fills with the surface of the stem, I sanded it with 220, 400 and 800 grit sand paper. I wiped the stem with cotton pad dipped in alcohol to remove the resultant dust. I rubbed some extra virgin olive oil in to the stem and set it aside to be absorbed in to stem. I polished the stem with micromesh pads, wet sanding with 1500 to 2400 grit pads and dry sanding with 3200 to 12000. I rub a little extra virgin olive oil in to the stem after every three pads. I finish the polishing of the stem by rubbing a small quantity of Paragon wax and giving it a final polish with a soft cotton cloth. The stem is now nice, smooth and shiny. I fill the “F” stamp on the stem with whitener and carefully remove the extra smear, revealing a clear and bold stamp.


 Once I was satisfied with the stem repair, I started work on the stummel which has dried by now. I rub a small quantity of “Before and After Restoration Balm” in to briar and let it rest for a few minutes. The balm almost immediately works its magic and the briar now has a nice vibrant appearance. I further buff it with a horse hair shoe brush.

 To finish, using a cotton cloth and brute muscle power, I gave it a final polish. I re-attach the stem with the stummel. The completed pipe looks lovely, fresh and vibrant; the photographs speak for themselves. Thank you for having the patience to reach this far while reading the write up. Your comments are of utmost importance to me for improving my skills in restoration process as well as writing about it. Cheers!!!!!
PS: Apologies for poor quality of pictures. I will definitely try to work on it.

Blog by Steve Laug
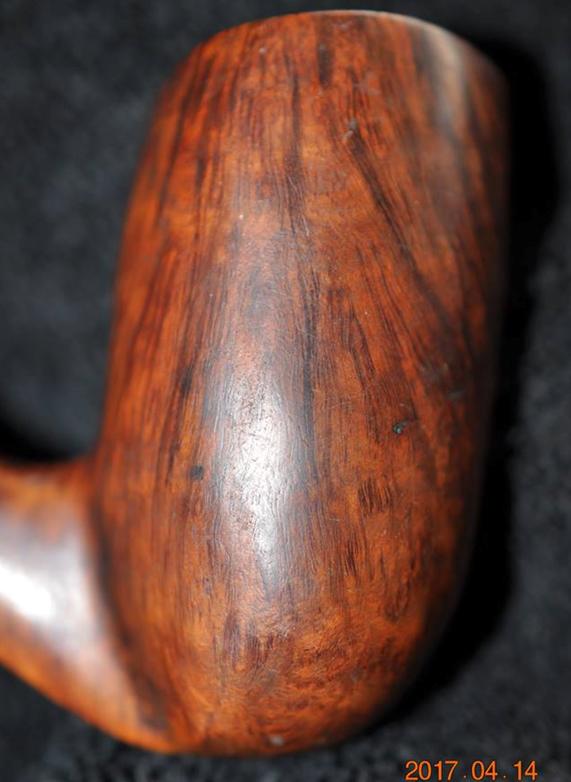
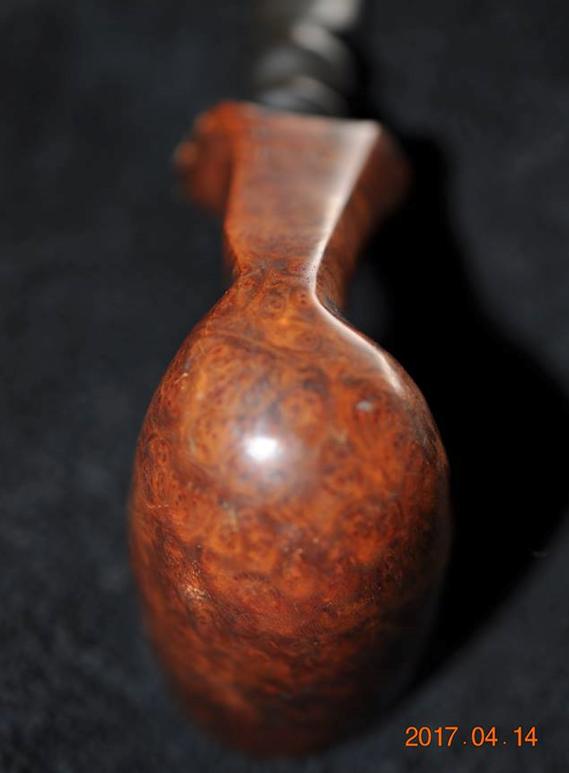
Jeff found this old pipe in an antique shop in Stevensville, Montana. He continues to show that he has an eye for old and unique pipes. This one is a tall, stack Freehand pipe with a large bowl and beautiful grain patterns around the sides of the bowl and shank. There is straight, flame and birdseye grain around the sides, top and bottom of the bowl. The rim cap is smooth and a mix of grain patterns. The finish was dirty but seemed to have a matte finish under the grime and grit. The rim top had an overflow of tars, oils – lava from the thick cake in the bowl. It was truly a mess but the buildup probably protected the inner and outer edges of the rim. It was stamped on the underside of the shank just ahead of where the stem is inserted. It is simply stamped Hand Made over In over Denmark. The stamping is identical to the stamping on Ben Wade Pipes that I have in my collection and something in my memory says I have read that somewhere. The stem has chair leg turnings that are similar to many freehand pipe stems. There is nothing stamped on the side or top of the stem. Jeff took photos of the pipe before he started his cleanup work. 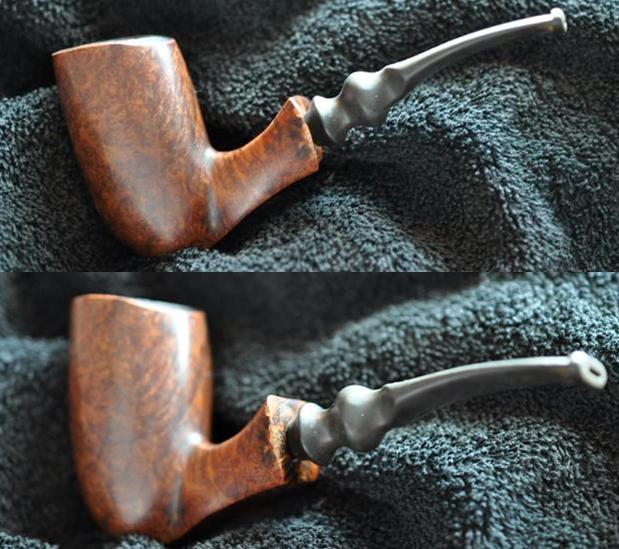
 Jeff took some close up photos of the rim top to show the condition of the bowl and rim. There was some overflow of lava and dirt on the rim top and there was a pretty thick cake in the bowl. The pipe is quite tall and the cake went to the bottom of the bowl. The inner and outer edges looked to be in good condition.
 Jeff took photos of the bowl from various angles to show the condition of the finish. The beautiful grain is visible in the photos. The finish is dirty but looks good under the grime.

 The stamping on the underside of the shank is clear and readable. It simply reads Hand Made with a faint stamp “In” below that followed by Denmark. The second and third photos below show the damage to the left edge of the shank. There were some chips and nicks in the finish. None were too deep in the briar so would need to rework that area of the shank.
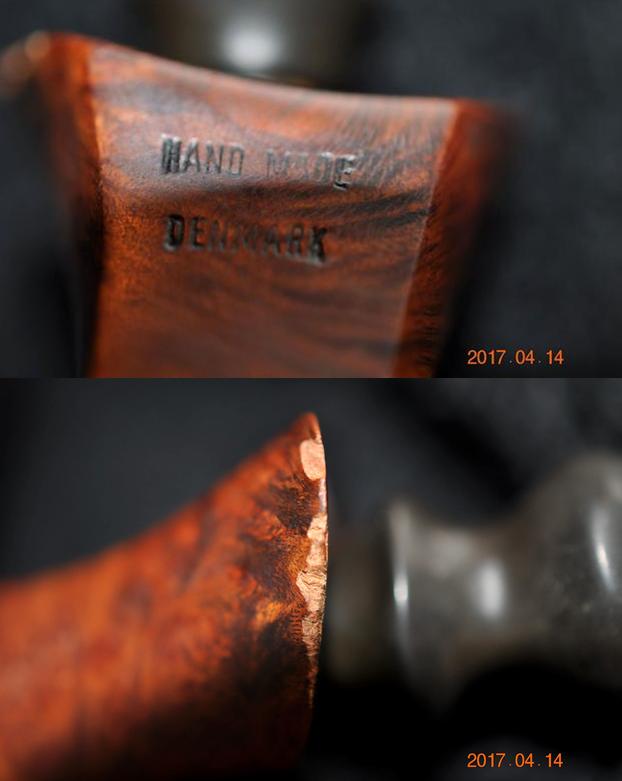
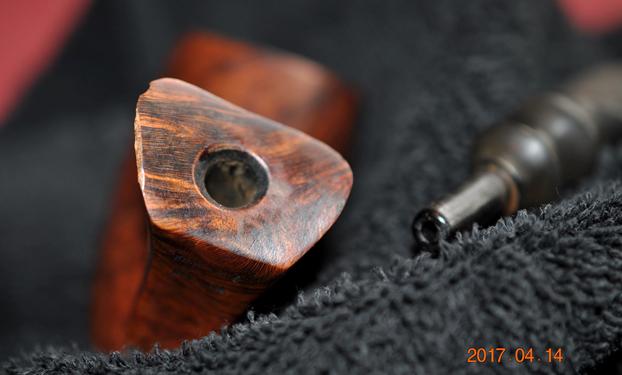 The stem was in decent condition. It was oxidized on both sides and there were some nicks and tooth marks and chatter on both sides near the button. There were no deep tooth marks which is really a relief.
 I reread the articles on Pipedia and Pipephil on both Preben Holm and Ben Wade pipes. I could not find the comment I was looking for on the Hand Made In Denmark stamp. So I would not have the luxury of knowing the history or who the carver was. Many things about the pipe made me still think it was a Ben Wade pipe but I may never know. I am hoping one of you who are reading this might have a clue for me.
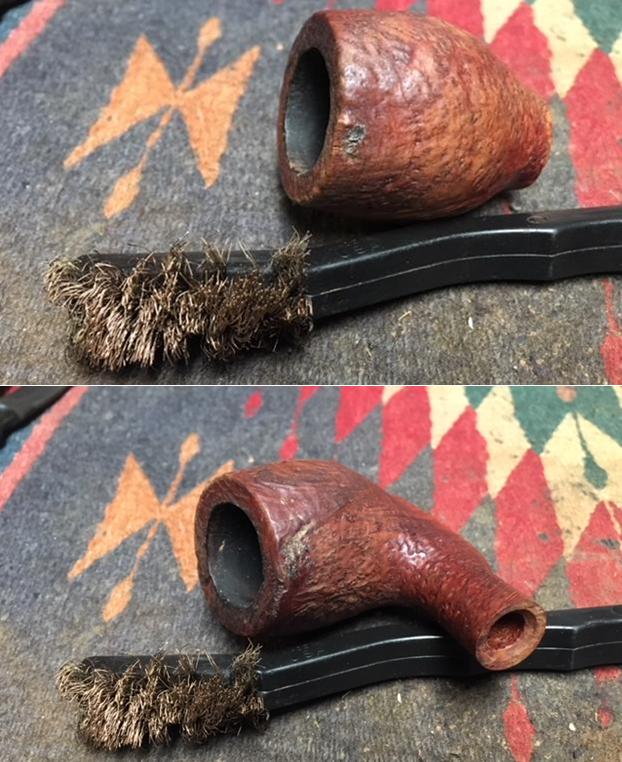
Jeff has become a magician in cleaning up pipes. When I get them they are clean to the point of looking almost new. It is nice to work on pipes that he has cleaned up once again. In this case he reamed it with a PipNet reamer and smoothed the walls of the bowl with a Savinelli Fitsall pipe knife. He scrubbed out the mortise and the airway in the shank and the stem with alcohol, cotton swabs and pipe cleaners. He scrubbed the exterior of the bowl, rim and shank with a tooth brush and Murphy’s Oil Soap to the oils and tars on the bowl, rim and shank. He rinsed it under running water. He dried it off with a soft cloth. He was able to remove all of the buildup on the rim top and the grime from the bowl. He soaked the stem in Before & After Deoxidizer and when it had done its work rinsed and cleaned the airway with pipe cleaners and alcohol. The tooth marks were clean but visible. I took photos of the pipe to show its condition before I started my work on it.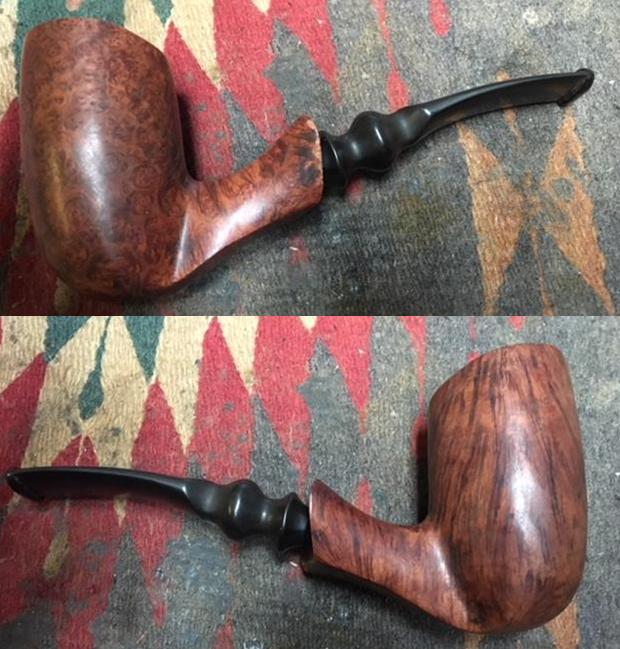
 I took some photos of the rim top to show what it looked like after Jeff had cleaned off the grime and tars. The briar was in good condition but there were some nicks and scratches in the flat top but none appeared too deep. The inner and outer edges of the bowl looked very good. The stem had cleaned up really well with the deoxidizer and need repair and polishing. It showed tooth marks on the underside and some chatter but it was otherwise in good condition.
 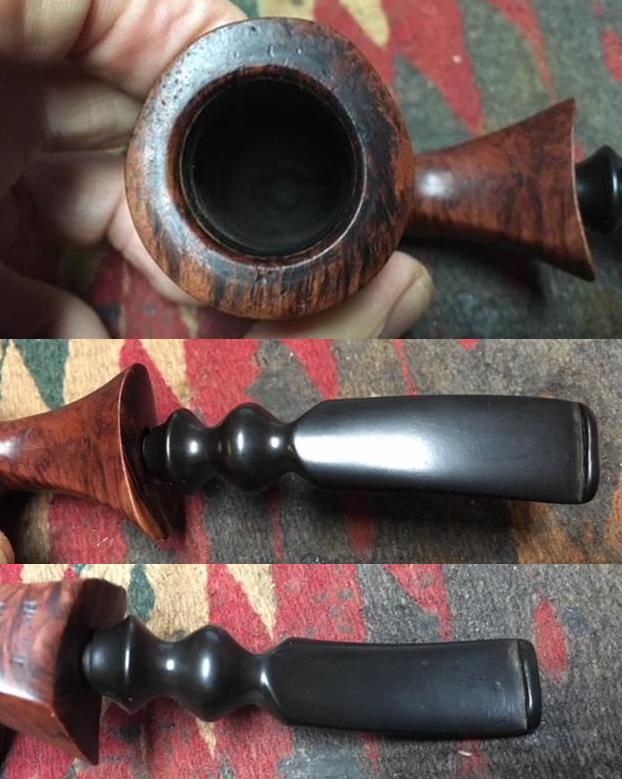 I decided to address the chips on the left side of the shank and reshape the shank end first. I sanded out the chips and reshaped the edge with a folded piece of 220 grit sandpaper. I shaped it to match the shape of the shank edge on the right side of the pipe. I worked on the end view as well.
 I wiped down the bowl with alcohol on cotton pads to remove the debris and dust from the clean up. I worked on the rim top as well to work on the darkening that was on different parts of the rim.
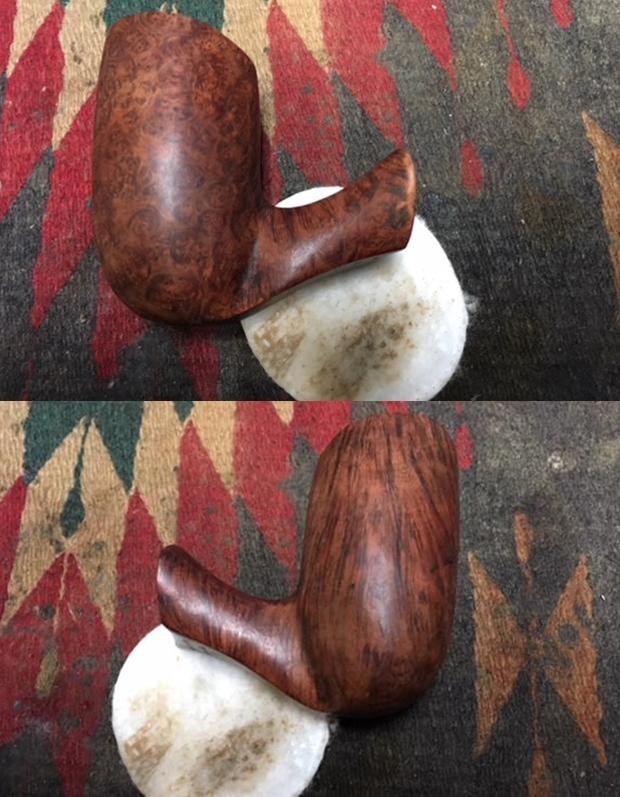
 I rubbed some Before & After Restoration Balm into the surface of the briar to enliven, clean and preserve it. I rubbed it in with my fingertips working it into the briar. I worked it into the edges of the shank and the bowl. I set it aside for a little while to let the balm do its work. I buffed it off with a cotton cloth. The photos below show the pipe at this point in the restoration process.
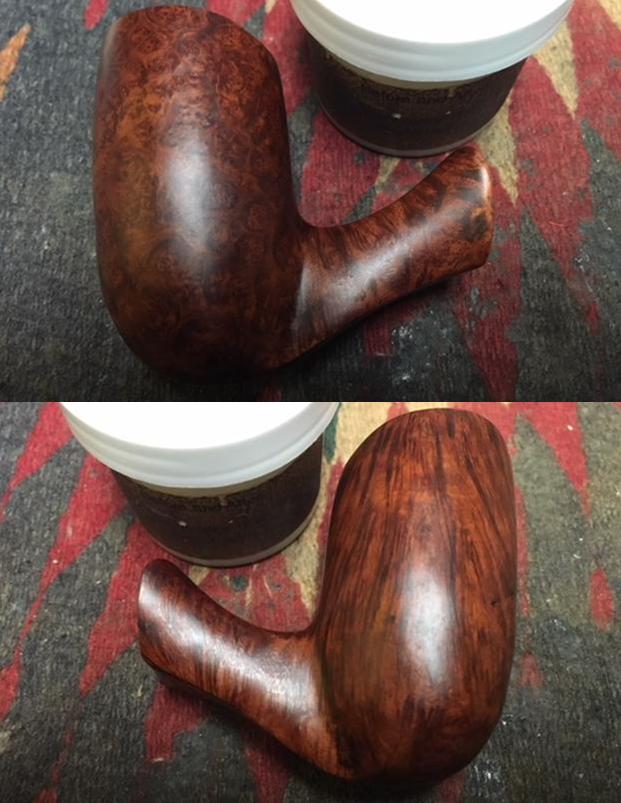 The rim top still had some areas on the left side and back edge that would need to be worked on. You can see it as a line around the bowl. I have circled the area in red so that you can see what I am noting at this point.
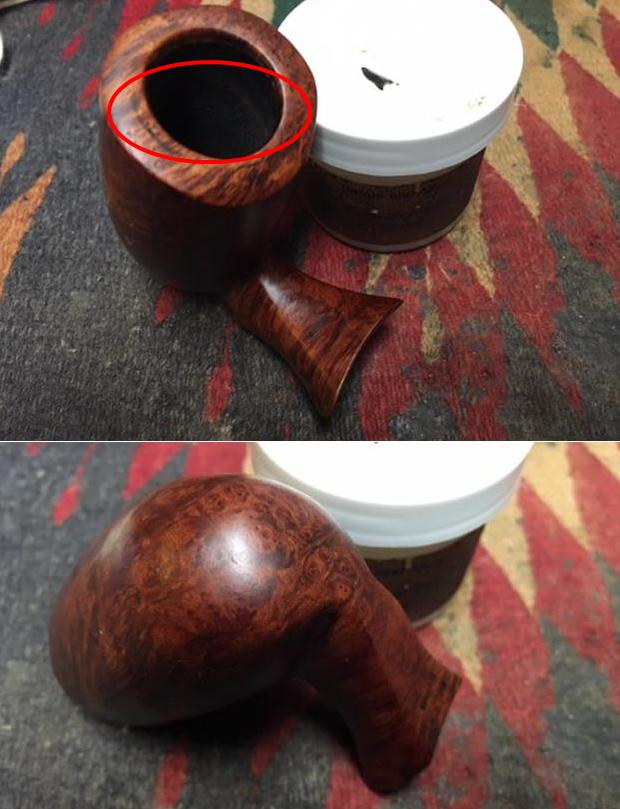 I worked on the rim top and the edge of the shank that I had reshaped with micromesh sanding pads. I wet sanded the rim top and the left side of the shank with 1500-2400 grit pads and was able to remove the circled damage on the rim and blend the edge of the shank. I polished it by dry sanding it with 3200-12000 grit sanding pads. I wiped the areas down after each pad with a damp cloth to remove the dust.
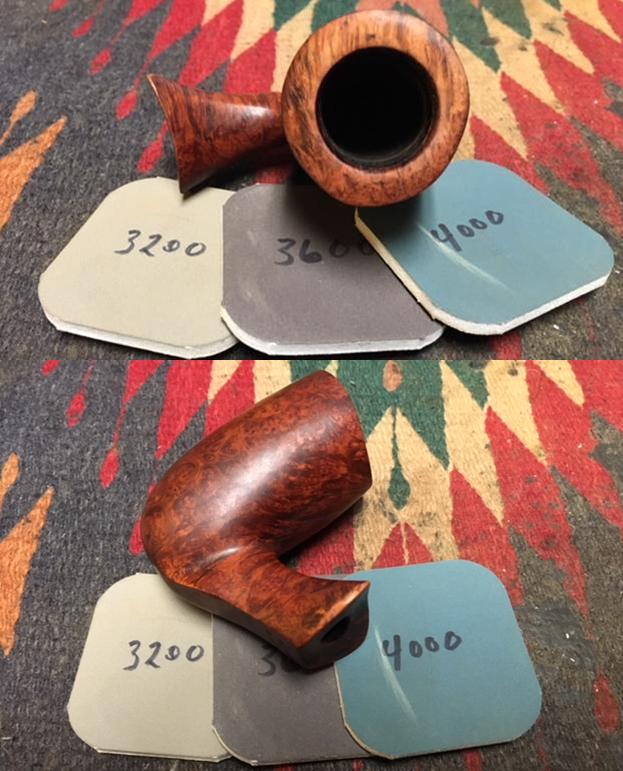
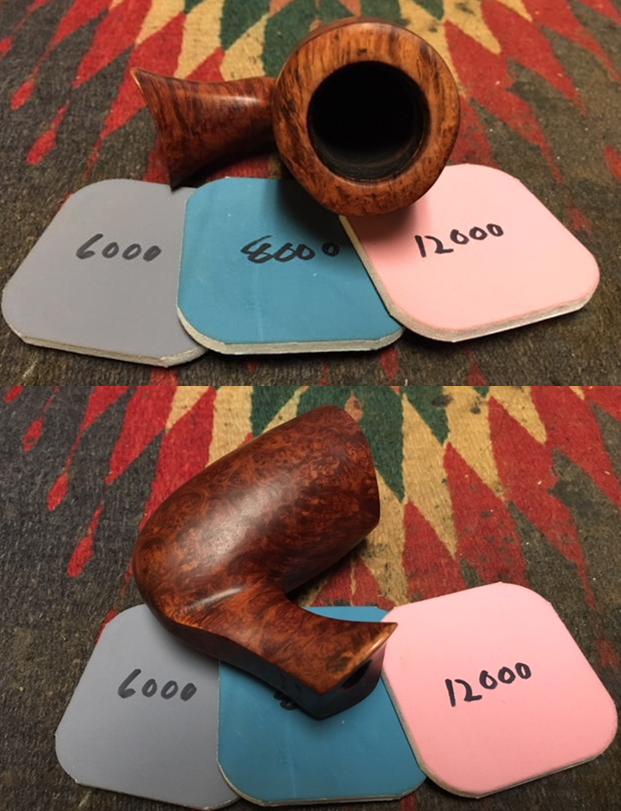 I touched up the stain on the top of the rim and left edge of the shank to blend those areas into the colour on the rest of the pipe. I used a Maple and Cherry stain pen to approximate the colour of the pipe. I still need to buff the bowl and shank but the colour appears to be a perfect match.
 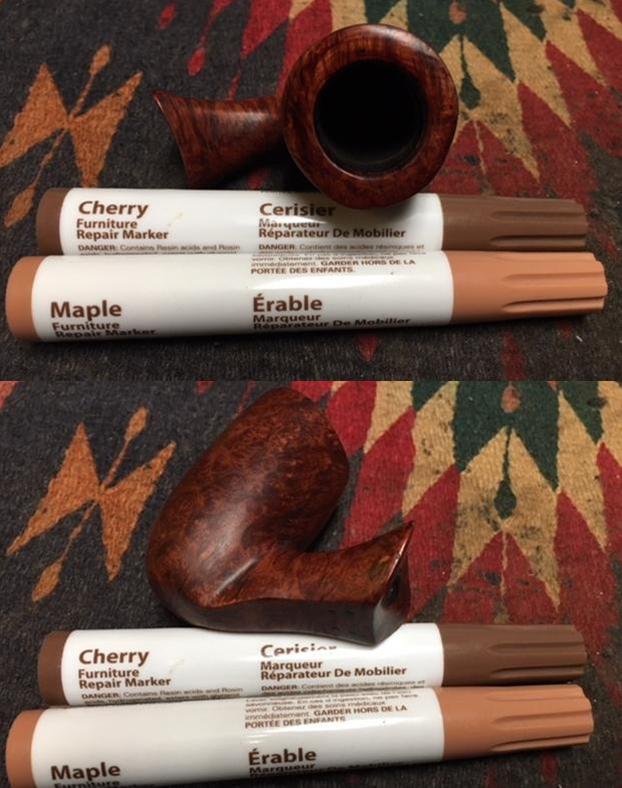 I buffed the bowl and shank with Blue Diamond on the buffing wheel and gave the bowl a coat of carnauba wax. I buffed it with a clean buffing pad to raise a shine and blend the stain into the rest of the finish. I took the following photos to show the bowl at this point in the process.
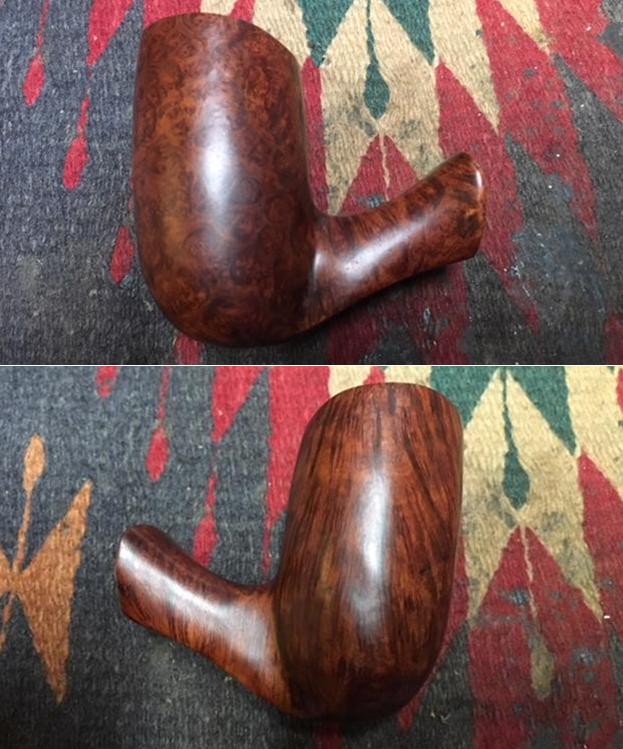
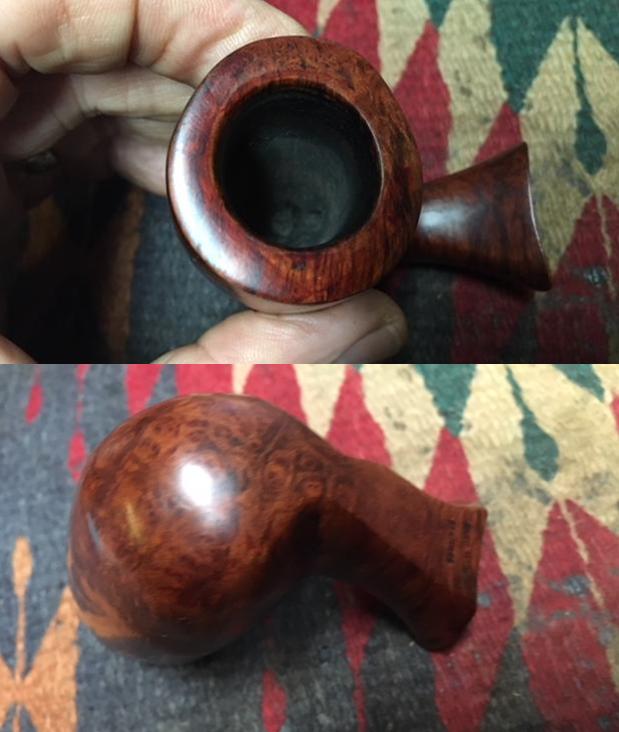 I set aside the bowl and turned my attention to the stem. I wiped down the stem with alcohol and filled in the tooth marks on the top and underside with clear super glue. I set the stem aside to let the repairs cure.
 When the repairs cured I sanded them with 220 grit sandpaper to blend them into the surface of the vulcanite. I wiped it down with Obsidian Oil and took some photos of the stem at this point.
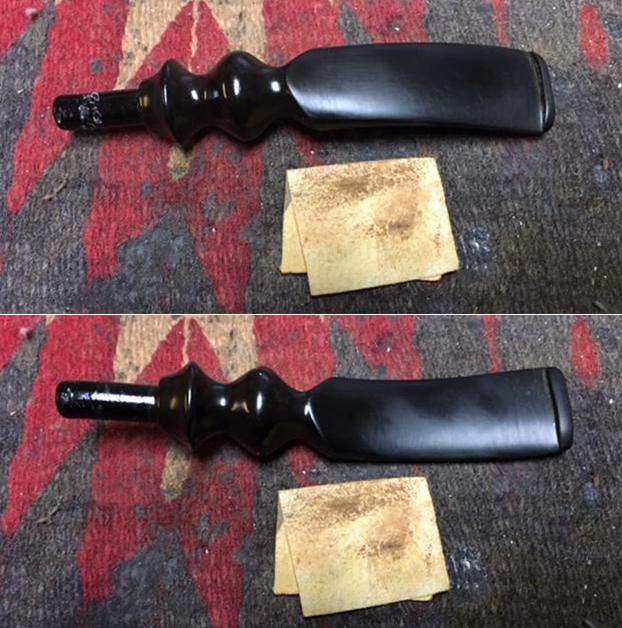 I polished the stem using micromesh sanding pads – wet sanding with 1500-2400 grit pads and then buffing on the wheel with red Tripoli. I dry sanded the stem with 3200-12000 grit pads to further polish it. After each pad I wiped it down with Obsidian Oil to protect and enliven the stem. I polished it further with Before & After Pipe Polish – both Fine and Extra Fine. When I finished with the polish I gave it a final coat of oil and set it aside to dry.
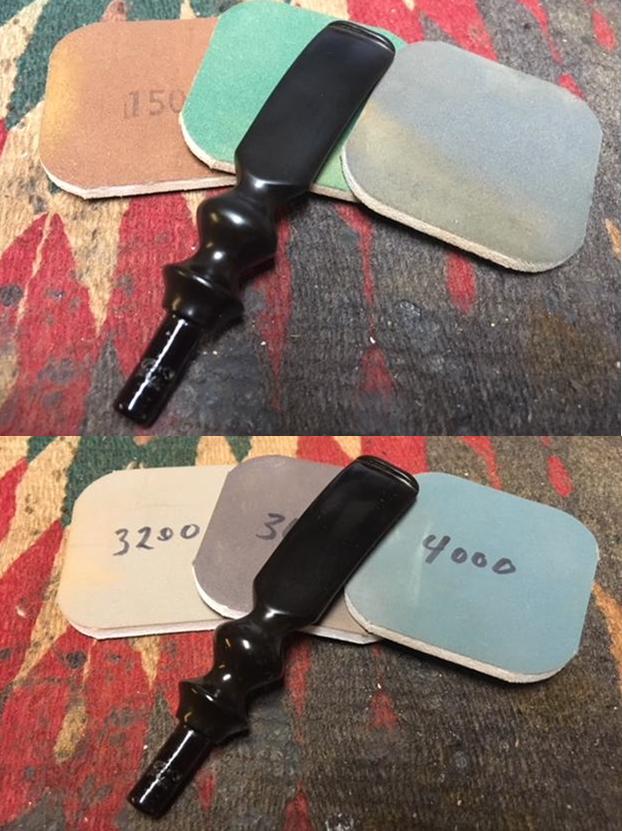
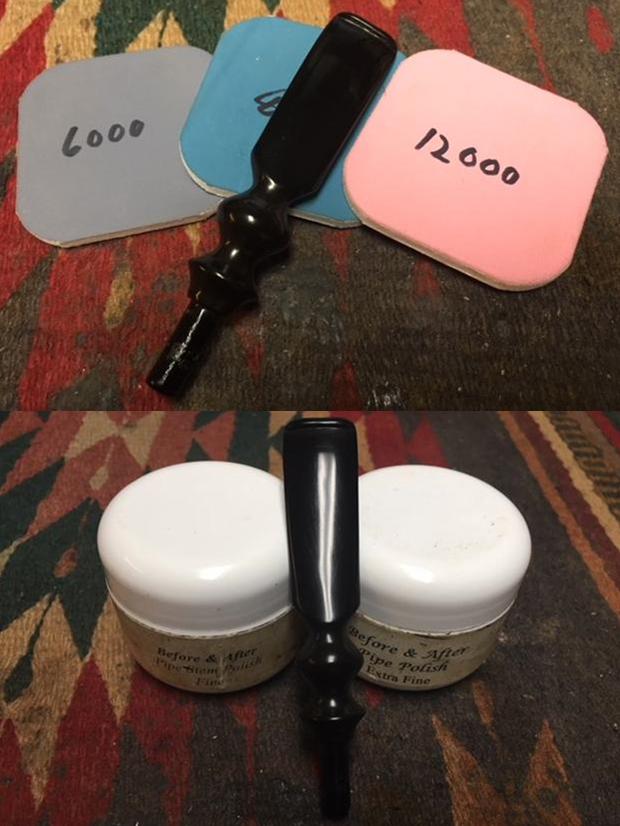 This smooth finished stack Freehand is an interesting and unusual piece. The Hand Made In Denmark stamp on the shank I think is one of Preben Holm’s marks but I cannot prove it. The shape of the pipe takes full advantage of the grain on the briar. The mix of grains – straight, flame and birdseye all work together to give this pipe a beautiful look from any direction it is viewed. The reddish brown of the bowl and the black of the vulcanite stem contrast well together. I buffed the bowl and the stem with Blue Diamond polish to raise the shine on the briar and the vulcanite. I was careful to not buff the stamping and damage it. I gave the bowl and the stem multiple coats of carnauba wax. I buffed the entire pipe with a clean buffing pad to raise the shine. I hand buffed it with a microfiber cloth to deepen the shine. The finished pipe is shown in the photos below. The dimensions of the pipe are: Length: 6 inches, Height: 2 3/4 inches, Outside Diameter: 1 1/2 inches, Diameter of the chamber: 7/8 of an inch. It is an interesting old pipe and should make a great collectible piece. Thanks for walking through the restoration with me.