Category Archives: Pipe Refurbishing Essays

Essays and pictorial essays on the art of refurbishing

Restoring a Budapest Purchase – A Tatu Pipe 1126 Freehand


Blog by Steve Laug

When I was traveling for work I was in Budapest, Hungary I visited the Gallwitz Pipe Shop. It is a shop I have visited several times in the past. I wrote about my first visit to various Budapest Pipe shops including Gallwitz back in 2015 (https://rebornpipes.com/2015/09/30/my-how-things-change-reflections-on-pipe-smoking-while-visiting-budapest/). When I visited it this time I spent time with the current owner and proprietor of the shop, Viktor Zollner (the grandson of the last Gallwitz owner). We had a great visit talking about the current state of pipes and pipe repair in Hungary since I had visited in 2015. Viktor had carved many pipes but was currently focusing his attention on pipe repair and estate pipes. He said that he loves the challenge of pipe and stem repair more than pipe carving – just as I do. 
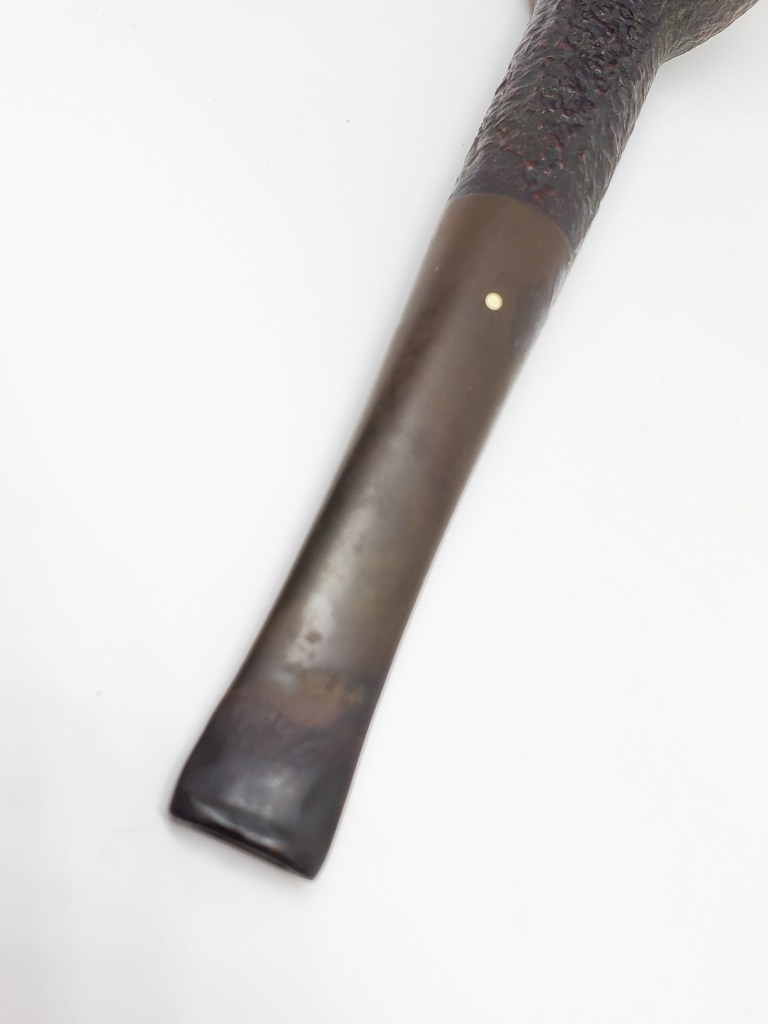
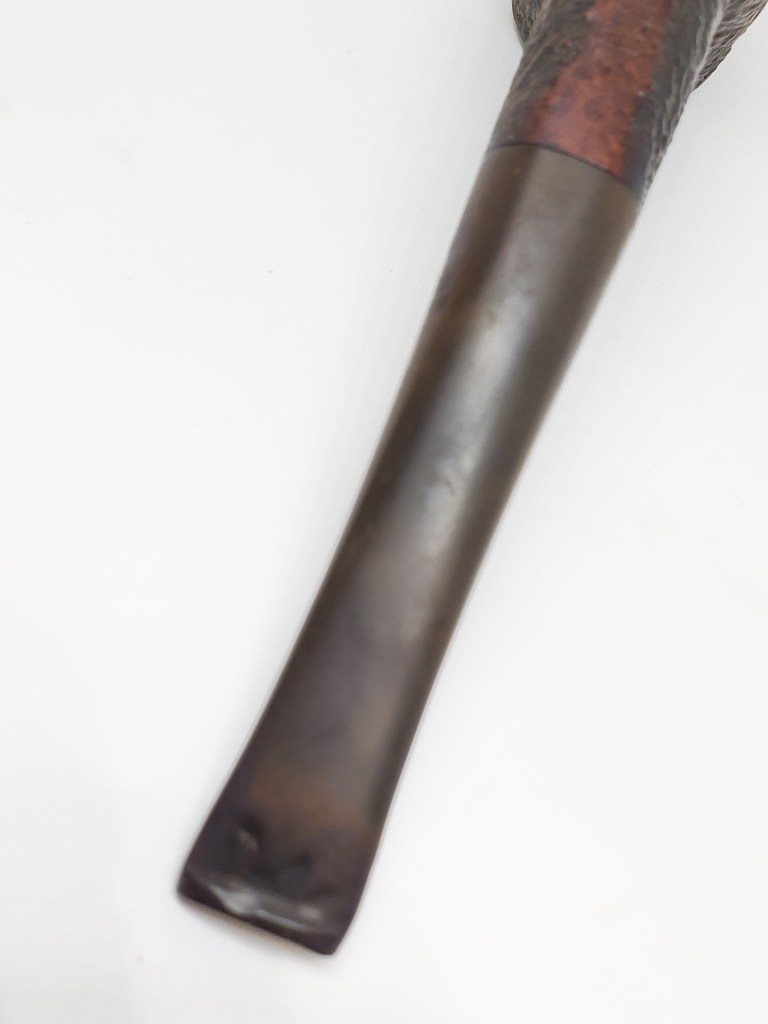
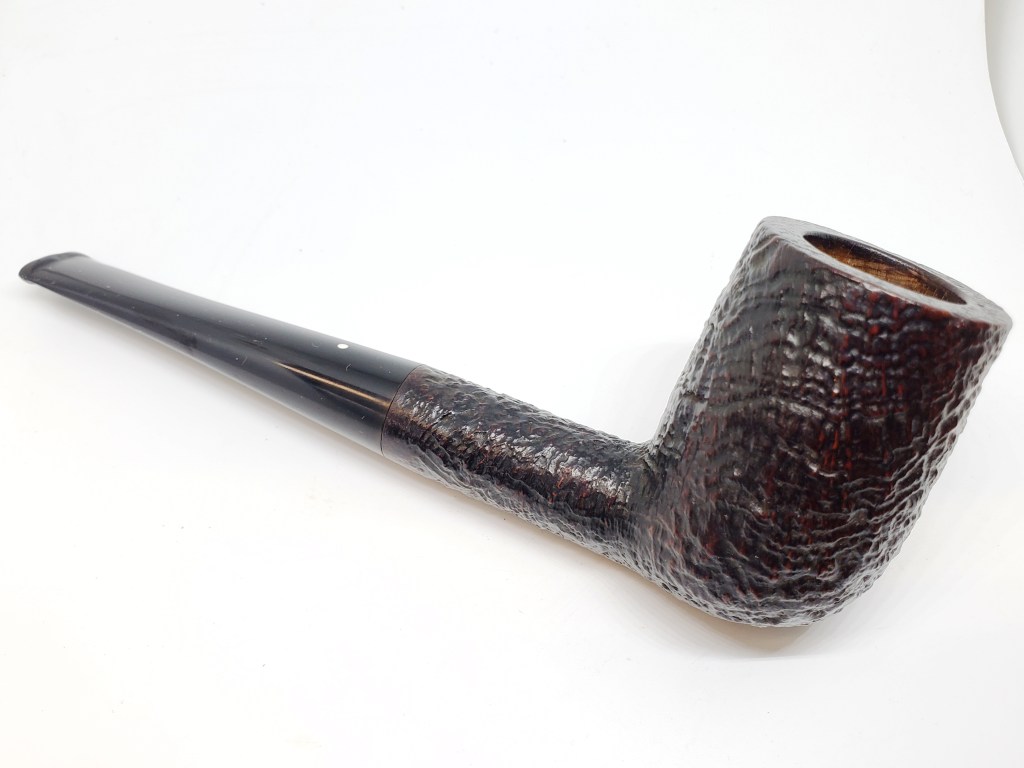
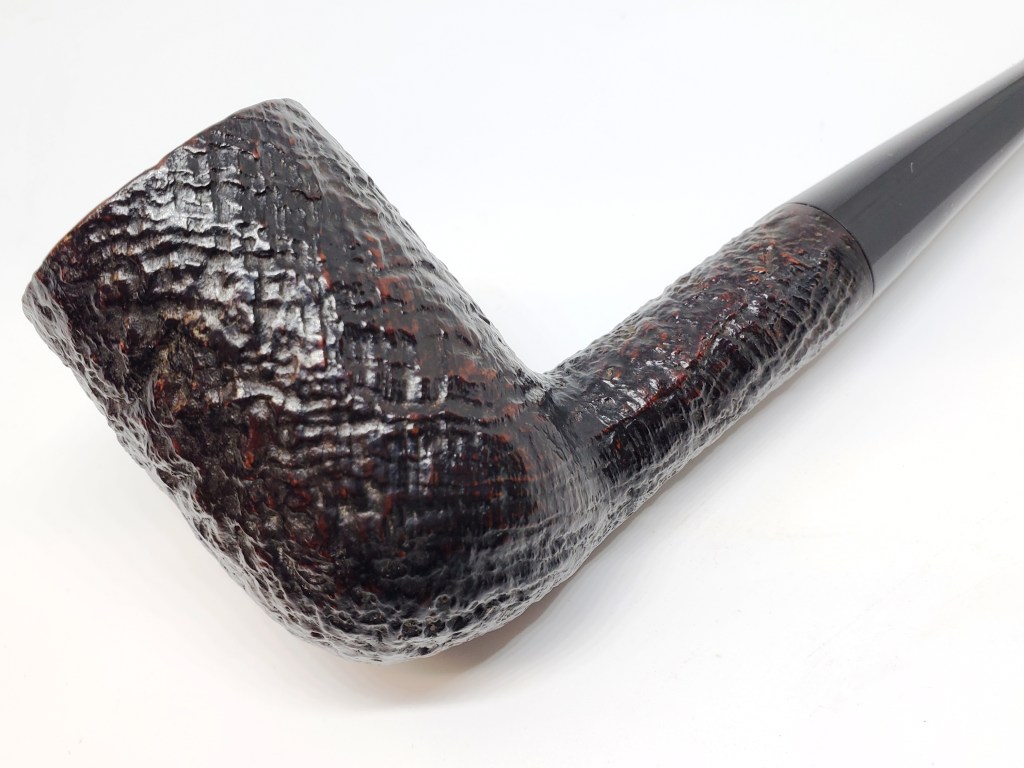
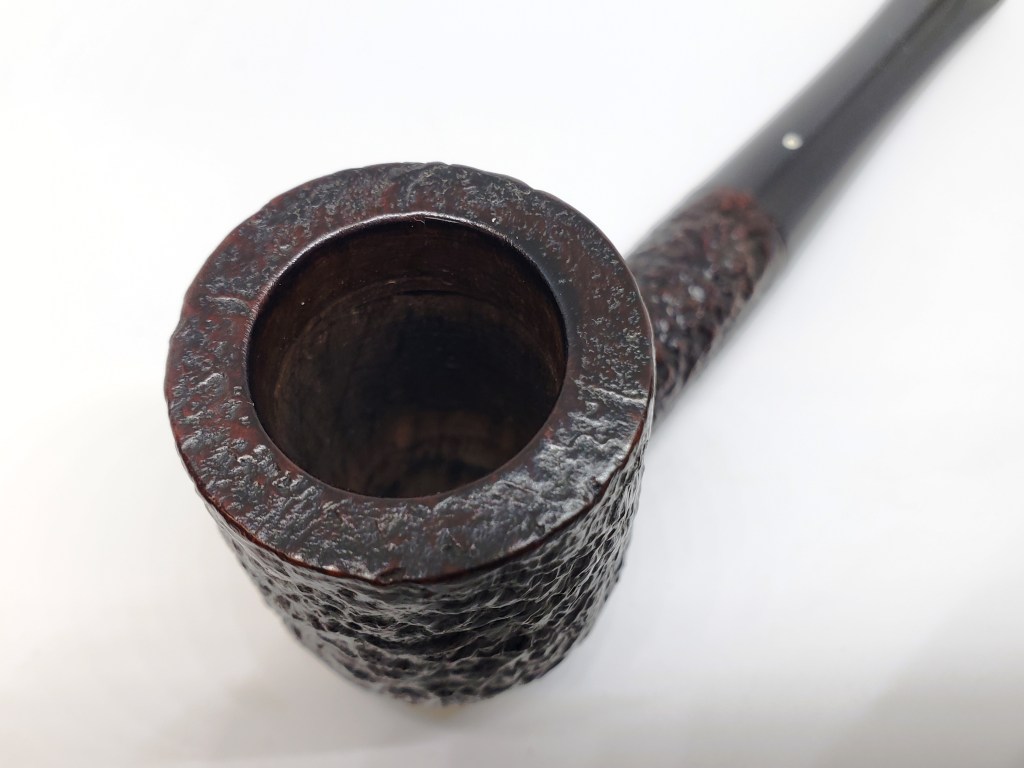
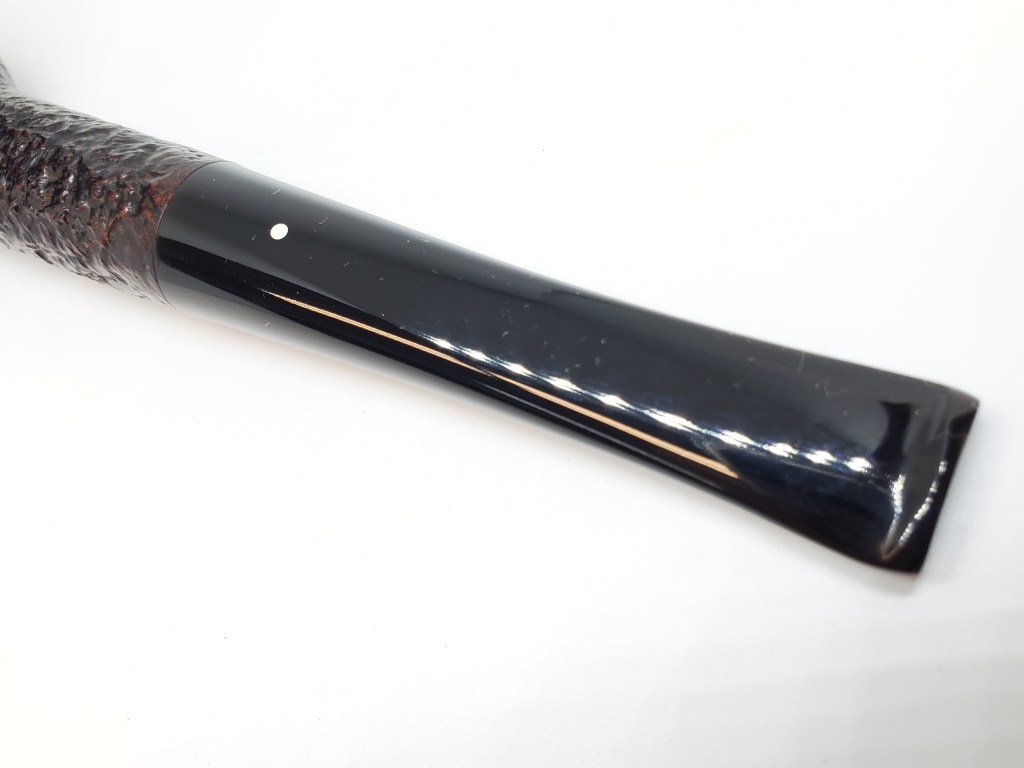
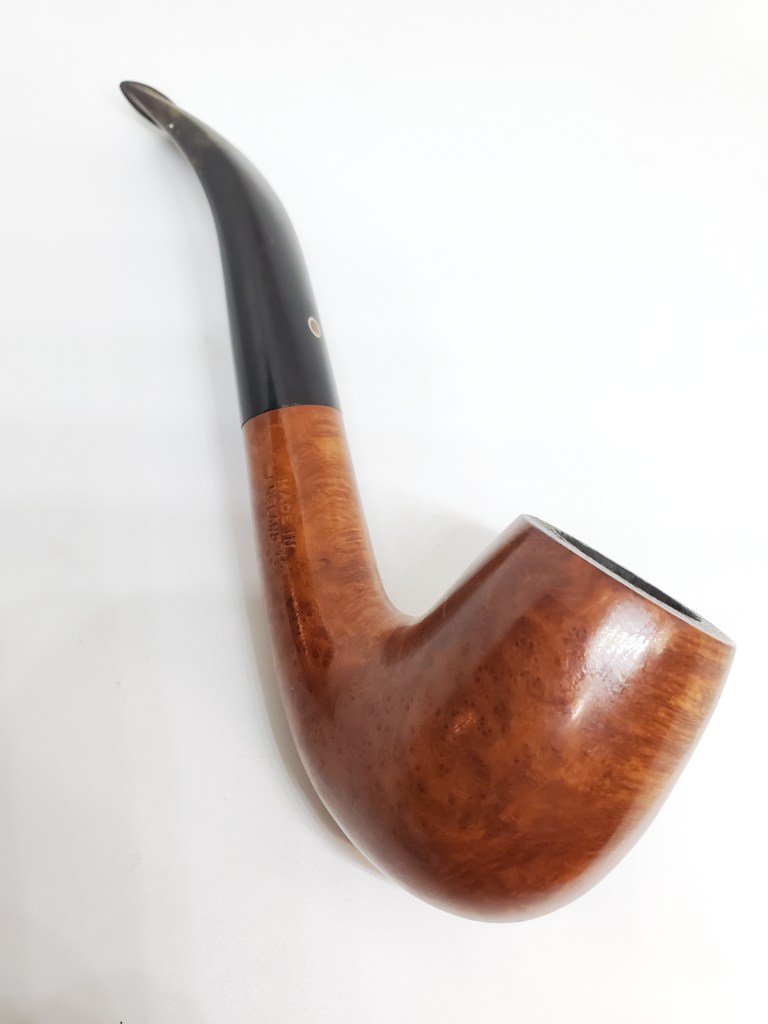
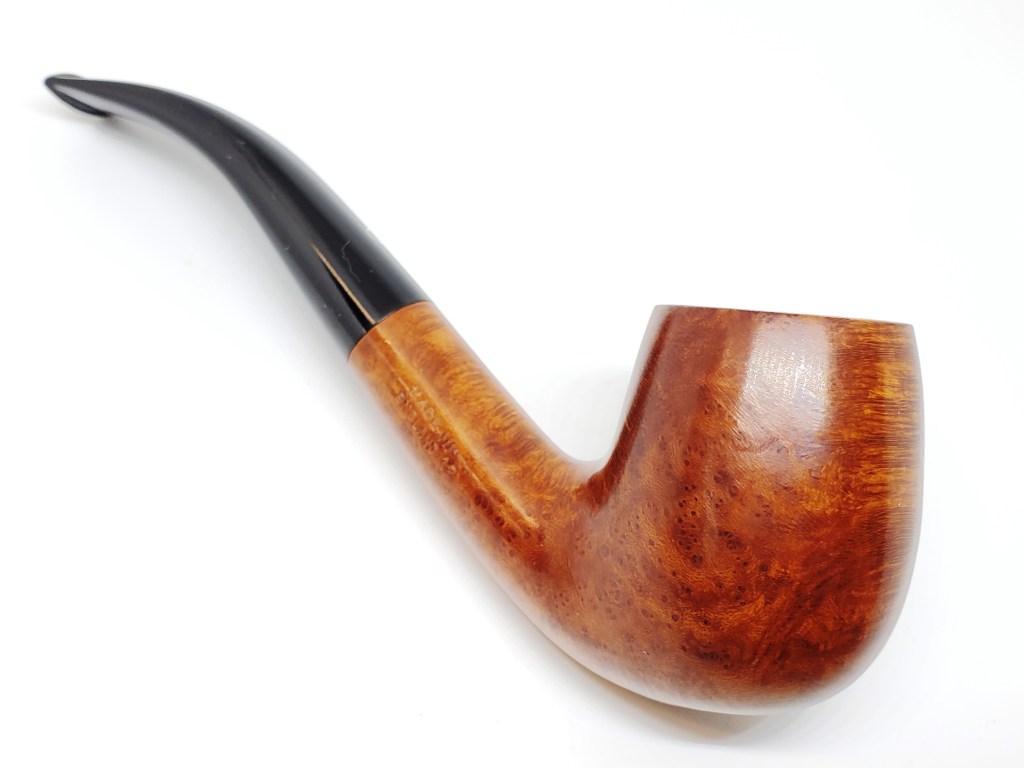
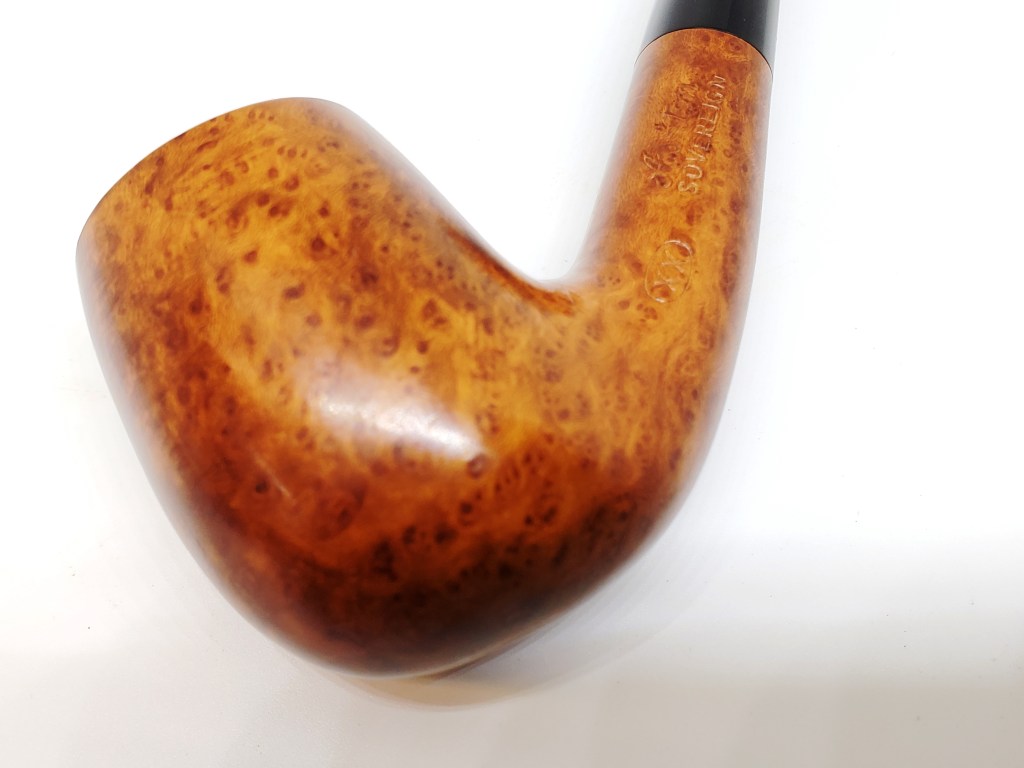
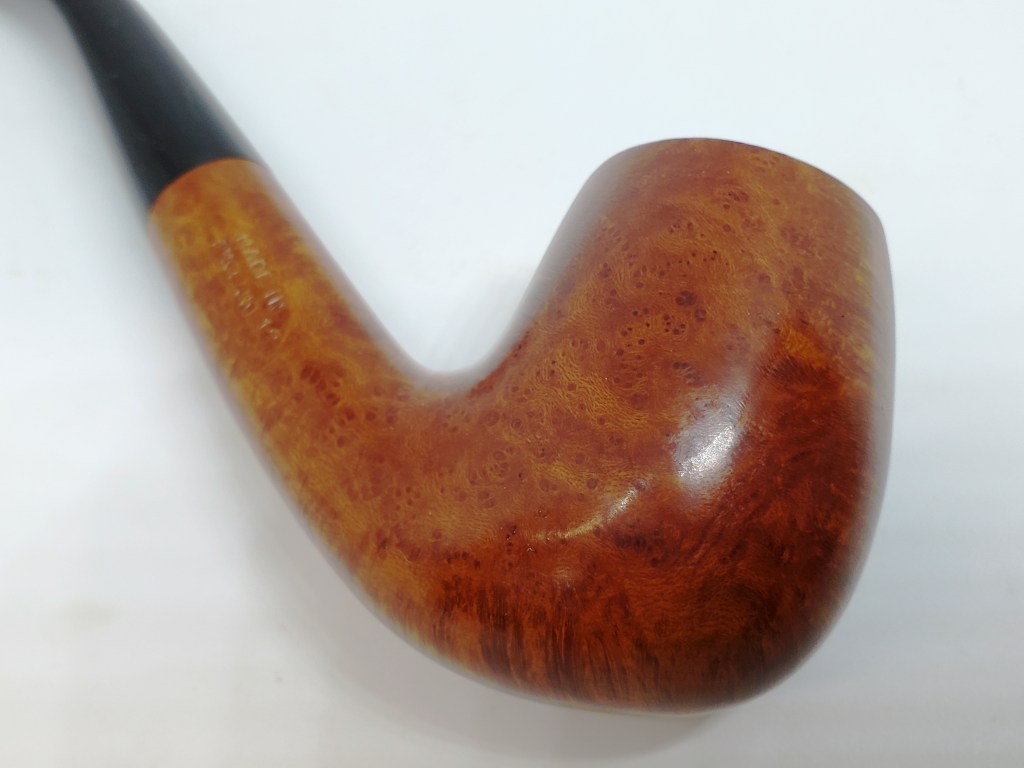
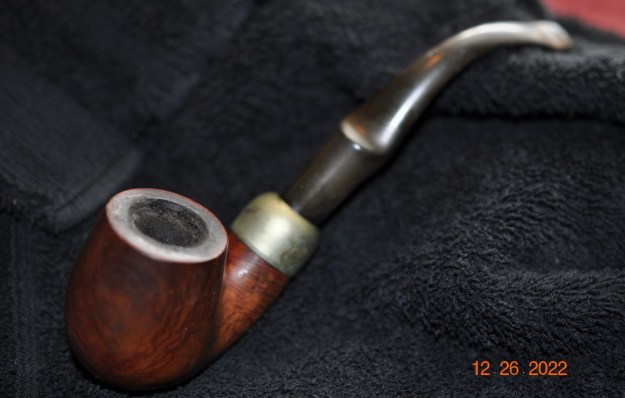
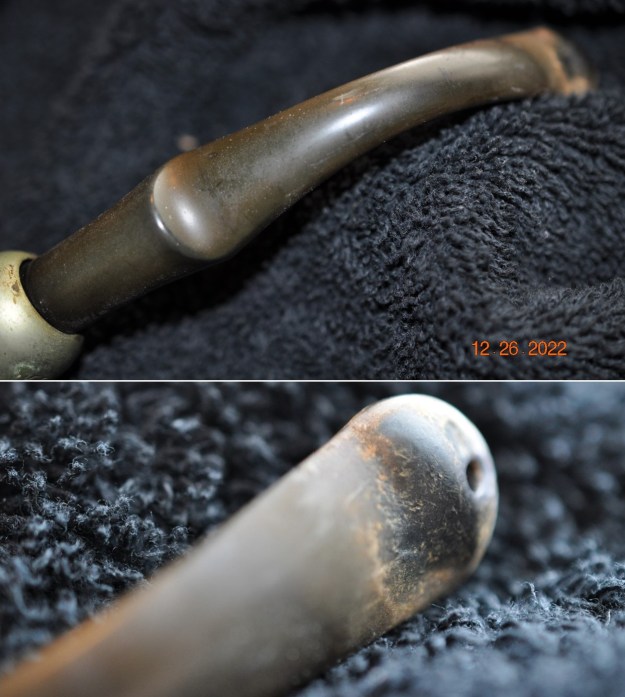
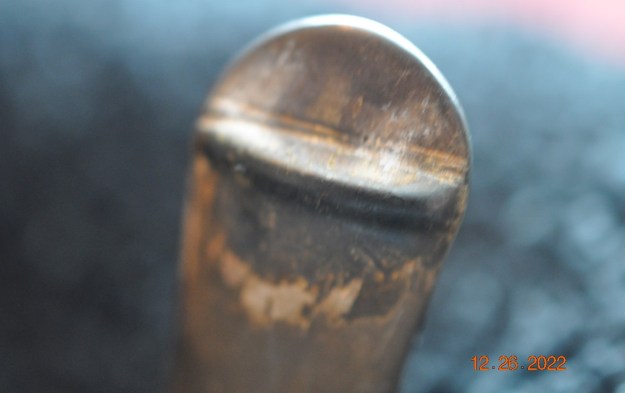
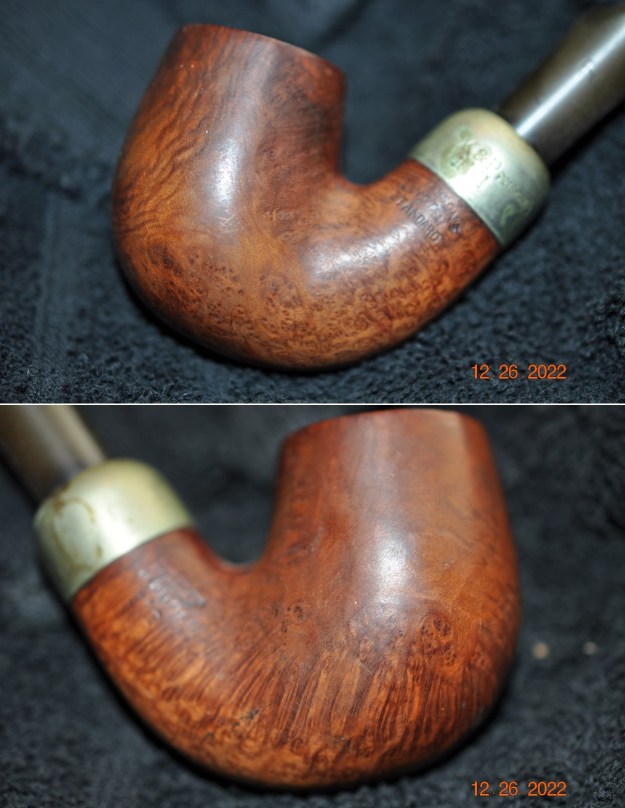
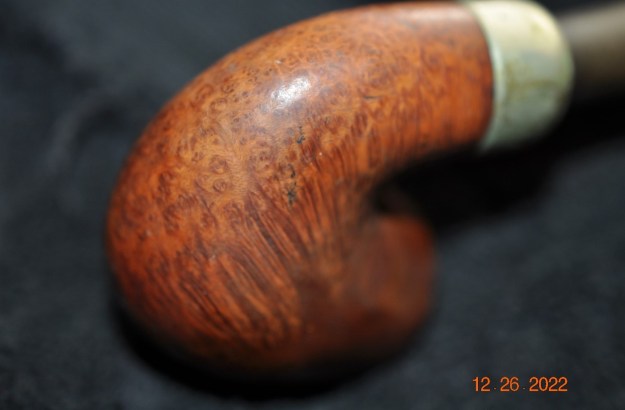
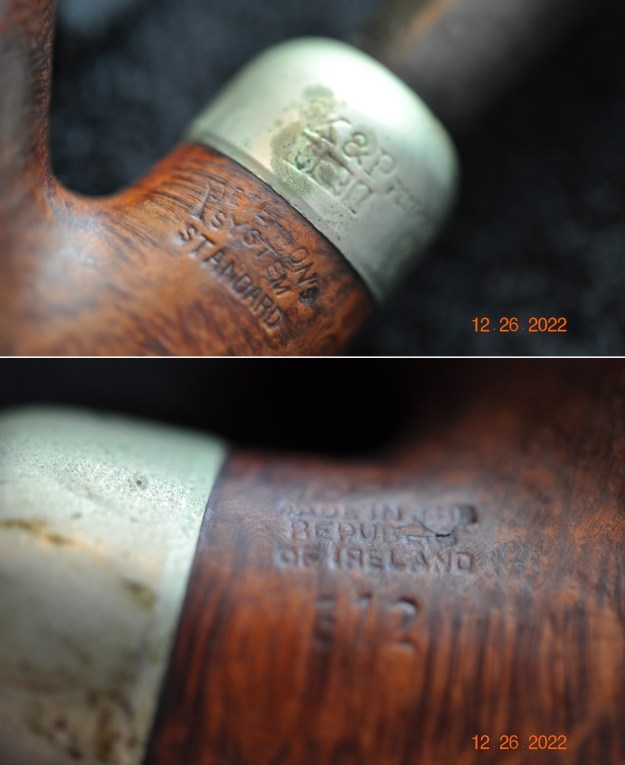
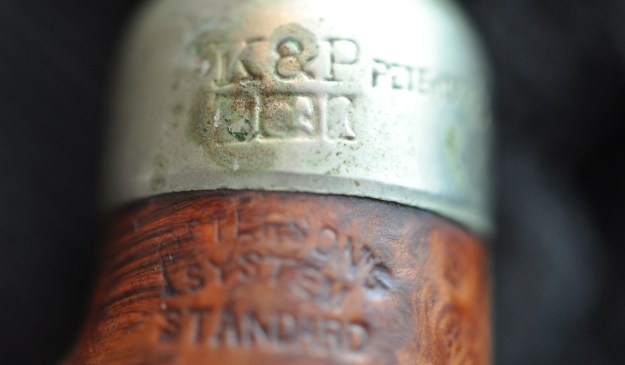
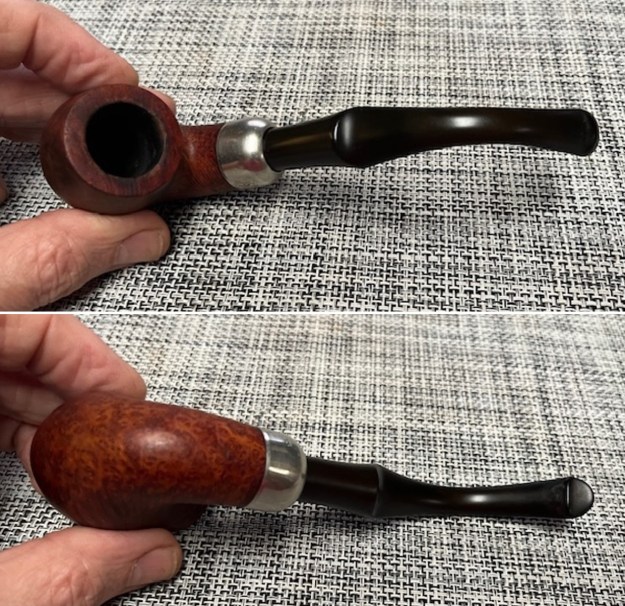
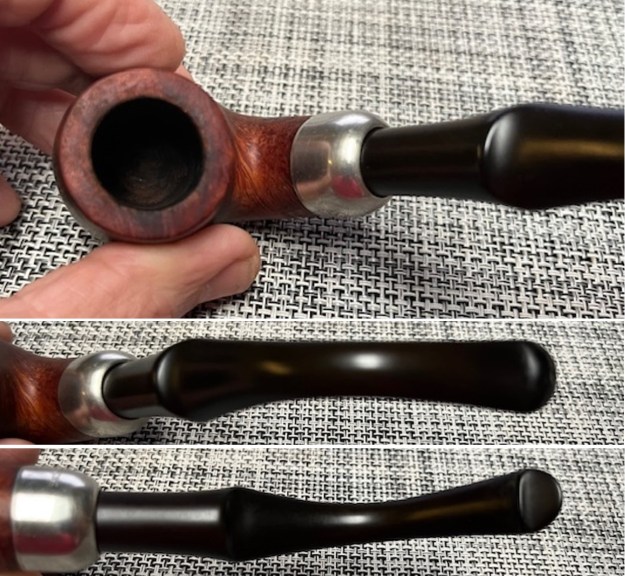
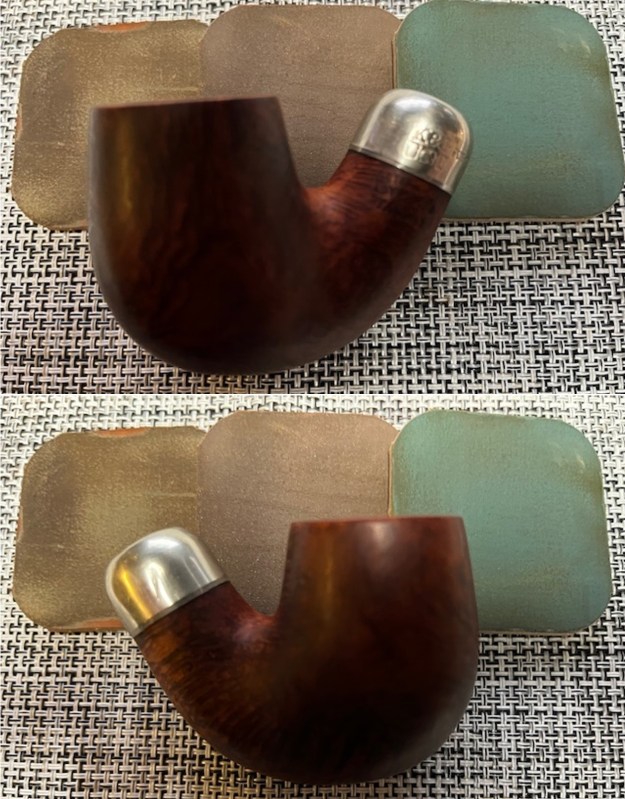
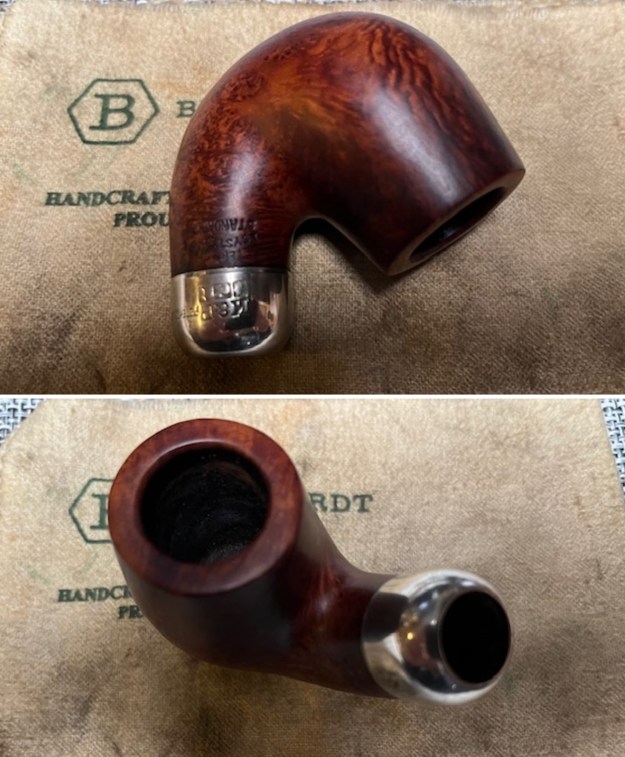
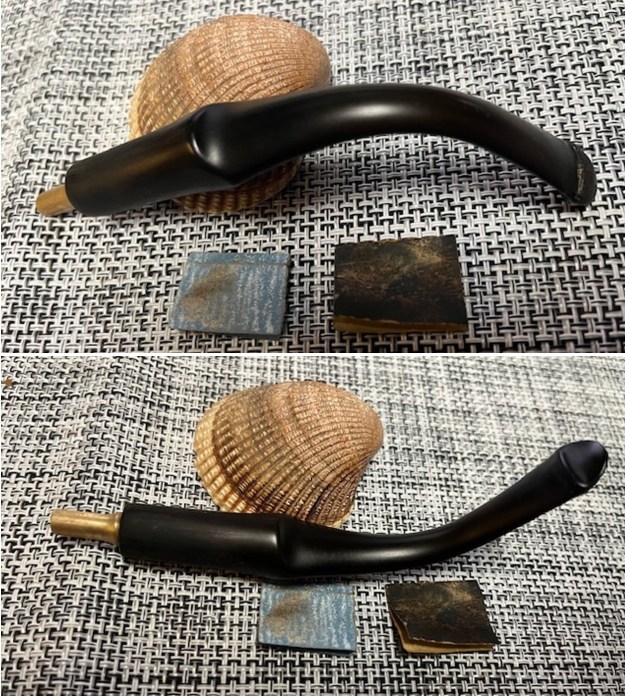
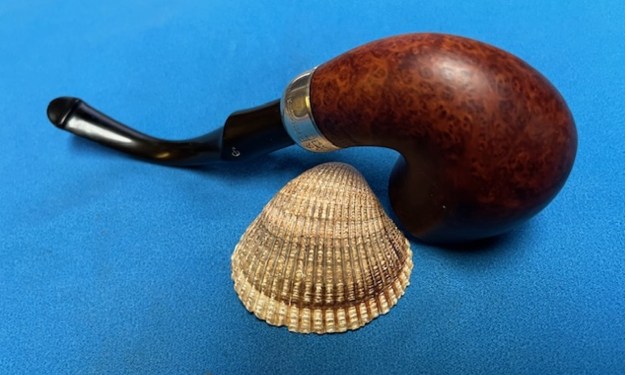
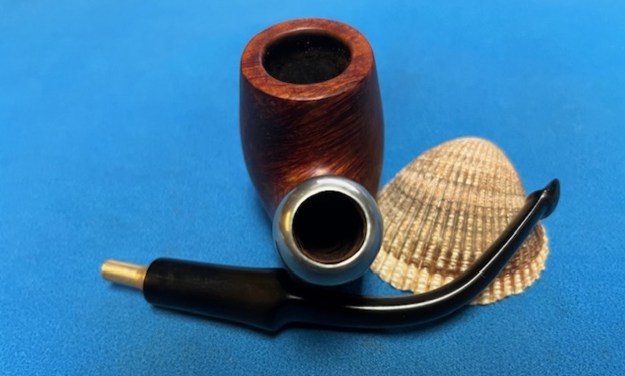
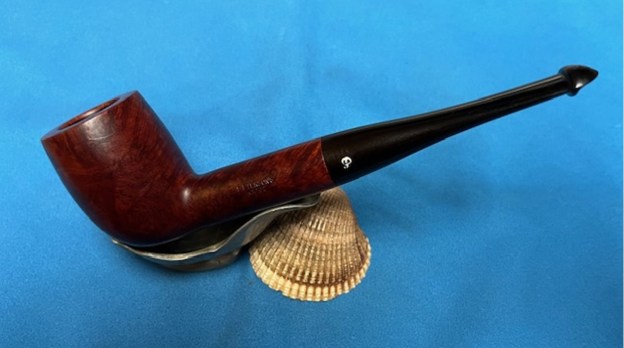
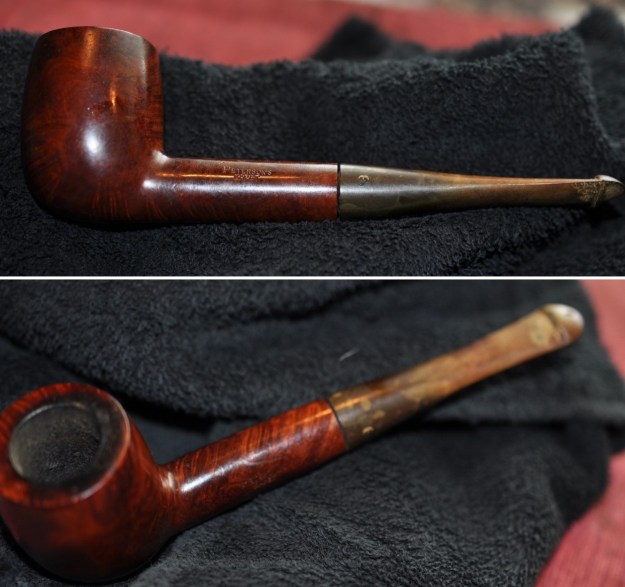
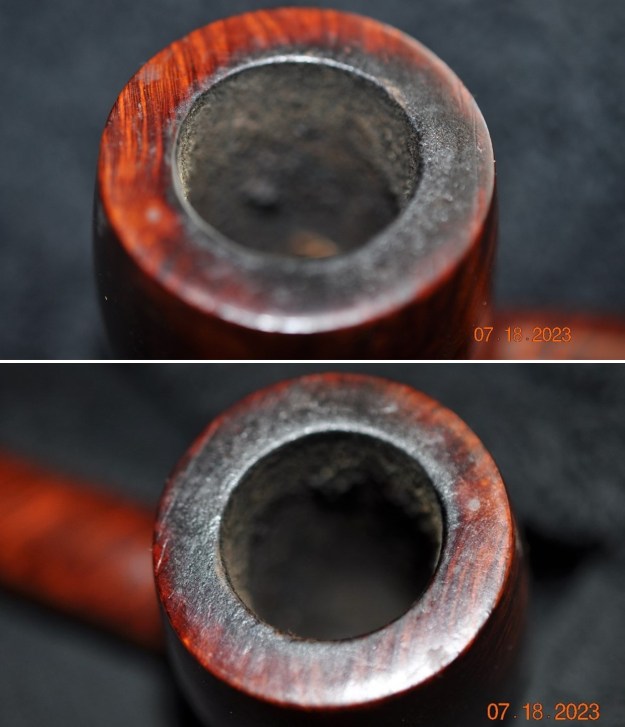
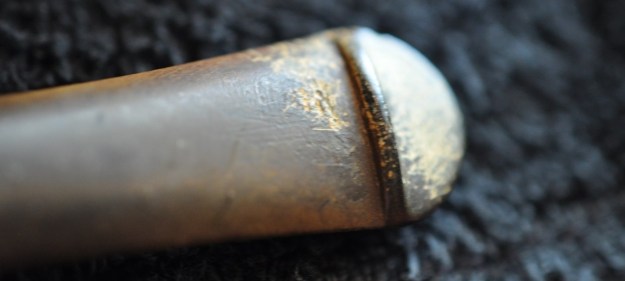
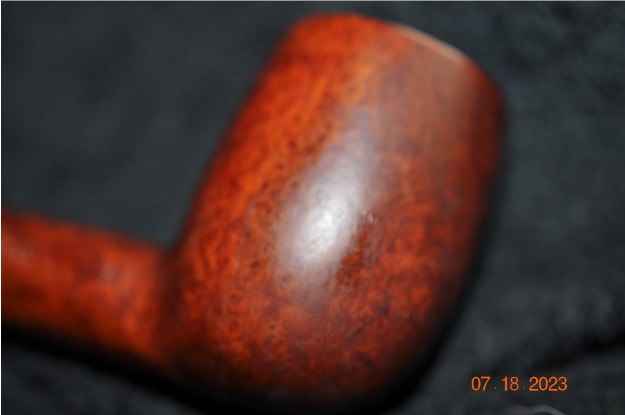
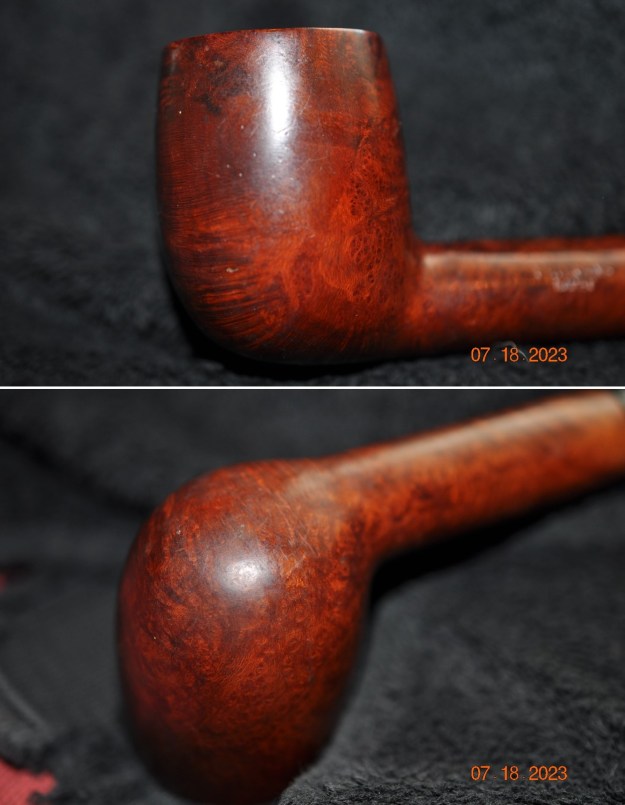
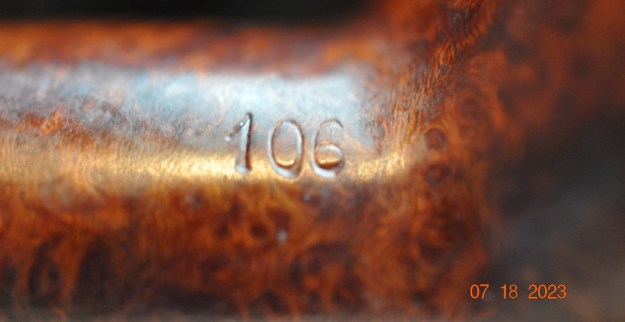
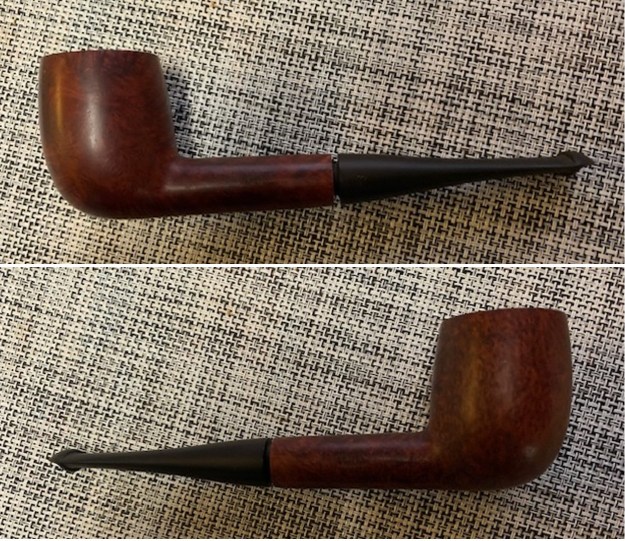
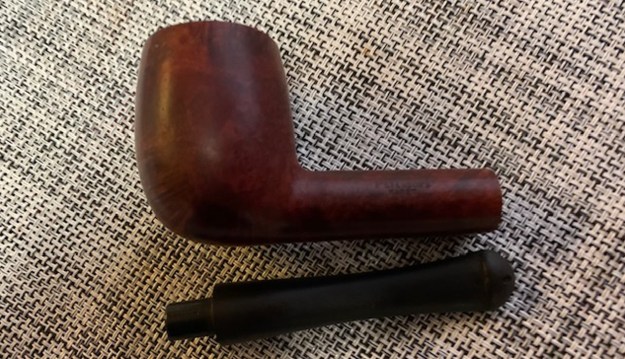
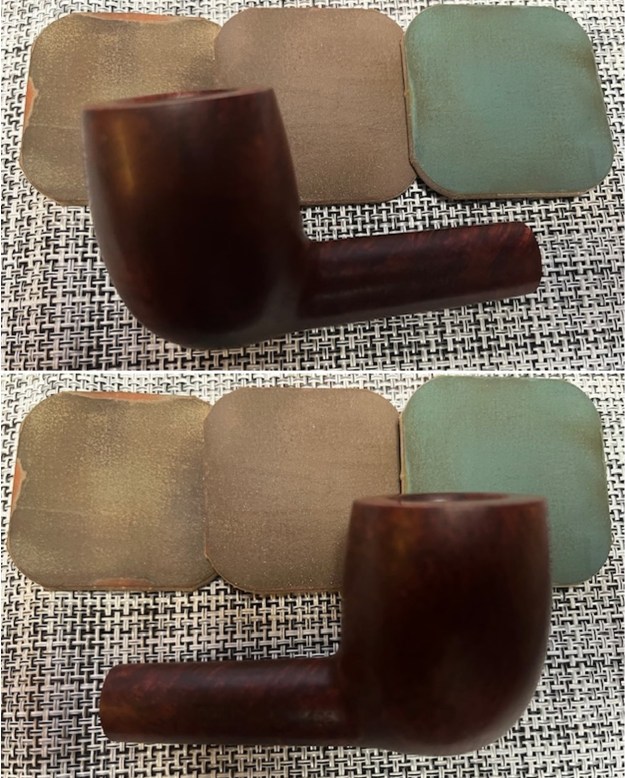
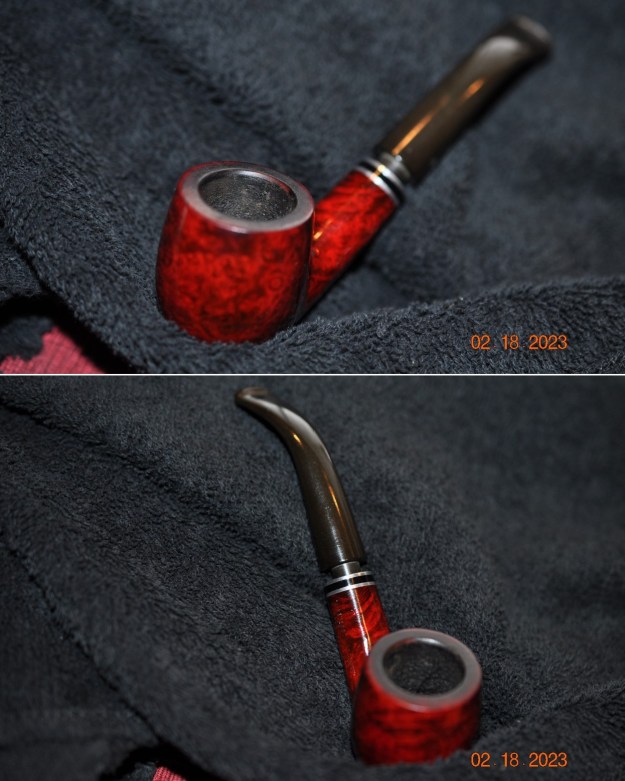
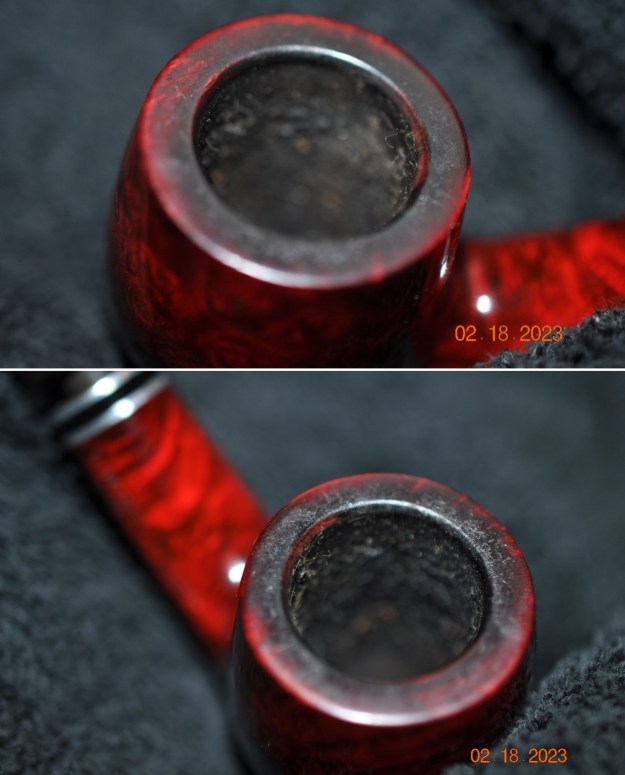
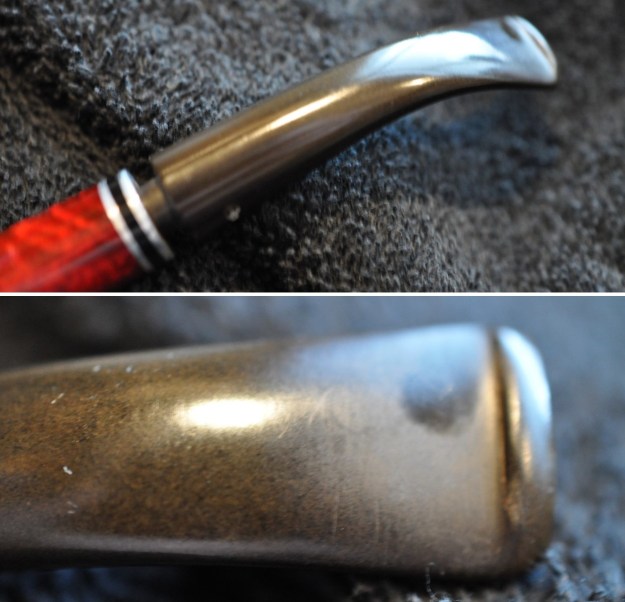
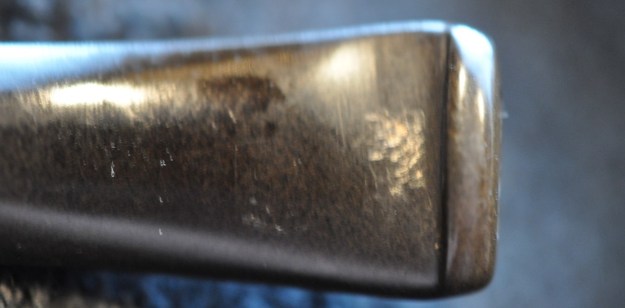
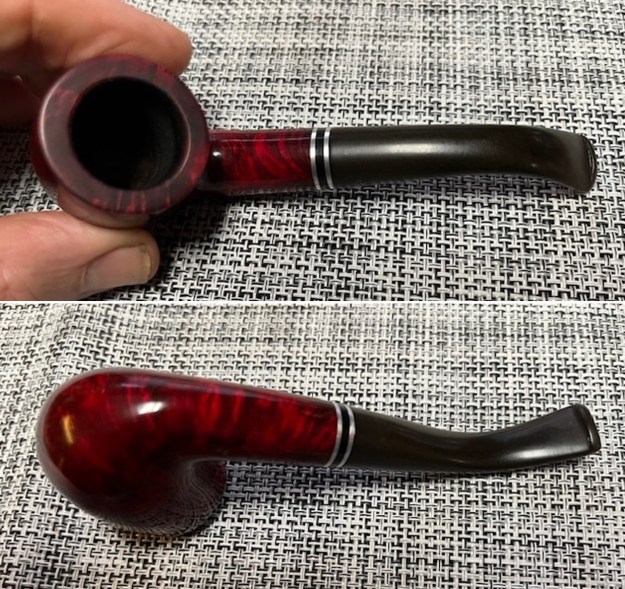
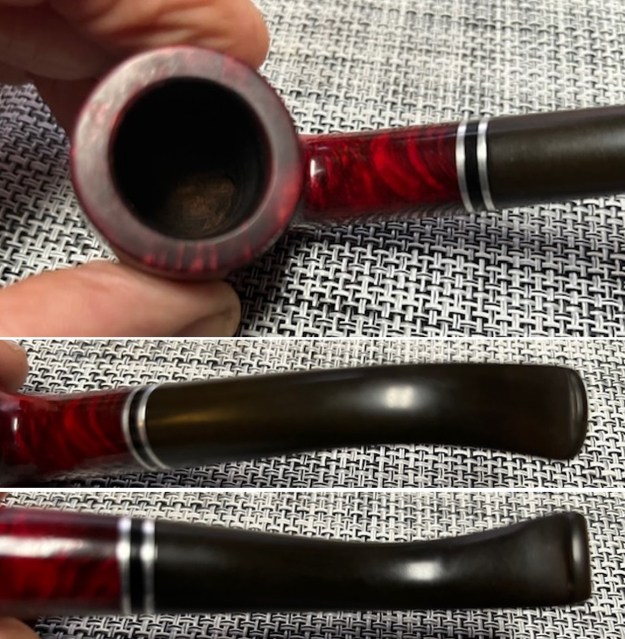
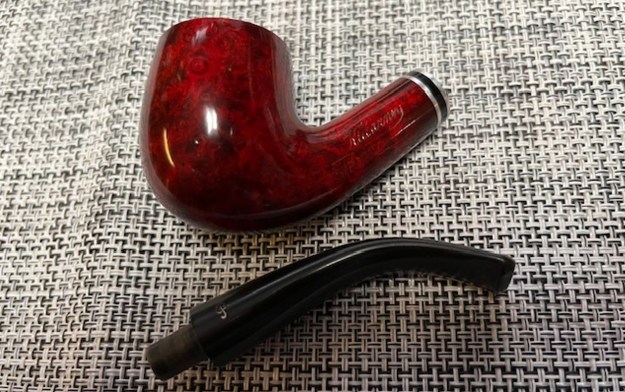
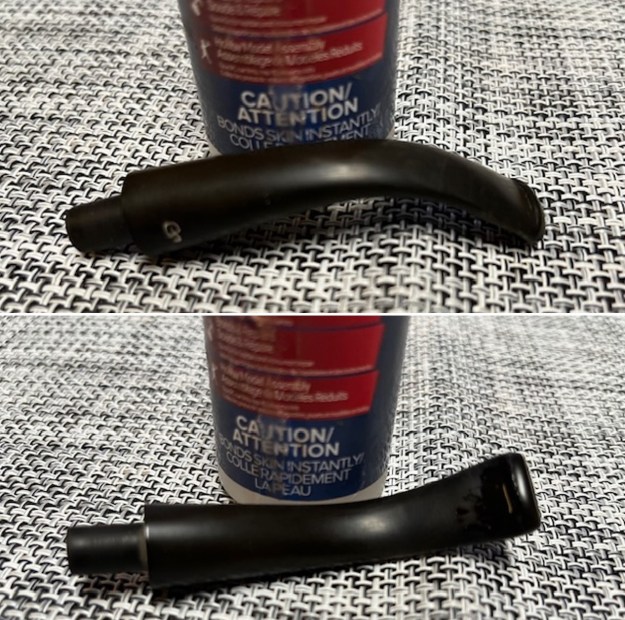
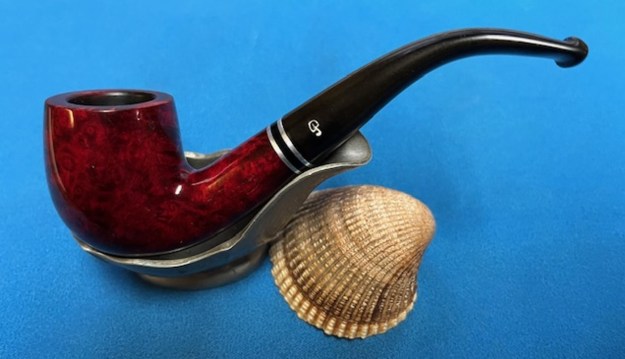
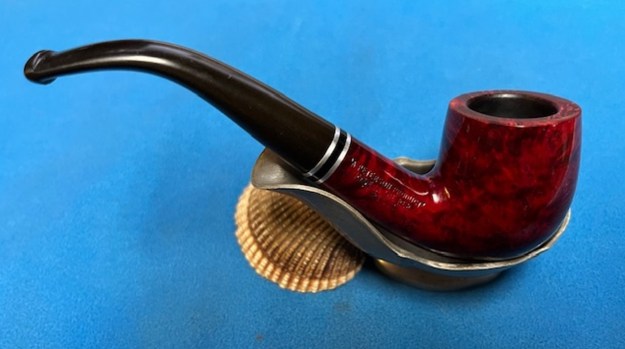
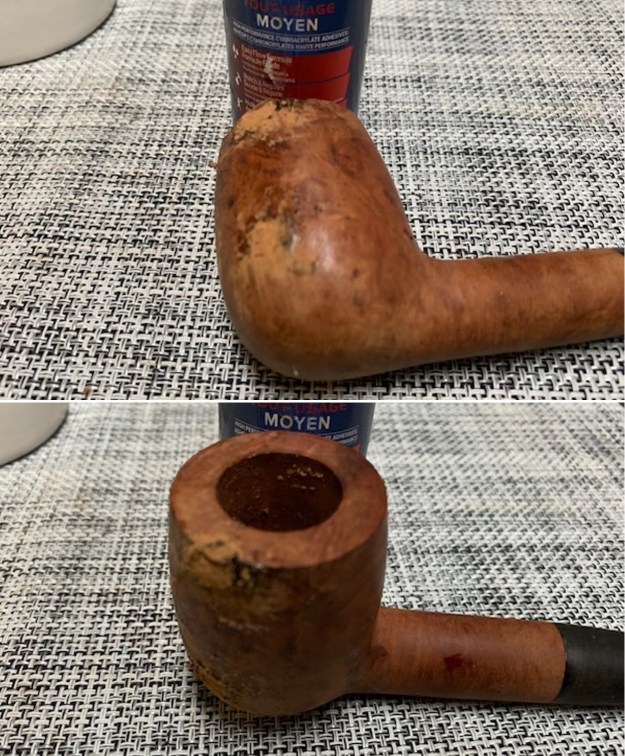
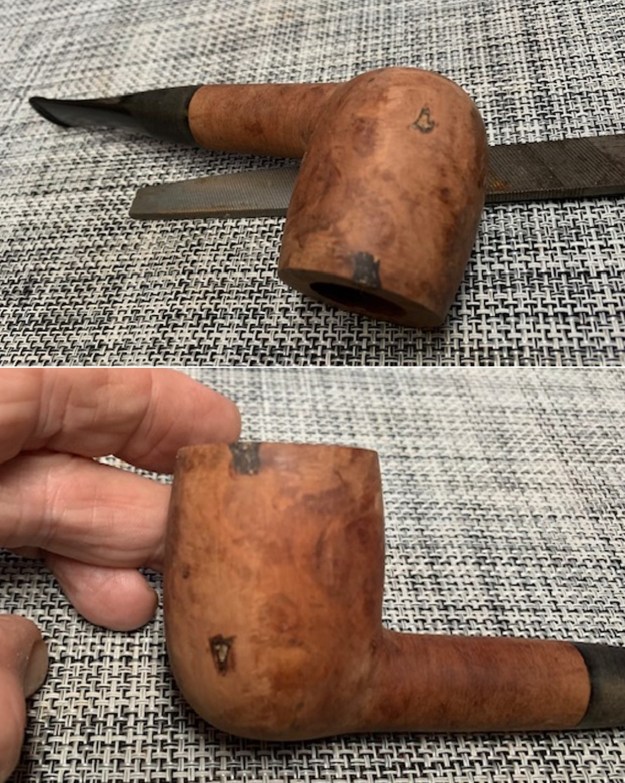
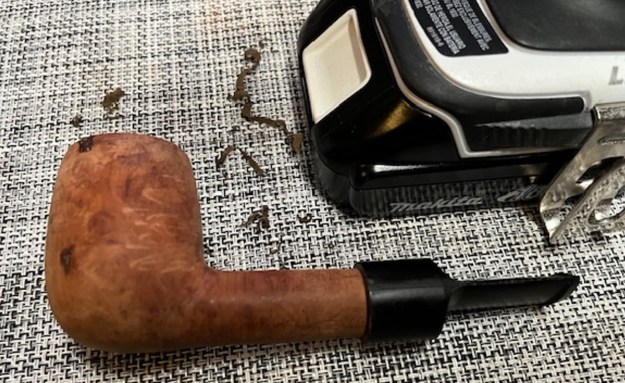
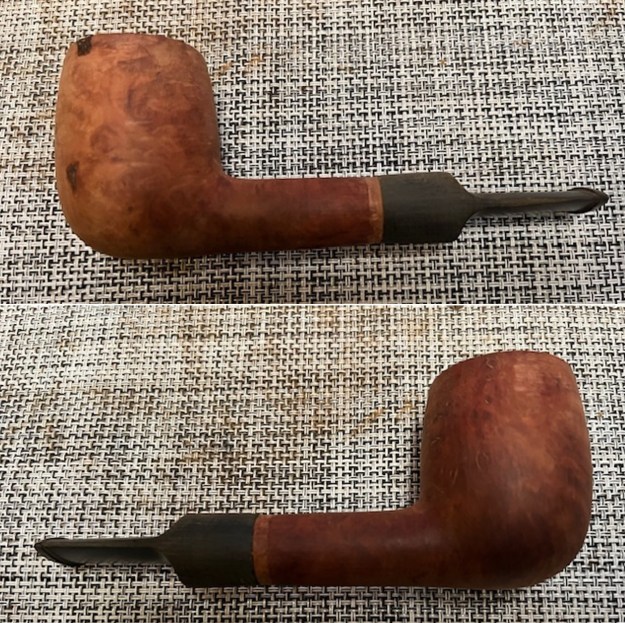
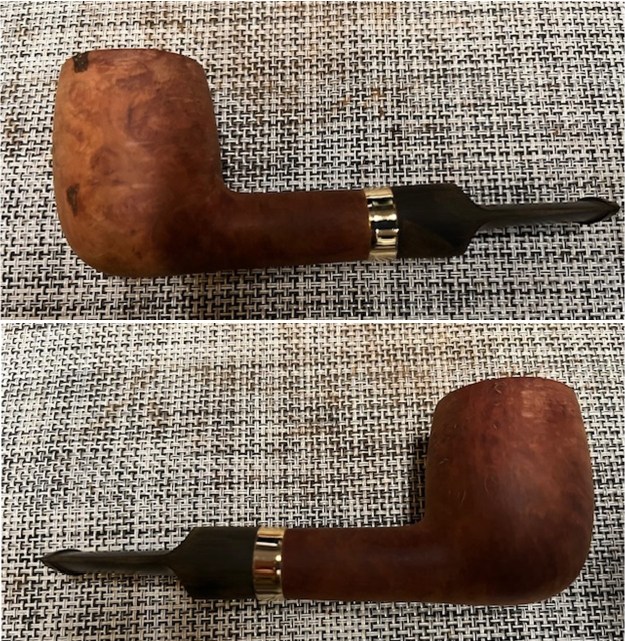
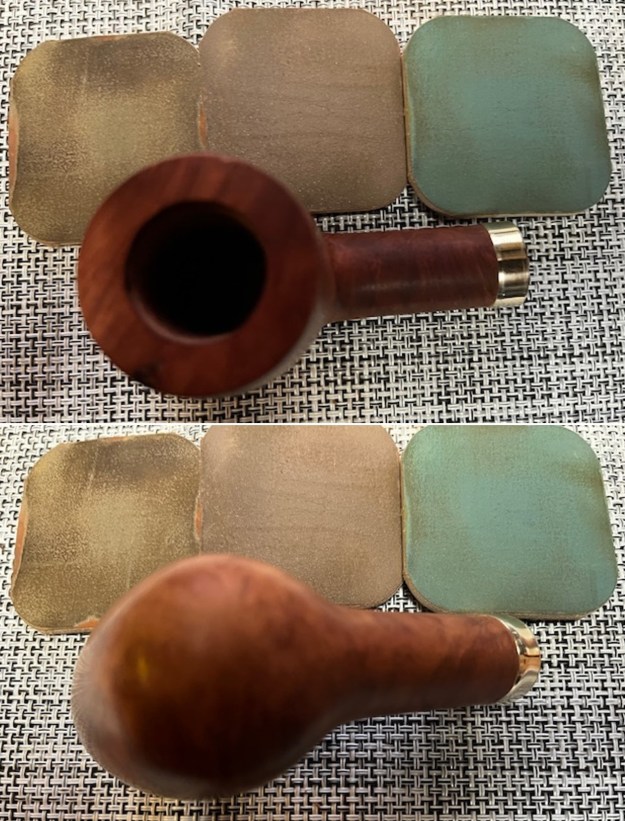
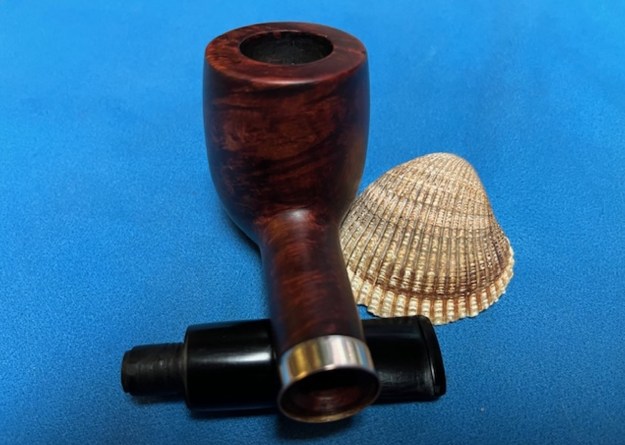
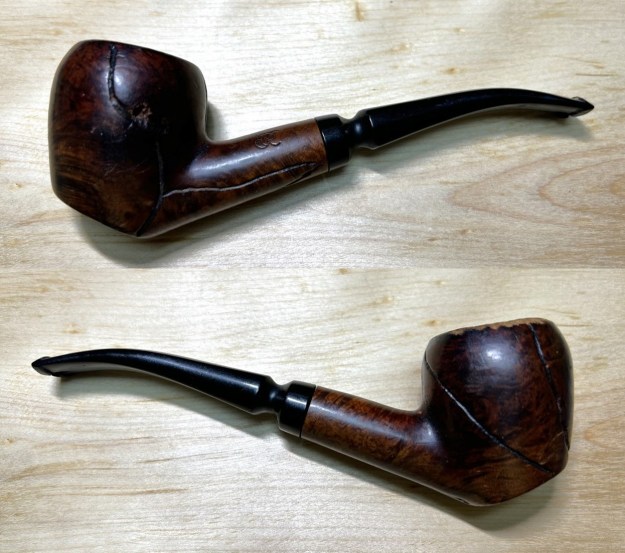
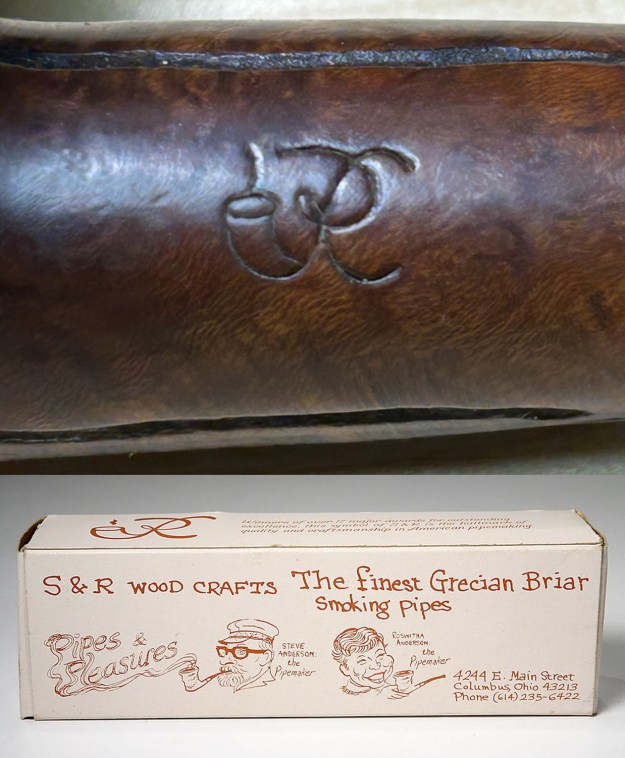
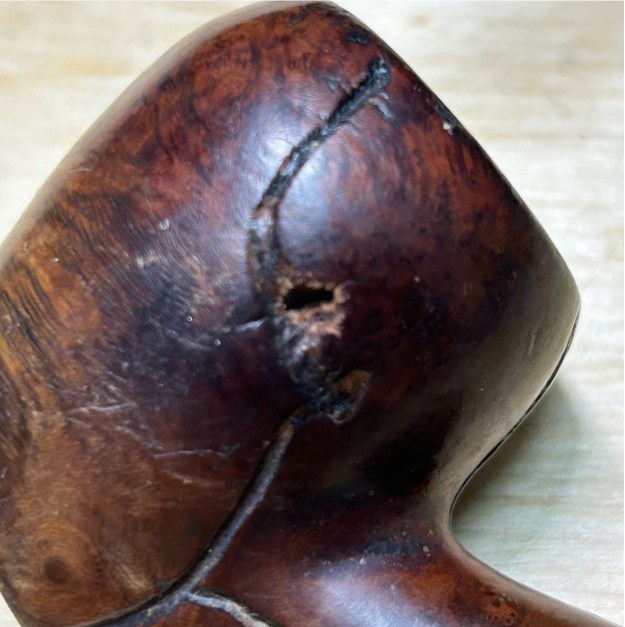
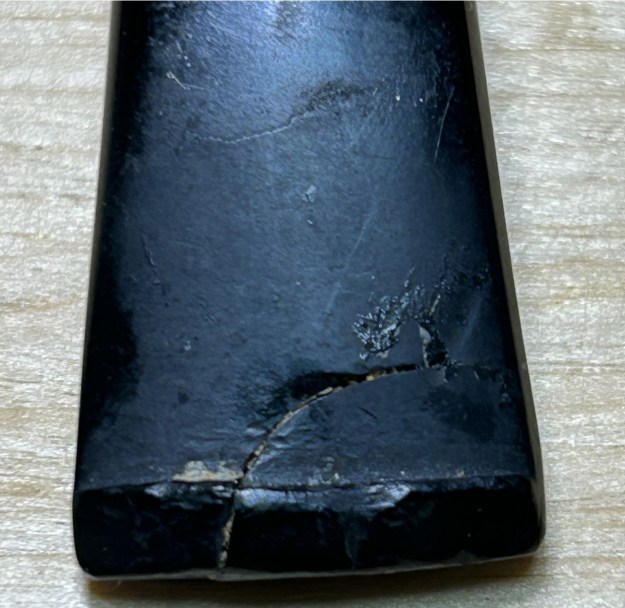
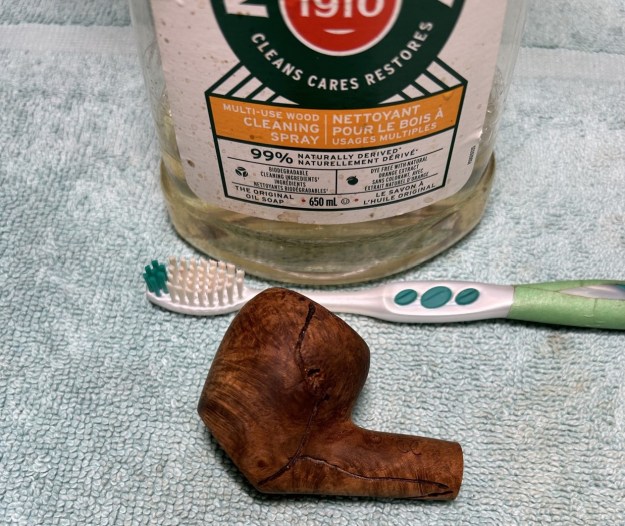
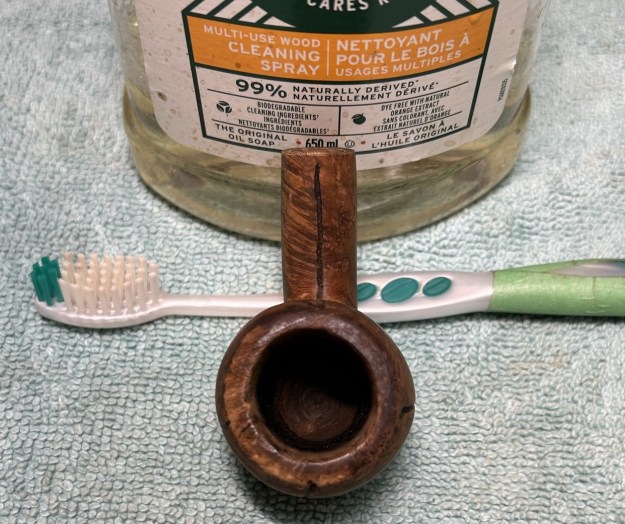
He brought out some boxes and bags of estate pipes for me to look over and there were some real beauties that I have not seen before among them. We talked about repairs and cleaning of pipes and stems. One of the pipes that he had not worked on yet was a freehand that he said was a Tatu Pipe. It caught my attention enough that I laid it aside while looking at the others he brought out. It was stamped with two pipes toward the front of the smooth panel on the underside. That was followed by the stamping 1126 [over] Tatu Pipe. It was a large freehand pipe in a mushroom shape. It had a smooth rim and a sandblast bowl finish. There was a bit of plateau on the rim top toward the front of the bowl. There as also what looked like a boxwood shank extension. It was light and a contrast with the briar. The shank end had a brass circle to re-enforce the mortise of end of the shank. There was what appeared to be a burn mark on the bottom front of the bowl toward the bottom. I examined it but it was not clear if it was a burn mark on the briar or the beginning of a burn through. The bowl had a thick cake around the bowl and some lava overflow and darkening on the inner edge, heavier toward the back of the bowl. The stem was lightly oxidized and had light tooth marks and chatter on both sides ahead of the button. I took photos of the pipe when I got back to the flat we had rented in Budapest. 
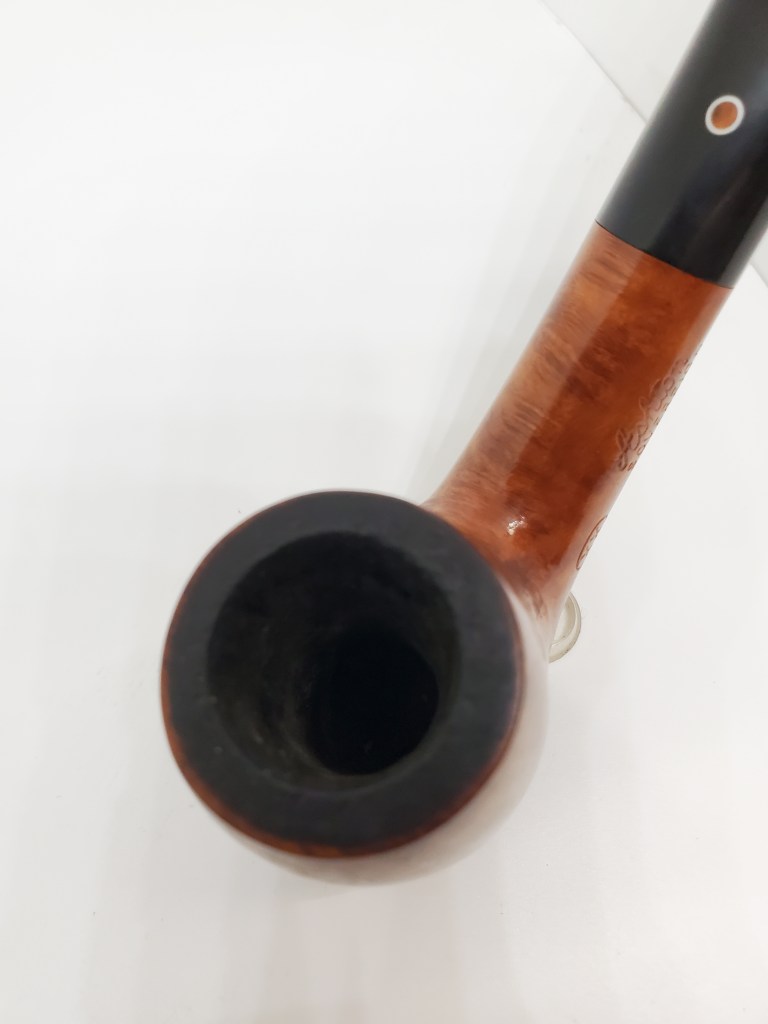
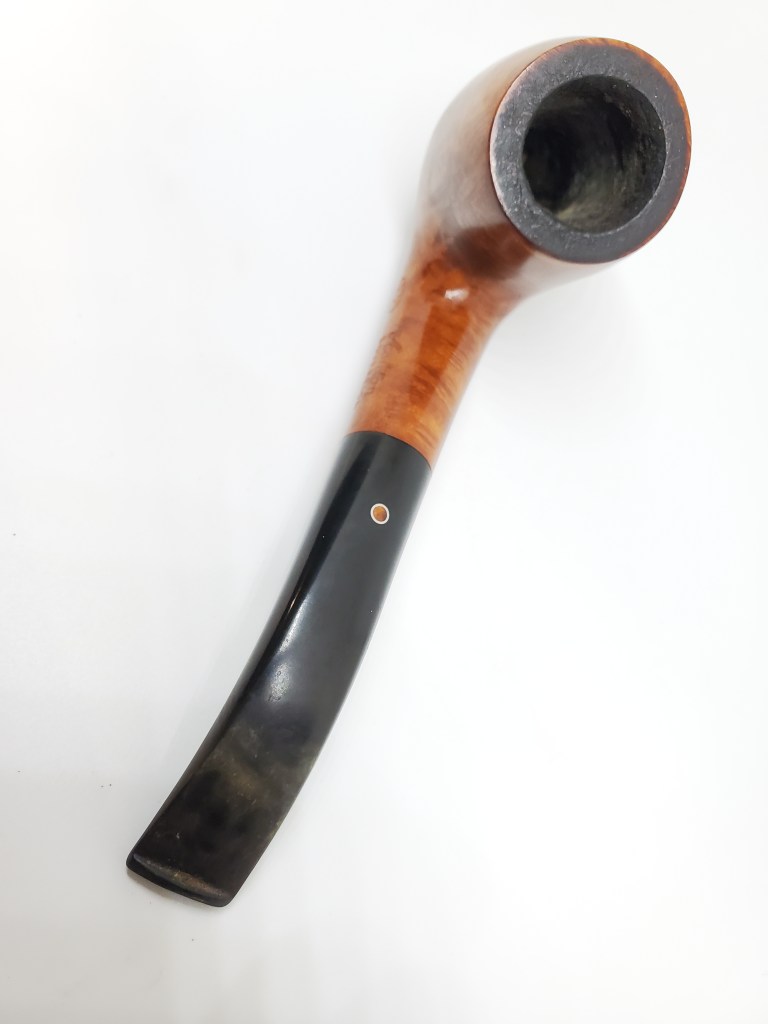
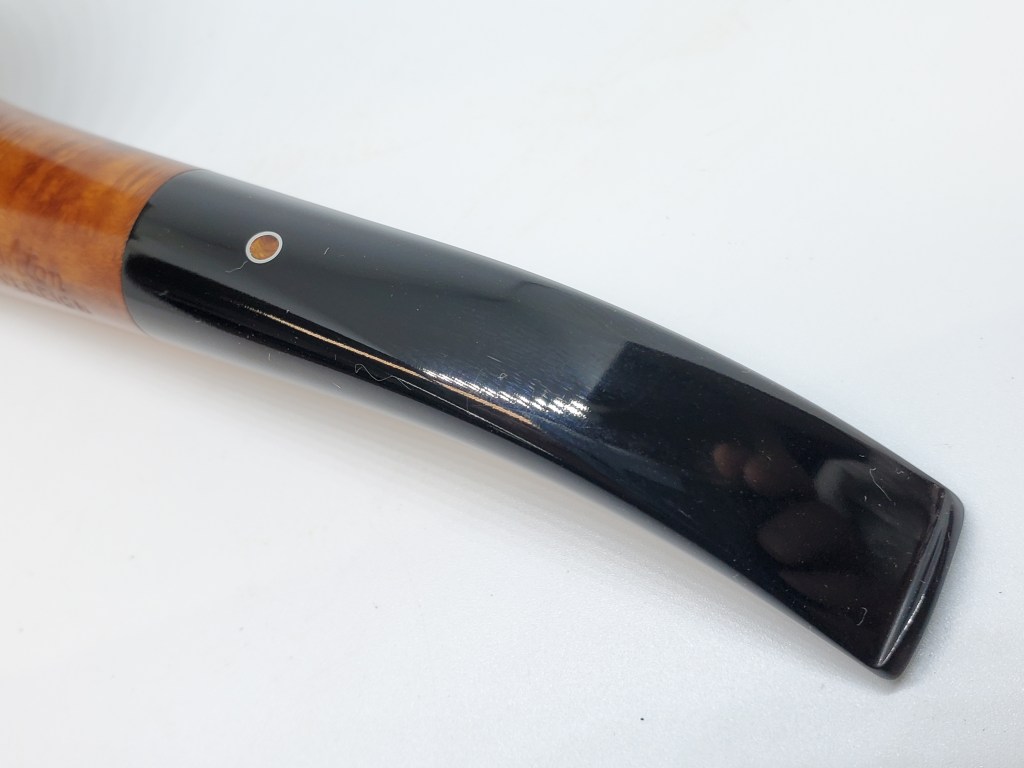
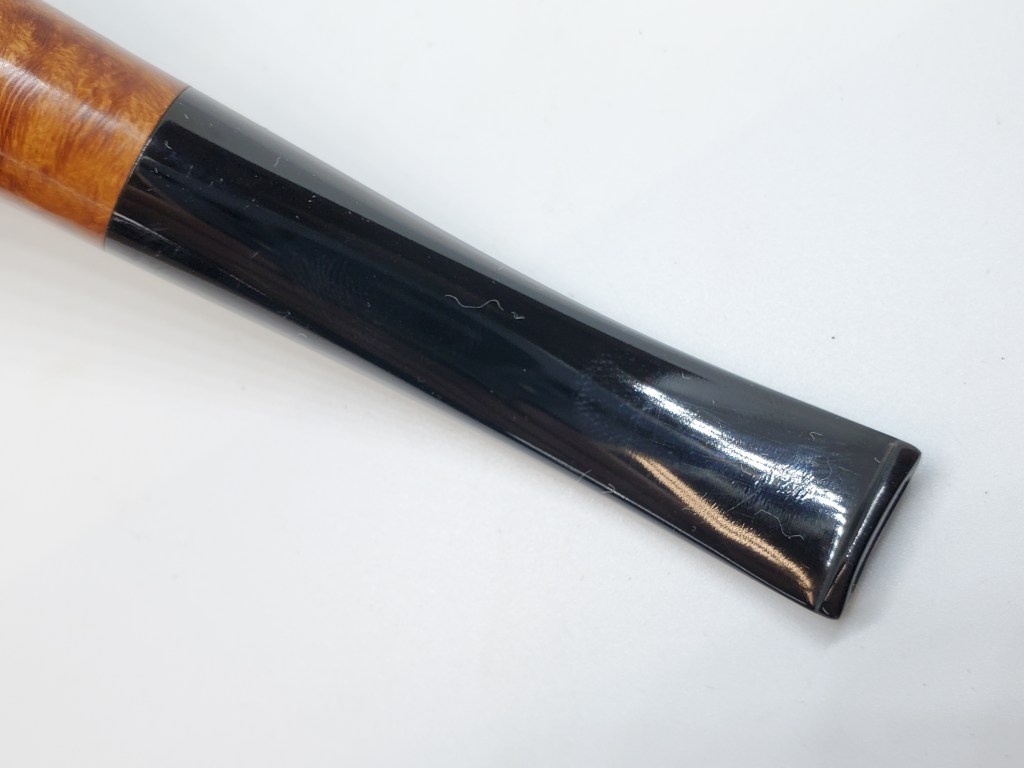
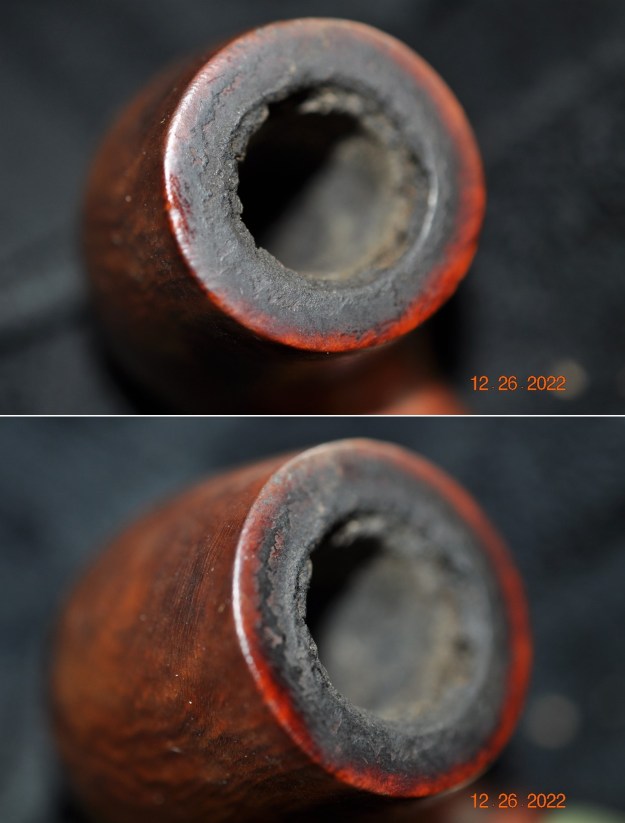
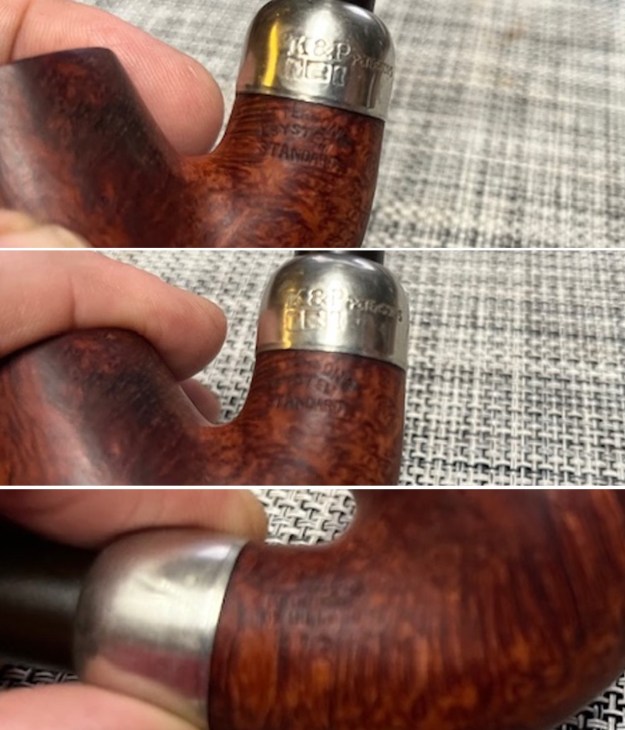
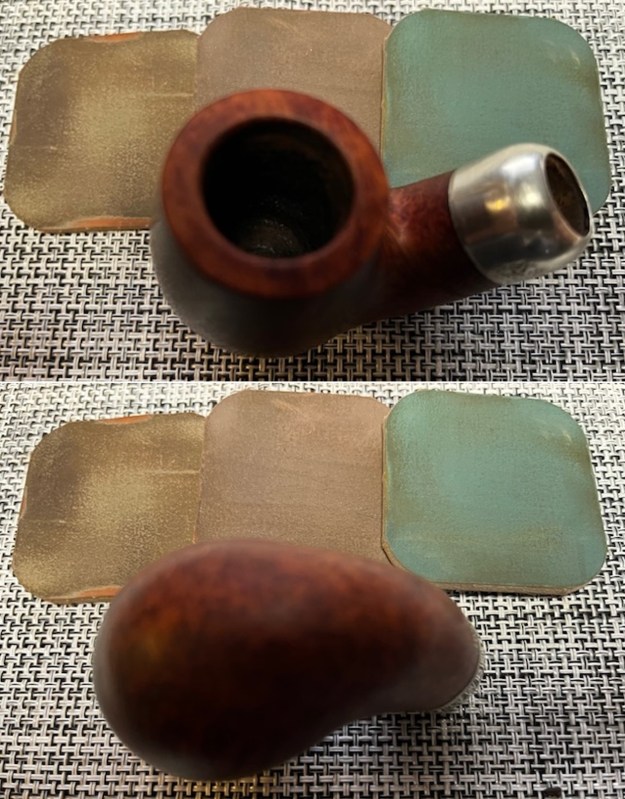
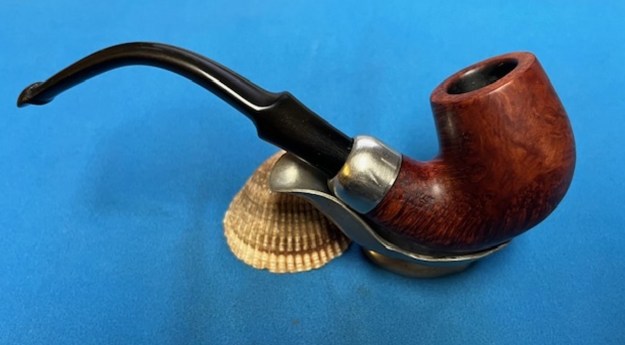
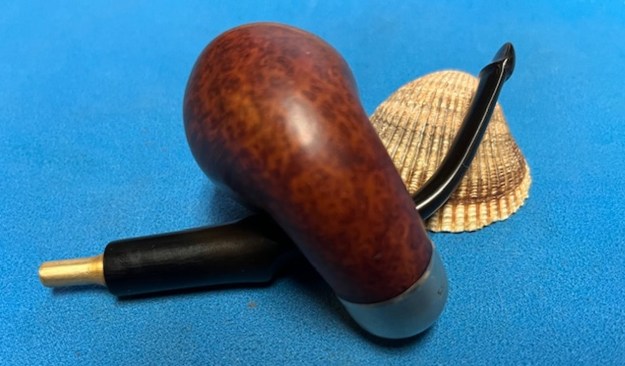
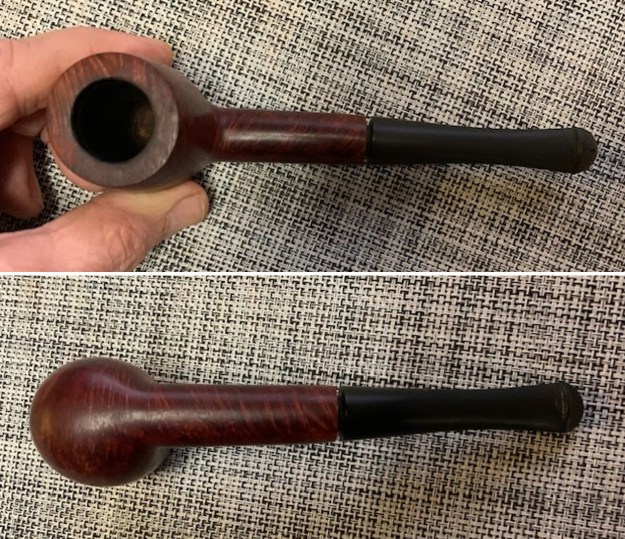
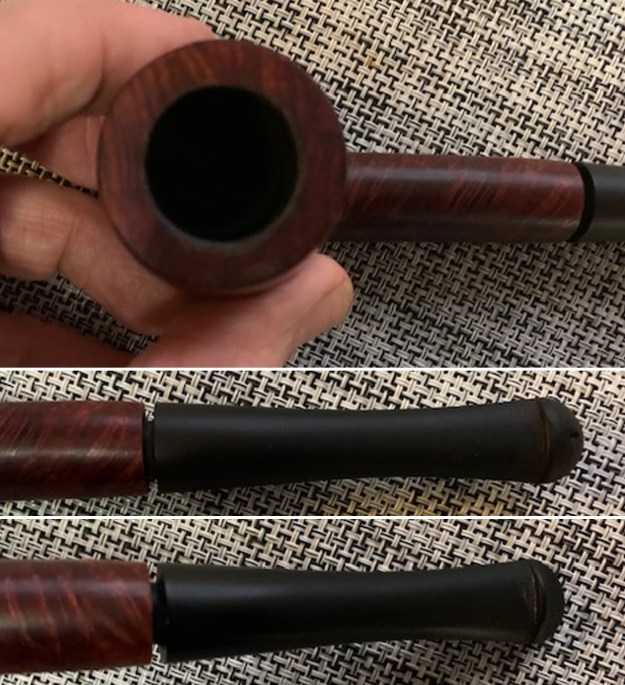
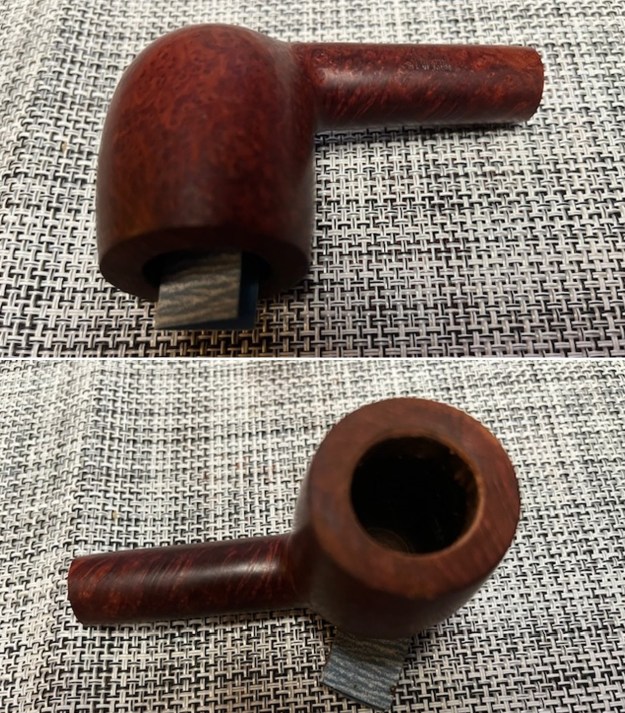
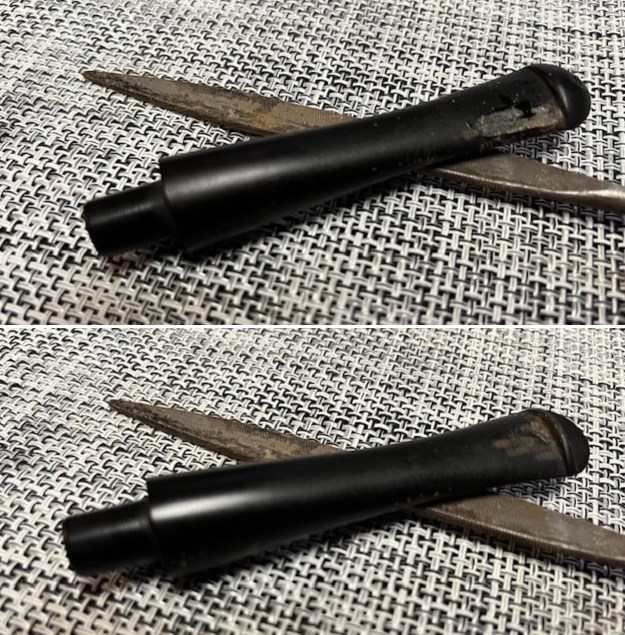
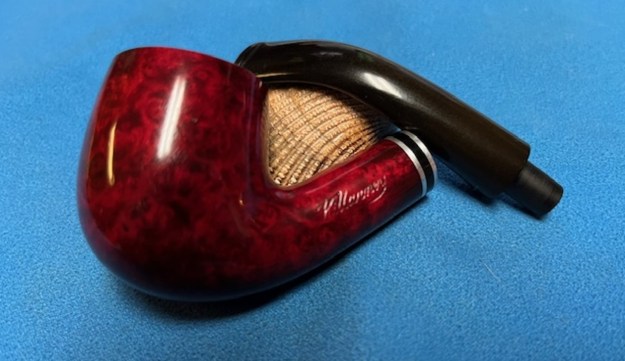
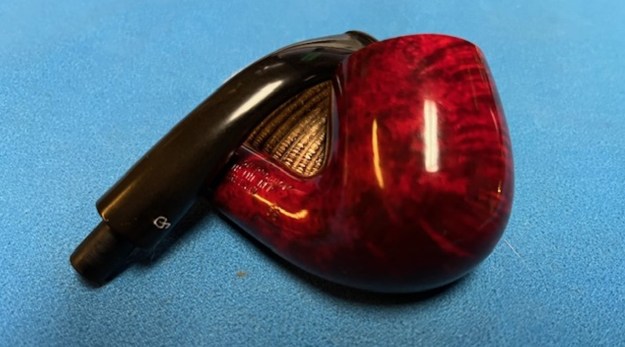
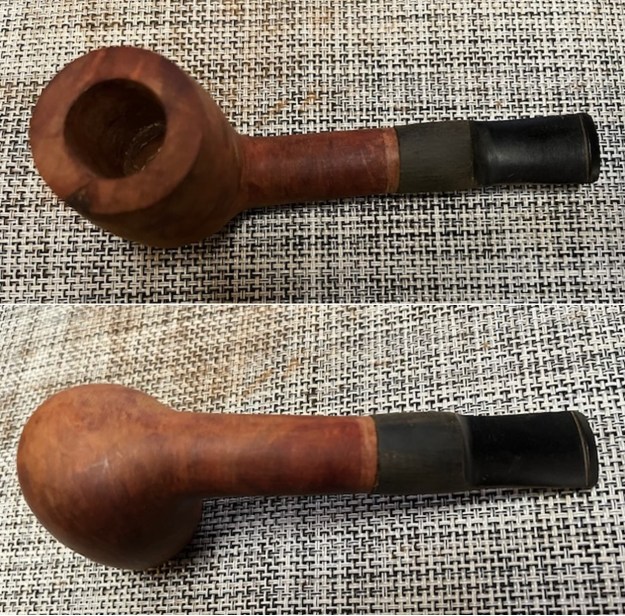
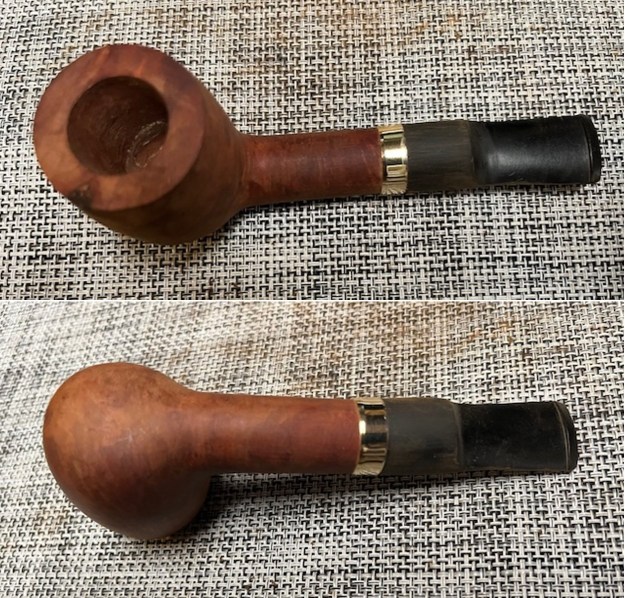
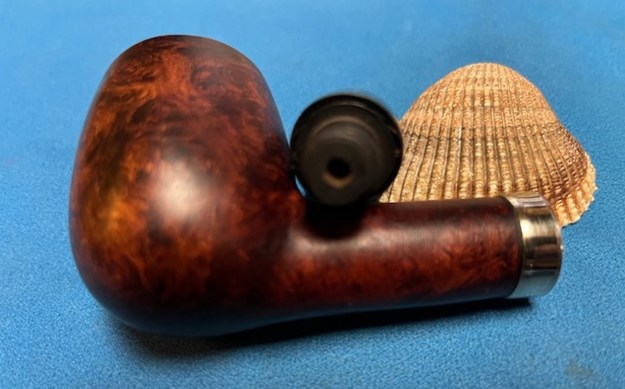
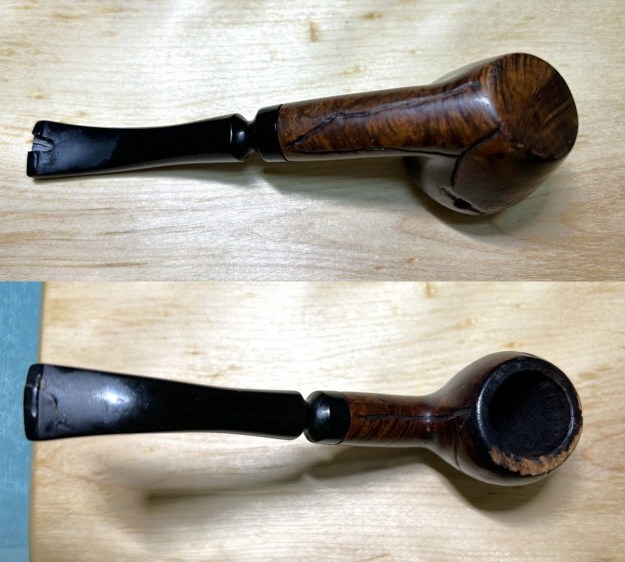
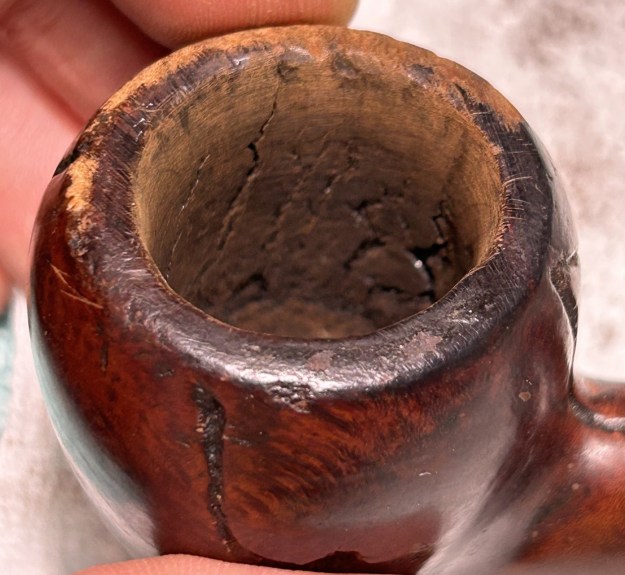
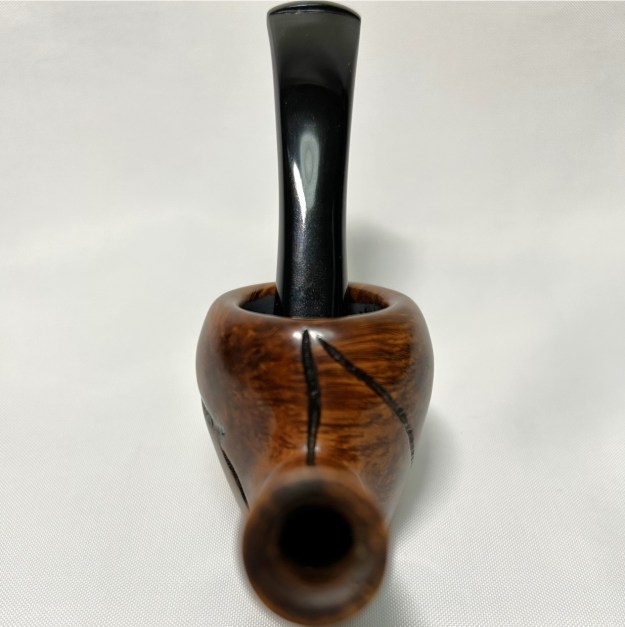
I took some photos of the bowl, rim top and the stem. The details of the rim top and inner edge were as noted in the description above. The stem also shows the condition as noted in the above.
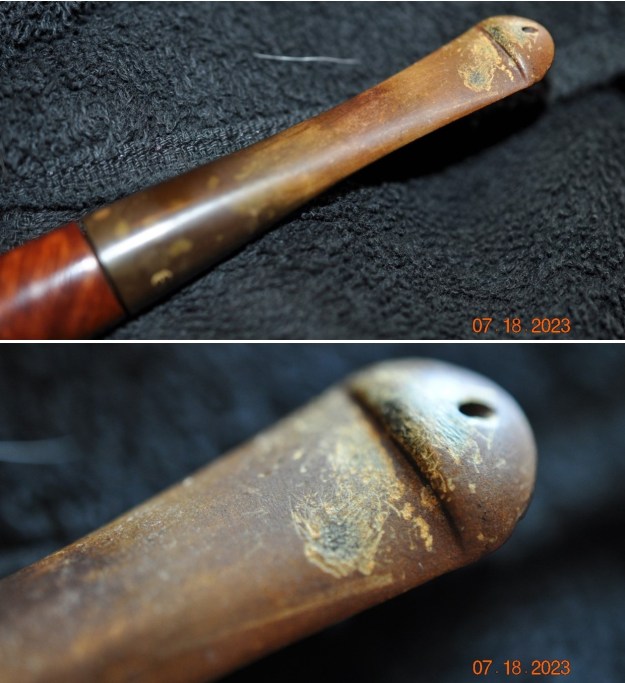
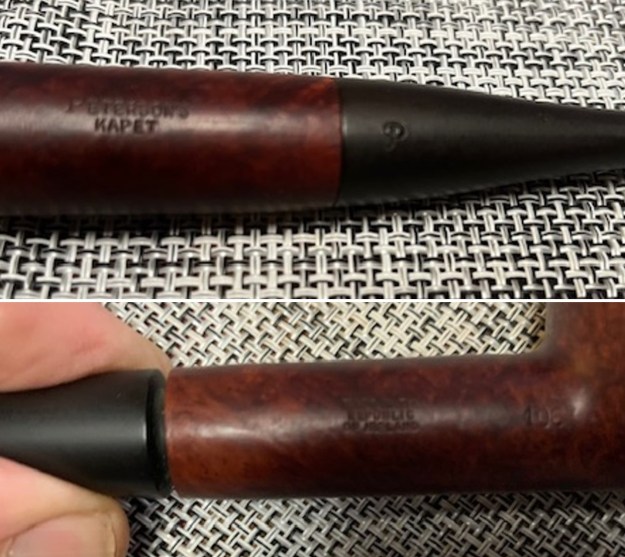
I took a photo of the stamping. It was faint but readable with a lens and read as noted above.
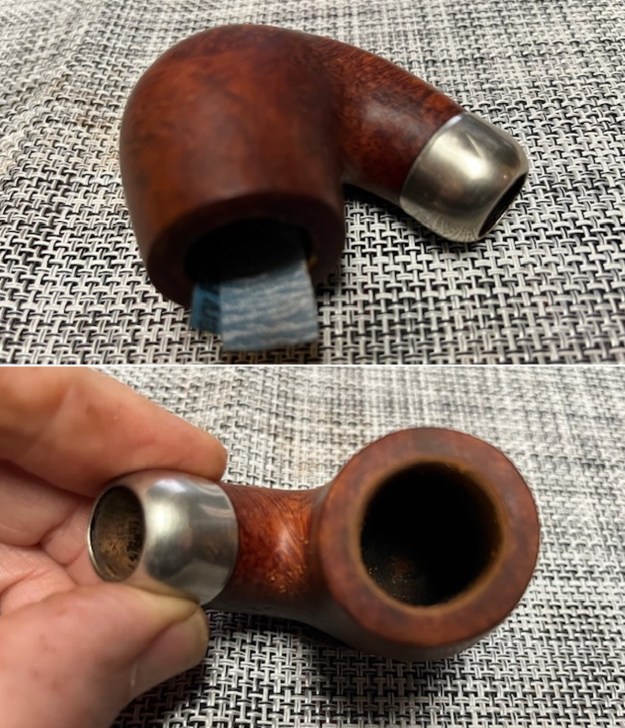
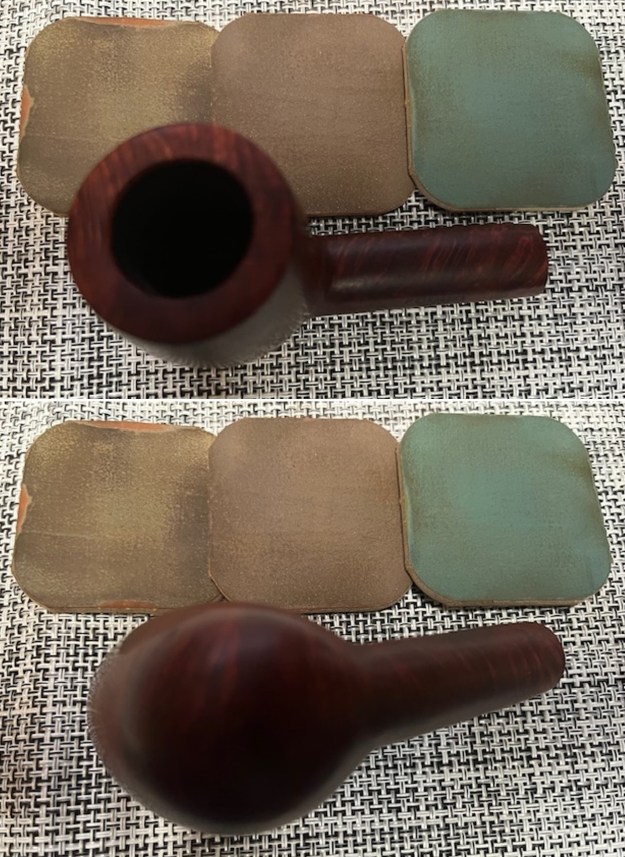
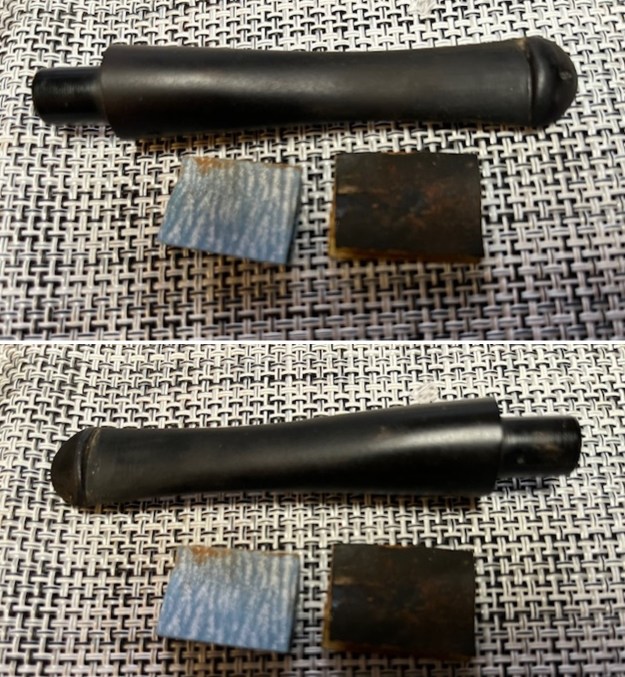
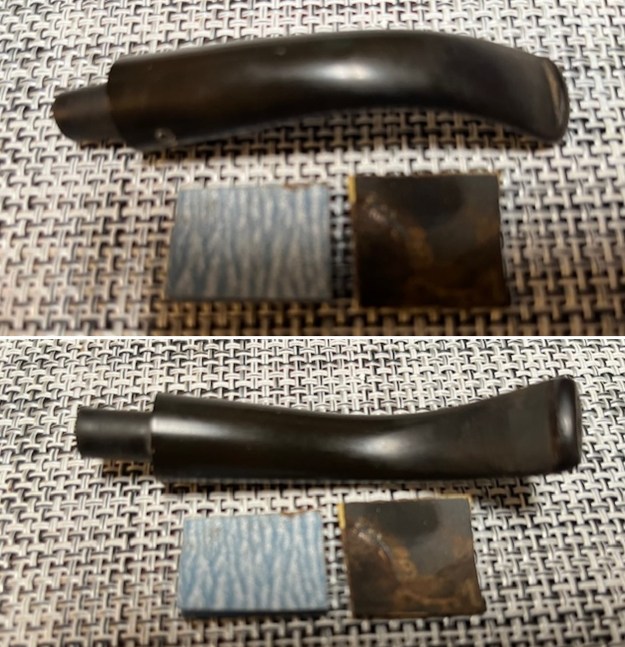
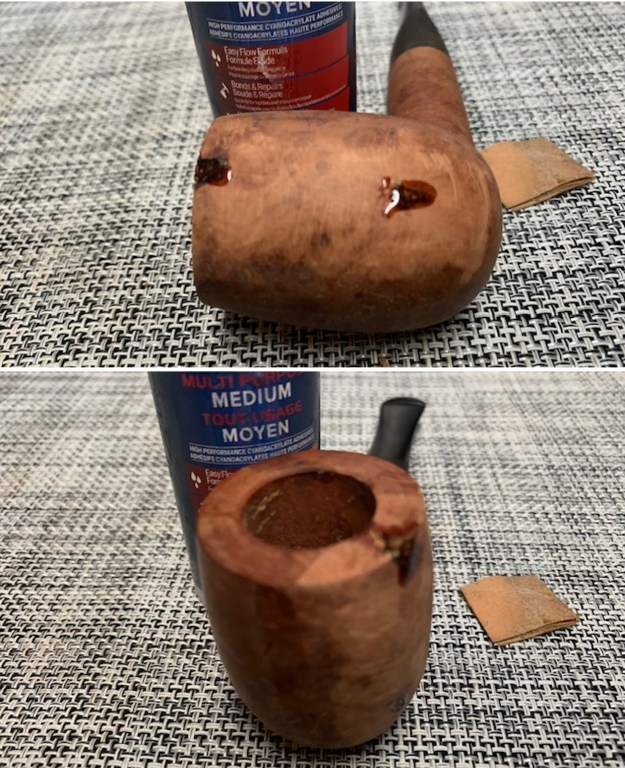
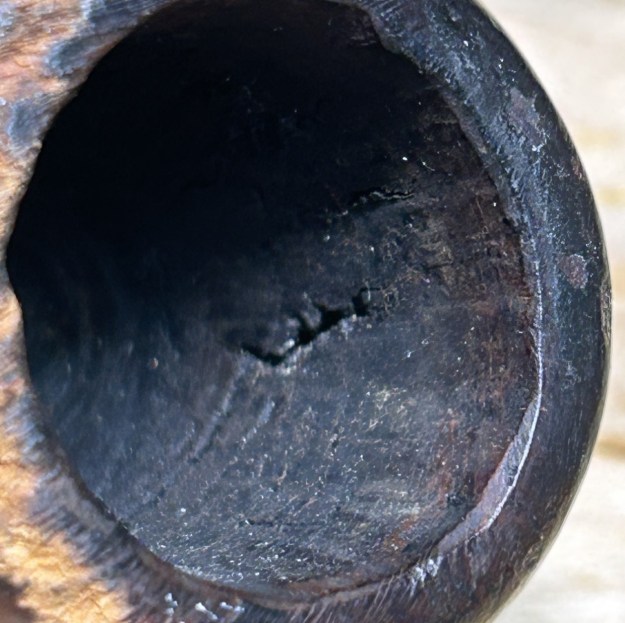
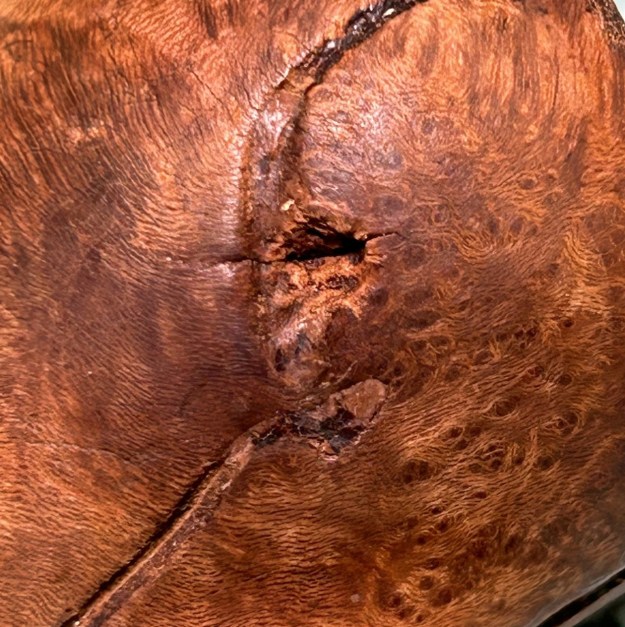
I also took a photo of the burn damage on the front lower part of the bowl. It was hard to tell whether it was the beginning of a burn out or burn damage on the briar from setting it in an ashtray.  I decided to take a calculated risk and purchase the pipe. I would more once I had cleaned it up.Before I started my work on the pipe I really wanted to know about the brand. It was a brand I was not overly familiar with and wanted to gather background information. I did a Google search to see if there was anything under the Tatu Pipe stamp. The first site that came up was for a pipe for sale on smokingpipes.com. I quote from there below as it pointed toward more information for me (https://www.smokingpipes.com/pipes/estate/japan/moreinfo.cfm?product_id=143673). It was description of a particular freehand pipe but the background information included was very helpful in giving me clues to move ahead.

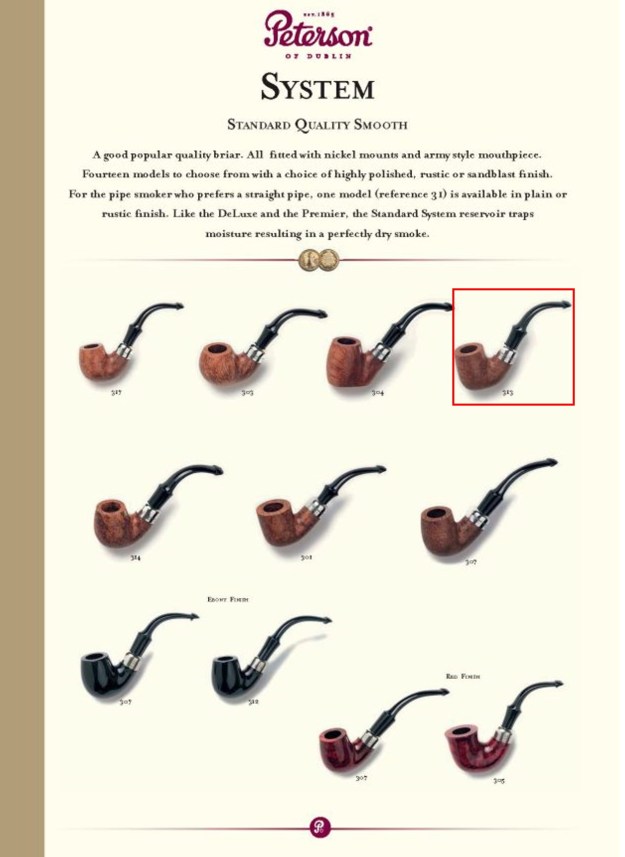
Japanese Estates: Tatu Pipe by Tetsuo Tajima (Unsmoked) Tobacco Pipe

Tajima-san made his US debut at the 2011 CPCC, and his work impressed enough, that both European and American dealers were all but slapping each other’s hands, in an effort to acquire his briars. Up until the end of 2004, Tatsuo worked as film and graphic designer, but 2005 found him committing his time to learning pipe carving and his mentor was none other than Shizuo Arita. If memory serves, this Tajima oceanic denizen was carved in 2012, and it remains unsmoked to this very minute. Novel shape, solid grain, and best held with the ever-reliable finger-crook method.

From that clue I turned to the Tatu pipe information on Pipephil’s site to get some more history and background on the brand (http://www.pipephil.eu/logos/en/logo-t2.html#tatupipe). I have included a screen capture of the information that was included there along with a photo of the pipe maker, Tatsuo Tajima and some sidebar information below. It also helped give me information on the stamping on the pipe. Artisan: Tatsuo Tajima (born 1955) formerly was a film and graphic designer. He started making pipes in 2005.

Since the pipe I had bore the stamp 1126 which I could now interpret to refer to the year the pipe was made (11=2011) and the 26 indicates the manufacture rank in that year (rank 26). That was a significant piece of information on the pipe. I now knew the date of the carving was 2011 and that this was the 26th pipe of the year.

I turned then to Pipepedia and looked in the Japanese Pipe Makers section under the name Tajima (https://pipedia.org/wiki/Tajima) and found some more information as well as other pipes that he had carved with similar design features. I quote below.

Tatsuo Tajima, born in 1955, native of Tokyo. His previous life was a well decorated Film and Graphic Designer. Since 2007, as fate says under the guidance of Shizuo Arita and Shigeyoshi Yanagihara embark on pipe crafting as a second career.

Drawing from other genre of smoking culture such as shisha and similar paraphernalia he makes you wonder and reconsider what smoking pipe actually is about. At most part, he would say the experience, the quality of smoke (moisture, flavour, and temperature) while using something that we can appreciate aesthetically. His work set boundaries free and invite smokers to be more universal and uniting at one point: on the flavour of tobacco and the experience of drawing a smoke.

For inspiration, he goes to the same park most of the time. He picks up elements of nature that he saw interesting. “Nature is different everytime we visit.” says Tatsuo-san. It is alive. Some days, even hours, leaning more towards the sun. It might be blooming, or fallen to the ground. There are movement.

Not only a naturalist in approach but artificial landscape and man-made creation also inspire him. NASA space shuttle to construction site digging gave him inspiration. I just called it simply being a Japanese and their fascination of robots and mechanical wonders. If his pipe is a painting, his expression would be Dali kind of surrealism.

Capturing nature in his own way, it could often be more realistic as a result.

Often you will see his combination of modernism and retro being executed with Wabi-sabi aesthetic. Also, behind that artistic styling and unique structure, he is always on the exploration on the new experience of smoking, when possible contribute to the health aspect. Such as the use of reverse calabash and longer shank to decrease moisture and cool down the smoke due to longer travel.

In life, he drinks tea throughout the year, warm Oolong Tea in winter and cold Mugicha in summer. He drinks no alcohol. By all means, I have tried with both tea or alcohol, and his pipes still smokes like a dream. He is also in touch almost on a daily basis with a retired senior pipemaker, Shigeyoshi Yanagihara.

Tatsuo Tajima, currently resides in Tokyo, lives quite close with his teacher and friend, Yanagihara-san. His current pipe production is about 60 pipes a year.

I then turned to Pipes2smoke where Maxim Engel currently sells Tatsuo Tajima’s pipes for further information (https://pipes2smoke.com/collections/tatsuo-tajima). I quote from that site below.

Tatsuo Tajima, (“Tatu”) was born in 1955 in Tokyo. He originally worked as a film and graphic designer and contributed large-scale image displays mainly for feature films and for such events as Tsukuba Expo ’85, Nara Silk Road Expo ’87, and Design Expo Nagoya ’89 as well as for museums such as Edo-Tokyo Museum. From ’93 onwards, with the general shift to digital media, he focused on multimedia titles and graphics as a graphic designer. He has received numerous awards from such competitions as Opel Design Contests, Epson Imaging Contests, and Victor Video Festivals.

From 2005 onward, Tatu committed himself to pipe making under the guidance of Shizuo Arita and Shigeyoshi Yanagihara. In 2009 he made his debut as a full time pipe artist at Amanoya in Setagaya, Tokyo. 

He had his first US exposure in 2011 at the Chicago Pipe Show. Every Tatu pipe shows the Japanese pipe aesthetic with its mix of curved and straight lines & at times asymmetry flowing into a harmonious whole. And always with the famous Japanese attention to detail.

If you would like to see more of Tatsuo Tajima’s work have a look at his Instagram site (https://www.instagram.com/tatupipe/). He does some fascinating work.

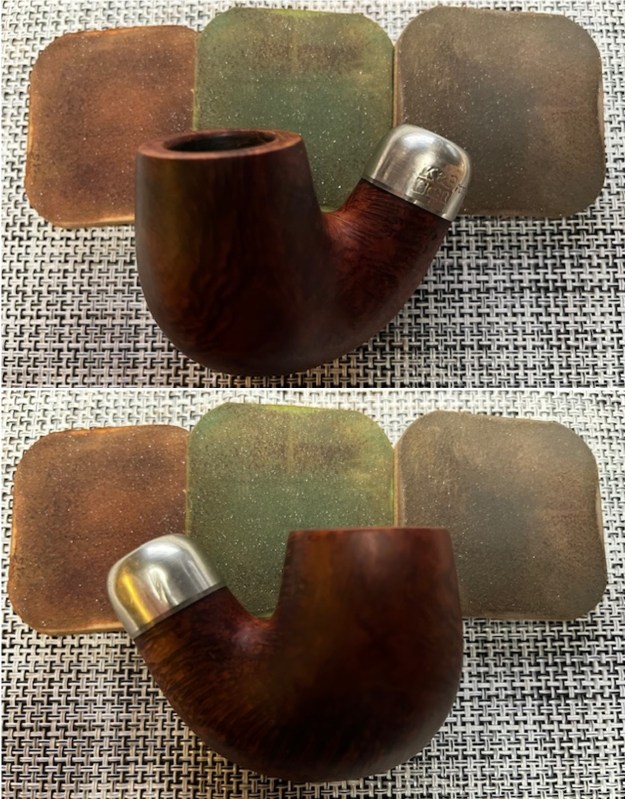
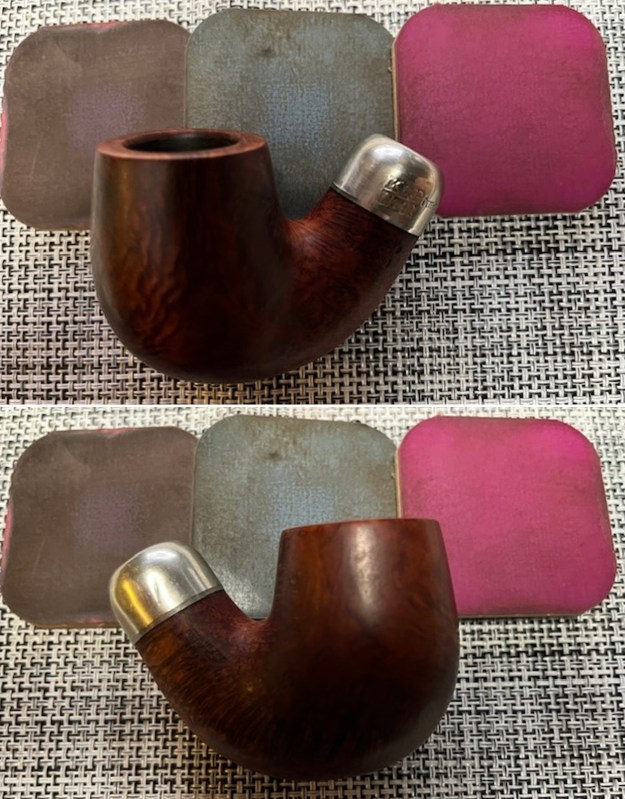
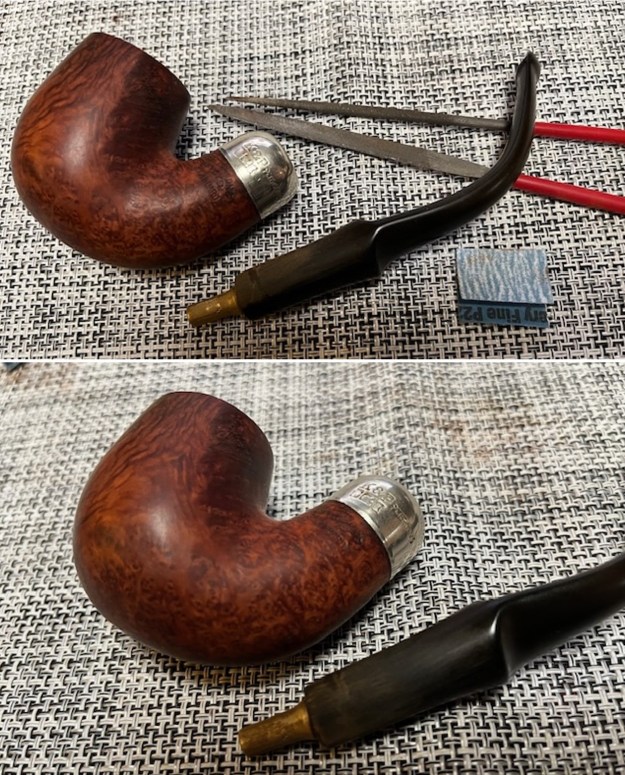
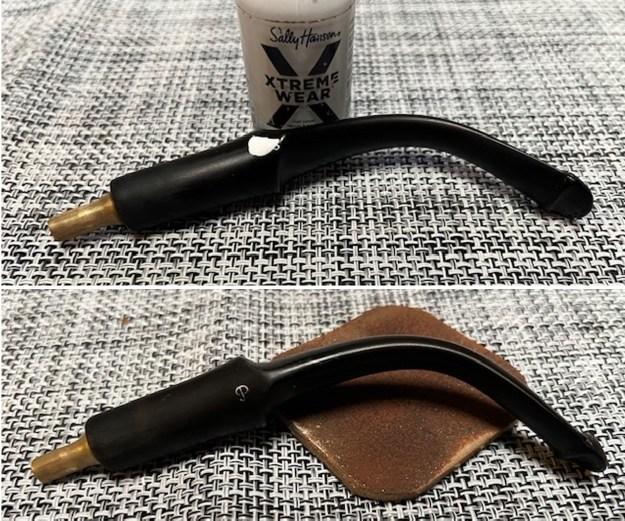
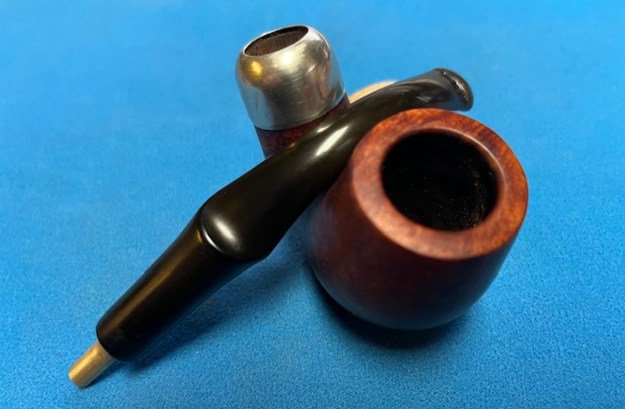
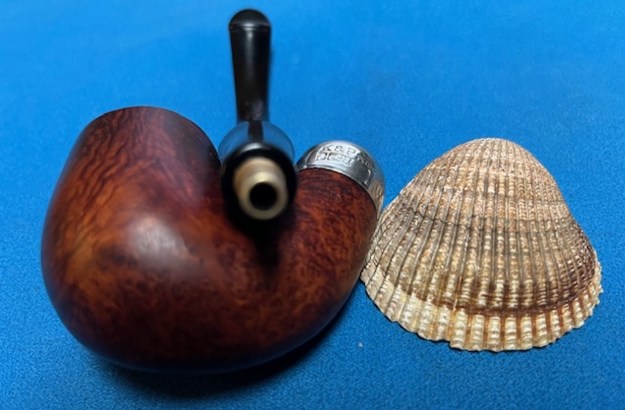
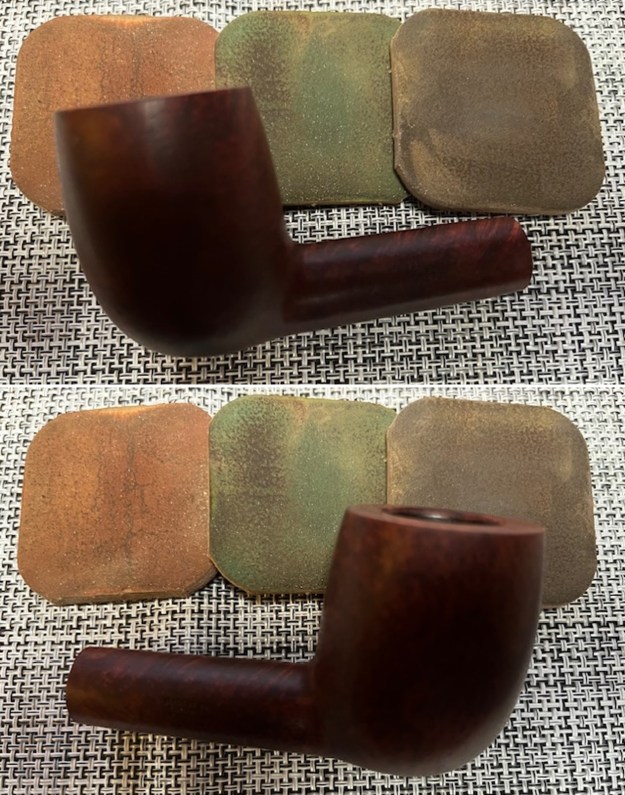
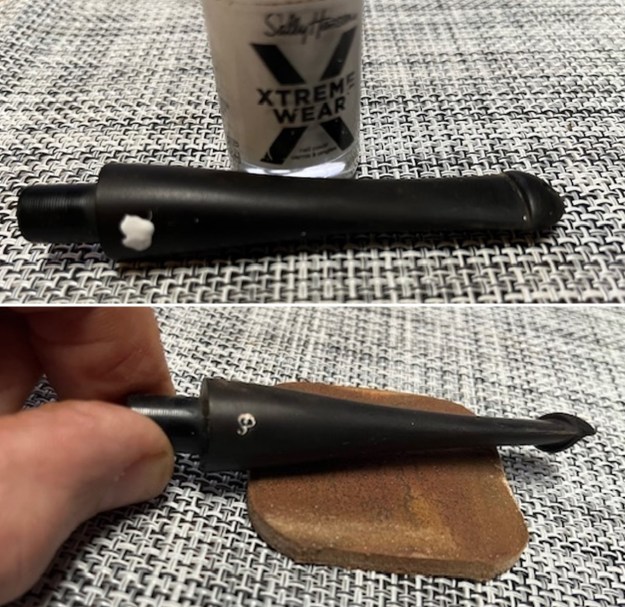
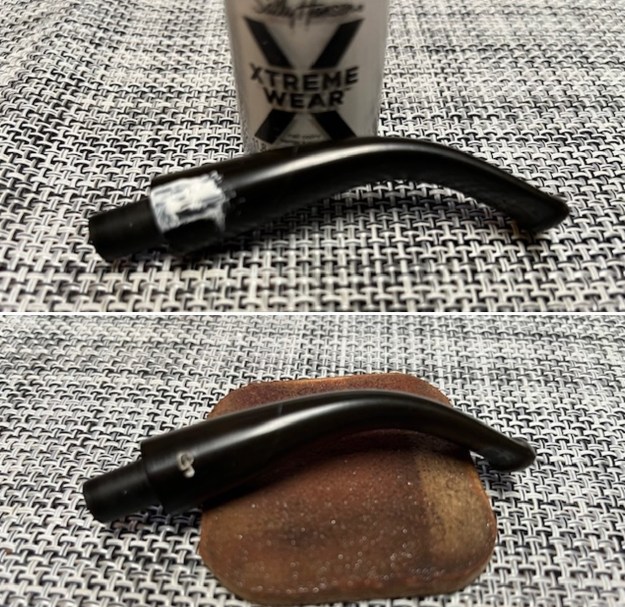
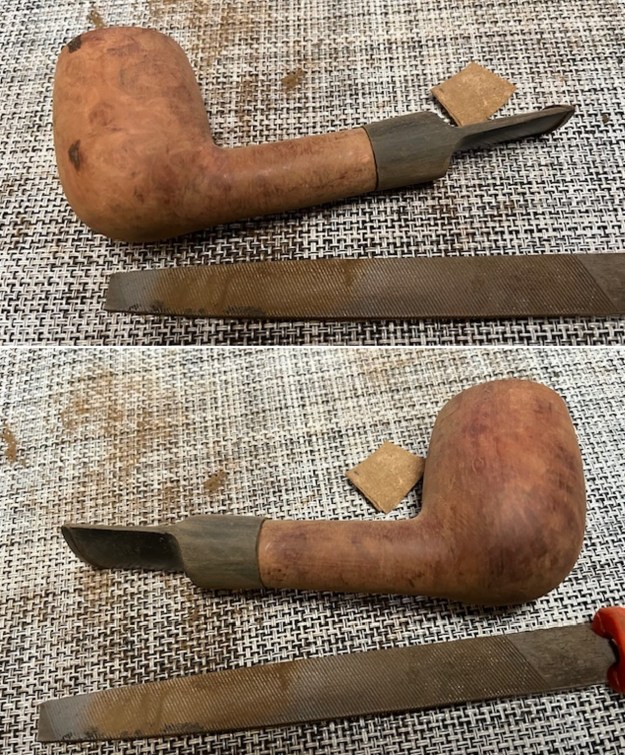
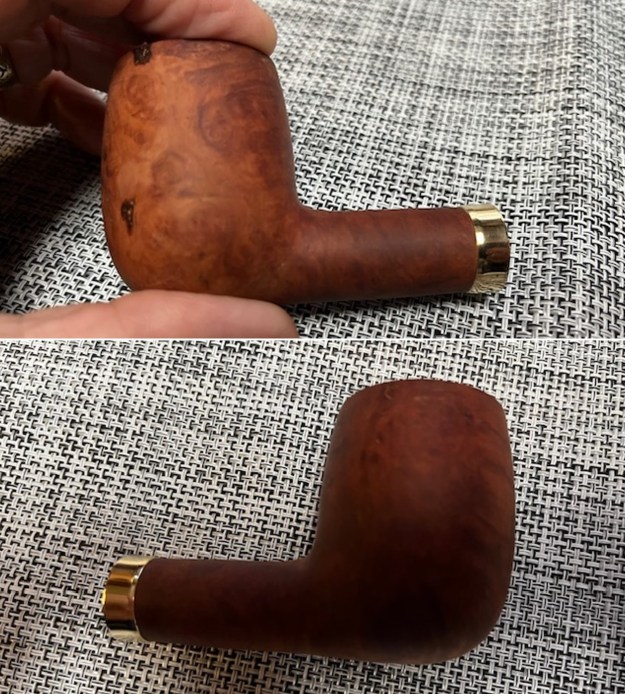
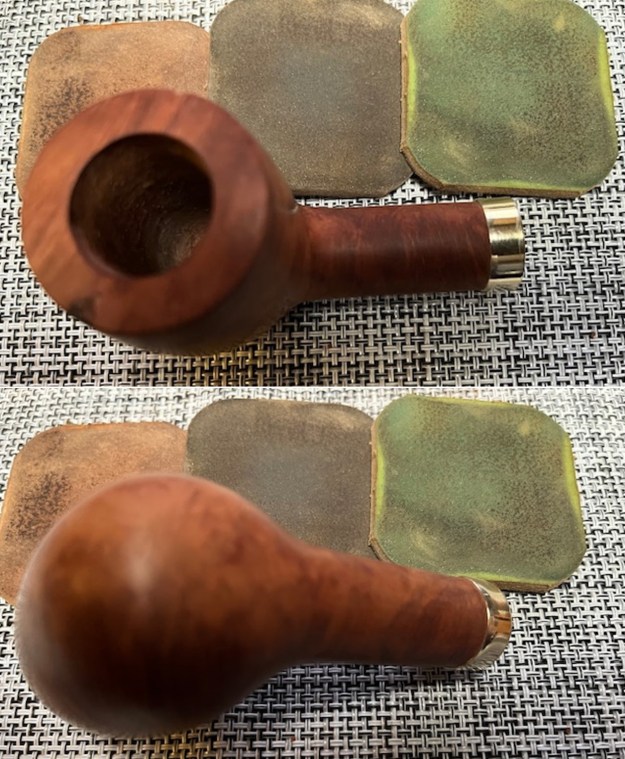
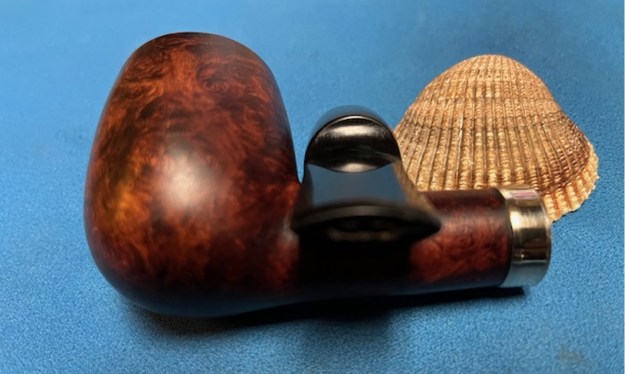
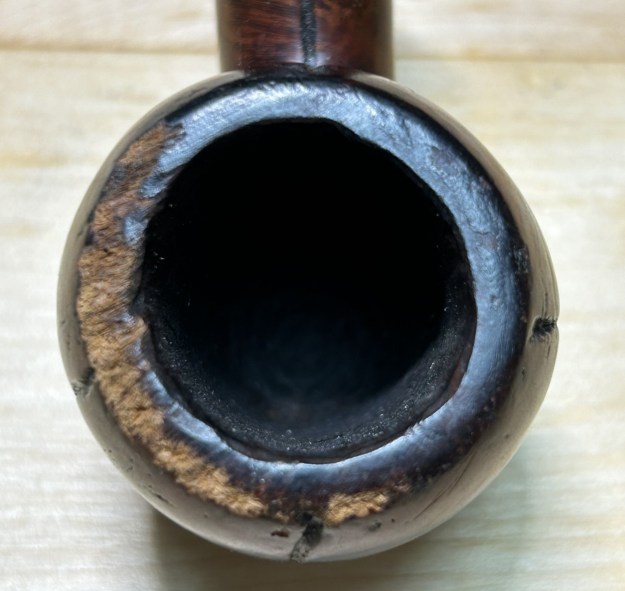
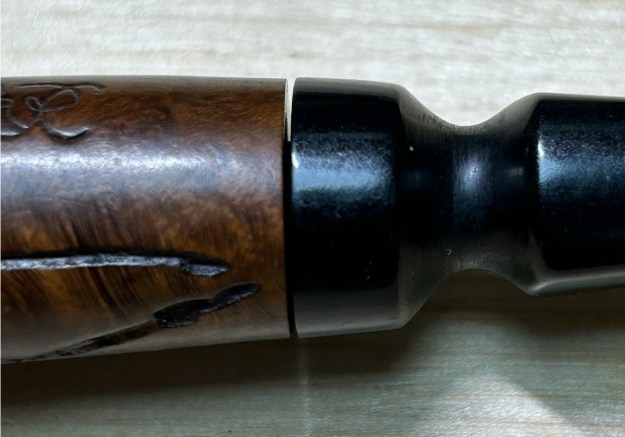
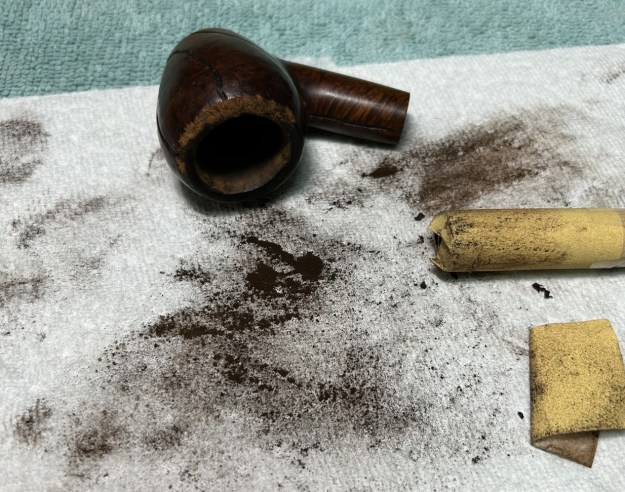
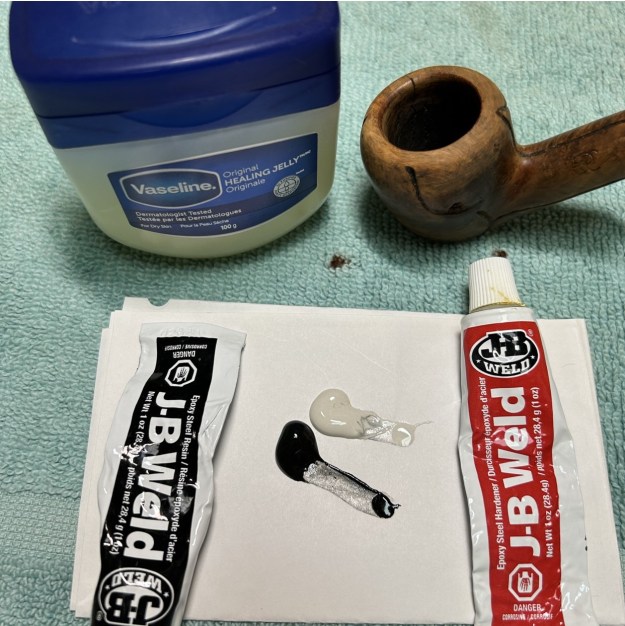
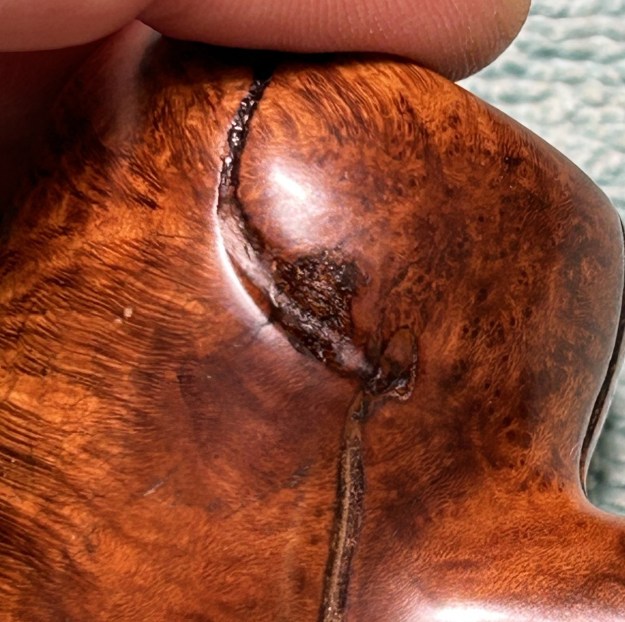
Now it was time to work on restoring this interesting Japanese Freehand. I decided to evaluate the damage to the front of the sandblast bowl. I wanted to know if it was the beginning of a burn out in the briar or if it had come from it having been set on a live coat in an ash tray. I examined the interior of the bowl and could find no obvious damage on the walls. I would know more once I had reamed and cleaned the bowl. I worked on the exterior of the finish with a brass bristle wire brush. I wanted to know if the damage was surface or only on the top of the finish. The brass brush revealed that it was not too deep. It appears that there was a flaw in the briar – a sandpit in blast. I circled the area with a red line in the second photo below.I filled in the sandpit with briar dust and clear CA glue. I used the brass bristle wire brush after the repair had cured to remove the excess repair and also rework the sandblast finish. It looks very good though there is some darkening around the spot. 
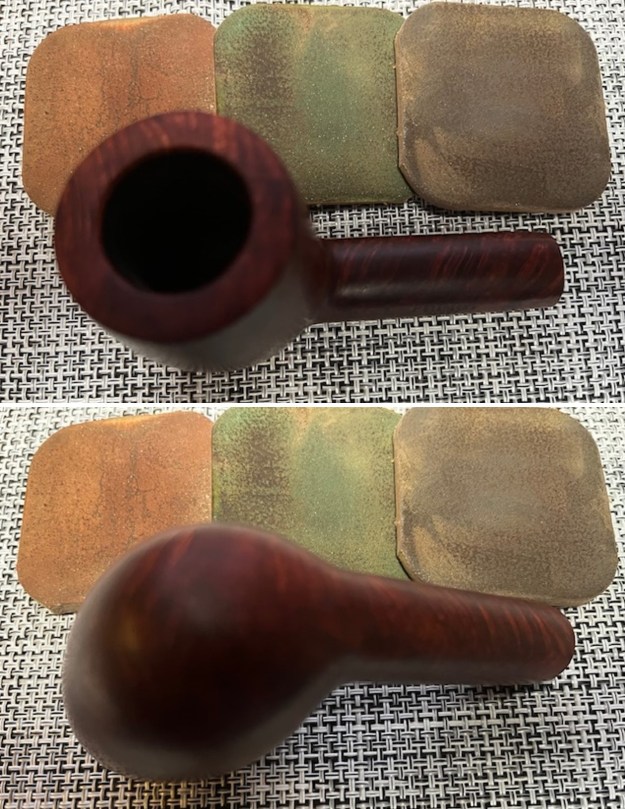
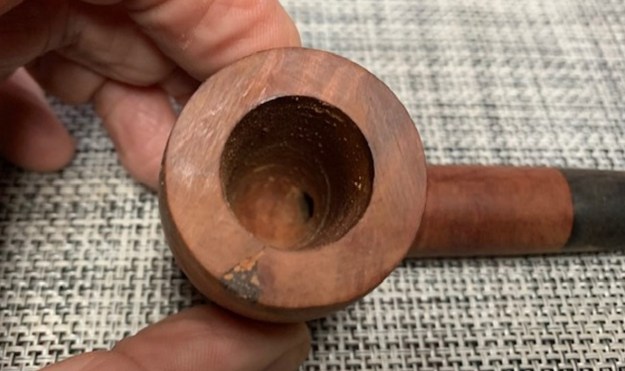
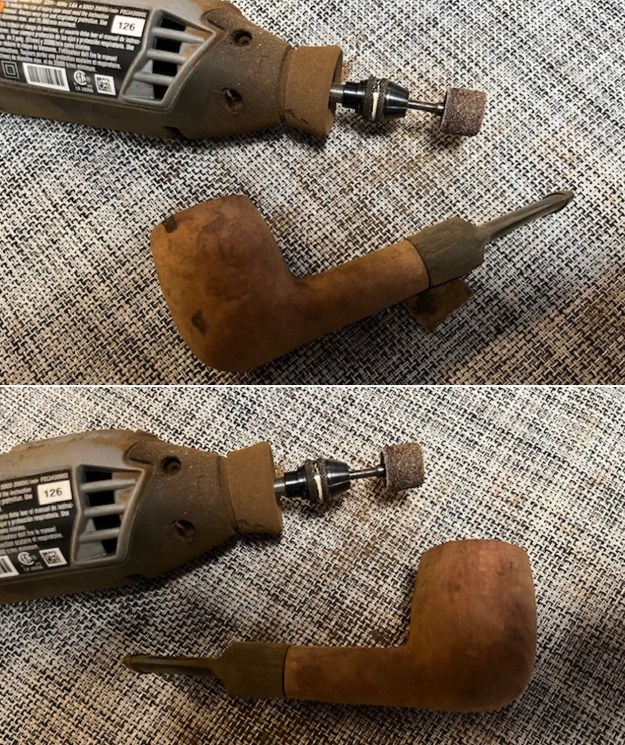
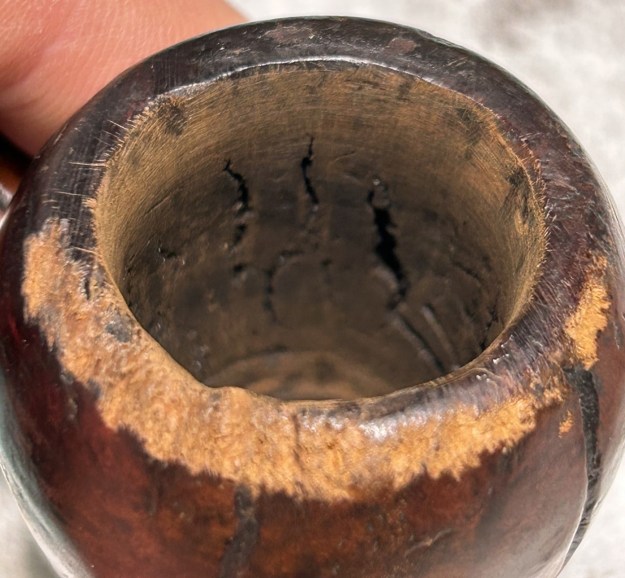
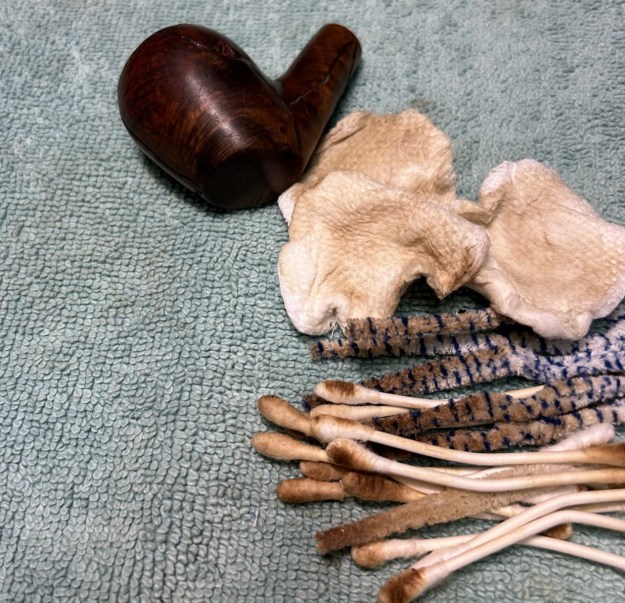
Once I knew that there was a sandpit/flaw and had repaired it I turned to more deeply examine the walls of the bowl to see if there were any checking or burns on the bowl walls or heel in the surrounding interior area behind the flaw. I reamed the bowl with a PipNet piper reamer to remove the thick cake on the walls. I cleaned up the reaming with a Savinelli Fitsall Pipe knife to remove the remaining cake on the walls. I sanded the bowl walls with 220 grit sandpaper wrapped around a dowel. I wiped the bowl out with a damp cloth to remove the dust and debris. I examined the bowl walls and they were smooth and wihtout checking or burn damage on the wall behind the mark on the outside of the bowl. 
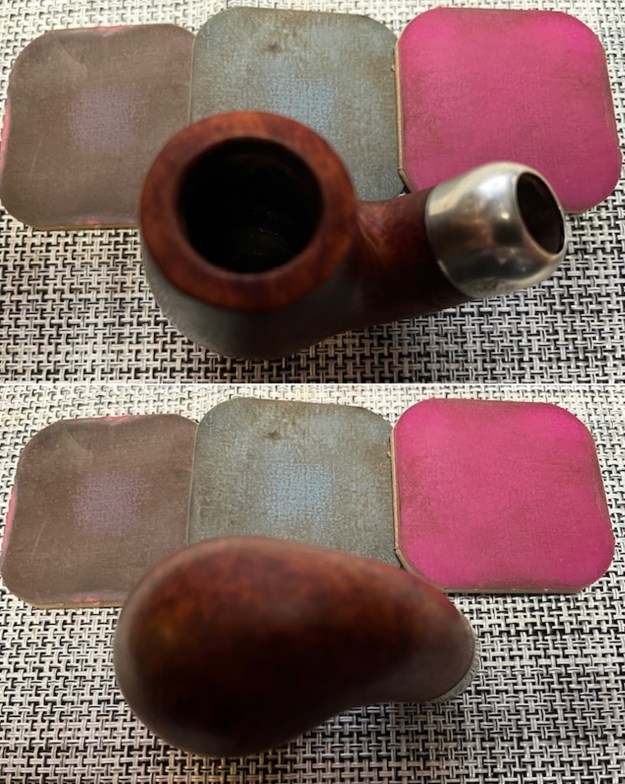
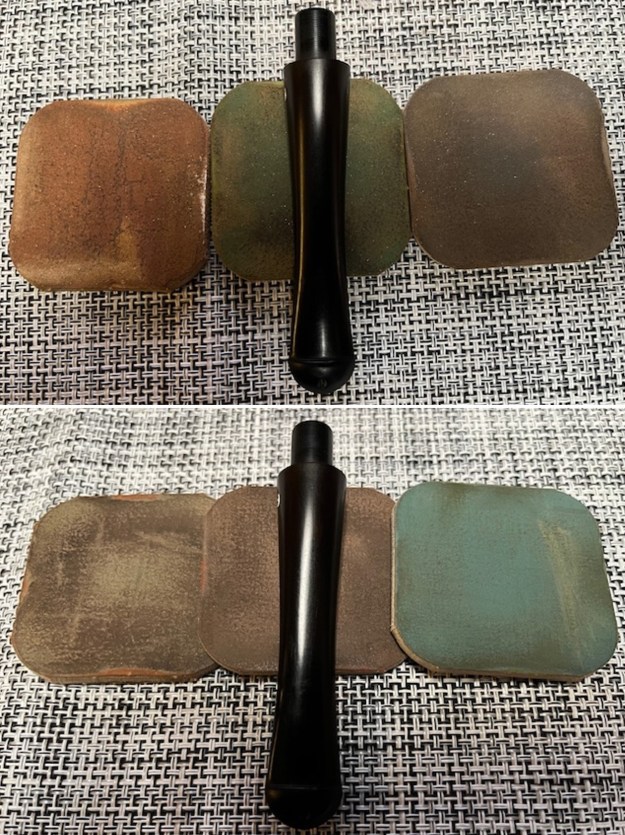
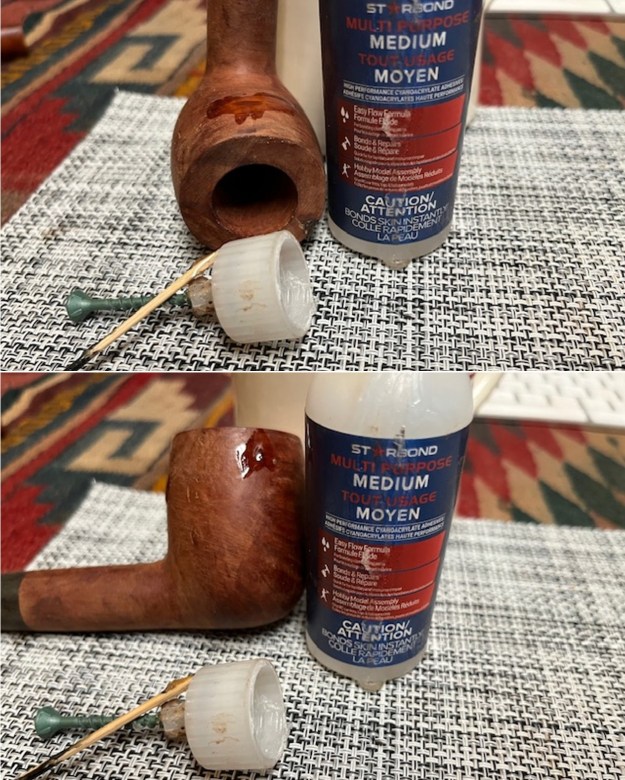
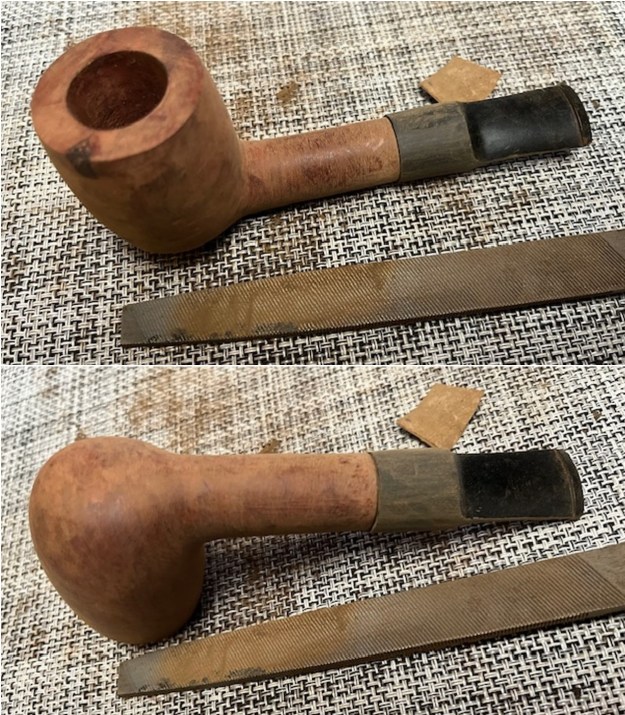
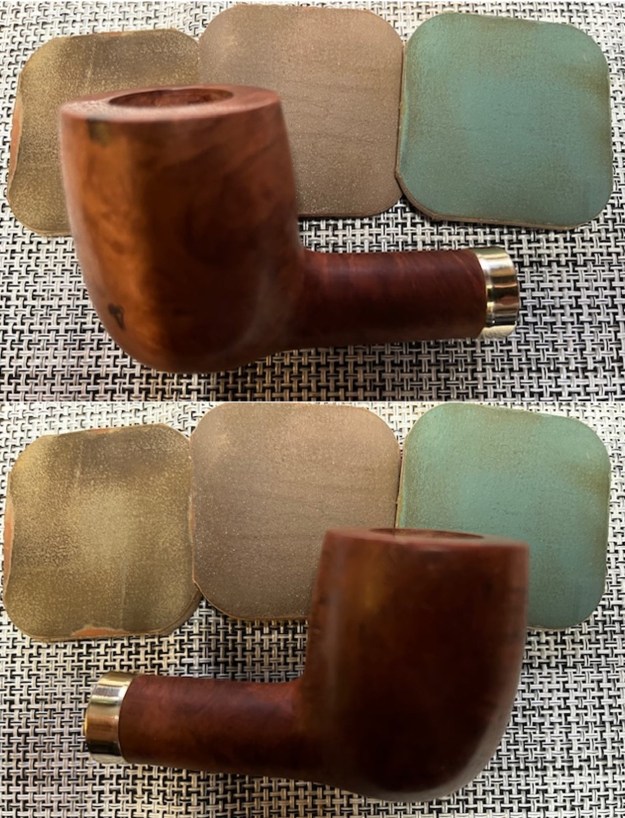
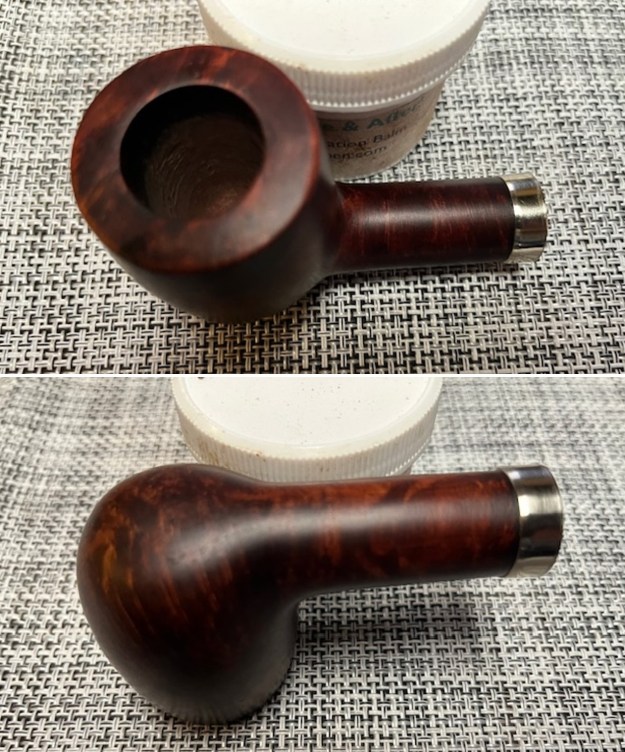
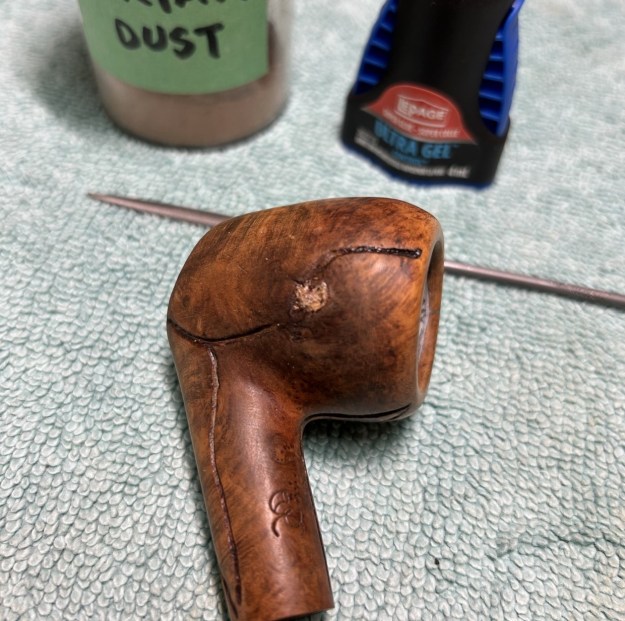
I cleaned up the darkening and the burn damage to the rim edge and the top with a folded piece of 220 grit sandpaper. Once I had finished it looked much better.
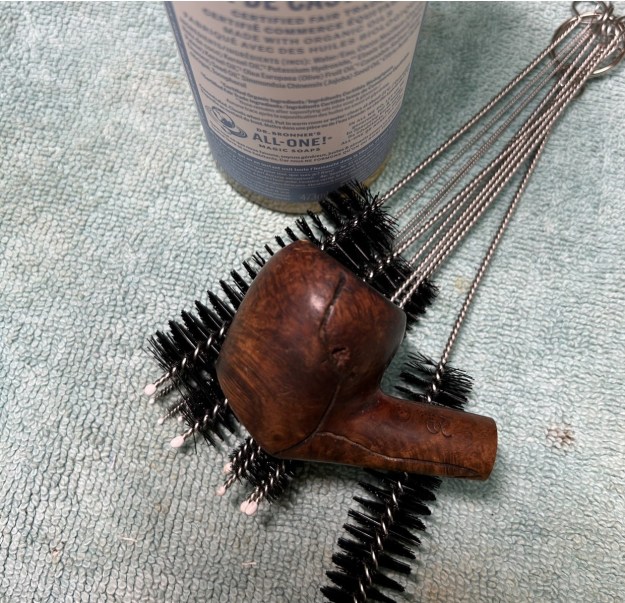
I scrubbed the exterior of the bowl with a tooth brush and undiluted Murphy’s Oil Soap and warm water to remove the grime in the sandblast finish. When I cleaned it the shank extension was loose but the pipe looked much better. 
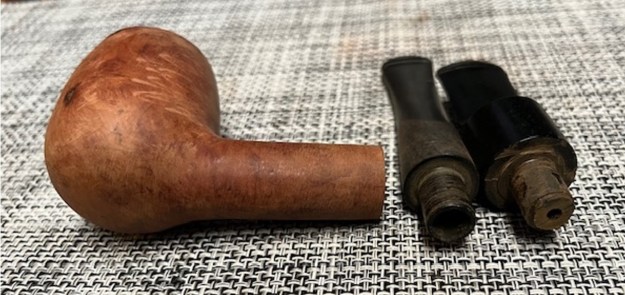
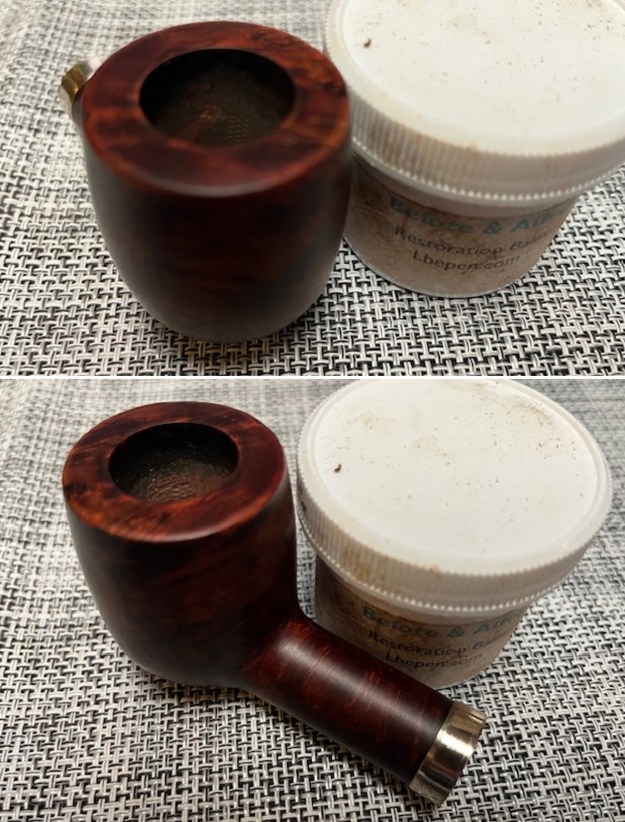
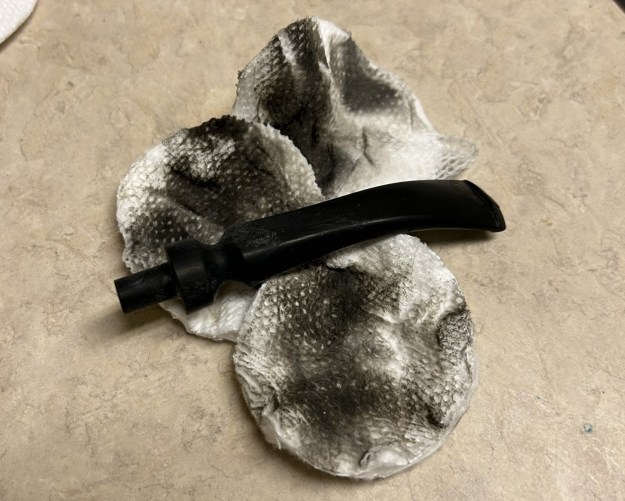
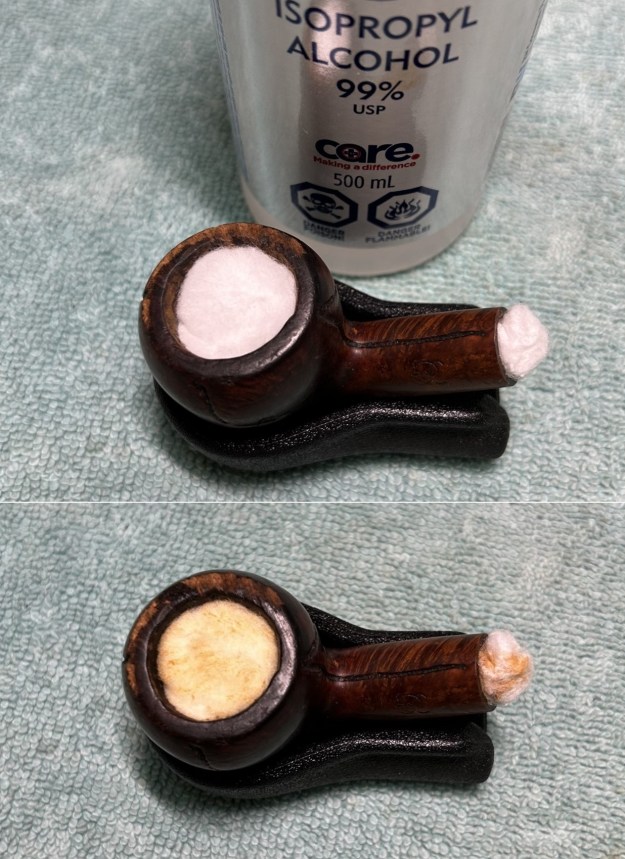
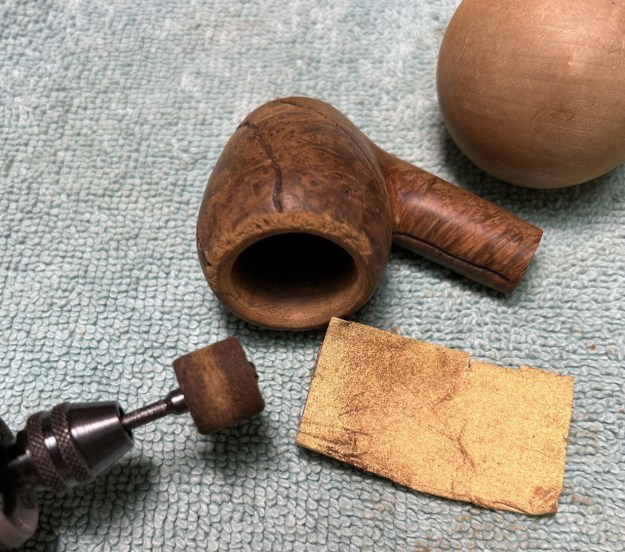
I cleaned out the inside of the shank extension, shank and the stem with pipe cleaners, cotton swabs and 99% isopropyl alcohol. It was really filthy so with a bit of work the pipe smelled much better.
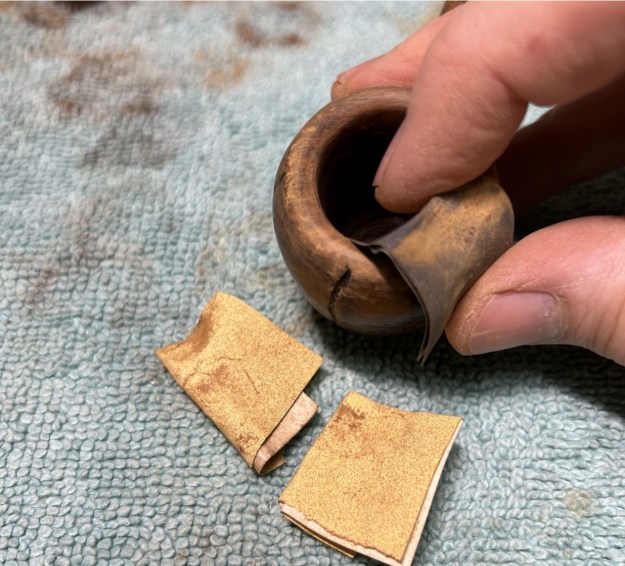
I reglued the shank extension to the shank with Weld Bond all purpose glue. I applied it to both smooth ends of the shank and extension with a tooth pick and pressed it onto the tube that held it in place on the shank. I aligned the sharp edge of the extension with the sharp edges of the shank and press it in place until the glue cured. 
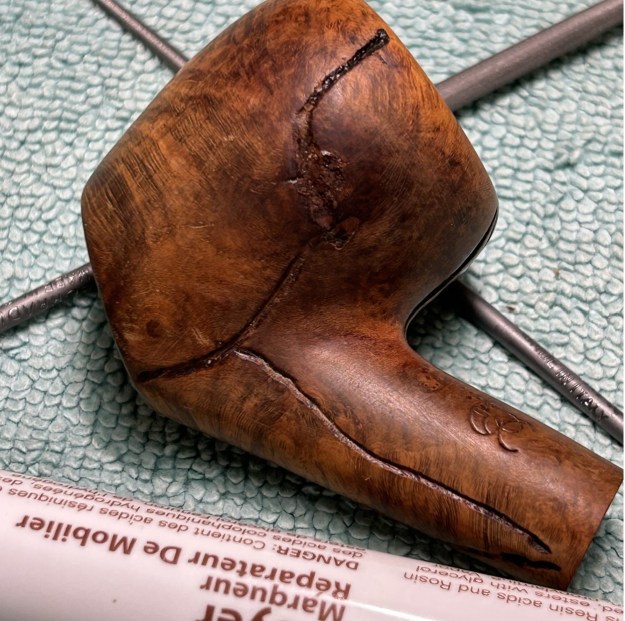
I stained the bowl with a light brown aniline stain to blend in the burn marks on the exterior of the front lower sandblast bowl. I felt that it would blend in the damaged area with the rest of the sandblast on the bowl. I applied it with a dauber and then flamed it to set it in the finish. 
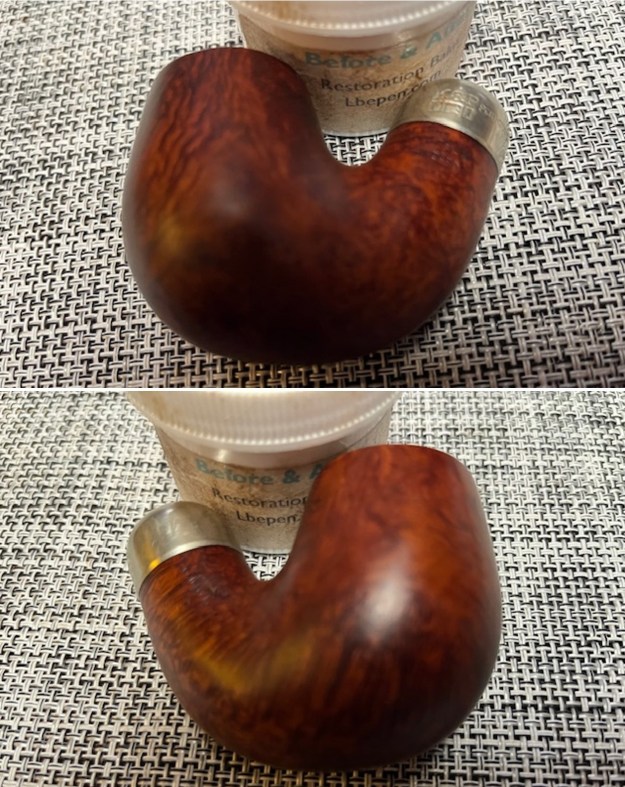
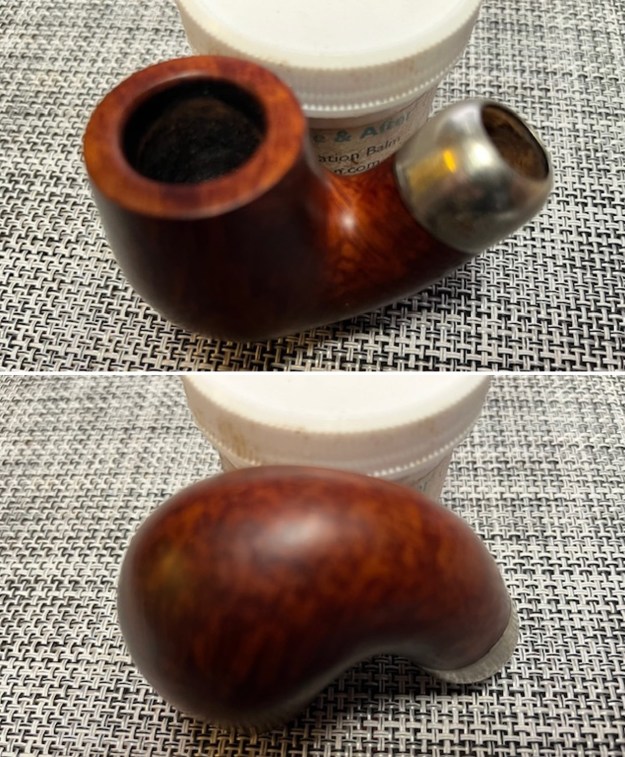
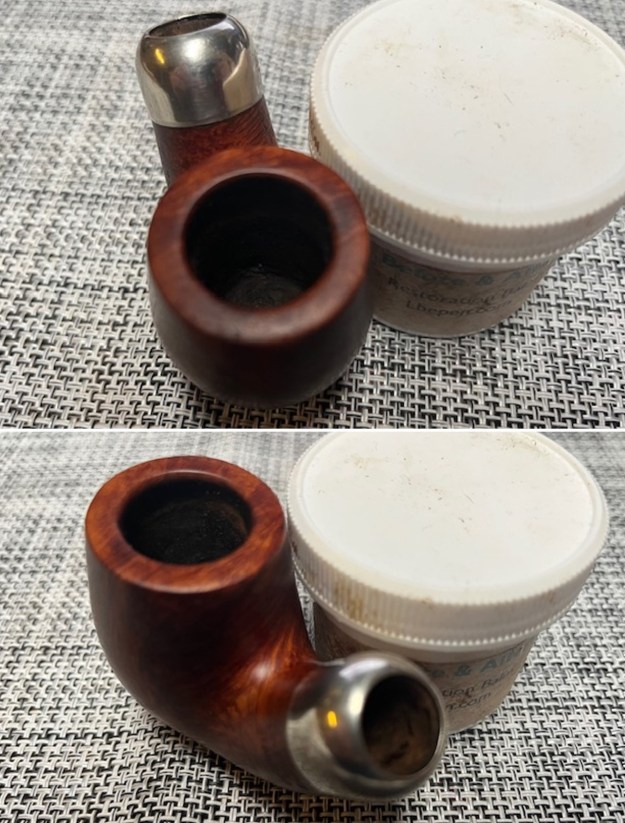
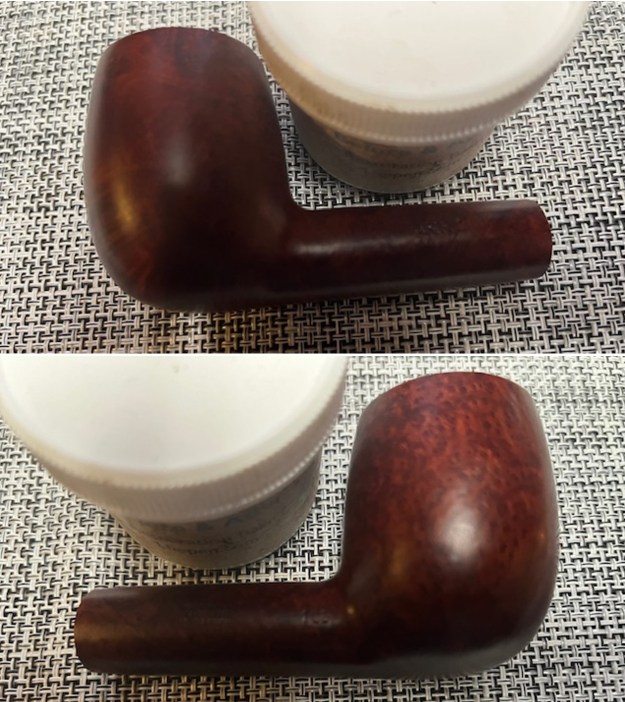
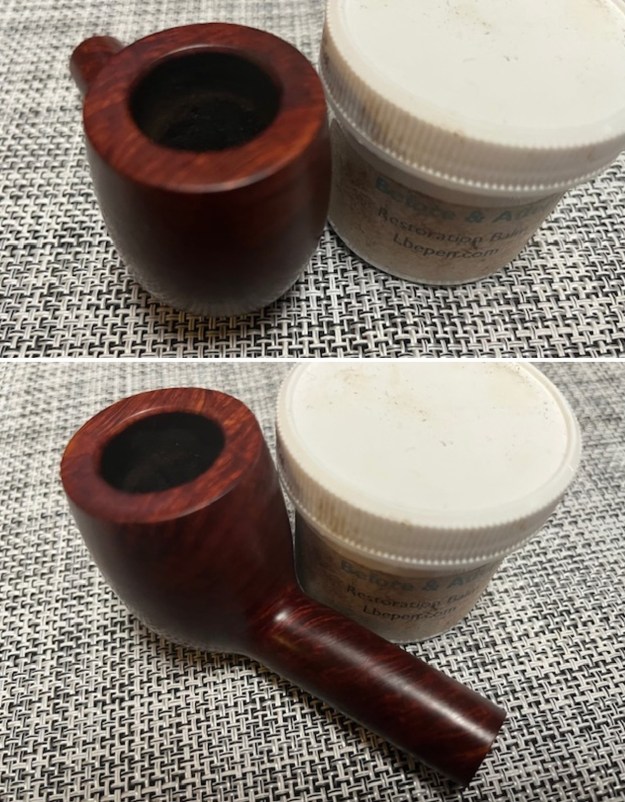
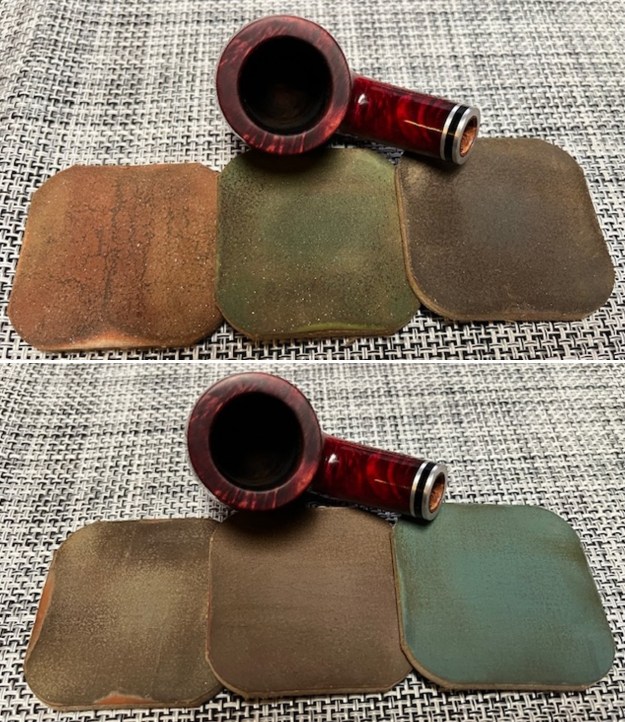
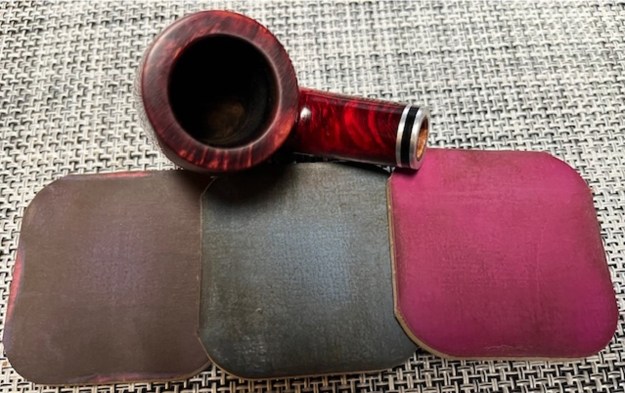
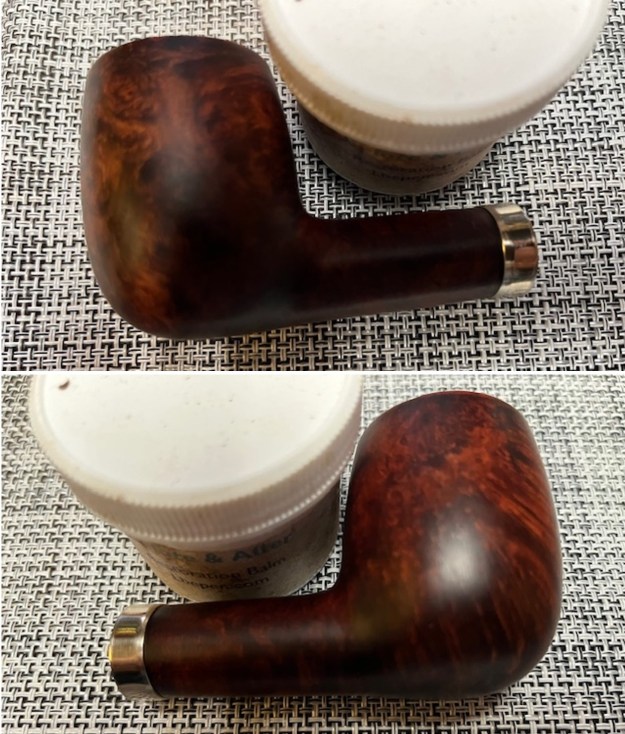
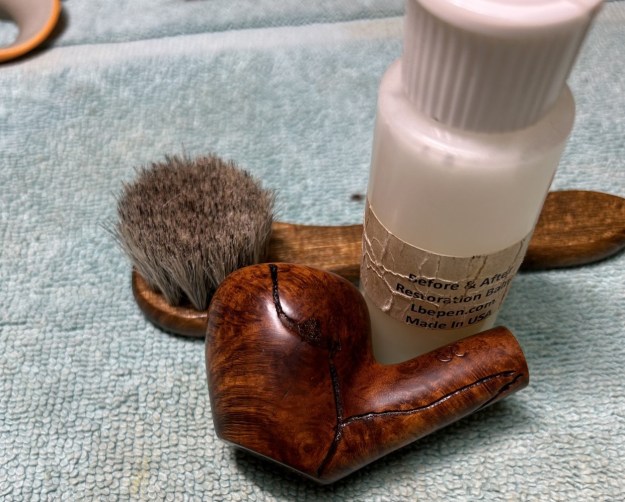
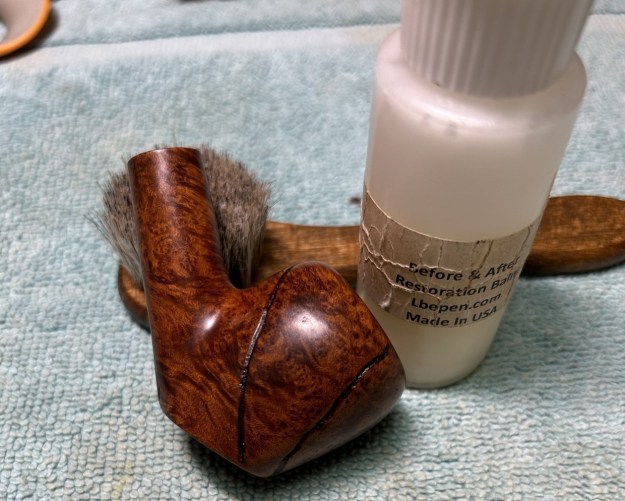
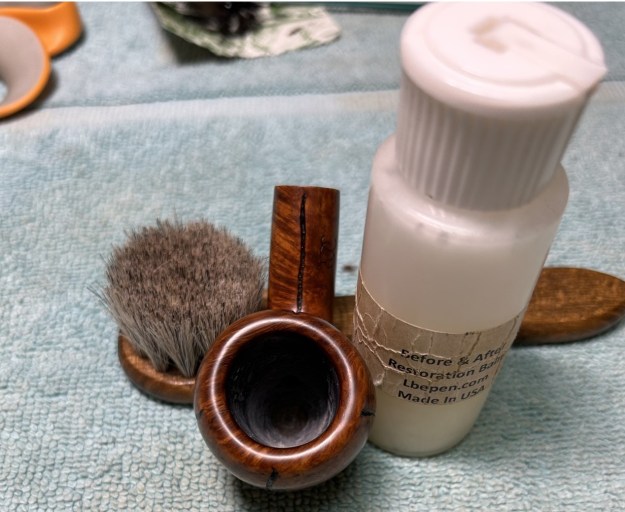
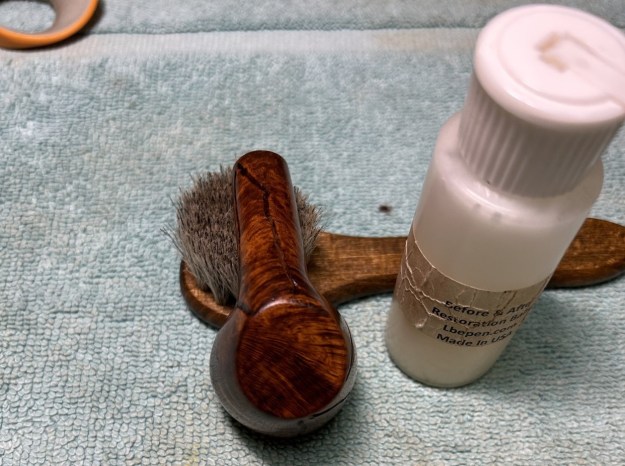
Once the stain had cured I worked some Before & After Restoration Balm into the briar with my fingertips and a horsehair shoe brush. I wanted to make sure that it was in the deep grooves of the sandblast. I also worked it into the smooth shank extension with my fingertips. I let it sit and do its magic for 15 minutes then buffed it off with a soft cotton cloth. The pipe looked much better and the burn marks were blended into the surface with the stem. 
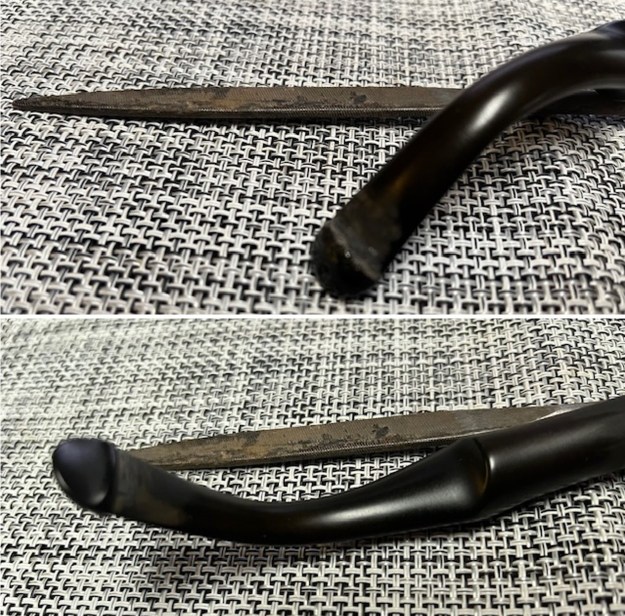
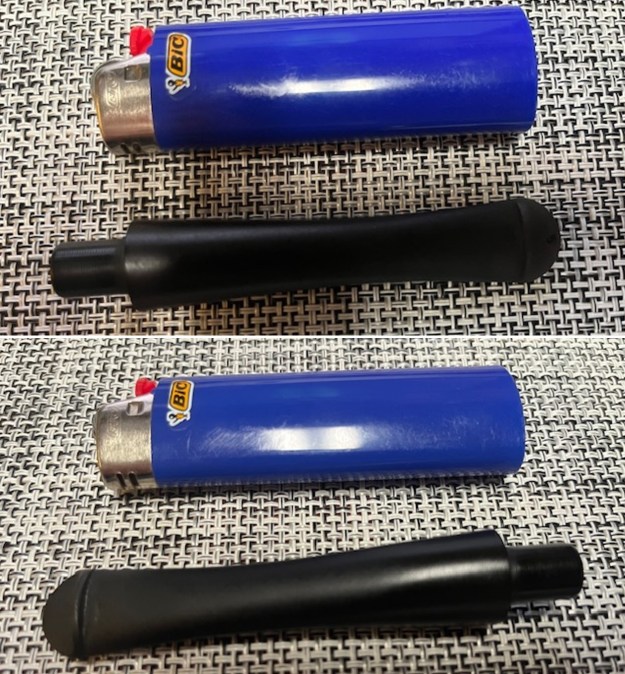
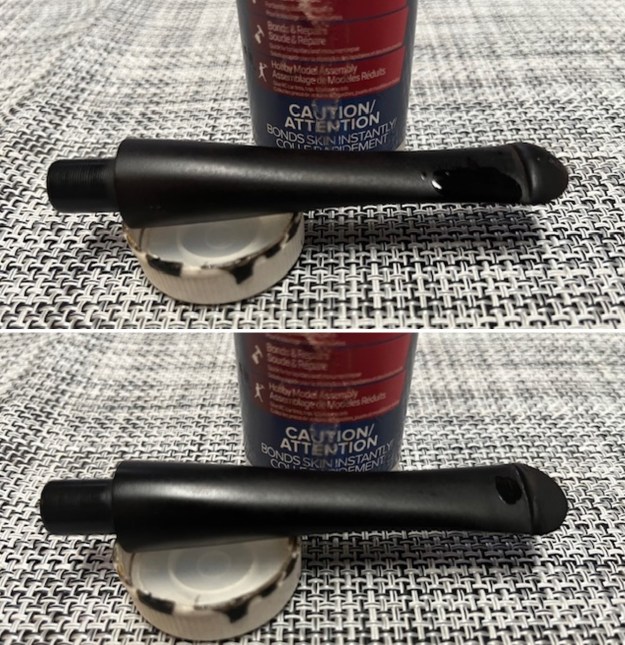
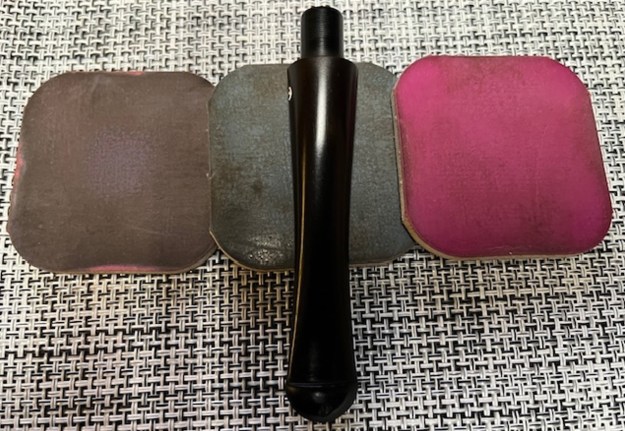
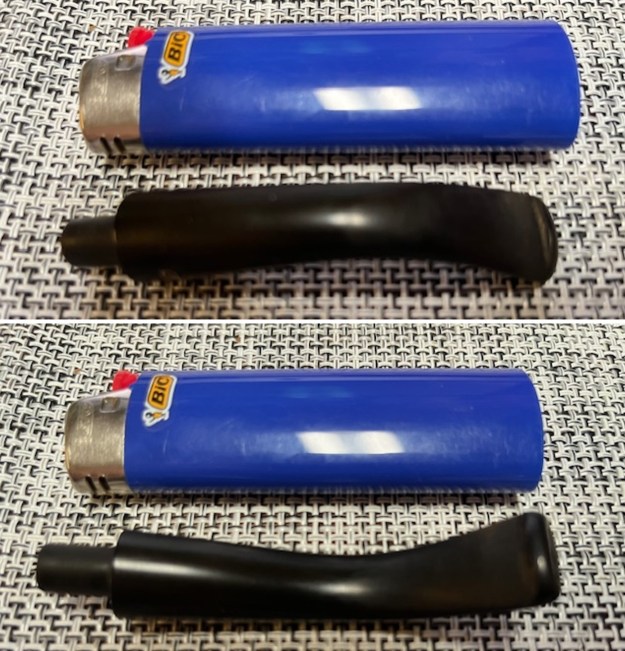
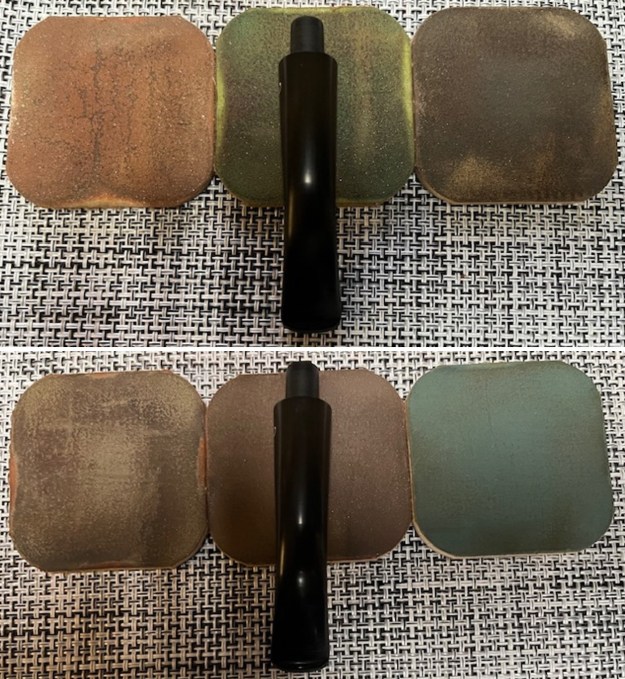
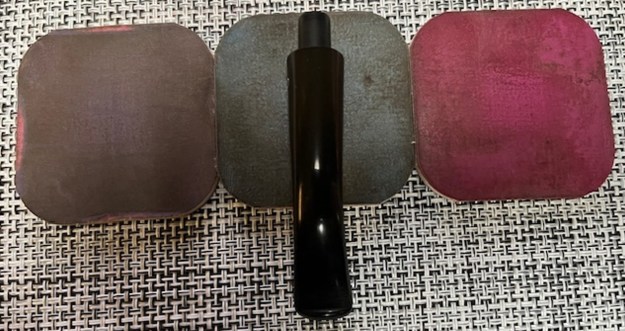
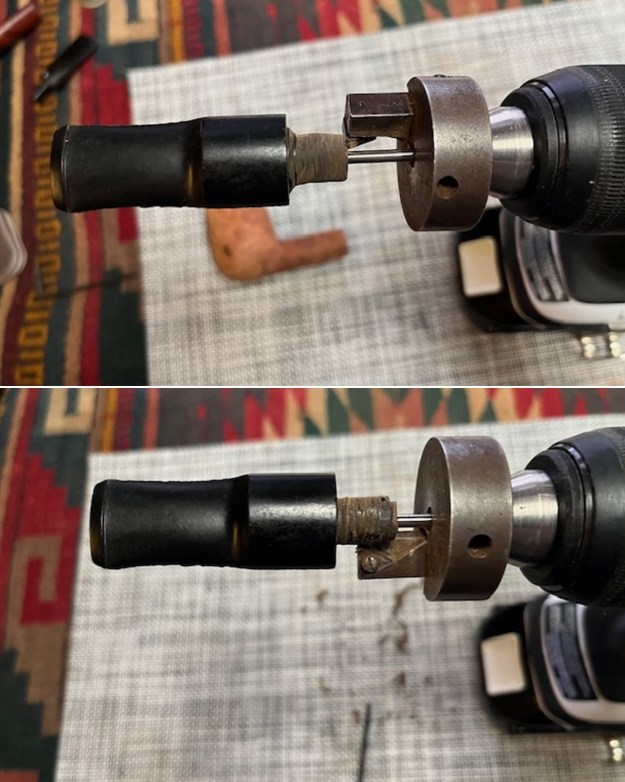
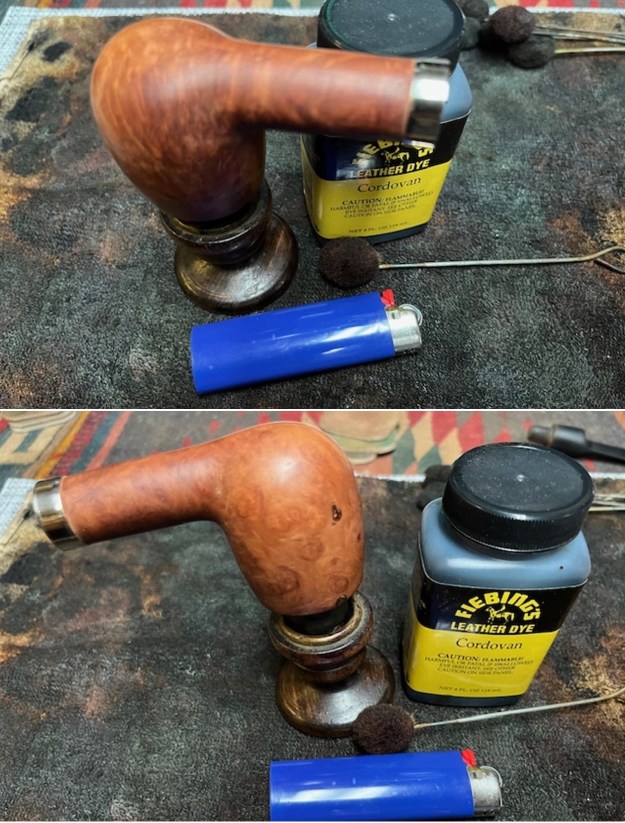
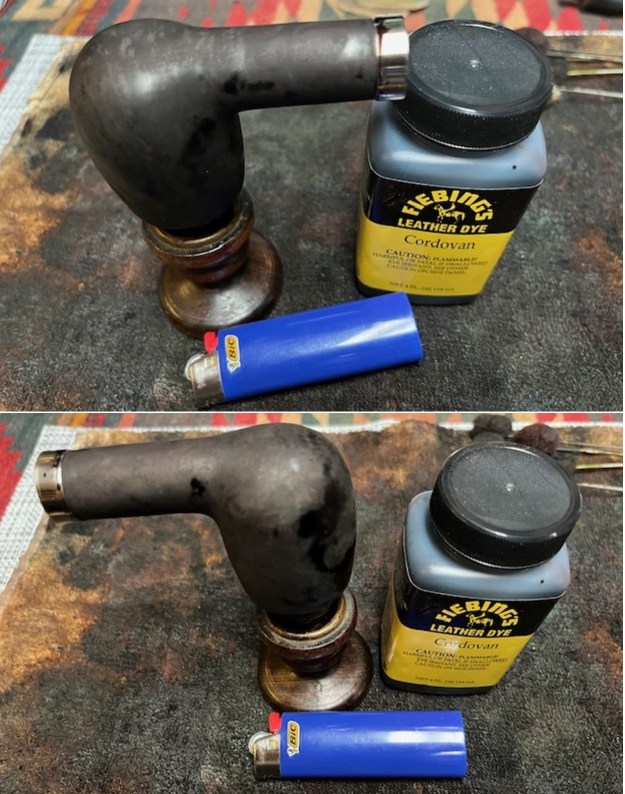
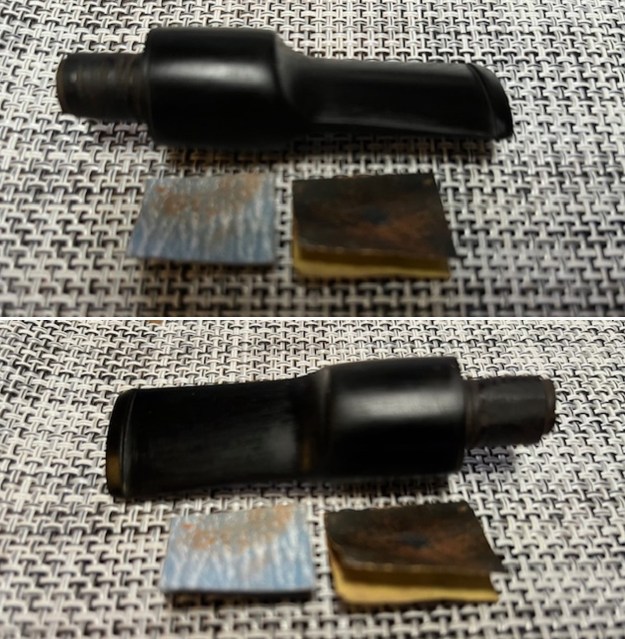
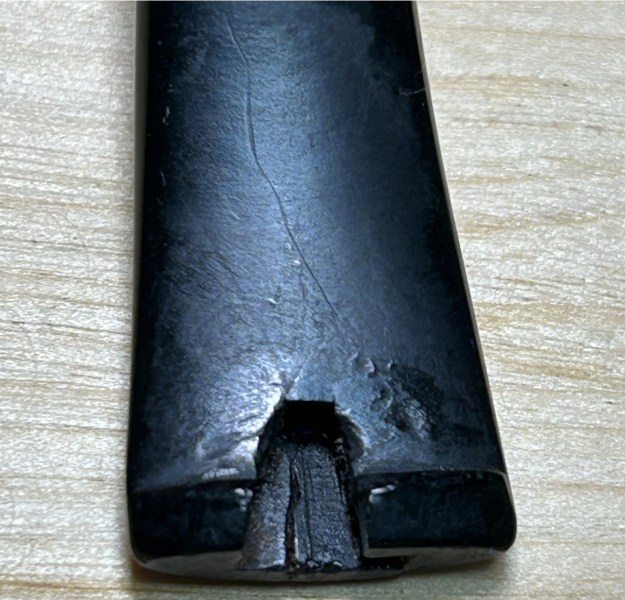
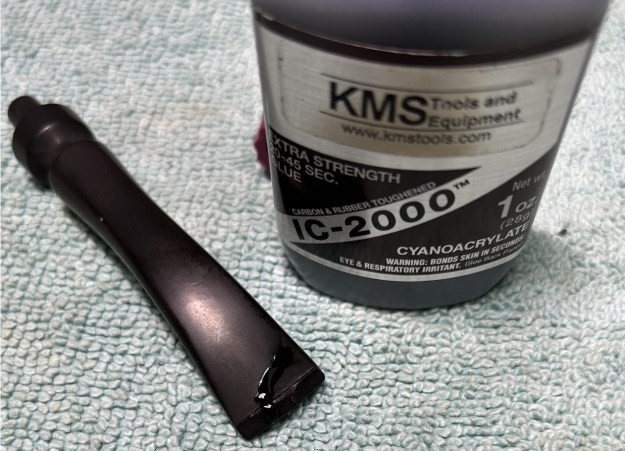
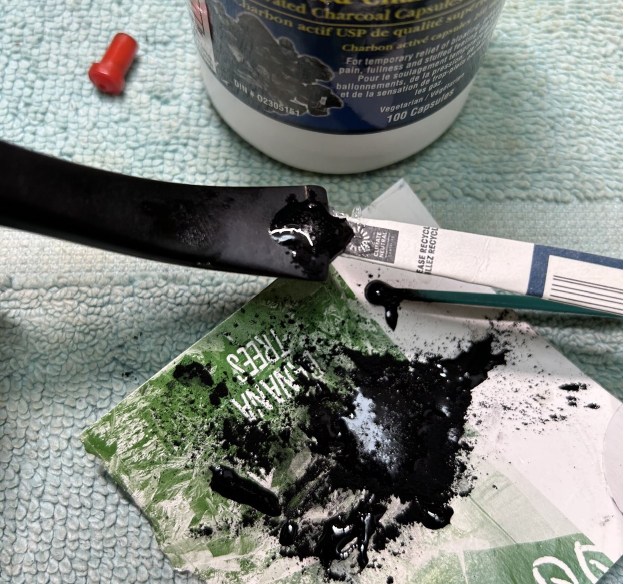
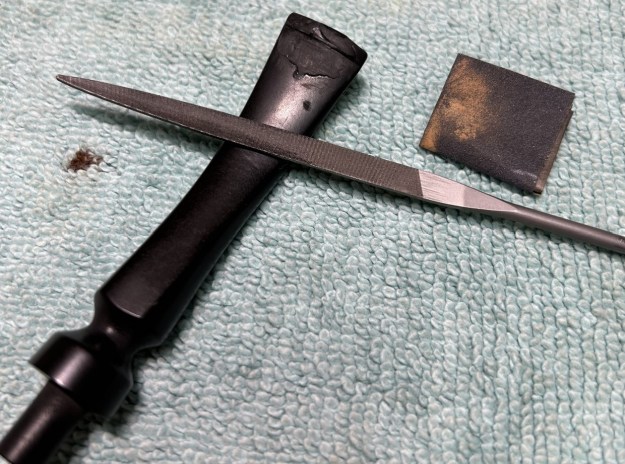
I set the bowl aside and “painted” the stem surface with the flame of a “Bic” lighter to lift the tooth marks. I was able to raise them some but not completely. I filled in the remaining marks on the button edge and the surface with black CA glue. Once it cured, I used a file to shape the button edge and also smooth out the fill. I sanded the remaining marks with 220 grit sandpaper to blend them into the surface of the surrounding vulcanite. I started polishing the stem surface with 600 grit wet dry sandpaper. 
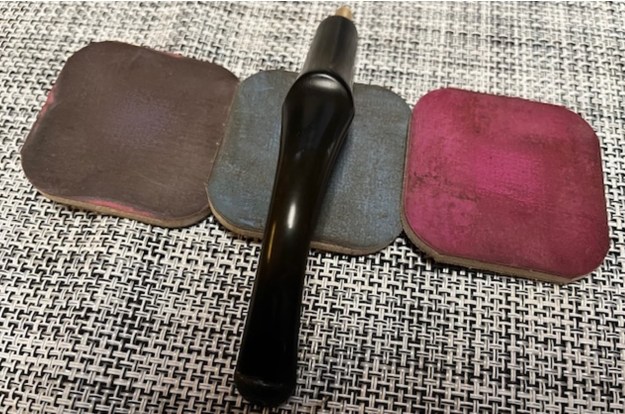
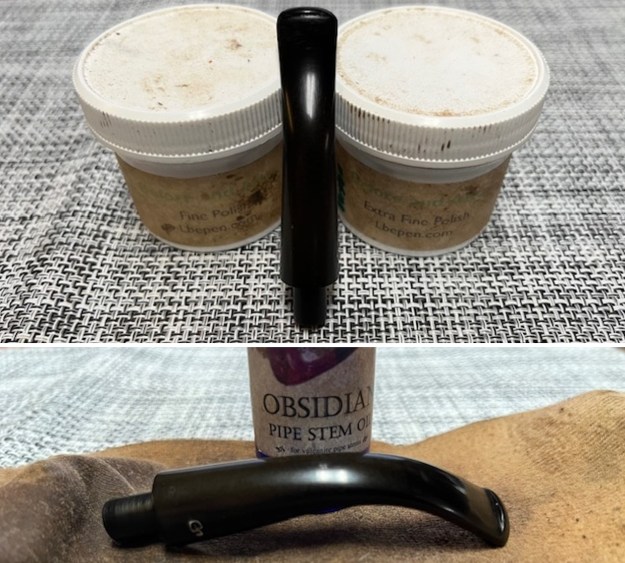
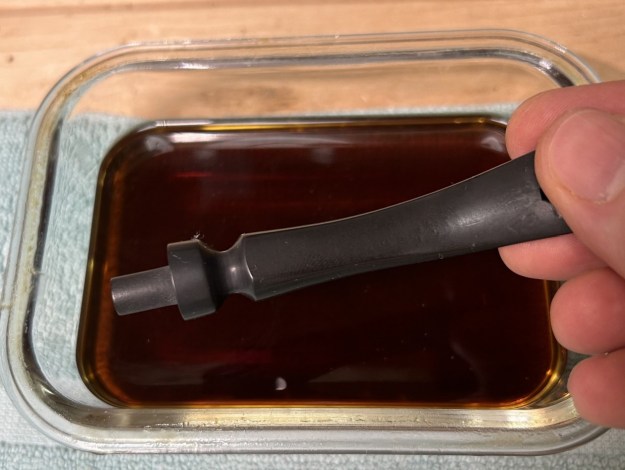
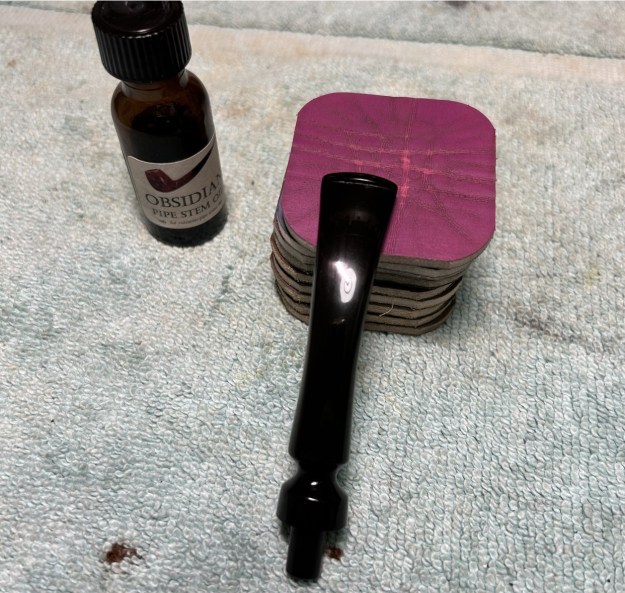
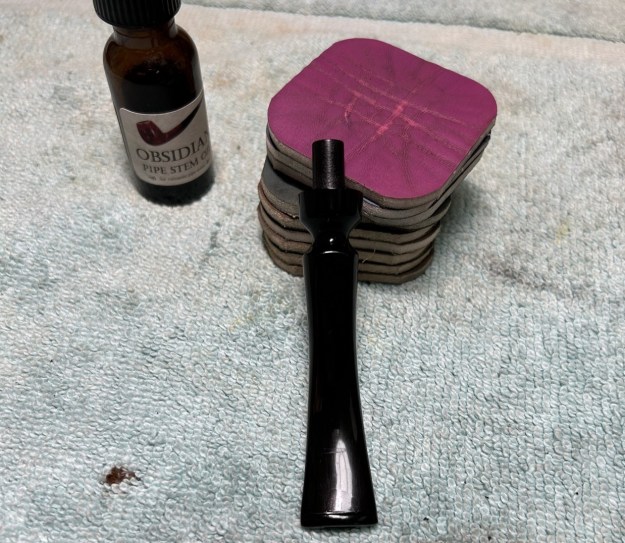
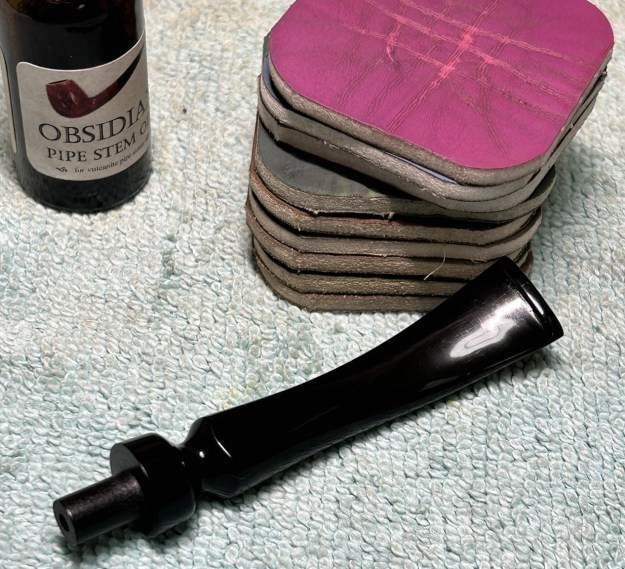
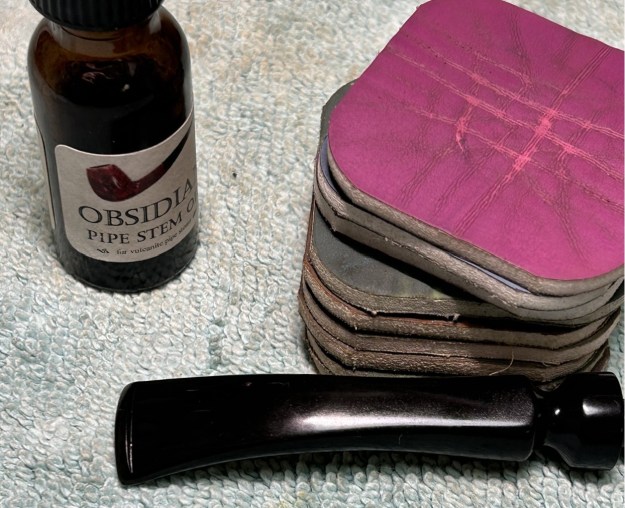
I polished the stem with micromesh sanding pads – wet sanding with 1500-12000 grit sanding pads. I wiped it down after each sanding pad with Obsidian Oil. 
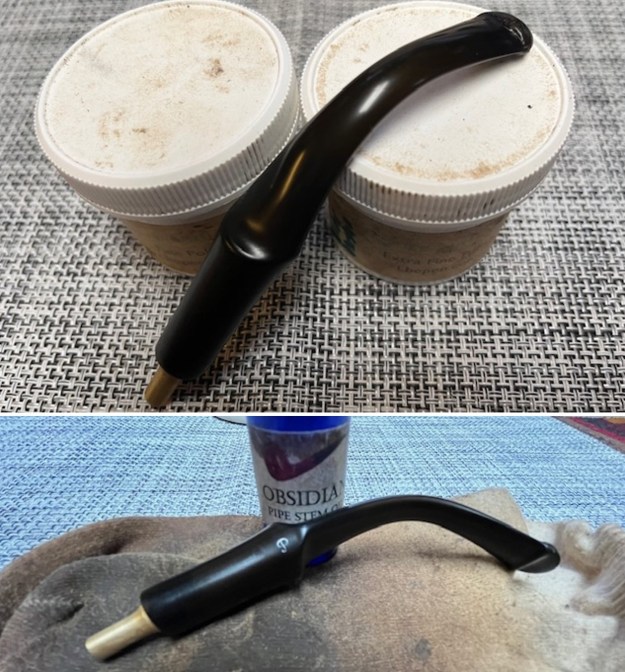
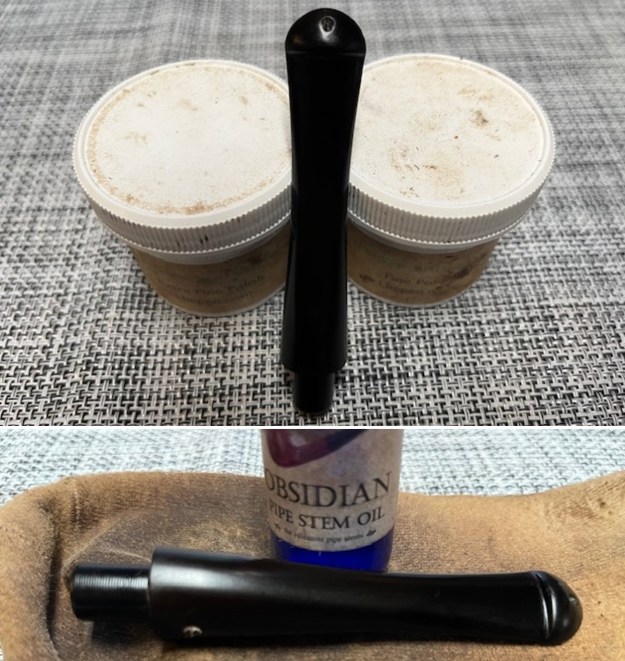
I finished polishing it with Before & After Pipe Stem Polish – both Fine and Extra Fine and buffed it off with a cotton cloth. I gave it a coat of Obsidian Oil to preserve and protect the stem. 
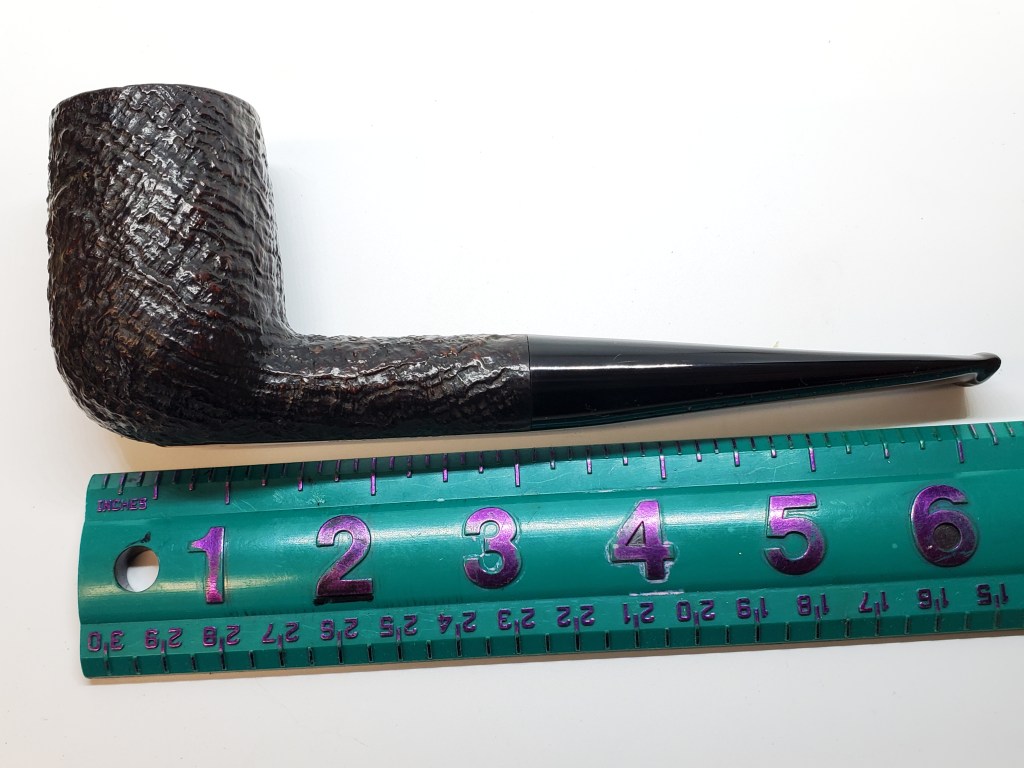
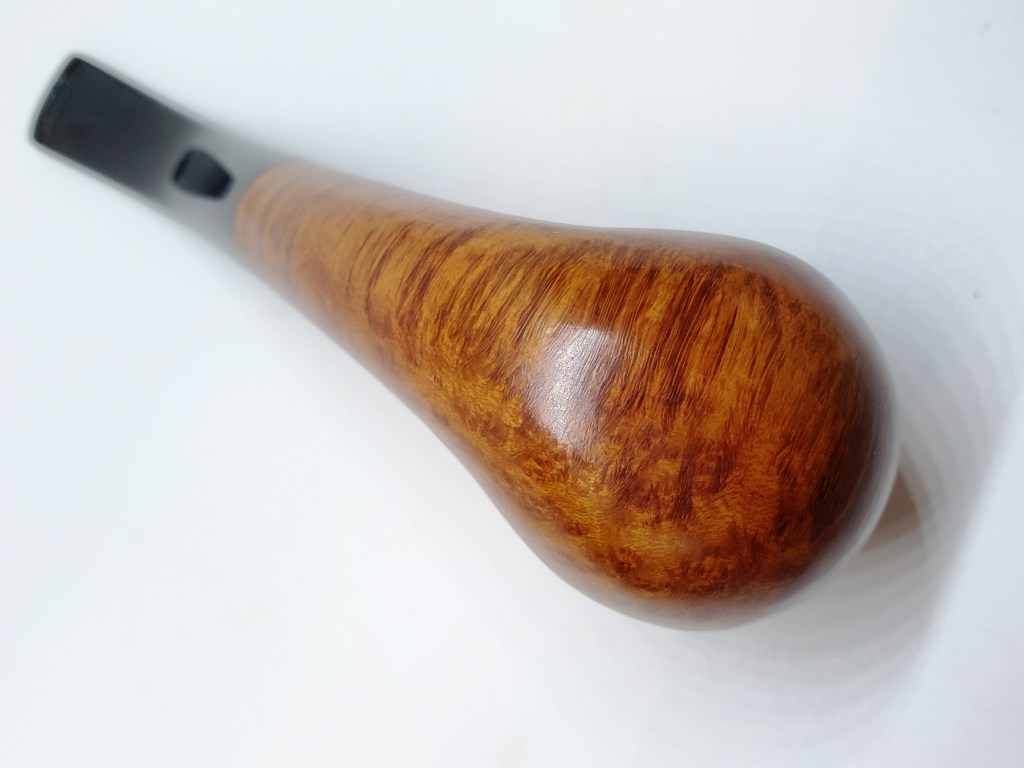
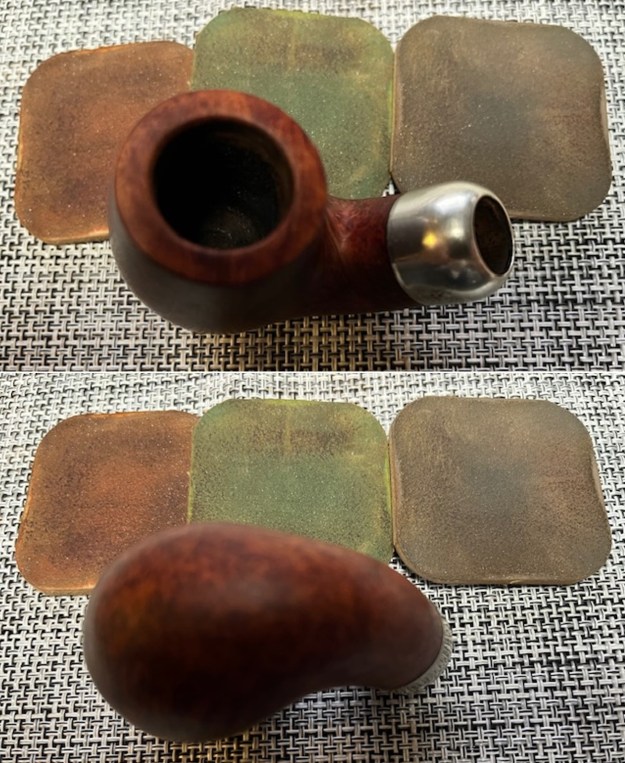
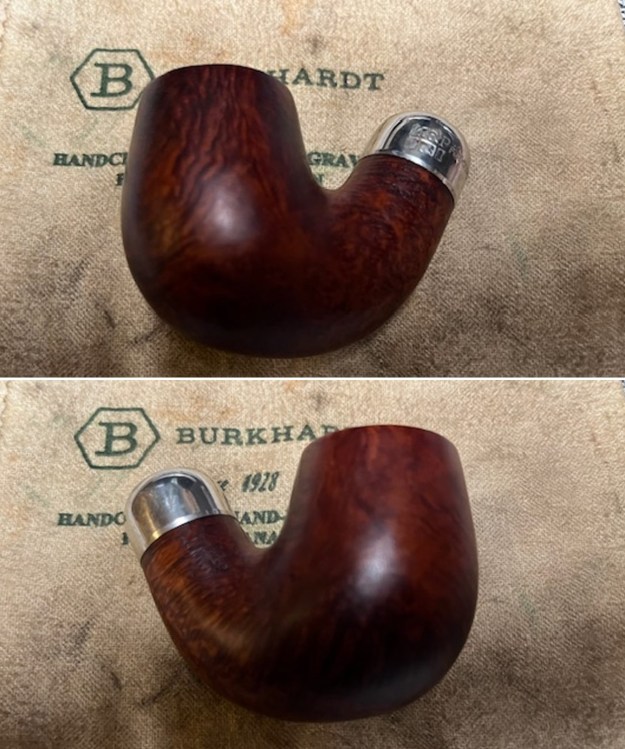
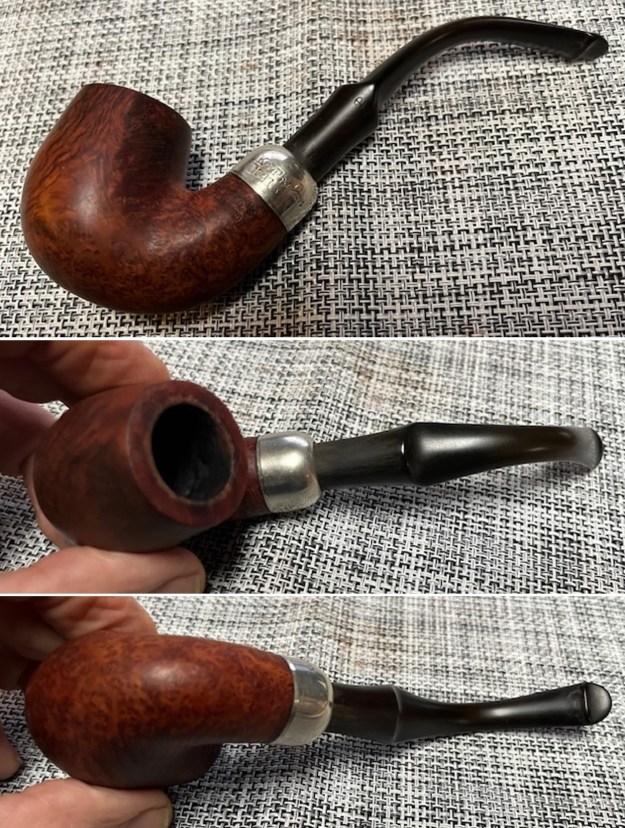
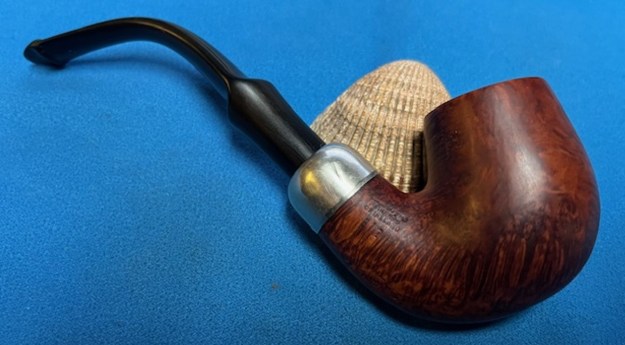
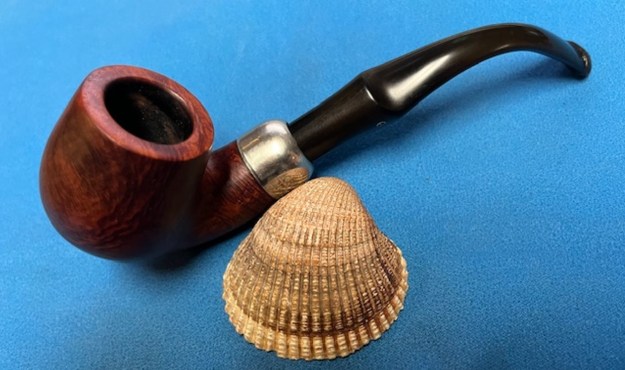
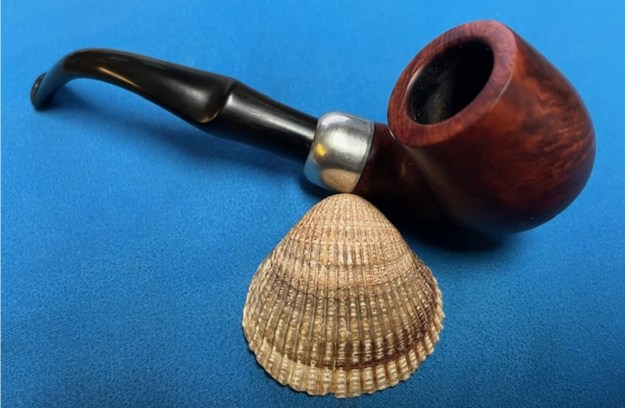
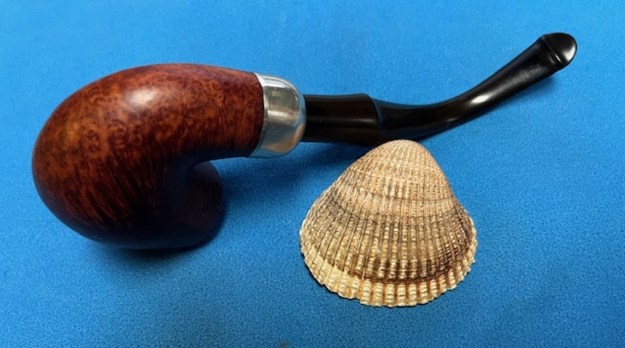
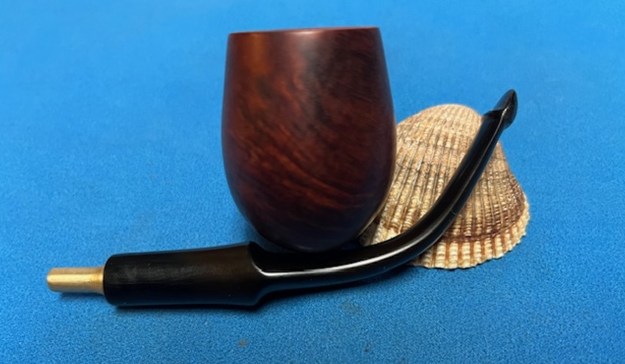
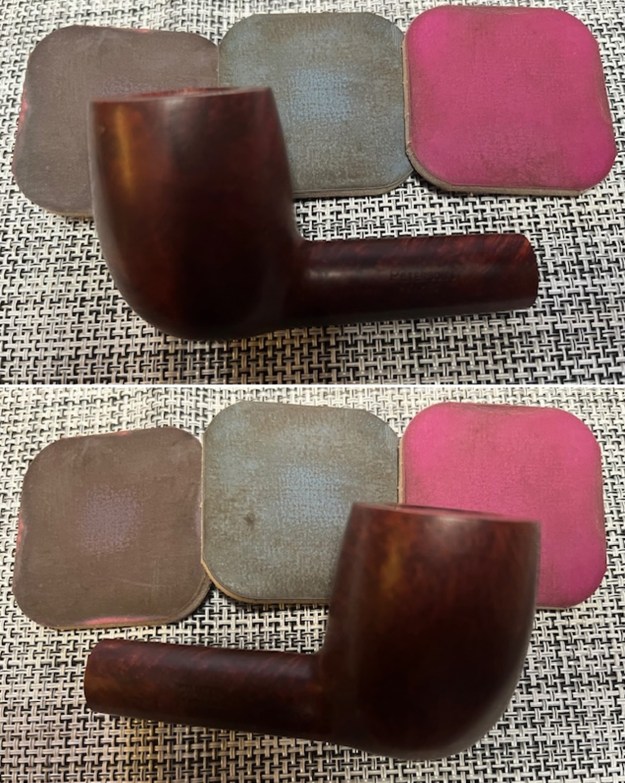
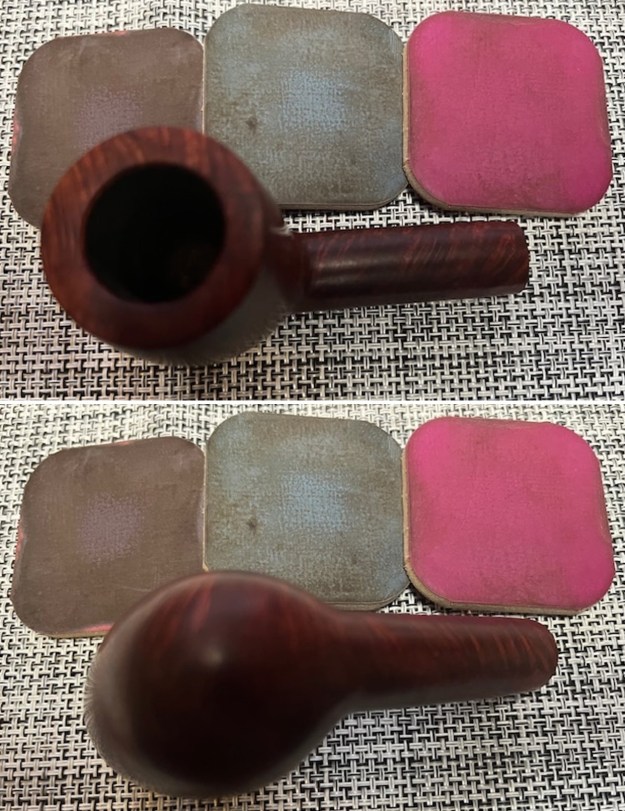
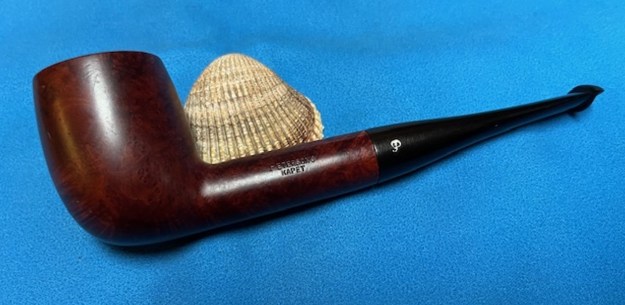
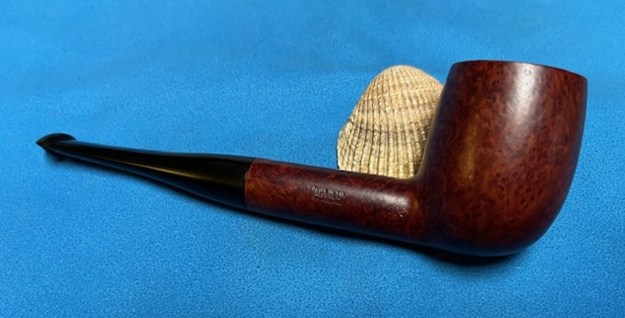
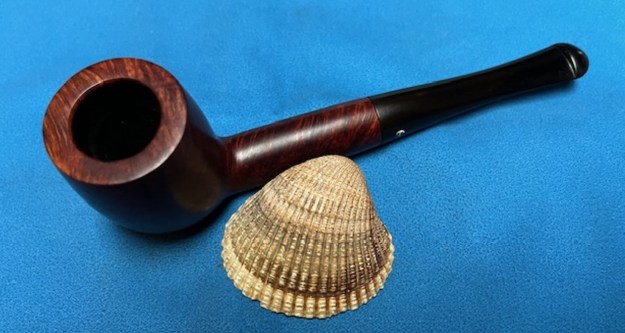
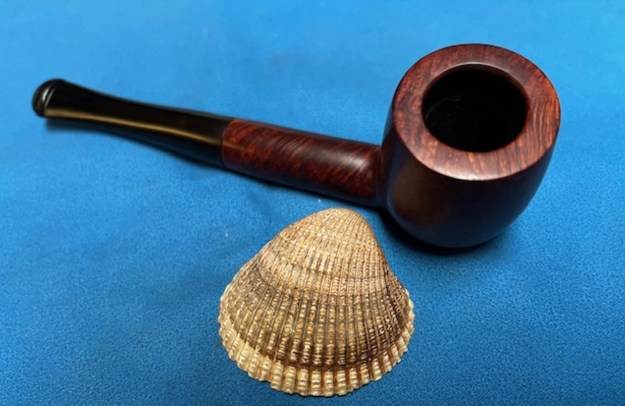
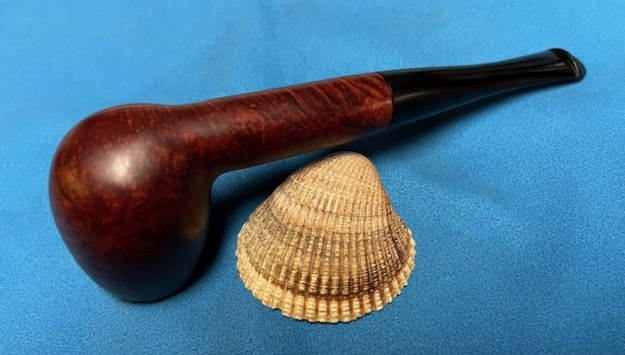
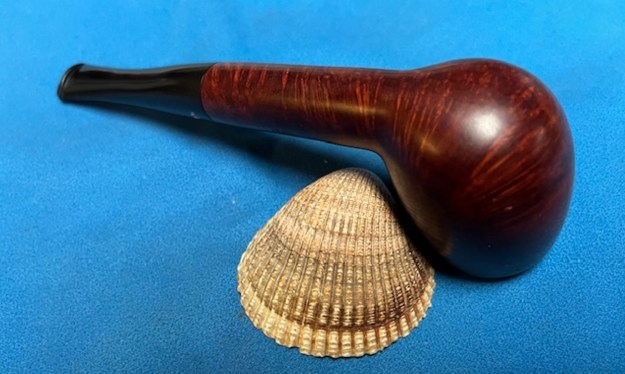
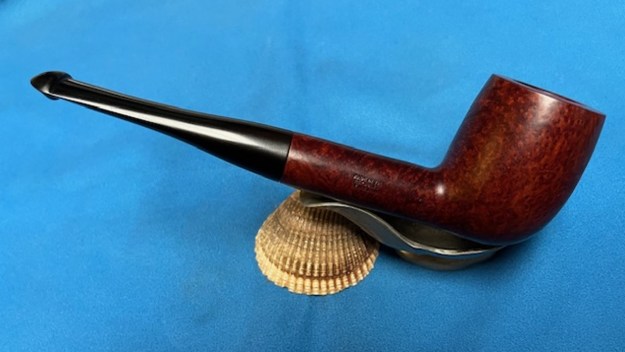
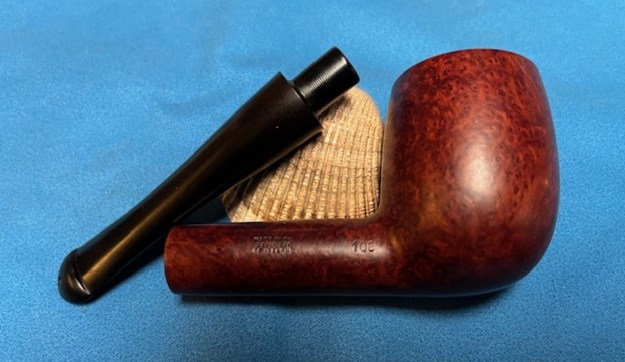
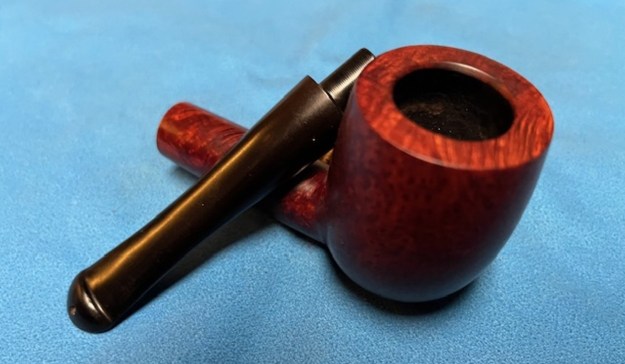
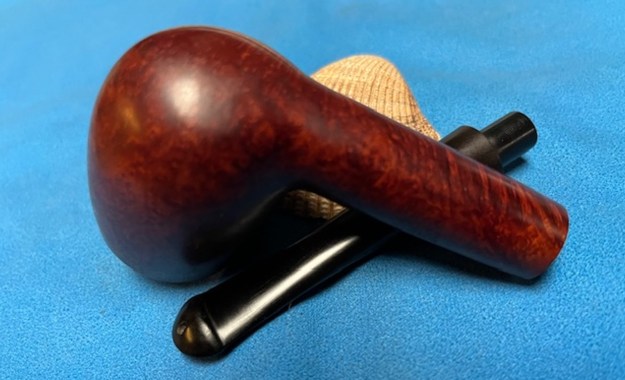
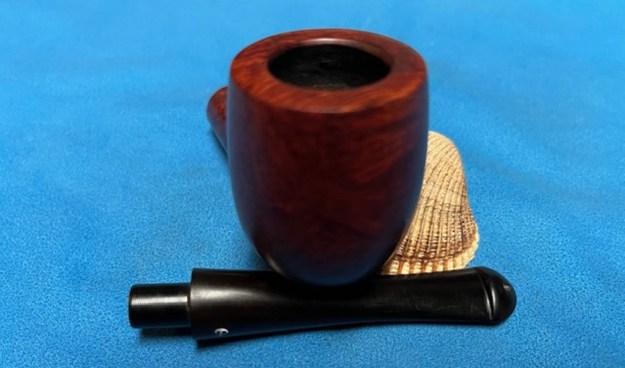
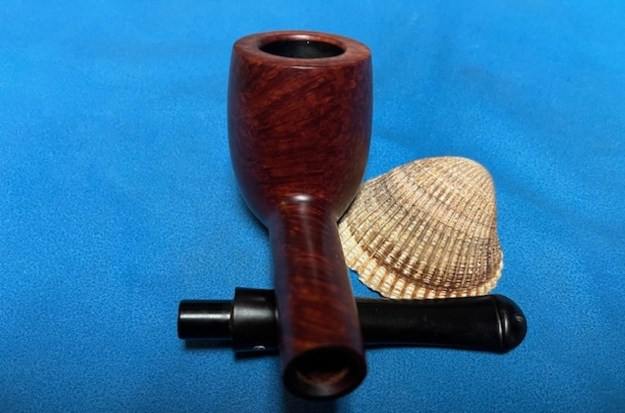
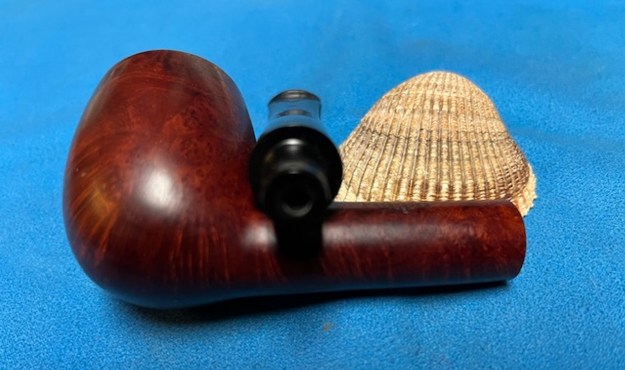
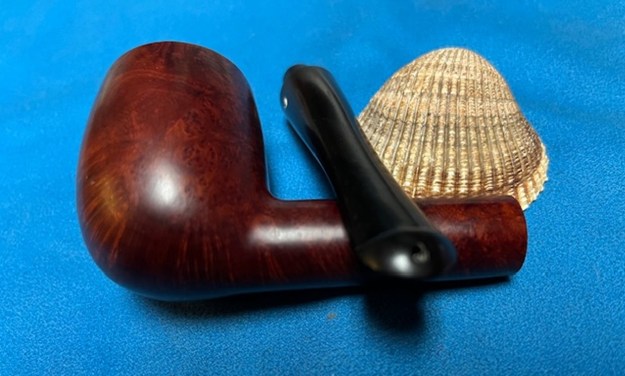
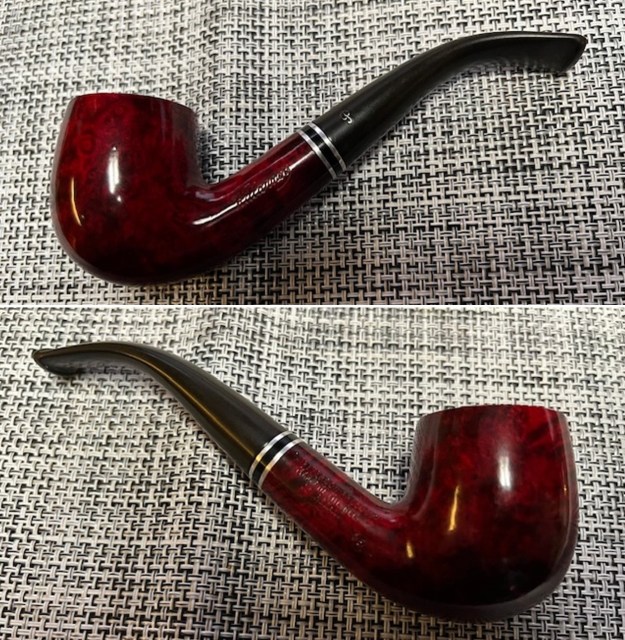
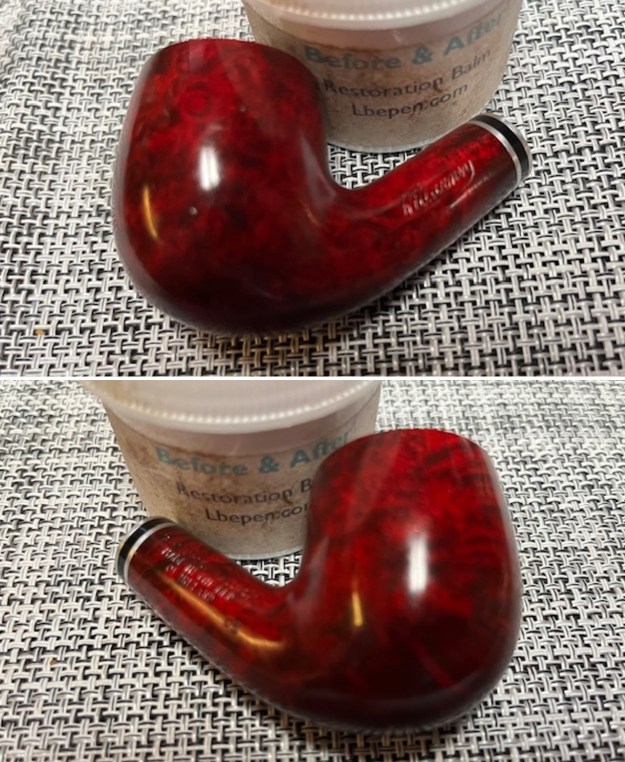
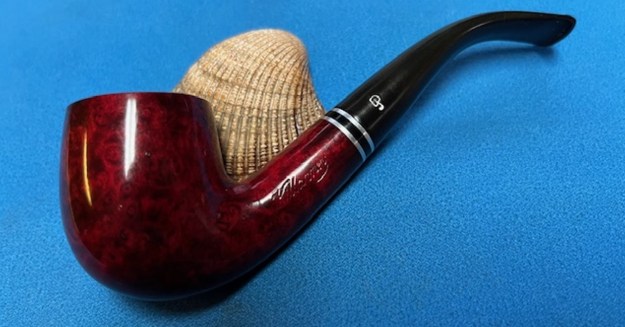
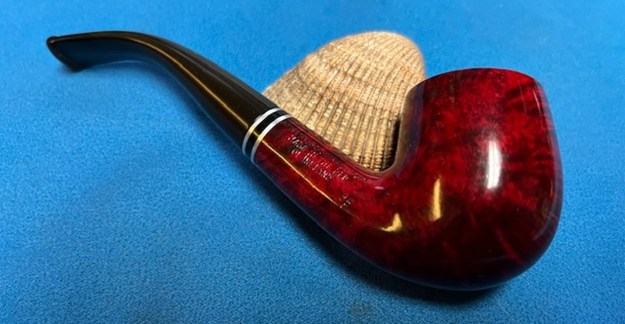
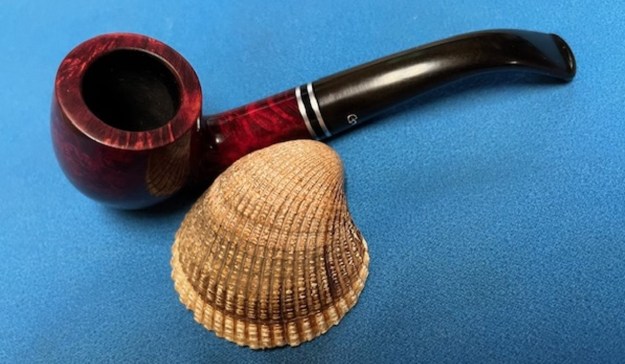
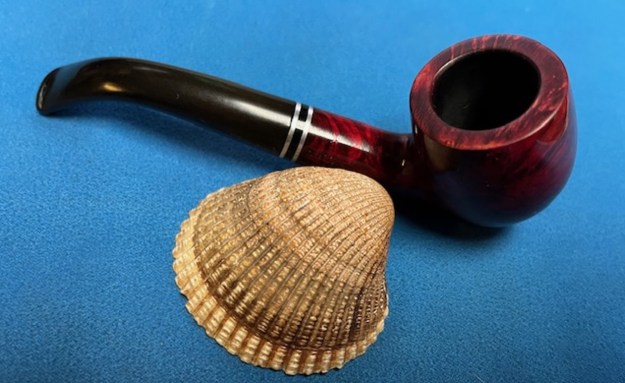
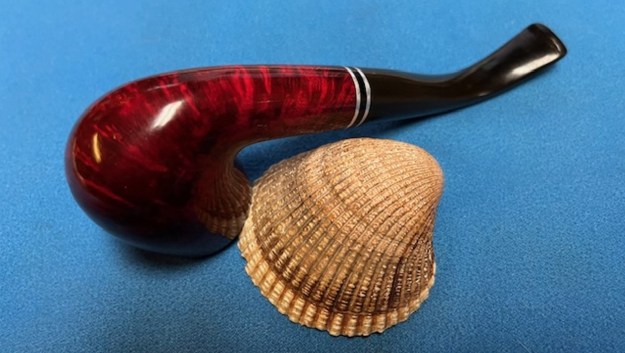
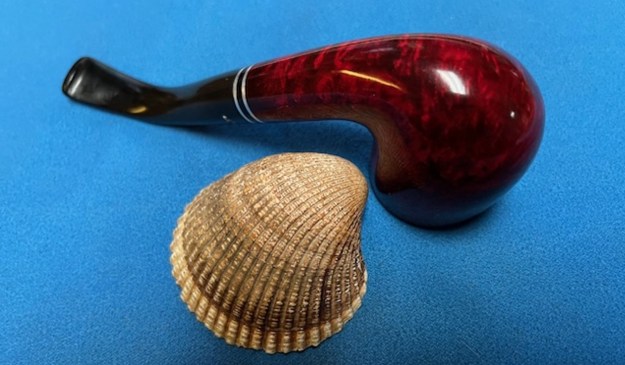
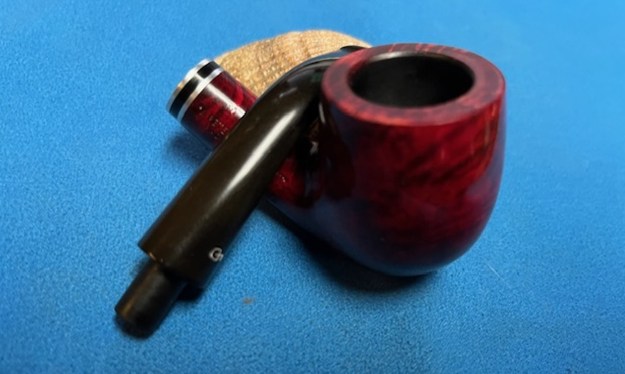
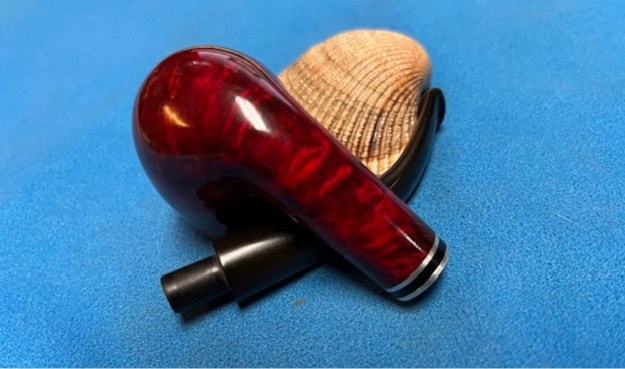
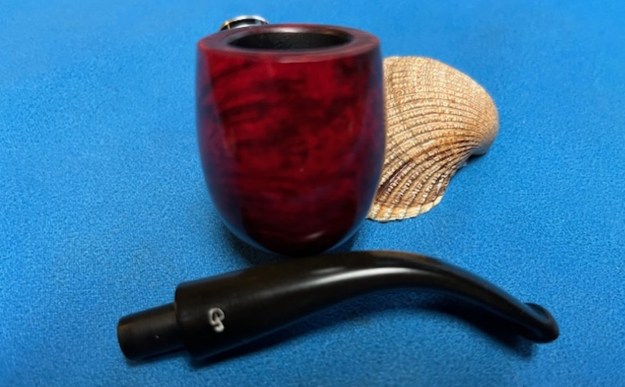
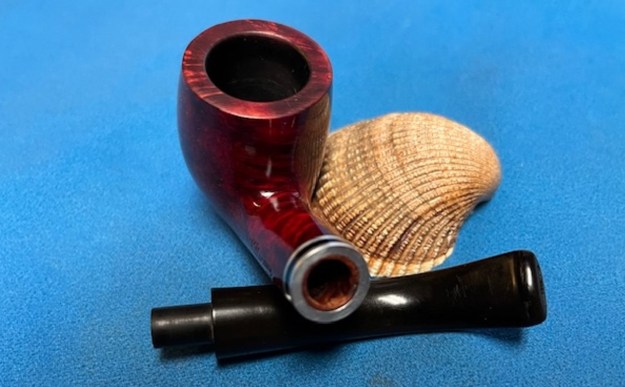
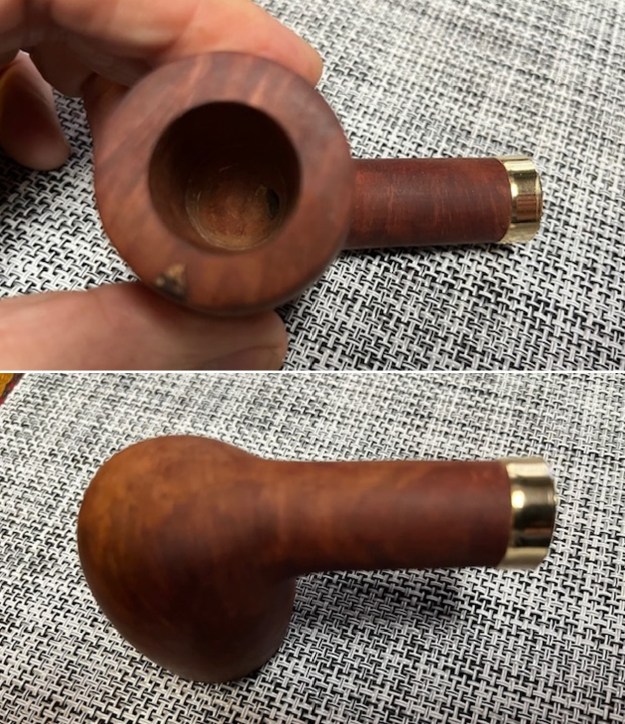
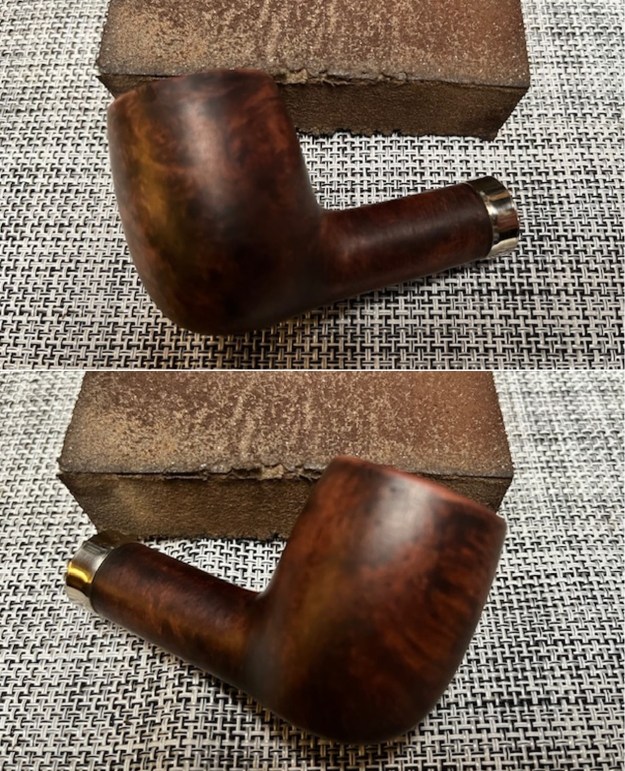
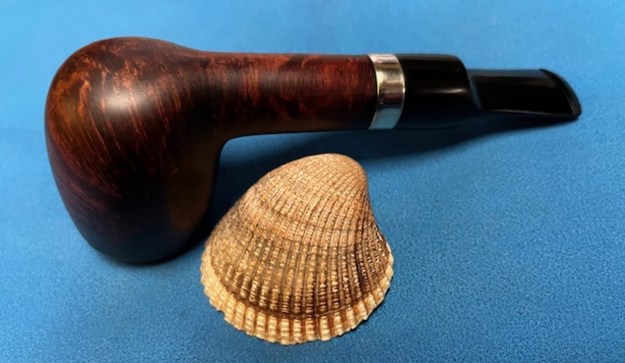
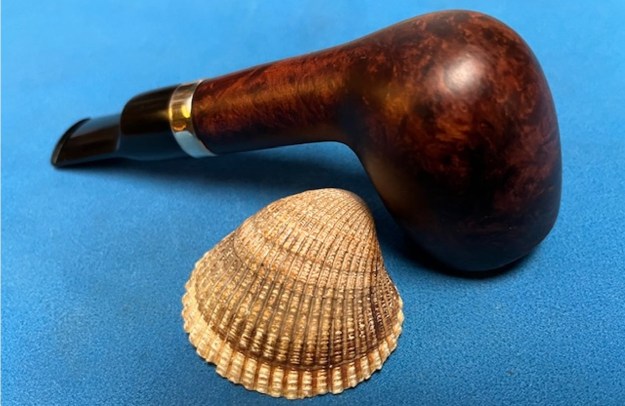
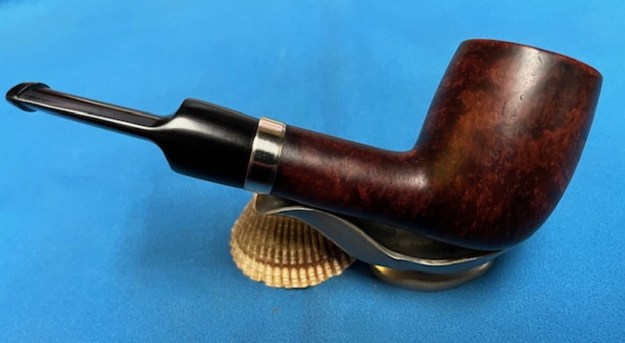
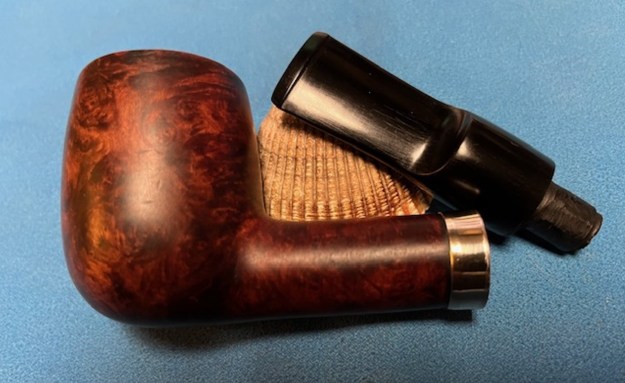
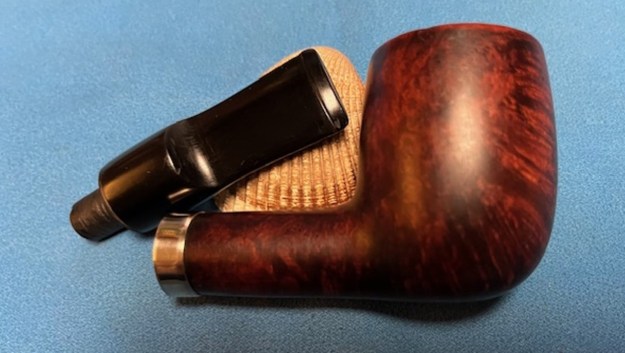
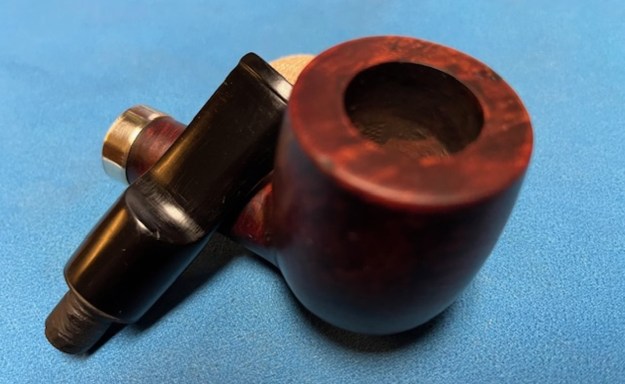
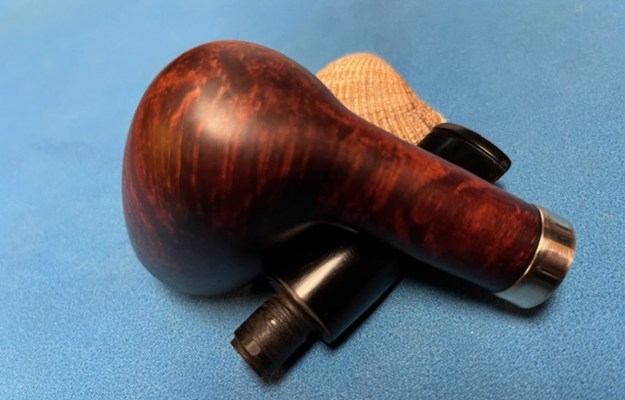
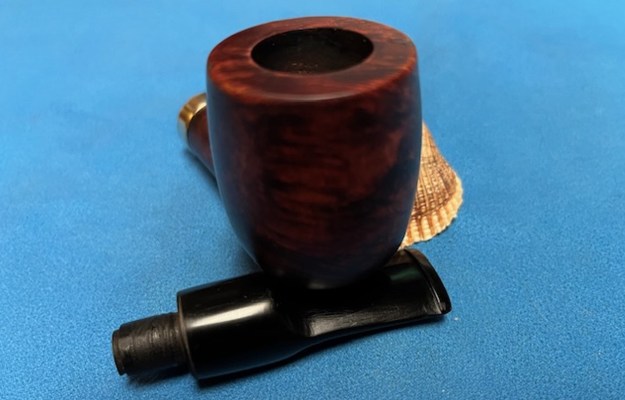
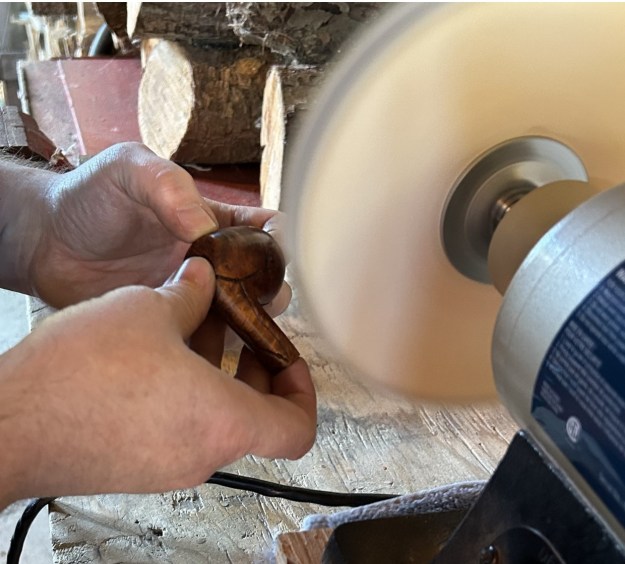
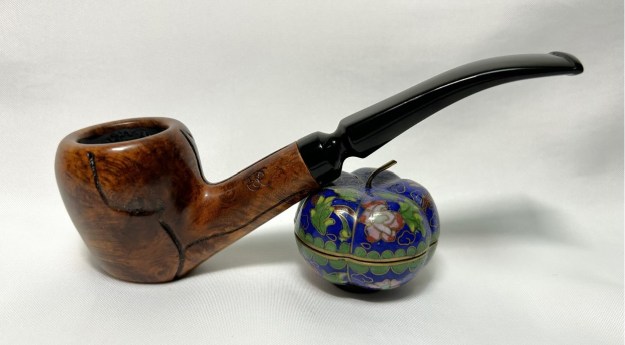
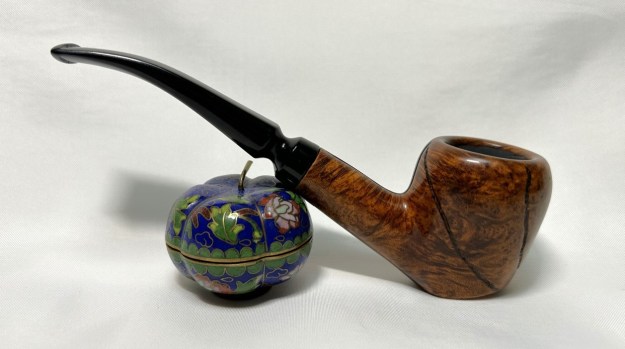
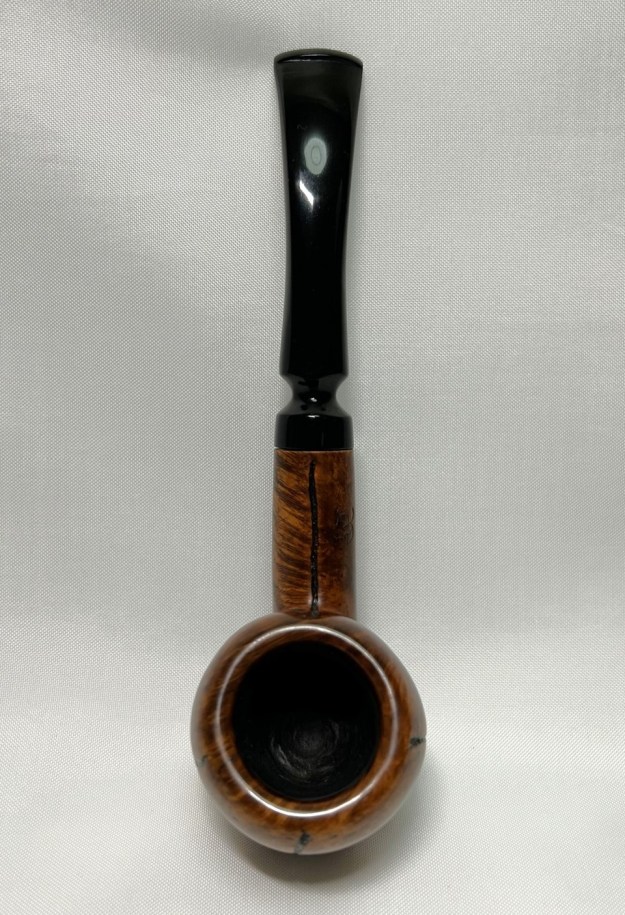
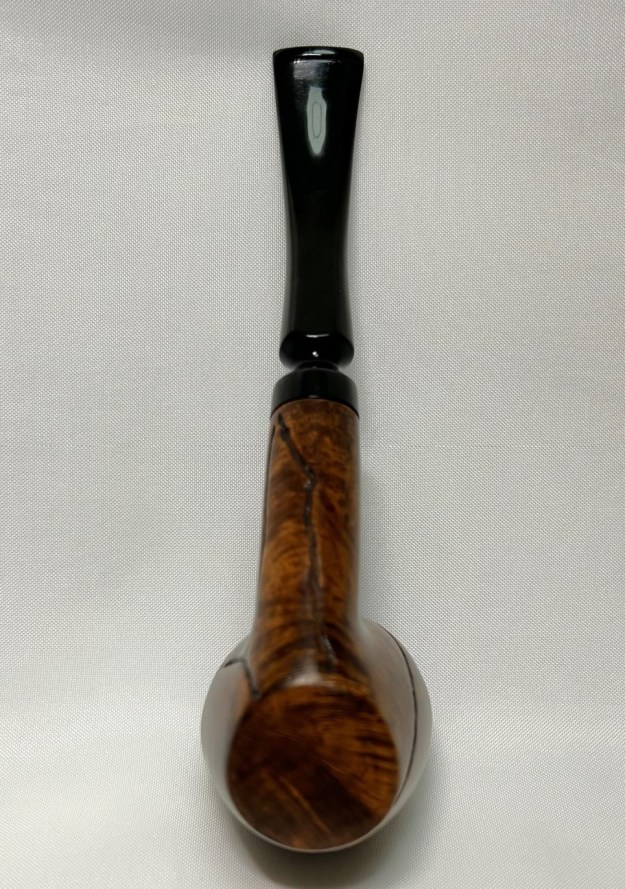
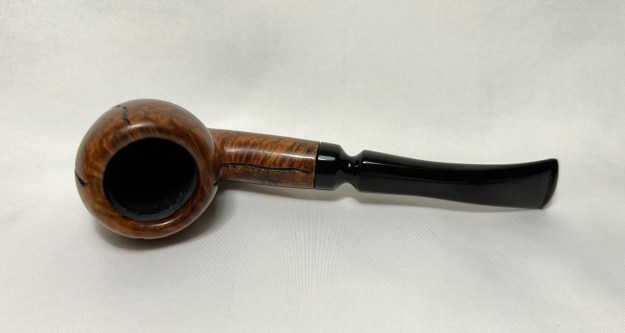
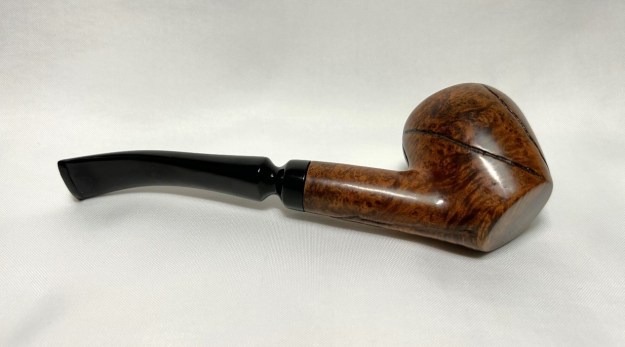
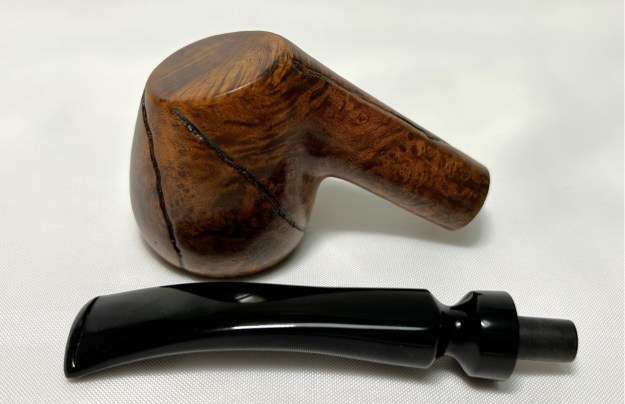
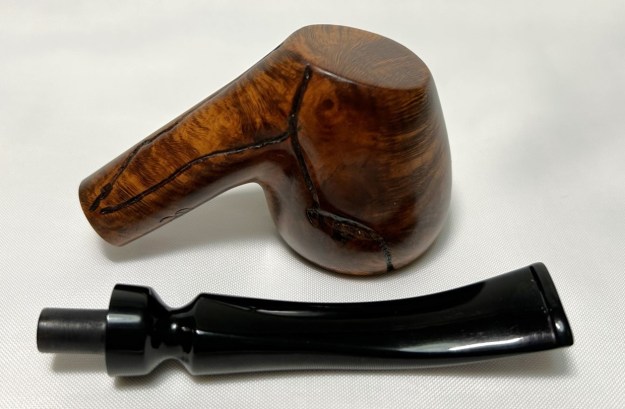
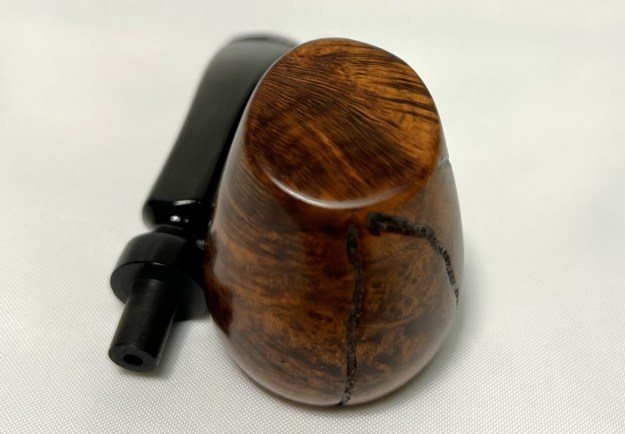
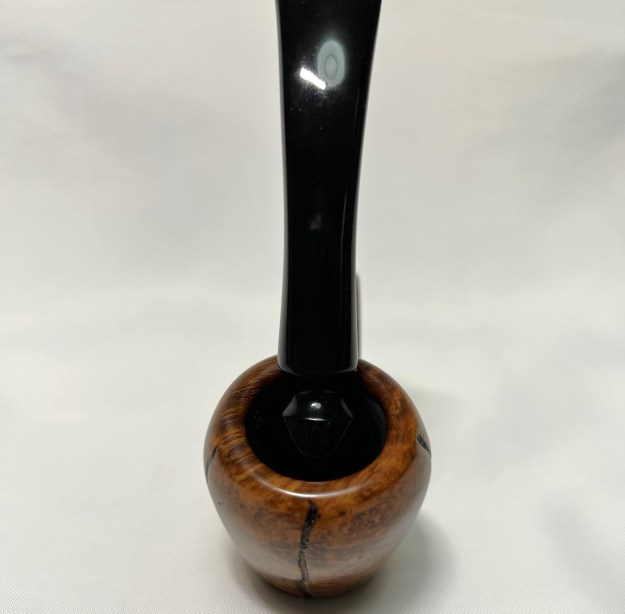
I am excited to finish this Japanese Tatu Pipe by Tetsuo Tajima. I put the pipe back together and buffed it with Blue Diamond on the buffing wheel. I gave the bowl multiple coats of Conservator’s Wax and the stem multiple coats of carnauba wax. I hand buffed the pipe with a clean buffing pad to raise the shine. It is fun to see what the polished bowl looks like with beautiful mixed grain all around it. The polished black vulcanite stem combined with the bowl made a stunning pipe. This smooth Japanese Made Tatu Pipe 1126 Freehand is great looking and the pipe feels great in my hand. It is light and well balanced. Have a look at it with the photos below. The dimensions are Length: 6 ½ inches, Height: 1 ¾ inches, Outside diameter of the bowl: 2 ¼ inches wide x 2 ¾ inches long, Chamber diameter: ¾ of an inch. The weight of the pipe is 57 grams/2.01 ounces. It is a beautiful pipe that I will hang onto for awhile to enjoy. One day I may add it to the rebornpipes store. Thanks for walking through the restoration with me as I worked over this pipe. Thanks to each of you who are reading this blog.

As always, I encourage your questions and comments as you read the blog. Thanks to each of you who are reading this blog. Remember we are not pipe owners; we are pipe men and women who hold our pipes in trust until they pass on into the trust of those who follow us.

Smoking Vintage Falcon Bowls on Modern Stems


Blog by C.W. Hawes

The Falcon pipe was invented in 1936 by American engineer Kenly Bugg. The same year a German-American engineer, Frederick Kirsten, invented the pipe that bears his name.

While the Kirsten Pipe Company appears to be on hiatus, no new pipes having been made for several years now, the Falcon pipe continues to be a top seller worldwide, having sold 44 million pipes as of 2006.

I smoke at least one of my Falcons every day. They have become my go to pipe.

What I especially like is the simplicity of the design from the user’s end. A single unit stem, or frame, and a bowl that threads onto the stem. That’s it. Which makes the Falcon one of the simplest metal pipes I’ve seen.

Recently, I purchased a vintage Falcon and several vintage bowls from Steve Laug. And I eagerly added them to my collection of modern Falcons.

The beauty of the Falcon is not only its simplicity, but the interchangeability of bowls and stems. Giving you hundreds of bowl and stem configurations.

So, imagine my surprise when I couldn’t get a draw on a vintage bowl and modern stem combo. Quite frustrating.

There was obviously a leak somewhere, but where?

I set out a vintage bowl and a modern bowl, along with a vintage stem and a modern stem.

The stems appeared to be nearly identical. The major change being a narrower central post in the modern humidome.

The bowls, however, have gone through a more significant change.

Modern bowls have gaskets and are flatter on the bottom than their vintage counterparts.This change allows for the use of a dry ring, which absorbs moisture in the humidome.

Vintage bowls, having an extended bottom, sit nearly flush with the bottom of the humidome. Vintage bowls have no gaskets. They sit right on top of the humidome.The modern bowl sits higher due to the gasket.When a vintage bowl is screwed into a modern stem, it also sits higher.And it was that observation that lead me to test how well the vintage bowl seals.

I covered the top of the bowl very tightly with a booklet and sucked on the stem. I got air. Lots of air. But testing the same vintage bowl on a vintage stem — no air.

Apparently, with the introduction of the dry ring and the gasket on the bowl, the stem threads were machined to accommodate the gasket.

To use a vintage bowl on a modern stem, one must add a gasket to the vintage bowl in order for it to seal properly.

I’m frugal. I simply use a rubber band. The improvised rubber band gasket works like a charm. I get a tight seal and can smoke my favorite vintage bowls on my favorite modern stamps. A win–win.

I have used Vaseline as a gasket. It works, but is rather messy. I prefer the rubber band.

If you are a Falcon smoker and have a mix of modern and vintage bowls and stems, let me know in the comments if you’ve solved this little problem in a different manner.

Falcon pipes. Made in England, but a great American invention. Smoke on!

Dunhill Shell Big Billiard Restored


By Al Jones

This Dunhill Shell billiard belongs to a member of the PipesMagazine.com forum, and was found at small antique store in Tennessee. He collects antique tools and pipes and spied this sitting on a shelf while searching for tools.

The small, two digit date stamp is a bit worn, but I identified it as a 25. The pipe is a Shape 6103 Shell, and that two digit stamp tells me it was made in 1985. The handy Pipepedia Dunhill dating guide confirmed the date. The nomeclature told me to add 25 to the 1960 start date.

The four digit 6103 shape number breaks down to:

Group 6 size

Tapered stem

03 Billiard shape

The pipe had some heavy build-up on the bowl top and a very heavy cake. The stem was oxidized and it had some teeth indentions on both sides of the button. The pipe is just under two ounces, and clenched, teeth indentions would have been inevitable. Below is the pipe as it was received.

I used a piece of Scotch-Brite with water to remove the build-up on the bowl top. That lightened the stain, so I used some Fieblings Medium brown to match the rest of the bowl. The cake was removed with the largest bit in my Pipenet reamer set, and the bowl was in excellent condition. I soaked the bowl with alcohol and sea salt. Following the soak, the shank was scrubbed with a bristle brush dipped in alcohol.

I used a heat gun to lift some of the teeth indentions. The remaining indentions, on the bottom, were shallow enough to let well enough alone. The stem was mounted and the oxidation was removed with 600, 800, 1500 and 2000 grade wet paper. The stem was then buffed with White Diamond and Meguiars Plastic Polish. I used Halcon wax on the sandblast finish for the final buff.

Below is the finished pipe.

Ashton Sovereign Bent Billiard Addition/Restoration


By Al Jones

I’m not adding many pipes to my personal collection these days, but British made, small bent billiards always catch my attention. I love Taylor era Ashtons, particularly in the XX size (43 grams!) The Sovereign grade/finish is also a favorite. This one also had a somewhat rare tapered stem that I prefer. The has the date code stamp of 12 shows the pipe was made in 1992 (1980 + 12). Also as a bonus, the pipe is drilled perfectly and easily passes a cleaner (not always a given for Taylor era Ashtons).

The finish was faded, but nomenclature sharp. The top had some very heavy build-up, that I hoped was not scorching. The stem was lightly oxidized, with no teeth indentions. Unpacking the pipe, the restoration appeared promising. Below is the pipe as it was received.

I removed the build-up on the bowl top with a piece of Scotch-Brite and water. Gratefully, once removed,there was no damage other than a faded stain. I used White Diamond to freshen the finish followed by several coats of Carnuba wax.

I removed the very slight cake with my PIpenet reamer set,and soaked the bowl with sea salt and alcohol. Following the soak, the stem was mounted and oxidation removed with White Diamond and Meguiars Plastic Polish.

Below is the finished pipe that I am very pleased to add to my collection. I also include a picture of my small Bent Billiards that are in my collection.

My small Bent Billiard collection, clockwise from 12 o’clock:

Sasieni Regent Ruff Root

Sasieni Regent Walnut

Comoy’s Deluxe Shape 70

Castello Sea Rock KK

Barlings Sandblast (1965)

James Upshall B Grade Silver Spigot

Ashton Sovereign XX

Customizing an Acrylic Cumberland Stem Blank for a Bari Wiking Handmade Stummel


The COVID pandemic disrupted supply chains worldwide as countries sought to limit the spread of the disease. Probably the most well known example of …

Customizing an Acrylic Cumberland Stem Blank for a Bari Wiking Handmade Stummel

Refreshing a Peterson’s System Standard Smooth Made in the Republic of Ireland 312


Blog by Steve Laug

The next pipe on the work table is Rusticated Peterson’s System pipe that we purchased from and estate in Plano, Texas, USA on 03/30/2022. It was stamped Peterson’s System Standard on left side of the shank and reads Peterson’s [over] System [over] Standard. On the right side it reads Made in the Republic of Ireland (in three lines) [over] the shape number 312. It has nice grain around the bowl and shank that has oils, debris and grime ground into the finish. There was a thick cake in the bowl with remnants of tobacco stuck on the walls. There was a lava overflow on the rim top that was heavier toward the back side. The top and edges of the rim were well hidden under the tars and lava. There was a very beautiful pipe underneath all of the buildup of years of use. The nickel ferrule on the shank end was oxidized and is stamped on the top and left side K&P [over] three hallmarks – a harp, a wolf hound and a tower. That is followed by Petersons. It small dents in the nickel ferrule on the right side. The vulcanite stem is a Peterson’s style P-Lip with a “P” logo on the left side of the saddle stem. It was oxidized and calcified toward the end with some tooth chatter. There were also some tooth marks on both sides of the stem ahead of the button. Jeff took photos of the pipe before he started his cleanup work on it. Jeff took photos of the bowl and rim top to show the thick, hard cake in the bowl with remnants of tobacco stuck on the walls of the bowl. There was a lava build up on the top of the rim and the edges of the bowl. The rim top looked pretty good but it was hard to know for sure if there was damage under the thick lava. Only clean up would tell the full story. Jeff took photos of the top and underside of the stem showing the tooth chatter, scratching and oxidation on the stem surface and wear on the edges of the button. Jeff took photos of the sides and heel of the bowl to show the condition of the finish. You can see the grime in finish around the sides of the bowl and shank. Even under the dirt and debris of the years it looked very good. Jeff took photos of the stamping on the sides of shank. The stamping was readable as you can see from the photos. It read as noted above. The nickel ferrule on the shank end is stamped on the top and left side K&P Peterson’s over three Peterson marks. I have included the information on the shape number on this pipe that I picked up on researching the previous pipes. This is the second of two Peterson’s System Standard pipes in Bob’s collection marked with the 312 shape number. I have included a page from a Petersons Catalogue that I have on rebornpipes (https://rebornpipes.com/tag/peterson-hallmark-chart/). I have put a red box around the 312 shown in the catalogue page shown below. That should give a clear picture of the size and shape of the pipe. I am also including the information from Pipedia’s article on Peterson pipes. It is a great read in terms of the history of the brand (https://pipedia.org/wiki/Peterson). I have included a bit of the pertinent history here.

1950 – 1989 The Republic Era  – From 1950 to the present time, the stamp for this era is “Made in the Republic of Ireland” in a block format generally in three lines but two lines have been used with or without Republic being abbreviated.

During the 1950’s and 60’s the Kapp & Peterson company was still in the ownership of the Kapp family. However 1964 saw the retiral of the company Managing Director Frederick Henry(Harry) Kapp.

Pipedia also included a section of information on the System pipes including a diagram of the systems look (https://pipedia.org/wiki/Peterson#Republic_Era_Pipes). I quote a section of the article in part and include a link to another article on Pipedia on the System pipe.

The Peterson System pipes are the standard bearers of the Peterson pipe family, famous for the excellent smoking pleasure they provide. Often imitated but never equaled, the Peterson System smokes dry, cool and sweet, thanks to the scientific effectiveness of the original design. The heart of the System is the unique graduated bore in the mouthpiece. This makes the suction applied by the smoker 15 times weaker by the time it reaches the tobacco chamber. The result is that all the moisture flows into the reservoir and, thus cannot reach the smoker’s mouth. The Peterson Lip further enhances the effectiveness of the graduated bore by directing the flow of smoke upwards and away from the tongue. This achieves a uniquely even distribution of smoke and virtually eliminates any chance of tonguebite or bitterness. Furthermore, the shape is contoured so that the tongue rests comfortably in the depression under the opening. Each “PLip” mouthpiece is made from Vulcanite. For the Peterson System pipes to work properly, the stem/tenon has to have an extension, the tip of which will pass by the draft hole from the bowl and into the sump. Upon the smoker drawing in smoke, this extension then directs the smoke down and around the sump to dispense a lot of the moisture before the smoke enters the extension and stem. On the System Standards and other less expensive systems, this extension with be made of Vulcanite turned integrally with the stem. On the more expensive System pipes this extension will be made of metal which screws into the Vulcanite stem. This extension on the earlier pipes will be of brass and the newer pipes will be of aluminium. Most smokers not knowing this function of the metal extension, assumes that it is a condenser/stinger and will remove it as they do with the metal condensers of Kaywoodie, etc. Should you have a System pipe with this metal extension, do not remove it for it will make the System function properly and give you a dryer smoke (https://pipedia.org/wiki/A_closer_look_at_the_famous_Peterson_Standard_System_Pipe).

With that information in hand I knew what I was dealing with in terms of the stamping and the age of this pipe. I knew from the information that the pipe was made during the Republic Era between 1950 and 1989. My guess is that the pipes is a 1960s era System pipe. Now it was time to work on the pipe.

Jeff cleaned this filthy pipe with his usual clean up process. This one was a real mess and I did not know what to expect when I unwrapped it from his box. He reamed it with a PipNet pipe reamer and cleaned up the reaming with a Savinelli Fitsall Pipe Knife. He scrubbed out the internals with alcohol, pipe cleaners and cotton swabs until the pipe was clean. He scrubbed the exterior of the bowl with Murphy’s Oil Soap and a tooth brush to remove the grime and grit on the briar and the lava on the rim top. The finish looks very good with great looking grain around the bowl and shank. Jeff soaked the stem in Briarville’s Pipe Stem Deoxidizer to remove the oxidation on the vulcanite. When the pipe arrived here in Vancouver for the second stop of its restoration tour I was amazed it looked so good. The stem showed some damage on the button edge and surface. The bonus was that the tenon had a brass chimney in the end that was correct for this pipe. I took some close-up photos of the rim top and also of the stem surface. I wanted to show what an amazing job Jeff did in the cleanup of the rim top. The rim top and inner edge had darkening and damage. There was damage to the inner edge on the back of the bowl. I also took close up photos of the stem to show the condition of the vulcanite. It was quite clean and the tooth marks and damage to the button edge and stem surface is visible in the photos below.One of the things I appreciate about Jeff’s cleanup is that he works to protect and preserve the nomenclature on the shank of the pipes that he works on. He was able to preserve and maintain its condition in the process. I took some photos to show the clarity of the stamping. I have noticed that many restorers are not careful to protect the stamping in their cleaning process and often by the end of the restoration the nomenclature is almost destroyed. I would like to encourage all of us to be careful in our work to preserve this as it is a critical piece of pipe restoration! I took the stem off the shank and took a photo of the pipe. I decided to start my work on the pipe by cleaning up the rim top and inner edge of the bowl. I started by working over the edge and the rim top with a folded piece of 220 grit sandpaper. I minimized the damage on the inner edge and rim top. It looked significantly better. I polished the briar with micromesh sanding pads – dry sanding it with 1500-12000 grit sanding pads. I wiped it down with a damp cloth after each sanding pad to remove the dust. The briar was really shining by the final pad. I rubbed the bowl and rim down with Before & After Restoration Balm. I worked it into the surface of the briar with my fingertips to clean, enliven and protect it. I let the balm sit for 10 minutes and then buffed with a cotton cloth to raise the shine. I really like watching the Balm do its magic and bring the briar alive. I polished the nickel ferrule with a jewellers cloth to remove the remaining tarnish and to protect the surface from further tarnishing. The shine was quite nice. I set the bowl aside and turned my attention to the stem. There were several issues that I needed to deal with to secure a good fit. The brass chimney was stuck in the tenon and I could not remove it. I heated the chimney with a lighter and was finally able to unscrew it from the stem end. I cleaned out the threaded area on the stem and the threads on the chimney and greased it with Vaseline. I screwed it back in the stem.The fit of the stem in the shank was canted to the left and the brass chimney hit against the wall of the mortise. As I examined it I saw that the drilling in the shank was more worn on the right side than the left. I smoothed out the walls of the left side of the shank with small half circle needle files. I also sanded the right side of the stem to adjust the seat in the shank. Once I had completed the process the fit was perfect in the shank.I fit the stem in the shank and the adjustments straightened out the cant of the stem. I took photos of it to show the new fit in the shank.I rebuilt the top edge of the button with black CA glue. I filled in the tooth marks on the top and underside of the stem. Once the repair hardened/cured I used a small file to reshape the edge of the button and flatten the repairs. I reshaped the top of the button with the file at the same time. I sanded the repairs with 220 grit sandpaper to blend them into the surface of the vulcanite. I started polishing the stem with 600 grit wet dry sandpaper to further smooth it out. I touched up the “P” logo on the left side of the saddle stem with white acrylic fingernail polish. I let it dry then I polished off the excess with a worn 1500 grit micromesh sanding pad. Once the excess was removed the stamp looked much better. There were some weak spots on the leg and tail of the “P” stamp.I polished the stem with micromesh sanding pads – wet sanding with 1500-12000 grit pads. I wiped the stem down after each sanding pad with Obsidian Oil. I polished it with Before & After Pipe Stem Polish – both Fine and Extra Fine. I gave it a coat of Obsidian Pipe Stem Oil. It works to protect the stem from oxidizing. I set it aside to dry. Once again at this point in the restoration process I am excited to be on the homestretch. I look forward to the final look when the Republic Era Peterson’s System Standard 312 is put back together, polished and waxed. I put the bowl and stem back together. I lightly polished the bowl and the stem with Blue Diamond. I gave the bowl and the stem multiple coats of carnauba wax. I buffed the pipe with a clean buffing pad to raise the shine. I hand buffed it with a microfiber cloth to deepen the shine. The pipe polished up pretty nicely. The grain really pops with the wax and polish. The shiny black vulcanite stem is a beautiful contrast to the browns of the bowl and thick shank and nickel ferrule. This Republic Era Peterson’s System Standard 312 Bent Billiard was another fun pipe to work on. It really is a quite stunning piece of briar whose shape follows the flow of the briar. The pipe feels great in the hand will be better when warmed up while smoking. The finished pipe is shown in the photos below. The dimensions of the pipe are Length: 5 ½ inches, Height: 1 ¾ inches, Outside diameter of the bowl: 1 ¼ inches, Chamber diameter: ¾ of an inch. The weight of the pipe is 2.01 ounces/57 grams. I will be putting it on the rebornpipes store in the Irish Pipemakers Section if you would like to add it to your rack and carry on the previous pipeman’s legacy. This is an interesting estate to bring back to life.

As always, I encourage your questions and comments as you read the blog. Thanks to each of you who are reading this blog. Remember we are not pipe owners; we are pipe men and women who hold our pipes in trust until they pass on into the trust of those who follow us.

New Life for a Peterson’s Kapet Republic of Ireland 106 Billiard


Blog by Steve Laug

The next pipe on the work table is Peterson’s Large Straight Billiard pipe that we purchased from and our connection in Copenhagen, Denmark on 04/11/2023. It was stamped Peterson’s [over] Kapet on the left side of the shank. On the right it is stamped Made in the Republic of Ireland (in three lines) followed by the shape number 106. It is a large Billiard that has a smooth finish with great grain around the bowl and shank that is covered with a lot of oils, debris and grime. There was a thick cake in the bowl with remnants of tobacco stuck on the walls. There was a heavy lava overflow on the rim top and edges. The top and edges of the rim were well hidden under the tars and lava. There was a very beautiful pipe underneath all of the buildup of years of use. The stem was a Peterson’s style P-Lip taper stem with a “P” logo on the left side. It was oxidized and calcified toward the end with some tooth marks and chatter on both sides ahead of the button. Jeff took photos of the pipe before he started his cleanup work on it. Jeff took photos of the bowl and rim top to show the thick, hard cake in the bowl with remnants of tobacco stuck on the walls of the bowl. There was a lava build up on the top of the rim and the edges of the bowl. The rim top looked pretty good but it was hard to know for sure if there was damage under the thick lava. Only clean up would tell the full story. Jeff took photos of the top and underside of the stem showing the tooth marks, chatter, calcification and oxidation on the stem surface on both sides of the stem. Jeff took photos of the sides and heel of the bowl to show the condition of the finish. You can see the grime around the sides of the bowl and shank. Even under the dirt and debris of the years it looked very good. Jeff took photos of the stamping on the sides of the shank. The stamping was readable as you can see from the photos. It read as noted above.

I am including the link to the Pipedia’s article on Peterson pipes. It is a great read in terms of the history of the brand (https://pipedia.org/wiki/Peterson). There was a short note toward the bottom of the page about the series. It is definitely referring to the newer line that came out later. I quote:

I turned to Pipedia (https://pipedia.org/wiki/Peterson) to first pin down a date that the pipe was made. I knew that the Made in the Republic of Ireland stamp would give me that. I quote:

As usual when trying to get accurate facts in regard to Peterson history, something will jump up and get in the way. They are missing many of their records. The following is the best that we can do for a guide to the myriad markings during the period 1922–1949. Prior to 1920 it was rare for a country of origin to be stamped on the pipe, just Peterson’s Dublin on the band. After 1921/22, if it is stamped “MADE IN IRELAND” and the “Made in” is stacked over “Ireland” or “MADE IN EIRE” or several other forms, it was made between 1922 and 1938. A considerable number of Peterson pipes were stamped “Irish Free State”. From about 1930 to 1949, most of the pipes (those which were stamped) were stamped “Made in Ireland”.” If the stamp reads “MADE IN IRELAND” in a circle, the pipe was made between 1939 and 1948. These are all “Pre-Republic” pipes. I can tell you that the mark “Irish Free State” was adopted in 1922; and replaced by “Eire” in 1937 and then by “Republic of Ireland” in 1949.

That gave me a date for the pipe – it was made after 1949 as can be proved by the Made in the Republic of Ireland stamp on the right side of the shank.

I turned to “The Peterson Pipe” by Mark Irwin and Gary Malmberg to get some background on the Peterson’s Kapet Line. On page 305 it had the following information.

Kapet (1925-87) Line first described in 1925 brochure and featured in occasional catalogs through 1987. Early specimens will be stamped IRISH over FREE STATE. Described in 1937 catalog as available in dark plum or natural finish. Featured an aluminum “inner tube” or stinger until 1945.  Mid-century specimens may be stamped Made In over Ireland. Specimens from 1970 on may have mounts with hallmarks.

Judging from the Made in the Republic of Ireland stamp, the pipe I am working on is probably made after 1949. Those dates work also for the Kapet information above. The stem the “P” emblem on the stem side but no inner tube.

Jeff had cleaned it thoroughly. He had reamed it with a PipNet reamer and cleaned that up with a Savinelli Fitsall Pipe Knife. He had scrubbed the exterior of the briar with undiluted Murphy’s Oil Soap. He removed the shiny coat on the briar with acetone on cotton pads. He cleaned out the interior of the shank, sump and airway in the shank and stem with alcohol, pipe cleaners and cotton swabs. He scrubbed the stem with Soft Scrub to remove the oxidation and calcification on the surface. He soaked it in Briarville’s Pipe Stem Deoxidizer to remove the oxidation. He removed it from the Deoxidizer and rinsed it off with warm water. I took some photos of the pipe before I started my part of the work.  I took some close up photos of the rim top and also of the stem surface. I wanted to show what an amazing job Jeff did in the cleanup of the rim top. The rim top and inner edge had darkening and damage. There was damage to the inner edge on the back of the bowl. The rim top is clean but in nicked and scratched. I also took close up photos of the stem to show the condition of the vulcanite. It was quite clean and the tooth marks on ahead of the button are present but hard to see in the photos.Once again I have to comment on what I appreciate about Jeff’s cleanup is that he works to protect and preserve the nomenclature on the shank of the pipes that he works on. The stamping on this one was very faint to start with so I was worried that it would disappear altogether with the cleanup. He was not only able to preserve and maintain its condition in the process. I took some photos to show the clarity of the stamping. I have noticed that many restorers are not careful to protect the stamping in their cleaning process and often by the end of the restoration the nomenclature is almost destroyed. I would like to encourage all of us to be careful in our work to preserve this as it is a critical piece of pipe restoration! I took the stem off the shank and took a photo of the pipe. I decided to start my work on the pipe by cleaning up the rim top and inner edge of the bowl. I started by working over the edge and the rim top with a folded piece of 220 grit sandpaper. I minimized the damage on the inner edge and rim top. It looked significantly better. I polished the briar with micromesh sanding pads – dry sanding it with 1500-12000 grit sanding pads. I wiped it down with a damp cloth after each sanding pad to remove the dust. The briar was really shining by the final pad. I rubbed the bowl and rim down with Before & After Restoration Balm. I worked it into the surface of the briar with my fingertips to clean, enliven and protect it. I let the balm sit for 10 minutes and then buffed with a cotton cloth to raise the shine. I really like watching the Balm do its magic and bring the briar alive. I set the bowl aside and turned my attention to the stem. I “painted” the tooth marks with the flame of a Bic lighter to try and lift the marks. I was able to lift them slightly. I filled in the marks that remained on the stem with clear CA glue and set it aside to cure. Once cured I used a file to flattened the repairs and redefine the button edge. I sanded the stem with 220 grit sandpaper to further blend in the repairs. I polished it with 600 grit wet dry sandpaper. I touched up the “P” logo on the left side of the saddle stem with white acrylic fingernail polish. I let it dry then I polished off the excess with a worn 1500 grit micromesh sanding pad. Once the excess was removed the stamp looked much better. There were some weak spots on the leg and tail of the “P” stamp.I polished the stem with micromesh sanding pads – wet sanding with 1500-12000 grit pads. I wiped the stem down after each sanding pad with Obsidian Oil. I polished it with Before & After Pipe Stem Polish – both Fine and Extra Fine. I gave it a coat of Obsidian Pipe Stem Oil. It works to protect the stem from oxidizing. I set it aside to dry. I always am excited to finish working on a pipe. This Made in the Republic of Ireland Peterson’s Kapet Straight Billiard is no exception. I put the pipe back together and buffed it with Blue Diamond on the buffing wheel. I gave the bowl and the stem multiple coats of carnauba wax. I buffed the pipe with a clean buffing pad to raise the shine and hand buffed it with a microfibre cloth to deepen the shine. It is fun to see what the bowl looks like with the black vulcanite taper stem. This Classic looking Peterson’s Kapet Smooth Billiard feels great in my hand. It is light and well balanced. Have a look at it with the photos below. The dimensions are Length: 6 inches, Height: 2 inches, Outside diameter of the bowl: 1 ¼ inches, Chamber diameter: ¾ of an inch. The weight of the pipe is 53 grams/1.87 of an ounce. I will be putting it on the rebornpipes store shortly in the Irish Pipe Makers Section if you are interested in it. Thanks for walking through the restoration with me as I worked over this pipe. Thanks to each of you who are reading this blog.

As always, I encourage your questions and comments as you read the blog. Thanks to each of you who are reading this blog. Remember we are not pipe owners; we are pipe men and women who hold our pipes in trust until they pass on into the trust of those who follow us.

Fresh Life for a Republic Era Killarney Red 65 Bent Billiard


Blog by Steve Laug

The next pipe on the work table is smaller cherry red Peterson’s Bent Billiard pipe that we purchased from and our connection in Copenhagen, Denmark on 01/26/2023. It was stamped Killarney in script on the left side of the shank. On the right it is stamped “A Peterson’s Product” [over] Made in the Rep of Ireland (in two lines) [over] the shape number 65 near the bowl/shank junction. It has a smooth, shiny red finish with great grain around the bowl and shank that is covered with a lot of oils, debris and grime. There was a thick cake in the bowl with remnants of tobacco stuck on the walls. There was a lava overflow on the rim top and edges. The top and edges of the rim were well hidden under the tars and lava. It appeared that there was a beautiful pipe underneath all of the buildup of years of use. The stem was a Peterson’s style Fishtail stem that did not fit fully against the shank. There was a gap and the stem would not fit snug. It was oxidized and calcified toward the end with some tooth marks and chatter. The button edges were quite clean. Jeff took photos of the pipe before he started his cleanup work on it. Jeff took photos of the bowl and rim top to show the thick, hard cake in the bowl with remnants of tobacco stuck on the walls of the bowl. There was a lava build up on the top of the rim and the edges of the bowl. The rim top looked pretty good but it was hard to know for sure if there was damage under the thick lava. Only clean up would tell the full story. Jeff took photos of the top and underside of the stem showing the tooth chatter, scratching, calcification and oxidation on the stem surface and wear on the edges of the button. Jeff took photos of the sides and heel of the bowl to show the condition of the finish. You can see the grime around the sides of the bowl and shank. Even under the dirt and debris of the years it looked very good. Jeff took photos of the stamping on the sides of the shank. The stamping was readable as you can see from the photos. It read as noted above. I am including the information from Pipedia’s article on Peterson pipes. It is a great read in terms of the history of the brand (https://pipedia.org/wiki/Peterson).

I turned to “The Peterson Pipe” by Mark Irwin and Gary Malmberg to get some background on the Kilarney Pipe. On page 306 it had the following information on the pipe.

Kilarney (1949-) Entry line with smooth finish and P-Lip mouthpiece. May have either a K or P stamped on the mouthpiece; may have aluminum singer (not to be confused with the tenon extension tube found on straight System pipes). 1949-c.1957 examples made for the US market may have any of the following COM stamps: MADE IN IRELAND (forming a circle), “A PETERSON’S PRODUCT” over MADE IN IRELAND or LONDON MADE over ENGLAND. Some early specimens stamped KILLARNEY over NATURAL (a higher grade) have MADE IN IRELAND (forming a circle). Examples c. 1986-90 feature a nickel band, which was replaced in ’91 with a shank extension of nickel band with black acrylic inlay. Fishtail  mouthpiece from ’86 although P-Lip is sometimes seen. For the current German market, the Killarney is stamped CONNEMARA

I knew that I was dealing with a pipe made 1991 due to the stamping on the shank and the shank extension of a nickel band with black acrylic inlay. It has the “P” stamp on the stem side and a P-lip mouthpiece. Now it was time to work on the pipe.

Jeff had done a great job cleaning up the pipe as usual. He reamed the pipe with a PipNet reamer and cut back the cake back to the bare briar. He cleaned up the walls with a Savinelli Fitsall Pipe Knife. He scrubbed the interior of the bowl and shank with pipe cleaners, cotton swabs and alcohol to remove the tars and oils. He scrubbed the exterior of the pipe with Murphy’s Oil Soap and a tooth brush to remove the grime from the finish. He worked on the rim top lava and darkening with the soap and tooth brush. He scrubbed the inside of the stem with alcohol and pipe cleaners. He scrubbed the exterior with Soft Scrub and then soaked it in Briarville’s Pipe Stem Deoxidizer. He washed it off with warm water to remove the Deoxidizer. The pipe looked far better when it arrived. I took some close up photos of the rim top and also of the stem surface. I wanted to show what an amazing job Jeff did in the cleanup of the rim top. The rim top and inner edge had some slight darkening on the top. The edges of the bowl looked very good. I also took close up photos of the stem to show the condition of the vulcanite. It was quite clean and there were light tooth marks on the button and on the stem.One of the things I appreciate about Jeff’s cleanup is that he works to protect and preserve the nomenclature on the shank of the pipes that he works on. The stamping on this one was very faint to start with so I was worried that it would disappear altogether with the cleanup. He was not only able to preserve and maintain its condition in the process. I took some photos to show the clarity of the stamping. I have noticed that many restorers are not careful to protect the stamping in their cleaning process and often by the end of the restoration the nomenclature is almost destroyed. I would like to encourage all of us to be careful in our work to preserve this as it is a critical piece of pipe restoration! I took the stem off the shank and took a photo of the pipe. I polished the rim top and edges of the bowl with micromesh sanding pads – dry sanding it with 1500-12000 grit sanding pads. I wiped it down with a damp cloth after each sanding pad to remove the dust. The briar was really shining by the final pad. I rubbed the bowl and rim down with Before & After Restoration Balm. I worked it into the surface of the briar with my fingertips to clean, enliven and protect it. I let the balm sit for 10 minutes and then buffed with a cotton cloth to raise the shine. I really like watching the Balm do its magic and bring the briar alive. I set the bowl aside and turned my attention to the stem. I “painted” the stem with the flame of a Bic lighter to lift the tooth marks. I was able to lift all but two – one on the top and one on the underside. I filled those in with clear CA glue. I sanded the repairs with 220 grit sandpaper. I started the polishing with 600 grit wet dry sandpaper. I touched up the “P” logo on the left side of the saddle stem with white acrylic fingernail polish. I let it dry then I polished off the excess with a worn 1500 grit micromesh sanding pad. Once the excess was removed the stamp looked much better. There were some weak spots on the leg and tail of the “P” stamp.I polished the stem with micromesh sanding pads – wet sanding with 1500-12000 grit pads. I wiped the stem down after each sanding pad with Obsidian Oil. I polished it with Before & After Pipe Stem Polish – both Fine and Extra Fine. I gave it a coat of Obsidian Pipe Stem Oil. It works to protect the stem from oxidizing. I set it aside to dry.Once again at this point in the restoration process I am excited to be on the homestretch. I look forward to the final look when the “A Peterson’s Product” Killarney 65 Bent Billiard with a taper stem is put back together, polished and waxed. I put the bowl and stem back together. I lightly polished the bowl and stem with Blue Diamond to polish out the scratches in the briar and the vulcanite. I gave the bowl and the stem multiple coats of carnauba wax. I buffed the pipe with a clean buffing pad to raise the shine. I hand buffed it with a microfiber cloth to deepen the shine. The pipe polished up pretty nicely. The depths of the rustication really pop with the wax and polish. The shiny black vulcanite stem is a beautiful contrast to the browns of the bowl and thick shank. This Republic Era Peterson’s Killarney 65 Bent Billiard was another fun pipe to work on. It really is a quite stunning piece of briar whose shape follows the flow of the briar. The pipe feels great in the hand will be better when warmed up while smoking. The finished pipe is shown in the photos below. The dimensions of the pipe are Length: 5 inches, Height: 1 ½ inches, Outside diameter of the bowl: 1 1/8 inches, Chamber diameter: ¾ of an inch. The weight of the pipe is 1.09 ounces/31 grams. I will be putting it on the rebornpipes store in the Irish Pipemakers Section if you would like to add it to your rack and carry on the previous pipeman’s legacy.

As always, I encourage your questions and comments as you read the blog. Thanks to each of you who are reading this blog. Remember we are not pipe owners; we are pipe men and women who hold our pipes in trust until they pass on into the trust of those who follow us.

Thanks Bill for the chance to craft one of my own


Blog by Steve Laug

Earlier in the summer I received a package from a friend in Saskatchewan that included some nice pipes for me to enjoy that he had restored along with this partially finish Billiard. It had been shaped and drilled and had some large flaws on the left side of the bowl. The one mid-bowl was quite large and another toward the top of the bowl and onto the rim top. Both were deep and ragged looking and both would need work. I filled them both in with briar dust and clear CA glue and set it aside to cure. I was not too worried about it as in the shaping process much of the briar around the sides and rim would be removed. I took closer photos of the repairs to the flaws in the sides of the bowl. I layered in briar dust and clear CA glue to build up the flawed areas. I wanted to be able to start the process with a smooth surface on the bowl and shank. Once the repairs cured I flattened them out with files and then sanded them smooth with 220 grit sandpaper. I used a Dremel and a sanding drum to further blend them into the surface of the bowl. I removed the long taper billiard stem and “discovered” that it was a filter stem made for a 9mm filter. I decided to get rid of that stem and with the length of the thick shank that I would fit a new stem. I chose a stem that was about an inch shorter than the taper original. It was a thick looking saddle stem that I thought would look great and create a nice looking Lovat.I set up the PIMO tenon turning tool on my hand drill. I adjusted the settings to give me a very clean turn on the tenon. In the first photo you can see the misshaped tenon. I measured the tenon and then turned it once. I cleaned off the excess and turned it a second time to smooth out the roughness of the edges. I tried it in the shank and though the diameter of the stem was larger it looked very good. I used a flat rasp to remove excess material from the stem diameter. I continued to sand and file off the excess until it was close to the same diameter as the shank. I took photos of the fit of the stem to the shank on the pipe. I used a Dremel and sanding drum to bring it down further. I worked on the stem/shank fit with 220 grit sandpaper. It was looking very good at this point. It was getting very close to the shank fit. I fit the stem on the shank and took photos of the new look of the stem/shank fit. It still needed work but it looked very good at this point. I worked on the stem some more with 220 grit sandpaper to smooth out the transition between the stem and the shank. Once it was smooth I decided to see what the shank would look like with a band. I had a gold band that was perfect size for the shank. I put the band on the shank and took photos of the bowl with the shank. What do you think? To me it is exactly the touch I needed for this pipe to step up a bit. I like the look on the shank. I fit the stem to the shank to have a look at the flow of the pipe with the gold band and the saddle stem. Now I was even more convinced that the band was a great idea. It gives the pipe a classic Lovat look with a touch of bling. In preparation for staining the bowl I polished it with micromesh sanding pads 1500-400 grit pads to smooth out the repaired areas and the scratches on the surface of the bowl and rim top. It looked much better at this point in the process. I wiped the bowl down with a damp cloth to remove the sanding dust and then put a cork in the bowl and prepared the bowl for staining. I have had success in using a Cordovan stain when I am dealing with large repairs like this bowl had on the rear and left side of the bowl. It works to blend them in better than just a brown stain.I applied the stain with a dauber and then flamed it with a lighter it to set it in the grain. I repeated the process until I was happy with the coverage. You can see the darkness and coverage of the stain in the photos below.I like the stain to be more transparent to allow the grain to shine through but I want it opaque enough around the repairs to blend them into the surrounding briar. I sanded the bowl and shank with a medium and fine sanding sponge and I am really pleased with the coverage and the transparency of the colour. I rubbed the bowl and rim down with Before & After Restoration Balm. I worked it into the surface of the briar with my fingertips to clean, enliven and protect it. I let the balm sit for 10 minutes and then buffed with a cotton cloth to raise the shine. I really like watching the Balm do its magic and bring the briar alive. I sanded out the file marks and the scratches with 220 grit sandpaper and started the polishing with 600 grit wet dry sandpaper. It looked significantly better and was ready to polish it. I polished the stem with micromesh sanding pads – wet sanding with 1500-12000 grit pads. I wiped the stem down after each sanding pad with Obsidian Oil. I polished it with Before & After Pipe Stem Polish – both Fine and Extra Fine. I gave it a coat of Obsidian Pipe Stem Oil. It works to protect the stem from oxidizing. I set it aside to dry. I love it when I am carving or shaping a pipe to come to this point in the process. If always feels I am on the homestretch. I look forward to the final look when the Lovat I have carved is put back together, polished and waxed. I put the bowl and stem back together. I lightly polished the bowl and stem with Blue Diamond to polish out the scratches in the briar and the vulcanite. I gave the bowl and the stem multiple coats of carnauba wax. I buffed the pipe with a clean buffing pad to raise the shine. I hand buffed it with a microfiber cloth to deepen the shine. The pipe polished up pretty nicely. The depths of the rustication really pop with the wax and polish. The shiny black vulcanite stem is a beautiful contrast to the browns of the bowl and gold band on the thick shank. This Thick Shanked Lovat was a fun pipe to carve and to finish. It really is a quite stunning piece of briar whose shape follows the flow of the briar. The repaired fills blend well into the stain of the finish. The pipe feels great in the hand will be better when warmed up while smoking. The finished pipe is shown in the photos below. The dimensions of the pipe are Length: 5 ½  inches, Height: 2 inches, Outside diameter of the bowl: 1 3/8 inches, Chamber diameter: ¾ of an inch. The weight of the pipe is 2.15 ounces/61 grams. I am looking forward to loading a bowl and enjoying this pipe. Thanks again Bill for the gift and the joy I had in working on it.

As always, I encourage your questions and comments as you read the blog. Thanks to each of you who are reading this blog. Remember we are not pipe owners; we are pipe men and women who hold our pipes in trust until they pass on into the trust of those who follow us.

A Major Overhaul for an S&R Woodcrafters Pipe


Blog by Kenneth Lieblich

I’ve mentioned before that there are some pipes that are so challenging that they are an entire pipe-restoration course in and of themselves. This is one may not be as bad as some I’ve tackled in the past, but it certainly needs some major help! This is a S&R Woodcrafters Pipe and it belongs to my cousin in Montréal. He asked me if I could bring it back to life and I said I’d give it the old college try. This pipe reminded me that sometimes the wear-and-tear of the years needs to remain on a pipe as part of its story. This pipe has been abused over the years. I managed to bring great beauty back to this pipe, but it would always retain signs of its past. The pipe in question was made by Stephen and Roswitha Anderson (hence, S&R Woodcrafters) of Columbus, Ohio. They make unique, handcrafted pipes and are fascinating pieces. I read a blog Steve wrote on an S&R pipe earlier this year to learn more about the pipe’s background. I was directed to the Pipedia page on S&R and it has a lot of good information:

Stephen and Roswitha Anderson of S&R Pipes, also known as S&R Woodcrafters, have become pipe makers renowned throughout the world as talented carvers of high-grade briar pipes. They have been featured in several trade publications and magazines such as Pipes and Tobaccos and PipeSmoker, and have several pieces on display in museums in Europe and the United States. 

They are the first American pipe carvers honored with induction into the Conferee of Pipe Makers of Saint-Claude, France; the very place where the carving of briar pipes became a world-wide industry. Sadly, Steve passed away in March of 2009. Roswitha is still carving S&R pipes and carrying on with the shop with help from her “guys” David, Marty, and Tony. 

Steve and Roswitha began carving pipes in the 1960’s. They travelled to pipe shows and arts and crafts shows throughout the country and Europe selling their pipes and built up quite an extensive loyal customer base. Eventually, it became time to offer their pipes to the retail fraternity of pipe smokers. 

Pipes & Pleasures had its grand opening in a distinct red brick house on Main Street in Columbus, Ohio in 1977. The front section of the house was converted into a traditional tobacco shop selling pipe tobacco, cigars, and pipes manufactured by well known companies such as Dunhill, Charatan, and Savinelli as well as the high-grade S&R pipes that Steve and Roswitha carved. A workshop was set up in the back section of the house. 

When the cigar boom hit in the ’90’s, the shop was expanded by building a large computer controlled walk-in humidor. It’s no secret throughout the country that Pipes & Pleasures has the best maintained cigars in the Columbus area as well as the best selection of premium cigars available in the area including the much sought-after Davidoff line. 

Soon after the boom began, Steve and Roswitha moved their pipe making workshop to their farm and converted that space into a large smoking lounge for their many customers. The lounge features comfortable easy chairs, a television set, a stereo, a library of books and magazines about every aspect of tobacciana, a chess table, and a couple of card tables. The lounge is populated daily with long-time loyal customers and newcomers to the enjoyment and relaxation of cigar and pipe smoking. It’s also the room where several cigar tastings and samplings are held every year by representatives from cigar companies such as Davidoff and La Flor Dominicana.

In fact, their shop, Pipes & Pleasures, is still running. You can visit their website here.This is a charming pipe, but it had a number of significant issues, aside from the usual. Let’s take a closer look.

  • The rim is heavily shredded and notably burned.
  • The opening of the bowl is badly out of round.
  • There’s a big gouge on the side of the bowl.
  • There are several fissures inside the bowl (one of which might connect to the gouge).
  • There’s a crack on the top of the button.
  • There’s a piece missing on the underside of the button.
  • The mortise and tenon are not seated properly, but this might be corrected by a thorough cleaning.

I began by cleaning the outside of the stem with some Murphy’s Oil Soap on cotton rounds. This removed some of the surface staining. Then, I started cleaning the insides with isopropyl alcohol, cotton swabs, and pipe cleaners. The inside was dirty and it took a bit of cotton.There was some oxidation and calcification on the stem, so I wiped it down with SoftScrub cleaner. Once this process was done, the stem went for an overnight soak in the Pipe Stem Oxidation Remover. This allows me to clean the oxidation off in a couple of ways: by applying a mild cleaner to the surface and sanding the stem. The next day, I used SoftScrub again with some cotton rounds. As the photos show, the bit of the stem was badly damaged. The top side was significantly cracked and ruptured, while the underside was missing a chunk of vulcanite. I brought out my black cyanoacrylate adhesive and I applied it to the topside damage. I used some accelerant to get the glue going, and then moved on to the underside.The major gouge would need far more work. I made a patch out of black cyanoacrylate adhesive and a little activated charcoal in). I first plugged up the stem’s draught hole with a shaped piece of cardstock, coated in petroleum jelly. This ensured that any of the CA glue would not accidentally plug up the air passage in the stem.This was a tricky business and it took some real patience and effort to make it work. As the photos show, after I applied the cyanoacrylate, it looked pretty darn ugly, but I was expecting that. After the curing, I ended up sanding down the end of the stem to reduce some of the excess material. To carry this process on, I used some miniature files to further shape the button and make it suitable for sanding. I used another file on the inside to ensure there were no rough edges in the bore.I then sanded the stem down with 220- and 400-grit sandpapers to meld seamlessly into the stem. This ensures that it keeps its shape and looks like it should. I then used all nine Micromesh pads (1,500 through 12,000 grit) to bring out the lovely black lustre on the stem. I also used Obsidian Pipe Stem Oil in between each pad scrubbing. It is worth noting that a repair this big on a stem will never be completely invisible, but I was pleased with the results. On to the stummel – and there was plenty of work here too. As the photos show, there was a notable crater on the outside of the bowl and I could see a couple of fissures. This concerned me greatly, as I wondered if the two wounds were connected (literally and figuratively). The insides (both bowl and shank) had plenty of cake and tar. The bowl really needed to be reamed, so I used the KleenReem tool to scrape off as much built-up cake. Generally, I prefer to sand the chamber down to bare briar. When restoring, it is important to ensure that there is no damage to the briar under the cake. There are a few situations when I might leave some cake in the bowl, but not today. Sadly, there were definitely some hidden flaws to the briar on this pipe. I’ll come back to that later. I wiped down the wood with some Murphy’s and pulled off lots of grime. Then I started cleaning the insides with isopropyl alcohol, cotton swabs, and pipe cleaners. The inside was pretty dirty and required some cotton to clean it up.I decided to de-ghost the pipe in order to remove any lingering smells and dirt of the past. I thrust cotton balls into the bowl and the shank and saturated them with 99% isopropyl alcohol. I let the stummel sit overnight. This caused oils, tars and smells to leach out into the cotton. I finished this part off by cleaning the shank with Castile soap and tube brushes. The bowl was nice and clean after this. I went back for another go with the Murphy’s and a toothbrush, to ensure the grooves were done too. Now that the pipe was clean, I wanted to have a closer look at the state of the briar. One piece of good (and remarkable) news was that the crater on the outside of the bowl and the fissures on the inside did NOT meet up. This was a great relief. Nonetheless, both areas needed to be repaired. But before that, I wanted to correct the appalling roughness (and burns) on the rim of the pipe. It was bad – really bad – and it would be a challenge to make the pipe look normal. At the same time, it was necessary to address the bowl being so badly out of round. I put a sanding drum (and a couple of other bits) on my Dremel and carefully began removing the burns and shredded wood, and correcting the out-of-round- bowl. This is NOT an option that I use regularly. The risk of oversanding is high and that can be an even bigger problem. However, I worked slowly and cautiously. I only used the Dremel briefly before moving on to sandpaper. I also used a solid wooden sphere on the inner edge of the rim. In addition to this, I also sanded down the outside of the bowl, near the rim, so as to minimize the visual effect of the bashed edge. I sanded all the way around to ensure that the pipe retains its look. It was a laborious process to sort out these issues, but I was delighted in the end. Moving back to the fissures – the solution to this problem is always a tricky one: epoxy. I prepared some J.B. Weld epoxy and filled the cracks and gouges, ensuring that the epoxy was evenly spread throughout the bowl. Of course, I did plug the draught hole with a folded pipe cleaner (coated in Vaseline) to make sure none of the epoxy made its way up there. Once done, a good 24 hours was needed to ensure that the epoxy was properly cured. Once done, I gently sanded the inside of the bowl to provide a rough surface for what was to come next. I coated the entire inside of the bowl with a mixture of activated charcoal and my wife’s homemade yogourt. Once hardened, this provided a good, slightly rough surface for a new cake to build.As mentioned earlier, there was a crater on the bowl. It was large enough that I would not be able to make it disappear entirely, but I wanted to make it solid and smooth, and meld into the rest of the wood. I fixed it up with a mixture of cyanoacrylate adhesive and briar dust. This, too, was tricky, as the wound occurred immediately adjacent to one of the stylized grooves in the pipe. Next, I used all nine Micromesh pads (1,500 through 12,000 grit) all over the stummel to make it lovely and smooth. Then, applying some Before & After Restoration Balm added that je ne sais quoi which brings out the wood’s beauty. At long last, I was off to my bench buffer to put the final touches on this pipe. I first gave it a thorough going-over with White Diamond compound. Following that, several coats of carnauba wax created a beautiful, glossy seal on the pipe and some closure to this long and involved repair.The lovely shine made the wood look beautiful! Once again, I’m sure my cousin will love this pipe! I hope you enjoyed reading the story of this pipe as much I as I did restoring it. The approximate dimensions of the pipe are as follows: length 5¾ in. (146 mm); height 3½ in. (90 mm); bowl diameter 1½ in. (39 mm); chamber diameter ¾ in. (20 mm). The weight of the pipe is 1½ oz. (46 g). If you are interested in more of my work, please follow me here on Steve’s website or email me directly at kenneth@knightsofthepipe.com. Thank you very much for reading and, as always, I welcome and encourage your comments.