Thanks Mark for this catalogue – lots of eye candy to grab our interest.
New Peterson Pipes for 2015
Leave a reply
Thanks Mark for this catalogue – lots of eye candy to grab our interest.
Blog by Steve Laug
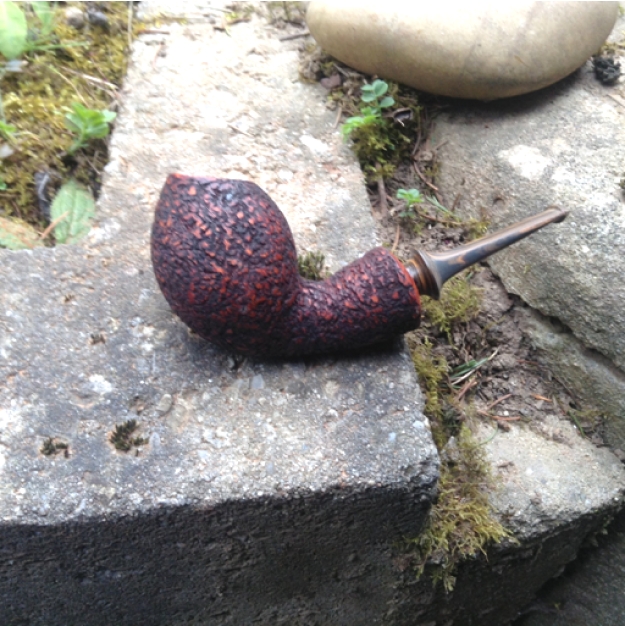
When I met with James in Stuttgart recently I spoke about ordering another pipe from him. On the evening of the day we met I went on his website and a couple of US based sites that carry his pipes and nothing truly caught my eye. I went through his photo gallery of pipes that he had made over the years and chose two different shapes from his website and sent him my request. I really like his Speckled Egg shape and his uniquely rusticated Ria shape. I emailed him regarding these two pipe shapes and let him know of my interest. He said he would let me know when he cut another one of either pipe.
I traveled from Stuttgart to Berlin to meet with another team and do some development work for the Foundation I work for. Then on my last day in Berlin, before heading back to Canada, I got an email from James about a pipe he was in the process of carving. Here is a portion of that email “…I got the urge to do a Speckled Egg… I’ll send you pictures once it’s done… absolutely zero obligation… I just like making the shape… you have first dibs on it if you want”. I could not believe he was already working on one of the shapes I had mentioned. I have to tell you I was really looking forward to seeing the photos of the pipe that he would send.
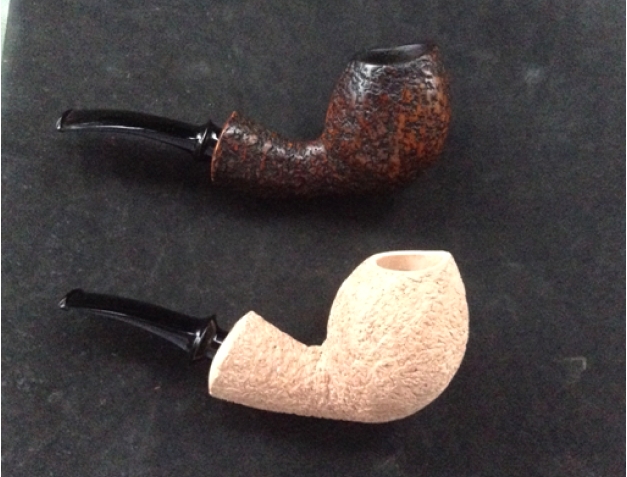
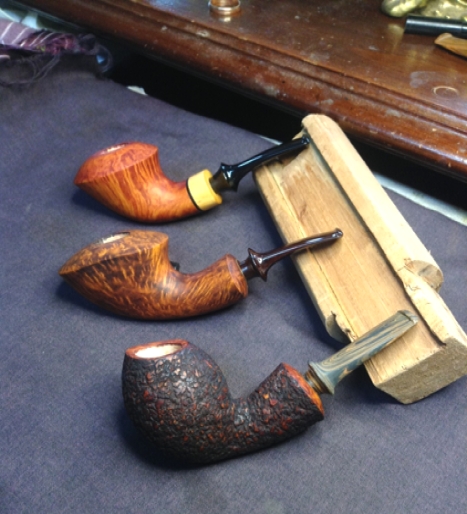
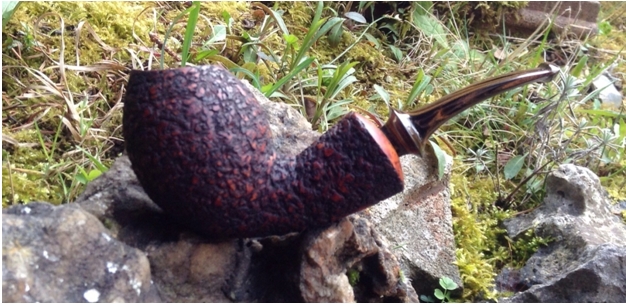
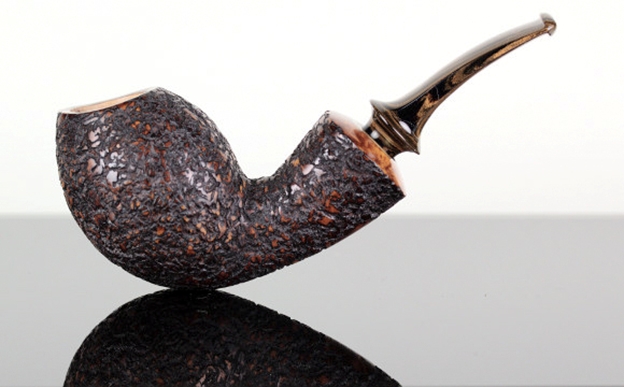
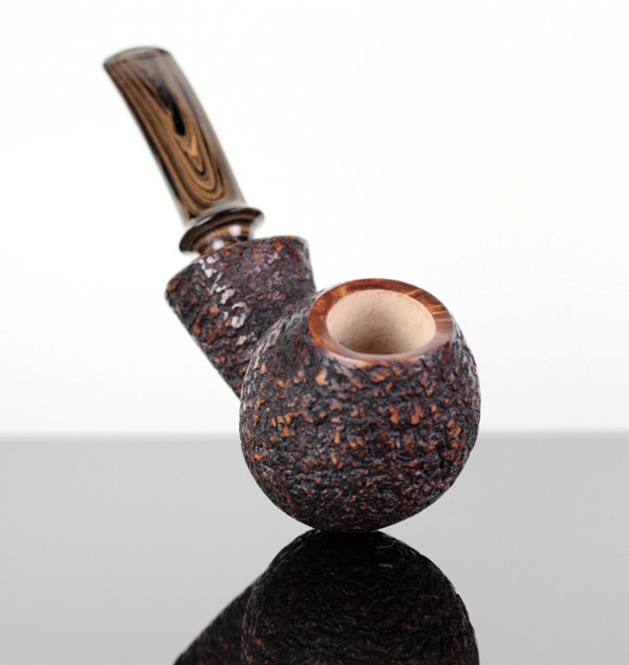
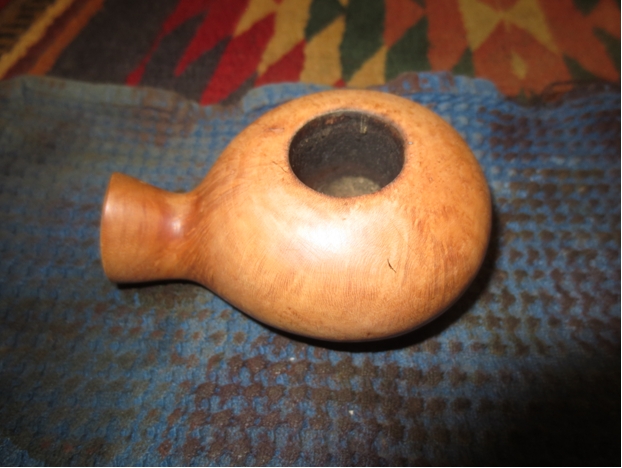
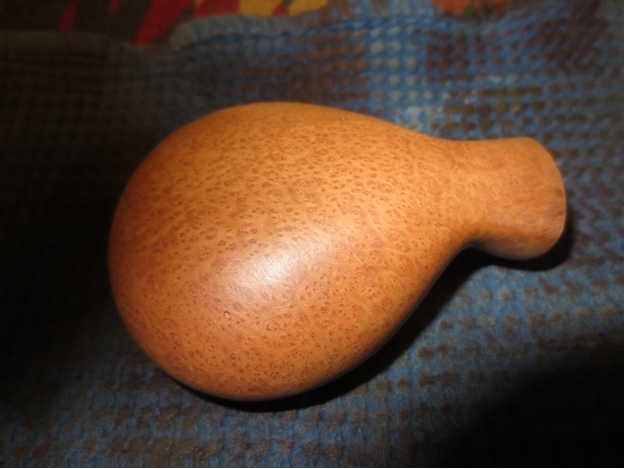
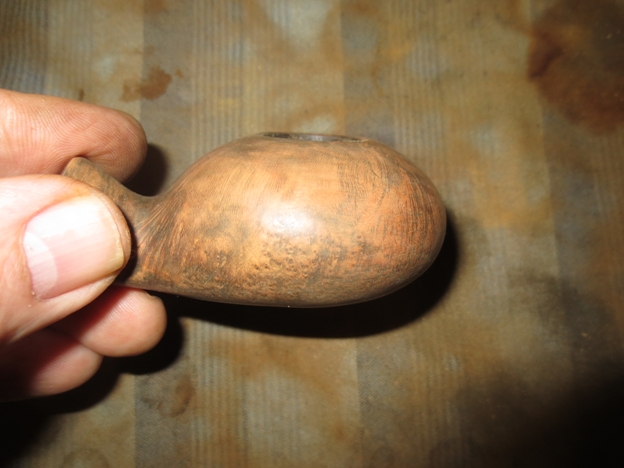
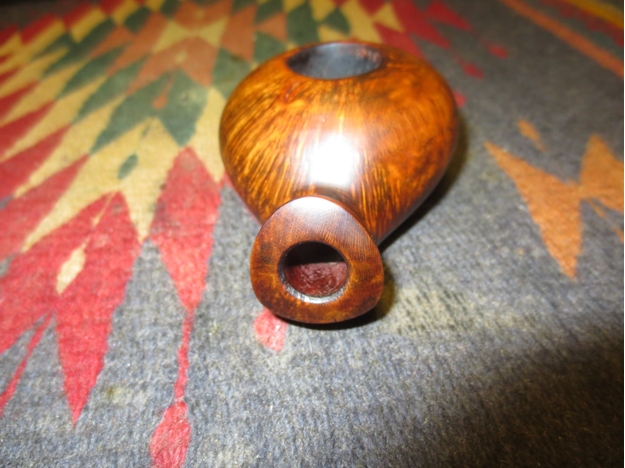
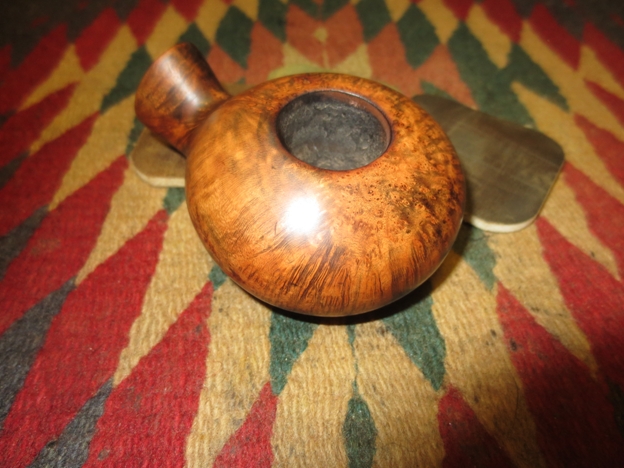
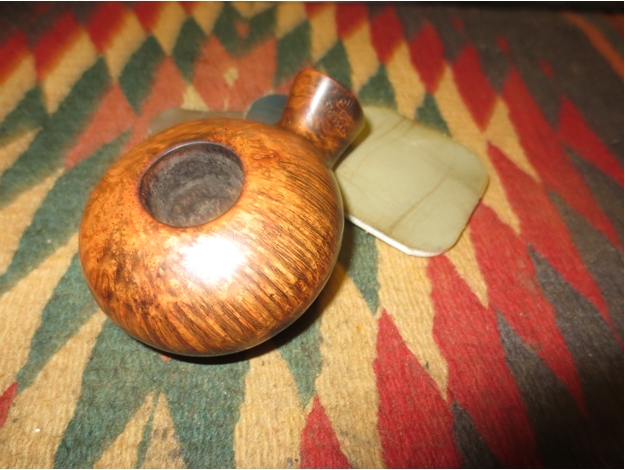
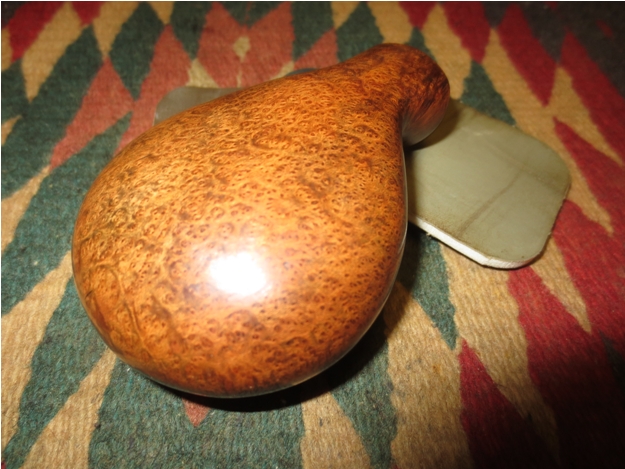
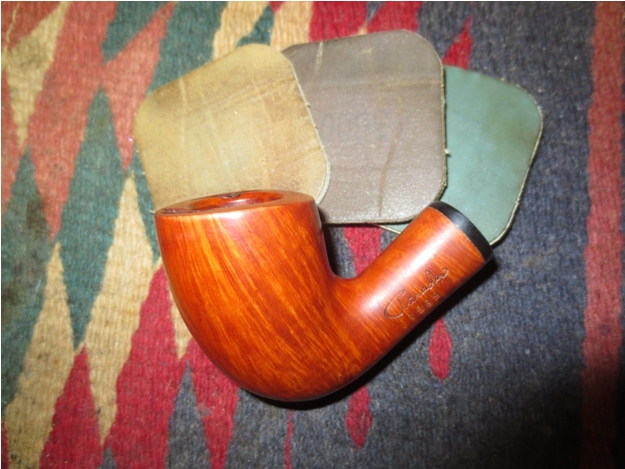
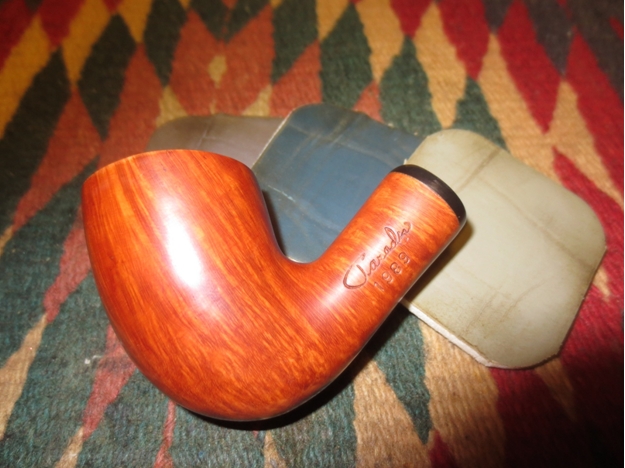
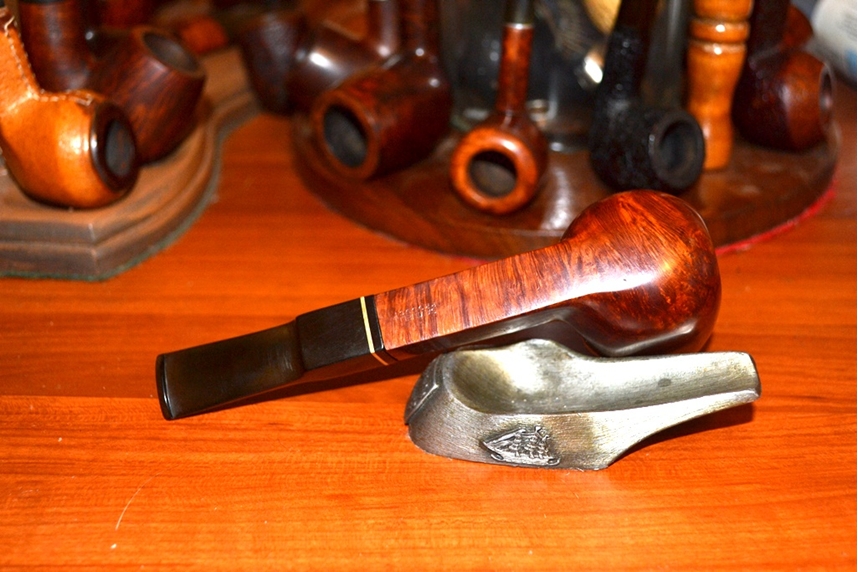
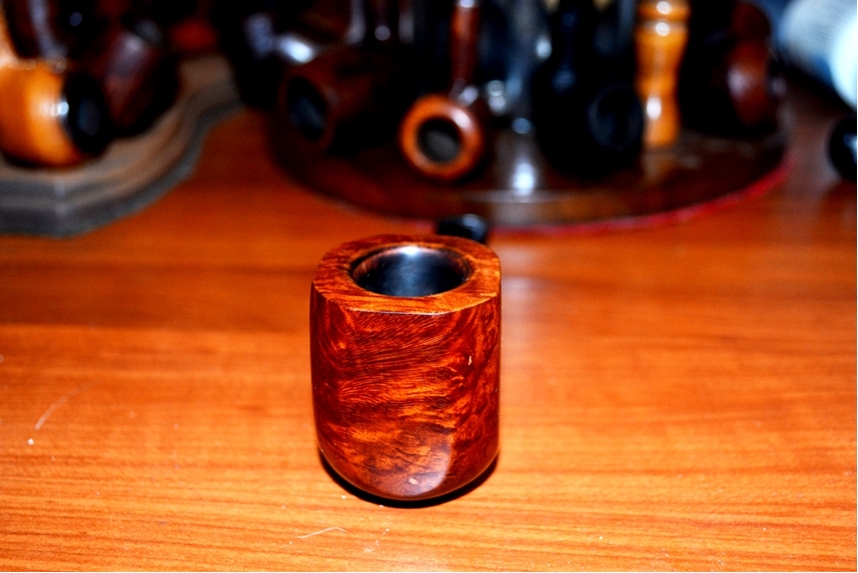
I spent Friday in the air between Berlin and Vancouver and thus totally out of the loop for emails. When I arrived back in Canada though, I had an email waiting for me with the first photos of the new pipe he was working on. It is shown in the photo below of a group of four that he is currently working on. The pipe that I was interested in is on the bottom left of the photo below.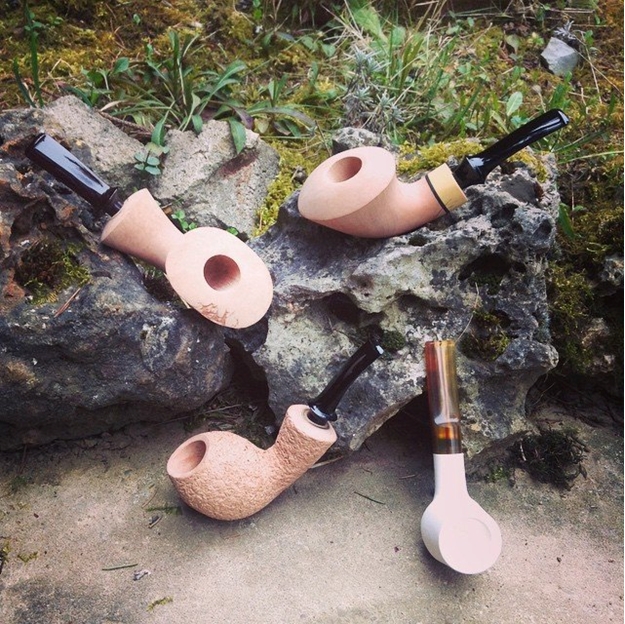 Included with that photo were several other photos showing the new pipe with the one that he had been smoking when we had coffee together. He wrote the following, “As you can see the bowl is more defined… I placed the other in the pic for comparison… I can bring in the shank side of the bowl a tic more if you prefer that, but it sits really nicer in the hand than the original…This is the how the shape has morphed over the years… I have several… It’s my favorite shape…” With those words and the photos he had me. I wanted this pipe to be mine.
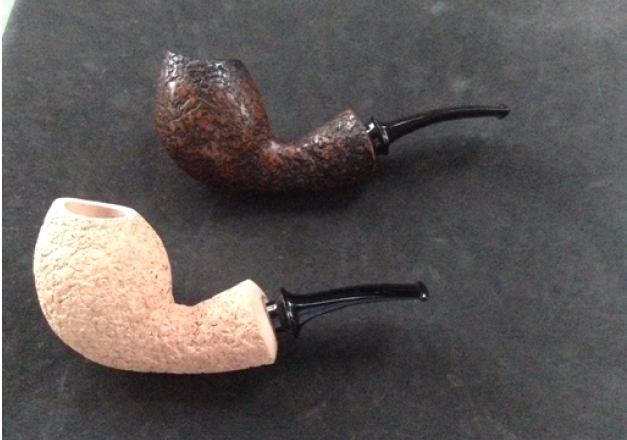
 Once I had decided that this was the pipe for me James sent me some choices for the stem material. In the above photos he used a black Ebonite and that was beautiful but I had also seen some of his Cumberland stems. There was a particular Cumberland that he had used on other pipes that I liked. It was a Briar Cumberland. That is what I decided to go with and a stain colour that would match. James sent me the following email after I made my choices: “You won’t be disappointed (with the briar Cumberland)… It’s beautiful material… Me and one other guy are the only ones I know using it a lot 😉 The black is a classic color and you can’t go wrong with it, but Cumberland stems are my favorite… I got a lot of criticism from the U.S. Makers early on because of it… Makes me chuckle now… Since they started using different Cumberland mixes in the last year or two. Have a great rest of your weekend… I’ll send you some progression pictures when they warrant it… James”.
Now the wait began. I was looking forward to the updates on the pipe that would come via email. I have to tell you that James letting me be a part of the process of the birth of this pipe was a special bonus for me. I was excited to see how the pipe would develop when he sent the next installments.
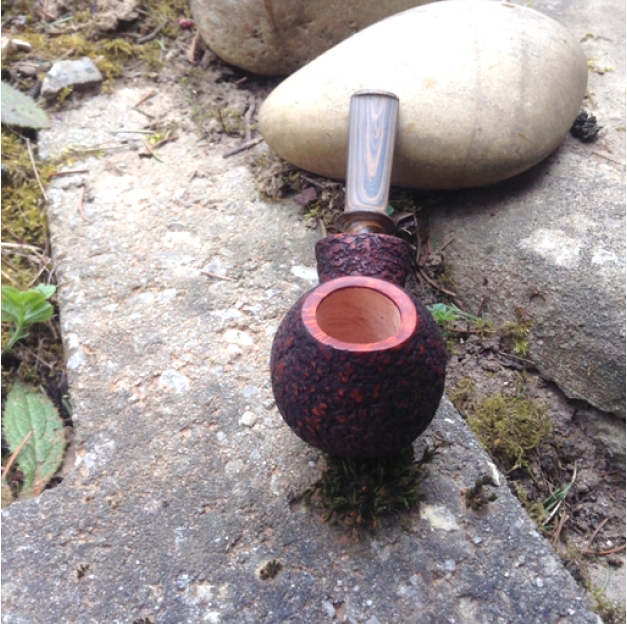
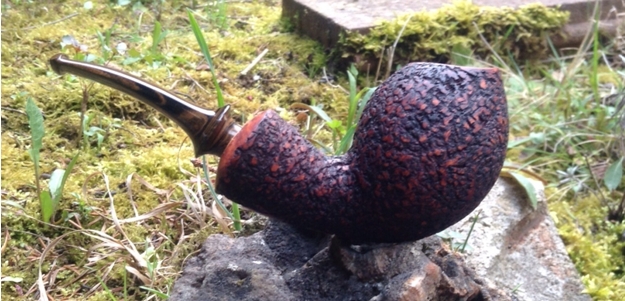
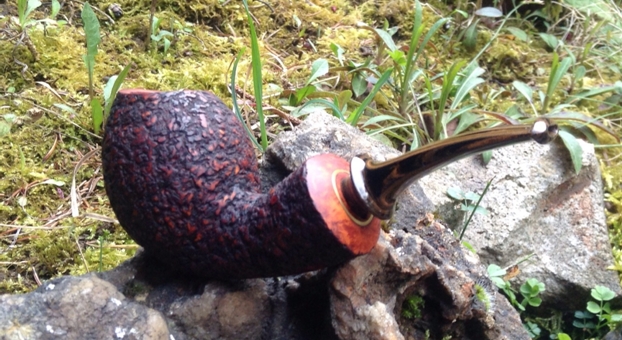
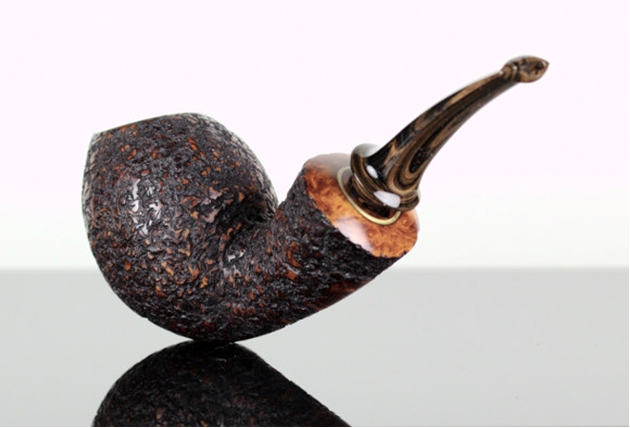
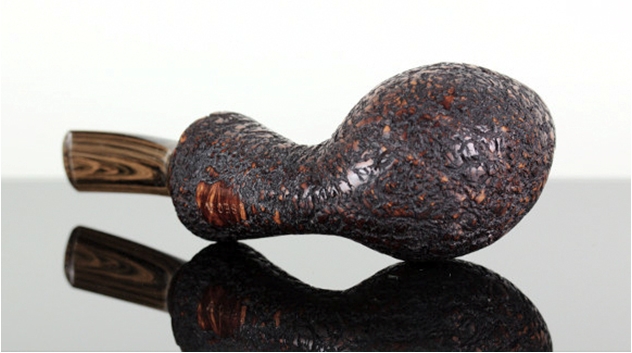
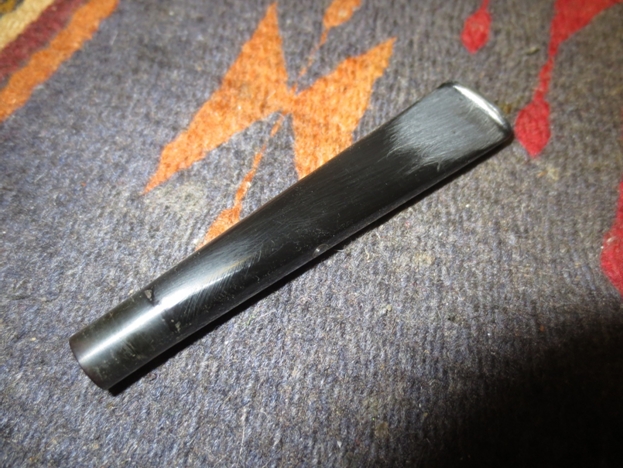
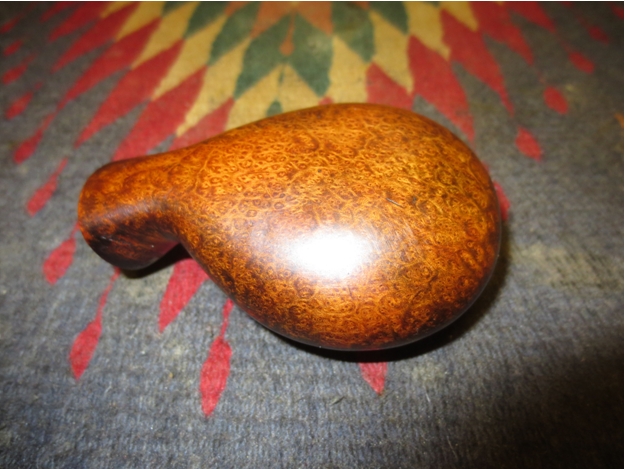
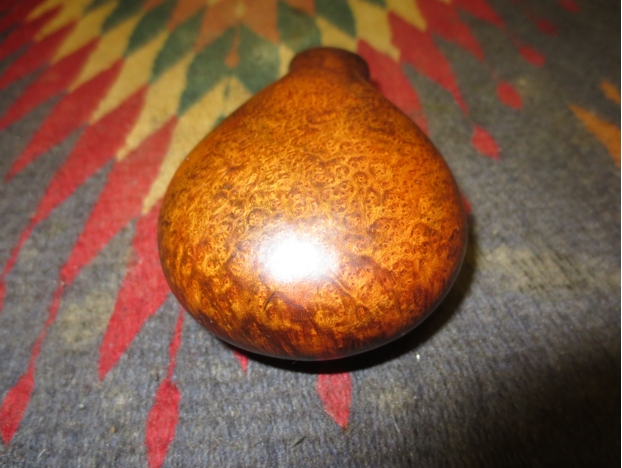
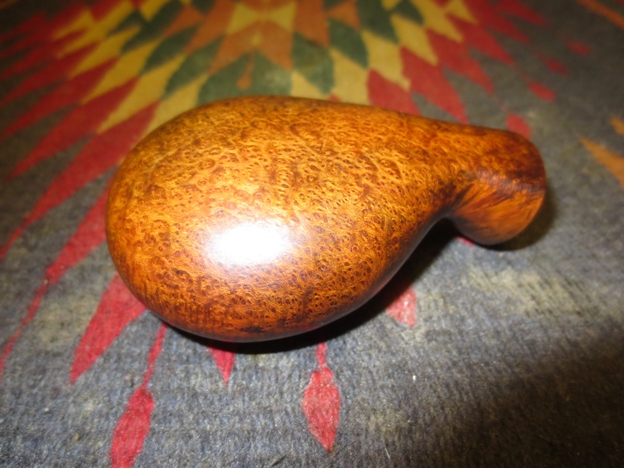
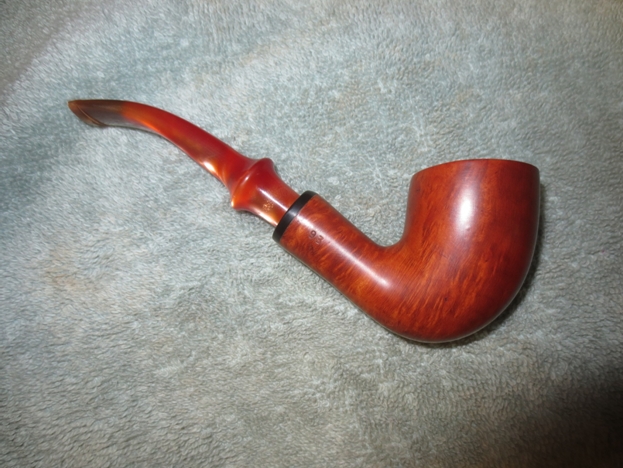
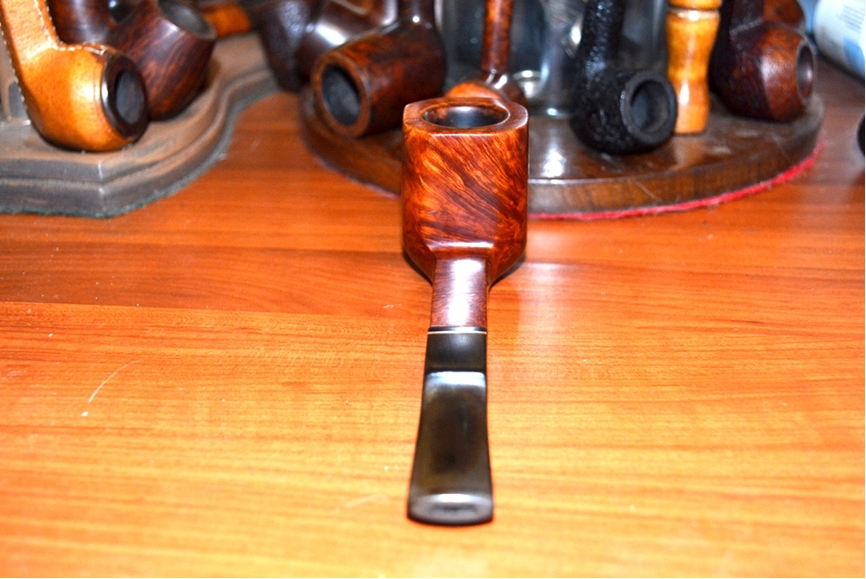
I did not have to wait too long. On Sunday morning (Vancouver time) I woke to several more emails from James. These all included updates and photos of the pipe. It had been stained with his contrast colour stains. It looked very similar to the pipe he smoked while we were together in Stuttgart. The newly cut Briar Cumberland stem looked amazing. I could not wait to see it polished. I loved both the shape and the colours of the pipe and stem. The swirls on the Cumberland stem are very similar to the stem on a pipe I had made by Todd Bannard of Briar Sweat and Tears http://www.briarsweatandtears.com/. James included the following message with the photos: “Getting closer… Wait until the stem is polished and bent… ;-)”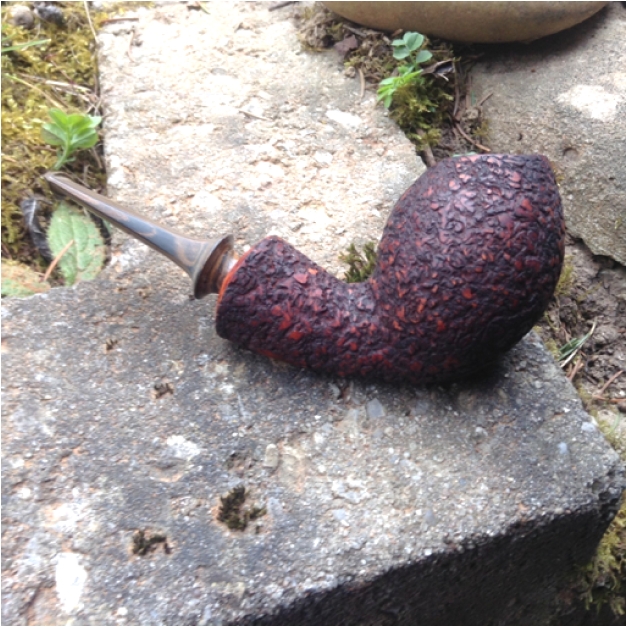
 I wrote James about my excitement at the look of the stem and the pipe. I really liked the way the Cumberland stem had come out and noted that. James replied, “I told you the briar Cumberland is nice… wait till it’s polished up… it will almost match the colors of the pipe itself”.
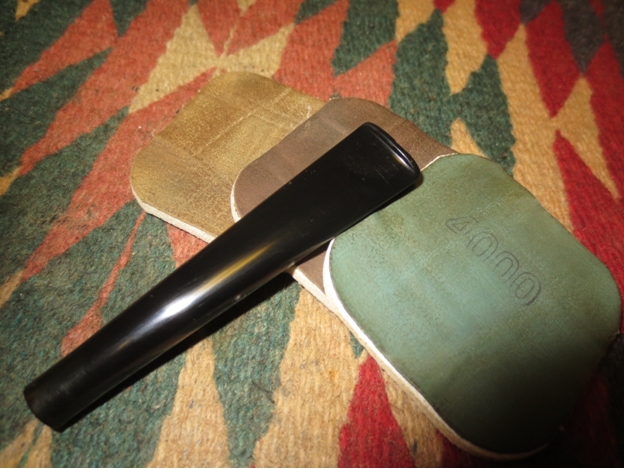
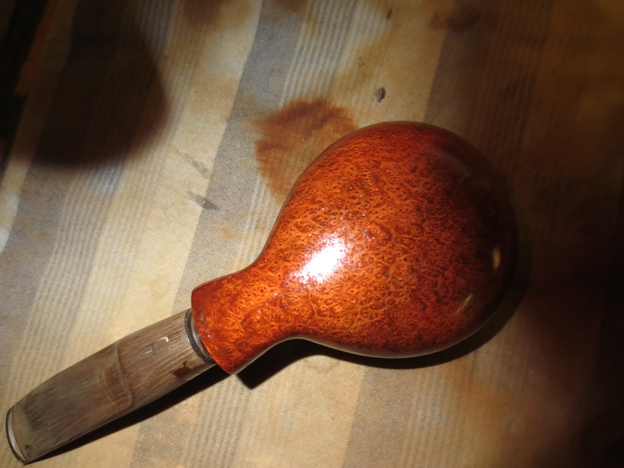
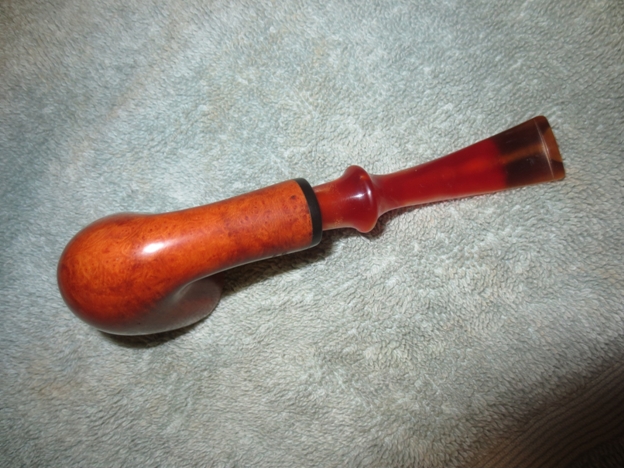
The next morning when I opened my email there was another email from James that included five more update pictures of the polished stem. He wrote: “I think you’ll be pleased with the stem… I love this material… And it shines up really nice… and has an awesome pattern on it.”
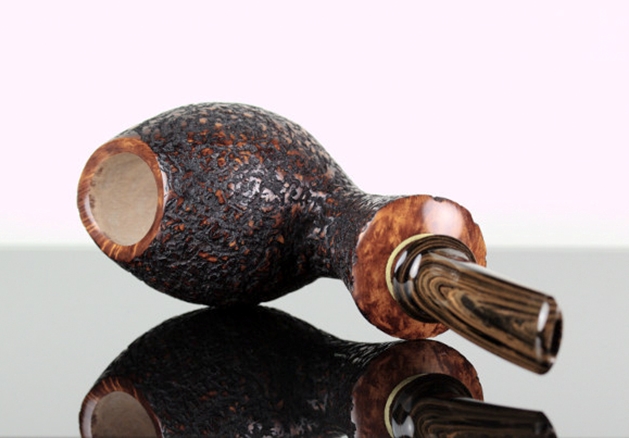
Once again I wrote back letting him know that the pipe was amazing in my book and I was very pleased. I asked him about the dimensions and he responded with a few more pictures and the dimensions of the pipe. Here are the dimensions:
Length: 5″ 127mm
Width: 1 5/8” 41mm
Height: 2″ 51mm
Bowl depth: 1 3/8” – 1 ½” 35-37mm depending on where you fill it to
Weight: 56 grams
James also wrote: “I normally coat my bowls on all my pipes… but if you don’t want the bowl coated, I’ll need to know before the weekend… I don’t mind leaving it bare for you… I’m pretty sure you know how to smoke a pipe… Ha, ha. James.” I wrote back and asked that he leave it bare for me.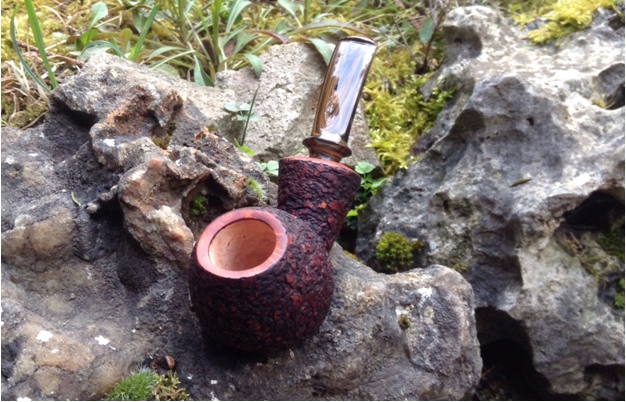

 The rest of the week went past quickly with no updates. I knew James put a finish coat on the pipe to set the stain and then did some more polishing. Whatever the process was he said it took about a week before the pipe was completed. Then on Good Friday I received an email that the pipe was finished. James included the following information in his email: “Steve it’s done…. 😉 I like the way the colors came out… Would you like it mailed via German Mail…I can do that tomorrow… or US Mail…that will have to wait till Monday… the German mail should be quicker by a day or two…would be mailed as an international letter… works like a charm each time.”
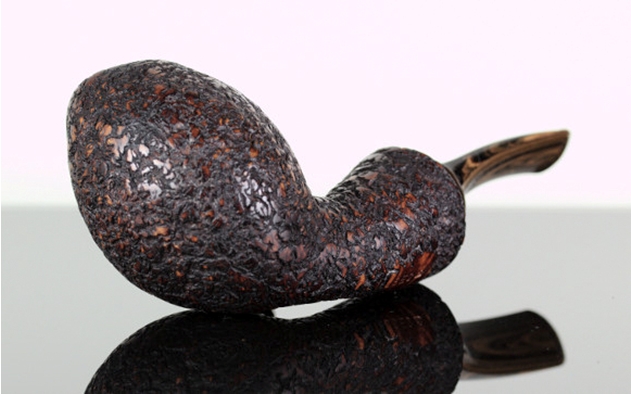
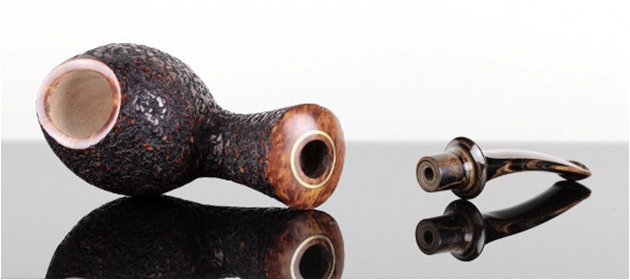
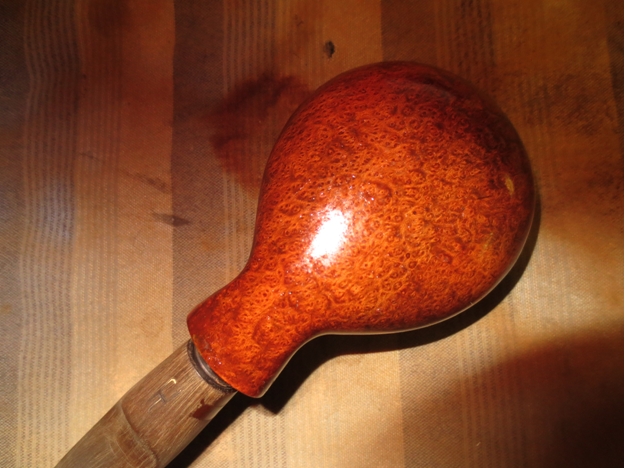
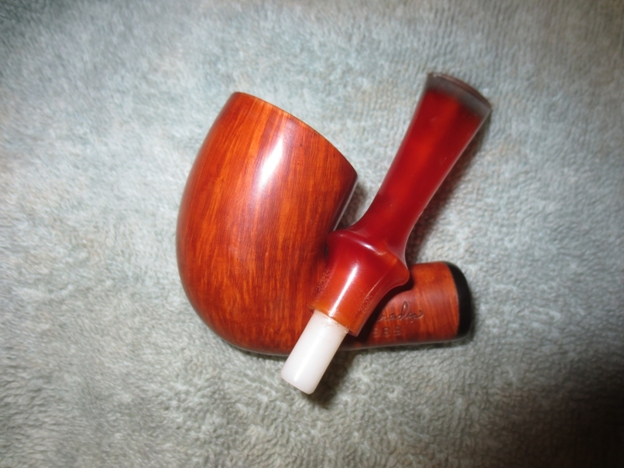
James included the following finished photos of the pipe to make me salivate. I can’t wait to see it in person. I paid James via PayPal, sent him and email that German mail would be fine. He sent me a notice that the payment came through and a tracking number to trace the shipment.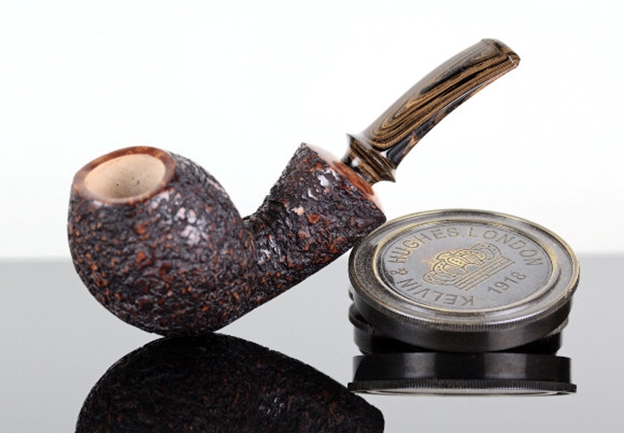


 I have to tell you, I have checked that tracking number on the postal site every day since he sent it to see the progress of the pipe from Stuttgart to Vancouver. Can’t wait until I hold it in hand and see firsthand the workmanship that James puts into his pipes. I am already scheming what tobacco tp break it in with. I have a bit of Mc Clellands 5100 mixed with some Perique that has about 5 years or more in the jar. That may well be my break in smoke. We shall see.
Blog by Steve Laug
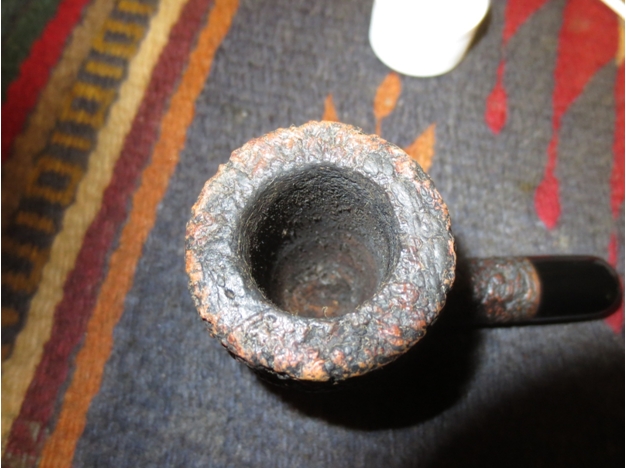
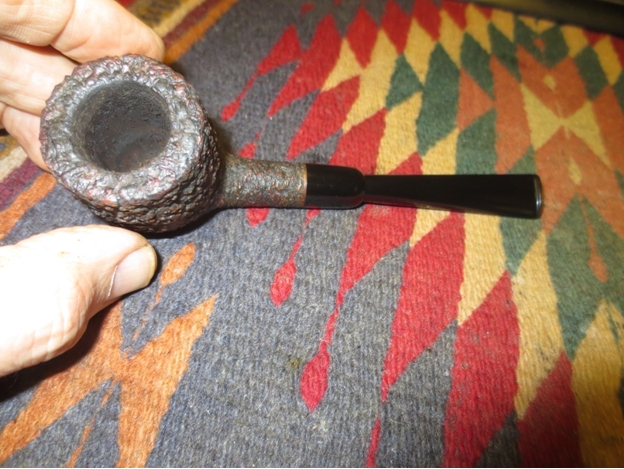
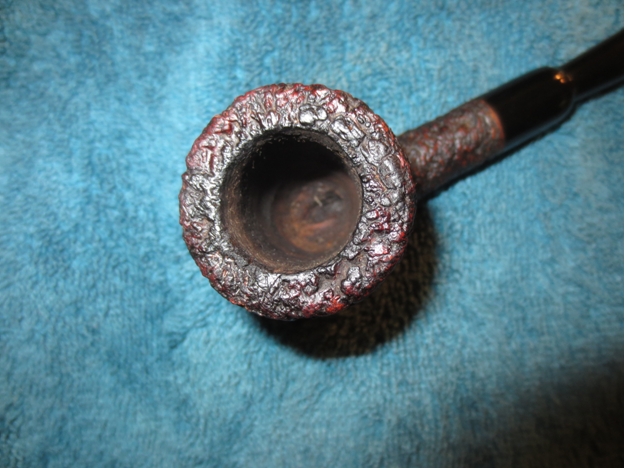
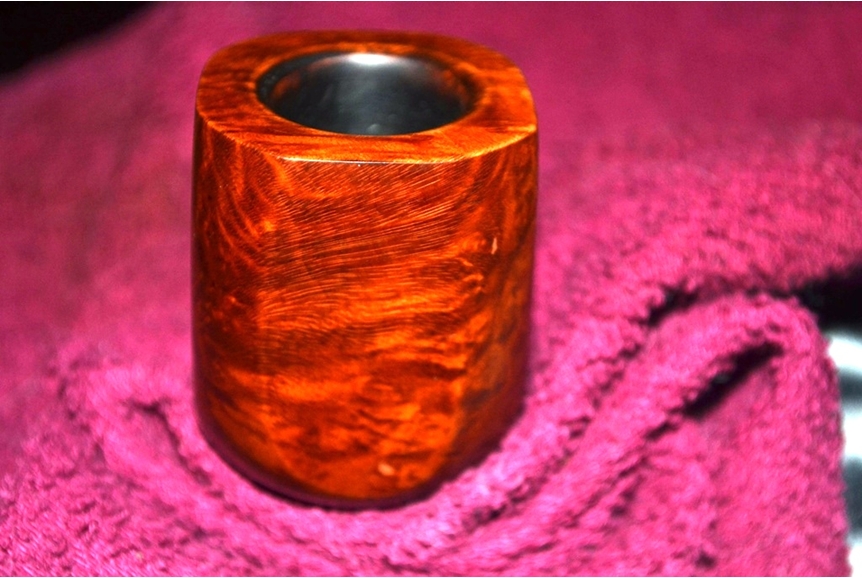
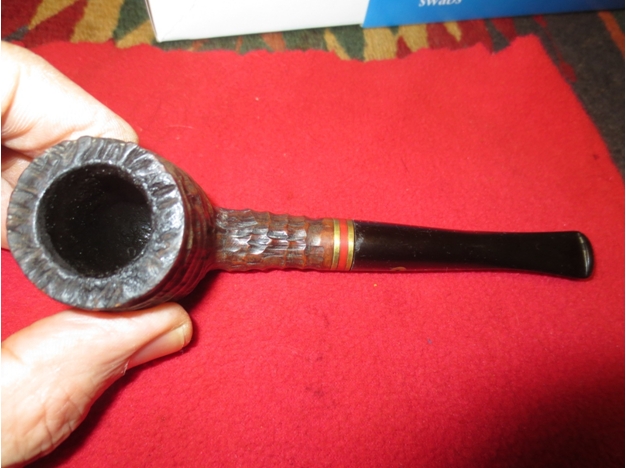
One of the surprises in the craigslist lot I purchased was a Castello Sea Rock 15FA military mount billiard. When I saw the photos in the seller’s advertisement I only saw a rusticated billiard and in the way it laid in the pipe rack it was unclear it was a military mount or a Castello. When I got it home and looked at the assortment I was surprised to see that it was indeed a Castello Sea Rock. It is shown in the photo below – the third pipe down on the right side.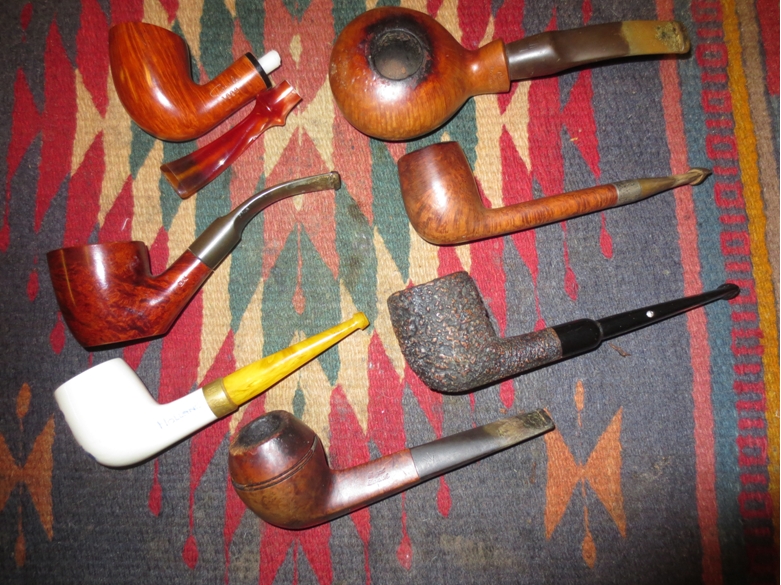 I think this must have been a pipe the seller loved as it was well smoked. There was still a bowl of tobacco unlit in the depths of the bowl. The cake was quite uneven but was thick around the top of the bowl. The rim was overflowing with tars and oils to the point that it had clogged the rustication on the top. It was higher in some places than others from the buildup. The outer edges of the rim were knocked about to the degree that it was work and there were scratches and stain missing from the edges. The stem was dirty on the end like it had sported a softie bit and had some calcification on it. There were also tooth marks on the topside and underside of the stem near the button. The button itself had some damage and scratches. The tenon end was also covered with a buildup of calcium on the end around the insert in the end cap.
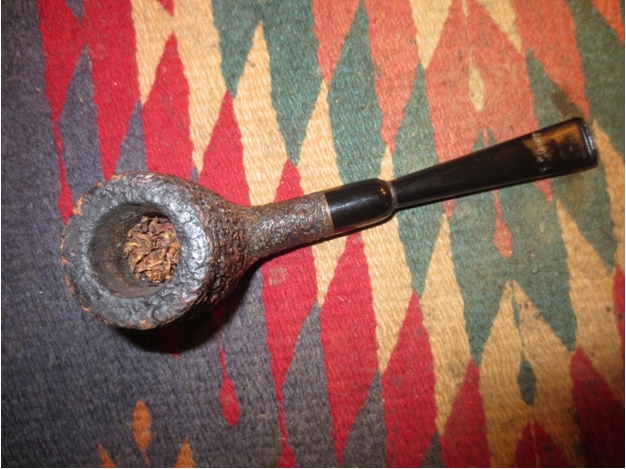 The stem had the “diamond” inset on the side that showed that it was originally made for the North American Market. I did a bit of research and found some information on the stem logo. I quote: “American logo’d Castello pipes use a small round “Diamond” (referred to and looking like, but it is NOT actually a diamond) inlaid into the mouthpiece. This was originally done so that the standard Castello white bar logo did not conflict with another brand and logo that was sold by Wally Frank called the “White Bar Pipe” (in the 1950’s).” I also found that “The SEA ROCK [Carved Black or dark brown] is the lowest grade of the Castello line and is the most common in the USA. Sea Rocks are produced by taking a smooth bowl that has not been “final finished” and surface carving the finish with tools. This “carved” finish is then evened out using a steel wire brush, stained and then waxed.” This information was found and condensed from the PCCA Castello Grade & Style Guide – by Robert C. Hamlin (c) 1988, 1992, 1994.
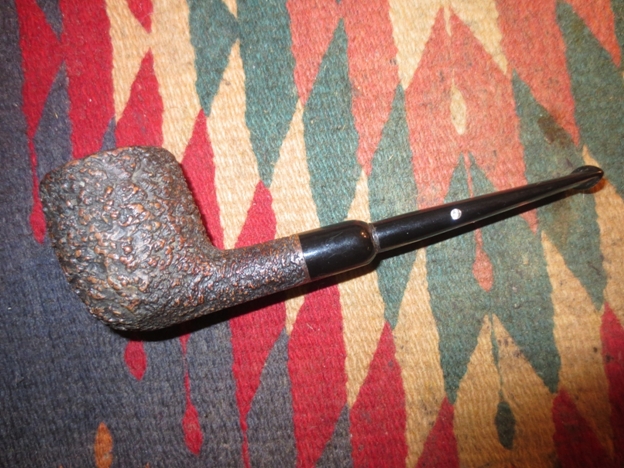
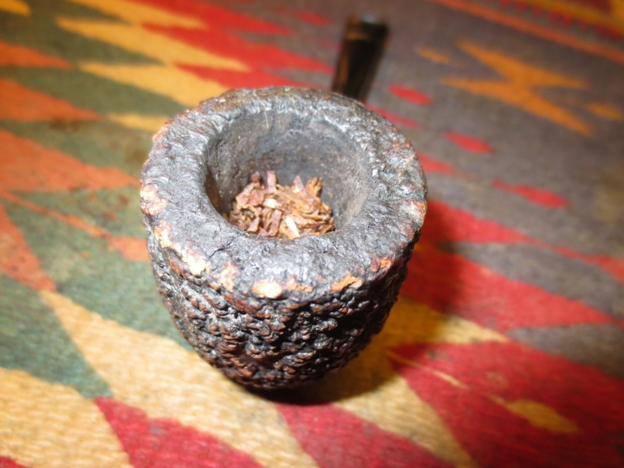
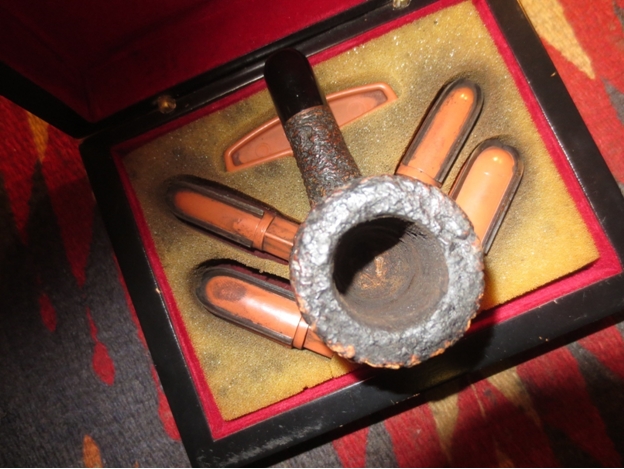
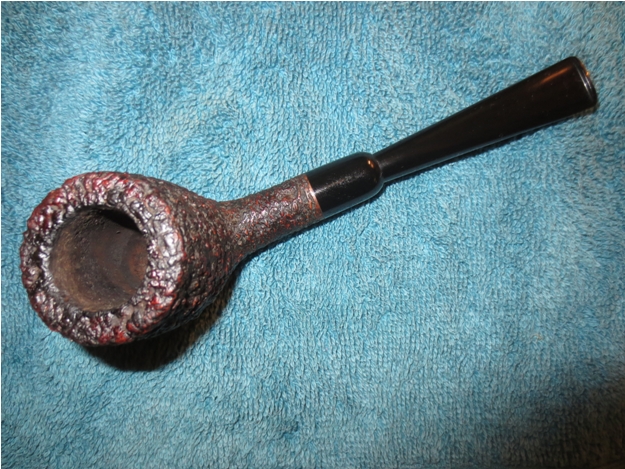
 The two photos below show the buildup on the rim more closely. The thick tars and oils over flowed on the top of the rim. You can see that the rustication is buried under the lava.
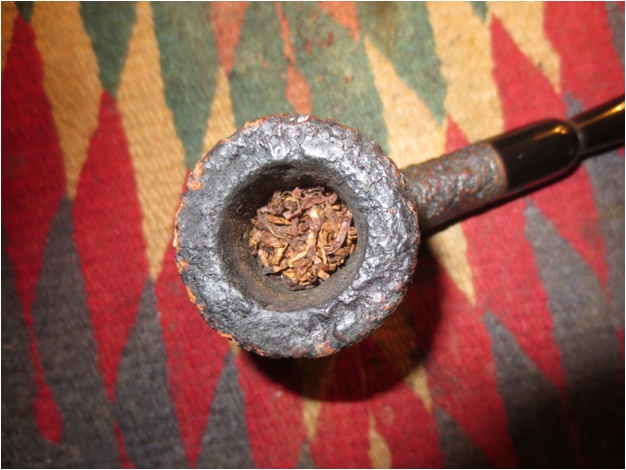
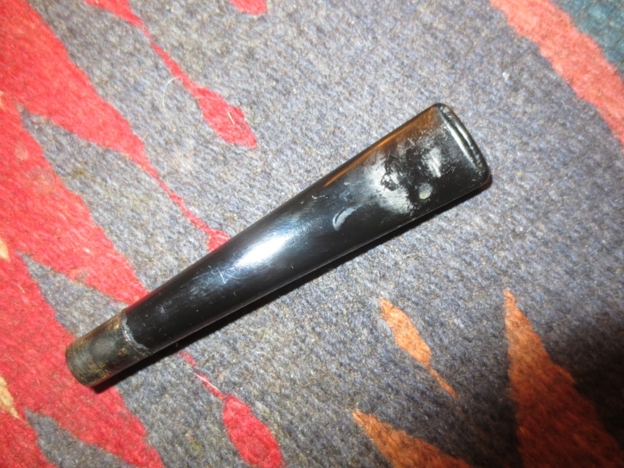
 The next two close up photos show the stem with the bite marks on the top and the bottom side and the calcification on the surface of the stem. In the second photo there is also buildup around the insert end of the stem.
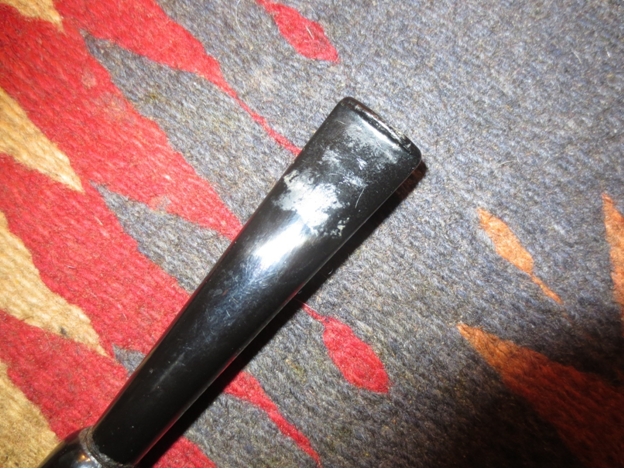
 I reamed back the cake to bare wood to remove the uneven surface with a PipNet reamer. I started with the second cutting head and finished with the third cutting head.
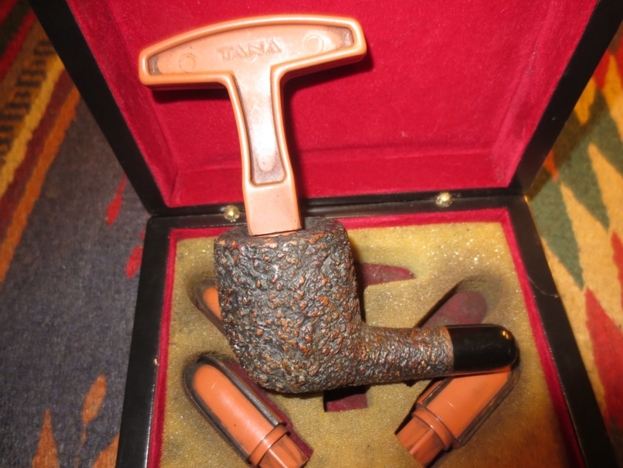
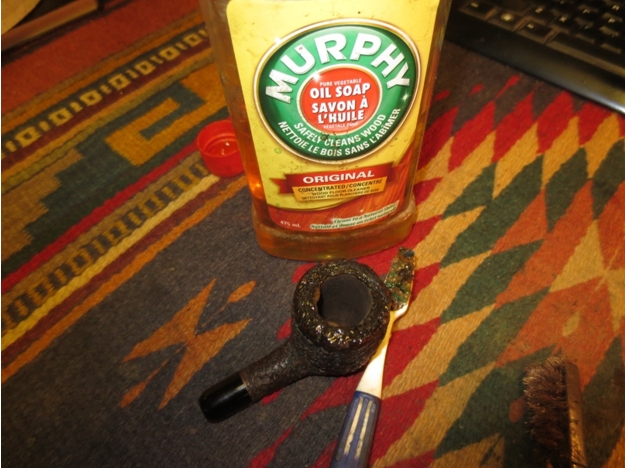
 I used a brass wire brush and a dental pick to work on the tars on the rim. I scrubbed it and then used a tooth brush to put Murphy’s Oil Soap on the rim. It softened the tars enough that I scrubbed it again with the wire brush and picked at it with the dental pick. I rinsed off the soap with running water and then dried the bowl.
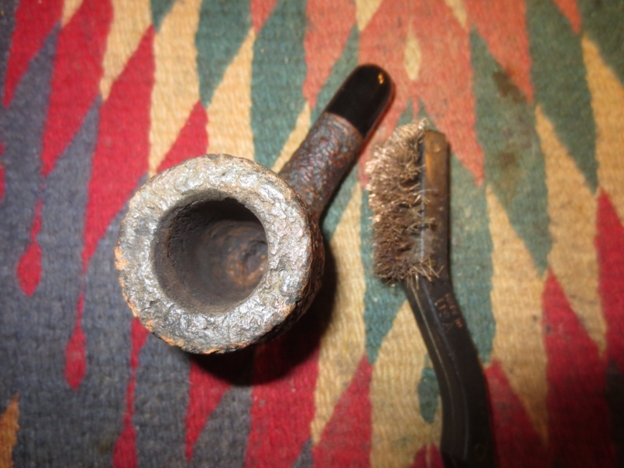
 I restained the worn areas on the top of the rim and the outer edges with a Guardsman Stain pen. I used the dark stain pen as it matched the rest of the bowl. Once I had touched up the stain I rubbed the top of the rim with a cotton cloth to blend the stain into the rest of the rim colour.
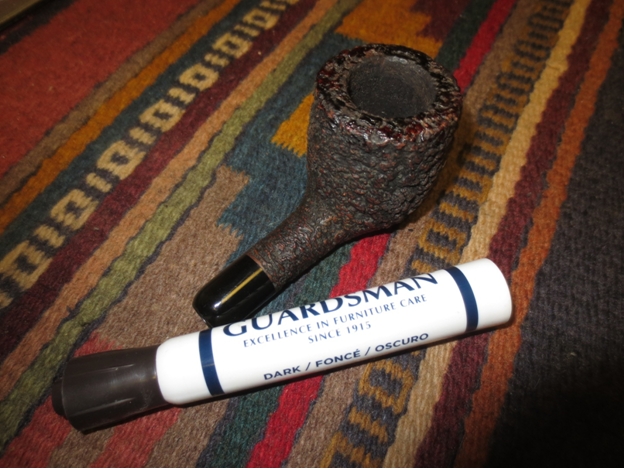
 I sanded the stem with 220 grit sandpaper to remove the tooth chatter and the tooth marks. I also sanded the stem to remove the calcification. I then sanded it with a medium and fine grit sanding sponge to reduce the scratching.
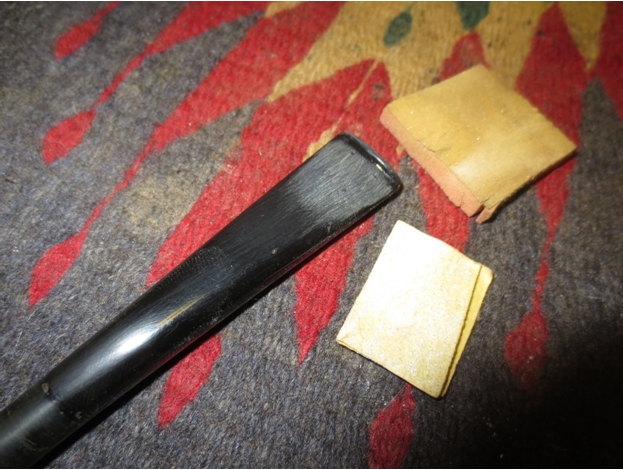
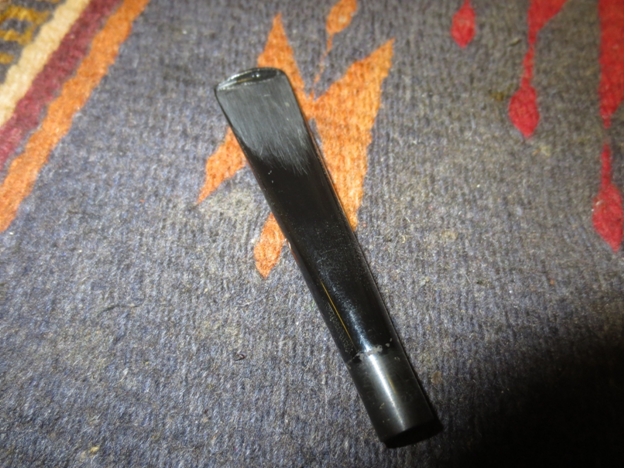
 I sanded the stem with micromesh sanding pads. I wet sanded with 1500-2400 grit pads and dry sanded with 3200-12,000 grit pads. I rubbed the stem down with Obsidian Oil between each set of three pads.
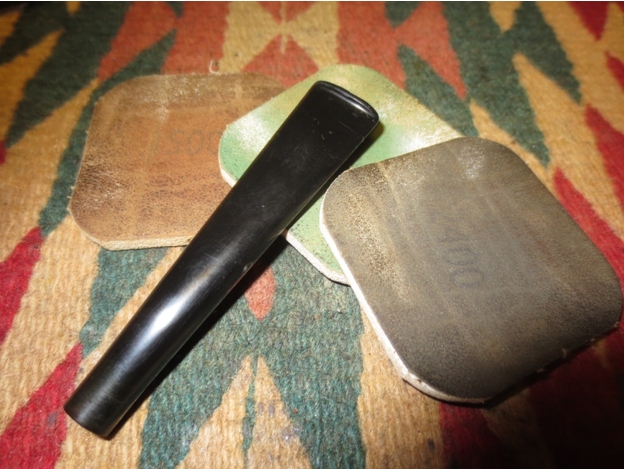
 I also polished the edges of the end cap to remove the worn areas on the surface. I fit the stem back into the shank and hand polished the stem with a cotton polishing cloth. I gave the bowl a coat of Halcyon II wax and buffed it with a shoe brush. The photos below show the pipe after the buff with the brush.
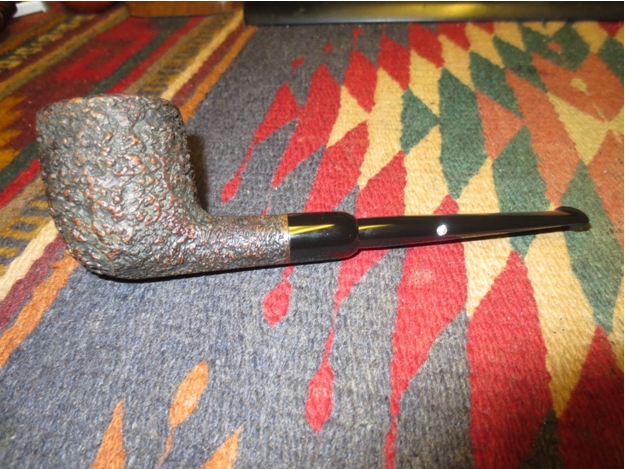
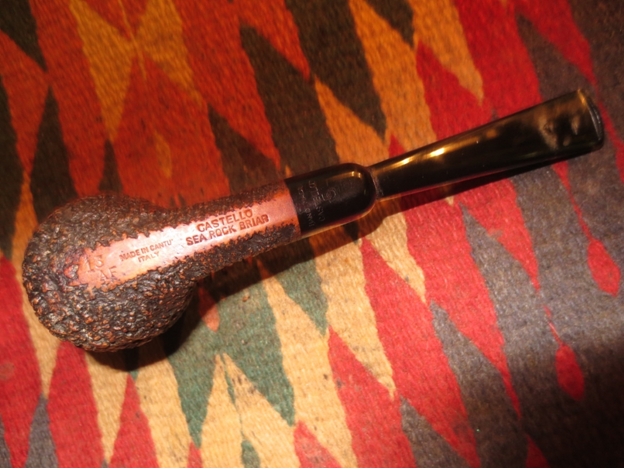
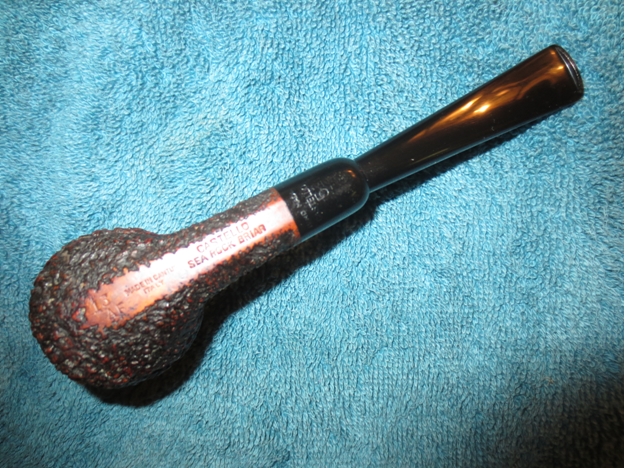
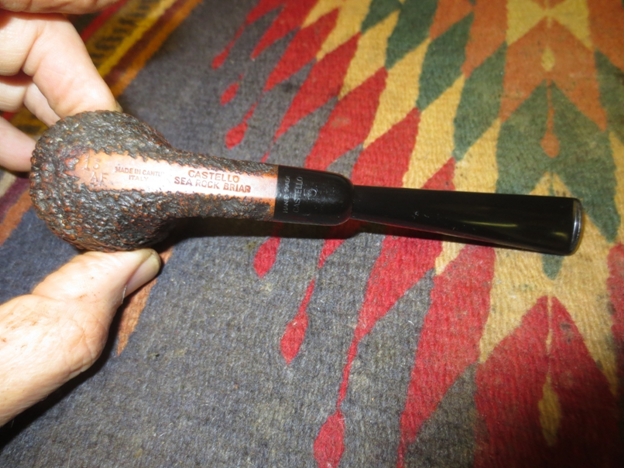 The next close up photo shows the stamping on the pipe. It is stamped CASTELLO over SEA ROCK BRIAR on the flat portion of the shank bottom. To the left of that stamping it reads MADE IN CANTU over ITALY and to the left of it is the number 15 over AF. The end cap is also stamped HAND MADE over CASTELLO over 5.
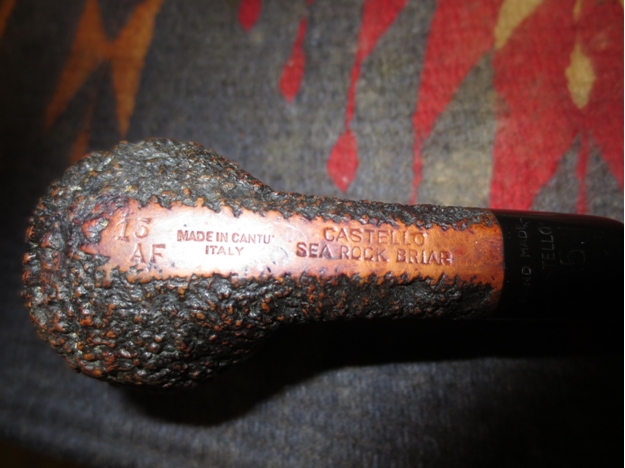 The next series of photos shows the finished pipe. I lightly buffed it with a soft flannel buffing pad. It raised the shine on the briar. I buffed the stem with Blue Diamond and then gave the stem several coats of carnauba wax. I buffed the entire pipe lightly with the clean soft buff.
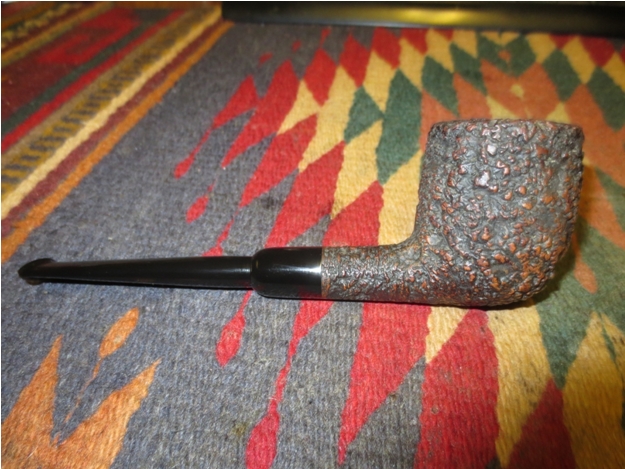
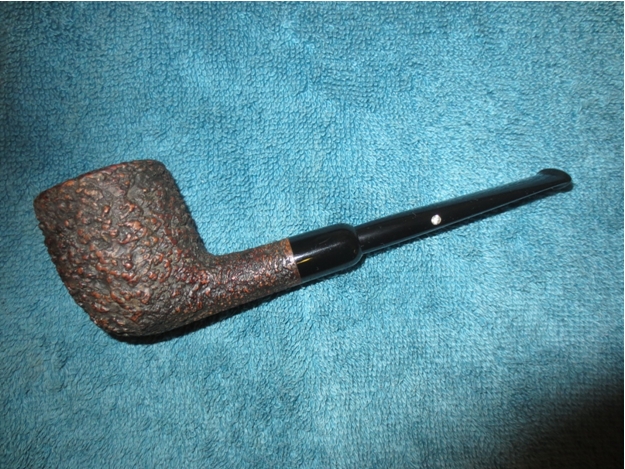

 After looking at the finished photos I decided to give it a light rubdown with olive oil. I wanted to enliven the finish and what better way than to add some Italian Olive Oil to and Italian briar.
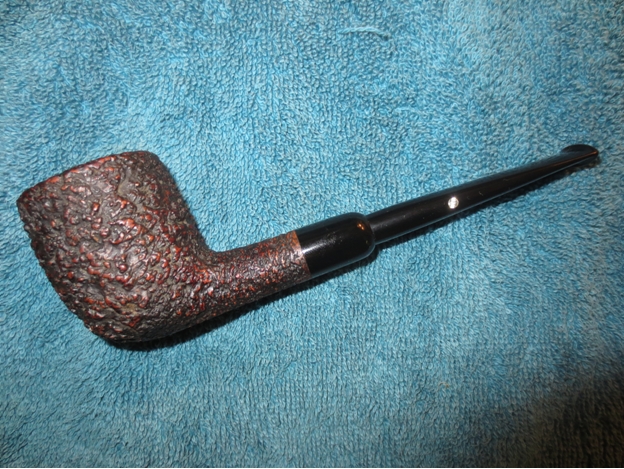
ADDENDUM: I wrote this while wondering about the 15 AF stamping. I knew that the 15 was the shape stamp but the AF threw me for a loop. I posted on both Smokers Forums and Pipe Smokers Unlimited Forum and asked for help. Many offered suggestions. Several said to write Mike Glukler of Briarblues so I did that. Mike replied fairly quickly that he had no idea about the mystery stamp but sent it on to Marco at Novelli, and Castello collector Dave Peterson. Dave replied that he believes that it stands for Army Fitment. He went on to say that the newer army fit pipes that he has have the letter (SC) size designation and have no AF suffix so he assumes the AF stamp was discontinued in the early 60’s. He also said he would check with some others. So it seems I have a tentative answer regarding the stamping.
ADDENDUM 2: Bill on Pipe Smokers Unlimited wrote to Castello and asked them what the stamping meant. He posted their response this morning:
“Steve here is the Castello response and I think you will be quite pleased and surprised.
Dear Customer,
thank you for your inquiry,
the number stands for the shape 15, the billiard. Then “A” stands for
“amici” = friends, “F” stands for flock.
That is a pipe given to friends (read “not for sale”) with a flock. I
hope it helps.”
You got to love the pipesmoking community and the wealth of information available to us if we ask.
Blog by Steve Laug
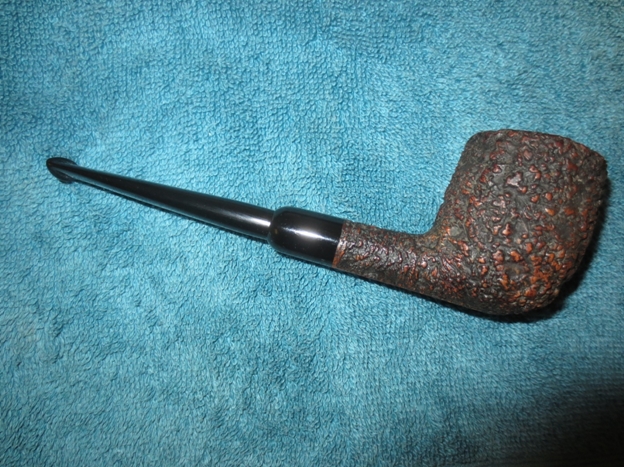
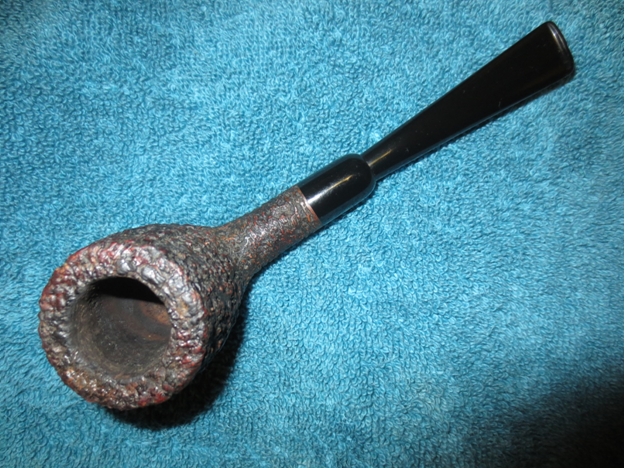
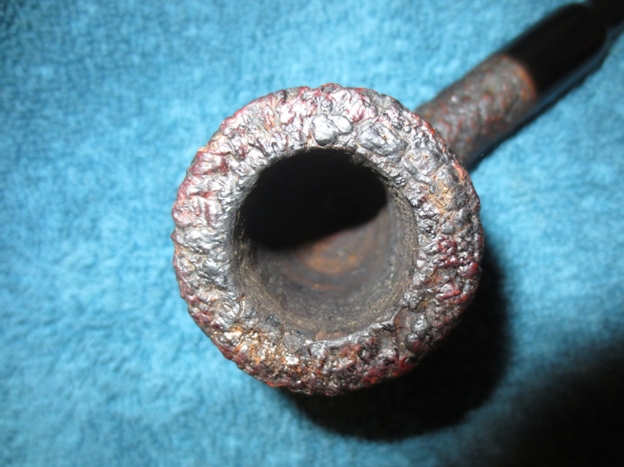
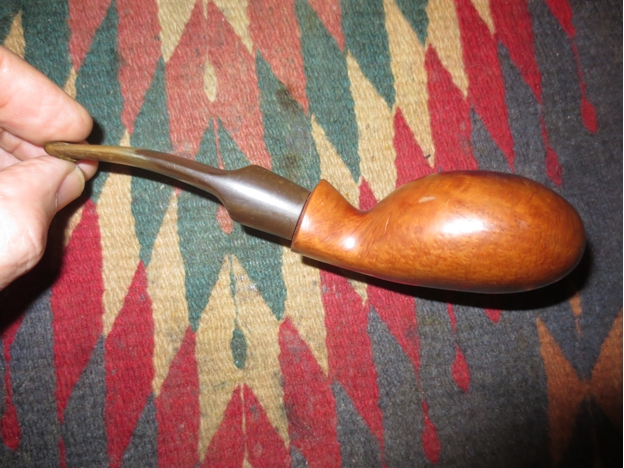
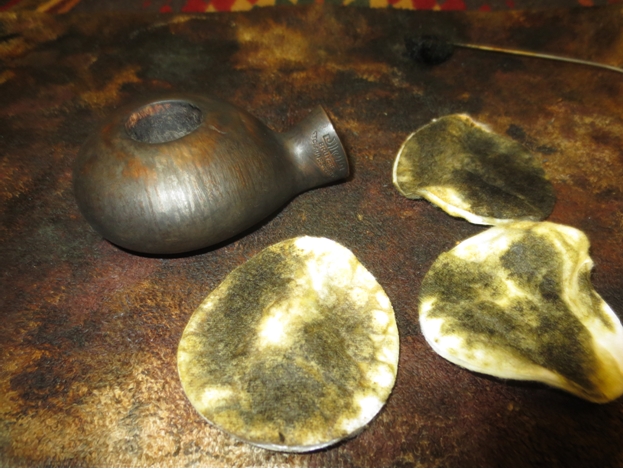
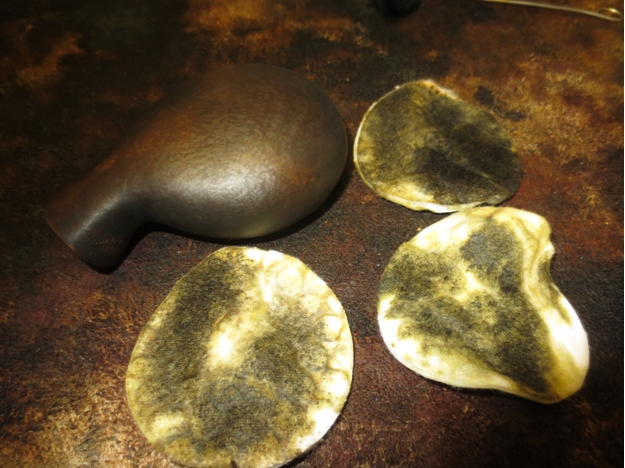
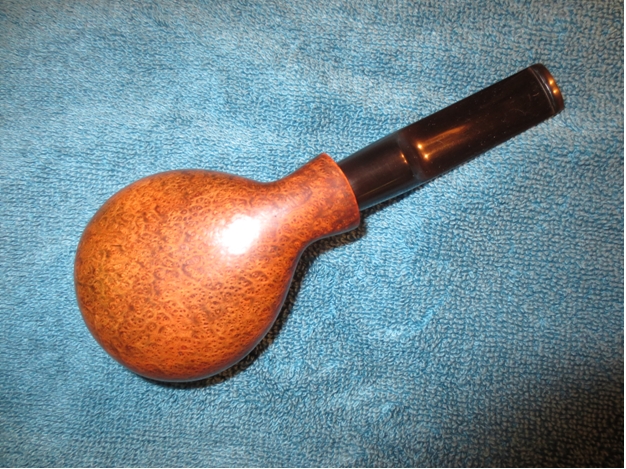
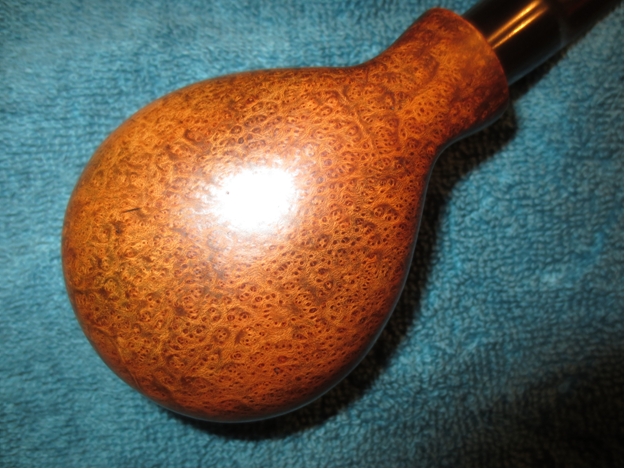
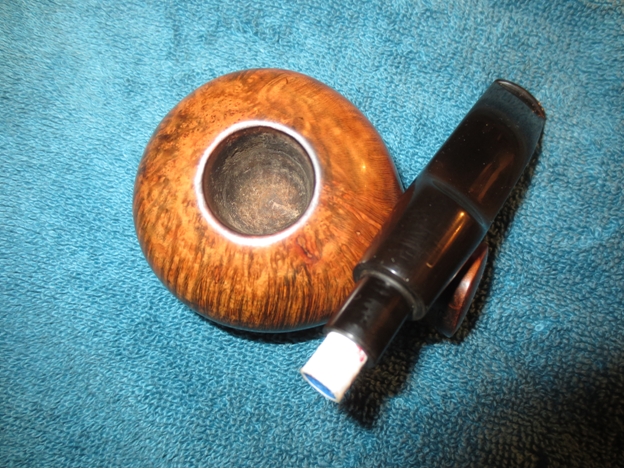
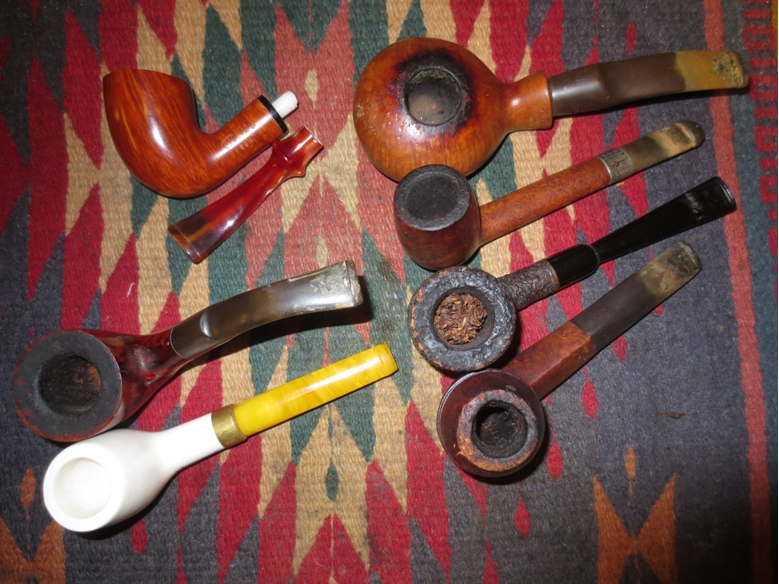
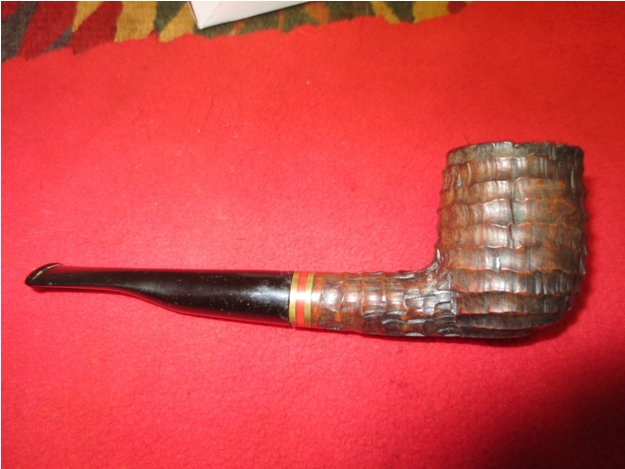
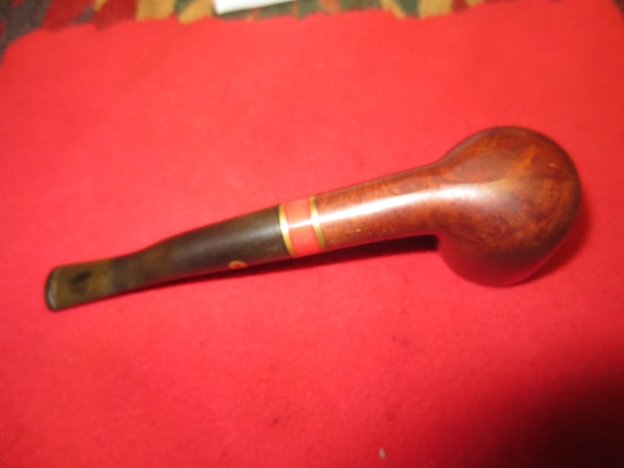
When I first saw the pipe lot on craigslist Vancouver the pipe that caught my eye was the squashed tomato that is shown in the photo below on the top right. I had no idea who the make was but it was obviously a large pipe and a unique shape that made me want to know more. It is actually the pipe that pushed me to make the phone call to the seller. I have a Rad Davis that is similarly shaped but nowhere near as large. When I got to the seller’s home and looked at the pipe I could see that it was stamped JPL over Bruyere over St. Claude France on the shank. The pipe was well smoked. The finish was pretty well dried out – I think originally it had been an oil finish over the natural briar and that was gone and in its place was a lot of grime. The top of the bowl was in the roughest shape. It had a thick coat of tar/oil that I call lava flowing over the rim. The bowl had a cake that was hard and there were remnants of tobacco stuck in the walls and bottom of the bowl. The top also had what looked like road rash on the front. There were many pin prick nicks and dents that made me think that the pipe had been dropped on concrete. The redeeming feature was that the briar had some stunning flame grain around the sides and top portion of the bowl and featured great birdseye grain on the bottom. The stem was oxidized and there were two deep tooth marks on the top and bottom sides of the stem near the button. There was also a lot of tooth chatter and it looked as if the stem had been covered at one time with a softie bit.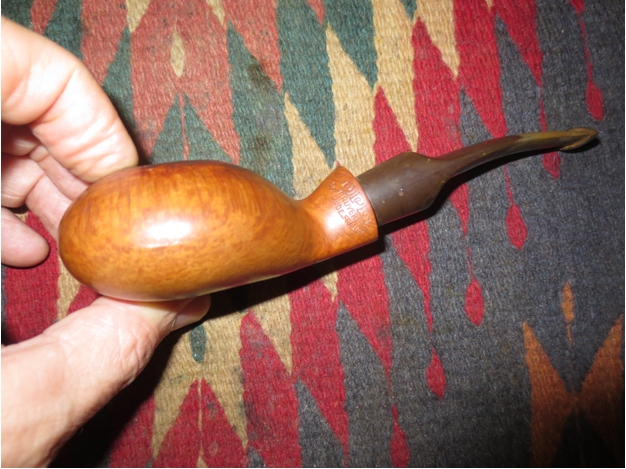
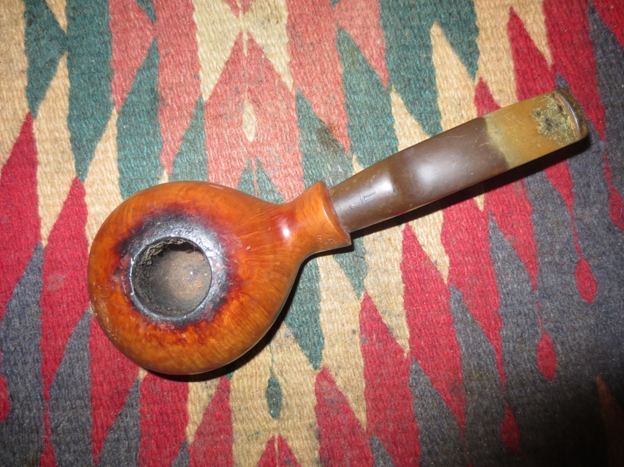
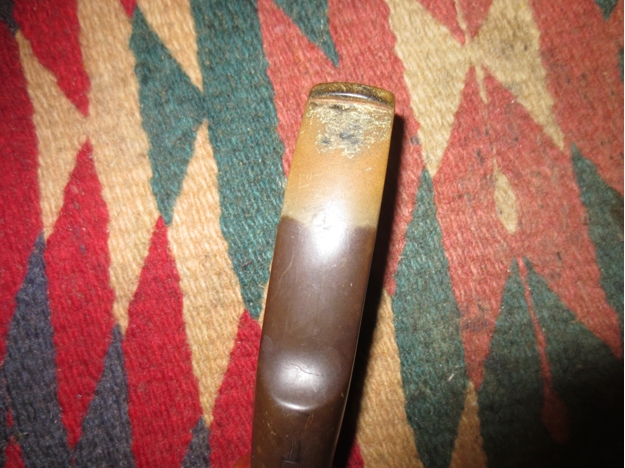
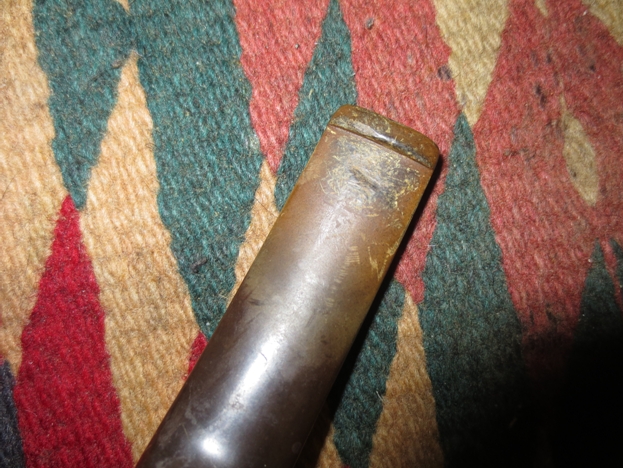
 I took the next series of three photos to show the damage to the top of the bowl and the tooth marks in the stem.
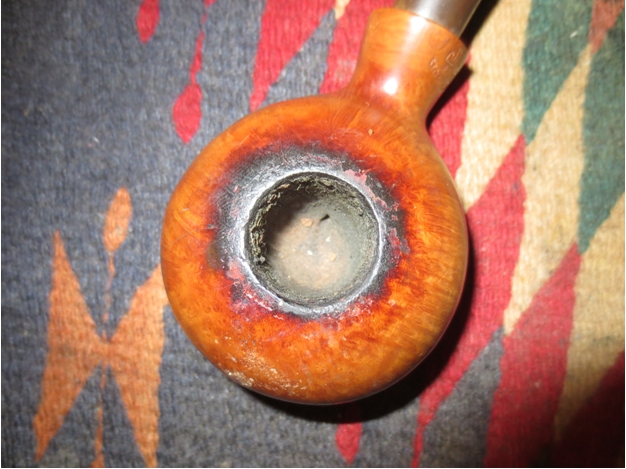
 I was unfamiliar with the stamping on the pipe as I had not seen it before. Once Googled it on the web I found that JPL stood for Jean Pierre Lacroix. That was a name I was familiar with in previous reading on St. Claude pipe making families. I looked on Pipedia and found the following information:
“Lacroix Pipes have a rich history of pipe making tradition and the brand was started in 1962. Eugine Lacroix began making pipes for the Delacour factory in the 19th century; his sons founded their own factory in 1921. Two of the grandsons (including Jean) continued on in the business, but parted ways and struck out on their own in 1962. At that time, Jean set up Jean Lacroix pipes, coincidentally in the old Delacour building his grandfather started in 85 years prior. Today, Jean Lacroix, Chacom, Jeantet, and Vuillard are all pieces of the larger Cuty-Fort Enterprises, and Jean is actively involved with the prestigious Confrerie des Maitres-Pipiers de Saint-Claude. Jean still makes pipes; his spectacular freehands are known throughout the world. The model named “Nizza” De Luxe is made by him with scripted stamp showing his name (hard to read!). Jean Pierre Lacroix sometimes marked Maitre Pipier a Saint-Claude.” Quoted from Pipedia http://pipedia.org/wiki/Lacroix
More information is available on PipePhil’s website. http://www.pipephil.eu/logos/en/infos/lacroix-en.html#split
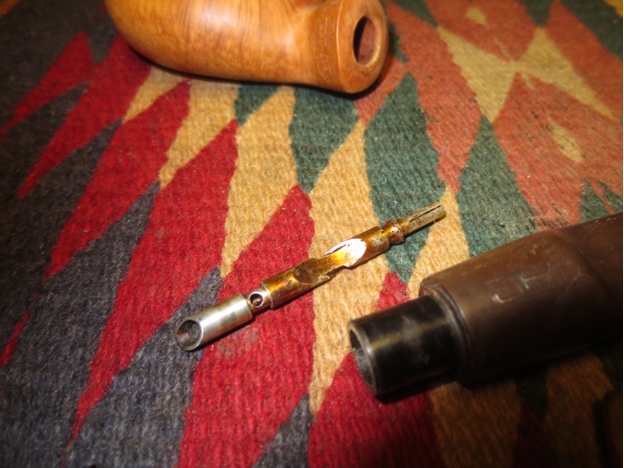
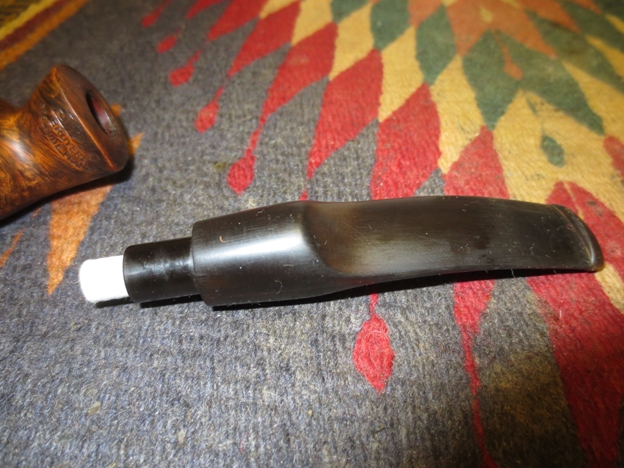
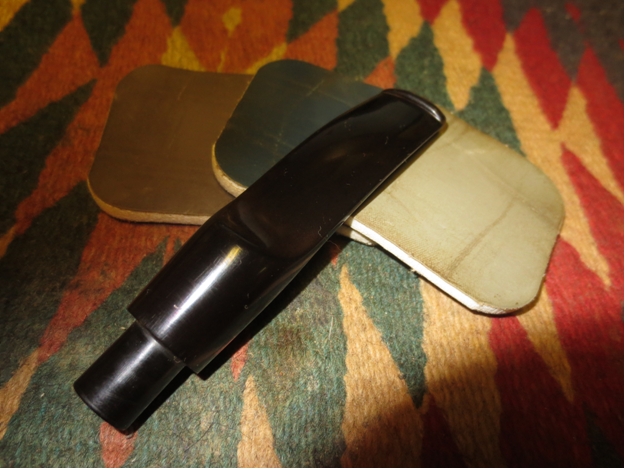
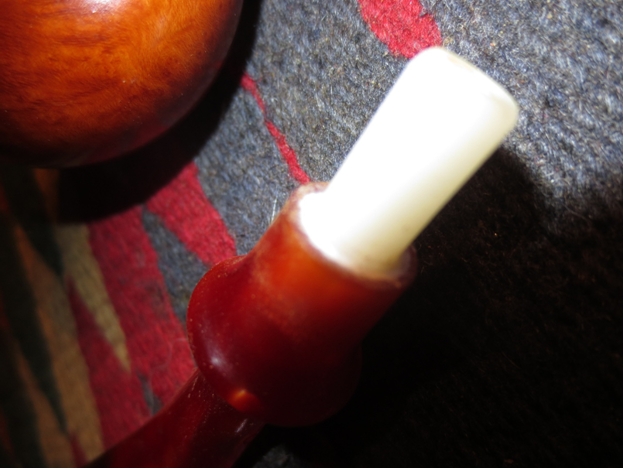
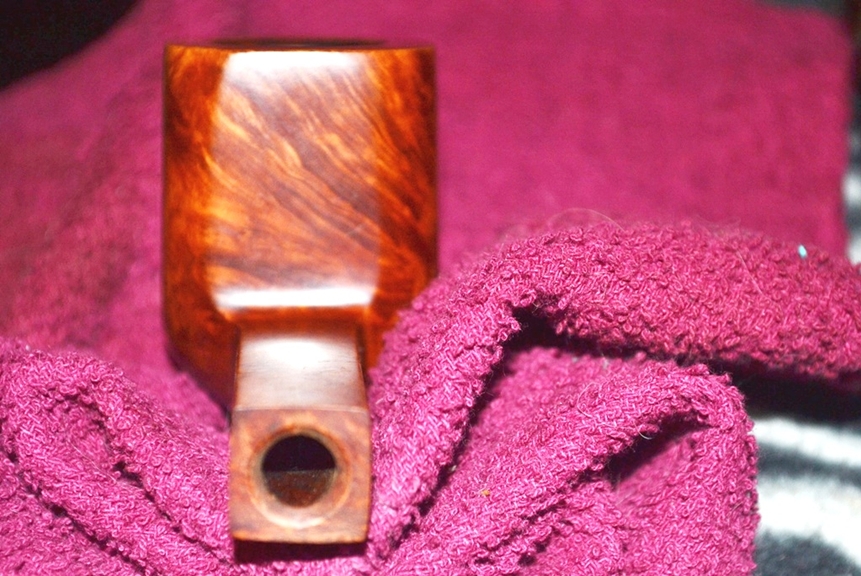
I began cleaning up the pipe by scrubbing the rim with acetone on a cotton pad. Since the pipe was unfinished and was so dirty I used acetone rather than alcohol. I scrubbed the bowl top until I had removed all of the tars and oils. I also wiped down the remainder of the bowl to remove the oils and dirt from the years of being held in the hand.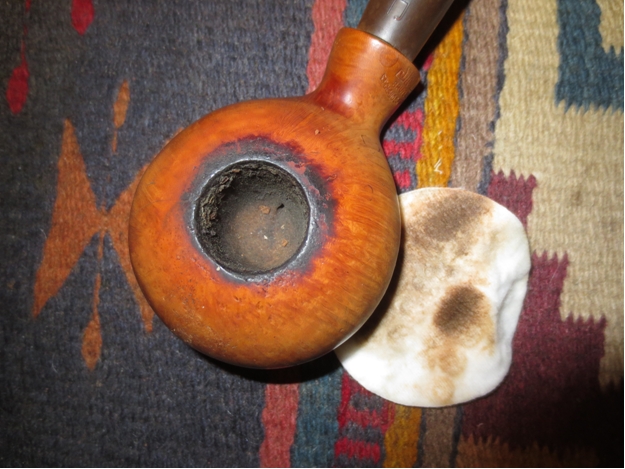 Once I had the bowl top cleaned I removed the stem to see what I was dealing with. I found that the stem and the shank was drilled for a 9MM filter but that somewhere along the way someone had inserted an ill fitting stinger apparatus in the tenon. It was pressed in place deep in the tenon and there was a lot of wiggle room around it. It did not extend very far into the shank and as such the shank was filthy. The first photo below shows the stinger in place. The second shows the length of the stinger once I removed it from the tenon.
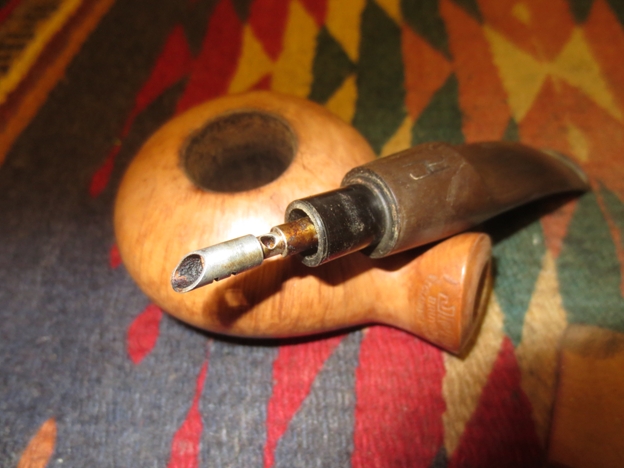
 I sanded the bowl with 220 grit sandpaper to remove the damage on the top of the bowl. I sanded until I had removed the road rash on the front edge and the damage to the back of the bowl. I sanded it further with a medium and fine grit sanding sponge to minimize the scratches left behind by the sandpaper.
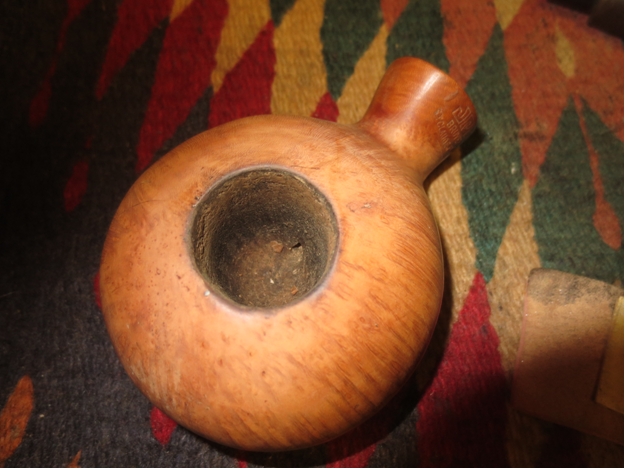
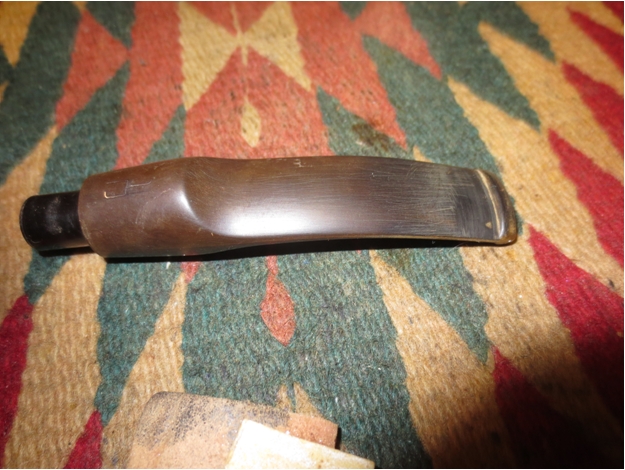
 While I had the sandpaper out I also sanded the tooth chatter and tooth marks on the stem. You can see that after sanding I still had a fairly large tooth dent on the underside of the stem and a small one on the top near the left edge.
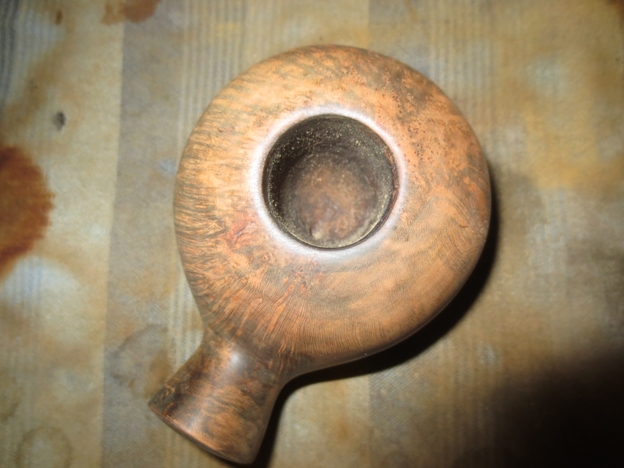
 I reamed the bowl with a PipNet reamer starting with the largest cutting head that would fit and working my way up to the largest head in the set. I took the cake back completely to leave the bare briar exposed and ready to build a new cake of my liking.
 I did some more sanding on the stem and was able to remove the damage from the top side near the button completely. The mark on the underside was still deep. I cleaned the surface of the stem with alcohol and picked the tooth mark clean with a dental pick. I filled it with black super glue and set it aside to dry.
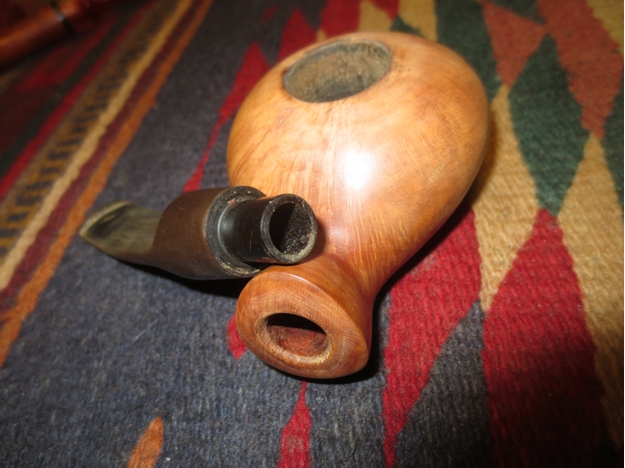
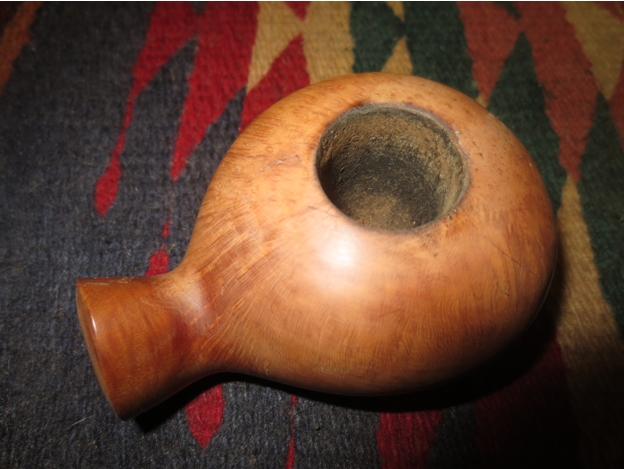
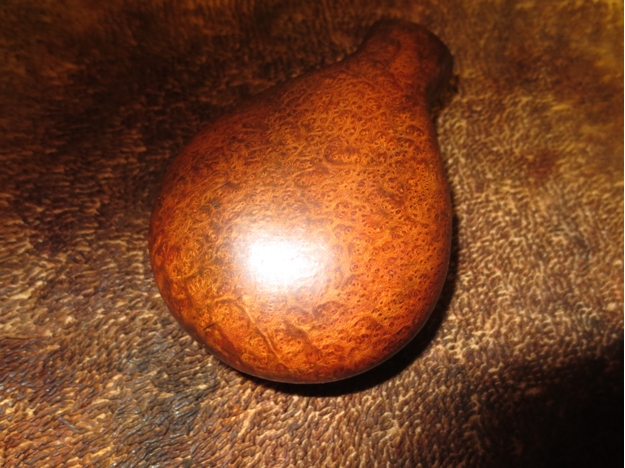
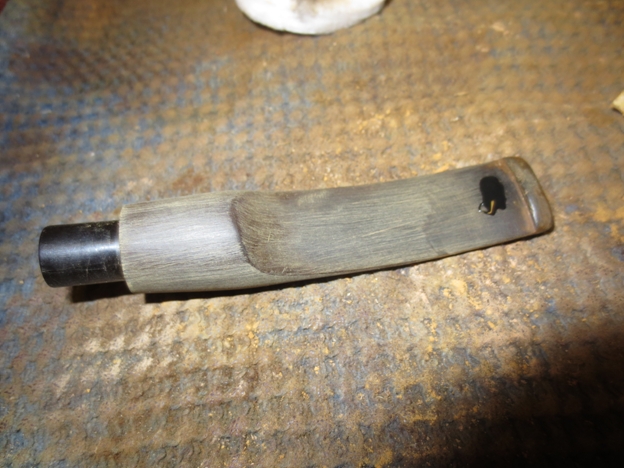 I sanded the bowl with a medium and a fine grit sanding block and worked over the damaged area on the top front and some of the more minor damage on the sides and back of the bowl. I sanded it and then wiped it clean with isopropyl alcohol on a cotton pad. After wiping it down the grain really began to show. The final photo in this series shows the birdseye on the bottom of the bowl.
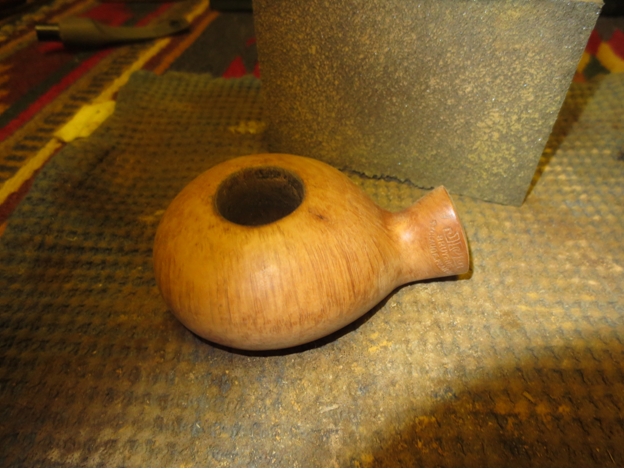
 I scrubbed out the shank of the pipe with pipe cleaners, cotton swabs and isopropyl alcohol until it was clean and the swabs came back white. I may well use a retort on it later but at this point I stopped with the swabs.
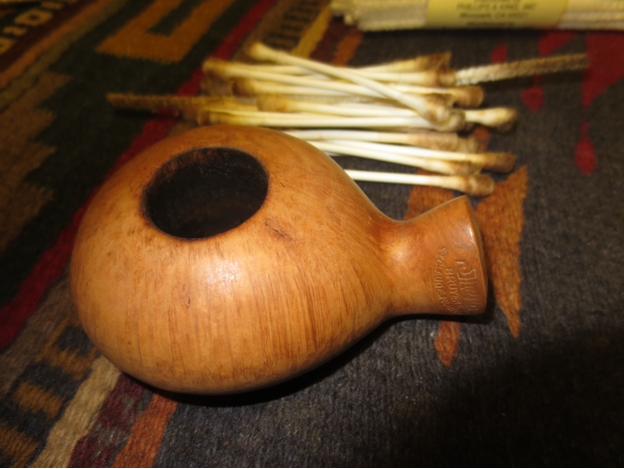 I sanded the bowl with micromesh sanding pads – wet sanding with 1500-2400 grit pads in preparation for staining the bowl.
 Though the pipe was originally unstained when it was made I decided to use a contrast stain to highlight the beautiful grain on the bowl. I heated the briar and then applied several coats of black aniline stain. I flamed the stain to set it in the grain. I wiped the briar down with alcohol on cotton pads to remove the topcoat of black stain.
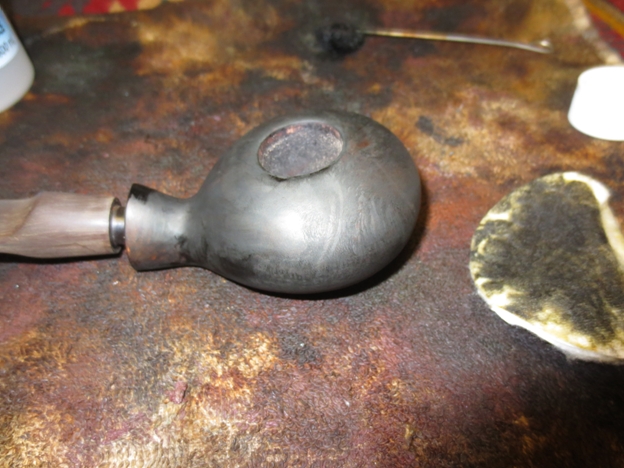
 I took the pipe to the buffer and buffed it with red Tripoli to further remove the topcoat of stain. I sanded it with a medium grit sanding sponge and the fine grit sanding block.
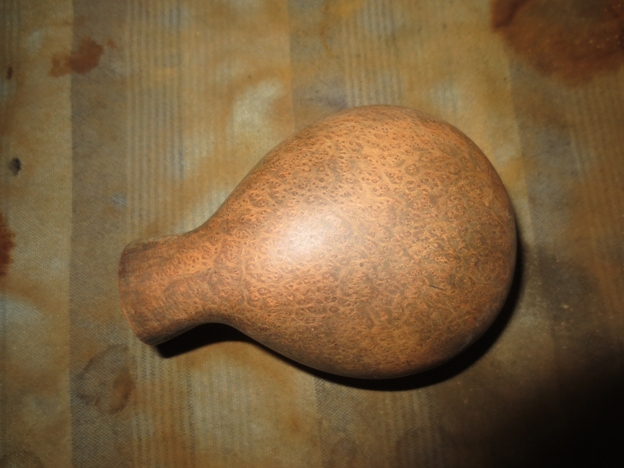
 Once I had the surface stain removed and the remaining black stain highlighted the grain I wiped the bowl down a final time with alcohol and prepared to stain it with the contrast stain. I decided to use a rich mahogany aniline stain for the contrast coat. I applied the stain and then flamed it to set it in the briar.
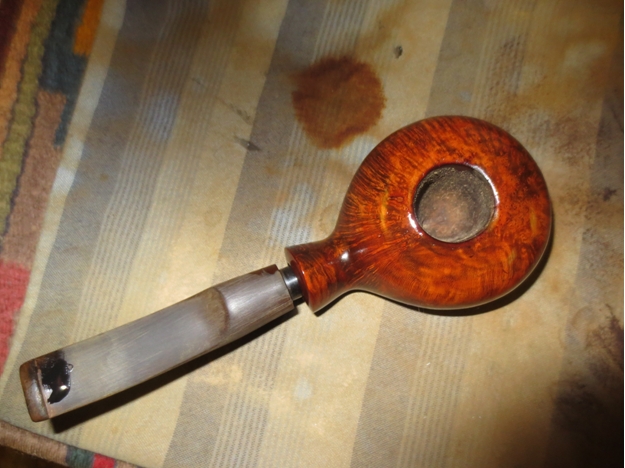
 When it had dried I buffed it with White Diamond and took the following photos to show where it stood at this point in the process.
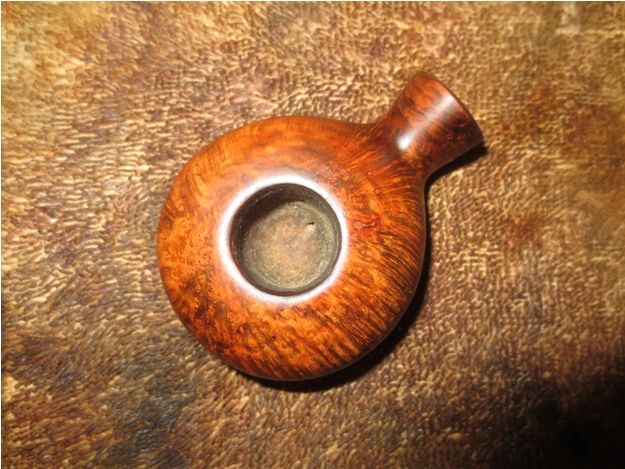
 The grain really stood out on the pipe at this point. I still needed to sand it with micromesh to develop a richer sheen.
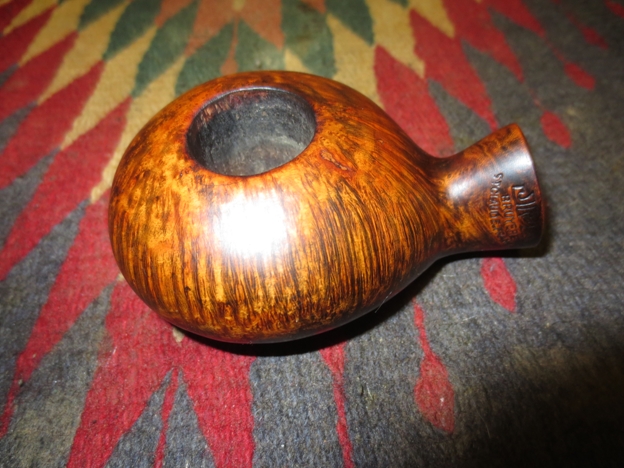

 I wet sanded the bowl with 1500-2400 grit micromesh sanding pads.
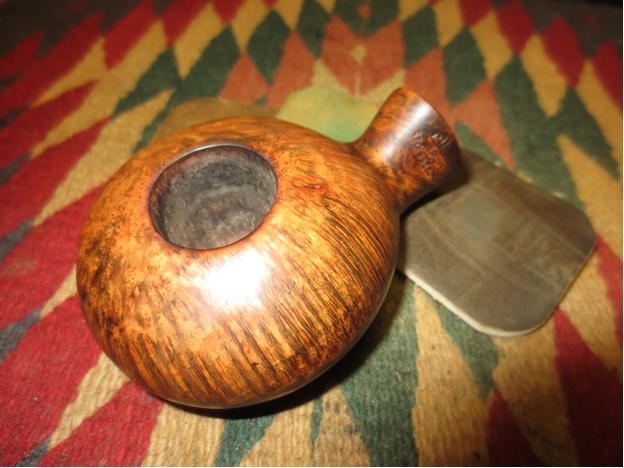
 I dry sanded with 3200-12,000 grit micromesh sanding pads.

 After sanding with the 12,000 grit micromesh pad I buffed the bowl with Blue Diamond on the buffing wheel and then gave it a coat of carnauba wax. I buffed it with a soft flannel buffing pad to raise the shine. I set the bowl aside and went to work on the stem. I cleaned out the 9MM tenon with alcohol and cotton swabs and pipe cleaners. I worked until the stem was clean.
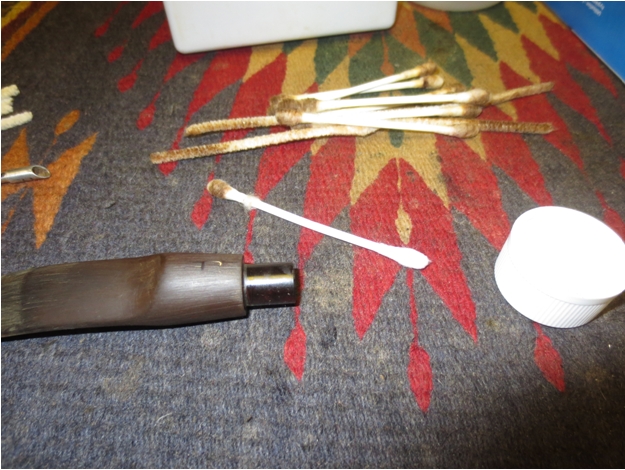
 I sanded the stem with a medium grit sanding sponge and then rubbed it down with Obsidian Oil. I had a box of 9MM filters so I took one out of the box to try in the stem. It fit well and made the draw less open.
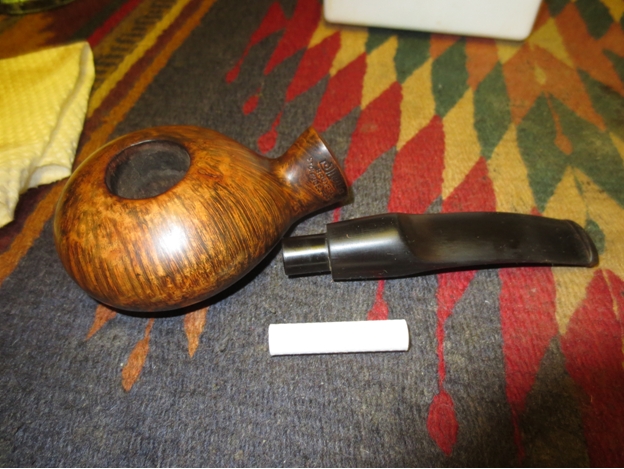
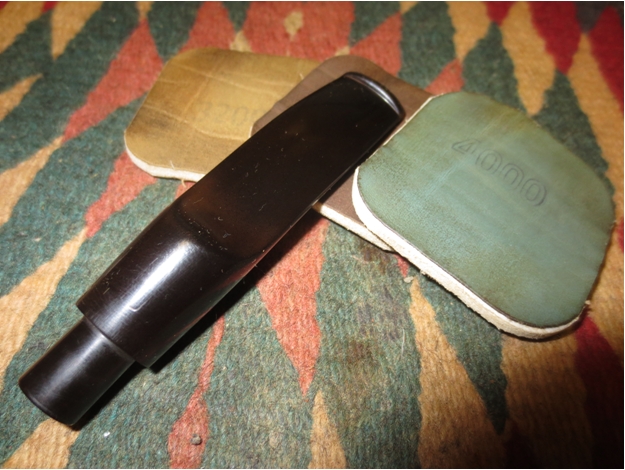
 I wet sanded the stem with 1500-2400 grit micromesh sanding pads and then buffed the stem with red Tripoli to remove the stubborn oxidation. I resanded it with the micromesh before moving on and dry sanding with 3200-12,000 grit sanding pads. I rubbed the stem down with Obsidian Oil between each set of three pads. After sanding with the 12,000 grit pad I buffed the stem with Blue Diamond and polished until the stem shone. I then gave it a coat of carnauba wax and buffed it with a soft flannel buff.
 I put the stem back on the pipe and buffed the whole pipe with carnauba wax. I gave it multiple coats of wax and then a final buff with a soft flannel buffing pad.
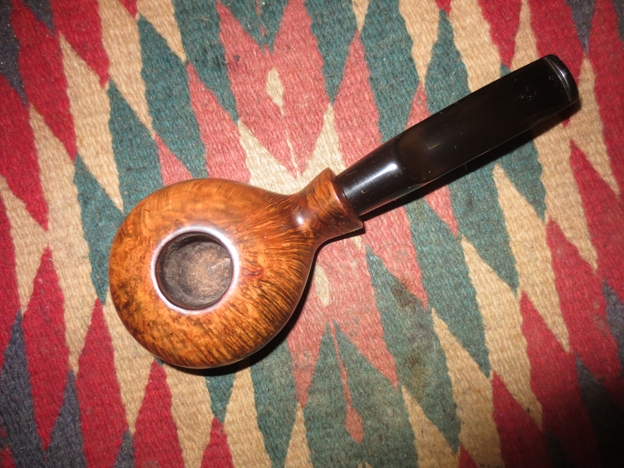
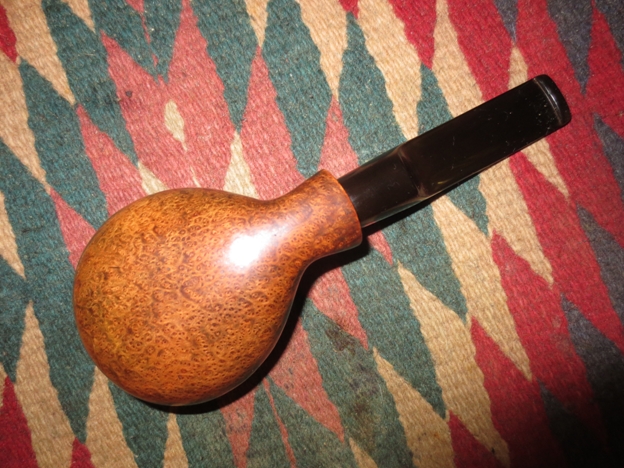
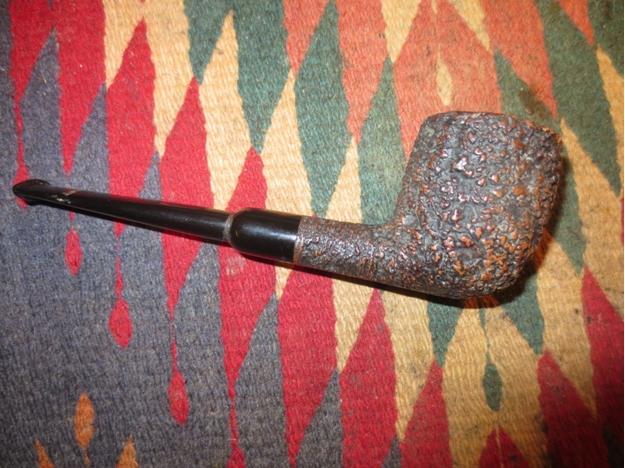
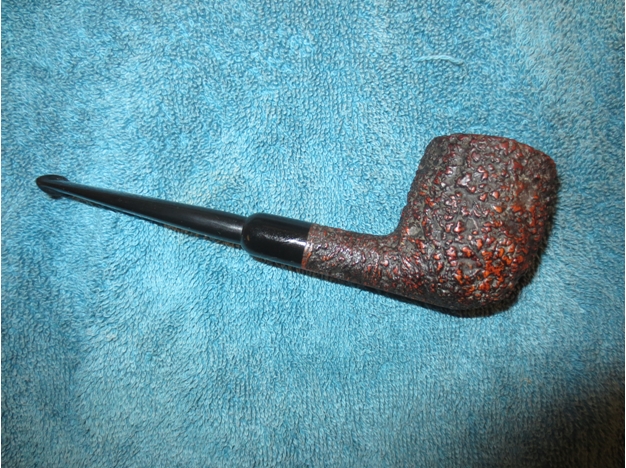
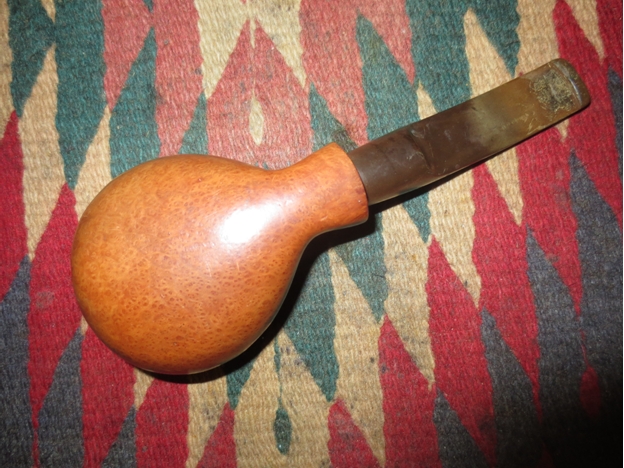
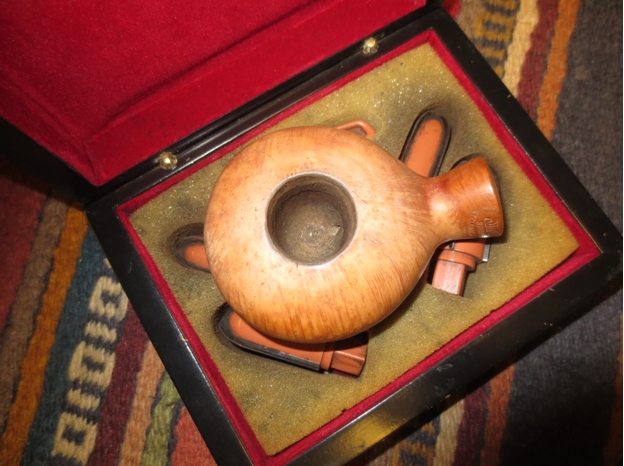
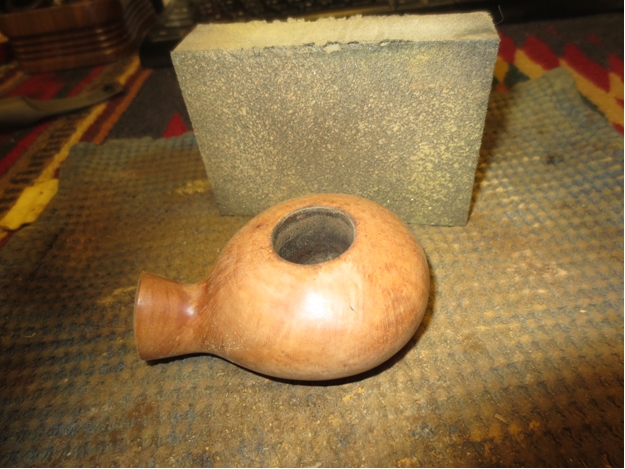
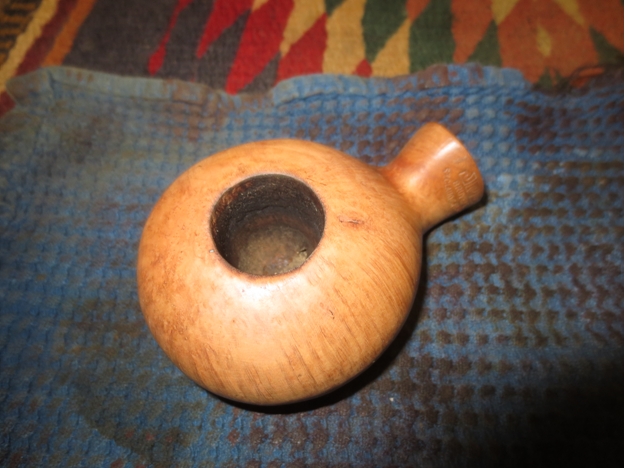
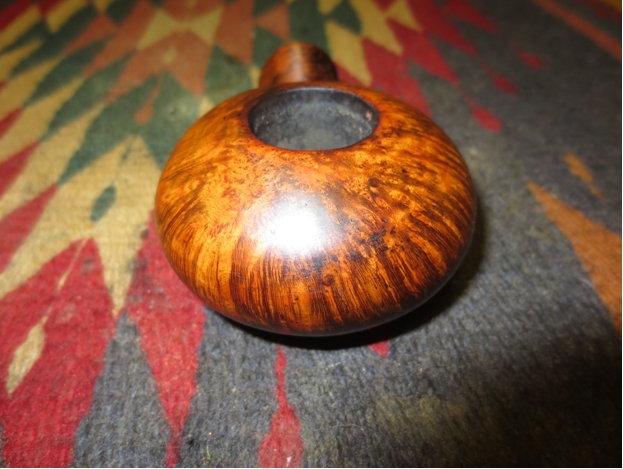
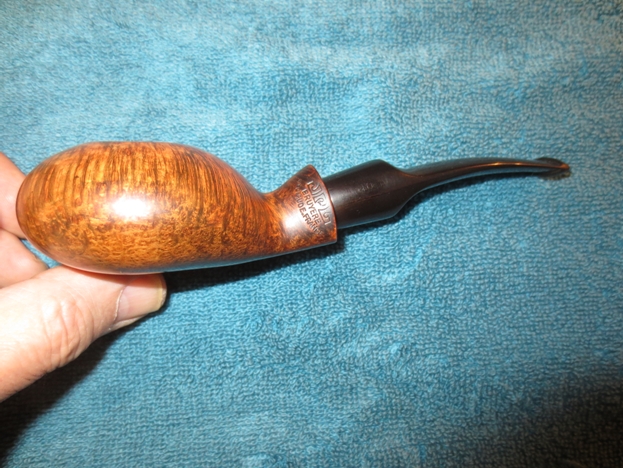
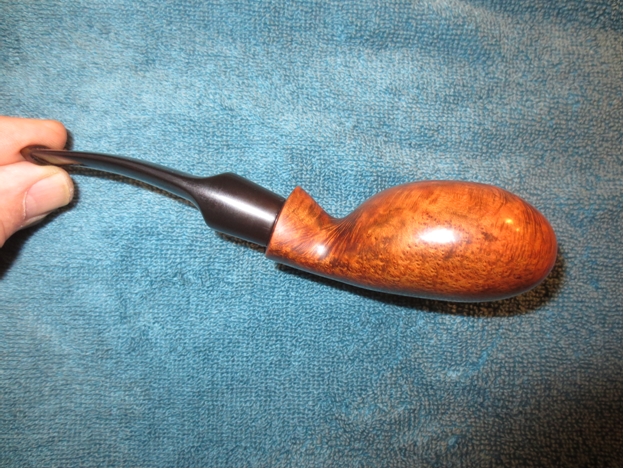
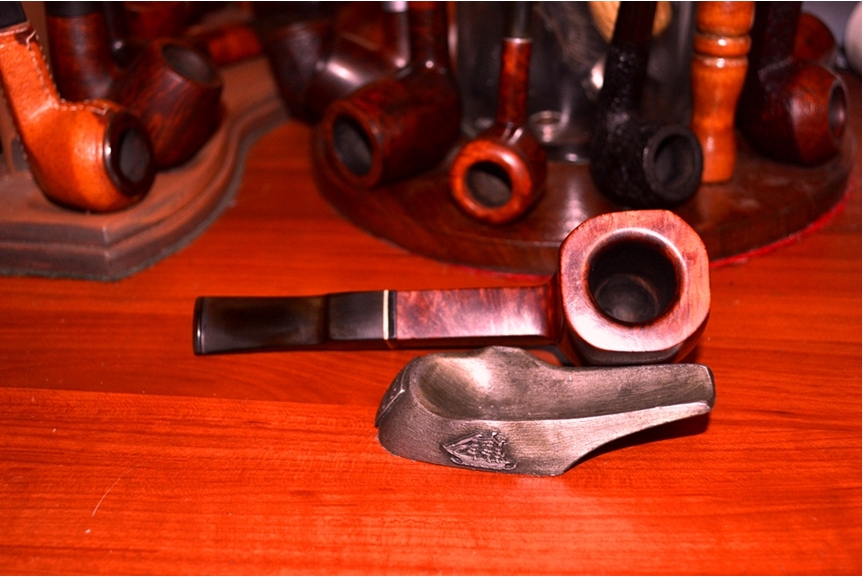
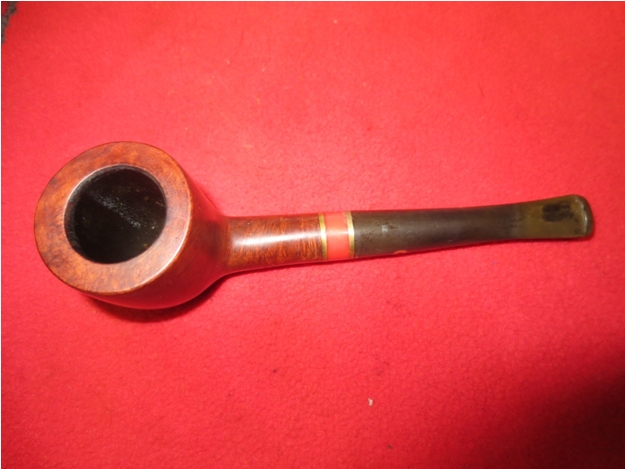
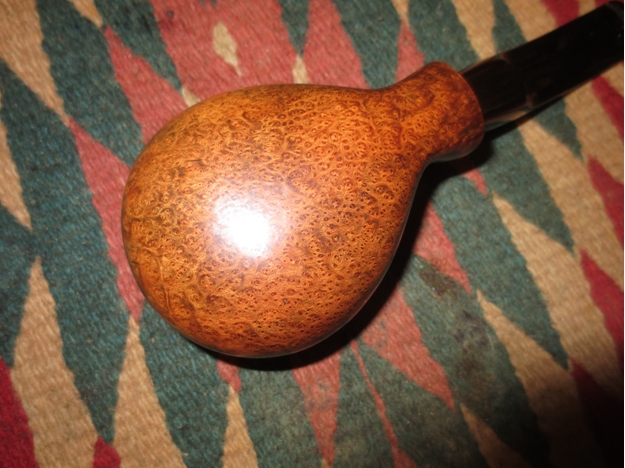 The finished pipe is shown in the photos below. I really like the new look that the contrast stain gives the pipe. The colour makes the grain pop and stand out very well.


Blog by Steve Laug
I picked up a lot of seven pipes from a craigslist seller in Vancouver. The first one I decided to work on was the Paradis with the broken tenon pictured at the top left in the photo below. It included quite a few nice pipes including this virtually unsmoked Paradis pipe. It was stamped Paradis in script and underneath that 1989 on the left side of the shank. On the right it was stamped 93. The pipe is Canadian made coming from Saintes-Foy, Quebec. Paradis pipes are made by two brothers. They sell their pipes on the Pipesworld website at this link. The prices are quite reasonable. http://www.pipesworld.com/pipes/search.php3?PIPEMAKER=Paradis&SEARCH=&x=29&y=4
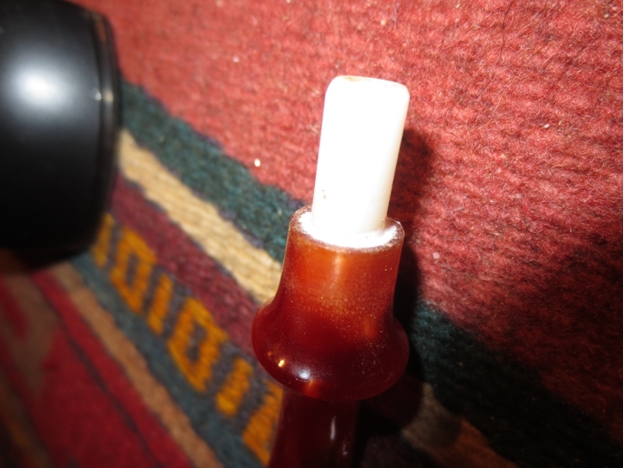
 The finish appeared to be a natural colour, unstained and clean though it was coated with at thick coat of Polyurethane. There appeared to be a deep scratch on the left side of the bowl near the top side. The tenon was snapped and stuck in the shank. Looking at it the tenon was threaded and it had snapped inside the stem. There was a portion in the stem. The stem was orange/amber coloured acrylic. It was stamped with a script “P” on the left side. From the looks of it the pipe had been smoked once and the stem broke during that initial smoke. There was a bit of darkening on the top ¼ inch of the bowl and the rest of it was raw briar. The stem was clean on the inside so I had a virtually unsmoked pipe to work on.
The broken tenon came out of the shank fairly easily. It was not stuck and there was some of the threaded portion of the tenon extending out of the shank. I was able to get a good hold on it with a pair of pliers and pull it out of the tenon. It had broken in the threaded area inside of the stem so it was going to be a relatively easy repair. The stem was not damaged so I could glue it into the stem and then fill in the gap around it with glue to give a solid repair. I cleaned the end of the break on the tenon piece and then put super glue on it. I pressed it into the stem and pressed the two parts together until the glue set. I filled the open area around the tenon with glue and pushed it down in the gap with a dental pick. I set the stem aside to dry.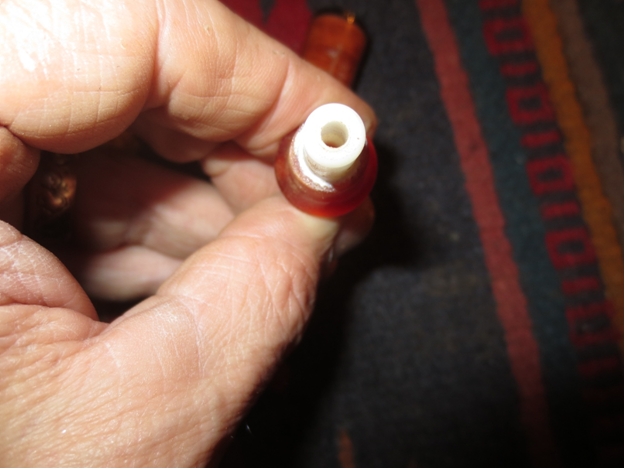
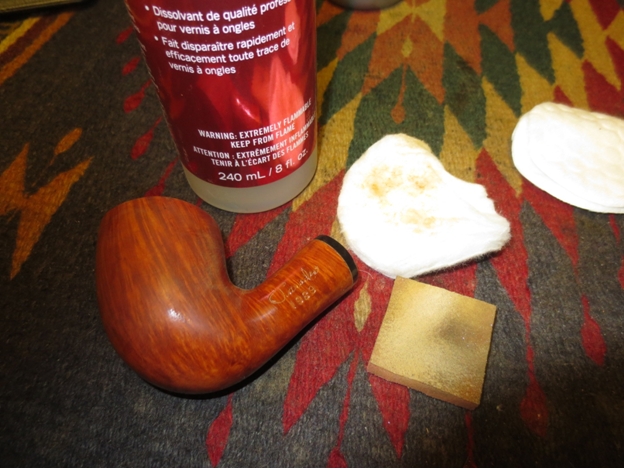
 I took the next photos of the pipe and stem as it was drying.
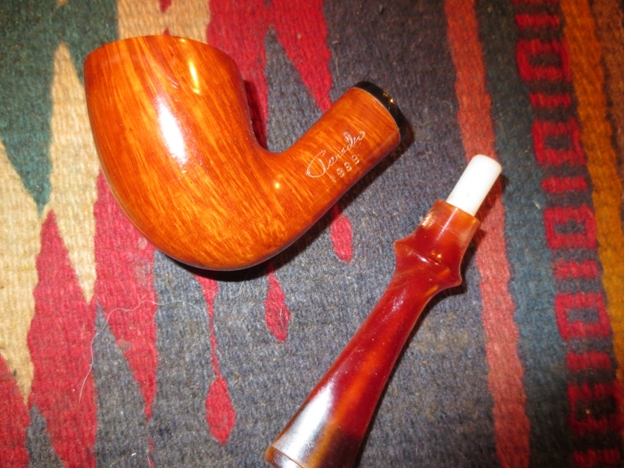
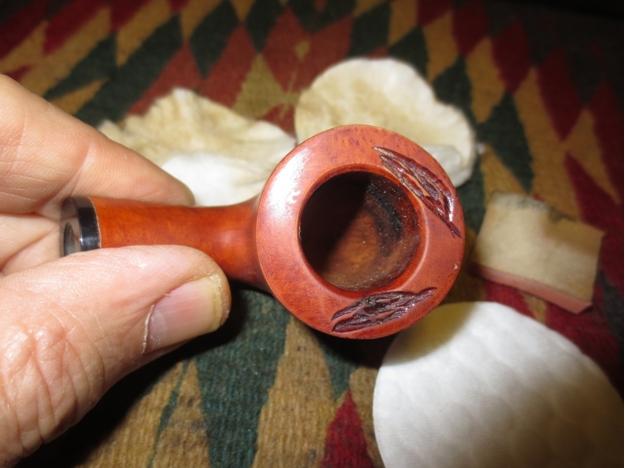
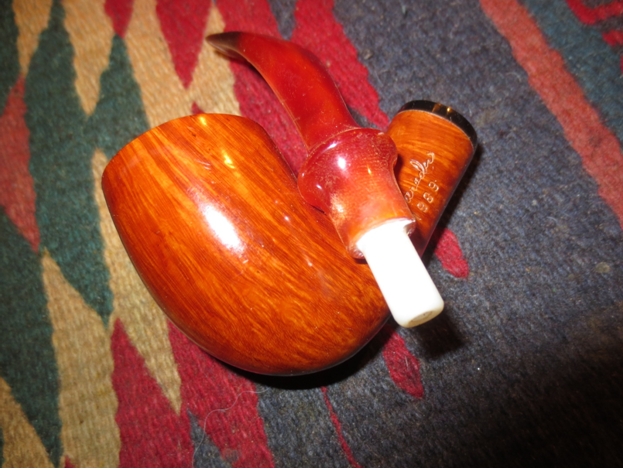 On the left side of the bowl near the top was what appeared to be a large horizontal dent. In the photo below you can see the dent looking almost like a line on the briar. It was about 1 inch long and followed the curve of the bowl.
 I tried to steam out the dent using a damp towel and a hot butter knife.
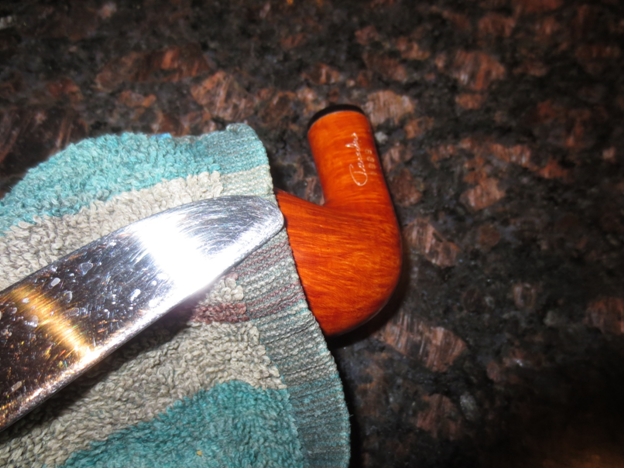 The next photo shows the look of the dent even more clearly. After steaming I examined it more closely and found that the dent had lifted and what remained was a run in the polyurethane coating that was on the bowl. It was like a long sag in the coating.
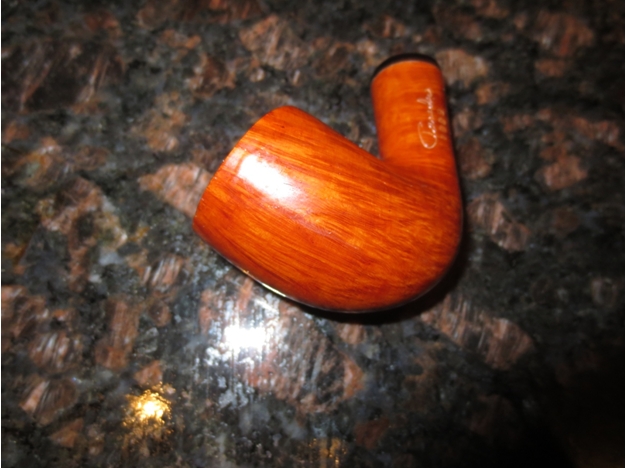 I took the pipe back to my work table and sanded the sag in the finish with a medium grit sanding sponge. I knew that I would have to remove the entire polyurethane coat from the bowl to clean up the sag completely.
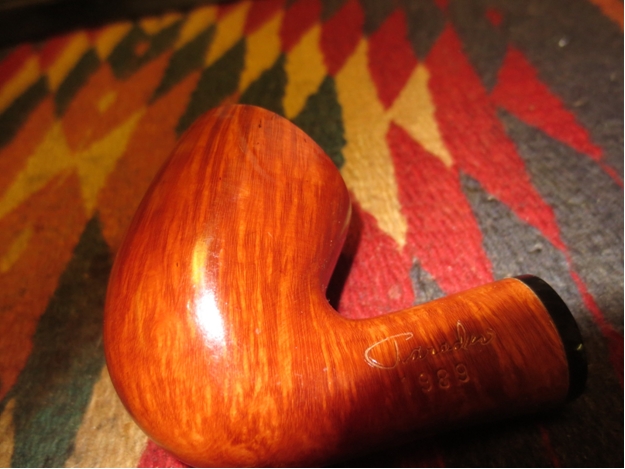 I sanded the bowl and shank with a medium grit sanding sponge and then wiped it down with acetone on cotton pads to break through and remove the finish.
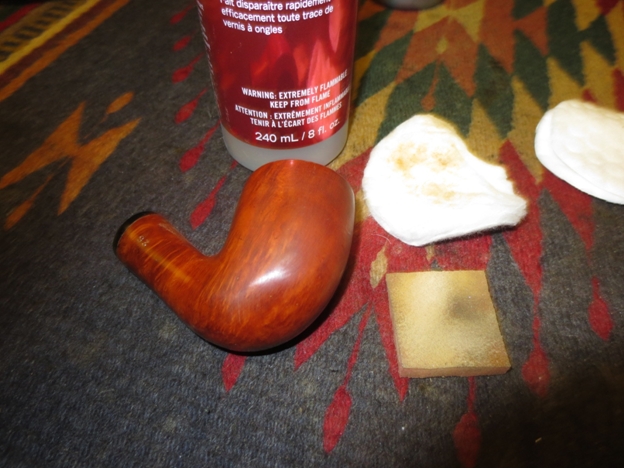
 It took a lot of sanding and scrubbing before the polyurethane finish was gone and a clean smooth briar surface remained.
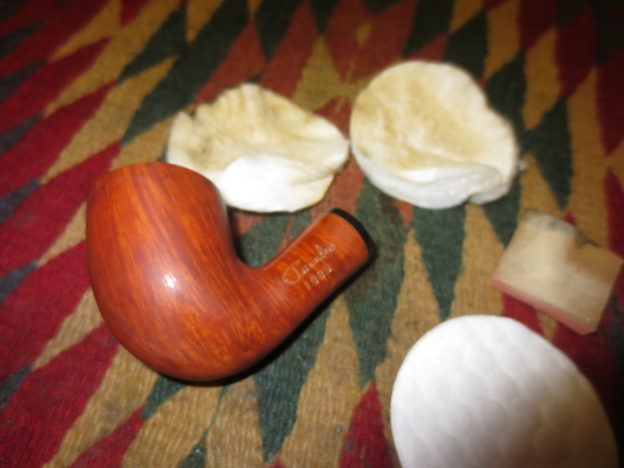

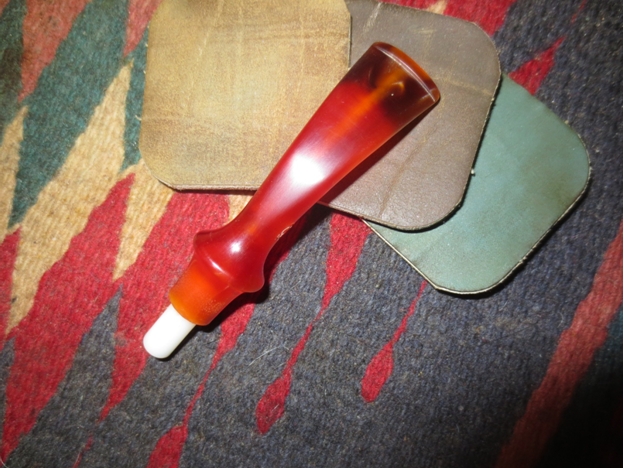
 When I finished cleaning up the surface of the bowl and removed the finish completely I set the bowl aside and addressed the stem. There were no tooth marks or chatter to deal with so all I had to do was polish the dull surface with micromesh sanding pads. I wet sanded with 1500-2400 grit pads and dry sanded with the 3200-12,000 grit pads. I buffed the stem with White Diamond to polish the acrylic.
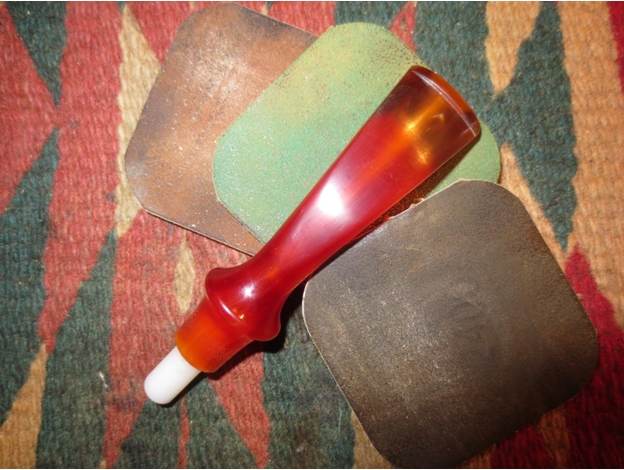
 I dry sanded the bowl with micromesh sanding pads using all of the grits to raise a shine in the briar and smooth out the surface of the briar.
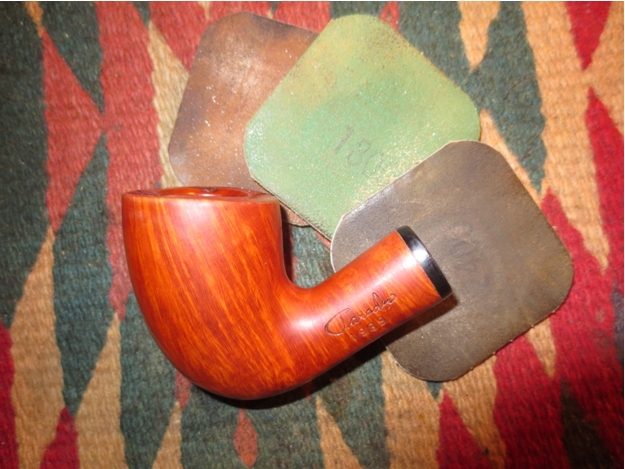
 I gave the bowl a light buff with Blue Diamond polish and did the stem separately. I gave the bowl and stem several coats of carnauba wax and buffed it with a soft flannel buffing pad to raise the shine. The finished, repaired and refinished pipe is shown in the next series of photos.
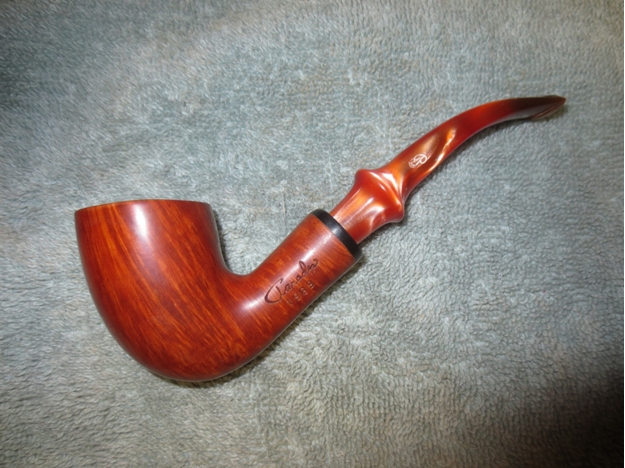

Guest Blog by Robert M. Boughton
Member, North American Society of Pipe Collectors
http://www.naspc.org
http://www.roadrunnerpipes.com
http://about.me/boughtonrobert
Photos © the Author
“Cave ne venditor.”
“Let the seller beware.”
― From Latin, inspired by “Caveat emptor” – Let the buyer beware
INTRODUCTION
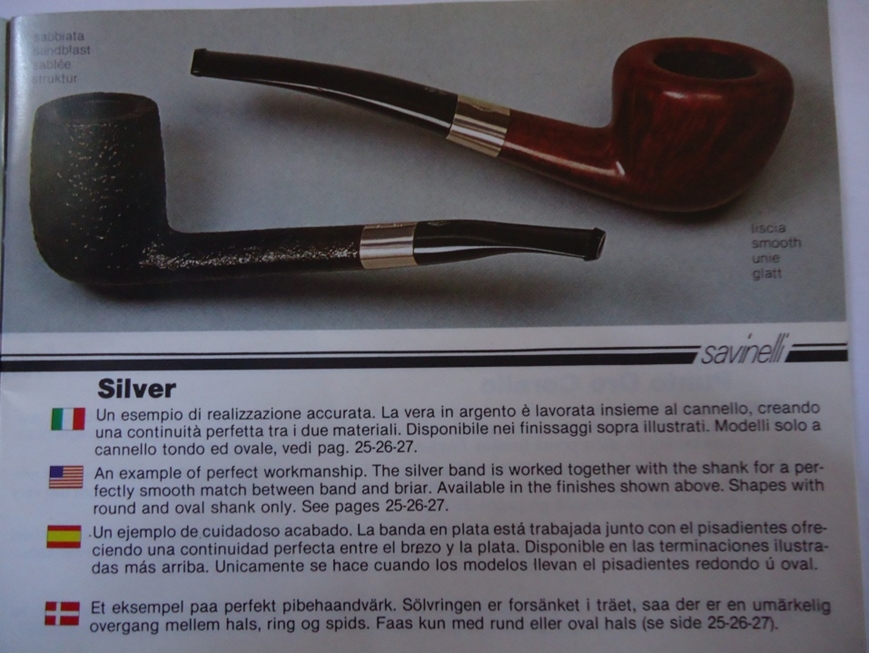
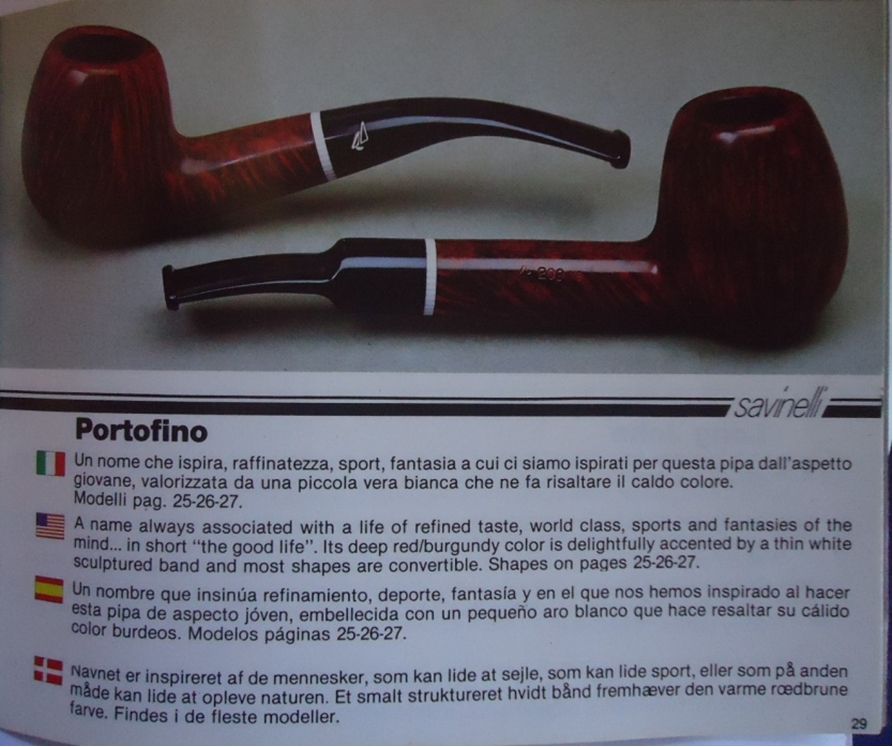
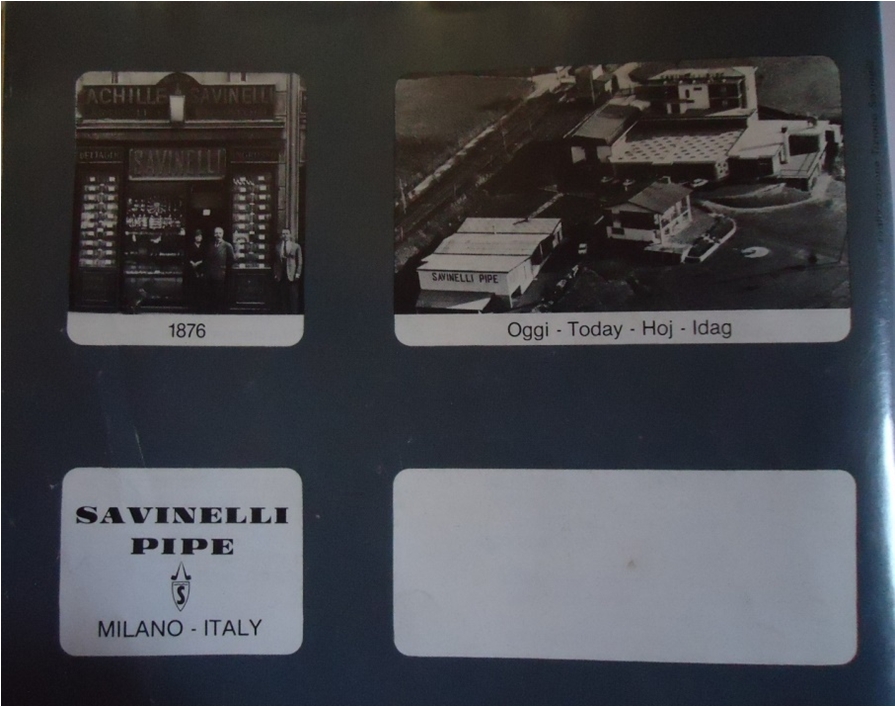
I might just as well have started this blog with former President Richard Nixon’s televised statement to 400 Associated Press editors on November 17, 1973, denying any involvement in the Watergate scandal: “Well, I’m not a crook. I’ve earned everything I’ve got.” He certainly did. But I thought the Latin reference was more appropriate to describe my fortunate acquisition of this unusual and magnificent example of a Savinelli panel pipe. After all, it’s not my fault the online seller probably thought he would get more for it. I suspect that in hindsight, he now wishes he had asked for a higher amount, perhaps as a “Buy Now” offer. I would have paid it, within reason. In fact, I went so far as to look for a charitable donation link to make up for some of the money I saved, but this seller didn’t have one.
The two aspects of this serendipitous acquisition that surprised me even more were that the other four bidders seemed not to recognize a fantastic bargain when it seemed to scream the fact at them, and that I lucked out in that no other serious collectors chanced upon the offer. The minimum asking price was $9.50. About 24 hours later, the first bidder appears to have made a max offer of $12.00 and for the moment had it for $10. Then the second entrant offered $14.50 because when I entered what I thought would be a sharply escalating war with my first $25 bid and two days left, a third-party had the beautiful pipe for $15. The second and third amateurs took the price up to $24.50 by the time I bumped my bid to $50 with 22 minutes remaining and my finger on a higher last-second bid should it have become necessary. It did not, and I won for a total of $29.45 with shipping. The vagaries of eBay bidding never cease to amaze me.
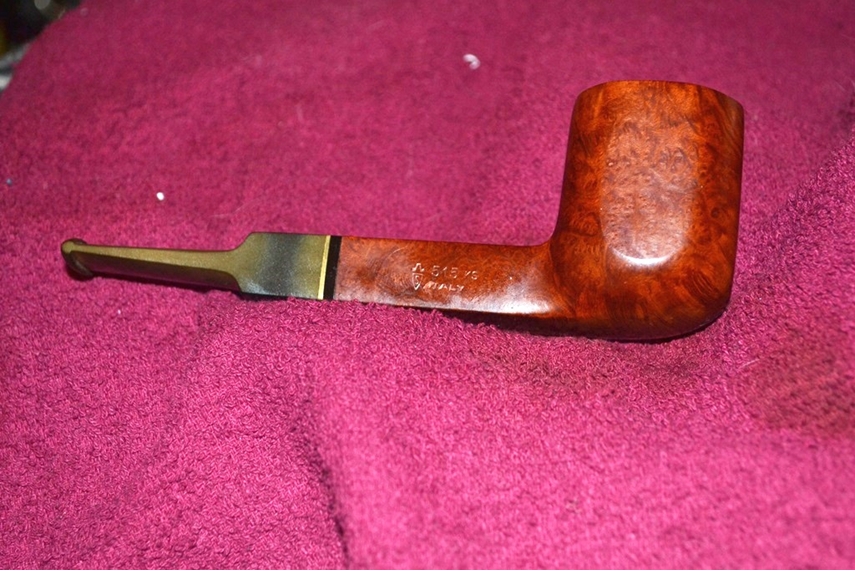
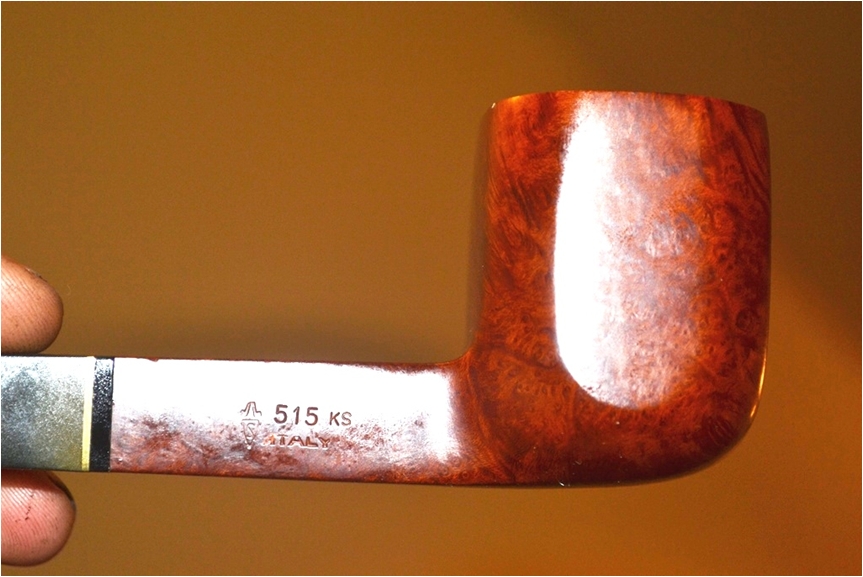
The Champagne, as with most varieties of the 515 KS shape, measures 6″ in length with a chamber diameter of ¾”x1″. The bowl is 5¼”x1¾”. The shank is a 2¼” square leading into the 2½” stem with a wide comfort bit. Check out these other versions.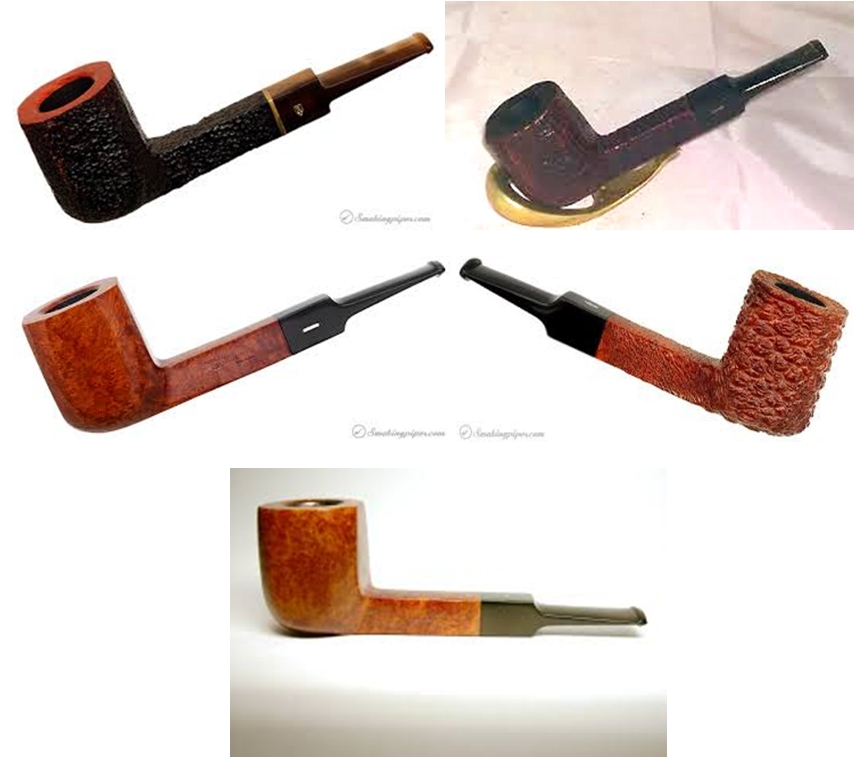 When the box arrived, somehow I managed to keep it unopened on the seat beside me until I reached my next destination, the best old-style tobacconist in these parts, where I almost have my own cushioned chair and a cot to sleep on in the back. Taking a seat in my favorite spot, with its view of the whole shop, I retrieved my knife from my pipe go-bag and slit through the packing tape, then peeled open the glued sides of the box. Here is what I was overjoyed to find inside.
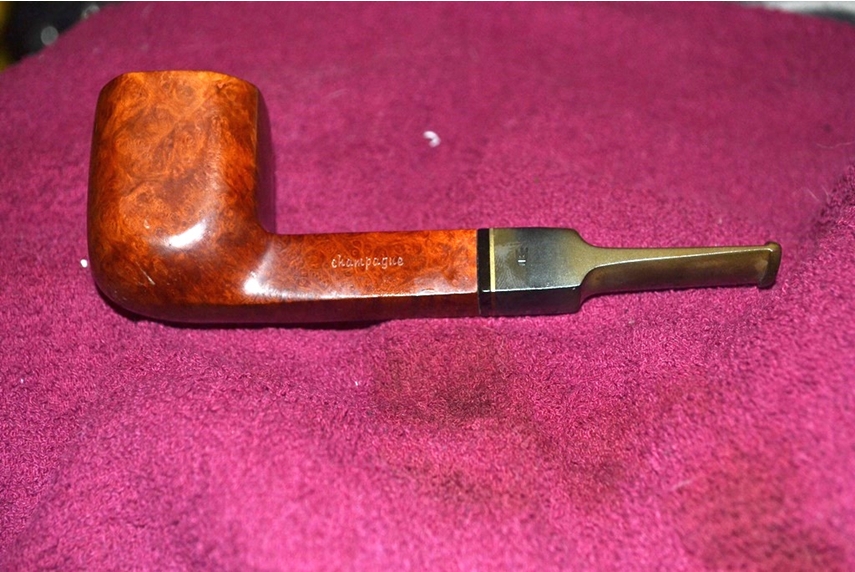
 THE RESTORATION
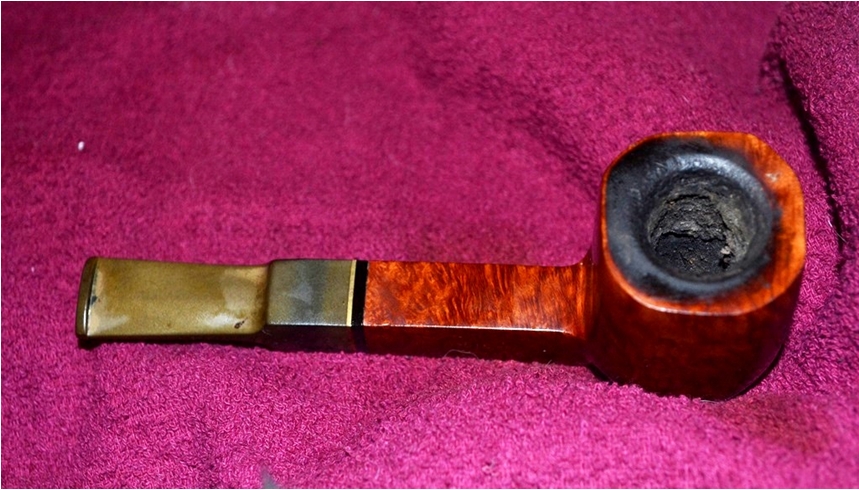
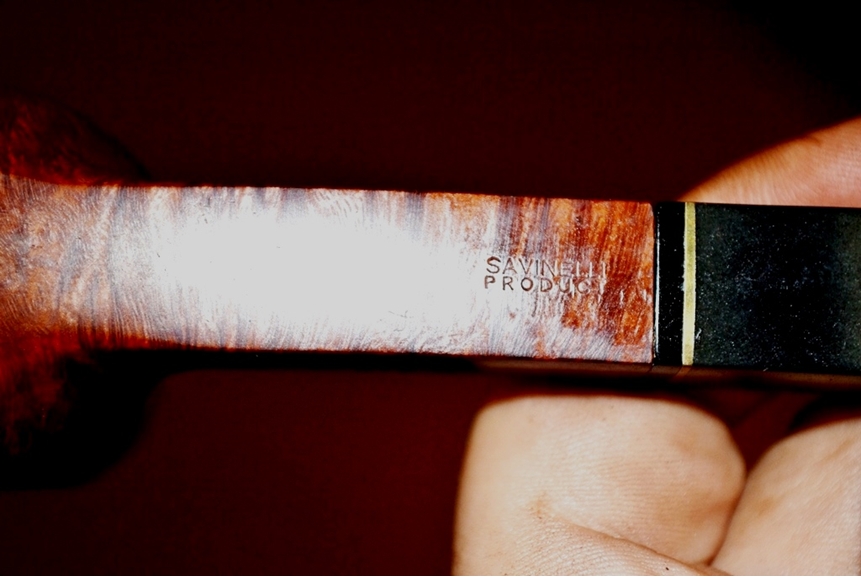
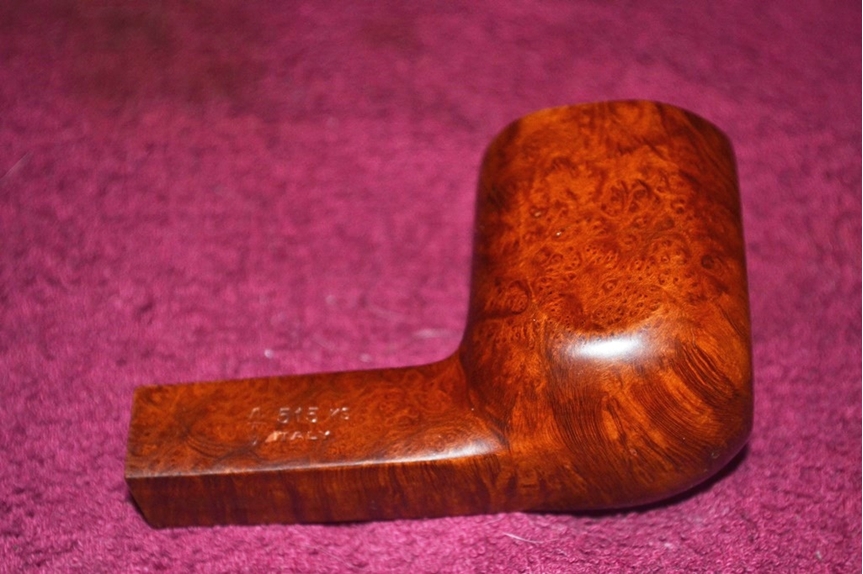
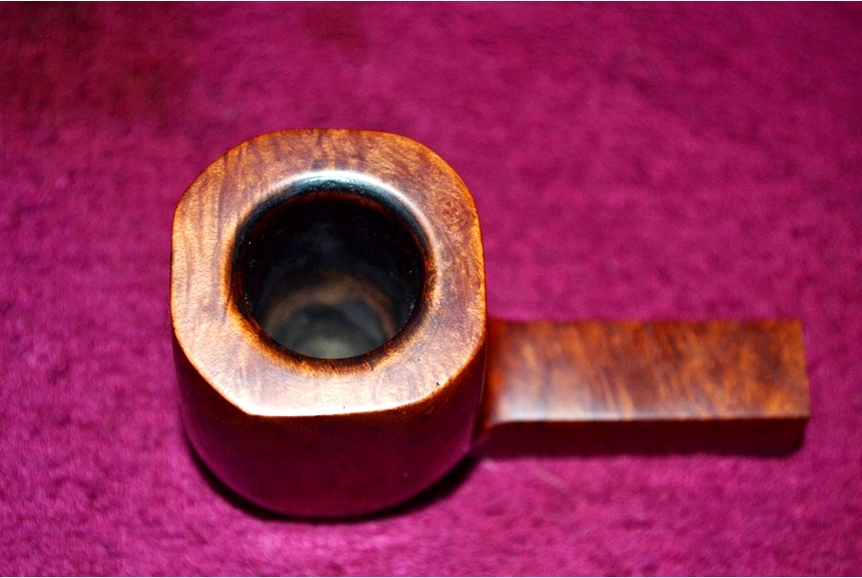
Disregarding the few minor detractions seen in some of the photos above (namely, the rim, chamber and stem), this was a restorer’s dream. The nomenclature was crystal clear through the oil and dirt of handling: Champagne on the left shank, the Savinelli shield and 515 KS above Italy on the left and Savinelli Product on the bottom. Even the full black outline of the crown was still on the stem.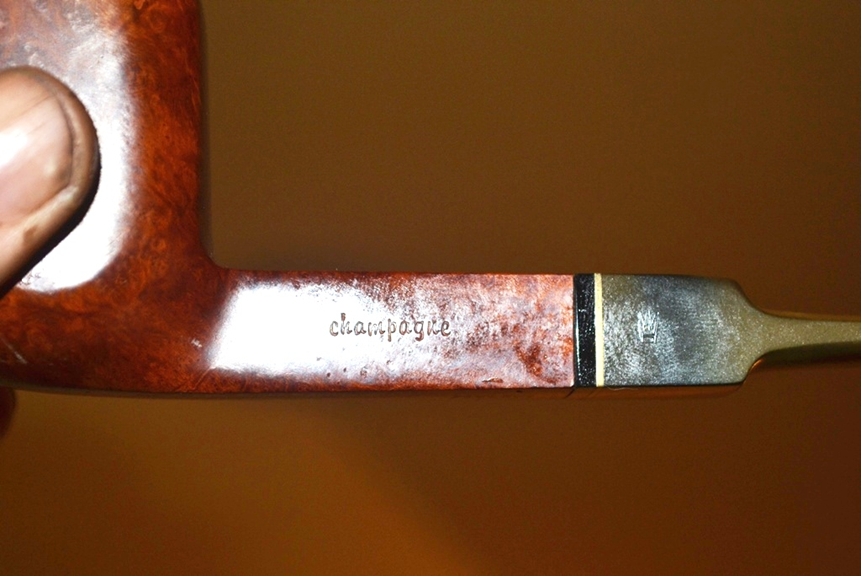
 And for the first time in my experience, the chamber was all that needed sanding, with 150-grit paper followed by 320. I put the stem in a water and OxiClean soak for a half-hour while I gave the bowl and shank a quick bath with purified water and a couple of small pieces of cotton cloth, and then prepared the rim with super fine steel wool and the chamber as described.
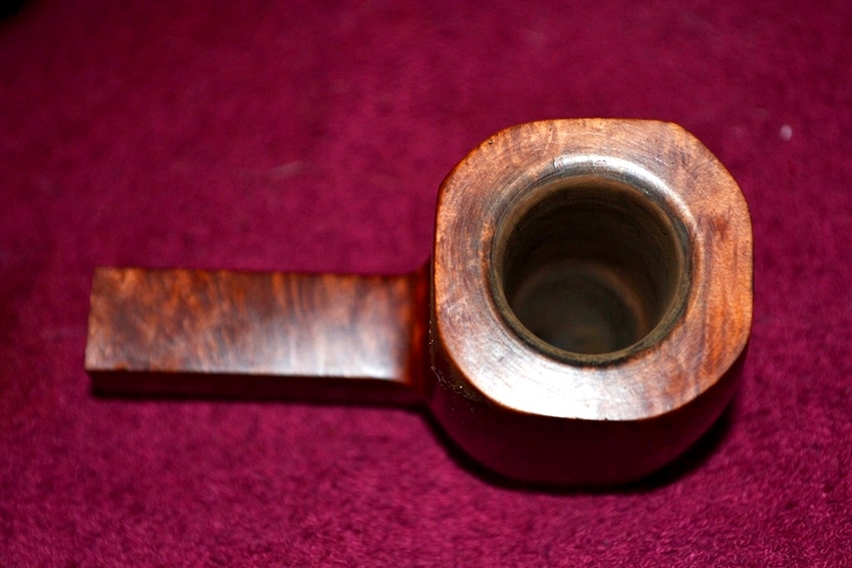 Removing the stem from the wash, I ran a soft fluffy cleaner through the air hole, clearing out considerable grime. An initial concerted scrubbing of the rinsed and still wet outer stem with a soft meshed cotton rag followed by rubbing hard with a four-grade progression of micromesh from 1500-4000 removed all but a few pernicious patches of green. And so I replaced the stem in the OxiClean mix and gave it another hour. By then, a second fluffy cleaner came out almost clean, all discoloration was gone and the same micro-meshing left it ready for buffing.
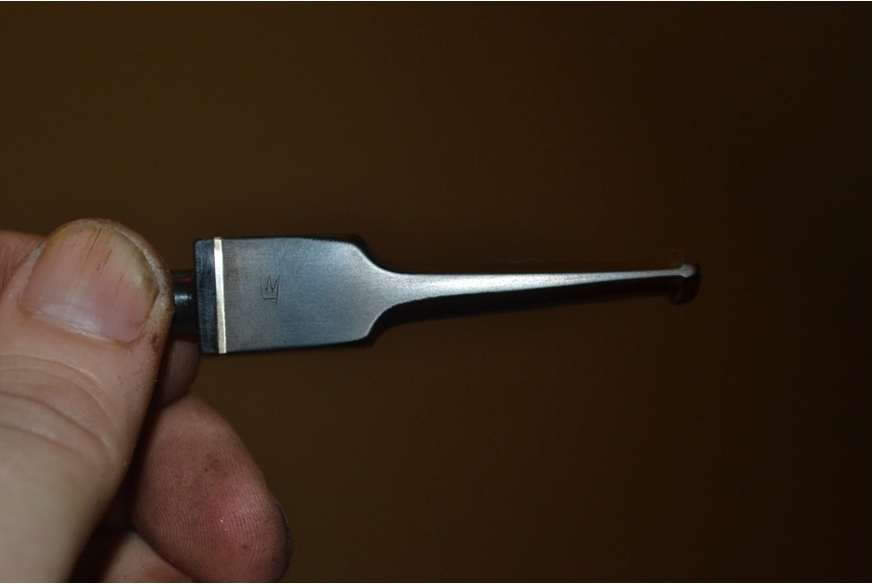
 I retorted the pipe with two Pyrex test tubes of boiled alcohol and eliminated the considerable smoke, carbon and other crud that had, over time, leached into the shank and bowl. A vigorous scrubbing of the inner shank with both ends of another fluffy cleaner pulled out the residual dark wet mess that remained after extraction from the briar; the same treatment of the chamber with hard, tight, squeaky turns of a final small piece of thin cotton cloth cleared the last bit of blackness there.
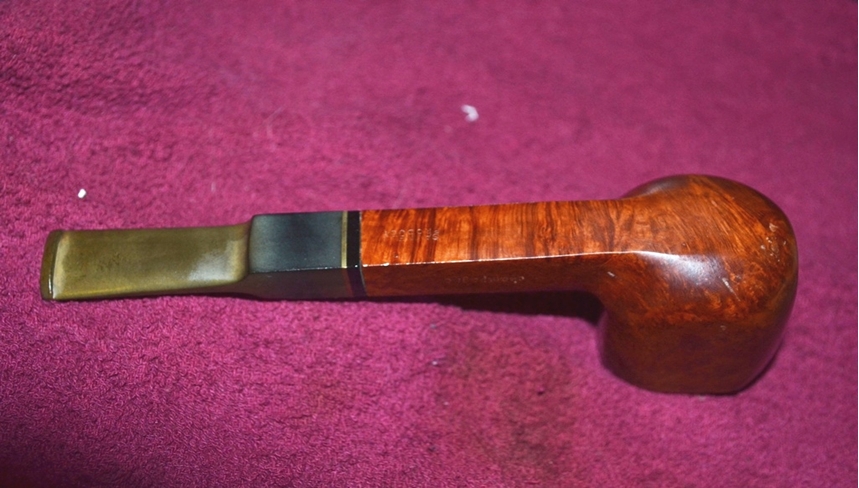
There were very fine scratches all around the panels of the pipe, but they were so minuscule that they all but vanished with steady, even, up-and-down strokes of 1500 and 3200 micromesh, and dissipated to a nice gloss with the final buffs of 3600 and 4000.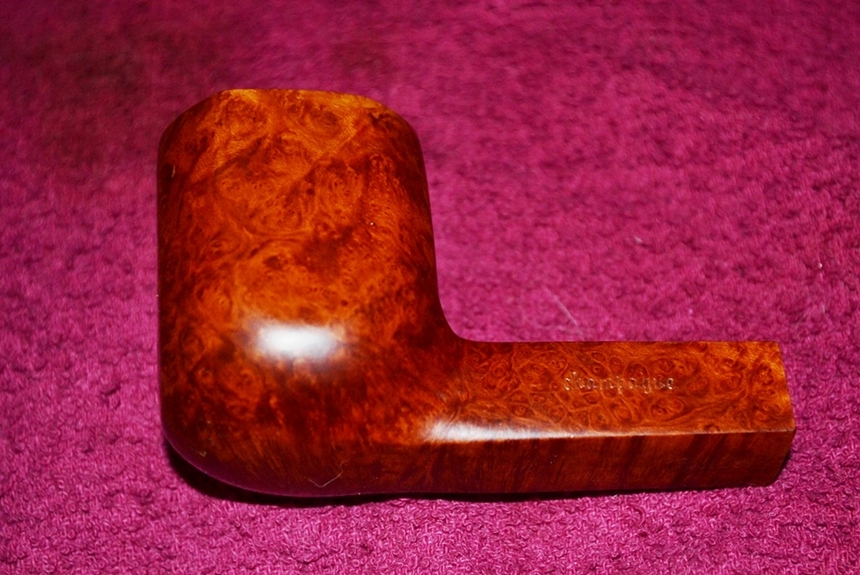
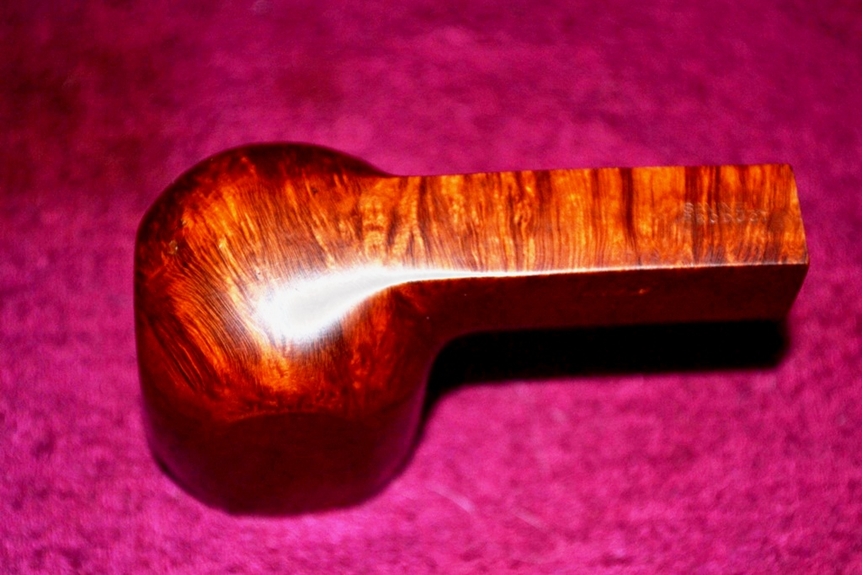
 The final step of putting the stem to the wheels with white and red Tripoli and White diamond, clearing the excess and giving all of these a stronger grip with a gentle spin on an un-waxed buffing cloth, brought out a high, more durable sheen. The same approach, without the red Tripoli but adding two coats of carnauba, had the same effect on the briar.
The finishing touch was filling in the crown on the stem with a white china marker.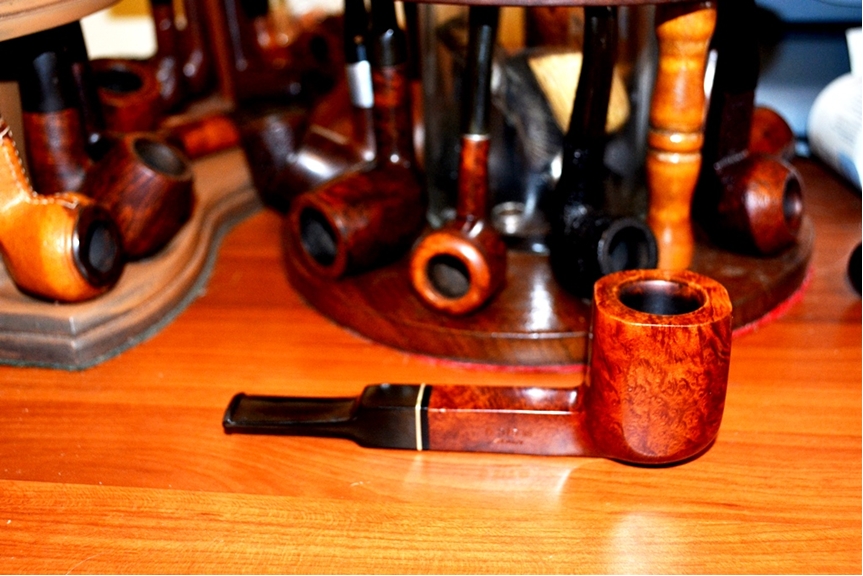
 CONCLUSION
In my online pipe sales and service business, I have been successful in a steady upgrade of the brands and quality of products offered. I have listed and sold a number of pipes I dearly wanted to keep – including a smooth, old meerschaum bulldog with an excellent patina, a Comoy’s Satin Matte Christmas edition, a Jobey Fawn small apple, a WDC 14K band full bent smooth billiard and even a no-name Italian semi-rusticated full bent billiard that was exceptional in its resemblance to a Peterson full bent system pipe and was engineered as well as most of that brand’s models.
My struggle with the question of whether to add the newly restored Savinelli Champagne Panel to my private collection or offer it up for sale was the longest, most tortuous inner debate I have made due to my strong desire to add a Savinelli to the inventory, which I have in fact already done by sacrificing one of my old favorites, a Clark’s Favorite medium smooth churchwarden that sold immediately. But, as some might already have guessed, I succumbed to the more powerful voice urging me to keep this one. I know I can’t horde everything that comes my way, but I can select those that speak to me deeply and personally.
I have not even enjoyed the pipe yet, so recent was my decision not to let it go. That patience will almost certainly end today, and soon.
Blog by Steve Laug
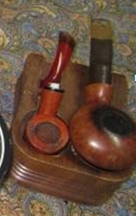
For years now I have checked craigslist Vancouver in hope of finding pipes. I have found a few but they never worked out in terms of picking them up. They always were sold to someone just before I arrived to pay for them. So when I saw this lot on craigslist I was not too hopeful. I fired off an email to the seller and got no response regarding the lot. It had seven pipes, a humidor rack, a two pipe rest and two large unopened 200 gram tins of Borkum Riff tobacco. Yesterday I went online and found the seller’s phone number. I could not believe it when he said that he still had them. I made arrangements to pick them up on Friday. Here are three photos from the advert on craiglist.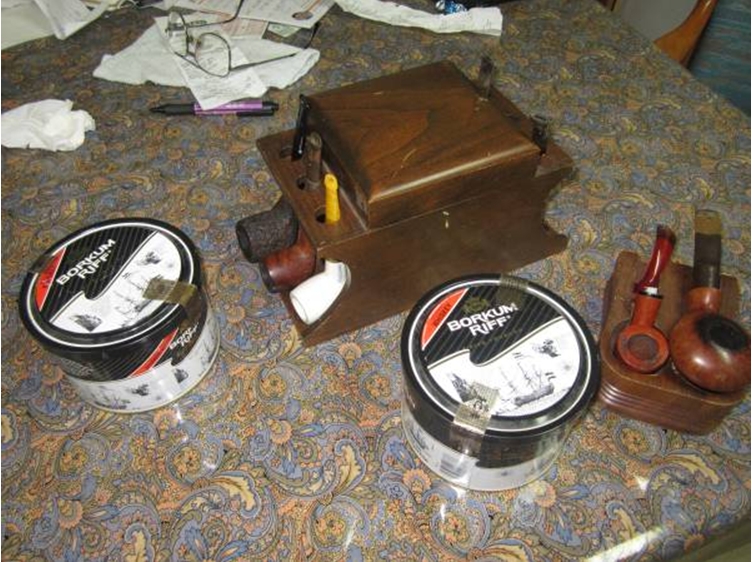
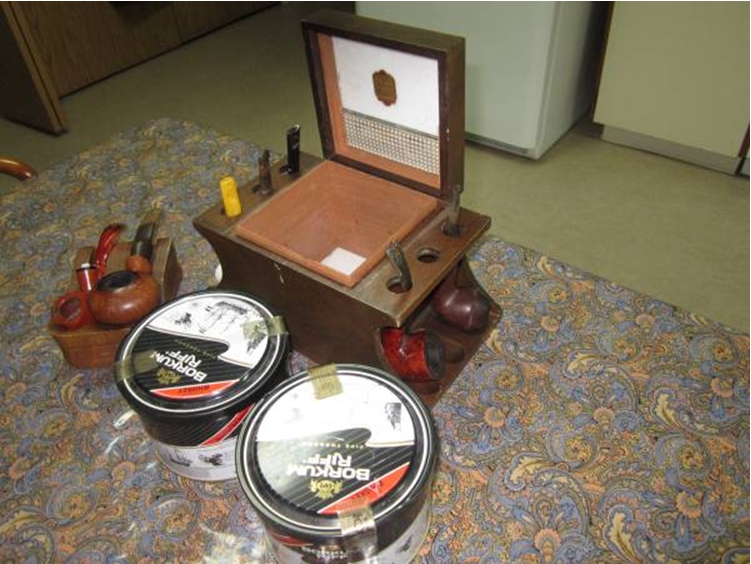
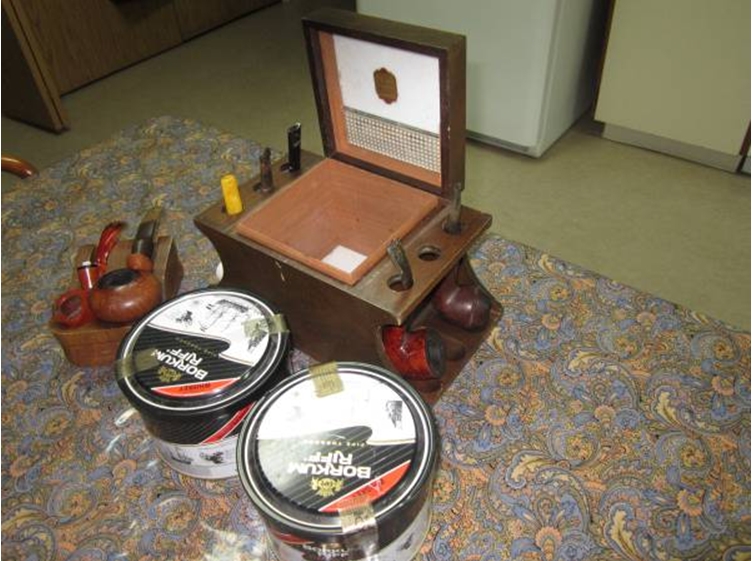 I talked my youngest daughter and number two daughter into going with me to pick them up. I drove to the seller’s apartment with low expectations. He was selling the lot for $99 or best offer. When I arrived I phoned and he let me into the apartment. It was a bit of déjà vu for me. He was a stroke survivor – same age as I am. I too am a stroke survivor. He had stroked on the left side of his brain leaving his right side damaged – same as me. He had the curled hand and a dragging foot with a bit of slurred speech the same as I had. I stood quite speechless for a few moments and remembered my own struggle with my stroke. I then breathed a prayer of thanks to God for the gracious recovery he gave me through the prayers of his people and hard work. I have very little remaining of the stroke damage. God is good.
We talked for a little while and he showed me the goods. I decided to pay him what he asked – or at least close to it. I had $97 with me so I gave him that and he gave me a bag for the loot. At this point in the game I had not looked too closely at the pipes. When I got to the car and put them in the trunk I went through them quickly. There were some great pipes in the lot along with some I had never heard of. When I got home I unpacked the loot and took the next series of photos. I was very pleased with what I had purchased.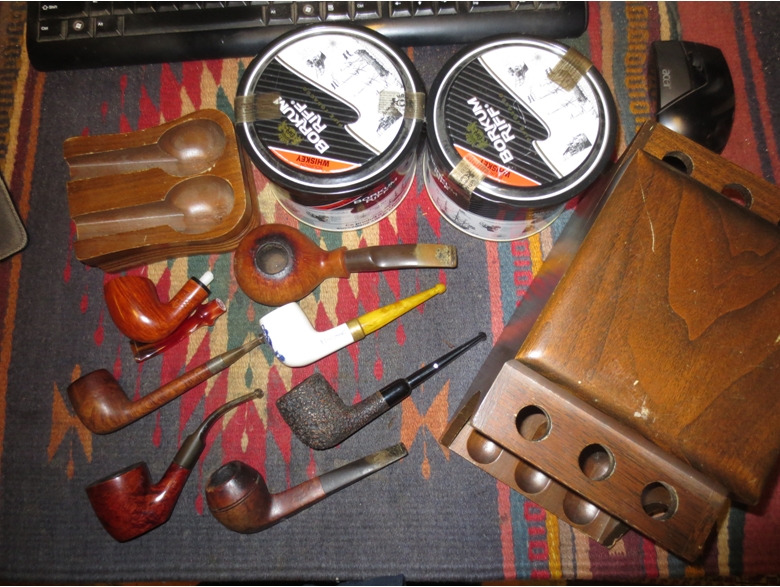 The next two photos show the pipes. Starting with the column on the left of the photo below the names of the pipes were as follows.
Column 1: (left side)
1. Paradis Brothers 1989 shape 93 bent with a broken tenon. Paradis is a Canadian made pipe. It had a dent on the left side of the bowl. The tenon is threaded and I will be able to remove it and put a new tenon on the stem. This one may have had one bowl smoked through it but it was not even darkened from mid bowl to the bottom.
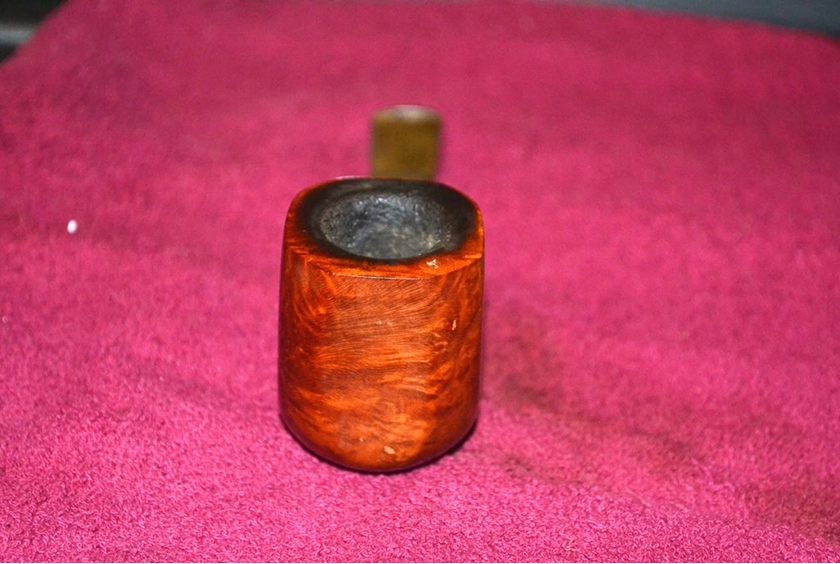
2. Italian made MAT Pot sitter with a stuck stem. The rim was covered in a coat of tars and oil. The stem has tooth marks in it on the top and on the underside near the button.
3. Dutch Ceramic double wall billiard with Delft coloured painting on the front of the bowl of a man in the stocks. It reads Holland on the left side of the shank. The stem is acrylic and is clean. The cork gasket that holds it in the shank is perfect. This is an unsmoked pipe.
4. Royal Danish 33 straight bulldog made by Stanwell. The bowl has a thick cake in it and the top is damage and sloped toward the front of the bowl. The stem is oxidized and has some deep tooth marks in it on the top and bottom near the button. There appears to be a small bite through on the underside.
Column 2: (right side)
5. Squashed Tomato stamped JPL Bruyere, St. Claude, France. Large chunk of nice briar with lots of birdseye on the bottom of the bowl. The bowl has a light cake and the rim is covered with tars and oils. The stem is oxidized and has tooth marks and tooth chatter. JPL stands for Jean Pierre Lacroix. http://pipedia.org/wiki/Lacroix
6. K&P Dublin (Peterson’s) Canadian with a sterling silver band and a p-lip. The rim has some build up and the bowl is lightly caked. The stem is in excellent shape with no bite marks or tooth marks. It is oxidized.
7. Castello Sea Rock 15 AF – made for the North American market with the “diamond” stem insert. Military bit with tooth marks on the top and underside of the stem near the button. Slight build up of white calcification like the stem had originally been smoked with a softee bit. This one has a full bowl of unsmoked tobacco. There is some rim damage from knocking out the pipe on the front outer edge and some tars and oils on the back surface of the bowl.
 I am quite happy with the find. It was a purchase well worth the price. I was more than glad to have paid the bill. The meeting with the seller was also memorable and gave me a lot to be thankful for this Good Friday.
Blog by Steve Laug
We live in a time of political correctness and a burgeoning anti-smoking lobby. More and more of the childhood characters that I grew up recognizing them by the pipe in their mouth have had the pipe eradicated. Frosty the Snowman is sans pipe, so is Old King Cole, Popeye and even Santa Claus. The ongoing removal of all things pipe and tobacco from the stories of some of my early childhood favourites continues with new victims being added each day to the blade of this hunt. It is irritating to see figurines of characters that the pipe was a part of their persona all mercilessly without the signature pipe. I have come to expect that when I see wood carvings of figurines the pipe will be noticeably missing. It is with that background that the events described in this blog took place.
I travel quite a bit for the work I do – both in Canada and globally. I am always on the hunt for pipes and tobacco shops for me but I also have an ongoing assignment to bring something notable home for my wife and four daughters. On a recent trip to Europe I was in Germany, visiting Stuttgart, Karlsruhe and then ending the trip with about 3 days in Berlin. Down the street from my hotel was a beautiful Christmas shop. My wife has trained me to pay attention to these shops and have a look. Over the years we pick up Christmas ornaments for our four daughters and ourselves at these shops to remember our trips. I could not pass up a visit to the Käthe Wohlfahrt in Berlin, which is open all year, located on the Kurfürstendamm at numbers 225 and 226 (opposite the famous Café Kranzler). I could not be that close to a Christmas shop of that renown and fail to visit it. If the wife and daughters got wind of the fact that I was that close to a shop they would have loved and did not take the time for a visit I would never live it down. Thus, with fear and trembling I knew that I needed to visit and make some purchases for the family Christmas collection. On the second morning I walked down the street and visited the shop.
The shop is huge. It fills two floors and as you wander through it you find baskets and trees and walls of wonderful ornaments, fine Christmas decorations and stylish gift ideas for every occasion. At the heart of the store is a winding, spiral rotunda, leading from the ground floor to the first floor, which allows you to walk up around a festively decorated tree. I have included the photo below and the link to their website for other Christmas lovers. https://wohlfahrt.com/102-1-berlin As I wandered through the shop I found that it was filled with many surprises from finally carved Black Forest Cuckoo Clocks to Christmas carousels with windmill blades on top that turned from the heat generated by candles. There were ornaments and carved table settings that all were amazing. But for this North American who has visited many Christmas shops around the world and in both the US and Canada the greatest surprise was the fact that many of the ornaments and displays had Santa Claus and other characters that were smoking pipes. These pipes were a prominent feature of the characters. I have to say that discovering this was a breath of fresh air for me. I have almost given up on finding Santa figures with a pipe let alone wood cutters, dwarves and elves all with pipes. I was delighted and took pictures all around the shop to capture some of the figures and displays showing pipes. There were so many that I easily could have filled a memory card with photos. The few I took convey the feeling of the prevalence of the pipe among the characters of the shop. I am including those photos in this blog to give you a bit of a feel for what I saw.
Use your imagination to walk with me up the winding, spiral rotunda in the shop and see the figures through my eyes. I felt like a kid in a candy shop. Not only could I find the ornaments that my wife and daughters would love but I could also take in the stirred memories of childhood characters from books and movies that were present with pipe in hand or mouth. It was astounding. In the first photo I took every character had a pipe in his mouth regardless of the figure. There must have been over 30-40 figurines in that display and all had different pipes. Some were short pipes like the ones in the photo below and some were longer old German style folk pipes.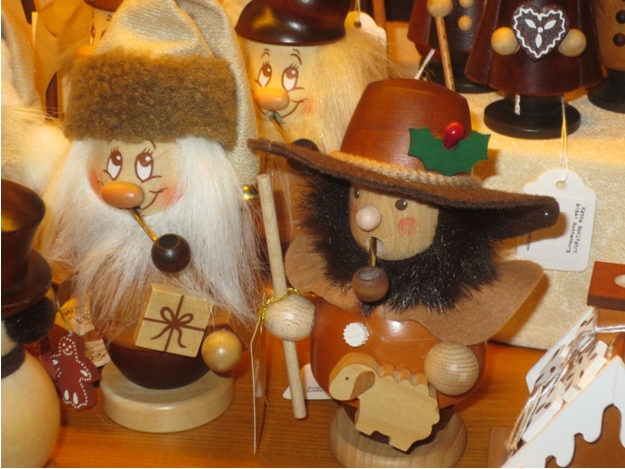 The next display that caught my eye was a shelf filled with a variety of Santa Claus figures. Every one of them had a pipe in his mouth all different pipes of various shapes and styles.
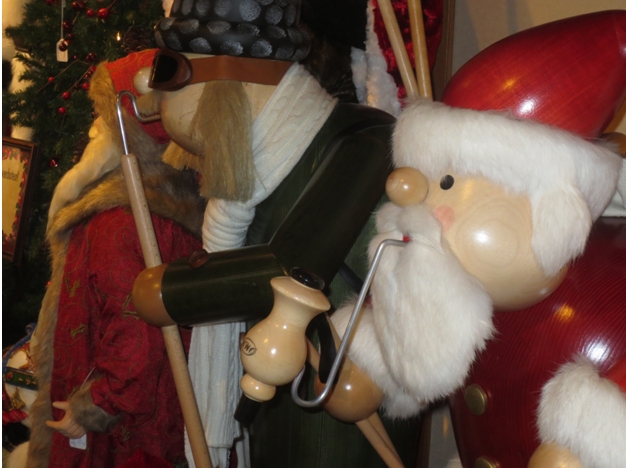 Even the wooden cut out tableaus had pipemen featured in them. The picture below shows one such tableau with a wood-cutter taking a pipe break after cutting firewood. The first photo below is a close up of the wood-cutter. The second photo is of the larger tableau – with a base of at least 1 meter. Throughout the scene there were figures smoking a variety of pipes.
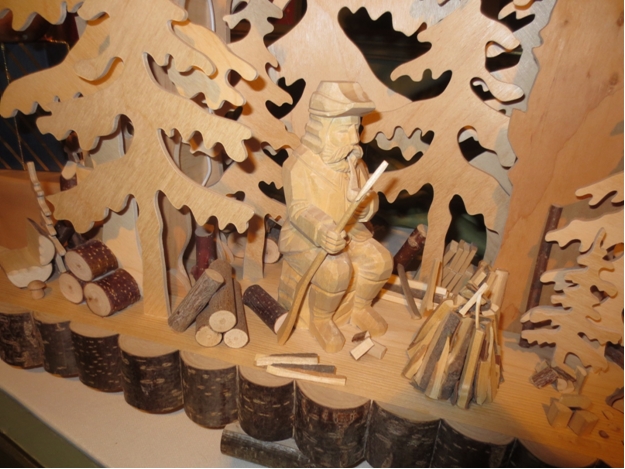 Next to the wood-cutter was another tableau of a quiet clearing in the woods with trees and ground covered with snow. In that scene there were several figures at work, again all had pipes in their mouths.
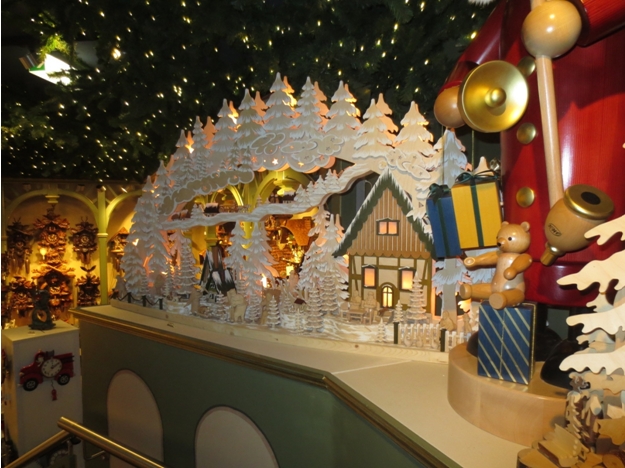 When I finished taking in as much of the shop as my mind and eye could contain I carried the ornaments I had picked for the wife and daughters to the cash register to check out. As I laid them down on the counter I looked up. And what to my wondering eye should appear? There above the checkout desk was another Santa figurine with a German Folk pipe in his mouth.
 Thanks for giving this old man’s written memories a read. For me the shop was a breath of fresh air. It was a delight to walk into a shop that still paid service to my literary and film memories of characters who I grew up with who still looked like I remembered them. It was a pleasure to see that those who raise the placard of anti smoking had not made their way into this bit of paradise and sanitized yet another place of memories from my childhood. Yes indeed, the pipe is alive and well in the figurines of at least one Christmas Shop that I visited. I only wish the shop was closer to Vancouver so that I could visit again to take in more of the incredible ornaments and figurines. Ah well, I will be back in Berlin again in the year ahead and will certainly visit the shop once again.
Guest Blog by Robert M. Boughton
Member, North American Society of Pipe Collectors
http://www.naspc.org
http://www.roadrunnerpipes.com
http://about.me/boughtonrobert
Photos Provided by Gustavo Capozzi
“The original is unfaithful to the translation.” ― Jorge Francisco Isidoro Luis Borges, KBE(1889-1986), Argentine short story writer, essayist, poet, translator and Knight of the British Empire, regarding Henley’s translation of Beckford’s “Vathek” [1943]
I noticed fairly frequent comments from a certain Argentine member of the Smokers Forums on various threads of mine as well as others, but his note on my most recent post about the restoration of a Savinelli Panama Bent Bulldog #111 KS was – in particular because of the broken English that seemed to me even more apropos to his meaning – eloquent and moving. The member, whose real name I now know is Gustavo Capozzi, referred to a comment I made, that I never bought a Savinelli I didn’t like, when he wrote:
“Robert I agree with you. When I´m a young boy, looked through the window the Savinelli pipes, and as people with money buy.In my student days had only national pipes and an Albanian as ‘imported’.I have a catalog Savinelli of that time where I enjoyed. Even today I could not get some. Congratulations!”
Concluding from the message that he has never owned a Savinelli, I experienced a series of vivid mental images of the young Gustavo growing into manhood, saving the cherished Savinelli catalogue and never being able to afford one or, now, to find the fine Italian brand anywhere in his native country because of governmental commercial import regulations. To be open to the point of risking sounding mushy, I was very touched. And the final word of congratulations to my good fortune added a sense of downright guilt.
In a private message to him on the Forums, I suggested that our host, Steve, would likely be quite interested in the catalogue, which Sr. Capozzi agreed to photograph and email. In fact, he replied that he had already done so, with such speed that I was further struck by his deep love of Savinellis. However, in a case of miscommunication, I believed he had sent the photos to Steve. Eager to know that they were received, Sr. Capozzi wrote to me again, and I contacted Steve, who responded that he had no such email. When I relayed this news to him, he dashed back the frantic note, “emails were sent to you!!!!!!”
With a rising sickness in my stomach, I searched my email, not finding anything. Then I found all but the first batch in the WRONG Junk Mail folder (only with MS Office, I know) and hastened to alleviate Sr. Capozzi’s clear agitation. He shot back the first eight photos.
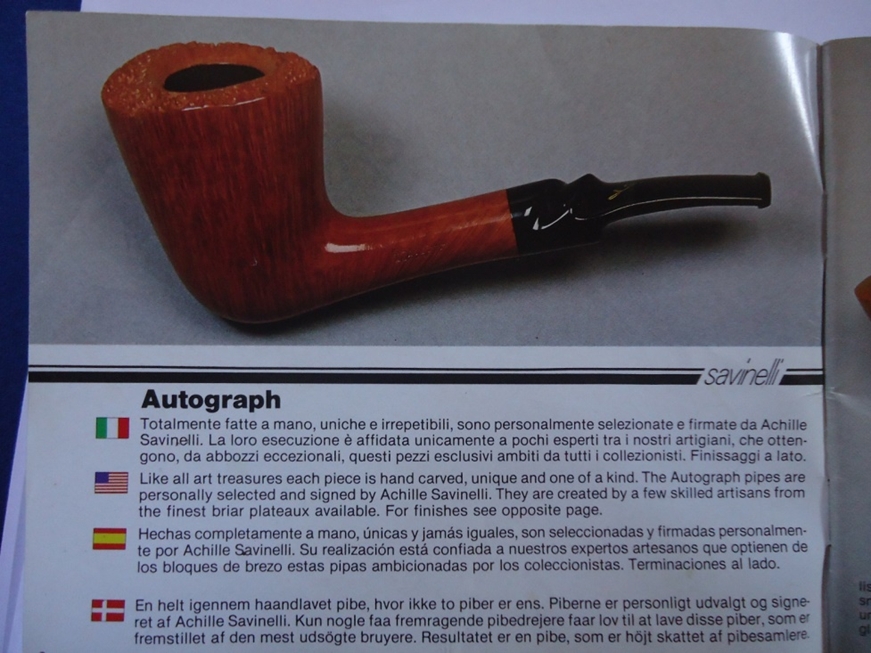
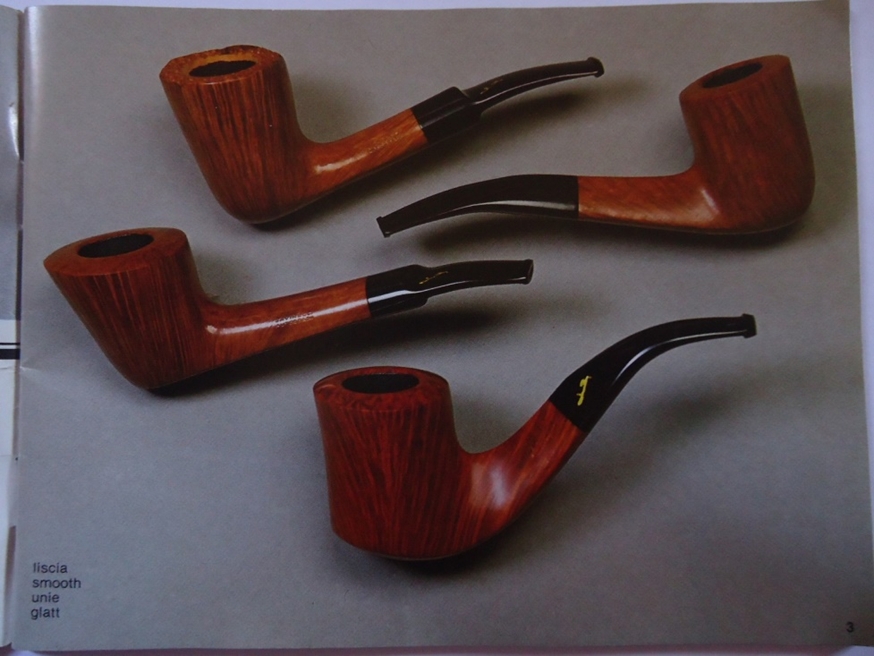
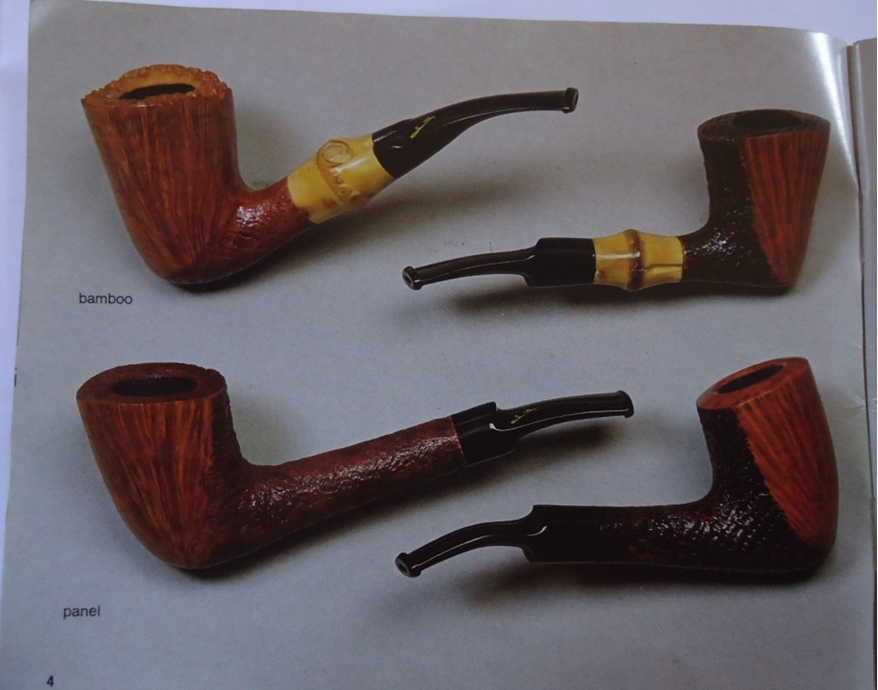
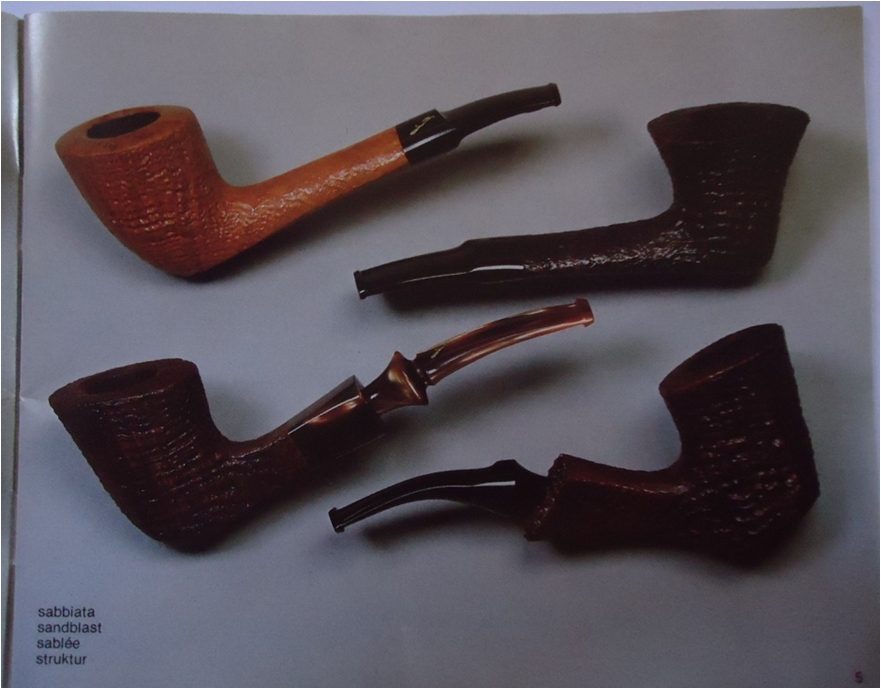
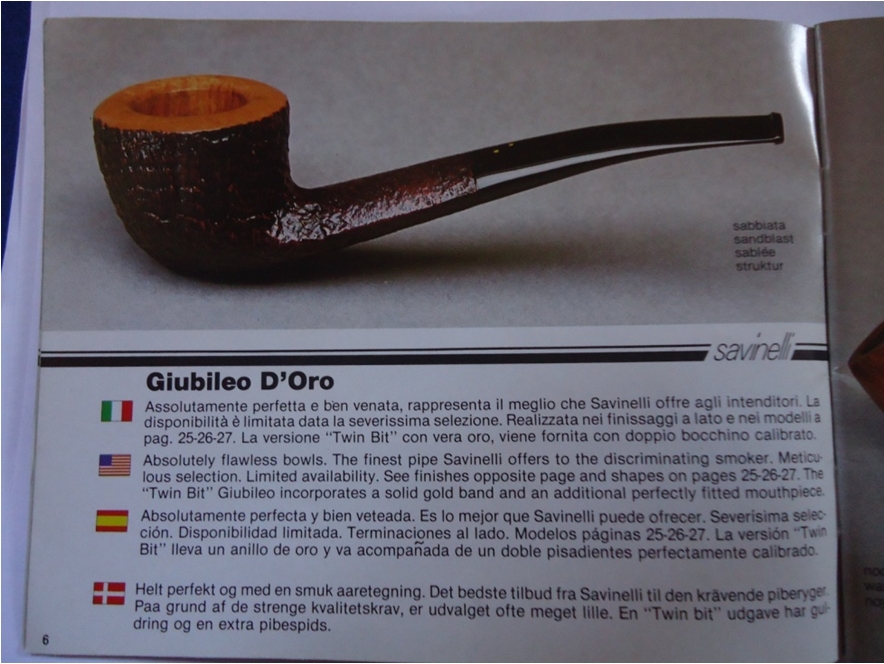
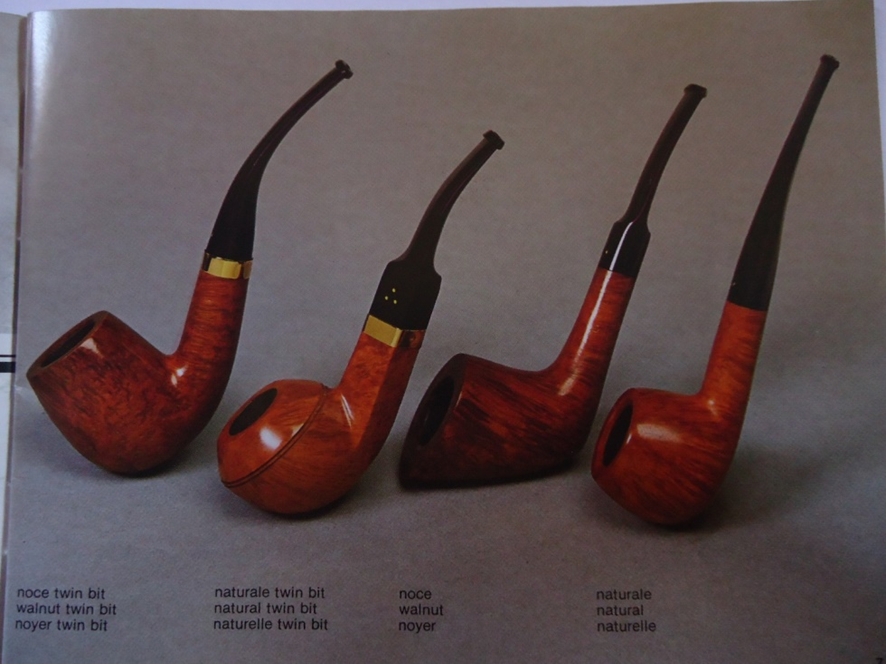
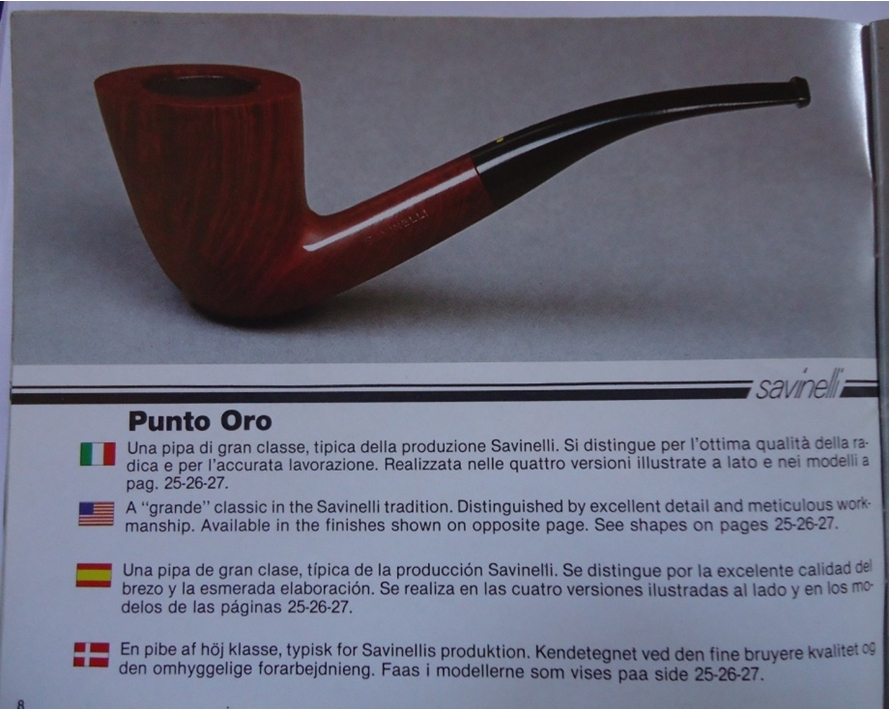
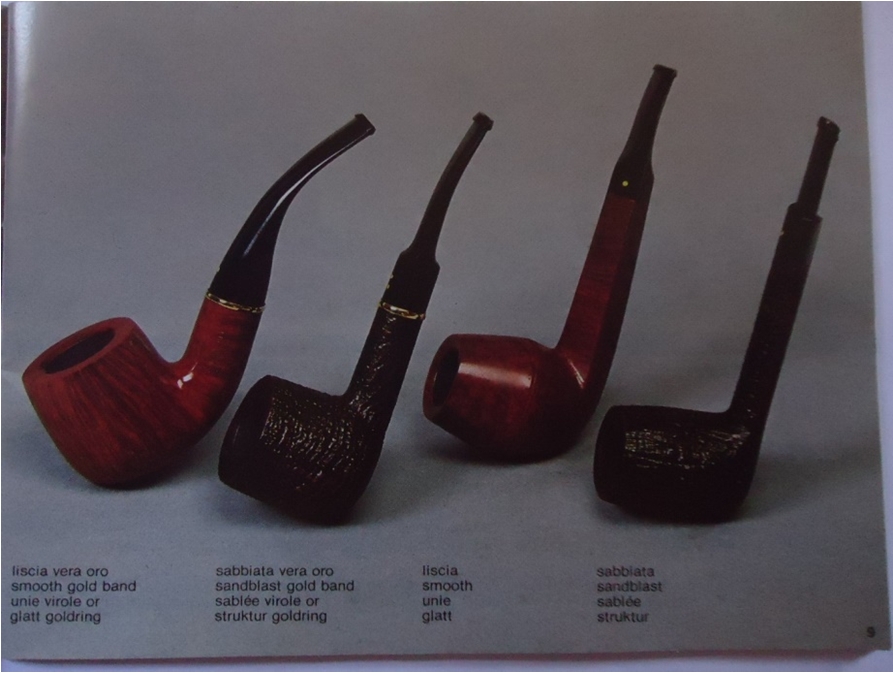
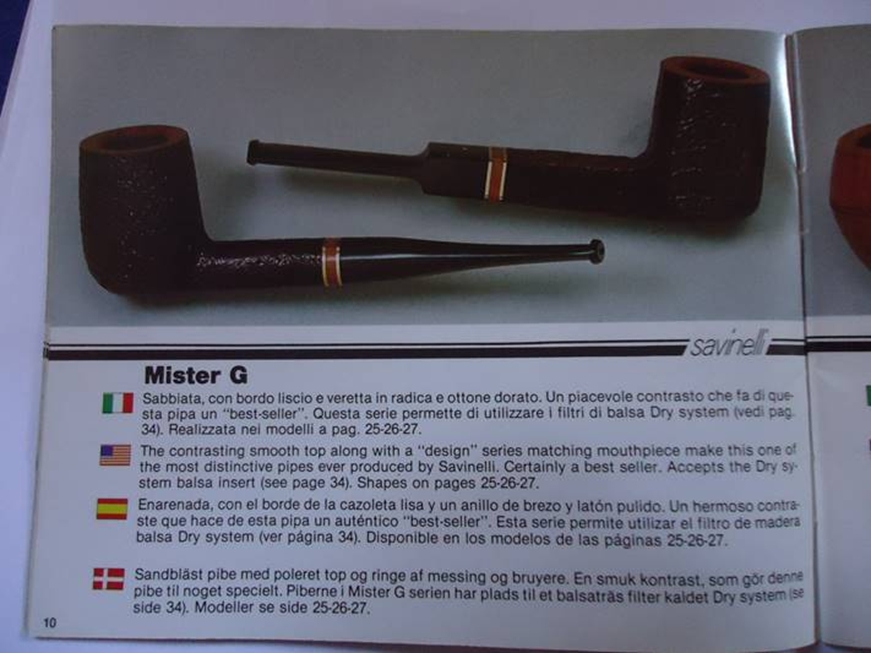
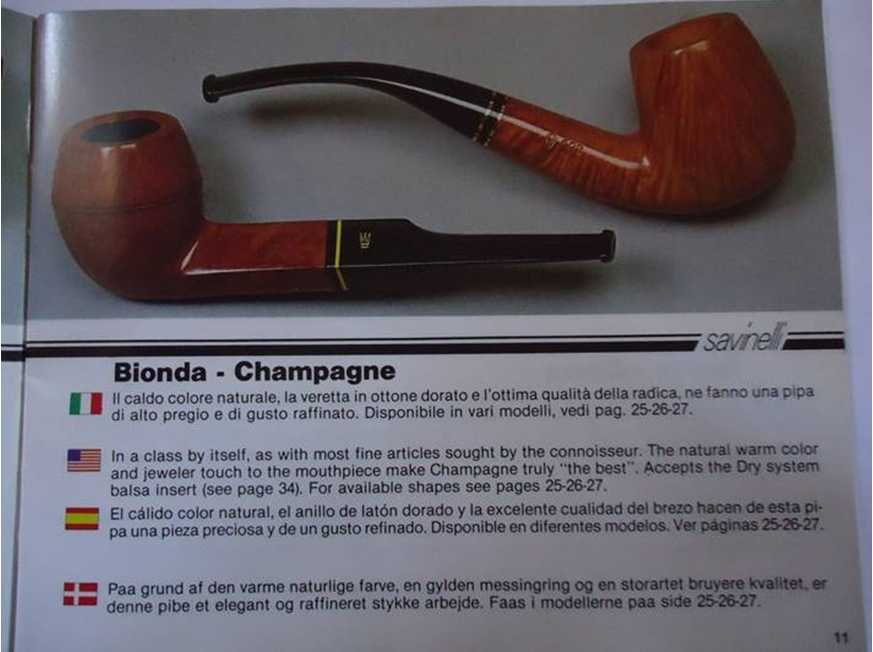
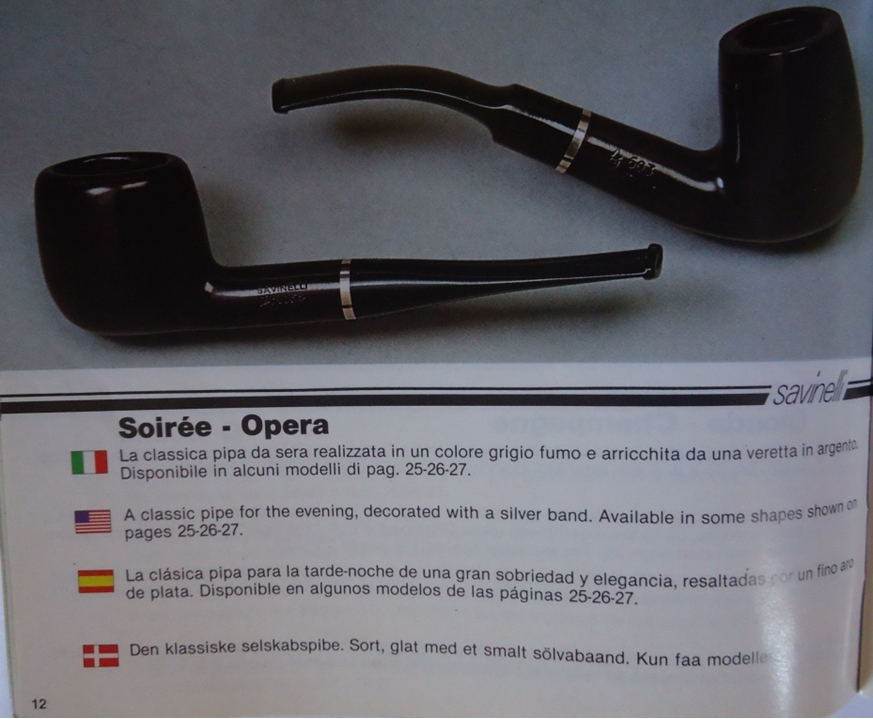
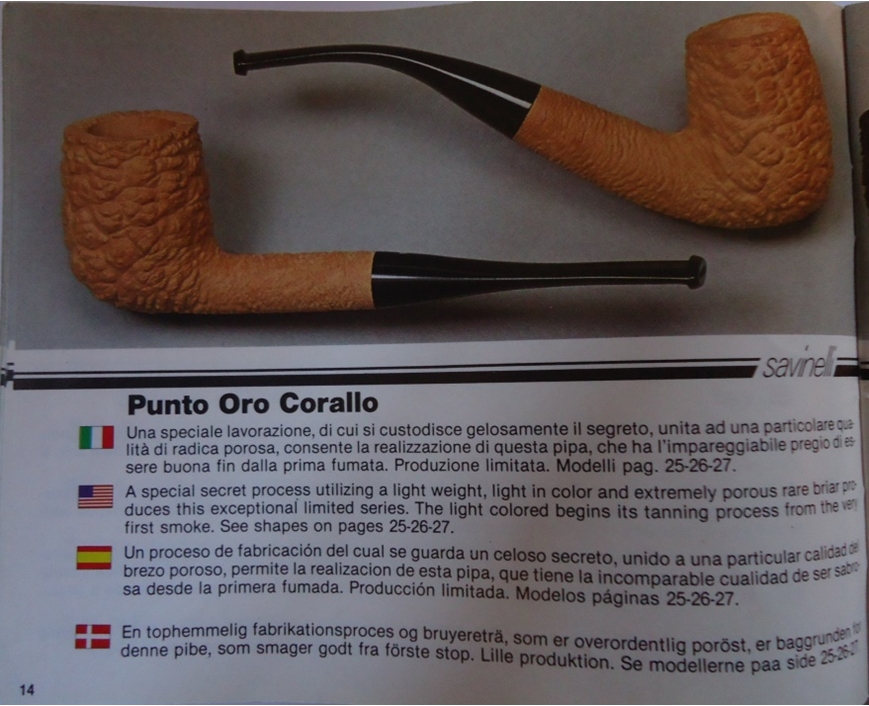
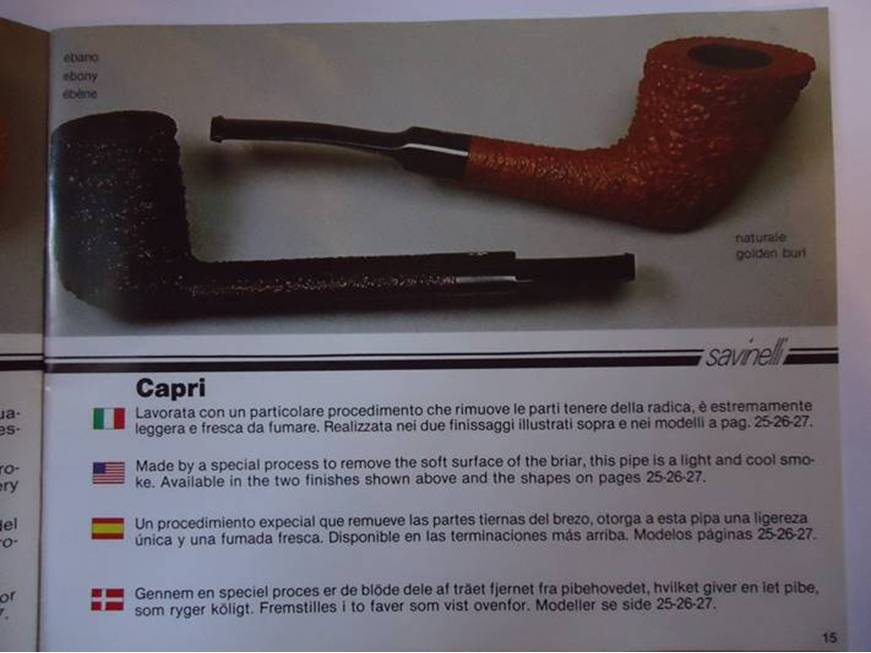
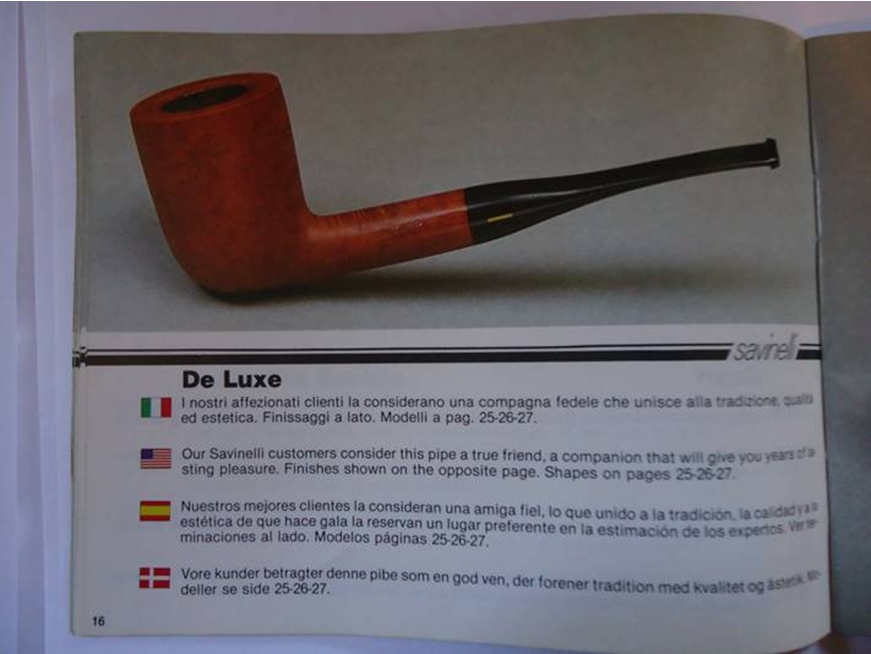
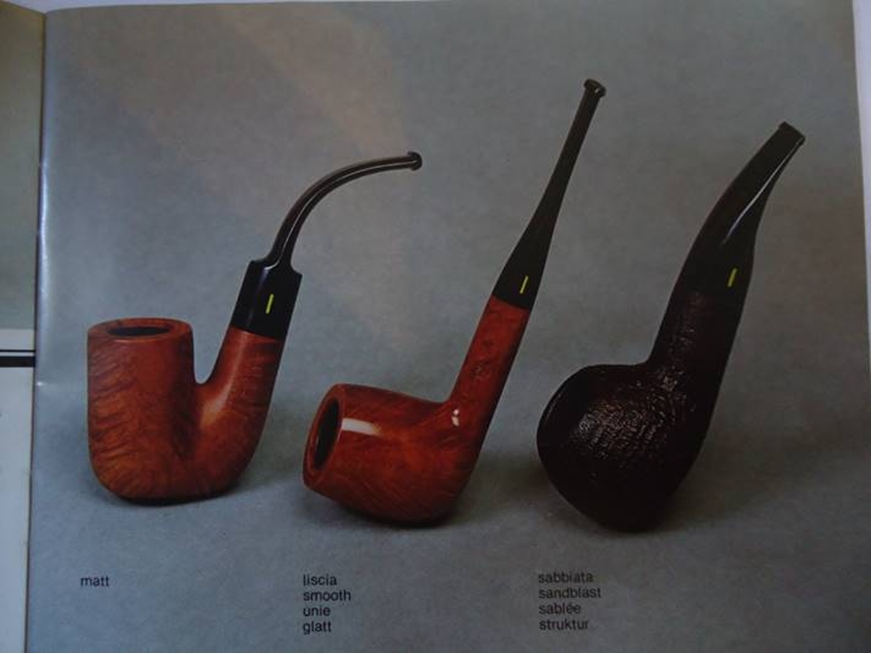
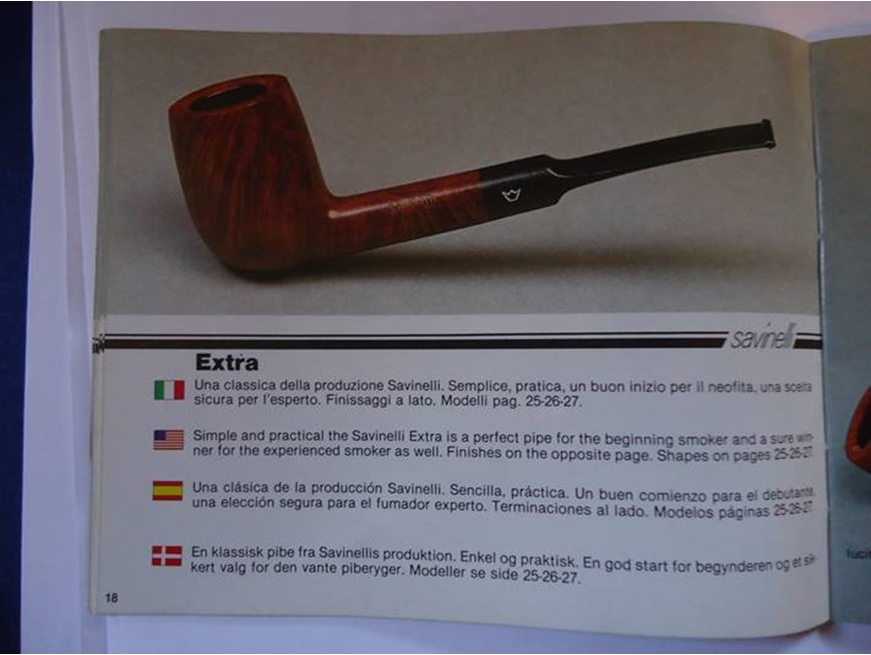
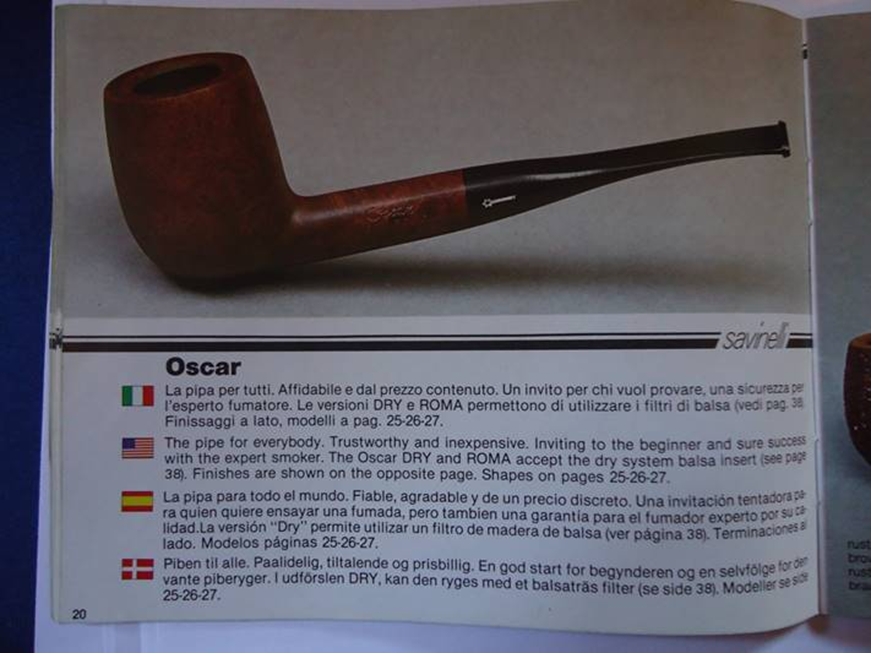
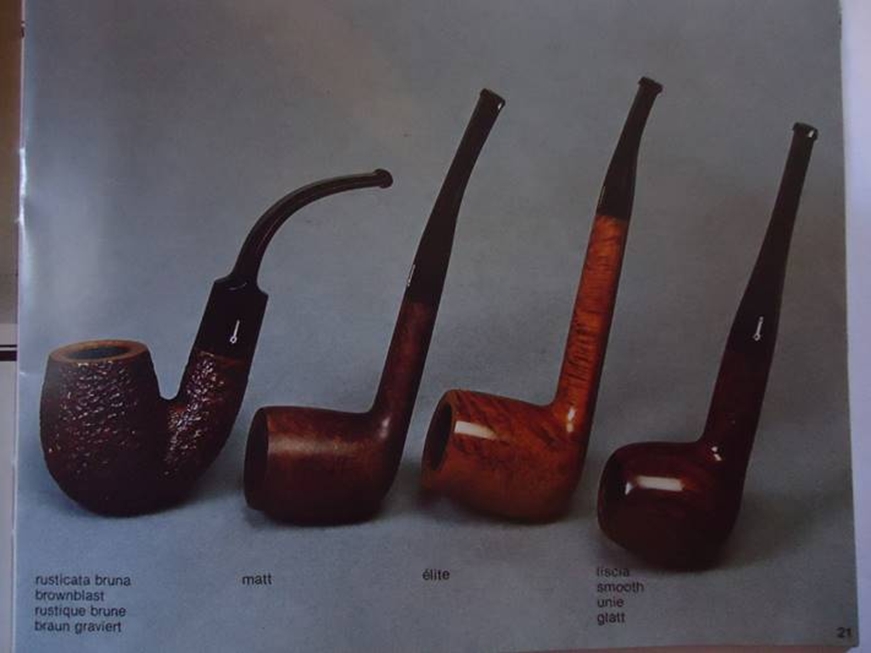
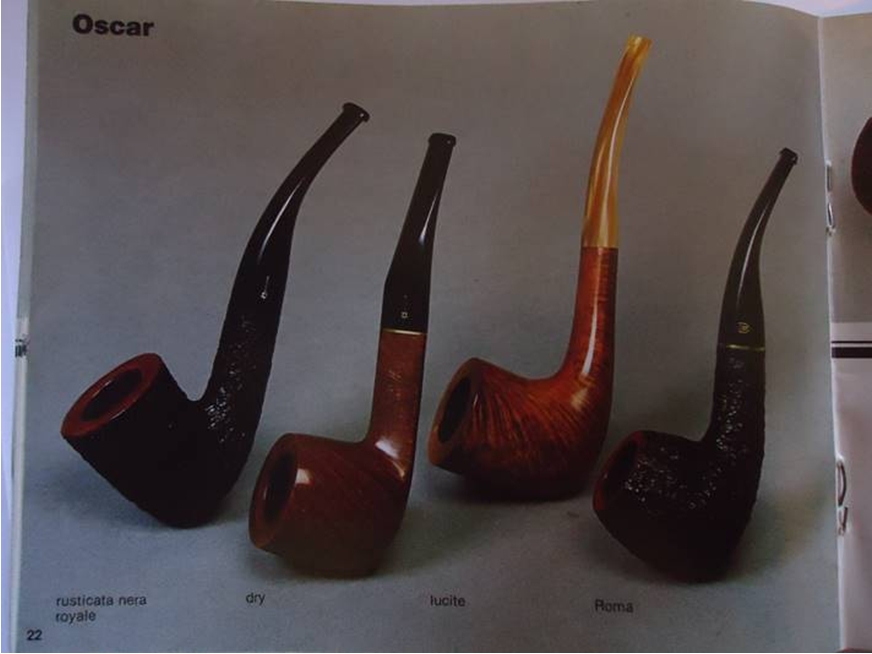
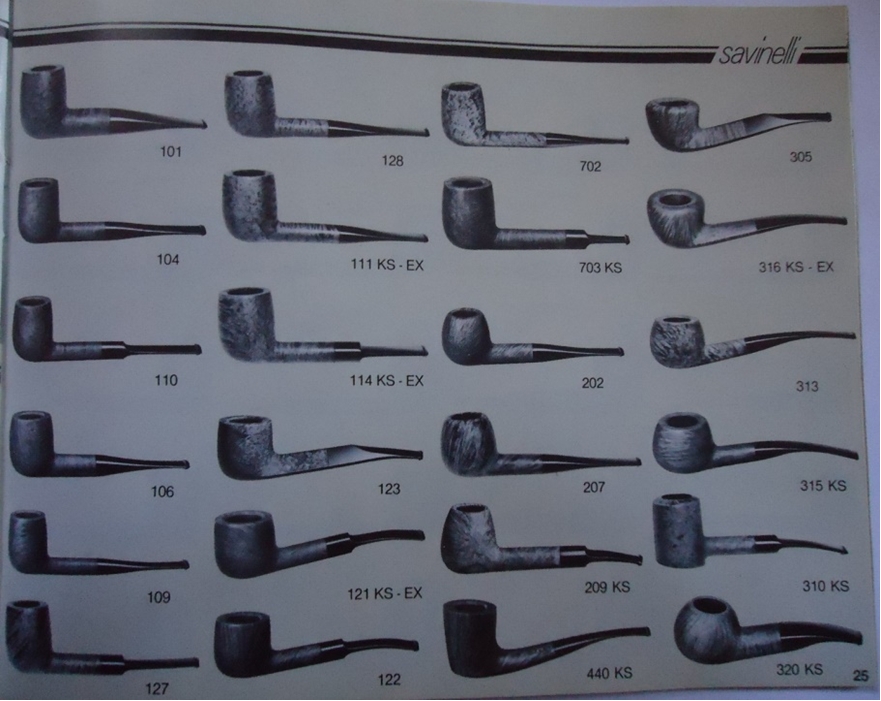
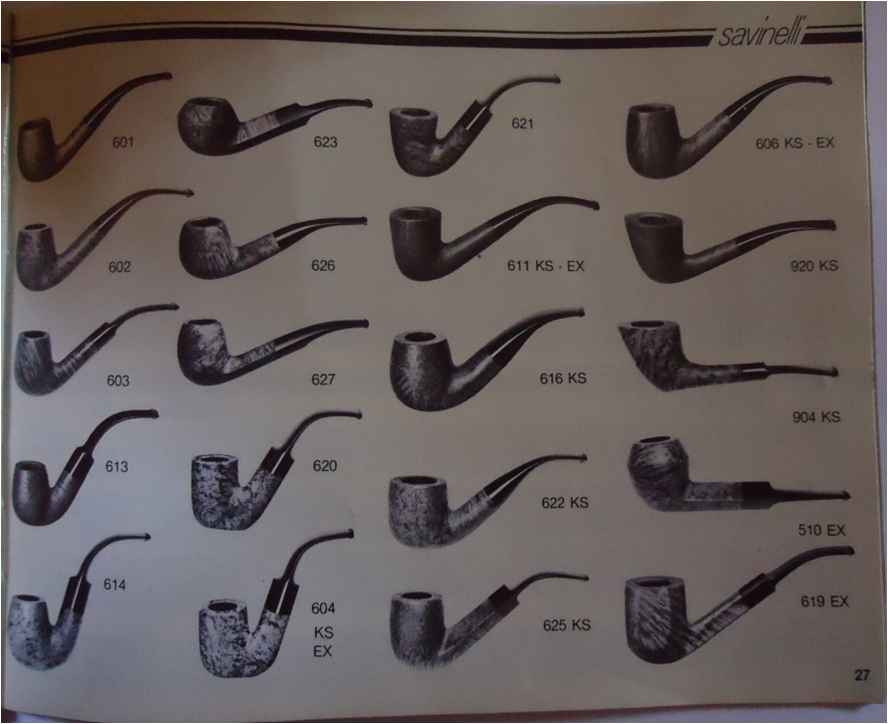
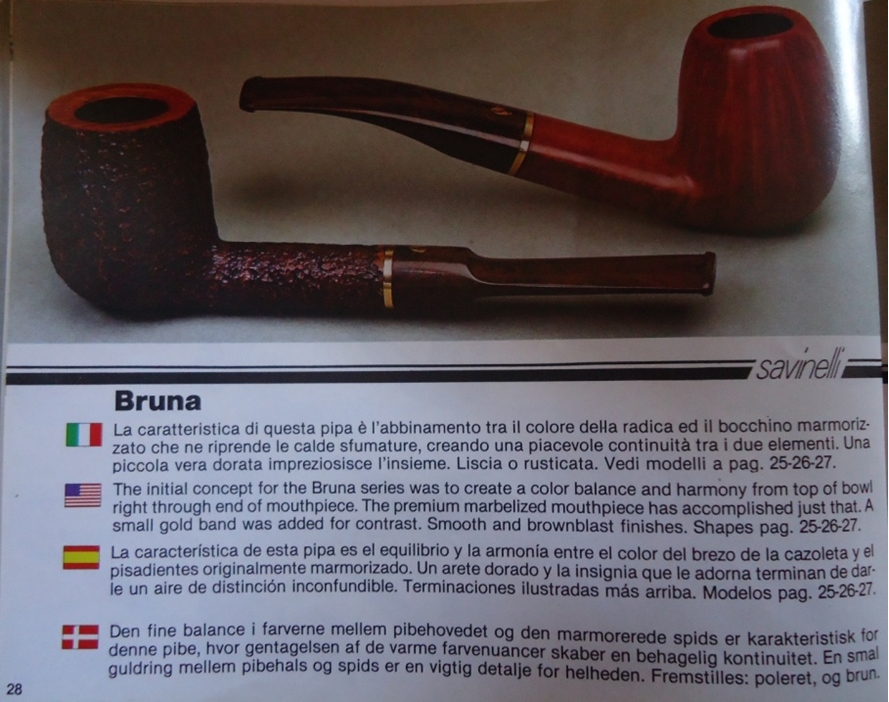
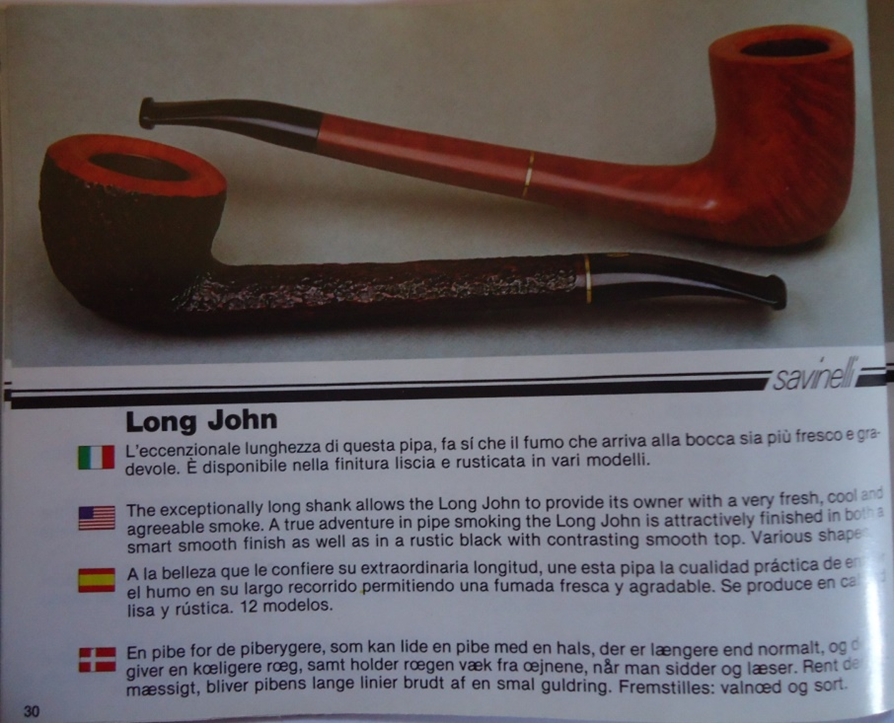
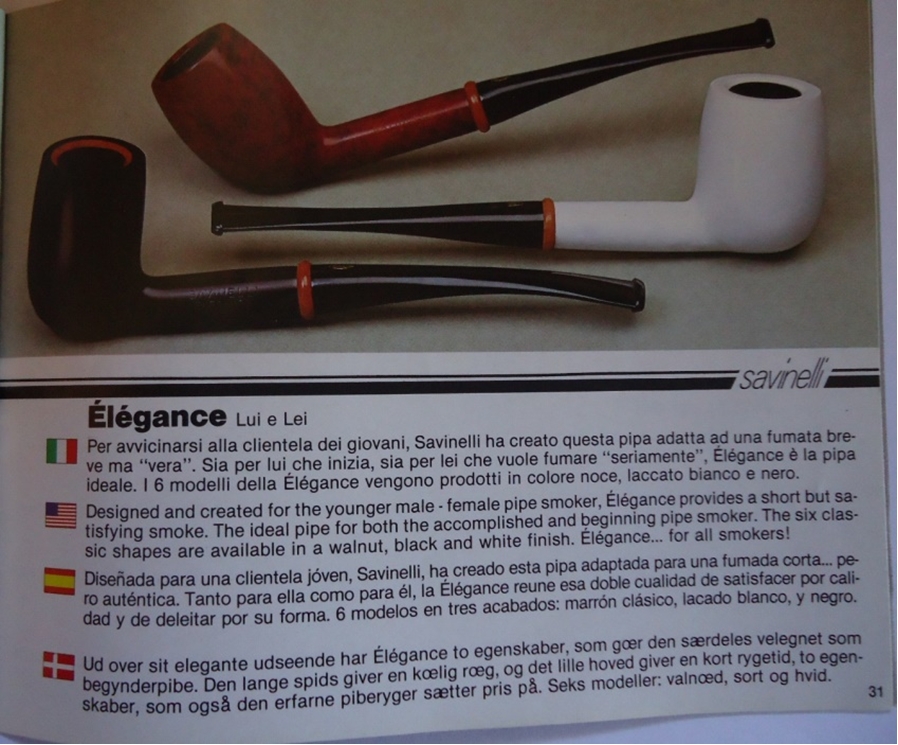
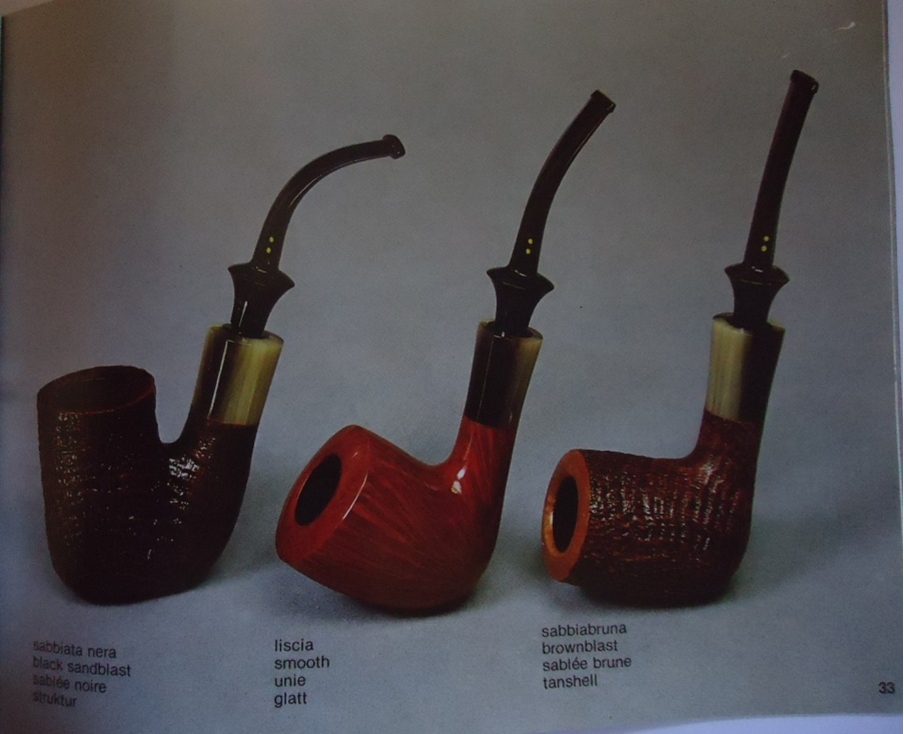
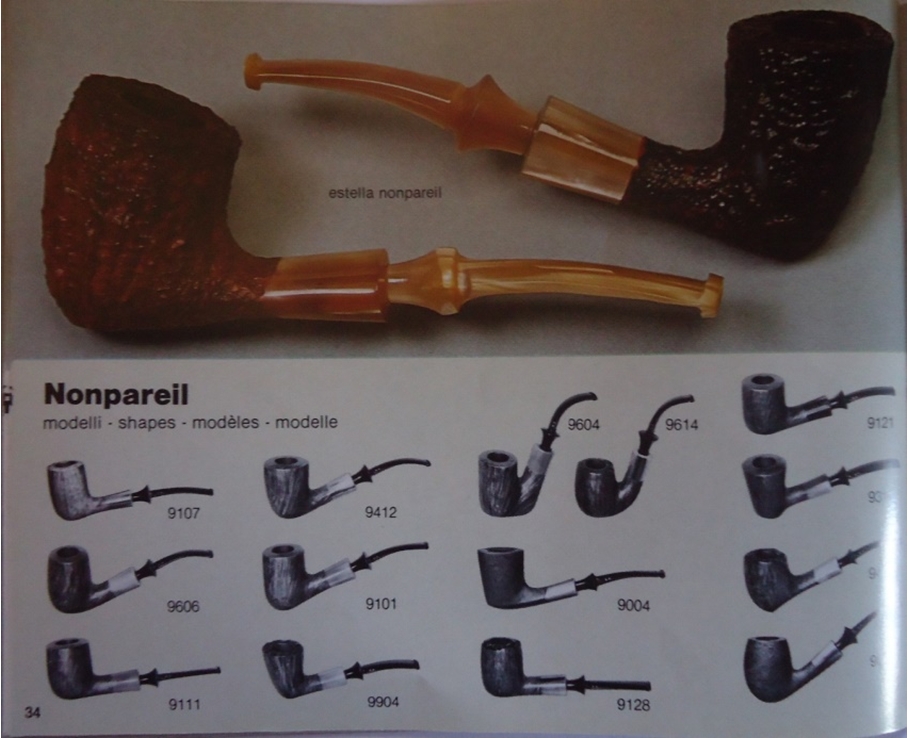
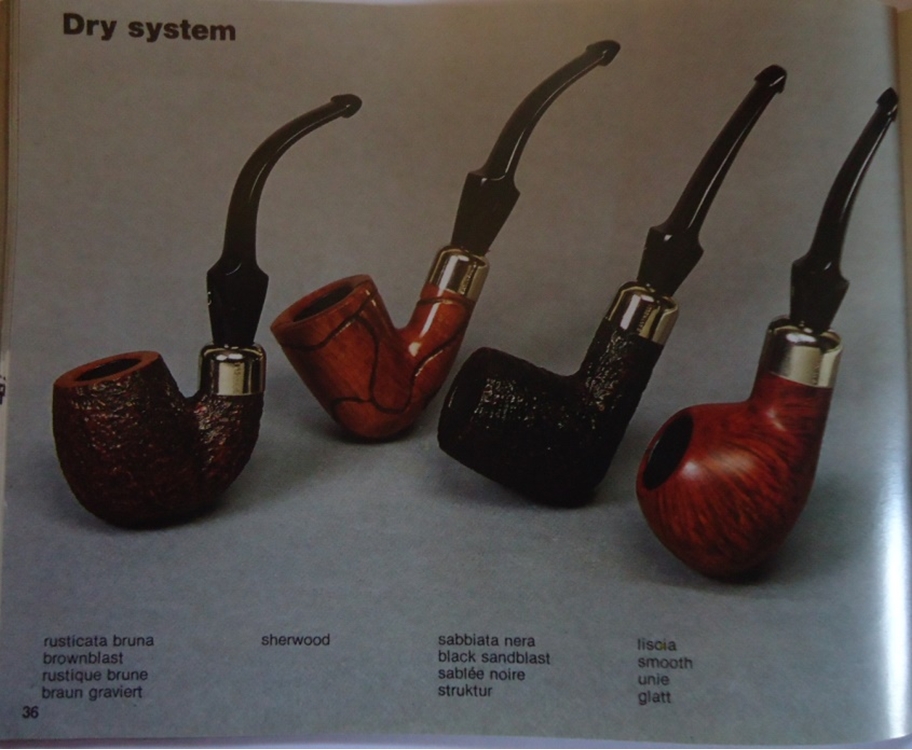
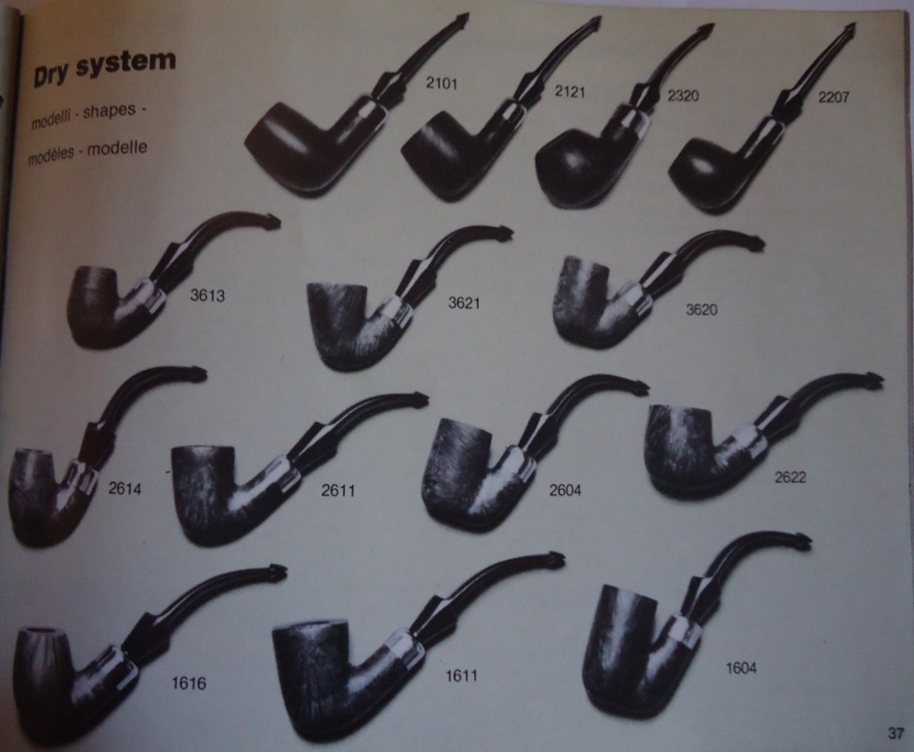
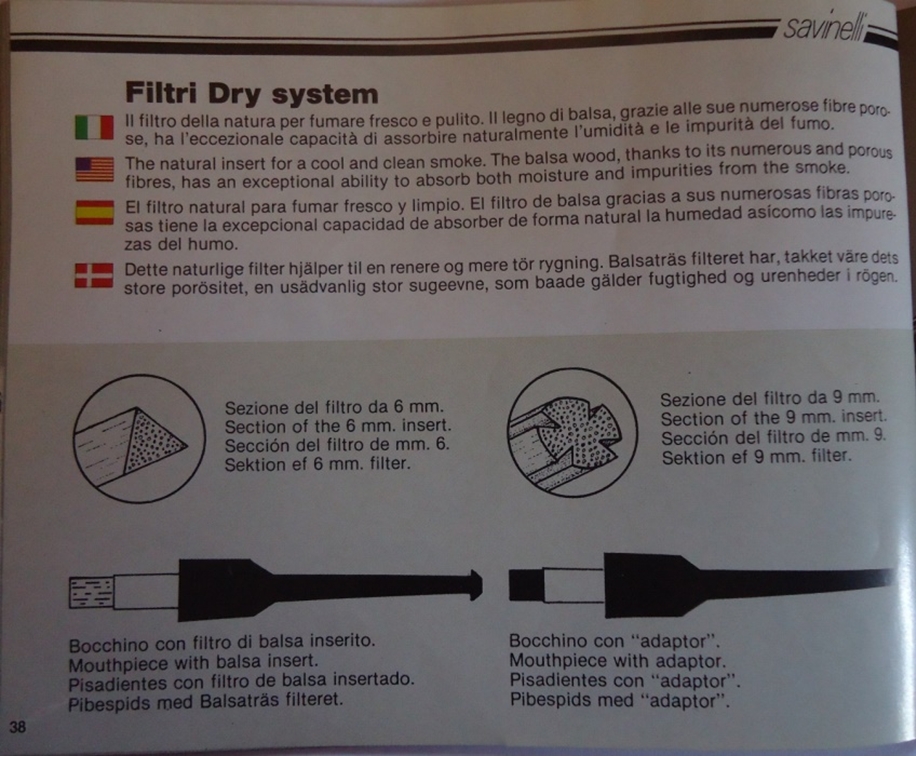
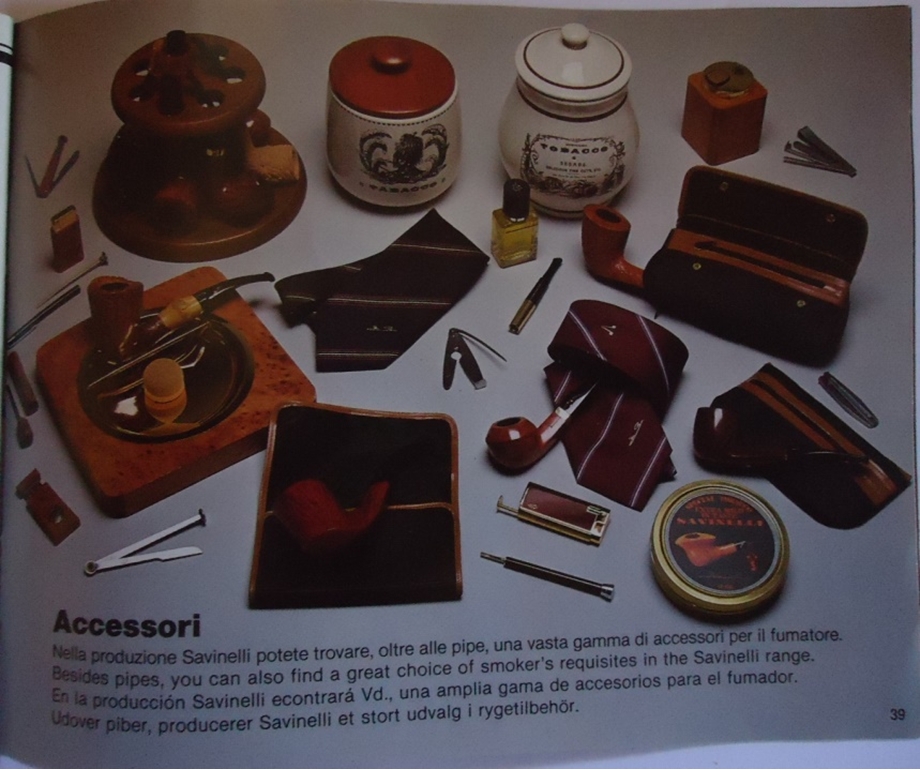
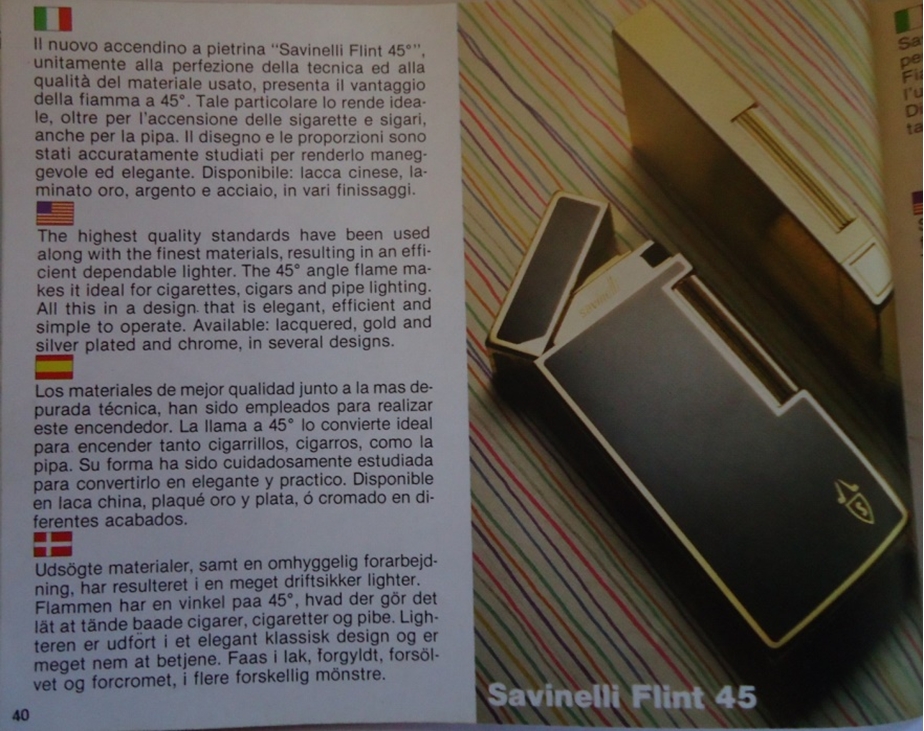
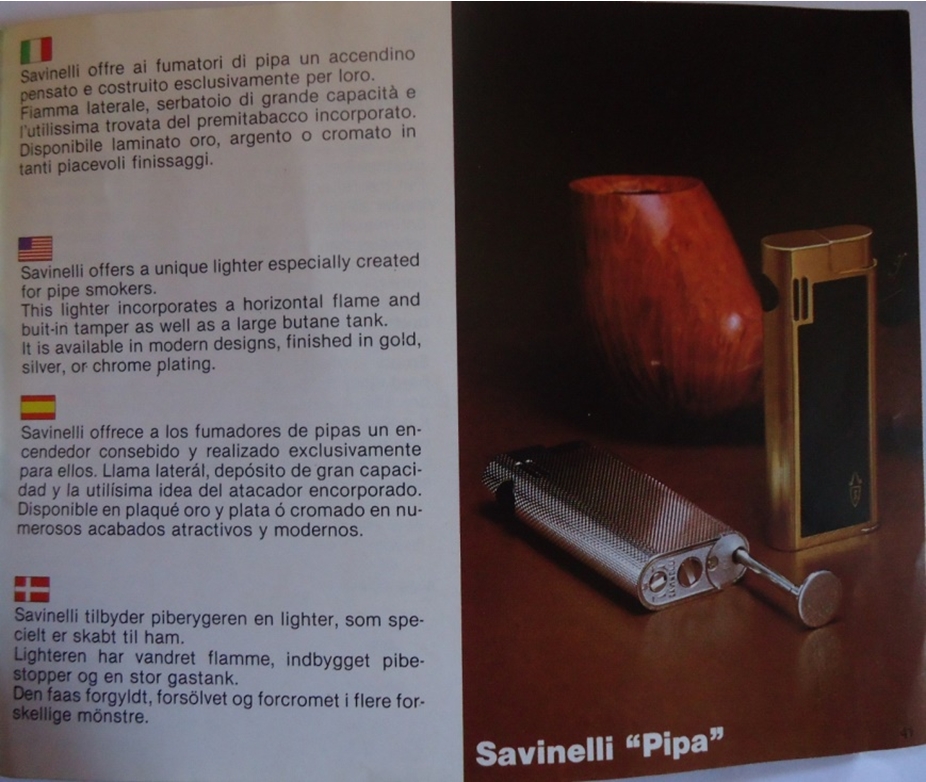
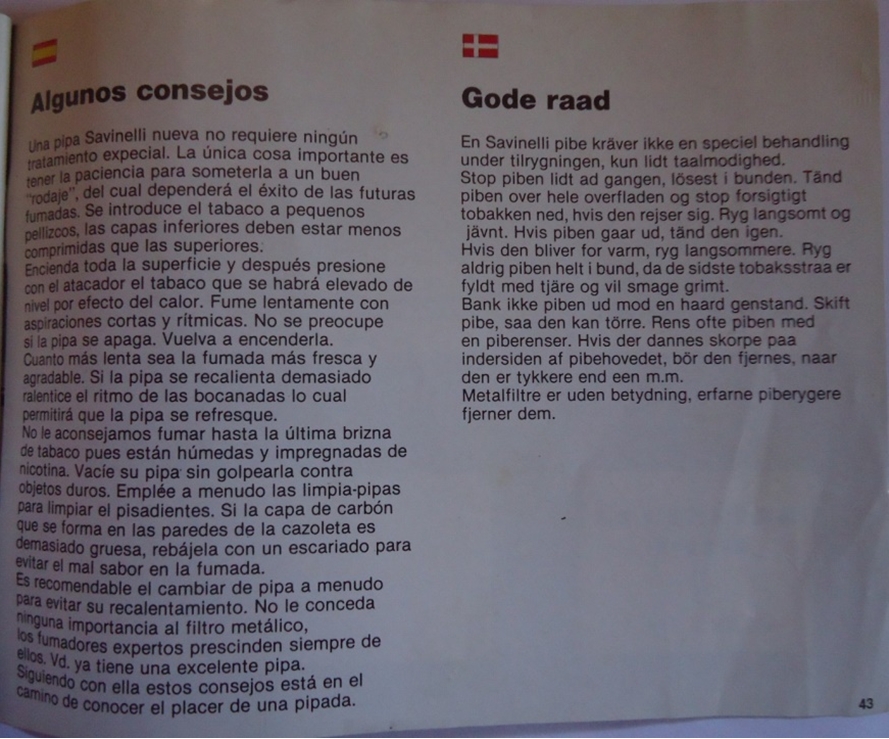
As a final note before posting the catalogue, I will just add that Sr. Capozzi and I turned out to be mutual fans of the great Argentine writer Jorge Luis Borges, whose quote above seemed fitting to the means of my new friend’s photo translation of the catalogue for our enjoyment and learning…and how much there is to learn from this marvelous catalogue is astonishing: pipe lines, shape charts, dry system pipes, filter dry systems, accessories and even “suggestions.”


 There happens to be one particular Savinelli in my possession that I have good reason to suspect would make an excellent first for him, if I can find a way to clear Argentina’s red tape. And, of course, provided Sr. Capozzi will give me his address.
Blog by Steve Laug
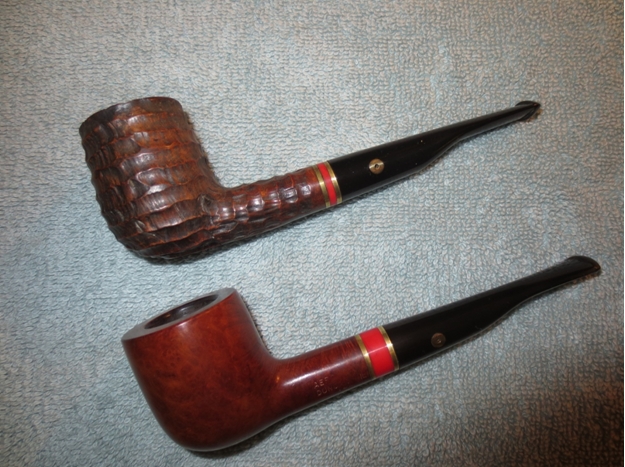
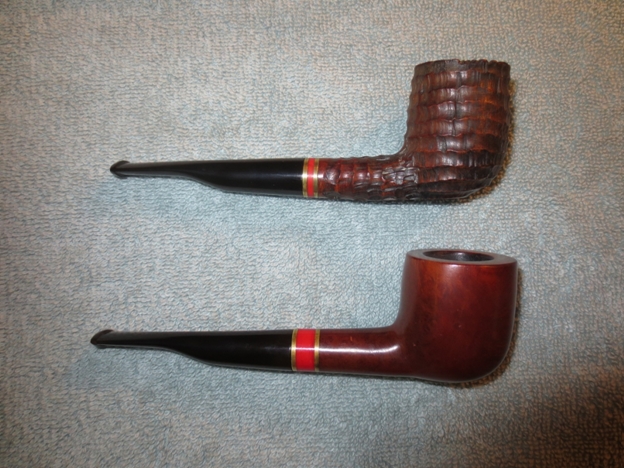
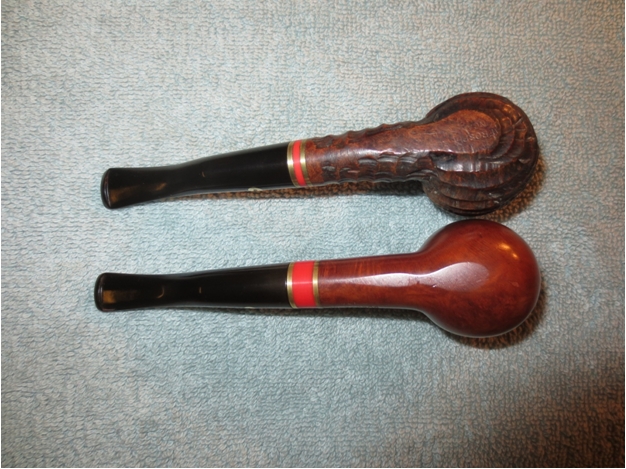
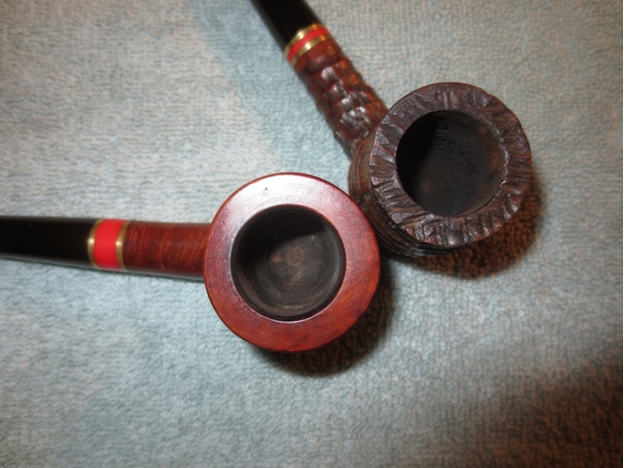
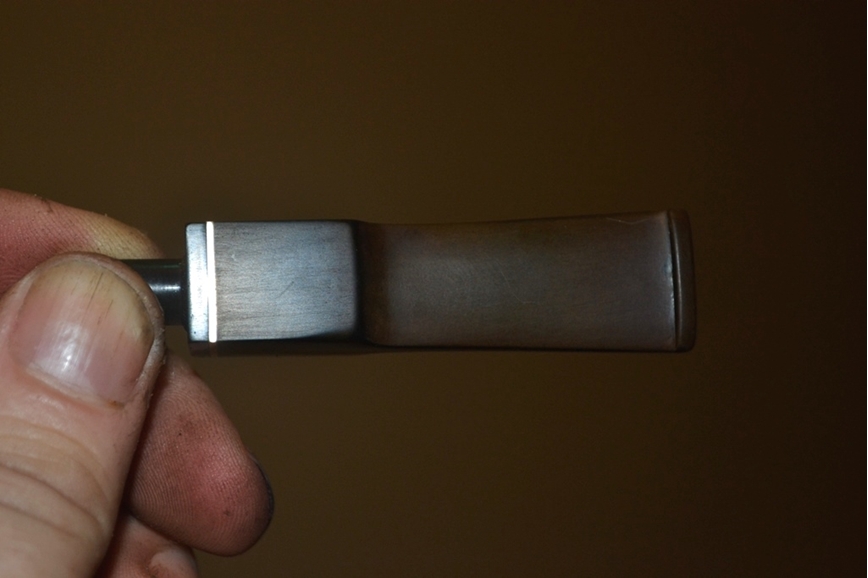
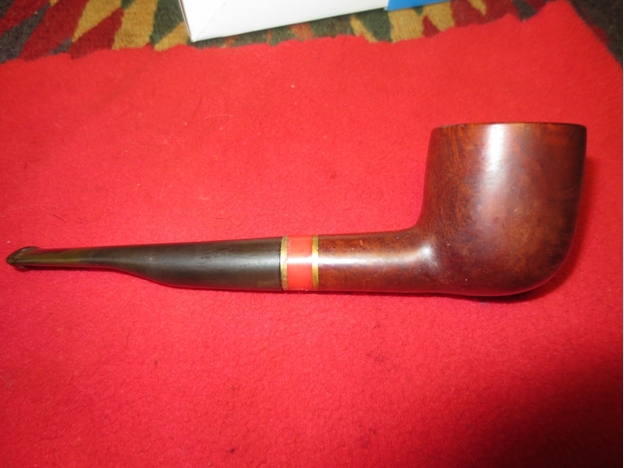
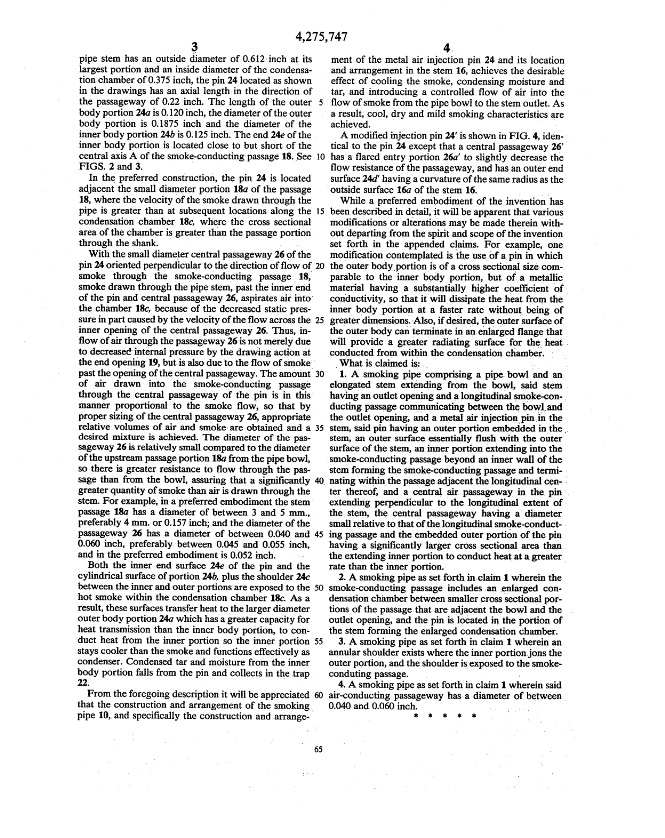
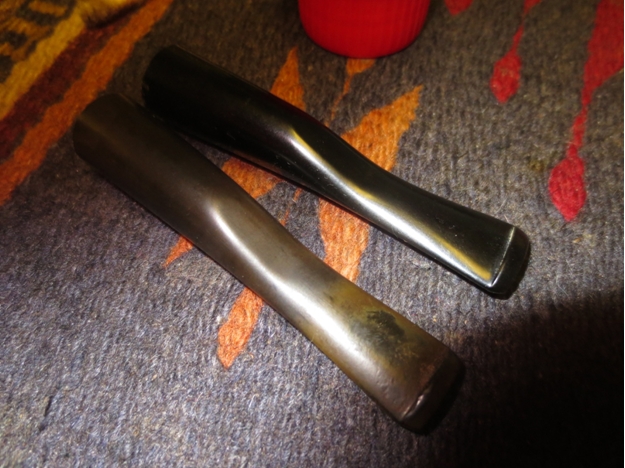
The last pair of pipes needing refurbishing from my gift box was a pair of Duncan Hill Aerosphere pipes – one a smooth pot and the other a rusticated billiard. I have had quite a few Duncan Hill pipes over the years and sold some, restemmed others without the reverse tenon system and really never paid much attention to them. The pot was a nice piece of briar and actually quite clean. The finish was in good shape though dirty. The inserted reverse tenon was loose and would need to be repaired. The bowl was dirty and had some pieces of tobacco attached to the walls of the bowl. The rim was in great shape. The stem was oxidized and the round brass carburetor hole was plugged. There was minimal tooth chatter on the stem and no bite marks that would need to be repaired. The stamping was slightly worn in the middle but it still clearly read Aerosphere over Duncan Hill over Ltd.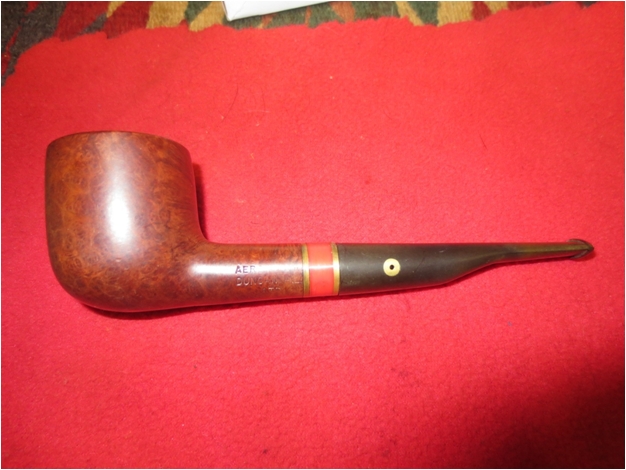 The rusticated billiard was also fairly clean though there was dried wax stuck in the grooves of the rustication. The rim top was quite dirty with tars and oils built up and filling in the rustication. The bowl had a light cake and tobacco leaf stuck on the bowl sides. The finish was workable but dirty. The stem was in better shape than the one on the pot. It was dirty and had sticky tape remnants on the top but there was little oxidation and no tooth chatter. The carburetor on this one was also clogged and the stem was loose on the reverse tenon. It was stamped with the same stamping as the smooth pot but on a smooth band on the bottom of the shank.
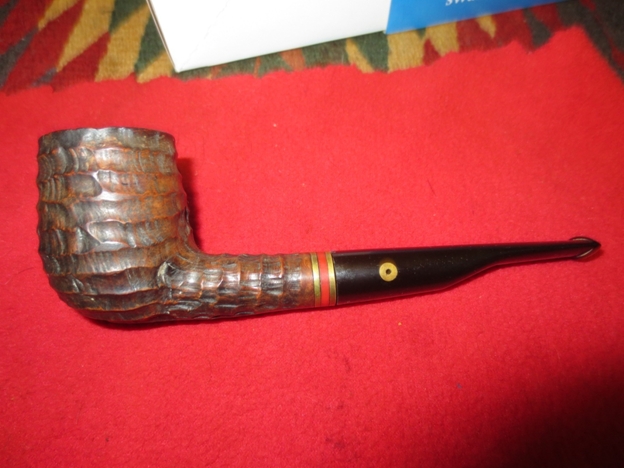
 I removed the stems and put the bowls in my alcohol bath to soak for a while. While they were soaking I wanted to do a bit of research on the brand and see what I could discover about it. I was curious to look for patent information and old advertisements to see if I could discover the marketing schemes that made this quite a prolific seller over the years.
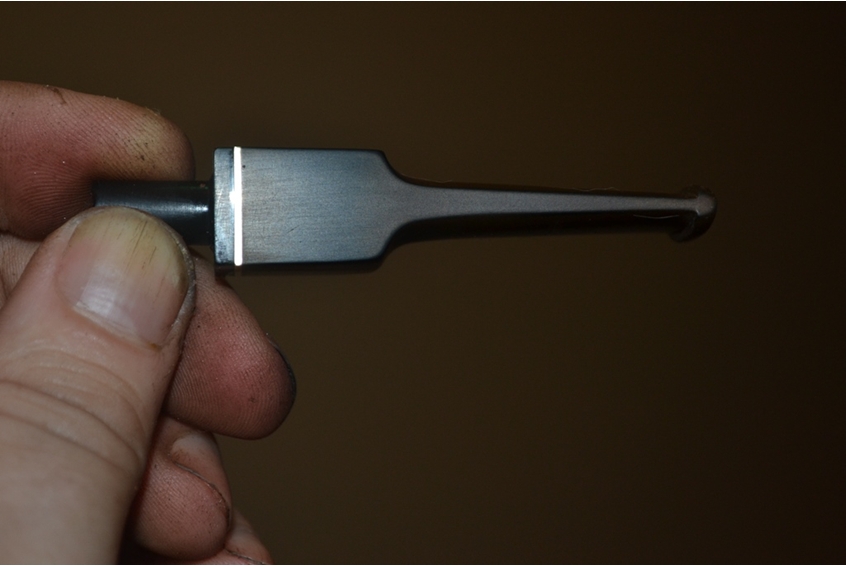
 I Googled Duncan Hill Aerosphere and the first bit I found was from a Google group for ASP. There I found the following quote. I have the reference link placed at the end of the quote if you want to follow up on the information: “The Duncan Hill Aerosphere smoking system (U.S. patent #4,275,747) utilizes the same principle of physics as the manometer. The Aerosphere, visible as the brass pin on the side of the mouthpiece, brings a scientifically measured amount of air into the stem with each puff. The control of the amount of air and the velocity of the air produces two effects that result in superior smoking pipe performance.” https://groups.google.com/forum/#!topic/alt.smokers.pipes/GUxdN5Dus4Q
I also found a link to an advertisement for the brand featuring the designer in Popular Mechanics Magazine, February 1980, pg. 31 on Google books. Here is the link:
https://books.google.ca/books?id=m9UDAAAAMBAJ&pg=PA31&lpg=PA31&dq=Duncan+Hill+Aerosphere+Pipes&source=bl&ots=tR4egGI0ig&sig=XeACE0-Vh19-1JNcA0kAgS87kRI&hl=en&sa=X&ei=p1QbVbPTEpLvoATEpoLoCQ&ved=0CBwQ6AEwADgU#v=onepage&q=Duncan%20Hill%20Aerosphere%20Pipes&f=false  Next is an advertisement from Popular Mechanics Magazine, September 1982, pg. 216 on google books. Here is the link. https://books.google.ca/books?id=f9kDAAAAMBAJ&pg=PA216&lpg=PA216&dq=Duncan+Hill+Aerosphere+Pipes&source=bl&ots=fsZtVqD0z9&sig=Kl3wI-76NJqpFxAg8SPndnnWyqM&hl=en&sa=X&ei=owEcVdGGKdj9oQSD_4L4Bw&ved=0CCgQ6AEwAjgo#v=onepage&q=Duncan%20Hill%20Aerosphere%20Pipes&f=false
  Finally using the patent number in the ASP quote I was able to find the patent documents for the pipe on the US Patent Office site. I have included the documents from the US Patent Office here. There are four pages – 2 of drawings and two of description.
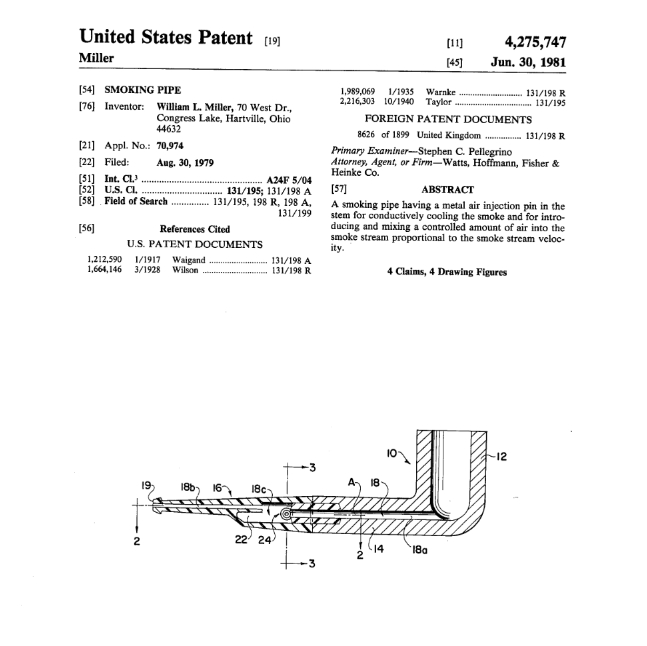
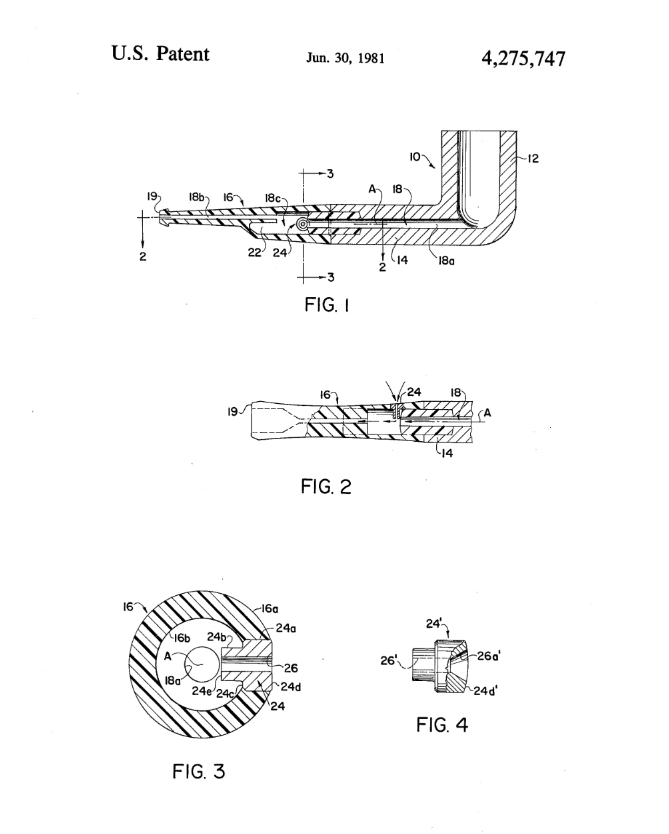
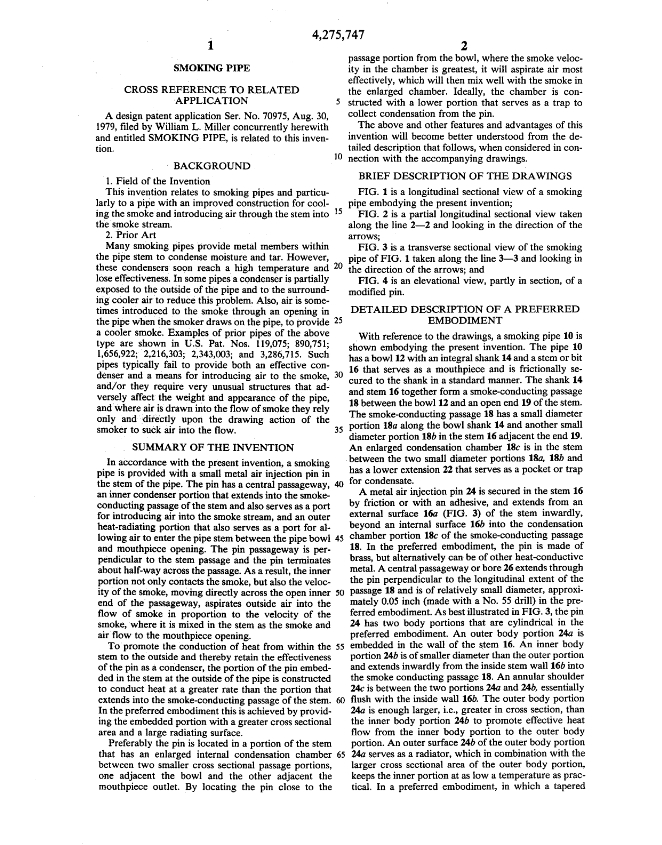
 I love finding this old information and reading about the persistent search for the dryer cooler smoking pipe that has led to many creative solutions. It lends some colour to the work of my refurbishing to be able to read about the design ideas and the inventors themselves as I work on the pipes. Armed with new information I worked on the stems while the bowls were soaking in the alcohol bath. I cleaned the inside and outside of the stems with 99% isopropyl alcohol on cotton swabs and pipe cleaners. It took some scrubbing to clean out the grime built up around the interior of the carburetor insert in the stem and in the second chamber below the airway in the stem. The tars and oils were built up in there but far less so than I would have expected on these pipes from the 1980s.
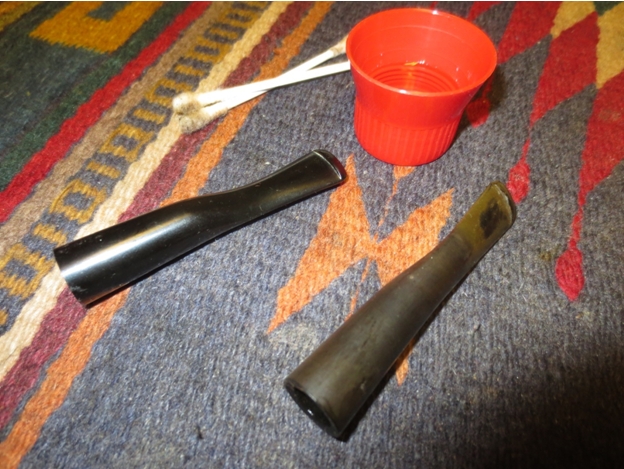
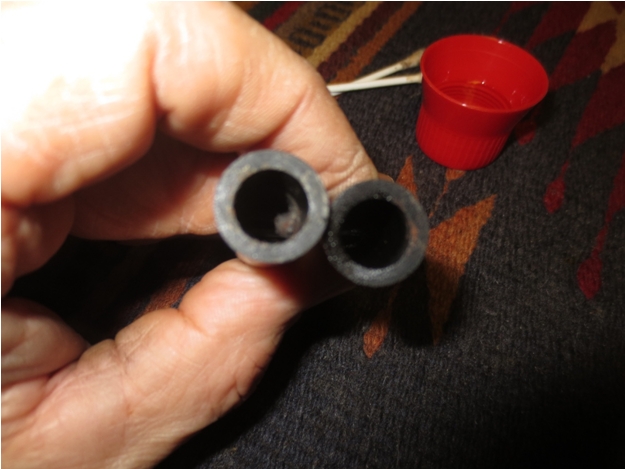


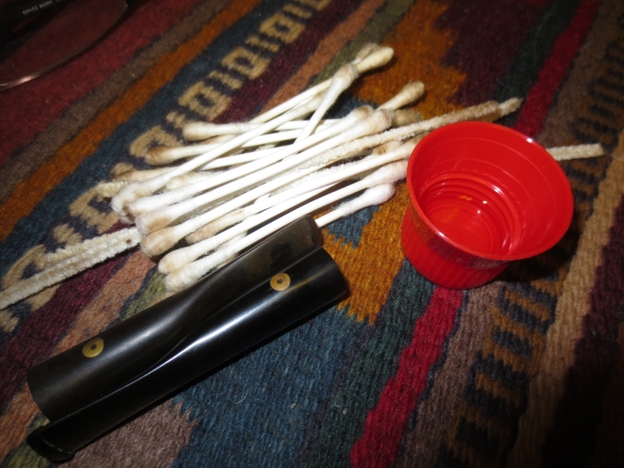 With the stems cleaned and the carburetor air hole opened in both of them with a dental pick it was time to take the bowls out of the alcohol bath and begin to work on them.
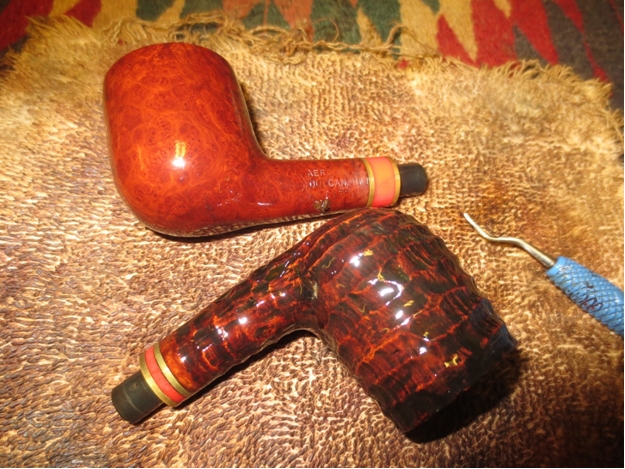 I dried off the bowls and pulled the loose reverse tenon out of the shank of the pot. I cleaned the shank with alcohol, cotton swabs and pipe cleaners then pressed the loose piece back in place. Once the alcohol evaporated the fit was tight. I cleaned the shanks on both pipes until the pipe cleaners and swabs came out white.
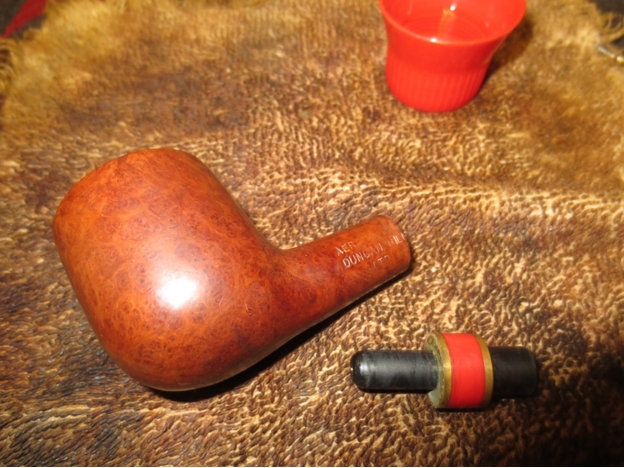

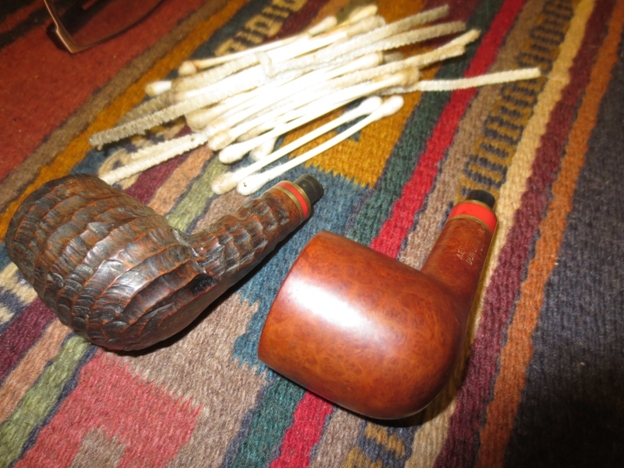 By the time I finished cleaning out the shanks the bowls had dried enough to ream them with the PipNet reamer. I cut back the cake in the billiard to the bare wood and cleaned up the light cake in the pot.
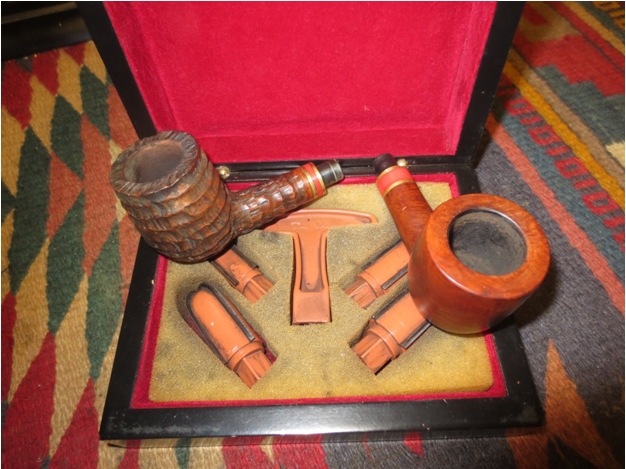 In the photo below the wall of the billiard on the left looks damaged. I used a slightly larger reaming head and took back the remaining cake until the wood was clean and solid.
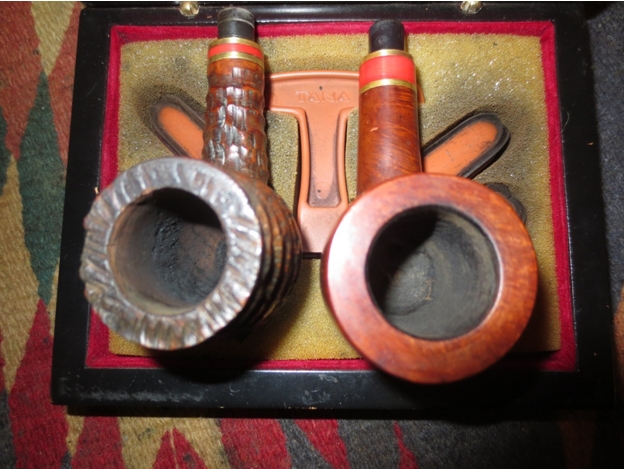 Then it was time to work on the stems. I did a rough sand with 220 grit sandpaper to remove the sticky build up on the darker of the stems and to break up the oxidation on the other one. I followed that by sanding them both with a medium and fine grit sanding sponge.
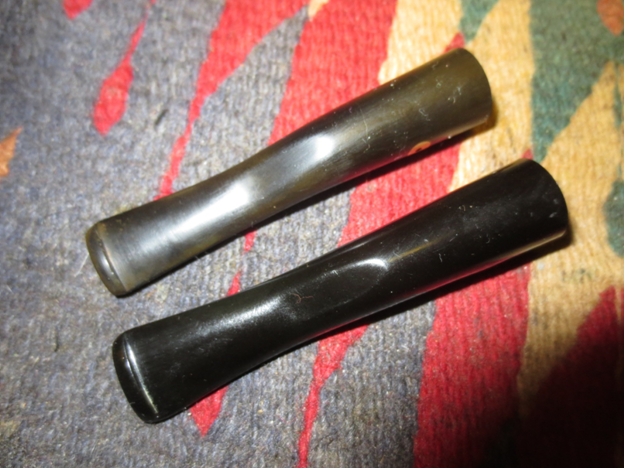 I put them on the pipes to have a look at the progress of the restoration.
 I buffed the stems with red Tripoli and worked on the stubborn oxidation on the one stem. I then buffed it with White Diamond. I took them back to the work table and sanded them with micromesh sanding pads – wet sanding with 1500-2400 grit pads and dry sanding with 3200-12,000 grit pads.
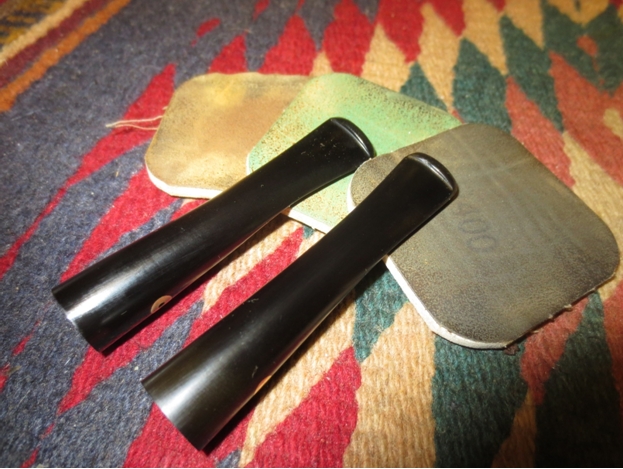
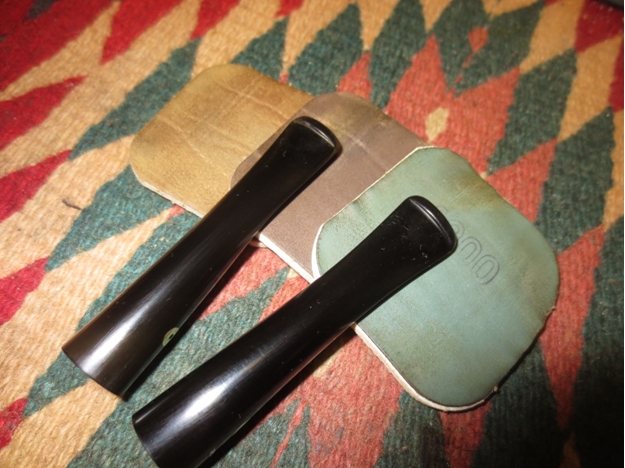
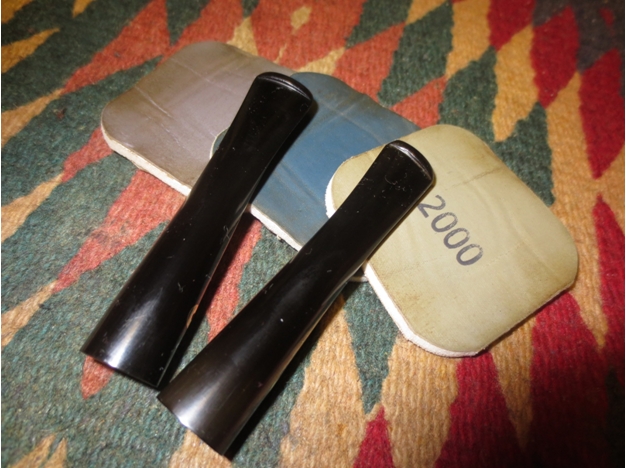 I rubbed the stems down with Obsidian Oil and when it had been absorbed I buffed the stems with Blue Diamond plastic polish. The oxidation still showed on the one stem so I started again and sanded it with the medium and fine grit stem and repeated the process through the micromesh and buffing until I had conquered the oxidation.
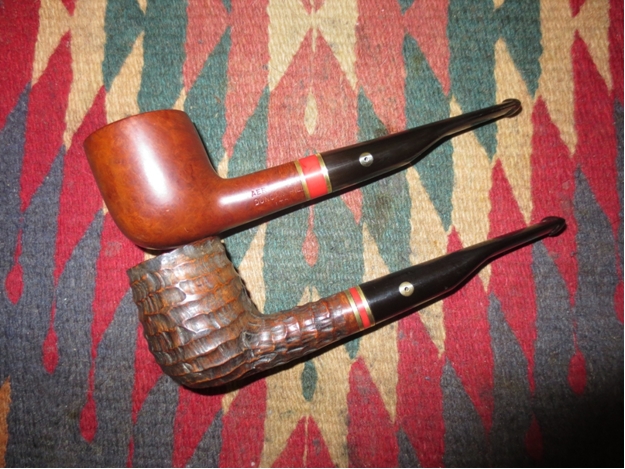
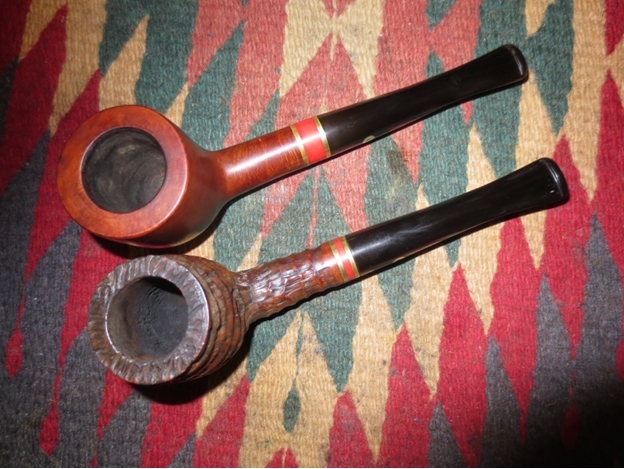
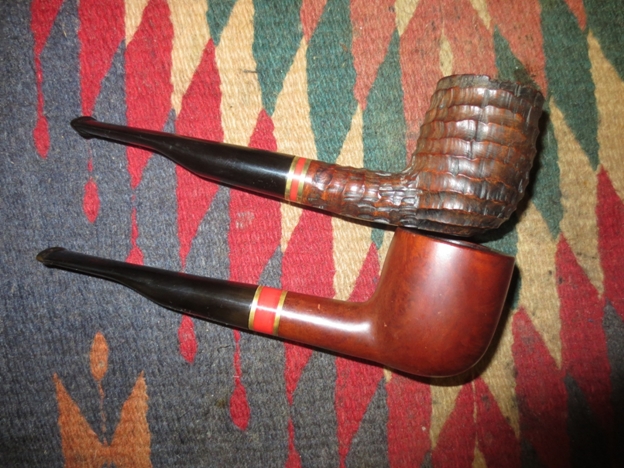
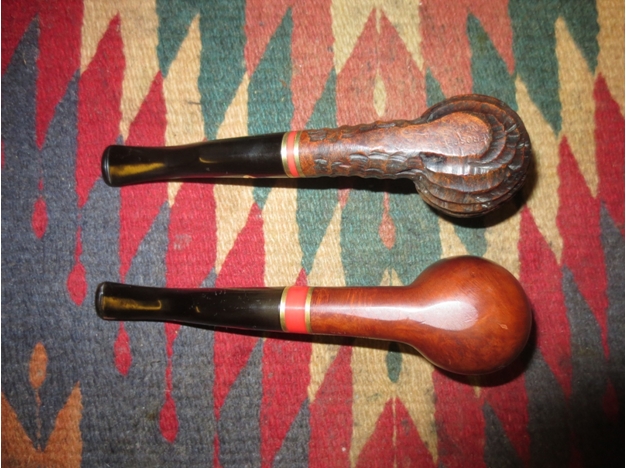 I buffed the stems with Blue Diamond once again and gave them multiple coats of carnauba wax. I buffed the smooth bowl with carnauba and a soft flannel buff. I stained the rusticated bowl with dark brown aniline stain diluted 1:2 with isopropyl alcohol and then buffed it with White Diamond. I finished that pipe with several coats of Halcyon II wax. The finished pipes are shown in the photos below.