Blog by Paresh Deshpande
With this write up, I have reached a personal statistical milestone of 200th contribution on rebornpipes.com, a journey that I was encouraged to embark upon, helped and supported at each hurdle by my Guru, mentor and now a dear friend, Steve and without whom I would have remained alienated from this fantastic world of pipe repairs, restorations and pipe collection.
So, thank you Steve for making this platform available to me for learning and enjoying myself! And now, back to the pipe on my work table!
I had purchased three Les Wood pipes from a gentleman and had restored two of the three pipes and have added it to my personal collection. Given below is the link to the first write up posted on Reborn pipes and is a recommended read to know how I came to be in possession of this lot and brief research on husband wife duo of Leslie Wood and Dolly and the pipes they make.
https://rebornpipes.com/2022/08/05/pipe-gods-smiled-and-i-got-not-one-but-three-les-wood-pipes-restoring-a-les-wood-poker/
Below is the link to the second Les Wood pipe that I have refurbished and added to my personal collection. I would request you to read through the write up as the stampings are totally at a variance from those seen on the Les Wood Poker pipe.
https://rebornpipes.com/2023/07/15/pipe-gods-smiled-and-i-got-not-one-but-three-les-wood-pipes-restoring-second-of-the-three-les-wood-pipes-a-bark-silver-spigot/
The third pipe from this lot of Les Wood pipe is a large smooth bent pipe in classic English bulldog shape in dark brown and red color. The pipe oozes very high quality briar and a well cut handmade vulcanite stem, all in the hallmark of a Les Wood pipe! The pipe is stamped on the lower panel of the square shank with three stars one below the other on the far left side. It is followed by “FERNDOWN” in an arch over “REO”, all in block capital letters. These stampings are followed by “HAND MADE IN” over “ENGLAND” over “LES WOOD” towards the sterling silver shank end band. The Sterling silver band bears the stamp “L & JS” in a rectangular cartouche over “.925”. The vulcanite saddle stem is stamped on the left side of the saddle as “LJS”. 
 In addition to the information that I have assimilated while working on the two Les Wood pipes above, I would like to reproduce the following snippet of information from pipedia.org
To many pipe smokers, Les Wood’s pipes embody the revival of great English pipe making initiated by Ashton in the early 1980s. The high-grade Italian and Spanish plateau he prefers is oil-cured in the tradition of both Dunhill and Ashton. The pipes are renowned for their pleasant, slightly nutty flavor and remarkable smoking characteristics. They feature impeccable craftsmanship extending to very good stem/bit work, though many pipes are often a bit heavier. The hallmark of his work, of course, is the excellent silver work. Almost all of his pipes feature rings or ferules for spigot stems. Grading is by finish: “Bark” (ca. 90%, rusticated, dark brown and black), “Antique Bark” (tan rusticated), “Reo” (brown and red, smooth), “Root” (orange, smooth), and “Tudor Root” (orange and brown smooth) and by size (one to four stars). He also designates straight grains with SG.
Due to the vagaries of international trademark law, he sold his earlier pipes as ” L.&J.S Briars”, “Ellwood”, “Les Wood” or “L. Wood”. Until recently, an average of 1500 – 2000 pipes a year were sold as “Ferndown” — named for the mansion he lives in — in the UK and US, but as “L. Wood” pipes in Germany.
Thus, from the above, the pipe currently on my work table is an early Les Wood pipe made in US/ UK and is one of 10% smooth pipe made in that year.
Initial Visual Inspection
The pipe is heavy! That’s the first thing that I noticed, heavier than even the Poker that I had restored earlier. The finish is dark and dull with dust and grime ground in to the surface. There is some darkening of the rim top surface, more noticeably towards the back of the rim in 6 ‘O’ clock direction. The rim edges are sans any damage. There is a thick layer of cake inside the chamber with a wad of unburnt tobacco at the heel of the chamber. The hand cut, high quality vulcanite stem is deeply oxidized with some very light bite marks in the bite zone. The mortise has some serious accumulation of old oils and tars that needs to be cleaned. There are serious ghost smells emanating from the chamber and the mortise. Overall, with some TLC, this pipe should regain its former glory when it first left Ferndown Mansion.

 Detailed Visual Inspection
The chamber has a thin layer of cake with some unburnt residual tobacco at the heel of the bowl. However, if my experiences of working on two previous Ferndown from this same estate are anything to go by, then I think the cake layer is thick, but evenly maintained. The chamber smells a rather strong fragrant hinting at being used to smoke English blend or an aromatic. The rim top surface is clean, smooth and even and so are the rim edges. I do not envisage any issues related to heat lines/ fissures along the chamber walls.
 The stummel surface is covered in a layer of dust and grime giving the surface a dull and lackluster appearance. From underneath this grime, a mix of bird’s eye swirls and cross grains can be seen that waits to be brought to the fore. The twin rings separating the cap of the stummel from rest of the bowl is without any nicks/ chips/ dents or dings. The mortise shows presence of some oils and tars, but should be easily cleaned. The Sterling Silver band is deeply oxidized and tarnished at places. Once cleaned and polished, this band will add a nice classy bling to the appearance of the pipe.

 The beautiful vulcanite stem is hand cut and oozes very high quality of material use and also craftsmanship of highest quality. The stem is oxidized with very minor tooth chatter and bite marks seen in the bite zone on both the upper and lower surfaces of the stem. These tooth chatter and tooth indentation should be easily addressed by heating the affected areas to raise the vulcanite and thereafter sanding it down to match the rest of the stem surface. The tenon end and the horizontal slot end show very minor traces of accumulation of dried gunk and grime.
 The Restoration Process
I started the refurbishing of this Les Wood by working the stem first. Since there were other stems that were ready to be put into the stem deoxidizer solution, I decided to clean the internals of this stem first so that it could be put in the solution with other stems. I cleaned the stem airway with a thin shank brush and anti-oil soap. I used a sharp dental tool to clean the horizontal slot and further cleaned the internals with regular and bristled pipe cleaners dipped in alcohol. The stem was immersed in the Deoxidizer solution, a product that has been developed by Mark Hoover. This solution helps raise the stem oxidation to the surface thus helping in easy removal and subsequently imparting a nice shine to the stem after polishing cycle. The pipe is indicated with a red arrow. The stem is allowed to soak into this solution overnight.
 The pipe next to the one indicated in the picture above, is also a Ferndown which is the next pipe in line. This one is a NOS un-smoked pipe that too came from the same gentleman’s collection as these three Les Wood pipes and was the last one that he intended to pass on to his family members. However, for reasons best known to the gent, he voluntarily offered the pipe to me at the price which I had first quoted for the very first Les Wood from his collection. I could sense a feeling of sadness in his communication and I made him a payment without further queries. The pipe made its way to me as I worked on the REO.
Now it was time for me to work on the stummel. I did this by first reaming the chamber with size 3 and 4 PipNet reamer heads. I further scraped the chamber walls with my fabricated knife to remove the remaining carbon deposits where the reamer head could not reach. Once the cake was reamed back to the bare briar, I used a piece of 220 grit sand paper to remove all the traces of remaining cake and also to smoothen out the inner walls of the chamber surface. Finally, to remove the residual carbon dust, I wiped the chamber with a cotton pad wetted with 99.9% pure isopropyl alcohol. The huge pile of carbon dust that was reamed out is an indication enough to the amount of carbon that had accumulated in the chamber while the smaller heap is that of the un-burnt tobacco from the chamber. The chamber walls are solid without any heat lines or fissures.
 I further cleaned the mortise by scrapping out the dried gunk with a dental tool. I ran a few pipe cleaners dipped in alcohol to moisten the dried gunk and assist in its removal. I shall further continue the internal cleaning of the chamber and mortise with cotton and alcohol soak.
 I continued the cleaning of the chamber and shank internals with a salt and alcohol bath. I use cotton balls which is an at par substitute to Kosher salt as I have realized over the years. I draw out a wick from the cotton and along with a folded regular pipe cleaner; insert it in to the mortise and through the draught hole in to the chamber. Thereafter, I packed the chamber with cotton balls to about quarter of an inch below the inner rim edge and soaked the cotton balls with isopropyl alcohol up to the brim. About half an hour later, the level of alcohol had gone down, having being absorbed by the cotton. I topped it up once again and set it aside overnight. By next morning, the cotton and alcohol had drawn out all the remaining oils and tars from the chamber and mortise, fulfilling its intended task. I removed the cotton balls and ran pipe cleaners through the mortise to clean out all the loosened tars and gunk and further cleaned it with alcohol and q-tips.
 With the internal cleaning now completed, I undertook the cleaning of the external surface. I wiped the surface with Murphy’s oil soap on a cotton pad and further cleaned it with a wet cotton swab to remove all the soap from the surface and wiped it dry with paper towels and cotton cloth. The usual process that I follow while cleaning the external surface is to scrub the stummel with oil soap and rinse under running warm water. However, in this case, I was keen to preserve the stain and finish to max extent possible and hence the slight modification to the process. I further dried the surface with a heat gun to ensure that there is no moisture in the surface.

 My exuberance to see the shine and gloss that this pipe is capable of, thanks to the processes employed by Les Wood’s wife; I decided to continue with the stummel refurbishment. I dry sand the surface with 1500 to 12000 grit micromesh pads, wiping frequently with a dry soft cotton cloth to check the progress made. Once the micromesh polish cycle was completed, I massaged a small quantity of ‘Before and After Restoration Balm’ in to briar surface and set it aside for few minutes. Once the briar was rejuvenated, I hand buffed the stummel with a microfiber cloth to a deep and luxurious shine.

 It was here that I noticed that all the cleaning of the stummel had left the finish over the rim surface a bit splotchy and light. Using a dark brown wood stain pen, I stained the rim top surface and set it aside for the stain to set.
 Now that the internal and external cleaning of the stummel was nearly done and also the stem had now been soaking for more than 24 hours, I removed the stem from the solution. I first scrubbed the stem surface with a Scotch Brite pad, always being mindful of the stem logo on the left side. I followed this scrubbing with a nice cleaning of the surface using a 0000 grade steel wool. I rinsed the stem under running water to rid the stem of the thick deoxidizer solution. I ran a couple of pipe cleaners to remove any residual deoxidizer solution from the airway.
 To address the minor tooth chatter on either surface, I heated the bite zone with the flame of a soft flame lighter. The heat from the lighter expands the vulcanite and fills up the tooth chatter. The results are not always perfect, but in this instance, the results are very satisfactory.
 I followed it up by wet sanding the entire stem surface using320, 400, 600, 800, 1000, 1500 and finally with a piece of 2000 grit sand paper. This progressive sanding with higher grit sandpapers serves to reduce the sanding marks of the more abrasive sand papers. I also sharpened the button edges while sanding. I wiped the stem with a moist cotton swab to remove all the oxidation and sanding dust from the surface. I applied a little Extra Virgin Olive oil over the stem and set it aside to be absorbed by the vulcanite.
 With a jeweller’s cloth, I polished the sterling silver band at the shank end to a nice shine.
 On the way to complete the project, I polished the stem and stummel surface with White Diamond. Next, I replaced the buffing wheel on the rotary tool with the one that has been earmarked for Blue diamond compound and polished the entire pipe. I like the way the pipe is polishing up at this stage.
 With a cotton buffing wheel that I use for carnauba wax, I applied a coat of carnauba wax and continued to work on it till the complete coat of wax had been polished out. I mounted a clean cotton cloth buffing wheel and gave the entire pipe a once over buff. I finished the restoration by giving the entire pipe a rigorous hand buffing using a microfiber cloth to raise the shine further. The finished pipe looks beautiful and is ready to be added to my personal collection of pipes.


 P.S.: The finished pipe has a fantastic glass like shine which has been a hallmark finish from Dolly and the pipe looks very beautiful. This entire project has been very close to my heart for a reason and shall find a place of pride in my Les Wood collection.
I wish to thank readers of rebornpipes.com who have spared their valuable time in reading through this work. I look forward to your comments and suggestions for improvements. I wish to make a mention of one follower of Reborn Pipes who had been regularly in touch. However, since last month there has been no communication. If you are reading this blog my friend, a simple message of your well-being will be highly appreciated. Cheers…
 First is a gorgeous black meerschaum billiard with an amber stem (not snapped – Deo gratias) and sterling silver bands around the shank and bowl. And it came with its proper case! I checked the hallmarks and they date this pipe to 1919 – a real old timer. Markings indicate that this is an Adolph Frankau. More on this pipe will come when I do some research.
 Second is a pipe that we thought was from Preben Holm – but isn’t. Doesn’t matter, it’s still a beauty. It’s made in Denmark by Granhill, which was a brand used by an American, Michael Kabik. This is a really well-made freehand pipe with a fine stem and stunning grain all over the bowl.
 Third is a really handsome rusticated pipe from Edward’s – a storied company from Florida that secretly stashed a bunch of Algerian briar during a time when it was hard to come by. I really like this shape and looking forward to cleaning it up.
 Fourth is a fascinating Peterson meerschaum Rhodesian. It has really neat colouring on the bowl and looks like it was greatly enjoyed by its previous owner. I assume that this pipe was made in the Isle of Man, as I believe all (or most) of Peterson’s meers were made there.
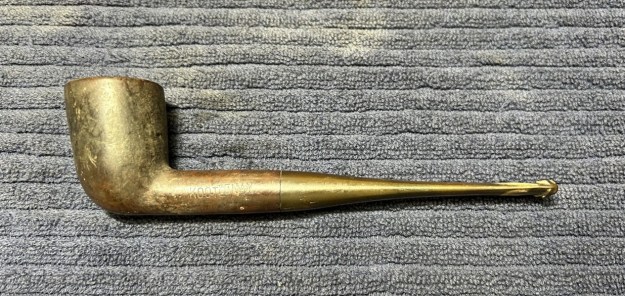 Fifth is a cutty that’s a bit of a gamble. It isn’t fancy in any way, but it is well-drilled and well-fitted. It says KOOTENAY on the shank, which is a word I know from geography, but not from the world of pipes. Why did I buy it? Because the other side of the shank reads “Made in Canada” in a style that strongly resembles the pipes of the great Canadian artisan, Leonard Payne. More research will definitely be needed here.
 Sixth and last is a handsome French Lovat with no name of note, but a lot of character. It’s a real looker and I think it’s going to clean up really well.


