Over the years, many pipe retailers commissioned established makers to produce pipes marked with the retailer’s own brand, in much the same way that …
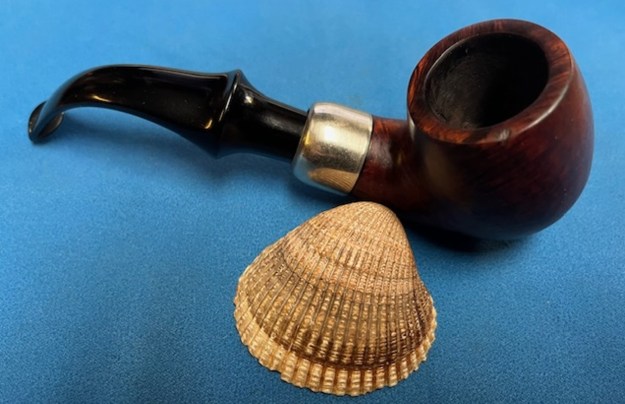
A Hand Cut Stem for a Tinderbox Unique by Charatan
Over the years, many pipe retailers commissioned established makers to produce pipes marked with the retailer’s own brand, in much the same way that …
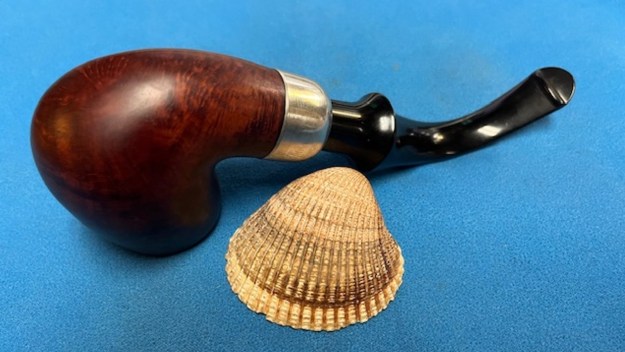
A Hand Cut Stem for a Tinderbox Unique by Charatan
Blog by Steve Laug
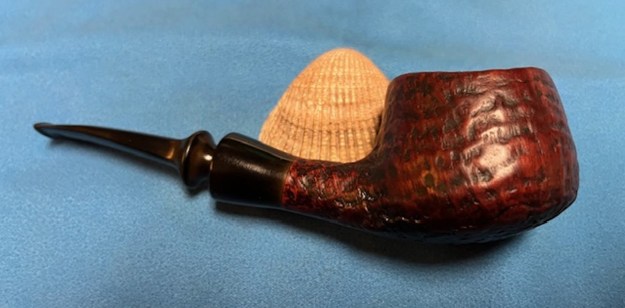
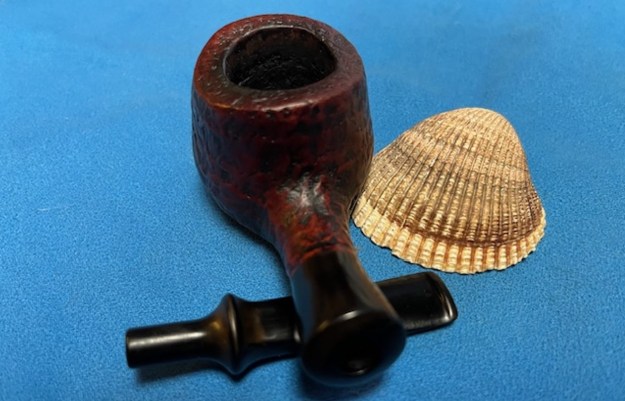
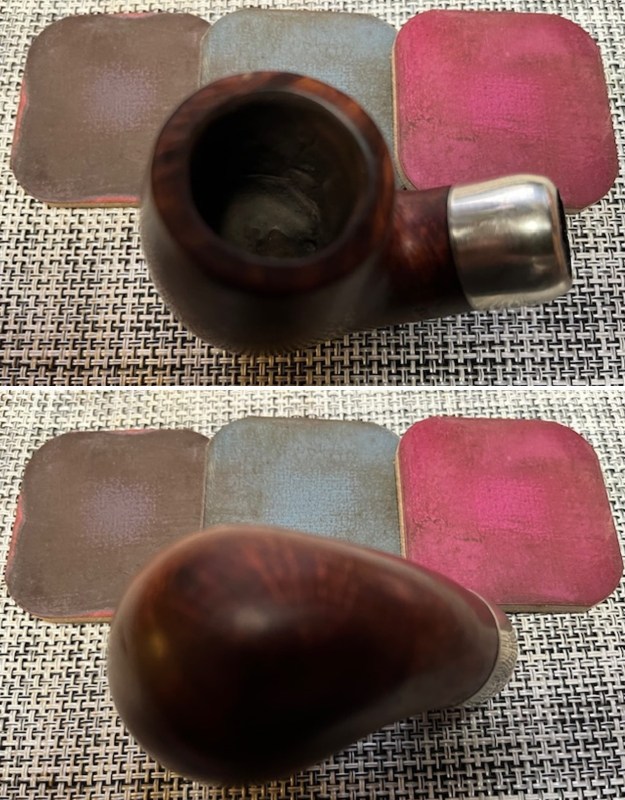
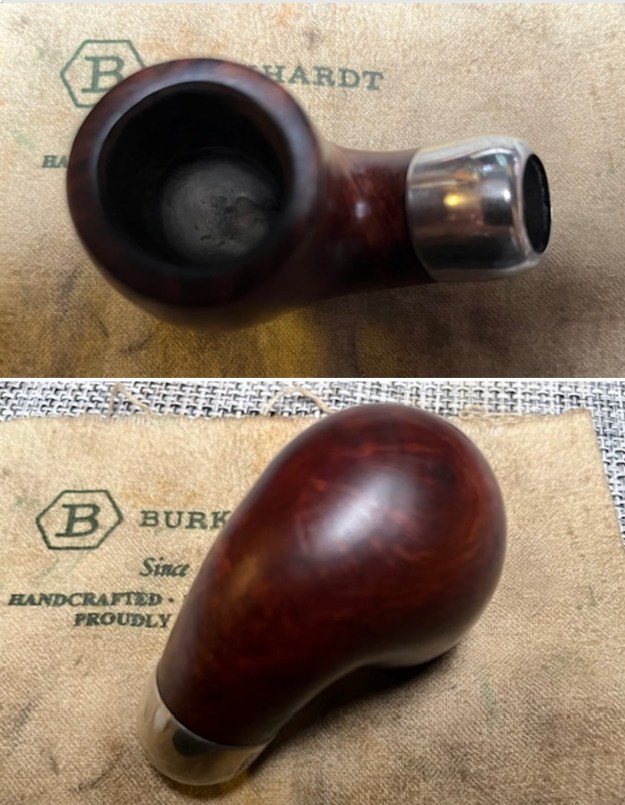
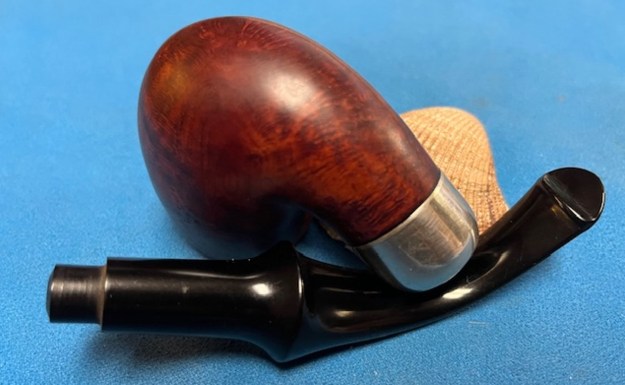
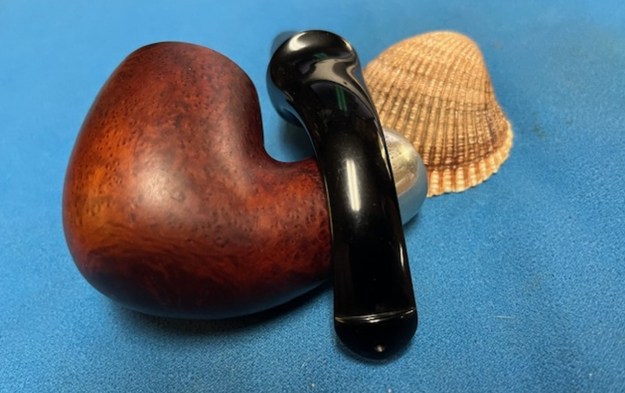
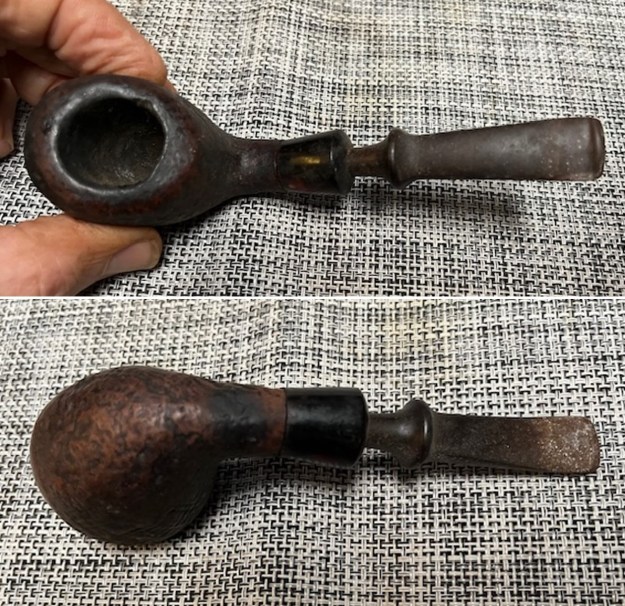
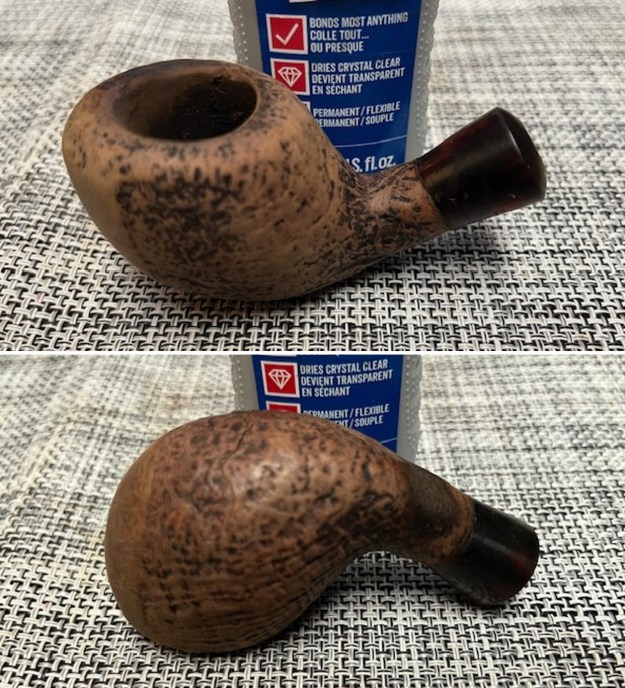
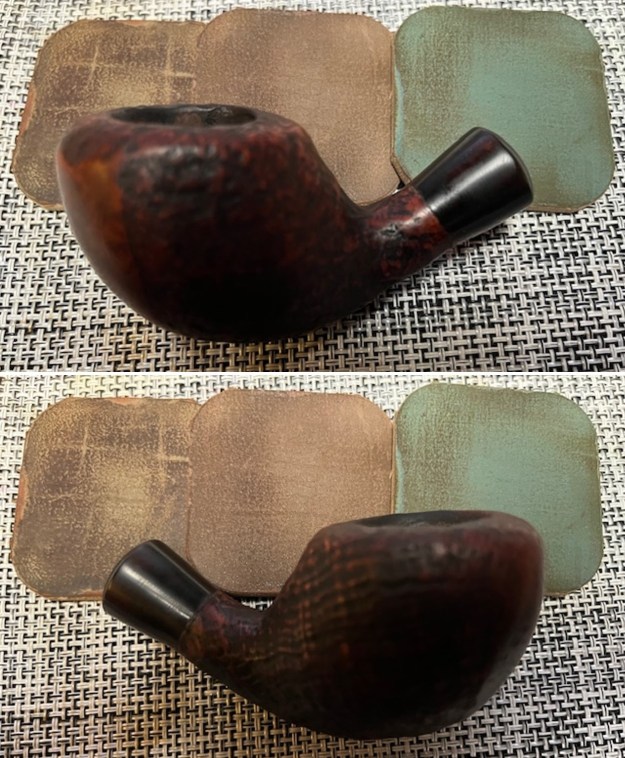
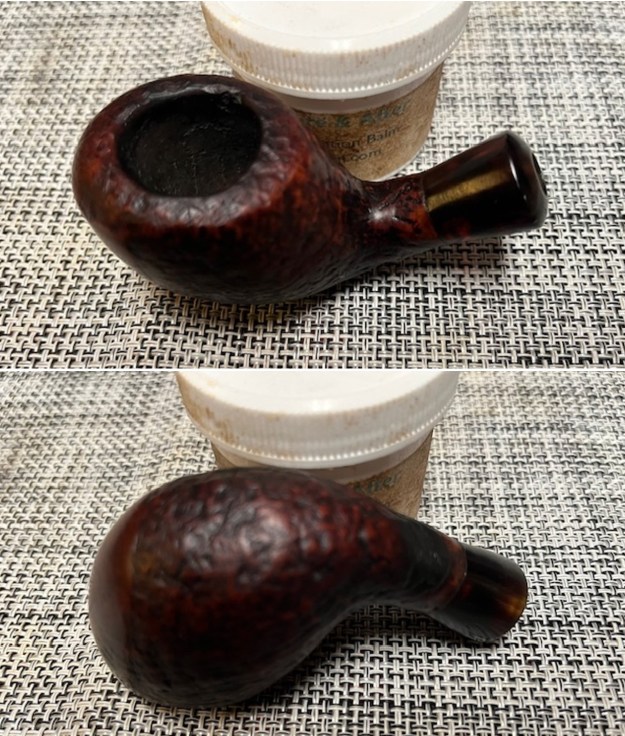
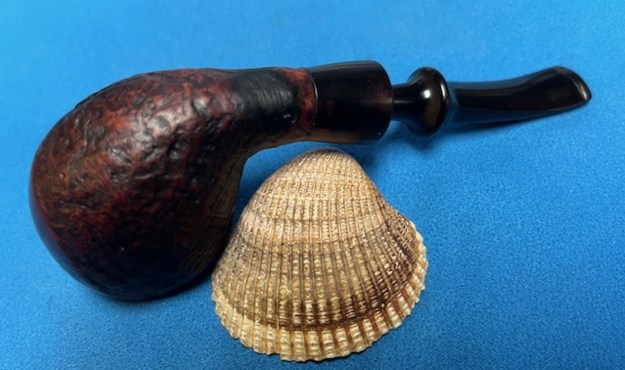
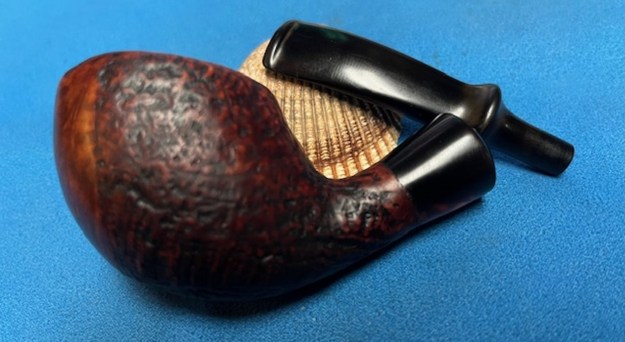
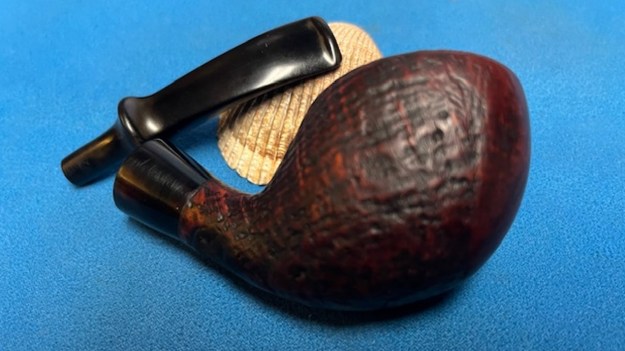
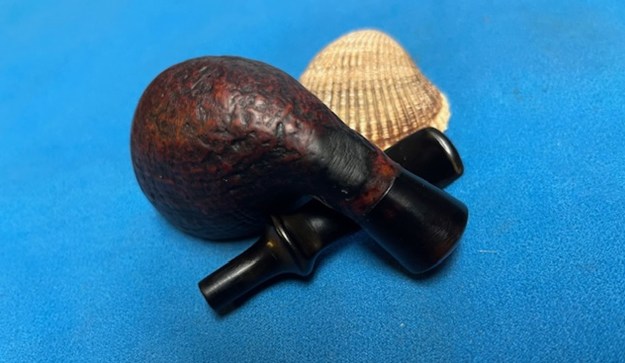
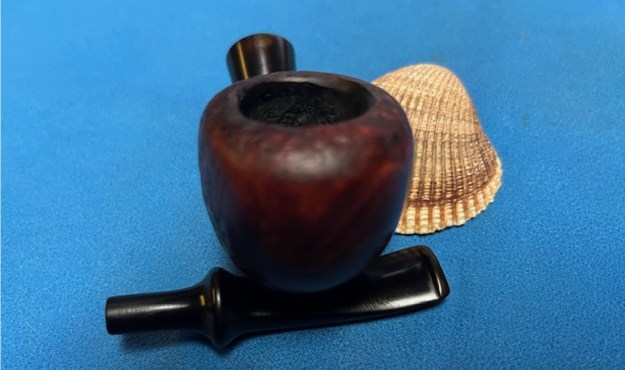
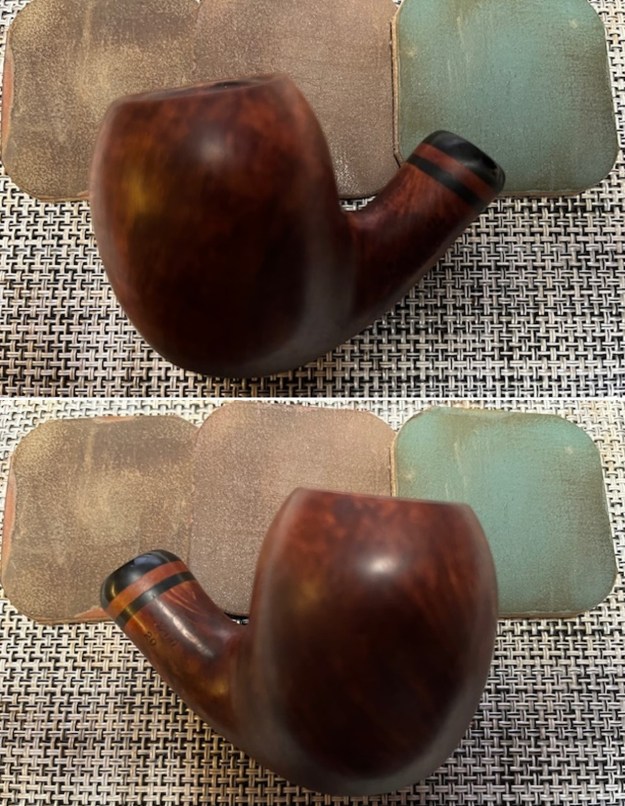
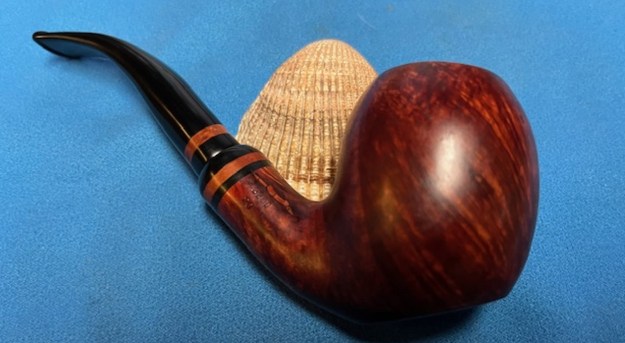
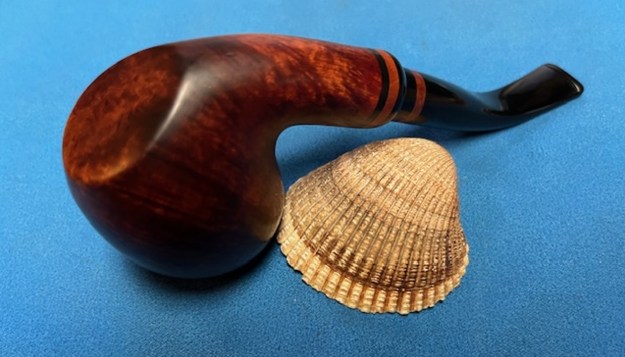
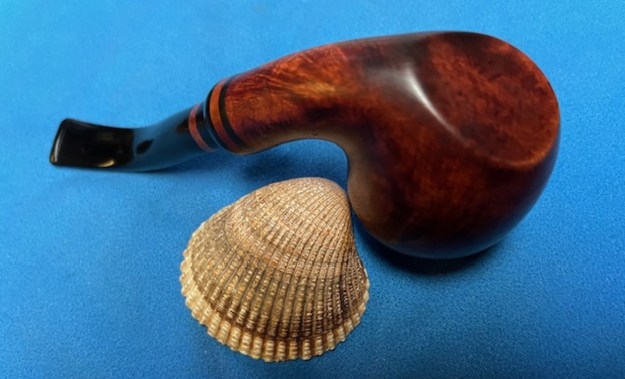
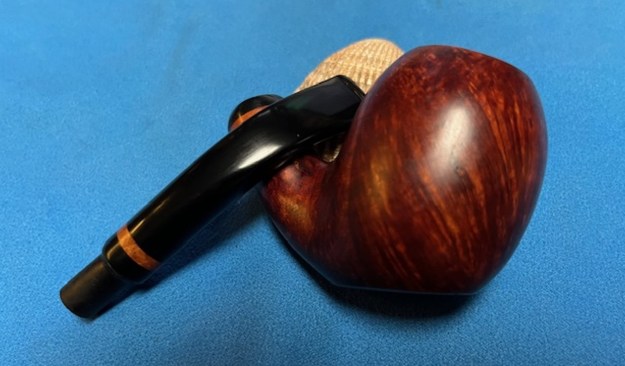
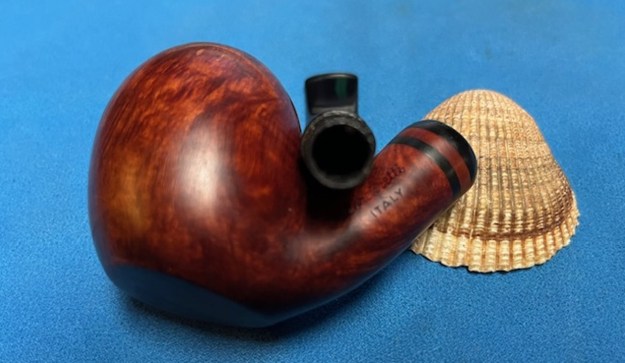
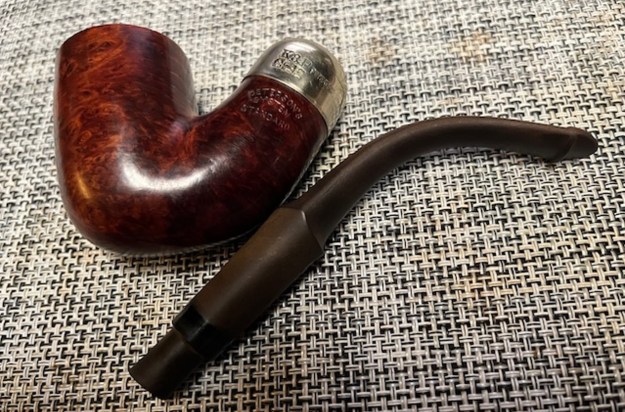
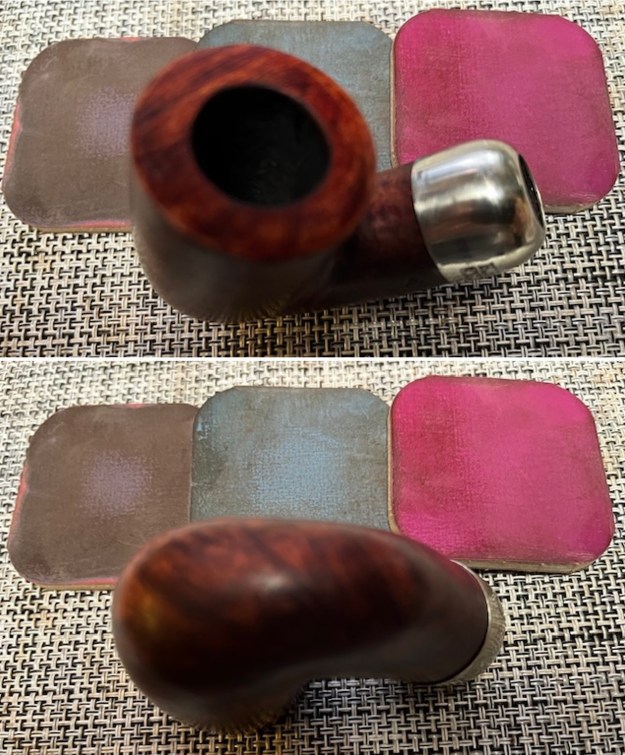
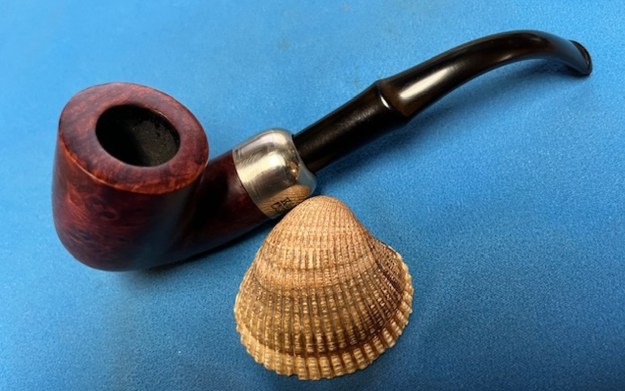
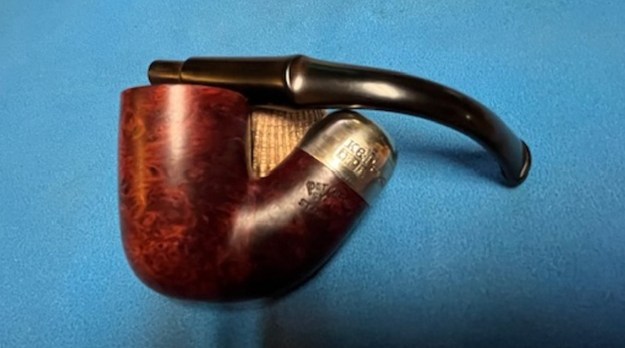
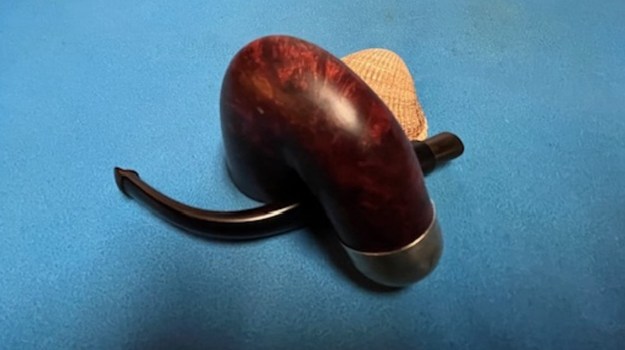
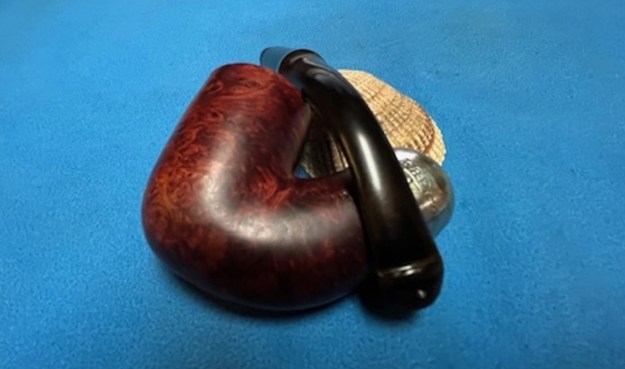
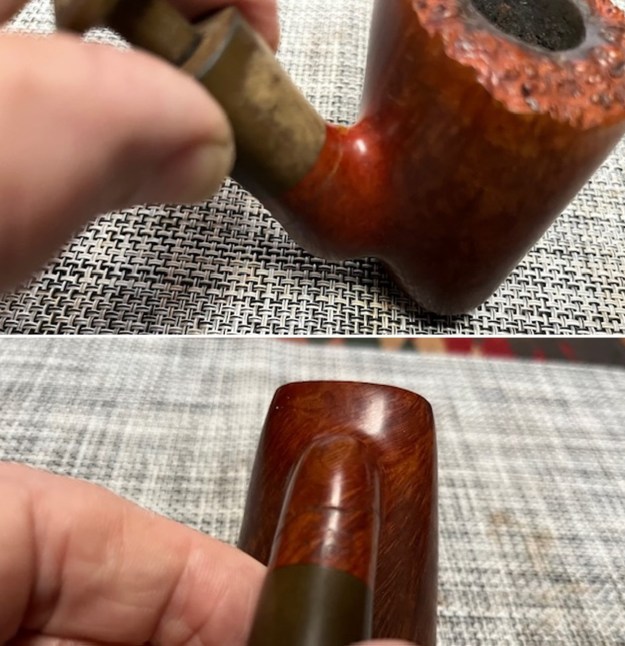
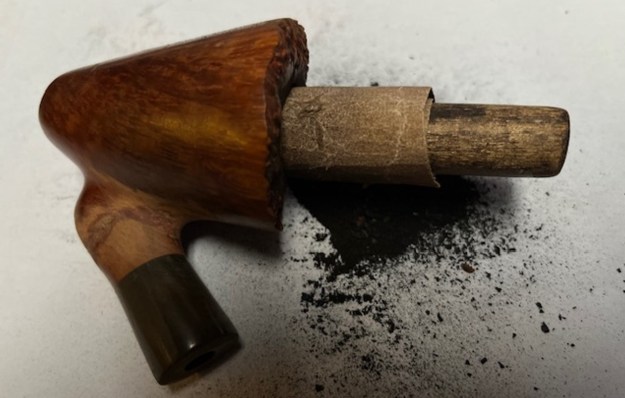
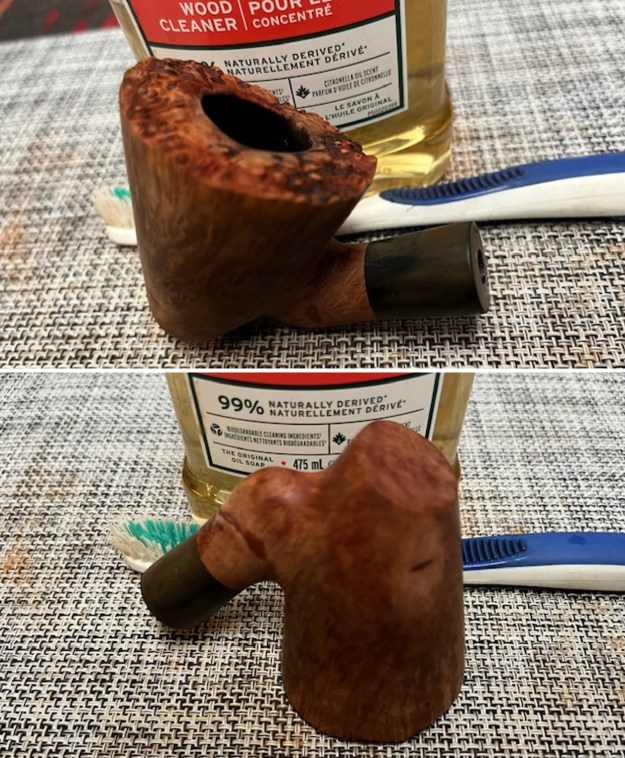
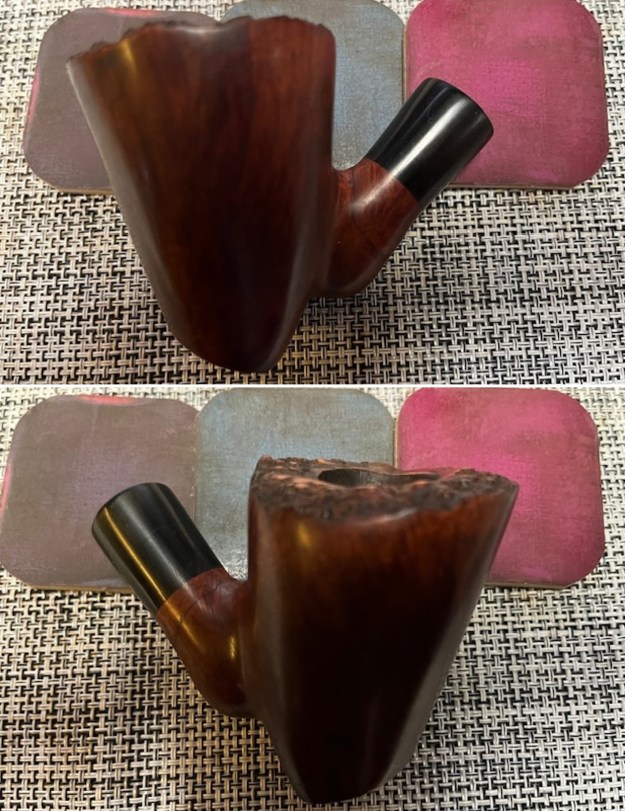
The next pipe on the work table is Smooth Peterson’s System pipe that we purchased somewhere along the way. Neither Jeff or I remember where we picked it up. It is an interesting system pipe with some light road rash on the right side of the bowl and a chip out of the outer edge of the bowl on the right side. It was stamped Peterson’s [arched over] System [arched over] Standard on the left side of the shank. It is a bit faint but it is readable. On the right side it is stamped Made in the Republic of Ireland (in three lines) [over] the shape number 307. The nickel ferrule on the shank end was oxidized and is stamped on the left side K&P [over] Petersons. Jeff had cleaned and reamed the bowl somewhere along the way and the finish is very clean. The top and edges of the rim were clean but showed some damage. The inner edge was out of round and the outer edge had a chip on the right side. The stem was the wrong stem for the pipe. It was not a Peterson’s style P-Lip but rather a Wellington style with the airway exiting on the end of the stem. Jeff had cleaned it up as well and it did not look too bad. I would need to restem it with a proper stem. I took photos before I started working on it today.
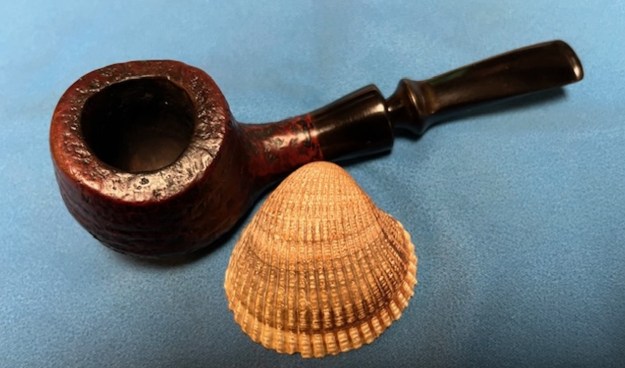
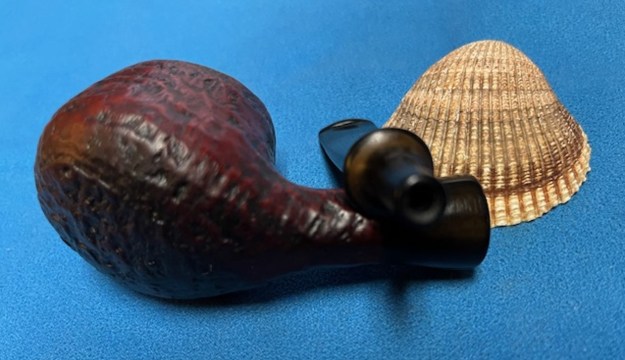
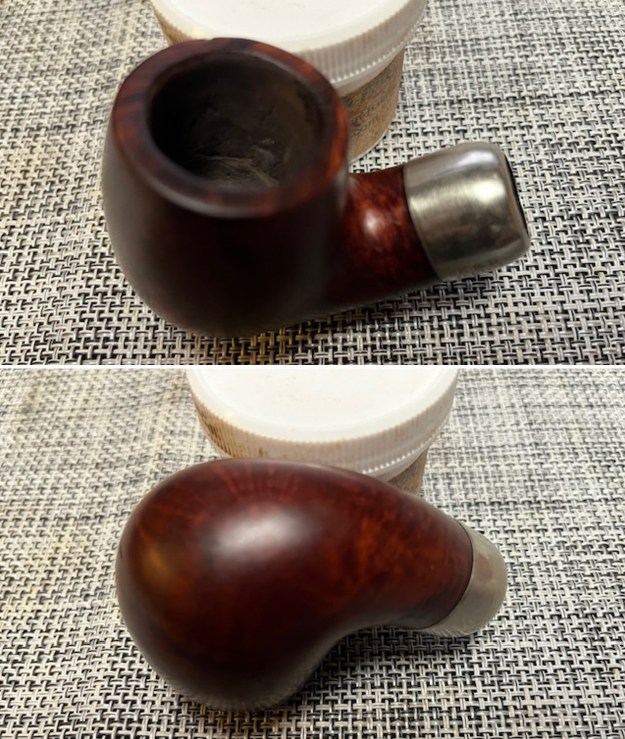
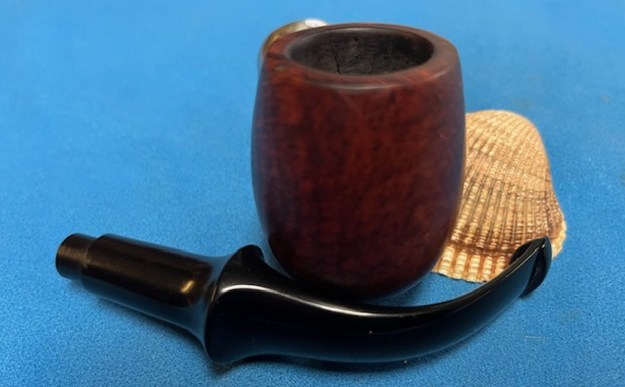
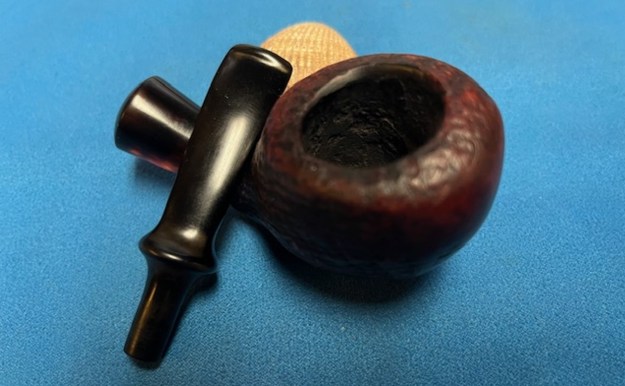
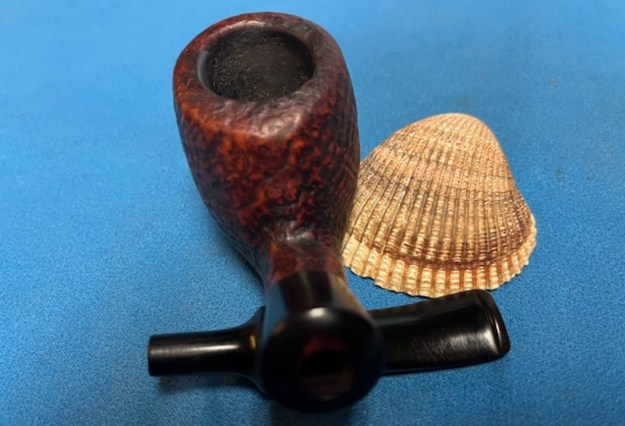
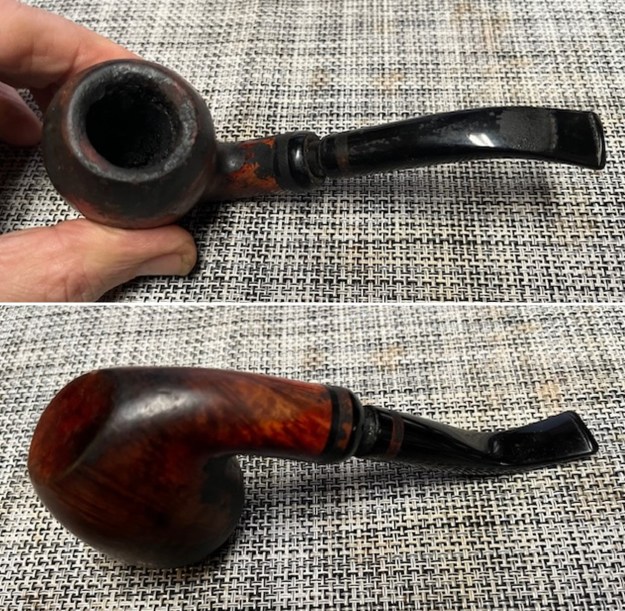
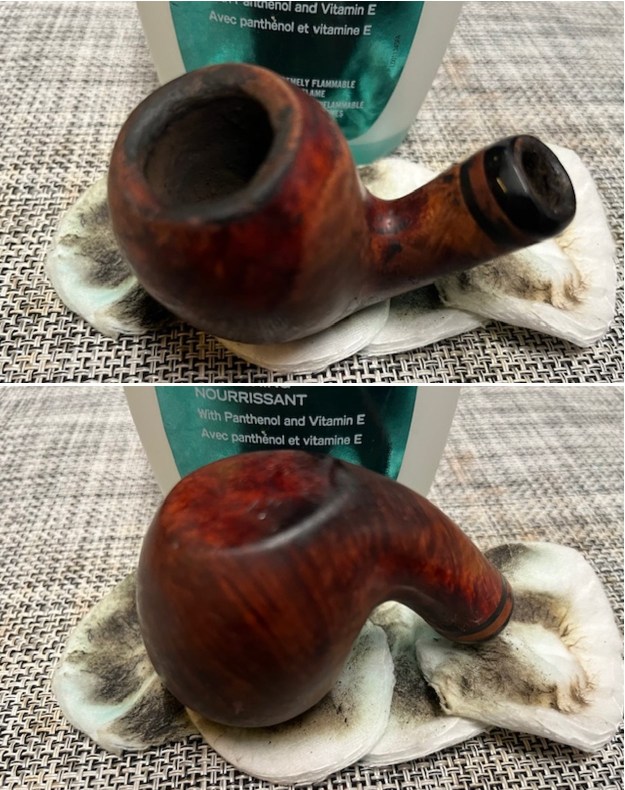
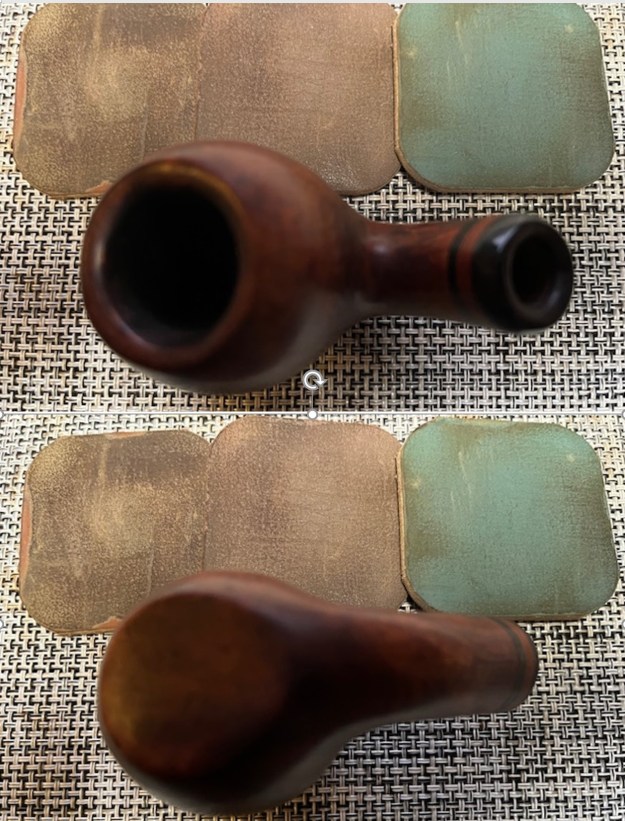
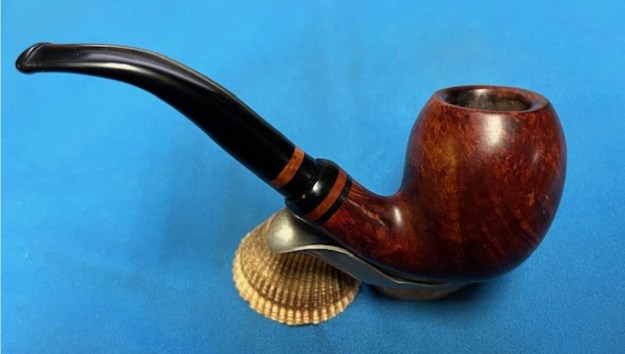
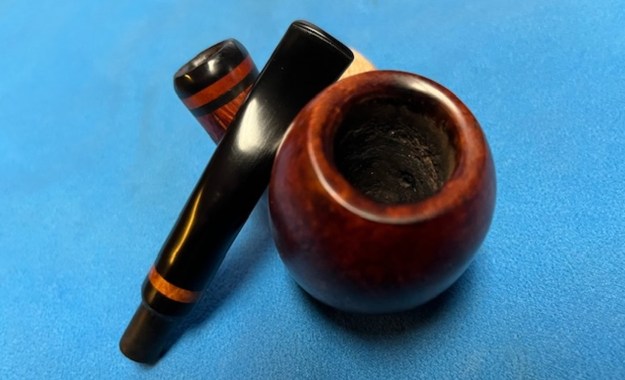
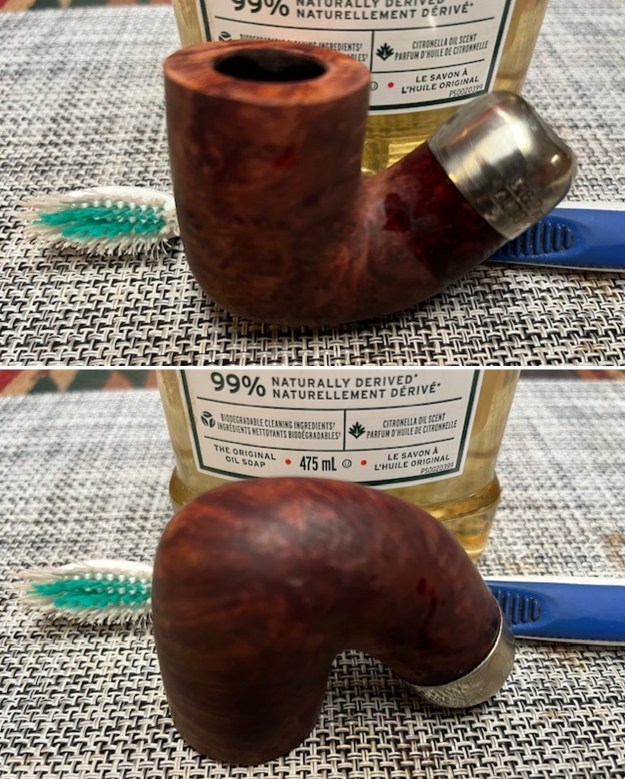
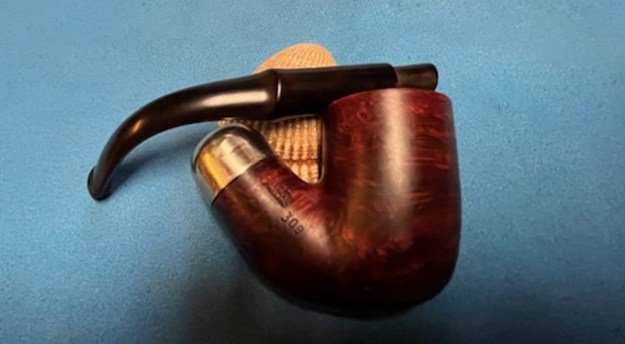
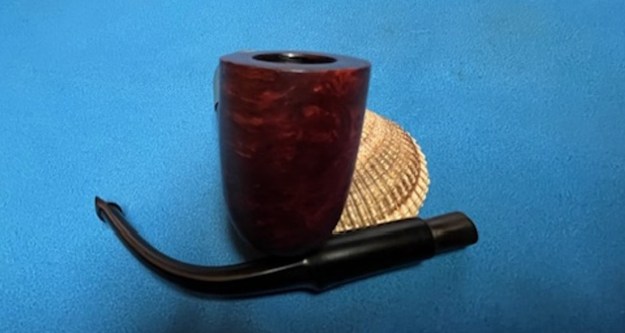
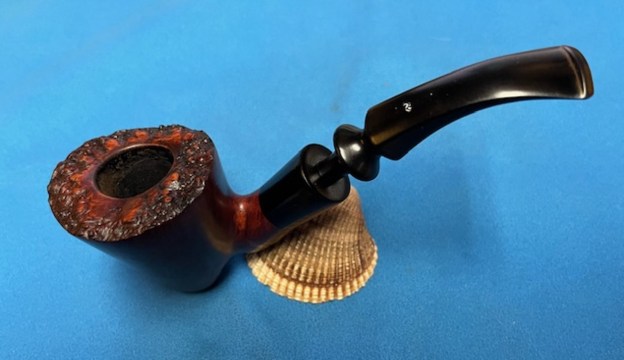
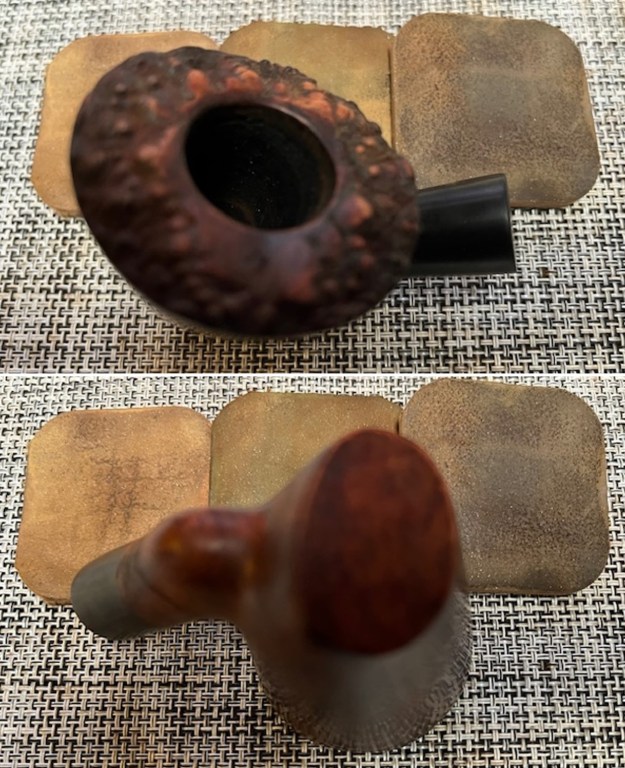
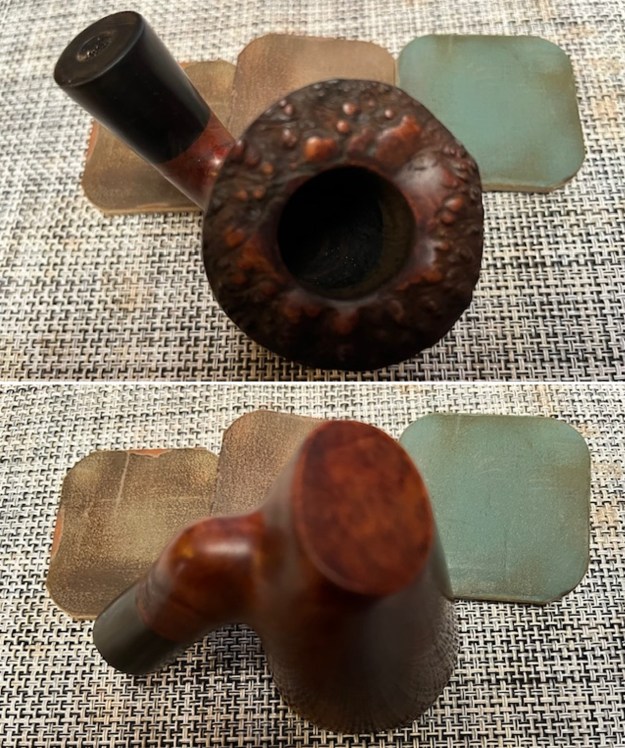
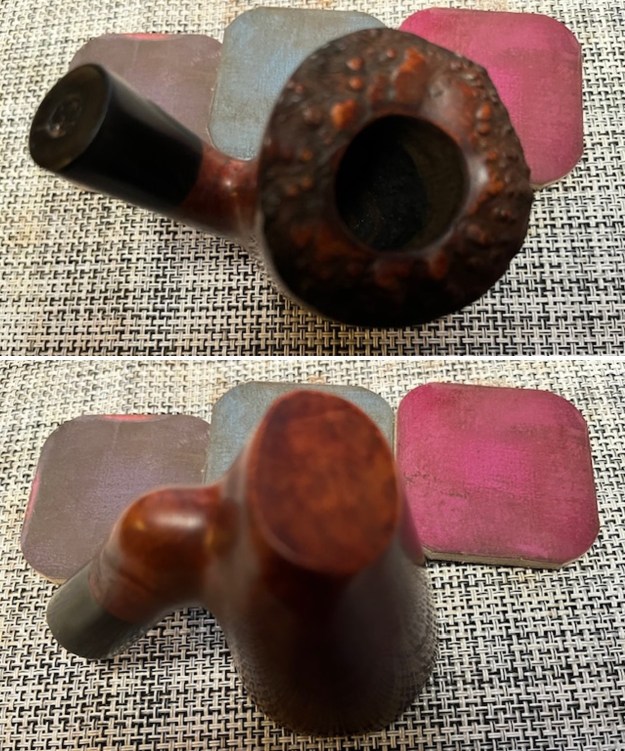
 I took a photo of the bowl and rim top to show the condition of the bowl and the top of the rim and the edges of the bowl. The rim top had darkening and damage and the inner edge was out of round. The outer edge on the right side showed a chip. I took photos of the stem it came with as well. You can see the tooth chatter and marks on the stem surface and wear on the edges of the button. You can also see the exit of the airway on the stem end rather than the to of the P-lip.
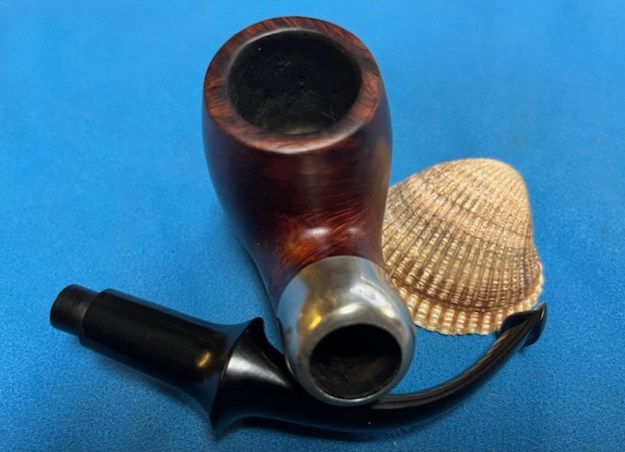
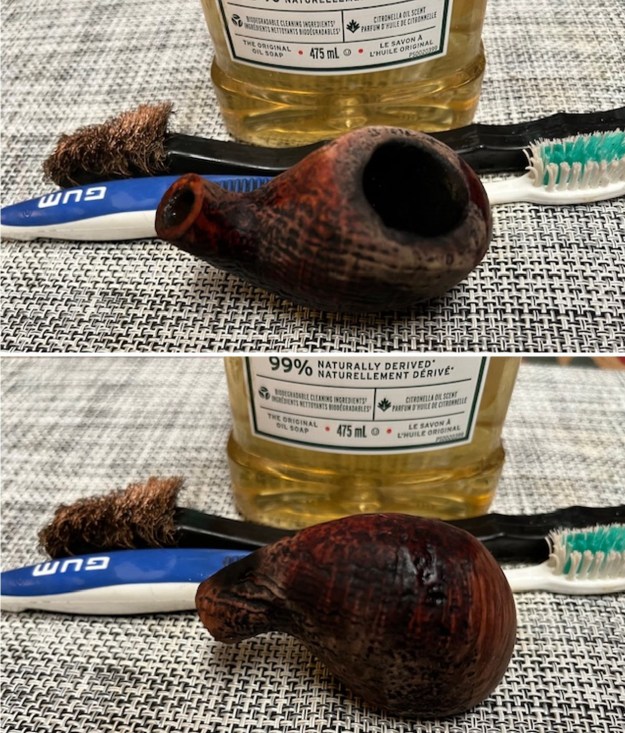
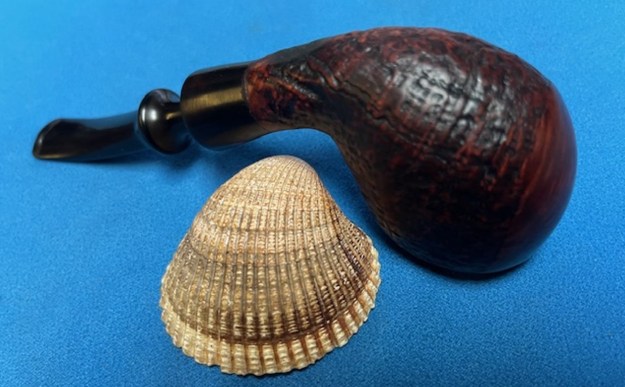
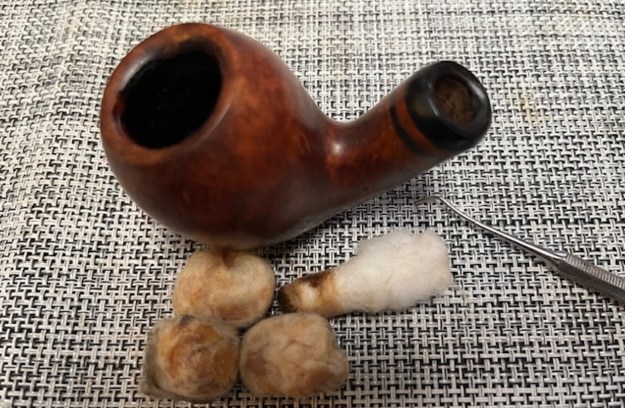
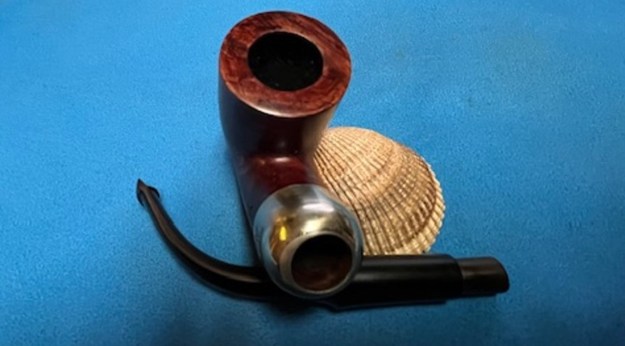
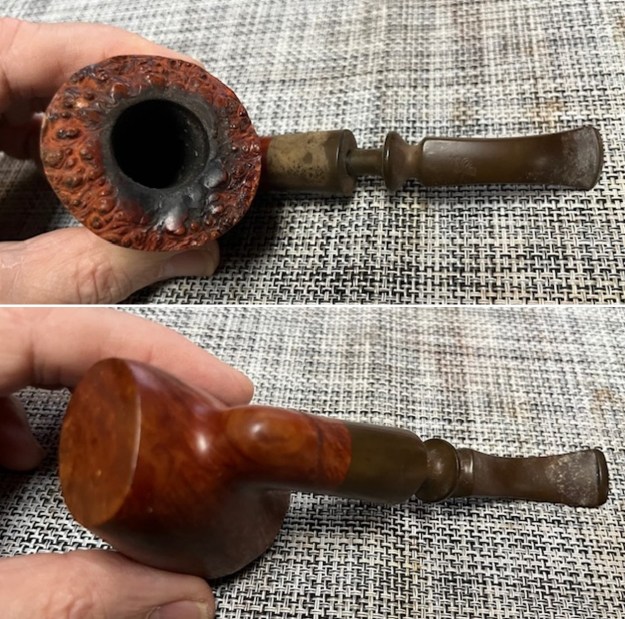
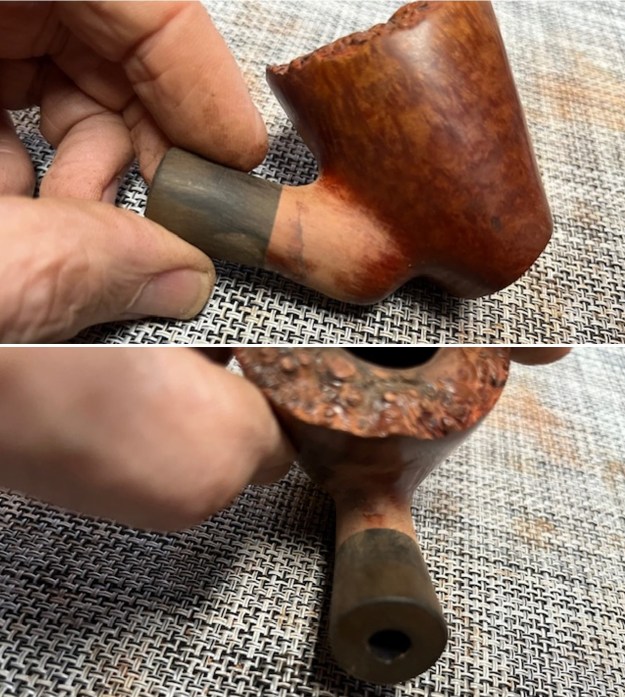
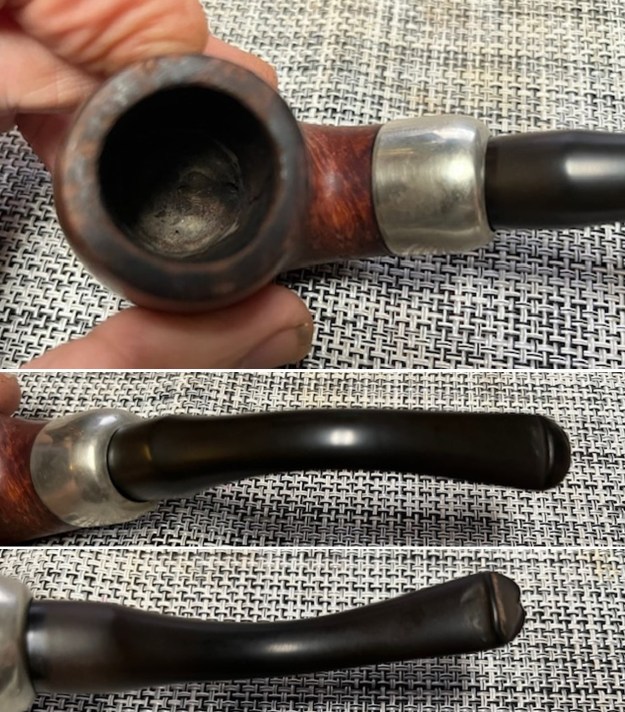 I took photos of the stamping on the side of the shank. The stamping was faint but readable as you can see from the photos. It read as noted above. The nickel ferrule on the shank end is stamped on the top and left side K&P [over] Petersons. I took the stem off the shank and took a photo of the parts. You can see how the stem is definitely not a Peterson’s P-Lip.
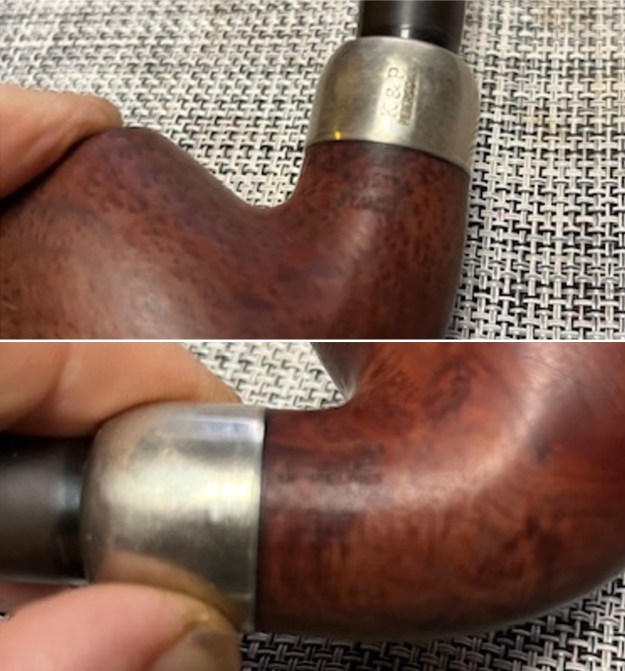
 I have included the information on the shape number on this pipe that I picked up on researching the previous pipes. It is a large looking 307 System Standard. I have included a page from a Petersons Catalogue that I have on rebornpipes (https://rebornpipes.com/tag/peterson-hallmark-chart/). I have put a red box around the 307 shown in the catalogue page shown below. That should give a clear picture of the size and shape of the pipe.
 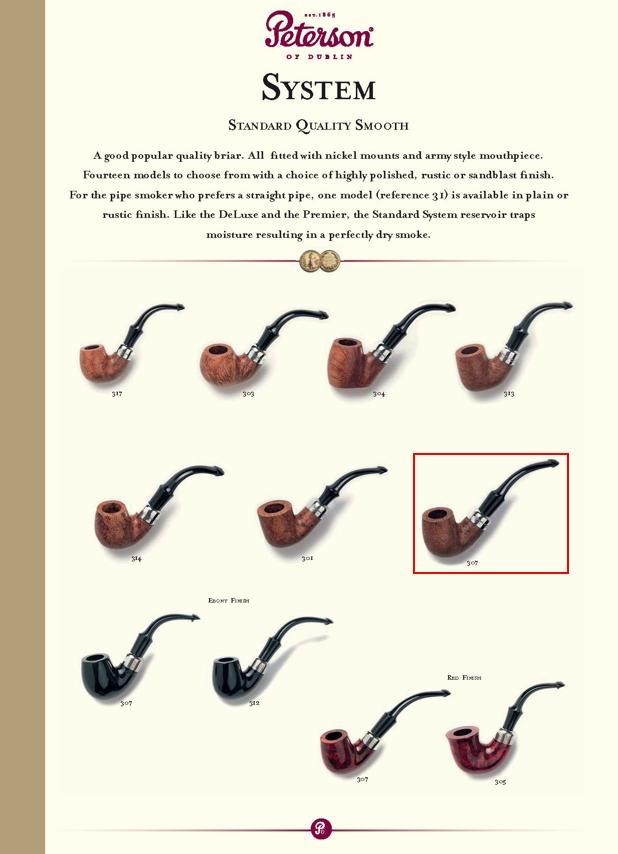 I am also including the information from Pipedia’s article on Peterson pipes. It is a great read in terms of the history of the brand (https://pipedia.org/wiki/Peterson). I have included a bit of the pertinent history here.
1950 – 1989 The Republic Era – From 1950 to the present time, the stamp for this era is “Made in the Republic of Ireland” in a block format generally in three lines but two lines have been used with or without Republic being abbreviated.
During the 1950’s and 60’s the Kapp & Peterson company was still in the ownership of the Kapp family. However 1964 saw the retiral of the company Managing Director Frederick Henry(Harry) Kapp.
 Pipedia also included a section of information on the System pipes including a diagram of the systems look (https://pipedia.org/wiki/Peterson#Republic_Era_Pipes). I quote a section of the article in part and include a link to another article on Pipedia on the System pipe.
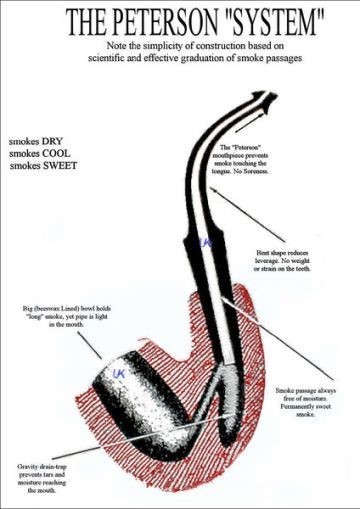
The Peterson System pipes are the standard bearers of the Peterson pipe family, famous for the excellent smoking pleasure they provide. Often imitated but never equaled, the Peterson System smokes dry, cool and sweet, thanks to the scientific effectiveness of the original design. The heart of the System is the unique graduated bore in the mouthpiece. This makes the suction applied by the smoker 15 times weaker by the time it reaches the tobacco chamber. The result is that all the moisture flows into the reservoir and, thus cannot reach the smoker’s mouth. The Peterson Lip further enhances the effectiveness of the graduated bore by directing the flow of smoke upwards and away from the tongue. This achieves a uniquely even distribution of smoke and virtually eliminates any chance of tonguebite or bitterness. Furthermore, the shape is contoured so that the tongue rests comfortably in the depression under the opening. Each “PLip” mouthpiece is made from Vulcanite. For the Peterson System pipes to work properly, the stem/tenon has to have an extension, the tip of which will pass by the draft hole from the bowl and into the sump. Upon the smoker drawing in smoke, this extension then directs the smoke down and around the sump to dispense a lot of the moisture before the smoke enters the extension and stem. On the System Standards and other less expensive systems, this extension with be made of Vulcanite turned integrally with the stem. On the more expensive System pipes this extension will be made of metal which screws into the Vulcanite stem. This extension on the earlier pipes will be of brass and the newer pipes will be of aluminium. Most smokers not knowing this function of the metal extension, assumes that it is a condenser/stinger and will remove it as they do with the metal condensers of Kaywoodie, etc. Should you have a System pipe with this metal extension, do not remove it for it will make the System function properly and give you a dryer smoke (https://pipedia.org/wiki/A_closer_look_at_the_famous_Peterson_Standard_System_Pipe).
With that information in hand I knew what I was dealing with in terms of the stamping and the age of this pipe. I knew from the information that the pipe was made during the Republic Era between 1950 and 1989. My guess is that the pipes is a 1960s era System pipe. Now it was time to work on the pipe.
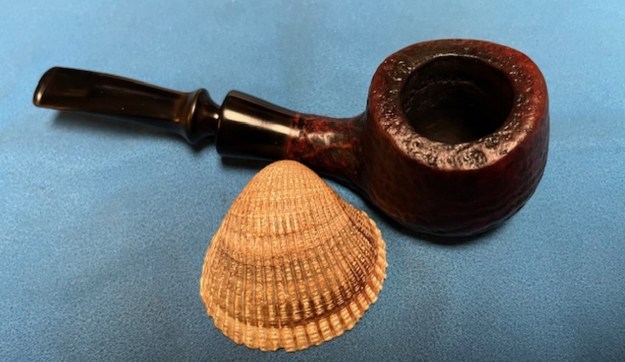
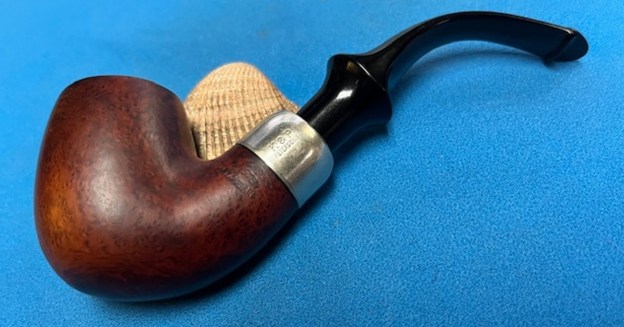
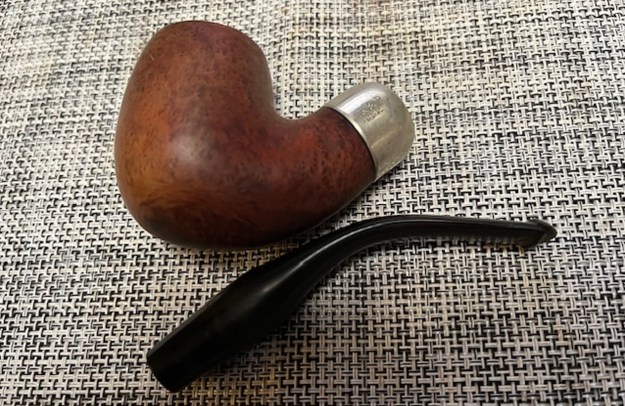
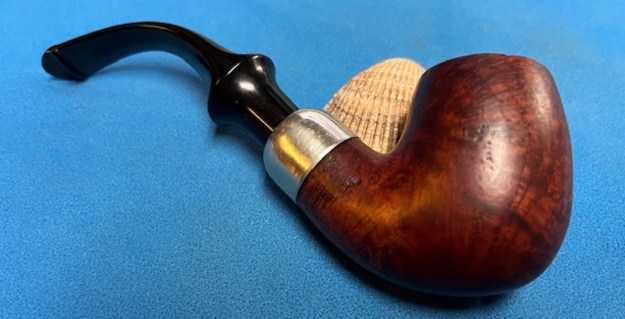
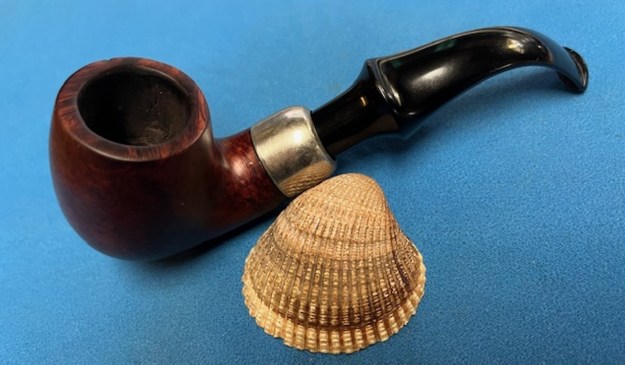
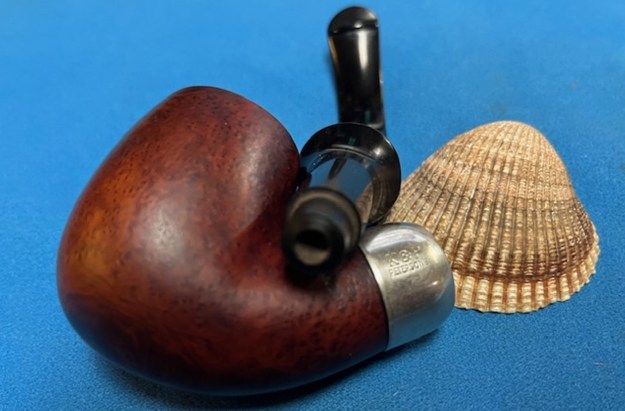
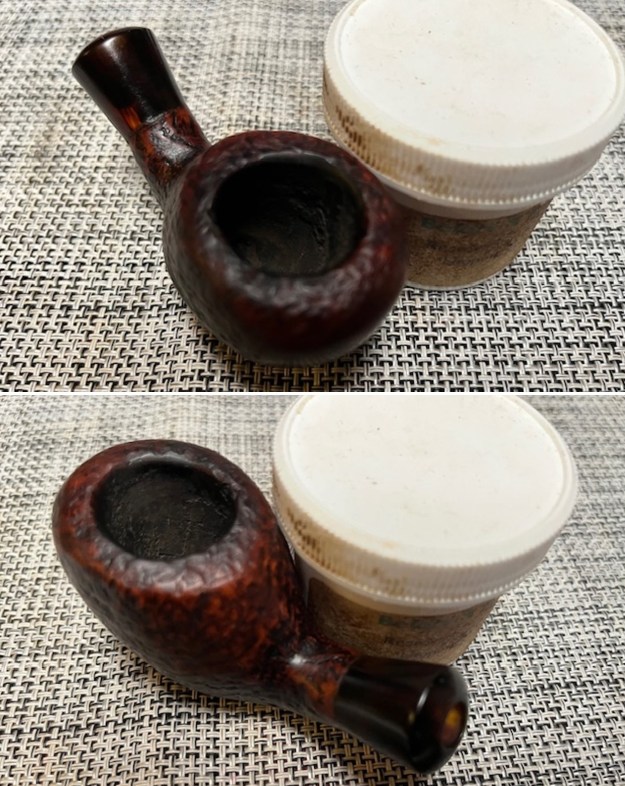
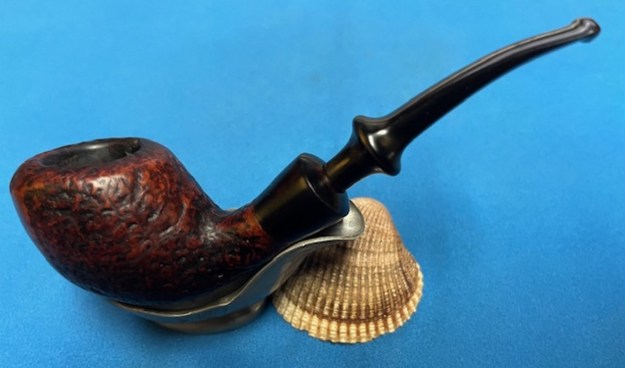
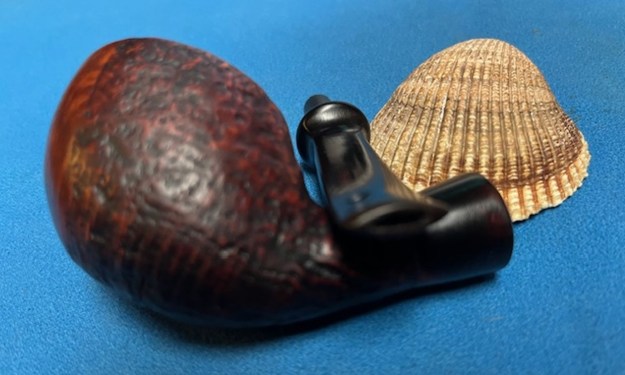
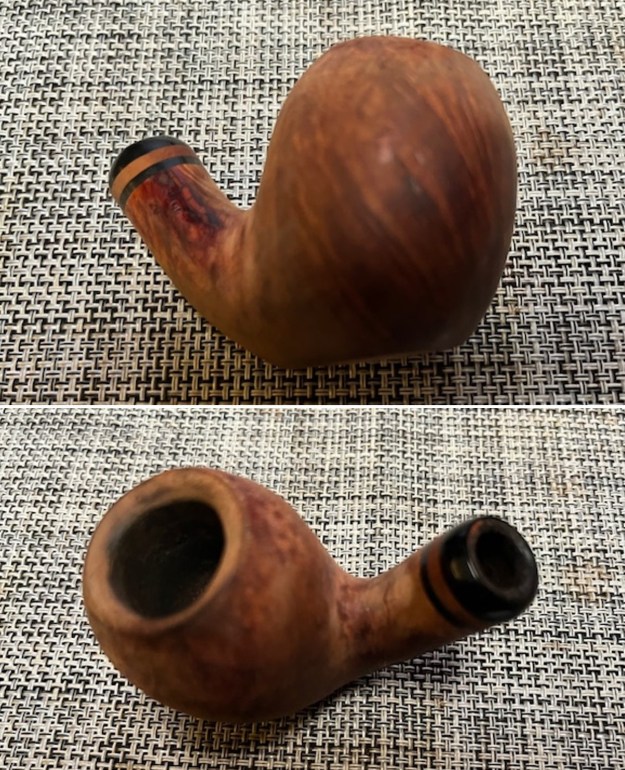
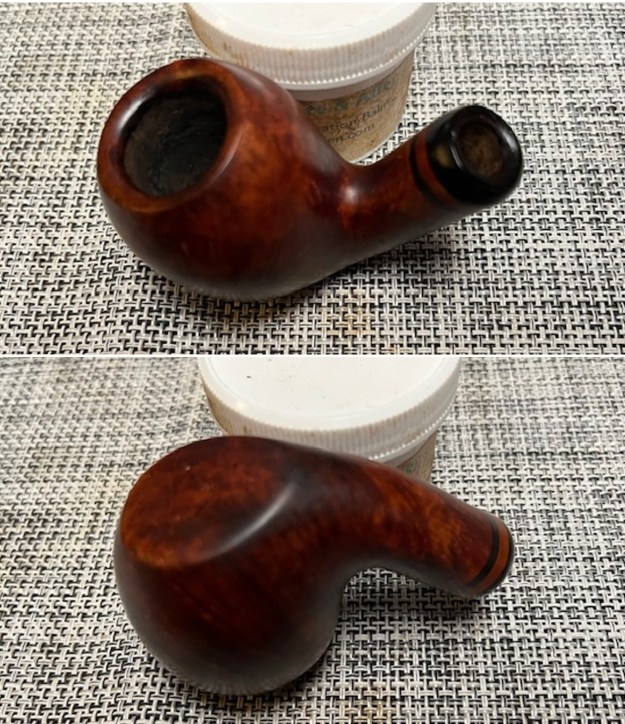
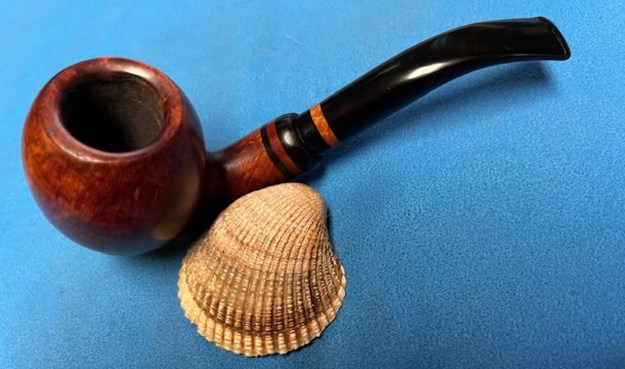
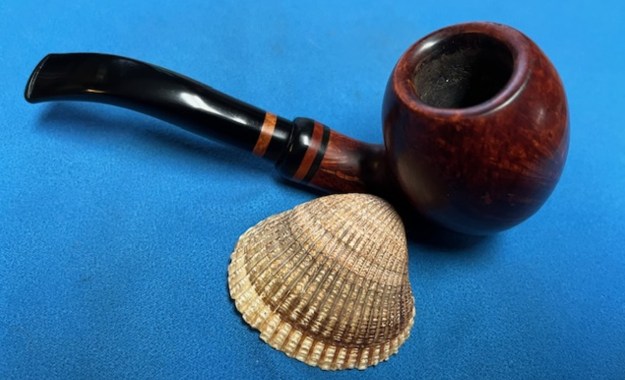
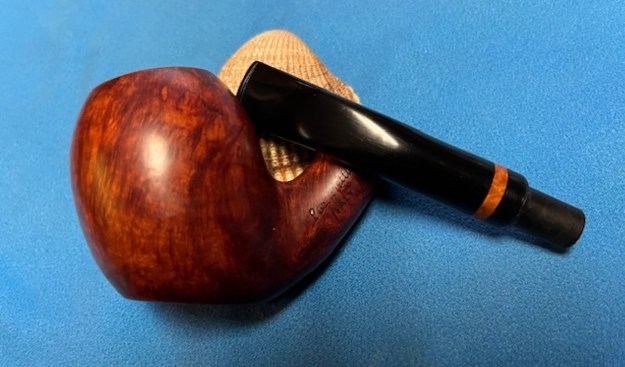
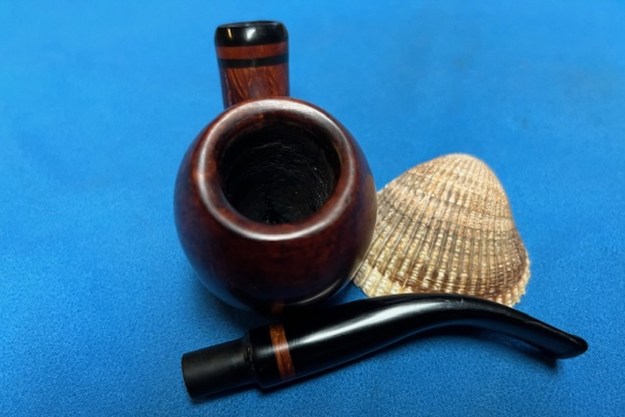
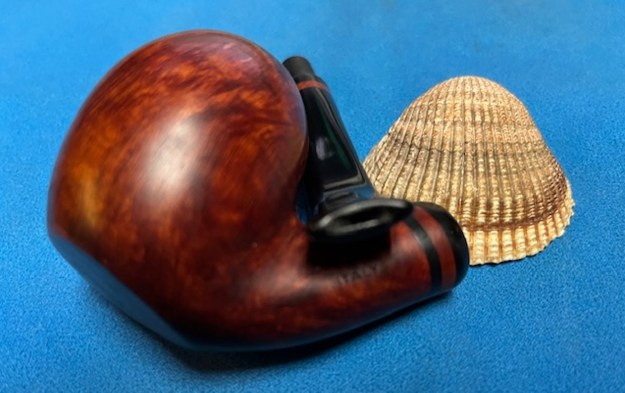
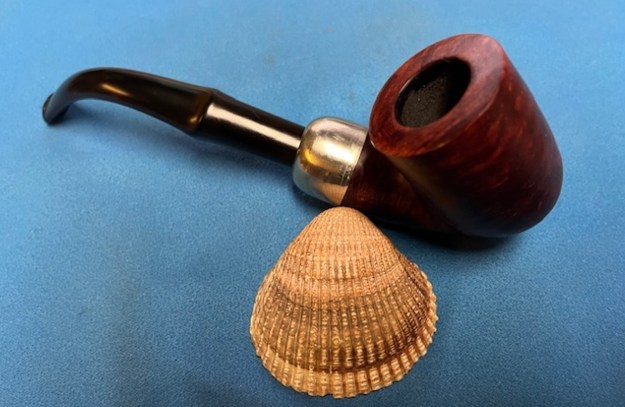
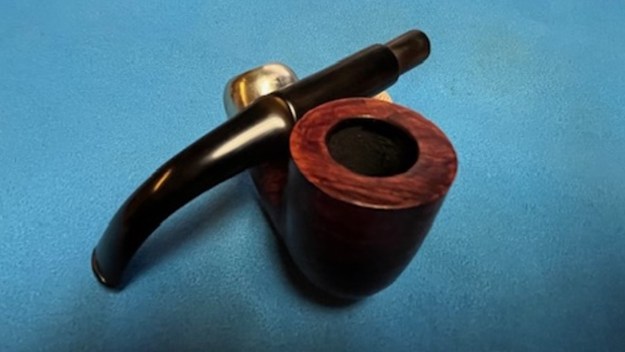
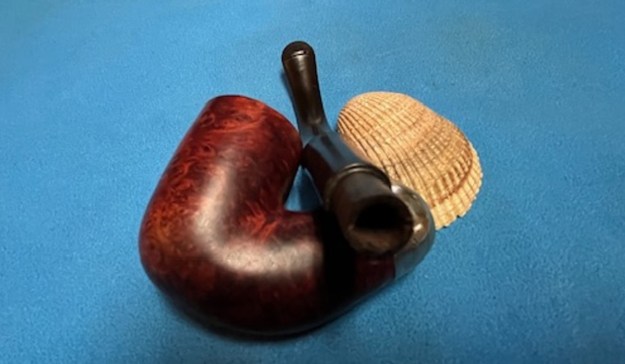
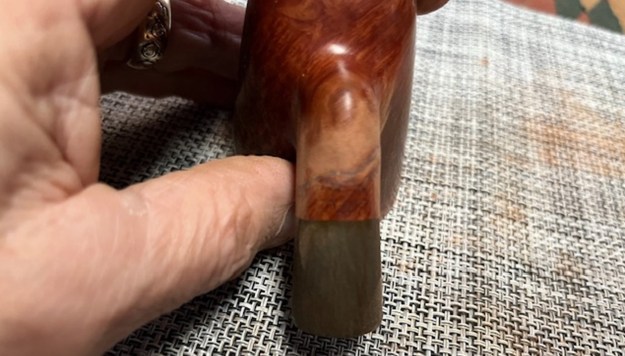
I removed the incorrect stem and replaced it with a correct P-Lip stem for a 307 that I had here in my box of stems. It has a little larger flare than I remembered but it still fit better and looked very good. I took photos of the pipe with the new stem.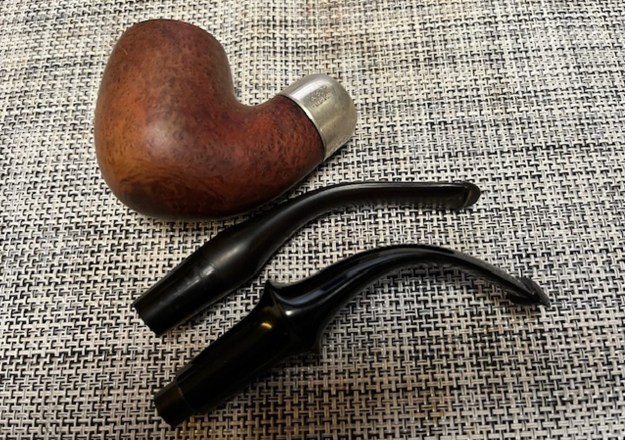
 I worked over the rim top and the inner and outer edge of the bowl with a folded piece of 220 grit sandpaper. I was able to smooth out the damage on the inner edge and remove the nicks on the top surface. The outer edge looked better though I left one nick on the right outer edge as a part of the story of the pipe.
 I polished the briar with micromesh sanding pads – dry sanding it with 1500-12000 git sanding pads. I wanted remove as many of the light scratches in the briar as I could. I wiped it down with a damp cloth after each sanding pad.
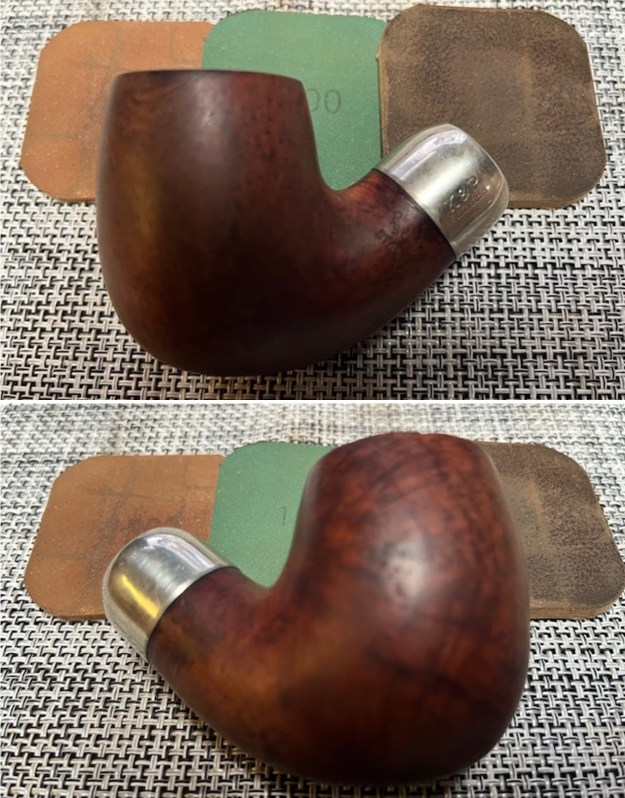
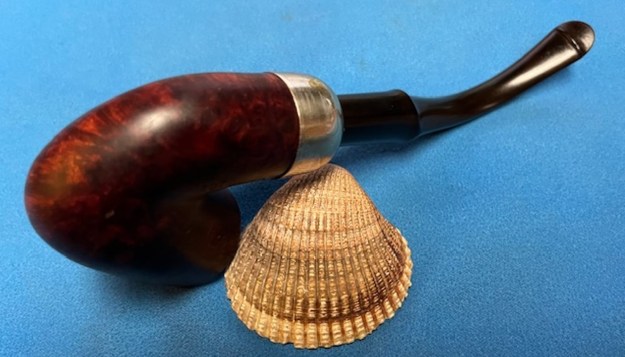
 I worked some Before & After Restoration Balm into the surface of the briar with my fingertips to clean, enliven and protect the briar. I let the balm sit for 15 minutes and then buffed with a cotton cloth to raise the shine. The photos show the bowl at this point in the restoration process.
 With briar polished with the Restoration Balm I moved onto the metal. I polished the nickel ferrule with a jewellers cloth to raise the shine and to protect the ferrule from further oxidation.
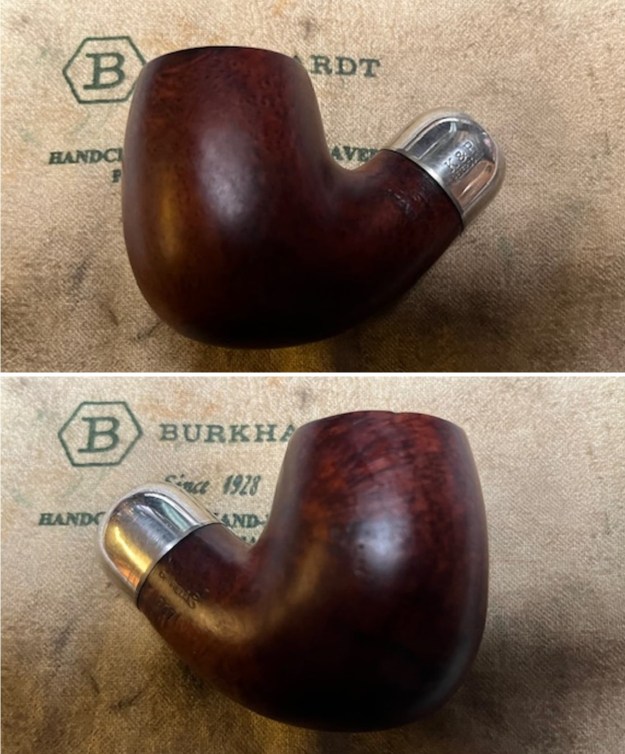
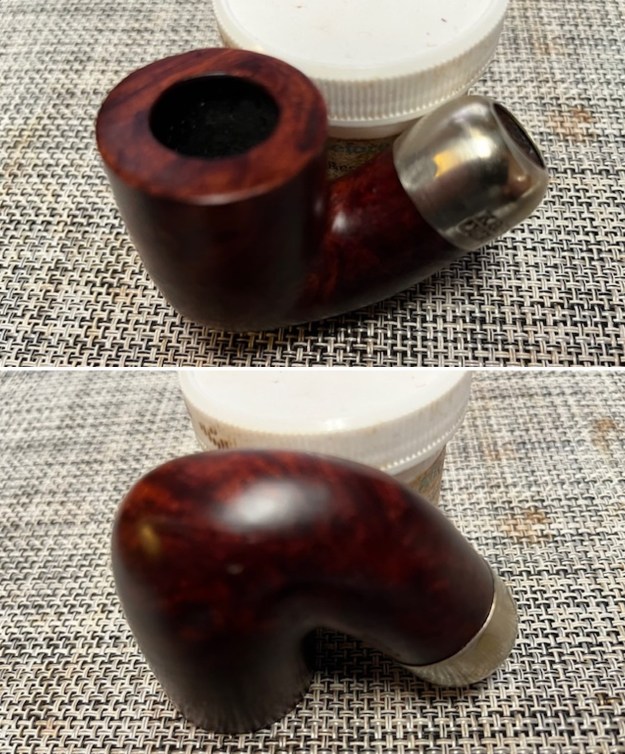
 I took photos of the new stem before I put it in the shank. It is a new stem so it is quite shiny. It will look great on the pipe.
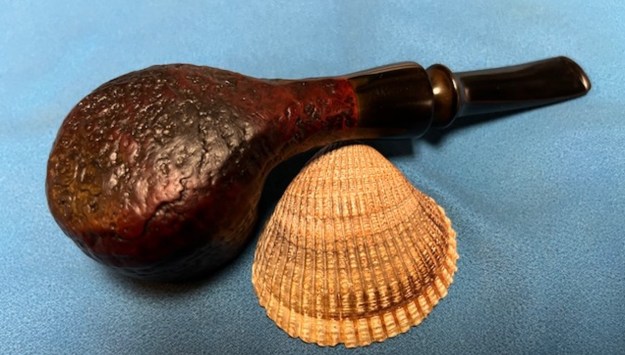
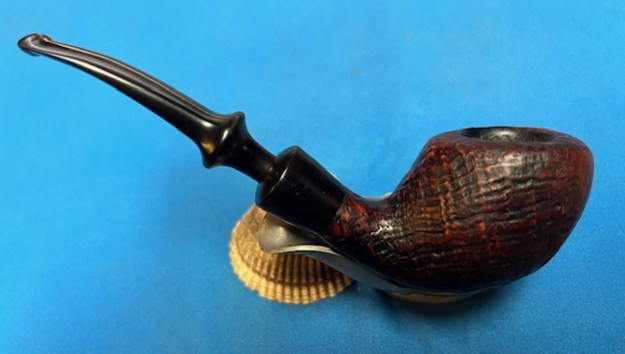
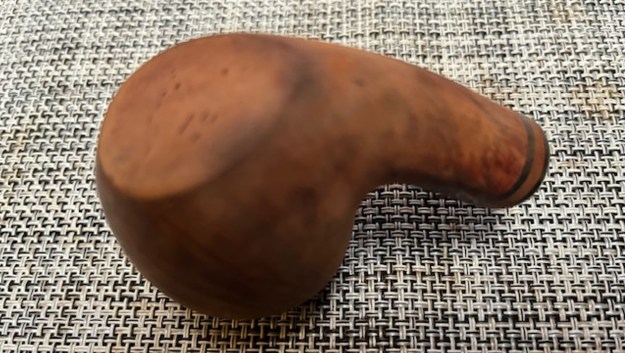
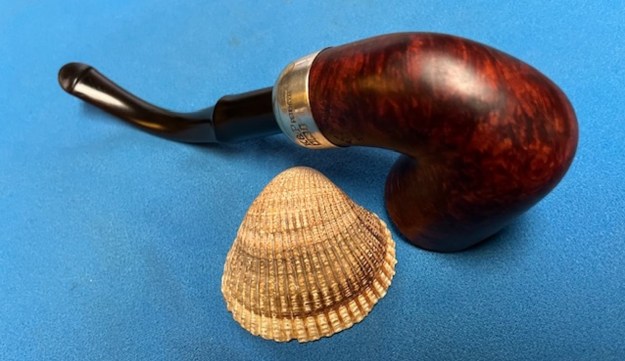
 I am excited to be on the homestretch. I look forward to the final look when the Republic Era Peterson System Standard 307 is put back together, polished and waxed. I put the bowl and the new stem back together. I polished the bowl and stem with Blue Diamond to polish the briar and the vulcanite. I gave the bowl and the stem multiple coats of carnauba wax. I buffed the pipe with a clean buffing pad to raise the shine. I hand buffed it with a microfiber cloth to deepen the shine. The pipe polished up pretty nicely. Grain stands out nicely as do the marks of the pipe journey. The shiny black vulcanite stem is a beautiful contrast to the browns of the bowl and thick shank and nickel ferrule. This Peterson’s System Standard 307 Bent Billiard was another fun pipe to work on. It really is a quite stunning piece of briar whose shape follows the flow of the briar. The pipe is tactile in the hand and should feel great as it is warmed up when smoking. The finished pipe is shown in the photos below. The dimensions of the pipe are Length: 6 inches, Height: 2 inches, Outside diameter of the bowl: 1 ¼ inches, Chamber diameter: 7/8 of an inch. The weight of the pipe is 2.47 ounces/71 grams. I will be putting it on the rebornpipes store in the Irish Pipemakers Section if you would like to add it to your rack and carry on the previous pipeman’s legacy. This is an interesting estate to bring back to life.
As always, I encourage your questions and comments as you read the blog. Thanks to each of you who are reading this blog. Remember we are not pipe owners; we are pipe men and women who hold our pipes in trust until they pass on into the trust of those who follow us.

Blog by Steve Laug
Not long ago Jeff saw an ad for a set of Yello-Bole Hand Made pipes that were unsmoked and still wrapped in the display case. The display case is a yellow box that is slightly worn on the outside from time sitting and all of the likely transit it has had but is still in good condition.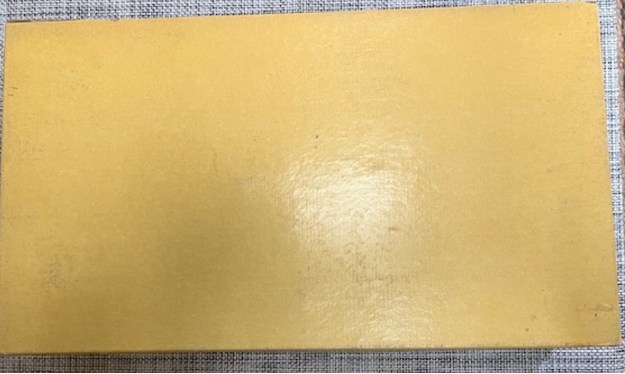 The case is hinged on the back edge and has red ribbon on each side keeping the lid open. The inside of the lid is a great advertisement on the brand as you can see in the first photo below. Look carefully at the descriptions of the pipes – custom sculptured bowls, unusual shapes, imported briar, permanent filter, large tobacco capacity, thick briar walls for cooler smoking. They are billed as Man-sized and over sized. The base of the box has six compartments divided by loose fitting pieces of cardboard. Each compartment holds two pipes for a total of twelve unsmoked Yello-Bole Hand Made pipes.
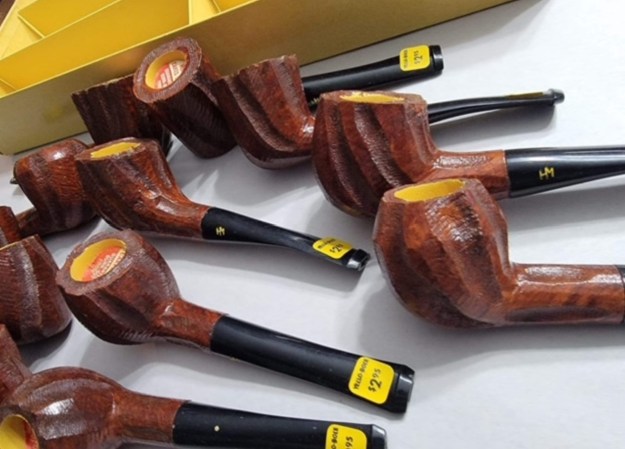
 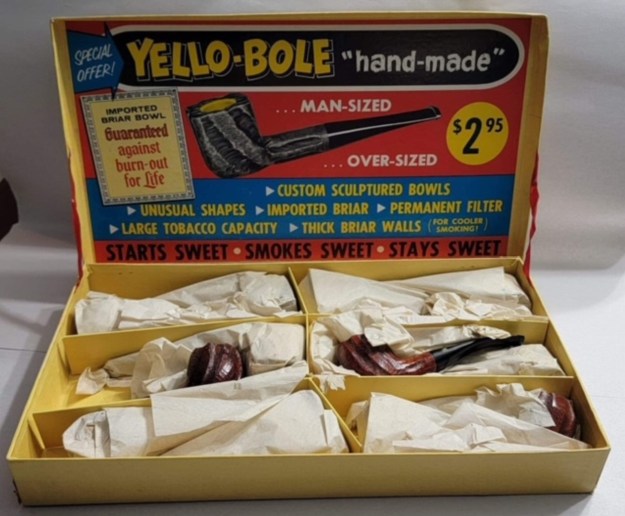 The seller unwrapped the pipes and took the photos below. The briar is finished a lot like Tracy Mincer’s Custom-Bilt or Custombilt pipes with a rusticated finish and “worm trail” carvings around the bowl and shank. Each one has the famous Yello-Bole yellow honey coat on the inside of the bowl to “enable easier break ins that are sweet from the start”. Each one has the bowl insert spelling out the coating in the bowl. The stems are all in unsmoked condition and have the original price tags on them. Can you believe that they sold for $2.95 when they were new? Pretty remarkable that they were that price. The stems have a HM logo for Hand Made on the left side. You can see that there are a variety of shapes from classic billiards, apples, panels, Dublins, Zulus, Rhodesians and others. All are unsmoked.
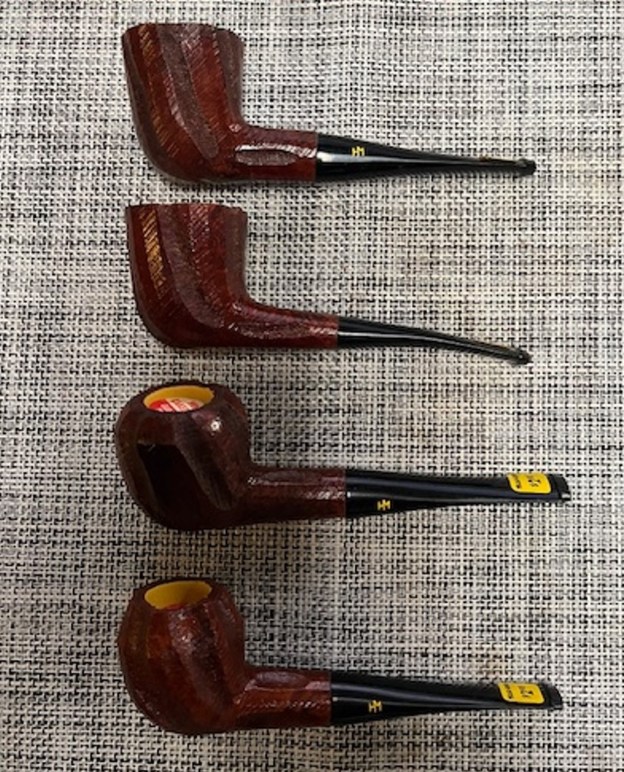
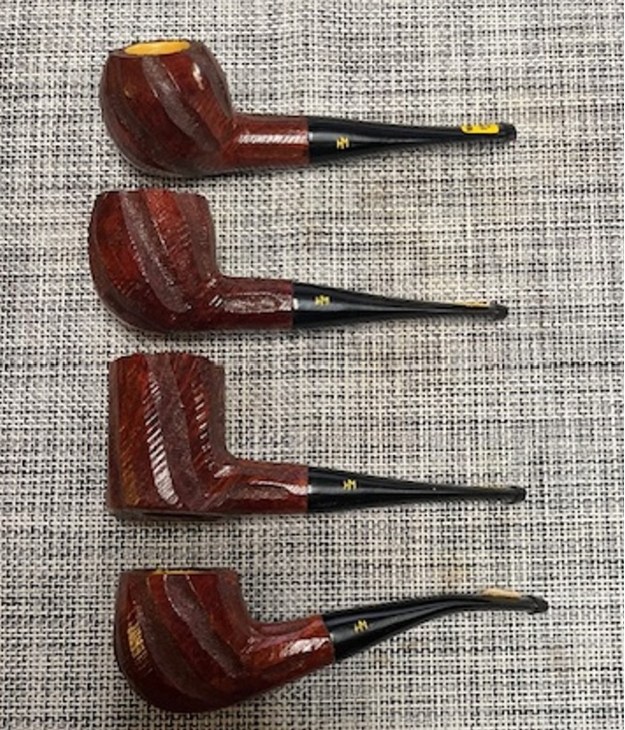
 The pipes arrived in Vancouver yesterday and I had to have a look at them all. I carefully unwrapped the pipe and grouped them by fours and took photos so you can see what they look like. All are unsmoked and have been sitting in the case for many years.
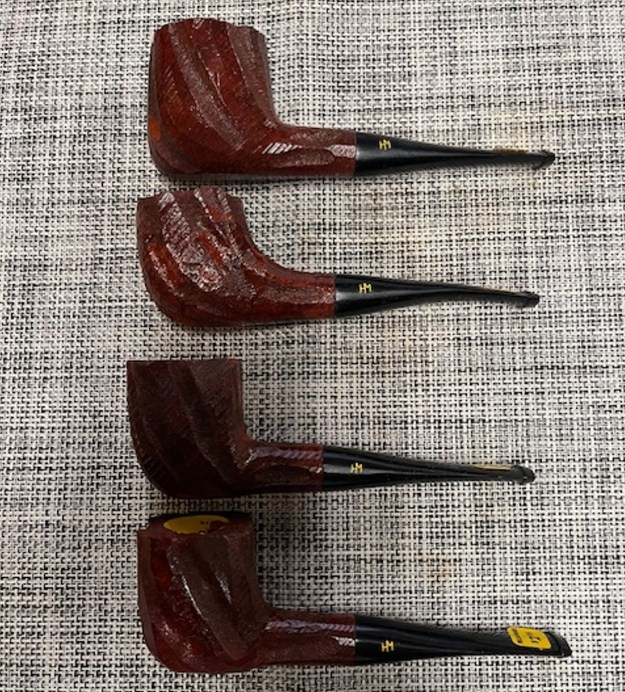
 This set of pipes is available as a set of 12 in the collector’s box on the rebornpipes store in the American Pipemakers Section. It is a set that I would love to keep but cannot add another one to the collection so I want to move it on to someone who would like this piece of history and enjoy breaking in some older unsmoked, New Old Stock Yello-Bole pipes. I am asking $400USD for it. If you are interested in purchasing the set email me at slaug@uniserve.com and I will gladly pass it on to you. Thanks for having a look.
Blog by Steve Laug
The next pipe I chose to work on came is another one from the lot of 11 pipes I purchased from a lady in Regina, Saskatchewan. She had found them in a house she bought and wanted to know if I wanted them. We struck a deal, I paid for the pipes and shipping and the box arrived while I was traveling in Europe. In the box were 4 Stanwells, I Danmore Bowl, 1 Soren Freehand, 1 Calabash with a Briar Bowl, 1 Nording Freehand, 1 Italian Made Bertenetti, 1 Rhodesian with a banded cracked shank, and 1 Brigham. I have restored the Nording, the snapped Stanwell, the Brigham, the Gourd Calabash with the briar bowl, restemmed the Danmore bowl and cleaned the Lorenzetti. There are blogs on each restoration available.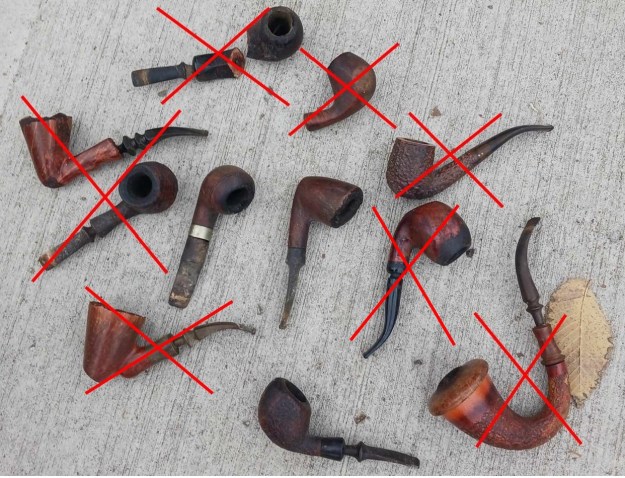
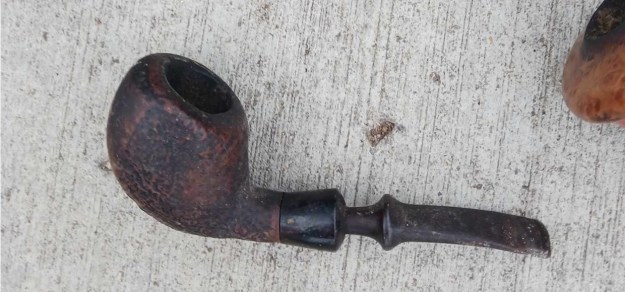 The next pipe on the table is another one of the dirtiest pipes in a box full of very dirty pipes. It is stamped on the underside of the shank and reads Stanwell [over] Antique [over] Made in Denmark. There is no visible shape number stamped on the pipe. There was a thick cake in the bowl, debris in the bottom and on the bowl walls and some remnants of tobacco. The airway was plugged and there was no draught on the pipe. There was a heavy lava overflow on the rim top and down the sides of the bowl and shank. It was hard to know the condition of the inner edges of the bowl because of the cake. The outer edge actually looked quite good under the grime. The finish was dirty and dusty and there was lava on the sides and heel of the bowl. The ruby coloured acrylic shank extension was filthy and loose on the shank. The stem was in rough shape in appearance but underneath the calcification and oxidation the tooth marks and chatter looked minimal. I took photos of the pipe before I started my cleanup work on it.
 I took a close-up photo of the bowl and rim top to show the cake in the bowl. The rim top shows some thin lava spots on the smooth finish. The inner edge of the bowl is pretty rough with some nicks and lava buildup. The outer edges of the bowl are worn. I took photos of the top and underside of the stem surface and button to show its general condition. It looked very good under the spotty oxidation.
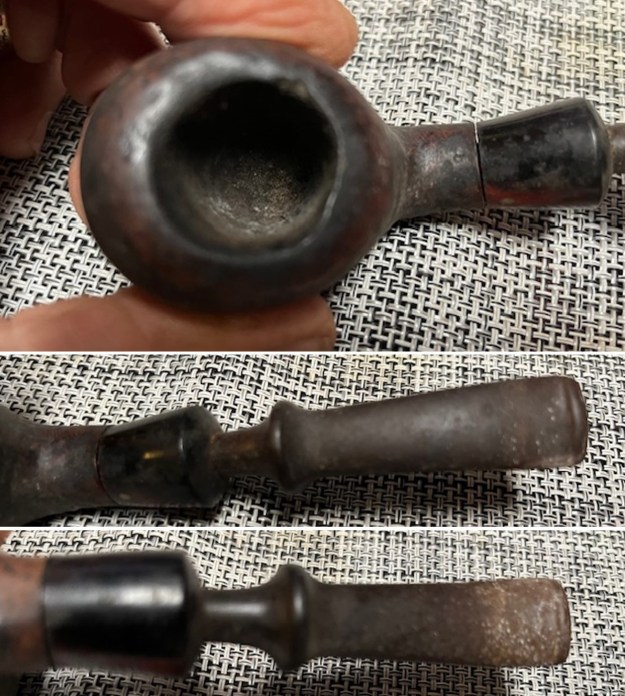 The stamping on the underside of the shank is faint but readable as noted above. You can barely make out the Stanwell stamp on the smooth panel near the shank extension but it is present. There appears to be a burn mark on the shank in the flat spot. I took the stem and the shank extension off the pipe and took a photo to give a sense of the proportion of the pipe.
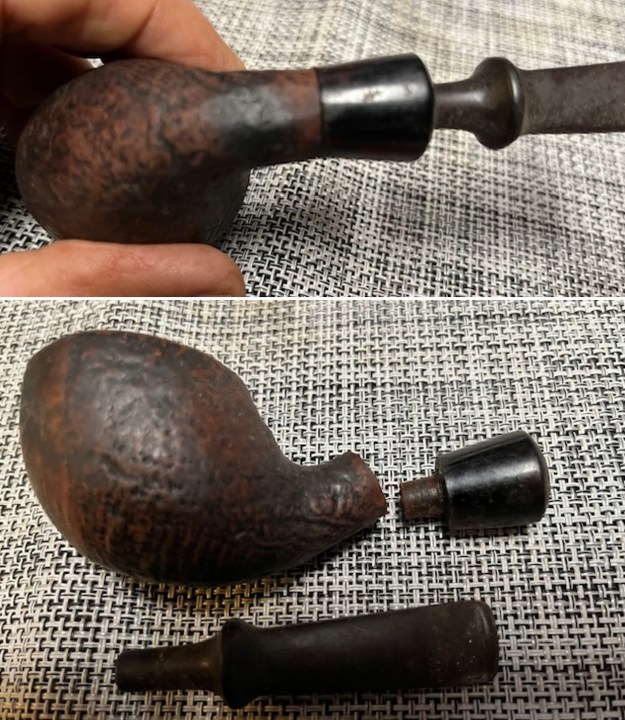 I recognized the shape as being a Sixten Ivarsson design but Icould not remember the shape number associated with it. I turned to Pipedia’s article on shapes that Bas Stevens originally worked on to check it out (https://pipedia.org/wiki/Stanwell_Shape_Numbers_and_Designers). I am including a shape chart below. It identifies the shape as an 25 (second from the bottom of the second column in the photo below).
 I also have included information the site regarding the shape 25. The pipe I am working on is 25b in the list below. Stanwell’s “25” shape number actually corresponds to two different designs. The first is a larger version of the “24,” a Freehand with an oval shank; the second is a rather gestural Danish Scoop of sorts with an oval bowl and a slight saddle-like bevel to the rim. Designed by Sixten Ivarsson. This vintage “25” is of the latter type, really showcasing its cupping gesture in profile and is seen here as part of the Antique series. It wears a dark sandblast and is accented by a ruby-hued ferrule, which matches the smoothly polished patch of briar along the bowl’s fore. (typically saddle, but can also be military mount, tapered, faux spigot saddle etc.), by Sixten Ivarsson.
List by designer
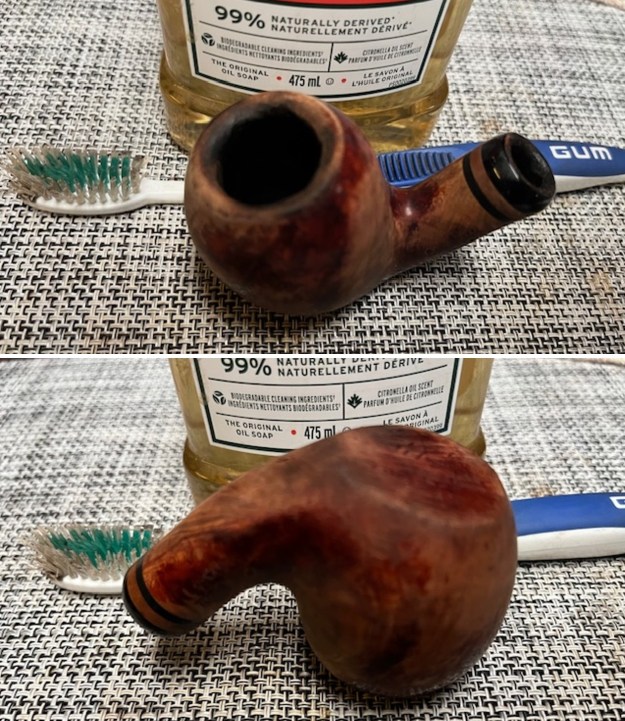
Now I knew it was an Ivarsson Design shape 25 with a military style saddle stem. Now it was time to work on the pipe. I removed the stem and turned my attention to the bowl clean up. I reamed the bowl with a PipNet pipe reamer using the fourth (and largest) cutting head to take the cake back to bare briar. I cleaned up the reaming with a Savinelli Fitsall Pipe Knife. I sanded the walls with a piece of 180 grit sandpaper wrapped around a dowel to smooth them out. 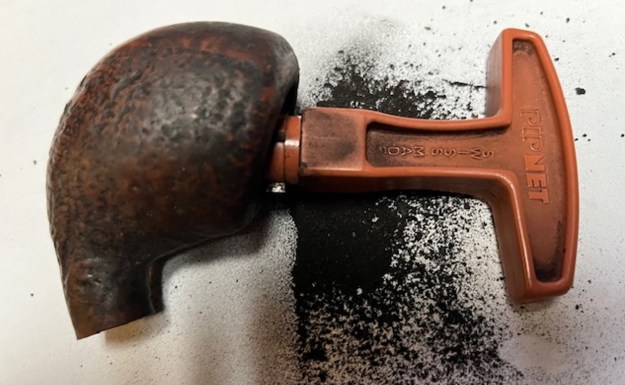
 I scrubbed the exterior of the briar with a brass bristle wire brush, a tooth brush and undiluted Murphy’s Oil Soap. I rinsed it off with warm water to remove the grime and soap. It looked much better and the dust and debris was gone. I dried it with a cotton towel.
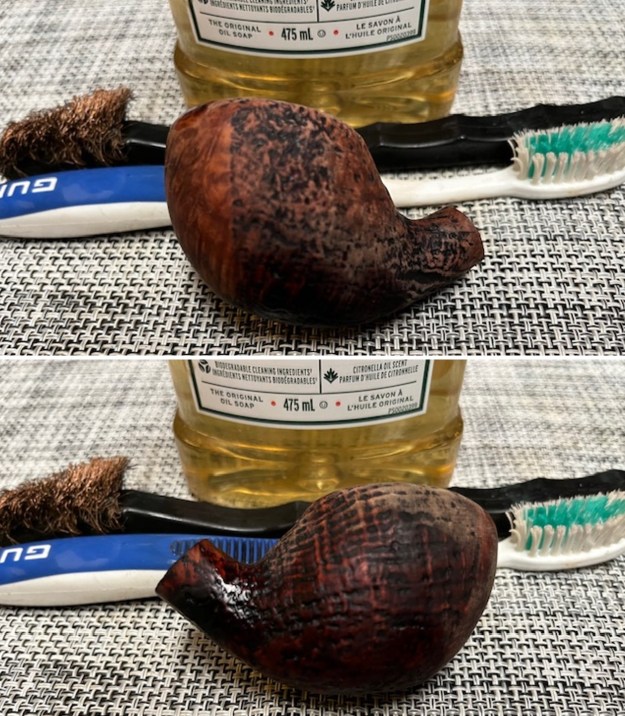
 I worked over the sandblast rim top and the bowl and shank sides with a brass bristle wire brush to further knock off the debris in the valleys of the blast.
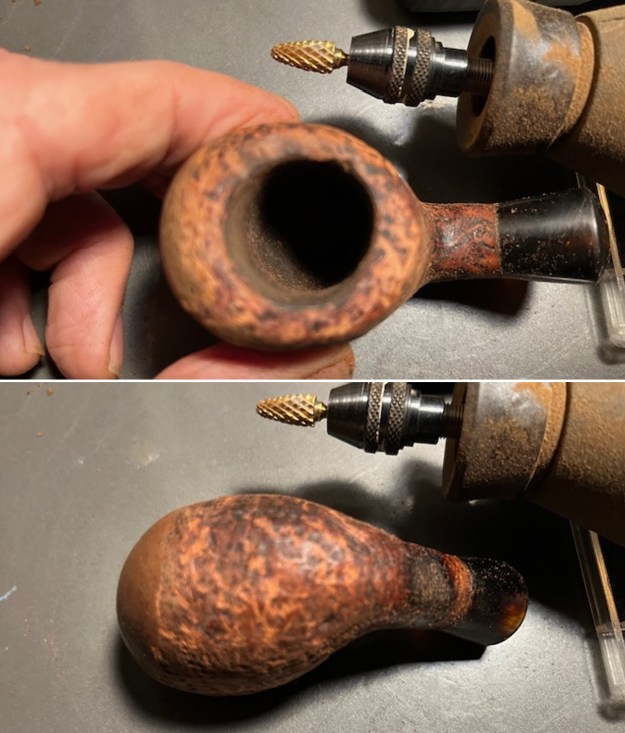
 I worked over the damage on the inner edge of the bowl and the rim top. I also smoothed out the damage on the outer edge with a folded piece of 220 grit sandpaper. It looked much better after I sanded the damaged areas smooth. I worked over the rim top and the heel of the bowl with a dry brass bristle brush to remove some of the darkening. It is looking better.
I scrubbed out the internals of the shank extension with 99% isopropyl alcohol, pipe cleaners and cotton swabs.  I wiped down the tenon on the shank extension with some white all purpose glue and the shank end and extension end with the glue and pressed it onto the shank. I aligned the shank and extension and held it in place until the glue set.
 I used my Dremel and a dental burr to retrace the lines of the sandblast on the sides of the bowl and the heel. I also used it to recut the lines of the blast on the rim top as well.
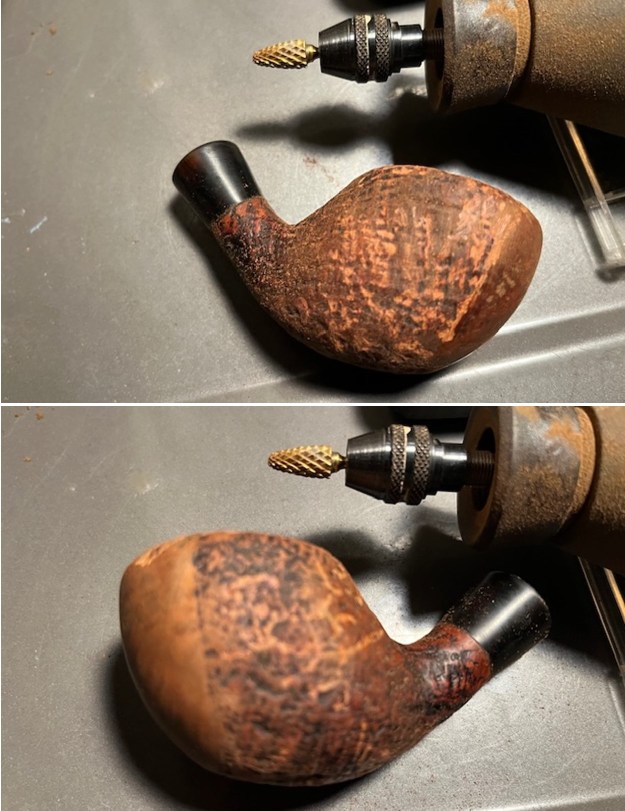
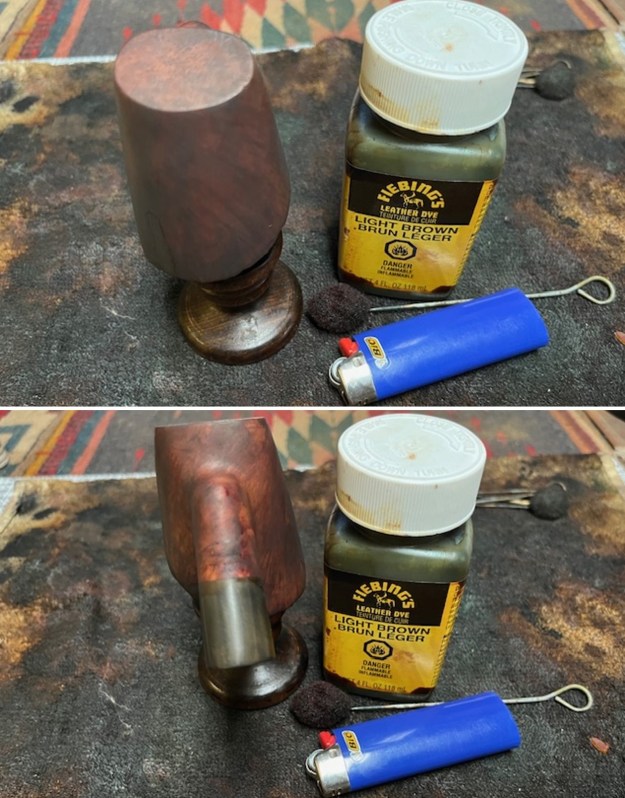
 I stained the bowl and shank with a light brown stain wash. I applied it to the surface of the briar with a wool dauber. I flamed it with a lighter flame to set it in the grain. I repeated the process until I was satisfied with the coverage.
 I polished the acrylic shank extension and the briar with micromesh sanding pads – dry sanding it with 1500-12000 git sanding pads. I worked on the smooth front of the bowl and on the high spots on the sandblast. I wanted to make the new stain coat a bit more transparent. As I finished the last of the micromesh it looked much better.

 I cleaned out the shank now that the extension was attached with alcohol and pipe cleaners. It was not too bad in the shank end but the short briar to the from there to the bowl was dirty. I probably should have done the clean up earlier but I did not do so until now.
  I worked some Before & After Restoration Balm into the surface of the briar with my fingertips to clean, enliven and protect the briar. I let the balm sit for 15 minutes and then buffed with a cotton cloth to raise the shine. The photos show the bowl at this point in the restoration process.
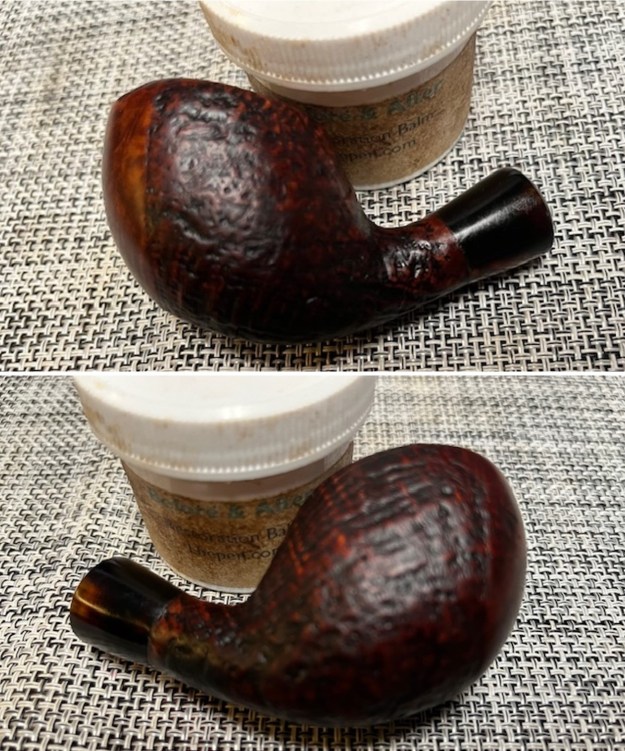
 With that done, the bowl was finished other than the final buffing. I set it aside and turned my attention to the stem. I cleaned out the airway in the stem with pipe cleaners and isopropyl alcohol.
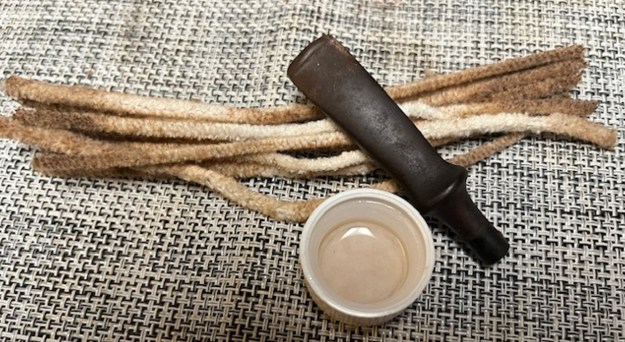 I wiped it down with some Soft Scrub on cotton pads to remove the oxidation and calcification. I was able to remove most of the oxidation and the calcification. It looked much better when I finished.
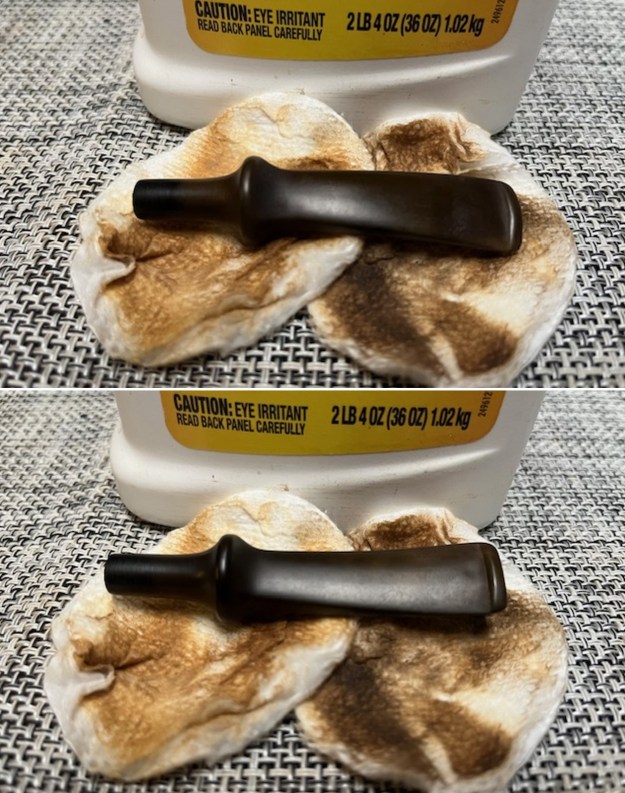 I sanded out the light tooth marks and chatter along with the remaining oxidation with 220 grit sandpaper and started polishing the stem with 600 grit wet dry sandpaper.
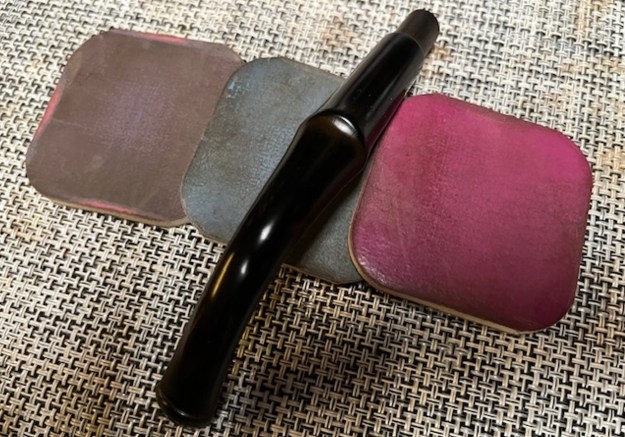
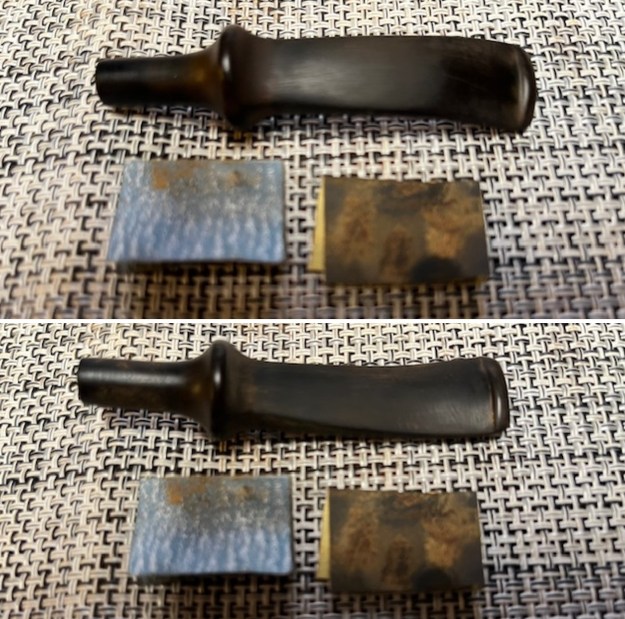 I polished the stem with micromesh sanding pads – wet sanding with 1500-12000 grit sanding pads. I wiped it down after each sanding pad with Obsidian Oil.
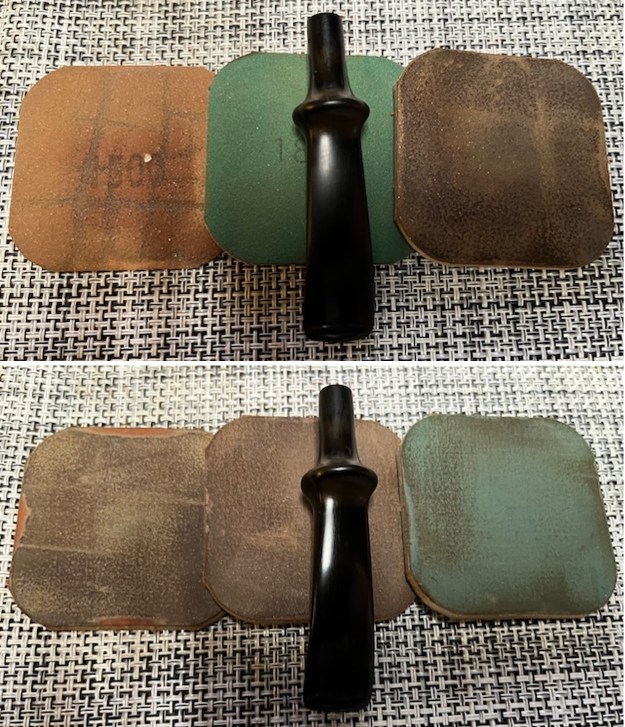
 I finished polishing the stem with Before & After Pipe Stem polish (both Fine and Extra Fine) then wiped the stem down with another coat of Obsidian Oil.
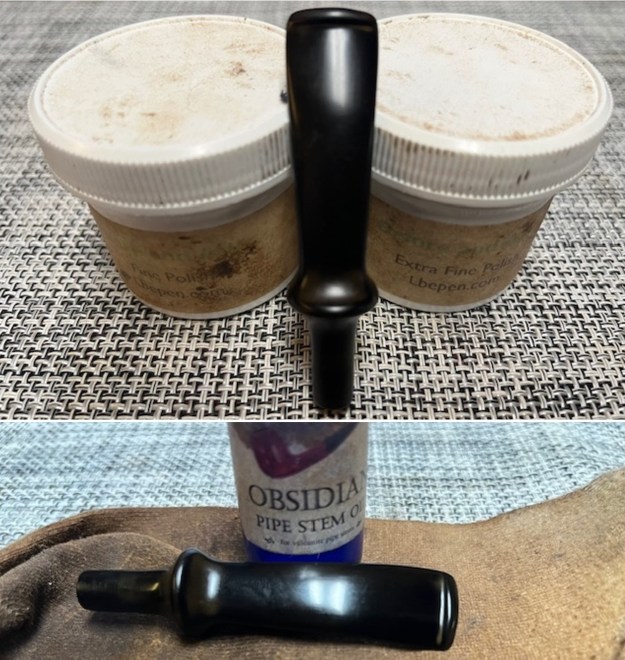 I am excited to finish this Ivarsson Design Stanwell Antique Made in Denmark 25. I put the pipe back together and buffed it with Blue Diamond on the buffing wheel. I gave the bowl and the stem multiple coats of carnauba wax. I buffed the pipe with a clean buffing pad to raise the shine and hand buffed it with microfiber cloth to deepen the shine. It is fun to see what the polished bowl looks like with the polished black, fancy turned vulcanite stem was beautiful. This Stanwell Antique 25 Made in Denmark Scoop is nice looking and the pipe feels great in my hand. It is light and well balanced. Have a look at it with the photos below. The dimensions are Length: 5 ½ inches, Height: 1 ¾ inches, Outside diameter of the bowl: 1 ½ inches wide x 1 ¾ inches long, Chamber diameter: 7/8 of an inch. The weight of the pipe is 1.66 ounces/47 grams. It is a beautiful pipe and one that I will be putting in the Danish Pipemaker Section on the rebornpipes store. Thanks for walking through the cleanup with me as I worked over this pipe.
As always, I encourage your questions and comments as you read the blog. Thanks to each of you who are reading this blog. Remember we are not pipe owners; we are pipe men and women who hold our pipes in trust until they pass on into the trust of those who follow us. 


Blog by Steve Laug
The next pipe I chose to work on came is another one from the lot of 11 pipes I purchased from a lady in Regina, Saskatchewan. She had found them in a house she bought and wanted to know if I wanted them. We struck a deal, I paid for the pipes and shipping and the box arrived while I was traveling in Europe. In the box were 4 Stanwells, 1 Danmore Bowl, 1 Soren Freehand, 1 Calabash with a Briar Bowl, 1 Nording Freehand, 1 Italian Made Bertenetti, 1 Rhodesian with a banded cracked shank, and 1 Brigham. I have restored the Nording, the snapped Stanwell, the Brigham, the Gourd Calabash with the briar bowl, restemmed and restored the Danmore bowl, a Stanwell Ivarsson design 11 Pot and Soren Hand Carved Freehand. There are blogs on each restoration available.
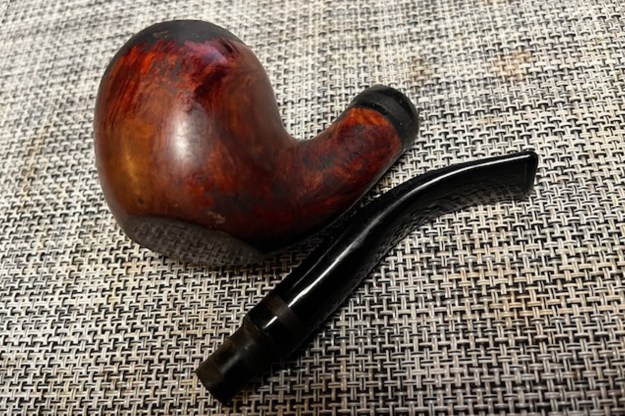
 The next pipe on the table is an extremely dirty pipes in a box full of very dirty pipes. It is stamped on the left side of the shank and reads Lorenzetti [over] Italy. On the right side it reads 3200 [over] 20 which could be the shape number of the pipe. There was a thick cake in the bowl, debris in the bottom and on the bowl walls and some remnants of tobacco. The airway was plugged and there was no draught on the pipe. There was a heavy lava overflow on the rim top flowing down the sides of the bowl and covering much of the shank. There appears to be some varnish or topcoat that is damaged and the grime is both on top of and underneath. It was hard to know the condition of the inner or the outer edge of the bowl for sure because of the cake. There was an acrylic shank extension sandwiching a briar ring. The shank end is also covered in a thick tar and oil residue flowing out of the mortise on to the stem and shank end. The acrylic stem had a briar ring next to the tenon and looked to be in decent condition underneath the thick oils and tars. There were minimal tooth marks and chatter on the shank. I took photos of the pipe before I started my cleanup work on it.
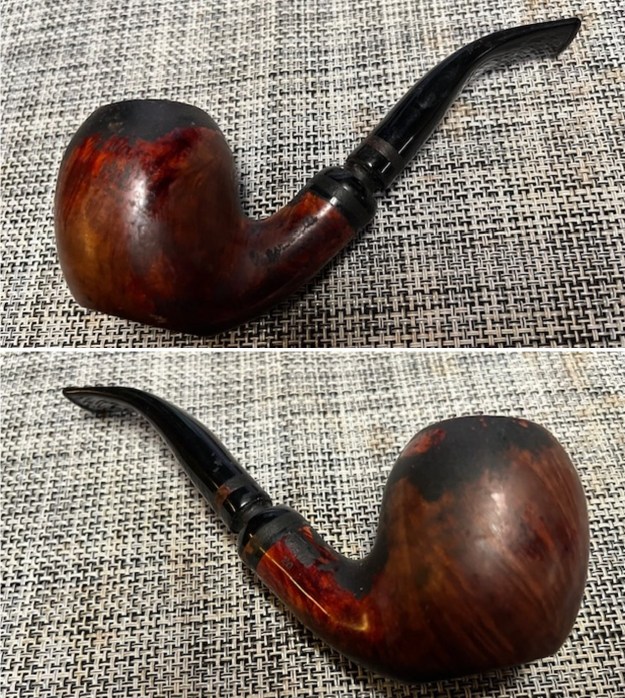
 I took a close-up photo of the bowl and the inwardly bevelled rim top to show the cake in the bowl. The rim top shows the thick lava on the inner edge of the bowl. The outer edges of the bowl also showed the lava flowing down the bowl sides. The shank end had an acrylic extension sandwiching a briar ring. I took photos of the stem surface and button to show its general condition. There was a briar ring around the stem surface near the tenon. The stem was a 9mm filter stem. The inside was filthy. It looked very good under the tars and oils that coated the surface.
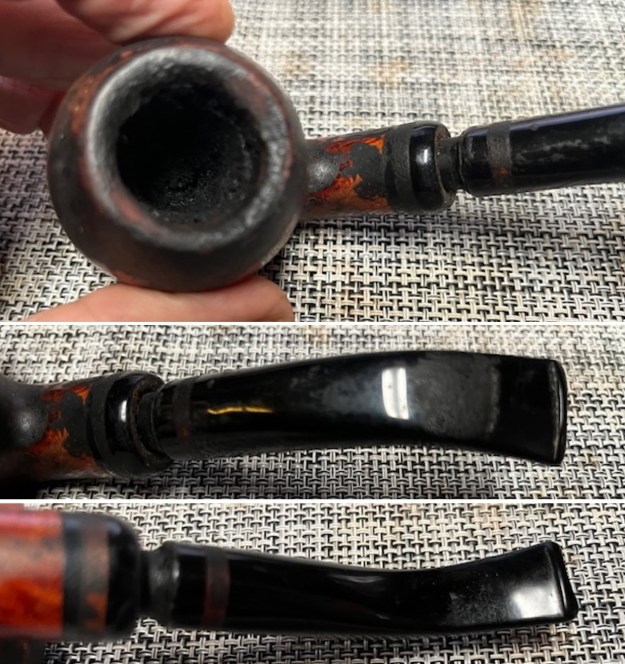 The stamping on the sides of the shank are covered with tars and oils but are readable as noted above. I took the stem off the shank and took a photo to give a sense of the proportion of the pipe.
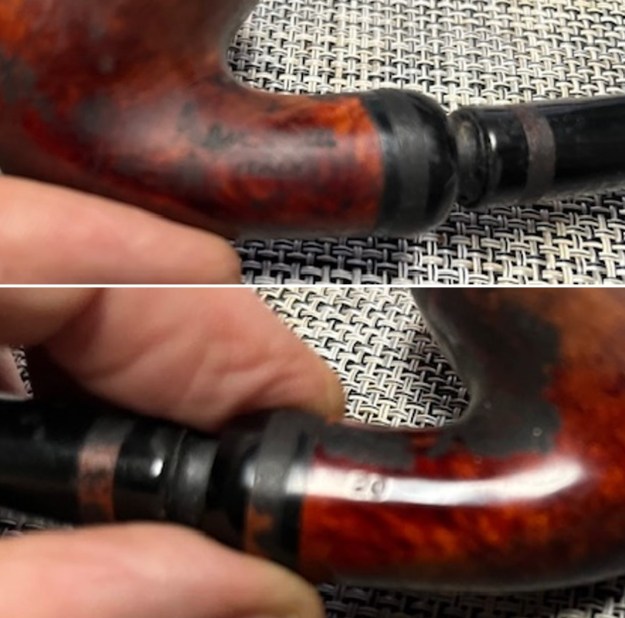
 I have worked on a few Lorenzetti pipes over the years but have little memory of the background of the brand. I turned to Pipephil to get a quick overview (http://pipephil.eu/logos/en/logo-l6.html). I have included a screen capture of the information on that site for quick reference. I learned that the brand was created in 1934 by Otello Lorenzetti. As of (2009) the company was managed by Alessandro Lorenzetti.
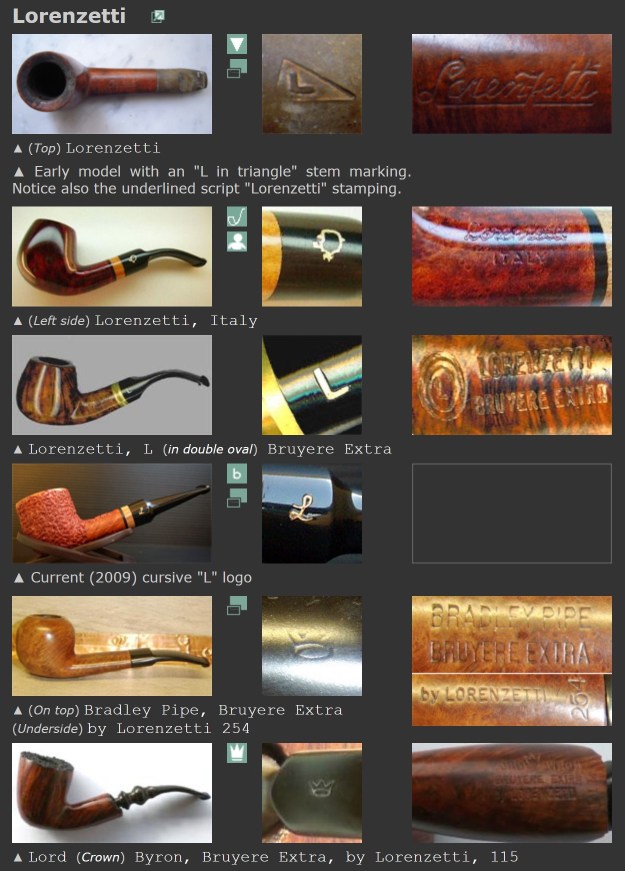 I then turned to Pipedia and found a great historical survey of the founder Otello Lorenzetti. It is a great read regarding the history of the brand and its development from small beginnings with Otello selling pipes from his bicycle around his community to a brand that is available around the world today (https://pipedia.org/wiki/Lorenzetti).
The site also had a photo of a pipe that has the same finish as the one that I am working on. You can see from the photo what the one I am working on must have looked like when it sold. Here is the photo courtesy SmokersHaven.com. From that I knew that the pipe in my hands looked like when it came out. It was a real beauty that gave me the impetus to work on it. Armed with that information I turned my attention to restoring the pipe.
I decided to start my work on the pipe by reaming the bowl with a PipNet pipe reamer using the first and second cutting head to take the cake back to bare briar. I cleaned up the reaming with a Savinelli Fitsall Pipe Knife. I sanded the walls with a piece of 180 grit sandpaper wrapped around a dowel to smooth them out. 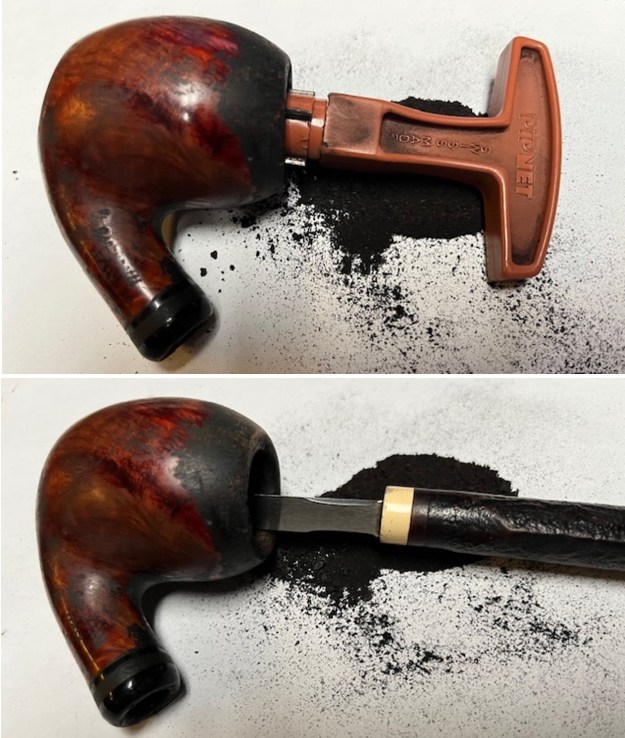
 I wiped the bowl down with acetone to remove the tarry build up and the varnish on the briar. There was a lot of grime that came off with the varnish. It still needed a lot of work but it was looking better.
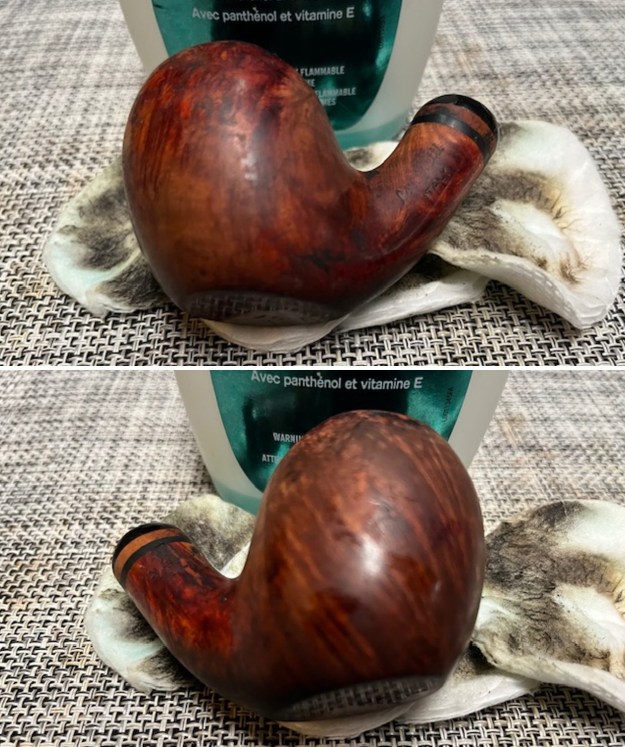
 I scrubbed the exterior of the briar with a tooth brush and undiluted Murphy’s Oil Soap. I rinsed it off with warm water to remove the grime and soap. It looked much better and the dust and debris was gone. I dried it with a cotton towel.
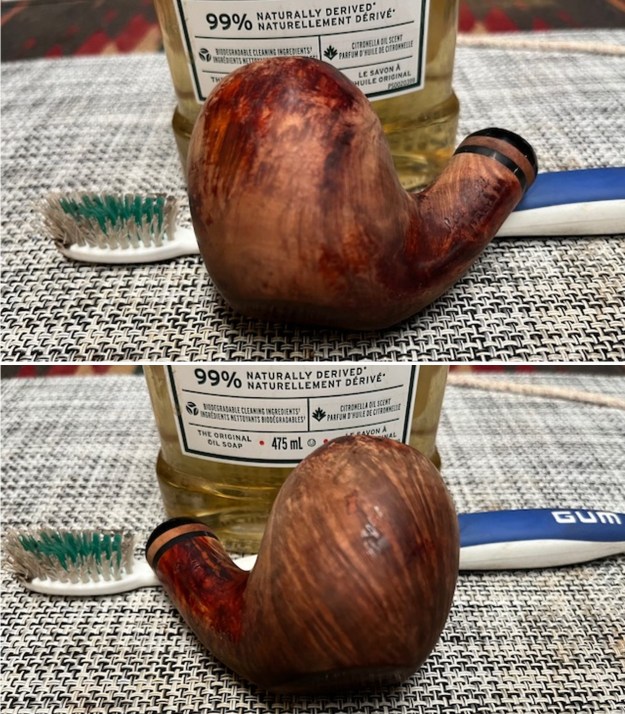
 Next, I worked on the rim top of the bowl to clean up the bevel and the inner edge. I also worked on the marks around the bowl that needed work. It took some work but it cleaned up well. I used a folded piece of sandpaper to clean up the inner edge of the rim and to sand the darkening off around the bowl sides.
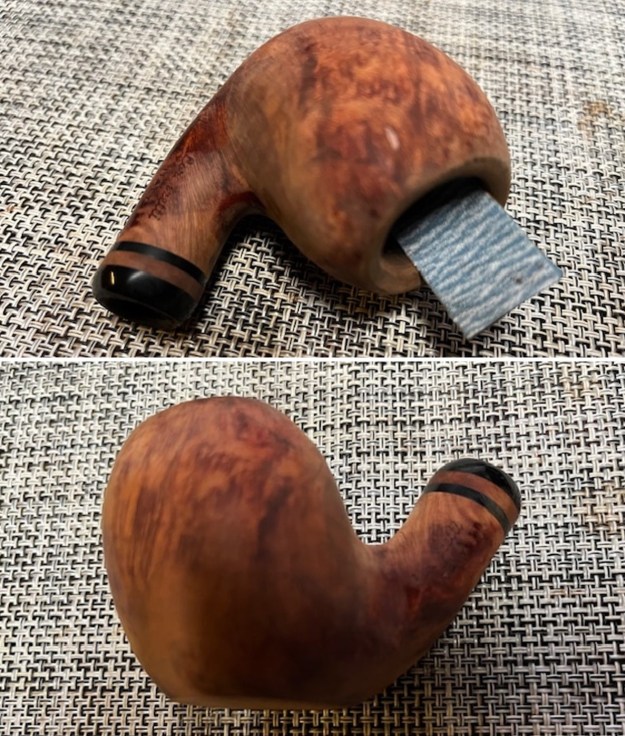
 I scrubbed out the internals of the pipe with 99% isopropyl alcohol, pipe cleaners and cotton swabs. I cleaned out the airway in the stem as well. The airway into the bowl was a little different. It was in the bottom of the bowl toward the back. It has some wear on the top edge of the airway entrance. I worked on these areas repeatedly until the shank and the airway in all the parts was clean.
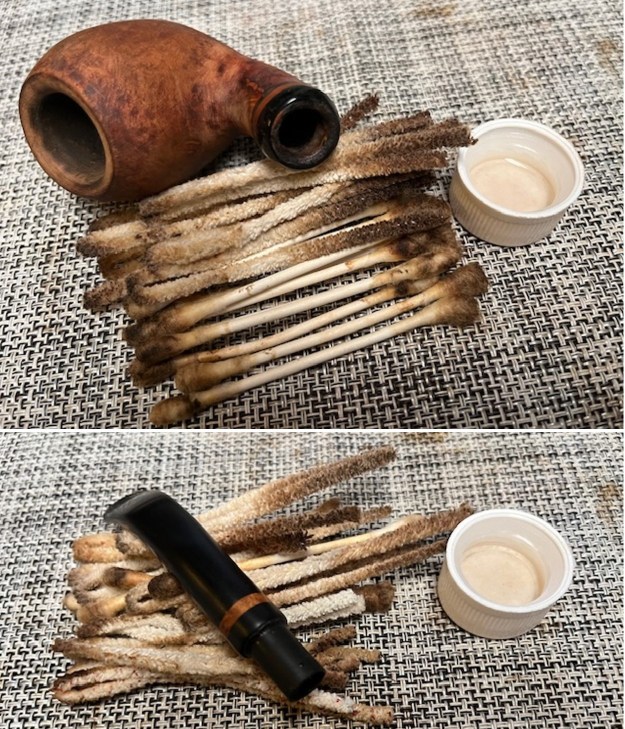 I stained the bowl and shank with a light brown stain wash. I applied it to the surface of the briar with a wool dauber. I flamed it with a lighter flame to set it in the grain. I repeated the process until I was satisfied with the coverage.
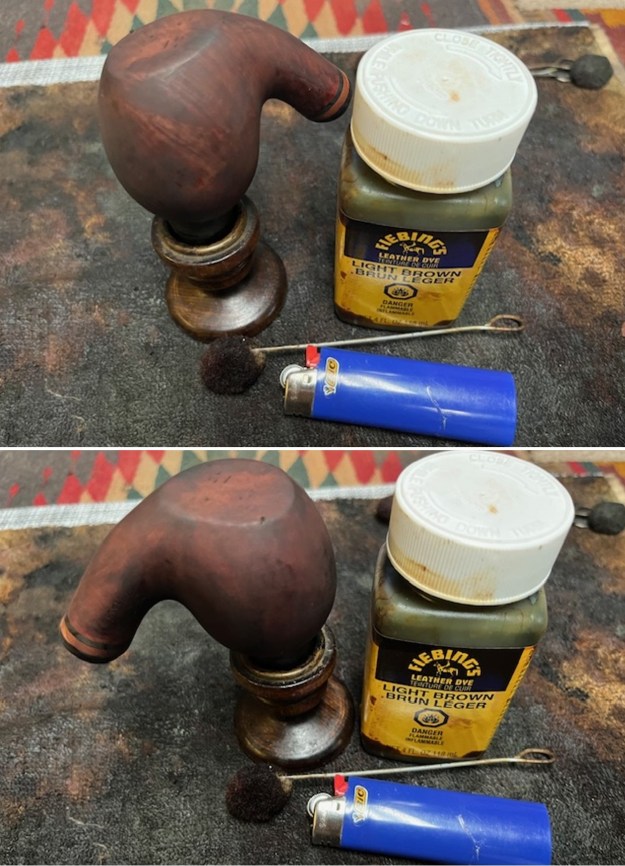
 I polished the shank extension and the briar with micromesh sanding pads – dry sanding it with 1500-12000 git sanding pads. I wanted to make the new stain coat a bit more transparent. I wiped it down with a cloth and some Obsidian Oil.
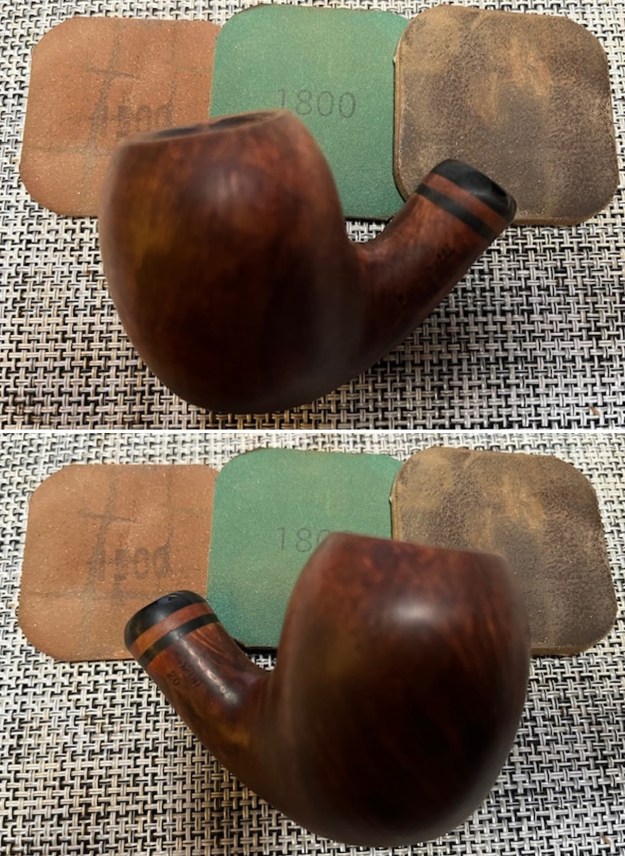
 The bowl had a very fowl tobacco ghost that hung over the pipe and the desk top where I was working on it. I stuffed the bowl with three cotton bolls and twisted one into the shank end. I used an ear syringe to fill the bowl with alcohol. I let the bowl sit for several hours to work on the stem. Once I came back to it the cotton boll was filthy. Once it was removed I ran pipe cleaners through and the pipe smelled much better.
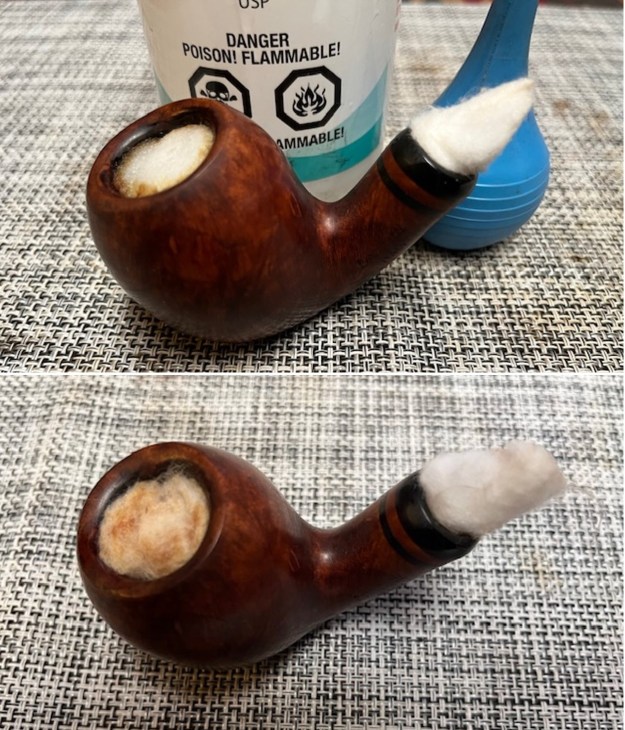
 I worked some Before & After Restoration Balm into the surface of the briar with my fingertips to clean, enliven and protect the briar. I let the balm sit for 15 minutes and then buffed with a cotton cloth to raise the shine. The photos show the bowl at this point in the restoration process.
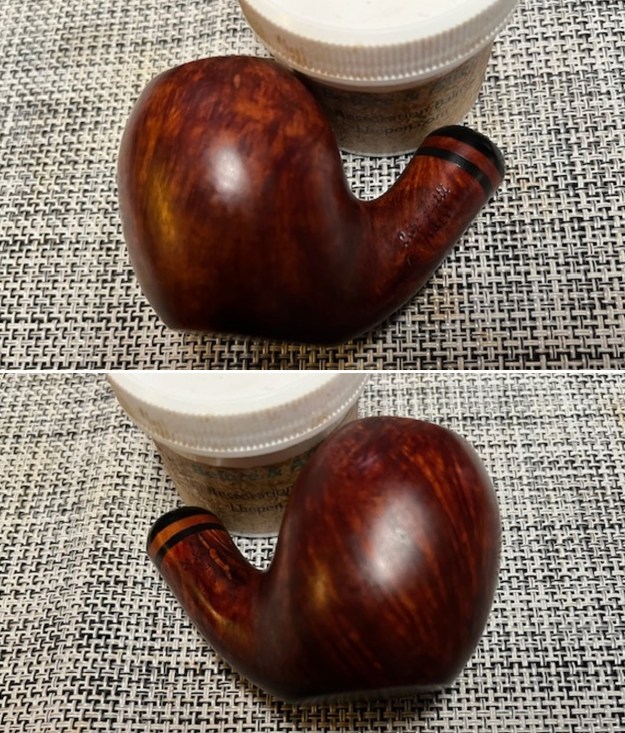
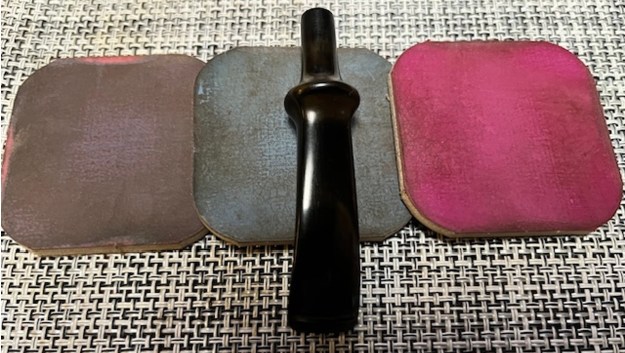
 With that done, the bowl was finished other than the final buffing. I set it aside and turned my attention to the stem. I polished the oxidation and tooth chatter on the stem with micromesh sanding pads – wet sanding with 1500-12000 grit sanding pads. I wiped it down after each sanding pad with Obsidian Oil.
 I finished polishing the stem with Before & After Pipe Stem polish (both Fine and Extra Fine) then wiped the stem down with another coat of Obsidian Oil.
 I polished finished Lorenzetti Italy 3200-20 Bent Egg Sitter with Blue Diamond to polish out the remaining small scratches. I gave the bowl and the stem multiple coats of carnauba wax and buffed the pipe with a clean buffing pad to raise the shine. I hand buffed it with a microfiber cloth to deepen the shine. The pipe polished up pretty nicely. The smooth briar shows the effect of the brown stain wash and works very well with the black acrylic stem. The finished pipe is shown in the photos below. I have worked on several Lorenzetti’s over the years and I have always been impressed by his ability to a craft a comfortable and functional smoking pipe. The Length: 5 ½ inches, Height: 2 inches, Outside diameter of the bowl: 1 ¼ inches, Chamber diameter: 7/8 inches. The weight of the pipe is 64 grams/ 2.26 ounces. I will be putting it on the rebornpipes store in the Italian Pipemakers Section if you would like to add it to your rack and carry on the previous pipeman’s legacy. This is an interesting estate to bring back to life.
As always, I encourage your questions and comments as you read the blog. Thanks to each of you who are reading this blog. Remember we are not pipe owners; we are pipe men and women who hold our pipes in trust until they pass on into the trust of those who follow us. 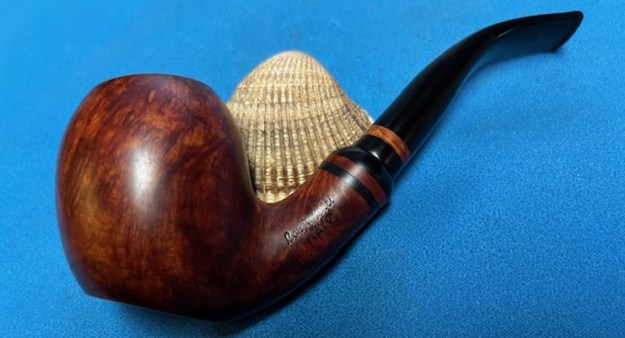


Blog by Steve Laug
A few weeks ago, I received an email from a customer, Ted about some pipe work for him. He had three pipes that he said needed different things and offered to send some photos. He also sent a second email with a description of what each pipe needed. I have included that email and the photos he sent below.
Peterson 309 needs stem restoration and bowl cleaned out. Rhodesian needs full restoration – my English teacher from high school gave it to me a little over two years ago. The Comoy’s Canadian needs a new bit I broke it… 
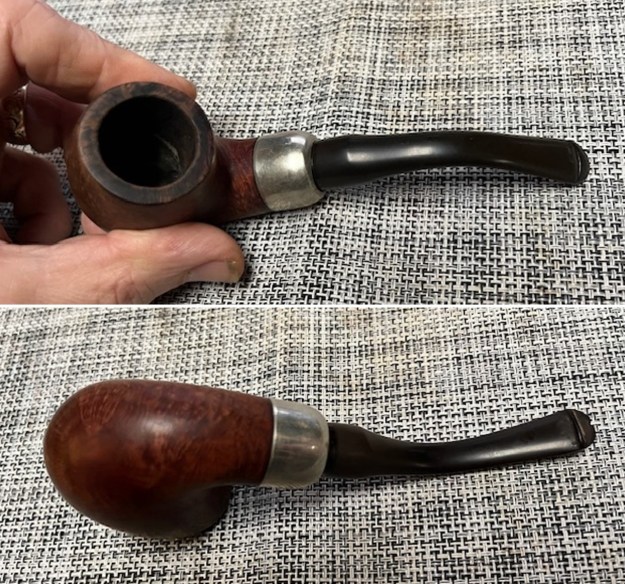
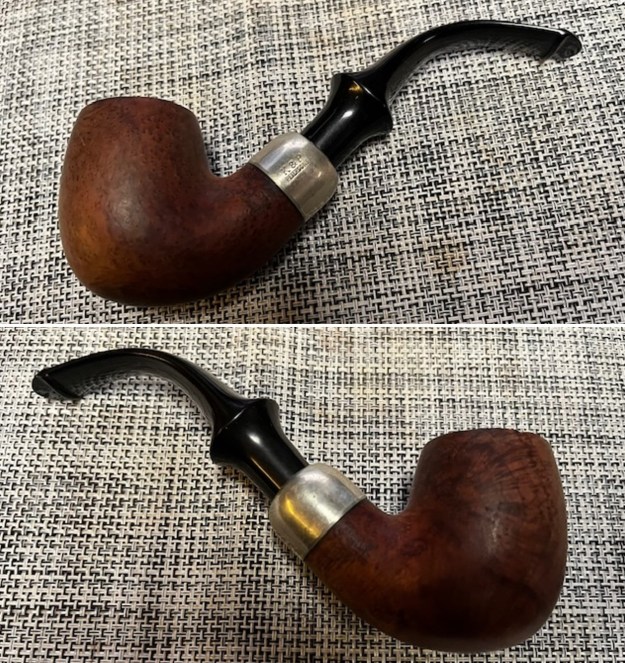
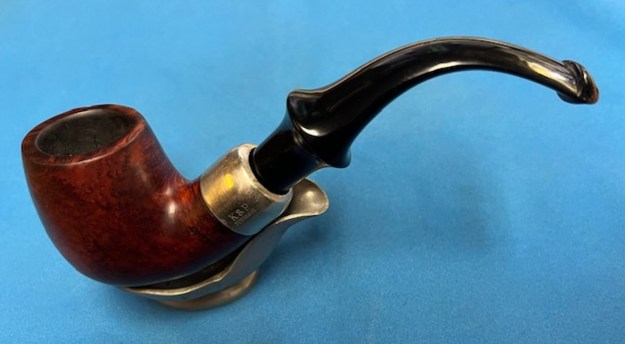
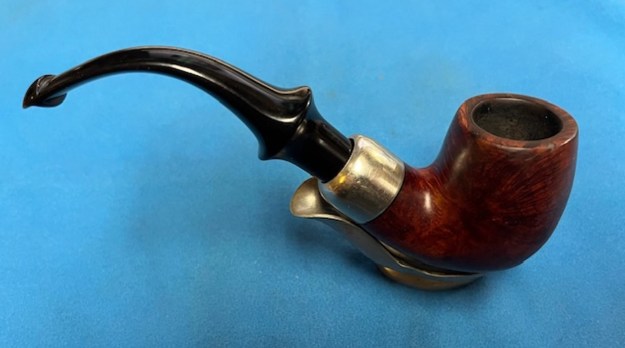
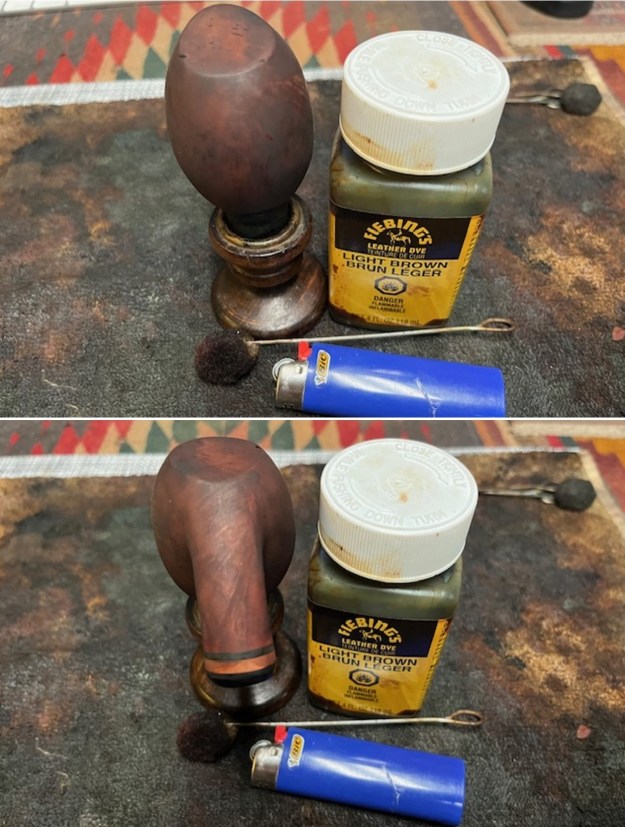
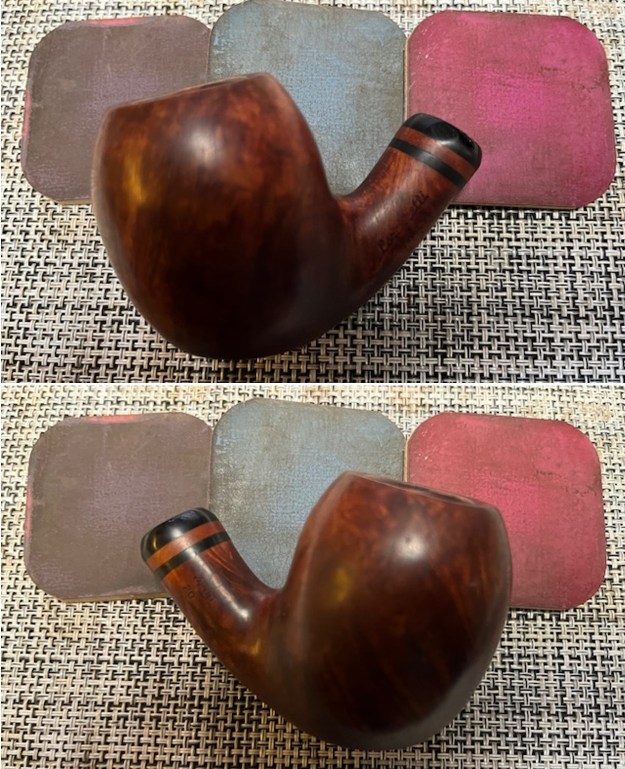
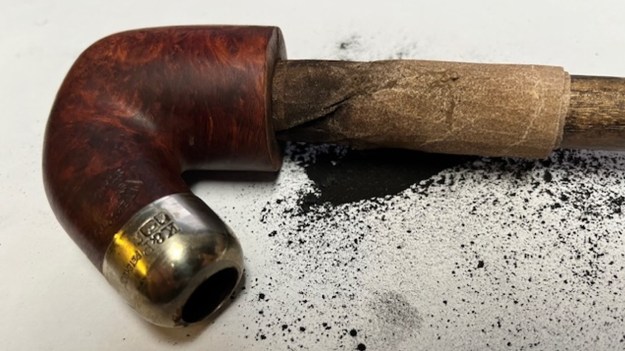
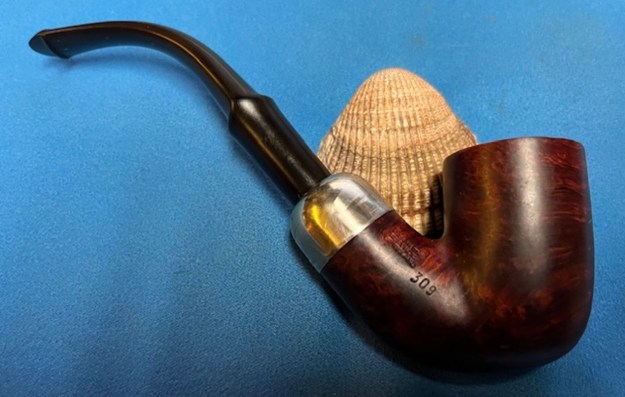
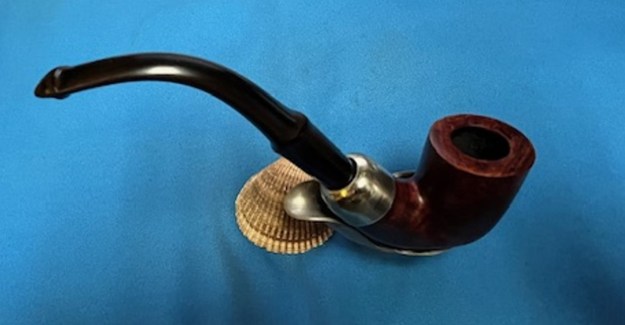
 I have finished the Comoy’s Restem and the restoration of the Andre pipe. This third pipe is stamped on the left side of the shank and read Peterson’s [arched over] System [arched over] Standard. On the right side it is stamped Made in the Republic of Ireland (three lines) and next to that is the shape number 309. The nickel ferrule is stamped K&P Peterson over the three common hallmarks on System pipes with Nickel ferrules – a shamrock, a wolf hound, and a tower. There was a moderate cake in the bowl with lava on the rim top. The finish was in decent condition but there was a varnish coat that was spotty. There was dirt and debris ground into the finish on the bowl sides and around the edges of the rim. Under the grime is a coat of varnish that was spotty and worn. The nickel ferrule is oxidized and dirty. The stem was oxidized and there were light tooth marks and chatter on both sides of the stem. I took photos of the pipe before I started work on it.
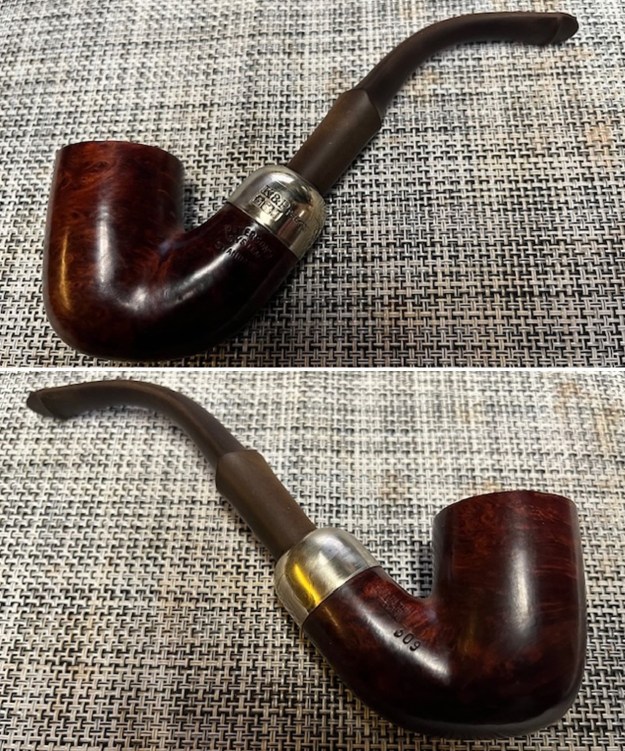
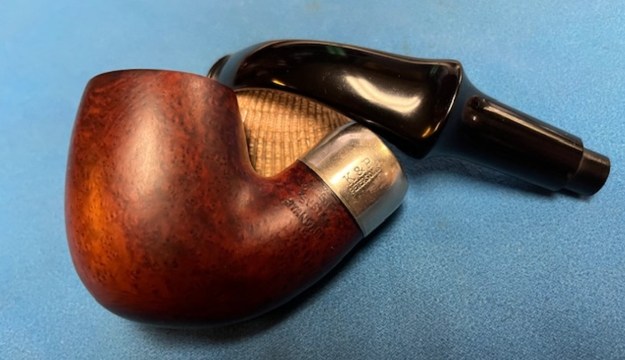
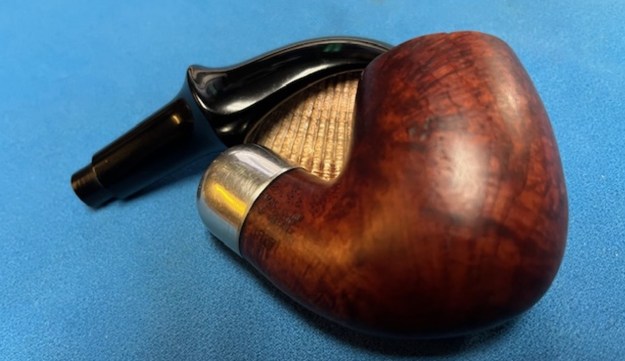
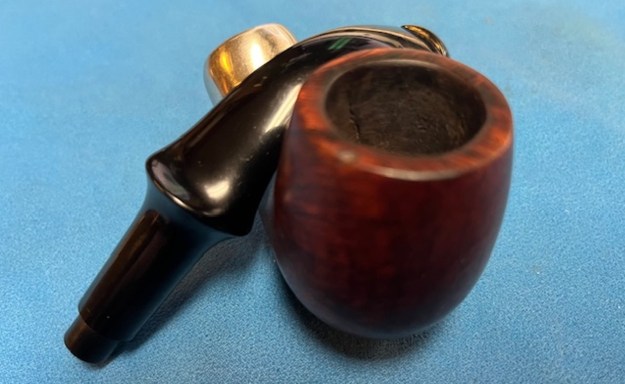
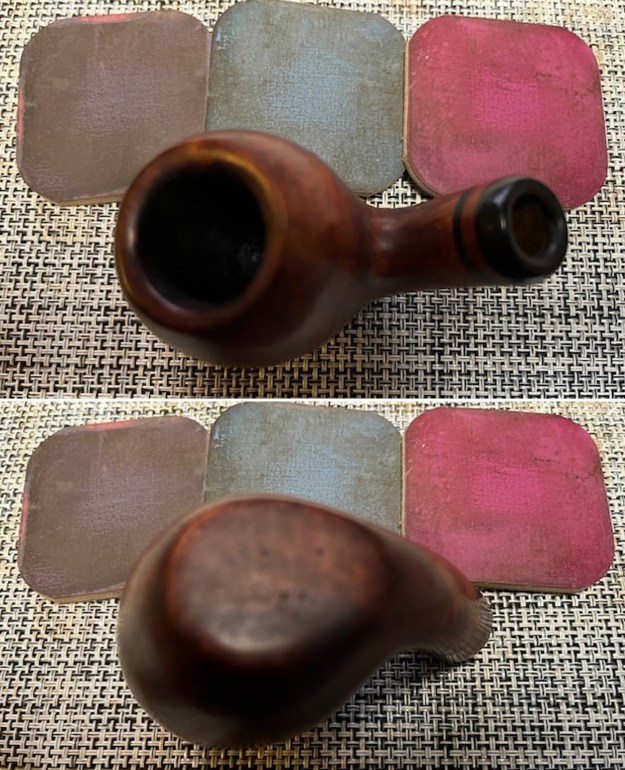
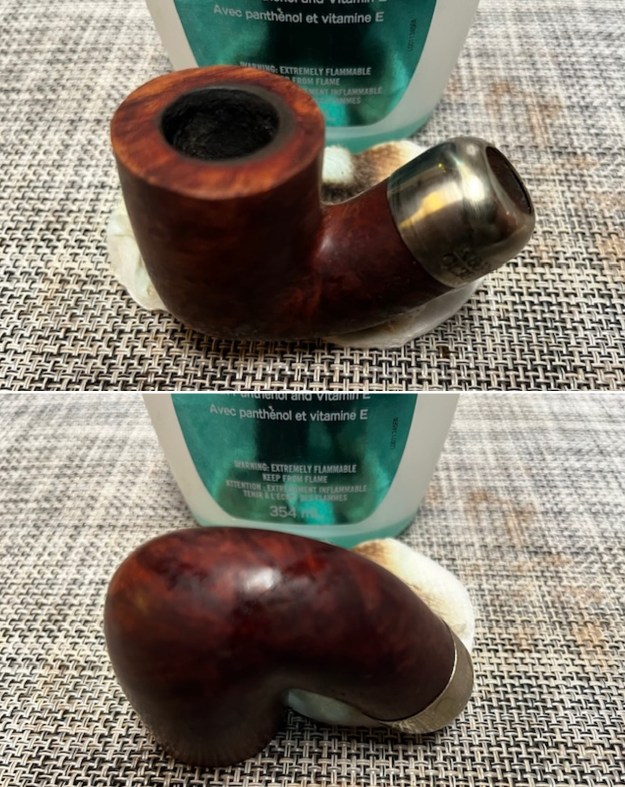
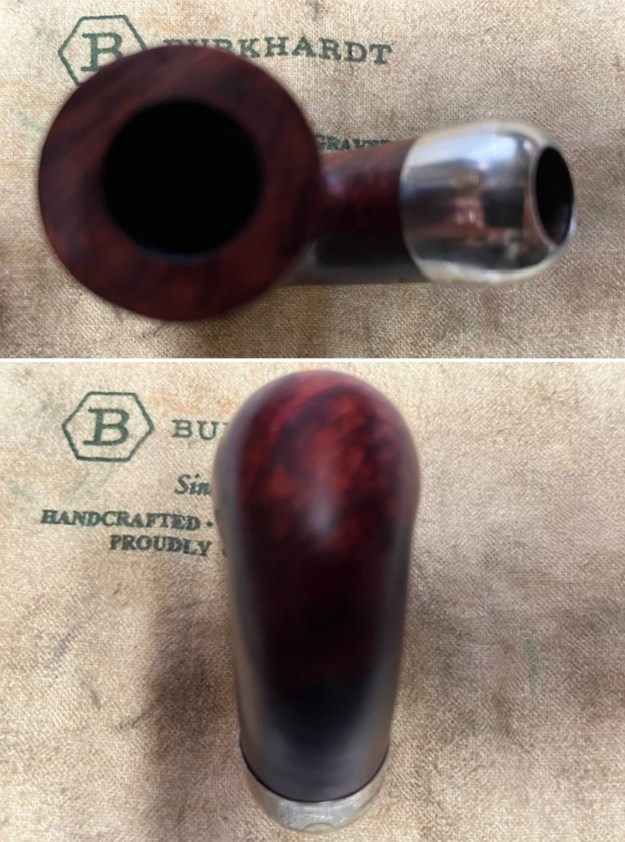
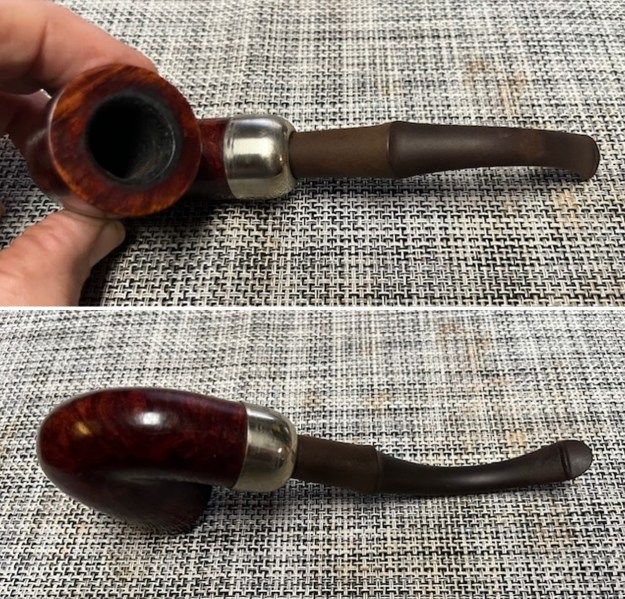 I took a close-up photo of the bowl and rim top to show the cake in the bowl. The rim top shows some lava on the smooth finish. The inner edge is quite dirty and is covered with a coat of lava but the outer edges of the bowl looked good. The stem photos show the oxidation and the light tooth marks and chatter next to the button.
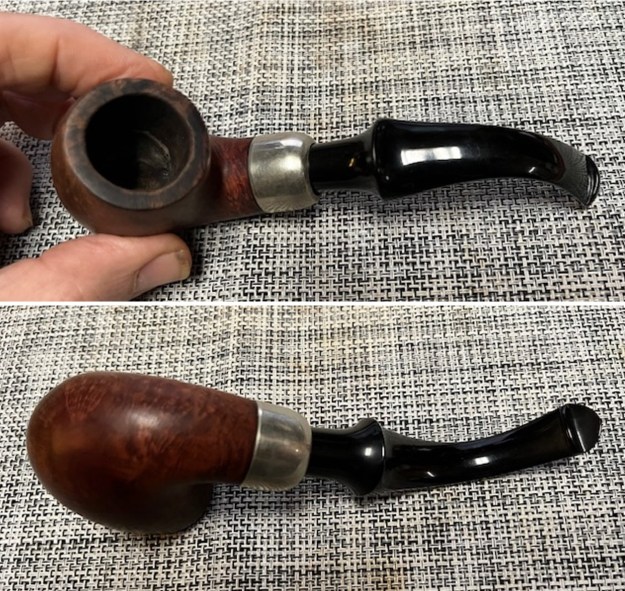
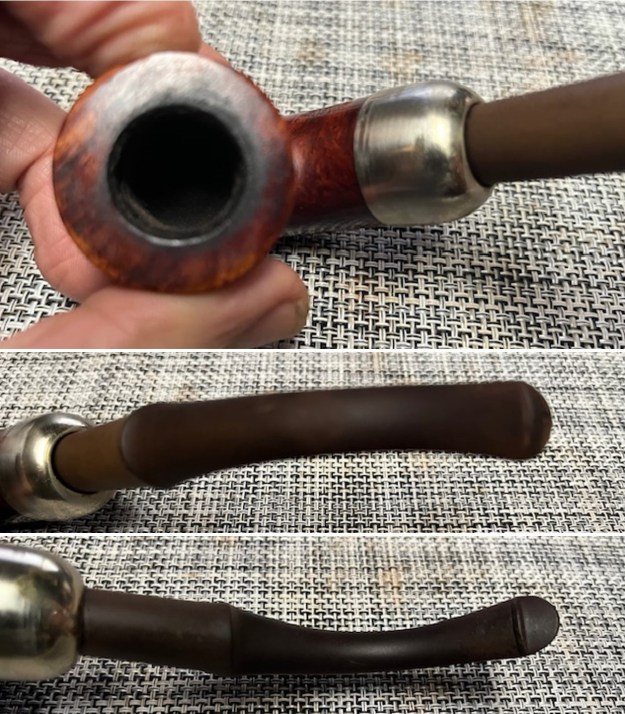 I took a photo of the stamping on the pipe. It is stamped on both sides and reads as noted above. It was clear and readable as noted above. The stamping on the ferrule is also very clear and readable. I removed the stem from the shank and took a photo of the pipe parts to give a sense of proportion of the pipe. It is quite nice.
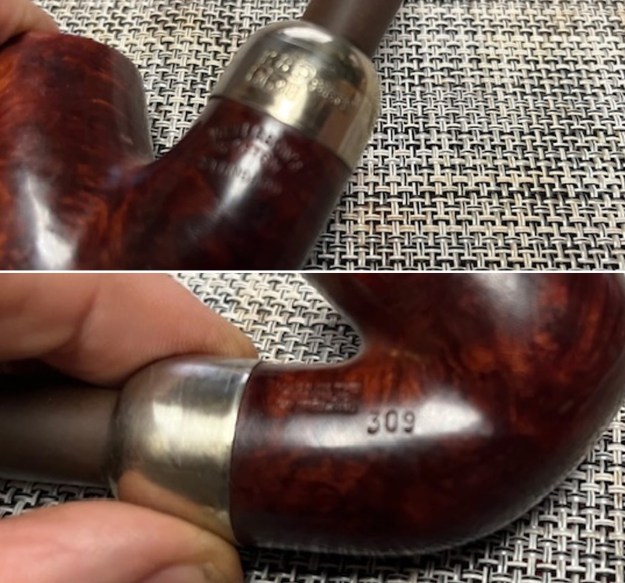
 I am including the information from Pipedia’s article on Peterson pipes. It is a great read in terms of the history of the brand (https://pipedia.org/wiki/Peterson). I have included a bit of the pertinent history here.
1950 – 1989 The Republic Era – From 1950 to the present time, the stamp for this era is “Made in the Republic of Ireland” in a block format generally in three lines but two lines have been used with or without Republic being abbreviated.
During the 1950’s and 60’s the Kapp & Peterson company was still in the ownership of the Kapp family. However 1964 saw the retiral of the company Managing Director Frederick Henry(Harry) Kapp.
 Pipedia also included a section of information on the System pipes including a diagram of the systems look (https://pipedia.org/wiki/Peterson#Republic_Era_Pipes). I quote a section of the article in part and include a link to another article on Pipedia on the System pipe.
The Peterson System pipes are the standard bearers of the Peterson pipe family, famous for the excellent smoking pleasure they provide. Often imitated but never equaled, the Peterson System smokes dry, cool and sweet, thanks to the scientific effectiveness of the original design. The heart of the System is the unique graduated bore in the mouthpiece. This makes the suction applied by the smoker 15 times weaker by the time it reaches the tobacco chamber. The result is that all the moisture flows into the reservoir and, thus cannot reach the smoker’s mouth. The Peterson Lip further enhances the effectiveness of the graduated bore by directing the flow of smoke upwards and away from the tongue. This achieves a uniquely even distribution of smoke and virtually eliminates any chance of tonguebite or bitterness. Furthermore, the shape is contoured so that the tongue rests comfortably in the depression under the opening. Each “PLip” mouthpiece is made from Vulcanite. For the Peterson System pipes to work properly, the stem/tenon has to have an extension, the tip of which will pass by the draft hole from the bowl and into the sump. Upon the smoker drawing in smoke, this extension then directs the smoke down and around the sump to dispense a lot of the moisture before the smoke enters the extension and stem. On the System Standards and other less expensive systems, this extension with be made of Vulcanite turned integrally with the stem. On the more expensive System pipes this extension will be made of metal which screws into the Vulcanite stem. This extension on the earlier pipes will be of brass and the newer pipes will be of aluminum. Most smokers not knowing this function of the metal extension, assumes that it is a condenser/stinger and will remove it as they do with the metal condensers of Kaywoodie, etc. Should you have a System pipe with this metal extension, do not remove it for it will make the System function properly and give you a dryer smoke (https://pipedia.org/wiki/A_closer_look_at_the_famous_Peterson_Standard_System_Pipe).
I have included the information on the shape number on this pipe that I picked up on researching the previous pipes. I have included a page from a Petersons Catalogue that I have on rebornpipes (https://rebornpipes.com/tag/peterson-hallmark-chart/). There is no shape 309 shown in the catalogue page of rusticated shaped shown below. I wonder if it is an older or a newer shape. But I am uncertain of that. 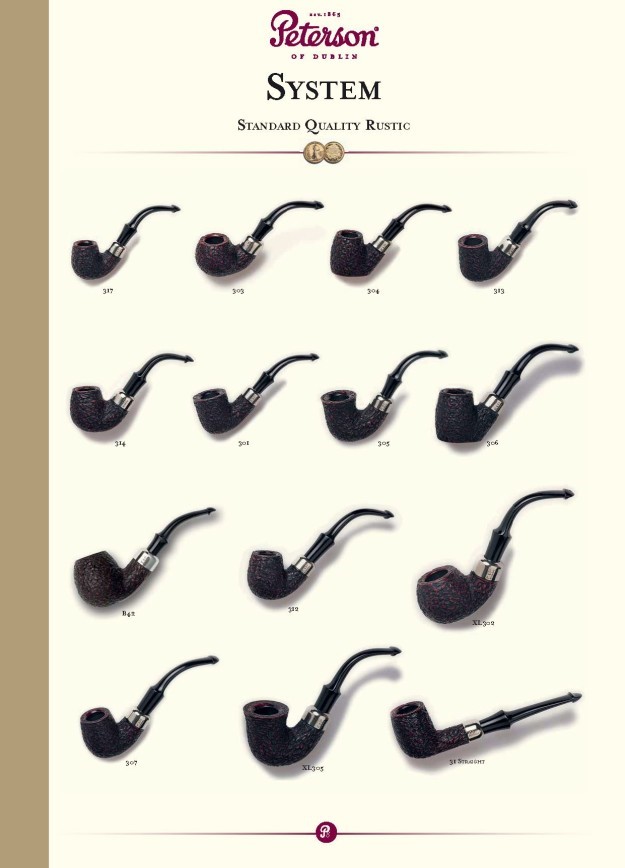 I knew that I was dealing with a Republic Era pipe made between 1950-1989. It was a Peterson’s System Standard 309 Bent Billiard with a great rustication. The bowl was stained with a combination of reddish-brown stains. Now it was time to work on the pipe.
I started my work on the pipe by reaming the bowl with a PipNet reamer to remove the cake from the bowl and take it back to bare briar. I cleaned up the remnants with a Savinelli Fitsall Pipe Knife. I sanded the bowl walls with a piece of 220 grit sandpaper. The bowl was very clean.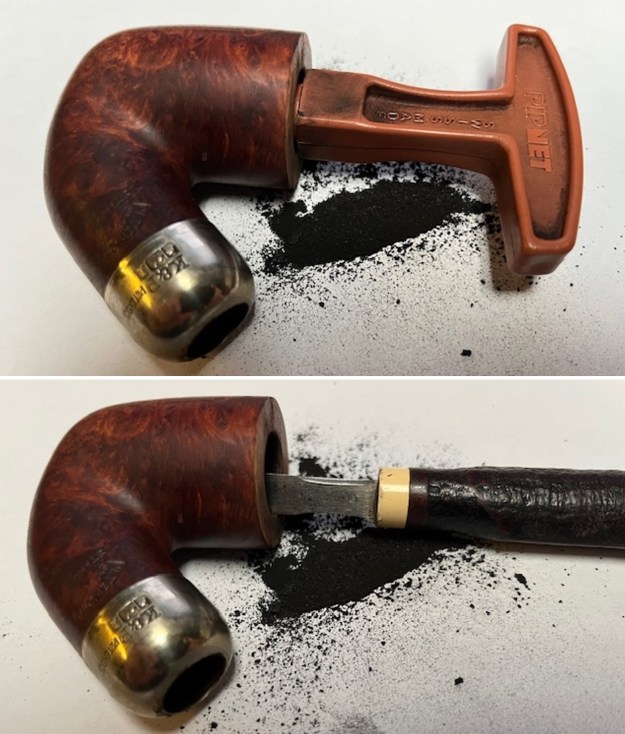
 I removed the shiny varnish coat and grime with a cotton pad and acetone. Once it was finished it looked much better.
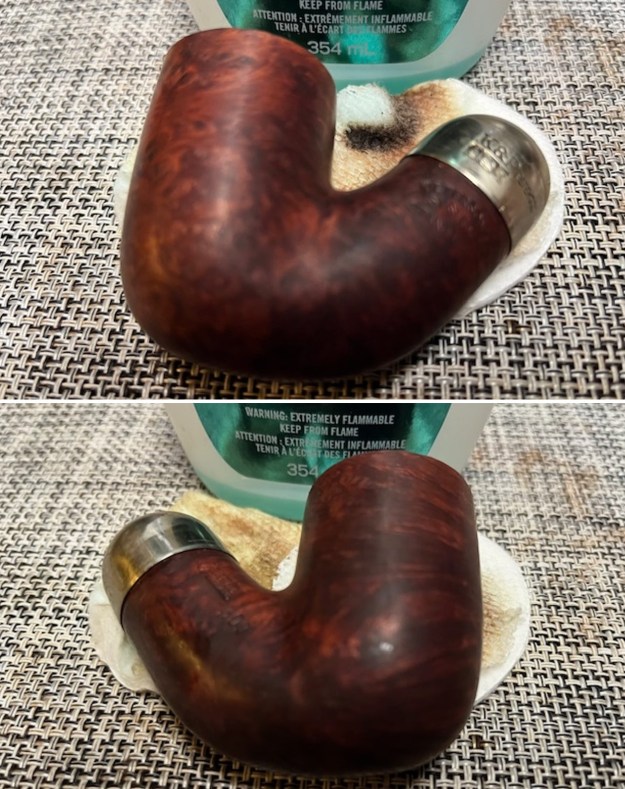
 I worked on the rim top and the bowl edges with a piece of 220 grit sandpaper and a worn 1550 grit micromesh sanding pad to remove the tars and oil damage.
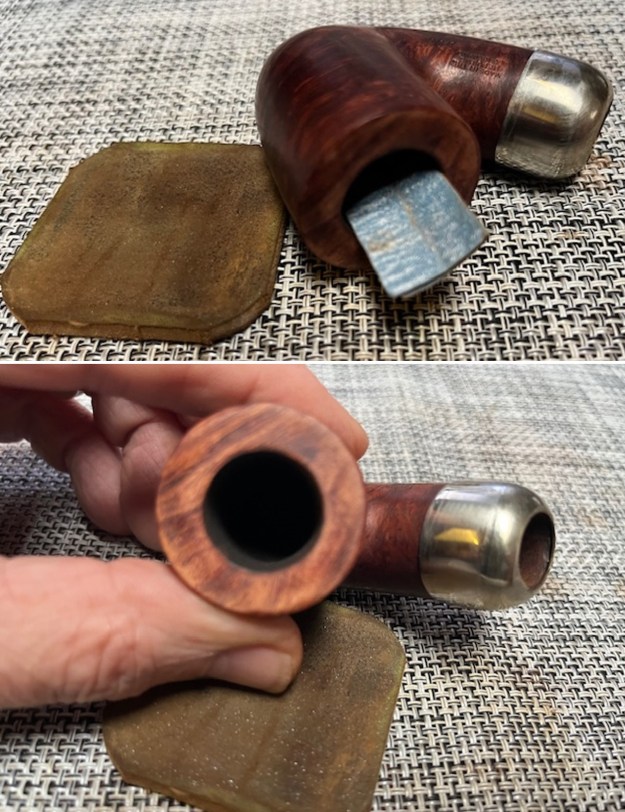 I scrubbed the exterior of the briar with a tooth brush and undiluted Murphy’s Oil Soap. I rinsed it off with warm water to remove the grime and soap. It looked much better and the dust and debris was gone. I dried it with a cotton towel.
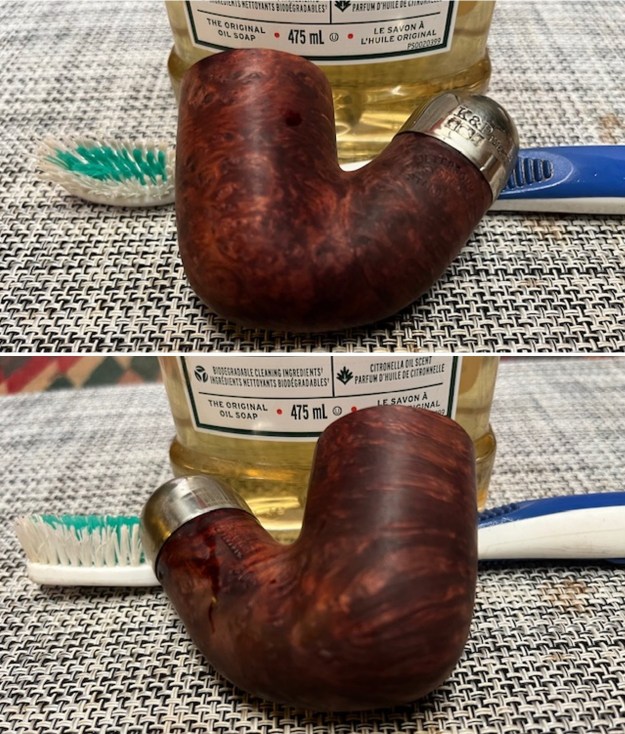
 I scrubbed out the internals of the pipe with 99% isopropyl alcohol, pipe cleaners and cotton swabs. I cleaned out the airway in the stem as well. I worked on these areas repeatedly until the shank and the airway in all the parts was clean.
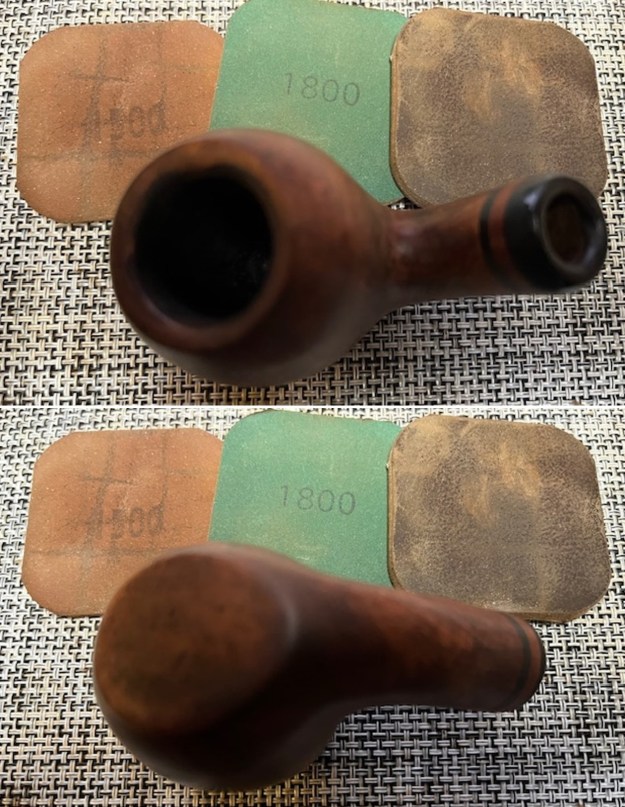
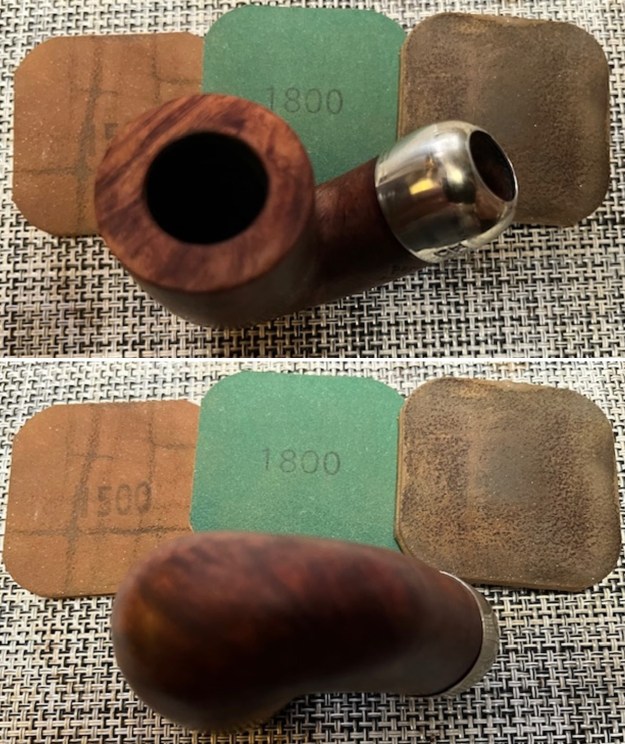
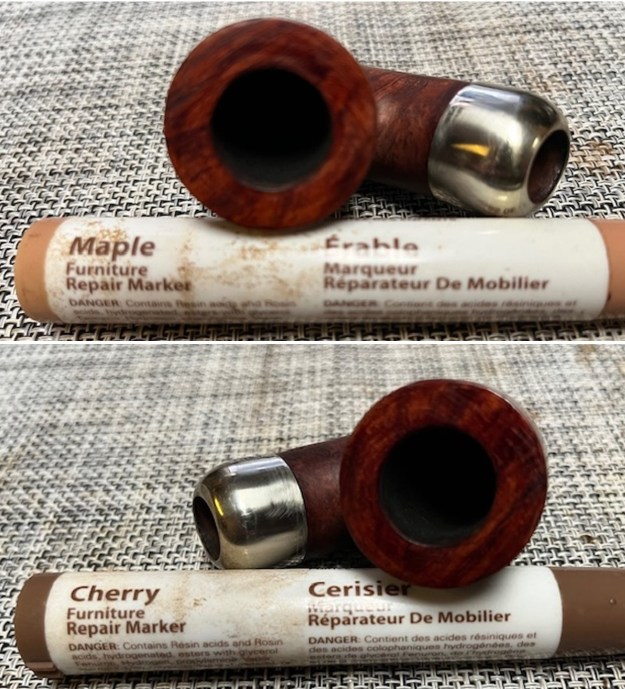
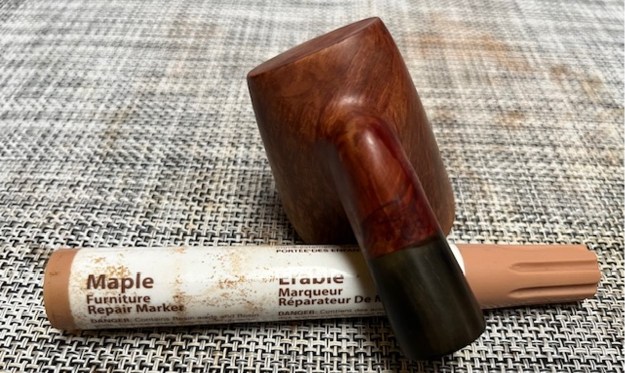
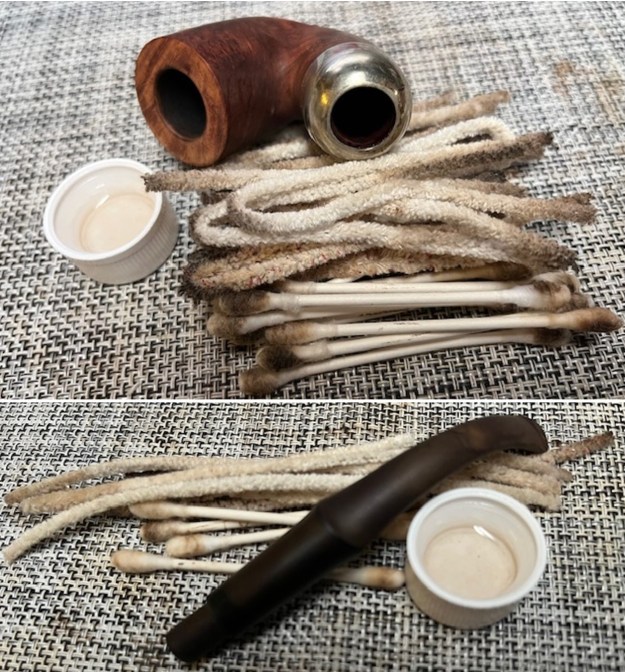 I polished the smooth briar with micromesh sanding pads – dry sanding with 1500-12000 grit sanding pads. I wiped it down with a damp cloth after each pad. The bowl began to take on a rich shine. Between the 2440 grit pad and the 3200 grit pad, I stained the rim top with both a Maple and a Cherry stain pen. It was a close match to the rest of the bowl. With the remaining micromesh and the buffing it would be a good match.
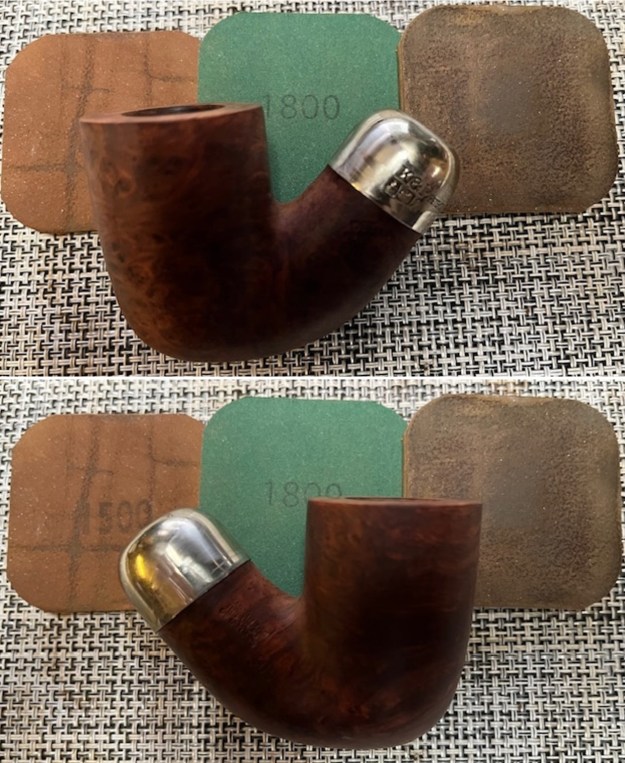

 I worked some Before & After Restoration Balm into the surface of the briar with my fingertips to clean, enliven and protect the briar. I let the balm sit for 15 minutes and then buffed with a cotton cloth to raise the shine. The photos show the bowl at this point in the restoration process.
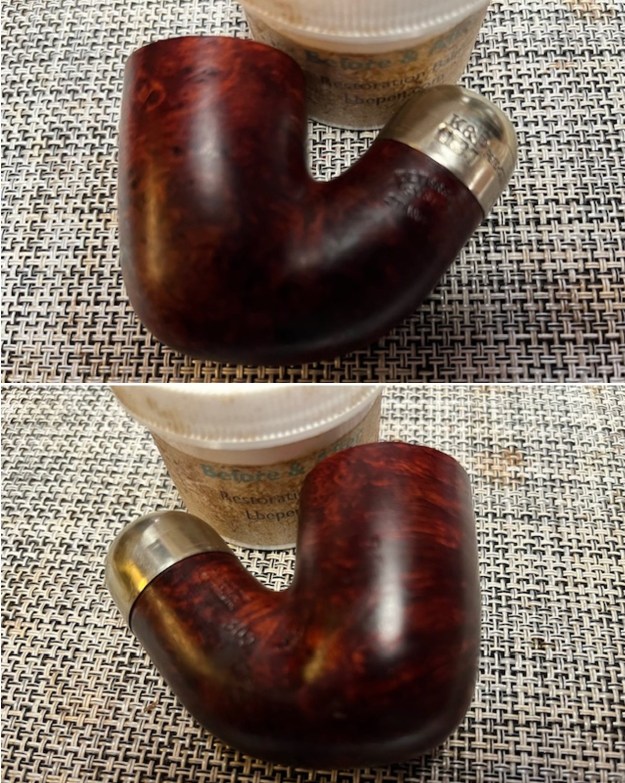
 I polished the nickel ferrule on the shank end with a jewellers cloth to remove the tarnish, polish the nickel and protect it from further tarnish. It looks very good.
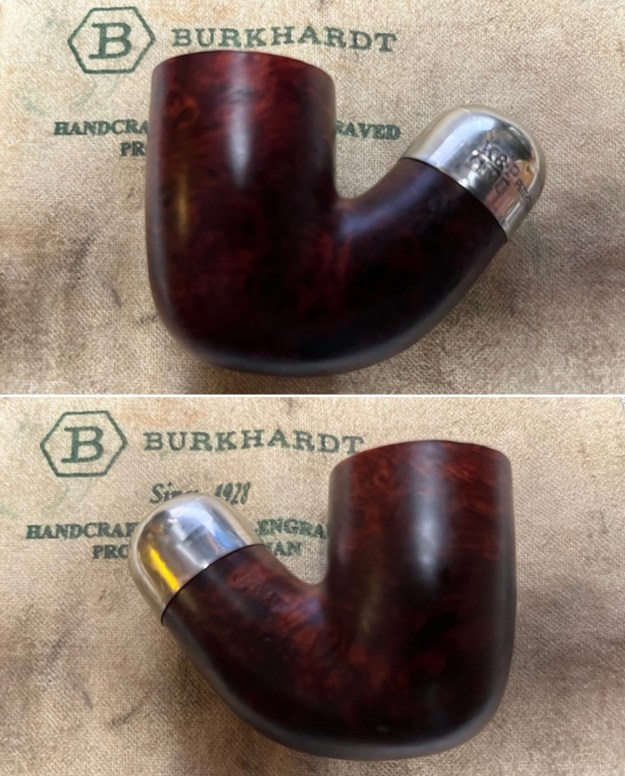
 With that done, the bowl was finished other than the final buffing. I set it aside and turned my attention to the stem. I worked on the oxidation on the stem with Soft Scrub Cleanser. I worked it into the vulcanite with a cotton pad and was able to remove much of the oxidation.
  I polished the stem with micromesh sanding pads – wet sanding with 1500-12000 grit sanding pads. I wiped it down after each sanding pad with Obsidian Oil.
 I finished polishing the stem with Before & After Pipe Stem polish (both Fine and Extra Fine) then wiped the stem down with another coat of Obsidian Oil.
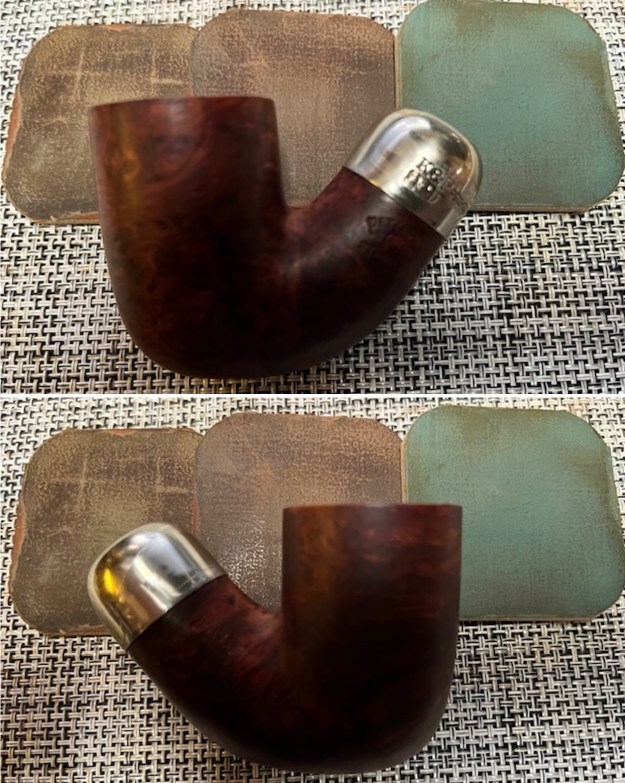
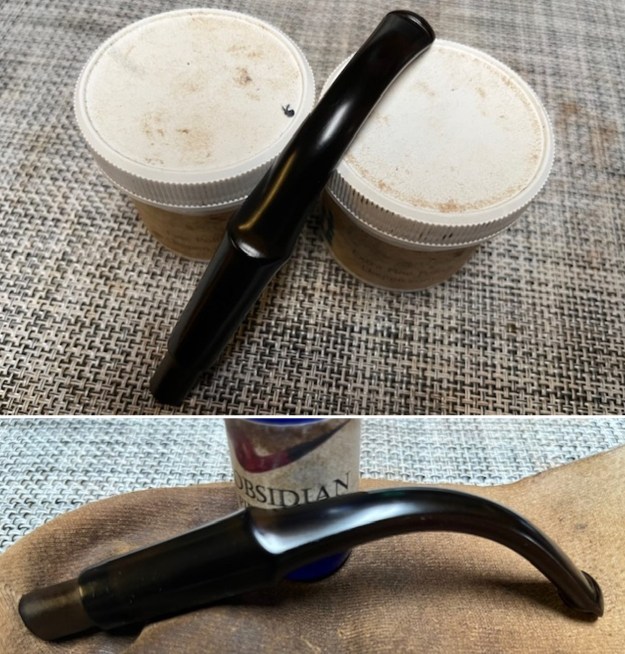 Once again at this point in the restoration process I am excited to be on the homestretch. I look forward to the final look when the Smooth Peterson System Standard 309 is put back together, polished and waxed. I put the bowl and stem back together. I lightly polished the bowl and stem with Blue Diamond to polish out the scratches in the briar and the vulcanite. I gave the bowl and the stem multiple coats of carnauba wax. I buffed the pipe with a clean buffing pad to raise the shine. I hand buffed it with a microfiber cloth to deepen the shine. The pipe polished up pretty nicely. The depths of the rustication really pop with the wax and polish. The shiny black vulcanite stem is a beautiful contrast to the browns of the bowl and thick shank and nickel ferrule. This Republic Era Peterson’s System Standard 309 Bent Billiard was another fun pipe to work on. It really is a quite stunning piece of briar whose shape follows the flow of the briar. The pipe feels great in the hand will be better when warmed up while smoking. The finished pipe is shown in the photos below. The dimensions of the pipe are Length: 6 inches, Height: 2 inches, Outside diameter of the bowl: 1 ¼ inches, Chamber diameter: ¾ of an inch. The weight of the pipe is 1.80 ounces/51 grams. It is the last of the three pipes that were sent to me by Ted for refurbishing. Now that it is complete I will be boxing up the threesome and sending them back to him. I am sure he will enjoy them and build even more memories with them. This was another interesting estate to bring back to life.
As always, I encourage your questions and comments as you read the blog. Thanks to each of you who are reading this blog. Remember we are not pipe owners; we are pipe men and women who hold our pipes in trust until they pass on into the trust of those who follow us. 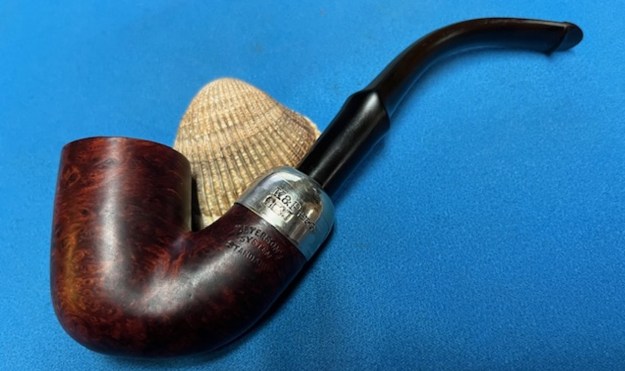

Blog by Steve Laug
The next pipe I chose to work on came is another one from the lot of 11 pipes I purchased from a lady in Regina, Saskatchewan. She had found them in a house she bought and wanted to know if I wanted them. We struck a deal, I paid for the pipes and shipping and the box arrived while I was traveling in Europe. In the box were 4 Stanwells, 1 Danmore Bowl, 1 Soren Freehand, 1 Calabash with a Briar Bowl, 1 Nording Freehand, 1 Italian Made Bertenetti, 1 Rhodesian with a banded cracked shank, and 1 Brigham. I have restored the Nording, the snapped Stanwell, the Brigham, the Gourd Calabash with the briar bowl, restemmed and restored the Danmore bowl and a Stanwell Ivarsson design 11 Pot. There are blogs on each restoration available.
 The next pipe on the table is one of the dirtiest pipes in a box full of very dirty pipes. It is stamped on the underside of the shank and reads Soren [over] Hand Carved [over] Made in Denmark. There is no visible model name or shape number stamped on the pipe. The shank had been snapped through the last line of the stamp but it was faint. There was a thick cake in the bowl, debris in the bottom and on the bowl walls and some remnants of tobacco. The airway was plugged and there was no draught on the pipe. There was a heavy lava overflow on the plateau rim top. It was hard to know the condition of the inner edges of the bowl for sure because of the cake. The outer edge actually looked quite good under the grime. The finish was dirty and dusty and there was glue from the shank repair along the repaired shank. The vulcanite shank extension was filthy and oxidized. The stem looked to be in decent condition underneath the calcification and oxidation. The tooth marks and chatter looked minimal. I took photos of the pipe before I started my cleanup work on it.
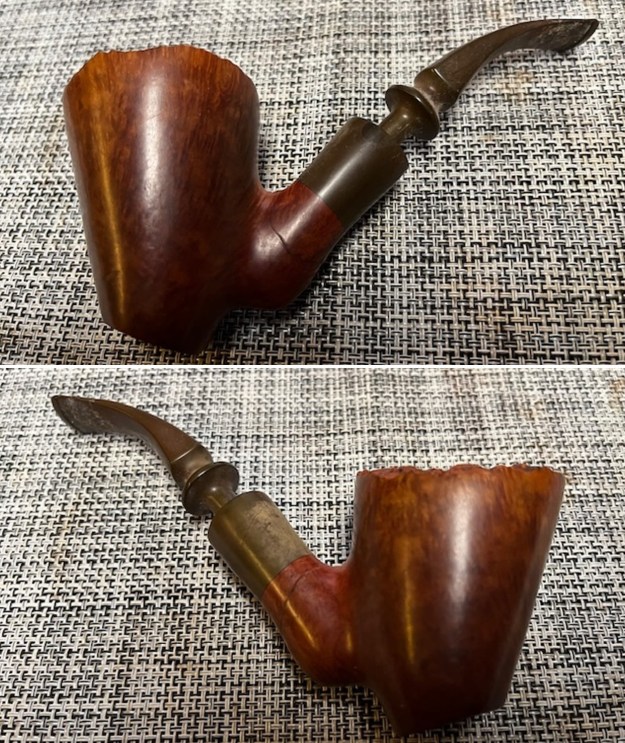
 I took a close-up photo of the bowl and the plateau rim top to show the cake in the bowl. The rim top shows some lava on the smooth area around the inner edge of the bowl. The outer edges of the bowl looked good. I took photos of the vulcanite shank extension and the top and underside of the stem surface and button to show its general condition. It looked very good under the spotty oxidation.
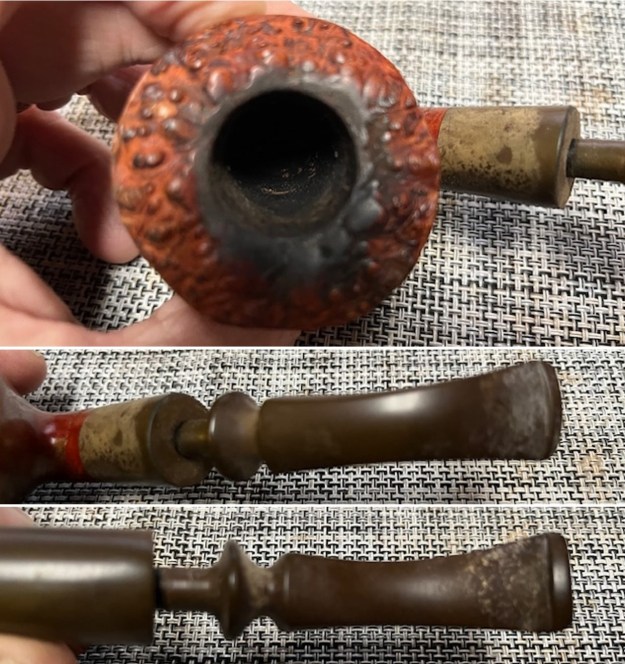 I took some photos of the repaired crack around the shank. You can see it clearly in the photos below. In spots the glue is higher than the repair and in spots it is lower. I will need to rework the repair surface but the repair itself is very well done.
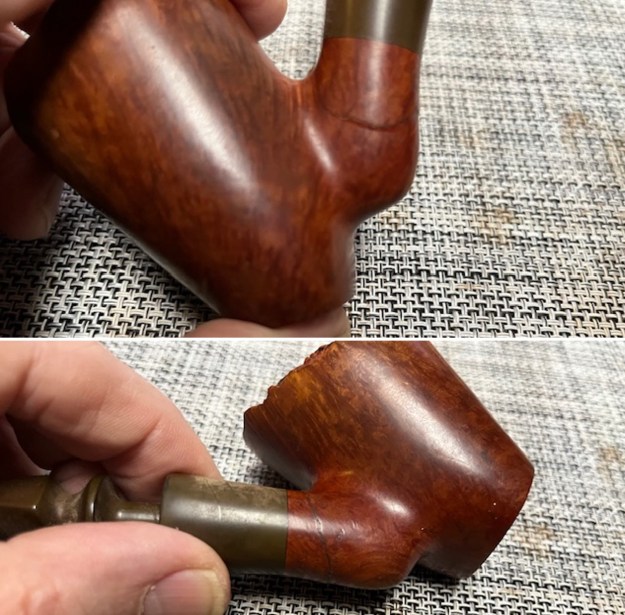
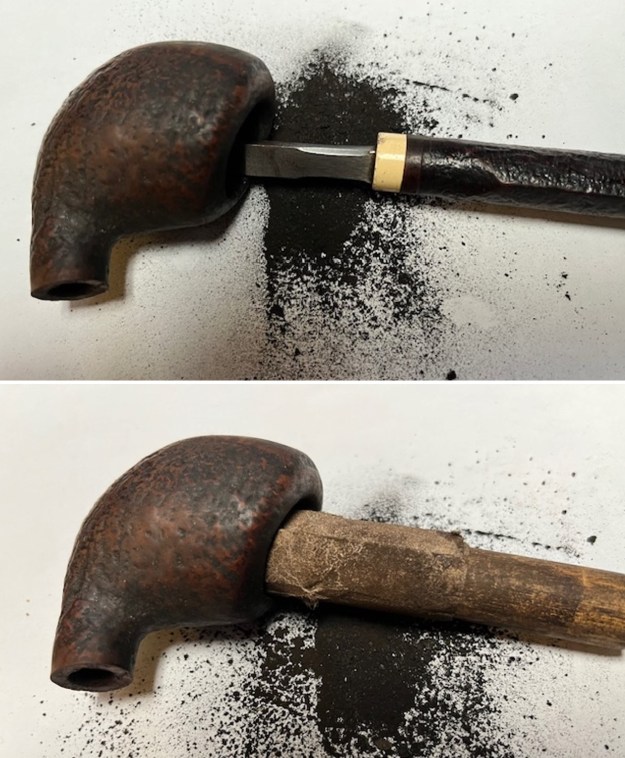
 The stamping on the underside of the shank is faint but readable as noted above. You can barely make out the third line of the stamp on underside of the shank but it is present. I took the stem off the shank and took a photo to give a sense of the proportion of the pipe.
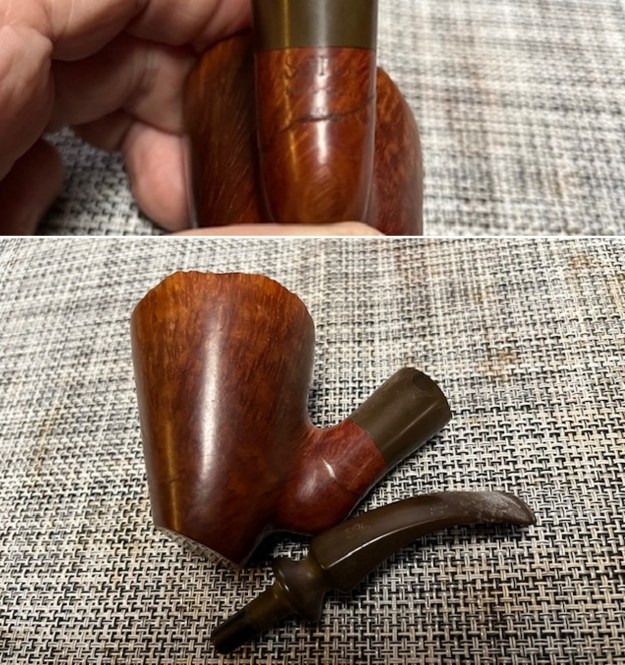 I needed to refresh my memory on the history and background of the Soren pipes so I went to a previous blog and reread what I had written. https://rebornpipes.com/2016/09/12/repairing-and-rejuvenating-a-soren-danish-freehand/. I quote from that blog post: I looked up the brand on pipephil (http://www.pipephil.eu/logos/en/logo-s10.html) and found that the brand was carved by Søren Refbjerg Rasmussen. Pipes that he made for the European market were mostly stamped “Refbjerg” while those made for the US market were stamped “Soren”. Thus I knew that one I was working on was imported into the US market.
It looked like I was once again working on a pipe made by Soren Refbjerg Rasmussen for the US market as it was stamped Soren. I continued to do reading on another of my go to websites, Pipedia. Here is the link for the article there. https://pipedia.org/wiki/Refbjerg. I quote some of the more pertinent information.
Søren Refbjerg Rasmussen founded a company in 1969, which employed an average of 8 – 12 craftsmen in the 1970’s. The semi-freehands they produced were traded under his prename Søren. Rasmussen himself finished only the very best pipes. So his way of pipemaking closely resembled the ways of Preben Holm, Karl Erik Ottendahl or Erik Nørding. Altogether more than 1,000,000 pipes were sold.
There was also a note from Soren himself regarding the Danbark line of pipes that he made. I think that it is interesting to note that even on these he used the finest Corsican and Grecian briars. I assume that is also true of his other lines as well. I quote the note in full.
“A note from the carver:
I am very proud to introduce my new (!) series of hand-carved Danbark Pipes by Søren. These pipes are crafted from the finest Corsican and Grecian briars. I take a great deal of pride in crafting the Danbark Pipes to be highly functional and so they will provide the smoker with many years of dedicated service. The Danbark Pipes by Søren are available in several different styles and finishes with my personal touch and inspirations. At this time I favor making classic shaped pipes with a slight touch of my own hands and feelings. I do not produce many pipes today but the pipes that I do make available are individually crafted from the finest Corsican and Grecian Briars available to me. I still make free-hand pipes but not as many as I once made. For the past 35 years I have always tried to make good smoking pipes in my workshop located near Copenhagen, Denmark. I have always tried to craft my pipes in such a way as they will be long lasting and best friends with the owners. I take great pride in the shape of my pipes, the drilling of the pipes, and the overall dimensions of the pipes. I enjoy spending my spare time on the very long, rugged coasts of Denmark. I derive much relaxation from being on the coast while angling for Sea Trout with my own hand-tied flies. I find this environment is a great inspiration to me for making pipes. Many times I think to myself, “Inspired by nature, made by me”. — Happy puffing, Søren”
From that I knew that the pipe in my hands came from the 1970s. It bears the Soren signature stamp which also says that it was made for sale in the American pipe market. Armed with that information I turned my attention to restoring the pipe.
I decided to start my work on the pipe by working on the shank repair issues. I filled in the repair area with clear CA glue and pressed some briar dust into the glue. It took a few layers to smooth it out but the touch up on the repair was effective.
 I sanded the repaired area on the shank smooth with 220 grit sandpaper to blend it into the surrounding briar. I also sanded the burn mark on the side of the bowl. I wiped the bowl down with a damp cloth to remove the sanding dust.
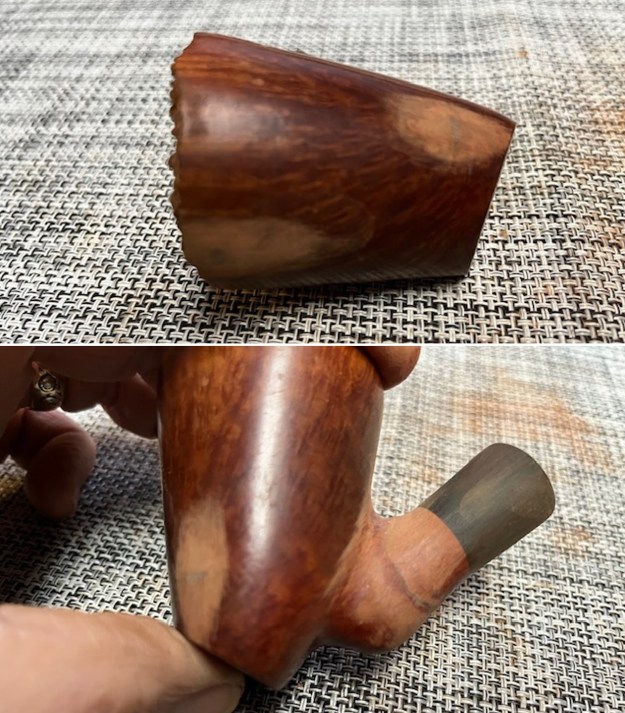
 I reamed the bowl with a PipNet pipe reamer using the third cutting head to take the cake back to bare briar. I cleaned up the reaming with a Savinelli Fitsall Pipe Knife. I sanded the walls with a piece of 180 grit sandpaper wrapped around a dowel to smooth them out.
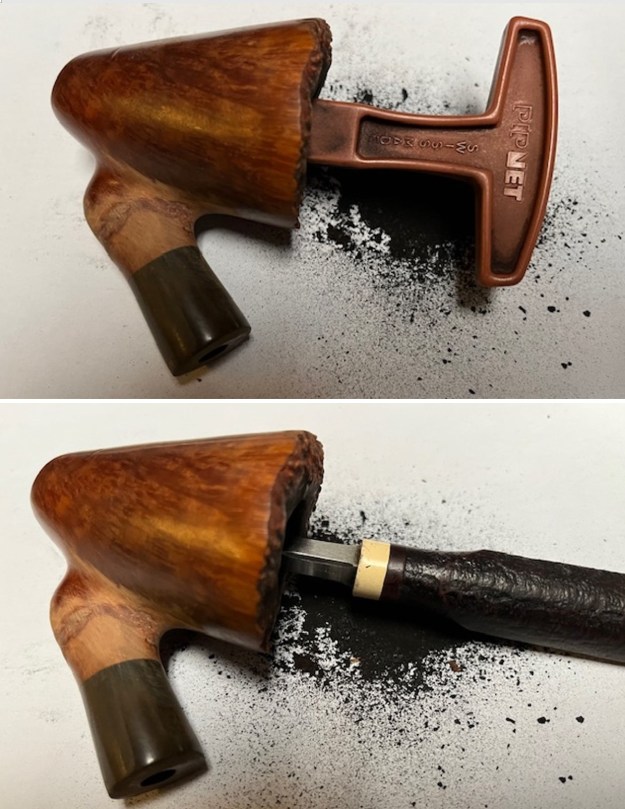
 I used a brass bristle wire brush to knock off the debris in the plateau on the rim top. It took some work but it cleaned up well. I used a folded piece of sandpaper to clean up the inner edge of the rim and to sand the darkening off the smooth area around rim top. I sanded the vulcanite shank extension at the same time to break the oxidation on the surface.
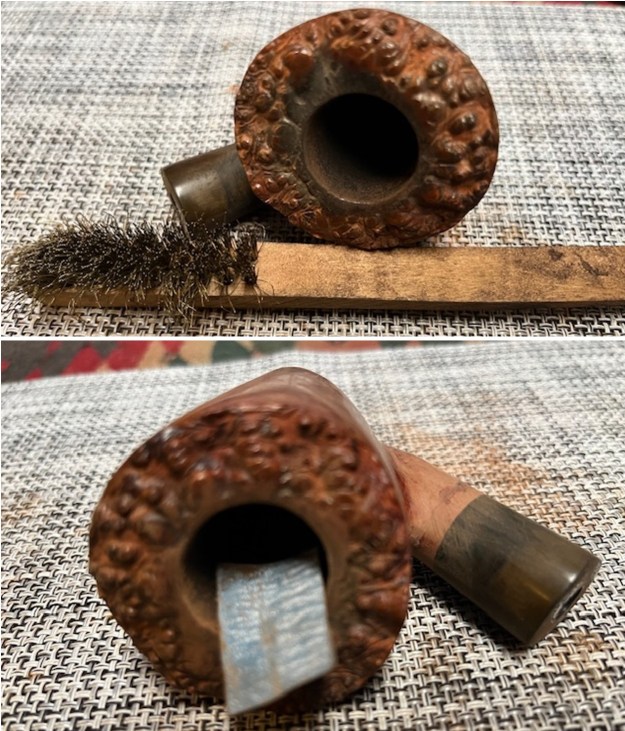
 I scrubbed the exterior of the briar with a tooth brush and undiluted Murphy’s Oil Soap. I rinsed it off with warm water to remove the grime and soap. It looked much better and the dust and debris was gone. I dried it with a cotton towel.
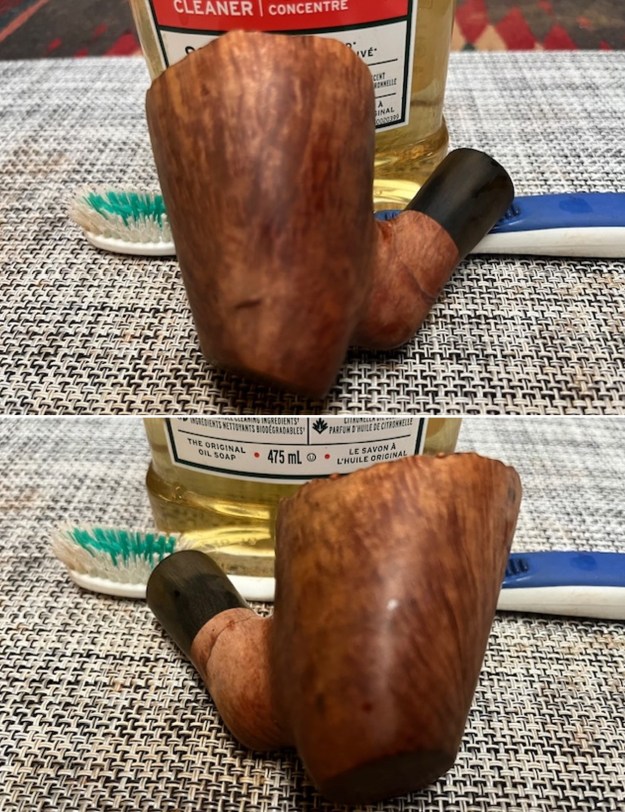
 I touched up the sanded areas on the shank and the bowl spots using a Maple Stain Pen to start the process of blending them into the rest of the bowl. The colour is very close and once I restain the bowl it will work very well.
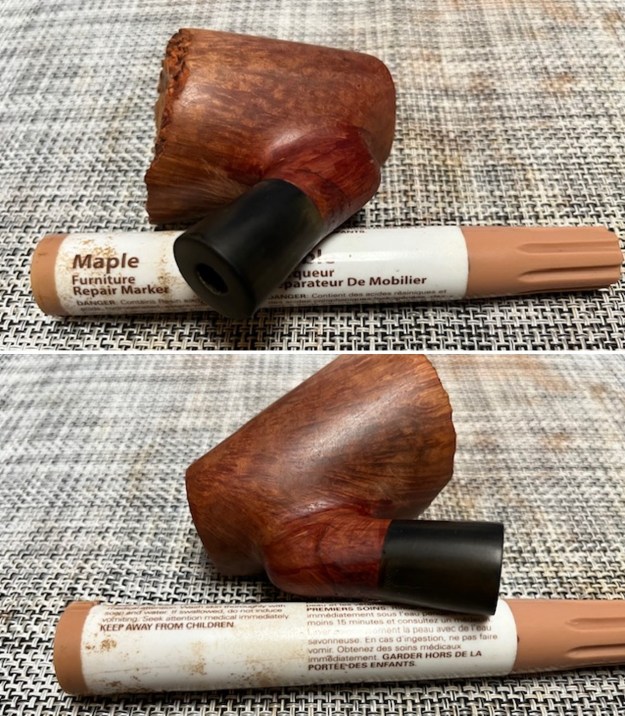
 I stained the bowl and shank with a light brown stain wash. I applied it to the surface of the briar with a wool dauber. I flamed it with a lighter flame to set it in the grain. I repeated the process until I was satisfied with the coverage.
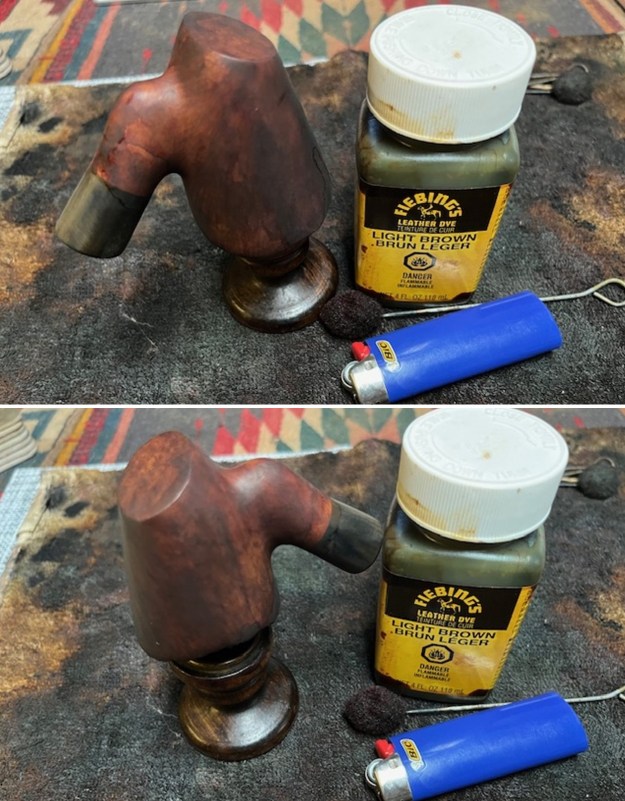
 I polished the vulcanite shank extension and the briar with micromesh sanding pads – dry sanding it with 1500-12000 git sanding pads. I wanted to make the new stain coat a bit more transparent. I wiped it down with a cloth and some Obsidian Oil.
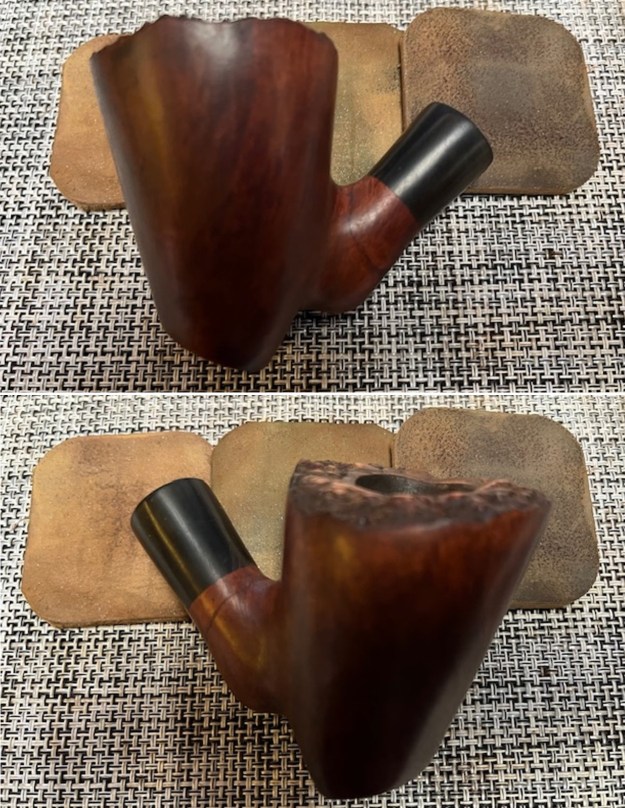

 I scrubbed out the internals of the pipe with 99% isopropyl alcohol, pipe cleaners and cotton swabs. I cleaned out the airway in the stem as well. I worked on these areas repeatedly until the shank and the airway in all the parts was clean.
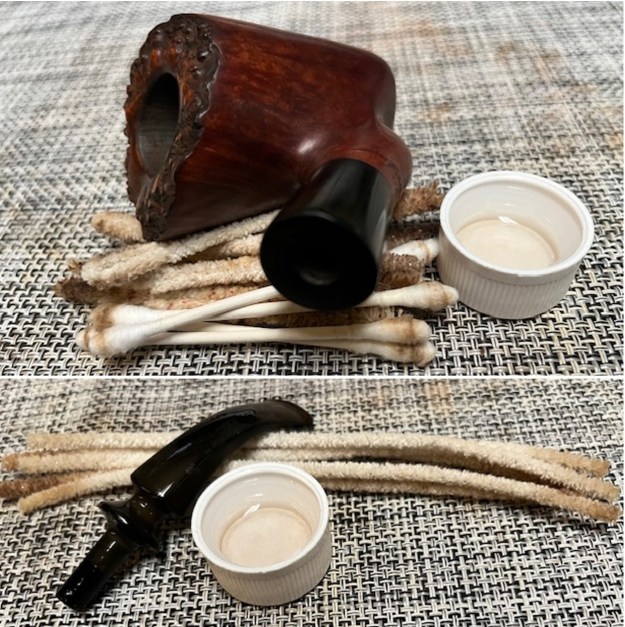 I worked some Before & After Restoration Balm into the surface of the briar with my fingertips to clean, enliven and protect the briar. I let the balm sit for 15 minutes and then buffed with a cotton cloth to raise the shine. The photos show the bowl at this point in the restoration process.
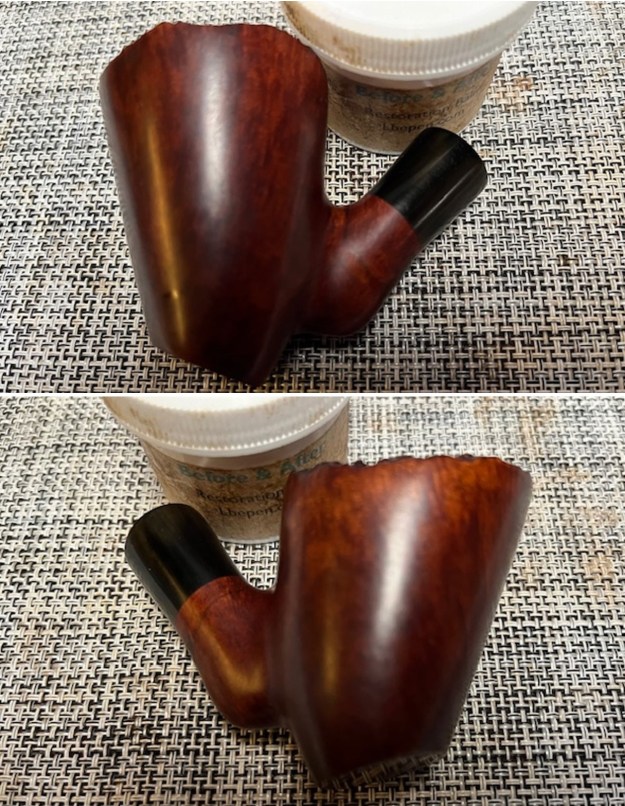
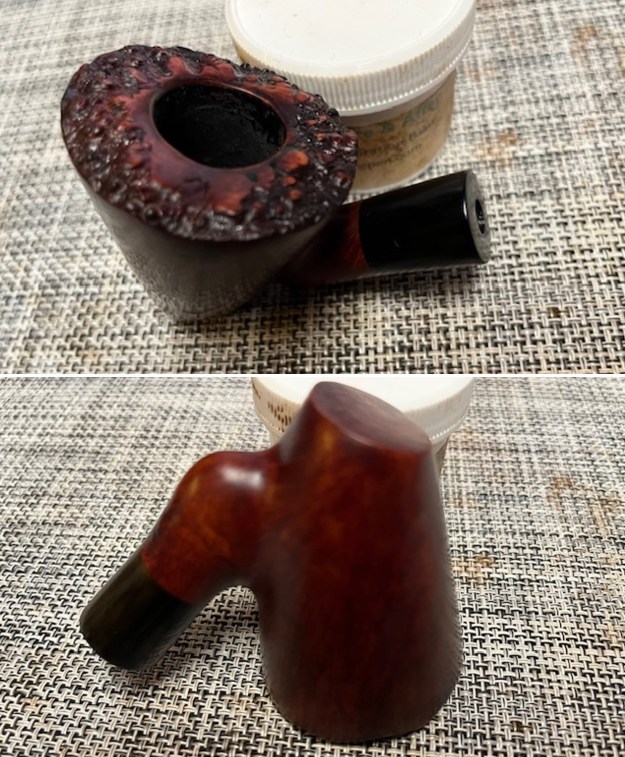
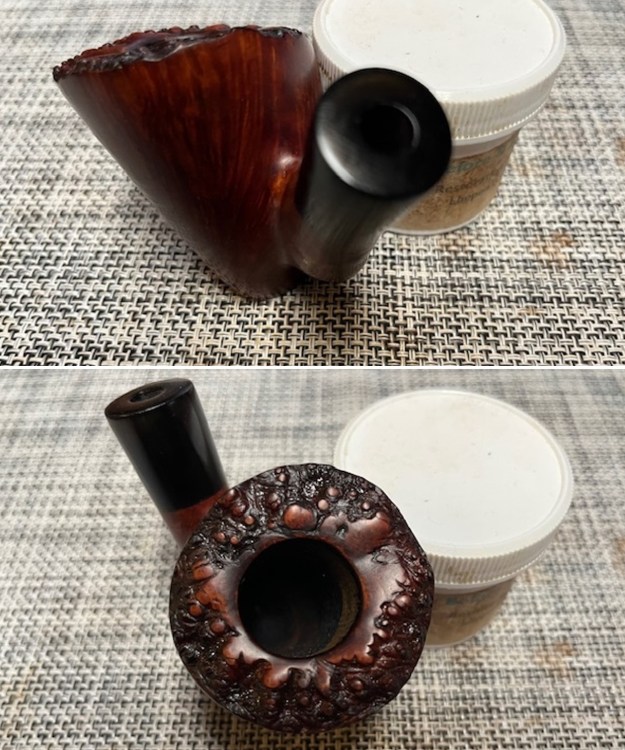 With that done, the bowl was finished other than the final buffing. I set it aside and turned my attention to the stem. I wiped it down with some Soft Scrub to remove the oxidation.
 I touched up the “S” stamp on the top of the stem with white acrylic nail polish. Once had dried I sanded out the excess with a worn 1500 micromesh sanding pad.
 I polished the oxidation and tooth chatter on the stem with micromesh sanding pads – wet sanding with 1500-12000 grit sanding pads. I wiped it down after each sanding pad with Obsidian Oil.
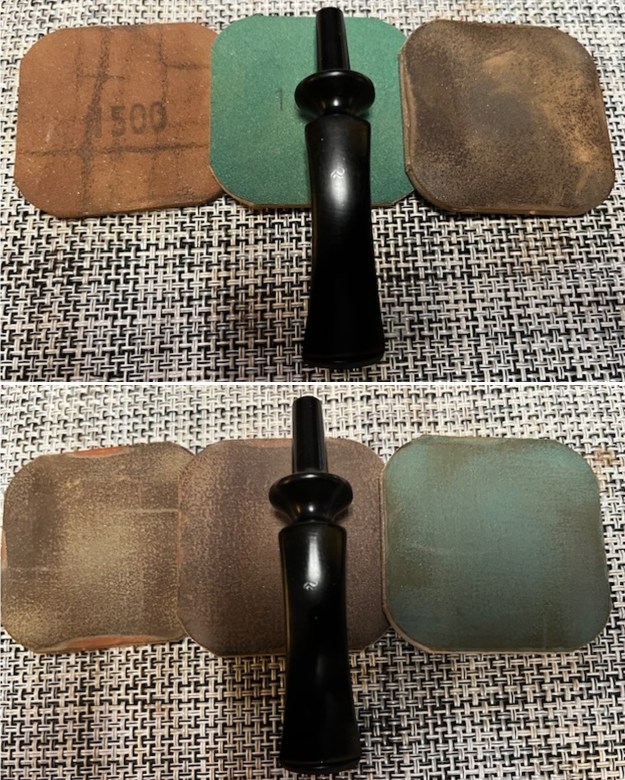
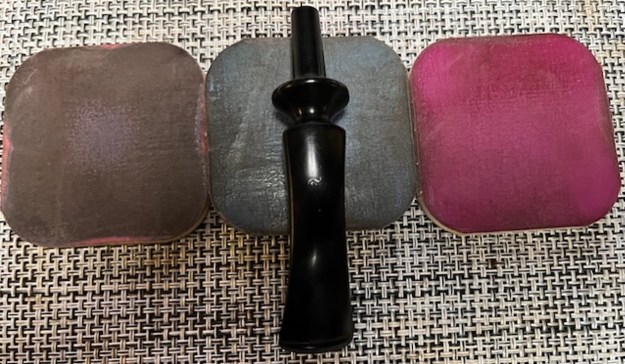 I finished polishing the stem with Before & After Pipe Stem polish (both Fine and Extra Fine) then wiped the stem down with another coat of Obsidian Oil.
 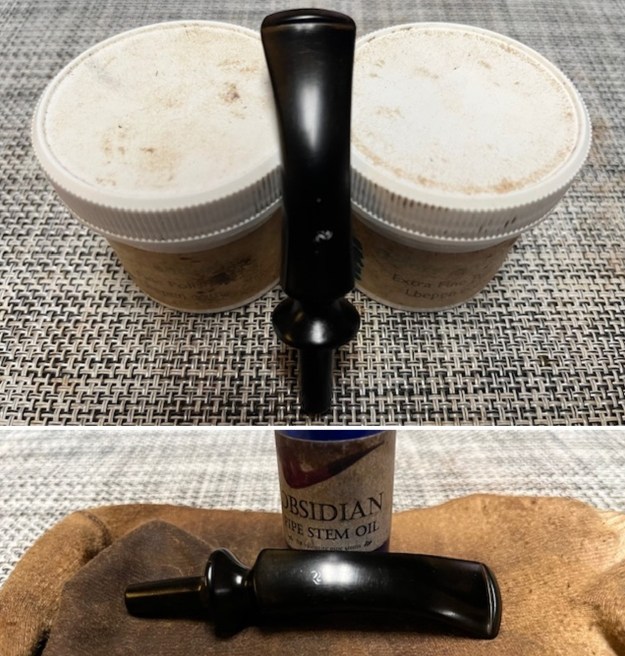 I polished finished Soren Hand Carved Danish Freehand with Blue Diamond to polish out the remaining small scratches. I gave the bowl and the stem multiple coats of carnauba wax and buffed the pipe with a clean buffing pad to raise the shine. I hand buffed it with a microfiber cloth to deepen the shine. The pipe polished up pretty nicely. The plateau on the rim top and shank end and the smooth Dark and Medium brown contrast finish work very well with the black vulcanite stem. The finished pipe is shown in the photos below. I have worked on several Soren pipes by Soren Refbjerg Rasmussen and several Refbjerg pipes over the years and I have always been impressed by his craftsmanship and ability to work a pipe to follow the grain of the briar. He does great work and is quite innovative in terms of shapes, flow and finishes on his pipes. The Length: 5 ½ inches, Height: 2 ½ inches, Outside diameter of the bowl: 2 inches, Chamber diameter: 7/8 inches. The weight of the pipe is 73 grams/ 2.57 ounces. I will be putting it on the rebornpipes store in the Danish Pipemakers Section if you would like to add it to your rack and carry on the previous pipeman’s legacy. This is an interesting estate to bring back to life.
As always, I encourage your questions and comments as you read the blog. Thanks to each of you who are reading this blog. Remember we are not pipe owners; we are pipe men and women who hold our pipes in trust until they pass on into the trust of those who follow us. 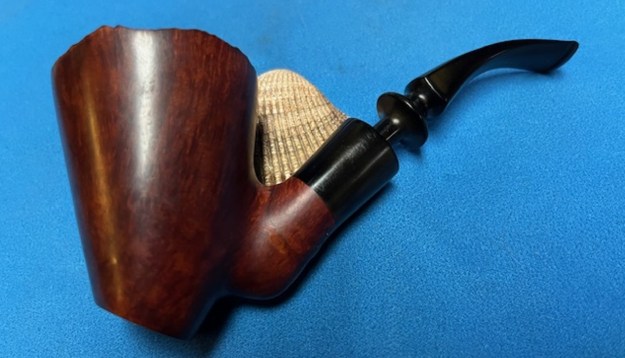
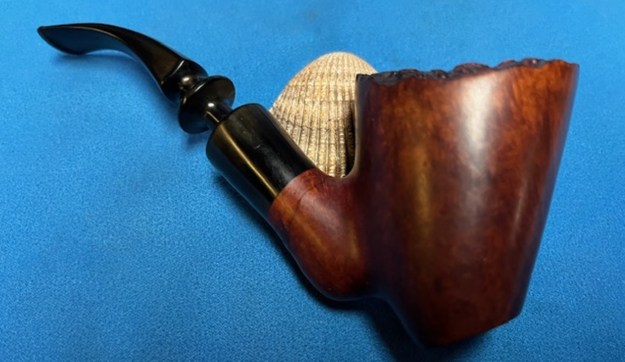
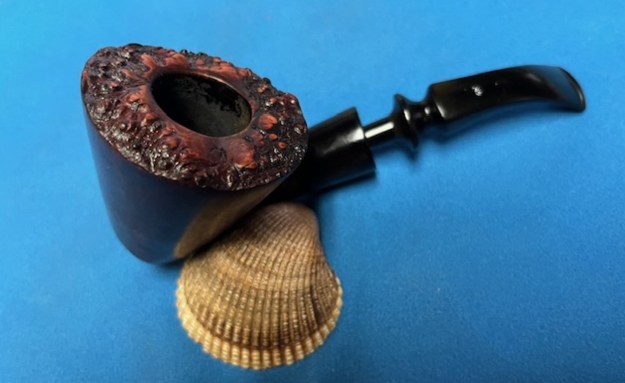
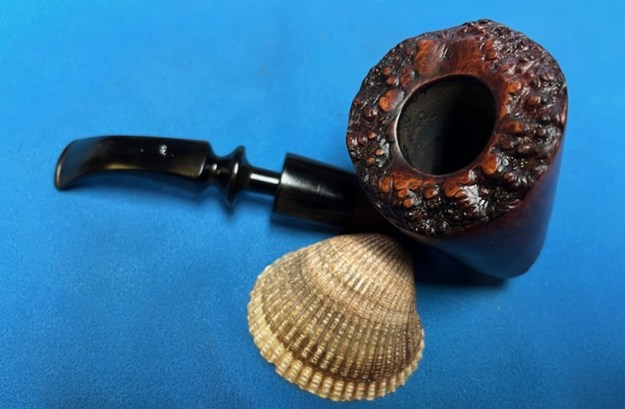
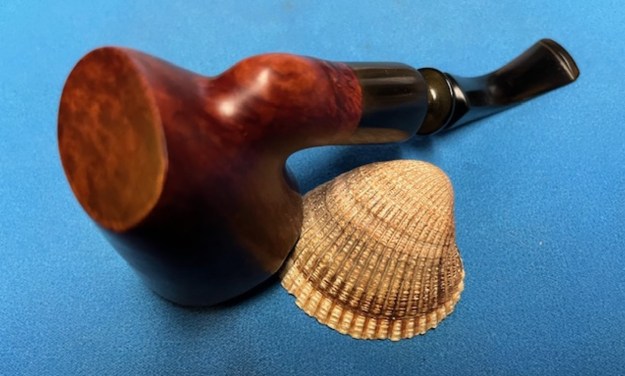


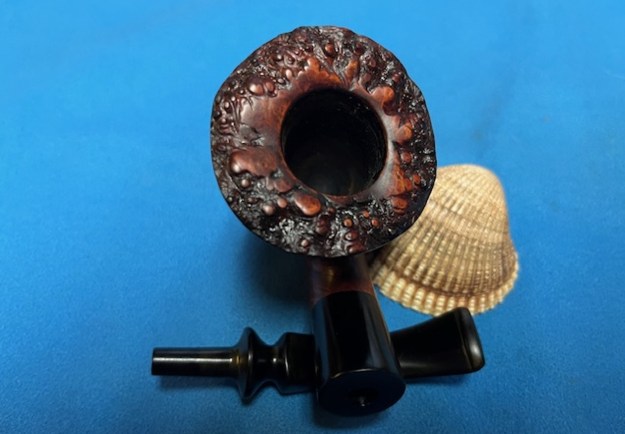
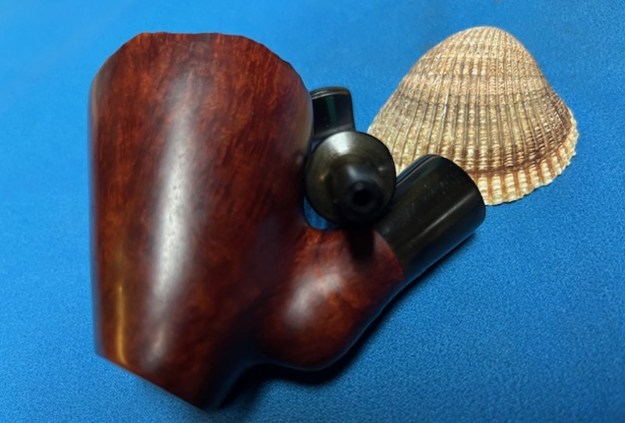

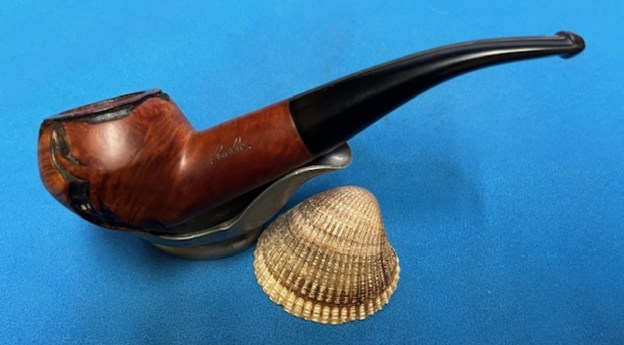
Blog by Steve Laug
A few weeks ago, I received an email from a customer, Ted about some pipe work for him. He had three pipes that he said needed different things and offered to send some photos. He also sent a second email with a description of what each pipe needed. I have included that email and the photos he sent below.
Peterson 309 needs stem restoration and bowl cleaned out. Rhodesian needs full restoration – my English teacher from high school gave it to me a little over two years ago. The Comoy’s Canadian needs a new bit I broke it… After finishing the restem and restoration of the Comoy’s I moved on to the second pipe. The Rhodesian shaped pipe is stamped on the right side of the shank and reads Andre [signature script]. There was no other information stamped on the pipe. There was a light/moderate cake in the bowl with lava on the rim top. The finish was in decent condition but there was a varnish coat that was spotty. There was dirt and debris ground into the finish and particularly in the rusticated patterns on the bowl sides and around the outer edge of the rim. The stem was oxidized and there had obviously been a Softee Bit on the end as it left a line and some calcification next to the button. There were light tooth marks and chatter on both sides of the stem. I took photos of the pipe before I started work on it. 
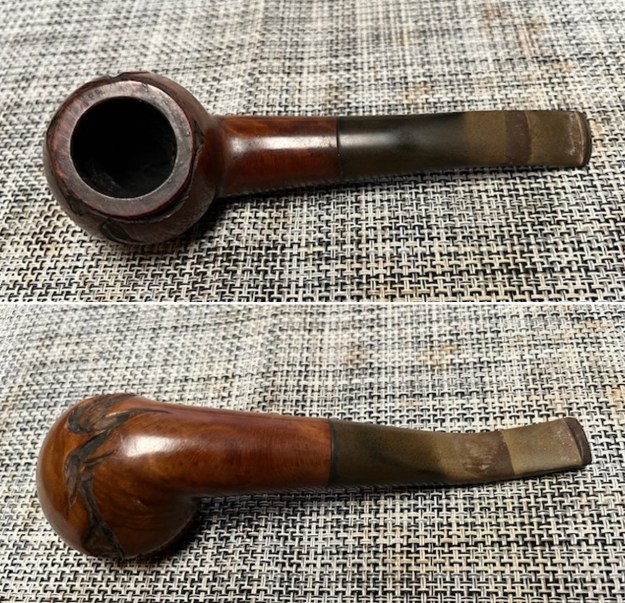 I took a close-up photo of the bowl and rim top to show the cake in the bowl. The rim top shows some lava on the smooth finish. The inner and outer edges of the bowl looked good. The stem photos show the oxidation and calcification as well as the mark from the Softee Bit that I spoke of above. Otherwise, the tooth marks and chatter are minimal.
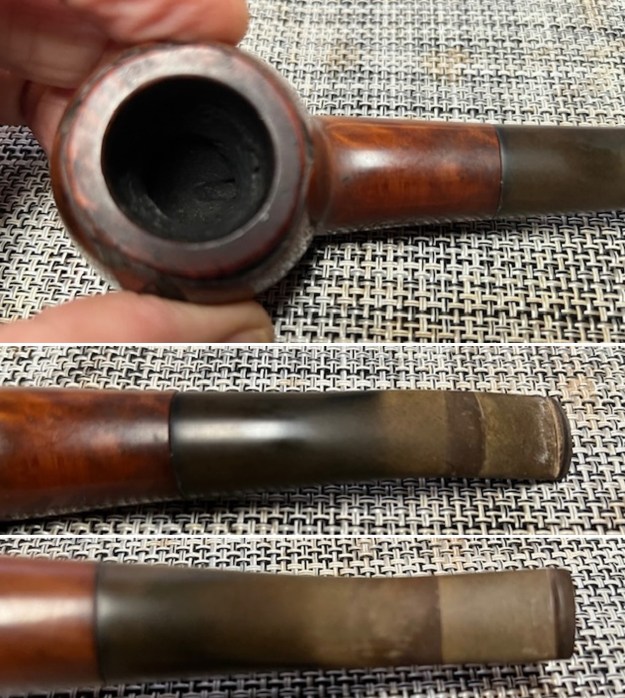 I took a photo of the stamping on the pipe. It is stamped or etched on the left side of the shank. It was clear and readable as noted above. I removed the stem from the shank and took a photo of the pipe parts to give a sense of proportion of the pipe. It is quite nice.
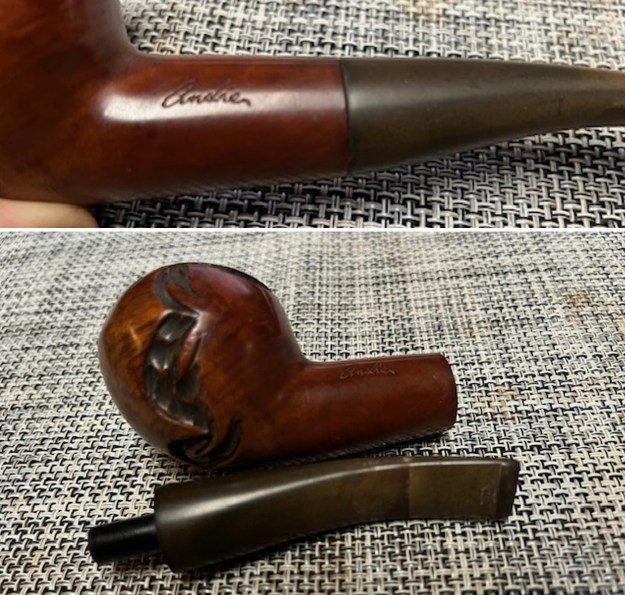 I wanted to know more about Andre so I did a bit of digging on the internet. I turned first to Pipephil’s site (http://www.pipephil.eu/logos/en/logo-a6.html) and found the brand listed. The signature on the pipe is the same as the one I am working on. I have included a screen capture and a side bar note below that gives some helpful information on the pipe.
 Artisan: André Mermet was a French craftsman who immigrated to the USA. He (and after him his son) produced pipes for Barclay Rex or Wilke pipeshops.
It was great to know that there was a connection to both Barclay Rex and Wilke pipeshops. Now I wanted to see if Pipedia had any more information but there was nothing listed.
I then quickly did a google search of the brand and low and behold I found that I had worked on one of his pipes back in 2018. The pipe was a very different shape than the one I have in my hands now but the rustication pattern is similar. Now, armed with that helpful information about the carver André Mermet and knowing that he provided pipes to such US companies as Barclay Rex and Wilke I was ready to work on the pipe itself.
I started my work by ream the bowl with a PipNet pipe reamer using the third cutting head to take the cake back to bare briar. I cleaned up the reaming with a Savinelli Fitsall Pipe Knife. I sanded the walls with a piece of 180 grit sandpaper wrapped around a dowel to smooth them out. 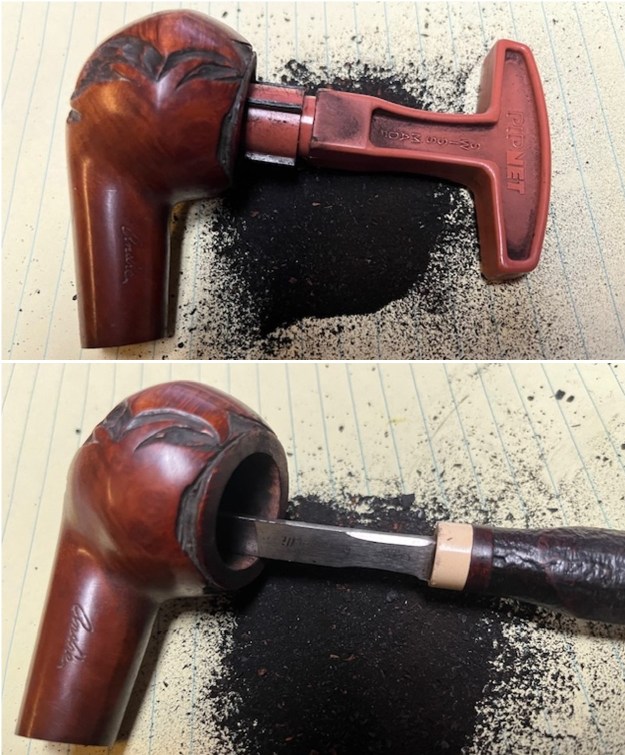
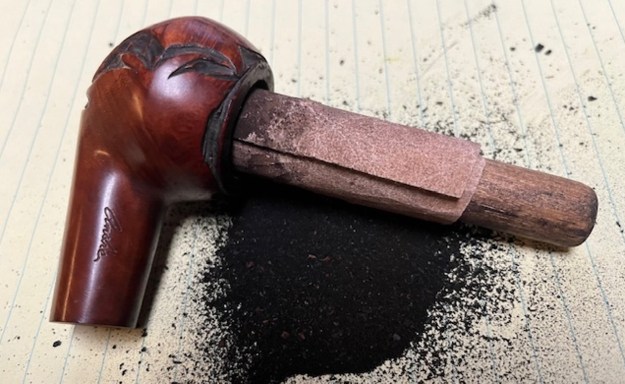 I cleaned up the rim top with a worn piece of 1500 grit micromesh and a piece of 6000 grit wet dry sandpaper. It looked much better once it was finished.
 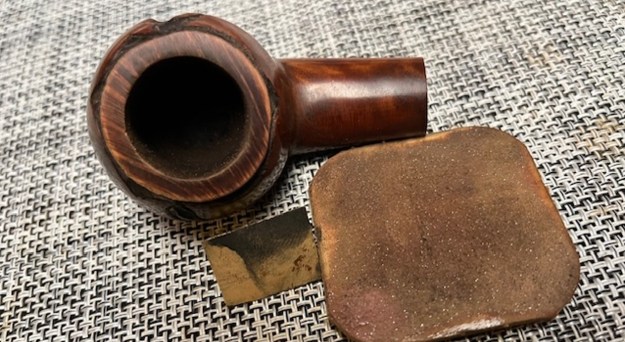 I wiped the bowl down with acetone to remove the varnish coat on the wood. It looked much better.
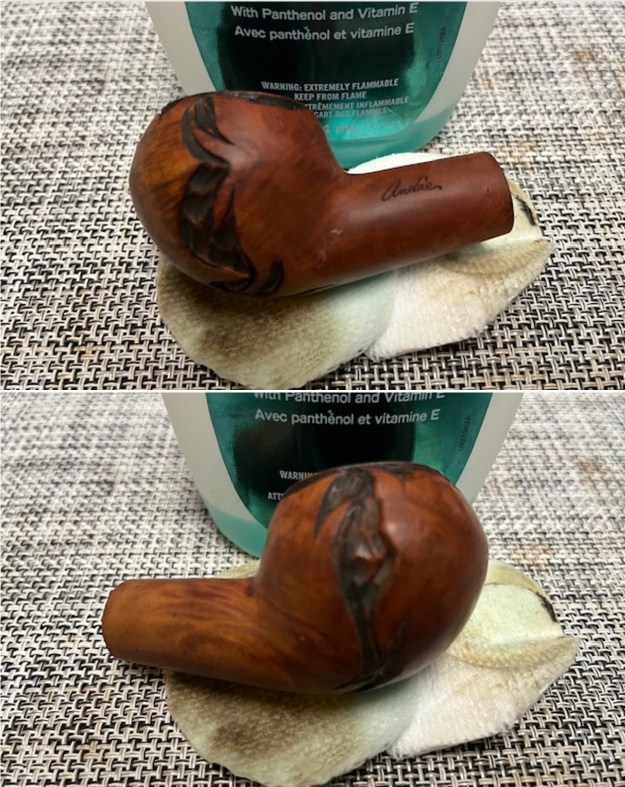
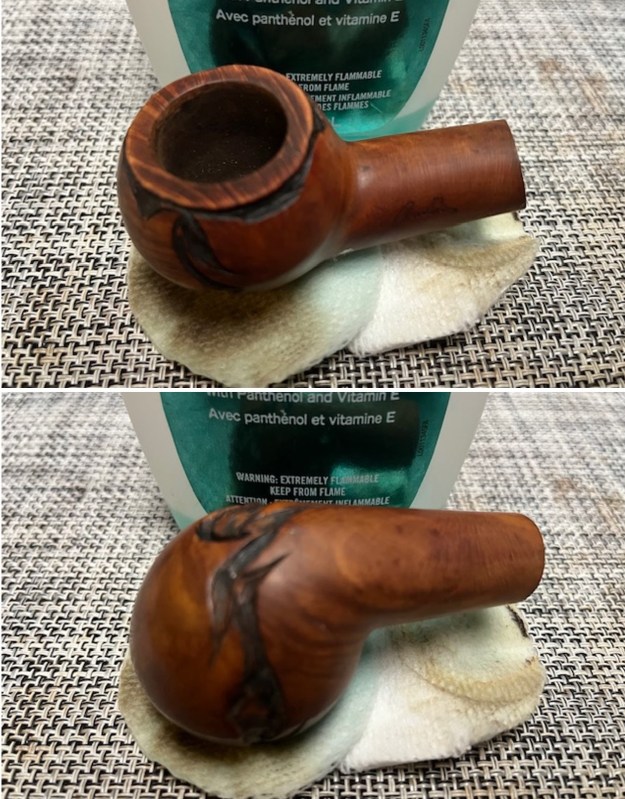 I scrubbed the exterior of the briar with a tooth brush and undiluted Murphy’s Oil Soap. I rinsed it off with warm water to remove the grime and soap. It looked much better and the dust and debris was gone. I dried it with a cotton towel.
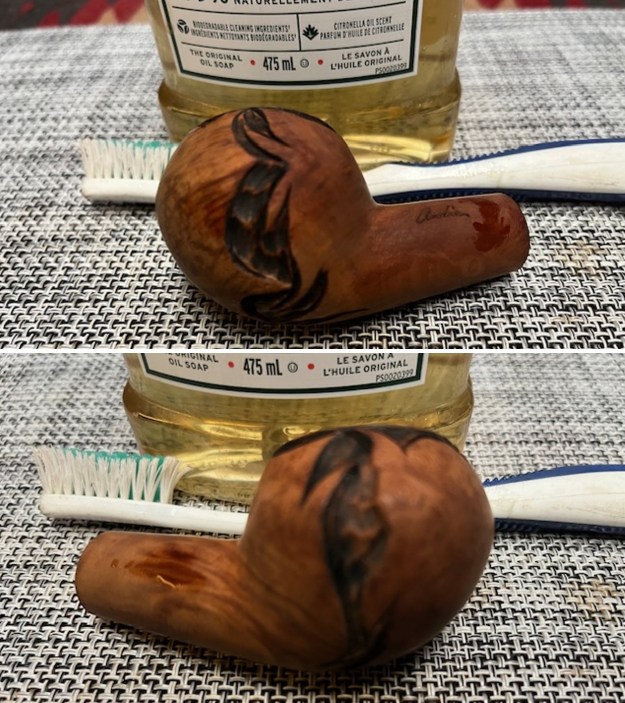
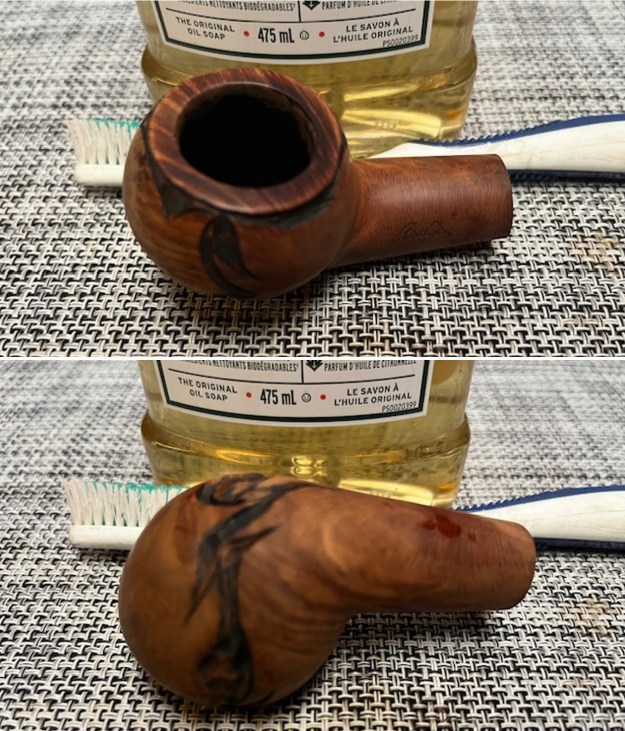 I scrubbed out the internals of the pipe with 99% isopropyl alcohol, pipe cleaners and cotton swabs. I cleaned out the airway in the stem as well. I worked on these areas repeatedly until the shank and the airway in all the parts was clean.
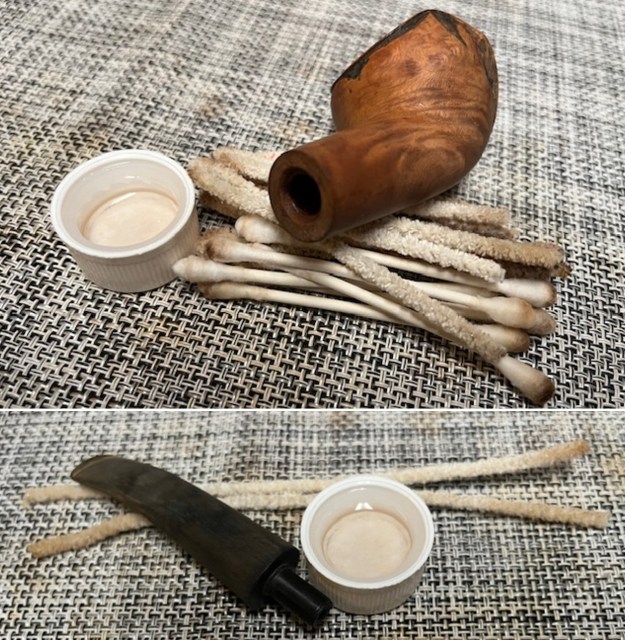 I polished the smooth briar with micromesh sanding pads – wet sanding with 1500-12000 grit sanding pads. I wiped it down with a damp cloth after each pad. The bowl began to take on a rich shine.
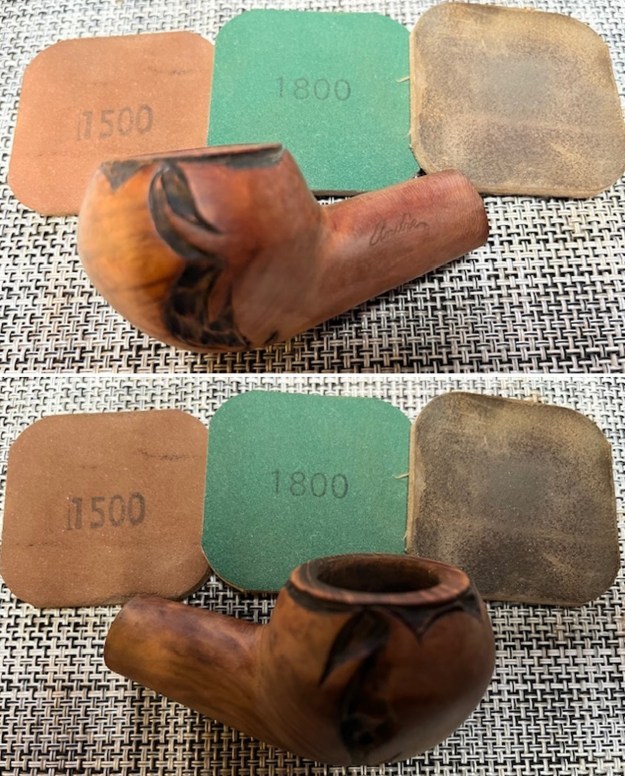
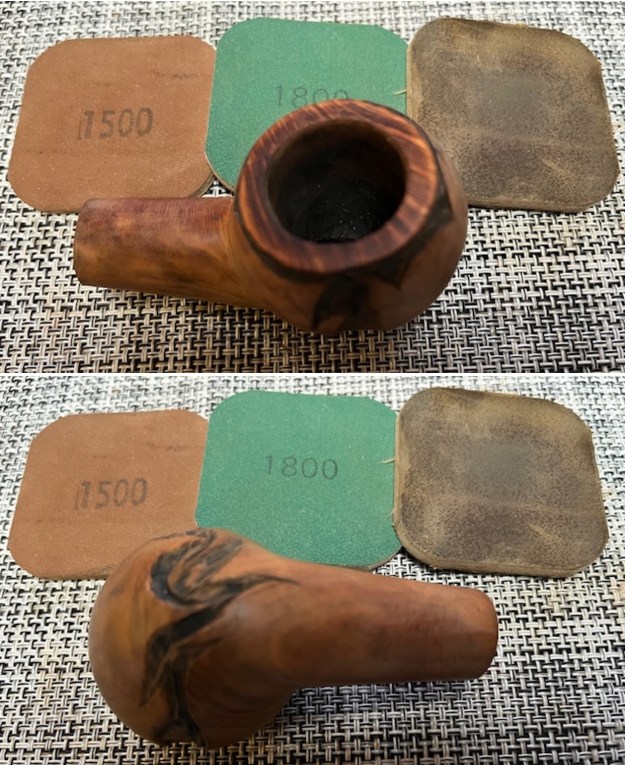
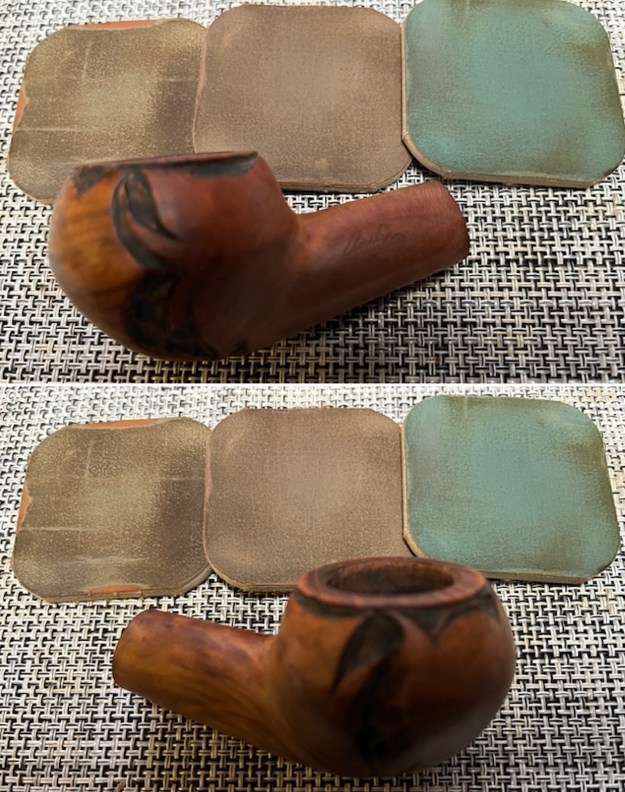
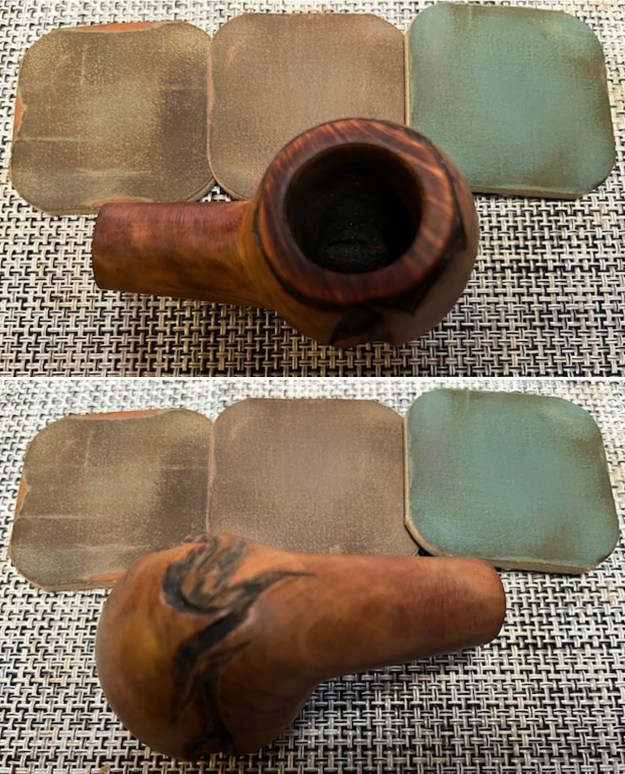

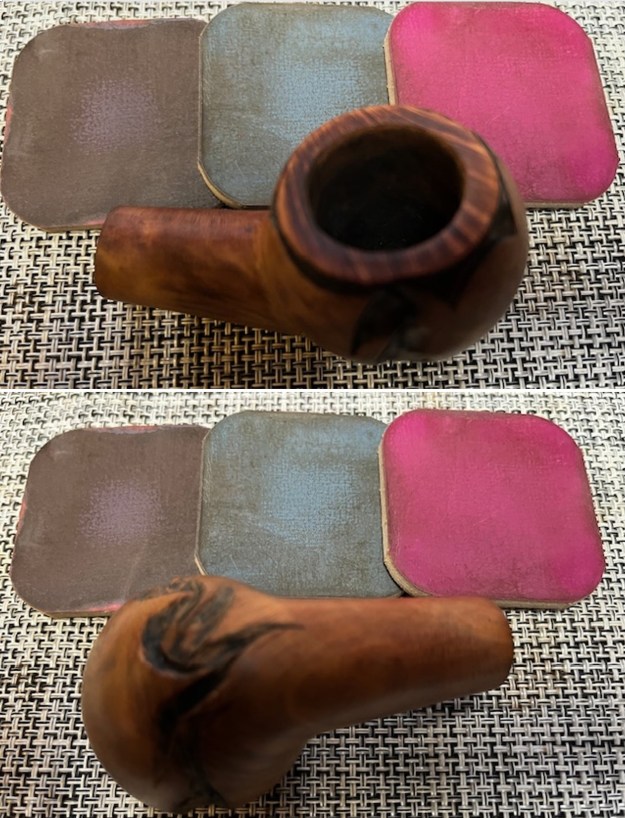 I worked some Before & After Restoration Balm into the surface of the briar with my fingertips to clean, enliven and protect the briar. I let the balm sit for 15 minutes and then buffed with a cotton cloth to raise the shine. The photos show the bowl at this point in the restoration process.
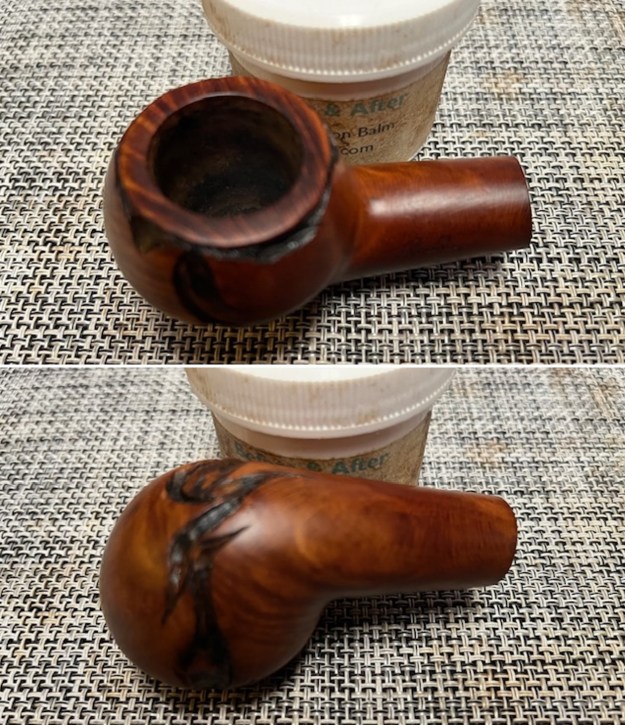
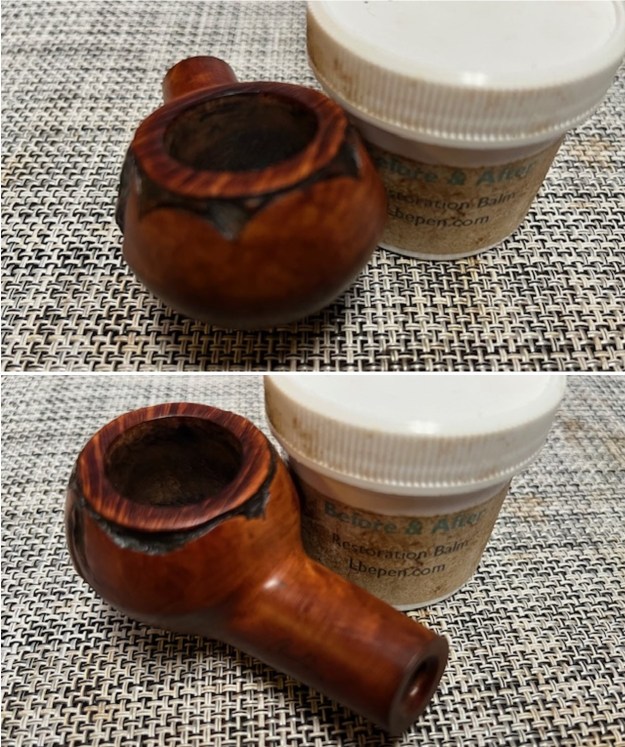 With that done, the bowl was finished other than the final buffing. I set it aside and turned my attention to the stem. I sanded out the oxidation, calcification, light tooth marks and chatter along with 220 grit sandpaper and started polishing the stem with 600 grit wet dry sandpaper.
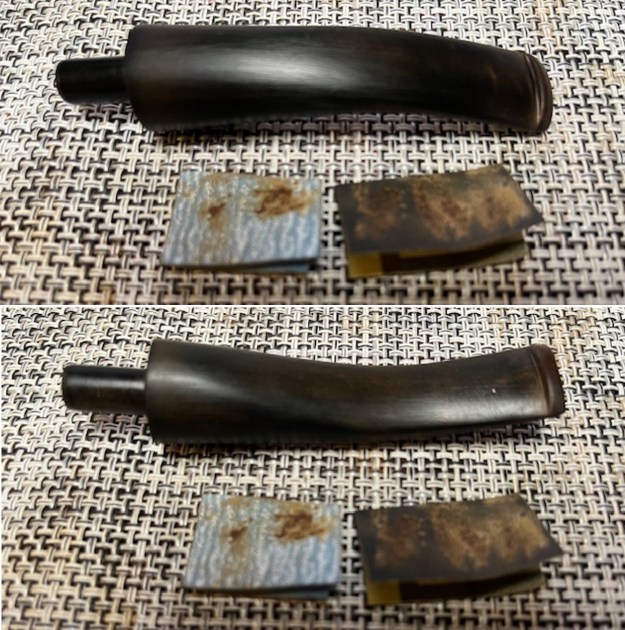 I polished the stem with micromesh sanding pads – wet sanding with 1500-12000 grit sanding pads. I wiped it down after each sanding pad with Obsidian Oil.
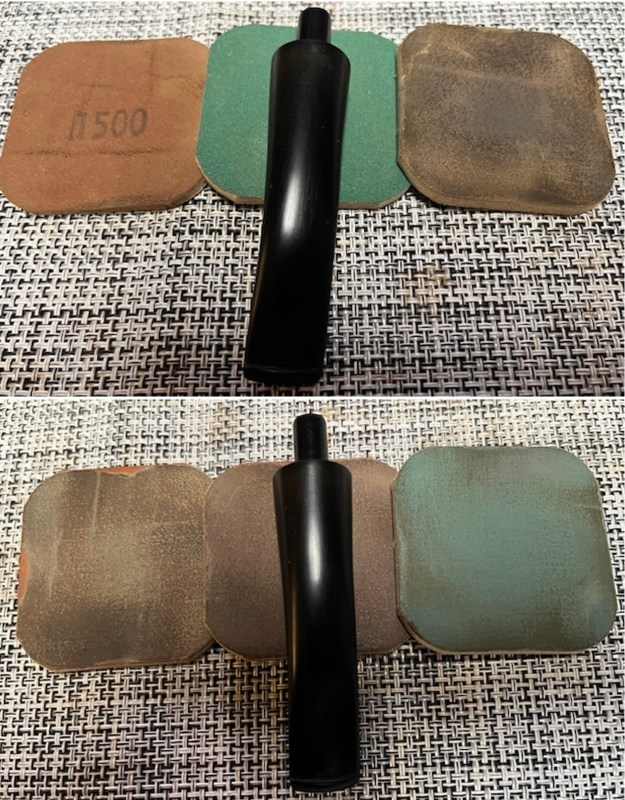
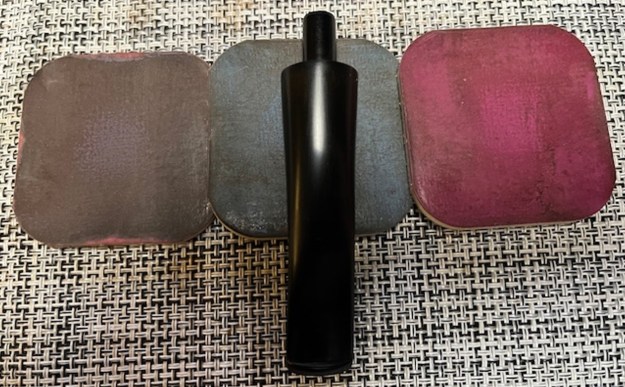 I finished polishing the stem with Before & After Pipe Stem polish (both Fine and Extra Fine) then wiped the stem down with another coat of Obsidian Oil.
 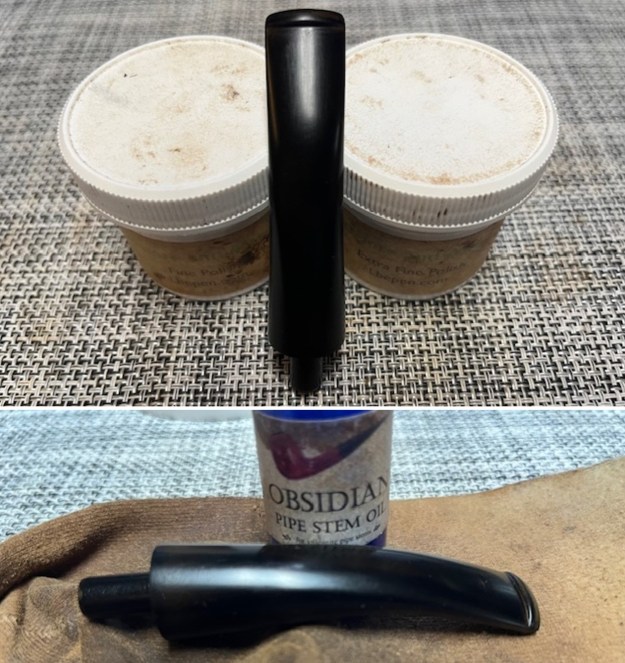 I am excited to finish the restoration of this Andre Rhodesian. I put the pipe back together and buffed it with Blue Diamond on the buffing wheel. I gave the bowl and the stem multiple coats of carnauba wax. I buffed the pipe with a clean buffing pad to raise the shine and hand buffed it with microfiber cloth to deepen the shine. It is fun to see what the polished bowl with the nickel band looks like with the new, polished black, vulcanite stem was beautiful. This Andre Rhodesian is nice looking and the pipe feels great in my hand. It is light and well balanced. Have a look at it with the photos below. The dimensions are Length: 5 ½ inches, Height: 1 ½ inches, Outside diameter of the bowl: 1 ¼ inches, Chamber diameter: 7/8 of an inch. The weight of the pipe is 1.66 ounces/47 grams. It is a beautiful pipe and after I finish Ted’s last pipe I will be sending the three pipes back to him to enjoy. Thanks for walking through the cleanup with me as I worked over this pipe.
As always, I encourage your questions and comments as you read the blog. Thanks to each of you who are reading this blog. Remember we are not pipe owners; we are pipe men and women who hold our pipes in trust until they pass on into the trust of those who follow us. 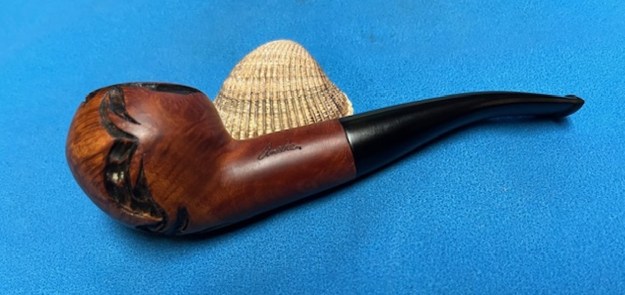
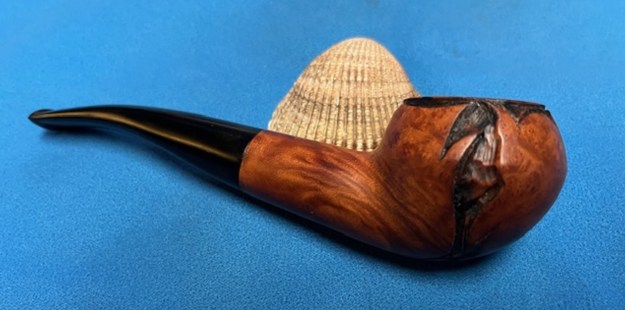
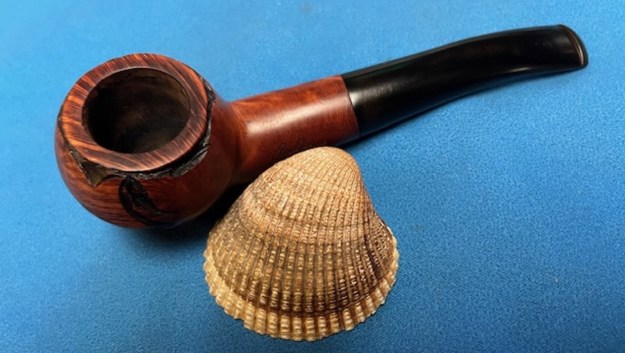
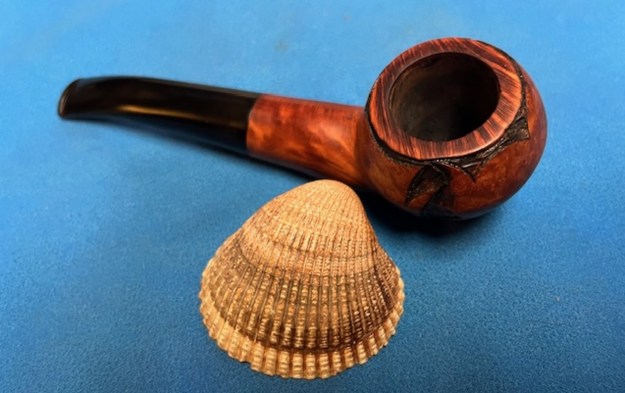
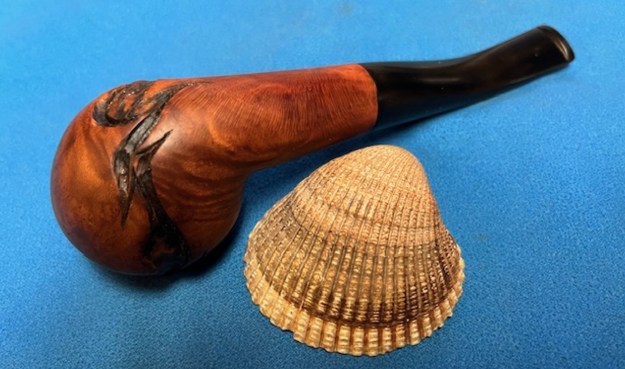
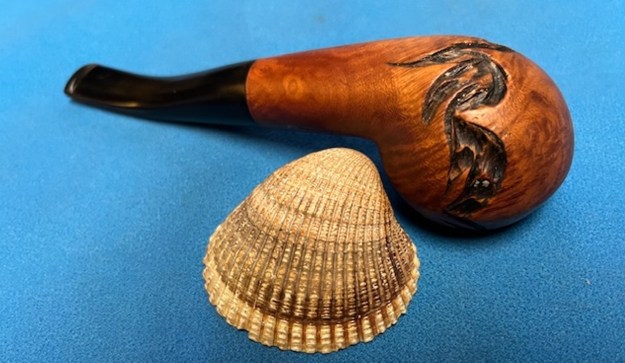
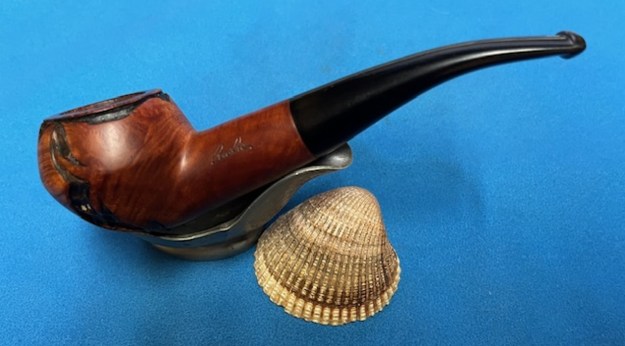
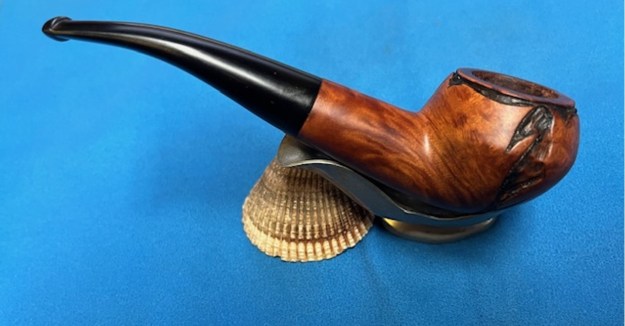
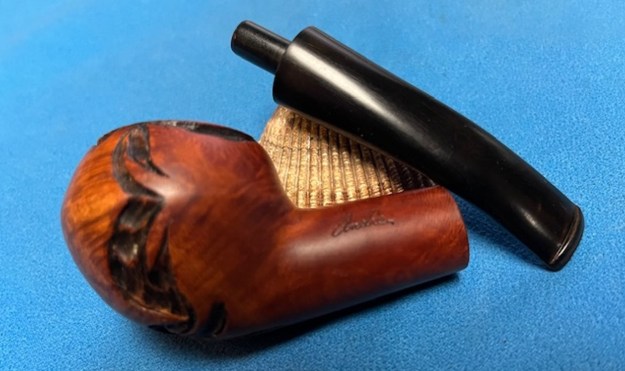
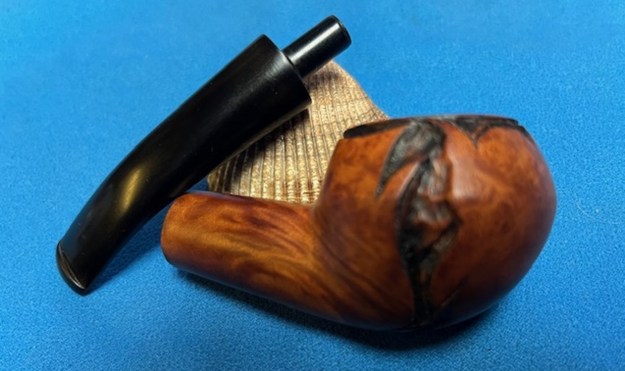

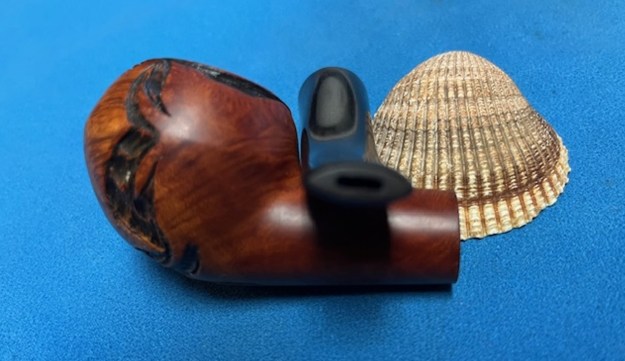

Thanks for the shout out. I love digging into the background on the pipes I work on.glad you found it useful. Great read.
Written and photographed by John M. Young Pretty sneaky, eh? Starting a post with a photo of an unfinished pipe slathered in Restoration Balm. Well…
A Pipe by Lee Restoration
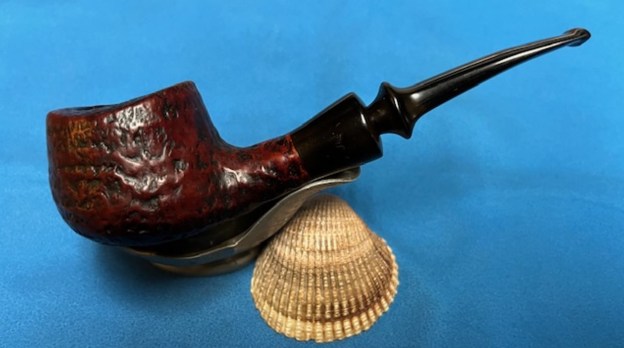
Blog by Steve Laug
The next pipe I chose to work on came is another one from the lot of 11 pipes I purchased from a lady in Regina, Saskatchewan. She had found them in a house she bought and wanted to know if I wanted them. We struck a deal, I paid for the pipes and shipping and the box arrived while I was traveling in Europe. In the box were 4 Stanwells, I Danmore Bowl, 1 Soren Freehand, 1 Calabash with a Briar Bowl, 1 Nording Freehand, 1 Italian Made Bertenetti, 1 Rhodesian with a banded cracked shank, and 1 Brigham. I have restored the Nording, the snapped Stanwell, the Brigham, the Gourd Calabash with the briar bowl and restemmed the Danmore bowl. There are blogs on each restoration available.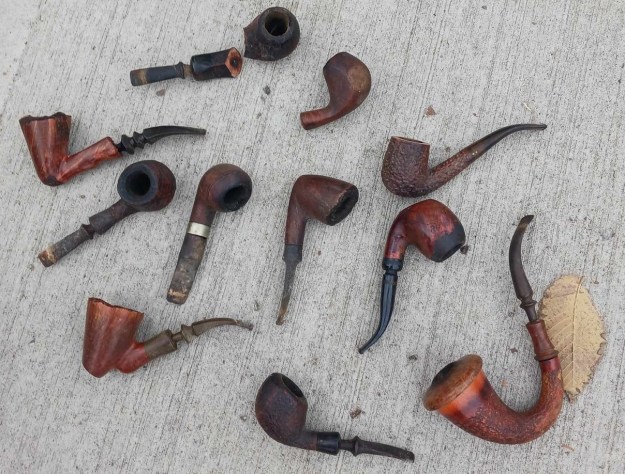
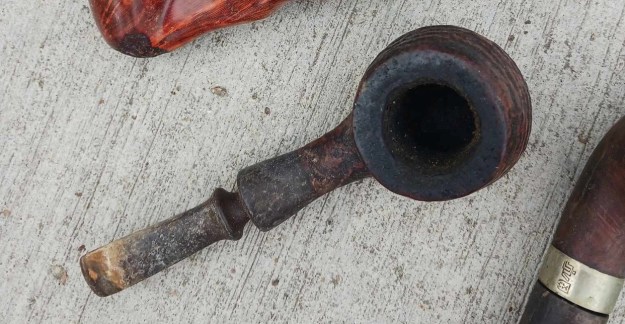 The next pipe on the table is one of the dirtiest pipes in a box full of very dirty pipes. It is stamped on the underside of the shank and reads Stanwell [over] Made in Denmark. There is no visible model name or shape number stamped on the pipe. There was a thick cake in the bowl, debris in the bottom and on the bowl walls and some remnants of tobacco. The airway was plugged and there was no draught on the pipe. There was a heavy lava overflow on the rim top and down the sides of the bowl and shank. It was hard to know the condition of the inner edges of the bowl because of the cake. The outer edge actually looked quite good under the grime. The finish was dirty and dusty and there was lava on the sides and heel of the bowl. The vulcanite shank extension was filthy and oxidized. The stem was in rough shape in appearance but underneath the calcification and oxidation the tooth marks and chatter looked minimal. I took photos of the pipe before I started my cleanup work on it.
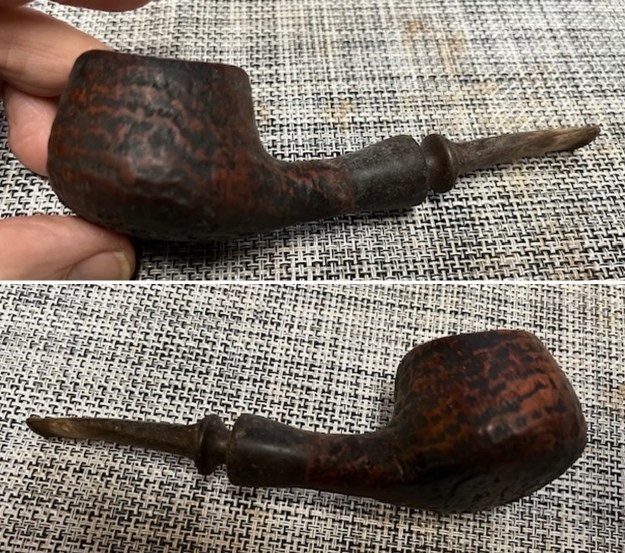
 I took a close-up photo of the bowl and rim top to show the cake in the bowl. The rim top shows some thin lava spots on the smooth finish. The inner and outer edges of the bowl looked good. I took photos of the top and underside of the stem surface and button to show its general condition. It looked very good under the spotty oxidation.
 The stamping on the underside of the shank is faint but readable as noted above. You can barely make out the Stanwell stamp on the smooth panel near the shank extension but it is present. I took the stem off the shank and took a photo to give a sense of the proportion of the pipe.
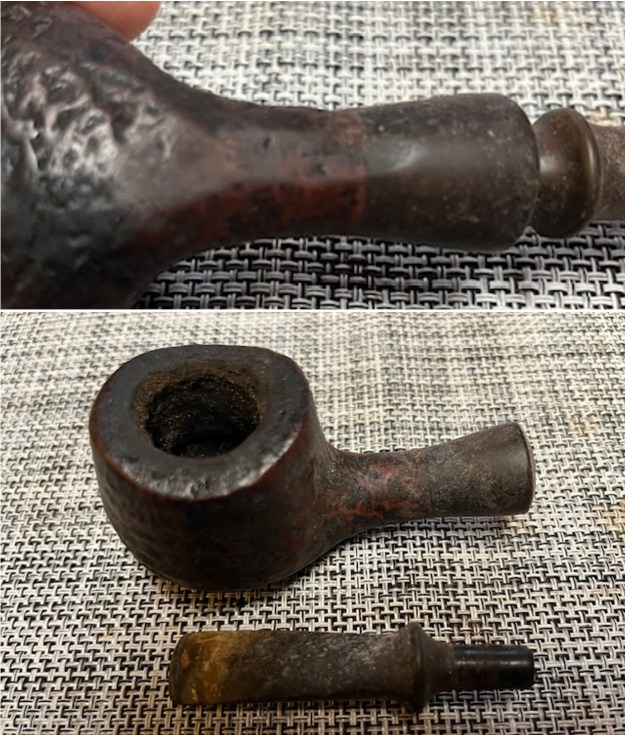 I recognized shape as being a Sixten Ivarsson design but Icould not remember the shape number associated with it. I turned to Pipedia’s article on shapes that Bas Stevens originally worked on to check it out (https://pipedia.org/wiki/Stanwell_Shape_Numbers_and_Designers). I am including a shape chart below. It identifies the shape as an 11 (bottom left corner of the photo below).
 I also have included two screen captures regarding the shape 11. The pipe I am working on is 11b in the list below. It is a slightly bent large, wide pot with a concave rim and various possible stem configurations (typically saddle, but can also be military mount, tapered, faux spigot saddle etc.), by Sixten Ivarsson.
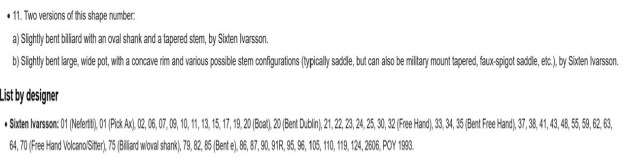 Now I knew it was an Ivarsson Design shape 11 with a military style saddle stem. Now it was time to work on the pipe. I removed the stem and turned my attention to the bowl clean up. I reamed the bowl with a PipNet pipe reamer using the fourth (and largest) cutting head to take the cake back to bare briar. I cleaned up the reaming with a Savinelli Fitsall Pipe Knife. I sanded the walls with a piece of 180 grit sandpaper wrapped around a dowel to smooth them out.
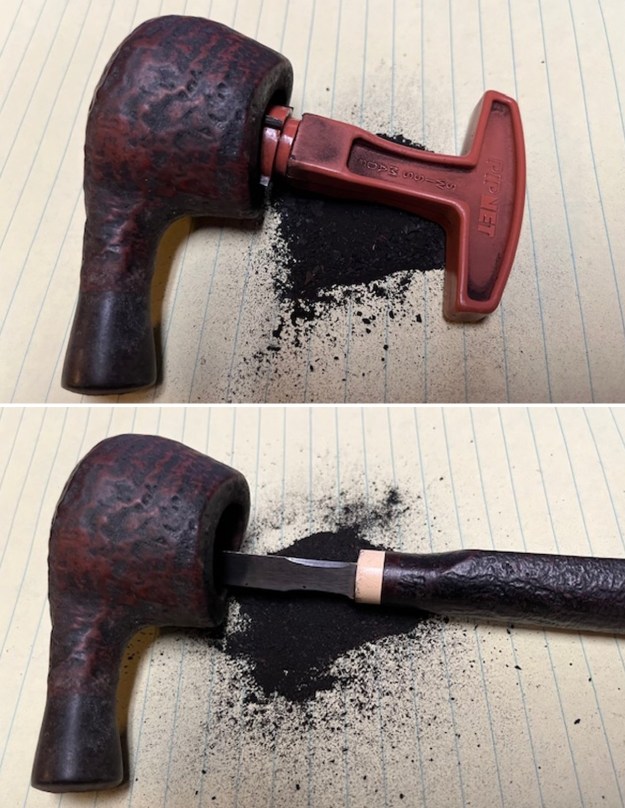
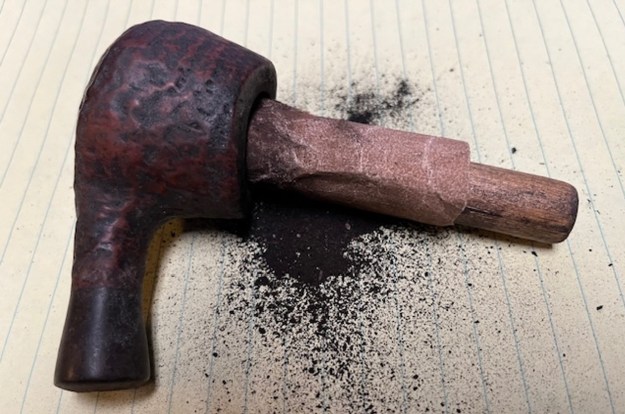 I scrubbed the exterior of the briar with a brass bristle wire brush, a tooth brush and undiluted Murphy’s Oil Soap. I rinsed it off with warm water to remove the grime and soap. It looked much better and the dust and debris was gone. I dried it with a cotton towel.
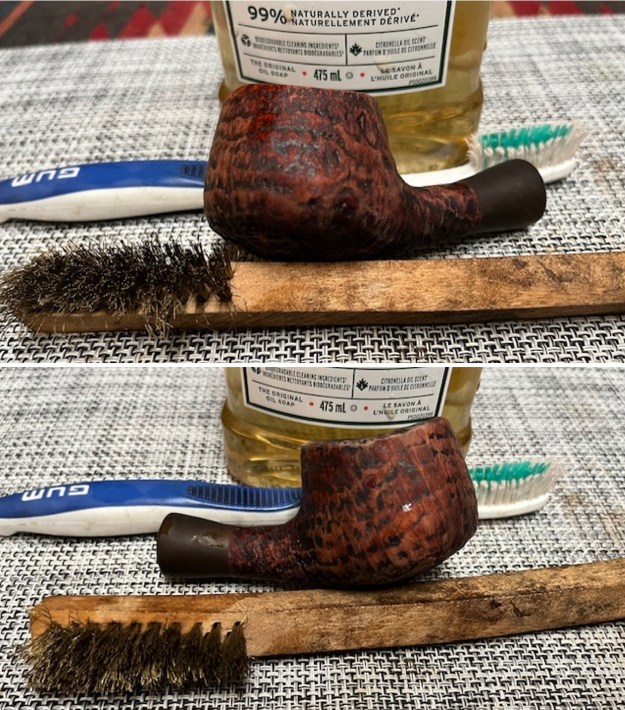
 I worked over the damage on the inner edge of the bowl and the rim top. I also smoothed out the damage on the outer edge with a folded piece of 220 grit sandpaper. It looked much better after I sanded the damaged areas smooth.
 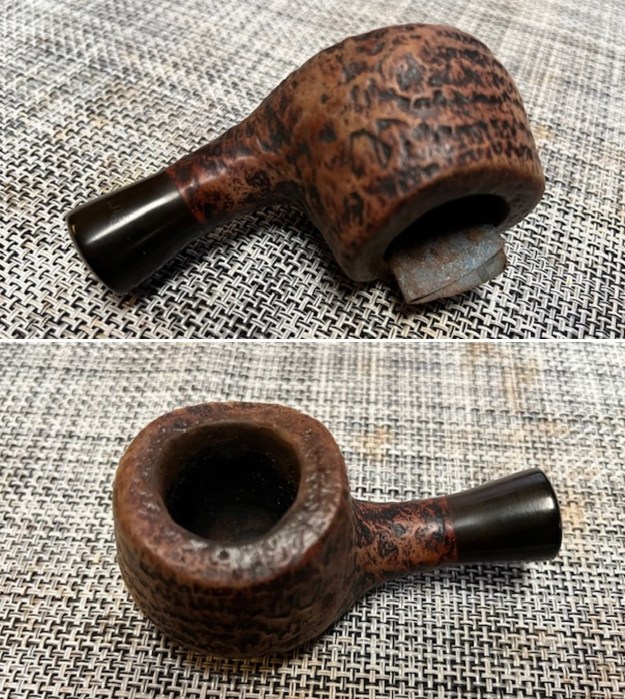 I worked over the rim top and the heel of the bowl with a dry brass bristle brush to remove some of the darkening. It is looking better.
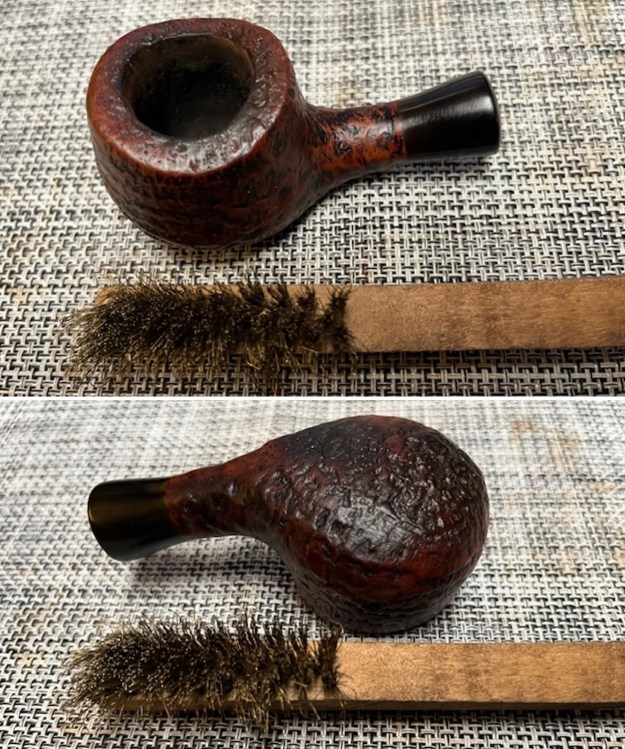 I scrubbed out the internals of the pipe with 99% isopropyl alcohol, pipe cleaners and cotton swabs. I cleaned out the airway in the stem as well. I worked on these areas repeatedly until the shank and the airway in all the parts was clean.
 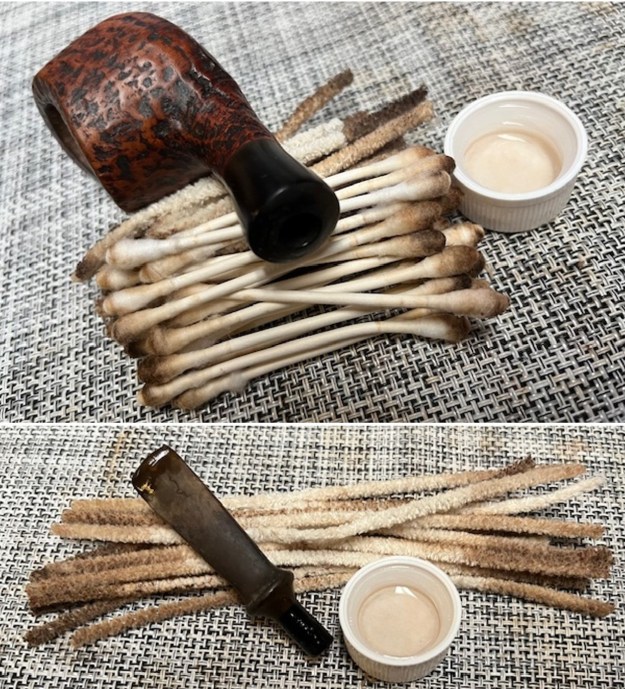 I polished the vulcanite shank extension with micromesh sanding pads – wet sanding it with 1500-12000 git sanding pads. I wiped it down with a cloth and some Obsidian Oil.
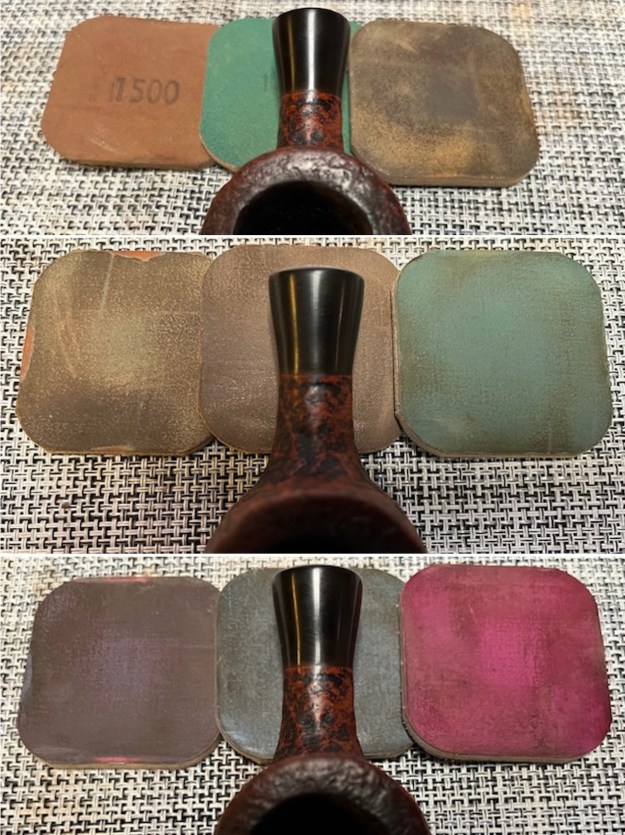 I stained the bowl with a light brown aniline stain to blend the lighter and darker portions into each other. I applied it with a wool dauber and then flamed it with a Bic lighter to set it in the grain. I repeated the process until the coverage on the bowl was what I wanted.
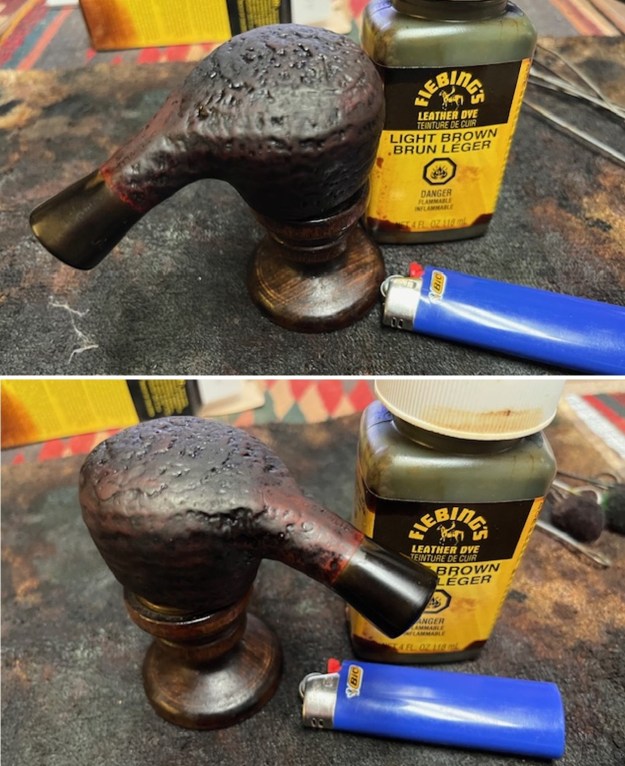
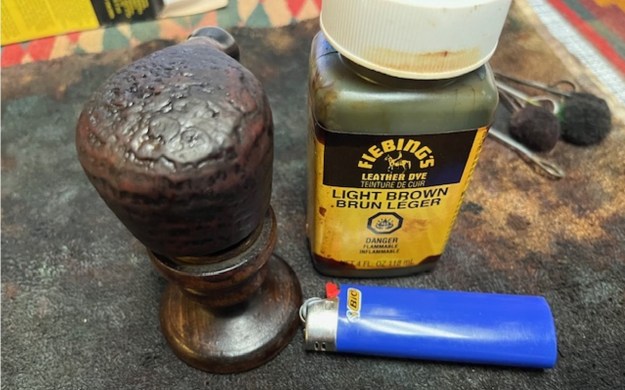 I wiped the bowl down with isopropyl alcohol on cotton pads to make it more transparent and show the other colour underneath.
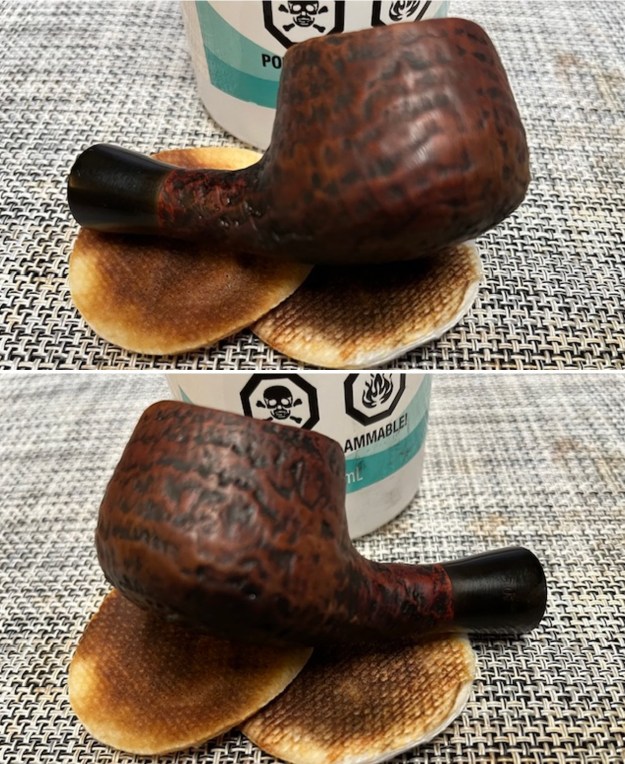
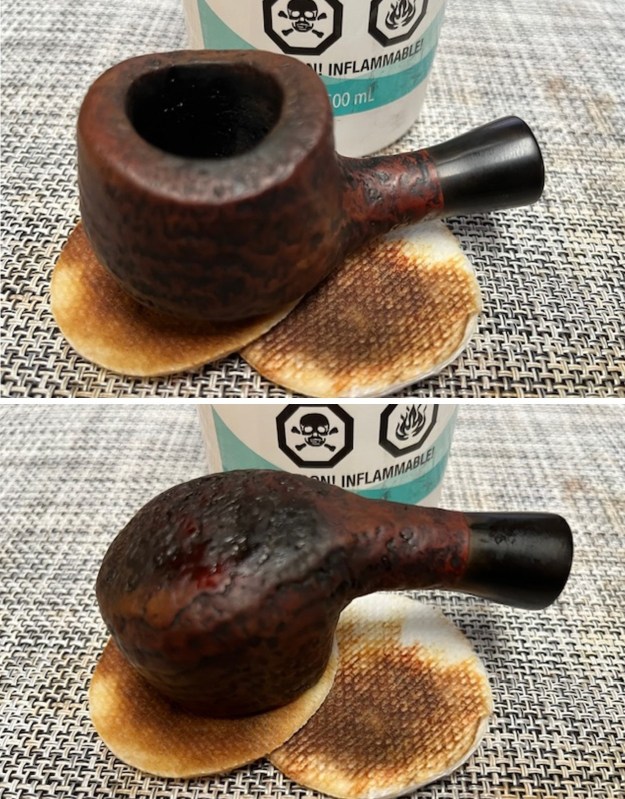 I worked some Before & After Restoration Balm into the surface of the briar with my fingertips to clean, enliven and protect the briar. I let the balm sit for 15 minutes and then buffed with a cotton cloth to raise the shine. The photos show the bowl at this point in the restoration process.
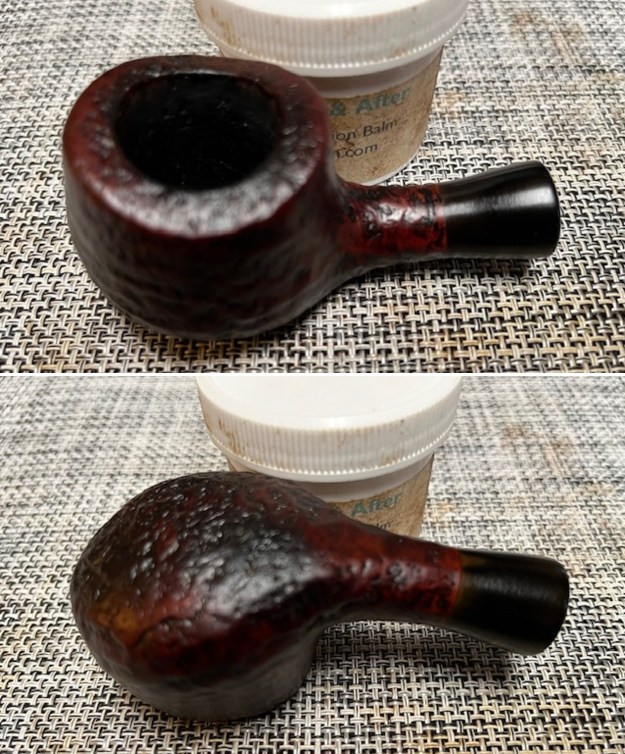
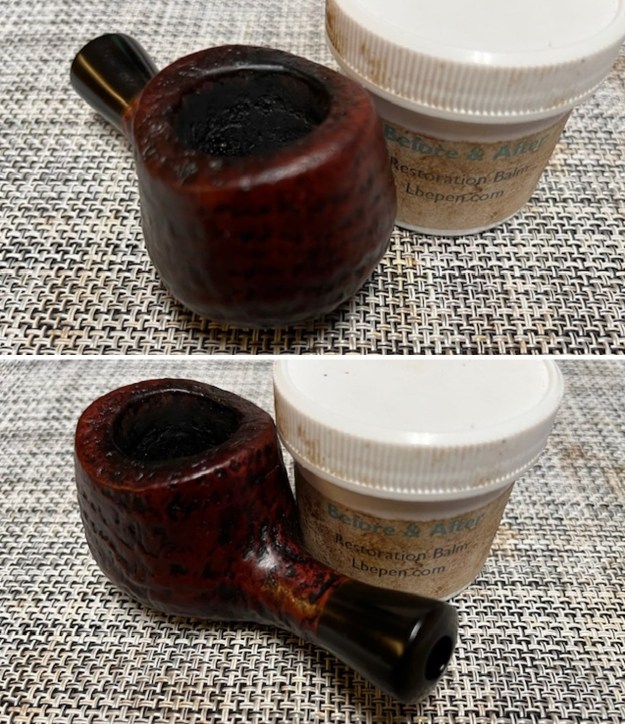 With that done, the bowl was finished other than the final buffing. I set it aside and turned my attention to the stem. I wiped it down with some Soft Scrub to remove the oxidation and calcification. I sanded out the light tooth marks and chatter along with the remaining oxidation with 220 grit sandpaper and started polishing the stem with 600 grit wet dry sandpaper.
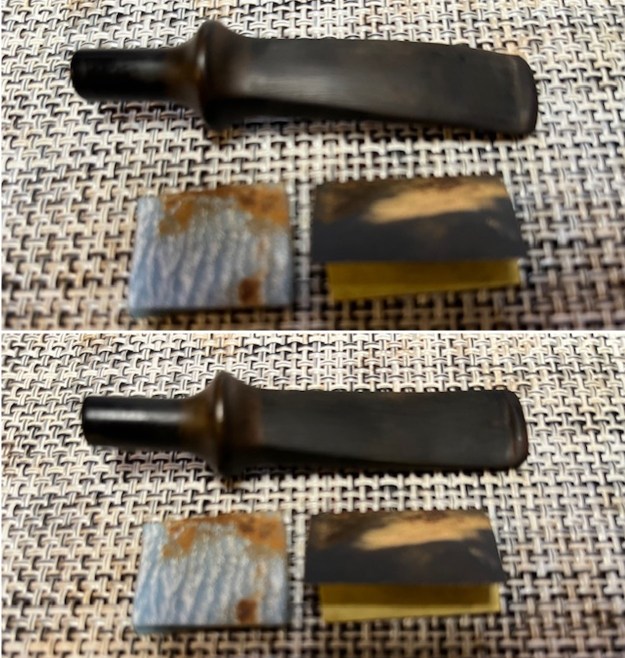 I polished the stem with micromesh sanding pads – wet sanding with 1500-12000 grit sanding pads. I wiped it down after each sanding pad with Obsidian Oil.
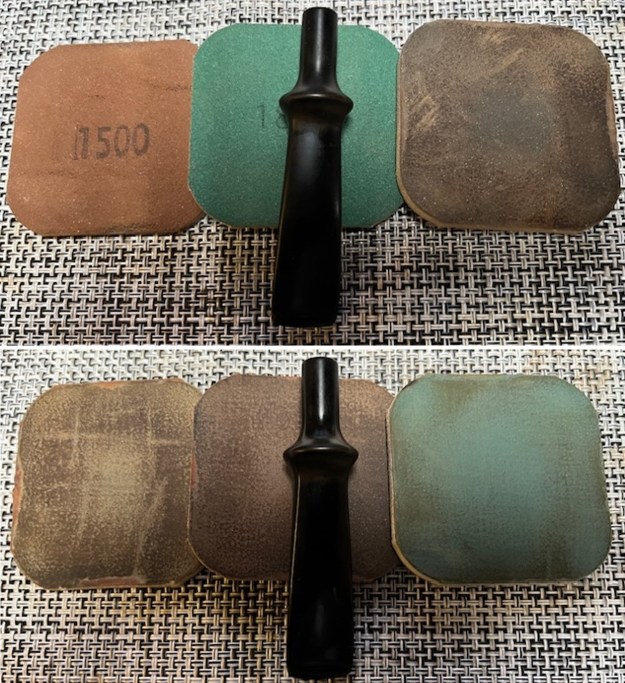
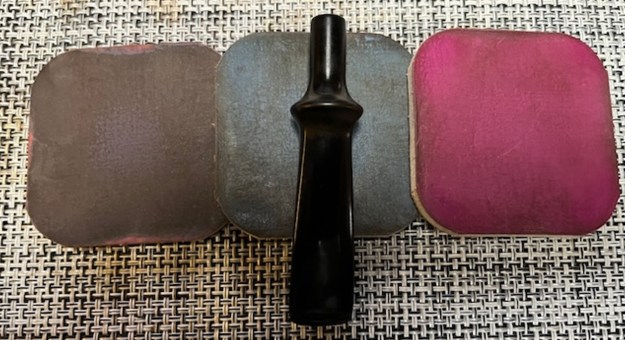 I finished polishing the stem with Before & After Pipe Stem polish (both Fine and Extra Fine) then wiped the stem down with another coat of Obsidian Oil.
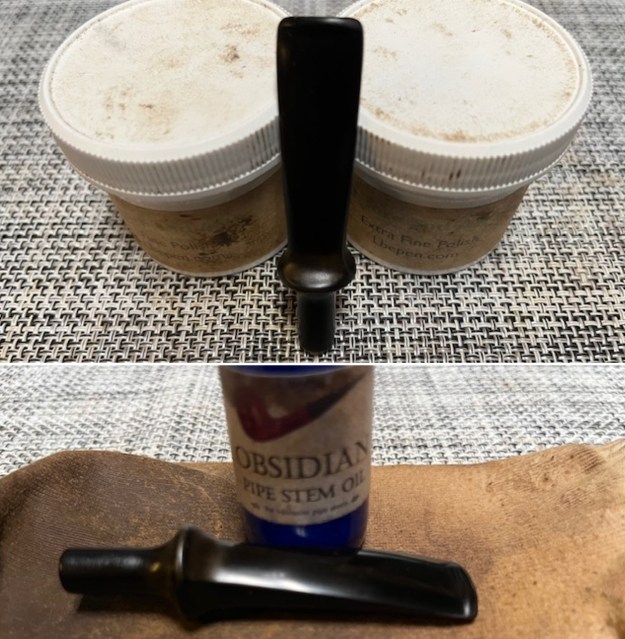 I am excited to finish this Ivarsson Design Stanwell Made in Denmark 11. I put the pipe back together and buffed it with Blue Diamond on the buffing wheel. I gave the bowl and the stem multiple coats of carnauba wax. I buffed the pipe with a clean buffing pad to raise the shine and hand buffed it with microfiber cloth to deepen the shine. It is fun to see what the polished bowl looks like with the polished black, fancy turned vulcanite stem was beautiful. This Stanwell Large Pot 11 is nice looking and the pipe feels great in my hand. It is light and well balanced. Have a look at it with the photos below. The dimensions are Length: 5 ½ inches, Height: 1 ½ inches, Outside diameter of the bowl: 1 ½ inches, Chamber diameter: 7/8 of an inch. The weight of the pipe is 1.69 ounces/48 grams. It is a beautiful pipe and one that I will be putting in the Danish Pipemaker Section on the rebornpipes store. Thanks for walking through the cleanup with me as I worked over this pipe.
As always, I encourage your questions and comments as you read the blog. Thanks to each of you who are reading this blog. Remember we are not pipe owners; we are pipe men and women who hold our pipes in trust until they pass on into the trust of those who follow us.