Monthly Archives: December 2021

Reworking a Messy Hack Job on a Stem of a Lace Carved Meerschaum Dublin


Blog by Steve Laug

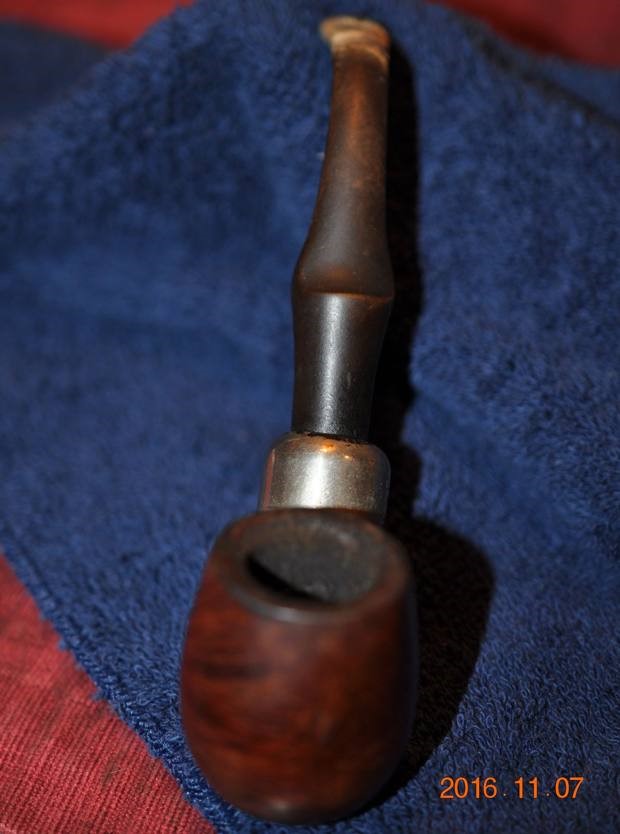
I am kind of on a meerschaum restoration binge so I thought I would have a look at my box of meerschaums to restore. I pulled out this nice looking lace carved Dublin meerschaum with a great patina. Jeff received an email from a fellow early in January, 2018 who lived in Los Fresnos, Texas, USA. He told us that he had a few pipes that had been his grandfather’s and he was selling them off for the family. This pipe was one of those. We love to pick up pipes with a bit of the back story attached so we did it. The exterior of the pipe was dirty but still quite beautiful. The bowl had a thick cake in it and there was lava on the rim top. It was obviously a well loved and oft smoked pipe. The stem was a mess with what looked like a reshaping done with a pocket knife that had left all kinds of hack marks and cuts in the surface. To my thinking it was done by the previous pipeman who had customized it to his liking for a more comfortable fit. The push tenon was old and tired and the threads holding it in the stem were stripped so that it was a very loose fit and would need to be replaced. The pipe had potential but would need a lot of work to bring it back. The stem would take the most time as I would need to smooth out the damage and reshape it properly. Jeff took photos of the pipe before he went to work on it. 
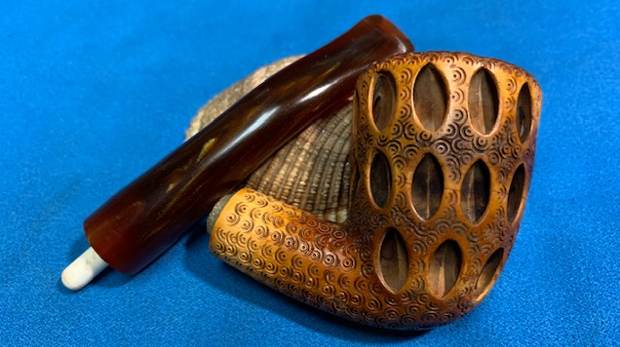
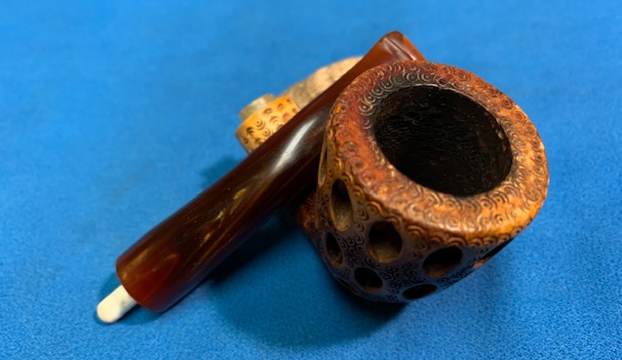
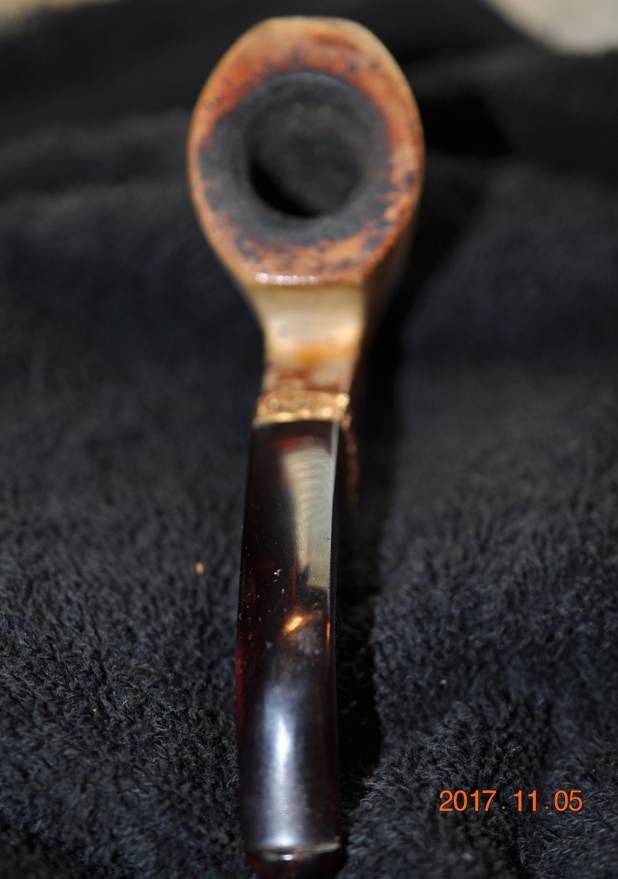
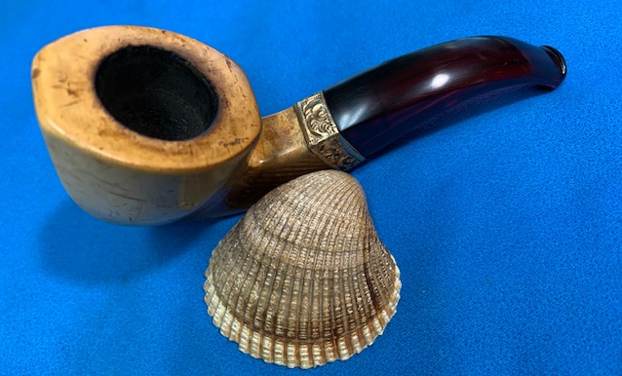
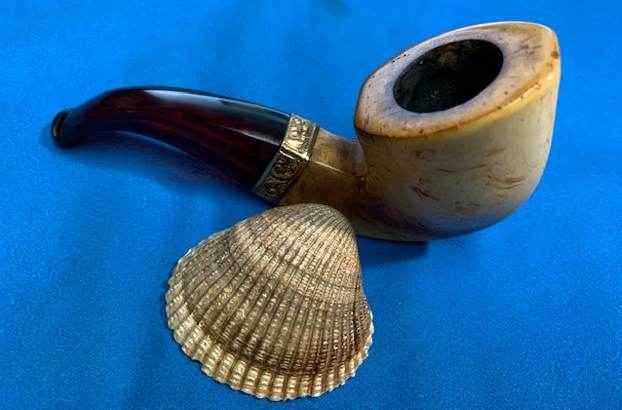
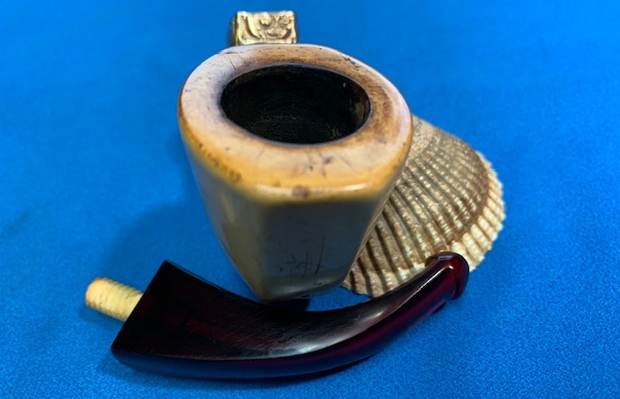
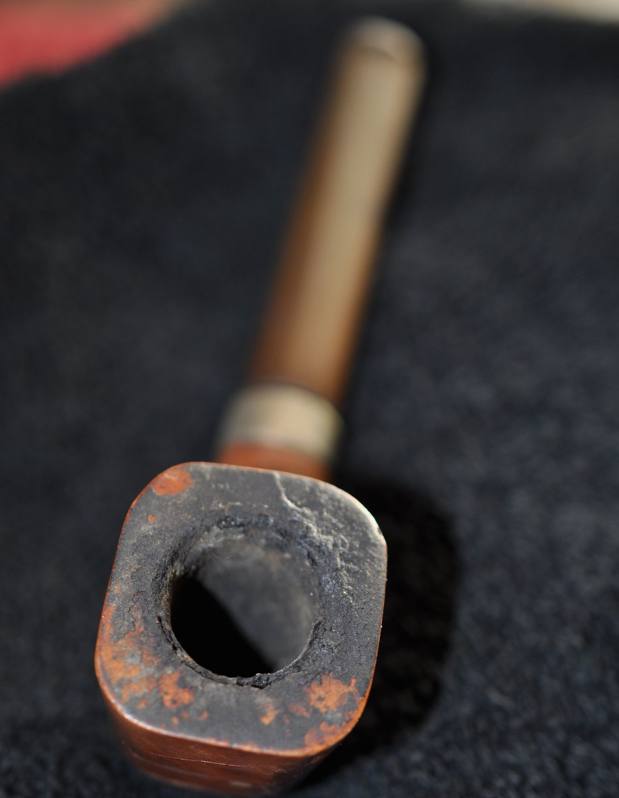
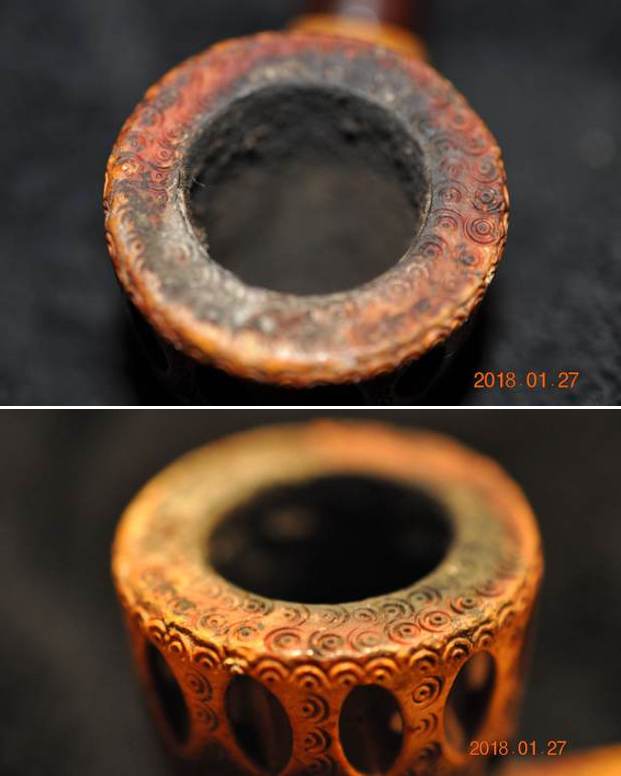
He took photos of the rim top and included different angles to capture condition of the bowl and rim top. You can see the lava build up on the rim top carving and edges as well as the thick cake in the bowl. He also took some photos of the stem to show the hacked condition of the acrylic and what would need to be done to reshape it. 
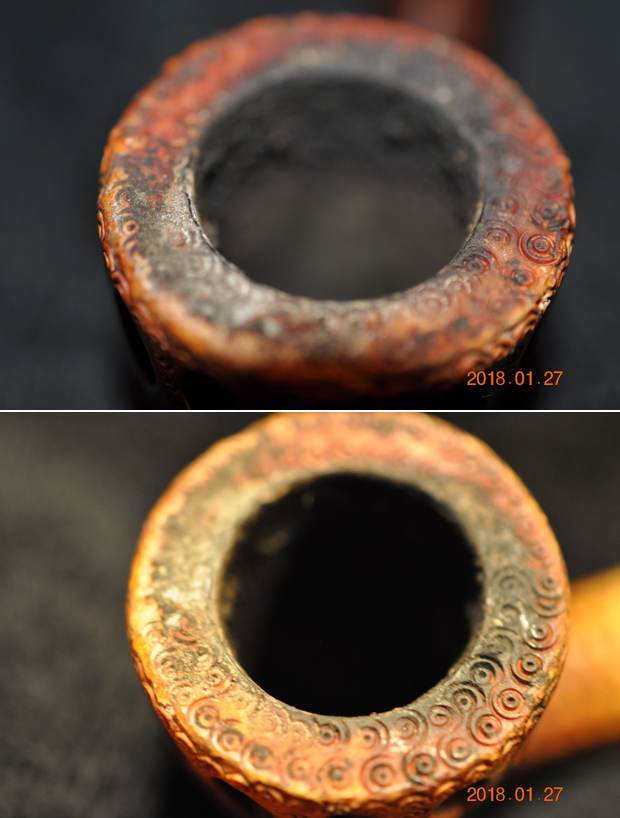
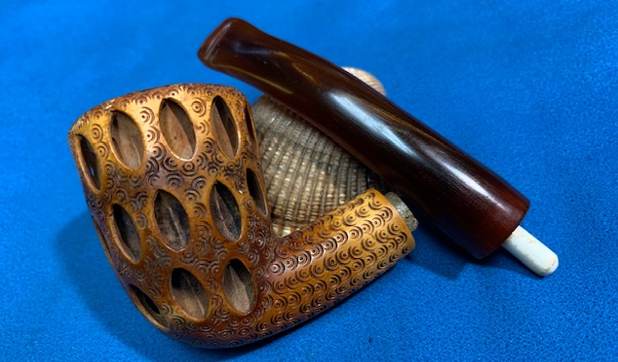
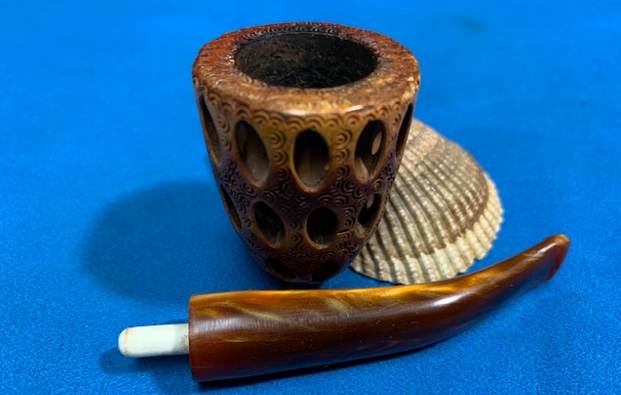
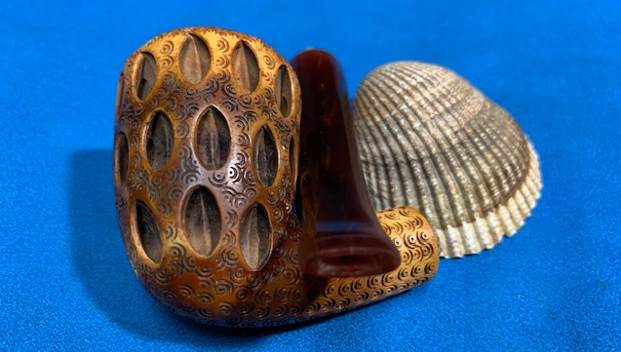
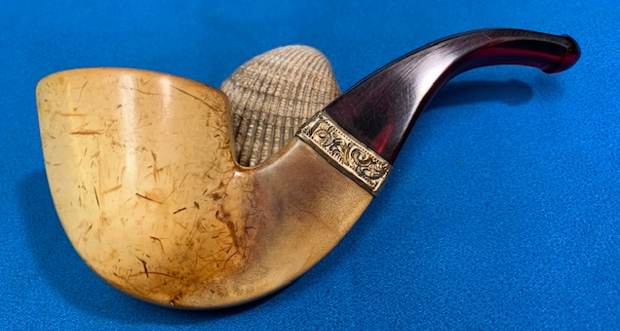
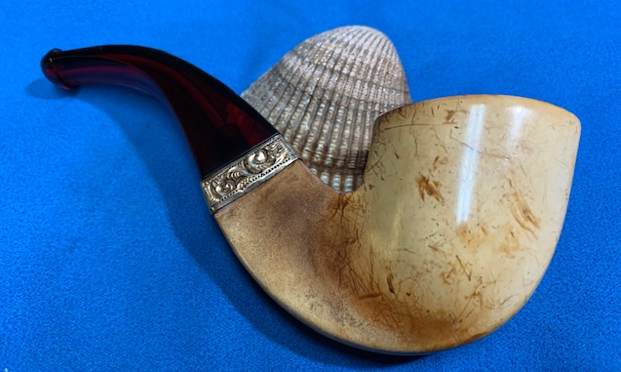
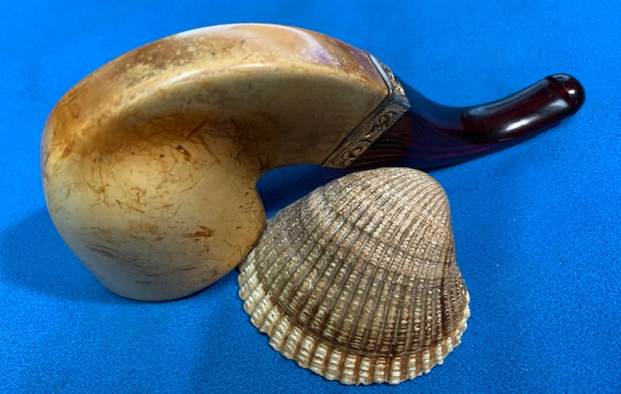
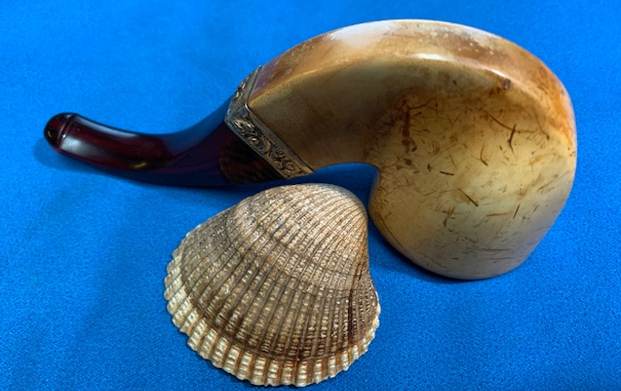
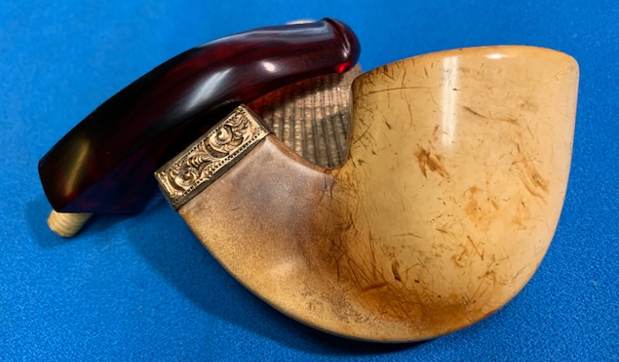
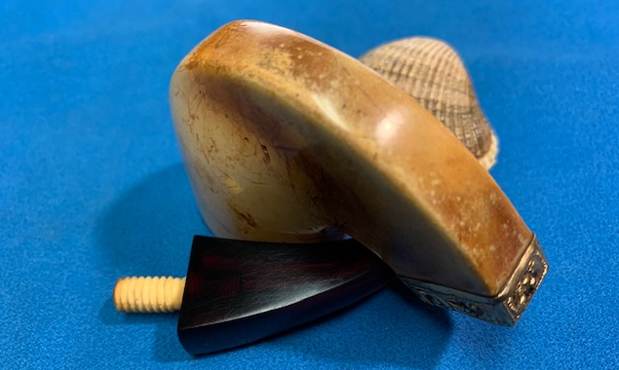
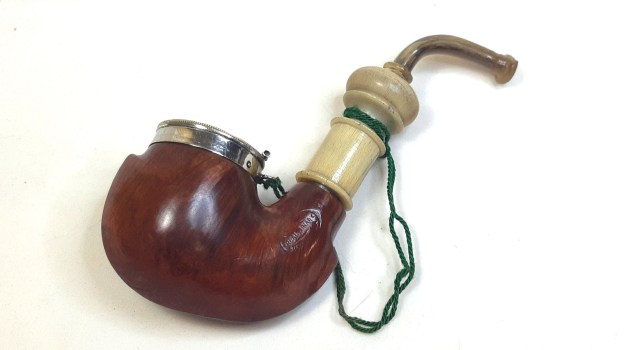
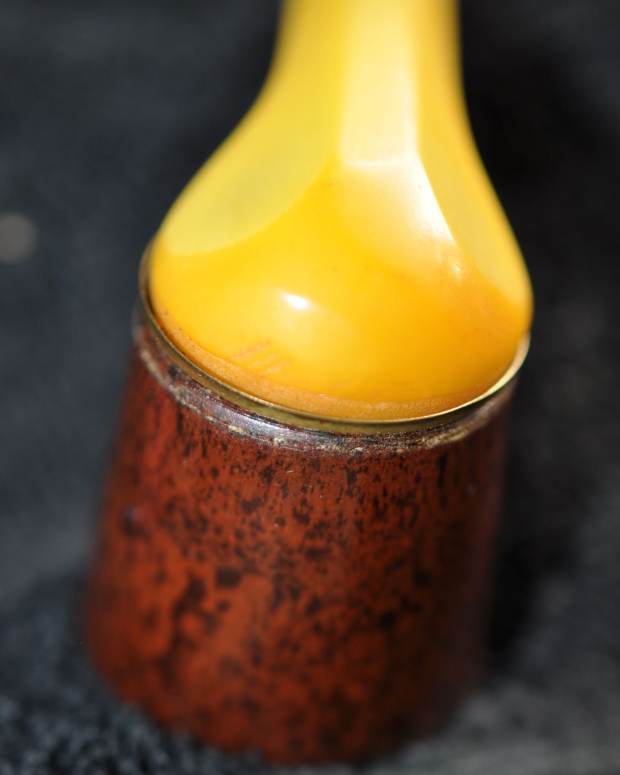
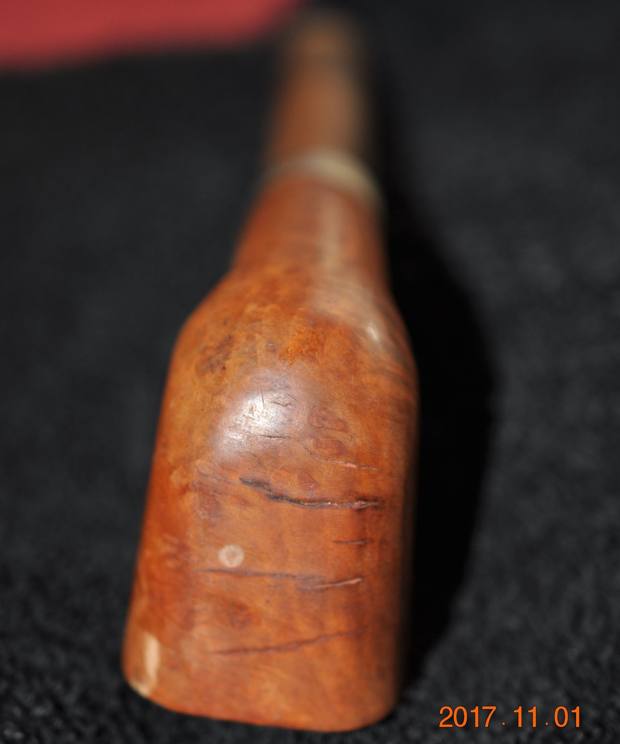
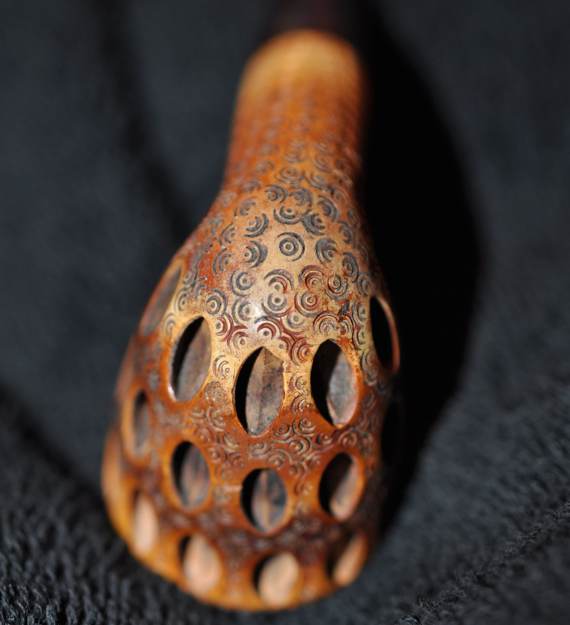
Jeff took some photos of the heel of the bowl and side to give a sense of the patina already yon this beauty. The under bowl (inside the lace) has really darkened and adds depth to the carving. Very nice! 
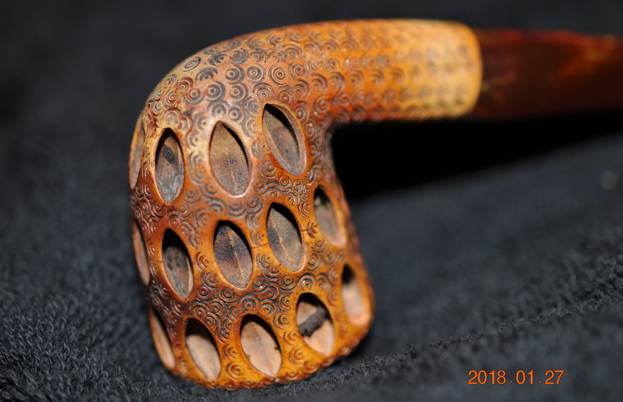
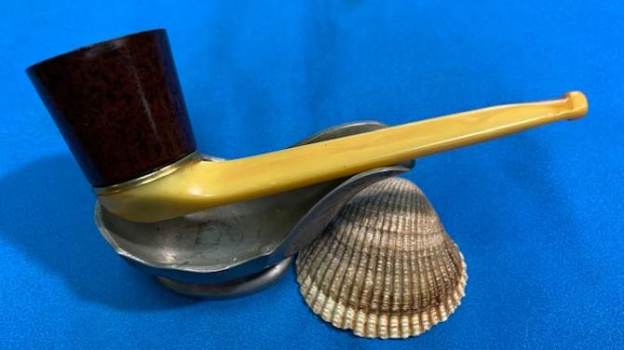
Jeff had cleaned the pipe thoroughly. He had reamed it carefully with a PipNet reamer and cleaned that up with a Savinelli Fitsall Pipe Knife. He worked slowly so as not to damage the inner edge of the bowl. It was a mess. He had scrubbed the exterior of the meerschaum with undiluted Murphy’s Oil Soap and a soft tooth brush. He cleaned out the interior of the shank and airway with alcohol, pipe cleaners and cotton swabs. He cleaned out the hacked acrylic stem with alcohol, cotton swabs and pipe cleaners to remove the debris and oils in the airway and the threads of the push tenon. Once it was clean the thread no longer held the tenon in the stem. I took photos of the pipe when it arrived here. It has real potential to be a great looking pipe. 
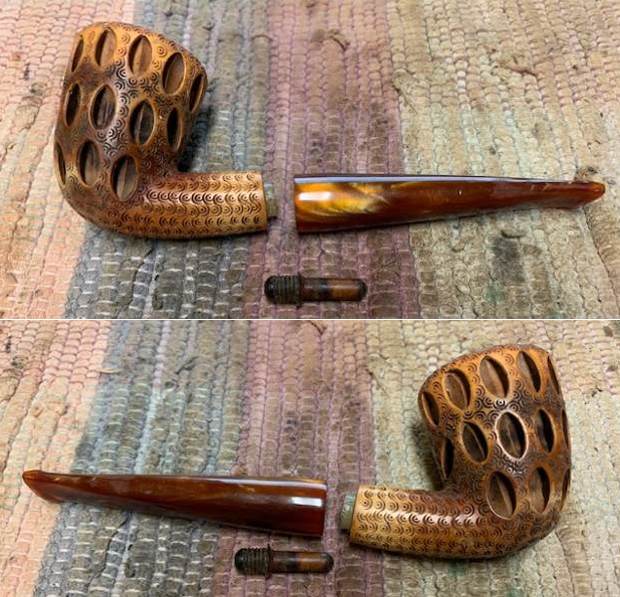
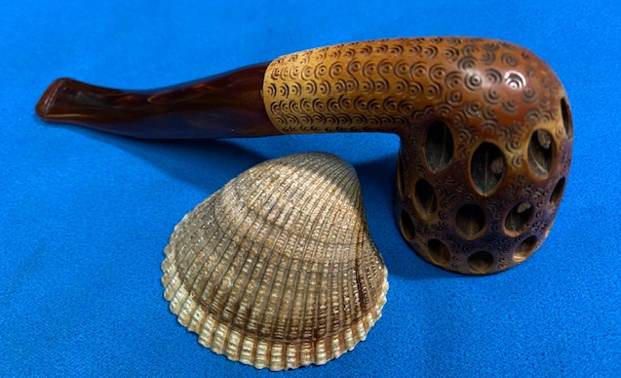
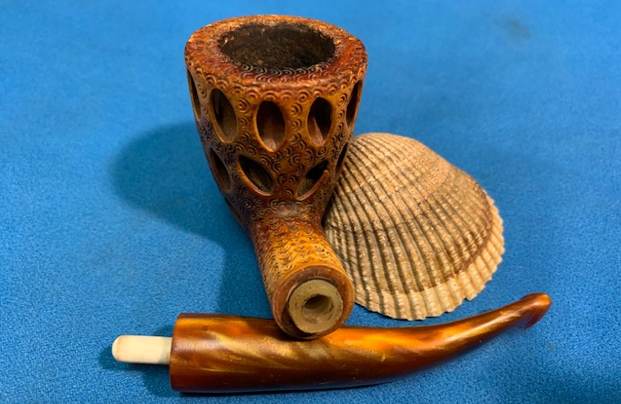
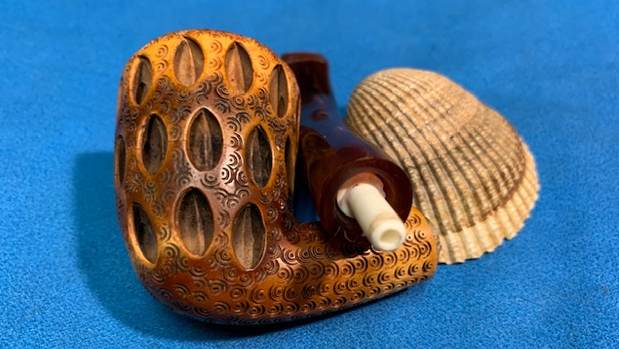
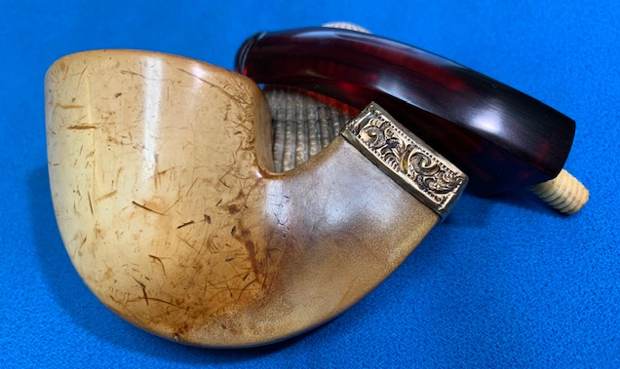
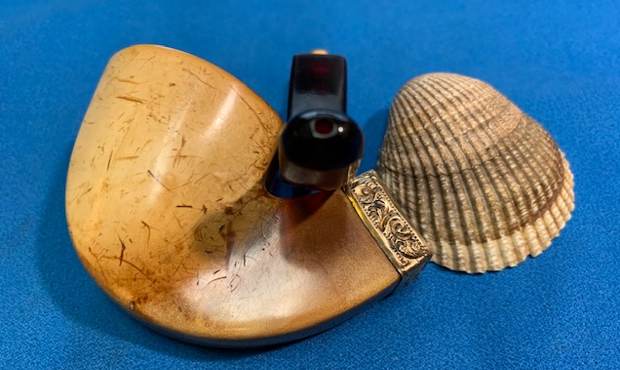
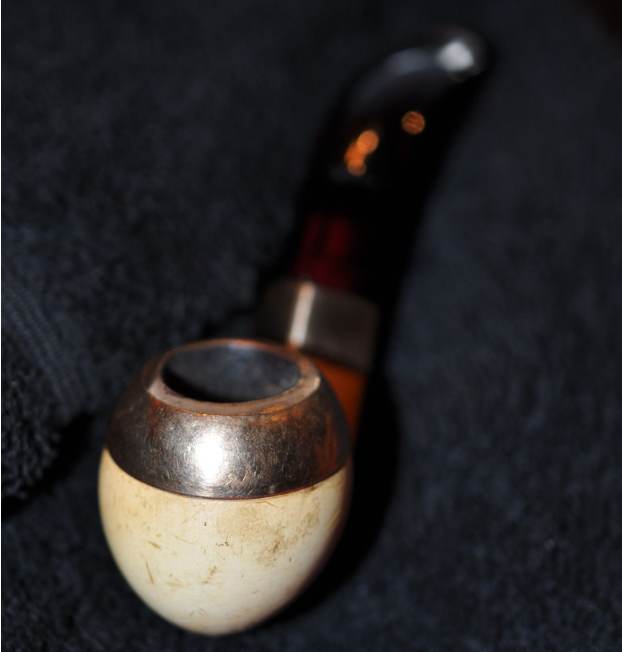
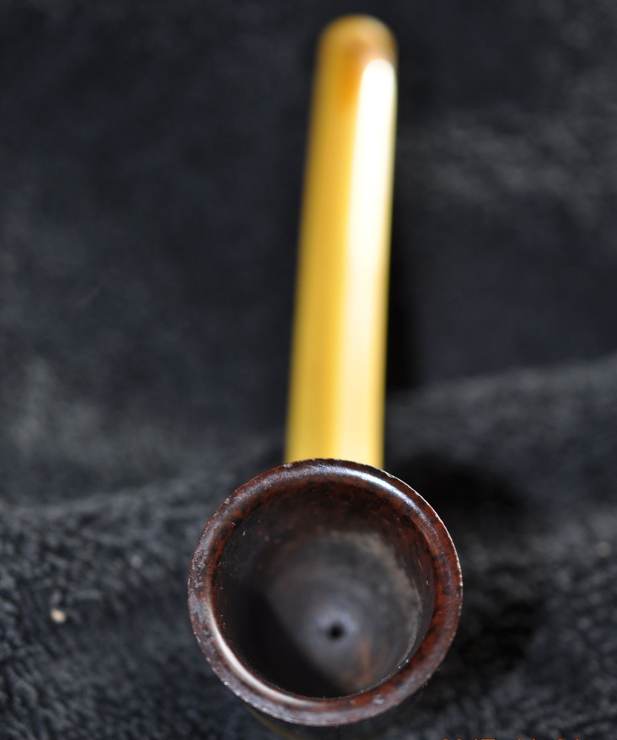
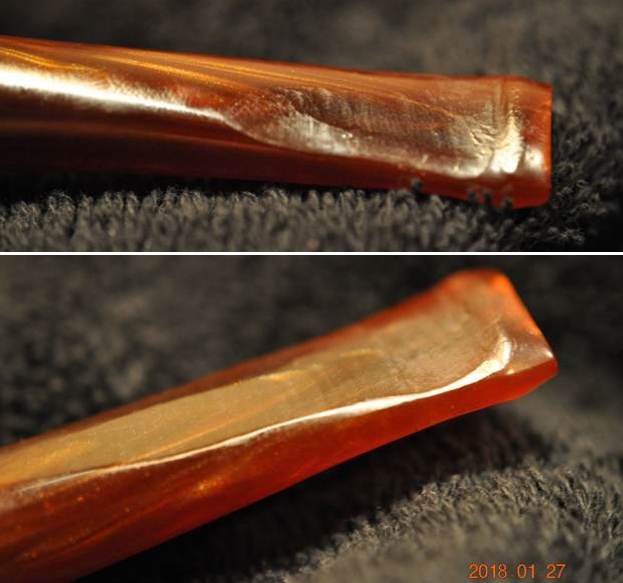
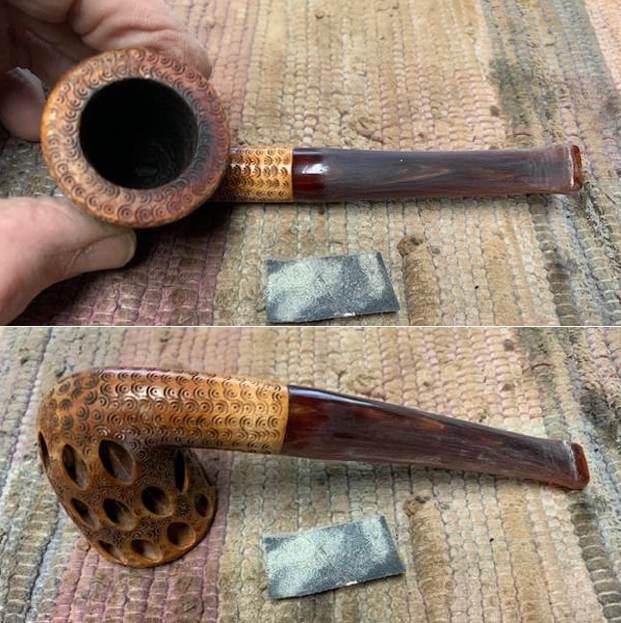
I took some close up photos of the bowl, rim top and both sides of the stem to show what they looked like before I started my part of the work. They are quite clean but the stem particularly is very roughly carved.
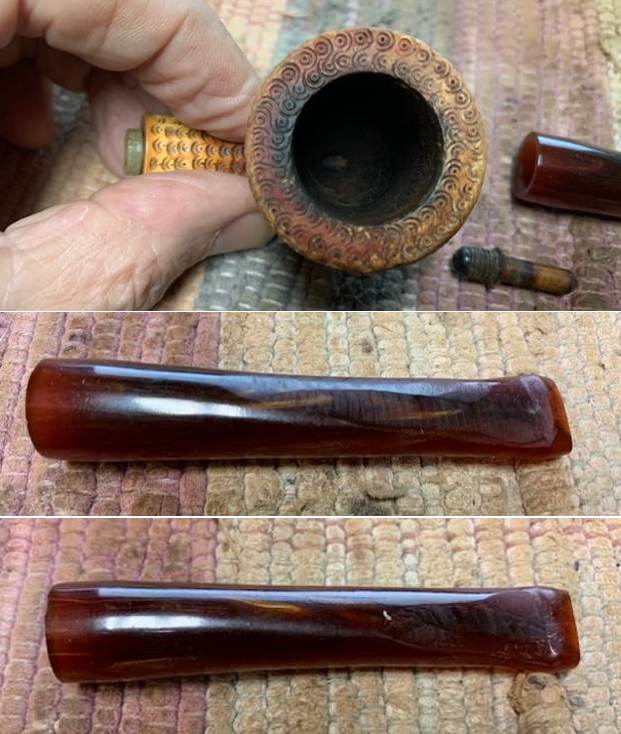
I went through my jar of tenons and found a push tenon that was close to the original size of the one that had been used. The threads on the stem end fit perfectly but the push tenon portion was slightly too big. I would need to reduce the diameter slightly to get a perfect fit.I used a small flat file to flatten out the ridges and waves in the top and underside of the stem. I also used it to recut the button and sharpen the edge for more definition. A lot more shaping work to go but it is going to work well.
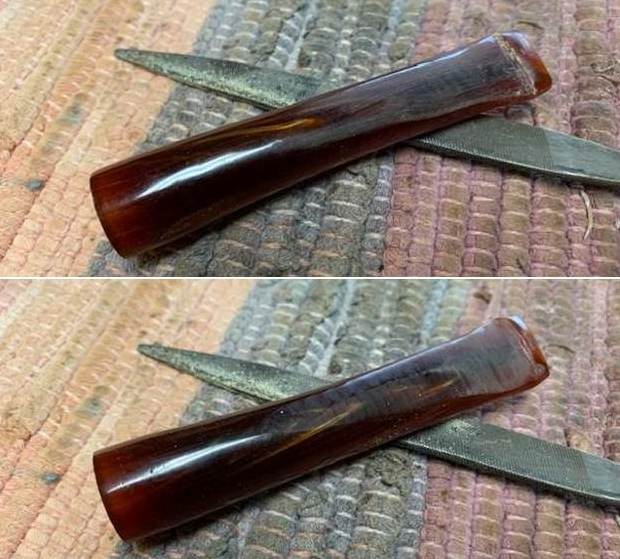
I fit the push tenon in the shank portion and it was smooth and snug but removable by my fingers with little problem. I thread it in the stem portion and tightened it. I would put the stem on the shank to further shape the stem.
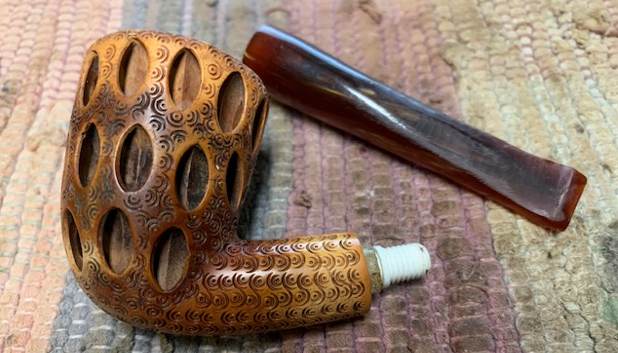
With the stem in the shank I sanded the stem with 220 grit sandpaper to further shape the stem and to remove the deep gouges and file marks from the previous pipeman’s work on it. It began to take shape with each pass of the sandpaper. 
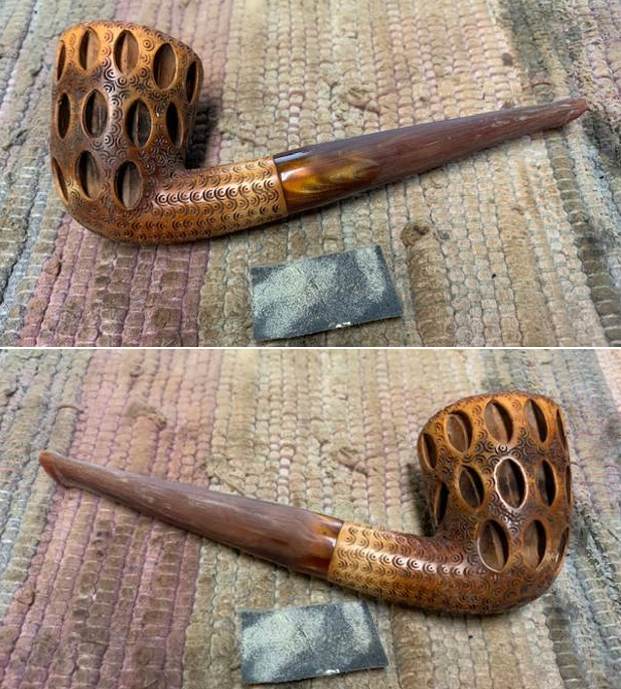
With the shaping on the stem basically finished and the rough sanding done I decided it was time to bend the stem to match the flow of the bowl. I heated it with a heat gun until the acrylic became flexible. I carefully bent it while on the pipe to make sure that the bend was not angled to either side. I wanted to take care of one of the shaping issues that I noticed in my work. The stem was tweaked slightly toward the right side. I knew I could not do much to change that but I could minimize it a bit in the bending. 
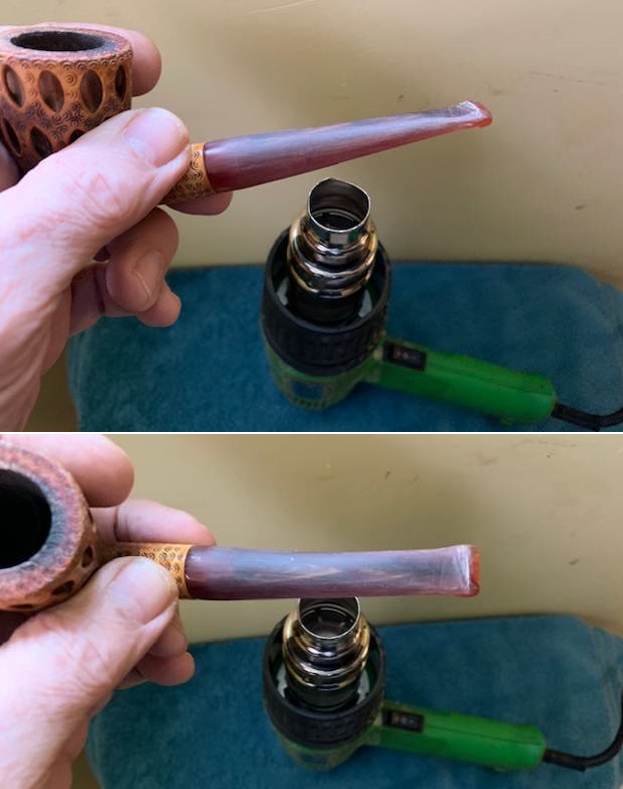
I bent softened stem to the right angle and cooled it quickly under water to set the bend. I took photos of the newly bent stem to show how it looked. I wanted the bend to reflect the bowl angles. I wanted the pipe to sit in the mouth with the bowl flat rather than angled down. The bend I put in worked to achieve that perfectly. I was also happy how the bend actually did minimize the rightward tweak of the stem. It looked much better. 
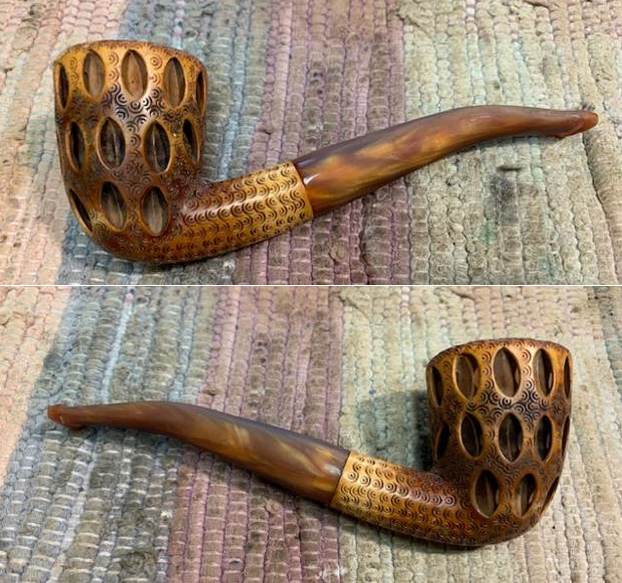
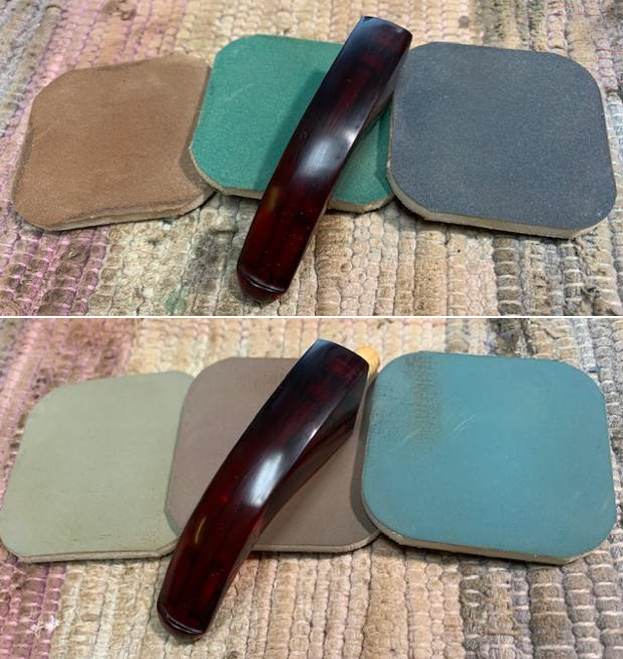
With the bend correct I went back to some final shaping of the stem surface. I worked on it with 220 grit sandpaper to get the shape I wanted. While not perfect it is a vast improvement from where it was when we purchased it. Once I had that I started the polishing of the stem with 400 grit wet dry sandpaper. It was starting to look really good!
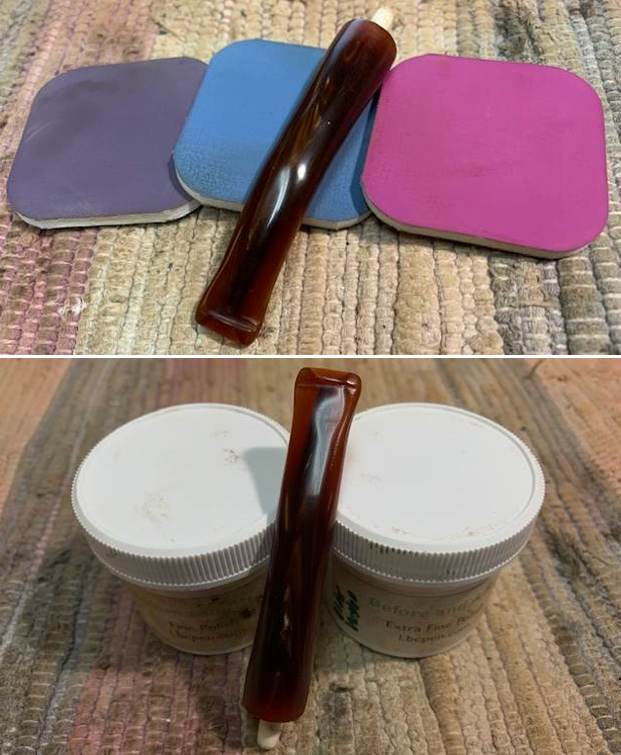
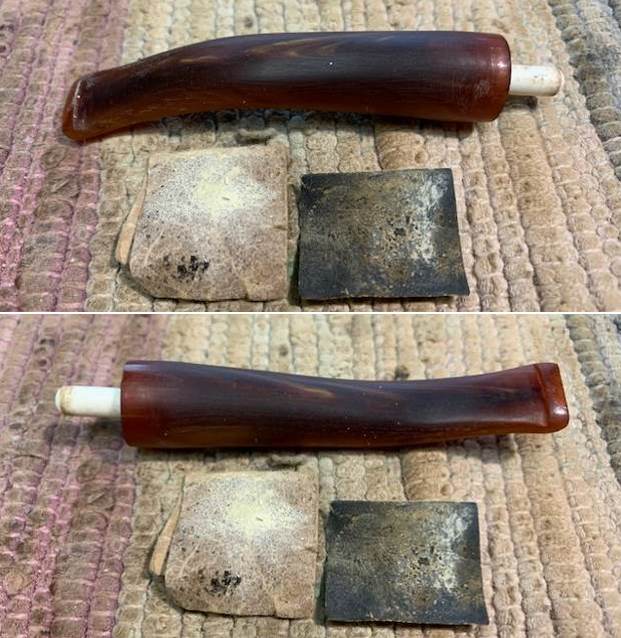
I polished the newly shaped acrylic stem with micromesh sanding pads – dry sanding with 1500-12000 grit sanding pads. I wiped it down after each sanding pad with a cloth containing some Obsidian Oil. I know Obsidian Oil does nothing for acrylic but I have found that it removes the small particles left behind by the polishing. I finished polishing the surface with Before & After Pipe Stem Polish – both Fine and Extra Fine and buffed it off with a cotton cloth. I gave it a final coat of obsidian Oil and set it aside to dry. It is a beautiful looking variegated brown/copper/gold acrylic stem. 
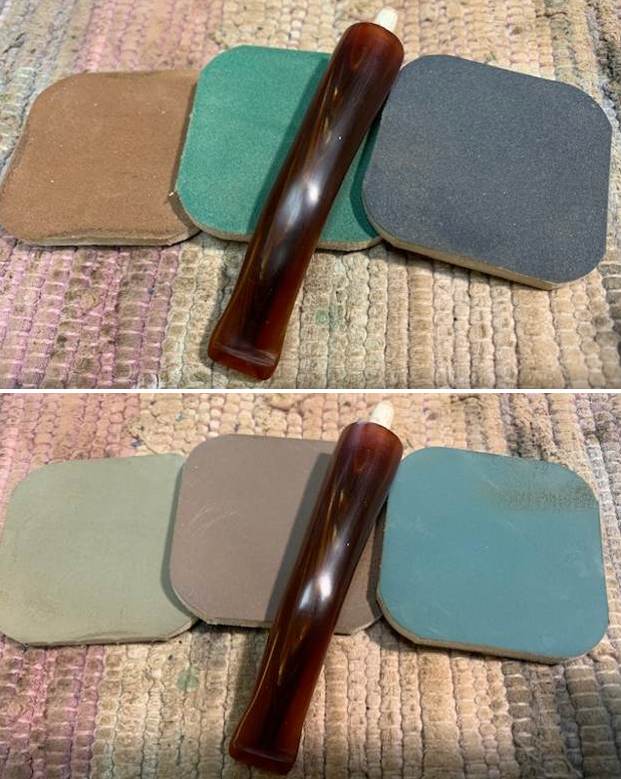
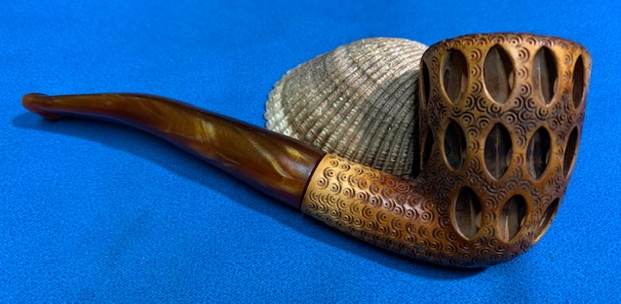
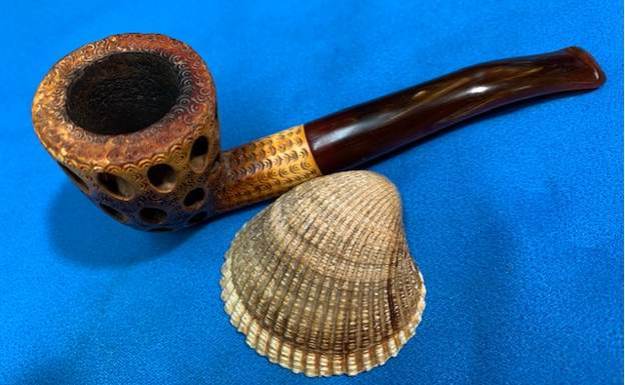
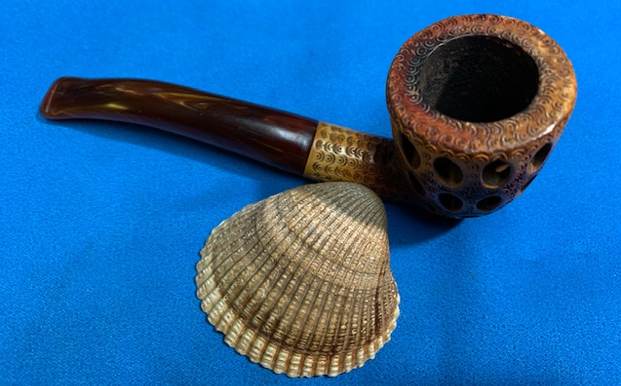
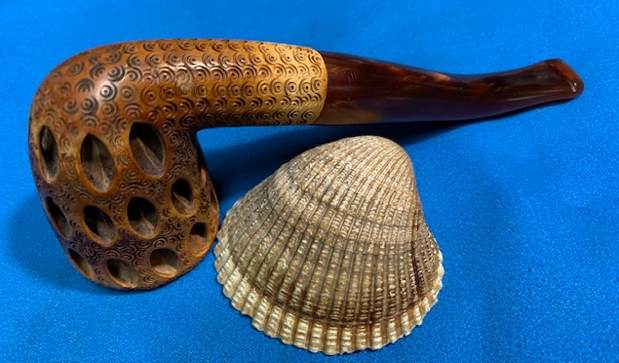
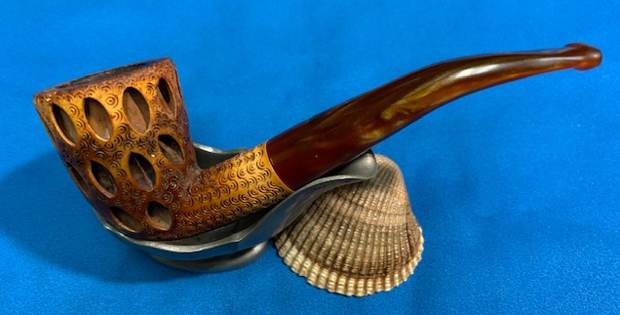
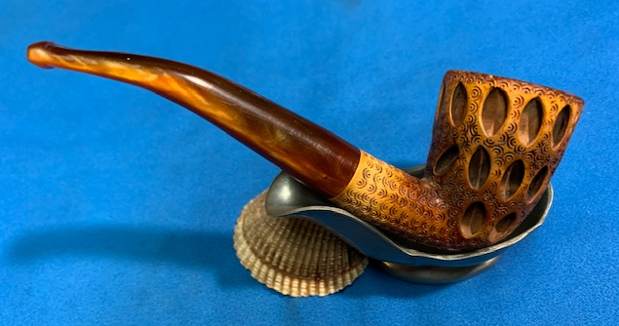
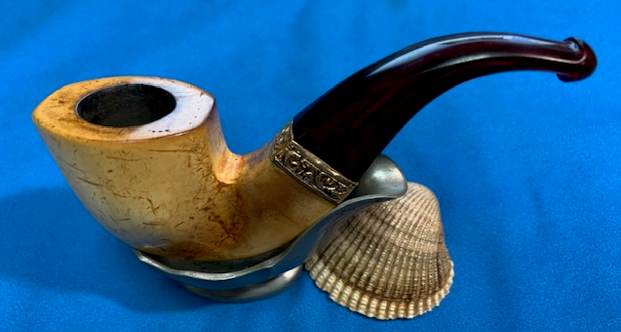
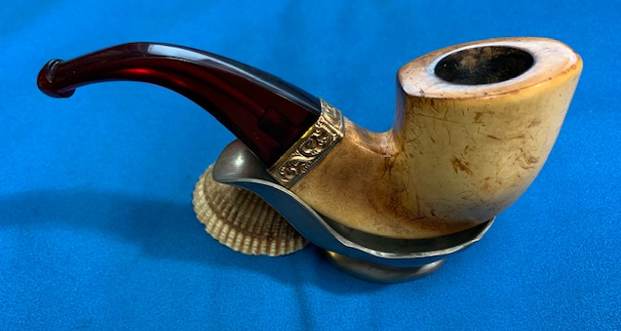
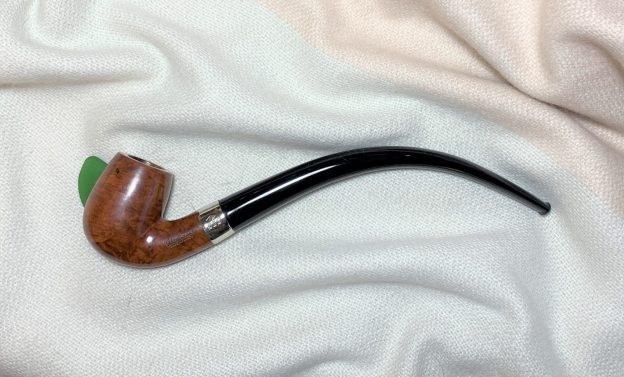
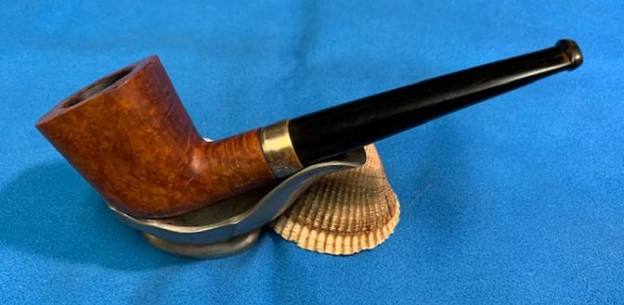
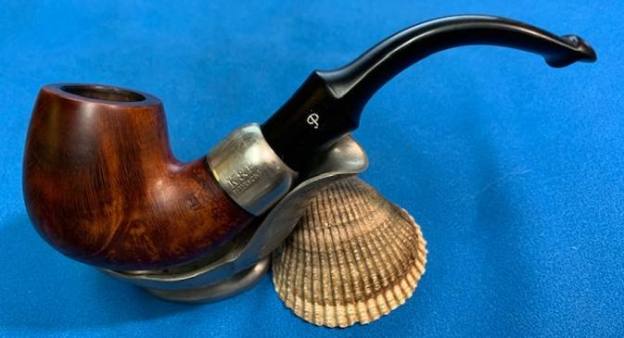
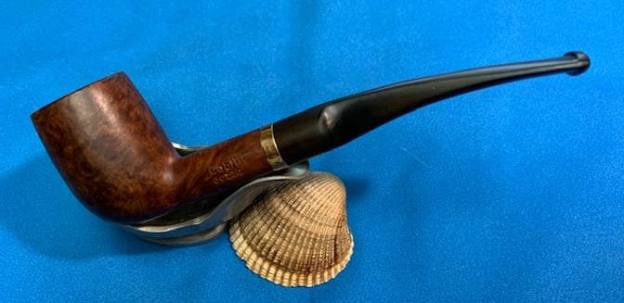
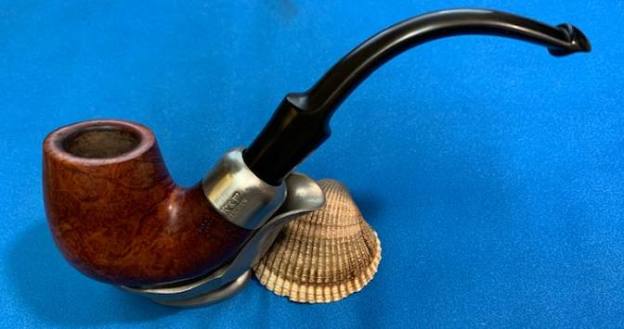
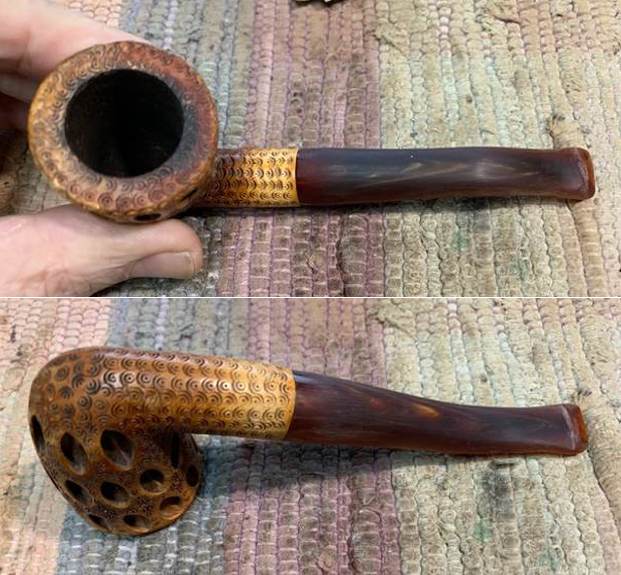
This Lace Carved Meerschaum Dublin turned out to be another fun pipe to work on and I was excited to see it come back together. With the grime and debris gone from the finish it was a beauty and the patina was quite nice. I chose not to rewax it because of the intricate lacework of the carving. I did not want to fill it in. I put the stem back on the bowl and carefully buffed the pipe with a clean buffing pad to raise the shine. I hand buffed the pipe with a microfiber cloth to deepen the shine. The rich polished meerschaum on the bowl looks really good with the polished variegated acrylic stem. It all came together better than I expected. Give the finished pipe a look in the photos below. I can only tell you that it is much prettier in person than the photos capture. The dimensions of the pipe are Length: 5 ½ inches, Height: 2 inches, Outside diameter of the bowl: 1 ½ inches, Chamber diameter: ¾ of an inch. The weight of the pipe is 37 grams/1.31 ounces. This is truly a great looking Meerschaum. Thanks for walking through the restoration with me as I worked over another beautiful pipe. I will be putting it on the rebornpipes store in the Ceramic and Meerschaum Pipe Section. If you are interested in the pipe send me an email or a message. Thanks for your time.

Reclaiming a Uniquely Shaped Cased Bent Opera Meerschaum with a Redmanol Stem


 Blog by Steve Laug

This afternoon I finished a nice little meerschaum apple with a gold rim cap and gold band on the shank and a Ruby Bakelite/Redmanol stem (https://rebornpipes.com/2021/12/25/next-on-the-table-is-a-blinged-out-meerschaum-bent-apple-with-a-ruby-bakelite-stem/). I posted it on the blog and it sold almost before it was on the store. I was contacted by another friend for the same pipe and had to tell him that it sold. I did however have another interesting one in the box that he might be interested in seeing. The pipe was also a meerschaum with rectangular shank, rolled gold band on the shank and a Red Bakelite stem. We purchased of Ebay from Queensbury, New York, USA. This pipe was heavily smoked and needed a lot of work but showed promise. The leather cover on the case was in was worn but still in decent condition. There was some wear on the edges of the case but the hinges and lock worked very well.Don’t you want to know what is inside of this case? Do you want to compare it with the other meerschaum I wrote about? Well… I will get there. Jeff opened the case to show us what the pipe looked like inside. The lining of the case was worn and had a faded green colour to it. There was not identifying stamp on the lid. The rolled band was ornate and filigreed. It really was a beautiful looking older pipe. Jeff took a photo of the pipe in the case. It look like it had been smoked hard and often. The case was filled with chunks of tobacco and ash and the rim top was covered with thick lava. The meerschaum however was really beginning to take on some nice patina – particularly on the shank. Have a look at this beauty!He removed it from the case and really it is the first look of the profile of this interestingly shaped old timer. I would almost call it an Opera pipe but it is a bit big for that. It is however longer and thinner than a standard bowl. Otherwise it is a squashed bent Dublin. It is really filthy but look at the patina on the shank and the rolled gold band on the shank. It is really quite lovely. The second photo below shows the top view of the pipe. You can see the cake in the bowl and the lava on the rim top but do not miss the shape of the bowl. It is a unique one for sure. Jeff took some close up photos of the rim top to show the lava build up and the very thick cake in the bowl. It really made me wonder what the inner edge of the bowl looked like. You can also see some of the scratches on the side of the bowl. It is a mess but… The stem is very nice and actually surprisingly unchewed. There are light tooth marks and chatter on the stem surfaces but nothing deep and the shape is also quite unique. The rolled gold band on the shank is also very ornate.He took some photos of the sides and heel of the bowl to give a sense of the wear and tear on the pipe. You can see it has been a hard worn and greatly used pipe. It must have been a terrific smoker and someone’s favourite go to pipe. I really like the look of the patina on the shank. The mottled reds and browns are very nice. Jeff had cleaned it thoroughly. He had reamed it carefully with a PipNet reamer and cleaned that up with a Savinelli Fitsall Pipe Knife. He worked slowly so as not to damage the inner edge of the bowl. It was a mess. He had scrubbed the exterior of the meerschaum with undiluted Murphy’s Oil Soap and a soft tooth brush. He cleaned out the interior of the shank and airway with alcohol, pipe cleaners and cotton swabs. He carefully cleaned out the Bakelite stem with clean water and pipe cleaners to remove the debris and oils in the airway and the threads of the bone tenon. I took photos of the pipe when it arrived here. The first two photos show case after he had cleaned it in the process. The third photo shows the pipe in the fitted case The overall look of the pipe after cleaning shows the tiredness and worn look of the bowl sides. The stem on the other hand is quite remarkably unscathed and the bone tenon almost looks new. The pipe is a beauty in the rough and definitely needs some TLC. I took a close up photo of the bowl and rim top to show the condition of the cleaned bowl and rim. You can see the clean bowl and the many scratches and darkening on the back edge and top of the rim. I also took some photos of the stem to show how it looked. It was remarkably clean. Even the tooth chatter and marks were very minor.I unscrewed the stem from the shank to see an almost new looking threaded bone tenon on the stem. Amazingly it was free of damage and had not been over or under-turned in the shank.I decided to start my work on this pipe by addressing the damage to the inner edge of the rim and the rim top. I used a folded piece 220 grit sandpaper to work over both. I was able to remove most of the damage on the inner edge and a fair bit on the rim top with the sandpaper. It definitely is an improvement.I polished the briar and the shank with micromesh sanding pads – dry sanding with 1500-12000 grit pads. I worked on the rim top and make it even better looking. I figured that once I heated it to rewax they would look significantly different (Time will tell). I wiped the bowl down after each pad with a damp cloth. The meerschaum began to shine and the scratches were less intrusive. The photos tell the story!   Now it was time to wax the meerschaum bowl. I melted a block of beeswax and dipped the pipe I in the mix and painted the wax with a cotton swab into the hard to reach spots on the shank corners. I heavily coated the bowl with the liquid wax. I let the wax harden dry then I used the cork as a handle while I heated it with a heat gun. As the wax melted I wiped it off with a paper towel. I let the excess drip back into the container. The bowl began to really take on some patina even though the scratches also stood out more. Those scratches were part of the story of the pipe’s journey. I buffed it with a soft cloth and took pictures of the pipe at this point in the process of the restoration. The wax did its magic and the patina was rich and deep. Even the scratches looked better to me! The pipe is well traveled and the scratches help tell the story. I set the bowl aside and turned to deal with the stem. I polished the Bakelite stem with micromesh sanding pads – dry sanding with 1500-12000 grit sanding pads. I wiped it down after each sanding pad with a cloth containing some Obsidian Oil. I finished polishing it with Before & After Pipe Stem Polish – both Fine and Extra Fine and buffed it off with a cotton cloth. I gave it a final coat of obsidian Oil and set it aside to dry. It is a beautiful looking ruby coloured stem. This beautiful no name Bent Opera shaped Meerschaum with a Bakelite stem was another fun pipe to work on and I really was looking forward to seeing it come back together again. With the grime and debris gone from the finish it was a beauty and after the waxing with Beeswax the patina was quite nice. The rolled gold filigreed band on the shank is an added bonus. I put the stem back on the bowl and buffed the pipe with Blue Diamond on the buffing wheel.  I buffing it with a clean buffing pad on the buffer to raise the shine. I hand buffed the pipe with a microfiber cloth to deepen the shine. The rich polished meerschaum on the bowl looks really good with the polished ruby Bakelite stem. It is very well done. Give the finished pipe a look in the photos below. I can only tell you that it is much prettier in person than the photos capture. The dimensions of the pipe are Length: 5 inches, Height: 2 inches, Outside diameter of the bowl: 1 1/8 inches x 1 ¾ inches, Chamber diameter: 7/8 of an inch. The weight of the pipe is 39 grams/1.38oz. This is truly a great looking Meerschaum. Thanks for walking through the restoration with me as I worked over another beautiful pipe. This beauty has already been spoken for and is reserved for the next pipeman. I hope to send it out in the mail tomorrow. Thanks for your time.

Next on the table is a Blinged Out Meerschaum Bent Apple with a Ruby Bakelite Stem


Blog by Steve Laug

We finished up around the tree and our Christmas Breakfast so now there is a quiet time before we eat again. I decided that a snowy Christmas day in Vancouver demanded the right pipe to be worked on so I think I chose appropriately. We bought the pipe I chose at an auction from a fellow in Los Angeles, California, USA. Though it is not shiny white and new looking it is a meerschaum ball/apple/ornament with a gold rim cap and shank band that are quite blinged out and beautiful. The bowl had a thick cake and there was a light lava overflow on the rim. The gold coloured rim cap looked good underneath the lava and oils. The exterior of the bowl and shank was smooth and starting to develop some colouring on the shank and sides. The finish had a lot of scratches and some dark spots on the bottom side of the diamond shank near the band. The pipe did not have any stamping on the shank or band. The rim cap had some nicks and dents in it but they did not detract from the beauty of the pipe. The shank band was also scratched but not dented. The Bakelite (Redmanol) stem was in excellent condition with light tooth marks on the surface in front of the button. I expected the stem was screwed onto the shank but that would be revealed soon enough. Jeff took photos of the pipe before he started his cleanup work. Jeff captured the condition of the bowl and rim top with the next series of photos. You can see the work that is ahead of us in the photos. The cake is very thick and heavy. The rim looked like it might have some damage on the top and inner edge of the cap. The photos of the stem show the shape and the top and underside of the stem. It is dirty and there is some gummed stickiness on the underside where there must have been a price sticker. The tooth marks and chatter was very light on both sides. Jeff took some great photos of the sides of the bowl and heel showing what is underneath the developing patina and the scratches in the surface of the meerschaum. It will be interesting to see what happens as the pipe is cleaned and restored. He removed the stem from the shank. You can see the threaded tenon end in the shank of the pipe and the wide open airway in the stem. It looks to me that there is a push tenon in the shank and the threading was for anchoring it in the stem. I took it out of the box of pipes and looked it over. It was amazingly clean. Jeff carefully reamed it with a PipNet pipe reamer and cleaned up the reaming with a Savinelli Fitsall Pipe Knife. He scrubbed out the internals with alcohol, pipe cleaners and cotton swabs until the pipe was clean. He scrubbed the exterior of the bowl with Murphy’s Oil Soap and a tooth brush to remove the grime and grit on the meerschaum and the lava and oils on the rim top. The bowl looked very good. He scrubbed the stem with Soft Scrub to remove the grime and rinsed it off with warm water. It came out looking far better. Now it was time for me to do my work on the pipe. I took photos before I started my part of the work. I took some photos of the rim top and stem. The rim top is clean but you can see some of the dents in the gold cap. I am afraid that they will remain a permanent part of the pipe’s story. The bowl itself looks very clean. The close up photos of the stem shows that is it very clean and the tooth marks are visible.The way the stem lined up with the shank made me wonder about the tenon system that was used. From Jeff’s photos it looked like the threaded portion sticking out of the shank was part of a push tenon system. If that was true then I truly believe that someone had replace the original bone tenon on what I think is actually an older pipe with a new push tenon system. The stem has an orific opening on the end and it is definitely made of Bakelite. I unscrewed the stem from the shank and then pulled the tenon free from the shank end. It was indeed a push tenon. I took a photo of the bowl and stem to give a sense of the proportion of the pipe. It is a classic looking apple for sure.I polished the briar and the shank with micromesh sanding pads – dry sanding with 1500-12000 grit pads. I worked on the two dark spots on the underside of the shank and was able to determine they were not burn marks but rather spots that had taken on a dark patina.I figured that once I heated it to rewax they would look significantly different (Time will tell). I wiped the bowl down after each pad with a damp cloth. The meerschaum began to shine and the scratches were less intrusive. The photos tell the story!   Now it was time to wax the meerschaum bowl. I melted a block of beeswax and dipped the pipe I in the mix and painted the wax with a brush into the hard to reach spots on the shank corners. I heavily coated the bowl with the liquid wax. I let the wax harden dry then I put a cork in the bowl to provide a handle while I heated it with a heat gun. As the wax melted I wiped it off with a paper towel. I let the excess drip back into the container. The bowl began to really take on some patina and the dark spots changed in colour. I buffed it with a soft cloth and took pictures of the pipe at this point in the process of the restoration. The wax did its magic and the patina was rich and deep. Even the scratches looked better to me! I set the bowl aside and turned to deal with the stem. I polished the Bakelite stem with micromesh sanding pads – dry sanding with 1500-12000 grit sanding pads. I wiped it down after each sanding pad with a cloth containing some Obsidian Oil. I finished polishing it with Before & After Pipe Stem Polish – both Fine and Extra Fine and buffed it off with a cotton cloth. I gave it a final coat of obsidian Oil and set it aside to dry. It is a beautiful looking ruby coloured stem. This beautiful no name Bent Apple shaped Meerschaum with a Bakelite stem was another fun pipe to work on and I really was looking forward to seeing it come back together again. With the grime and debris gone from the finish it was a beauty and after the waxing with Beeswax the patina was quite nice. I put the stem back on the bowl and buffed the pipe with Blue Diamond on the buffing wheel.  I buffing it with a clean buffing pad on the buffer to raise the shine. I hand buffed the pipe with a microfiber cloth to deepen the shine. The rich polished meerschaum on the bowl looks really good with the polished ruby Bakelite stem. It is very well done. Give the finished pipe a look in the photos below. I can only tell you that it is much prettier in person than the photos capture. The dimensions of the pipe are Length: 4 ½ inches, Height: 1 ¾ inches, Outside diameter of the bowl: 1 inch, Chamber diameter: ¾ of an inch. The weight of the pipe is 35grams/1.23oz. This is truly a great looking blinged out Meerschaum Bent Apple. Thanks for walking through the restoration with me as I worked over another beautiful pipe. I will be adding it to rebornpipes store in the Ceramic and Meerschaum Pipes section if are interested in adding it to you collection. Let me know by email or message. Thanks for your time.

A Christmas Pipe for Me – A 1920s Champion Made in France House Pipe


The research on this one answers several mysteries on pipes that I have worked on. Now I want to know if the Swiss Champions I worked on marked France were made by the same French Company Dal Identified. Good job!

Dal Stanton's avatarThe Pipe Steward

My son, Josiah gifted this pipe to me Christmas of 2018. He was in St. Louis working on his master’s degree and happened upon a lot of 26 pipes in an antique store nearby where he lived. He knew that I’m always looking for pipe deals to help benefit the Daughters of Bulgaria – a work helping women and girls who had been trafficked and sexually exploited. Josiah saw a bunch of good pipes in the batch and sent a text to me in Bulgaria with pictures and this proposal – that he would split the cost of purchasing the Lot of 26 on the condition that I would pick one from the Lot that would be his gift to me for Christmas. That year our family gathered in Denver to celebrate Christ’s birth, and my wife and I flew from Bulgaria to join them. A gift-wrapped box was under…

View original post 4,207 more words

Repairing a Horn Stem on an Heirloom Czech-Made Bavarian


I am a lover of horn stems and also pipes that come with identifiable stories. Thanks for sharing this one Charles and thanks for the preservation work on it. Well done.

Charles Lemon's avatar

Every now and again I get the particular pleasure of working on a family heirloom pipe, a treasured part of someone’s family history they wish to preserve for display or their own use. This Made in Czechoslovakia Bavarian style pipe is one such piece, first owned by the current pipe steward’s grandfather.

As this first series of photos shows, the pipe was in fairly good shape for its age, though there were certainly signs of wear and tear. The nickel bowl cap had been lost , though the rim ring and half of the hinge were still present. A layer of carbon covered most of the rim ring, but it didn’t appear to be dented or otherwise damaged.

The varnish coat on the stummel was flaky, with patches worn off here and there, which gave the pipe a rather unloved look. The stem, attached to the bowl ring by a…

View original post 1,088 more words

Restoring a Unique Bakelite Dublin with a Removable Bowl


Blog by Steve Laug

This next pipe on the table is a really unique looking piece. It is like a Bakelite version of a Falcon Metal pipe but I think it is older than them. The pipe had a yellow Bakelite single unit base and stem with a metal decorative ring and a brown Bakelite bowl. There is no mark or stamp any where on the base or on the bowl to identify the maker of the pipe. Jeff bought it from an antique store on September 09, 2017 in Salt Lake City, Utah, USA. The pipe had been well smoked. There was a light cake in the bowl and a bit of lava on the rim top. The base was dirty inside and there were light tooth marks on the top and underside of the mouthpiece. Jeff took some photos of the pipe before he started his clean up work. Jeff took some closer photos of the bowl and the sides of the stem. The rim top looks to be in good condition. The inside of the bowl has a thin cake in the bottom half of the bowl. The rim top is dirty. The stem/base is clean but has some light tooth marks on both sides. He took a picture of the base of the bowl and sides of the bowl. It is a very nice looking Bakelite bowl and base. There was some buildup and sludge on the bottom of the bowl and the base. The brass ring was loose and worn looking. It is not clear to me if the brass ring is meant to be on the base or on the bowl.Jeff unscrewed the bowl from the base and what a collection of tars and oils had collected in hollow of the base and on the surface where the bowl sat when screwed in. He also took photos of the ring. The threaded base of the bowl was filthy with tars, oils and shards of tobacco on the surface. This unique Bakelite base and bowl is an incredibly light and almost indestructible pipe. It is the kind of pipe that can be put in the pocket and carried along. The filthy pipe had cleaned up well. Jeff had reamed the bowl with a Savinelli Fitsall Pipe Knife to remove the light cake. He then scrubbed the outside of the bowl and base with undiluted Murphy’s Oil Soap and rinsed it off. He cleaned the inside of the shank and the airway in the shank and stem with alcohol, cotton swabs, and pipe cleaners. The Bakelite cleaned up remarkably well. The grain in the bowl portion was very nice. The gold base ring was thin and clean and looked very good. The base and stem is Bakelite as is the bowl. There are some faint tooth marks and chatter. It has an orific button (round air hole) on the end of the button. I took some photos of the pipe to show the condition when I received it. It was an interesting piece of pipe history from someone’s collection and it had been well smoked. I took close up photos of the bowl and rim top and the stem to show their condition. You can see the clean bowl. There were some light nicks and scratches on the Bakelite rim top that would need to be polished out but it was nice looking. The stem and base looks really good. There was some darkening on the end of the stem and the bottom of the base but it was very clean. There was some light tooth chatter on both sides.I took the pipe apart and took photos of the parts to show how it all worked. The base had tobacco stains and tars but was very clean. Have a look at the parts. I polished the yellow Bakelite base and mouthpiece with micromesh sanding pads – dry sanding it with 1500-12000 grit sanding pads. I wiped it down after each pad with a cloth impregnated with Obsidian Oil. I worked some Before & After Restoration Balm into the surface of the base and stem. I find that it works well to clean, preserve and protect Bakelite as much as it does briar. I like the way it works and the way the base looks when it is polished. I spread some white all purpose glue on the ledge on the base to anchor the brass band on the top. I used a dental spatula to spread the glue around the surface of the Bakelite. I pressed the band in place on the base and screwed the bowl on top to press it down into the glue until the band cured.I polished out the scratches and nicks on the rim top with micromesh sanding pads. I worked my way through 1500-12000 grit pads and wiped the top and bowl down with Obsidian Oil on a cloth to protect the surface after each pad. I worked some Before & After Restoration Balm into the surface of the Bakelite bowl. I find that it works well to clean, preserve and protect Bakelite as much as it does briar. I like the way it works and the way the base looks when it is polished.I really enjoyed refurbishing this unique Bakelite Base and removable Bowl because I love the final touches that make it sing. I put the bowl and stem back together to have a look at the whole with all it of it polished. I carefully buffed the bowl and stem with Blue Diamond on the wheel. I gave it several coats of carnauba wax and buffed the pipe with a clean buffing pad to raise the shine. I hand buffed it with a microfiber cloth to deepen the shine. It is fun to see what the polished bowl looks like with the silver plated band and the polished yellow Bakelite base and stem. This unique Bakelite Dublin System is light weight and it is clean and ready load up with a favourite tobacco. Have a look at it in the photos below. As noted above, Its measurements are Length: 4 ½ inches, Height: 1 ¾ inches, Outside diameter of the bowl: 1 ¼ inch, Diameter of the chamber: 1 inch. The weight of the pipe is 26 grams/.92 oz. I will be putting it on the rebornpipes store in the American (USA) Pipemakers section. If you would like to add it to your collection let me know by message or email. Thanks to each of you who are reading this blog. Remember we are not pipe owners; we are pipemen and women who hold our pipes in trust until they pass on into the trust of the next generation. 

A Rare Find – a CPF (Colossus Pipe Factory) Panel Dublin


Blog by Steve Laug

The next pipe on the worktable is another interesting piece of pipe history that comes from the bag of old pipes that I have been working on intermittently. This one is an interesting panel Dublin with a round shank. The bowl was a mess both inside and out. It must have been a great smoking pipe. The bowl had a thick cake with a thick overflow of lava on the rim top and edges. The finish on the briar was a mess. The front of the bowl had a lot of flaws that ran along the cross grain on the bowl. The fills in the flaws had fallen out and the grain was open. The band was stamped in gold and read Genuine French Briar in an oval with French in the centre of the stamp. The shank was banded with a silver plated band that was stamped C.P.F. in an oval with three false hallmarks above that stamp. The stem was vulcanite that had oxidized and had tooth marks on the top and underside near the button. It has a push tenon and an orific button on the end. The fit in the shank was very tight and it did not fit tightly against the band face. Jeff took photos of the pipe before he started his clean up. He took photos of the rim top and the stem to show the condition of both. The rim top and bowl had a thick cake and overflowing lava coat. The stem showed the oxidation that was deep in the vulcanite and the tooth marks and chatter on both sides ahead of the button.Jeff took some photos of the flaws in the front panel of the bowl. You can see that they follow the grain across the bowl. They go across the bowl and evenly spaced down the bowl front. There are also some paint spots on the front of the bowl.He took photos of the stamping on the left side of the shank and the band on the shank end. It is clear and readable on both of them.A short description would be that it is a heavily smoked Panel Dublin with a silver plated band and vulcanite push stem. It is stamped on the left side of the shank and reads Genuine [arched over] French [arched over] Briar all in an ovals shape. The band on the shank end is stamped with three faux hallmarks that I have seen on many C.P.F. pipes [over] C.P.F. in an oval. I have a collection of C.P.F. pipes here that I have worked to build up over the years in all different sizes and shapes as well as a variety of materials. This old Panel pipe will fit well into that collection. I wrote a blog a few years ago on the brand that gives a clear history and defines the meaning of the C.P.F. stamp. Here is the link to the blog and a pertinent quote that I am including below.

(https://rebornpipes.com/2013/04/14/some-reflection-on-the-historical-background-on-cpf-pipes/).

From my research I believe that we can definitively assert that the C.P.F. logo stands for Colossus Pipe Factory. The brand was purchased by KB & B sometime between 1884 and 1898 and that it continued until 1915. That time frame gives help in dating some of the older CPF pipes you or I might find. It can be said that prior to the dual stamping it is fairly certain that the pipe is pre-1884 to 1898. After the dual stamping it can be placed post 1898 until the closure of the brand line in 1915. CPF made beautiful pipes. I believe Sam Goldberger was correct in his assertion of the potential carvers that made the pipes being of European training and the classic shapes and well aged briar. That coincides with all the CPF pipes that I have come across.

This well shaped hard smoked C.P.F. is a real beauty. The rim top is worn but clean now that Jeff has done his magic clean up. He reamed the bowl with a PipNet pipe reamer and cleaned up the reaming with a Savinelli Fitsall Pipe Knife. He scrubbed the outside of the bowl with undiluted Murphy’s Oil Soap and rinsed it off. He scrubbed out the inside of the shank and the airway in the shank and stem with alcohol, cotton swabs, and pipe cleaners. The finish is dull and lifeless but there is some great grain poking through the dry briar. The gold stamping is faint but readable. The silver plated band is lightly corroded on the left side near the stem. The marking on the band is readable. The stem is vulcanite. There are some faint tooth marks and chatter. It has an orific button (round airhole) on the end of the button. I took some photos of the pipe to show the condition when we received it. It was dusty, dirty and had some grime worked into the surface of the briar from sitting unused in someone’s collection. I took close up photos of the bowl and rim top and the stem to show their condition. You can see the clean bowl and the heavily damaged inner edge of the rim. The rim top has a lot of scratches and marks in it. The stem has some oxidation remaining as well as a misfit of the tenon against shank band.I took a photo of the stamping on the left side of the shank. You can see that it is faint but still was readable.I removed the stem from the shank and took a photo of the parts to give a sense of the beautiful proportions of this nice little pipe. I think it will be quite stunning once it is restored.I took a photo of the flaws in the surface of the bowl front. I filled them in with clear CA glue to smooth out the surface. Once the repairs cured I sanded them smooth with a folded piece of 220 grit sandpaper. The surface looked much better once the repair was blended in. With the flaws repaired I addressed the faded stamping on the shank side. I worked in some Rub’n Buff Antique Gold into the stamping with a tooth pick. I buffed off the excess gold with a soft cloth.I polished the briar with micromesh sanding pads and dry sanded with 1500-12000 grit pads. I wiped the bowl down with a damp cloth after each pad to remove the sanding debris and dust. By the end the bowl was taking on a natural shine and the grain really stood out. I rubbed the bowl and shank down with Before & After Restoration Balm. I worked it into the surface of the bowl sides and shank with my fingertips to clean, enliven and protect the briar. I let the balm sit for 10 minutes, then buffed with a cotton cloth to raise the shine. The Balm did its magic and the grain stood out on the briar. I set the bowl aside and turned to deal with the stem. I scrubbed it with Soft Scrub to break down the oxidation that was deep in the vulcanite. I was able to remove a large portion of it that way. I then sanded it with 220 grit sandpaper to remove more. I started polishing it with 400 grit wet dry sandpaper. I polished out the scratches and more of the oxidation in the surface of the vulcanite with micromesh sanding pads – 1500-12000 grit pads. I wiped it down with Obsidian Oil after each pad. I used Before & After Pipe Polish – both Fine and Extra Fine to further polish the stem. I gave it a final coat of Obsidian Oil and set it aside to dry. I really enjoyed refurbishing this old C.P.F. French Briar Panel Dublin because I love the final touches that make it sing. I put the bowl and stem back together to have a look at the whole with all it of it polished. I carefully buffed the bowl and stem with Blue Diamond on the wheel. I gave it several coats of carnauba wax and buffed the pipe with a clean buffing pad to raise the shine. I hand buffed it with a microfiber cloth to deepen the shine. It is fun to see what the polished bowl looks like with the silver plated band and the polished black vulcanite stem. This richly finished C.P.F. Dublin is light weight and it is clean and ready load up with my favourite tobacco. Have a look at it in the photos below. As noted above, Its measurements are Length: 5 ½ inches, Height: 1 ¾ inches, Outside diameter of the bowl: 1 ¼ inch x 1 ¼ inch, Diameter of the chamber: ¾ of an inch. The weight of the pipe is 36 grams/1.27 oz. This is one will be joining other C.P.F. pipes in my personal collection of the brand as it is a unique addition. Thanks to each of you who are reading this blog. Remember we are not pipe owners; we are pipemen and women who hold our pipes in trust until they pass on into the trust of the next generation.

Breath of Life for a Republic Era Peterson’s System Standard 314 Bent Billiard


Blog by Steve Laug

The next pipe I have chosen is another Peterson’s System Standard pipe. This one is a nice smaller size It has a saddle style Peterson’s stem on the shank end. It came to us from the estate of Anglican minister that was a great friend of mine here in Canada. I was in the airport in Hong Kong when his daughter contacted me to tell me of his death and asked if I wanted to take on his pipes. I told her that I was sad to hear of his death but would gladly take on his pipes to restore and sell. This pipe was obviously a favourite of his. It had been well smoked and there was a thick cake in the bowl and lava overflowing onto the rim top. The briar was dirty with grime and dirt ground into the finish and some of the lava flowing down the bowl sides. The nickel ferrule was oxidized but undamaged. There were oils oozing out under the ferrule and also out of the top of the ferrule onto the stem. The pipe was stamped on the left side and read Peterson’s System Standard. On the right side it had the three line Republic of Ireland stamp [over] the shape number 314. The ferrule was stamped K& P over Peterson’s on the left side. The stem was oxidized, calcified and had tooth marks on both sides ahead of the button. The P logo stamp on the left side was also filled with grime. Jeff took photos of the pipe before he started his clean up work on it. Jeff captured the thick cake in the bowl and the heavy lava overflow onto the rim top in his photos. There really was no way of knowing what the edges looked like under the thick cake. You can also see the lava flowing down the sides of the bowl in the photos. The stem surface had a lot of tooth chatter and marks and was heavily oxidized and calcified. He took photos of the sides and the heel of the bowl to show the interesting grain patterns in the briar. It was quite beautiful.He took photos of the stamping on the sides of the shank and on the ferrule and stem. It is readable but faint in places.I remembered that Paresh had restored a Peterson’s System Standard 314 earlier this year and as usual had done good work on the research. I turned to his blog and read through his work on the pipe (https://rebornpipes.com/2021/07/24/helping-a-fellow-piper-with-his-dream-pipea-petersons-system-pipe/). I quote below from the section on his blog regarding the dating of the pipe.

While dating a Peterson’s pipe, I always fall back to my under mentioned favorite site; http://thepetersonpipeproject.blogspot.com/2007/07/dating-peterons-pipes.html

I quote from the above site.

Stamping of Bowl:

During the years of Kapp and Peterson’s business operations, the country of Ireland has undergone several name changes and K&P’s stamping on their pipes reflects these changes. Knowing these changes, a Peterson pipe can be roughly dated and placed in “eras.”

  • The Republic Era is from 1949 until the present. The Republic of Ireland was formed on 17 April 1949. From 1949 to present the stamp for this era is “Made in the Republic of Ireland” in a block format generally in three lines but two lines have been used with or without Republic being abbreviated.

With that information at hand I turned to work on the pipe itself. Jeff had thoroughly cleaned up the pipe. He reamed the pipe with a PipNet Pipe Reamer and cleaned up the remnants with a Savinelli Fitsall Pipe Knife.  He scrubbed the bowl with undiluted Murphy’s Oil Soap with a tooth brush. He rinsed it under running warm water to remove the soap and grime. He cleaned out the inside of the shank and the airway in the stem with alcohol, cotton swabs and pipe cleaners. He scrubbed the exterior of the stem with Soft Scrubb to remove as much of the oxidation as possible. He soaked the stem in Before & After Deoxidizer and rinsed it off with warm water. I took photos of the pipe once I received it. I took photos of the rim top and bowl as well as the stem to give a sense of the condition of both. The rim top looked had some scratching on the top and some damage to the inner edge but over all it was in much better condition than I thought. The stem cleaned up well and the tooth marks on the top and underside ahead of the button are visible in the photos.I took photos of the stamping on the shank sides. The are clear and readable as noted above. There is some faintness on parts of the stamping but it is still readable.I took the stem out of the shank and took a photo of the overall look of the pipe.I decided to start my work on the pipe by addressing the damage on the inside edge of the bowl and the rim top. I used a folded piece of 220 grit sandpaper to smooth out the edge. I topped the bowl with 220 grit sandpaper on a topping board. I wiped it down with a damp cloth and the rim top damage and burn marks on the outer edges were gone. I polished the briar with micromesh sanding pads – dry sanding with 1500-12000 grit pads. I wiped the bowl down after each pad with a damp cloth. I restained the rim top and inner edges with a Walnut Stain Pen to blend it into the rest of the surrounding briar. The match was good.I rubbed the bowl down with Before & After Restoration Balm. I worked it into the surface of the bowl sides and shank with my fingertips. The product works to clean, enliven and protect the briar. I let the balm sit for a little while and then buffed with a cotton cloth to raise the shine. I set the bowl aside and turned my attention to the stem. I “painted” the tooth marks on the surface with the flame of a lighter to lift them as much as possible. I was able to lift many of them but a few still remained. I filled in the remaining tooth marks with clear CA glue and set it aside to cure. I sanded the repairs smooth with a folded piece of 220 grit sandpaper to begin blending them into the stem surface. I started the polishing with some 400 grit wet dry sandpaper.I touched up the “P” logo on the stem with white acrylic fingernail polish. I worked it into the tails on the “P” with a tooth pick and scraped off the excess with my fingernail and then buffed it with a soft cloth.I set the bowl aside and turned to work on the stem. I polished the stem with micromesh sanding pads – 1500-12000 grit pads. I wiped it down with Obsidian Oil after each sanding pad. I used Before & After Pipe Polish – both Fine and Extra Fine to further polish the stem. This Republic Era Peterson’s System Standard 314 Bent Billiard with a vulcanite stem is a great looking pipe now that it has been restored. The beautiful grain that shines through the polished finish is stunning. As the pipe is smoked the patina should develop and look even better. I put the stem back on the bowl and carefully buffed the pipe with Blue Diamond on the buffing wheel. I gave the bowl and the stem multiple coats of carnauba wax on the buffing wheel and followed that by buffing the entire pipe with a clean buffing pad. I hand buffed the pipe with a microfiber cloth to deepen the shine. The finished Peterson’s System Standard 314 fits nicely in the hand and feels great. Give the finished pipe a look in the photos below. The dimensions of the pipe are Length: 5 inches, Height: 1 ½ inches, Outside diameter of the bowl: 1 1/8 inches, Chamber diameter: ¾ of an inch. The weight of the pipe is 45grams/1.59oz. This one has been reserved for first refusal. If you are interested in being in the queue for this pipe send me a message or an email. Thanks for reading this blog and my reflections on the pipe while I worked on it. There are many more to come!

Replacing a Broken Tenon on an Italian Made Capri Gozzo Billiard


Blog by Steve Laug

Yesterday I received an unexpected package from a fellow living in Port Clements, British Columbia. I say unexpected because I had not spoken to anyone from there about a repair. But here it was so I opened it to find a pipe with a broken tenon and a cheque for the work. There was a note in the package with a return address but no phone number or email. The pipe had the tenon broken off cleanly and stuck in the shank.The edges of the shank had some nicks in the edges and face on the left side. The stem face had some remnants but otherwise the break had been clean. The pipe was stamped on the left side of the shank and read Capri [over] Gozzo. On the right side of the shank it was stamped and read Made in Italy. The finish was dirty and there was a moderate cake in the bowl and lava overflowing on the rim top. It looked like he had dropped it somewhere along the way and snapped the stem off. The stem was lightly oxidized and had some chatter and tooth marks on both side ahead of the button but nothing to deep. I took some photos of the bowl and stem when I received it to show what it looked like when I received it here in Vancouver. I took photos of the rim top to show the condition of the bowl and the damage to the inner edge and the top of the rim. I also took photos of the stem to show the oxidation and tooth chatter on both sides at the button.I took a photo of the stamping on the left side of the shank. It was clear and readable as noted above.I took some photos of the shank end and stem end to show the broken tenon and the remnant on the face of the stem.I decided to start my work on the pipe by pulling the tenon from the shank. Usually I use a dry wall screw and twisted it into the airway. On this pipe it was stuck tight. I put it in the freezer for about 30 minutes and it was still stuck. I decided to drill it out and move on. I went through my tenons and found that I was missing the black Delrin one that I needed for the size of the shank. I did find a threaded white Delrin one that would fit the shank with a few minor adjustments. I used a Dremel and sanding drum to remove the shoulder ahead of the threads and it fit perfectly in the shank. I am hoping that the fellow will return my calls so I can chat with him about the tenon. No luck on many phone calls so the tenon was glued in place this morning.Now it was time to work on replacing the broken tenon. I drilled out the face of the stem with a cordless drill and a bit roughly the size of the airway in the stem. I find that this helps to center the drilling. I worked my way through drill bits up to 15/64s which is approximately the size of the threaded portion of the tenon.I turned the threaded portion of the tenon into the drilled airway and the fit was perfect. I used a dental pick to spread some black CA glue on the threads of the tenon and turned it in place in the stem. I set it aside to wait for the glue to cure.While the glue cured on the new tenon I turned my attention to the bowl. I reamed the bowl with a Savinelli Fitsall Pipe Knife and then sanded it with 220 grit sandpaper wrapped around a piece of dowel.I used a piece of folded 220 grit sandpaper to clean up the inner edge of the bowl and smooth out the nicks there. I also sanded the rim top at the same time to remove the lava and darkening there. I stained the rim top with an oak stain pen to blend it into the surrounding briar.I polished the briar with micromesh sanding pads – dry sanding with 1500-12000 grit pads and wiping the briar down with a damp cloth after each pad. The briar began to take on a shine as the pads progressed. I worked some Before & After Restoration Balm into the surface of the briar with my fingertips to clean, enliven and protect the briar. I let the balm sit for 15 minutes and then buffed with a cotton cloth to raise the shine. The photos show the bowl at this point in the restoration process. I pressed a thin brass band on the shank end to take care of the nicks and chips there. It also gave a smooth surface for the face of the stem to sit. I like the addition of the bling. I set the bowl aside and turned my attention to the stem. It was in such great condition that I polished it with micromesh sanding pads – wet sanding with 1500-12000 grit sanding pads. I wiped it down after each sanding pad with Obsidian Oil. I polished it with Before & After Pipe Stem Polish – both Fine and Extra Fine. This Capri Gozzo Fancy Saddle Stem Billiard turned out to be a more beautiful pipe than I had expected when I took it out of the package. The finish on the briar is nice and the grain really stands out. I put the pipe back together and buffed it lightly with Blue Diamond on the buffing wheel. I gave the bowl and the stem multiple coats of carnauba wax. I hand buffed the pipe with a clean buffing pad to raise the shine and hand buffed it with a microfibre cloth to deepen the shine. It is fun to see what the polished bowl looks like with the polished black vulcanite stem. This classic looking Capri Gozzo Billiard feels great in my hand. It is light and well balanced. Have a look at it with the photos below. The dimensions are Length: 6 inches, Height: 1 ½ inches, Outside diameter of the bowl: 1 ½ inches, Chamber diameter: 7/8 of an inch. The weight of the pipe is 63 grams/2.22 oz. The pipe definitely looks better than when it arrived. It will be heading back to pipeman who sent it to me later this week. Thanks for walking through the repair and restoration with me as I worked over this pipe. Thanks to each of you who are reading this blog.

A Lot of Work…But it is a Beautiful Republic Era Peterson’s System Standard 312


Blog by Steve Laug

The next pipe on the table was purchased on eBay on October 3, 2016 from Des Moines, Iowa, USA. It was a very dirty Peterson’s System Standard 312. The finish is quite nice with a classic Peterson’s shape and smooth finish. The pipe had a lot of grime ground into the smooth finish with oils and tars in the grain. The bowl had a thick cake with a lot of lava overflow on the rim top and edges. The pipe is stamped on the left side of the shank and reads Peterson’s [over] System [over] Standard. On the right side is stamped Made in the Republic of Ireland [three lines] with the shape number 312 under that. On the oxidized nickel shank cap (ferrule) it is stamped K&P [over] Peterson. The stamping is clear and readable on the pipe and band. The ferrule has a lot of tars and oils oozing out of the end where the stem fits. The stem was dirty, oxidized and calcified with tooth marks and chatter on the stem near the button on both sides and some on the surface of the button as well. There was no Peterson’s “P” on the left side of the P-lip stem. Jeff took photos of the pipe before he worked on it. He took photos of the rim top to show the thick cake in the bowl and the thick overflow of lava on rim top and edge. It is very hard to know what the inner and outer edges look like under the lava. The stem looked rough – there was oxidation, calcification and some deep tooth marks on both sides. He took a photo of the side and heel of the bowl to show the amazing grain that was shining through the grime and oils there. It would definitely look really good once it was cleaned up.The stamping on the sides of the shank read as noted above. The photos show that they are very clear and readable. The stamping on the nickel ferrule is also readable. I am including the information from Pipedia’s article on Peterson pipes. It is a great read in terms of the history of the brand (https://pipedia.org/wiki/Peterson). I have included a bit of the pertinent history here.

1950 – 1989 The Republic Era – From 1950 to the present time, the stamp for this era is “Made in the Republic of Ireland” in a block format generally in three lines but two lines have been used with or without Republic being abbreviated.

I knew that I was dealing with a Republic Era pipe made between 1950-1989. It was a smooth Peterson’s System Standard 312 Billiard with nice grain. The finish was stained with a combination of brown stains. Now it was time to work on the pipe.

Jeff had cleaned it thoroughly. He had reamed it with a PipNet reamer and cleaned that up with a Savinelli Fitsall Pipe Knife. He had scrubbed the exterior of the briar with undiluted Murphy’s Oil Soap. He cleaned out the interior of the shank, sump and airway in the shank and stem with alcohol, pipe cleaners and cotton swabs. He scrubbed the stem with Soft Scrub to remove the oxidation and calcification on the surface. He soaked it in Before & After Deoxidizer to remove the oxidation. He removed it from the Deoxidizer and rinsed it off with warm water. I took some photos of the pipe before I started my part of the work. The rim top had some scratches and darkening on the surface. The outer and inner edges of the rim was okay but there was some burn damage on the front outer edge and on the back inner edge. The stem surface looked better with some tooth marks and chatter on both sides near the button. There was still some light oxidation that would need to be dealt with on the shank end and around the P-lip. I took photos of the stamping on the shank sides. It is clear and readable as noted above.   I removed the stem and took a photo of the pipe to give a sense of the whole. The stem is a typical Peterson’s System stem.I started my work on the pipe by working over the rim top and the inner edge of the bowl to clean up the damage. I topped the bowl lightly on a topping board with 220 grit sandpaper. I used a folded piece of 220 grit sandpaper to rework the inner bevel on the bowl. It worked well and the finished rim top looked significantly better. I polished the briar with micomesh sanding pads – dry sanding with 1500-12000 grit pads. I wiped the bowl down after each pad with a damp cloth. I rubbed the bowl down with Before & After Restoration Balm. I worked it into the surface of the bowl sides and shank with my fingertips. The product works to clean, enliven and protect the briar. I let the balm sit for 15 minutes and then buffed with a cotton cloth to raise the shine. I set the bowl aside and turned to work on the stem. I polished the stem with micromesh sanding pads – 1500-12000 grit pads. I wiped it down with Obsidian Oil after each sanding pad. I used Before & After Pipe Polish – both Fine and Extra Fine to further polish the stem. This Peterson’s System Standard 312 Bent Billiard with a vulcanite stem is a great looking pipe now that it has been restored. The beautiful grain that shines through the polished finish is stunning. As the pipe is smoked the patina should develop and look even better. I put the stem back on the bowl and carefully buffed the pipe with Blue Diamond on the buffing wheel. I gave the bowl and the stem multiple coats of carnauba wax on the buffing wheel and followed that by buffing the entire pipe with a clean buffing pad. I hand buffed the pipe with a microfiber cloth to deepen the shine. The finished Peterson’s System Standard 312 fits nicely in the hand and feels great. Give the finished pipe a look in the photos below. The dimensions of the pipe are Length: 6 inches, Height: 1 ¾ inches, Outside diameter of the bowl: 1 ¼ inches, Chamber diameter: ¾ of an inch. The weight of the pipe is 61grams/2.15oz. This one has been reserved for first refusal. If you are interested in being in the queue for this pipe send me a message or an email. Thanks for reading this blog and my reflections on the pipe while I worked on it. There are many more to come!