Yearly Archives: 2017

Quick Refresh of a Very Lightly Smoked Blatter Montreal Red Dot Lovat


Charles, thanks for the information on the one and two red dot Blatter pipes. I am a fan of their pipes – having two older ones and am always on the look out for more of them.

Charles Lemon's avatar

Blatter & Blatter have been producing high quality pipes in Montreal since 1907, established in that city only a year after Brigham set up shop in Toronto.I’ve wanted to work on a Blatter pipe for some time, so when this Red Dot Lovat came up on eBay, I snapped it up. It was listed in used, estate condition, but when it arrived it became obvious that the pipe had been smoked no more than a few times.

The rim showed a very light haze of lava, but the walls of the tobacco chamber were without cake. In fact, the factory bowl coating was in nearly perfect condition. The stummel was likewise in excellent condition, without dents or dings. The slightly flared saddle stem was without tooth chatter. Even the aluminum stinger was shiny as new when I removed the stem for inspection.

20170204_13344020170204_133446

20170204_13345220170204_133500

20170204_13350920170204_133535

20170204_133558

The pipe is stamped only with “Blatter” in…

View original post 424 more words

‘Gramps’ – A Redonian Deluxe London Made 26 Rescued


Blog by Dal Stanton

I know exactly where I was when Charles Lemon, of Dad’s Pipes, posted his blog Family Heirloom Comes in from the Cold on December 22.  I was dutifully, pushing the shopping cart at the Target in Golden, Colorado, while my wife and I were engaged in last-minute Christmas shopping.  Well, my wife was shopping and I was catching up on pipe blog reading with my iPhone 6s.  The story Charles told was of a pipe (without a stem) discovered on a stroll in a pasture, how it arrived there was a mystery, which, after some research looking at old photos, was determined to belong to a great-great uncle.  The restoration was to be a Christmas gift for the great-great nephew, the pipe finder’s step-father….  It was an excellent restoration on Charles’ part, but the story itself, the condition of the pipe, the fact that it was found after how many years – contributed to one of the core reasons I love restoring pipes.  As I read Charles’ heart-warming story, I found myself rooting for the pipe to make it and to again be restored to the lineage of the steward.  While I continued faithfully to keep pace with the shopping cart, dodging frantic shoppers and kids on too much sugar and reading Charles’s post, ‘Gramps’ came to mind.  The first time I saw the pictures of ‘Gramps’ and read the eBay seller’s comments, I determined to place my bid to rescue the old, worn out, tossed aside, pipe.  Why did I immediately name him ‘Gramps’?  Here is what the eBay seller said:

Vary rare REDONIAN Pipe.  Found at the Estate Auction of a 98-year-old man.  (Who said smoking will kill ya?…no way). So the pipe has some ware marks up by the mouth piece, see pictures.  Pipe is marked bowl piece is marked 26 on one side and SARDINIAN de Luxe Made in London on the other.  It is a used pipe.  Ready to be Enjoyed, Gifted or Resold…ENJOY!  

With a smile on my face while looking at Gramps’ pictures, notwithstanding the ‘mild’ exaggeration of the seller’s sales bravado, “Ready to be Enjoyed, Gifted or Resold…ENJOY!”, this is what I saw:red1 red2 red3I have no idea if I can bring Gramps to drink of the Fountain of Youth or not, but I’m now looking at him on my worktable here in Sofia, Bulgaria.  The markings on the left shank are Redonian Deluxe over London Made.  The right side of the shank bears the mark, 26, which I assume is the shape number.  Surprisingly, the stem stamping is legible – a red ‘R’ ensconced in a circle.  A look at Pipedia and I discover that the Redonian was made by the John Redman Ltd./British Empire Pipe Co. in London, the same company that was a possible manufacturer of the L. J. Perretti I restored not long ago – the Perretti Co. is based in Boston and the second oldest Tobacconist in the United States.  According to the Pipedia article, John Redman Co. pipe lines, along with Redonian, include Aristocrat, Buckingham, Buckingham Palace, Canberra, Captain Fortune, Dr John, Golden Square, Richmond (not Sasieni),  and Twin Bore.   I take some additional pictures of ‘Gramps’ for a fresh look.red4 red5 red6 red7 red8 red9Like Charles’ patient, this pipe looks to have been left outside or exposed in a barn or something, as half of it seems to be colored differently – laying on its side for some time.  The stem has the heaviest oxidation I’ve seen to date – perhaps something else is going on – it appears to be leprous!  The surface is so soiled and the cake so thick – there appears to be a spider web in the fire chamber – I really can’t determine the condition of either the stummel or stem, so after taking some pictures from my work table, I plop the stem in Oxi-Clean to start dealing with the stem leprosy and I plop the stummel along with spider web, in an alcohol bath – isopropyl 95% to soften the ages of crud clinging to the stummel – inside and out.red10About 24 hours later, I retrieve the stem from the Oxi-Clean bath and the oxidation was raised to the vulcanite surface as hoped and expected.  I first attack the oxidation by wet standing the stem with 600 grit sanding paper.  I’m very careful to stay clear of the Redonian ‘R’ stamping and work around it.  I sand for quite some time.  After making some progress, I switch to using 0000 steel wool to take off more oxidation and smooth in the process.  Again, I’m steering clear of the ‘R’ stamping.  I wish I would have taken a picture at this point.  The stem is looking much improved except for the circle ‘R’ stamping – still encased in thick oxidation.  I know that taking anything abrasive to the stamping will erode it and for me, this is anathema.  I try another tack – I think I remember reading somewhere about using Mr. Clean Magic Eraser.  I brought it to Bulgaria from the US and hadn’t used it yet.  The sponge that emerges from the box would not be abrasive – I hope.  So, I wet the sponge and start working on the area of the stamping. I start very cautiously and gingerly apply pressure with the sponge Magic Eraser.  When I discover that it is not eating away at the stamping I apply more pressure.  Before long I was working on the area aggressively.  Very gradually, and without perceptible damage to the ‘R’, the oxidation disappeared – or at least, in very large measure.  The last picture in the set below shows the magic brought by the Magic Eraser! I’m pleased with the progress cleaning up a once, leprous stem!red11 red12Satisfied with the progress on the stem, I fish the stummel out of the alcohol bath.  I use several pipe cleaners attempting to open the airway between the mortise and draft hole – unsuccessfully.  I then use about a 6-inch length of hanger wire as a probe and to ream the airway gently.  After a while, I finally push through the ancient muck and reconnect the mortise and bowl.  After this, I put the stummel back in the alcohol bath to soak further after stirring up and opening the internals.red13 red14 red15Out of the bath again, I take Q-tip cotton swabs and pipe cleaners and clean the gunk out of the mortise and draft airway while it is still loosened.  It’s cleaning up well, but I need to ream the bowl to remove the softened cake and the old residues.  I want Gramps to have a new start down to the fresh briar.  I use the Pipnet reaming kit using the two smaller blades of the four available.  The cake comes easily.  I fine tune the reaming more using the Savinelli pipe knife.  I then take 240 grit sanding paper, wrapped around a Sharpie Pen and sand the chamber walls to remove the remaining carbon.  I finish by cleaning the bowl using cotton pads wetted with isopropyl 95%.  The fire chamber looks good – no problems, no burn throughs detected visually. The pictures mark the progress.red16 red17 red18With the bowl reamed and cleaned, I now turn to the stummel externals.  I take another critical look at the stummel surface and lava flow on the rim and take a few pictures to show the condition of the briar before I use Murphy’s Oil Soap.  I want to mark the progress moving from the desperate condition in which the Redonian Deluxe started.  I use undiluted Murphy’s Soap and scrub the rim and stummel surface with cotton pads. I also use a bristled tooth brush to scrub the surface.  After cleaning, I rinse the stummel with warm tap water careful not to allow water into the stummel internals.  The rim cleans nicely and it looks good.  Looking at the briar surface, not surprising I detect several pits which need to be either sanded or filled.  What is emerging from underneath the gunk, grime and grunge is a piece of briar holding much potential to shine with the gradual appearance of some nice-looking grain.  With my work day ending, I decide to apply olive oil to the stummel to hydrate the very dry wood – letting it absorb the oil through the night. The pictures show the progress.red19 red20 red22 red23The next morning, I decide to further clean and purify the stummel using the salt/alcohol soak.  I fill the bowl with Kosher Salt and cover the opening with my palm and shake the stummel to distribute the salt.  I then place the stummel in an egg carton to give stability, and fill the stummel with isopropyl 95% until it surfaces over the salt.  I then cork the mortise and let it sit and do its thing – letting the salt absorb the crud.  I then turn to the stem.  I clean the stem internals using pipe cleaners dipped in alcohol.  Using a sharp dental probe, I dig gunk out of the slot to clean it.  It takes a while to work a pipe cleaner all the way through the stem.  Once I do accomplish this, I use a bristled pipe cleaner with alcohol to run it back and forth several times to clear and clean the airway – hopefully allowing a pipe cleaner easier passage.red24 red25After cleaning the internals of the stem, I now look at the condition of the button area.  The 98-year-old grandpa that owned the Redonian did not leave teeth marks (is that a clue to his dental condition??) but the upper and lower bits are almost flush with the stem surface. This is not good – the button edges are necessary to hang the pipe properly on the teeth so that one does not bite the stem leaving the teeth chatter and dents one must remove when restoring a pipe!  I will use charcoal/superglue putty to build up the button area.  I form a wedge made of index card and fit it into the slot of the stem to keep putty from covering the opening.  I open a capsule of activated charcoal and pour the powder on an index card.  I then put a small puddle of Hot Stuff Special ‘T’ CA glue (extra thick glue) next to the charcoal powder.  With a toothpick, I draw charcoal into the glue, mixing it as I go.  I continue to add charcoal powder until I reach a thickness like molasses.  When I reach this viscosity, I then dollop the putty around the button area – more than is needed to provide excess to sand down to the proper button proportions.  I use an accelerator to set the putty.  I then remove the wedge from the slot and put the stem aside to cure.  The pictures show the process.red26 red27 red28Several hours have passed since the stummel began its salt/alcohol soak.  The salt has darkened some, so I assume it’s done its work!  I dump the used salt from the stummel and thump it on my palm to remove lodged salt crystals.  I take a paper towel and wipe out the bowl.  Using a bristle brush, I clean the mortise to remove any salt lodged in the internals. I want to be sure all the salt is purged.  I then return to using Q-tip cotton swabs, pipe cleaners and isopropyl 95% to complete cleaning the internals.  With 2 Q-tips, the verdict is in – the Kosher Salt and alcohol soak did a great job drawing out the muck and freshening the mortise.  I complete the job by wiping the chamber with a cotton pad with isopropyl 95%.  Done.  The pictures show the result!red29With the stummel now clean, I take a close look at the stummel surface to be reminded of the question areas.  I take a few pictures to show these. The stummel is in surprisingly good condition for what it looked like when I started.  I find some pitting on the surface that I will fill with superglue.  I also detect a rim ‘skin’ on the front end of the stummel.  There are also other nicks around the rim from normal wear and tear. I start preparing the stummel surface by sanding with a medium grade sanding sponge to remove a layer off the finish – to determine where fills are needed.  After using the medium grade sanding sponge, I apply super glue to the 3 places on the stummel I detected earlier to fill the larger pits and a small crevasse and put the stummel aside for the superglue fills to cure.  The pictures show the progress.red30 red31 red32Now to return to the stem’s button rebuild.  The charcoal superglue putty has fully cured and ready for shaping.  I take pictures of the upper and lower bit to mark the progress.red33The technique I’ve developed for button shaping is to start at the end of the stem, using a flat needle file I file to establish the vertical – perpendicular slot area – that it’s flat.  This establishes a base-line for the end of the button and shaping the rest (I forgot to document this in a picture!).  I then start with the upper button area with the flat needle and begin filing from the stummel-side toward the end to establish the straight edge of the button’s ‘lip’.  I gradually file this toward the stem’s end until it appears a good depth for the upper button. I then file top of the bit’s lip to shape in further.  When I’m satisfied with the upper button shaping, I then flip the stem over doing the same with the lower button seeking to match the upper. When the basic filing is completed, I use a pointed needle file to enlarge the slot.  The pictures show the button rebuild process.red34 red35 red36To remove the roughness of the files, I then use 240 then 600 and finally 0000 steel wool to further perfect the shape and to cover the treads left by the files. Which often is the case, air pockets encased in the charcoal/superglue are exposed during the shaping and sanding process. I apply some CA glue to the button surface and paint it with a toothpick to cover the pin-sized air pocket holes and then spray an accelerator on the glue to cure it more rapidly.  After a while, I return with 240, 6000 paper and then 0000 steel wool to remove the excess CA glue on the button and complete the button rebuild.  The pictures show the completion of the button rebuild.red37 red38 red39With stem internals cleaned, and new button completed, I transition to the externals.  Using micromesh sanding pads 1500 to 2400, careful to guard the Redonian ‘R’ stamping, I wet sand the stem and follow the set by applying Obsidian Oil.  I then use micromesh pads 3200 to 4000 and after, pads 6000 to 12000 following each set with an application of Obsidian Oil.  I set Gramps aside to soak in the Obsidian Oil.   All I can do is to say, ‘Oh, my!’  Gramps is responding well to the TLC. The pictures tell the story – I can’t but help to throw in a reminder of how far we’ve come! red40 red41With a reborn stem waiting, I turn to the stummel.  The 3 pit-holes that were filled with superglue are cured.  Using 240 grit paper I sand the excess glue to the surface and blend the patches. red42 red43I take a close-up picture of the rim and inspect the rim more closely.  Along with nicks, I can see that rim lines are not sharp.  There is evidence of a bevel on the inside ring of the rim which is scorched.  I decide to mildly top the stummel and reestablish a crisp bevel. The bevel will also remove the scorching I see.  I use 240 grit paper on a chopping board and rotate the inverted stummel in an even, circular motion to remove old briar.  I stop and check things after every couple of revolutions to make sure I’m staying level.  I only take off enough to leave the former bevel more distinct.  To recut the inner bevel, I use 120 grit paper rolled very tightly to create a hard-sanding surface.  I want the bevel to be straight and uniform.  I follow the 120 using 240 grit also tightly rolled to remove the coarser lines.  The topping and bevel look good.  The bowl is in-round.red43 red44 red45After completing the rim and bevel, I take a medium grade sanding sponge and then a light grade sanding sponge and sand the stummel to blend the superglue fills – careful to work around the Redonian Deluxe London Made markings on the stummel.  Then, using micromesh pads 1500 to 2400 I wet sand the stummel, followed by dry sanding using micromesh pads 3200 to 4000 and then 6000 to 12000.  I never tire seeing the grain emerge during this process.  After I complete the micromesh cycles, I unite stummel and stem to get a look at where we are.  Gramps is looking good. The pictures show the progress – woops, I forgot to take a picture after the first micromesh cycle!red46 red47 red48I’m liking very much the progress of the Redonian Deluxe London Made – aka, Gramps.  I decide to use Fiebing’s Dark Brown Leather Dye with Gramps.  I think the rich depth of the leather dye will create the subtle expression of the straight grain hugging the bottom of the stummel as it expands into horizontal patterns and scattered bird’s eye on top.  I give the surface a quick wipe with a cotton pad to clean and remove any leftover briar dust.  I use my wife’s hair dryer to warm the stummel to expand the wood to help the grain to be more receptive to the dye.  I use a cork in the shank as a handle and I then take a folded over pipe cleaner and apply the dark brown dye over the entire surface.  After this, I fire the wet dye which immediately burns the alcohol and sets the dye in the grain.  In a few minutes, I repeat the process concluding with firing the wet dye.  I put the crusted stummel aside to rest.  I decide to do the same and call it a day.  The pictures show the progress.red49The next day, after a full day’s work, I’m anxious to look at Gramps, and with the Dremel I begin unwrapping the fired dye crust.  After mounting a dedicated felt wheel for applying Tripoli, I set the Dremel’s speed for 1, the slowest possible, and first purge the wheel with the sharp edge of the Dremel’s tightening wrench – to rid it of old compound and to soften the felt wheel.  I apply very little pressure on the briar surface, allowing the RPMs and compound to do the work for me.  To reach the inside of the bent shank elbow with the Tripoli compound, I switch to a smaller, pointed felt wheel to get in the tight angles.  With the Tripoli finished, I rejoin the stem to the stummel and I mount a Blue Diamond dedicated felt wheel and again buff stem and stummel.  When completed, I hand buff the pipe with a cotton cloth to remove the compound dust left over.  The pictures show the progress.red50 red52With the abrasive application of the compounds finished, before I apply carnauba wax to the stummel and stem, I want to dress up Gramps’ stem stamping.  The original appears to have been red so I take red acrylic paint and apply a dab over the Redonian ‘R’ and circle and let it dry thoroughly – overnight.  When dry, I gently rub/scrape off the excess with the flat side of a toothpick which protects the paint in the indentations.  After this, I rub it well with a cotton pad to clean the remainder of the excess – gently leaving a rebranded stem – very nice, a refreshed stem stamping.  The pictures show the results.red53 red54With the Redonian stem stamp completed, I reunite stem and stummel and mount the cotton cloth Dremel wheel and apply several coats of carnauba wax to the pipe. I increase the speed of the Dremel to 2.  I follow the carnauba wax with a vigorous hand-buff using a micromesh cloth to dissipate wax that was not spread evenly and to deepen the gloss of the shine.

When I think about the 98-year-old steward from whose estate this Redonian Deluxe London Made came, I cannot believe he would have dreamt his pipe would one day start a new lifetime serving another steward.  I gave this old, worn pipe the nickname, ‘Gramps.’  Bear with me one more time to put a picture of ‘Gramps’ in front of the younger man he has now become.  I’m amazed at the transformation and it is why I love this hobby – the pictures speak for themselves.  I sell my restorations with the profits helping the work we do with the Daughters of Bulgaria – those sexually exploited and trafficked.  This Redonian Deluxe London Made is ready to serve a new steward.  If you’re interested in adopting him and helping the Daughters, check out ‘Gramps’ at The Pipe Steward Store.  Thanks for joining me!red55 red56 red57 red58 red59 red60

Renewing and restemming a La Strada Staccato Bent Pot


Blog by Steve Laug

This tired old La Strada came to me for repairs. It was in rough shape. The stem had been gnawed, broken and gnawed again. The finish was shot and covered in oils and grease to the point that it was hard to see the rope rustication around the bowl. The bowl had a thick crumbling cake and smelled heavily or aromatics. The lava from the bowl had flowed over the top of the rim and darkened the finish there. The outer edge of the rim was heavily damaged on the front left side and looked as if the bowl had been dropped. There were dents on the underside of the bowl as well from a similar event. The shank was so dirty that the stem would not fit into the mortise. I was able to get it in but the fit was not tight against the shank. The shank is slightly off round so the stem was slightly different.la1 la2The next photo is out of focus but the road rash on the bowl bottom is visible.la3I took a series of close up photos of the bowl and rim and the stem to show the condition of the pipe when I started. In the first photo you can see the thick crumbly cake and the damage to the rim surface and edges. It was hard to tell if the inner edge of the bowl was damaged and only after reaming would I be able to know for certain. The stem was a write off as the damage was too extensive to repair. The fit against the shank also warranted a new stem.la4 la5I reamed the bowl with a PipNet reamer and went through the various cutting heads. I cleaned up the remaining cake in the bowl bottom with the Savinelli Pipe Knife. I took the cake completely out of the bowl and reamed it back to bare briar.la6I wiped down the surface of the bowl with acetone on cotton pads to remove the finish. It came off with a bit of scrubbing but there were places where it did not come off with the acetone. It would take some sanding to remove the totality of the finish.la7 la8The damage to the bowl top and outer edges required that I top the bowl. I gently topped it on the topping board so as not to remove too much and remove the smooth portion above the rope rustication on the top edge.la9I sanded the bowl and rim top with a medium and a fine grit sanding sponge and took the following photos.la10 la11I cleaned out the internals of the shank and the replacement stem that I fit to the shank with alcohol, pipe cleaners and cotton swabs. It took a lot of scrubbing to get the mortise and the airway clean in the shank. The stem was in decent shape so it did not take too much work on it.la12I took some photos of the pipe at this point to get a feel for the look with the new stem in place.la13 la14I wrapped some sandpaper around a dowel and sanded the walls and bottom of the bowl. There was a ring at the bowl bottom that was grooved and needed to be smoothed out. It did not take a lot of sanding before the inside walls were smooth.la15I restained the bowl with a dark brown aniline stain mixed 50/50 with isopropyl alcohol to approximate the original colour of the pipe and to highlight the grain on the pipe. I flamed the stain and repeated the process until the coverage was even around the bowl and rim.la16I buffed the bowl with White Diamond on the buffing wheel to even out the new finish and give it a bit of a shine. I took photos of the bowl at this point to give a clear picture of the new look.la17 la18Now all that remained was to finish the fit and polishing of the stem. I sanded it with 220 grit sandpaper until it fit the shank well. It took some adjusting of the diameter of the stem to match the slightly out of round shank. In the end it fit well. I polished the stem with micromesh sanding pads – wet sanding it with 1500-2400 grit pads and dry sanding with 3200-12000 grit pads to give it a deep shine.la19 la20 la21I buffed the bowl and stem with Blue Diamond on the buffing wheel to polish the minute scratches on the vulcanite and on the briar. I buffed them both until the stem and briar glowed. I gave the bowl and stem multiple coats of carnauba wax. I buffed the bowl and stem with a clean buffing pad to raise the shine. I hand buffed it with a microfibre cloth to deepen the shine. The finished pipe is shown in the photos below. It is ready to go back to the pipe man who sent it to me for restemming and refurbishing. I think he will enjoy it and it will deliver a life time of good smokes to him. la22 la23 la24 la25 la26 la27 la28 la29 la30

 Coming home to an amazing surprise


Blog by Steve Laug

I was in India and Nepal for work through most of the month of January returning to Canada on the first of February. While I was traveling, I got an email from a woman in Ontario, Canada saying that she was the daughter of a fellow pipe smoker and an Anglican minister that I had talked to over the years. I knew him as Fr. Dave (his online name). Her father and I had many conversations over the years about our common work and love of pipes. We emailed, chatted on the forums and shared phone conversations. I had repaired, refurbished and sold quite a few of his pipes over the years for the benefit of an online forum that we both frequented and where we had met. I have several pipes in my collection that were gifts from David and whenever I smoke them, I think of him and our conversation.

I knew that he had struggled for a long time with a degenerative spinal disease and other health issues. I had not talked to him for some time. The last time we spoke, he let me know that he was coming near the end of his life. We had enjoyed a good conversation, laughed and reflected on the brevity of our lives together. We said good-bye but I had no idea that it would be the last of our conversations. The email from his daughter informed me that she was cleaning up his estate and that he had specified that the last box of his pipes should go to me because I would do what was necessary for them to be usable. She wanted to know if I wanted them. She was uncertain as to what they were in terms of brand other than they were probably his personal smokers. She did not know if they were worth anything or if I would even want them.

When I received his daughter’s email, it saddened me that David was gone. I knew that his struggle had been long and painful and now that it was over. I was glad for him regarding that and because of our common hope, I looked forward to the day that we would connect once again. I wrote back to her from Kathmandu, Nepal and thanked her for her email. I passed on my condolences regarding her dad and sent my regards to her mom. I let her know that it was an honor to have the opportunity take her father’s pipes. I would gladly do whatever it took to make sure that they would continue to be used by pipe smokers.

I received another email from her while I was in Hong Kong waiting for a connector flight back to Vancouver that the package had been shipped. She said that surprisingly the box had over 60 pipes in it. From my calculations, I figured that the package and I would arrive in Vancouver at roughly the same time. She asked that I let her know once it arrived and what I thought about the contents. Now my curiosity was peeked. I could not wait until I got home. I had to wait 11 hours for the connecting flight in Hong Kong and then another 11+ hour flight to Vancouver before I would see the box. I was excited to see what she had sent me.

I am sure I am probably strange, but during that time I mulled over what I thought might be in the box she sent. I had worked on enough of David’s pipes over the years that I had some ideas. I knew that in the later years he has smoked small pipes that were lightweight and easy to clench or hold. I knew that these would probably be small. I had no idea with regard to brand or shapes might be in the assortment she had sent. I knew that whatever was there I was in for a treat when I unpacked it and reflected on David and our talks. It made my wait and the trip go by much quicker.

I took a cab from the airport home and my daughter met me at the door. The rest of the family was at work for a few more hours. The first thing she said after our greetings was that I had a package on the dining room table. I put my bags aside and went to look at the box. It was from David’s daughter. It was far bigger than I expected from our emails. It was a computer paper box about 10×12 inches wide and long and 12 inches tall. I carried it into the living room and opened it with a knife. When I took the lid off the box I was really surprised. She had packed the box full with pipes. Each pipe was individually wrapped with paper towels so I had no idea what was hidden inside them. There were also two books and a plastic box in the top of the package. I took these out first. They are shown in the photo below.remembranceThe books were the Perfect Smoke by Fred Hanna and Pimo’s Guide to Pipe Crafting at home. There were three pipe rests – two made of pieces of leather and one a wrapped iron contraption. I opened the plastic box and inside were a few surprises. There were pipe stems and parts for a Lepeltier ceramic pipe. There were envelopes of powdered alcohol based stains. There were two pipe reamers – a Castleford and a Senior Reamer. There was a needle file and a dowel with sandpaper. The last item was a tube of pipe stem polish from Savinelli. There were also four pipe bowls and some stems. They were apart so I had no idea if they went together. I sorted through the stems and found that all had stems. This must have been David’s workbox because all of them had been reamed and cleaned. All of them were small Peterson’s pipes.

Now I was curious as to what the rest of the box held. I carefully unwrapped each paper towel covered package and made a pile of the pipes. I counted the pipes as I unwrapped them and put them in the pile. I was like a kid opening his Christmas presents. Each new package revealed another beauty and my daughter laughed as she heard my ooohs and ahhhs. The pipes were all quite diminutive. Many were brands I had heard of but even among those were lines I had not heard of and shapes that I had not seen before. Some brands were new to me while others I had heard of but had not seen before. The pile of paper towels and the pile of pipe both grew as I unwrapped each pipe. When I was finished, there were seventy-three pipes in the pile.

I sorted the pipes into piles for each of the brands that were present. The first pile included forty-three Peterson’s pipes and pipe socks. The photo below shows the assortment of shapes – princes, billiards, apples, pots, bulldogs, Canadians, Lovats, Zulus and system pipes. There was a Pete Meerschaum, a barrel and a tankard. All were in decent shape and would be easy cleanups. I was surprised at this lot.

Here is a cursory list of the stampings: Shamrock, Kapruf, Aran, Kilarney, Sterling Silver, Kapet, Kildare, Wicklow, Flame Grain, Galway, System, Donegal Rocky, Emerald, Barrel, Premier, Tankard, Special, Sports, Dublin 2, Dublin 3 and Meerschaum.remembrance1There were five Brigham pipes of different shapes and bearing different numbers of dots. There was a 2 Dot Lovat, a 1 Dot Prince, a ¼ bent 1 Dot Dublin, a straight 2 Dot Bulldog and a Sportsman 5 Dot bent Dublin. I have worked on a lot of Brigham pipes over the years but I do not know enough about them to be able to identify the era of the pipes but Charles Lemon of Dad’s Pipes is my go to guy for that kind of information. I will be contacting him with the stamping on each one and try to gather more information on them.remembrance2There was a Trypis semi rusticated bent billiard with original box and pamphlet. That would be a fun historical piece to clean up and restore.remembrance3There was an old clay pipe that was darkened and worn looking. I can see markings on the shank and the bowl that were cast into the clay. The pipe should clean up nicely and give me a chance to play around with a method of cleaning old clays that I have read about and wanted to try out.remembrance5The next photo shows the remainder of the pipes. They were a mix of brands and shape – from basket pipes to English Made to hand made Danish. Before I list them for you see how many you can identify from the photo. There are some nice old pipes in the lot that should clean up nicely.remembrance4How did you do in your identification? I will give you the brand names in no particular order and see if you can match them to the photo and also see how you did.  Here is the list: Missouri Meerchaum Spool, London Made Lovat, Royal Prince British Made Billiard, Chateau Bruyere Sandblast Prince, Radiator Apple, Royal Captain Apple, Corvette Bent Dublin, Goldstar Holiday Rustic, Kiko Pigskin Safari 343, Irish Second Bent Dublin, SC Special 18 Filter Billiard, WO Larsen Handmade Super Tan 65 Brandy, Mackenzie LeBaron Bent Dublin, Bent Billiard no name Meerschaum, Premier Deluxe Bent Billiard, Dr. Grabow Omega, Kiko Meerschaum Prince, Elsinor ¼ bent Dublin, No name Sandblast Volcano sitter, Coronation Meerschaum lined Bulldog, Croydon Bent Billiard, Ropp Supreme Cherrywood, Ross Arundel England 37 Lovat.

This is one of those occasions where I was able to remember a lot of my conversations and correspondence with David. It brought a mixture of gratitude for his kindness in thinking of me with these pipes and of sadness that our conversations would be no more. In the months ahead as I clean up the pipes and post them on the blog I will try to include some of those memories in the write ups.

Rest in Peace David, I suppose I can say that I will see you one day in the not too distant future as the years roll by for me. I lift a bowl of nice Virginia tobacco in your memory in a pipe you gave me and pause to think of you and give thanks. Thank you also to your daughter for following up on your wishes.

Another Hole in the Wall find! Stanwell Silver Mount 85


Blog by Dal Stanton

I first laid my eyes on the Danish made, Stanwell Silver Mount a couple of weeks ago, not really knowing what I was seeing.  I was giving a tour to a new team member who had just arrived in Bulgaria.  As part of orientation I take ‘newbies’ on a tour of the center of Sofia – I sprinkle in a bit of history, architecture, politics, religion and culture as we stroll through the streets and boulevards.  The tour was also the perfect opportunity to showcase a ‘typical’ Bulgarian antique shop – I’m always looking for a way to drop by the ‘Hole in the Wall’ where I’ve landed several great pipes in past visits.  As my guest surveyed the shelves of stuff stacked on stuff, I went directly to THE basket, stuffed up into one area among the artifacts, where I started plucking through the newer offerings of pipes added since my last visit – since before Christmas.  I did spy a very nice unmarked Brandy shape with a hearty stummel.  When the shop owner diverted my attention, conspiratorially confiding that there was something he wanted me to see – my curiosity heightened.  He pulled the Stanwell out from a closed cabinet which always is an indicator of a treasure of greater value.  I left the Hole in the Wall with the pipe on my mind but not in my pocket. A week later, I returned to the Hole in the Wall with two other people as part of another tour.  This time, however, I wanted to see the Stanwell again – hoping it was still there.  It was.  This time I took pictures and dickered a bit, but again, left without a pipe.  I wanted to do some research on this Stanwell and send a note off to Steve to get his feedback, including some of the pictures I took at the Hole in the Wall.dress1dress2 dress3

His response was to the point: “That line of Stannies is a pricey one.  Nice find.”  Added to this was confirmation that the asking price was indeed very reasonable! That sealed the deal for me and with resolve (after receiving my wife’s blessings) I returned to the Hole in the Wall the next day and negotiated a favorable deal. Sweetening the transaction of the Stanwell was bundling the Brandy Unmarked I saw in the basket.  I’m a good customer and he agreed to a “good customer” price.  He was happy and I walked out of the Hole in the Wall this time with two nice pipes – but the Stanwell was the find pipe pickers place their hopes!

With my newest Hole in the Wall find now in front of me, I take more pictures for evaluation.  On the lower side of the shank is stamped Stanwell over Made in Denmark over Silver over Mount. Unfortunately, through wear or over-aggressive buffing, the ‘S’ of Stanwell and the “Ma” in Made in Denmark are very thin.  There is a shape number on the right side of the shank stamped 85 – I’ll need to research this to see if I can place this pipe with the plethora of information about Stanwell pipes on the internet.  Both the shank’s ferrule and the military or spigot mounted stem’s band, have 925 stamped – the world-wide authentication of sterling silver (.925).  What I did not see in the poor lighting of the Hole in the Wall, was that the mortise ferrule also had Stanwell stamped in the sterling.  The silver inlaid crowned “S” stem cartouche is in good shape.  The acrylic stem has many scuffs and nicks and tooth chatter near the button.  The rim and bowl surfaces also are nicked and dented a good bit.  As a matter of personal taste, I am not too partial to the black finish that hides the briar grain.  These pictures fill in the gaps.dress4 dress5 dress6 dress7 dress8 dress9 dress10My first time dealing with a Stanwell pipe was with a second – a Danske Club Vario, a very nice pipe also landed at the Hole in the Wall.  Pipedia’s article describes the beginning of the well-known Danish pipe making company, Stanwell:

At the end of the war, briar became available again, so Nielsen began importing his own briar and started making briar pipes to compete with the English manufacturers. It must be remembered that in 1948, England was the single great center for pipe making. Therefore, Nielsen changed the name of his pipes to “Stanwell”, which sounded much more like a proper English name than “Nielsen”. He also created the horse-drawn carriage logo for its English connotations. He later changed his own last name from Nielsen to Stanwell, a testament to his devotion to the pipes he made. Stanwell’s relationships with Danish pipe makers goes back to Sixten Ivarsson, who is considered the originator of modern Danish pipe making. Ivarsson was commissioned to design Stanwell shapes. In 1969, the factory was moved to a town called Borup, just outside of Copenhagen to be closer to Ivarsson.

To establish the date of this Stanwell Silver Mount style, thanks to Bas Stevens’ extensive compilation of Stanwell pipe shapes posted on Rebornpipes, the shape number 85 is listed as a bent billiard which was discontinued in 2006 (changed to shape number 246).  I also found the Silver Mount style featured in two Stanwell catalogs listed in Pipedia’s collection.  One ‘Brochure by the Lorup Group’ displayed samplings of the Silver Mount style but I could not establish the date of the brochure.  The other was a Russian catalog of Stanwell offerings including Silver Mounts dated 2001.  This pipe could predate 2001 but the latest possible dating would be 2006 when the shape number was discontinued.  Since Stanwell closed the doors of their manufacturing operations in Denmark and moved it to Italy in 2009 (link above), this confirms the Danish origin of the pipe.  The Silver Mount style is unique, not only because it provides two large sterling silver adornments to the classic bent billiard shape – a shank ferrule and stem band insert, but it creatively immolates a military or spigot stem mount.  I found two different comments on SmokingPipes.com about Stanwell’s Silver Mount line.  The first highlighted Stanwell’s Silver Mount shape 85:

If you like the look of a military or spigot mount but prefer a more conventional tenon/mortise arrangement, this Stanwell offers both — along with an elegant, graceful silhouette and plenty of chamber to boot.

Of the stem style itself, there was this comment, that even though not a true military mount, since it has a tenon instead of a tapered fit, it nonetheless is one of the best faux-military mounts this observer had seen.  The sense I have of the pipe’s design is that it is an interesting mixture of higher class elegance with the ample showcase of sterling silver, but with the military/spigot stem style a ruggedness is also introduced.  My challenge now is to help this Stanwell, a ‘knight in shining armor’, regain its former glory!  The sterling silver ferule mounted on the shank is easily removed.  This will help the ease of the stummel’s cleanup.  The chamber in this billiard is large with a depth measurement of 1 3/4 inches and width of 7/8 inches – a good long smoker able to pack a bowl of one’s favorite blend.  The chamber is lightly caked but I want to clean it down to fresh briar.  I do this with my Savinelli pipe knife working over a paper towel for easy disposal of the carbon.  The reaming did not take long. Then I take a rolled piece of 240 grit sanding paper wrapped around both my index finger and then a Sharpie pen and sand the chamber wall.  I finish the bowl cleaning by using a cotton pad wetted with isopropyl 95% and wash the chamber.  The fire chamber looks good – I see no problems.  The pictures show the progress.dress11 dress12 dress13With isopropyl 95% on the work table, I turn directly to cleaning the stummel internals.  Using pipe cleaners, Q-tips dipped in alcohol, I work cleaning the mortise.  Using the flat edge of a dental spade, I scrape the sides of the mortise walls cleaning the tars and gunk.  The Q-tips and pipe cleaners are doing the job.  Later, I will also give the stummel a Kosher salt and alcohol soak to freshen the internals even more.  On a roll, I take the acrylic stem and clean the internals with pipe cleaners and Q-tips in the 9mm tenon area with alcohol.  There was little resistance.  With a cotton pad wetted with isopropyl, I also give the stem’s and mortise’s sterling silver an initial cleaning and polishing.  The progress is shown.dress14 dress15With internals finished, I take another look at the stummel and take a few close-ups looking closely at the surface and rim.  As I said earlier, personally, I’m not a fan of the solid black finish.  My standing ovations are roused by gazing upon natural briar grains!  In my research looking into the Silver Mount line of Stanwell in catalogs, I came across a similar Stanwell line called the, ‘Silhouette Pipe’, featuring several different shapes with the same black finish.dress16 dress17 dress18 dress19My plan is to remove the black finish and repair the stummel and rim surfaces, then apply a darker stain that is essentially black, but allowing the grain to be seen.  This will maintain the sleek, dark look of the bent billiard and continue to set it off in sharp contrast to the sterling silver ferrule and band along with the classic silver crowned ‘S’ Stanwell inlaid silver cartouche. With this plan before me, I use acetone to remove the finish.  Not knowing how tough the finish will stand, I start with a cotton pad wetted with acetone and see how the work progresses.  The cotton pads wetted with acetone are not making much progress so I add the gentle abrasion of 0000 steel wool.  I am careful to avoid the nomenclature on the lower part of the shank as well as the shape number.  With these areas, I only use cotton pads and a bristled tooth brush, acetone and a lot of elbow grease.  I do not want to erode the stampings!  As the black finish gradually gives way, I’m amazed that Stanwell covered such a beautiful piece of briar!  The straight grains travel vertically up the bowl from the heel of the stummel which holds a nest of bird’s eye grain – the whole effect is like a camp fire flowing upward from the fire pit. dress20 dress21 dress22With the black finish removed, I’m able to see some small pin hole pitting exposed on the surface.  To address this, I use a medium grade sanding sponge followed by a light grade sanding sponge to remove most of the pitting as well as nicks that remained on the rim.  The pictures show the progress.dress23 dress24With the initial stummel prep complete, I decide to use the Kosher Salt and alcohol soak to clean the internal airway and mortise more fully.  Using Kosher salt (versus iodized which can leave an after-taste) I fill the bowl and then after corking the shank opening, I hold my palm over the bowl and give the stummel a shake.  This displaces the salt a bit into the mortise. I then pour isopropyl 95% into the bowl until it fills just over the level of the salt.  I put the stummel in an egg crate for stability and put it aside for 4 to 5 hours to let the salt and alcohol draw out the tars and oils residing in the briar.  The pictures show this process.dress25With the stummel is ‘cooking’ with the salt/alcohol soak, I turn my attention to the stem.  The question and concern that comes to mind is the care in cleaning the stem while protecting the sterling silver band that is attached to the stem?  Will sanding the stem damage the band if the sanding runs over the edge?  Unlike the sterling silver shank ferrule that came off easily, the stem band is not going anywhere.  Just to get an idea how well the silver will clean up before I start on the stem clean up, I take the shank ferrule and apply Weiman Silver Cream to it. As the directions describe, using the sponge in the container, applying the compound, rubbing then rinsing off with tap water.  Wow! It works well.  The pictures show the result!dress26I move forward with caution with the acrylic stem by protecting both the crowned ‘S’ stem mark and the sterling silver band.   I do this by holding my thumb over the areas to keep the sanding instruments at bay.  After taking a few ‘before’ pictures to mark progress, I begin addressing the rough scratches in the acrylic with 240 grit paper to do the heavy lifting.  I also work out the teeth chatter in the bit area – upper and lower.  Following the 240 grit paper, I use 600 grit paper and then 0000 steel wool, taking a picture at each step to mark the progress.  Following the steel wool, I run the stem through the complete 1500 to 12000 micromesh pad treatment, taking a picture at the customary sets of 3.  In the final set, I also apply Weiman Silver Cream to the sterling silver band to spruce it up.  I discovered along the way, that the finer grade micromesh pads were not a problem for either the band or Stanwell stem mark – they shine up quite nicely!  I’m pleased with the progress.dress27 dress28 dress29 dress30With stem completed, I again look to the stummel which is benefiting from a Kosher Salt and alcohol soak.  The salt has darkened somewhat indicating the success of the process.  I dump out the old salt, thumping it on my palm to rid the stummel of the expended salt.  I use a paper towel to clean the bowl and I also utilize bristle brushes and pipe cleaners dipped in isopropyl 95% to further clean the airway and mortise.   dress31 dress32Time to address the finish of the stummel.  I use an Italian stain which is called Wenge’ – it appears to have a black base.  After I heat the stummel with my wife’s hair dryer, I liberally apply the stain to the stummel with a folded over pipe cleaner.  I fire the dye and the alcohol immediately burns off.  After a few minutes, I repeat the process and fire the stain.  Then, within a few minutes, I use a cotton pad and wipe the stummel with isopropyl 95% to blend the stain in the wood.  After wiping the stummel down with alcohol, I decide to switch and use a black water based dye and mix it 50 to 50 with isopropyl 95%.  I apply the mixture to the stummel with a folded over pipe cleaner and fire the stummel again.  With this mixture, it did not ‘fire’ the way an aniline dye will but it did evaporate as I passed it over a lit candle.  This helped to set the dye in the grain.  I set the stummel aside to rest.  The pictures show the progression.dress33 dress34Well, in the interest of full disclosure, what is not pictured are the several iterations of applying ‘black’ stain to this stummel.  When I first ‘unwrapped’ the stummel from the fired crust, buffing with my Dremel using Tripoli and then Blue Diamond compounds with a cotton cloth wheel, I was not satisfied with the hue of black I saw emerge.  I wanted the finish to be a translucent black, allowing grain to show through, but in black spectrum hues.  What I was seeing was the brown of the grain emerging giving more of a dark chocolate brown look.  I repeated the staining several times, changing up the black dye content and alcohol, flaming and then wiping the stummel with a cotton pad wetted in isopropyl 95% to blend the stain with the briar and each time repeated buffing with Blue Diamond with the Dremel cotton cloth wheel.  I finally started seeing emerge a stummel that correlated with the image in my mind – a black stummel, in keeping with the original Stanwell intent, but with subtle grains showing through.  Satisfied finally with the result, I move on and apply several coats of carnauba wax to the stummel and to the acrylic stem with the Dremel’s cotton cloth wheel set to speed 2 (one notch up from the slowest speed).  I also attach the sterling shank ferrule with a bit of super glue to keep it in place and finish with a rigorous hand-buffing of stummel, sterling, and stem with a micromesh cloth.

It is true, personal tastes are subjective, but my sense is that I’ve improved this dressy Stanwell Silver Mount bent billiard by transforming the solid black to a translucent finish allowing the natural grains to show through.  This presentation of grain pattern is subtle and I believe it is in keeping with this special line of Stanwell pipes, the Silver Mount.  You’ll notice at the end of the presentation pictures below, I’ve included two pictures taken on a dark surface which enables the grain to be seen more clearly.  Stanwell’s retired shape number 85 is a larger bent billiard with a pleasing feel in the palm. The faux military stem mount brings a rugged look to the pipe but the twin sterling silver adornments, uniting the shank and acrylic stem, places this Stanwell a touch of class.  This Stanwell Silver Mount bent billiard is ready to serve a new steward.  If you’re interested in this pipe, check out the store at my new site, The Pipe Steward. The profits of all pipe sales go to the Daughters of Bulgaria, an organization my wife and I work with helping women and children who have been sexually exploited and trafficked.  Thanks for joining me!dress35 dress36 dress37 dress38 dress39 dress40 dress41 dress42 dress43 dress44


Comoy’s 185 Sandblast “Goldenbark” Restoration


By Al Jones
al_pipes_-85

I’ve worked on a number of Comoy’s Sandblast pipes, but this is the first one that I’ve encountered with the “Goldenbark” stamp. A member of PipesMagazine posted one last year, but I found no online information about this finish. I assume it might have been Comoy’s answer to the Dunhill Tanshell finish? This one has the 3-part C stem logo indicating a pre-merger pipe and made before 1981.

The pipe was in very good shape. The stem was heavily oxidized but it had very little teeth damage. The bowl top had some darkening.

comoys_185_sandblast_golden_bark_before-1

comoys_185_sandblast_golden_bark_before-4

comoys_185_sandblast_golden_bark_before-3

comoys_185_sandblast_golden_bark_before-2

The bowl had a heavy cake, which was reamed. I soaked the bowl with alcohol and sea salt. While it was soaking, I put a dab of grease on the C stem logo and soaked it in a mild solution of Oxy-Clean. The shank scrubbed with a brush dipped in alcohol, but I found it surprisingly clean. The bowl interior was also in excellent shape, having been protected by the cake. I used a rag dipped in water to remove the build up on the bowl top, which came off quite nicely. The stem had some very slight teeth marks, which lifted out nicely with heat from a lighter. One tiny tooth prick on the underside was all that remained.

I mounted the stem and removed the oxidation starting with 800, then 1,000 and finally 2,000 grit paper. Next up was the 8,000 and 12,000 grade micromesh. The stem was then buffed with white diamond and Meguiars Plastic polish. I waxed the bowl by hand with Halycon wax.

Below is the finished pipe.

comoys_185_sandblast_goldenbark_finish-1

comoys_185_sandblast_goldenbark_finish-5

comoys_185_sandblast_goldenbark_finish-3

comoys_185_sandblast_goldenbark_finish-6

comoys_185_sandblast_goldenbark_finish-4

comoys_185_sandblast_goldenbark_finish-2

comoys_185_sandblast_goldenbark_finish-7

comoys_185_sandblast_goldenbark_finish-9

comoys_185_sandblast_goldenbark_finish-10

Checkered History and Heritage of an East German Howal Old Briar Rustified Dublin


Blog by Dal Stanton

Finally, a ‘simple’ clean up!  Or, so I hope.  The Howal has been in my ‘Help Me!’ basket for some time.  I bought him from a vendor in an antique market, in the shadow of Nevski Cathedral in downtown Sofia, Bulgaria.  It was from the same young man I purchased, out of his bag of pipe parts, an orphaned stummel which became my maiden restoration project published on Reborn Pipes.  I titled it, A Newbie Restore of a Dr. Plumb 9456 Oom Paul – only it wasn’t an Oom Paul.  Al Jones’ (aka, Upshallfan) comment to my first blog observed correctly: “the 9456 is a classic GBD shape, although it is considered to be a Bent Billiard (rather than a Oom-Paul).”  I’m thankful for much ‘newbie’ grace I have received!  Though, the pipe’s name is still Chicho Pavel, Bulgarian for Uncle Paul!  He continues to be a favorite in my rotation and a special friend.  The Howal (over Old Briar) Rustified Dublin now before me is of interest to me partly because of its origins.  The pictures from my work table give an overview of the pipe itself.howal1 howal2 howal3 howal4 howal5 howal6The Howal name is of interest to me because it originated from behind the former ‘Iron Curtain’ in East Germany during a geopolitical climate rife with change and human tragedy.  My wife and I have spent over two decades living behind what was formerly the Iron Curtain and this is the second Howal I’ve found in the same Antique Market here in Bulgaria.  The question that comes to my mind is whether Howals are more commonly found in Eastern Europe where perhaps, they were circulated under the old USSR in an enforced socialist, command economy?  Pipedia’s article was both interesting and helpful in understanding the predecessor of and origins of the Howal name:

C.S. Reich howal7was founded by Carl Sebastian Reich in Schweina, Germany in 1887. By its 50th jubilee in 1937 C.S. Reich was the biggest pipe factory in Germany.  In 1952, however, the owners of the company were imprisoned and the company itself was nationalized as Howal, an abbreviation of the German words for “wood products Liebenstein” or “Holzwaren Liebenstein”.  By the 1970’s Howal, after acquiring many other smaller pipe making firms, was the sole maker of smoking pipes in East Germany. In 1990, with the fall of the Berlin Wall and reunification of the Germanys, the company was closed.

While helpful for a broad sweep, I discovered much missing from this summary and it raises more questions.  From another interesting source, Edith Raddatz’s lecture on tobacco pipe production in Schweina at the Tobacco Pipe Symposium in 2003, it describes a history of pipe production in this central German village that was reminiscent of my research into France’s pipe mecca, St. Claude.  A strong development of the pipe making industry can be traced in the 1800s to the apex of the C.S. Reich Co. being Germany’s largest pipe producer in 1937, but Raddatz’s lecture reveals that other producers of pipes were also based in the German village of Schweina.  Pipedia’s article above describes how the owners of the C.S. Reich Co. were arrested and imprisoned followed by the nationalization of the Reich Co. and becoming ‘Howal’, an acronym for “Wood Products Liebenstein” – Bad Liebenstein was the town that bordered and absorbed the village of Schweina. The question begs to be asked – which, unfortunately introduces the human tragedy wrapped around the name ‘Howal’ – Why were the owners arrested?  In an unlikely source, the website of the ‘Small Tools Museum’ adds the names of those imprisoned: shareholders Robert Hergert and Karl Reich.

Edith Raddatz’s lecture (referenced above) brings more light to the difficult geopolitical realities these people faced (Google translated from German – brackets my clarifications):

By 1945 the company, which had meanwhile [passed to] the next generation – Kurt Reich And Walter Malsch – [had] about 100 employees.   Among them were many women who mainly did the painting work.  At the beginning of the 1950s, an era ended in Schweina. The first [oldest] tobacco pipe factory in Schweina closed their doors. There were several reasons for this. Kurt Reich passed away in 1941, [and] Walter Malsch [in] 1954.  The political situation in the newly founded GDR made the conditions for private entrepreneurship difficult. The heirs of the company “AR Sons” [Reich family] partly moved to West Germany. The operation was nationalized and later toys were made there.

howal8In post WWII occupied Germany, the Soviet occupied section was declared to be a sovereign state and the German Democratic Republic (GDR) was established in 1949 (See link).  With a rudimentary understanding of Marxism and the economic philosophy undergirding it, it is not difficult to deduce what brought the demise of the C. S. Reich Co. and the formation of Howal.  Solidification of the FDR’s hold on power paralleled the necessity to nationalize private ownership and to institute a State-centered command economy.  These efforts gained momentum and forced companies/workers to work more with no additional pay.  In 1952, the year that the owners of C. S. Reich Co., were arrested, this edict was advanced (See link):

In July 1952 the second party conference of the Socialist Unity Party of Germany (SED) took place in East Berlin. In SED General Secretary Walter Ulbricht‘s words, there was to be the “systematic implementation of Socialism” (planmäßiger Aufbau des Sozialismus); it was decided that the process of  Sovietization should be intensified and the importance of the state expanded. The party was acting on demands made by Soviet premier Joseph Stalin.[2]

howal9As a result, Germany remembers the Uprising of 1953 which started in East Berlin, as factory workers revolted against the repression of the GDR, and spread to all East Germany.  Many lost their lives as Moscow responded to squelch the unrest with tanks on the streets.  In play also, was the mass exodus of people fleeing to West Germany, which included, per Edith Radditz’s lecture, the Reich family, who would have been heirs of the family’s legacy and company – pipe making.  Also in 1953, completing the State forced abolition of any Reich claim, the largest pipe making company of Germany was seized, nationalized, and changed from C. S. Reich Co. to Howal.  As ‘Howal’, pipes continued to be produced, undoubtedly with the same hands and sweat of the people of Schweina, along with other wooden products, such as toys.  In the Pipedia article I quoted above, it said:

By the 1970’s Howal, after acquiring many other smaller pipe making firms, was the sole maker of smoking pipes in East Germany. In 1990, with the fall of the Berlin Wall and reunification of the Germanys, the company was closed.

My curiosity piqued, what does it mean when it says that Howal acquired many other smaller pipe making firms?  Should we question whether these words can be understood in the normal free market enterprise way we are accustomed?  Doubtful.

As I now look at this Howal before me, it is with a greater connection to its checkered past, the people of Germany’s pipe making heritage, and specifically, to the hands that drilled, shaped and finished the pipe.  The possible dating of this Howal spans from 1953 to 1990, when the Howal factory was closed for good with the fall of the Berlin Wall and the old USSR (See link).  The Howal markings on the left side of the shank are in very good shape.  The rustification is very attractive in the Dublin style – definitely an ‘olde world’ feel.  There are some marks on the rim.  The bowl is totally free of cake – someone did some clean-up work before coming to me.  The dark color of the stummel appears to be paint or a black stain – I can see brown around the nomenclature on the shank.  I will clean the stummel with Murphy’s and see what happens.  There is no oxidation on the stem nor teeth chatter or dents.  So, could this Howal be only a simple cleaning and freshening?

I start by taking a picture of the rim and markings to take a closer look at areas of question.  Then using Q-tips and pipe cleaners with isopropyl 95% I start cleaning the stummel internals.  After only one plunge of a Q-tip, I see that the mortise is full of the black finish that is also on the external surface.  I find no tobacco gunk in the mortise, only black dye – or whatever it is.  After several Q-tips and some pipe cleaners, I decide simple to fill the mortise with isopropyl and let it soak for a few hours.  This did the trick.  After pouring off the dirty isopropyl the Q-tips, after the soak, started coming out clean very quickly.  Stummel done.  The stem required very little effort.  The pictures show the progress.howal10 howal11 howal12 howal13 howal14 howal15I take undiluted Murphy’s Oil Soap and scrub the stummel surface with cotton pads and a bristled brush. I want to test the finish to see how solid it is as well as clean the grime out of the rustification ridges.  After a good scrub, I rinse the soap of the stummel with tap water, careful not to allow water inside. howal16After drying, I have two impressions of the black finish.  First, the splotched glossy areas left over from the Murphy’s scrub remind me of the acrylic finishes that I’ve seen on smooth briars.  Secondly, the finish now is speckled where the briar is coming through.  Decision time.  A plan starts formulating in my mind.  I like the rustification of the Howal Dublin and I very much like the feel of the Dublin in my hand – it has a good ‘meditation’ appeal, which is a good quality for a pipe J.  Yet, truth be known, I’m not a fan of the black finish.  To me it is plain and stark – it lacks depth and interplay with the tight, crisp rustification patterns.   I decide to continue scrubbing the surface with Murphy’s Soap to remove the remaining glossy spots but to leave the black hue in place.  After Murphy’s, I use some isopropyl 95% with a cotton pad and work on the glossy areas.  While not 100% gloss free, the last picture shows sufficient progress.  I will give more thought to the plan at this point.  The pictures tell the story.howal17 howal18 howal19With a night of rest now fueling the thoughts, I decide to use the dark stain on the stummel as a back coat for a subtle Oxblood over-coat.  My goal is to create more depth in the rustification by introducing another hue.  I begin preparation of the stummel by very lightly sanding the top peaks of the rustification ridges with a 1500 grade micromesh pad.  I do this to create entry points for the new dye in raw briar opened by the sanding.  I’m thinking of the restoration I did with the classic rustified Lorenzo Rialto for the basic approach I’m now employing.  I want the surface to be clean so I follow the sanding by wiping the surface with a cotton pad and isopropyl 95%. I use a black Sharpie pen to darken the worn ring of bare briar around the rim of the Dublin for better blending.  I included a picture of the Lorenzo Rialto to get an idea of where I’m hopefully heading!howal20 howal21 howal22 howal23In preparation to apply the stain, I cover the Howal gold lettering stamping with a bit of Petroleum Jelly to protect it. Using my wife’s hair dryer, I warm the stummel to open the briar to the new dye. Using a cork inserted in the bowl as a handle, I liberally apply Fiebing’s Oxblood Leather Dye to the surface of the stummel with a doubled pipe cleaner – careful to cover the entire stummel and rim.  After the initial application, I fire the aniline dye and the alcohol burns off quickly setting the hue in the briar.  After a few minutes, I repeat the process to assure an ample coverage and put the stummel aside to rest. The pictures show the progress.howal24 howal25With the newly dyed stummel resting, since the Howal’s stem came to me in good condition – no tooth chatter or dents, I start wet sanding the stem using micromesh pads 1500 to 2400.  I follow the wet sanding with an application of Obsidian Oil on the hungry vulcanite.  I then dry sand with micromesh pads 3200 to 4000 and then 6000 to 12000 – following each set with an application of Obsidian Oil.  The stem looks great – that newly polished vulcanite pop is very nice.  I put the stem aside to dry.  The pictures show the progress.howal26 howal27 howal28Time to ‘unwrap’ the fired, crusted Oxblood dye I applied to the dark stummel.  I mount a new felt polishing wheel on the Dremel and set the speed to the slowest setting and utilize the fine abrasion of Tripoli compound to take the crusted layer off.  Patiently, I move the wheel across the surface in a circular motion, allowing the RPMs of the Dremel and the compound to do the work – I apply little downward pressure on the briar.  As the results started to appear, I see the Oxblood speckling I was hoping to see, but not as much.  I decide to follow by lightly sanding the rustified surface with a 1500 micromesh pad.  This resulted in the direction I wanted to go, but I wanted the Oxblood hints, beginning to peek out, to be a few shades darker, richer.  Even though I had already put away the stain and cleaned up, I decide to repeat the staining as before – hopefully to realize the results I can envision in my mind.  The bottom picture in the set shows the stummel after the second staining with Frieberg’s Oxblood Leather Dye – not looking much different than before but simply to chronicle my procedure.  The first picture, after the Tripoli then after, the sanding show the developing motif with the Oxblood and the rustification. howal29 howal30 howal31After several hours, admittedly, I was a bit impatient to unwrap the fired crust the second time around.  In the time in between, I had some time to think about the next step. My usual approach is to use a felt polishing wheel with the application of Tripoli compound to smooth briars.  A felt wheel is flatter and firmer than a cotton cloth wheel and therefore, more abrasive than the cotton cloth wheel.  With use on a rustified surface, I’m thinking that the felt wheel might possibly ride more naturally on the peeks of the raised ridges and possible do its work unevenly – at least in theory.  My usual approach with the Dremel is to use a cotton cloth wheel when coming to the carnauba wax polishing stage.  I decide to mount a cotton cloth wheel for both compounds I employ, Tripoli and Blue Diamond, and see how it goes.  With the new cotton cloth wheel mounted on the Dremel, I’m ready to put theory into practice first with the Tripoli compound.  The only problem breaking in a new cotton cloth wheel is that loose fibers run amuck and I’m covered!  I continue to use the slowest speed the Dremel can offer for the compound.  After the Tripoli, again with a new cotton cloth wheel, I apply Blue Diamond compound.  I am truly amazed at the subtle Oxblood texturing that emerges – it is working!  I find that I spent more time with the Tripoli as the Tripoli was the abrasive that created the effects of the Oxblood speckles.  Where there were none or few Oxblood accents, I focused the Tripoli wheel at that area and the highlights would begin to appear.  With the Blue Diamond I spend much less time as it was shining what was already revealed not bringing out more.  I take a picture after the compound phase.howal32 After the compounds, I hand buff the stummel with a cotton cloth, not so much as to shine the stummel but to remove residue compound powders left over.  I do this before the application of carnauba wax, also with a cotton cloth wheel, but with the Dremel increased to number 2 of 5 (being the fastest).  After reuniting the stummel and stem, I give both several applications of carnauba wax.  The only difference in technique with the wax is that with a small, Dremel polishing wheel, I am able strategically to apply the wax so it doesn’t get gunked up in the ridges of the rustification.  I keep the wheel parallel with the grain and follow the ridges/valleys as I apply the carnauba.  With the compounds, you are still sanding and ‘taking off’ from the finish, even though it’s shining things.  With the wax, you’re not taking but leaving something behind – the wax has the purpose of polishing and protecting the finish. After applying the carnauba, I decide to do one more thing to recommission the rustified Dublin.  With Rub ‘n Buff European Gold Wax Metallic Finish, which I just acquired during my Christmas visit to the States, I spruced up the Howal nomenclature.  I applied the Rub ’n Buff with a pointed Q-tip and carefully wiped the excess.  After dried, again I spruced up the area with a few passes of the carnauba wax wheel.  A few pictures show the before and after.howal33 howal34To finish, I give the stummel and stem a rigorous hand buffing with a micromesh cloth to bring out and deepen the shine.

I have a deeper appreciation for the name this rustified Dublin carries.  Understanding the past helps us to stay rooted in the present.  I appreciate better the legacy of the Howal name and the journey of the Carl Sebastian Reich family beginning in Schweina, Germany in 1887.  I’m very pleased with the results of the Oxblood finish.  In the presentation pictures below, I had to take some unusually close shots to see the subtle Oxblood highlights hidden by the reflection of the light.  To me, the finish adds depth and texture to the attractive rustified Dublin.  If you would like to add this Howal Old Briar to your pipe collection and stories, see my blog at The Pipe Steward.  Thanks for joining me!howal35 howal36 howal37 howal38 howal39 howal40


Restoring a Patent Era Brigham Executive Statesman


Masterful job on the stem and rim repair Charles. Good to see you back at the repair work! Nice first bat! Well done. The information you are gathering on the Brigham pipes will soon be worthy or a book my friend.

Charles Lemon's avatar

I could not pass up the opportunity to add this Brigham Statesman to my collection. Despite its flaws, including a battered rim and a large bite-through in the lower bit, the pipe was in decent vintage shape and was certainly restorable. Besides, I didn’t have the “bent stacked billiard” Statesman shape in the collection, so this was a good chance to fill a gap in my rack.

These pictures of the pipe as it arrived on the worktable attest to a reasonable level of care given to the pipe over its lifetime. As I’ve already pointed out, the rim was ringed with dents under a layer of lava crust, and the stem suffered from a large void on the underside of the bit. The gap, however, had been carefully smoothed with a file to make the damaged stem as comfortable as possible for the piper.

The vulcanite stem was heavily…

View original post 805 more words

Spotlight: Ladies Pipes, Part 7/7, Concerning the Summit of Diminutive


Blog by Robert M. Boughton

Member, International Society of Codgers
Member, North American Society of Pipe Collectors
Member, Facebook Gentlemen’s Pipe Smoking Society
https://www.facebook.com/roadrunnerpipes/
http://about.me/boughtonrobert
Photos © the Author except as noted

For Liz B. Smith: this one’s for you

It’s not the size of the dog in the fight; it’s the size of the fight in the dog.
— Samuel Langhorne Clemens (Mark Twain), 1835-1910, U.S. humorist, writer, editor and extraordinary adventurer

The word ‘American’ terminates in ‘I can,’ and ‘dough’ begins with ‘do.’
— Attributed to Alfred Carl Fuller (1885-1973), founder of the Fuller Brush Co.

INTRODUCTION

A great American rock group called The Doors summed up this blog in the most famous couplet from the 1967 song “The End.”  The rest of the brilliant yet rambling lyric poetry, alas, is too morose and even sinister to cobble together a quote for the occasion, no matter how many annoying ellipsis marks might be used by, say, someone with the skill set to edit negative book reviews so they sound glowing on the dust jackets.  Hence the more merry samples above, which still bely the sadness I feel at the close of my attempt to serialize various facets of the ways women enjoy the pleasures of pipes as much as  do men.  (Twain, I’m sure, would have despised Fuller’s aphorism and hated being associated with a salesman.)  The nine months since my first installment seem more like years given the travails I’ve faced and overcome.  But fret not; I won’t go there now – at least not in great detail.

I had two more conventional instruments for savoring pipe tobacco set aside for the seventh and last part of the series and was still deliberating which to use.  As circumstances transpired, they were lost to the most shameful, unscrupulous and downright worthless excuse for a human I have ever encountered in a slumlord, and with whom I am still engaged, in ever-escalating legal battles.  The dispute is now poised to escalate from civil to criminal for the felony property conversion perpetrated by the contemptible principal of several offenders.  But I will write more about that in a future blog detailing the loss of almost every material possession I held most dear.  Suffice it to say for now that the devastating event has proved to be the single most unnerving and excruciating test of my ability to come to terms in my own mind with any set of undeniable facts, to discuss the odious injustice of the whole despicable experience with family and friends and, perhaps most difficult of all, even to brooch the subject in this forum, I have ever experienced.  The memories still sting and I believe will even after the full weight of the law crushes the scoundrel.

And so, after careful consideration, I decided to combine a look at salesman samples, a separate blog of which I began drafting some months ago, with the culmination of my ladies pipes series.  In the span of a few years I amassed an admirable collection of these little gems of tobacciana and still have several, thanks to the fact that they were stashed in my go-bag, as I call the portable kit of rotation pipes, tobaccos, restoration tools and odds and ends.  They were snug in a small box of restorations in progress or just completed when the slime ball who is now the central focus of my ever more litigious life made the premeditated decision to lock me out of my home with the purpose of converting my property to his own gain.  After all, he was sued twice in the past on the same grounds and only had to pay for one of them.  At any rate, in my research into female pipe enjoyers, I found a greater incidence of affinity for these tiny pipes among women compared to men, despite the frequent common ground of the two genders viewing them as impractical for loading with leaf and lighting up.  I shall do my best to dispel the myth.

While I am aware of the unusual interest in salesman samples in recent contributions to this forum, all of which included good information on the peculiar items, I will give my two cents worth for those who may have missed the others six parts and, I hope, add a little more context and color.  I would also like to celebrate some of the collection that was mine and those that remain.

Salesman samples were not toys – nothing like the Matchbox and Hot Wheels cars many of us collected as children.  They were not knickknacks such as thimbles or figurines of people, animals, castles, super heroes and creatures from fantasy and mythology.  Salesman samples came into existence as marketing tools for manufacturers of almost every mechanical and non-agricultural commodity and were most popular in the early 20th century.  Few folks nowadays remember a time when cars and airplanes were not the standards of transportation, and products could not be shipped in viable ways, often overnight, to showrooms all over the country and world.

Enter the intrepid peddlers of every type of ware – baseballs, coal stoves, violins, furniture, upright carpet cleaners and, of course, tobacco pipes, to name a fraction of the goods they offered – and who had no mode of travel better than trains, and in some more remote locales, stagecoaches and even by horseback.  Think about that.  How could one person carry many samples of the items he sold, which were either huge or fragile, to convince prospective buyers to purchase them?

Then some merchandising brainiac came up with the idea of exact replicas that could be conveyed in valises.  Giants like Sears & Roebuck were made as much by direct salesmen as mail order catalogs, to be sure.  The reality of traveling salesmen is that they covered vast and perilous territories going “door-to-door,” which in those days was farm to farm, and they were often far between.  For anyone who complains about road conditions now, thank your lucky stars you weren’t around back in the day.  Then again, maybe a few old curmudgeons were!  True, there were also small general stores to be pitched, but most folks had few chances to make the dusty, jarring journey into town.  Some salesmen even had to pay in advance for their merchandise and keep the profits.  Here’s the real kicker: back then, bartering was the name of the game, and with little cash on hand, the yokels and mercantile proprietors tended to trade with eggs, butter, vegetables and other what-have-you.  In short, the life of the traveling salesman was rough and grungy long before the latter word was coined in the 1960s, yet today he is remembered in popular movies and cheesy novels as a fast-talking bespectacled dandy from “sumwer back east.”

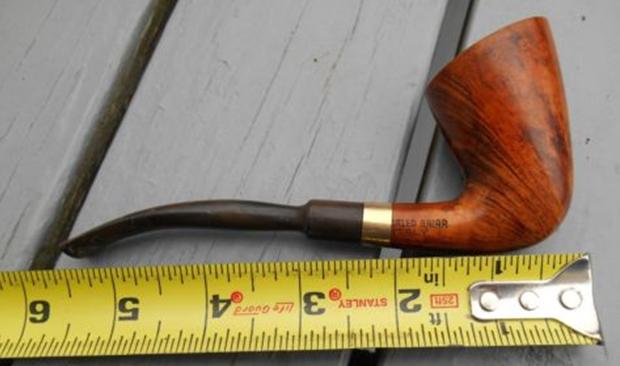
Remember, all of the following genuine salesman samples are about the size indicated in the photos with a tape measure and a ruler.lad1Now for some pipes I’d like to own.lad2 lad3 lad4
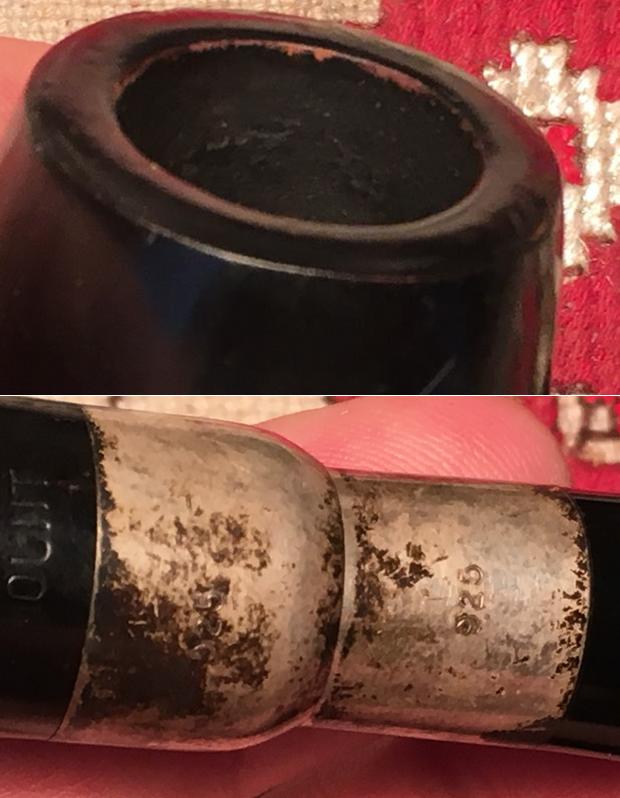
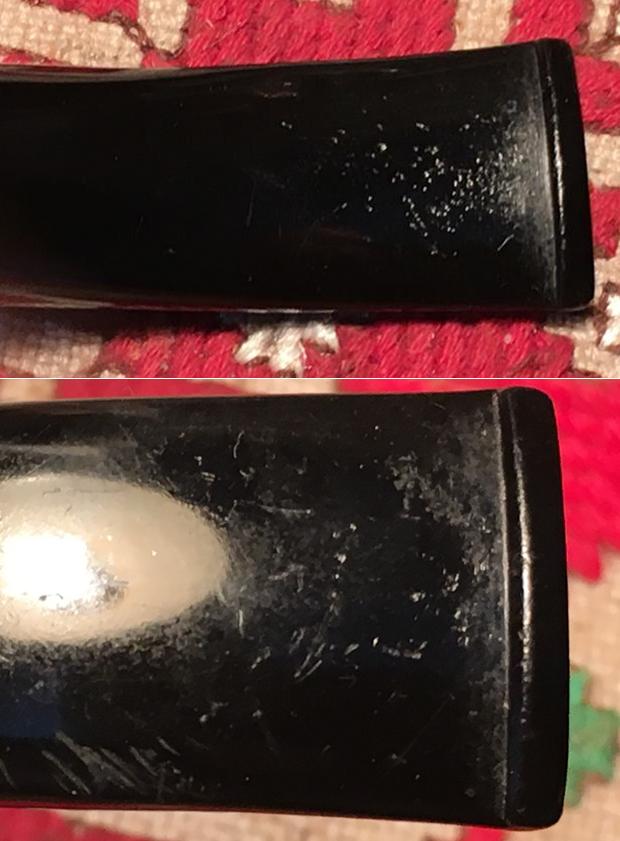
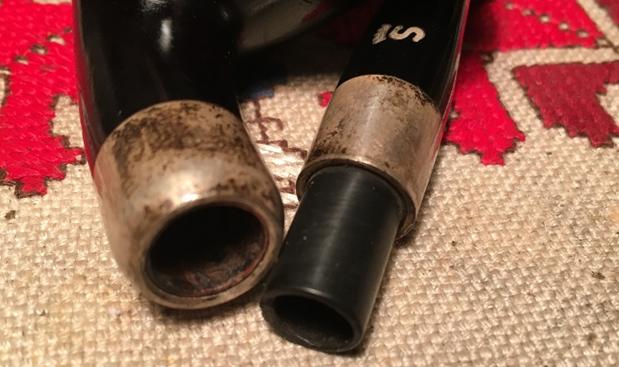
And here was my own collection of salesman samples.lad5 lad6lad7
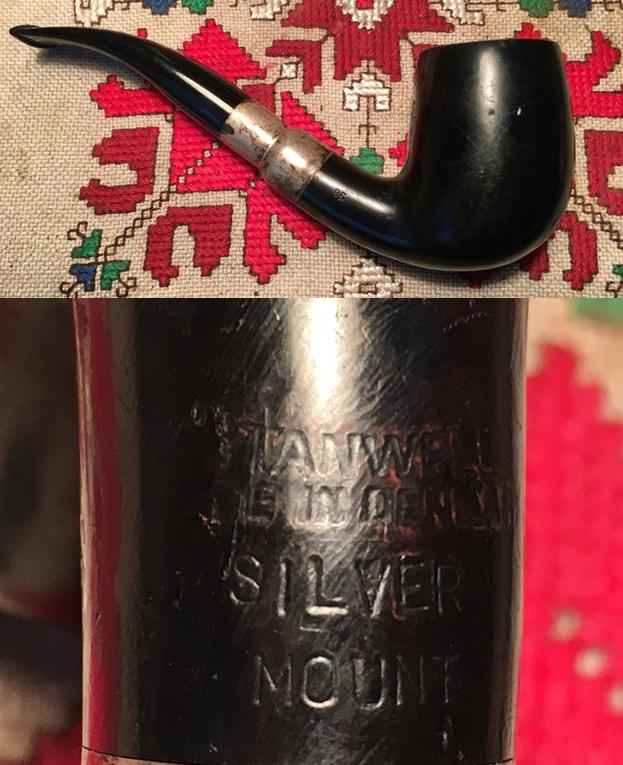
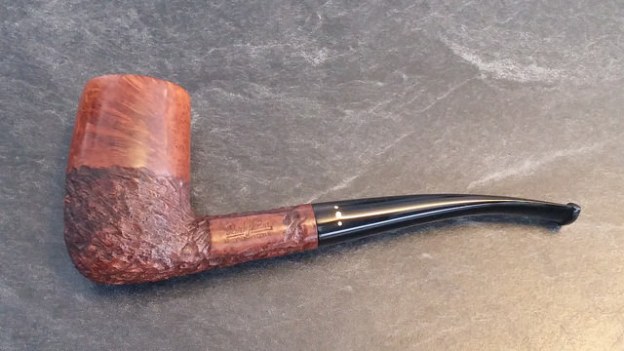
William Demuth & Co. (WDC) Bent Pot with screw-in rim guard, before and after

lad8 lad9 lad10WDC Wellington Bent Apple, before and after

lad11
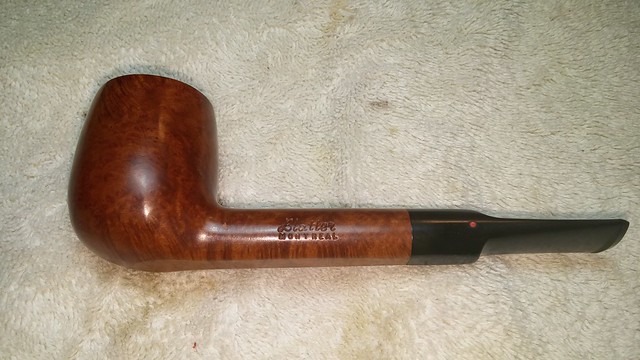
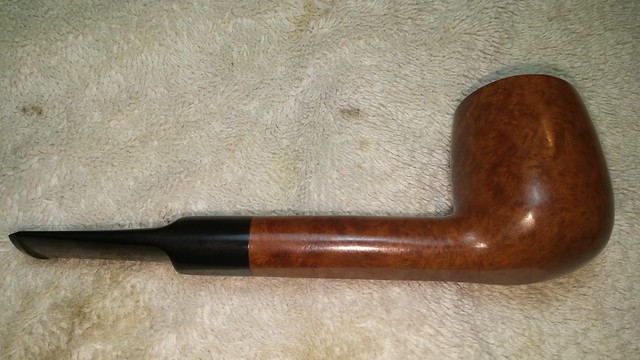
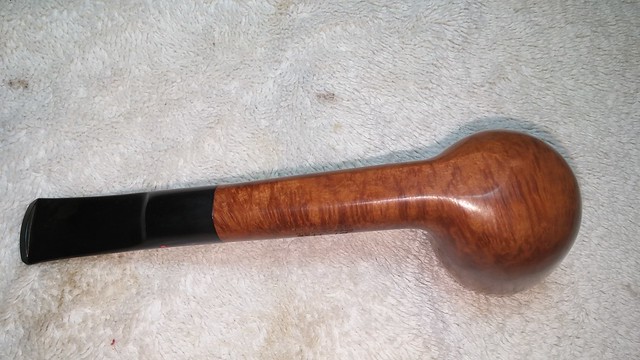
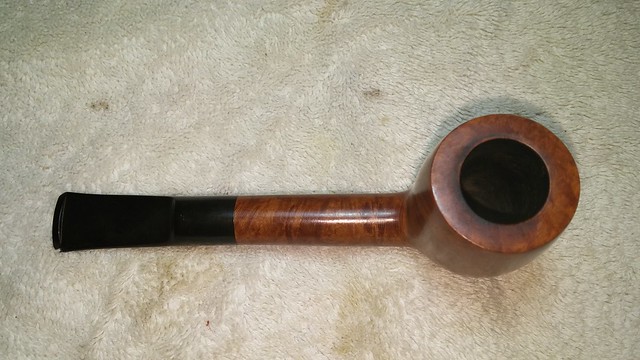
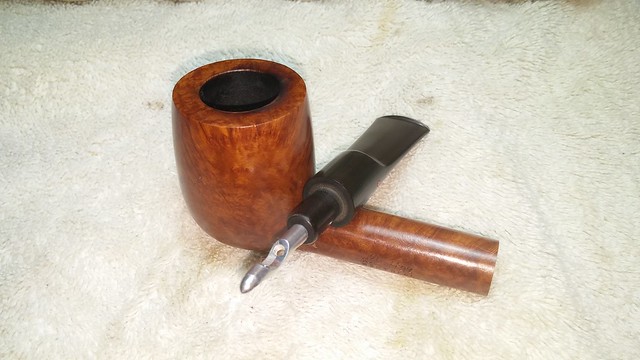
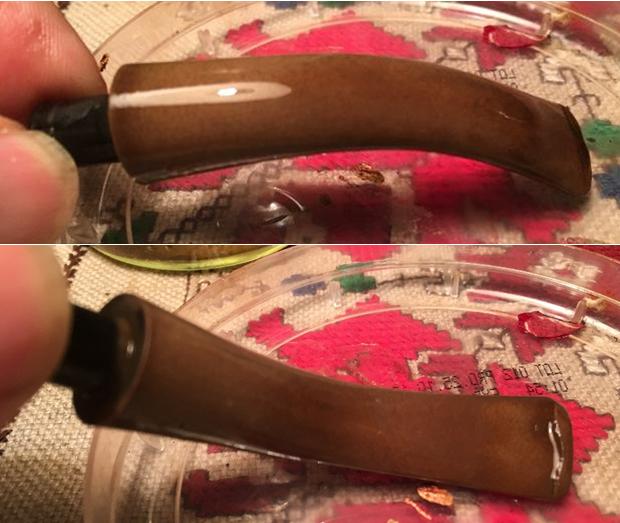
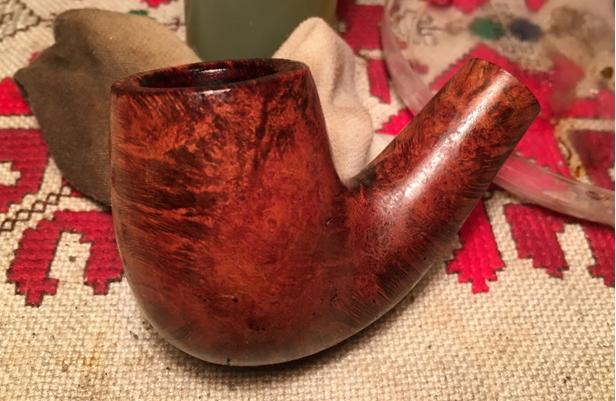
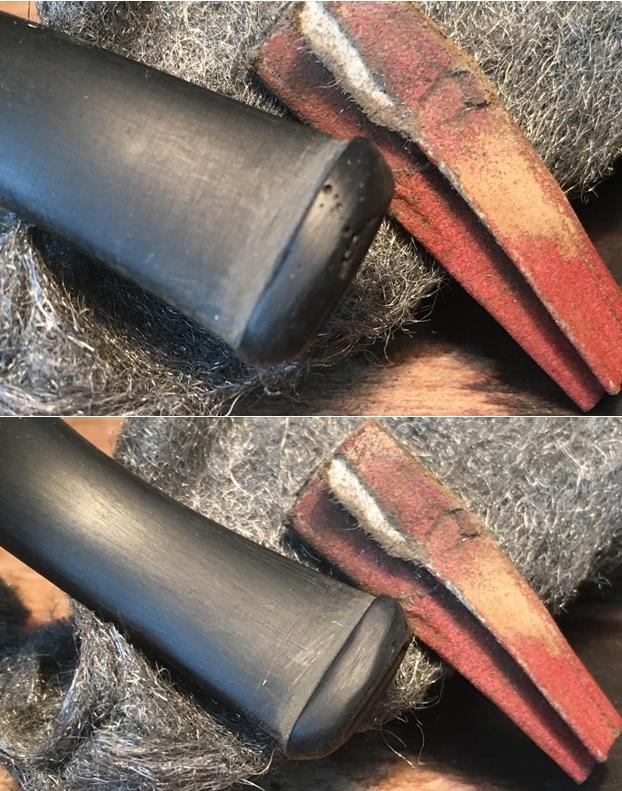
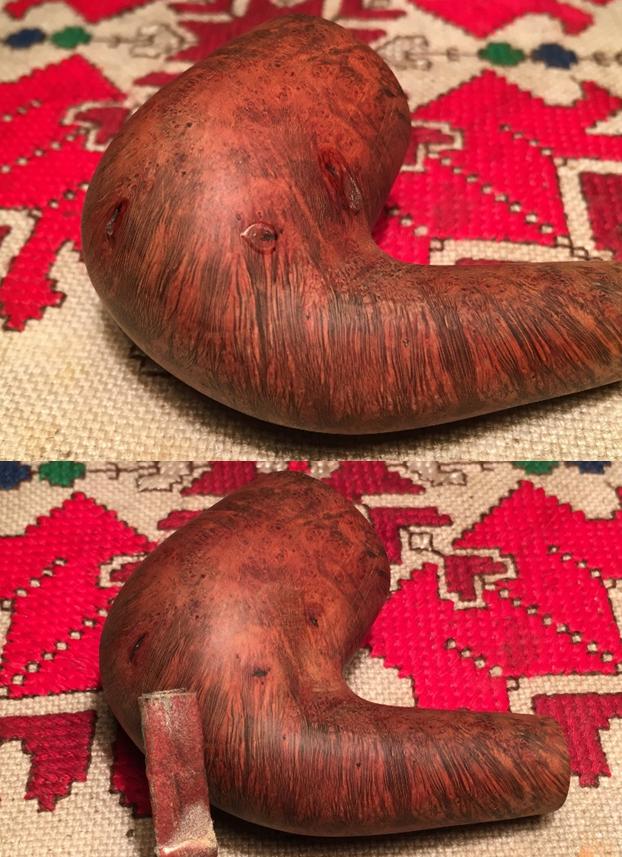
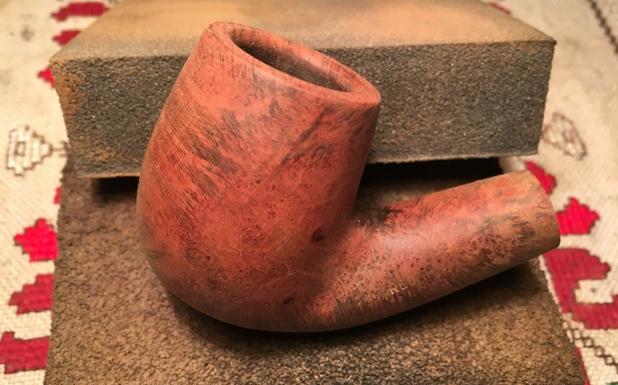
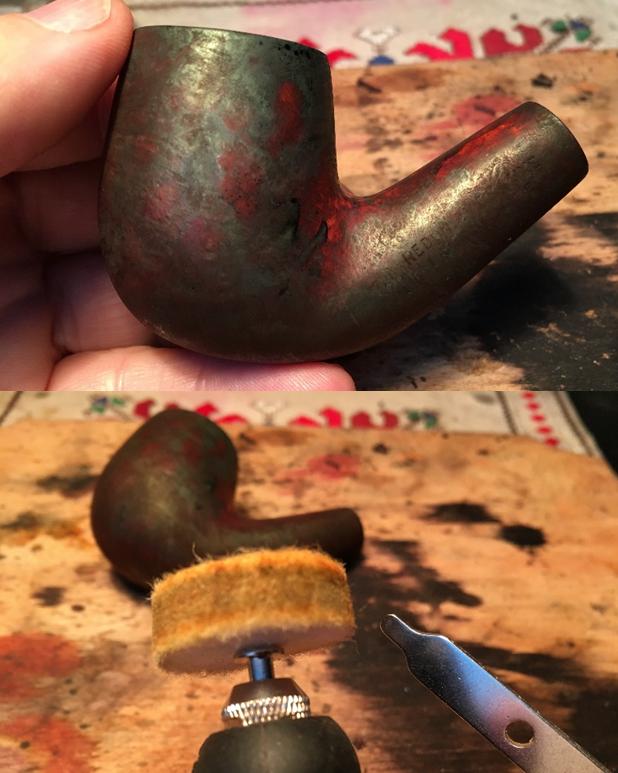
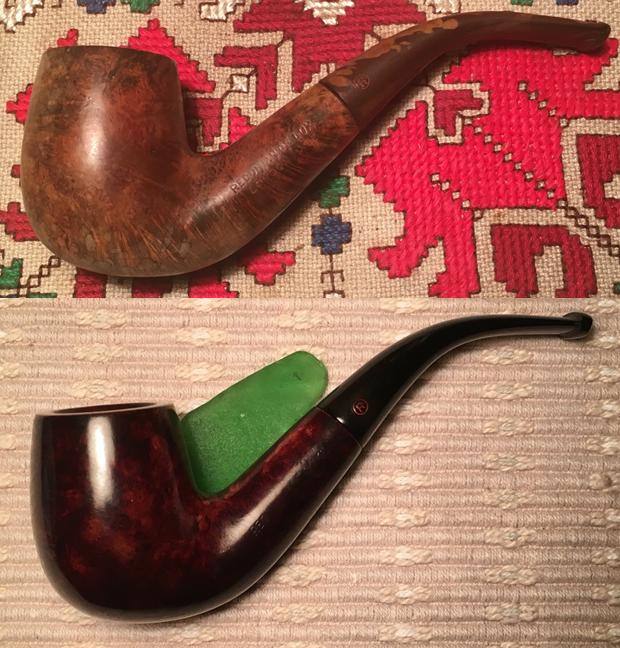
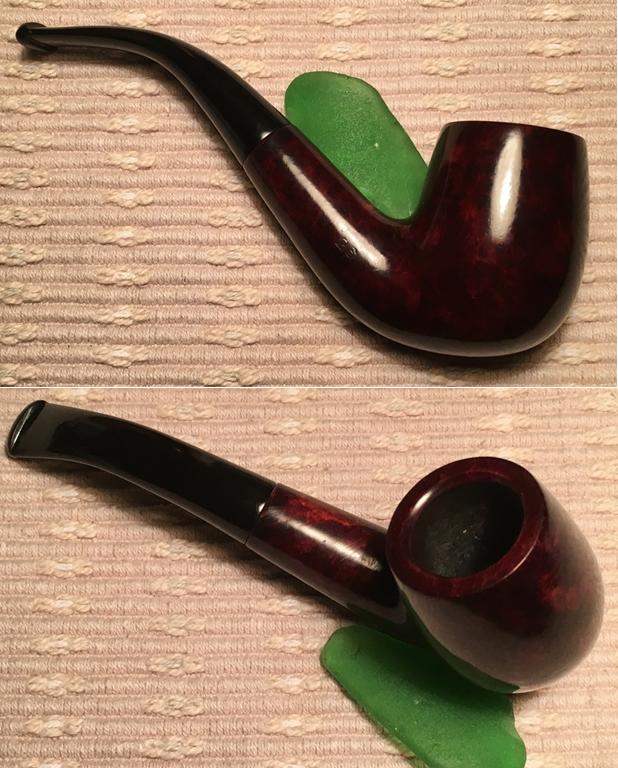
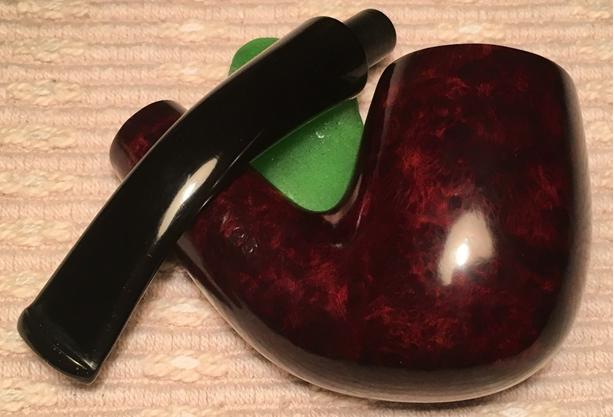
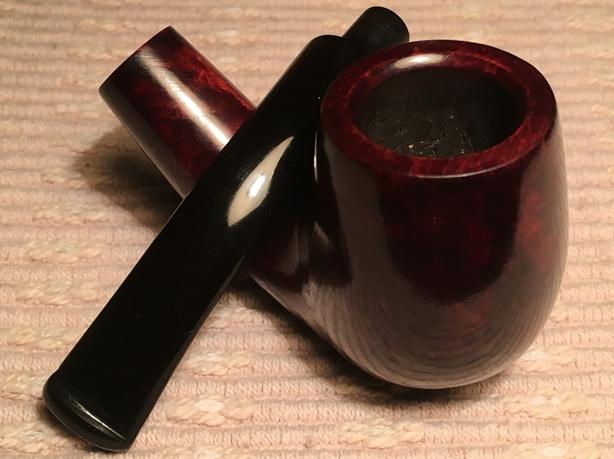
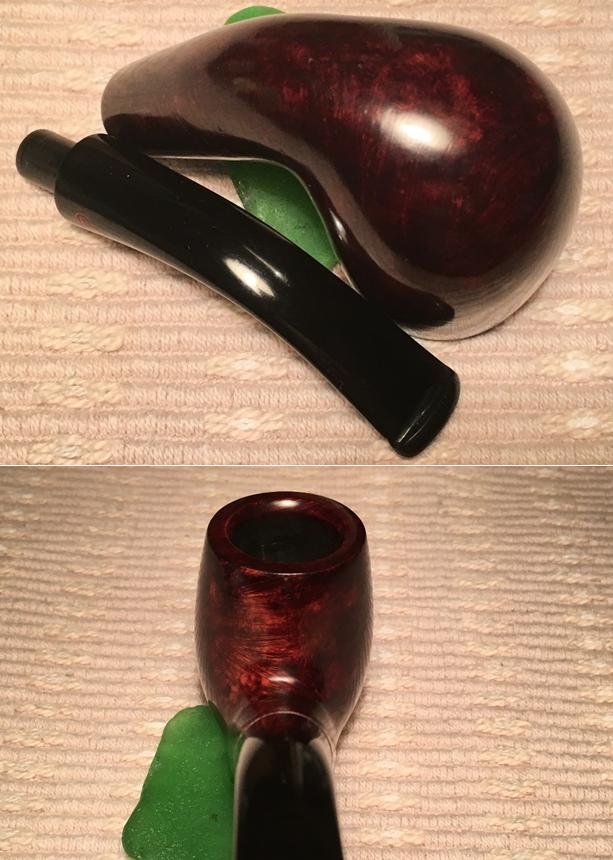
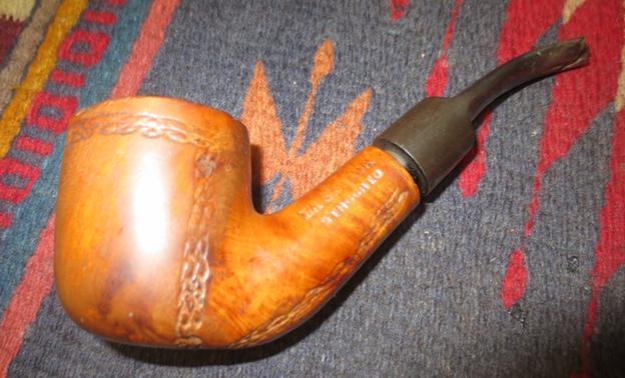
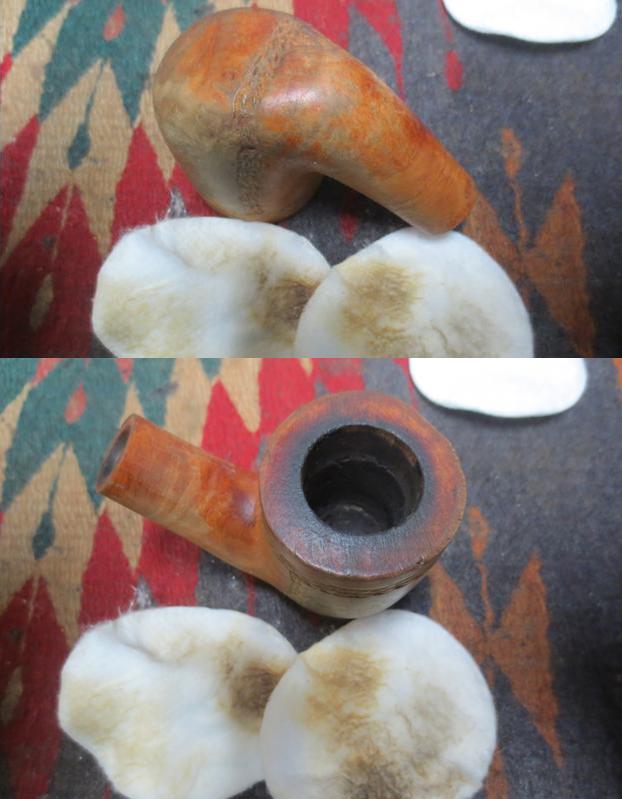
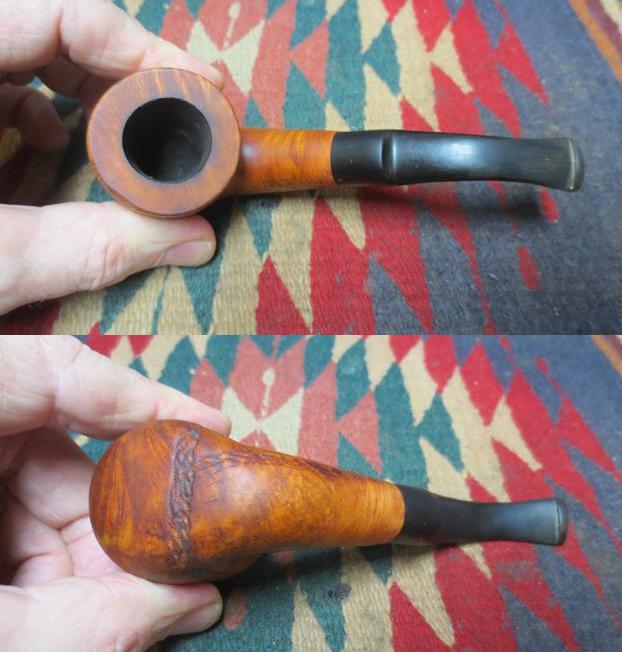
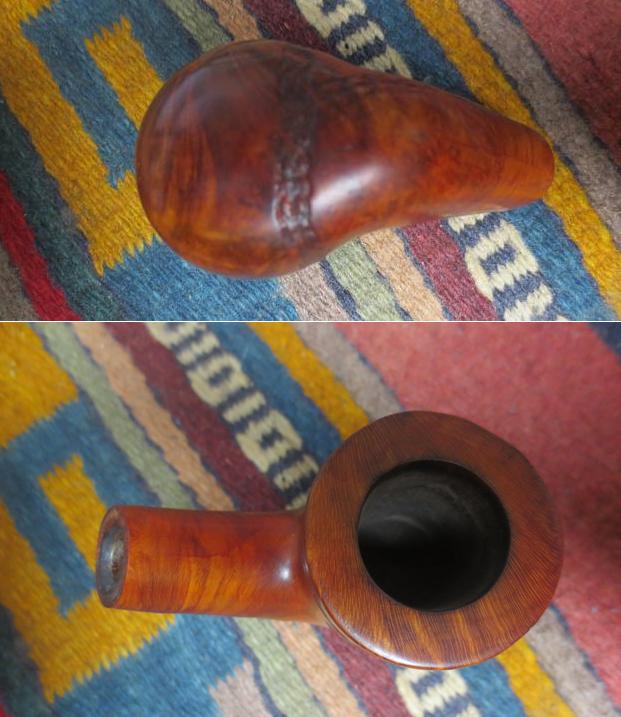
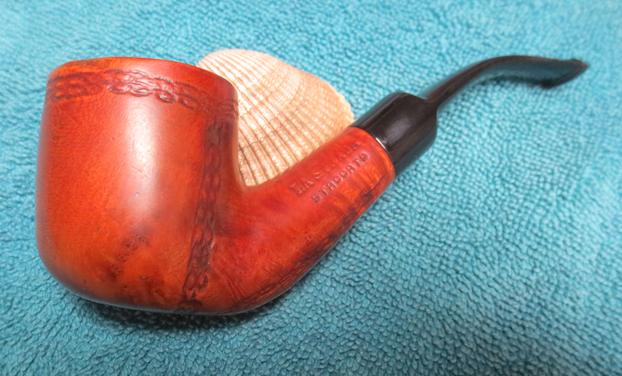
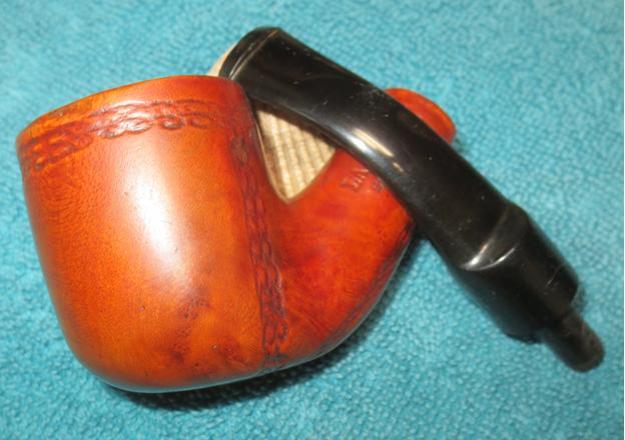
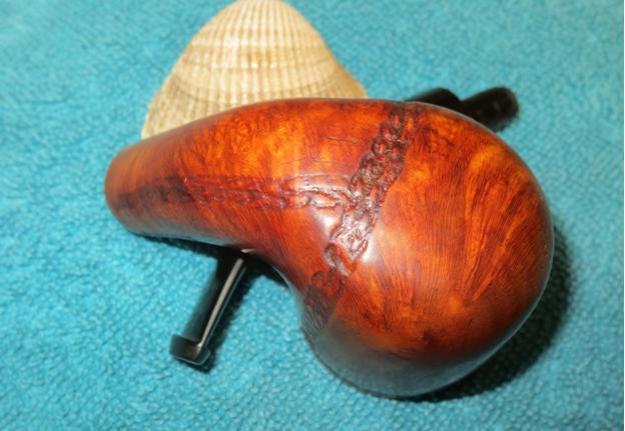
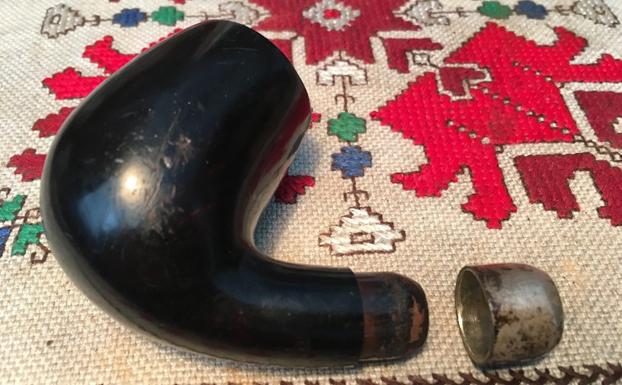
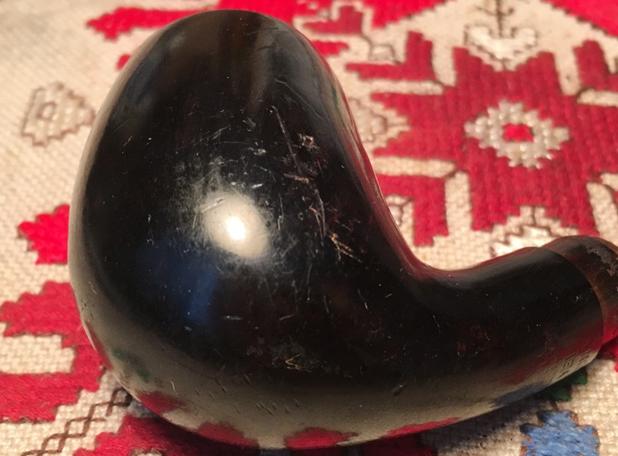
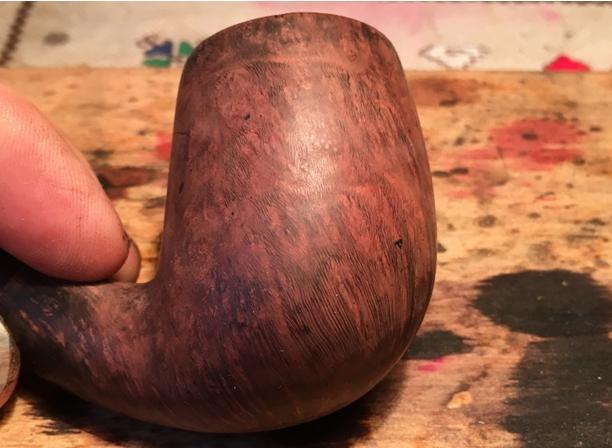
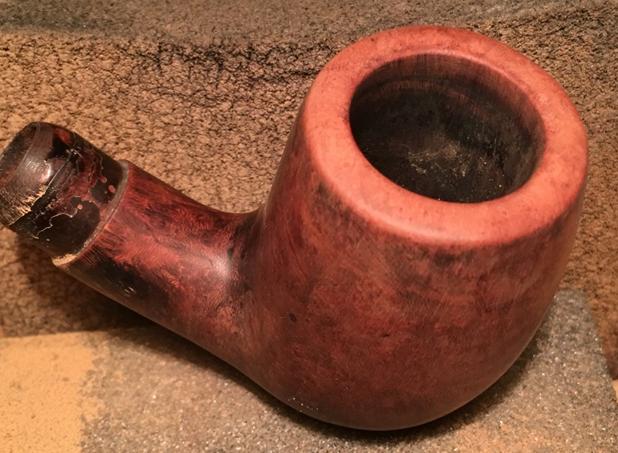
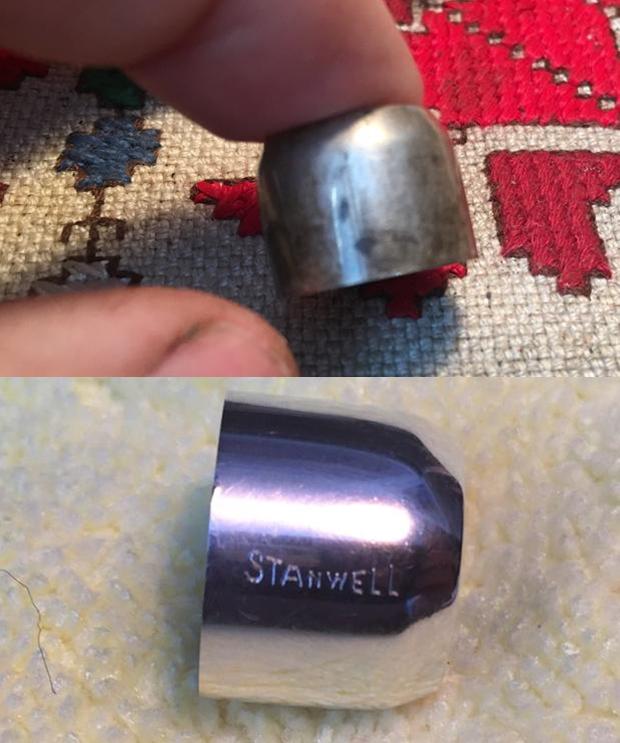
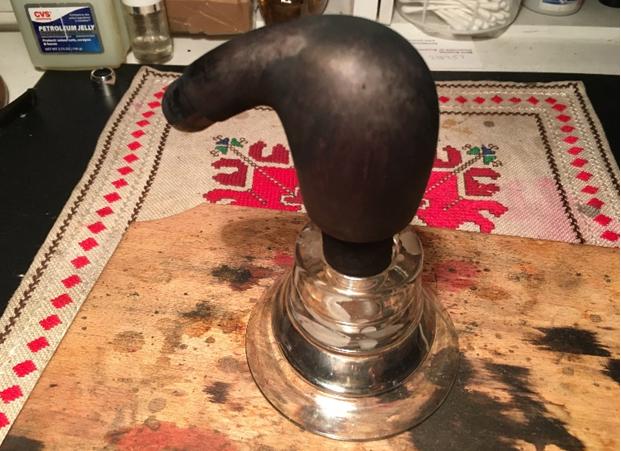
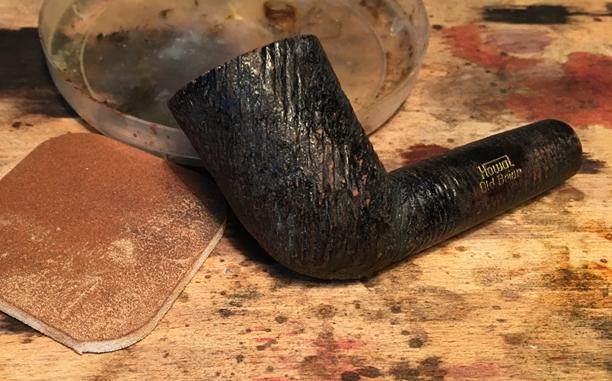
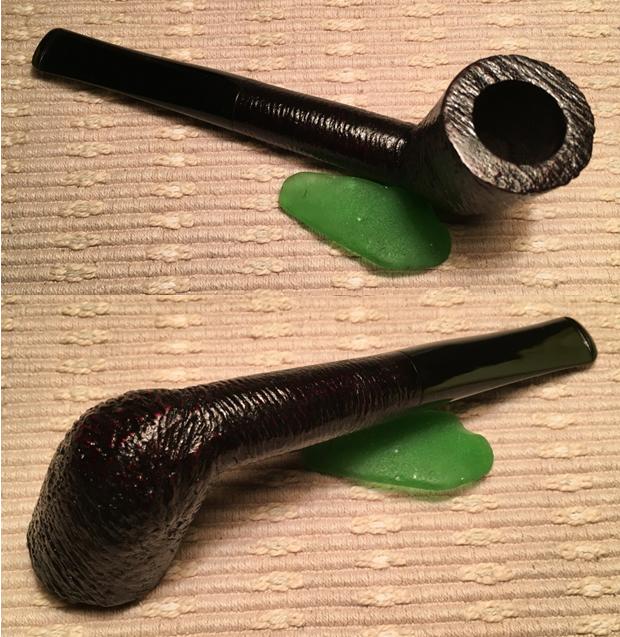
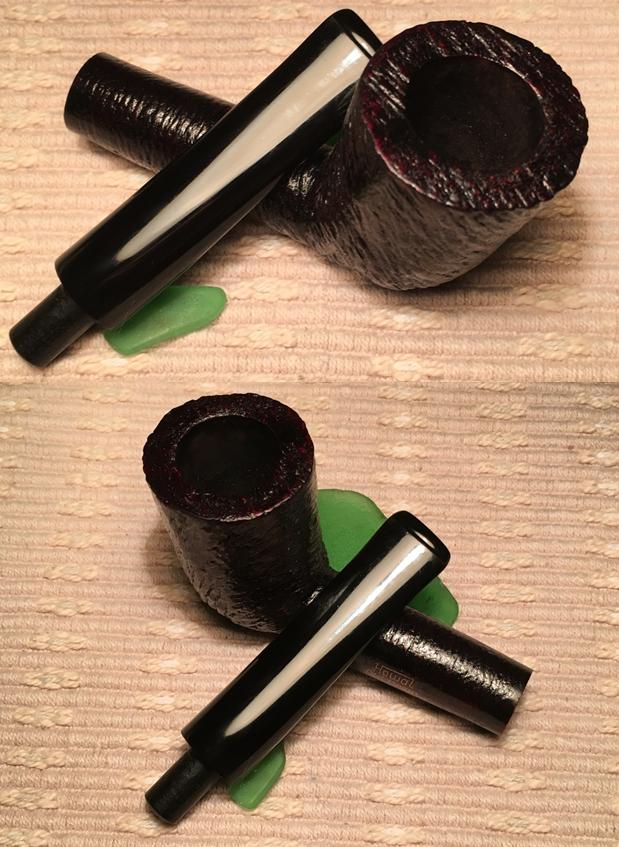
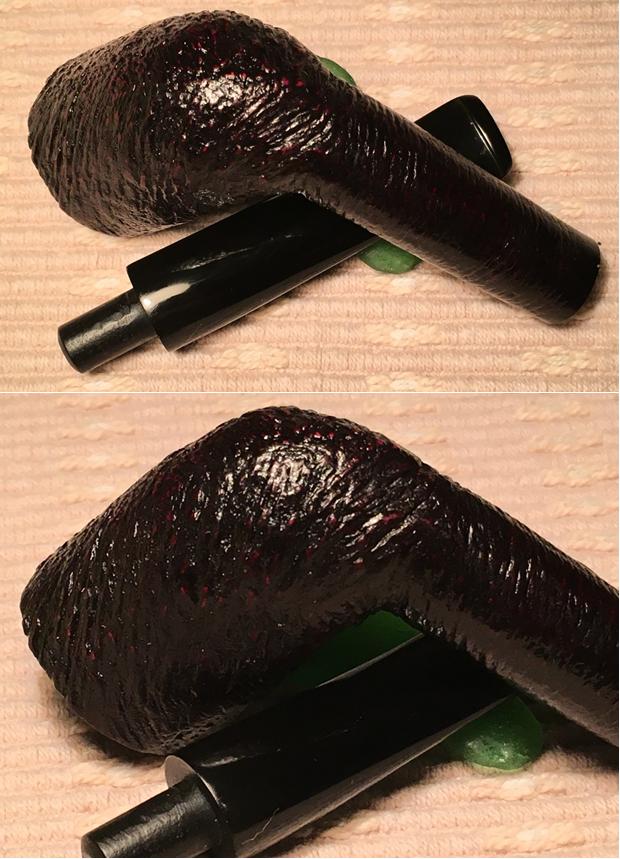
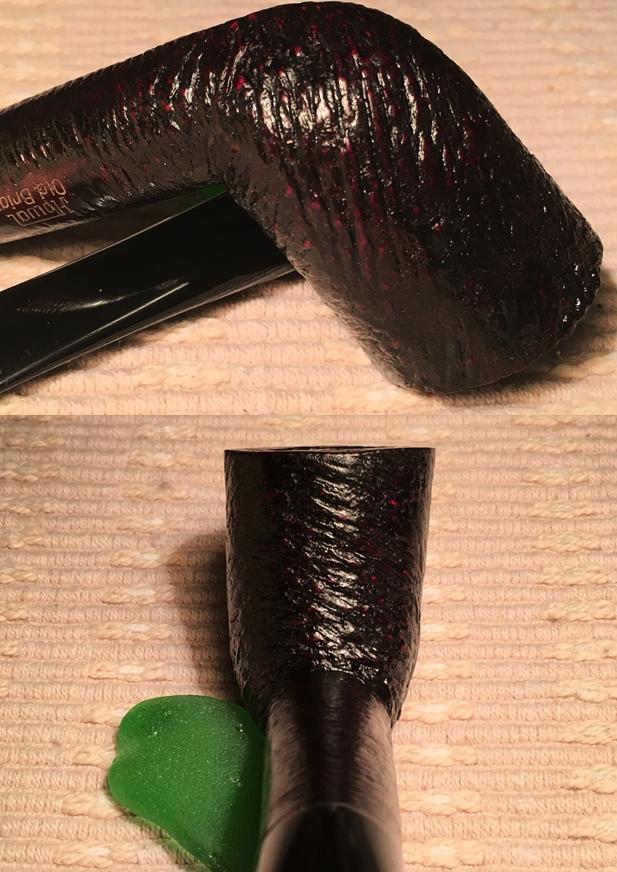
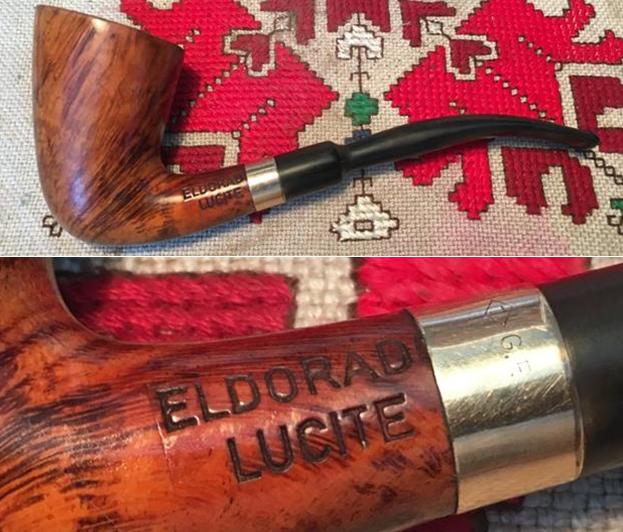
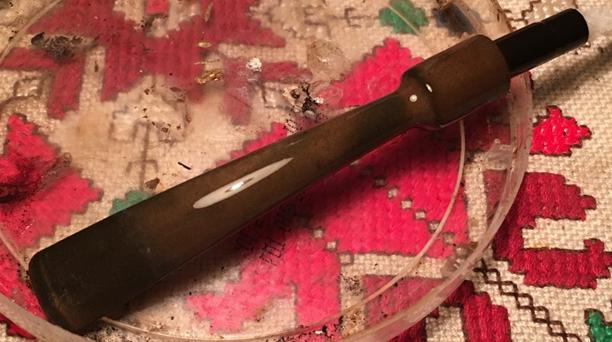
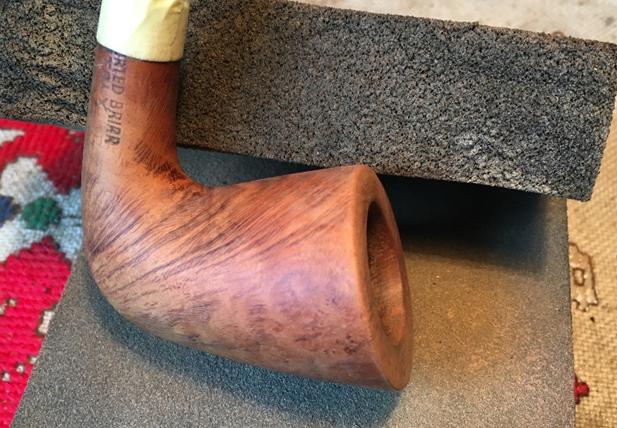
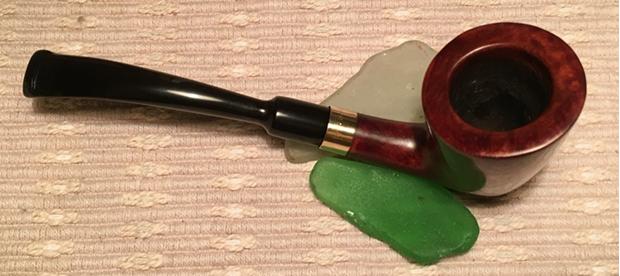
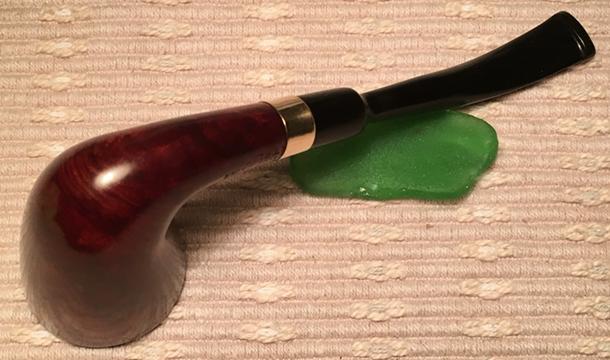
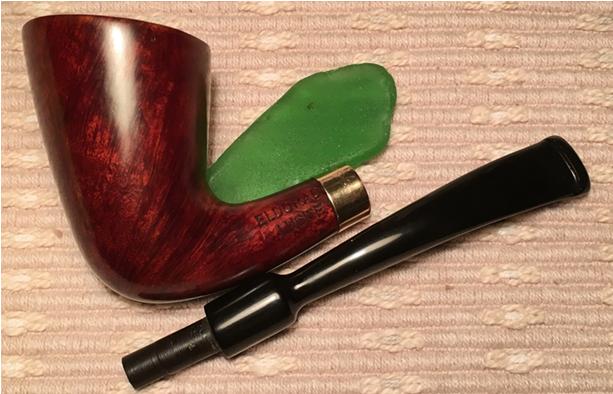
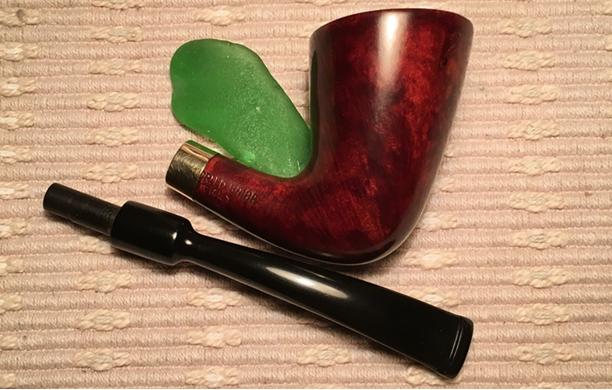
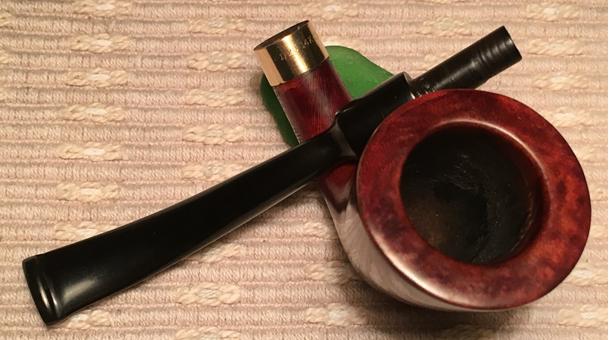
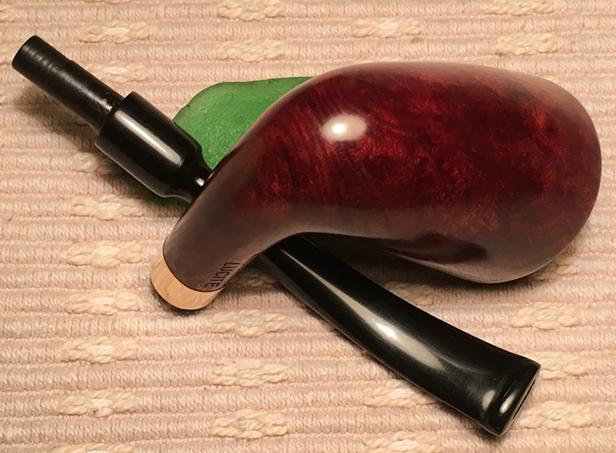
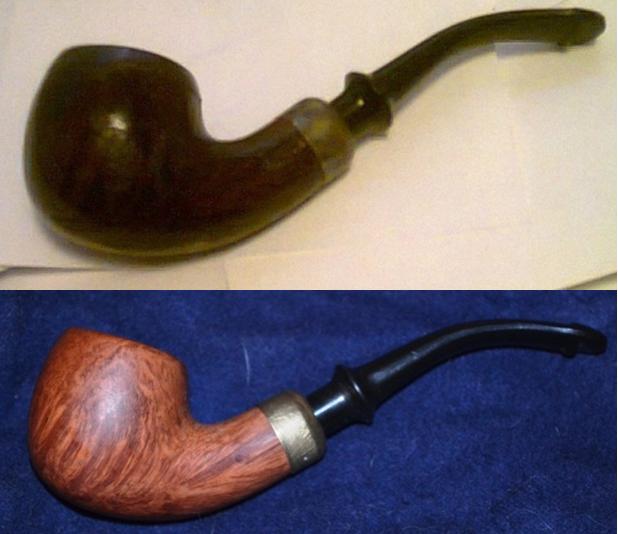
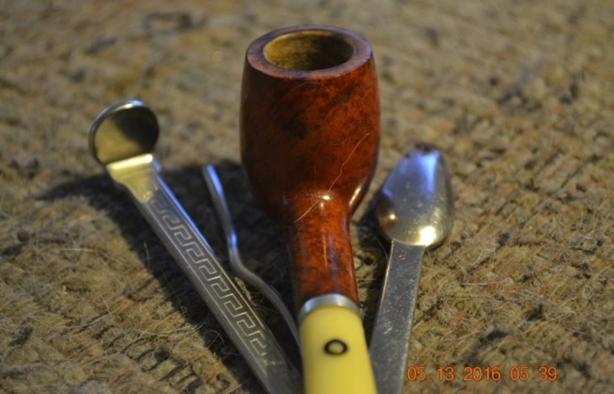
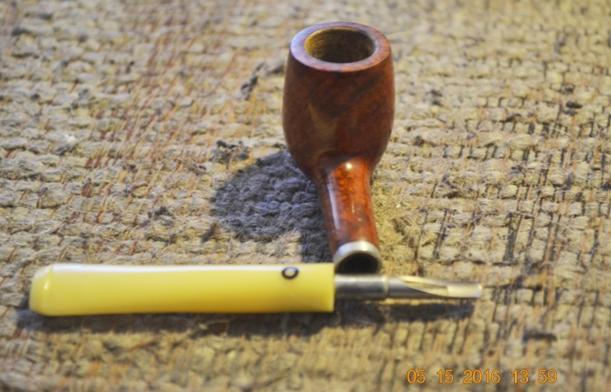
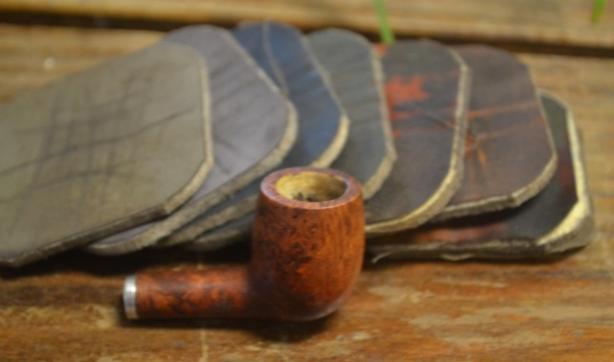
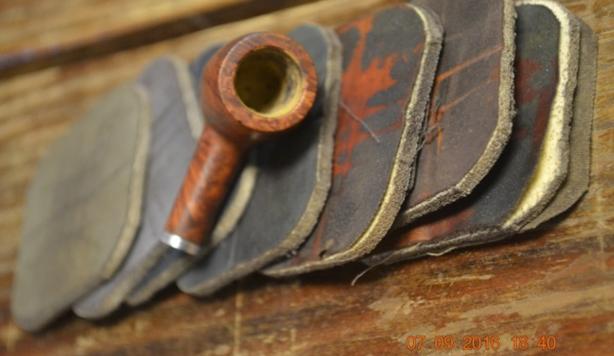
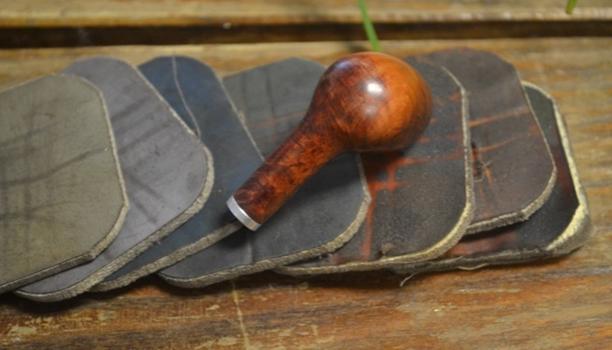
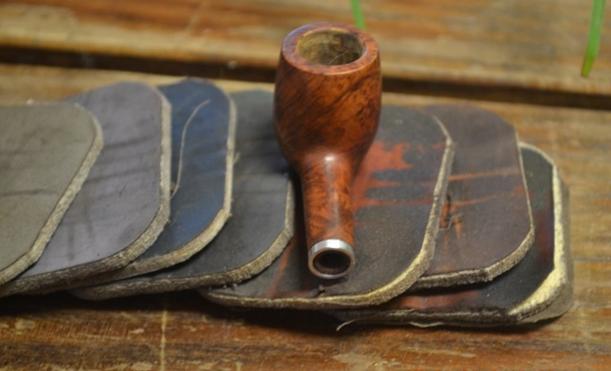
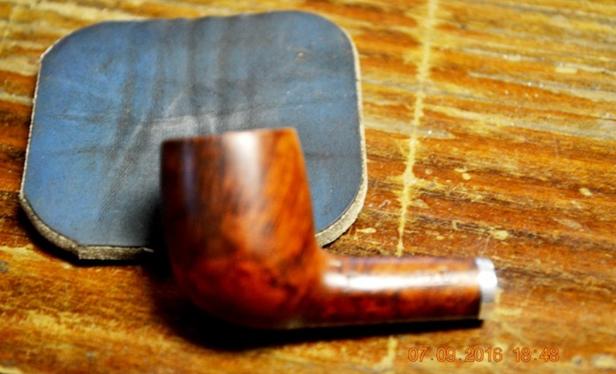
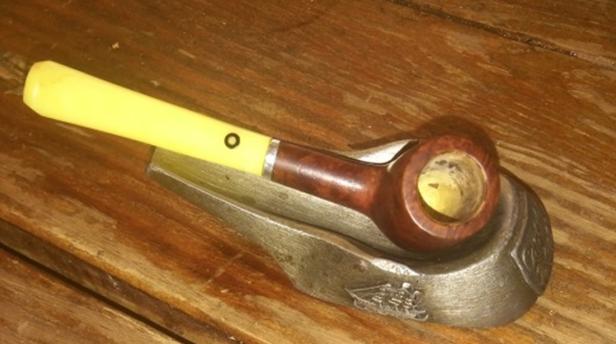
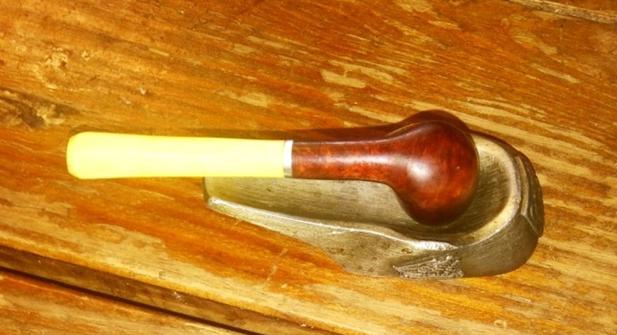
Yello-Bole Straight Billiard

lad12
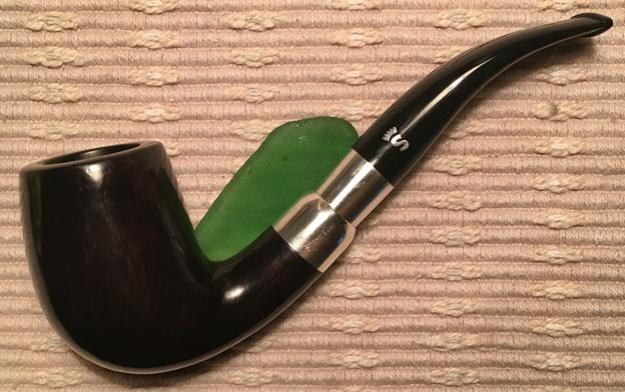
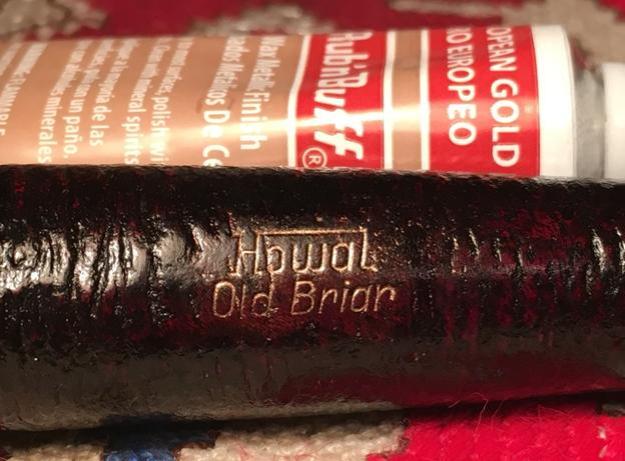
“Mahjong” Bent Billiard, probably made of Bakelite

lad13Kaywoodie Straight Apple

lad14Custombilt Porcelain (filled mouthpiece – not smokable)
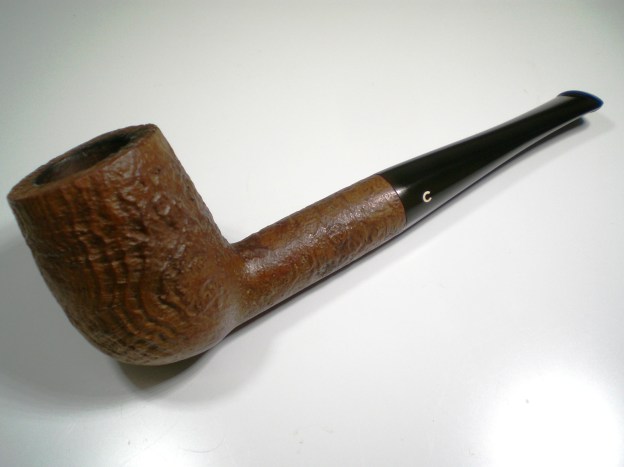
lad15No-Name Rhodesian

lad16
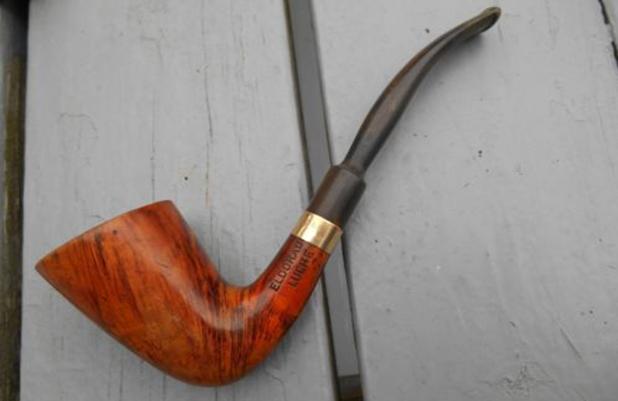
La Grande Bruyere  Bent Apple, Czech, before and after.  This was my first restore.

 Only three of the diminutive but intricate works of craftsmanship in my promising and cherished sub-collection of these fading pieces of tobacciana and history survived theft by the slumlord: the Mahjong, which at an astounding length of 2½” with a chamber diameter of ⅜” x ¾” may indeed be the smallest functional tobacco pipe ever made, as the seller hinted; the WDC bent billiard, mere fractions larger in every respect,  and last but by no means least, the Yello-Bole, at a whopping 3¾” long sporting a ⅜” x ½” chamber.  To emphasize the point, their salvation was by the sole grace of my having them with me when the illegal lockout was executed.

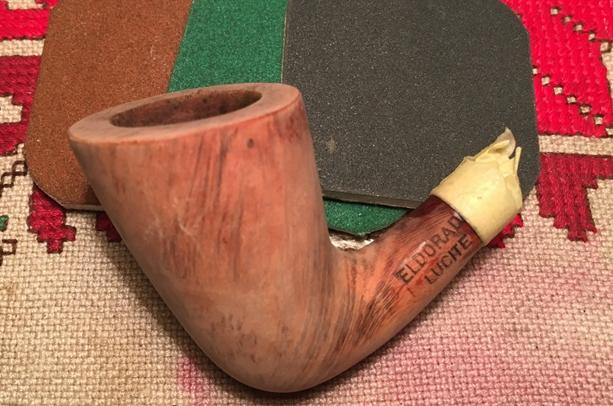
The subject of this final Ladies Pipes blog is the restoration of the Yello-Bole, which, I’m sorry to report, was not all that difficult, beyond Plato’s maxim, “Better a little which is well done, than a great deal imperfectly.”  Steve wrote a wonderful blog concerning a no-name carved apple salesman sample (3¼” long, 1″ tall with a ⅞” outer bowl diameter and a ⁷∕₁₆” inner bowl diameter).  In the first photo, my favorite, he contrasts the dinky apple with a giant KBB Yello-Bole Imperial 3068C Bent Billiard (length 10″, height 2¼” and inner bowl diameter ⅞”).  See https://rebornpipes.com/2016/12/26/a-tiny-salesman-pipe-what-a-contrast-to-those-giant-house-pipes/.lad17
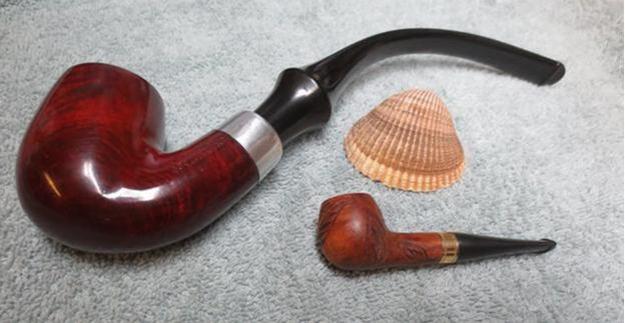
KBB Yello-Bole Giant vs. Tiny Carved No-Name, courtesy S. Laug

Steve also summed up the relative natures of a standard pipe restoration and that of a salesman sample when he wrote, “It takes as much work to clean and restore a tiny pipe as it does a big one and the steps and process [are] the same regardless of size.”

And so, as I begin again to practice the wonderful disorder that is pipe acquisition, with the three salesman samples and a handful of other survivors to my name, I have a strong desire and need to share.  My good friend and mentor emeritus, Chuck Richards, taught me that.  Therefore, in light of the kindness and encouragement she has shown me on the Smokers Forums UK, her invaluable guidance in this series and the interest I know she has in mini pipes and salesman samples, to repeat my opening dedication with a tad more emphasis: this Yello-Bole is for you, Liz – literally.

RESTORATIONlad18 lad19 lad20 lad21 lad22 lad23 lad24
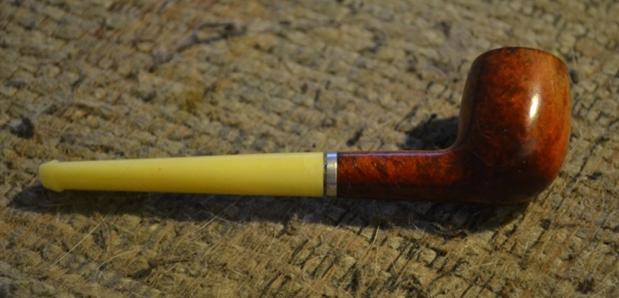
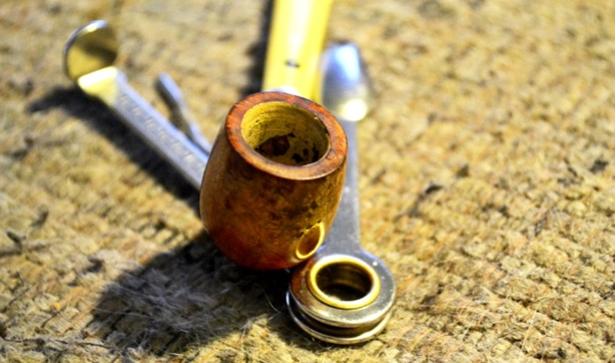
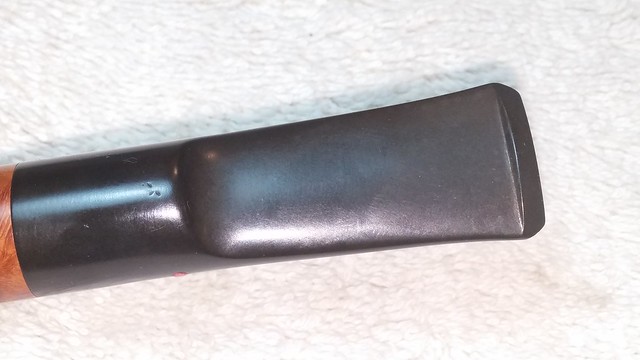
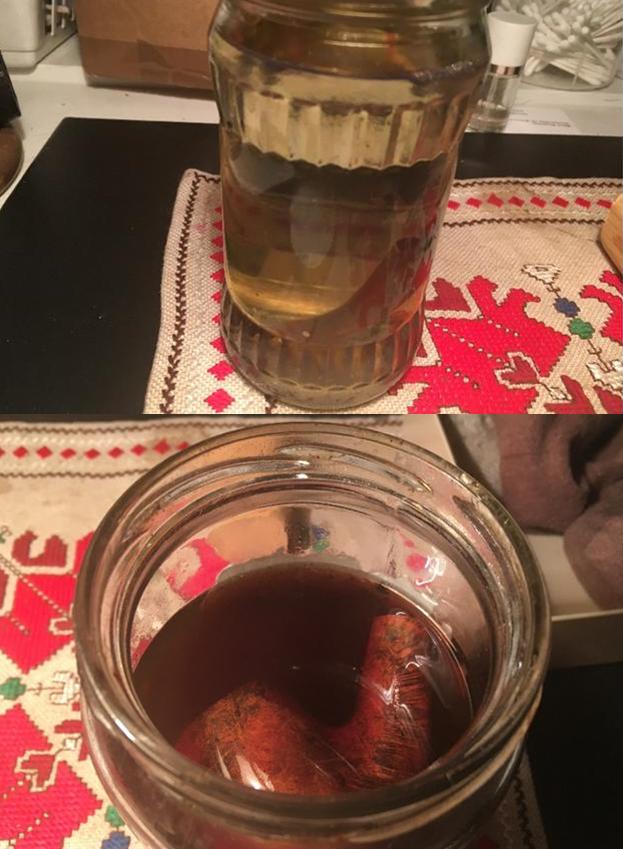
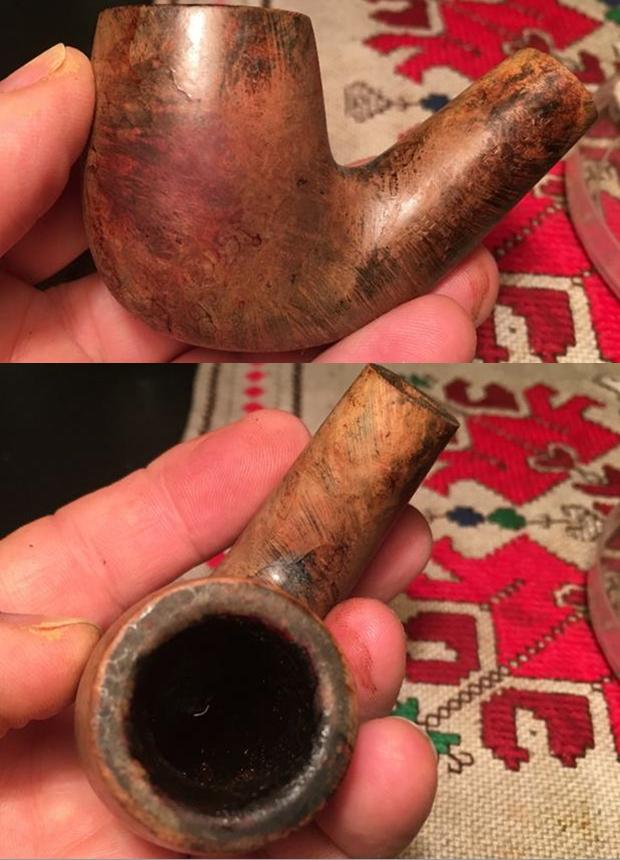
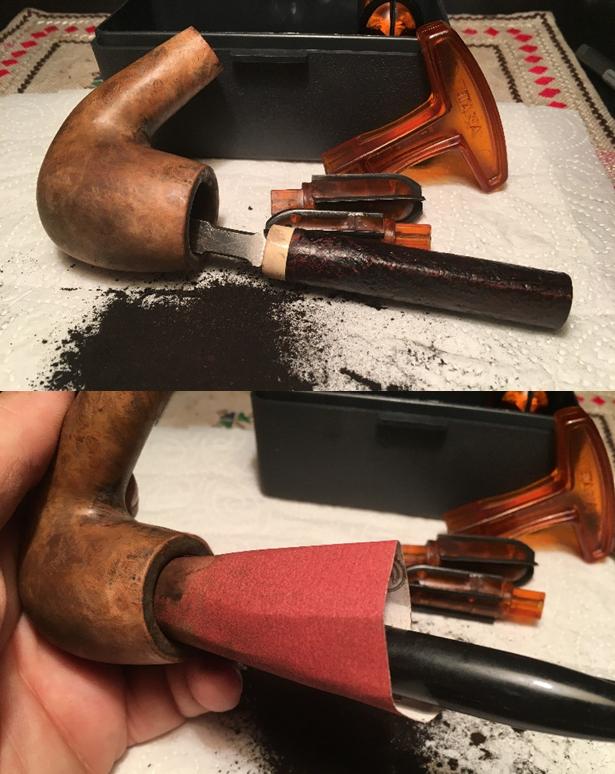
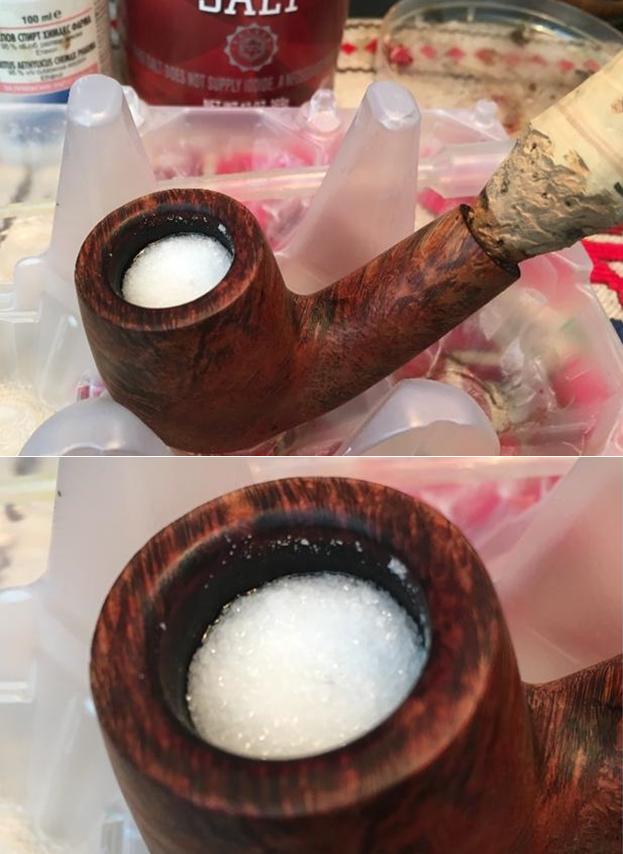
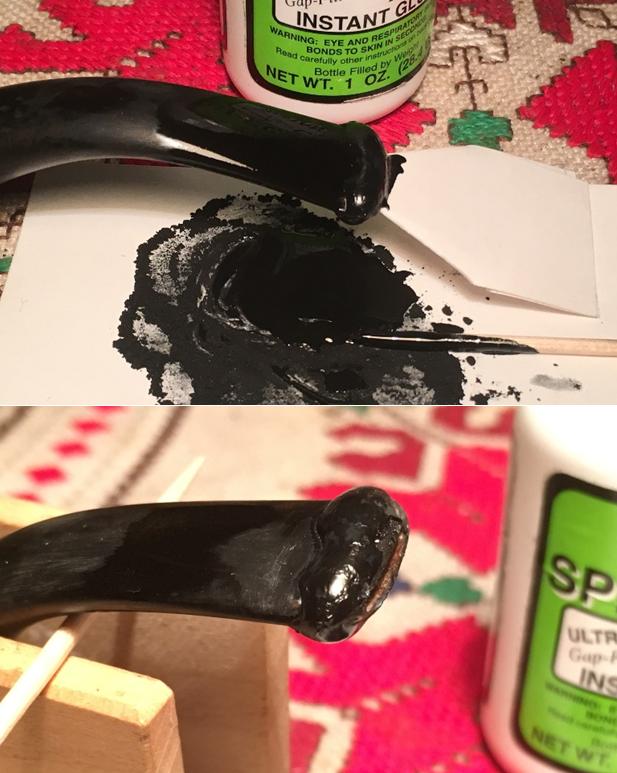
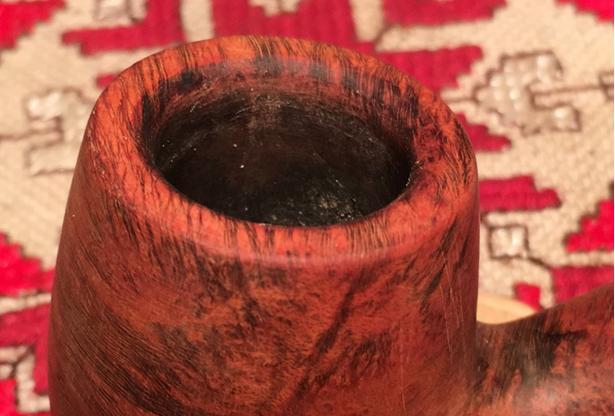
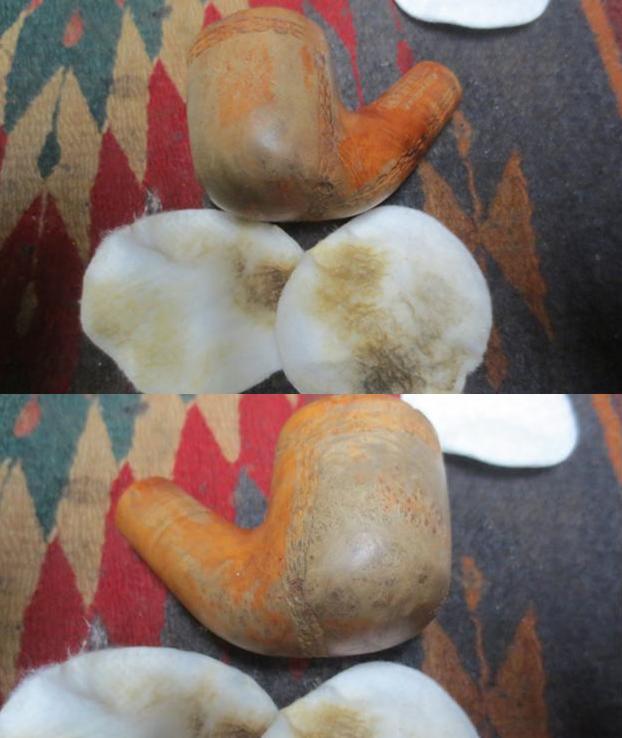
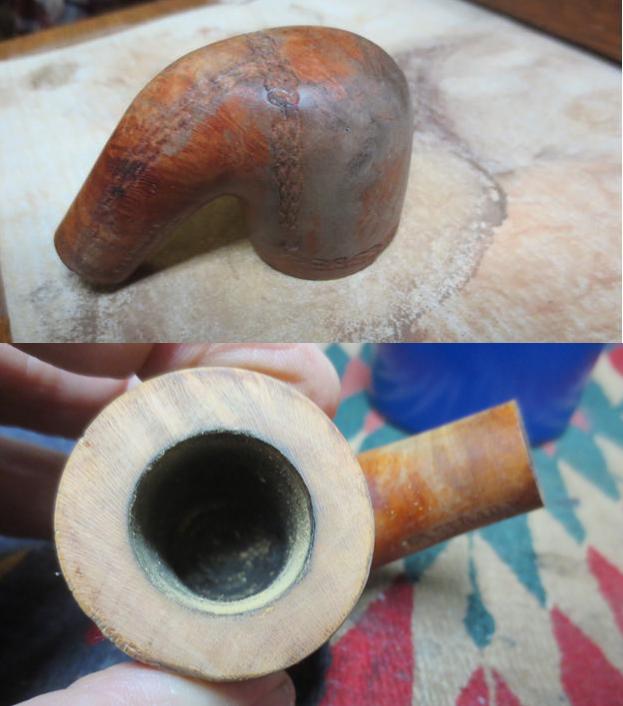
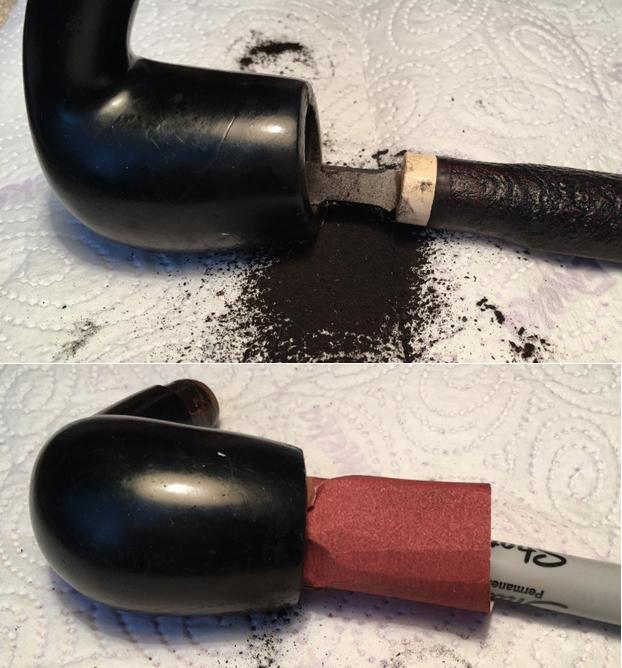
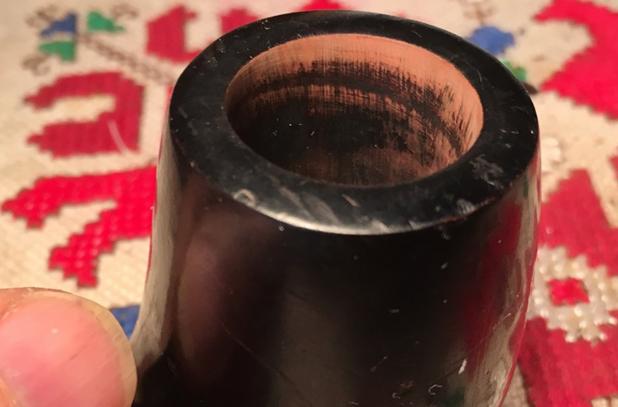
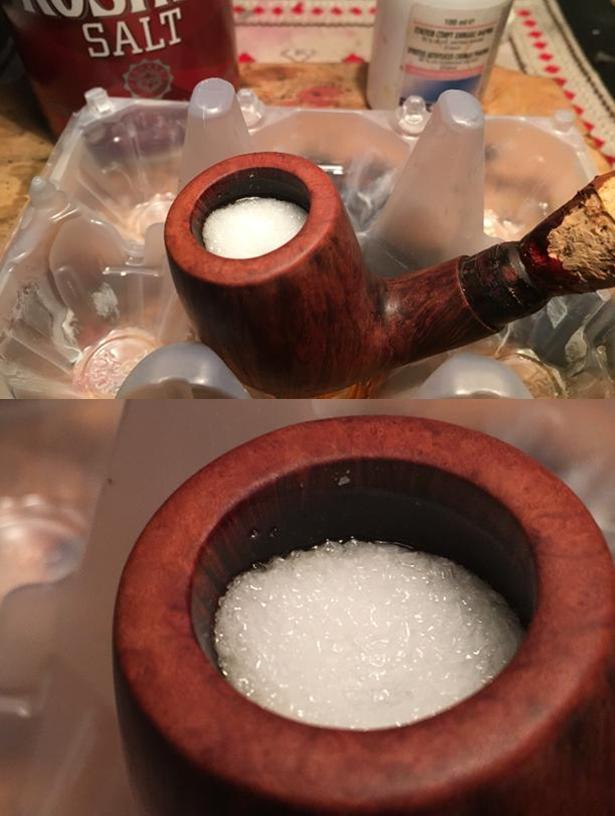
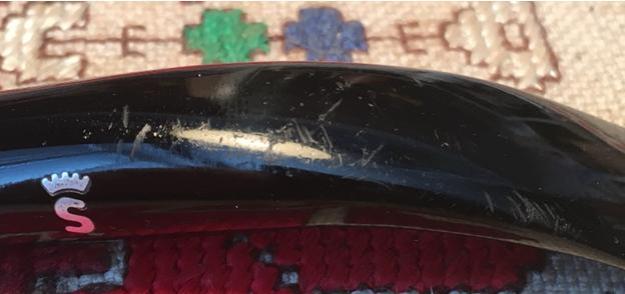
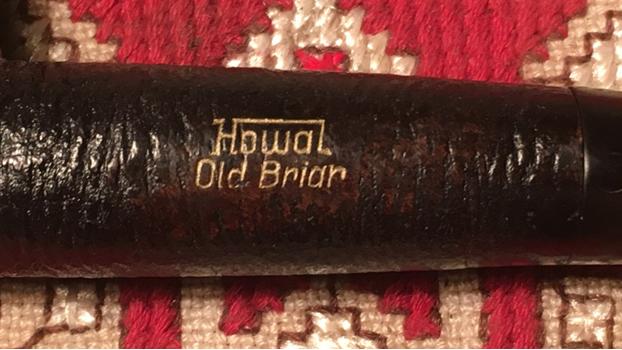
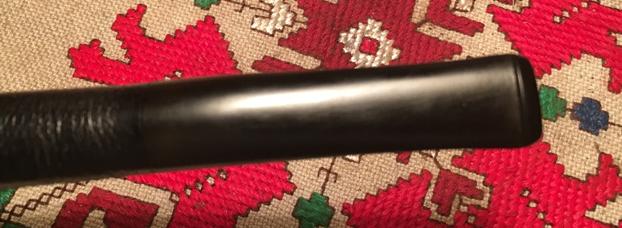
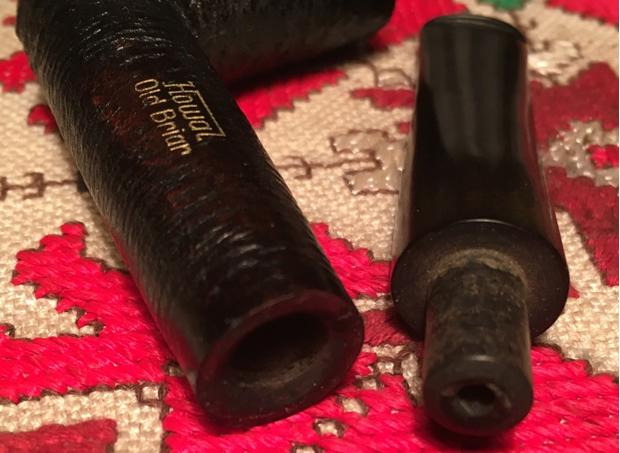
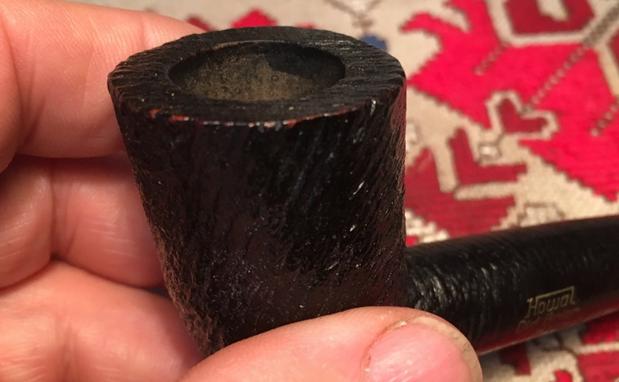
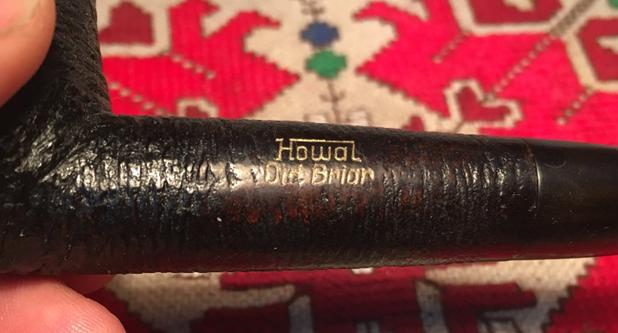
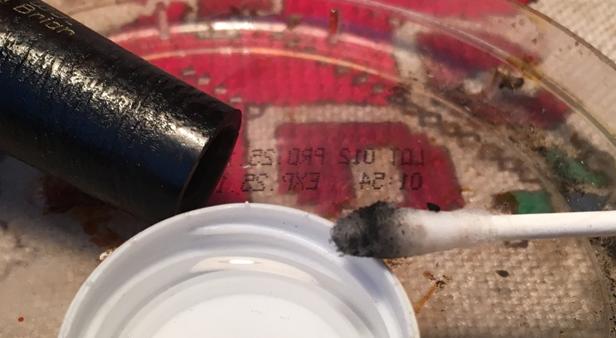
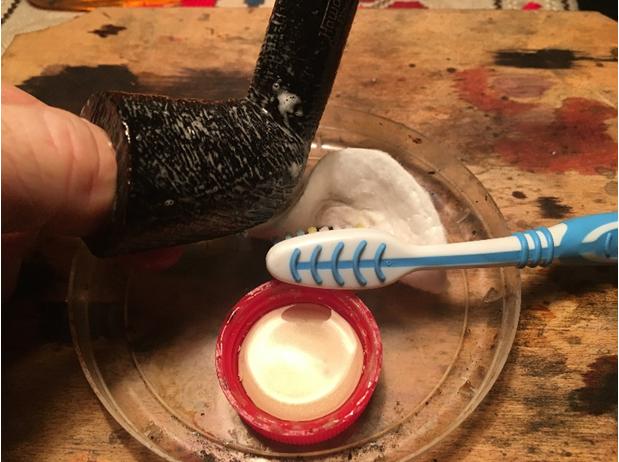
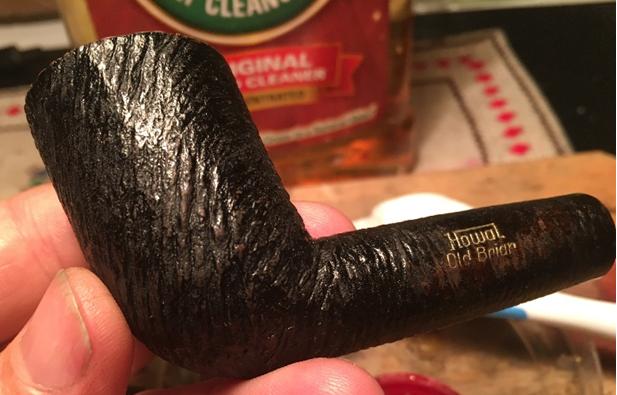
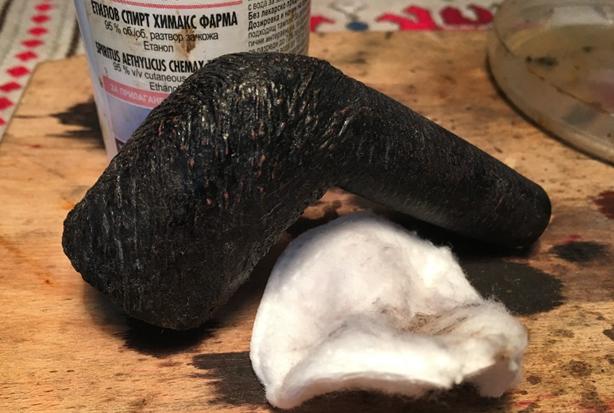
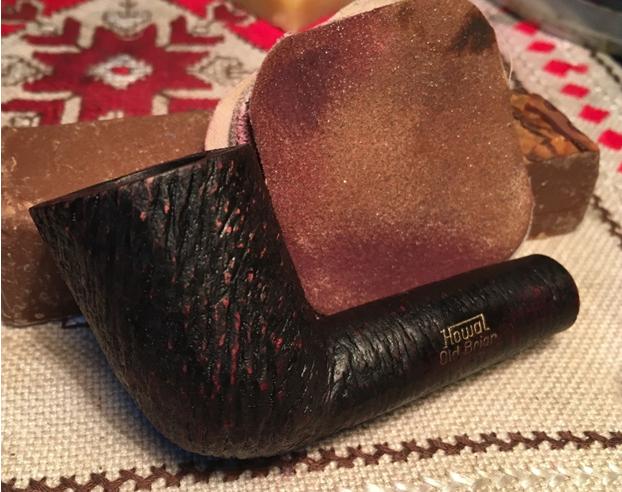
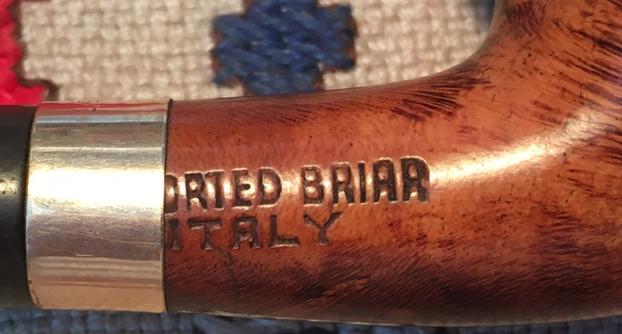
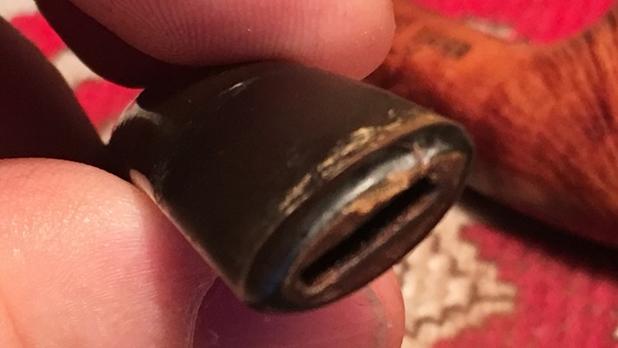
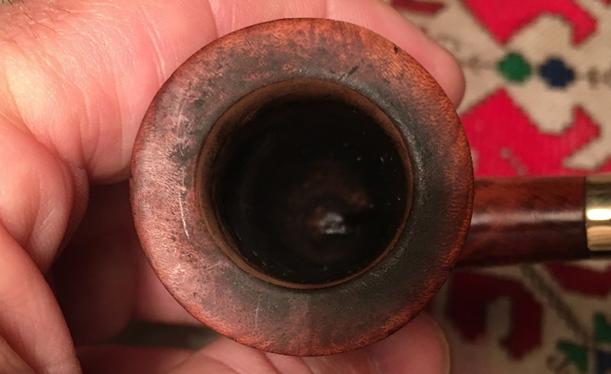
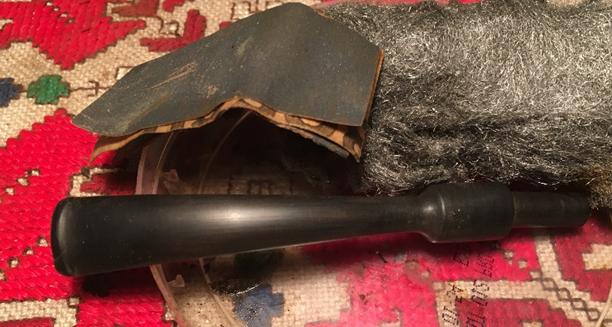
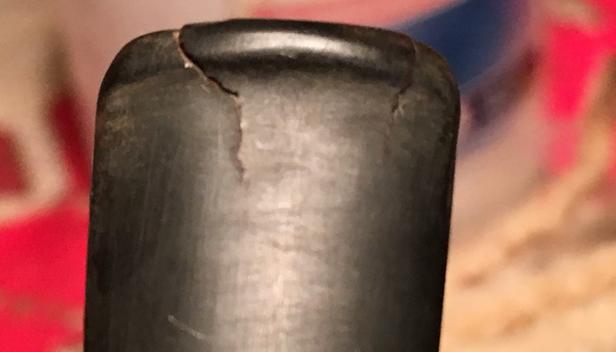
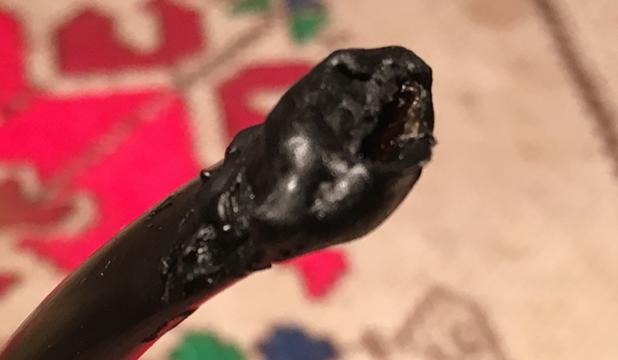
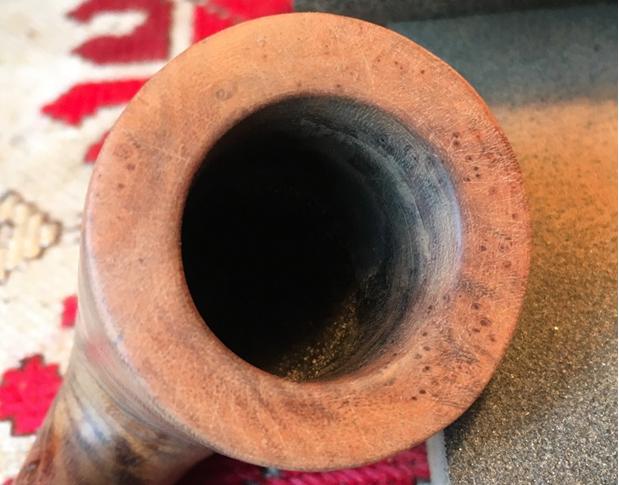
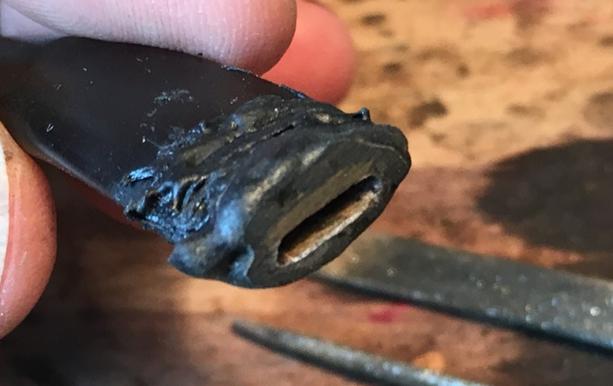
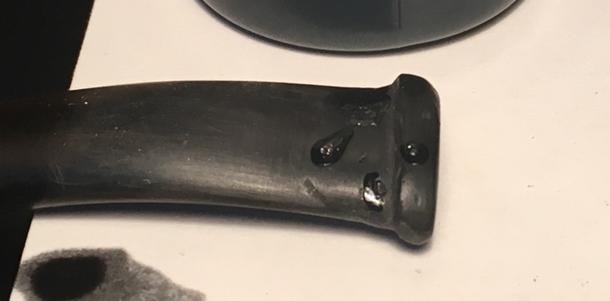
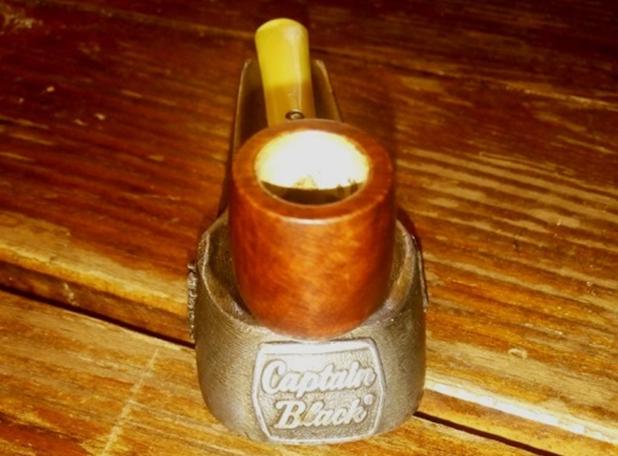
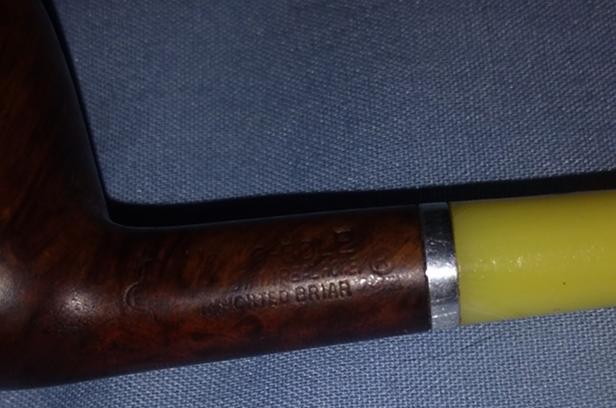
The Yello-Bole, to be honest, was a cleanup job.  The most troublesome aspect of rejuvenating the delicate little working scale example of a pipe that would likely measure 5½” long was stripping the old stain and replacing it, and as a consequence removing a bad discoloration on the front.  Confident an Everclear soak would not harm the nomenclature, I began with that and an OxiClean bath for the bit. Stripping the original stain did a fine job of revealing the rough edges, so to speak, of the briarwood.  To be still more honest, after perhaps ten minutes of immersion in Everclear, the stummel might just as well have cried to me through the depth, as I recall even now the mental flash of eradicating that all-important if carbon-obscured facet of the chamber, being “CURED WITH REAL HONEY.”

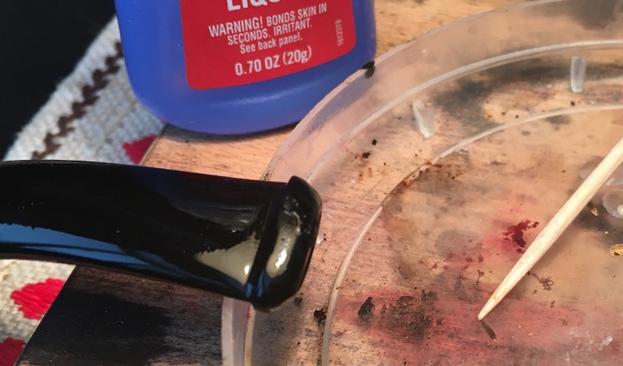
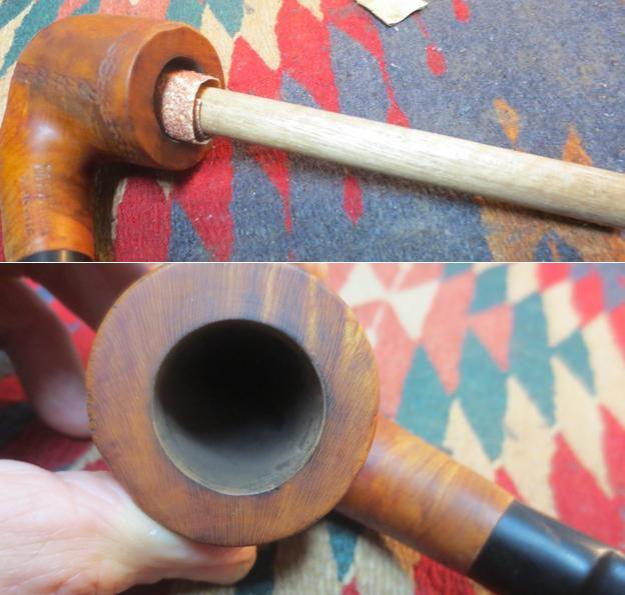
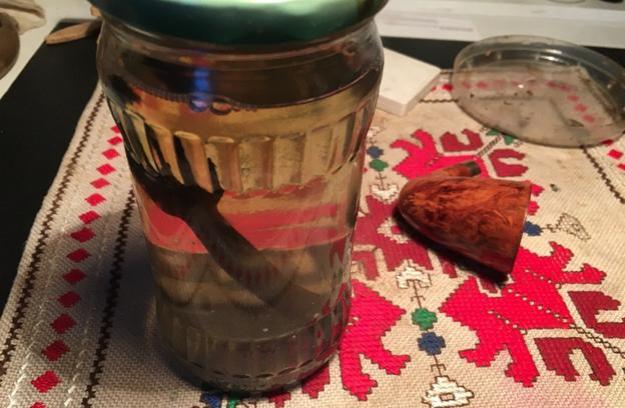
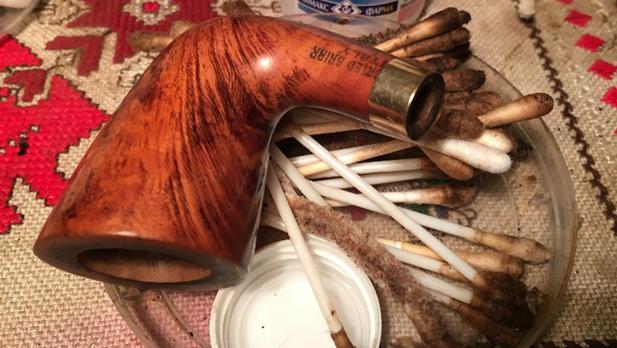
With a reflexive thrust of a hand toward the Tupperware bowl in which the minuscule bit of wood had sunk to the bottom like lost treasure, I plucked it out and wrapped it in a soft cotton cloth.  I wiped it.  I turned and scrubbed it, inside and out.  I ran an end of a cleaner through the shank and bent it in half to dry the chamber walls.  I did everything short of CPR.  Observing the miraculous near perfection of the coat of whatever cured honey concoction the factory applied so many years earlier,  I’m here to tell you, the full comprehension of the reprieve I was granted in the nick of time was acute and profound.lad25 lad26 lad27 lad28
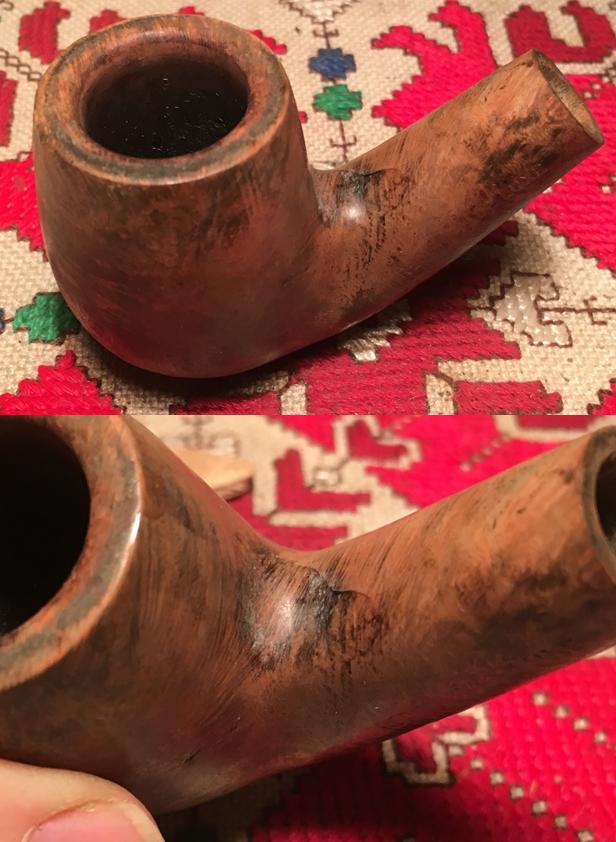
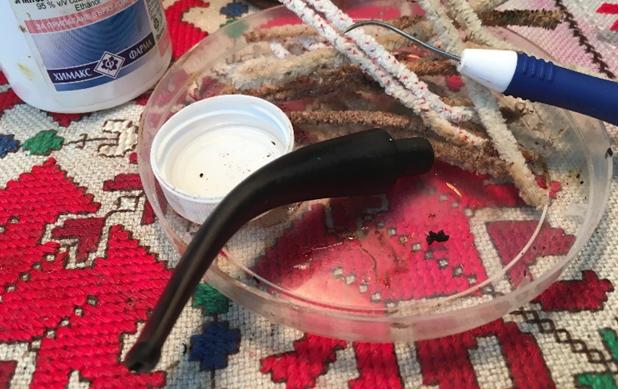
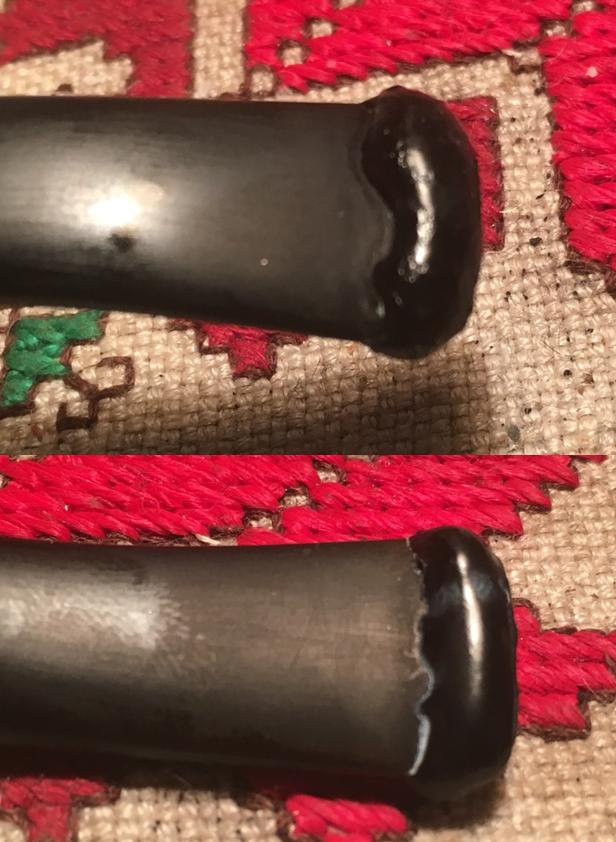
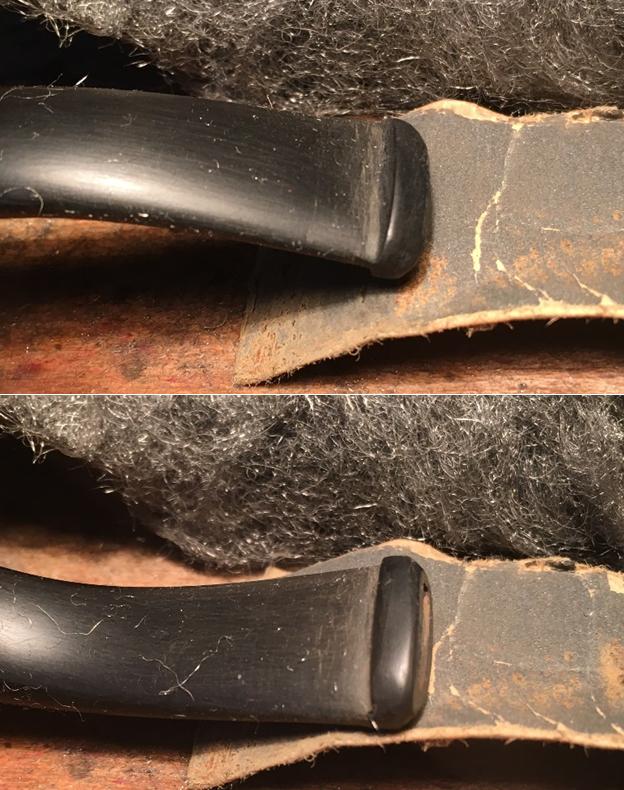
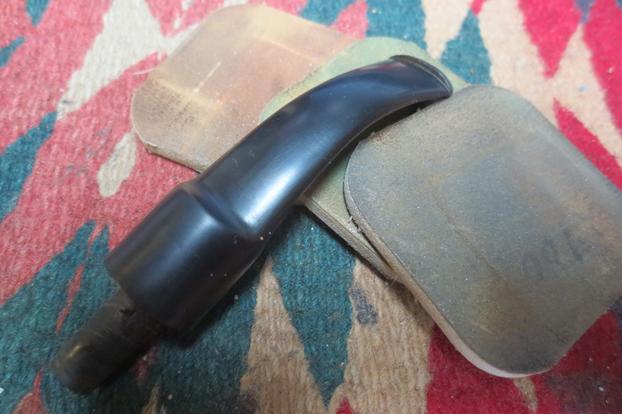
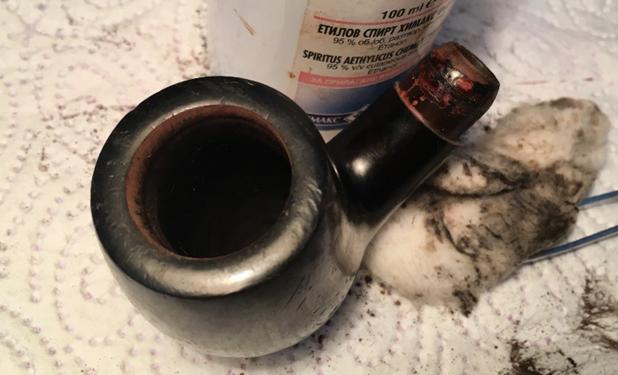
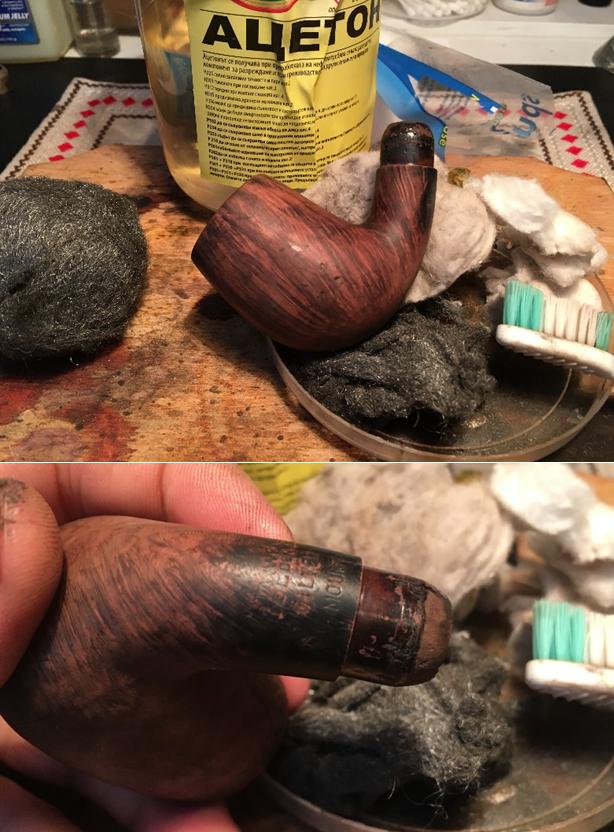
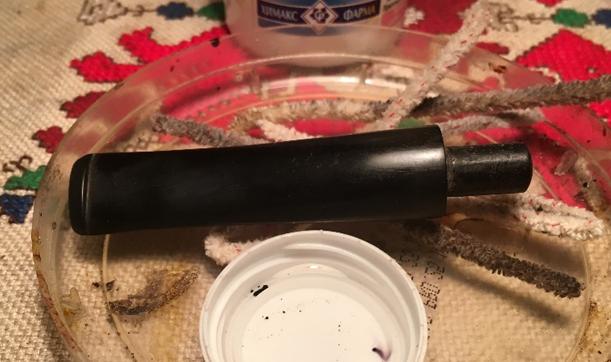
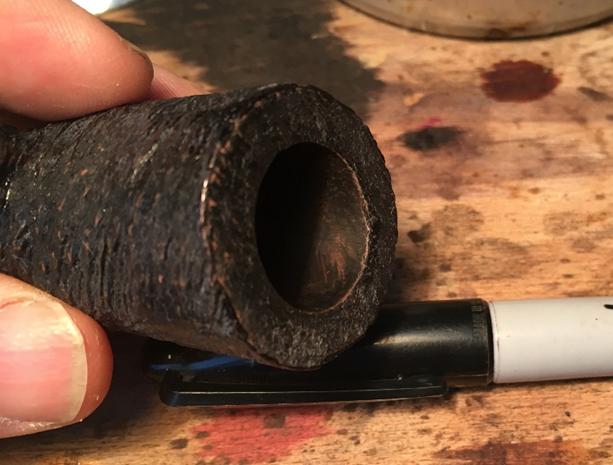
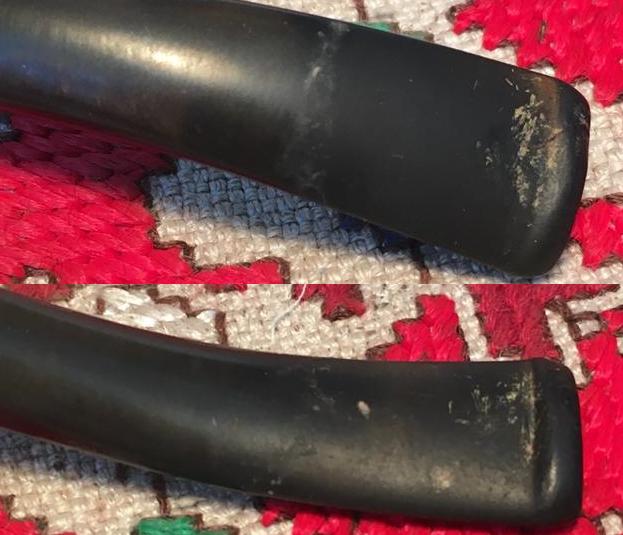
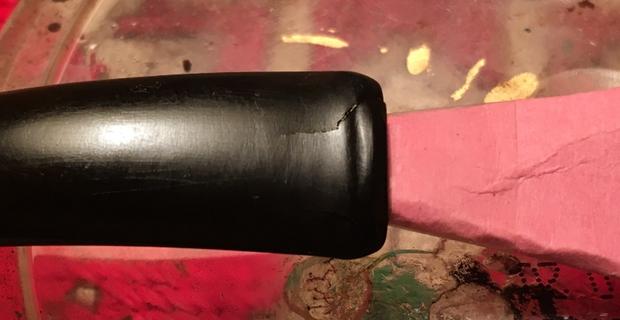
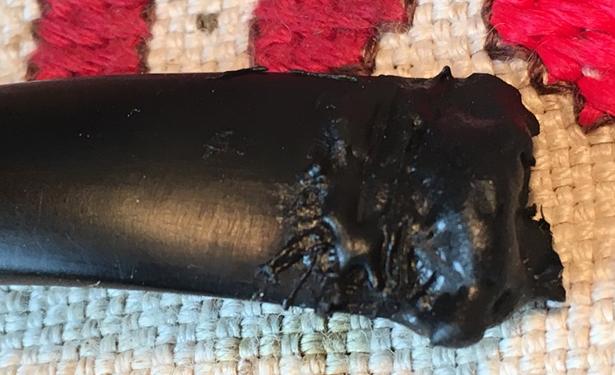
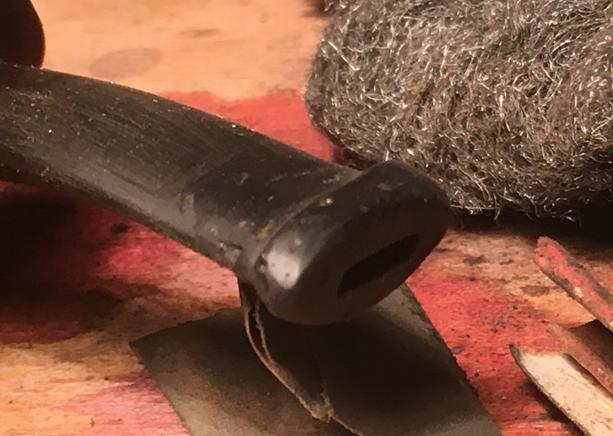
The bit came out of its cleaning solution some time later, a little better for the bath.  I used the white end of the same cleaner as before to dispel the insignificant impurities that remained.

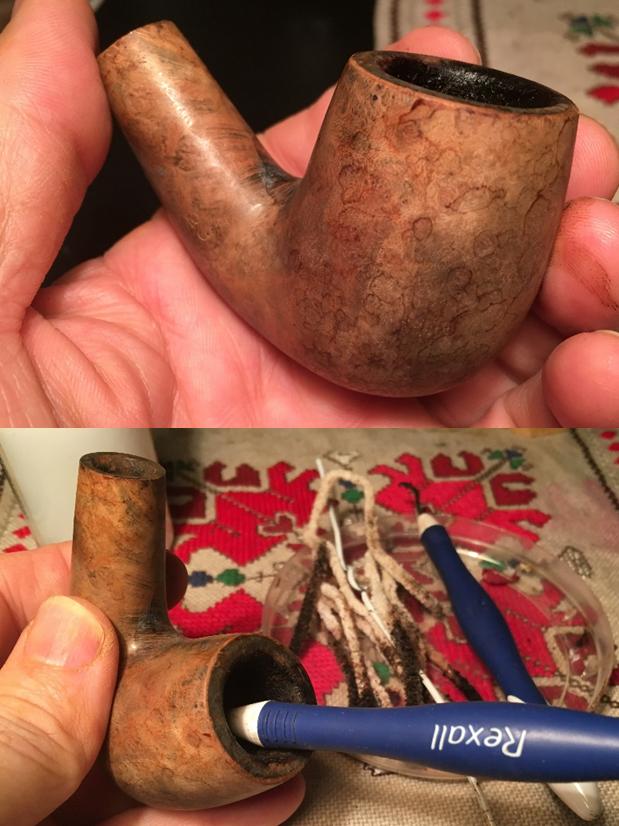
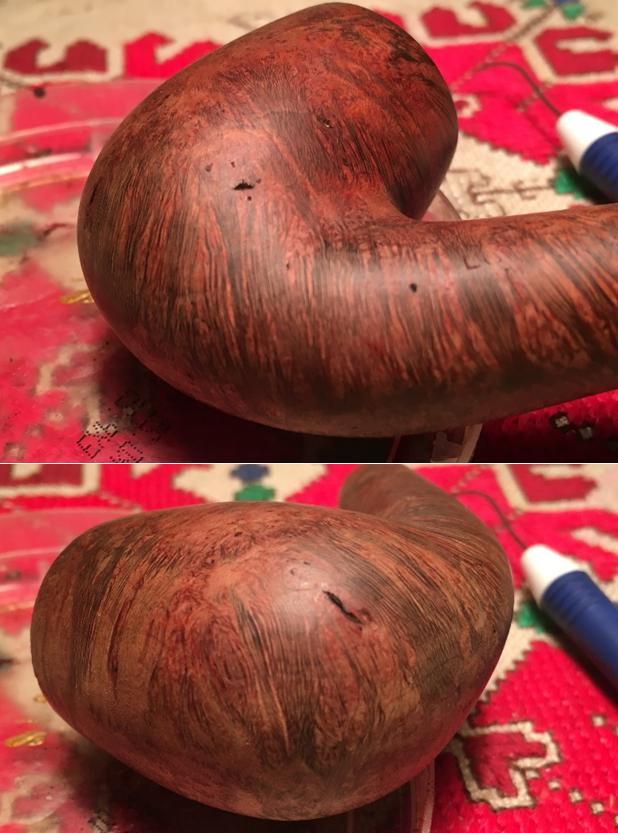
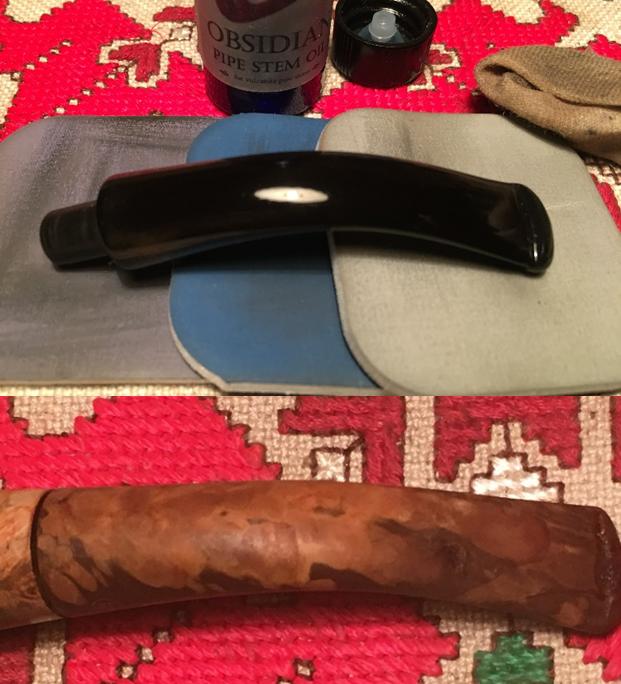
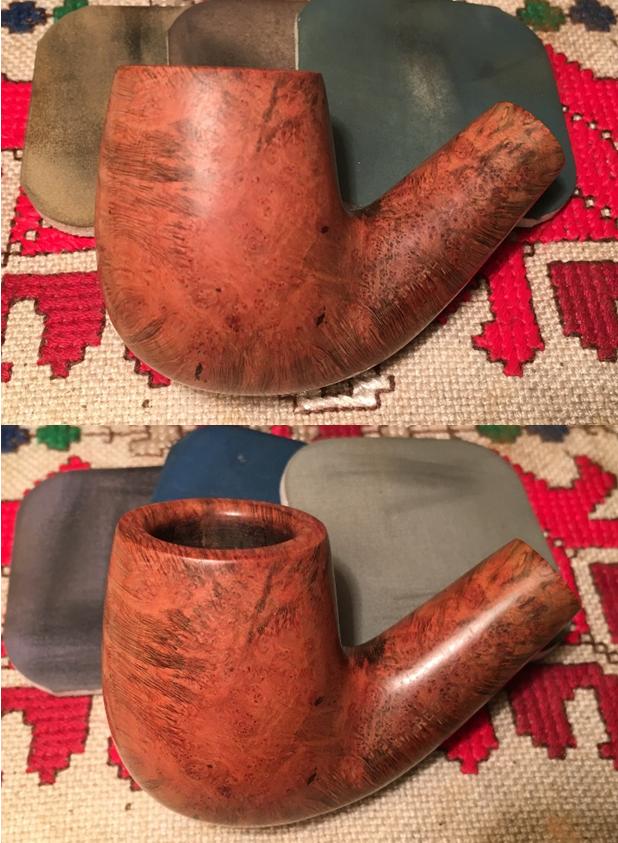
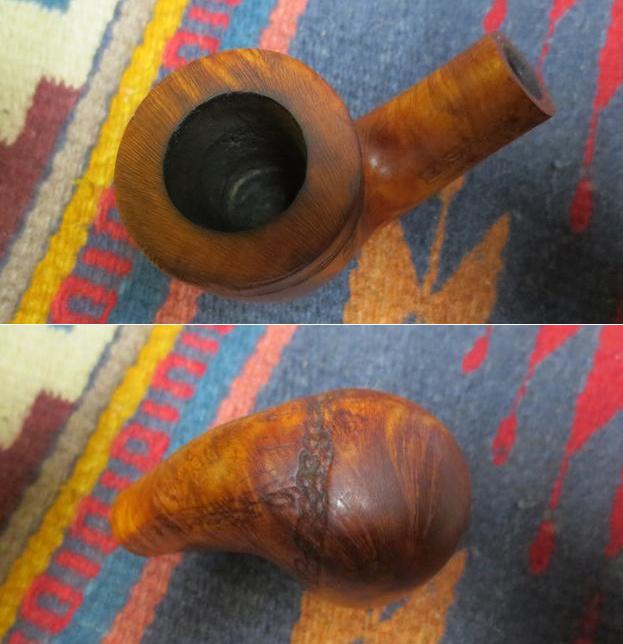
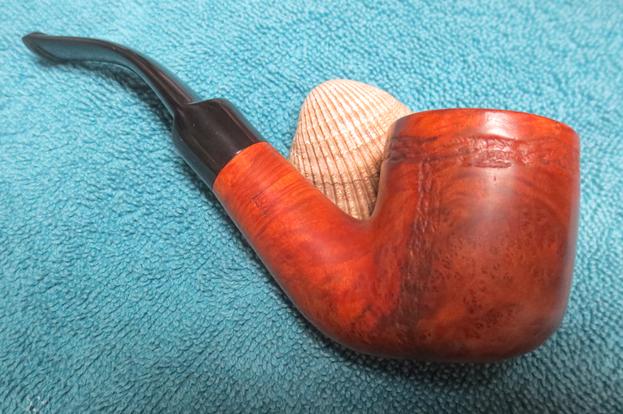
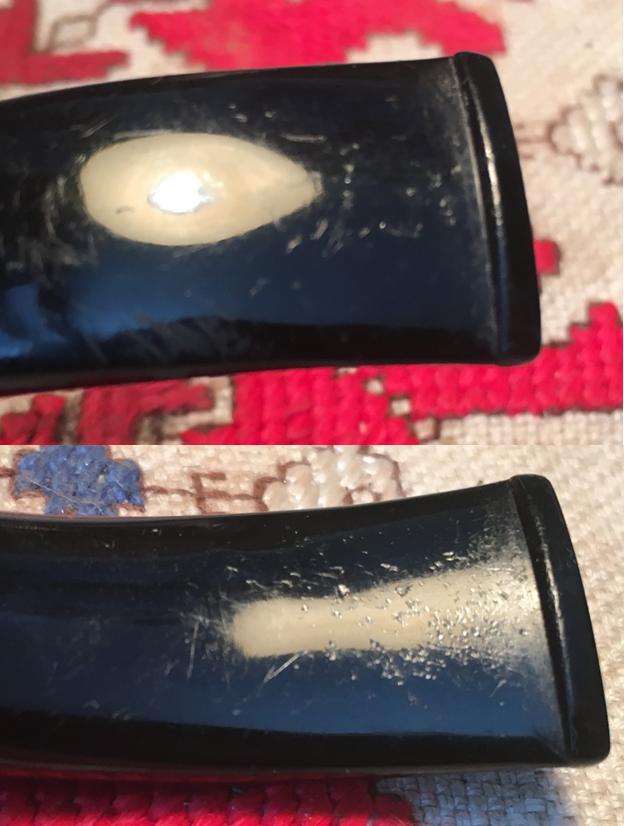
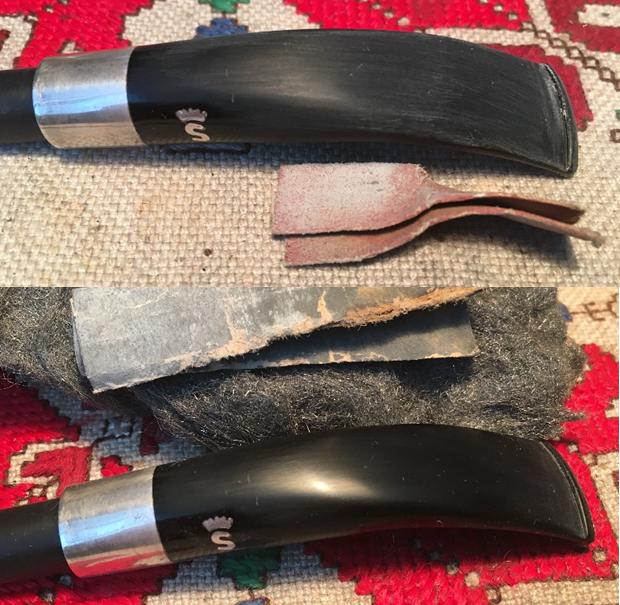
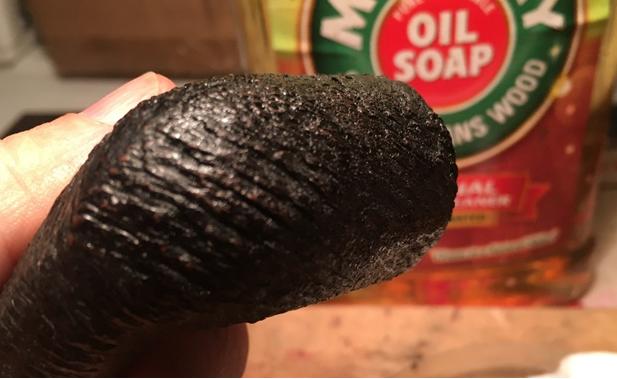
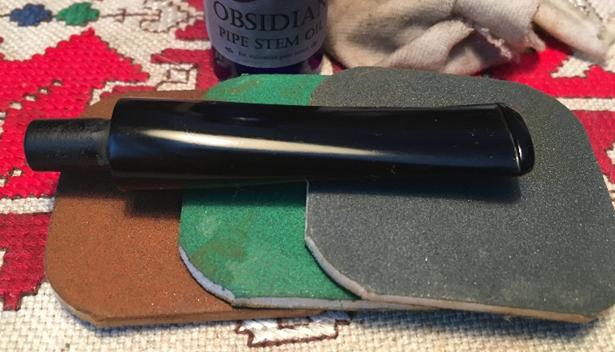
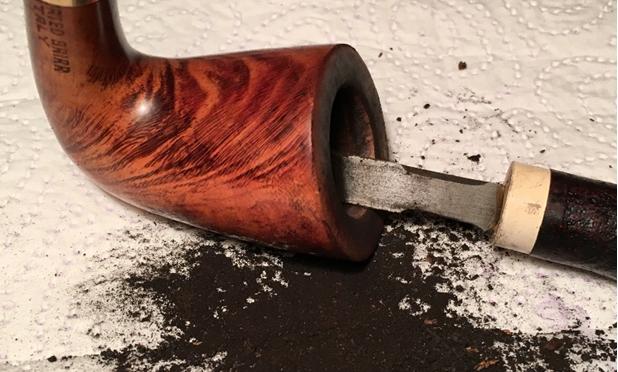
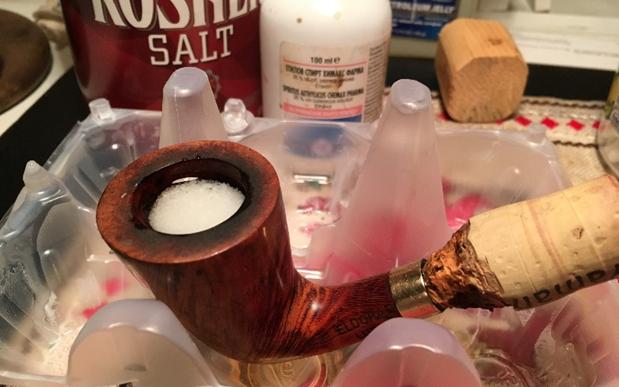
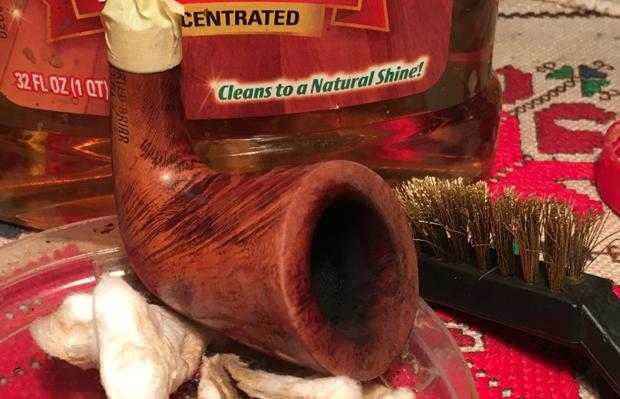
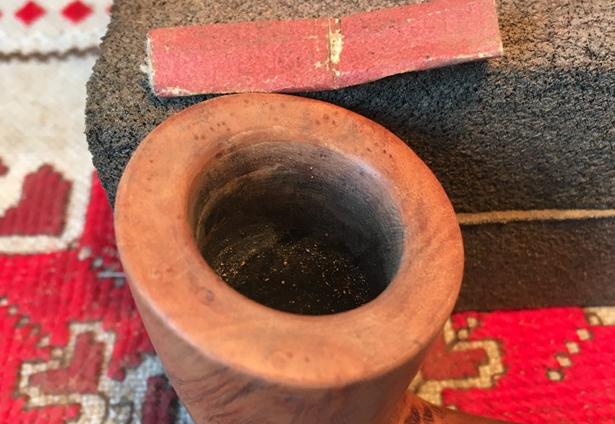
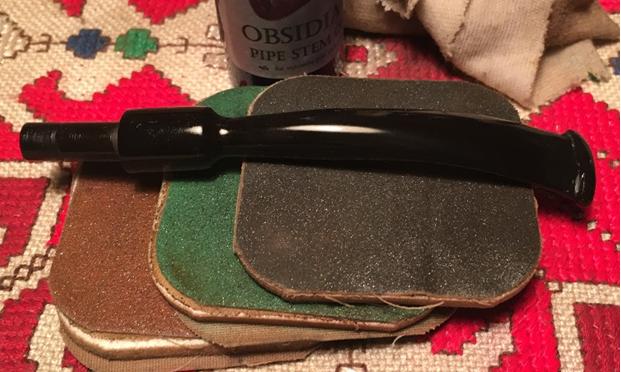
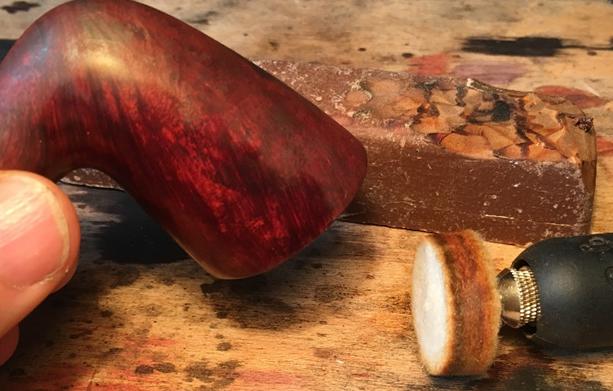
Super fine “0000” steel wool and 320-grit paper got rid of the unpleasant large light blotch on the bowl’s front and gave the whole spotted but rich wood a nice shine.lad29 lad30lad30a
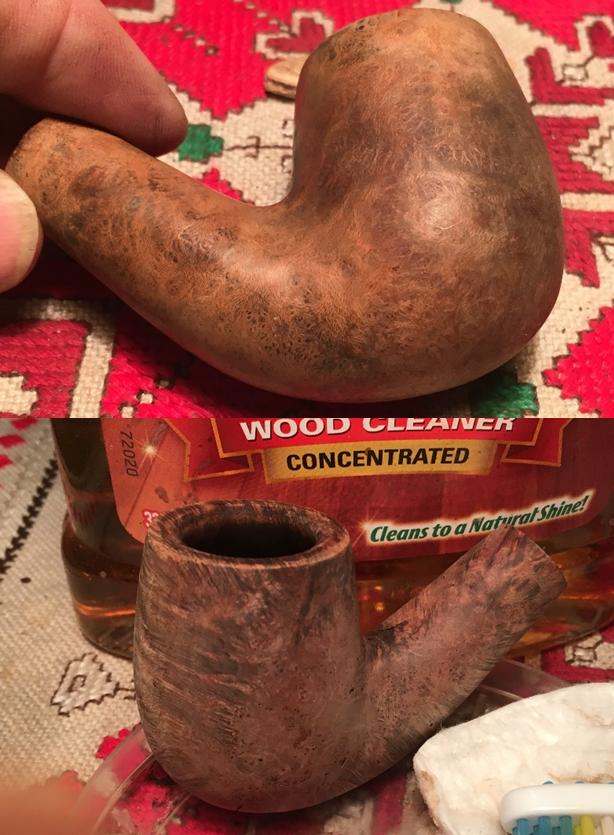
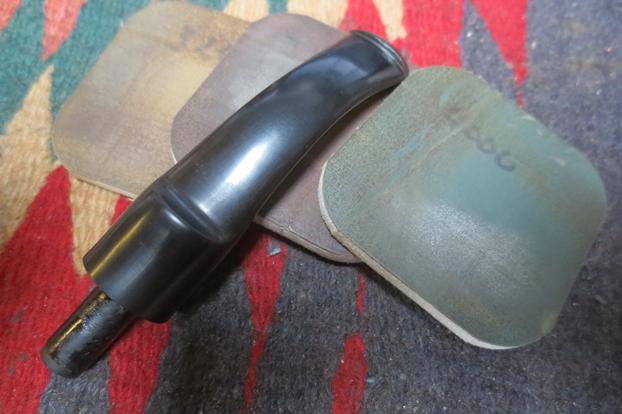
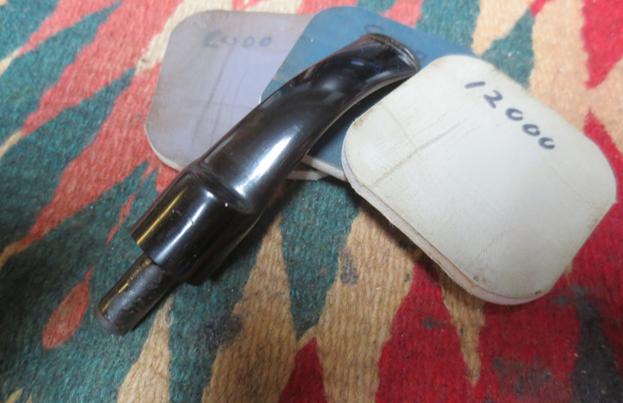
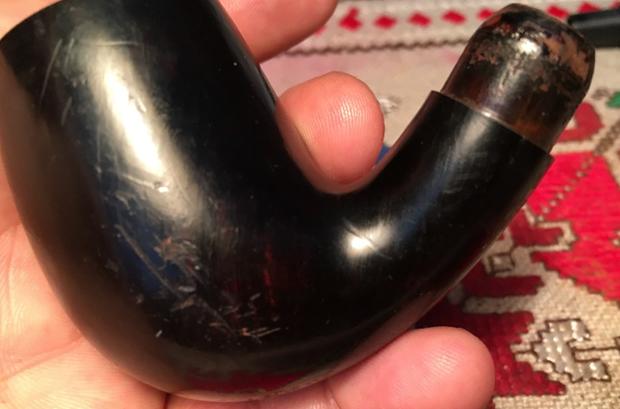
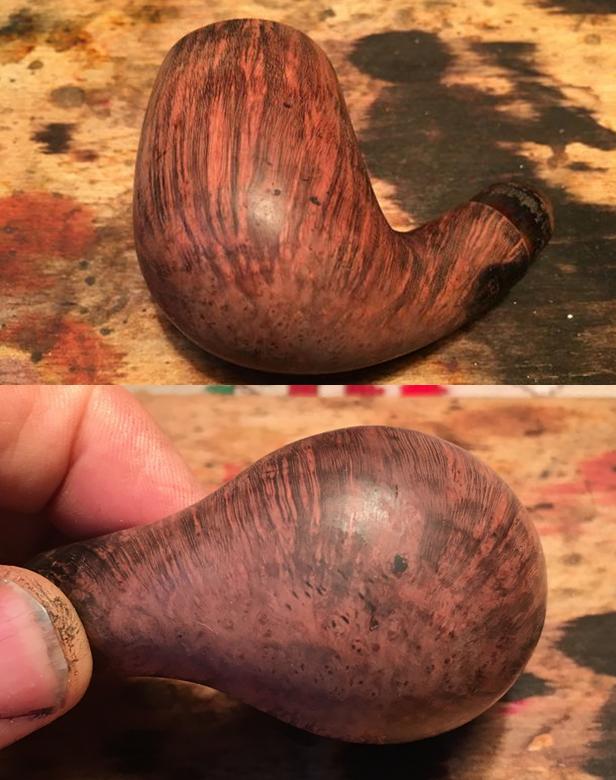
The gamut of micro mesh from 1500-12000 elicited the highest sheen the briarwood would achieve before the final electric buffing. lad31 lad32 lad33 lad34 lad35 lad36
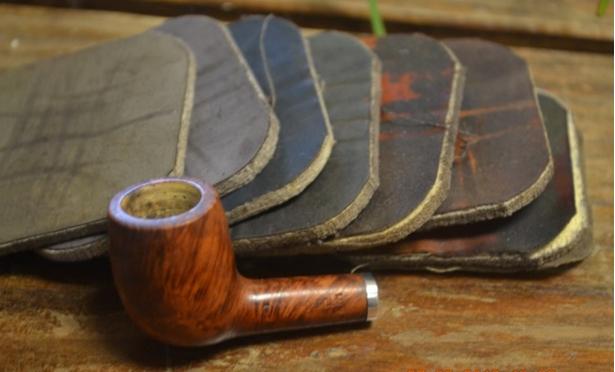
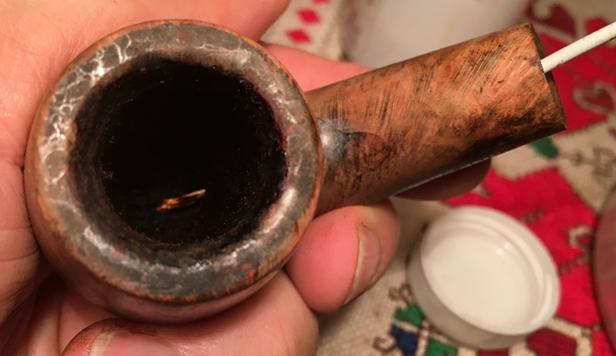
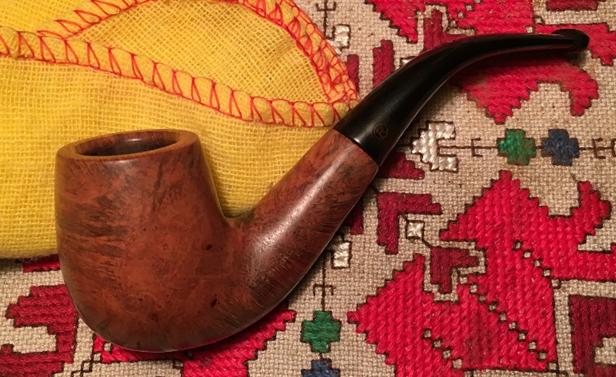
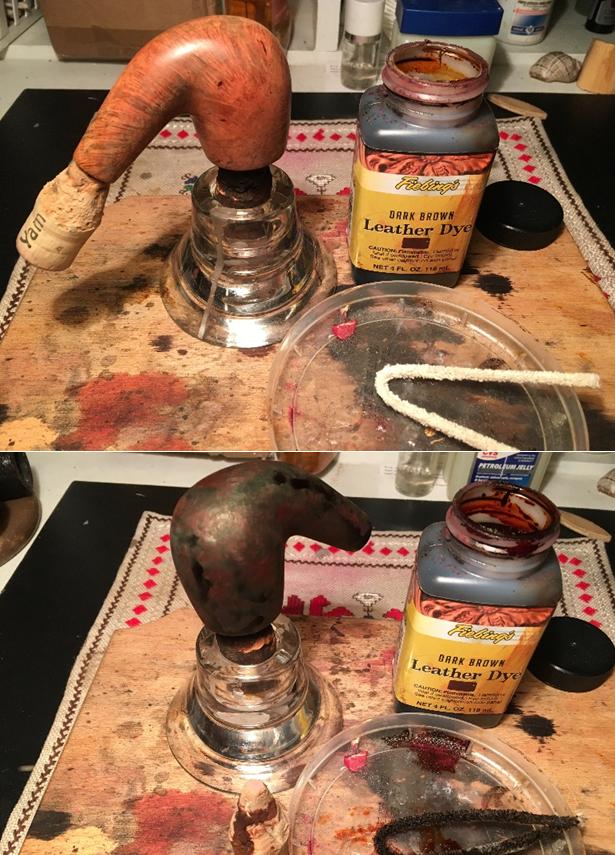
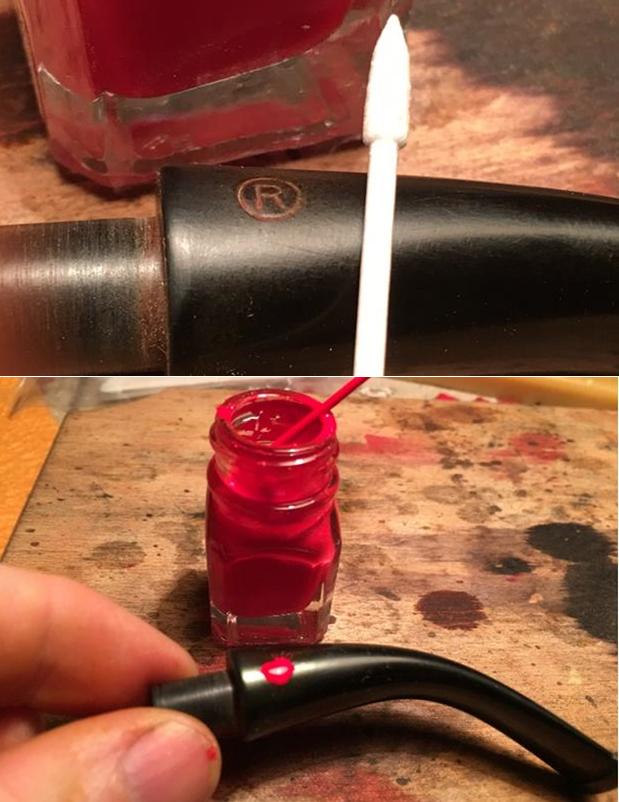
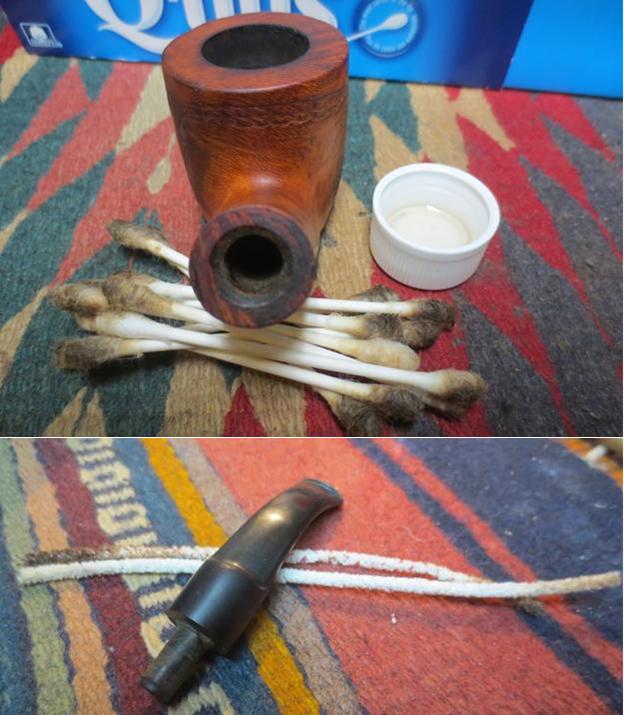
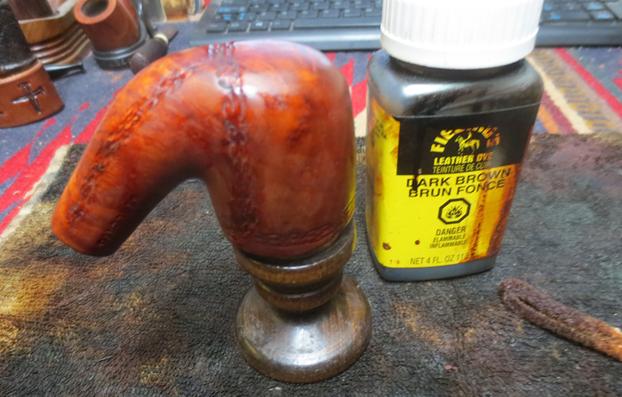
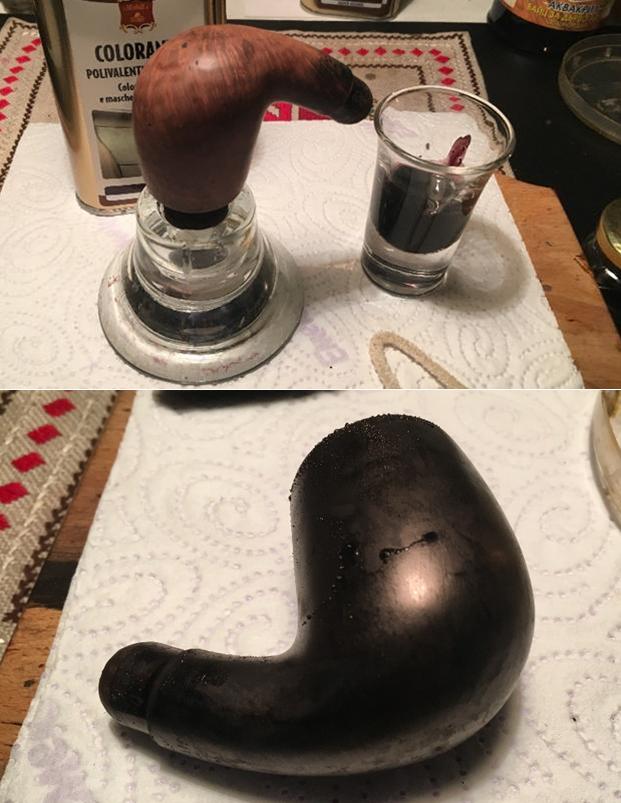
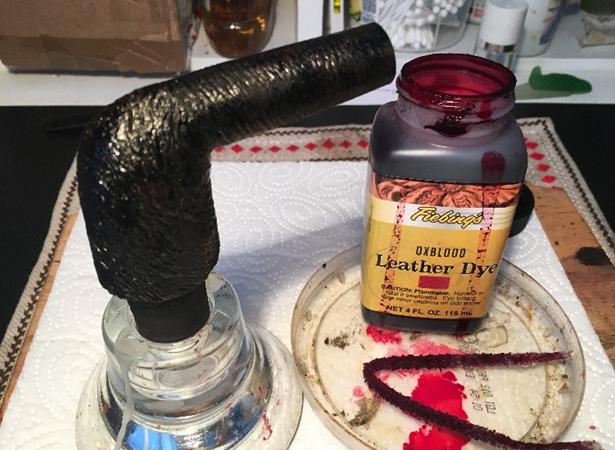
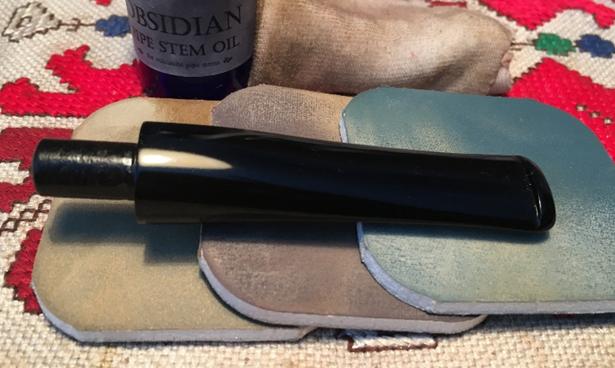
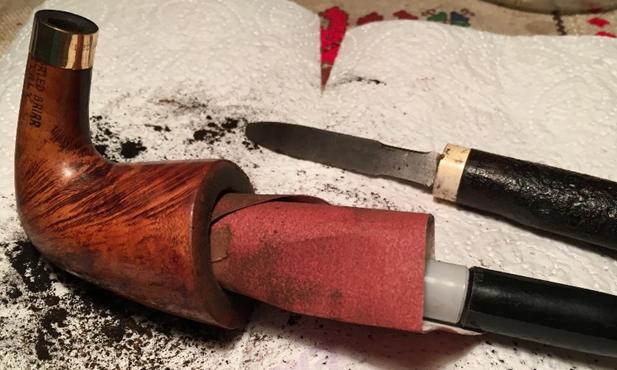
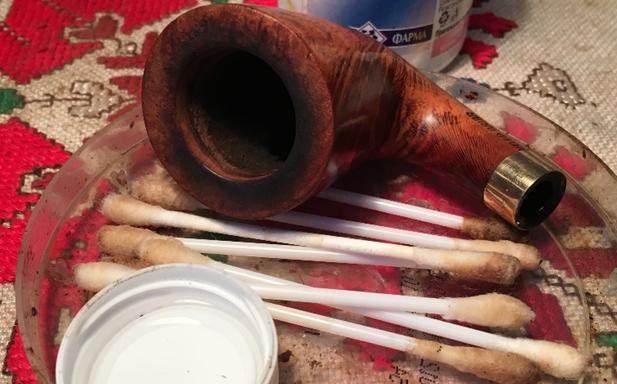
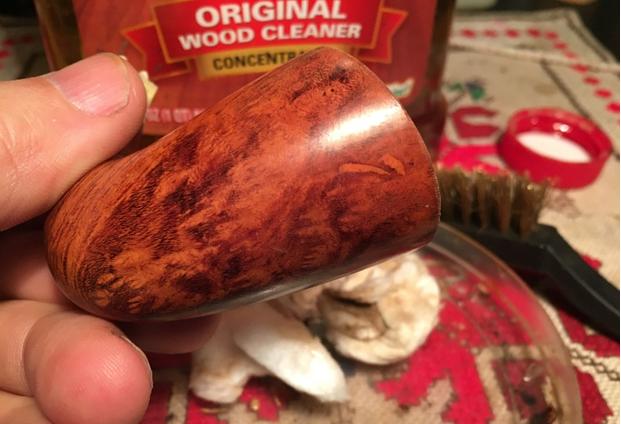
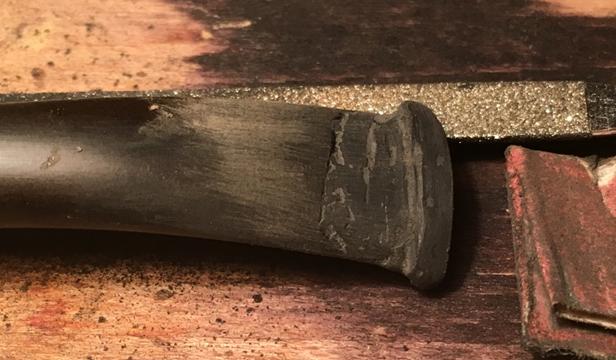
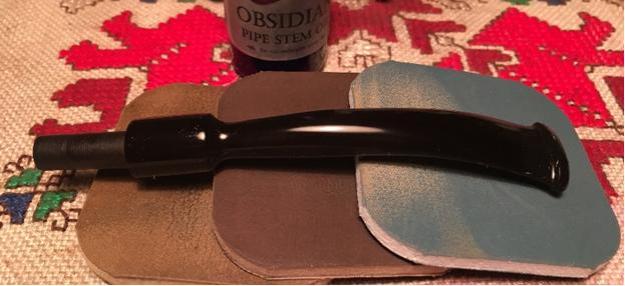
Several minutes after staining the stummel with Fiebing’s Brown leather dye and flaming out the alcohol with a Bic, I gave the surface a gentle buff with 8000 grade micro mesh.lad37lad38
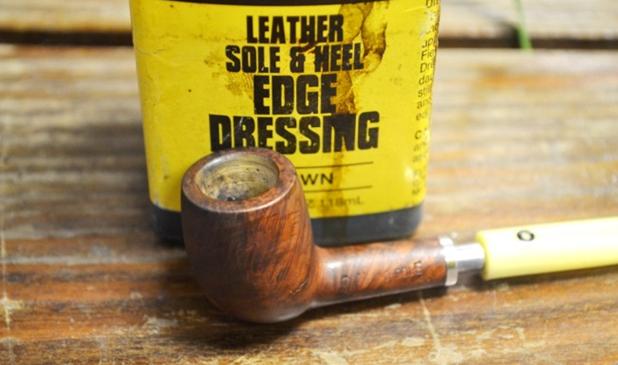
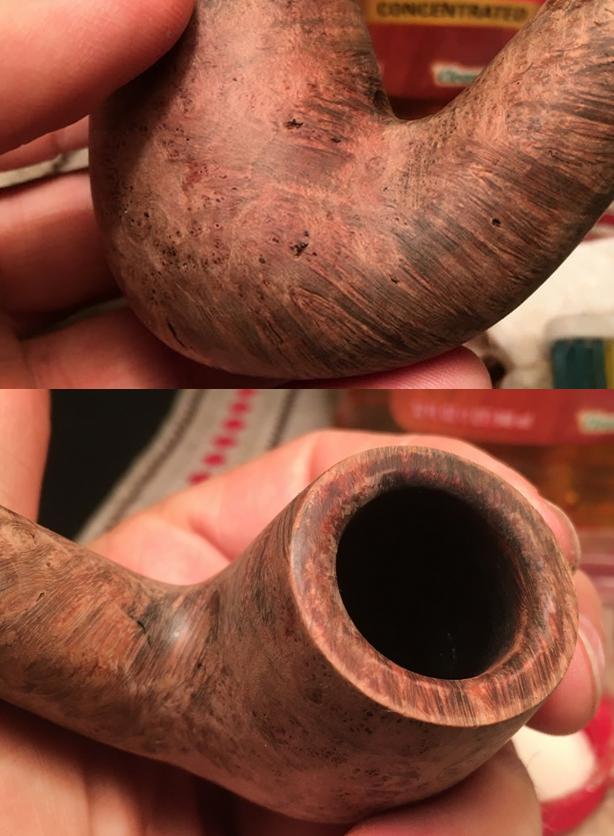
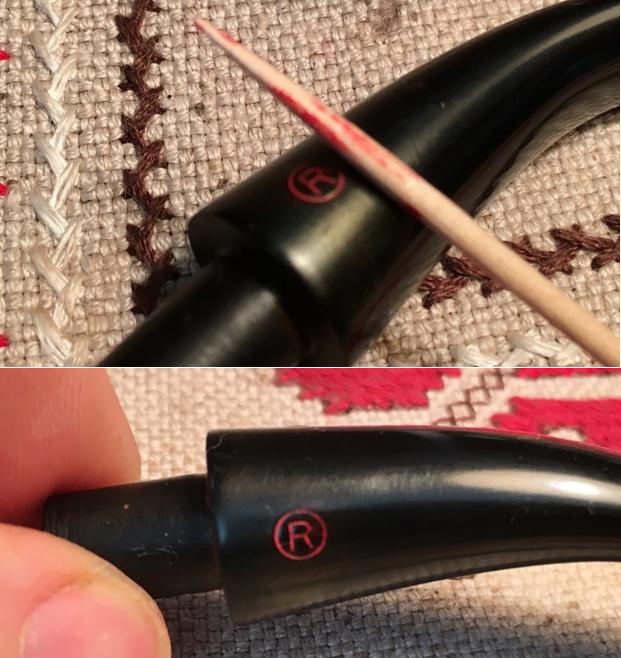
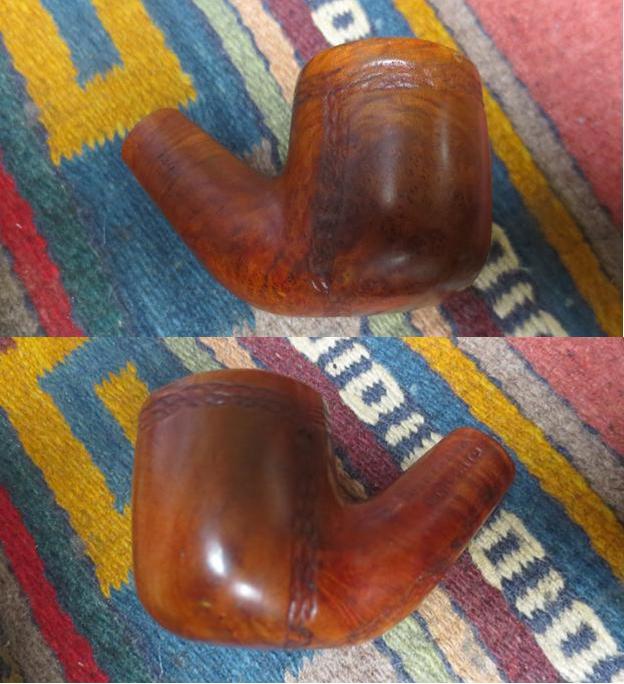
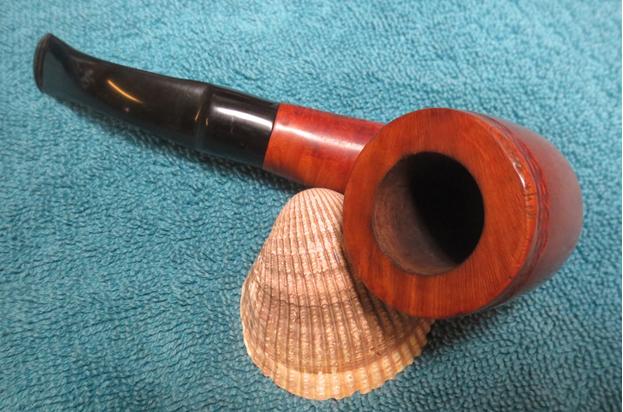
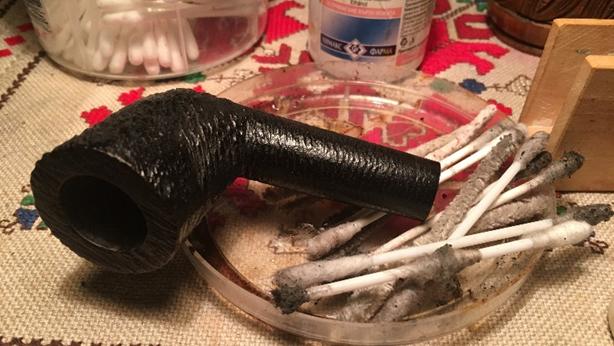
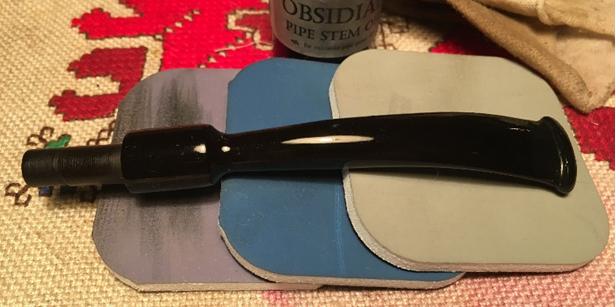
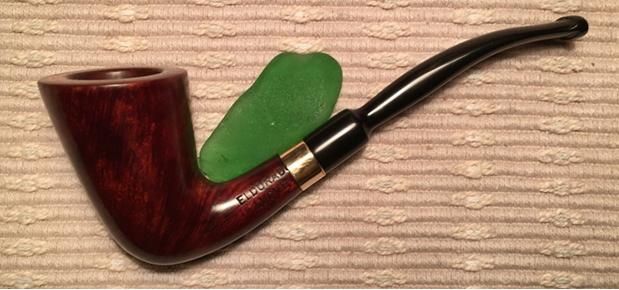
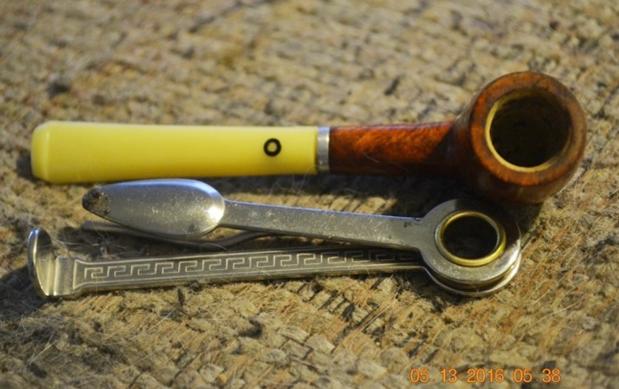
A retort was neither needed nor called for under the circumstances I described earlier with my nearly disastrous soaking of the stummel in Everclear.  Micro meshing the bit was so simple I forgot to mention doing it until now.  And so, all that remained to do was buff the wood with red and white Tripoli, White Diamond and carnauba, and the bit with white Tripoli and carnauba.lad39 lad40 lad41 lad42 lad43 lad44 lad45
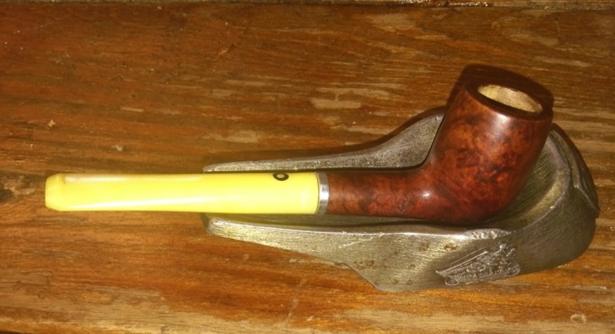
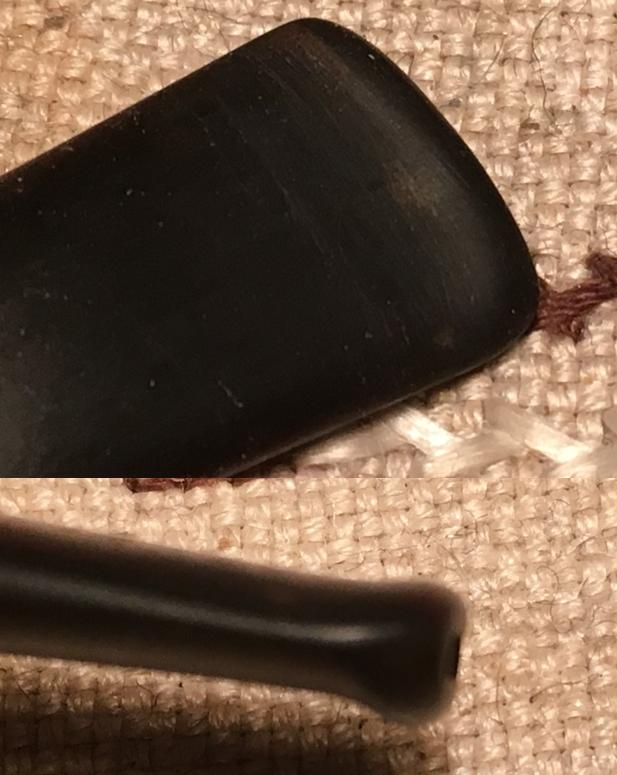
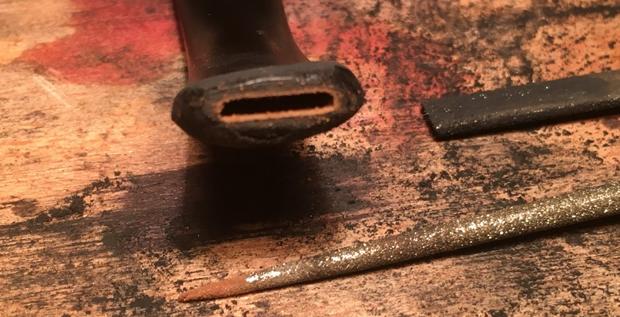
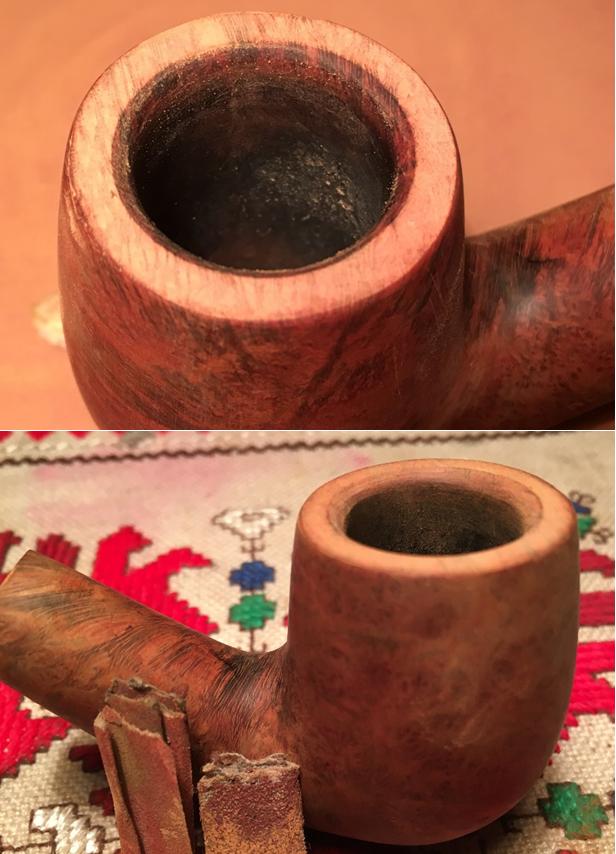
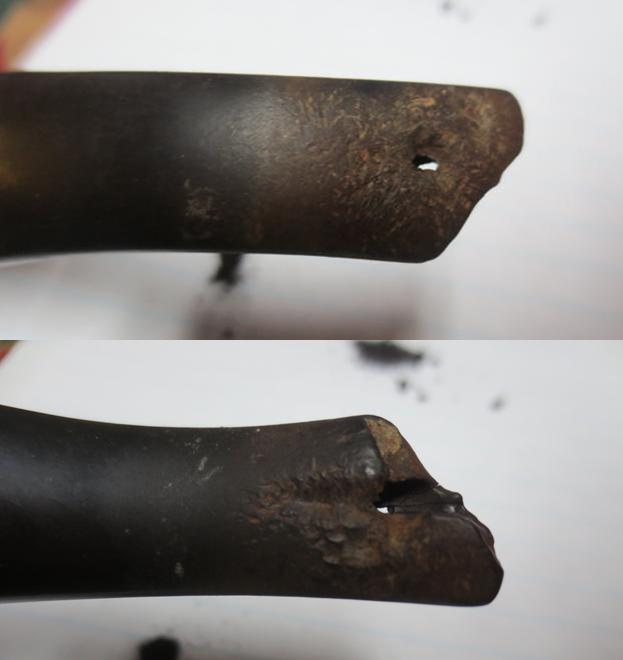
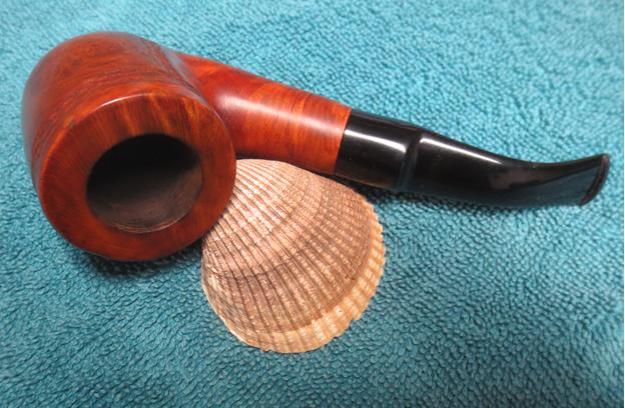
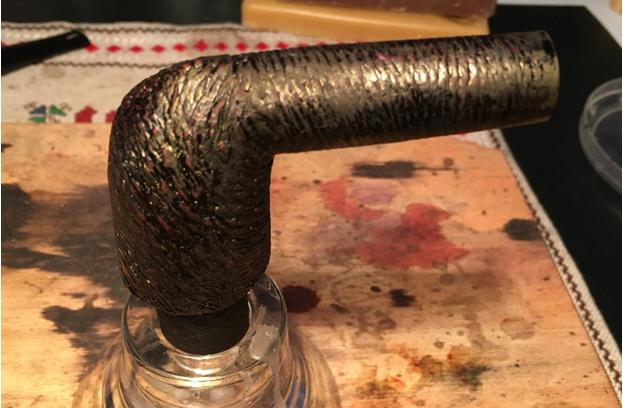
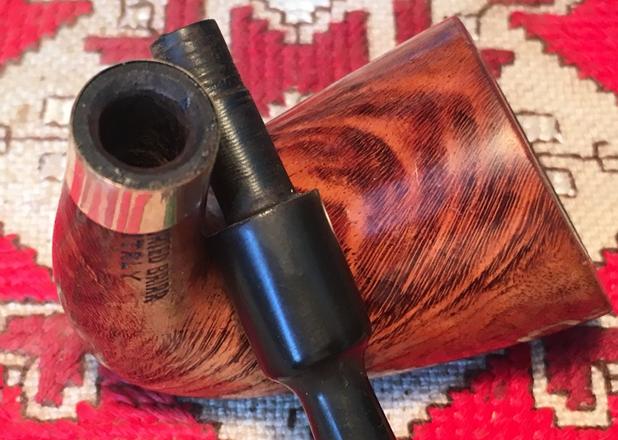
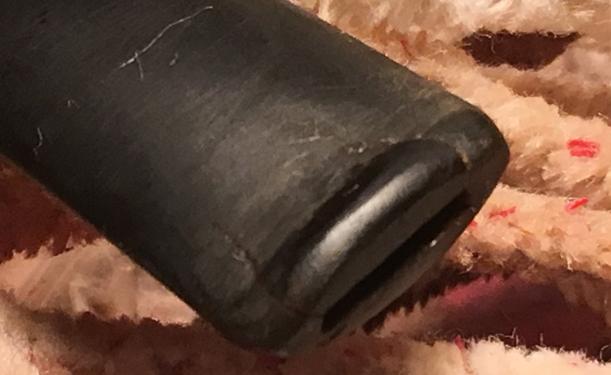
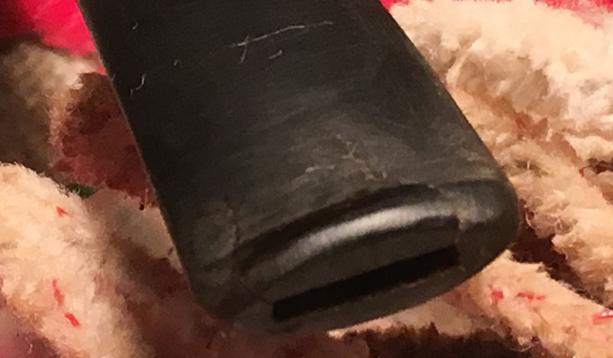
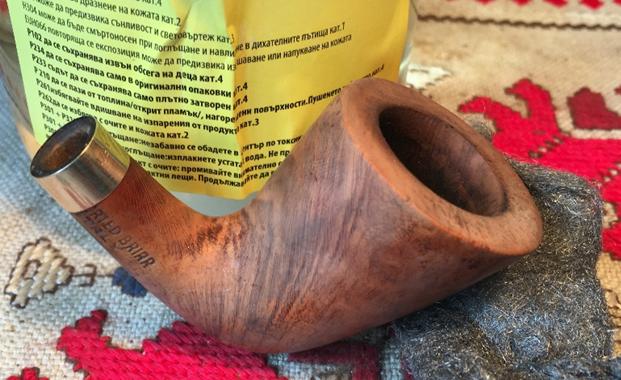
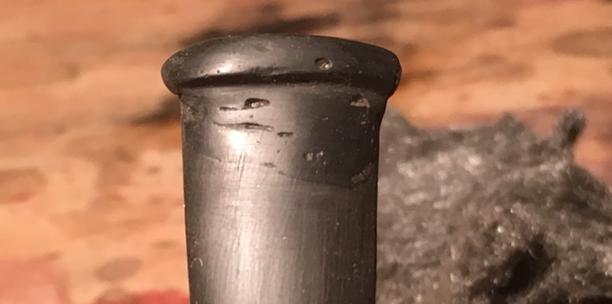
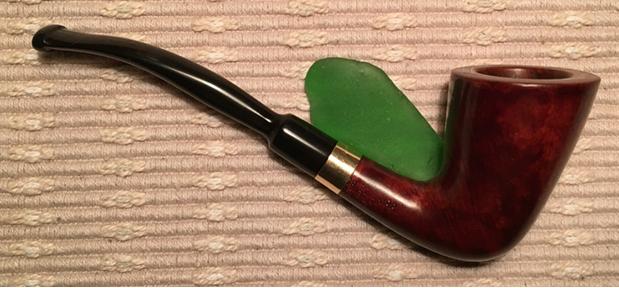
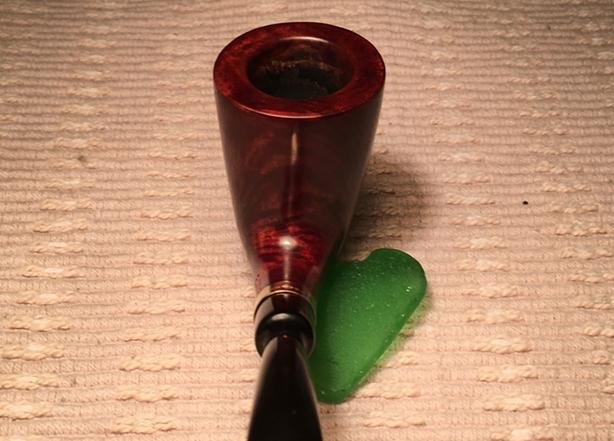
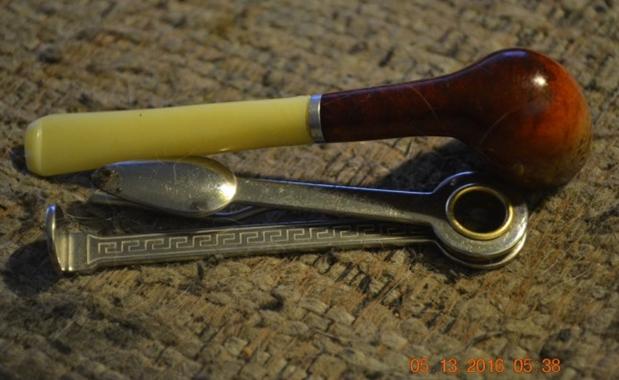
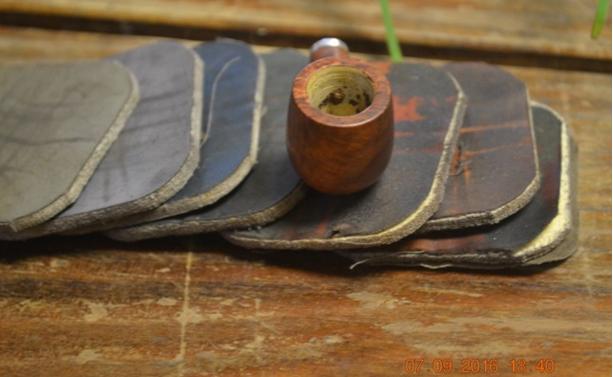
The final shot I took is some sort of weird view I found by accident with a cell phone camera toggle switch marked “NG.”  So far I haven’t a clue what it stands for, but it seems to show the inner pipe.  I offer it for entertainment purposes more than anything else.  Maybe someone can explain it to me.
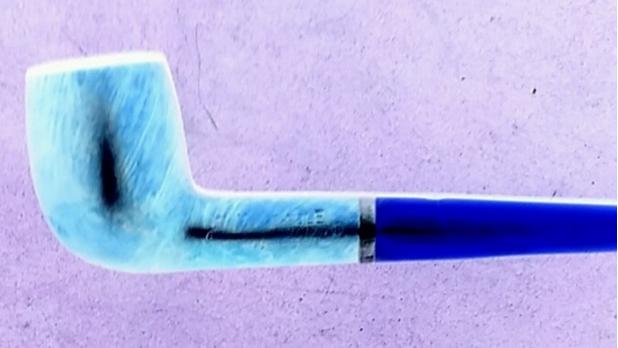
lad46CONCLUSION

My ideal for the series was, in the language of college essays, to compare and contrast the primary topic of tobacco pipes and their attraction to men and women in general through some key aspects of the pastime, and to gain potential insights into what differences in tastes and interests, if any, might exist.  I knew from the beginning that my hopes were overambitious, but I have at least made some headway.  Perhaps a book is in order.

At times I was disheartened by the apparent lack of interest in the topic.  But comparing reactions to the first six, looking at votes, comments and likes, I see they all average out to one of my typical blogs here.  My primary objective was to bring the men and women of the pipe community more together. Only time will tell.

Now I just need to get Liz’ address to send her the pipe.

SOURCES

http://www.collectorsweekly.com/advertising/salesmans-samples
http://www.amiright.com/parody/90s/deepbluesomething11.shtml WARNING: SOME OFFENSIVE LYRICS
https://rebornpipes.com/2016/10/08/a-living-tiny-kbb-yello-bole-salesmans-pipe/
https://rebornpipes.com/tag/yello-bole-pipes/
http://buckcreek.tripod.com/salesman.html
http://www.sloperama.com/majexchange/id.html

THE REST OF THE SERIES

https://rebornpipes.com/2016/05/04/spotlight-ladies-pipes-part-17-a-frasa-french-bent-billiard/
https://rebornpipes.com/2016/05/07/spotlight-ladies-pipes-part-27-a-clinton-straight-oval/
https://rebornpipes.com/2016/05/14/spotlight-ladies-pipes-part-37-a-tiny-medico-acorn/
https://rebornpipes.com/2016/05/20/spotlight-ladies-pipes-part-47-a-real-briar-bounty/
https://rebornpipes.com/2016/06/17/spotlight-ladies-pipes-part-57-a-vintage-dr-grabow-carved-duke/
https://rebornpipes.com/2016/09/26/spotlight-ladies-pipes-part-67-an-albertson-baby-bent-brandy/

A Gold Banded Bent Dublin Eldorado Lucite of Italy


Blog by Dal Stanton

When I first saw this Eldorado Lucite, I believed it to be a Zulu or Woodstock, the Dublin’s smaller cousin.  In the end, I settled on it being a bent Dublin because the stummel was larger than I would expect a Zulu’s to be.  When I saw the Eldorado Lucite bent Dublin on the eBay auction block, two things, no, three things drew my attention motivating me to slog through the bidding and bring this pipe home to Bulgaria.  First, the shape is very attractive – I like the curve of the Dublin’s natural ‘nose-forward’ stummel flowing to and through the stem; an attractive pipe, I wanted to try it out in my palm.  Secondly, the briar’s potential.  I love taking smooth briars and bringing out the grain to encourage a double-take.  The straight grain of the Eldorado is nice.  Thirdly, the band – a touch of class for any pipe, but for this pipe, also raises some questions. The following eBay photos from the seller show what I saw.el1 el2When I retrieved this pipe out of the “Help Me!” basket in Sofia, I take a fresh look at the Eldorado over Lucite – stamped distinctly on the left shank.  The right shank shows Imported Briar over Italy.  Both stamps are obstructed/hidden somewhat by the band which immediately brings into question the possibility of the band being part of a cracked shank repair.  I would not think the original design would include a band hiding part of the nomenclature, but I might be wrong!  After removing the stem, I inspect the mortise and conclude that a crack may be there, but it’s not conclusive – at least to me.  The band is gold and stamped with hallmarks of 1/20 14KT (ensconced in a diamond) G.F.  Looking on the internet, I discover from  RareGoldJewelry.com these hallmarks indicate the ratio of gold in the band is at about 1 to 20.  Rated at 14 karats means that it’s approximately 58% gold and the band is ‘gold filled’ rather than ‘gold plated.’  Regarding gold filled and gold plated, eBay’s buyers’ guide jewelry describes the difference:

Gold-filled jewelry is much more valuable than gold-plated. In fact, there is almost 100 percent more gold in gold-filled items than is found in gold-plated items. Just as gold-plated jewelry is plated with gold, gold-filled jewelry is as well, but there is a big difference between the ways these products are made.  Gold-filled items have a much thicker layer of gold on them, and the gold is a much higher quality. In fact, it is just a step down from solid gold when it comes to quality and value. Speaking of solid gold, pure gold is very soft and is not a good choice for jewelry; that is why an alloy is almost always used for gold jewelry items, even in jewelry pieces worth an incredible amount of money.

If this band is part of a cracked shank repair, which doesn’t appear to be the case, it seems that whoever had this pipe valued it quite a bit to add a gold band.  Another question is raised regarding the name – Eldorado Lucite.  According to the compilation of Herb Wilczak & Tom Colwell (3/3/97) ‘Who Made That Pipe’ (Yes, Santa brought this!) lists Eldorado as Maker or Seller as the Linkman Co./ Parker Pipe and country USA/ENGL.  My subsequent research into Linkman turned up the connection to Dr. Grabow pipes – ‘Eldorado’ is a high-end pipe of Dr. Grabow – which doesn’t fit the pipe before.  Dr. Grabow pipes are usually marked as such.  Parker Pipe Company turned up nothing too.  This pipe is also stamped, Italy, but does this mean country of manufacturer or source of the briar in this case? – as the right shank has the marking ‘IMPORTED BRIAR’ over ‘ITALY’.   Would the ‘Imported Briar’ indicate a US manufacturing – the usual US marking and spelling?  But this, I found is not always the case.  One more question that doesn’t find answers in my research – Eldorado Lucite – does ‘Lucite’ refer to a unique pipe name or is it referring to the stem material with which it was originally outfitted?  If this is the case, is the stem now with this Dublin a replacement because it certainly isn’t Lucite but vulcanite?  Yet, as I look at the stem, it works VERY well with the stummel and shape – it doesn’t appear to be a replacement stem.  So are the many questions this beautiful pipe creates, but now I turn to the pipe itself and take more pictures to fill in the gaps!el3 el4 el5 el6 el7 el8 el9 el10 el11 el12The stummel appears to be in good condition except I detect what might be an acrylic finish with normal wear marks and scratches on top of it.  I’ll want to clean the old finish off.  The bowl has moderate cake build up and old dottle flakes left in the bottom.  I’ll remove the cake bringing the bowl down to the briar for a fresh start.  The rim looks to be in good condition structurally, but has light lava flow and possibly some scorching.  I need to clean the rim to assess this fully.  The stem is attractive.  I’m not sure if it has a special name, but it flays out from the shank and the button is fanned – a fish tail?  It has minor oxidation.  There are tooth dents on the upper and lower button area and a possible crack on the slot side through the button lip pictured above.  I’ll need to look closely at this.  The band is in good shape – I’ll polish it simply with a clean cloth, no more!

I begin the clean-up of the Eldorado Lucite by plopping the stem into the Oxi-Clean bath to work the oxidation to the surface of the vulcanite.  I take the Pipnet reaming kit out and discover that the conical chamber is too tight and angled in the Dublin’s shape to employ the reaming blades.  I’ll use the Savinelli pipe knife instead to ream the bowl.  With the Savinelli pipe knife I make good progress removing the cake in the tight quarters of this chamber.  Following the reaming, I sand the chamber walls with 240 grit paper wrapped around a Sharpie pen and then finish by wiping the chamber with cotton pads and isopropyl 95% to remove the carbon dust.  The chamber looks good.  The pictures show the progress.el13 el14 el15 el16 el17Before continuing with cleaning the external stummel, I tackle the internals with pipe cleaners and Q-tips and isopropyl 95%.  The cleaning job proves to be a bit more than I expected. I’m not positive about the internal layout and drilling of the mortise but it ‘feels’ like there is a gunk trap slightly below the air passage leading out toward the draft hole in the chamber.  After building a good mountain of expended Q-tips and pipe cleaners, and after looking at the lateness of the hour, I decide to give the stummel a salt soak, and let the Kosher salt and alcohol do some of the work for me.  I put the stummel in an egg crate to keep it stable, and fill the bowl with kosher salt which is not iodized – iodine can leave a taste (Thanks to Charles Lemon of Dad’s Pipes for this information).  I cover the bowl with my hand and give it a bit of a shake to displace the salt.  After corking the shank side, I fill the bowl with isopropyl 95% and turn out the light.  The next morning I see that the salt has darkened a bit and I toss the used salt into the waste basket.  I take a paper towel and wipe out the remaining salt from the bowl and use a bristle bush both in the bowl and the mortise making sure that salt residue is purged.  I then return to cleaning with Q-tips, pipe cleaners and isopropyl and finish the internals very quickly. Done! The pictures show the progress.el18 el19 el20 el21Time to retrieve the stem from the Oxi-Clean bath and I see that the oxidation has risen to the vulcanite surface which is shown very nicely in the first picture below. I attack the oxidation by wet sanding with 600 grit paper.  I follow this by using 0000 steel wool to remove more oxidation and begin the smoothing process as well.  Following this, I work on cleaning the internals of the stem with pipe cleaners and isopropyl.  It was going so well until it wasn’t!  Earlier, you recall, as I was doing the initial inspection of the stem, I identified what appeared to be a crack on the left side of the button.  The pressure exerted by the pipe cleaners exacerbated this crack and now I see fissures developing in the vulcanite – not only at the original crack sighting but now also on the right side of the button.  It would not be difficult to project the path of the fault line and the ultimate stem break if not addressed. Ugh! The pictures tell the story.el22 el23 el24 el25 el26Oh, ‘the best laid plans of mice and men’ – my plan is to apply thin CA Instant Glue to the cracks to seal them and hopefully to stop the fissure’s progress.  I fold a piece of index card and cover it with tape and insert it in the slot to keep glue from possibly entering the airway.  It also serves to ‘torque up’ a bit, and opening the cracks a hair to allow better glue penetration.  After this, I will build up the button with a mixture of charcoal dust and super glue and redefine the bit hopefully to reinforce the area.  I put the stem aside for the glue to cure.  The pictures show the progress.el27 el28After the initial CA glue cures, I start the button rebuild.  I use 240 grit sanding paper to rough up the button area, upper and lower.  Then I clean the area with a cotton pad and isopropyl to prepare for the charcoal/glue putty.  While in the States for Christmas, I picked up a bottle of activated charcoal capsules.  In the past, using a mortar and pestle, I had to grind up granulated charcoal which was sold for an aquarium filtration application for use with charcoal patches.  Generally, I was not satisfied with the results.  After the patches were applied, sanded/shaped, and polished, etc., I found a very porous and speckled result – not smooth as I wanted.  I suspected the cause was that the charcoal grade was not fine enough.  So, we’ll see if better results are realized with current charcoal powder.  I decide to re-use the ‘slot insert’ that I earlier made from an index card.  With the crack going through the lip of the button, I make sure I have sufficient ‘overage’ of charcoal putty to cover the crack.  After opening a charcoal capsule, I empty it onto the index card and then add a puddle of Hot Stuff Special ‘T’ CA glue next to the charcoal.  The ‘T’ stands for extra thick.  Using a toothpick, I begin to draw the charcoal into the glue puddle to form the putty.  I’m aiming at a honey-like viscosity for the putty – not to thin that it won’t remain where I put it and not to thick that it doesn’t shape well.  When I arrive at what looks good, I use the toothpick as a trowel and apply the putty to the button – the top receiving the most attention.  With charcoal putty applied to the button, I put the stem aside giving time for the curing process.  The pictures show the progress.el29 el30 el31 el32I return to the stummel to clean the externals.  I’ve not worked before with a gold band and I don’t believe that any cleaning agents I use will deface the gold, but to stay on the safe side, I cover the band with a few layers of masking tape.  I then take undiluted Murphy’s Soap and cotton pad and clean the stummel surface and rim.  With the help of a brass brush, which will not scratch the briar, the light lava flow on the rim becomes history.  I rinse the stummel with warm tap water keeping the internals dry.  After the Murphy’s Soap, I still can detect the acrylic shine of the finish which is not what I like (2nd picture below).  I prefer the shine of the natural briar and not what I have referred to as a ‘candy apple’ shine finish.  To remove the finish, I use acetone with a cotton pad.  After a few unsuccessful rounds of this, I utilize 0000 steel wool to add a little abrasion to the acetone removal process.  This does the trick, though the candy apple finish did not come off easily.  The pictures show the progress.el33 el34 el35To remove nicks and some pitting in the briar I use a medium grade sanding sponge on the stummel and rim.  I follow this with a light grade sanding sponge.  To remove some damage in the inner rim edge and to clean it up, I use 240 grit sanding paper rolled tightly.  I again follow the 240 grit paper and use the light grade sanding sponge on the rim to smooth things out.el36 el37 el38Before I move forward with sanding and finishing the stummel, I return to the stem and the shaping and repair of the button and slot.  I take another close-up of both the top and bottom to mark the progress.  I begin using a flat needle file and a pointed half-circle needle file to re-shape the slot and to redefine the end of the stem.  I will work from stem end, having established a base line.  When I finish the basic shaping with the needle files I then continue shaping the button with 240 grit paper then 0000 steel wool.  The pictures show the progression.  Near the completion of the button rebuild, I use K-150 Black Medium glue to fill pockets and unevenness in the upper bit area.  After cured, I re-sand the area with 240 grit, then 600 grit papers then complete the process with 0000 steel wool.  The last two pictures show the finished button rebuild.  It took some time, but I think it looks good as well as refortifying a formerly, weak and cracked button.el39 el40 el41 el42 el43 el44 el45 el46 el47 el48With button rebuild completed, I begin the micromesh sanding process first by wet sanding the stem with pads 1500 to 2400 and follow with an application of Obsidian Oil over the entire stem.  I then dry sand the stem using pads 3200 to 4000 and again with pads 6000 to 12000, following each set with a fresh application of Obsidian Oil.  The stem looks great and the button repair has blended well.  I put the stem aside to dry.  The pictures show the progress.el49 el50 el51Turning again to the stummel, I wet sand the surface with micromesh pads 1500 to 2400, then 3200 to 4000, and then 6000 to 12000, taking a picture after each set to show the progress.  The micromesh pads’ work is spectacular by teasing out the beautiful briar straight grain. The briar on this Eldorado Lucite is very nicely showcased cascading down the elongated Dublin canonical stummel.  A very nice choice of briar for this pipe style.el52 el53 el54As I moved through the micromesh cycles, my usual thought processing is to ponder the finish and what approach will best showcase the briar.  Should I leave the natural grain color and apply carnauba wax or apply a stain?  With the 14K gold band on this sleek Dublin, I decide to leverage toward a darker brown than the original.  I think the black stem and the darker stummel will give the gold band an extra pop – standing out very nicely.  To expand the briar and enabling the grain to be more receptive to the dye, I warm the stummel using my wife’s hair dryer.  Then, using a pipe cleaner folded in two, I apply Fiebing’s Light Brown Leather Dye liberally to the stummel and rim.  I cover the surface thoroughly.  When covered, I flame the wet dye using a lit candle and the alcohol in the dye immediately evaporates setting the dye hue in the grain.  After a few minutes, I repeat the process including flaming the dye.  I set the stummel aside for the night to rest.  The picture shows the dye-crusted stummel.el55The next morning, I’m anxious to ‘unwrap’ the crust of the fired dye from the night before.  Since I live in a flat on the 10th floor of former Communist block apartment building, I do not have a lot of room for my work shop.  The Dremel high speed rotary tool is how I solve the problem of not having regular high speed buffing wheels.  To unwrap the stummel, I mount the Dremel with a felt polishing wheel and set the speed of the Dremel to the slowest speed.  The felt material is abrasive and I don’t want to over-heat the wood with the higher speeds.  Each polishing wheel is dedicated to a specific compound used in the buffing process.  I mount the Tripoli wheel, and after purging it from old compound with the edge of the metal wrench, used to tighten the wheels on the Dremel, I apply Tripoli compound to remove the flamed residue of the light brown dye.  I rotate the wheel around the surface of the stummel slowly, not applying much vertical pressure on the surface but allowing the RPMs, felt and compound to do the work.  I use the sheen created on the surface of the briar (reflecting the bright overhead work lamp) to observe the compound’s behavior, which enables me to distribute the compound evenly over the surface.  See my essay, ‘My Dremel Polishing Technique’ if you want more detail.  I took a picture of the ‘unwrapping’ with the Tripoli compound and wheel.  You can see the before and after comparison very easily which demonstrates my typical approach.el56I follow the Tripoli compound with Blue Diamond.  Again, using a dedicated Blue Diamond wheel mounted on the Dremel, I work the compound into the surface in the same manner as Tripoli.  After the Blue Diamond cycle, I hand-buff the stummel with a cotton cloth simply to remove the powdery residue of the compounds from the briar surface.  I do this before applying carnauba wax. Next, I mount the cotton cloth polishing wheel onto the Dremel, increase the speed of the Dremel from 1 to 2 (5 is the fastest) and apply several coats of carnauba wax to both stummel and its reunited stem.  I finish with a rigorous hand-buffing with micromesh cloth not only to deepen the shine but to distribute any pockets of unintegrated carnauba wax.

I was hoping to create a pop with the classy gold band linking a slim, gently curving stem with the rich darker brown hues of the Dublin’s cascading briar patterns.  I think what I now see before me effectively does just that!  This gold banded Eldorado Lucite of Italy is an elegant Dublin which feels very comfortable in the hand.  It will be a great addition to some new steward’s collection.

Below, in the comments, I reposted this blog of Reborn Pipes to my new blog site, http://www.ThePipeSteward.com This site is serving not only as a ‘store front’ for pipes I’m selling, but it also describes the work we do in Bulgaria with the Daughters of Bulgaria Foundation – rescuing and restoring women and children who have been trafficked and sexually exploited. To help with this work, the profits of my sales go to the Daughters.  So, if you’re interested in adding this Eldorado Lucite Bent Dublin of Italy to your collection, jump over to The Pipe Steward, and check it out!  Thank you for joining me!el57 el58 el59 el60 el61 el62 el63 el64 el65 el66