Blog by Steve Laug
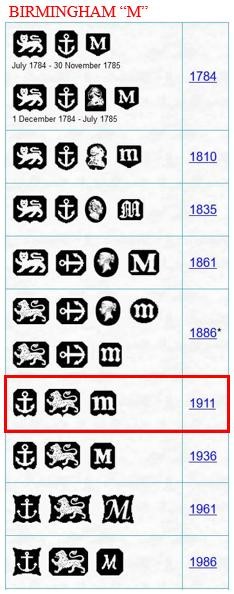
The next pipe I have chosen is a Peterson’s pipe that came to us from our connection in Copenhagen, Denmark on 11/10/2022. It is a nice Ebony Billiard with a Sterling Silver ferrule and a spigot stem with a Sterling Silver fitting on the end of tenon end of the stem. This pipe was obviously a favourite of the previous trustee. It had been well smoked and there was a thick cake in the bowl and thick lava overflowing onto the rim top. The lava was heavier on the back side of the rim top. It was hard to know clear the condition of the rim top and edges because of all of the lava. The pipe was dirty with grime and dirt ground into the finish on the bowl sides and heel. The black finish around the bowl and shank looks good other than the heavier on the top. The stamping on the shank is clear and readable. The left side is stamped Peterson’s [arched over] Dublin. On the right side it was stamped Made in the Republic of Ireland (3 lines) and near the bowl it is stamped with the shape number 6. The Sterling Silver ferrule is stamped and reads Peterson’s [over] Dublin followed by Sterling [over] Silver. That is followed by three hallmarks. The first was Hibernia seated, arm on a harp for the country of manufacture. The second was a Crowned Harp designating sterling quality. The third mark was a date stamp and, in this case, an upper-case cursive “Q” which dated the pipe as made in 2001. The silver was tarnished on the stem and ferrule and the stem was oxidized, calcified and had light tooth marks and chatter on both sides ahead of the button. Jeff took photos of the pipe before he started his clean up work on it. 
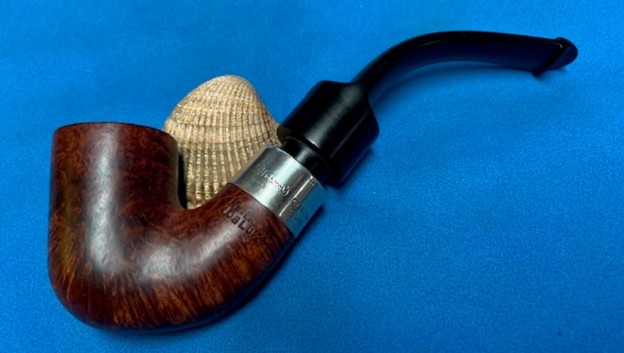
 The next photos show the bowl and rim top as well as the stem condition. The bowl had a thick cake that is very visible. The rim top and edges have a heavy coat of tar. It is hard to know what the rim edge looked like underneath the lava. The rim top also had some darkening. The stem looked good with some oxidation, calcification, tooth chatter and marks on both sides and the button. The silver work on both were tarnished.

 Jeff took photos of the sides and the heel of the bowl and shank to show the condition of the black paint around the briar. It is unique and quite beautiful. I can’t wait to see it once it is cleaned and polished.
 The stamping on the shank sides and the Sterling Silver band was clear and very readable. It read as noted above.
 I did a Google search on the Peterson’s Dublin Ebony line of pipes and specifically shape 6 billiards. There was nothing on Pipephil or Pipedia on the line but there were links to other sites. There was a great description of the line on smokingpipes.com that I quote in part below (https://www.smokingpipes.com/pipes/new/peterson/moreinfo.cfm?product_id=192289).
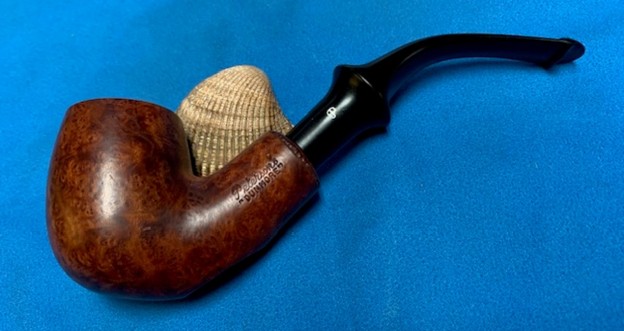
The ‘6’ shape is one of Peterson’s most iconic, classic straight Billiards. In the classic Peterson style, the shank is fairly large relative to the bowl and the tapered stem carries the same visual weight as the shank. While the pipe adheres rigorously to the classic definition of the Billiard (shank length to bowl height ratios etc.), it’s still unmistakably Peterson. It’s presented here as part of the Ebony Spigot series: a smooth black finish matched to a classic silver spigot mount.
It was a description of a pipe that was on the site for sale. I did not include the photos of the pipe that were included following the description.
I turned also to the Peterson’s Dublin site and found a photo and a lengthy description of the shape 6, the Ebony series and the range of the pipe (https://www.peterson.ie/pipes/high-grade/ebony-spigot/moreinfo.cfm?pd_product_Id=685). I have included a photo from the site of the pipe and the description below.  About The Shape
Striking an agile balance between the traditional archetype and our signature House Style, this medium-sized, straight Billiard shape houses a respectable fire hole with some fairly muscular proportions throughout while still cutting a lean silhouette.
About The Series
The pinnacle of our traditional dress pipes, the Ebony Spigot presents our Classic range shapes in a sleek, sophisticated palette, combining black semi-matt smooth finishes with bold, sterling silver, Face-style spigot mounts, each applied by the skilled hands of our most experienced silversmiths.
About The Range
Representing the pinnacle of our regular production, our High Grade designation is reserved for only the very best pipes to leave our factory. Each pipe in this range is distinguished by its plentiful grain, either smooth or sandblasted, and expert metal fitments, shaped and applied by the hands of our most experienced craftsmen. Our silversmiths are among the most talented in the world, having undergone traditional five-to-eight-year apprenticeships under a senior craftsman; each smith has engineered his own mandrel, meaning that every metal fitment is imprinted with the subtle, personal style of the one who machined it.
With that information in hand I knew what I was dealing with in terms of the stamping on the pipe. It is a Republic era pipe. The three line Made in the Republic of Ireland stamp on the right side of the shank along with the K&P stamp with hallmarks tell me it was made in 2001. The Ebony finish was one of the higher end lines and was well worth the cleanup. It is a beautiful pipe in a classic thick shank billiard.
Now, on to the restoration of this beautiful Peterson’s Ebony Silver Spigot 6 Billiard. Jeff had thoroughly cleaned up the pipe. He reamed the pipe with a PipNet Pipe Reamer and cleaned up the remnants with a Savinelli Fitsall Pipe Knife. He scrubbed the bowl with undiluted Murphy’s Oil Soap with a tooth brush. He rinsed it under running warm water to remove the soap and grime. He cleaned out the inside of the shank and the airway in the stem with alcohol, cotton swabs and pipe cleaners. He scrubbed the exterior of the stem with Soft Scrub to remove as much of the oxidation and calcification as possible. He soaked the stem in Before & After Deoxidizer and rinsed it off with warm water. About this time in the process I did a video chat with Kenneth and as usual don’t seem to be able to write, talk and work on pipes at the same time so I totally forgot to take the photos of the pipe before I started working on it. It was very clean but there was some residual tar on the backside of the rim top and the inner edge of the bowl was out of round with some damage on the edge. I also used some 600 wet dry sandpaper to sand off the tar that remained on the top. It looked significantly better with these two issues addressed. I polished the silver ferrule and the silver stem cap with a jeweller’s cloth to remove the tarnish and to protect the stem from further oxidation and tarnishing. It looks quite good at this point.
 I rubbed down the bowl with Before & After Restoration Balm. I worked it into the surface of the briar with my fingertips. The product works to deep clean, restore and protect the briar. I let it sit on the bowl surface for 10 minutes to let it do its work. I buffed it off with a soft cloth and it took on a deep shine in the Black/Ebony finish. It looks very good at this point in the process.

 I set the bowl aside and polished the vulcanite stem with micromesh sanding pads – dry sanding with 1500-12000 grit pads. I wiped the stem down after each sanding pad with a cloth impregnated with Obsidian Oil.
 I finished the hand polishing of the stem with Before & After Pipe Polish – both the Fine and Extra Fine polishes. I gave it a final coat of Obsidian oil and set it aside to dry.
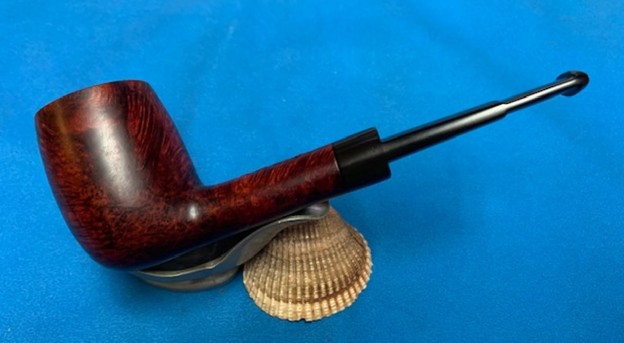
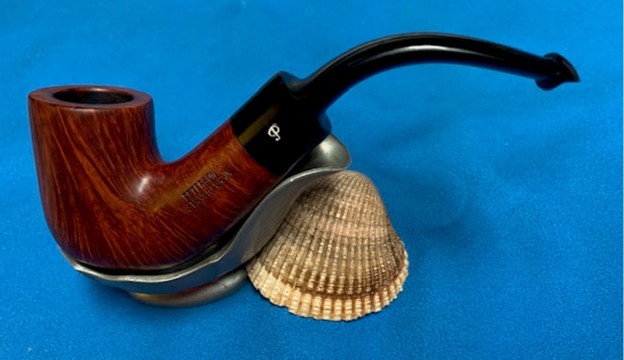
 This nice looking Peterson’s Dublin Ebony Silver Spigot 6 Billiard with a classic Peterson’s military or spigot stem looks much better now that it has been restored. The rim top and edges cleaned up very well. The rich ebony colour finish on the bowl came alive with the polishing and waxing. I put the stem back on the bowl and carefully buffed the pipe with Blue Diamond on the buffing wheel using a light touch on the briar so as not to damage the colour. I gave the bowl and the stem multiple coats of carnauba wax on the buffing wheel and followed that by buffing the entire pipe with a clean buffing pad. I hand buffed the pipe with a microfiber cloth to deepen the shine. The finished Peterson’s Dublin Ebony Silver Spigot is a beauty and fits nicely in the hand and looks very good. Give the finished pipe a look in the photos below. The dimensions of the pipe are Length: 6 inches, Height: 1 ¾ inches, Outside diameter of the bowl: 1 ¼ inch, Chamber diameter: ¾ of an inch. The weight of the pipe is 36 grams/1.27 ounces. I will be putting the pipe on the rebornpipes store in the Irish Pipemakers Section soon. If you are interested in adding this pipe to your collection send me a message or an email. Thanks for reading this blog and my reflections on the pipe while I worked on it. There are many more to come!
As always, I encourage your questions and comments as you read the blog. Thanks to each of you who are reading this blog. Remember we are not pipe owners; we are pipe men and women who hold our pipes in trust until they pass on into the trust of those who follow us.