Blog by Paresh Deshpande
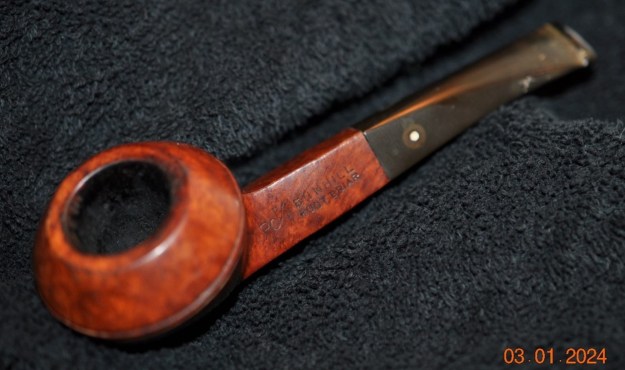
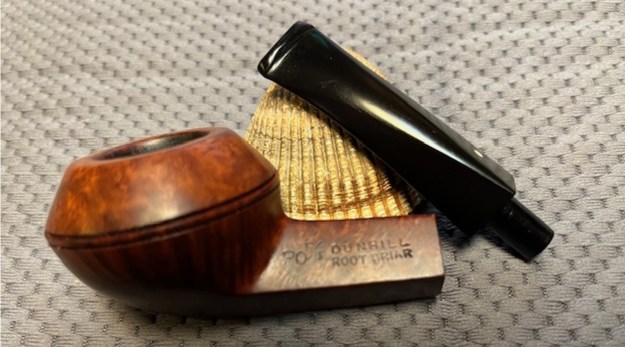
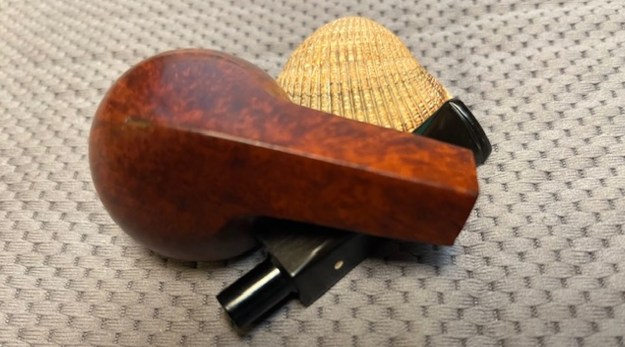
This pipe too came to me in that lot of 40 pipes purchased from Etsy.fr of which I have restored a few, the ROPP PNEUMATIC being the latest project. This pipe is a large billiard with a swan neck like graceful bend to the shank that extends over to the horn stem. The stummel appears dull and lifeless and yet through this, beautiful cross grains can be faintly made out over the sides of the stummel with bird’s eye grain at the foot. A copper band adorn the shank end with it’s crimped shank end edges covering the shank face. It is stamped over the left shank surface as “BUTZ-CHOQUIN” over “A” over “METZ”. The copper band has minuscule cartouche with some mysterious stampings that are neither visible under bright light nor under magnification. A couple of years ago, I had worked on an early Butz Choquin pipe that was very similarly stamped. I had studied the brand then and also before that when I had refurbished my inherited CHOQUIN PIPE from first era 1858. Given below is the link to the write up on the similarly stamped pipe. For the sake of brevity, I have avoided reproducing the information and implore readers to follow the link for better understanding the brand and establishing the provenance of the pipe (https://rebornpipes.com/2022/04/17/restoring-a-beautiful-older-butz-choquin-a-metz-pipe/).
After reading through the material and correlating the dates, I can, with certainty, claim that this pipe (broadly) is from pre 1951 when Berrod- Regad took over Butz Choquin and moved production from Metz to St. Claude as evidenced from the A METZ stamping.
Further narrowing down the period, I strongly feel that this pipe dates to pre 1920. This conclusion is based on the fact that; firstly, the stem and tenon material used is horn and bone respectively which were the preferred material after Amber during this period for making stems as hard rubber/ vulcanite gained prominence during 1920s. Secondly, the round orifice at the stem end was commonly used until 1920s when vulcanite/ hard rubber with elliptical slot end gained prominence subsequently. Thirdly, use of cork lining inside the mortise to firmly seat the bone tenon in to the mortise.
Any inputs and corrections to my above understanding are solicited and encouraged. Such healthy discussions not only promote interaction between us but also enhance knowledge about pipes and establishing its provenance by sharing information.
Initial Visual Inspection
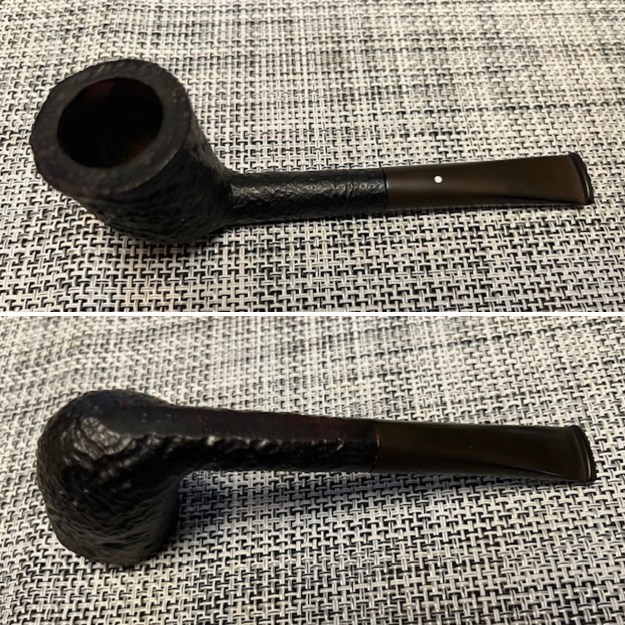
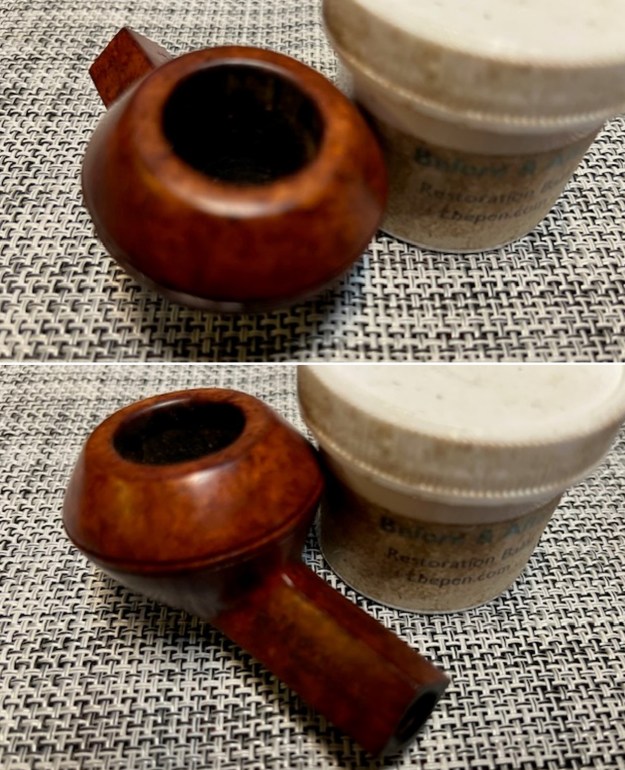
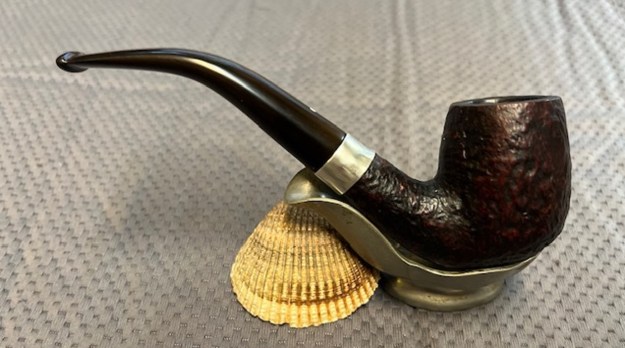
The elegant swan neck shape of the shank that extends into the stem is the USP of this pipe. The chamber appears to have an even thin layer of cake that appears to have been meticulously maintained by the previous owner. There are a few minor dings to both the inner and outer rim edges. The stummel boasts of beautiful cross grains over the surface with bird’s eye grains at the foot of the stummel. The briar looks dull and lifeless. The mortise has residual old oils and gunk making the draw hard. The horn stem with bone tenon is dull, dry and shows signs of beginnings of cracks over the surface. Both the tenon and orifice slot are clogged with old tars and grime. This one will require a ton of work to spruce it up to its former glory. Following pictures should provide a better understanding of the condition of the pipe before I begin my work.
 Detailed Visual Inspection
The first impression that I got at a glance of the chamber was an even well maintained layer of cake with practically no darkening of the rim surface or accumulation of carbon overflow. This definitely was either a well cared for pipe or the seller had done so for bargaining a better price. There a few dings on the right and left side of the outer rim edge (encircled in blue). The inner rim edge is intact save for some very minor divots that should be easily addressed with a couple of passes of a piece of 180 grit sandpaper along the edge. The rim top is nicely even and clean, requiring no topping, which I tend to avoid as much as possible.
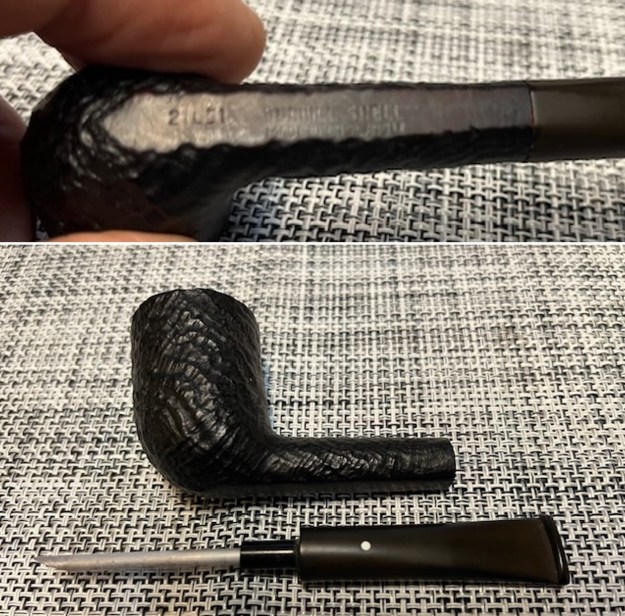
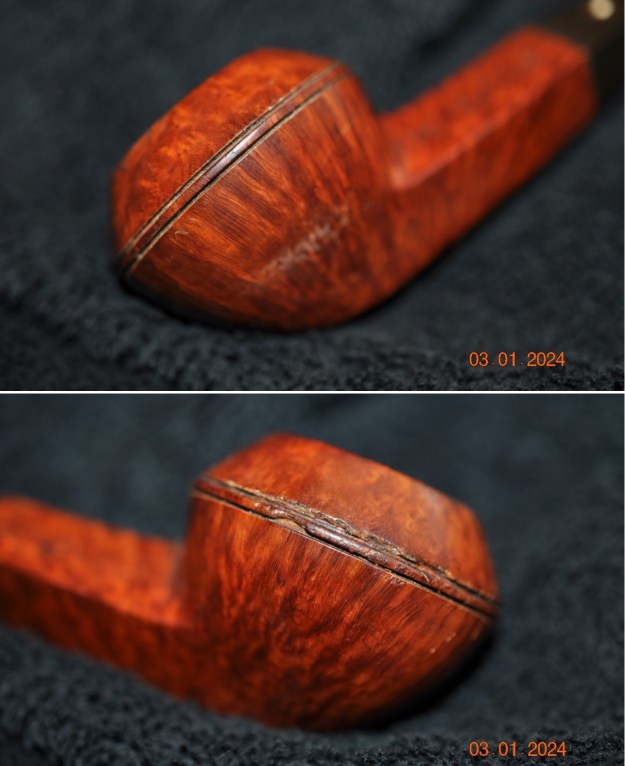
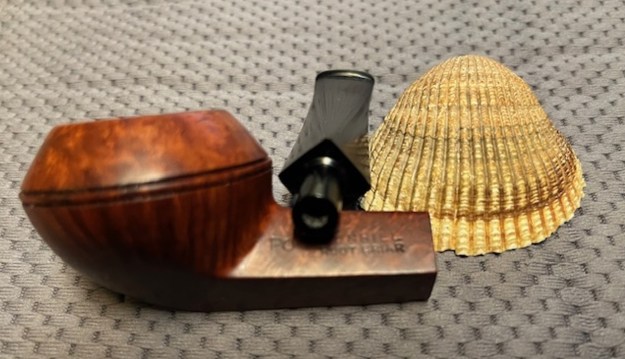
 The stummel is dull, lifeless and lacklustre. Under all the dullness and poor appearance, lurks some beautiful cross grains and bird’s eye over the feet of the stummel awaiting exposure. The stummel has developed a deep dark patina from all the years of smoking and handling. There is one fill (encircled in yellow) that would need to be refreshed. Also a couple of minor divots (encircled in red) mark the stummel surface. The mortise is chock-a-block with old oils, tars and gunk and this leads me to the conclusion that it was the seller who had reamed the cake and cleaned the rim surface to ask for a better price. The copper band at the shank end is dull and covered in dust, grime and oxidation.

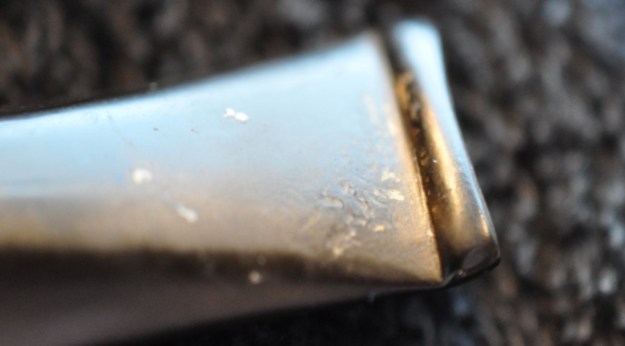
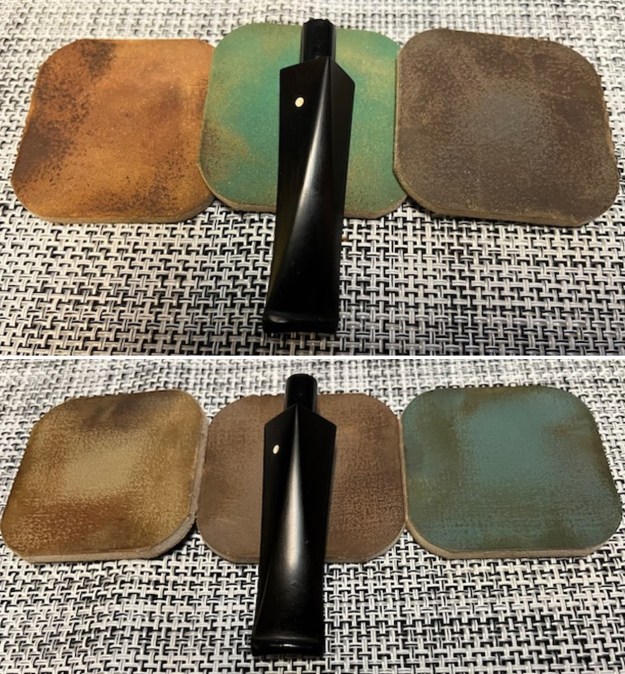
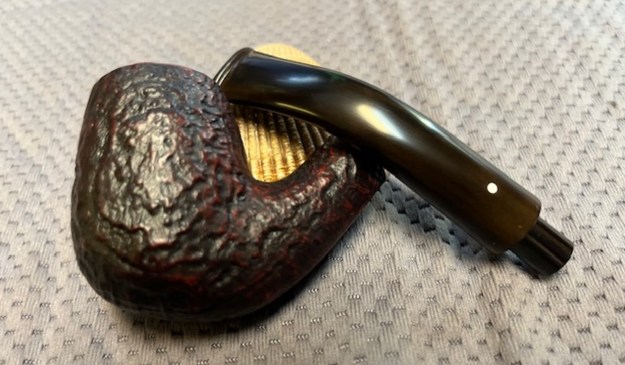
 The first issue that I noticed on close examination of the stem surface were a number of cracks all over the upper and lower surfaces. I drew out my magnifying glass and had a hard look at the cracks under bright light. Thankfully, almost all of these cracks were minor and very superficial, save for a few (encircled in red) over the upper surface and would need to be addressed. These cracks are caused because of drying of the horn material due to lack of usage and hot weather conditions. These cracks would need to be stabilized, repaired and hydrated. There are deep tooth indentations in the bite zone, very close to the button edges on either surface of the stem. The long bone tenon has darkened considerably and is covered in grime with the opening showing accumulation of oils, tars and gunk. This condition is similar at the orifice slot. The seating of the stem in to the mortise is very loose.
 The Restoration Process
The process of this restoration started with stem repairs. I first cleaned the stem airway by running a few hard bristled and regular pipe cleaners dipped in isopropyl alcohol followed by further cleaning with anti oil dish washing soap and thin shank brushes. The pipe cleaners pictured below and the gunk that was removed while cleaning with the shank brushes of which pictures were not clicked, tell a story of how dirty the stem internals were. I continued cleaning of the stem air way till white foam was seen coming out from the air way. I also scrubbed the stem surface with a Scotch Brite pad and soap.
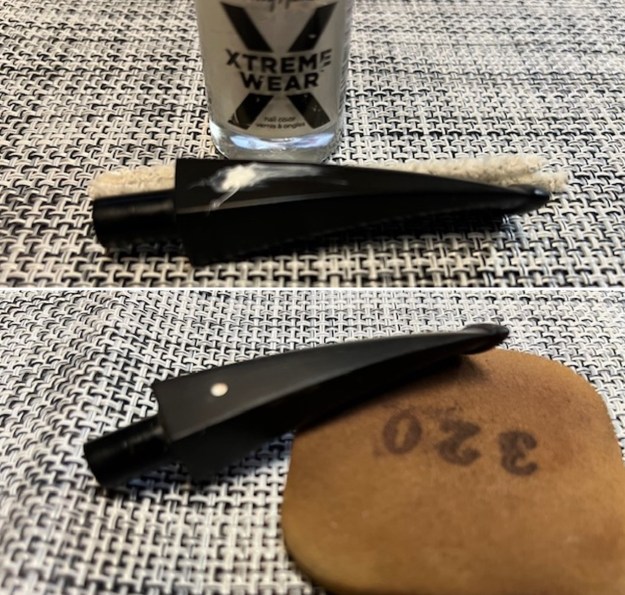
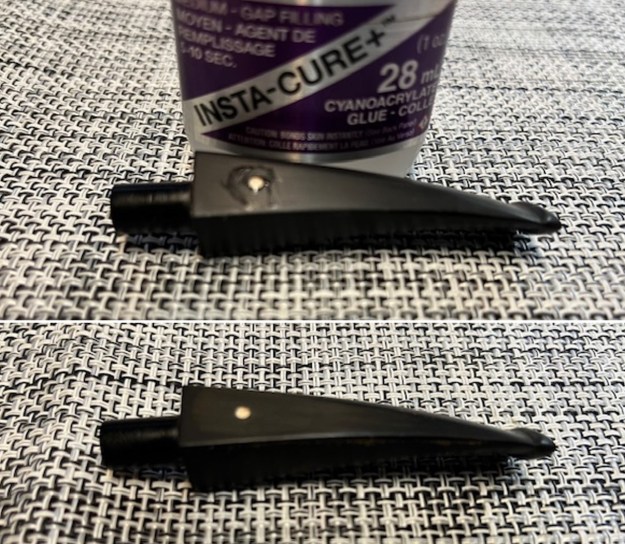
 The next step was to stabilize the cracks on the top surface of the stem. Using a 1 mm drill bit mounted on a hand held rotary tool, I drilled counter holes at the start and end points of these cracks. These counter holes prevent the further expansion of the cracks in either directions. I filled these holes, cracks and the tooth indentations in the bite zone with CA superglue and set it aside for the glue to harden.
 I was still sometime away from hitting the sack and with the stem set aside for the repairs to cure; I decided to work the stummel. I began with reaming the chamber with size 1 head followed by size 2 head of the PipNet reamer. The heap of dislodged carbon did surprise me as I had anticipated a far less cake formation along the walls. I further scraped the chamber walls with my fabricated knife to remove the remaining carbon deposits where the reamer head could not reach. Once the cake was reamed back to the bare briar, I used a 220 grit sand paper to remove all the traces of remaining cake and also to smooth out the inner walls of the chamber surface. Finally, to remove the residual carbon dust, I wiped the chamber with a cotton pad wetted with 99.9% pure isopropyl alcohol. The chamber walls are solid without any heat lines or fissures.
 While I was handling the bowl, the copper band at the shank end came loose and it was then that I saw the cork lining along the walls of the mortise that was in place to ensure a snug fit of the long bone tenon in to the mortise. This cork lining has dried and needs to be revitalized. This lining also means that I would have to be careful while I clean the mortise so as not to erode and break the cork thus disturbing the seating of the stem.
 As observed above, the mortise is completely clogged with old oils, tars and ash resulting in a very hard and laborious draw. This was the issue that I addressed next. Using dental tools and fabricated poker, I scraped out the entire gunk from the walls of the mortise taking care that the cork lining is not damaged in the process. I used the drill bit from the Kleen Reem to remove and open up the shank airway. It was a tedious and time consuming work, but well worth the caution and efforts. The heap of crud extracted from the shank confirms the reason for the hard and laborious draw. I ran a few hard and regular pipe cleaners dipped in alcohol through the mortise and airway to remove residual gunk. The mortise is now clean with a much better open and easy draw. I shall continue with the cleaning process when I clean the stummel surface.
 The last agenda for the night was the external cleaning of the bowl and further internal cleaning of the mortise. I cleaned the external surface with a hard-bristled toothbrush and concentrated Murphy’s oil soap. I scrubbed the rim top and stummel surface with the soap and Scotch Brit pad. I rinsed the stummel under warm running water and dried it with paper towels and soft cotton cloth. The grains are now clearly visible and awaiting a nice polish to pop out. This cleaning also brought a few dents and scratches over the stummel surface and outer rim edge to the fore that would need to be addressed and the fill observed near the foot has loosened that would need to be refreshed.

 I extended my work time for a while and cleaned out the shank internals. I cleaned the shank walls by scrubbing it with shank brushes and anti-oil dish washing soap while being careful around the cork! The bowl is now clean and fresh. I set the bowl aside to dry under a heat lamp.
 The next evening with the stummel now dry and the stem repairs completely cured, I had the option of either working on the stummel or the stem. There was this small step that was needed to address the fill that required to be refreshed and that is where I began. With sharp dental tool, I removed the old fill and cleaned the area with alcohol. Next, I mixed briar dust with CA superglue to form putty and applied this mix over the area to be filled. I set the stummel aside for an hour or so for the mix to harden, which is almost instantaneous over the surface.
 I set the stummel aside and worked on the stem repairs next. The repairs had completely hardened and all that needed to be done was to blend in these repairs with the rest of the stem surface. I began by sanding the fills with a flat needle file to achieve a rough match followed by sanding the entire stem with a worn folded piece of 180 grit sandpaper. The button edges were also evened out and sharpened during the process. The fills will be further blended during the polishing cycle using various grit sandpapers and micromesh pads. I applied a generous layer of EVO and massaged it in to the horn stem to hydrate it and set it aside for the oil to be absorbed into the horn.
 Using the same tools and sandpaper, I blend in the stummel fill with the rest of the briar surface. This blending of the fill will be further fine-tuned when I sand the stummel surface with 220 grit sandpaper to address the issue of dings and scratches over the surface.
 I addressed the dents and dings to the outer rim edge by creating a bevel with a folded piece of 180 grit sandpaper pinched between fingers and running them evenly over the outer edge surface. I am quite happy with the appearance of the bowl with the bevelled outer rim.
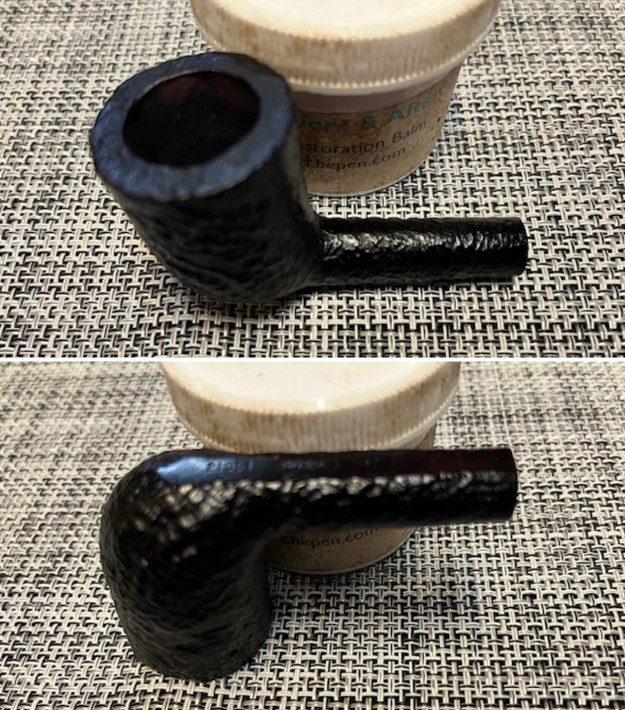
 Next, I cleaned the copper ferrule at the shank end with “Pitambari”, a powder that is available all across India that is used to clean and shine brass, copper and silver ware. This compound is a very fine powder and is least abrasive with fantastic results. The band is now a nice shining piece and will provide a nice contrast between the shining horn stem and the dark brown stummel. I attached the band at the shank end with all-purpose glue.
 The next step was to sand the entire stummel surface with sandpaper to remove the scratches and dings that are visible. I used a well worn piece of 180 grit sandpaper to sand the surface. The sanding marks that are now visible will not be so once the bowl is subjected to polishing regime with micromesh pads and compounds. There are a couple of dings and scratches that are still visible, but I shall let them be as part of the pipe’s century old existence!
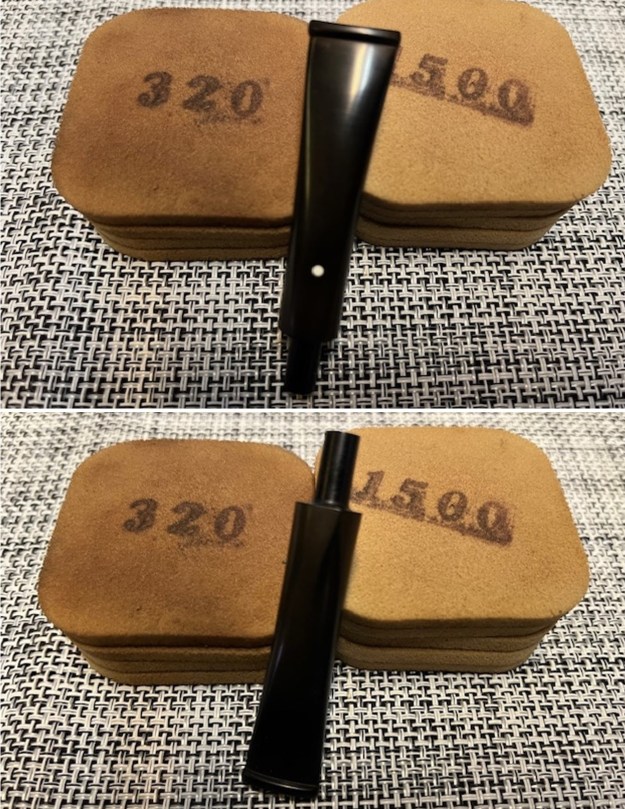
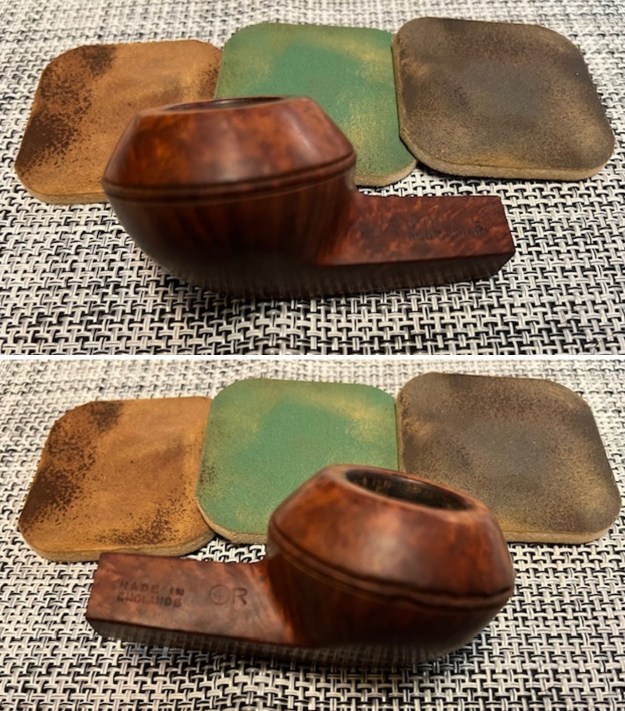
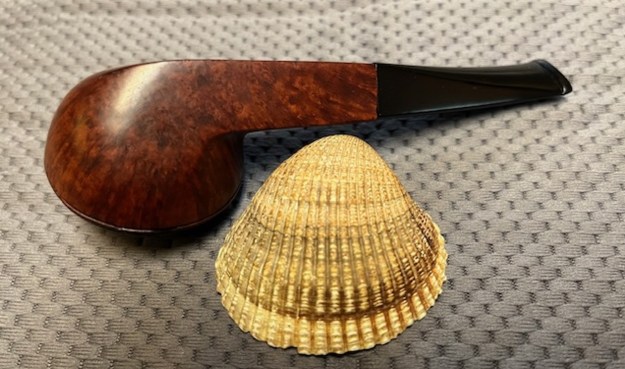
 I followed it by wet sanding the entire stummel with 1500 to 12000 grit micromesh pads, wiping frequently with a moist cloth to check the progress. I rubbed a small quantity of “Before and After Restoration Balm” deep in to the briar with my finger tips and let it rest for a few minutes. The balm almost immediately works its magic and the briar now has a nice vibrant appearance with the beautiful grain patterns displayed in their complete splendor. The contrast of the dark browns of the Bird’s eye and cross grains with the natural patina of the rest of the stummel adds an interesting dimension to the appearance of the stummel which cannot be sufficiently described in words and be rather seen in person. I really like the looks of the stummel at this point in restoration. The grains and the clean lines of this piece of briar is really appreciable.
 With the stummel set aside, I polished the stem by wet sanding, starting with 400 and progressing through 600, 800, 1000, 1500 and 2000 grit sandpapers. I rubbed a good amount of EVO in to the stem surface and set it aside to be absorbed.
 A few hours later, I wiped the stem surface with paper towels and began the polishing cycle using micromesh pads. I wet sanded the stem surface going through 1500 to 12000 grit pads. I set the stem aside after rubbing it down with EVO again.
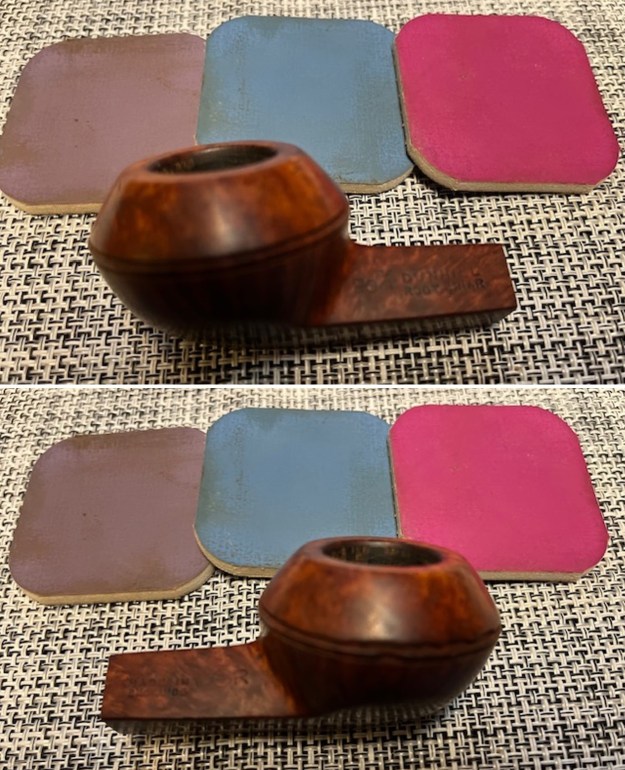
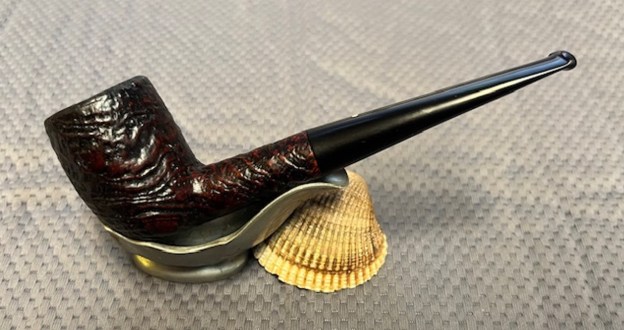
 To complete the restoration, I mount a cotton cloth buffing wheel on to my hand held rotary tool and polished the stummel and stem with Blue Diamond compound. This compound helps to remove the minor scratch marks that remain from the sanding. With another cotton buffing wheel that I have earmarked for carnauba wax, I applied several coats of the wax. I finished the restoration by giving the entire pipe a rigorous hand buffing using a microfiber cloth to raise the shine further. The finished pipe looks amazingly beautiful and is ready to join my collection. I only wish it could share with me its life story of the past years while I enjoy smoking my favorite Virginia blend in it or maybe an English blend or maybe just keep admiring it!


 Big thank you to all the readers who have joined me on this path by reading this write up as I restored and completed this project.


 Jeff took photos of the stem surfaces and the bowl and rim to give a sense of condition of the pipe. You can see the thick cake in bowl and the spots of lava overflow on the edges and rim top of the bowl. The stem surface is very dirty, oxidized, calcified and tooth marks covered by the dirt and debris. The stem did not fit the diameter of the shank properly. It was larger than the shank and would need to be fitted. The stamp on the top of the shank is faint.

 He also took photos of the sides of the bowl and the heel to show the interesting grain that went around the bowl. The grain is beautiful and you can see the oils and debris in the surface of the briar.
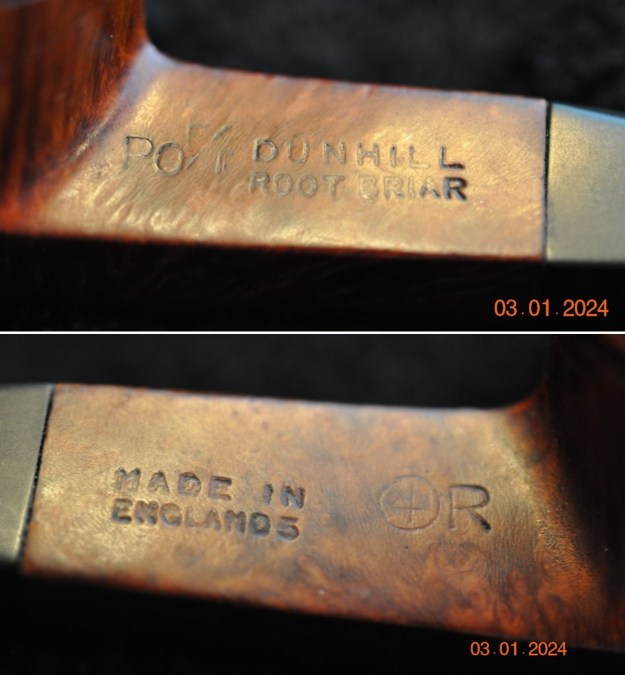
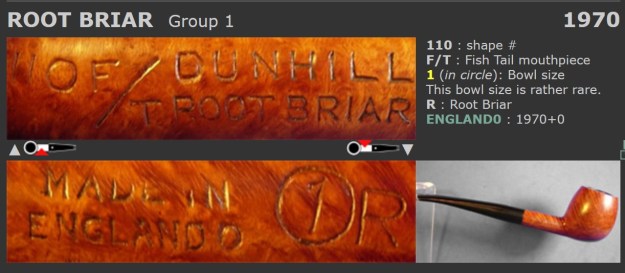
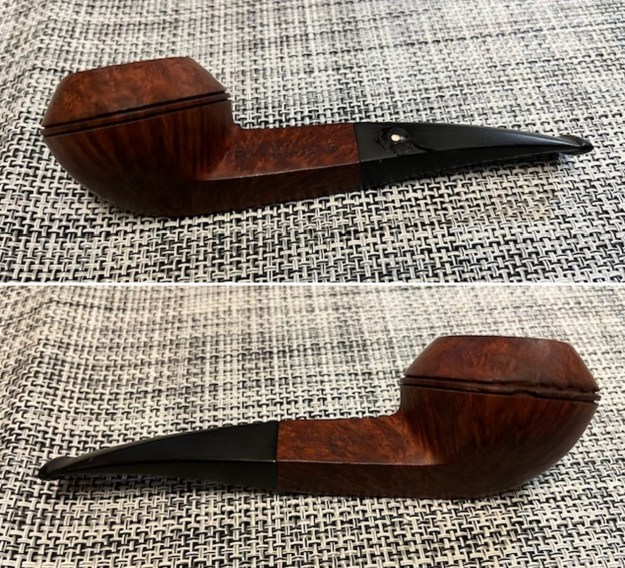
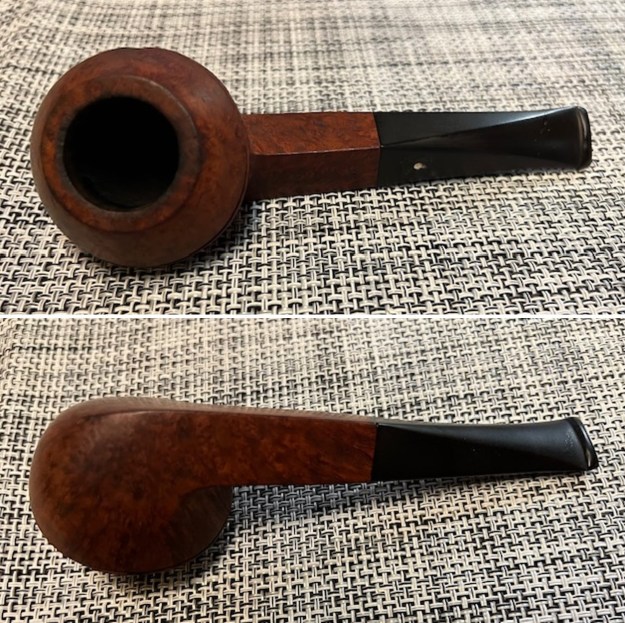
 He took photos of the stamping on the sides of the shank. It is clear and readable on all the shank sides as noted above. Jeff did not capture the stamping on the right side of the shank.
 I turned to Pipephil’s site (http://www.pipephil.eu/logos/en/logo-savinelli1.html) to get a sense of the Bing’s Favorite. It is a Savinelli Product and it is listed in the Savinelli pipe section. I did a screen capture of the section and included it below. The stamping on the stem confirms that the stem I have is a replacement.
 I turned to Pipedia (https://pipedia.org/wiki/Savinelli) and after reading through the history I focused on a section entitled Editions in the “Favorite” line. I have included that section below.
 I took a photo of the rim top to show the condition. You can see the clean bowl. The bowl is in excellent condition and is clean. The rim top and the inner edge was in great condition. The stem came out looking clean. There were some light tooth marks and chatter on both sides ahead of the button.
  I took photos of the stamping on the shank. It is faint but still very readable. There was also a very faint stamp on the stem but I am still not certain it is the correct stem because of the fit and shape of the stem. I removed the stem from the shank and took a photo of the pipe parts to show what I was working with.
 The pipe had cleaned up so well that I turned to polish the briar with micromesh sanding pads. I dry sanded it with 1500-12000 grit sanding pads and wiped the bowl down after each pad with a damp cloth. By the final pads the briar really had a shine.


 I rubbed the briar down with Before & After Restoration Balm. I worked it into the briar with my fingertips. The product works to clean, enliven and preserve the briar. I let it sit for 10 minutes then I buffed it with a cotton cloth to deepen the shine. The briar really comes alive with the balm.

 I set aside the bowl and turned my attention to the stem. I “painted” the stem with the flame of a lighter to soften the vulcanite and give the stem a slight bend like it must have originally had.
 Next, I worked on the diameter of the stem. I needed to take off the excess so that the flow between the shank and the stem was smooth. I used a flat rasp and small file to quickly remove the excess vulcanite. I sanded it with 220 grit sandpaper to clean up the file marks and smooth out the surface of the stem.
 I moved on to further smooth out the surface of the vulcanite. I sanded it with 320-3500 grit sanding pads to further clean up the scratches and file marks on the surface of the stem.
 I polished the vulcanite with micromesh sanding pads – 1500-12000 grit pads. I wiped it down with Obsidian Oil after each sanding pad. I used Before & After Pipe Polish – both Fine and Extra Fine to further polish the stem. It really took on a shine and I knew that once it was buffed it would look amazing.
 I put the stem back on the Bings Favorite ¼ Bent Vulcanite Stem Long Billiard and took it to the buffer. I worked it over with Blue Diamond to polish out the remaining small scratches. I gave the bowl and the stem several coats of carnauba wax and buffed the pipe with a clean buffing pad to raise the shine. I hand buffed it with a microfiber cloth to deepen the shine. The pipe polished up really well and the rim top looked good. I was happy with the look of the finished pipe. The photos below show what the pipe looks like after the restoration. The Bings Favorite Savinelli Product is a beautiful and unique take on a classic shape. The polished, reshaped vulcanite taper stem looks really good with the browns of the briar. The dimensions of the pipe are Length: 6 ½ inches, Height: 1 ¾ inches, Outside diameter of the bowl: 1 ¼ inches, Chamber diameter: ¾ of an inch. The weight of the pipe is 1.27 ounces/36 grams. This is another pipe that I will be putting it on the rebornpipes store in the Italian Pipe Makers Section shortly, if you are interested in adding it to your collection. The long shank and tall bowl look and feel great in the hand. This one should be a great smoker. Thanks for walking through the restoration with me on this beauty!