Tag Archives: restemming a pipe

A New Stem for a Barling’s Make Billiard


Blog by Steve Laug

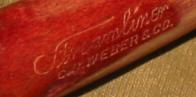
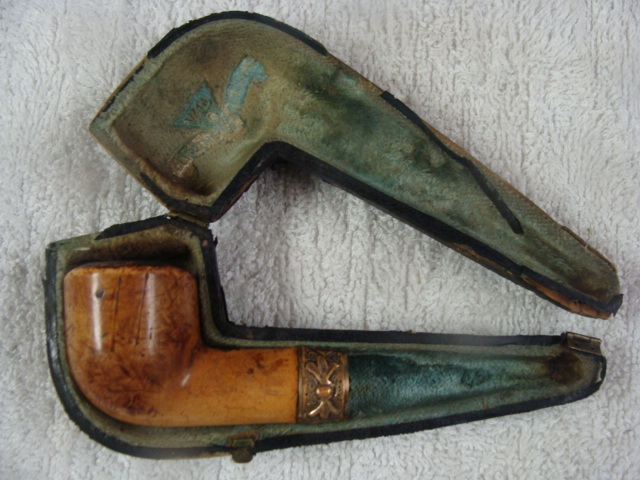
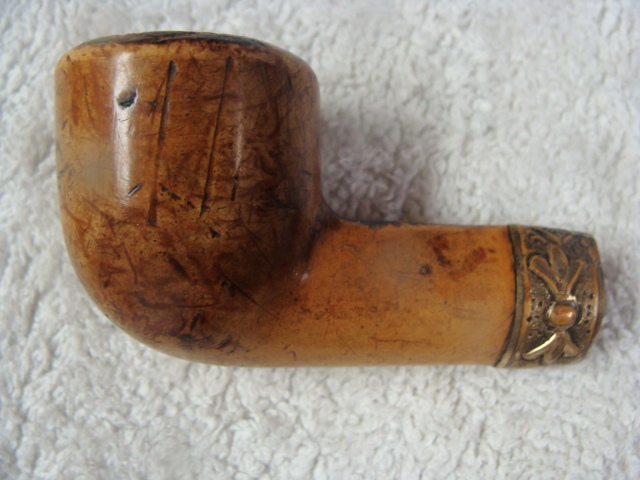
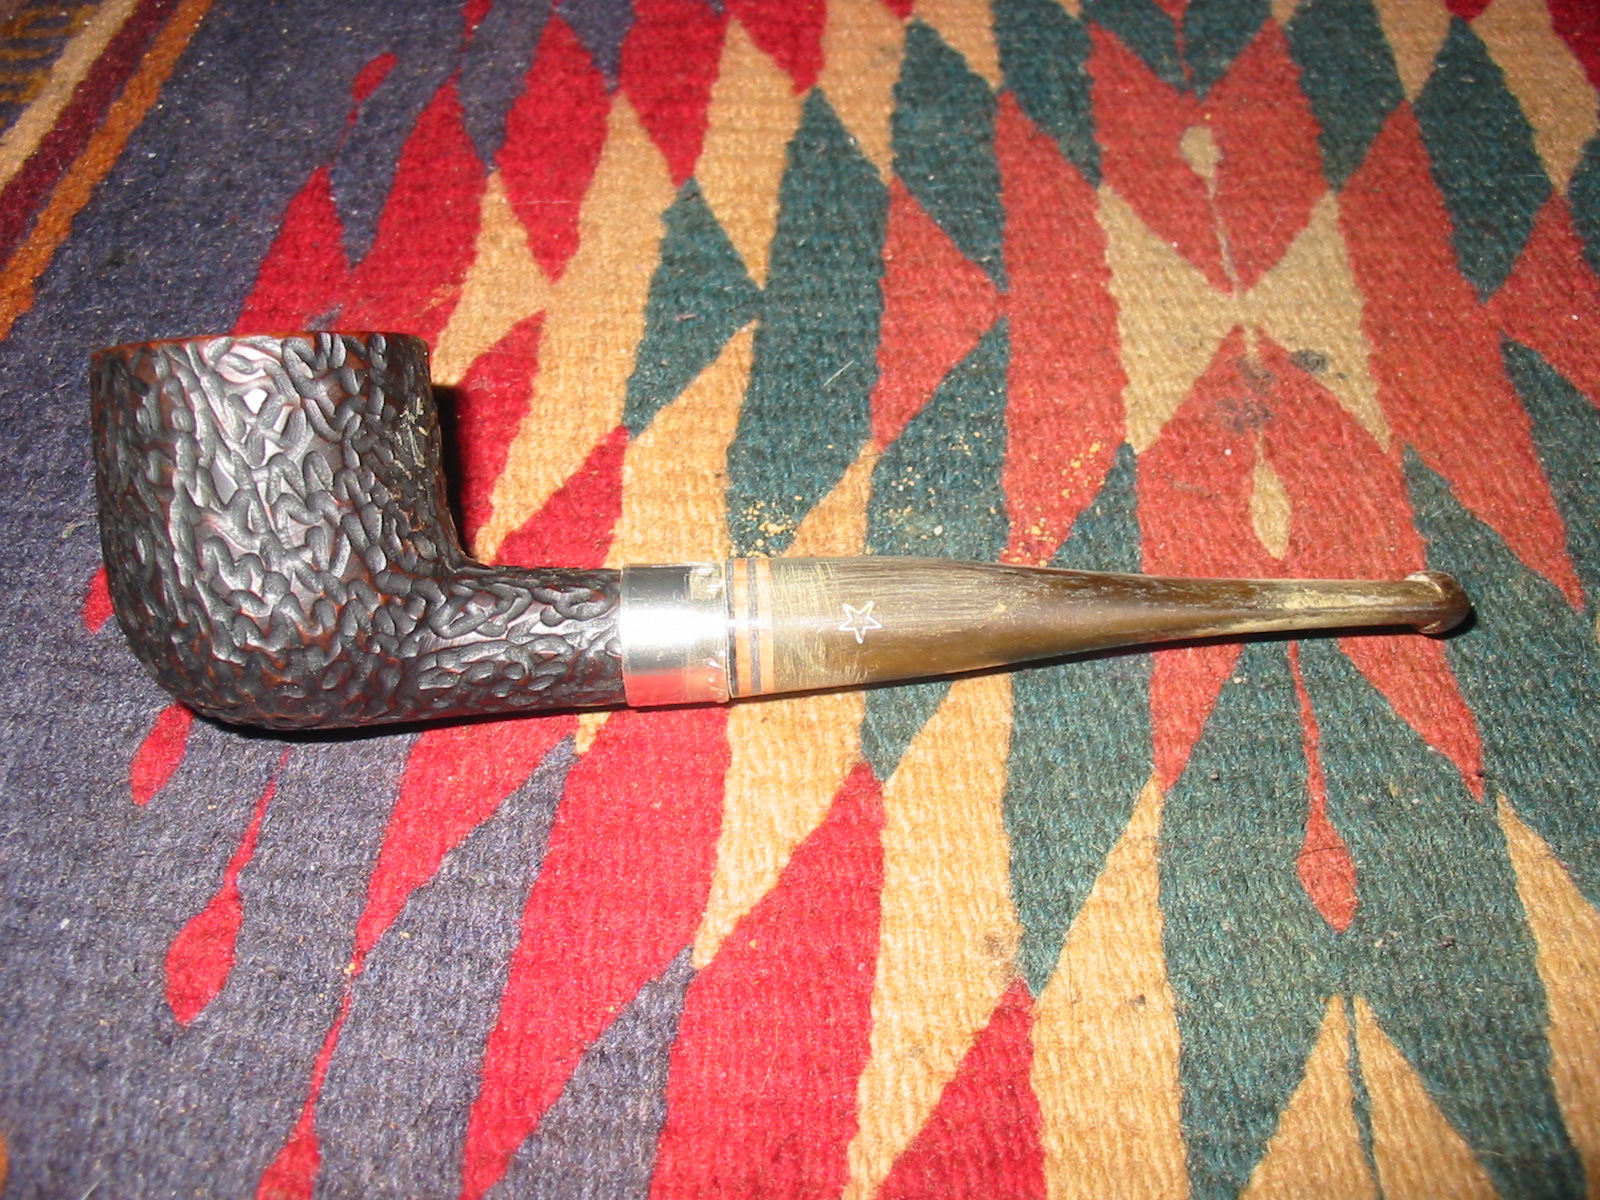
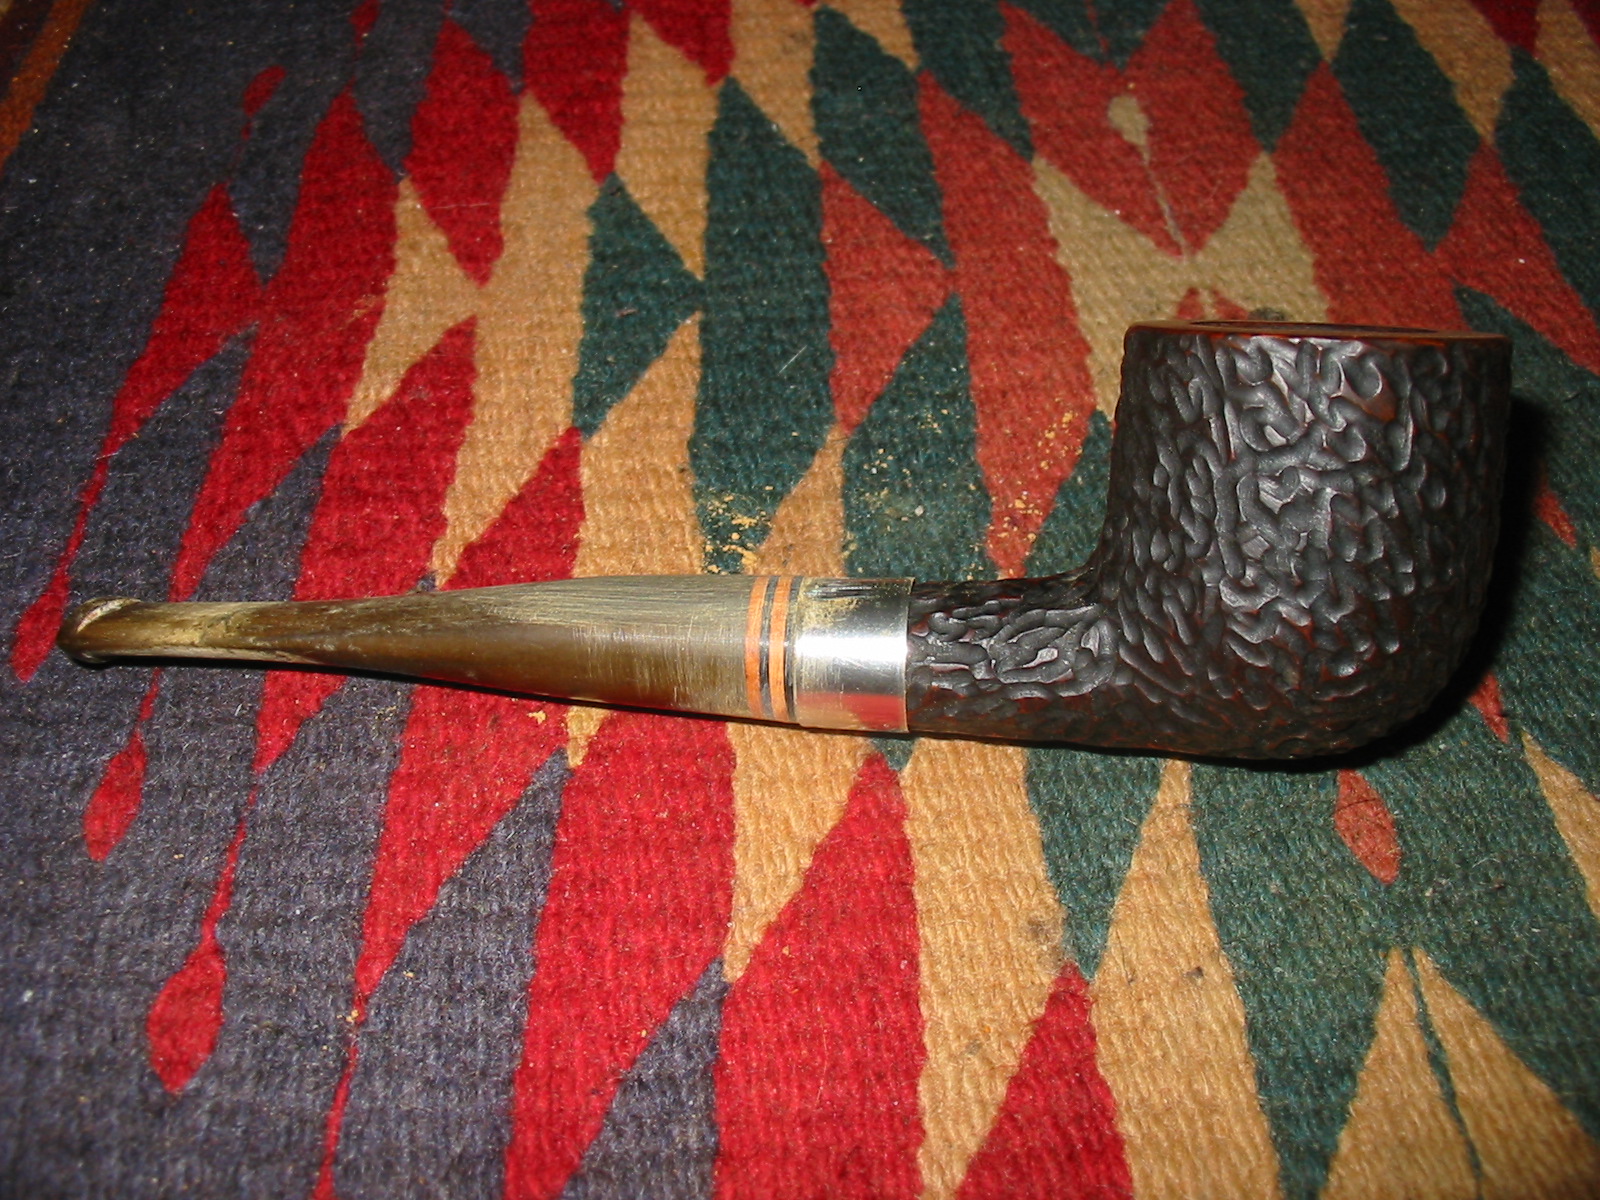
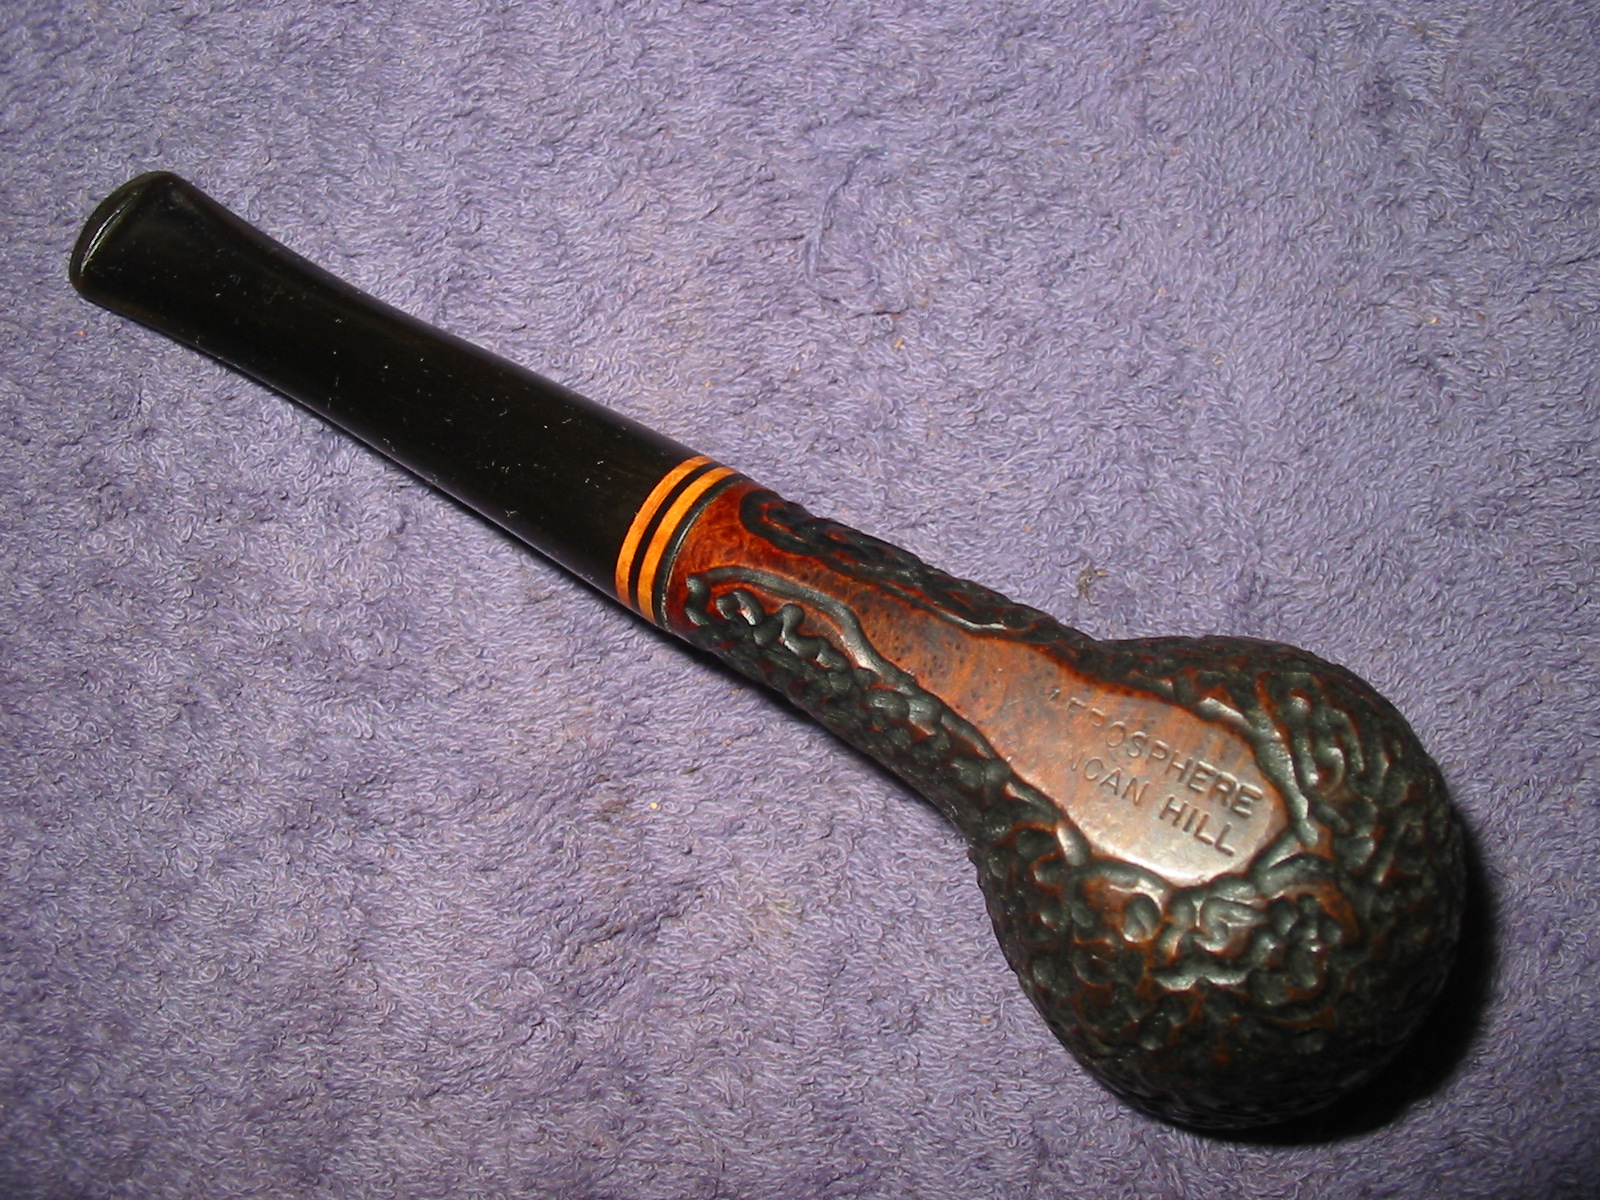
In talking with a friend a few days ago via email she mentioned that she had come across an old Barling pipe on US Ebay. She described it as a small billiard with nice grain, a few scratches and some over reaming in the bowl. The stem had a faded “W” or a crown on it the top. The stamping is Barling’s arched over Make on the left side and possibly a faint EL and a 3 near the bowl on the right side. She sent me the following two photos for me to have a look at the pipe.
BARLING MAKE PIPE PIC.1

BARLING MAKE PIPE PIC.2

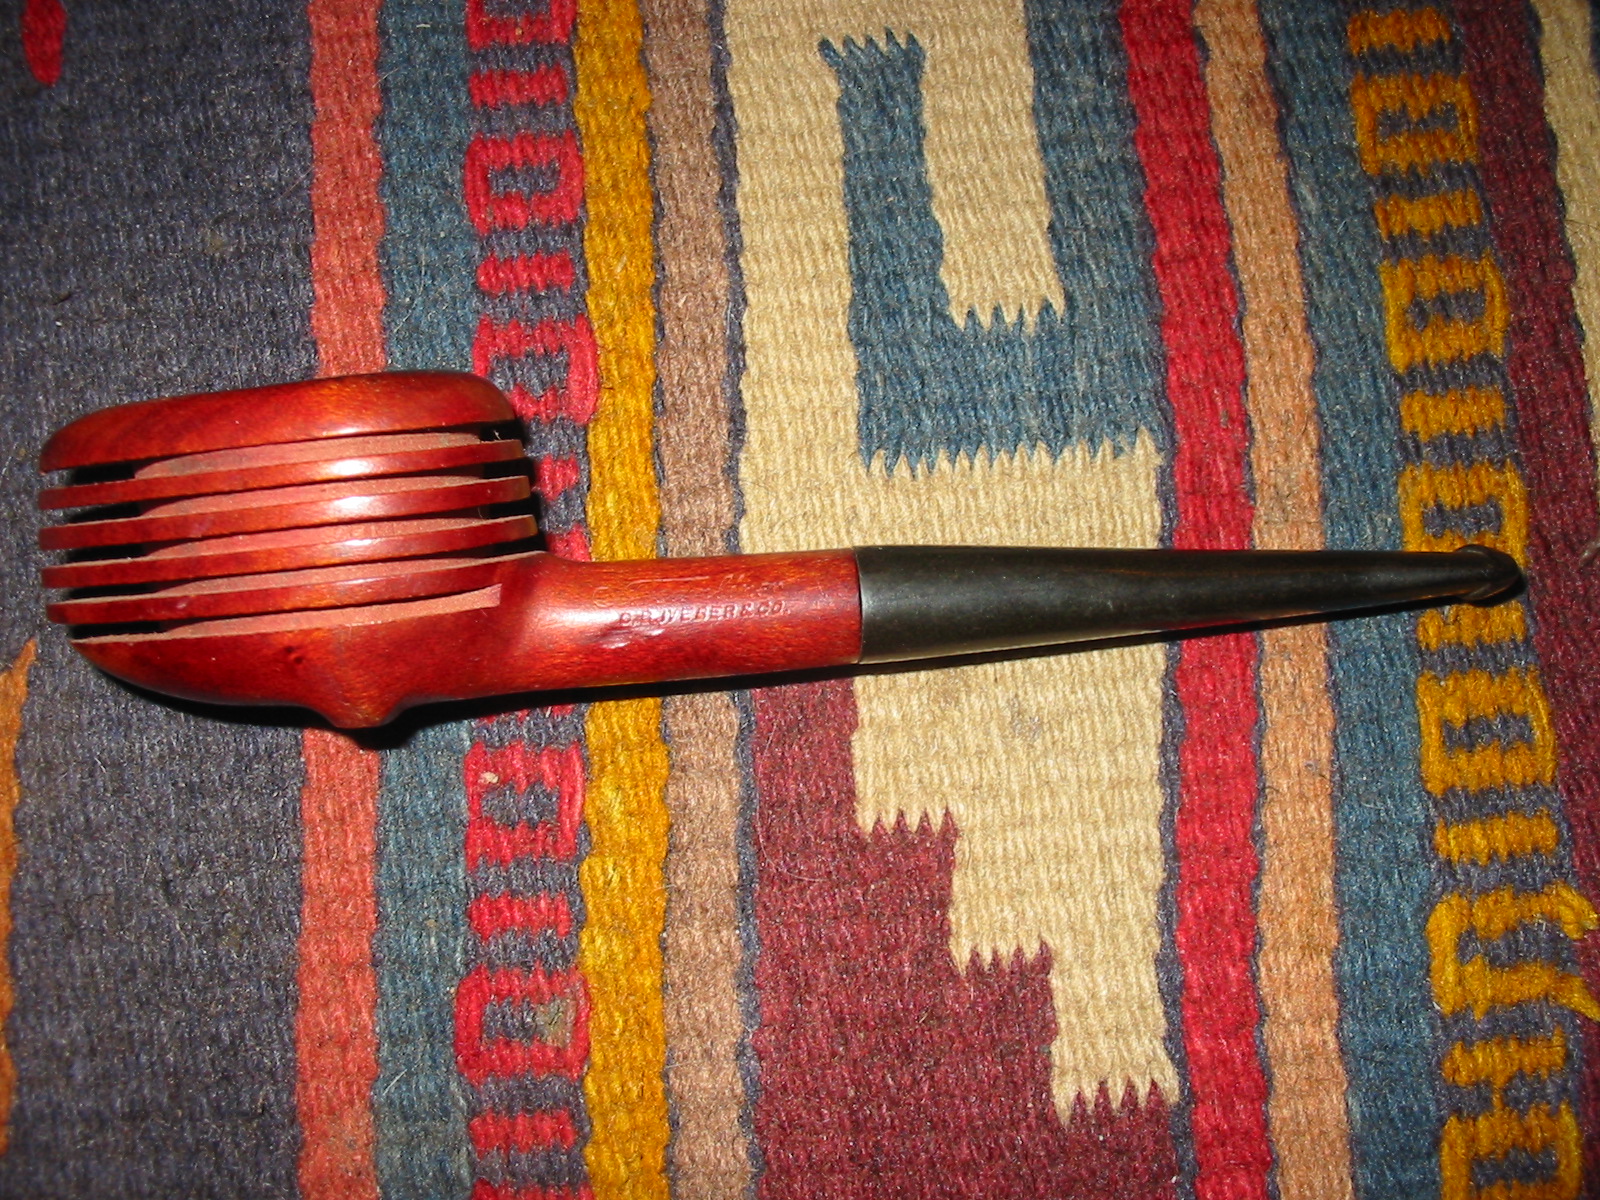
From the photos and her description I was pretty certain the pipe stem was not original. It just did not look right in the photos above – the fit was off on the shank and the length was too short. I was pretty sure she had a replacement stem on the pipe. She packed it up and sent it off to me. I received it yesterday and took it to the work table. My assessment is below.

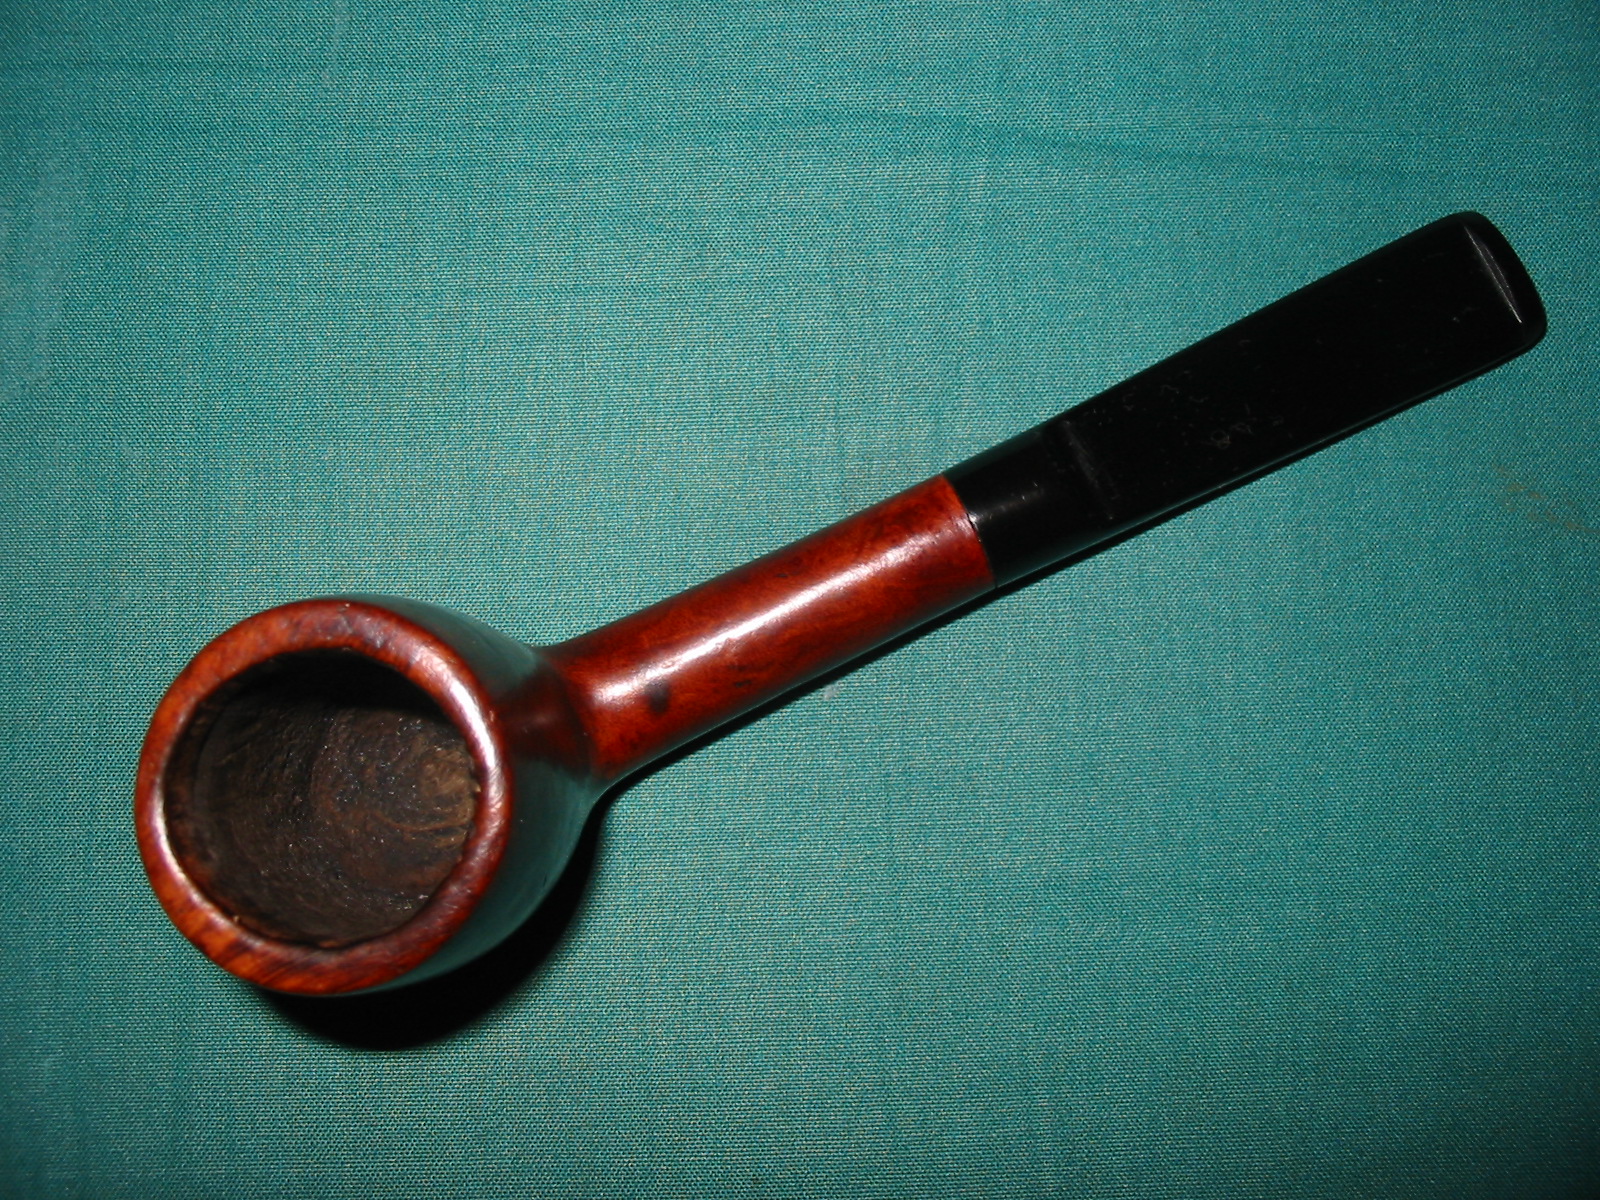
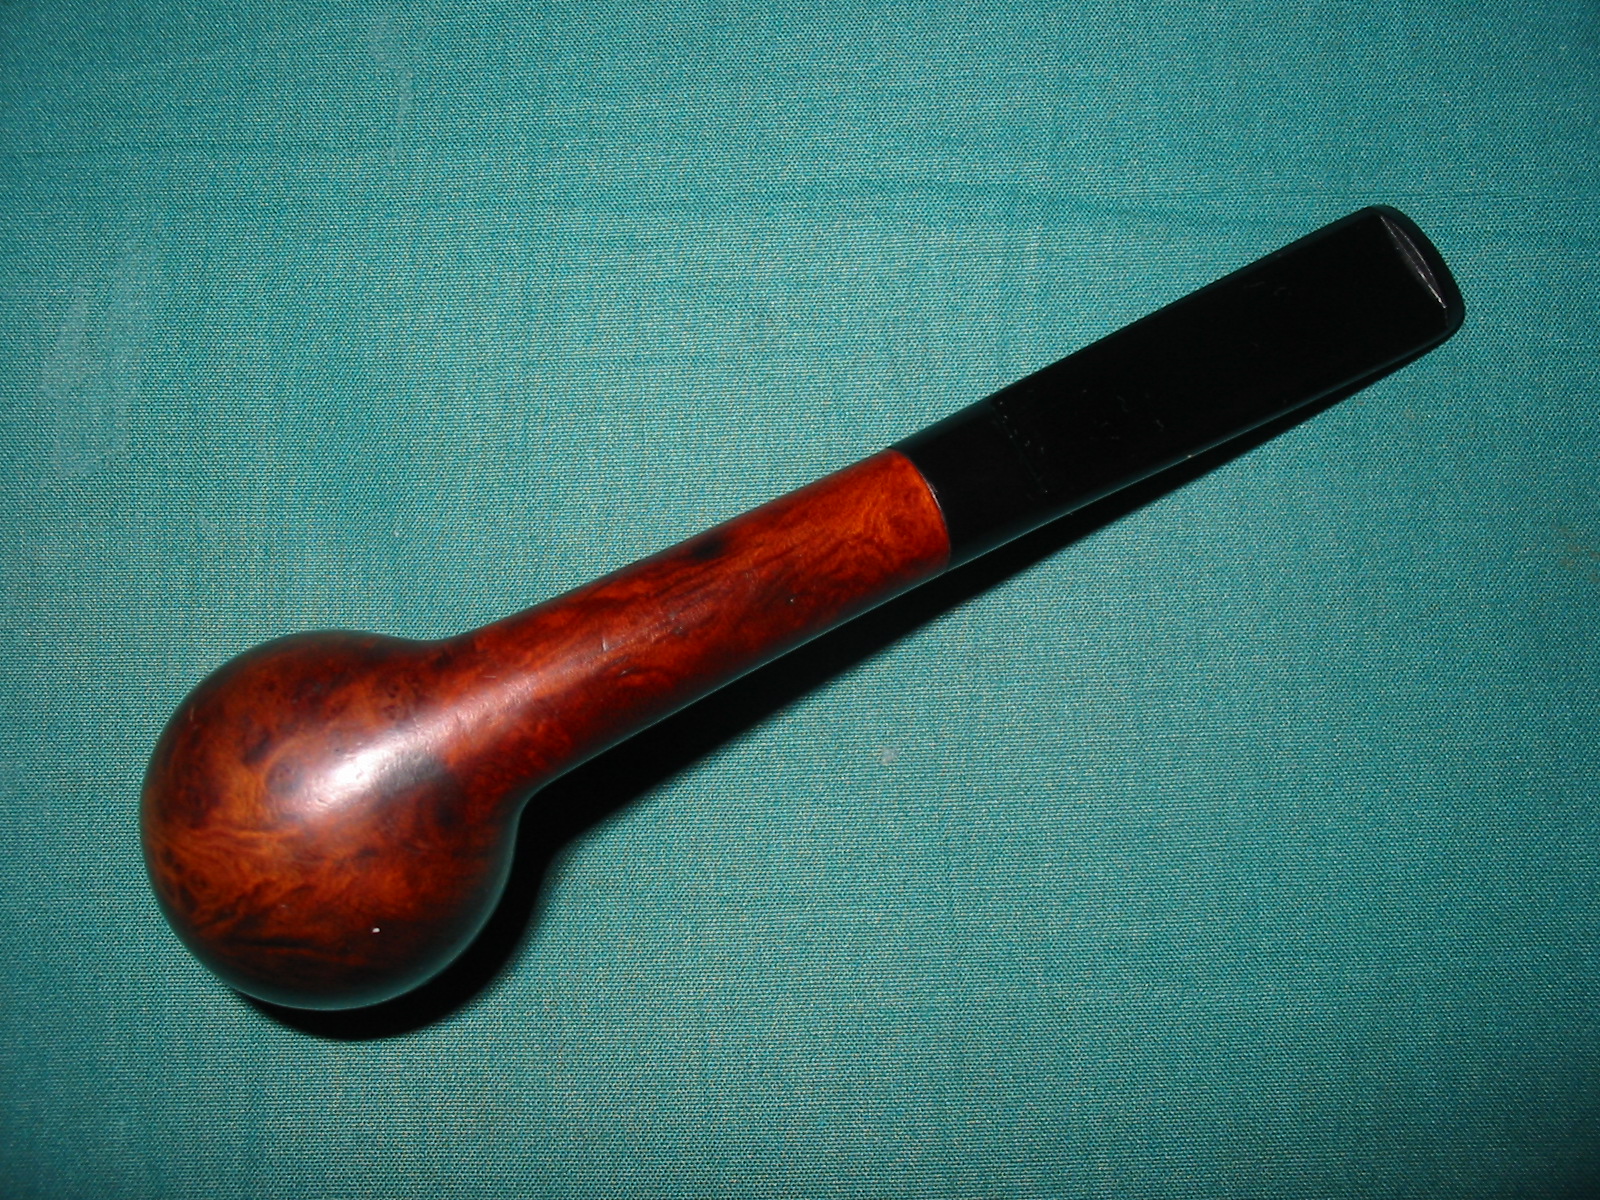
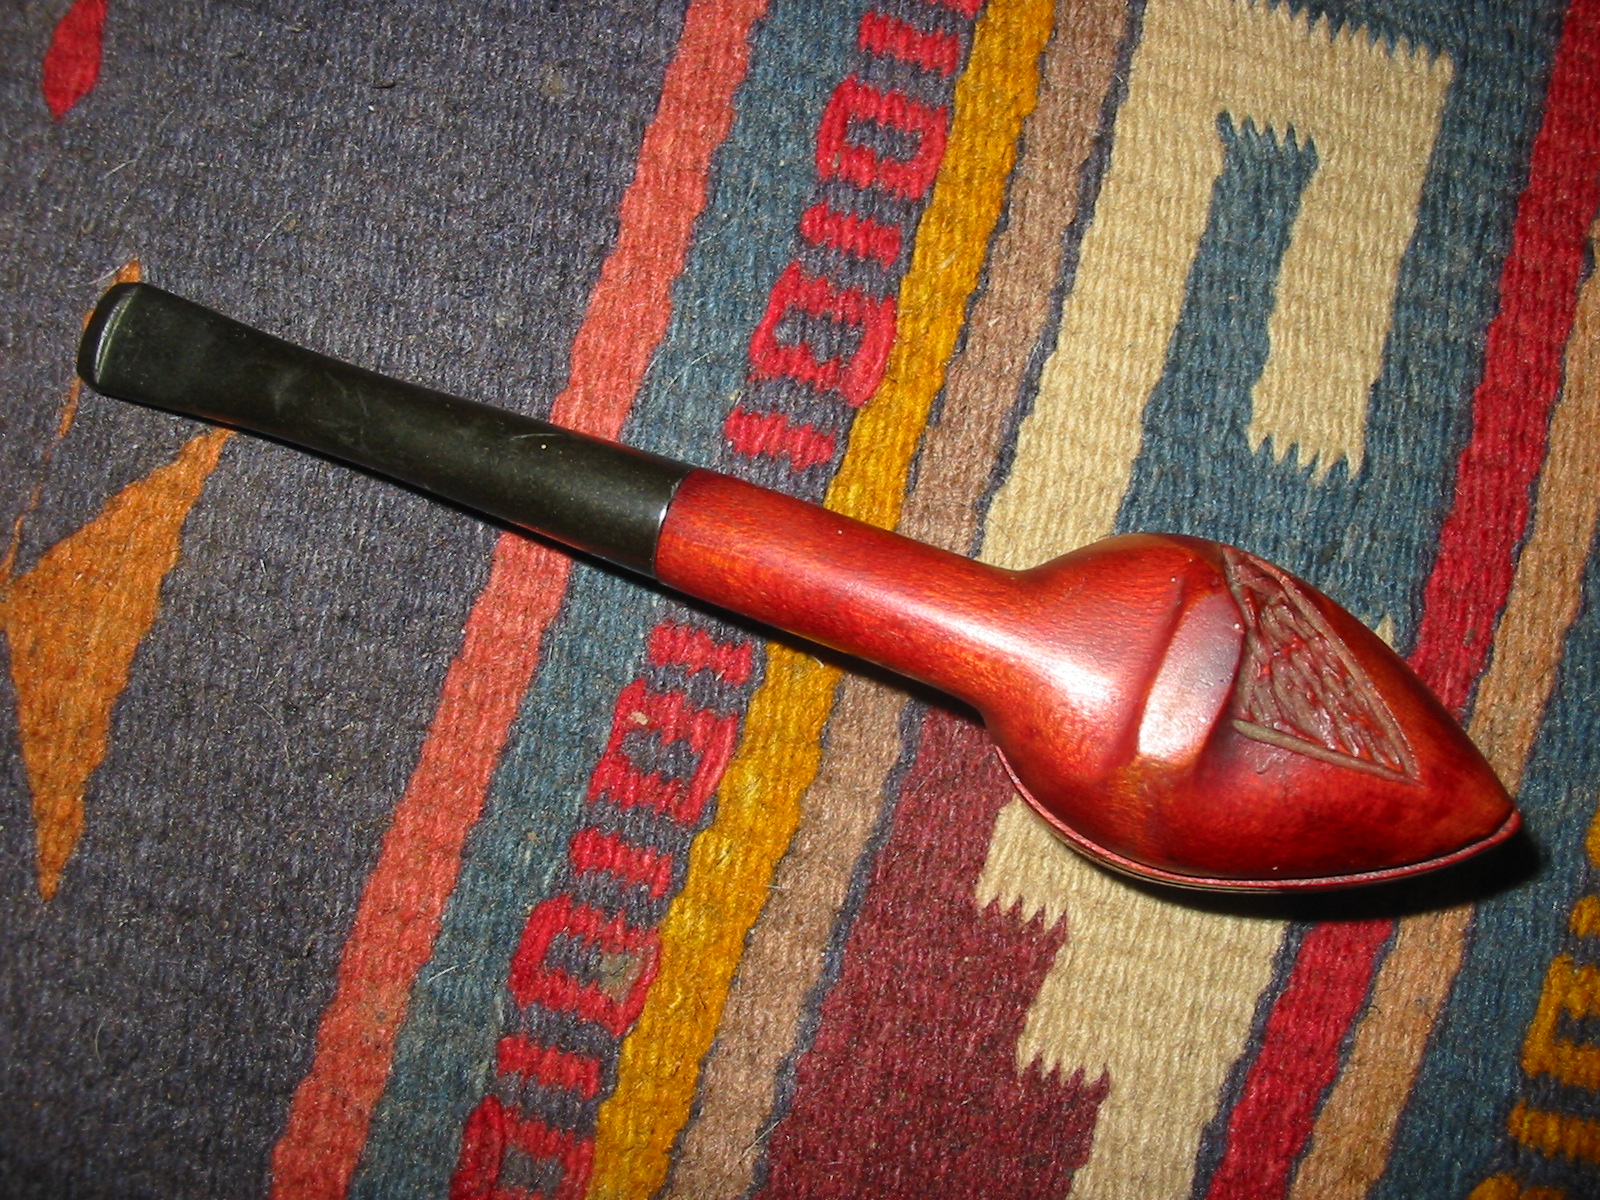
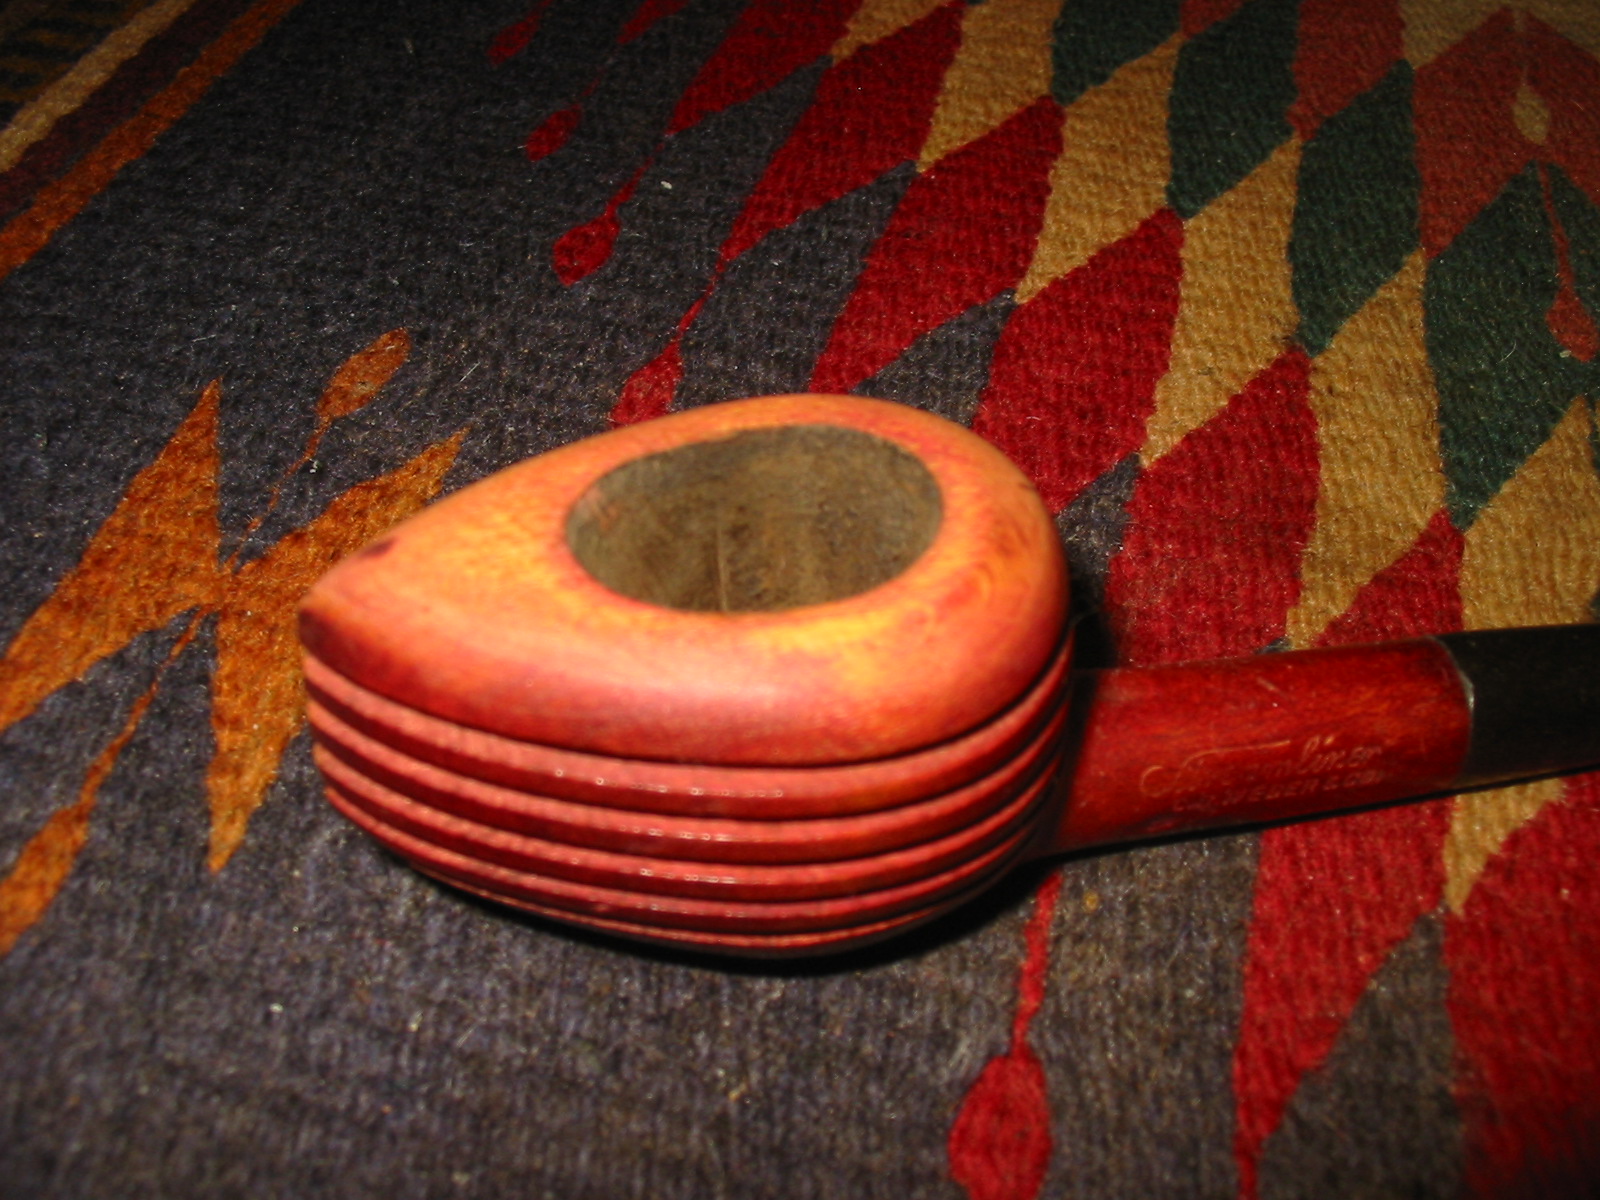
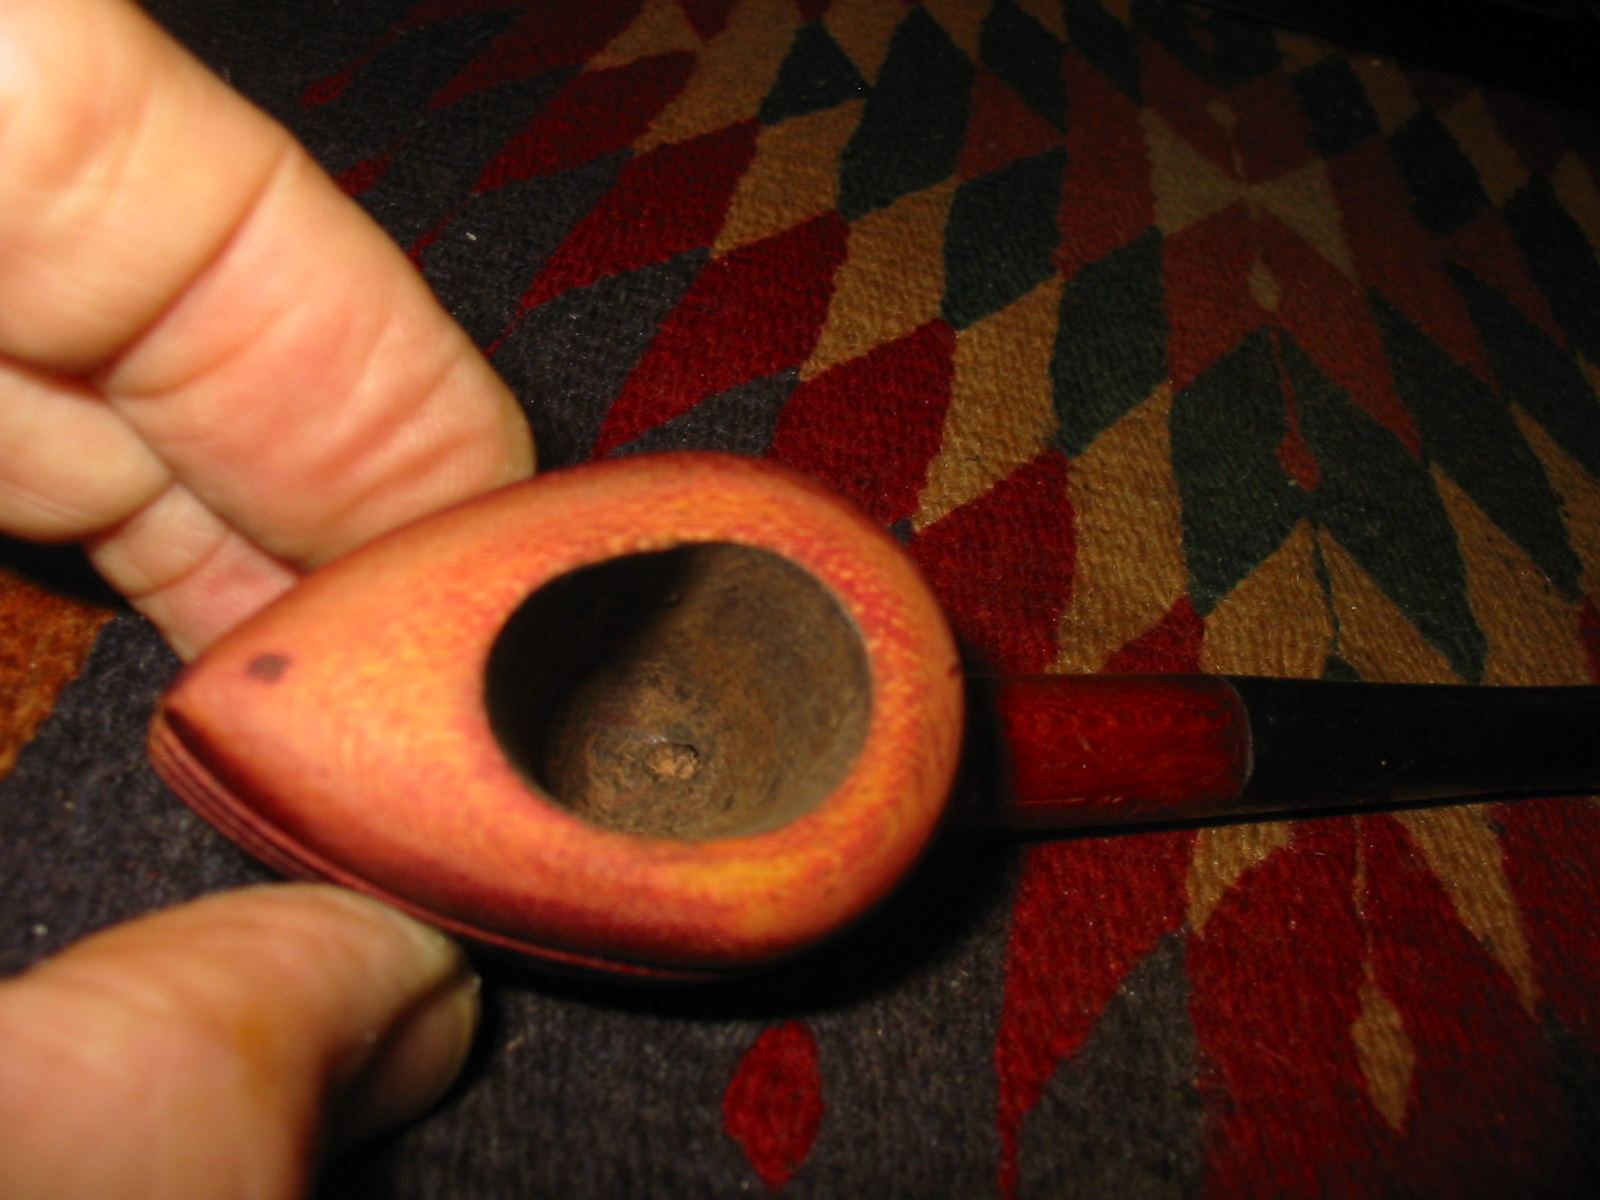
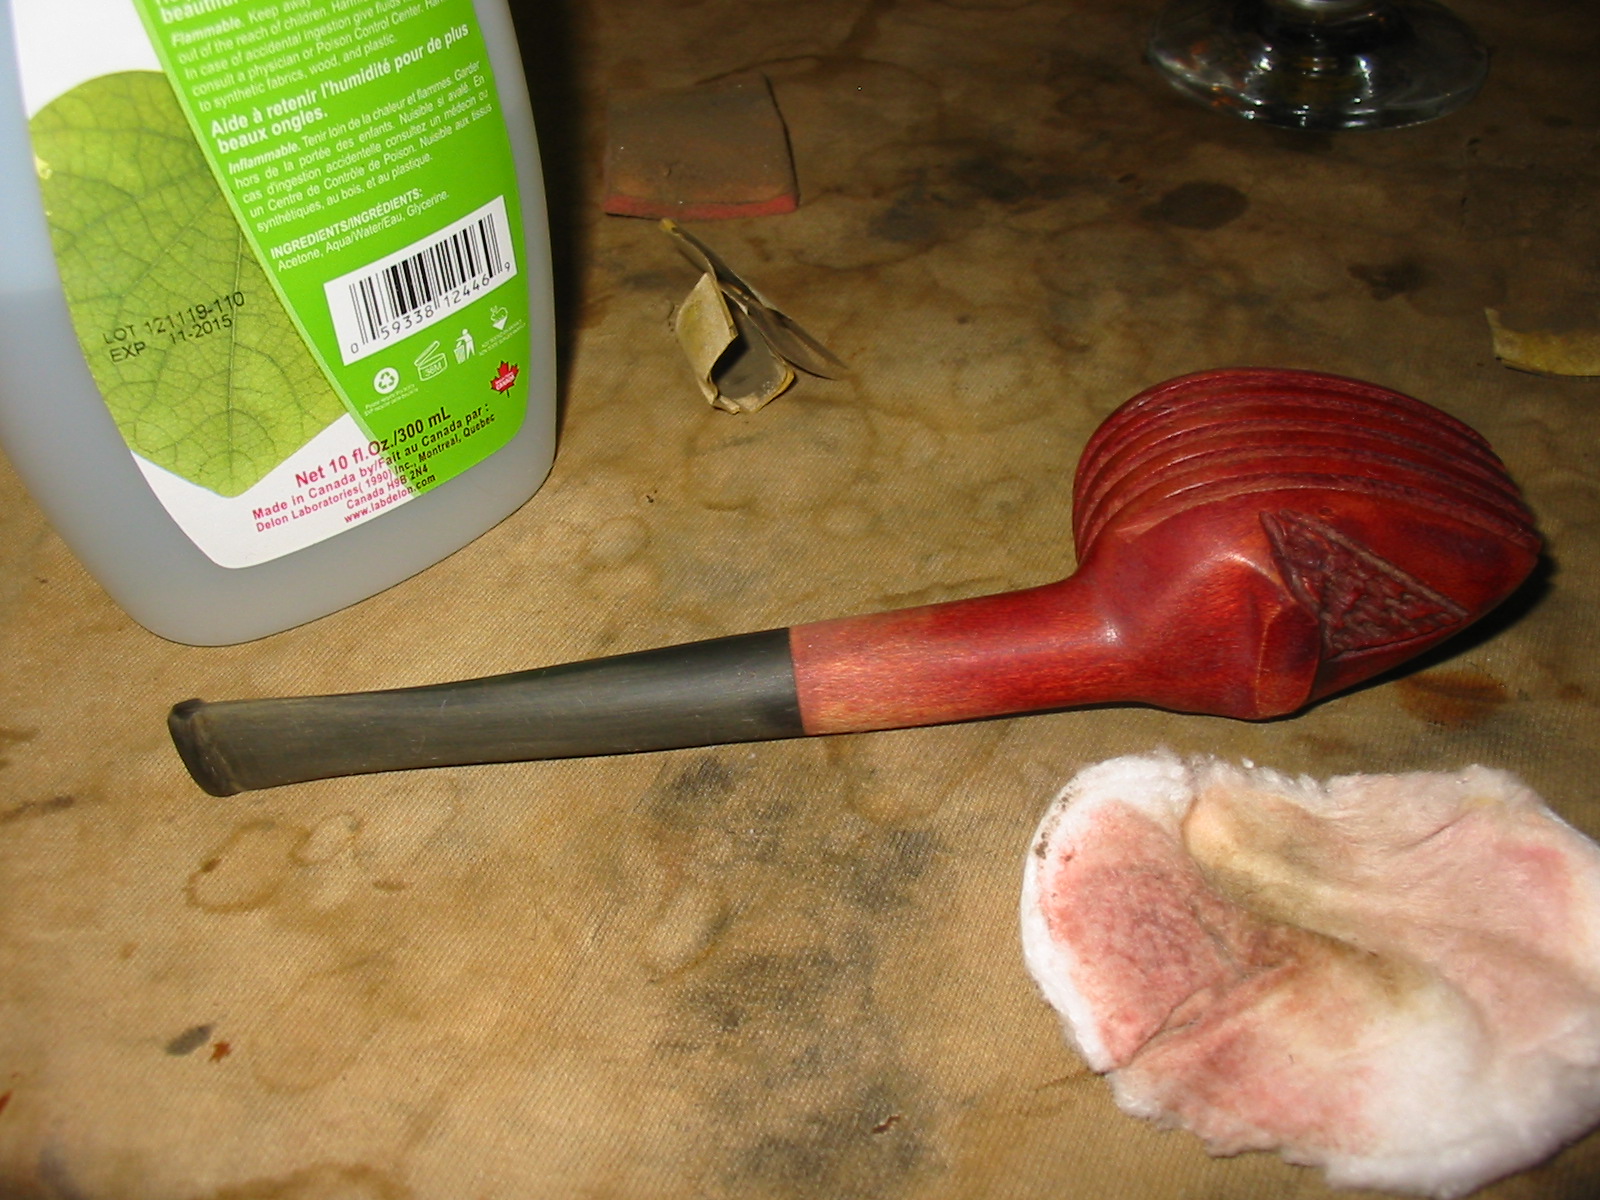
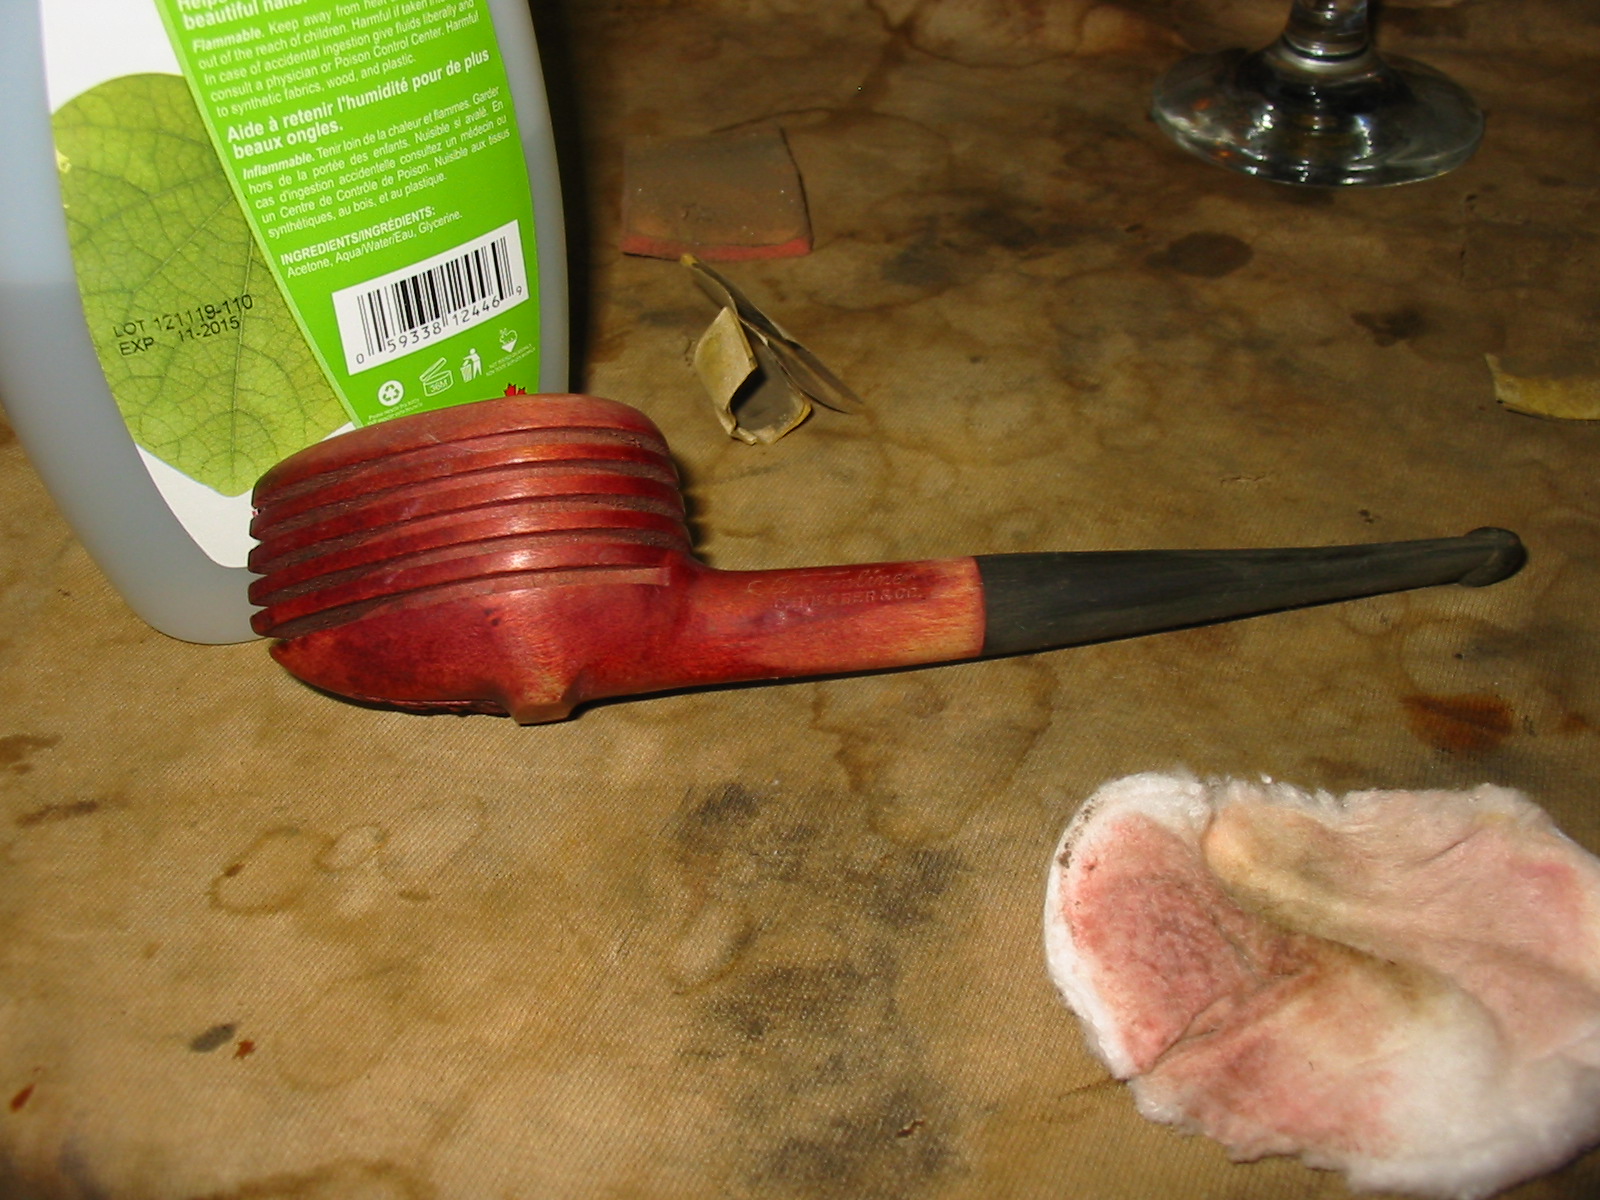
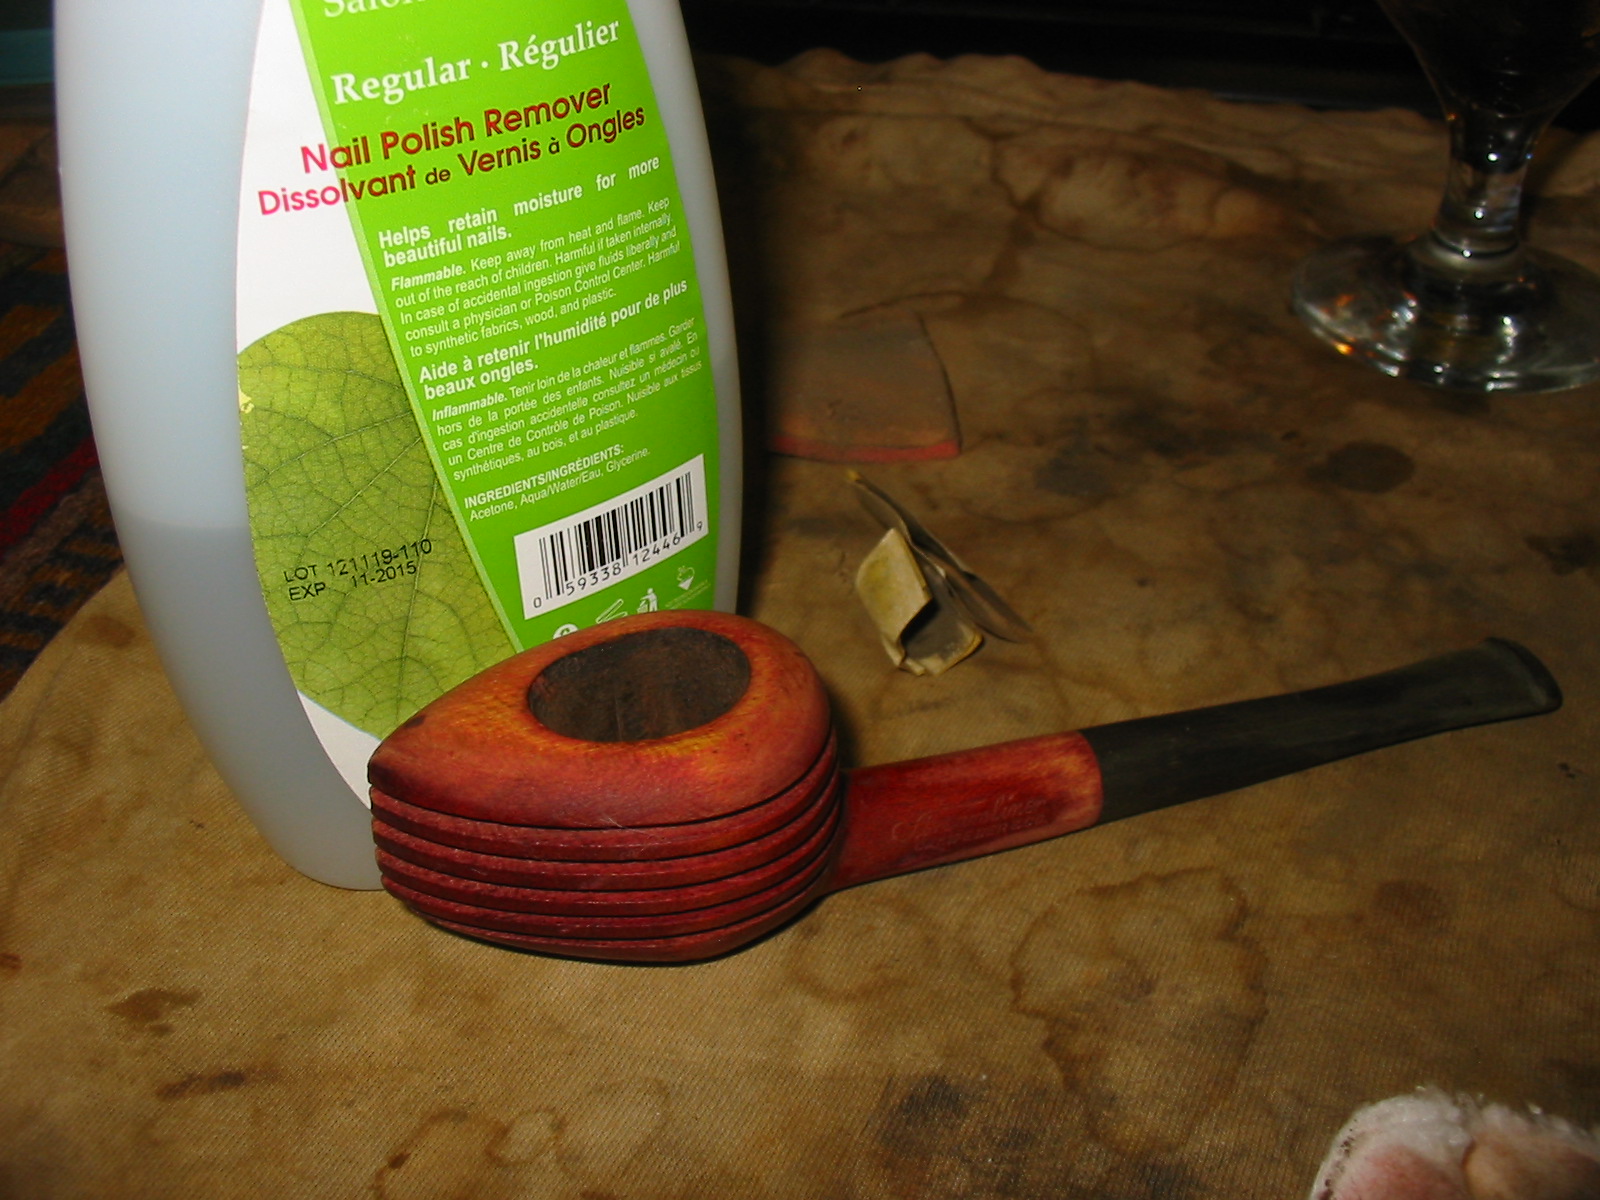
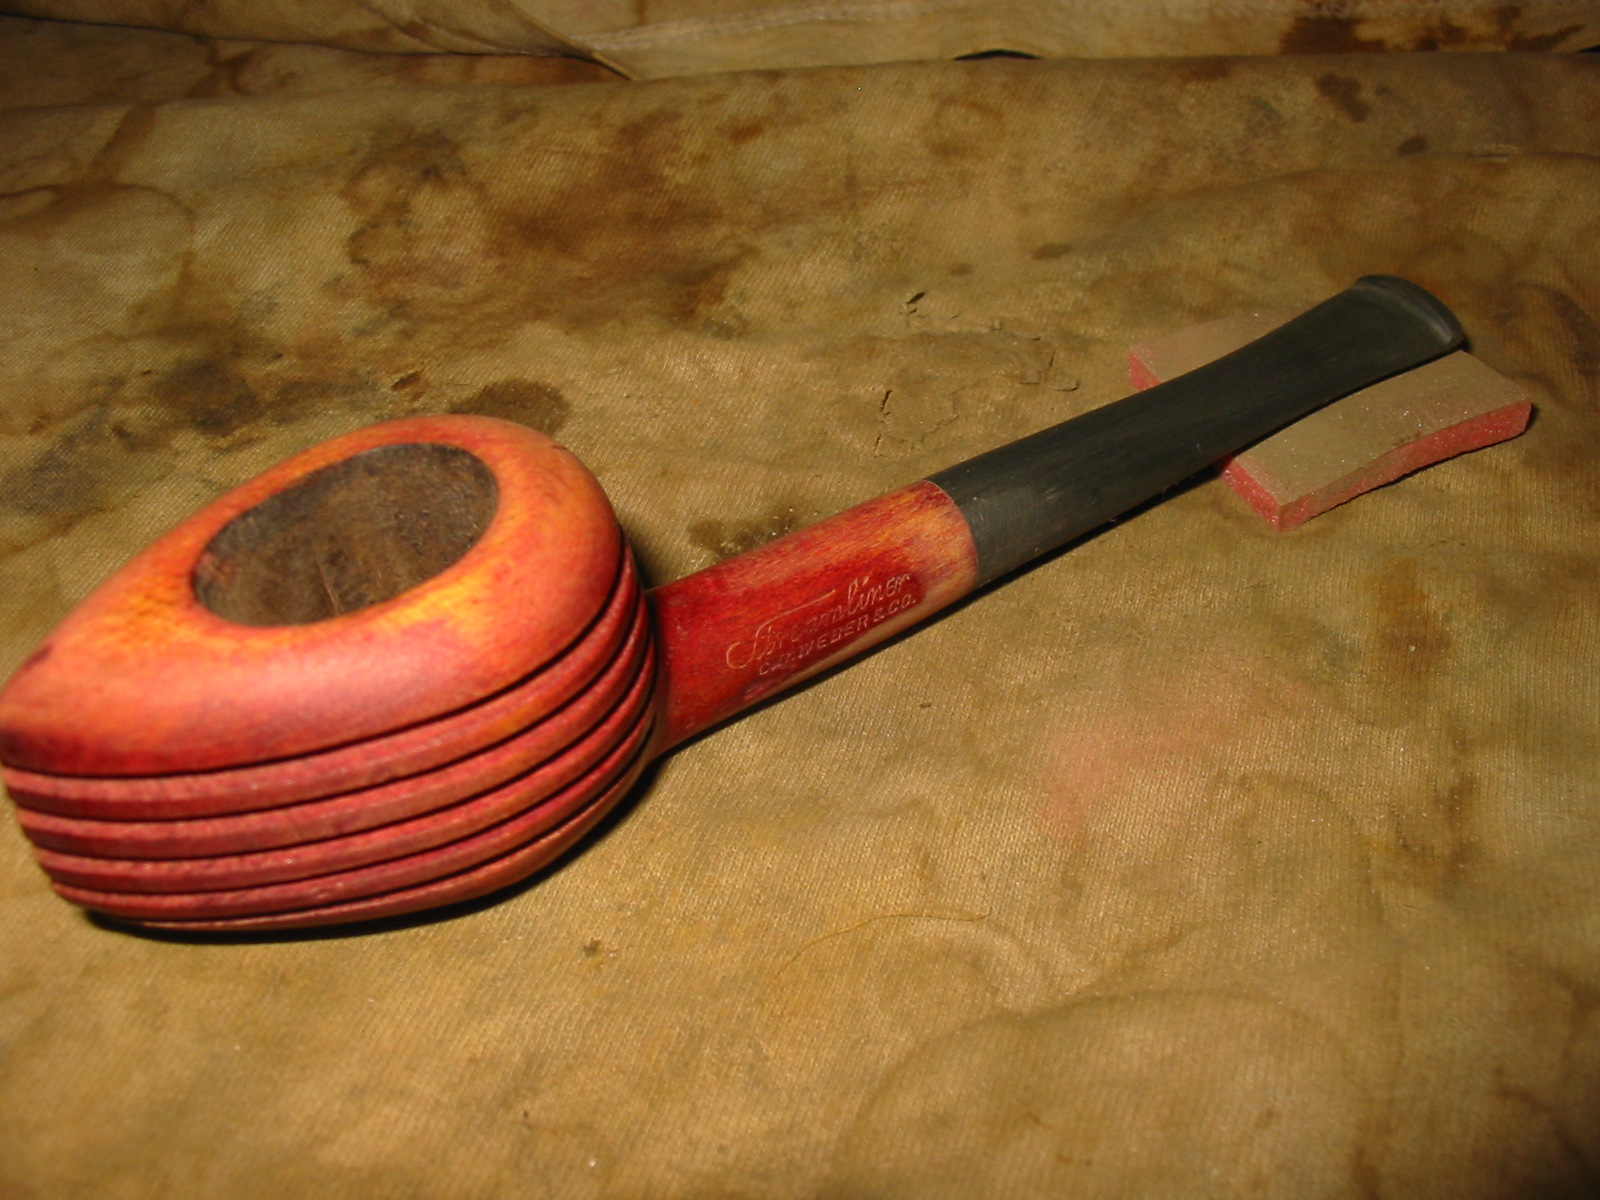
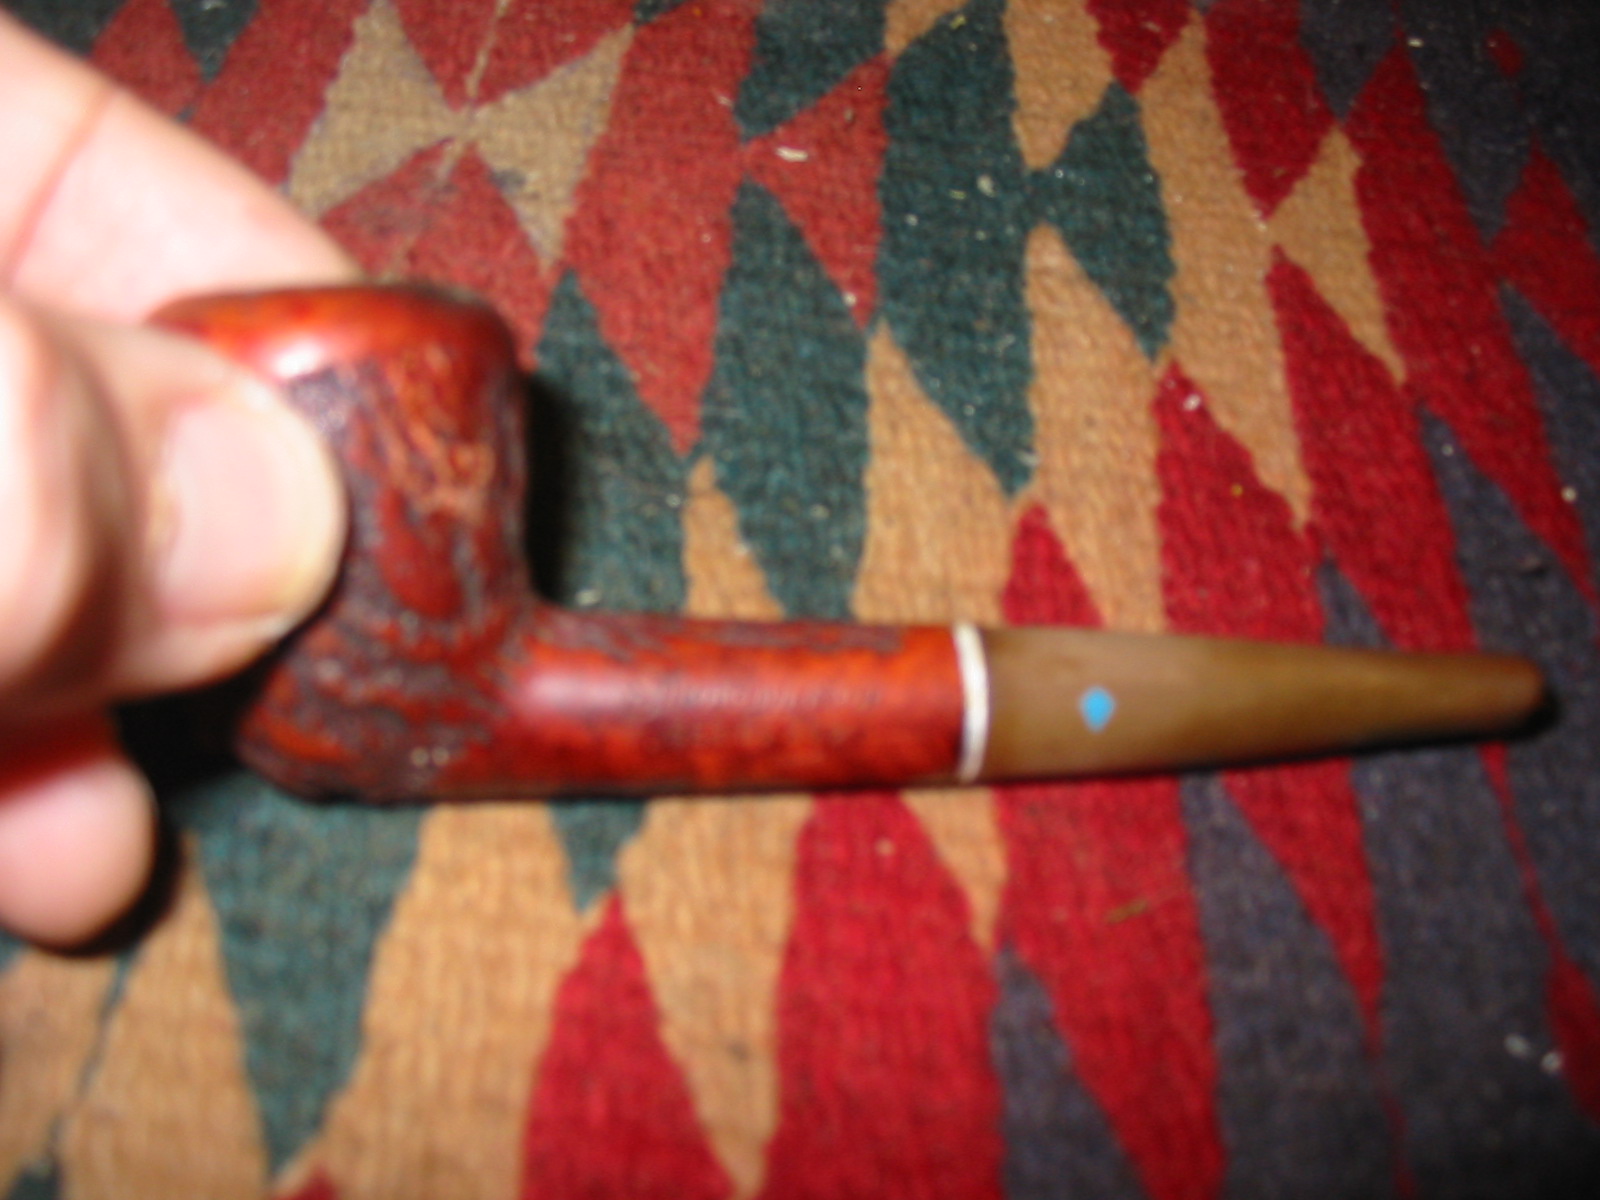
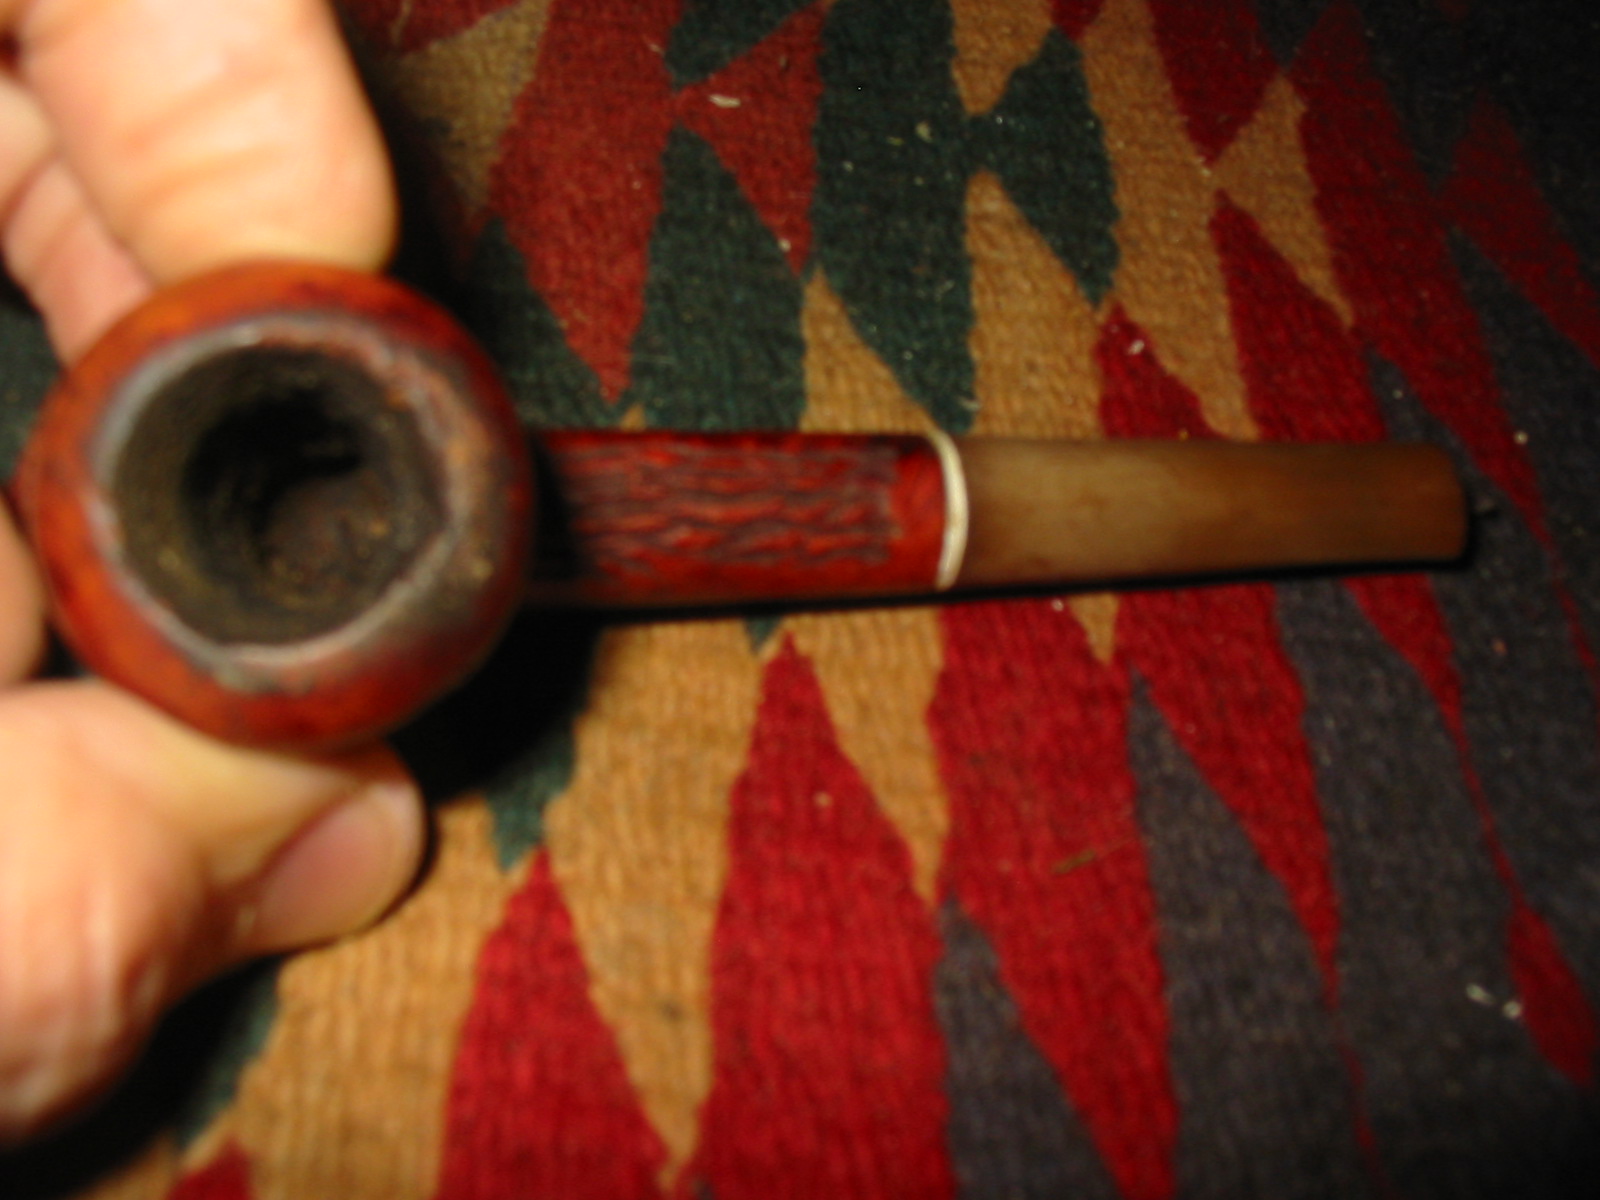
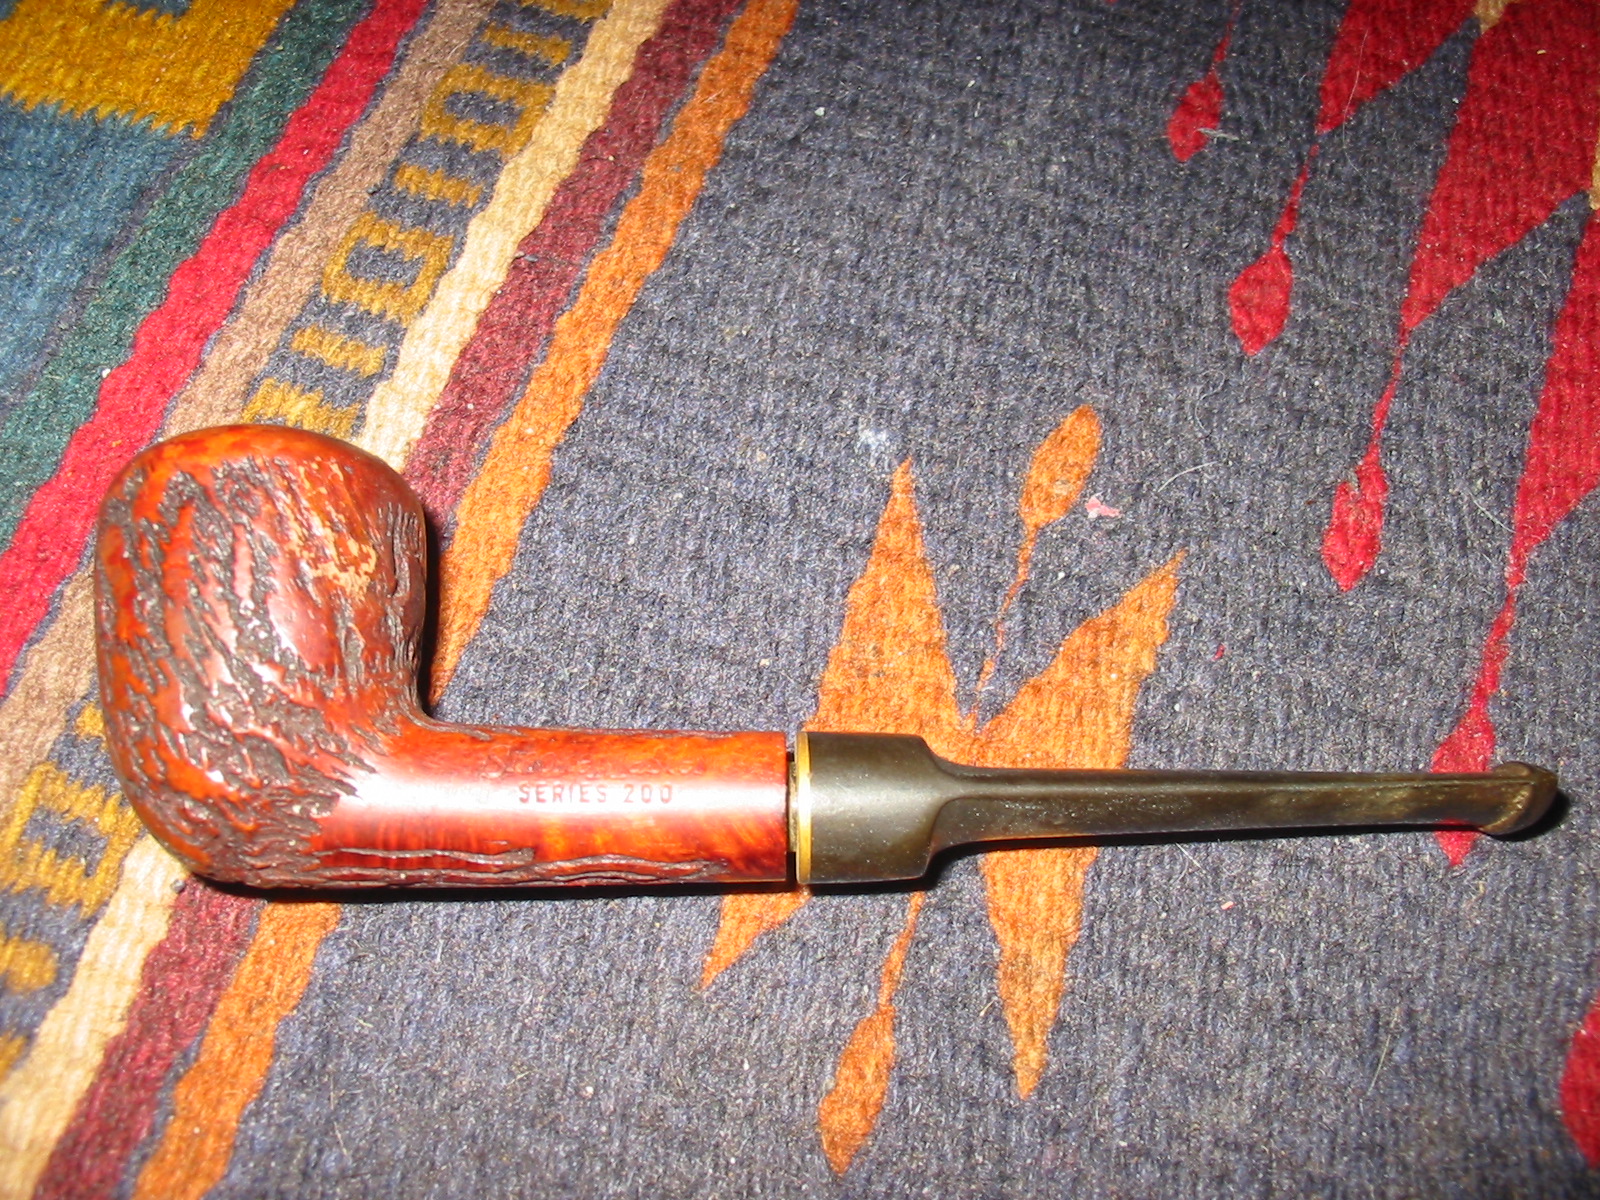
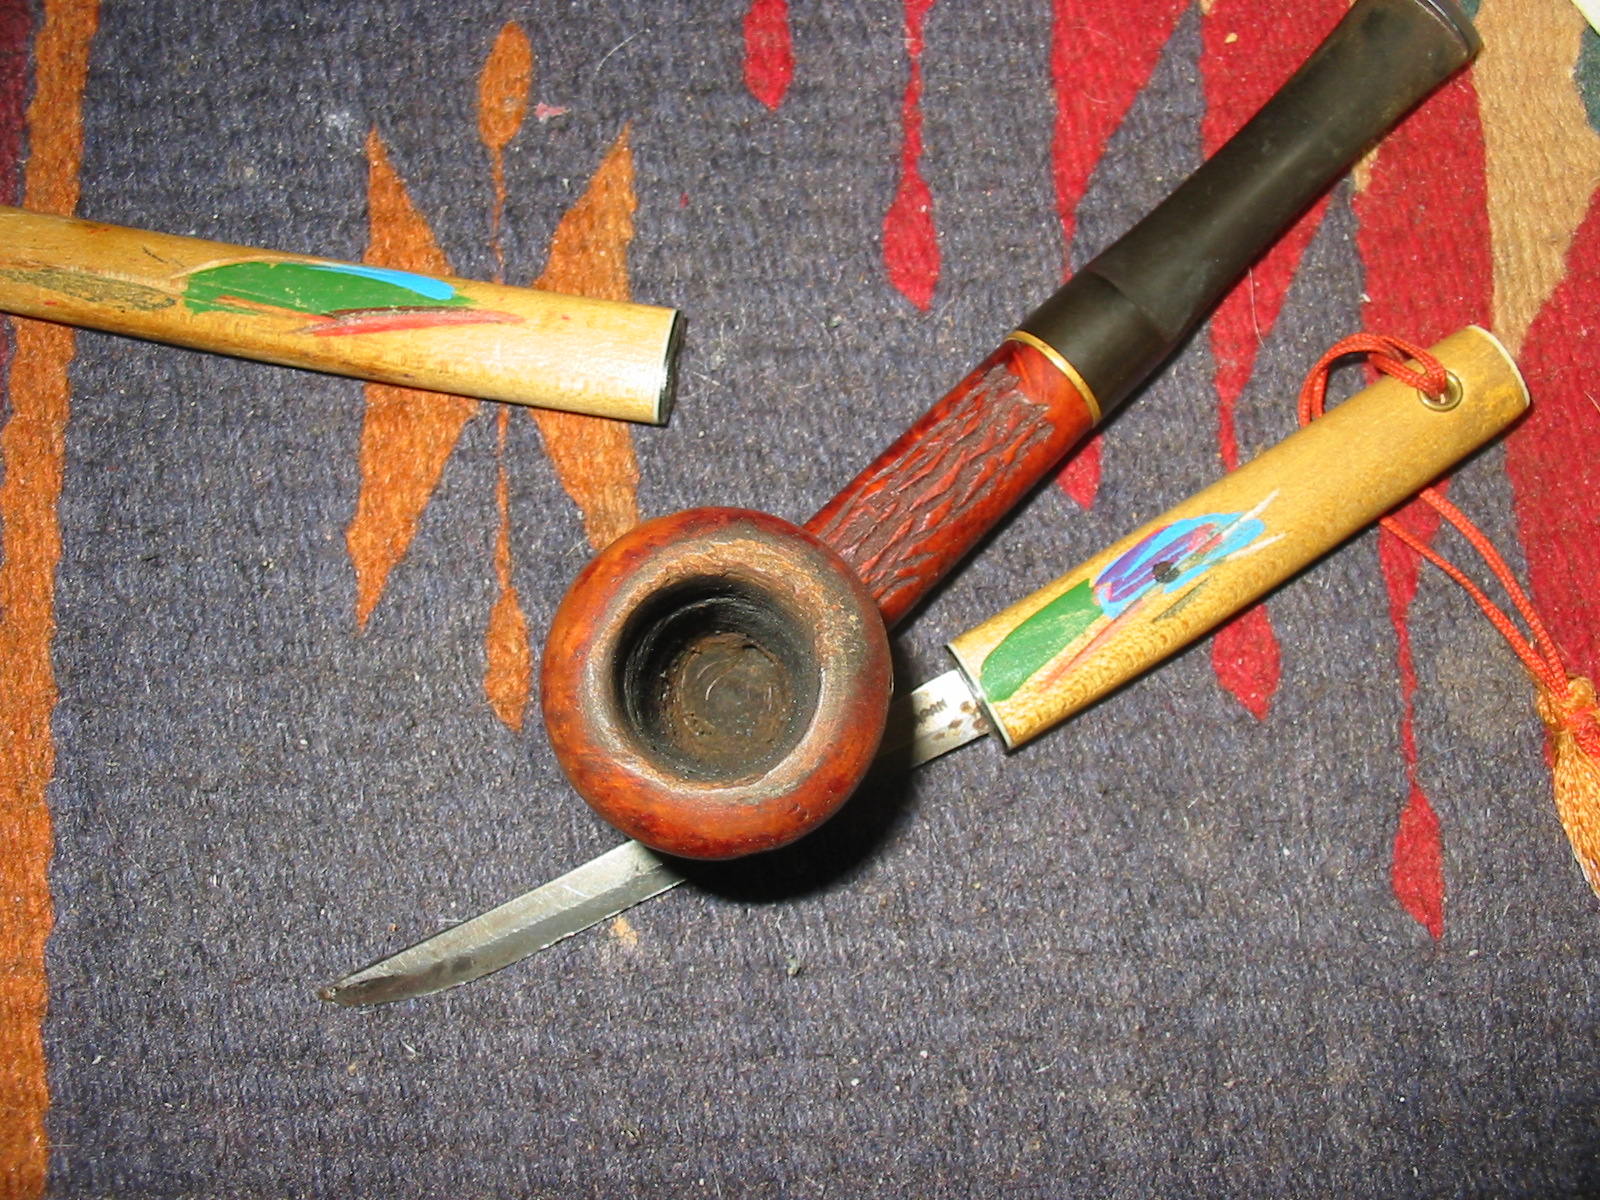
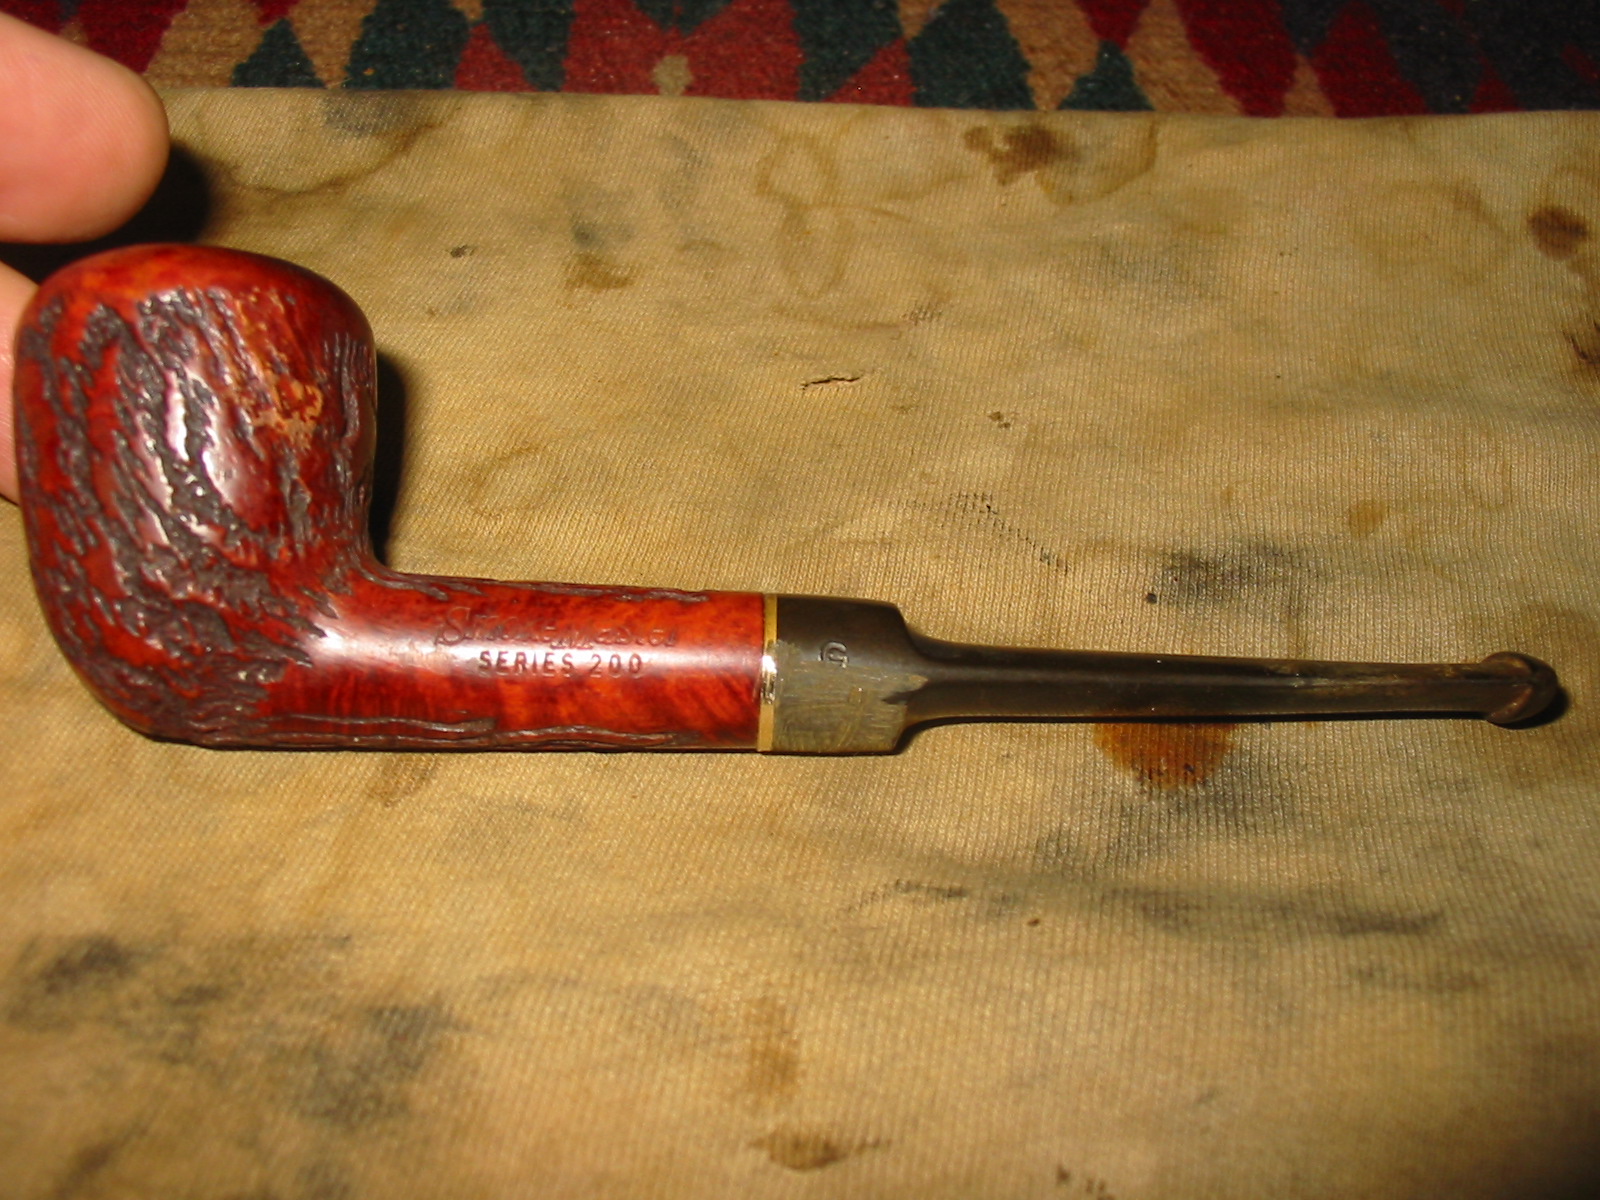
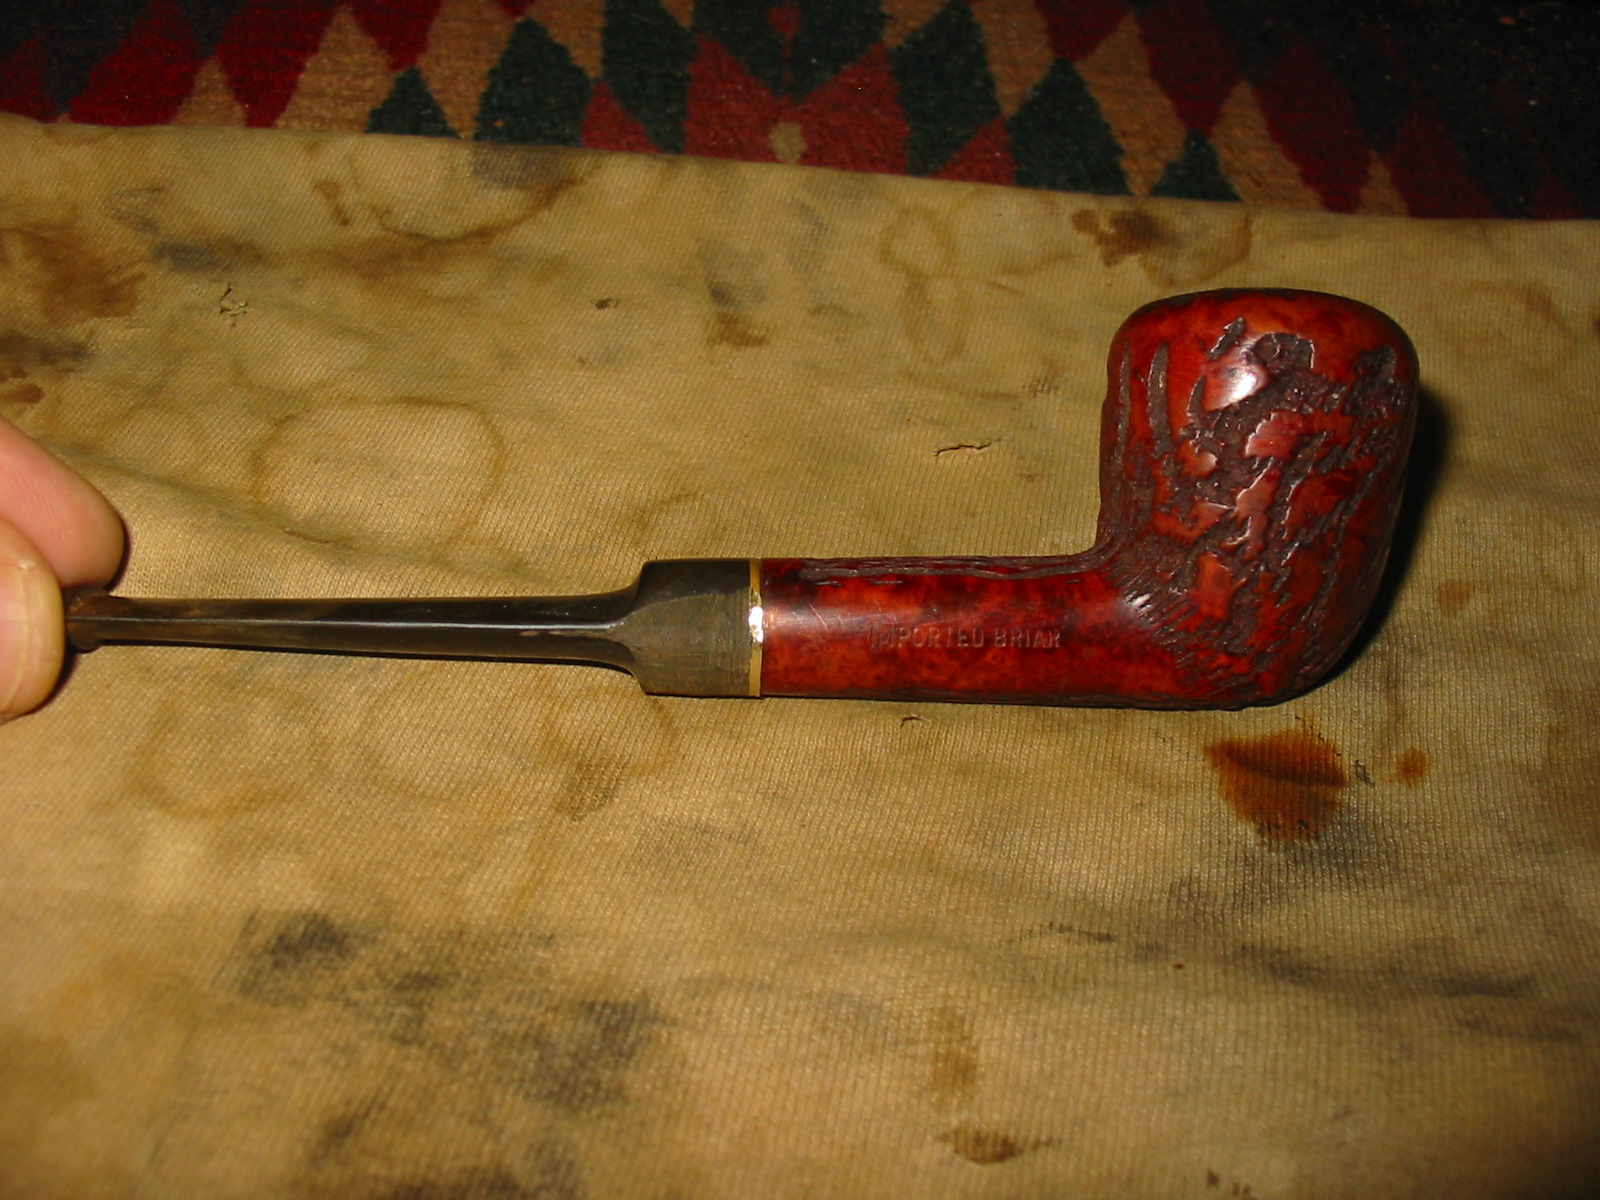
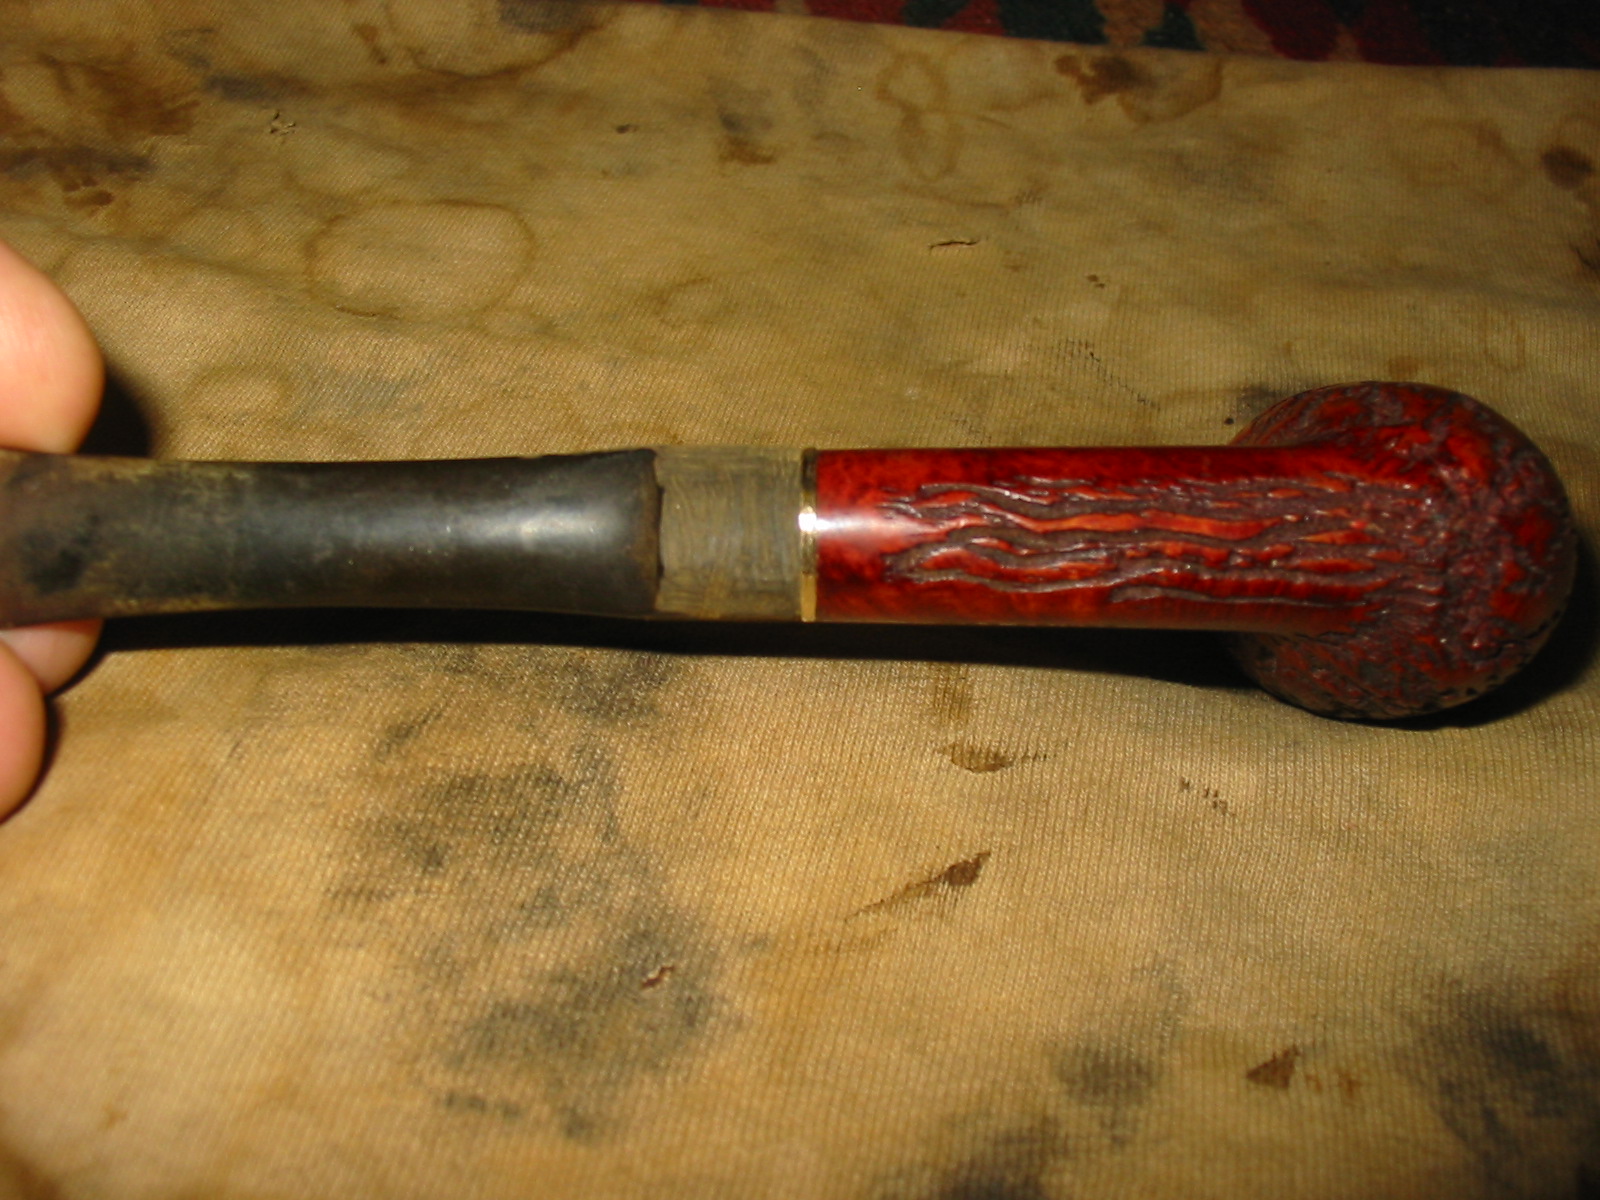
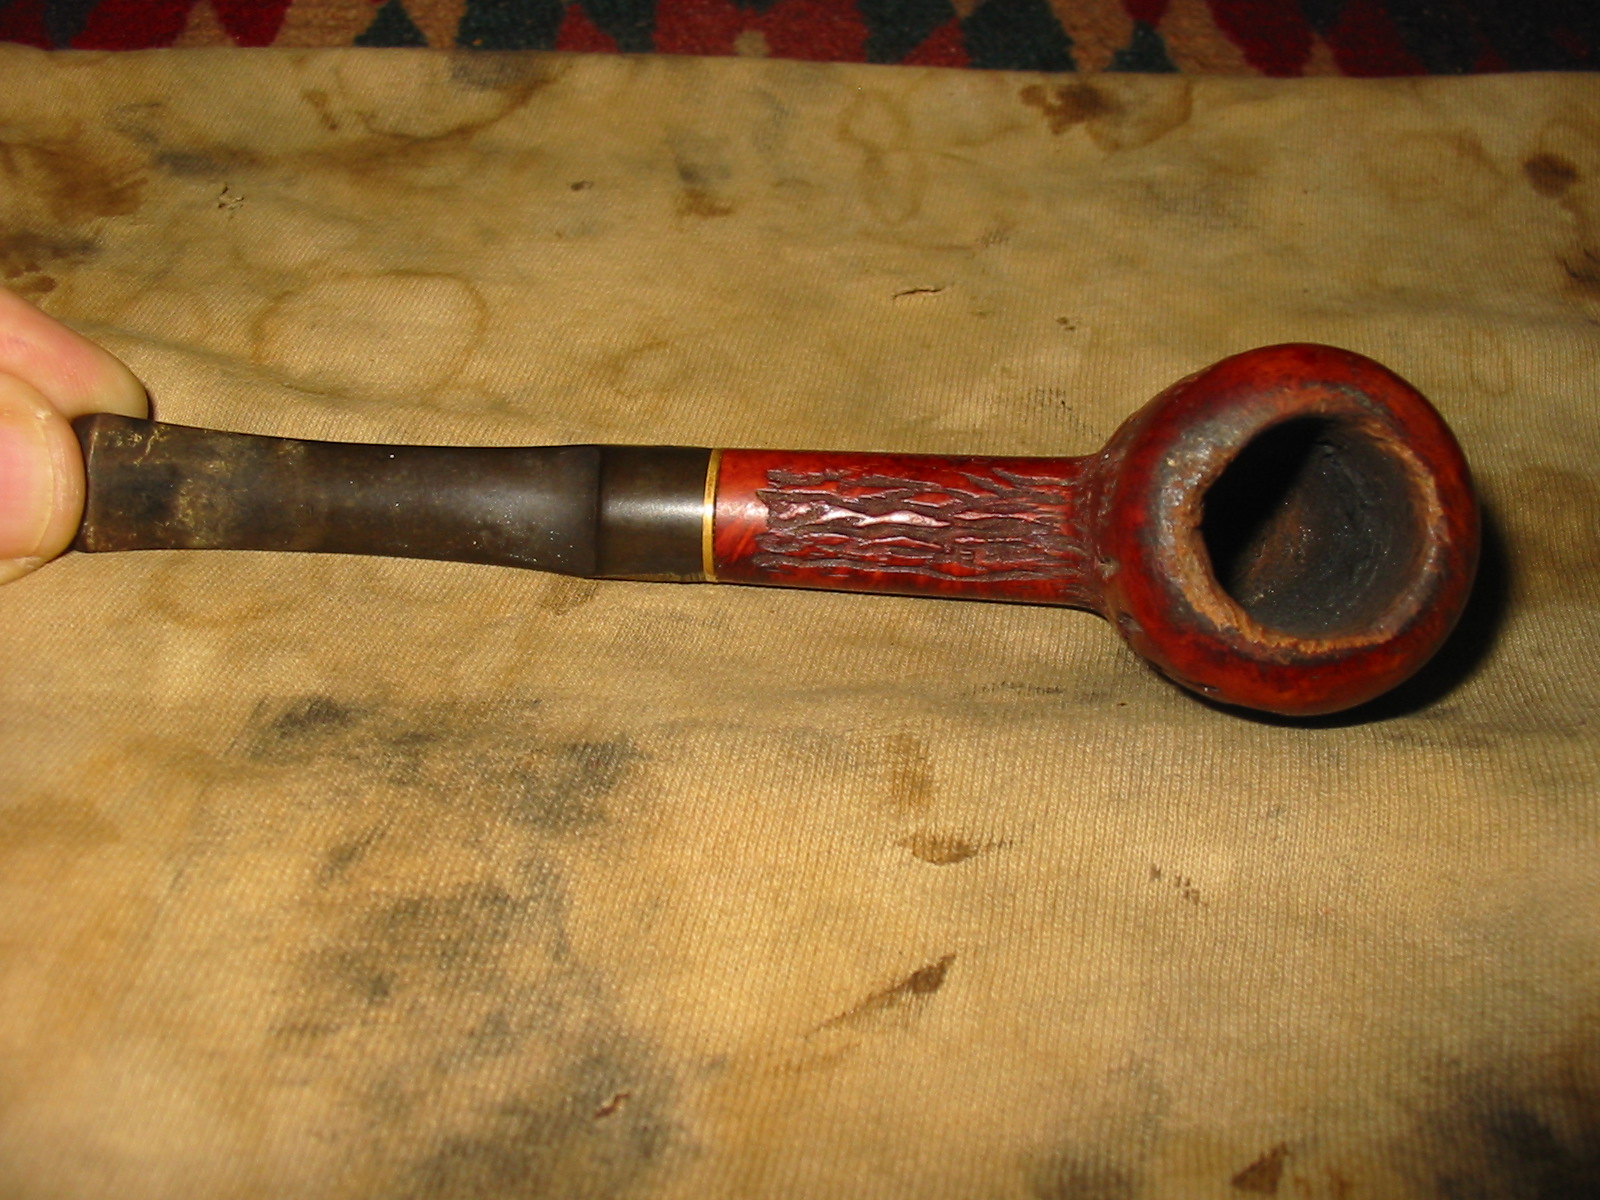
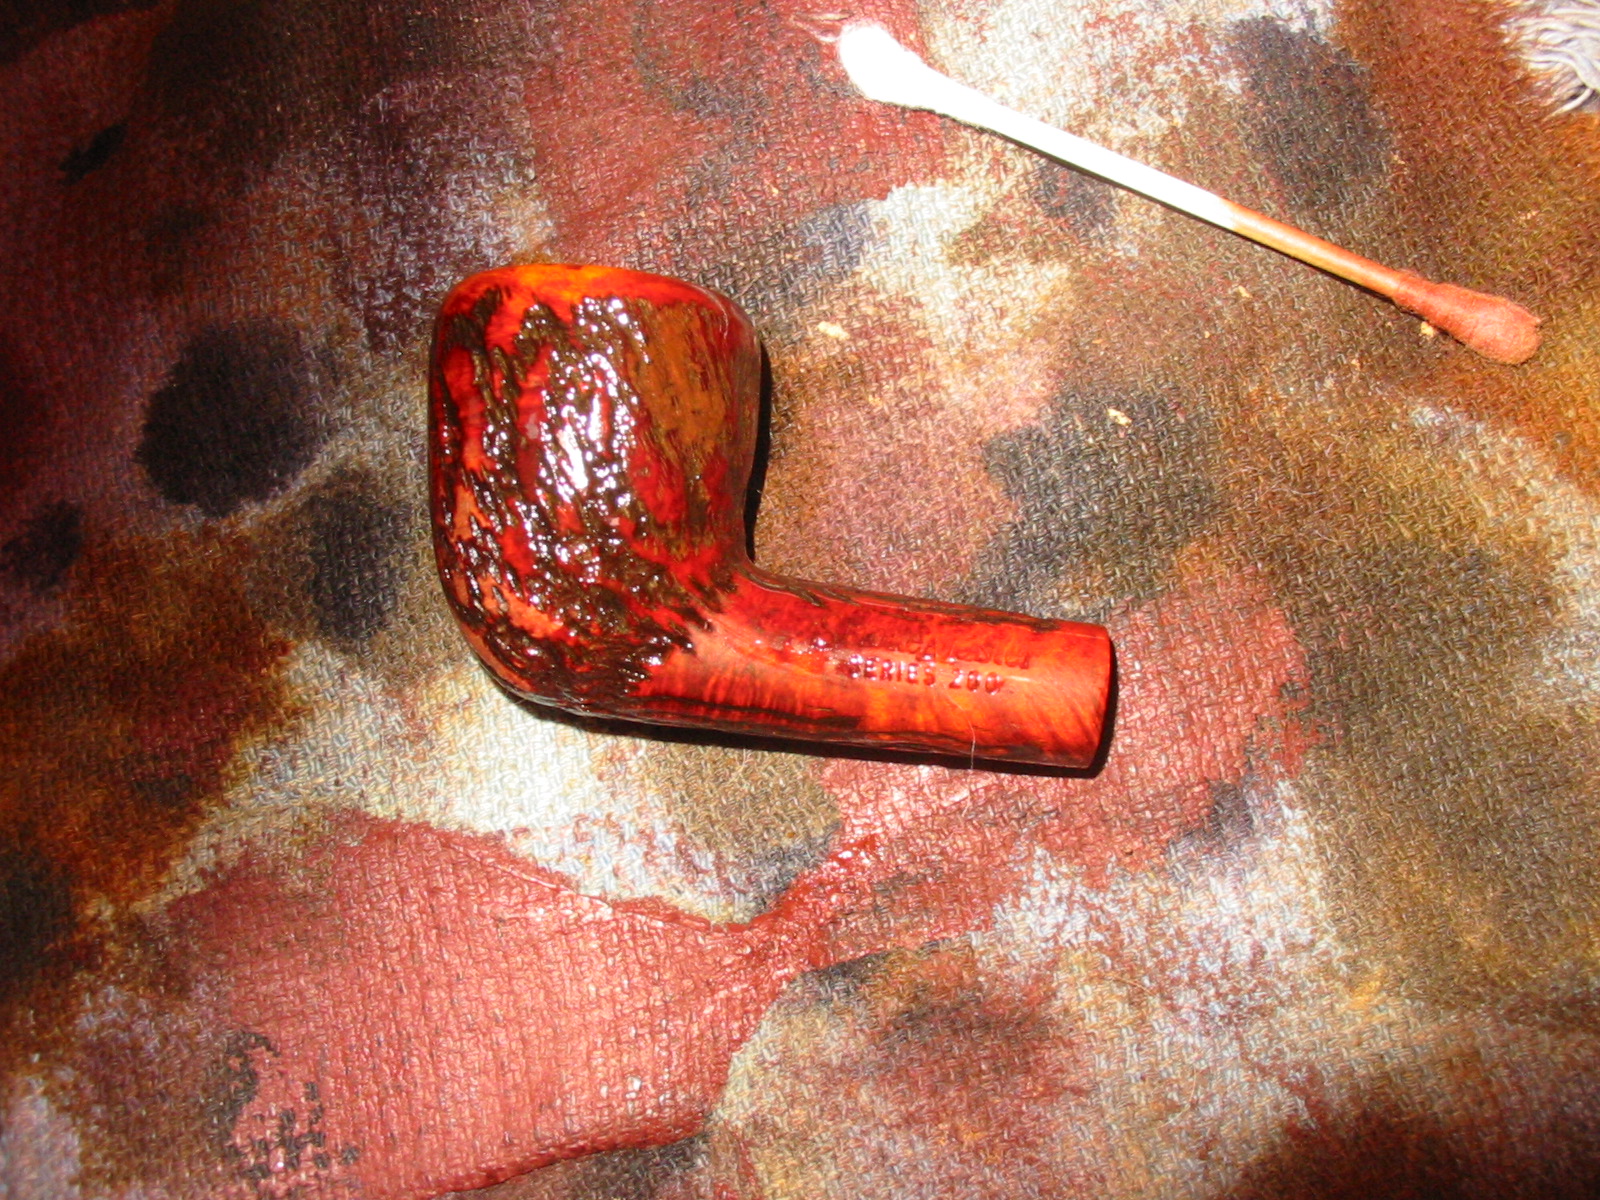
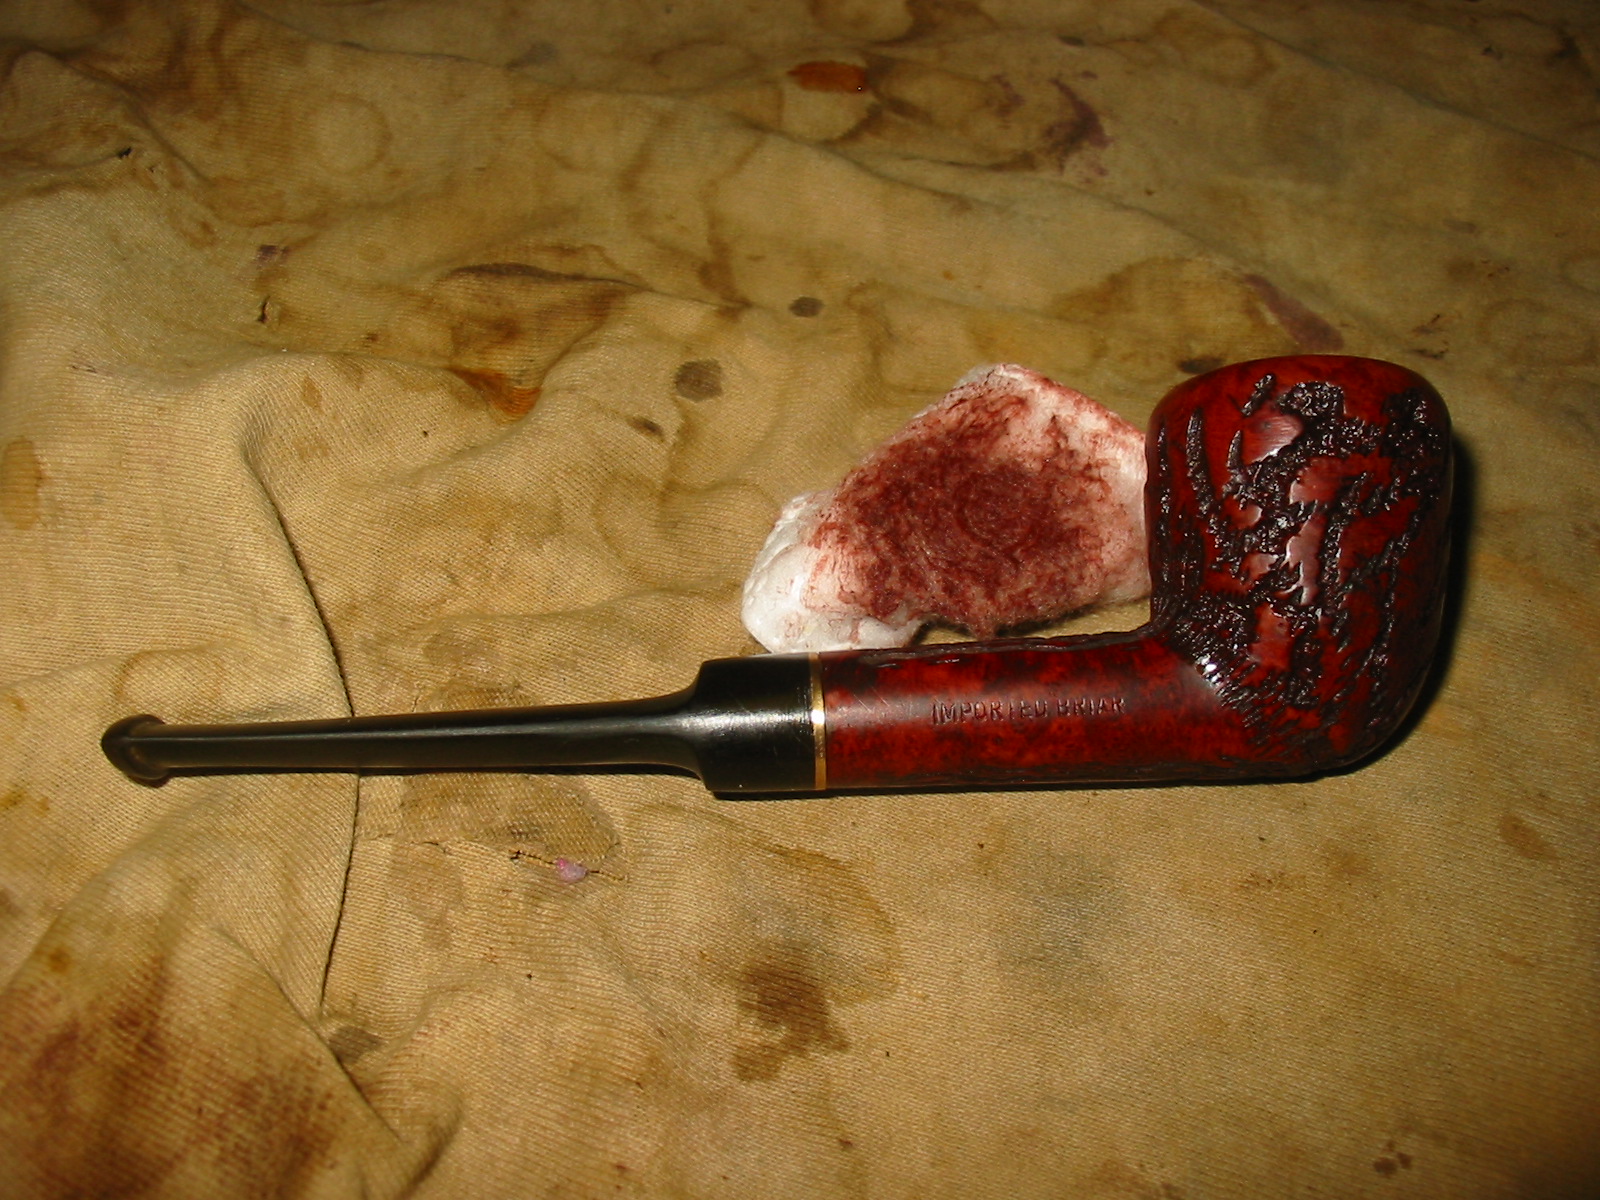
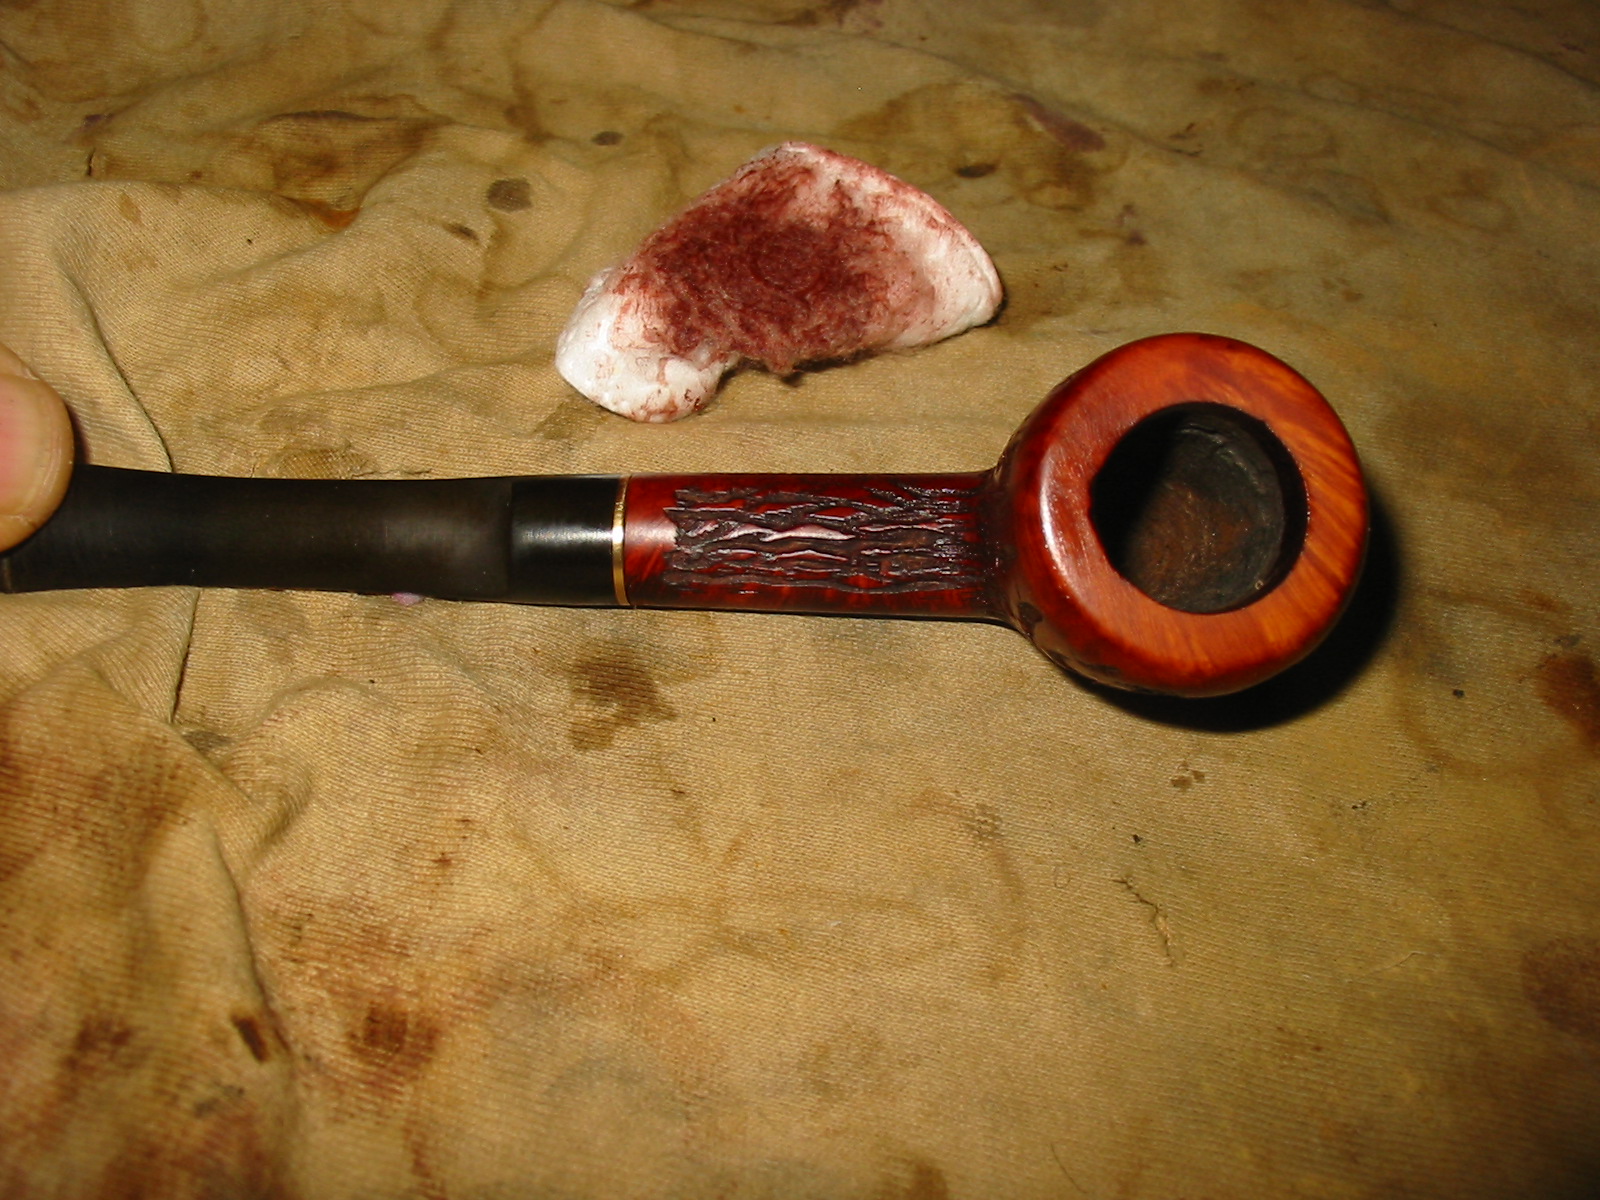
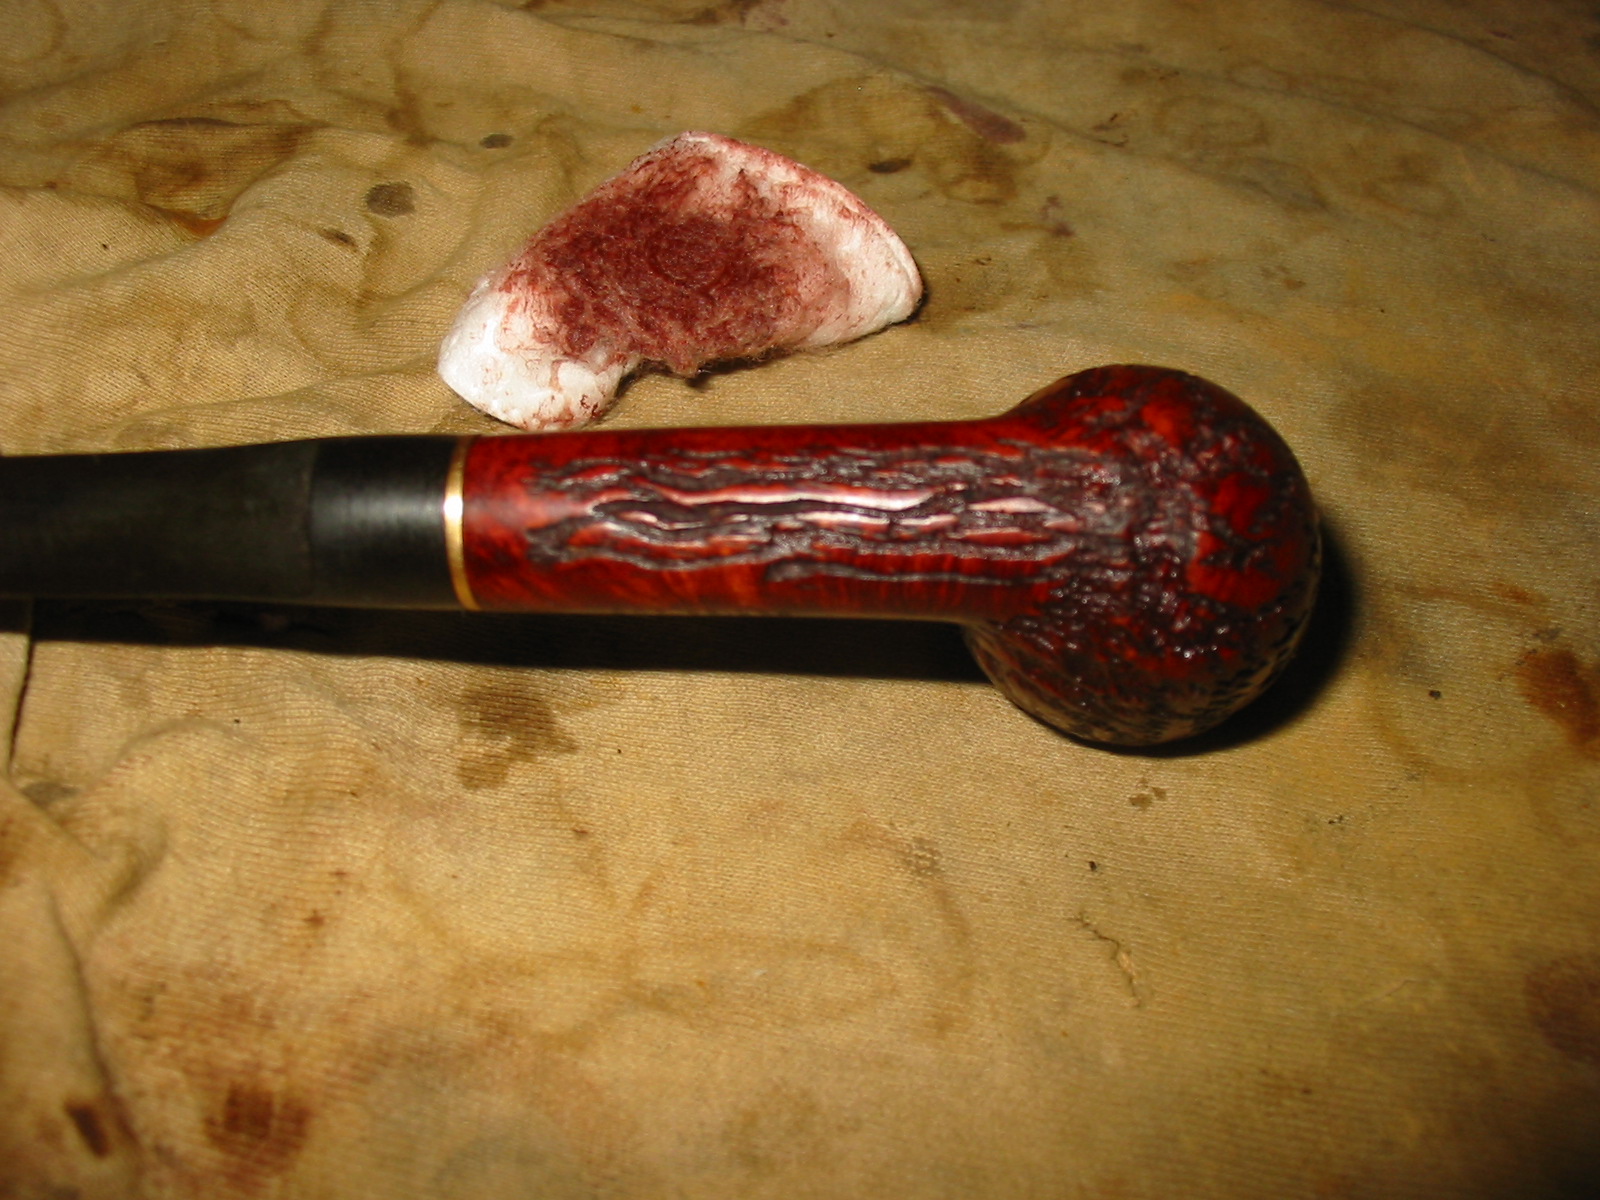
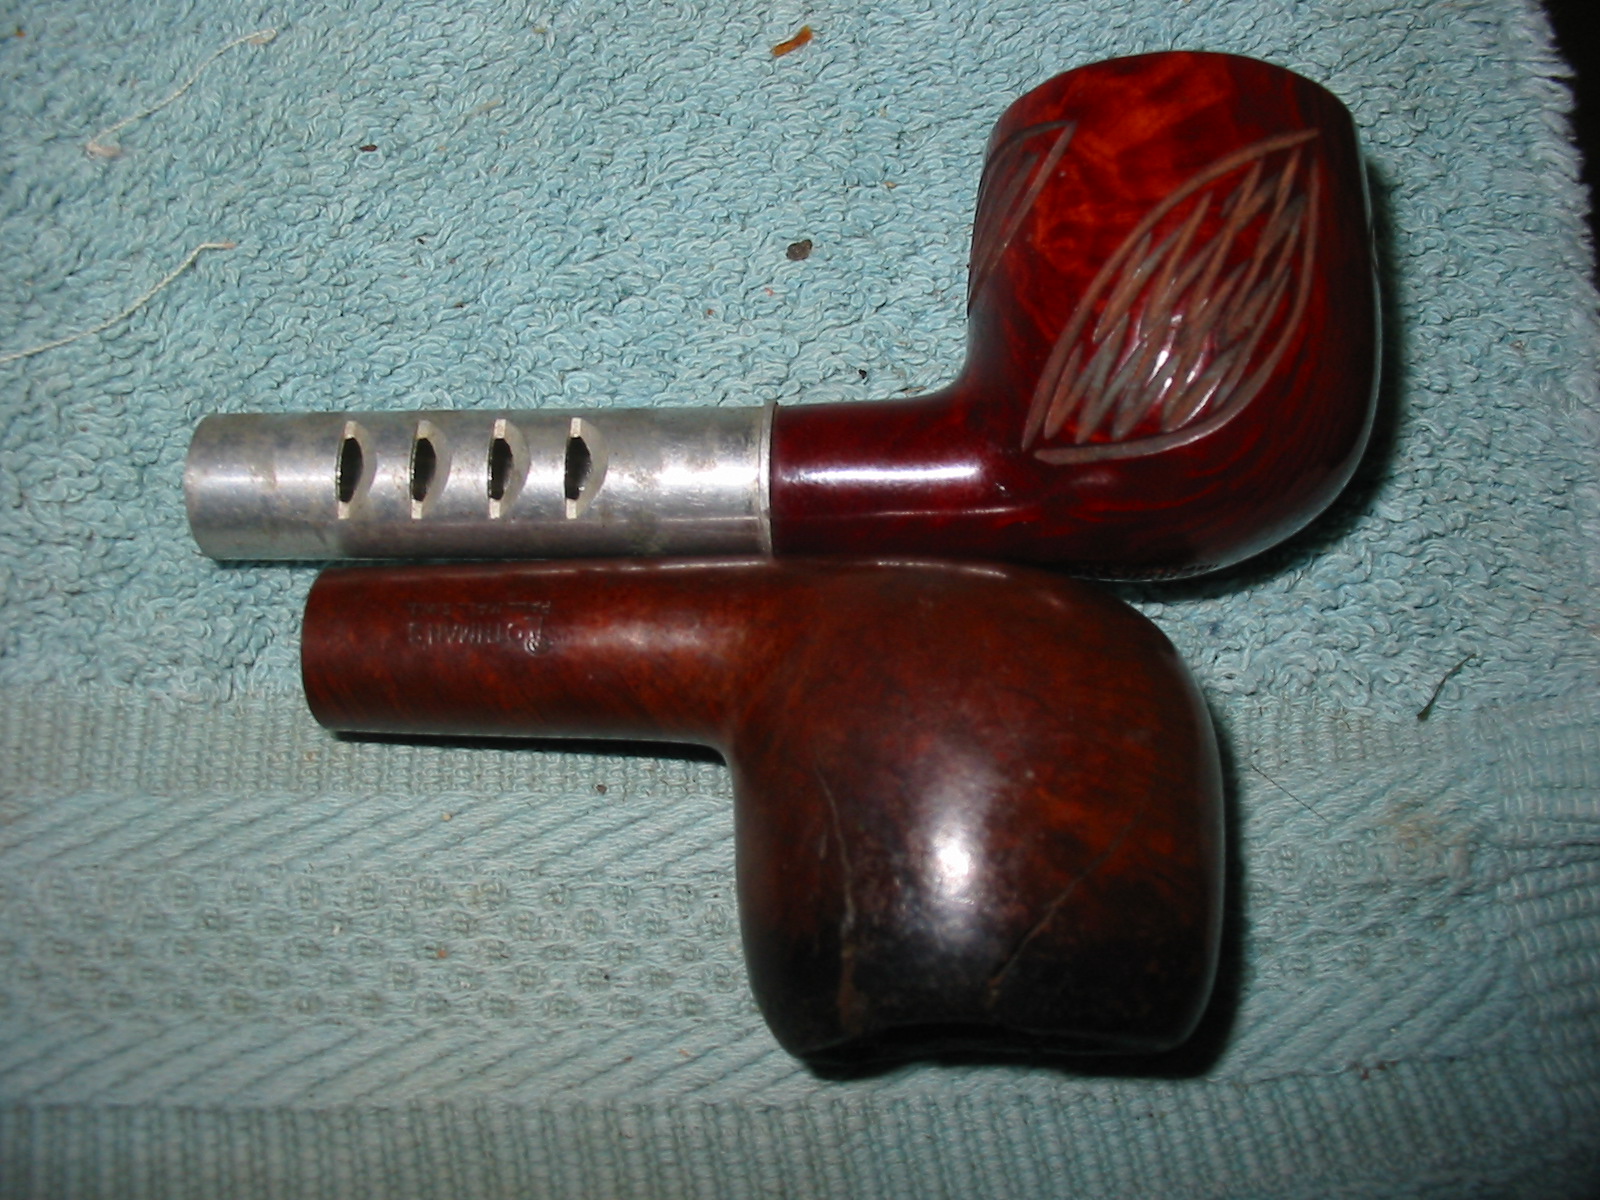
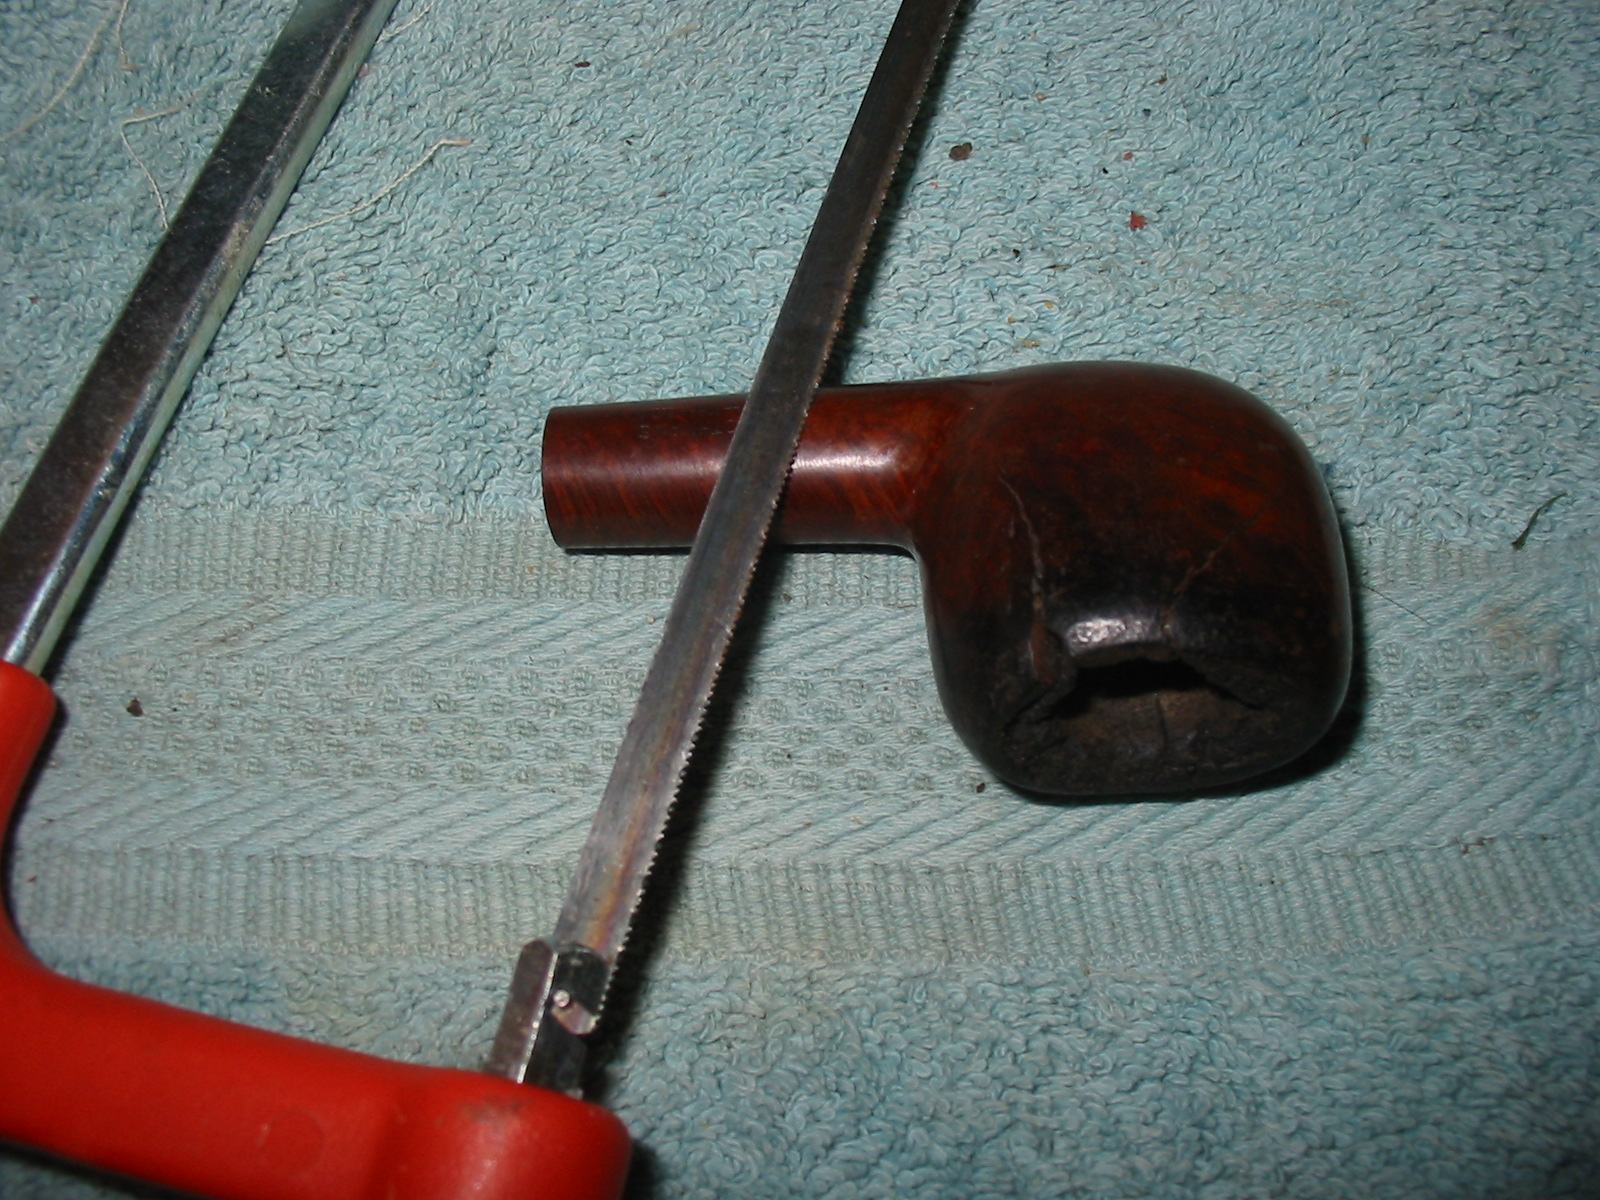
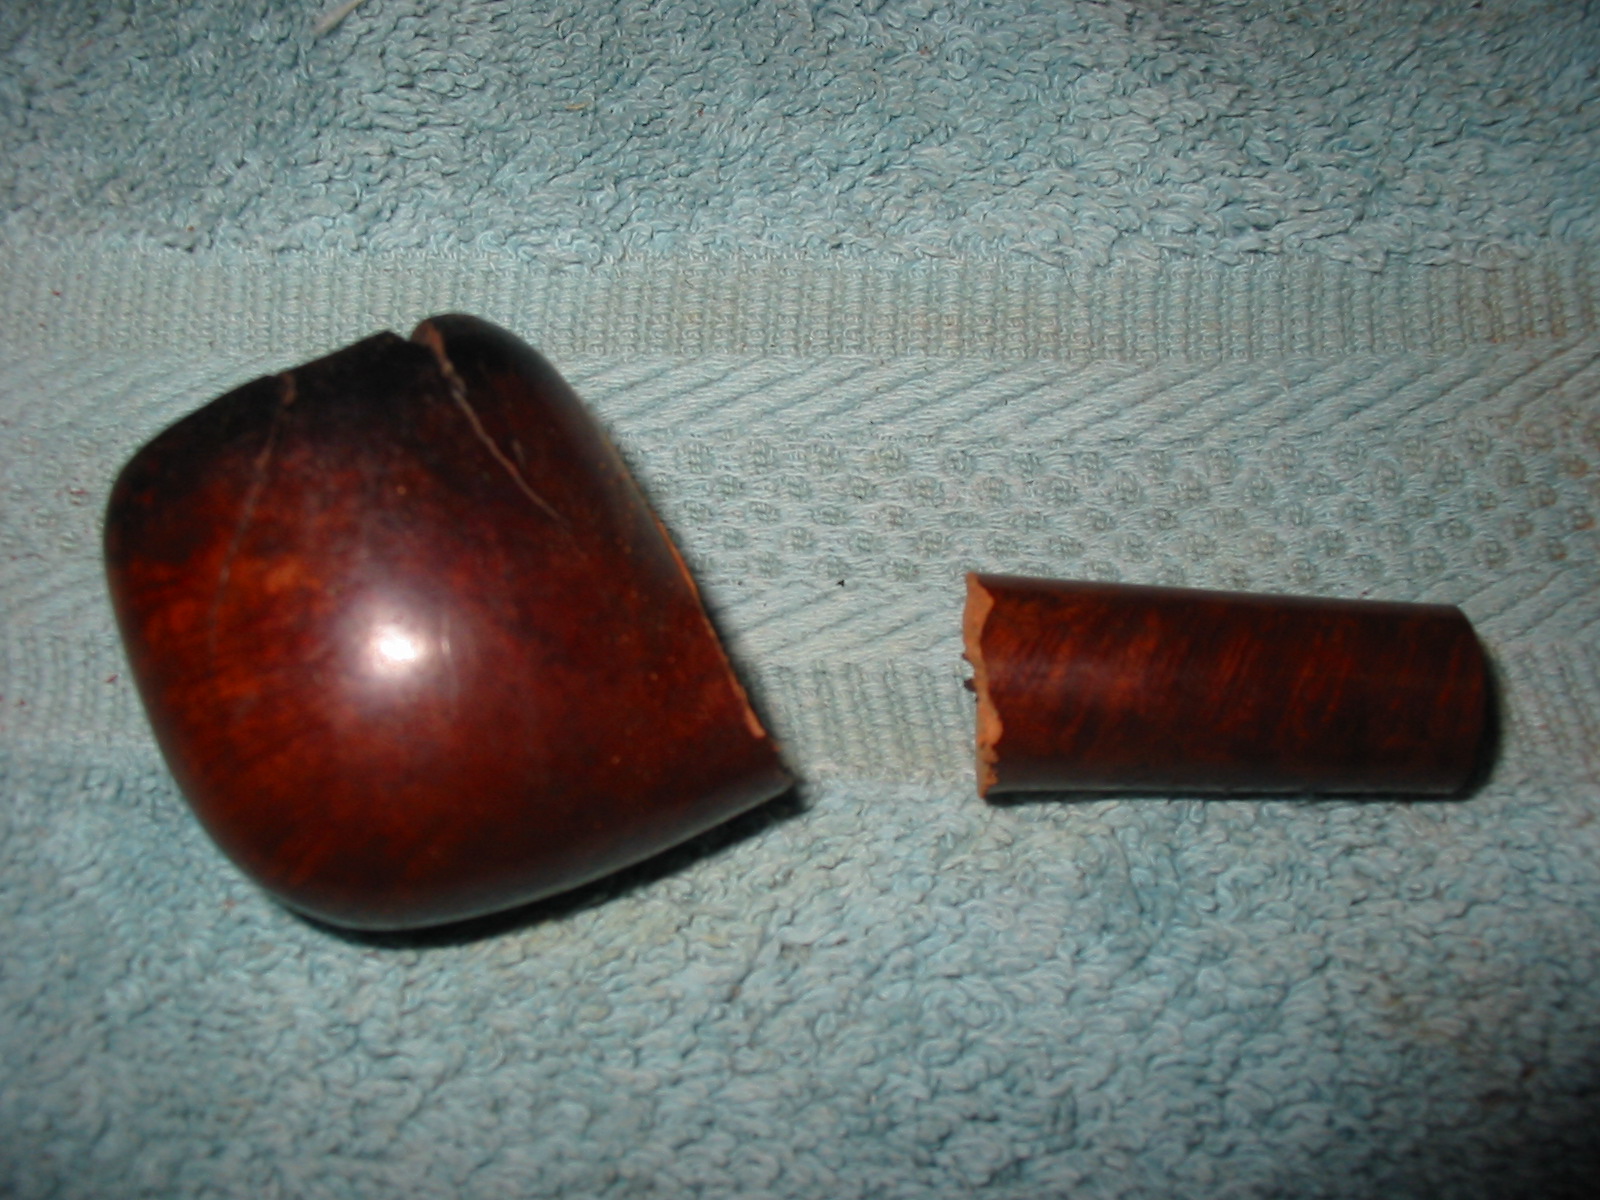
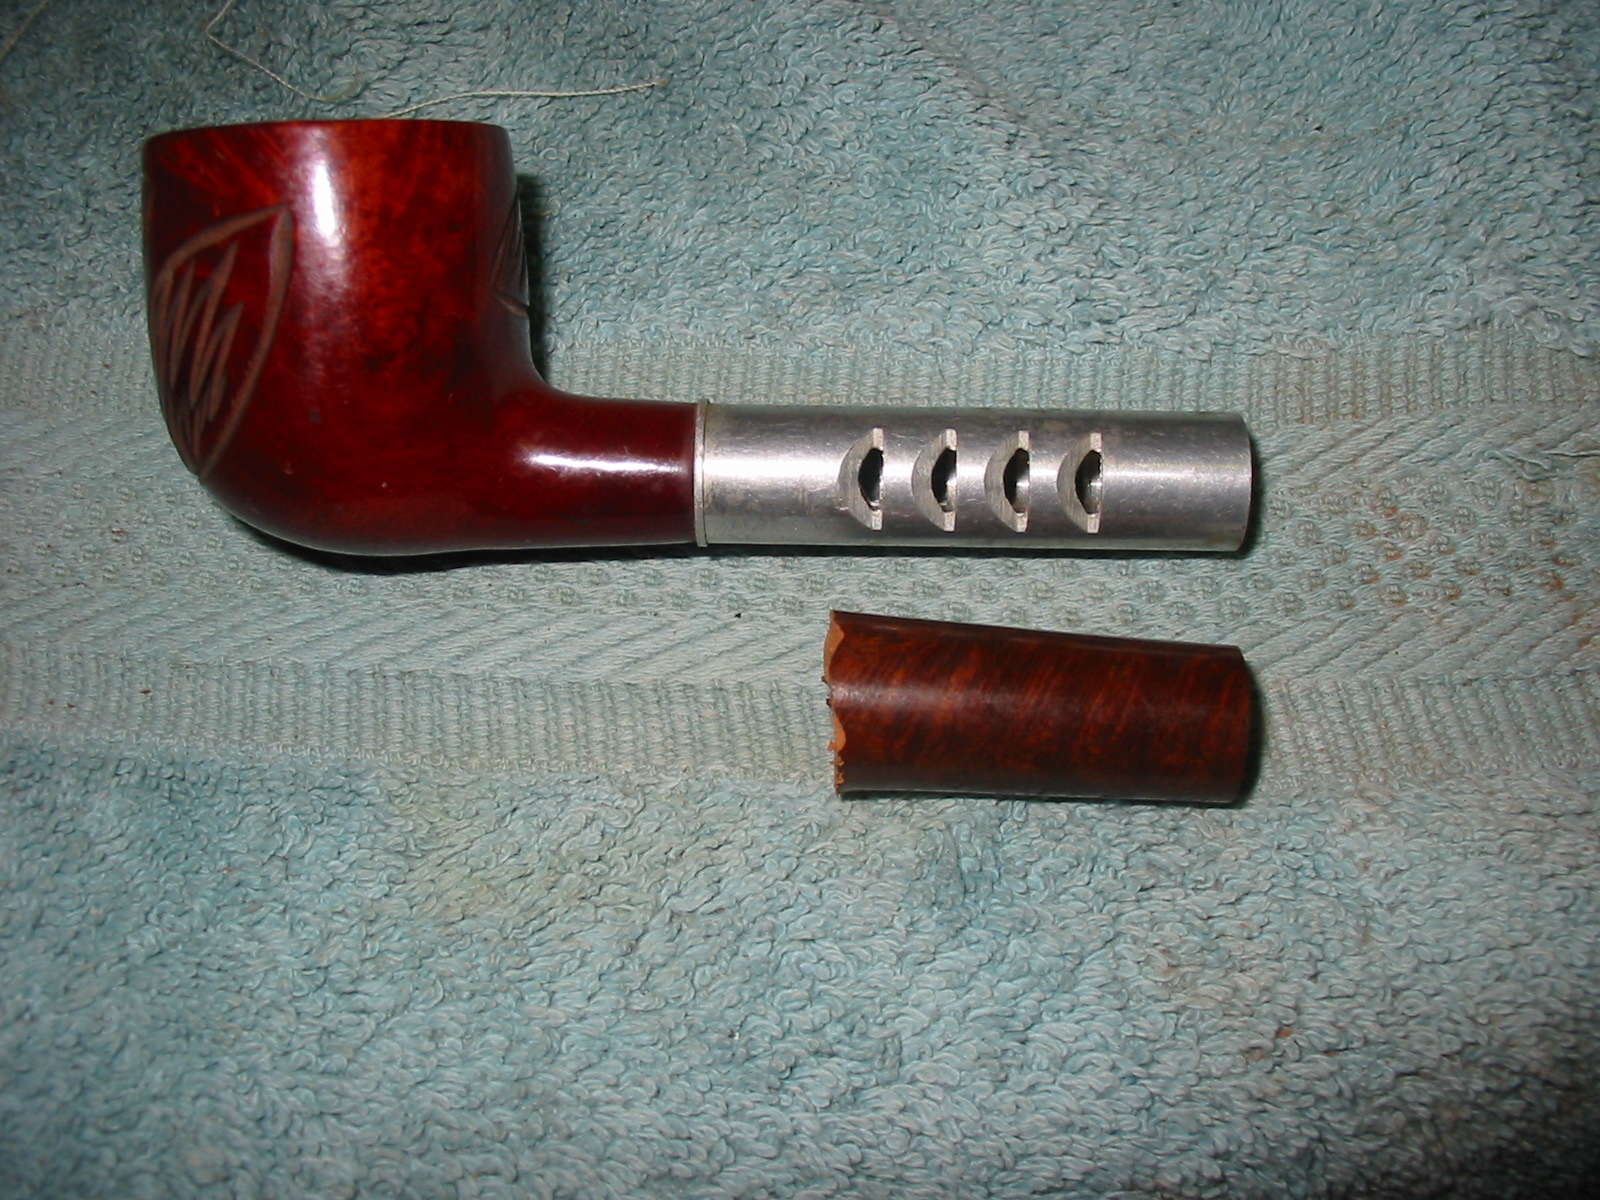
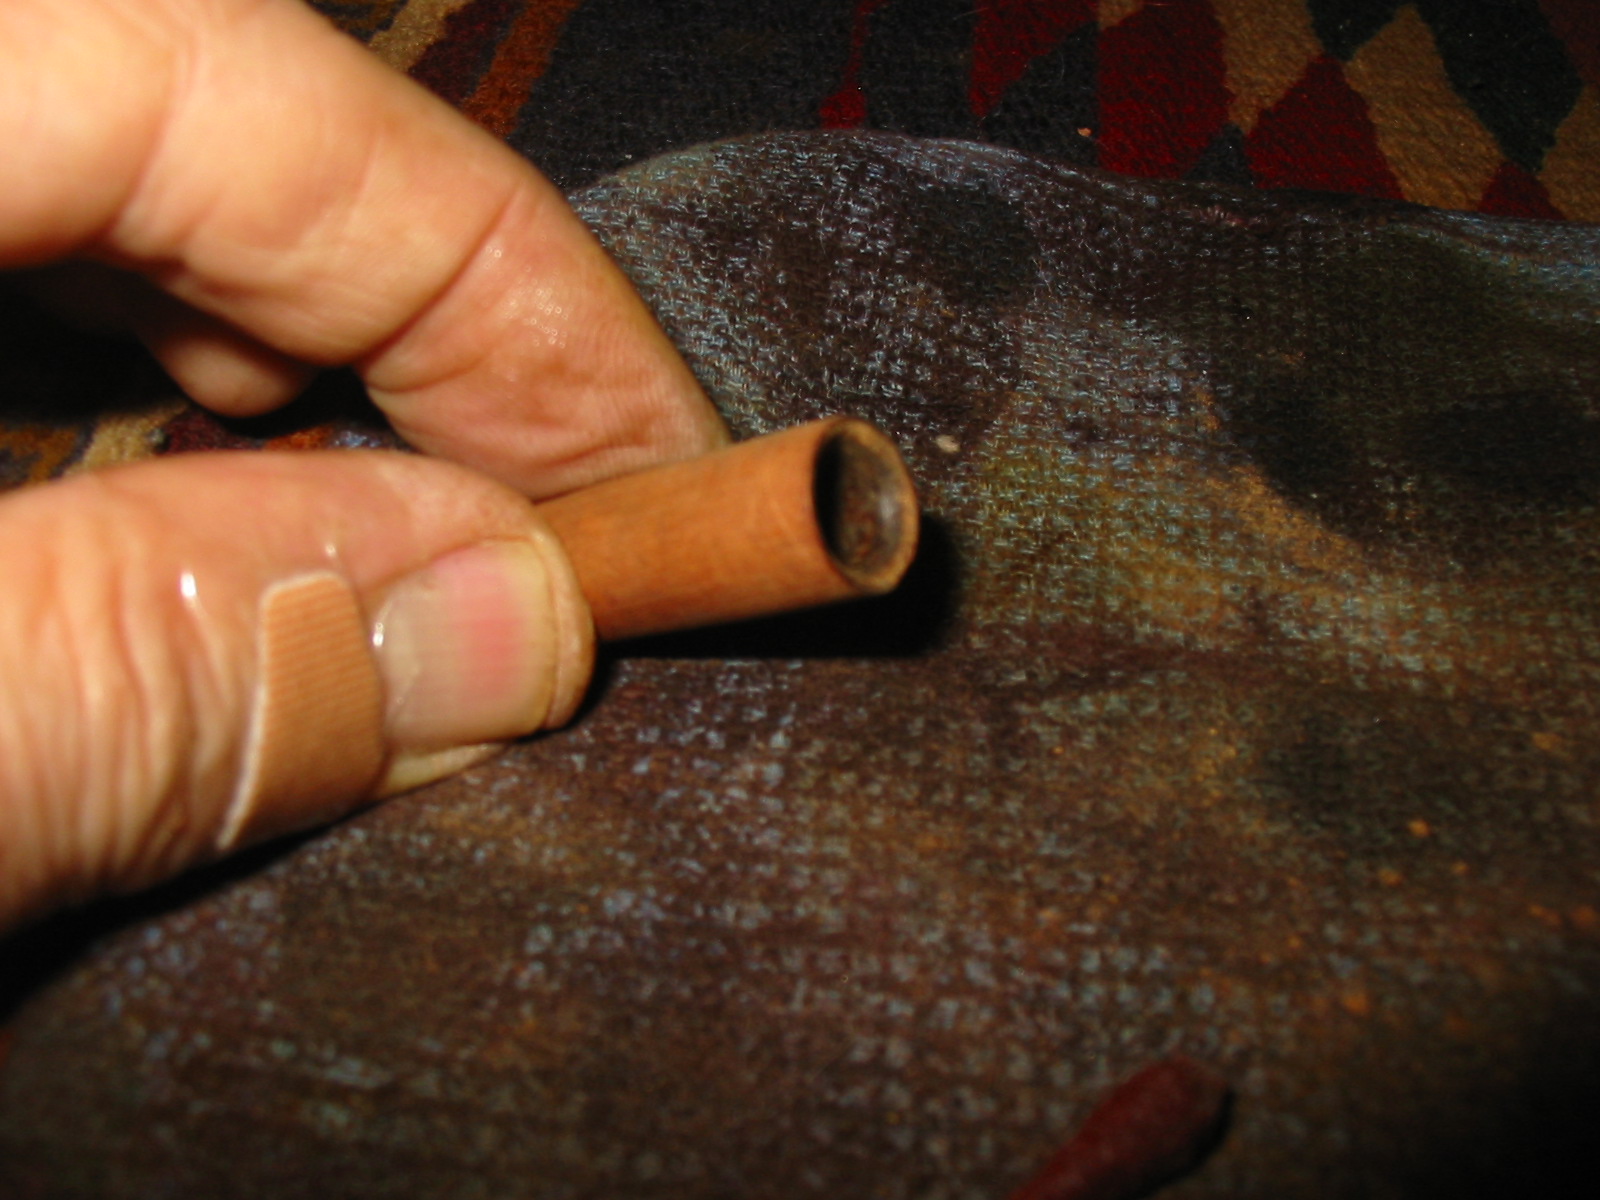
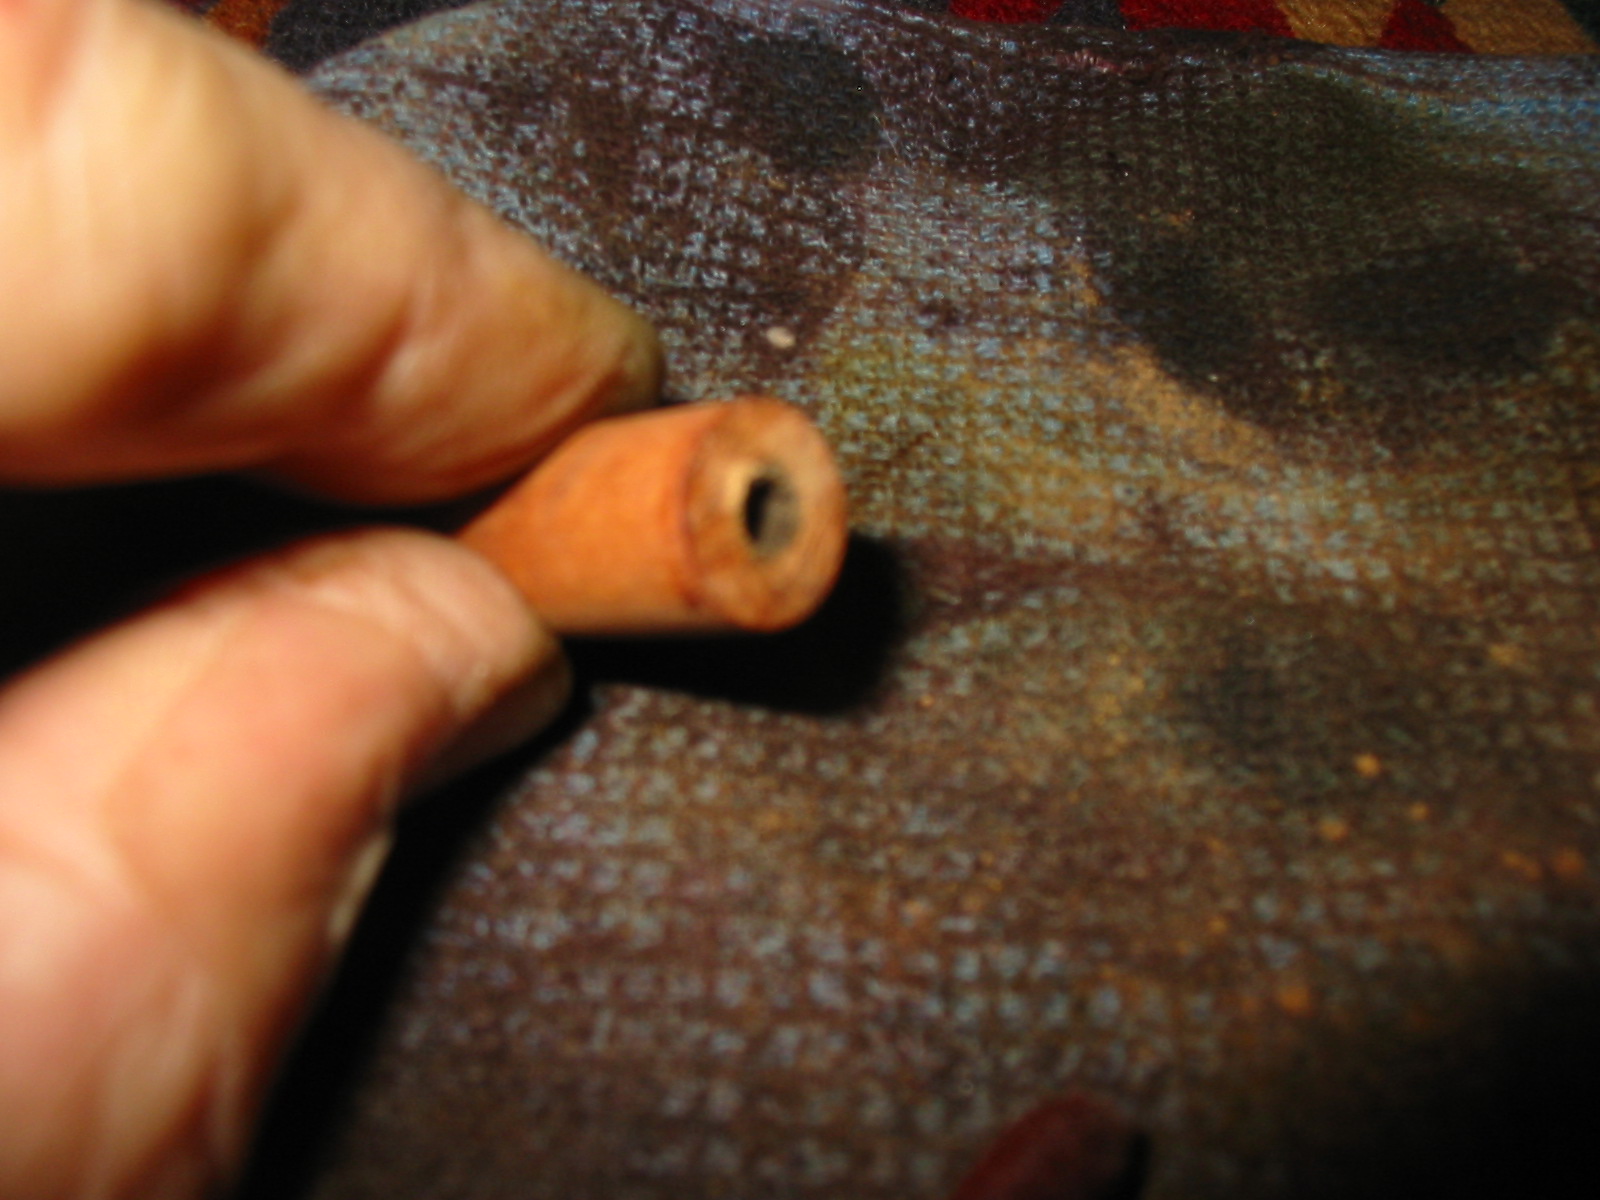
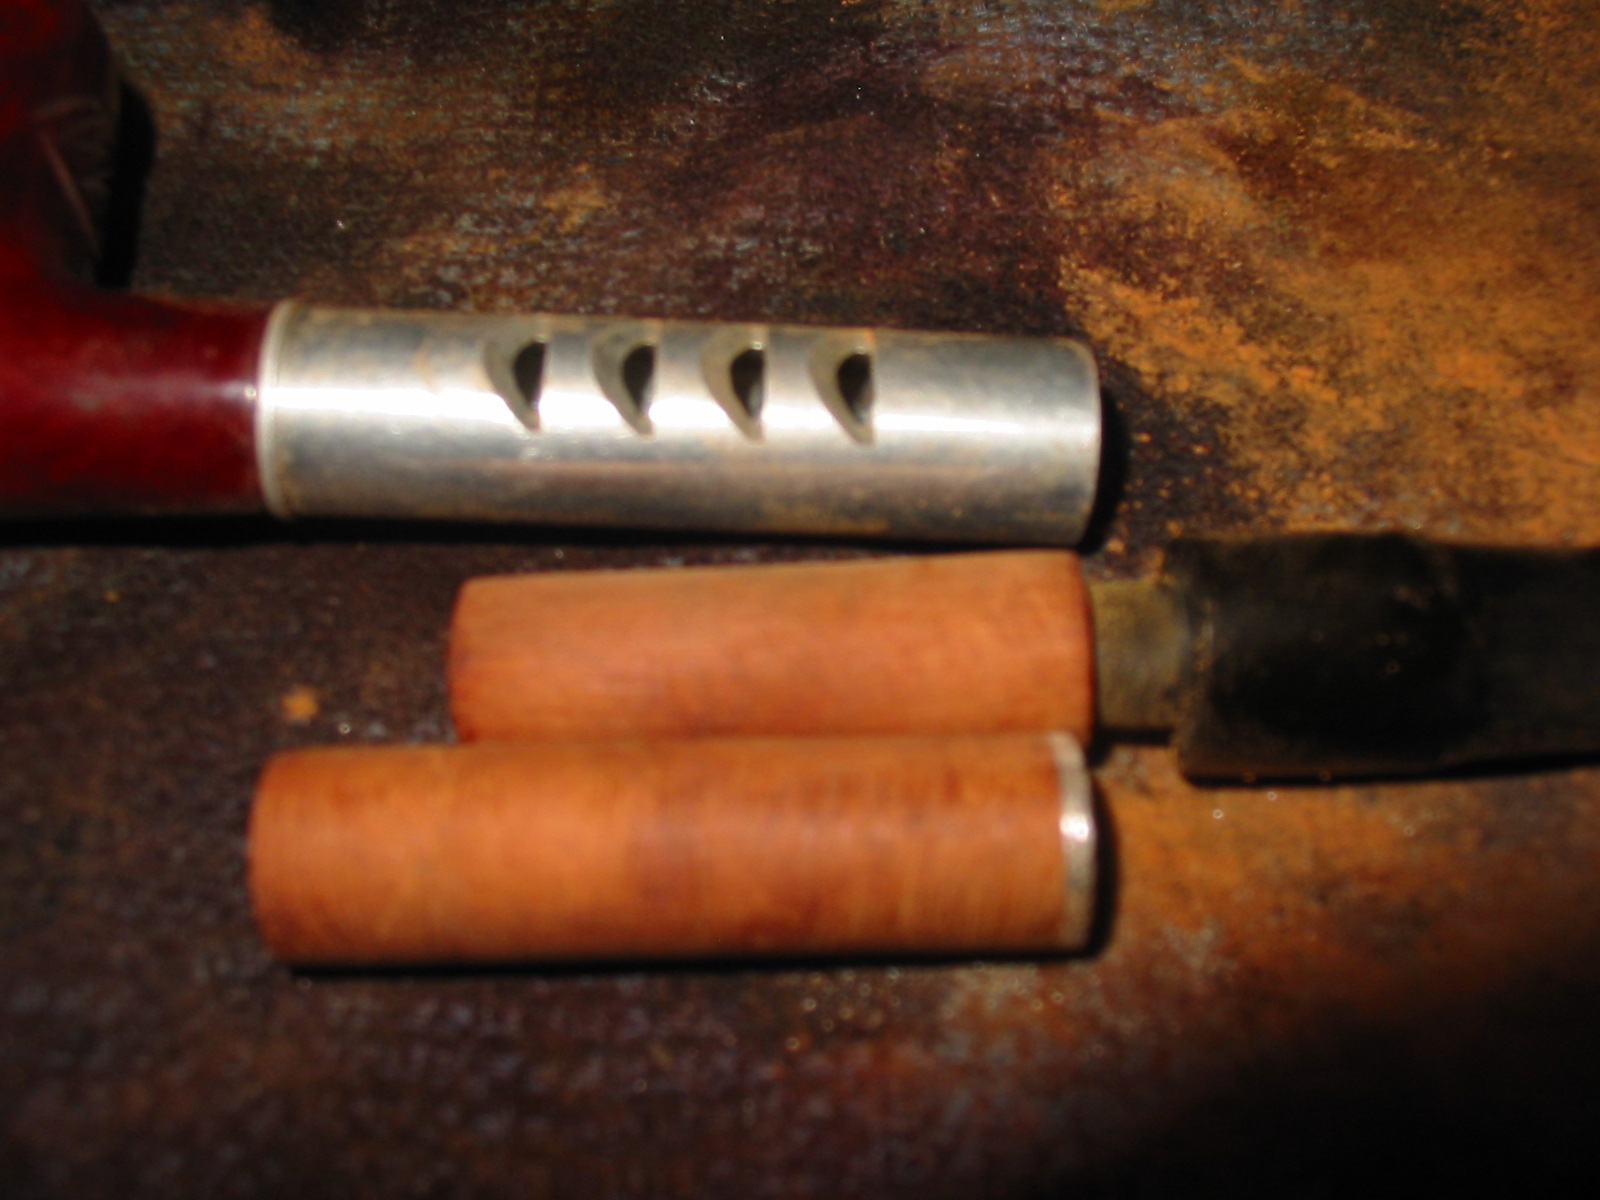
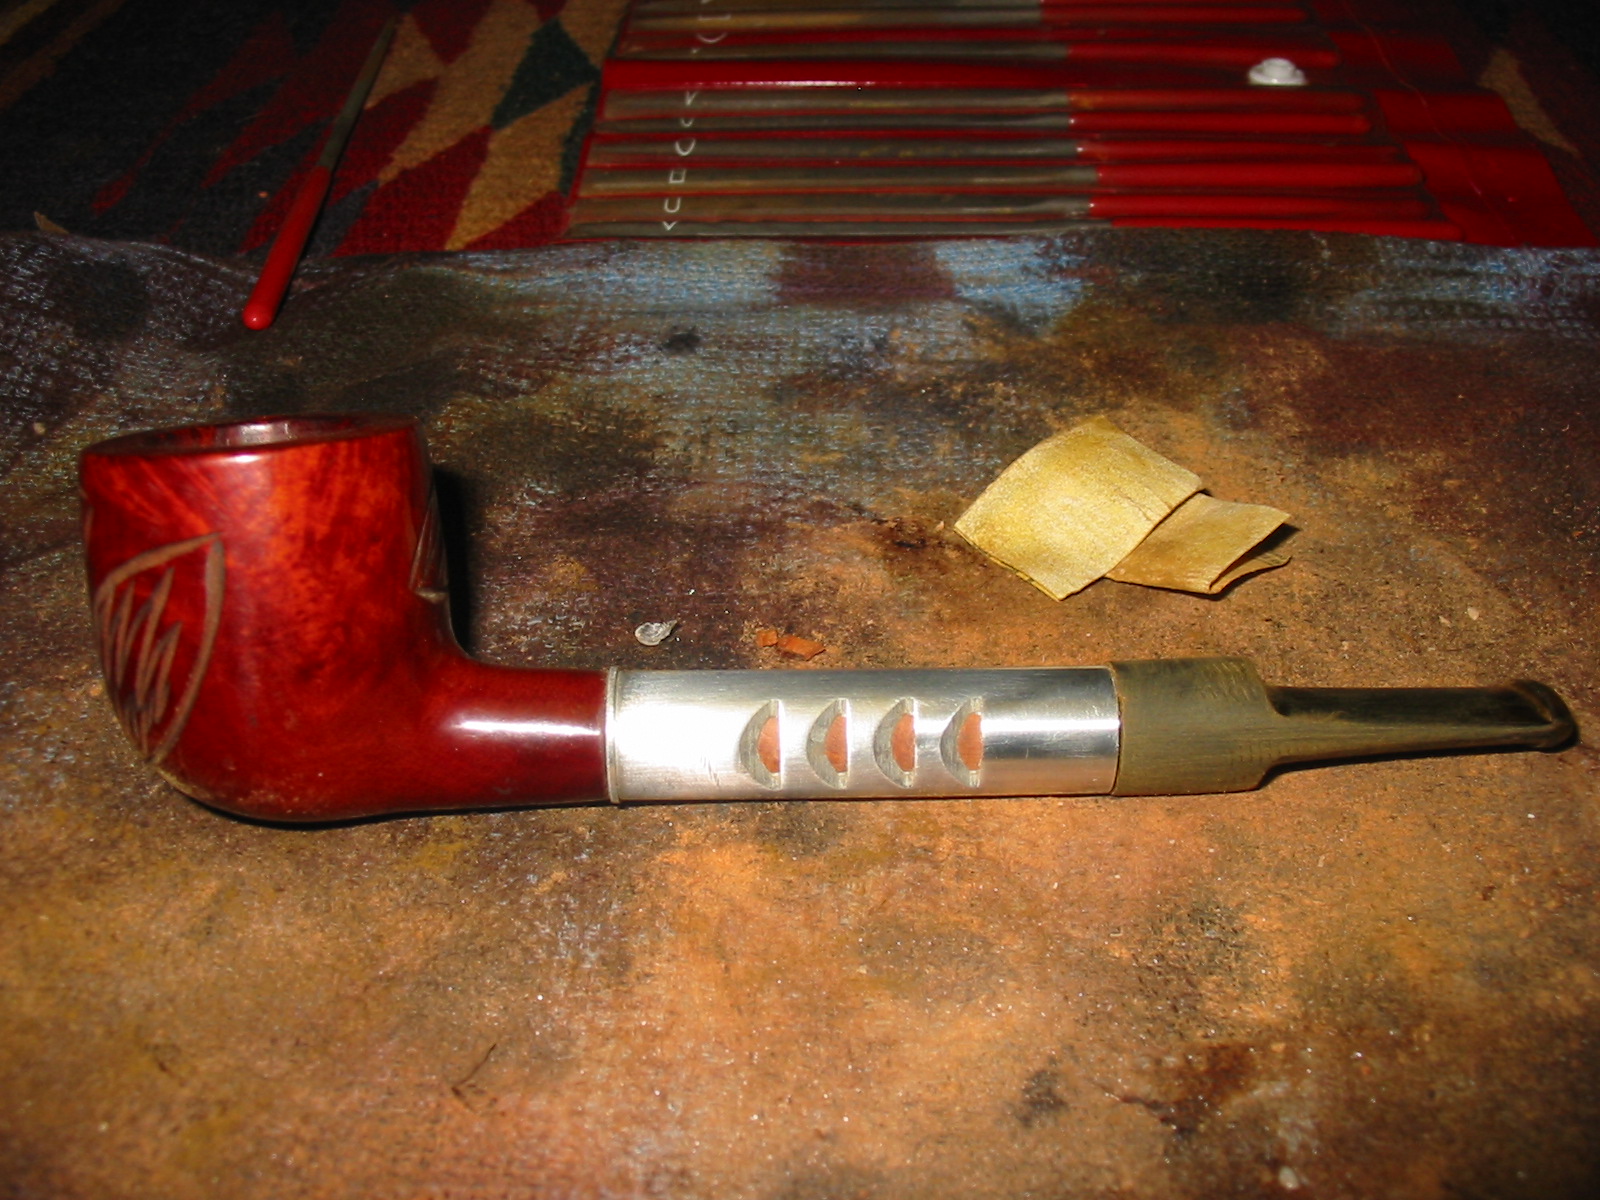
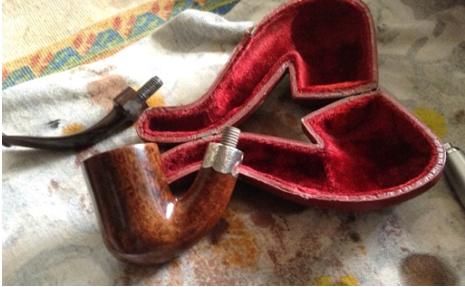
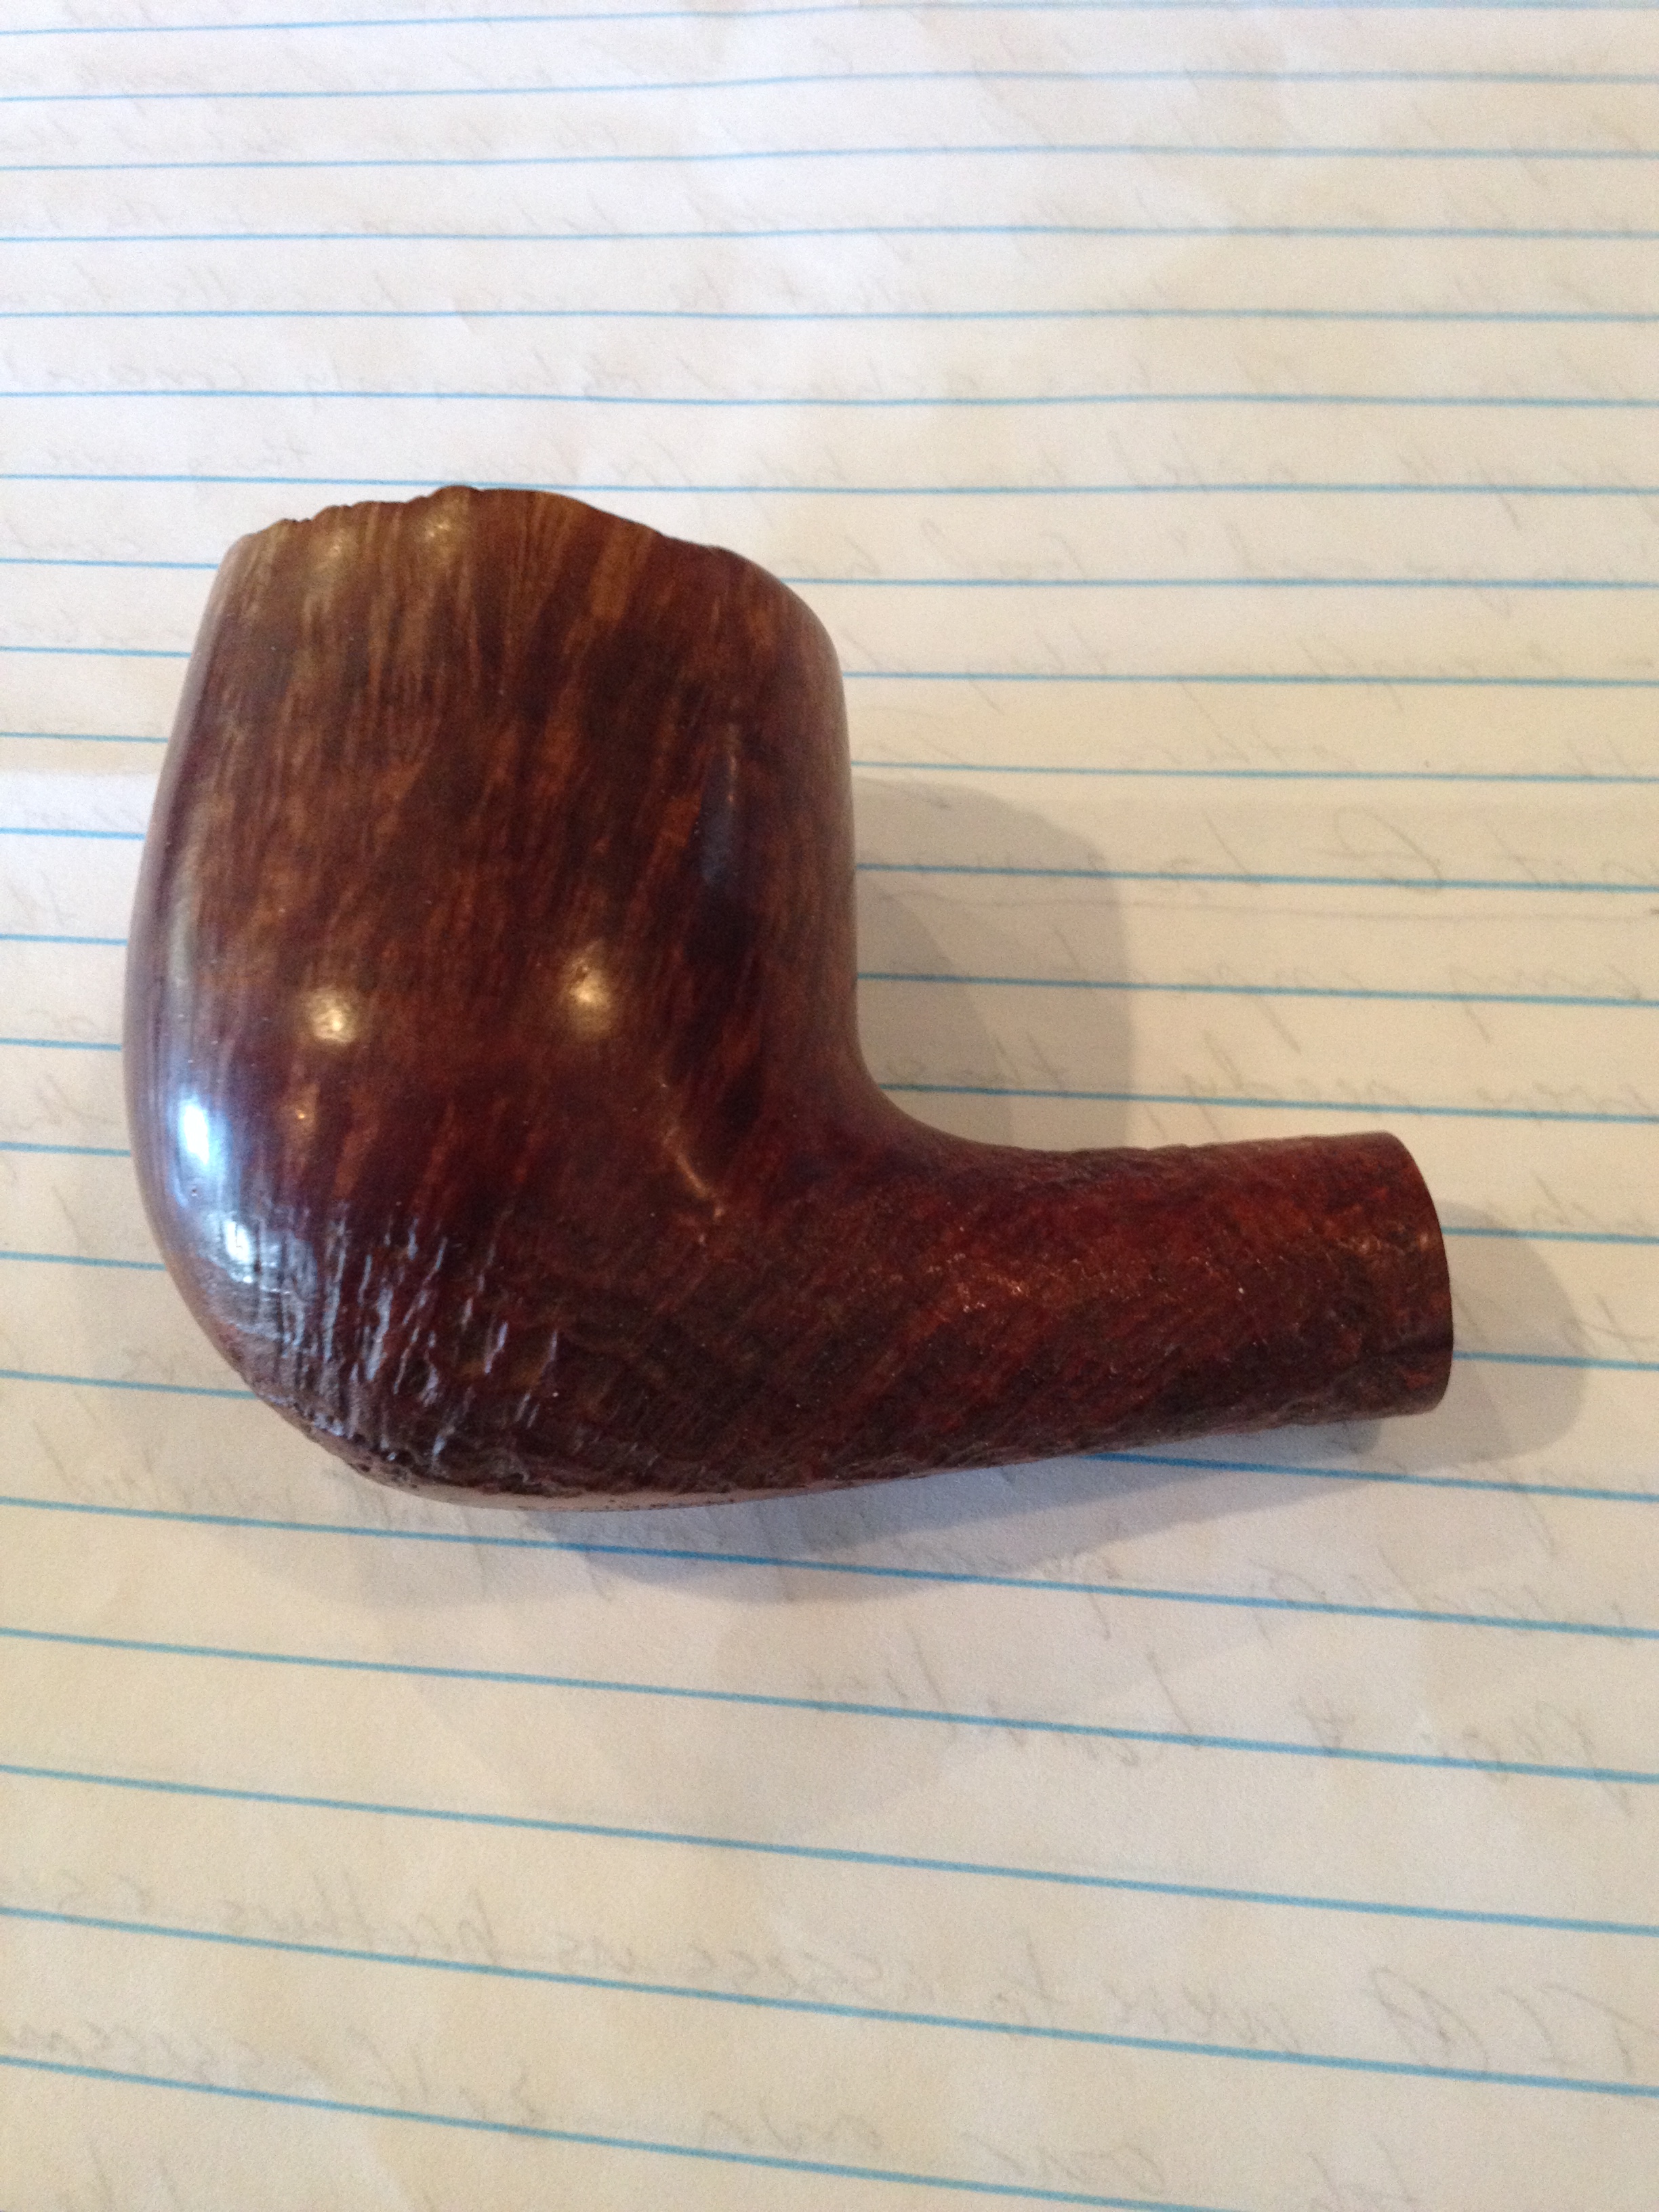
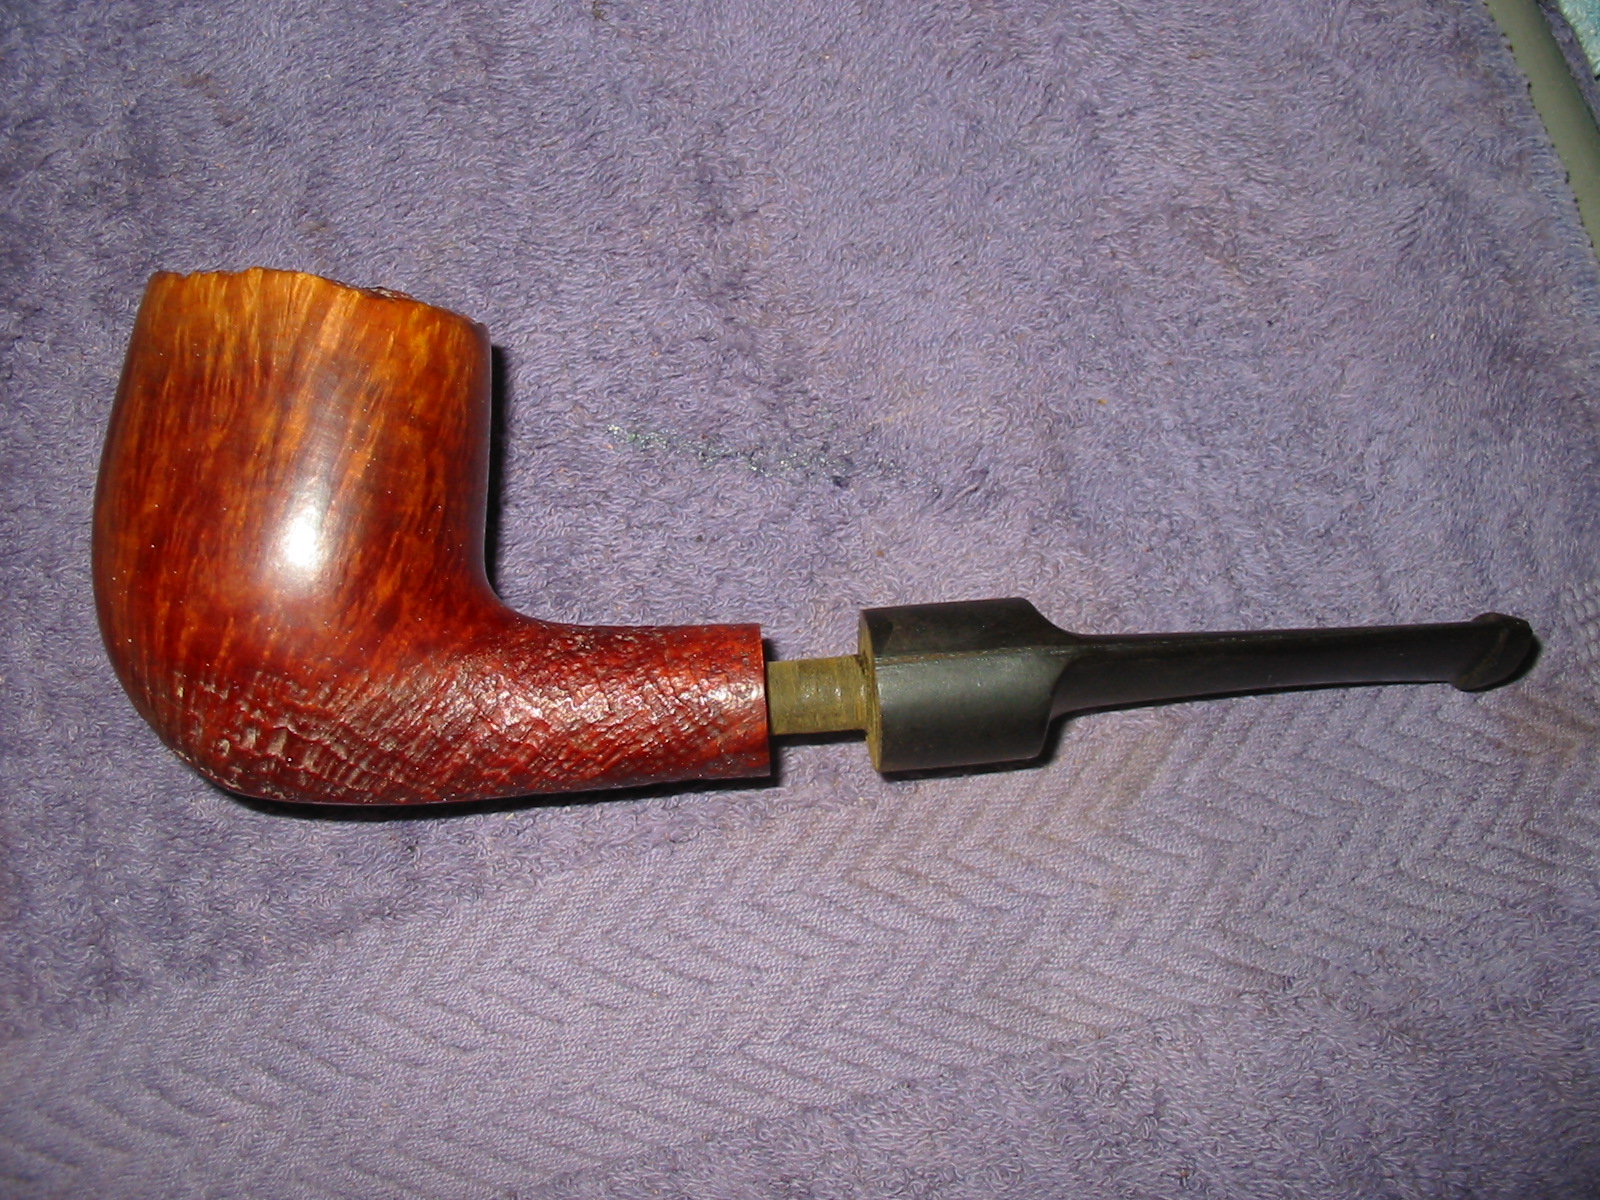
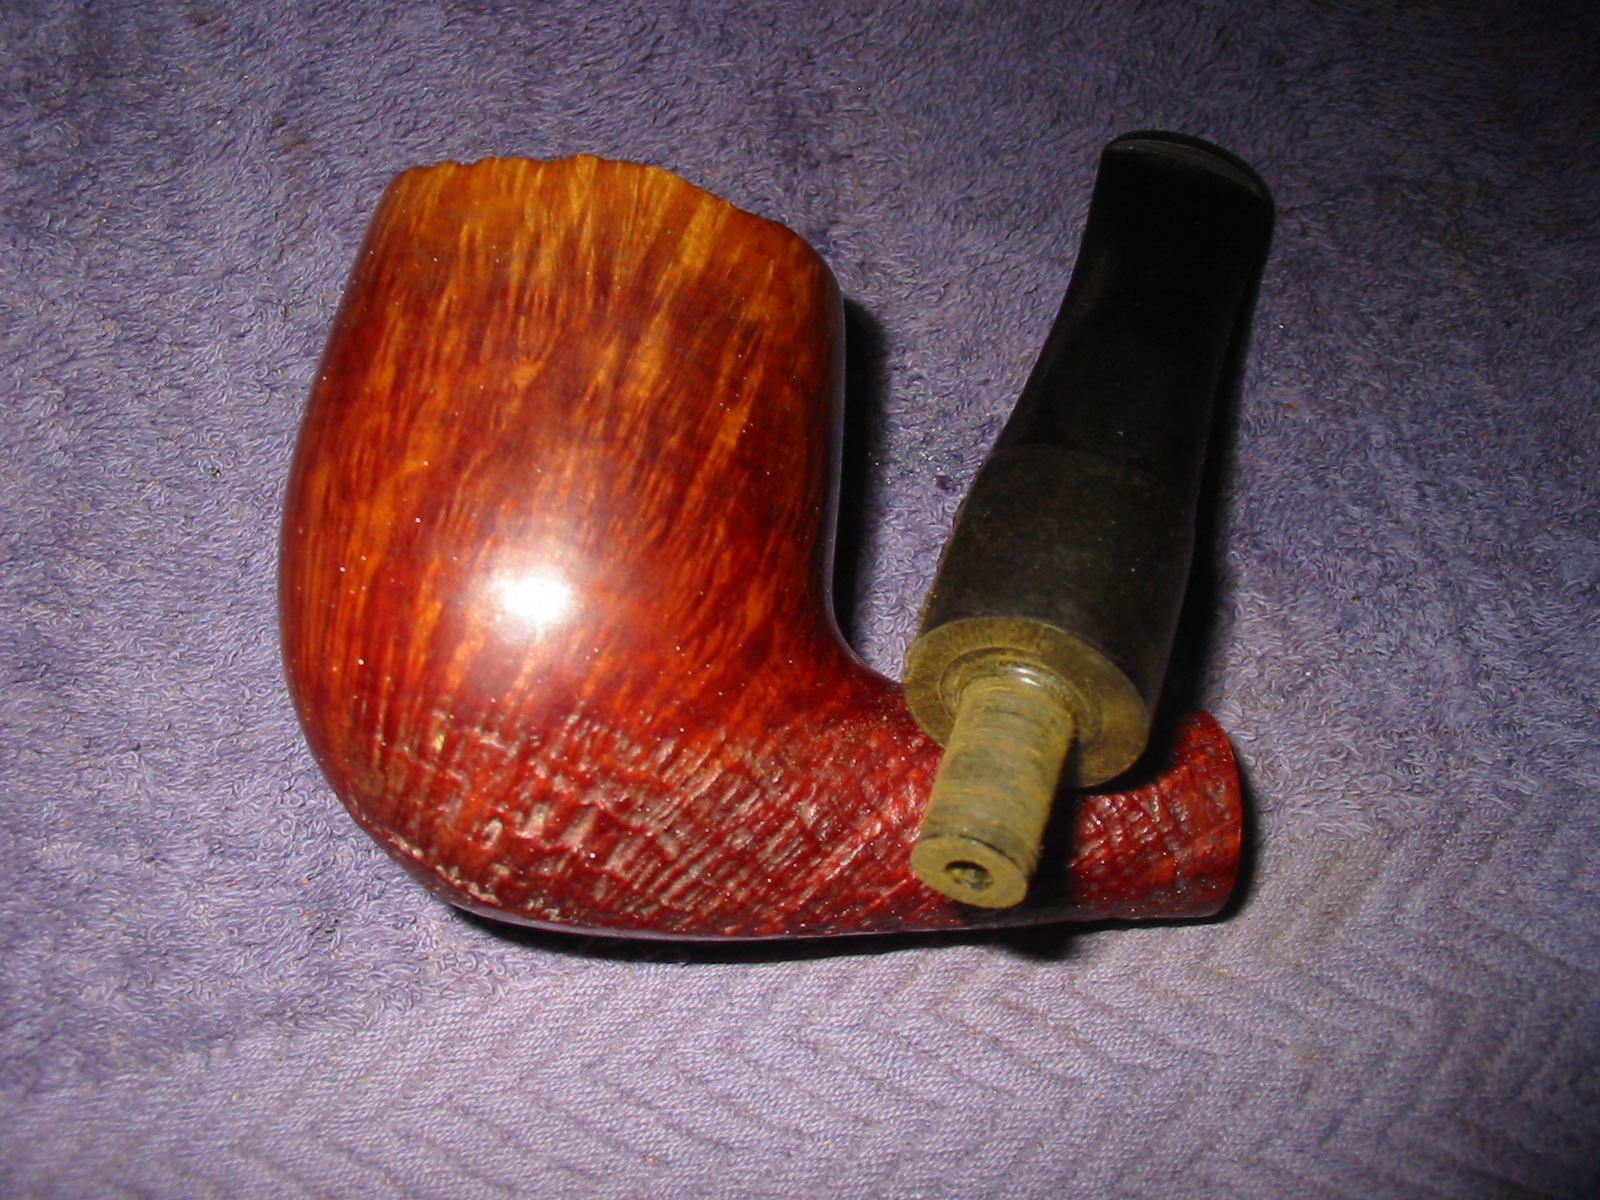
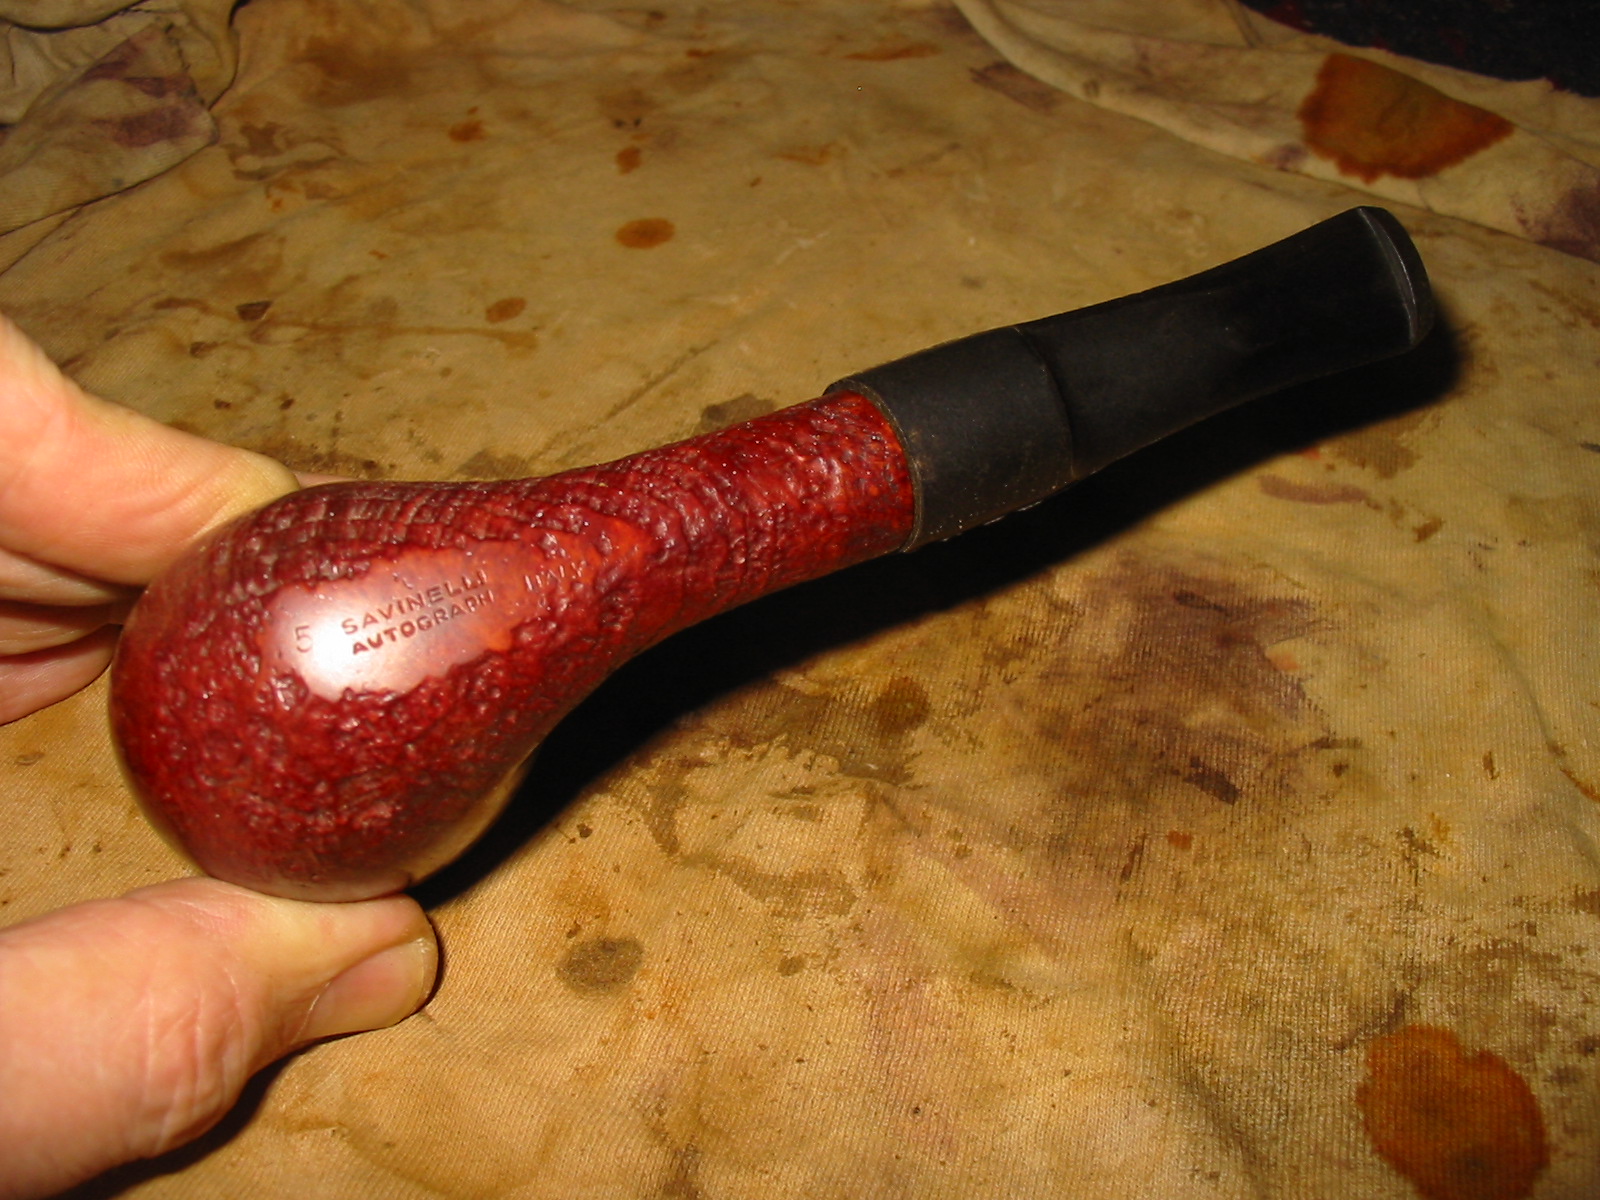
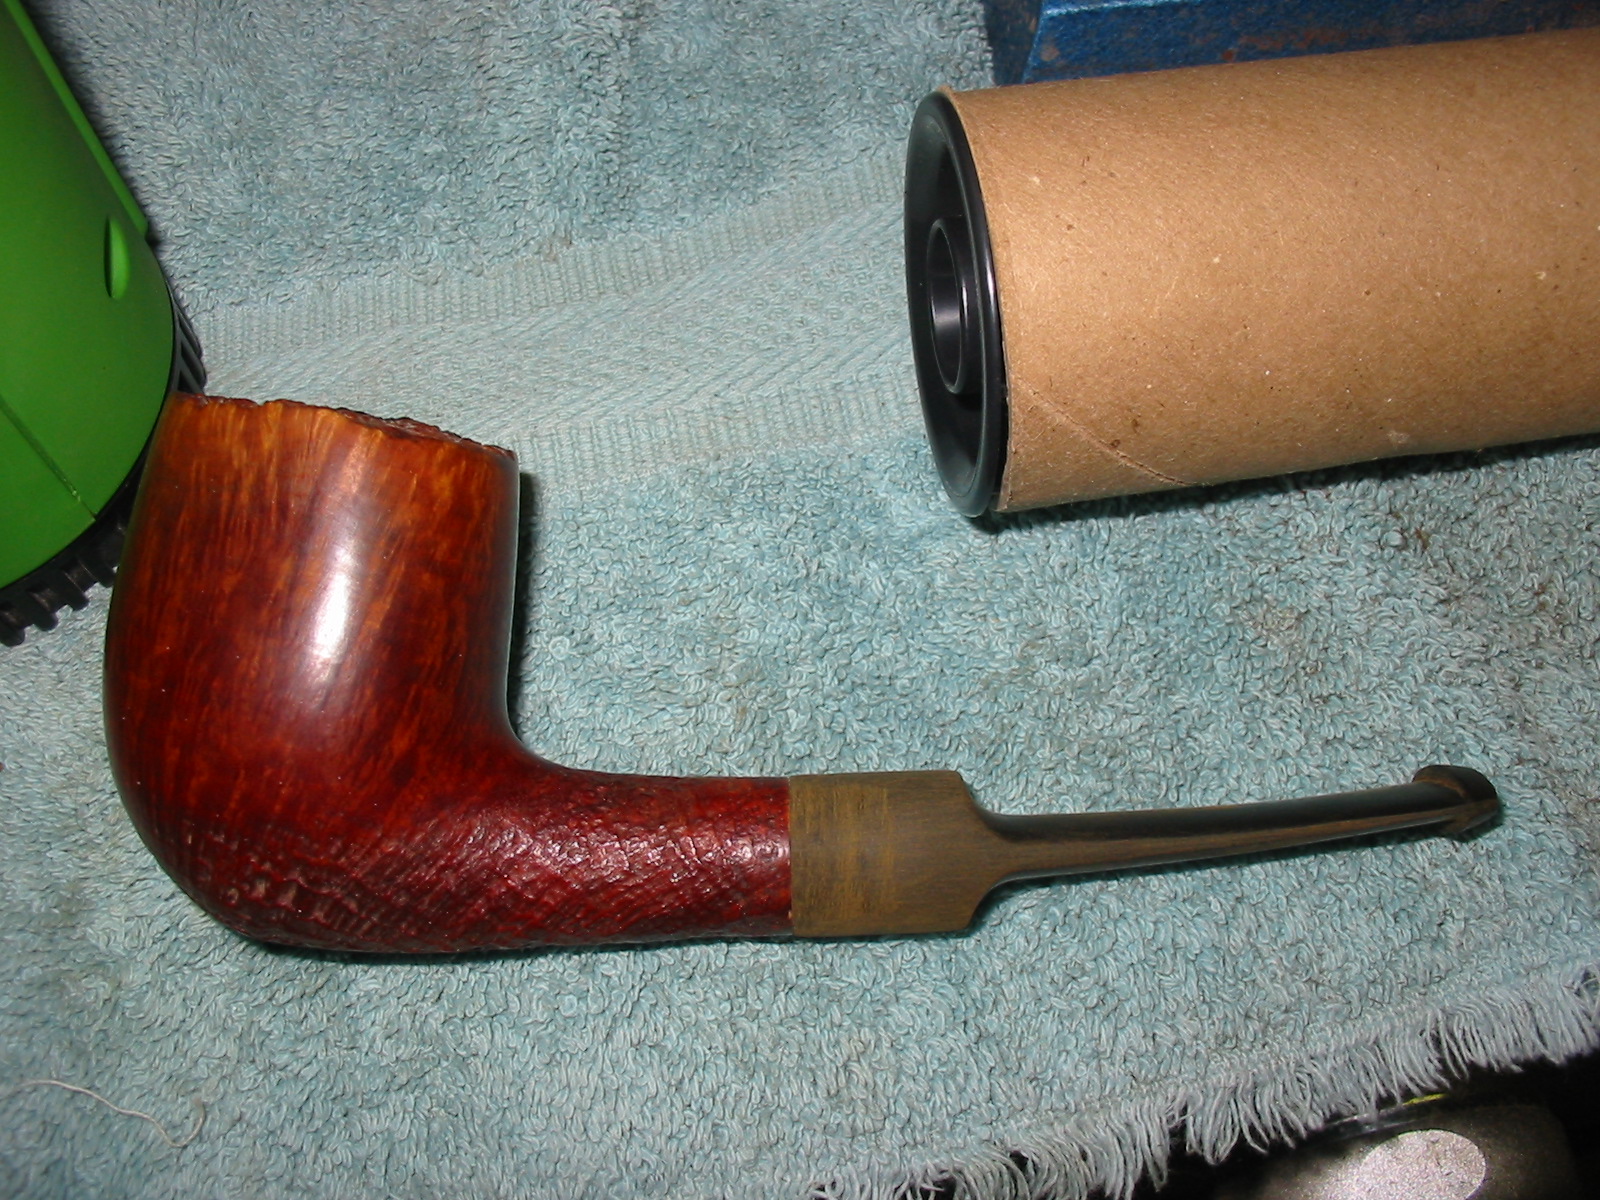
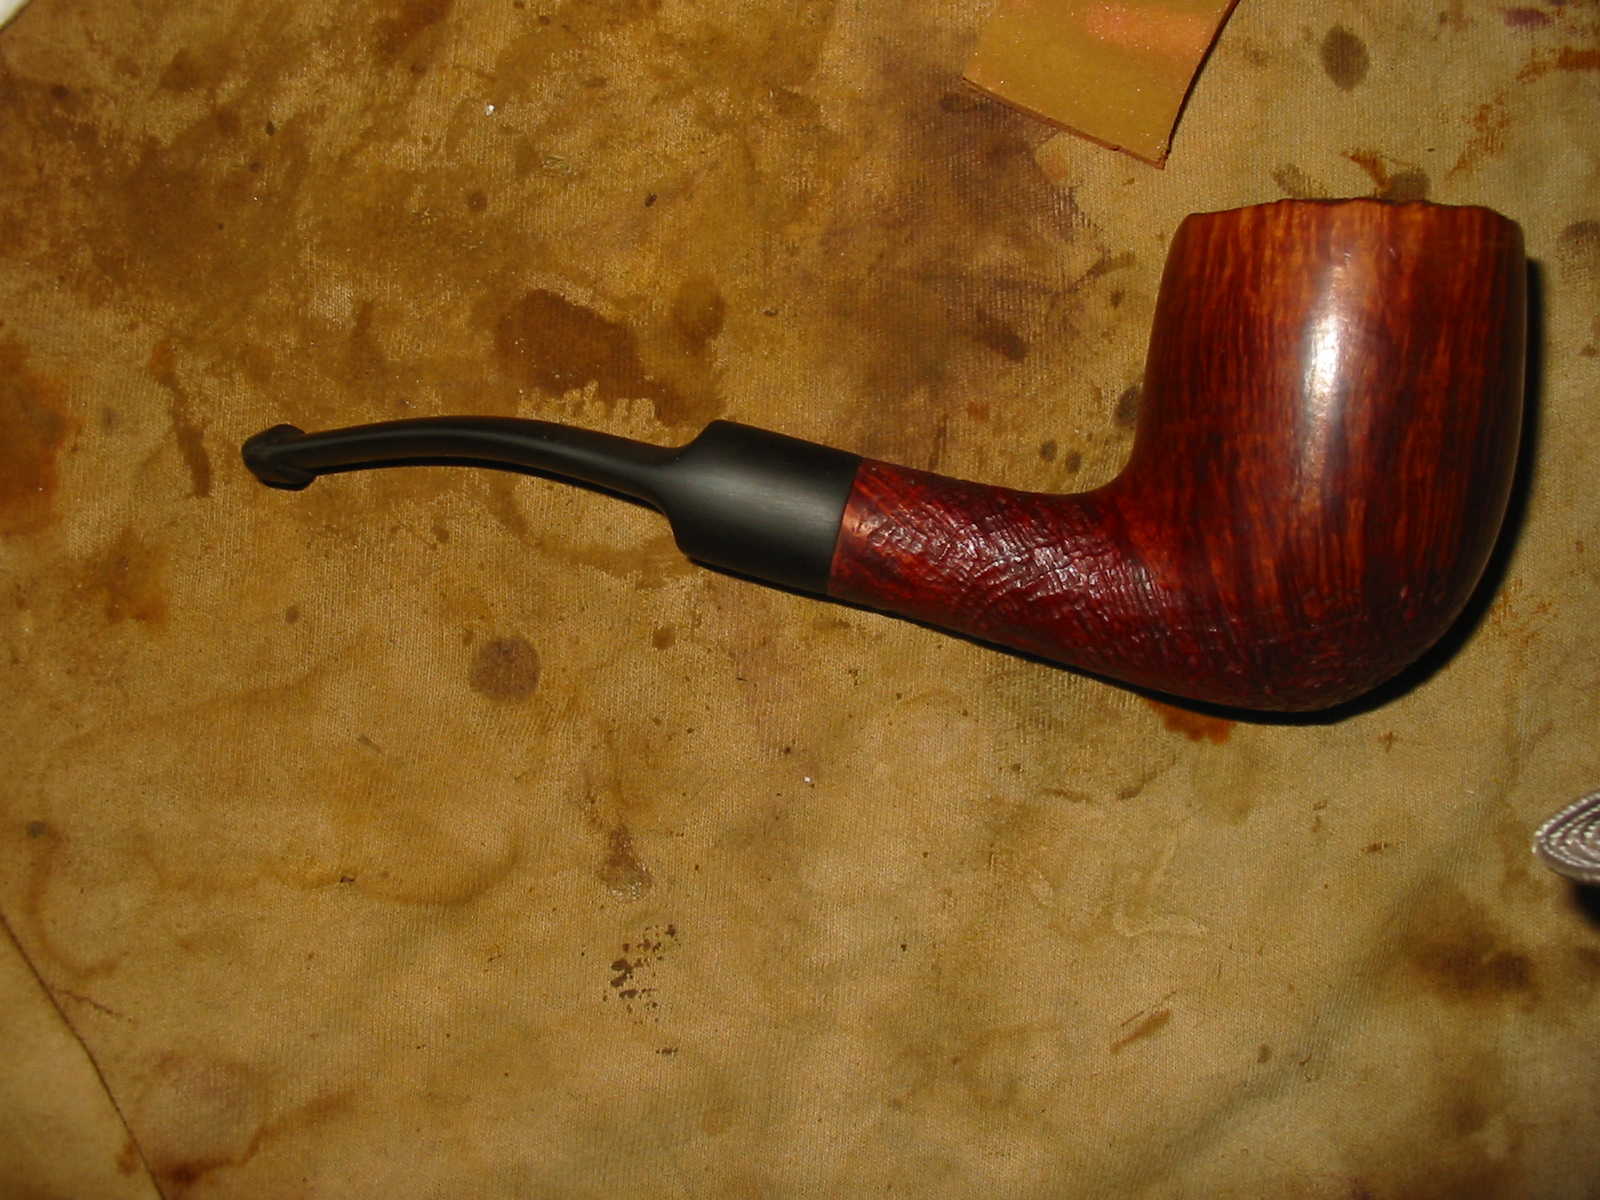
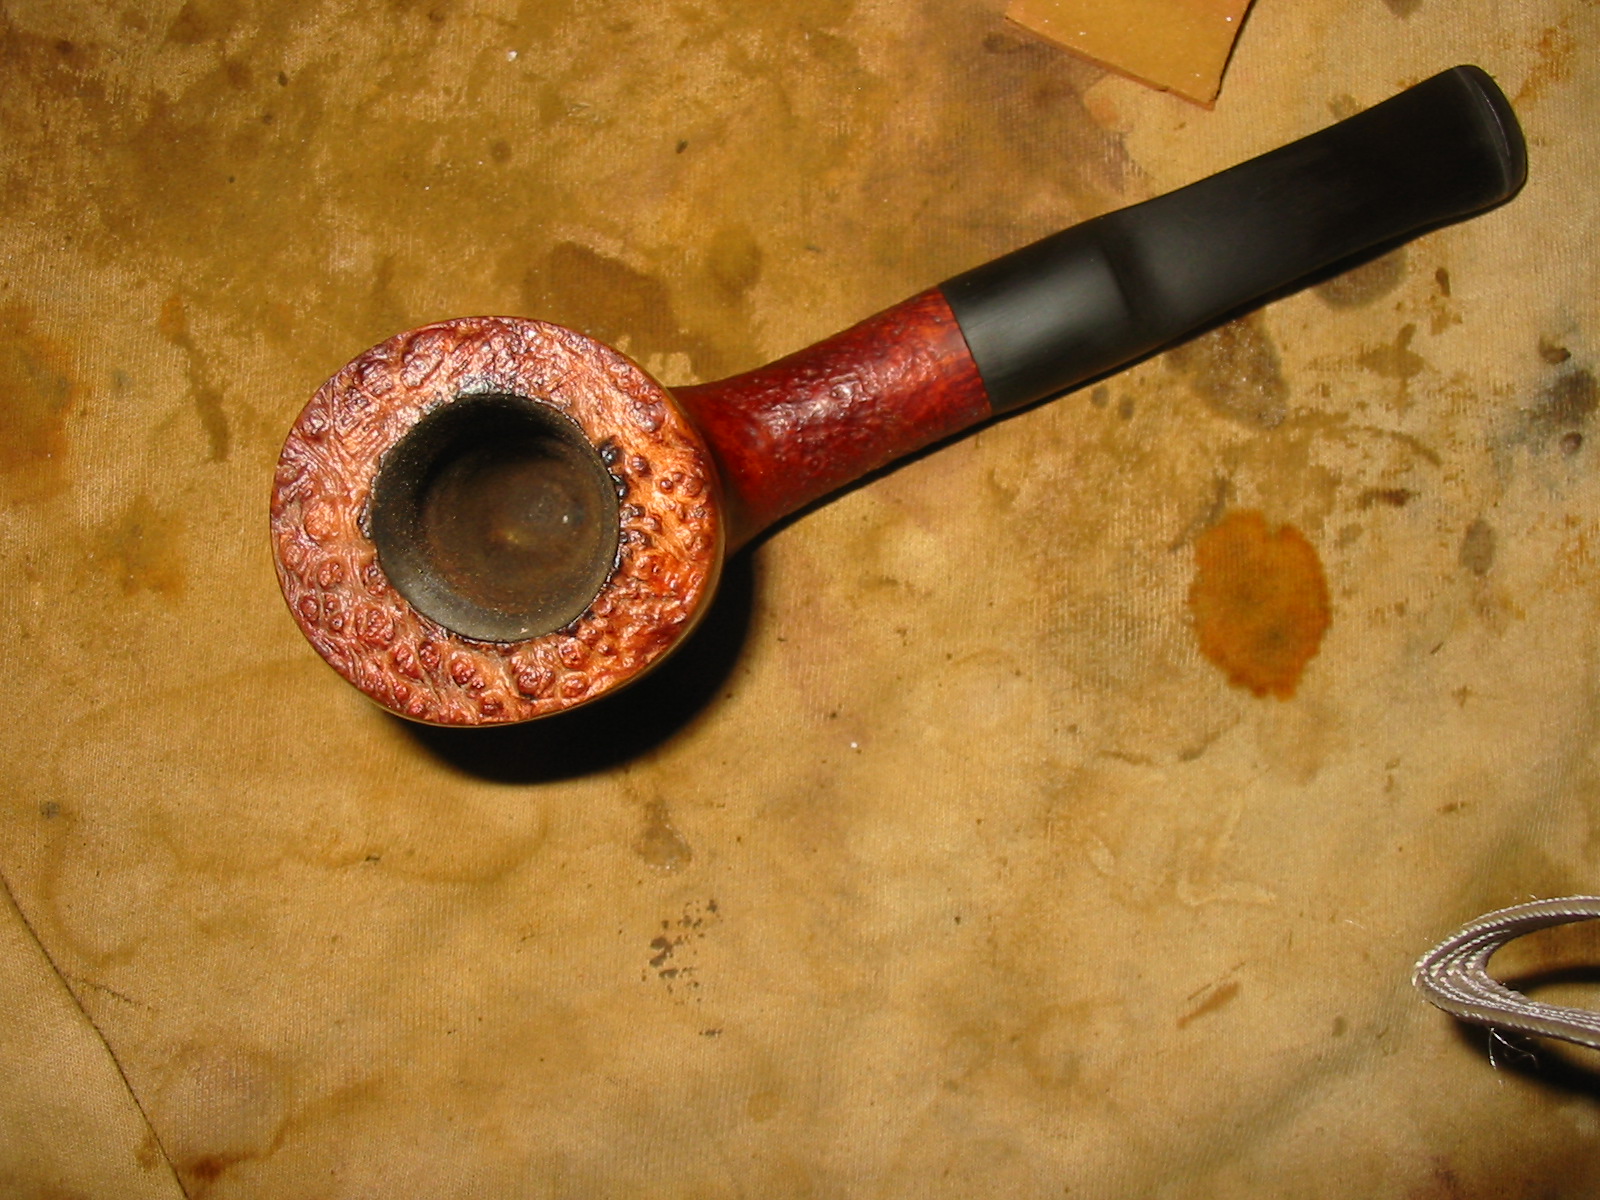
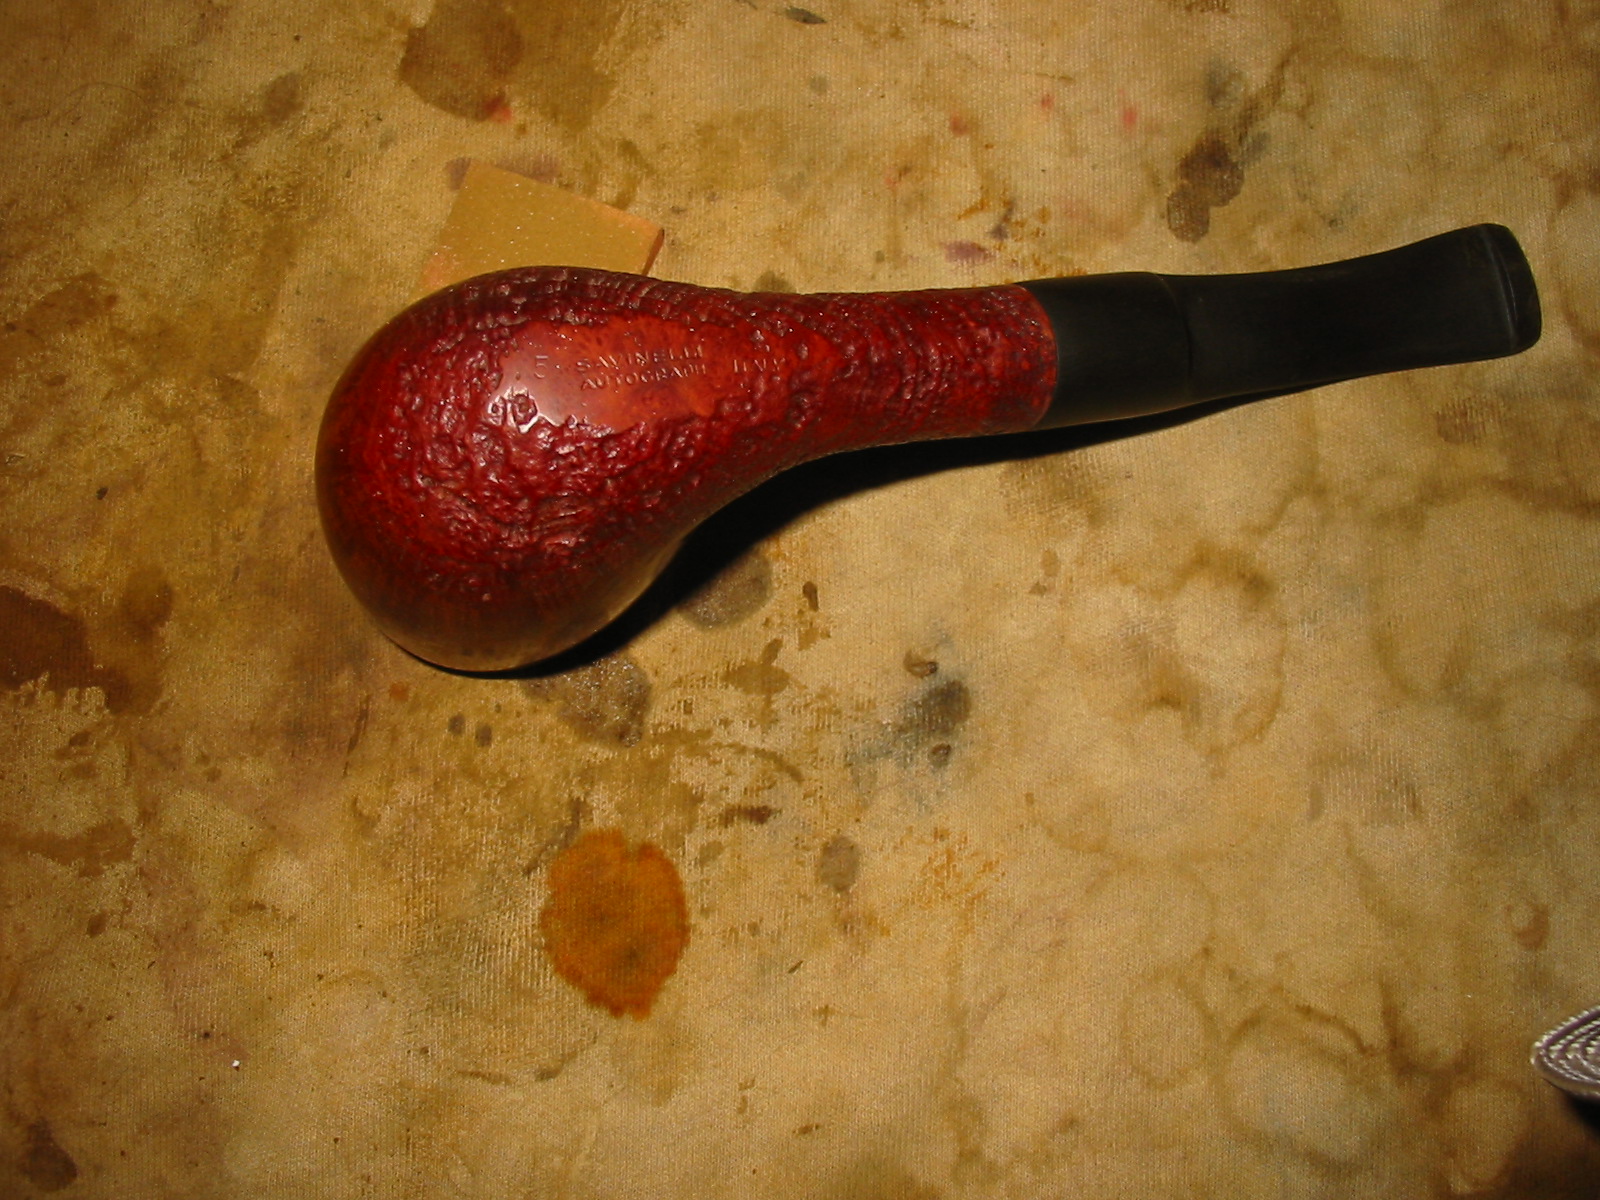
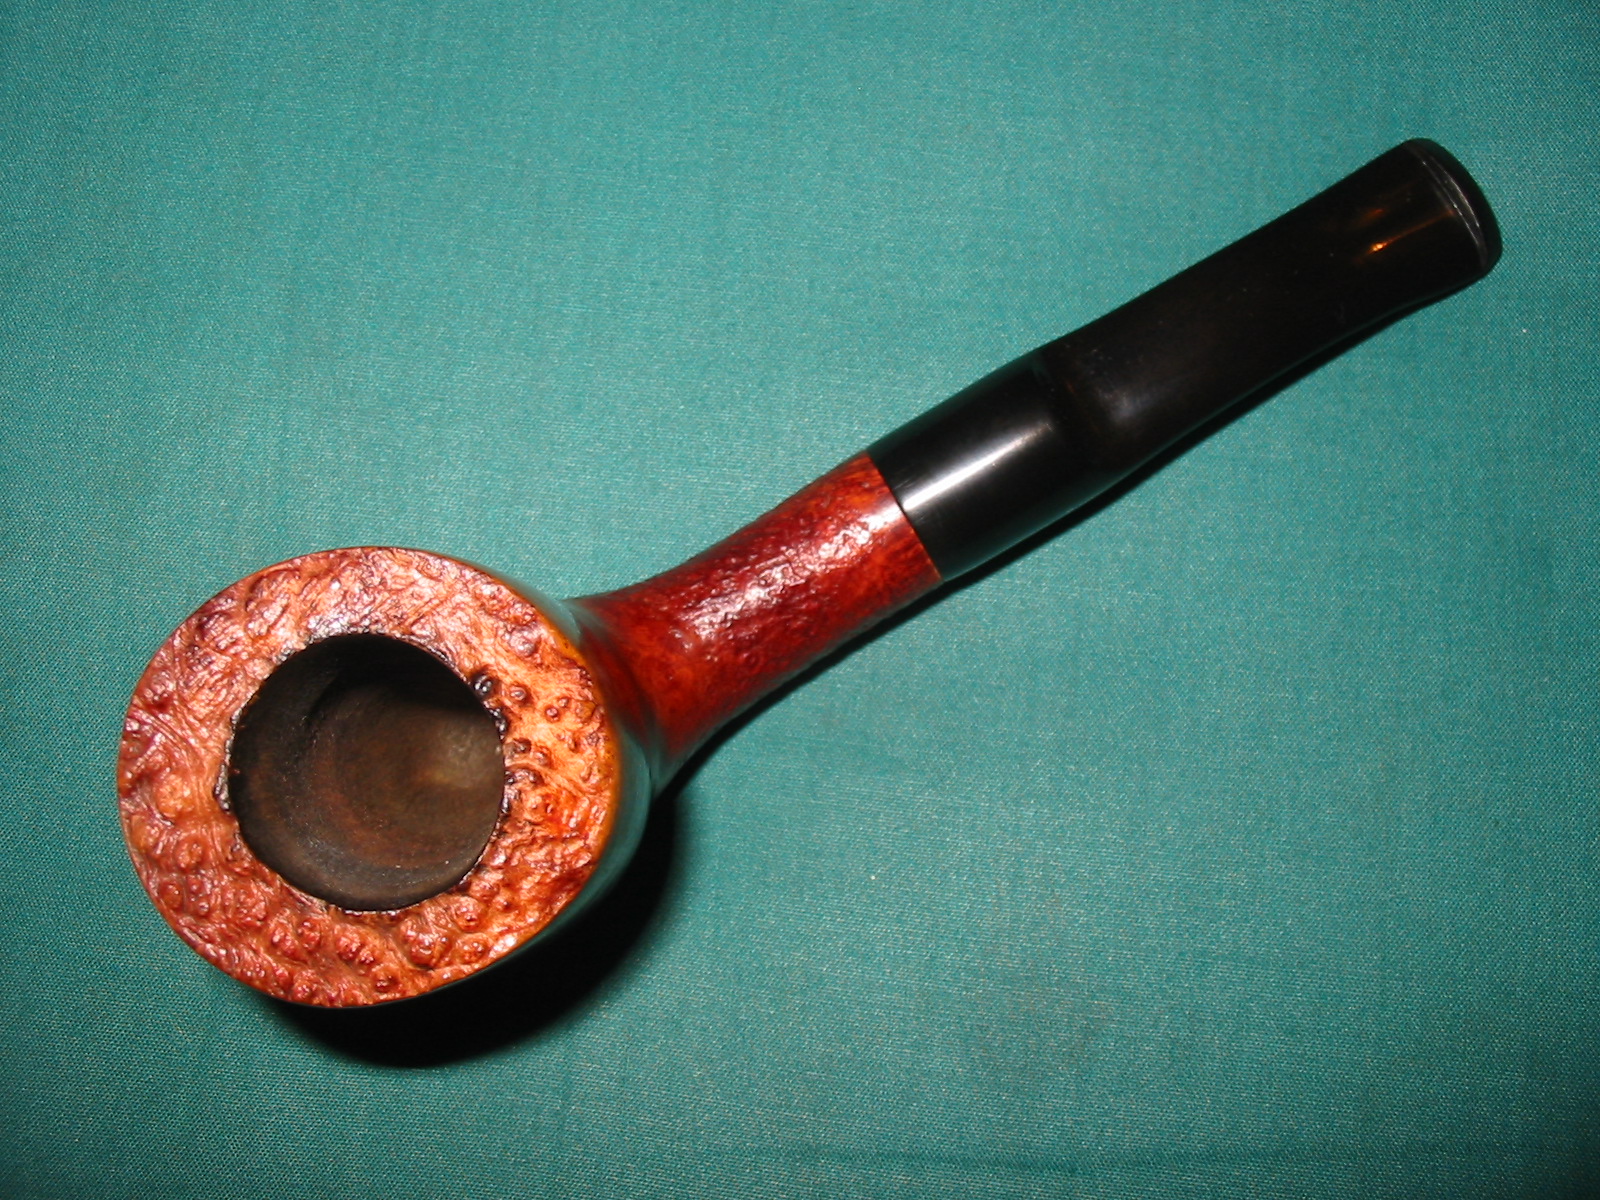
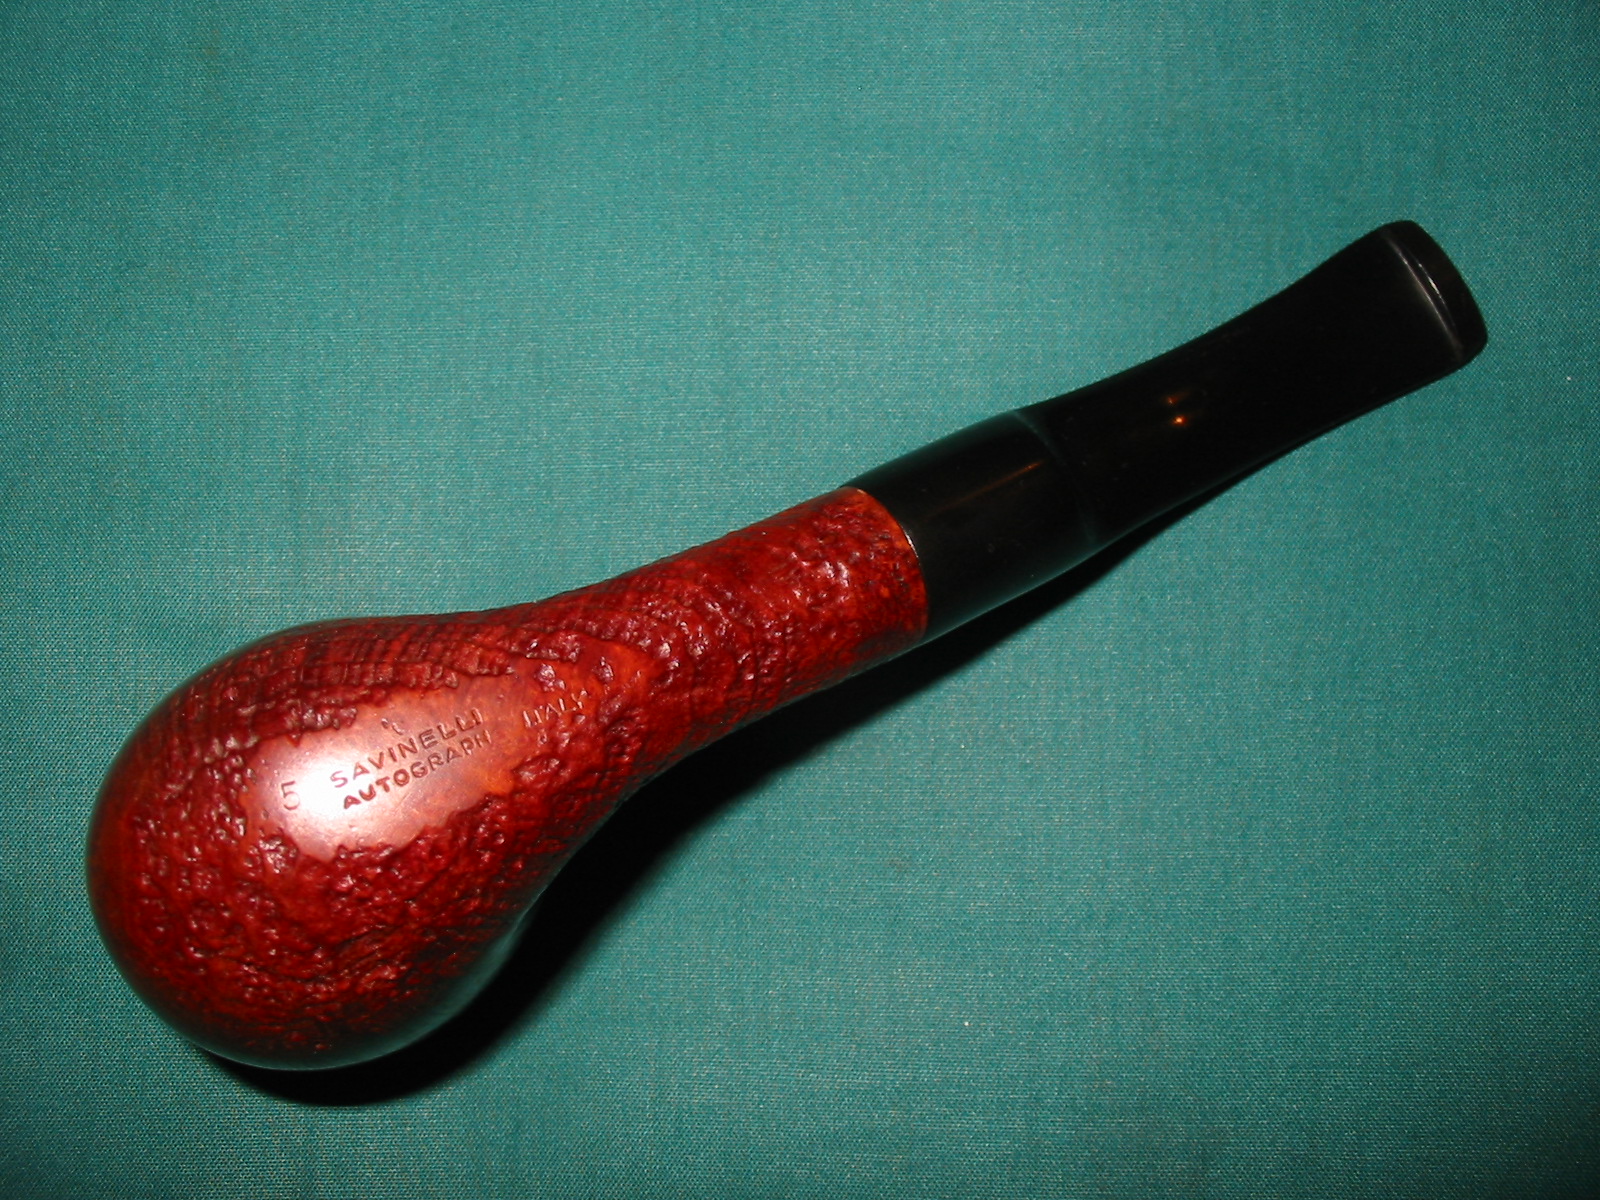
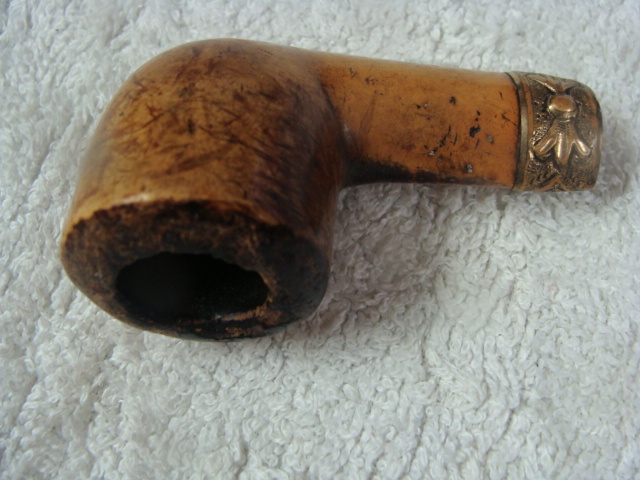
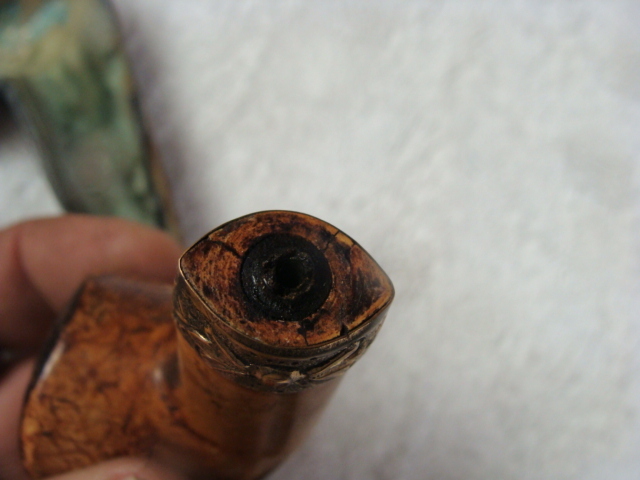
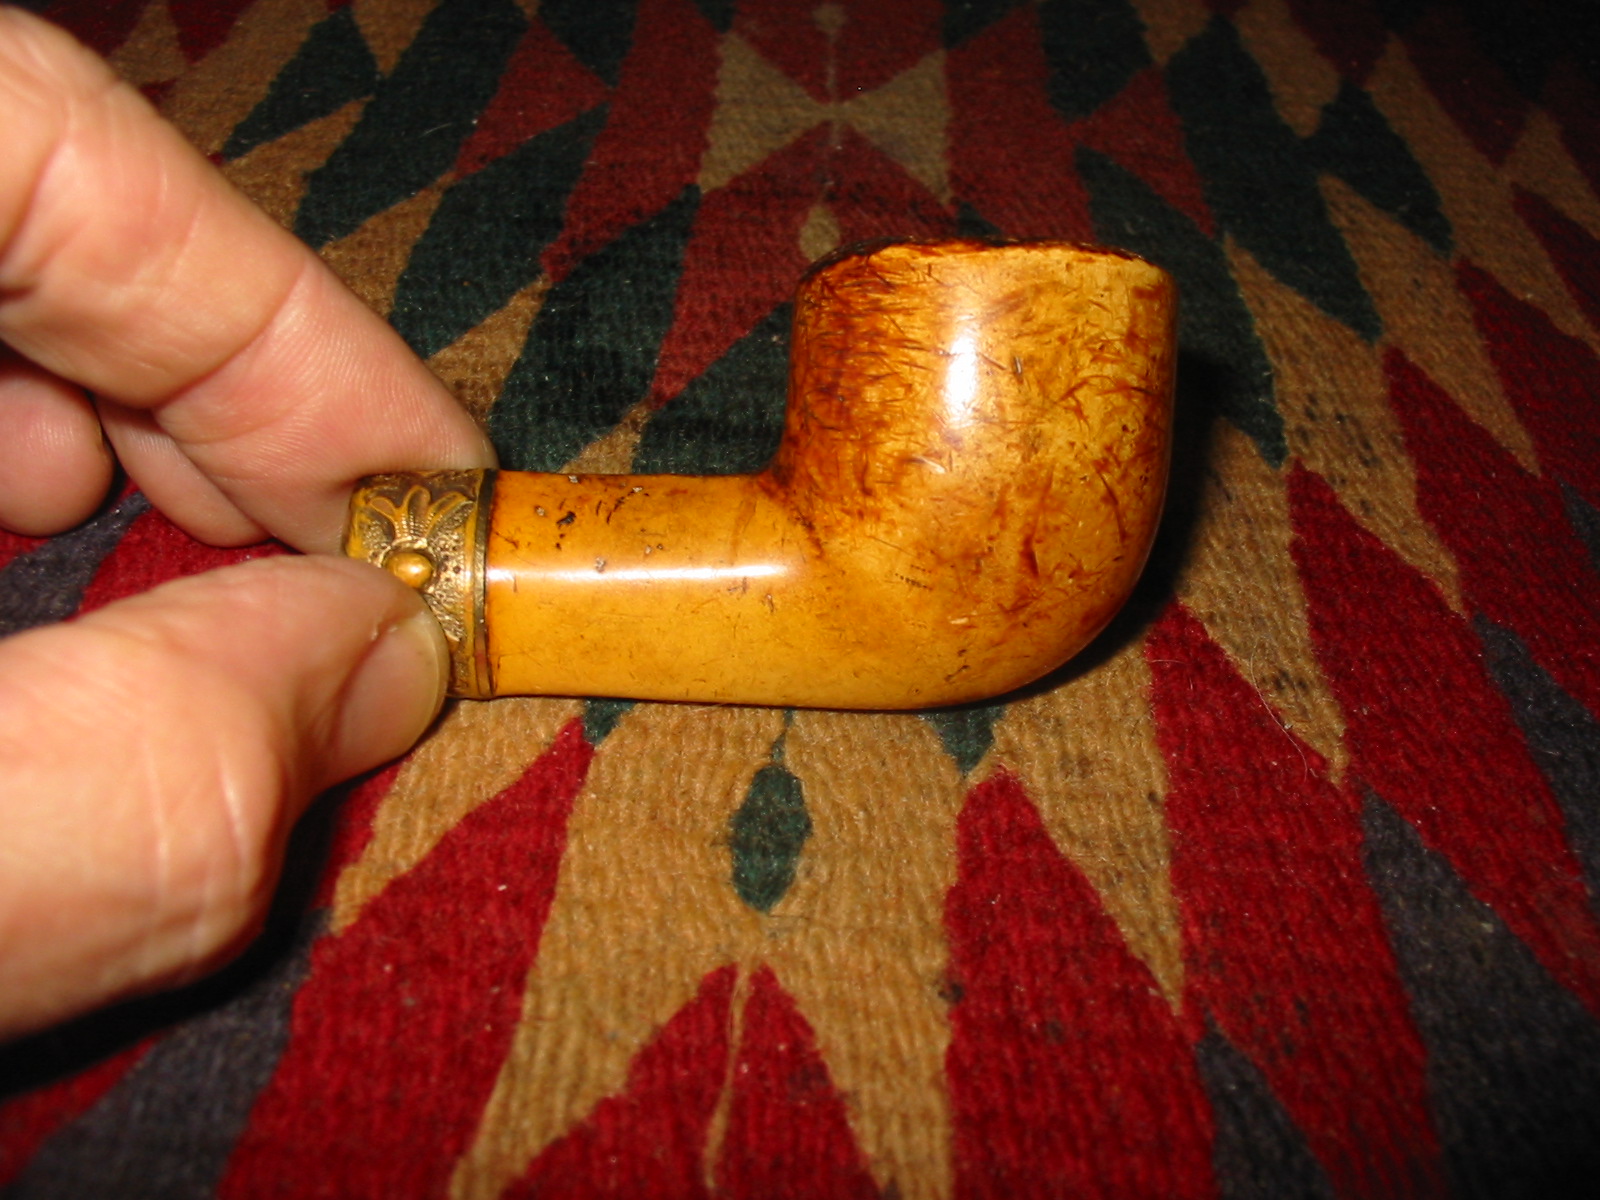
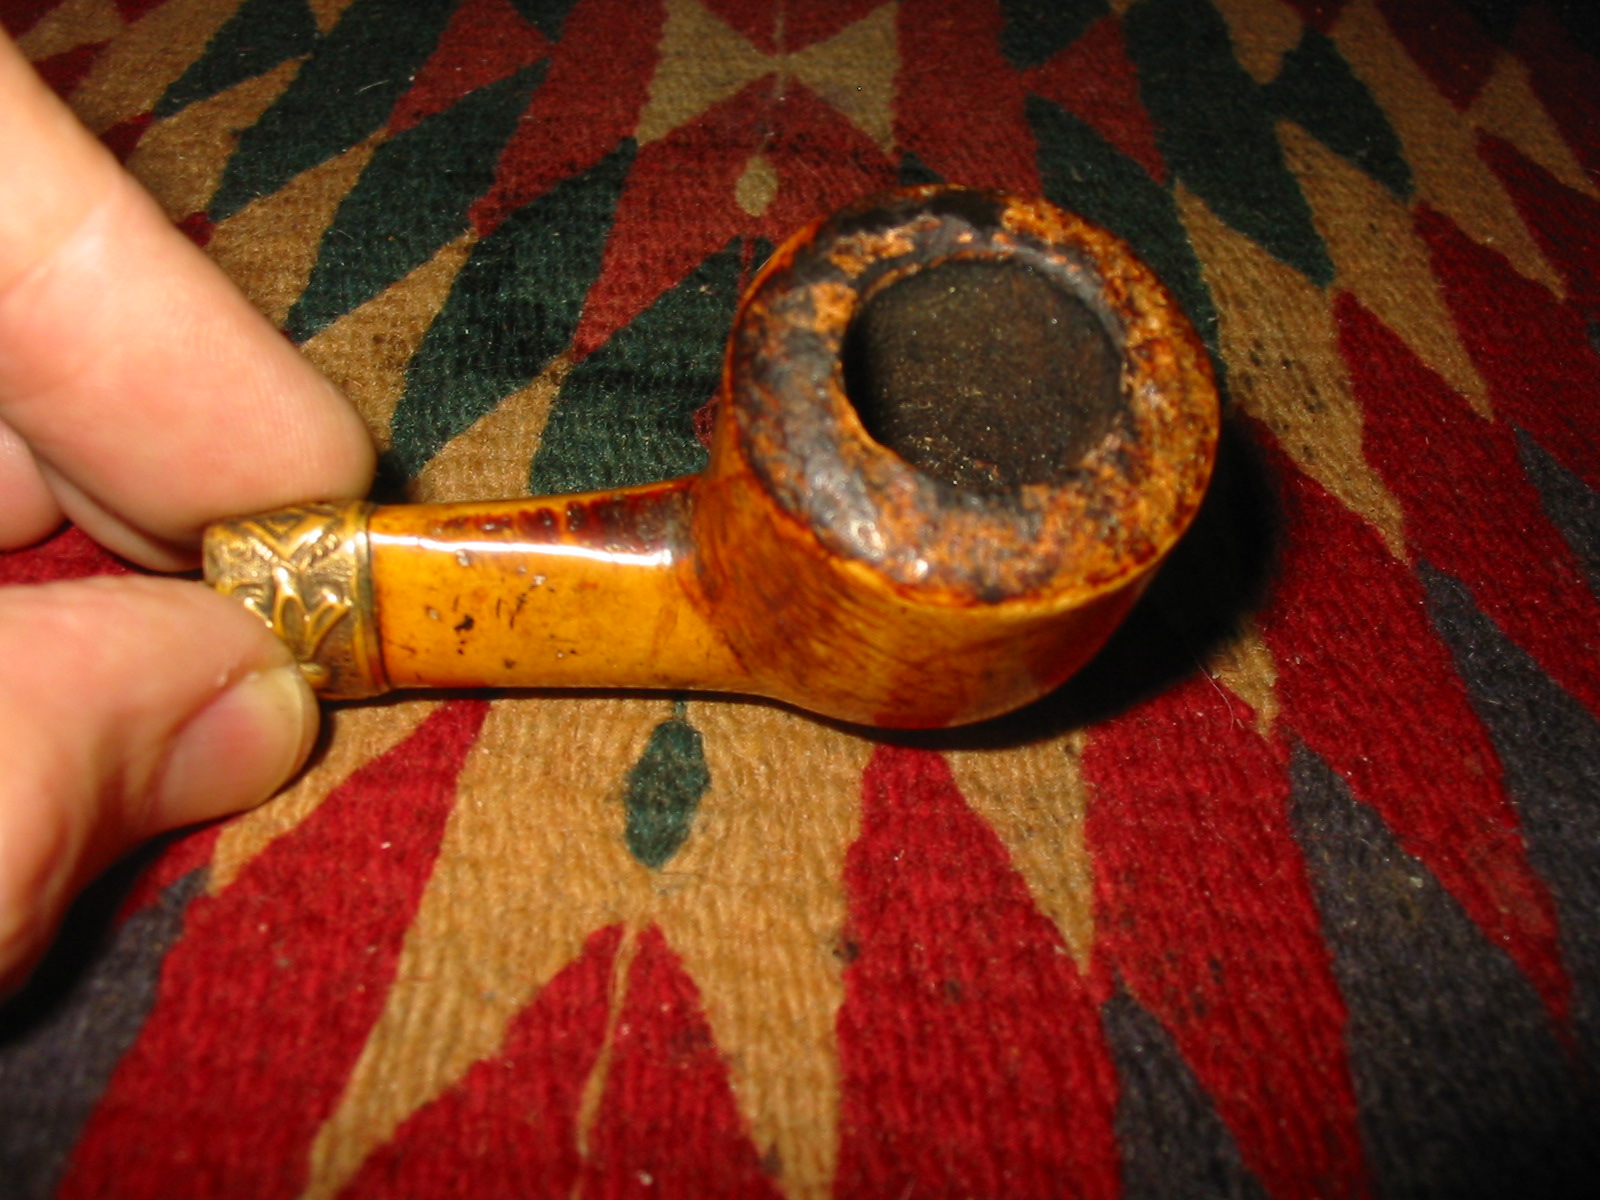
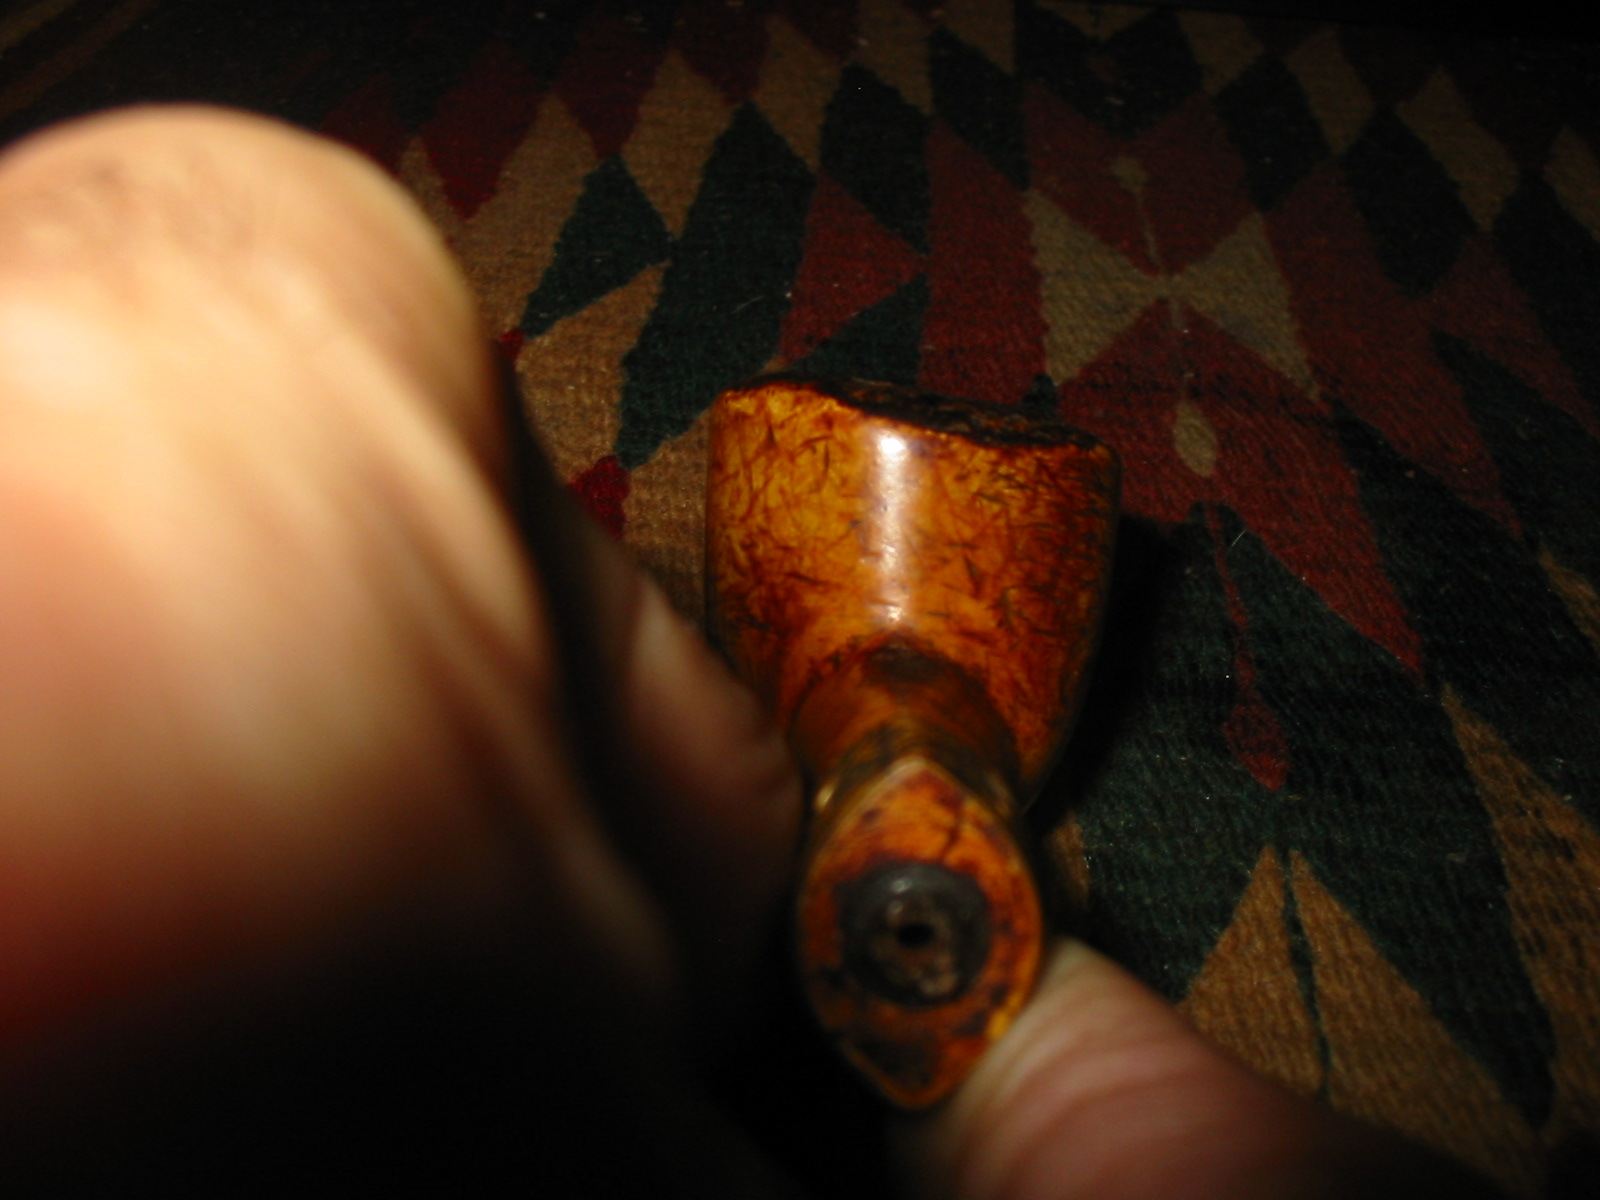
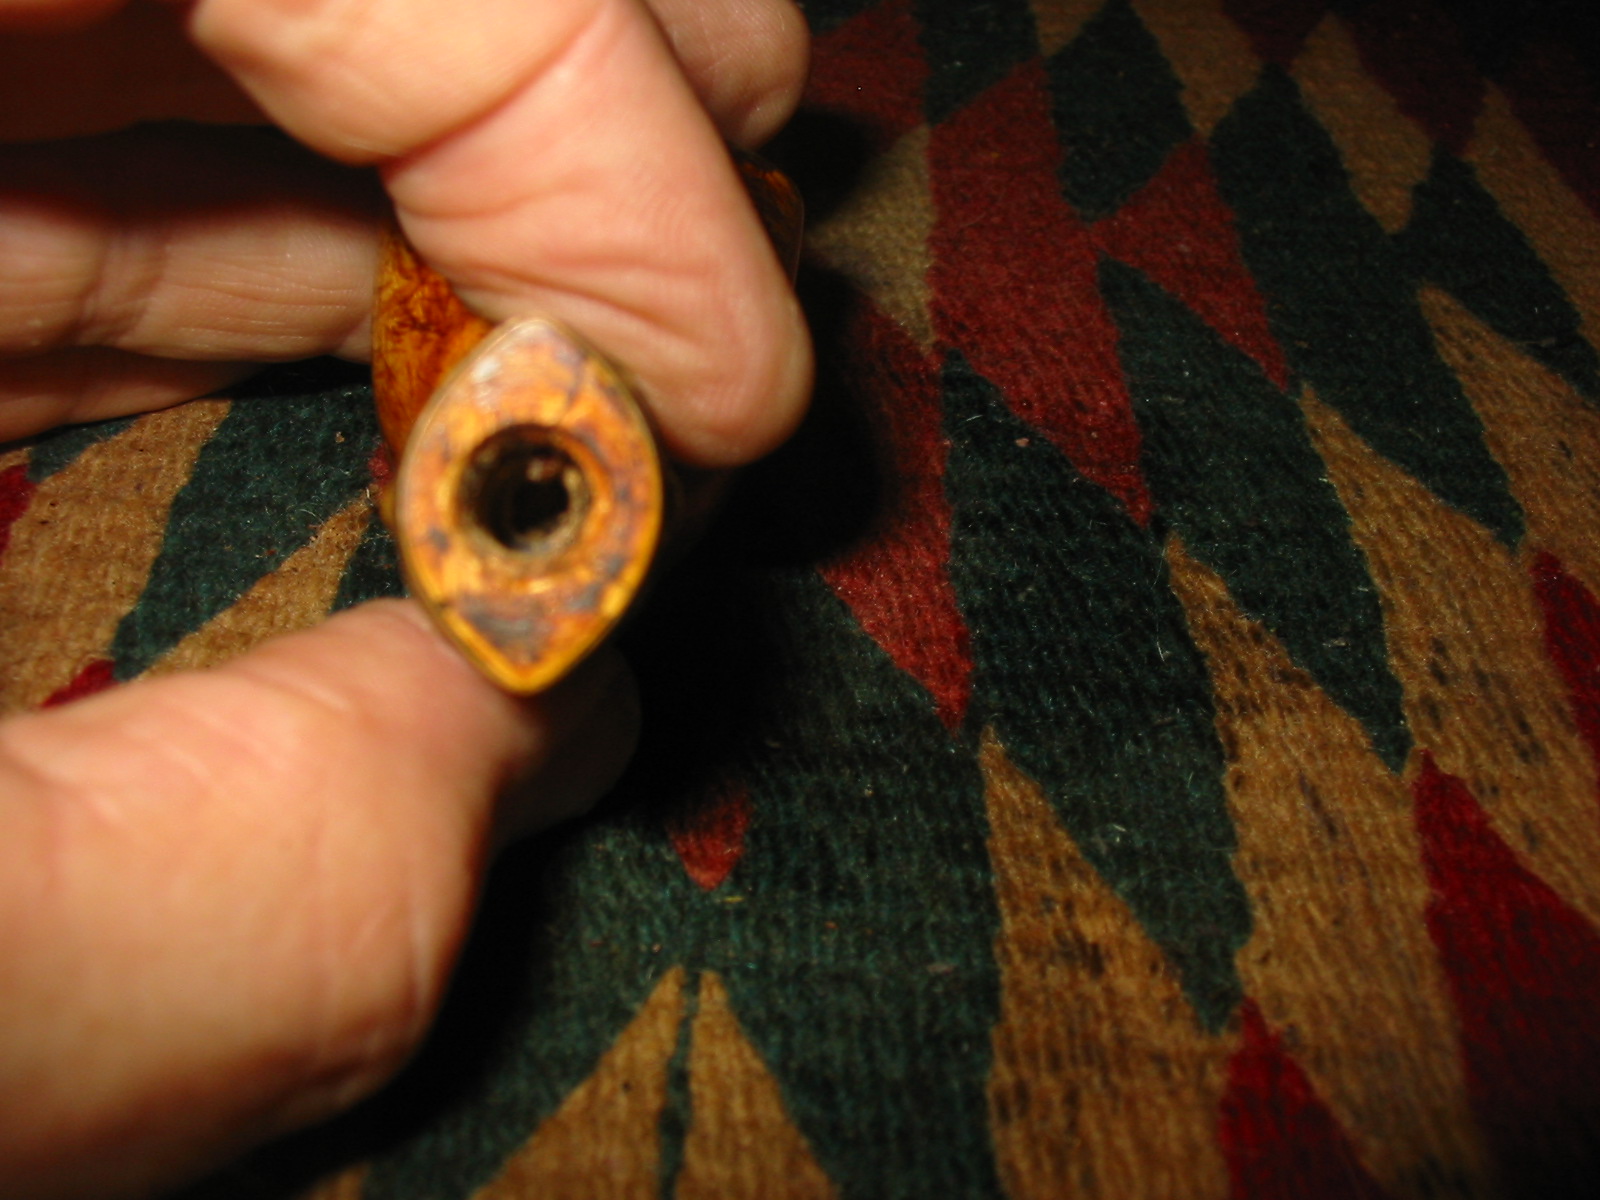
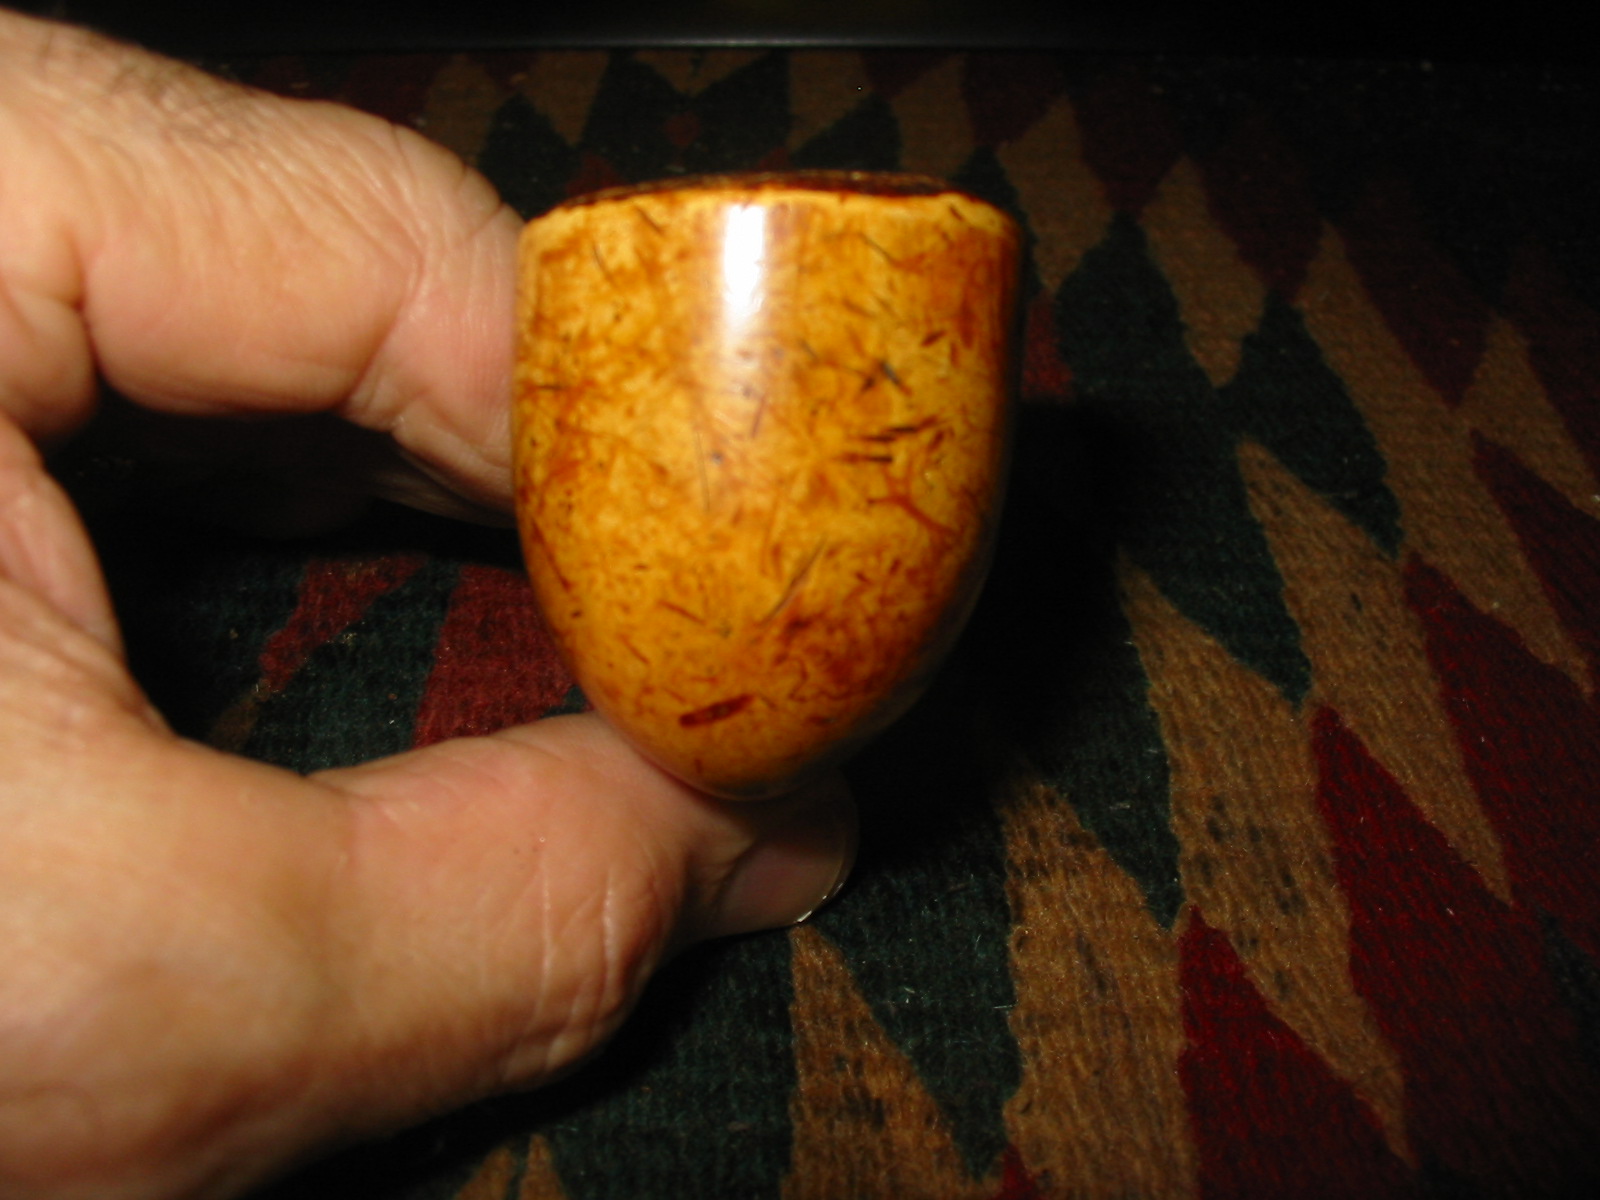
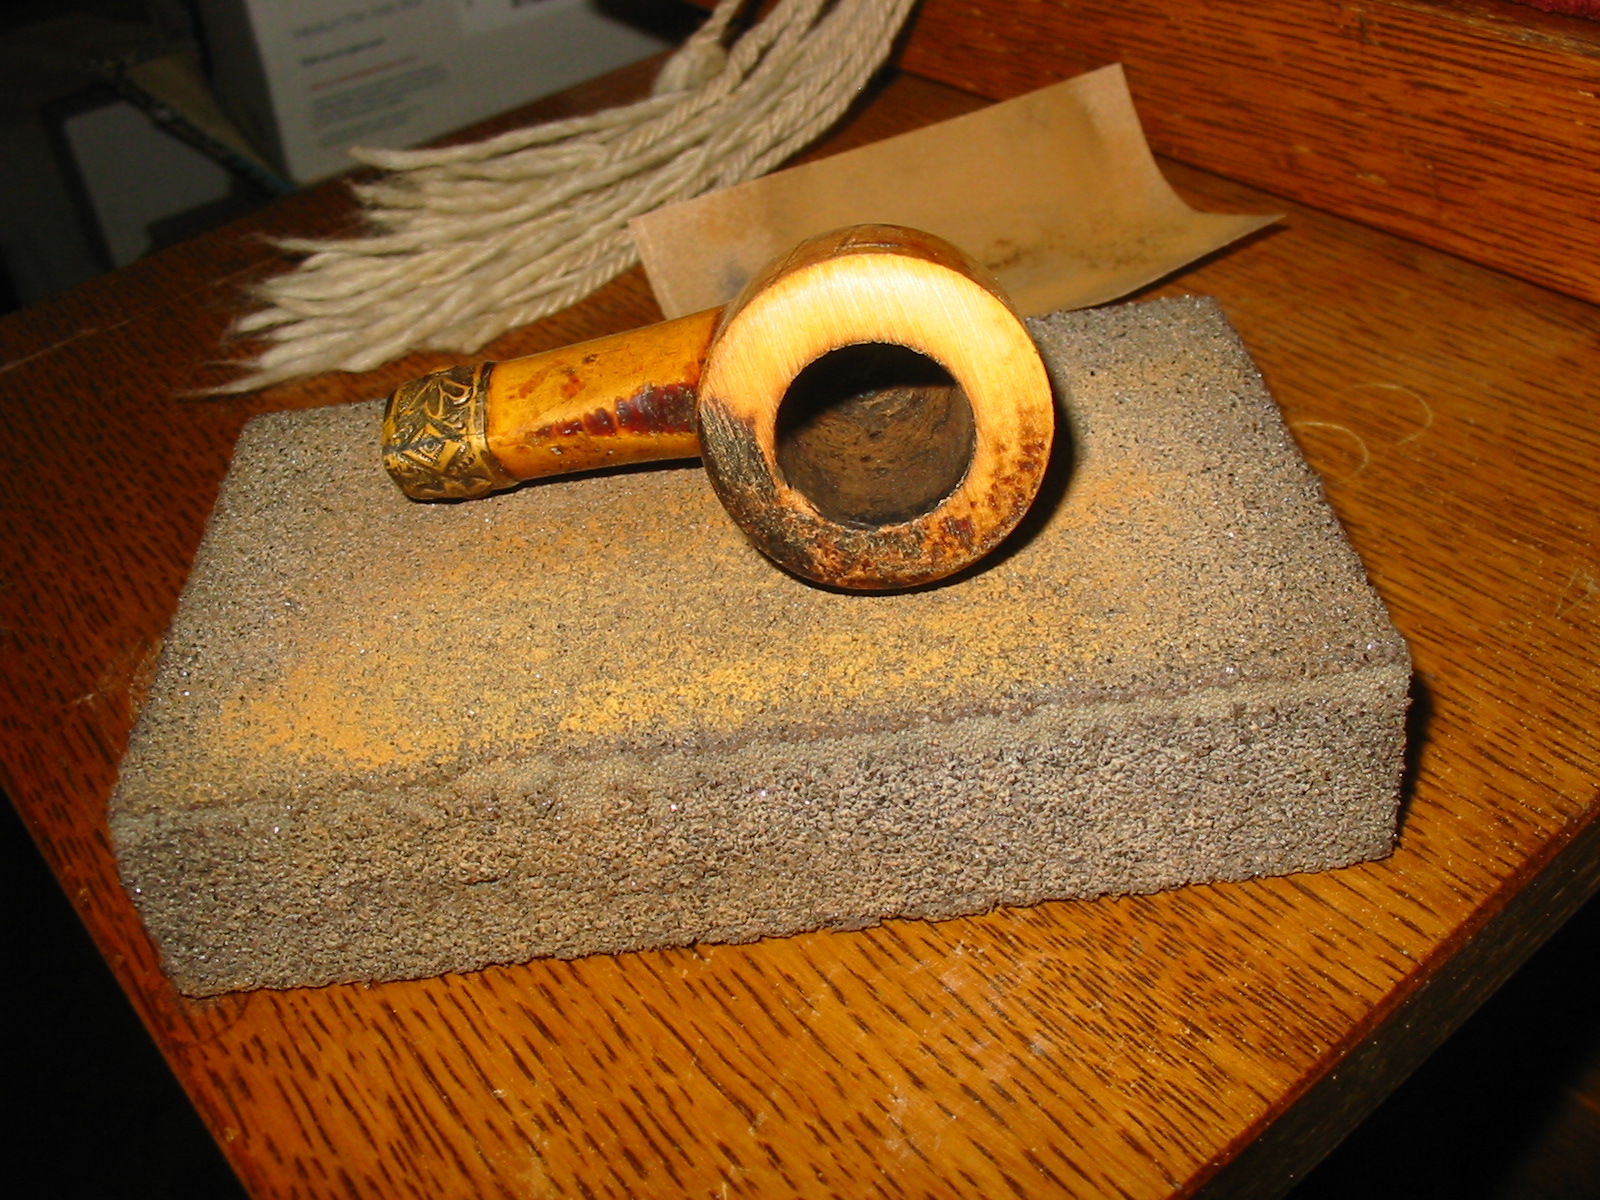
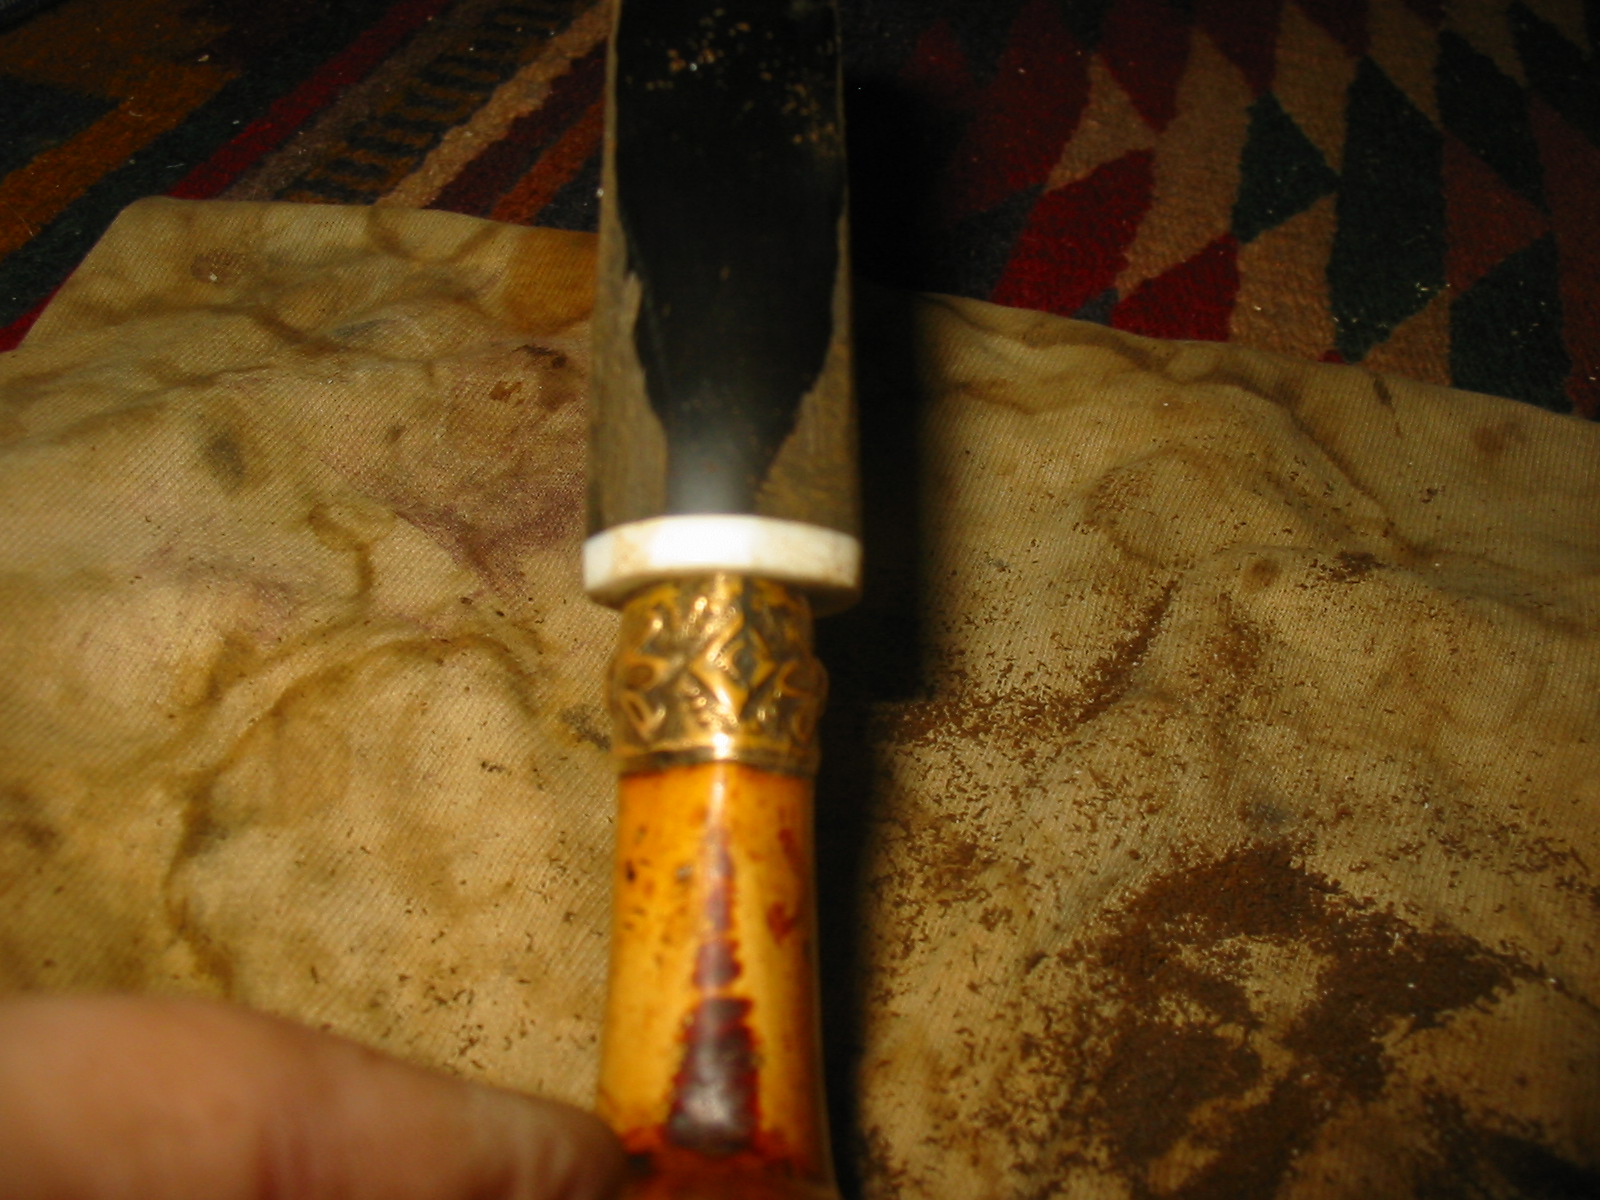
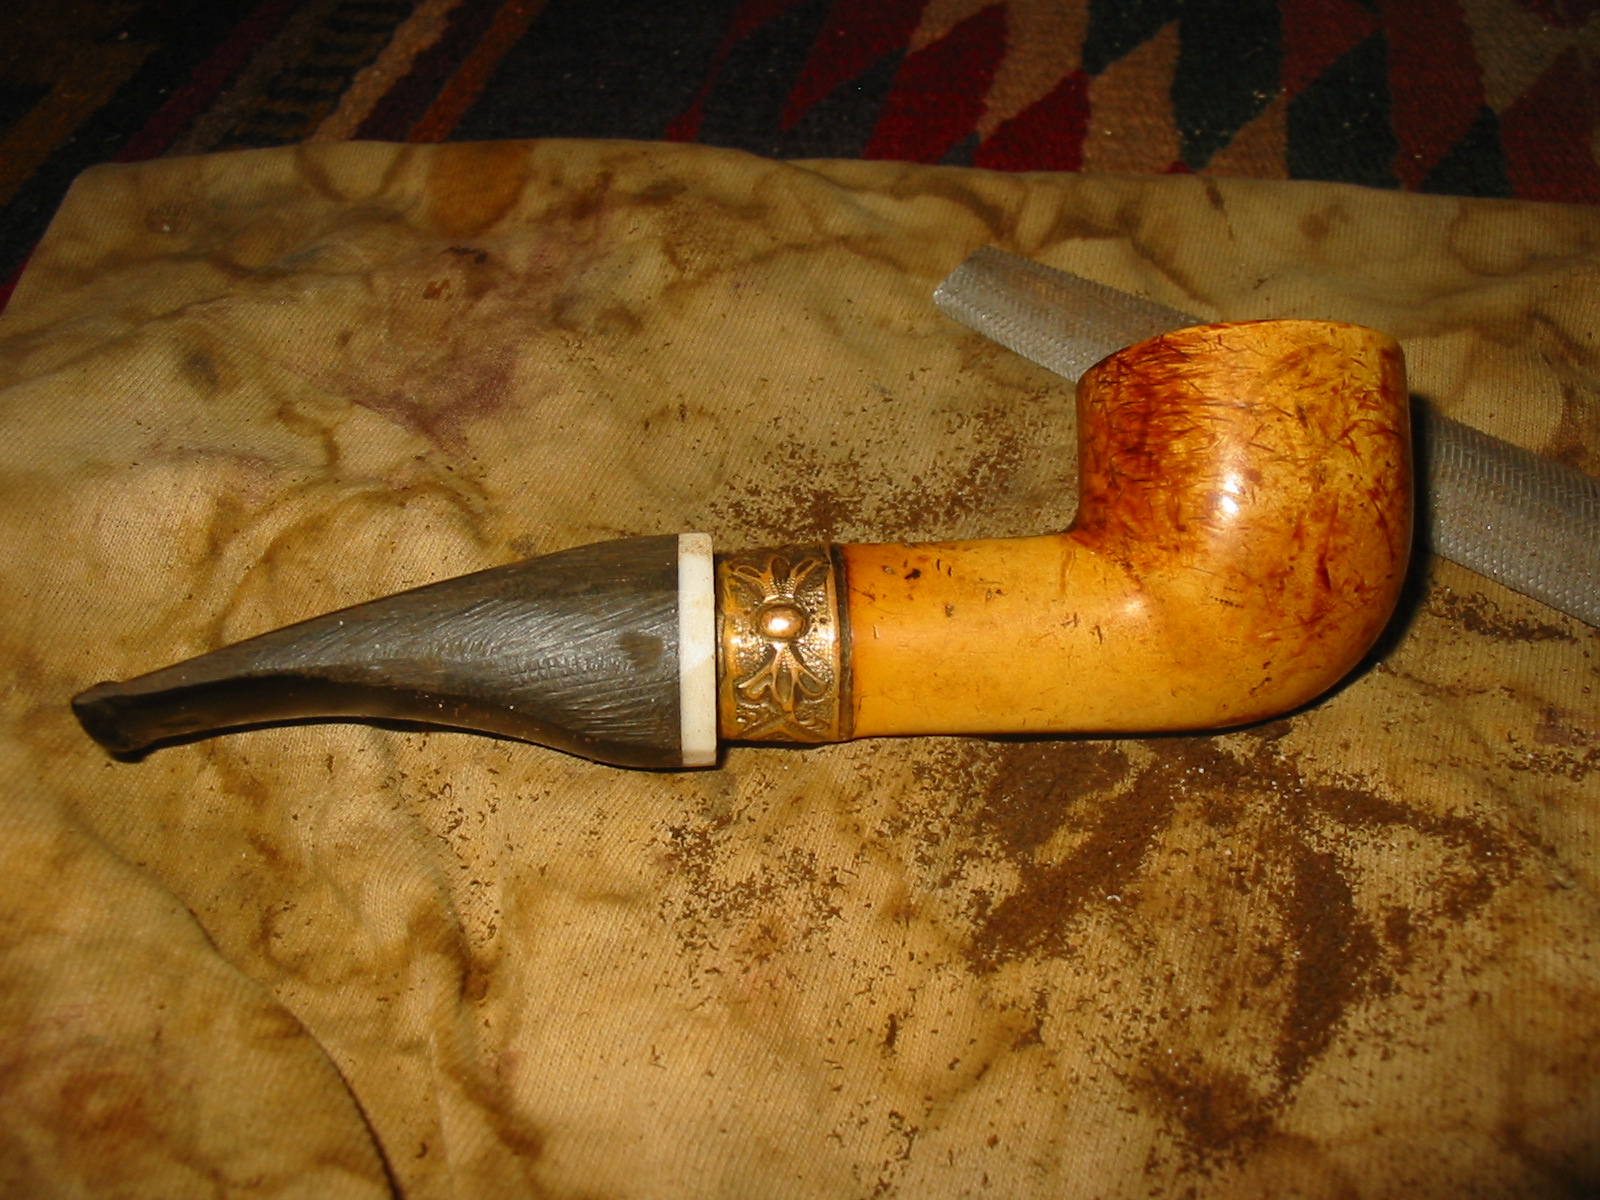
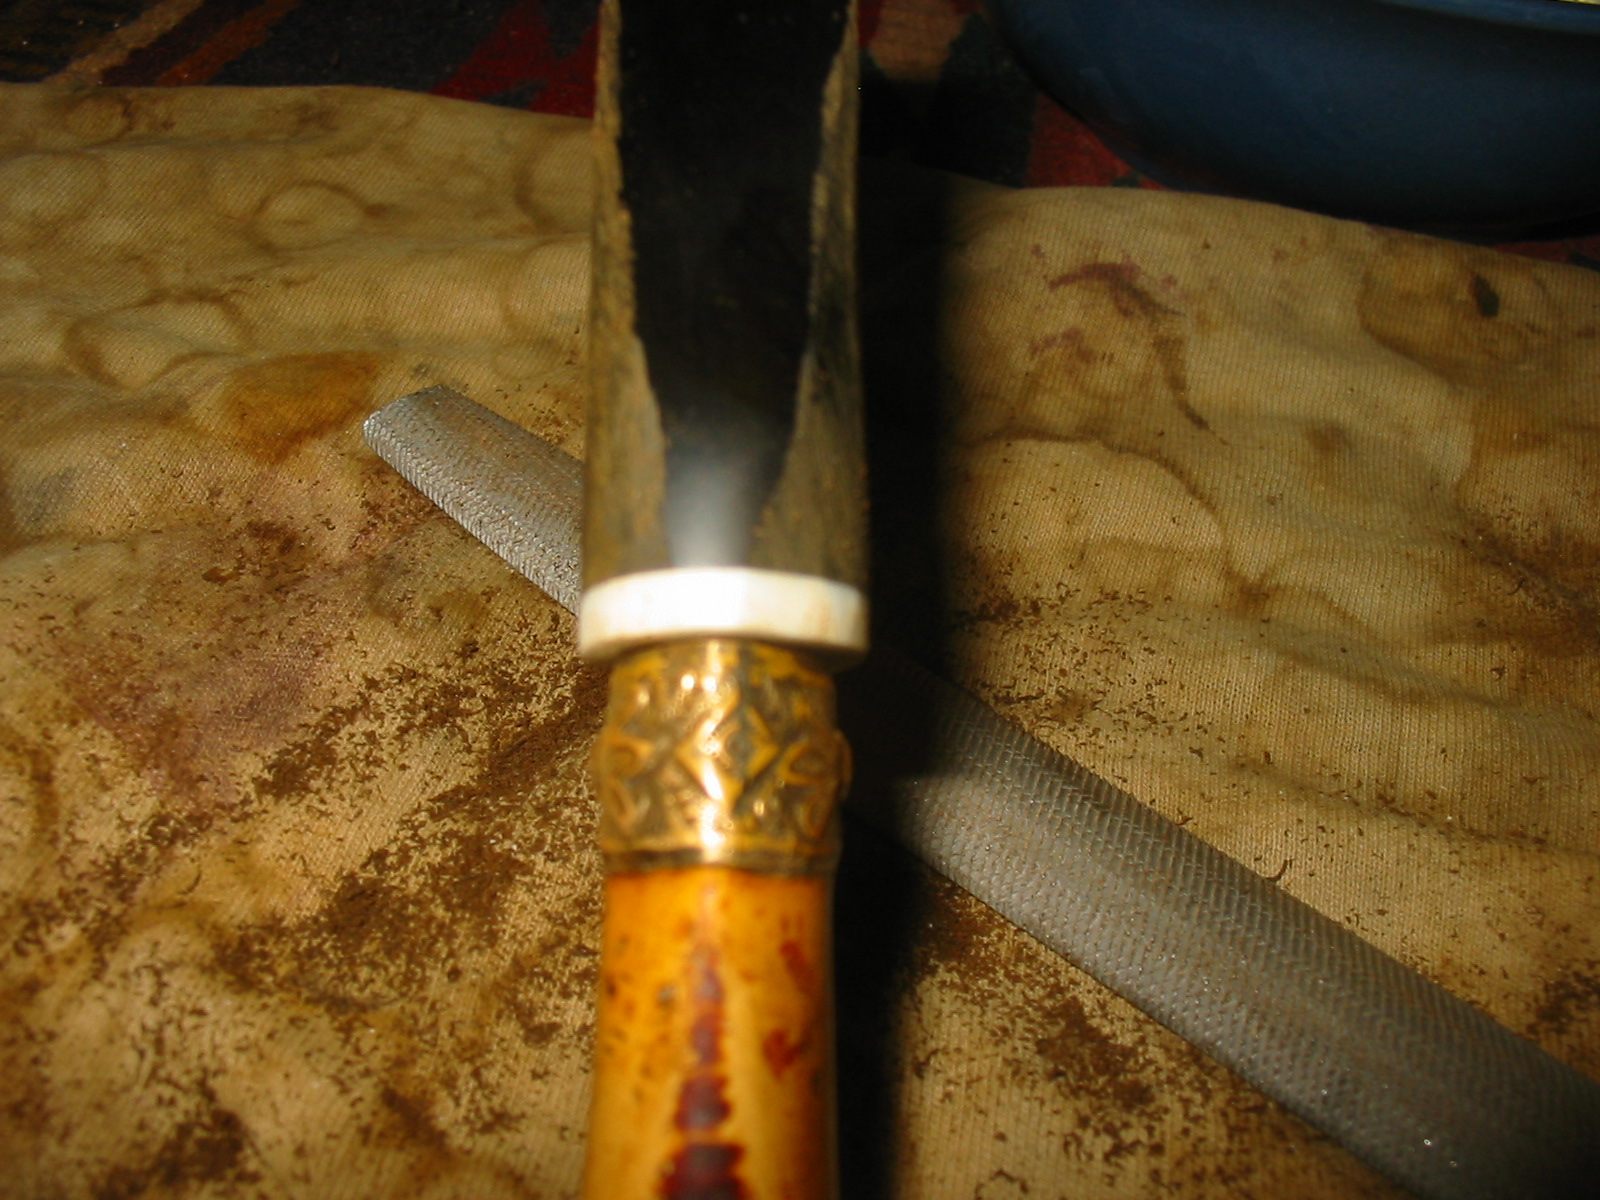
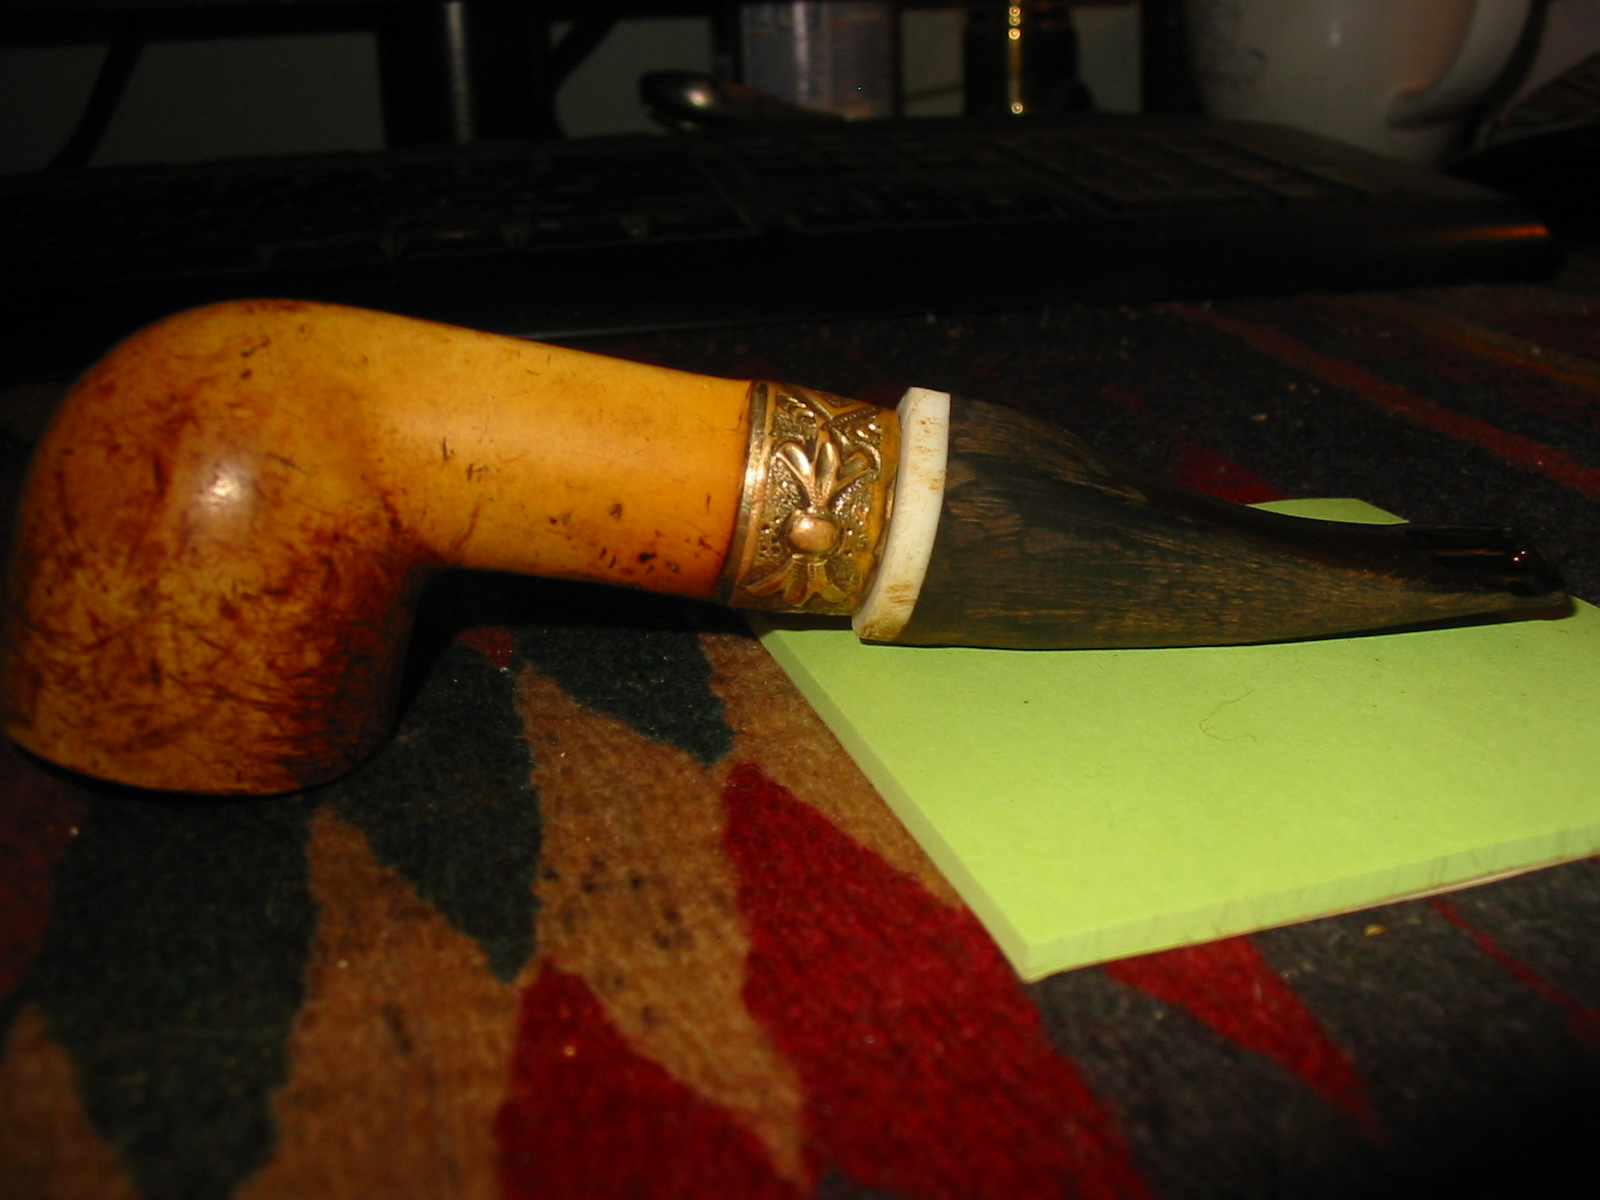
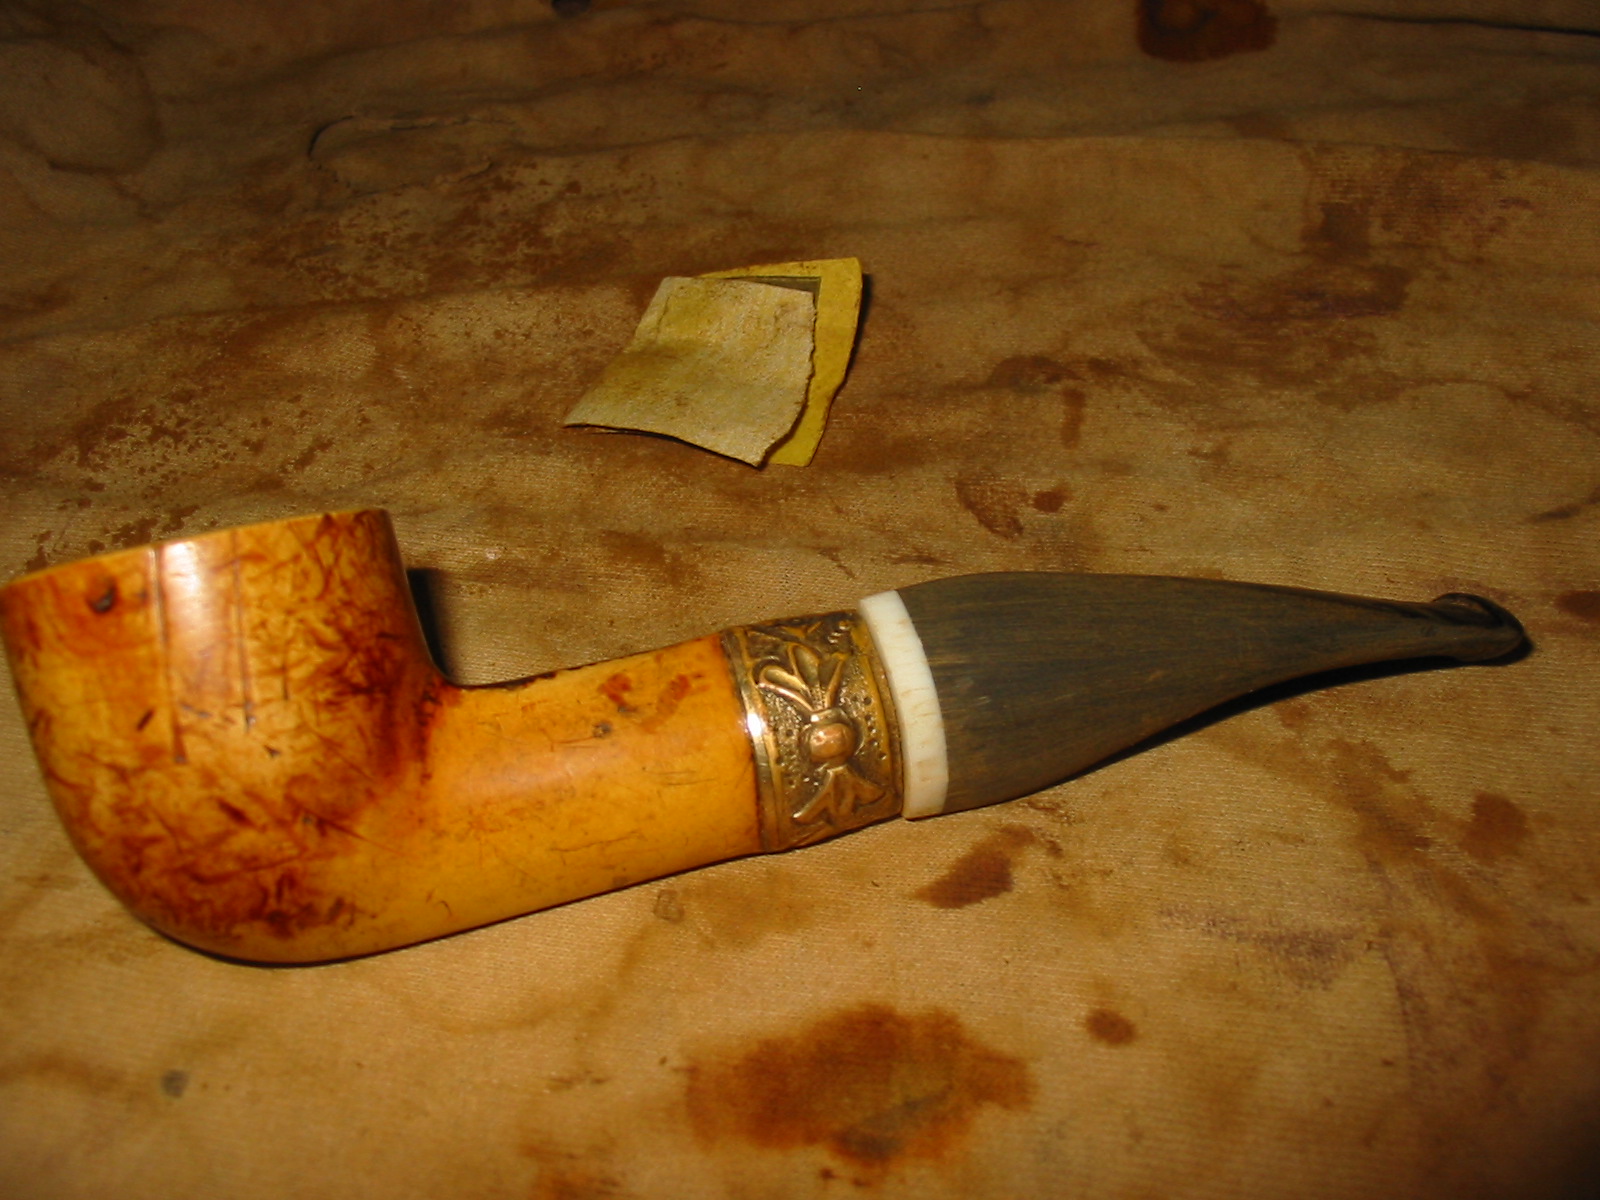
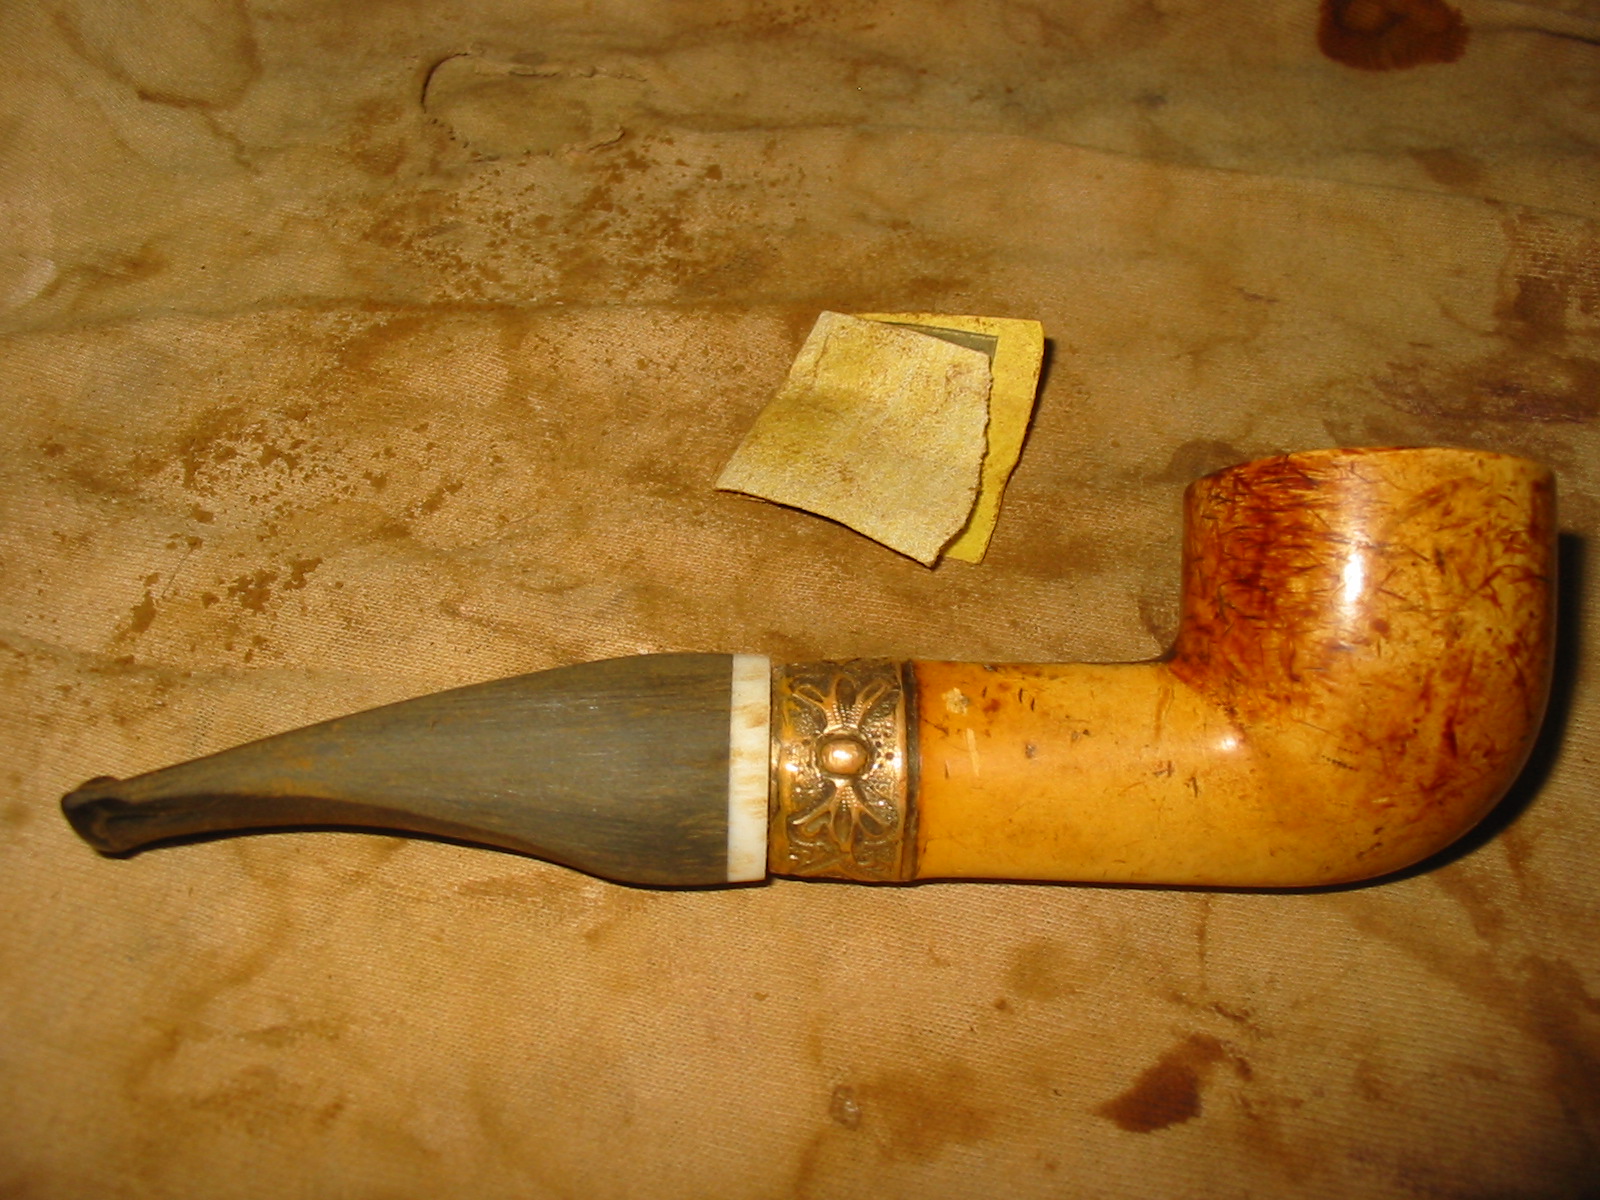
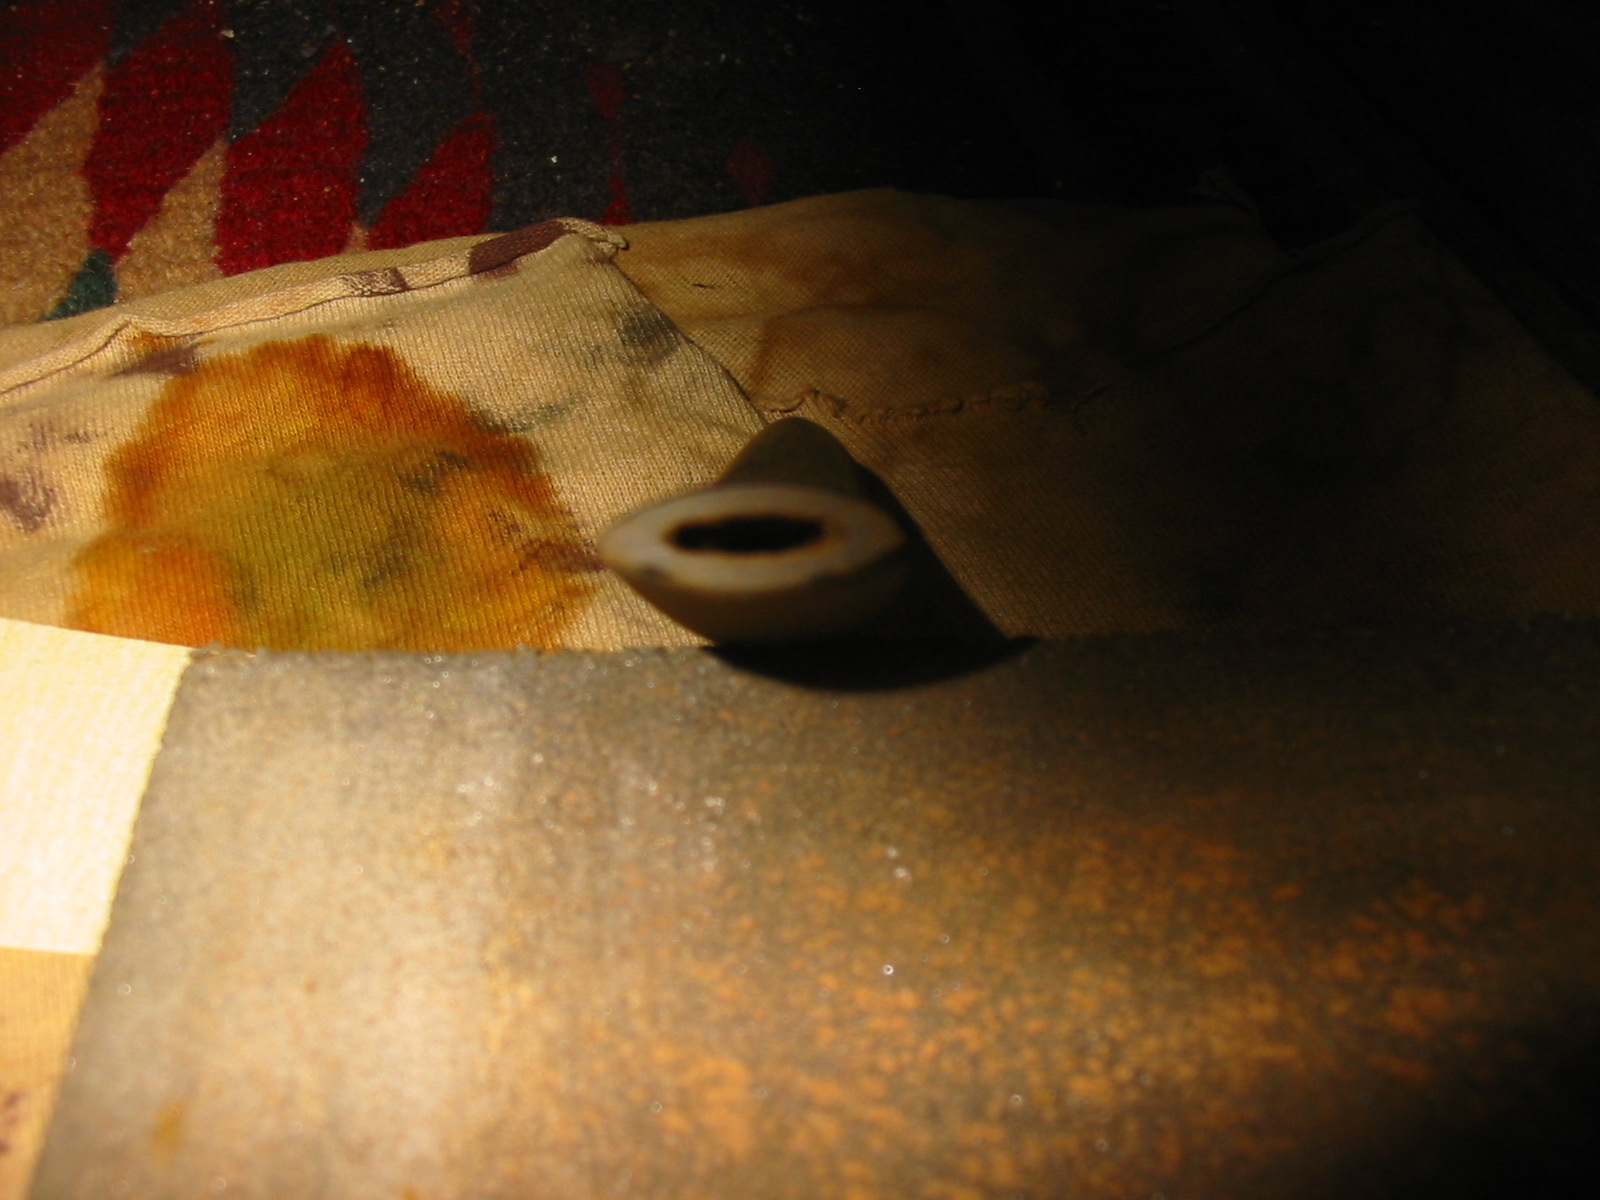
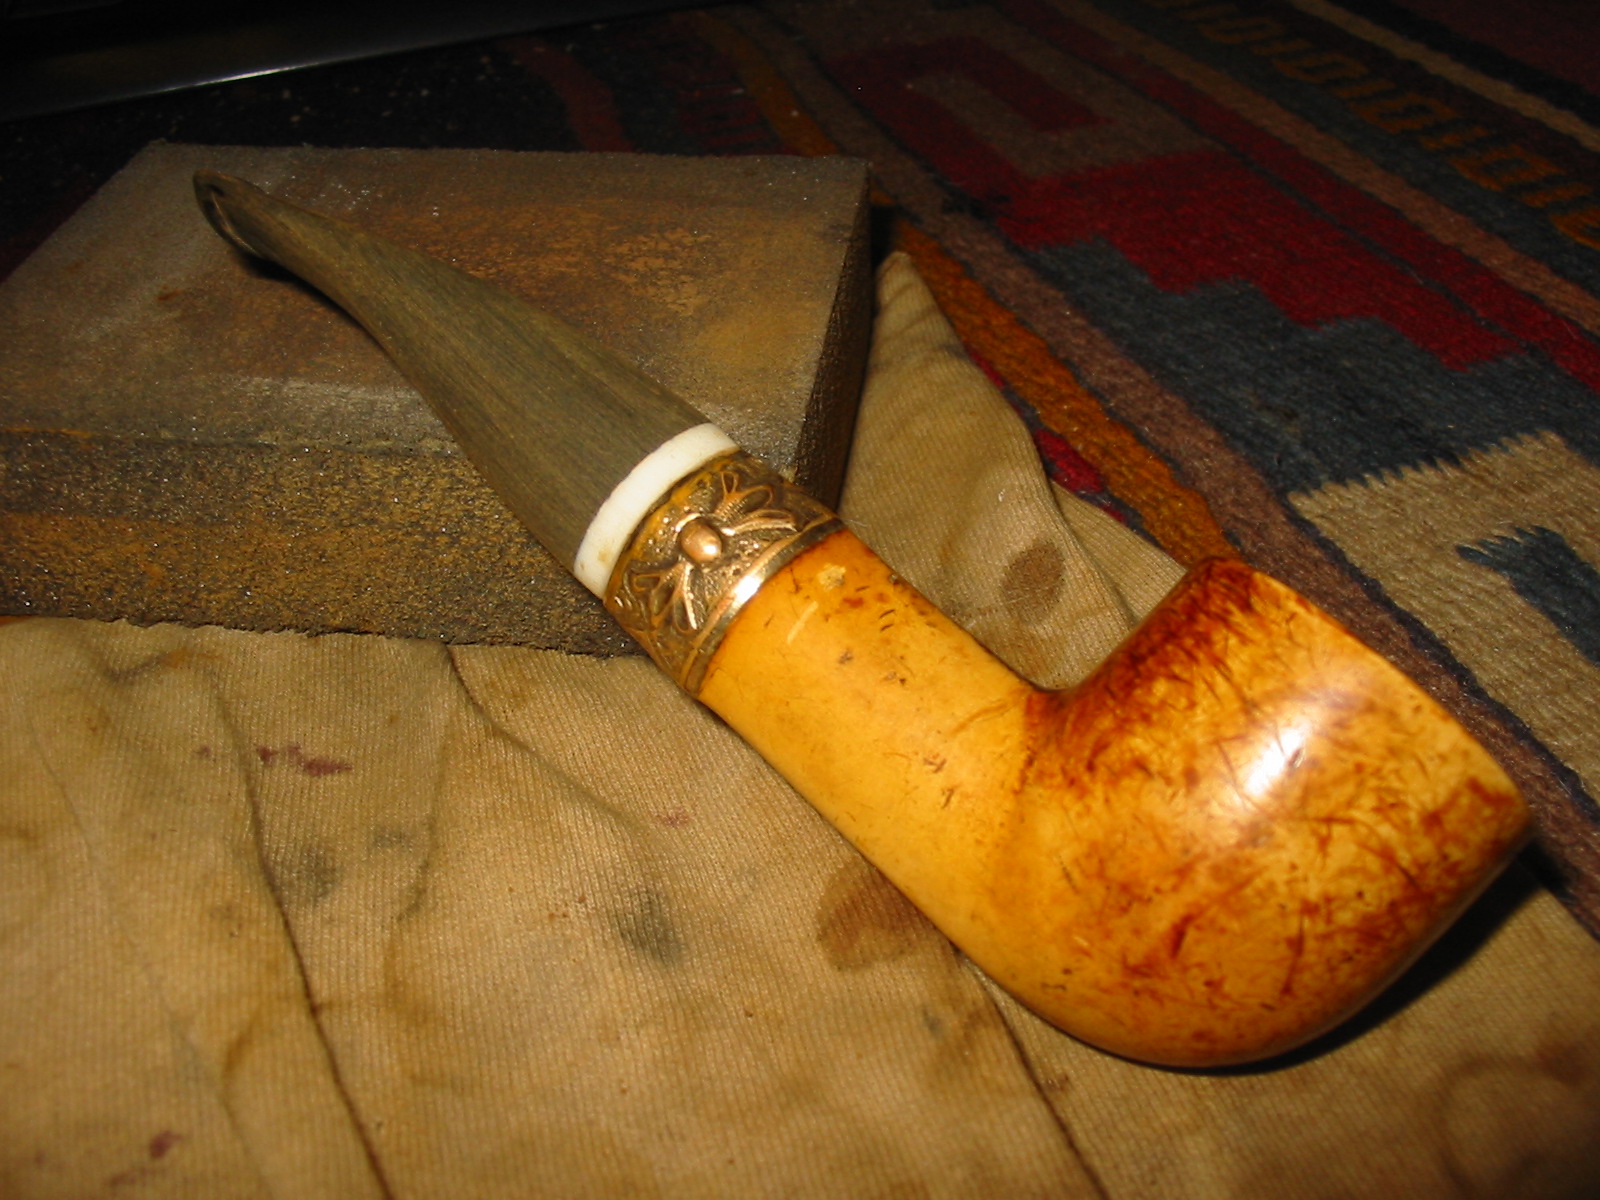
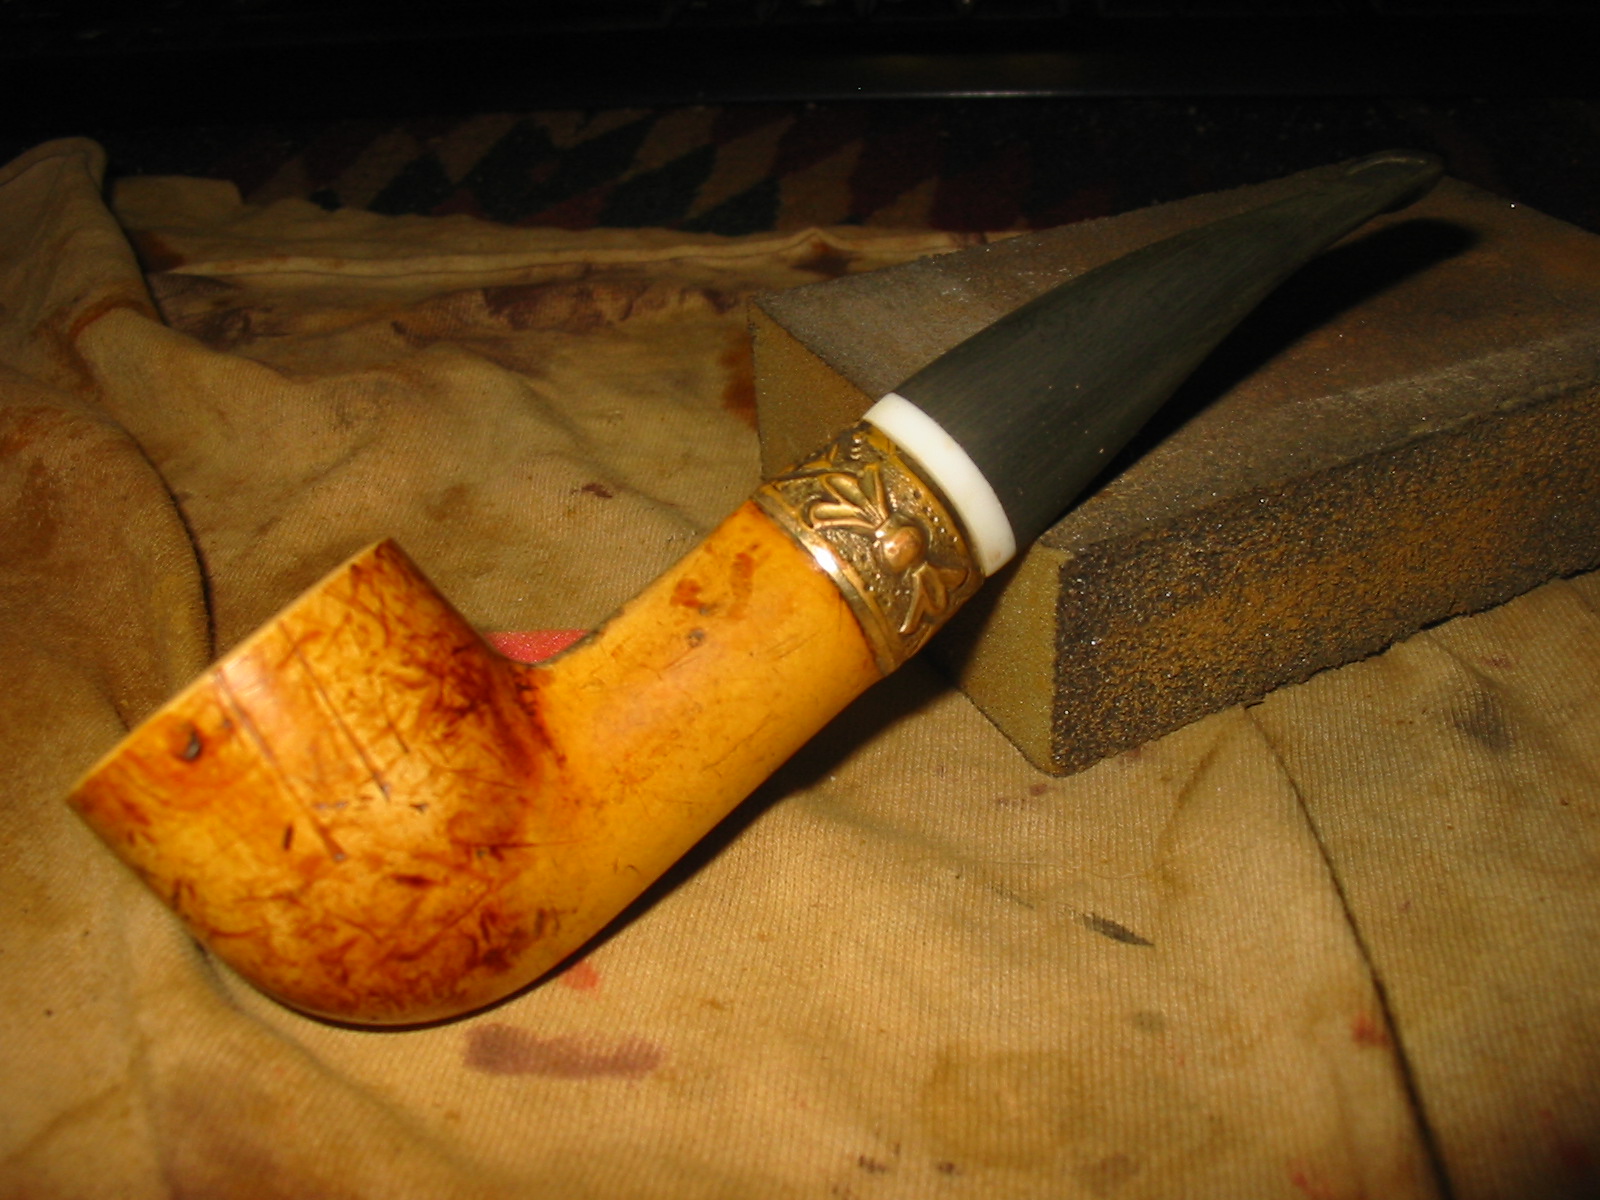
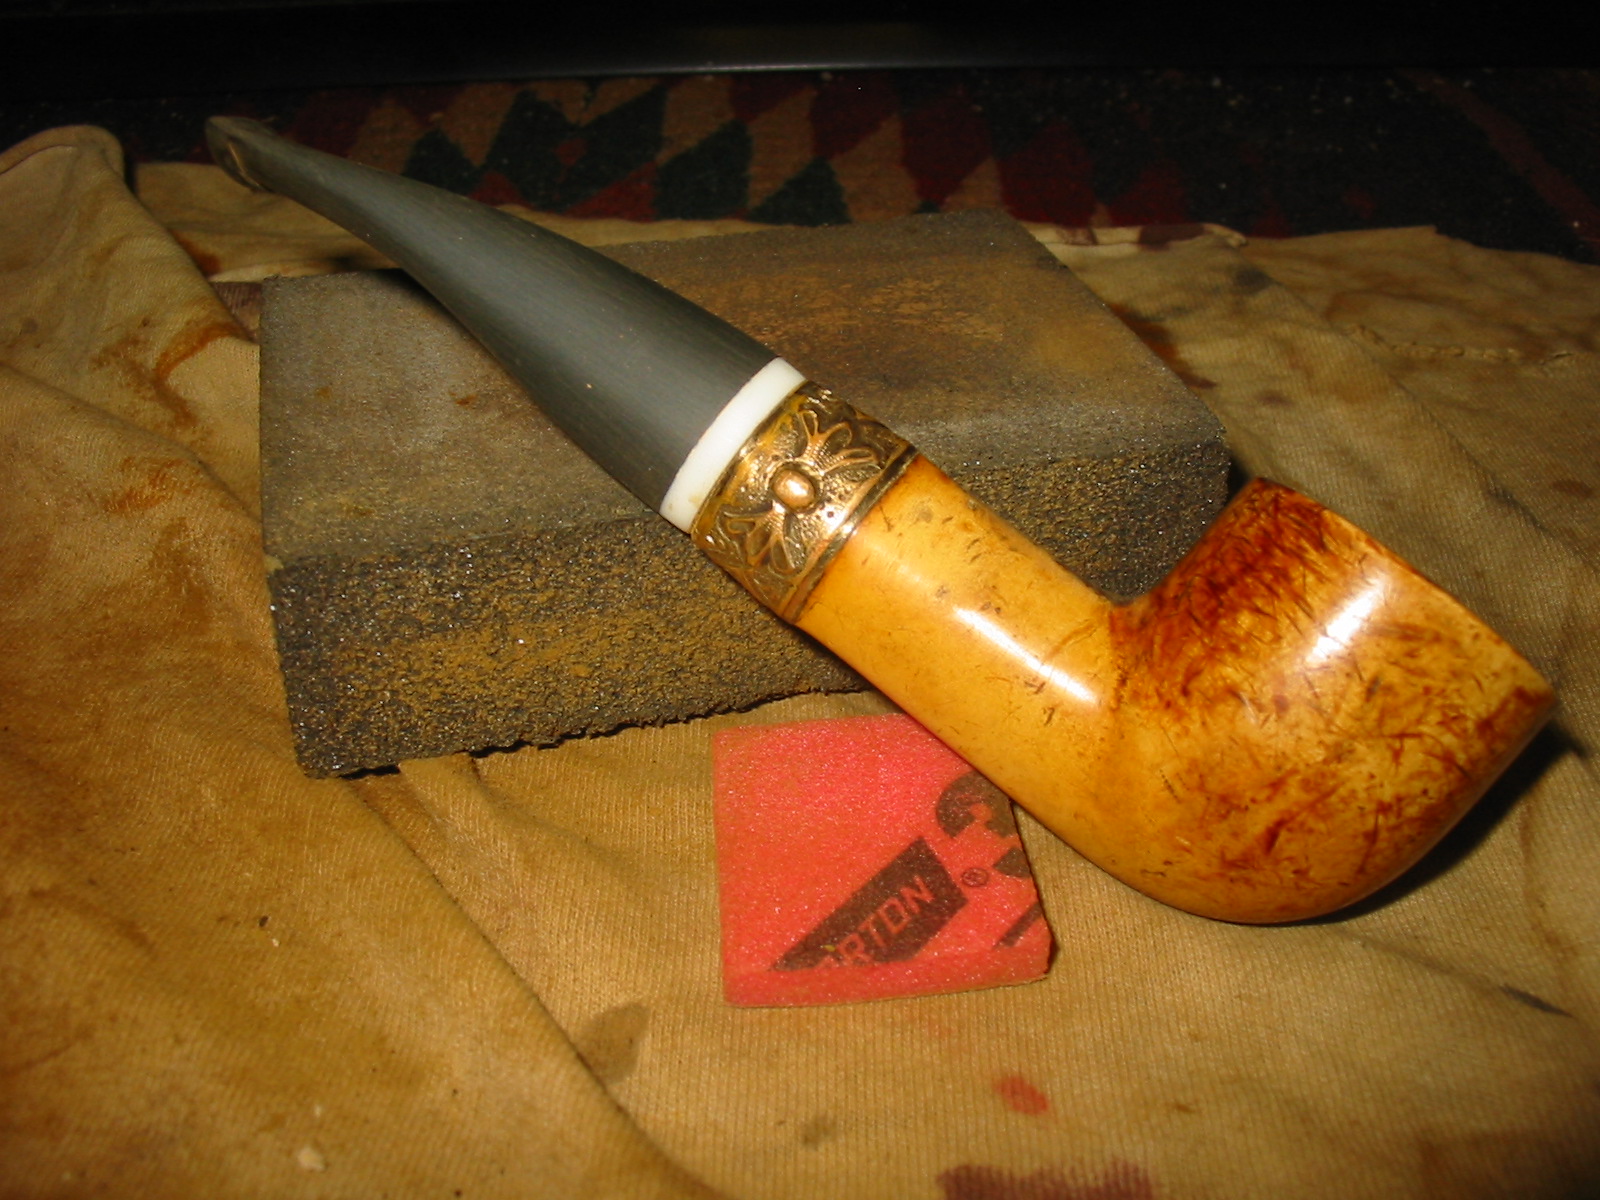
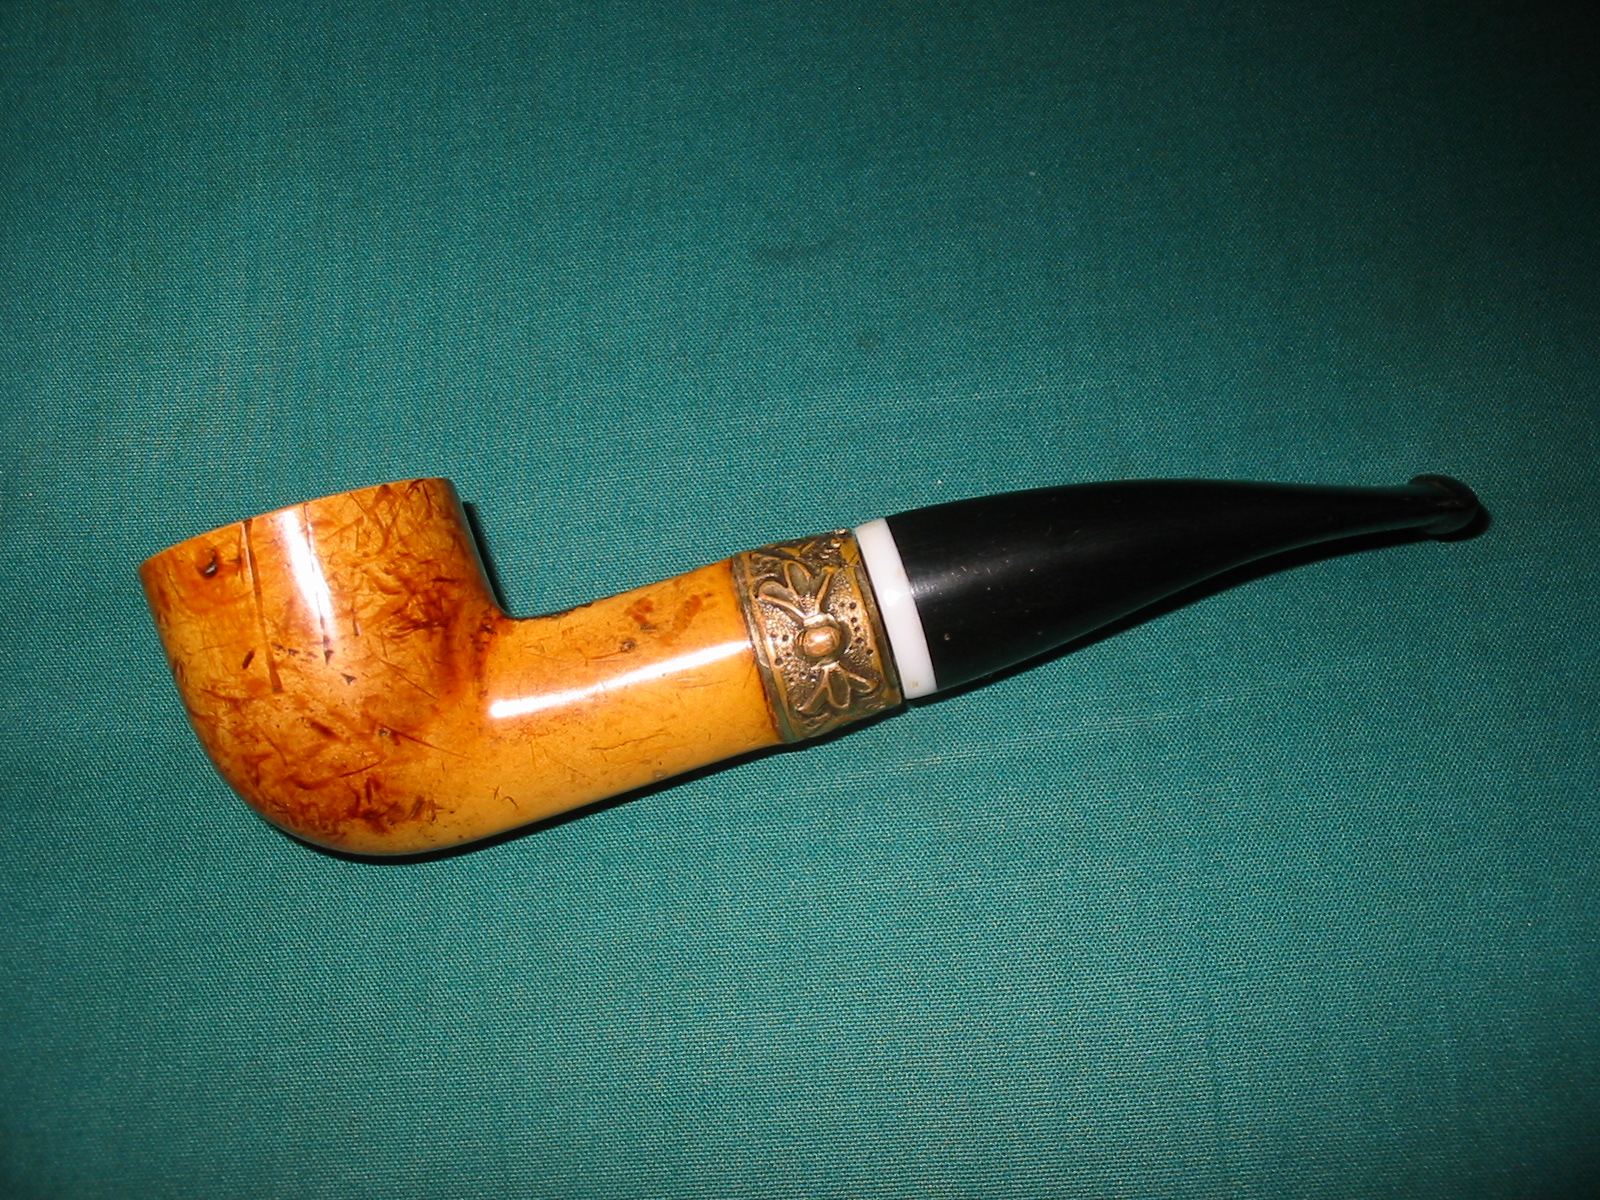
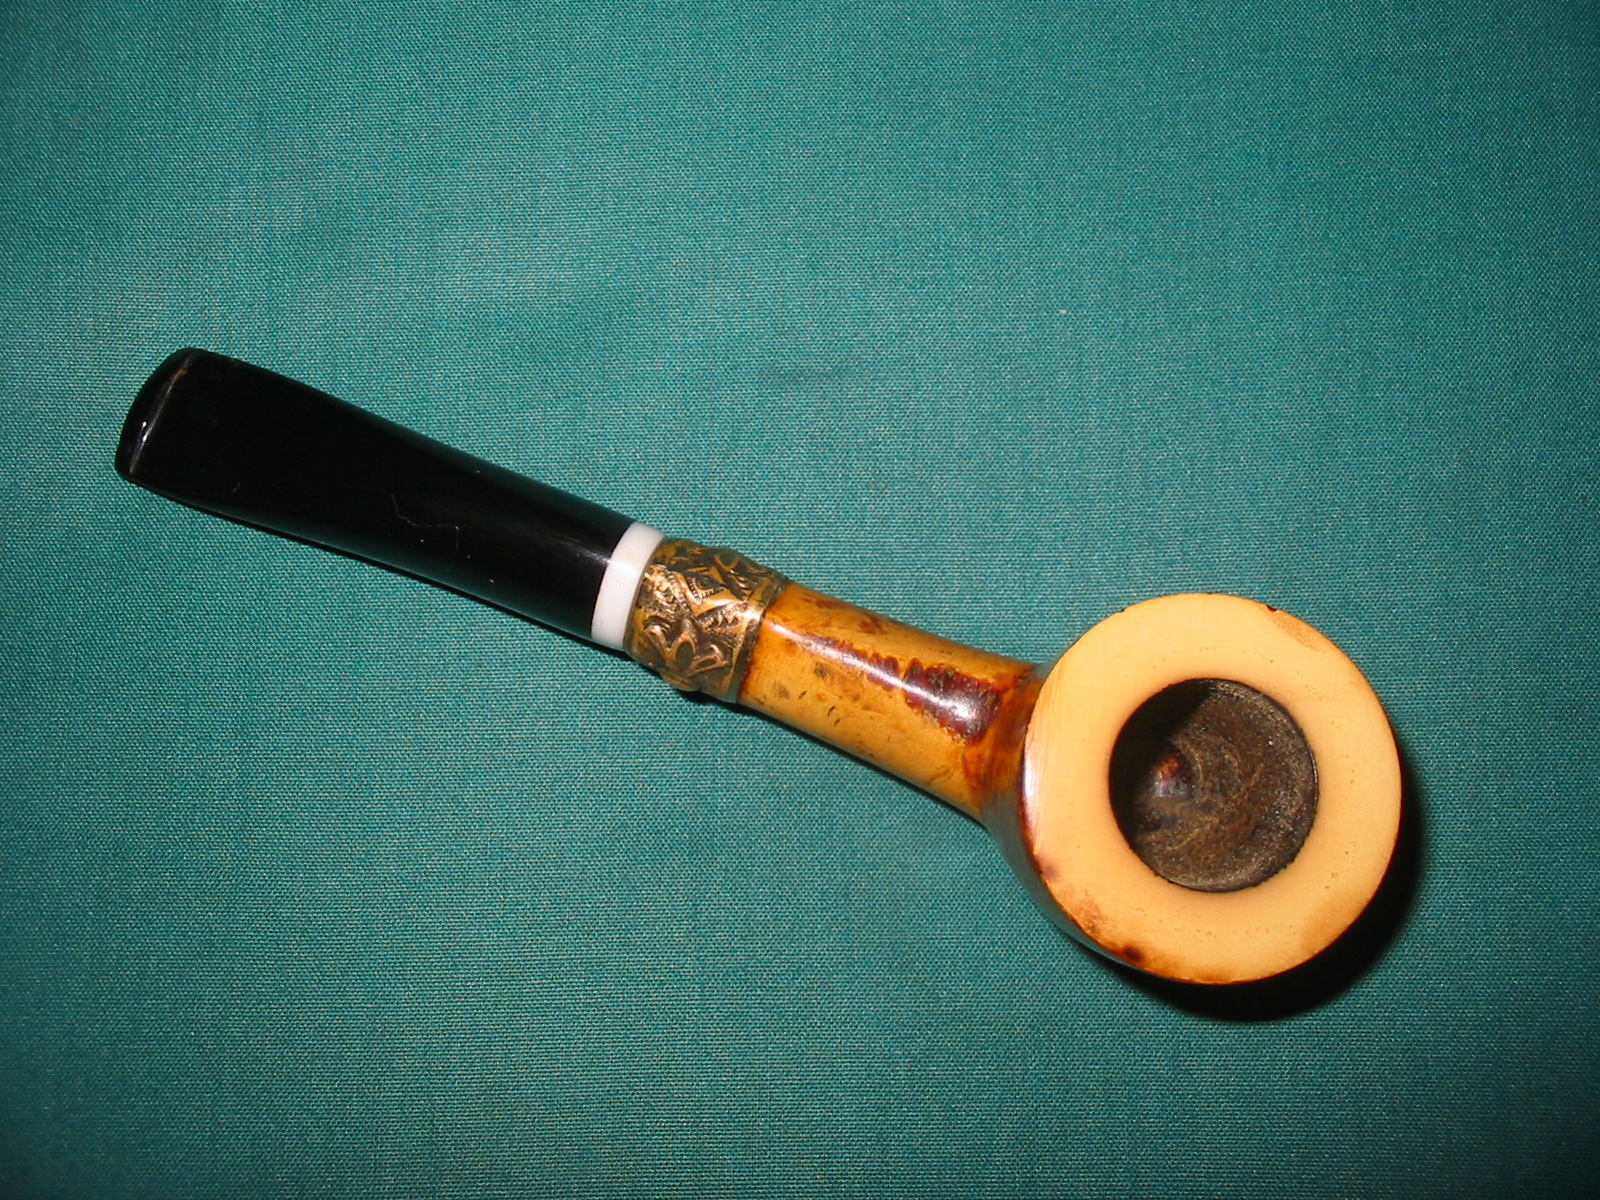
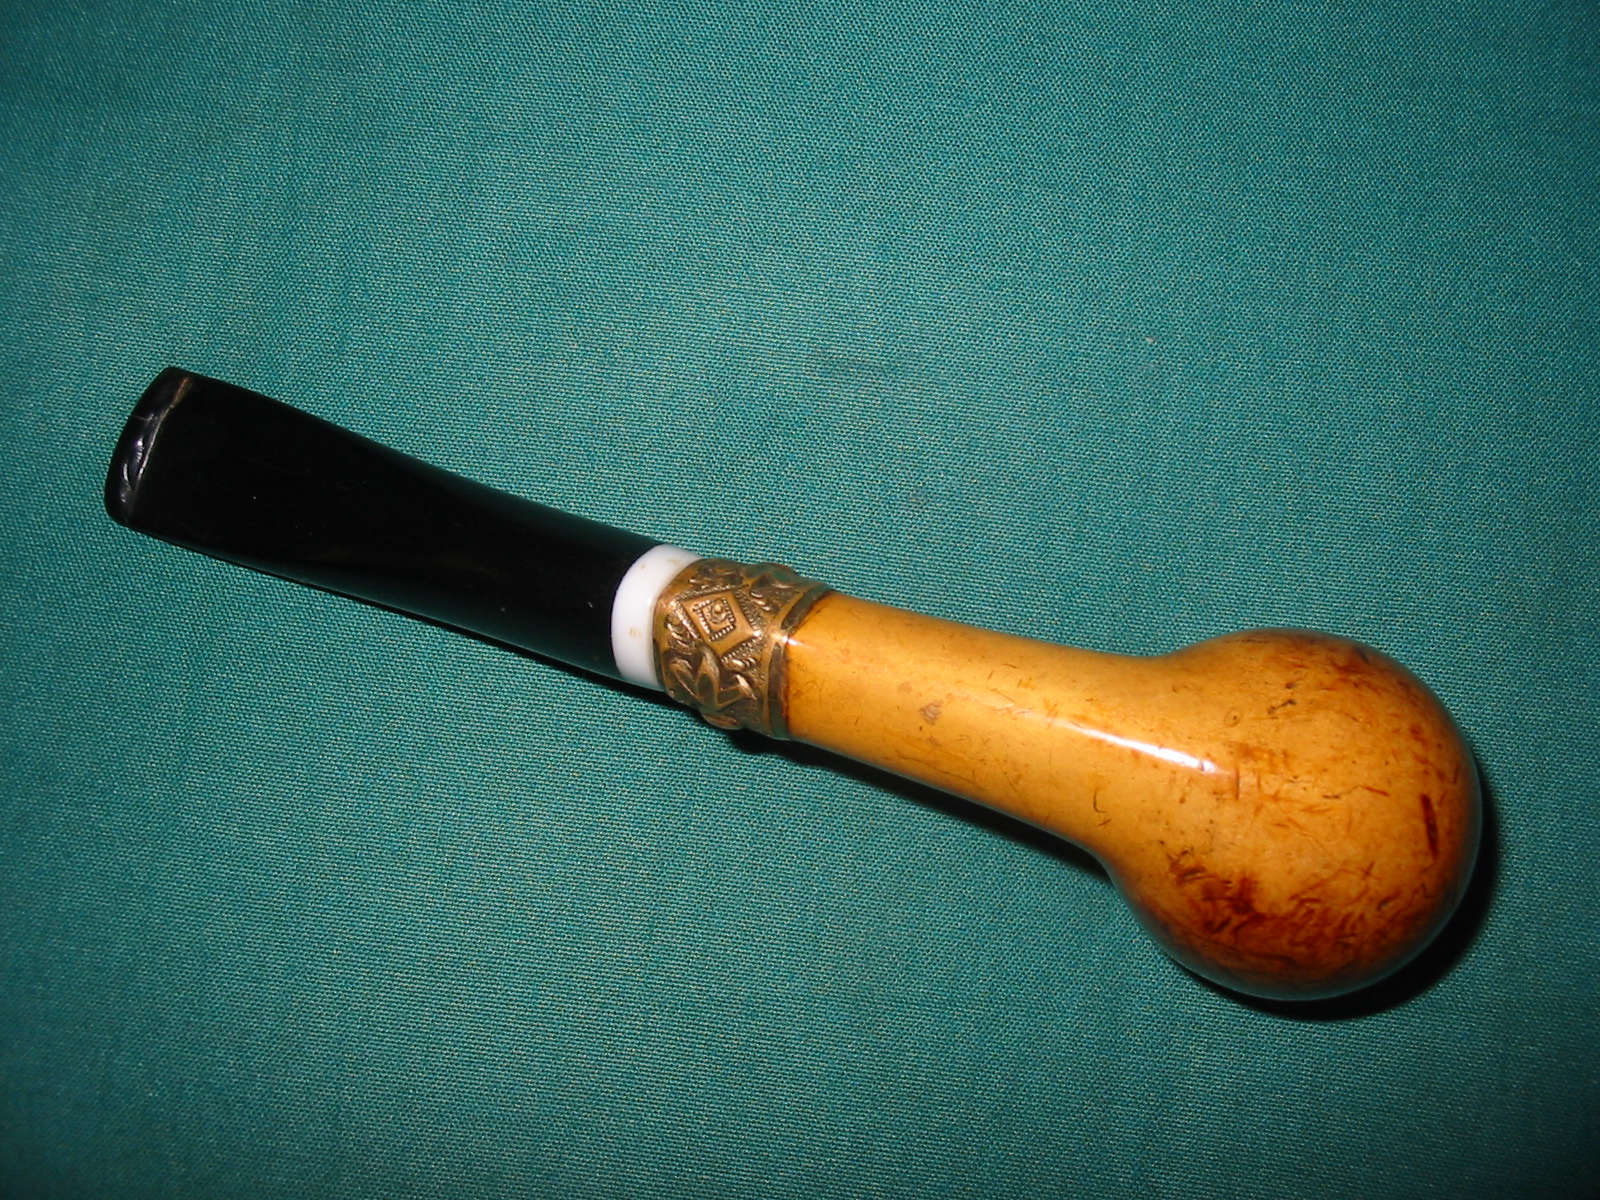
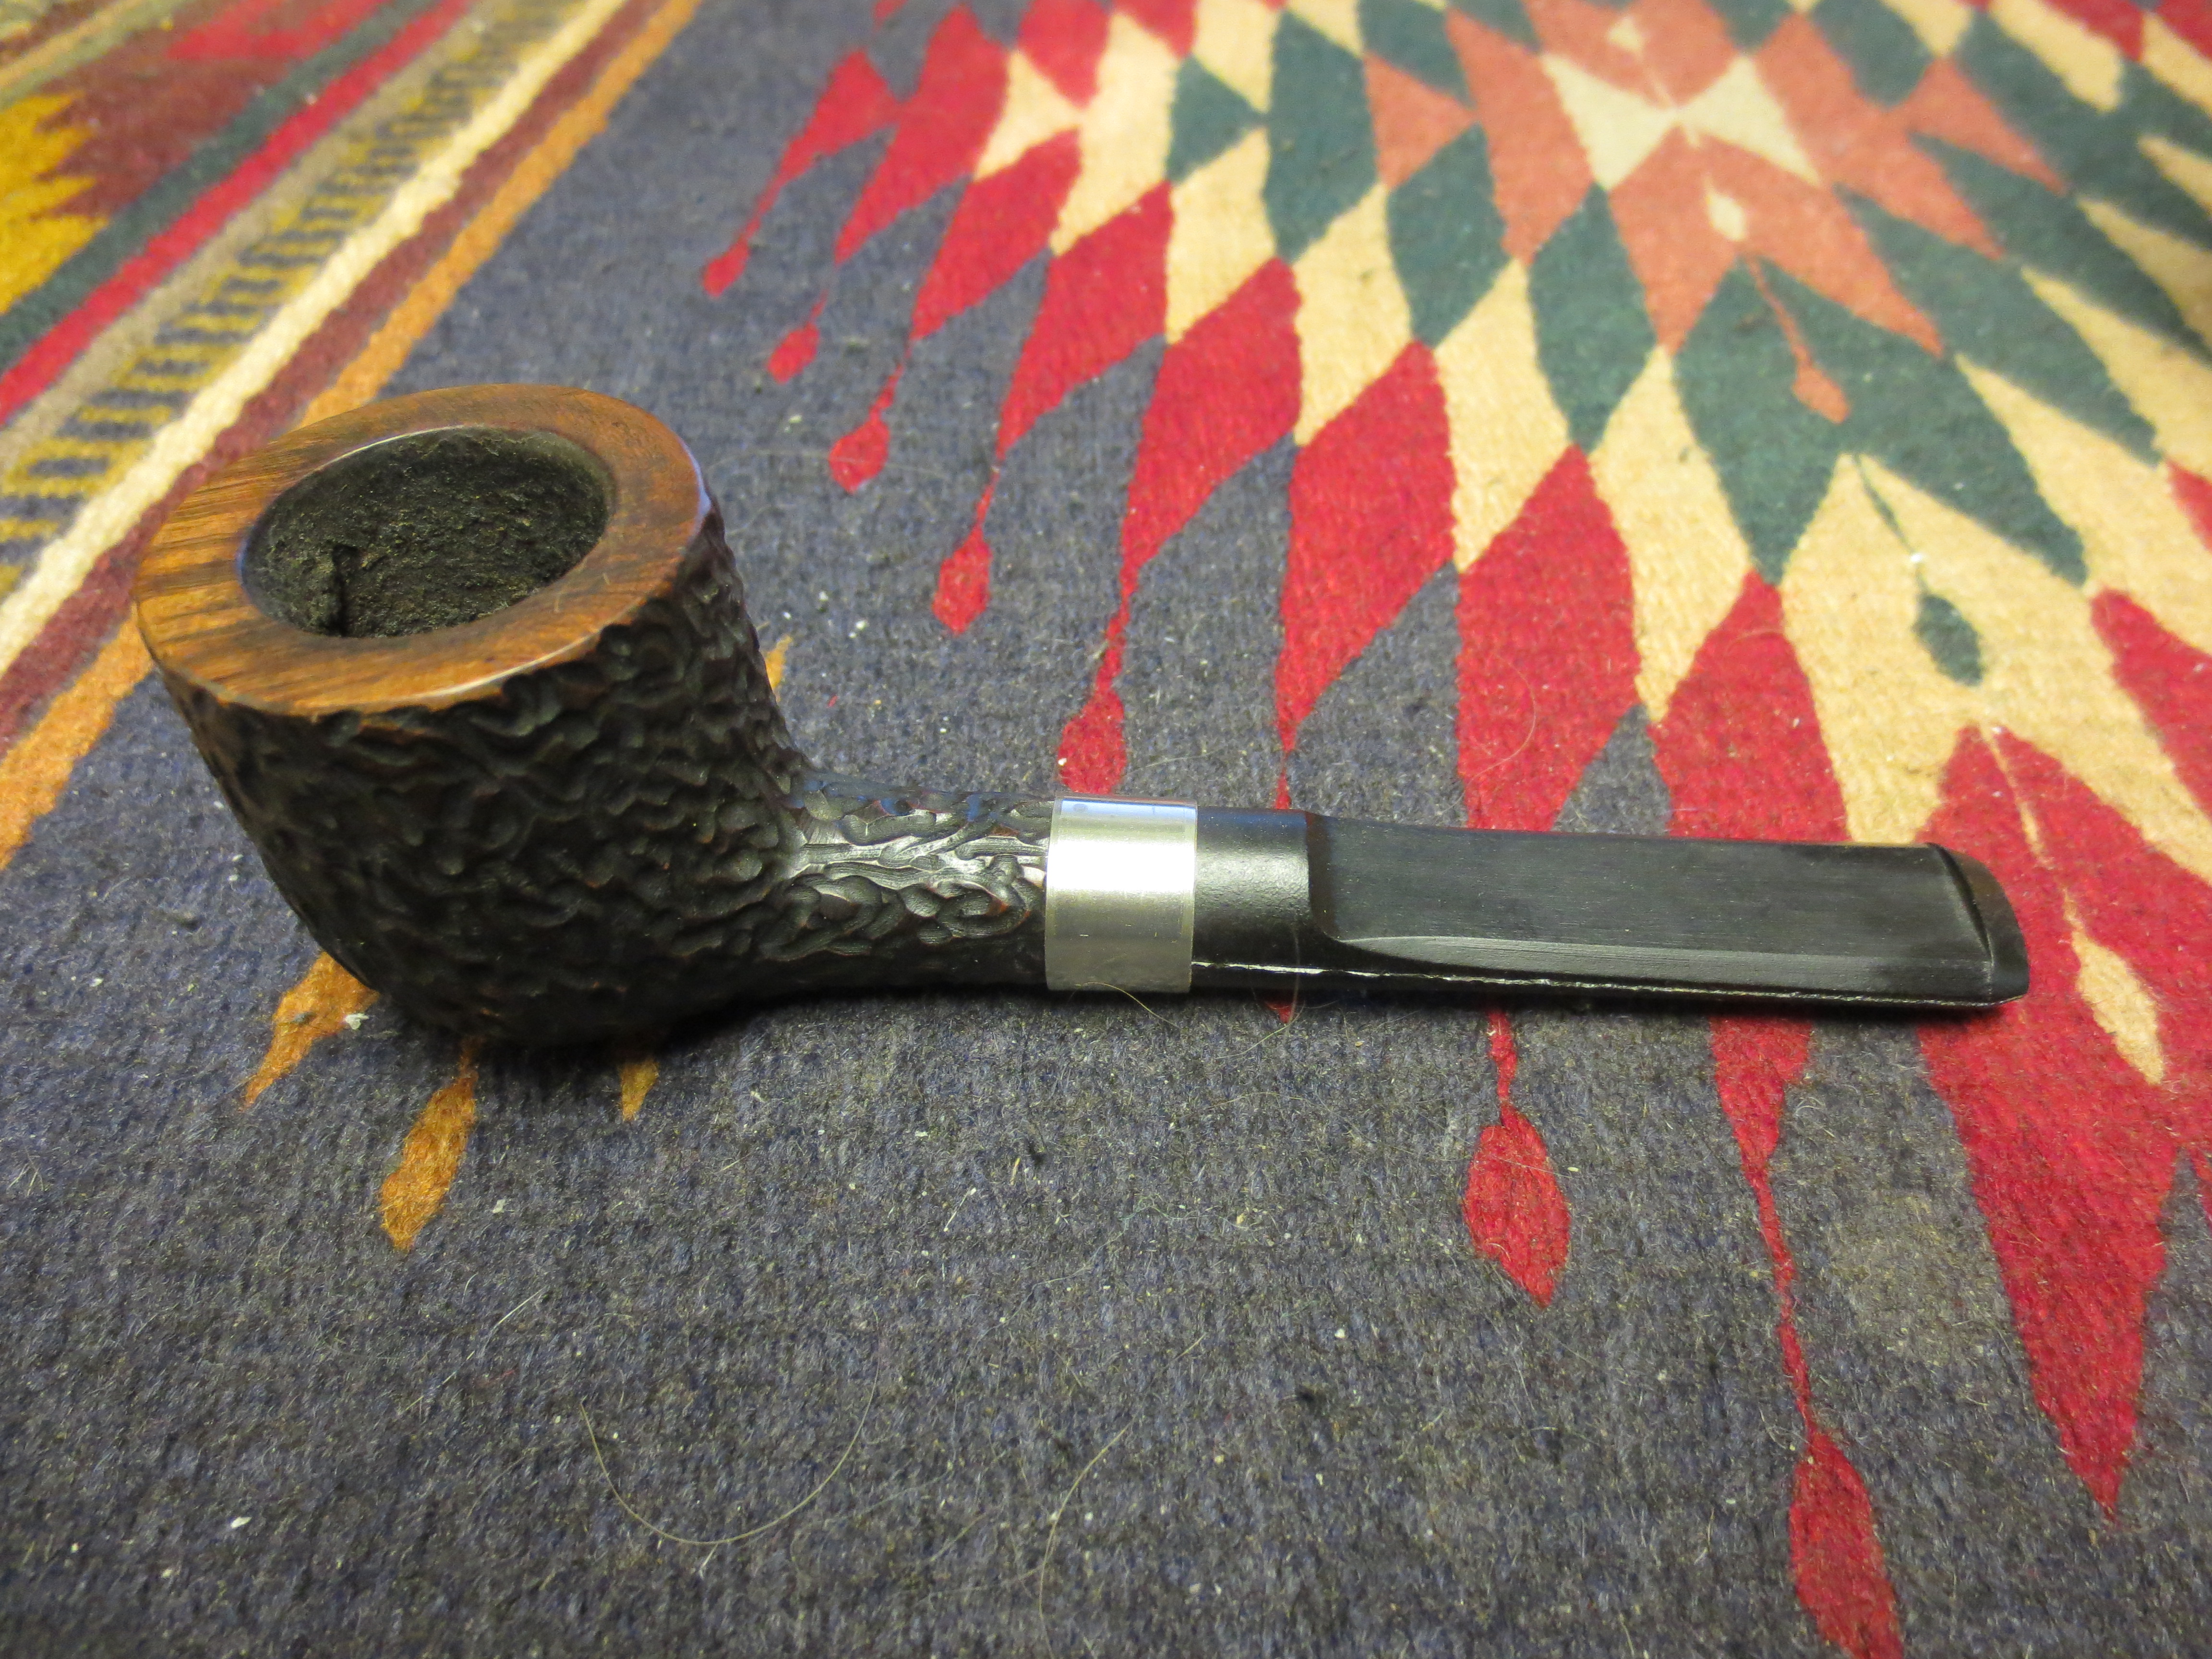
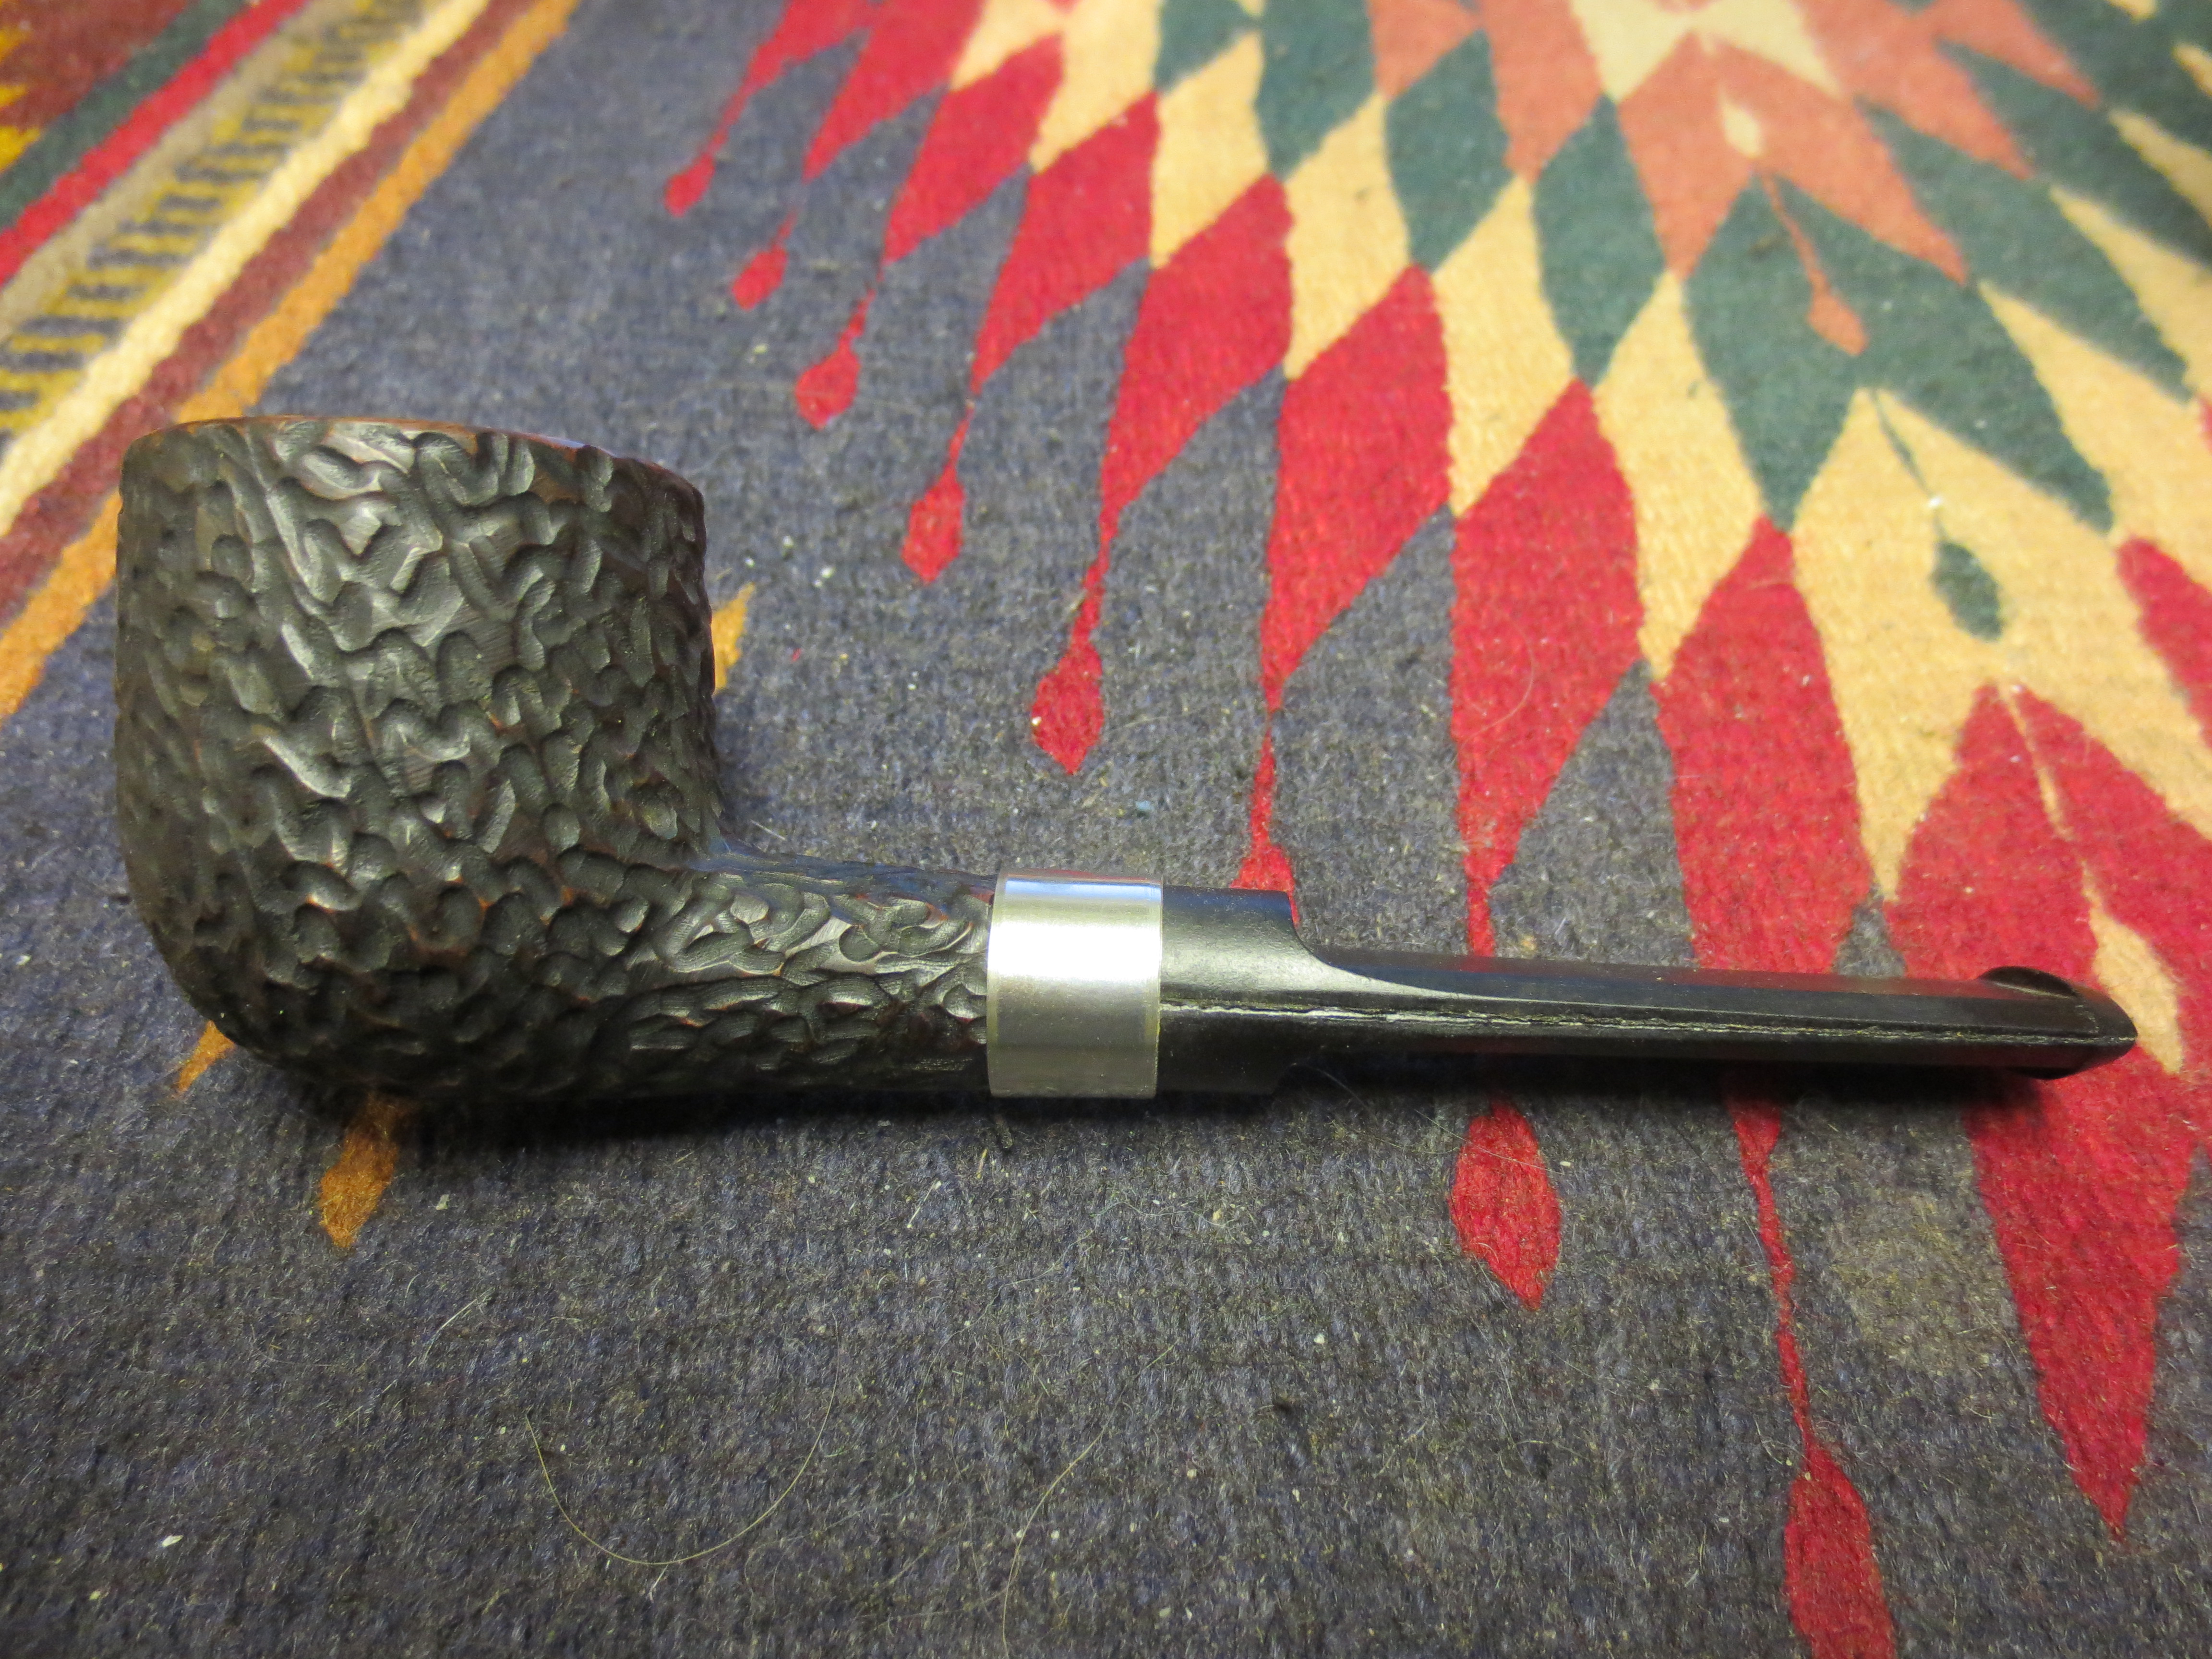
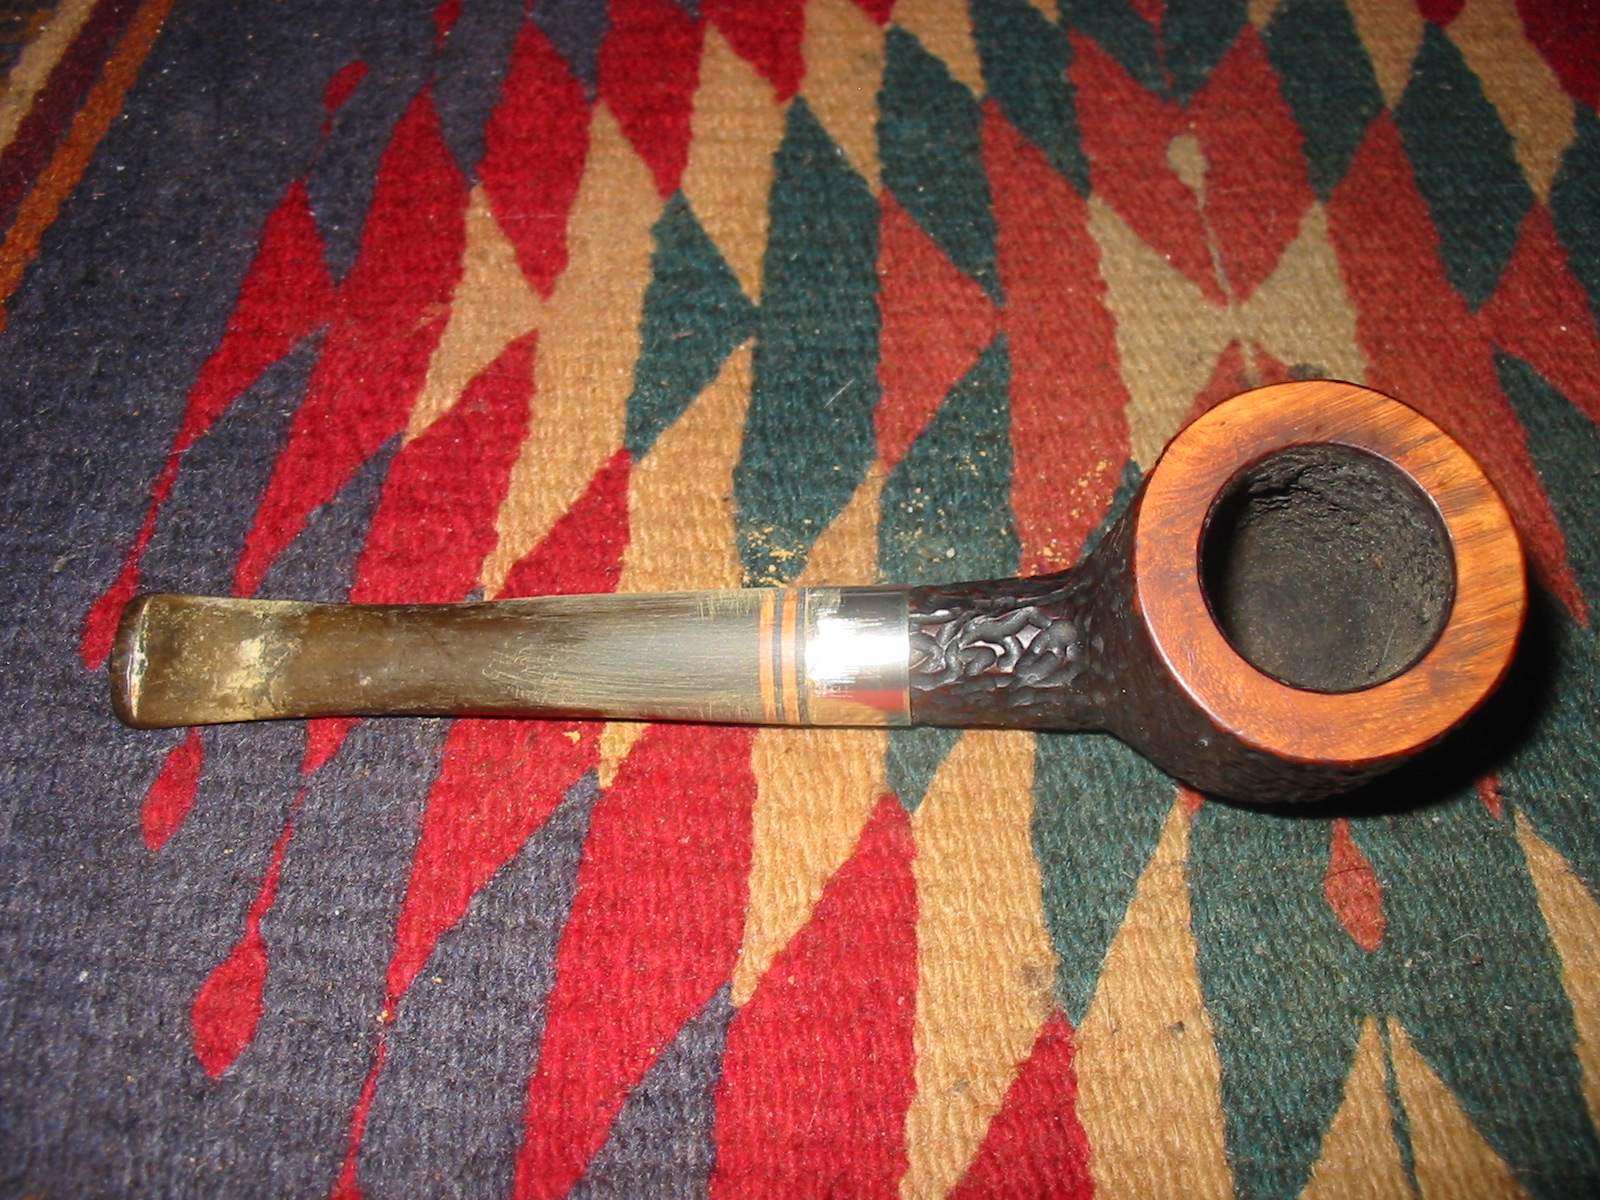
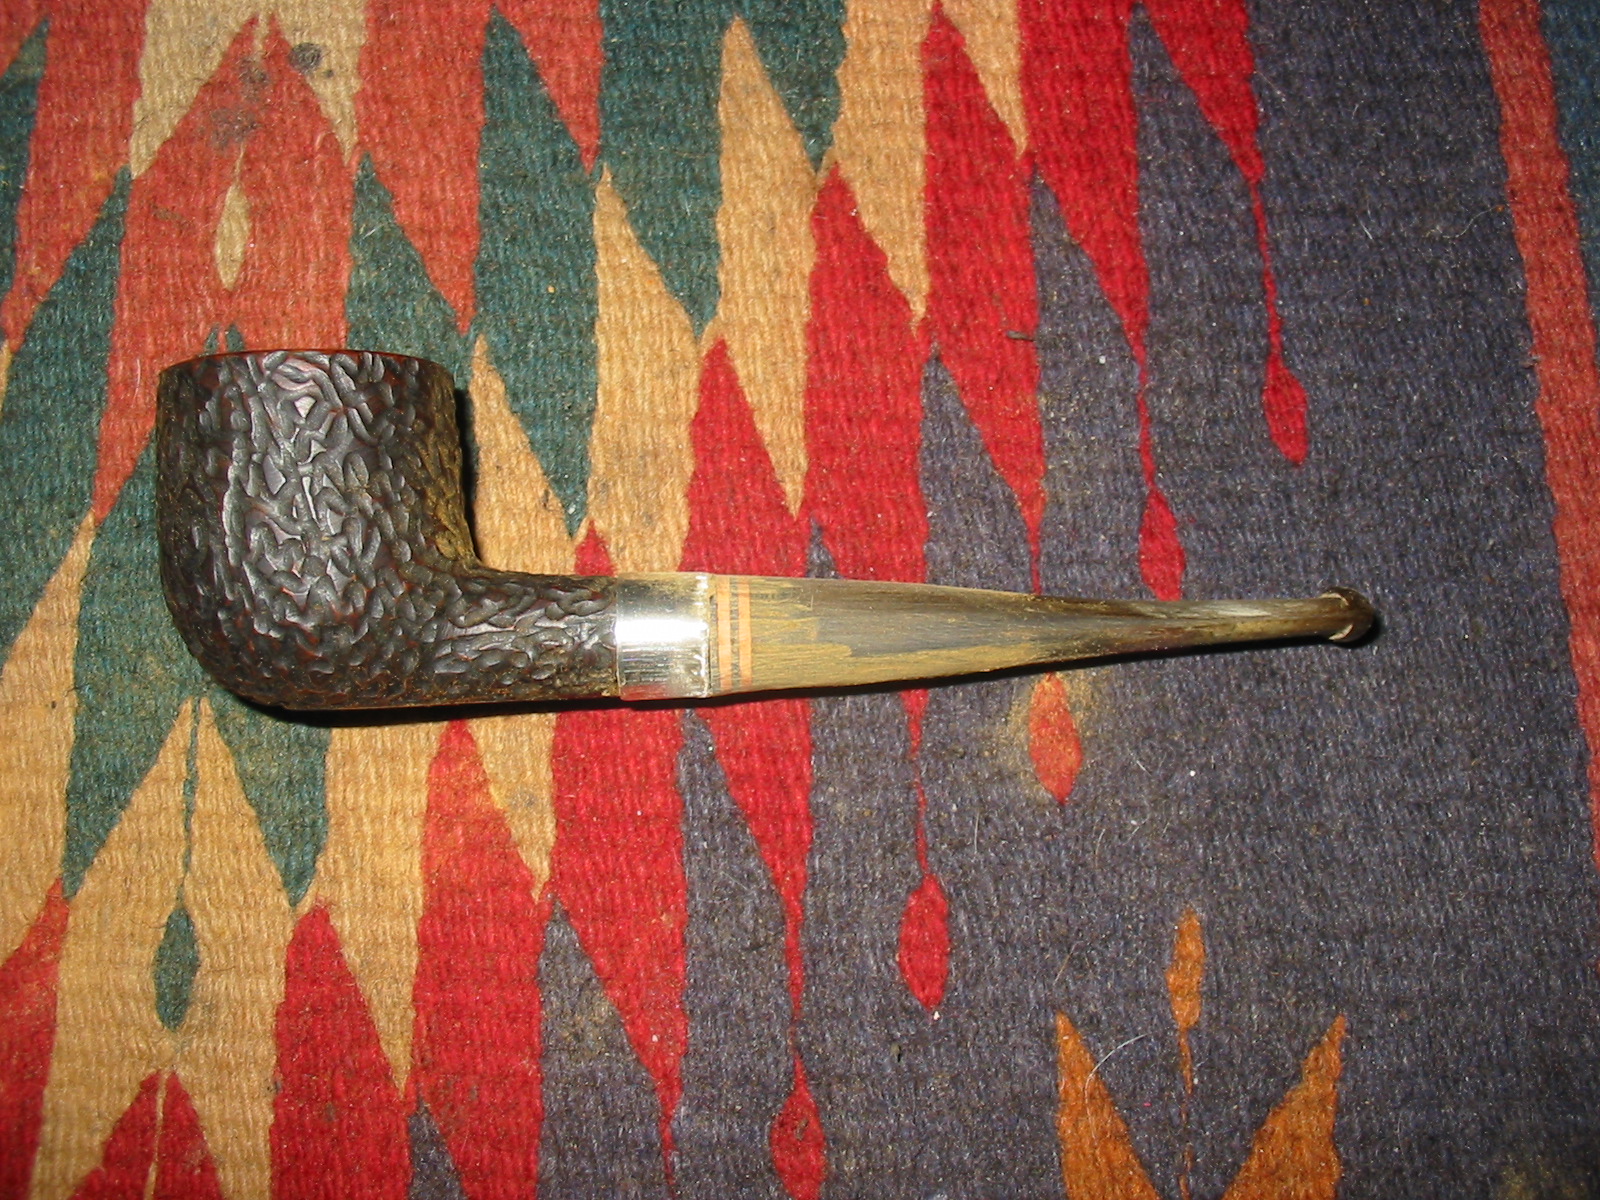
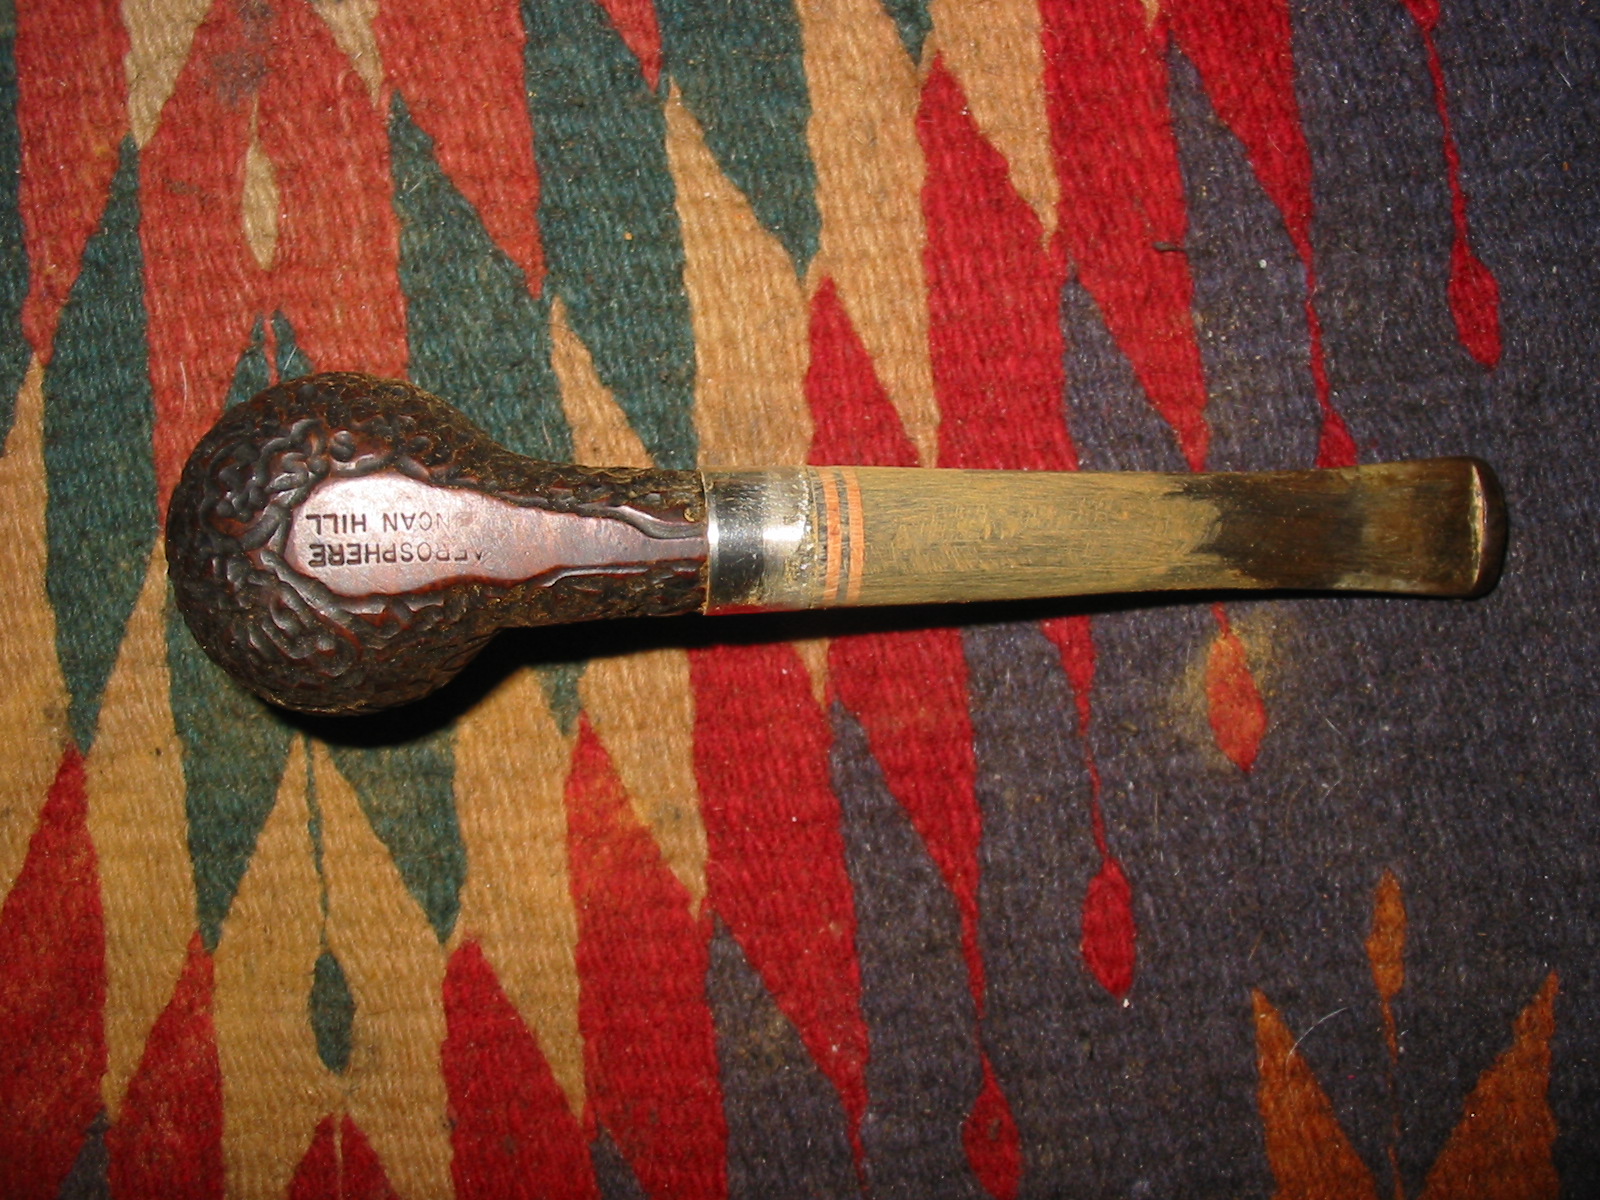
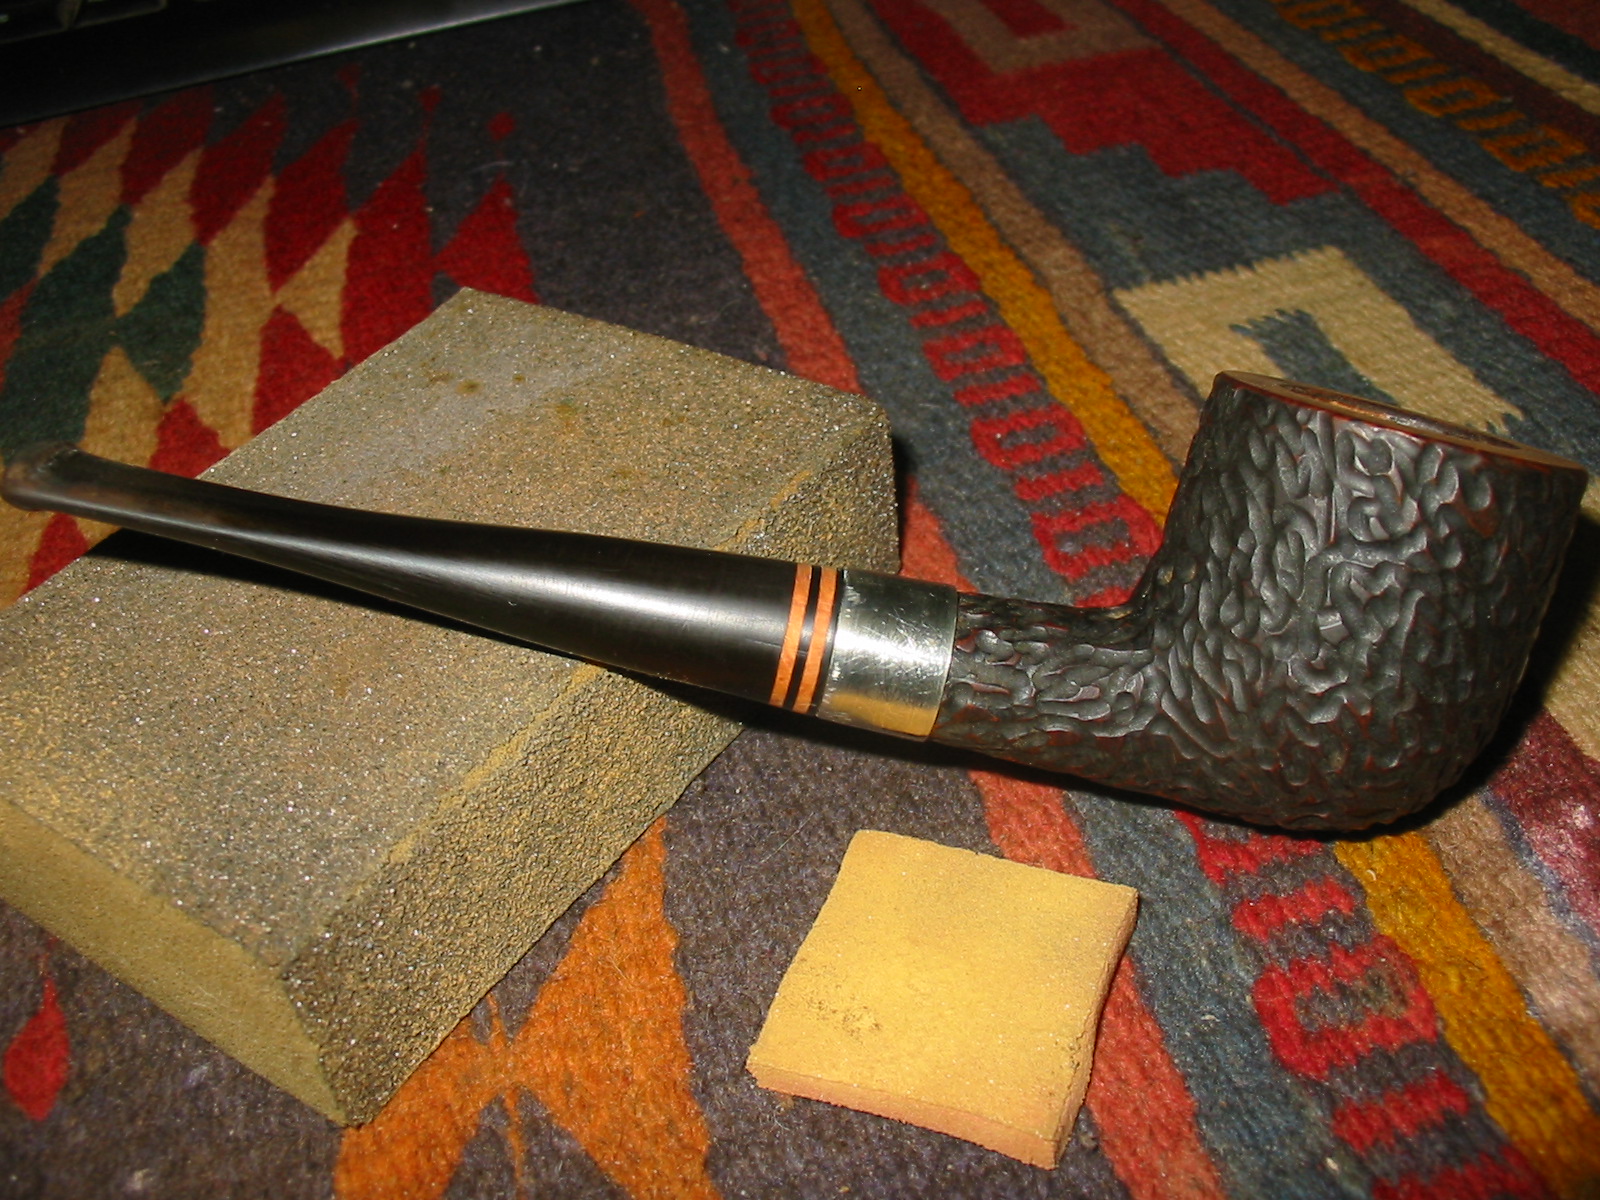
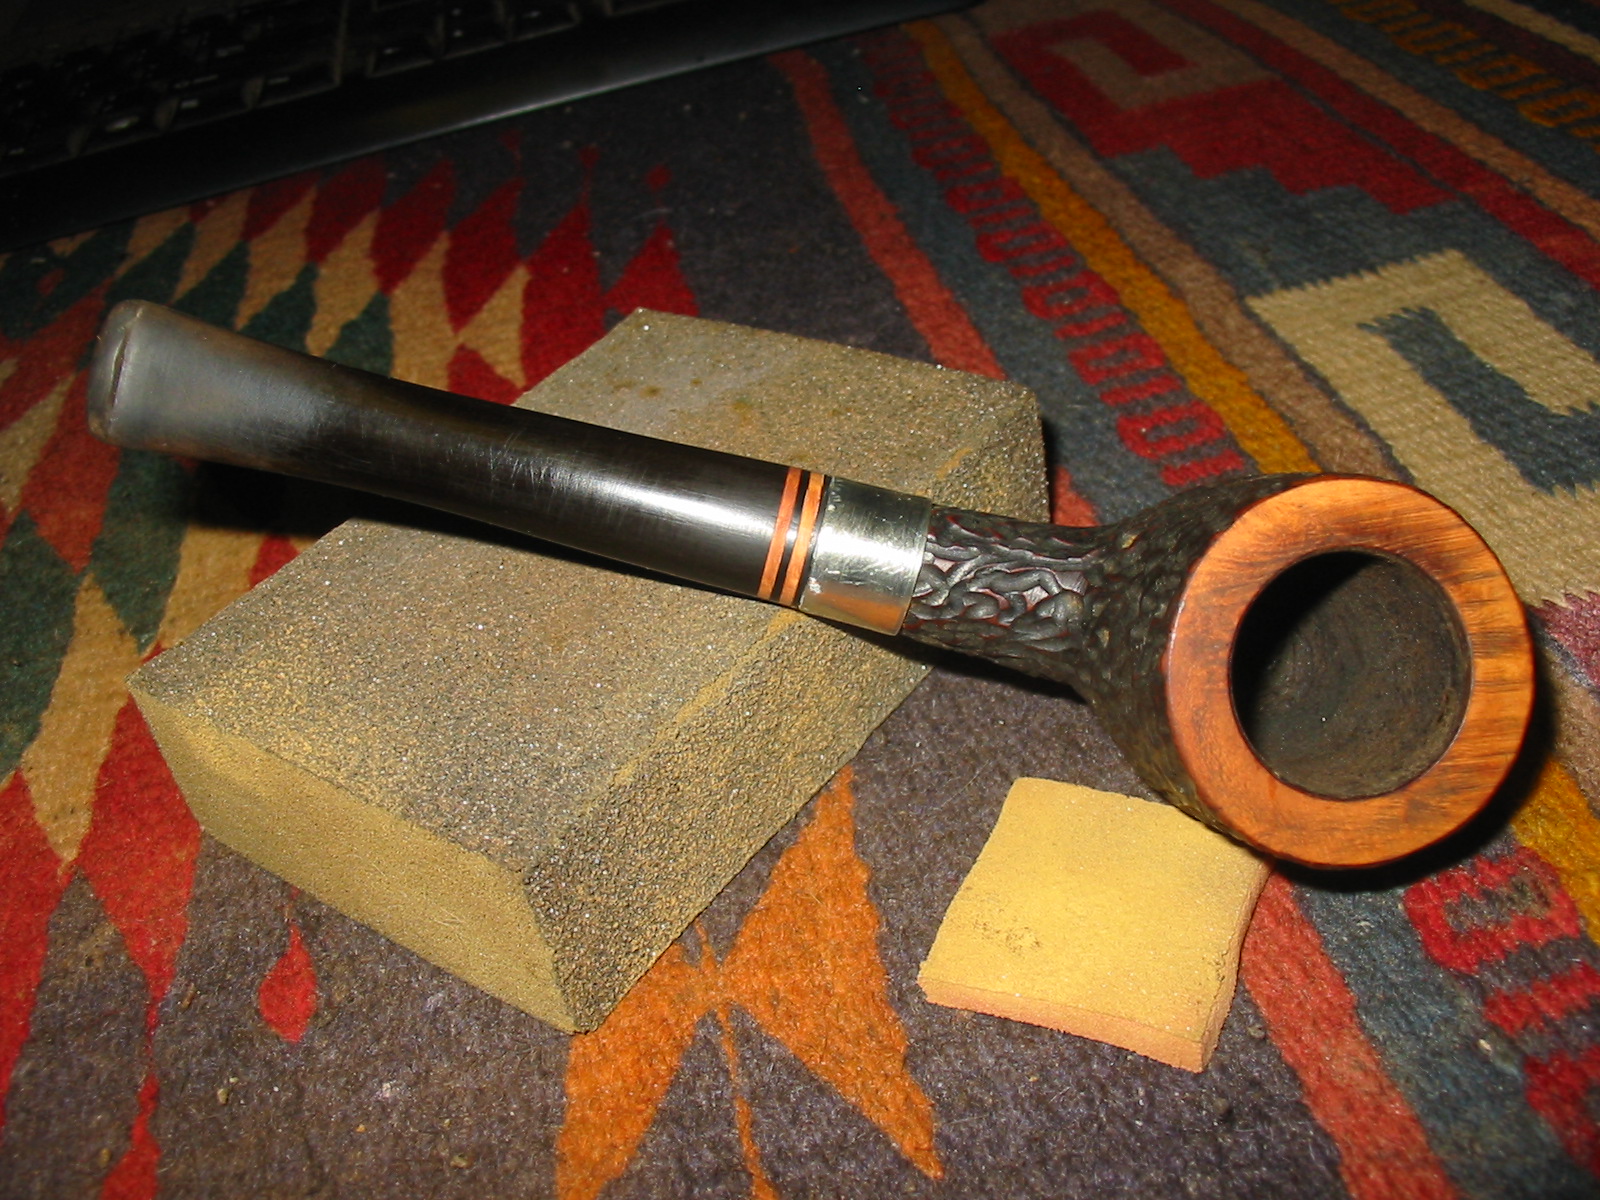
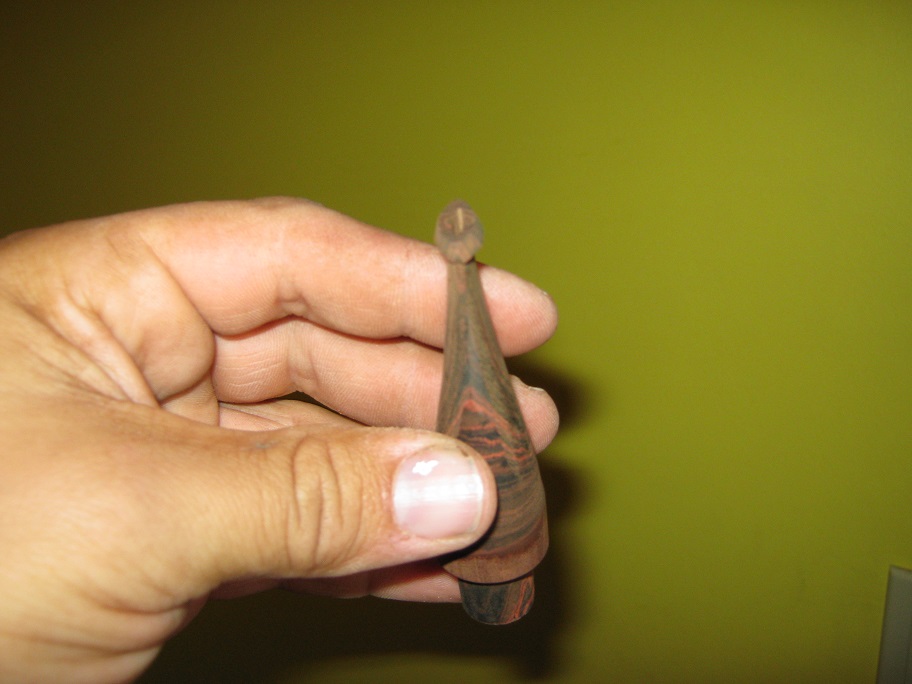
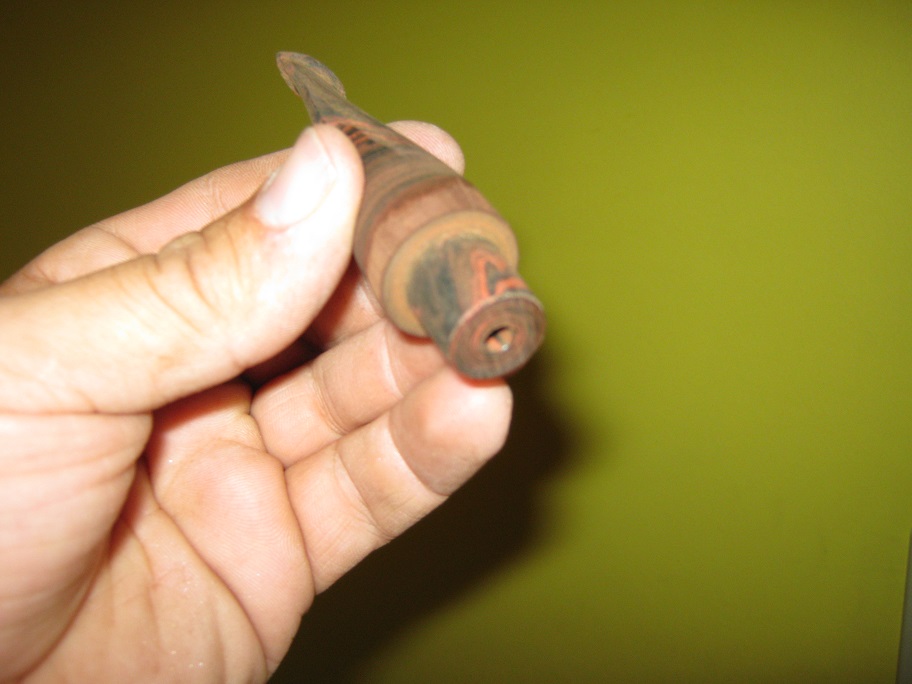
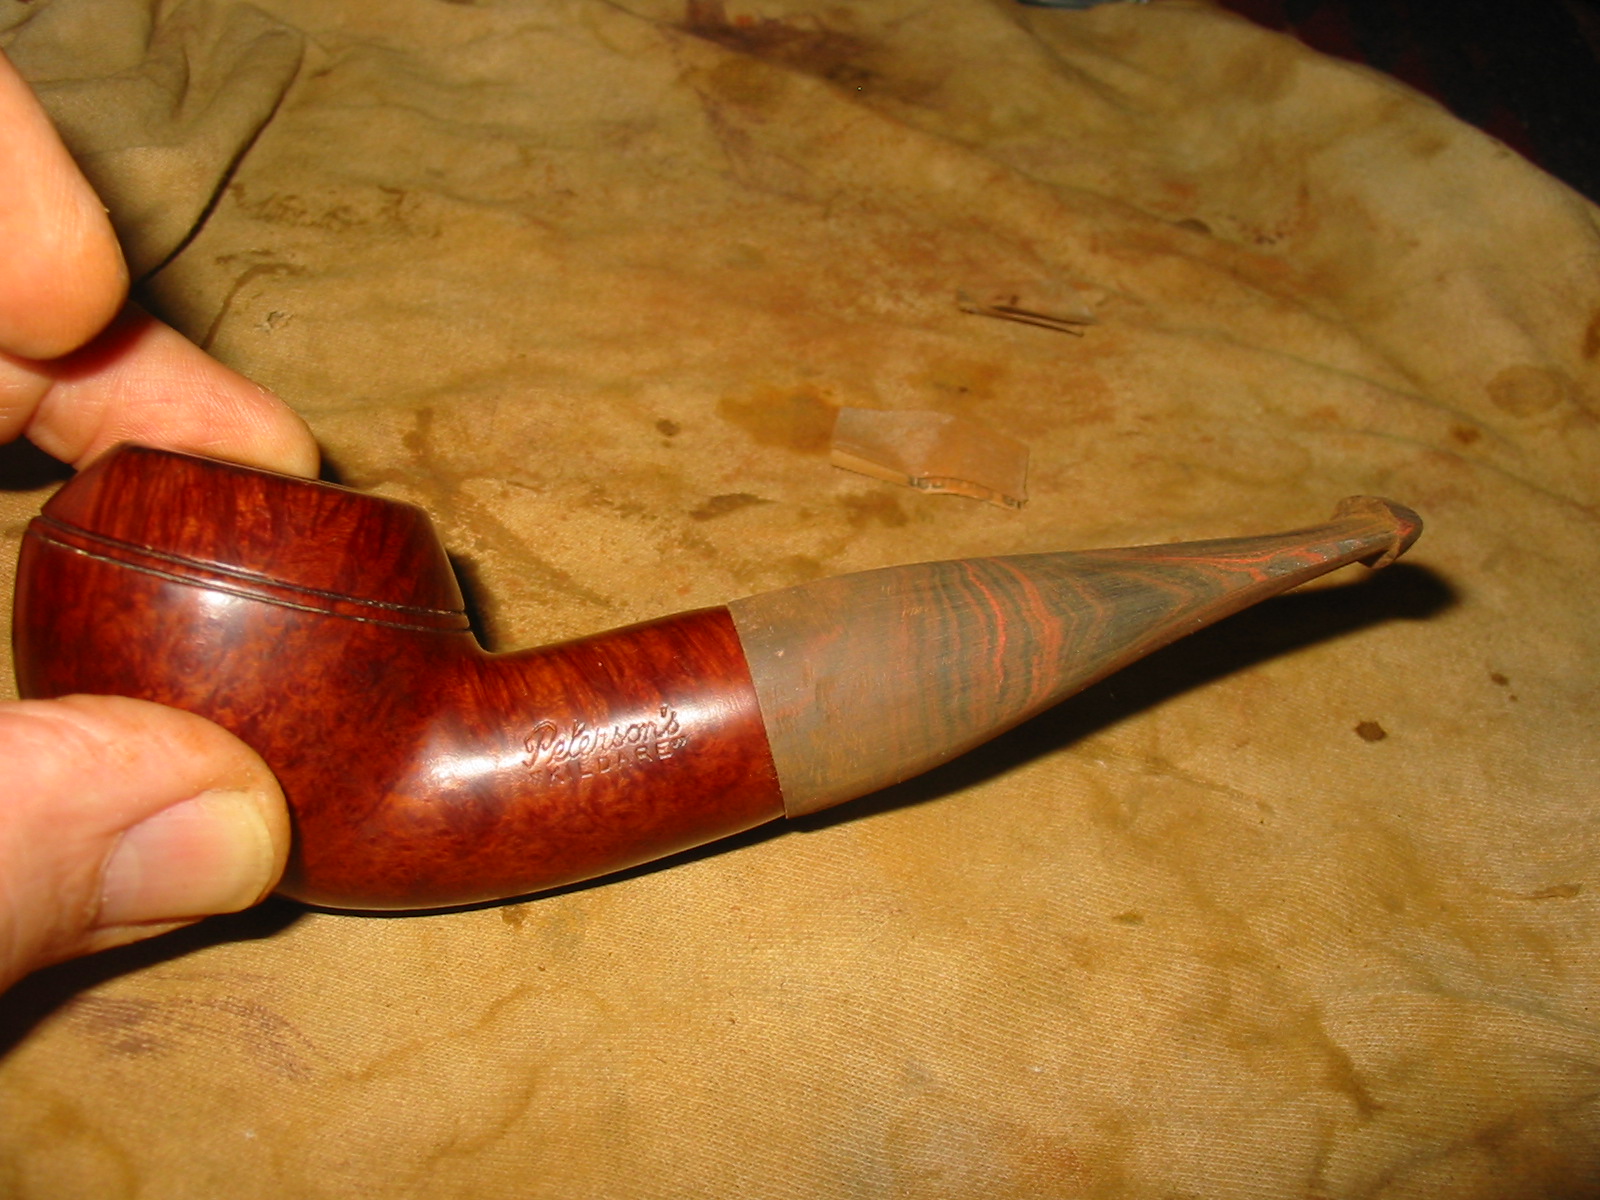
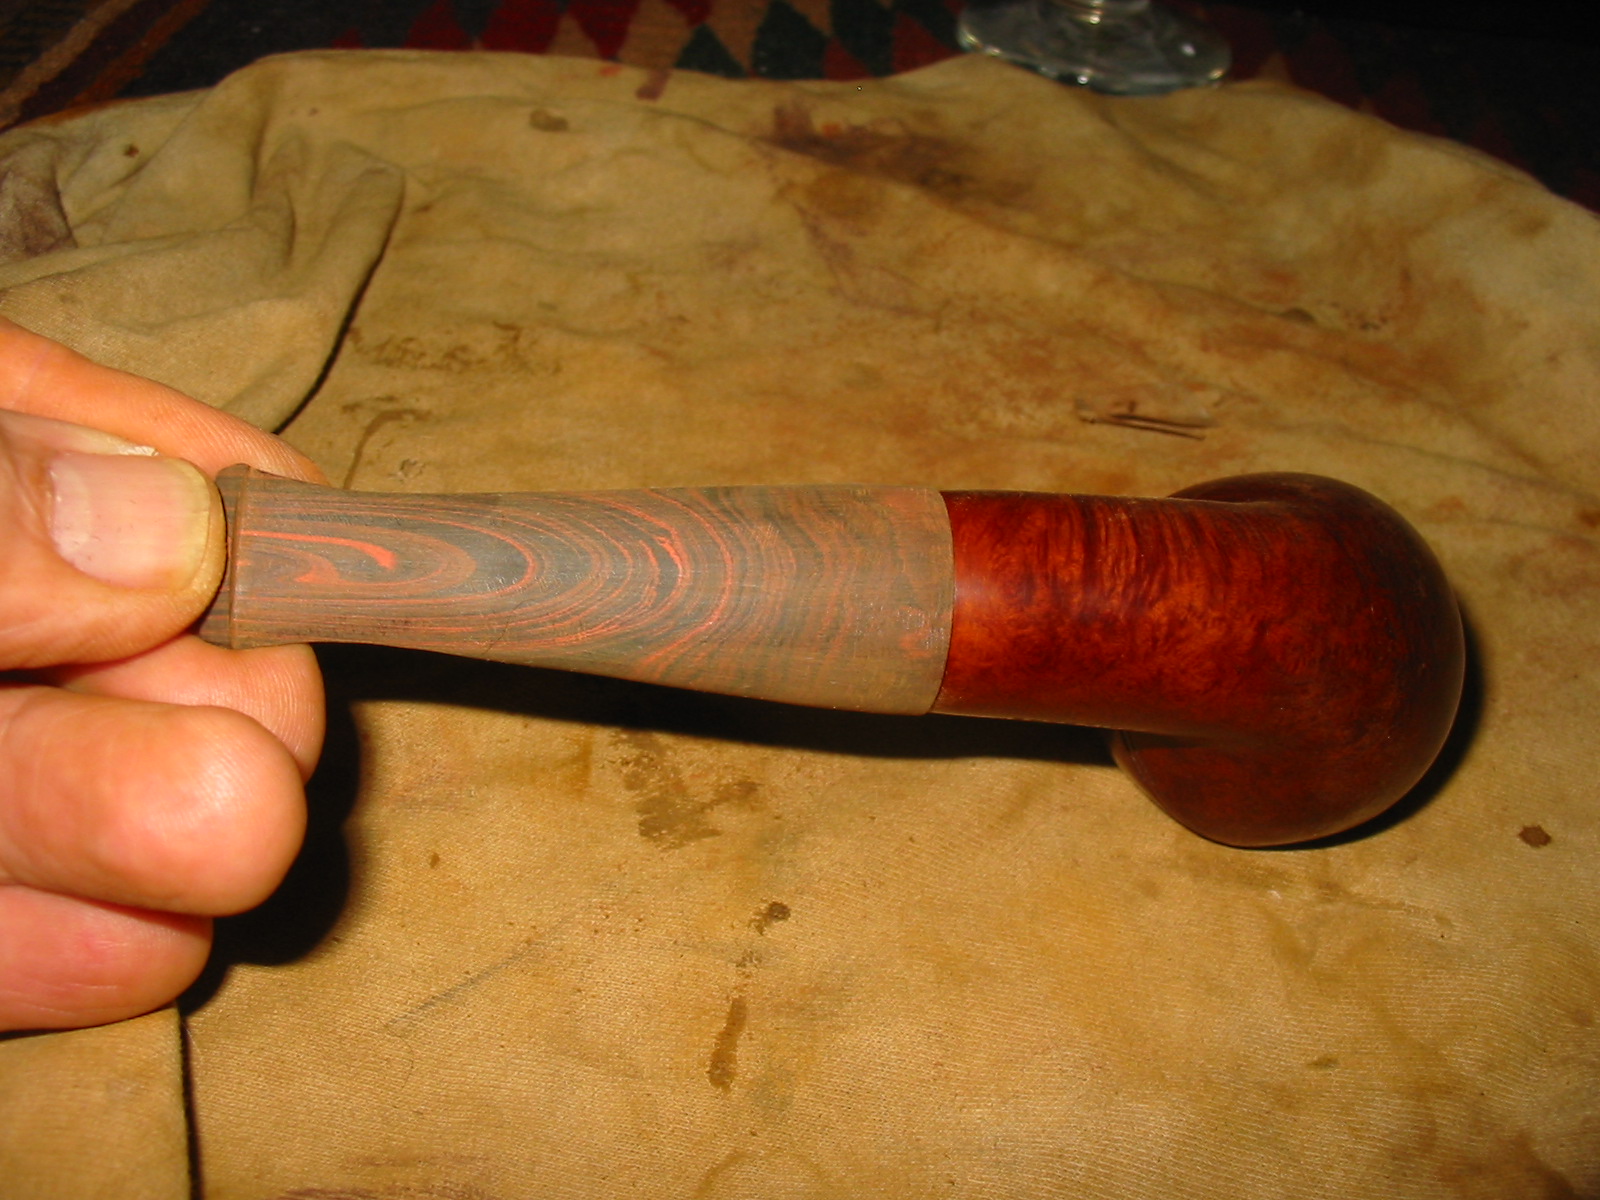
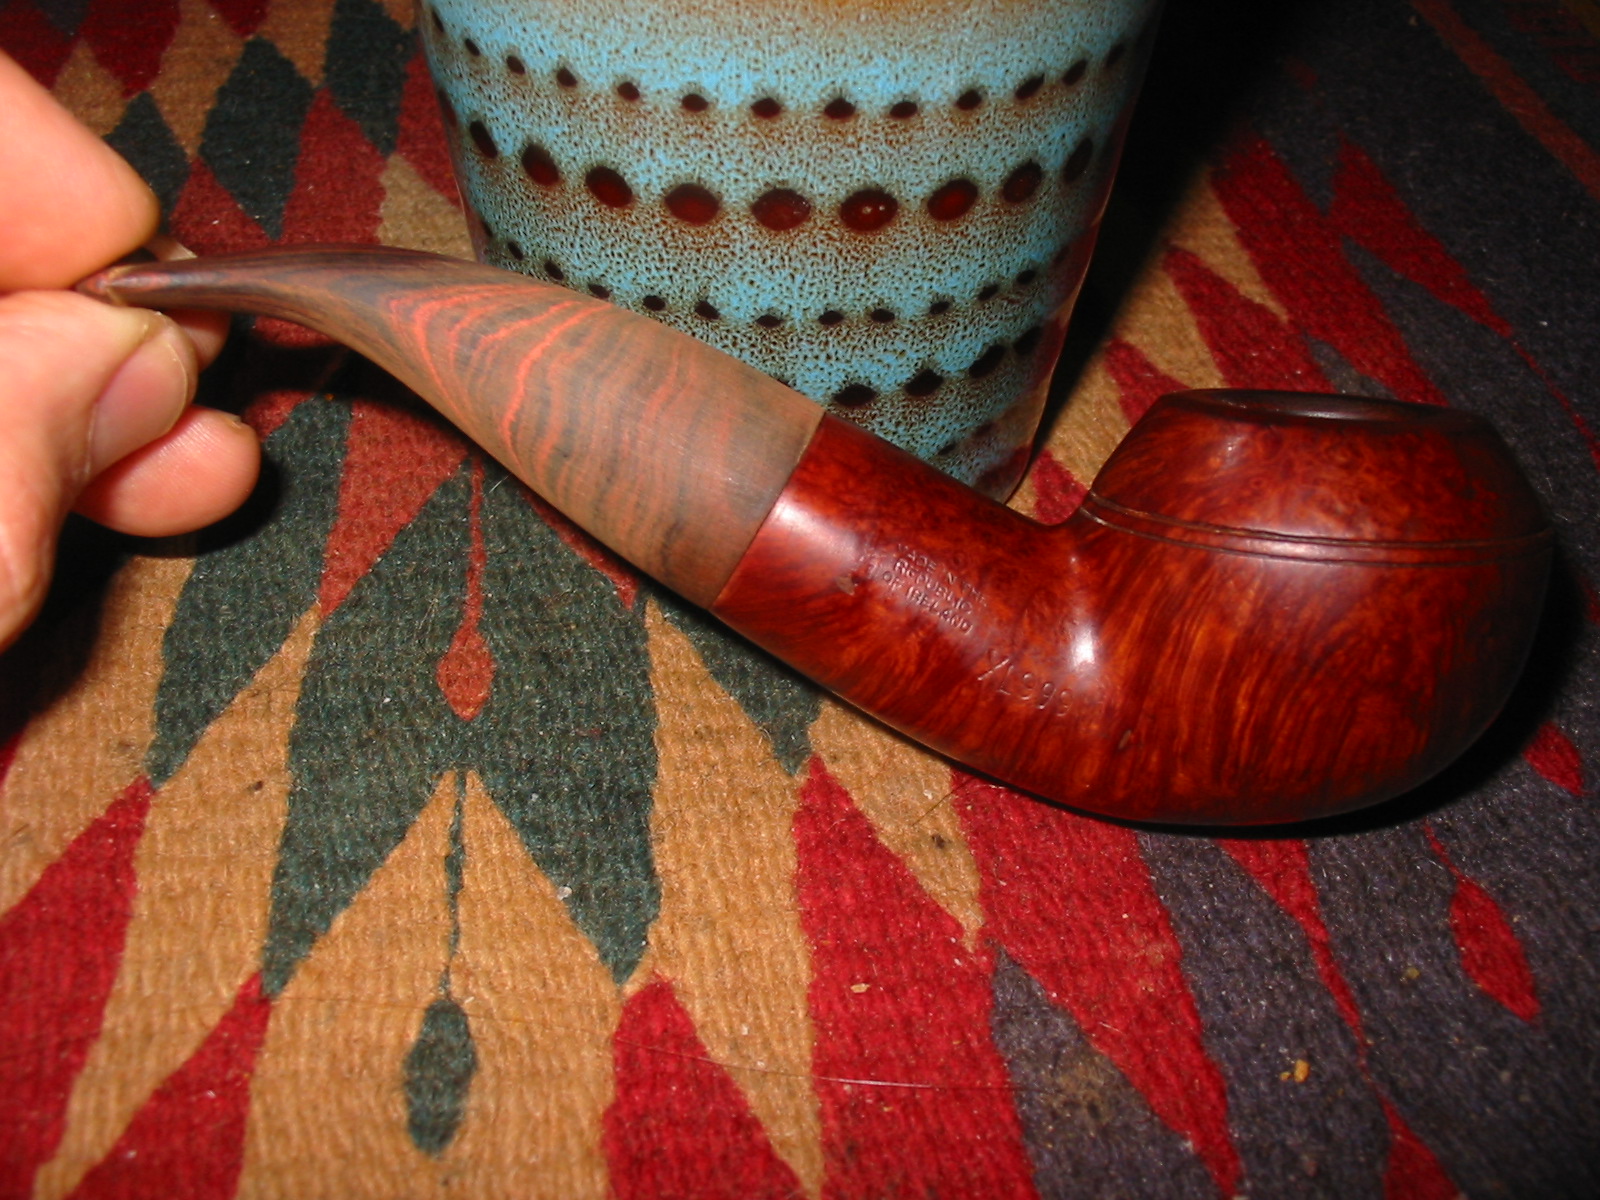
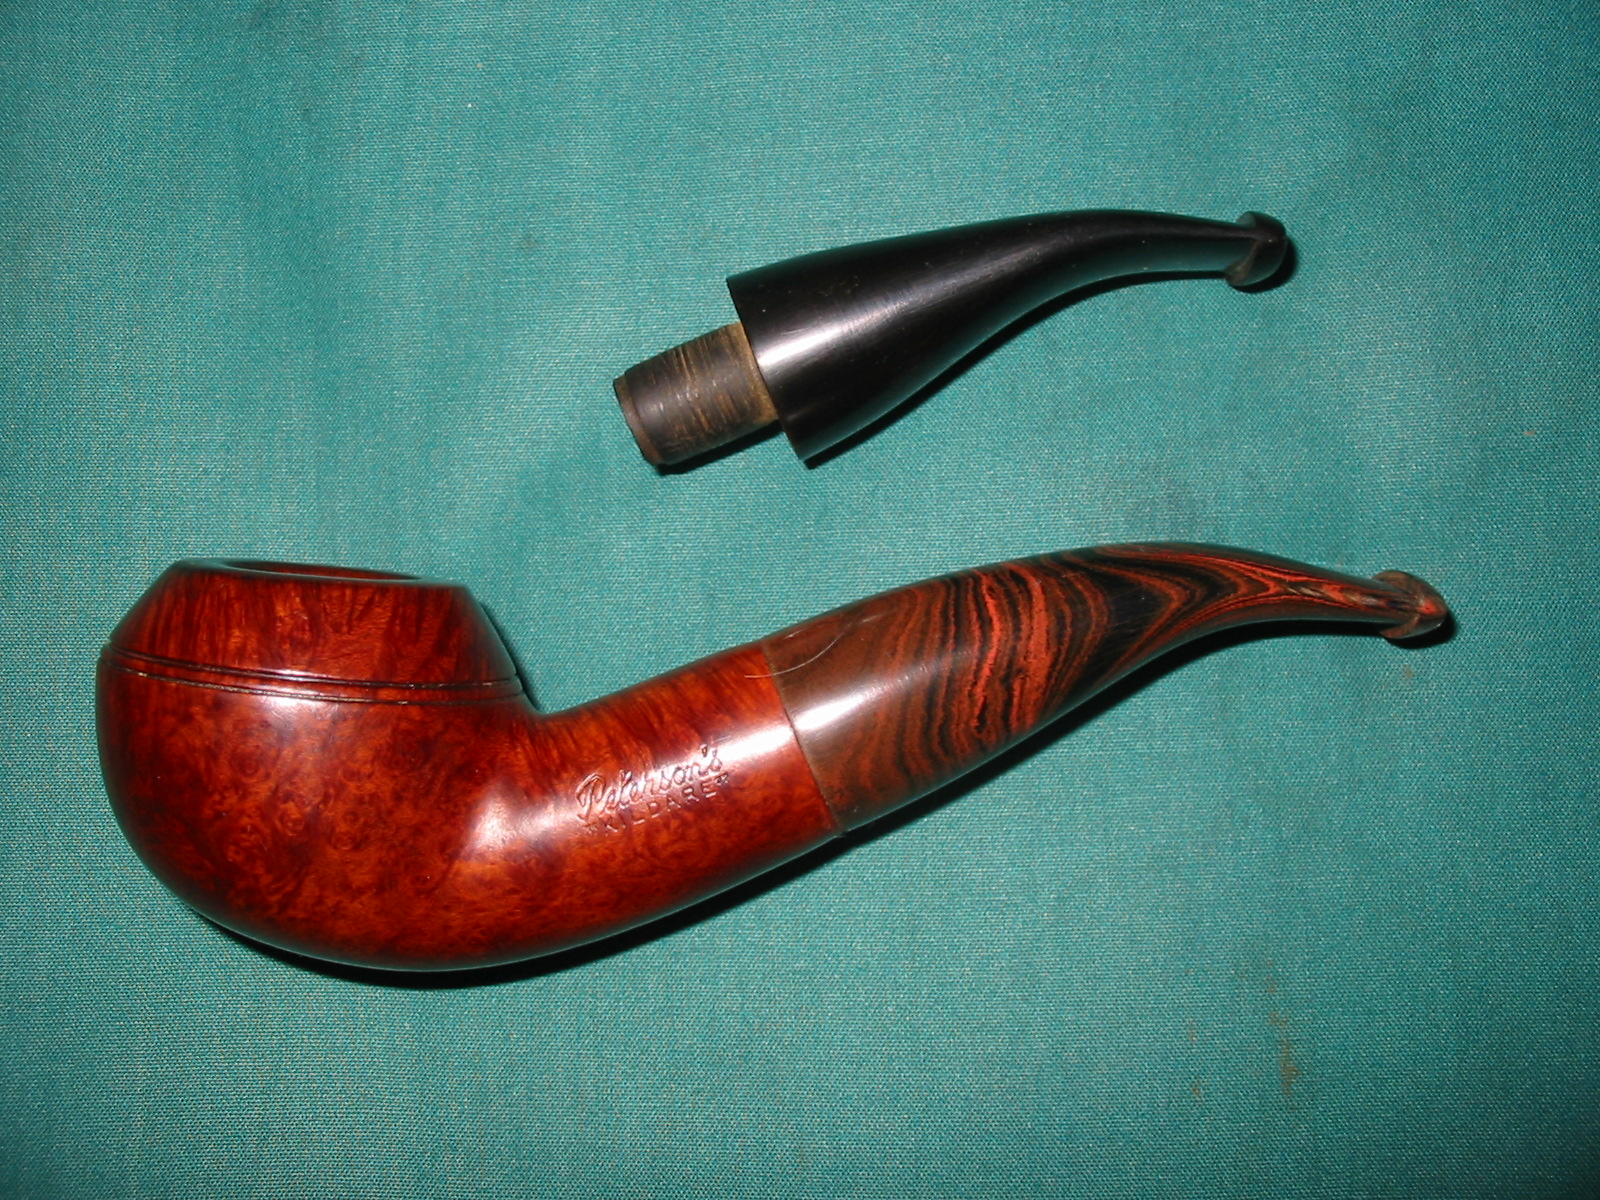
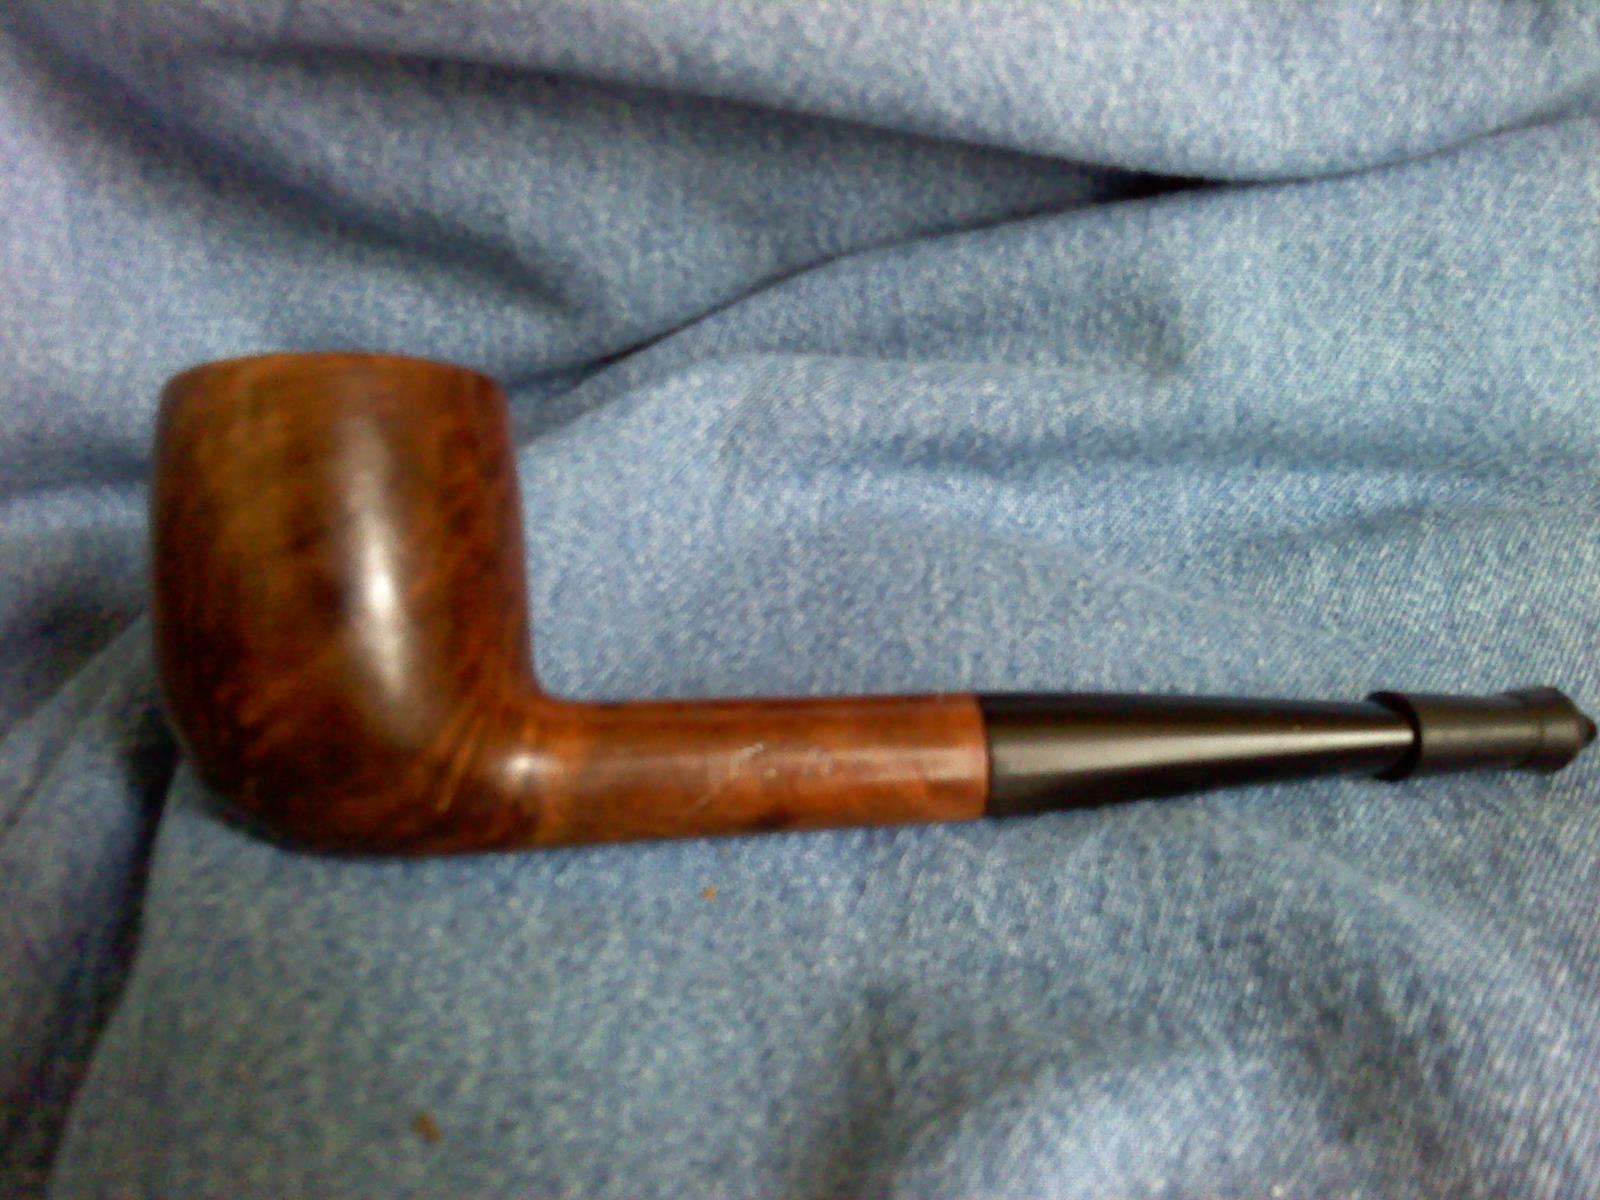
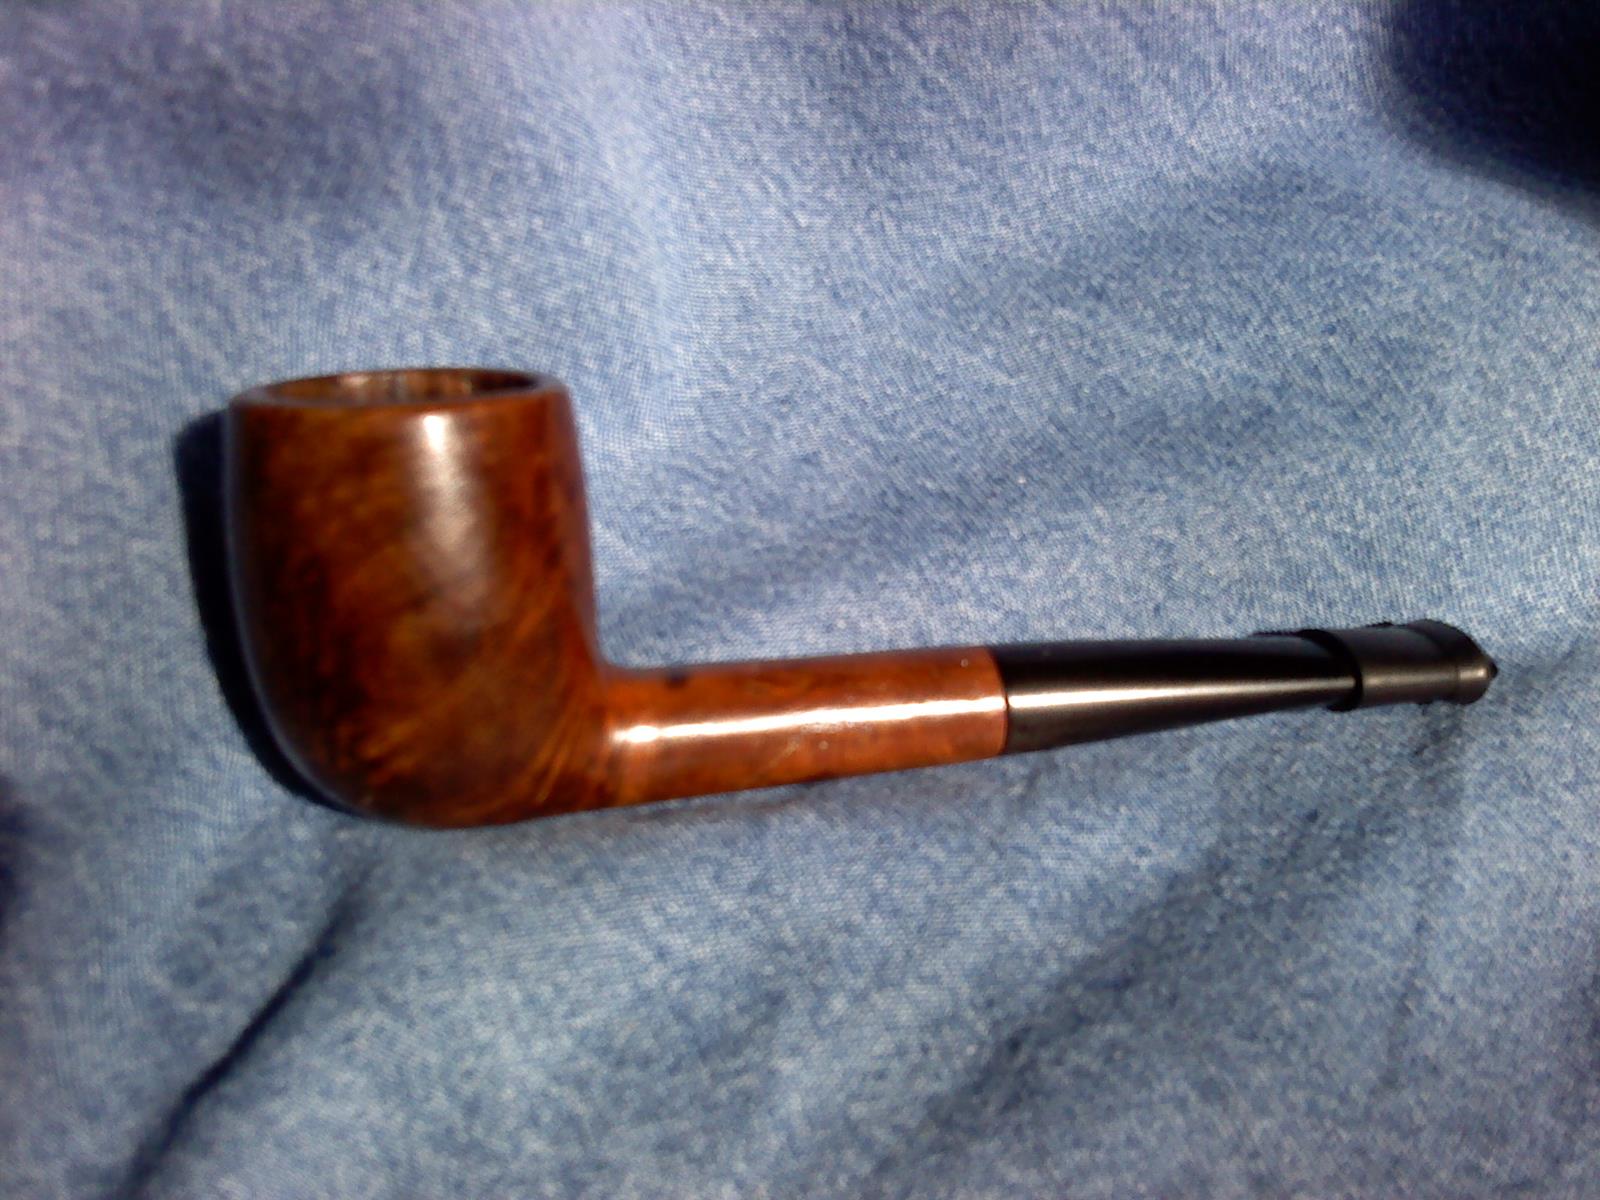
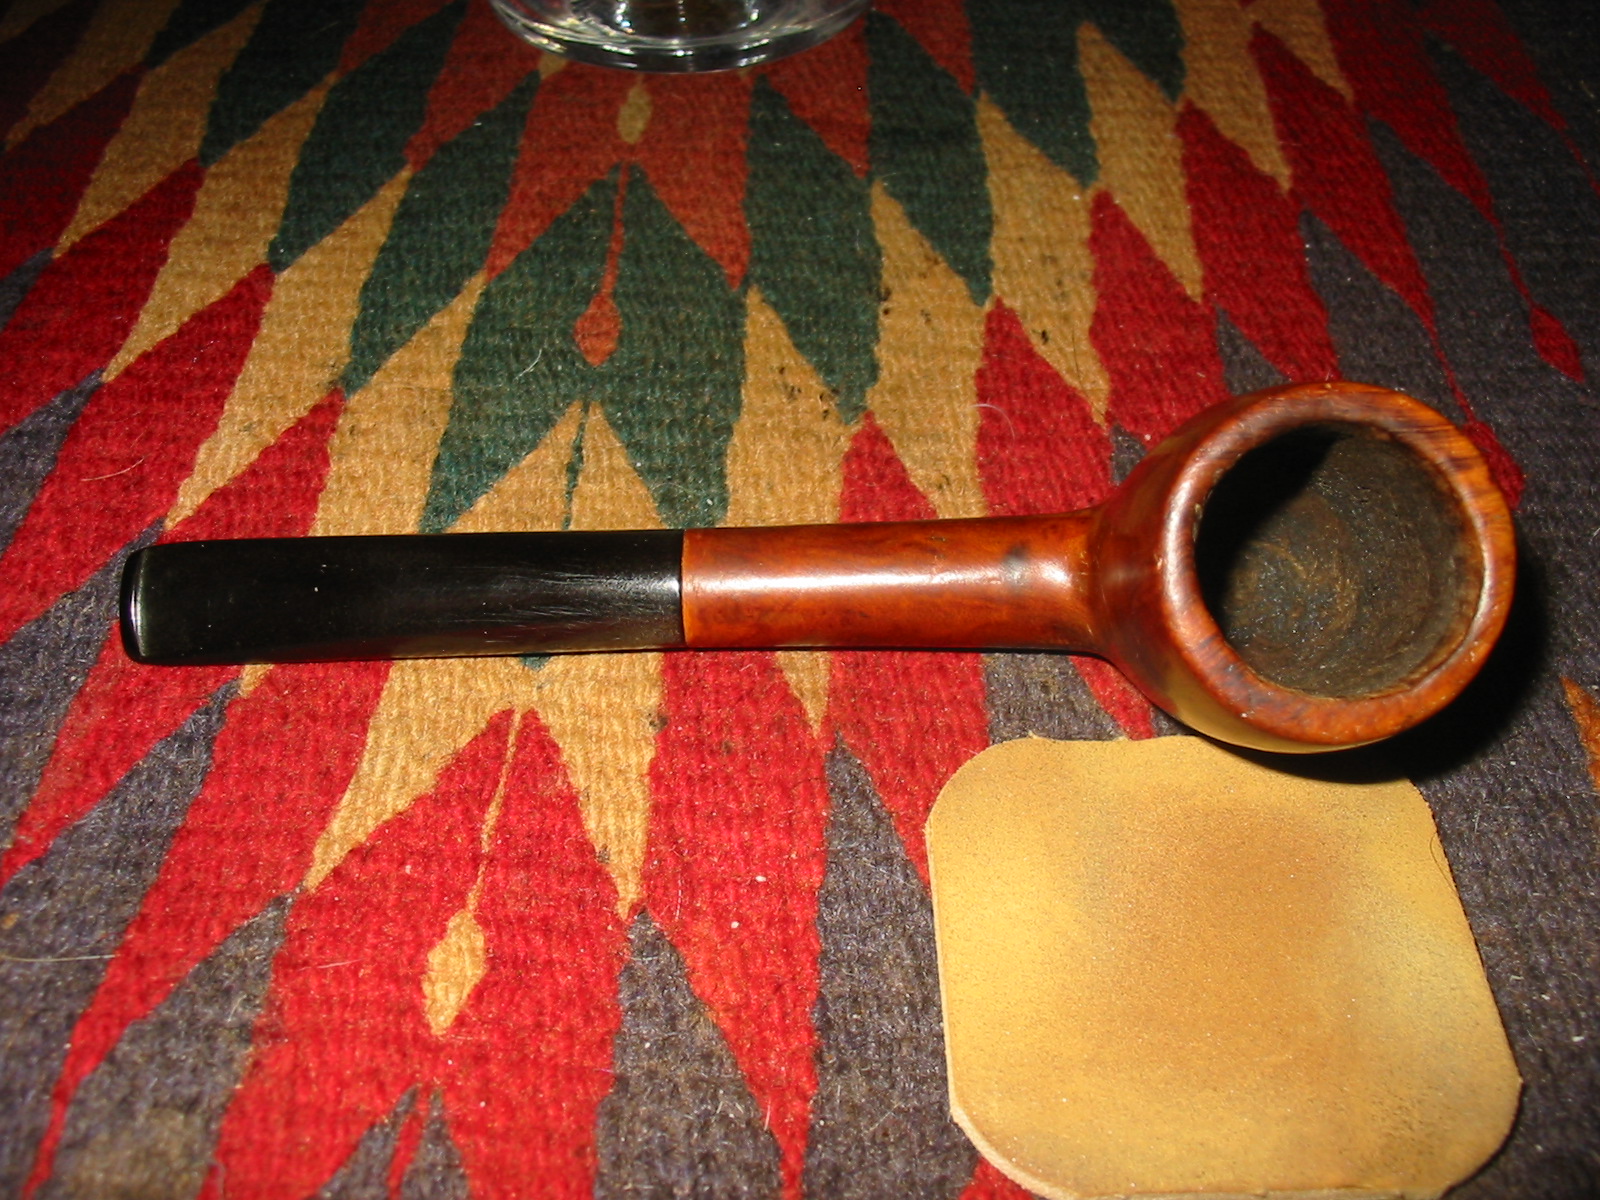
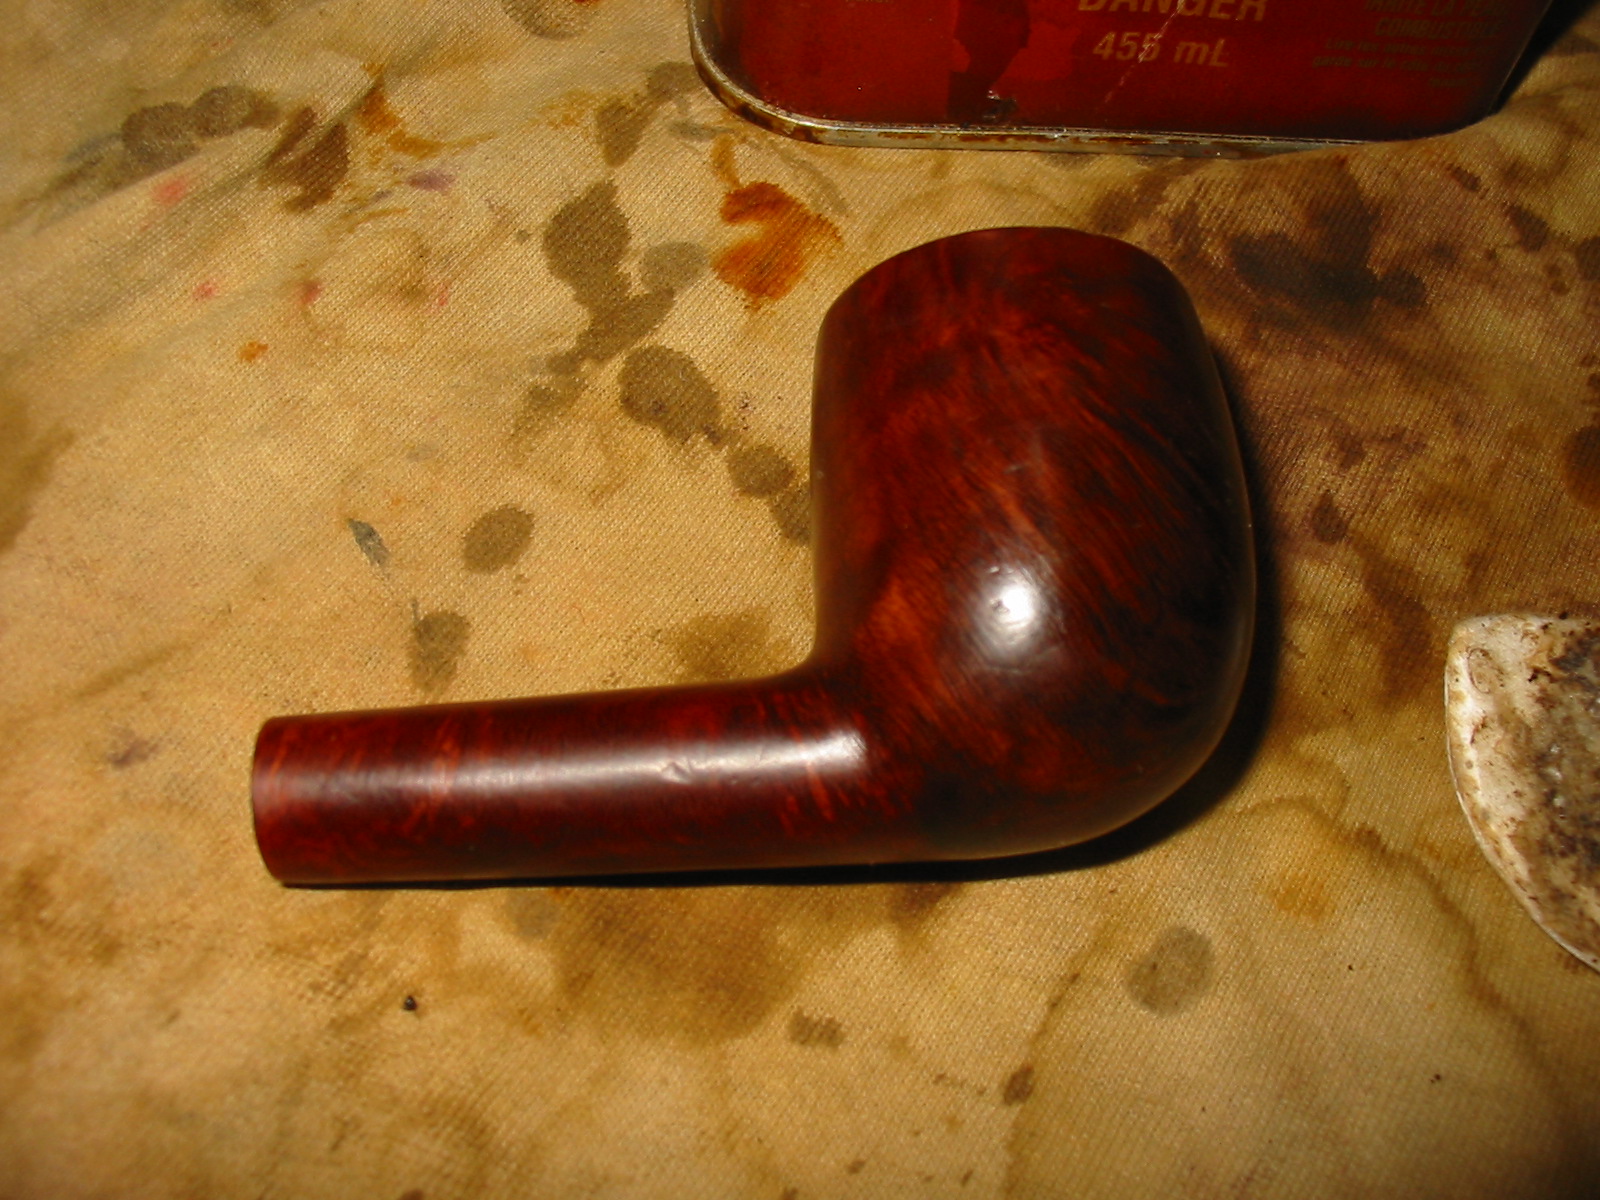
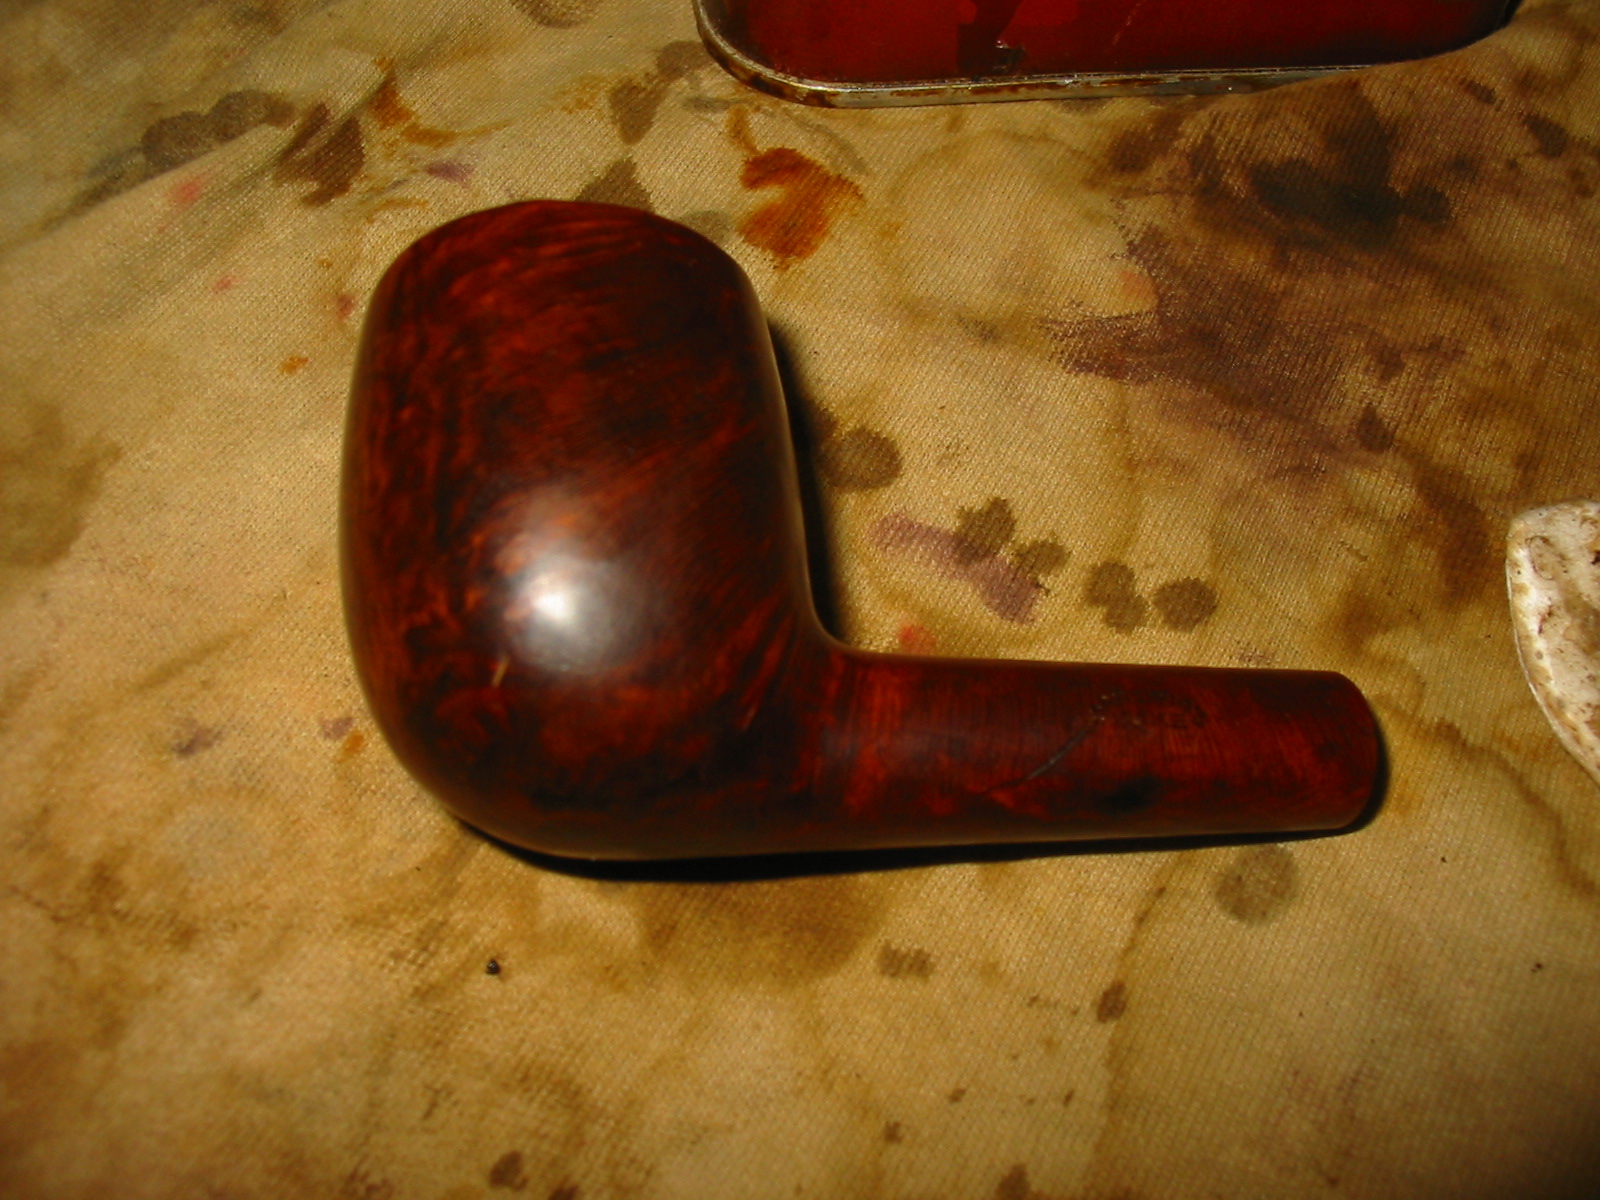
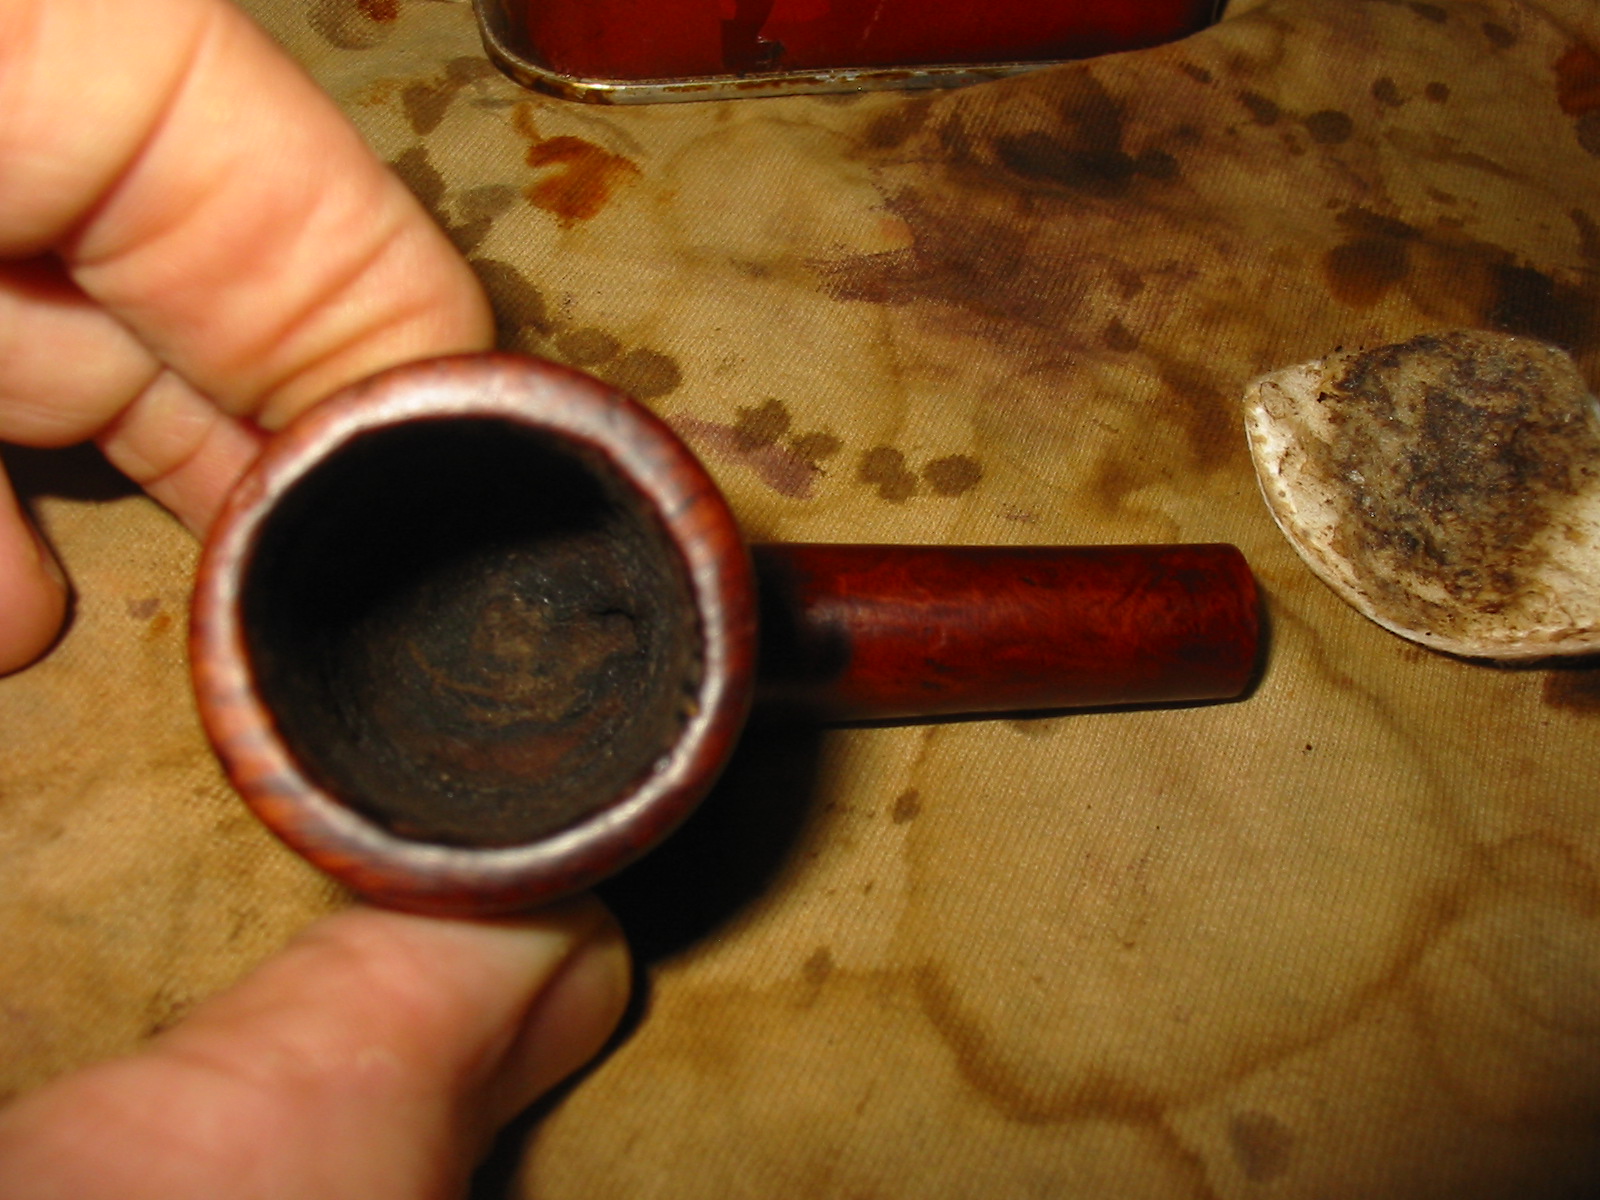
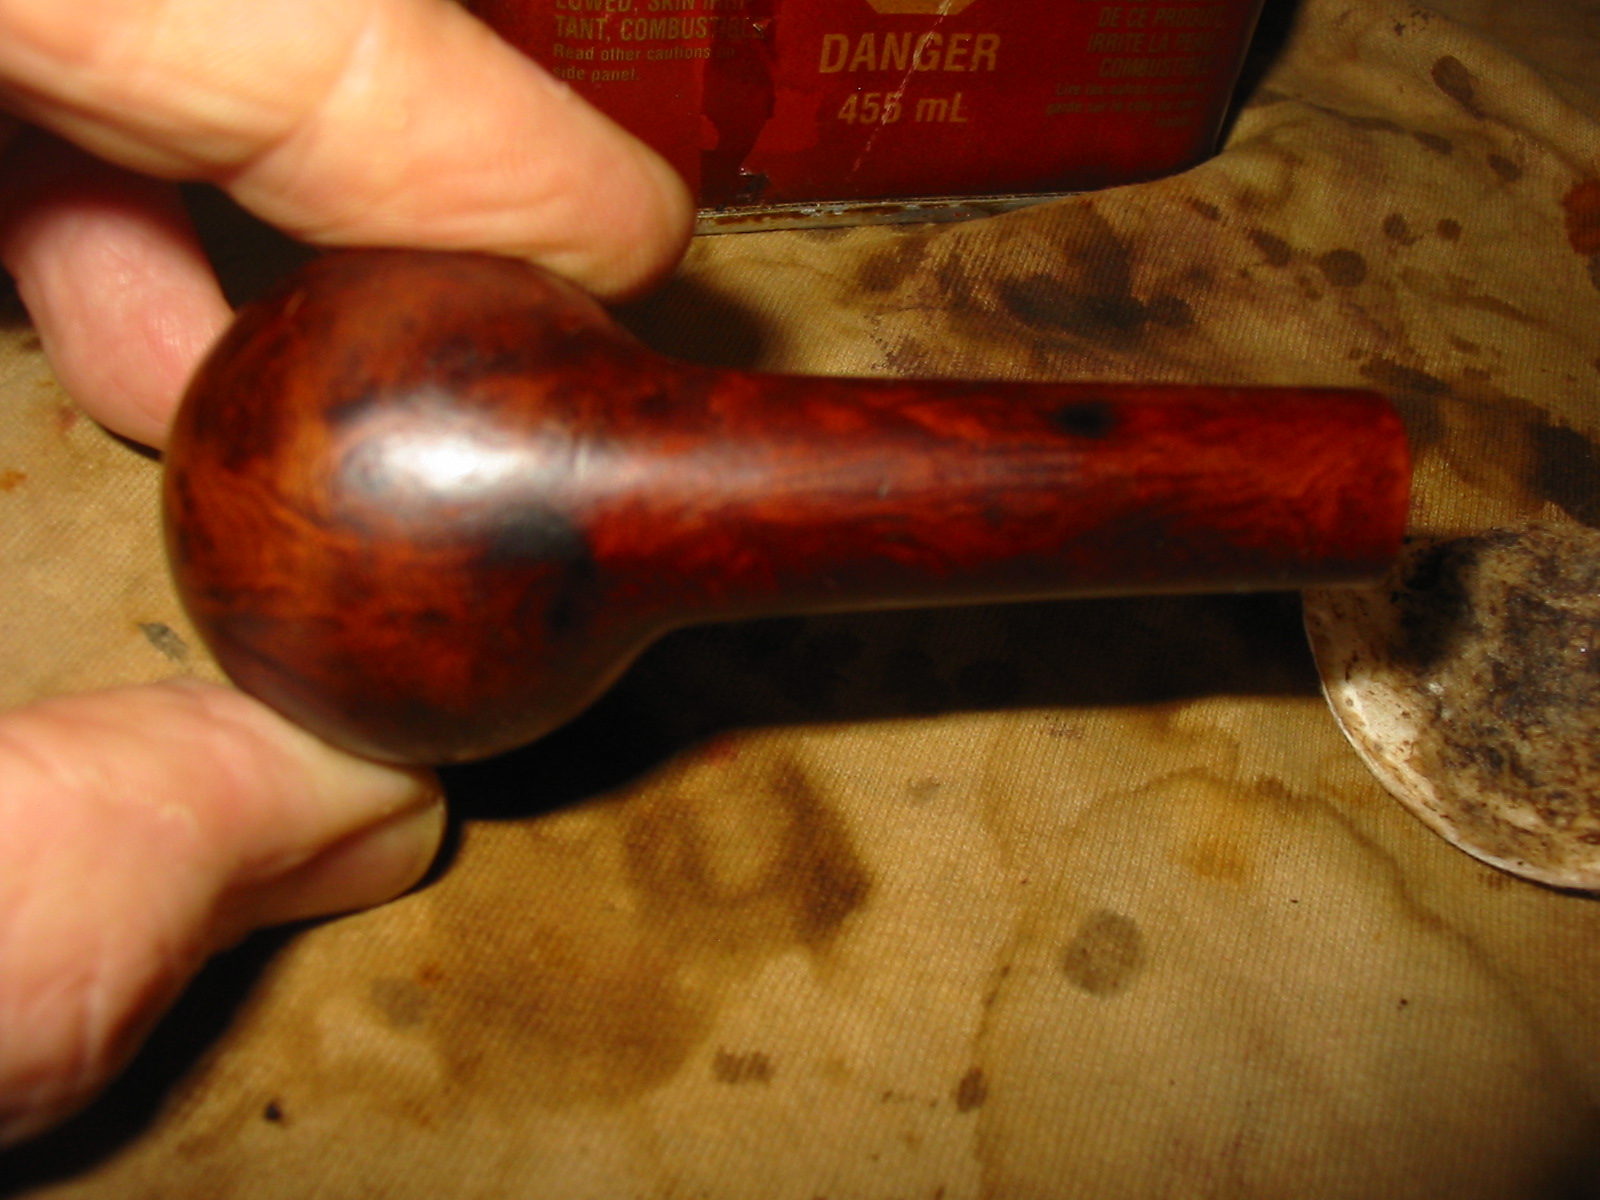
The pipe is old and very worn. The scratches that she mentioned were deeper than I expected from the photos. The finish was worn on the underside of the shank and in places on the sides of the bowl. There were some dark spots on the top and bottom of the shank that looked like stains from moisture or something sitting against the shank in a box. Several of the scratches had white markings in them. As she noted the bowl was over reamed but that too was worse than I expected. It had been reamed to the point that the walls were very thin all the way around and the inner edge of the bowl was out of round. In examining the tapered stem up close it indeed seems to be proportionally short in comparison to the length of the bowl and shank. The shoulders at the shank/stem union are rounded and the fit is not tight. The crown or “W” stamping she mentioned is very hard to see and I am not sure of the actual stamp. There were deep scratches on the vulcanite of the stem as well. In my opinion the pipe needed to be restemmed. The next three photos below show the pipe on my work table before I started fitting a new stem.
IMG_2505

IMG_2506

IMG_2507

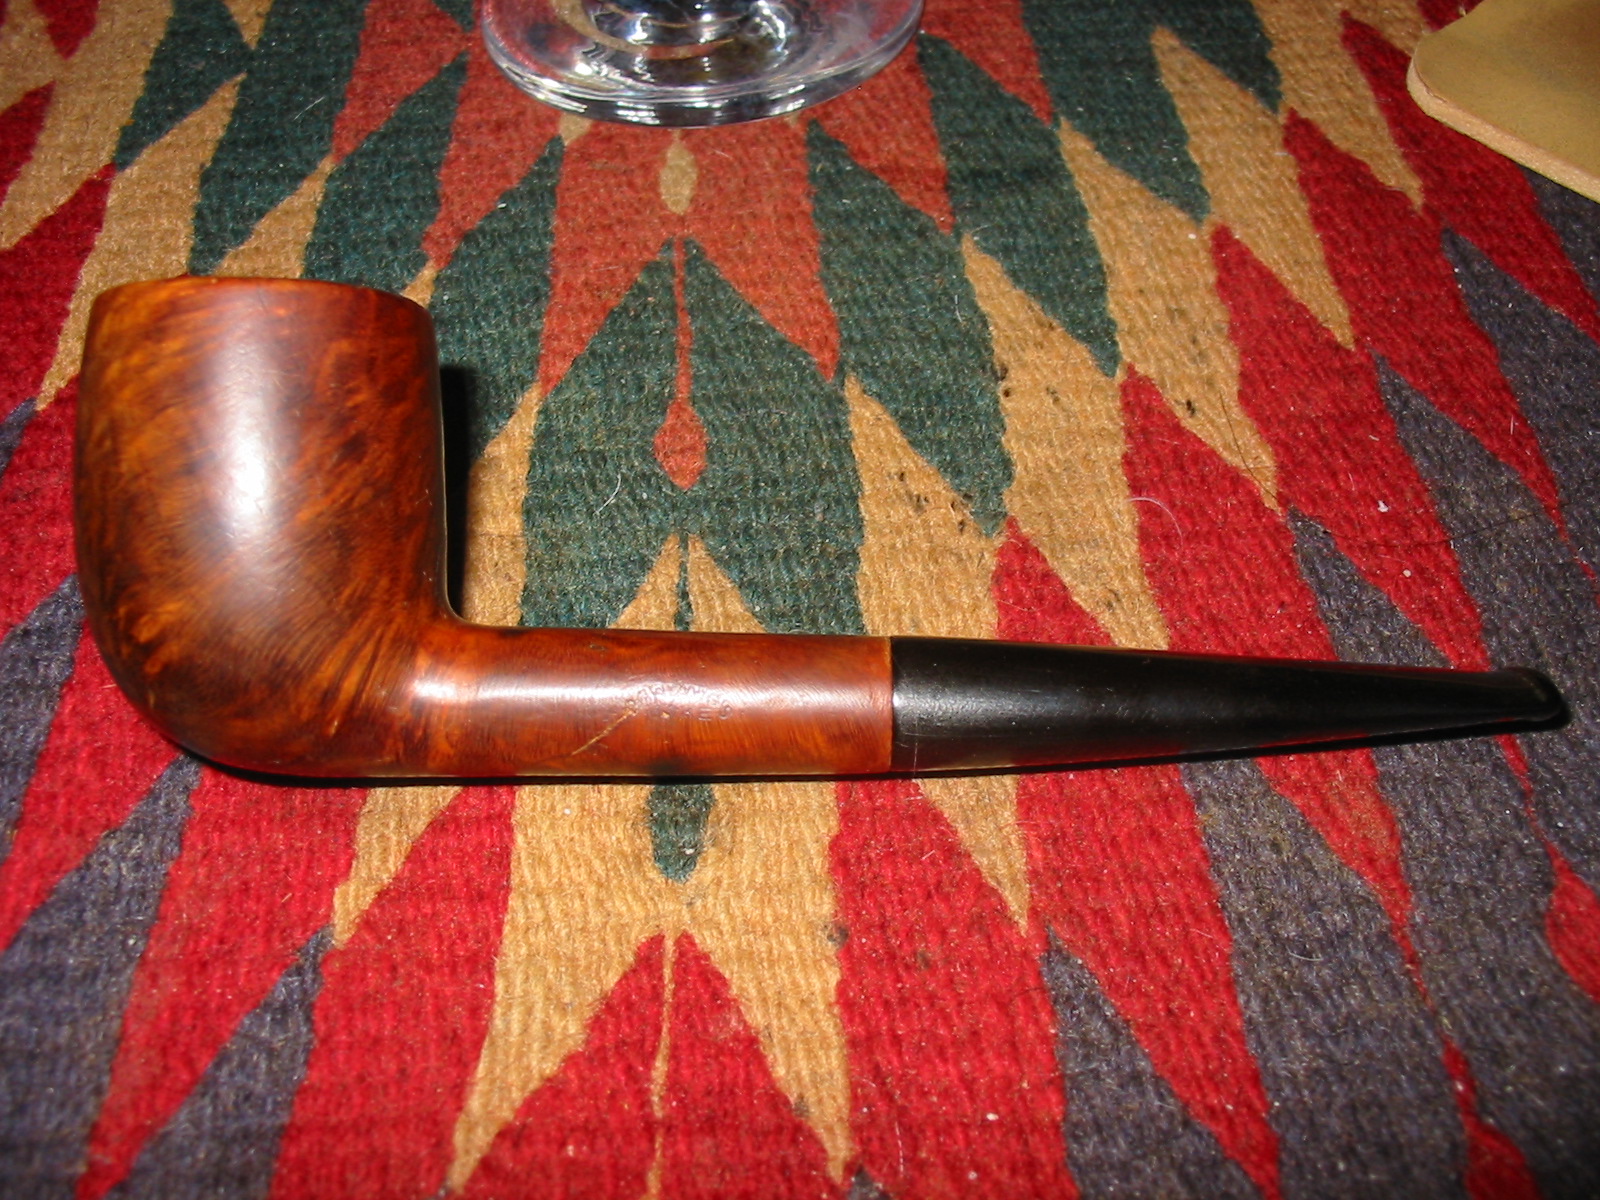
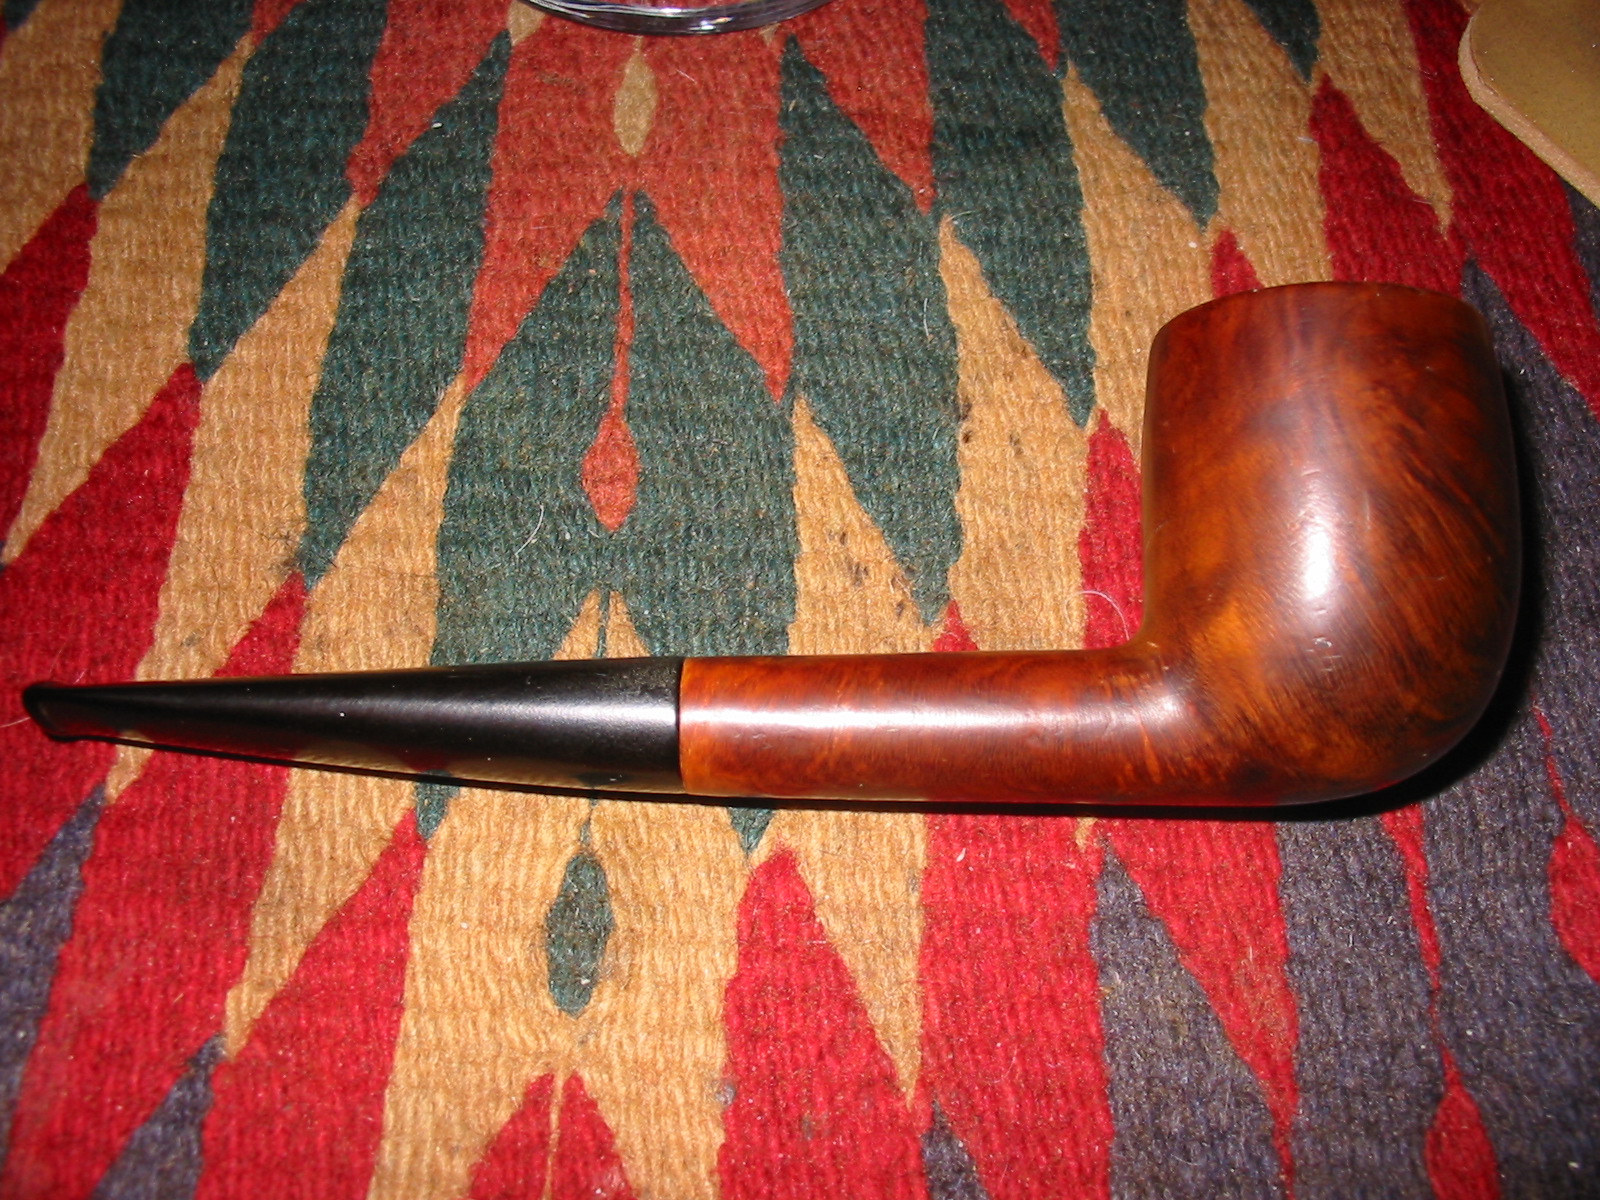
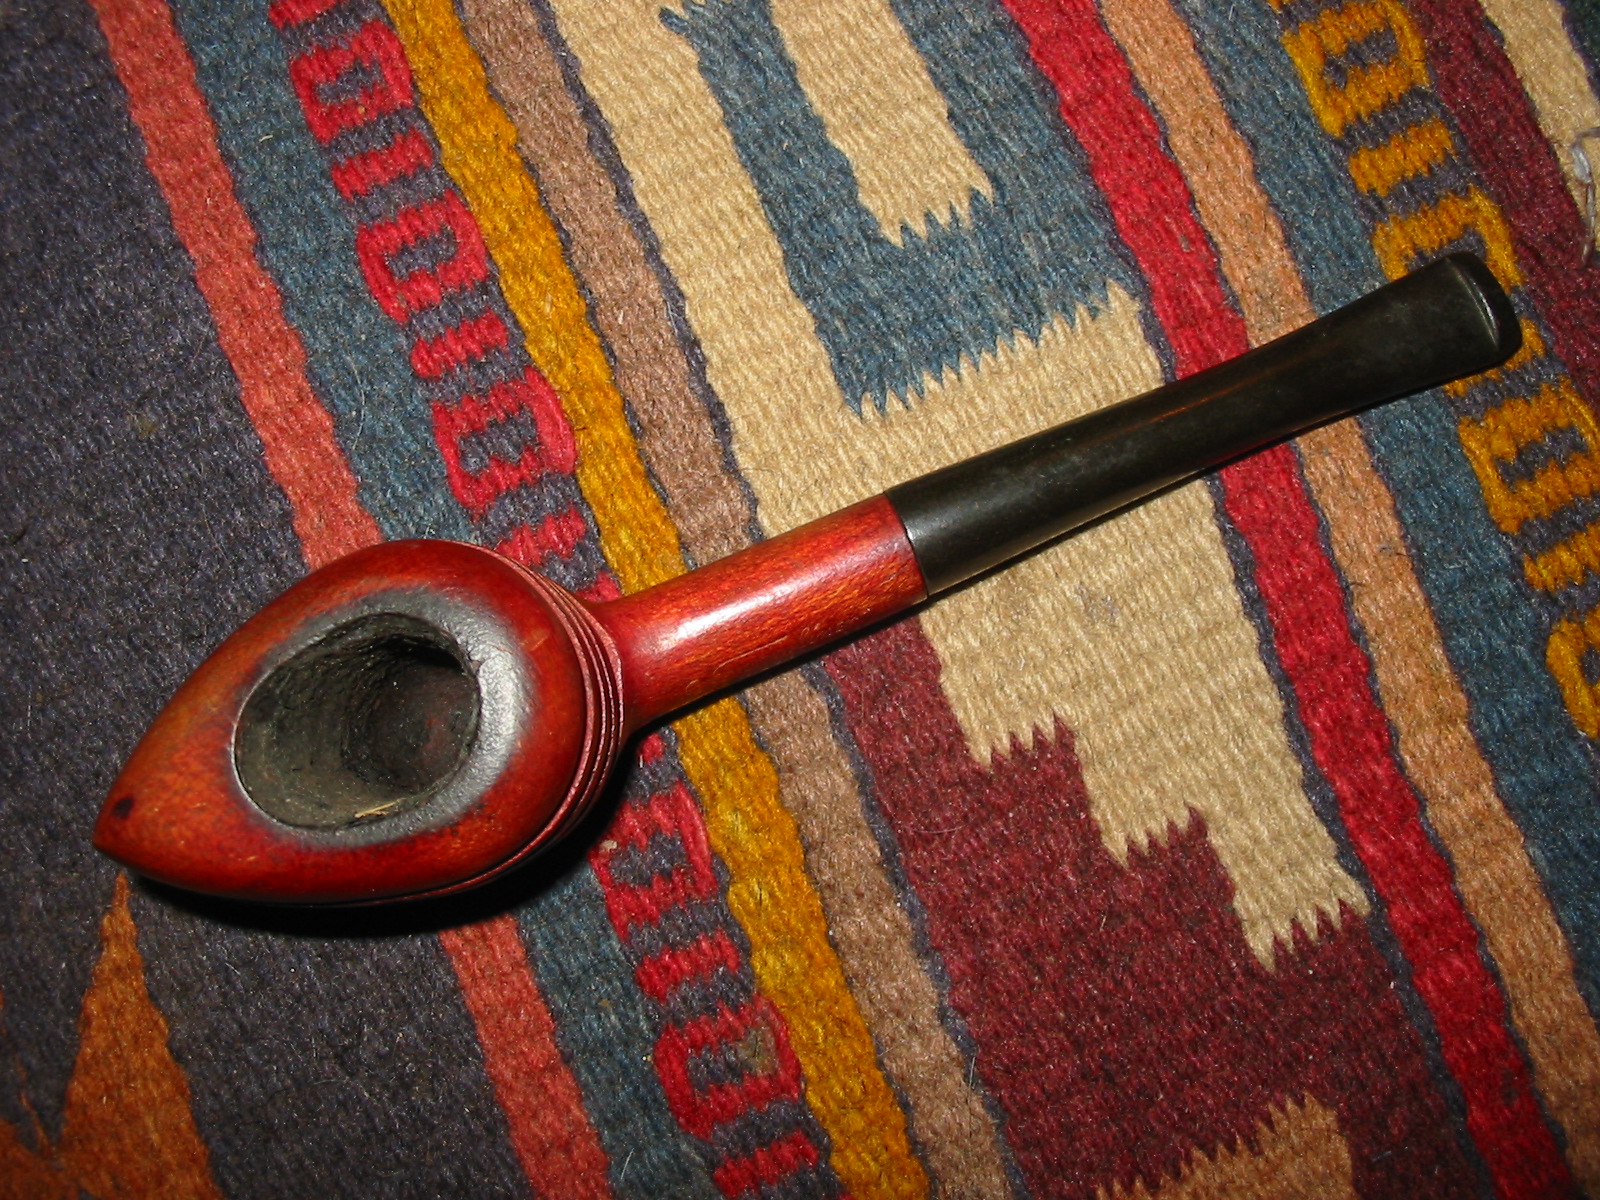
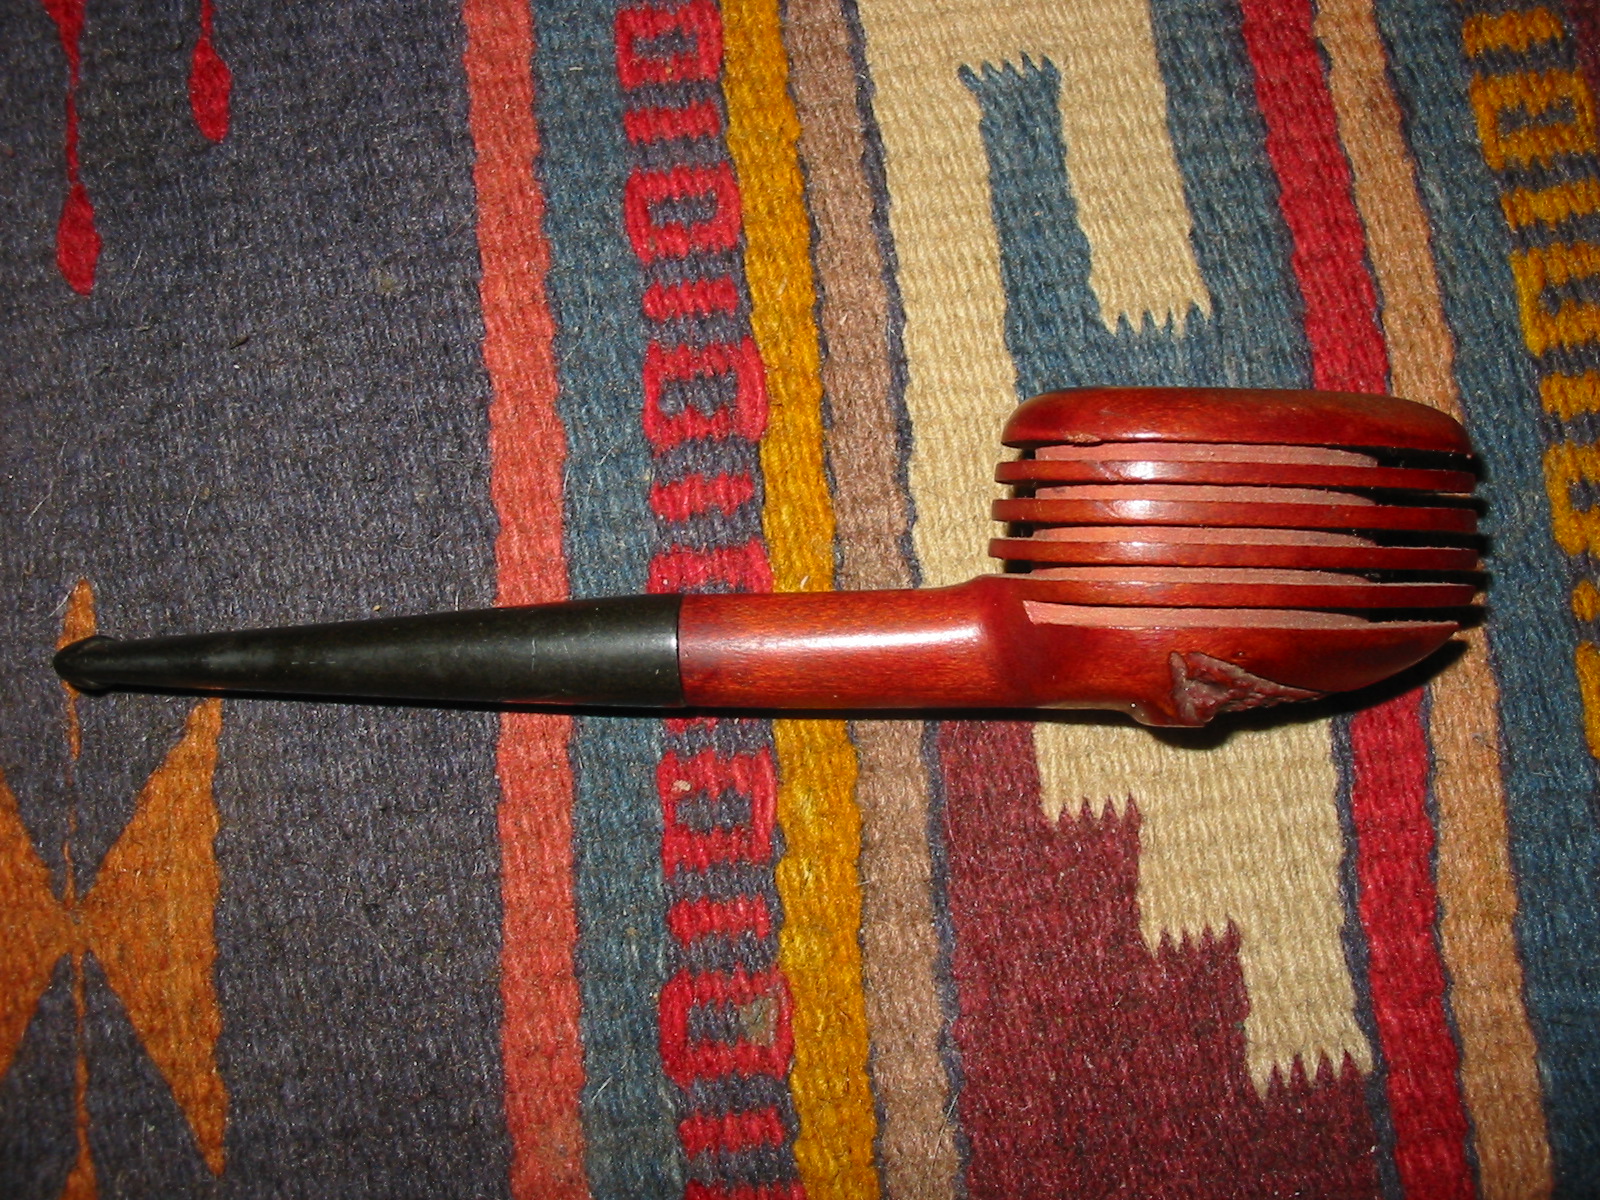
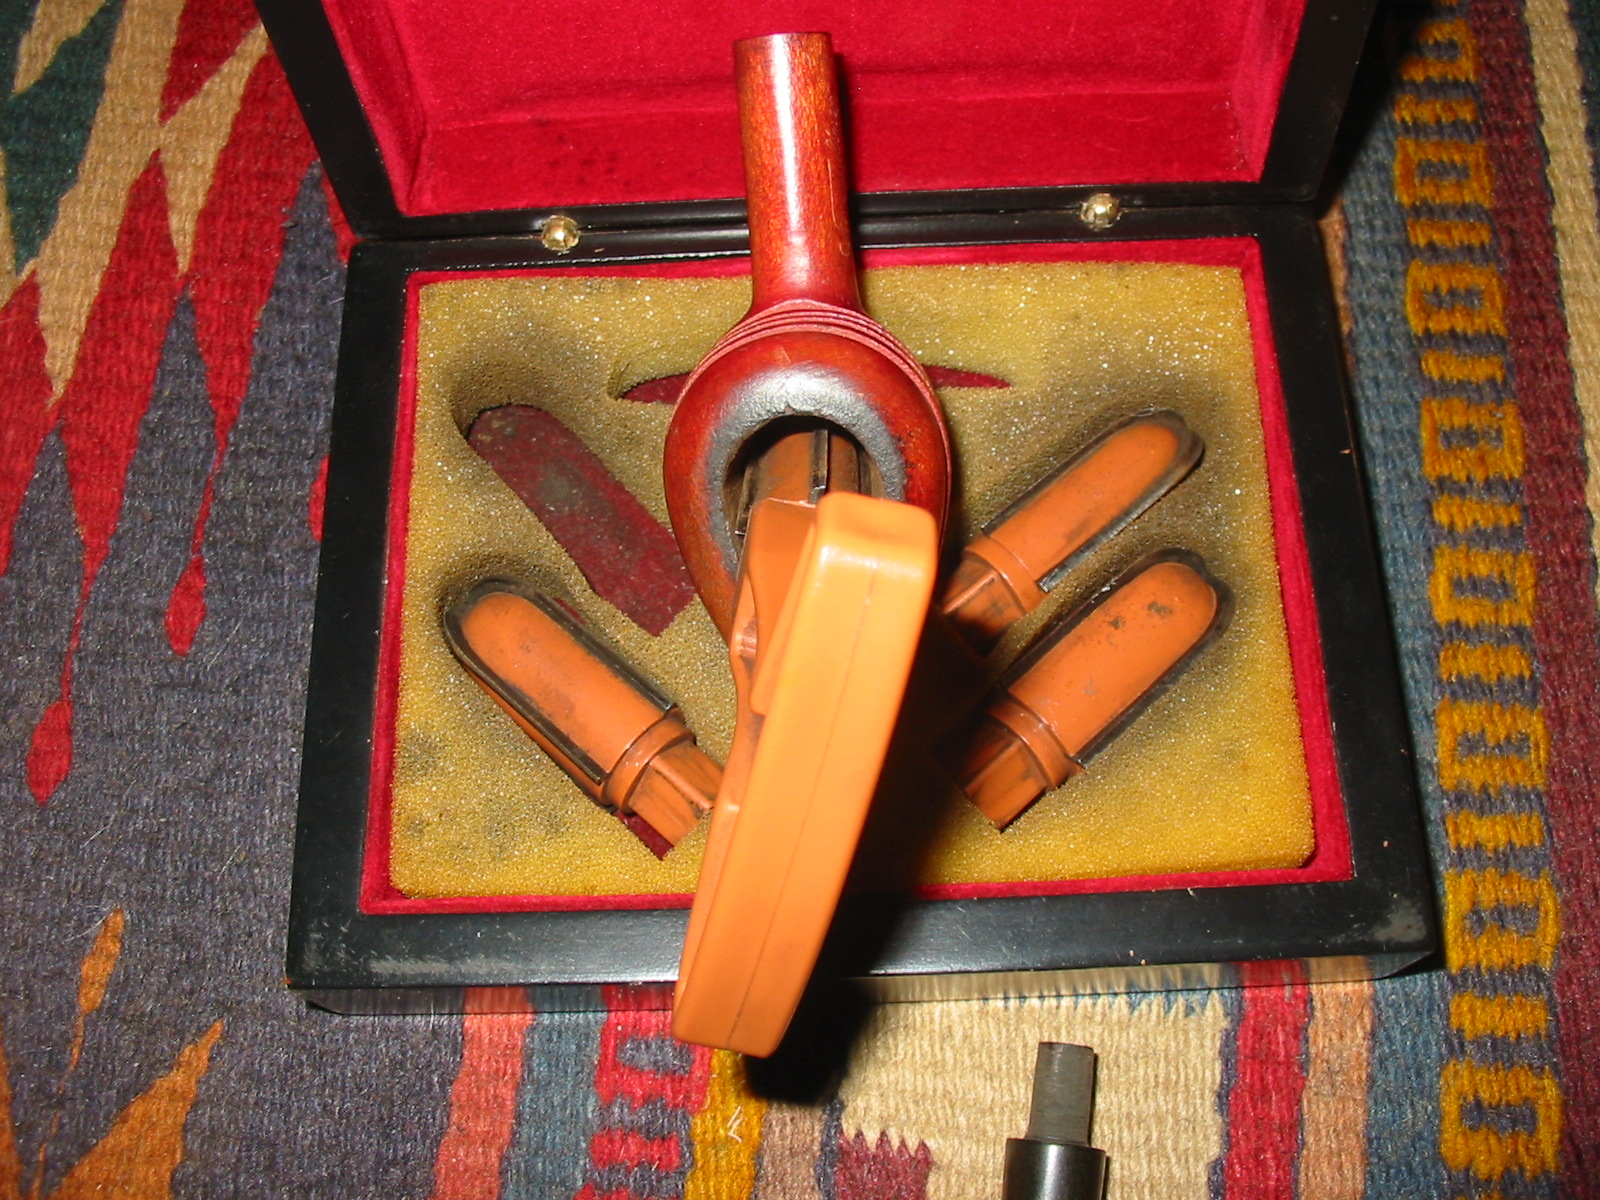
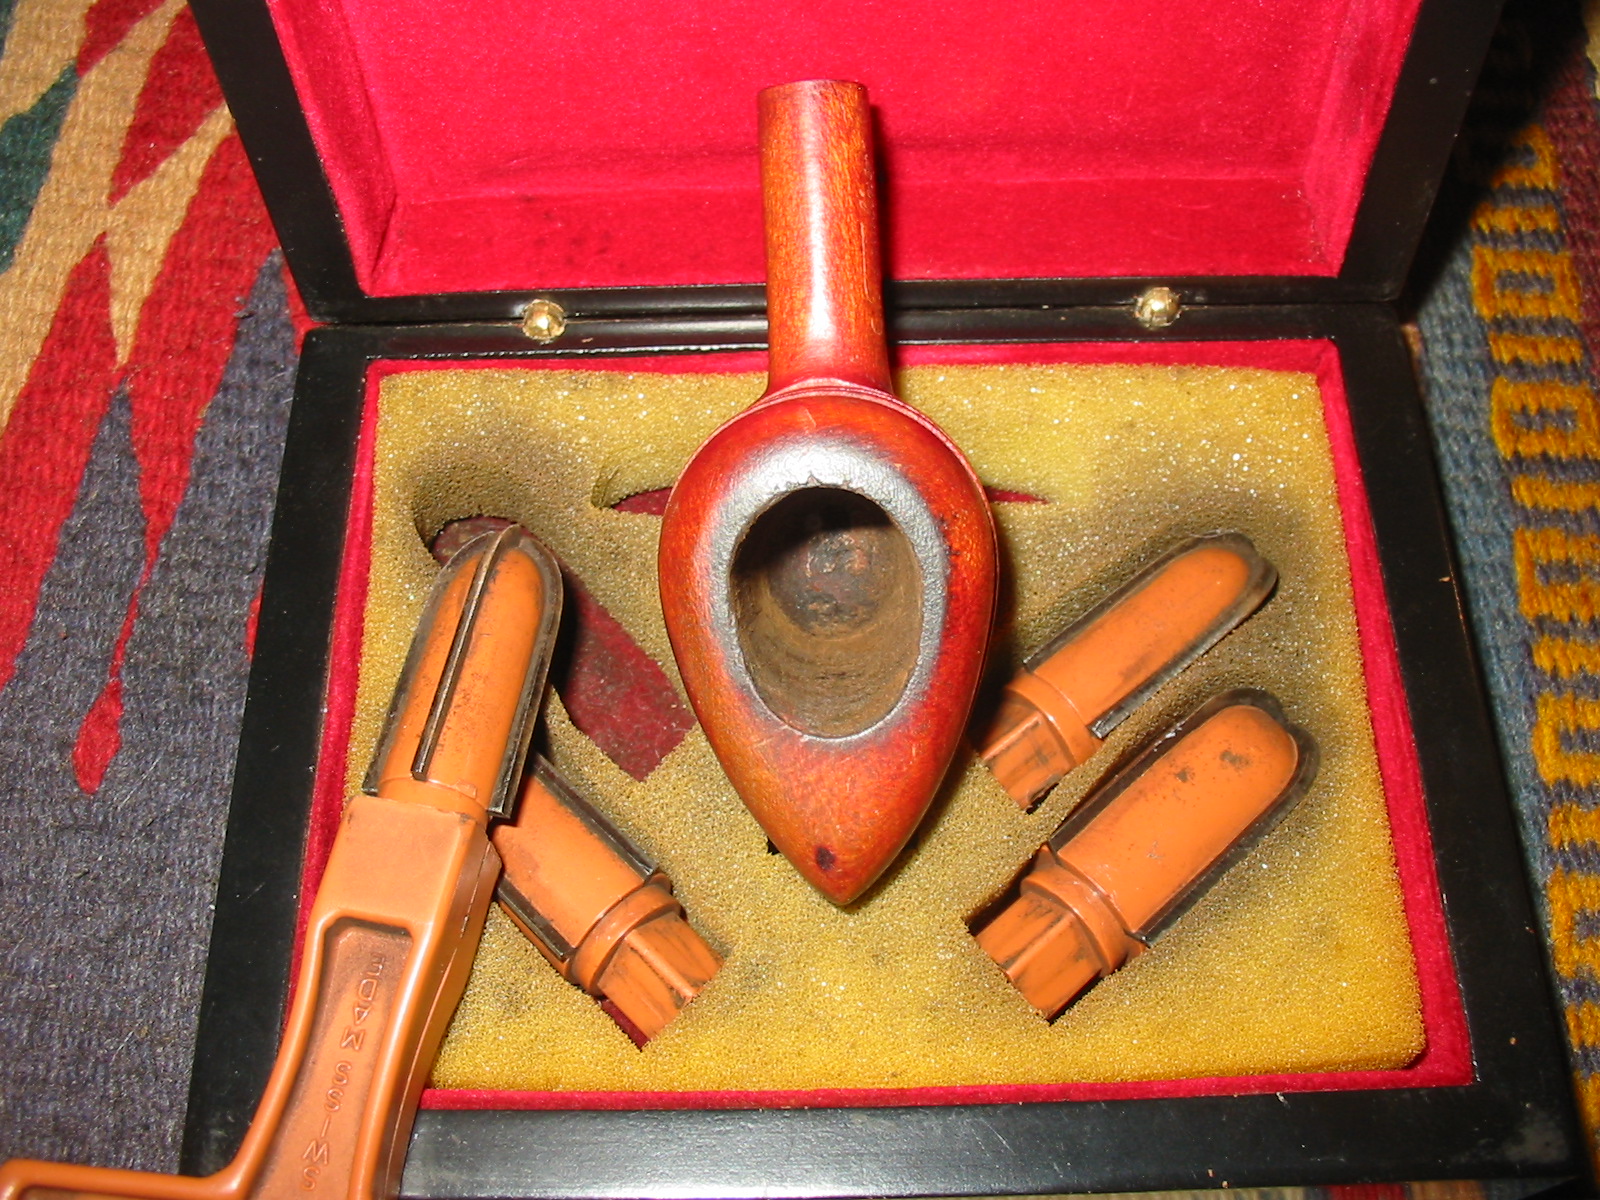
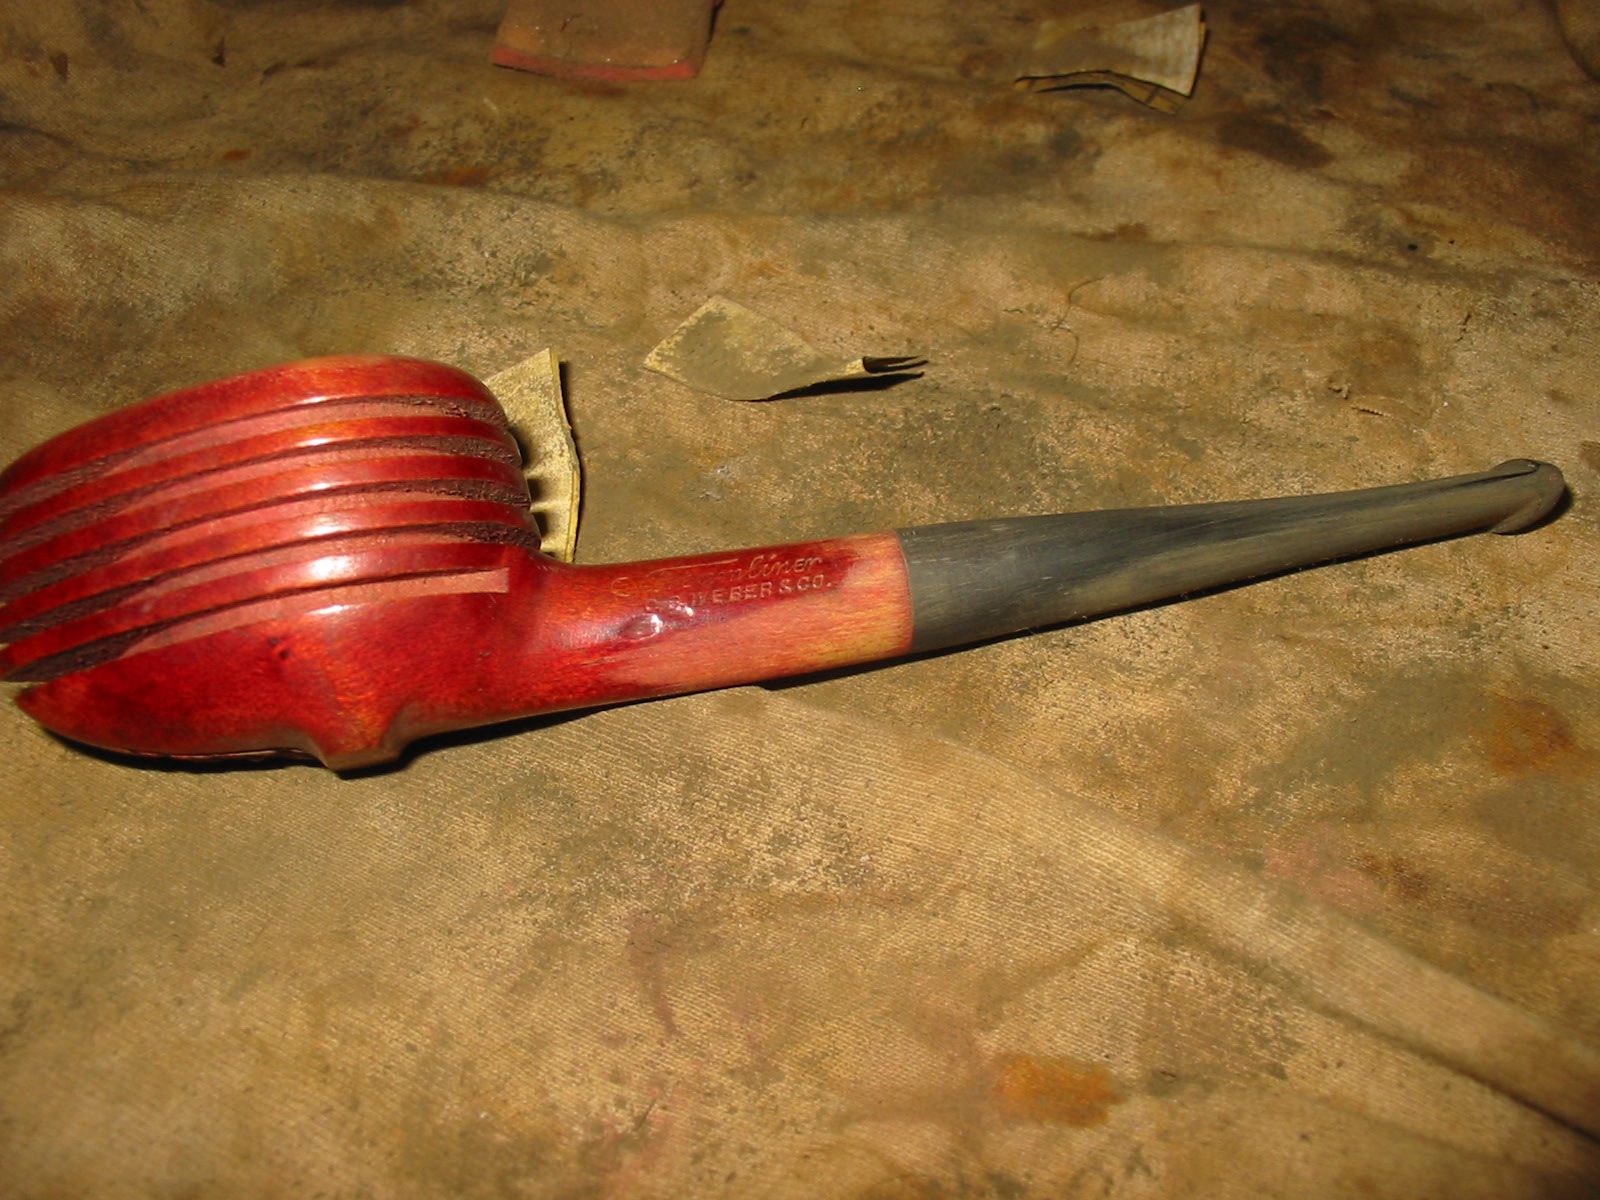
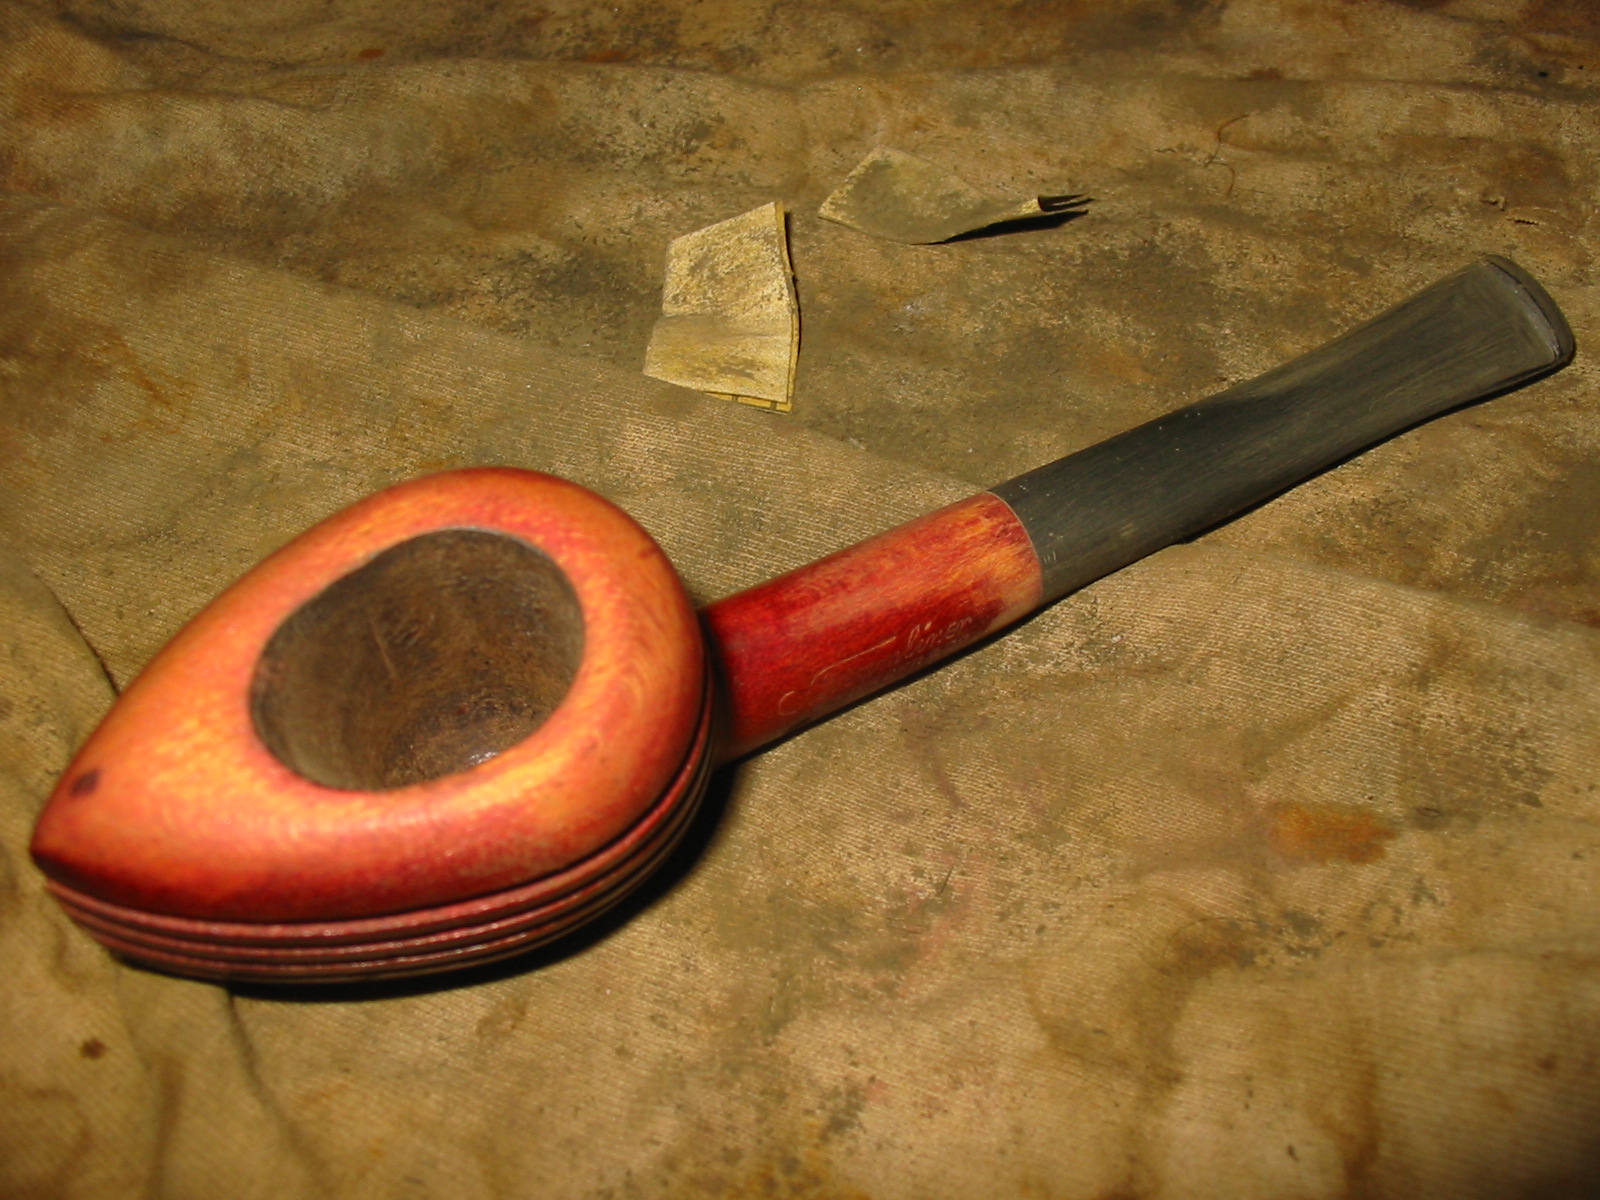
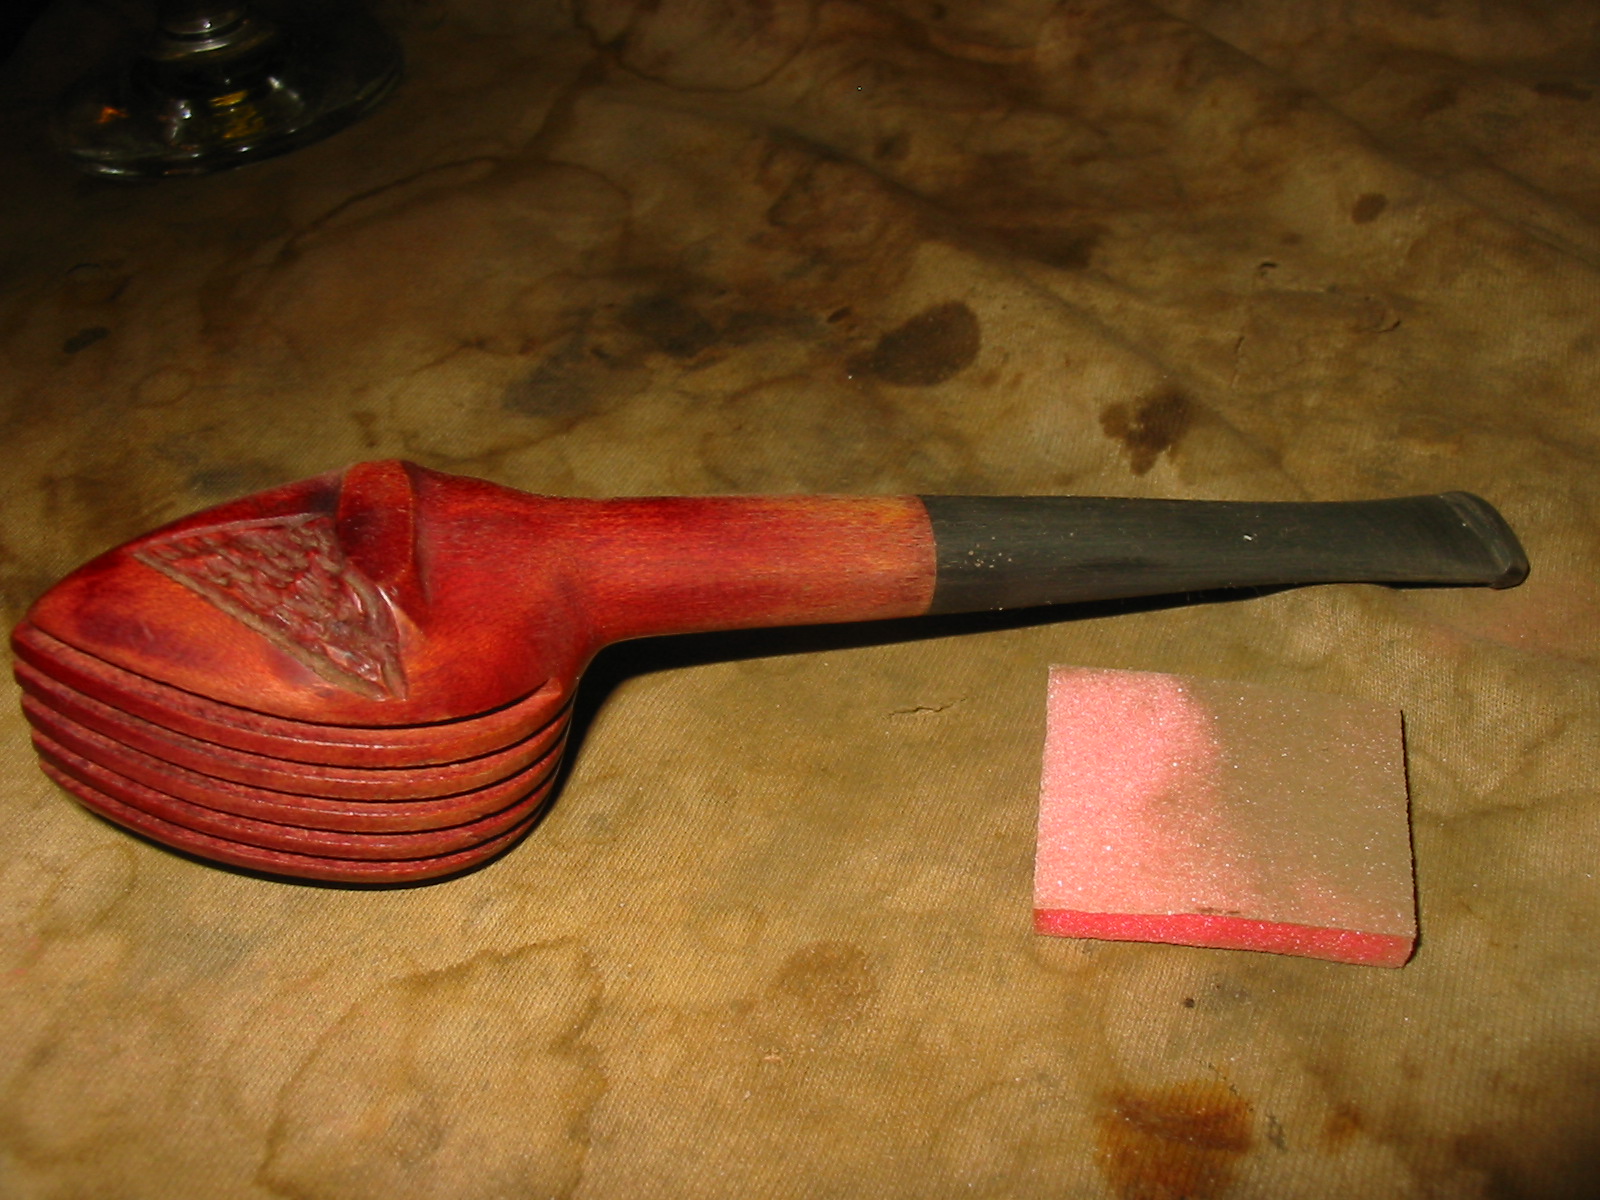
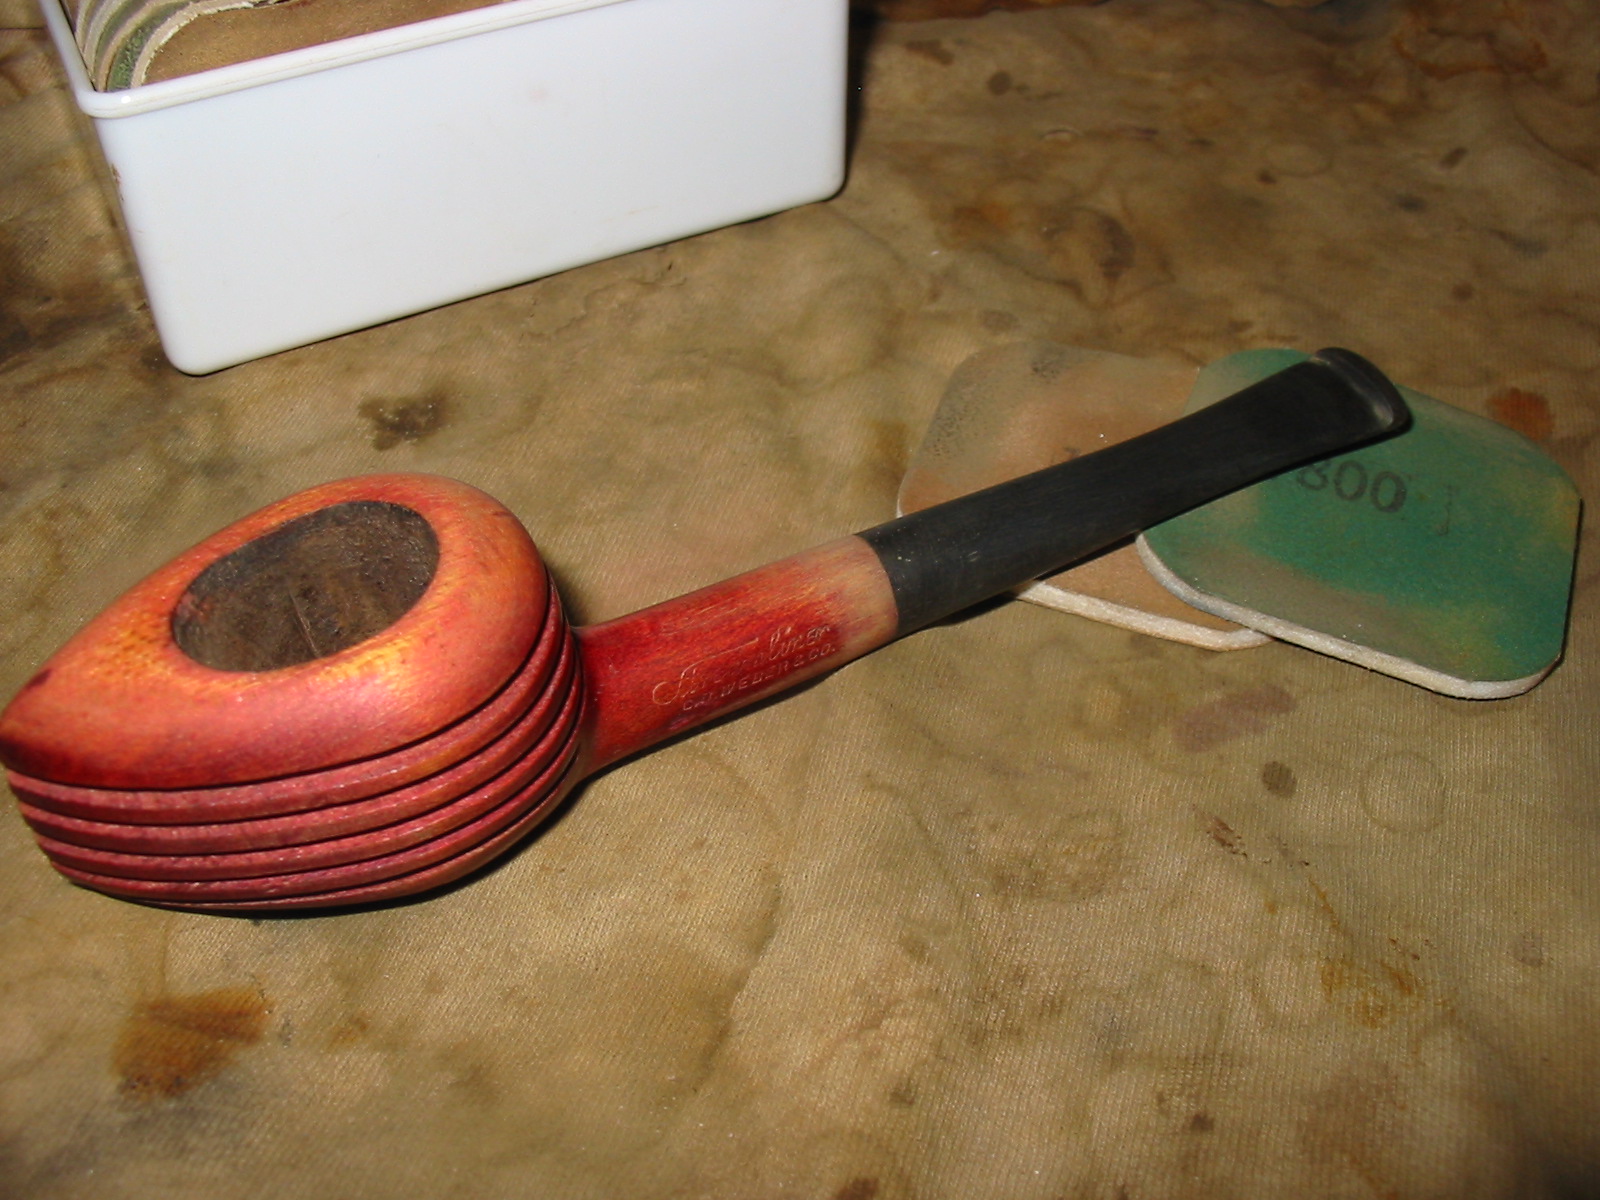
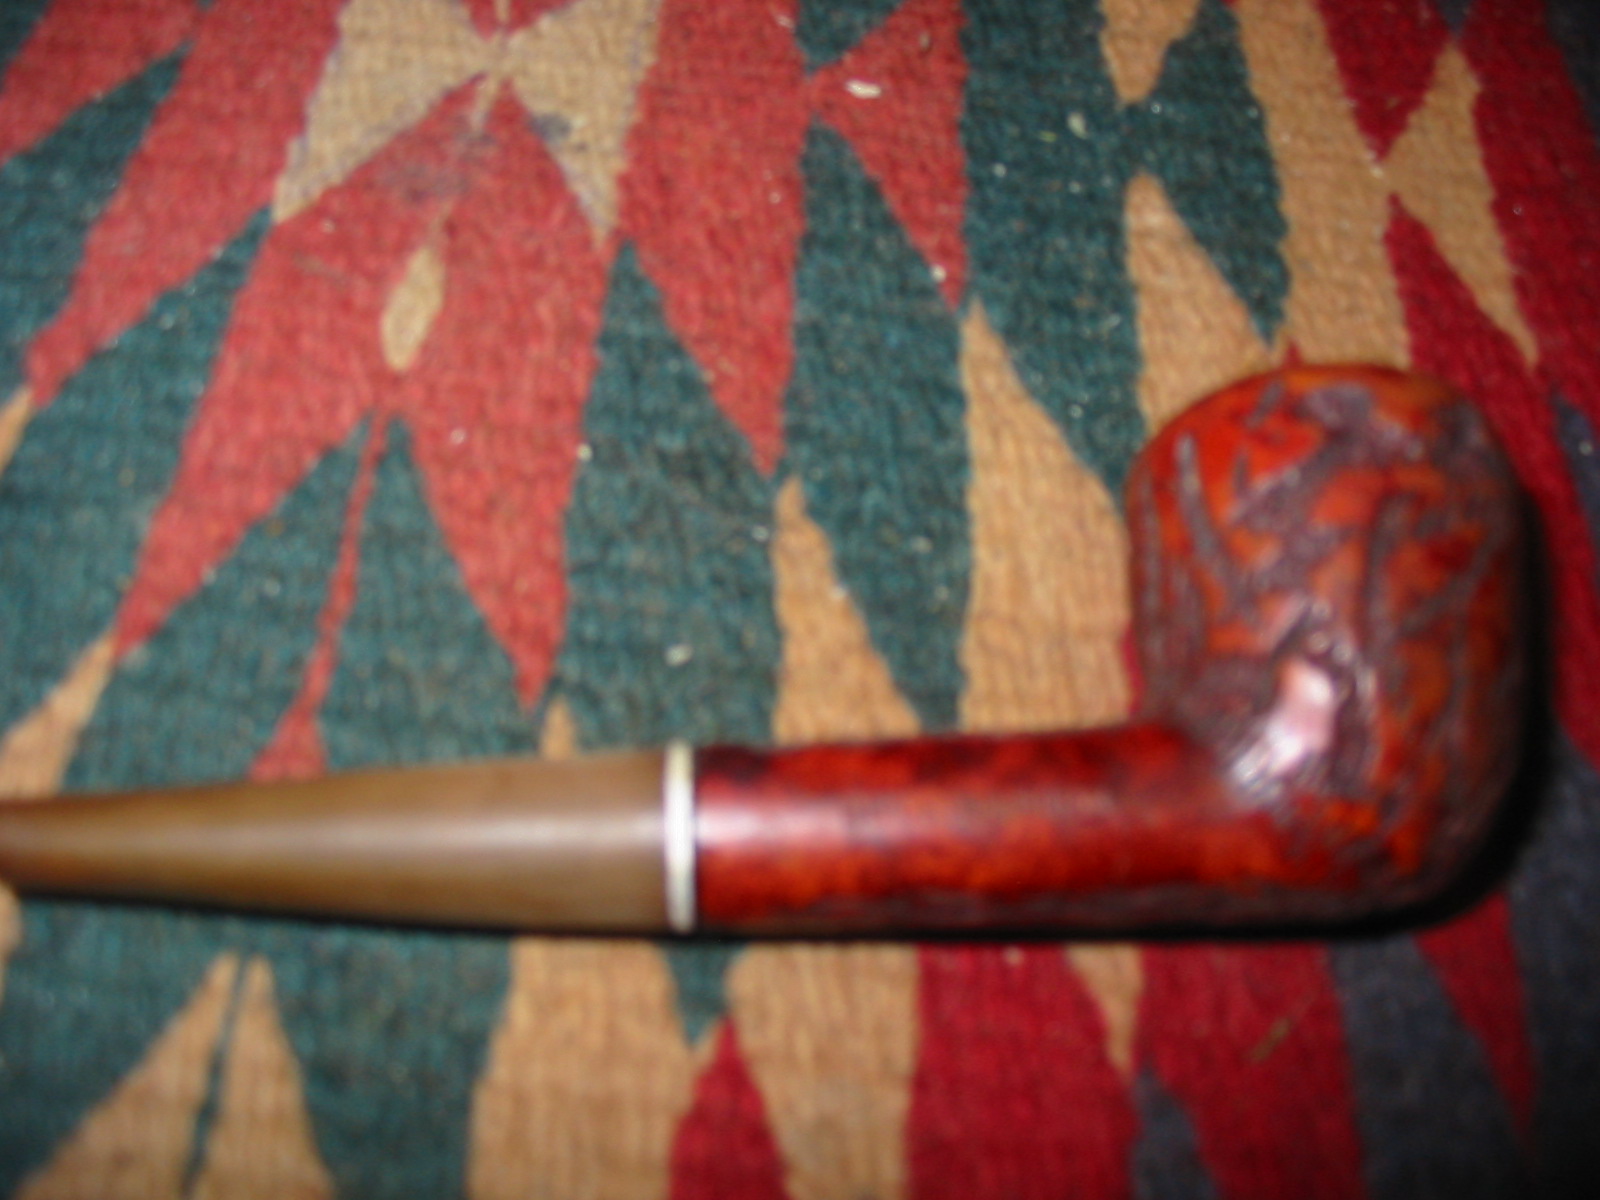
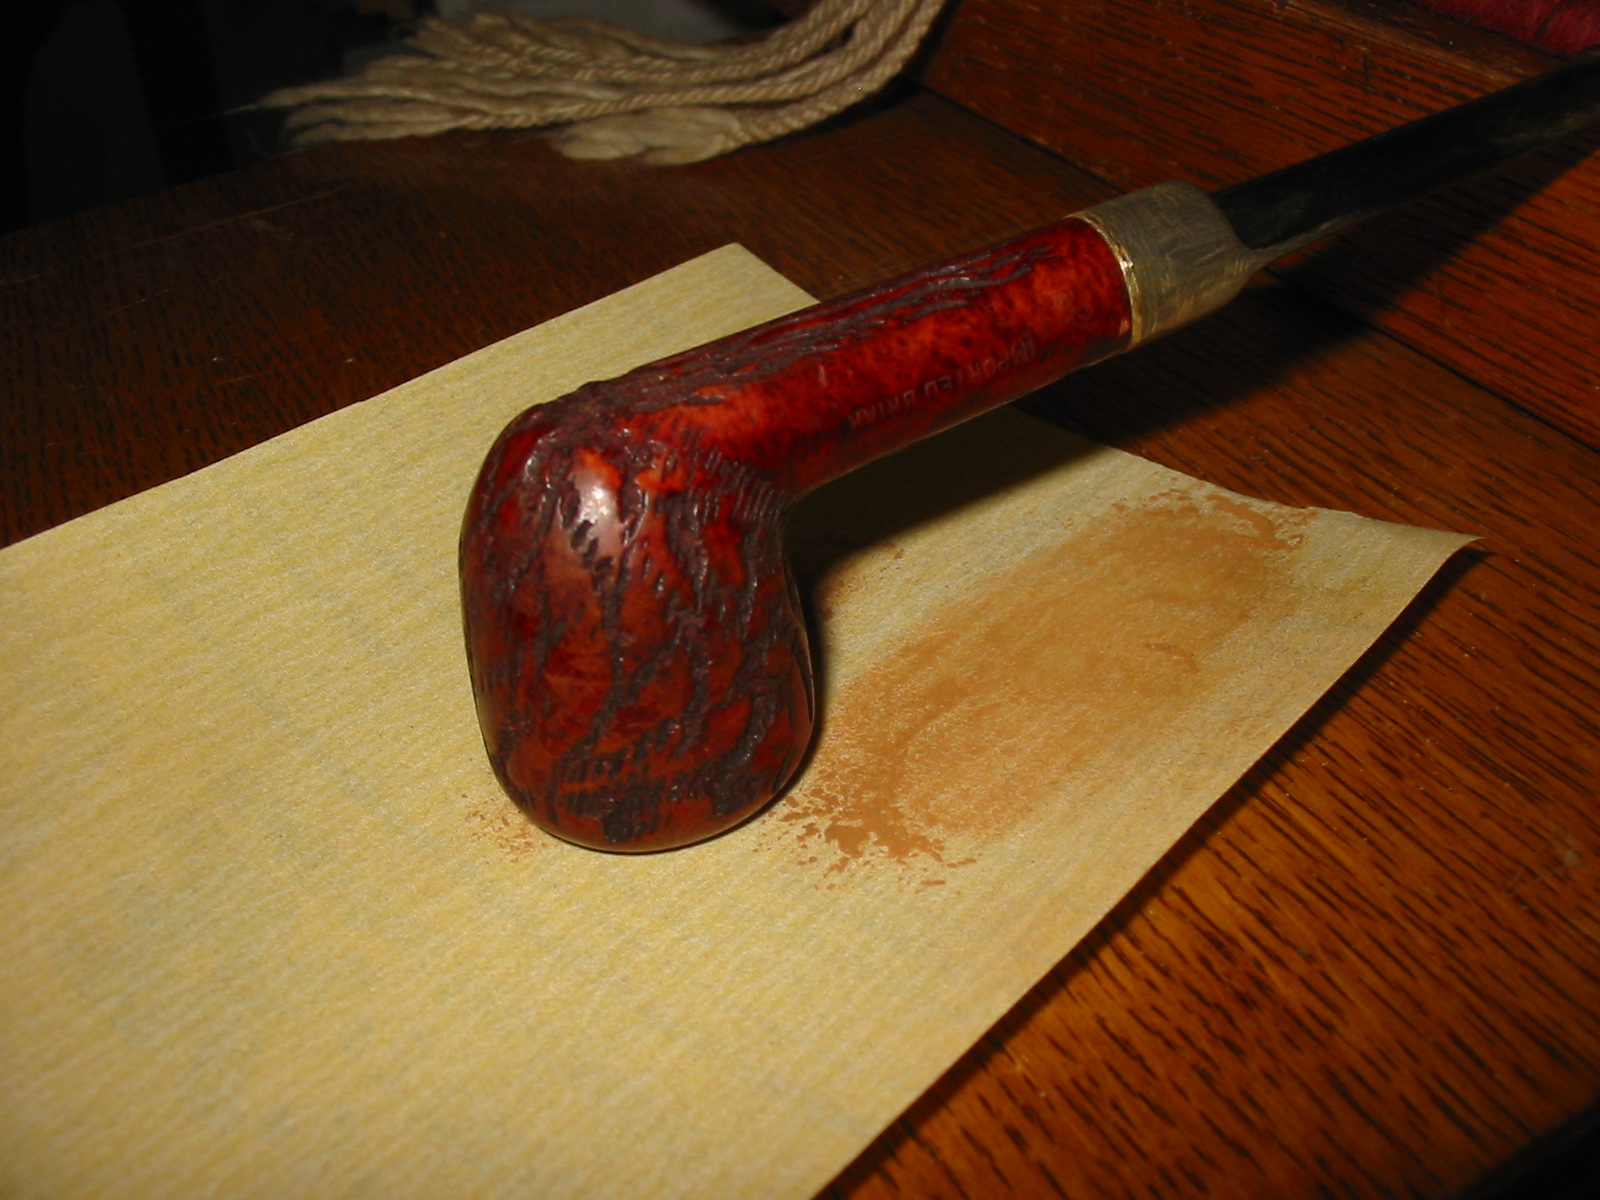
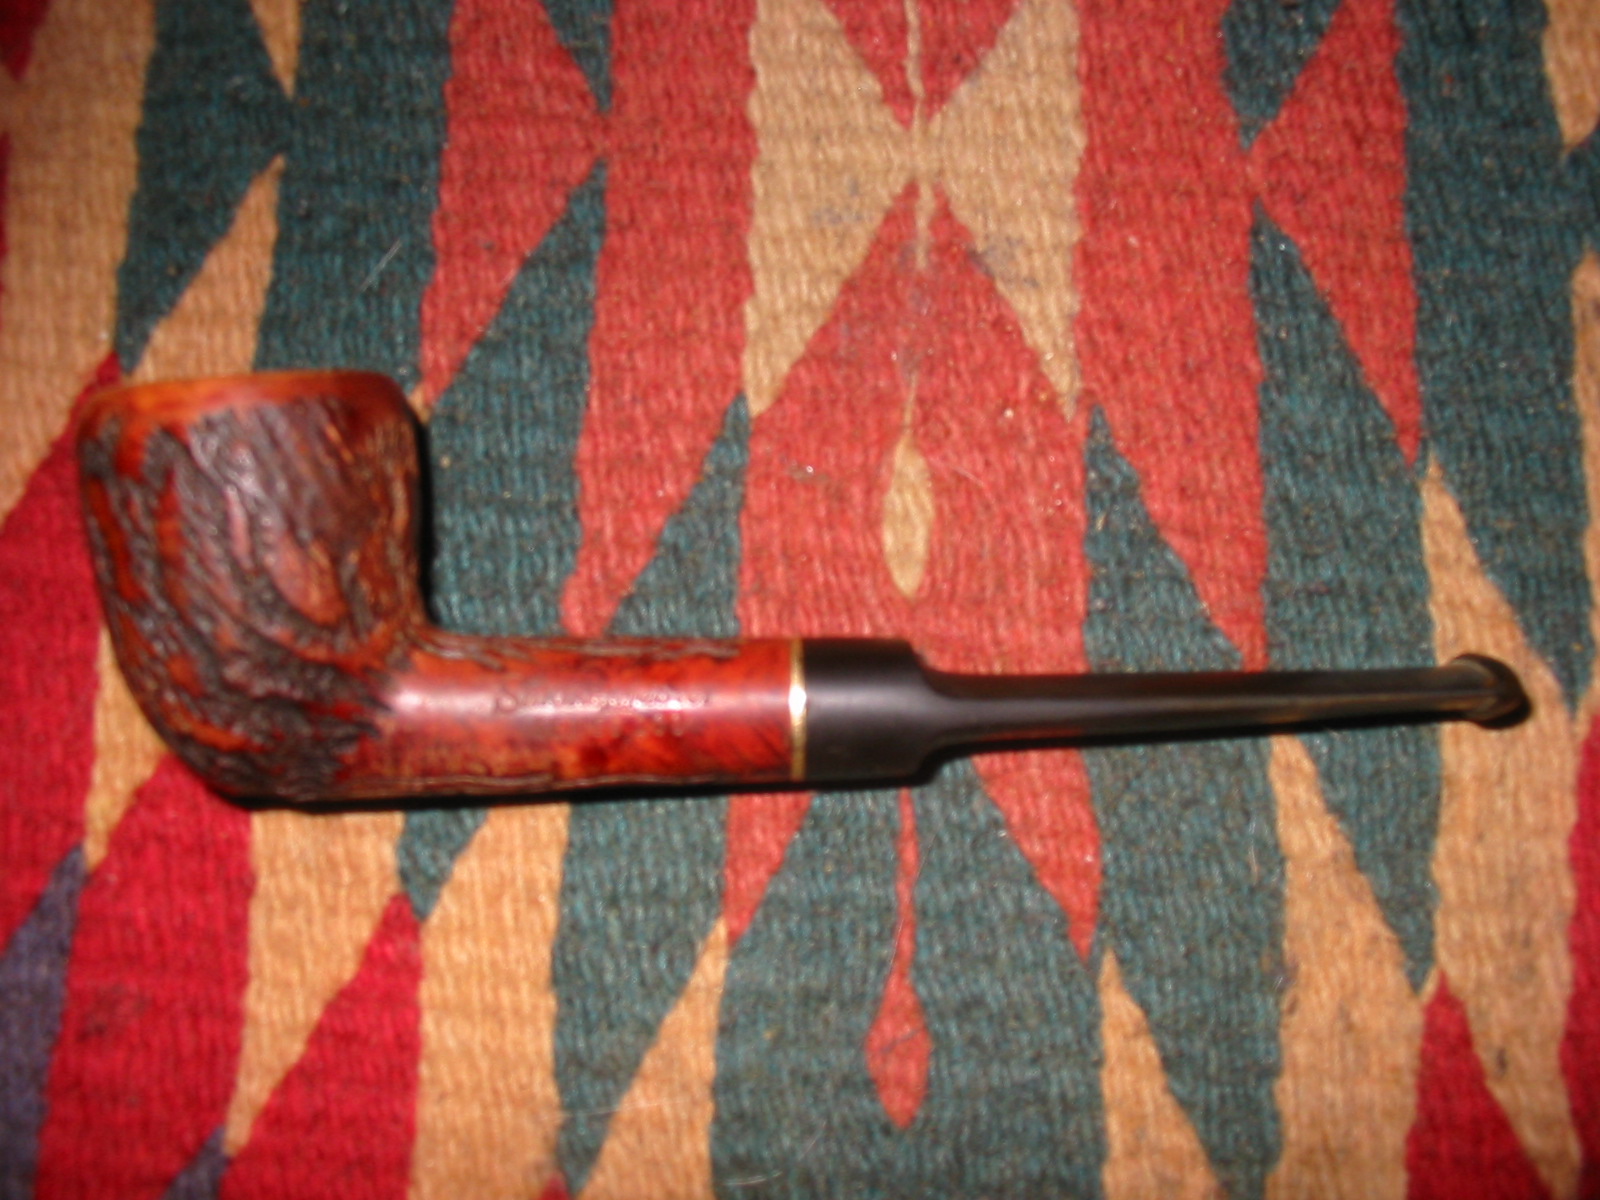
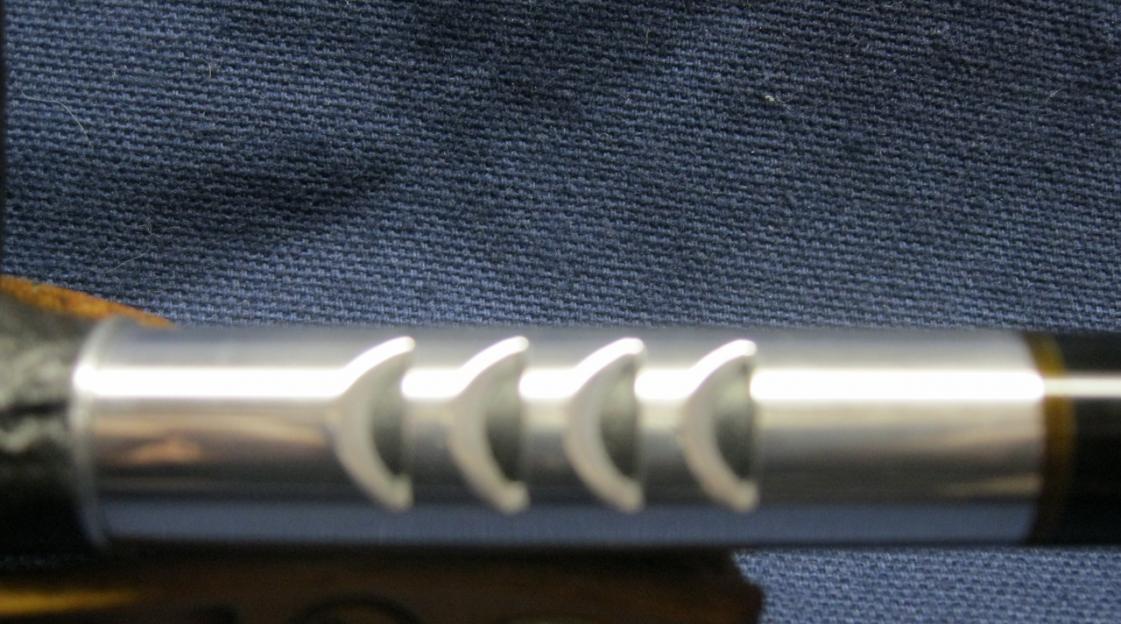
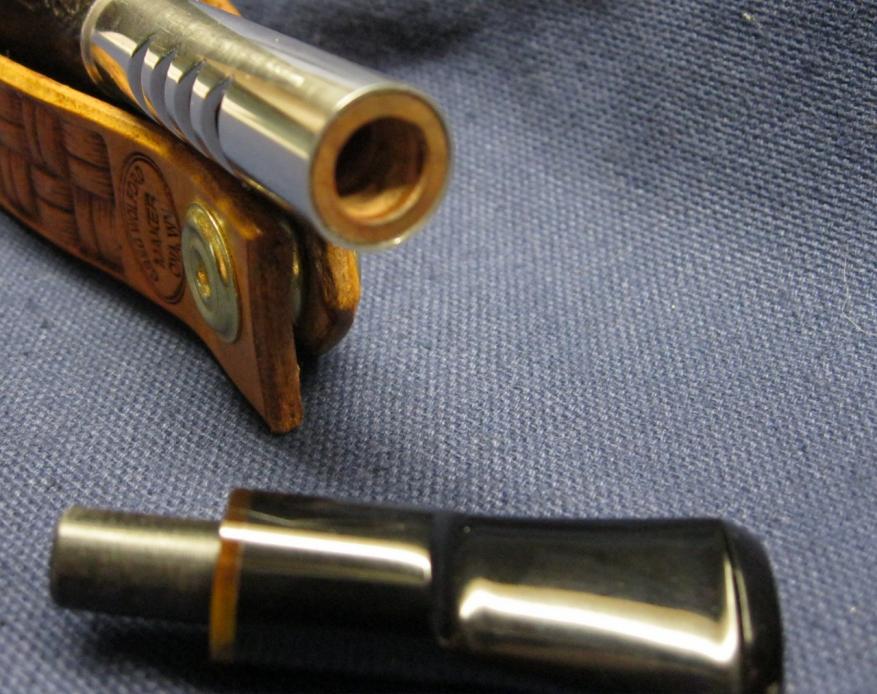
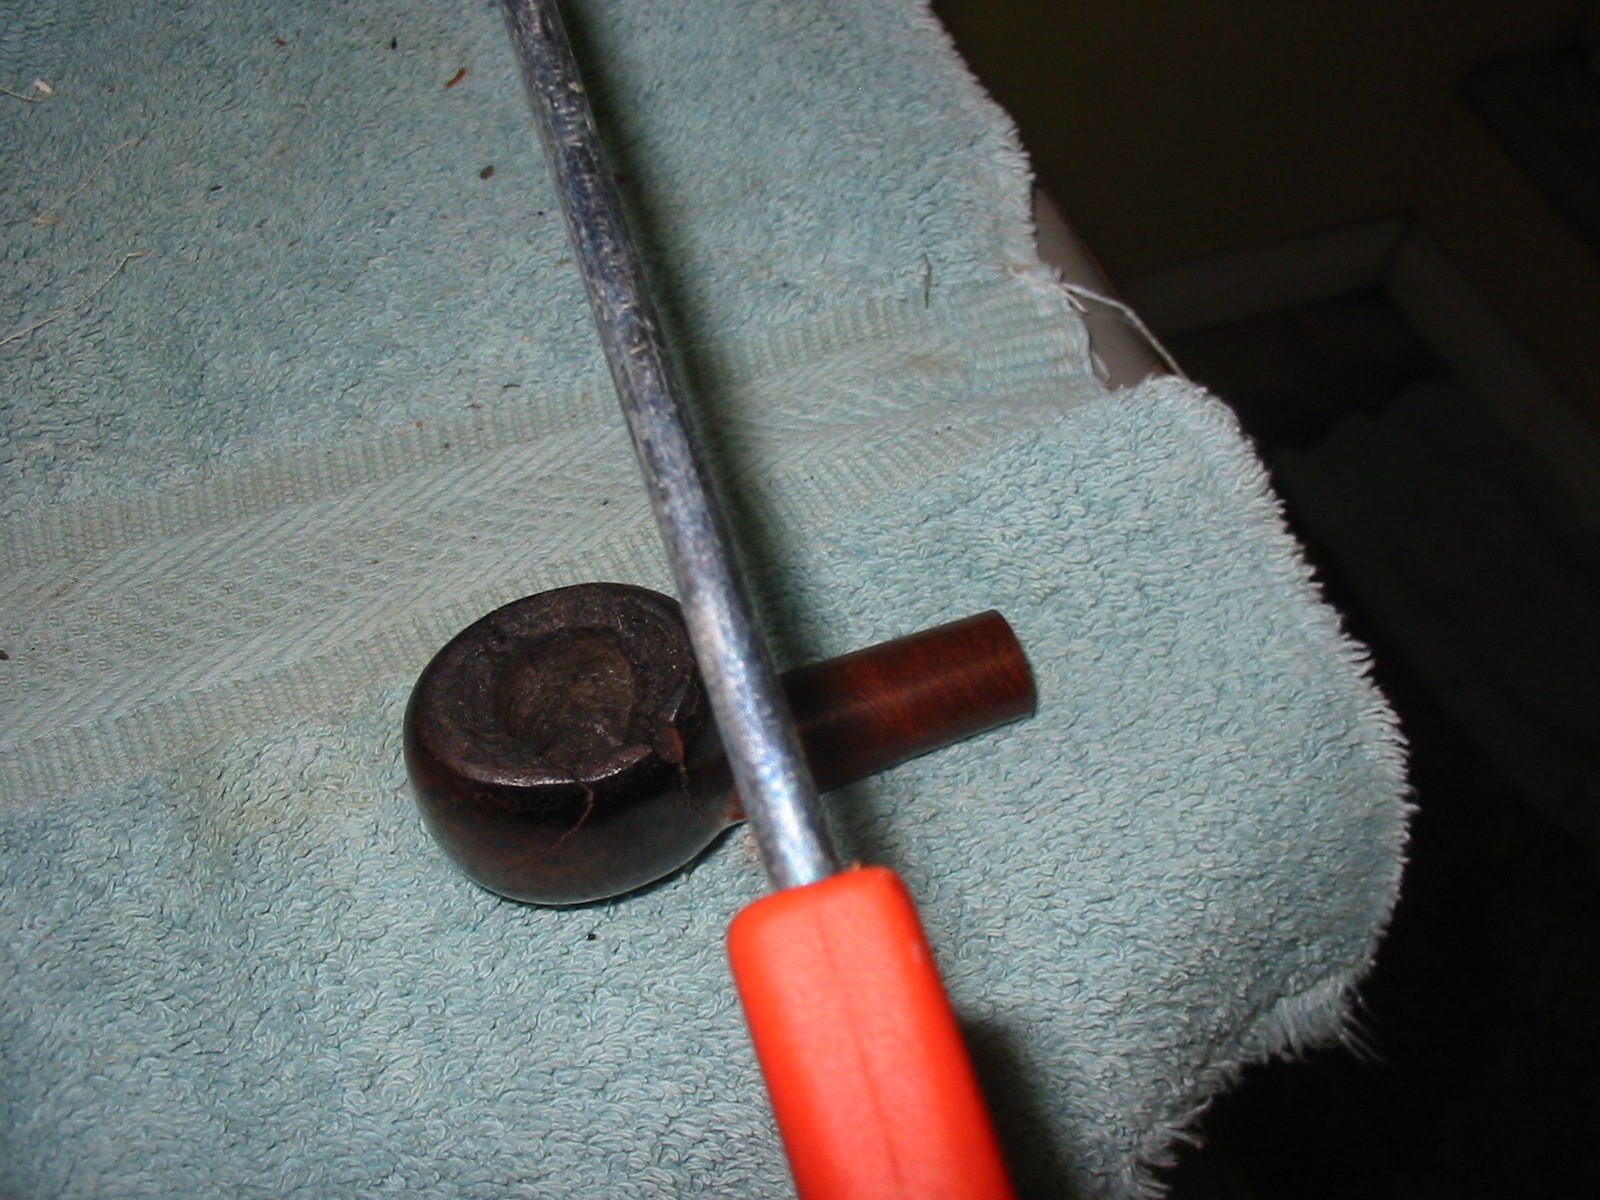
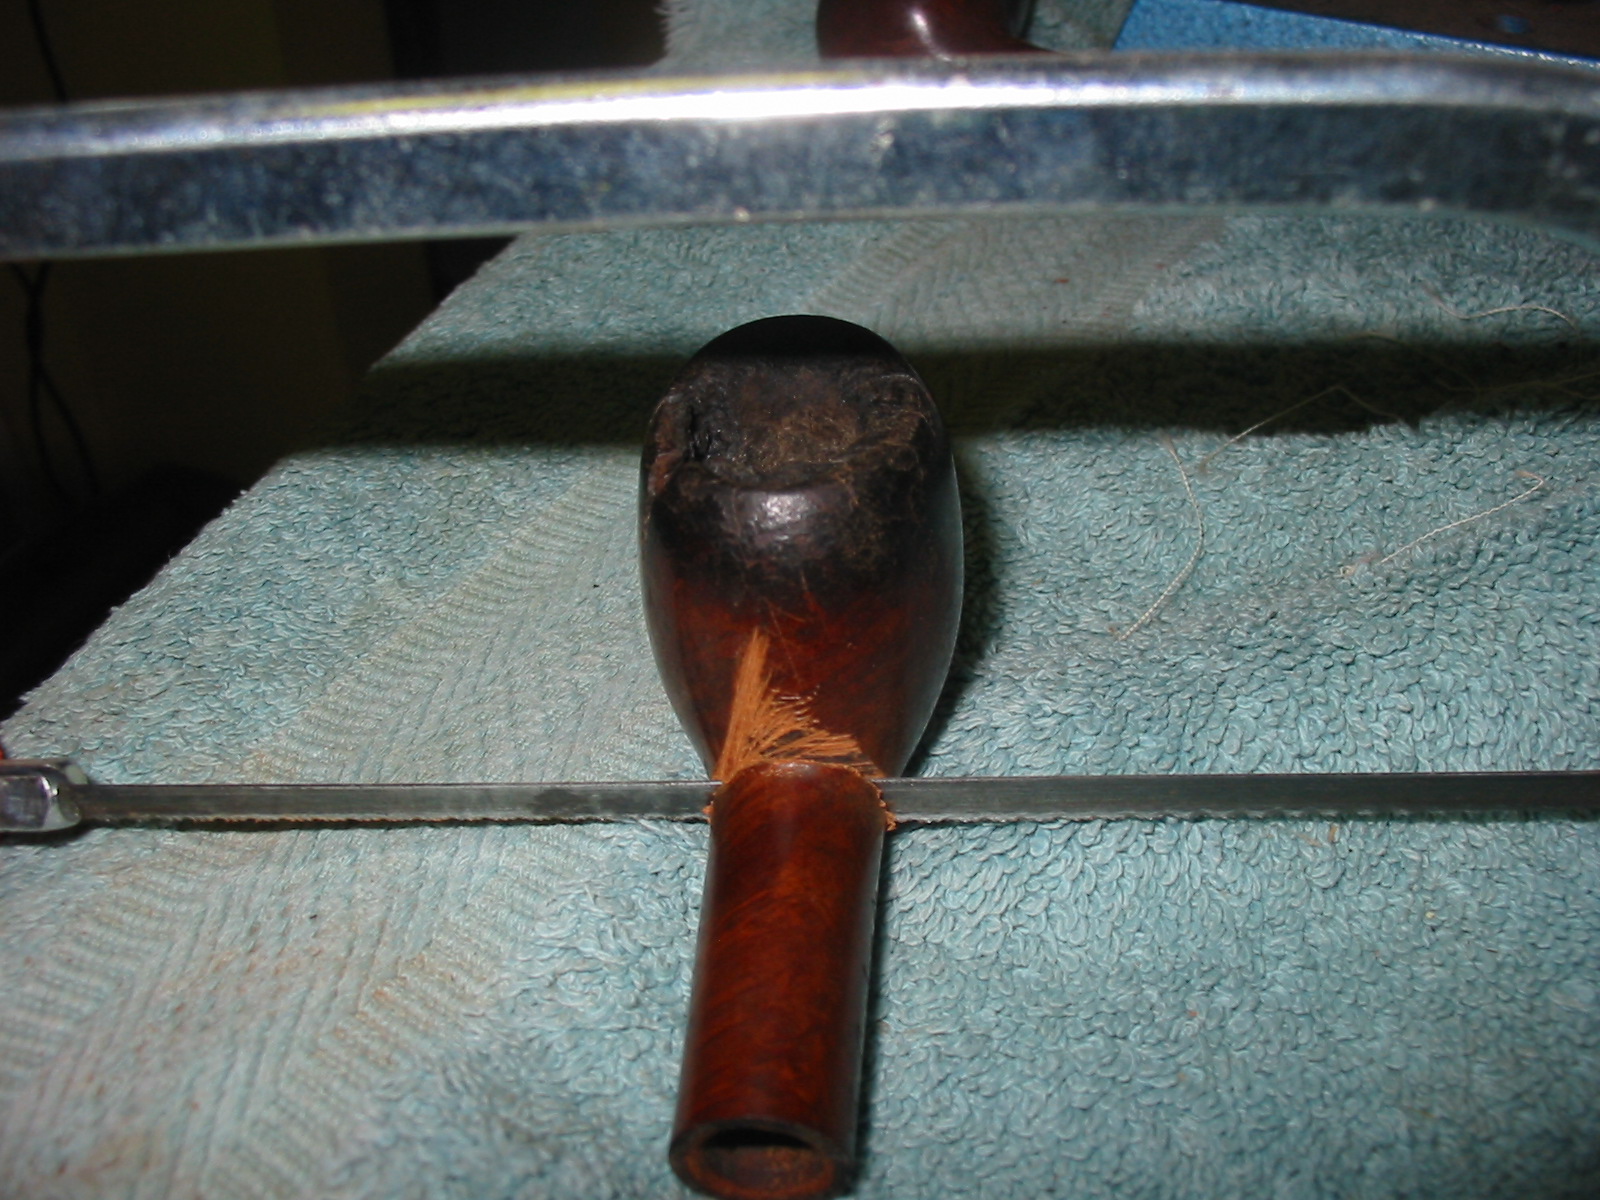
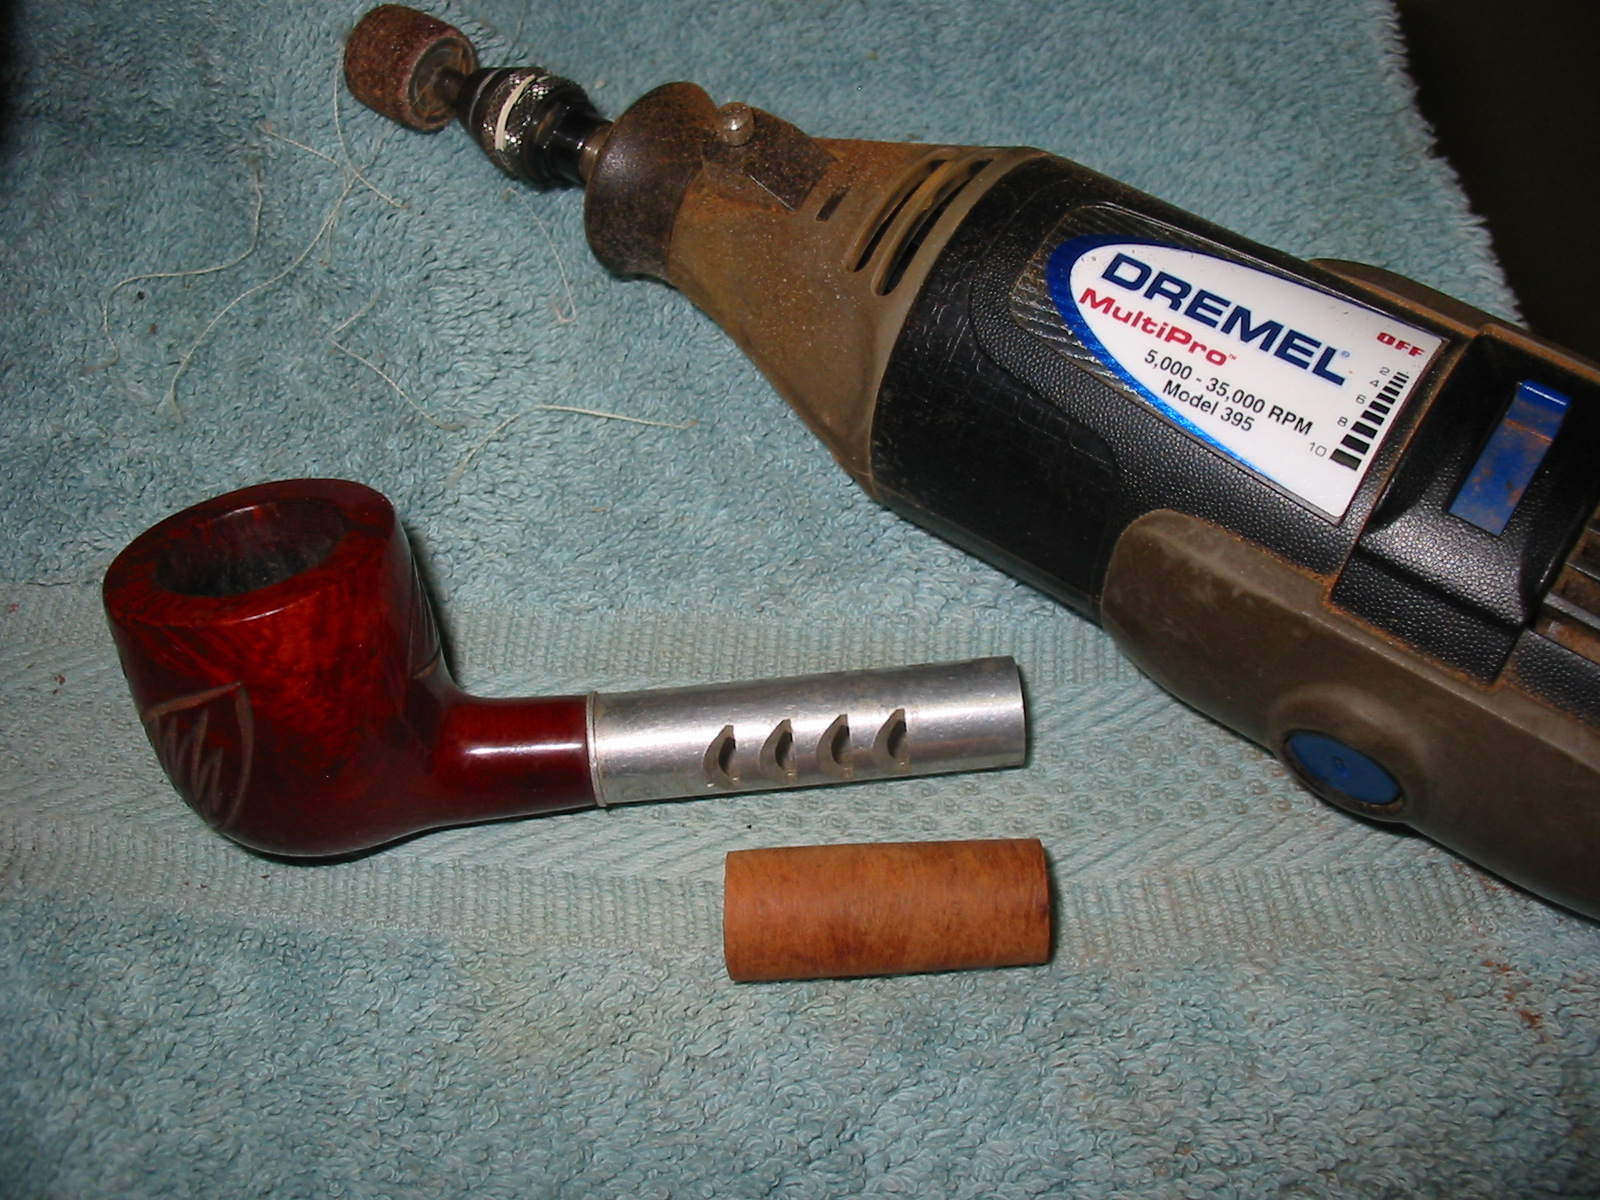
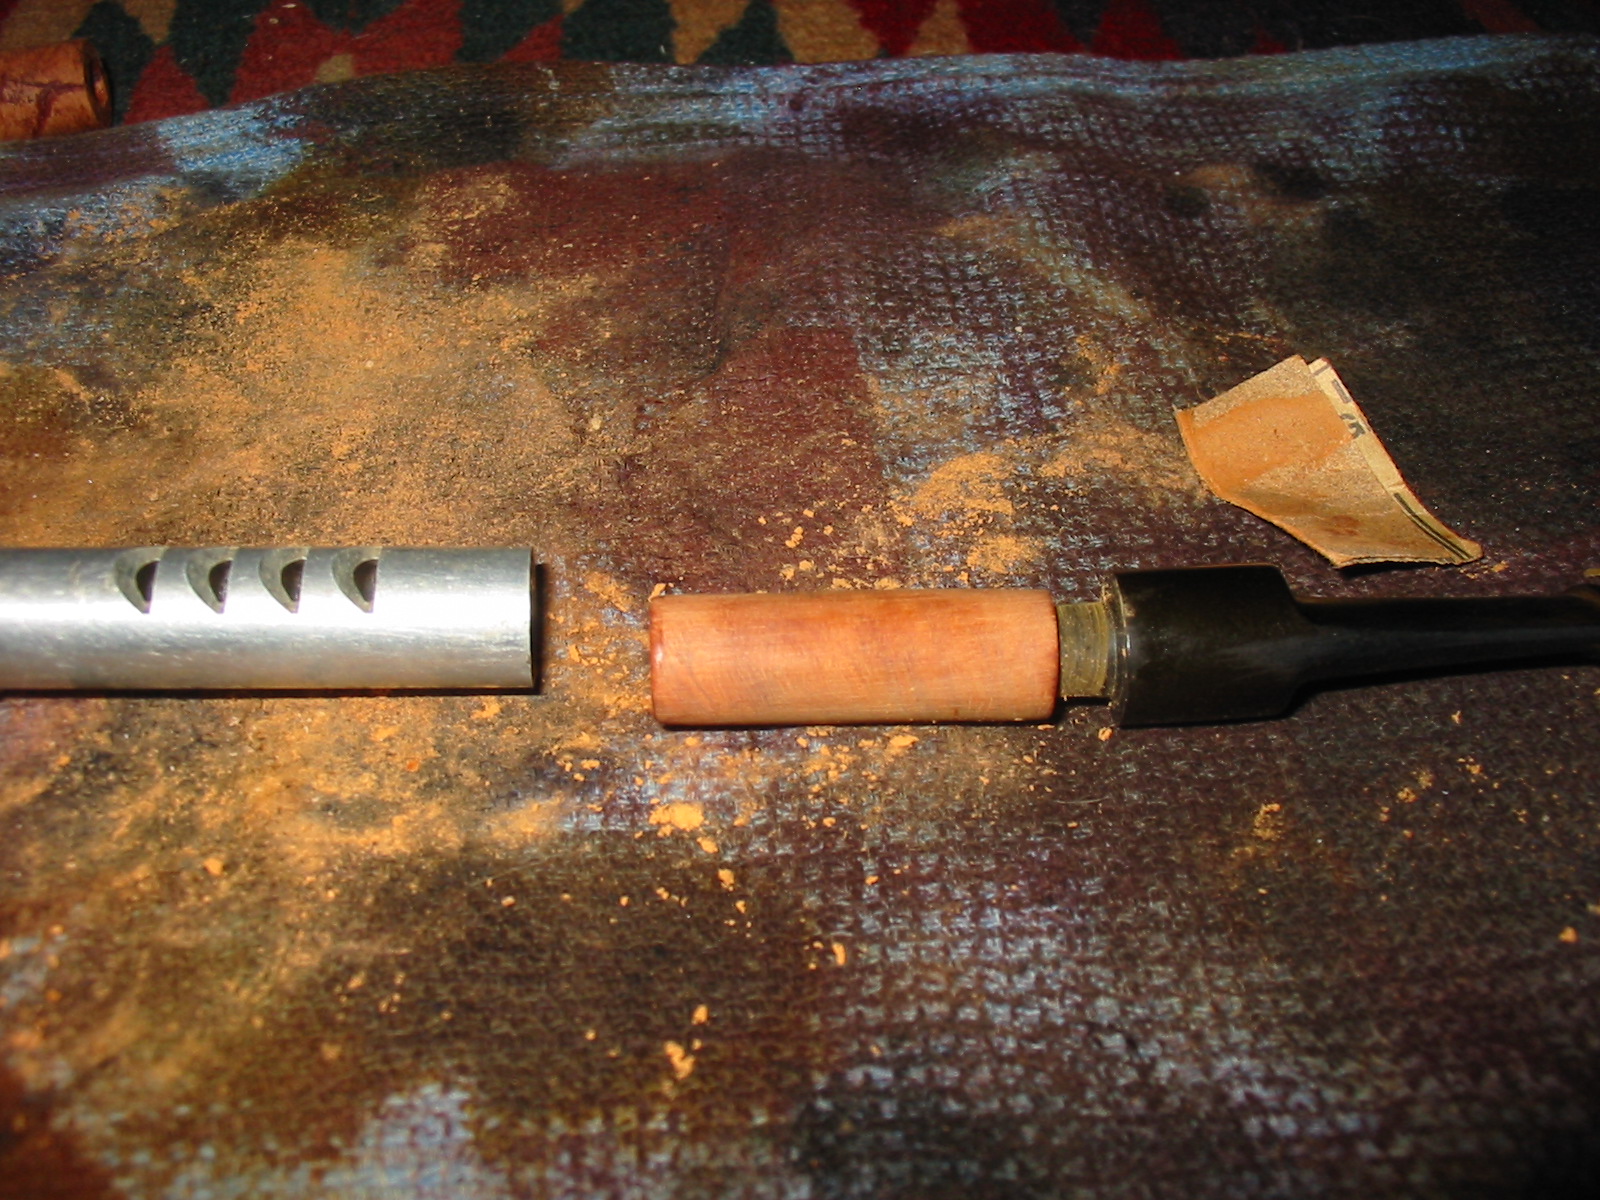
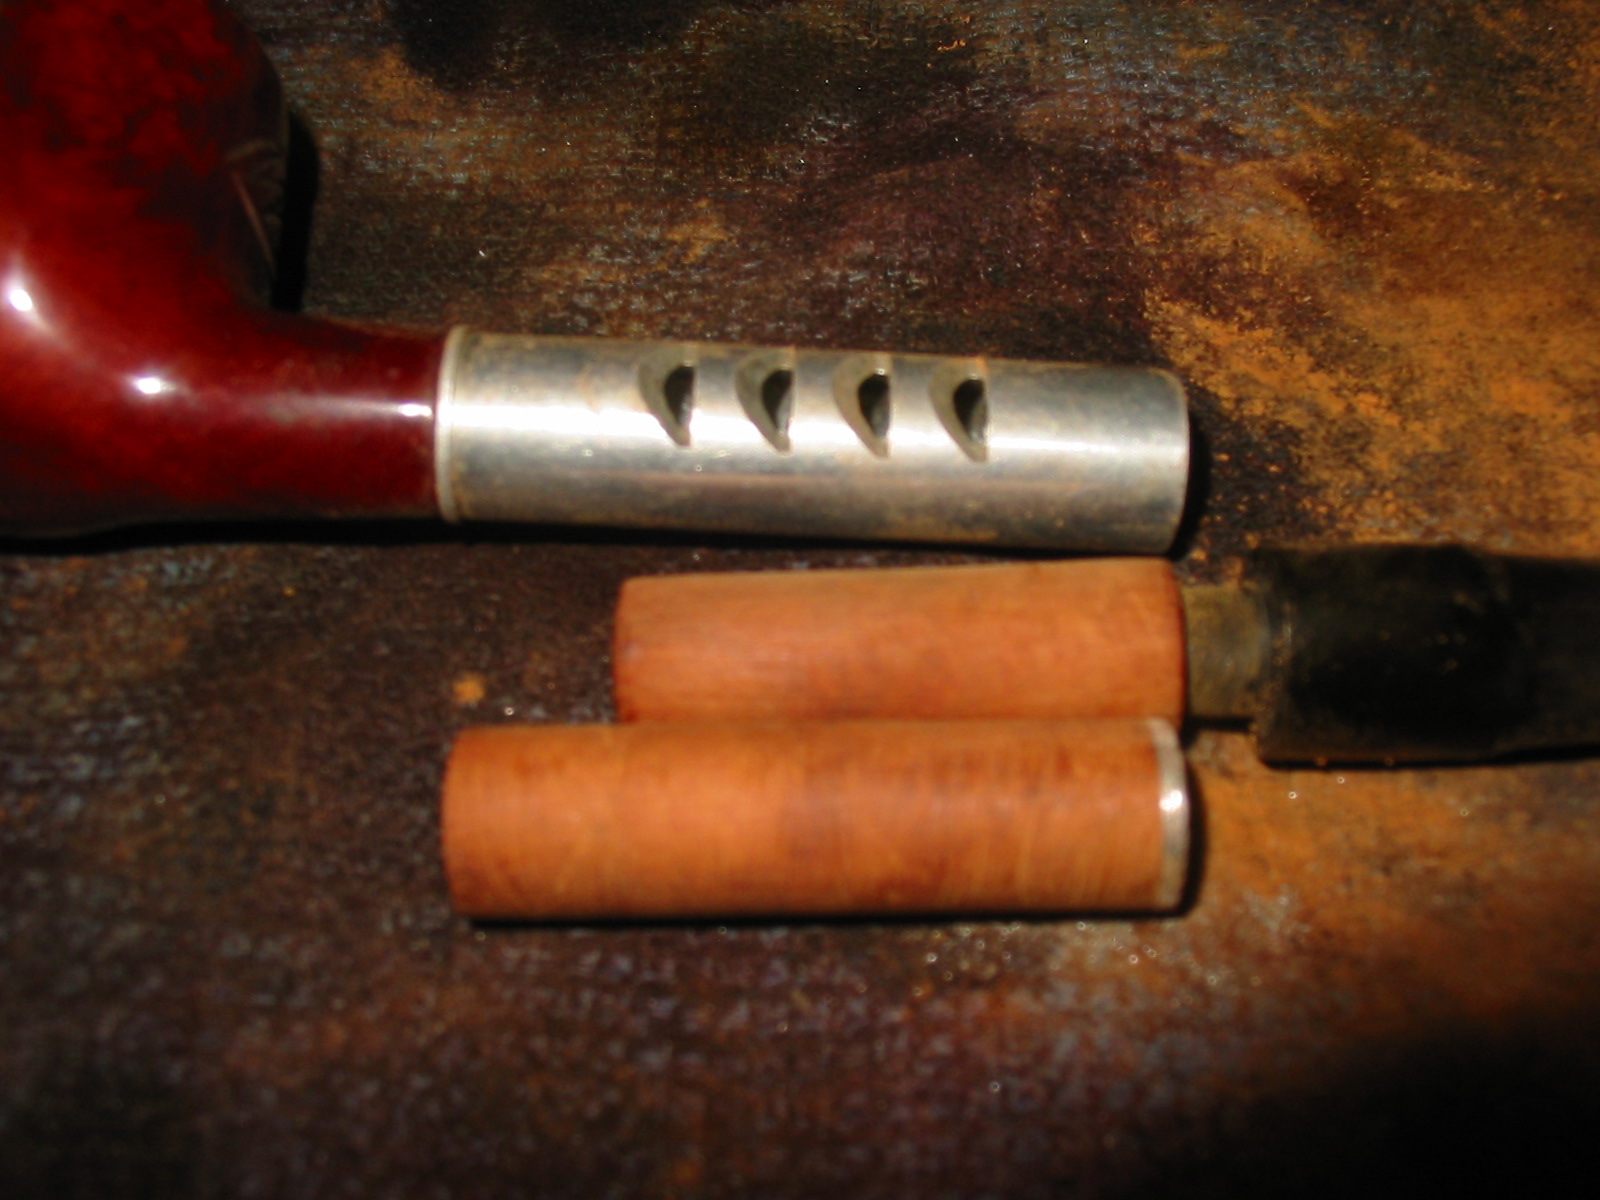
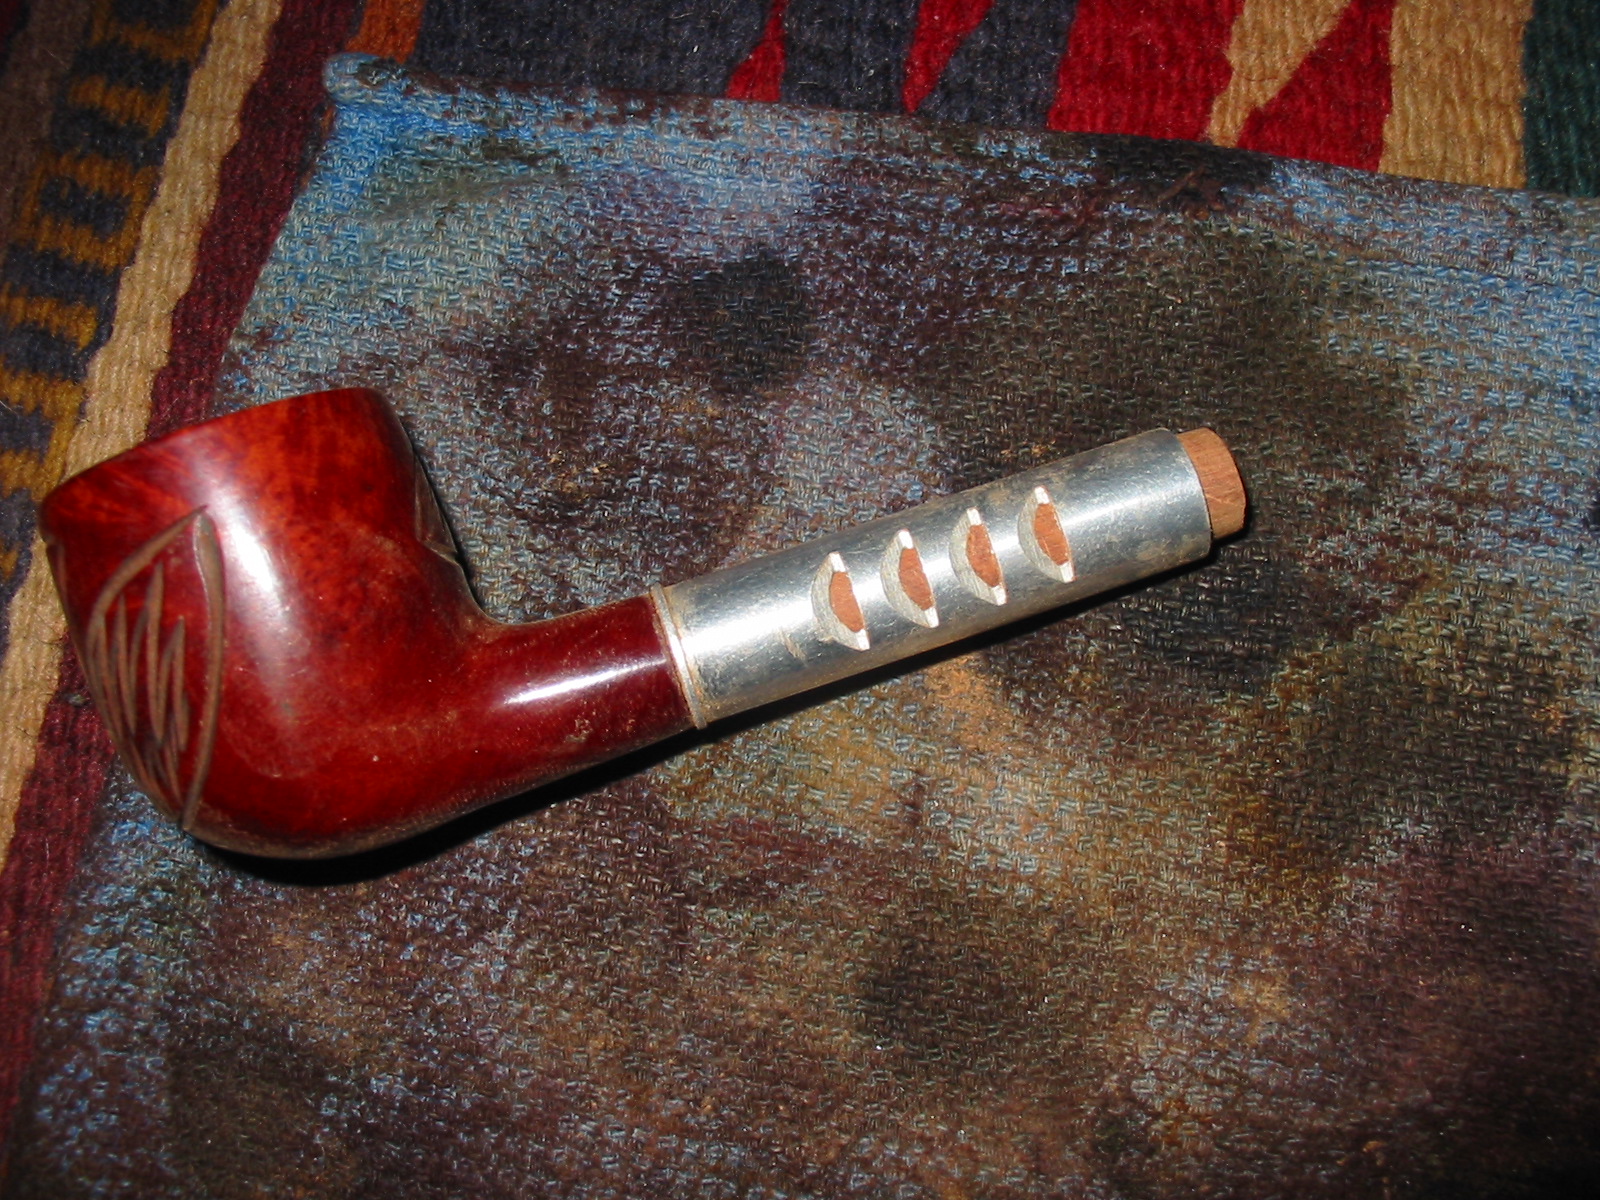
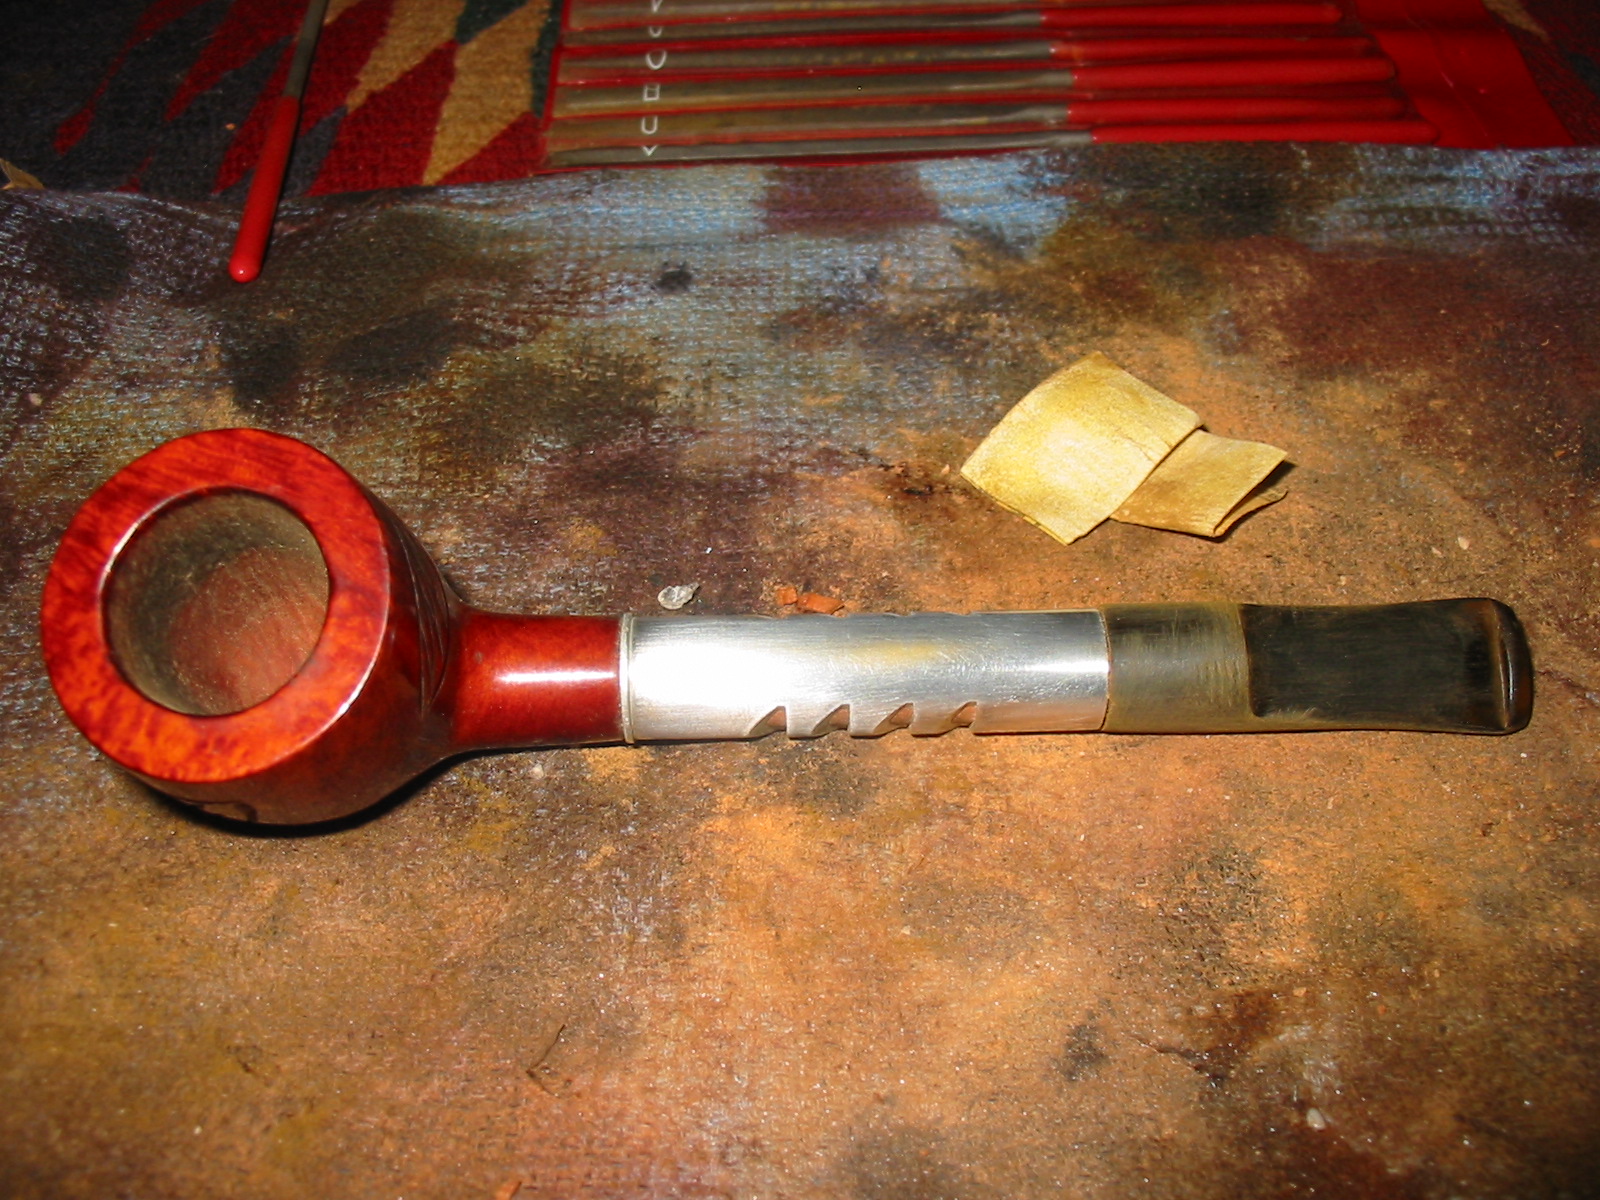
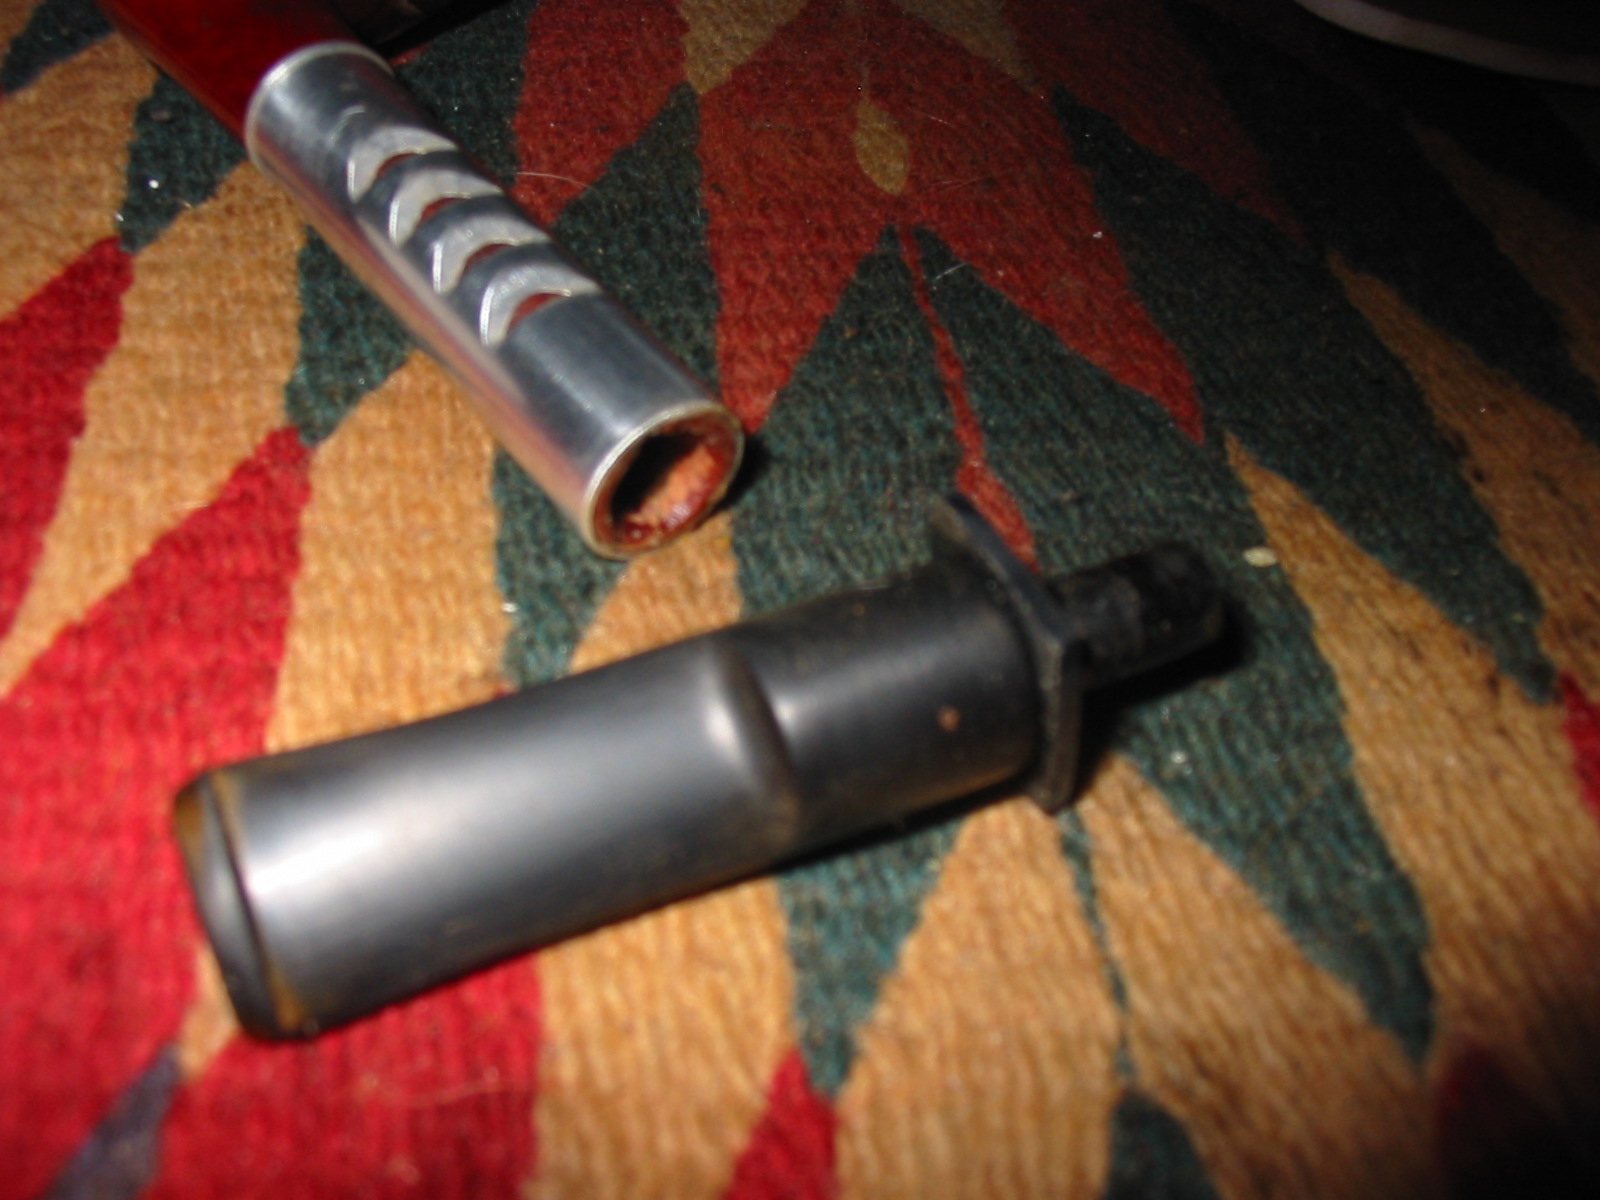
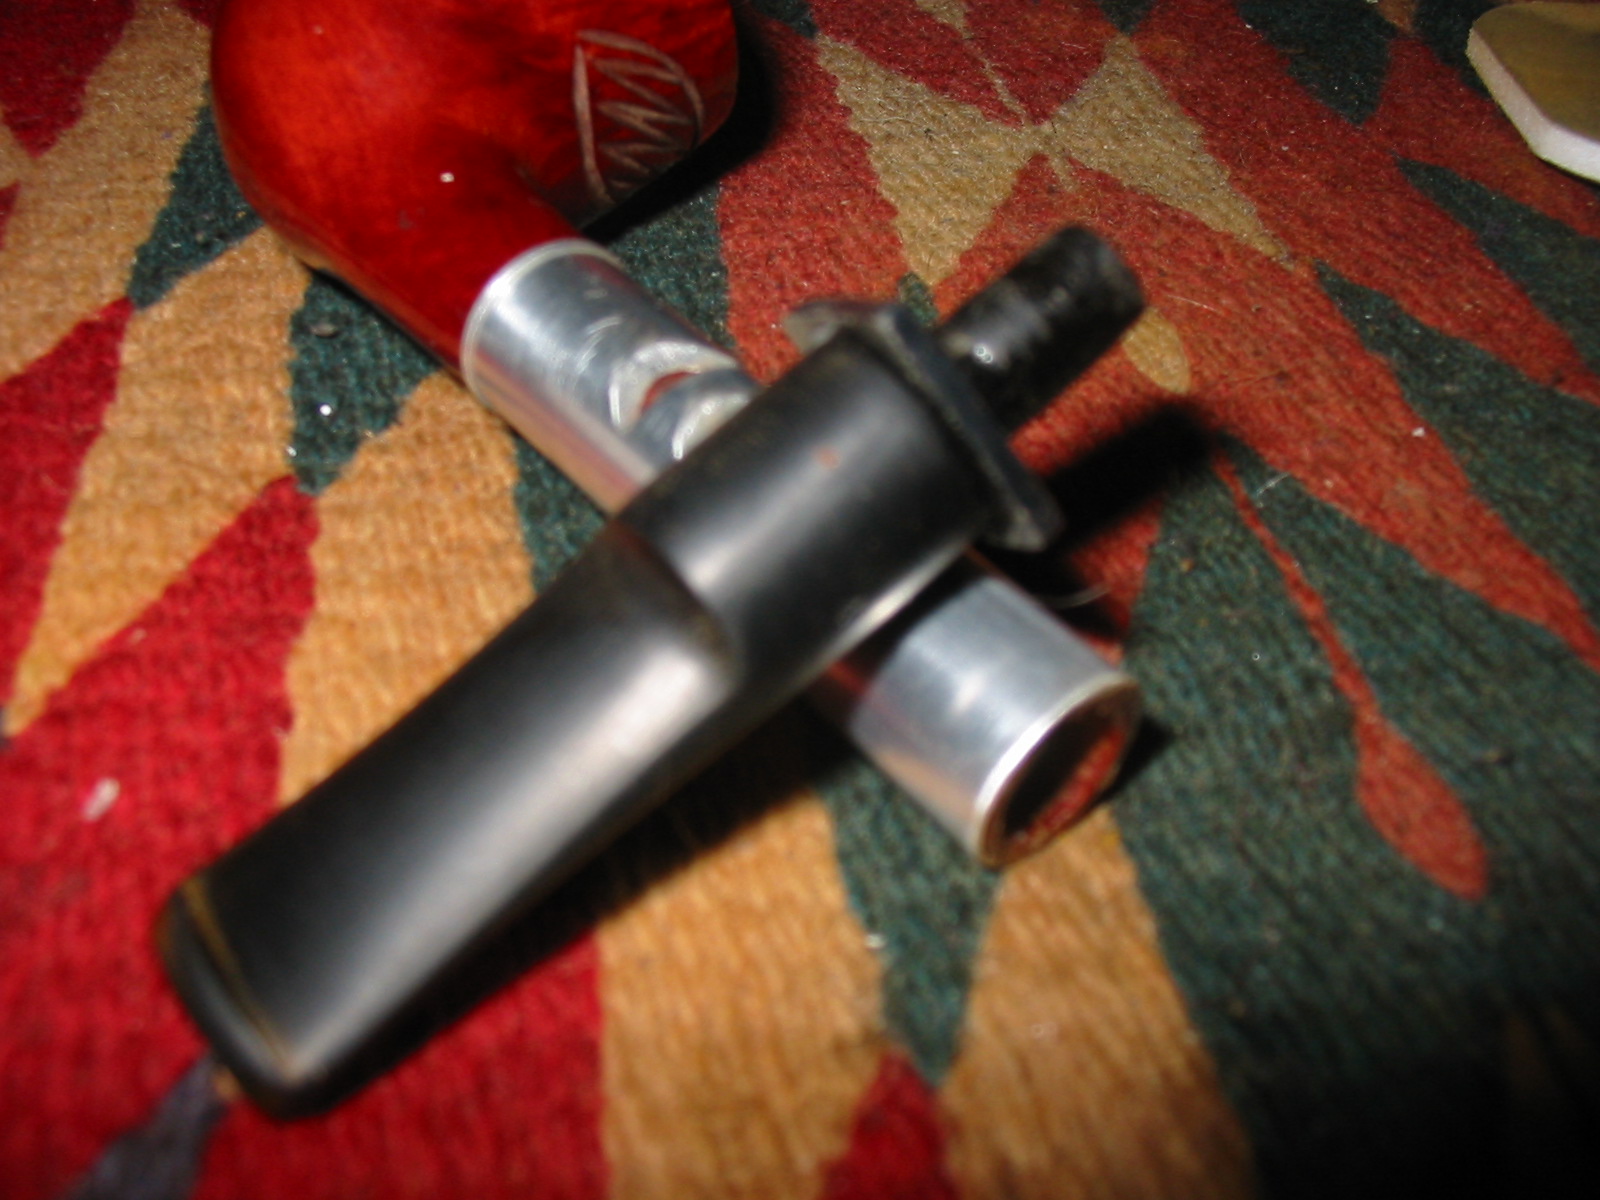
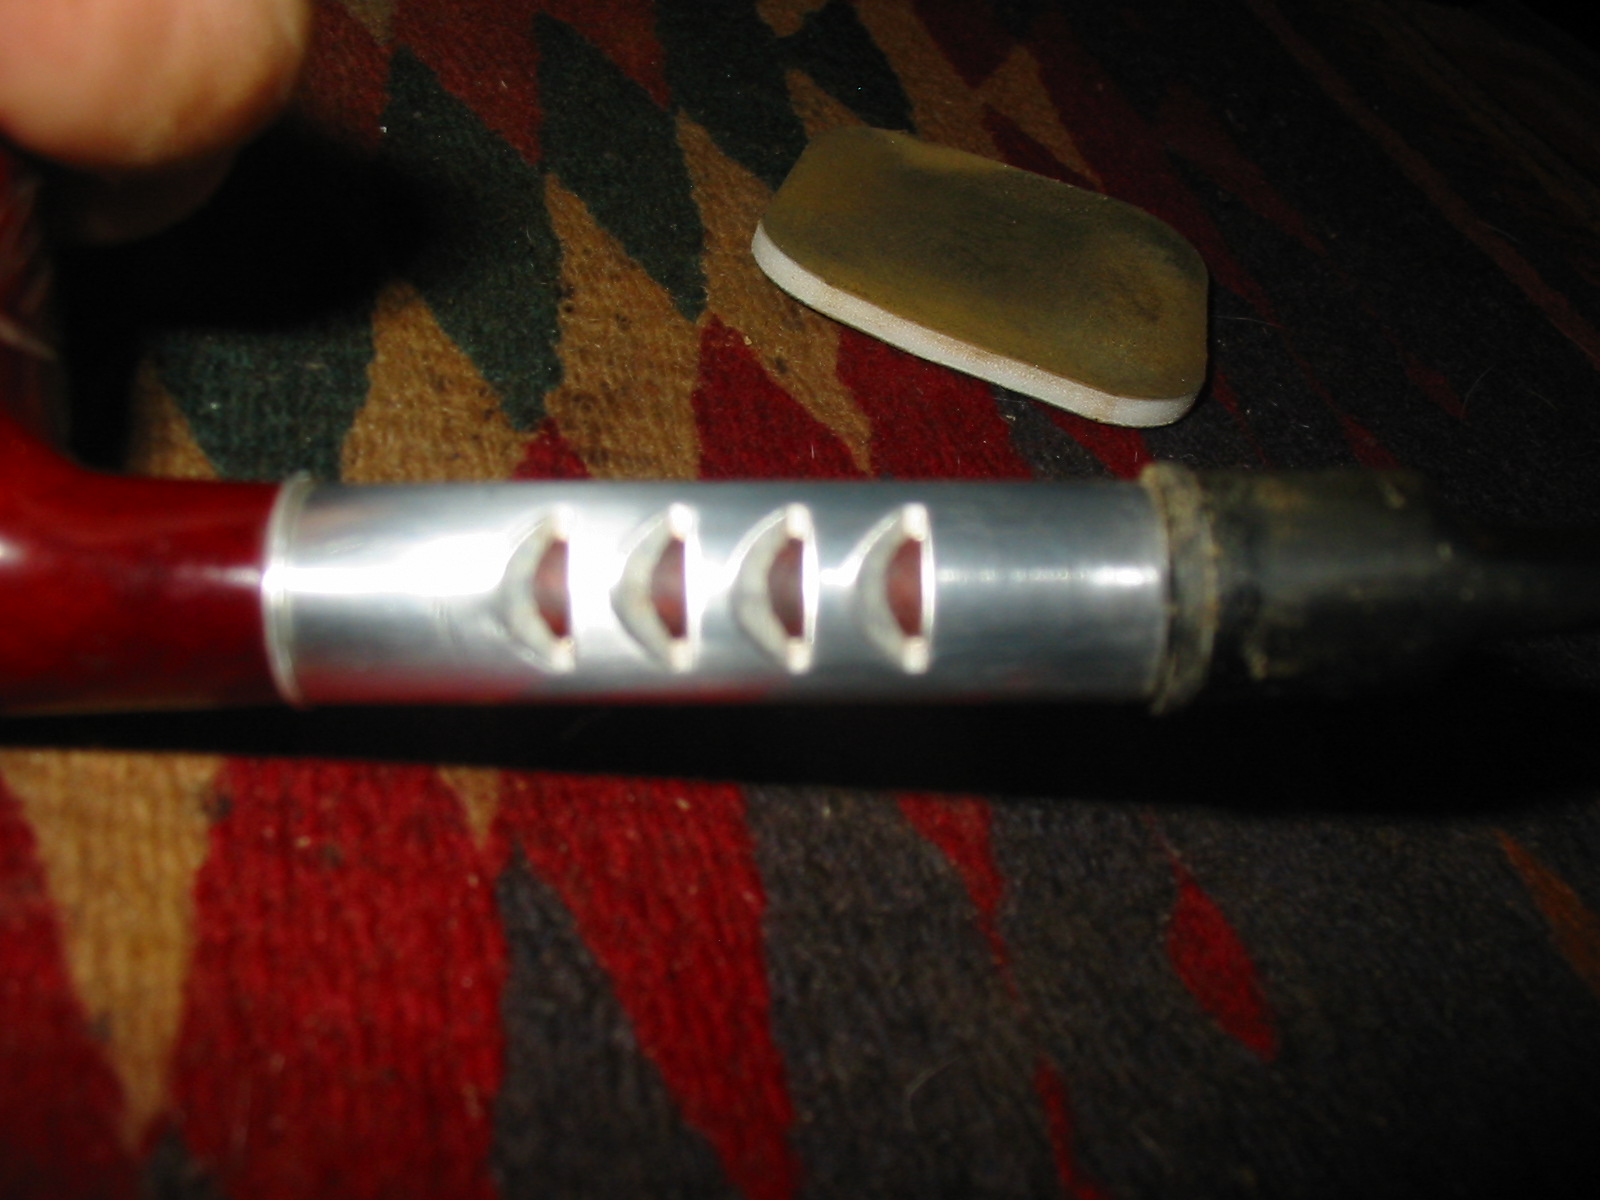
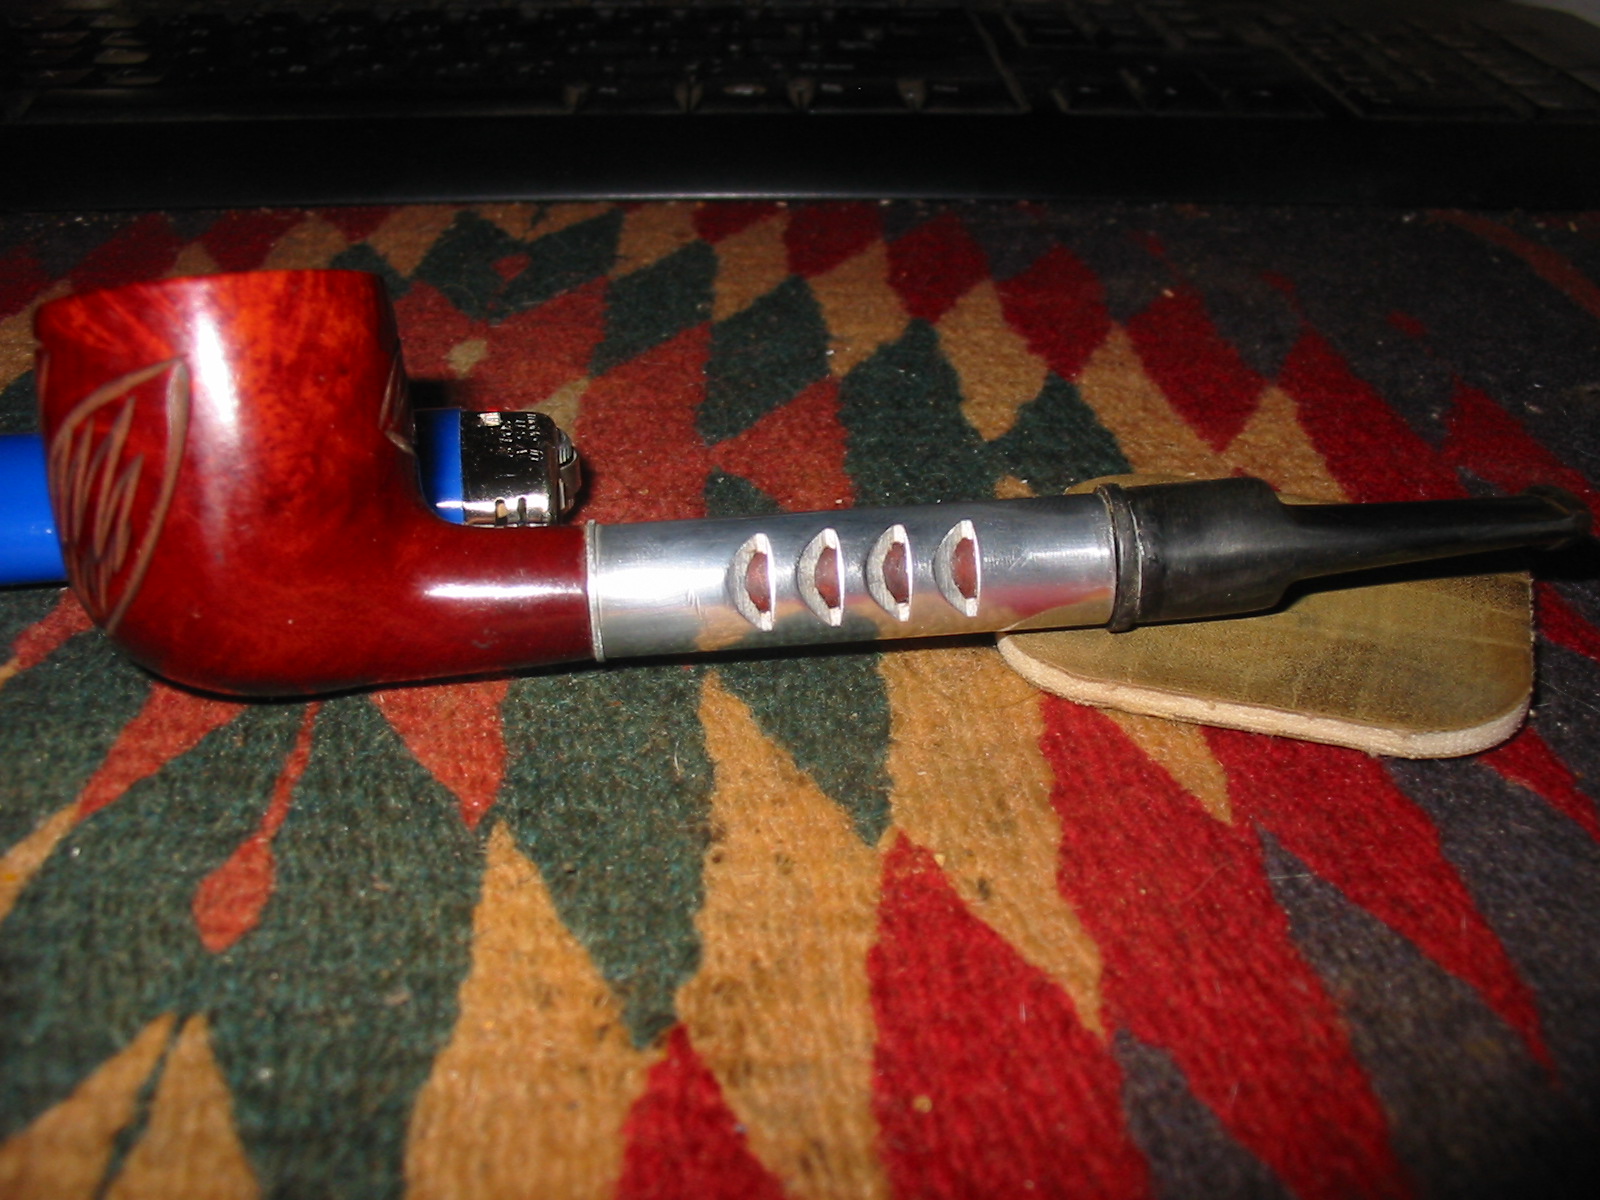
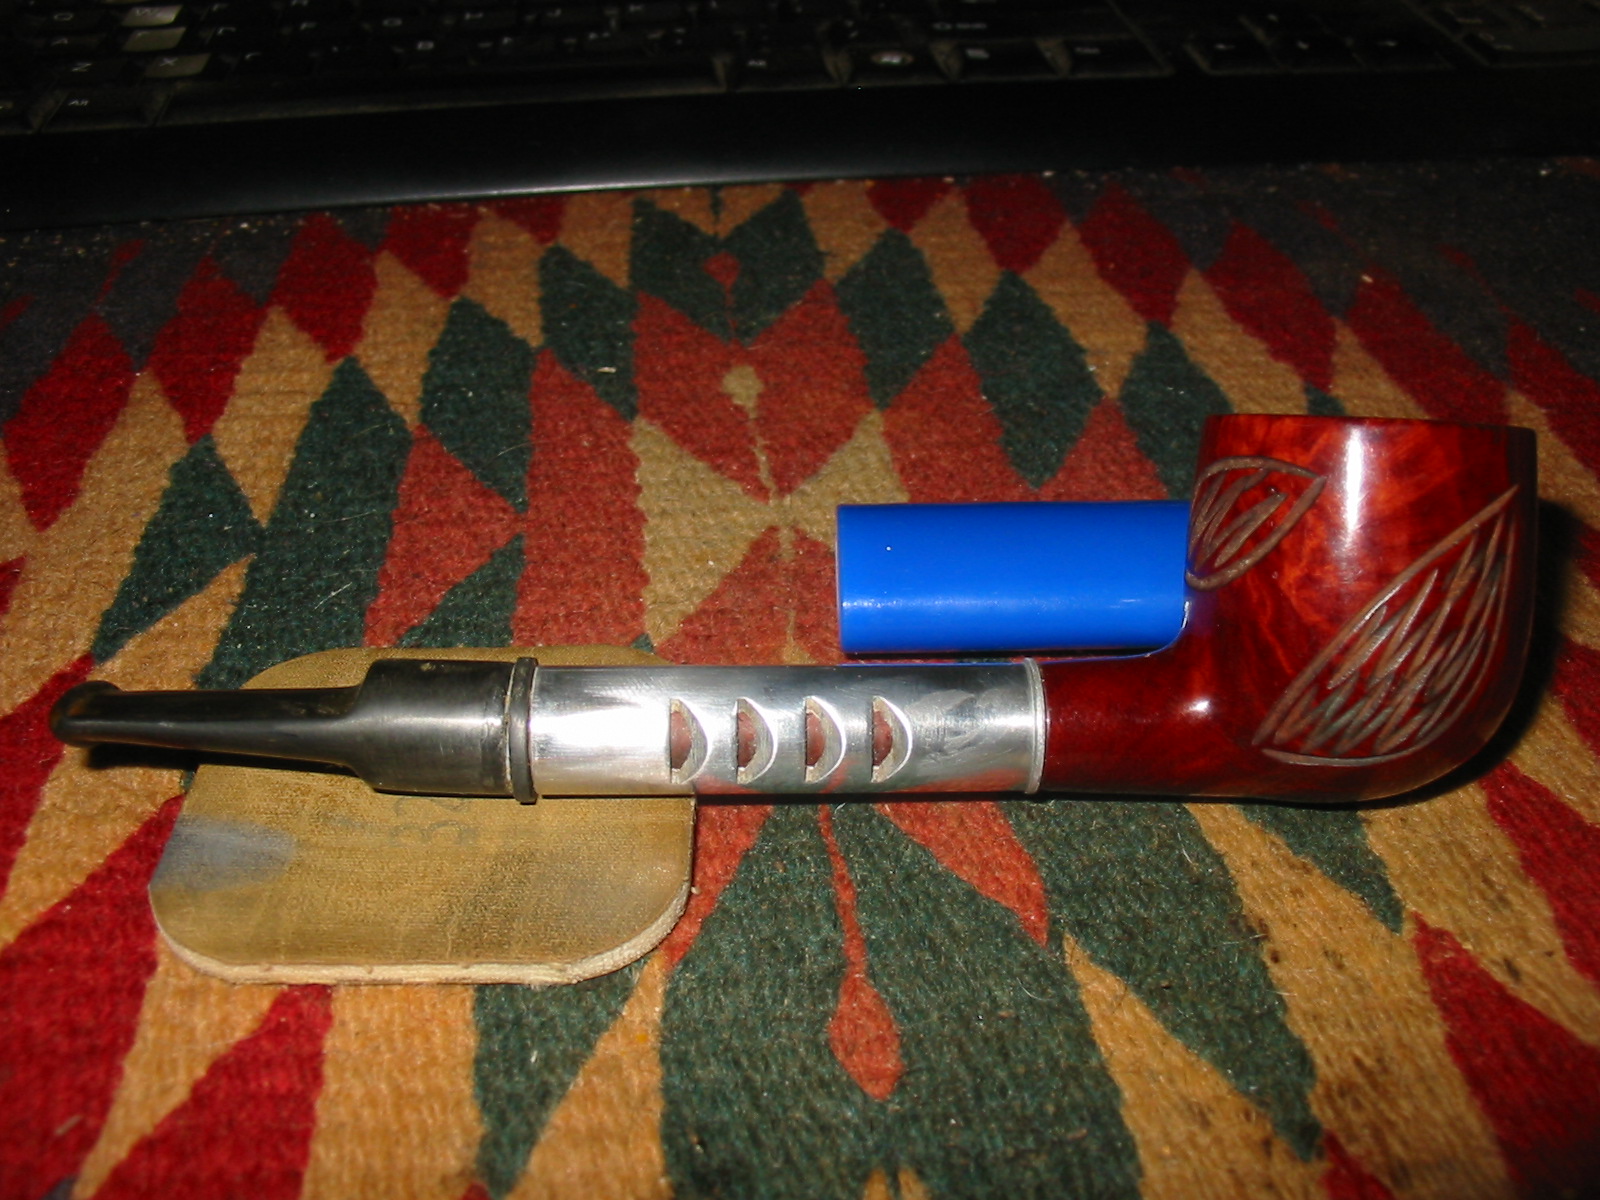
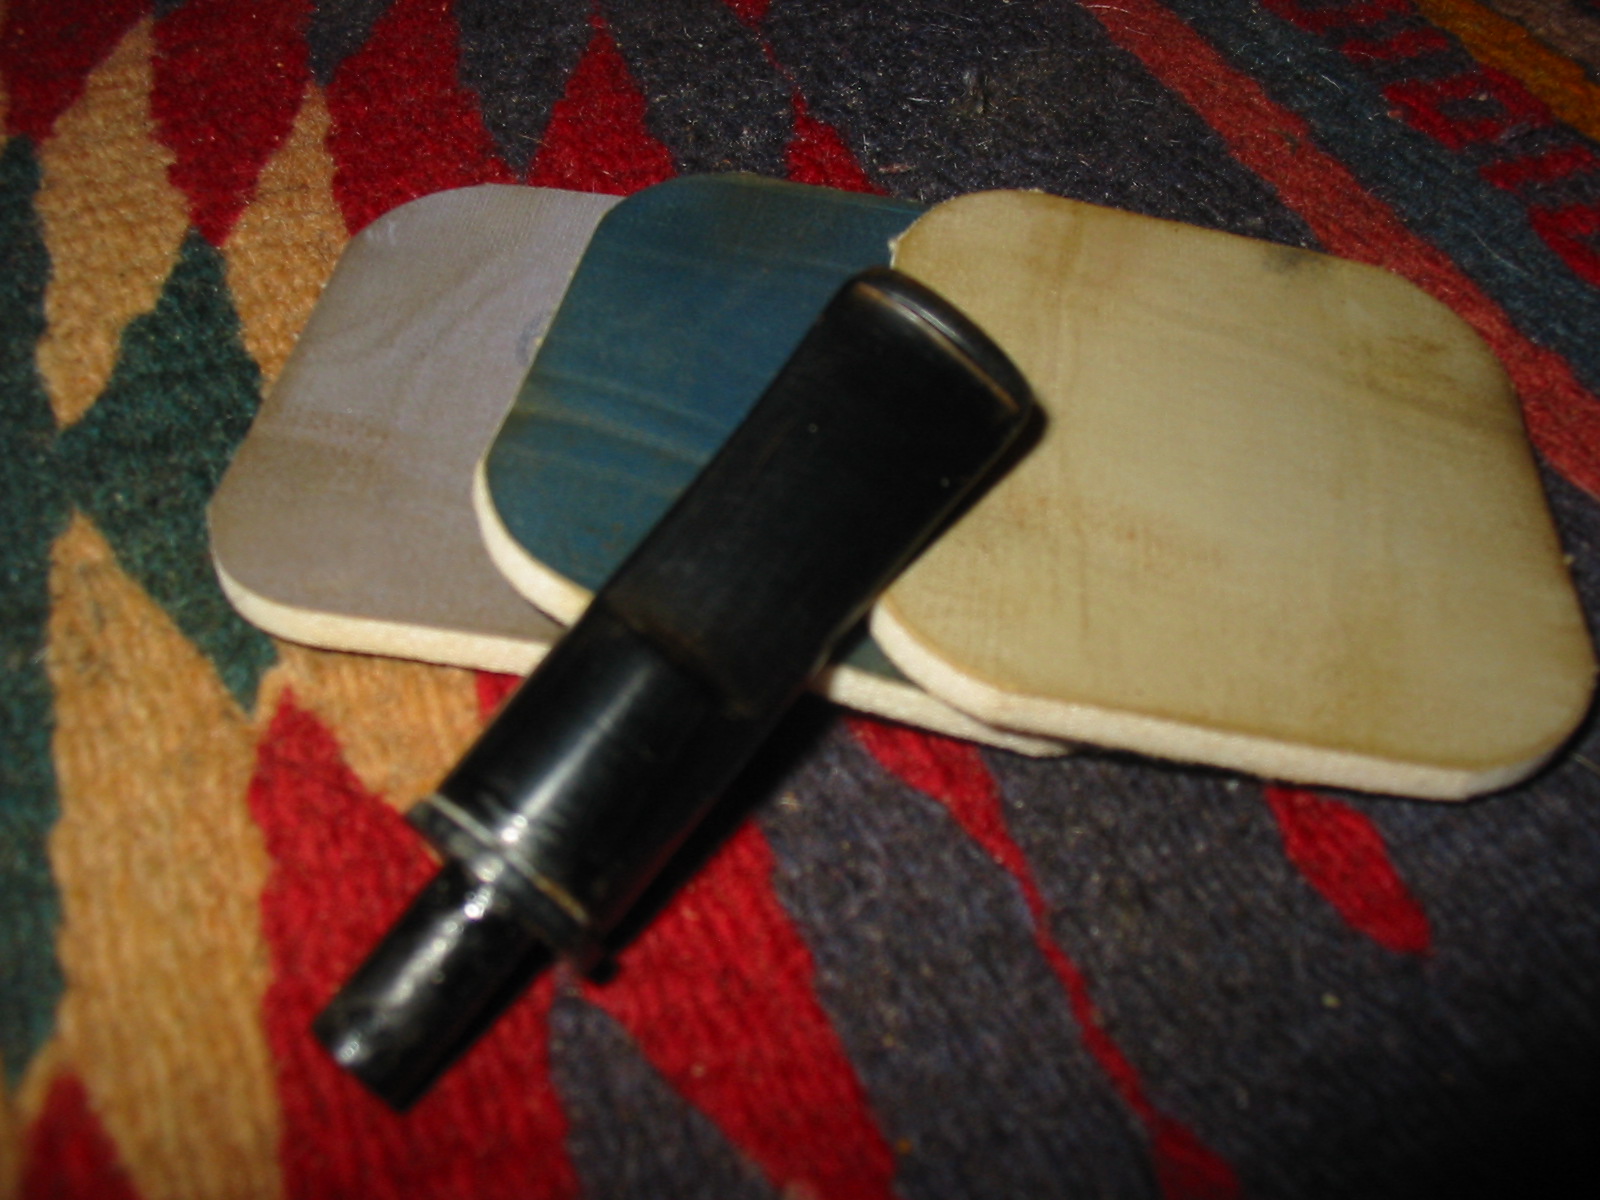
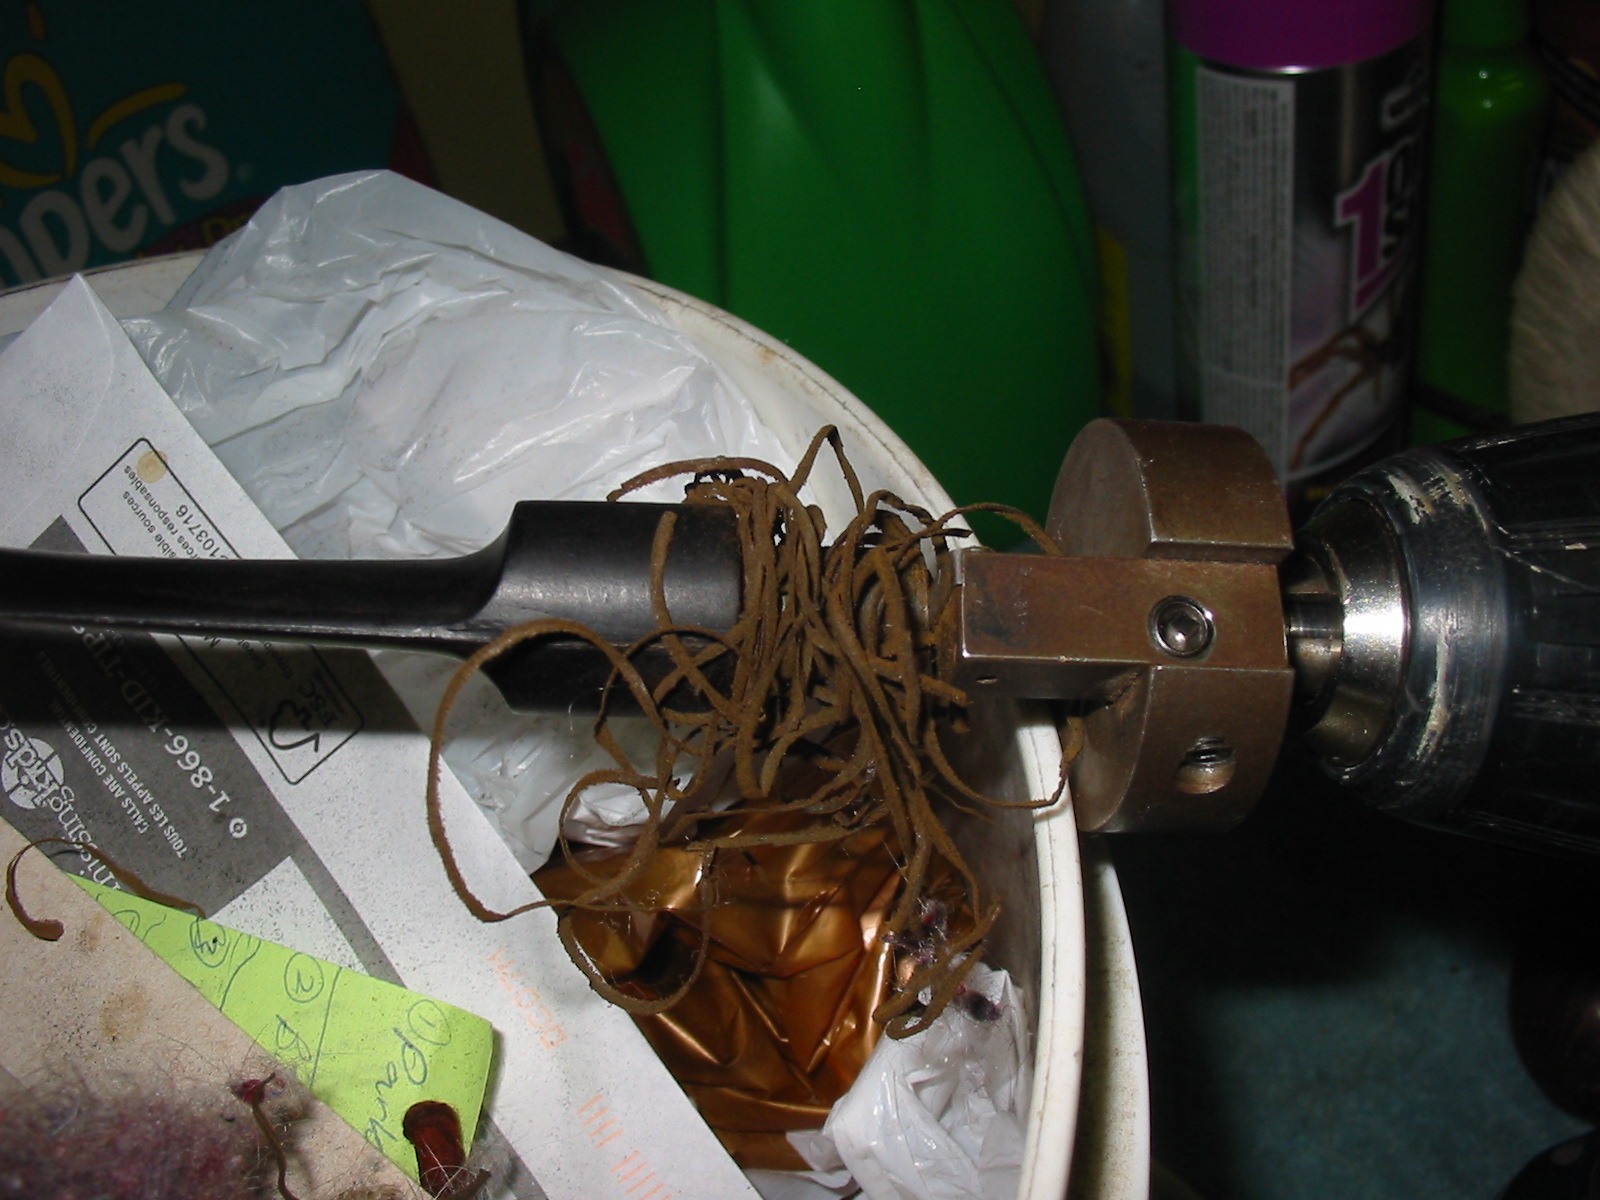
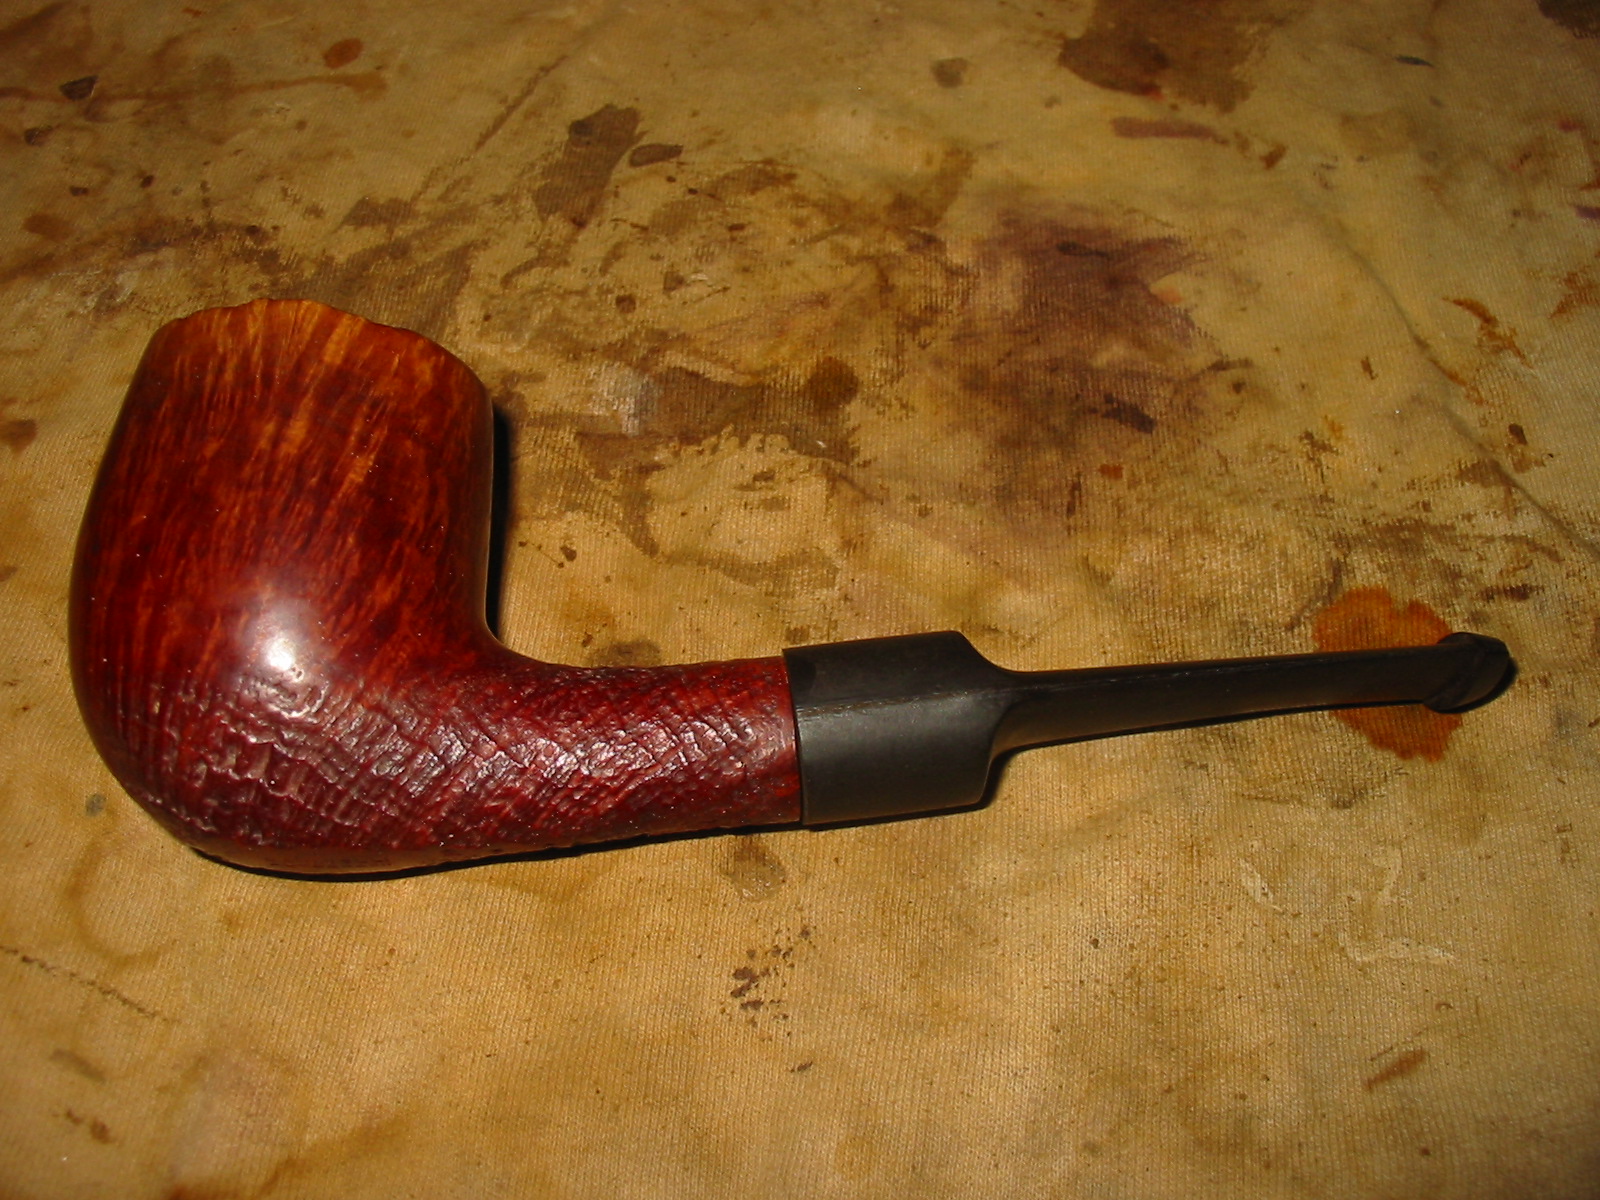
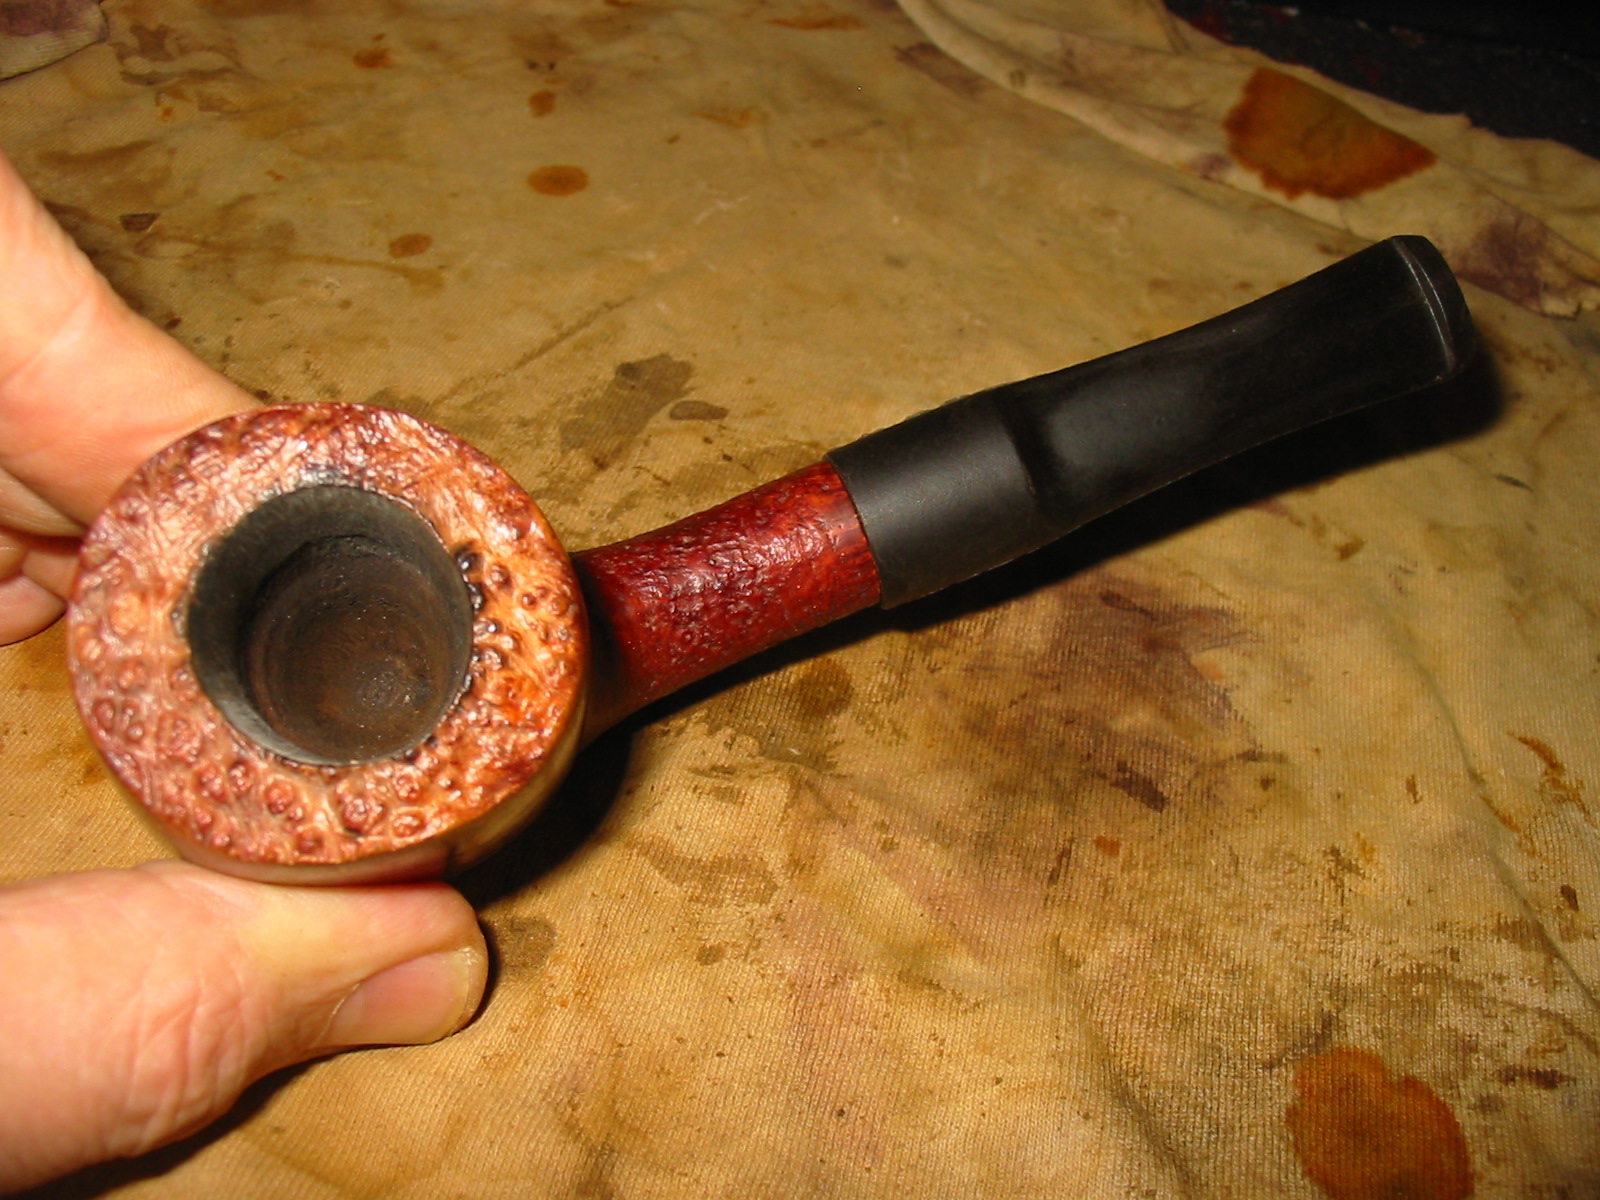
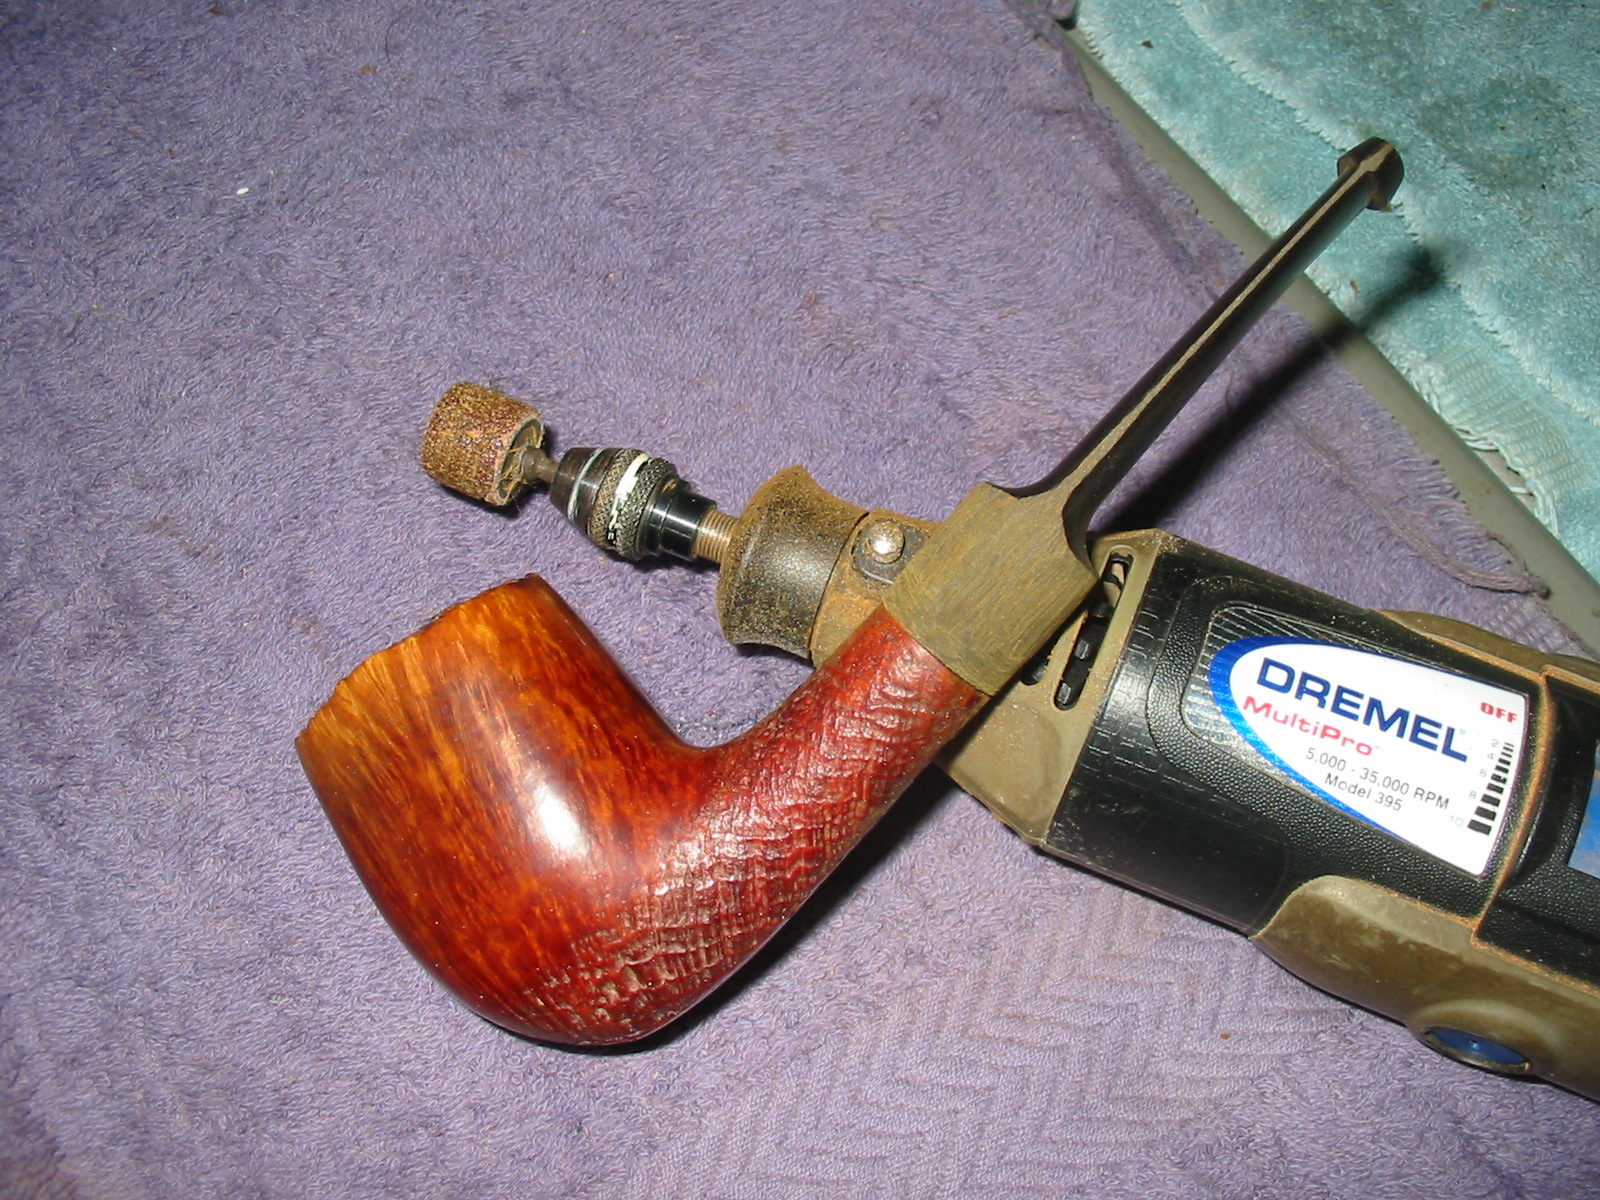
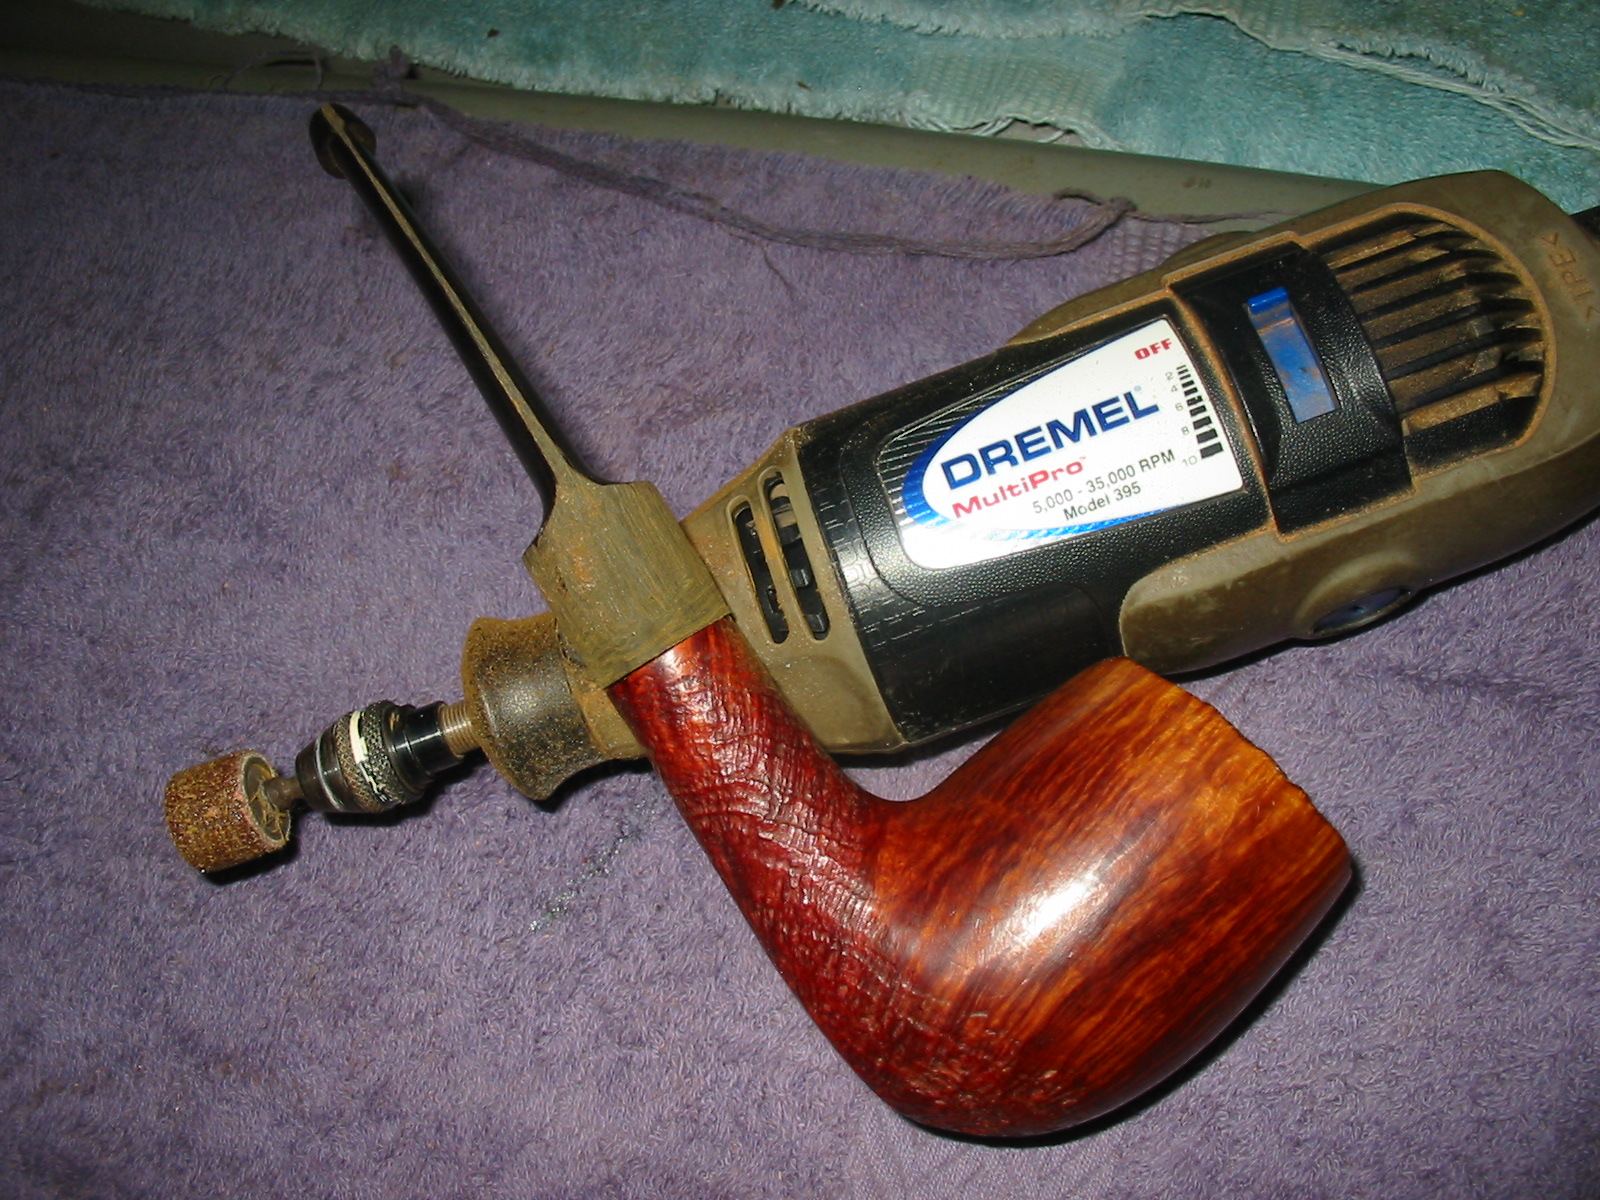
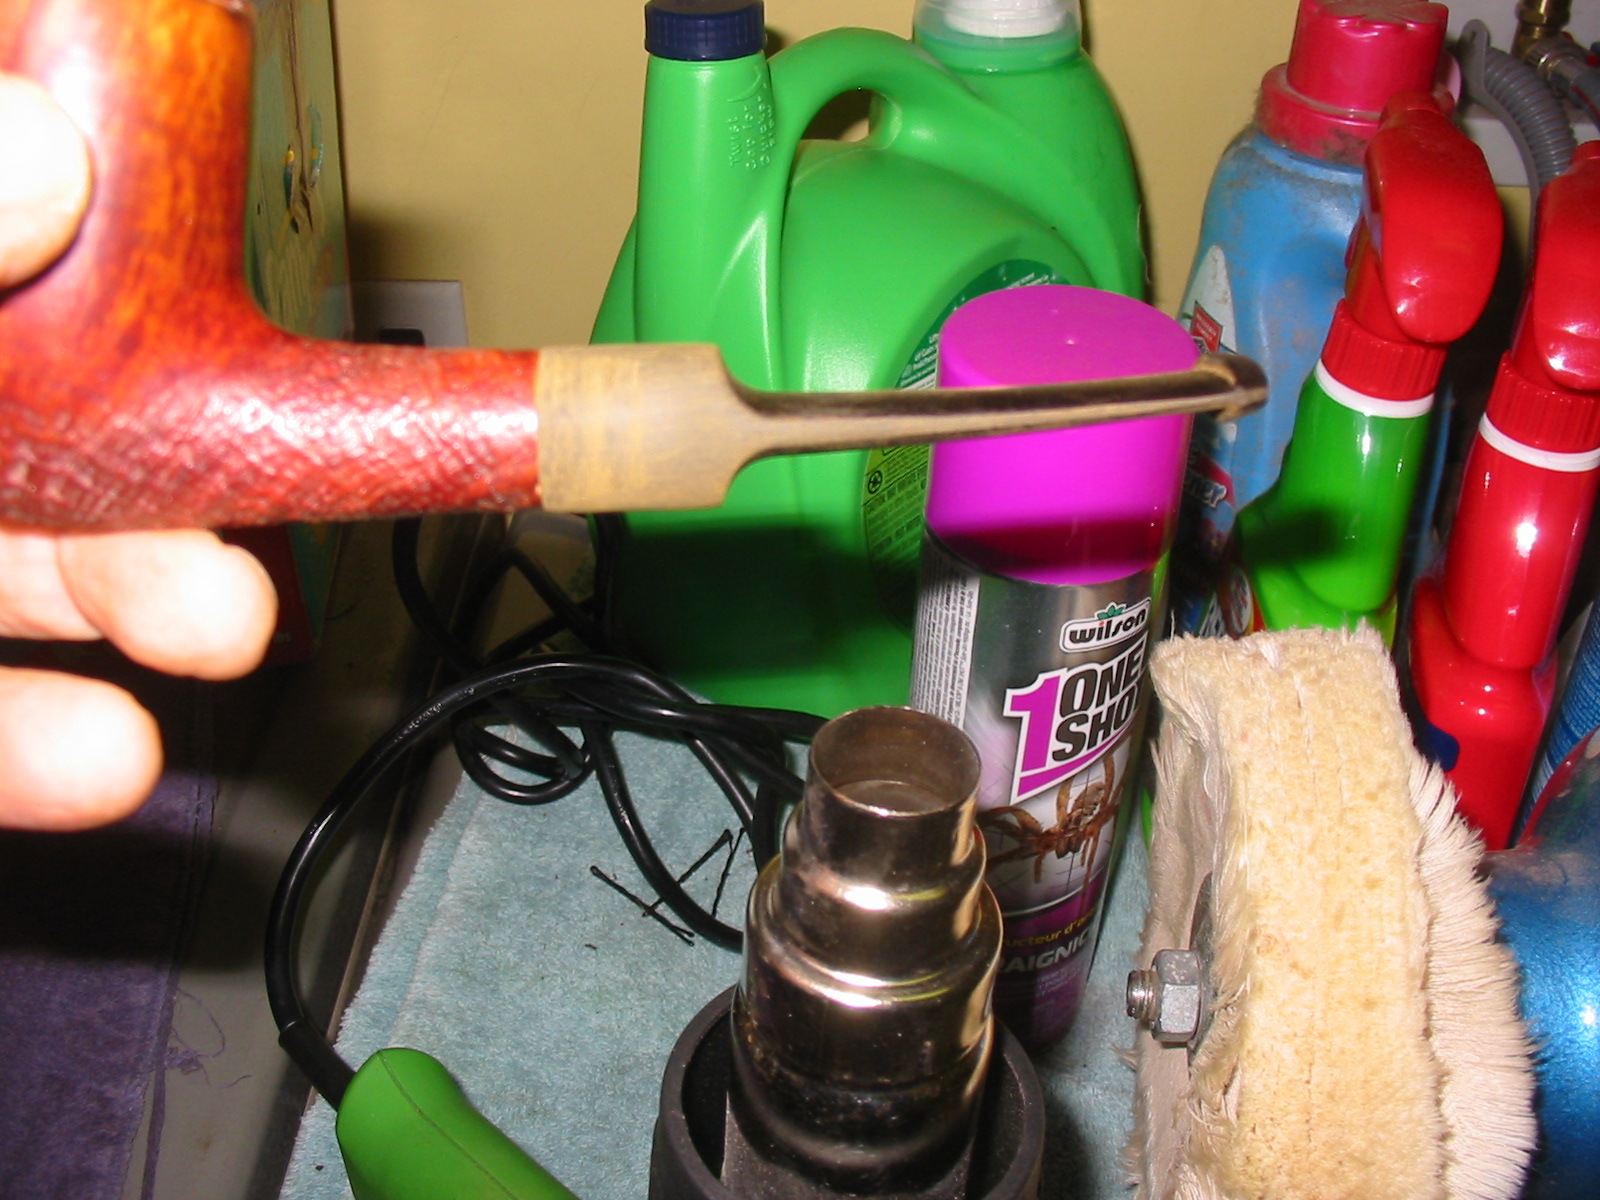
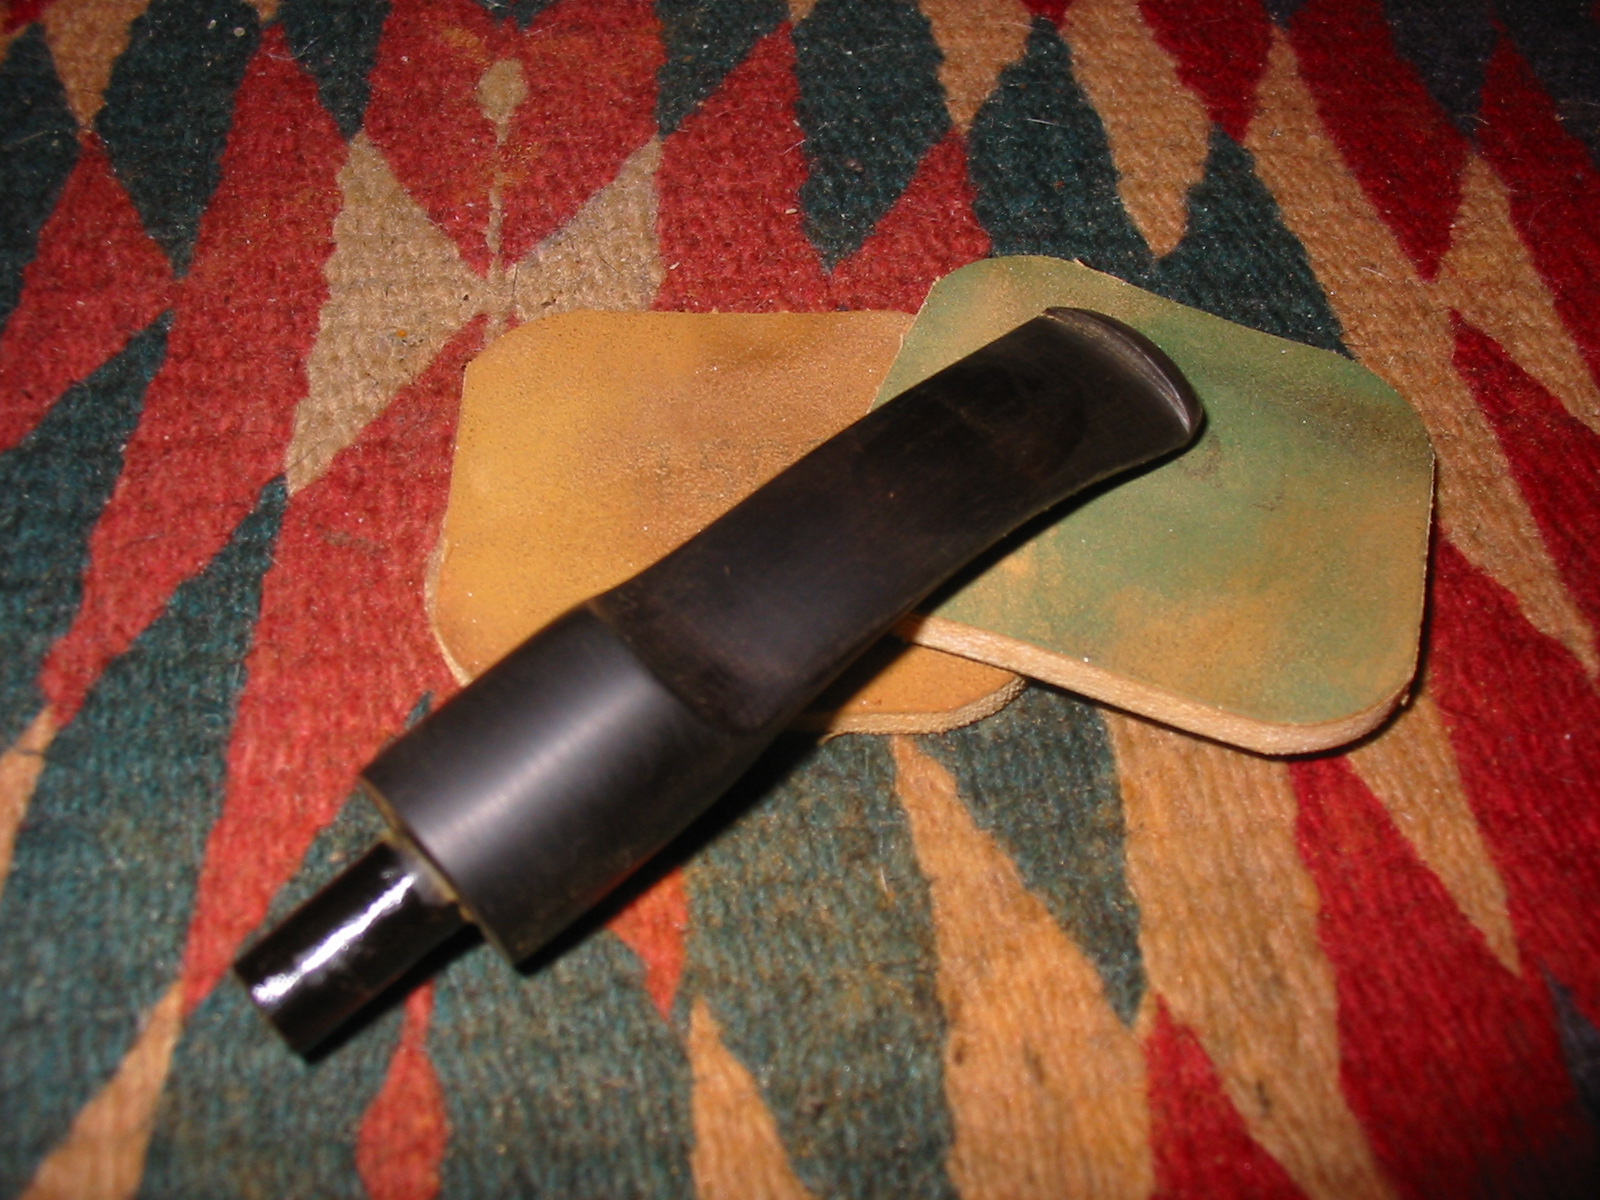
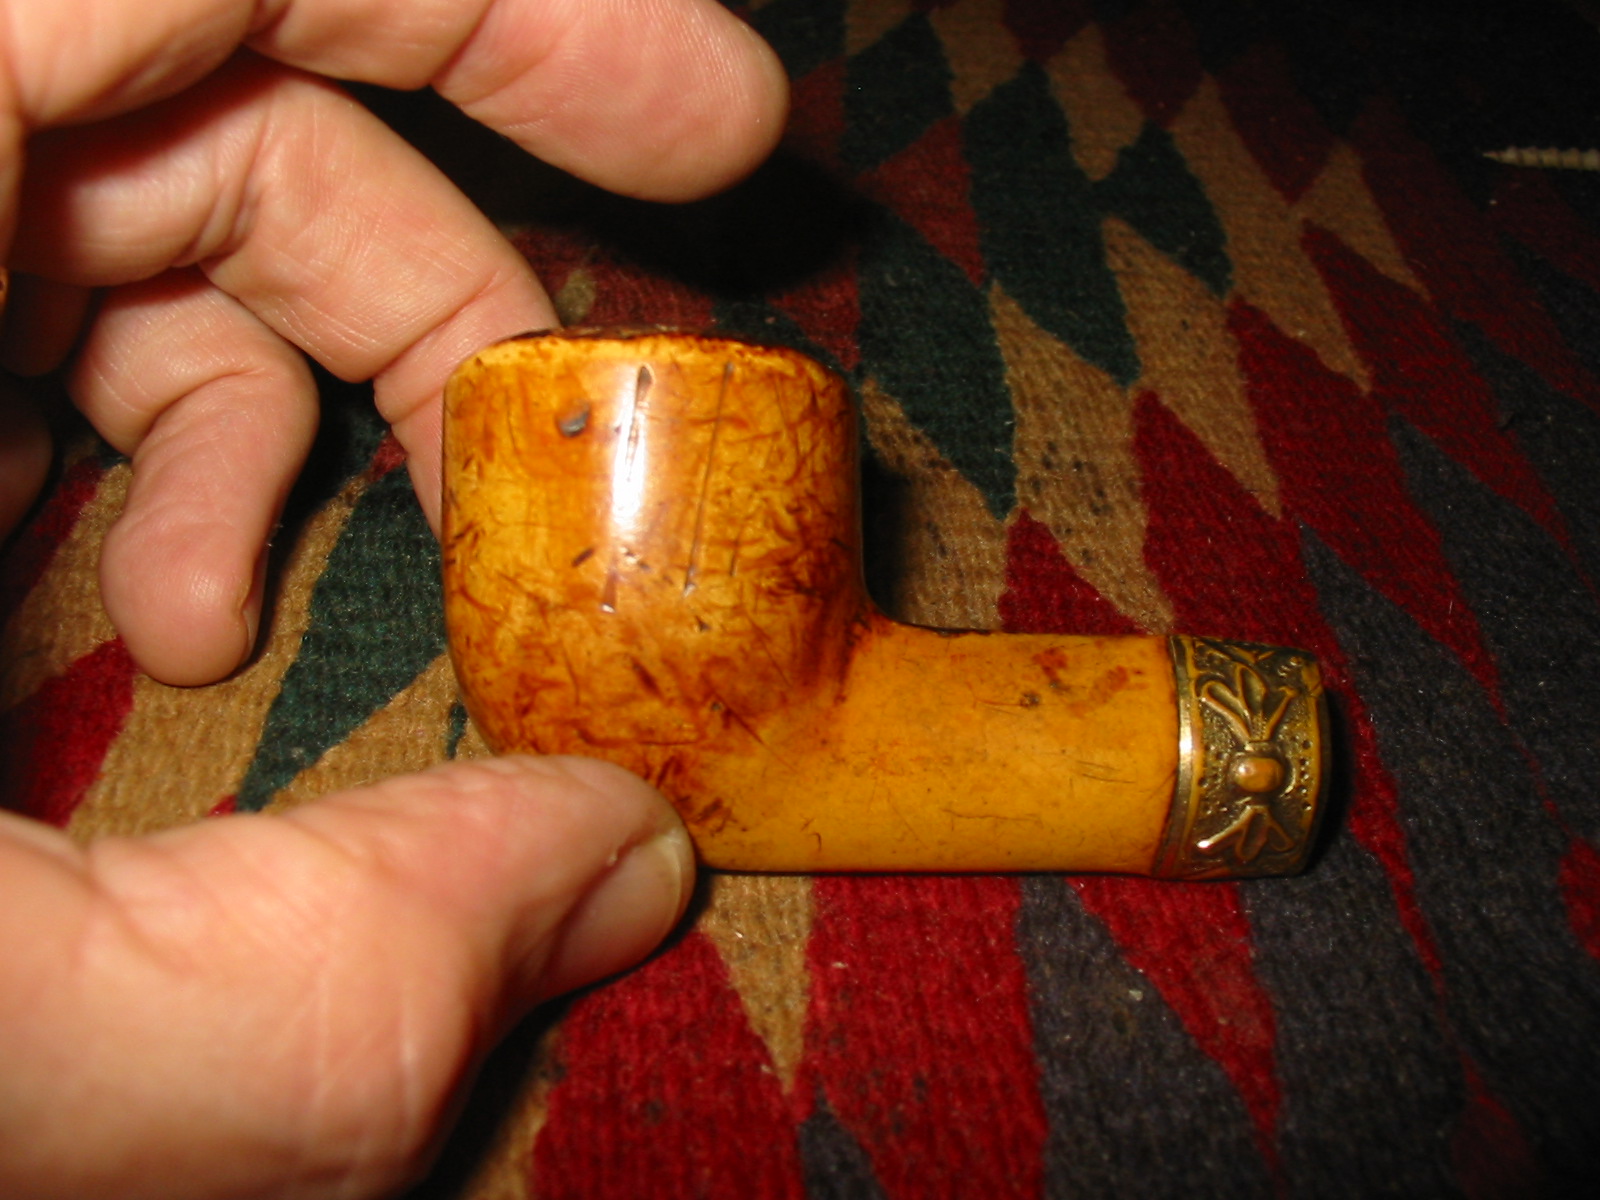
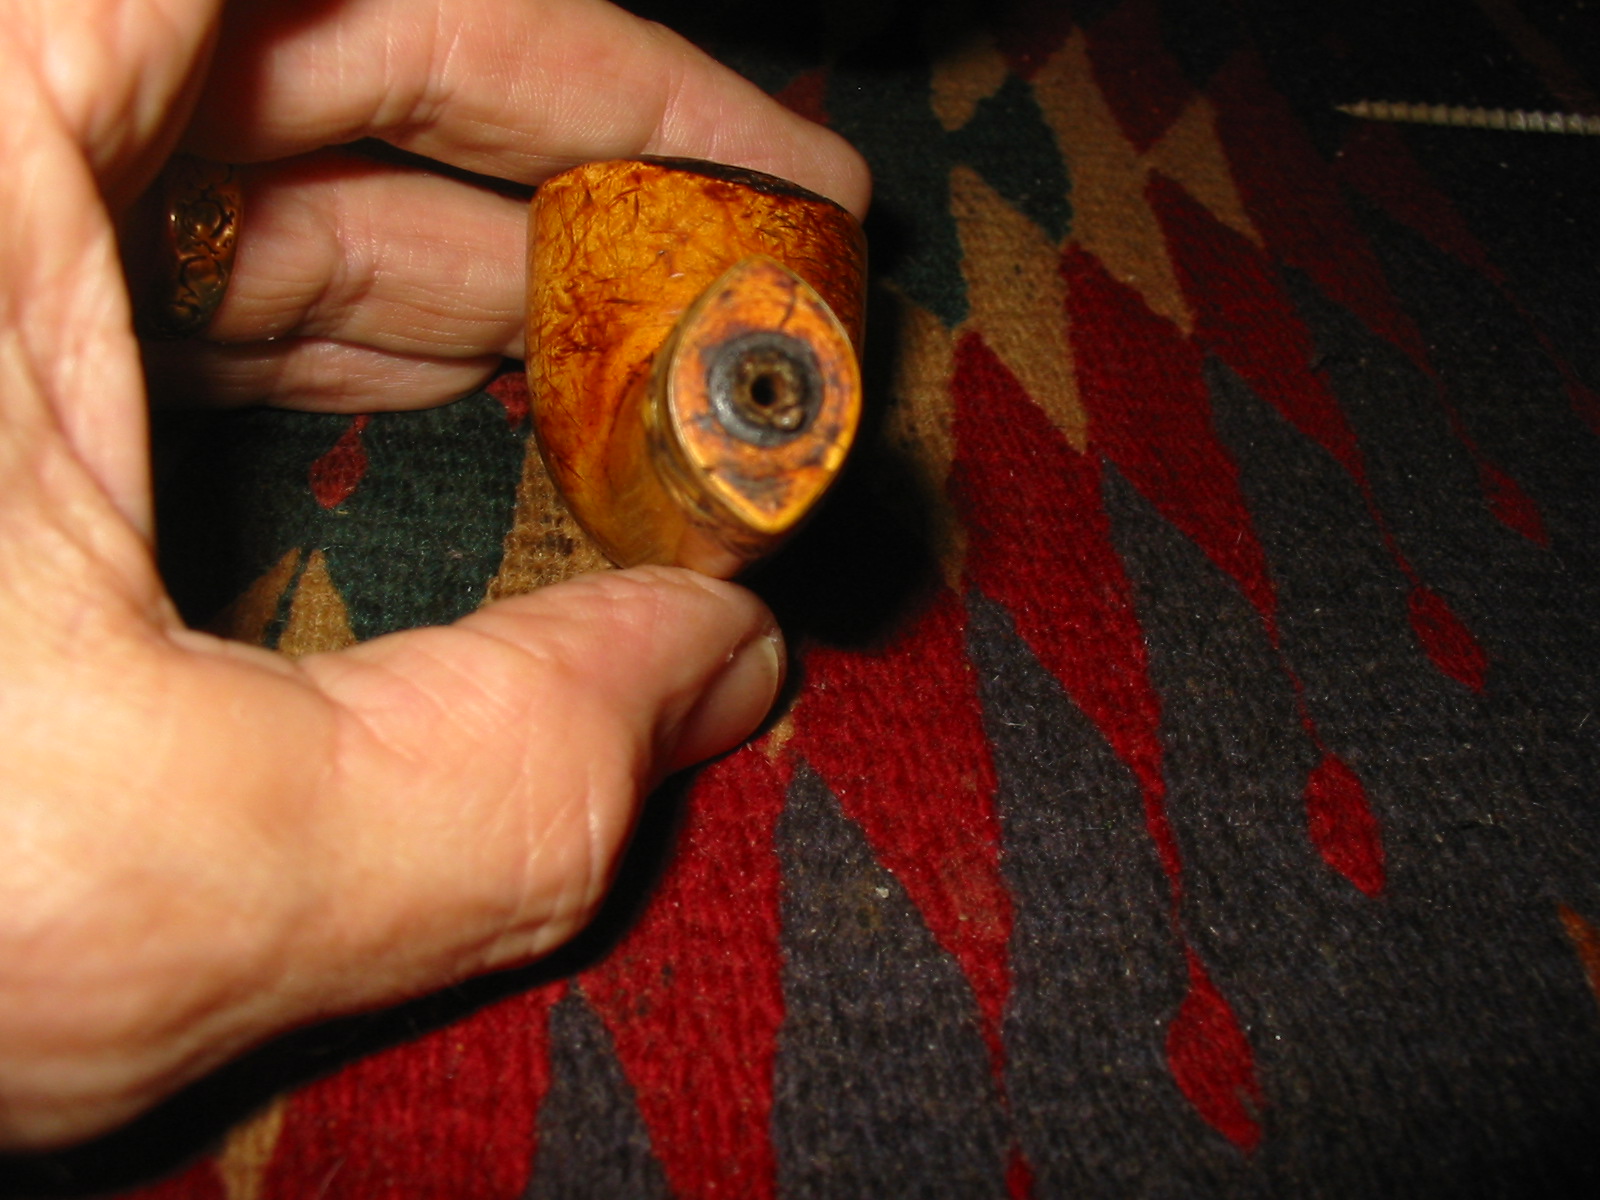
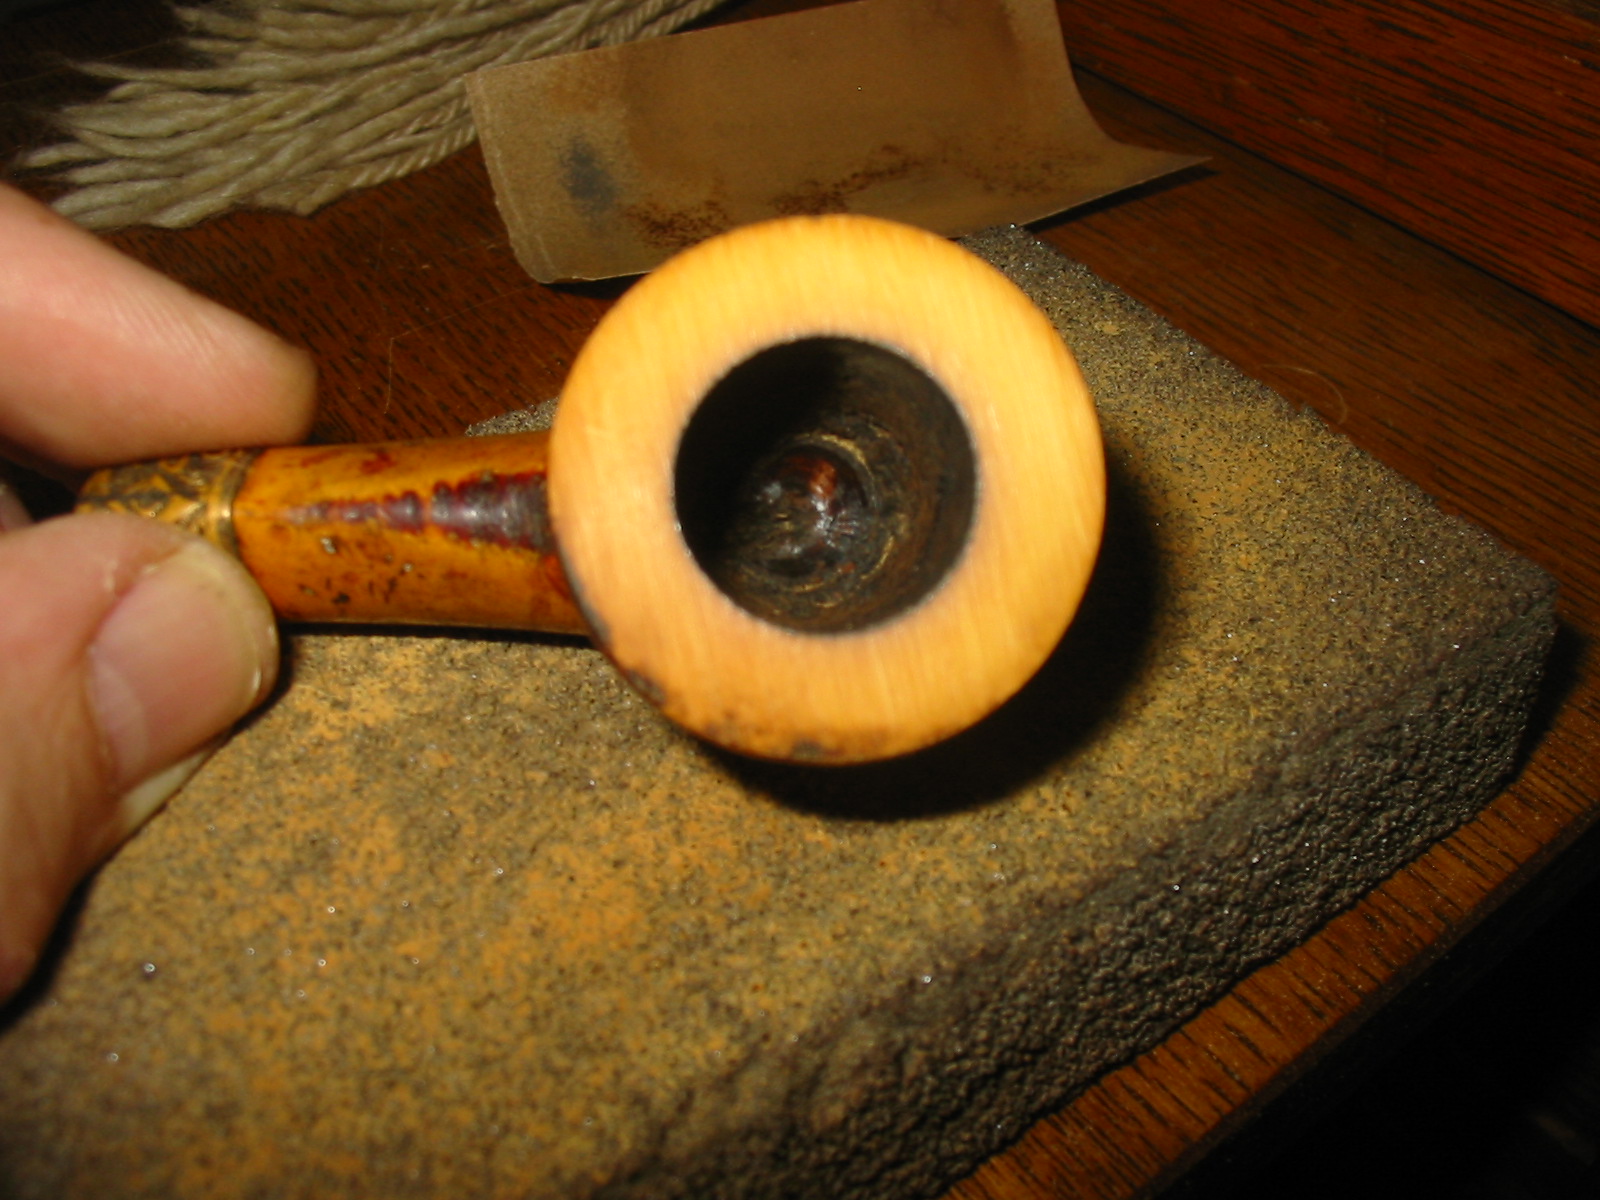
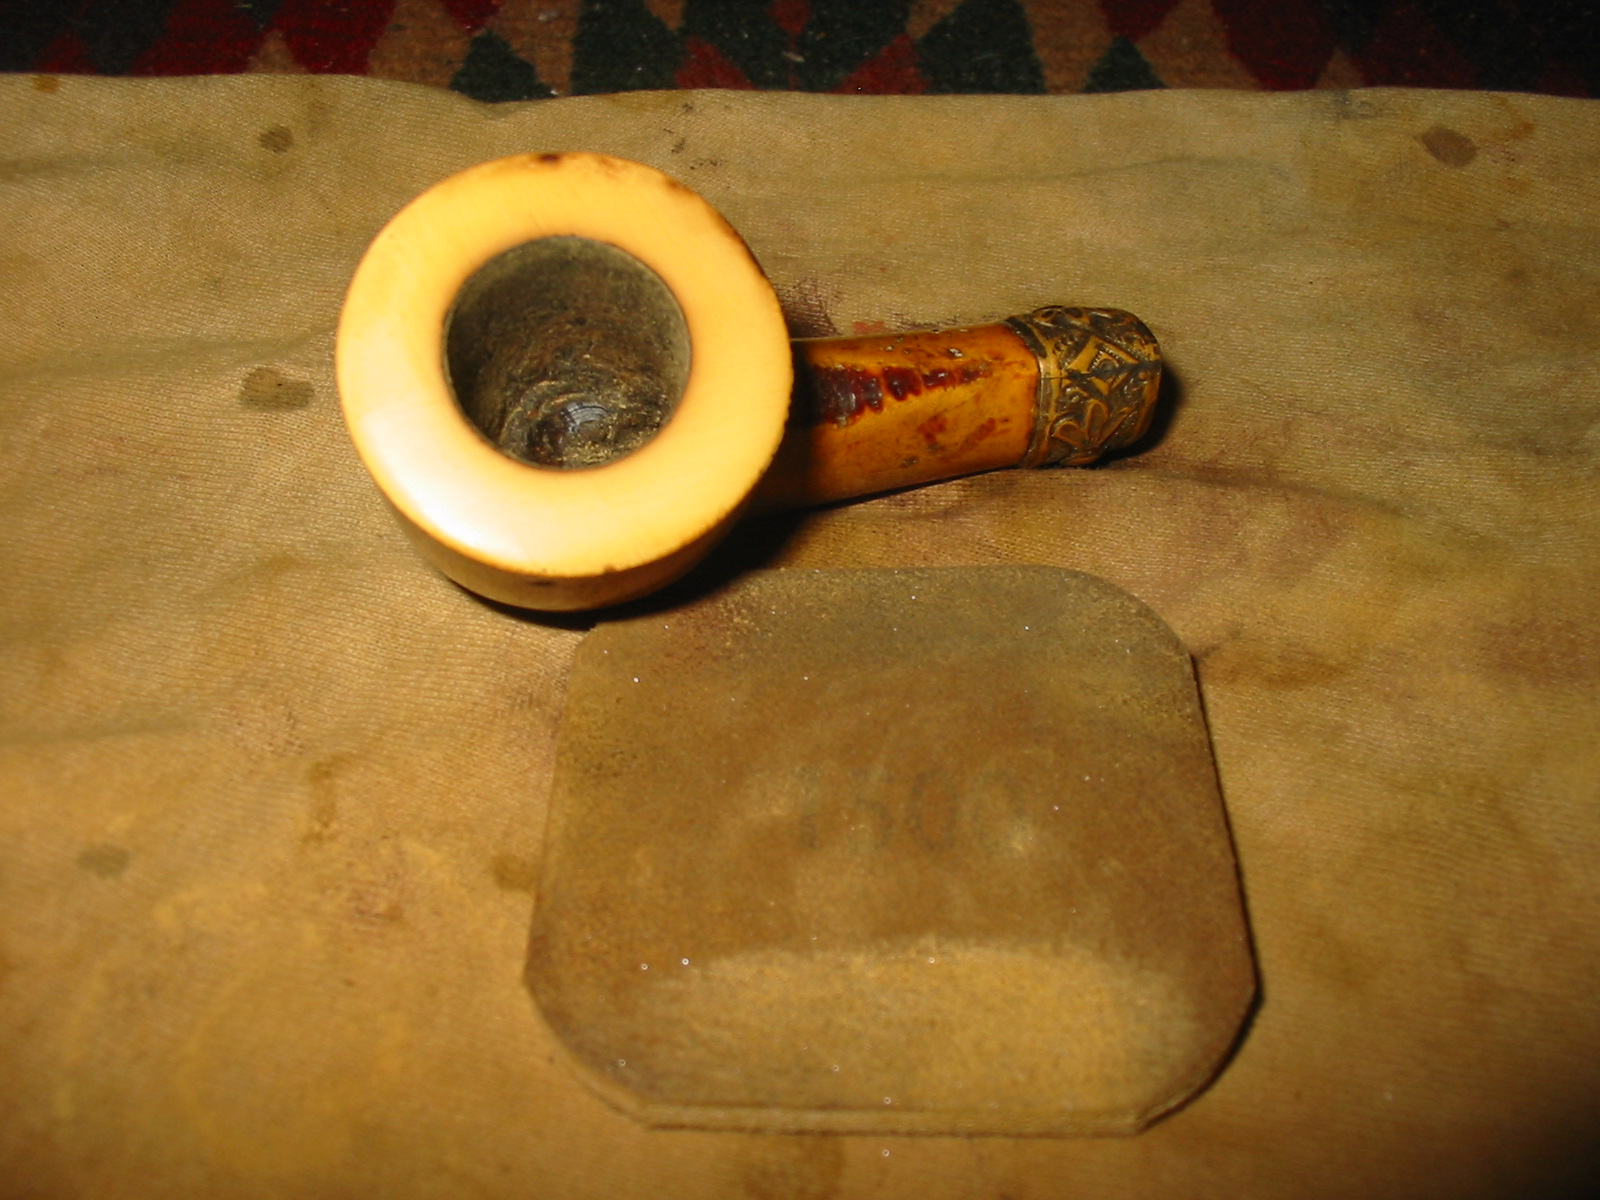
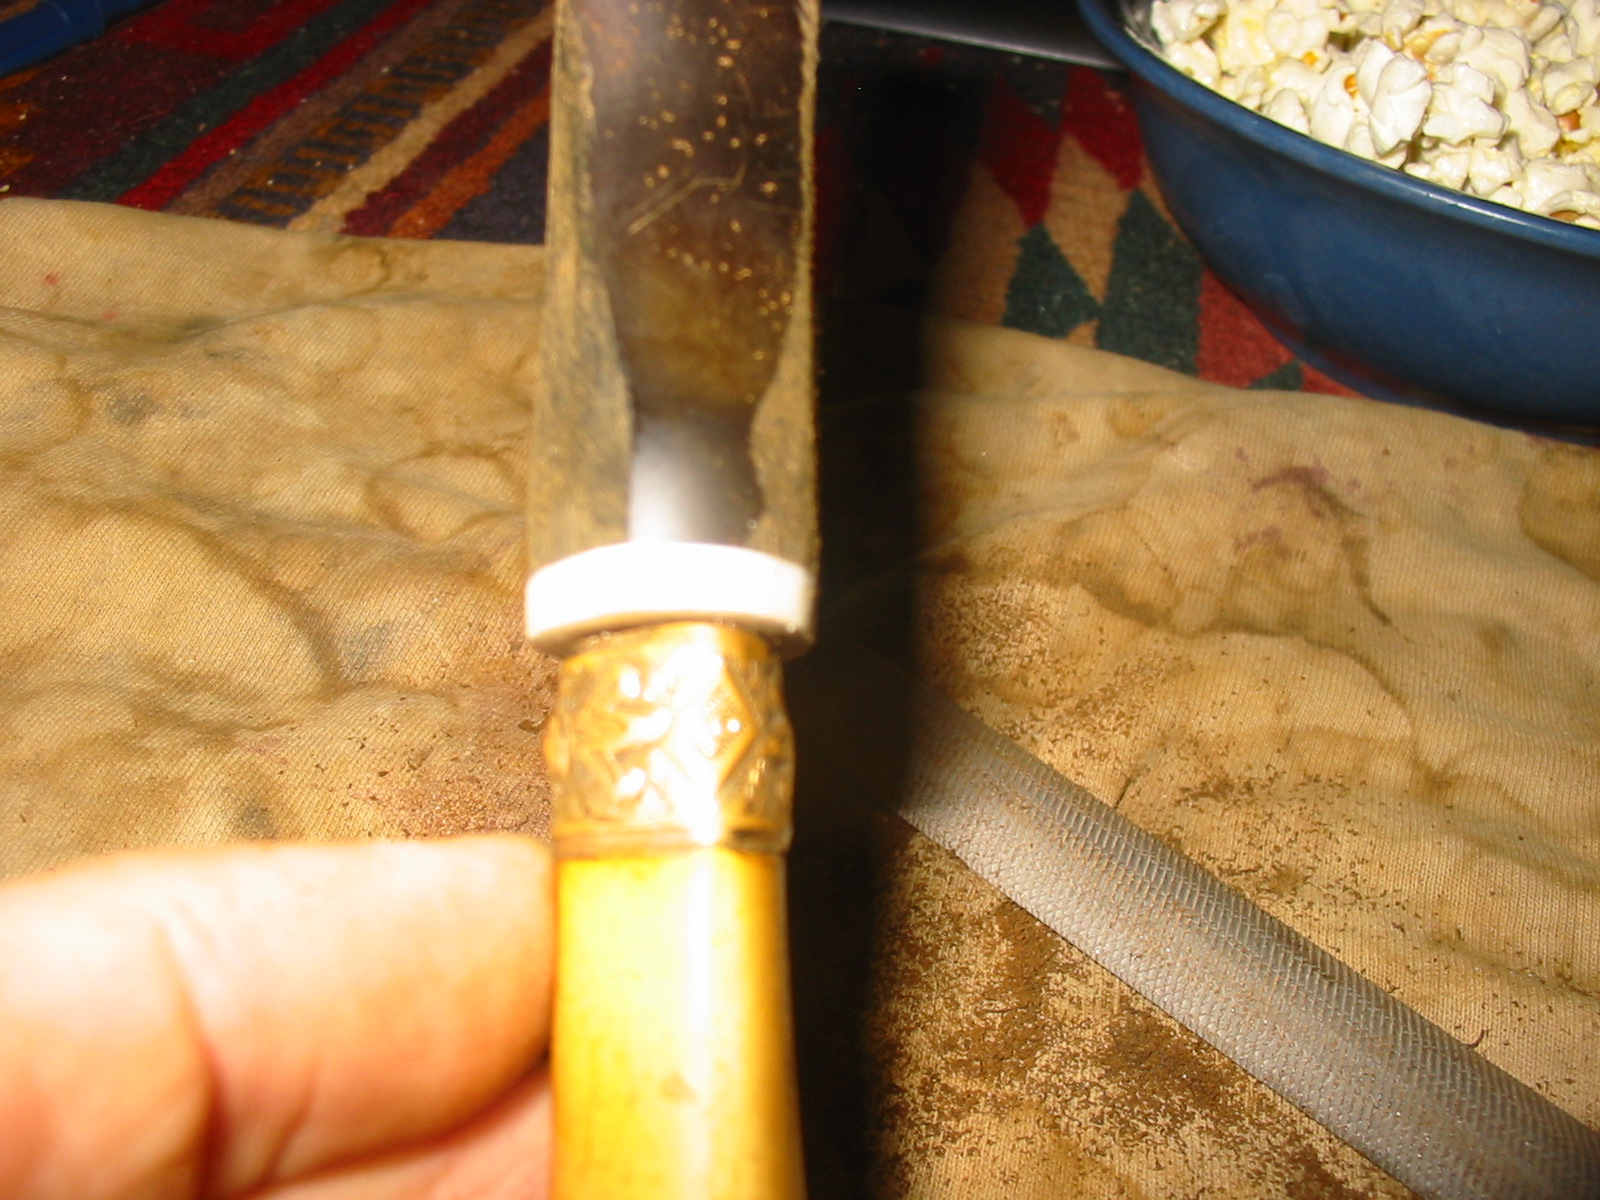
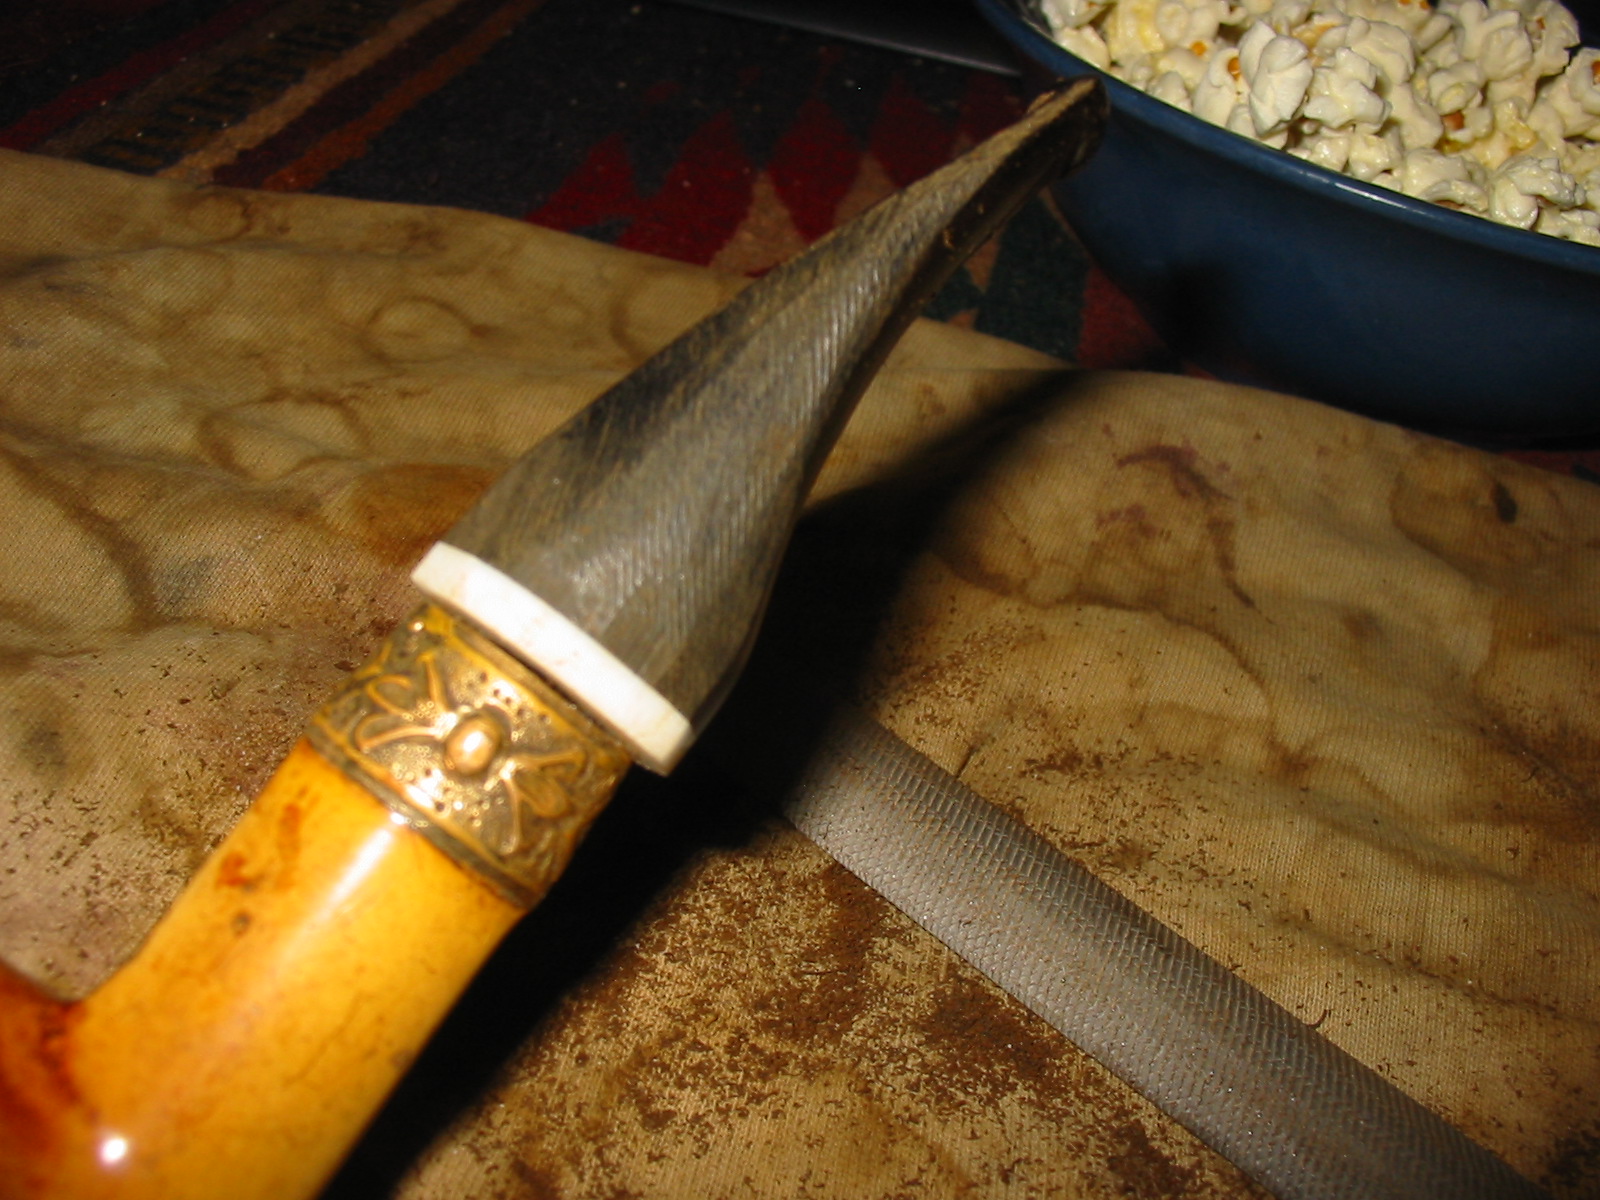
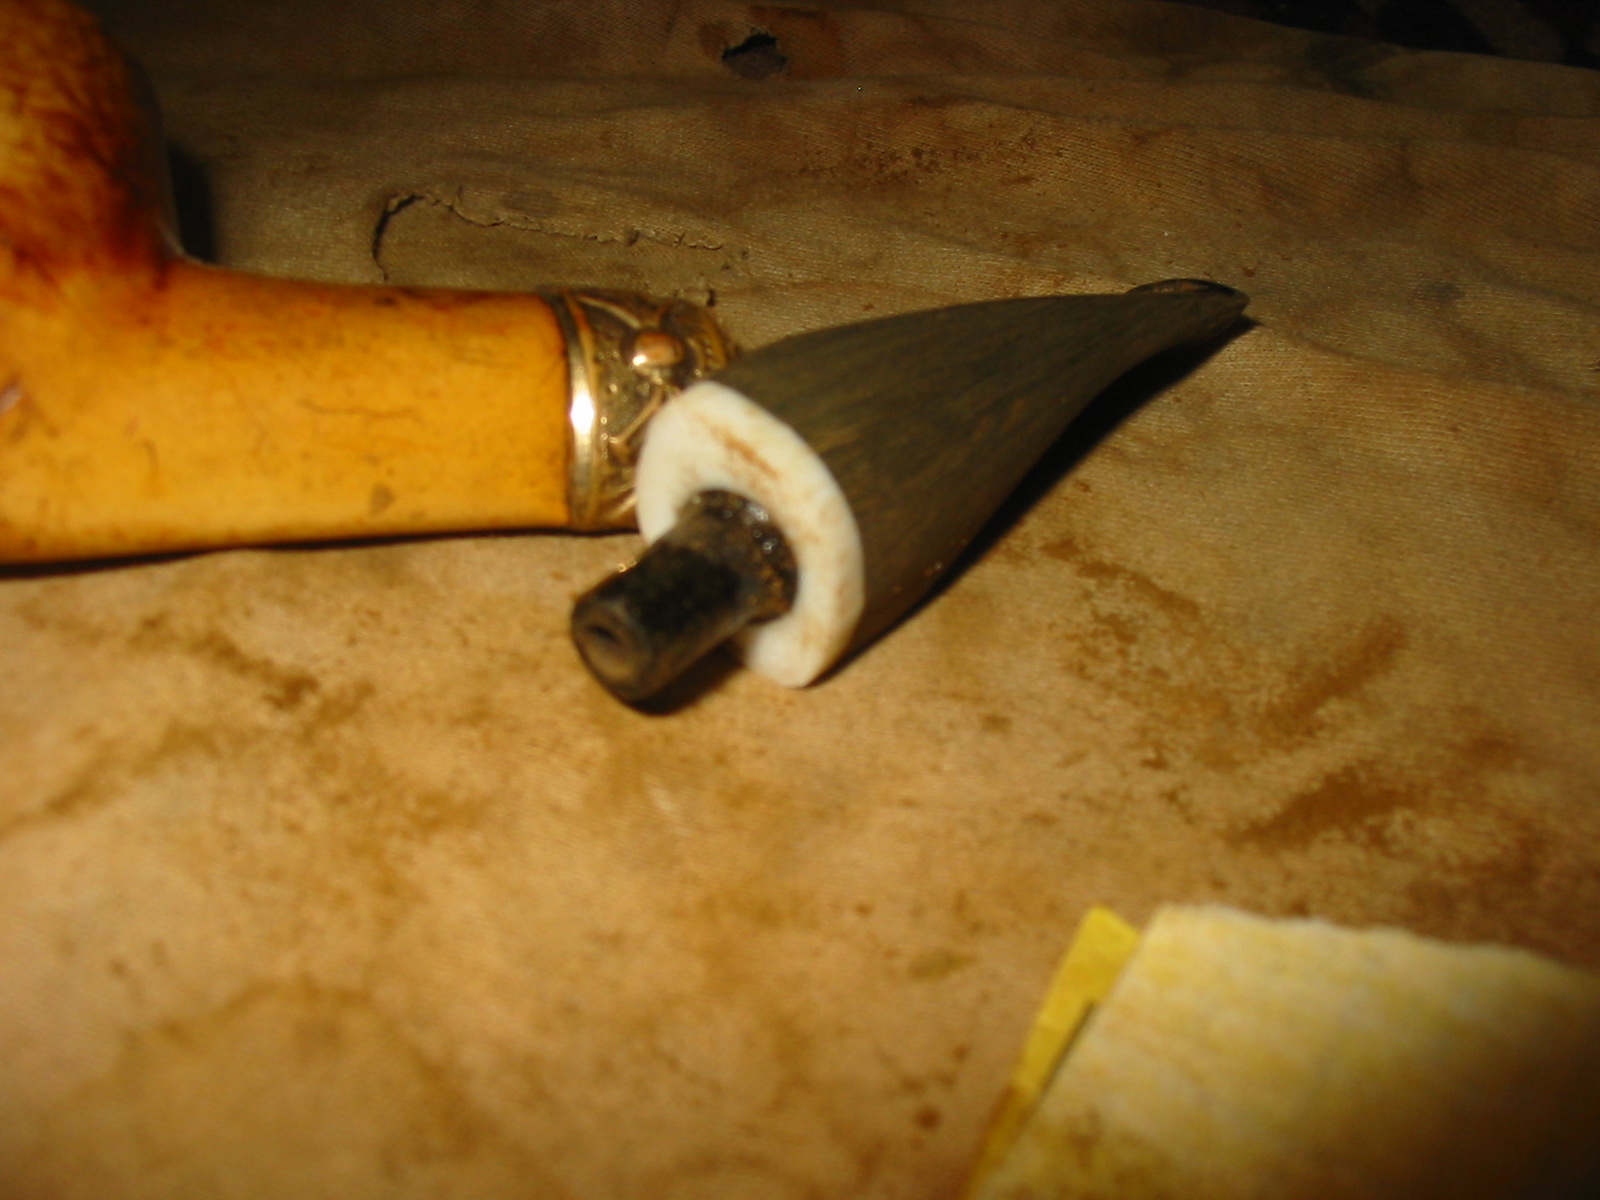
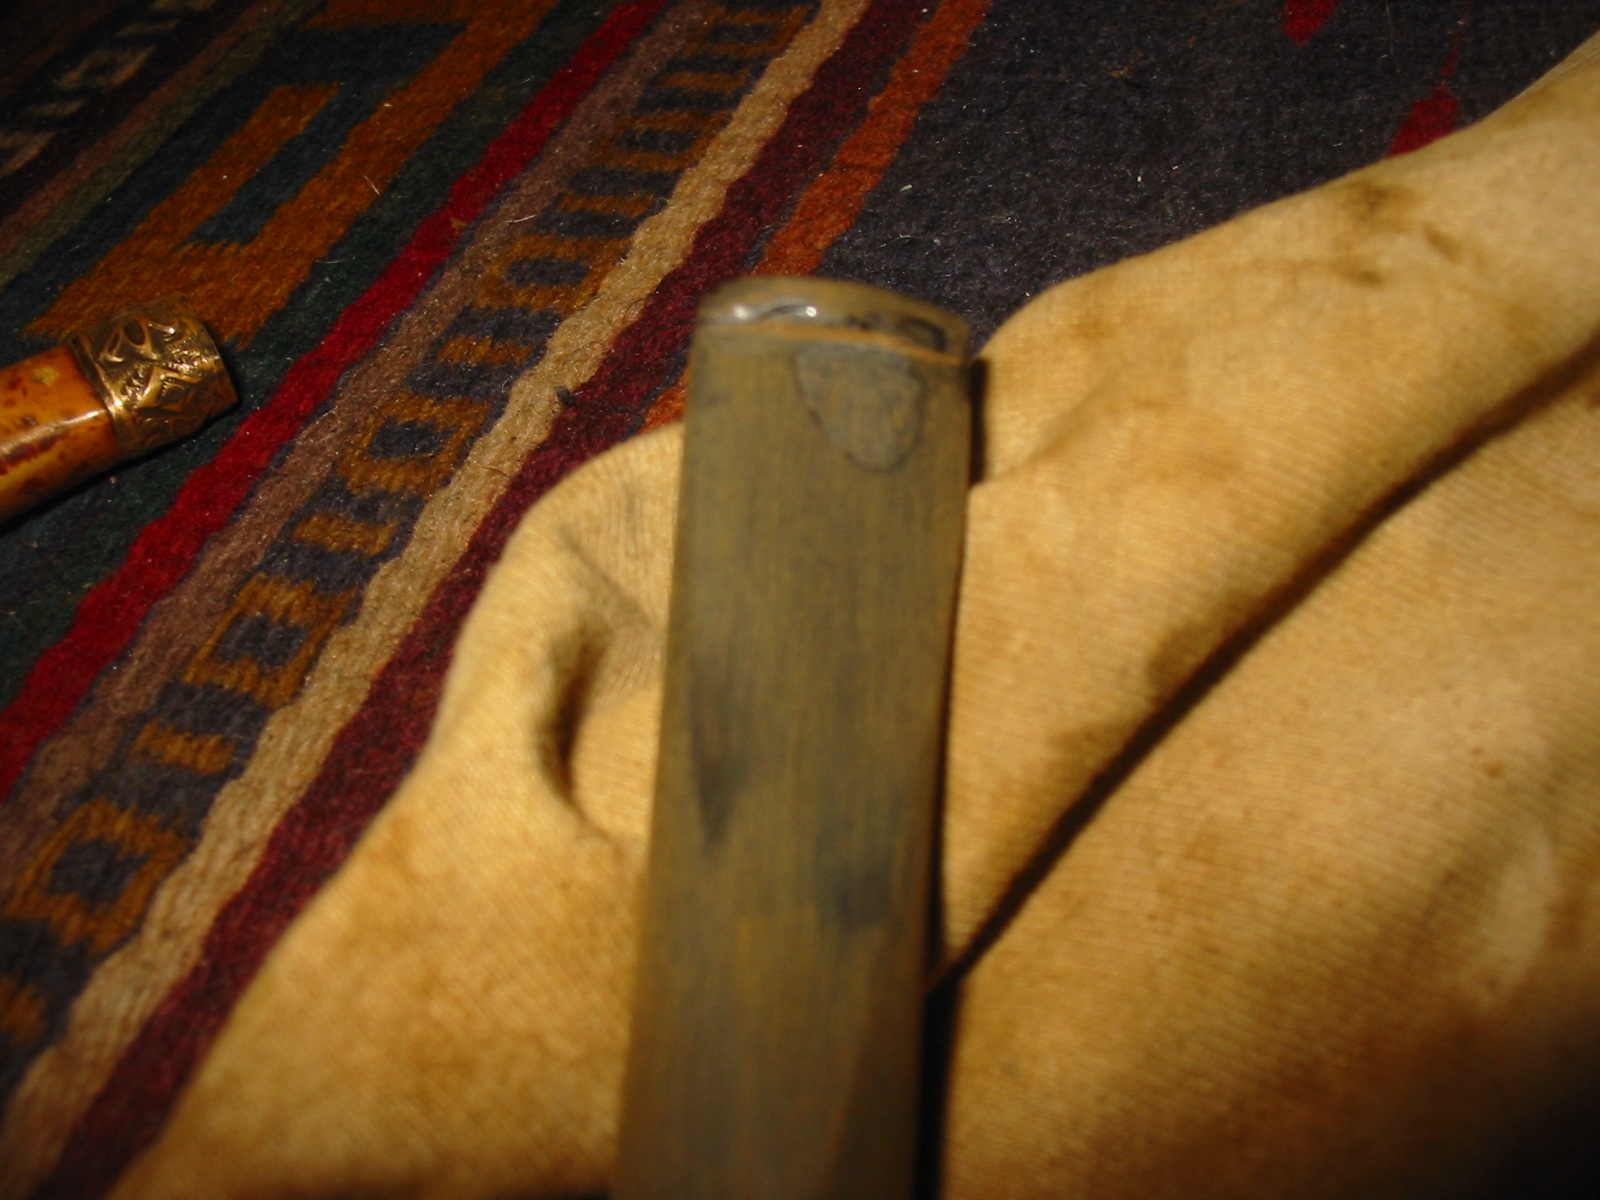
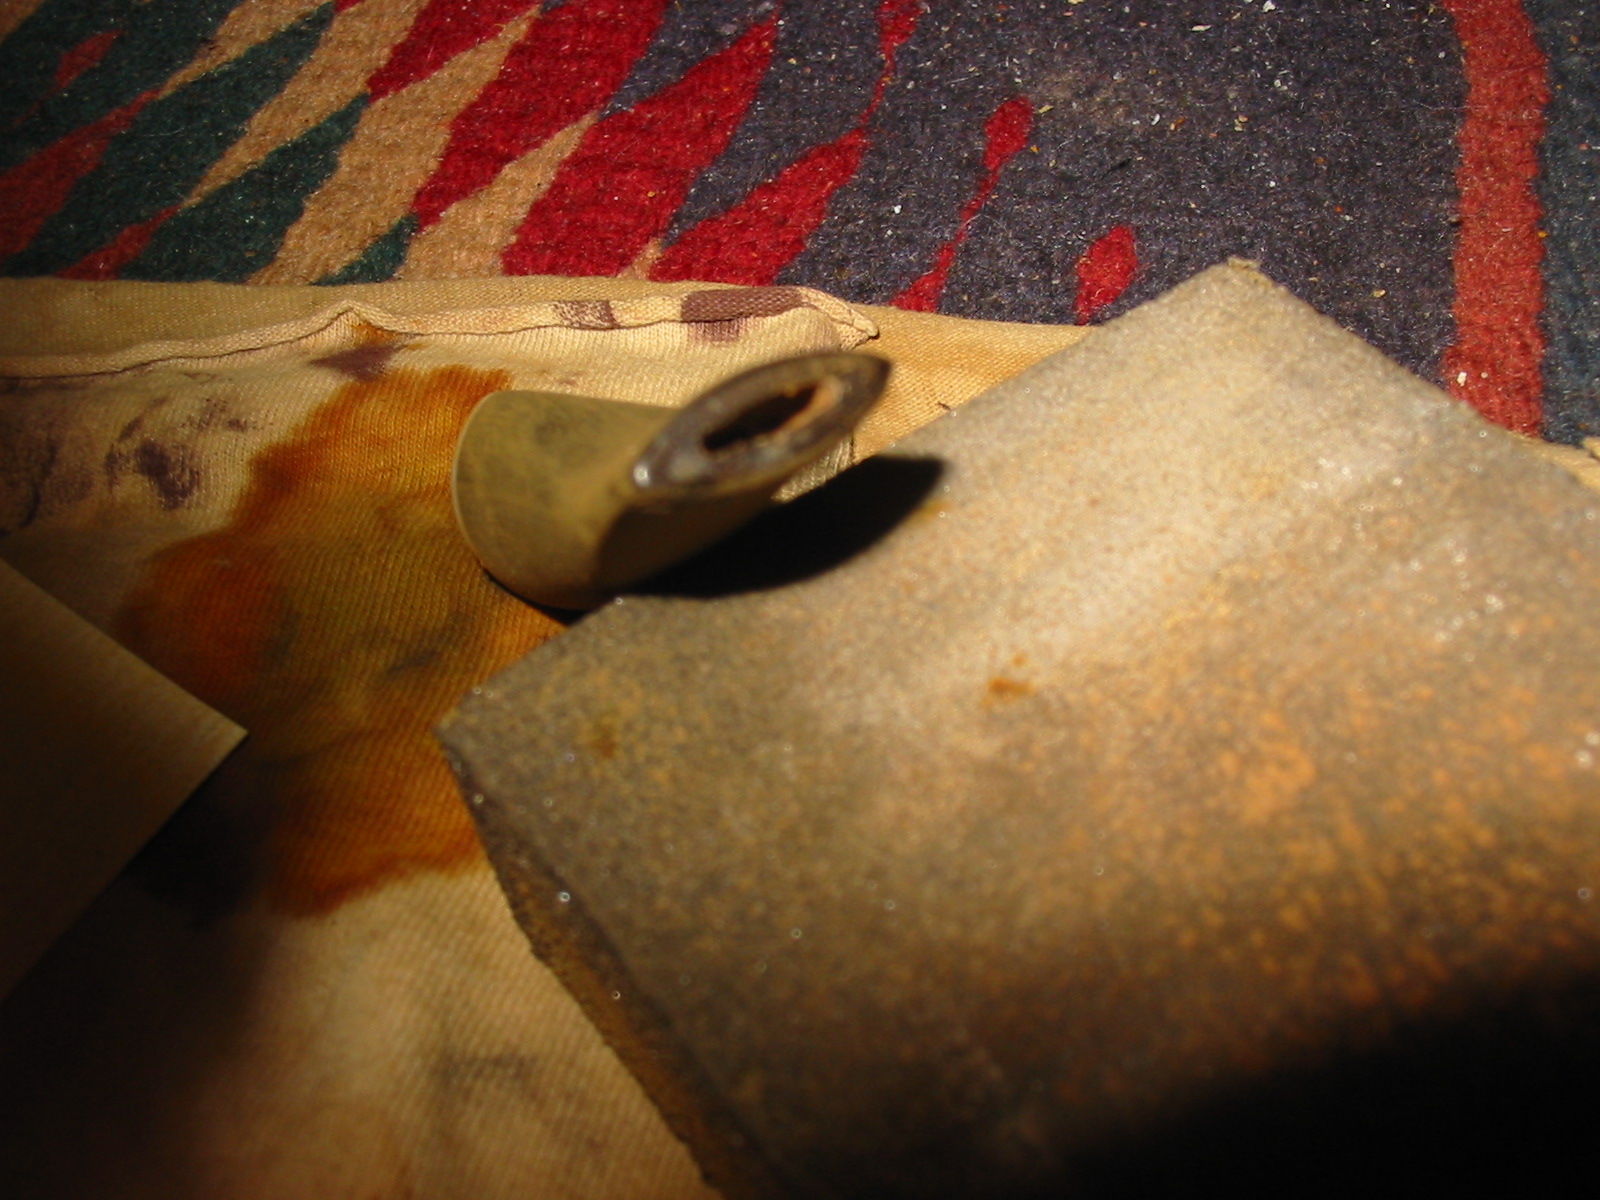
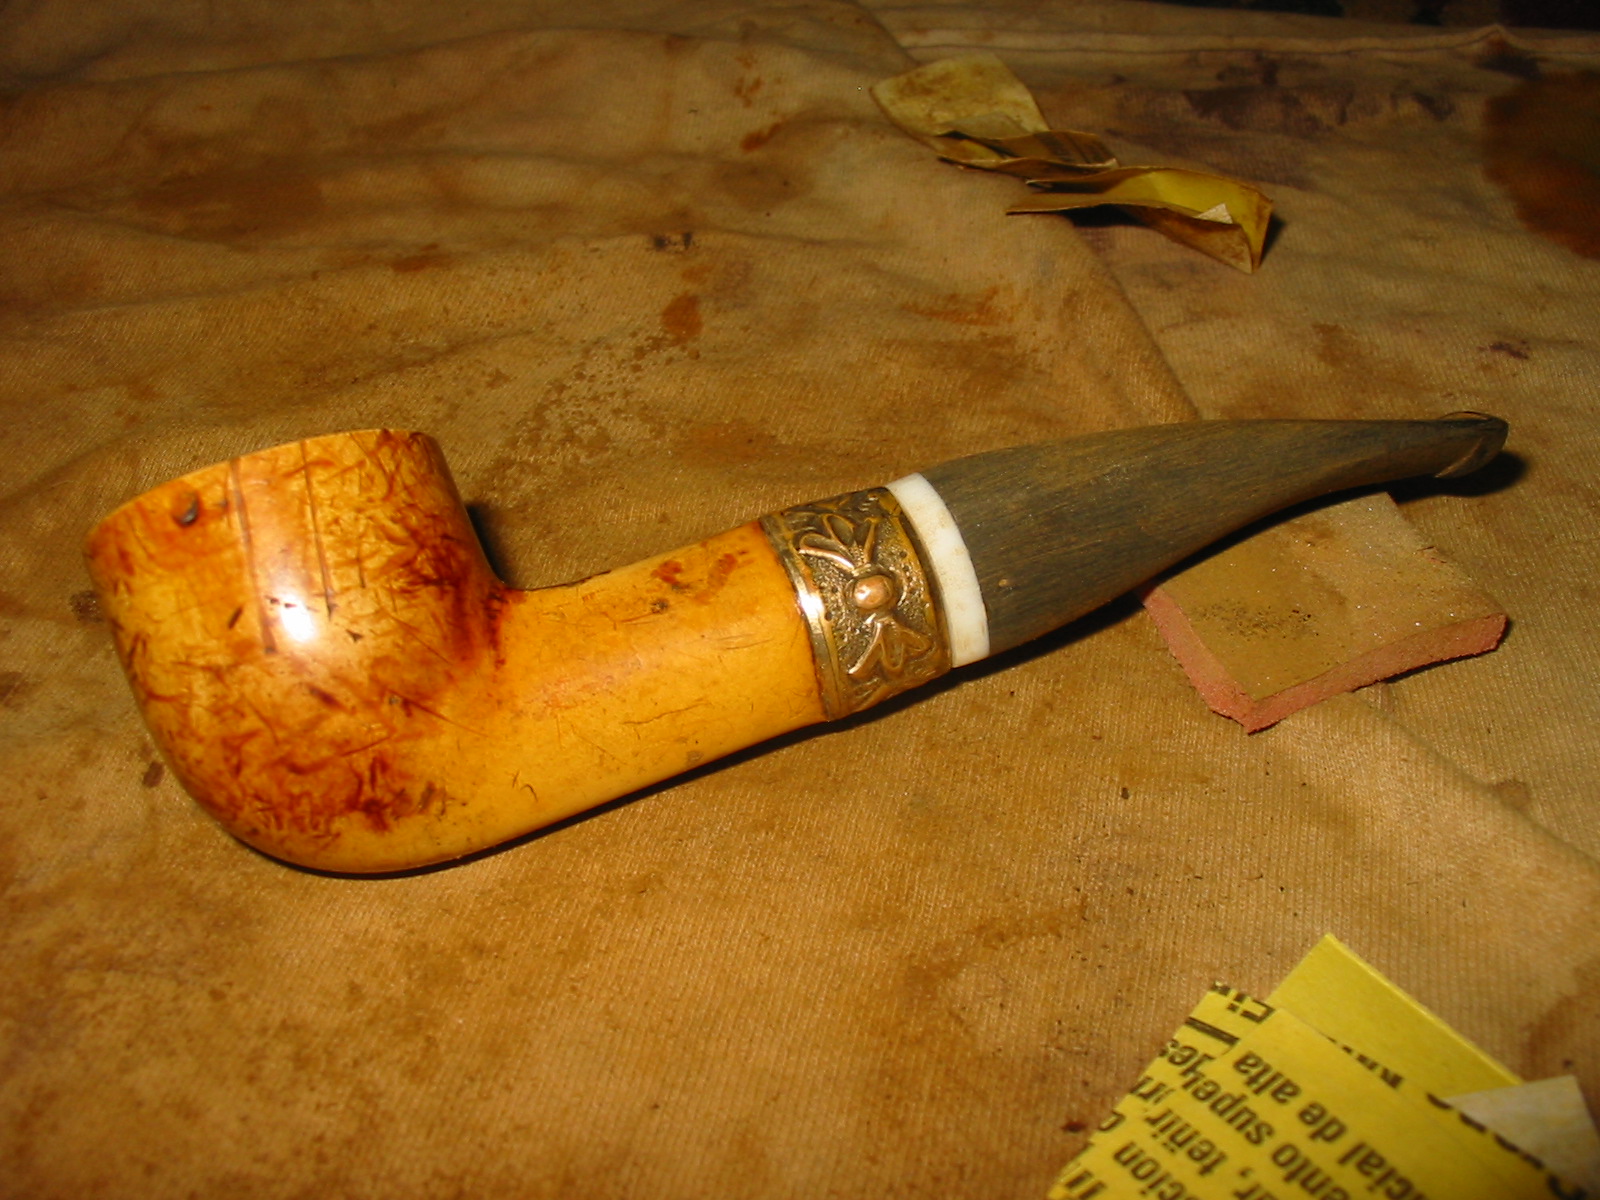
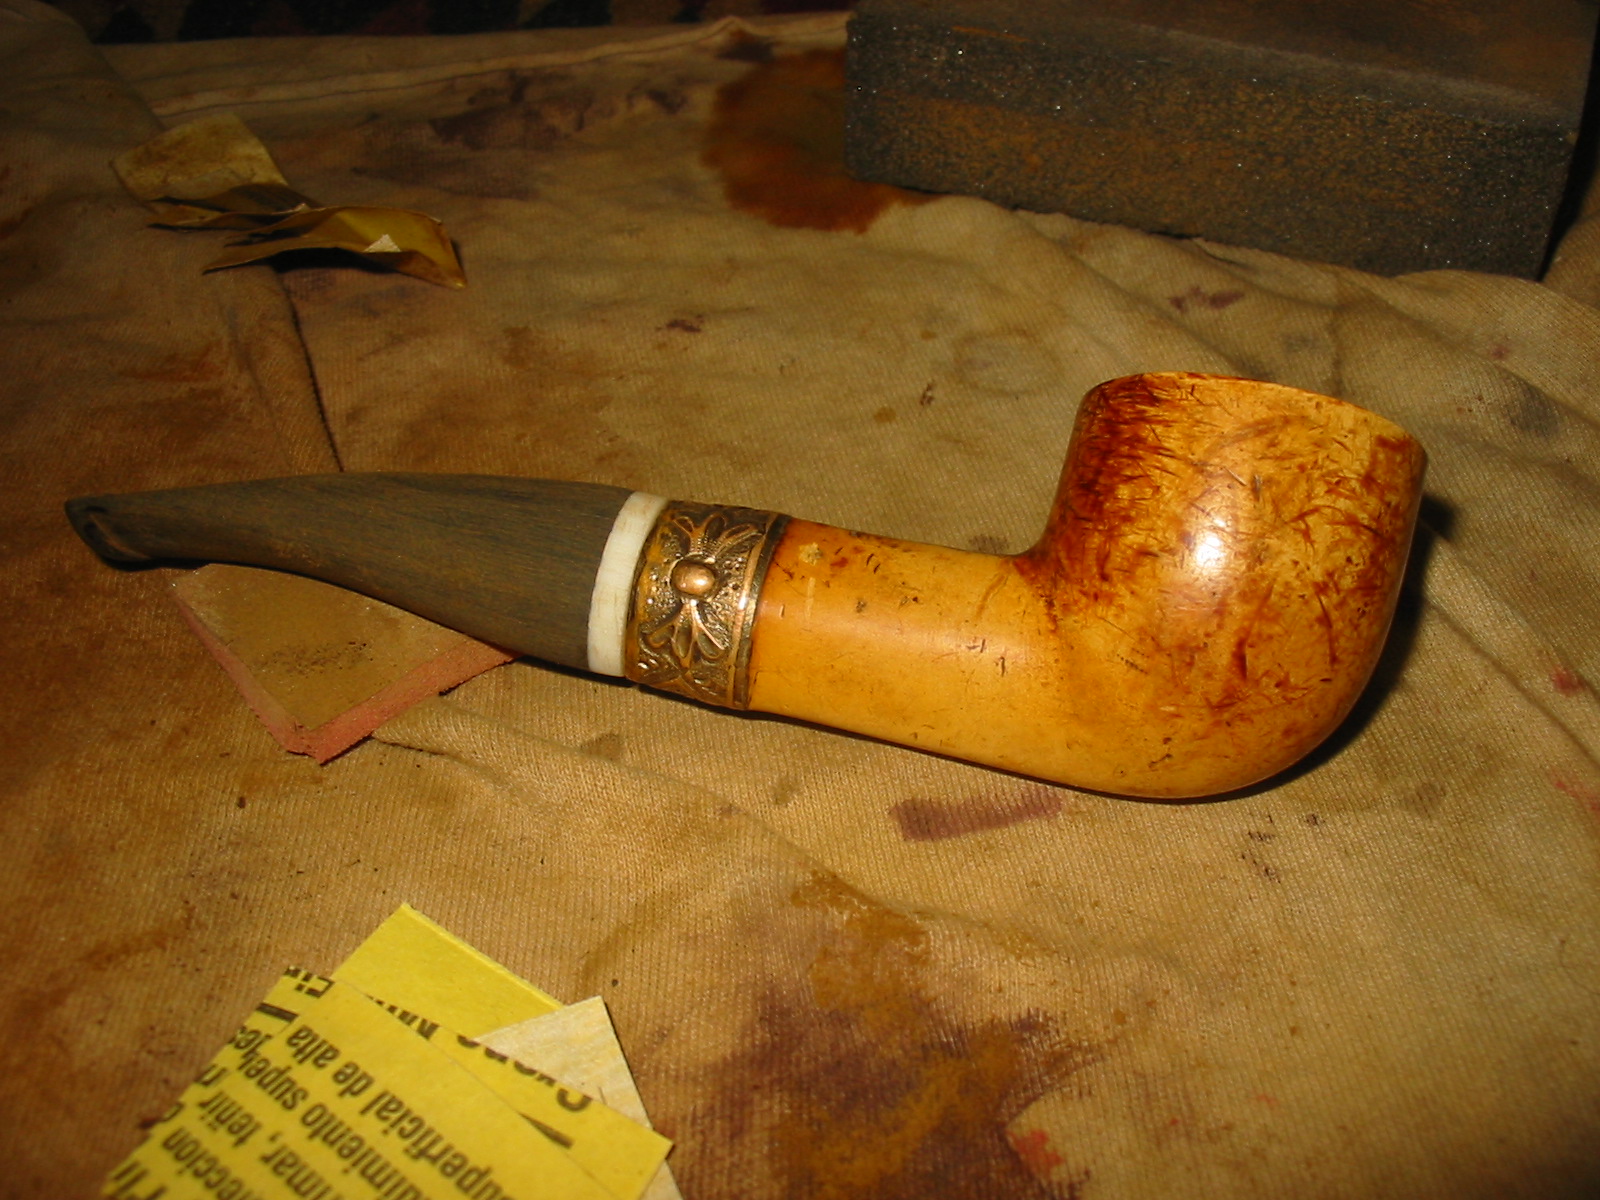
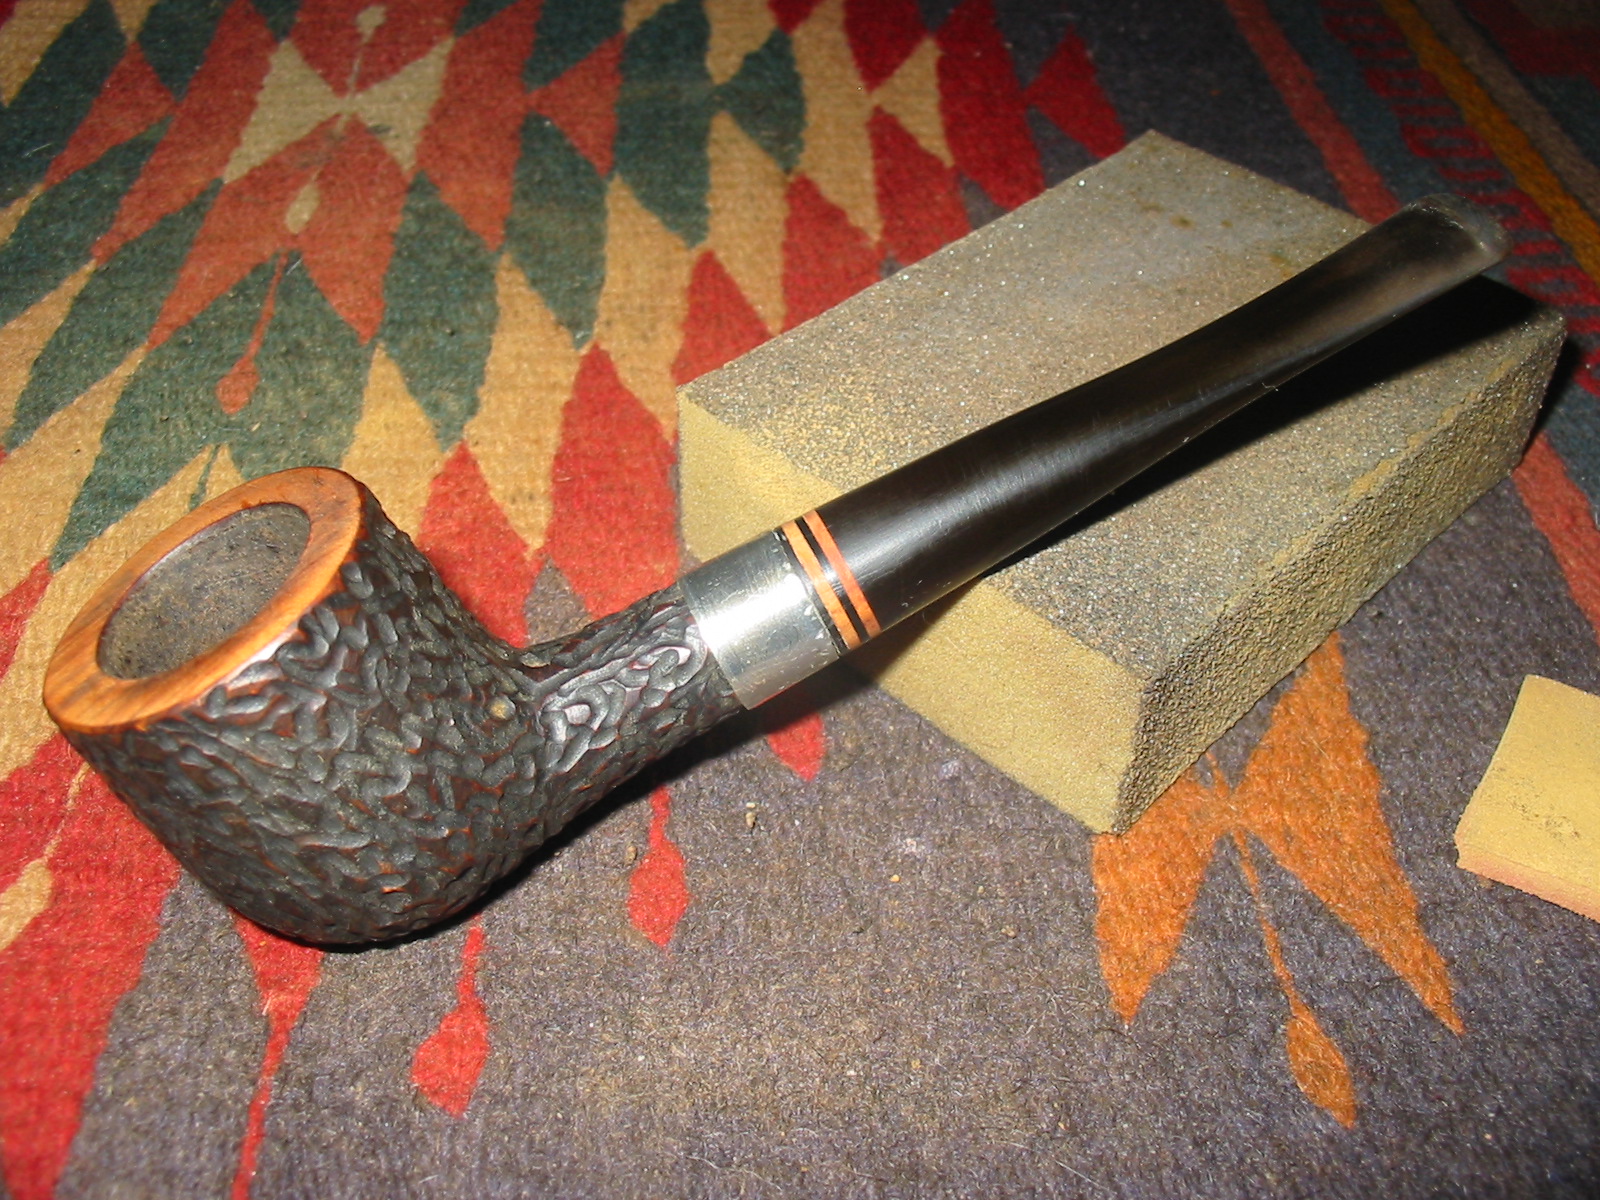
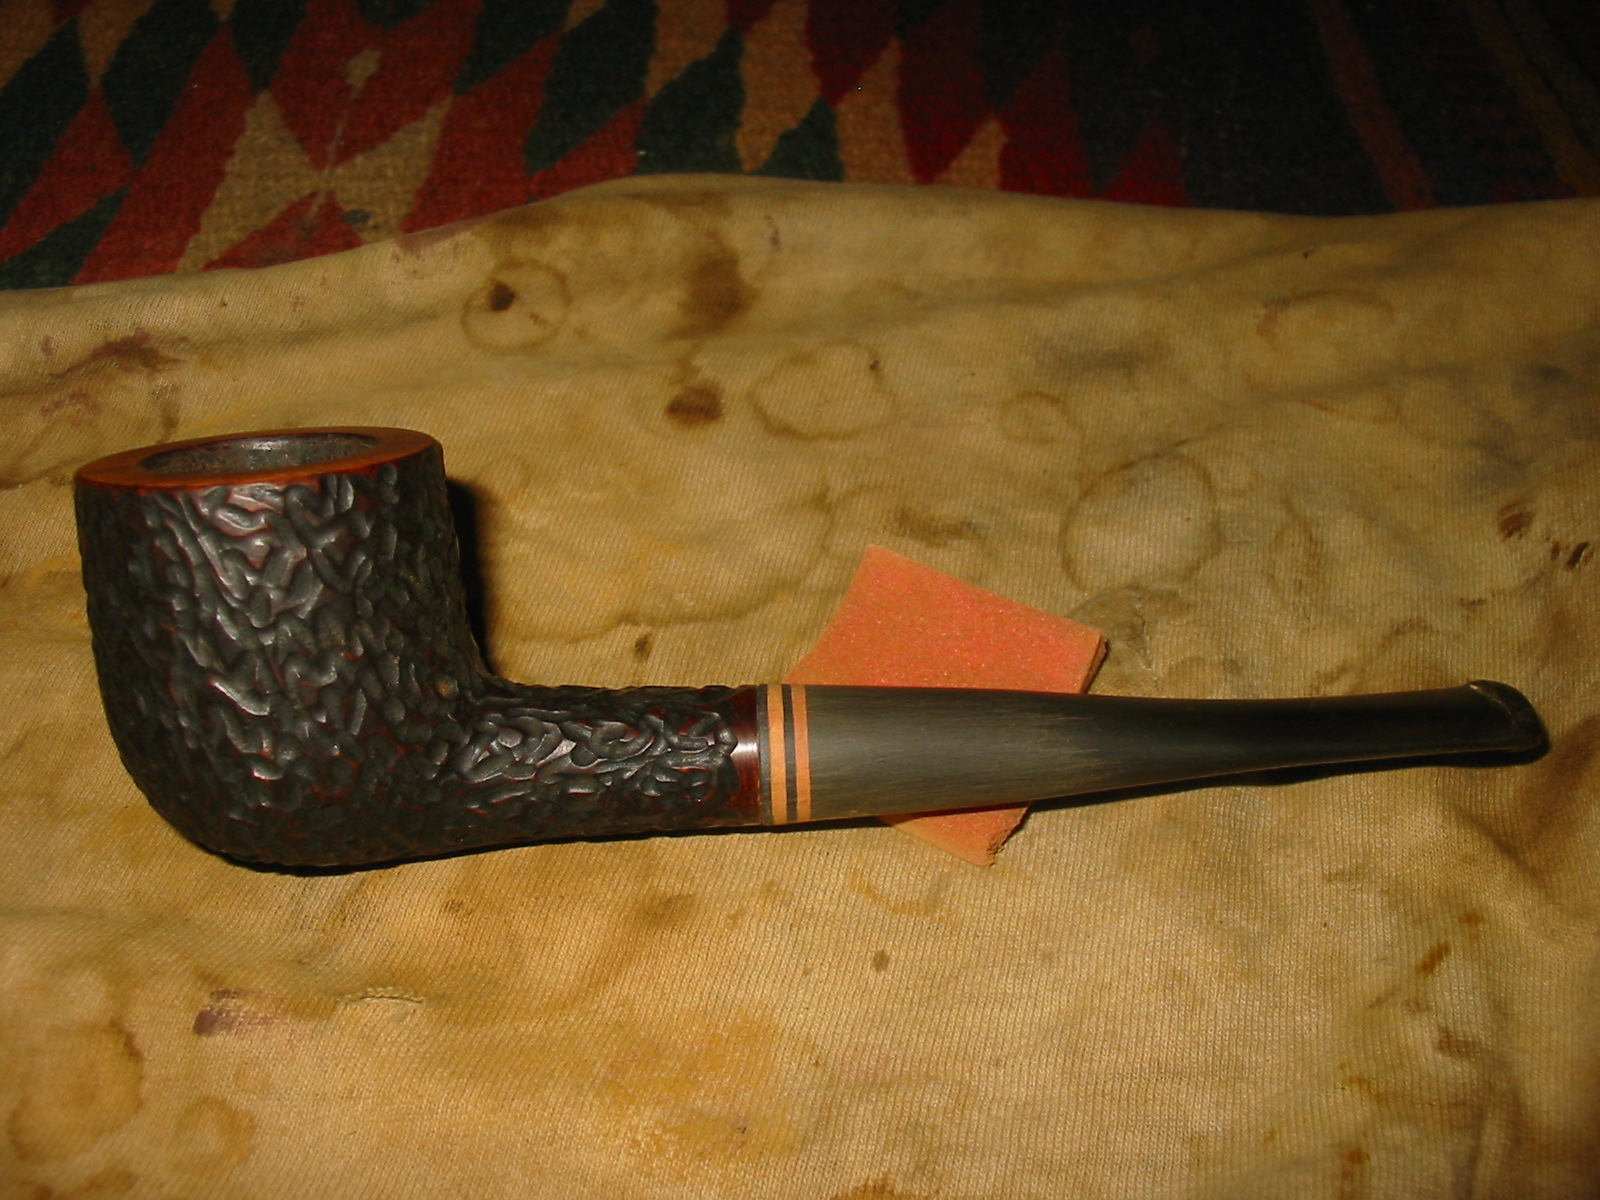
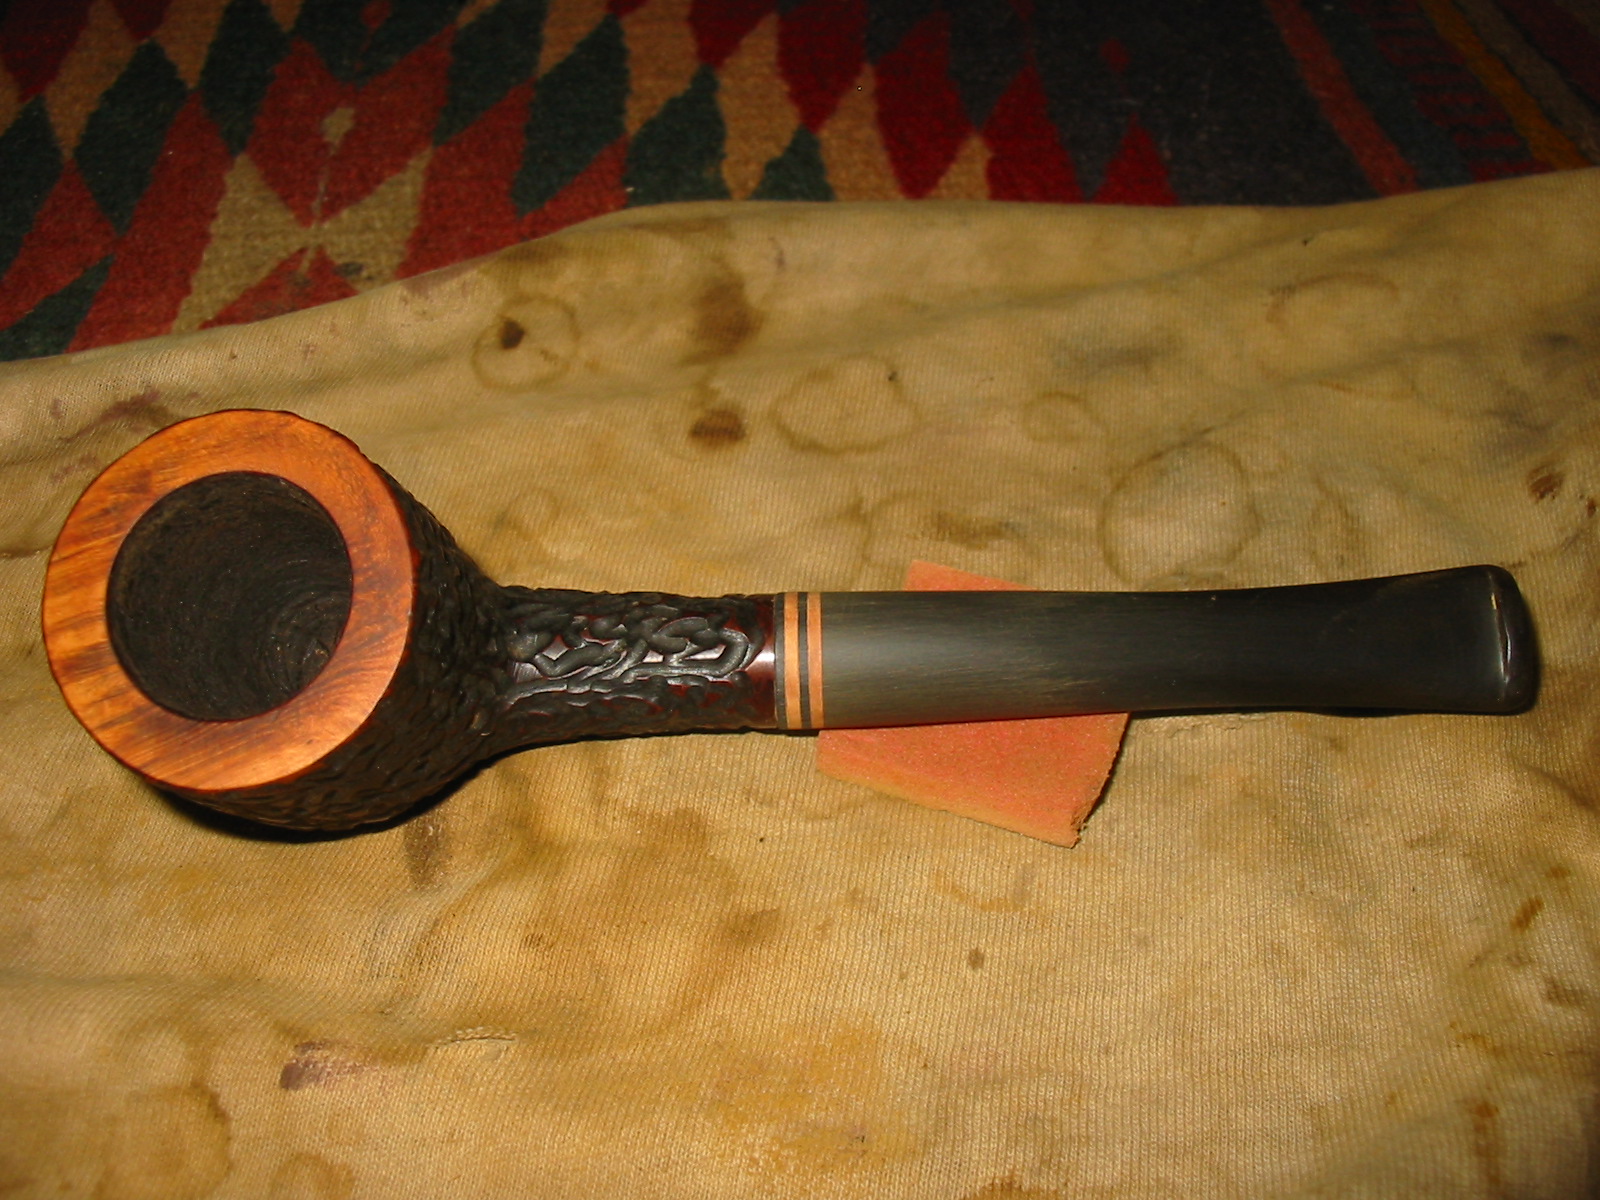
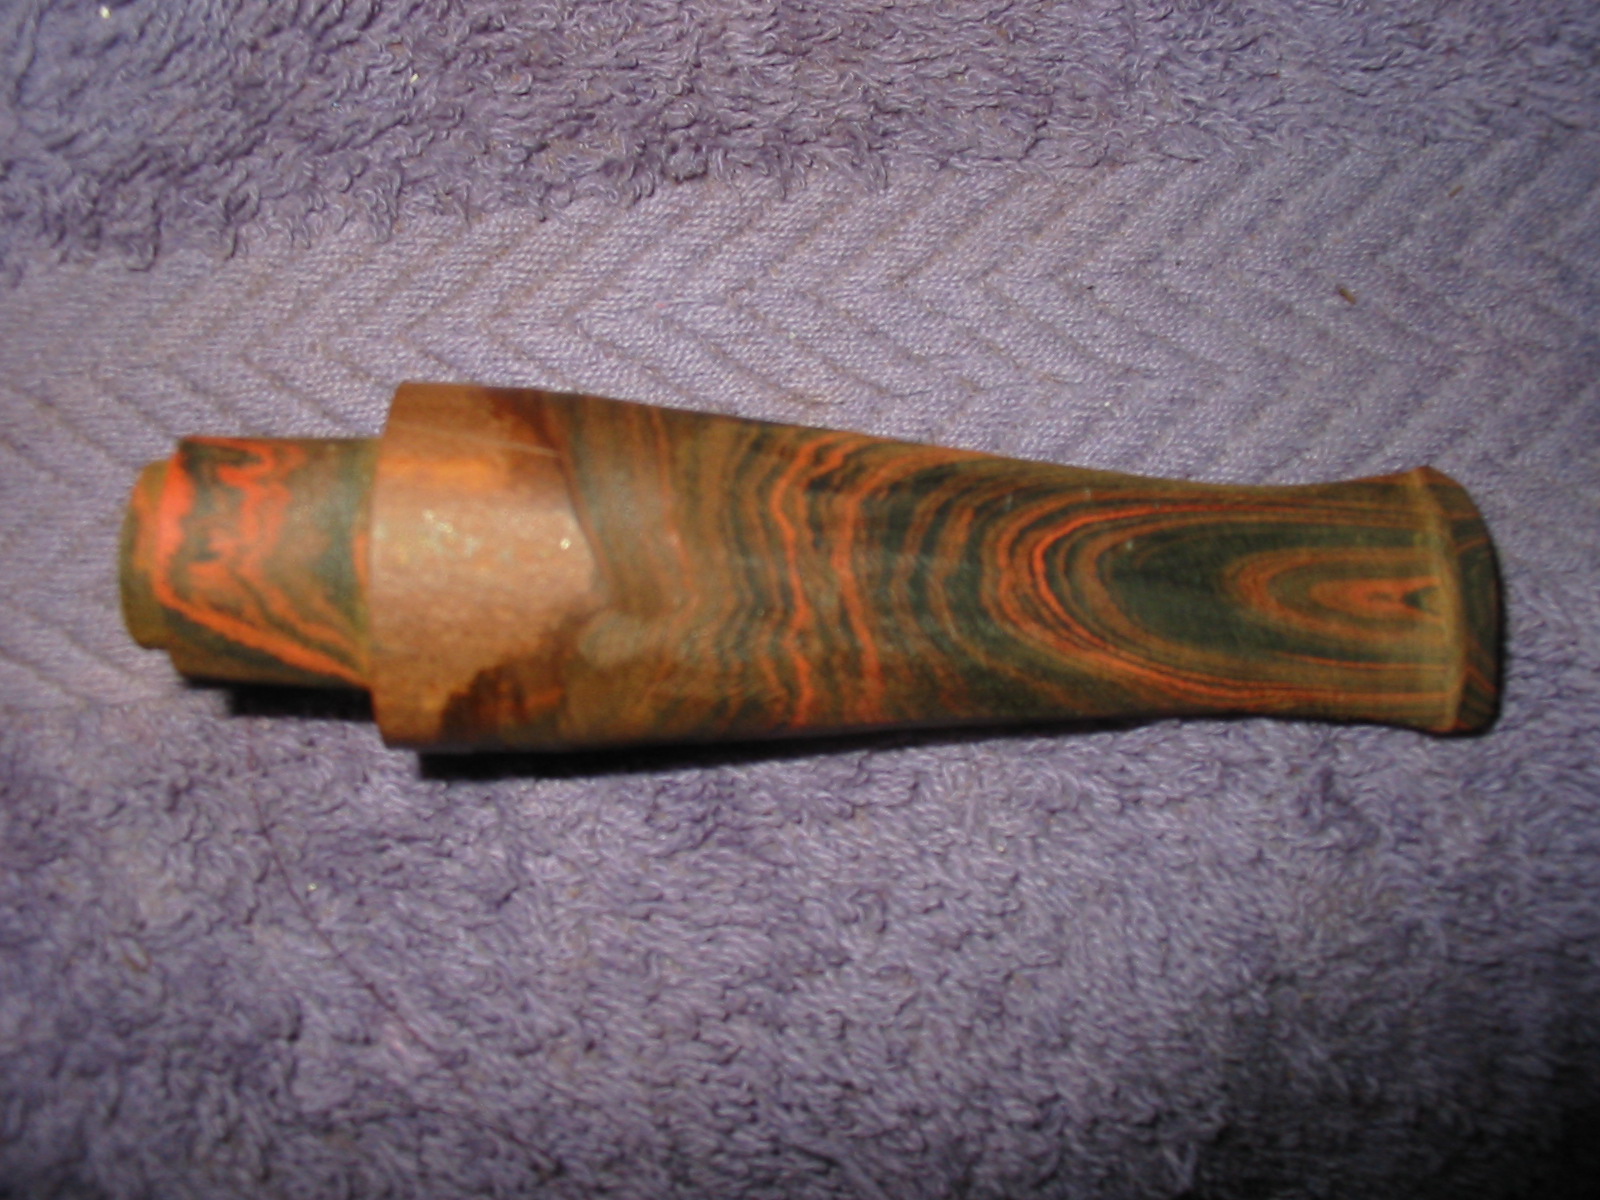
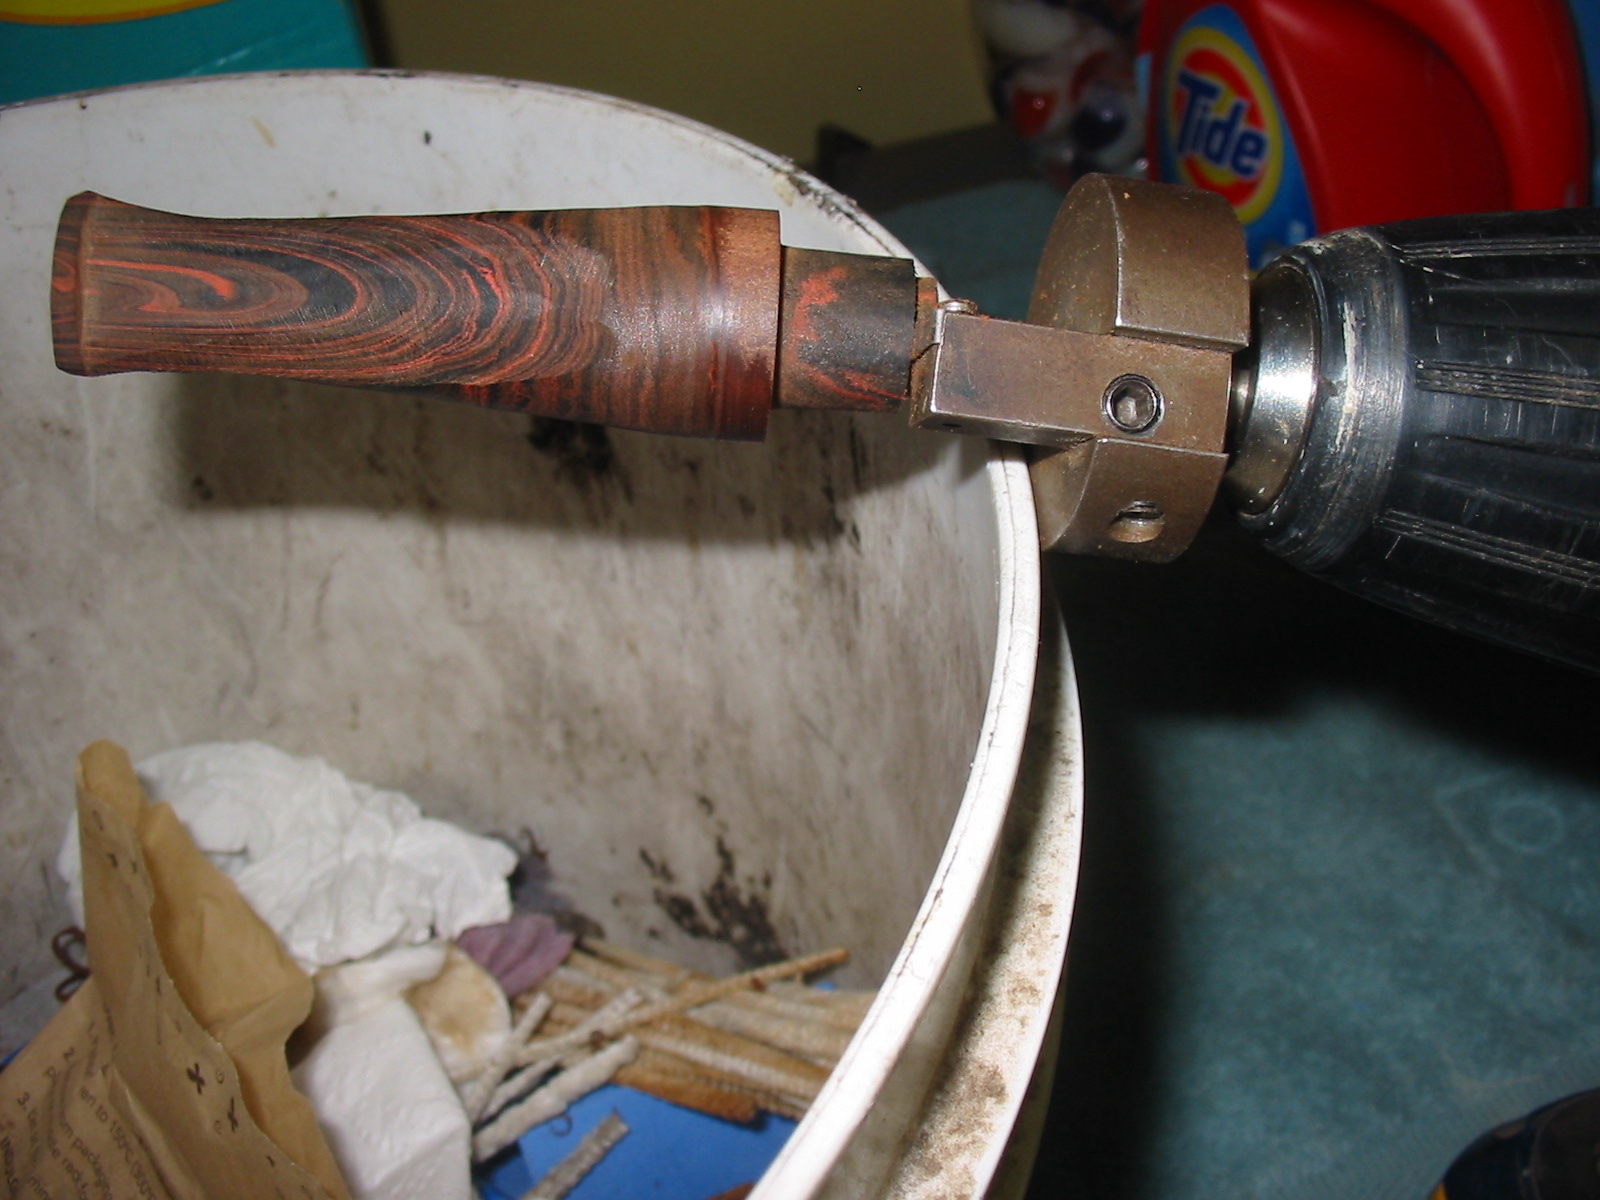
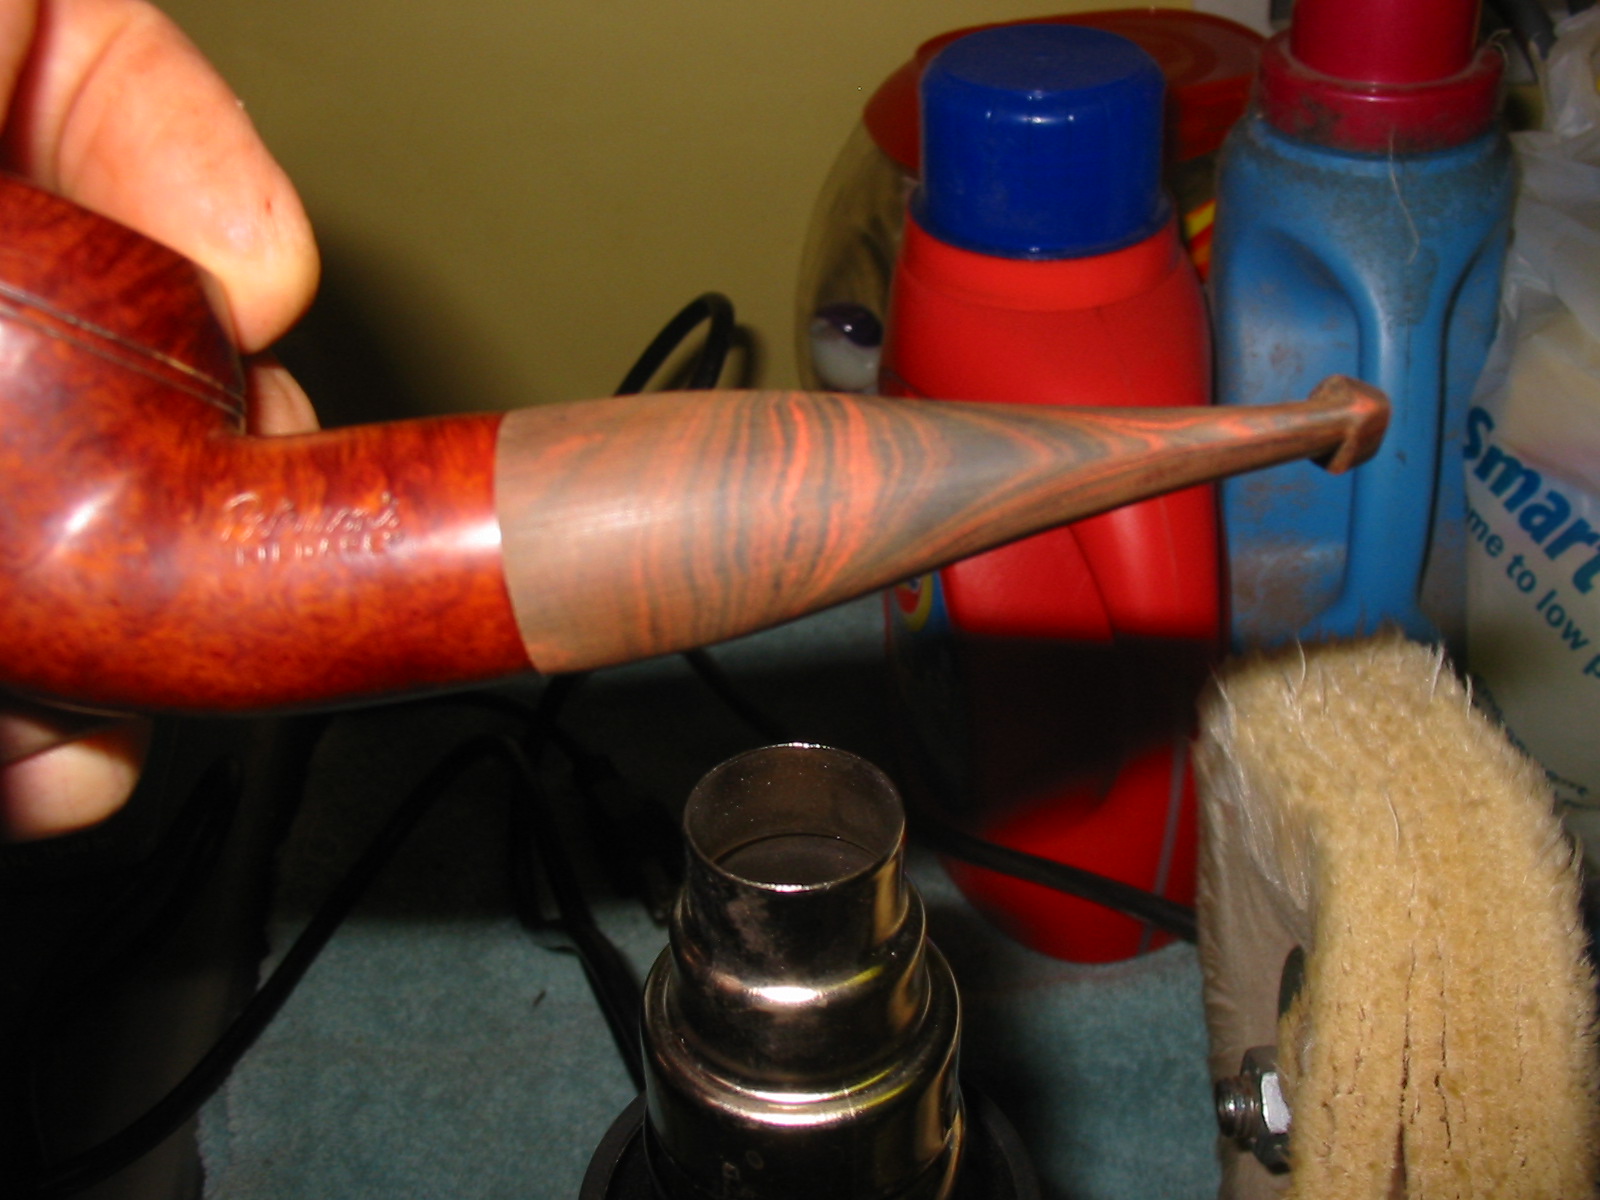
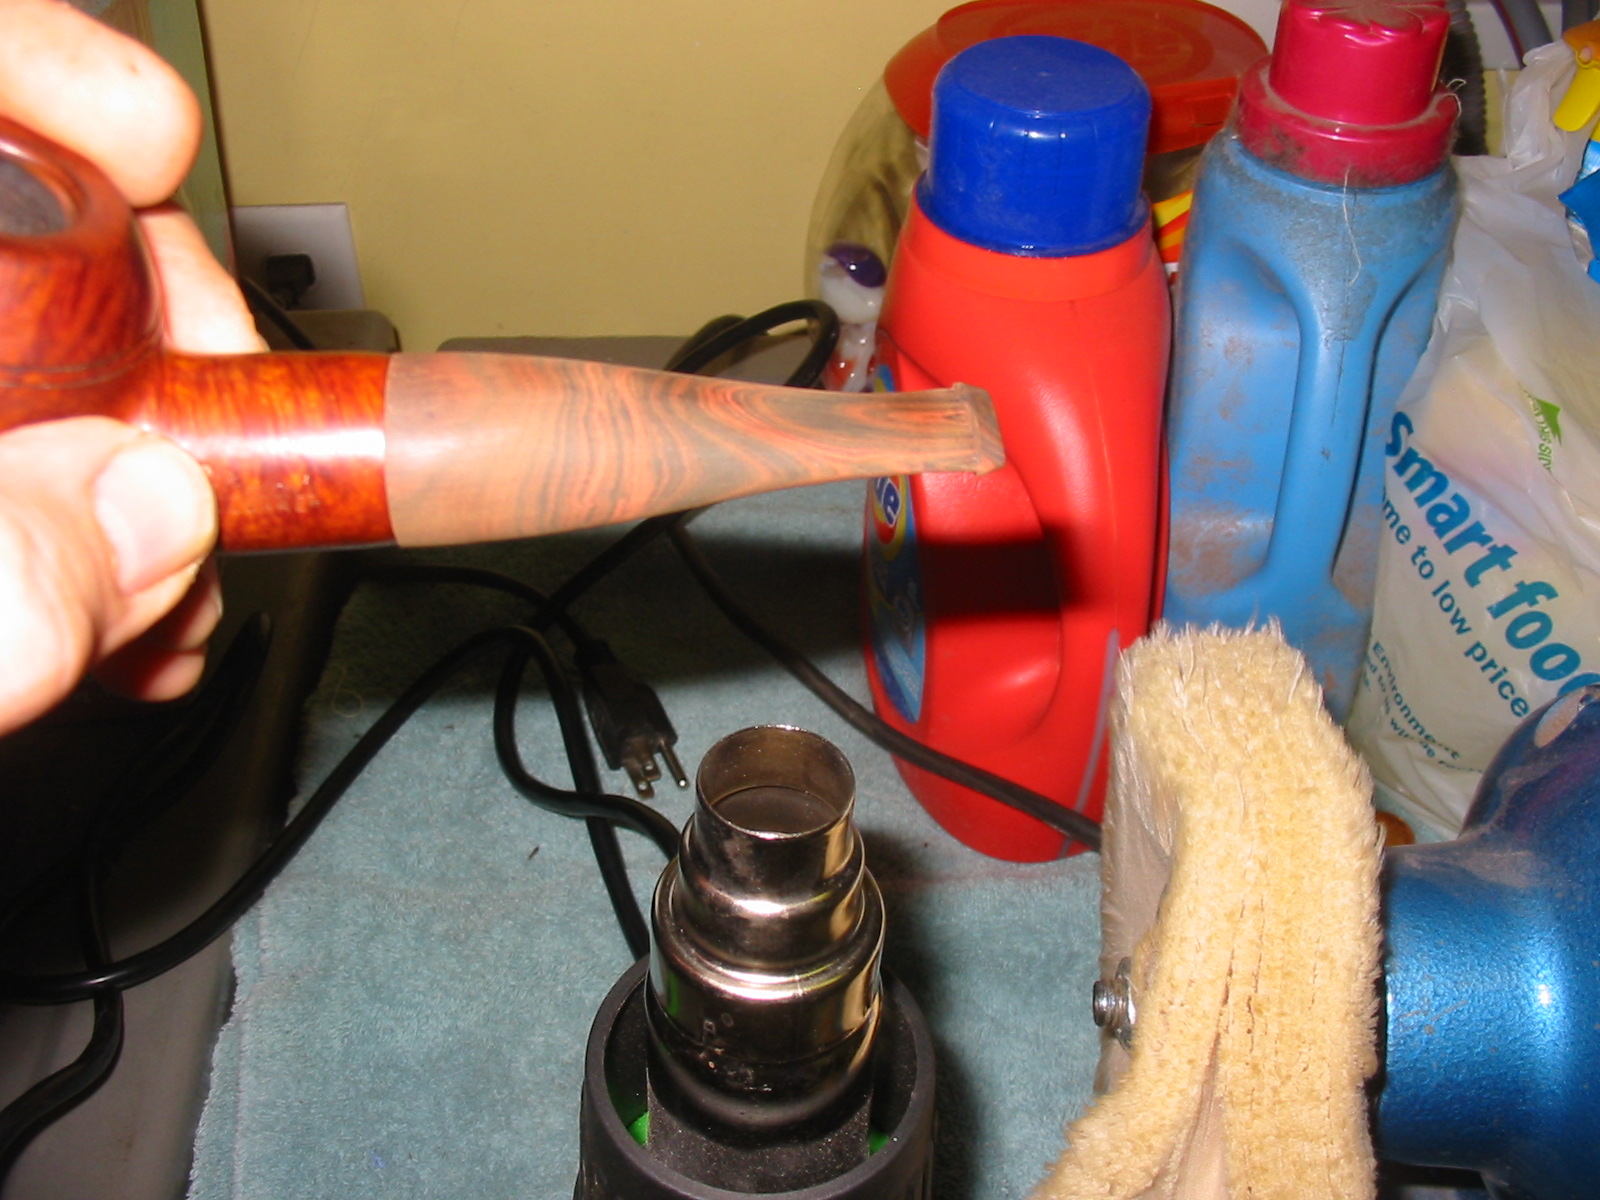
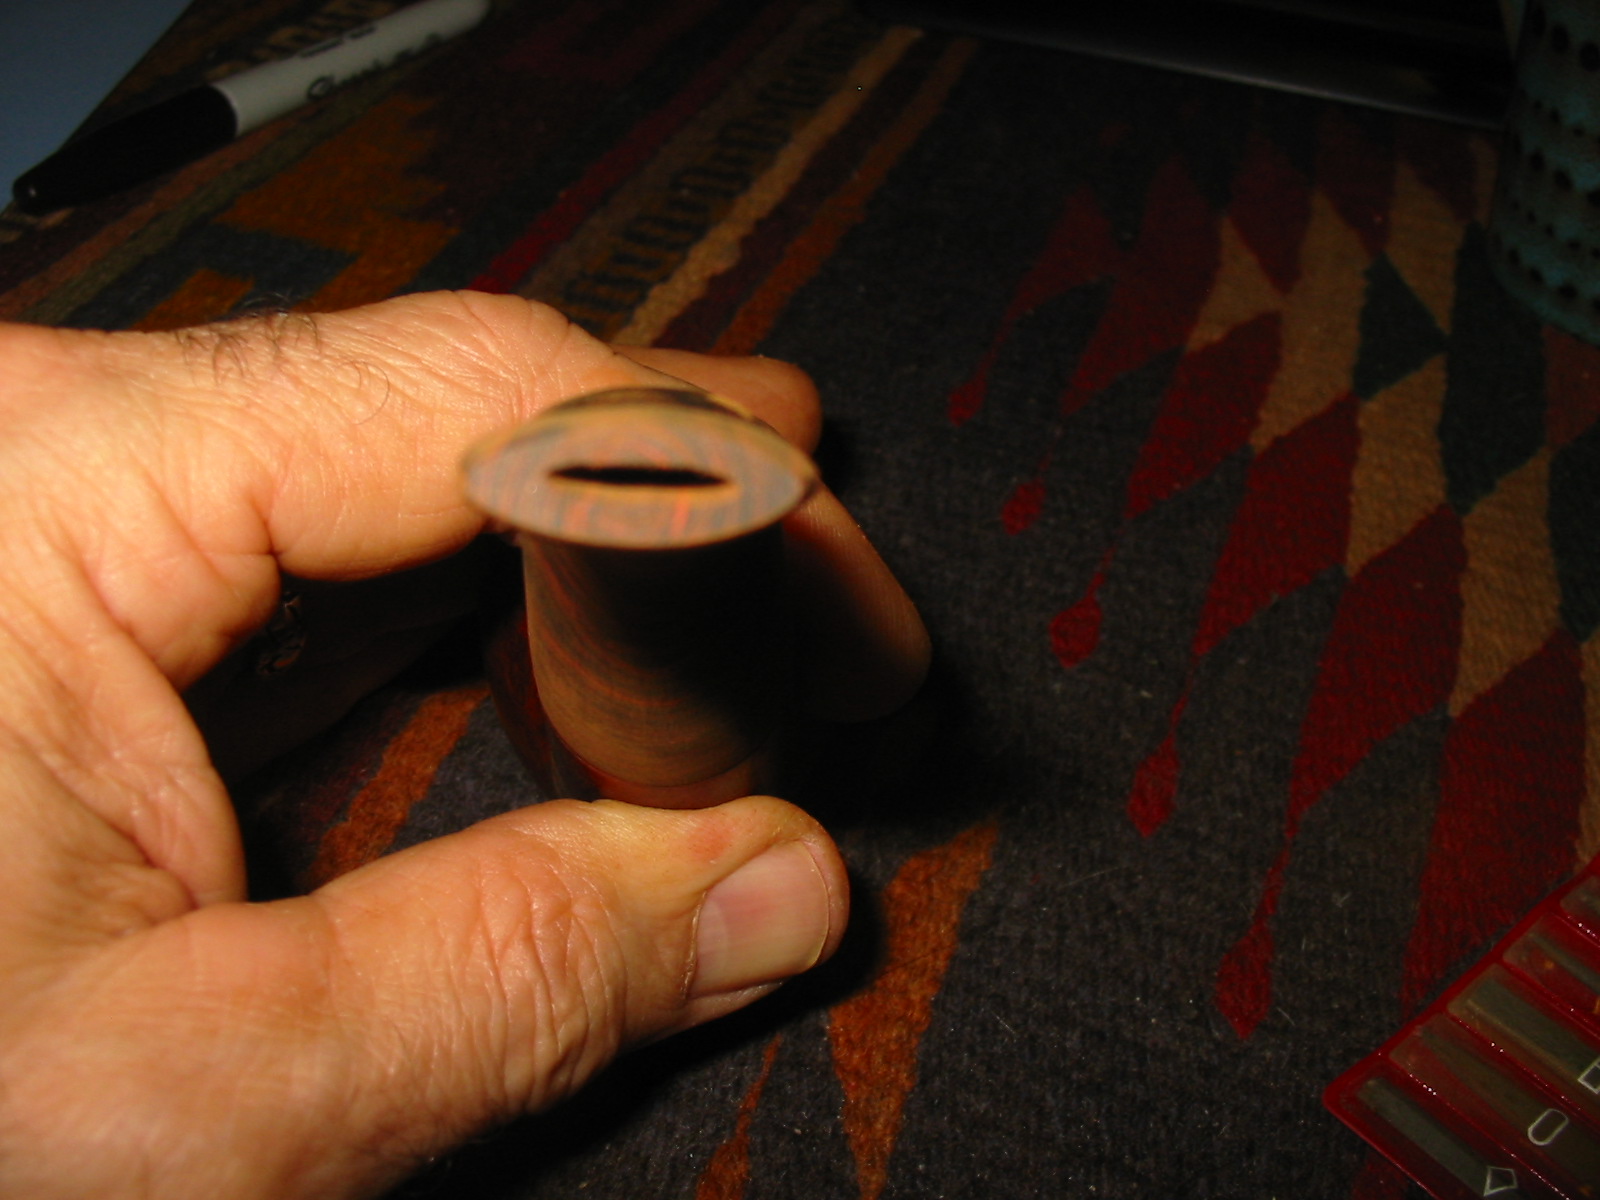
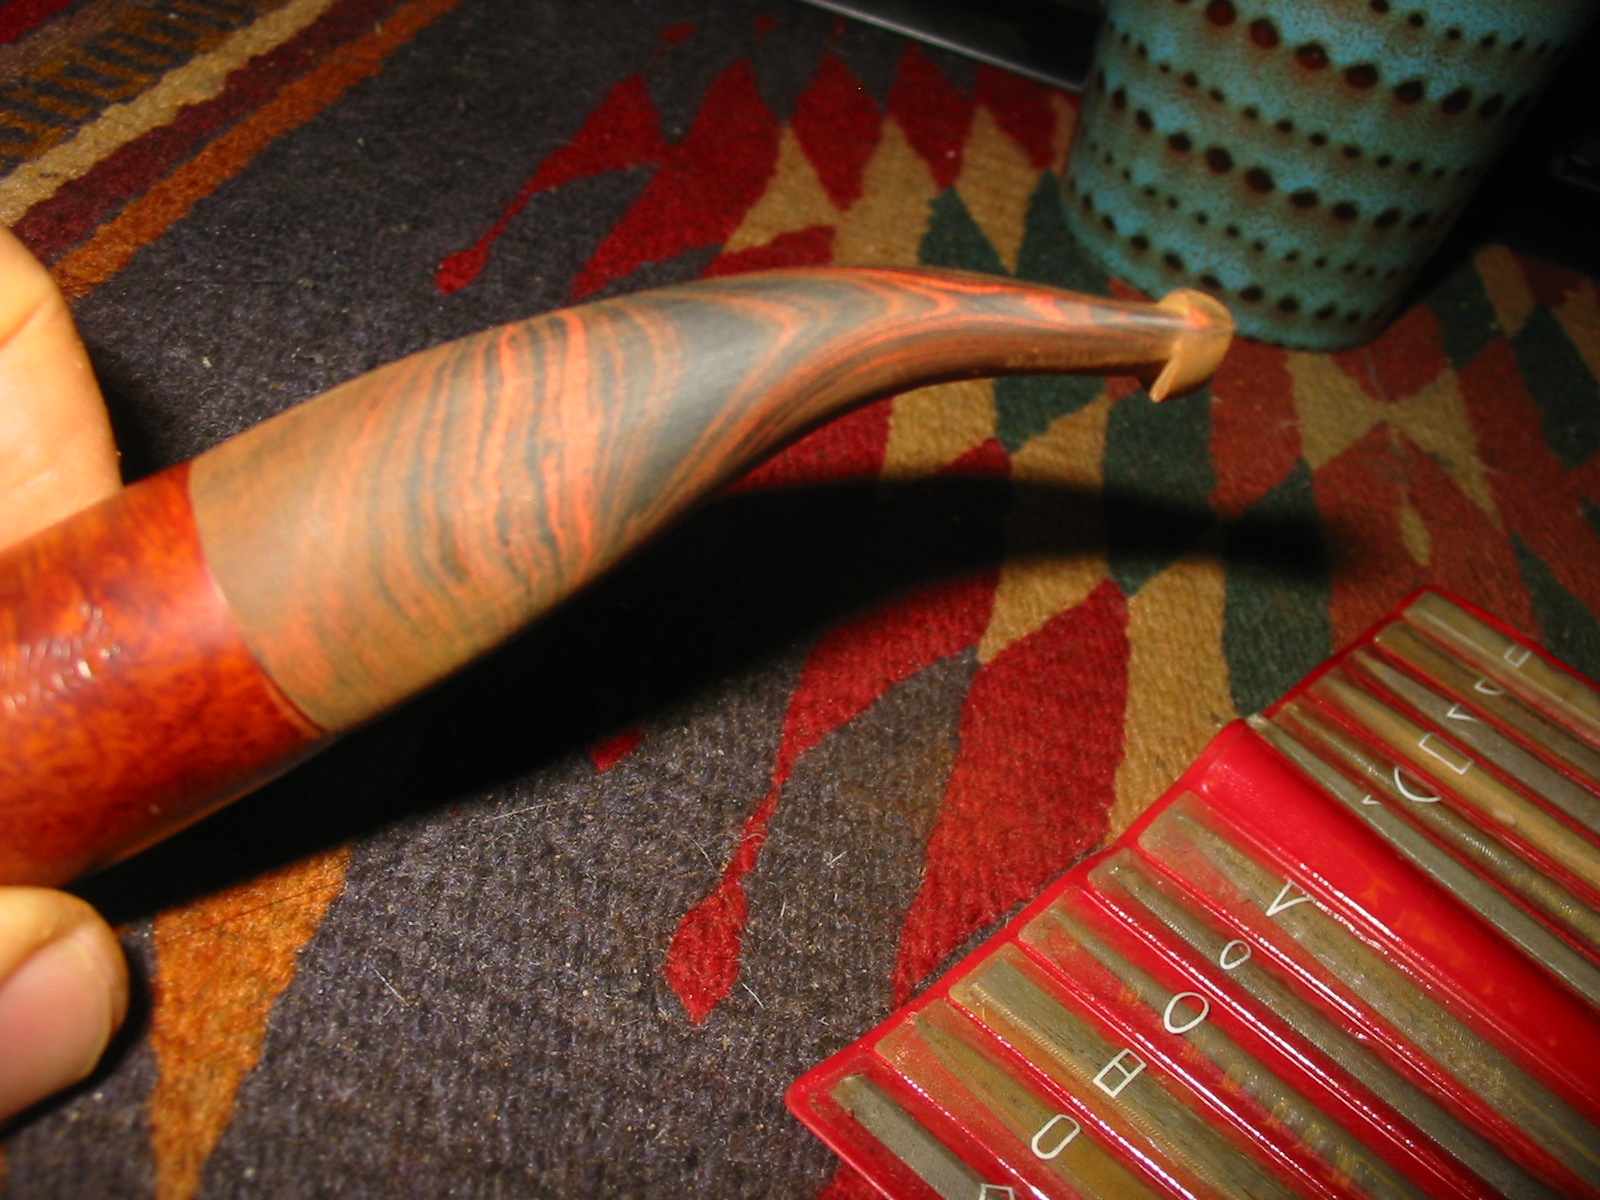
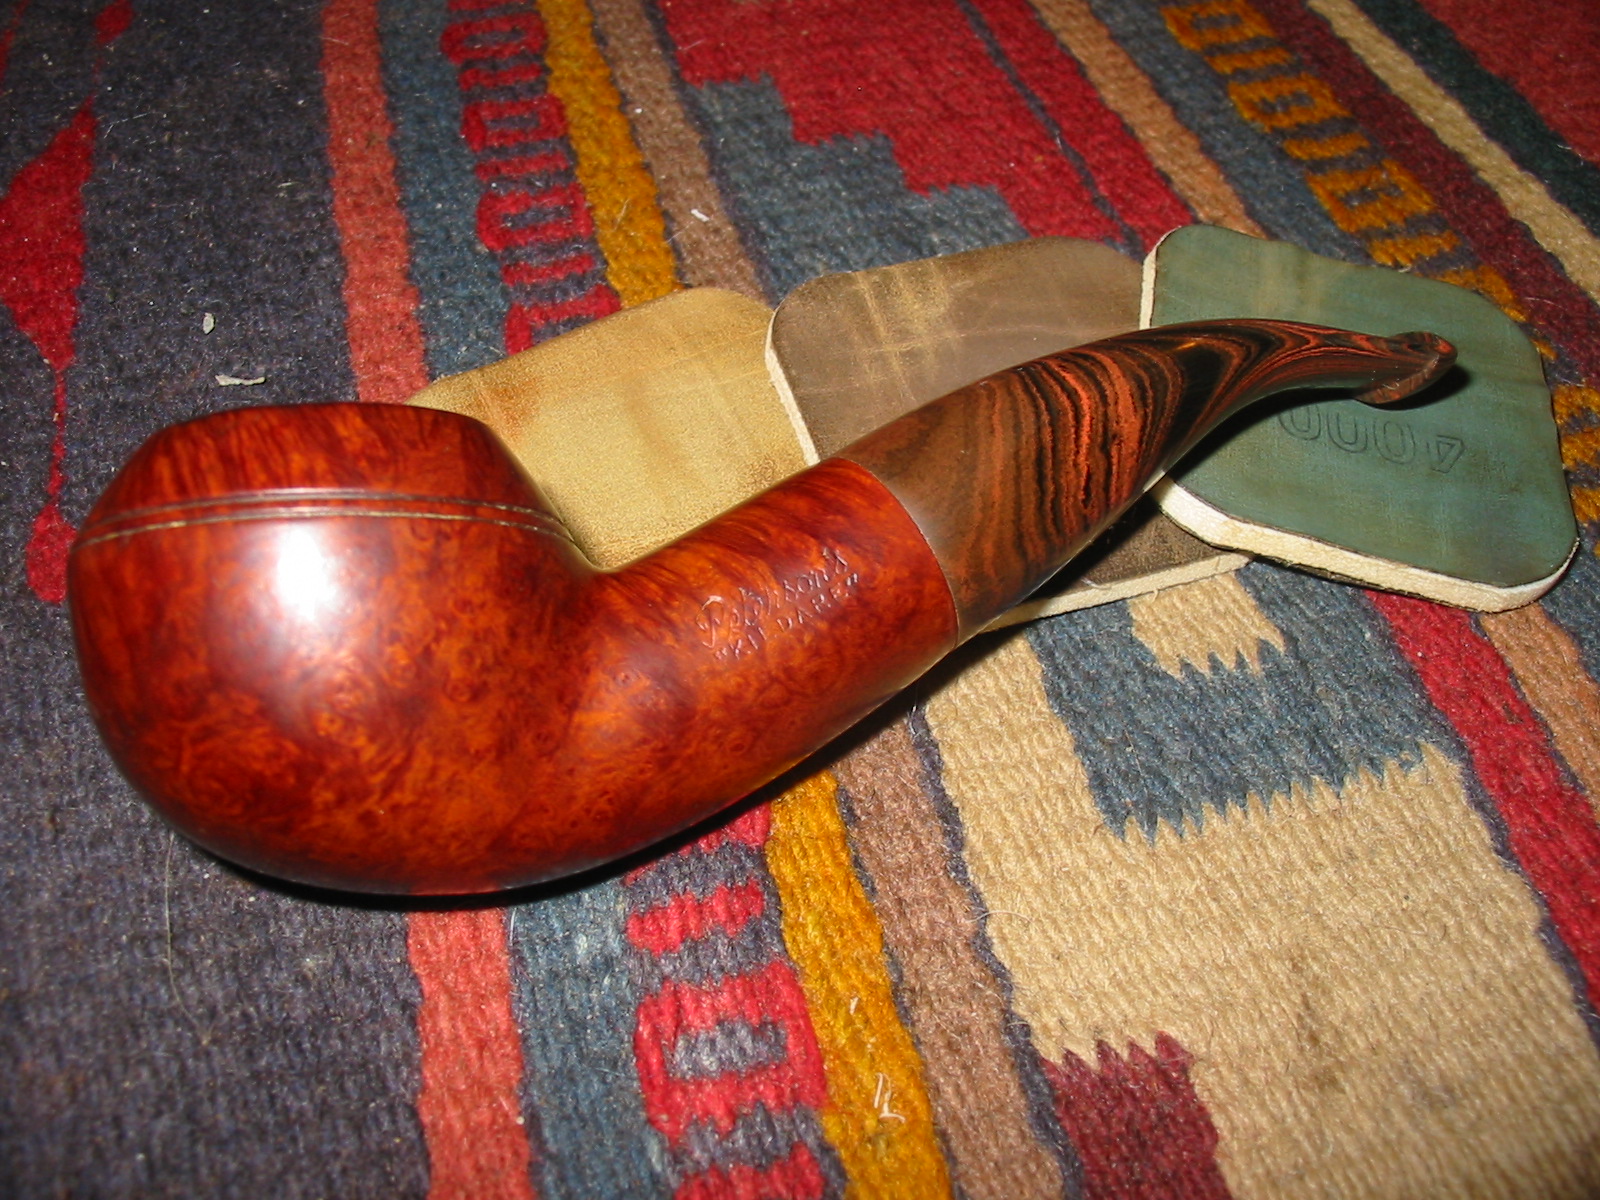
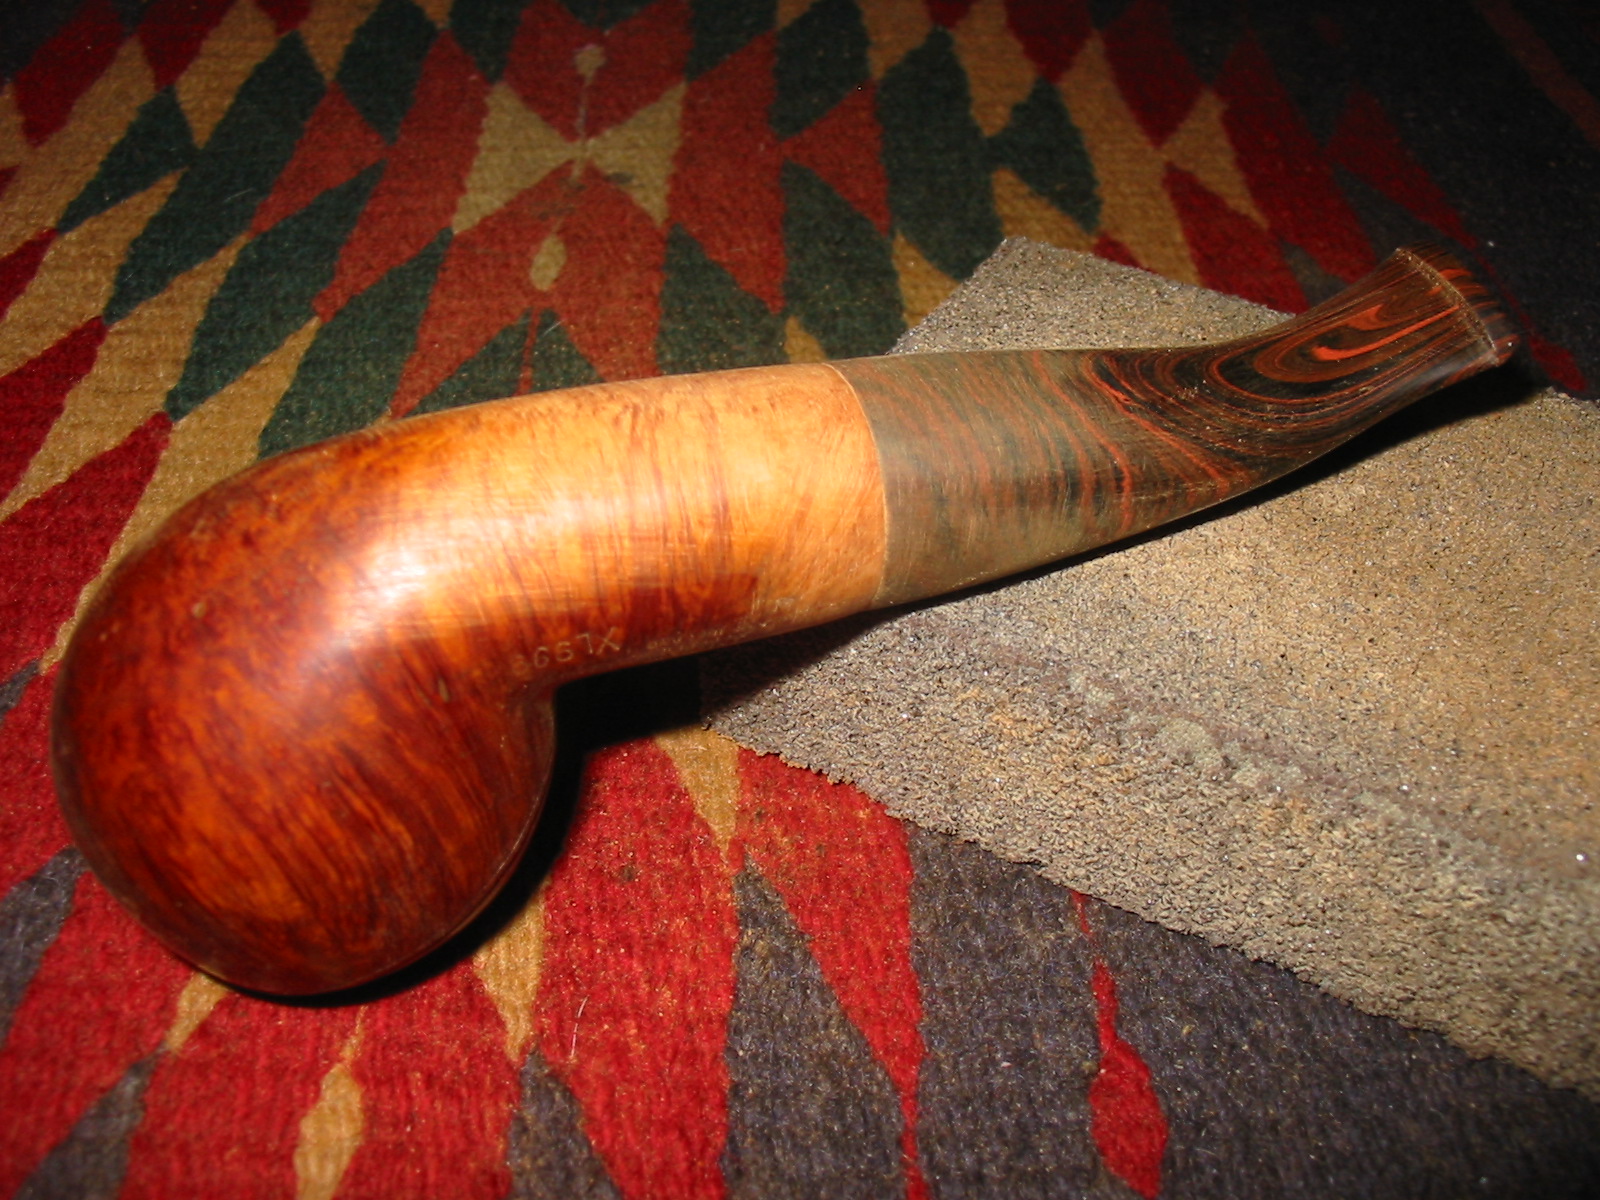
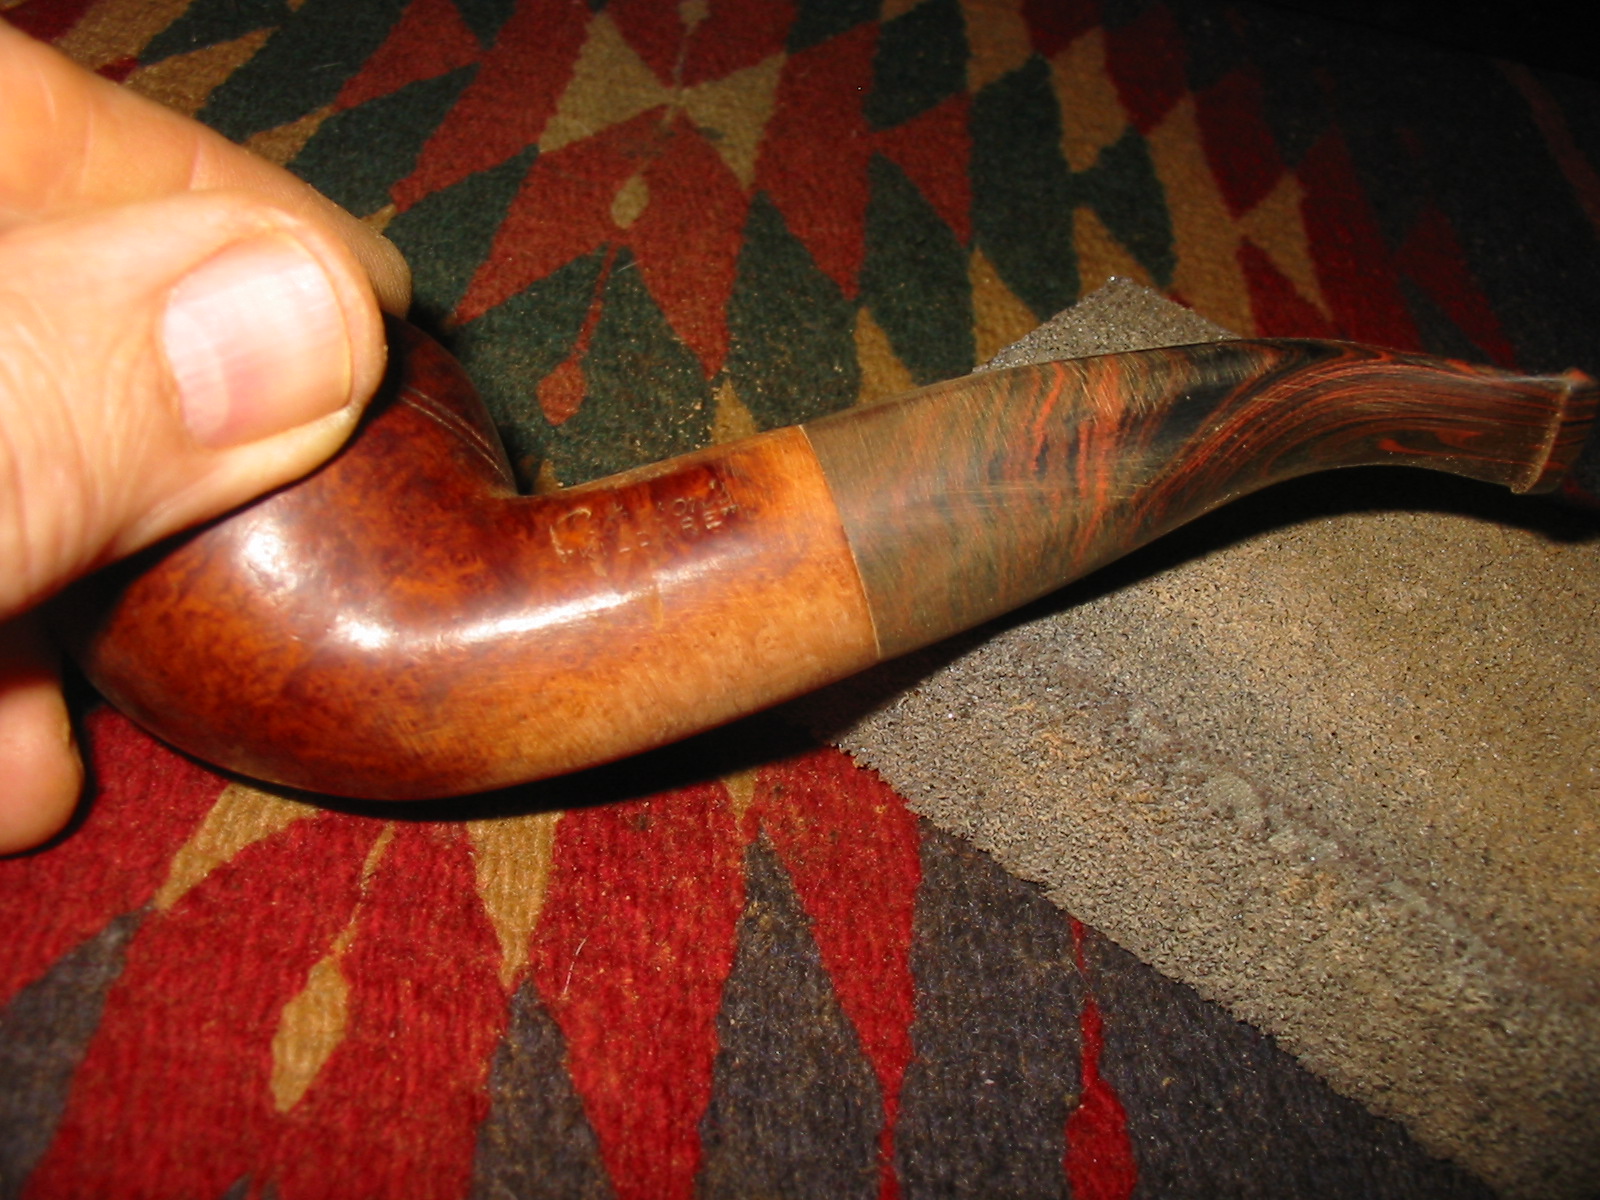
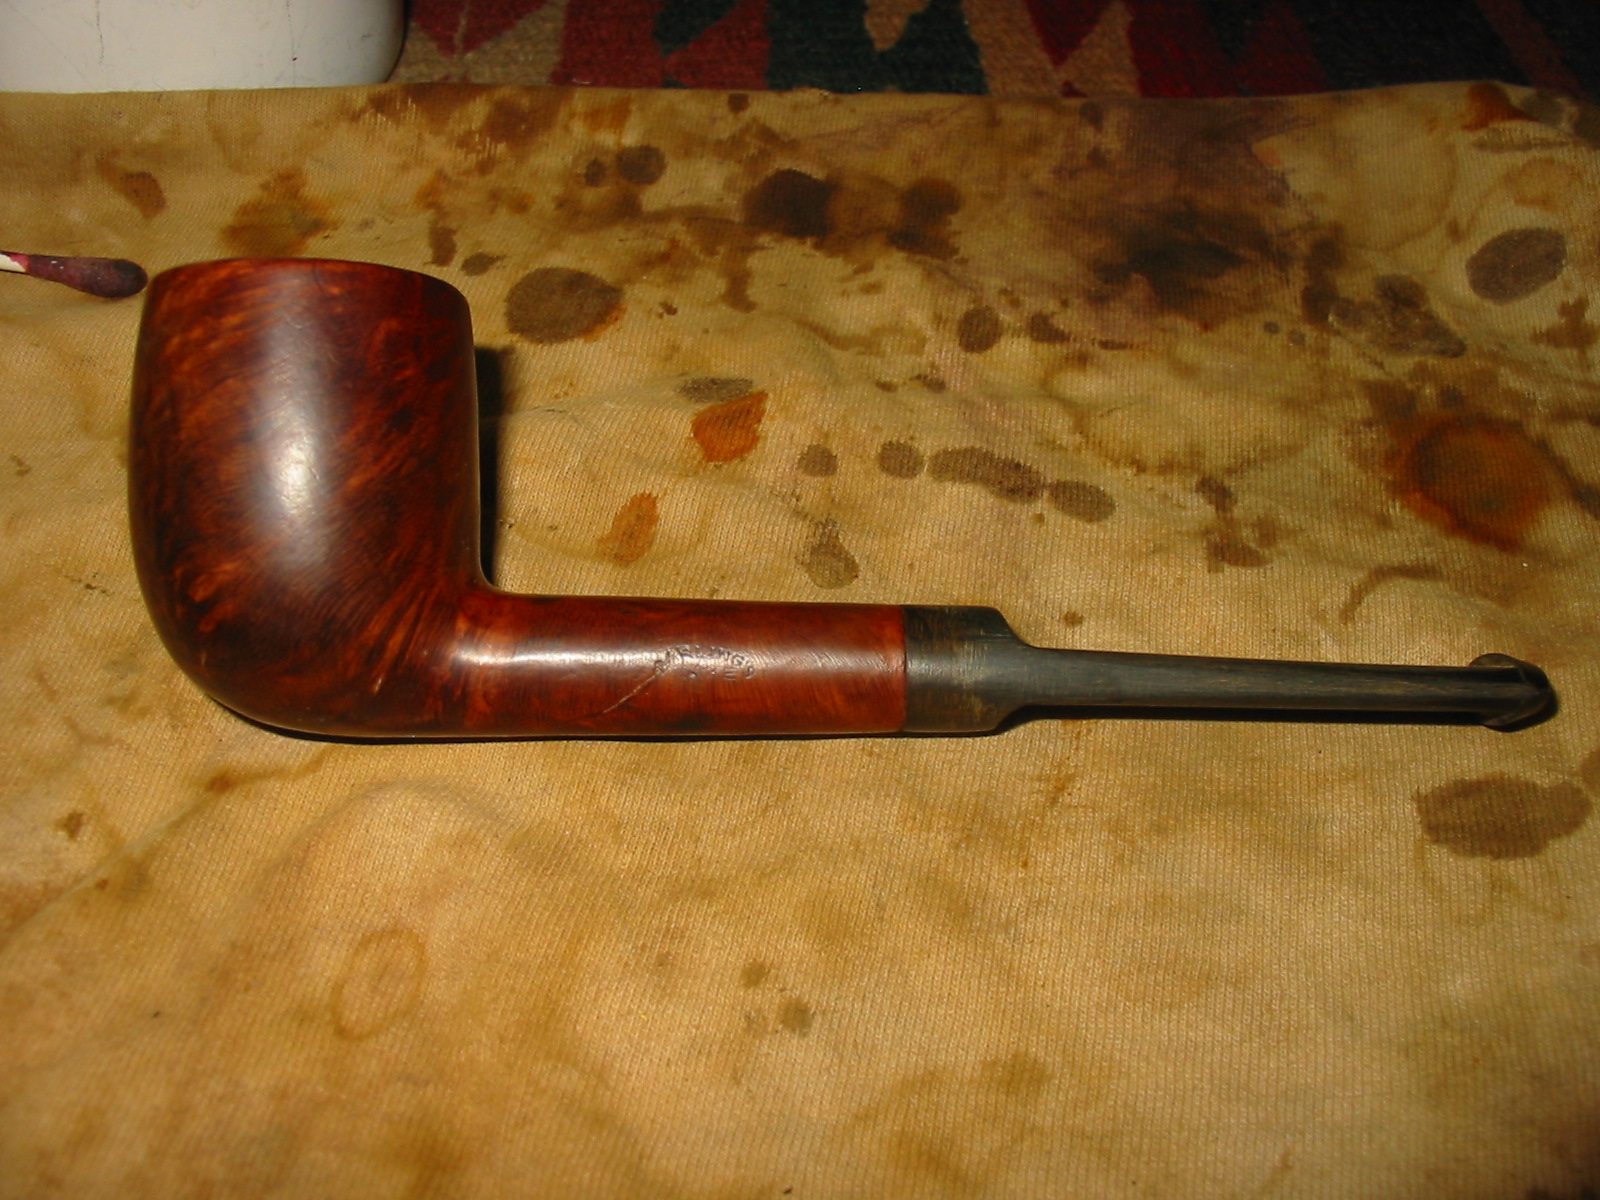
I had a slab cut stem blank in my box of stems that had a Barling like look to it. The tenon needed to be turned slightly and hand sanded to fit the shank well. The diameter of the stem at the joint of the shank and stem was larger and needed to be trimmed to fit well. The slab blank had casting seams along the edges, a tight slot and an unfinished look to the edges. I used a Dremel with a sanding drum to cut back the diameter of the stem at the shank. I also used it to sand away the casting marks and to smooth out the edges of the slab to give it a more finished looked. I took it back to the work table and sanded the saddle and slab with medium grit emery cloth to reduce the scratches left behind by the Dremel and to smooth out the fit to the shank. The next four photos show the state of the pipe after fitting the stem, using the Dremel and the emery cloth. The saddle still shows the marks of the sanding drum and needs more fine tuning to be a good tight fit but it is getting there. To me this stem looks more fitting to the old Barling’s Make billiard.
IMG_2501

IMG_2502

IMG_2503

IMG_2504

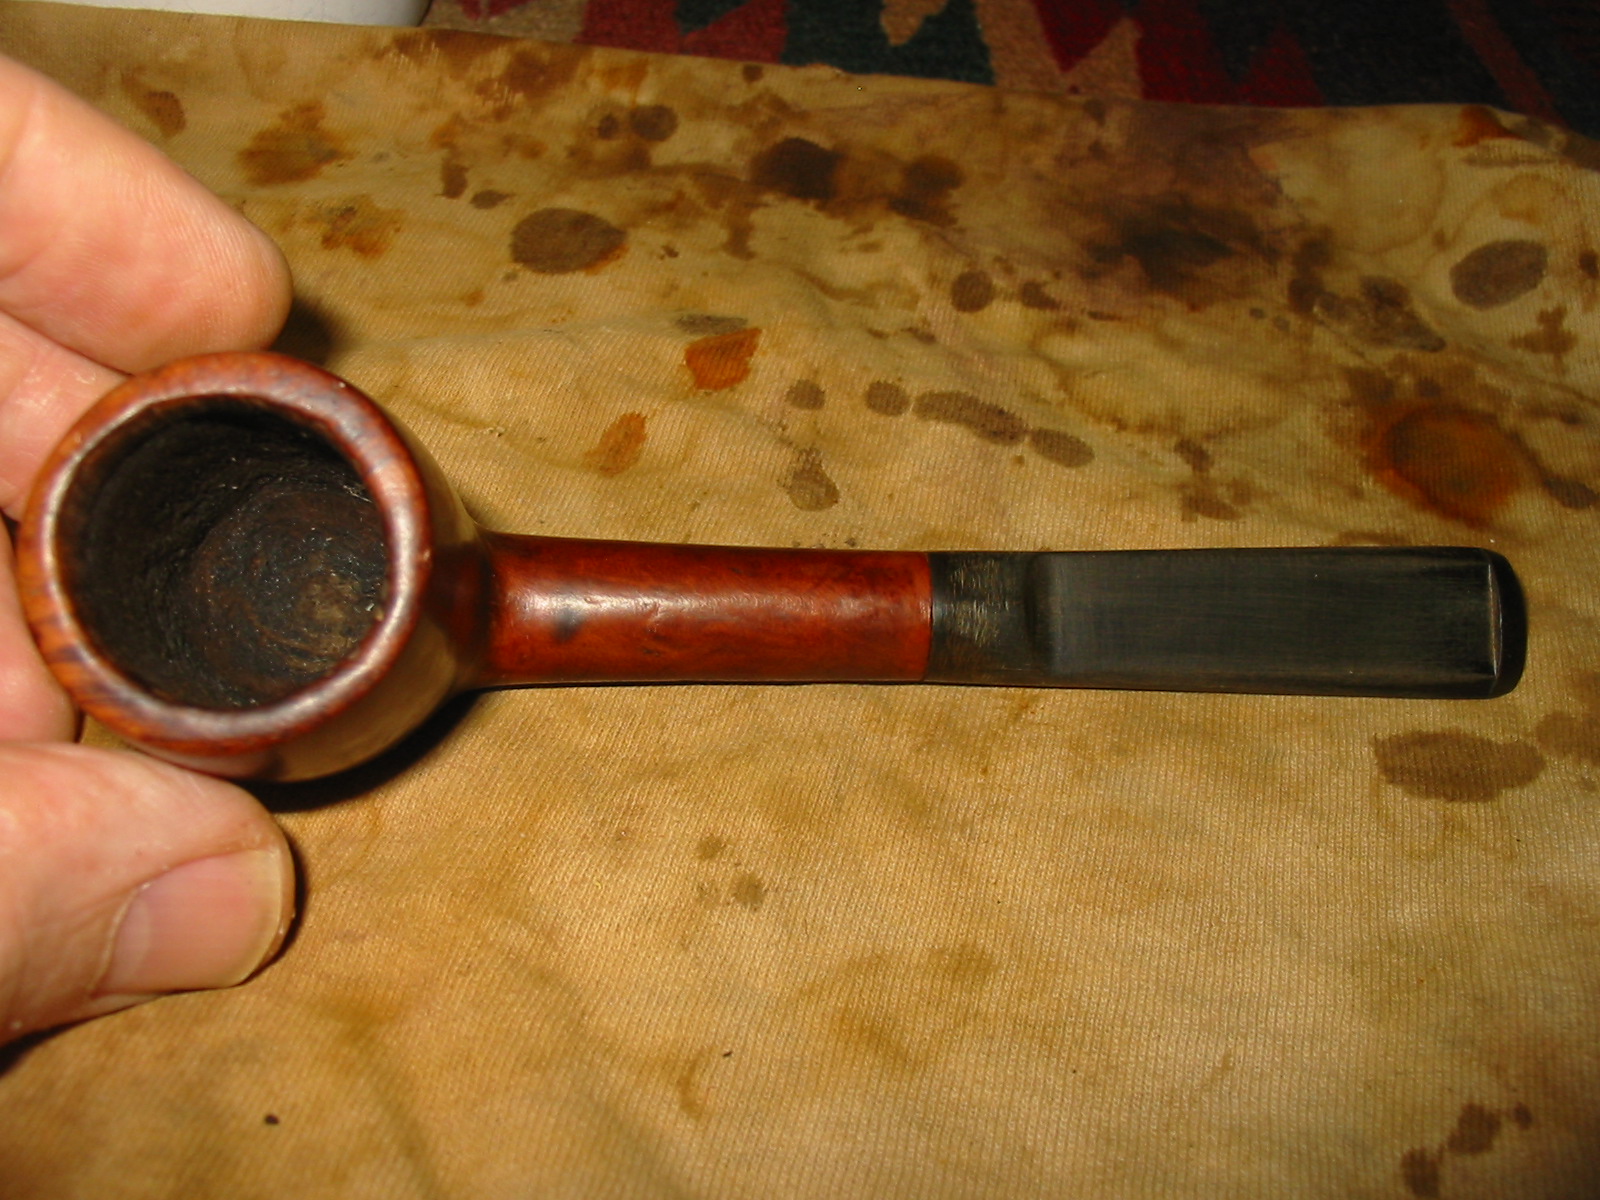
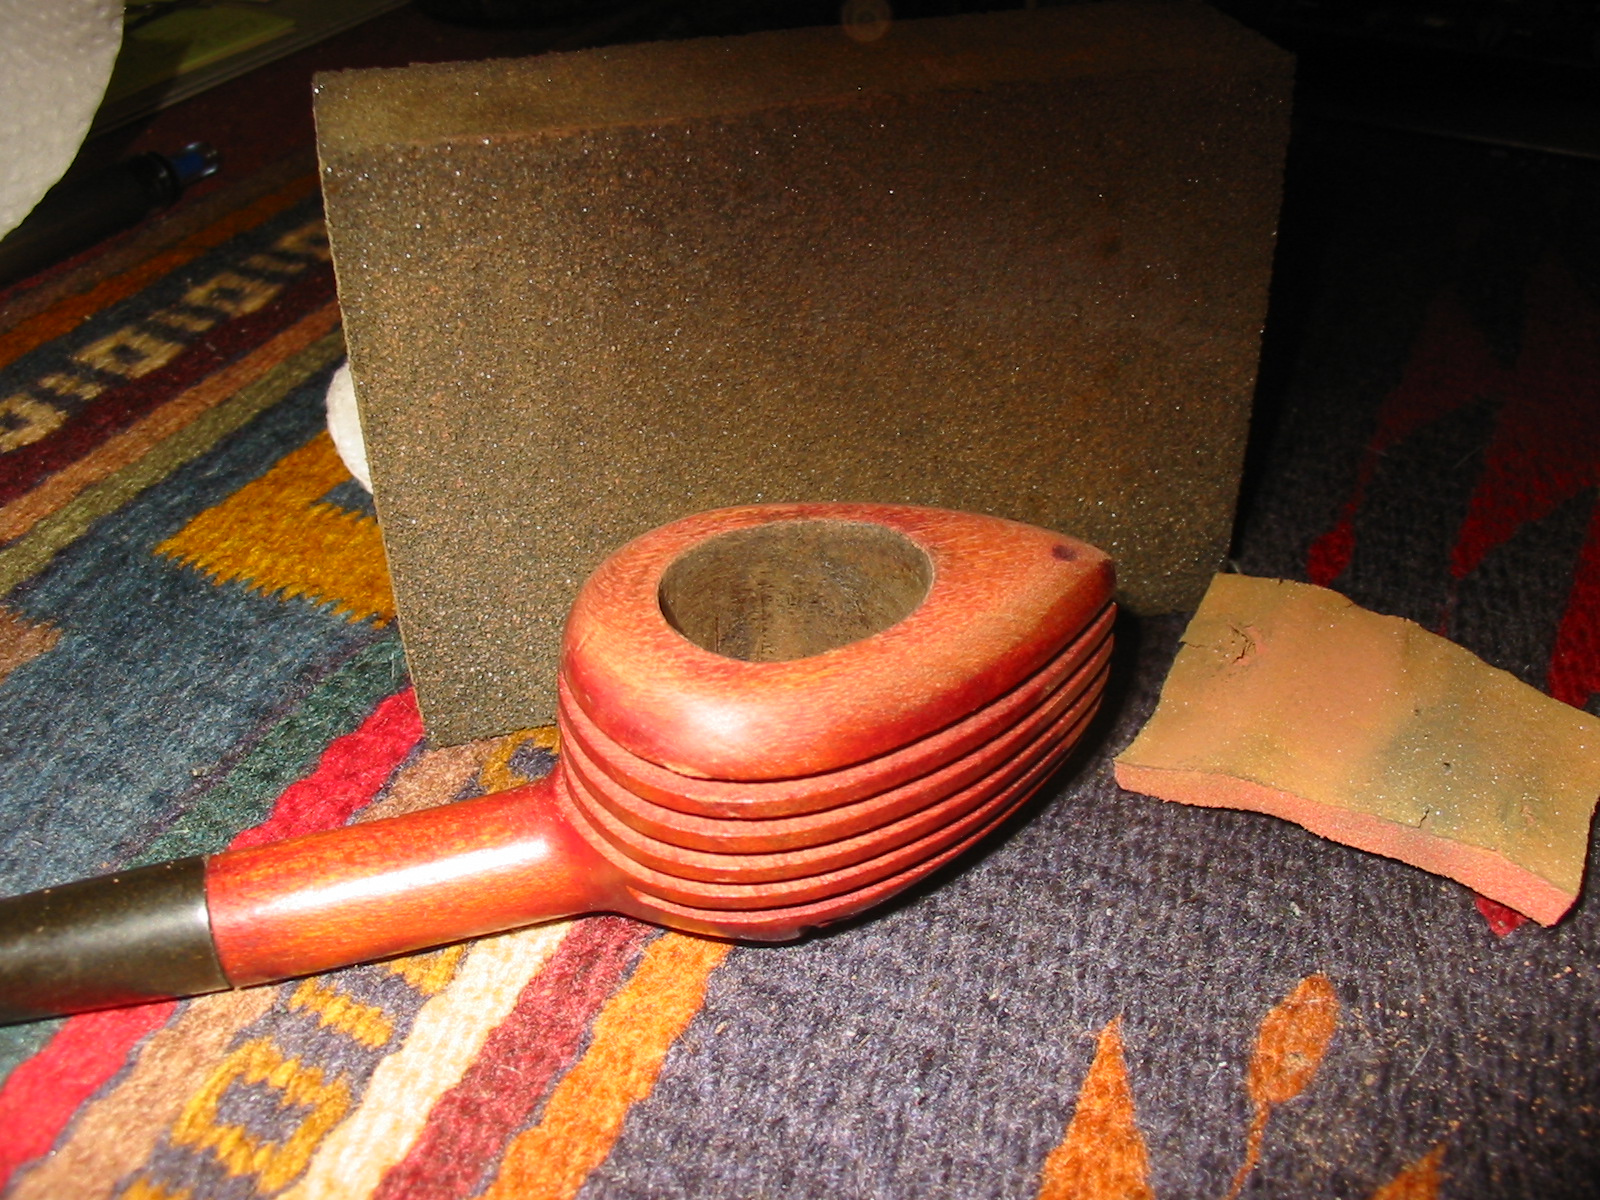
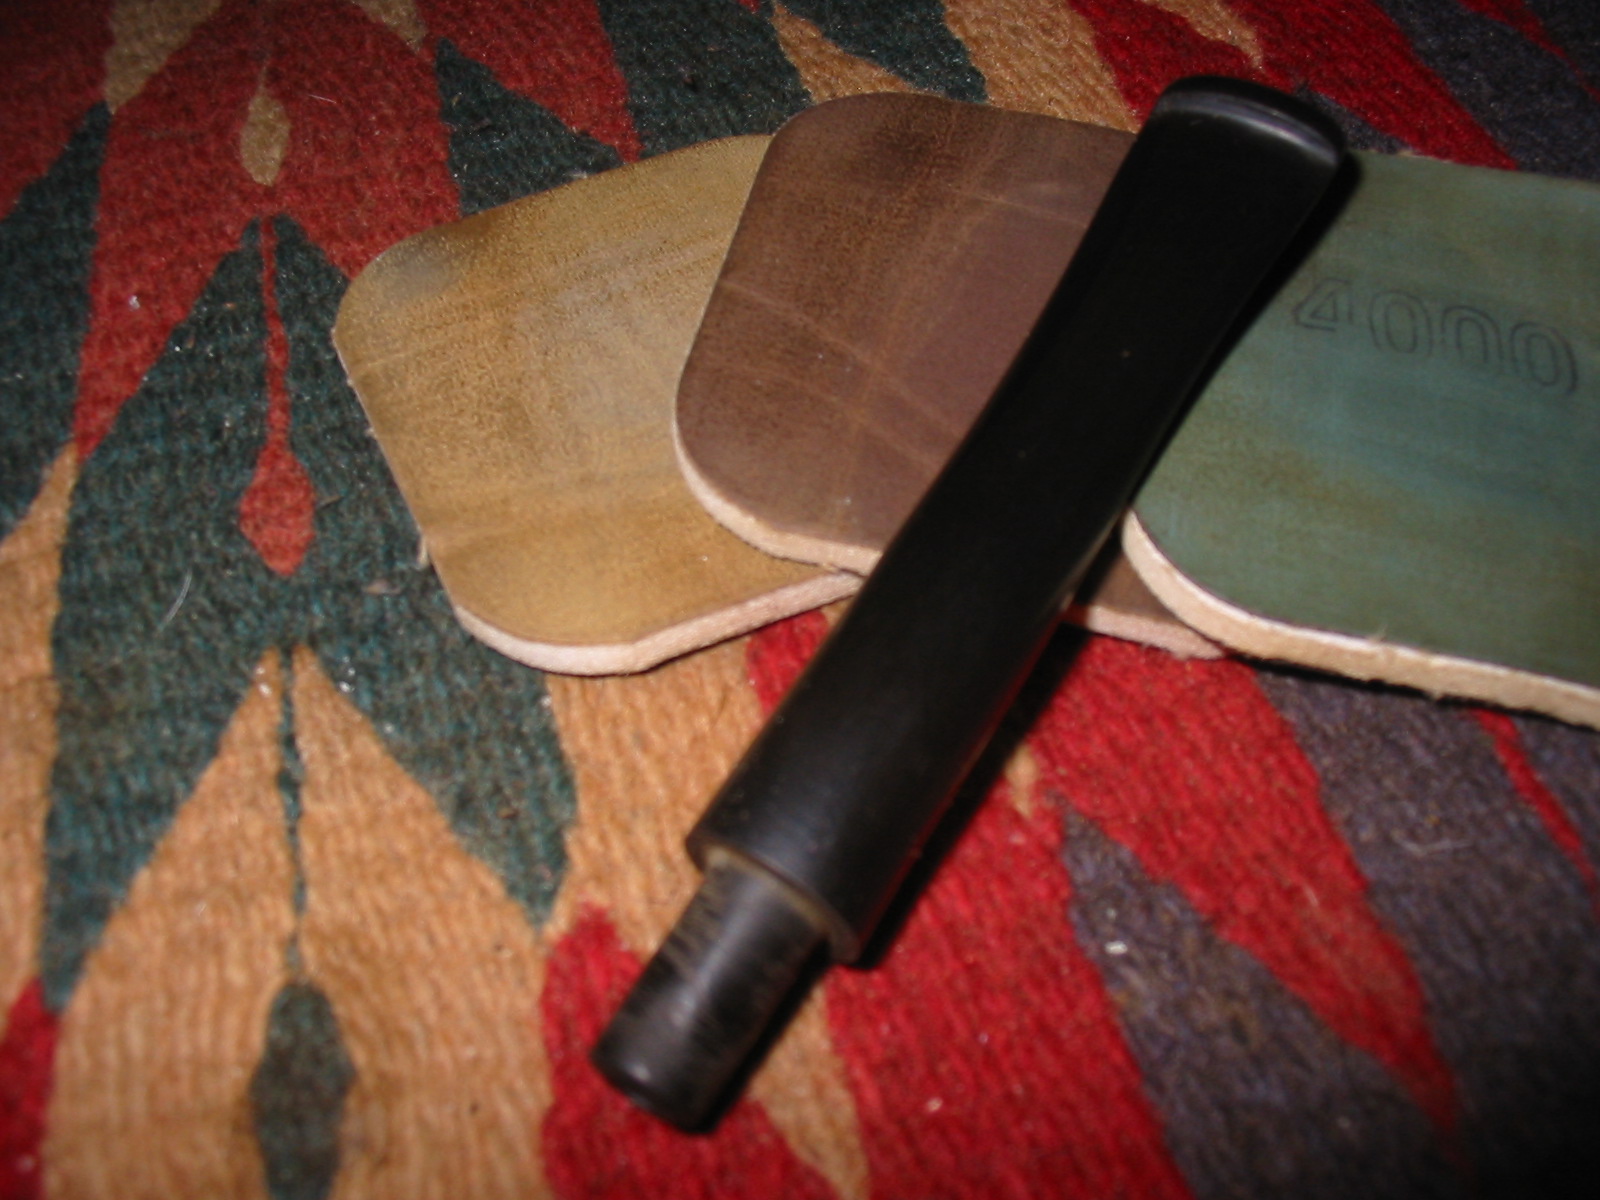
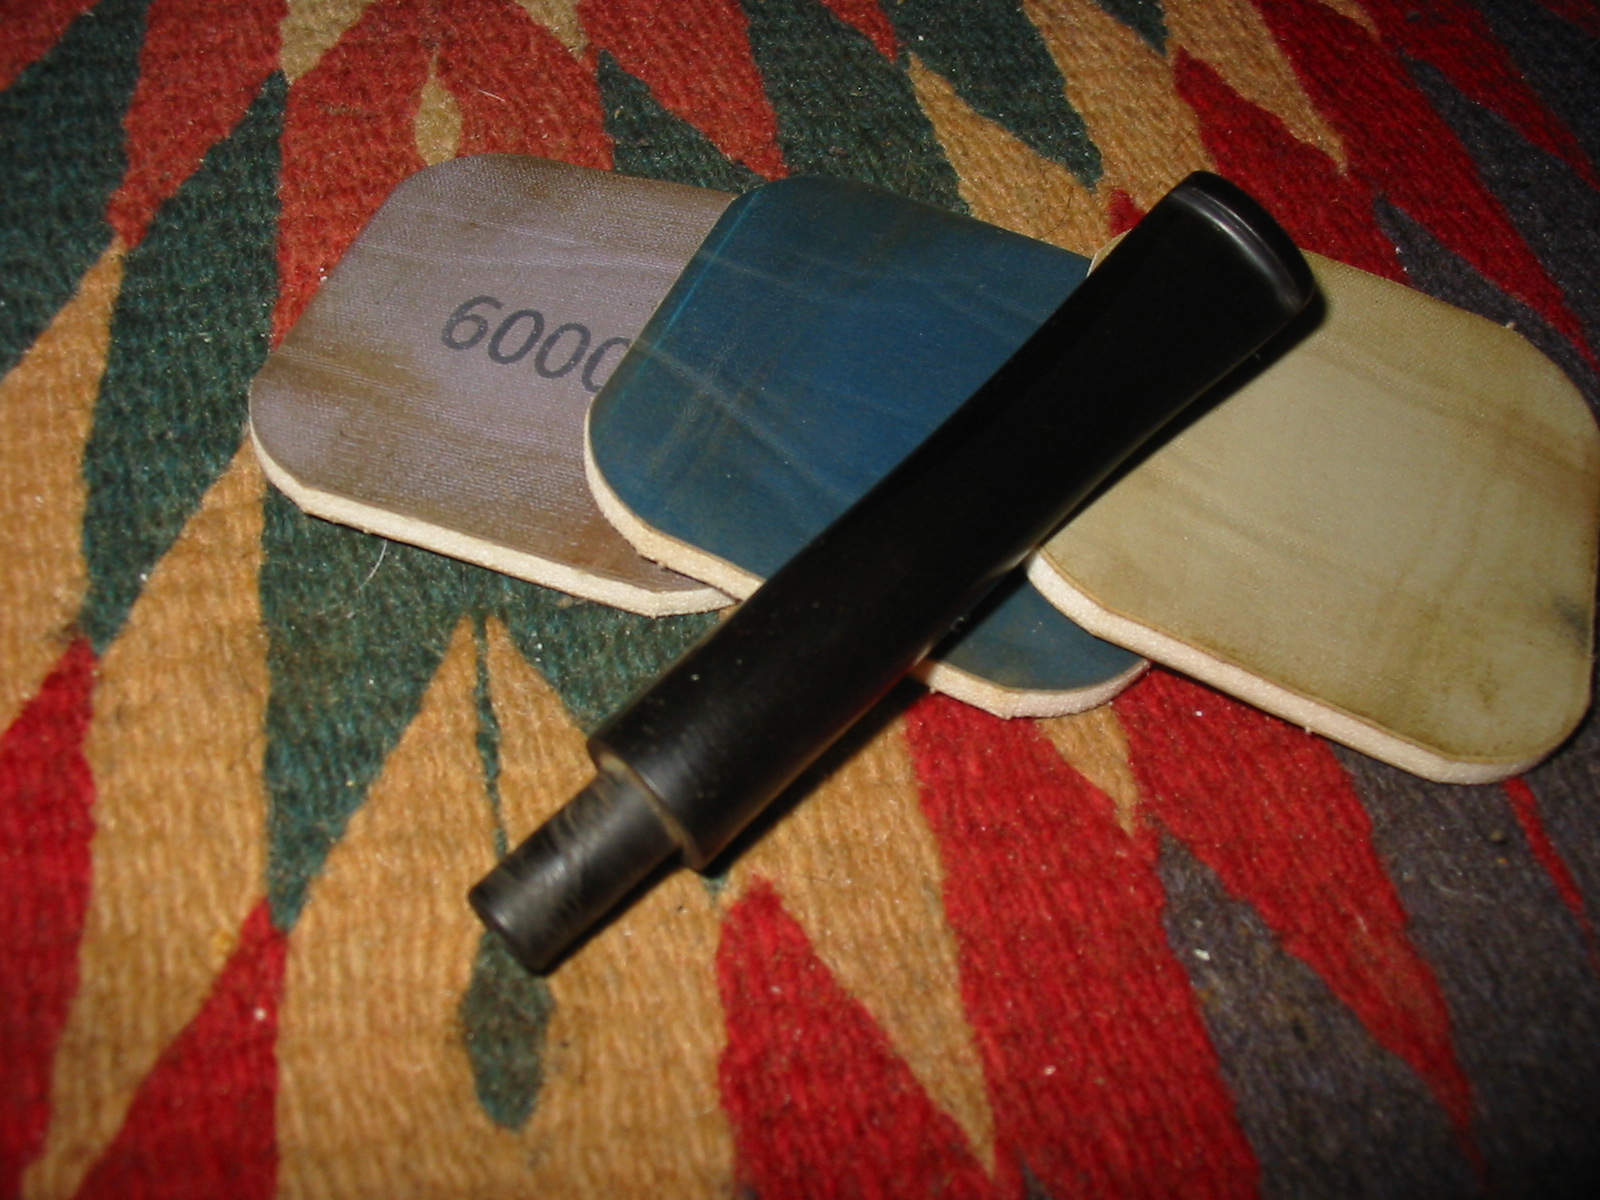
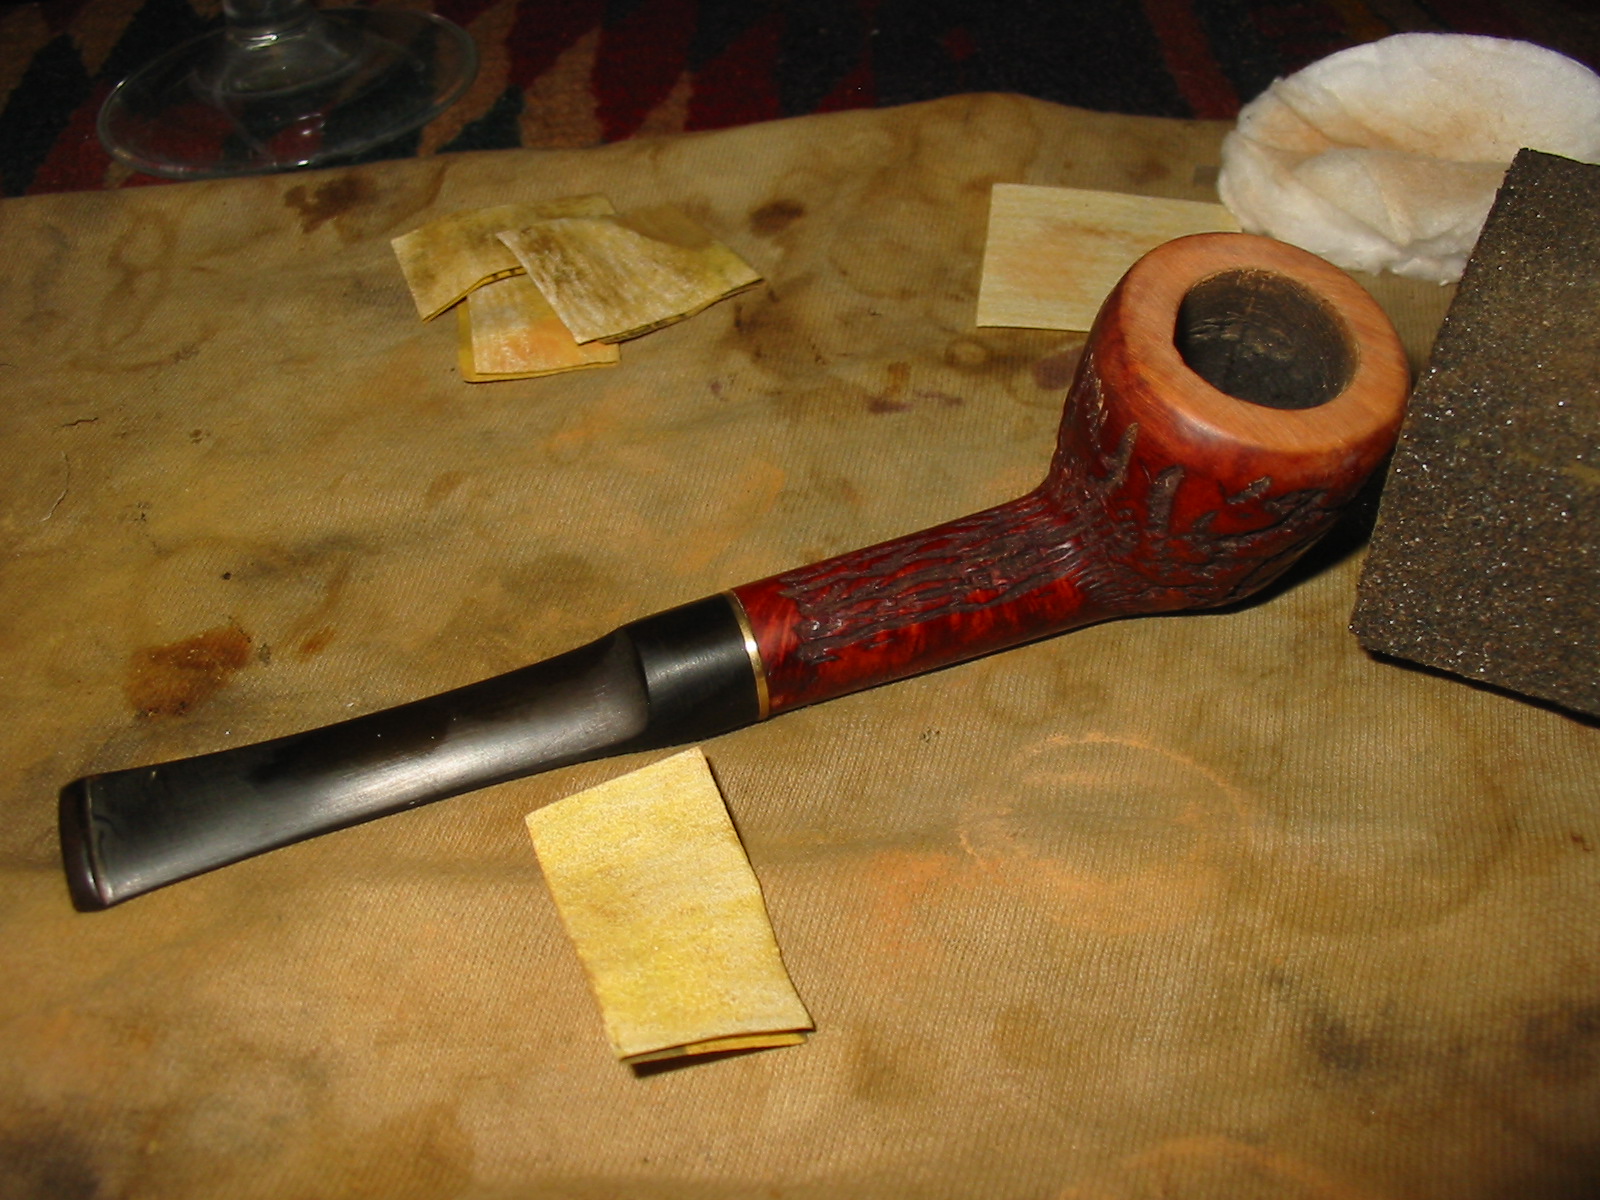
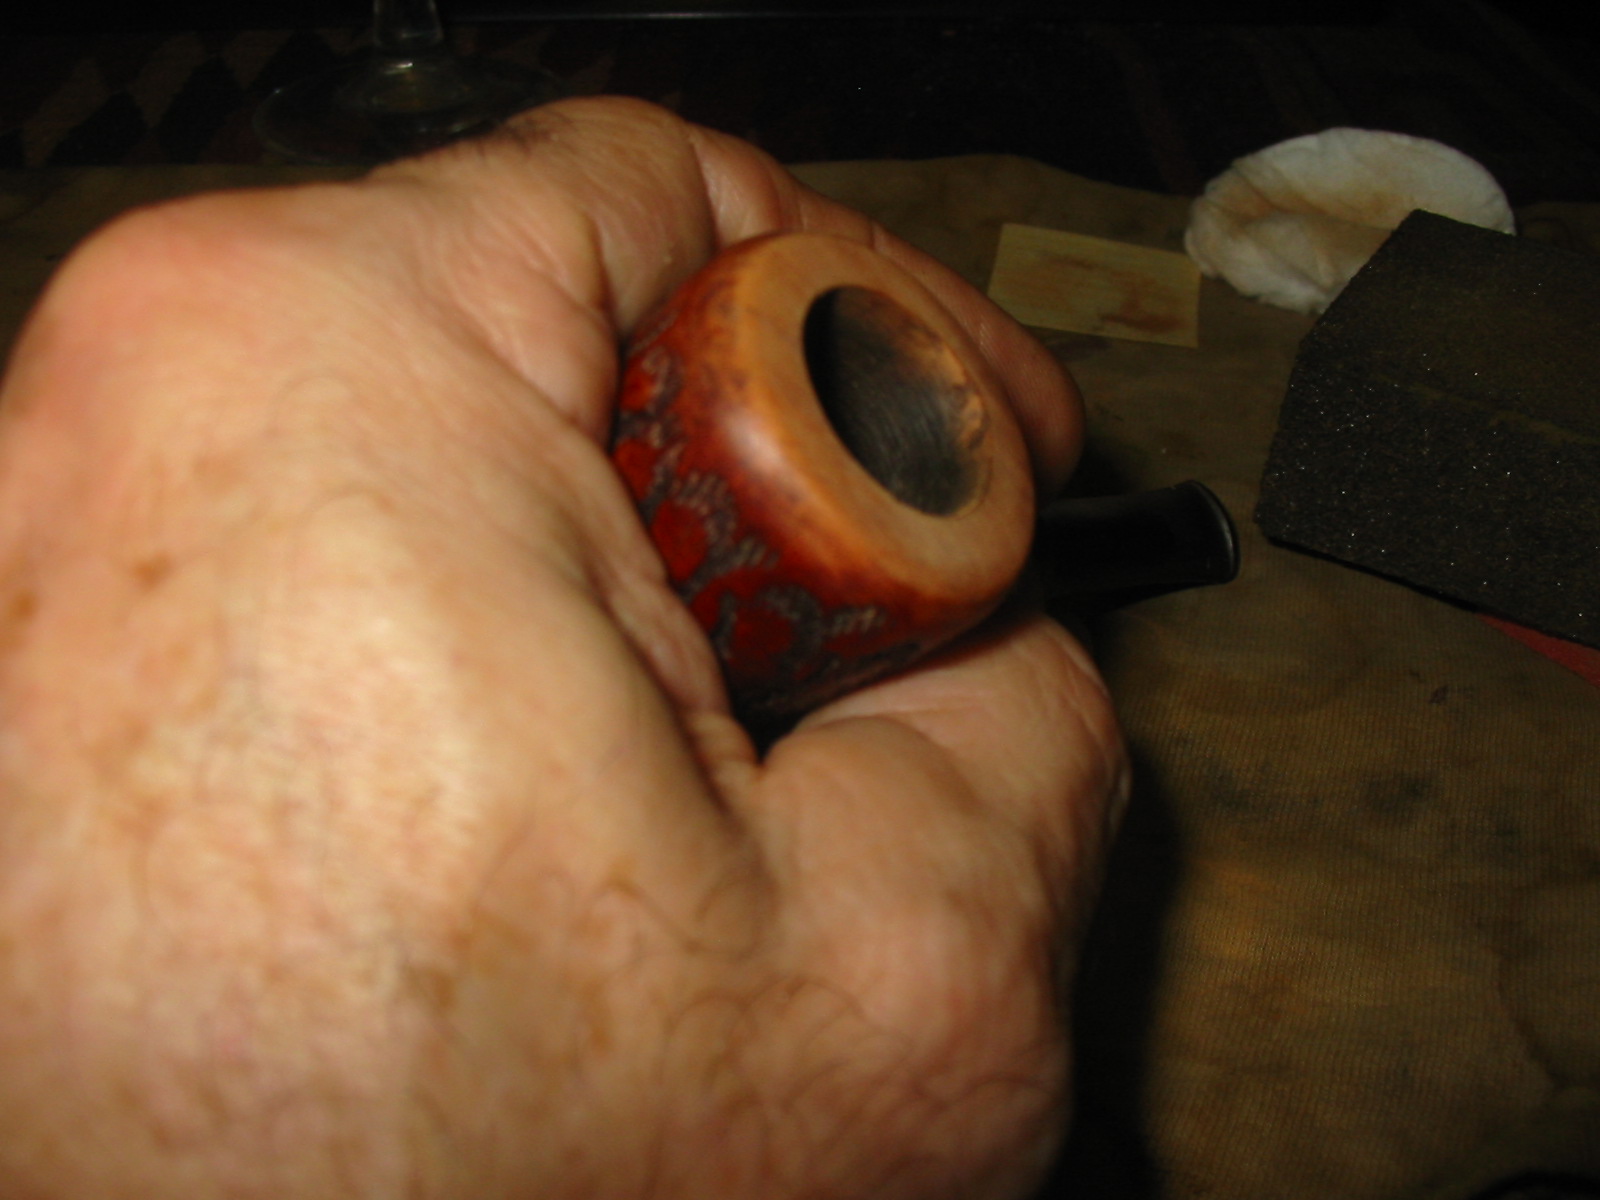
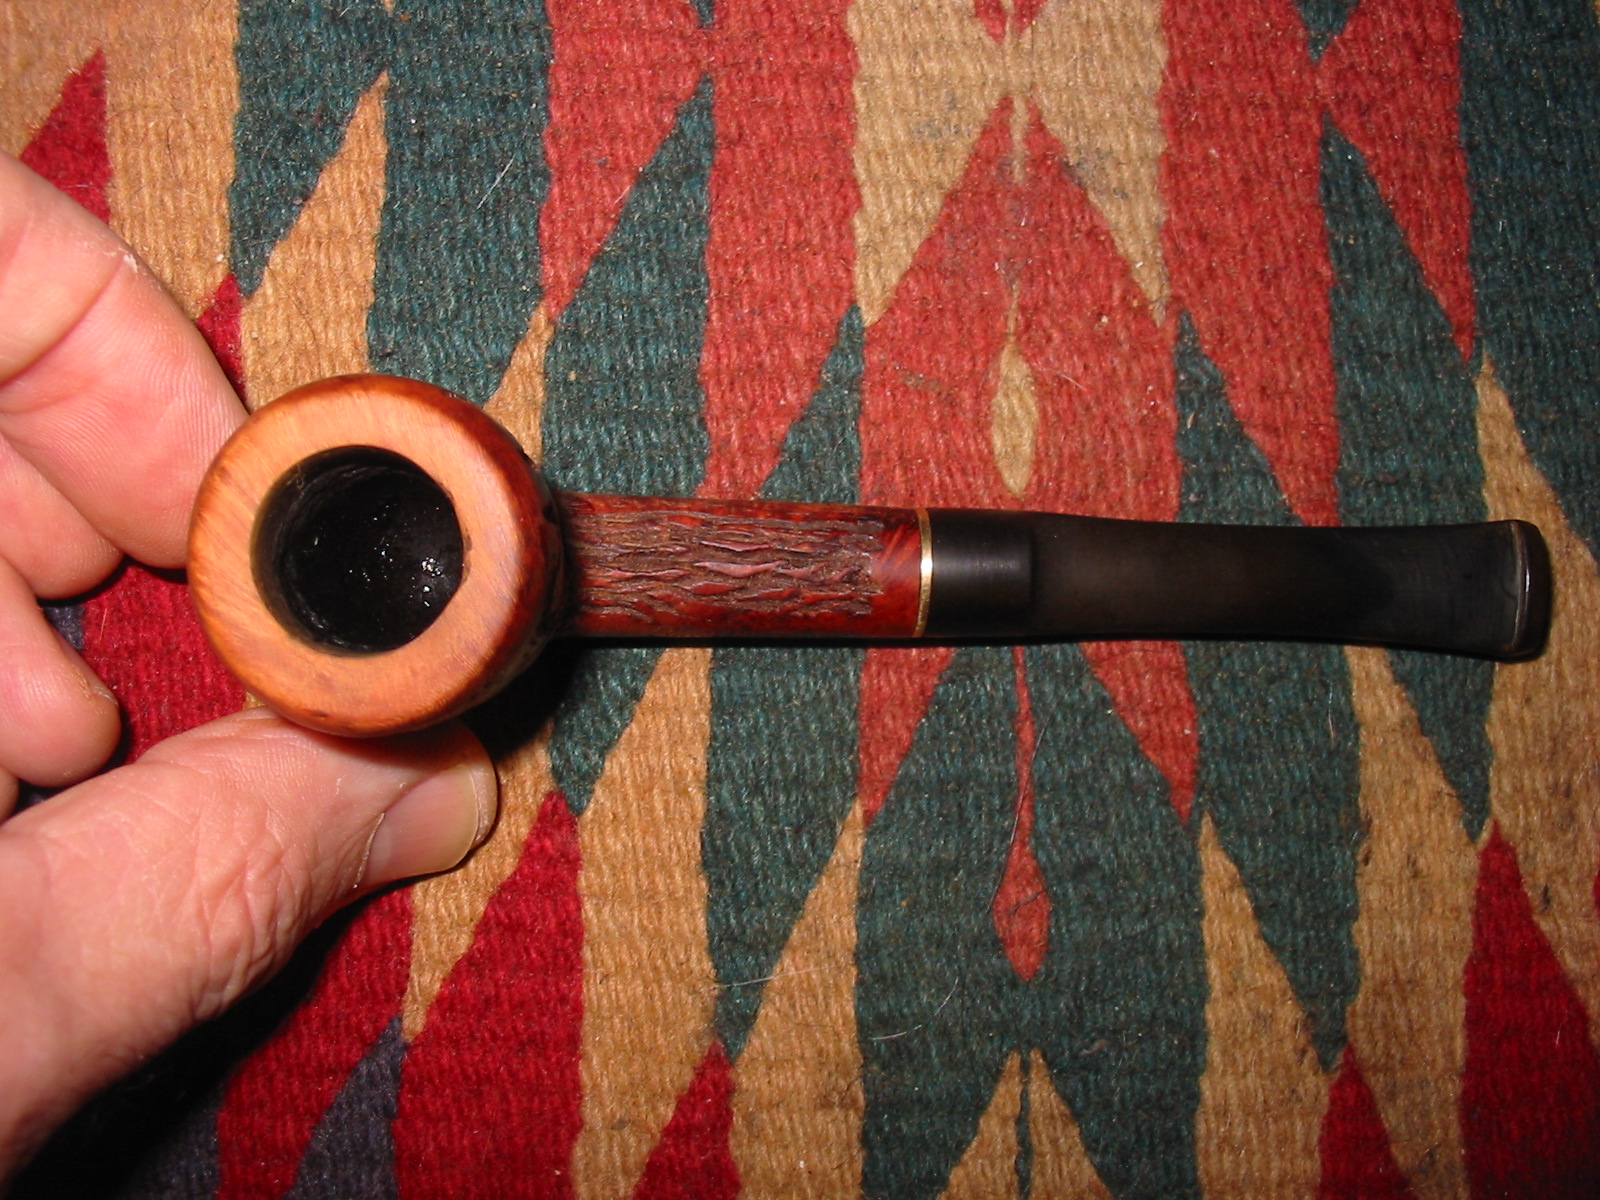
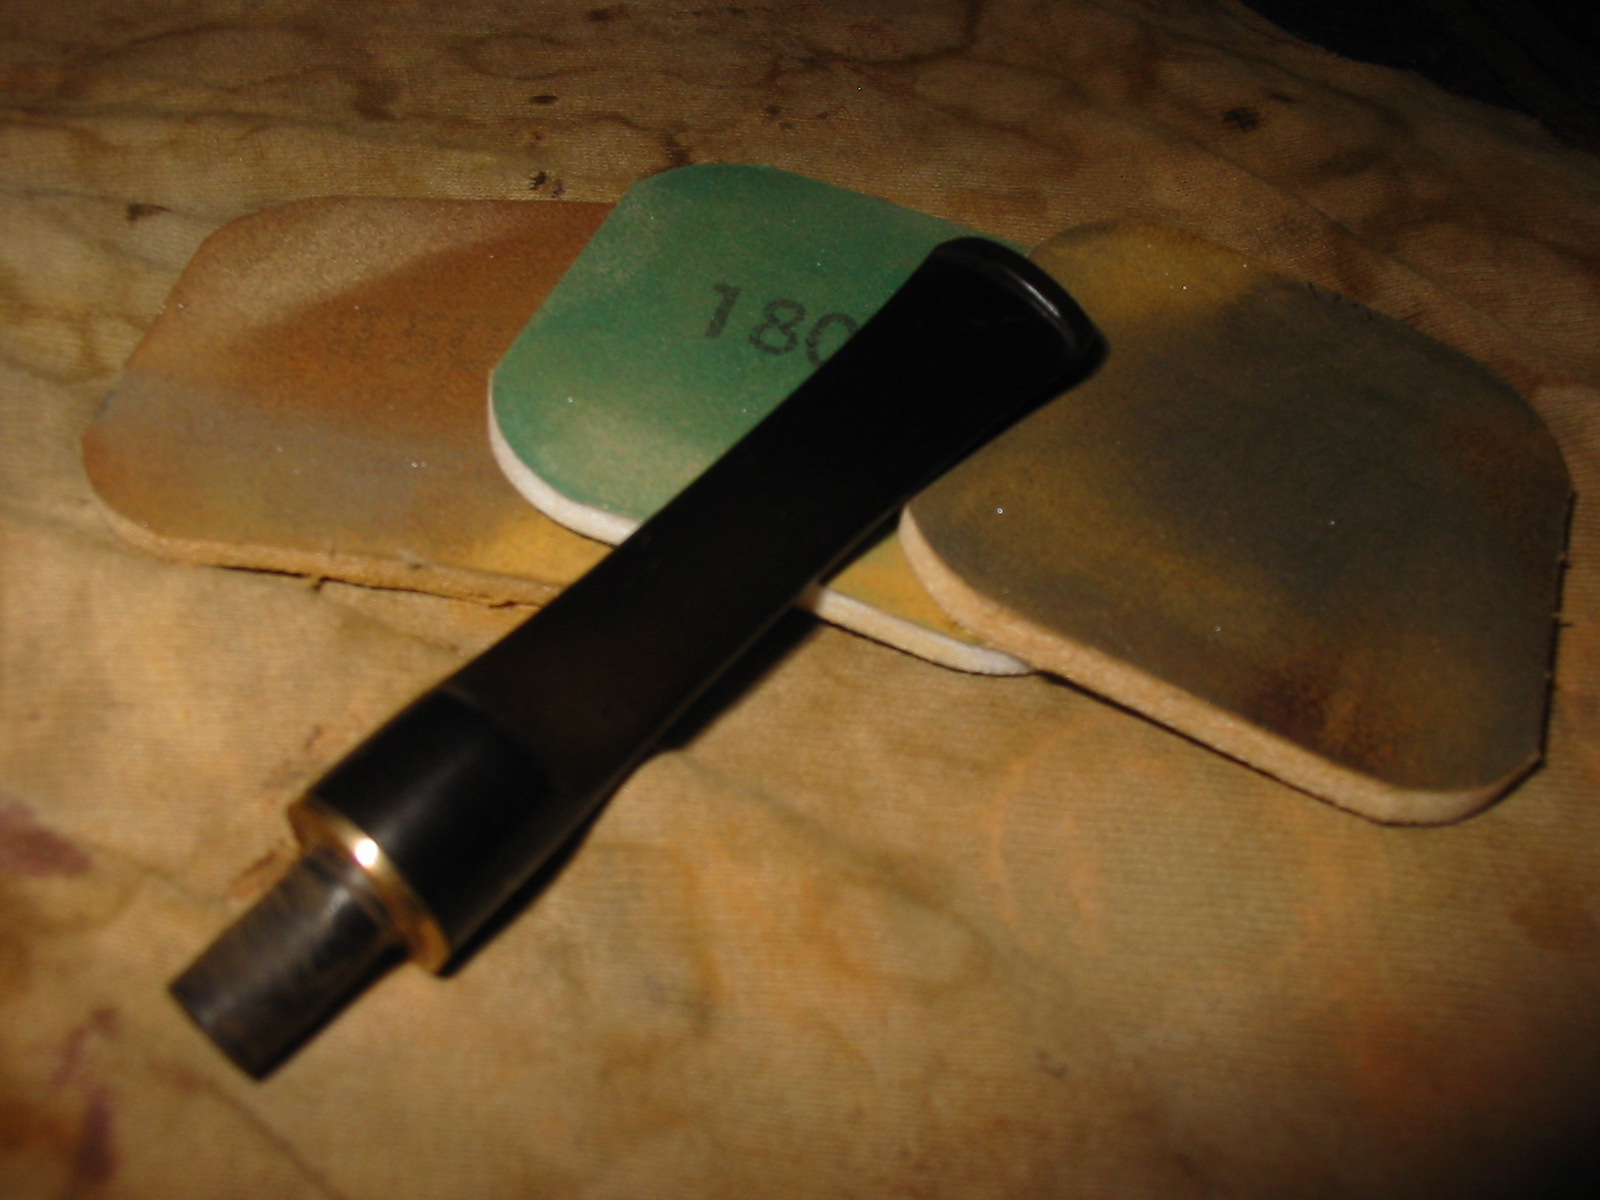
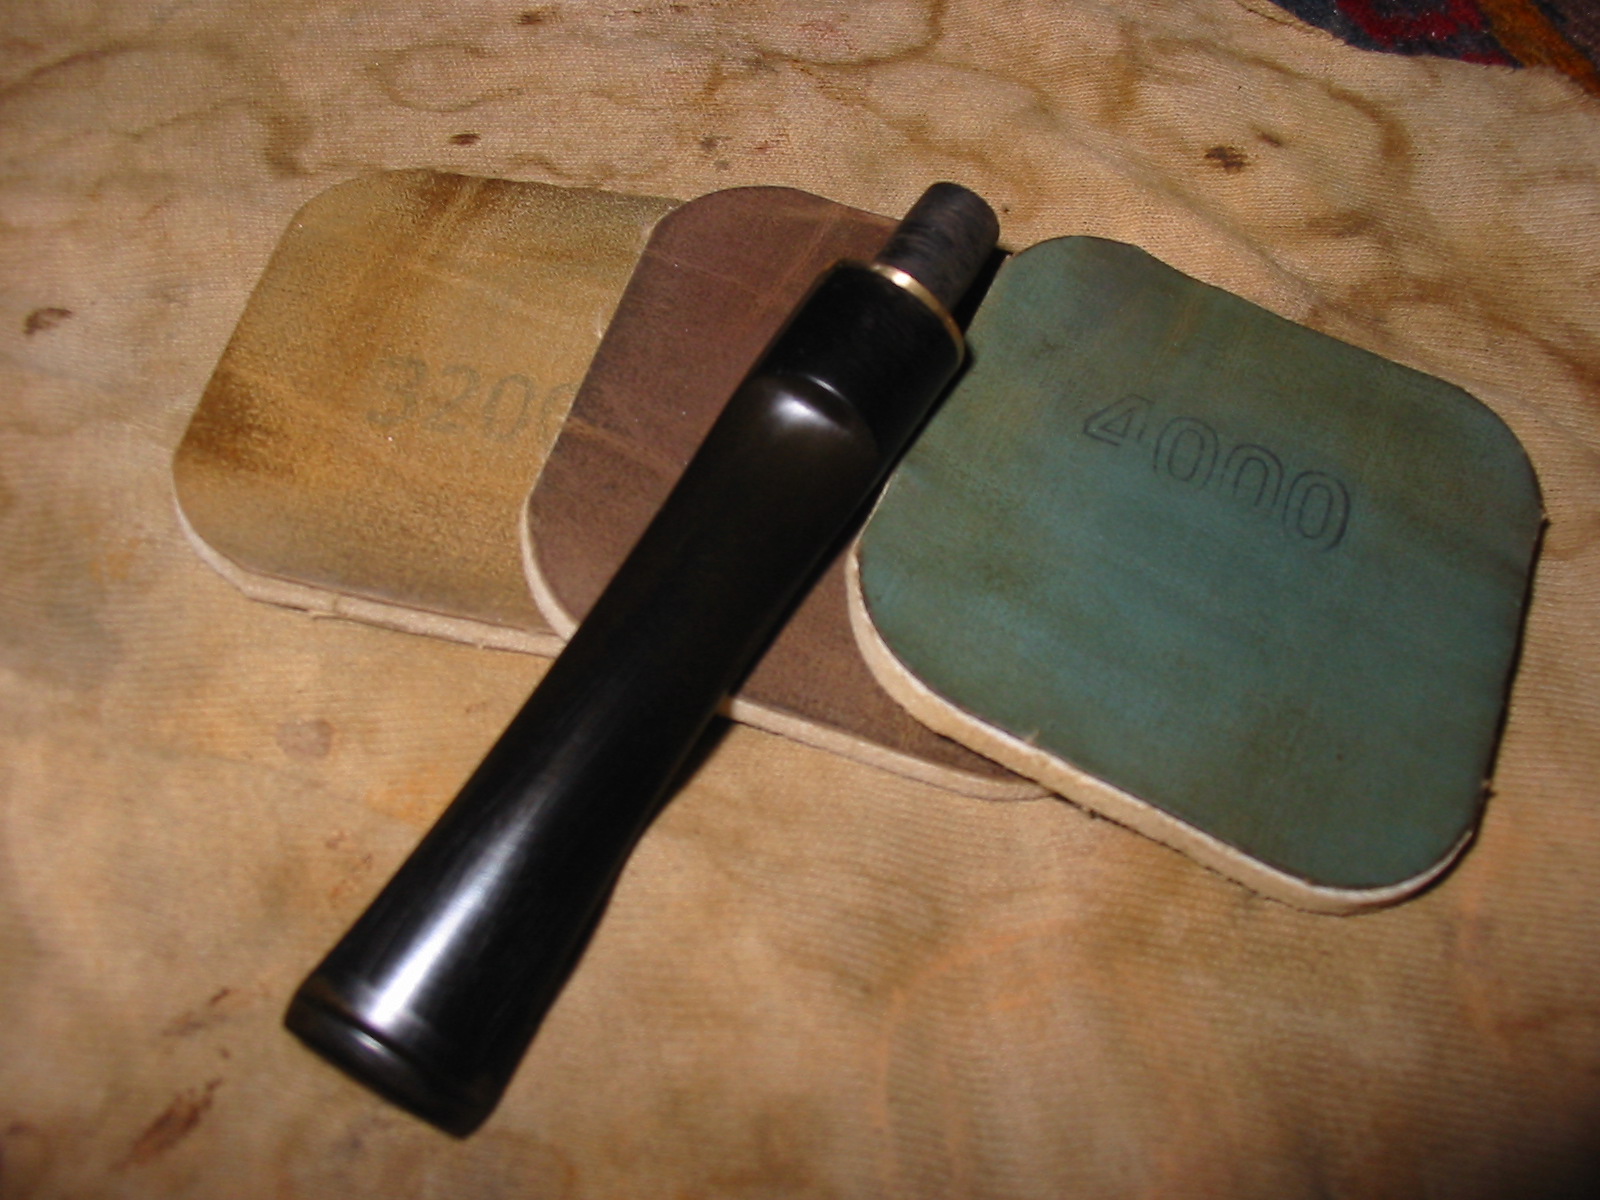
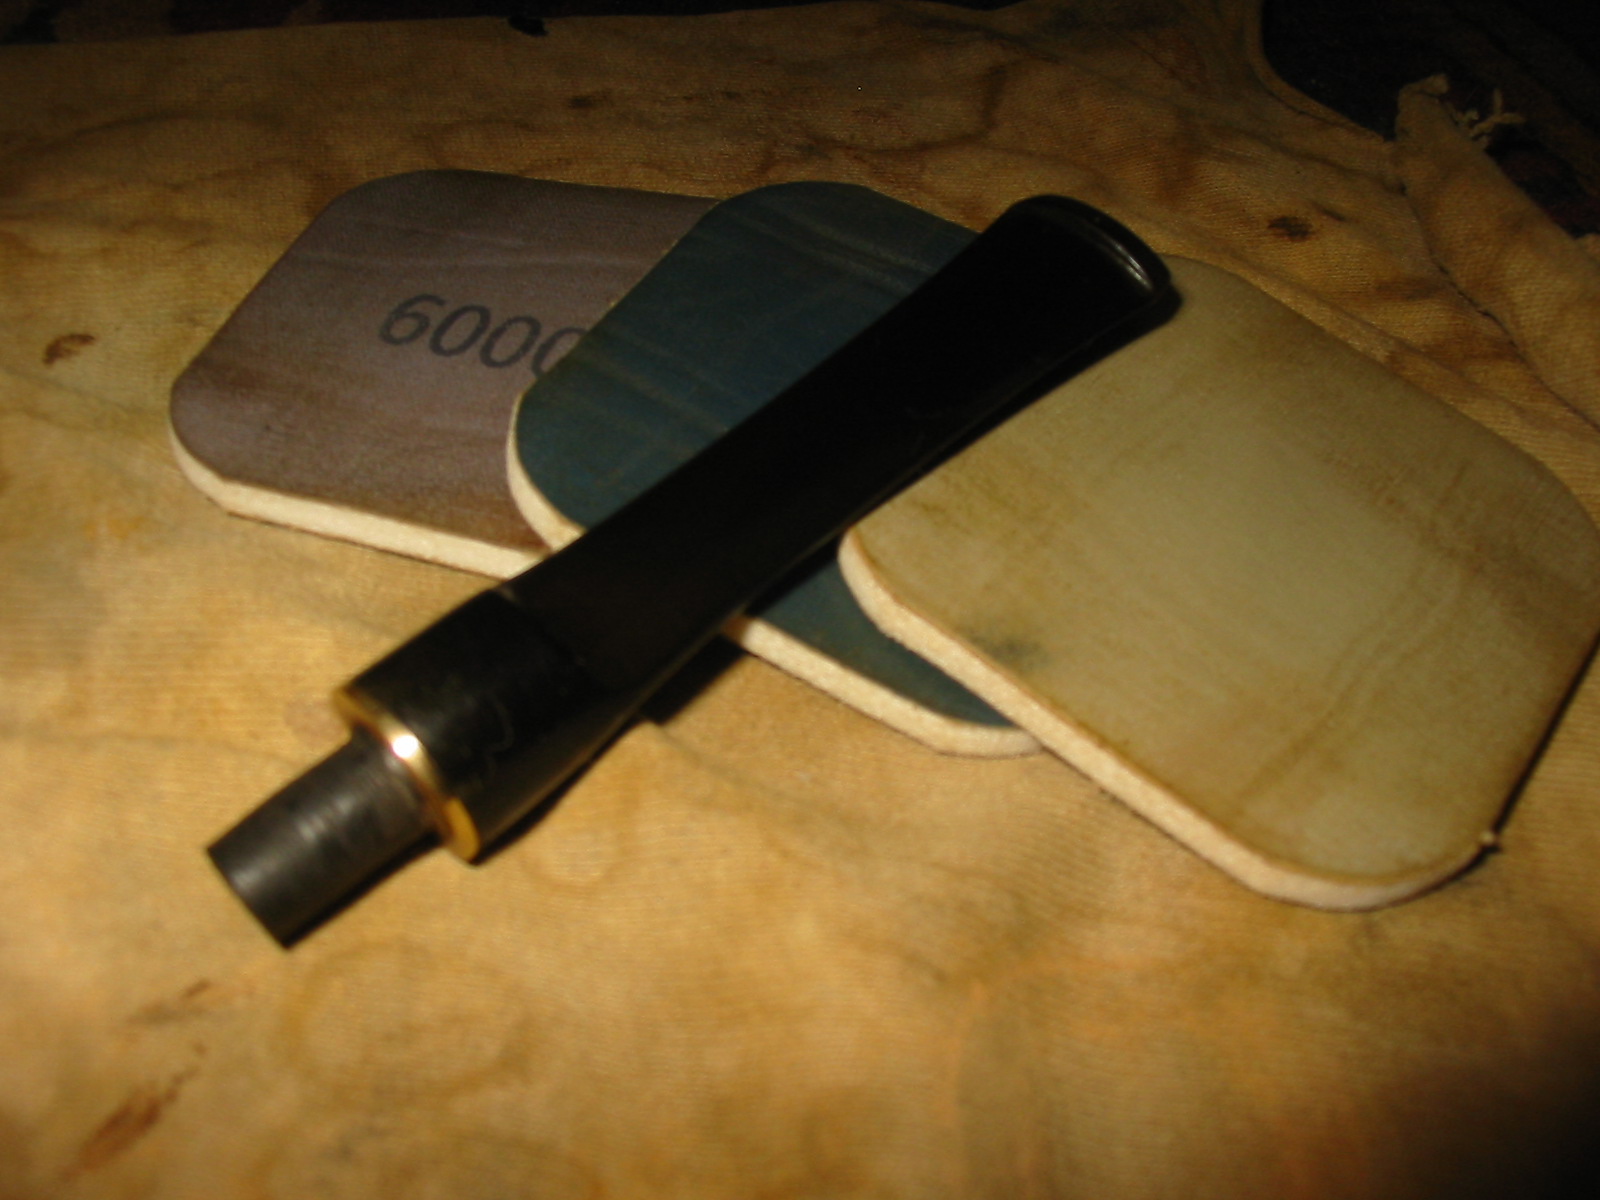
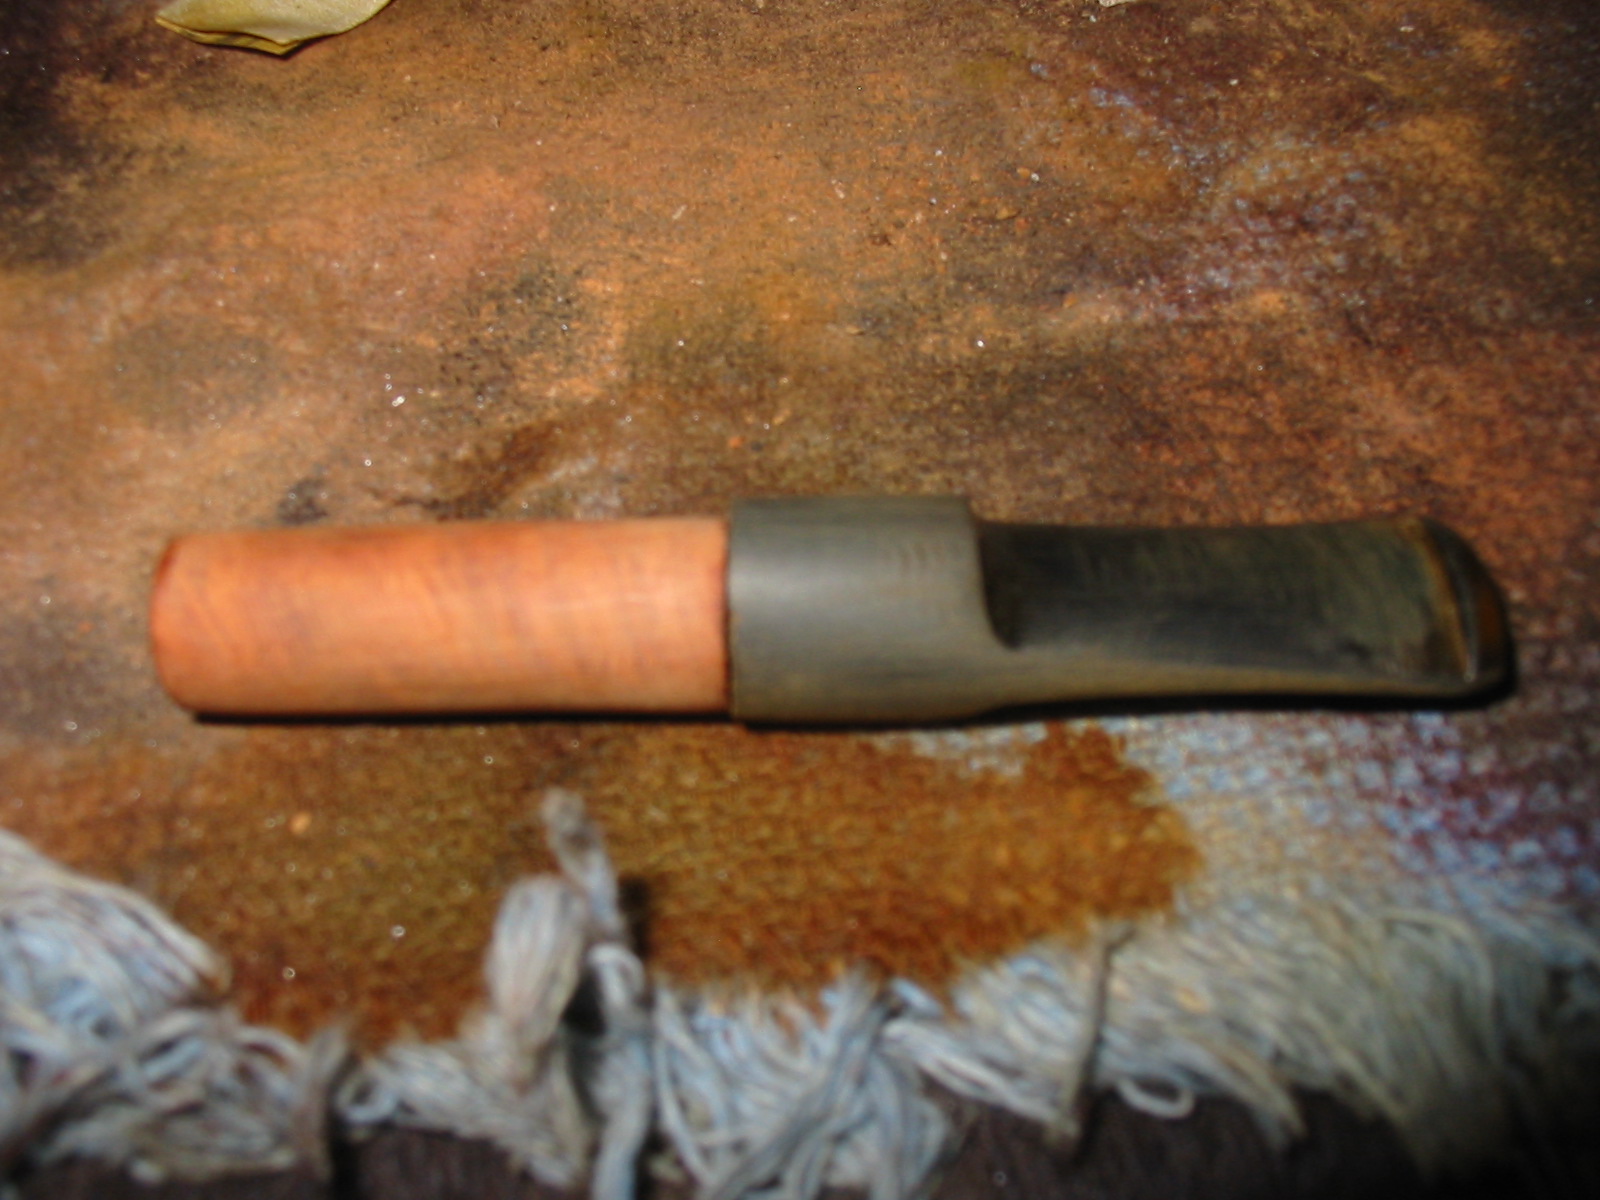
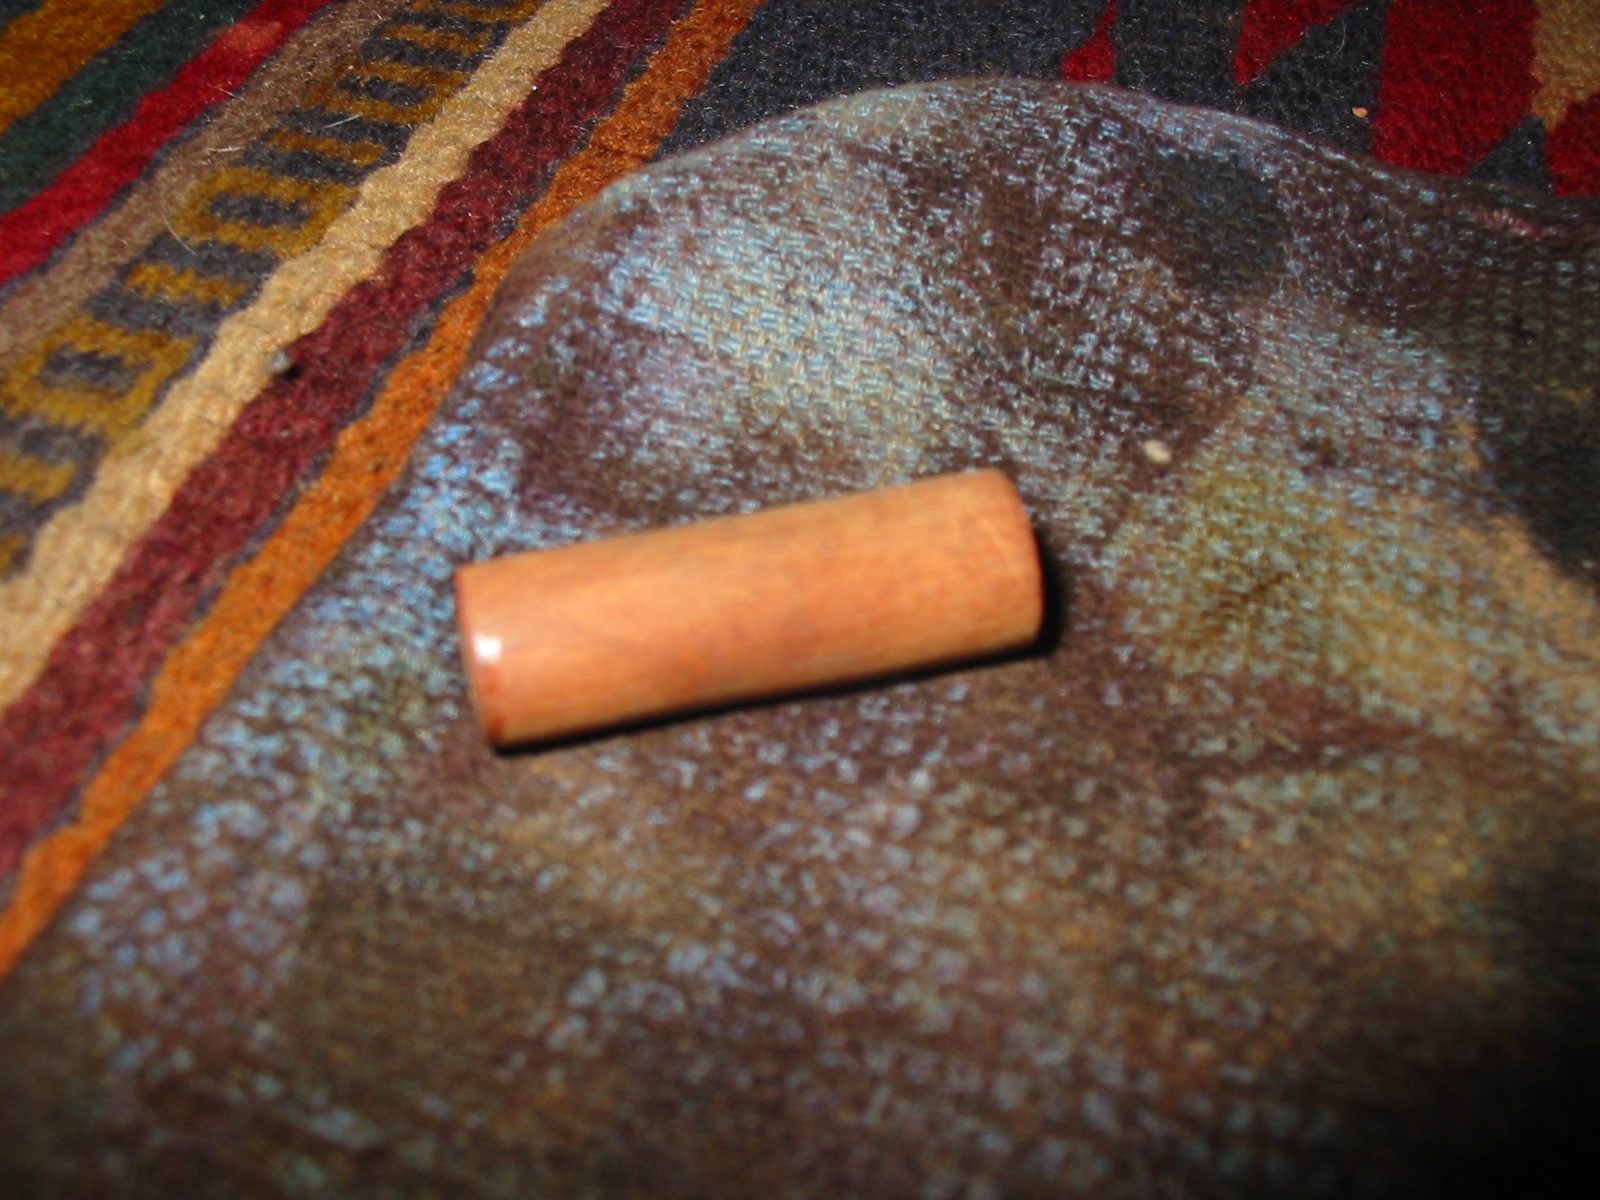
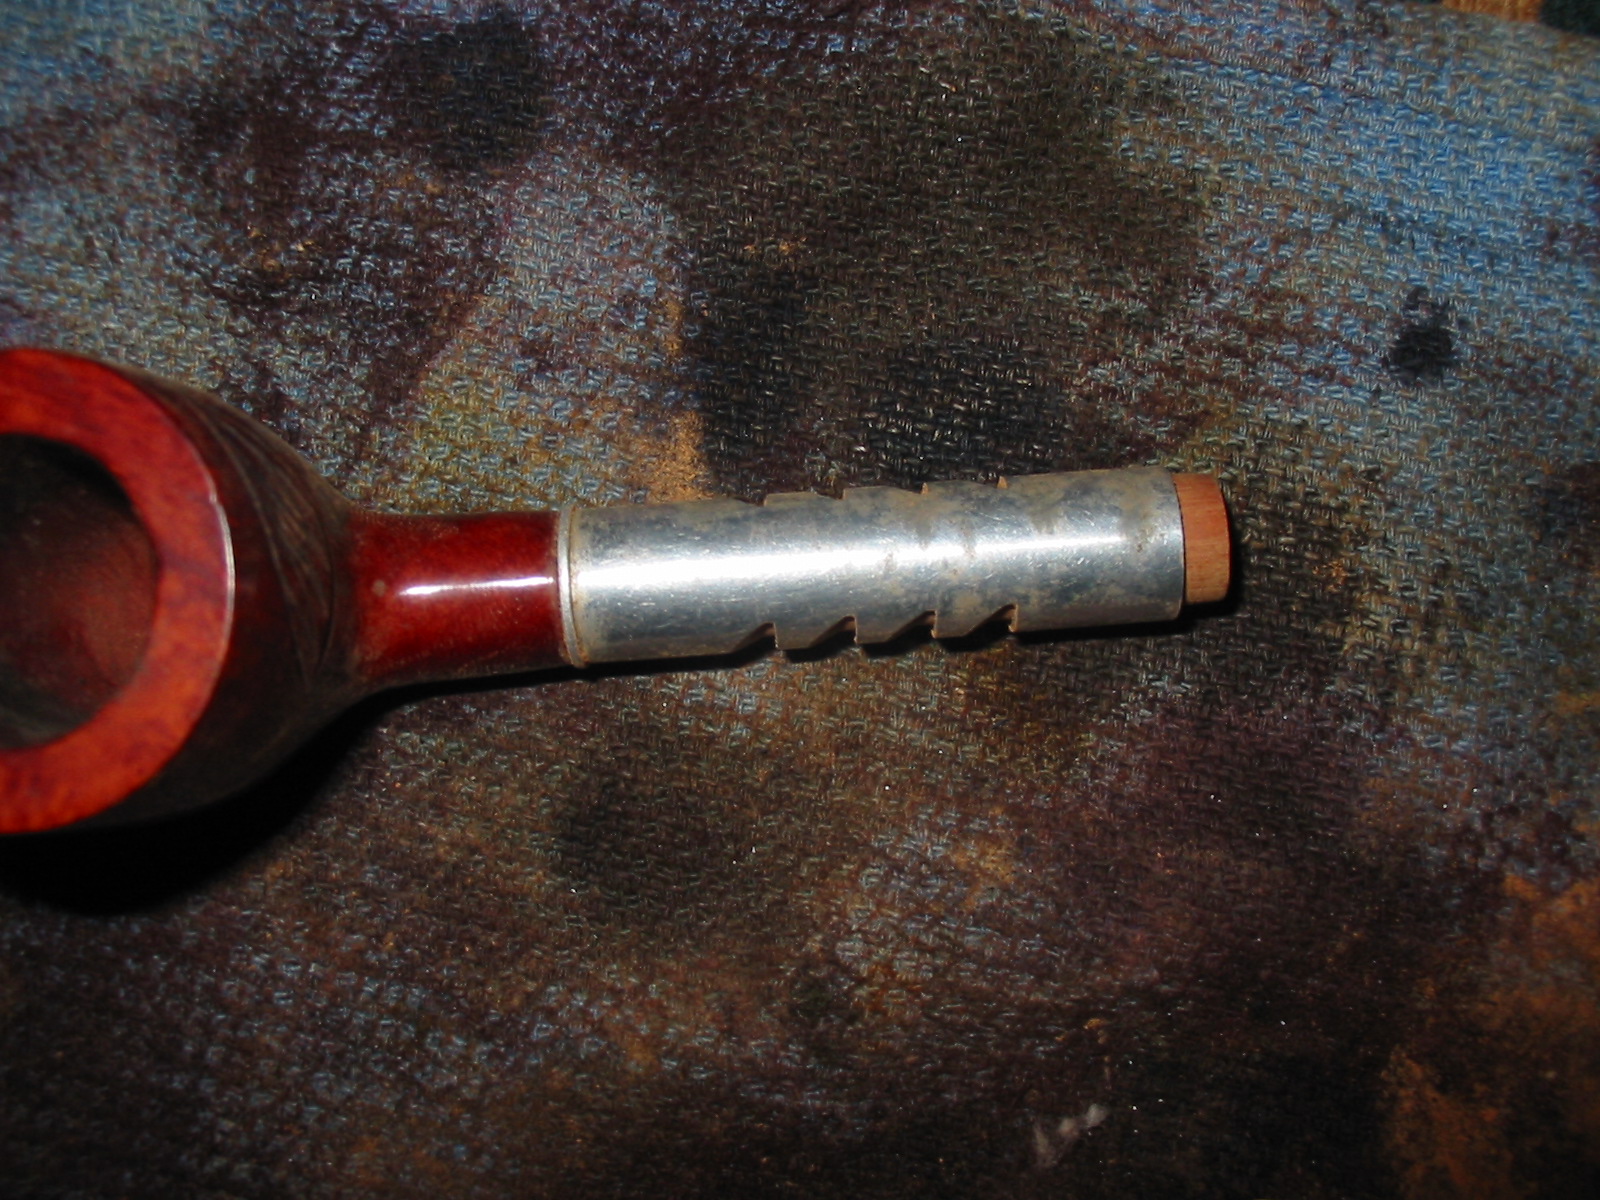
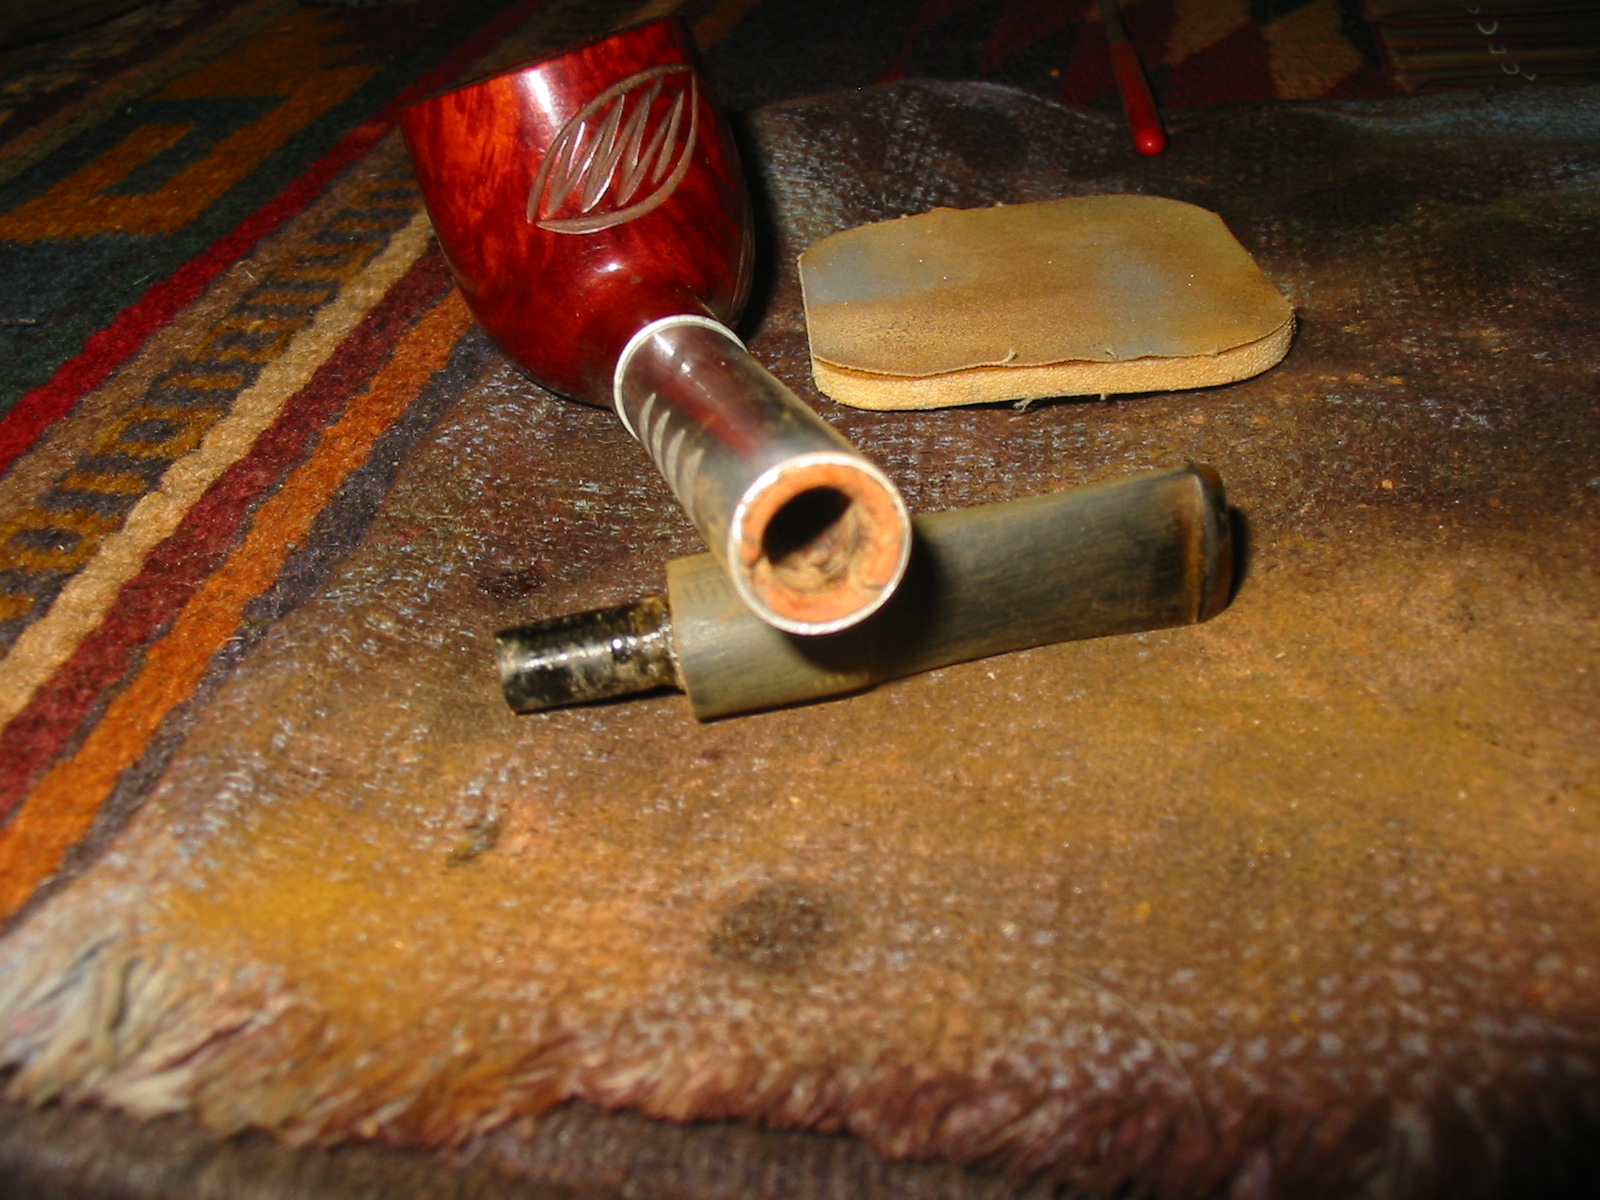
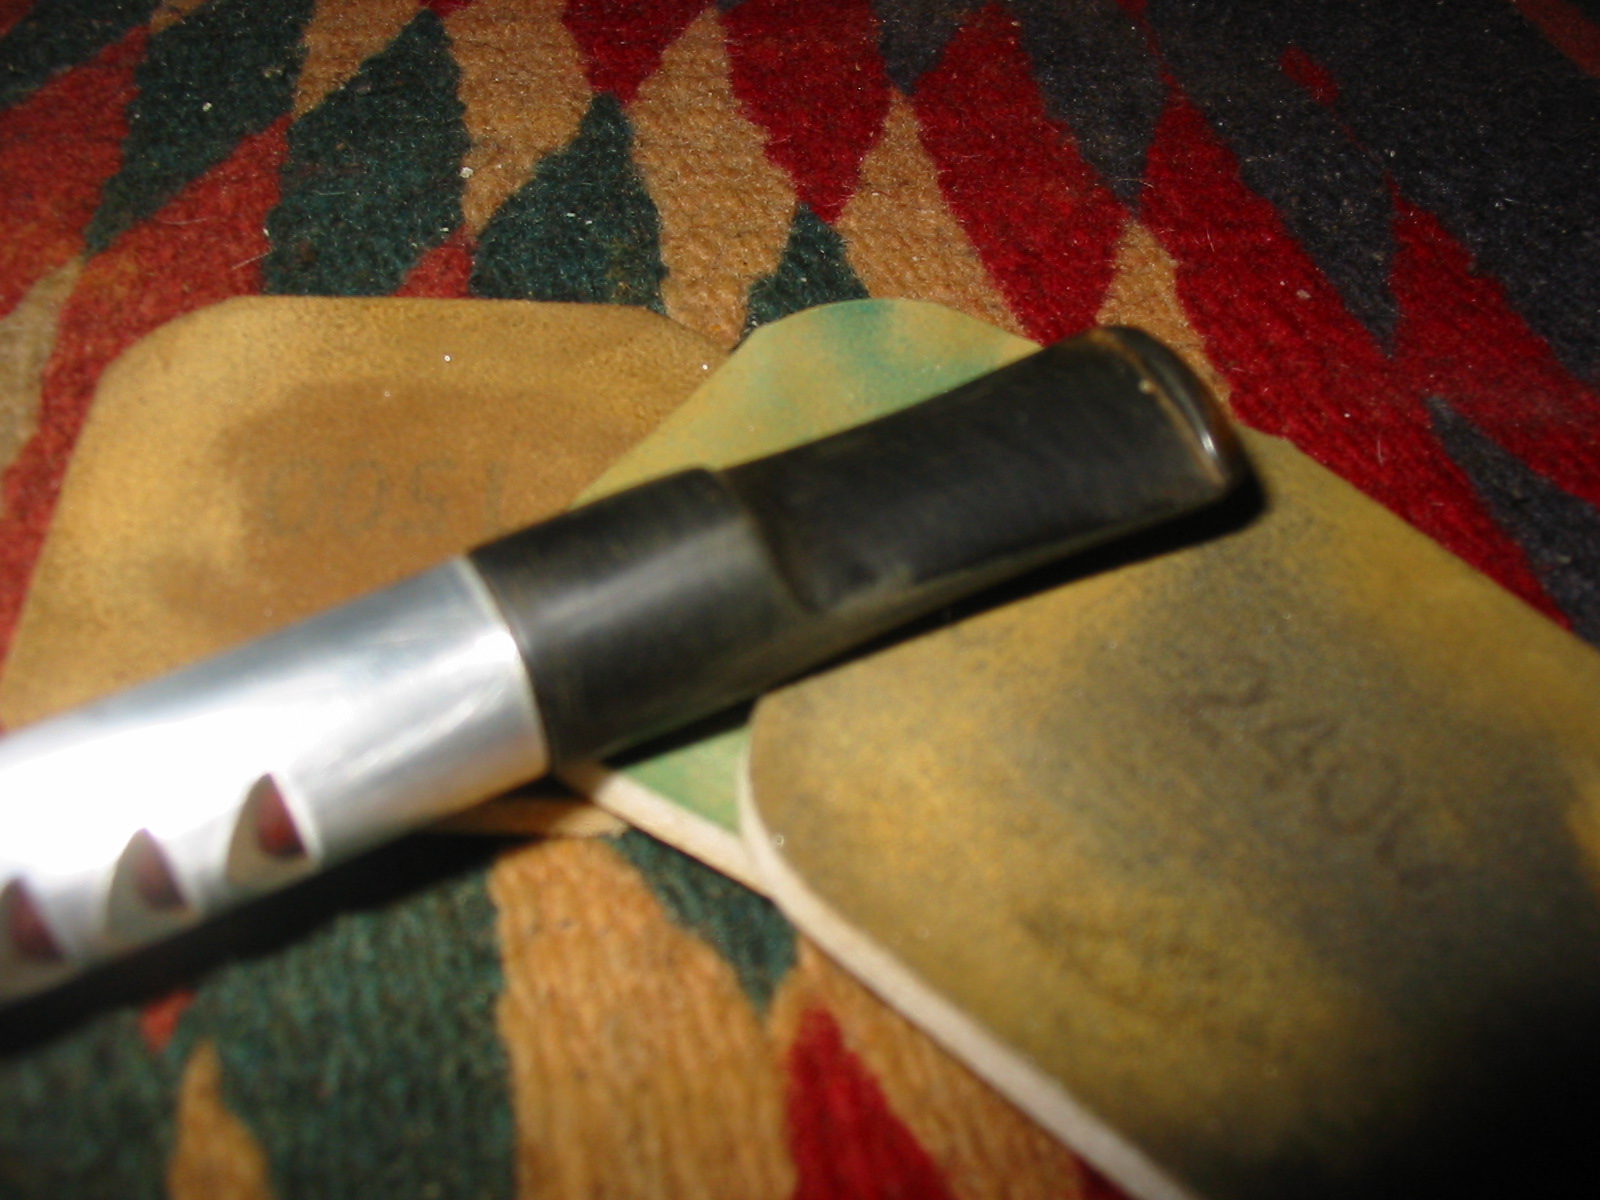
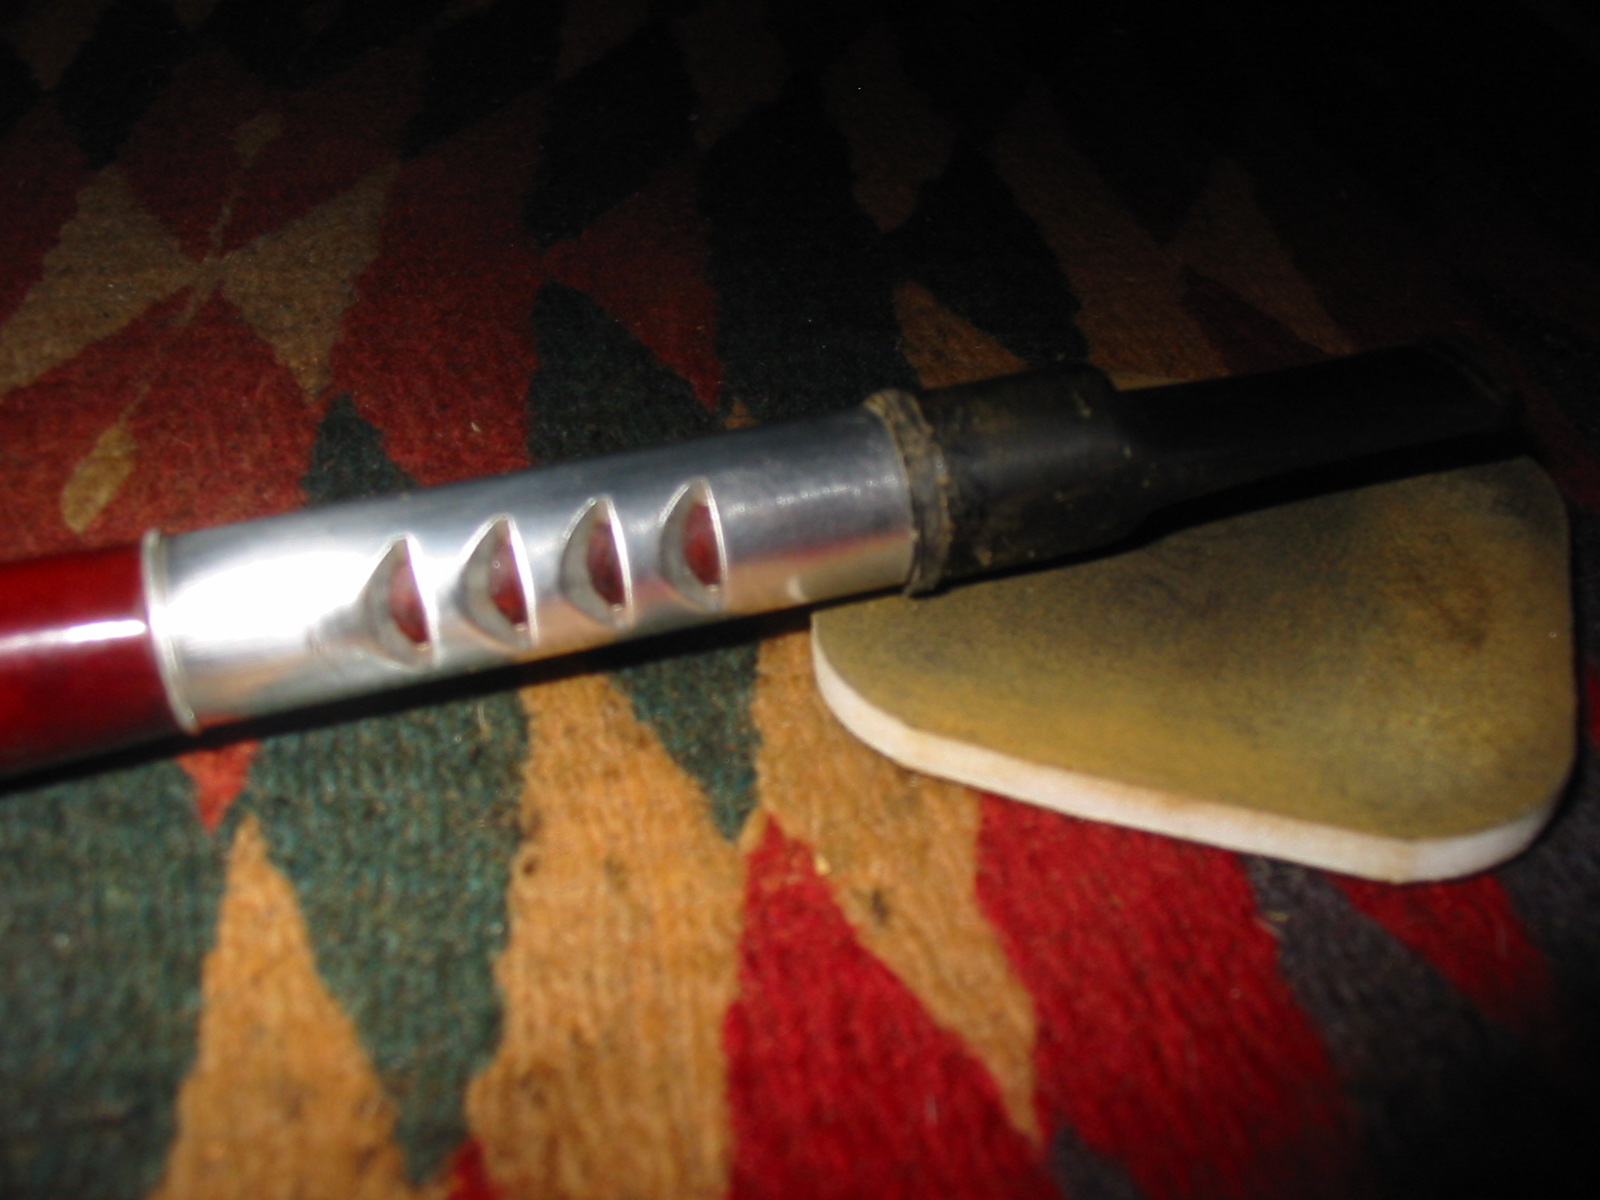
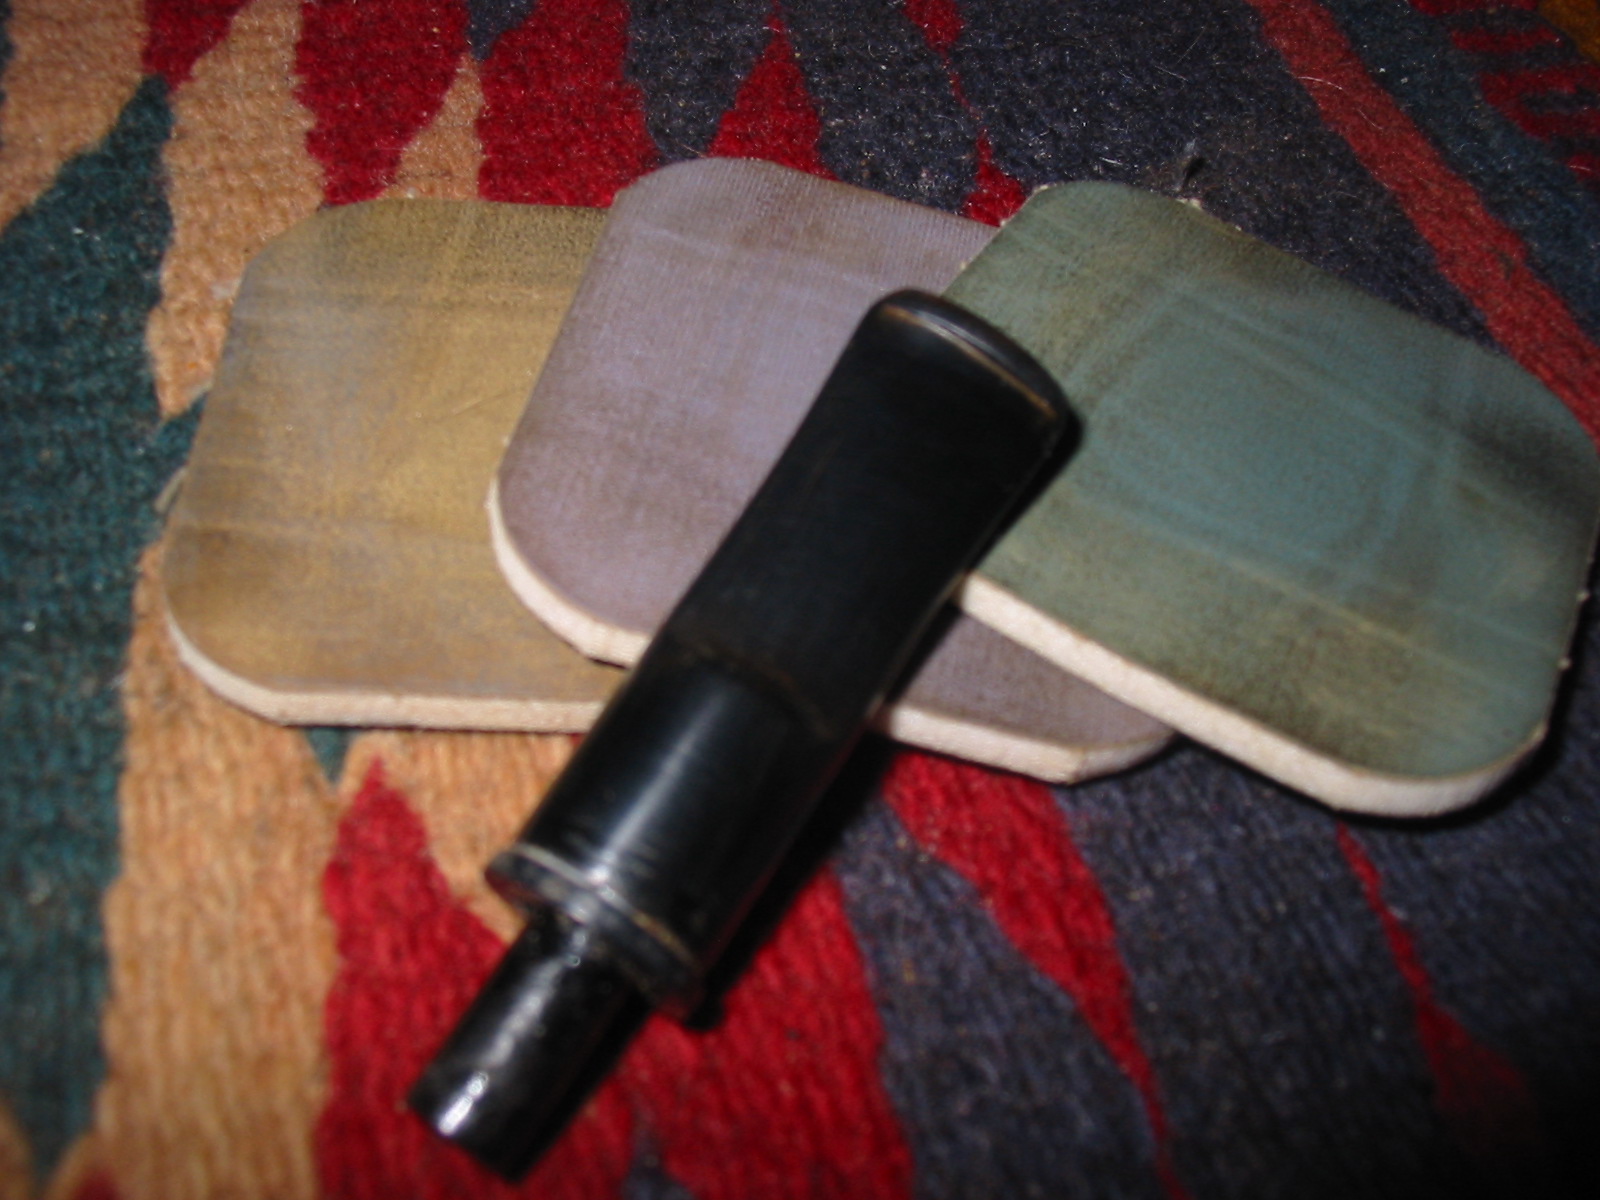
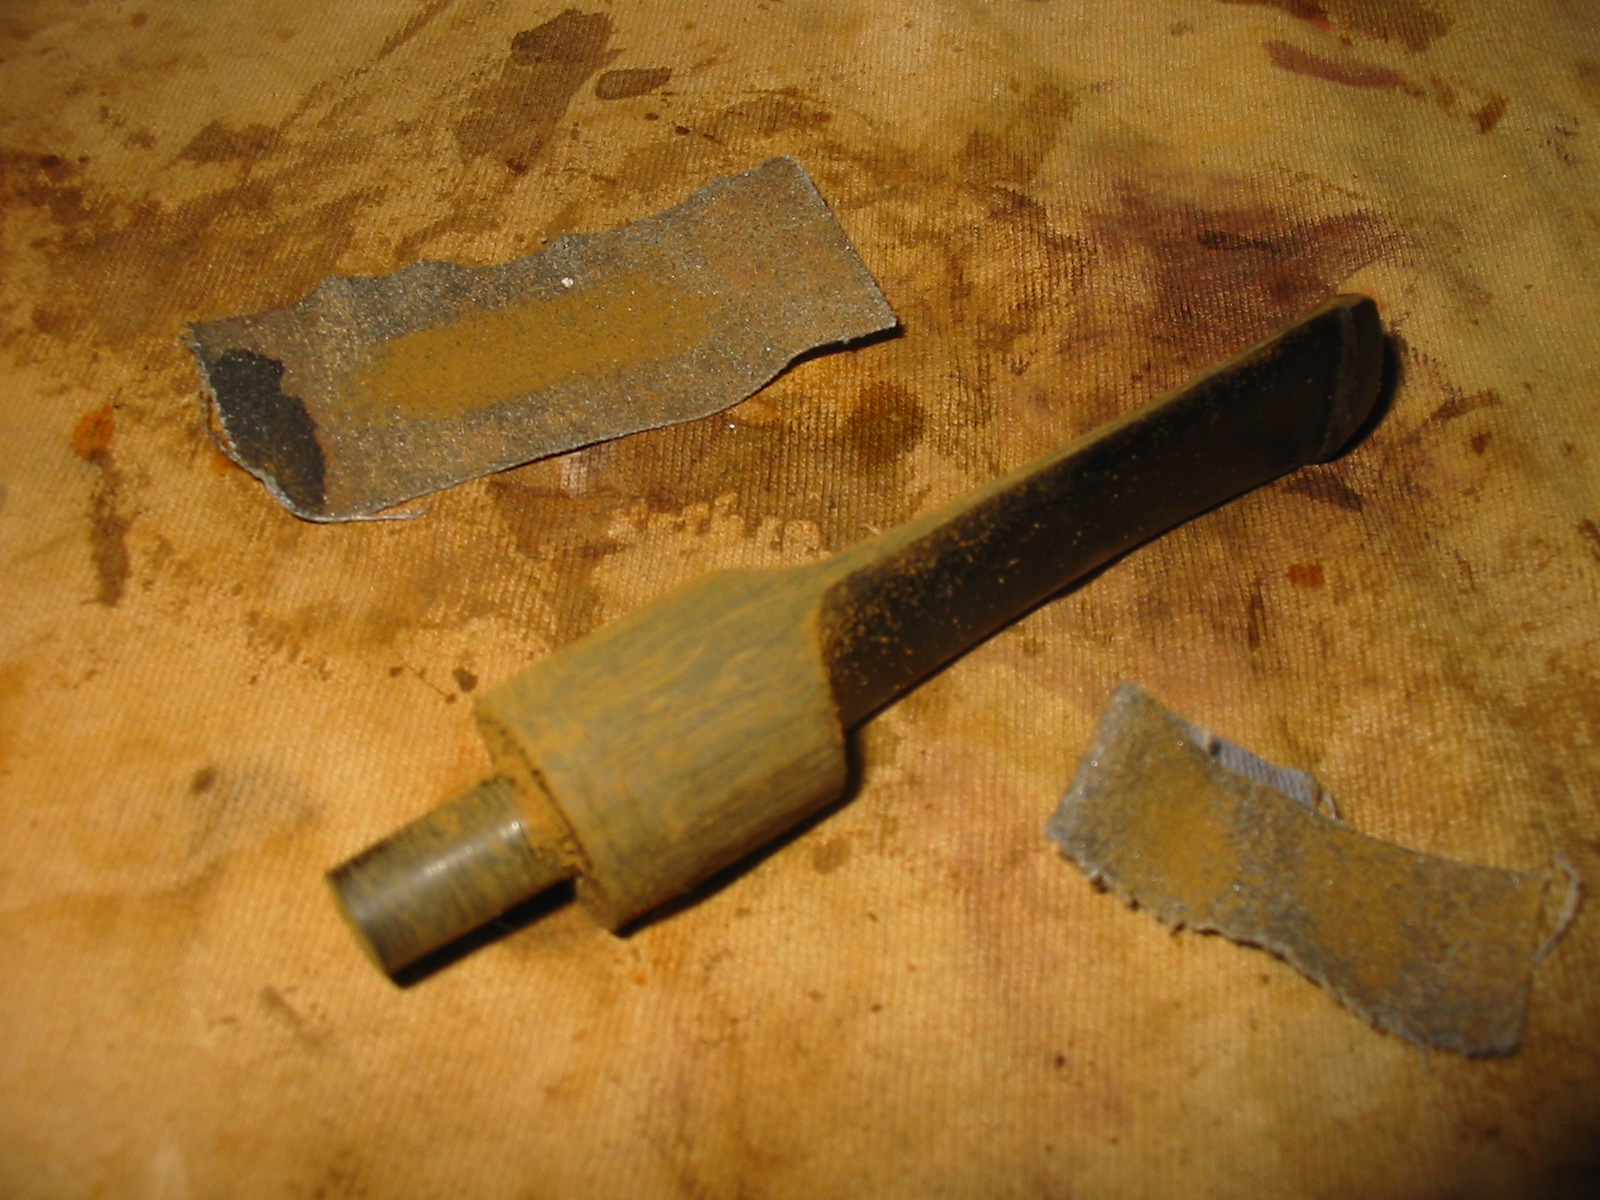
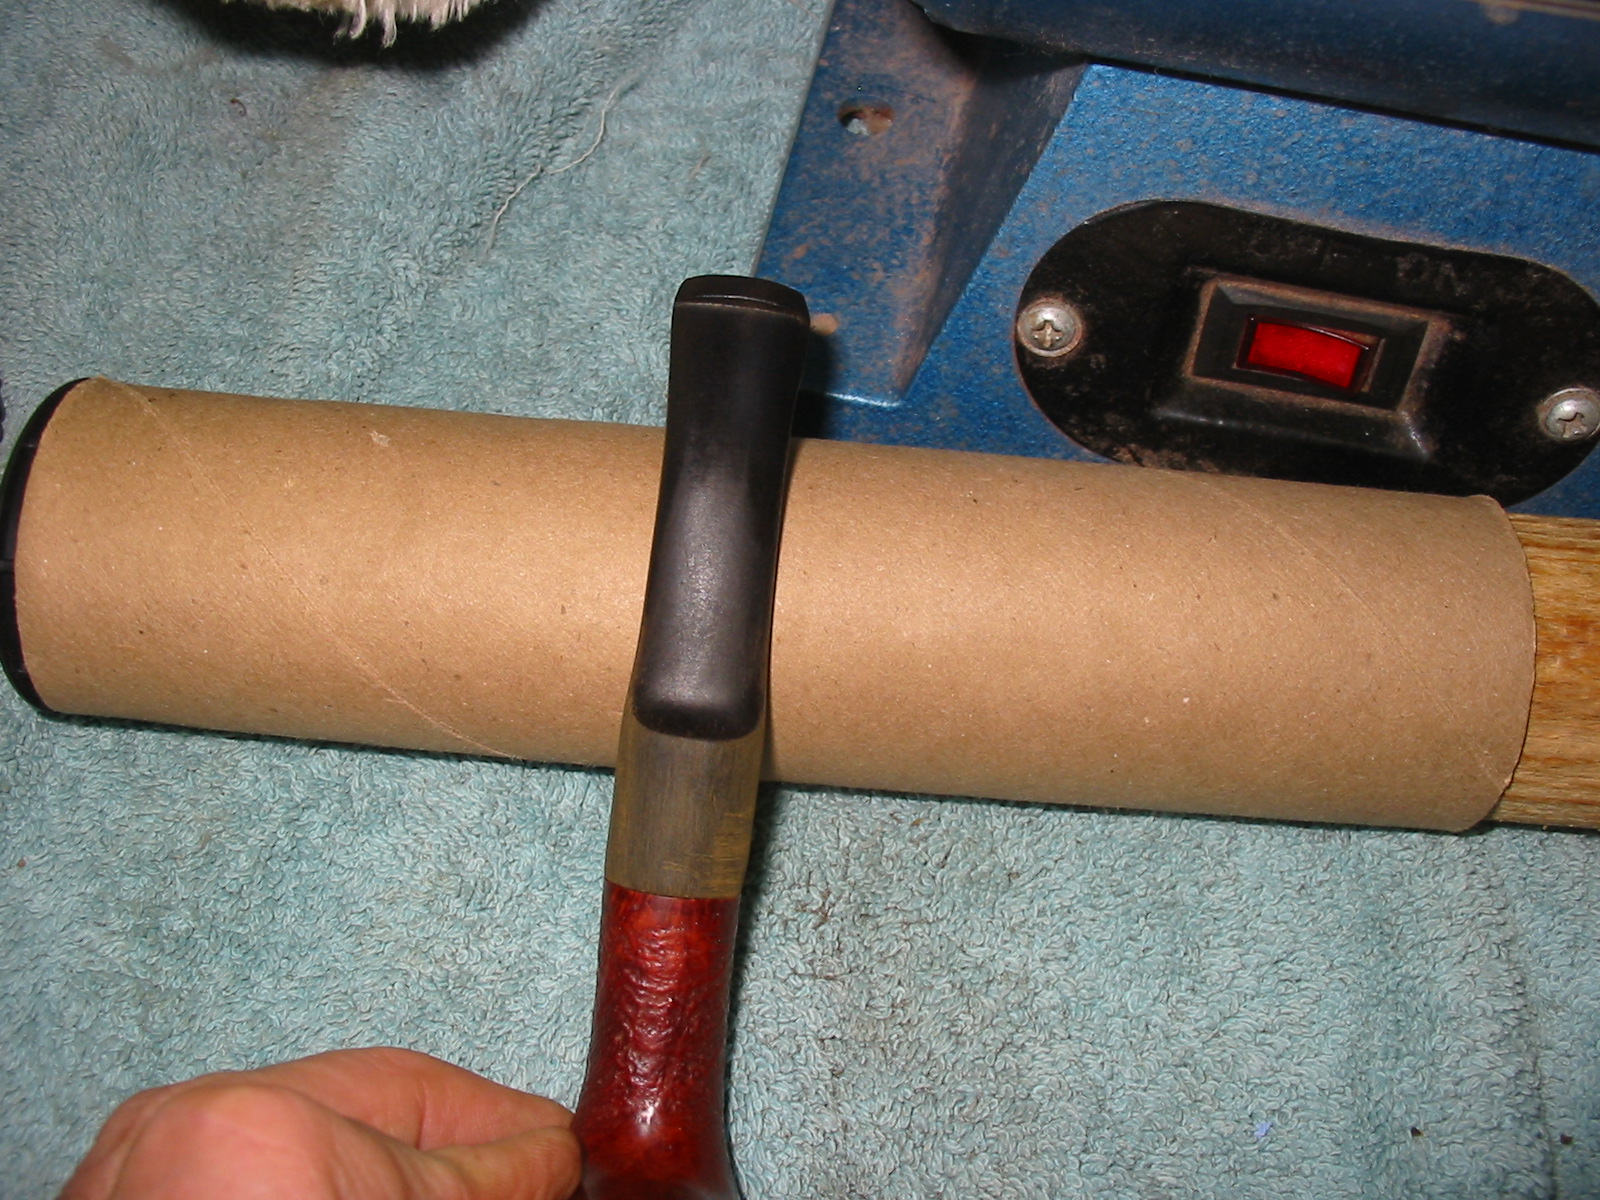
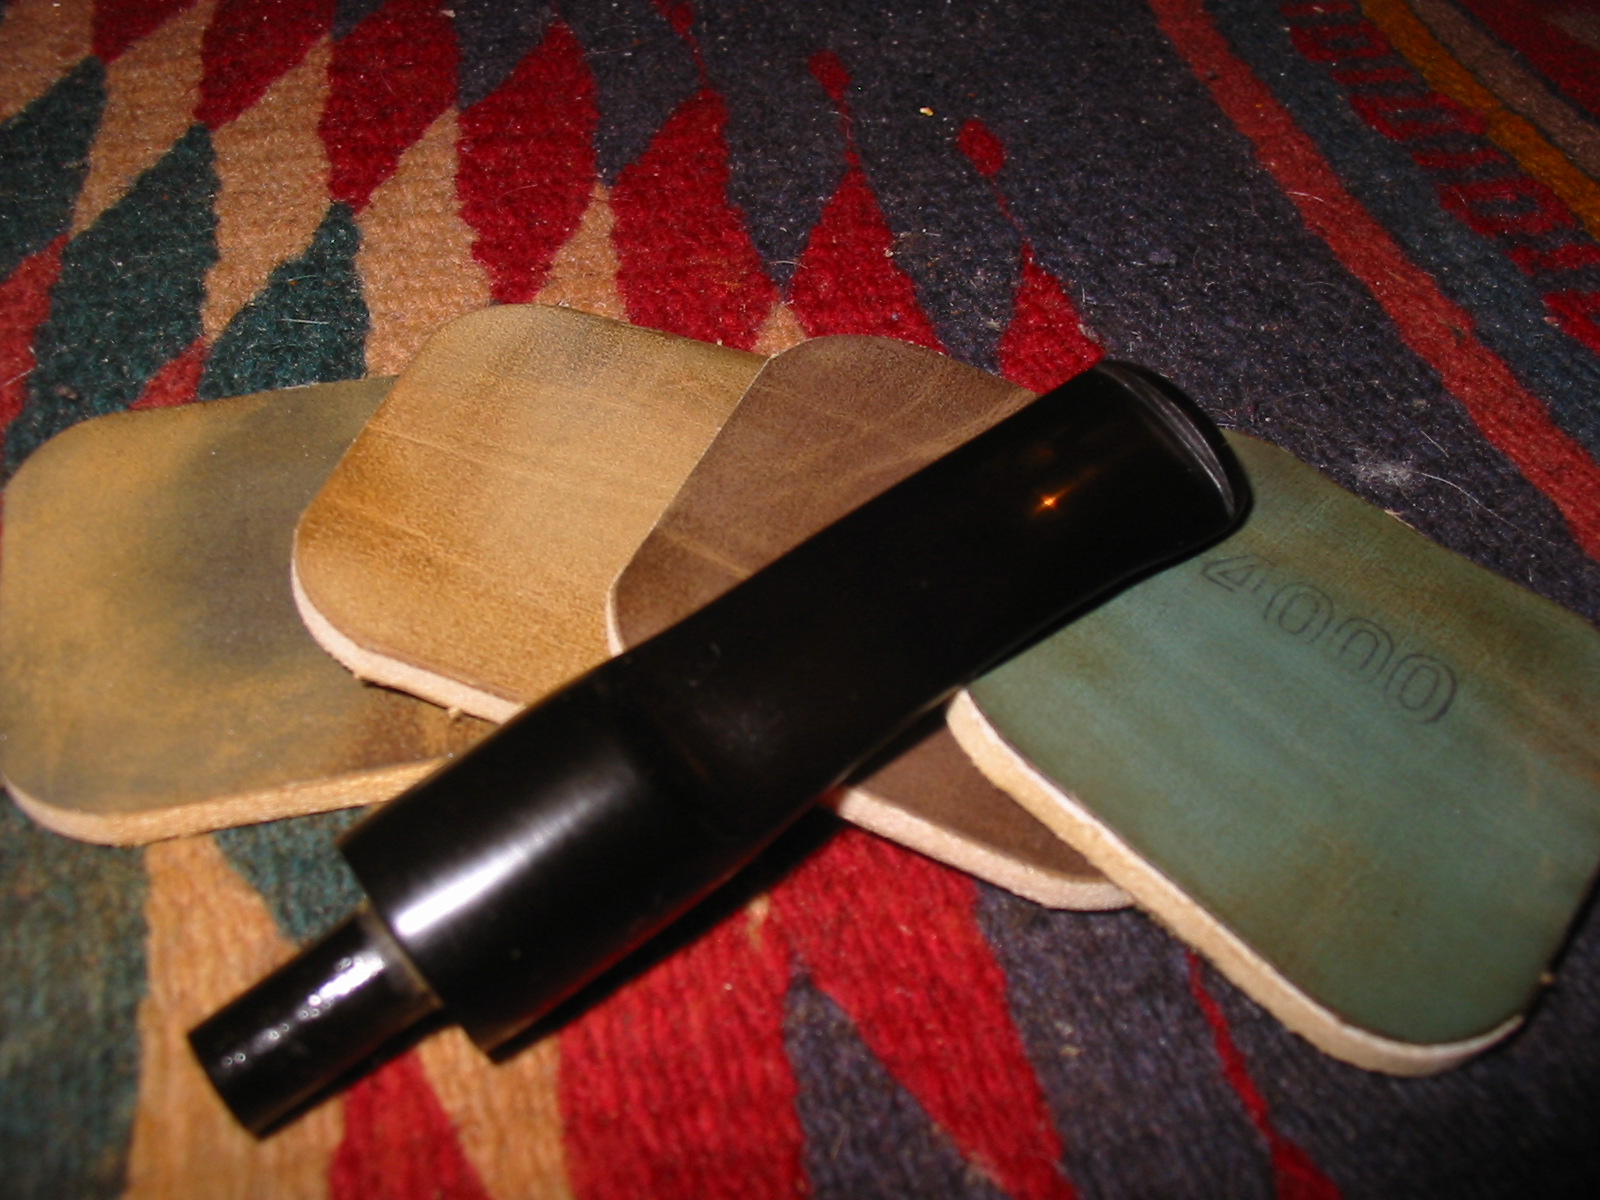
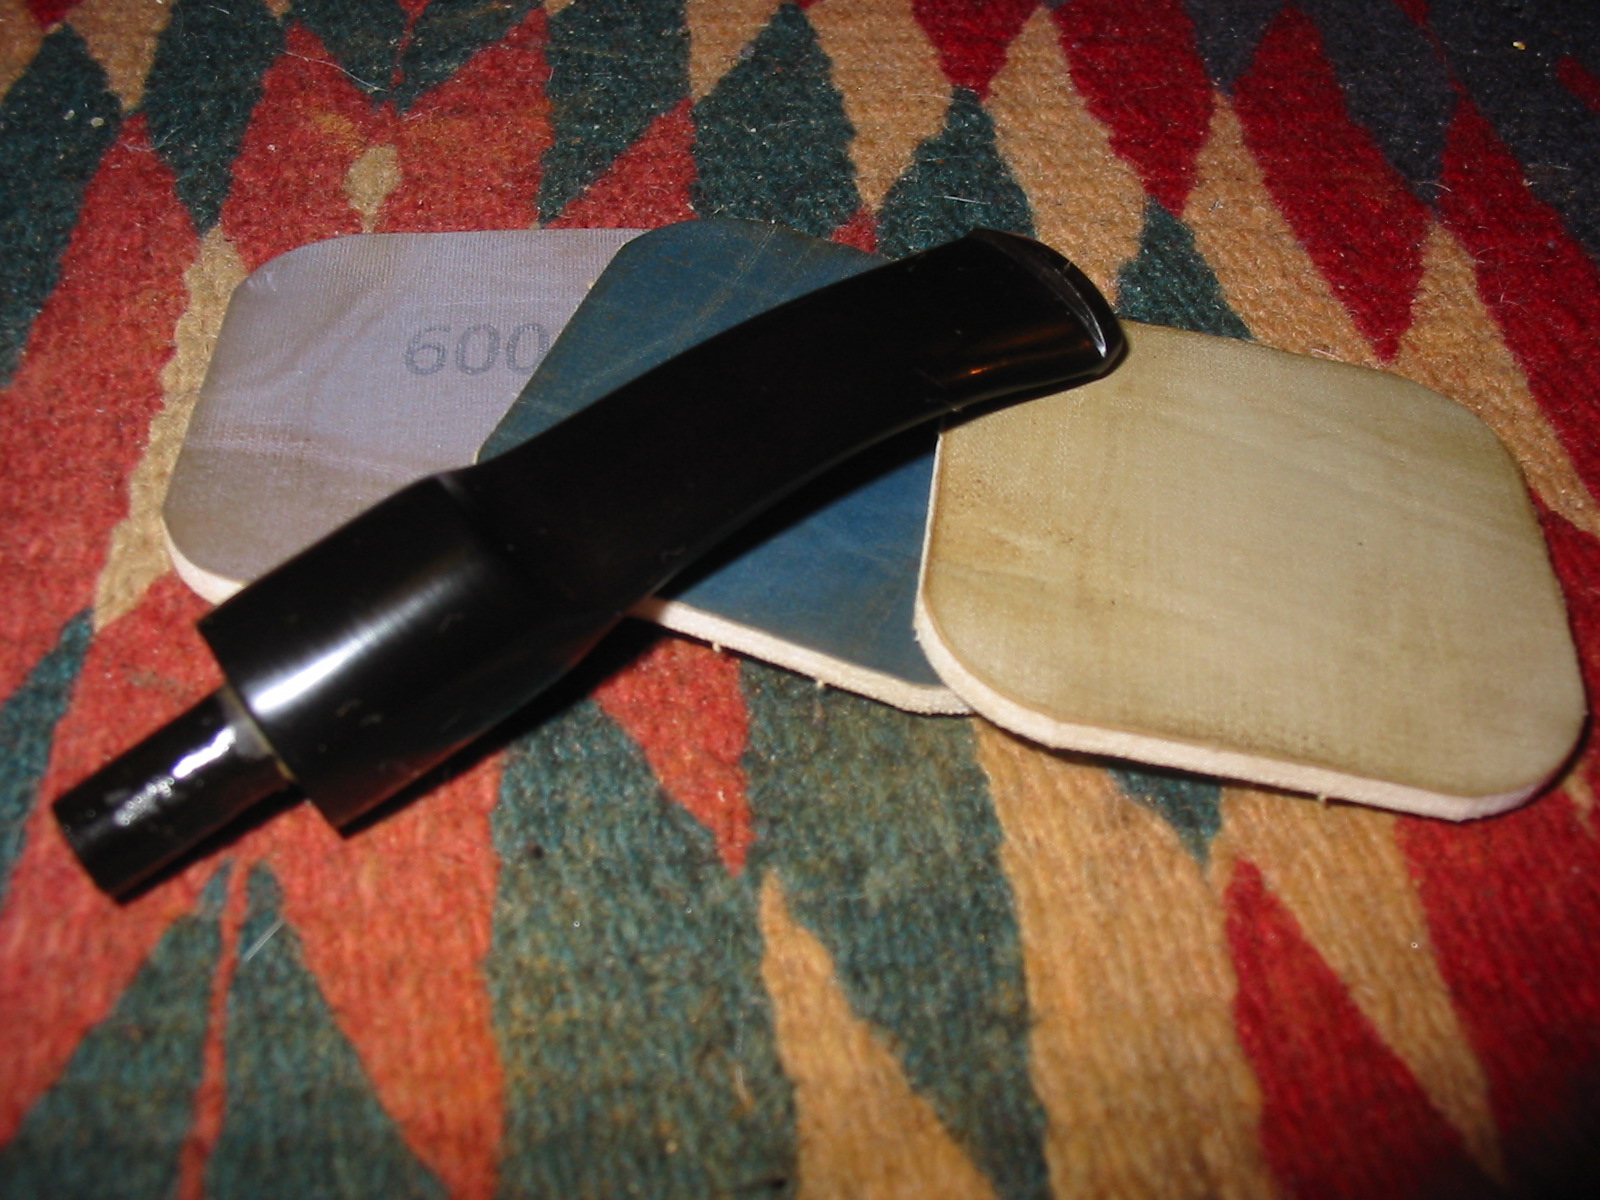
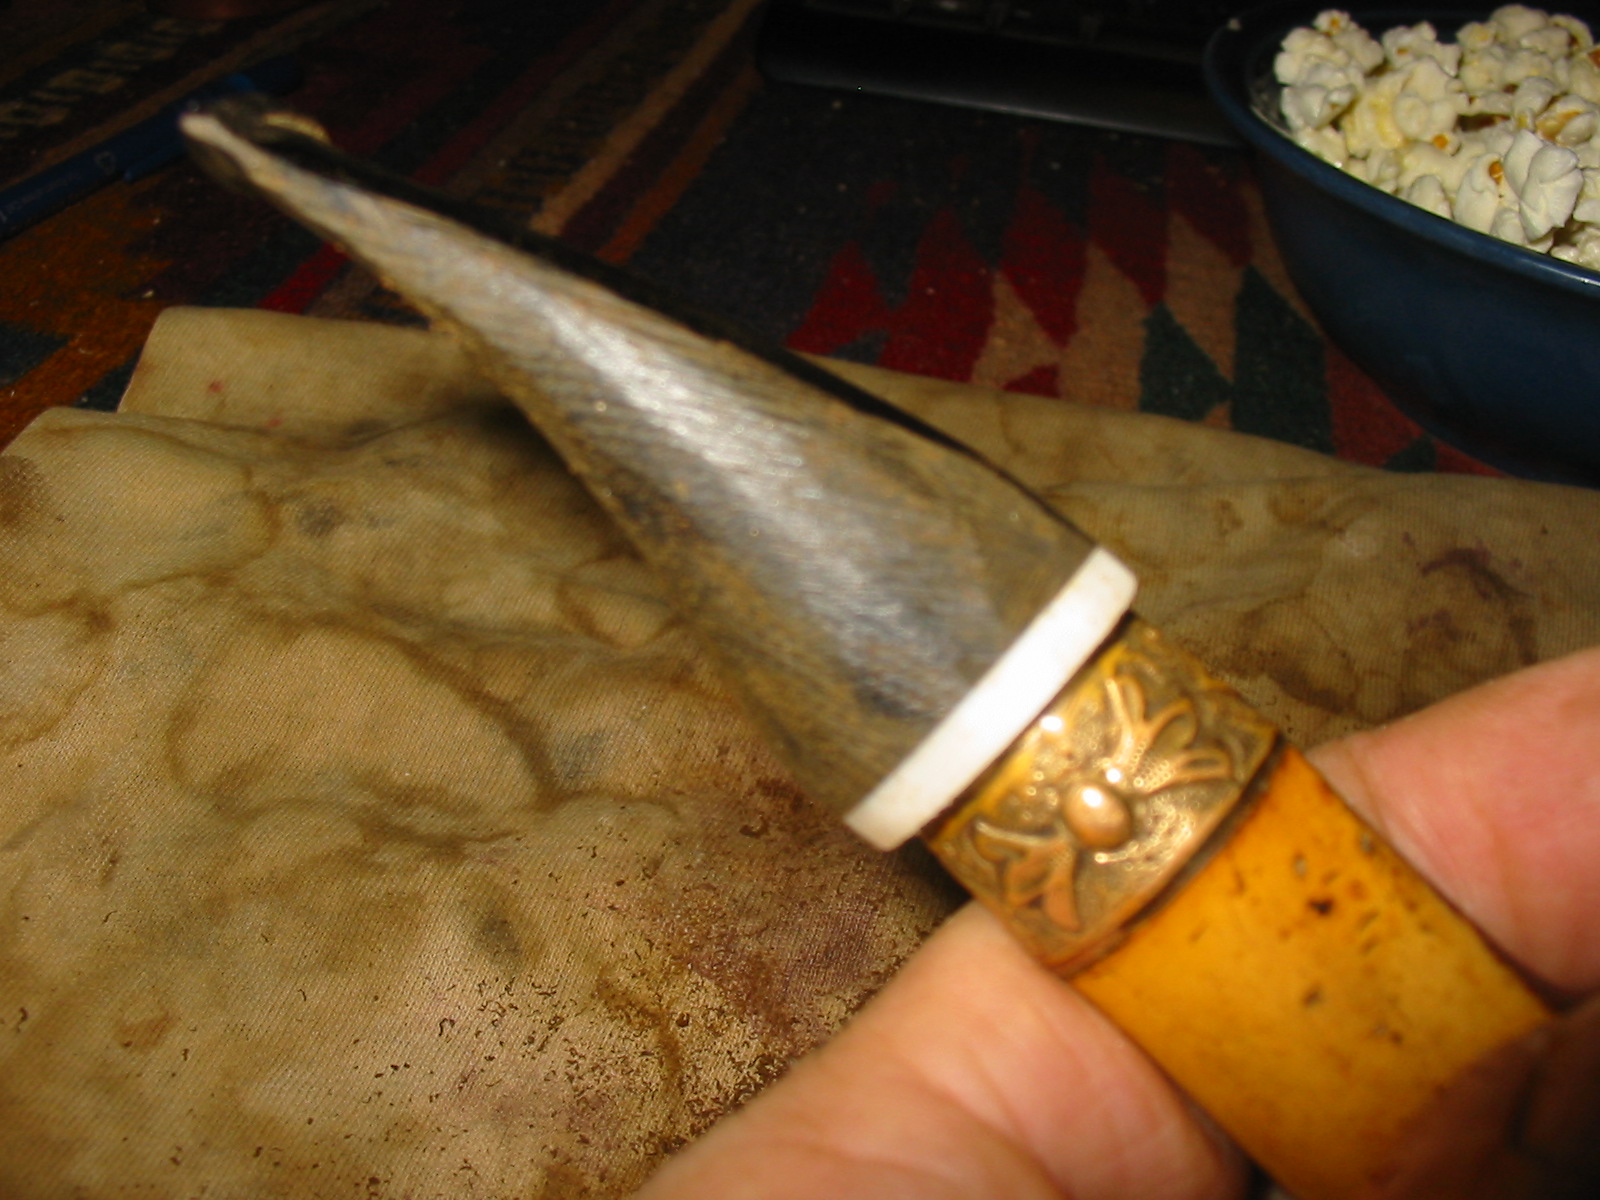
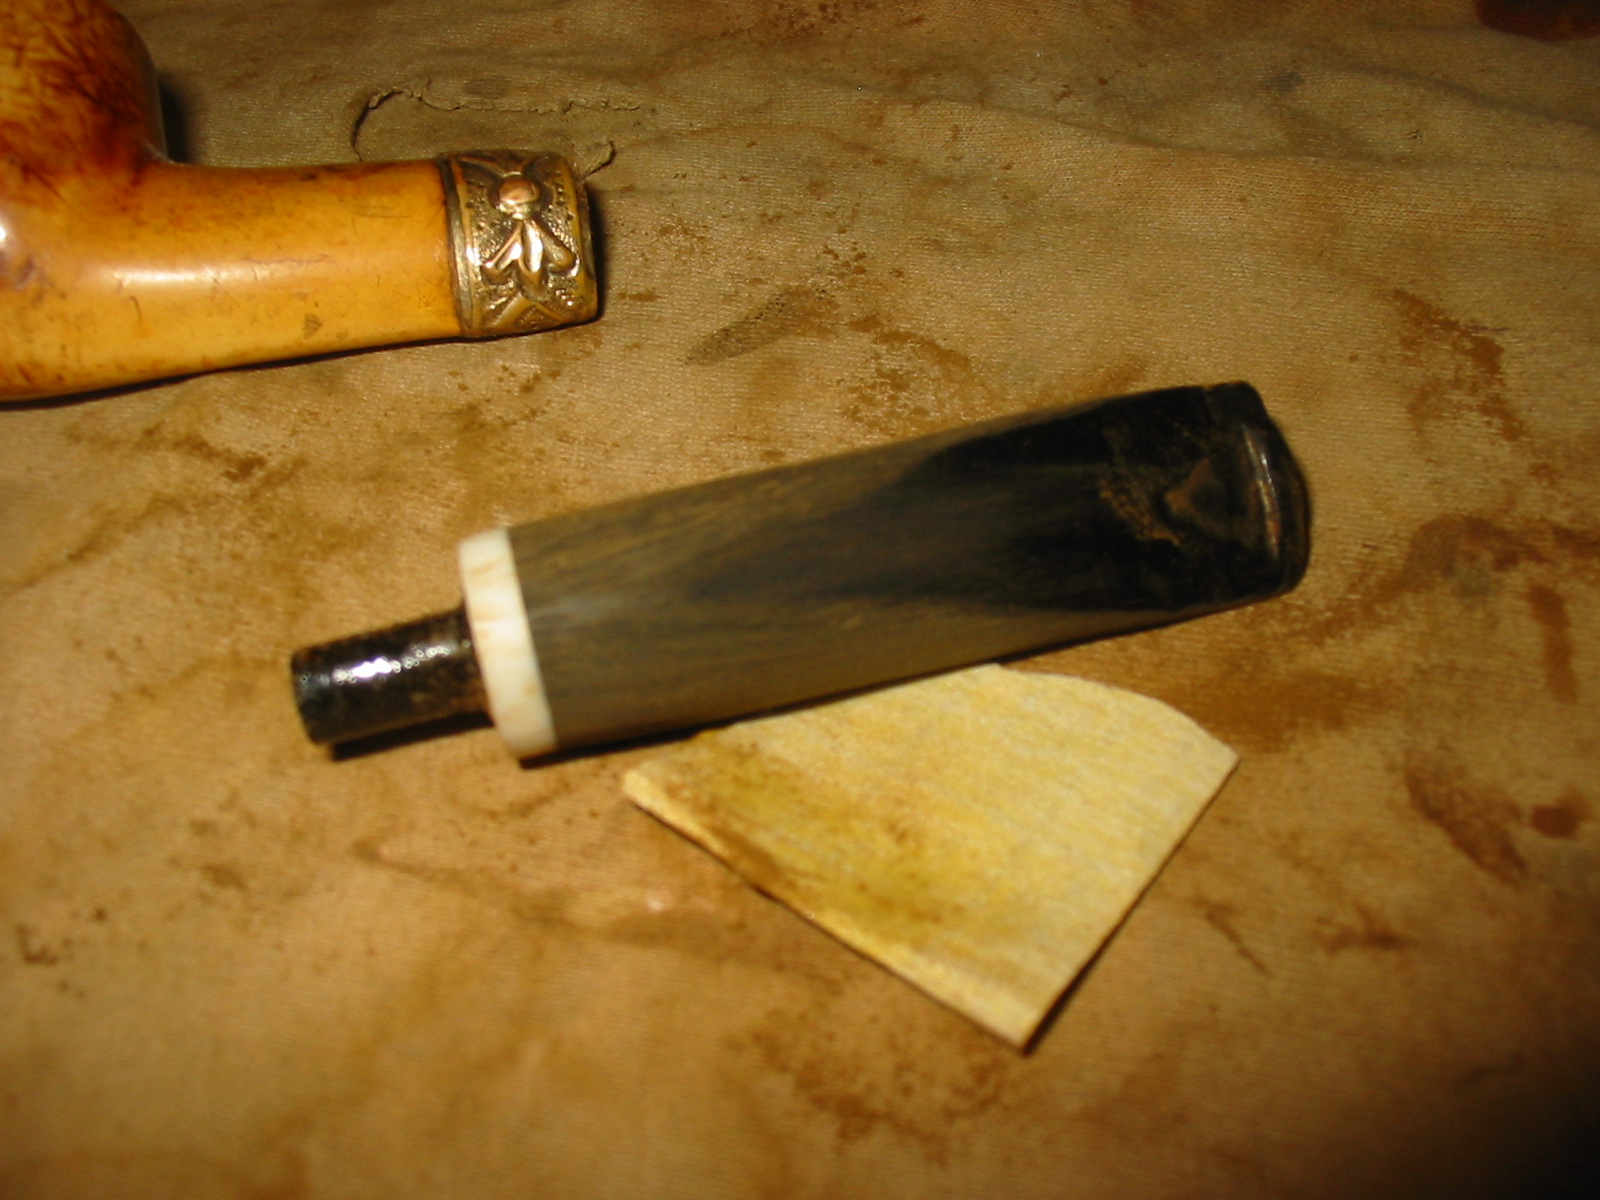
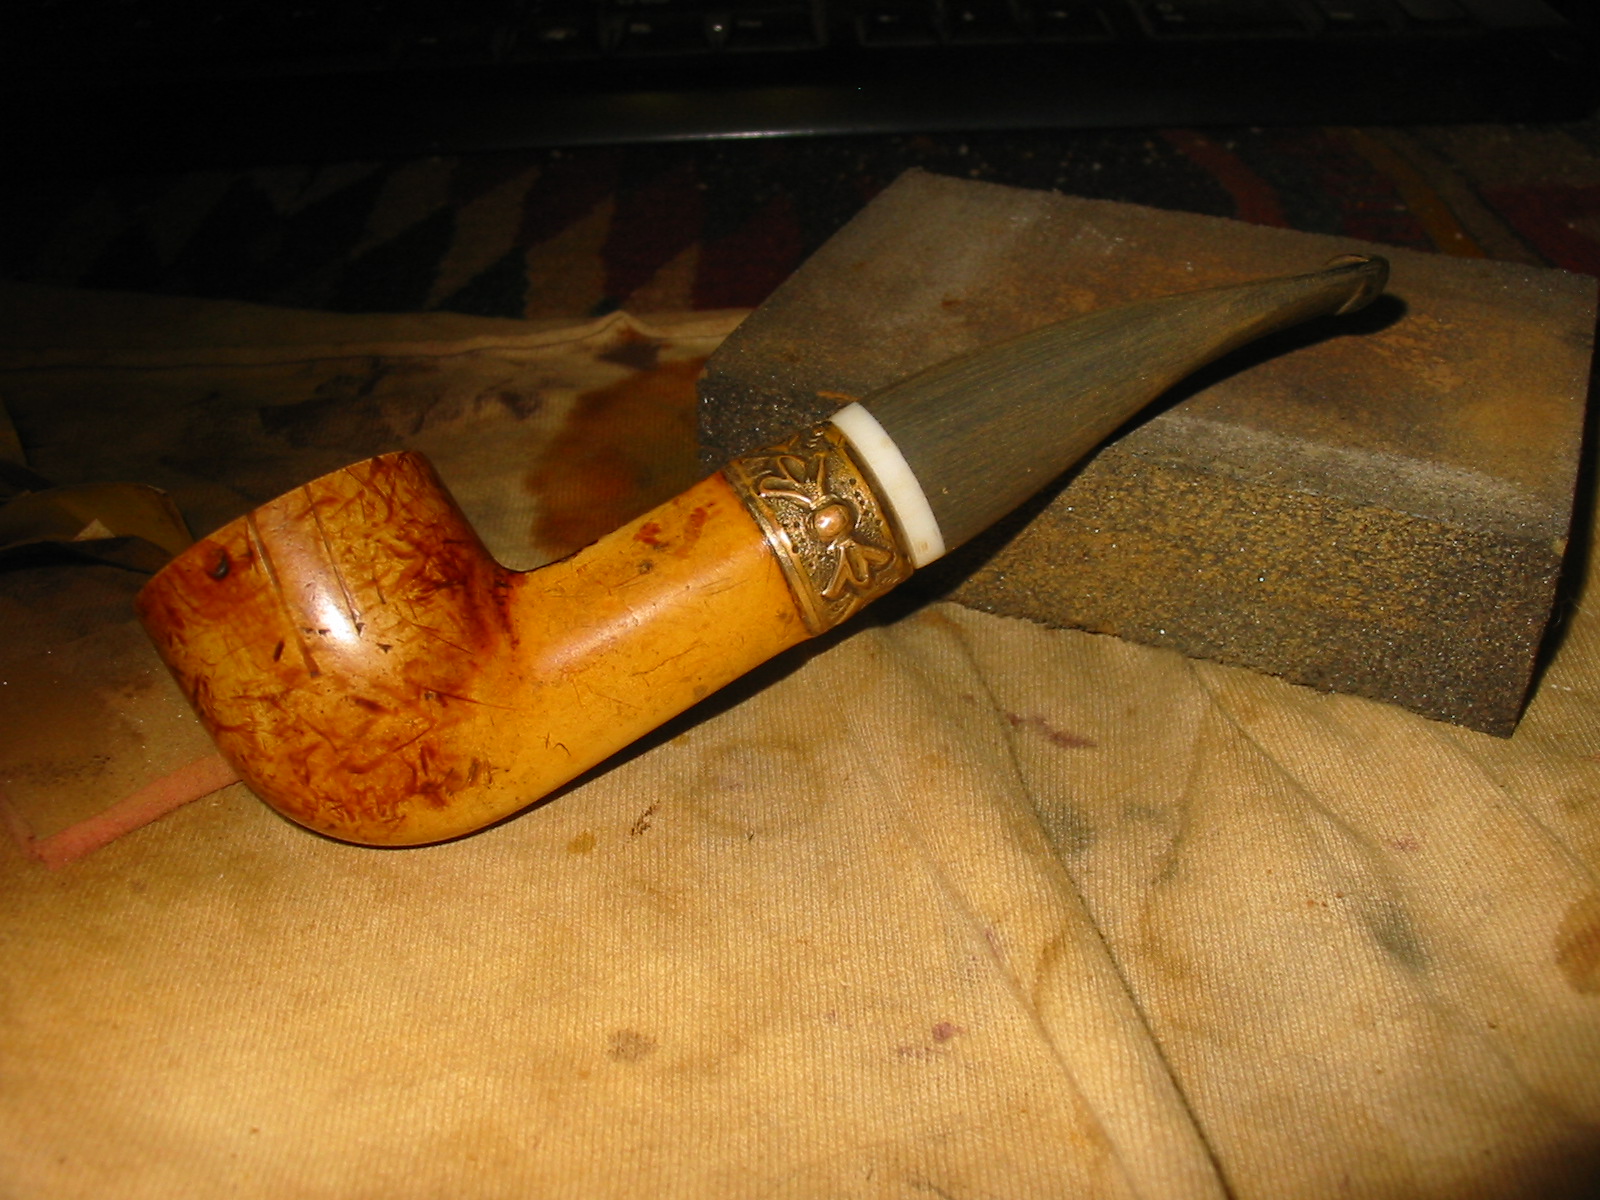
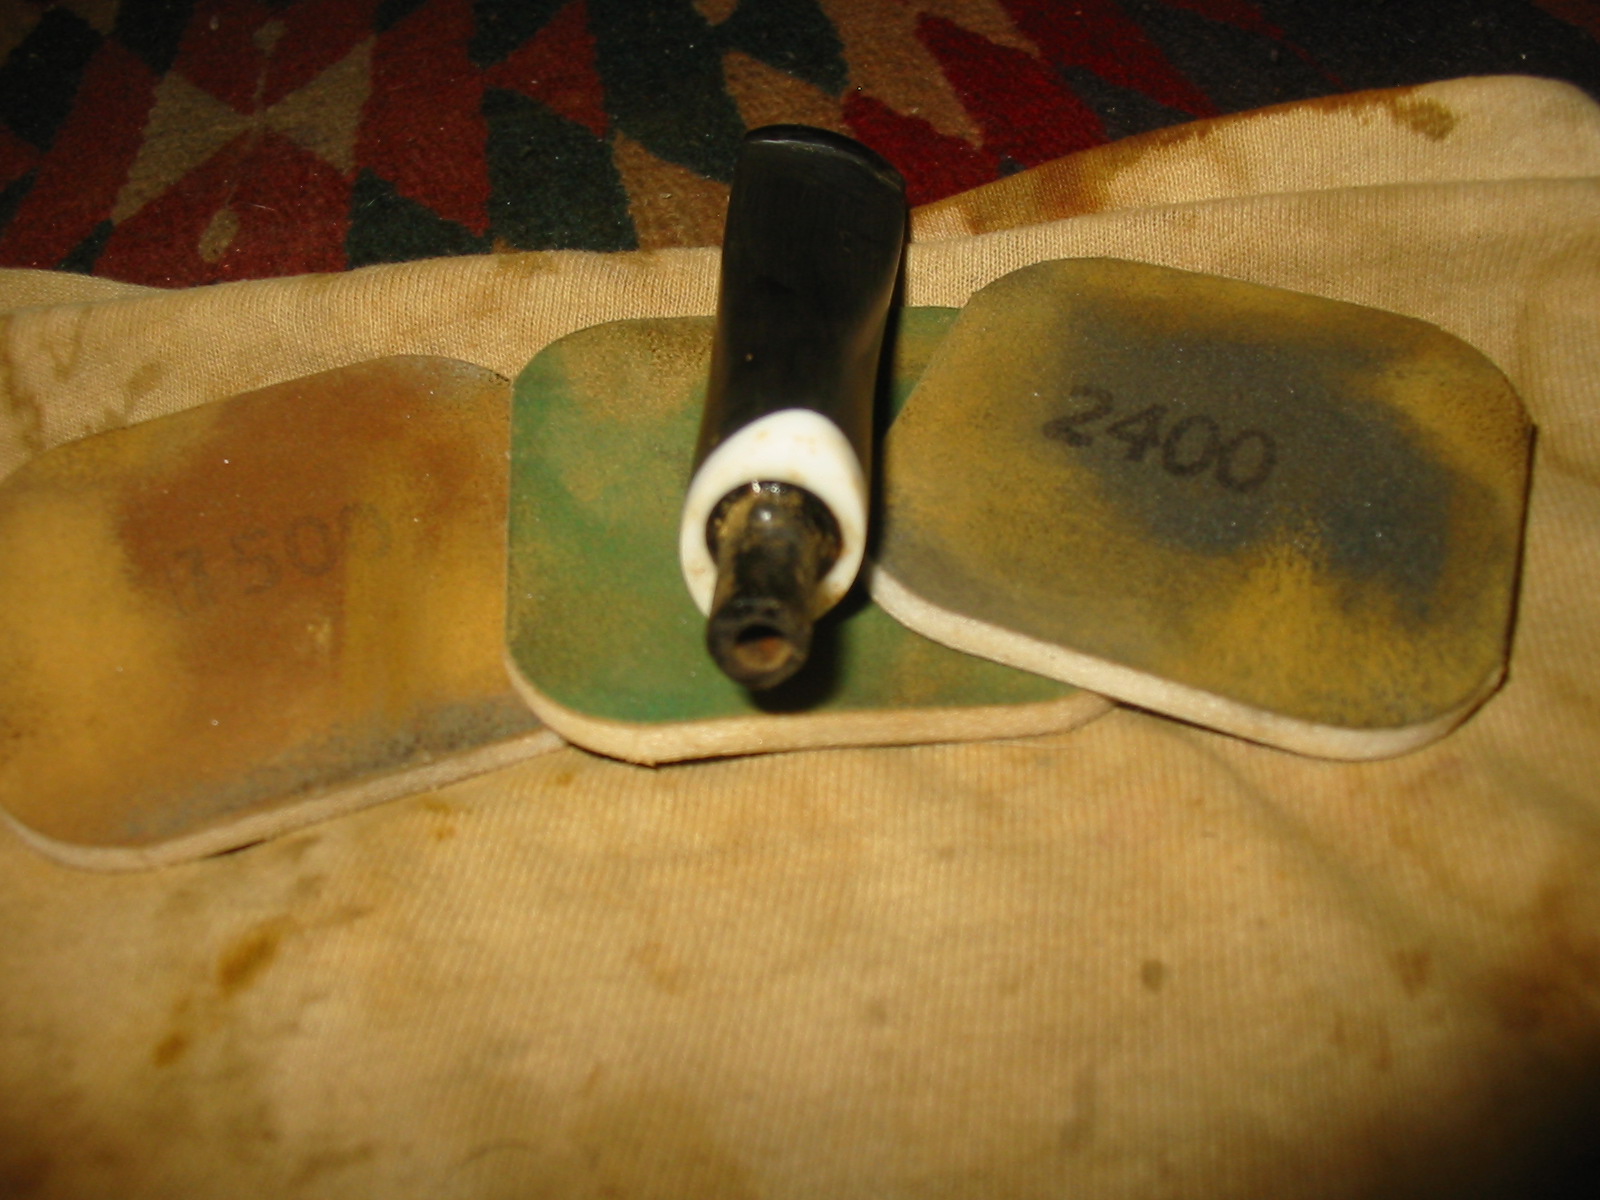
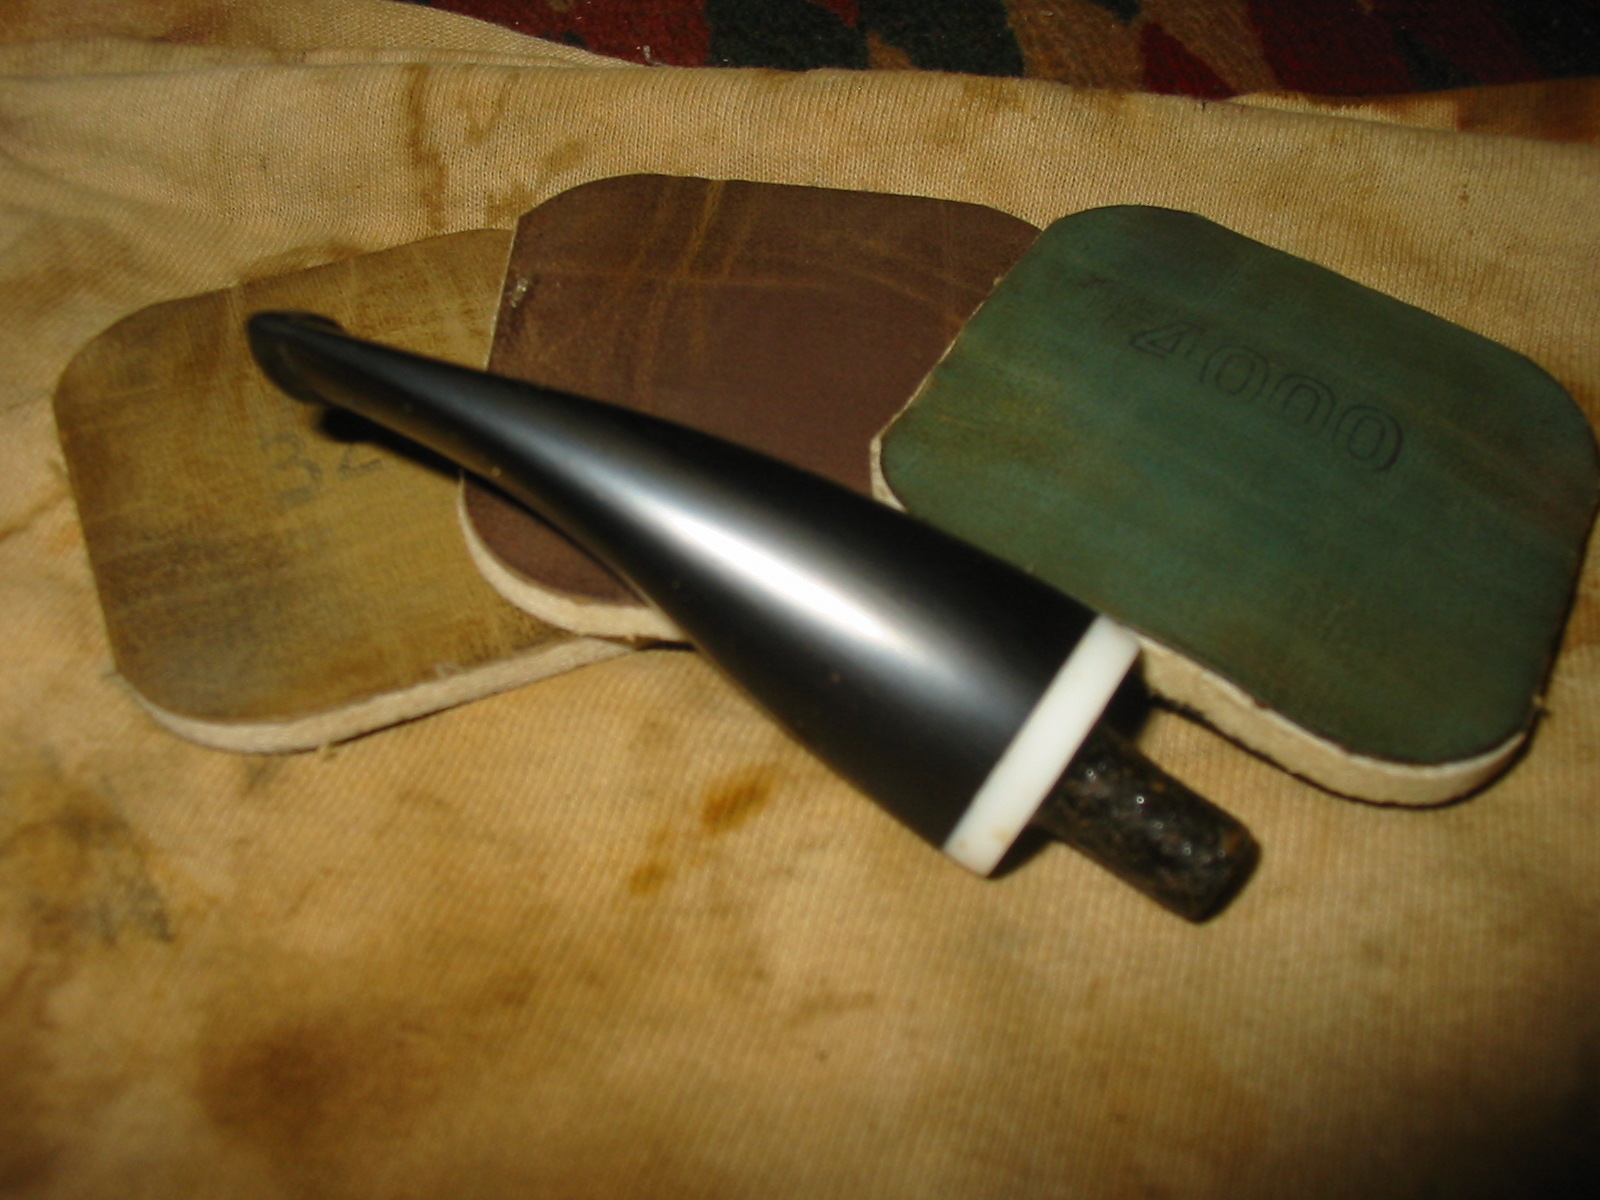
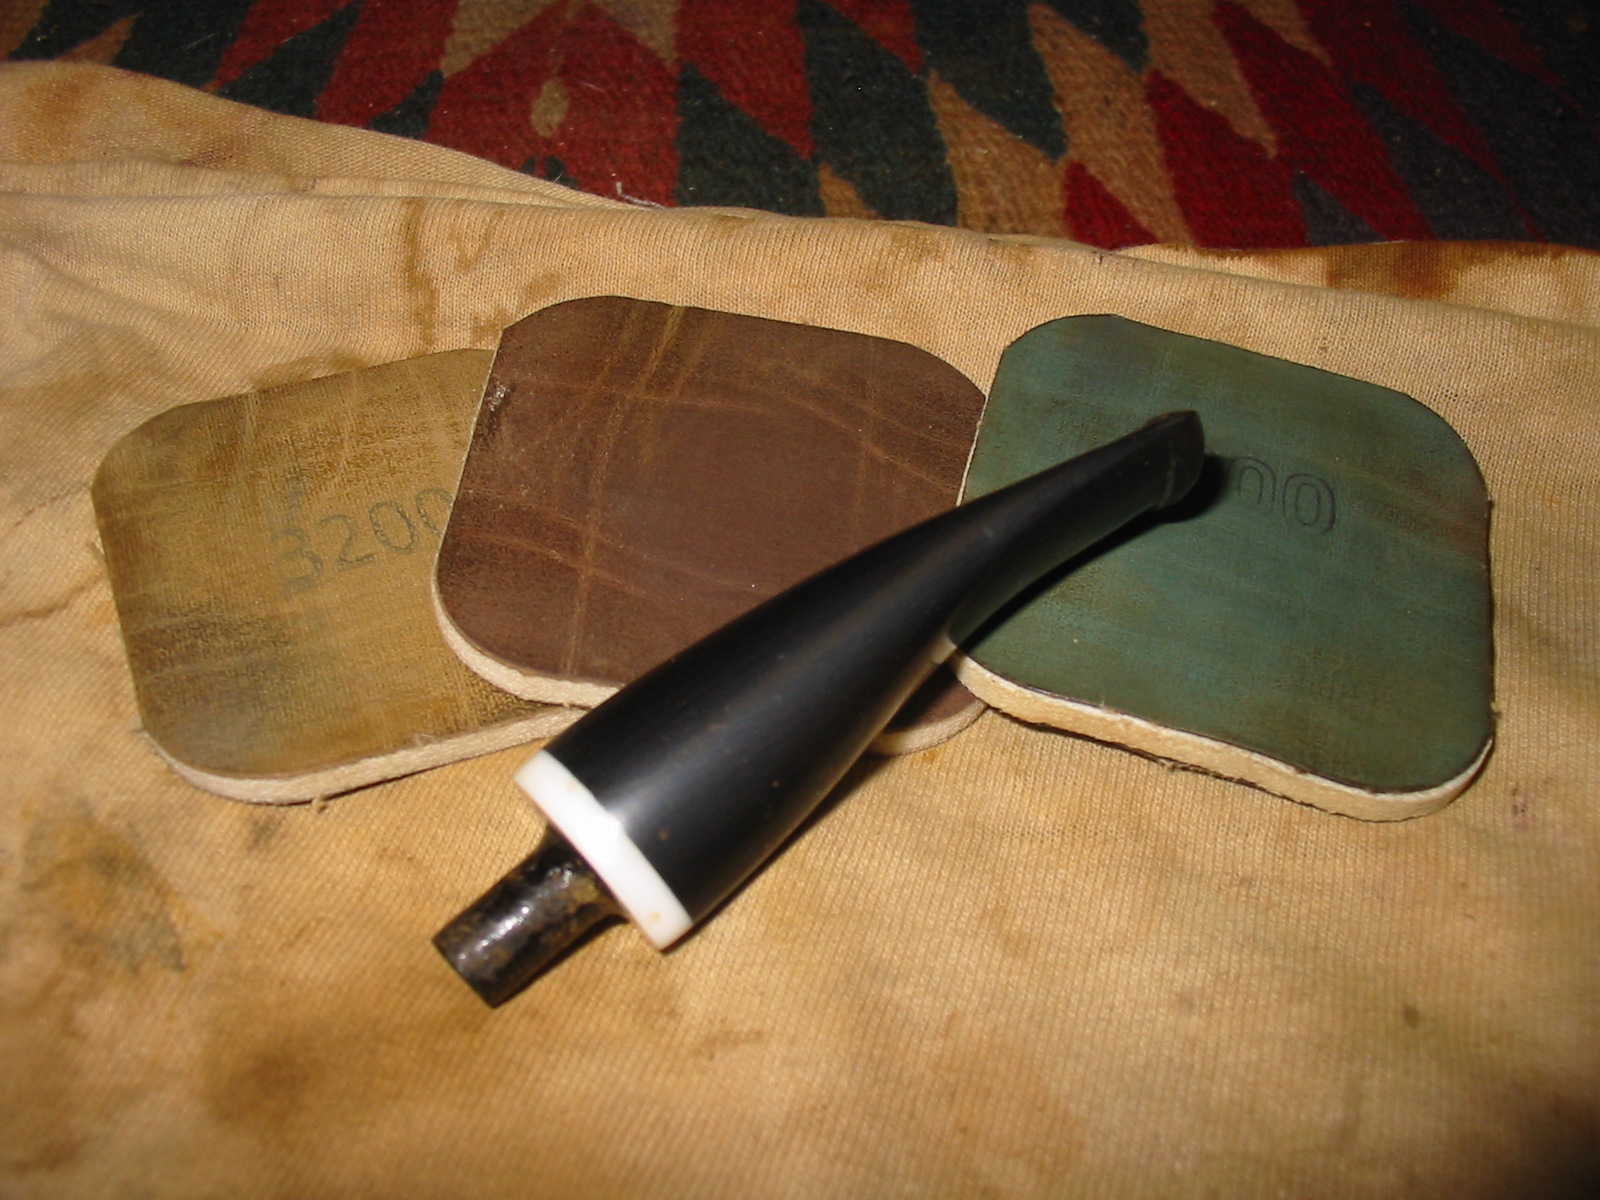
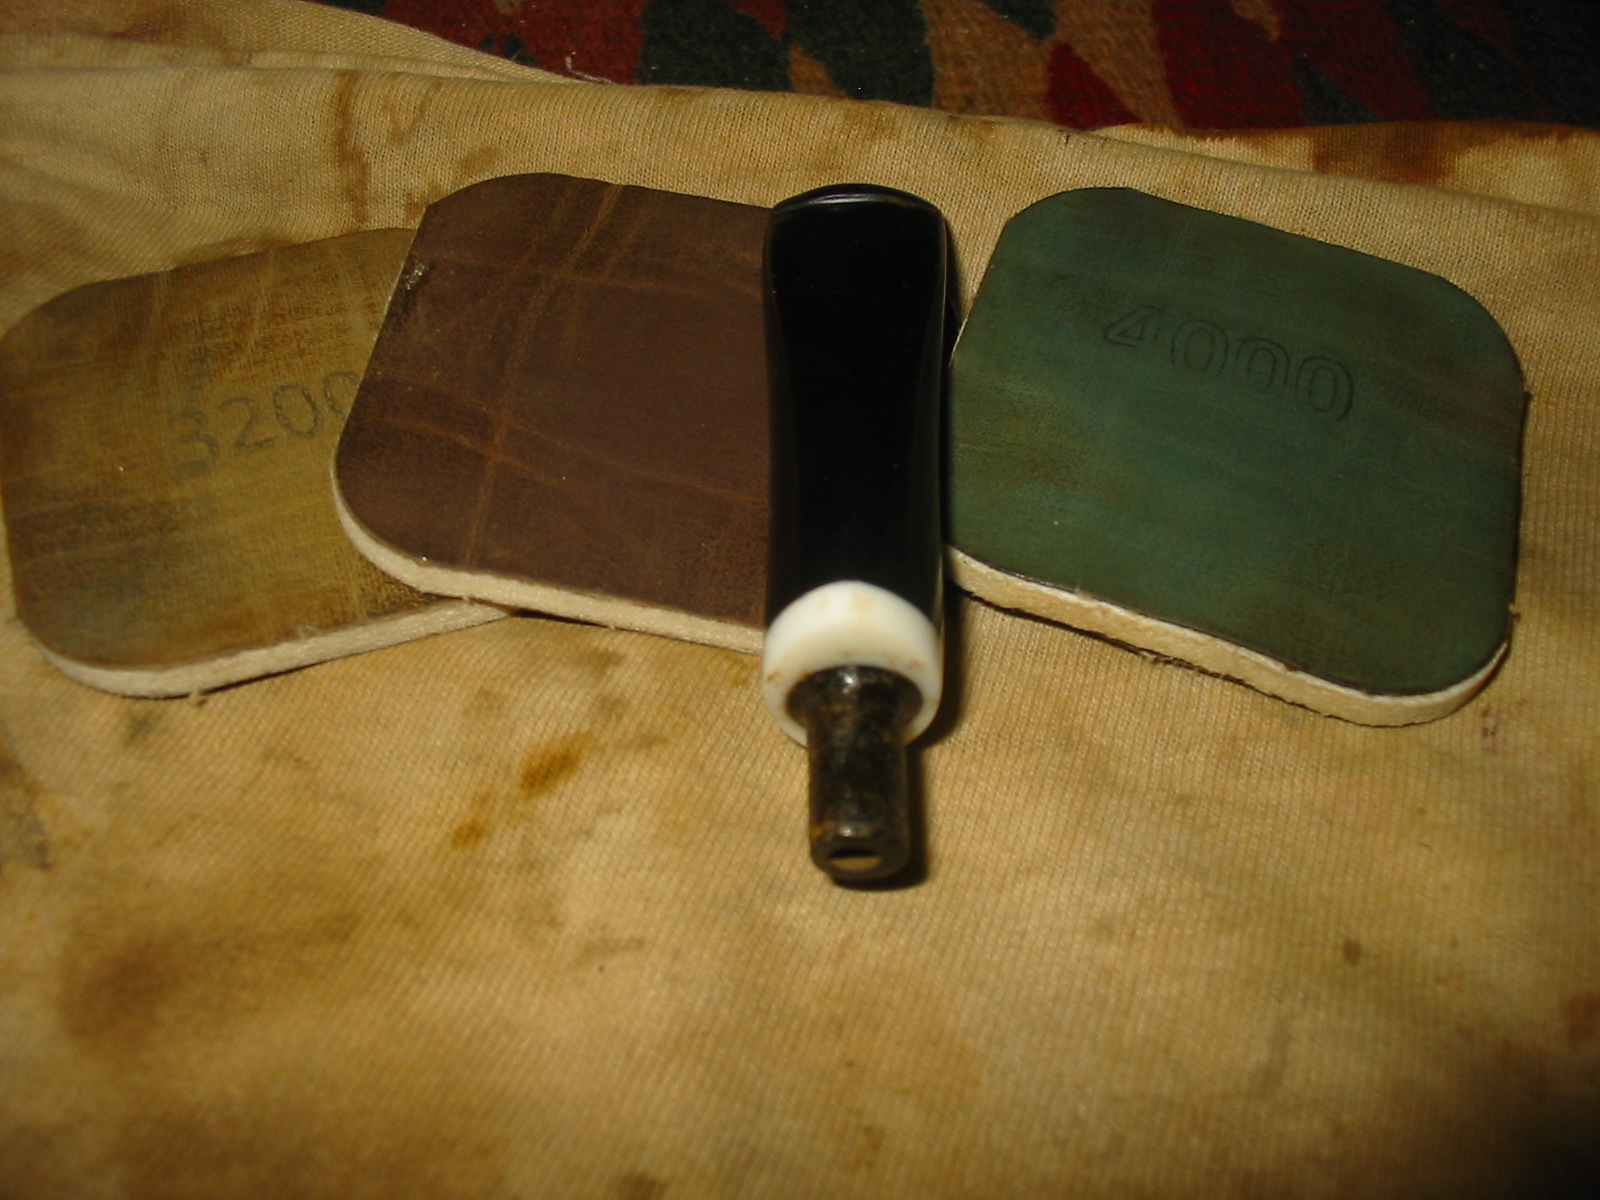
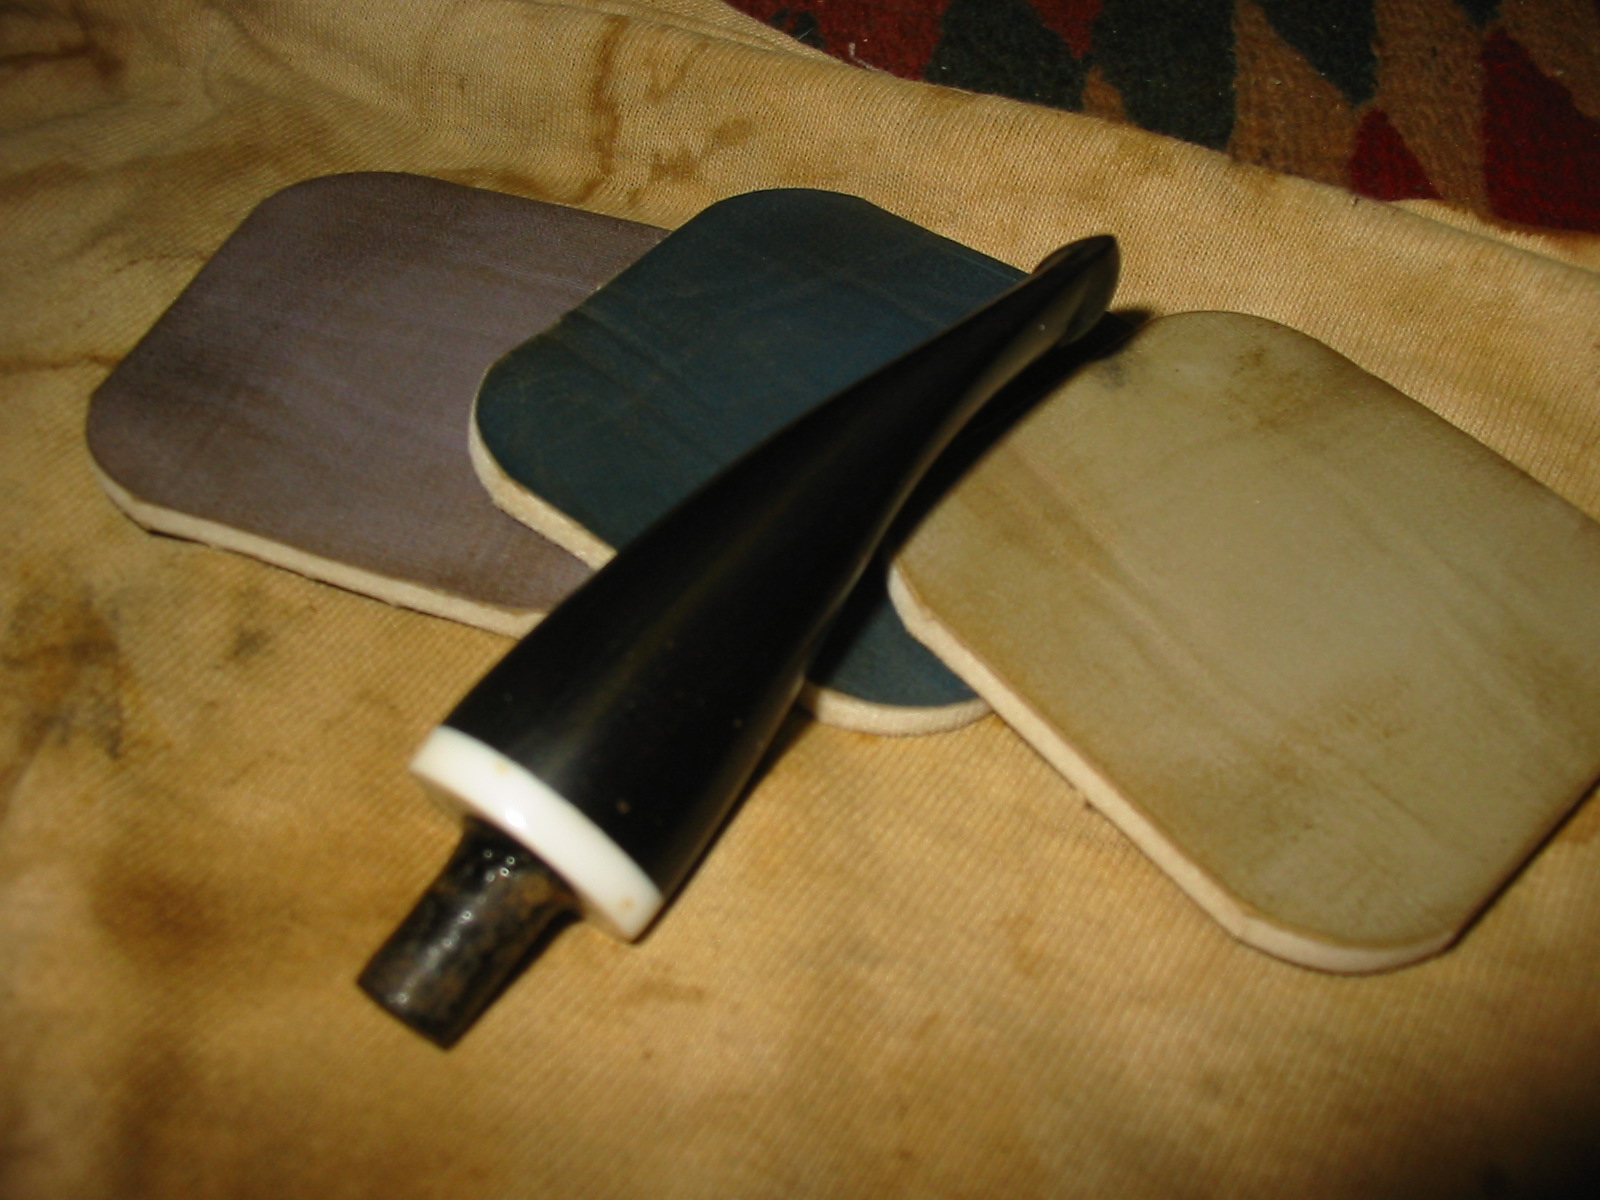
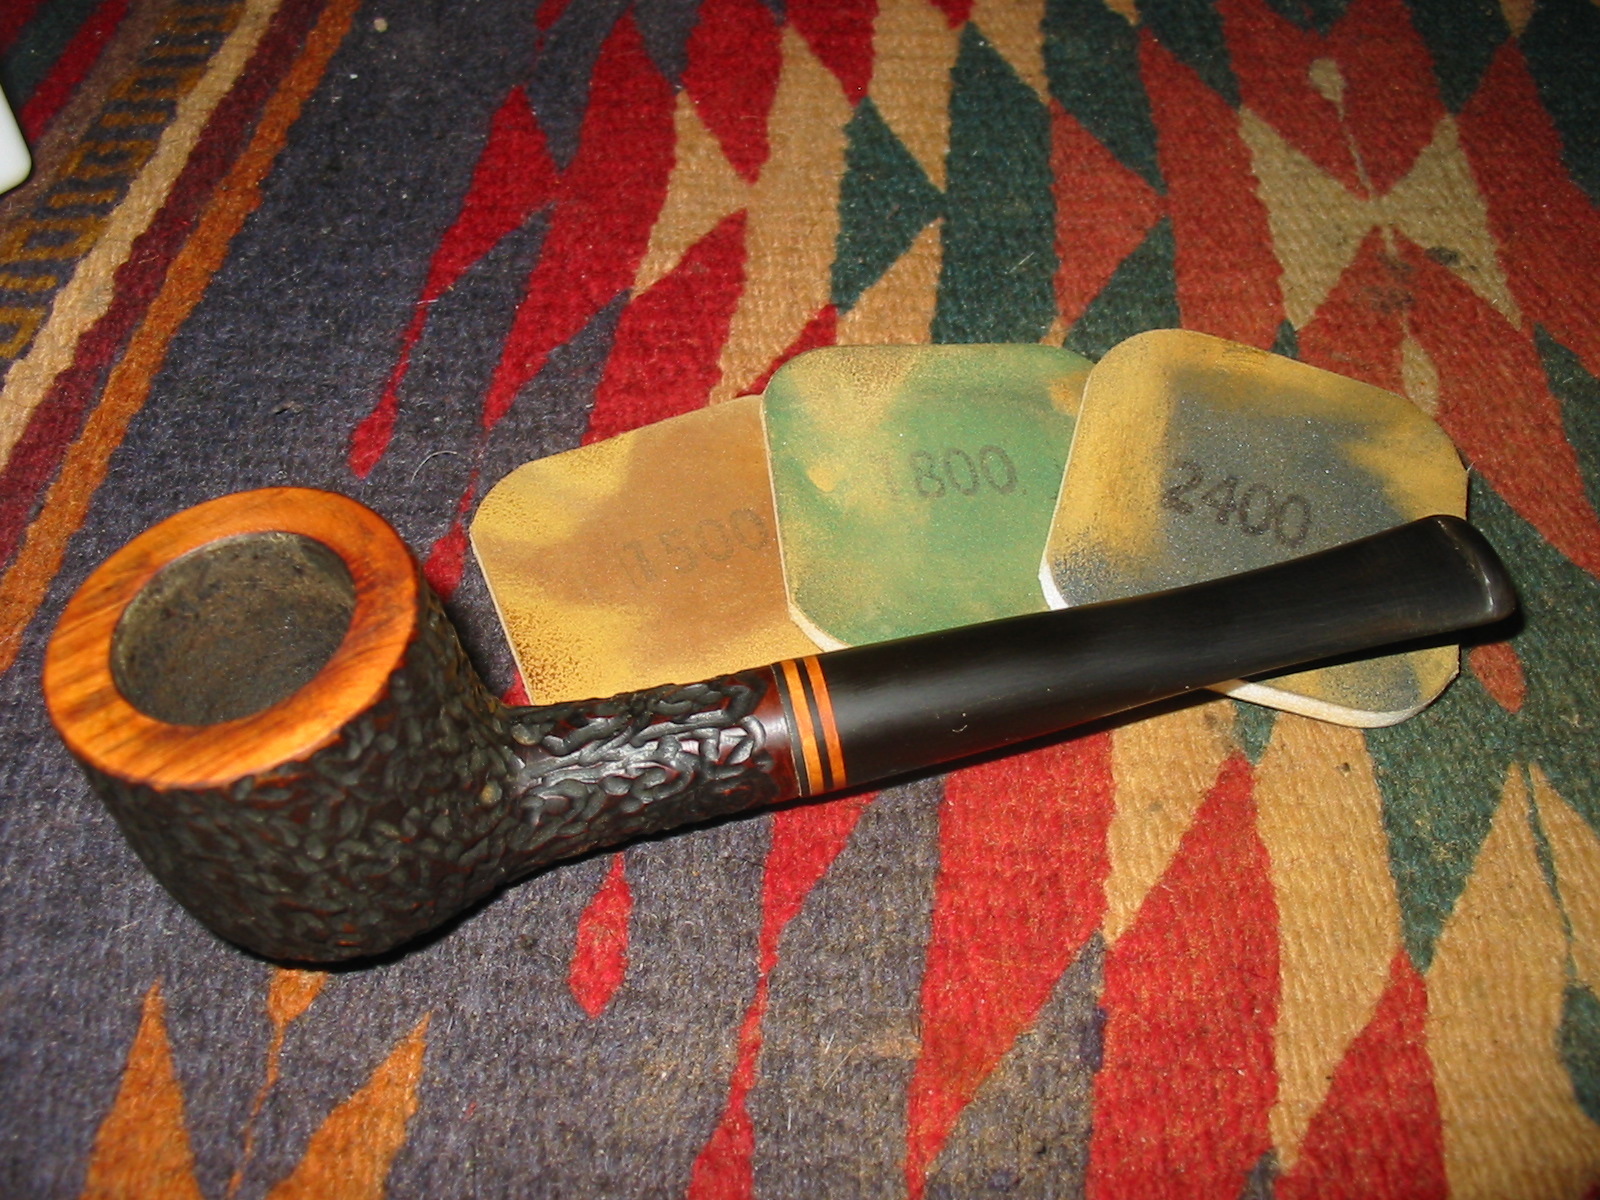
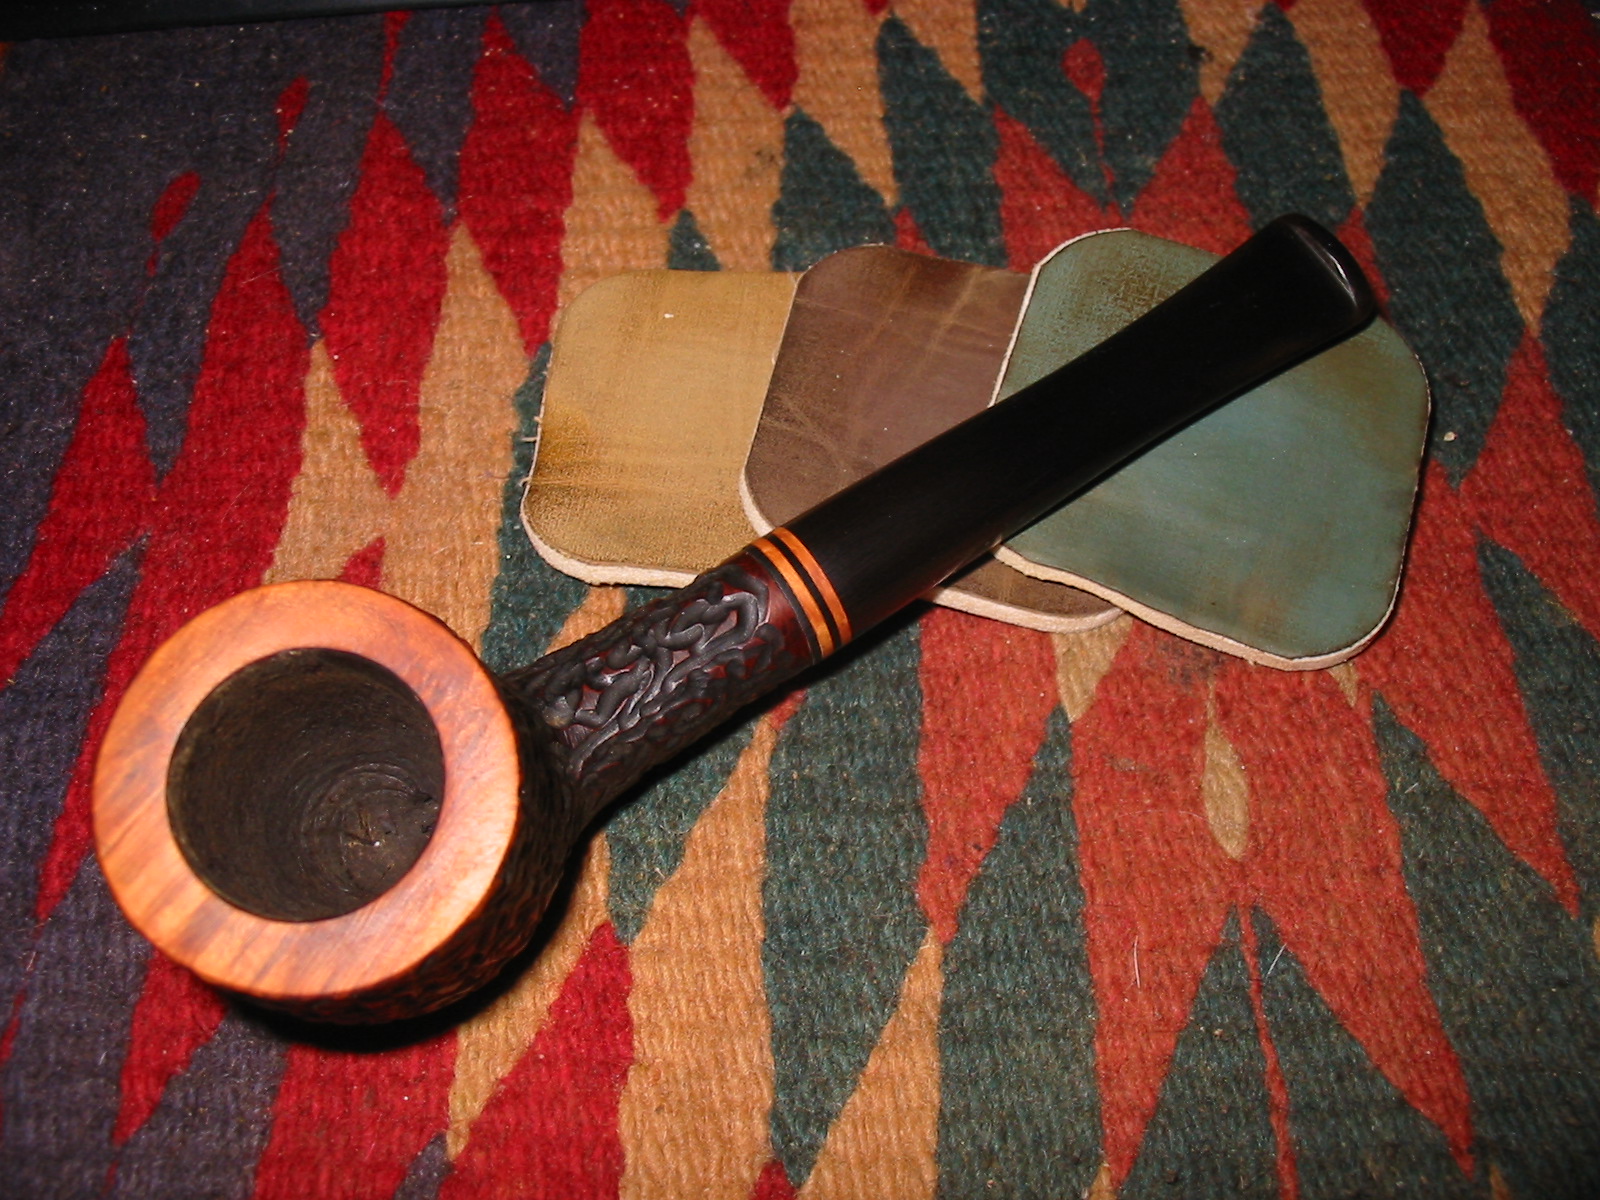
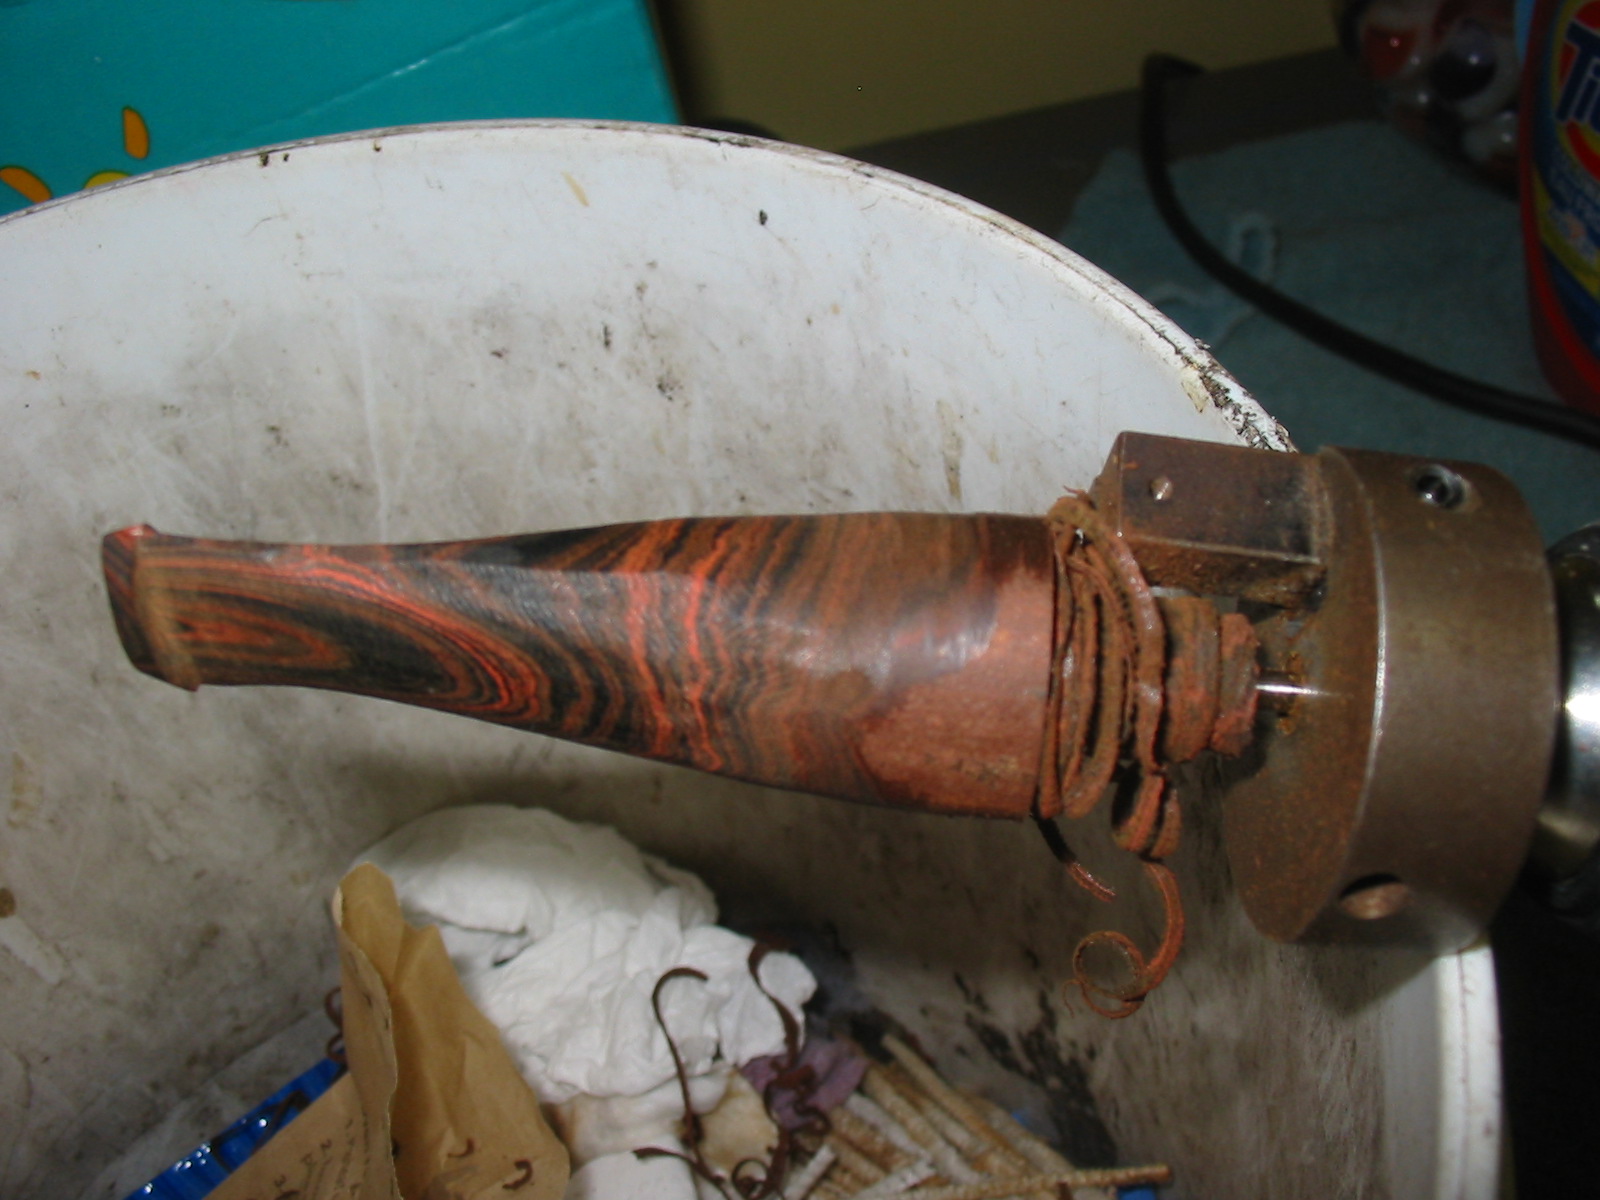
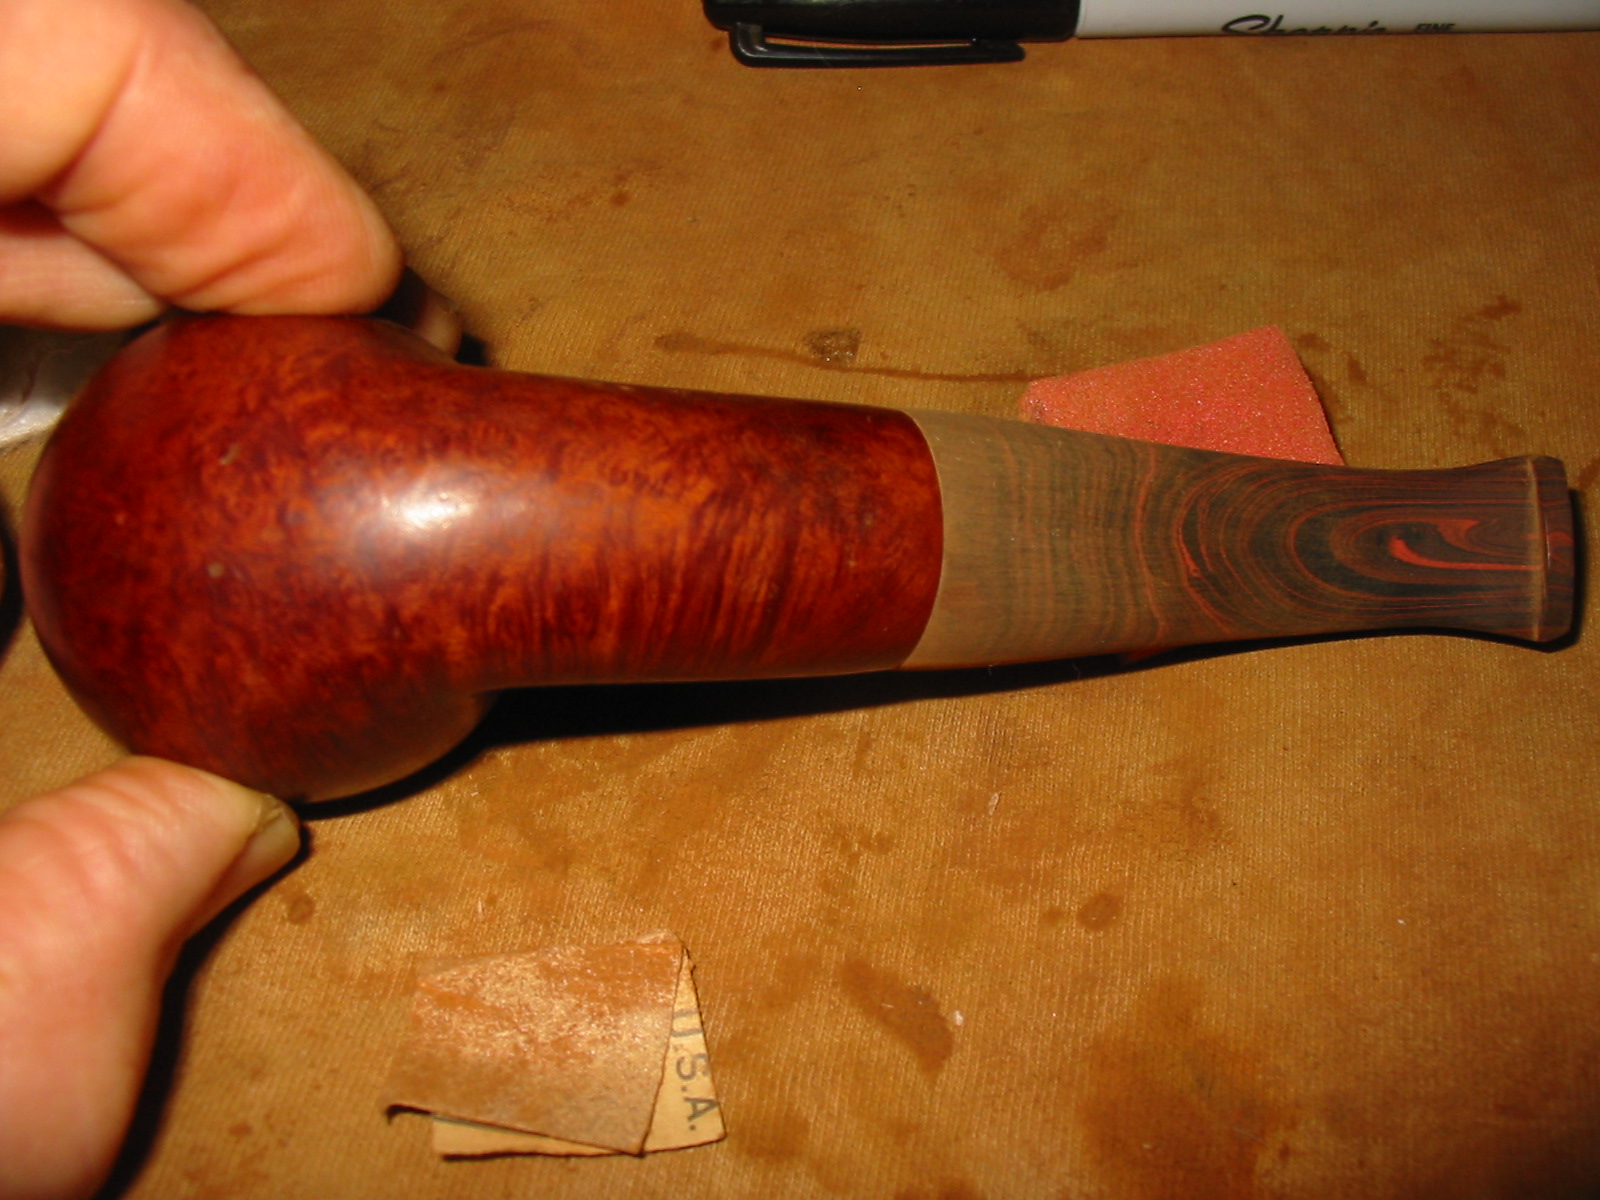
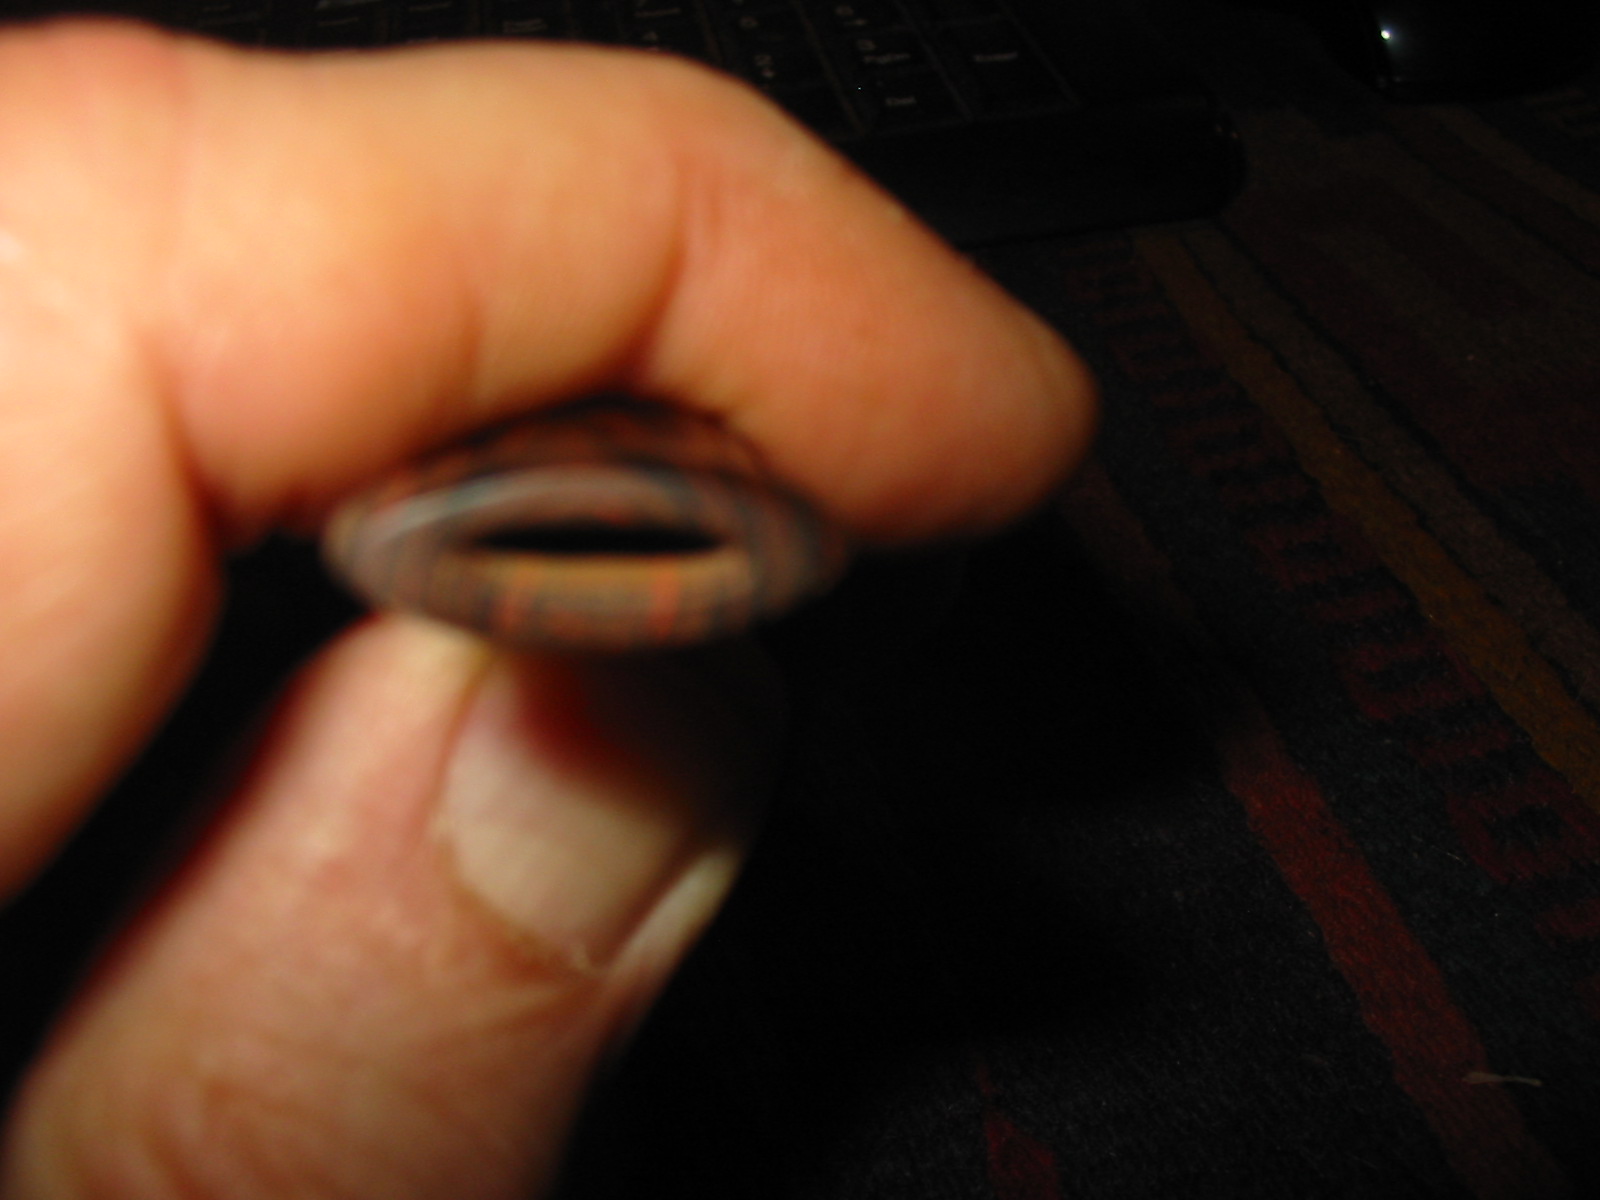
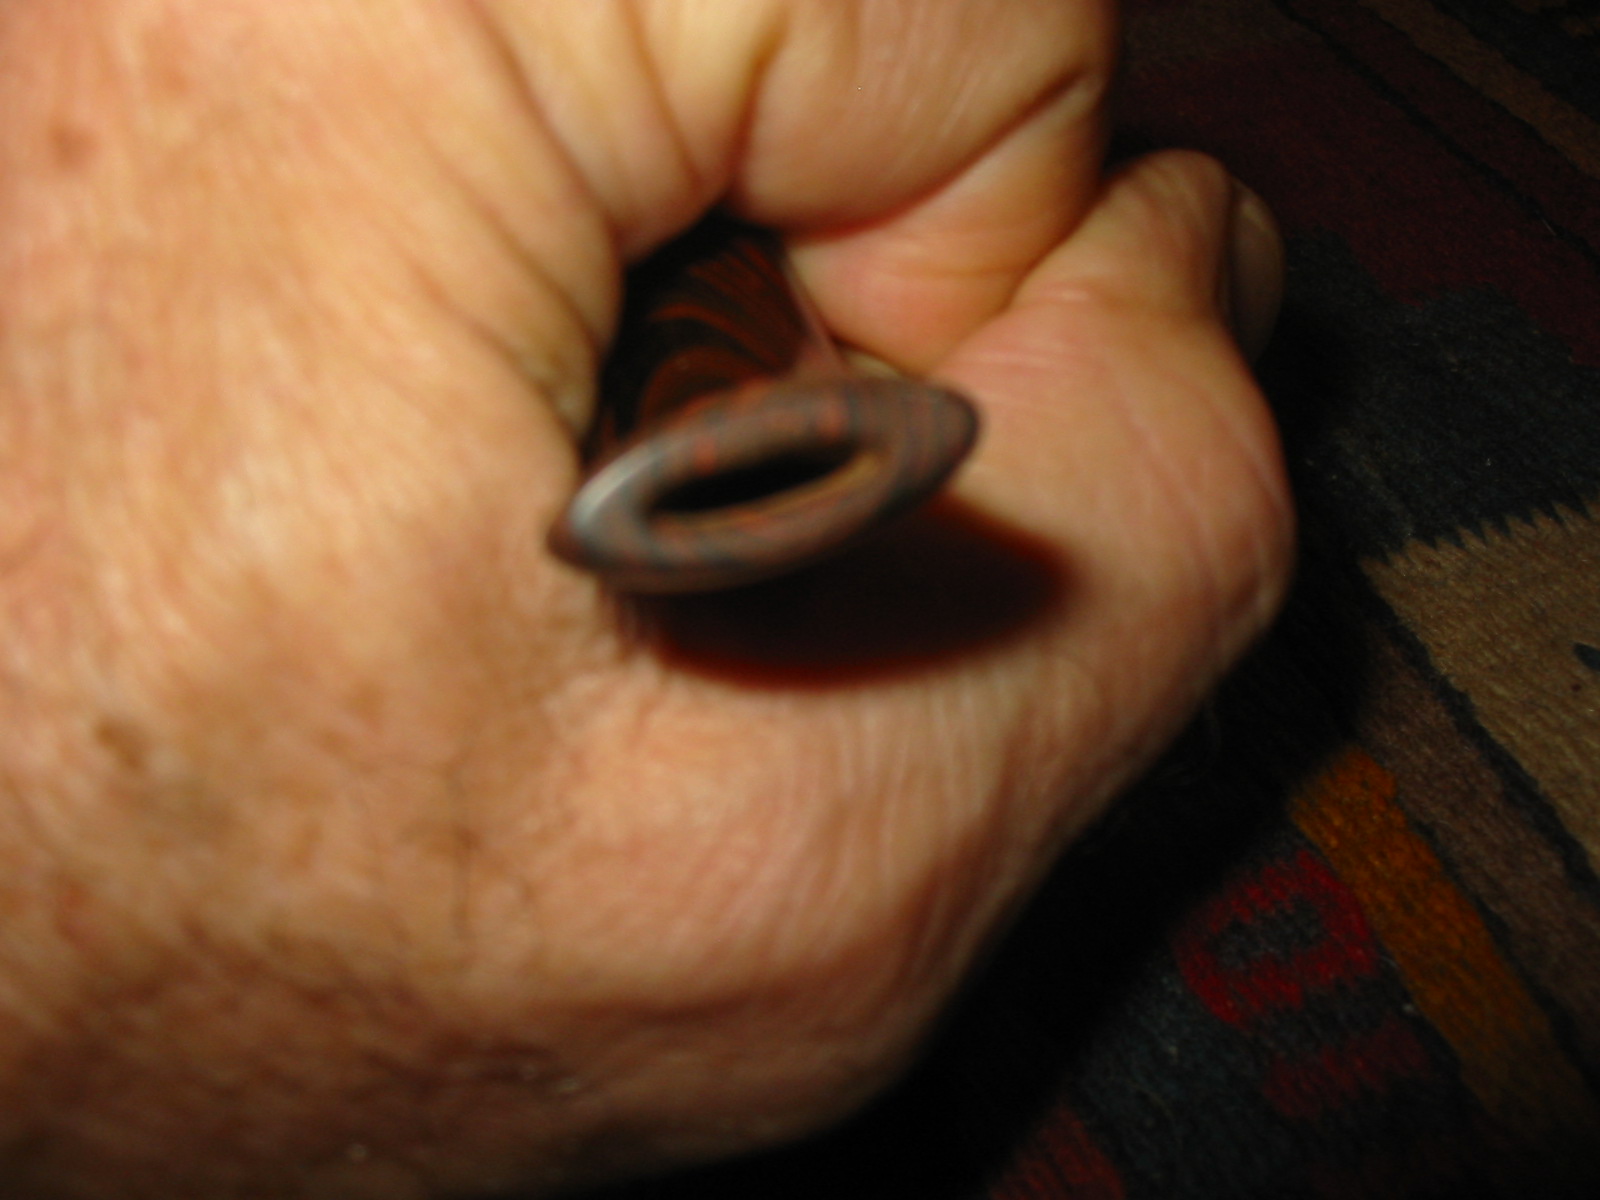
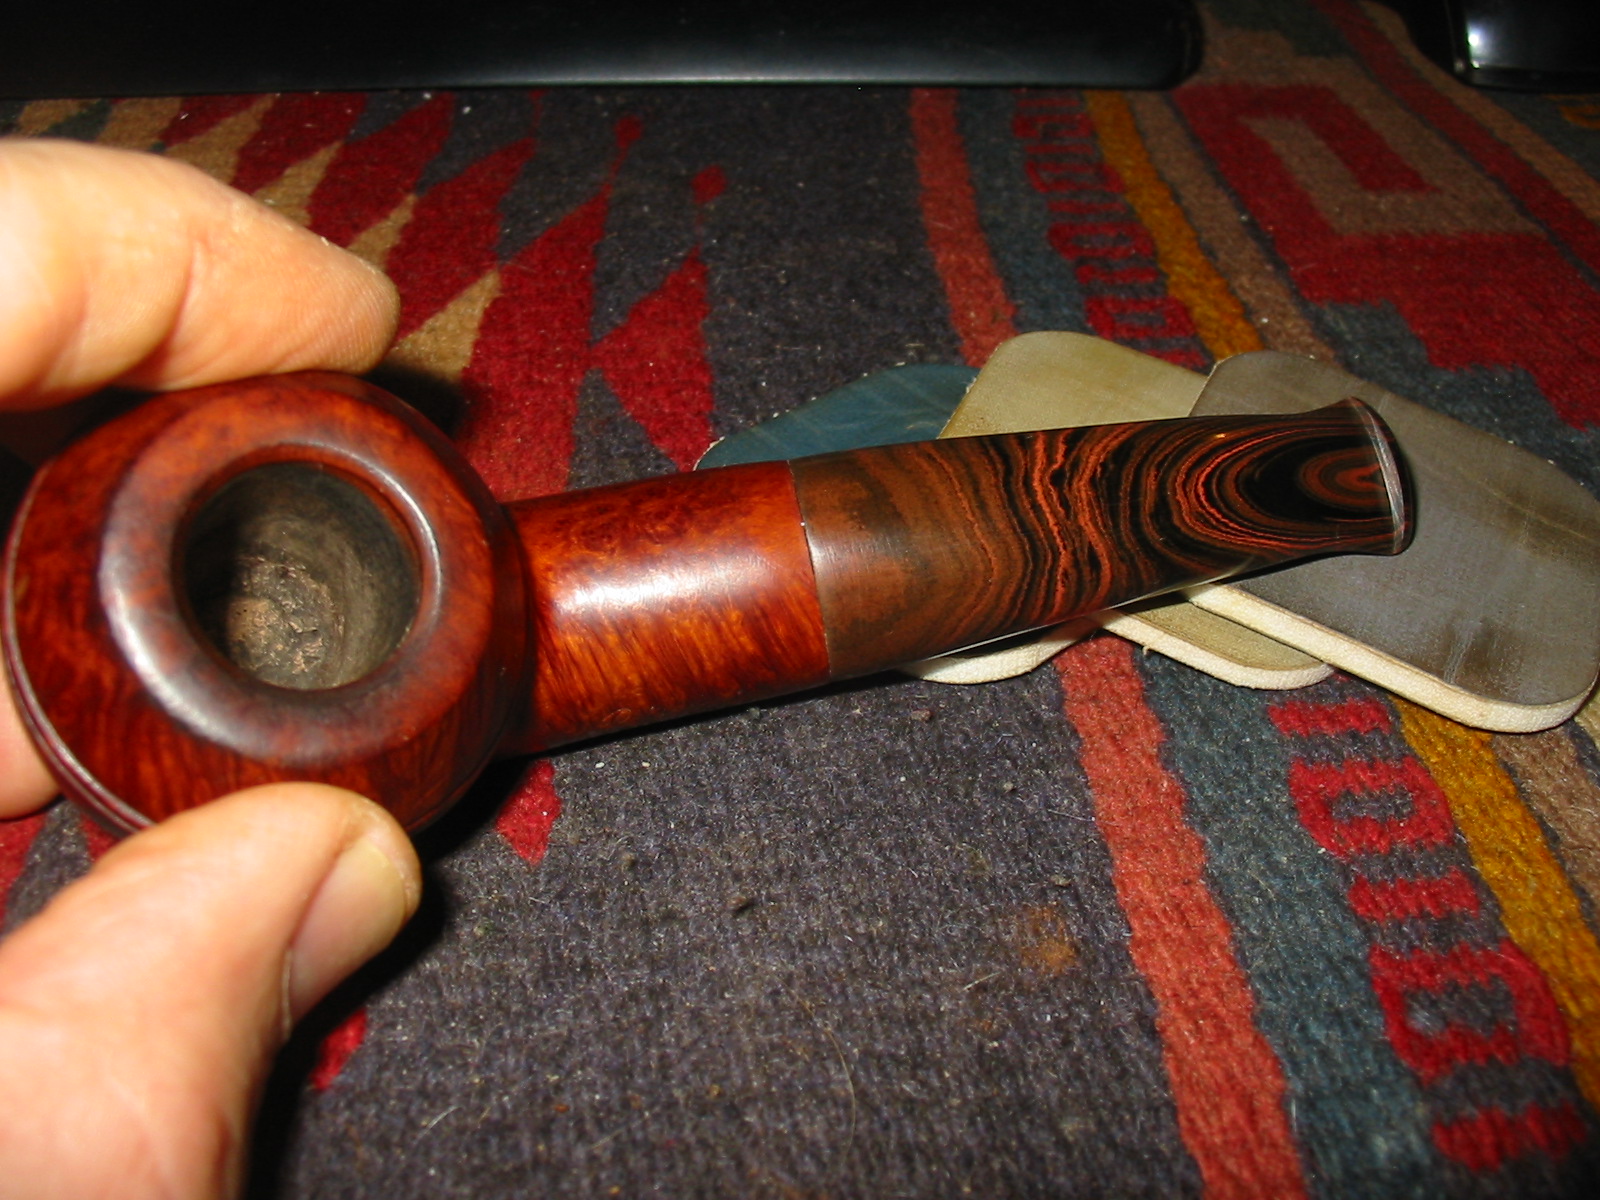
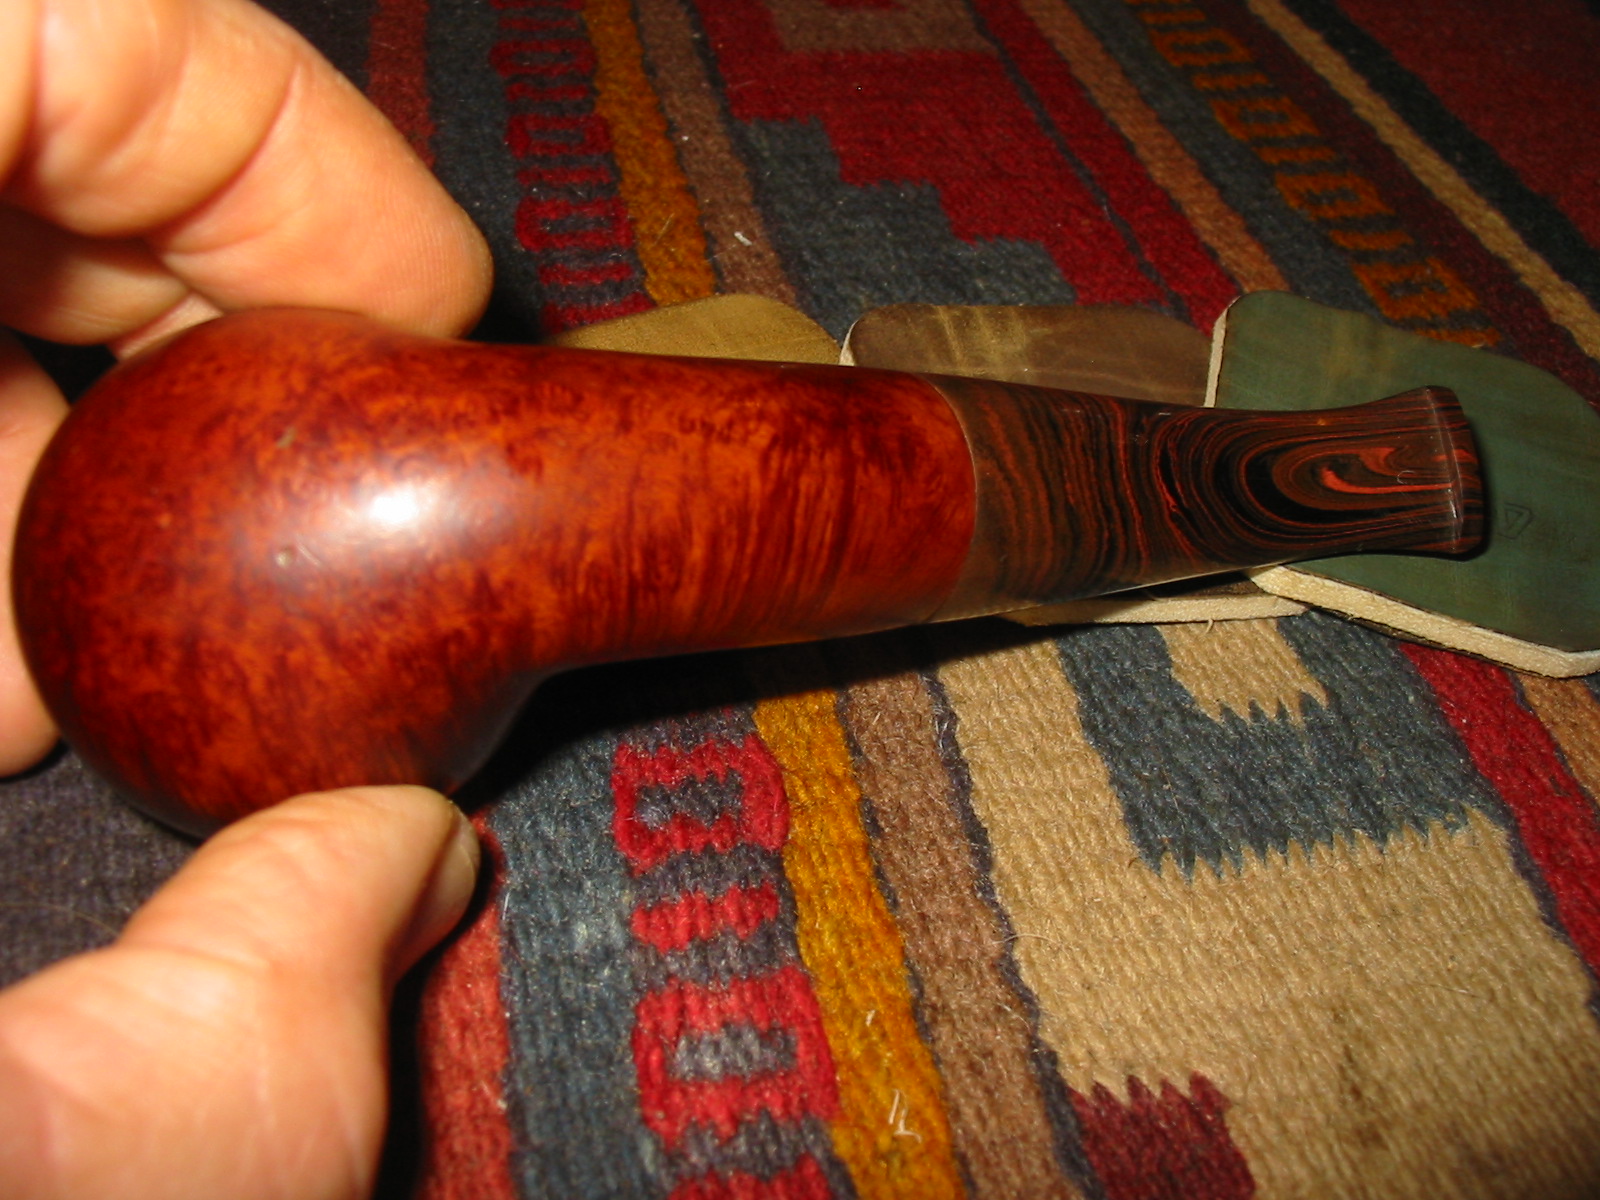
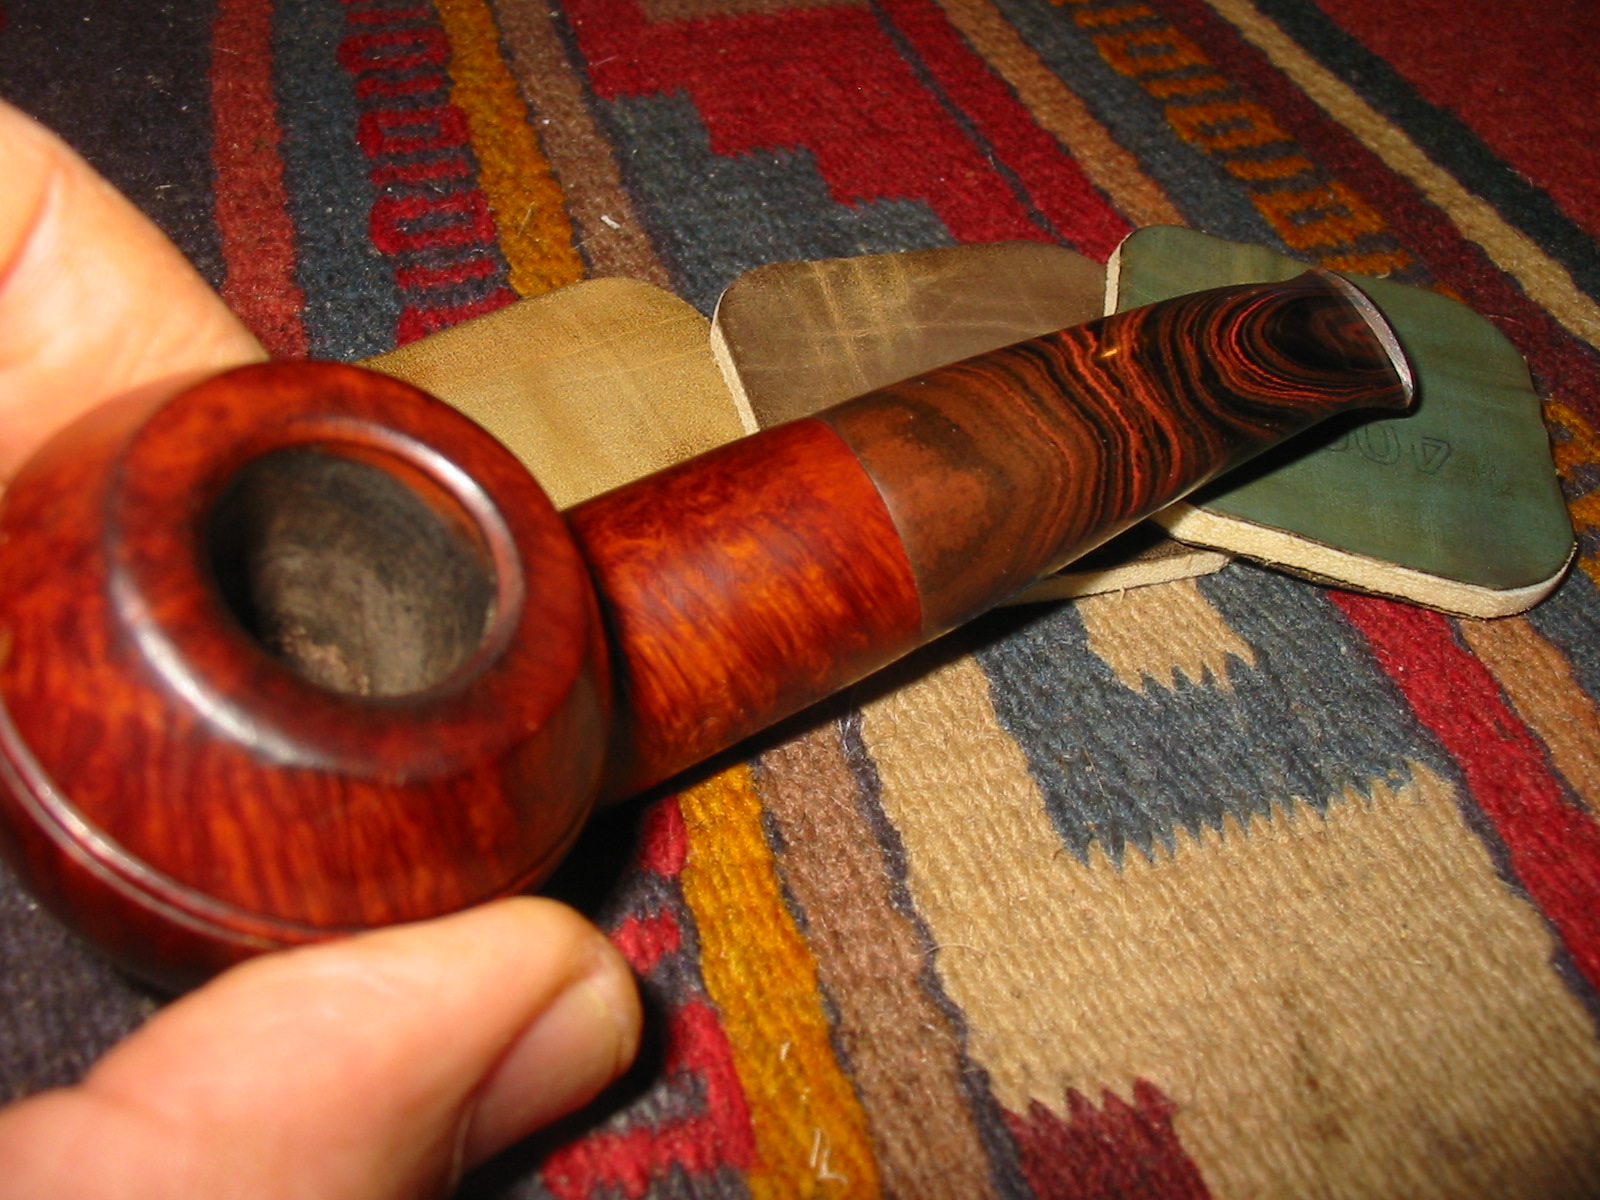
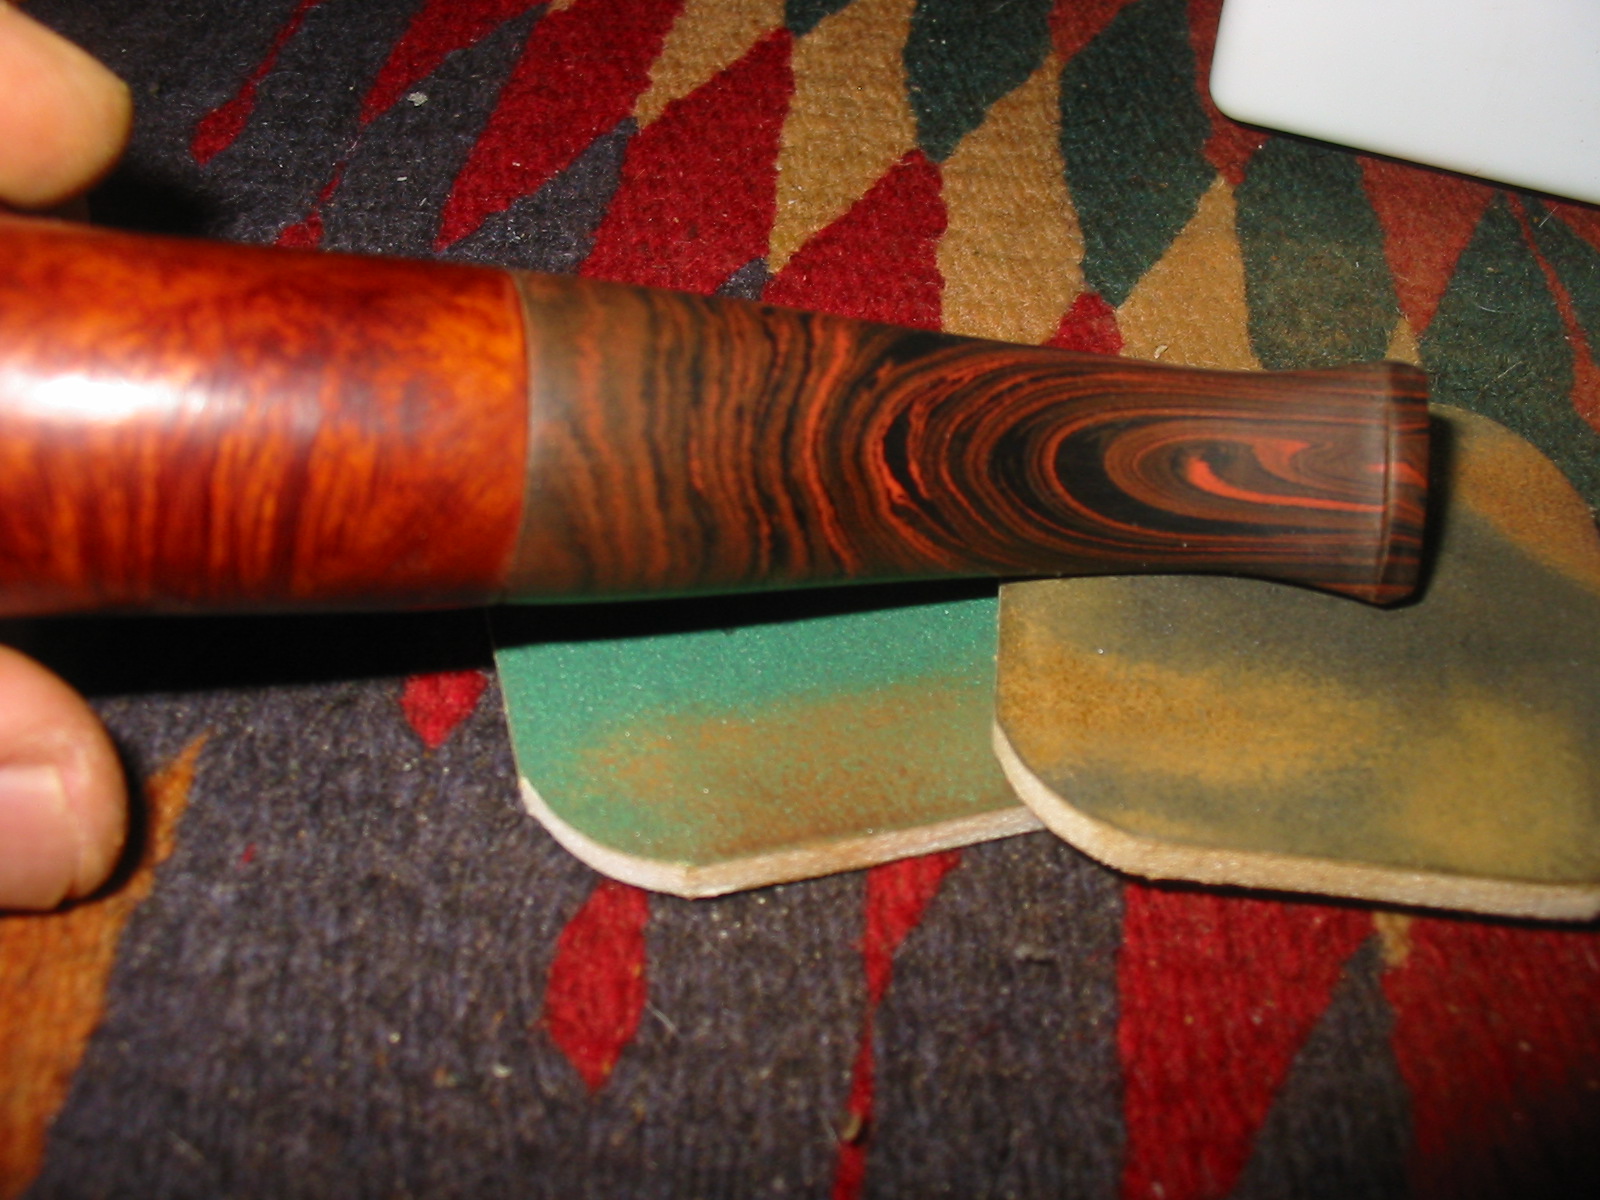
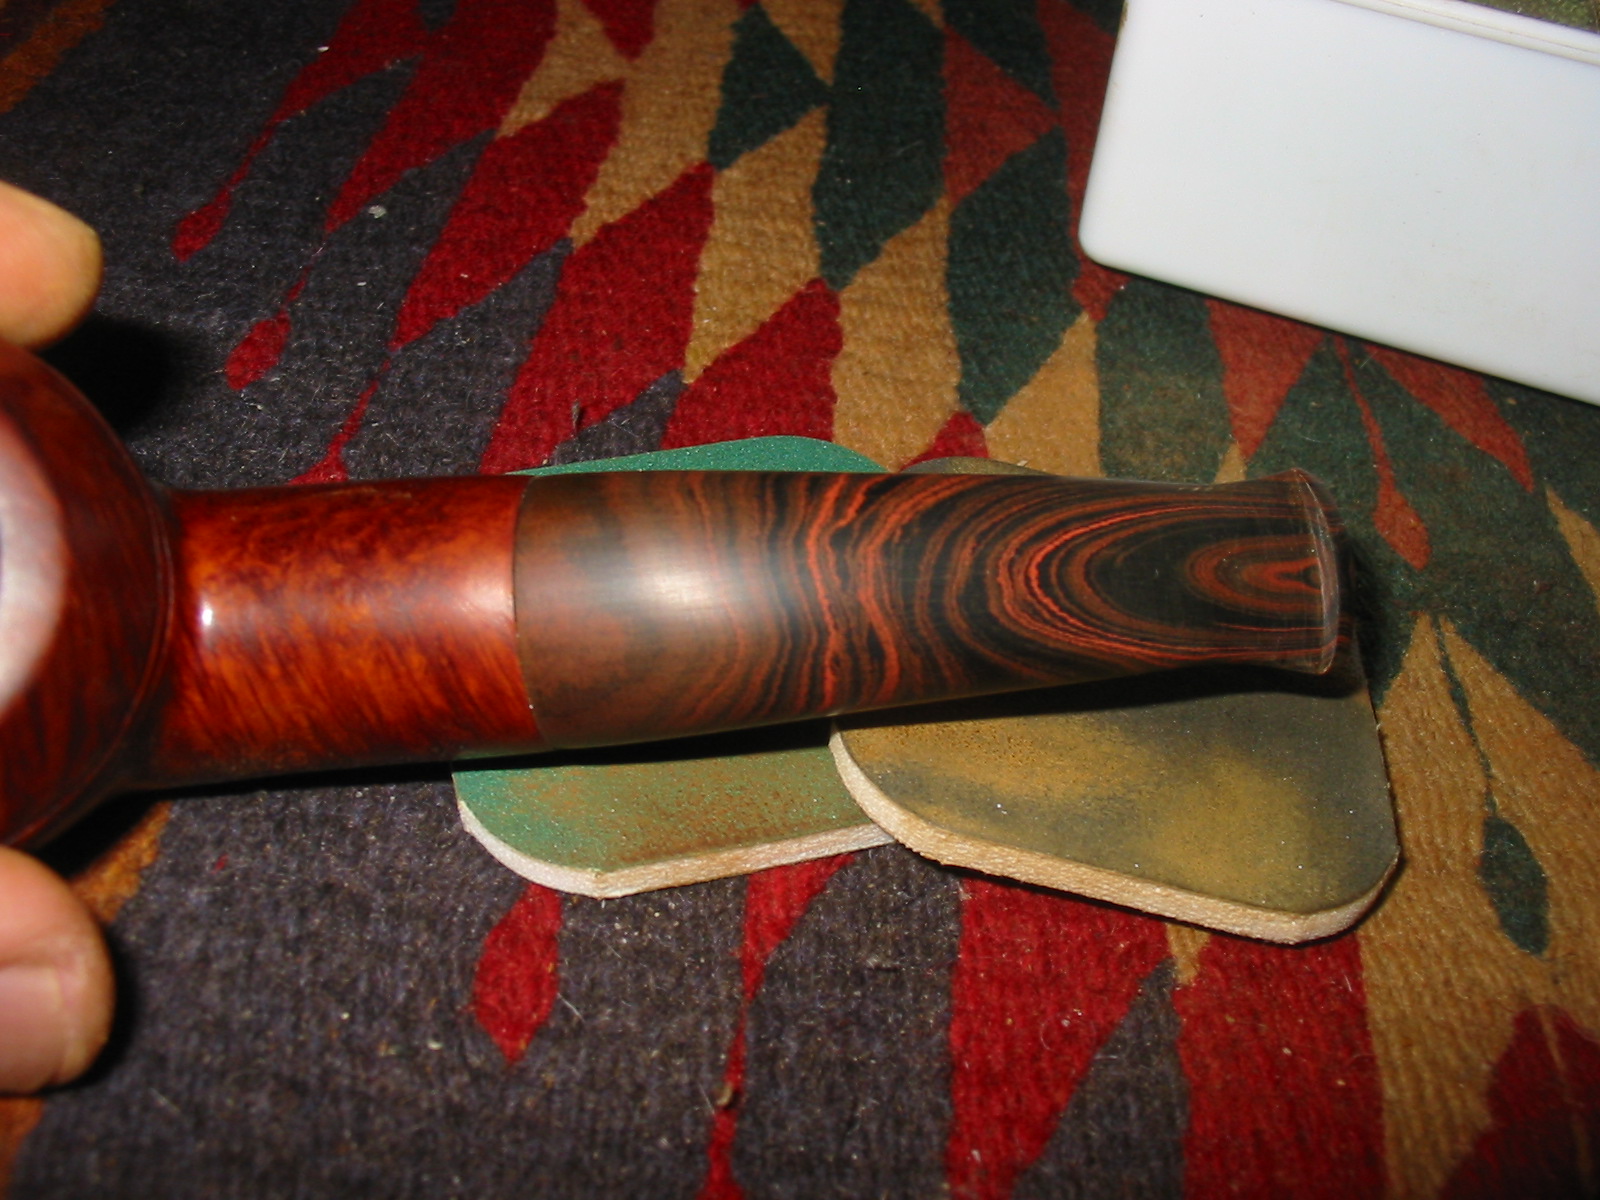
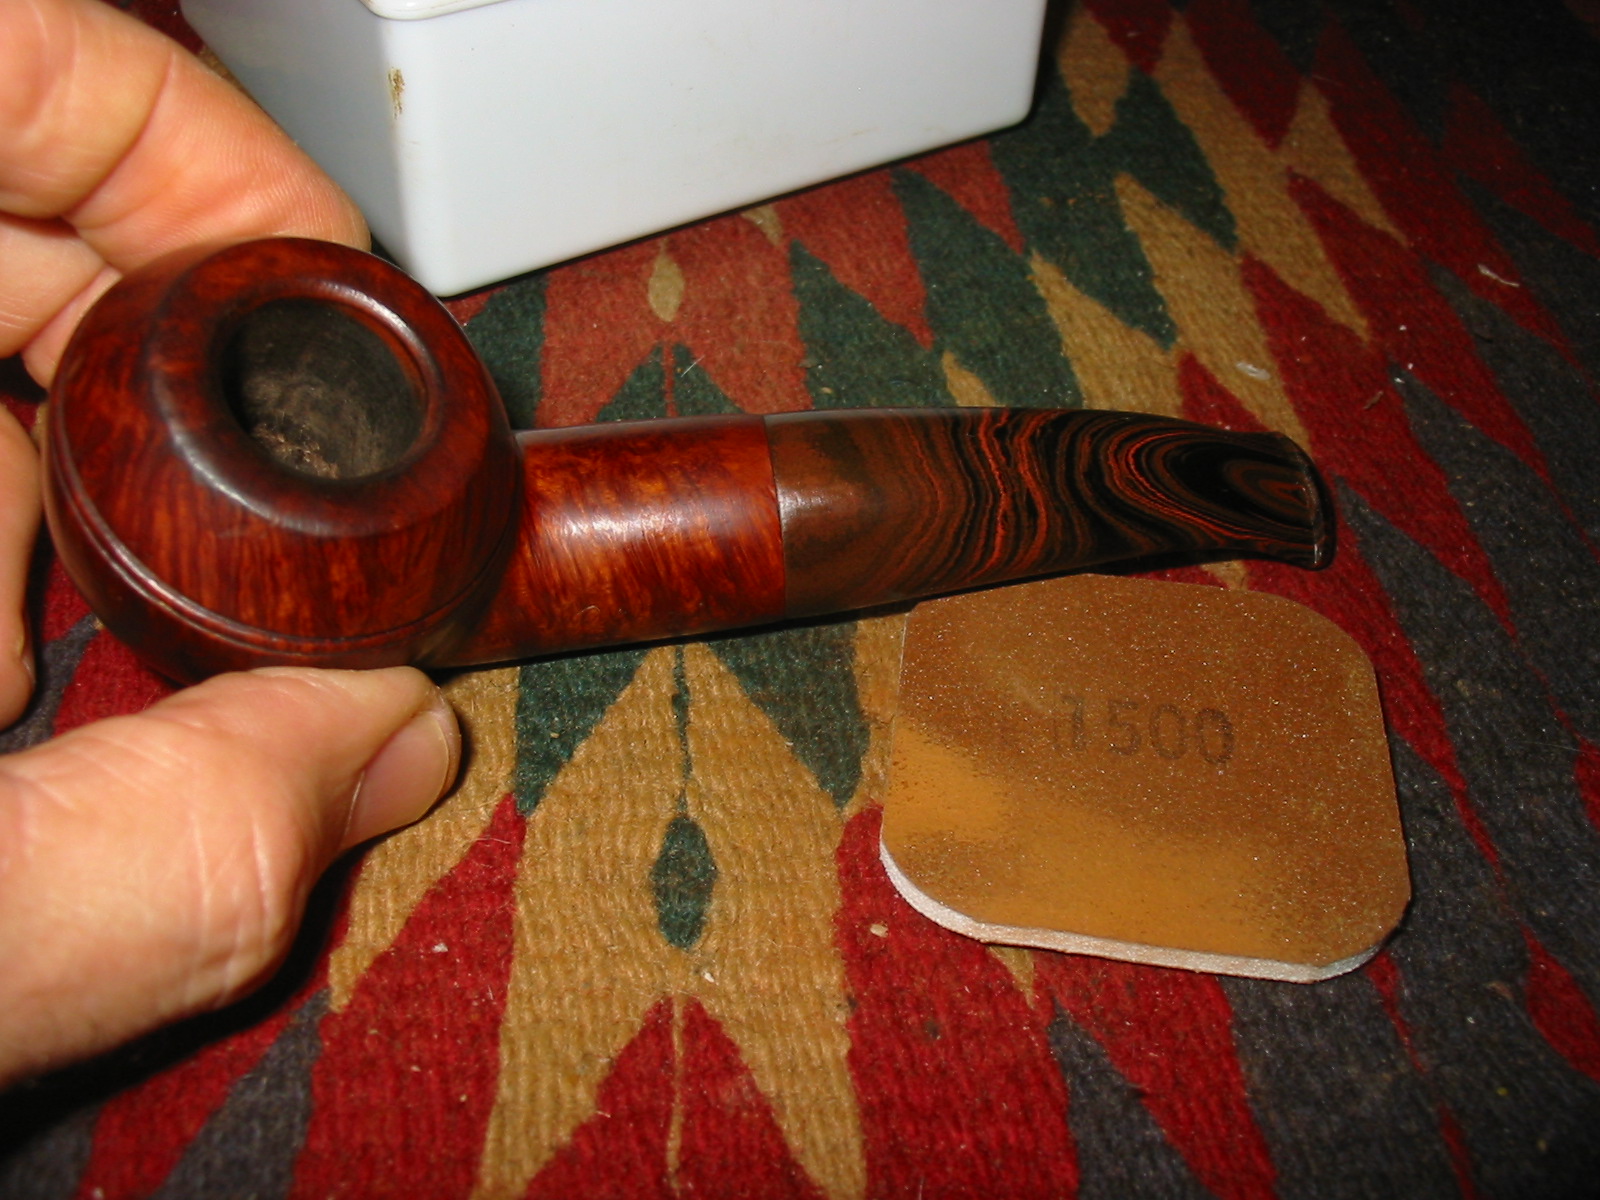
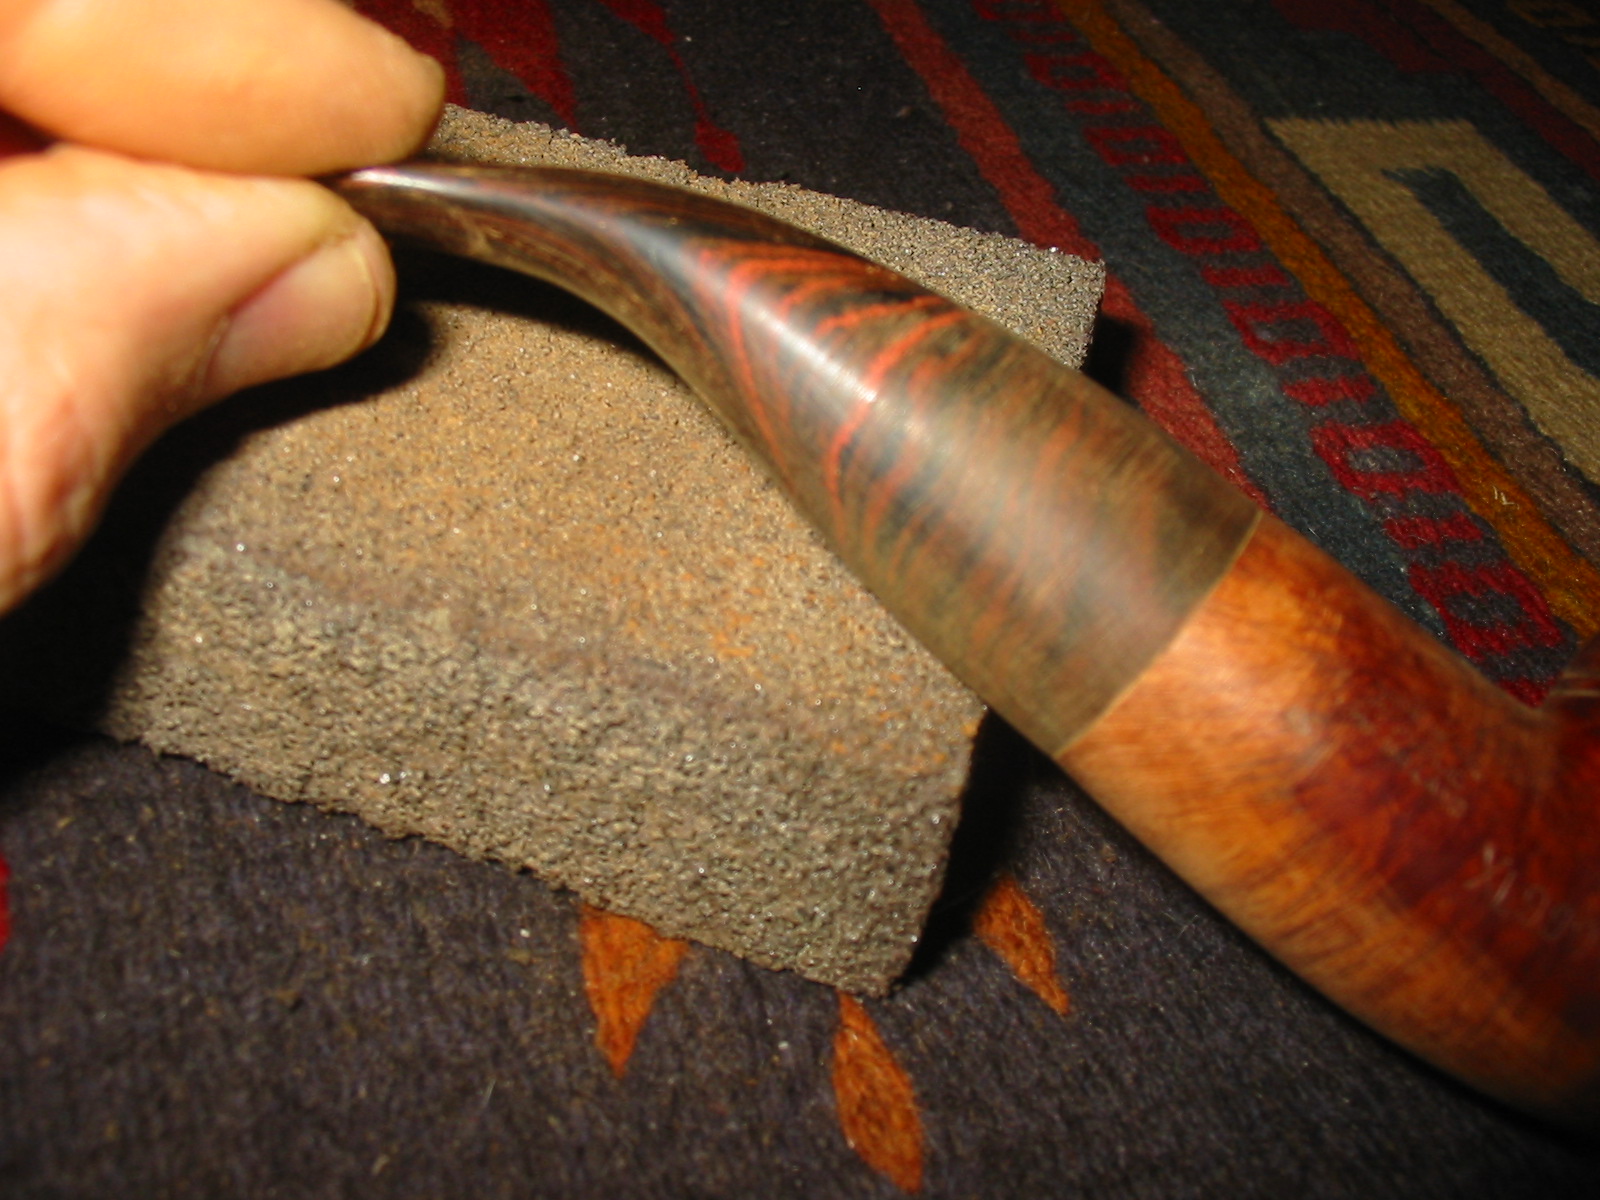
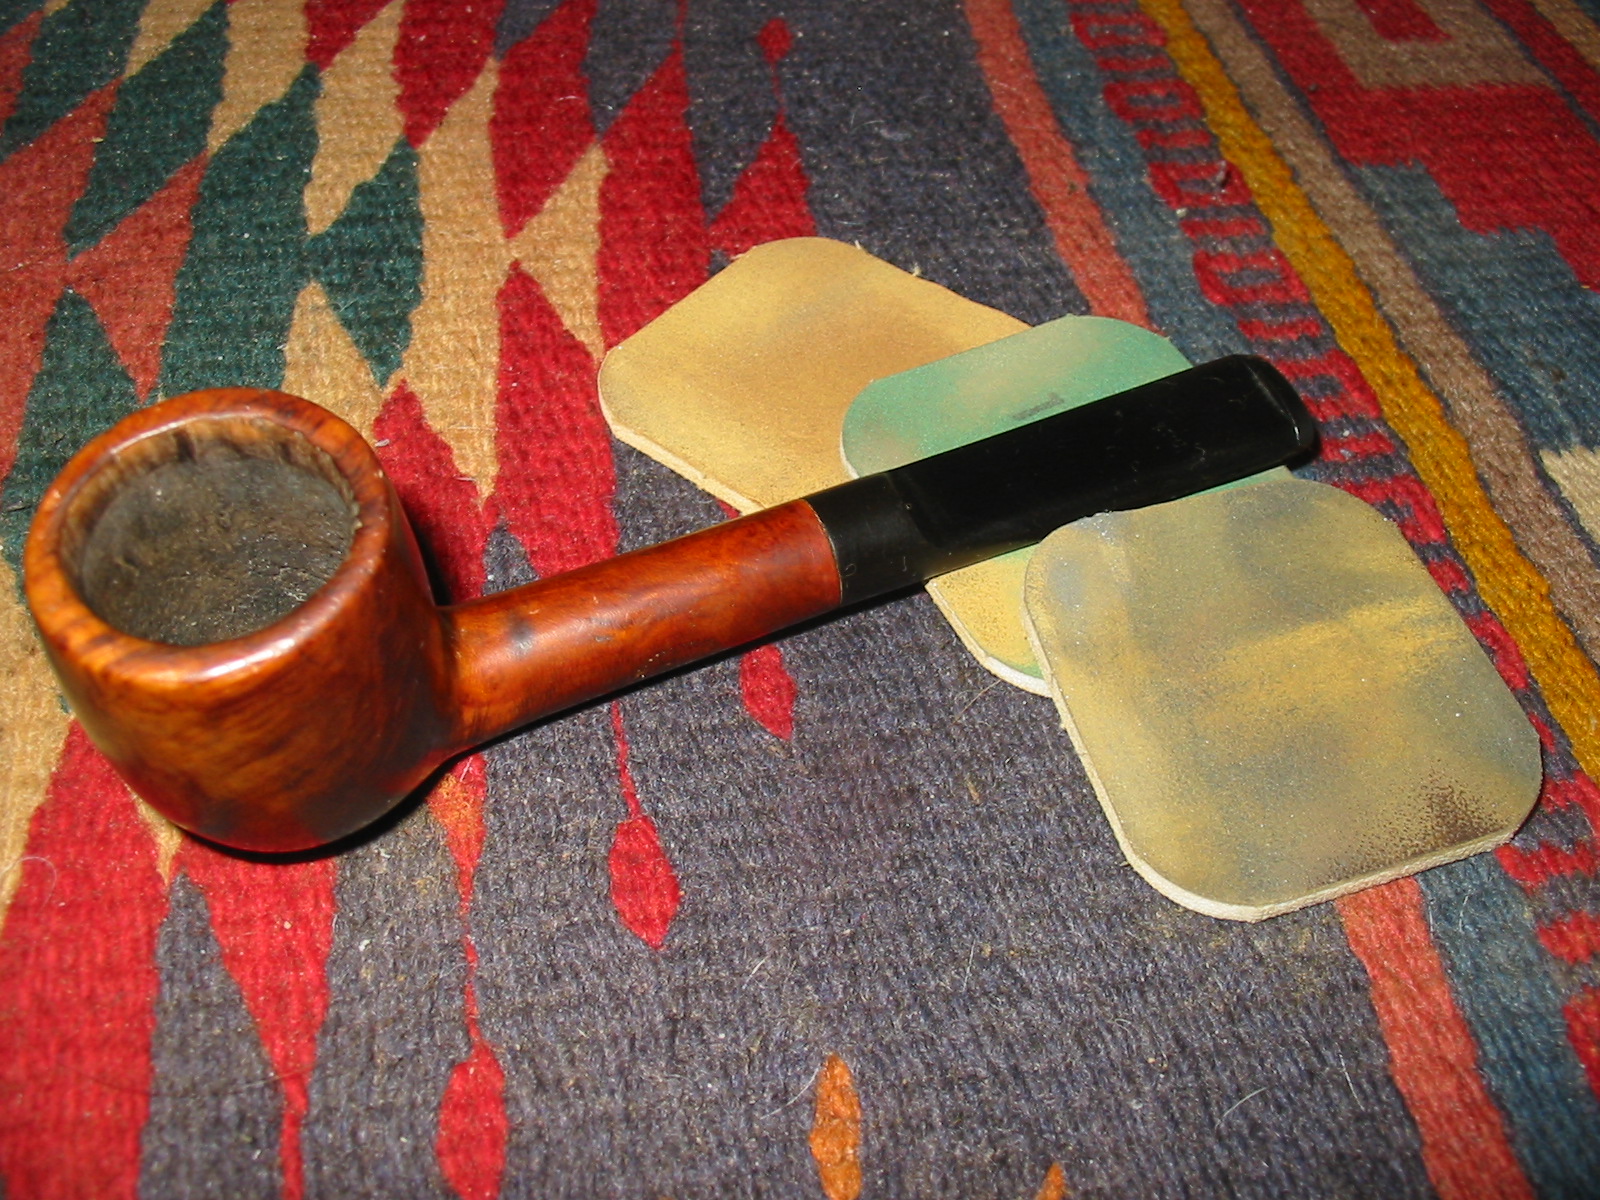
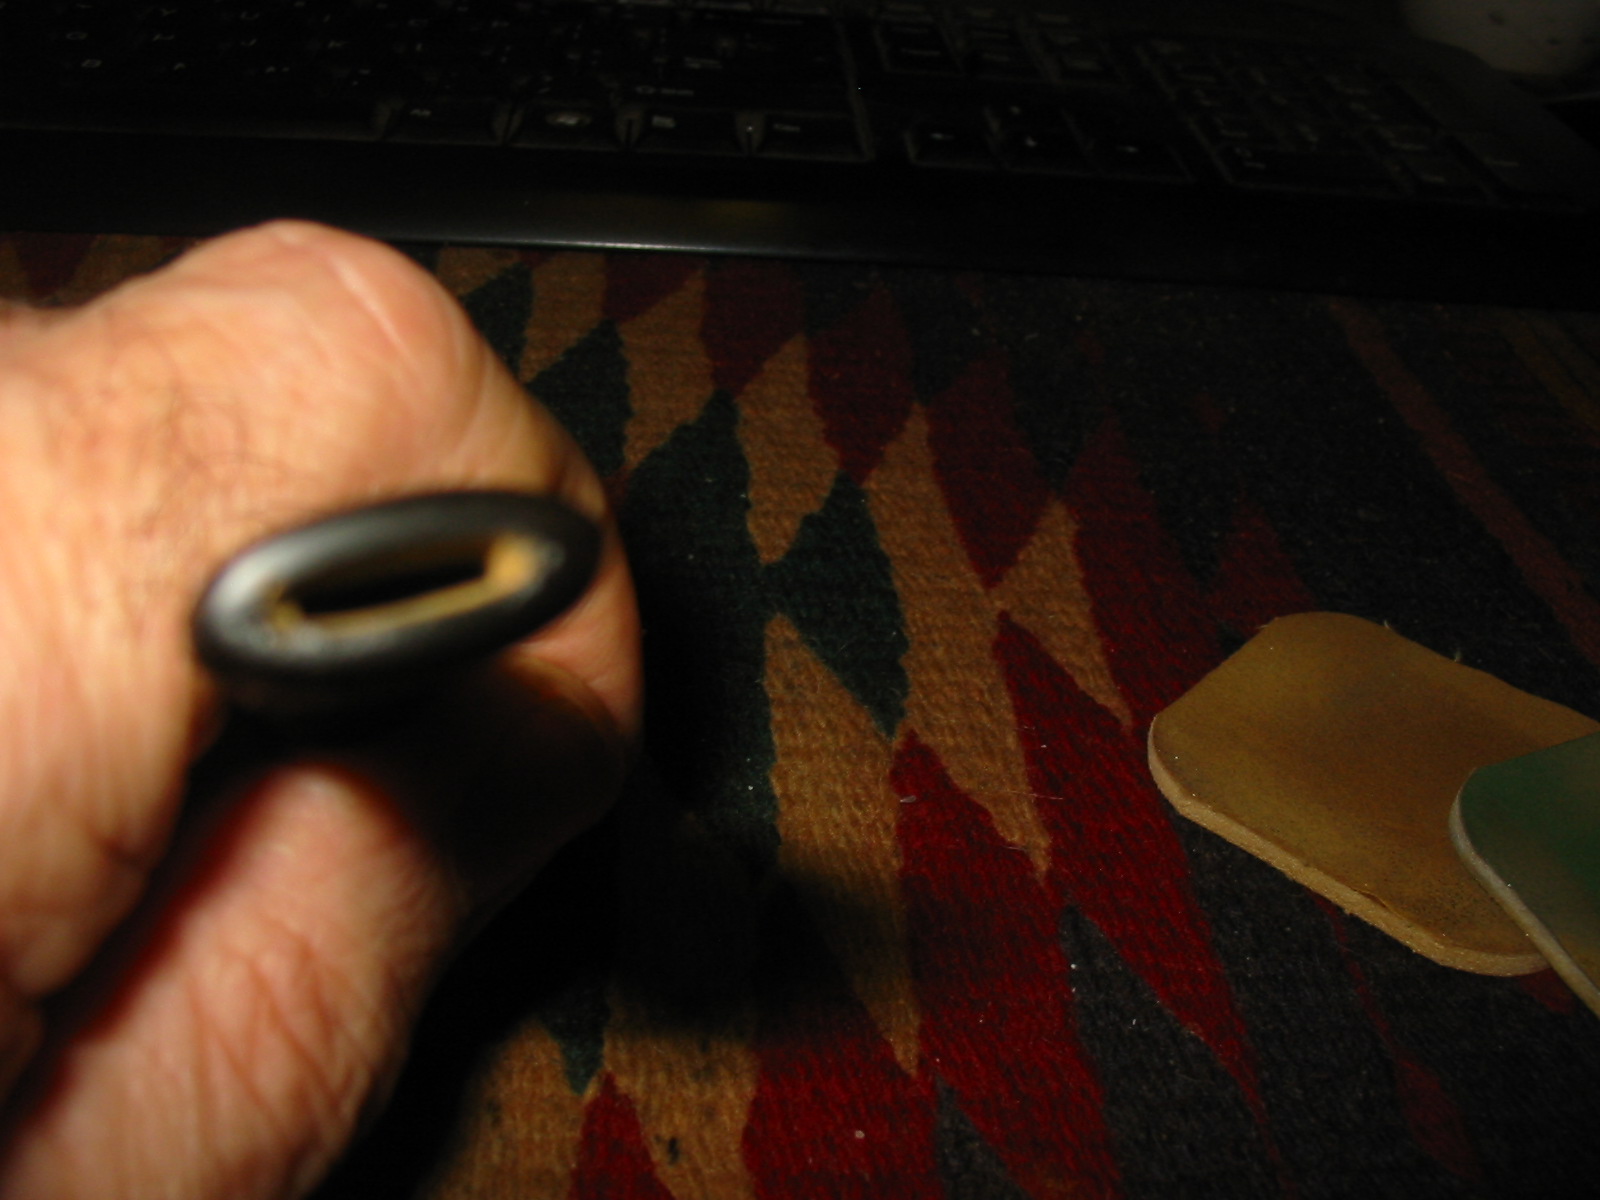
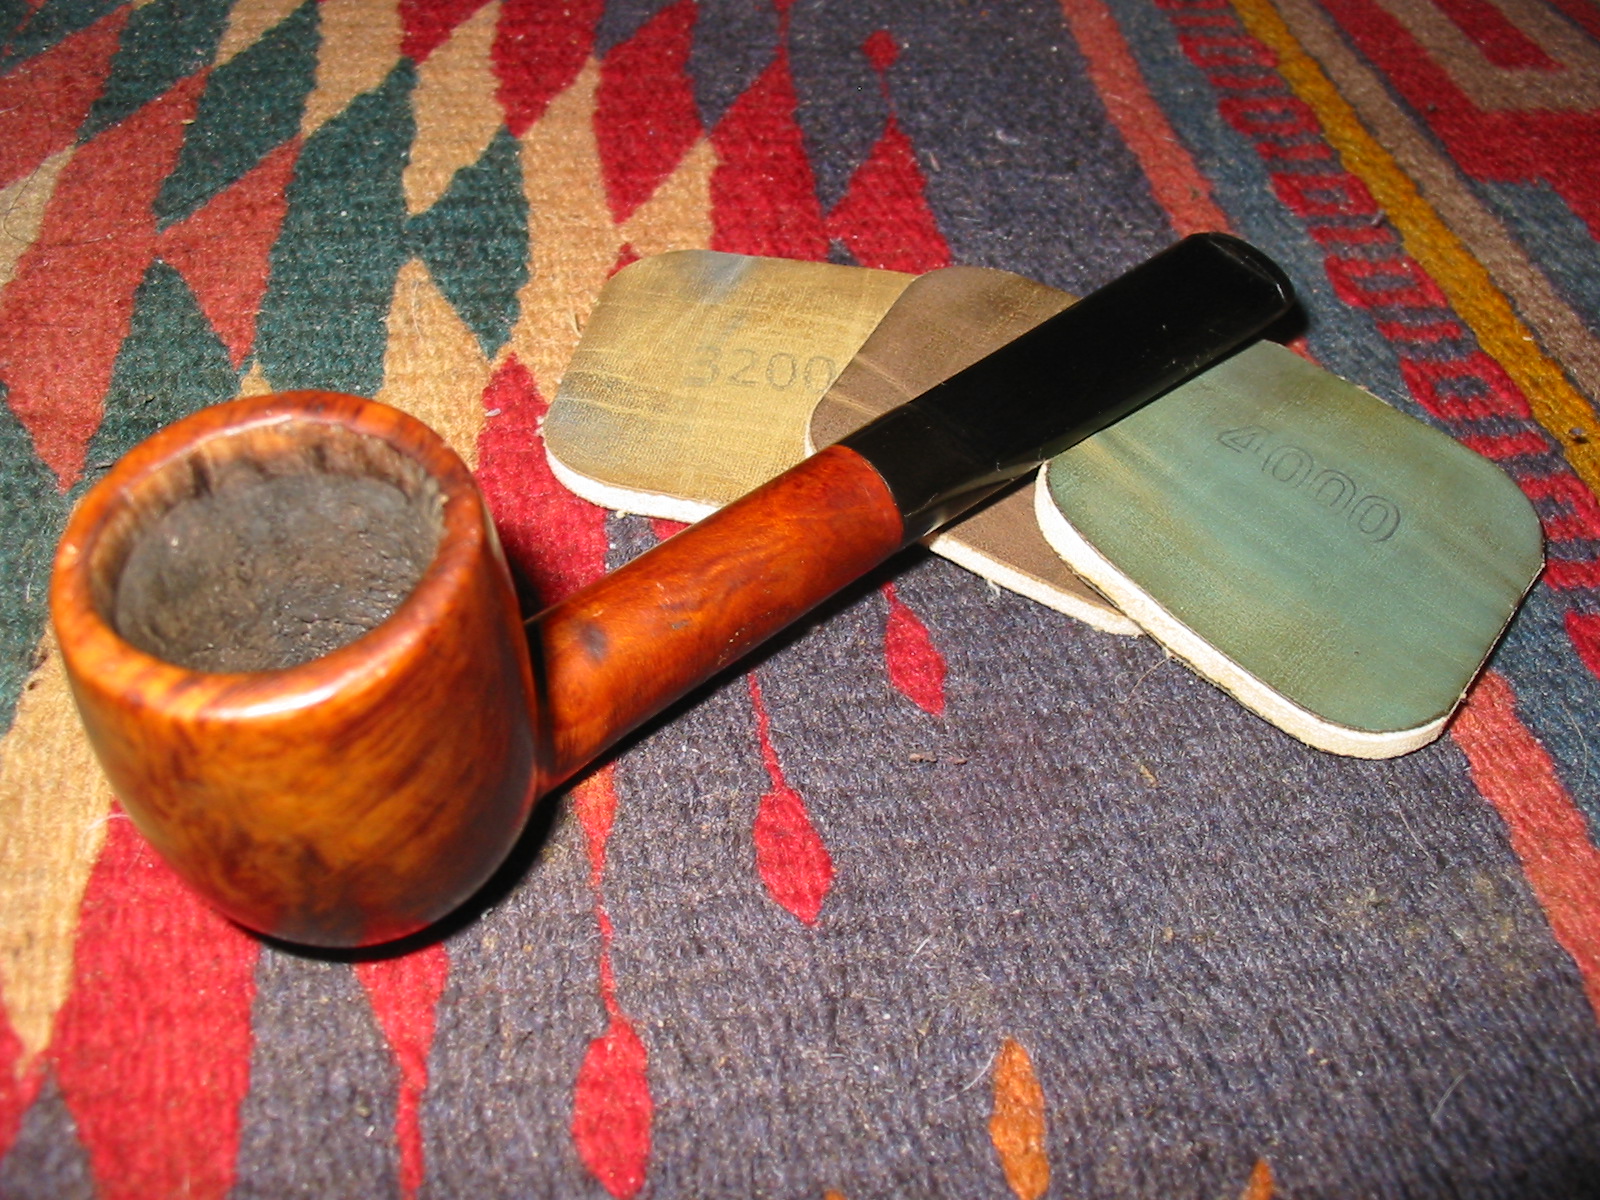
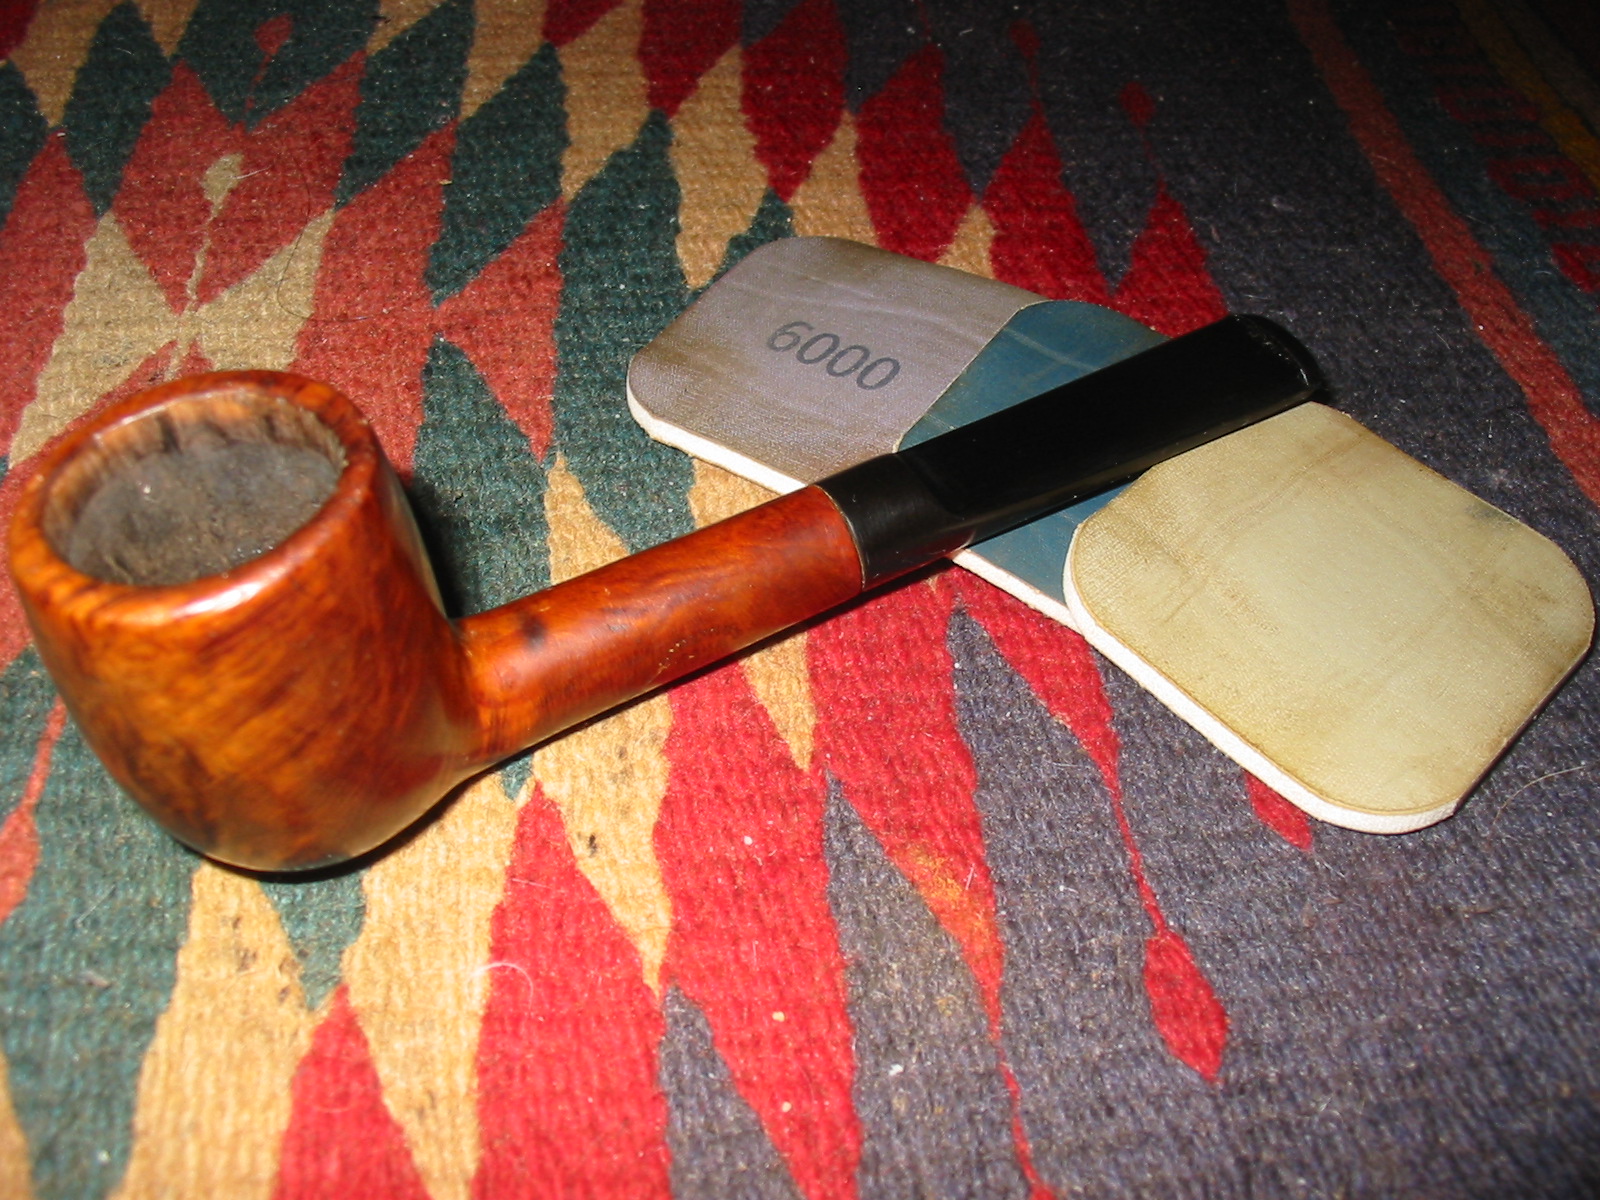
I sanded the stem with 220 grit sandpaper and a medium grit sanding sponge to fine tune the fit and to remove the scratches. I then sanded the stem with micromesh sanding pads. I wet sanded the stem with 1500-2400 grit pads and used needle files to open up the slot in the button. I used the round, oval and flattened files to open and shape the slot. I sanded it with a folded piece of 220 grit sandpaper to smooth out the newly shaped slot. I then dry sanded with the remaining grits of micromesh from 3200-12,000 grit. The photos below show the progress of the sanding.
IMG_2508

IMG_2509

IMG_2510

IMG_2511

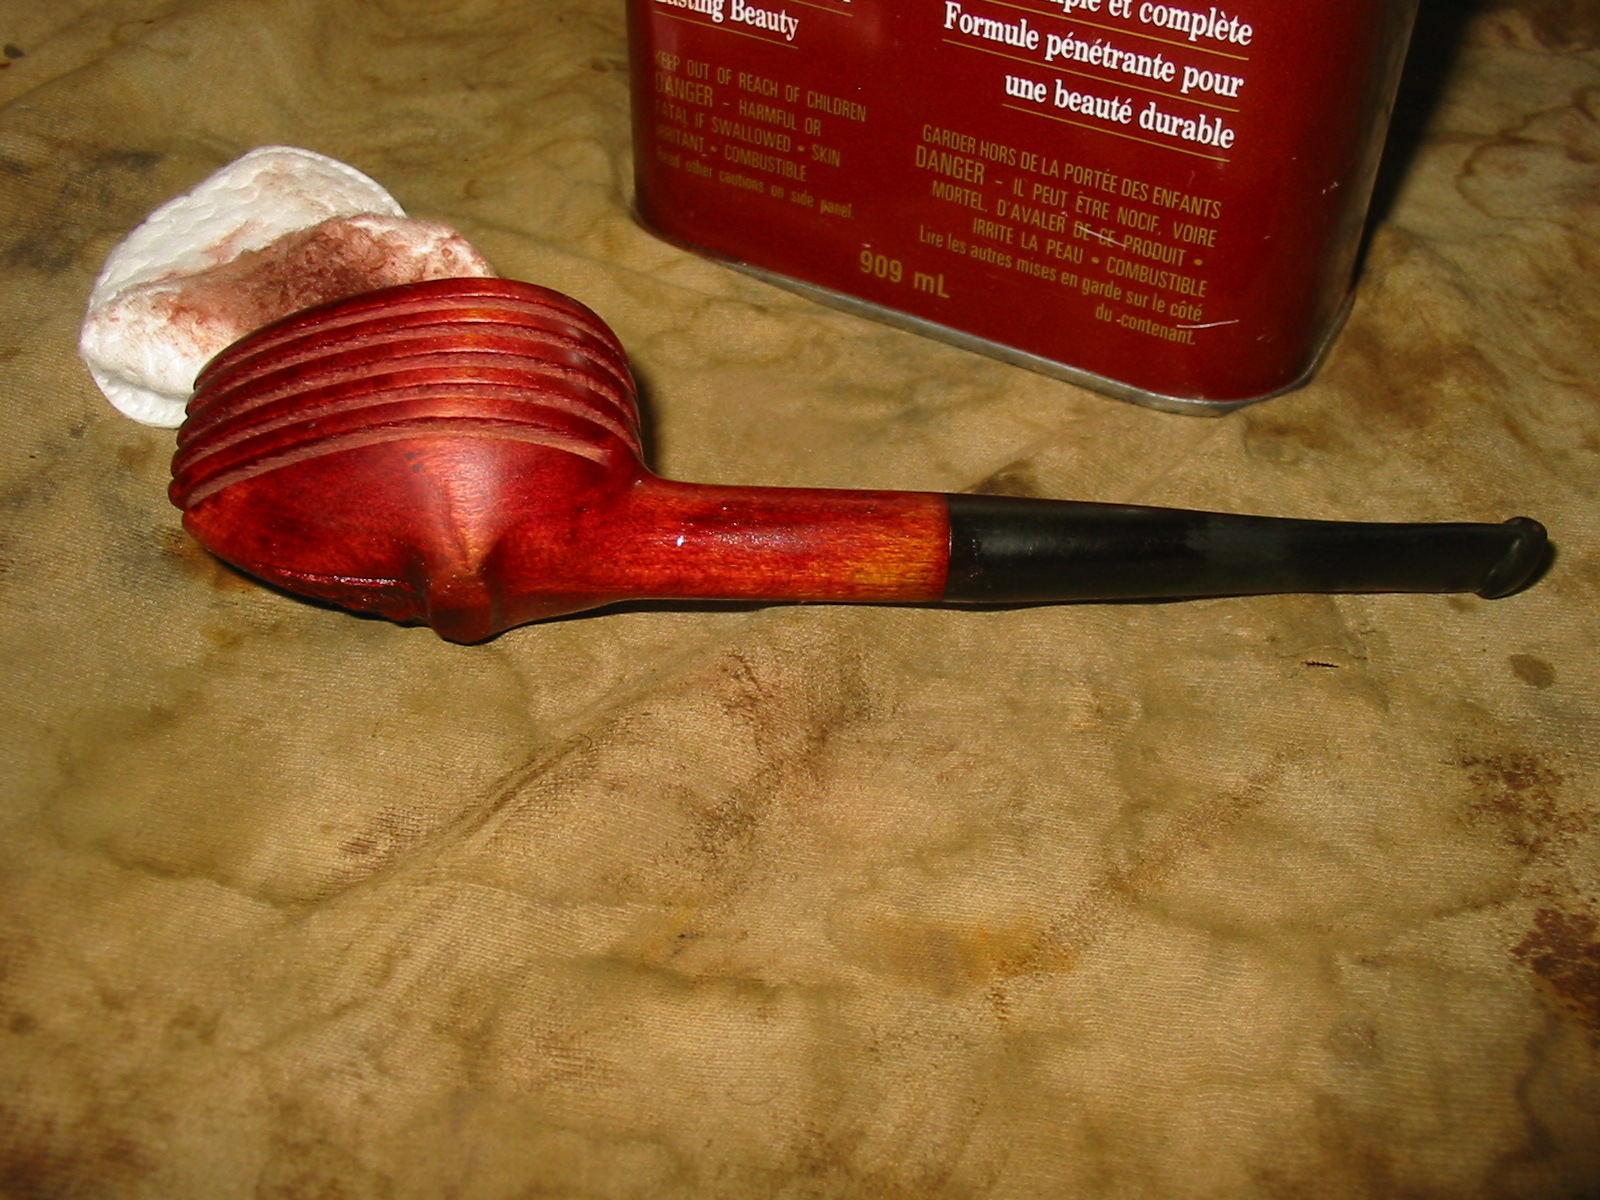
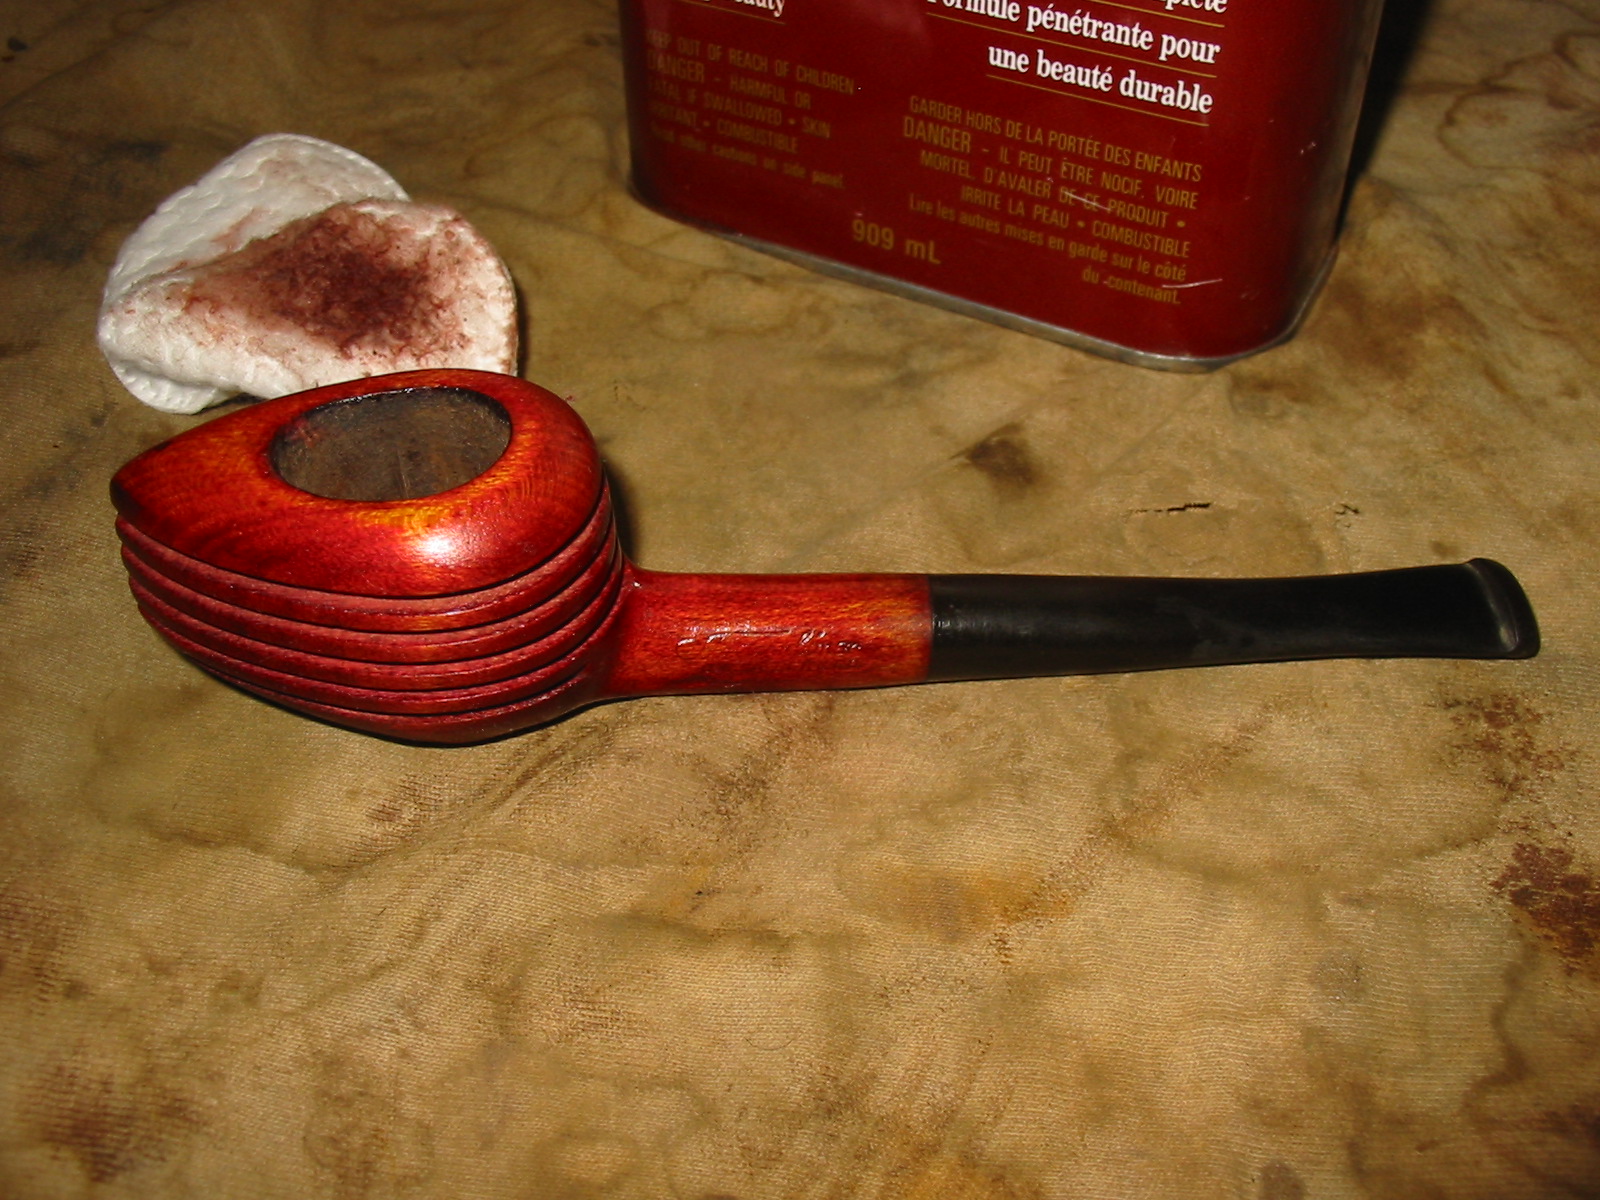
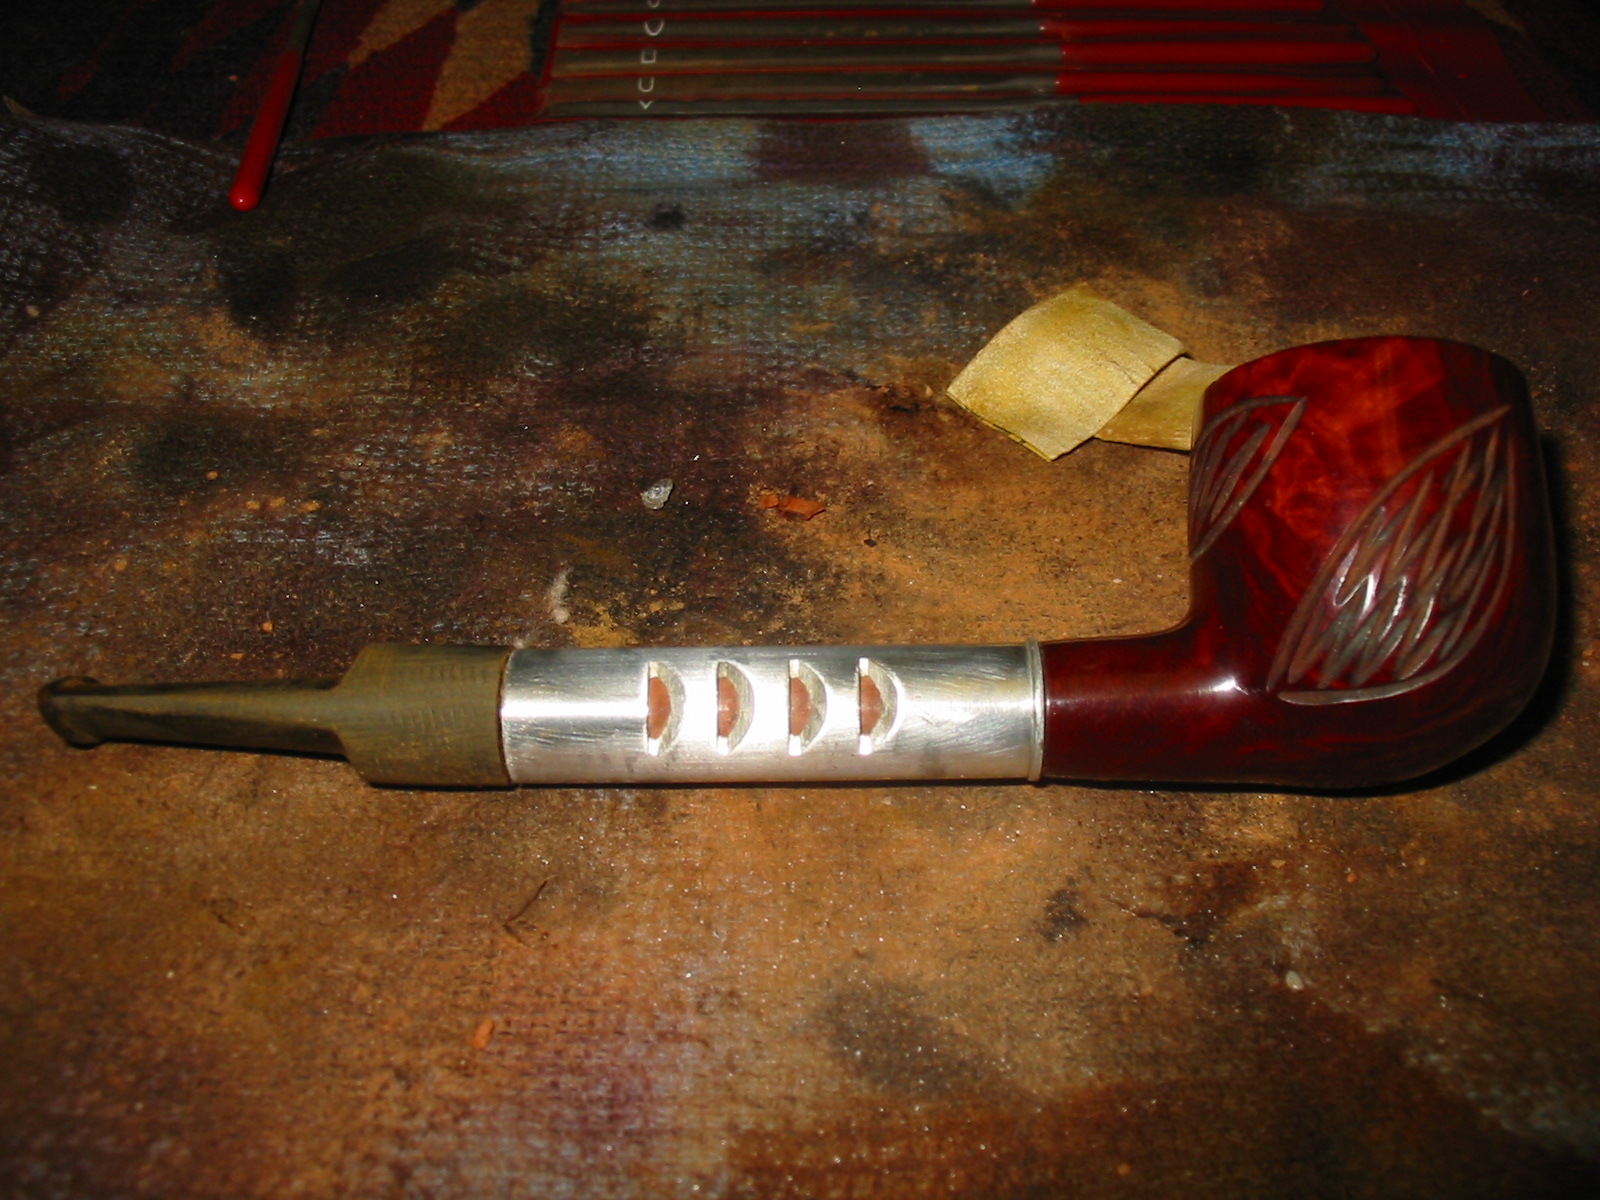
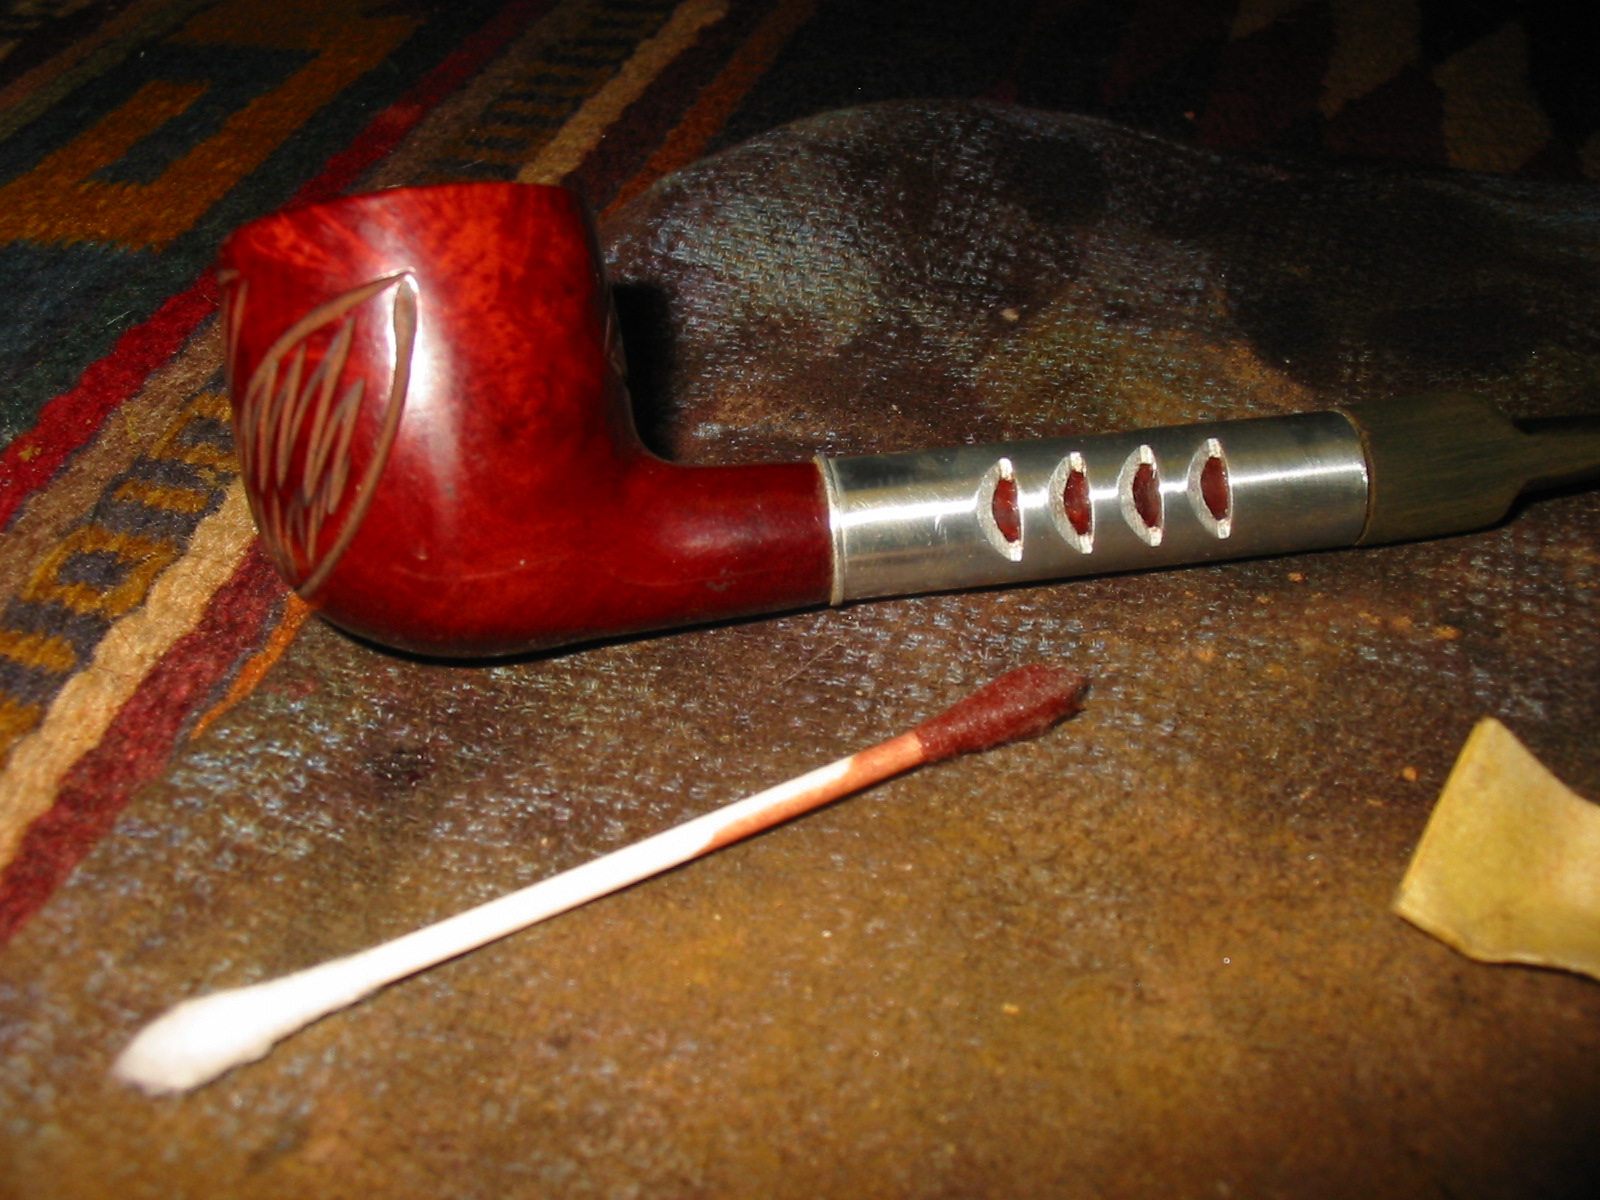
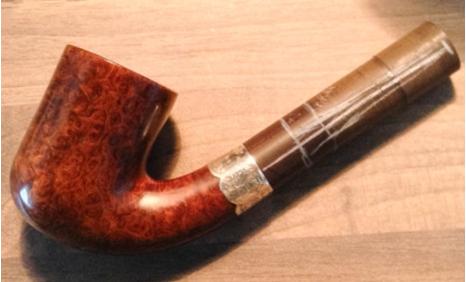
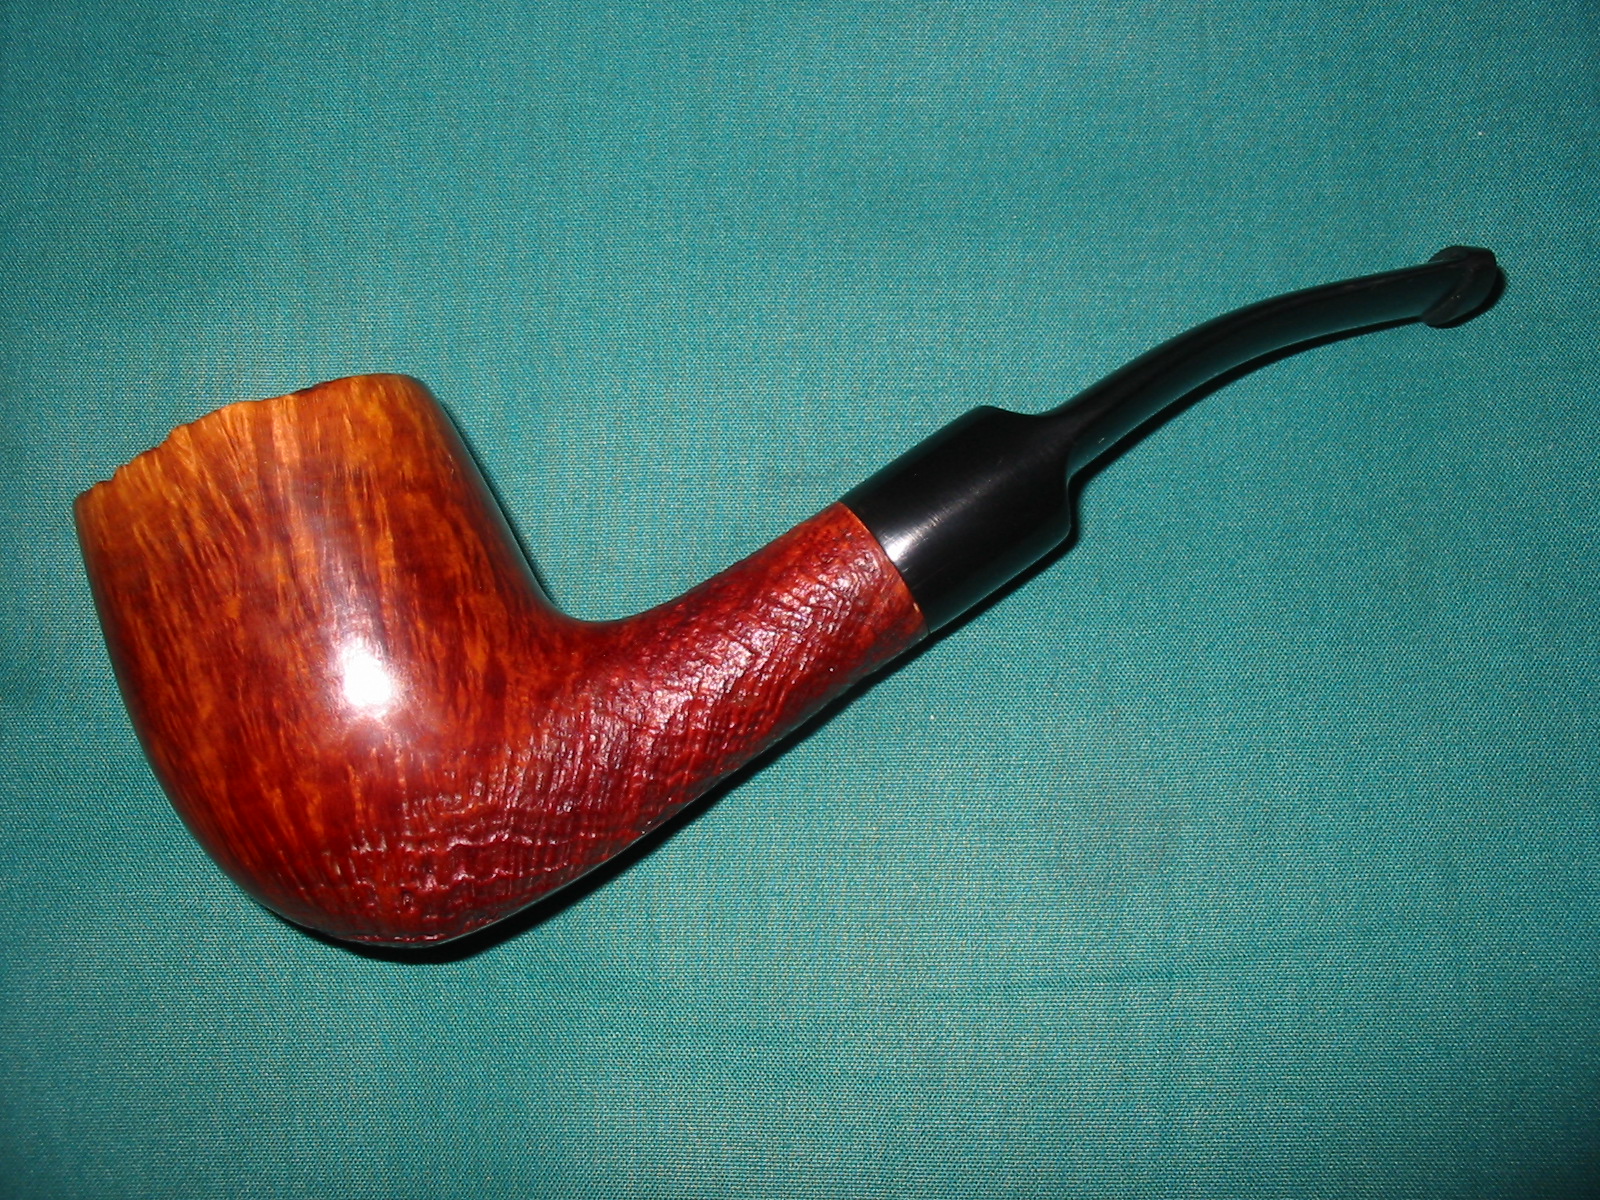
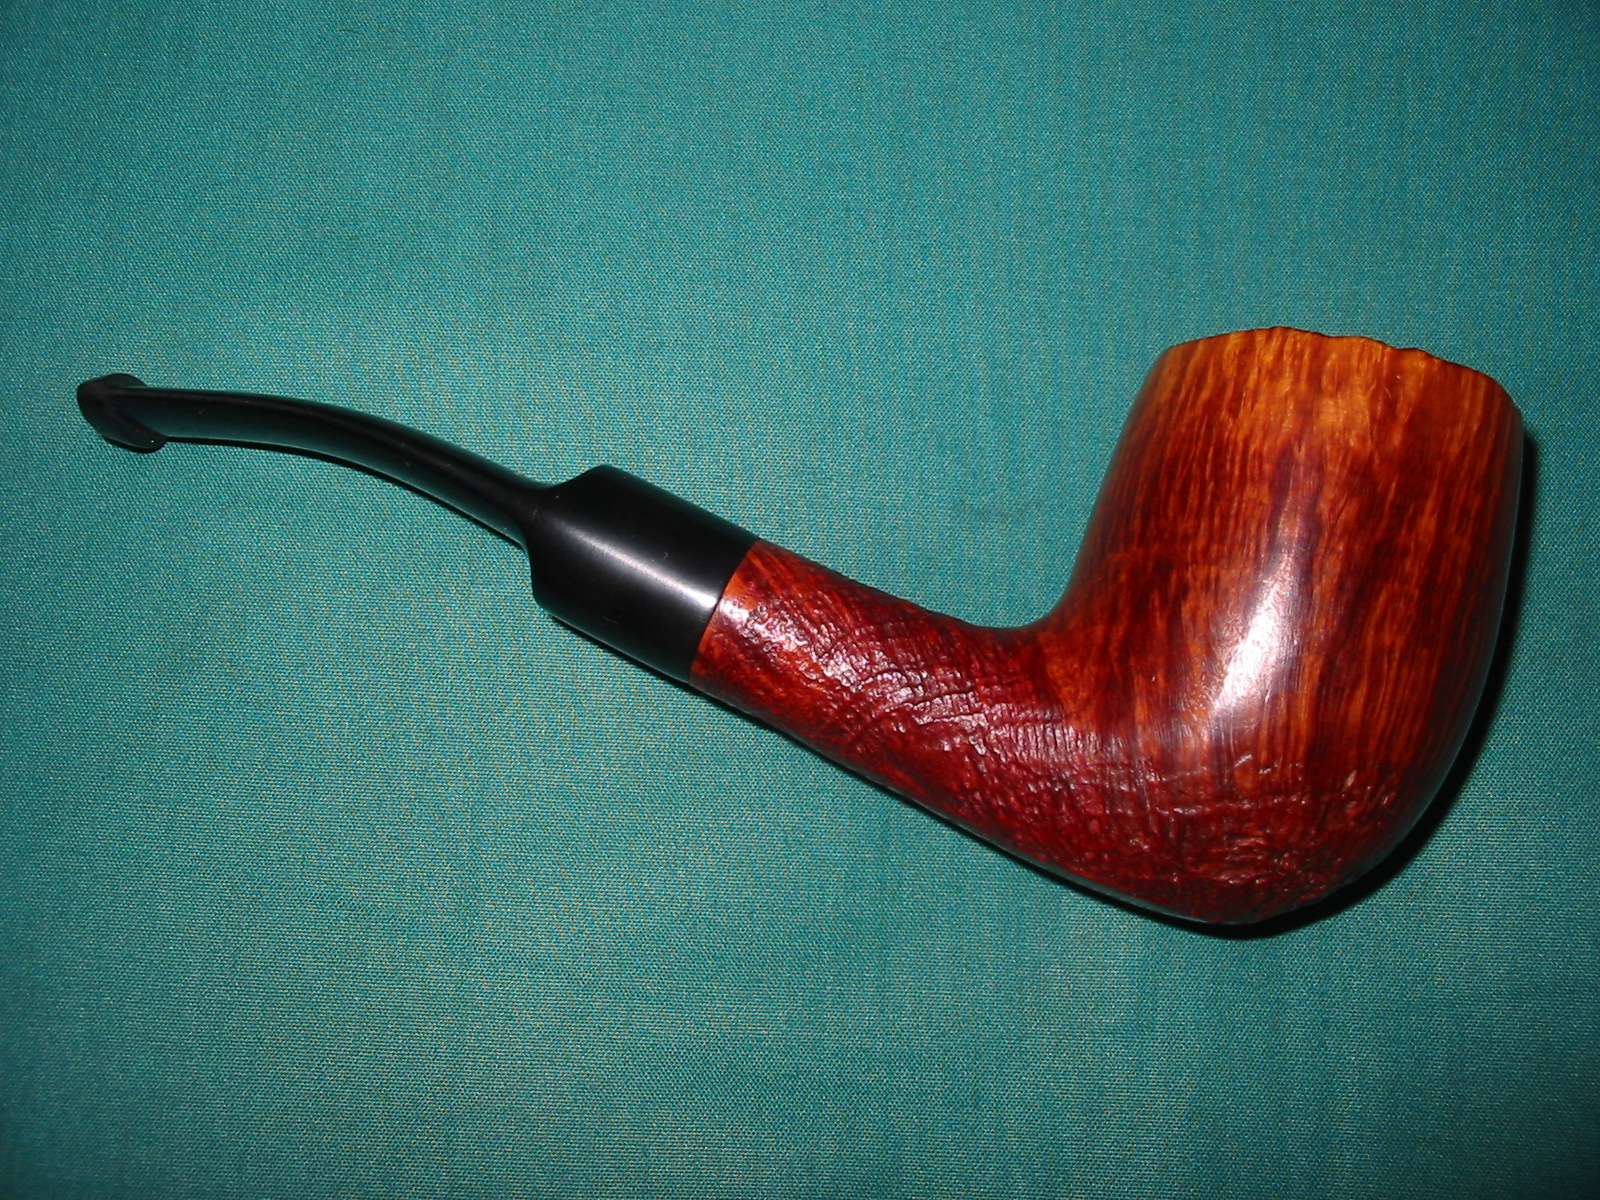
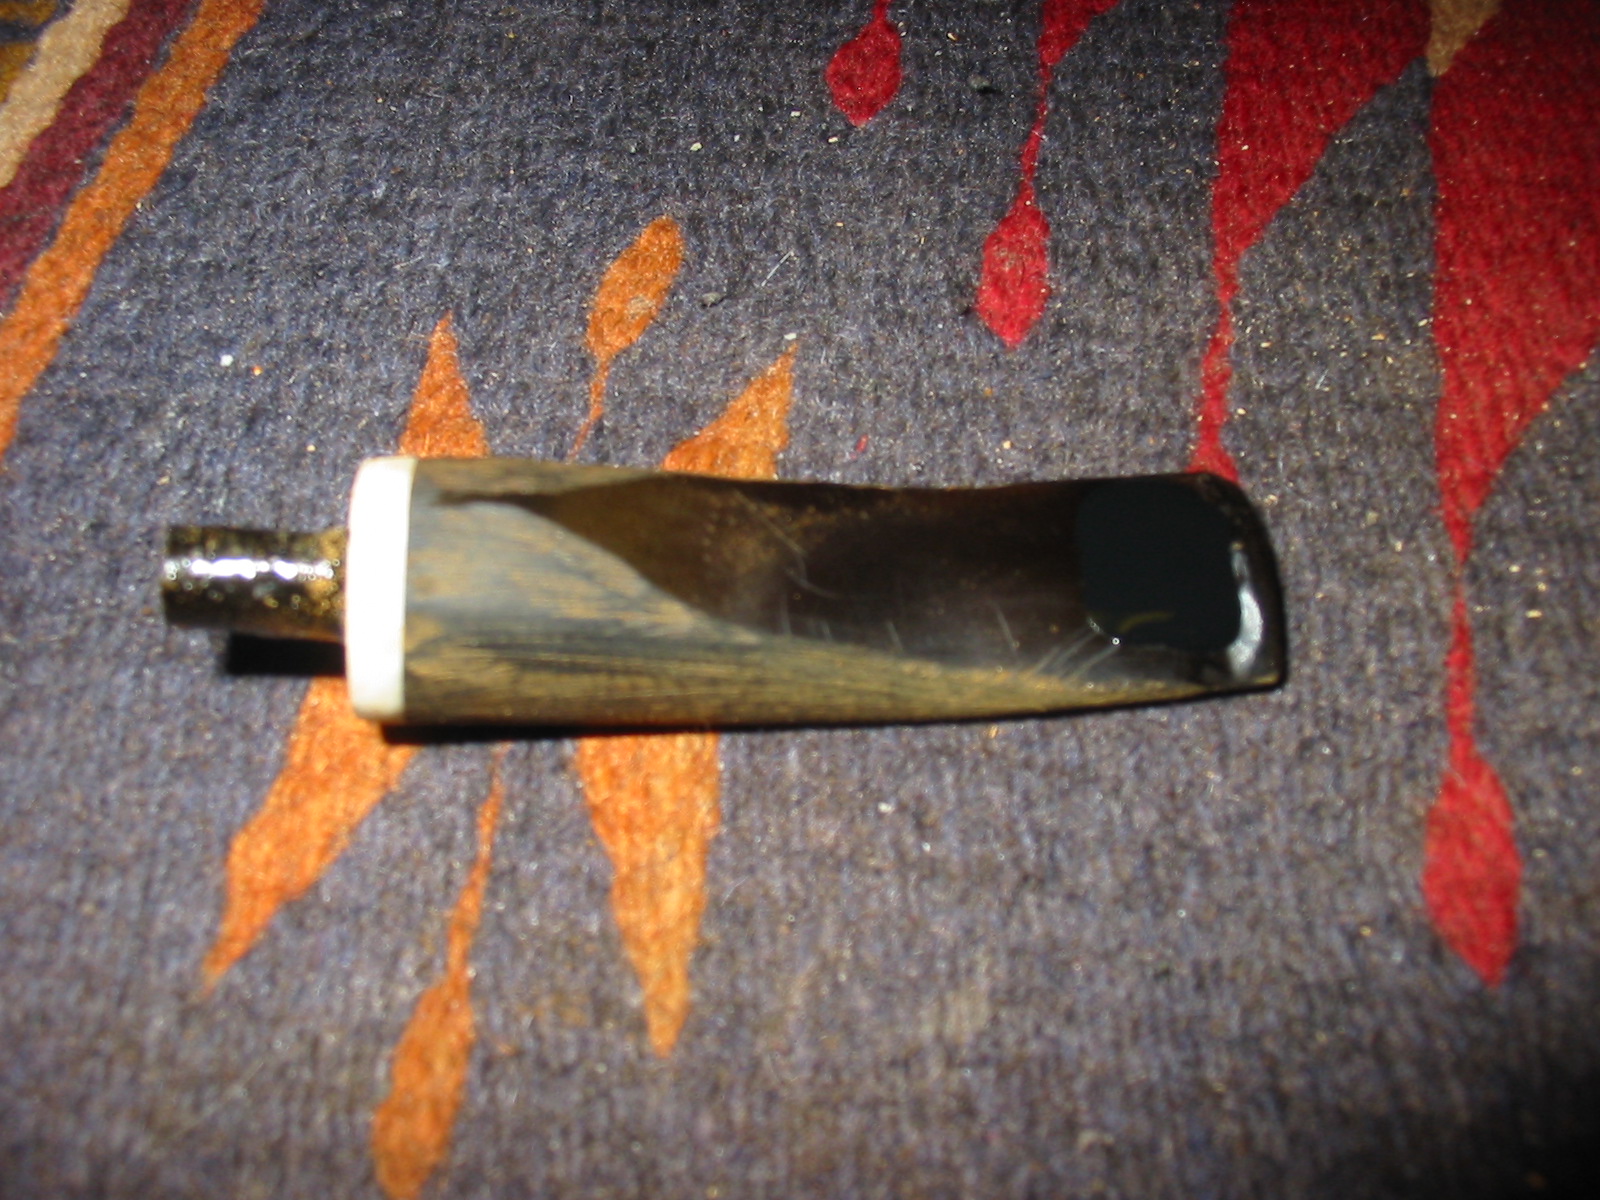
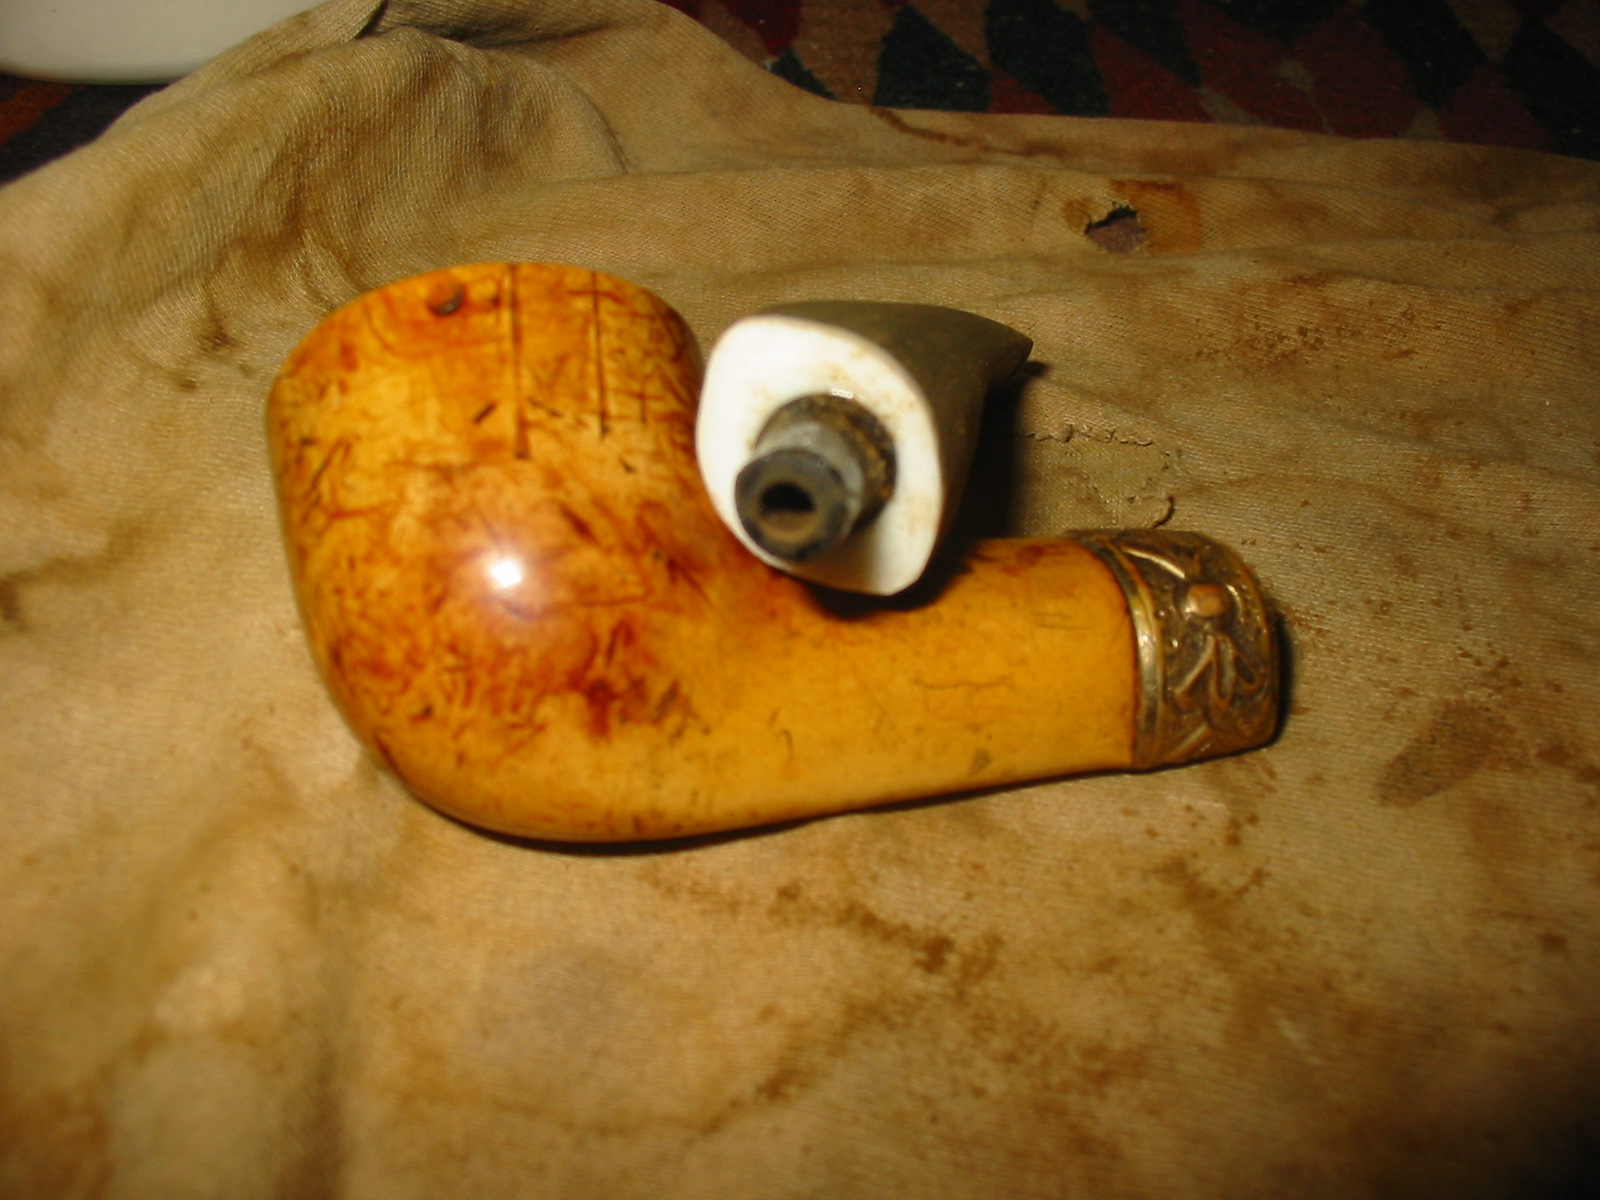
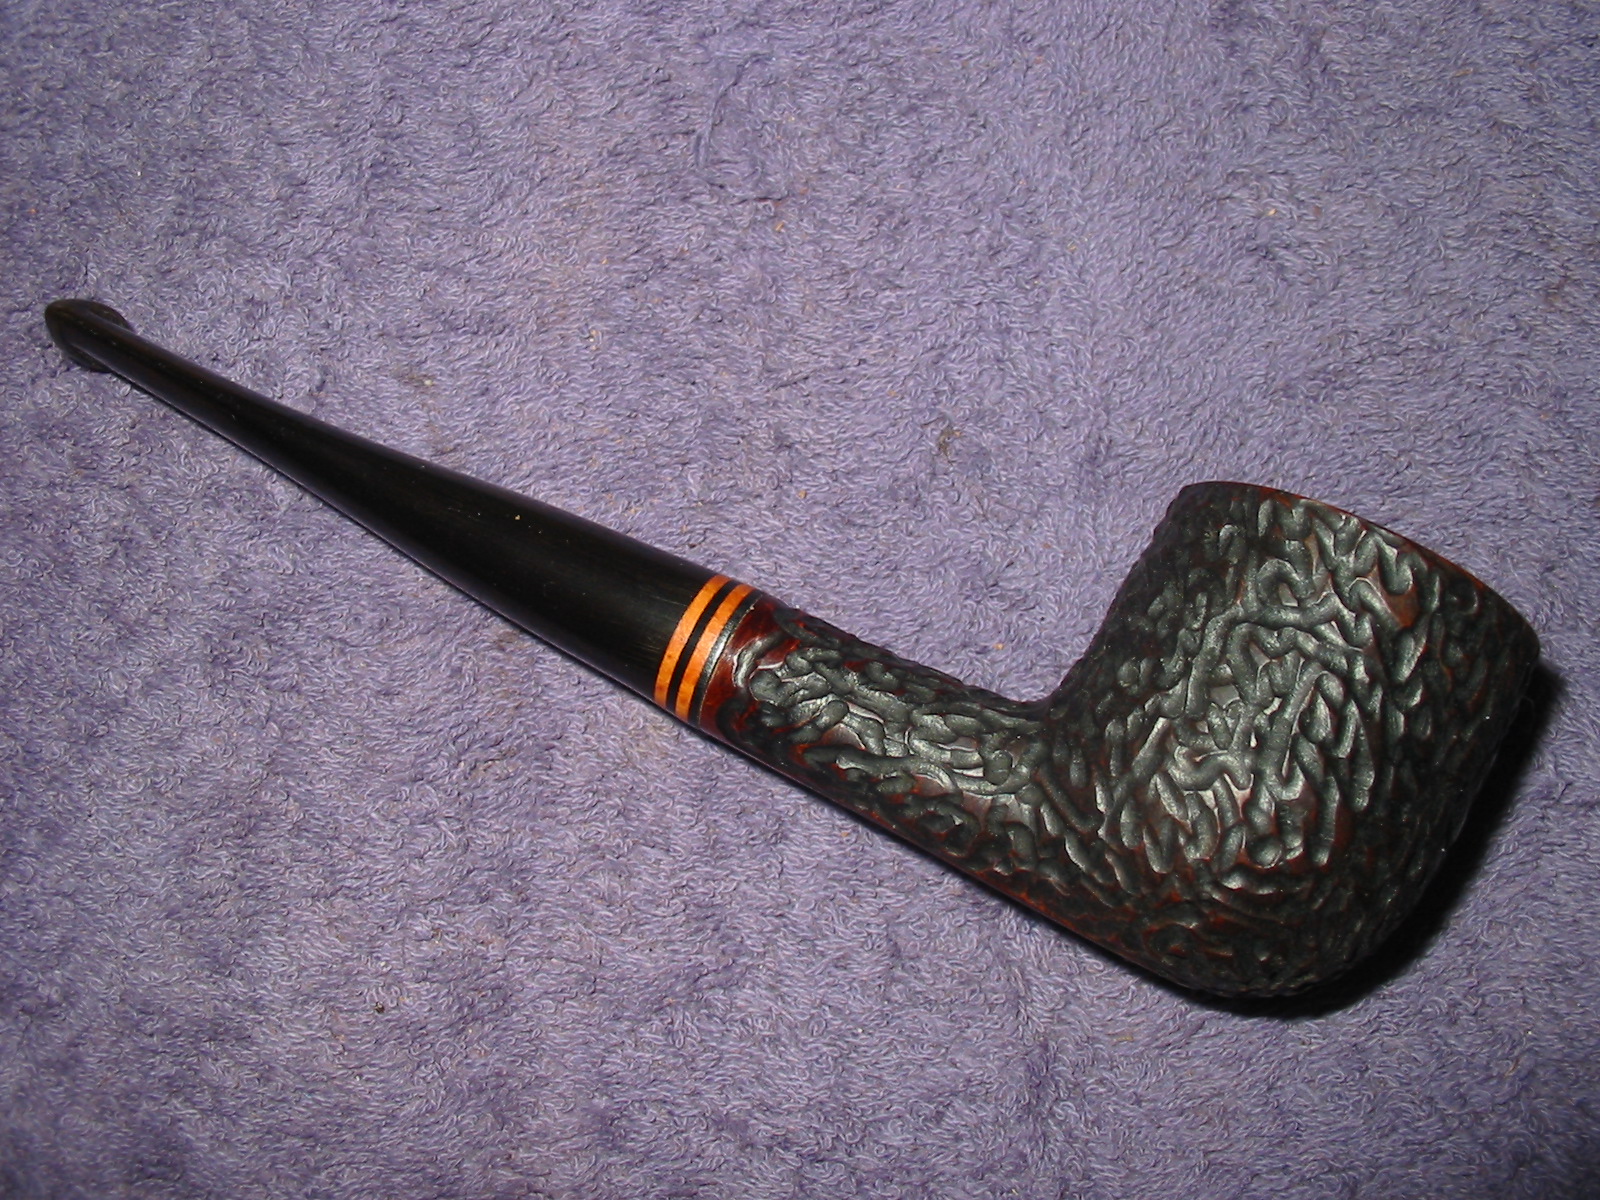
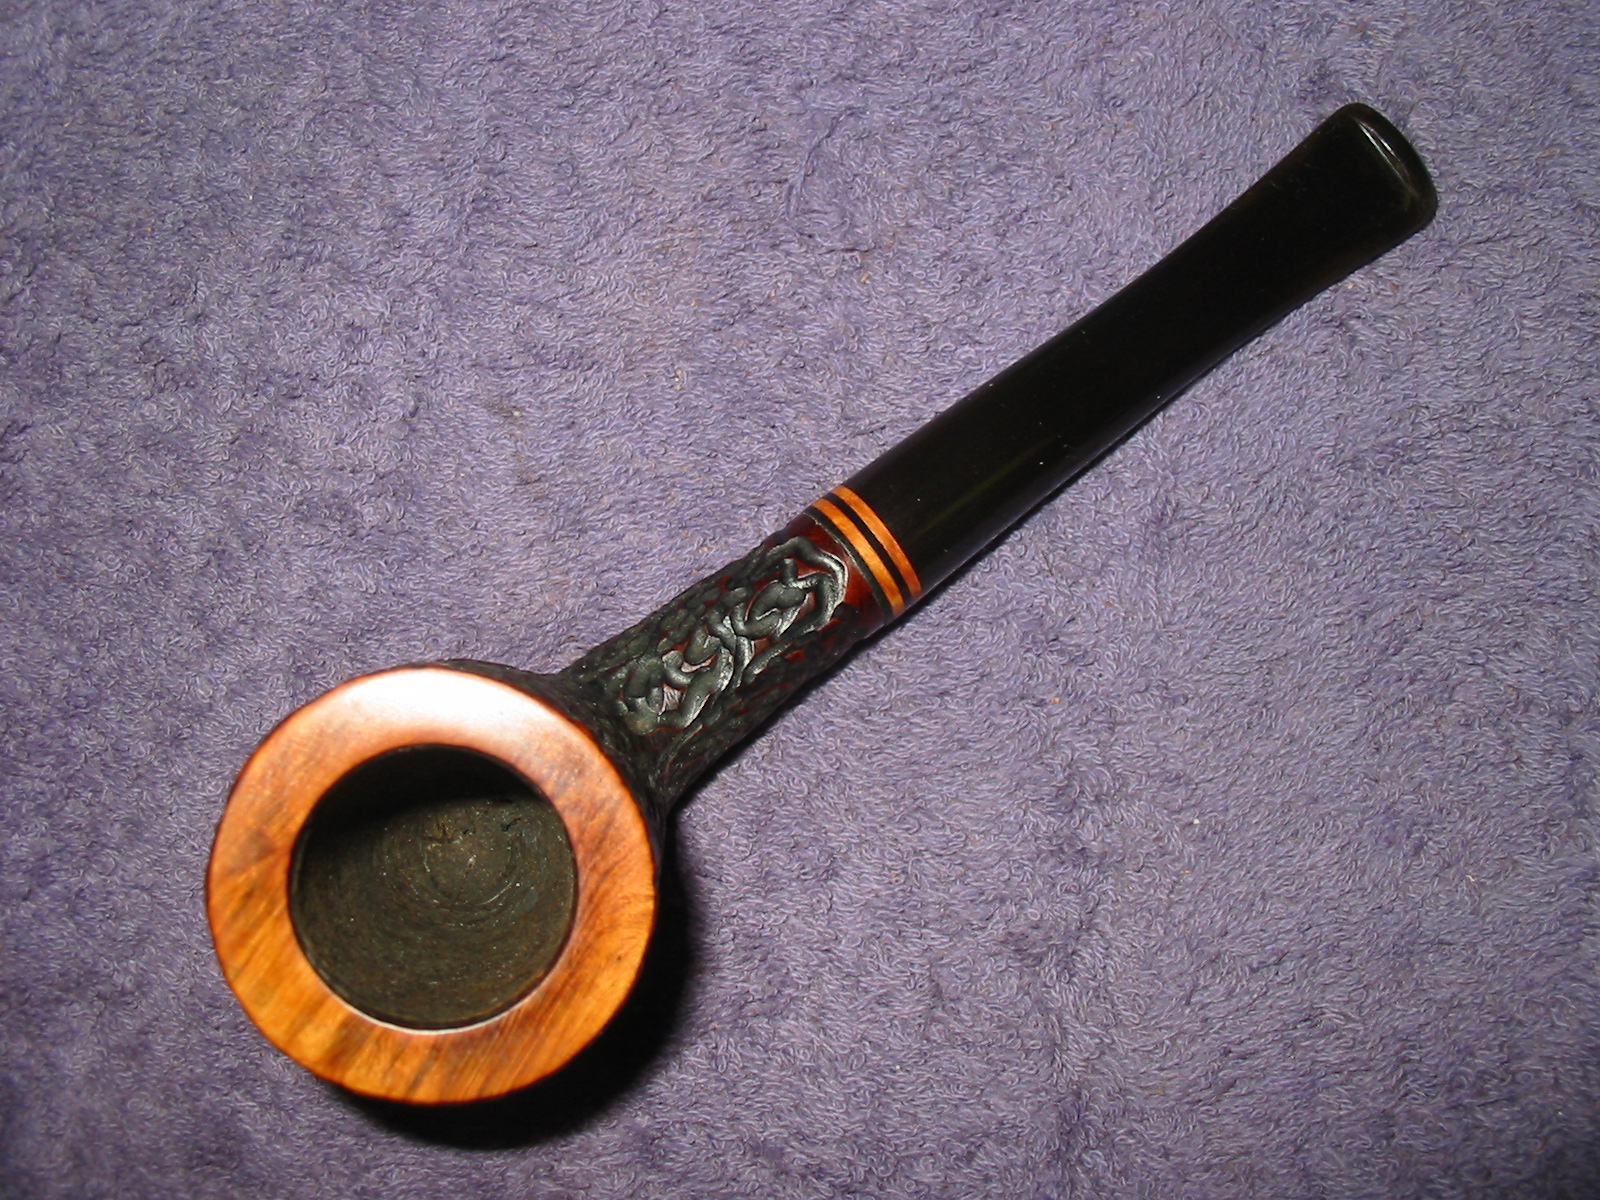
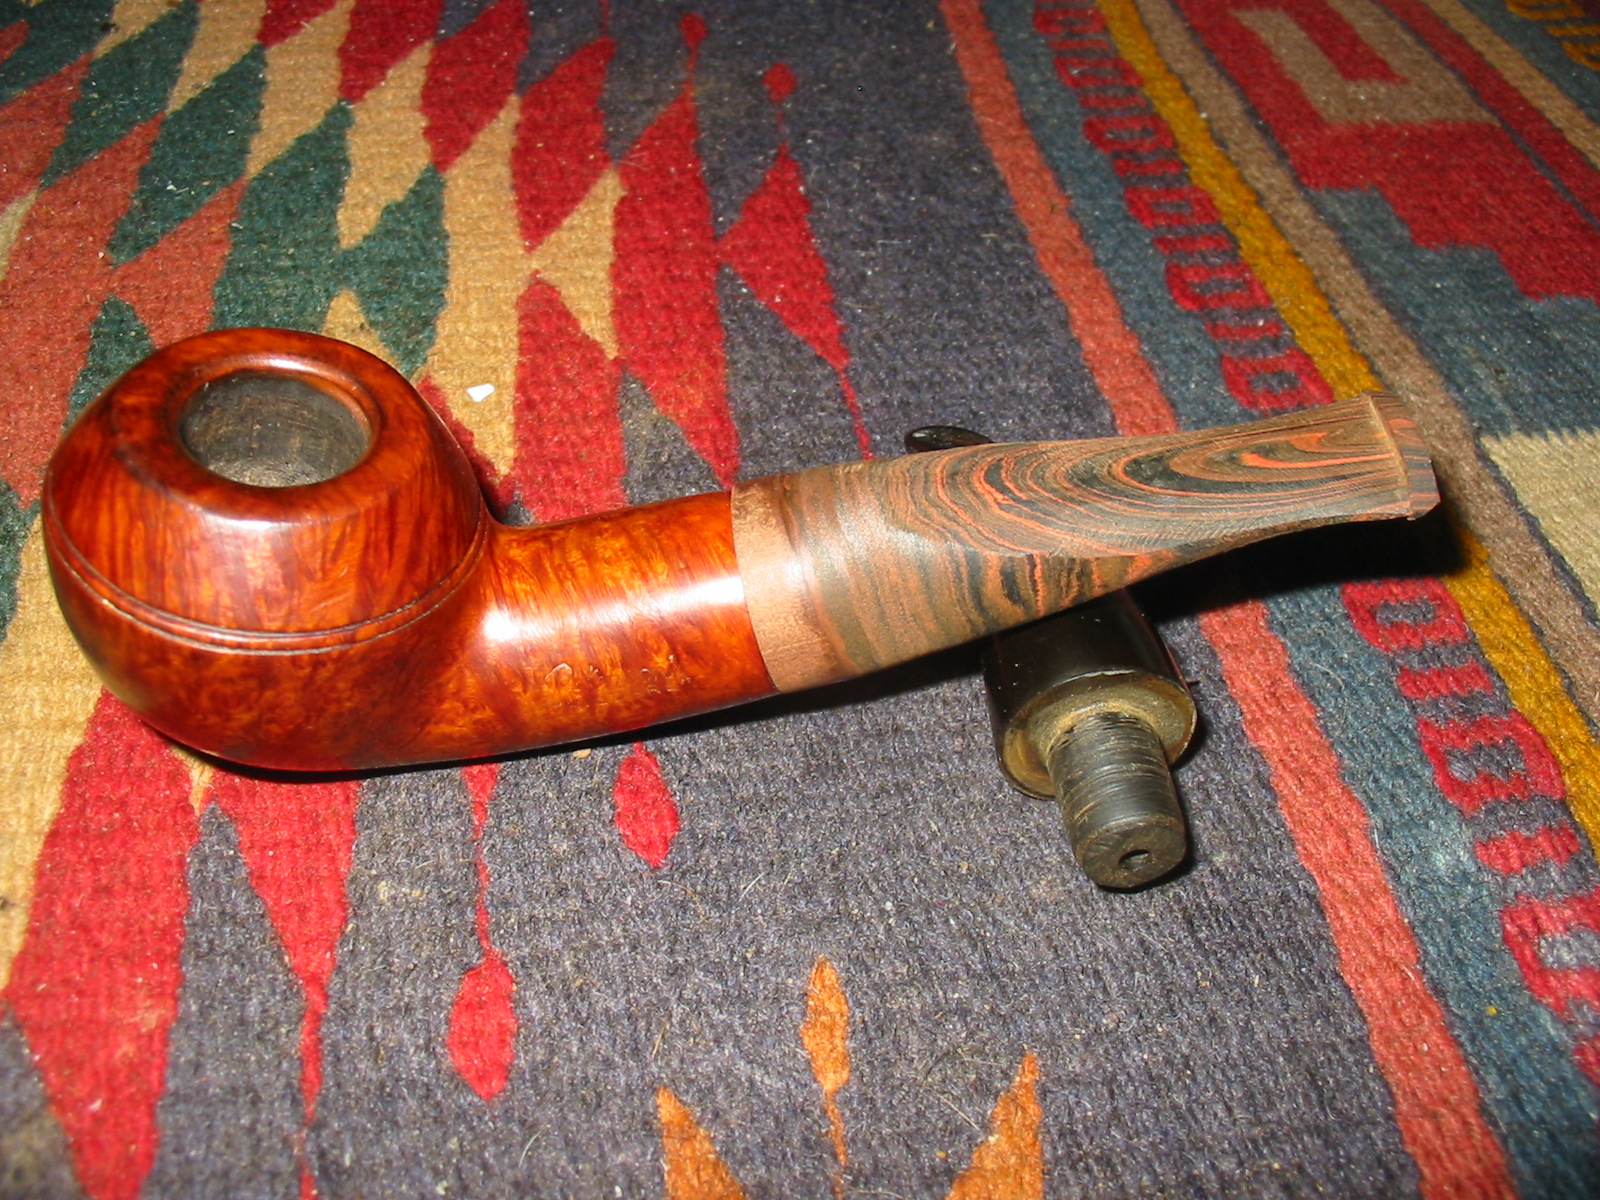
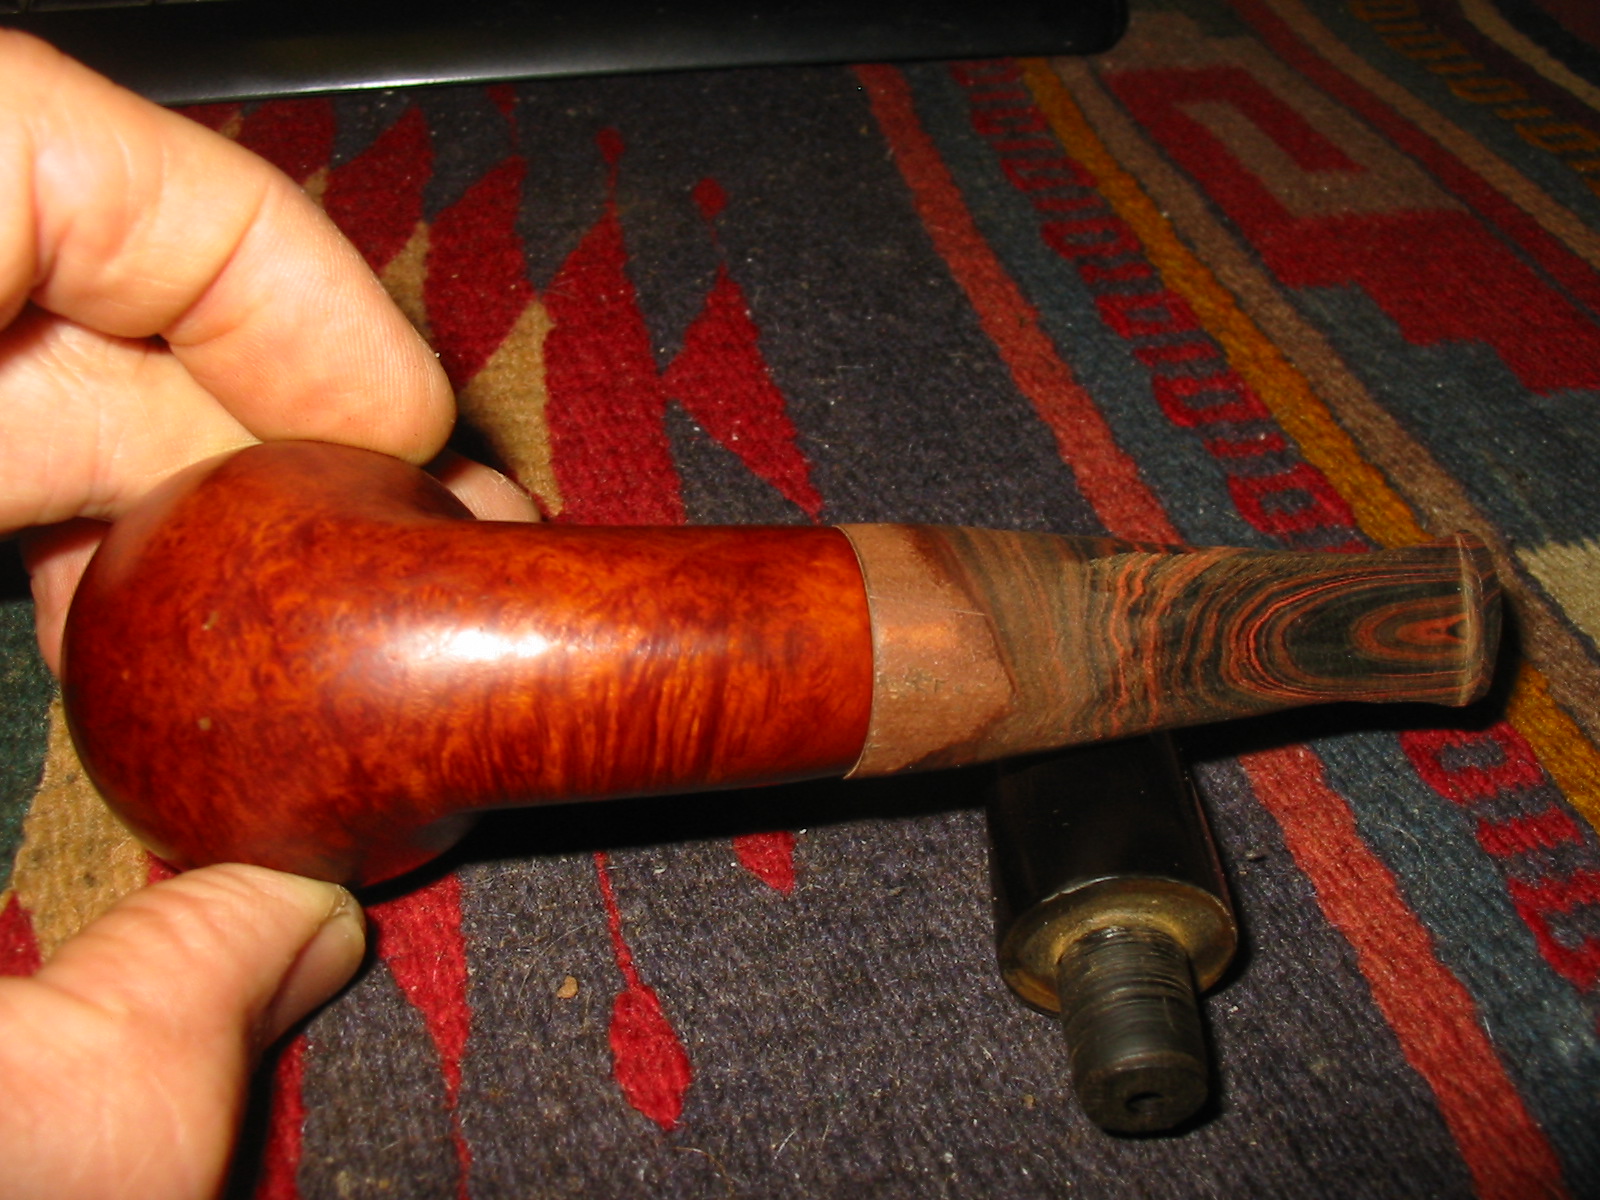
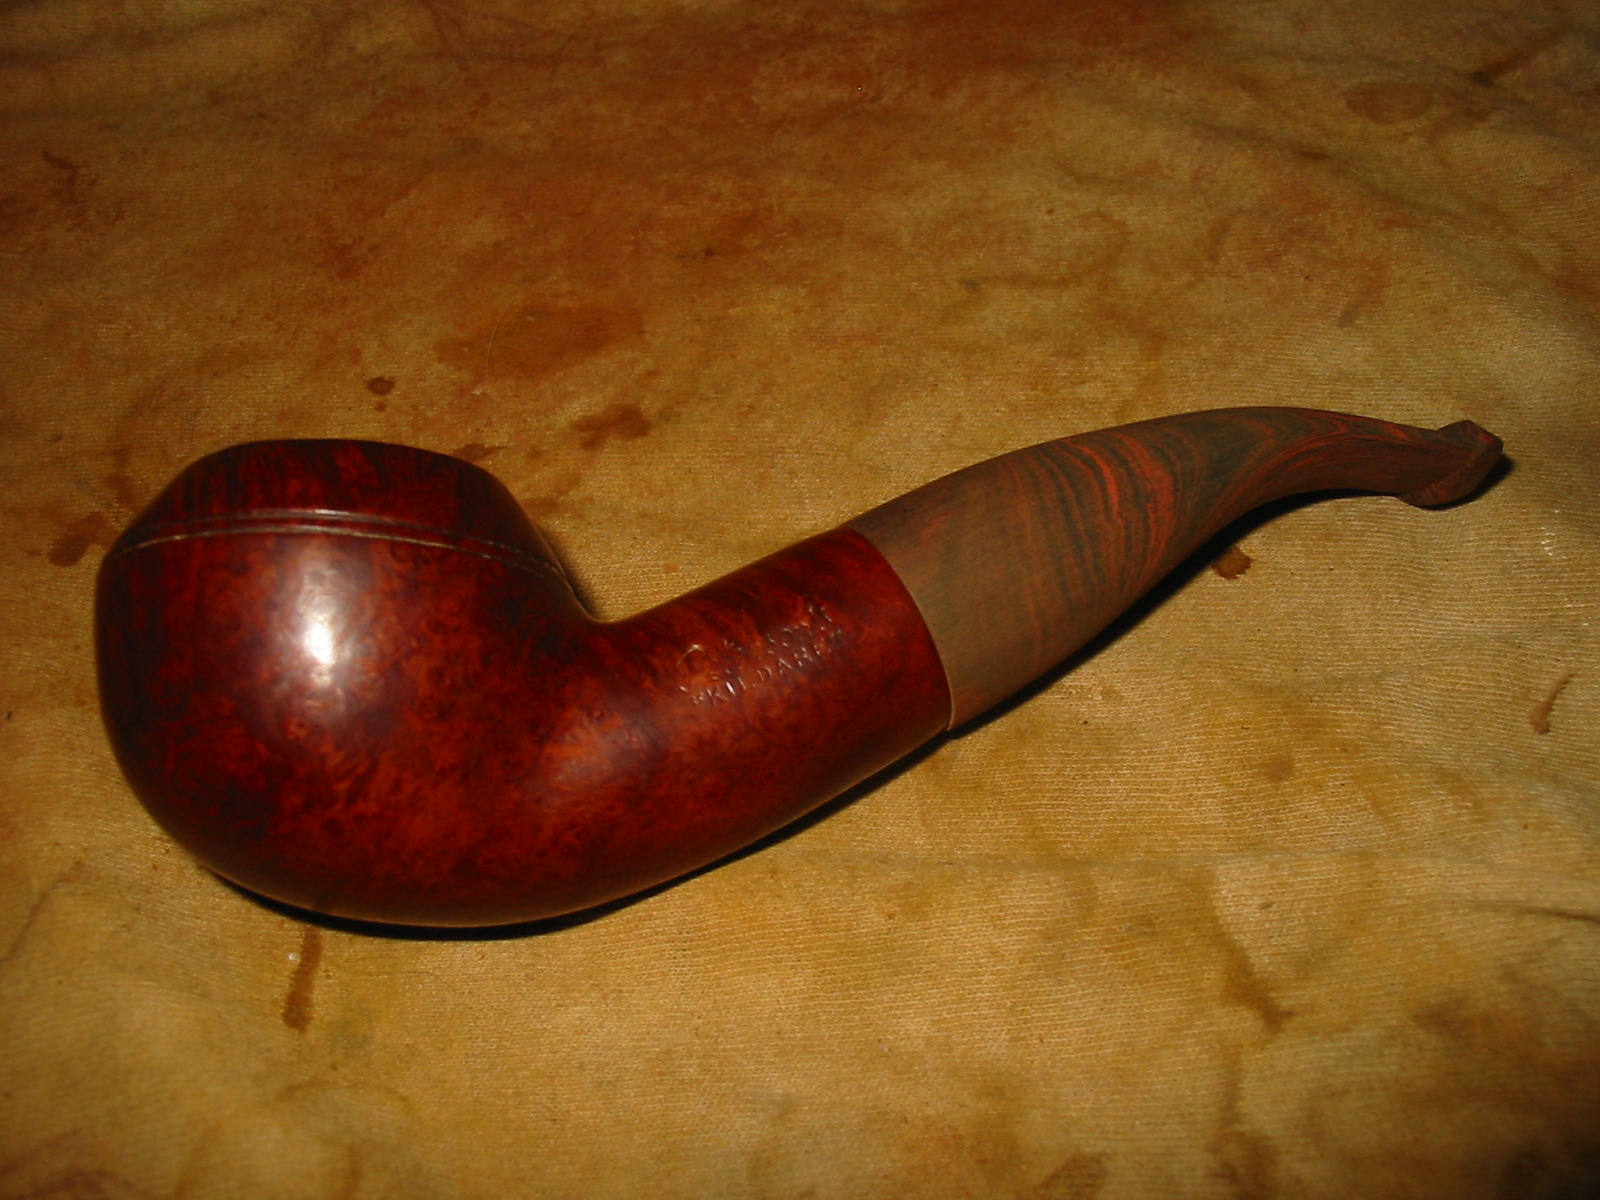
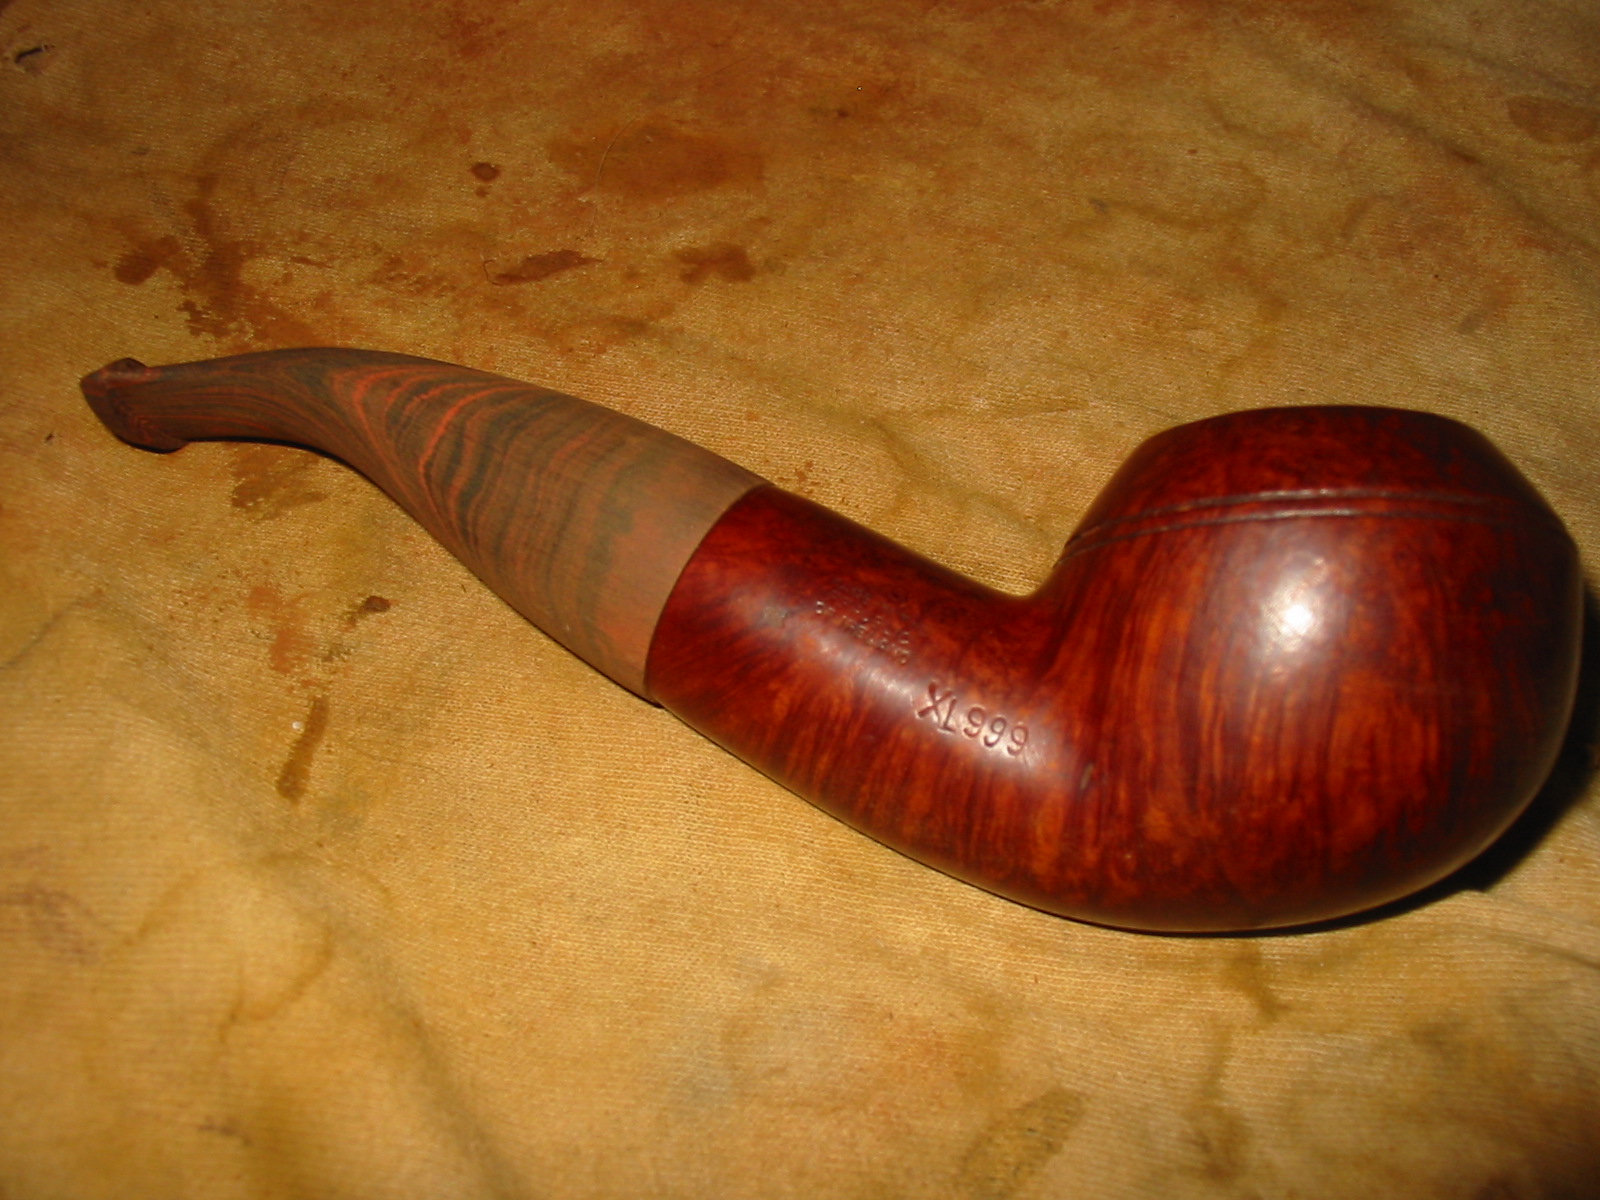
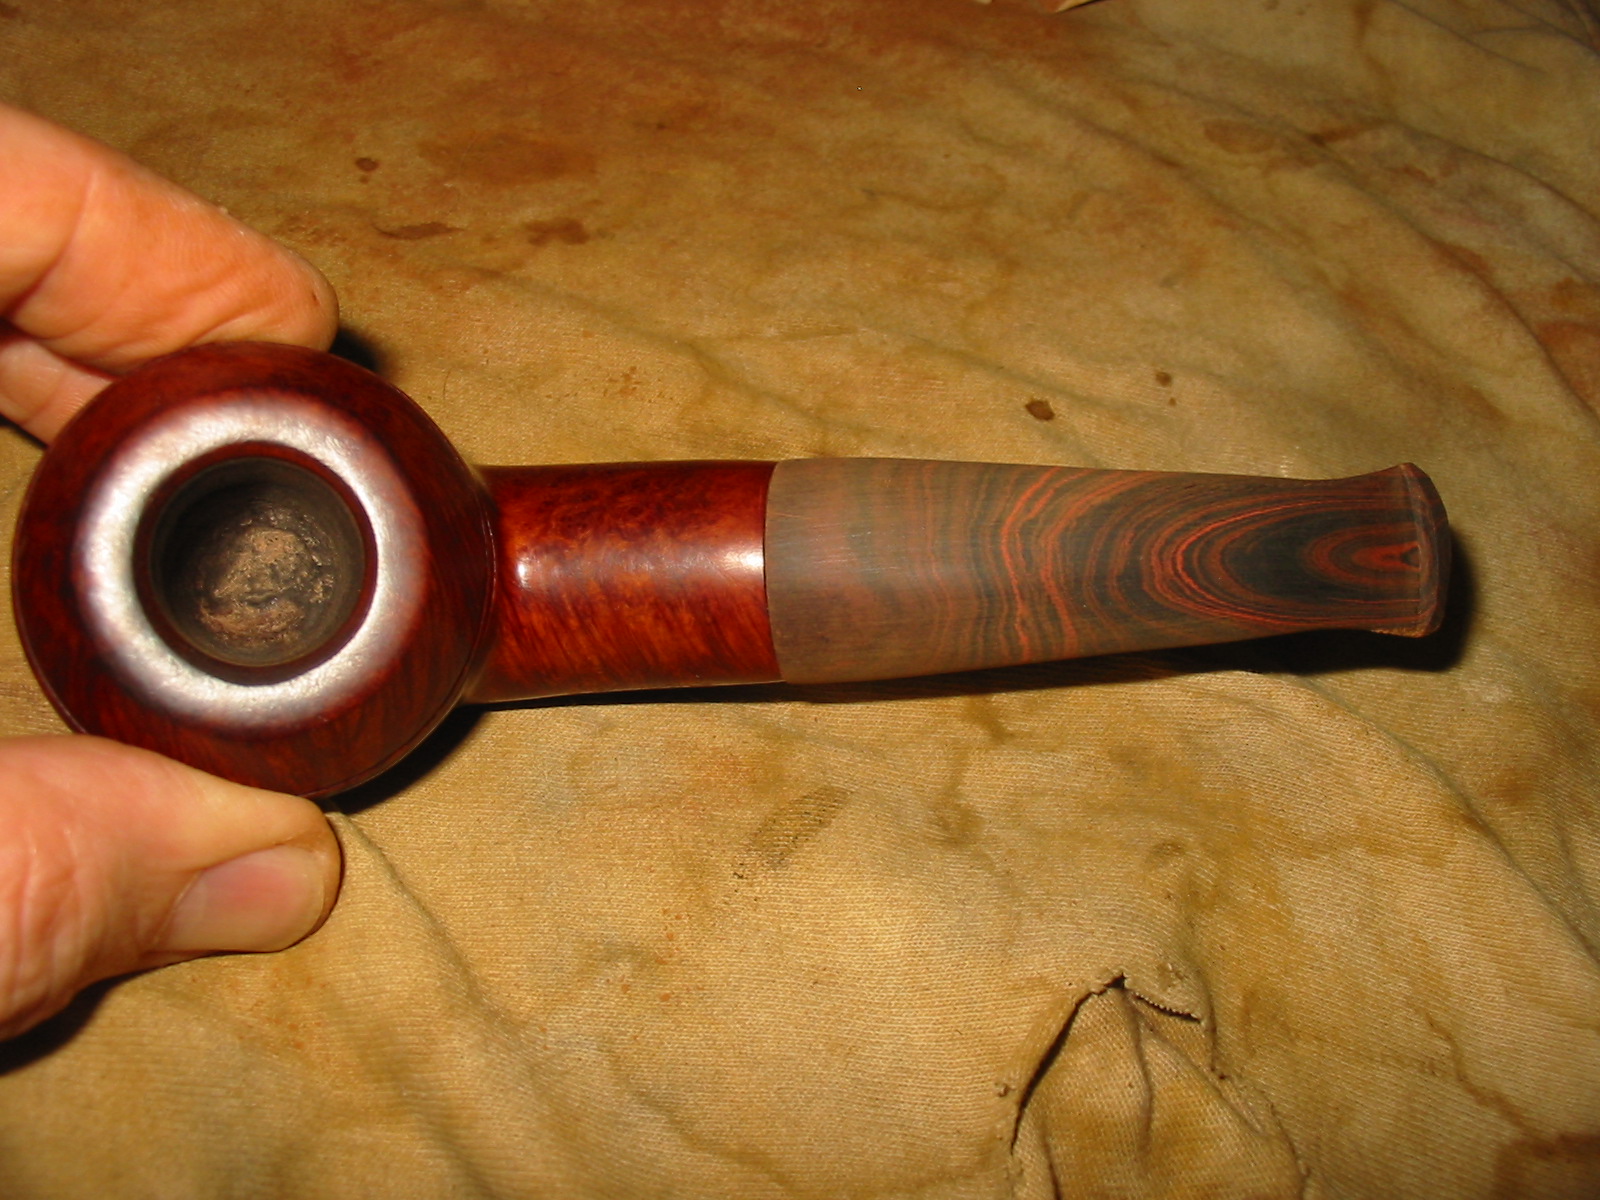
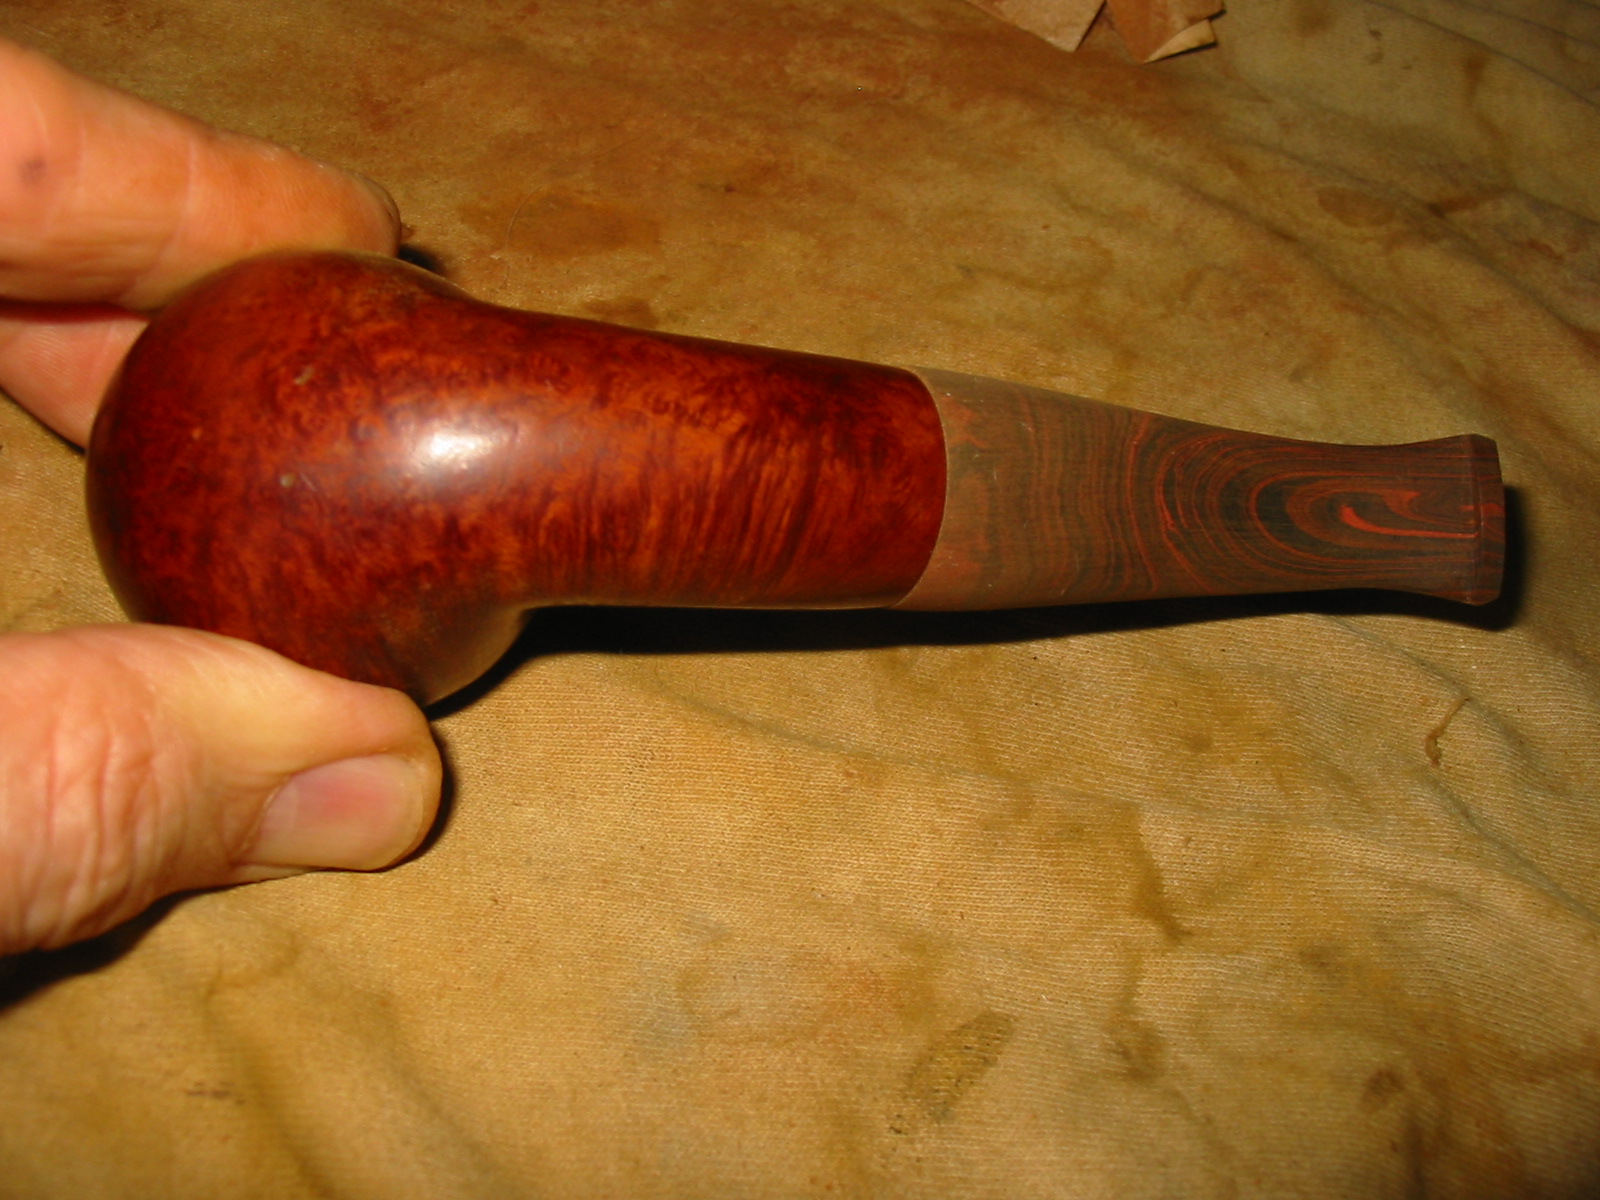
I rubbed the stem down with Obsidian Oil and set it aside to dry while I worked on giving the bowl a new coat of stain to bring it back to life. I gave it a coating of Medium Walnut aniline stain and flamed it. I took it to the buffer and gave it a light buff with White Diamond on the buffing pad. I was careful around the faint stampings on the shank and hand buffed the shank.
IMG_2512

IMG_2513

IMG_2514

IMG_2515

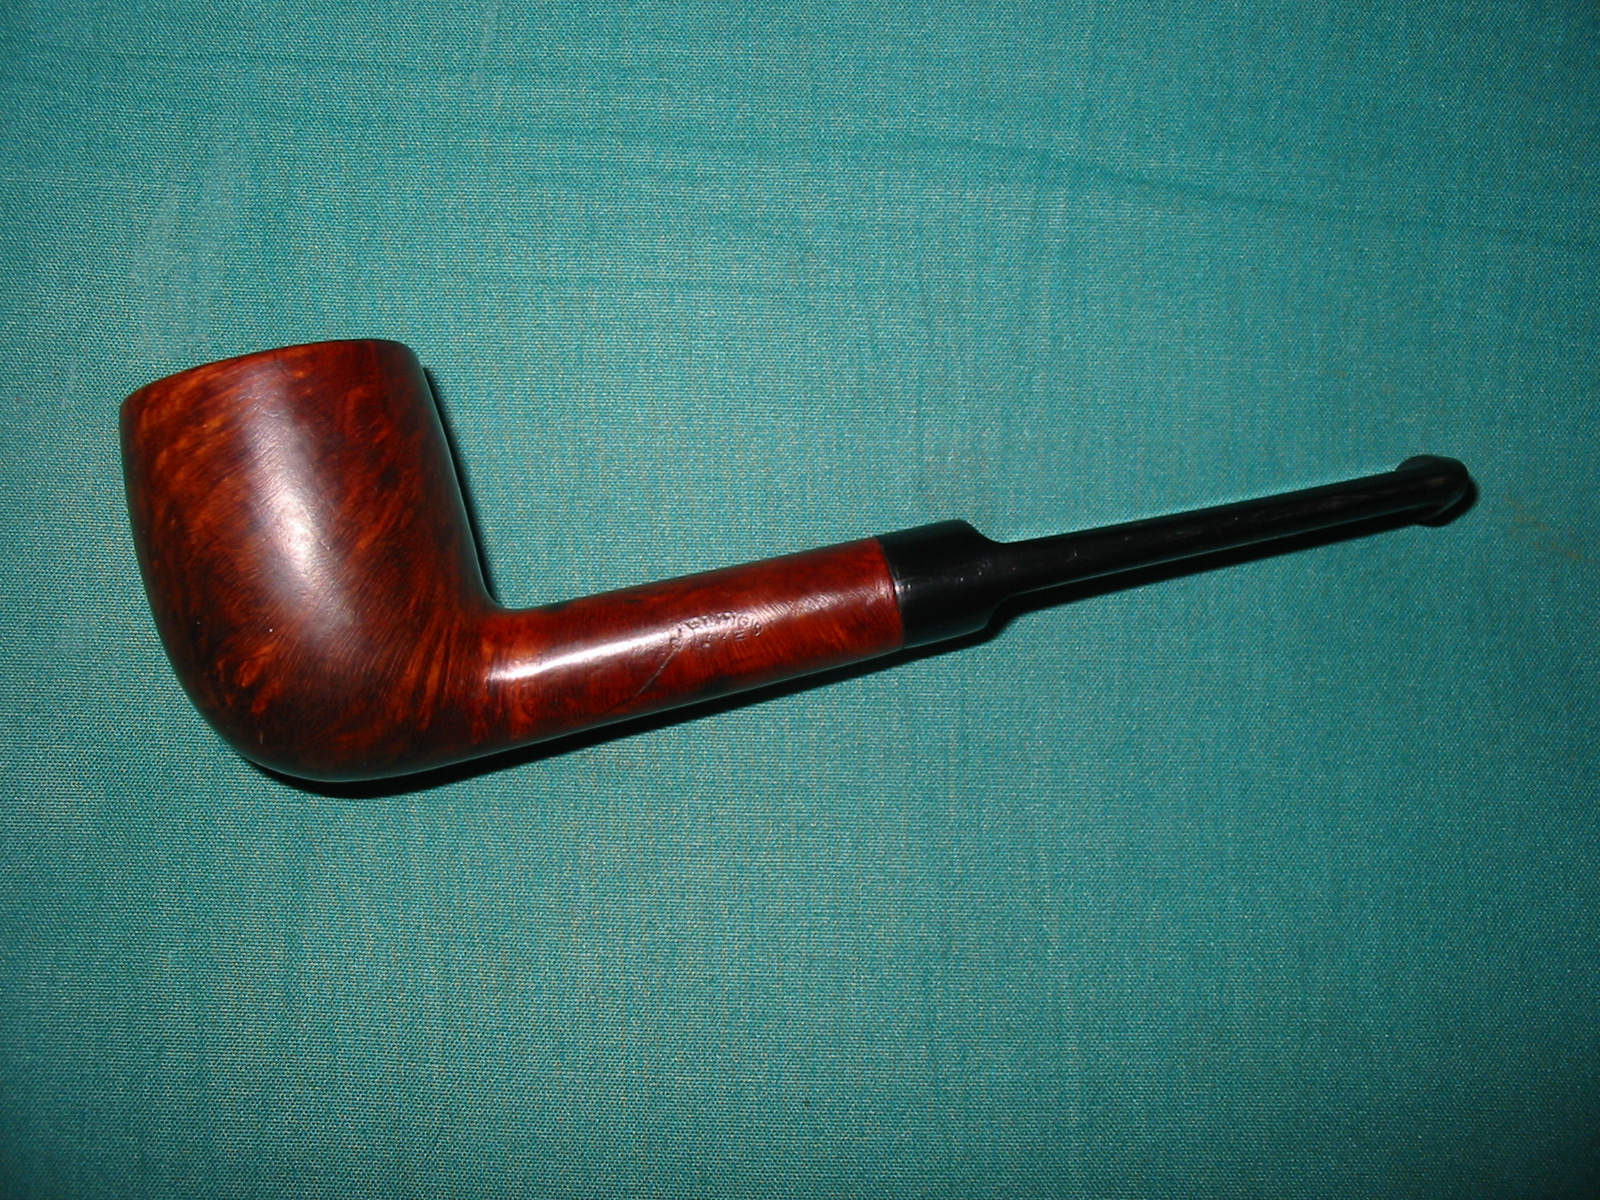
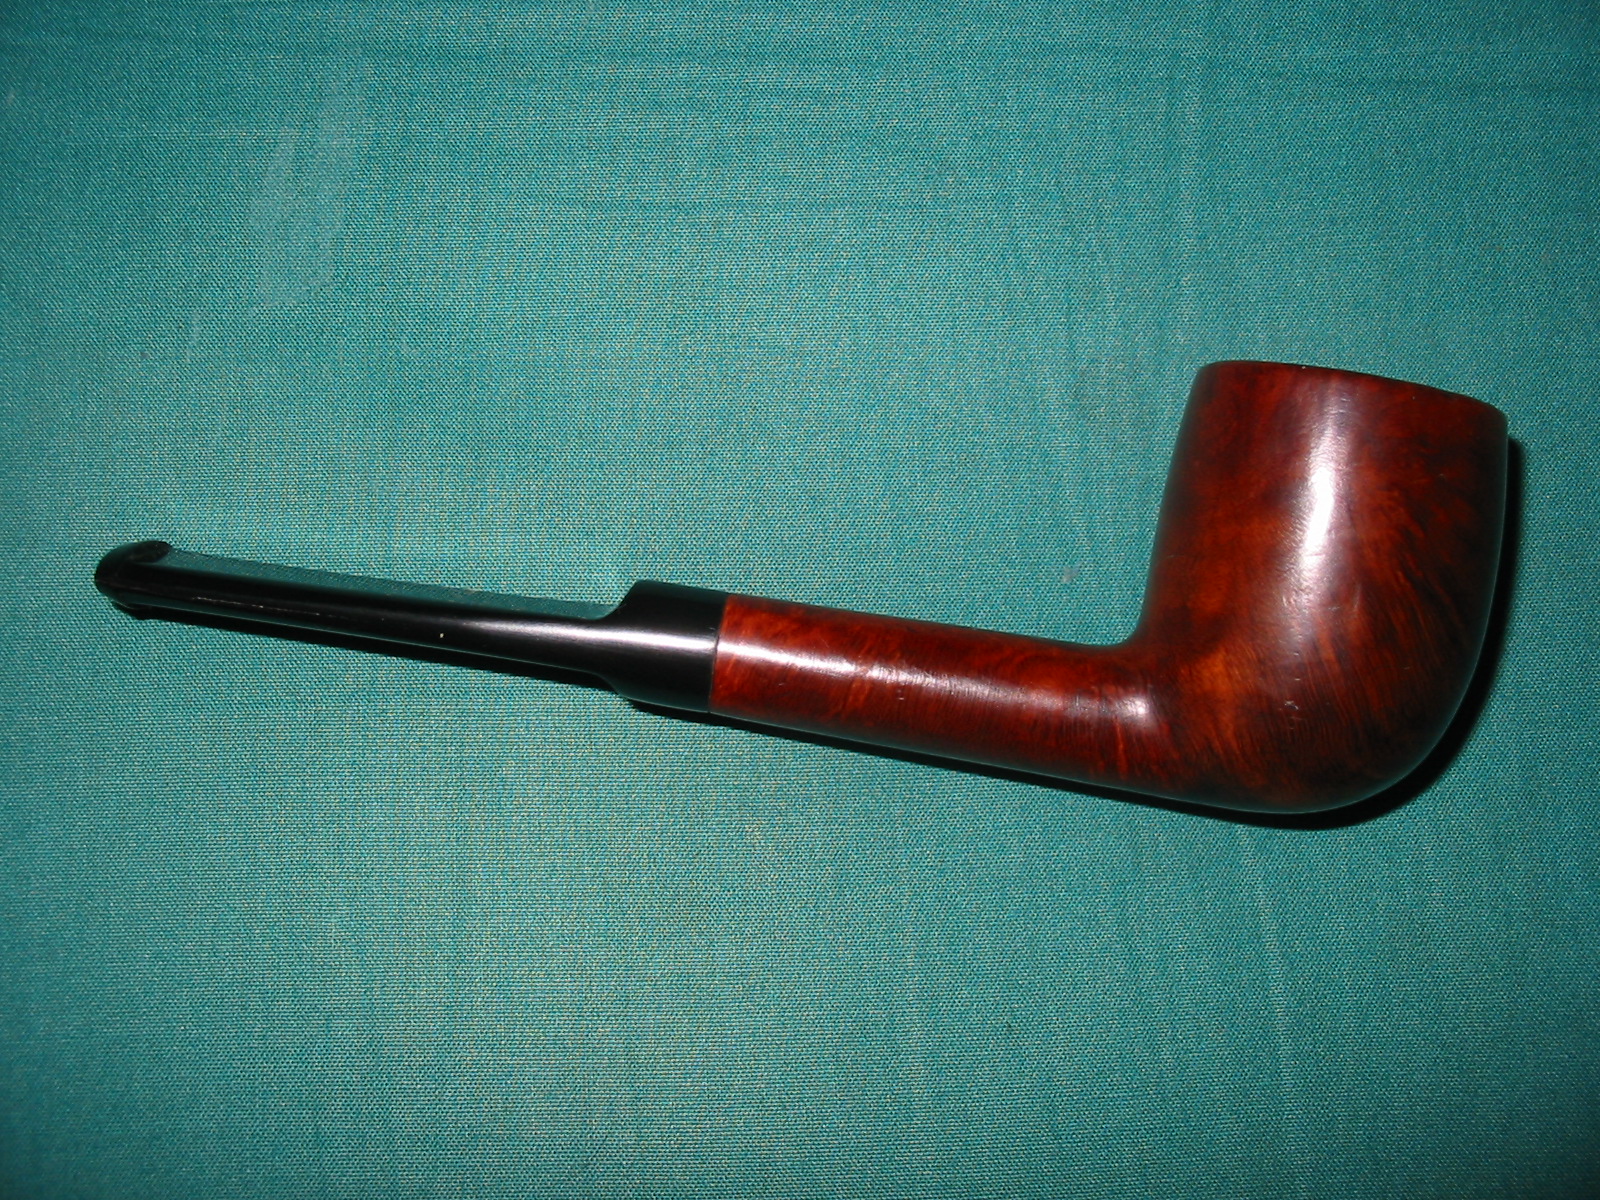
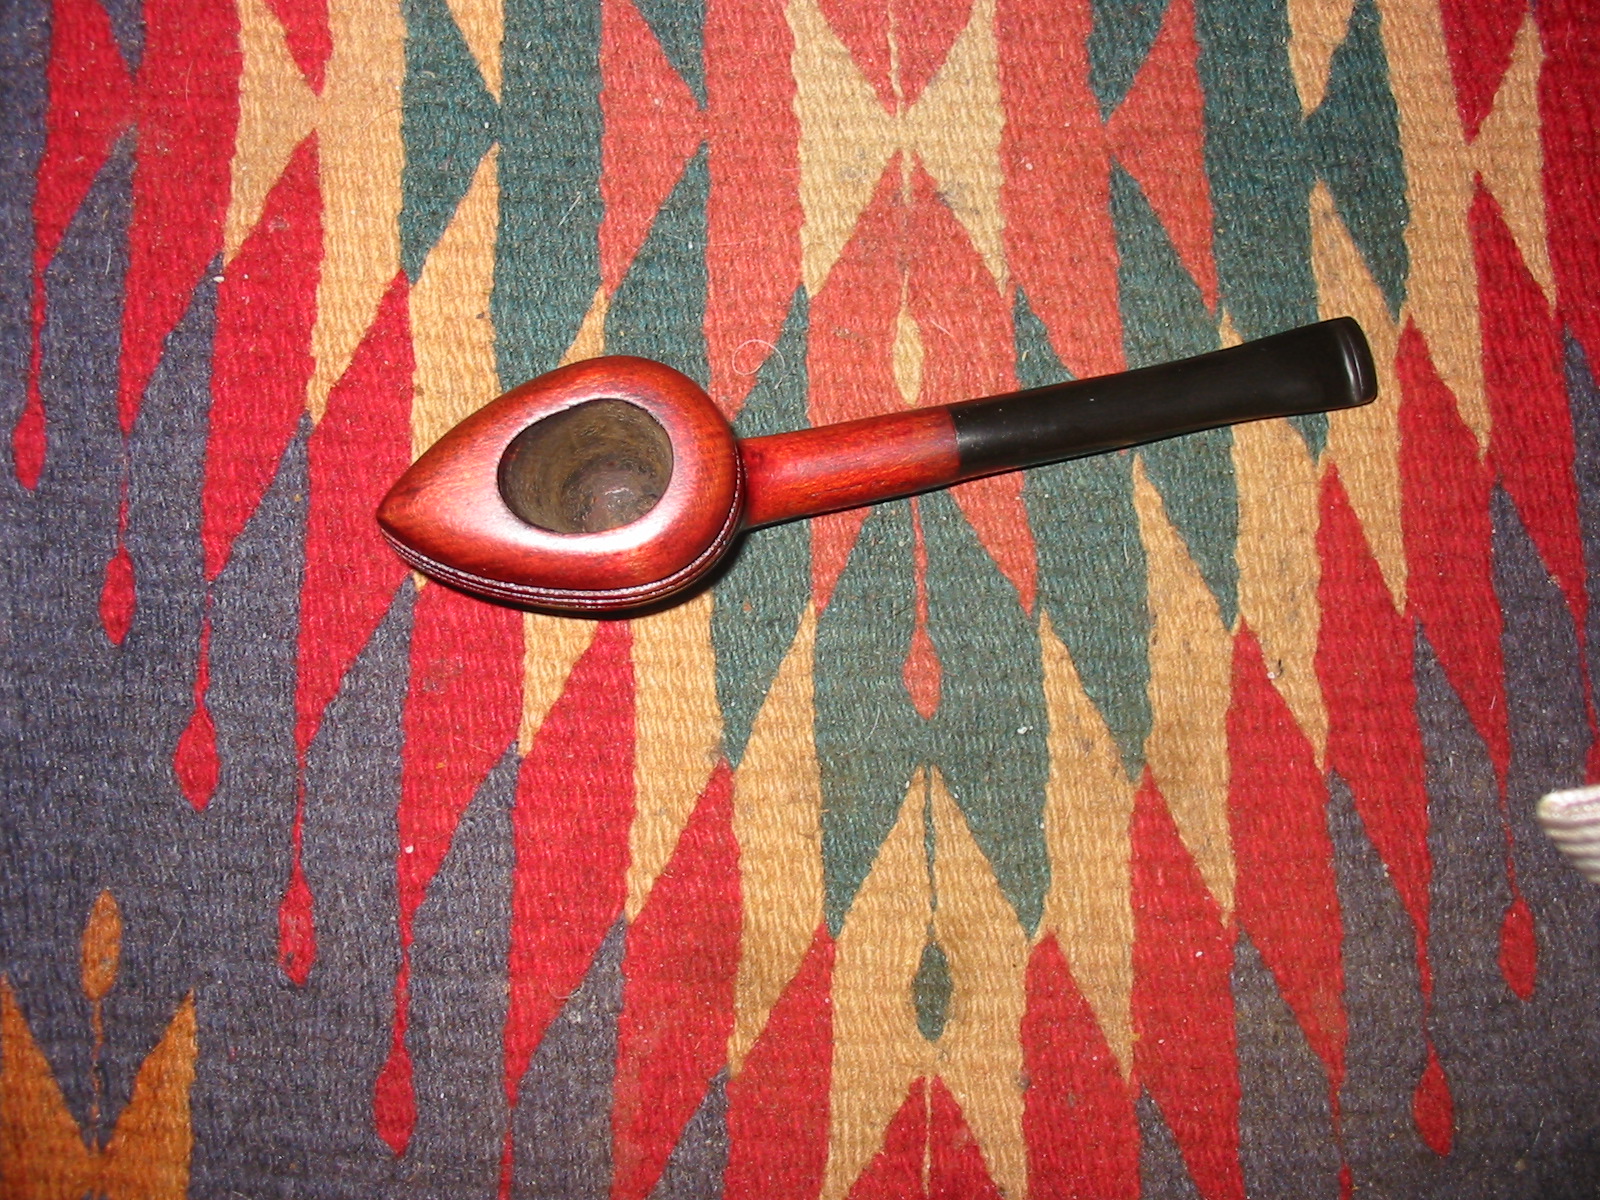
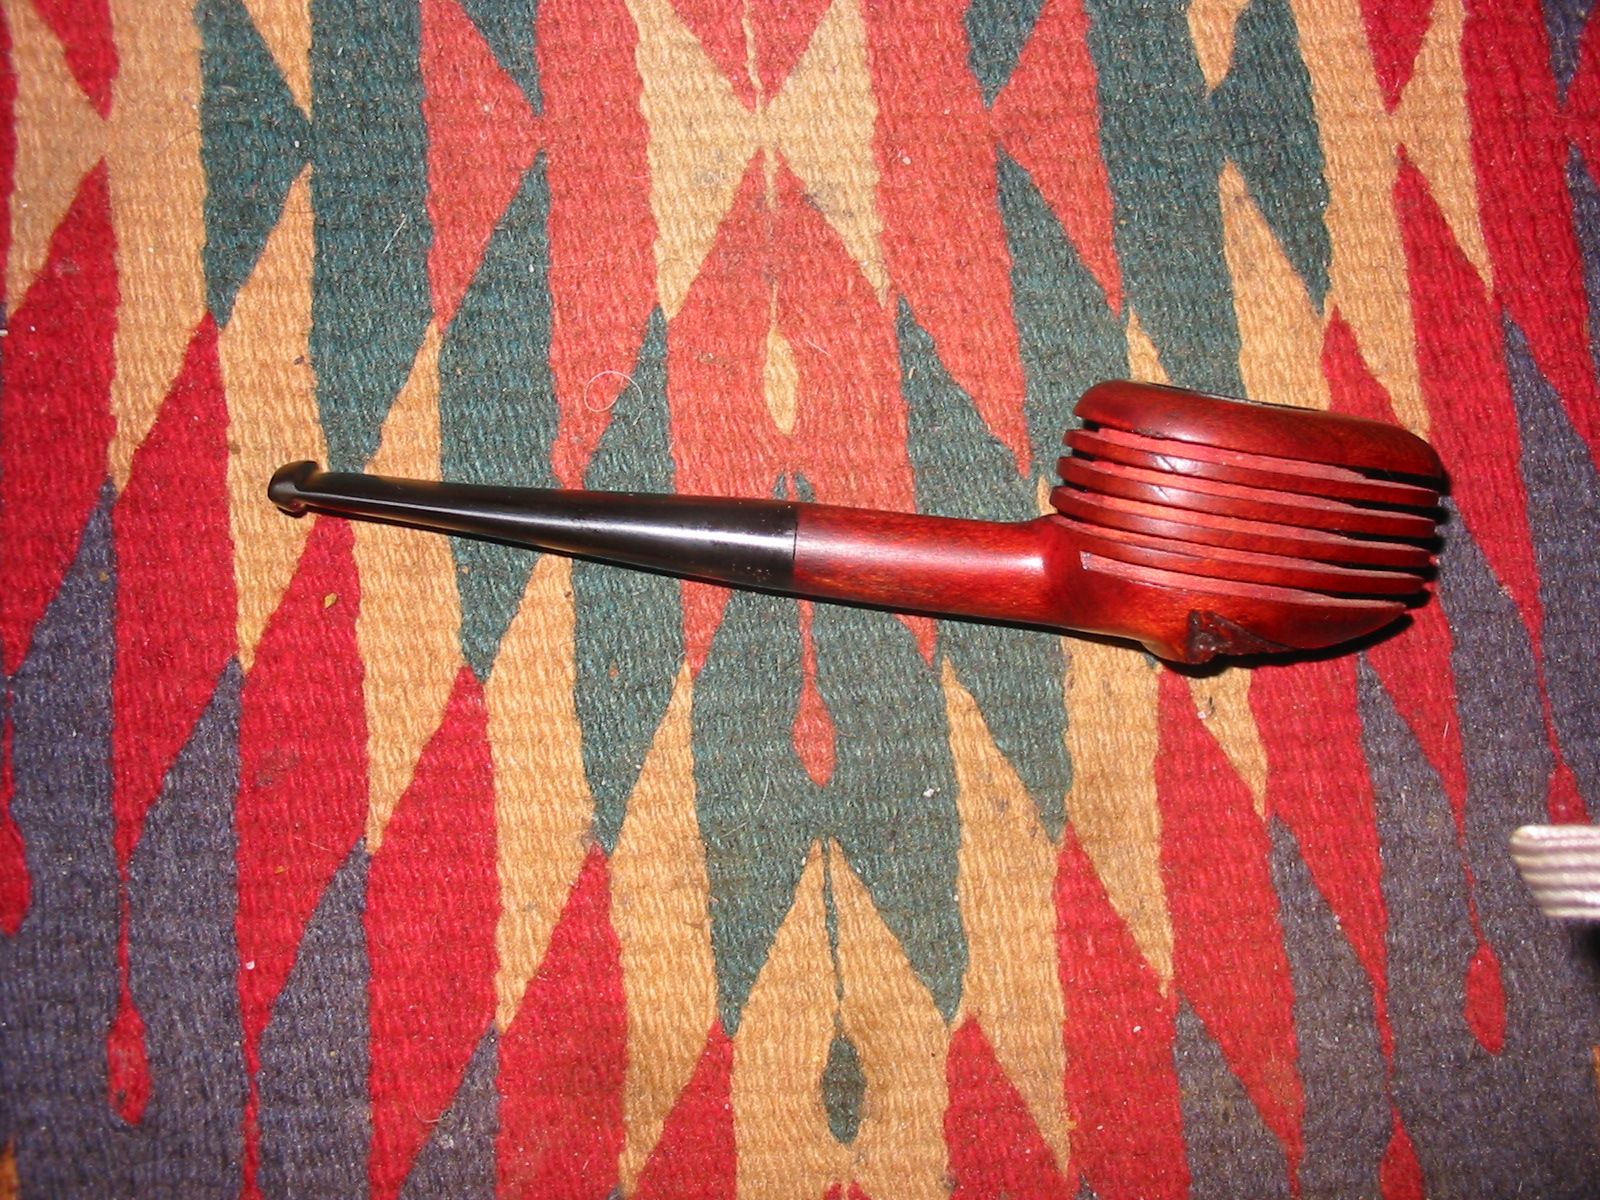
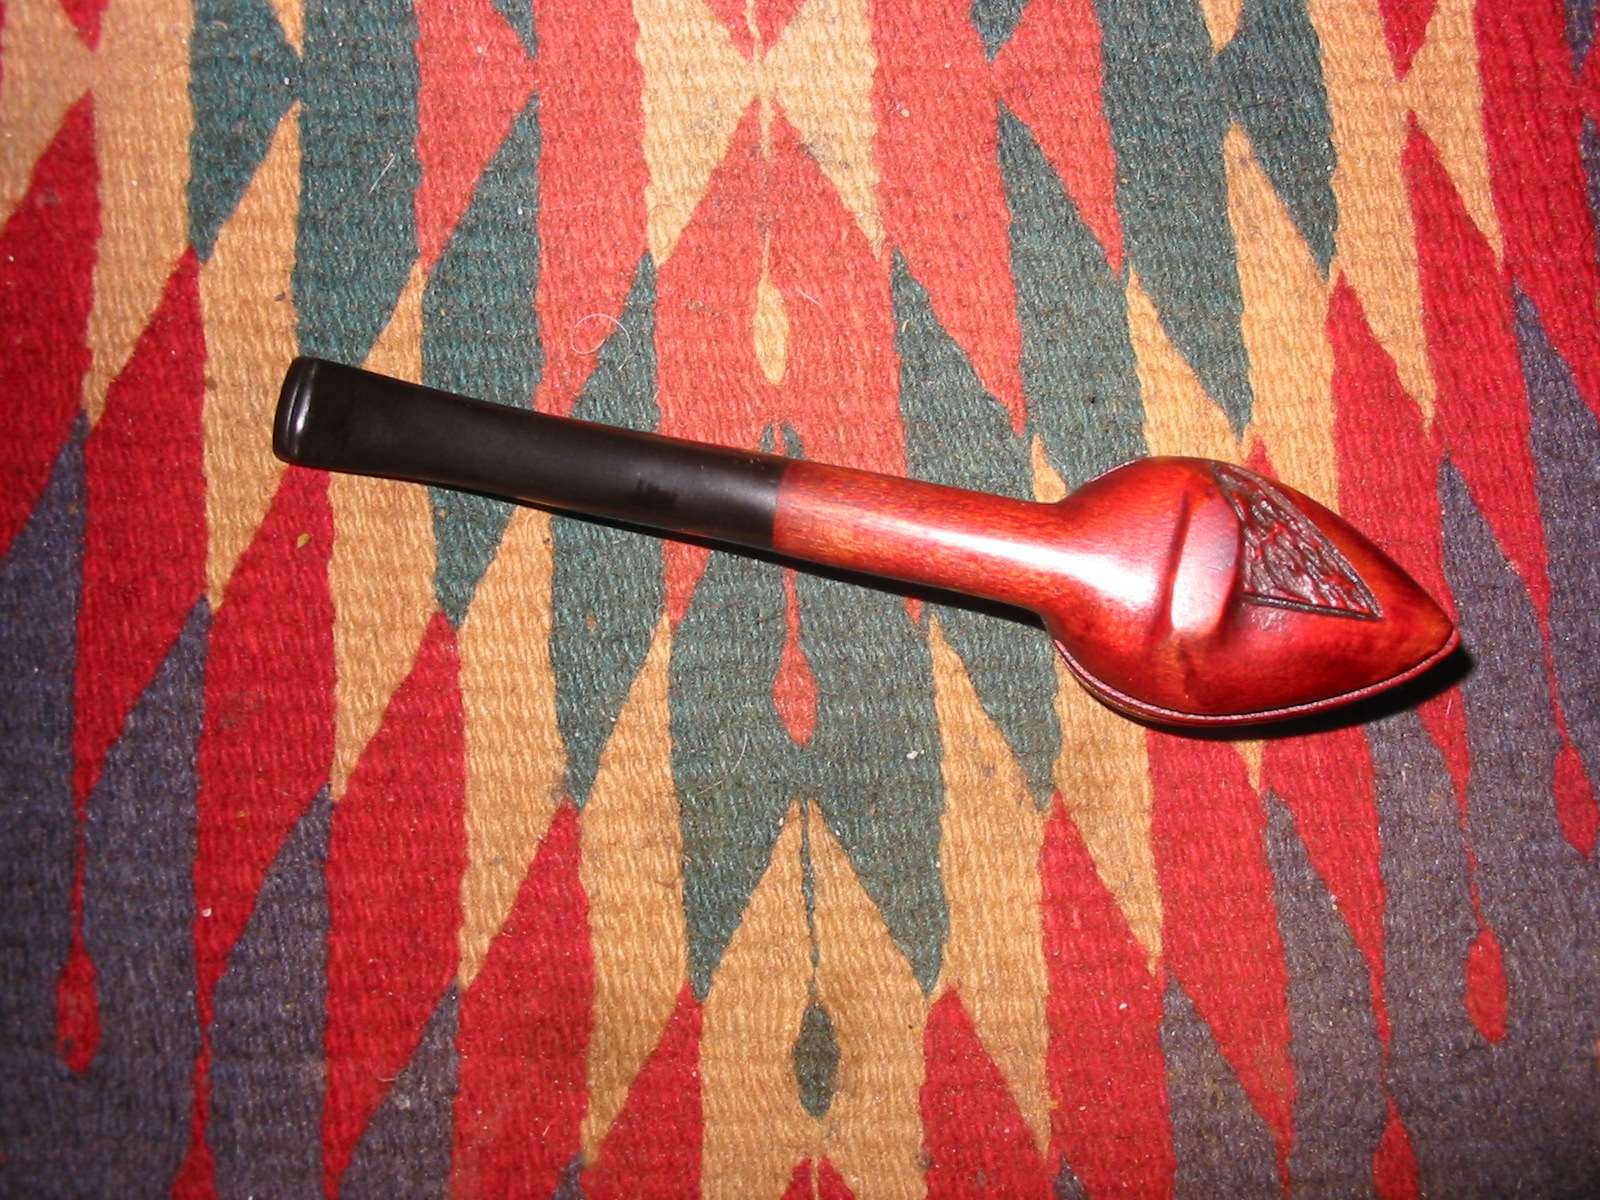
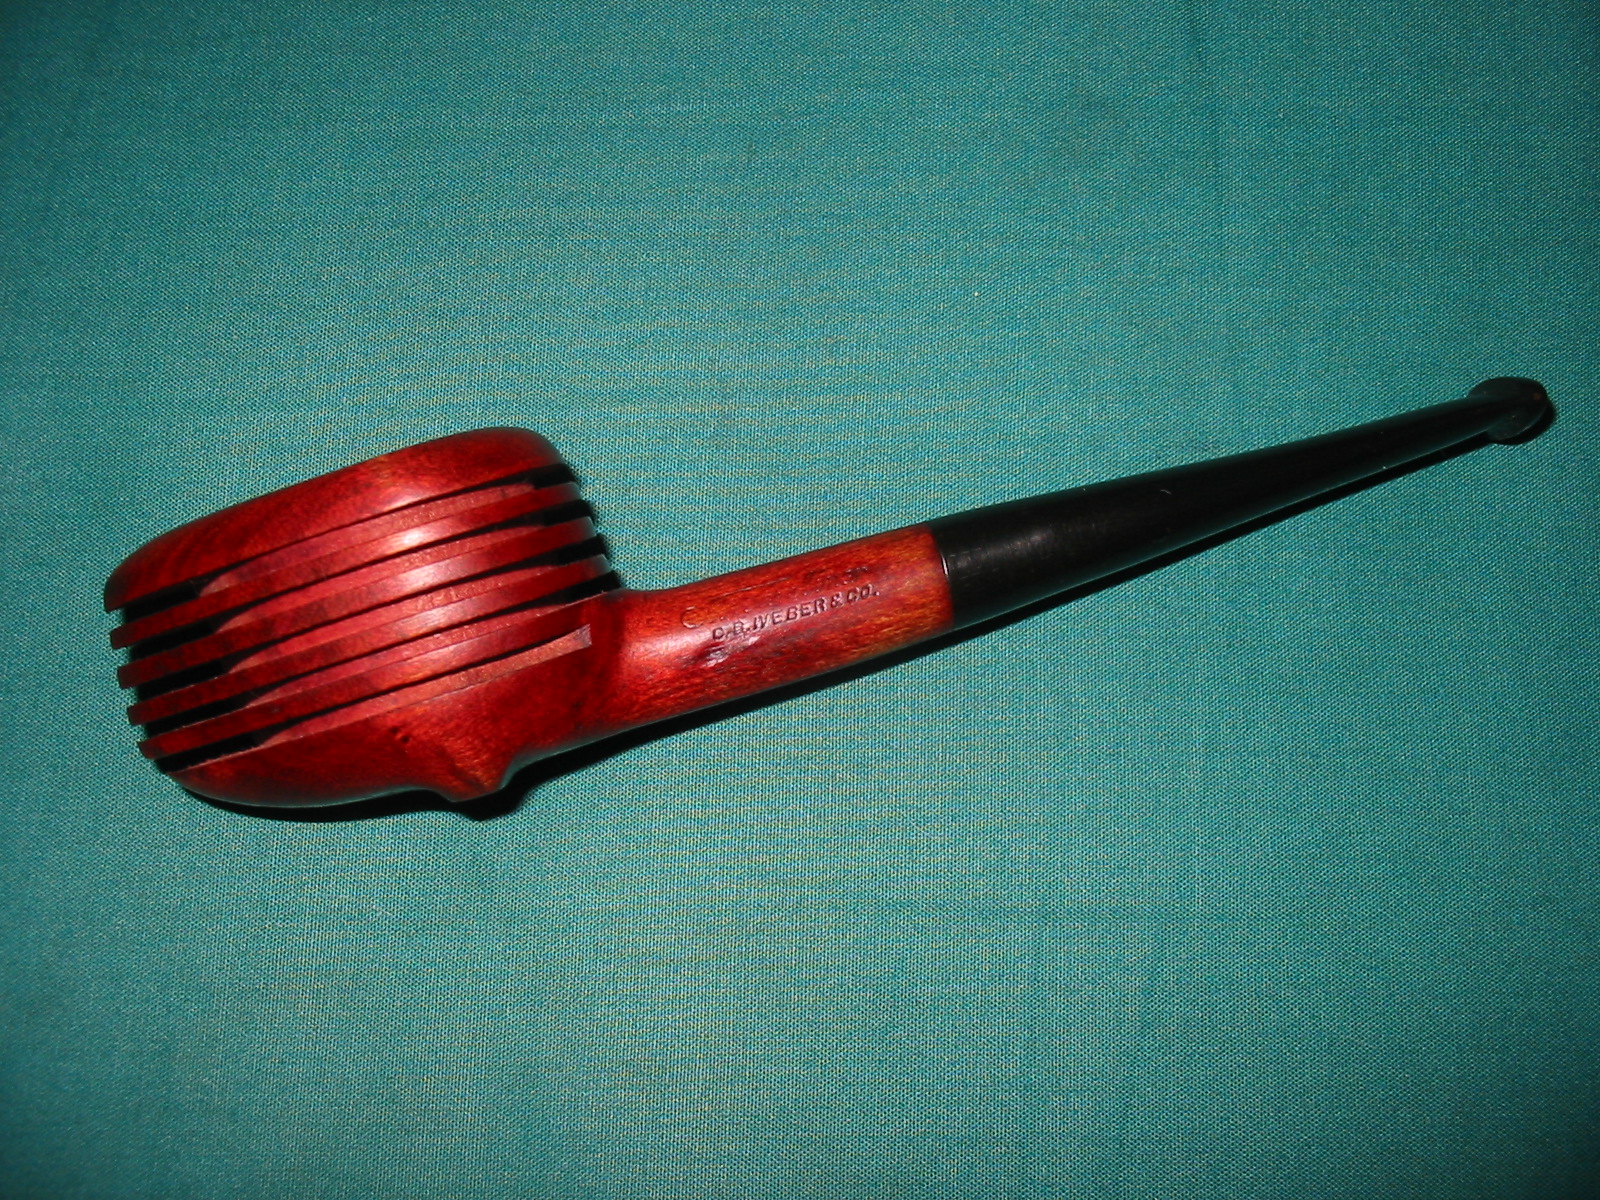
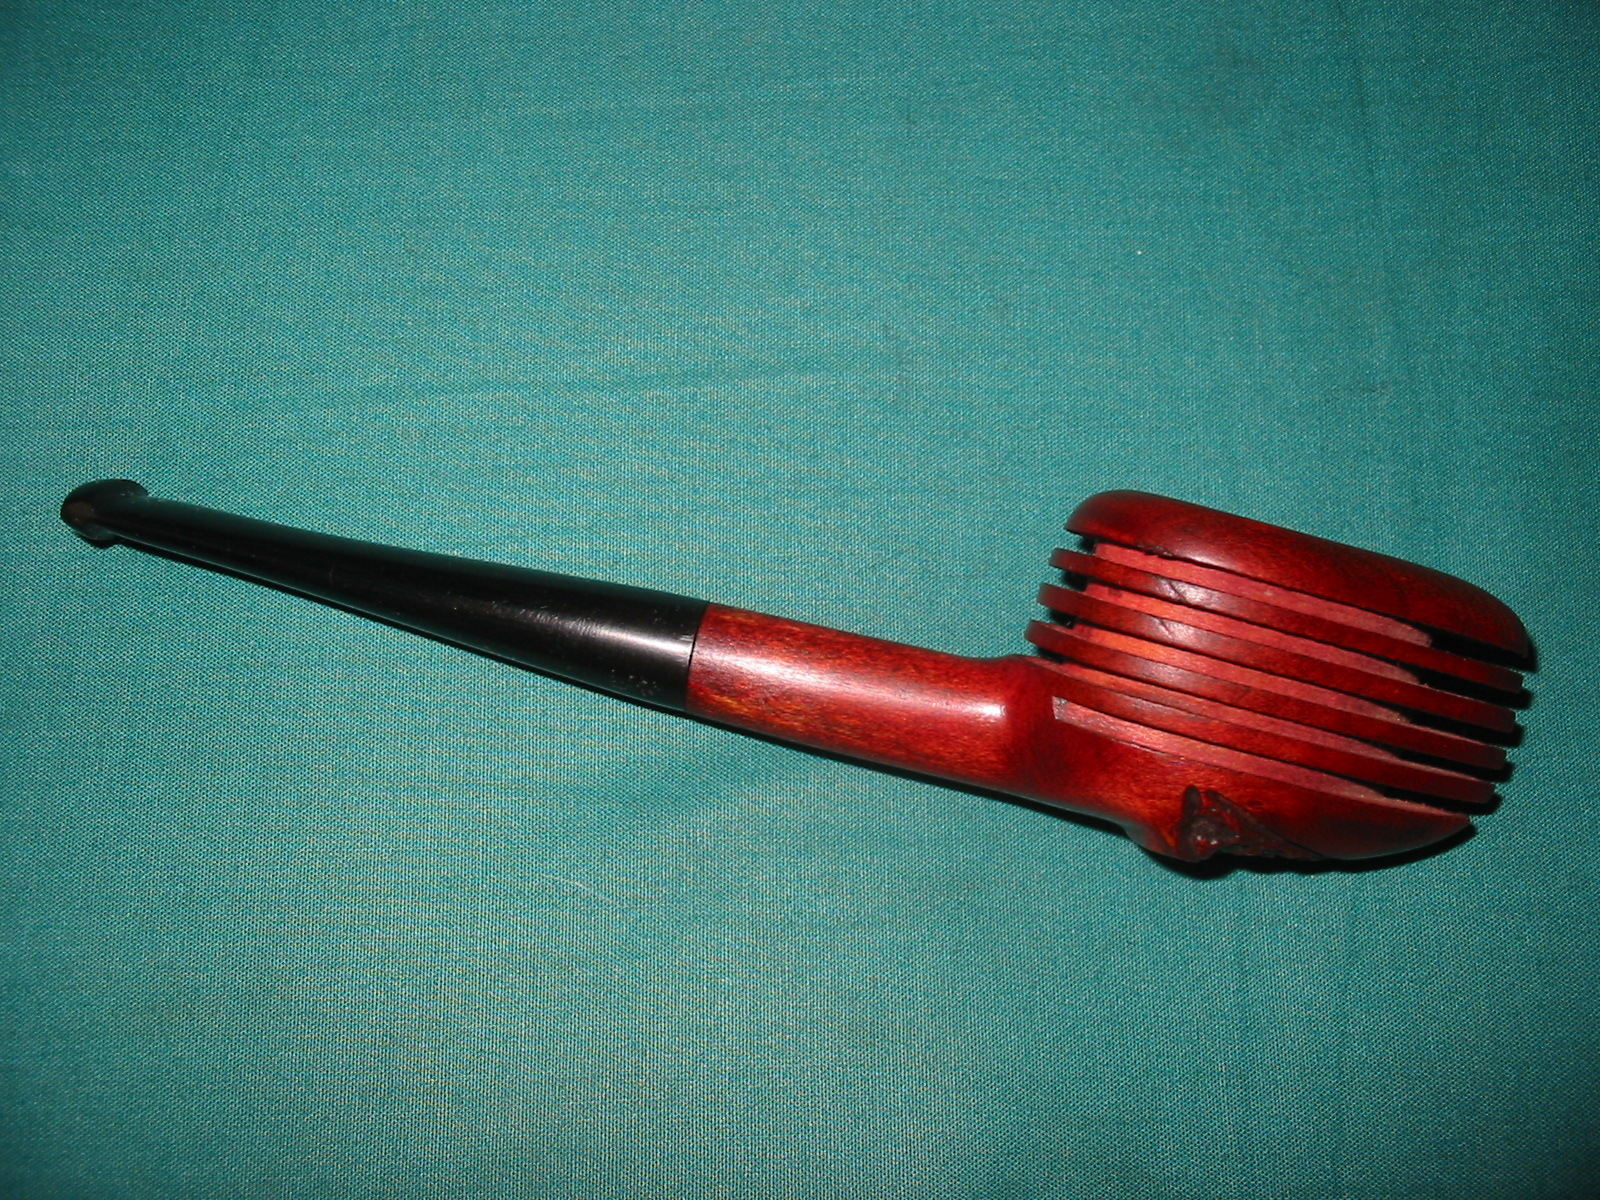
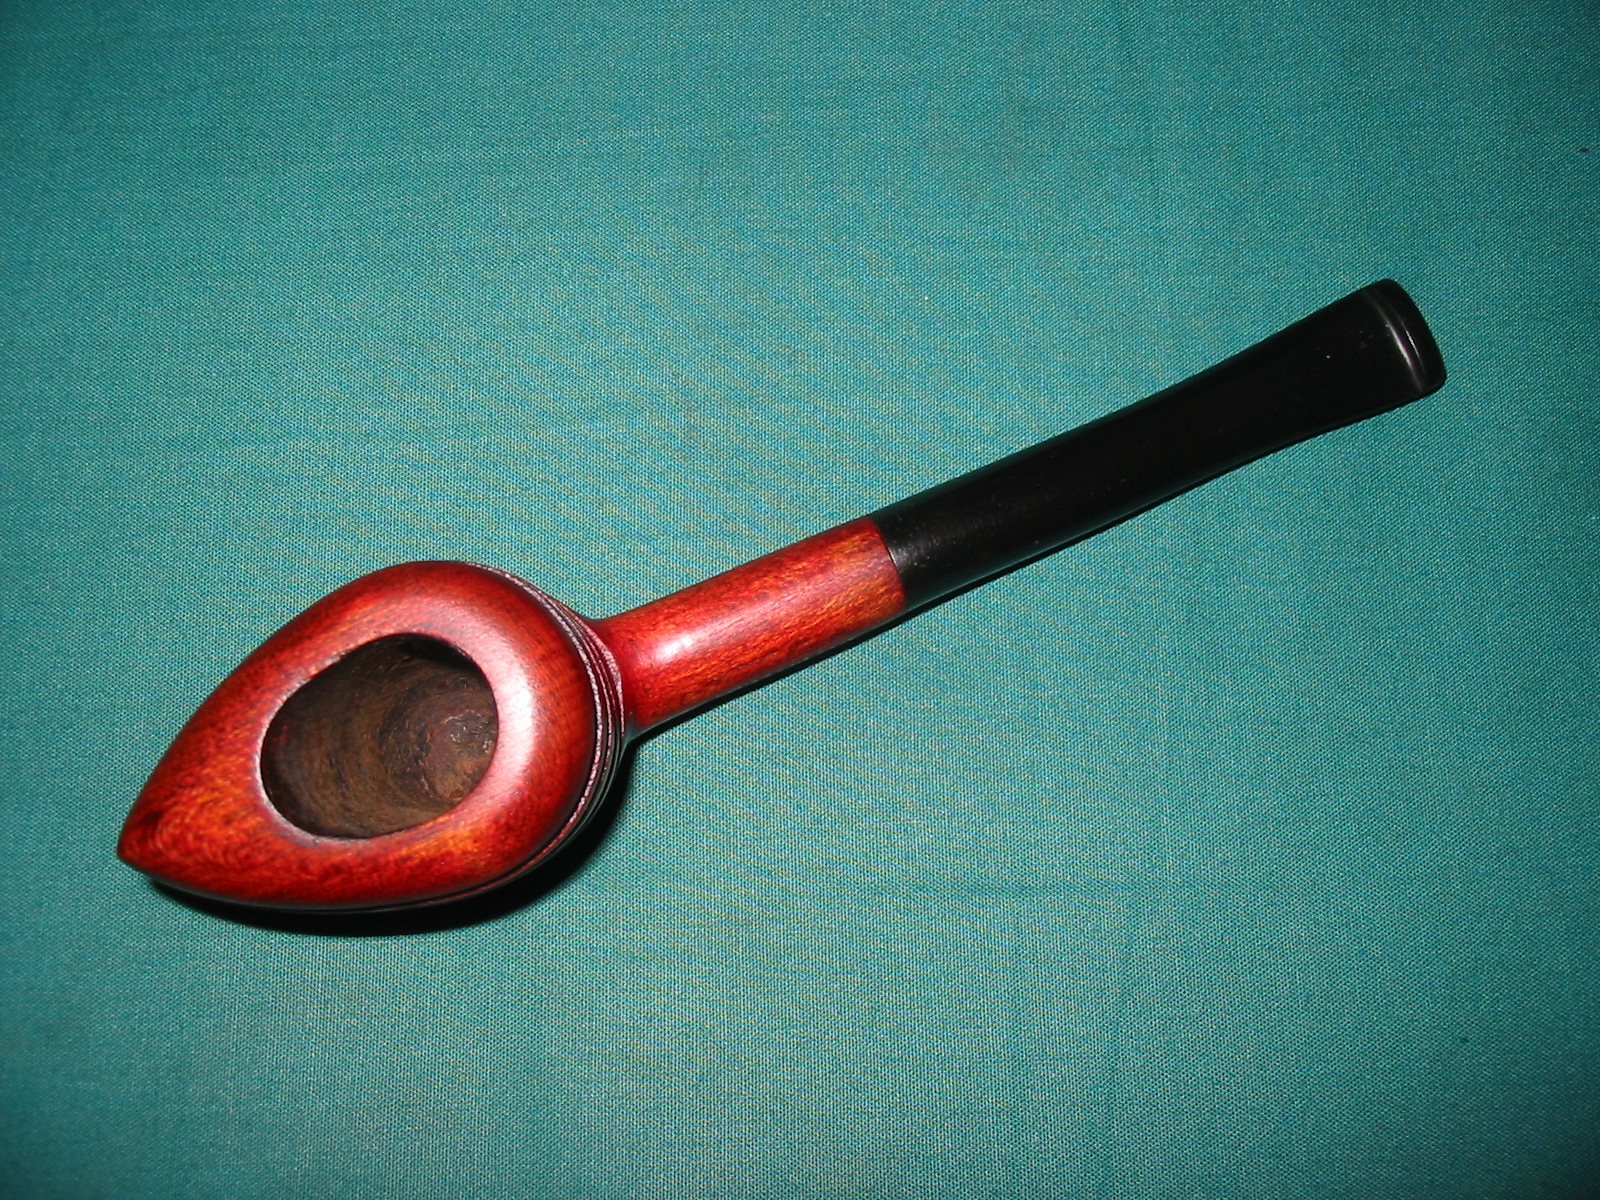
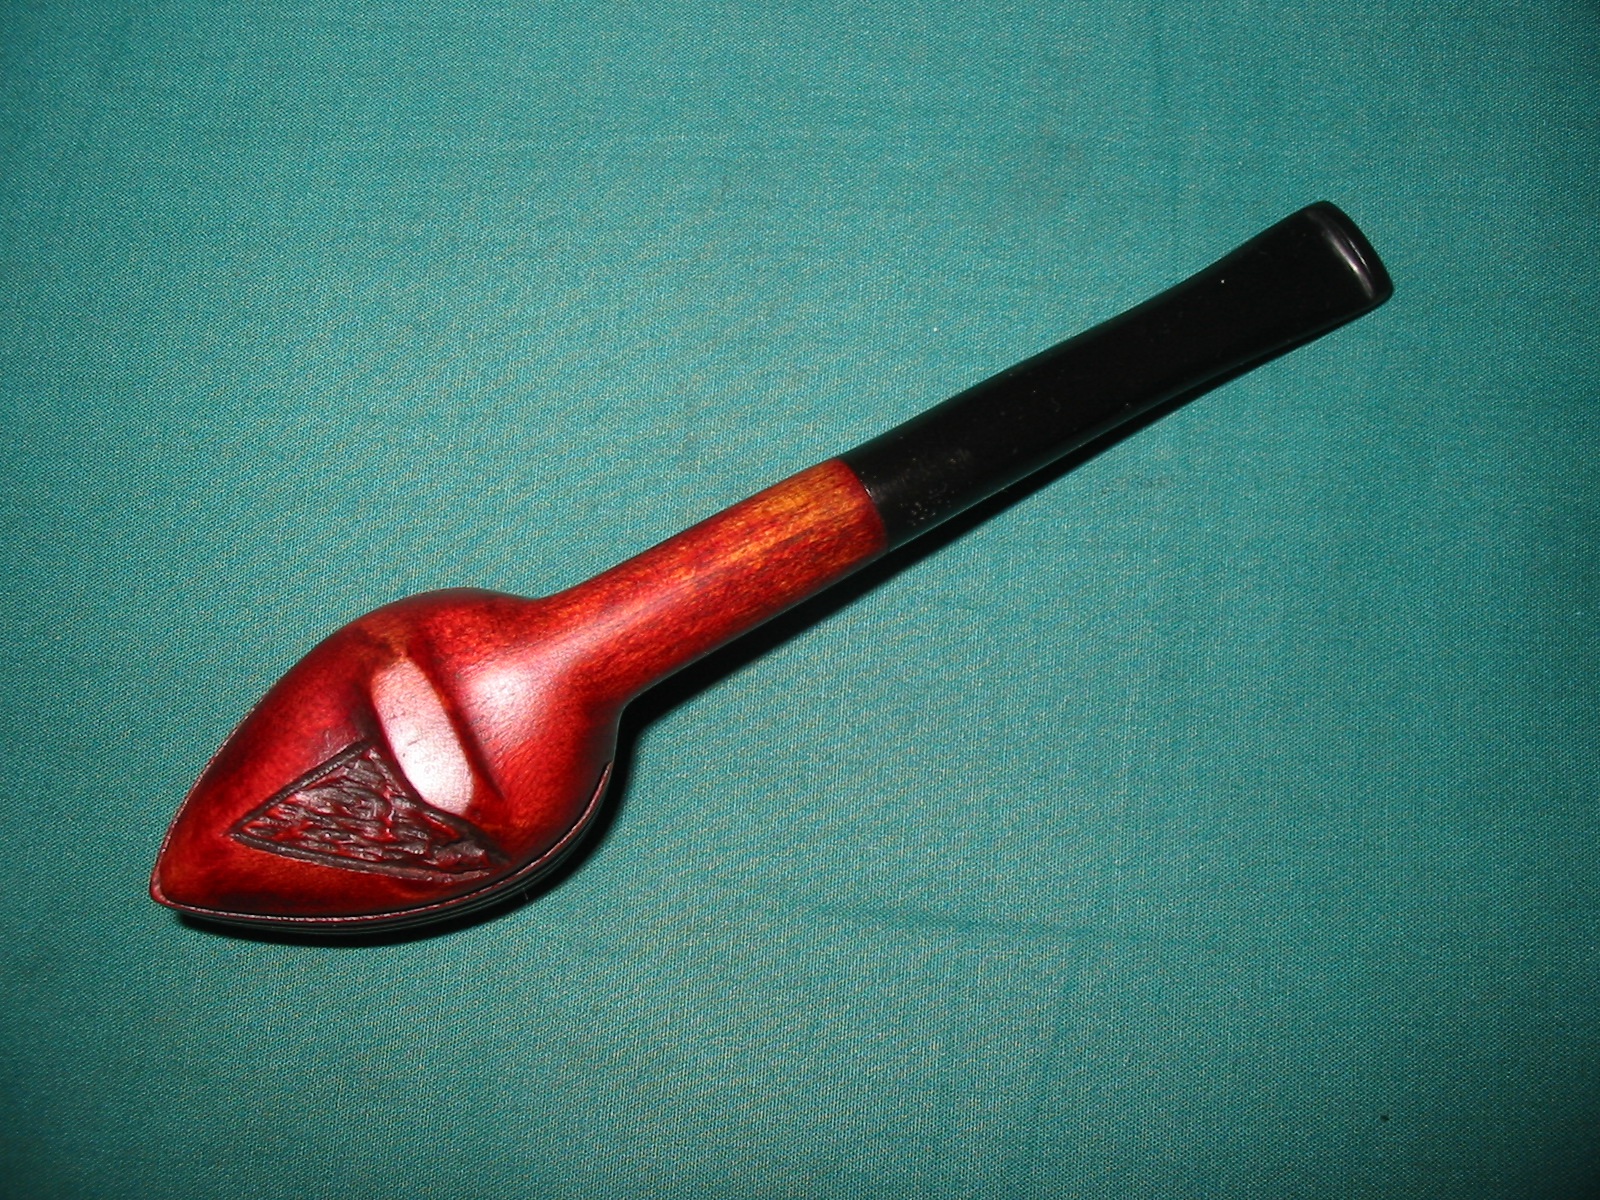
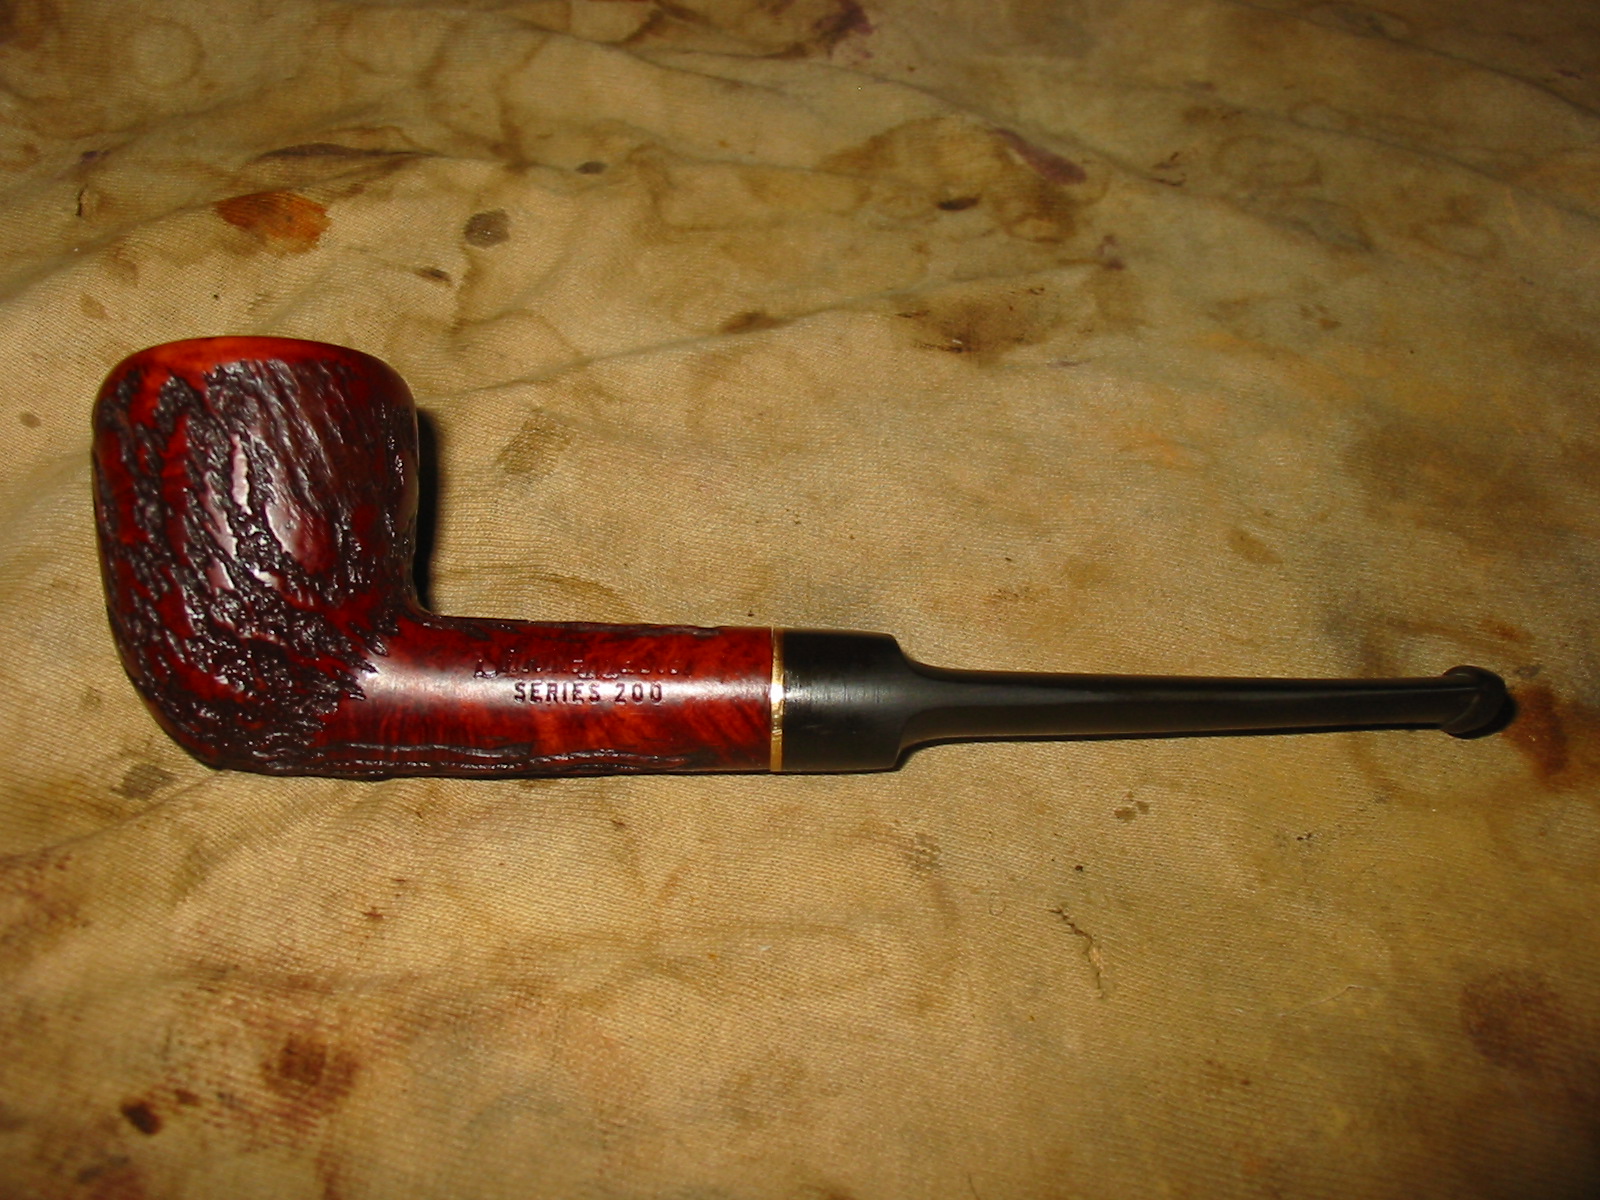
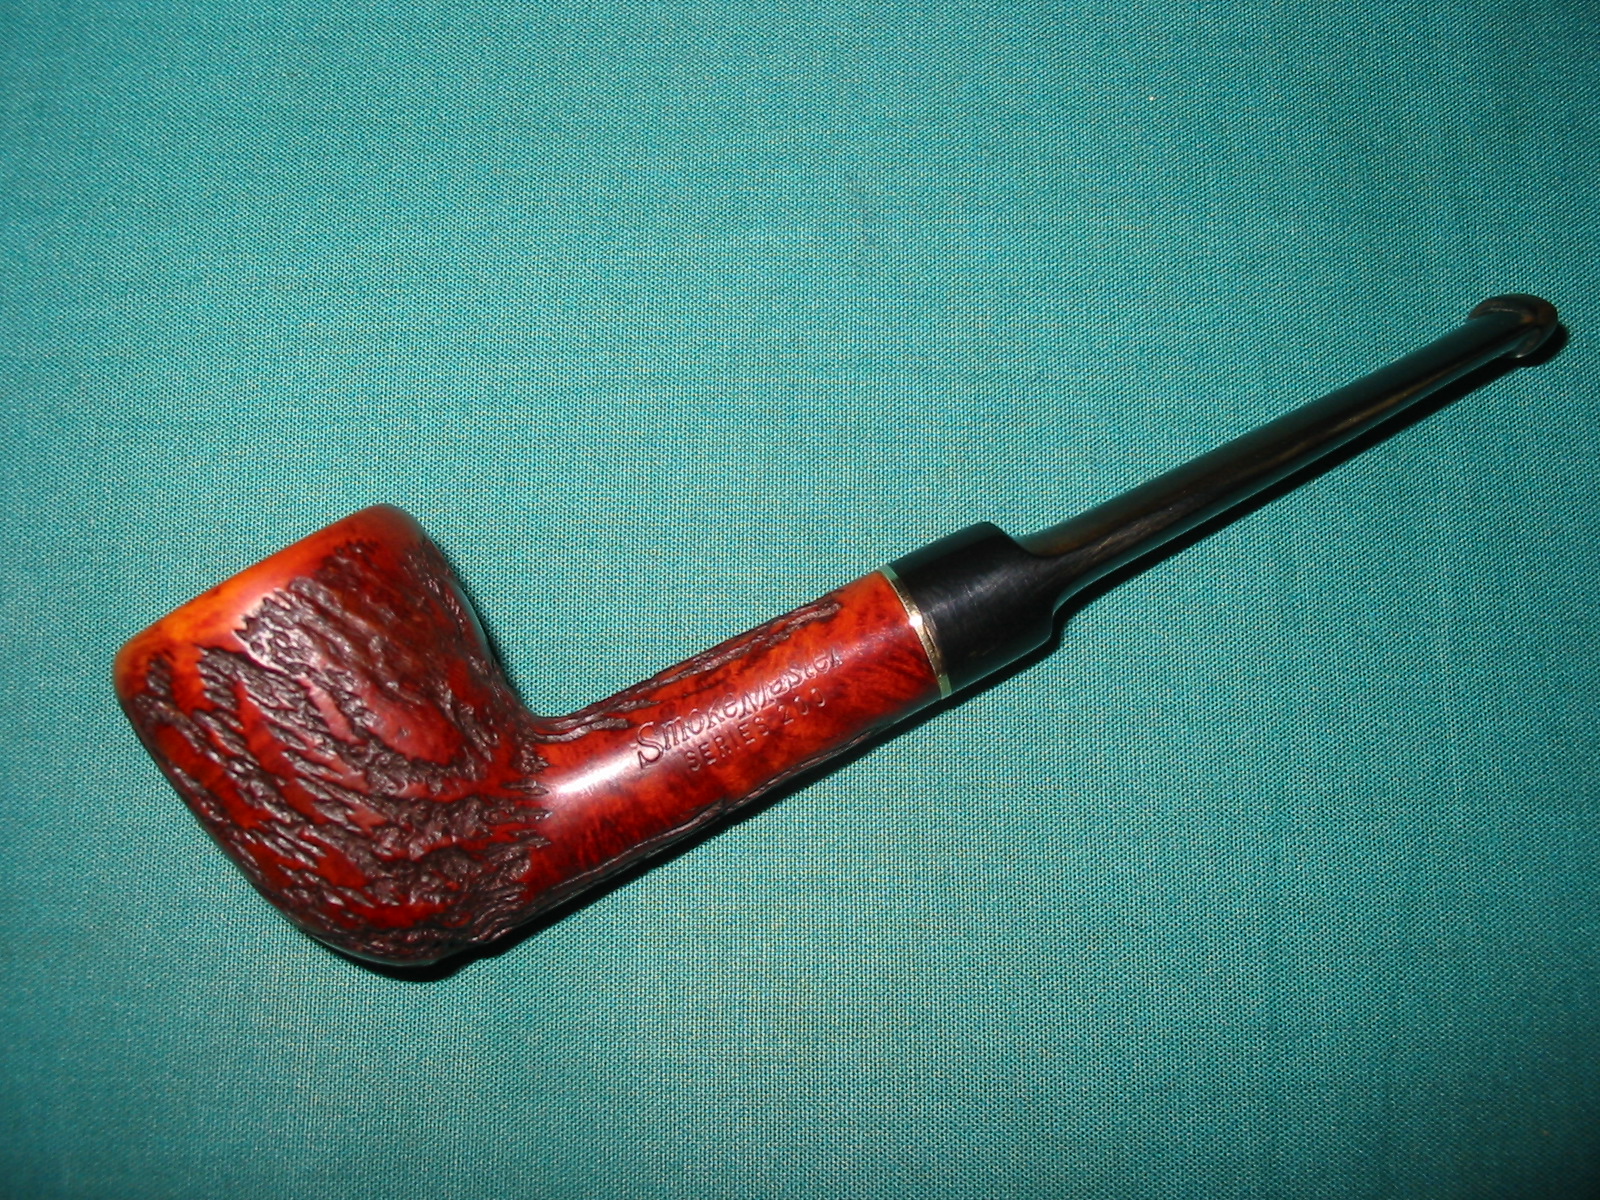
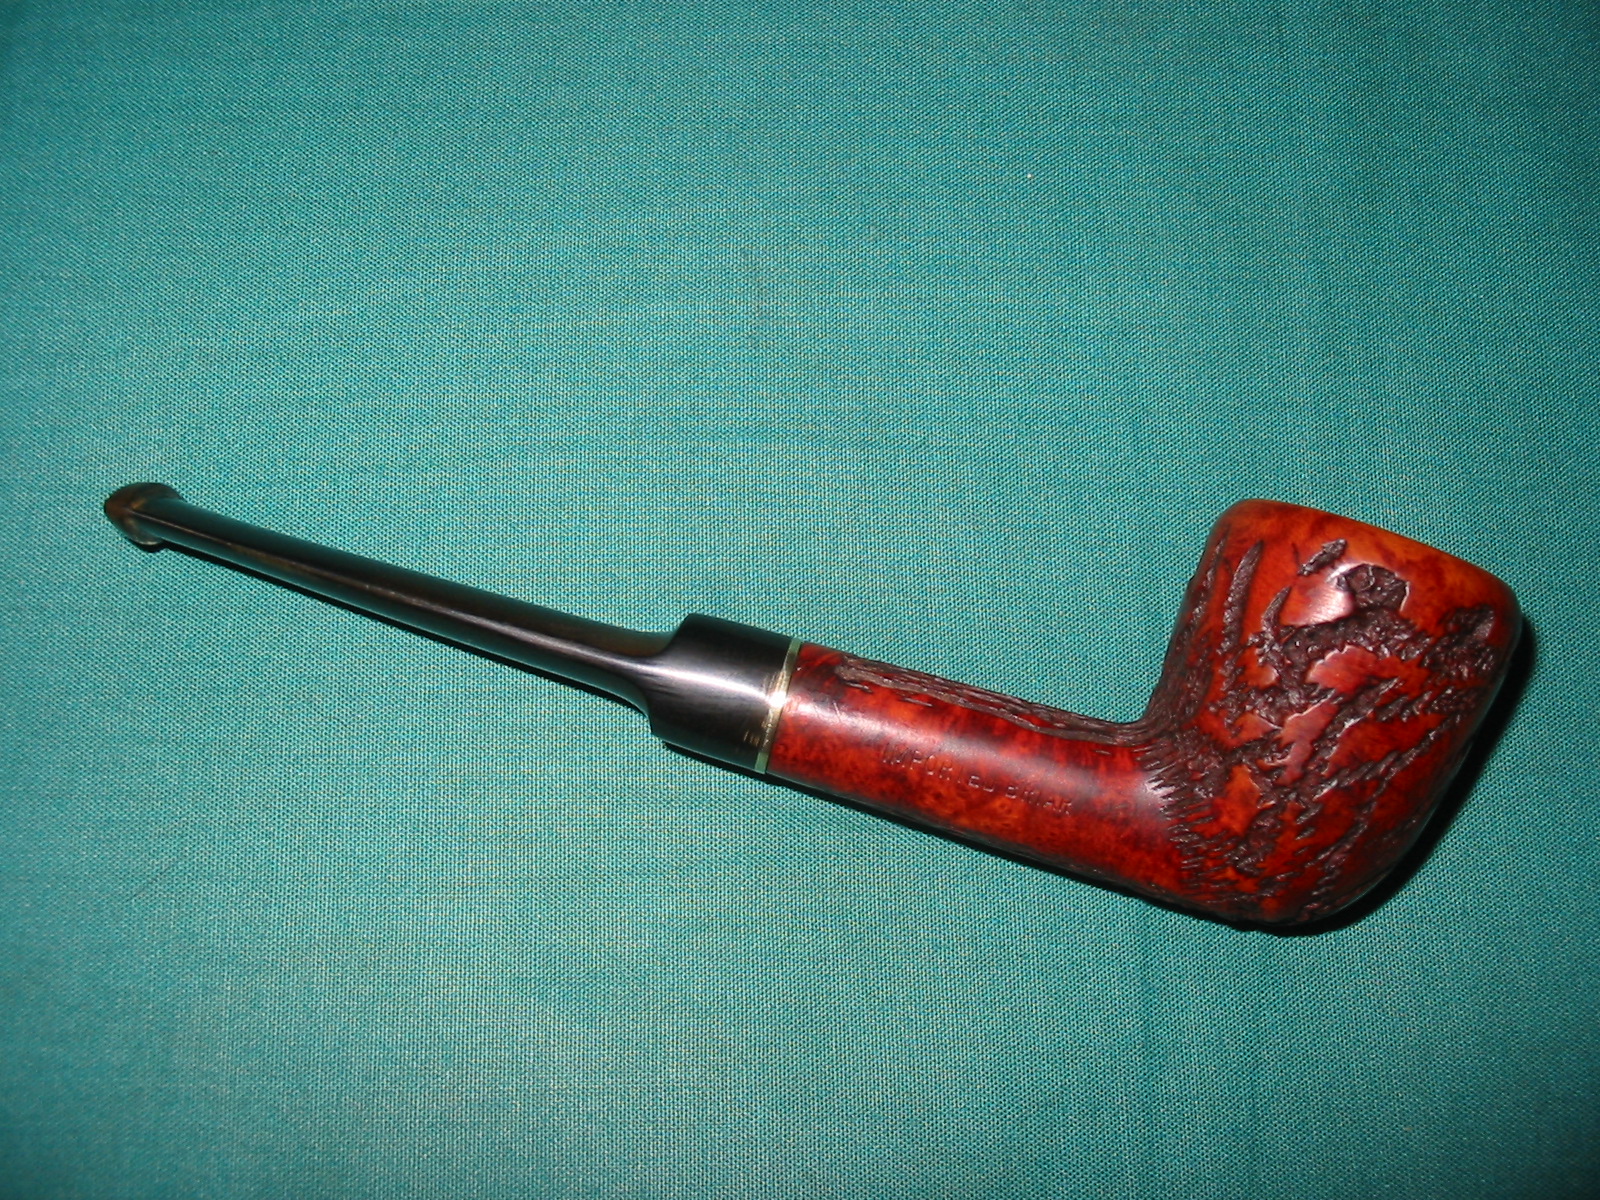
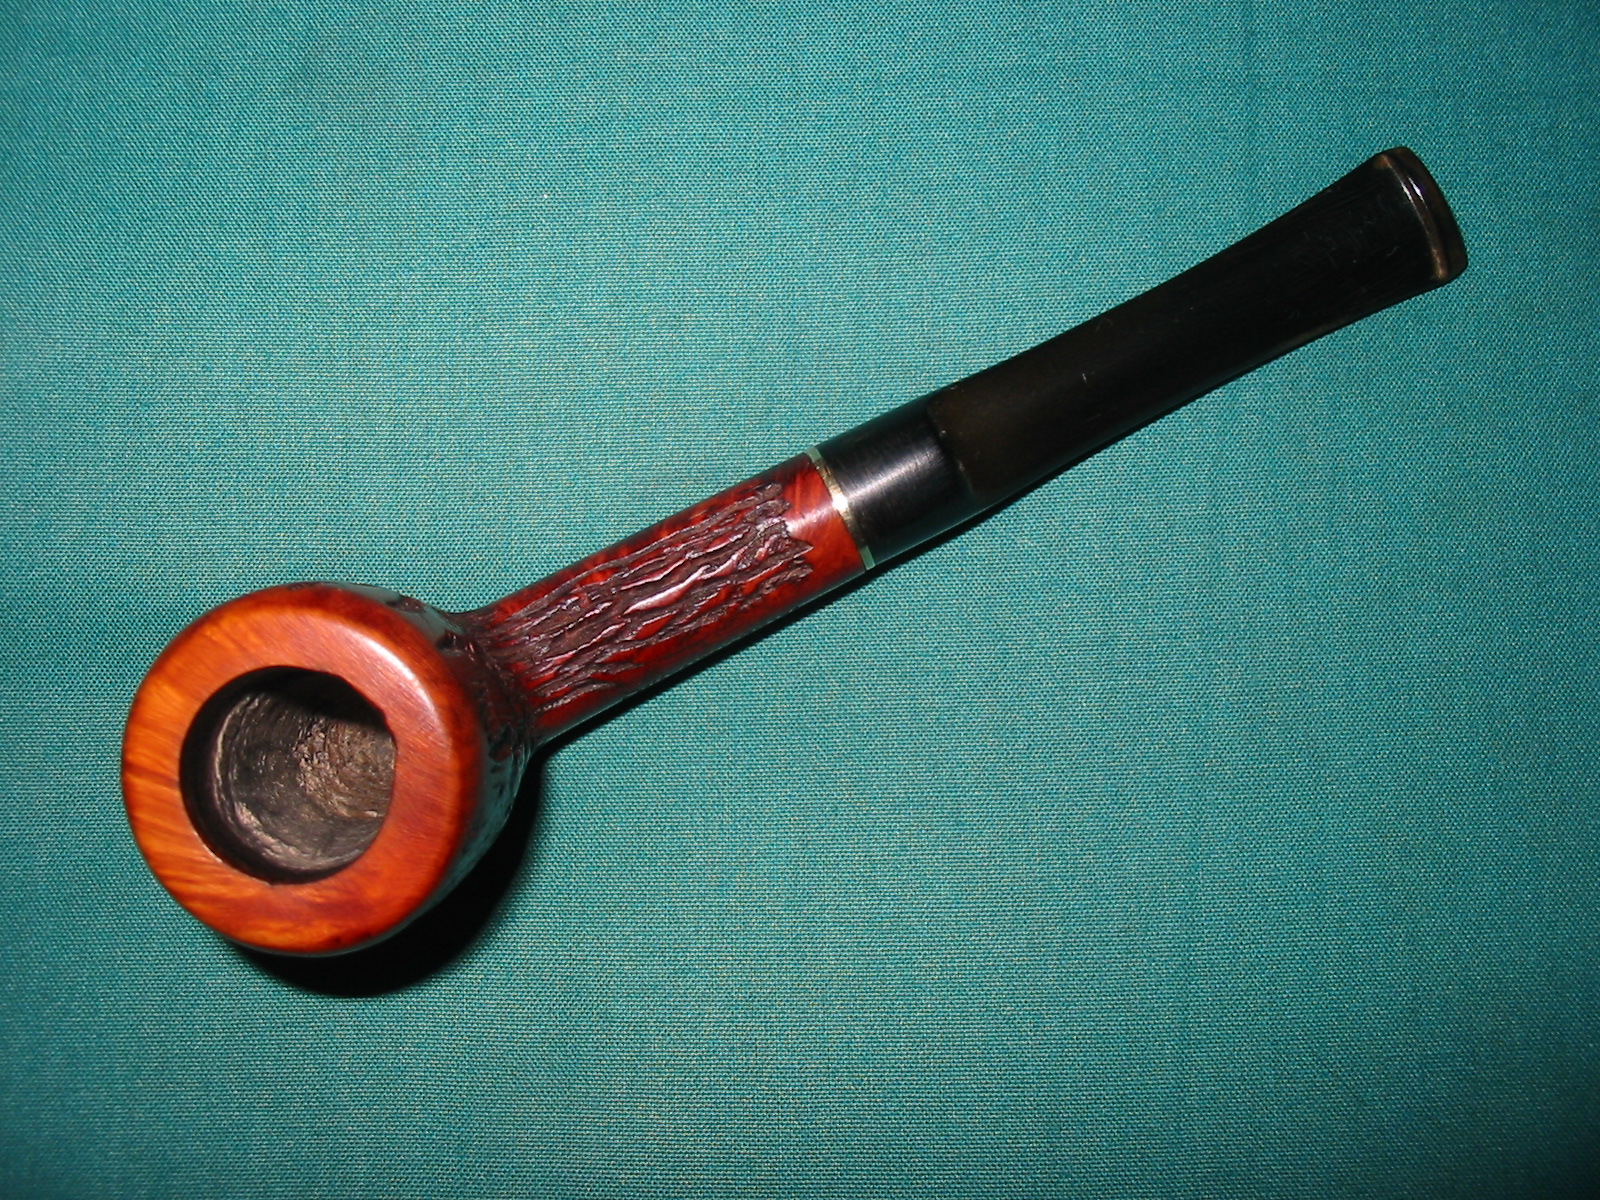
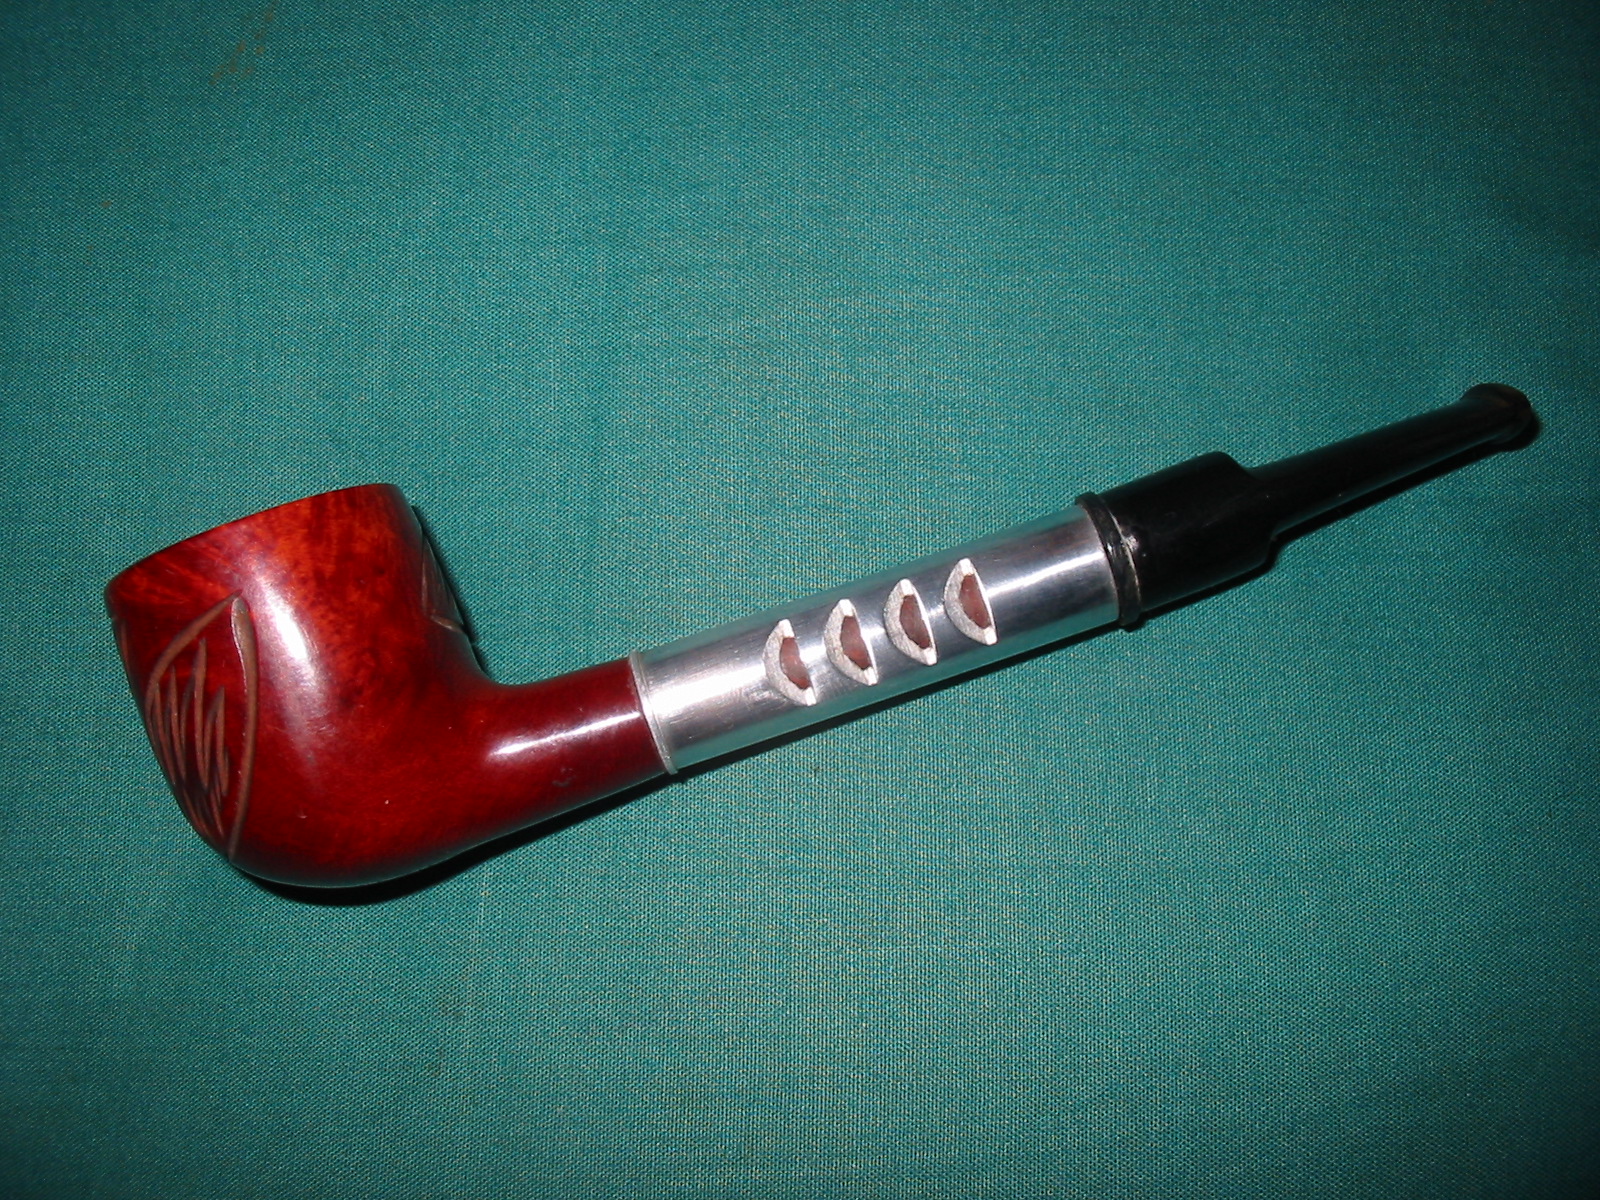
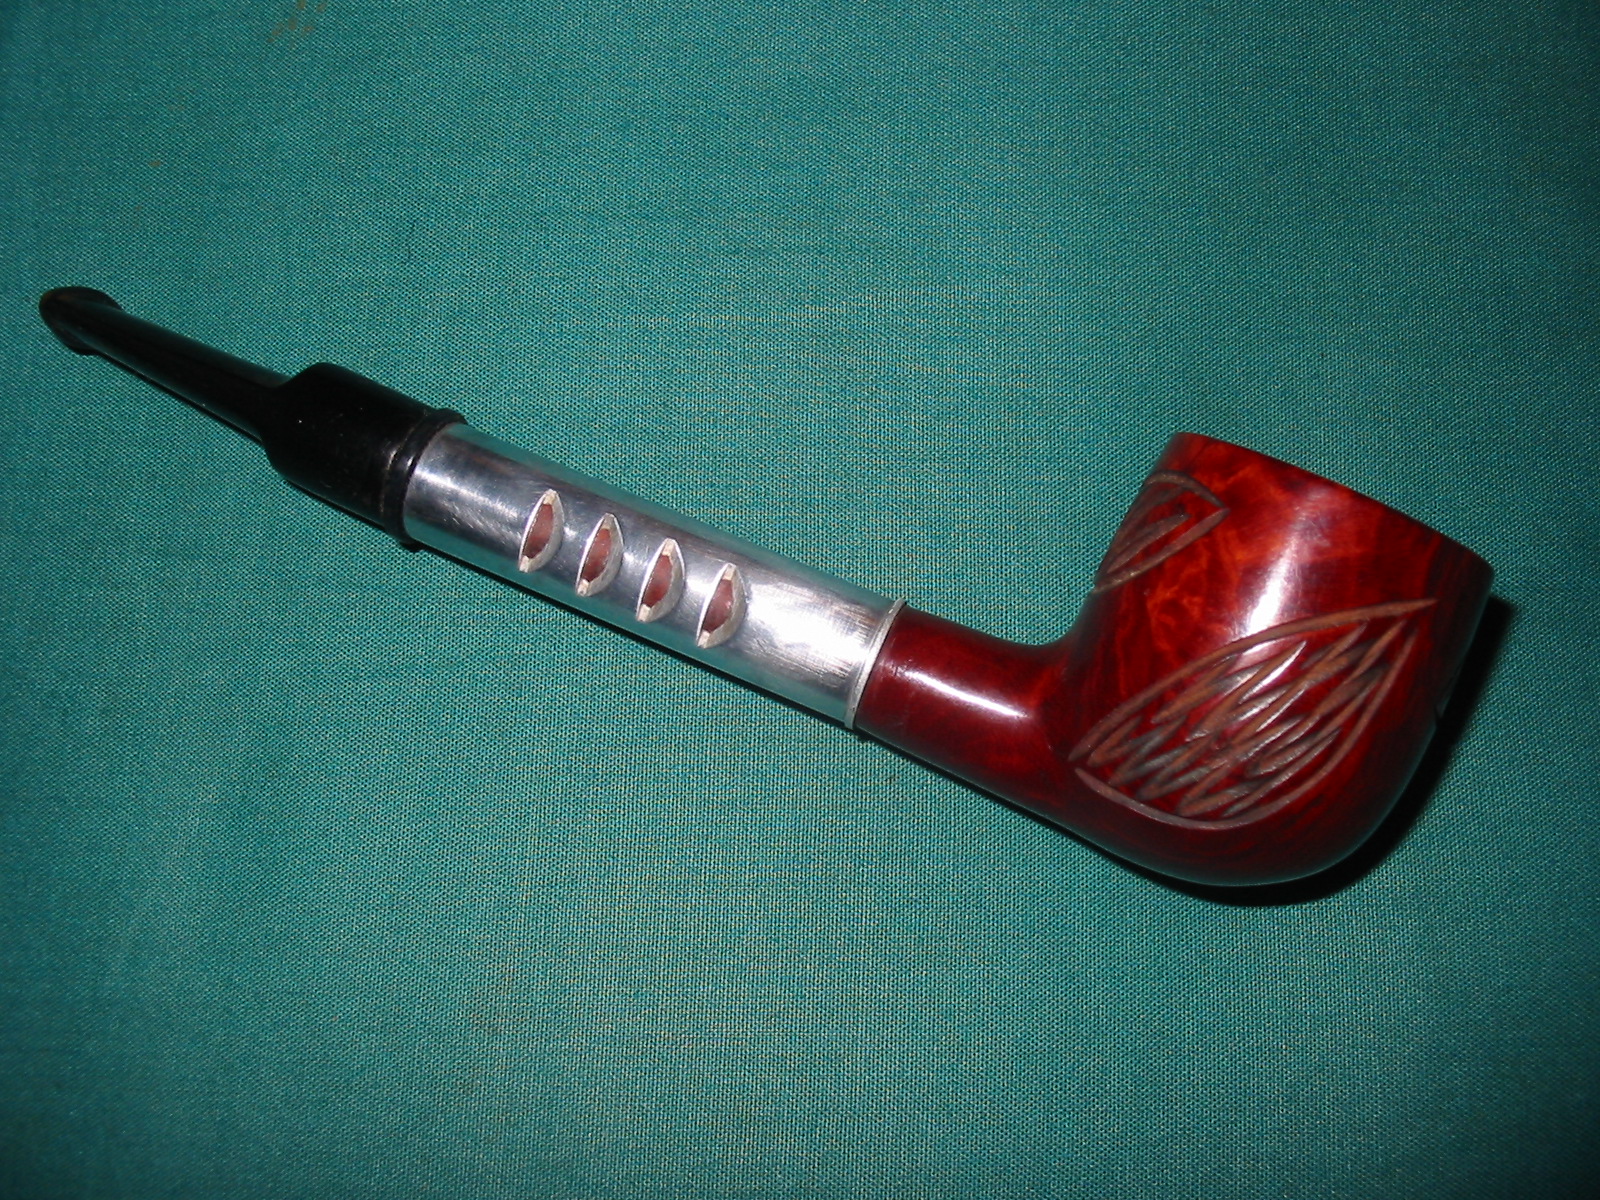
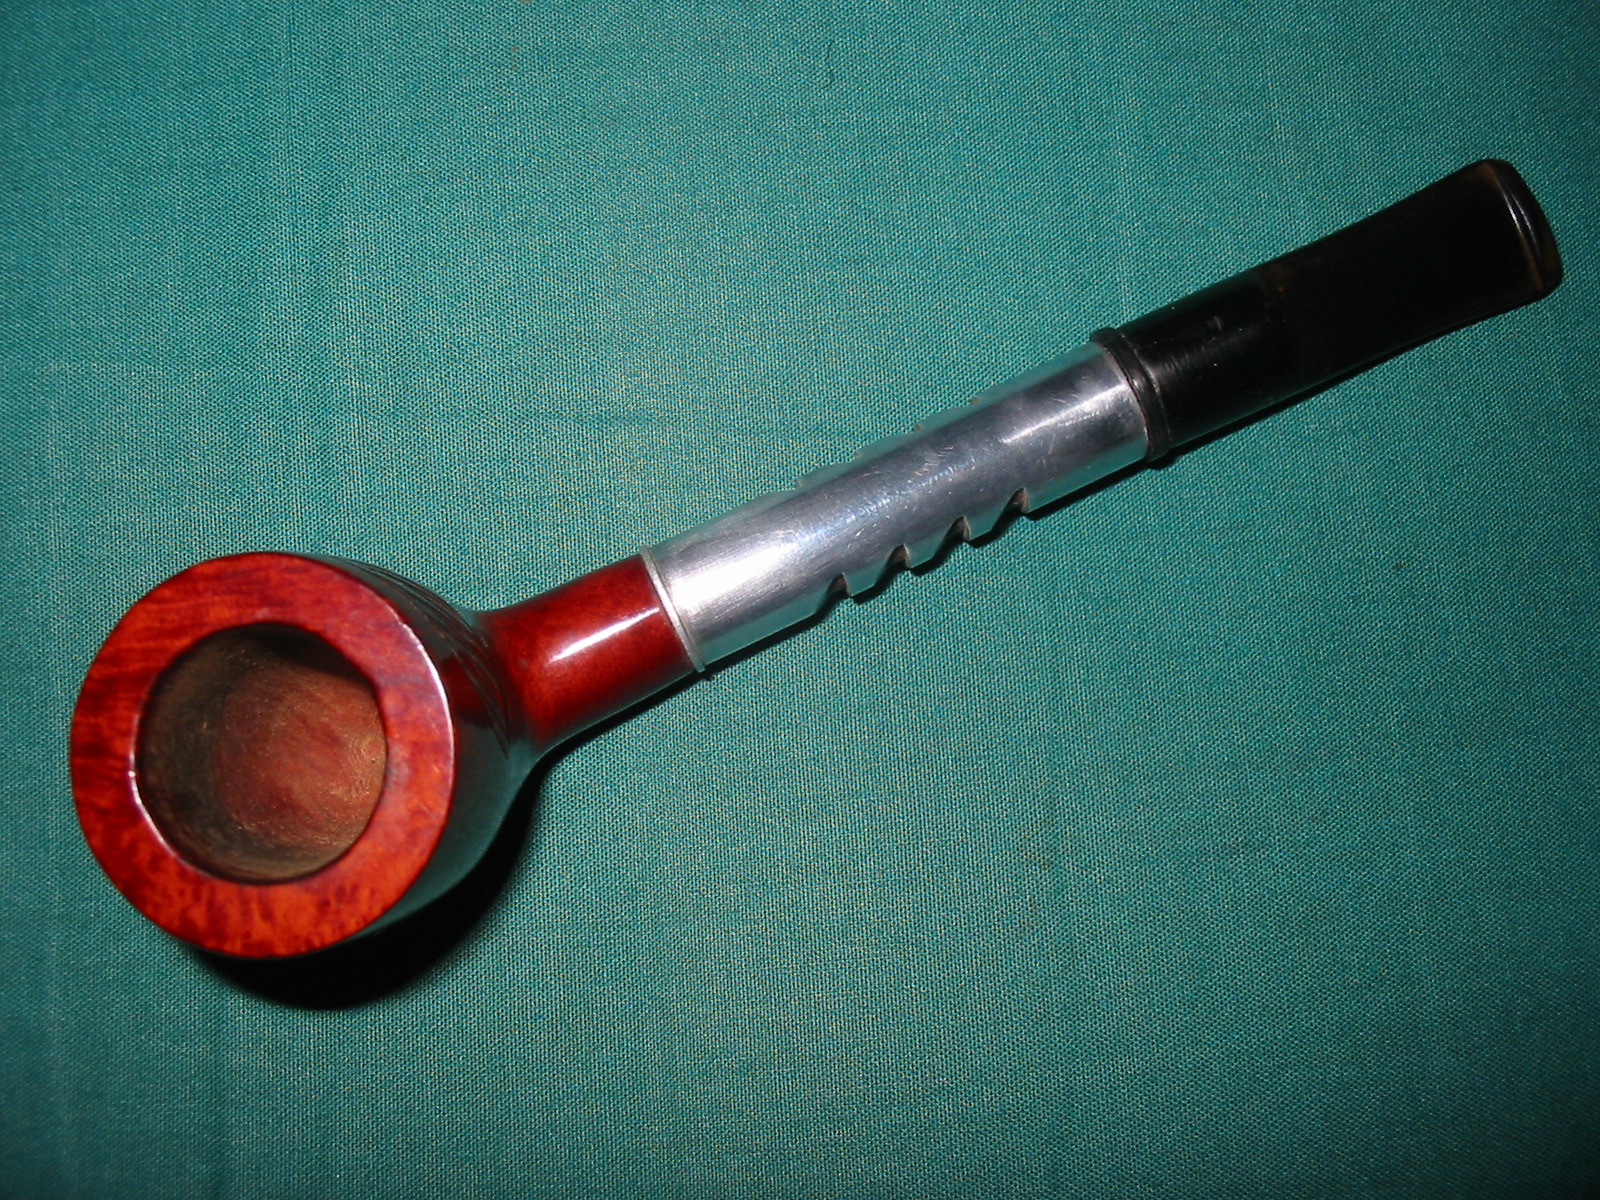
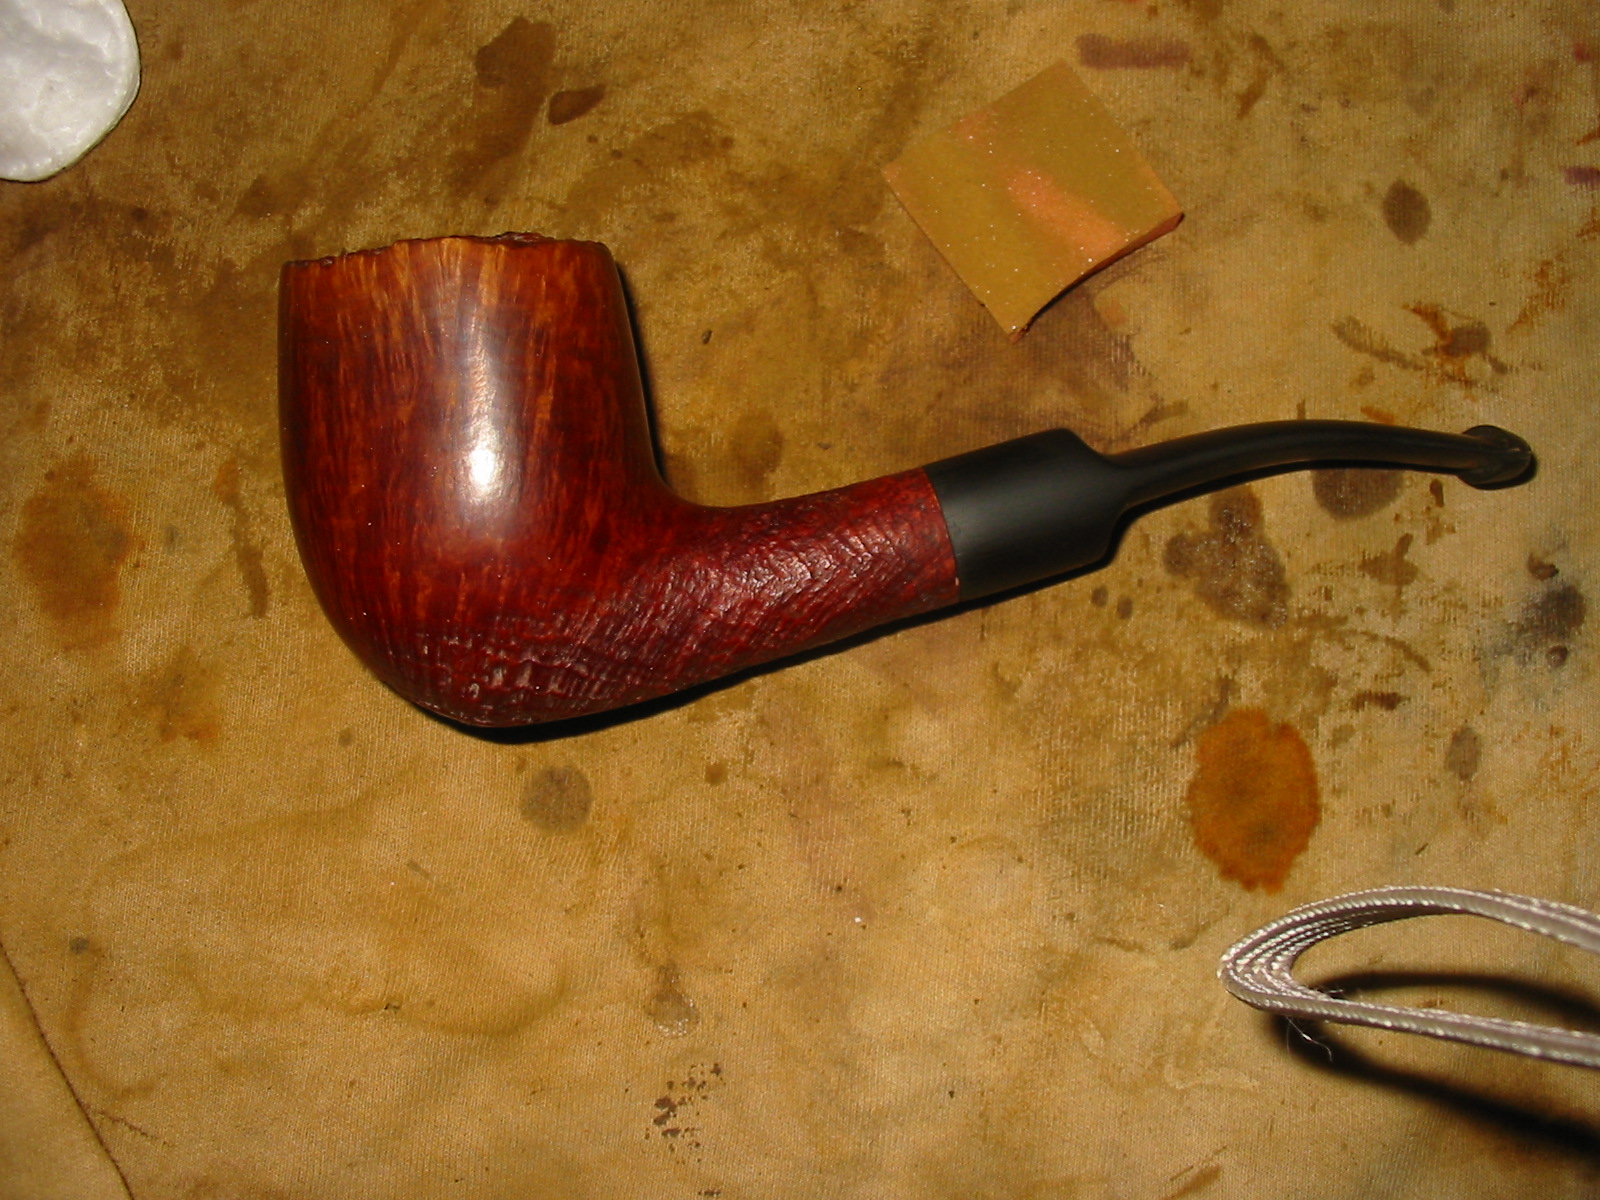
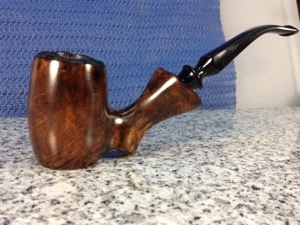
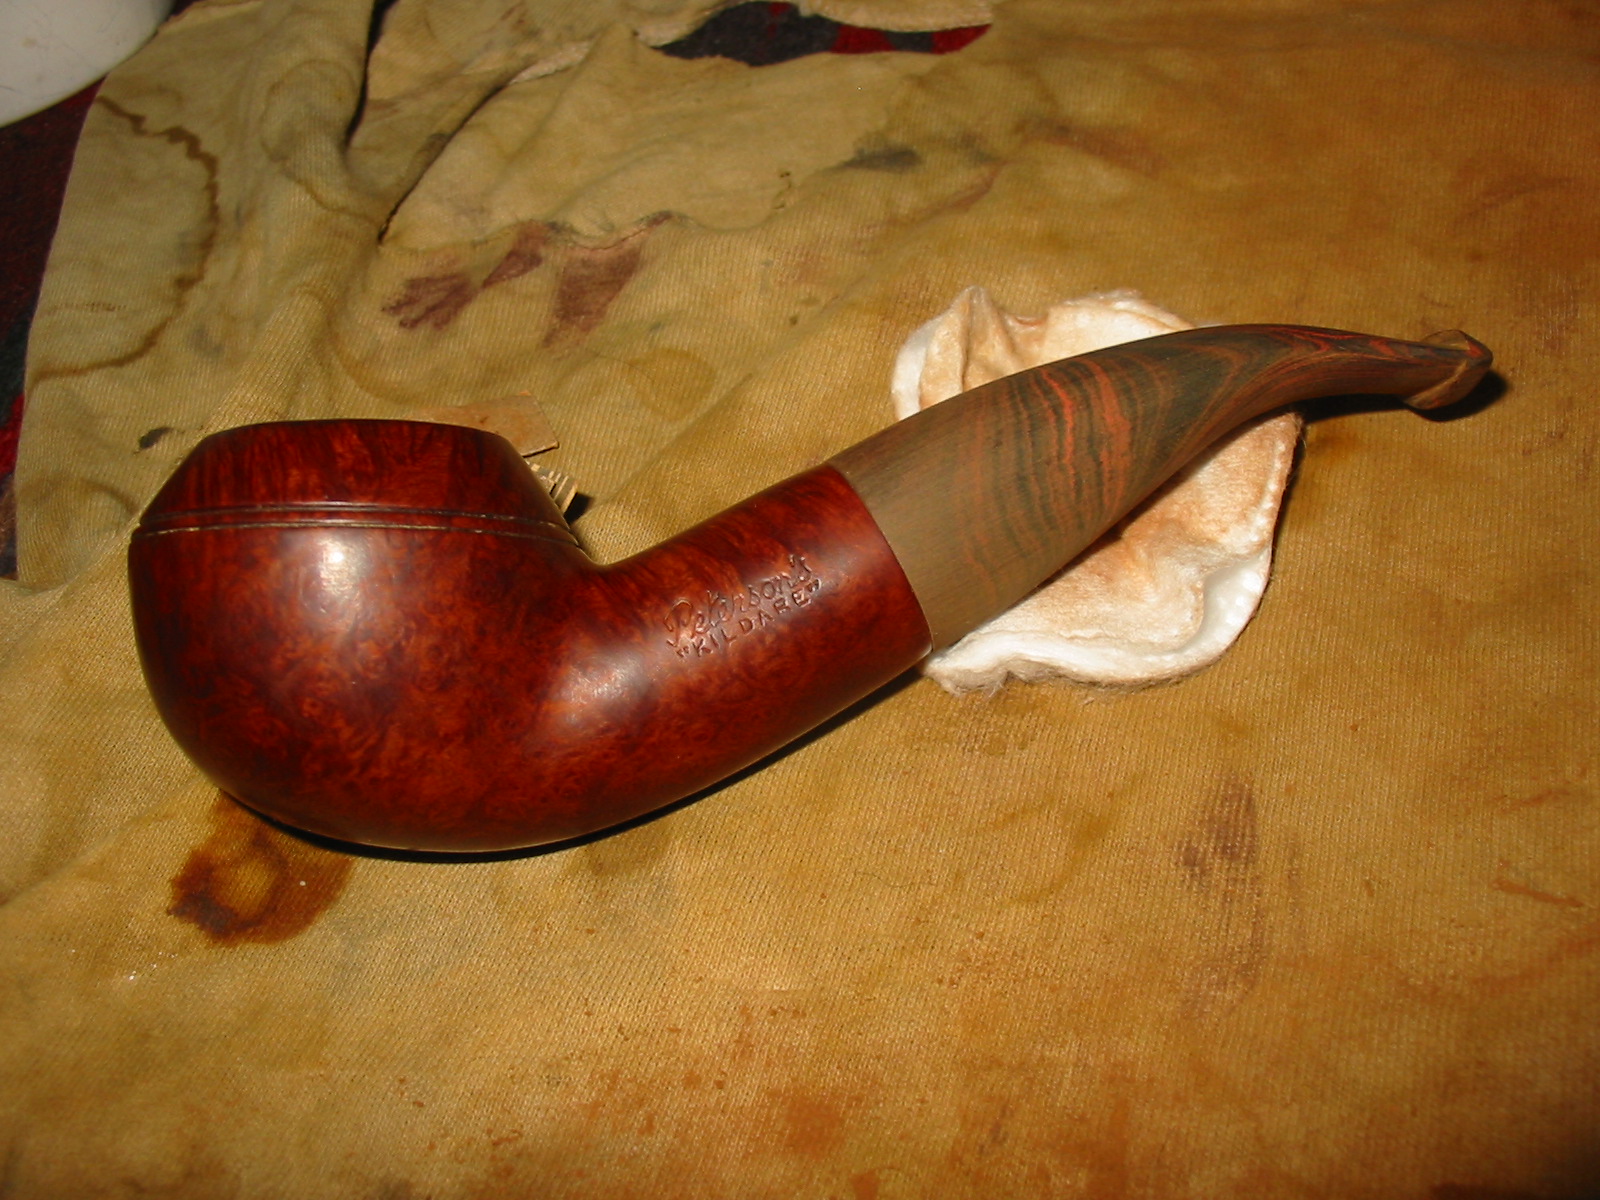
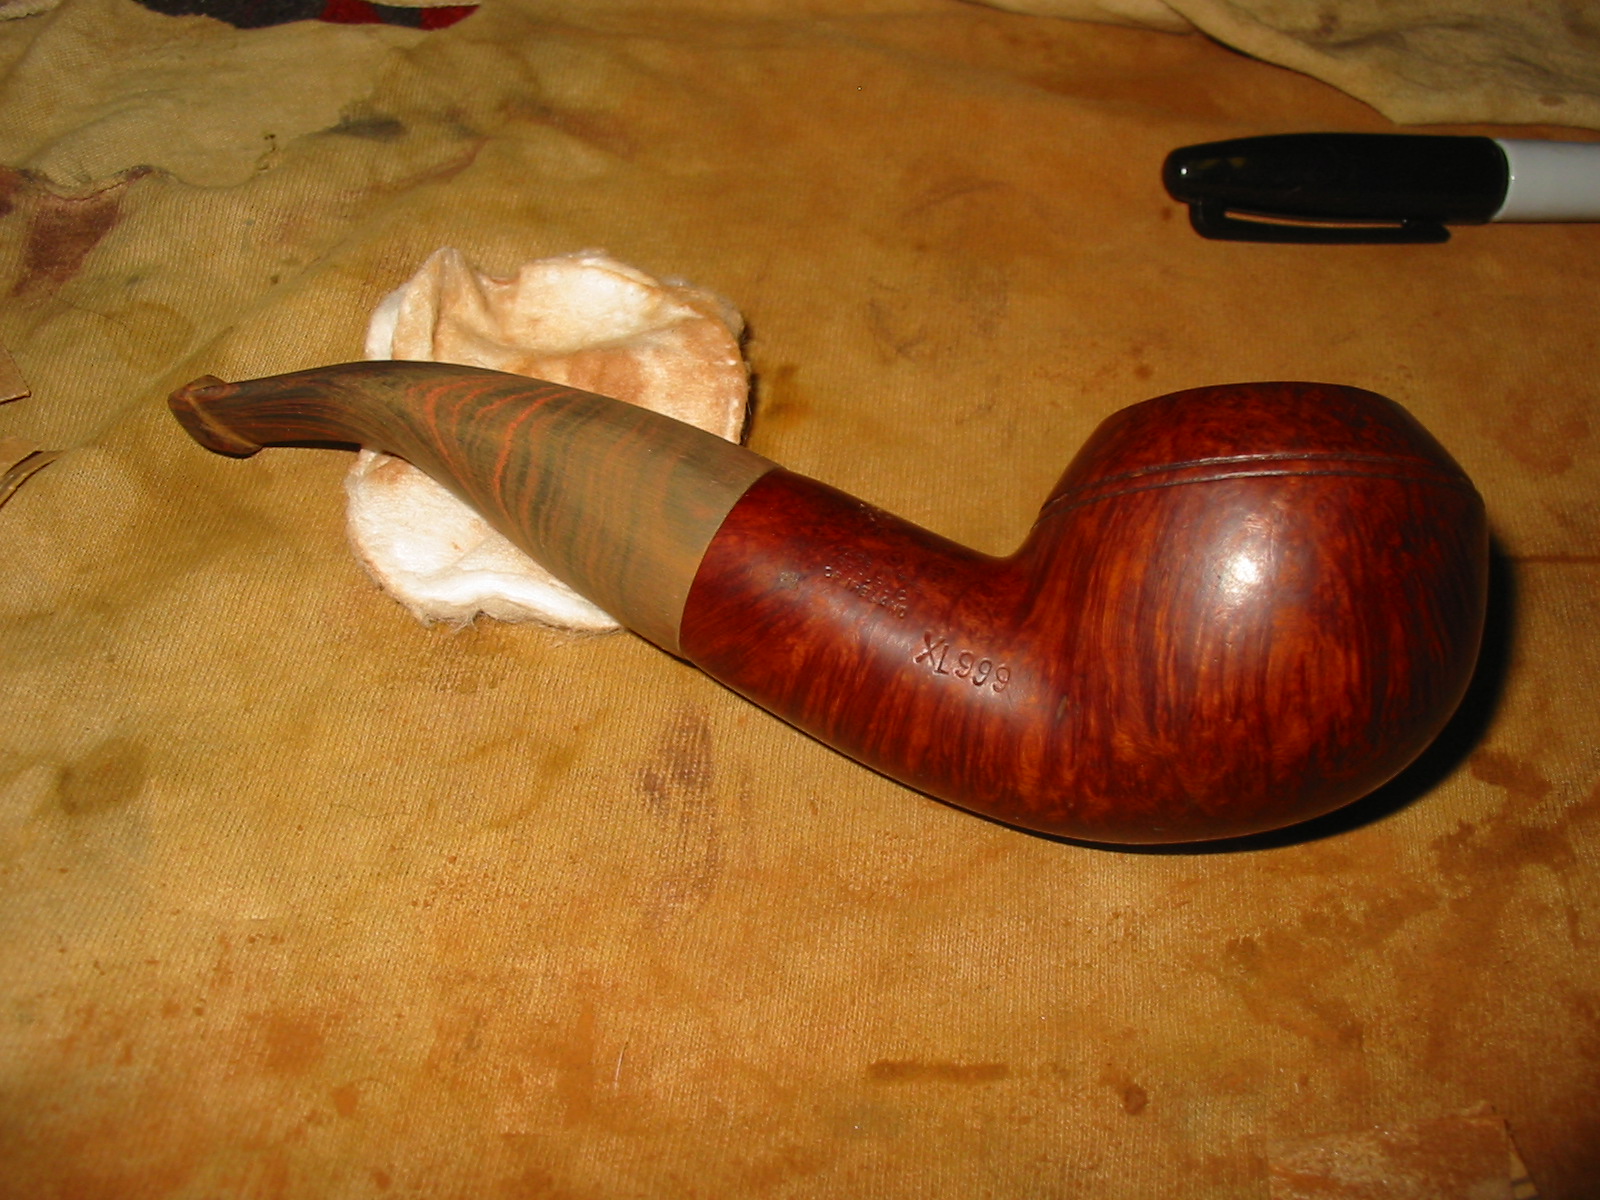
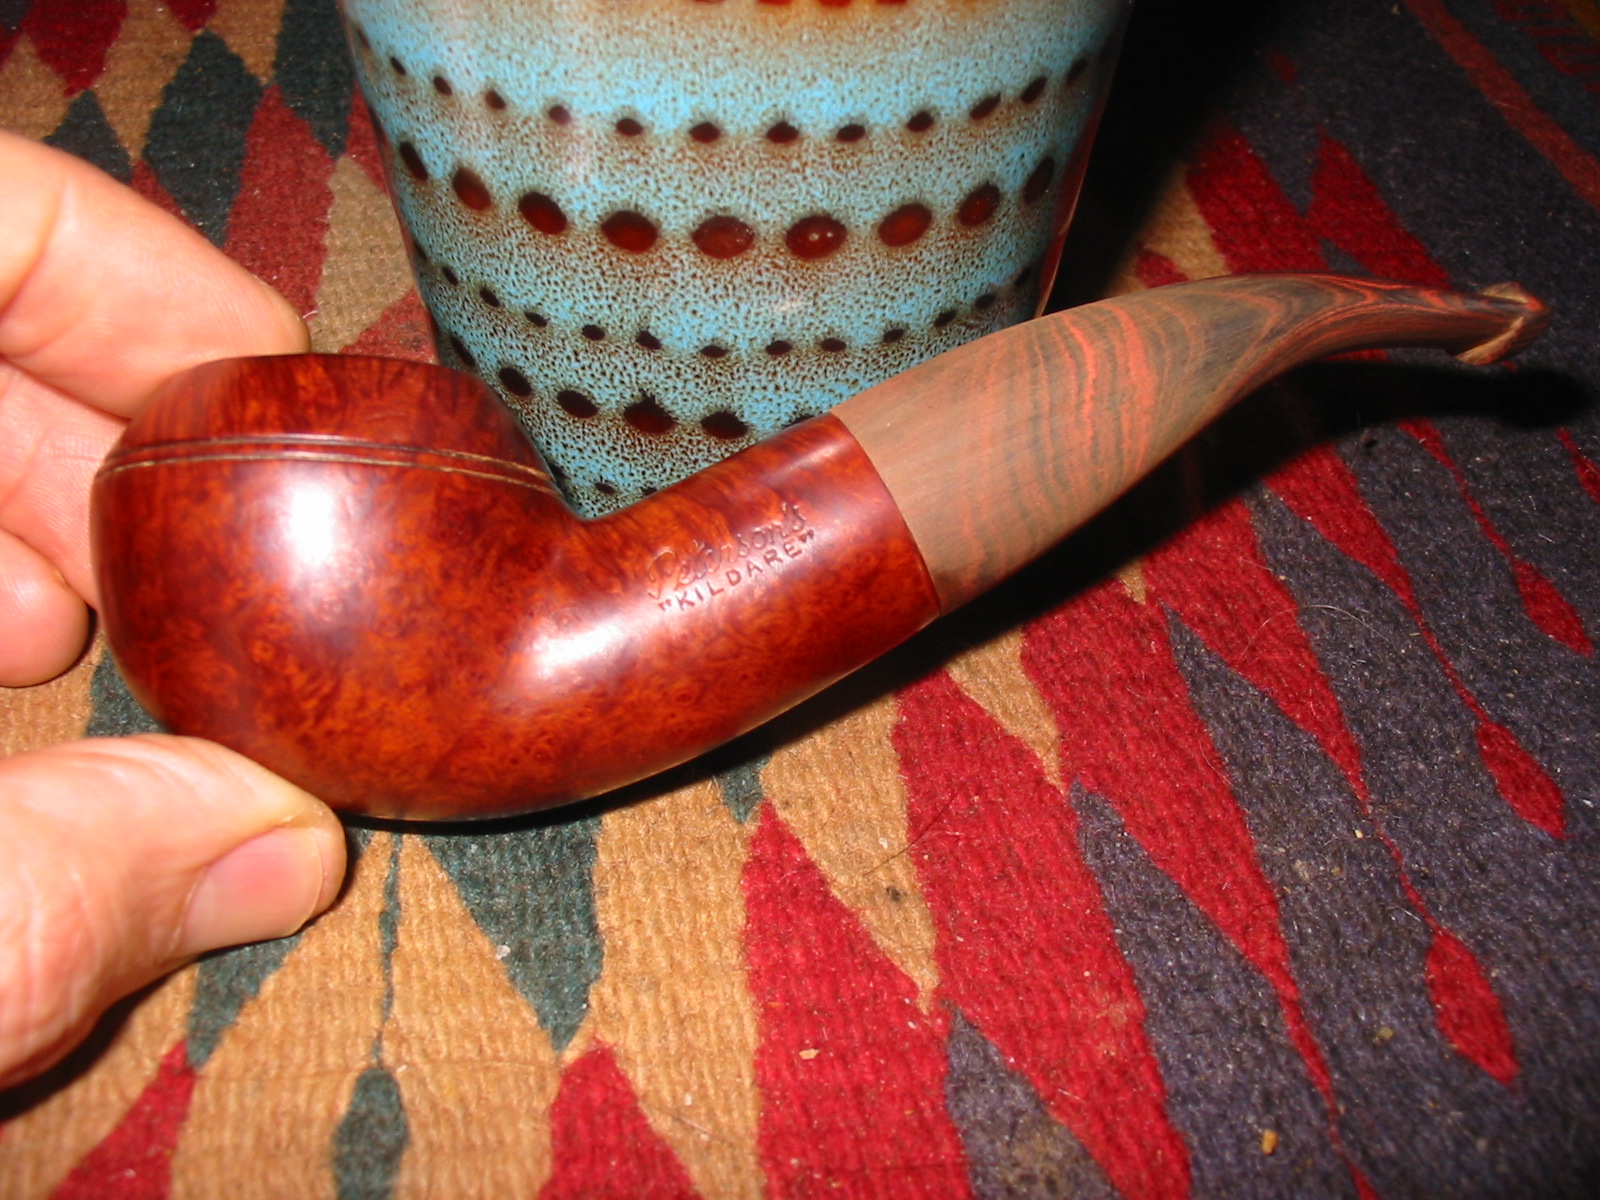
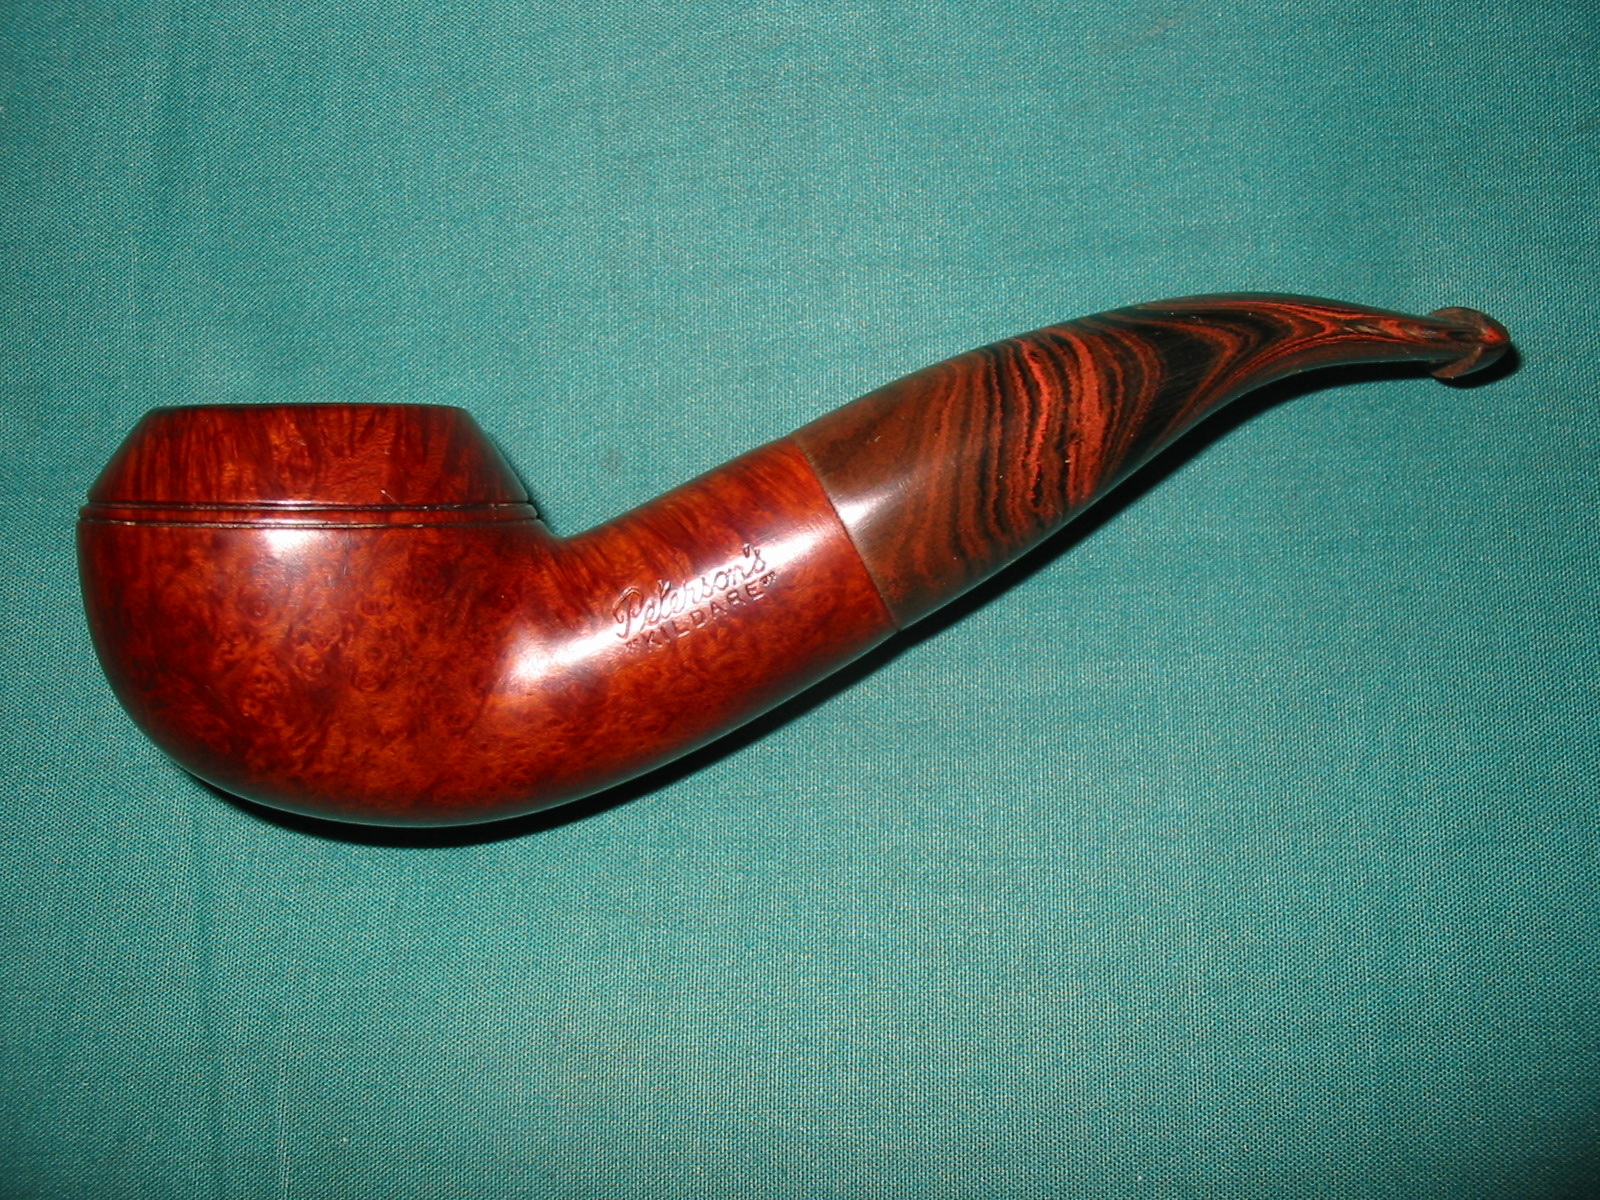
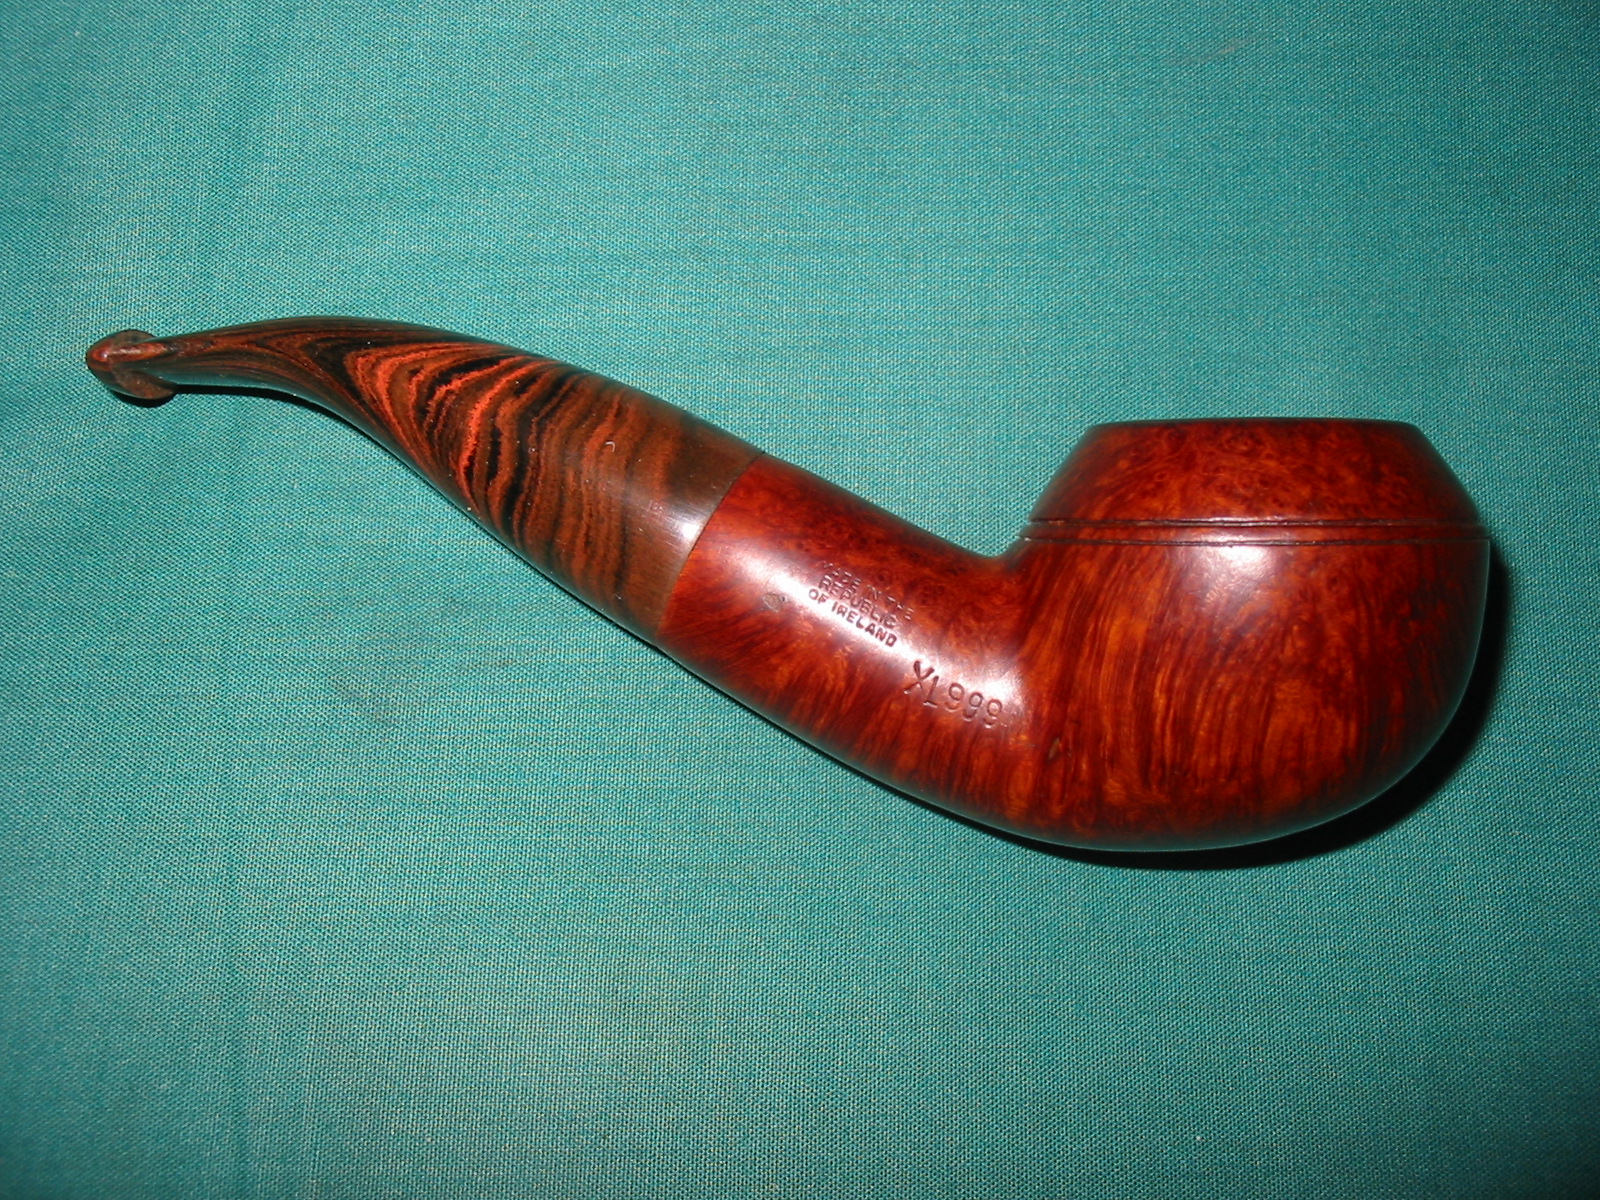
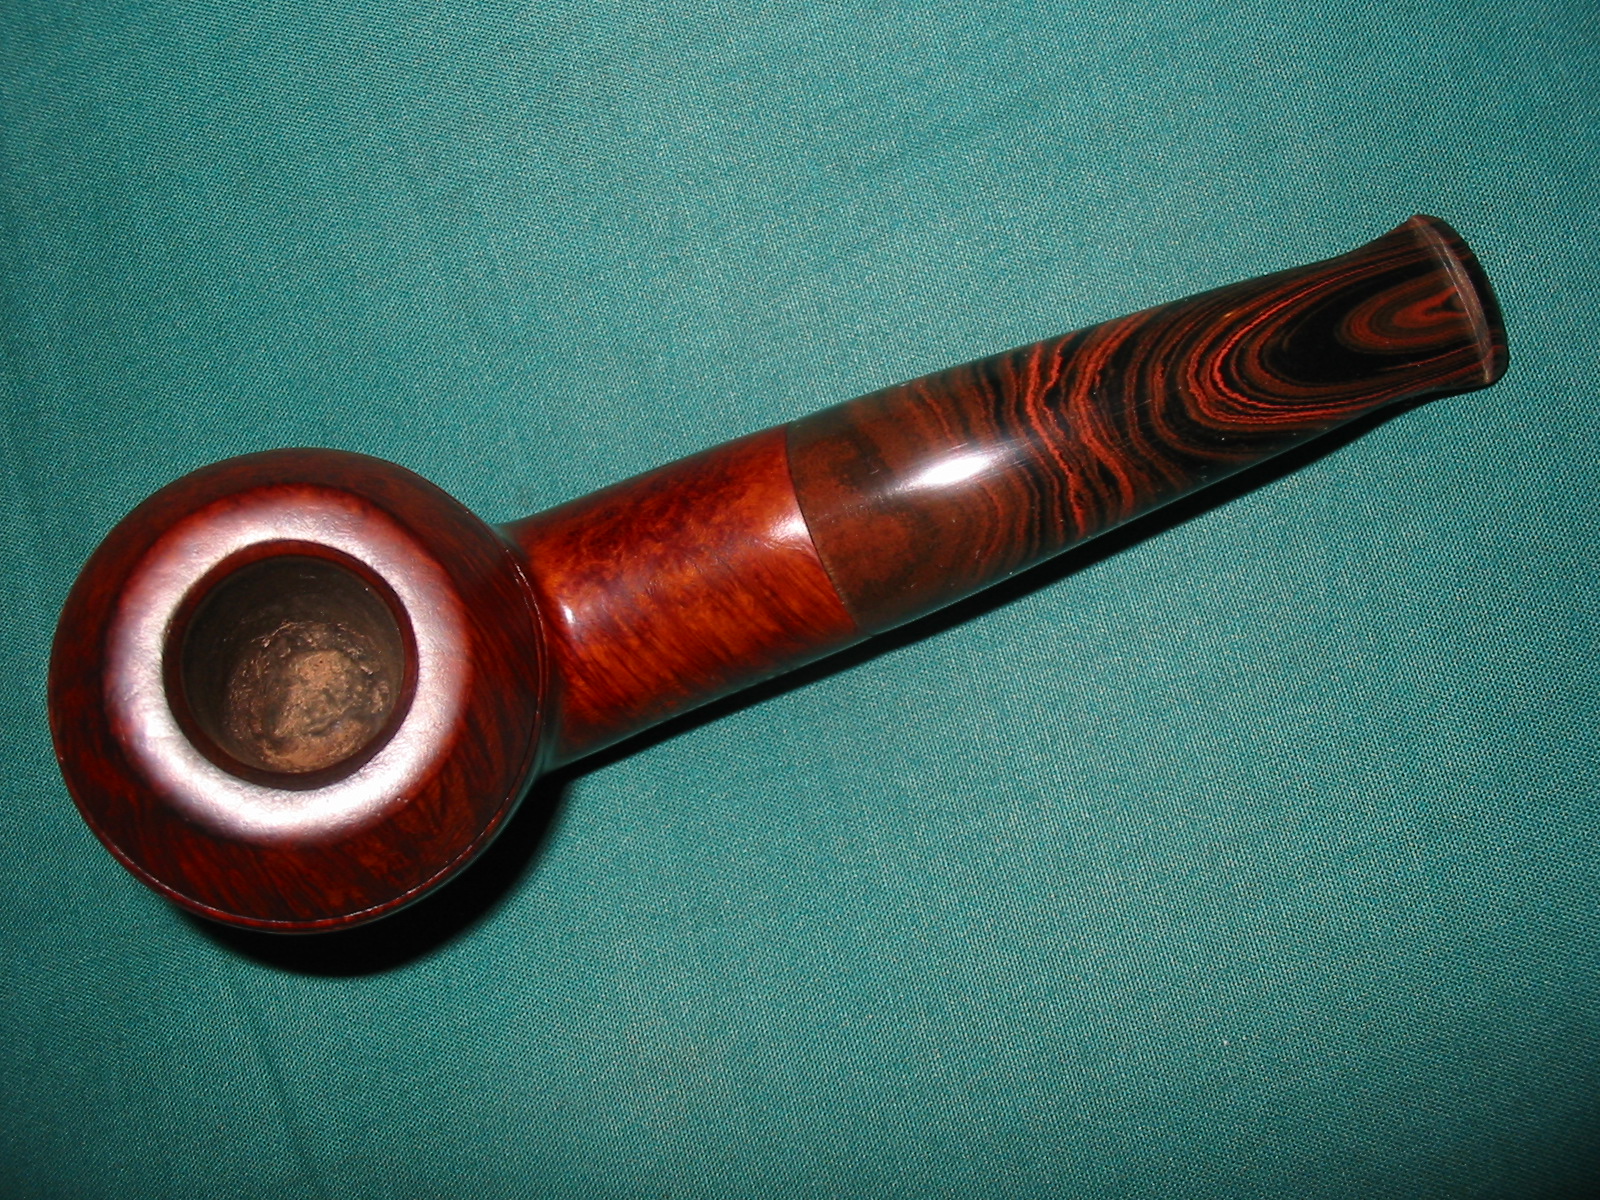
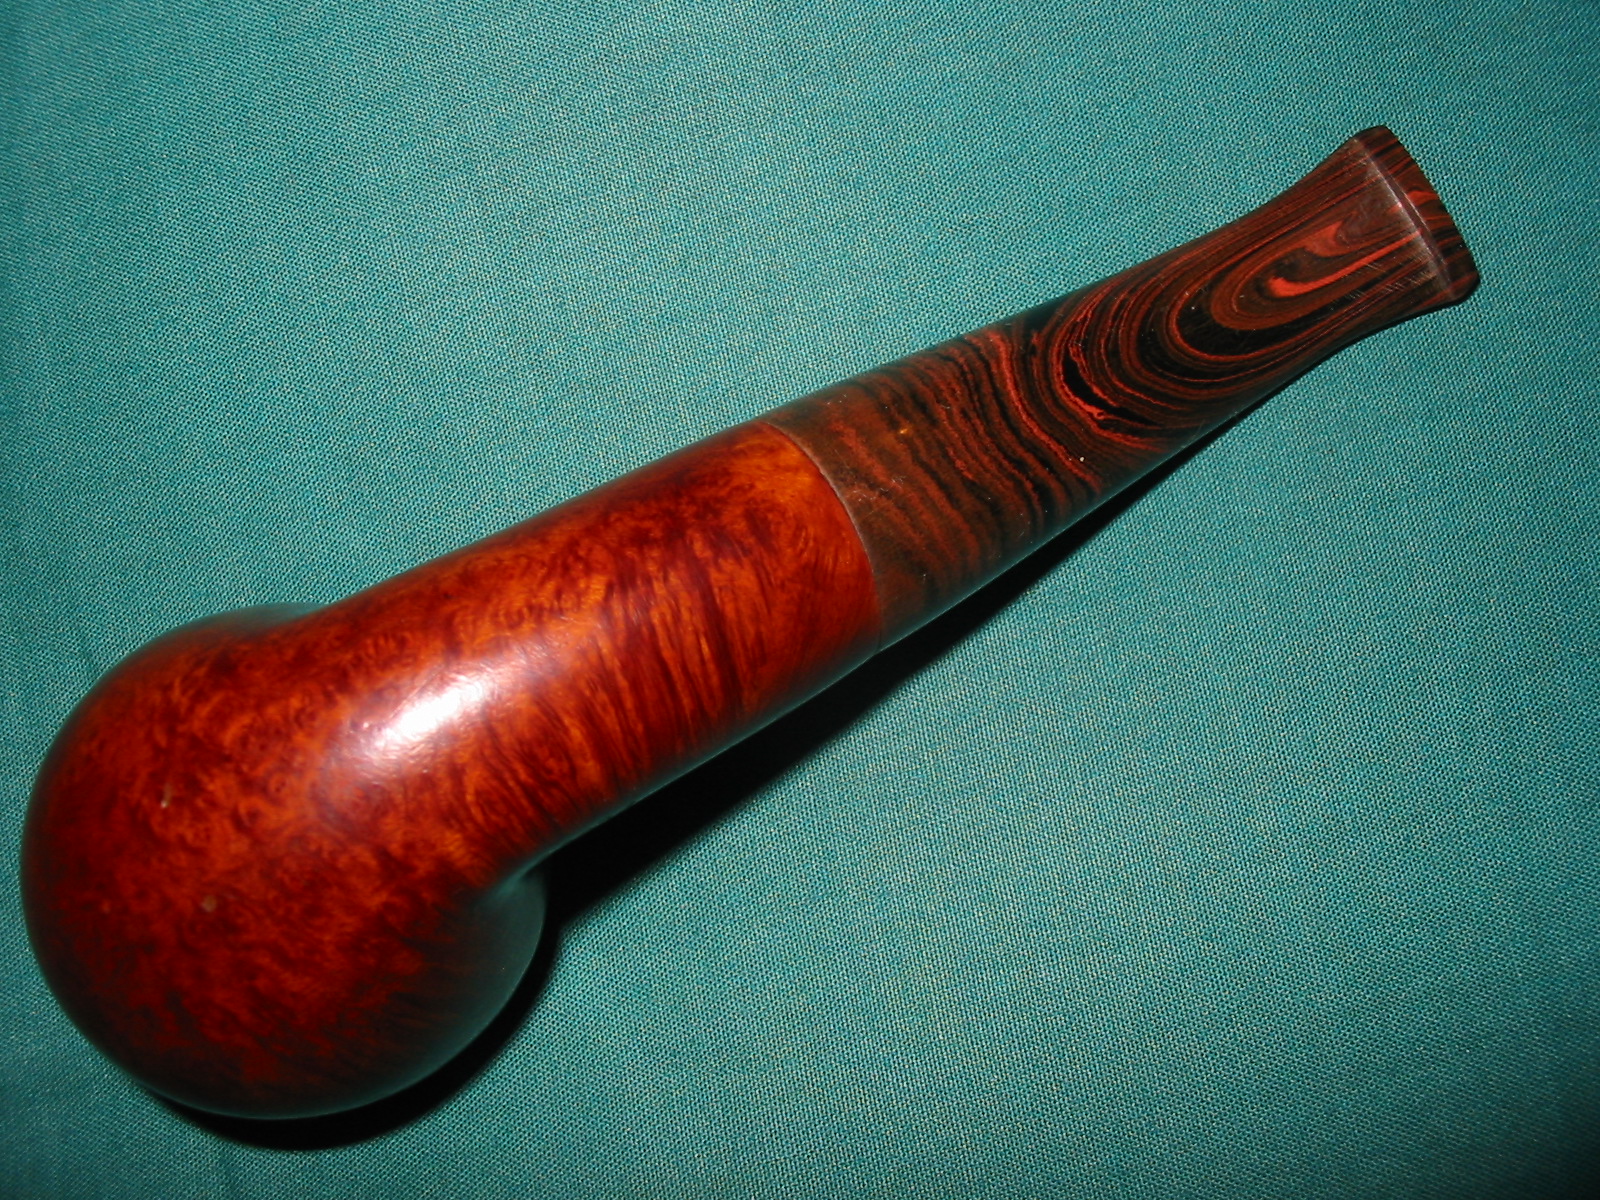
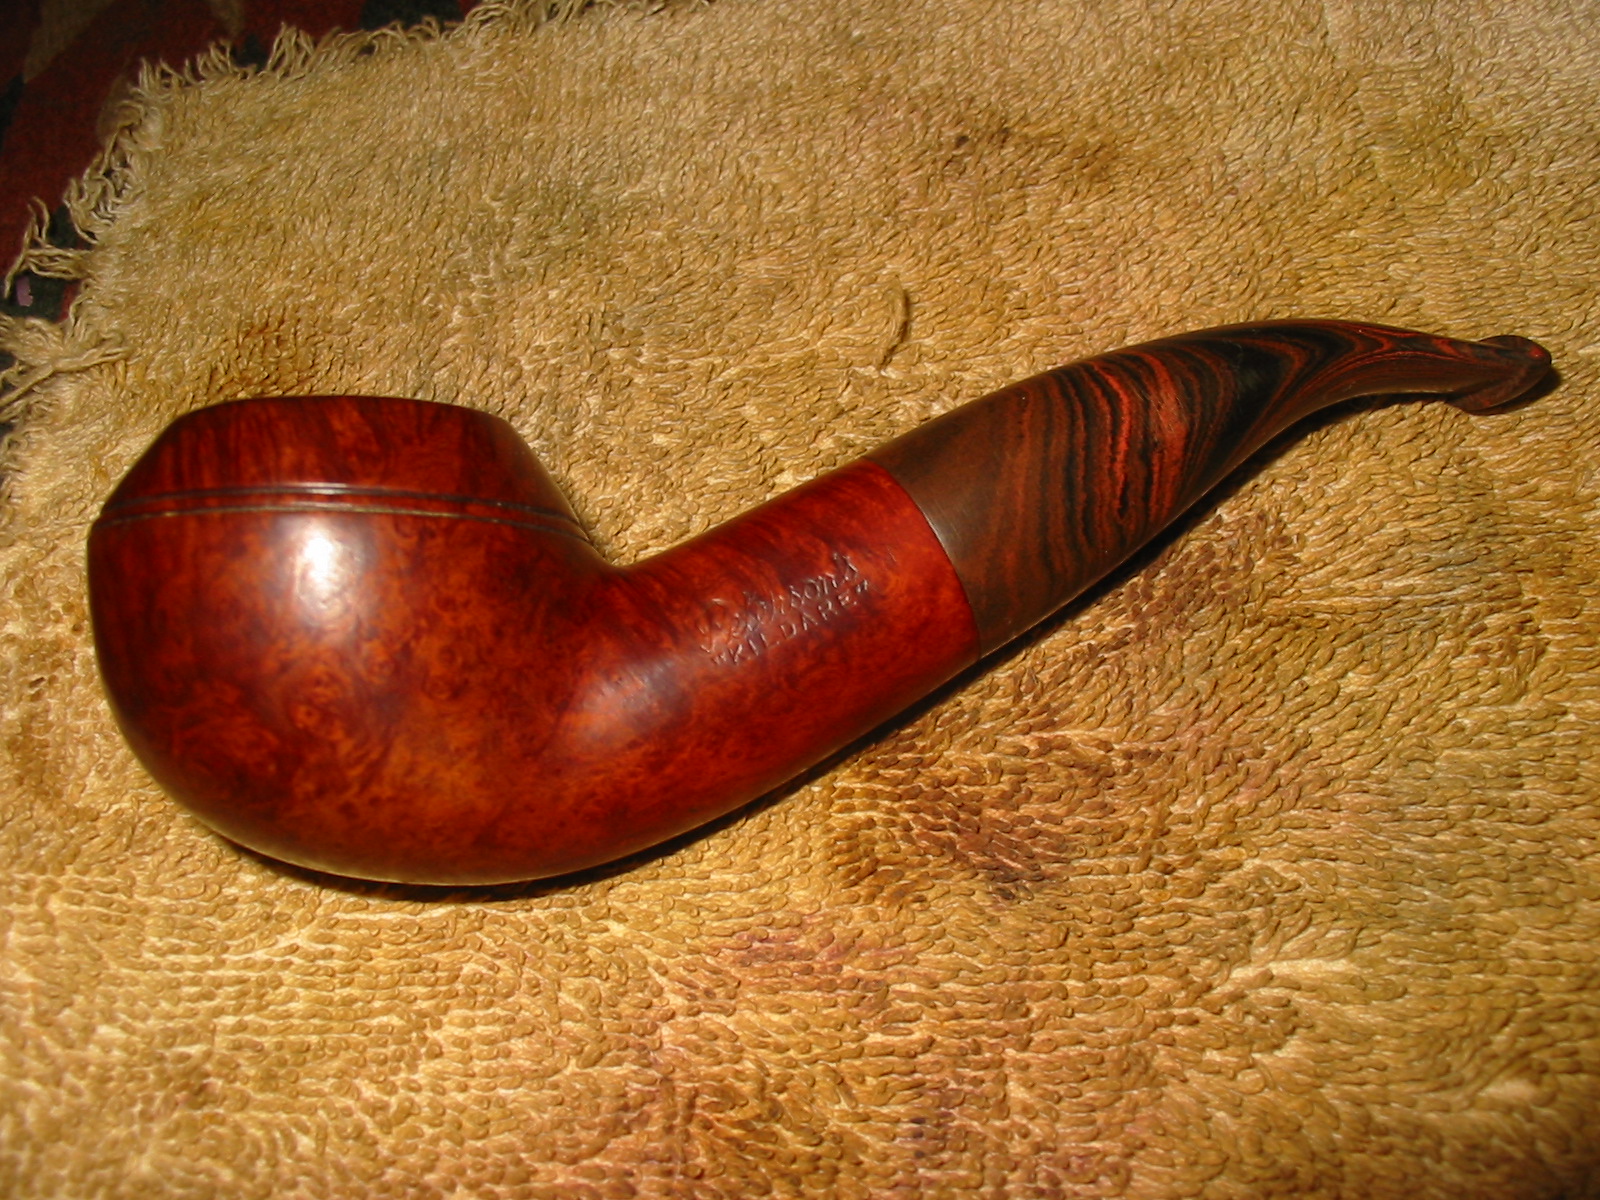
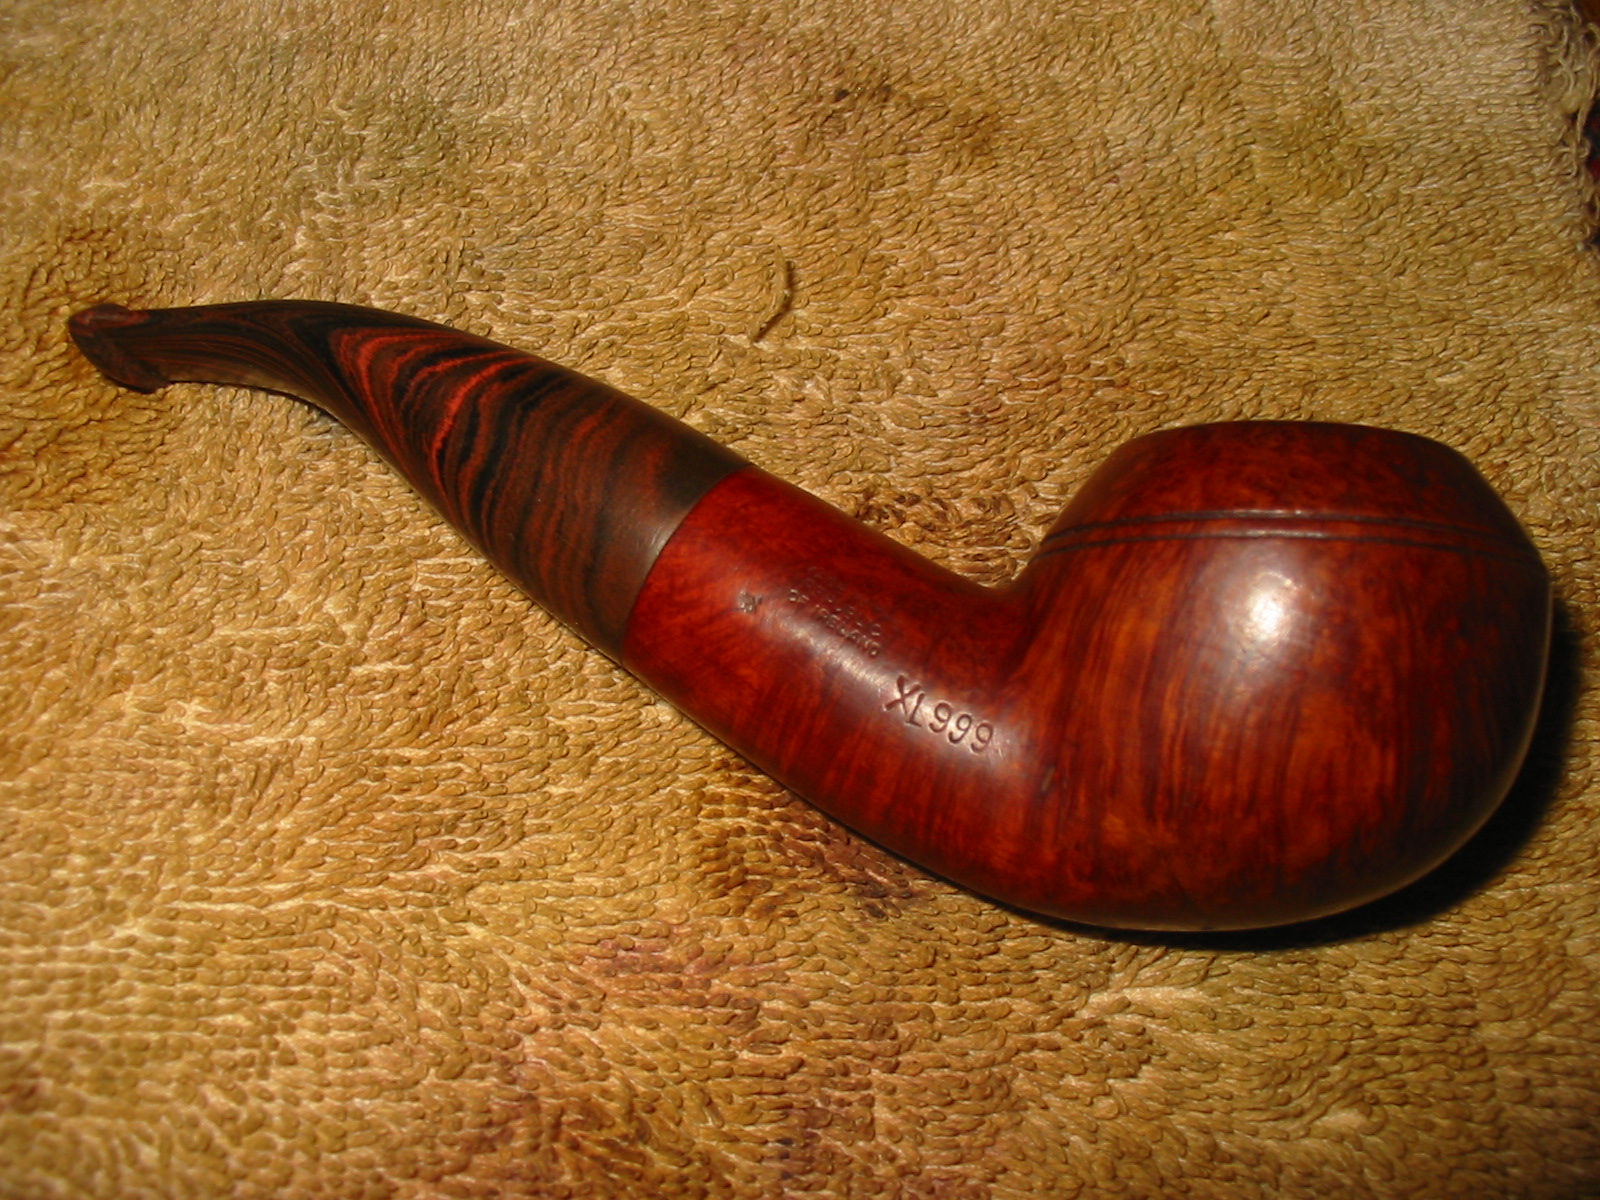
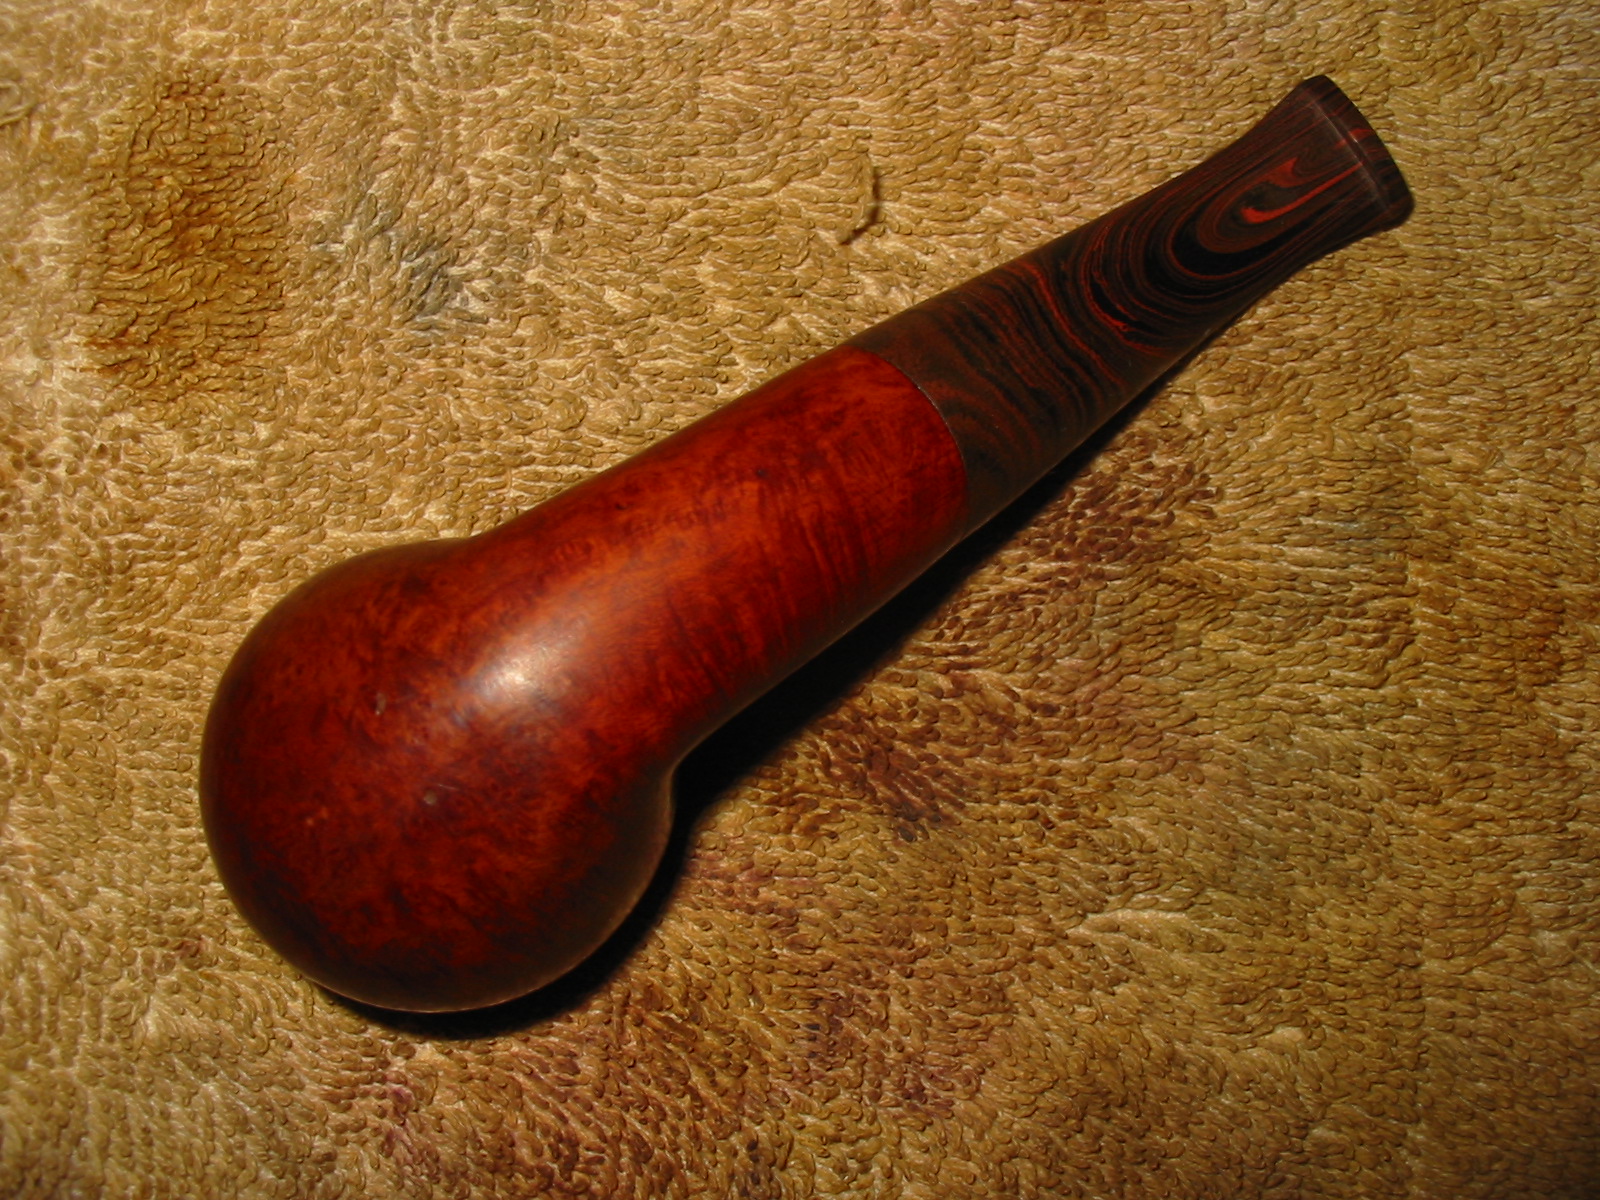
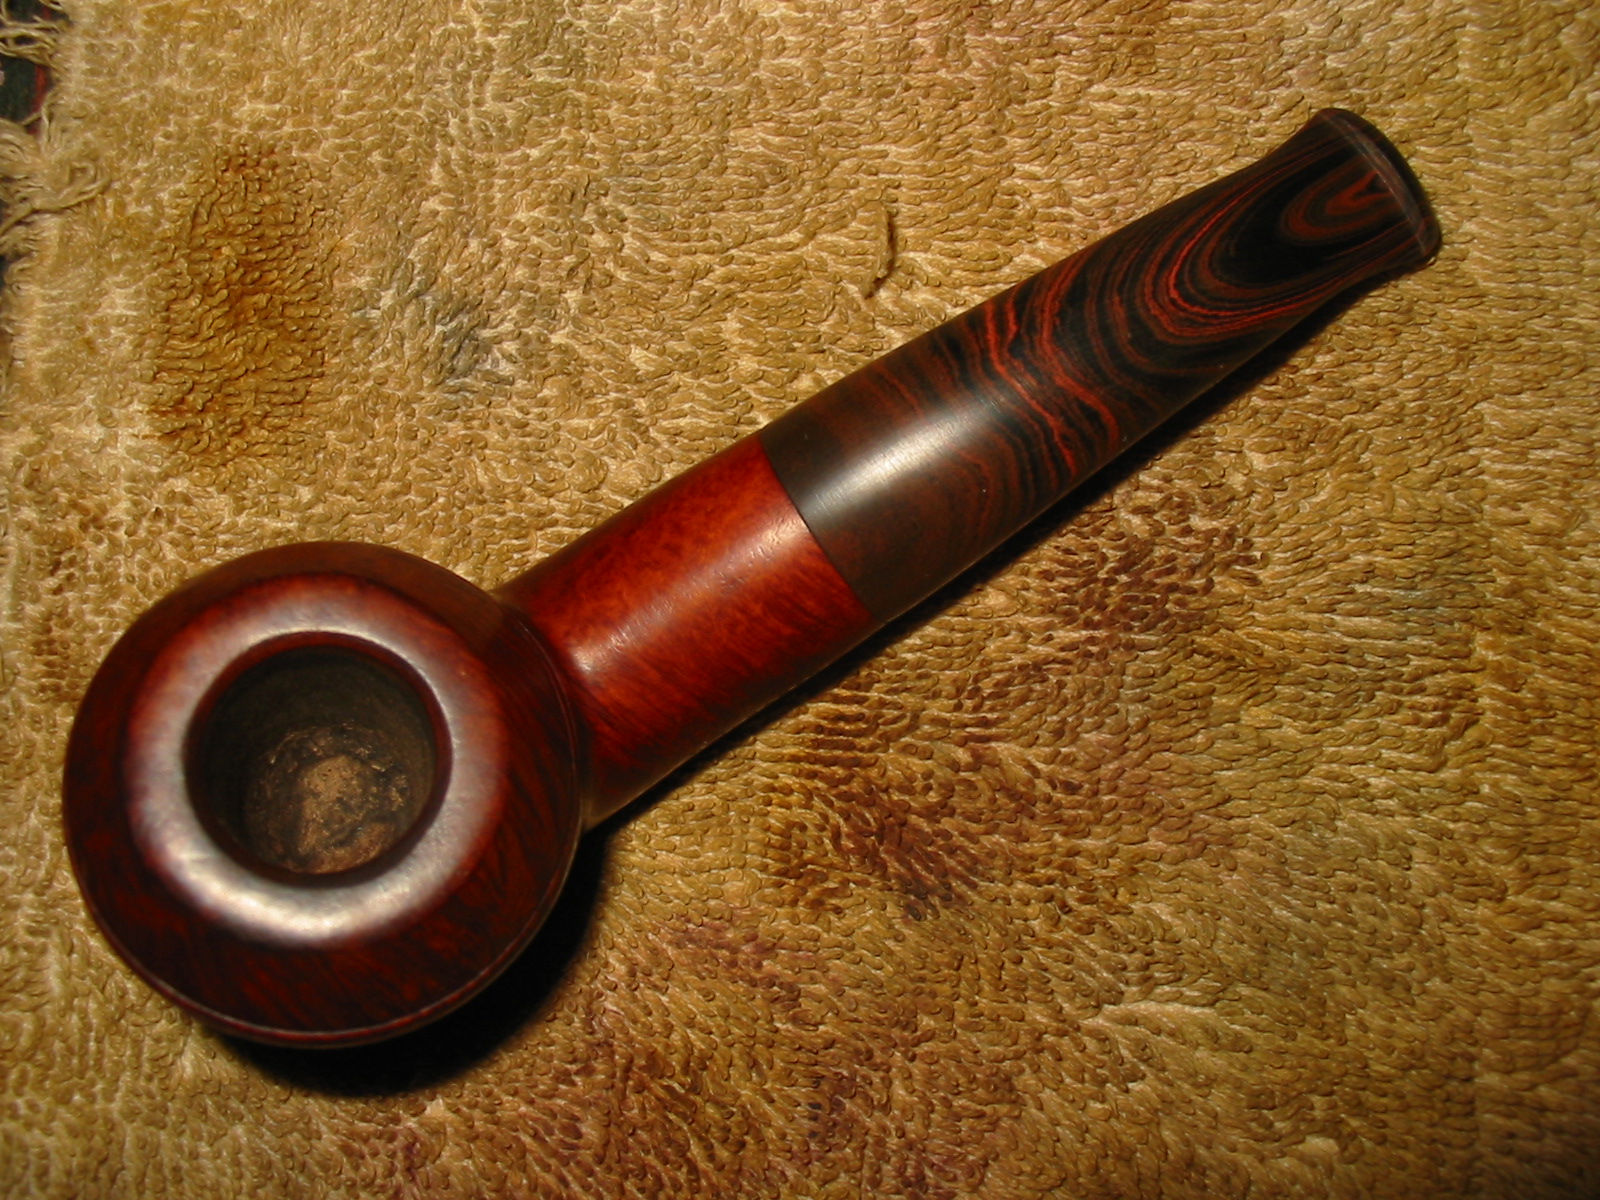
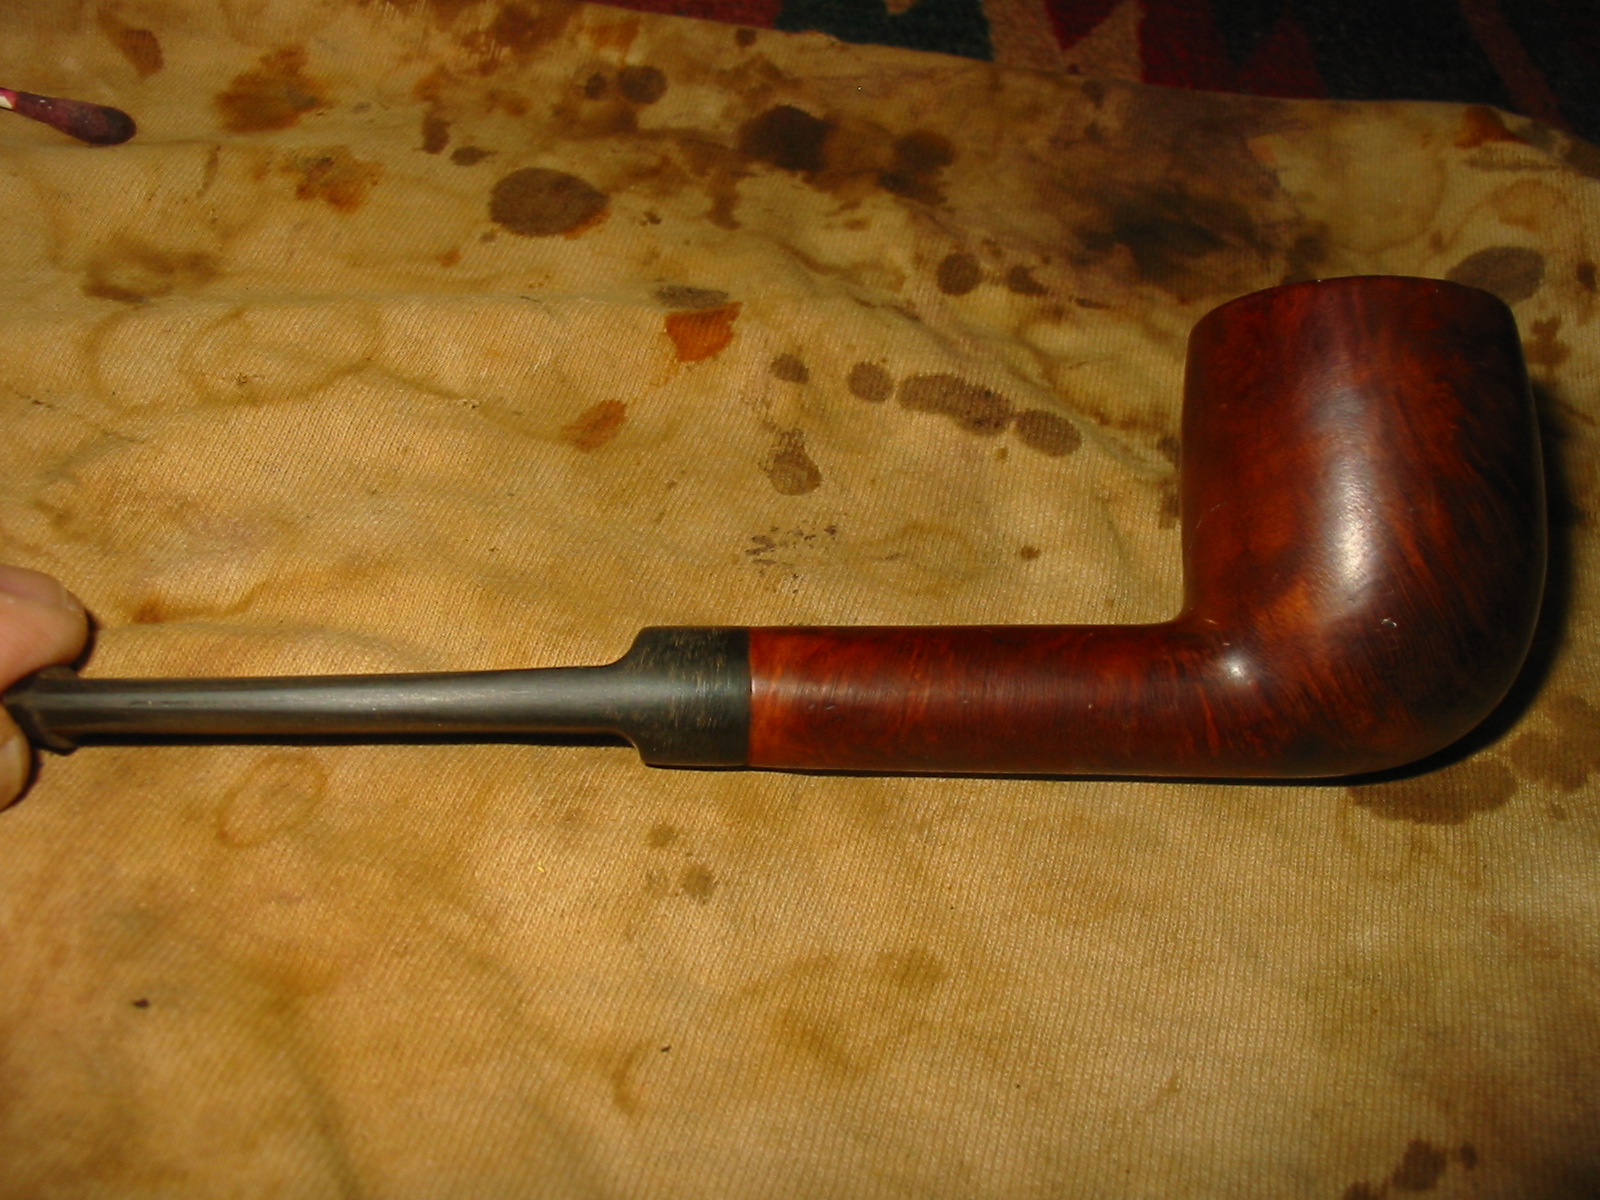
I reinserted the new stem and gave the stem a buff with White Diamond and then waxed the entire pipe with carnauba wax. I applied several coats of the wax and the buffed it with a clean flannel buff to bring up the shine. The finished pipe is pictured in the four photos below. The new stem gives the pipe a much more dignified new look. I can’t wait to get it back to the owner and see what she thinks of the “new” look her pipe now sports!
IMG_2516

IMG_2517

IMG_2518

IMG_2519

Restoring An Interesting Piece of Pipe History – An Art Deco C.B. Weber Streamliner


Blog by Steve Laug

In a recent EBay purchase I picked up a unique pipe that has a flowing look to it. I was intrigued to figure out the history and any information I could find regarding it so I went on a hunt on the web. One of the first articles I came across is found in the link below. http://streamlinesdeluxe.wordpress.com/2012/06/01/weber-streamliner-pipe-2/ The author of the blog makes a brief reference the pipe I found and even has a picture of it. He speaks of the stem being made of something other than vulcanite. Other references I found in online pipe forums spoke of the fact that the bowl was not made of briar but of some composite material. Others said that the bowls were made of American hardwoods. Interestingly no one spoke of what hardwoods were used. I have hunted high and low on the web and can find nothing definitive on the pipe’s manufacture or composition.

I broadened my search to information on finned pipes. I did not want information on Porsche design pipes or metal finned pipes but was looking for anything on wooden finned pipes. I came across the following information on a patent taken by a carver/designer named Wayne Leser. His diagrams and patent application is included below and it can be seen that it is actually very close to CB Weber’s Streamliner. His patent was applied for through the US Patent Office in January of 1941. I assume the patent was granted as it is on the Patent website. Weber’s design seems to be elongated a bit more than the Leser design but the tear drop shape of the outer bowl and the similarly tear drop shape of the drilling match quite well.

I can find no further information on Wayne Leser so I have no idea if he sold his concept to Weber, or worked for Weber. If anyone has further information on that connection it would be great to learn about it. Please post a response below.
Leser Patent Drawings

Leser Patent Application

The pipe I picked up is pictured below in photos from the EBay seller. The photos were not very clear so I could not see the condition of the pipe very well but I was intrigued by it nonetheless. It looked like the bowl was in good condition. The stem however, appeared to be a replacement stem and the fit was poorly done. In the second photo below it is evident that the junction of the stem and shank does not meet.
pipes2

Streamliner

When the package arrived from the seller I took the pipe to my worktable and photographed the condition of the pipe. The pipe was in fairly decent condition. The left side of the bowl was clean. It is stamped Streamliner in script over C.B. Weber & Co.
Streamliner logo3

Streamlinerlogo2
There were two small divots in the shank just below the stamping. I thought at first these might be dents but they are actually spots where the wood is missing. The right side of the bowl is also in good shape. The fins are intact all the way around the bowl with no chips or breakage. The rim was tarred and had a small burn spot on the point at the front of the bowl. The stem was definitely a replacement stem. In my reading I had found copies of the logo that was originally on the stem and also the fact that the stem had a stinger apparatus as part of the fitments. This stem had neither and the fit was wrong. The diameter of the stem was bigger; the tenon was off center therefore the fit was out of line with the left side being too large and the right side too small. The length of the stem was also too long and did not match the dimensions that I had found online regarding the overall length of the pipe. The bowl was in pretty decent shape though there was some kind of bowl coating on it that had broken free of the walls. It is a tear drop shaped bowl with a downward angle on the front portion so reaming it would be tricky. The wood on this one was definitely not briar. The bottom of the bowl has a foot that makes it a sitter and there is a rusticated pattern on the bottom of the bowl.
IMG_2425

IMG_2426

IMG_2427

IMG_2428

IMG_2429

I carefully reamed the bowl to remove the bowl coating and the slight cake that was there. I used two different cutting heads on the PipNet reamer. The first head was the same diameter as the main portion of the bowl. For the angle teardrop end I used the smallest cutting head. Between the two of them I was able to clean up the bowl and remove all of the coating.
IMG_2430

IMG_2431

Removing the tars from the rim was a bit of a challenge and combined with burn mark on the point I decided to sand off the rim with a medium grit sanding sponge. I would then have to restain the bowl. I sanded it with the medium grit sponge and then with a fine grit sanding block to work on the burn mark and the darkening of the rim.
IMG_2432

IMG_2433

IMG_2434

IMG_2435

I finished the sanding by wiping down the bowl with acetone on a cotton pad. I was able to even out the finish on the bowl and rim so matching stain would be much easier to do. I was also able to lighten the burn spot with the same process to the point that a good coat of oxblood stain would make it fade into the surface of the rim.

I then set the bowl aside and went to work on fitting a new stem to the bowl and shank. In the first photo below I have the new stem blank fit to the shank. It still needs work to make the diameters match. The stem is about an inch shorter and brings the pipe back to the original length as noted from my online work. I also think that proportionally it works better with the elongated bowl and shank than the one that came with it.
IMG_2436

In order to get the fit good and tight I used a sanding block to make sure that the transition between the bowl and shank was smooth. This entailed sanding the shank slightly in the process. In the next series of four photos below the fit is finished. The transition is smooth and the fit is good and tight.
IMG_2437

IMG_2438

IMG_2439

IMG_2440

I wiped the pipe down with acetone once again to even out the finish on the shank. The grain in the original wood is quite visible in these photos and it is not briar.
IMG_2441

IMG_2442

IMG_2443

The flow of the taper on the stem was still too chunky in my opinion to match the Streamline concept of the pipe. I used 220 grit sandpaper and files to change the slope of the stem. When I had it the way I envisioned I sanded it with 220 grit sandpaper, a medium grit sanding sponge and also a fine grit sanding block. The angle was right and the profile looked much more “streamlined”.
IMG_2445

IMG_2446

I sanded the stem, bowl and shank with micromesh sanding pads. I wet sanded them with 1500-2400 grit sanding pads and dry sanded with 3200-12,000 grit pads.
IMG_2447

I decided to try to match the original stain using a Danish Oil (linseed oil with a cherry stain). I applied the stain with a cotton pad and wiped it down. When it had dried I was not happy with the coverage and appearance so I removed the stain with acetone to try a different stain.
IMG_2448

IMG_2449

IMG_2450

Once I had the finish removed I restained it with an oxblood aniline stain. I had to apply it and flame it several times to the top of the bowl and shank to get the stain to set deeply and match the rest of the bowl. This was a hard one to get a good stain on. I decided to not apply the stain in the grooves of the fins but just on the surface of the bowl. It worked quite well with the original stain in the fins matching the surface colour really well.
IMG_2452

IMG_2453

IMG_2454

IMG_2455

I did some further polishing on the stem with the higher grits of micromesh from 3600-12,000. Once I had finished the sanding I polished the stem with Maguiar’s Scratch X2.0 to deepen the shine. I coated the stem with Obsidian Oil and then buffed it with carnauba wax to seal it and protect it. The final buff on the stem was done with a soft flannel pad.
IMG_2457

IMG_2458

I reinserted the stem and gave the pipe a final buff with carnauba wax and a soft flannel buffing pad. The finished pipe clearly shows some of the grain pattern of the alternative wood on the shank and the top and bottom of the bowl. The stem came out fitting nicely and giving the overall pipe a new “streamlined” appearance more accurately approximating the original stem. The bowl feels great in the hand and is uniquely attractive as a piece of pipe history. Time will tell if I smoke this one or just keep it around for display purposes. Below are photos of the finished pipe.
IMG_2463

IMG_2464

IMG_2465

IMG_2466

Link

One of the pipes that I had been given years ago was stamped SmokeMaster Series 200 and was an acorn shaped rusticated bow with a smooth side on each side of the shank for stamping and a smooth rim. The left side bore the name and series number and the right side was stamped Imported Briar. The stem had been well chewed and the internal apparatus was missing. It was not useable on this pipe. I would have to restem it. I knew nothing of the brand name. My search on the internet gave me some information on the brand.

On the Dr. Grabow site ( http://drgrabows.myfreeforum.org/sutra13181.php ) I found some interesting information. I quote this post by Dave Whitney, the author of Old Briar, a book on refurbishing. “Smokemaster was a Briarcraft pipe. Richard Kliethermes Sr. was the founder of Briarcraft. First located on Pipetown Hill Rd, Spring Valley, NY, it moved later to 66 Central Ave., Spring Valley, NY. After the death of RK Sr., the business was run by Richard Kliethermes Jr. († 1943) and was quite prosperous between 1920 and 1940. The company closed in 1950. Briarcraft seconds are as follows: Airo, Arcadian, Briarmeer, Smokemaster, Cavalcade, Hallmark, Sterling Hall, and Wimbledon. The Orange off-center diamond was one of their logos.”

The link also had the following scan that shows the original design for the stems and the unique folded pipe cleaner filtration system of the original pipe. I decided to restem the pipe with a stem of my own choice rather than hunt down an original stem.
Smokemaster Patent Stem

Please forgive the poor focus on the next three photos but they still give the idea of what the pipe looked like when it arrived to my work table. It was in rough shape. The bowl finish was spotty and the varnish was coming off. The rim was out of round and the back edge of the inner rim and top were beat up and rough. The stem was gnawed off and the short length would not work with this old pipe. The cake was thick and uneven with large flakes of tobacco stuck to the inner walls of the bowl.
IMG_1015

IMG_1016

IMG_1017

I went through my stash of stems and found an old saddle stem with a built in brass band that would approximate the aluminum one on the original stem. I would need to do some work on the tenon length and the diameter of the saddle portion of the stem to get a correct fit but it was workable as the new stem.
IMG_1018

I reamed the bowl with a PipNet reamer (Photo 1 below) and a plumber’s wire brush (Photo 2 below) to clean out the debris. I used a sharp knife (Photo 3 below) to reshape the inner edge of the bowl and bring it back to round. Photo 4 shows the reshaped and cleaned bowl. I would have to top the bowl to repair the roughness to the top of the rim.
IMG_1027

IMG_1028

IMG_1029

IMG_1030

I used a sanding drum on a Dremel to shape the saddle diameter to meet that of the shank. The sanding drum worked well on the vulcanite and the brass. Due to the difference in hardness of the two materials I had to be careful to not cut the vulcanite deeper than the brass. The idea was to make a smooth transition between the two materials on the stem.
IMG_2276

IMG_2277

IMG_2279

The next photo shows the condition of the top rim of the bowl. I decided to top the bowl and then rework the rounded edge to keep the acorn shape intact. I set up a piece of sandpaper on my flat board and turned the bowl into the sandpaper. I worked it and sanded it, repeatedly checking the flatness of the rim and also the amount of briar I was removing from the rim.
IMG_2278

IMG_2280

IMG_2281

Once the roughness was smoothed out I sanded the rim with 220 grit sandpaper and a medium grit sanding block to smooth out the top and to round the outer edge of the rim to make it less abrupt and more like the original shape. The next two photos show the rim after the sanding and shaping with the sanding block.
IMG_2282

IMG_2284

At this point in the process I put the bowl into an alcohol bath and let it soak overnight to remove the varnish finish that was spotty and damaged. The next morning I took it out of the bath, dried it off and cleaned out the shank and the shank. The first photo below shows the bowl after I removed it from the bath. The second, third and fourth photos show the bowl after drying.
IMG_2286

IMG_2287

IMG_2288

IMG_2290

I restained the pipe with a Danish Oil Cherry stain applied with a cotton pad. I need to be able to work the stain into the deep rustication and also on to the smooth portions of the shank and rim. The rim took several applications to match the rest of the bowl.
IMG_2291

IMG_2292

IMG_2293

IMG_2294

I put the bowl aside to dry and worked on the stem. I sanded out the remaining scratches around the brass band on the stem with 220 grit sandpaper and then reworked it with the medium grit sanding block. Once the scratches were no longer evident I worked on the stem using the micromesh sanding pads from 1500-12,000 grit to polish the stem and prepare it for waxing and buffing. Once I finished with the 12,000 grit pad I gave the stem a coat of Obsidian Oil to seal the surface and to soak deeply into vulcanite. I buffed the stem with White Diamond to finish the shine and then reinserted it into the shank.
IMG_2295

IMG_2296

IMG_2297

I buffed the entire pipe with White Diamond and gave it a coat of Halcyon II wax for rusticated pipes. I then buffed it again with a clean flannel buff to raise the shine. The photos below show the finished pipe.
IMG_2302

IMG_2303

IMG_2300

IMG_2301

Medico Ventilator — Unventilated (Thanks Ed for the idea)


When I read this post by Ed James (Ozark southpaw) on Pipe Smoker Unlimited. This is the link to his post: http://pipesmokerunlimited.com/showthread.php?3186-Medico-Ventilator-unventilated I thought I would love to try that as well. Here is Ed’s first post in that thread that got me started thinking about the project. Ed also is a refurbisher of long standing and does excellent work. Here is his website: http://www.ozarksouthpawpipes.com/index.html

On PSU Ed wrote; “I’ve had a few of these and they smoke fine, although sometimes it was hard to get the filter seated so the pipe will draw as it should. If you’re not familiar with the Ventilators, they cannot be smoked without a filter. I smoke mostly filtered pipes, but thought I would see if I could make a Ventilator filterless. Accomplished it by turning a piece of briar the length of the shank and epoxying it in place. For the stem I used a vulcanite blank after replacing the tenon with delrin and adding a ring of tortoise shell acrylic. On my third bowl in it and it is smoking fine.”

Here is the pipe – pictured below. It is a nice looking sandblast that Ed “unventilated”.
Un-Ventilated Ventilator 2013-08-27 001 (1280x960)

Un-Ventilated Ventilator 2013-08-27 003 (1280x712)

Un-Ventilated Ventilator 2013-08-27 005 (1280x1013)

So today was the day that I got to finally work on “unventilating” one of my own. Mark Domingues (dogtalker) recently sent me a few old bowls and pipe parts that needed some work. In that package was a Medico Ventilator. It was not as nice as the one Ed worked on, pictured above, but it was a Ventilator sans stem nonetheless and it was the opportunity I was looking for to try my hand at unventilating the Ventilator. This bowl was absolutely clean. I don’t think that it had been smoked other than maybe the first light or so. The bottom 2/3s of the bowl was still virgin briar. The bowl had the typical Medico lacquer coat and there were carved leaves all around the outside of the bowl. I decided to leave the finish alone and rework it as it stood. One day I may remove the finish but for now it will remain as it is.
IMG_2148

I have kept a few unredeemable bowls around in my box of stuff and they came in handy this time. I took two different bowls out of the box and used a hack saw to cut off the shank as close as I could to the back side of the bowl. My plan was to follow Ed’s instructions noted above about turning a piece of briar to fit inside the Ventilator tube. I do not have a lathe so I decided to repurpose some briar shanks to do the same job.
IMG_2151

IMG_2152

IMG_2153

IMG_2154

After cutting them off the bowl they were ready for me to begin shaping them. I used a Dremel and sanding drum to take the diameter of the cut off shanks down to the diameter of the tube on the Medico. The next seven photos show the process of removing the excess briar. I used two different pieces of slightly different lengths that could be used depending on the stem I chose to use. The one pictured in the first seven photos below was about ½ inch shorter than the length of the tube. I thought about using a plug in the bottom of the tube but later decided to use the longer of the two briar tubes.
IMG_2155

IMG_2156

IMG_2157

IMG_2174

IMG_2171

IMG_2172

IMG_2173

I used both the Dremel and 220 grit sandpaper to shape the briar tube to fit in the Ventilator. The first one was just briar. The second one was off of a screw mount shank. I decided to leave the aluminum in the shank and use that to but up against the aluminum seat in the Ventilator tube.
IMG_2158

IMG_2159

IMG_2160

I sanded both tubes so that I could try both and see which one I wanted to use. I chose the long of the two with the aluminum base. I inserted it in the shank of the Ventilator with the aluminum end in first. I pressed it into place in the tube. It is a pressure fit so I did not need to glue it to fasten it in place. I chose not to use epoxy or glue to hold it in place and opted instead for a tight fit. Once in place it was slightly longer than the tube. The aluminum was tight against the interior and could go no further. I used the Dremel with the sanding drum on it to remove the excess briar. Once was flush against the aluminum it was time to fit a new stem to the shank.
IMG_2161

IMG_2162

I had several saddle stems in my can of stems that would work on the new shank insert. I turned the tenon down with a PIMO tenon turner until it was close to the right size and then finished with sandpaper and files. I used a file to shape the seat in the insert so that the stem would sit well against the tube. The next three photos show the newly seated stem in place.
IMG_2164

IMG_2165

IMG_2168

I took the photo below to show the fit of the briar tube in the aluminum shank. There was a small divot out of the edge that is visible at about the ten o’clock position on the shank. This would be smoothed out as I beveled the inner edge of the shank inward.
IMG_2169

I beveled the shank inward with small round needle files to give the stem a proper seat in the shank. I used some cherry aniline stain to stain the briar shank inset in the fins on the aluminum. I applied the stain with a cotton swab and wiped it off. I sanded the aluminum with micromesh sanding pads. I used the 1500 and 1800 grit to polish the aluminum and remove the scratches that were present on the shank.
IMG_2170

I sanded the stem with a Dremel and sanding drum and then with 220 grit sandpaper to bring the diameter down to match the shank. I continued to sand until the scratches were minimized. Then I progressed to sanding with the micromesh sanding pads. I wet sanded with 1500 and 1800 grit and then dry sanded with the remaining grits of pads from 2400-12,000 grit. I decided to fit an acrylic ring on the stem with a slight ridge to match the slight ridge at the junction of the aluminum and the briar near the bowl. I liked the look of the black blue ring so I epoxied it in place. It began as a square piece of acrylic that had been a spacer on another stem. I shaped it with a Dremel to build a slight ridge that would parallel the one on the front of the aluminum shank.
IMG_2177

IMG_2178

IMG_2179

IMG_2180

IMG_2183

IMG_2184

IMG_2185

With the spacer glued in place the new look of the stem was more complete to my eye. The stem still needed a lot of sanding and shaping. I used the 1500 and 1800 grit micromesh sanding pads once again to sand the newly added ring and the stem. I worked through 2400 and 3200 grit sanding pads to give yet more polish to the stem. I wet sanded right through 3200 grit this time, something I rarely do to polish the ring and the stem. I continued to dry sand the stem to a shine with the remaining grits of micromesh sanding pads (3600-12,000).
IMG_2186

IMG_2187

Once the sanding was finished I buffed the stem with White Diamond on the buffing wheel and then gave the pipe and stem several coats of carnauba wax and buffed with a clean flannel buff to give it a shine. The finished pipe is pictured below. It is now a working pipe – an “unventilated” Ventilator. Thanks Ed, for the great idea on doing this Ed. It was fun to figure out how to make it work. Your “groundbreaking” made it much easier however!! Again I say thank you.
IMG_2188

IMG_2189

IMG_2190

IMG_2191

Louis Blumfeld 1901 BBB Bent Billiard – by James Gilliam of jsecpipes.com


When James posted his work on this pipe on the pipe forums I was amazed at how beautiful it looked. Wow a 1901 BBB – one of my favourite pipe makes and one of the old ones as well. Imagine the surprise when I got an email at the same time asking if I would like a write up and photos of the restemming for the blog. I did not have to think twice to answer that email. I quickly fired back an affirmative and what you have below is the story from James. Thanks again James for taking the time to document your work on this old timer. Enjoy smoking that great piece of pipe history. Below is his tale.

Every story has a beginning and this one even has a pre-story. The excerpt below was posted on several forums I’m a member of so I thought I would repeat it just for those that haven’t seen the posts.

“As some of you know I attend the 100km van Ieper in Belgium nearly every year since 2002. It’s a walk around the WWI Battlefields that consumed Ieper. I’ve been bitten by the pipe making bug, and how and along the way dabbled in restorations just because, but my search for a pre-WWI era pipe is finally over. I ended up getting this piece of history from Alan at Reborn Briar. Now he did the pipe restoration.. and a brilliant job he did, the only thing the pipe was missing was a stem.. well I can do that… I decided not to bore out the mortise and left it threaded, made a threaded tenon out of horn, since I don’t have any workable bone, and decided against using Ivory…… and went with Cumberland for my stem material.. I’m happy…Happy Columbus Day everybody”

Now for the rest of the story. What sticks around in usable condition for over 100 years… not too much, but since I’m kinda into this pipe thing, tobacco related history rates up there for my interest factor. This past July I was able to attend the Newark (UK) Pipe show, set up a table and sell some pipes. You never really sale (or at least I don’t) all the pipes you want to sale, but you do get to meet a lot of really interesting people, and the next table over was Alan Chestnutt from Reborn Briar. I’m always amazed at the folks like Steve and Alan that get into the restoration business. I’ve done a few, even wrote an article about it, but creation is where my passion lies.

Anyway, talking with Alan pre-World War I pipes came up, and fast forward to September he had one that he was going to restore but without a stem. As I mentioned above, stems are no problem…. that’s the making/creating/using machinery aspect I like. When the pipe arrived I was amazed at how well it looked. I mean wow, 1901, and all that.

The only real thing that threw me was the threaded mortise. Looking around the shop I pickup up a few of my mistake mouthpieces and tried fitting a few. The 7mm tenon fit without a problem, as it just slid into the mortise. But later that night while sitting around thinking about the mouthpiece I figured I’d make it as close to the original as I could. The stems profile was already in the leather case. So what do we know at this point.. 1900’s meant ivory, bone, or the like type of tenon. I don’t have any bone to use and didn’t really want to use ivory……but being a pipe maker I do have horn. I usually end up keeping the horn points after using the remainder of the material for a shank extension.

So horn it was to be. I shaped the tenon, drilled and set out to thread the tenon. I’m sitting with a 8mm tenon drilled to 4mm for the airway and went about threading the horn. Unfortunately it crushed under the pressure of my die, but I guess it only made sense… so I made another, except this time I threaded it first and then drilled it… And here is where the pictures come into play.

Threaded tenon, prior to drilling
Jogli1

And it fits just like it is supposed to. Looking right above the pipe you can see my trial delrin tenon with new threads.
Jogli2

Mouthpiece rough cut and drilled. The mortise is also threaded. I cleaned up the junction end before the next steps, so the fit would be flush
Jogli3

Epoxy’d and left to rest a while.
Jogli4

And it fits. So at least the scary parts are now done.
Jogli5

Drawing on the Cumberland to get my bearings at to decide where I want the saddle to sit. The line closest to the junction was chosen.
Jogli6

Jogli7

Time to sand a bit with a machine.
Jogli8

And done
Jogli9

Now it’s file time.
Jogli10

Now it’s sandpaper time.
Jogli11

And more sandpaper… I probably left a step or two out here…just to save the pictures, but my process is machine, medium cut file, fine cut file, another fine cut file, nail files, 180, 220, 320, 400, 600, 800, 1200 sandpaper, buffing paste, more sanding, high glass paste (Sometimes more sanding to remove scratches I missed) and a final buff. Here you can see the stem is bent to its final form.
Jogli12

And now it’s all shiny.
Jogli13

And here are the final pictures. Alan did the bowl, I did the stem and I have a pipe that is twice my age… gotta love it. Hope you enjoyed my story.
Jogli14

Jogli15

Jogli16

Jogli17

Restemming a Gift Pipe – a Savinelli Autograph 5


On a recent work trip to Alberta I stopped by and visited Todd Bannard (aka Sasquatch) in his workshop. He did a bit of work on a Delrin sleeve for me and we smoked some bowls together. I left a couple of refurbished pipes with Todd and he gave me a Savinelli Autograph 5 bowl that needed to be restemmed. This afternoon I got around to fitting a stem to the pipe. The briar is a beautiful piece with a lot of gorgeous grain. The bottom of the bowl and the shank are sandblasted. The bowl has a plateau top and the shank took a flush fit stem. It had been barely smoked and certainly was not broken in. If it had been smoked one or two times that may be saying more than is true as the grain in the interior of the bowl is still quite visible. Below are some pictures of the bowl before I restemmed it.
IMG_0466

IMG_0467

IMG_0468

IMG_0469

I did research on the Savinelli Autographs to see what kind of stems they had and found a variety of them in pictures. About half of the photos showed a saddle stem with much the same proportions as the one that I chose to use. I went through my box of stems and found one that would approximate the look of the pipes online. I also wanted one that would fit after I turned the tenon. It would also take some minimal adjustment to the diameter of the saddle in order to align with the shank. I drilled open the airway to hold the guide pin on the Pimo tenon turner. I put it in the cordless drill and slowly cut away the diameter of the tenon until it was close to fitting in the shank.
IMG_2000

I used a Dremel with a sanding drum to take down the tenon until it fit the shank. The next two photos show the newly cut tenon before I sanded it down to smooth out the marks left by the Dremel.
IMG_2001

IMG_2002

I sanded the tenon with 220 grit sandpaper and then with 1500 and 1800 micromesh sanding pads to smooth out the tenon. Once that was done the stem fit in the shank snuggly. In the four photos below the fit of the stem can be seen and the excess of vulcanite that needed to be trimmed away from the diameter is also visible.
IMG_2003

IMG_2004

IMG_2005

IMG_2006

I sanded the diameter with a Dremel and a sanding drum. I took off the casting marks left along the edges of the blade and on the sides of the saddle portion of the stem. I also used the Dremel to take off the excess diameter of the stem. I worked carefully and slowly along the joint of the stem and the shank so that I did not damage the briar with the sander. I was able to remove the majority of the overage with the Dremel and finished with sandpaper.
IMG_2007

IMG_2008

I sanded the Dremel marks out and further reduced the diameter with medium grit emery cloth. I sanded it until the fit was almost perfect. I would finish the fit with finer grits of sandpaper and the micromesh sanding pads later.
IMG_2009

I set up a heat gun and the rolling pin I use to bend the stems next to it. I heated the stem with the heat gun set on the lower of the two settings. I held it over the heat until the vulcanite was flexible. At that point I bent the stem over the rolling pin in order to get an even bend in the vulcanite. Once it was bent to the angle I wanted I held it under the cold water tap in the sink to set the bend. The next four photos show the process and the resultant bend in the stem.
IMG_2010

IMG_2011

IMG_2012

IMG_2013

I took the newly bent stem back to the work table and did some more sanding on the diameter of the saddle to further match the shank. I used 220 grit sandpaper and a medium grit sanding sponge to clean up the stem and remove the scratch marks left behind by the emery paper. I scrubbed the bowl with Murphy’s Oil Soap and a soft bristle tooth brush to remove the dust and grit left in the sandblast portion and the plateau on the top of the bowl. I rinsed the bowl under warm tap water and dried it with a soft cotton cloth. I gave the bowl several coats of carnauba wax on the buffer before inserting the stem and giving it a light buff with red Tripoli. The next four photos show the status of the pipe and the new stem after the polishing on the buffer.
IMG_2016

IMG_2018

IMG_2019

IMG_2020

Next I sanded the stem with the micromesh sanding pads. I wet sanded it with 1500, 1800 and 2400 grit micromesh and then dry sanded with the remaining grits 3200-12,000.
IMG_2021

IMG_2025

IMG_2026

When I had finished with the micromesh pads I gave the stem a coat of Obsidian Oil and rubbed it into the vulcanite. Once it was dry I buffed the stem and the bowl on the buffer lightly with White Diamond and then gave the pipe several coats of carnauba and buffed to a shine with a clean soft flannel buff. The pictures below show the finished pipe. It is now ready for the pleasure of breaking it in. I still have not decided what tobacco to use with it but there are several options on the table. I want to thank Todd for the great looking bowl to be restemmed and I will enjoy it and remember the visit to his shop.
IMG_2027

IMG_2028

IMG_2029

IMG_2030

A Unique Vertical Oval Shank Meerschaum Reborn


I saw this old Meerschaum pipe bowl on Ebay and decided to put a low bid on it. I was not surprised to have won it and paid for it quickly. The seller packed it very well and shipped it off to Vancouver, Canada. Below are the Ebay photos that caught my attention. I think the thing that intrigued me the most was the vertical oval shank on the pipe. To restem that pipe would be a great challenge – find a stem large enough to work with and shape it until it fit. I thought I had just the stem in my box – a gift from a friend on Pipesmokers Unleashed Forum, Robert.

From the photos it looked to be in rough shape. The pipe case said it was a WDC but I have no way of knowing if that is true. The gold filigree on the band looks like the old WDC pipes of the late 1890s but I am still uncertain as to the maker. It was in rough shape as can be seen from the photos. There were many scratches and gouges around the outside of the bowl. The shank had marks on the top that looked like someone had taken a file to it. The rim was probably the worst. With the rough edges on the back right side of the bowl the rim/top appeared to be angled to the right side and worn down. The tar build up was heavy in the bowl and on the rim. The tenon was broken off in the shank. It appeared to be an old bone tenon and a bone insert in the mortise that was threaded to take the screw in tenon. I am assuming the pipe probably had an amber stem in its first appearance in the shop but that was long since broken and lost. The WDC case was also very rough – the edges were worn away, the wood broken and a hinge dangling unused. The inside was badly stained.

meer1

meer3

meer4

meer5

Yesterday afternoon I came home from work early and found a package awaiting me – I knew that the meer had arrived. I had to laugh when I cut open the box – it had a previous label a Funeral Home in Ohio. I don’t know if that was a commentary on the pipe bowl that resided inside the box or if a funny coincidence. I cut the tape and opened the box. The pipe inside was both in worse shape than I had imagined from the seller’s excellent pictures and in better shape. The meer under the band was cracked as can be seen in the photo above and that was as it was when it arrived. The scratches in the surface of the bowl were not as deep as they appeared in the photos and the pipe when place on the rim on a flat board was actually not slanted to the right – the damage to the outer edges of the right back side made it appear worse than it actually was in reality. The next photos show the pipe on the work table just out of the box.

IMG_1799

IMG_1800

IMG_1801

IMG_1802

IMG_1803

After examining it carefully with my lens and a dental pick I decided to begin the clean up by trying to remove the tenon. I used the screw that I generally use to remove a tenon to no avail. The threads in the mortise were locked tight around the tenon. I picked at it with the dental pick and was unable to remove it that way either. I decided to drill out the old tenon. So I set up a cordless drill with a drill bit slightly larger than the airway in the broken tenon. I slowly drilled the airway with the bit and exchanged it for increasingly larger bits until I had the airway cleared of the debris. I then used a ¼ inch bit to open the mortise and clear out the remaining debris of the mortise and tenon. The second photo below shows the mortise after I opened it up. I used a dental pick to clean out the remaining pieces and hand turned the quarter-inch drill bit into the mortise to smooth out the walls of the airway and open it to receive a new tenon.

IMG_1804

IMG_1806

I took the pipe bowl back to the work table and set up a coarse sanding block on my worktable to top the bowl of the meer. I have used this block in the past with good success on the softer meerschaum material. I placed the bowl, rim down on the surface of the block and sanded it in a clockwise direction (no reason for that other than I am right-handed). I sanded it, checking often to see how the rim was cleaning up until the surface was clear and the top of the bowl once again level. Surprisingly I did not have to remove too much material from the rim to clean up the surface.

IMG_1805

IMG_1808

IMG_1809

IMG_1810

When I had finished the sanding, I used micromesh sanding pads to sand the top smooth once again and remove the scratches from the coarse sanding block. The micromesh sanding pads from 1500 – 12,000 grit bring a shine back to the surface of the meer and prepare it for rewaxing once the pipe is finished.

IMG_1811

At this point in the process I decided to see if I could fit a new stem on the pipe. The diameter of the oval shank was quite large and would require a large diameter round stem. To make it an oval stem would require that much of the existing vulcanite of the stem would have to be removed in the shaping process. I had an old Brebbia stem that a friend on Pipe Smoker Unleashed Forum sent me for an old Peterson that I was restemming. The tenon was too small for the Pete but too large for the old meer. I used a Dremel with a sanding drum to remove the excess material from the tenon until the fit was very close. The remainder of the fitting was done with a wood rasp and sandpaper. Once the tenon was finished I pushed the stem into the old meer to check on the fit of the tenon in the newly opened mortise. As can be seen in the photo below, the fit was perfect. You can also see from that photo how much work would need to be done to fit the stem to match the shank of the pipe.

IMG_1812

The stem had deep bite marks on the top and the bottom near the button. They did not break the surface of the vulcanite. I decided to heat the surface of the stem with a heat gun and try to lift the dents from both sides as much as possible. I also wanted to straighten the stem significantly to give a better profile to the pipe. The heat gun worked to achieve both aims. The tooth marks lifted quite a bit and would have to be filled with black superglue to finish the work and the bend straightened to the angle I wanted for the new stem.

IMG_1813

I sanded the initial excess vulcanite off the diameter of the shank with the sanding drum on the Dremel. Once I had removed a large portion I took it back to the work table and used a rasp to continue to shape and reduce the stem to the right proportions. The next series of eight photos shows the effectiveness of the rasp in shaping the stem. (In the midst of the shaping my daughters brought down a bowl of popcorn for a snack while I worked – that appears in several of the photos.)

IMG_1814

IMG_1815

IMG_1816

IMG_1817

IMG_1818

IMG_1819

IMG_1820

IMG_1821

I removed the stem from the shank and cleaned up the tooth dents so that I could fill them with black superglue. The glue takes quite a bit of time to cure so I waited until I was finished for the evening and then filled the dents and set the stem aside to cure over night.

IMG_1822

IMG_1823

This morning I sanded the stem with 220 grit sandpaper and also sanded the superglue patch on the underside of the stem. The next four photos show the stem as it begins to take shape and the repaired spot on the underside of the stem. The oval is coming along nicely but there was still a lot of excess material that still needed to be removed.

IMG_1824

IMG_1825

IMG_1826

IMG_1827

I continued to sand the stem to further tune the shape of the oval to match the shank. I used 220 grit sandpaper to remove the excess and shape the stem. I worked on the superglue patch on the underside of the stem with the 220 grit sandpaper as well. In the next series of three photos you can see the shape I am aiming for with this stem. You can also see the size of the patch on the stem. The patch is still larger than the marks it covers so more sanding will need to be done on it to blend it into the vulcanite.

IMG_1828

IMG_1829

IMG_1830

I cleaned up the bite marks on the top of the stem and applied the black superglue patch to that surface as well. I set it aside while I worked on the bowl. I wiped the bowl down with Murphy’s Oil Soap on a cotton pad to clean off the grime on the surface while leaving as much of the old patina as possible. The first photo below shows the superglue patch. I applied it and used a dental pick to push it around the surface and also build up a few tooth marks on the edge of the button. The second photo below shows the patch after it had dried and I had sanded the patch with 220 grit sandpaper.

IMG_1831

IMG_1833

While working on the stem I decided to open the button to make it simpler to insert a pipe cleaner. I used needle files to make the slot larger. The second photo shows the opened slot in the button. I sanded the inside of the slot with a folded piece of sandpaper to smooth the surface and polish the slot.

IMG_1834

IMG_1835

I took the pipe back to the Dremel and sanding drum to remove more of the excess vulcanite. I had the basic shape in hand and just wanted to get it closer to the size of the shank before doing the finish sanding. I brought it back to the work table and sanded with 220 grit sandpaper until the fit was right. The next four photos show the progress in the fitting of the stem.

IMG_1837

IMG_1838

IMG_1839

IMG_1840

I sanded the stem with a medium grit sponge backed sanding pad. It helped to remove the scratches left behind by the 200 grit sandpaper. Then I sanded the stem with micromesh sanding pads from 1500-12,000 grit to polish and shine the vulcanite and the patched areas. The white Lucite band that was a part of the stem began to take on a shine as well in the process. The next nine photos capture what took about an hour to achieve in the sanding process. I wet sanded with the 1500, 1800 and 2400 grit sanding pads and dry sanded with the remaining grits of micromesh.

IMG_1841

IMG_1842

IMG_1844

IMG_1845

IMG_1846

IMG_1847

IMG_1848

IMG_1849

IMG_1850

I buffed the stem with White Diamond and a blue plastic polishing compound to bring out the final shine on the stem. I hand waxed the meerschaum with beeswax and hand buffed it with a shoe brush. The next four photos show the finished pipe with the new stem. I like the marks and scratches in the meer as they seem to speak of the long journey the pipe took to get to me. The white Lucite band on the stem fits nicely in my thinking against the gold of the filigree band. The slight bend it the stem works nicely for me. From the last two photos you can see the oval shape of the stem now that it is completed. It has come a long way from the round stem I received as a gift from Ron.

IMG_1851

IMG_1852

IMG_1853

IMG_1854

Another Loose Stem Fix


Blog by Greg Wolford

As I undertook this project I had no idea that Steve was writing and posting an article on tightening a loose stem. But when I saw it I figured that since this was a little different fix, and the pipe was already blogged about here, I would go ahead with the article.

If you have read the story of Big-Ben then you know I had to restem it. It was the first time I’d done this and the first use of my new tenon turning tool, too. So, in my haste and excitement I made a goof, one that Ric Farrah was kind enough to comment on: I had not cleaned the shank out real well before fitting the stem, leading to a loose new stem.

I tried beeswax and “smoking it in” but neither of these worked on this particular problem; as Steve noted often an application of beeswax and use will tighten up an estate pipe stem. But I suppose since this was just a goof on my part and the stem had not been for properly these solutions weren’t going to work.

I was aware of the tools sold for stretching a tenon, the pluses and minuses that Steve mentioned. But I wasn’t really inclined to buy one at this point, especially since I had another idea on what might work: a drill bit! So, since the two easy fixes failed I went down to the shop to try out this new-to-me idea.

I removed the stem from the pipe and checked the size of the air-hole against my set of drill bits. I thought I had drilled it out to 5/32 so this is where I started. However, I soon realized that I had drilled it at 9/64 so I took both of these sizes and the stem to the heat gun set up.

I almost always use leather gloves when I use my heat gun; things can get real hot, real quick. And since I was using steel drill bits I definitely wanted the hand protection. So, I donned the gloves and turned the heat gun on low to start stretching!

Now, the first thing I need to say here is when doing this you are inserting the blunt end of the bit that normally gets chucked into the tenon. The sharp end is the turning end, in your hand for this procedure. This part is very important.

I began to heat the tenon slowly, checking every several seconds on the progress; I only wanted it warmed enough to be slightly softened, not so soft that it could easily be deformed or badly bent. Keeping the tenon moving, I would take the smaller bit and try to insert it in the air hole until it went in. At this point I worked very gently to get the bit inside the tenon the entire length of the tenon, removing the bit/tenon from the heat. I kept the bit turning slightly while it was inside the hole so it wouldn’t stick. After about a minute I gently removed the bit and allowed the tenon to cool a few minutes before checking the fit, which ended up being too loose still. So, I picked up the larger bit and began the whole process over, this time resulting in a perfect fit: good and snug with no “play” or slipping but not too tight either. Finally, the new stem was fit properly!

I left of overnight and loaded it up the next morning, checking the for again; it was still perfect, like it had been made for it (a little humor there)! The pipe smoked good before the adjustment but it now smokes very well with a good fit on the stem, part of which I’m sure is in my head, not fussing or worrying about the bowl falling off.

I found this fix very simple and expect to use it again in the future: it was done with tools/items I had on hand and only required a bit of patience and slow going to do right. Of course if I’d applied that idea to turning the tenon to start with I wouldn’t have had to refit the the stem. But then I’d not have had the opportunity to try out this fix if I had done it right to start with either: I suppose that is the silver lining in this cloud of errors!

20130822-211846.jpg

A New Look for a Duncan Hill Aerosphere


Blog by Steve Laug

Over the years I have owned and sold several Duncan Hill Aerosphere pipes. The system on the pipes and the thinness of the bit always made the airway too tight for me and the draught sluggish at best. I have repaired several of them over the years as well and never found one that really worked well for me. Then in one of the lots I picked up on Ebay that needed new stems there was a Duncan Hill Aerosphere bowl without a stem. It had a wide open airway and was in decent shape. The bowl had a light cake and the rim was tarred but not damage. The bowl was still round and obviously the pipe had not been smoked very much. I figured it was an opportunity to restem it with a standard stem and see what I could get from it.

I tried two different stems on the pipe. The first was a flat blade saddle stem blank. I turned the tenon with a PIMO tenon turning tool and fit it to the pipe. I decided to put a nickel band on the shank for cosmetic purposes as I thought it would look good with the saddle stem. There were two problems with this fitting. The rustication pattern on the Duncan Hill made a smooth fit of the band virtually impossible and the gap around the shank did not work for me. The second issue was that the stem itself was just a few millimeters’ smaller in diameter than the shank. It was not noticeable except with the band it was accentuated. I removed the band and tried the stem without the band and it did not work well. I abandoned that option and went back to my can of stems to see what else I could find that might work in terms of both diameter and length.

IMG_0730

IMG_0731

IMG_0732

For the second stem I found an older “pre-used” stem that worked in terms of length and diameter. I cleaned up the tenon and shortened it slightly and the fit was quite good. I left the band in place and tried to rusticate the band to match the bowl rustication. I heated it and used a scribing tool to carve it up to get the bowl finish look. I stopped that rustication process and worked on the stem fit. For some reason the stem taper on top and bottom did not match. With the fitting on the Duncan Hill bowl the angles at the top did not match the bottom. Reversing the stem made the stem fit even worse. The diameter needed slight adjustments to repair the taper and fit it well against the band.

IMG_1690

IMG_1691

IMG_1692

I used a Dremel to take off material on the stem to adjust the taper to match on both the top and the bottom. I also used the Dremel to clean up the fit at the shank/band. I tried to mark the band with the Dremel in the process as well. I used a scribing tip and still did not get much more of finish than I had with the hand scribing tip. I did not like the look so I took the stem back to the worktable and sanded it to remove the scratches left behind by the sanding drum.

IMG_1693

IMG_1694

IMG_1695

I sanded the stem with 220 grit sandpaper, a medium grit sanding sponge and a fine grit sanding block to clean up the fit and also remove the scratches. The more I looked at it the less I liked the band. The area around the stem shank union looked terrible and the scribing merely looked like scratches. It was awful looking. I decided at this point to remove the band from the shank. I heated the band and slipped it off the shank. I cleaned up the light marks left by the band on the shank with micromesh sanding pads.

IMG_1696

IMG_1697

IMG_1698

With the band off the pipe the tenon was too long for the stem to seat properly. This was not visible to me with the band in place. It felt tight but without the band there was a gap at the junction. I measured the tenon and found that I needed to remove some of the length on the tenon and also needed to countersink the mortise slightly. The countersink on the mortise is a slight bevel inward. I used a knife to bevel the inner edge of the mortise. Once the mortise was prepared and the tenon shortened to measure the stem fit tightly against the shank. I used 220 grit sandpaper and a medium grit sanding sponge to remove a little more of the diameter of the stem to clean up the junction. The two bands on the stem appear to be briar but are actually Cumberland/brindle inserts. I sanded the top of the bowl/rim and the colour matched the twin bands on the stem.

IMG_1699

IMG_1700

I sanded the stem with micromesh sanding pads from 1500-12,000 grit to remove the scratches on the vulcanite and polish the stem. I wet sanded with 1500-2400 grit micromesh pads and dry sanded with the remaining grits. Between 3600 and 4000 grit pads I polished the stem with Maguiars Scratch X2.0. It polished the stem considerably. I then finished sanding with the micromesh pads. While I sanded the stem with the micromesh I also sanded the rim to polish it. With each successive change of grit the rim and the twin bands on the stem began to truly match. The combination looked like it was factory designed to be a combination. I wiped the stem down with Obsidian Oil and set it aside for the evening. In the morning I rubbed the stem down and then waxed it with carnauba.

IMG_1701

IMG_1702

IMG_1703

I gave the bowl a several coats of Halcyon II wax and buffed it with a shoe brush to raise the shine. I buffed the stem with carnauba several time to raise the shine as well. I then buffed the pipe with a soft flannel buffing pad. The finished pipe is pictured below. The look of the Duncan Hill with the banded stem that matches the rim is a great combination. The improved draught of the pipe is exactly what I was aiming for. The Duncan Hill Aerosphere pipe re-enters life with a new level of service to the pipeman who ends up with it in their collection.

IMG_1708

IMG_1709

IMG_1710

IMG_1711

Restemming the Peterson’s XL999 with a Cumberland Stem


Blog by Steve Laug

I put out a request for a stem for a Peterson’s XL999 stem on various web forums I am on. I was sent several that almost worked but either the diameter of the tenon was wrong or that of the stem itself was off just a bit. I turned a tenon on a stem blank that was sent to me and made a nice looking black stem that I posted pictures of earlier on the blog https://rebornpipes.wordpress.com/2013/07/26/making-a-new-stem-for-a-petersons-kildare-xl999/ but Todd Bannard, who is a pipe maker in Alberta, Canada offered to cut a rough one for me from some rod stock he had available. He did not have black vulcanite but did have some Brindle or Cumberland stock. I sent him the rough dimensions of the stem – I needed tenon material that I could turn to ½ inches and I needed a piece of stock that was 7/8 inches or more in diameter to work with to match the shank. I have shaped stems from straight rod stock in the past so I was not too worried about doing that. However, I got an email from Todd saying the rod stock was ready and he was going to send it off. He sent the following two photos to me to show me what was coming. He did a lion’s share of the shaping work for me. I was amazed at how much work he had done on it. I needed only to turn the tenon and refine the shape and the button once it arrived. The Cumberland is vertical and swirling rather than horizontal and lined. It was intriguing looking and I was excited to see what I could do with it.

IMG_2008

IMG_2009

When it arrived I set up my PIMO tenon turning tool on a cordless drill to cut a tenon that was slightly over ½ inch which was the extent of the tools adjustment. I cut a slight step in the tenon first to get a rough idea on the setting on the tool (Photo 1 below). It was correct so I tightened the adjustments and and cut the new tenon for the stem (Photos 2 and 3 below). Once I had it turned close to size I used a Dremel with a sanding drum and gave it a once around sanding and fit the stem to the shank (Photos 4 and 5 below).

IMG_1538

IMG_1539

IMG_1540

IMG_1541

IMG_1542

I used the Dremel with the sanding drum to also remove excess material from the stem at the shank stem junction. Afterward I sanded the stem with medium grit emery paper to remove the scratches and marks left by the Dremel. I followed up by sanding the stem with 220 grit sandpaper to further remove the scratches. The next series of four photos show the fit of the stem at this point in the process. The pattern of the Cumberland is also very visible. The pinkish swirls would polish into a reddish brown and the darker colour would be a dark brown fading into black throughout the length of the stem.

IMG_1543

IMG_1544

IMG_1545

IMG_1546

Once I had sanded the stem to the smoothness and fit pictured above I heated it to bend it to the finished shape. I set up the heat gun and held the stem over the tip until it was soft enough to bend. Cumberland like vulcanite bends quite easily. What made this one a bit harder was the thickness of the stem where I wanted to bend it. Once flexible I bent it over a rolling pipe and cooled it under running water to set the bend.

IMG_1547

IMG_1548

I continued to sand the stem with 220 grit sandpaper to get a better fit with the shank. I wanted the transition to be smooth between the two parts so it took a lot of hand sanding. I sanded it removed from the shank, checking often for the fit, until it was a smooth fit.

IMG_1549

IMG_1550

IMG_1551

IMG_1552

I sanded with a fine grit sanding sponge to smooth out the scratch marks more thoroughly and to also fine tune the fit. The next series of seven photos show that progress.

IMG_1553

IMG_1554

IMG_1555

IMG_1556

IMG_1557

IMG_1558

IMG_1559

I worked on the button and slot with needle files to thin down the button and to also open the slot. The first photo below shows the slot and button before I started reworking it and shaping it. The second photo, though blurry, shows the button and slot after I had been working on it with the files and sandpaper. The button is thinner and the slot is beginning to open up. Photos three and four show the finished button and slot before buffing and polishing. The button is rounded and shaped, thinner than it originally was and the slot is oval and wide open. I used folded sandpaper to polish the inside of the slot and smooth out the edges. The fifth photo shows the profile of the button when I had finished working on it.

IMG_1560

IMG_1582

IMG_1581

IMG_1563

IMG_1561

I sanded the stem with micromesh sanding pads from 1500-12,000 grit, with each successive grit giving the stem a more finished appearance and removing the scratches from the Cumberland. The next series of ten photos show the progressive shine developing. I included quite a few photos in this section to show the various sides of the stem and the developing clarity of the Cumberland patterns in the stem as it was sanded.

IMG_1564

IMG_1573

IMG_1572

IMG_1571

IMG_1570

IMG_1569

IMG_1568

IMG_1567

IMG_1566

IMG_1565

I took the pipe to the buffer and buffed the stem with White Diamond and Blue polish to further enhance the shine. I gave the entire pipe several coats of carnauba wax and buffed with a clean flannel buffing pad.

IMG_1574

IMG_1575

IMG_1576

IMG_1577

The photo below shows both of the stem that I turned and shaped for the pipe. The black vulcanite one is about ½ inch shorter than the Cumberland stem. Both look very good on the pipe and are comfortable in the mouth.

IMG_1580

After staring at the pipe and handling it yesterday I was not happy with the stem shank union. There were some problems there with a slight taper to the shank that broke the smooth line of the pipe. I took it back to the work bench last night and did some more work on it. I will post the update later today.

Addendum
I took the pipe to work with me today and held it off and on while working on things and ran my fingers over the joint of the shank and the stem. There was a slight hip, with the shank tapering down slightly at the joint and breaking the flow of the lines of the pipe. It bugged me so when I got home I put it back on the worktable. I would have to deal with it and smooth things out. I knew it would take some more sanding and then refinishing the pipe and stem but so be it. I sat down and read the responses to my post regarding this pipe on Smokers Forums and also read my private messages. I had received a private message from bbqncigars (Wayne). I include his message in the paragraph below.

Steve,
Your restorations have been breathtaking. That said, I have a quibble with this pipe. The last 1/16″ or so of the shank exhibits a taper that is out of place with the lines of the rest of the pipe. This could be from over-buffing/sanding pressure on the end of the shank (BTDT). To restore the continuous line from the shank to the tip would require block sanding (might jeopardize the stamping) or removing the taper by shortening the shank. It’s a beautiful pipe and bit, but the bit/shank junction would drive me nuttier until I fixed it.

Yeah, I can be really anal about things I make that other people will see.

Wayne

I laughed when I read his words because they confirmed my own feelings and put into words some of my reserve regarding the restemming of this pipe. I looked at the pipe again and then wrote him back as follows:

Wayne
I agree with you totally! It bugs me as well. It forms a slight hip between the stem and the shank that really bugs me. I know that I am not finished yet either! The stummel came to me with a slight taper that was only clearly seen when there is a stem in place. The black stem has the same problem due to the shank. I have been contemplating hunting down a silver band to do deal with the issue and clean up the lines but we shall see. I could indeed block sand and may do that instead, we shall see. Thank you for your pm. I appreciate it as it has been bugging me.

Thanks
Steve

So after dinner this evening I decided to tackle the repair and remedy the situation. I used a pair of sanding blocks, one coarse and one fine to block sand the shank on the top and the bottom and more carefully along the sides of the shank around the stamping on the pipe. I sanded the briar and the stem material until the lines were smooth from the bottom of the bowl to the end of the stem and the same for the top. I worked on the sides to achieve the same thing. After sanding it with the coarse sanding block I sanded it with the fine grit block to remove the scratches.

IMG_1605

IMG_1606

IMG_1607

I sanded the stem and shank with 1500-12,000 grit micromesh sanding pads to bring back a smooth finish to the stem and the shank. I heated the shank with a lighter to warm the briar, restained it with a dark brown aniline stain that I thinned with isopropyl alcohol – 1 part stain to 2 parts alcohol. I flamed the alcohol and continued to stain the shank until it matched the rest of the bowl on the pipe. I buffed it with White Diamond and then gave it several coats of carnauba wax and buffed it lightly with a soft flannel buff. Tomorrow morning I will give it a careful examination in the light of day and see where I go from there. Thanks Wayne for your help.

IMG_1608

IMG_1609

IMG_1611

IMG_1612